¶ Introduction
This document introduces additional features and functions available in the Treasury module for Loans. It highlights a range of capabilities that extend beyond standard loan processing, including options for copying or refinancing loans, managing linked loans, handling special repayment scenarios, applying fees and charges, recalculating loan values, and more. The sections that follow provide an overview of these features, giving users a clearer understanding of how they can be applied to support complex loan management needs.
This document details further loan features, covering areas such as:
- Copy a loan
- Re-financing a loan
- Linked loans
- Negative payments
- Minimum repayments
- Loan charges and Fees
- Cost of Borrowing
- Recalculate loan
- Covenants
- Securities
- Loan revaluation
- Treasury invoices
- Disable/Enable interest accrual
- Write-off's
- Refunds
¶ Navigation
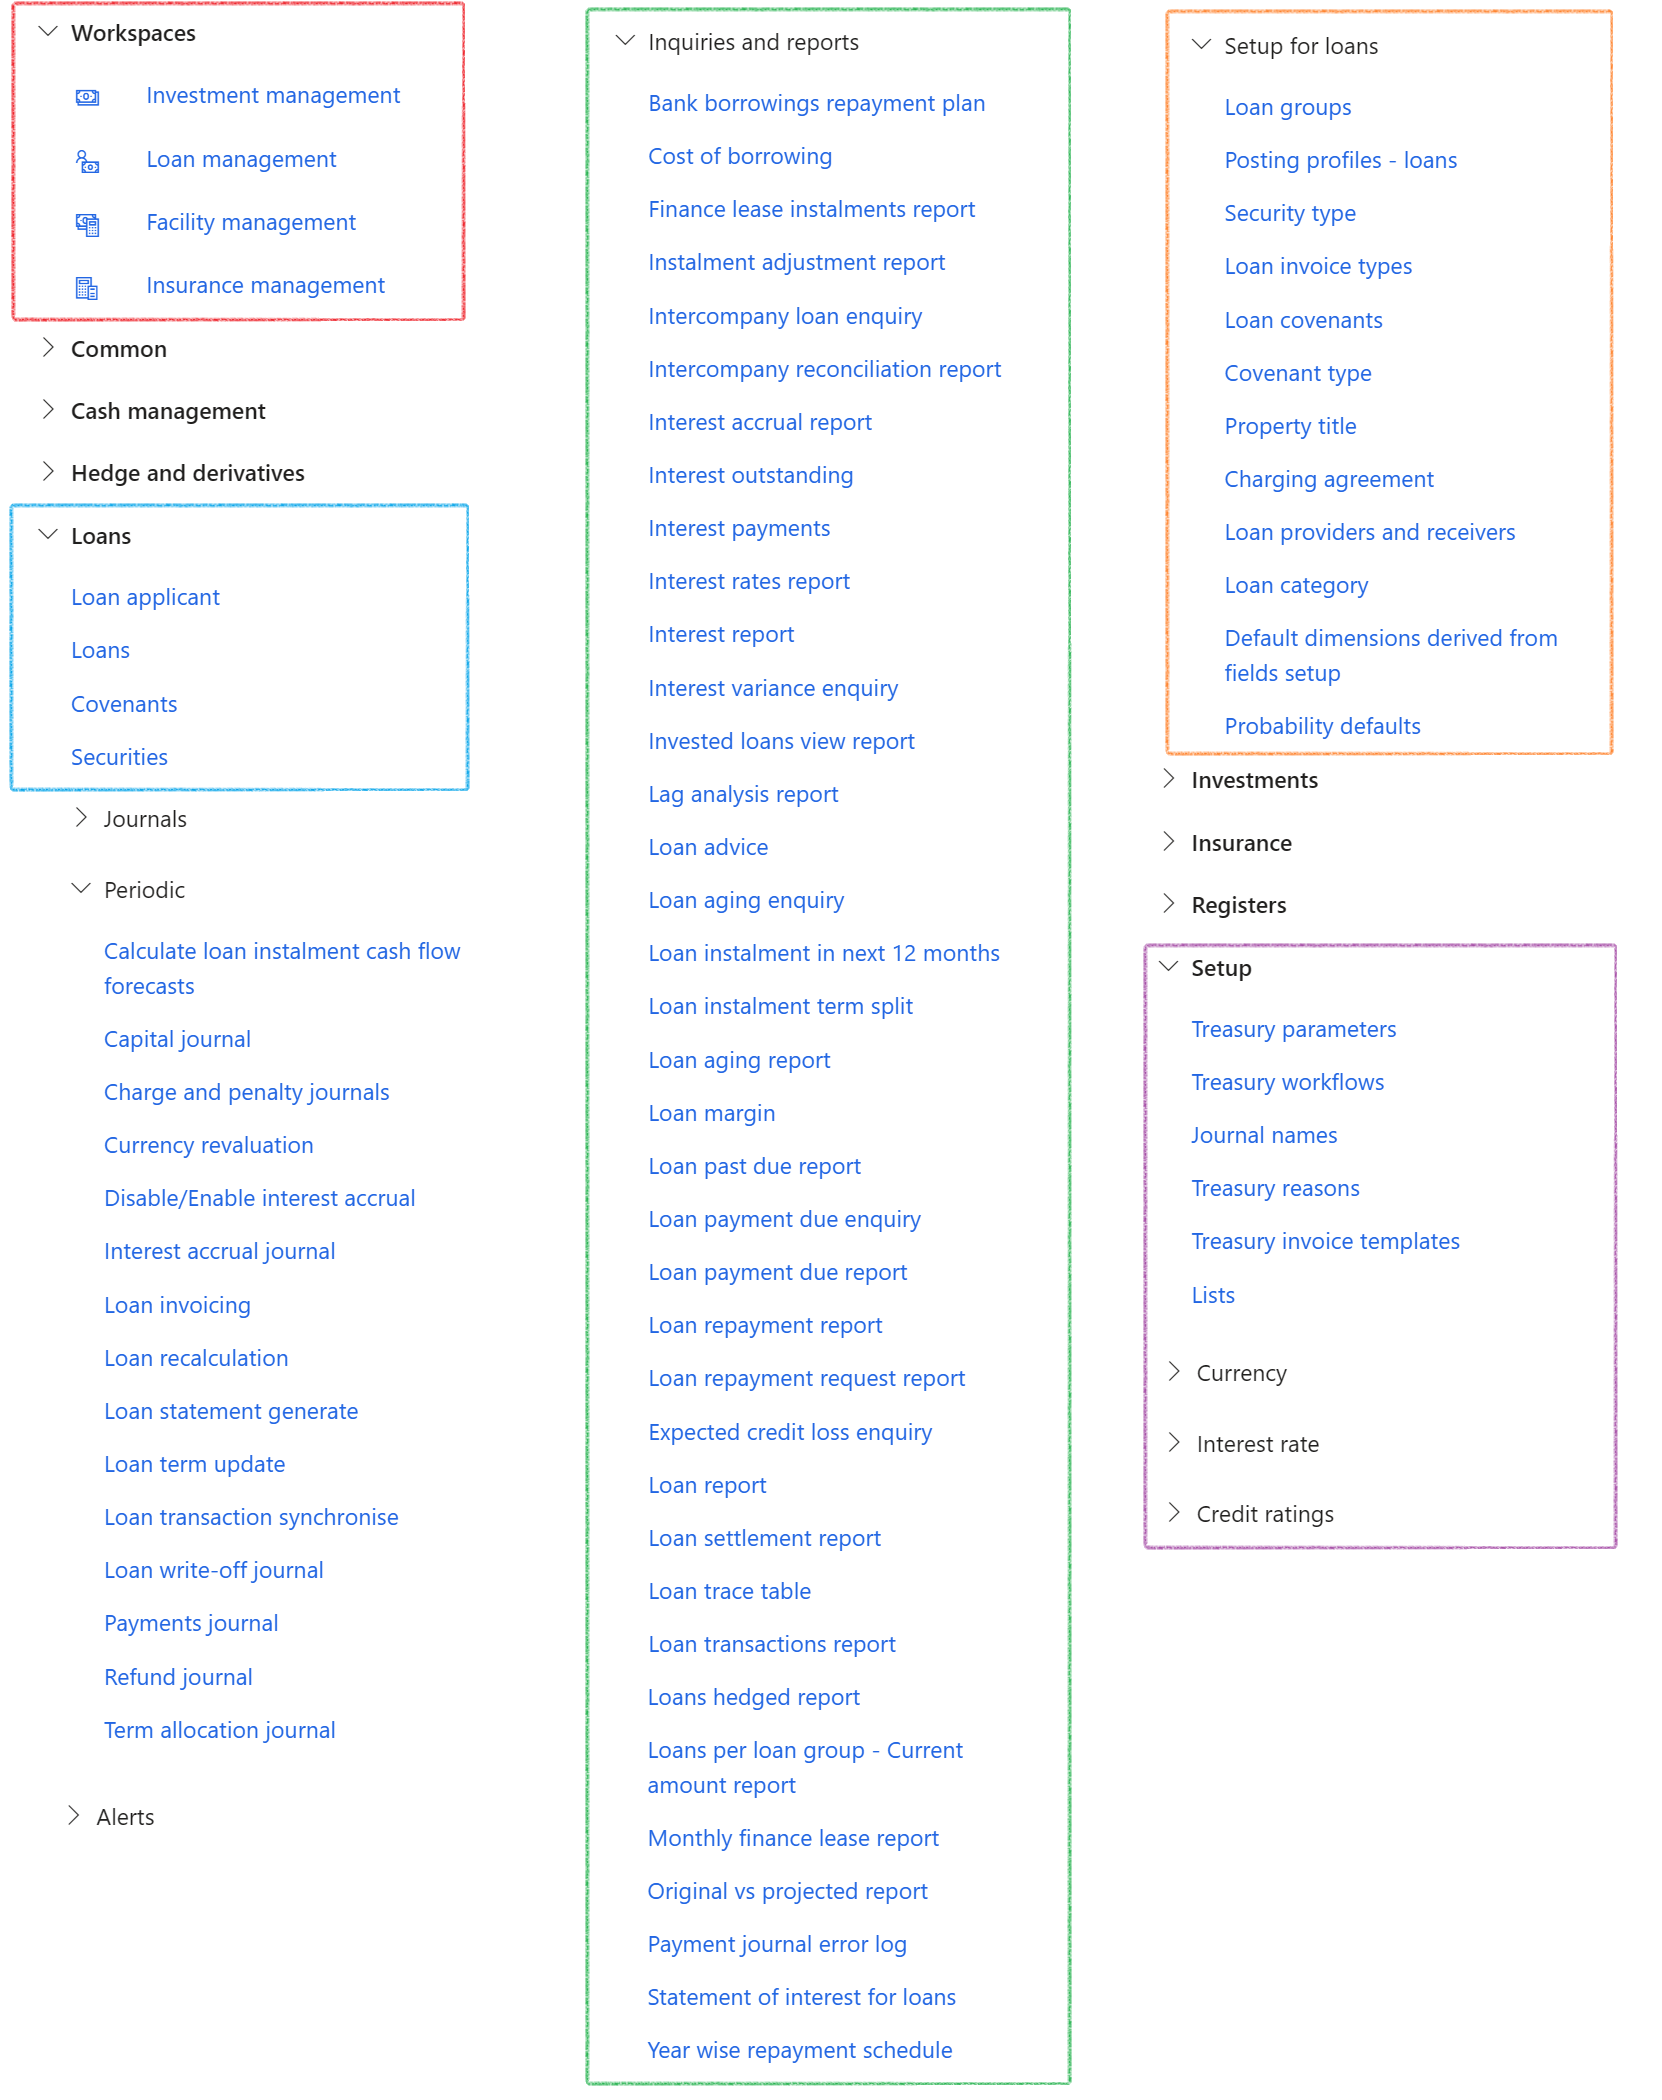
¶ Specific setup
The following specific TMS setup is required and will be covered in detail below:
- Set up Minimum repayments
- Set up Accrual Schemes
- Enable Loan recalculation
- Set up Loan covenants
- Set up Security type
- Set up Property title
- Set up Charging ageement
- Currency conversion
- Write-off days
¶ Step 1: Minimum repayments setup
Minimum repayment amount can be set up under Treasury parameters, or it can be set up to a specific Loan group.
It it is not set up under a Loan group, the set up on Treasury parameters will be used.
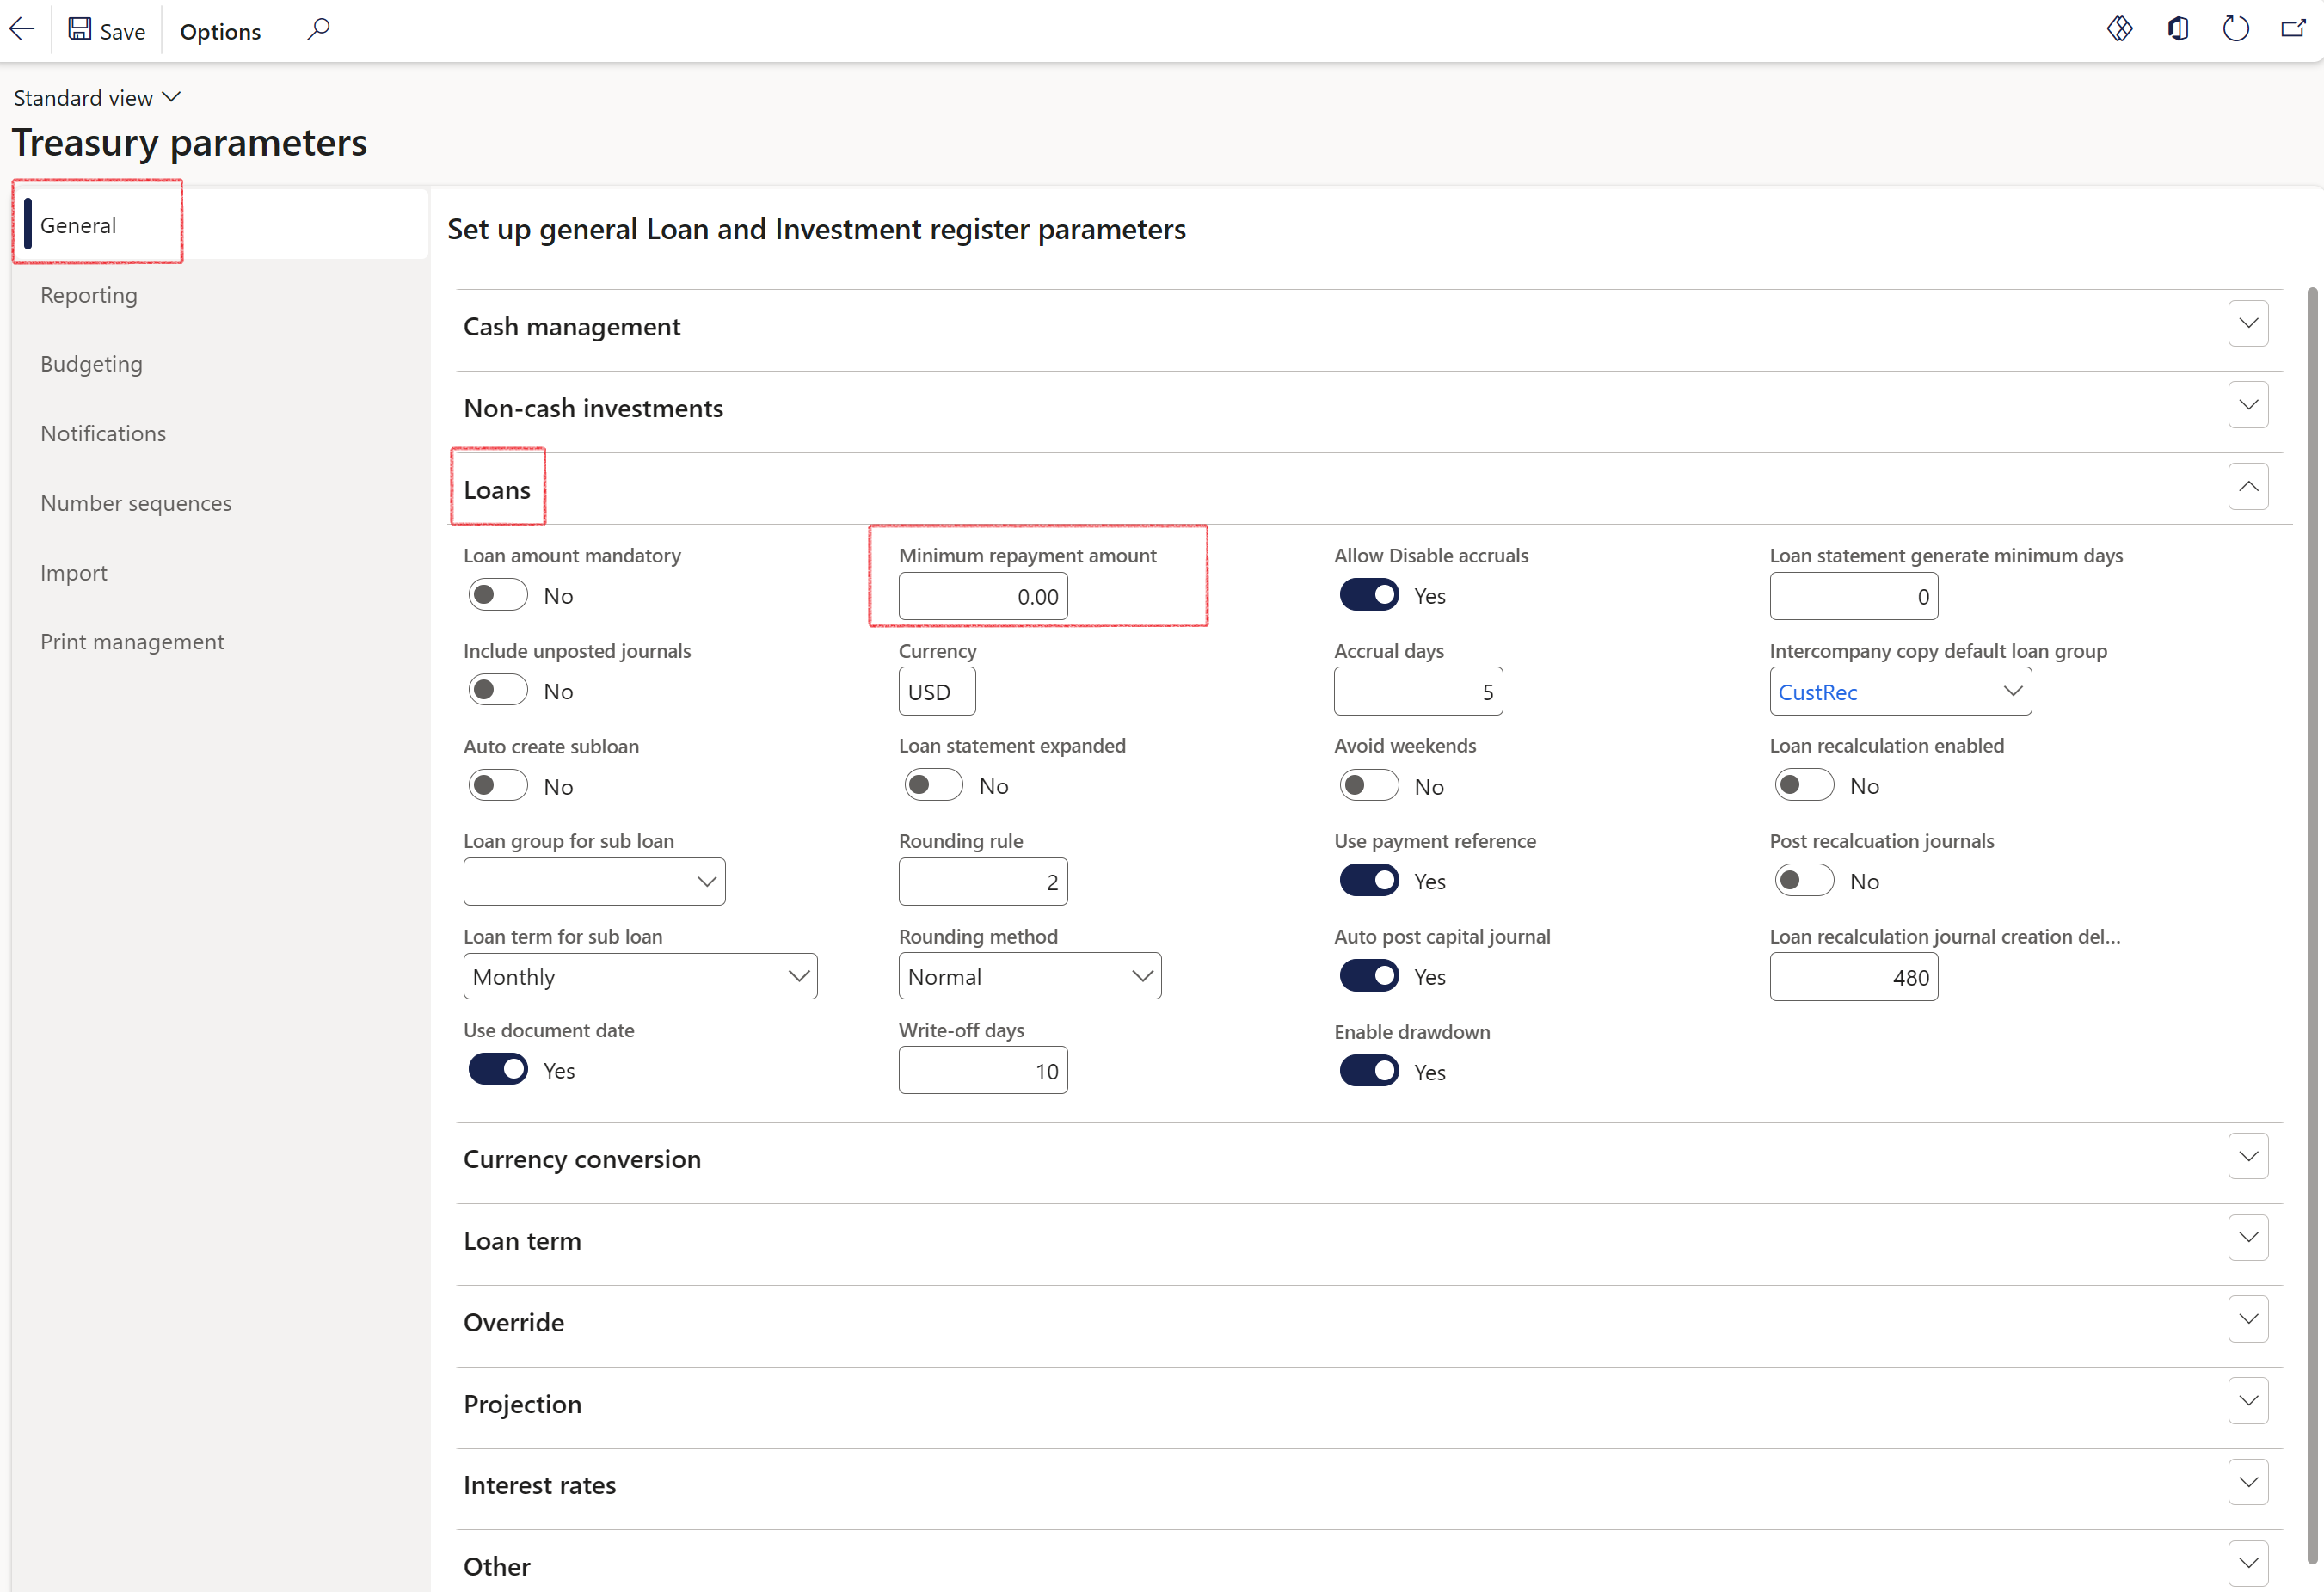
¶ Step 1.1: Treasury Parameters - General tab
- Go to: Treasury > Setup > Treasury Parameters
- Click on the General Tab
- Expand the Loans FastTab
- In the Minimum payment amount field, enter an amount
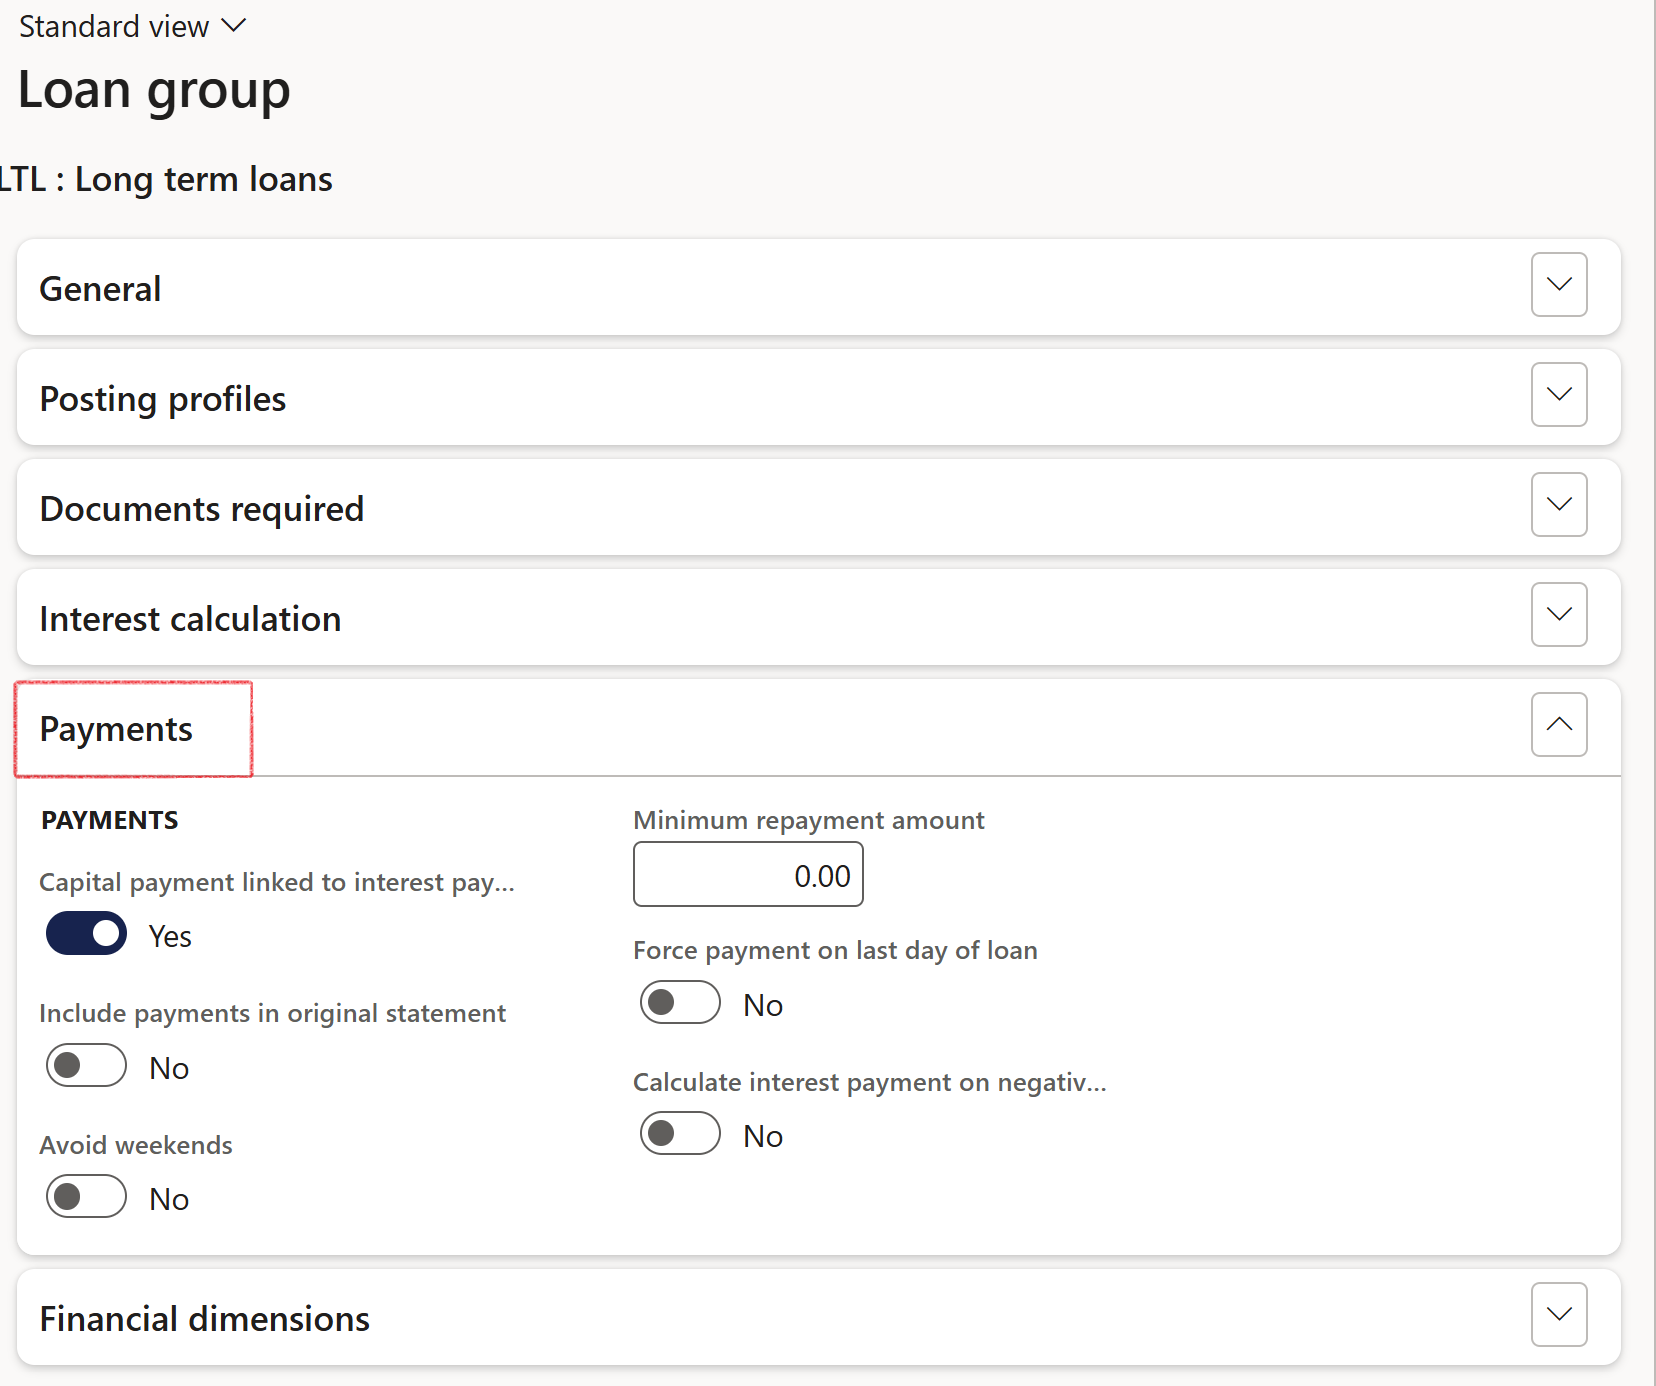
¶ Step 1.2 : Loan group - Payments FastTab
- Go to: Treasury > Loans > Setup for loans > Loan groups
- Expand the Payments FastTab
- Under Payments FastTab, the slider for Capital payment linked to interest payment can be set to Yes / No
- Select Yes / No to include payments in original statement
- Force payment on last day of loan - Yes / No toggle
- Calculate interest payment on negative balance - Yes / No toggle
- If the end date falls over a weekend, the user can setup the loan group to avoid weekends by sliding the Avoid weekends toggle to Yes . So, when a payment is due on a weekend, it will be moved to the Friday before the weekend.
- Enter a minimum repayment amount for this specific loan group (if required)
If user changes the loan type at any point, it will update the end date as well as per setup on the selected Loan type / group. This is applicable to imported loans and manually created loans
When Minimum repayment amount is filled in on a specific loan group, this value will be used by the system for the instalment recalculation in the event of a standard recalculated amount being less. This will apply to the Original and Projected loan statements. This could result in the loan being settled earlier than the original end date on the Interest agreement.
¶ Step 2: Accrual Schemes
Accrual schemes should be setup in the General Ledger, for upfront fees to be linked to a journal as an accrual scheme. This configuration will establish the monthly reduction amount of the prepaid balance. For Loans, the charges will display in Loan charges.
- In the navigation pane, go to: Modules > General Ledger > Journal Setup Accrual schemes
- Click on the New button
- Enter an Accrual identification
- Type in a Description of accrual scheme
- Select the Debit account
- Select the Credit account
- Enter a Period frequency
- Enter the Number of occurrences by period
- Select the transaction posting interval from the available options of days, weeks, months, or quarters.
- Specify whether the voucher generated for all transactions should be the same, or if a new voucher should be generated for accrual transactions, or if a new voucher should be generated for each accrual transaction date.
- Enter a Description
- Specify which Accrual basis should be used. Options include the following:
- Calendar
- Accuonting or financial
- Allocation key

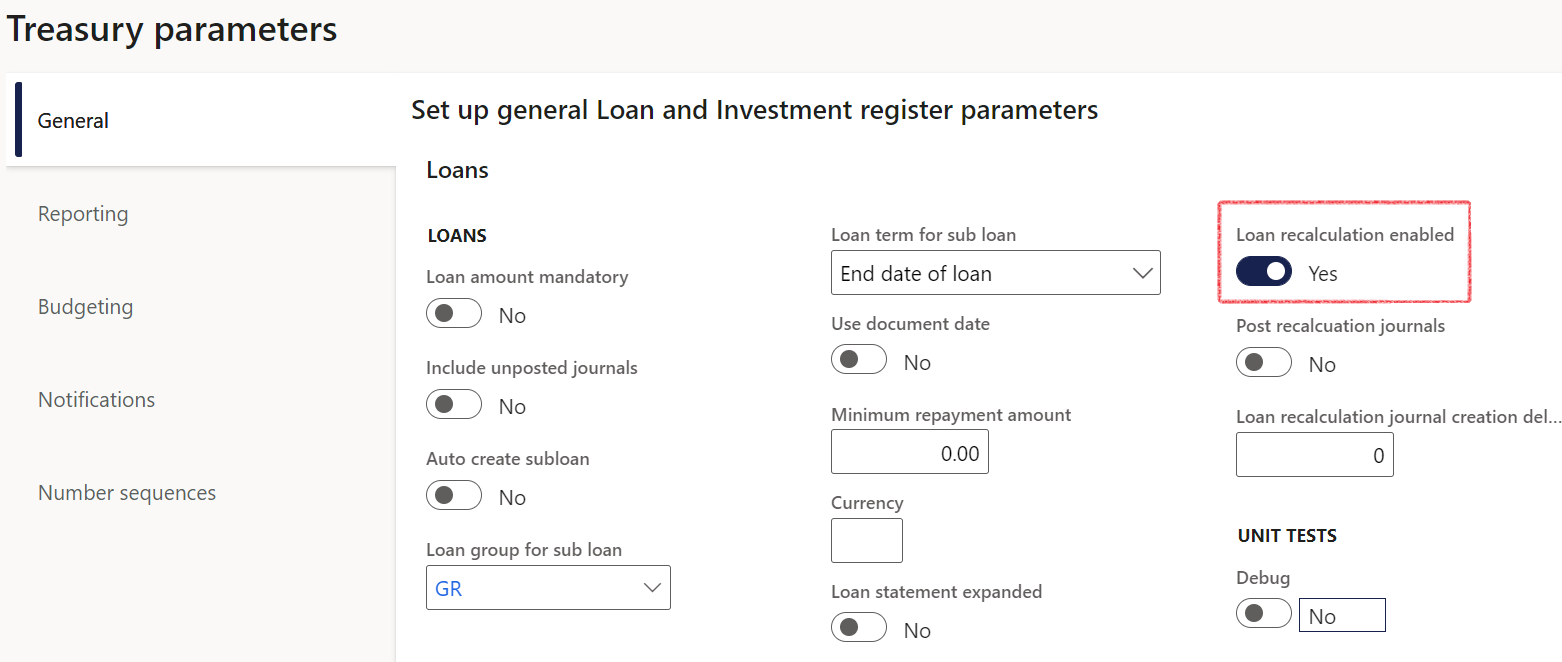
¶ Step 3: Enable loan recalculation
To enable loan recalculations on loans, go to:
- Treasury > Setup > Treasury parameters
- On the General tab, expand the Loans FastTab
- Slide the Loan recalculation enabled toggle to Yes
¶ Step 4: Loan covenants setup
A loan covenant is a condition or restriction that a lender imposes on a borrower as a part of a loan agreement to ensure that the borrower adheres to certain rules or guidelines. These covenants may be related to financial metrics such as debt-to-equity ratio or interest coverage ratio, or to business operations such as restricting the borrower from making large asset purchases or selling off assets. The purpose of loan covenants is to protect the lender's investment and to ensure that the borrower remains financially stable and able to repay the loan. If a borrower violates a loan covenant, the lender may have the right to call in the loan or take other actions to enforce the terms of the agreement.
To set up Loan covenants:
- In the navigation pane, go to: Modules > Treasury >Loans > Setup > Loan covenants
- Click on the New button
- Enter a Covenant ID and Description
- Select a Covenant type from the list. Choose between Financial, Negative and Positive Covenants
- Enter a Target Value
- Click the Save button

¶ Step 4.1: Setup Covenant type
There are three major covenant types: positive loan covenants, negative loan covenants and financial loan covenants. Financial loan covenants keep a guard over whether the borrower is reaching or closely attaining the targets of the estimates provided to the lender. Therefore, the closer to the targets, the more satisfied is the lender. Similarly, the farther from the actual projections, the more likely the borrower may default. Therefore, to be on the safe side, lenders may provide restrictions on the amount of credit the borrower may access at a given period.
- In the navigation pane, go to: Modules > Treasury > Loans > Setup for loans > Covenant type
- Click on the New button
- Enter a Covenant type
- Type a Description
- Add a note
- Click on the Save button

¶ Step 5: Security types
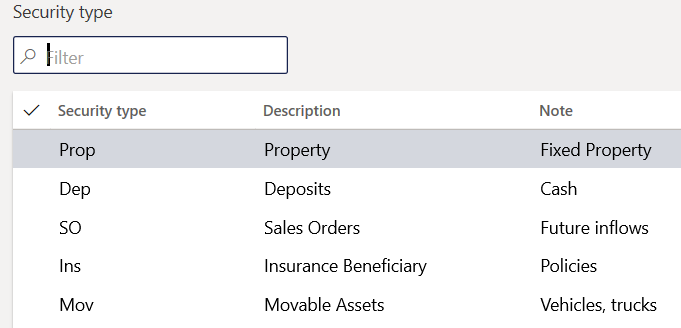
In this context, a security type refers to the type of asset pledged and typically transferred to the lender from the borrower, to secure a debt or loan. The security itself will be the pledged asset which is held in collateral by the lender.
- In the navigation pane, go to: Modules > Treasury > Loans > Setup for loans > Security type
- Click on the New button
- Type a Description
- Add a note
- Click on the Save button
¶ Step 6: Property titles
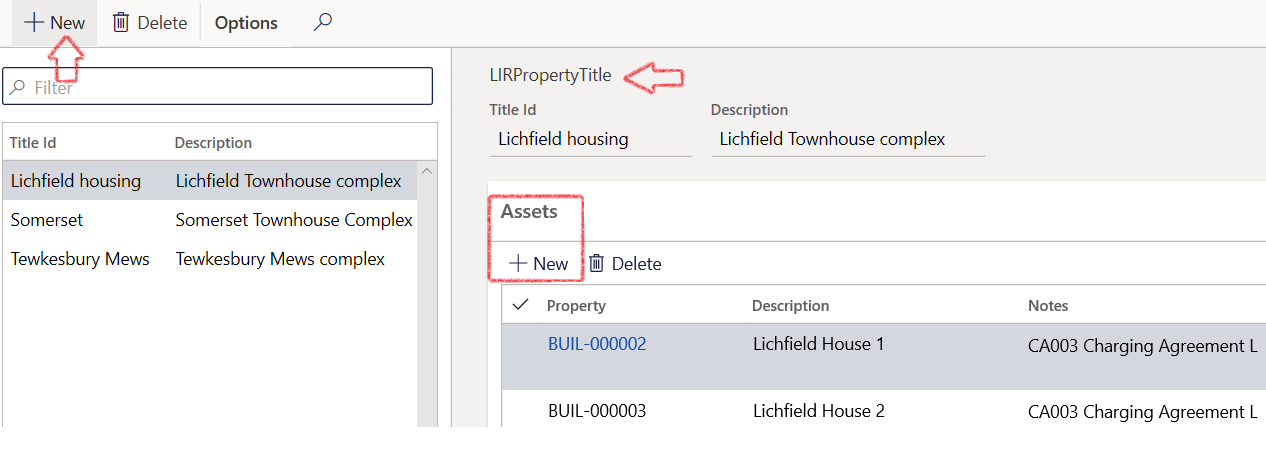
Charging agreements are often used in conjunction with property titles, which consolidate individual properties into a single title.
- In the navigation pane, go to: Modules > Treasury > Loans > Setup for loans > Property title
- Click on the New button
- Insert a Title ID and Description
- To associate an asset with the current record, navigate to the Assets FastTab, and select the New button to link the asset by choosing it from a dropdown list.
- Click the Save button
Step 7: Charging agreements
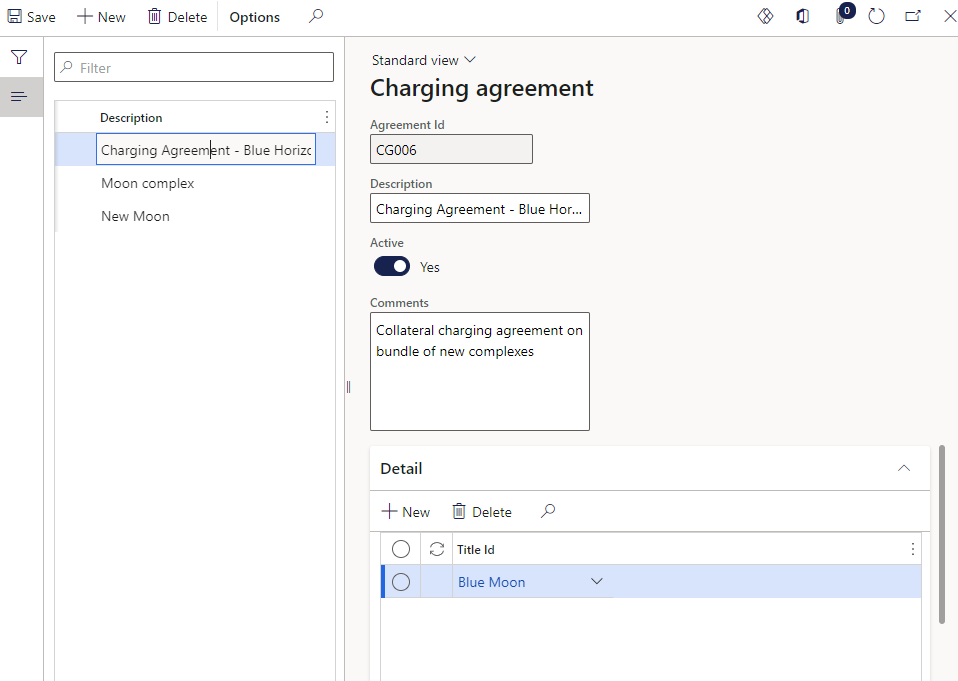
A charging agreement combines multiple Property Titles into one bundled agreement.
- In the navigation pane, go to: Modules > Treasury > Loans > Setup for loans > Charging agreement
- Click on the New button
- Enter an Agreement ID and Description
- Expand the Detail FastTab and click on the New button
- Select a Title ID from the list
- Click the Save button
¶ Step 8: Currency conversion
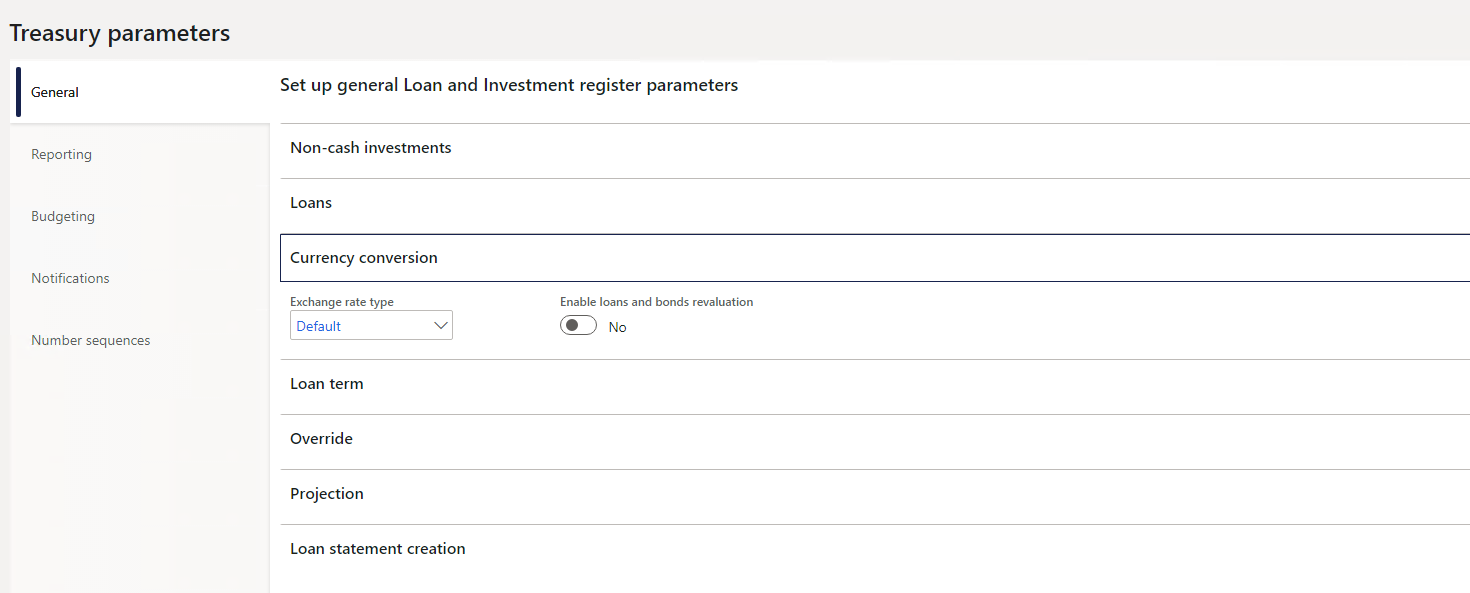
In order to perform loan revaluations, it is necessary to configure the Currency Conversion settings under Treasury Parameters.
¶ Step 8.1: Exchange rate type
Select the default Exchange rate type for Currency conversion. This will be used in Loan revaluation
- In the navigation pane, go to: Modules > Treasury > Setup > Treasury parameters
- On the General tab, expand the Currency conversion FastTab
- Select the default Exchange rate type
¶ Step 8.2: Loans and bonds revaluation
- In the navigation pane, go to: Modules > Treasury > Setup > Treasury parameters
- On the General tab, expand the Currency conversion FastTab
- The slider for Enable loans and bonds revaluation should be set to Yes
Step 9: Write-off setup
The Loans can be written off when no payment have been received for a specific amount of time. To perform a loan write-off journal, the following setups should be in place:
- Journal name for write-off’s, linked to Treasury journal type Loan register – write-off
- Write-off posting profile
- The Posting profile for write-off should be linked to the loan
- On the Account structure of the Posting profile setup page, the setup can be done on Amounts to use. For example, Capital write-off, Interest write-off, Total write-off and Fees write-off
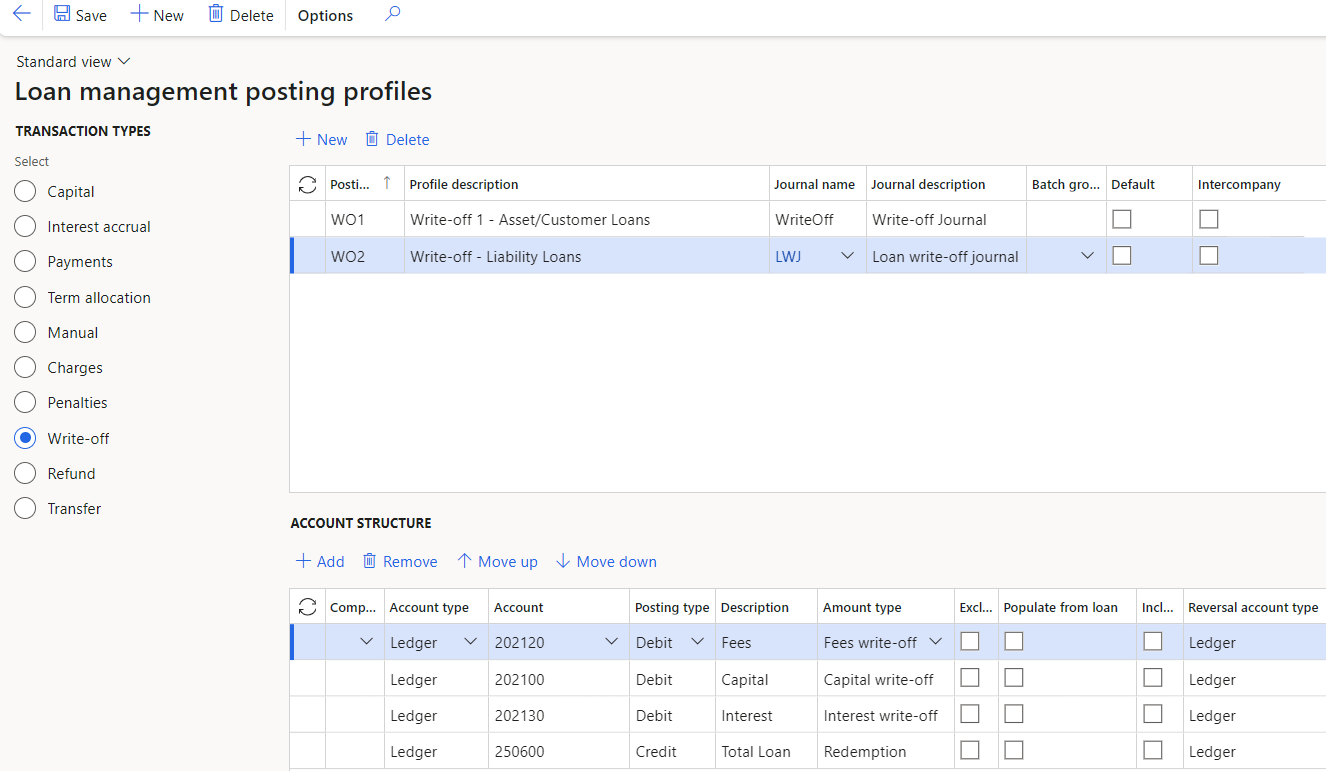
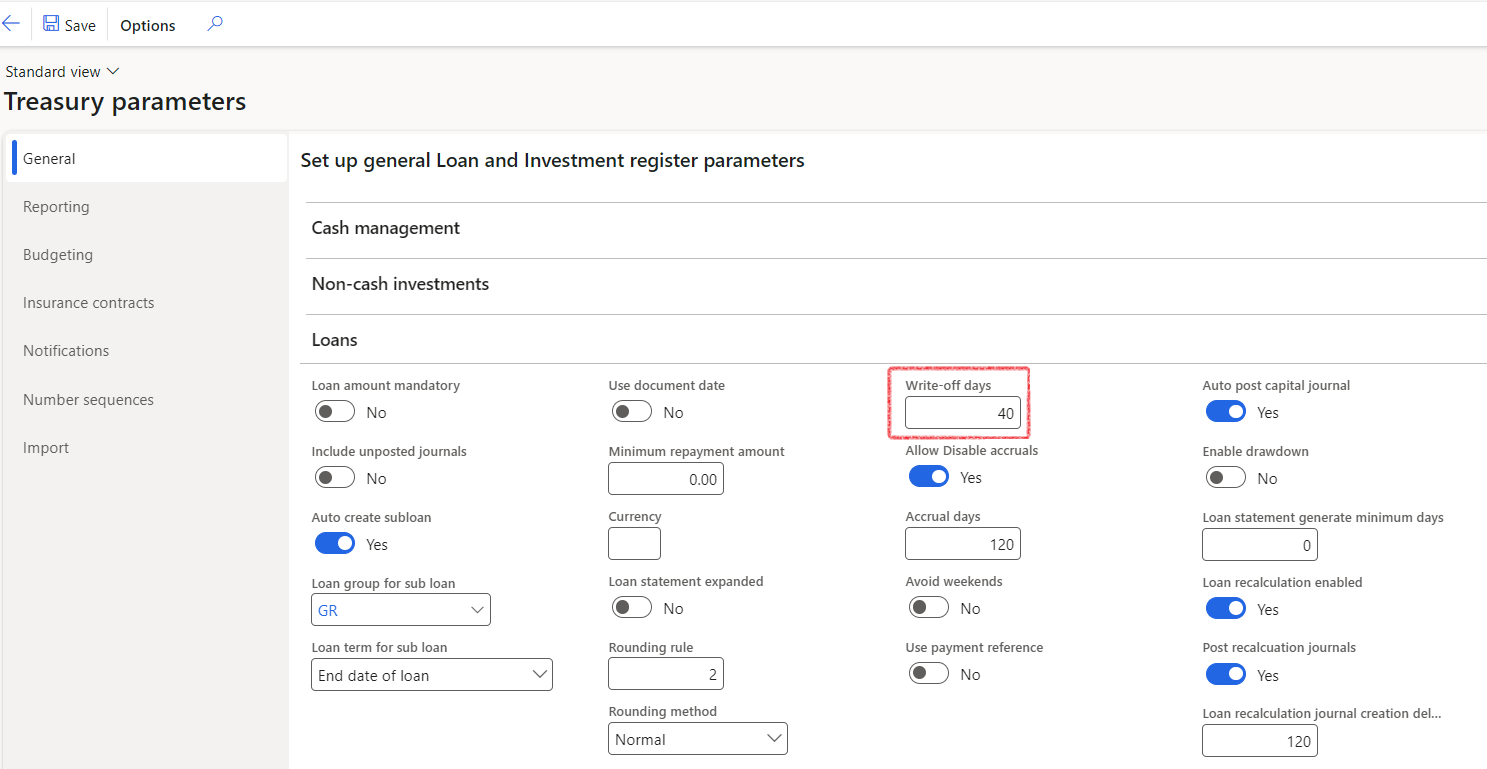
- Write-off days should be filled in on the Treasury parameters setup
- When no payments have been received for the amount of days on the Treasury parameters setup, a loan becomes eligible for a write-off.
The number of days for the Write-off period needs to be configured in the Treasury parameters. This period represents the duration of time that must pass without receiving a payment before a write-off can be initiated.
- In the navigation pane, go to: Treasury > Setup > Treasury parameters
- Expand the Loans FastTab
- In the Write-off days field, enter a value
- Click the Save button
Step 10: Refund setup
To process refunds, the following setups should be in place:
- Journal name for refunds, linked to Treasury journal type Loan register – refund
- Refund posting profile
- The Posting profile for Refunds should be linked to the loan
- On the Account structure of the Posting profile setup page, the setup can be done on Amounts to use.
To create a new posting profile for Refunds , navigate to:
- Treasury > Loans > Setup for Loans > Posting profiles – loans
- Within the Transaction types section, select the Refund radio button
- In the header section of the page, click on the New button
- Complete the following fields:
- Posting profile
- Profile description
- Select a Journal name from the drop-down list
- On the Account structure section of the page, click on the Add button to create a new line. Complete the following fields:
- Account type (choose between Ledger, Customer, Vendor, Project, Fixed assets or Bank)
- Account
- Indicate if this is a Debit or Credit Posting type
- Description
- Choose an Amount type from the provided list
Amount type categories:
- Refund payment
- The Refund payment amount type transaction will be mapped to the Refund total column on the loan statement
- Refund capital
- The Refund capital amount type transaction will be mapped to the Refund capital column on the loan statement
- Refund interest
- The Refund interest amount type transaction will be mapped to the Refund interest column on the loan statement
- Sales return
- The Sales return amount type transaction will be mapped to the Capital balance trans column on the loan statement
- Unpaid interest/
- The Unpaid interest amount type transaction will be mapped to the Annuity interest accrual column on the loan statement
Select the relevant tick boxes for the following:
- Exclude loan number (the Loan number will be excluded from the Refund journal)
- Populate from loan (When the account type is set to Customer , the Customer account field will automatically be populated from the Loan to the Refund journal)
- Auto settle
- Include in report
- If required, select a Method of payment
- Click on the Save button
¶ Daily use
¶ Step 11: Copy loan
Users have the ability to duplicate a loan, which initiates a process to generate a new loan with identical primary characteristics to those of the existing loan. When doing so, the user has an option to copy the Interest agreement as well.
- In the navigation pane, go to: Modules > Treasury > Loans > Loans
- Select one or more loans that you wish to copy
- Click on Functions in the menu bar, and select Copy/Intercompany
- New loan numbers will be assigned to the newly created loans that originate from an existing loan
- If you wish to duplicate an existing loan across one or more legal entities, enable the Intercompany Transaction slider by setting it to Yes
- There is an option to duplicate the loan trade agreement to the new intercompany loan
- An error will occur if the configuration settings in both companies are not accurate
- The Loan group will provide posting profiles
- The loan group configuration includes an inter-company flag that may be selected to indicate that the particular loan group is intended for inter-company transactions
- In the duplicated company, the Loan Provider will assume the role of the Loan Receiver and vice versa
- The loan will be copied in inverse, such that the Payable will become Receivable, and so on
- Within Periodic Journals, the user can generate Interest Accrual and Payment journals for multiple entities simultaneously, and filter on one or more loans for these batch jobs
- The newly copied loan will display an External Reference ID field that can be used to reference the original loan
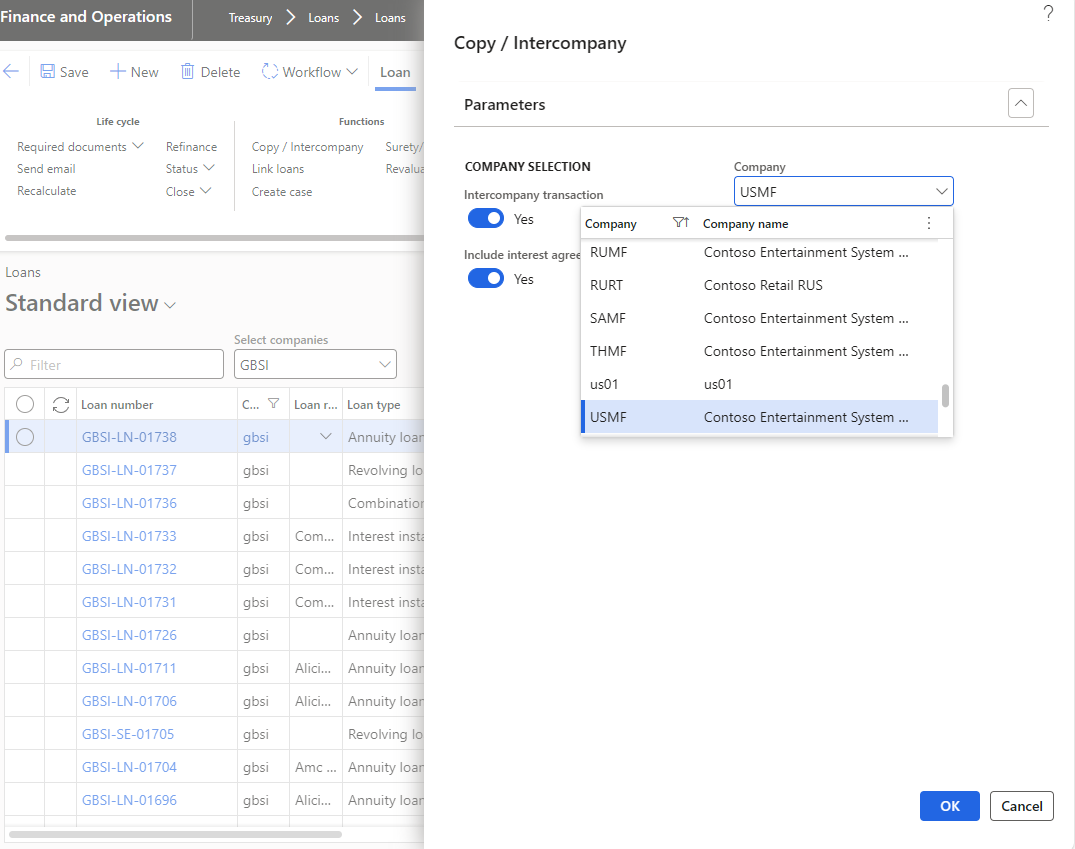
There is an option to duplicate the loan trade agreement (interest agreement) to the new intercompany loan.

When copying a loan, certain fields may not retain the same values as the original loan. These include:
- Use custom interest calculation (Yes/No toggle)
- Day
- Capital payment linked to interest payment (Yes/No toggle)
This is because these fields are configured at the Loan Group level. Even if the copied loan belongs to the same Loan Group as the original, any amendments made to the original loan that differ from the Loan Group settings will not carry over. Instead, the copied loan will default to the values defined in the Loan Group.
¶ Step 12: Re-financing loan
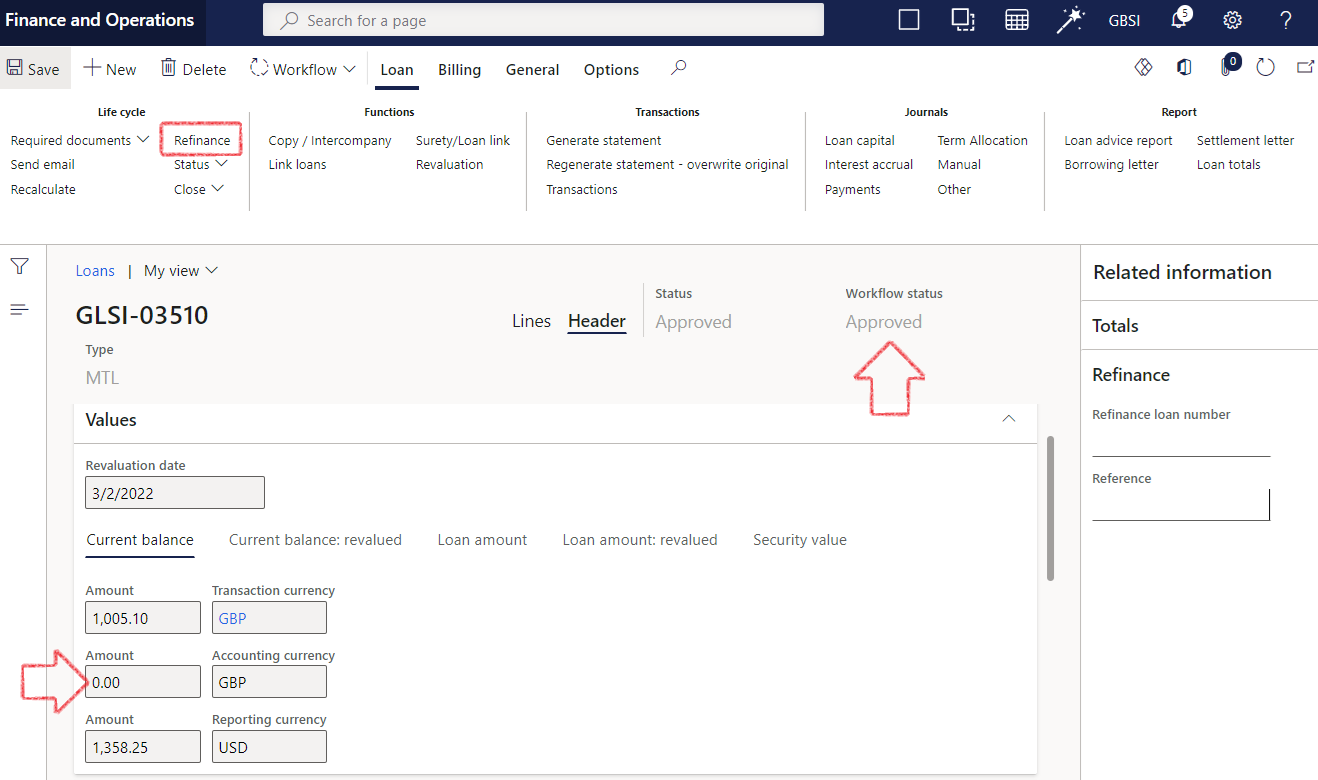
A loan can be refinanced using the functionality available within the Treasury module. However, several prerequisites must be met for this to occur. Firstly, the loan must have received Workflow approval, and secondly, the loan amount must reflect an accurate, zero-projected balance on the loan statement.
¶ Step 12.1: Submit Loan to Workflow for approval
- Go to Treasury > Loans > Loans
- Open an existing loan
- Look at the balance and ensure it is zero. If not, process the relevant journals (Interest accrual, payment journals, etc.)
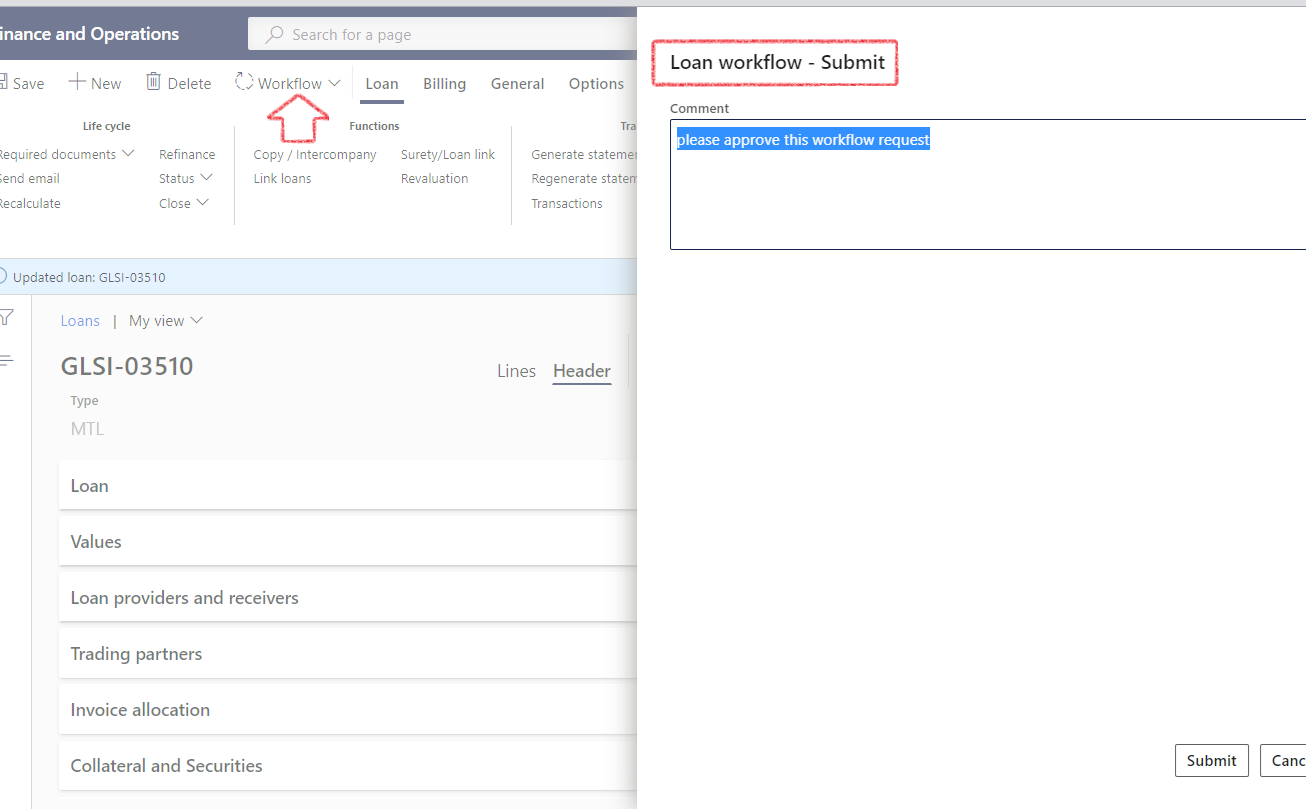
- In the Action pane, click on Workflow
- Enter a Comment
- Click on the Submit button
¶ Step 12.2: Refinance the Approved loan
- After the loan has been workflow approved, click on Refinance in the ribbon bar
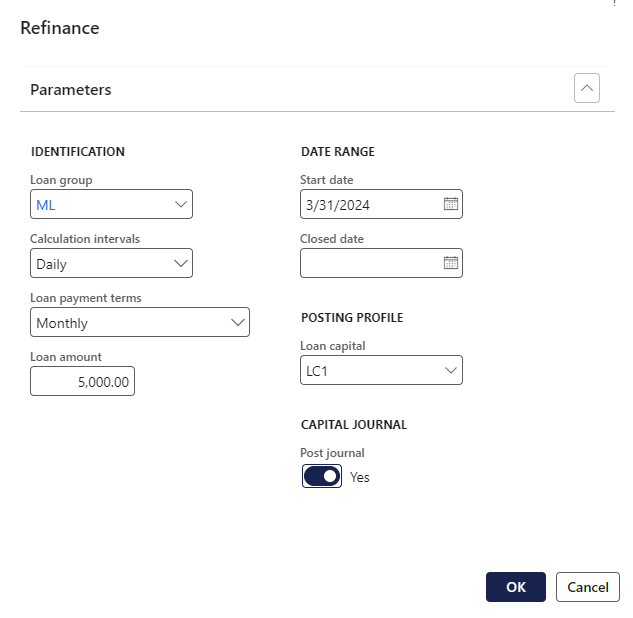
- A Refinance parameter dialogue will open for the new loan to be financed
- Select a Loan group from the dropdown list
- Select the Calculation intervals
- Choose the Loan payment terms
- Enter a Loan amount
- Select a Start and Closed date
- Choose a Loan Capital Posting profile from the list
- Specify whether the Capital Journal should be posted automatically
- Click the OK button
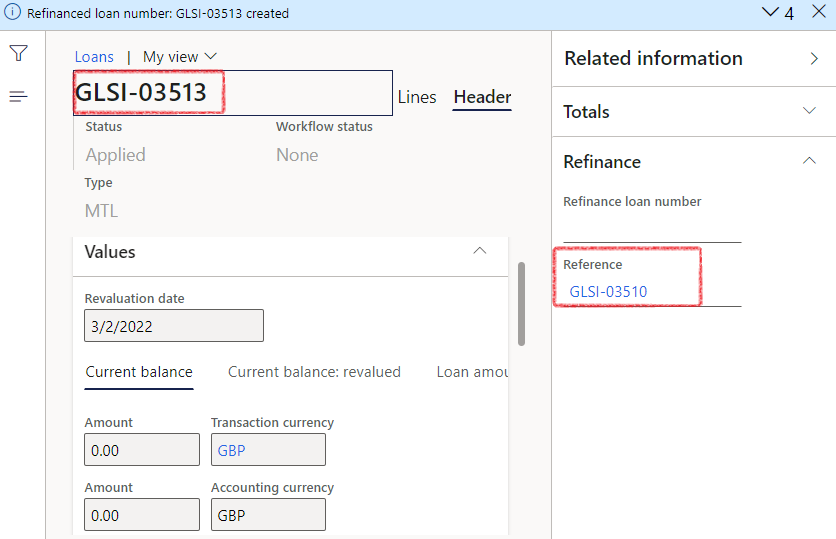
A new loan will be generated that references the original loan, as evidenced in the Related Information fact box.
¶ Step 13: Linked loans
In order to associate one or more loans with another loan,
- In the navigation pane, go to: Modules > Treasury > Loans > Loans
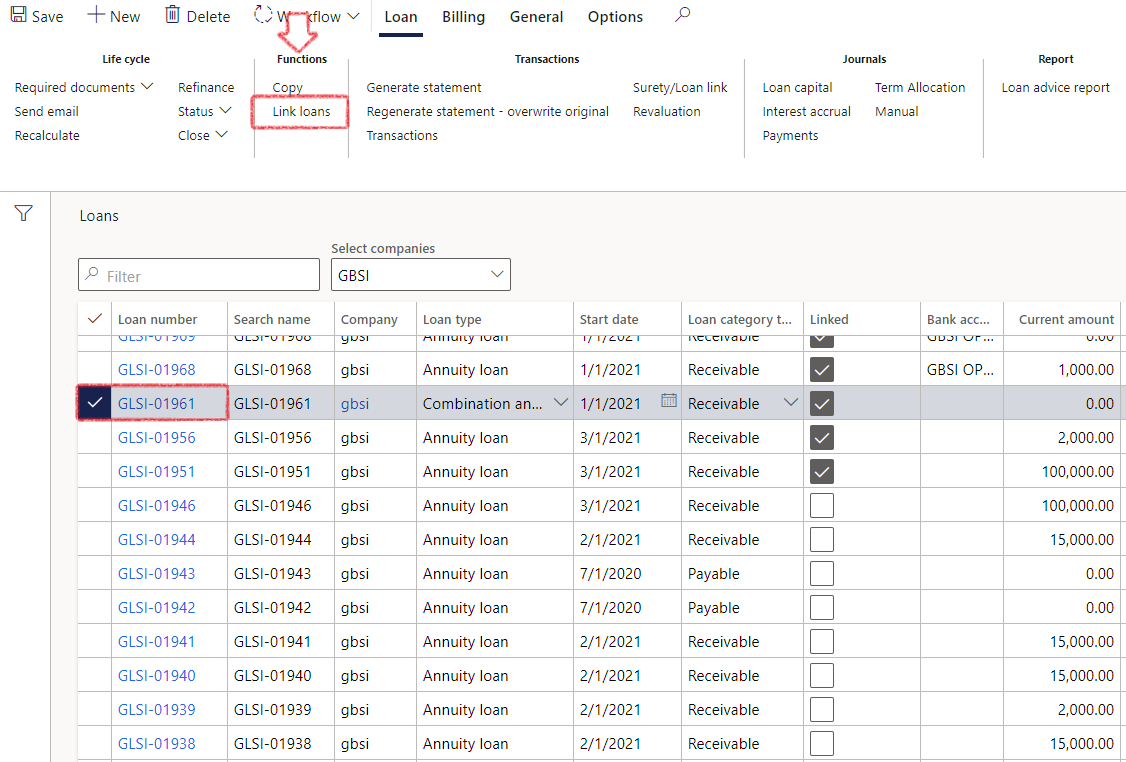
- Stand on the loan that you want to link to other loans
- In the action pane on Loan, click on Functions, click on Link loans
- On the right-hand side there is a column called Available loans
- Choose one or more loans to associate with the current loan. The selection can be filtered based on specific loan numbers
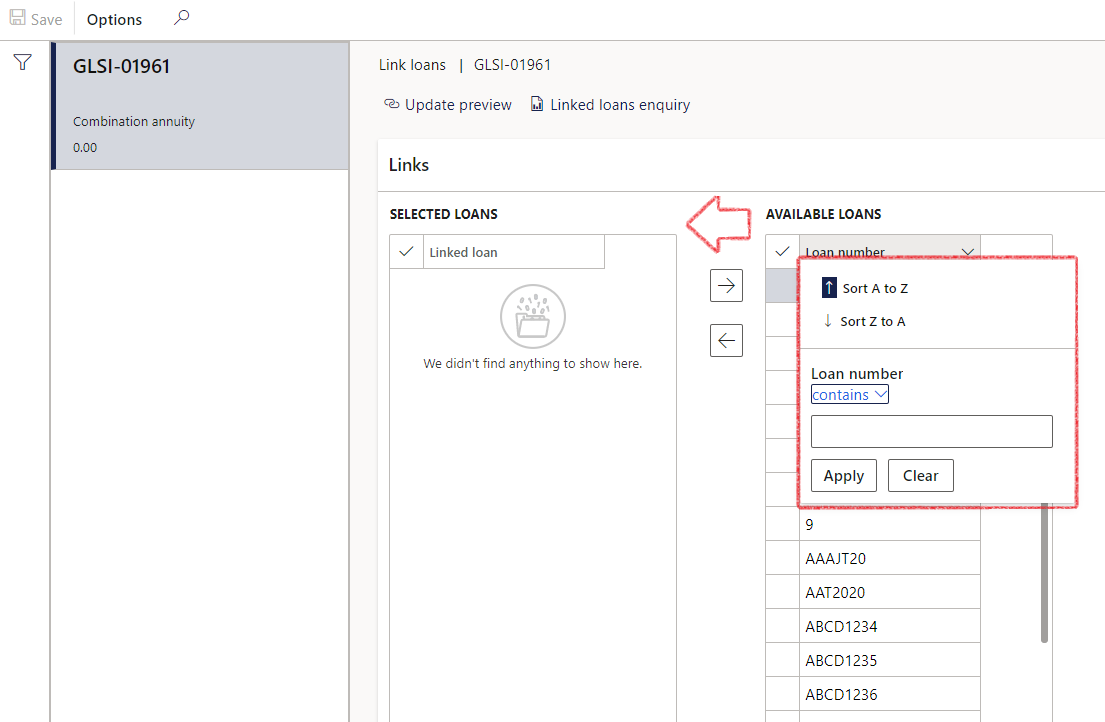
- Click on the arrow to move it to the left-hand column, called Selected loans
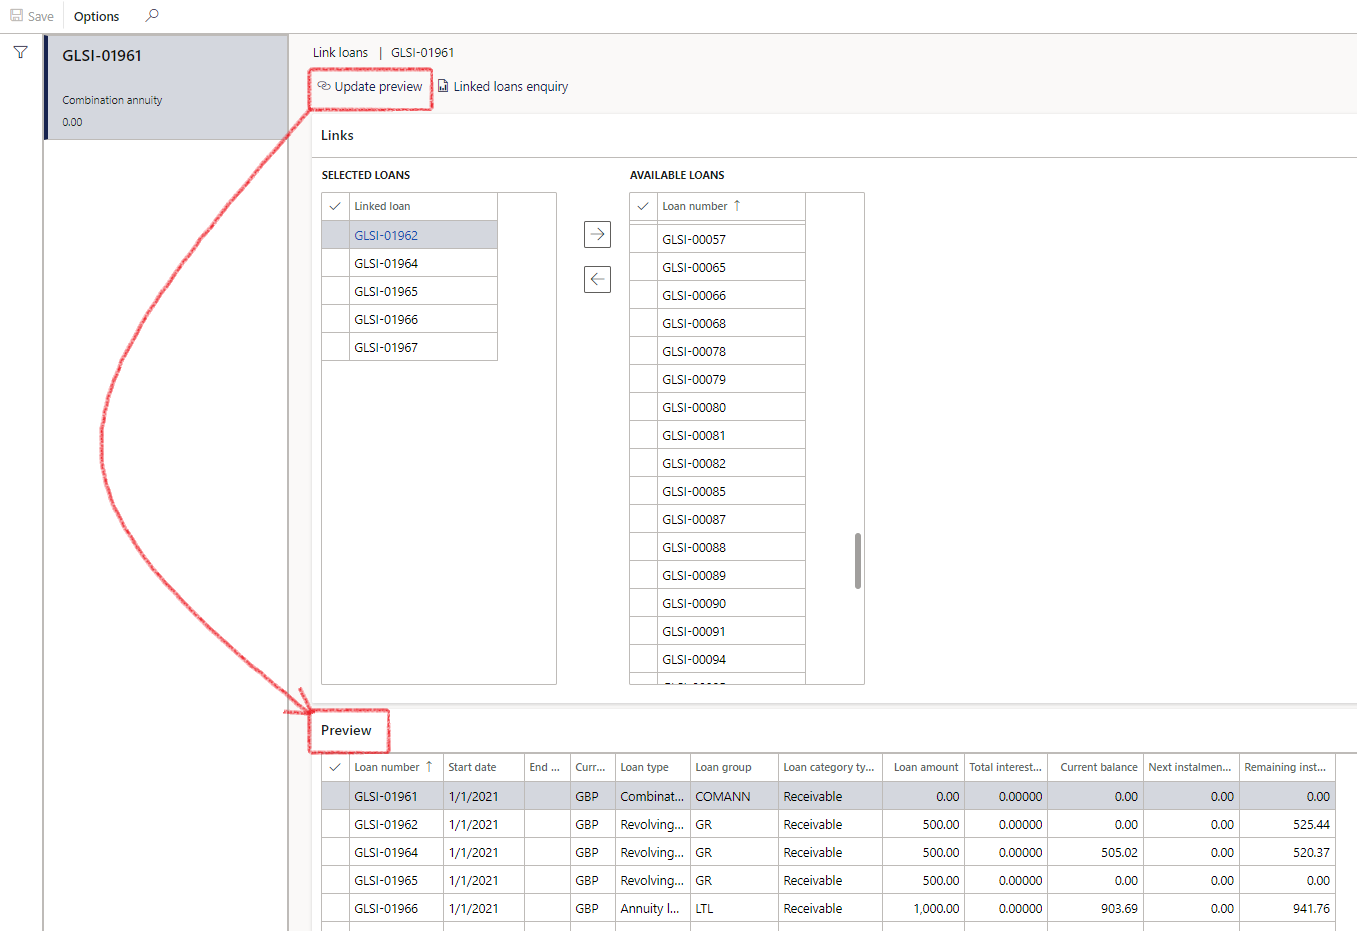
- Click on the Update preview button to view all the linked loans in the preview
- Click on the Linked loans enquiry button to view an on-screen report of the linked loans
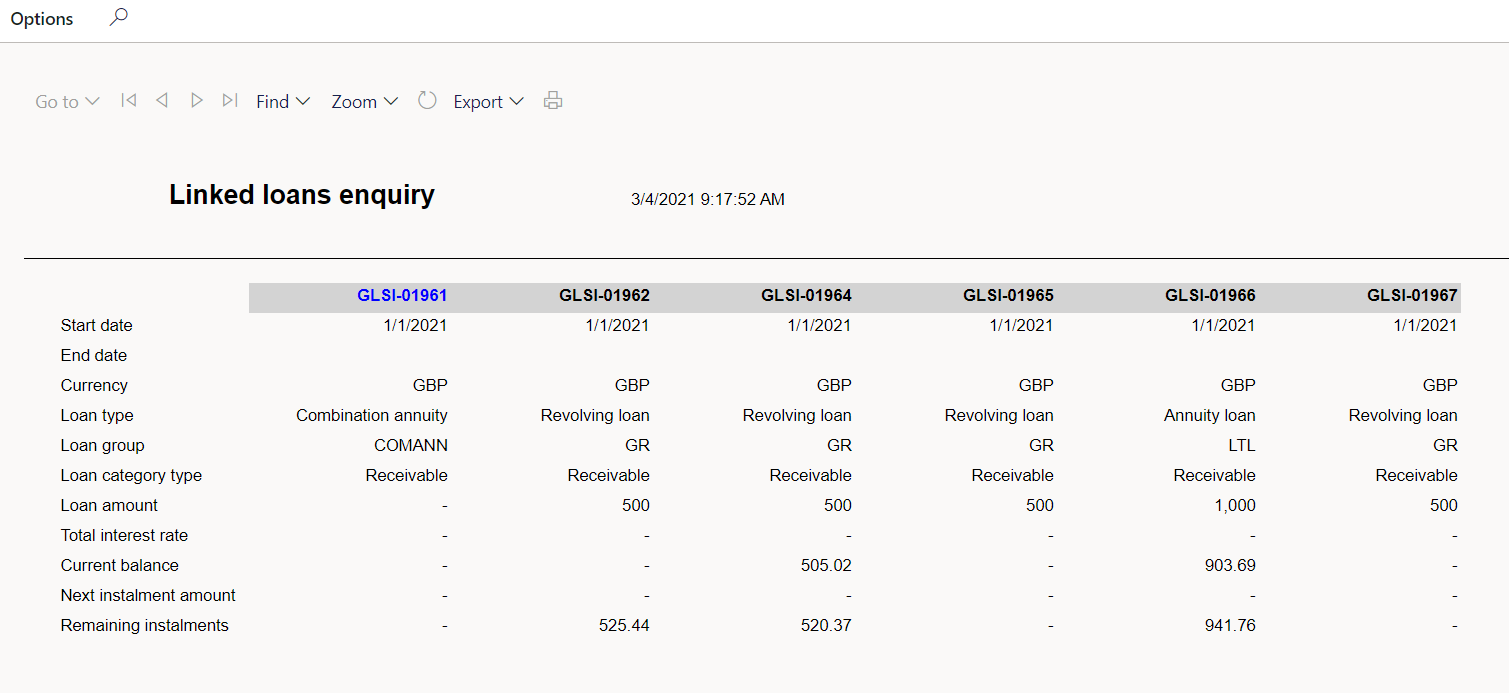
Once a loan is selected, it will not be available for selection on other loans. It has a one-to-many relationship.
¶ Step 14: Negative payments
Negative payment involves a Customer payment journal, where the amount is debited instead of credited, effectively returning funds to the customer
When a negative customer payment journal is received, the loan payment journal allocates the amount solely to the principal.
Previously, it followed the standard logic, allocating payments to interest first.
This updated logic applies only to negative customer payments - regular customer payment journals will continue to follow the existing allocation rules.
- In the case of a negative customer payment, the payment allocation used to function similarly to regular payment journals, with interest taking precedence. Now the logic has changed, and when a negative customer payment is received, it will allocate the payment to Principal (capital) only
- Refunds, which pertain to payments already made, allocate to paid interest first and then to the capital (principal). This means that if the negative payment exceeds the amount of paid interest, any excess is allocated to the capital
- The triggering of this logic occurs during the normal Loan payment journal batch, using customer payments as a source. If TMS detects a negative payment, this logic is applied
- The same posting profile as for a regular loan payment journal is utilized, with amounts being inverted (a debit on the posting profile corresponds to a credit on the journal)
¶ Step 14.1: Loan payment Rules
Normal payments are first allocated to outstanding interest
Negative payments are only allocated to capital
When:
- The loan is a receivable with a linked customer
- The loan payment is based on a customer payment
- The customer payment is a normal payment (not negative)
- There is a negative interest balance at the time of processing (in cases of overpaid interest)
Then:
- A journal line is created to allocate the amount required to reduce the negative interest to zero
- A corresponding line is created for capital redemption, ensuring the journal balances (sum of instalment and interest)
- This functionality ensures journal integrity and correct allocation in all scenarios involving overpaid interest
¶ Step 15: Planned payments
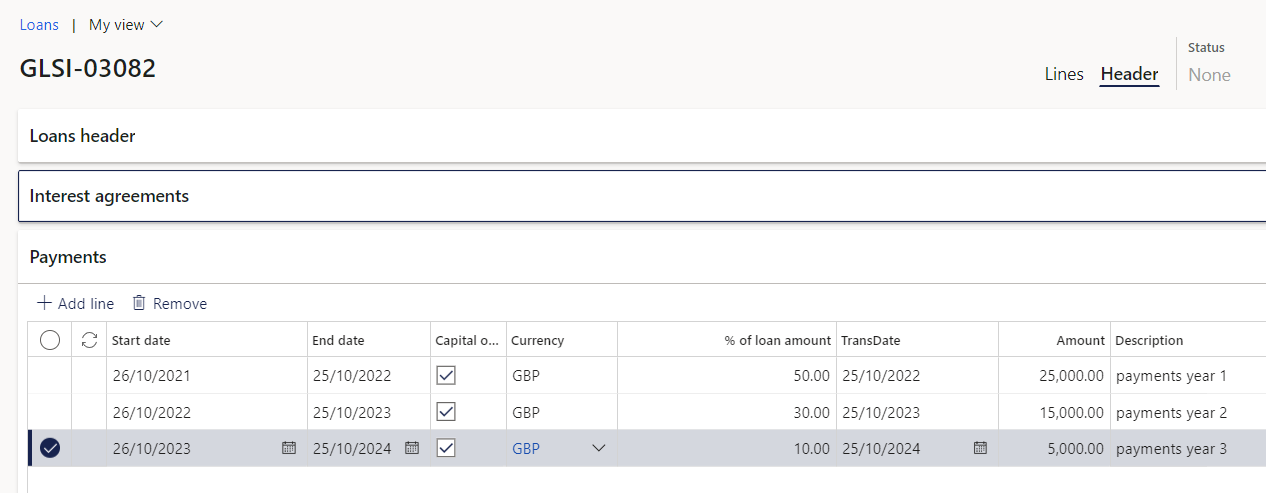
- In the navigation pane, go to: Modules > Treasury > Loans > Loans and click on the Lines index tab. Expand the Payments FastTab
- This is to capture planned payments which may be different from the system projected instalments
- For example, to capture a period of lesser payments or a period of zero payments
- Enter date range and amount under Payments FastTab
- The Start date and End date will default to the Transaction Date when adding a new payment line. All three date fields can be edited
- Users can set the payments up as a percentage of the total (Capital outstanding), or they can manually input the amount
- A loan can be flagged for non-payment and extend the terms, by capturing a zero-payment line for a period. (Roll-forward automation / payment holiday)
- This can be done by capturing a zero-payment line for a period
- Remaining payments are calculated in the remainder of the periods of the loan
- If zero payment line is saved, and the loan is linked to a facility, and the zero-payment date is on the last day of the loan, the system will prompt:
Must loan end date and facility be extended - Click the Yes button
- The loan end date will increment with one month
- The remaining calculations will be updated by using a new end date
- The credit facility will be auto updated with a new expiry date (valid until date), linked to the loan
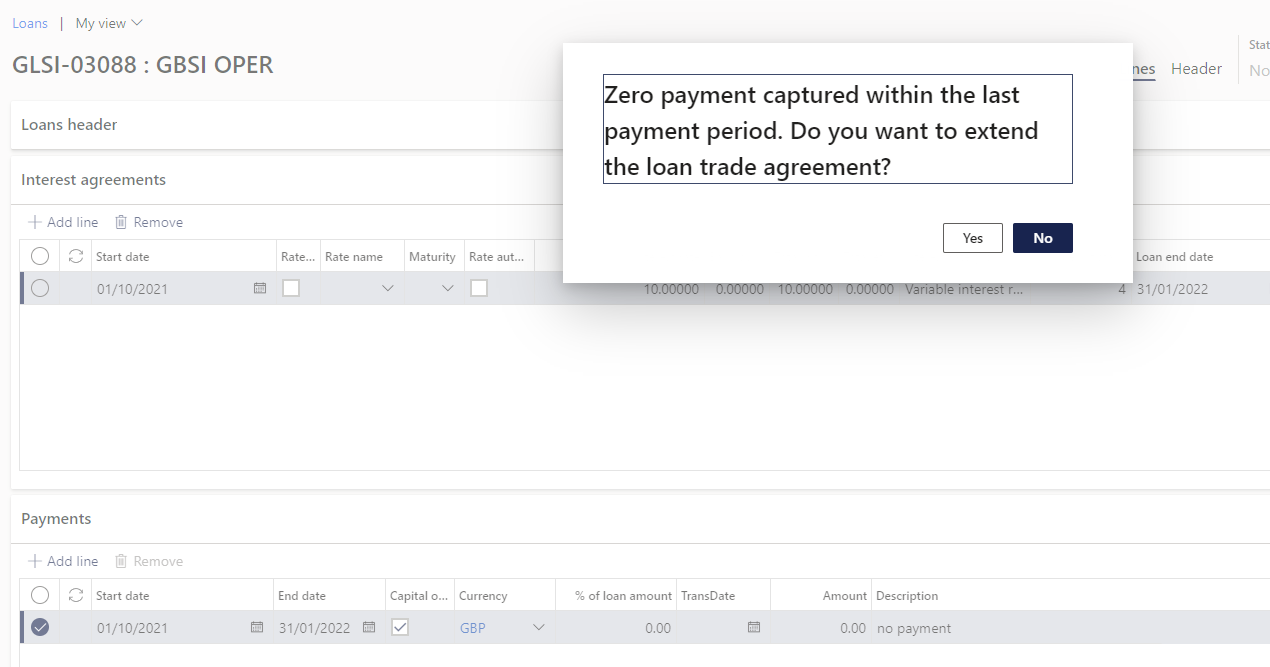
Note that the Loan Interest Agreement's end date has been automatically changed.

- Example of specific payments entered
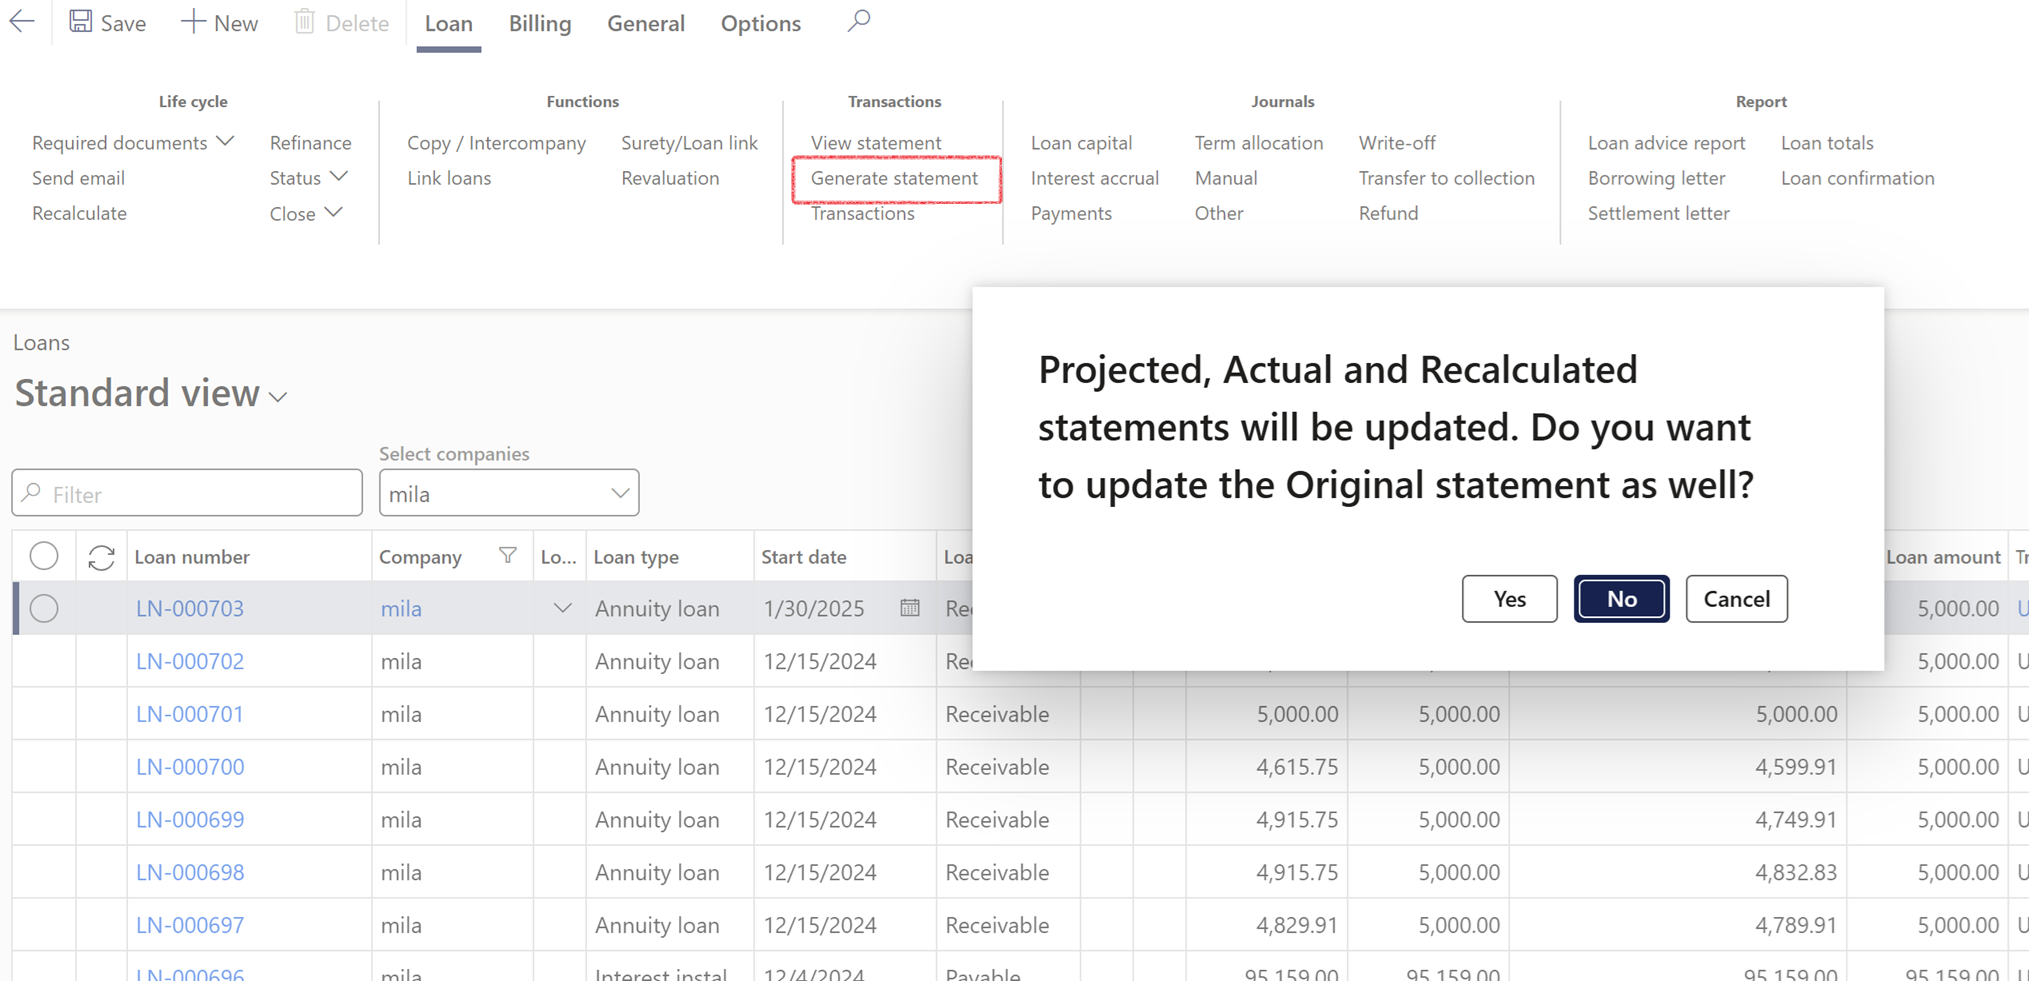
- Click on the Generate statement button to view the newly updated Loan statement
- Select the Yes button to overwrite the Original statement
¶ Step 16: Payments FastTab
A loan payment journal can be generated directly from the Payments FastTab by clicking the Create payment journal button after entering the line
Users will be prompted to decide whether to Post the journal immediately. If not posted, they can preview it before finalizing
- When the Capital only option is chosen, it applies the full amount to loan capital
- If the Capital only option is not selected, the process mirrors creating a payment journal from customer payments, where it first allocates against open interest (e.g., annuity, interest installment, revolving, etc.)
- The batch number of the journal will be visible under the Payments FastTab
- A Posted indicator will show whether the journal has been posted
- When this description field is populated, it will now be appended to the journal Description field in the Payment journal lines
¶ Step 17: Minimum repayments
When Minimum repayment amount is set up on Treasury parameters, this value will be used by the system for the instalment recalculation in the event of a standard recalculated amount being less.
This will apply to the Original and Projected loan statements. This could result in the loan being settled earlier than the original end date on the Interest agreement.
- A minimum repayment can be set up on Treasury parameters
- The projected statement will project instalments as per the setup of minimum repayment on the Loan group
- The loan period on the Loan statement will be adjusted according to the repayment schedule, so the end date on the statement can be earlier than the original end date on the interest agreement
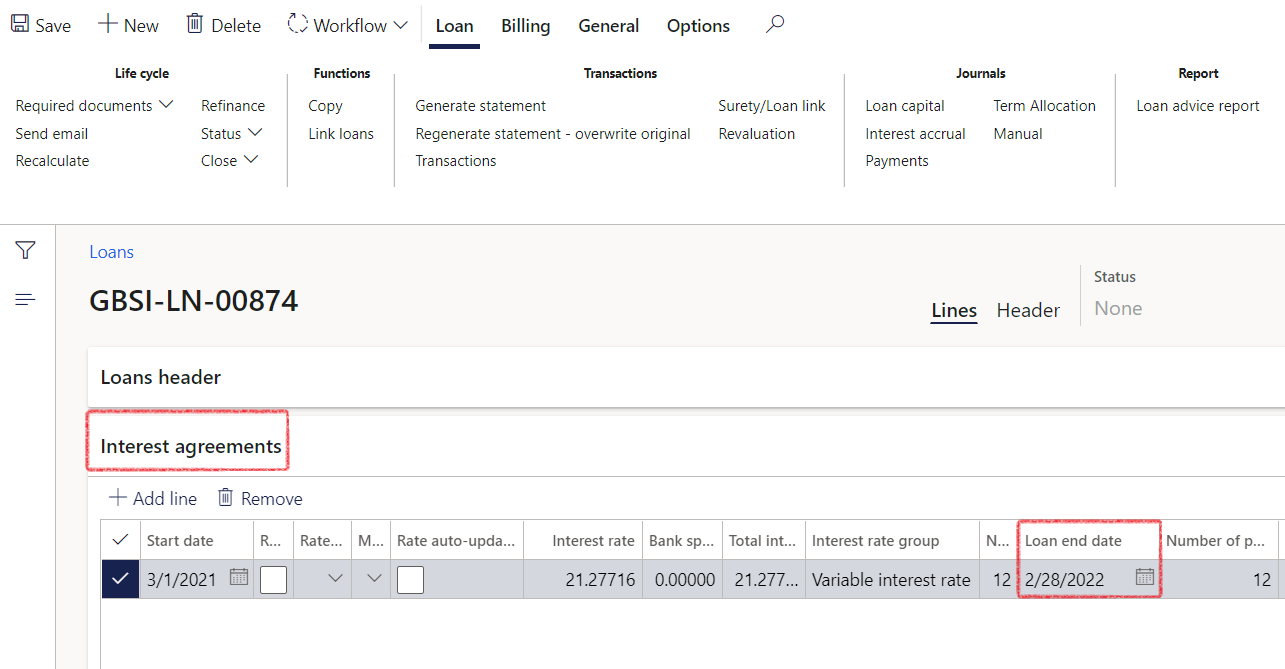
Notice the date of the last Projected instalment (on Projected statement) is shorter than indicated on the Loan end date on the Interest agreement, due to the minimum payment amount that is set up.
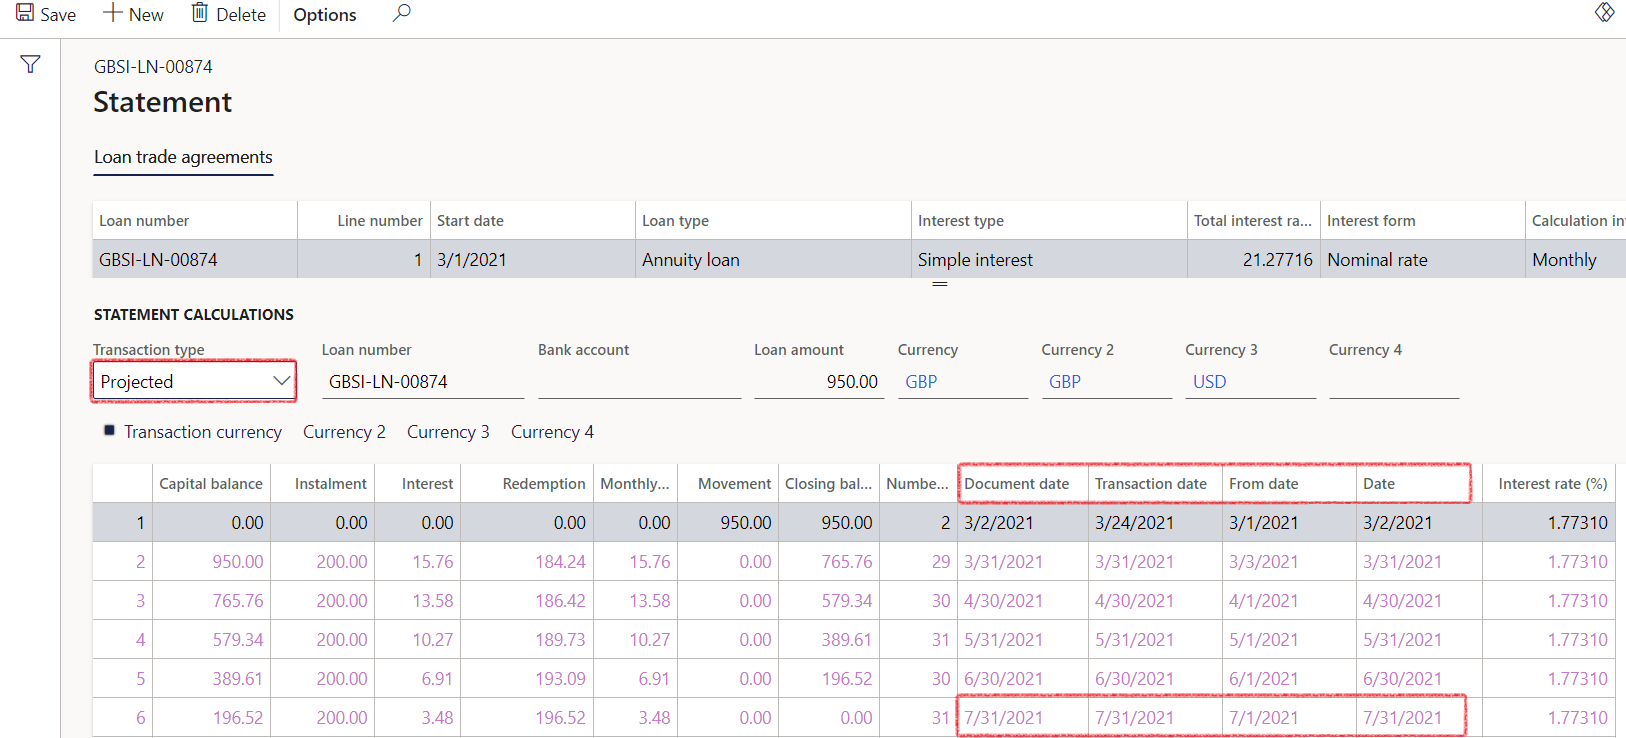
Example of a Projected statement without Minimum repayment setup on the loan group:
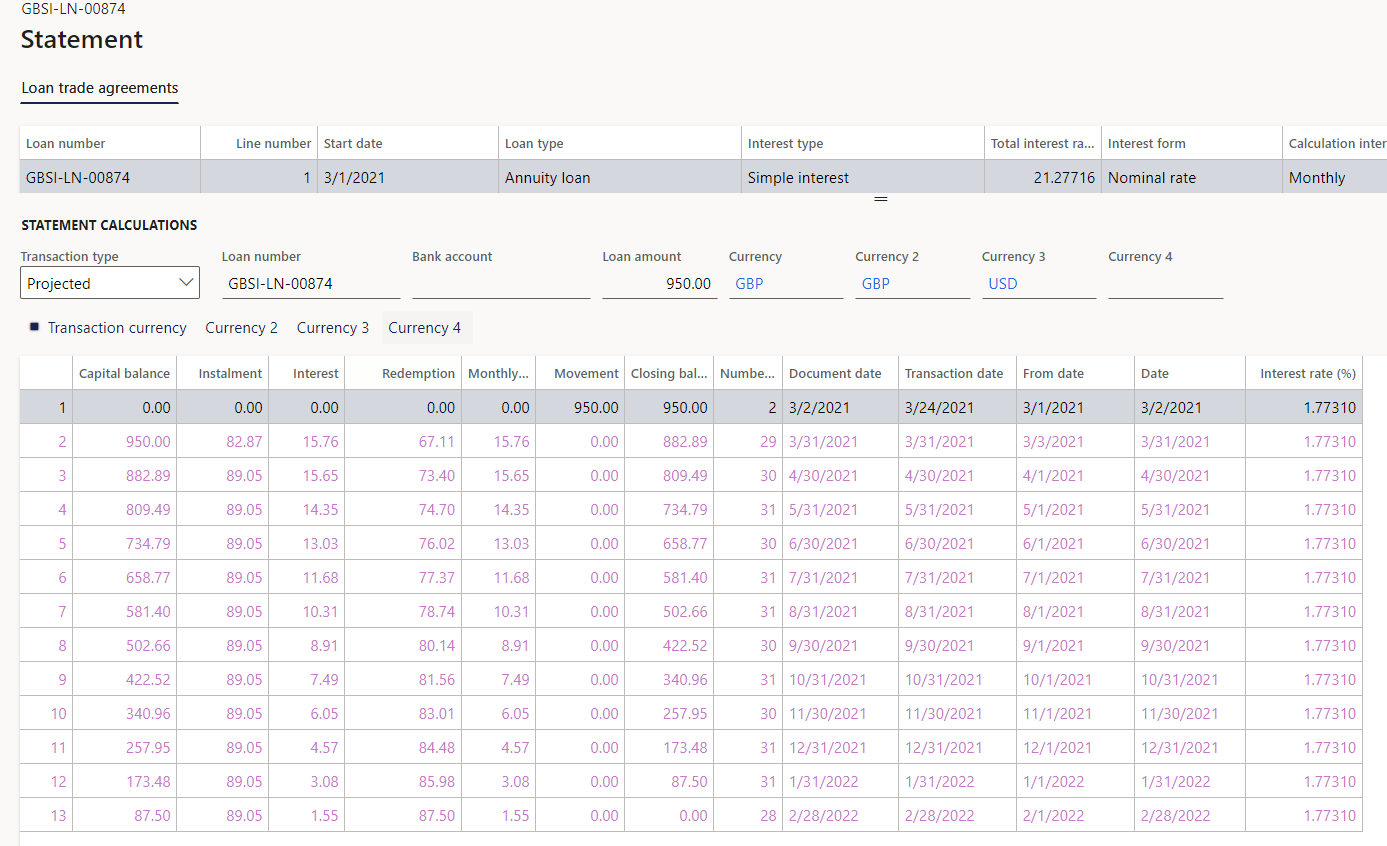
Note the specific setups required for Minimum repayments
¶ Step 18: Loan charges & fees
Loan charges and fees are the costs associated with borrowing money from a lender. These can include various types of fees, such as application fees, origination fees, processing fees, prepayment penalties, late payment fees, and interest charges. The specific fees and charges vary depending on the type of loan and the lender. It's important to carefully review and understand all of the fees and charges associated with a loan before accepting the loan offer.
¶ Step 18.1: Recurring charges
Users can setup recurring charges on a loan, by creating one line on the Loan charges FastTab and saving the record.
- Navigate to Treasury > Loans > Loans
- Open an existing loan details page
- Expand the Loan charges FastTab
- Click on the New button to create a new line
- Select a Date
- In the Notes field, type a value. It is important to have this field completed, in order for the Recurrence button to become available
- Enter an Amount
- Select a Currency
- Then click on the Recurrence button

¶ Step 18.1.1: Create a recurrence schedule
A new page will open:
- Click on Create recurrence schedule
- A recurrence schedule will be created

- The user can then create recurring fees by navigating to the Charges and penalties journals menu
- Go to: Treasury > Loans > Periodic > Charge and penalty journals
- Enter a Start and End date
- Type in a loan number
- Select a Statement type
- Click the OK button

- A single or multiple journals will be created, and the schedule will appear on the loan as follows:

When Loan statements are imported, for instance on the Simulated loan statement, and the field for Fee increased are populated, then that amount will be used when running the periodic batch job for Charge and Penalty journals
¶ Step 18.2: Upfront fees / Prepaid fees
Amortization of upfront fees or commissions can now be linked as a prepayment of fees on a loan, posted via a General Ledger journal.
Vouchers linked gets included in the Cost of borrowing (cost of capital ratios on a loan)
- Navigate to General Ledger > Journal Entries > General journal
- Create a journal
- Click on Functions and select Ledger accruals
- From the dropdown menu, choose the Accrual identification
- Click on Transactions to view the amounts
- Click the OK button

- Click the Post button to post the journal

- Click on Functions and select Link to loan
- Select your loan from the list
- Enter Notes
- Click the OK button

- To view the posted journal on the loan, navigate to Treasury> Loans>Loans and open the specific loan that was linked
- On the lines section, expand the Loan charges FastTab
- Vouchers linked to a General journal gets included in the Cost of borrowing

Note specific setup required for Accrual schemes
¶ Step 19: Cost of Borrowing
The Cost of borrowing FastTab on loans is a display only field. Any loans that are linked to a posted General journal will display here, but only for the current month.
- The Cost of borrowing can be viweed for various time intervals: Monthly, Quarterly and Yearly
- Bank charges are included with this calculation

- To view the enquiry screen for Cost of borrowing, navigate to: Treasury > Common > Inquiries and reports > Cost of borrowing
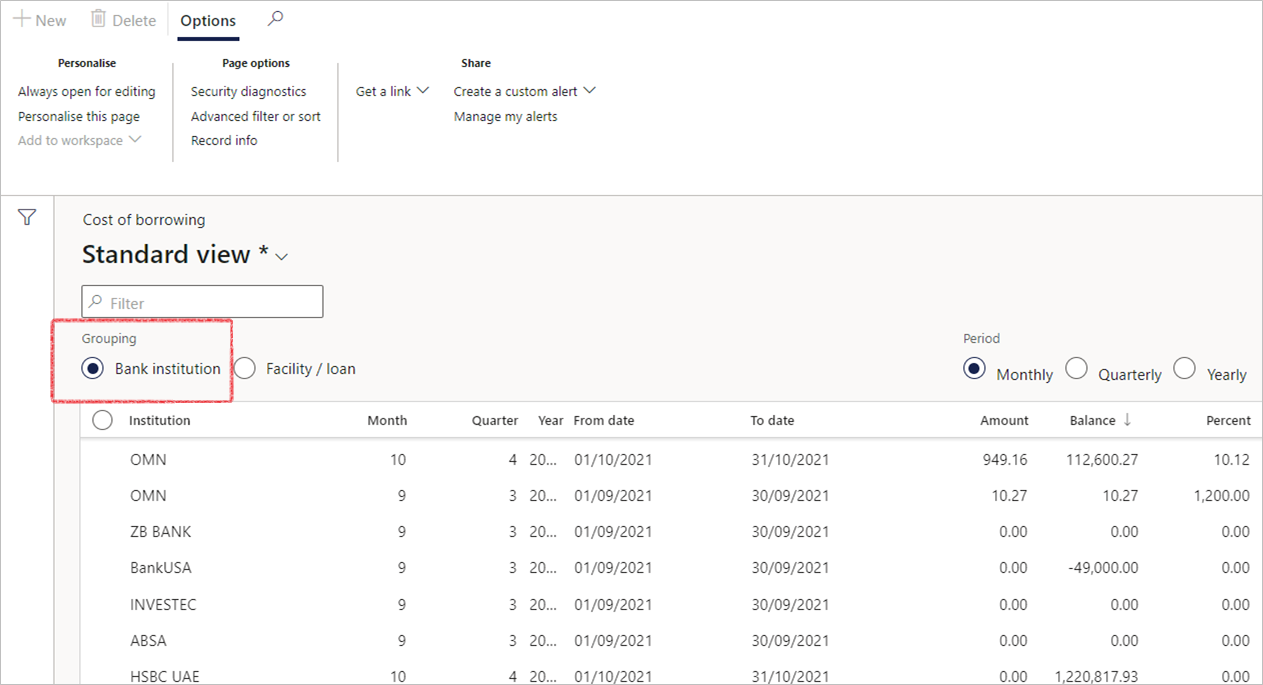
- Choose a grouping between Bank institution, or Facility/Loan
- Select the period by clicking one of the following:
- Monthly
- Quarterly
- Yearly
- This will display a summary per bank institution
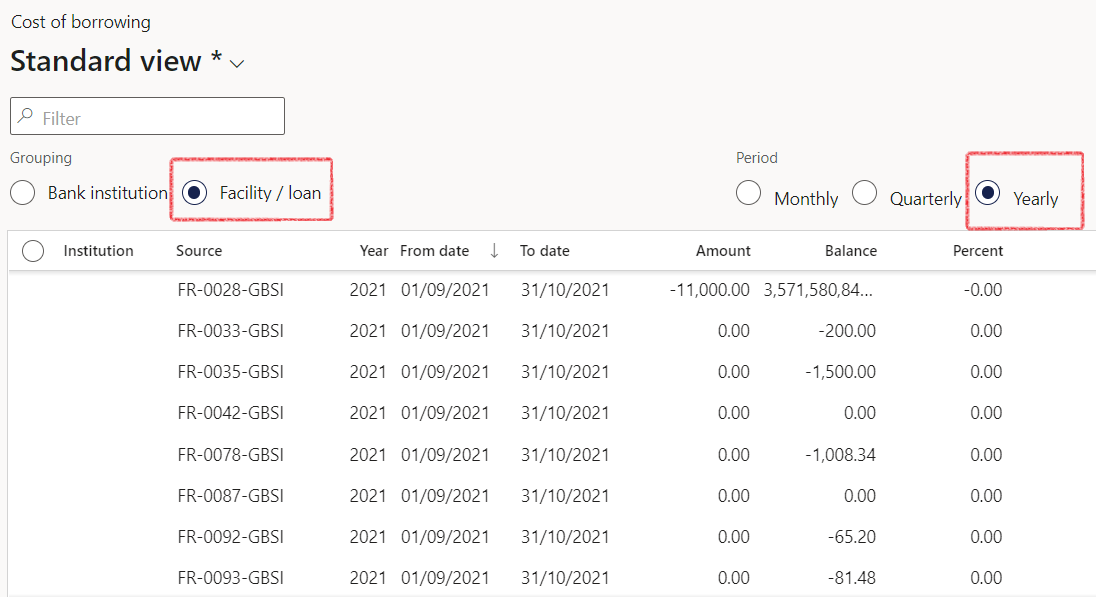
¶ Step 20: Recalculate a loan
Recalculate Interest accrual and repayment distribution
- On Treasury Parameters, select Loan recalculation enabled (Yes / No)
- Loan recalculation journal creation delay (in minutes) can be setup on Treasury parameters
- Recalculation triggers include adjustment to a pay-out, where a capital journal is captured with document date older than the last interest accrual, repayment back in time, if the journal captured with document date older than the last interest accrual, and changes to an interest agreement (when existing posted interest accrual and payment journals)
- When recalculating, and before creating new journals, prior journals will be reversed first and then only will new journals created. This is for both interest accrual and payment journals
- Previously reversed journals will be marked in order not to be reversed again, when doing more than one recalculation
- Journals will be auto-created, with the option to auto-post. The Post recalculation journals can be setup on Treasury parameters
- On the Loan statement, a new version of loan statement, called Recalculated can be used, so the Original and Actual loan statements will not be affected by the recalculation, unless adjustment journals are posted, which will then update the Actual statement, and in turn change the Projected statement as well
- Click on the Recalculate button on the action pane inside loans
- When recalculating the repayment amount for loans it also considers the minimum repayment amount for the Loan
- Batch job for bulk recalculations: Loans > Periodic > Loan recalculation
Example of a loan recalculation:
- For this example, we changed the Interest agreement (interest rate and end date)
- Then we click on Recalculate in the Loan action pane
- A message appears to indicate the loan was recalculated and payment journals was created
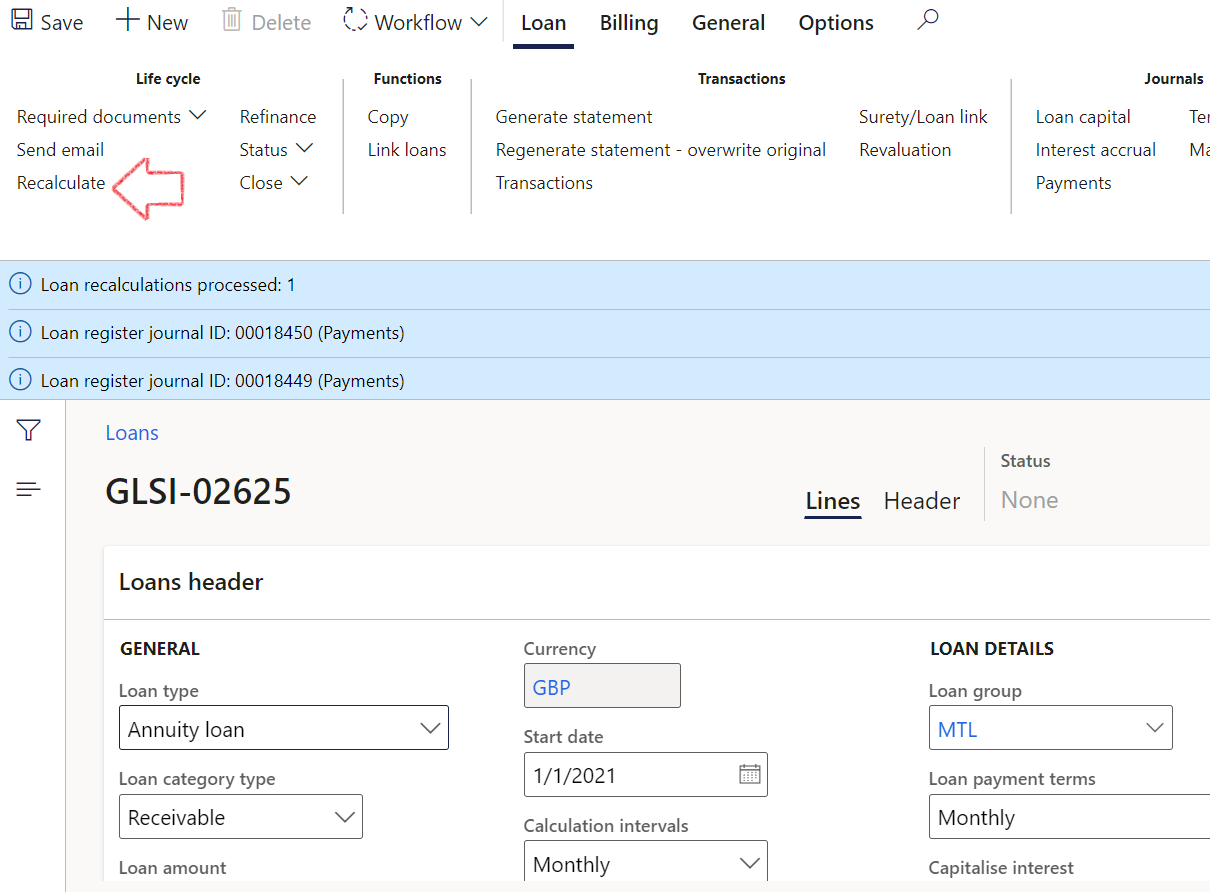
Journals created:
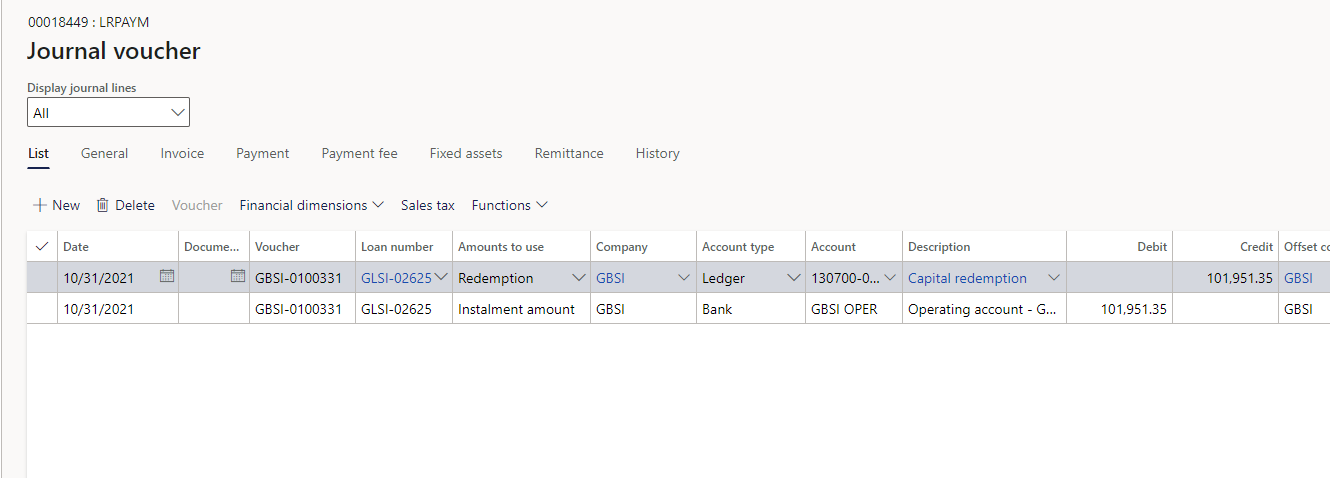
- After posting the journals, go back to the loan
- Click on Generate statement
- Select Yes to overwrite Original statement
- The loan statement will open on the Original transaction type by default
- Select Recalculated transaction type from the drop-down menu, to view all the recalculated transactions
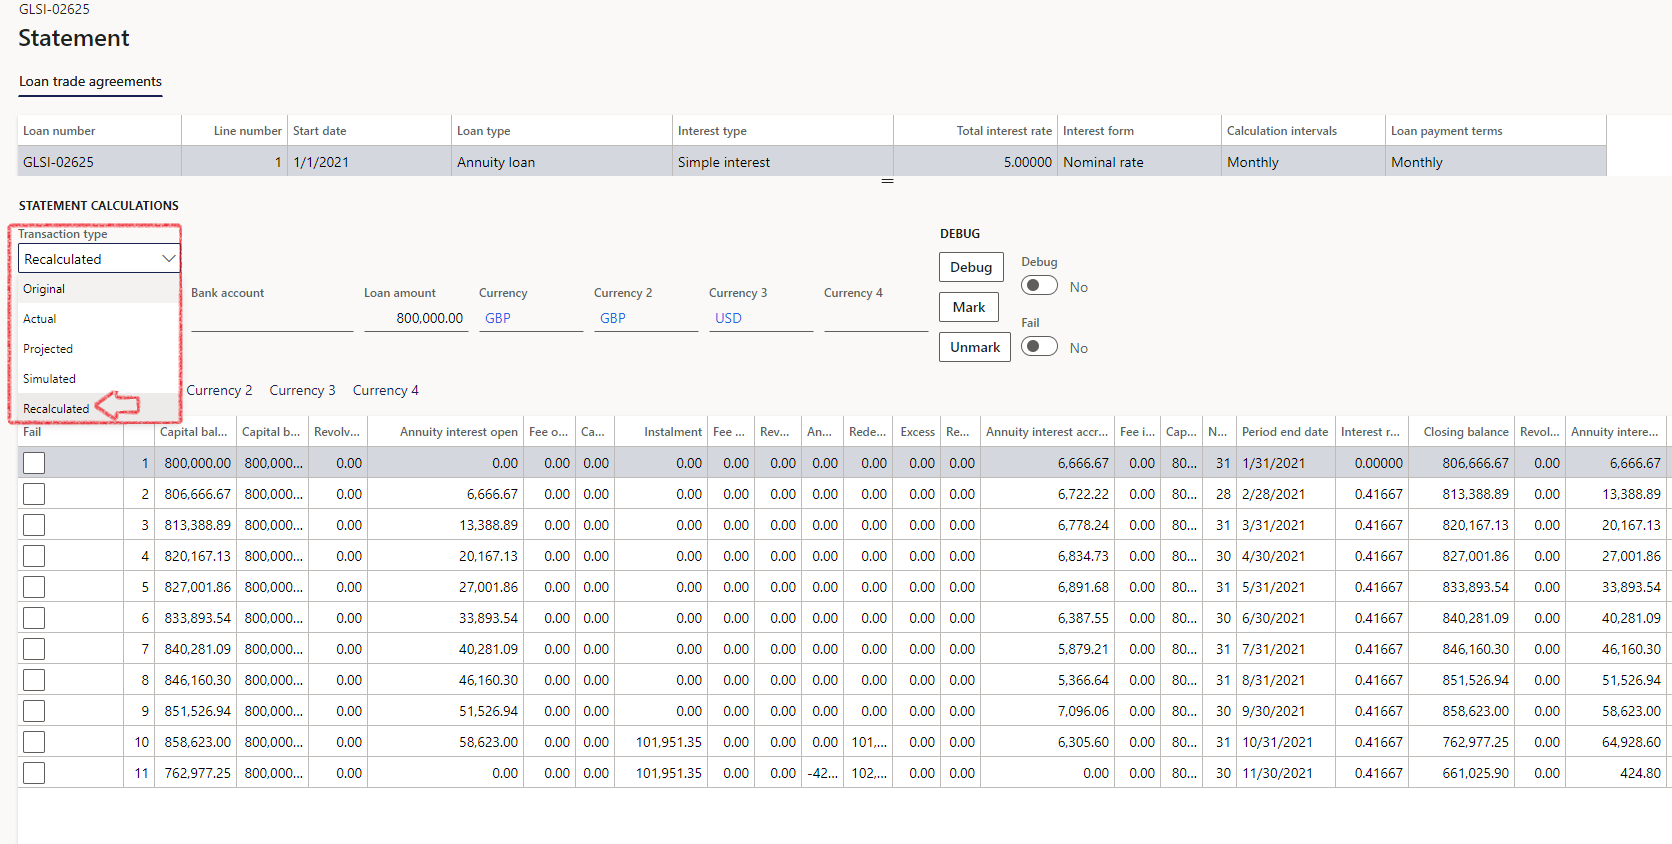
Note specific setup required under Treasury parameters to enable Loan recalculation
¶ Step 21: Covenants
Loan covenants are conditions in a loan that requires the borrower to fulfill certain conditions. It is promises or commitments against a loan.
- Go to Treasury > Loans > Loans
- Open an existing loan
- Expand the Covenant FastTab
¶ Step 21.1: View Covenant list page
On the Covenants list page, the user will be able to filter on Covenants for Facilities, or Loans, or both. This is a display-only page, and users will not be able to create new or delete records from here:
- Go to: Treasury > Loans > Covenants

Note specific setup required for Loan covenants and Covenant types

¶ Step 22: Securities
The Collateral and Securities FastTab is used to list all the securities that are pledged against the loan. If a cover ratio is filled in on the Loan FastTab, as well as an Asset market value, then a Loan margin will be calculated as well as a security cover percentage

- Go to Treasury > Loans > Loans
- Open an existing loan
- Expad the Collateral and Securities FastTab
Note specific setup required for Security type, Property title and Charging agreements
¶ Step 23: Loan revaluation
- On a Loan, the Values FastTab gets updated when you run a currency revaluation:
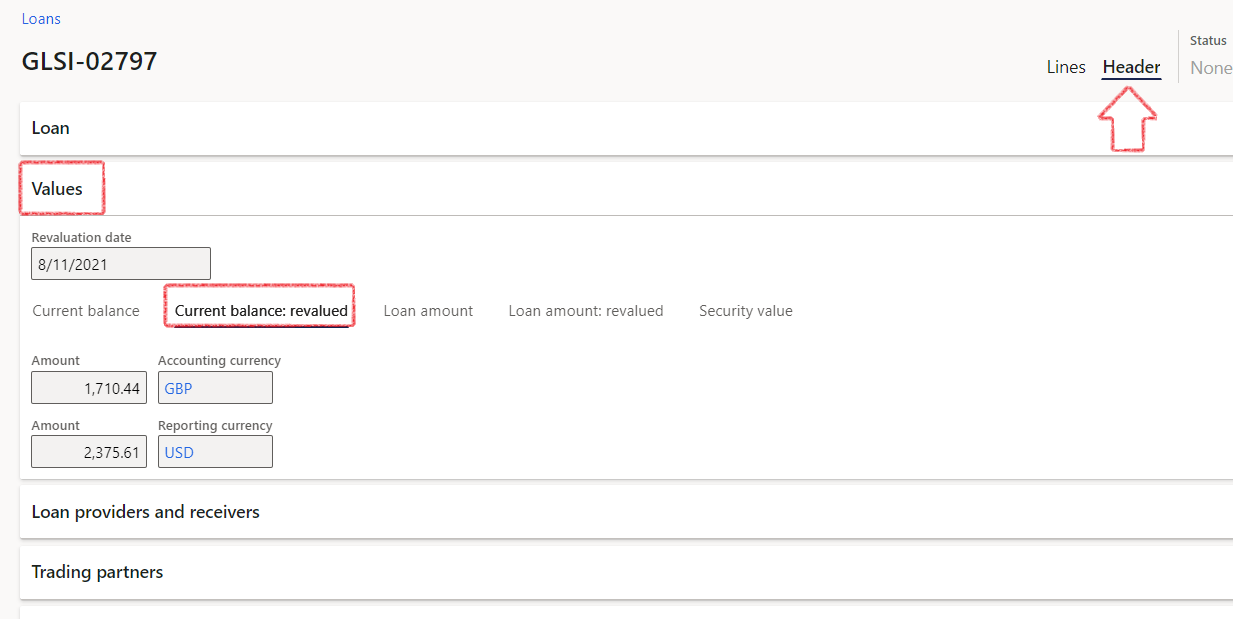
- Click on the Revaluation button as per screenshot above (Loans>Transactions>Revaluation)
- A message will appear, asking if you would like to update the cost (original) amount with the latest exchange rates
- Click on the Yes button
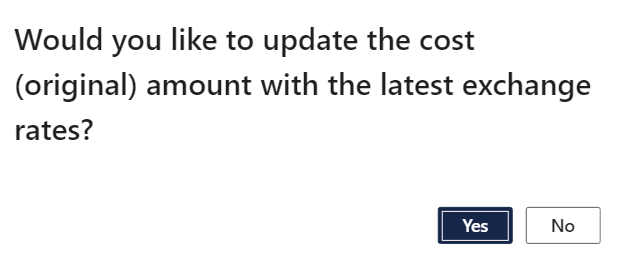
- When done, the Current balance, Current balance revalued, Loan amount, Loan amount revalued, and Security value tabs will be updated in Transaction currency, accounting currency and Reporting currency
Note specific setup required under Currency conversion
Step 24: Treasury invoices
The setup for Treasury Invoice templates should be done and a Treasury Invoice template should be linked to a loan group
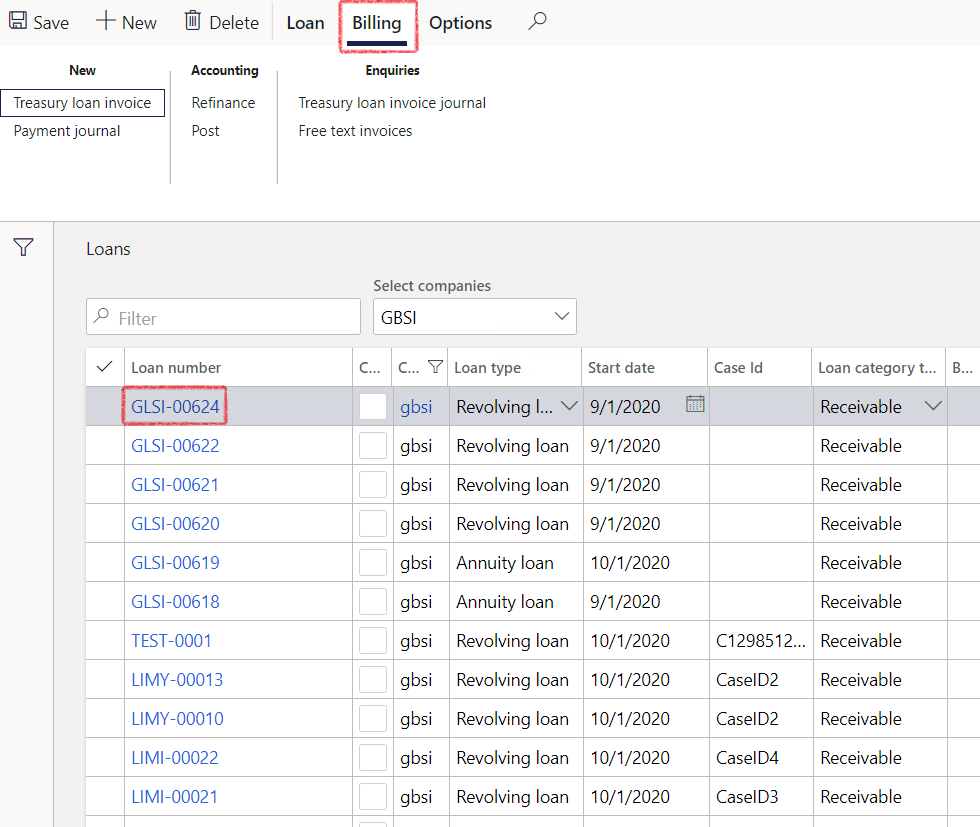
- Go to Treasury > Loans > Loans
- On the Loans list page, find the relevant Loan, click the link in the selected row to open the Loan detail page
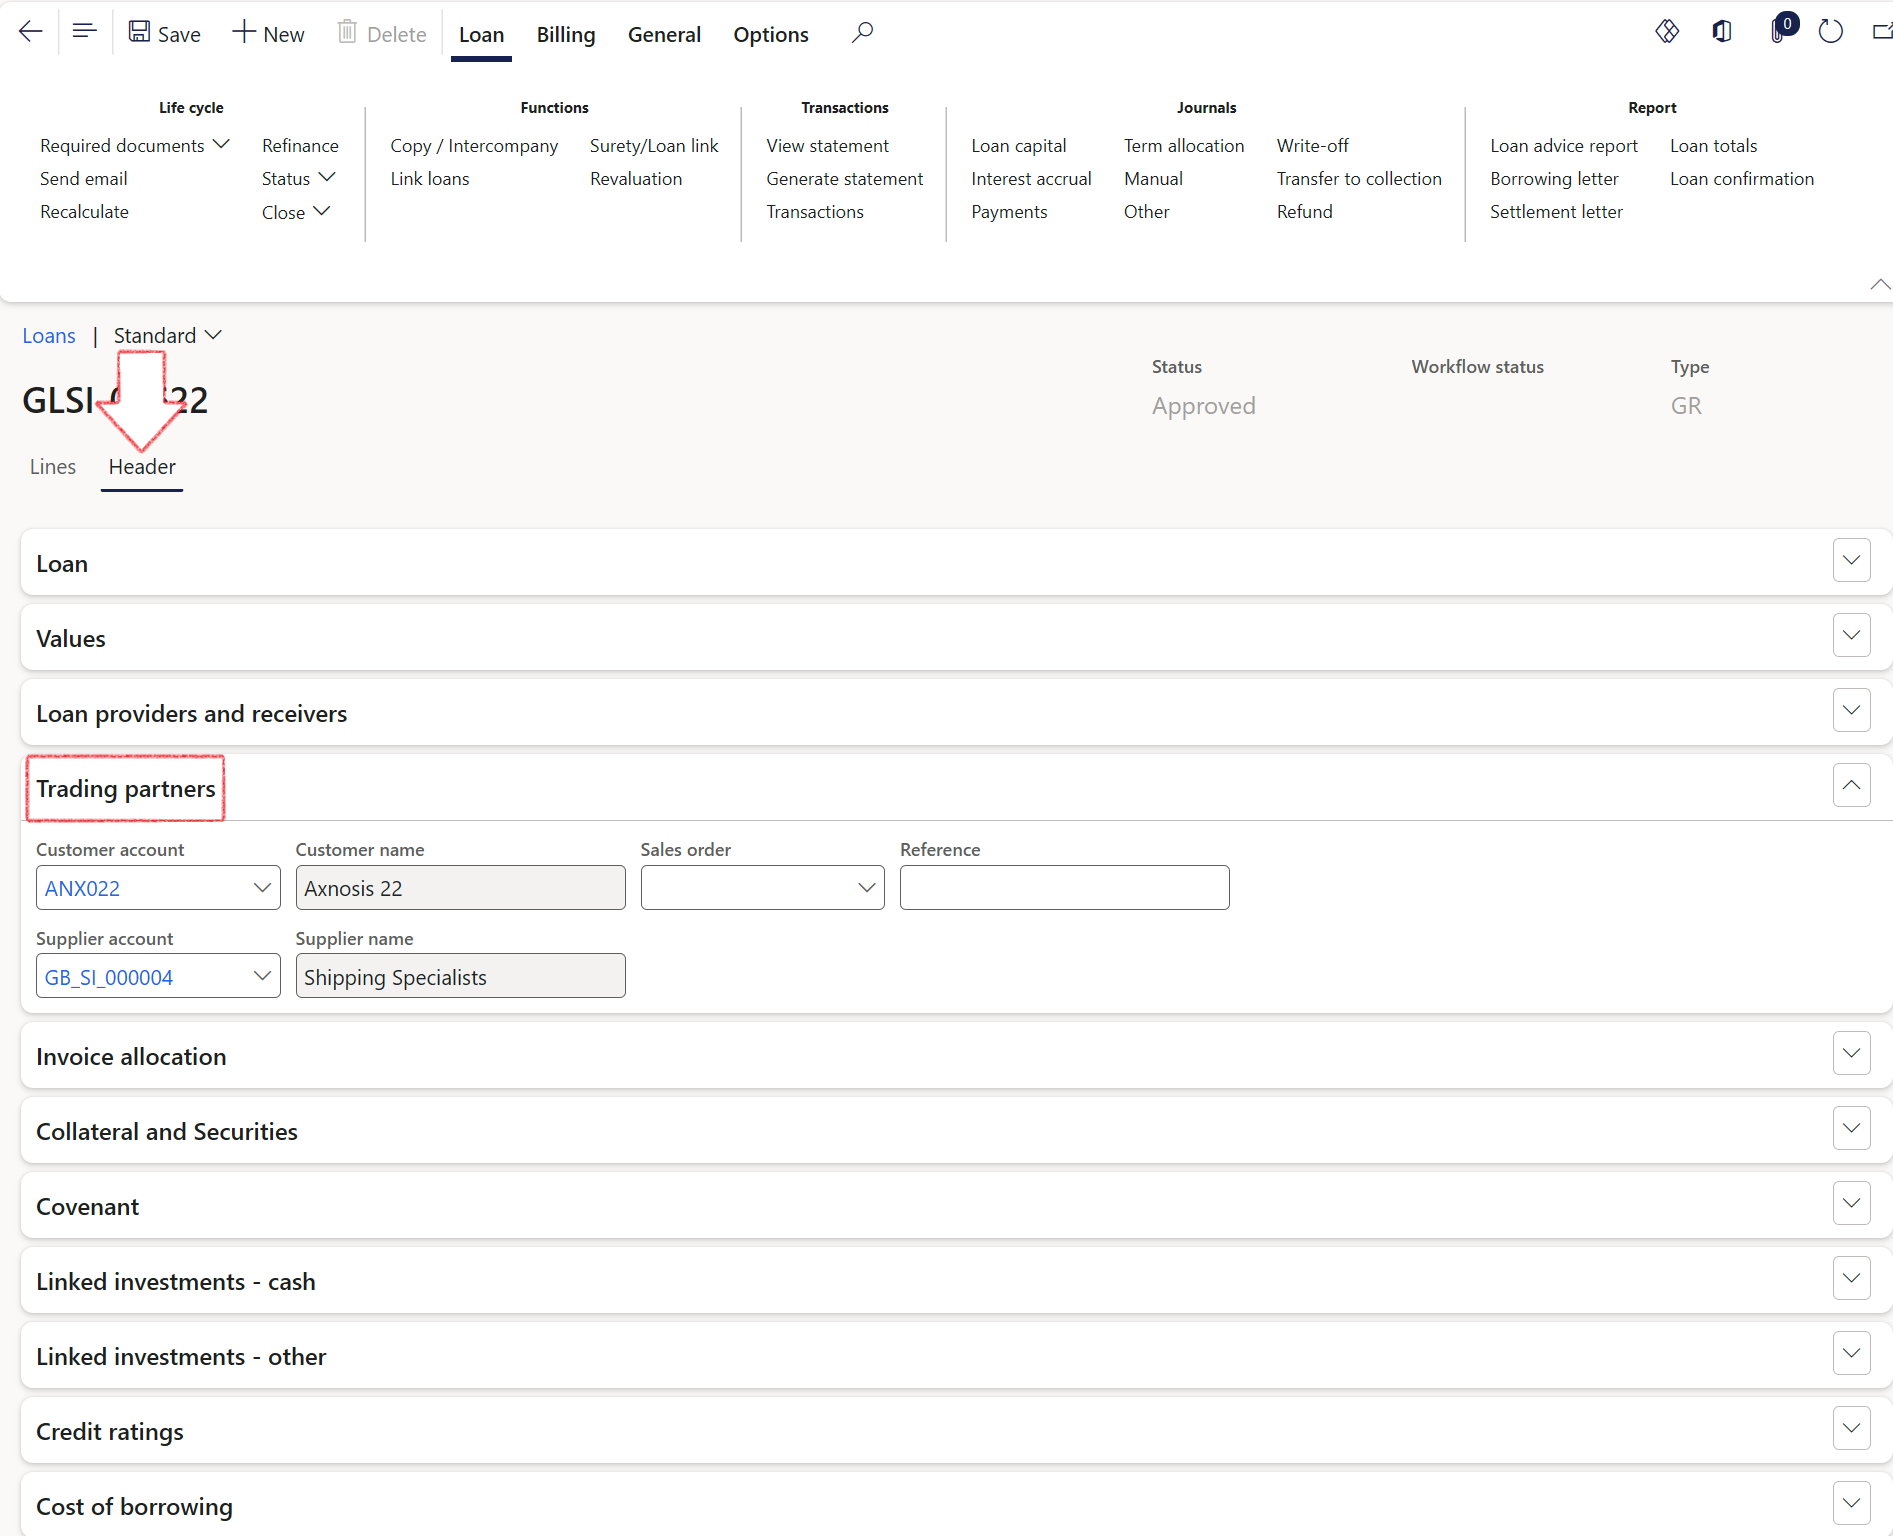
¶ Step 24.1: Trading partners
- To link a specific invoice to the loan, first expand the Trading partners FastTab and select the relevant vendor account or customer account
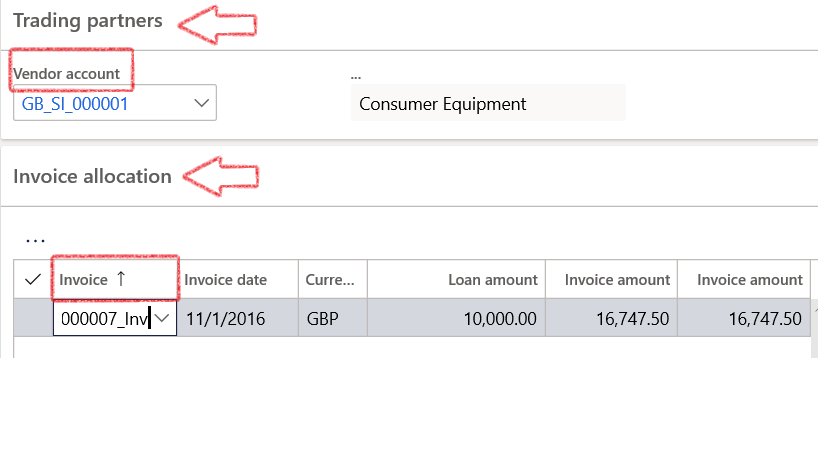
¶ Step 24.2: Invoice allocation
- Users can link a debtor or creditor's Open transactions against the loan.
- On the Invoice allocation FastTab, a specific invoice can be allocated to the loan (invoice linked to trading partner selected)
- For a Receivable loan, a Customer invoice can be selected, and for a Payable loan, a Vendor invoice can be selected
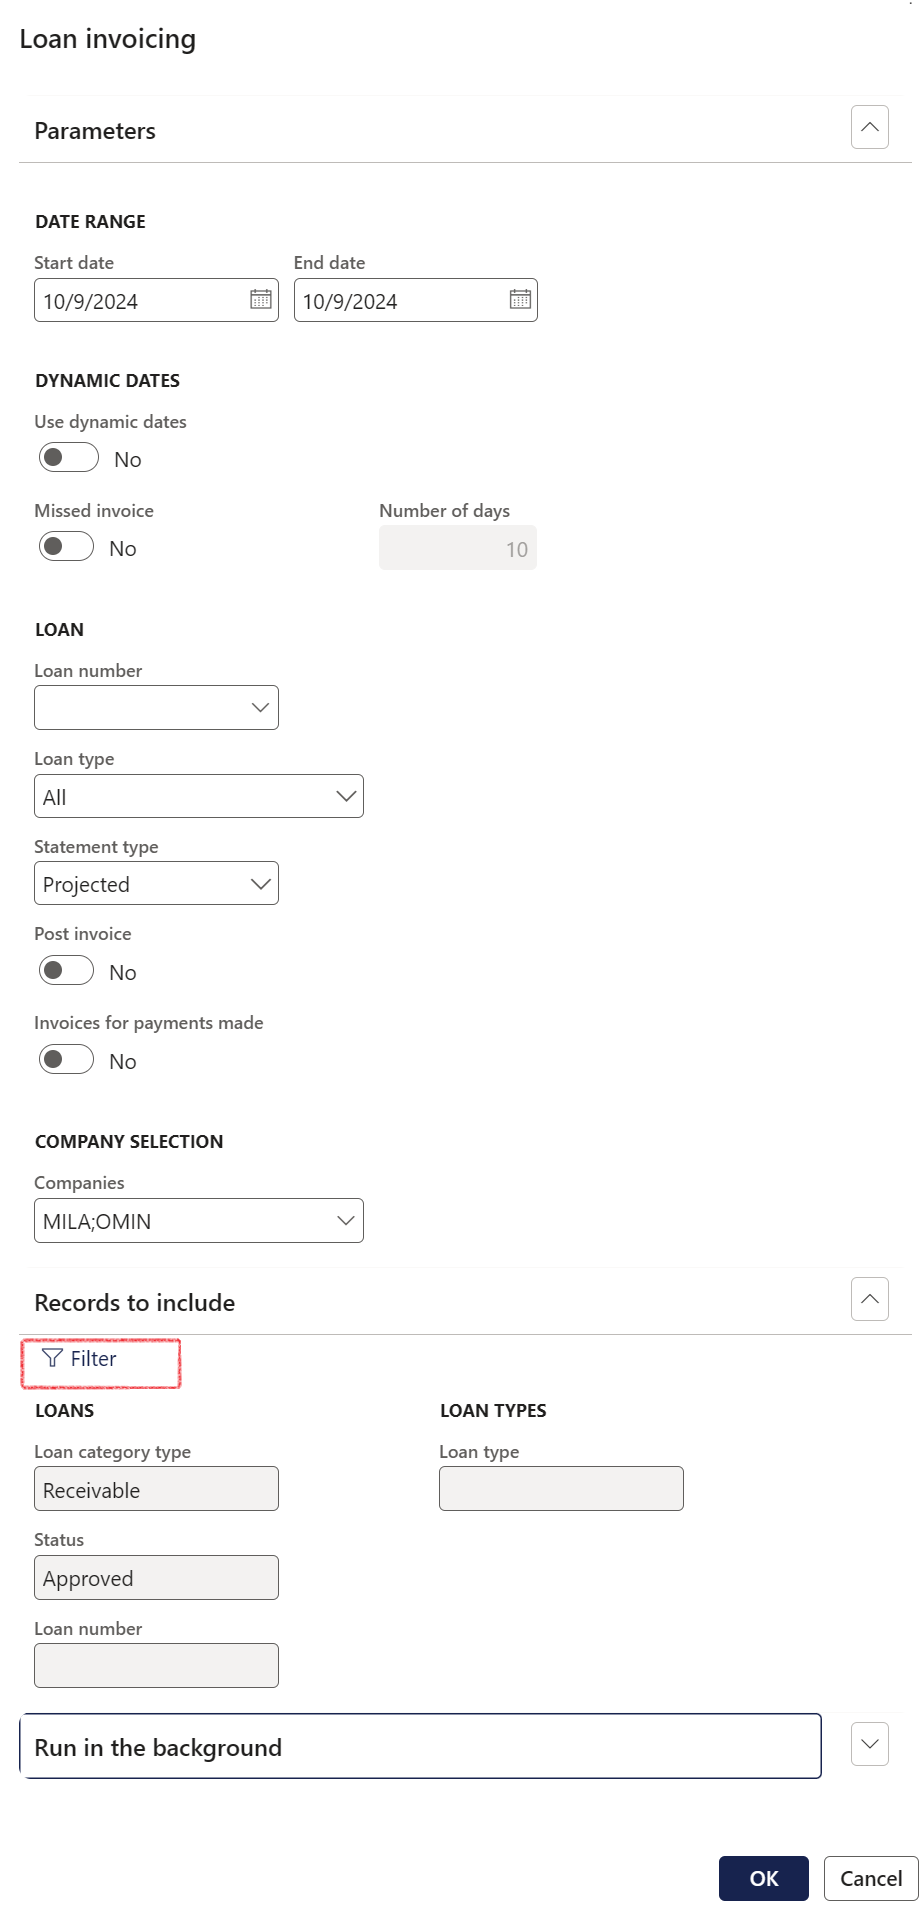
- In the Customer account field, enter or select a value.
- Go to Treasury > Loans > Periodic > Loan invoicing
- Enter a From and To date
- There is an option to automatically Post the invoices and to run monthly
- Users can choose which records to include, by clicking on the Filter button
- One or multiple companies can be selected for this Loan invoicing batch job
- Click OK
¶ Step 24.3: Manual invoice creation
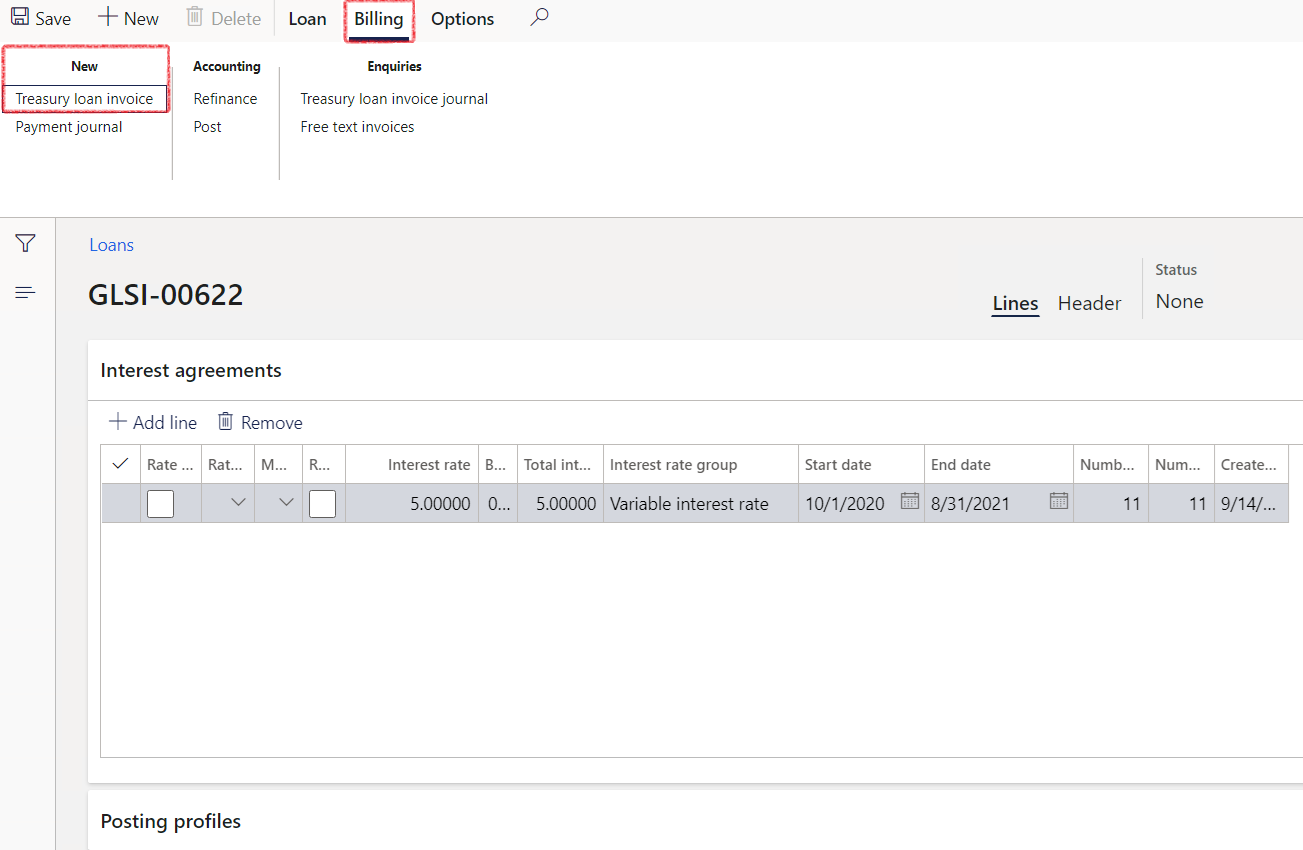
- To manually create a treasury invoice, open the loans details page, inside the loan, click on the Billing tab on top and select Treasury loan invoice
- Proceed to complete the required fields.
- Click the Post button when done

¶ Step 24.4: Invoices for payments made
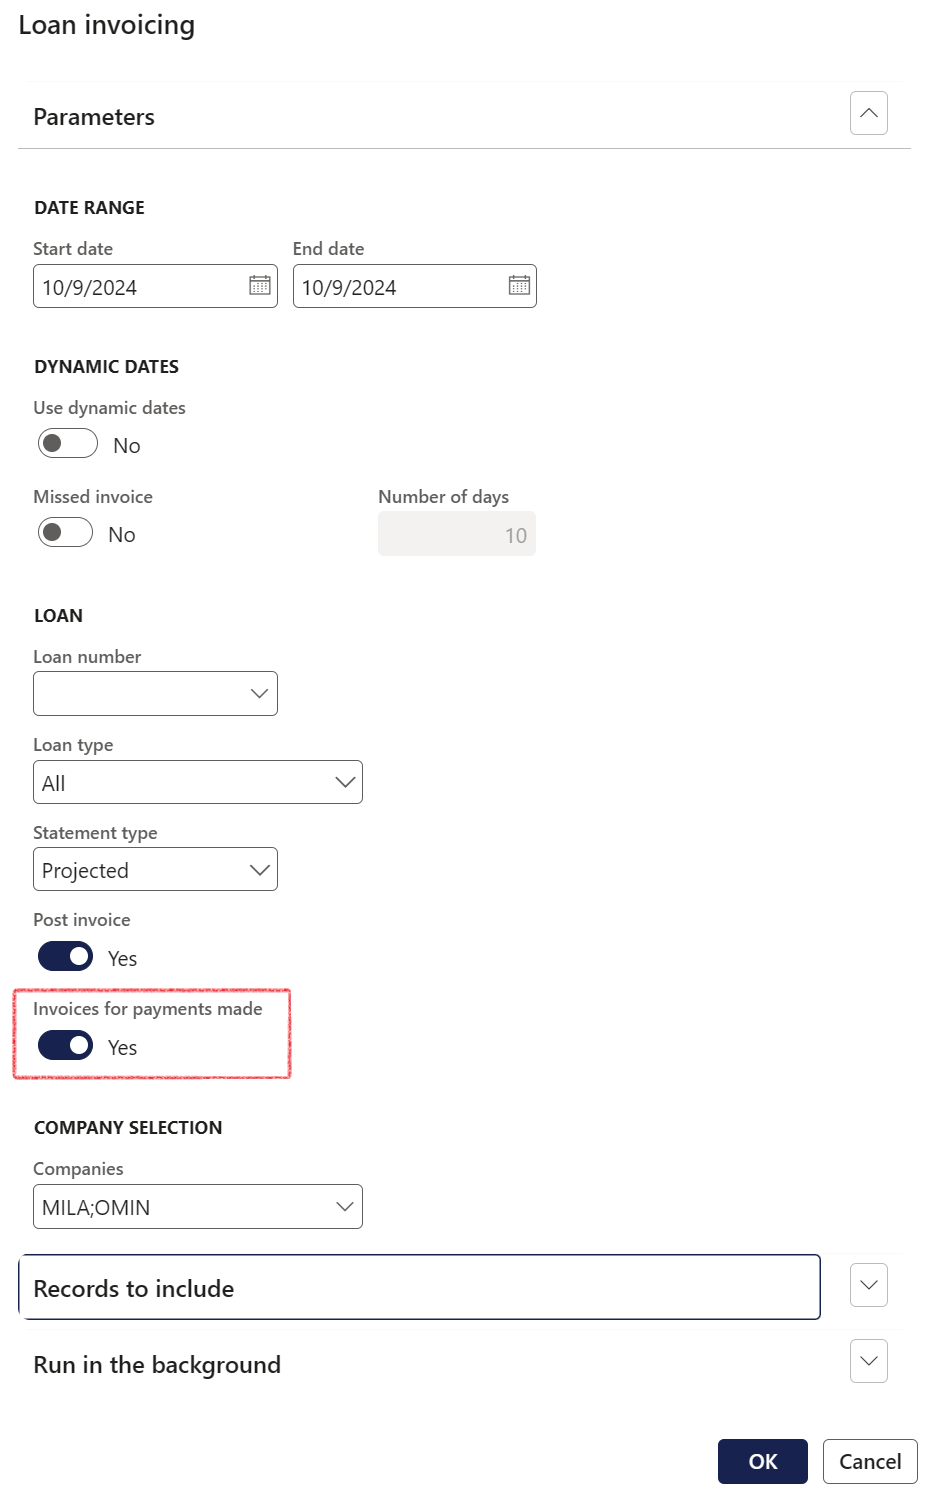
In instances where a customer makes an overpayment, their balance will reflect a credit surplus. TMS will detect instances of overpayment, leading to the automatic creation of an additional invoice via the Loan Invoice Batch Job
- On the Loan invoicing batch job dialogue page, there is a toggle for Invoices for Payments made. Users are given the choice to include these additional invoices by sliding the toggle to either Yes or No
- If the Yes option is chosen, the system will generate the invoice and simultaneously perform an automatic settlement of the customer's balance to account for the overpayment
- The balance being considered for an invoice is for the customer and loan combination
When generating Treasury Loan invoices through the Loan Invoicing periodic function, the Financial dimensions on the Invoice Line details section of a Treasury invoice (Financial dimensions line tab) are automatically populated to the Ledger account on the Distribute Amounts.
In instances where there are no financial dimensions specified on the Line Details Tab within the Invoice Lines section (Financial Dimensions line tab), the default financial dimensions from the Invoice Header section will be applied.
¶ Step 24.5: Missed invoices
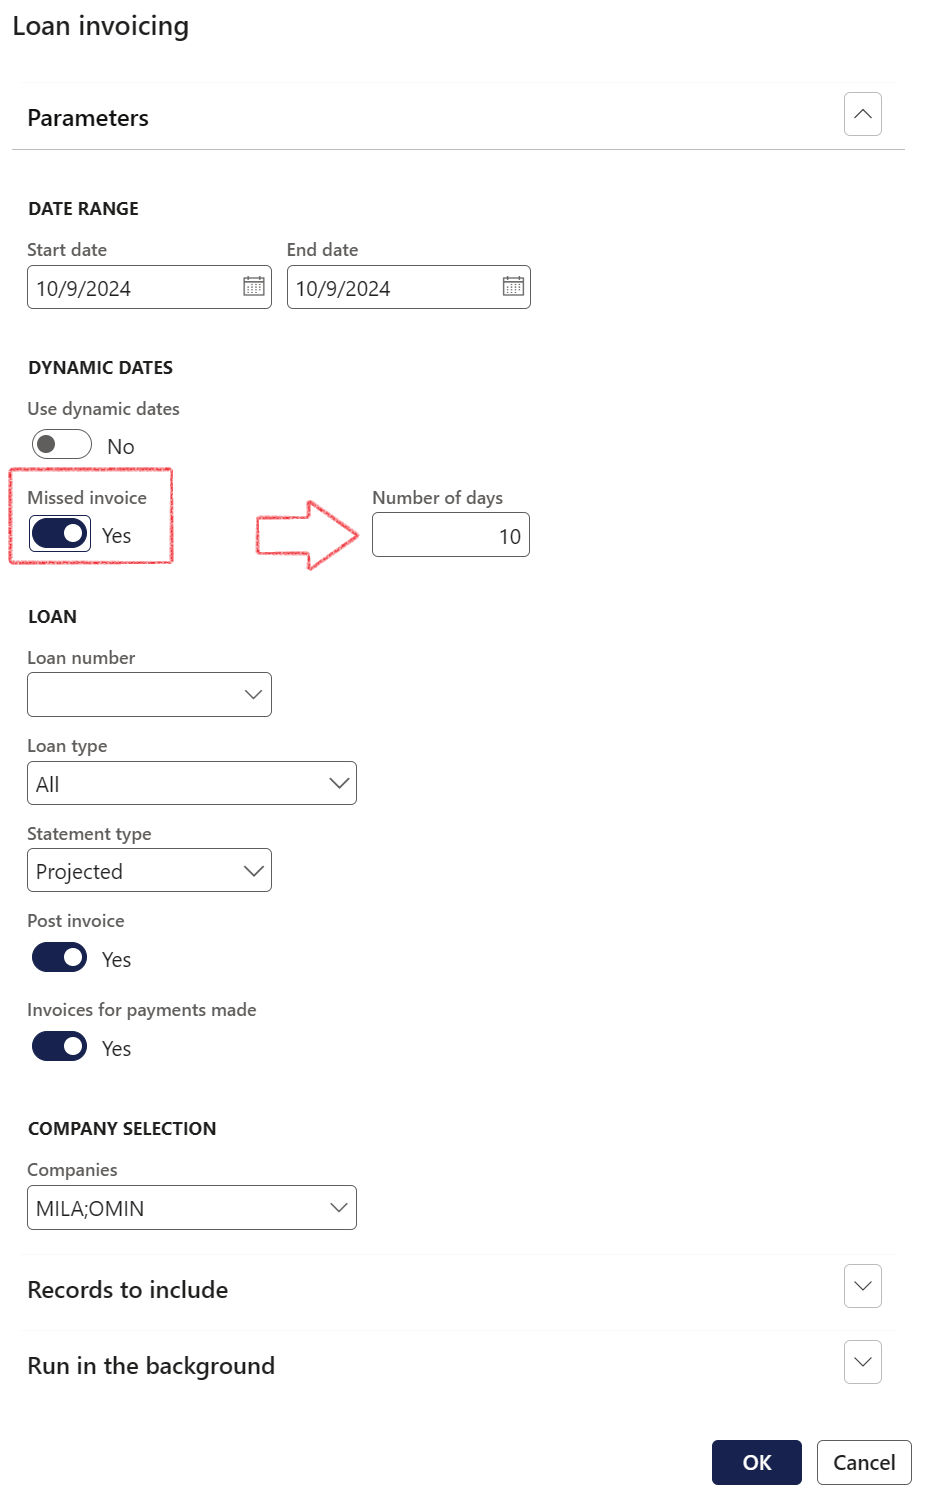
Within the Refund process, logic has been extended for missed invoices
- If the toggle is set to Yes for Missed invoice, a field called Number of days will become active, where users can insert the number of days for missed invoices
- This will extend the date range back in time when searching for invoices to be created
¶ Step 24.6: All treasury invoices
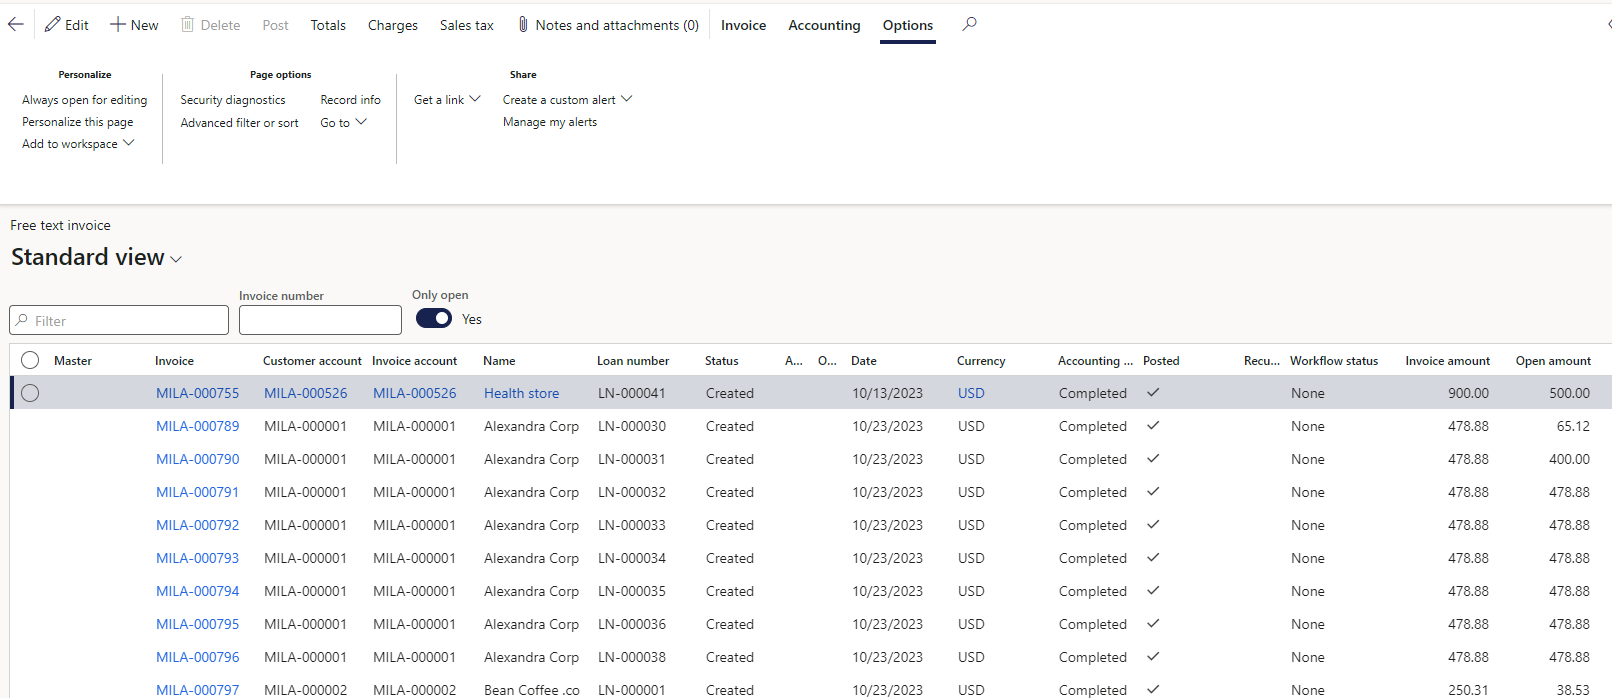
The TMS free text invoices inquiry page, compiles all TMS free text invoices that have been posted to the D365 customer account. Users can filter for open invoices using the Only open toggle at the top of the page.
- To view All treasury invoices, navigate to Treasury > Common > Accounts receivable > All treasury invoices
- The All treasury invoices page is a combination of the Customer Open Invoices list page and All Treasury Invoices
- It identifies invoices with an open amount and displays them in a new column labeled Open amount
- Invoice amount represents the total amount of the invoice
¶ Step 24.7: Treasury customer invoices
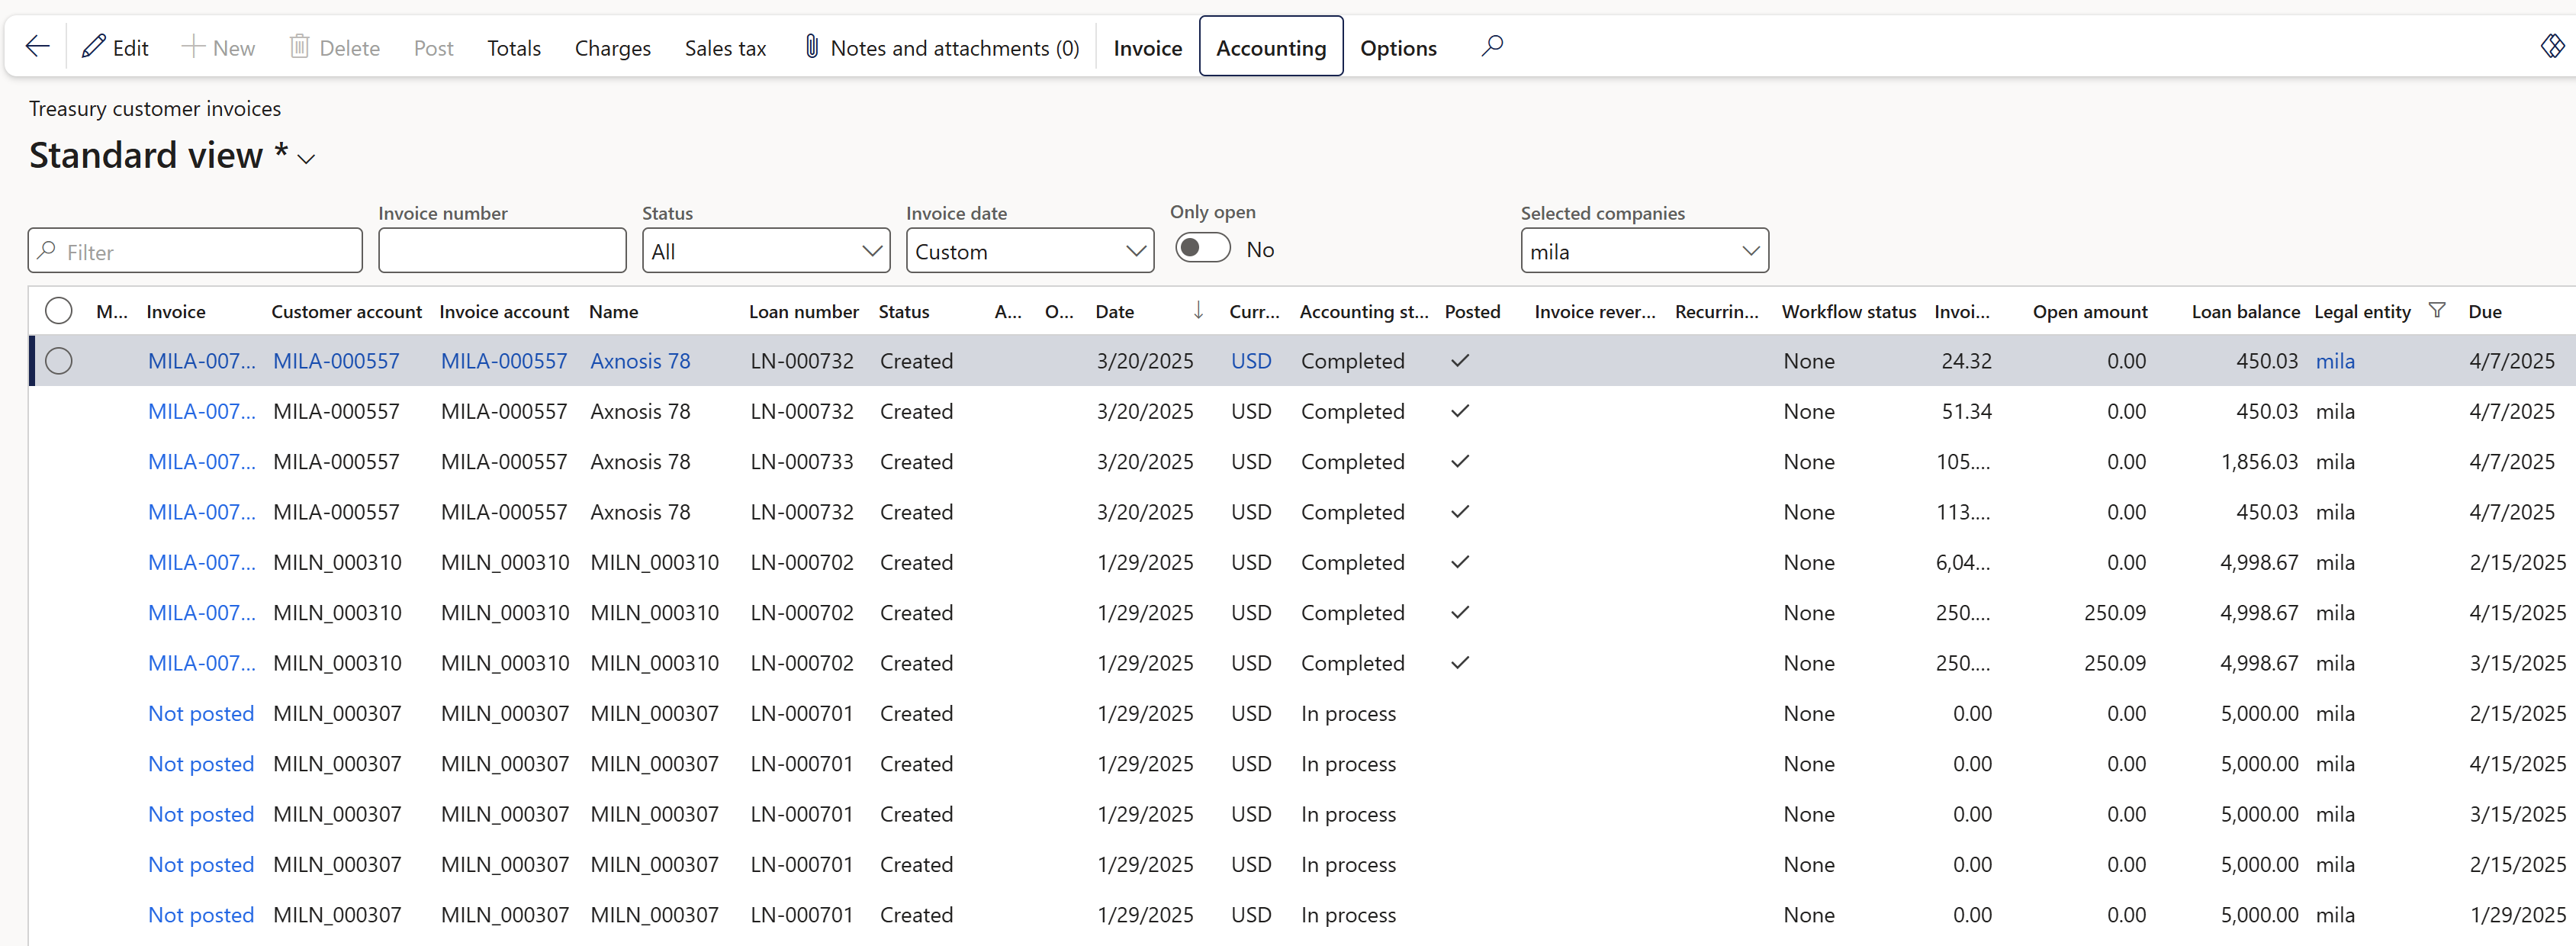
The Treasury customer invoices page compiles all Treasury free text invoices that have been posted to the D365 customer account.
- To access the Treasury customer invoices inquiry page, navigate to Treasury > Common > Inquiries and reports > Treasury customer invoices
- Select the Status. Options include All, Posted, Not posted
- A Yes/No toggle is available to filter on Only open invoices
- This feature is a combination of the Customer Open Invoices and All Treasury Invoices. It identifies invoices with an open amount and displays them in the column labeled Open amount
- Users can also filter on a specific company or multiple legal entities
- The column named Invoice amount represents the total amount of the invoice
- The Invoice Reversed column indicates whether an invoice has been reversed using a GL journal
¶ Step 24.8: Mark invoices for reversal
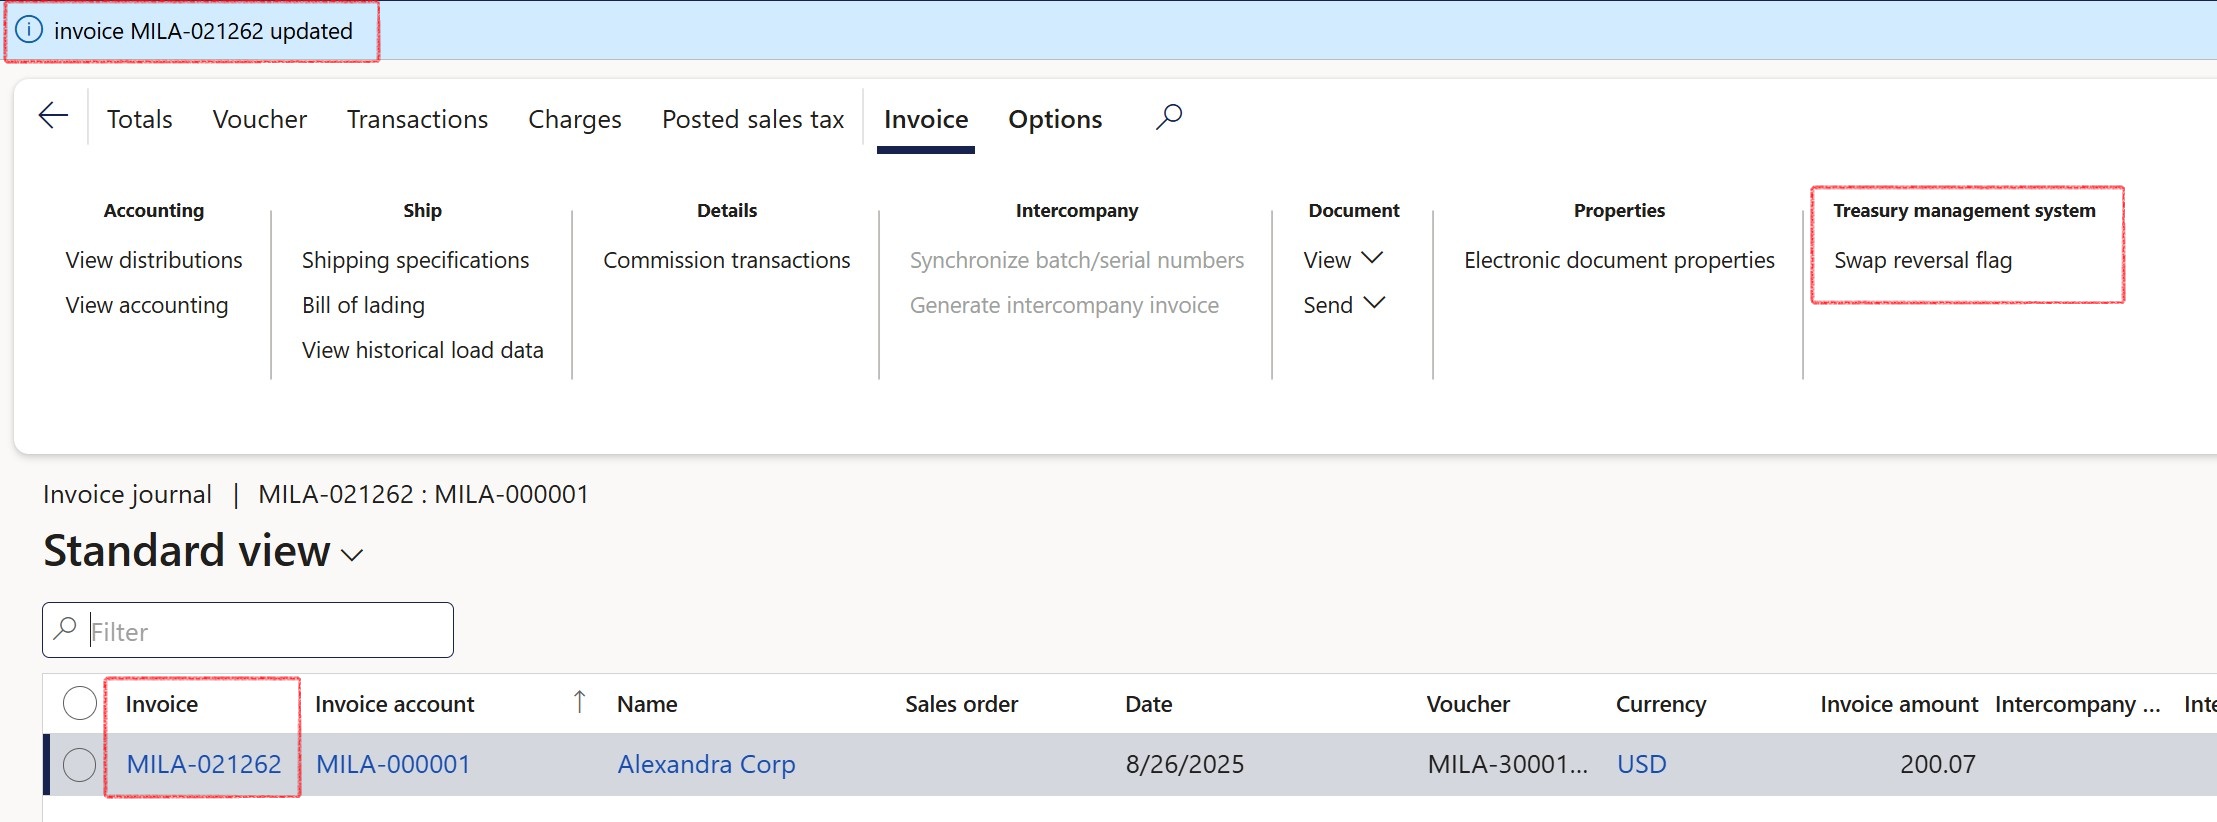
Situations may arise where an invoice needs to be reversed. To see if an invoice is marked for reversal, follow the steps below:
Navigate to:
- Treasury > Common > Accounts receivable > All treasury invoices
- Select the invoice that needs to be marked for reversal
- In the action pane, go to the Invoice tab
- Click on Invoice journal
- Note: There may be multiple journals - select the one related to the invoice in question
- Once in the journal, click on the Swap reversal flag button. This will automatically mark and unmark the Treasury free-text invoices for reversal
- To view if the invoice has been marked for reversal, once in the journal, personalize the page to bring in the field labeled Marked for reversal
- This is a Yes/No toggle and may be hidden by default
- Once visible, look at the toggle to see if it is set to Yes or No
- Alternatively, navigate to the Billing tab on the loans page, and click on Inquiries > Free text invoices. The marked for reversal column will indicate the status of the invoice


¶ Step 24.8.1: Mark invoices for reversal from csv
Situations may arise where an invoice needs to be reversed. To mark invoices for reversal, follow the steps below:
Navigate to:
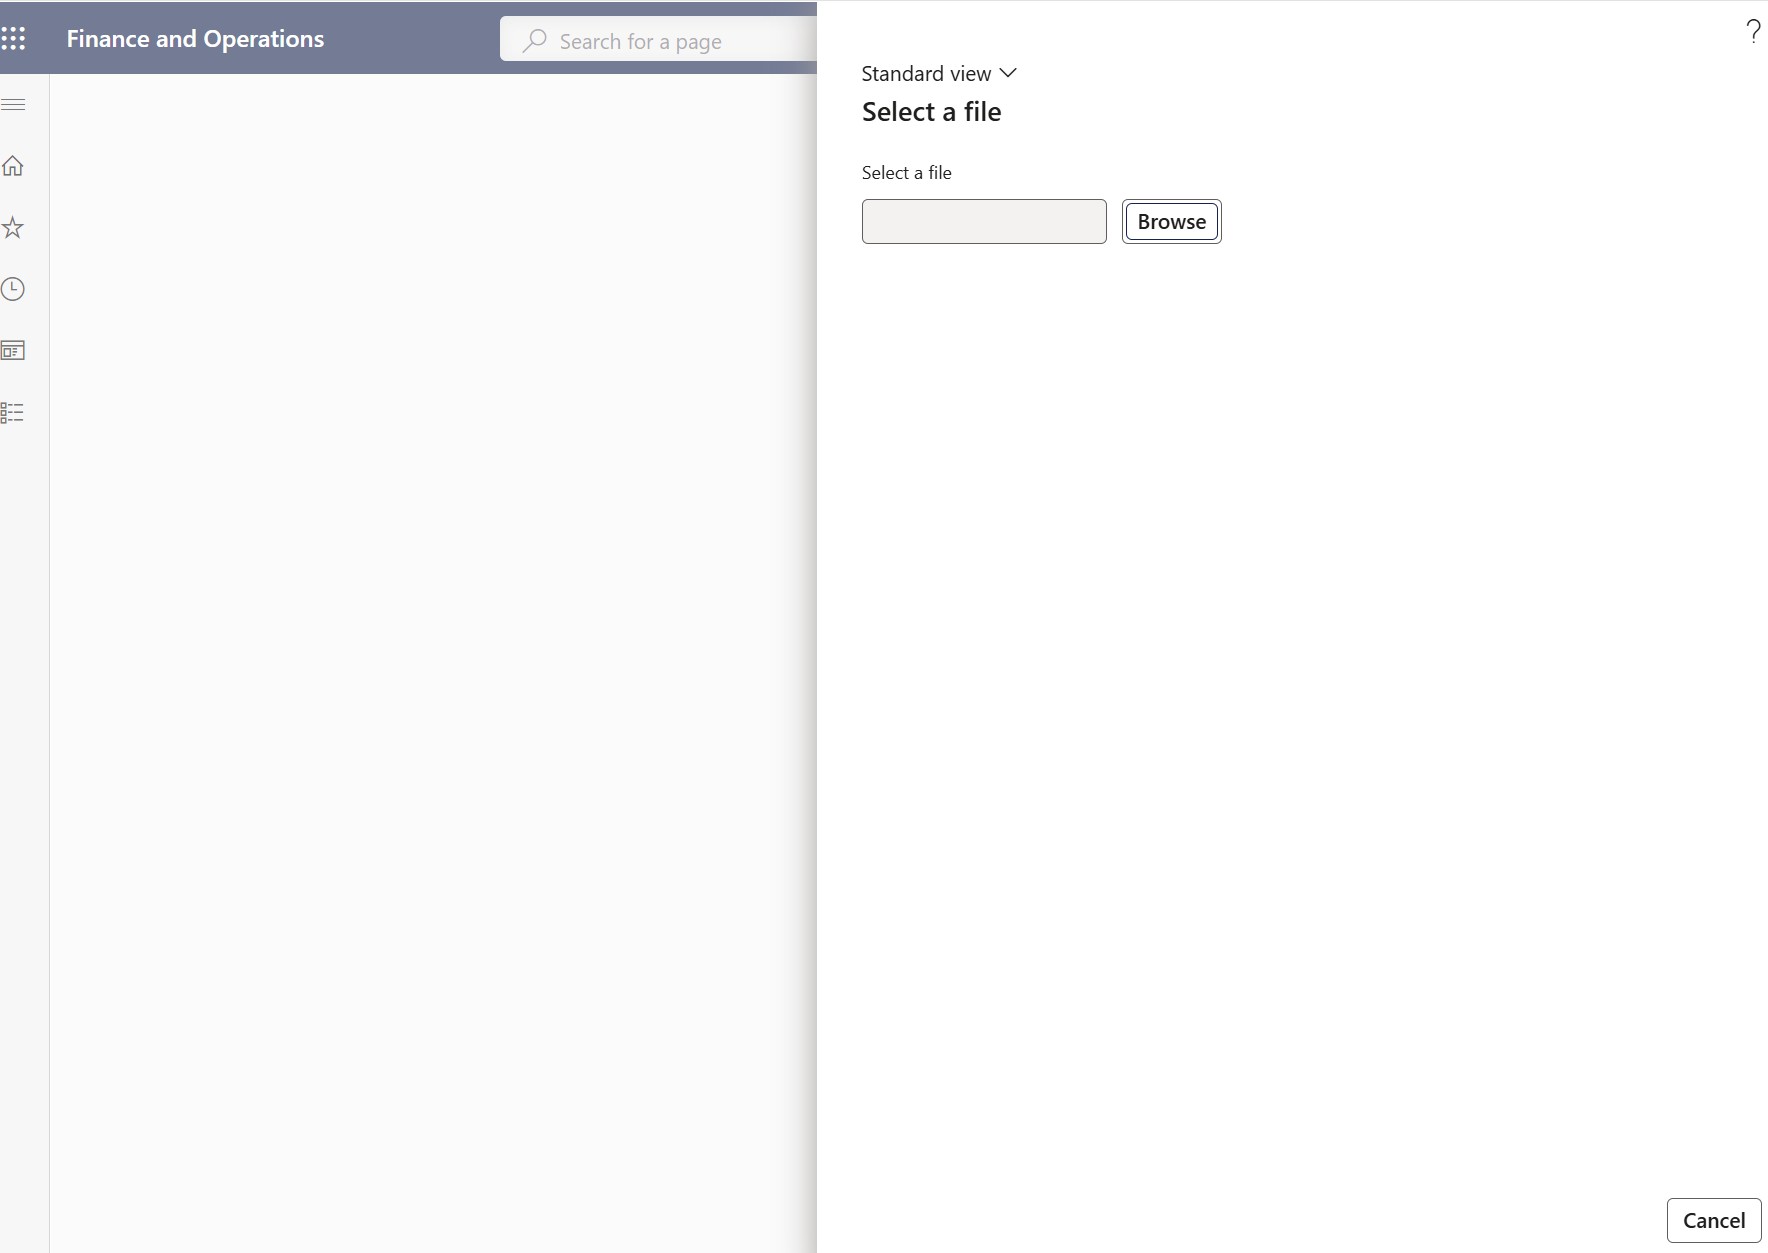
- Loans > Periodic > Adjustments > Mark invoice reverse from csv
- Create an Excel file, with a list of the invoices to be Marked for reversal
- Save the file as .csv
- When opening the dialogue for Mark invoice reverse from csv
- Click on Browse to import the file with the list of invoices
Users can prepare an Excel file, enter the invoice numbers, and save the file as a .csv.
Upon importing the file, the system automatically flags the specified invoices with Mark for reversal: Yes.
Multiple invoices can be imported simultaneously within the same file.
¶ Step 24.9: Re-invoice invoices
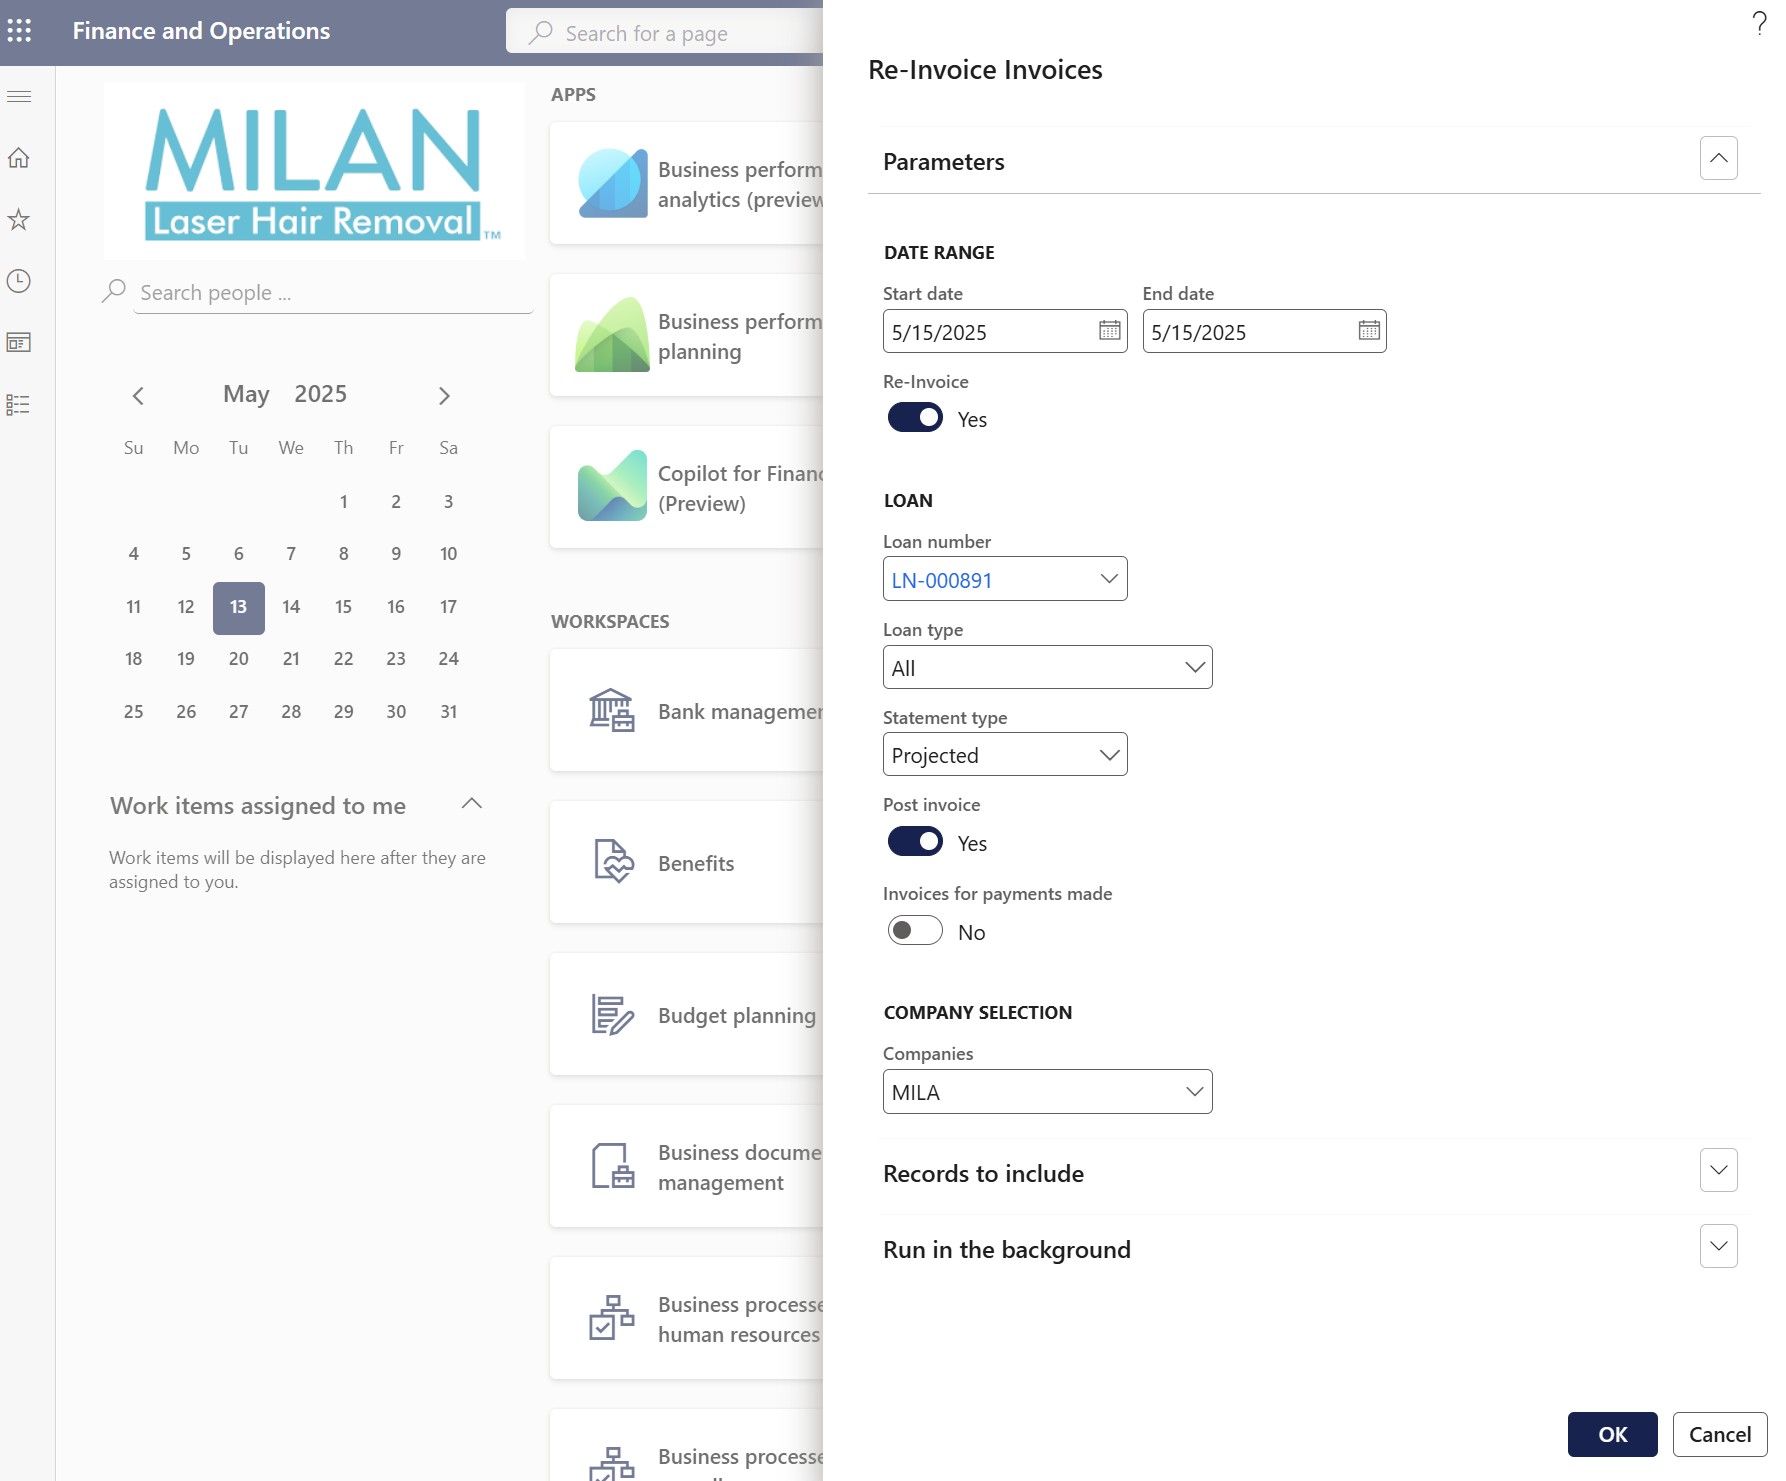
When an invoice is Marked for reversal, the system allows it to be reissued for the same date range. To re-invoice, follow the steps below
Navigate to:
- Loans > Periodic > Adjustments > Re-invoice invoices
- Specify the date range. Set the Start date, and the End date
- Set the Re-invoice toggle to Yes
- Enter a loan number or leave the field blank to include all applicable loans
- Select the appropriate loan type
- Choose a statement type, this isusually Projected
- To preview the invoice before posting, set Post invoice to No
- To post invoices directly, set the toggle to Yes
- For large volumes, it is recommended to run this process in the background using the batch processing functionality
¶ Step 25: Disable/Enable interest accrual
Users can choose to disable or halt interest calculations on loans.
- The system utilizes a specific setting, in conjunction with the duration elapsed since the previous payment (number of days since last payment), to determine if it is necessary to terminate the computation of interest.
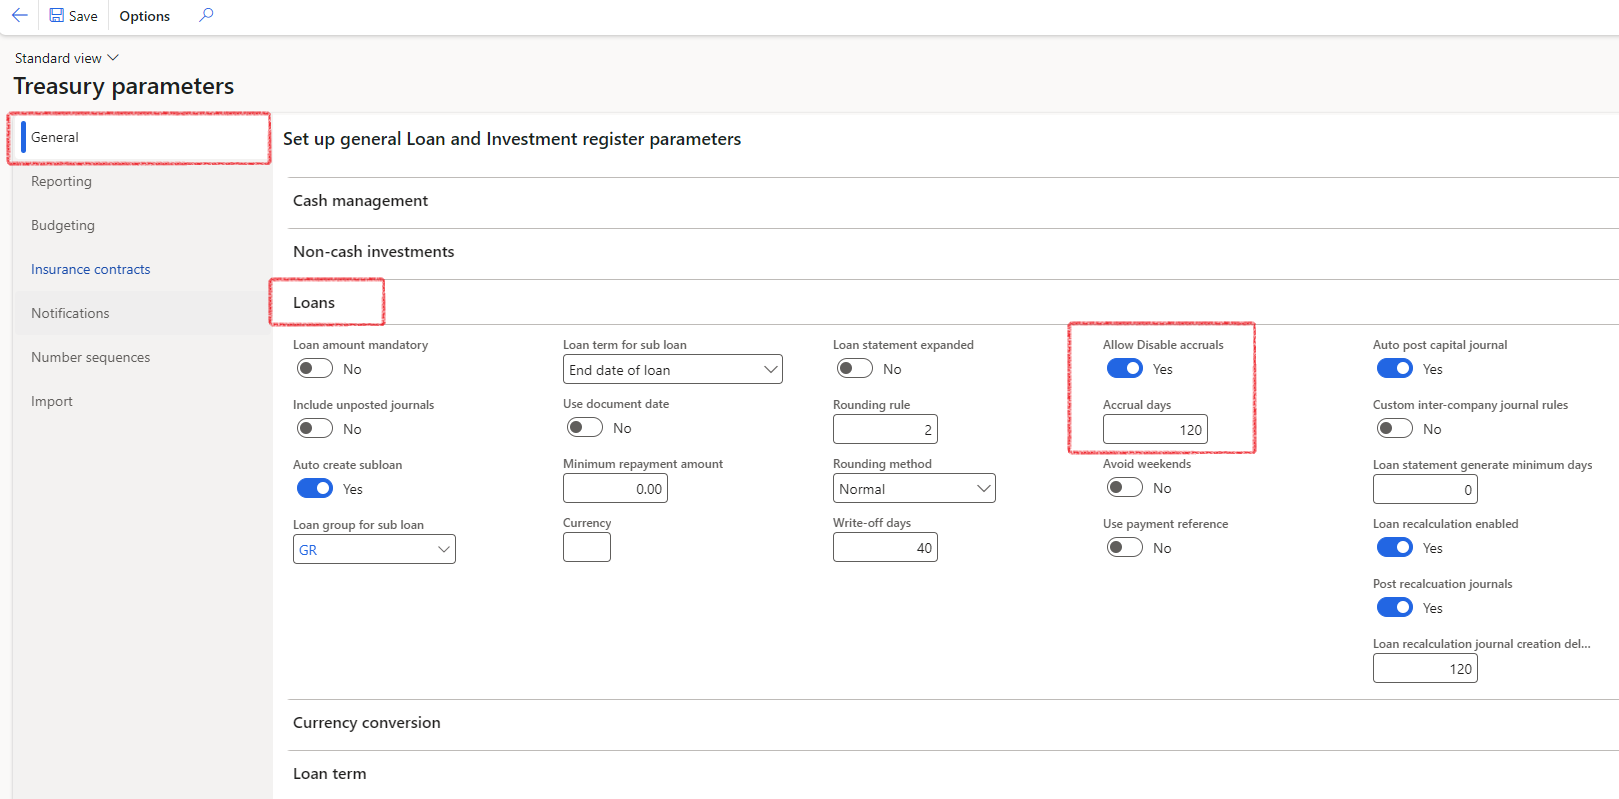
- Navigate to Treasury > Setup > Treasury parameters
- Click on the General tab, and expand the Loans FastTab
- To allow the option to stop accrual on a loan, the Allow disable accruals toggle should be set to Yes
- The Accrual days can be filled in
The Accrual days is the setting to take into account the duration which elapsed since the last payment was received.
When enabling or disabling interest accrual on a loan, it can trigger the background process of generating a Loan statement automatically:
If interest is marked for stoppage, this can trigger a new statement generation.
Both enabling and disabling interest will trigger a statement refresh if the functionality was enabled (by setting up a batch job for loan statement generation).
¶ Step 25.1: Run the periodic job for Disable/Enable interest accrual
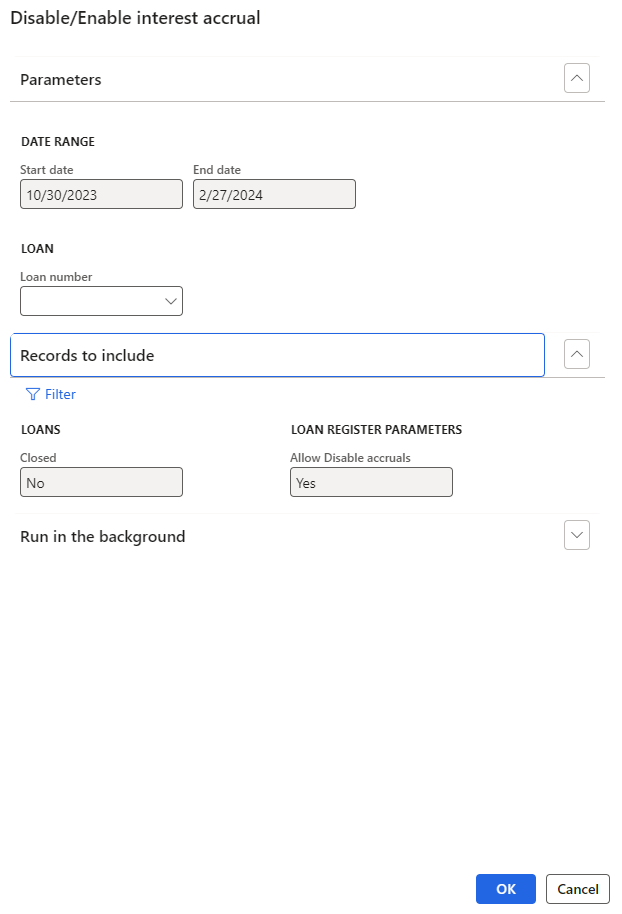
- To perform the periodic function for disabling interest accrual on loans, navigate to: Treasury > Loans > Periodic > Disable/Enable interest accrual.
- The date range will be filled in already, as per setup done on Treasury Parameters
- Enter a loan number, or leave the field blank to run for all loans
- Click the OK button
- A notification will appear, indicating the number of completed transactions
¶ Step 25.2: Checking for Disabled Interest on a Loan
- Navigate to Treasury > Loans > Loans
- Filter on the specific loan number
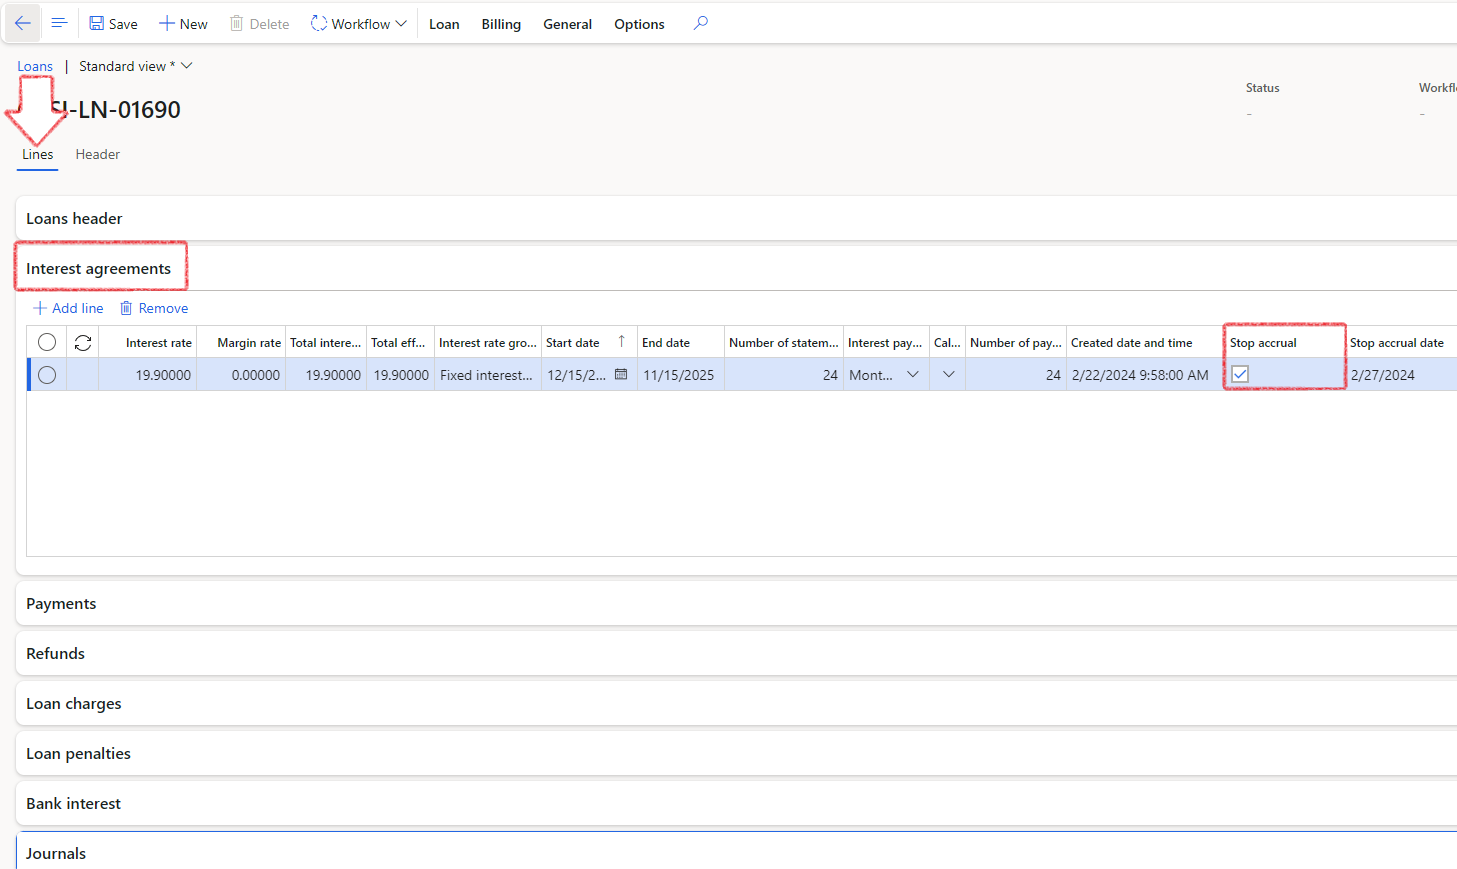
- Navigate to the Interest agreement FastTab within the Lines index tab.
- You'll find a field named Stop accrual. When interest is disabled, the checkbox will be selected
- In the Action pane, click on Generate statement to view the Projected statement
- See that the interest accrual amounts will be nil, from the current date, going forward
When manually selecting Stop accrual on the interest agreement FastTab inside a loan, it will disable the interest accrual regardless of any payments received in the last 120 days. Only the periodic job for Disable/Enable interest accrual will take into account the Treasury parameter setup for Interest accrual days
¶ Step 26: Write-off's
When no payments have been received for the amount of days on the Treasury parameters setup, a loan becomes eligible for a write-off.
The calculation logic determines whether a loan qualifies for write-off (this is yes/no result), in this example, the Days overdue is set to 150 in the Treasury parameters.
Example:
- If the current date is 31 January 2023, calculate 150 days back in time
- This equals 03 Sept 2023
- The system will check if any payment was received from the customer since the 3rd of Sept 2023. (of any value)
- If any payment received, it does not qualify for a write-off
- If payment received, the loan does qualify for a write-off
¶ Step 26.1: Loan write-off journals
To run the periodic job for Loan Write-off’s, navigate to:
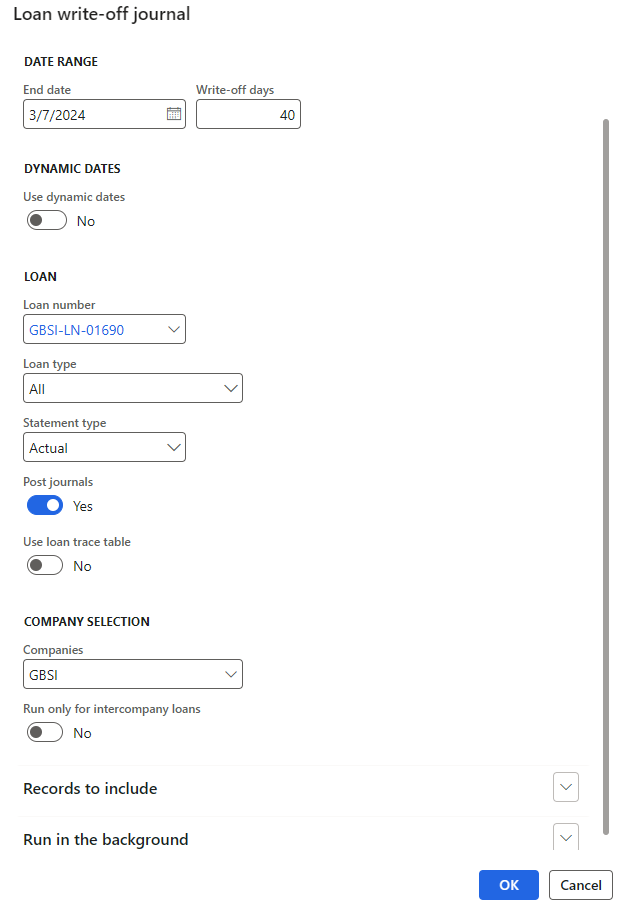
- Treasury > Loans > Periodic > Loan write-off journal
- Enter an End date. This date will be used in the Write-off journal, and the loan will be written off as of this entered date. When entering an end date in the write-off dialog page, the loan will be written off on the specified date rather than defaulting to today’s date
- Write-off days will be populated as per setup done
- Enter a loan number, or leave the field blank to include all eligible loan
- Select a statement type precedence of Actual
- Use loan trace table should be set to No
- Click OK
- A proposed Write-off journal will be generated with loan numbers and amounts
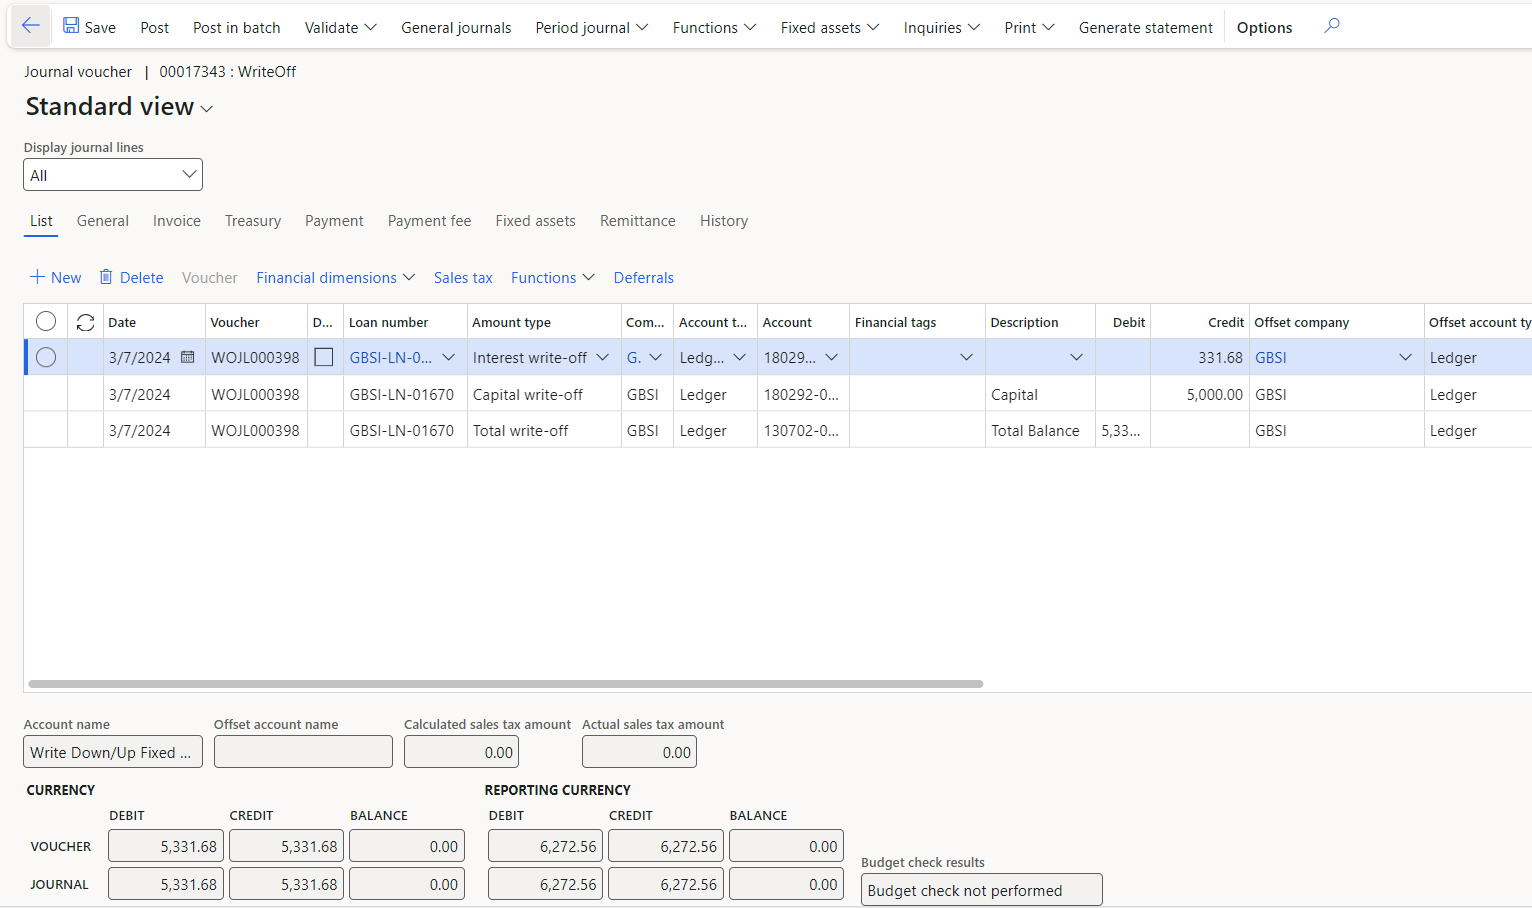
- The line entries being created, will be the full outstanding or unpaid balance for each qualifying loan
- The accounts on the journal will be as per the setup on the Posting profile
- One batch can be created for multiple lines for each loan being written off
- Select the loans that should not be written off, and delete it from the journal before posting the journal batch.
- Consider and modify the transaction date if required
It is important to regularly view and post loan write-off journal batches because if a loan number is deleted from the journal, it may be included in the next batch that will be run if no payment was received.
If a write-off journal was created but not posted, the system will allow for another write-off journal to be created if no payment was received. This can be done multiple times until a payment has been received or the write-off journal has been posted and the loan status has changed to written-off.
After posting a loan write off journal, the loan status will change to Written off
¶ Step 26.2: View write-off journal
To view the newly created write-off journals,
- Navigate to: Treasury > Loans > Journals > Write-off
- Filter on Not posted
- Sort the Journal batch number in descending order so that the latest batch appears at the top.

- Click on Lines to view the journal line details
- Click on Post
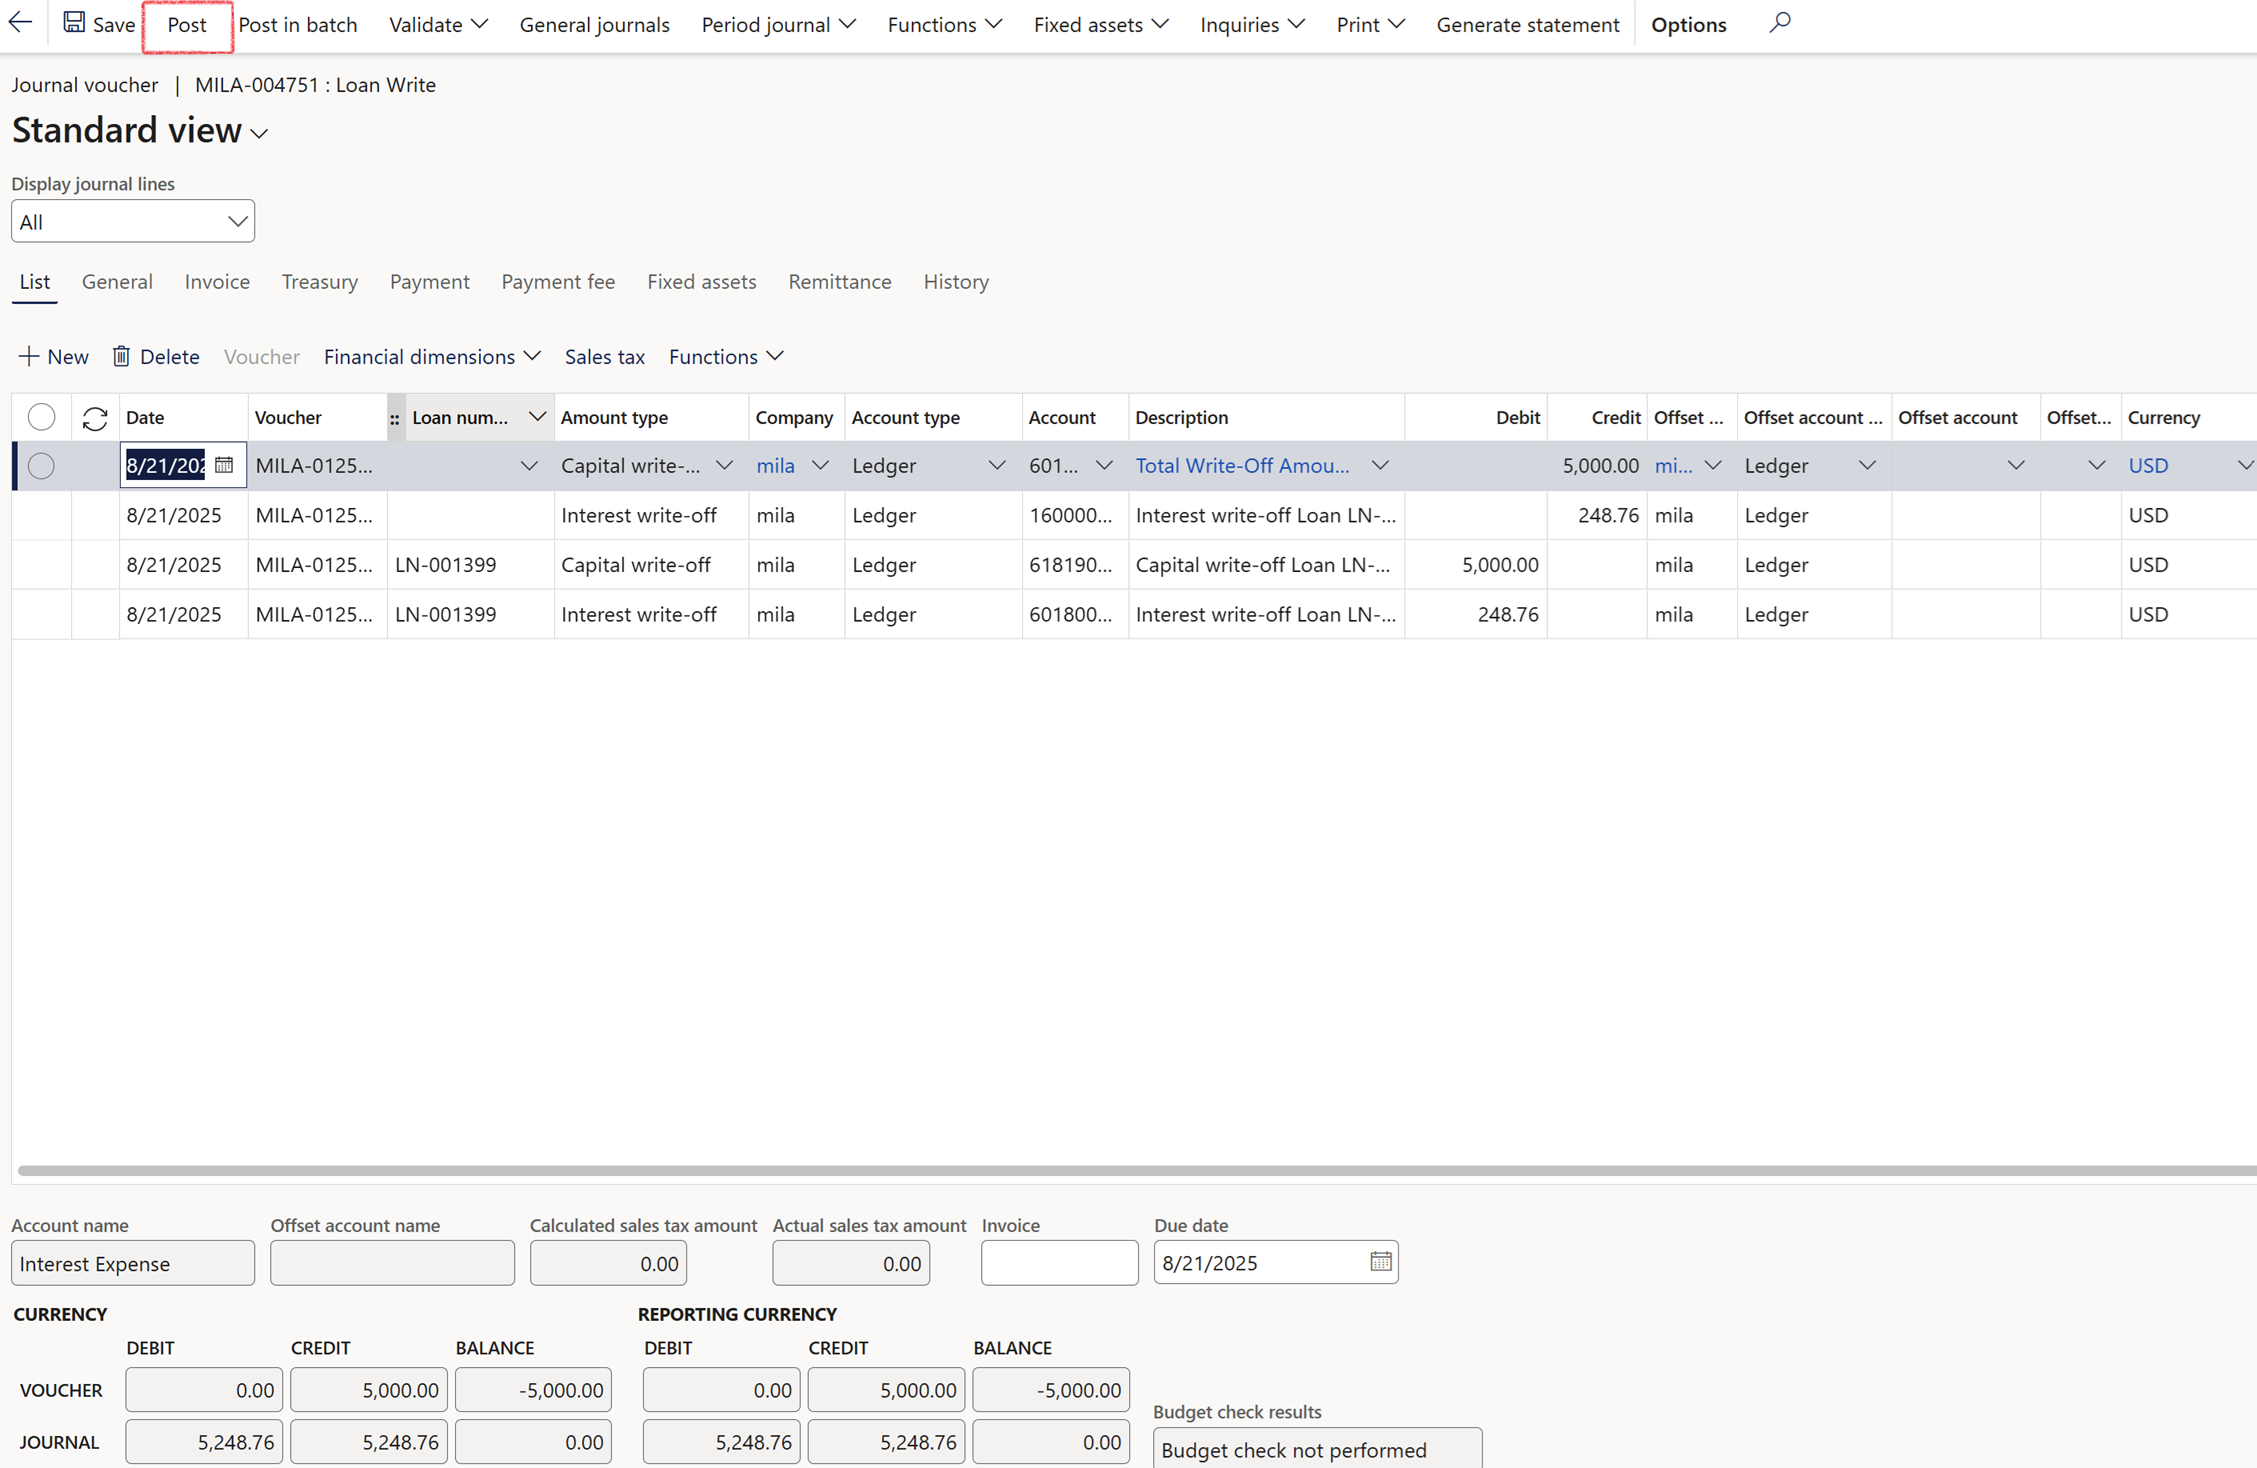
When clicking on Generate statement in the action pane of the loan details form, the loan statement will be updated with the posted Write-off journal amount.
After a write-off journal has been posted on a loan, the loan status will be changed to Written-off
After posting the Write-off journal, the expanded loan statement will reflect the following:
- The amount type Capital write-off will update the Capital closing balance column on the loan statement
- The amount type Fee write-off will update the Fee close balance column on the loan statement
- The amount type Interest write-off will update the Annuity interest close column on the loan statement
- The amount type Total write-off will update the Closing balance column on the loan statement
¶ Step 26.3: Reinstate written-off loans
A reversal of a write-off journal is possible, thereby re-instating the outstanding balance and updating the status to Approved. If a payment was received for a loan already written-off, the loan will be reinstated and invoices will be resumed.
- Unpaid customer invoices will be marked for reversal when a write-off is done
- It is also possible to post to different accounts in the GL when reversing a write-off
- The configuration takes place within Loan Posting Profiles, specifically in the Account Structure section of the Write-off Posting Profile setup, where you'll find the options for the new Reversal Account Type and Reversal Account field
- During the process of writing off a loan, TMS will flag the related invoice that should be reversed
- The loan data lines data entity will be updated with the newest fields for write-off’s
¶ Step 26.3.1: Processing a payment journal that Reinstate the written-off loan
When payment is received for a loan that has been written off, it is necessary to execute the Treasury Loan payment journal task
- Navigate to Treasury > Loans > Periodic > Payments journal
- On the Payments journal dialogue page, ensure that the Reinstate loans written off toggle is set to Yes
- After completing all the relevant fields, click the OK button
If the Reinstate loans written option is set to Yes , an additional check will be performed against the loan balance. If the loan's principal balance is zero and the loan transaction contains journals of type write-off, then reversal journals will be created for all the write-off journals associated with that loan.
- Write-off reversal accounts can be selected within the Write-off posting profile
- If these accounts are populated, they will be used when creating the reversal of the write-off journal
- If reversal journals are created, a notification will be provided
- If no write-off journals are created despite selecting Yes for reinstating loans, it will indicate that no write-off journals were created
When a written off loan received a payment, and the loan is reinstated, the loan status should change from Written off to Approved
¶ Step 26.3.2: Projected Statements
After the journals are posted, normal projected interest and payments will resume on the projected statement.
¶ Step 27: Refunds
The system includes functionality to process refunds for loans.
¶ Step 27.1: Create a Refund request
- Navigate to Treasury > Loans > Loans and filter on the specific loan
- On the Lines index tab, expand the Refunds FastTab
- Click on the Add line button
- Enter a Description
- Select the Currency
- Enter an amount the Capital amount field and/or in the Interest amount field
- Select a Date
- If required, select the check box to Perform recalculation
- If the selection is Yes to perform recalculation, the system will recalculate the loan installment, based on the updated Capital balance after posting the Refund journal
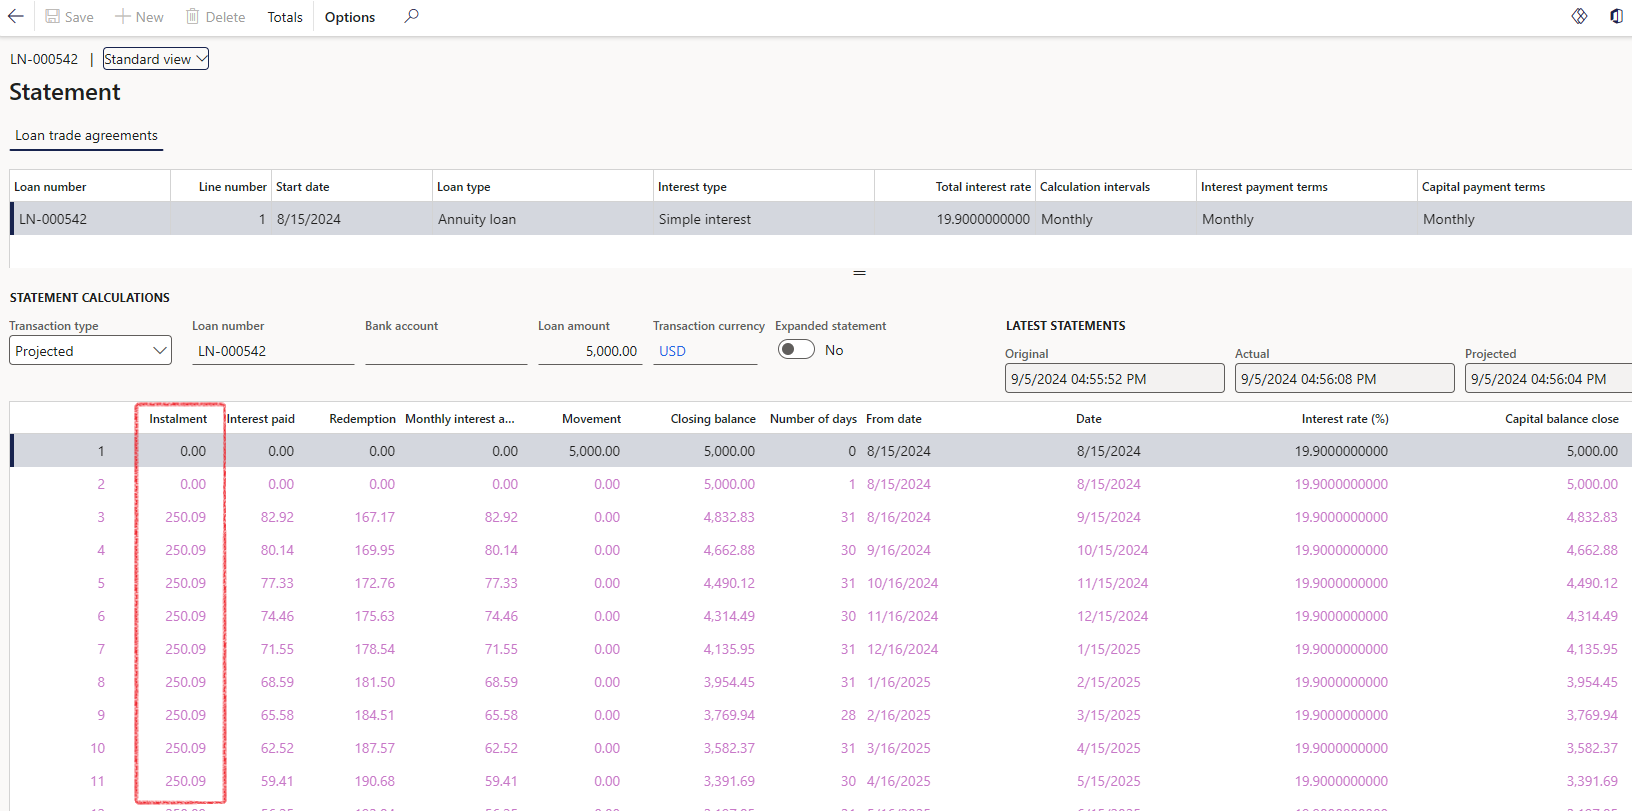
- The new instalment will be seen on the projected statement
- If the Perform recalculation tick is left off, the instalment will stay the same (this is only applicable to fixed instalment loans)
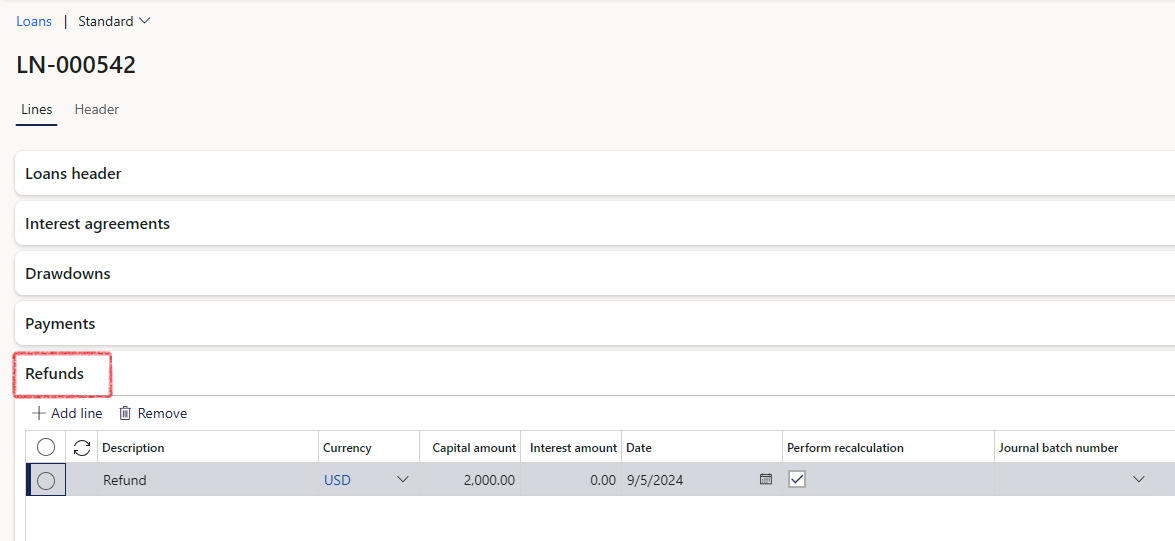
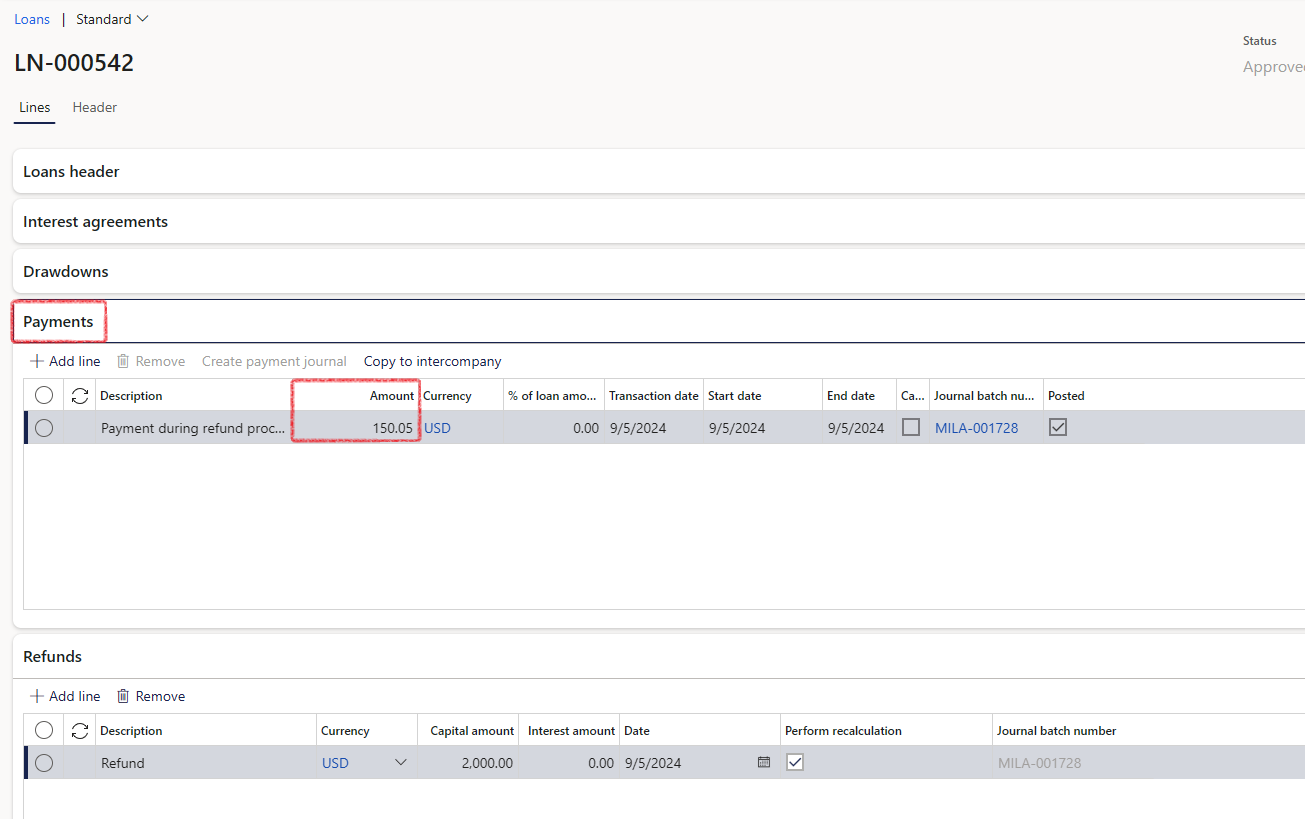
When the Perform recalculation checkbox is enabled, the projected instalment will be recalculated and reduced. Subsequently, a new amount will be displayed in the Payments FastTab once the Refund journal has been created and posted
When the toggle is selected to perform recalculation, the system will do a new calculation of the Installment amount, based on the updated Capital balance after posting the Refund journal.
If left off, the instalment will stay the same (this is only applicable to fixed instalment loans)
In the Refund FastTab for loans, there is a Posted indicator in the corresponding column. Once a refund is posted, the refund line will become non-editable.
¶ Step 27.2 View the Projected loan statement before refund is processed
Click on View statement and view the Projected instalment amount before the refund has been posted
¶ Step 27.3: Run the periodic job for Refunds
When running the periodic job called Refund journal, the logic will check Amount type to see where is Unpaid capital. The Refund journal periodic job will also consider the information entered in the Refunds FastTab on the loan details page when processing refunds. The periodic function will create a refund journal for all loans where a refund has been approved. The amounts used is calculated in TMS, based on a percentage of the full loan value or amount provided. The accounts for the refund journal will be obtained from the linked Posting profile for that loan as well as the posting side of the entry (debit/credit). The values will be based off of the Actual loan statement
- After filling in all the details within the Refunds FastTab, you can proceed to run the batch job for refunds, by navigating to Treasury > Loans > Periodic > Refund journal
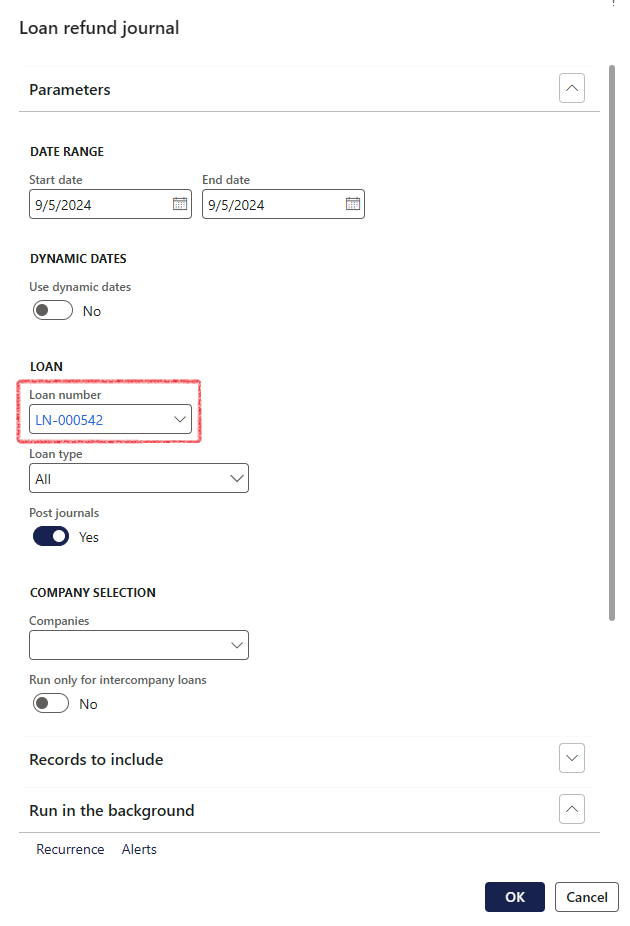
- The Loan refund journal dialogue page will open
- Enter a Start date and an End date, alternatively select the toggle for Use dynamic dates
- The Loan number field can be completed or left blank
- The Post journals toggle can be slide to Yes, or left at No
- Click the OK button to proceed
¶ Step 27.4 View refund journals
Components of the journal will be as follows:
- Refund amounts already paid by customer (this will only populate if the customer has made any payments)
- Reduction of outstanding balance: reduced proportionally
- Accrued interest reversal: If there had been additional interest accruals, with no payments, these values also need to be reduced proportionally
To view refund journals, navigate to:
- Treasury > Loans > Journals > Refund
- Posted and unposted refund journals can be viewed on this page
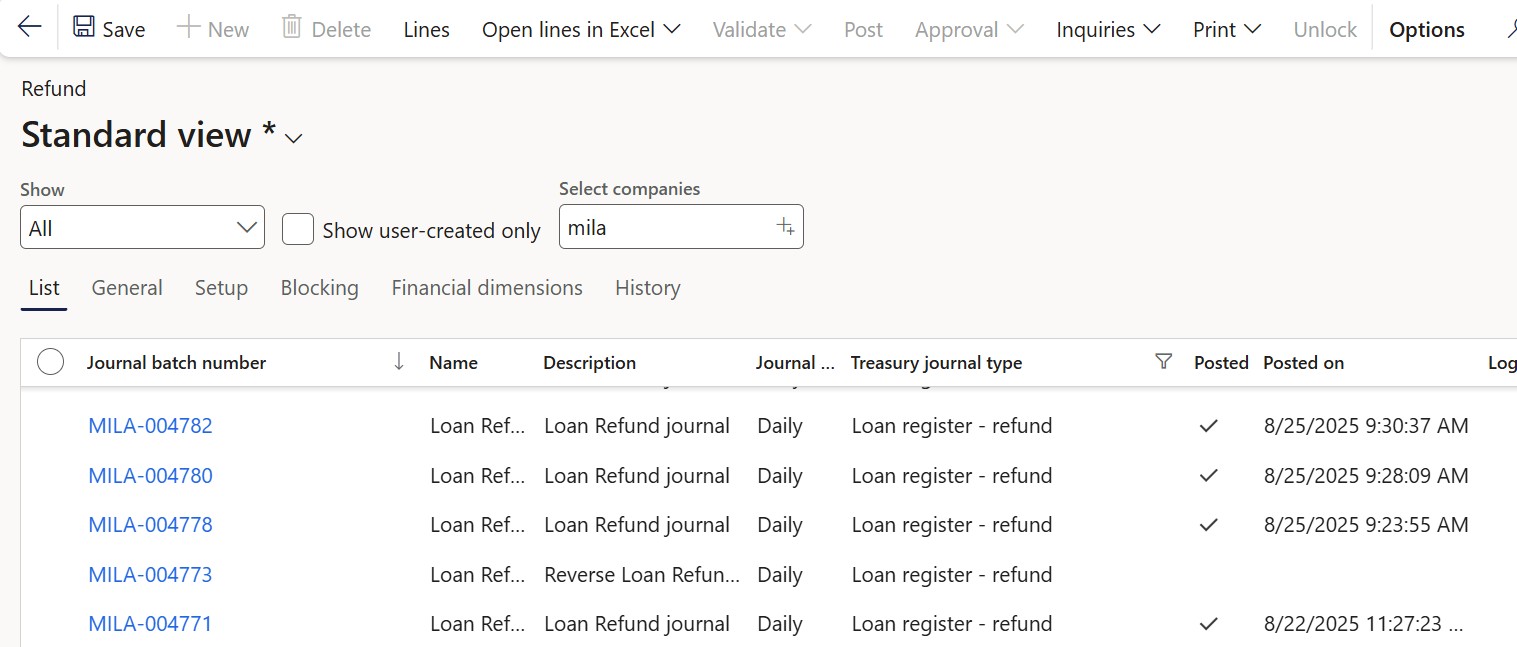
- Alternatively, to view the refund for a specific loan, navigate to Treasury > Loans > Loans and filter on the loan
- In the Action pane, select Loan > Journals > Refund

¶ Step 27.5 View the new instalment amount on the Payments FastTab
When the Perform recalculation tick box is selected at the time of the refund, a new line will appear under the Payments FastTab. The number of unpaid instalments will be used to calculate the new instalment amount, based on the latest Projected statement. This will reflect the number of remaining instalments at the point of refund.
On the Lines index tab, expand the Payments FastTab and view the new projected instalment amount
Columns on the Payments FastTab:
- Description
- Amount (this is the new instalment value)
- Currency
- % of loan amount
- Transaction date
- Start date
- End date
- Capital only (selection box)
- Journal batch number
- Posted
¶ Step 27.6 View posted refund on the Actual loan statement
Posted refund journals will be reflected in the actual statement.
The Movement column in the summarized statement will show the refund payment amount.
On the expanded statement, refund amounts will be displayed as follows:
- Refund total (which updates the Closing balance)
- Refund interest (which updates the Annuity interest close)
- Refund capital (which updates the Capital closing balance)
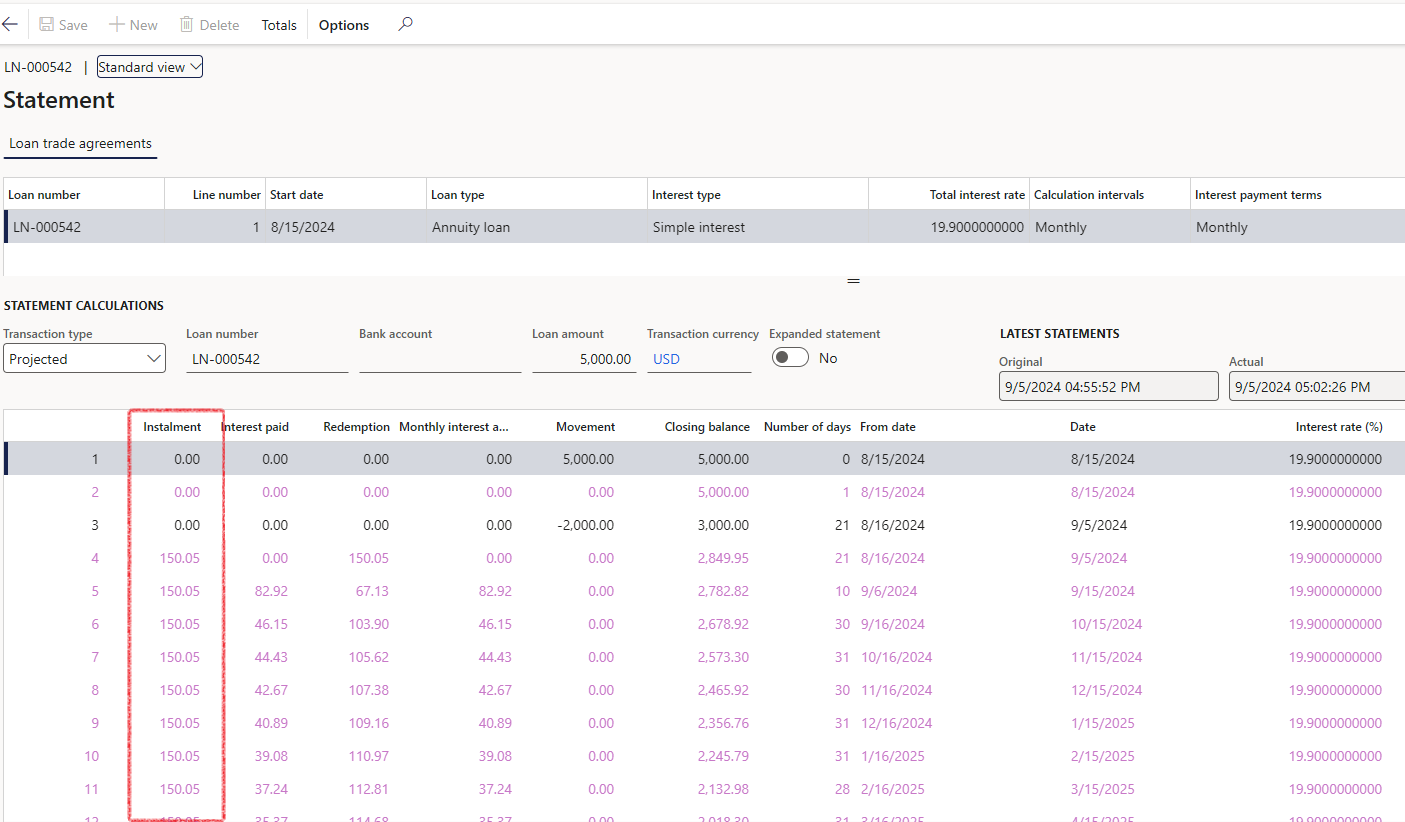
¶ Step 27.7 View the new instalment amount on the Projected loan statement
Click on Generate statement, and view the new instalment amount on the Projected statement
¶ Step 27.8 Loan invoices and Refunds
When a loan refund is processed and the system recalculates the projected installment amount, and if the invoice batch is run with the Missed invoice toggle set to Yes, the system will generate an invoice for the missed or previous invoice with the new correct amount. Additionally, it will create a current invoice for the following month, depending on the selected date range.
During the refund process, open invoices are reversed, which could include the current and following month. After the refund process, the current month’s invoice and the next month’s invoice must be recreated. Therefore: Within the Refund process, logic has been extended for missed invoices. If the Yes/No toggle for Missed invoice is set to Yes, it will extend the date range back in time when searching for invoices to be created
¶ Step 27.9 Missed interest accrual
It may happen that during the ongoing refund process, that interest for the current period was not raised. In order to retrospectively create the missed interest, the following process is required:
- To raise the missed Interest accrual journal, navigate to Treasury > Loans > Periodic > Interest accrual journal
- Enter the start date (today’s date)
- Enter the end date (today’s date)
- Select the Statement type precedence: Projected
- Ensure the toggle for Missed accrual is set to Yes
- Enter a loan number
- Click the OK button
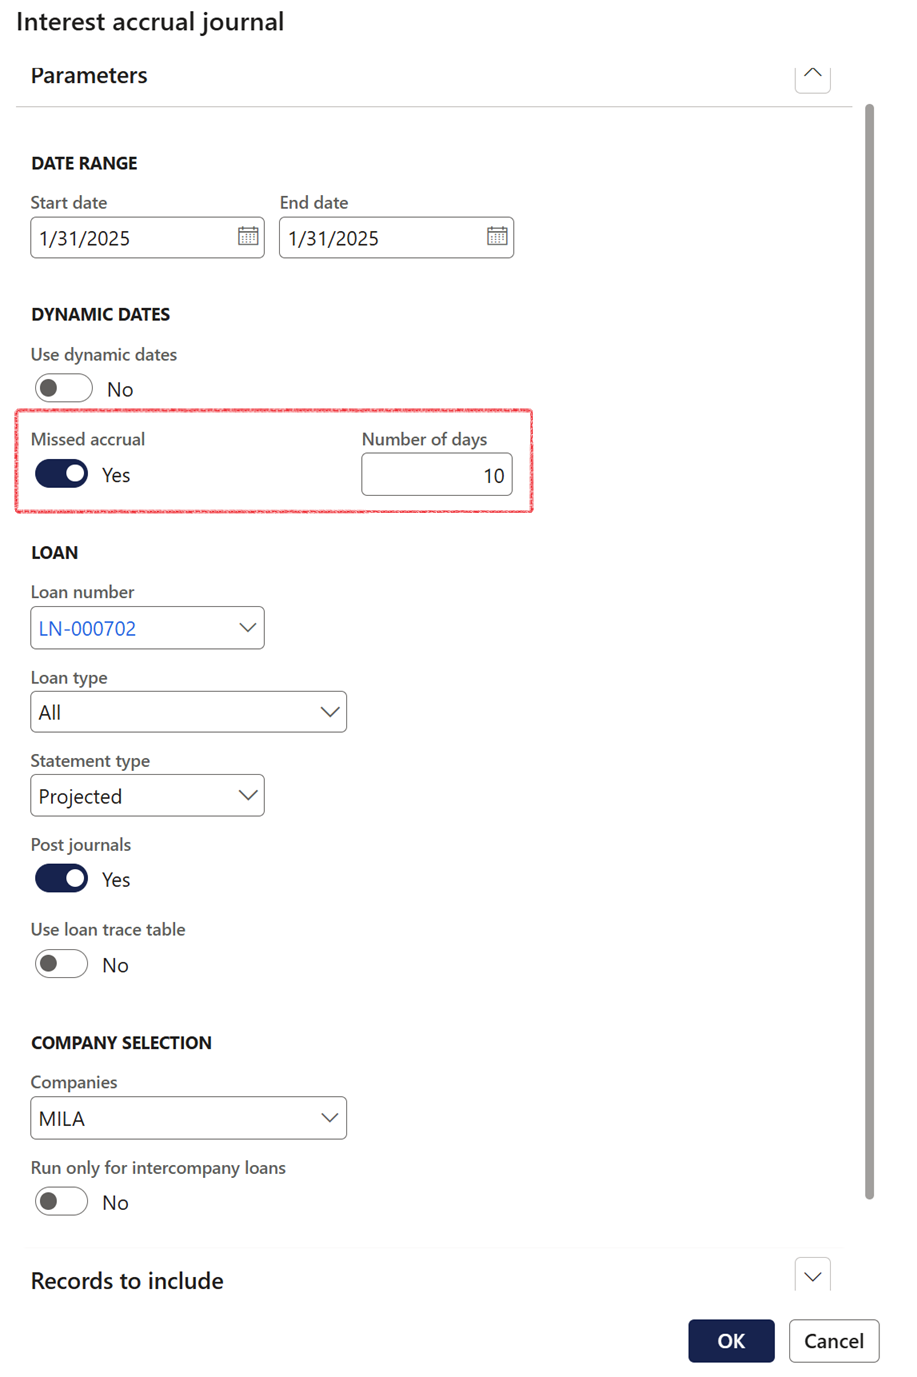
This will create interest for the current date, as normal, but will also search loans for cases where the interest date was reached but not raised due to the interest being disabled.
¶ Step 28: Loan Journal Reversal
A posted loan journal can be reversed
- Navigate to Treasury > Loans > Periodic > Adjustments > Loan journal reversal
- Enter a Journal id
- Leave the loan number field blank
- Enter a Voucher number . The voucher field will greatly assist when reversing journal batches with multiple loans, where a loan number was left blank
- Set the Post toggle to No. It is best to first view the journal before posting.
- Click the OK button
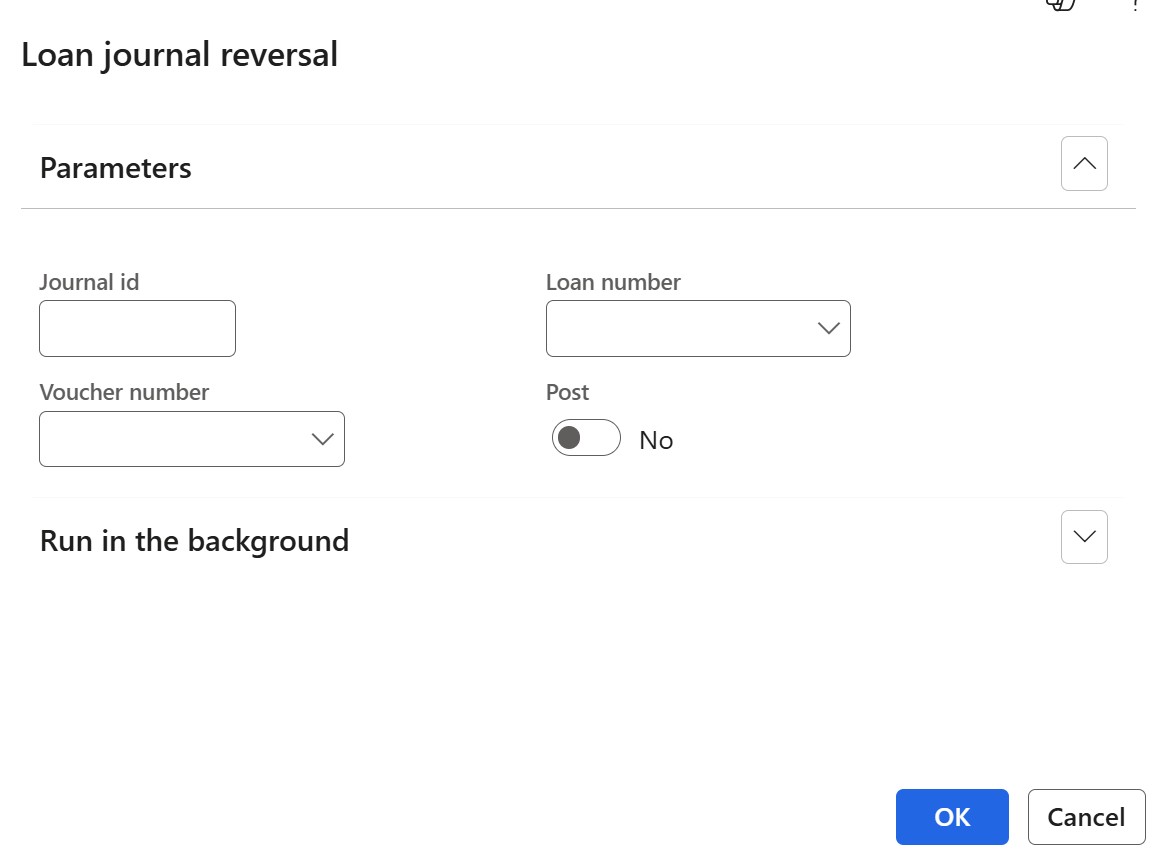
When reversing certain journals, such as a Refund journal, the Loan number must remain blank and the journal batch number should be specified. If a Loan number is entered in the Loan journal reversal dialog, the resulting journal may not include all reversal lines due to the posting profile setup. It is therefore recommended to enter the Voucher number instead.
Loan journal reversals follow the same voucher number rules as the original journals. Each unique voucher in the original journal generates a corresponding unique voucher in the reversal journal. This applies to all loan journal types, including:
- Capital journal
- Payment journal
- Reinstate Write-off journal (created with the payment journal)
- Interest accrual journal
- Refund journal
- Write-off journal
