¶ Navigation
There are four ways to access pages and forms in Microsoft Dynamics 365. these are Dashboard and workspaces, Navigation pane, Navigation search or Favourites
The Dynamics 365 home page is the default initial page when accessing Microsoft Dynamics 365. Since it contains all workspaces which are available to the current user, you can use the home page for navigating to workspaces. From the workspaces you can subsequently access list pages and detail forms.

1 Navigation bar
2 Company banner
3 Navigation pane
4 Calendar and work items
5 Workspaces
¶ 1. Navigation pane
Whereas workspaces and favorites contain a limited number of menu items for frequent use, the navigation pane provides access to all items for which you have got appropriate permissions.
In order to show the complete navigation pane, click on the menu icon ("hamburger") on the left-hand side.


If all modules and menu items are shown, the Dynamics 365 navigation pane includes following elements:
1 Navigation bar
2 Navigation pane
3 Favorites
4 Recent
5 Workspaces
6 Modules
7 Menu for selected module
If you want to show the navigation pane permanently, click on the Pin on the top right-hand side of the navigation pane.
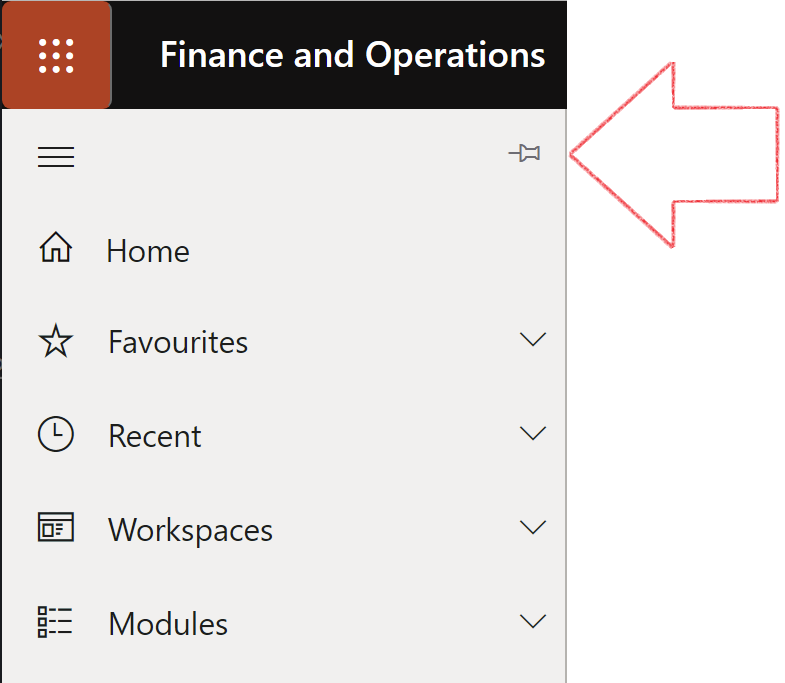
In case you want to collapse the navigation pane after pinning it open, click on the Collapse icon shown on the top right-hand side of the navigation pane.
¶ 2. Modules and Menu structure
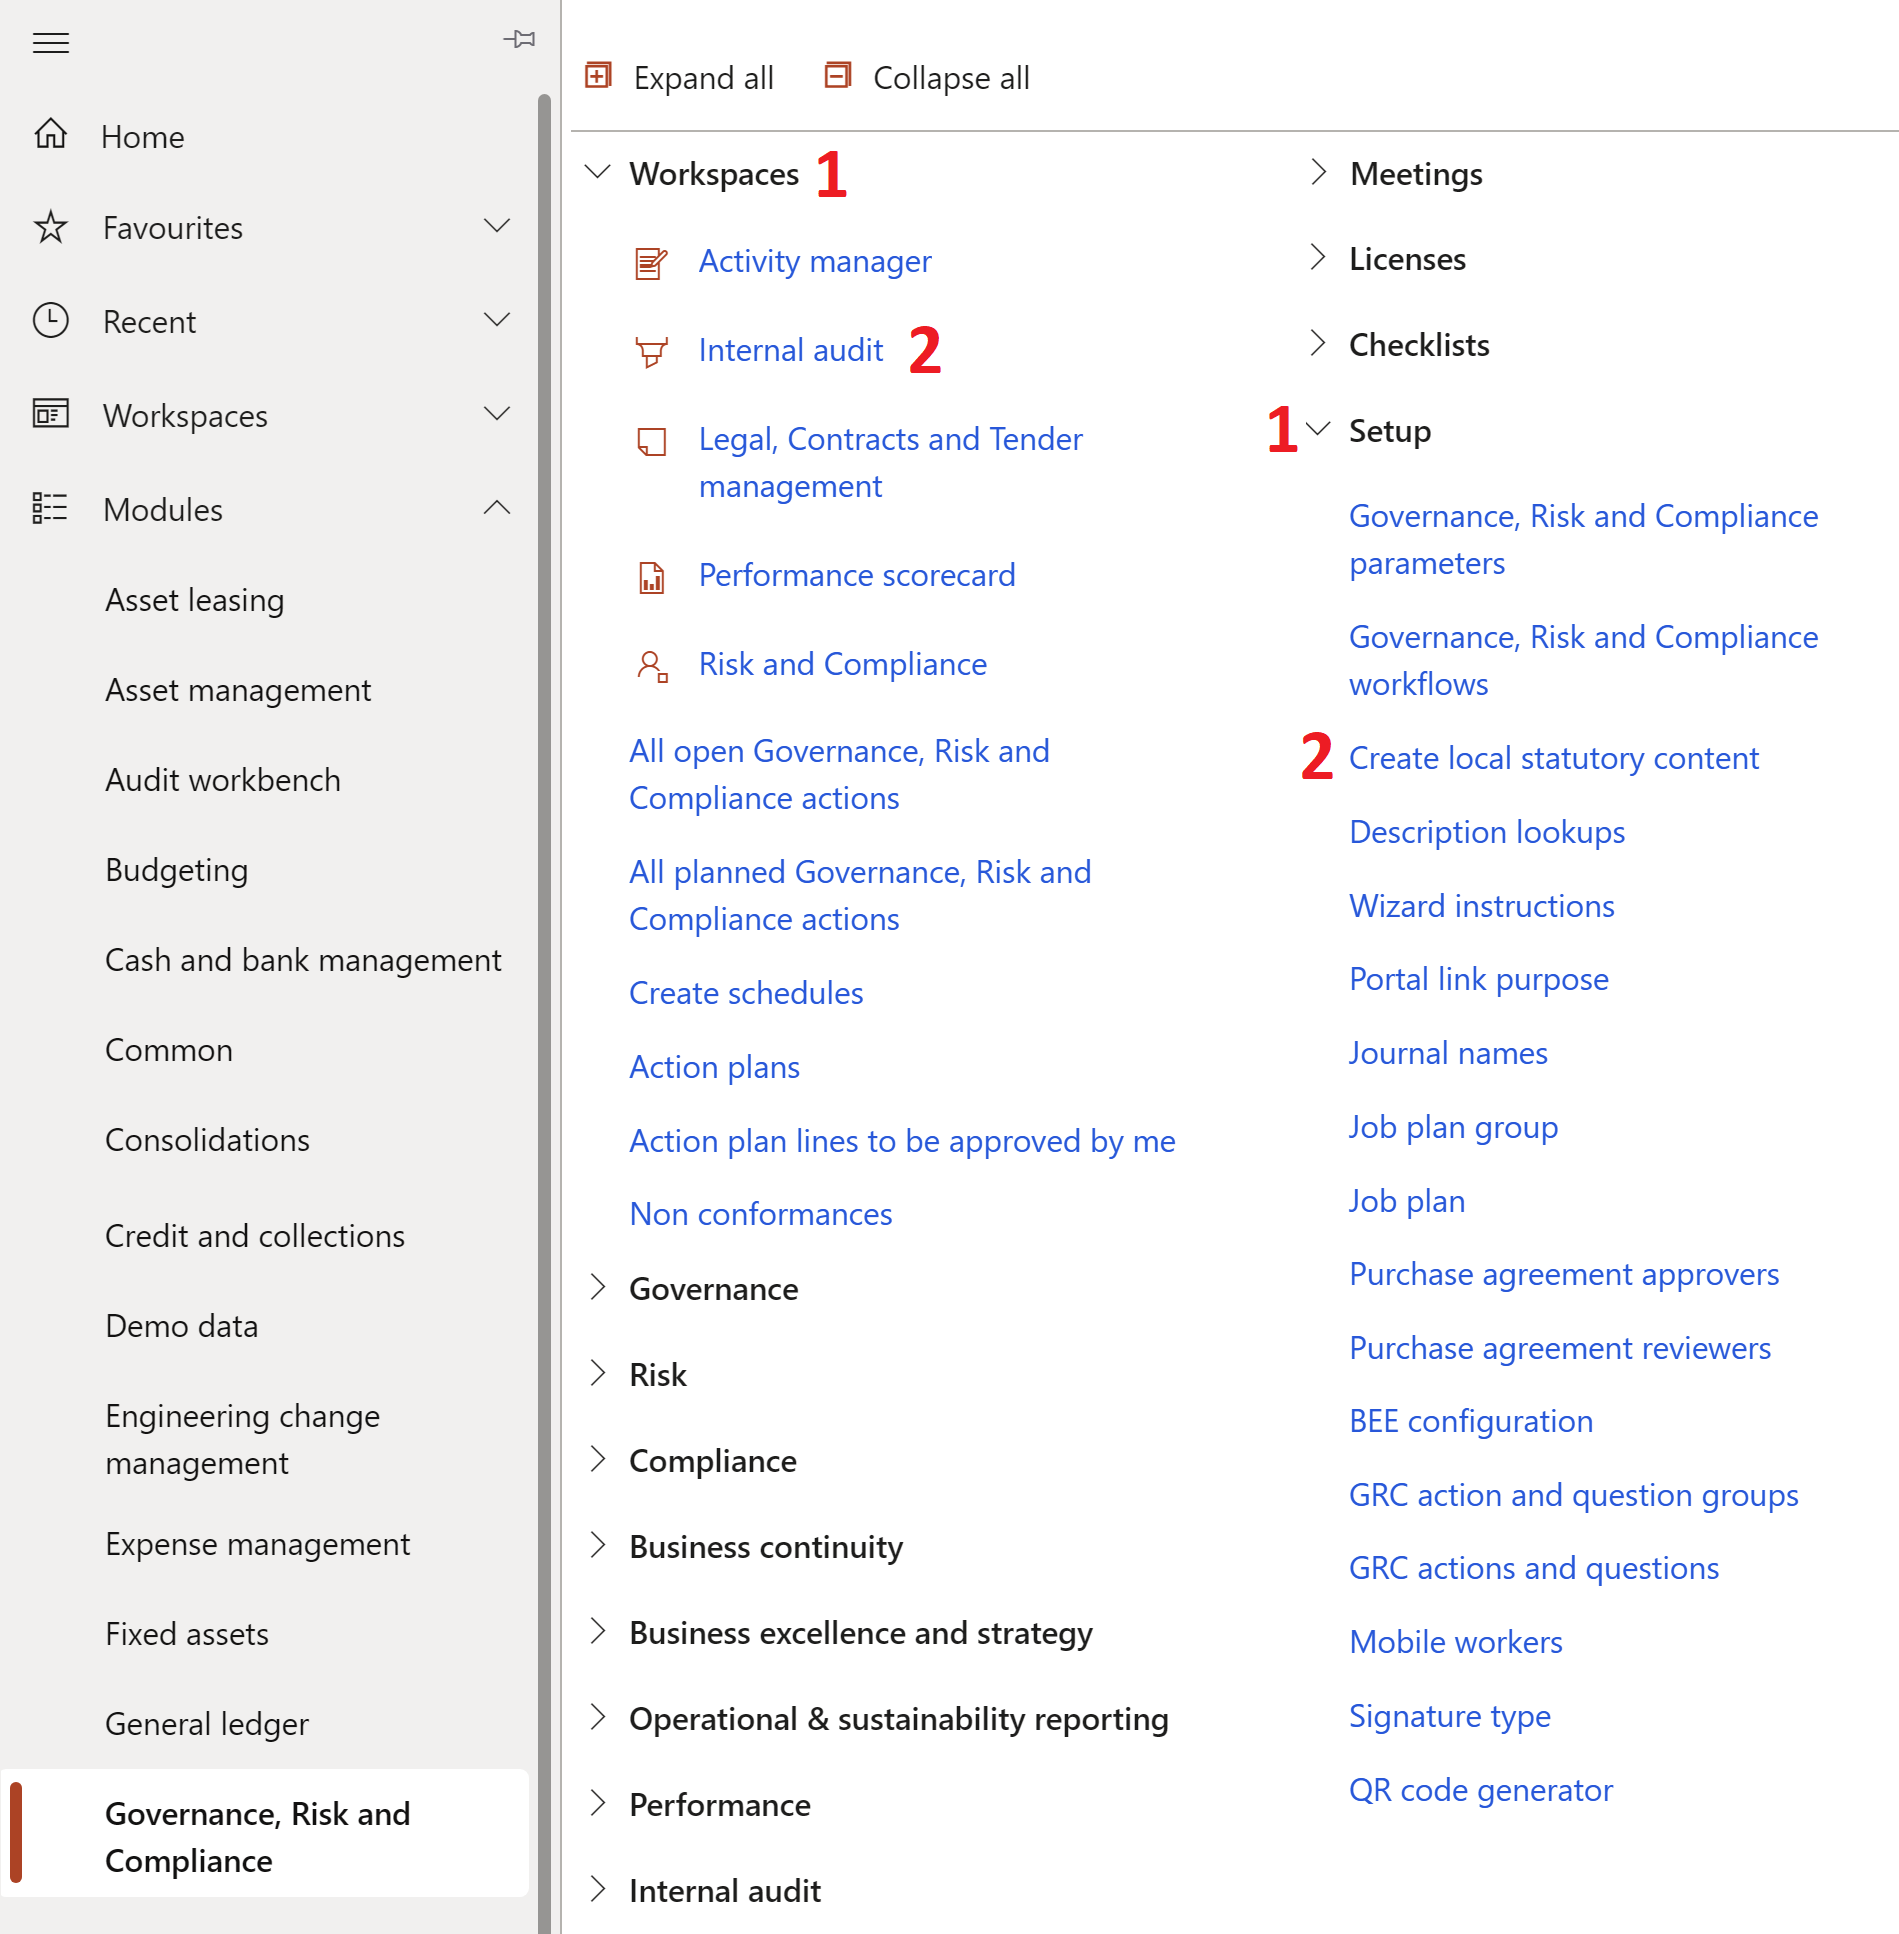
After selecting a module, the menu shows all accessible menu items of this module. The particular folders and menu items, which are depending on the individual module, comply with a common basic structure.
1 Folder and 2 Menu item
¶ 3. Favourites and shared links
The favorites section provides the option to collect menu items according to your particular requirements.
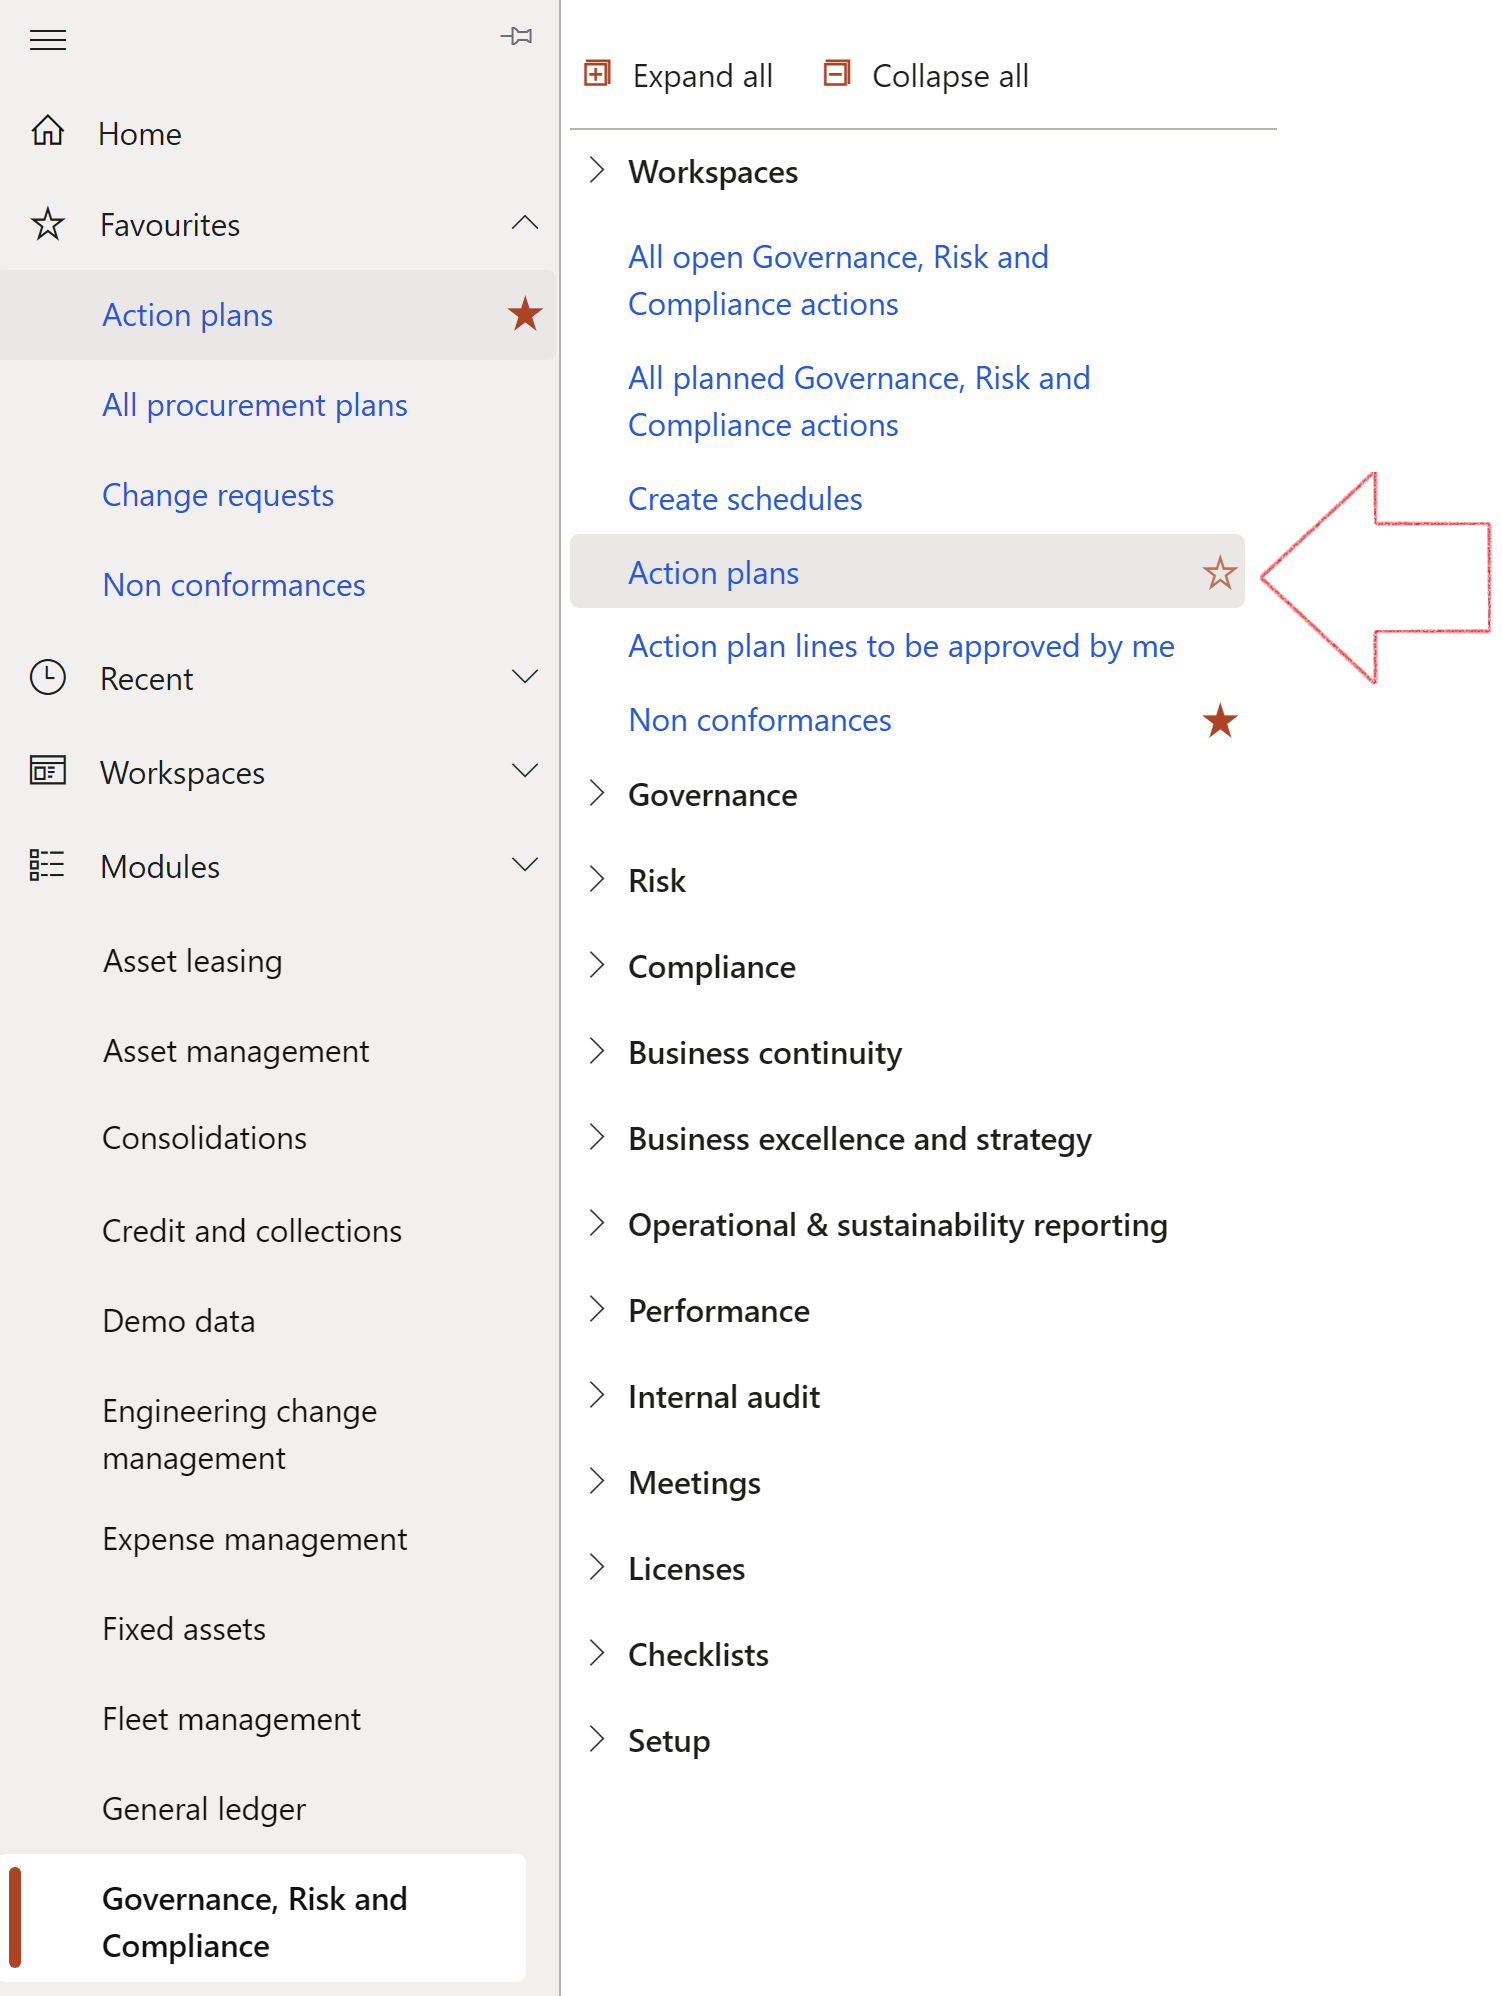
If you want to add a workspace or page to your Dynamics 365 favorites, open the navigation pane to show the particular menu item and click on the empty star on the right of the menu item.
A full star on the right of the menu item then indicates that it is included in the favorites.
¶ 4. Navigation bar

The navigation bar at the top of every Dynamics 365 form contains following icons for global Dynamics 365 features.
1 Go to dashboard
2 Company selector
3 Navigation search
The navigation search provides the option to directly access menu items by typing part of the name.
In order to use the navigation search, click on the Search icon in the navigation bar and enter the page title or navigation path in the search field.
4 Show messages
5 Settings (user options/general settings)
6 Help
7 User (for signing out)
¶ 5. Workspaces
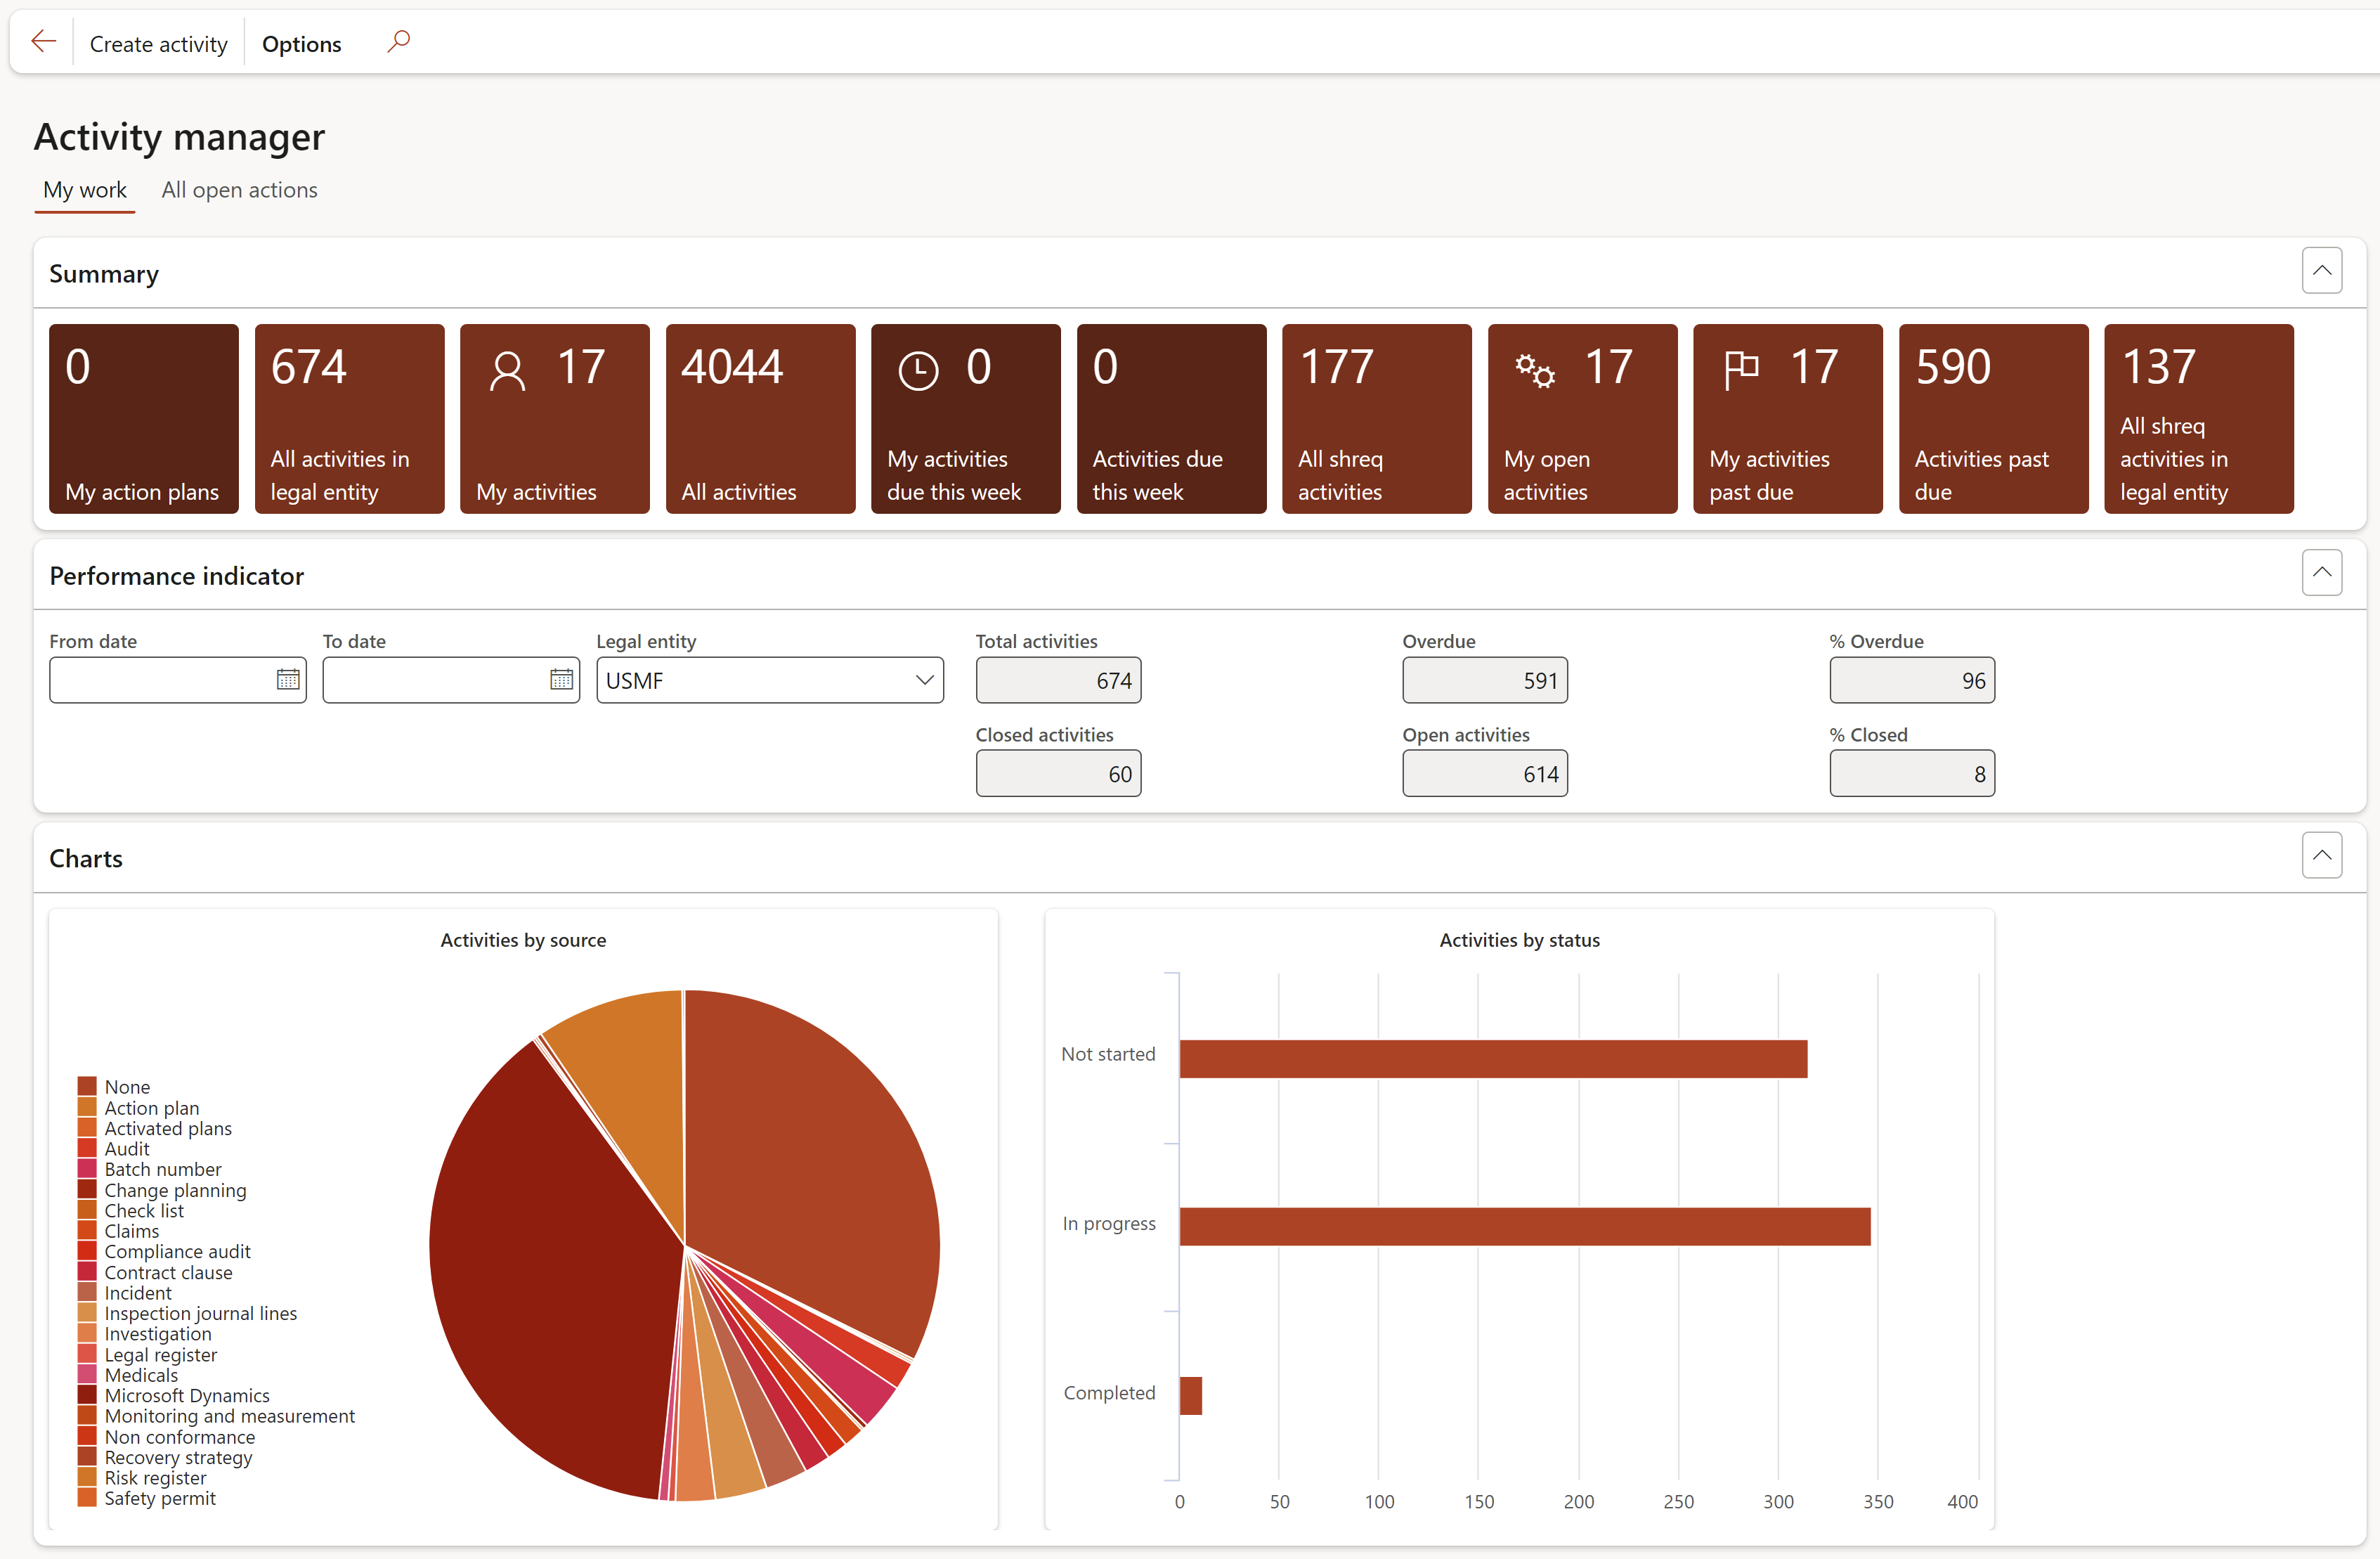
Dynamics 365 FO introduces the idea of workspaces. Workspaces in Dynamics 365 Enterprise are “personalised work centers” with data, reports, and transactions designed to make you more efficient in your daily tasks. The system comes with several workspaces out-of-the-box containing specific content for the different roles of an organization. These out-of-the-box workspaces can be updated or modified with additional information such as Power BI reports, data lists, and even transactions to make the experience completely personalized.
¶ 6. List pages
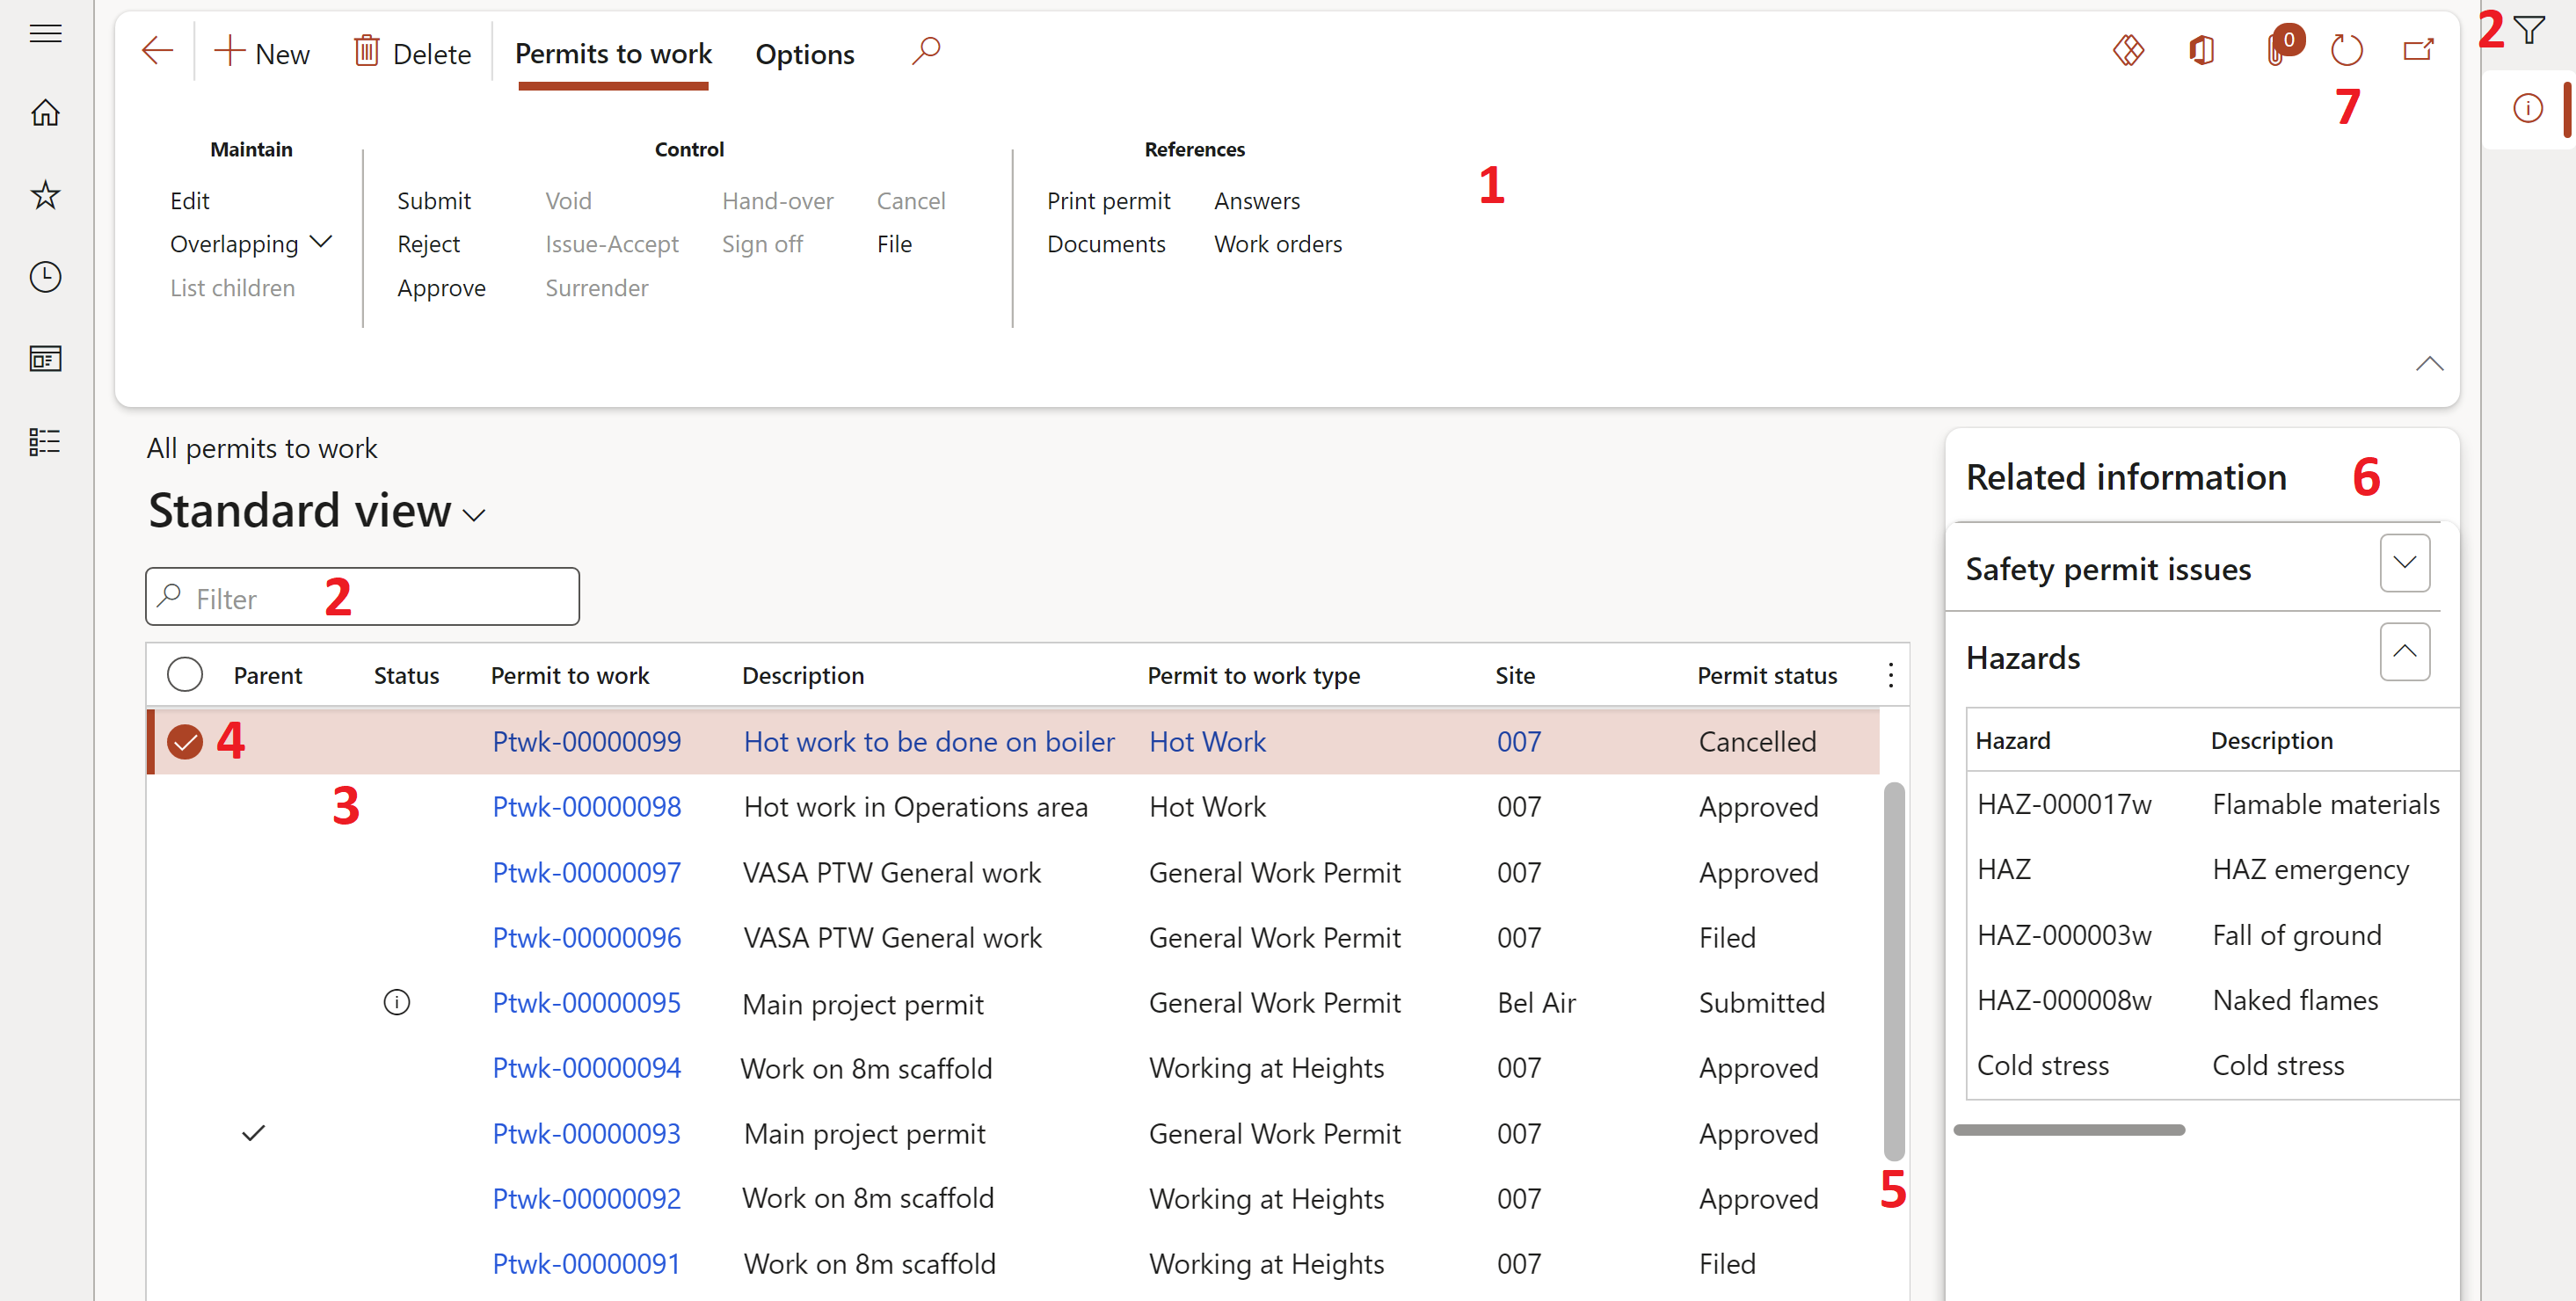
A list page shows the list of records of a particular table. While list pages are primarily designed for viewing and selecting records, buttons in the action pane provide the option to execute tasks on these records.
|
1 Action pane (contains action buttons) |
 |
If the full Action pane is displayed and you need additional space, collapse the Action pane by clicking on the Collapse icon |
|
|
 |
The Action pane will expand automatically when clicking on an Action pane tab (e.g. Permits to work). In order to show the full action pane permanently, click on the Pin icon when expanded |
|
2 Filter options |
 |
The user can use the free text field to filter, or click on the filter icon to use the advanced filter option |
|
3 Grid |
Displays the list of records |
|
|
4 Grid check boxes |
Enables the selecting of multiple, or if selecting the checkbox in the header line, all records |
|
|
5 Scroll bar |
Enables the use to scroll up/down to get to specific records |
|
|
6 Related information pane (Shows a summary of additional information related to the selected record) |
 |
If a page does not show the Related information pane, click on the Show icon |
|
|
 |
By clicking on the Hide icon, you can hide the Related information pane again |
|
7 Refresh |
 |
List pages do not automatically refresh if data displayed on the screen changes in the database. In order to refresh a list page, click on the Refresh icon in the Action pane. |
¶ 7. Detail forms
¶ 7.1 For master data
Detail forms are for inserting and modifying individual records. Clicking a key field shown as link in the grid of a list page, opens the related detail form. Detail forms have a structure which is similar to list pages and like in list pages the specific elements and functions are depending on the particular form.
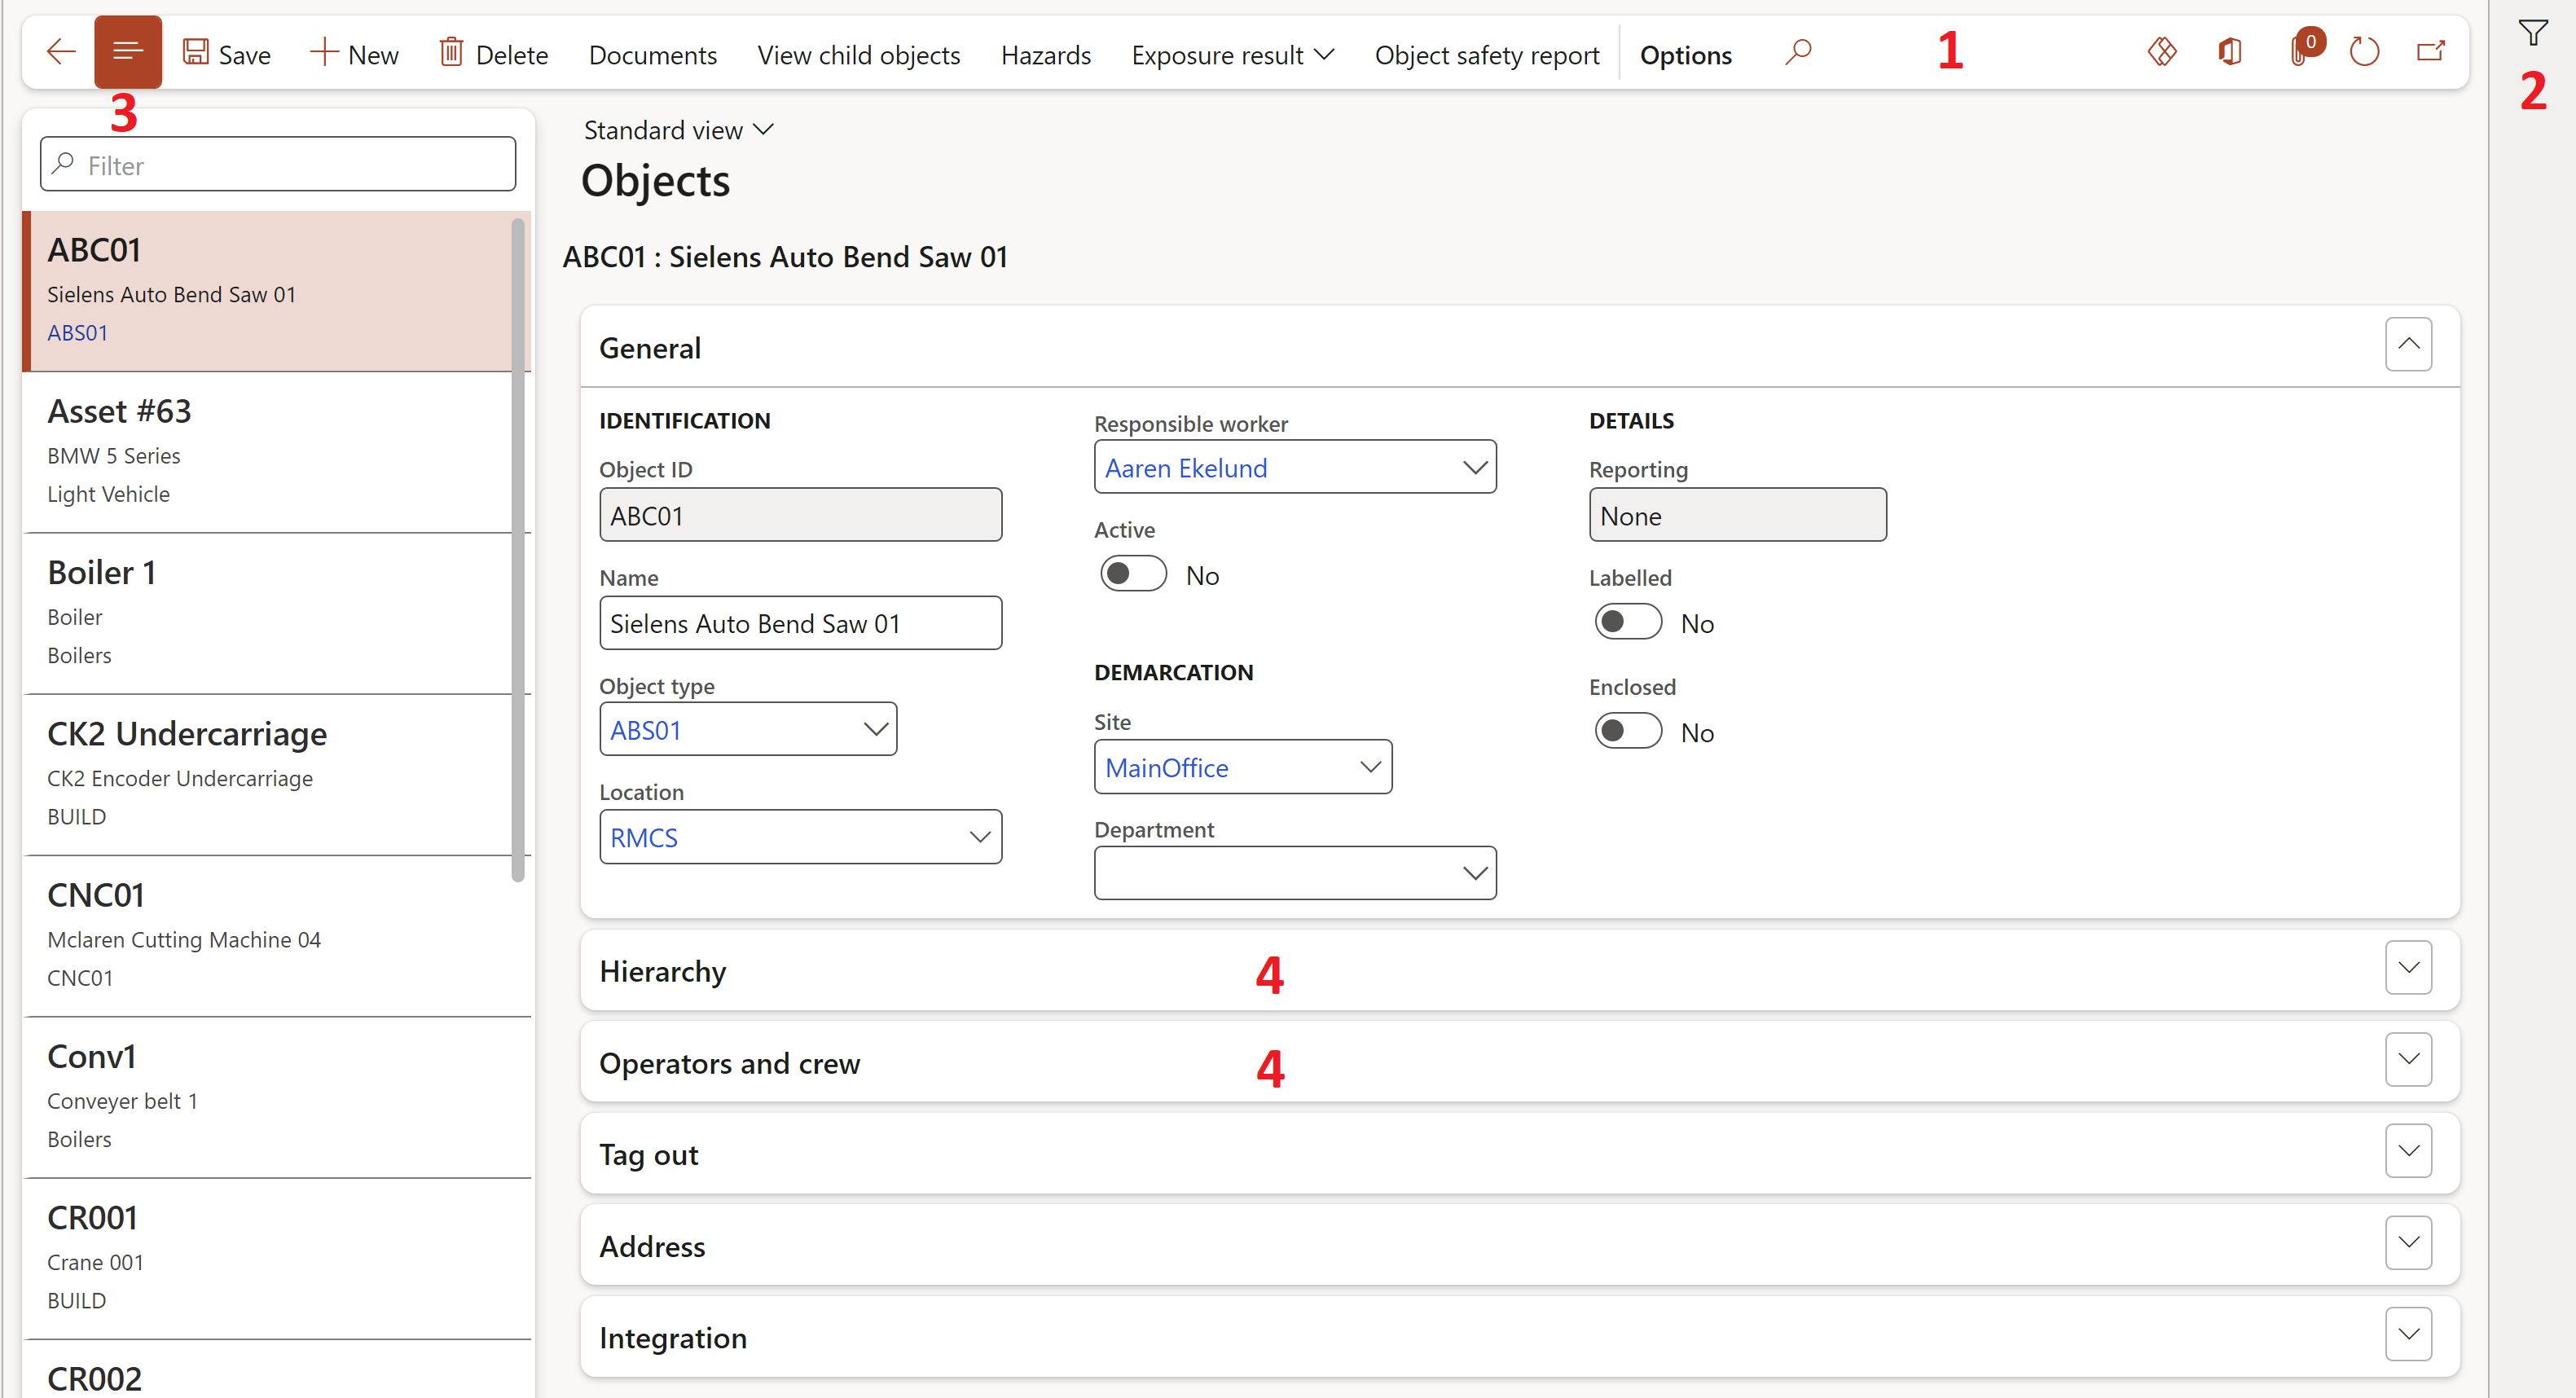
The common structure of detail forms includes the following basic elements:
- 1 Action pane (collapsed in the screenshot above)
- 2 Filter icon (opens a pane for entering filters)
- 3 List icon (opens a pane which displays a list of records)
- 4 Fast tabs (group fields according to their functional area and show summary fields, which display core data directly on the tab)
¶ 7.2 For transaction data
In addition to the detail forms for master data as described above, Dynamics 365 contains detail forms for transaction data. Clicking a key field shown as link in the grid of a list page, opens the related transaction detail form. When accessing a transaction detail form, it shows the Lines view where you can view or edit the lines.
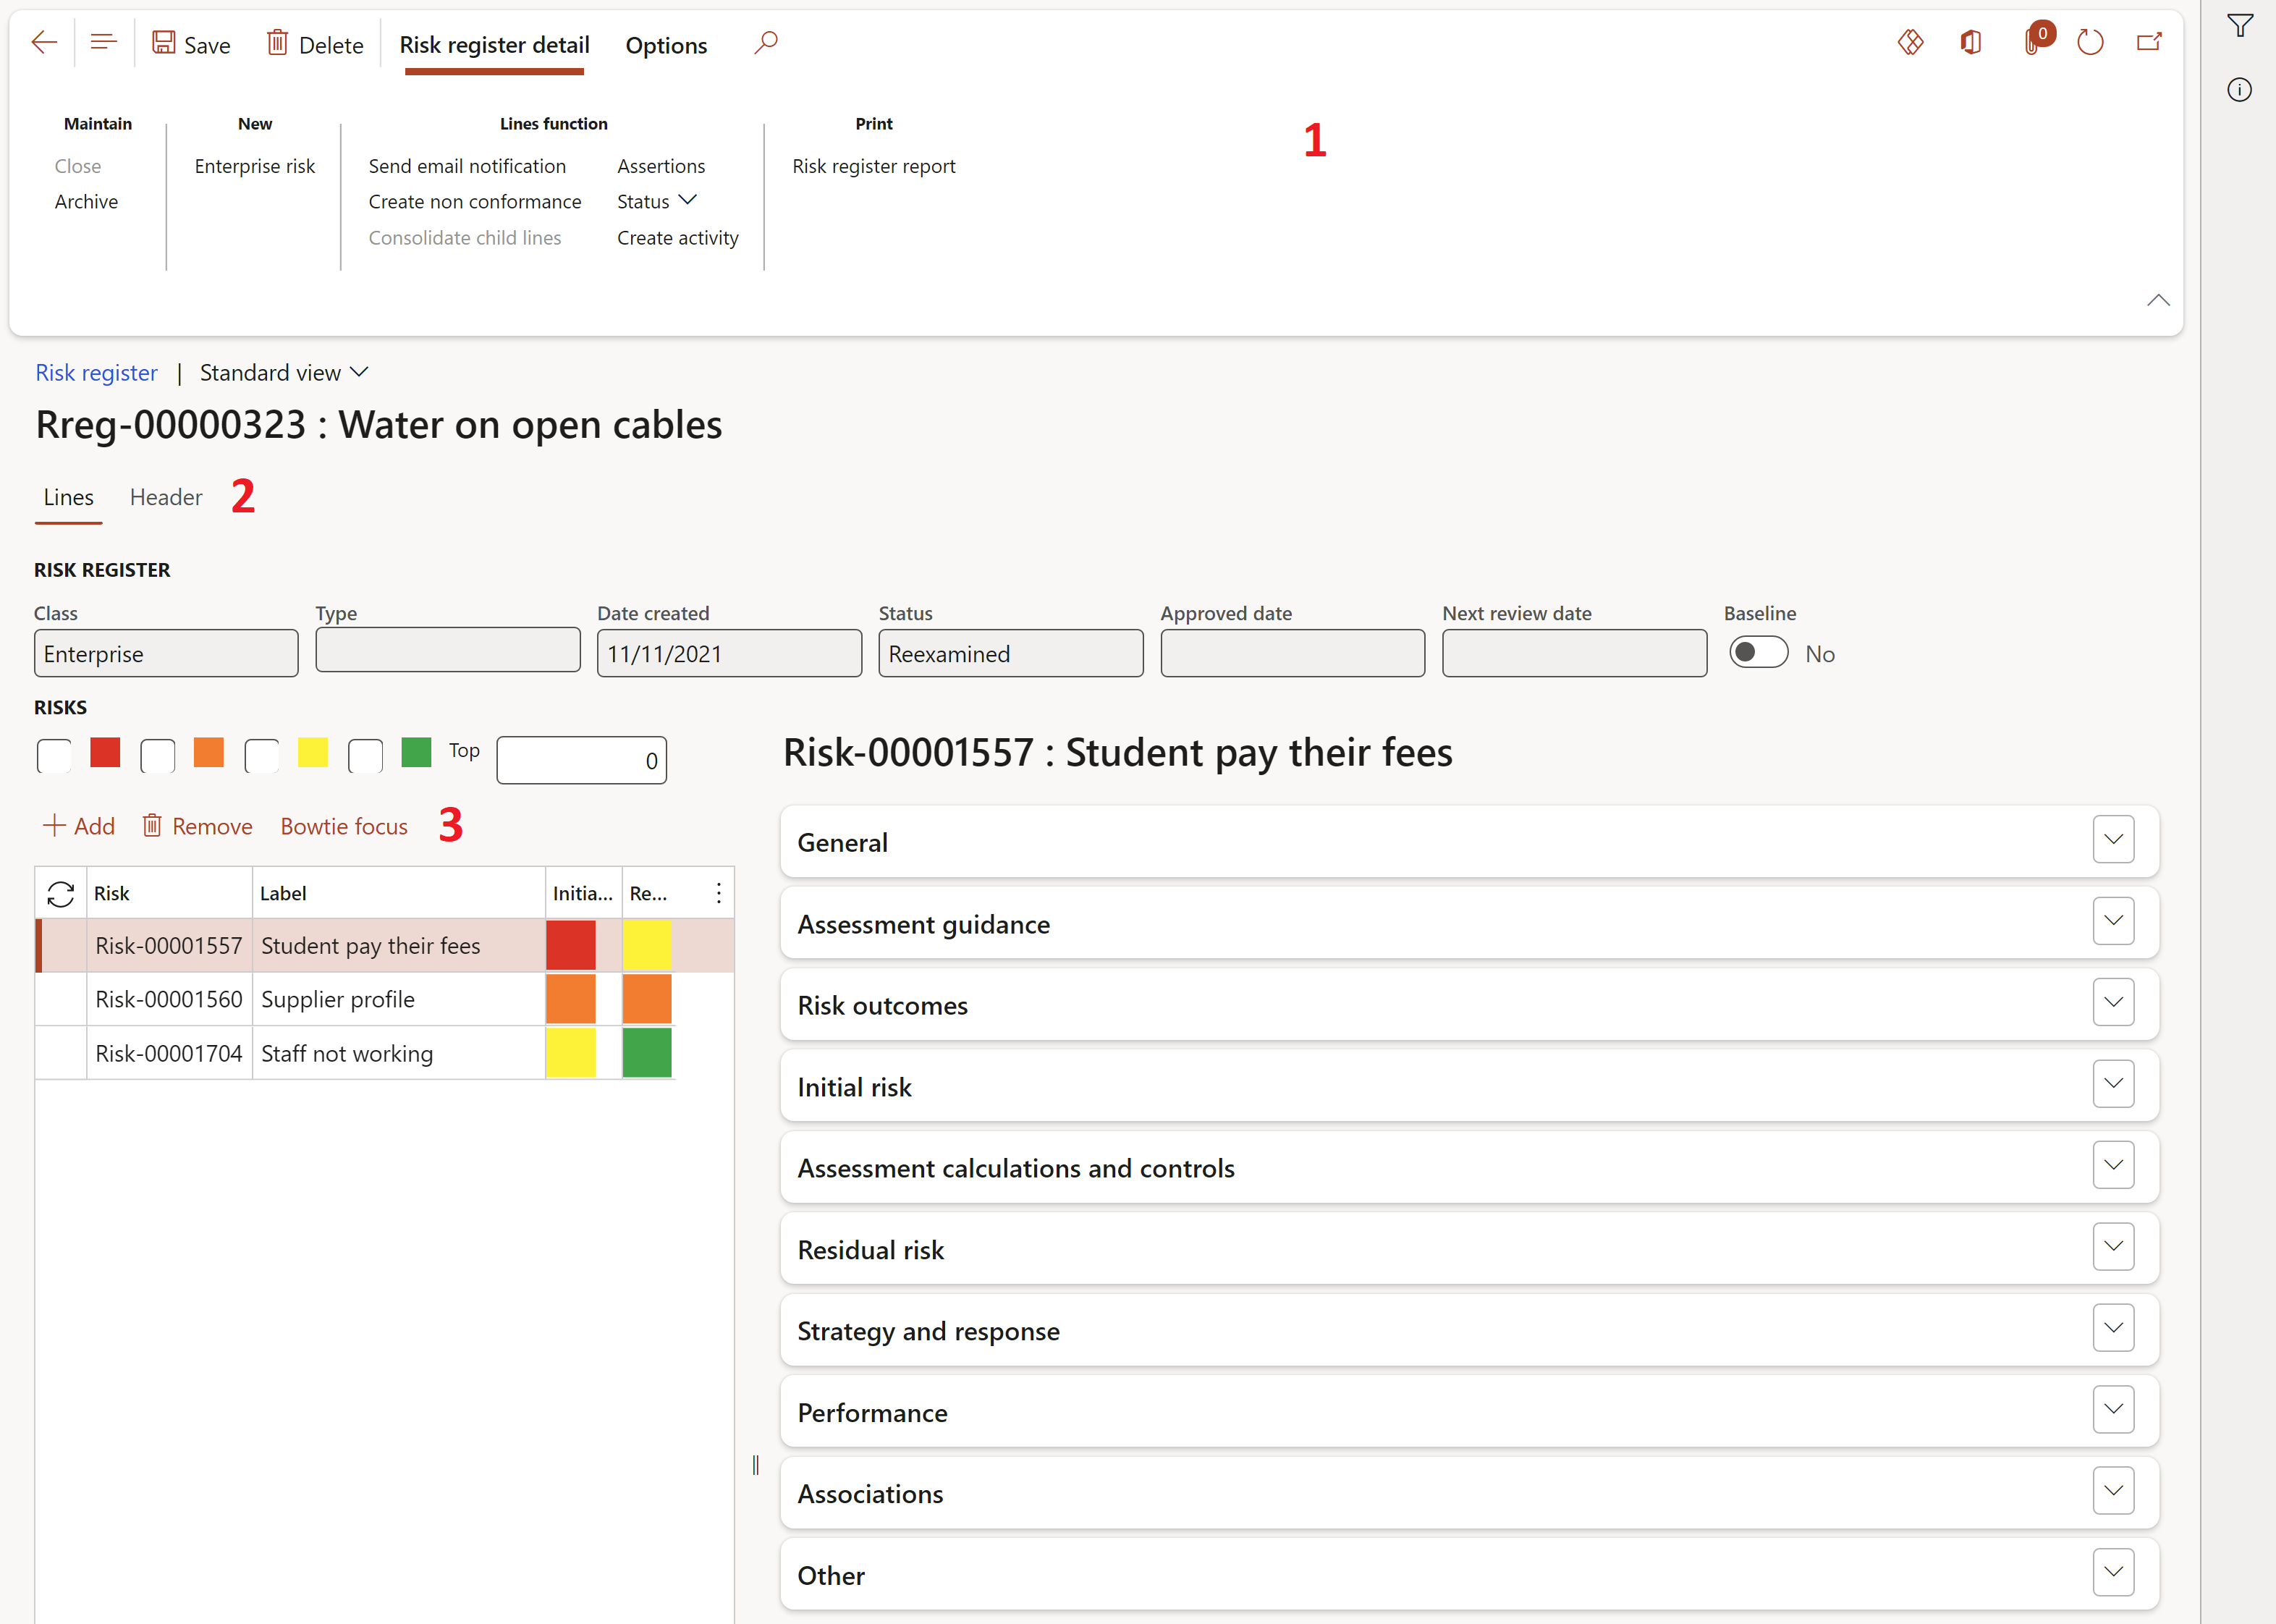
- In the toolbar 3 of the tab Lines, there are buttons for executing actions on the selected line – for example deleting a line by clicking on the Remove button.
- The action pane 1 at the top of the form provides the option to execute actions at header level – for example archiving a risk register by clicking the Archive button.
- The lines view shows basic header data in the Risk regsiter section. Clicking on the Header index tab 2 in the screenshot above, the detail form opens the header view, which contains all fields of the header record. In header view, the Lines index tab (next to the "Header") the detail form takes you back to the lines view.
¶ 8. Base or setup tables
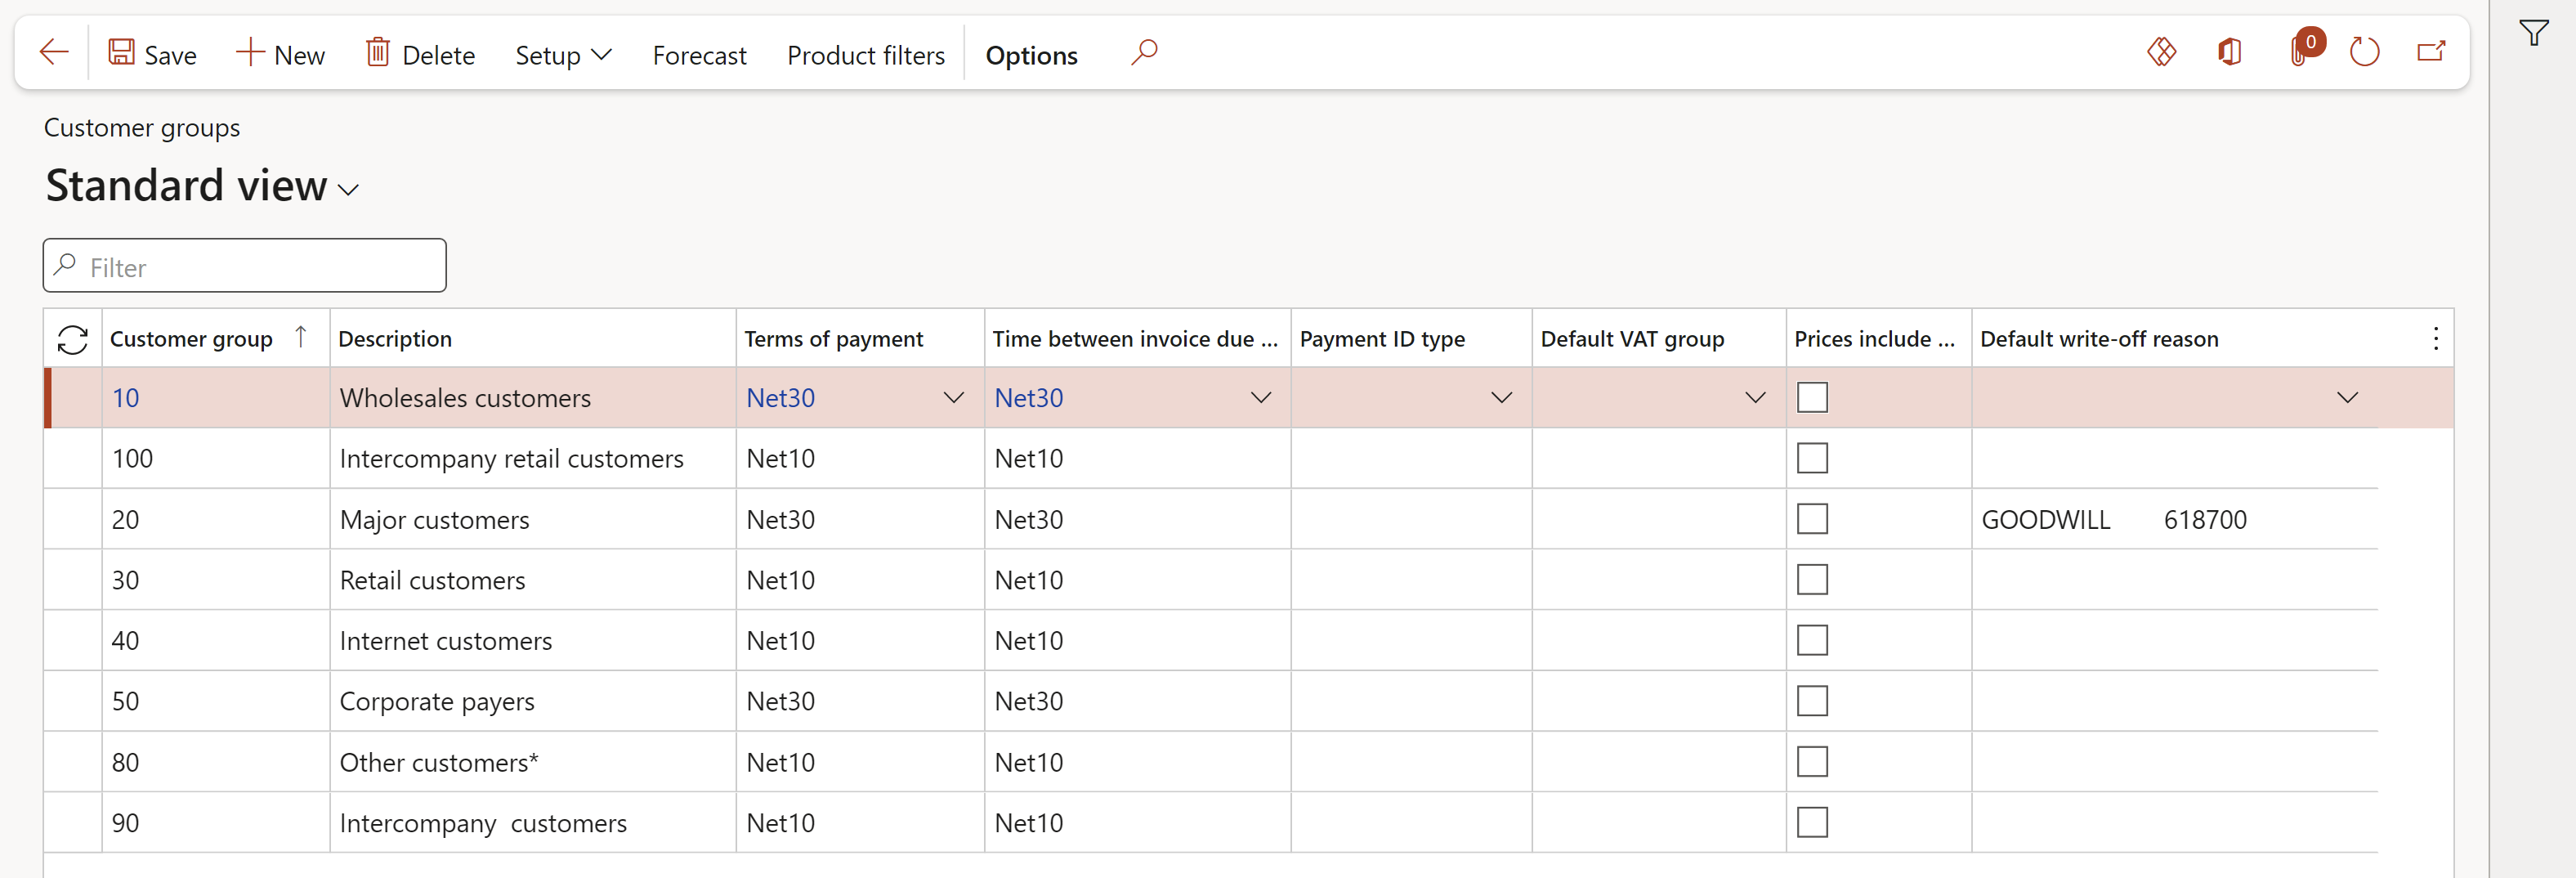
When beginning a new Dynamics 365 FO implementation, it is common to start looking at some of the basic setups for master data (customers, vendors, items, etc.). Looking at the customer master as an example, it is apparent that there are a lot of different ways to group and categorise customers within D365. One of these groupings is the Customer Group field which is a required field when creating a new customer. This is a base or setup table inside D365 and is normally referenced on other detail forms.
¶ 9. Parameters
Before you begin working in any specific module (for example Project management and accounting), you can configure many preferences and default values on the parameters form. By presetting default values, you can reduce some of the manual data entry that is required when new transactions are created. This includes defining module specific numbering sequences. In addition, business rules that are “module wide" are created and configured on the specific module's parameters form.

