¶ Introduction
The Data Management Framework offers a structured approach to managing, transferring, and integrating data across an organization. It is built around core components such as data entities, projects, jobs, job histories, and data packages - each designed to enable efficient data handling between systems. The framework supports key scenarios like data migration, configuration setup and replication, and system integration, helping users streamline operations, maintain consistency, and simplify overall data management.
The data management framework consists of the following concepts:
- Data entities - A data entity is a conceptual abstraction and encapsulation of one or more underlying tables. A data entity represents a common data concept or functionality. After data entities are created, you can reuse them through the Excel Add-in, use them to define import/export packages, or use them for integrations.
- Data project - A project that contains configured data entities, which include mapping and default processing options.
- Data job - A job that contains an execution instance of the data project, uploaded files, schedule (recurrence), and processing options.
- Job history - Histories of source to staging and staging to target jobs.
- Data package - A single compressed file that contains a data project manifest and data files. This is generated from a data job and used for import or export of multiple files with the manifest.
The data management framework supports using data entities in the following core data management scenarios:
- Data migration
- Set up and copy configurations
- Integration

¶ Navigation
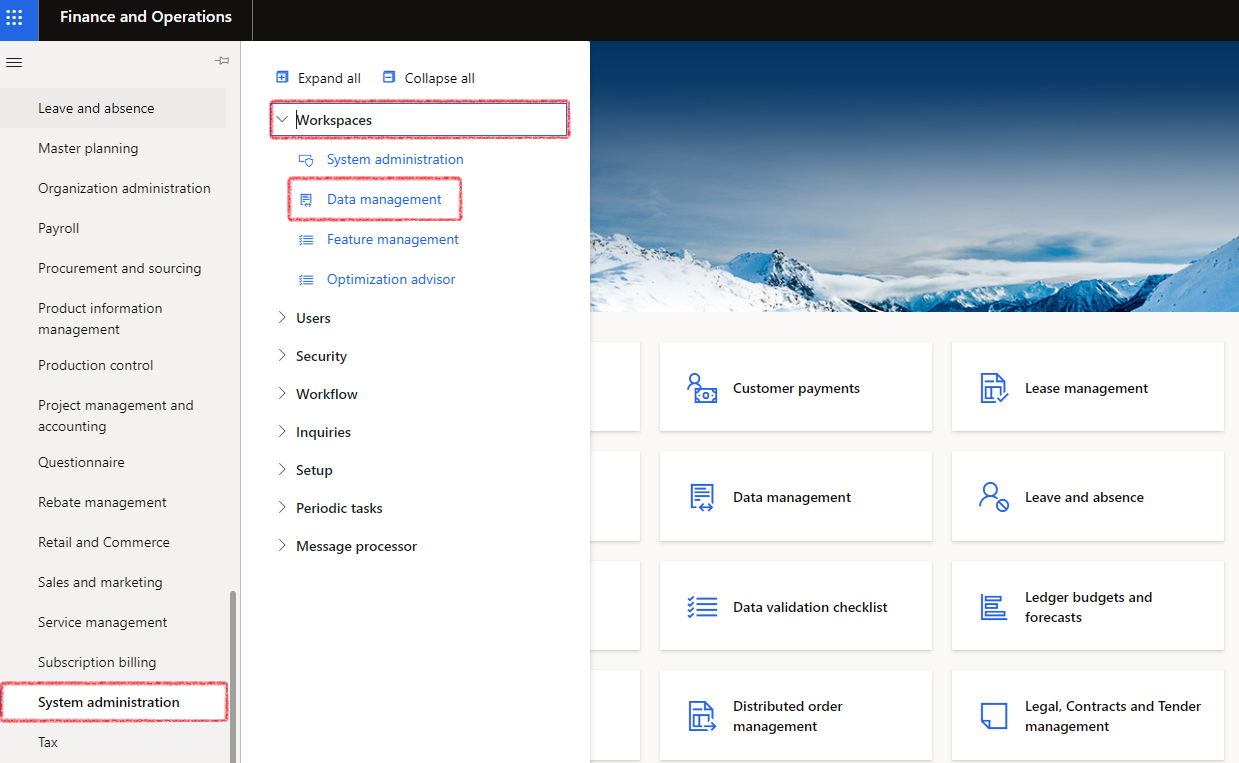
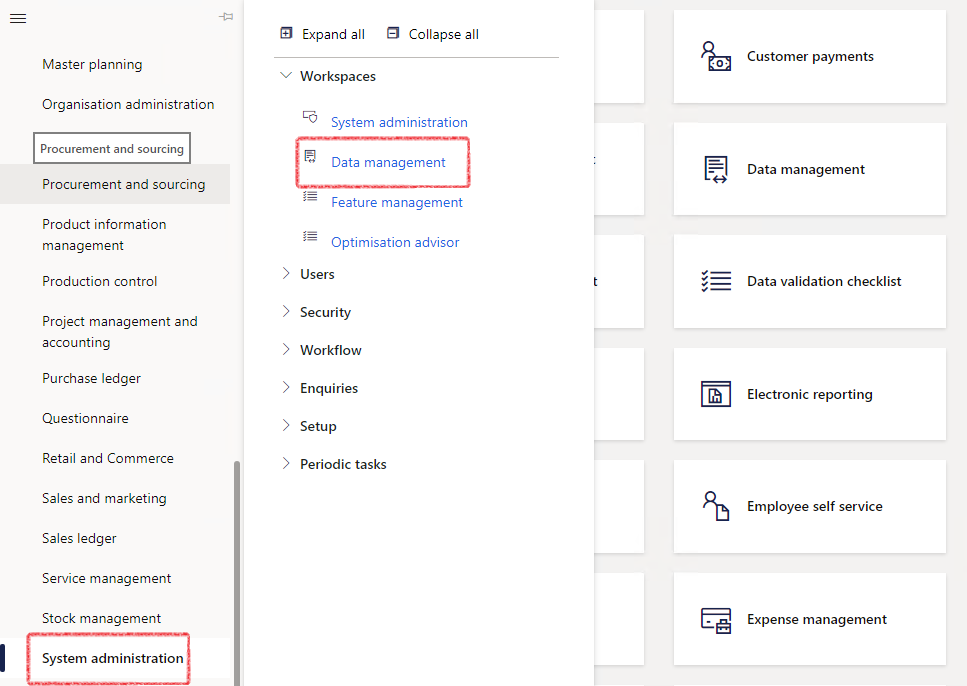
- Go to System administration > Workspaces > Data management
¶ Specific setup
The following setups is required and will be covered in detail below:
- Treasury parameters - Import setup for Loans
- Default dimension format for data entities
- Entity list refresh
¶ Step 1: Import setup for Loans
The Import tab contains fields that can be defaulted to the loan header when performing the Loan table data entity import, so that users do not have to fill in some of these fields on the Excel import templates.
- In the navigation pane, go to: Modules > Treasury > Setup > Treasury parameters
- Click on the Import tab
- Setup the following default fields for loan imports:
- Auto post capital journal toggle.
- If Yes, it will automatically post the capital journal when Loan table entity and Loan trade agreement has been imported
- Capitalize interest toggle
- Delete loan data lines toggle: if set to No, it will not allow deletion of imported loan data lines and will keep the history. Journal duplication will not be possible. If set to Yes, it will delete previously imported loan data lines for the Simulated loan statement, oppose to appending the statement lines.
- Loan group selection
- Loan category type
- Interest type
- Timing of payment
- Calendar convention
- Interest payment terms
- Capital payment terms
- Calendar
- Loan term
- Transaction currency
- Interest payment date
- Auto post capital journal toggle.

¶ Step 2: Setup Default dimension format for data entities
The purpose of dimensions is to add additional information to financial transactions which can be used for reporting and filtering purposes. The default dimension values are added to each transaction when posting in journals.
If all the setups are done, when importing loans via data management, the following fields will be created if they do not exist already:
- Loan receiver
- Loan receiver dimension
- Loan ID dimension and
- Loan group dimension
To view the newly created dimensions, go to:
- General Ledger > Chart of Accounts > Dimensions > Financial dimensions
- Select the dimension you want to view, for instance Loan receiver dimension
- Click on Dimension values in the ribbon bar
- Here you will see all the created dimension values
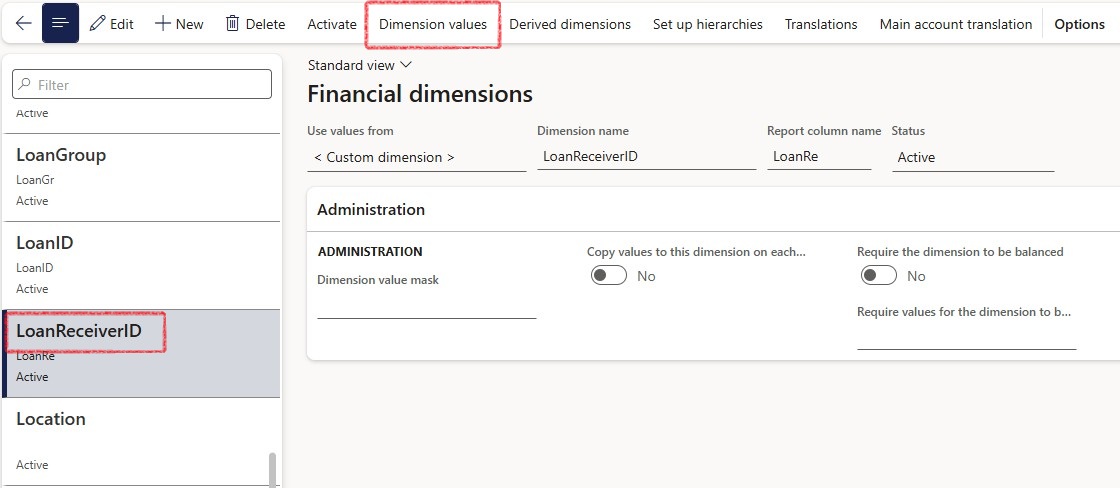
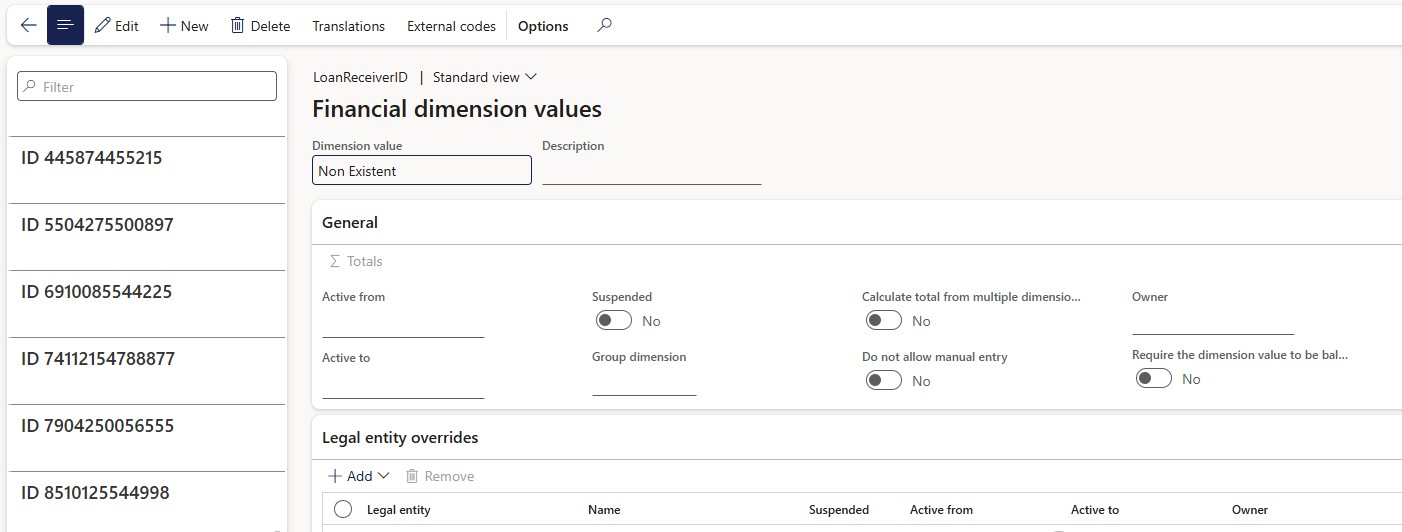
To setup specific dimensions for use on loans, remember that the Financial dimensions in the General ledger should be setup first (whilst the system is in maintenance mode).
¶ Step 2.1 Setup Financial dimensions configuration for integrating applications
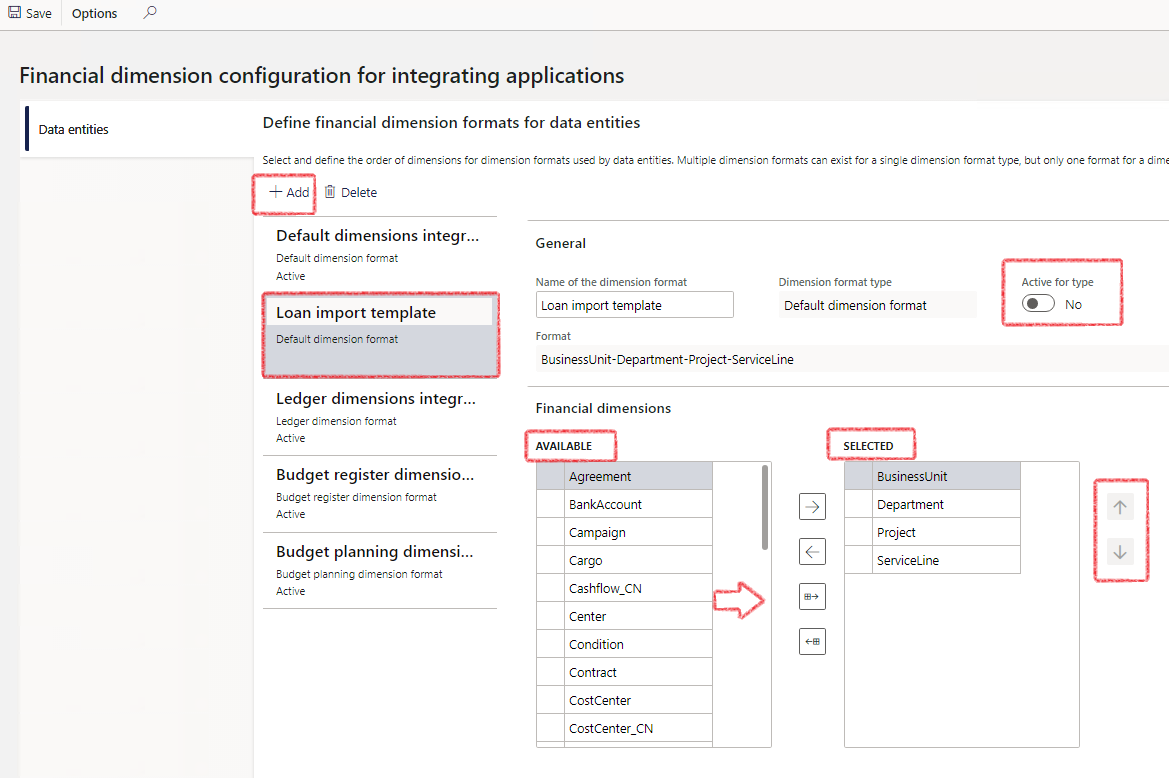
Select and define the order of dimensions for dimension formats used by data entities. Multiple dimension formats can exist for a single dimension format type, but only one format for a dimension format type can be active.
To configure the initial financial dimensions, go to
- General Ledger > Chart of accounts > Dimensions > Financial dimension configuration for integrating applications
- Click on the Add button or select an existing record
- Enter Name of the dimension format if you clicked on Add
- On the Financial dimension’s Available column, select the dimensions to be used and move it to the right-hand column, called Selected
- The order of the display can be changed as well, by making use of the up or down arrows
- When done, ensure it is Active for type
Other areas inside D365FO that will affect Financial dimensions:
General ledger > Ledger setup > Ledger. Expand the Account structures FastTab and click on the account structure to view the Segments and allowed values
¶ Step 2.2: Setup Default dimensions derived from fields setup
To setup the Default dimension format for data entities to be used inside loans, go to:
- Treasury > Loans > Setup for loans > Default dimensions derived from fields setup
- Select the newly activated Dimension tree name from the drop-down list
- Loan ID, Loan receiver and Loan group can be set up to automatically by creating a financial dimension
- Map the fields related to the Dimension attribute
- Mark the tick box if the Dimension attribute should inherit parent dimension
- Slide the Active button to Yes to activate your changes.

¶ Step 3: Entity list refresh
Entities in an environment must be refreshed using the following guidelines: When a new environment is deployed and the user goes to the data management workspace, entity list refresh starts automatically.
- When code packages are deployed to an environment where data management has already been used the entity list must be manually started
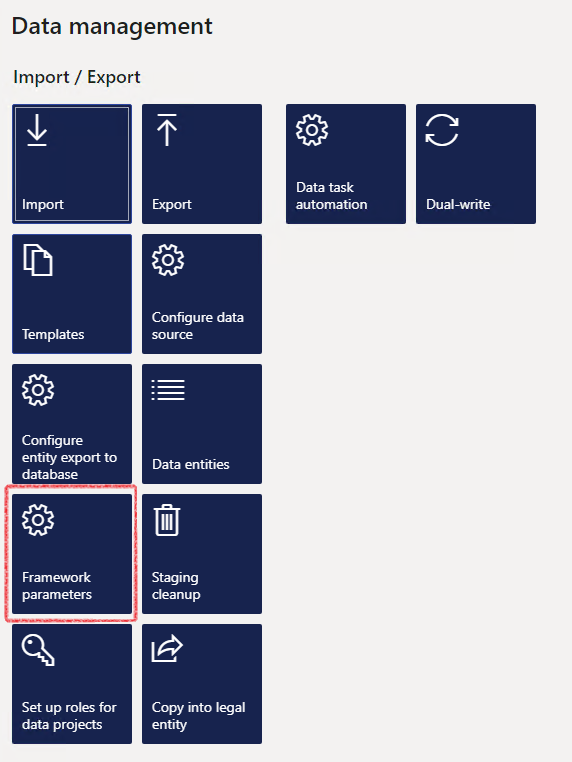
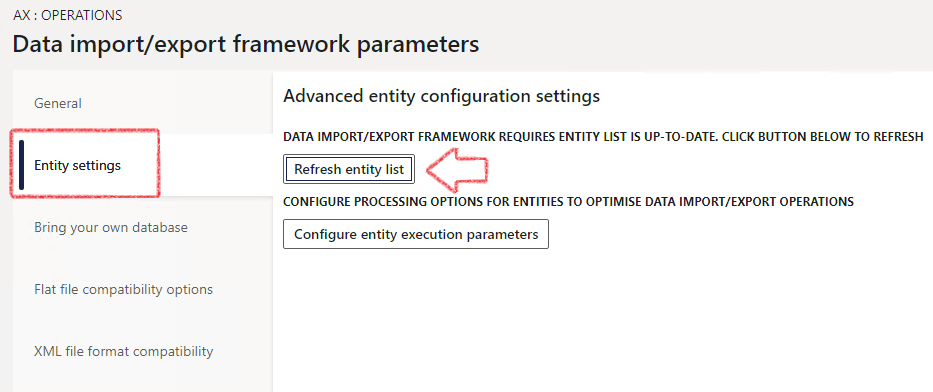
- When configuration keys are modified, then the entity list refresh must be manually started, by navigating to Data management > Framework parameters > Entity settings > Refresh entity list.
Refreshing the entity list ensures all entities are available in the environment and that the entities have the latest metadata.
¶ Daily use
¶ Step 4: Data management workspace
This section will show you how to work with data management or data imports. On the data management workspace, you will find different tiles related to data management.
This is an entire dashboard where you will find the following:
- All the data projects
- Job history
- Job execution and
- Data
¶ Step 4.1: Export a Data entity template
To download the latest format to use for any import, first run an export on the data entity and then use that file as your template.
- Go go to Home > Workspaces > Data management
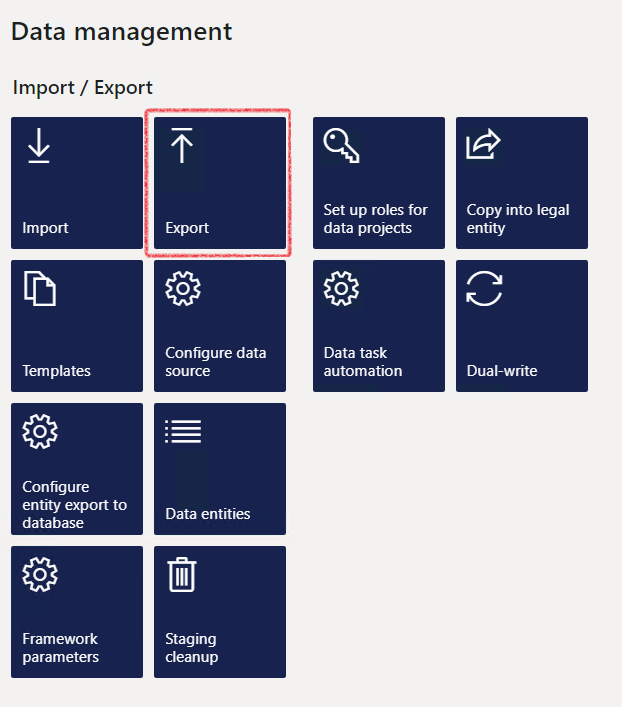
- Click on the Export tile
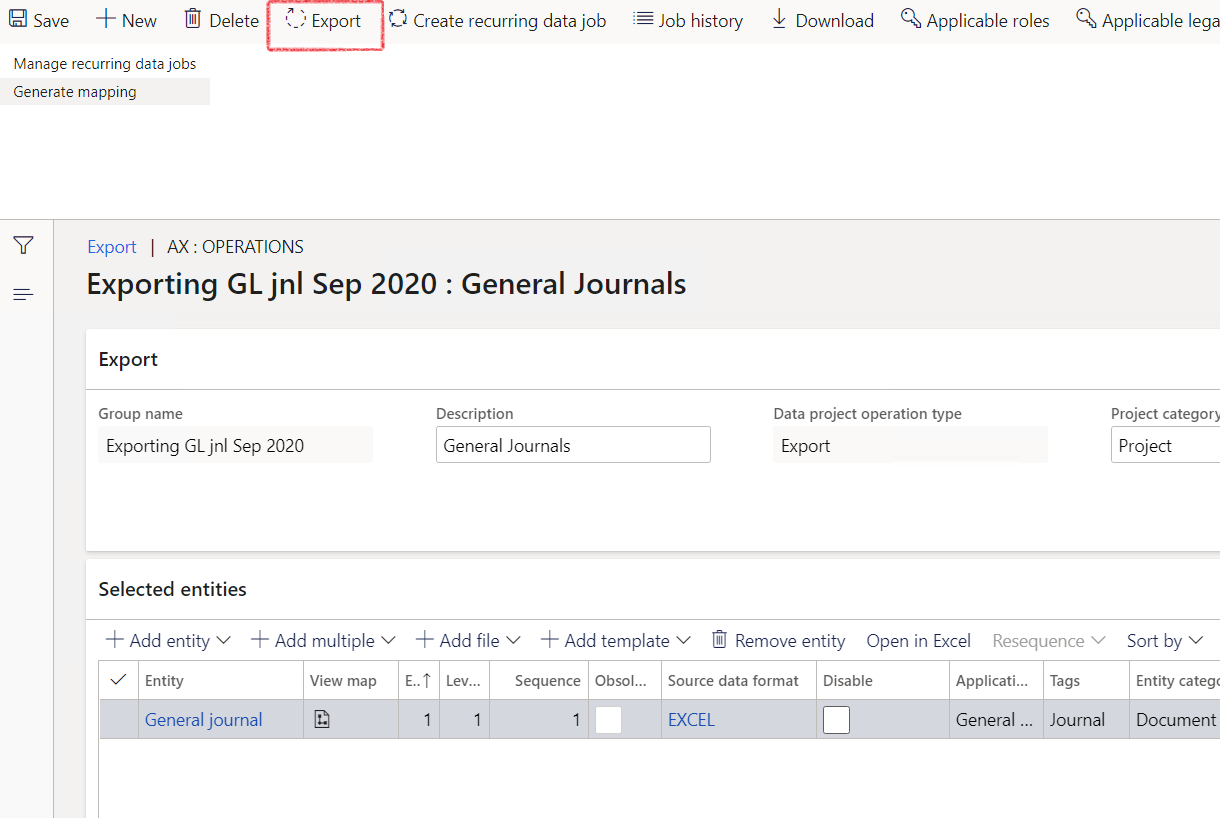
- Enter a Group name
- Description depends on the module for a group of files you want to import. Enter a relevant description
- Data project operation type should be Export

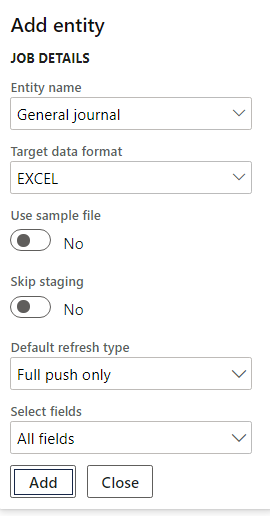
¶ Step 4.1.1: Add an entity to Export
- Click on Add entity
- Enter the Entity name
- Select the Target data format
- Click on the Add button
¶ Step 4.1.2: Export the selected data entity
- Click on the Export button on top
- Click on the Close button to close the notification
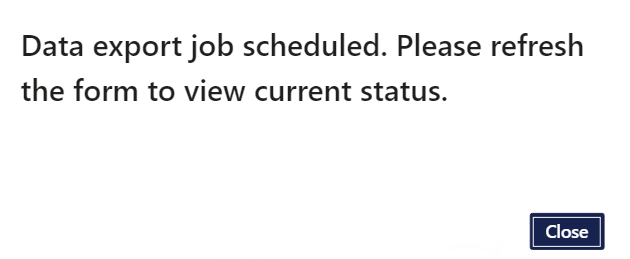
- Click the Refresh button
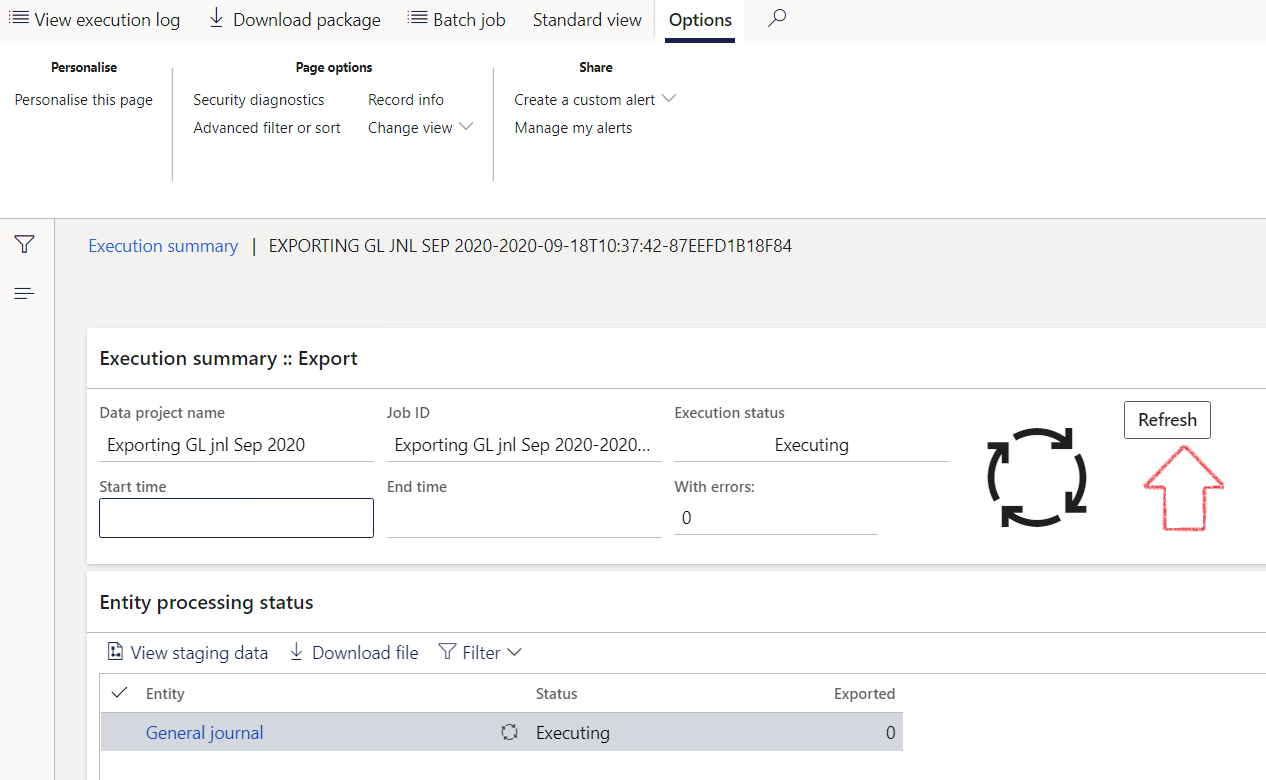
- The status will change from Executing to Succeeded
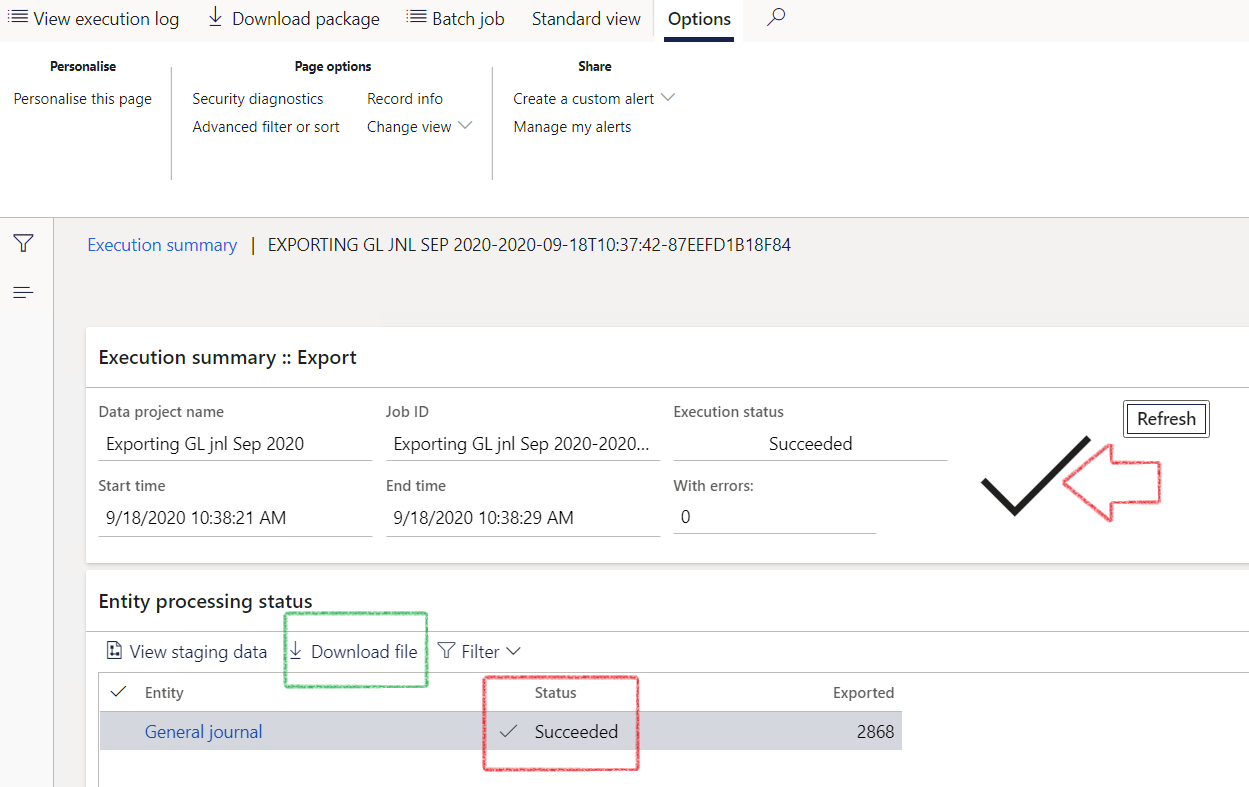
- Download the file and save it on your computer. Use the Excel column headings as guidelines for your Import template.
- Close the screen
¶ Step 5: General Journals Import functionality on Loans
Use the exported General journal template for the following imports.
¶ Step 5.1: Complete the Import template
Depending on the loan setup, the data might be different from one template to the next.
The attached Excel Import templates are just examples of the information that it may contain.
Click on the links below to see examples of Import files
The unique fields for loans to be completed are:
- LIRLOANJOURPAYMTYPEAMOUNTS (specific for Payment journals)
- LIRLEDGERJOURNALTYPE (see below for options GL journals)
- LIRLOANJOURNALTRANSTYPES (see below for option Capital and Interest accrual)
- LIRLOANTABLE_LOANNUMBERID (loan number)
¶ Step 5.1.1: Payment Types for payment journals
- Instalment amount
- Redemption
- Interest amount
¶ Step 5.1.2: Types of loans journals
- Loan register – Loan capital transaction for Loan capital journal
- Loan register – Monthly interest accrual for Interest accrual journal
- Loan register – Transactions for Manual journals
- Loan register – Payment for Payment journals
Keep same voucher number for all three lines:
Redemption, Interest amount & Instalment amount
¶ Step 5.1.3: Transaction Types for Journal types
- Loan capital for Loan capital journal
- Interest accrual for Interest accrual journal
- Manual for Manual journals
- Payments for Payment journals
If you import multiple lines inside the same journal batch, ensure that each line is numbered chronologically and unique to the previous number.
The same applies to voucher numbers, except for when the offset account is in a separate line.
¶ Step 5.1.4: Journal batch numbers and Mapping
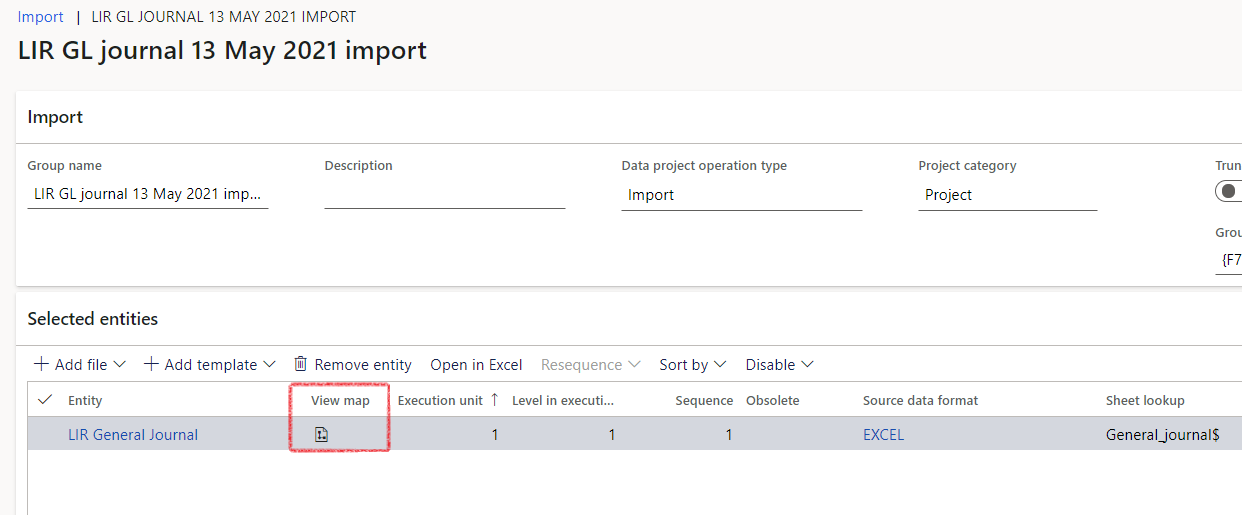
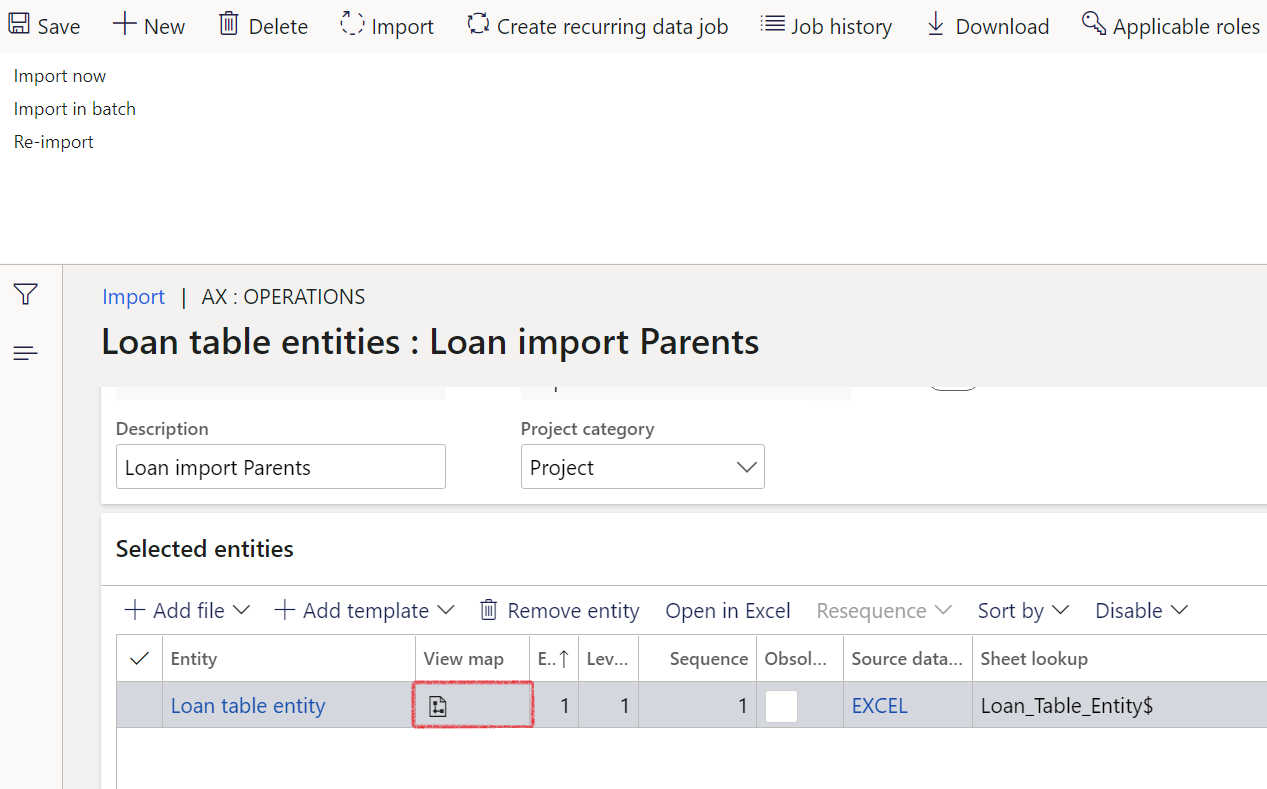
The journal batch number can be mapped to Auto-generate by clicking on View map on the selected entities line:
- Tick Auto-generated and tick Ignore blank values for the Source field JOURNALBATCHNUMBER
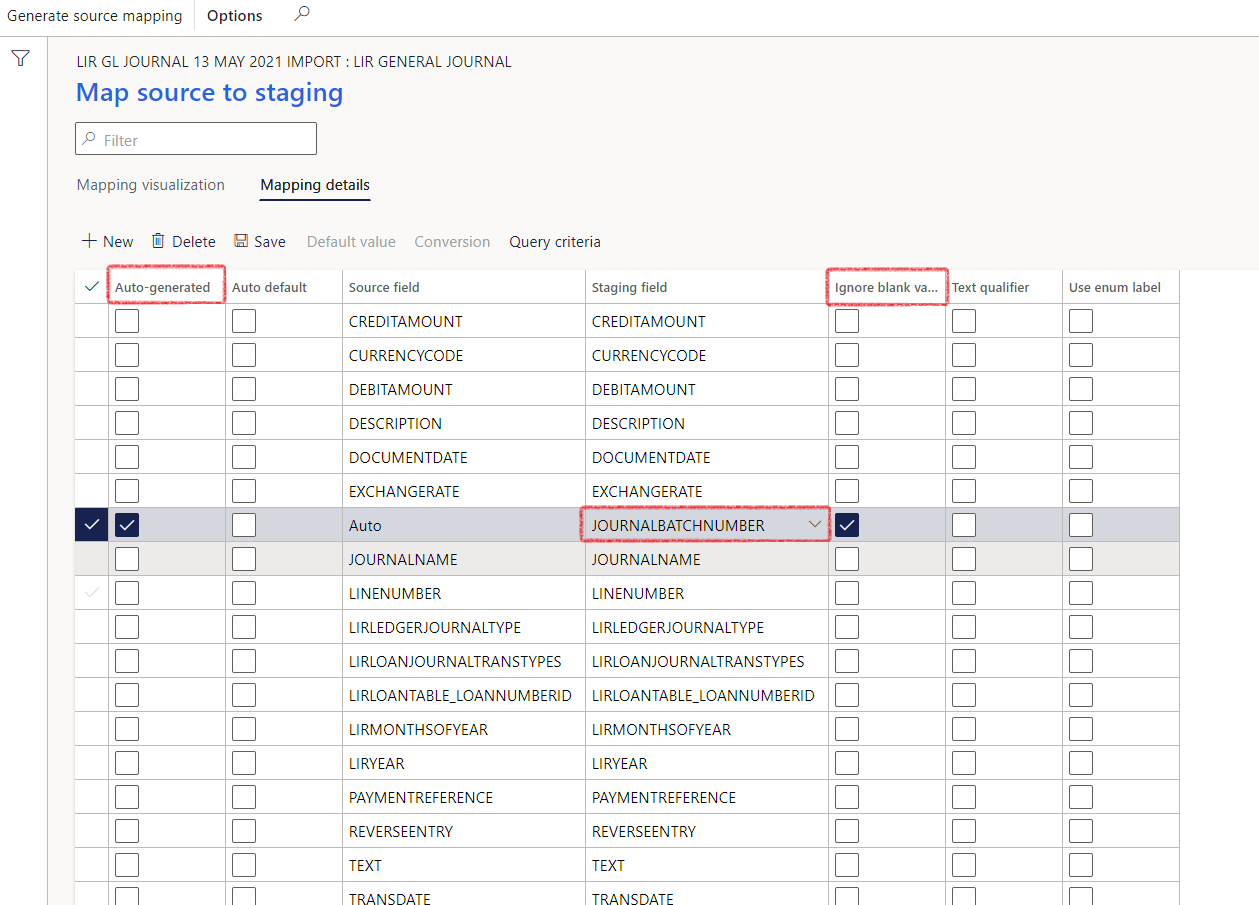
The Journal batch number will be overwritten with a system generated journal batch number, once the import is successful. Use the same number if you want to group multiple lines into the same journal. Alternatively, a journal header can be created beforehand and used in the import file, to be imported against.
¶ Step 5.2: Load the completed import template
To use the exported sheet for your import template:
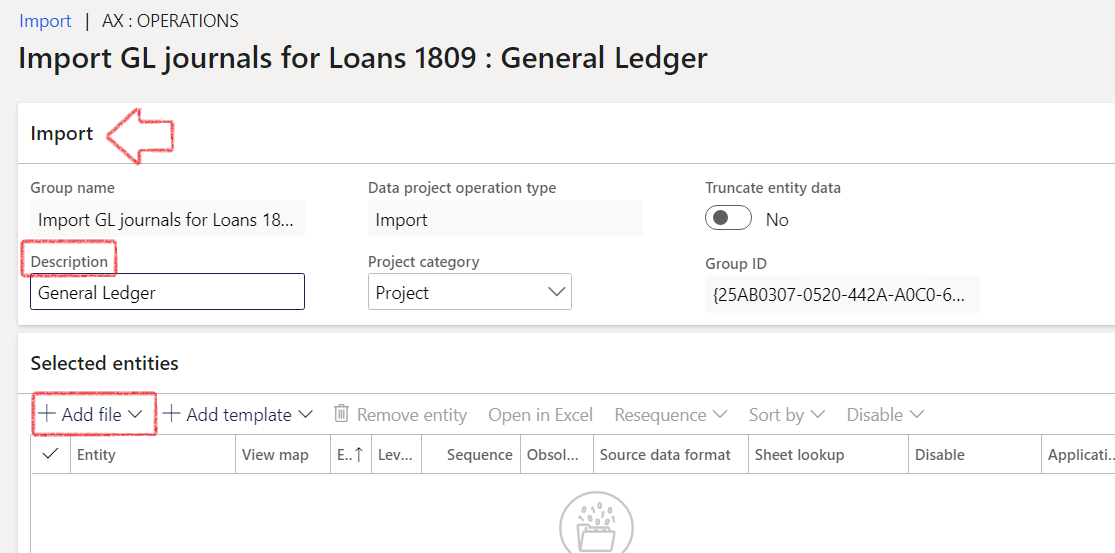
- To import General journals with loans linked, go to Home > Workspaces > Data management
- Click on the Import tile
- Enter a Group name
- Description depends on the module for a group of files you want to import. Enter a relevant description
- Data project operation type should be Import
- Click on the Add file button
On the Loan Journals Import template, multiple lines can be inserted into the same Excel template. When importing various Journal loan types (i.e.: Loan capital, Interest accrual, Payments, Manual), ensure to use a different journal batch number for each type. The voucher number should also be unique for each line transaction.
When you are not going to fill in data in a field on the LIR General journal import template, it is always better to delete that whole column.
This will eliminate unnecessary import errors.
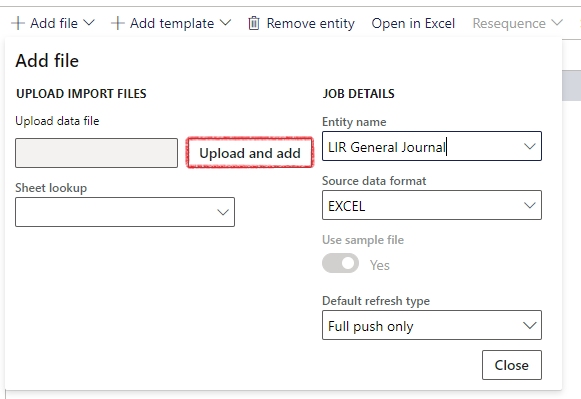
- Click on the dropdown and select the file format - Source data format, usually Excel
- Enter an Entity name LIR General journal or General Journal
- Set skip staging to No
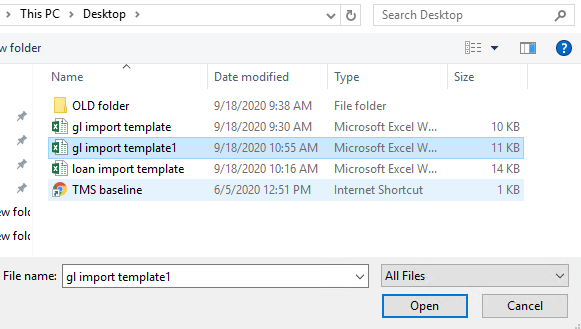
- Click on Upload and add to find the file on your computer
- Example of LIR General journal import template file to use:
- You will see an Infolog that your Information is loaded

- Click on the Close button
¶ Step 5.2.1 Re-sequncing and Mapping
- Now you can see the entity sequence and the source data file format
- There is an option to re-sequence the order of multiple data uploads for example if you want to upload more than one entity
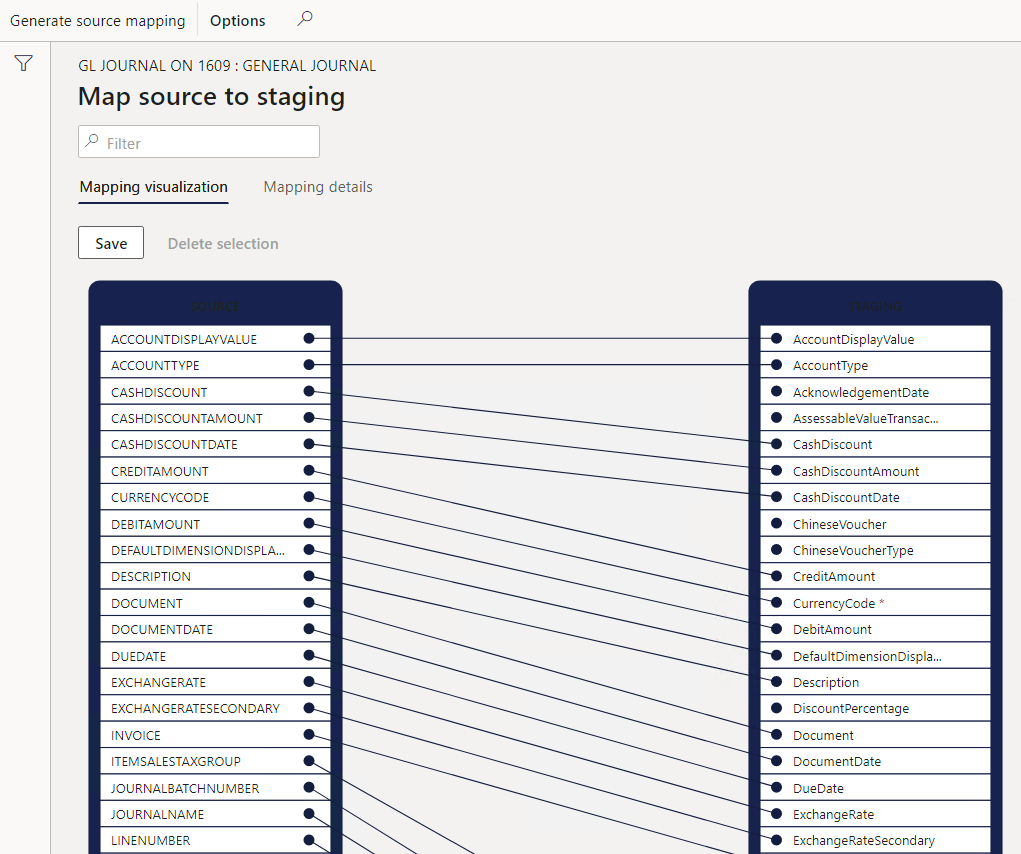
- To view the mapping, click on the view map icon in the column
Mapping is a function that applies to both import and export jobs. In the context of an import job, mapping describes which columns in the source file become the columns in the staging table. Therefore, the system can determine which column data in the source file must be copied into which column of the staging table.
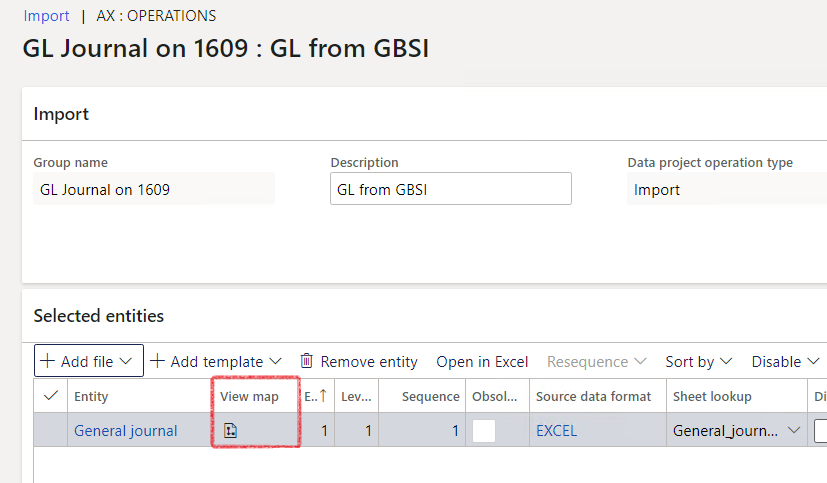
- This is where you can see the fields from your source, (in this case it is Excel) and the mapping with the staging tables
- Here you can also click on the mapping details to see the field level name and the details
¶ Step 5.3: Import LIR General Journal
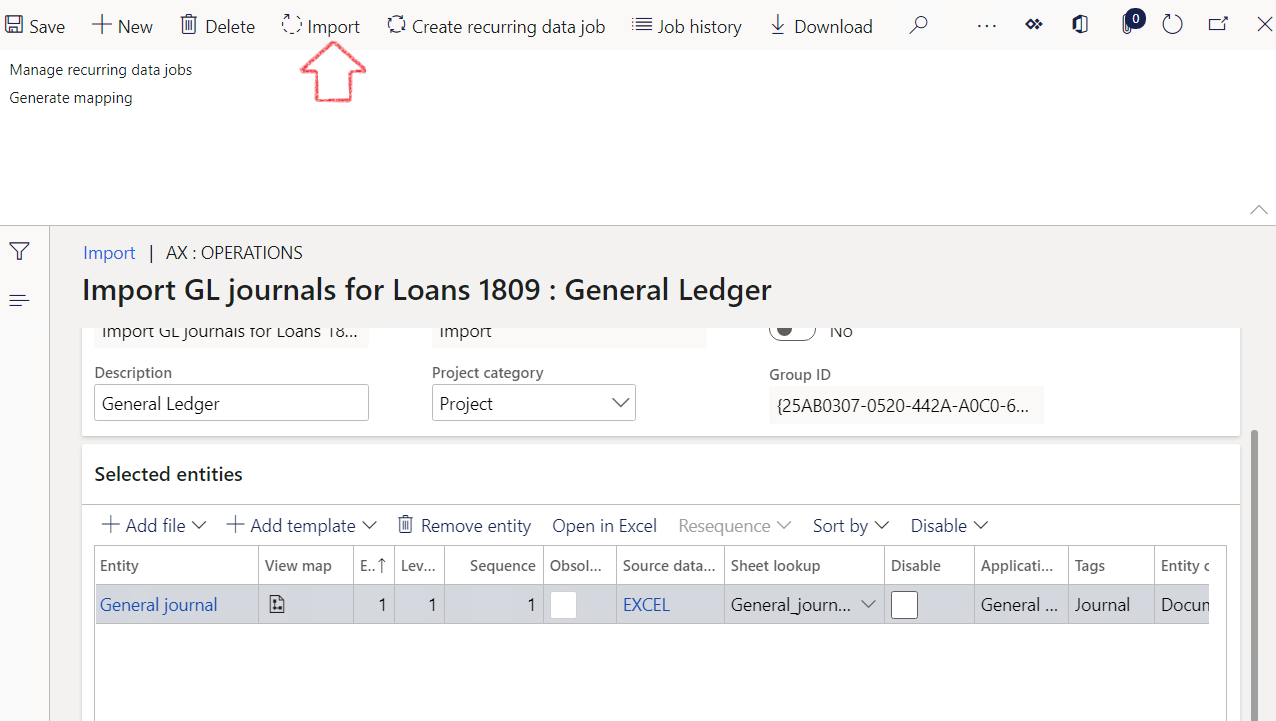
- To import, click on the Import button on top. This will push the batch job.
- Click on Close
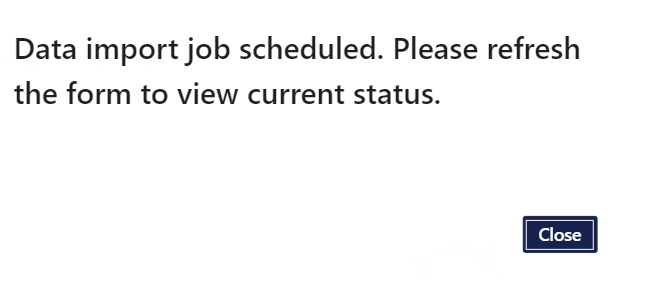
- Close the notification
- Click on Refresh
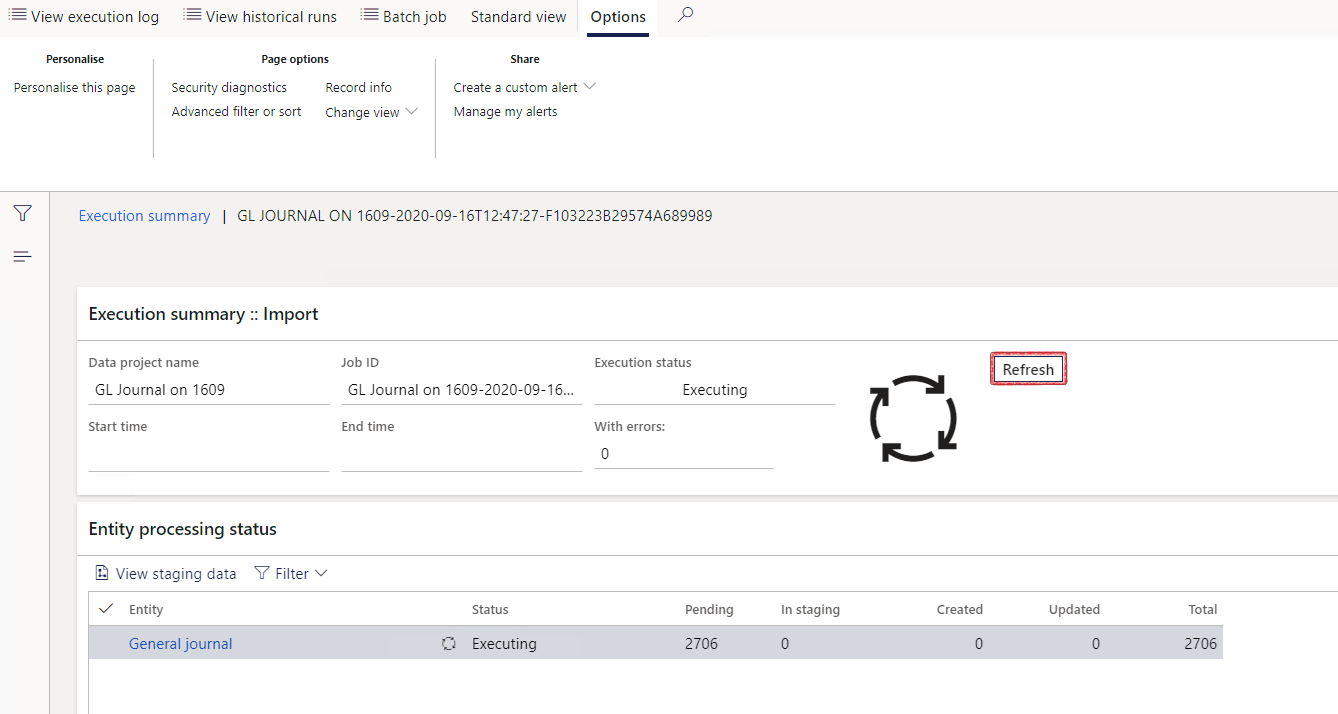
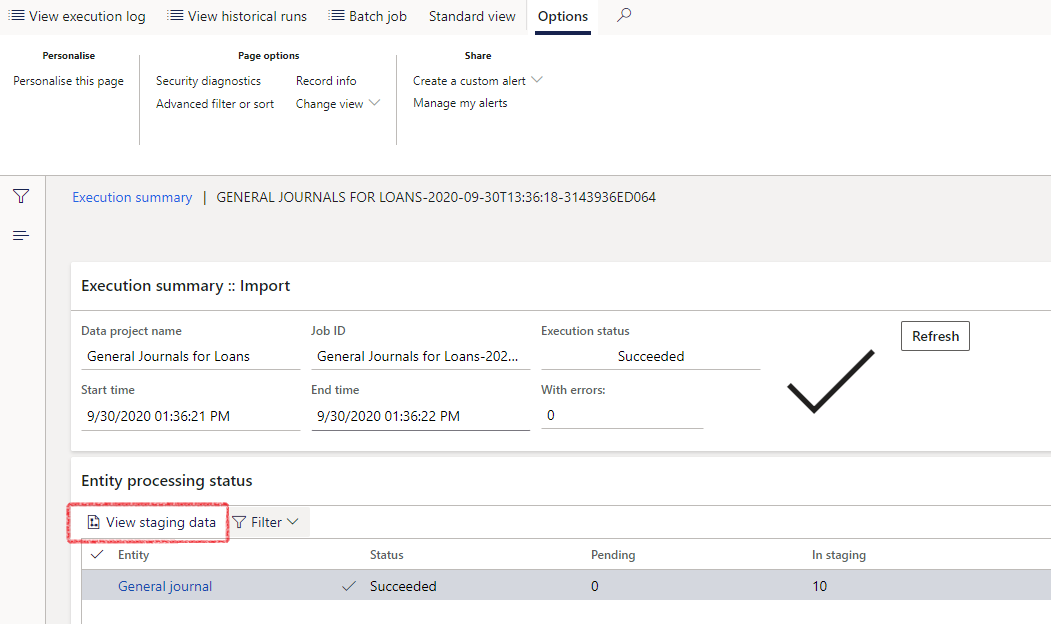
- You will see an Infolog with the Project name, Job ID, Start time and End time, as well as the Number of records imported.
- Execution status will change

¶ Step 5.3.1: View Staging data
- Staging data can be viewed, by clicking on View staging data

¶ Step 5.3.2: View imported records
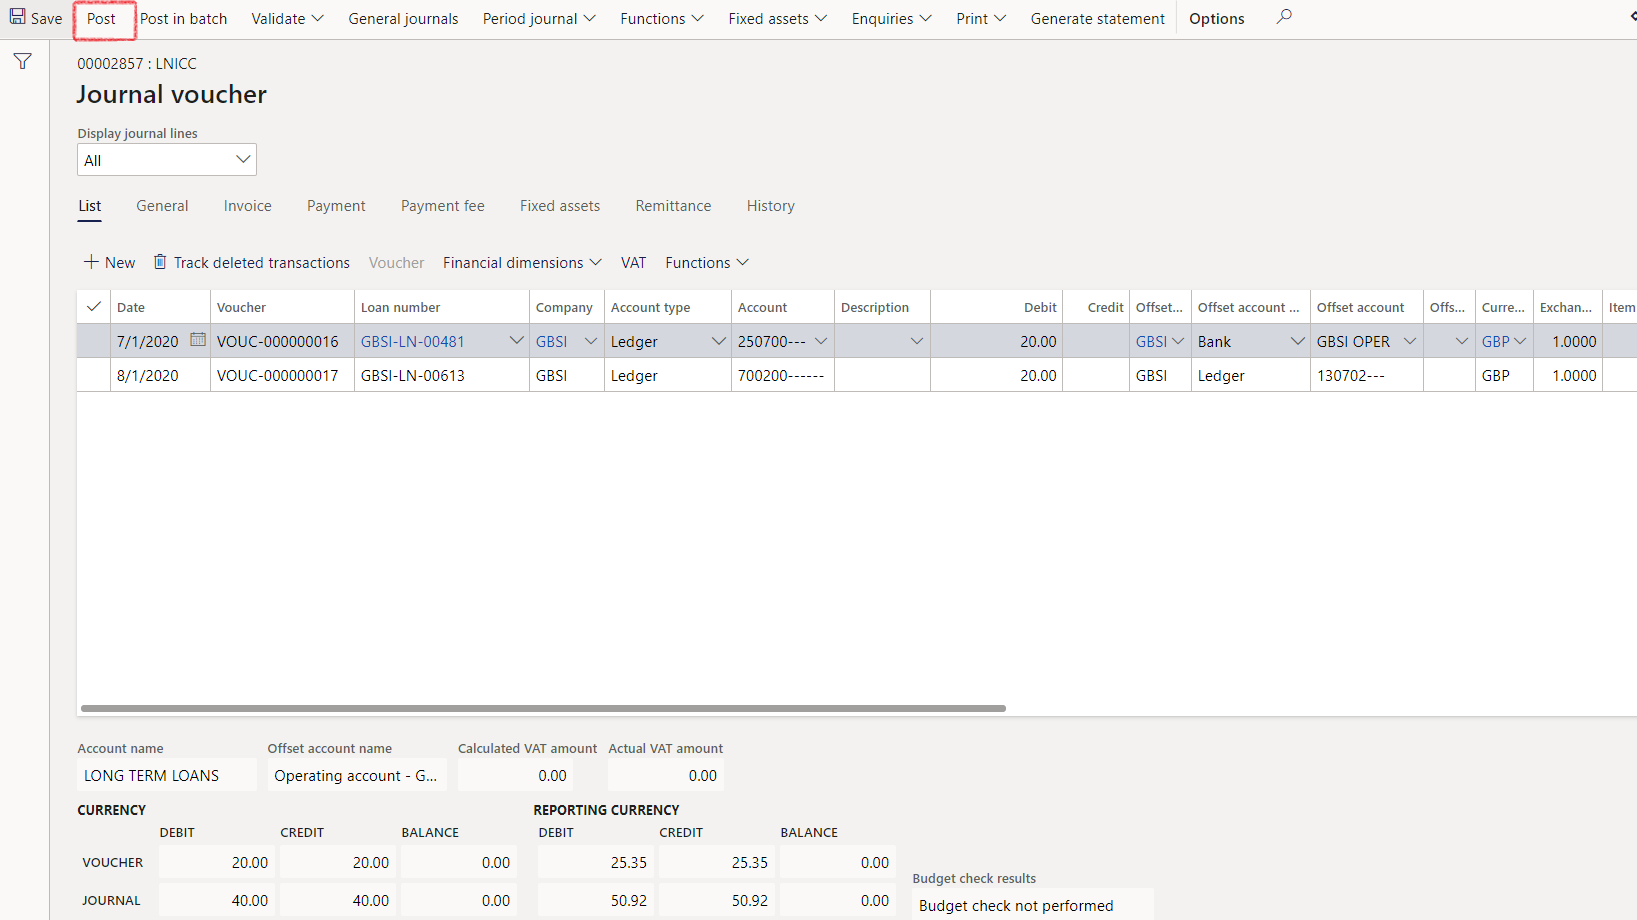
- Go to the module and view your imported files
- For this example, go to Treasury > Loans and Bonds > Journals > Interest accrual and open the Journal batch number to view the imported lines
- Click on Post
¶ Step 6: Import Loans
Loans should be imported in a specific order.
- First the Loan table entity should be imported.
- Then the Loan trade agreement and lastly the
- Loan data lines (loan statement), which is an optional import.
¶ Step 6.1 Loan Table entity
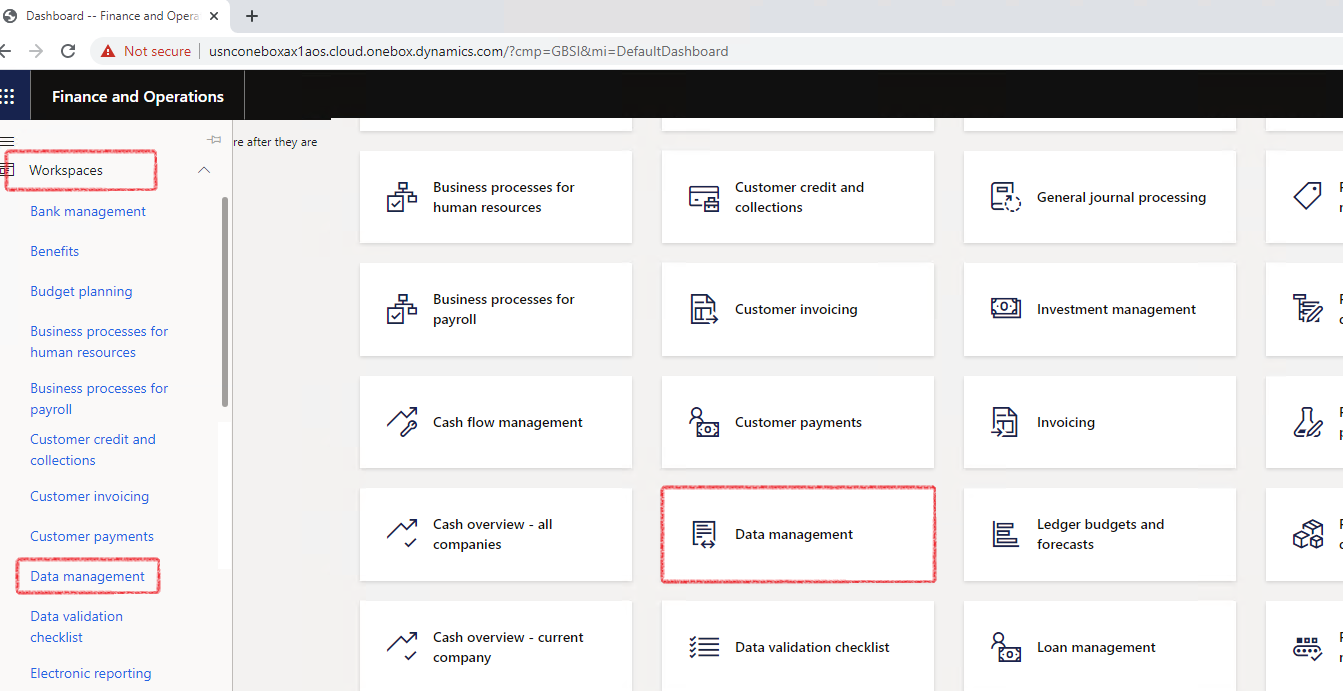
Users can go to the standard Data Management workspace to import the Loan table entity.
- Posting profiles will default to the loan when created via the data entity import.
- The loan group is a mandatory field on the Excel import template
- It can be entered on the loan import template and imported as different from the posting profiles on the loan group
- During the import process, if a loan number is provided, the system will allocate a new LoanNumberId. So the user can put placeholders in the place of a loan number, such as 1, 2, 3, 4, 5, etc. Then the system will replace each number with a system generated loan number.
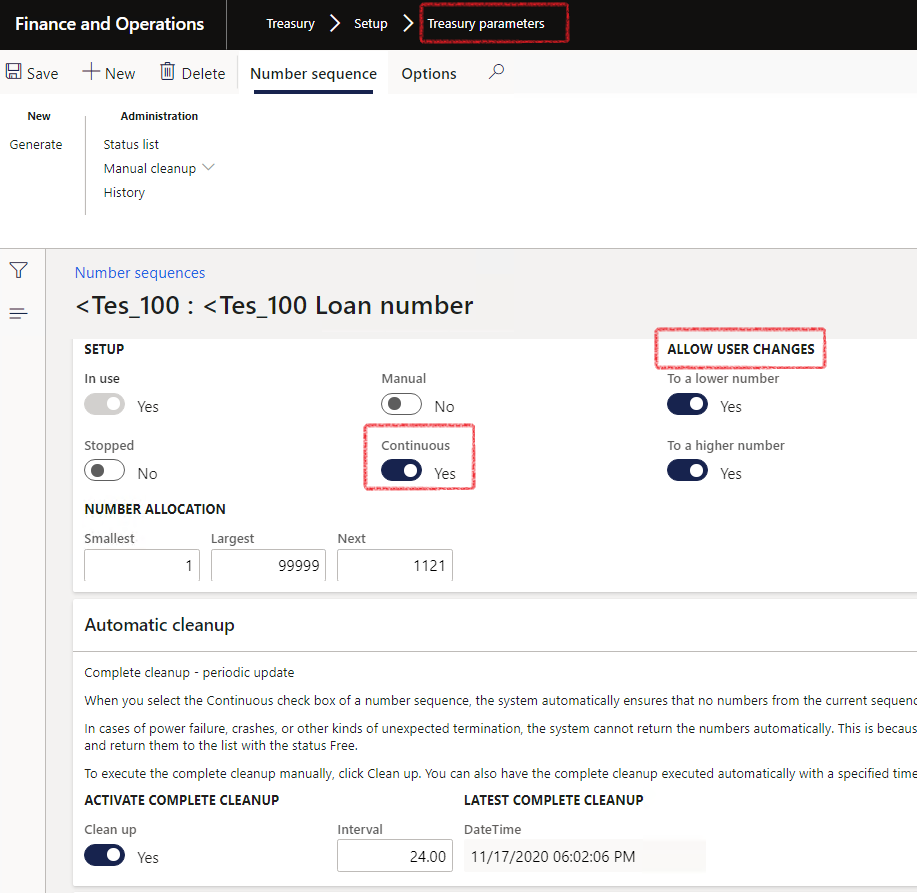
- If a LoanNumberId was not provided, a new LoanNumberId will be generated from the Number sequence as specified within the Treasury Parameters table.
For system generated loan numbers, the number sequence should be set to Continuous and Allow user changes to a lower number and to a higher number
- Example of Loan table entity template to use
When importing Loan table entity with a column header on Excel import for FISCALCALENDAR, and the field is left blank, then no calendar will be linked to the newly created loan.
When importing the Loan table entity from Excel without a column header for FISCALCELANDAR, then the loan will automatically be linked to the default calendar, i.e.: Fiscal
¶ Step 6.1.1: Import the loan table entity
- To import Loans (Loan table entity), go to Home > Workspaces > Data management
- Click on the Import tile
- Enter a Group name
- Description depends on the module for a group of files you want to import. Enter a relevant description
- Data project operation type should be Import
- Click on Add file
- Entity name will be Loan table entity
- Source data format is Excel
- Click on Upload and add to browse for your Excel file that you want to import
- Click Open
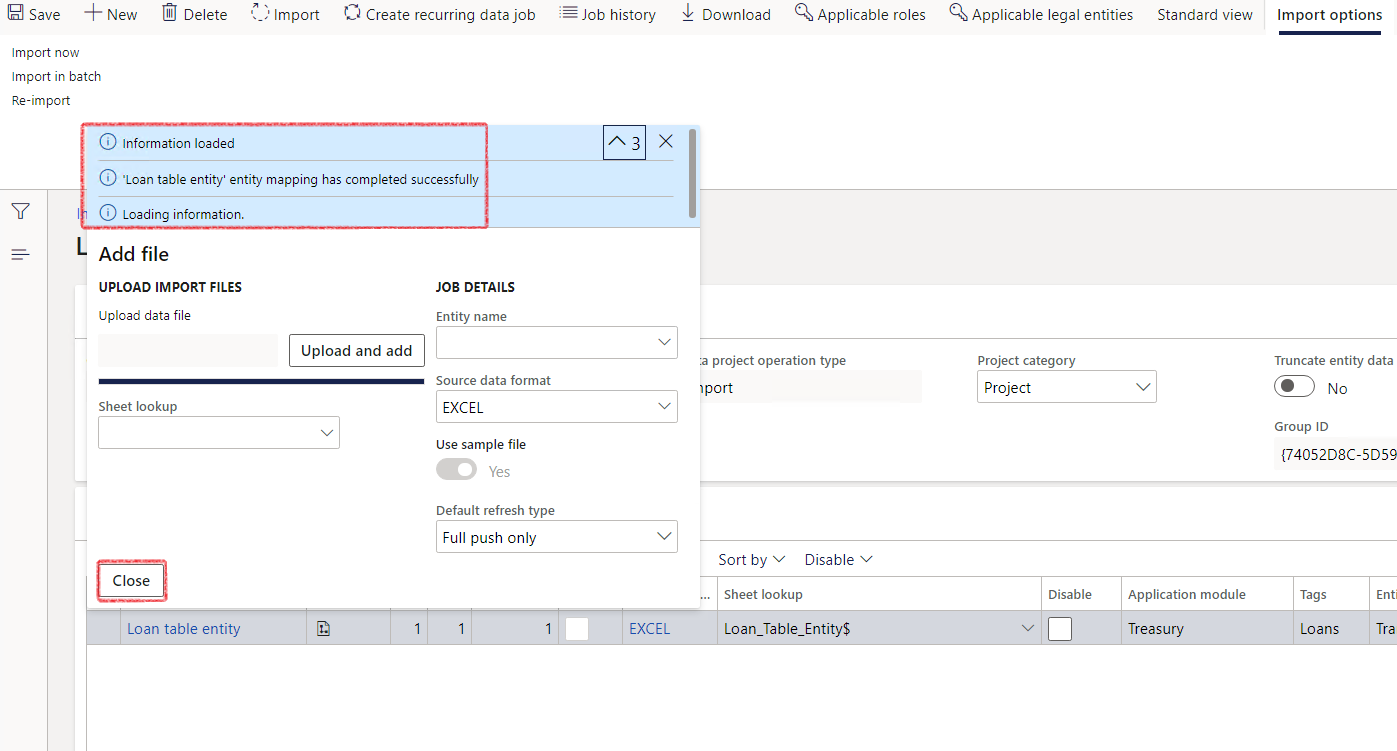
- Loading information notification will appear, and when done, Information loaded will appear in a blue line.
- Click on the Close button
¶ Step 6.1.2: Automatic loan numbers
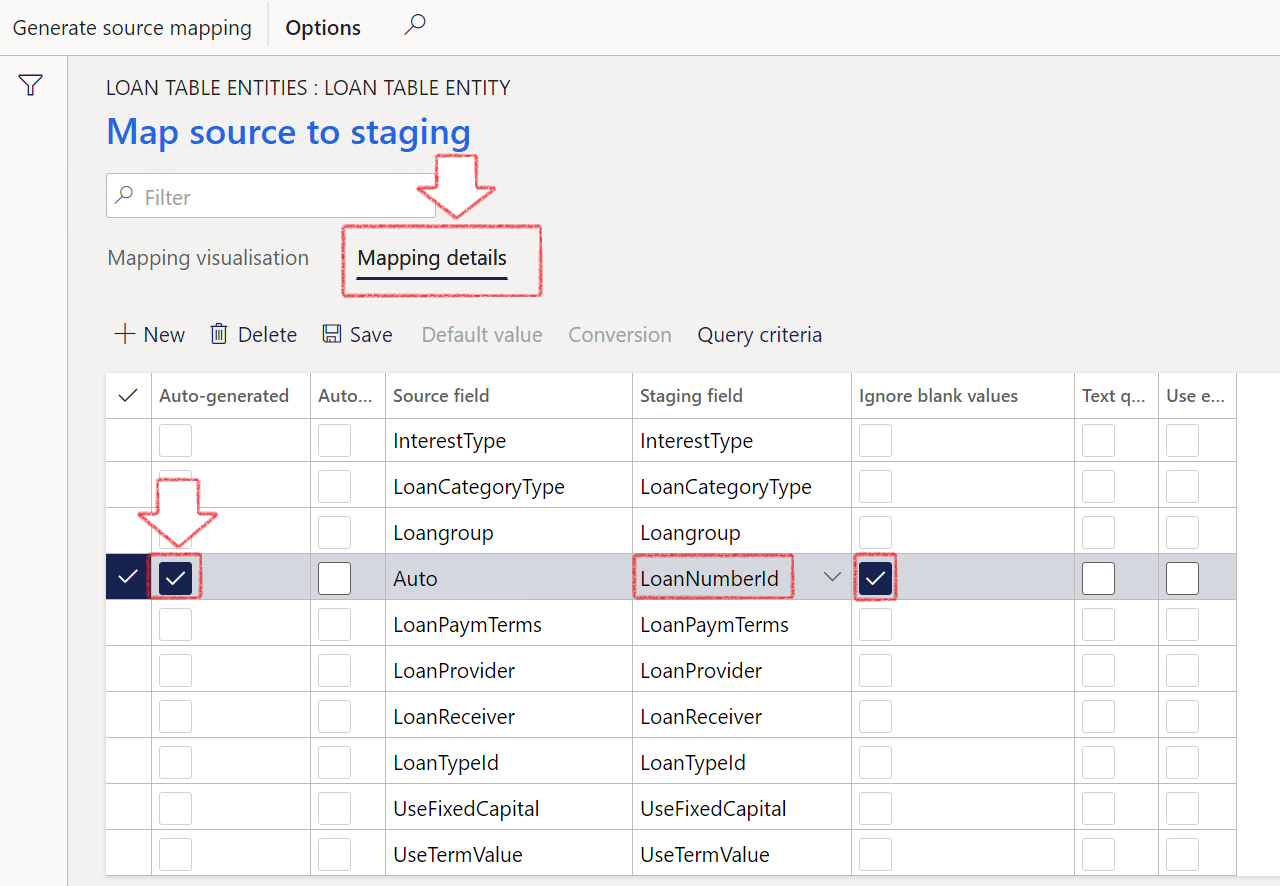
- In order for the system to generate automatic Loan numbers, click on Mapping details
- Tick the Auto-generated and Ignore blank values selection boxes
- Click Save, and close the screen
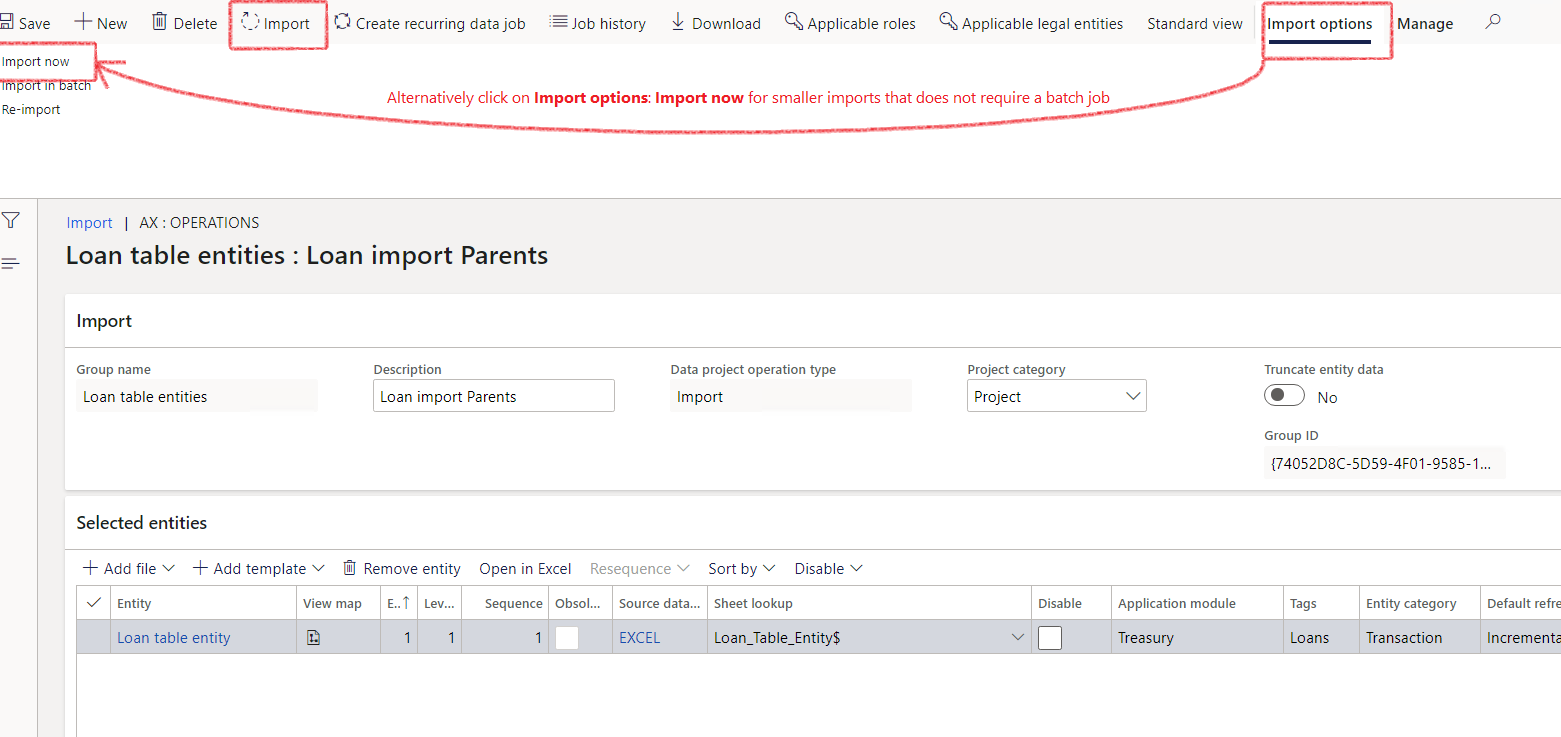
- Your file is now ready to be imported. Click on Import
- When done, a new screen will appear
- If still busy, you can click on Refresh
- When the import is completed, you can view the Status and total files updated
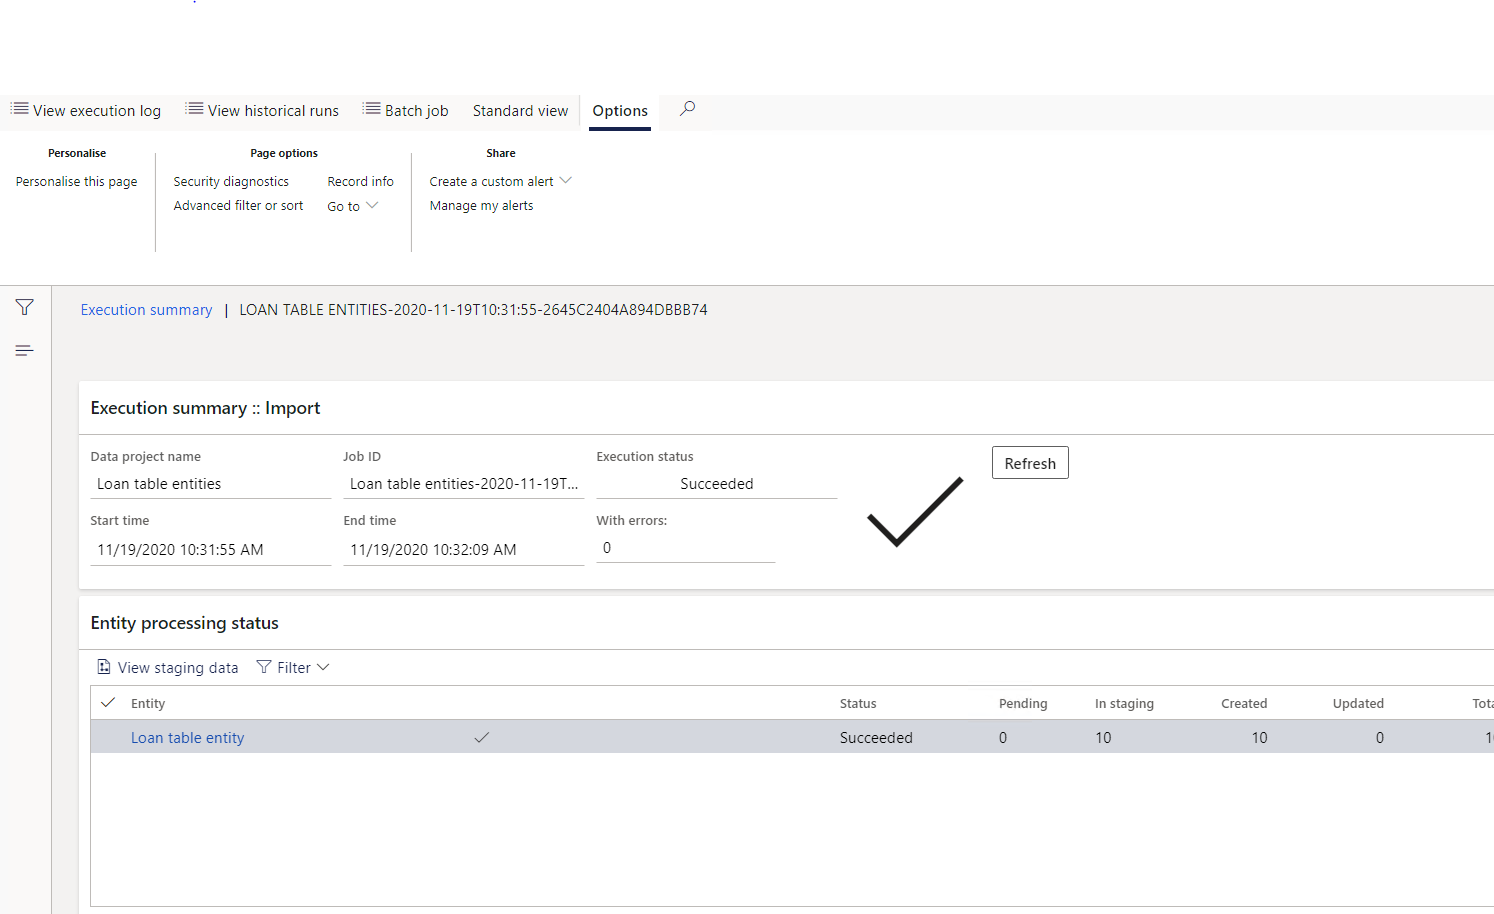
To import Child loans (sub loans) with parent loans, follow the same procedure, but with a different import template that caters for the LIRLoanTableParent_LoanNumberId table field (column in Excel).
Parent Child loan import template
Currently the child loan does not automatically inherit the calendar from the parent loan. Ensure it is filled in on the import template if need be.
¶ Step 6.2: Import Loan Trade agreements
Users can go to the standard Data Management workspace to import the Loan trade agreements entity. This is also known as the Interest agreement that can be viewed on the Loans details page > Lines > Interest agreements FastTab.
- To import Interest agreements on loans, go to Home > Workspaces > Data management
- Click on the Import tile
- Enter a Group name
- Description depends on the module for a group of files you want to import. Enter a relevant description
- Data project operation type should be Import
- Click on Add file
- Entity name will be Loan trade agreements
- Source data format is Excel
- Click on Upload and add to browse for your Excel file that you want to import
- Click Open
- Loading information notification will appear, and when done, Information loaded will appear in a blue line.
- Click Close
- Click on the Import button on top
- Execution status should be displayed as Succeeded
- Click on View staging data to see what information was imported.
- Example of Loan trade agreements template to use
¶ Step 6.3: Import Loan Data Lines Entity
Users can go to the Data Management workspace to import single or multiple Loan data lines. This is also known as the Loan statement / Amortisation schedule
- To import the Loan data lines entity, go to Home > Workspaces > Data management
- Click on the Import tile
- Enter a Group name
- Description depends on the module for a group of files you want to import. Enter a relevant description
- Data project operation type should be Import
- Click on Add file
- Entity name will be Loan data lines entity
- Source data format is Excel
- Click on Upload and add to browse for your Excel file that you want to import
- Click Open
- Loading information notification will appear, and when done, Information loaded will appear in a blue line.
- Click Close
- Click on the Import button on top
- Execution status should be displayed as Succeeded
- Click on View staging data to see what information was imported.
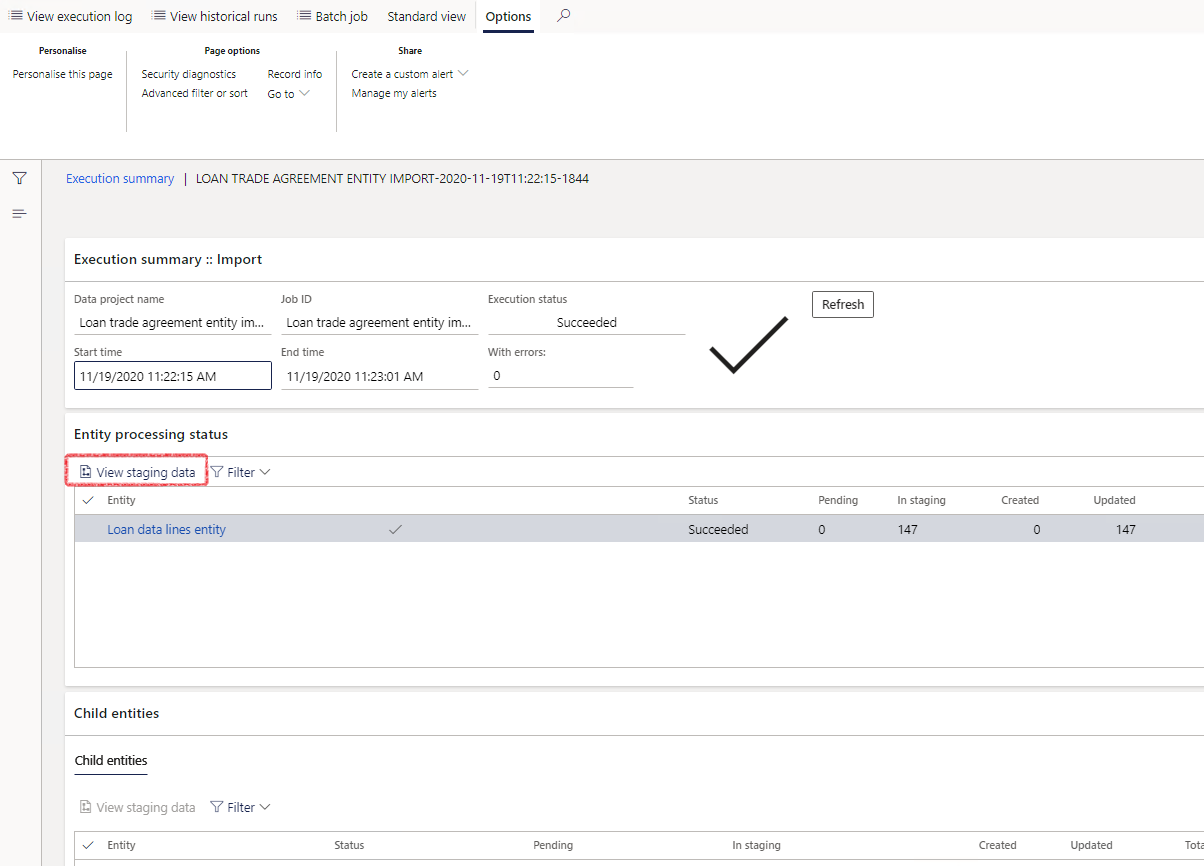
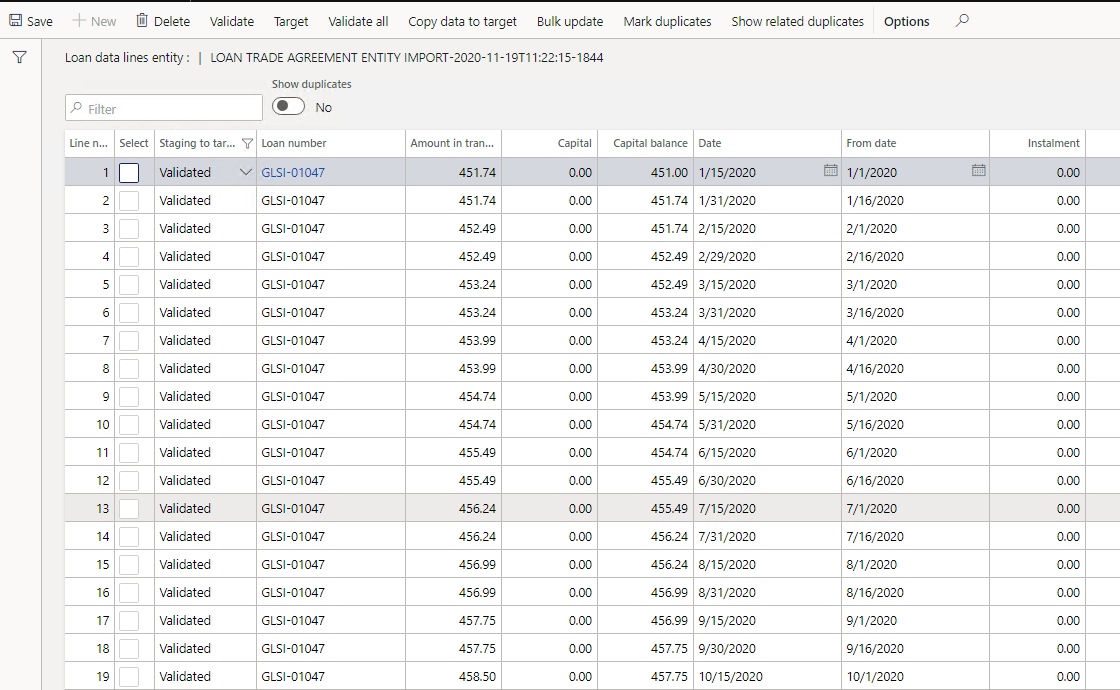
- Example of Loan data lines entity template to use
When importing Original statement data lines, it will not have an effect on the Projected statement.
The projected statement will project in two circumstances:
- If no journals exist, it uses the Loan header information to calculate a projection,
- If an actual journal does exist, it continues from the last posted journal.
Summary of import rules on loan statements (Loan data lines entity)
- Projected loan statement starts off from the Actual postings that is done
- Only start projecting from first date of Trade agreement and current interest rate and interest agreement date
- Any import will wipe existing loan statement (i.e.: if you import Original, it will first wipe all existing Original lines, then import your data) and then you have to re-generate to get latest Original statement (as per Interest agreement and journals posted)
- When import dates overlap with Interest agreement dates, the user will get an error message.
- User should ensure imported data dates does not overlap with first day of Interest agreement. So imported dates should be prior to Loan interest agreement start date.
- The Actual and Projected Statement will only display transactions that falls within the Interest agreement Start date and Loan End date
Note that when loan statements have been imported in bulk, the loans should be added to the LIRLoanStatementGenerateTable
- This table is used to determine which loans were recently updated, for the batch job to generate statements only for the loans that were changed. The system table browser is systablebrowser&tablename=lirloanstatementgeneratetable
- To run the bach job for automated loan statement generation, go to: Treasury>Loans>Periodic>Loan statement generate
¶ Step 7: Import Loan Providers and Receivers
Users can import Loan providers and receivers by navigating to the standard Data Management workspace
- To import the Loan providers and receiver’s data entity, go to Home > Workspaces (Default dashboard)
- Click on the Data management tile
- Click on Import
- Complete group name and description
- Click on Add file
- Enter the entity name Loan providers and receivers table
- Select your import file from your computer
- Source data format should be Excel
- Click the Upload and add button
- A notification will appear in blue:
Loan providers and receivers table entity mapping has completed successfully - Another notification will be displayed in yellow:
Fields DATAAREAIDPROVIDERRECEIVER in the file are not automatically mapped, as these are non-editable fields - Click Close when loaded
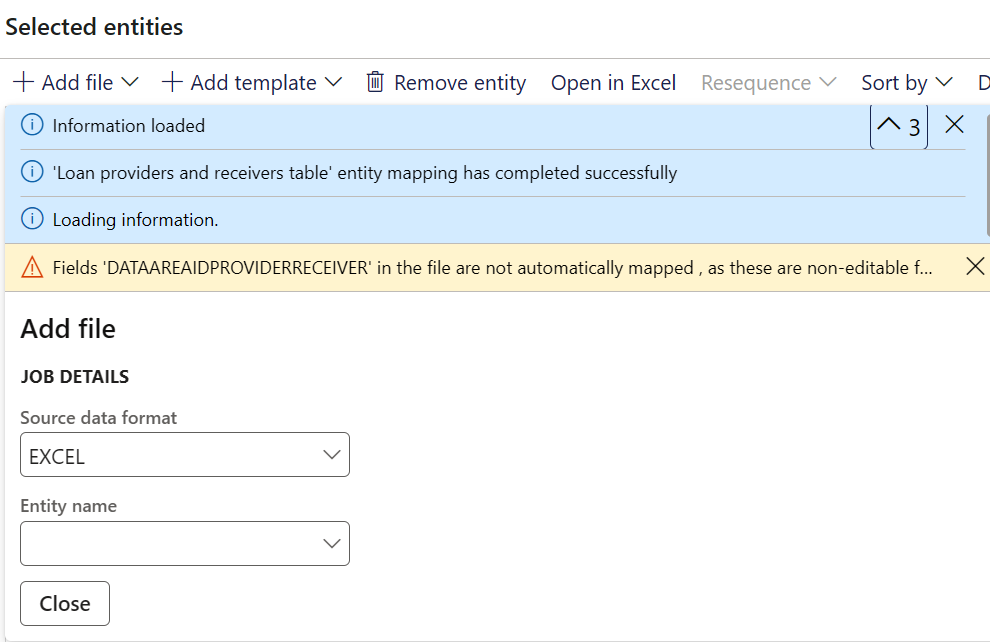
- Click on View Map

- Select Mapping details
- On the radio button, select the following fields:
- BRANCH
- CRNO
- DOUBLETAXTREATY
- OWNER
- TINNO
- VATNO
- Click on Delete
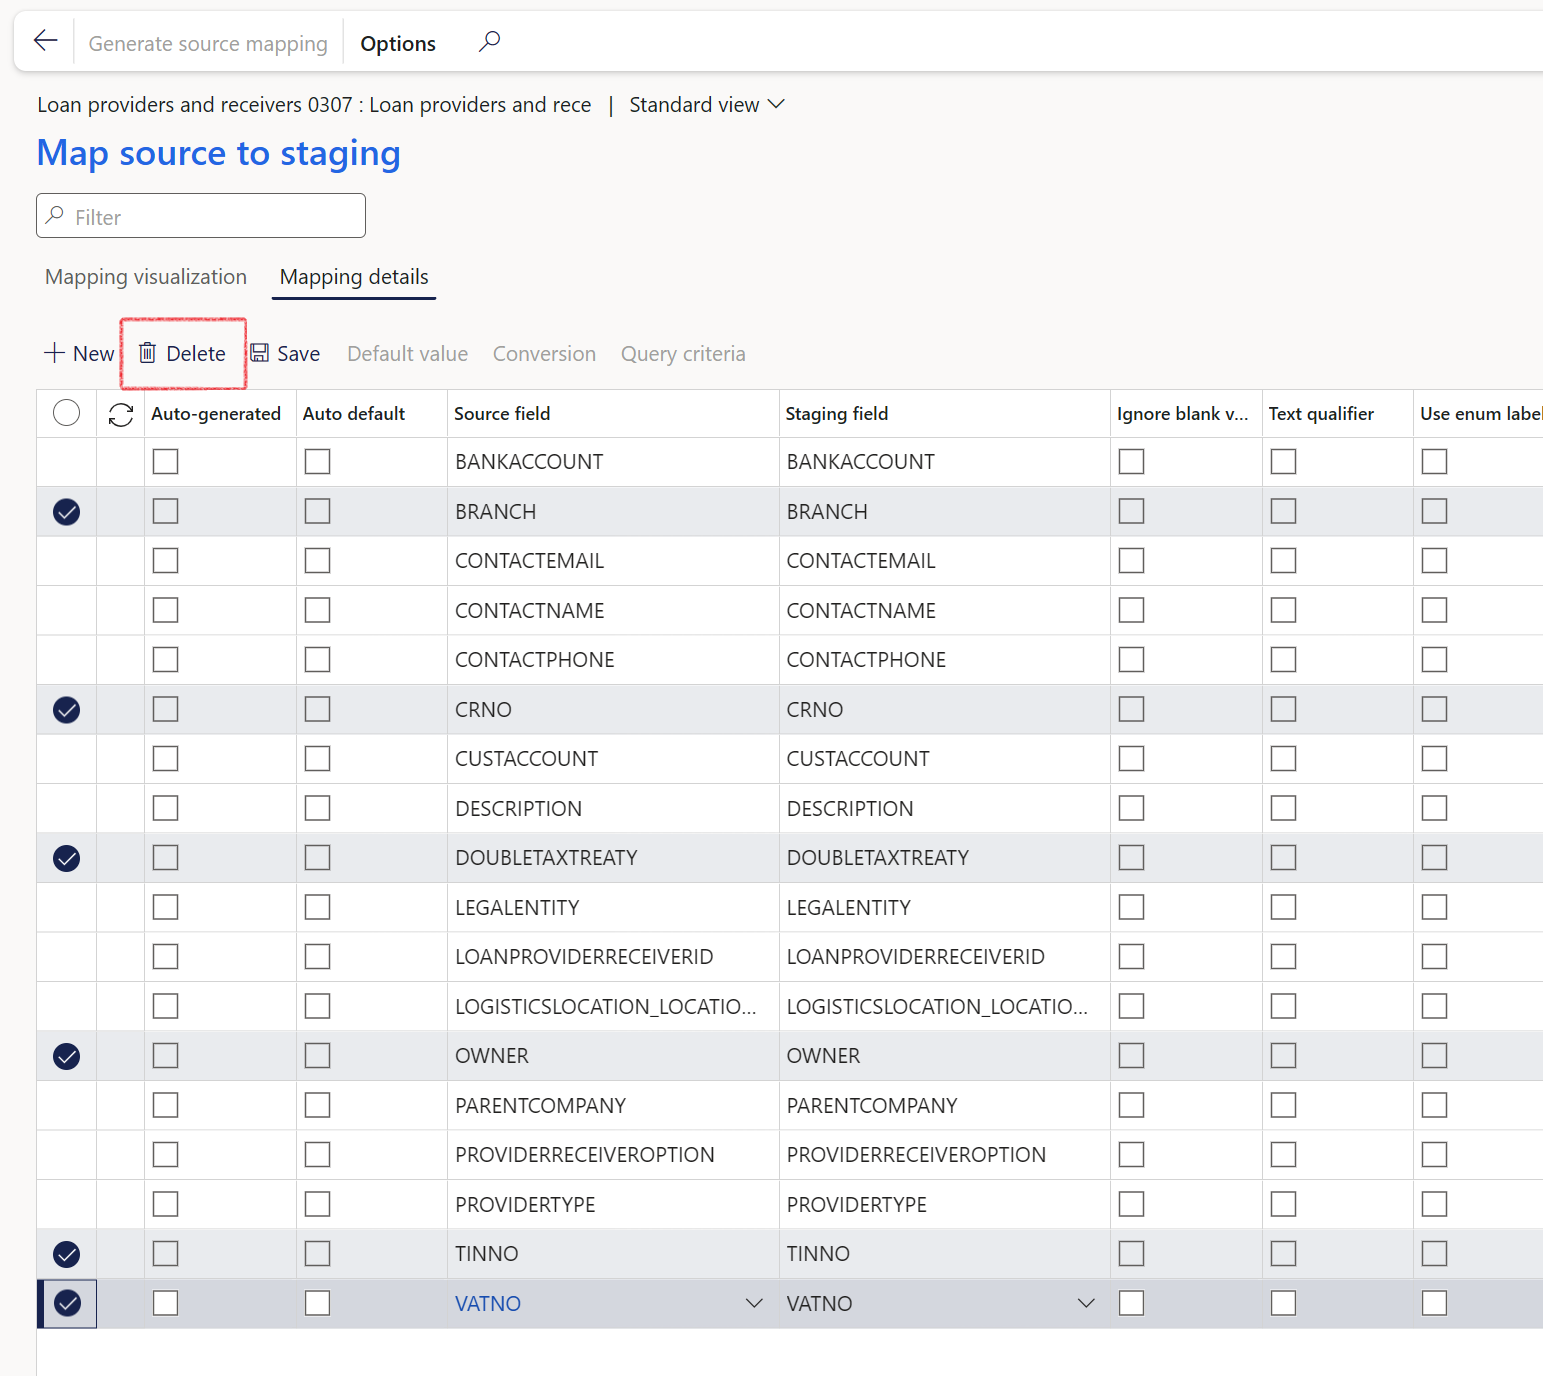
- A notification will appear, asking if you are sure you want to delete all marked records. Select Yes
- Click on Save
- So the only fields remaining will be
- BANKACCOUNT
- CONTACTEMAIL
- CONTACTNAME
- CONTACTPHONE
- CUSTACCOUNT
- DESCRIPTION
- LEGALENTITY
- LOPANPROIVDERRECEIVERID
- LOGISTICSLOCATION_LOCATION
- PARENTCOMPANY
- PROVIDERRECEIVEROPTION
- PROVIDERTYPE
- Press the back button to close this screen
- In the Action menu, click on Import now
- Execution status will appear, informing you if the import was successful
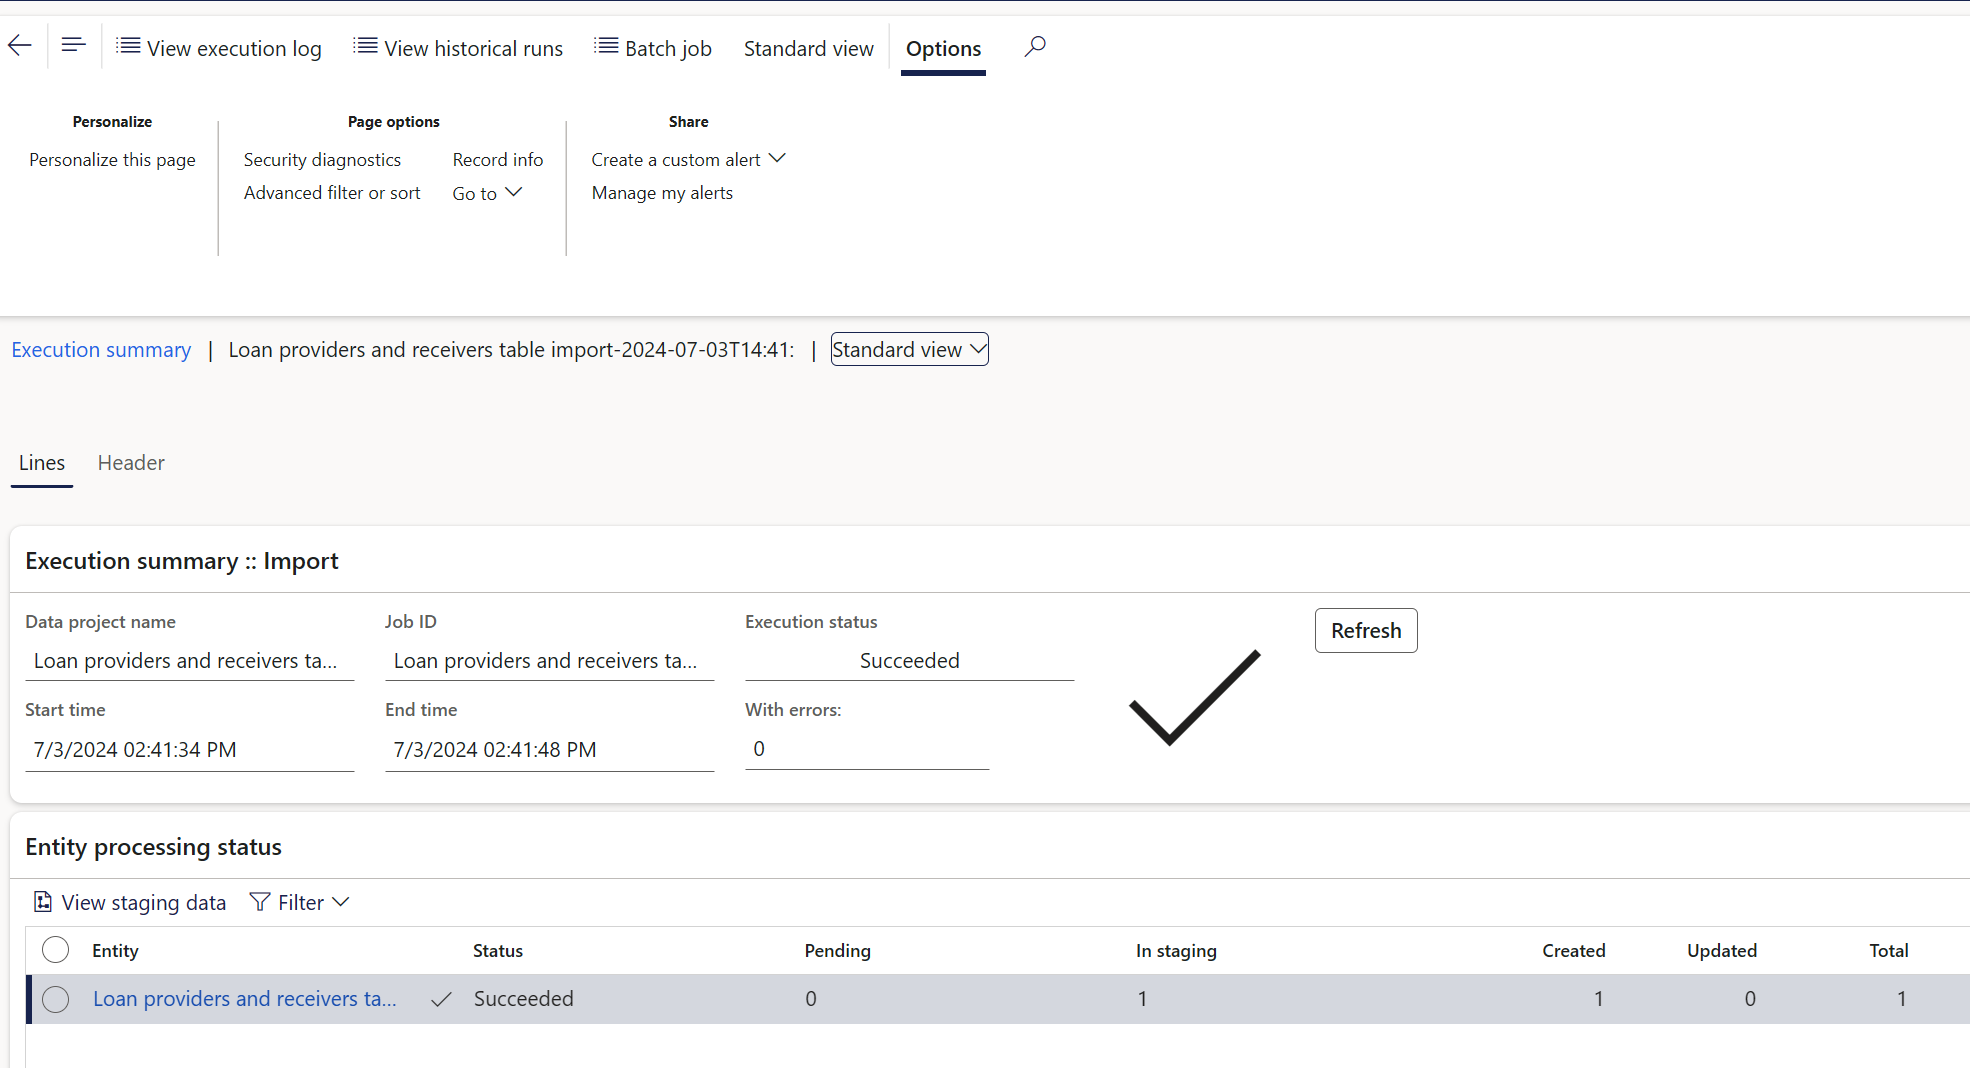
- Close all the screens and navigate to: Treasury > Loans > Setup for Loans > Loan providers and receivers
- See if the file was imported correctly
Example of Loan providers and Receivers import template
¶ Step 8: Import Loan Posting Profiles
Users can utilize a single data entity instead of two separate ones to import both the Loan posting profile header and lines (account structure) simultaneously.
The selection options from the Account structure is included in the Loan posting profile data entity. These include:
- ACCOUNTRELATION
- AUTOPOST
- AUTOSETTLE
- EXCLUDELOANNUMBER
- INCLUDEINREPORT
- ISDOWNPAYMENT
- LEDGERACCOUNTREVERSAL
- LEDGERACCOUNTTYPEREVERSAL
- PAYMMODE
- POPULATEFROMLOAN
The loan posting profile data entities include the following:
- Loan posting profiles
- the consolidated data entity includes both the header and lines sections of the Loan posting profiles
- Loan posting profiles headers
- relevant to posting profile headers alone, excluding the Accounting structure
- Loan posting profiles lines
- relevant to the account structure of posting profiles, excluding the header section
¶ Step 8.1: Import Loan Posting Profiles
Users can import Loan Posting profiles by navigating to the standard Data Management workspace
- To import the Loan posting profiles entity, go to Home > Workspaces > Data management
- Click on Import
- Complete group name and Description
- Click on Add file
- Enter the entity name LIRLoanPostingProfilesEntity
- Select your import file from your computer
- Source data format should be Excel
- Click Close when loaded
- Click on Import now
- Close the screen when done
Posting profiles import template example
¶ Step 9: Loan refund data entity
Data entity called Loan refund entity contains the following target fields:
- CAPITALAMOUNT
- CURRENCYCODE
- DESCRIPTION
- INTERESTAMOUNT
- LOANNUMBERID
- PERFORMRECALCULATION
- TRANSDATE
¶ Step 10: Customer loan balances data entity
The Customer loan balances data entity consist of the following fields:
- Company
- Currency code
- Customer account
- Interest balance
- The interest balance is unpaid interest, which reaches zero when the loan is fully repaid.
- This is the same as the Outstanding interest column from the Loans list page.
- The interest balance is the sum of Annuity interest close and Revolving interest close from the Actual loan statement.
- Invoice amount
- Invoice due date
- Invoice ID
- Loan
- Loan balance
- This is the same as the Total outstanding amount from the Loans list page.
- Total outstanding is the sum of outstanding capital and outstanding interest on the Actual (expanded) loan statement
- Loan number ID
- Loan responsible party
- Loan status
- Modified date
- Next instalment
- Next instalment date
- Paid capital
- Sum of all paid capital on loan actual statement
- Paid interest
- Sum of all paid interest amounts on loan actual statement
- Principal balance
- This amount shows if any capital is outstanding and decreases to zero when the loan is fully repaid. Loan current balance (after payments)
- This is the same as the Current amount from the Loans list page.
- It represents Capital outstanding
- Remaining instalments
- This value is derived from the TMS recalculation logic, which subtracts the number of actual payments received from the total instalments.
- Method of payment
- Total loan amount
- The primary objective of this field is to display the sum of all payments, accounting for scenarios that deviate from the projected statement.
- This includes both the history of payments and future planned installments
On the Customer loan balance data entity, the Responsible party is the Customer name of the linked customer on the Trading partners FastTab inside loans.
For Paid interest and Paid capital, the negative values are multiplied by -1.
The net paid amount (net credit) will appear as a positive value, and the net negative paid amount (net debit) will appear as a negative value
- Calculation: The calculation involves adding the Actual installments for the loan to the Projected installments for the loan.
- Dynamic Update: Furthermore, the Customer loan balance data entity will be dynamically updated each time a transaction is conducted against the loan. In this process, the modified Date and Time fields will be adjusted accordingly.
- Display Condition: The Customer loan balance data entity will display the oldest outstanding invoice on the loan instead of the latest Treasury invoice. This representation is irrespective of whether the invoice was partially settled or newer invoices were subsequently created.
-
Full Settlement: In the event of full settlement (payment) with no outstanding invoices, the data entity will appropriately indicate:
- no invoice number
- no invoice amount
- no due date
¶ Step 10.1: View Customer loan balances in OData format
To view Customer loan balances in OData format, append the following to the end of your URL:
- /data/CustomerLoanBalances
To run the OData query across all companies, use:
- /data/CustomerLoanBalances?cross-company=true
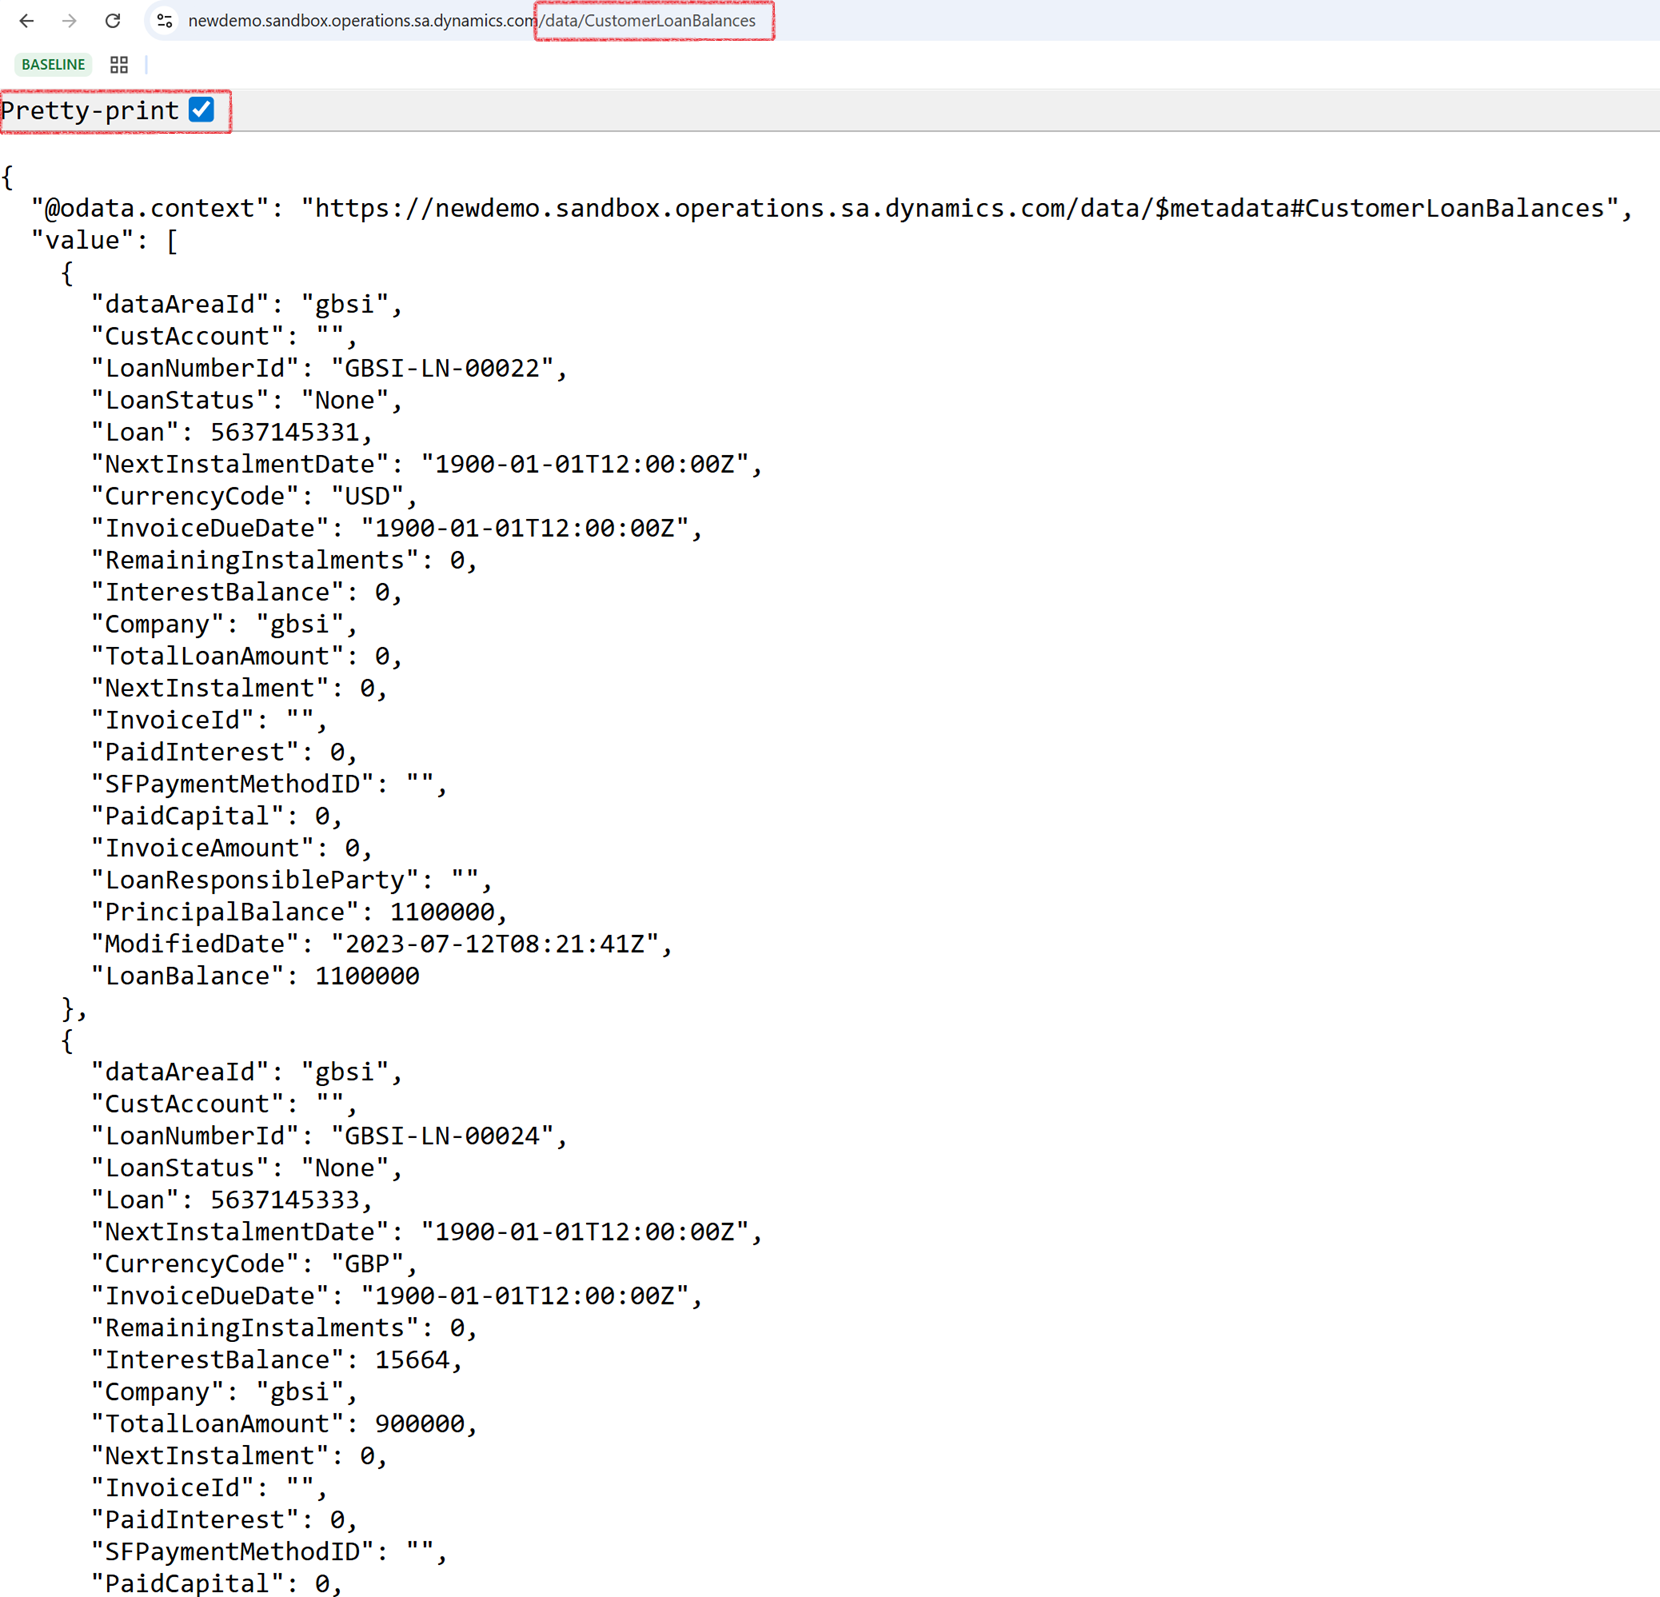
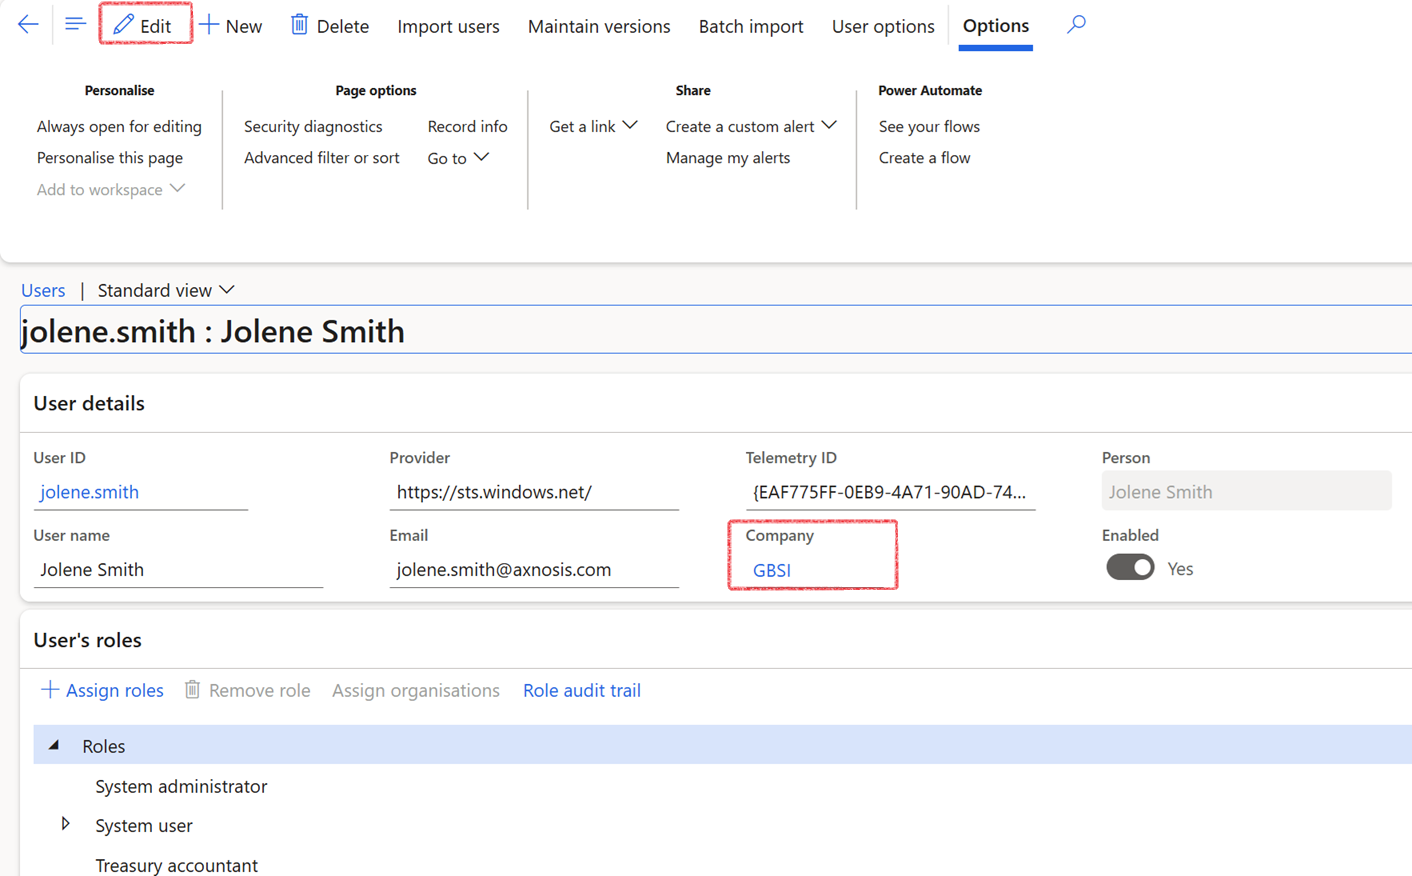
To make sure the data is extracted for the correct company:
- Go to System administration > Users > Users
- Select your User ID
- Click on the Edit button
- In the Company field, choose the relevant company
¶ Step 11: Derivative posting profiles
To import Derivative posting profiles, the data entity named Derivative Posting profiles can be used. This entity includes both the Header and the Lines of the Posting profile. The data entity supports the following types of profiles:
- Initial recognition
- Subsequent measurement
- Settlement
The data entity encompasses all fields from the Derivative posting profile setup, including options like Populate from Derivative, among others. It accommodates account types, specifically Customer and Vendor.
¶ Step 12: Invoice reversal data entity
The LIR invoice reverse data entity serves the purpose of managing instances where a loan is written off and outstanding invoices require reversal marking. The LIR invoice reverse data entity consist of the following fields:
- Invoice date
- Invoice ID
- LIR_Reverse
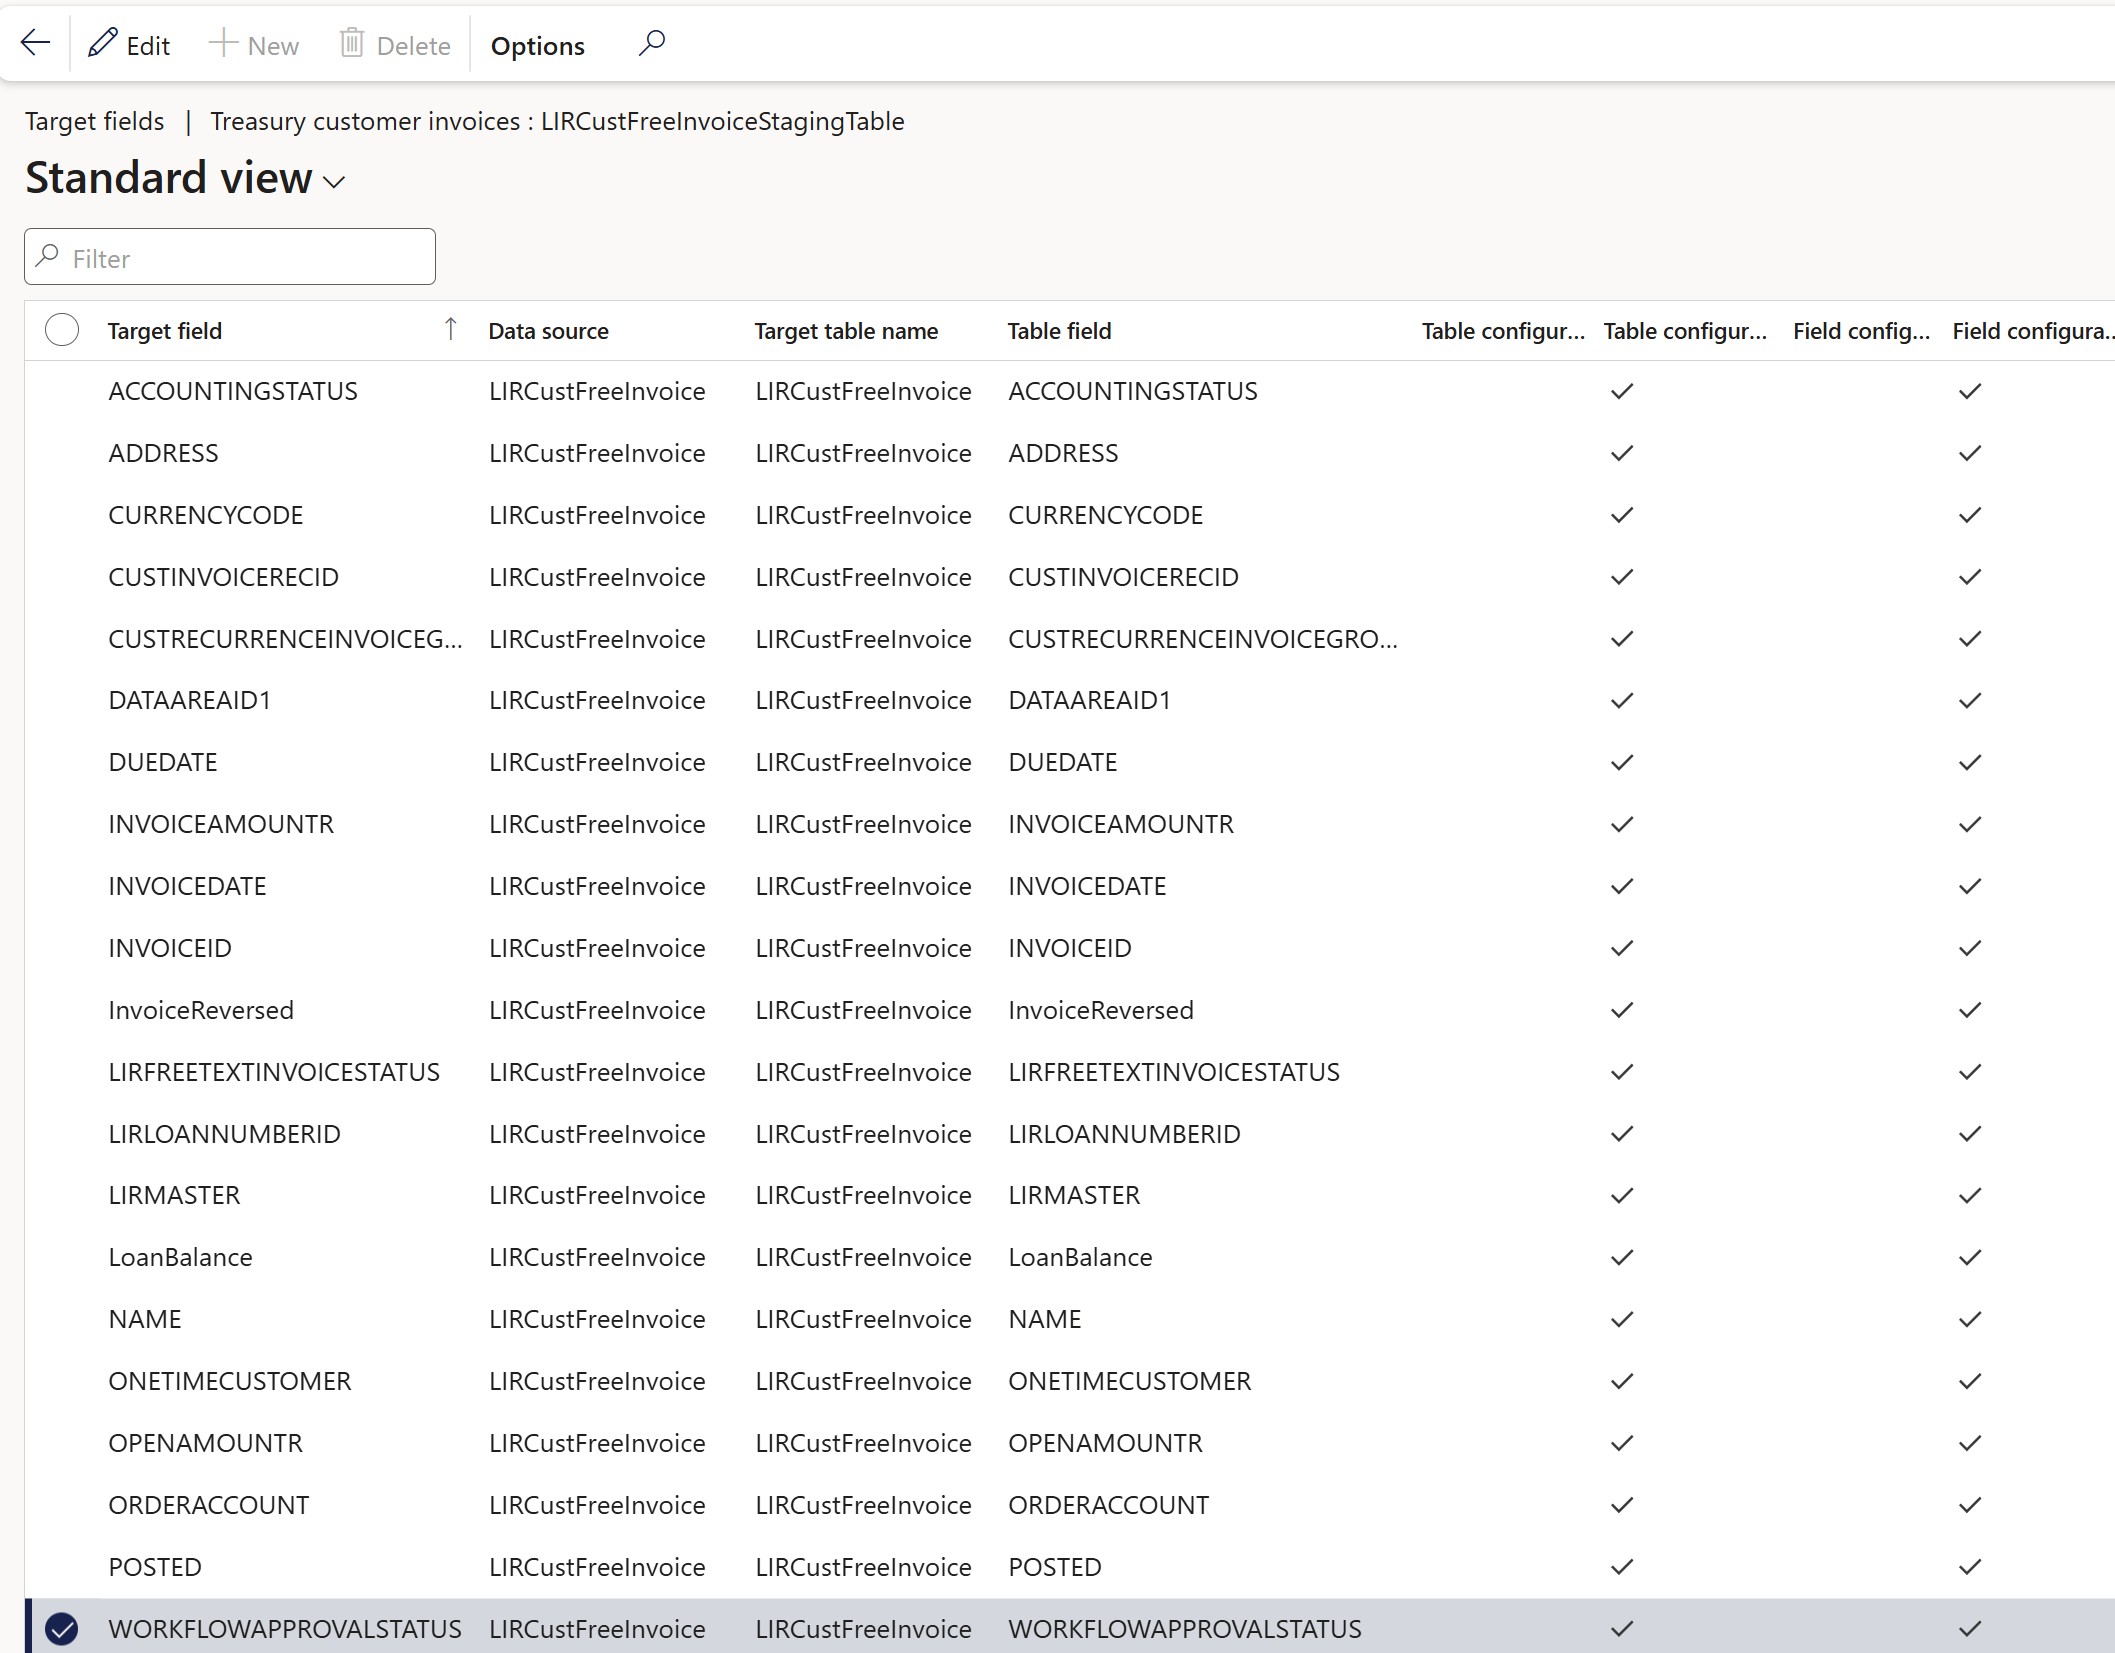
¶ Step 13: Treasury customer invoices data entity
The Treasury Customer Invoices data entity is used to support scenarios where users need to export a large volume of invoices. Large exports may time out when initiated from the front-end list page, so users should instead perform the export via Data Management. The Treasury customer invoices data consist of the following fields:
- Customer account
- Customer name
- Loan number
- Invoice number
- Invoice status
- Address
- One-time customer indicator
- Invoice date
- Currency
- Accounting status
- Posted status
- Invoice reversed indicator
- Recurring invoie indicator
- Workflow status
- Invoice amount
- Open amount
- Loan balance
- Legal entity (DataAreaId)
- Due date
