
¶ Introduction
The Anatomical pathology module (Pathology or Pth for short) is designed specifically to accommodate the requirements for setting up and maintaining results pertaining to Anatomical pathology investigations, which typically include:
- Histology
- Cytology
- Bone Marrows
- Some Genomics procedures
To enable the ordering; resulting; management and reporting of Anatomical pathology investigations and findings, specific LIMS setups should be completed including setting up of Tissues; Data sections and Pathology procedures.
General LIMS setups to be completed prior to Pathology setup should be completed include:
- Lab departments
- Canned comments
- Methods
- Markers
- Questionnaires and group responses
- Specimen sources
- Specimen types
- Specimen containers
- Service products defined for use in Laboratory Billing
- Providers (Global address book)
- Laboratories (Warehouses)
- Units of measure (Organization administration)
¶ Navigation

¶ Step 1: Setup Tissues
Tissues may be used in either the ordering or resulting process to define what tissue samples have been received. Billing charges may be associated with Tissues, which will be added to the Billing details and claims associated to the visit if added.
- Go to: Clinical lab information management > Setup > Pathology > Tissues
- To find existing Tissue records, enter the name or description of the tissue in the Filter field, and select the appropriate data source from the dropdown list
- The Navigation list is by default filtered to only display active records. Set the Show inactive slider button to Yes to view active and inactive records.
- To create a new tissue record:
- Click on New in the action pane
- In the General fast tab, enter a short unique Name. If a name is entered that is already in use, an error message will appear.
- Enter a longer Description
- If charges should be added to the visit billing details; select the appropriate CPT/Tariff code in the dropdown list
- If a CPT/Tariff code is selected, then also select a Lab product from the dropdown list
- The Active slider button should default to Yes to make the record available for use in LIMS.
CPT/Tariff codes are standard codes required by Medical funds/insurers to identify claim items, whilst the Lab product is used by the laboratory to define the charge price for the analysis item.
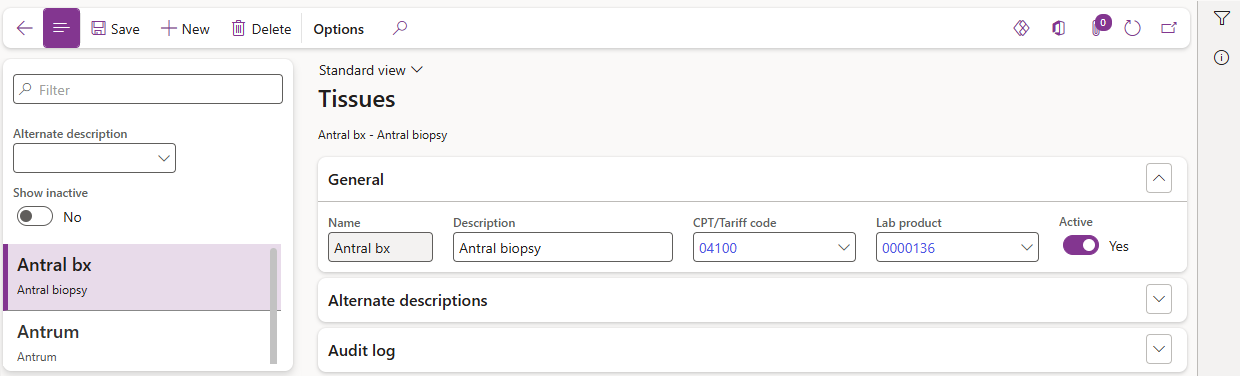
- Alternate names for the tissue may be specified in the Alternate descriptions fast tab. Adding alternate descriptions allow users to find tissues using the record name, defined in setup, as well as any other commonly associated with the tissue. Adding alternate descriptions is an optional added feauture. Expand the Alternate descriptions fast tab, should this be required.
- Click Add in the fast tab buttons
- Enter the other name in the Alternate description column
- Repeat the steps above to add as many alternate descriptions as is desired

- Expand the Audit log fast tab to view a list of all entries and modifications made to the tissue record for problem solving and traceability

- Expand the Related information pane to view related and dependent Pth procedures or Canned comments, where the tissue may have been selected. Click on the record names in the fact boxes to access the related setup forms
- To deactivate a record, set the Active slider button in the General fast tab to No
- To delete a record, click on Delete in the action pane. A confirmation dialogue will appear to confirm the deletion before continuing.
A Tissue cannot be deactivated or deleted if it has any dependent records.
¶ Step 2: Setup Data sections
Data sections are used in Enter findings forms, to record the outcomes of anatomical pathology investigations in. The Data section name appears as a heading in D365 and on laboratory reports above the findings entered in the section
- Go to: Clinical lab information management > Setup > Pathology > Data sections
- To find existing Data section records, enter the name; description or data section type in the Filter field, and select the appropriate data source from the dropdown list
- The Navigation list is by default filtered to only display active records. Set the Show inactive slider button to Yes to view active and inactive records.
- To create a new Data section record:
- Click on New in the action pane OR alternatively select an existing record then click on Copy in the action pane to create a new record by copying data from an existing record to a new record
- If an existing record is copied, a Copy data section dialogue will appear:
- Enter a unique Name
- Click OK
- If the name entered was not unique, an error message will appear. Modify the name then click OK again

- Once the record is created, expand the General fast tab to complete the required fields or update data copied from existing record
- Complete the Identification field group:
- Enter a short unique Name. If a name is entered that is already in use, an error message will appear.
- Enter a longer Description
- The Abbreviated description will default from the entry in the Description field but may be modified to improve readibility
The Abbreviated description is displayed in forms where there is limited space e.g. Enter findings.
- The Active slider button should default to Yes to make the record available for use in LIMS

- Complete the Specification field group:
- Select a Type in the dropdown list to specify the format in which findings will be entered i.e. Free text or Questionnaire
If Free text is selected, the findings section will allow entry of free text as well as insertion of canned comments.
If Questionnaire is selected, an existing questionnaire may be selected in the subsequent field. The queries related to the questionnaire will appear in enter findings as a structured and pre-defined list of questions to be completed to record findings.
- If the type field was set as Questionnaire, select the appropriate questionnaire in the dropdown list
- Enter a LOINC code if required
- If the findings should be treated as Confidential, set the slider button to Yes
- If the findings should appear on laboratory reports, se the Reportable slider button to Yes
- Complete the Enter findings field group:
- If the type field was set as Free text, a Default comment may be selected from the dropdown list
- If the name of the person should be recorded, who dictated the findings, set the Dictated by slider button to Yes
- To allow modification of a data section after authorisation of findings, set the Edit authorized slider button to Yes
- To allow modification of a data section after the sample status is already Completed, set the Edit Completed slider button to Yes
- To allow a verified/authorised data section to appear on Preliminary laboratory reports, set the Preliminary report slider button to Yes
- Expand the Audit log fast tab to view a list of all entries and modifications made to the data section record for problem solving and traceability

- Expand the Related information pane to view related and dependent Pth procedures or Canned comments, where the data section may have been selected. Click on the record names in the fact boxes to access the related setup forms
- To deactivate a record, set the Active slider button in the General fast tab to No
- To delete a record, click on Delete in the action pane. A confirmation dialogue will appear to confirm the deletion before continuing.
A Data section cannot be deactivated or deleted if it has any dependent records.
¶ Step 3: Setup Pathology procedures
Pathology procedures are setup to allow the ordering; resulting and reporting of Anatomical pathology findings.
- Go to: Clinical lab information management > Setup > Pathology > Pathology procedures
- To find existing procedures, enter the name; department or CPT/Tariff code in the Filter field, and select the appropriate data source from the dropdown list. Specific filters to locate procedures using the Alternate description or a Laboratory may also be utilised.
- The Navigation list is by default filtered to only display active records. Set the Show inactive slider button to Yes to view active and inactive records.
¶ Step 3.1: Create a pathology procedure
- Click on New in the action pane OR alternatively select an existing record then click on Copy in the action pane to create a new record by copying data from an existing record to a new record
- If an existing record is copied, a Copy pathology procedure dialogue will appear:
- Enter a unique Name
- Click OK
- If the name entered was not unique, an error message will appear. Modify the name then click OK again

Although the copied data may also apply to the new procedure in many of the fields, it is important to check and update all fields where required.
¶ Step 3.2: Complete the General fast tab parameters
- Expand the General fast tab to complete the required fields or update data copied from existing record
- Complete the Identification field group:
- Enter a short unique Name. If a name is entered that is already in use, an error message will appear.
- Enter a longer Description
- The Abbreviated description will default from the entry in the Description field but may be modified to improve readibility
The Abbreviated description is displayed in forms where there is limited space e.g. Enter findings.
- The Active slider button should default to Yes to make the record available for use in LIMS
- Select a Start date if required to identify the date from which the procedure was introduced
- Select an End date if required to identify the date the procedure was deactivated and no longer in use
- Complete the Specification field group:
- Select the appropriate Procedure type from the dropdown list i.e. Report or Charge:
- Select the relevant Department from the dropdown list
- If the Report type procedure and related data sections should appear on a laboratory report, set the Reportable slider button to Yes
- Enter a value in the Follow up days field if required. The value may be used in BI reporting to locate patients the should require follow up visits.
- Enter a value in the Turn around hours field. Procedures that exceed the TAT will be flagged as overdue
- Complete the billing details if ordering the procedure should result in charges being accded to the patient visit:
- Enter a CPT/Tariff code from the dropdown list. This is the code expected by the medical aid/insurance to identify the charge in claims.
- If a CPT/Tariff code is added for a procedure, the Lab product must also be completed. The lab product is used to define the charge price of the procedure, as set by the laboratory, independent of the amount the medical fund/insurance is willing to pay.
- Select if the procedure should be Billed on order or on Completion of the sample, by selecting the appropriate option from the dropdown list.
- Complete the Order instructions parameters:
- Set the Orderable slider button to Yes if the procedure should be available for ordering during the creation of a laboratory visit
Report: The procedure is used to generate laboratory samples which includes data sections where findings may be entered to appear on laboratory reports
Charge: The procedure does not generate samples or include data sections to be reported, instead it is ordered to add charges to the visit billing typically of a reportable pathology sample.
The Order instruction parameters are only enabled if the Orderable slider button is set to Yes.
- If the orderable procedure should be available for ordering, set the Available slider to Yes. If the procedure is temporarily unavailable, set the slider button to No
- If a procedure is set as not available, the Procedure unavailable comments fields is enabled and becomes mandatory to indicate why the procedure is not available. Enter a reasons if enabled
If an orderable active procedure is set to not available, the procedure will be visible to users whilst ordering tests for a visit, however, the procedure will be disabled and display the reason why it is not currently available.
- Set Allow patient order slider button to Yes if the patient should be able to order the procedure without provider referral
- If additional queries should be answered during the ordering of the procedure for a patient visit, select the appropriate questionnaire in the Order screen dropdown list
- If the ordering of a procedure should not recur within a specific number of hours, enter a value in the Duplicate hours field
If the procedure is ordered for a patient visit, a check will be performed to identify if the procedure had been previously ordered for the patient within the specified hours, and if so, a warning message will appear to dissuade users from ordering the procedure again. If the user decides to still continue with the ordering, a reason will have to be entered for the duplication, which will be recorded in the Order audit log.
- If the ordering of the procedure should be restricted to a certain visit priority, select the allowed priority in the Restrict to priority dropdown list
- If the ordering of the procedure should be restricted to a certain patient gender, select the allowed gender in the Restrict to gender dropdown list
- If charges associated with a procedure should be allowed to be increased for a visit e.g. consumables that should be charged multiple times, then set the Ask order count slider button to Yes
- The Default order count is only enabled when the Ask order count field is set to Yes. The value defaults to 1 indicating how many times the tariff code associated will be charged on the patient visit. If the field is enabled, the count may be increased if required

¶ Step 3.3: Add alternate descriptions
Adding variations and alternate names for a procedure, allows users to find a procedure with either the standard or alternate descriptions, which is especially helpful during the ordering of procedures in a visit request.
To add alternate descriptions for a procedure:
- Expand the Alternate descriptions fast tab to record alternate names for the procedure if applicable. Multiple alternate names may be added.
- Click on Add
- Enter the Alternate description in the line added

¶ Step 3.4: Add data sections
For Report type procedures, expand the Data sections fast tab. Data sections are listed in the order it is expected to appear in the Enter findings form as well as on laboratory reports. The data sections is where findings of the analysis is recorded with the name of the data section appearing as headers on the report.
- To add data sections to the fast tab grid, click Add
ThePosition number for the data section will automatically populate in numeric order. If the sequence of the data sections require to be changed, click on the Move up or Move down buttons, which will then change the data section position number and the position numbers of other affected data section lines.
- In the Data section dropdown list, select the appropriate data section to include
The data sectionDescription and Type will default from the data section set up form.
- If the data section should be available during ordering in the patient visit, to allow data to be completed upfront, select the Available on order checkbox
- At least one data section should be indicated as the Diagnosis data section. Select the correct data section line, then click on the Mark diagnosis button to select the check box
During findings entry, the sample will only be allowed to move to Completed status if the Diagnosis data section contains a value and has been verified and authorised.
- If the data section is mandatory to be completed before the sample may be final verified and authorised, then select the Required for authorisation checkbox to ensure its completion
- In the grid footer, set the Add dictated by for Addendum slider button to Yes if the field should be made available for addendum data sections in the enter findings form
