
¶ Introduction
Specific setups are completed and maintained by business in primarily the LIMS module in the D365FO environment. These setups are based on the specific and unique requirements of the business and is utilized by the various processes and reports available in the LIMS module.
The specific setups are typically completed by senior staff members with special access. These senior users will also be responsible for updating setups as needed on behalf of the laboratory.
Some standard D365 setups required prior to configuring Clinical LIMS setup include:
- Workers
- Providers recorded in the standard D365 Global address book
- Laboratories setup as Warehouses
- Users
- LIMS Number sequences
¶ Navigation
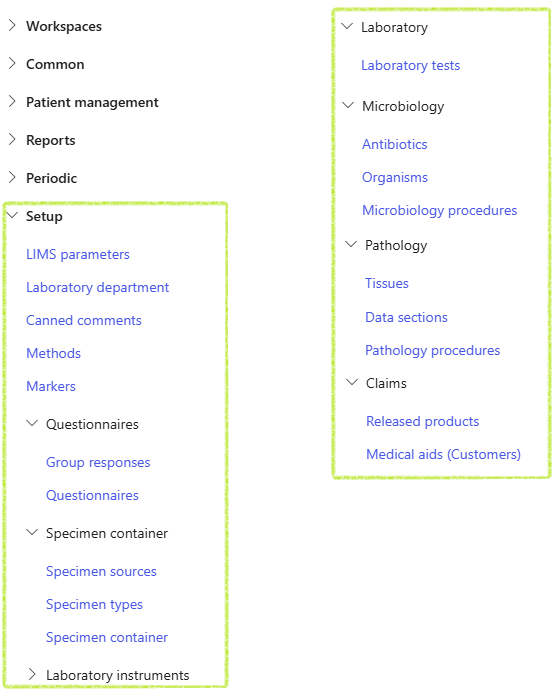
¶ Specific setups
¶ Step 1: Warehouses
Ordering and performing laboratories must be created as Warehouses in standard D365. The warehouse however has to be indicated as a Laboratory so that it may be selected in the LIMS module
Go to: Warehouse management > Setup > Warehouse > Warehouses
- Select the warehouse record to be defined as a laboratory
- In the General fast tab, set the Laboratory slider button to Yes
- Enter a Laboratory ID to a maximum of 3 characters if required.
The Laboratory ID may be utilised in the generation of request numbers, to allow easy identfication of the ordering laboratory in barcodes and D365 forms.

¶ Step 2: Users
To allow laboratory users access to process laboratory samples and define levels of access for entering results
Go to: System administration > Users > Users
- Select the relevant laboratory User from the list to access the user details
- In the User details fast tab, ensure a Person has been selected for the user. If not, select the related Person from the dropdown list.
- Set the Laboratory user slider button to Yes

- Expand the Laboratory access fast tab
- To copy laboratory access already defined for another laboratory user, select the relevant user from the Copy access from user dropdown list and click on the OK button.
- All access for the selected user will be updated to match that of the previously selected user in the Copy access from user field, but may be updated.

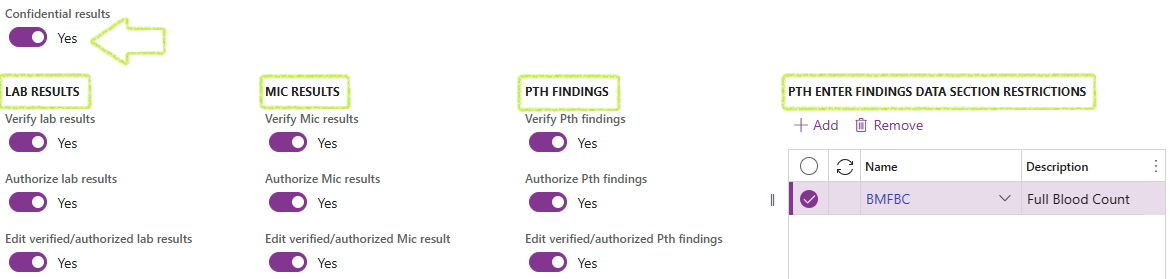
- Set the Confidential results slider button to Yes if the user should be able to enter or view confidential results
- In the LAB RESULTS field group, set the relevant slider buttons to Yes, to allow the user appropriate access to:
- Verify lab results
- Authorize lab results
- Edit verified/authorized lab results
- In the MIC RESULTS field group, set the relevant slider buttons to Yes, to allow the user appropriate access to:
- Verify Mic results
- Authorize Mic results
- Edit verified/authorized Mic results
- In the PTH FINDINGS field group, set the relevant slider buttons to Yes, to allow the user appropriate access to:
- Verify Pth results
- Authorize Pth results
- Edit verified/authorized Pth results
- If a user should be restricted to entering findings for specific Pathology data sections only:
- Click Add under the PTH ENTER FINDINGS DATA SECTIONS grid
- Select the relevant Name from the dropdown list
- Specify the LABORATORIES the user has access to for entering results and processing samples:
- Click Add
- Select the required Laboratory from the dropdown list
- Use the Move up and Move down buttons to change the list number of the laboratory
- If a user should be restricted to enter or manage results for specific departments only for a selected laboratory, then add the restricted departments in the Enter result department restrictions grid for the selected laboratory. These departments may be added manually or copied from setup already completed for another laboratory.
- To manually add a department:
- Click Add in the ENTER RESULT DEPARTMENT RESTRUCTIONS field group
- Select the Department from the dropdown list

The laboratory entered in line 1, will be the user's default laboratory when they sign in to D365. It is therefore suggested to ensure the main laboratory, where the user is usually stationed, should be entered in line 1. To make the list user friendly, enter the additional laboratories in alphabetic order.
The Assignment expiry date and time field displays the date and time, which the user has selected to expire a temporary assignment to a laboratory, other than the default laboratory.
- To copy from another laboratory:
- In the Copy from laboratory dropdown list, in the ENTER RESULT DEPARTMENT RESTRUCTIONS group field, select the laboratory to copy definitions from
- Click OK
- Once all user access levels have been defined, click Save in the action pane before exiting the user record

¶ LIMS parameters
¶ Step 3: General parameters
Go to: Clinical lab information management > Setup > LIMS parameters
- Open the General tab
- Expand the Bar codes Fast tab
- Select the appropriate Barcode setup from the dropdown list if required
- Set the Enable the SSRS label printing slider to Yes, if required
- Select the following:
- Default label layout data source ID
- Primary container default label layout ID
- Aliquot container default label layout ID
- Document label layout data source ID
- Doument label layout ID
- Expand the Azure fast tab and select the appropriate Azure storage container for test reports from the dropdown list if required
The label layouts have to be created in the Warehouse management module prior to the parameter selection in LIMS. These default layouts will automatically be applied when barcodes are printed in the Clinical LIMS module for specimen containers.

- Expand the Lab request numbers fast tab
- To Customize the lab request number, set the slider button to Yes
- Set the Use Lab ID as prefix to Yes if required
- Set the Include creation date slider button to Yes if required and select the appropriate Date format in the drop down list
- If a custom number sequence should be used to complete the lab request number, rather than using the D365 number sequence; set the Use custom number sequence slider button to Yes and then enter a value for the Custom number sequence length
Laboratory request (barcode) numbers may be generated using D365 number sequences. However, should the client require the option to customize the lab request numbers, these customizations may be selected in the Lab request numbers fast tab in LIMS General parameters. The customisation includes the option of prefixing the laboratory request numbers with a Laboratory ID and/or date as well as generating a custom number sequence. The custom number sequence, when combined with the date, allows the number wheel to restart each day at 1. When Laboratory ID; creation date and customized number sequence is selected; each ordering lab will have a unique number set for which the number wheel is restarted each day.
The Lab request number length is calculated based on the maximum allowed characters of each data set selected to be included in the number, including D365 number sequence if that is to be used. This calculation allows the administrator to be aware of the number length and allow adjustments to be made if needed.

- Expand the Samples fast tab
- To customise sample statuses, set the Customize sample statuses slider button to Yes. Enter the alternate status description to use for each standard status.
It is advised to utilise the standard Status descriptions for improvement processing and user experience whilst working in the LIMS module. Should a company however require alternate naming for the sample statuses, it is advised to set this before production implementation as a once-off setup. Once set, these values should not be changed as it may affect the integrity of existing samples.
- Expand the Laboratory results fast tab
- Enter a Print number format to be utilized in Clinical LIMS forms, related to the setup of Laboratory tests; Microbiology procedures and Pathology procedures.
- In the LAB RESULT FLAGS field group, enter an Identifier for each indicated abnormal result type.
- If required, set additional formatting for the abnormal results including:
- Colour application: Select either Line or Result to indicate if the formatting should be applied to the data in the result line or only the result
- Colour application type: Select either Font or Highlight from the dropdown list
- Colour: Select the colour required
- Font type: Select either Bold, Italics or none from the dropdown list
- In the REPORT TRAILERS memo boxes for Lab (Clinical laboratory), Mic (Microbiology) and Pth (Anatomical pathology i.e. Histology and Cytology), add laboratory contact details for providers to use for consultation regarding results.
- For Email reports define if required:
- Subject line
- Body text
- From email address
- Click on Print management setup to select the Report format to be used for viewing and printing of reports
- Expand the Patients fast tab
- Select the Default identification type from the dropdown list to be used in new laboratory visit requests if required
- Enter the Default name for new borns to be used in new laboratory visit requests if required
- Select if the Primary mobile number must be mandatory when creating visits and mantaining patient demographic data
- Select if an Email address must be mandatory when creating visits and mantaining patient demographic data
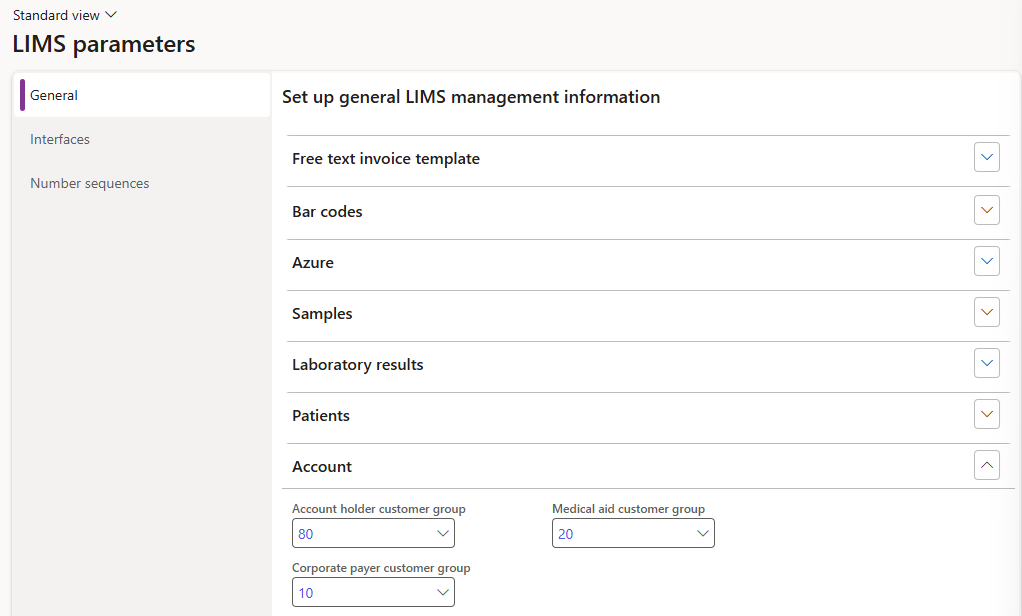
- Expand the Account fast tab
- Under the DEFAULT CUSTOMER GROUPS field group, select the following from the dropdown list:
- Account holder customer group
- Corporate payer customer group
- Medical aid customer group
- Select the appropriate DEFAULT VISIT DIAGNOSTIC CODES (ICD10 Codes) for Lab, Mic and Pth test orders. These codes will default for claims purposes when no diagnosis-specific codes were specified for the visit.
- Restrict workers, to ensure they only enter, verify and authorize results for which they are qualified.
- Group together tests and procedures in a meaningful way in various forms and for statistical purposes
- Group together tests with the same Sample prefix, so that the tests may result and reported together in a single sample.
- Sort tests in the correct order in LIMS forms in D365 and on laboratory reports using the Department sequence number.
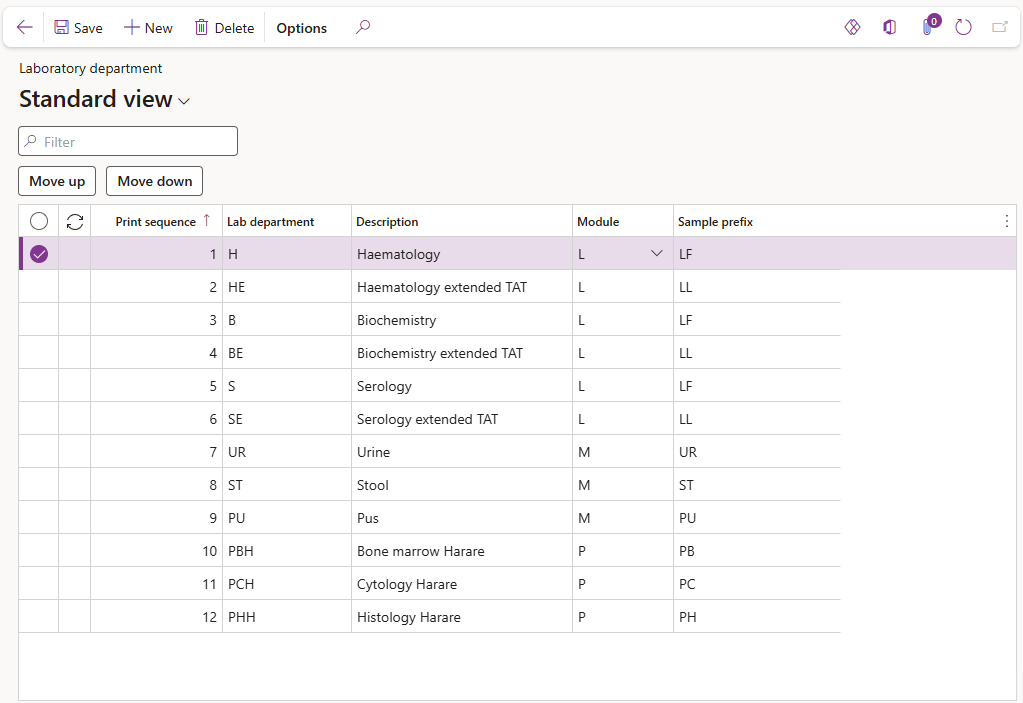
- Go to: Clinical lab information management > Setup > Laboratory department
- During initial setup, add a Lab QC Sample prefix to be used during the creation of Quality control samples. This prefix may also be modified in the future.
- To create a new Department:
- Click on the New button in the Action pane
- Enter a short Lab department name
- Enter a brief lab department Description
- Select the appropriate Module from the dropdown list i.e. L for Laboratory; M for Microbiology or P for Anatomical pathology.
- Select a short Sample prefix
- Click Save in the action pane to save the record.
- All entries and modification events may be viewed in the AUDIT LOG in the field group.
- Use the Move up or Move down buttons to move the department to the correct print position. The print sequence number will automatically be updated and entered as departments are added, deleted or moved into position.
- Click on the Delete button in the action pane to remove the record.
- Enter data in the Filter field to find a specific record or click on the record in the list to view or edit the record.
- The list displays active records by default. To list active and inactive records; set the Show inactive slider button to Yes
- To create a new Method, click on New in the Action pane
- Enter a short name for the Method
- Enter a brief Description
- Click on the Save button in the Action pane. The creation of the new record and any modifications will be displayed in the Event log fact box in the related information pane.
- Click on Print related records in the Action pane.
- The method, selected in the list, will default to the Records related to Methods dialogue box.
- Select another method from the dropdown if required or clear the method field to compile a list of related items for all methods.
- Select which other records to include in the list:
- Group responses
- Lab tests
- Mic procedures
- Instruments
- Include inactive
- Click on the OK button to compile the report.
- Enter data in the Filter field to find a specific record or click on the record in the list to edit.
- Set the Show inactive slider button to Yes to list both active and inactive marker records.
- To create a new Marker, click on New in the Action pane
- Enter a short name for the Marker
- Enter a longer Description
- Select the associated Module from the dropdown list, else leave the field empty when the marker may be used in all modules
- Select Save to patient if the marker should be saved to the patient file, as opposed to only for specific visits.
- Click on the Save button in the Action pane. The creation and all modification events will be dispayed in the Event log fact box in the Related information pane.
- If a Marker is no longer in use but has been actively used for patients and visits; it is suggested to indicate the record as inactivate rather than delete it. To show a record as inactive, deselect the record under the Active field group.
- Go to: Clinical lab information management > Setup > Comments > Tables
- Enter data in the Filter field to find a specific record or click on the record card in the filter pane of the required record to view or edit the record. The card details include the name and description of the Table as well as the module selected for the record, if any.
- The filter pane displays active records only. To list active and inactive records, set the Show inactive slider button to Yes
- To create a new Table, click on New in the Action pane OR alernatively
- Copy an existing table by selecting the table then click on Copy in the action pane
- A Copy table dialogue will appear where a unique Name should be entered
- Click OK
- If the name entered is already in use, an error message will appear. Update the name then click OK again
- If successfull, the new record will be created containing the data from the copied record
- Once a record is created, expand the General fast tab to complete the mandatory fields. If a table was copied, some updates may be required
- Enter a short Name
- Enter a longer Description
- Select a Module from the dropdown list if the use of the Table must be restricted to a specific module.
- The Active slider should auto default to Yes but may be set to No if the table is no longer in use
- Expand the Table columns fast tab
- To customise the column width of the table, set the Custom column width slider button to Yes
- Click Add to create a table column.
- The Position of the first line added will default to A with next columns added being auto assigned in alphabetic order
- Enter the Column name
- The column Width% will automatically default to 20% but may be changed if Custom column width is set to Yes. Select the preferred width in the dropdown list, which will appear in increments of 20% and based on the remaining width % available
- To assign a column to a different position, select the line then click on either Move up or Move down. The positions of other afected columns are automatically adjusted.
- To delete a column, select the line then click on Remove. A confirmation message should appear, click on Yes to continue. When a line is removed; the positions of other affected columns are automatically adjusted.
- Expand the Table contents fast tab. The labels of the columns created, should appear in the grid heading.
- Click Add to insert a row into the table. Row numbers are assigned in numeric order and may be adjusted by selecting the Move up or Move down buttons, which will also automatically adjust the row numbers of remaining lines.
- Enter data for the row in the various columns created
- Add as many rows as required and enter relevant data in the columns as needed. The number of rows are not limited as is the case with columns.
- Expand the Related information pane to see and navigate to Canned comment records, where the table has been inserted if any.
- Enter data in the Filter field to find a specific record or click on the record card in the filter pane of the required record to view or edit the record. The card details include the name and description of the canned comment as well as the module selected for the record, if any.
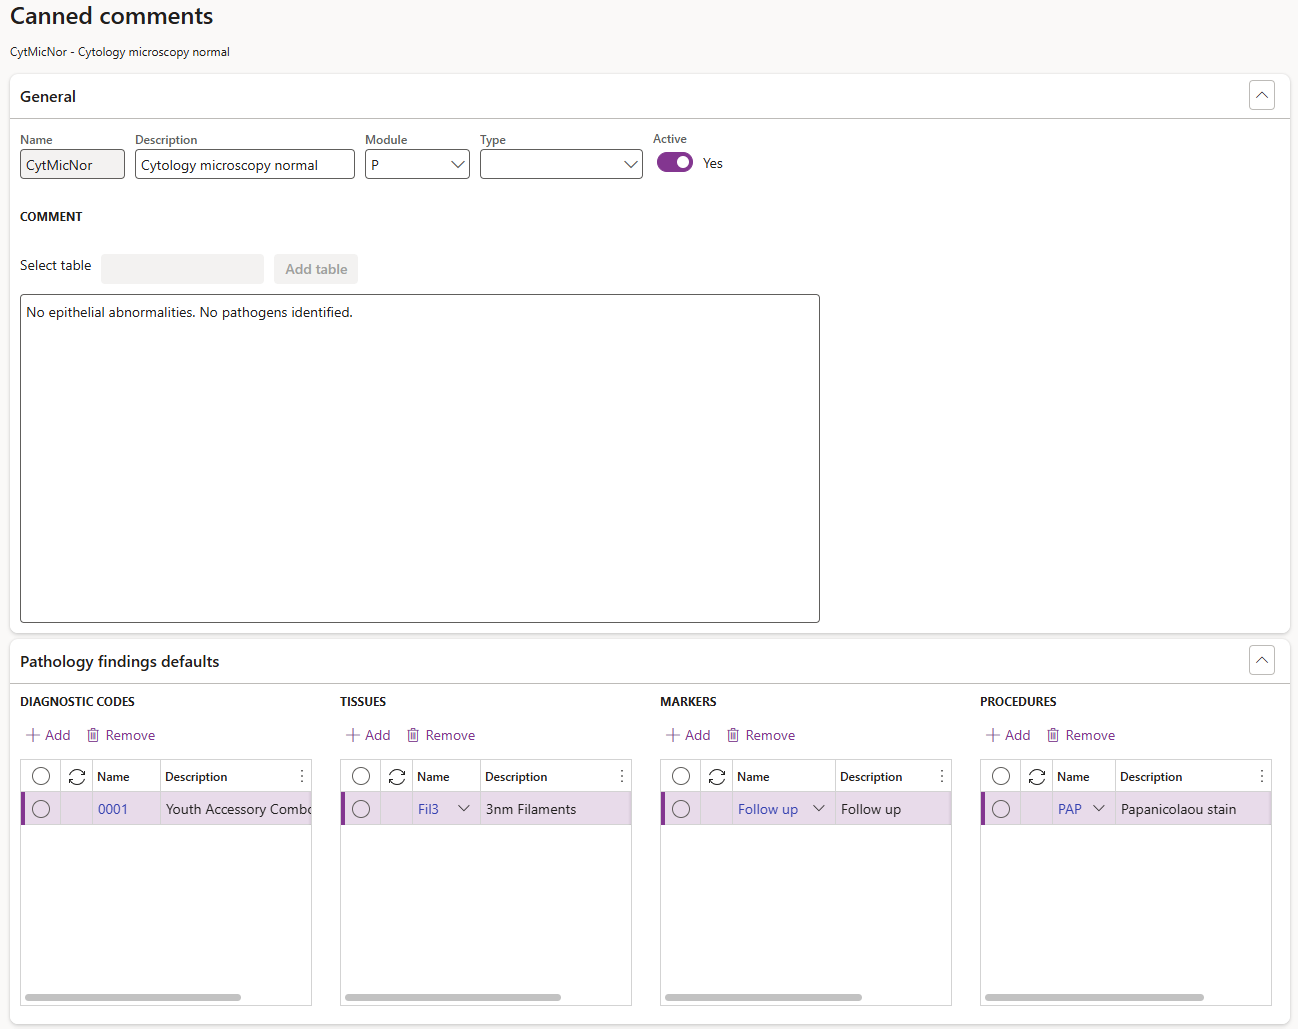
- To create a new Canned comment, click on New in the Action pane
- Complete the required fields in the General fast tab:
- Enter a short Name (maximum 15 characters)
- Enter a brief Description of the canned comment to indicate its purpose or content
- Select a Module from the dropdown list if the use of the canned comment must be restricted to a specific module.
- Select a Type from the dropdown list to indicate the purpose of the comment i.e. Order to be used in visit creation or Results to be used in result comments
- Set the Active slider to Yes
- Enter the text in the Comment memo box which will be displayed wherever this comment is selected.
- To insert a table into the canned comment, Select a table in the drop down list and click Add table
- To add basic formatting to display text as bold; italic or underlined, add html tags in the appropriate brackets before and after the text i.e. b for bold; i for italic and u for underline.
- If the Module has been selected as P (Anatomical pathology) in the General fast tab, the Pathology findings defaults fast tab and related field groups will become available. Default selections may be added, which will then automatically be added to the Anatomical pathology sample when the canned comment is selected during the entry of pathology findings. The default selection grids include:
- Diagnostic codes e.g. ICD10 Codes
- Tissues
- Markers
- Procedures
- To add default selections for Pathology samples:
- Click on the Add button under the relevant field group grids in the Pathology findings defaults fast tab.
- Select the required default option from the dropdown menu.
- Once all required fields have been completed; set the Active slider button in the General fast tab to Yes to make the canned comment available for use.
- To deactivate a canned comment; set the Active slider button to No
- To competely remove a canned comment; select Delete in the action pane. If selected, a confirmation message should appear; selected Yes to continue.
- To view any modifications made to the canned comment; expand the Audit log fast tab. If the comment itself was modified, select the modification event to view the comment, before and after the modification, below the grid.
- Enter data in the Filter field to find a specific record or click on the record in the list to edit or view the record.
- Set the Show inactive slider button to list either Active or both Active and Inactive records.
- To create a new Group response:
- Click on New in the Action pane
- Enter a short Name for the record in the General fast tab
- Enter a brief Description
- Select the appropriate Type from the dropdown list i.e. Order or Result which indicates the purpose of the group response record and in which type of questionnaires it may be selected
- If the group response may only be used for a specific module, select the approriate Module from the dropdown, else leave the field empty.
- The Display will default to Description, however this may be changed to Identifier by selecting it from the dropdown list. This indicates if the Description or Identifier must be displayed on reports.
- For a Results type Group response, select a Default method from the dropdown list if required
- Expand the Responses fast tab
- Click on the Add fast tab button to add a new response line
- Enter a short Identifier
- Enter a brief Description
- Additional selections and entries can be defined if used for entering Microbiology and Pathology results. These entries and selections will automatically be applied in the enter results/findings forms:
- If a specific result should default, select the response line then click on the Set default fast tab button.
- If a result should be flagged as abnormal, select the Abnormal result check box
- If a marker should automatically default , select the appropriate Marker in the dropdown list
- For Pathology only, if a follow-up is required by the laboratory, enter a number in the Pth Follow up days column
- For Microbiology:
- select Mic Inf Ctrl check box if the result should be flagged for infection control
- select a Mic method from the dropdown list, to display the method for the result, if required
- enter Mic delta hours to indicate how many days of previous results to consider to perform a delta check if required
- select a Default Mic comment from the drop down list if required
- Repeat the process of adding lines until all required responses are listed
- Click on the Active slider button in the General fast tab, to make the record active and allow for selection in a Questionnaire.
- Click Save in the Action pane to save the record
- To view any modifications made to the record; expand the Audit log fast tab.
- Enter data in the Filter field to find a specific record or click on the record in the list to edit or view the record.
- Click on the Show Inactive slider button to list either Active or both Active and Inactive records.
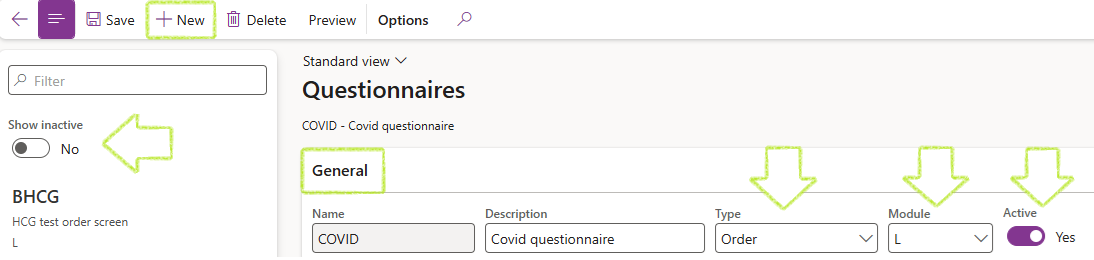
- To create a new Questionnaire:
- Click on New in the Action pane
- Enter a short Name for the record in the General fast tab
- Enter a brief Description
- Select the appropriate Type from the dropdown list i.e. Order or Results
- If the group response is specific to a module, select the approriate Module from the dropdown, else leave the field empty to use in all modules
- If the Questionnaire type is set to Order, it can only be selected as an Order screen for a test or procedure which will then be completed during the ordering of tests for a visit.
- If the Questionnaire type is set to Results, it can only be selected for use during the entry of Microbiology or Pathology results.
- The Active slider button will default to No when the record is created. The records can only be made active when at least one question has been added and all required fields have been completed.
- Only Group responses that are Active and match the Type of the Questionnaire i.e. Results or Order as well as the Module i.e. L; M; P; G or no module, which is allowed for use with all other modules, will be available in the dropdown list for selection.
- Expand the Questions fast tab
- Click on the Add fast tab button to add a question line
- Enter a short Question ID
- Enter the Question as it will be displayed to the user
- Select the Answer type from the dropdown list which will determine the way the question is answered. The following answer types are available:
- Yes/No answer: Will display to the user as a Yes/No slider button
- Date: Allows the selection of a date from a calender or manual entry
- Number: Allows the entry of a numeric value only
- Group response: An existing Group response can be selected of which the responses will then appear as a dropdown list
- Free text: A short text field used for entering shorter text answers e.g. a name
- Paragraph: Allows for entry of longer free text answers in a paragraph format
- If the answer type was selected as a Group response, then select the appropriate Group response from the dropdown list. The column will not be available for selection for any other answer types. (see line 4 below)
- Select the appropriate Answer option from the dropdown list:
- Required: The answer is mandatory
- Optional: The answer is not mandatory
- Conditional: Conditions may be set for when the question is mandatory or optional
- If the question and answer should appear on the laboratory report to the provider, select the Reportable check box
- If the Answer options for a question was selected as Conditional, the Conditions field group is enabled. The information entered will determine the action to be taken.
- Complete the Conditions fields as follow:
- Question ID: Select the Question to be used in evaluation of the condition
- Criteria: Select the Criteria to be used in evaluation of the condition
- Answer: Enter the answer entered for which the action should be taken
- Action: Select the action to take based on the condition criteria
- If the Questionnaire Type is Results and the Module selected M, then the RESULT REFERENCE RANGES field group will be enabled below the grid. This section allows the entry of reference ranges with the correct decimals and units, to be utilised during the entry of Microbiology results and to be displayed on Laboratory reports. Complete the fields as follow:
- Decimals field to indicate the amount of decimal places displayed.
- Low value
- High value
- The Reference range will default based on the Low and High values entered. The range may however be manually changed
- Select the relevant Unit from the dropdown list
- To ensure the questionnaire has been created correctly, click on Preview in the Action pane.
- The Questionnaire preview dialogue box will appear. The dialogue lists the questions and may be used to test the questionnaire to ensure it reacts as expected based on selected Answer options and Conditions. Click on the Close button to exit from the dialogue.
- If necessary, make corrections to the Questionnaire based on testing completed in the Preview dialogue and repeat the process of reviewing via the Preview dialogue until the questionnaire works as expected.
- Once the Questionnaire is ready for use, set the Active slider button in the General fast tab to Yes, to make the Questionnaire available for use in other forms.
- If a Questionnaire is no longer in use but has been actively used in other records; it is suggested to set the record to not active by changing the Active slider button in the General fast tab to No
- To view any modifications made to the record; expand the Audit log fast tab.
- Enter data in the Filter field to find a specific record or click on the record in the list to edit or view the record.
- To create a new Specimen source:
- Click on New in the Action pane. A new line is added to the grid, automatically marked as Active
- Enter a short name in the Specimen source column
- Enter a brief Description
- Click on Save in the Action pane
- To deactivate a specimen source, set the Show inactive slider to No. The inactive record will not be visible. Find the inactive record by changing the Show inactive slider button to Yes
- To completely remove a specimen source, select the record in the grid, click on Delete in the Action pane.
- Enter data in the Filter field to find a specific record or click on the record in the list to edit or view the record.
- To create a new Specimen type:
- Click on New in the Action pane. A new line will be added and automatically marked as Active
- Enter a short name in the Specimen type column
- Enter a brief Description
- If the Specimen type is to be used in Microbiology Culture and Susceptibility analysis, select a M.I.C Susceptibility target from the dropdown list as the default target during entry of the analysis results.
- If the Specimen type is to be used for Microbiology orders, SPECIMEN SOURCES may be specified to improve the ordering process. To add Specimen sources:
- Click on the Add button
- Select the relevant Specimen sources from the dropdown list. To add more Specimen soures for the specimen type, repeat this step
- To remove a specimen source, select the specific record in the grid, then click on the Remove button.
- Click on Save in the Action pane
- To deactivate a specimen source, set the Show inactive slider to No. The inactive record will not be visible. Find the inactive record by changing the Show inactive slider button to Yes
- To completely remove a specimen type, select the specific record, then click on Delete in the Action pane.
- Enter data in the Filter field to find a specific record or click on the record in the list to edit or view the record. Set the Active slider button to Yes to list Active only or No for both Active and Inactive records.
- To create a new Specimen container:
- Click on New in the Action pane
- Enter a short Name for the container
- Enter a brief Description
- Select the Item number from the dropdown list. This is a mandatory field to complete
- Select the Specimen type from the dropdown list, if relevant
- Select the Specimen source from the dropdown list, if relevant
- Select the Stability in hours
- The Count slider button defaults to No, which will require a standard volume to be defined for the container in the Volume ml field.
- If the slider button is set to Yes, a Count should be entered to indicate the amount of containers required e.g. Microbiology containers would typically be measured with a count whilst blood containers would be measured in volume.
- Enter either a standard volume in the Volume ml field or a Count, depending on the setting of the Count slider button
- Click on Save in the Action pane
- To deactivate a record, set the Active slider button in the General fast tab to No. The inactive record will not be visible. Find the inactive record by changing the Show inactive slider button to Yes
- To completely remove a Specimen container record, select the specific record and click on Delete in the Action pane.
- Expand the Audit log fast tab to view modication events and the changes made
- Expand the Related records fast tab to view any dependent records where the container has been selected
- Billing codes created as services
- ICD Codes created as services
- Specimen containers items
- Stock items
- Create a new product (standard D365) or select the existing product to be used in LIMS field group
- Set the Laboratory item slider button to Yes
- Select the appropriate Item type from the dropdown list
- To convert an existing customer into a Medical aid:
- Click on Customer in the action pane
- In the Medical aid field group, select Convert customer. This will open the Convert customer to medical aid dialog box
- In the Convert customer to medical aid dialogue box, select the appropriate Customer account in the dropdown list then click on OK
- If the customer does not exist, click on New in the action pane and create a new customer as per standard D365
- Once the customer has been converted or created, the Customer type will be set as Medical aid in the Laboratory field group
- Set the Update patient records slider button to Yes, if the medical aid should update patient records when utilised in a patient visit in LIMS
- Expand the Laboratory medical aid fast tab
- Set the Active slider button to Yes if the medical aid should be available for selection in laboratory visits
- If applicable, enter a value in the Medical aid number length field if the number has to match a specific length
- Set the Dependent code required slider button to Yes if required
- Set the Medical aid number required slider button to Yes if required in laboratory visits
- Enter the specific Medical aid number format the number needs to conform to. Enter Alpha characters, where applicable and #-signs for numeric values. Leave the field empty if a specific format is not required.
- If the medical aid is administrated by another, select the medical aid from the Administrated by dropdown list
- To list any packages unique to the medical aid:
- Click on the Add button in the PACKAGES field group
- Enter a short Name
- Enter a brief Desription
- If applicable, select the appropriate Legal entity associated from the dropdown list
- Click Save in the action pane
The identifiers; colour selection and font types will be used to indicate the abnormal and critical results in various LIMS forms and reports.
When reports are sent via email, the Report batch number is added after entries defined in the Subject line.
If the From email address is not added, the sender address will be that of the user who generated the report. The email address however must be valid, else the sending of the reports via email will fail.


The customer groups selected will automatically default when customers are created as LIMS account holders to ensure accurate selections during this process.
¶ LIMS General clinical laboratory setups
¶ Step 4: Laboratory departments
Laboratory departments are used to define smaller sections within a laboratory, typically indicating where the test is performed. The laboratory department may refer to Laboratory disciplines, benches, methods or other required definitions to identify analysis areas or groups.
Laboratory departments are used to:
To access the Laboratory department setup form:
The laboratory module cannot be modified once the record is saved.
A department may only be deleted if it is not in use in another LIMS form, e.g., laboratory test. An error message will appear indicating this is not allowed.

¶ Step 5: Methods
Methods are used in various LIMS setup forms to define the method used during testing. It is typically created for the actual analysis method or the instrument used.
Go to: Clinical lab information management > Setup > Methods
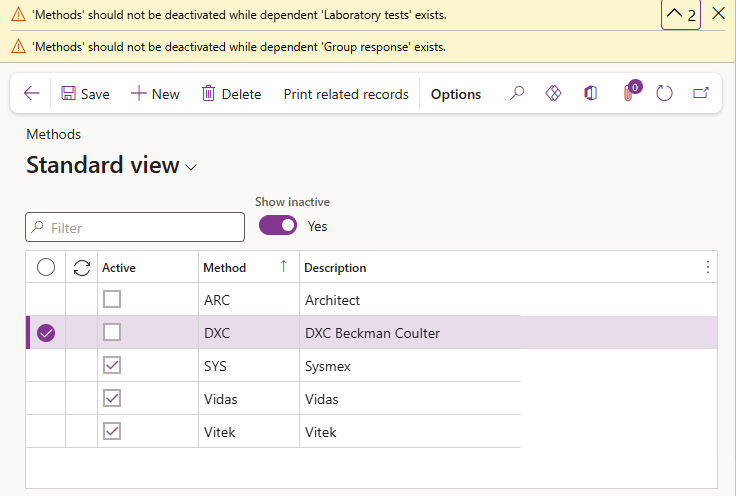
A Method cannot be deleted and should not be made inactive if it is referenced by active records. Error messages will appear should this be attempted.
To compile a list of records in which the current method is referenced:

The report lists the Method Name, Record Type, Record Name, Description and wheter the record is active or not.

¶ Step 6: Markers
Markers are used to flag patients or patient visits. An example of a marker is to flag a patient tested positive for Malaria to be considered in any subsequent tests.
Go to: Clinical lab information management > Setup > Markers

A Marker cannot be inactivated or deleted whilst it has a dependent record. Expand the Related information pane to view the related records in order to remove it from the dependant record first.
¶ Step 7: Canned comments and tables
Canned comments are pre-defined comments, which are regularly used by the laboratory during the ordering of laboratory visits or entering of results. By pre-defining the canned comments, users can easily select and add the comments without having to manually generate the comments when needed.
Canned comments may be manually entered or set to automatically default on order for specific tests/procedures and Microbiology organisms.
Canned comments have additional functionality for Pathology samples, by allowing pre-set Pathology procedures; Tissues; ICD codes and Markers to be automatically added to a sample when the canned comment is selected during the entering of findings.
¶ Step 7.1: Create a Table
Data may be recorded in Table format to be either inserted into Canned comments to be added to result comments during result entry. Tables can also be inserted into result comments directly without being assigned to a canned comment.
If a table is inserted into a result comment, a reference is added to the results comment instead of the actual table, due to the result comment memo box limitations to basic text only. When a laboratory report is generated, the table is rendered based on the design in the table setup form. Therefore, once a table is inserted in a canned comment or used in a sample result comment; the table is disabled for further modification to ensure the table is rendered correctly in the laboratory report and to maintain report integrity. If changes are required to a table after it has already been included in sample reports, a new table should be created. A copy function is available to allow a table to be created from an existing table after which the required modifications may then be made to the new table record.


Due to report paper size limitations; tables are limited to 5 columns or less. An error message will appear if a user tries to add more than 5 columns.
If Custom column width is set to No or if the maximum number of 5 columns is added, each column will automatically be set to 20% width of the report page.
The Combined column width % is automatically calculated as columns are added and width is selected. The calculated value is displayed below the grid to assist the user with designing and selecting colum width. An error message will appear if the combined width of the columns exceed 100%.


Once a Table has been inserted in a Canned comment or Result comment; the table will be disabled for further modifications.
¶ Step 7.2: Create a Canned comment
Go to: Clinical lab information management > Setup > Comments > Canned comments
The filter pane displays active records only. To list active and inactive records, set the Show inactive slider button to Yes.

Selection of tables are only enabled for Results type comments.
When a table is inserted into a comment, it will be labeled as Table reference followed by the name of the table. Take care to not in error edit this text, as it will negatively affect the display of the table.
Click on the Show comment tables button to view all tables included in a canned comment.

Note: When formatting tags are added to canned/result comments; text after the formatting is moved to the next line. It is suggested then to utilise formatting for headings in comments if used at all.
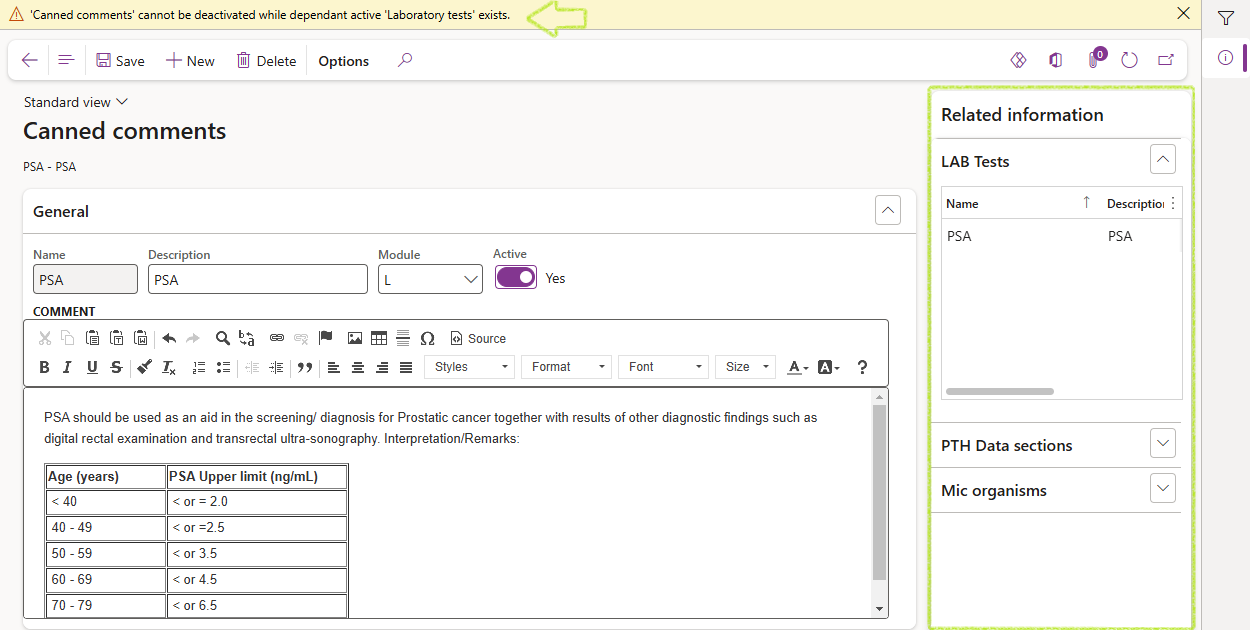
A canned comment record cannot be deleted or be made inactive if it is referenced by other active records. Refer to the Related information dialog box to view which records the selected canned text refer to.

¶ Step 8: Questionnaires and Group responses
Questionnaires may be used during the ordering of results of tests and allows the client to create a unique list of questions and answers for users to complete.
¶ Step 8.1: Create a Group response
Group responses are pre-defined answers within a questionnaire.
Go to: Clinical lab information management > Setup > Questionnaires > Group responses


A Group response cannot be inactivated or deleted whilst it is utilised by active questionnaires. Expand the Related information dialog box to view the various dependant Questionnaire records. Remove the group response from the active questionnaires or make the questionnaires inactive before the Group response may be made inactive or deleted

¶ Step 8.2: Create a Questionnaire
A Questionnaire is a list of questions which may be asked during the ordering of tests or as a way to enter results for Microbiology or Pathology. Questionnaires may include questions with different types of answers including Group responses (see previous steps). Conditions may be set to allow some questions to be asked or skipped or even to be made required when the conditions are met.
Go to: Clinical lab information management > Setup > Questionnaires > Questionnaires

The line number will automatically default to the next available number in numeric sequence when a line is added. Questions may be reordered by clicking on the Up or Down fast tab buttons. When a line is removed, the line numbers will automatically update.


A Questionnaire cannot be inactivated or deleted whilst it has a dependent record. Expand the related information pane to view the various records in which this Questionnaire may have been included in order to remove it from the dependant record first.

¶ Step 9: Specimen Sources; Types and Containers
Specimen containers are used to collect samples from patients for analysis. These Specimen containers are recorded in D365 to allow the containers to be specified for Laboratory tests, microbiology procedures, and Pathology procedures. This then allows the required containers to be automatically listed for collection when the tests and procedures are ordered for a laboratory visit. Specimen sources and Specimen types are also recorded, which may then be used to define the Specimen container further and are also used in ordering of Microbiology and Pathology procedures.
¶ Step 9.1: Create Specimen sources
Specimen sources refer to how or where the specimens were collected from e.g. left arm (for blood) or midstream (for urine).
Go to: Clinical lab information management > Setup > Specimen container > Specimen sources
A Specimen source cannot be deactivated or deleted whilst it has a dependent record. Expand the Related information pane to view the various related records, from where the record must be removed first.

The created event and subsequent modification events will be listed in the Event log in the Related information pane
¶ Step 9.2: Create Specimen types
Specimen types refer to the kind of specimen e.g., blood or urine.
Go to: Clinical lab information management > Setup > Specimen container > Specimen types
A Specimen type cannot be deactivated or deleted whilst it has a dependent record. Expand the Related information pane to view the various related records to remove it from the dependant record first.

The created event and subsequent modification events will be listed in the Event log fact box in the Related information pane.
¶ Step 9.3: Create Specimen containers
Before Specimen containers may be recorded, the inventory Item code for the container must be defined as a Released product.
Go to: Clinical lab information management > Setup > Specimen container > Specimen container

A Specimen container cannot be deleted whilst it has a dependent record. An error message will appear if attempted. Remove the record from dependant records first then try again
¶ Step 10: Claims
Some setup is required to assist with claims processes and includes setup of standard D365 forms, which have been enhanced for laboratory requirements.
¶ Step 10.1: Released products
Standard D365 Products are used to create various service or item records to be used in the laboratory including:
To set up these products to be used in LIMS:
Go to: Clinical lab information management > Setup > Claims > Released products

¶ Step 10.2: Medical aids
Medical aids are created using the standard D365 Customer form with some enhancements added to assist Laboratories when creating visits for patients.
Go to: Clinical lab information management > Setup > Claims > Medical aid (Customers)

The list is filtered to show existing Customers set as Medical aids. An Active checkbox is also added to the standard Customer form for use in LIMS


The Created date and time and Created by as well as the Modified date and time and Modified by fields will automatically be populated.
