A permit to work system is an integral part of a safe system of work and is used to ensure that work is done safely and efficiently. These are typically used in hazardous industries and involve procedures to request, review, authorise, document and most importantly, de-conflict tasks to be carried out by front line workers. Permit to work is an essential part of control of work, and the integrated management of maintenance processes. Control of work is made up of permit to work, hazard identification and risk assessment, with the necessary mitigation and control measures, including isolation management.
A permit-to-work is not simply permission to carry out a dangerous task but is an essential part of a system which determines how that task can be carried out safely and helps communicate this to those performing the task. The issue of a permit does not, by itself, make a task safe - that can only be achieved by those preparing for the work, those supervising the work and those performing the work.
A permit-to-work system is a formal recorded process used to control work which is identified as potentially hazardous. It is also a means of communication between site/installation management, plant supervisors and operators and those who carry out the hazardous work.
Permits to work is dependent on objects and setups in related modules, for example:
Human resources or HRM - workers and competencies
Asset management or EAM – objects/equipment and functional locations
Health, safety and environment or HSE – Hazards, PPE and more
Governance, risk and compliance or GRC - risk assesments, audit management and more
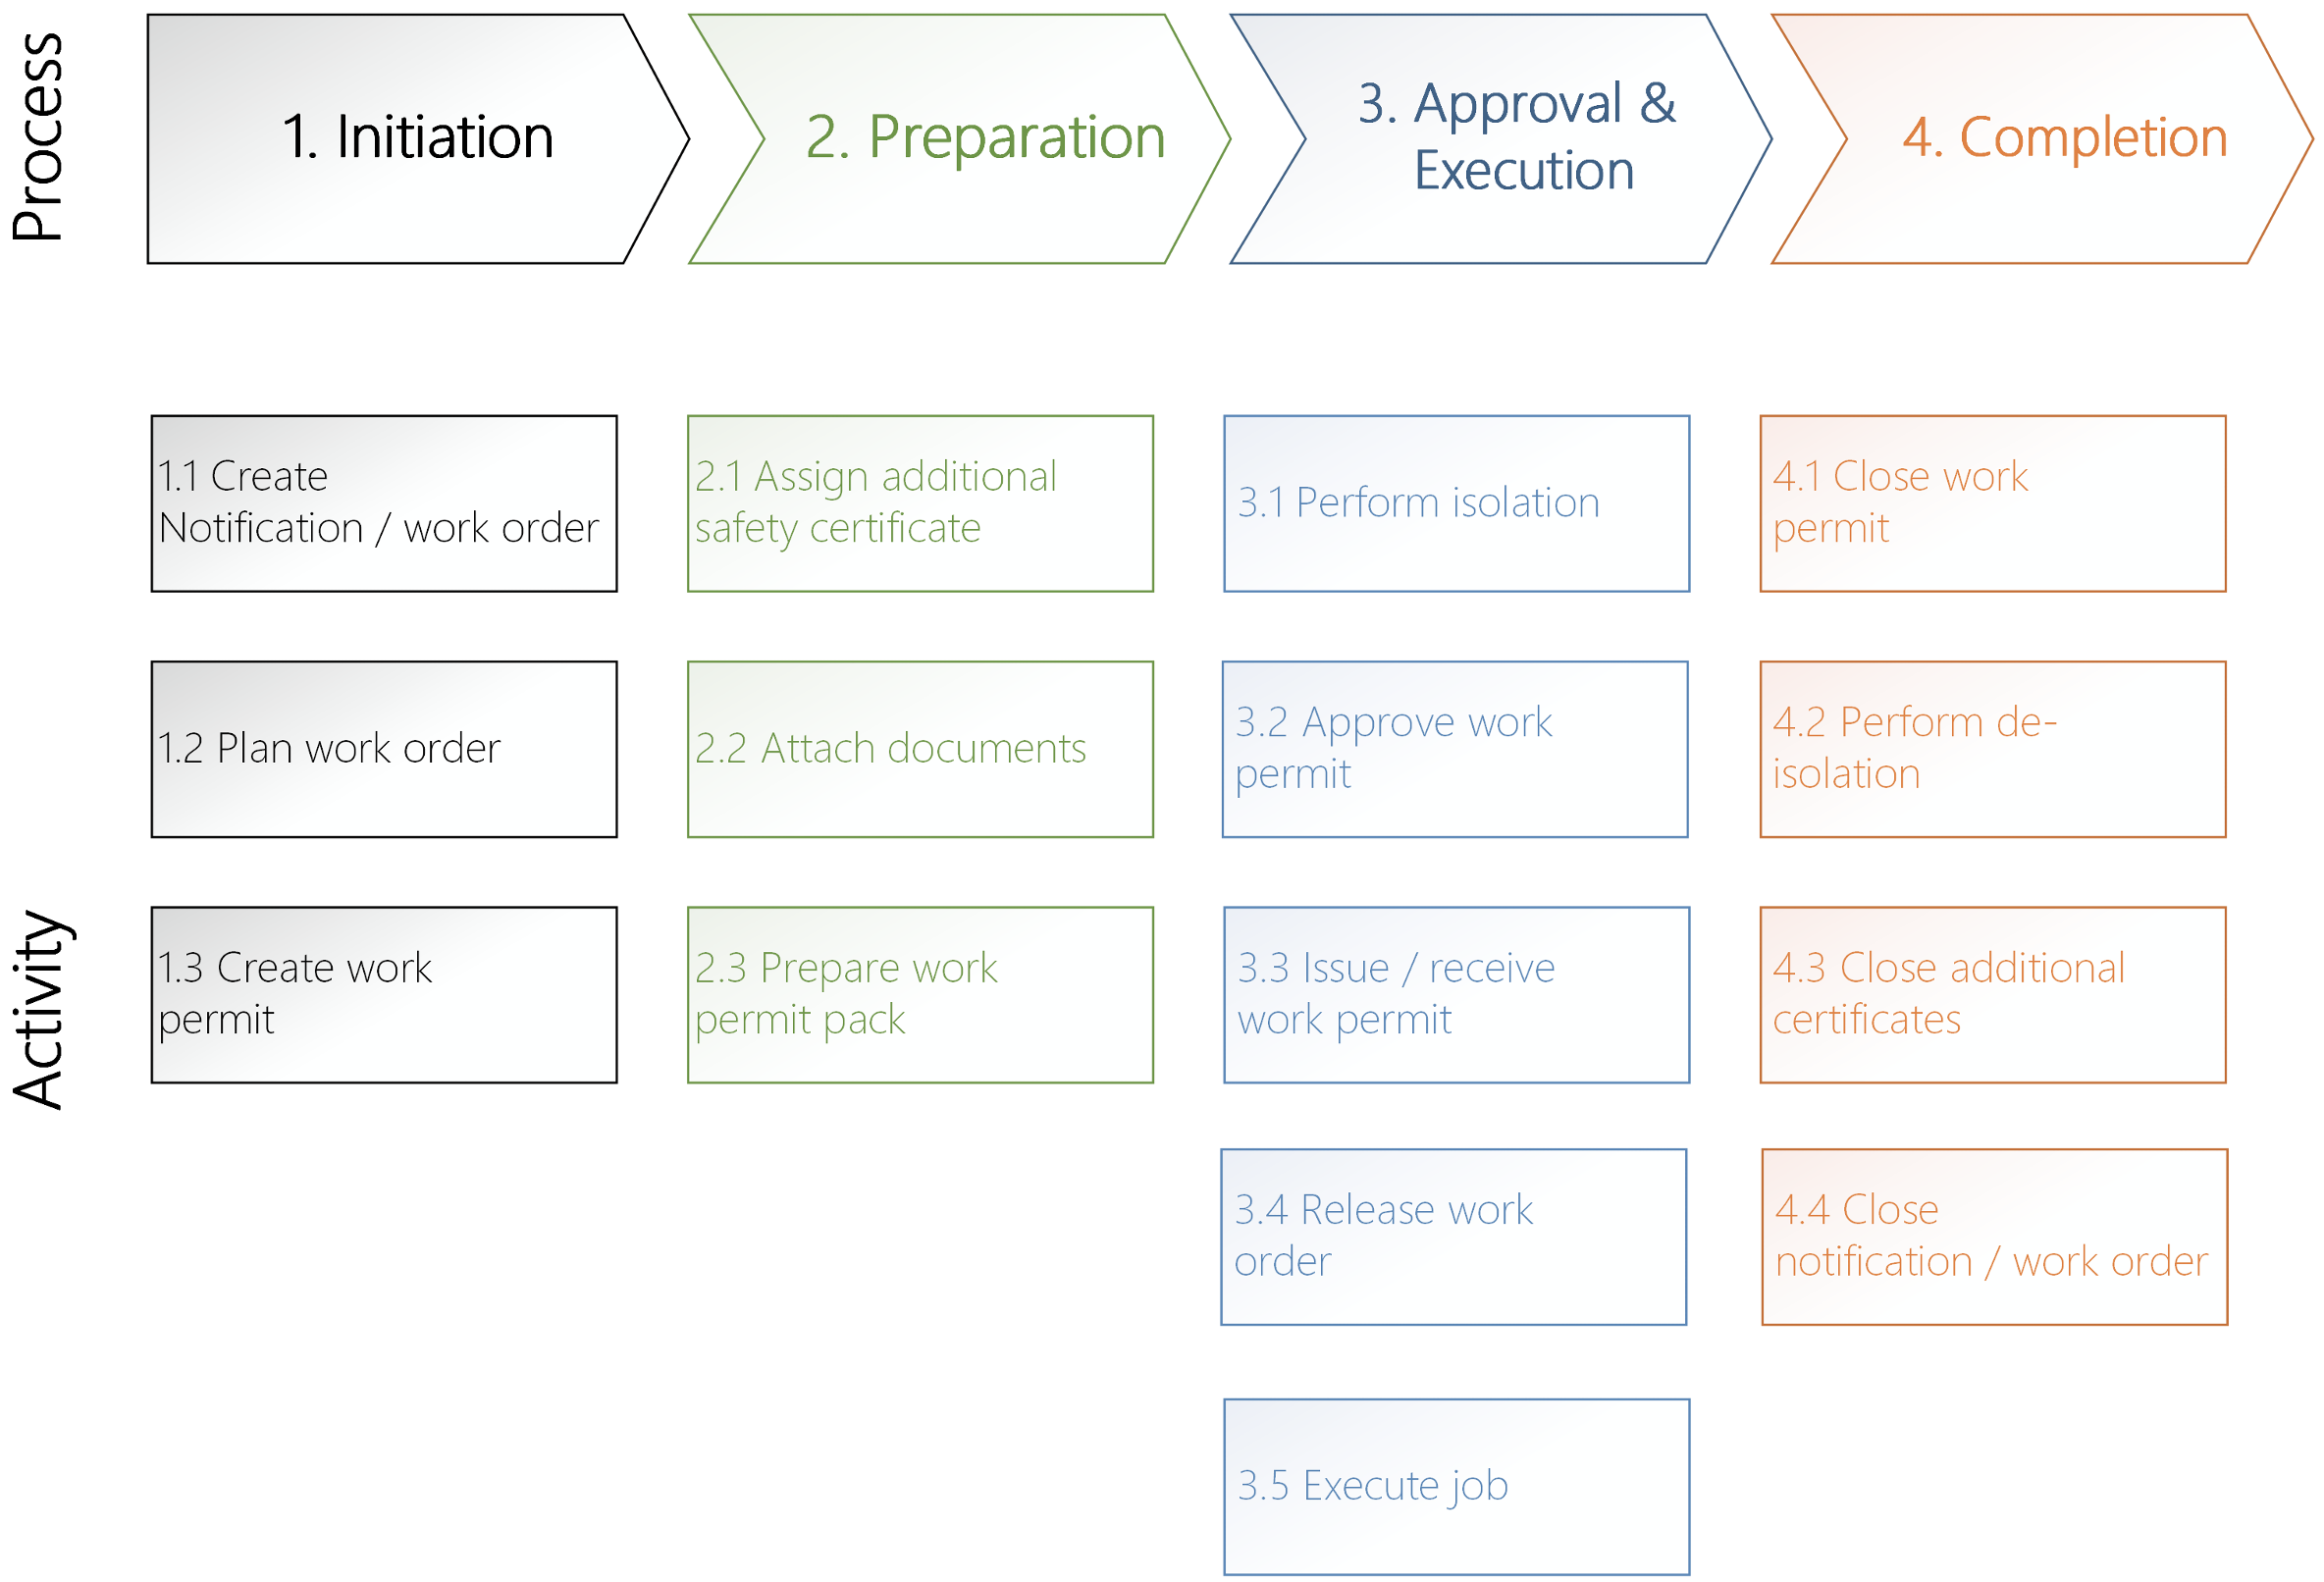
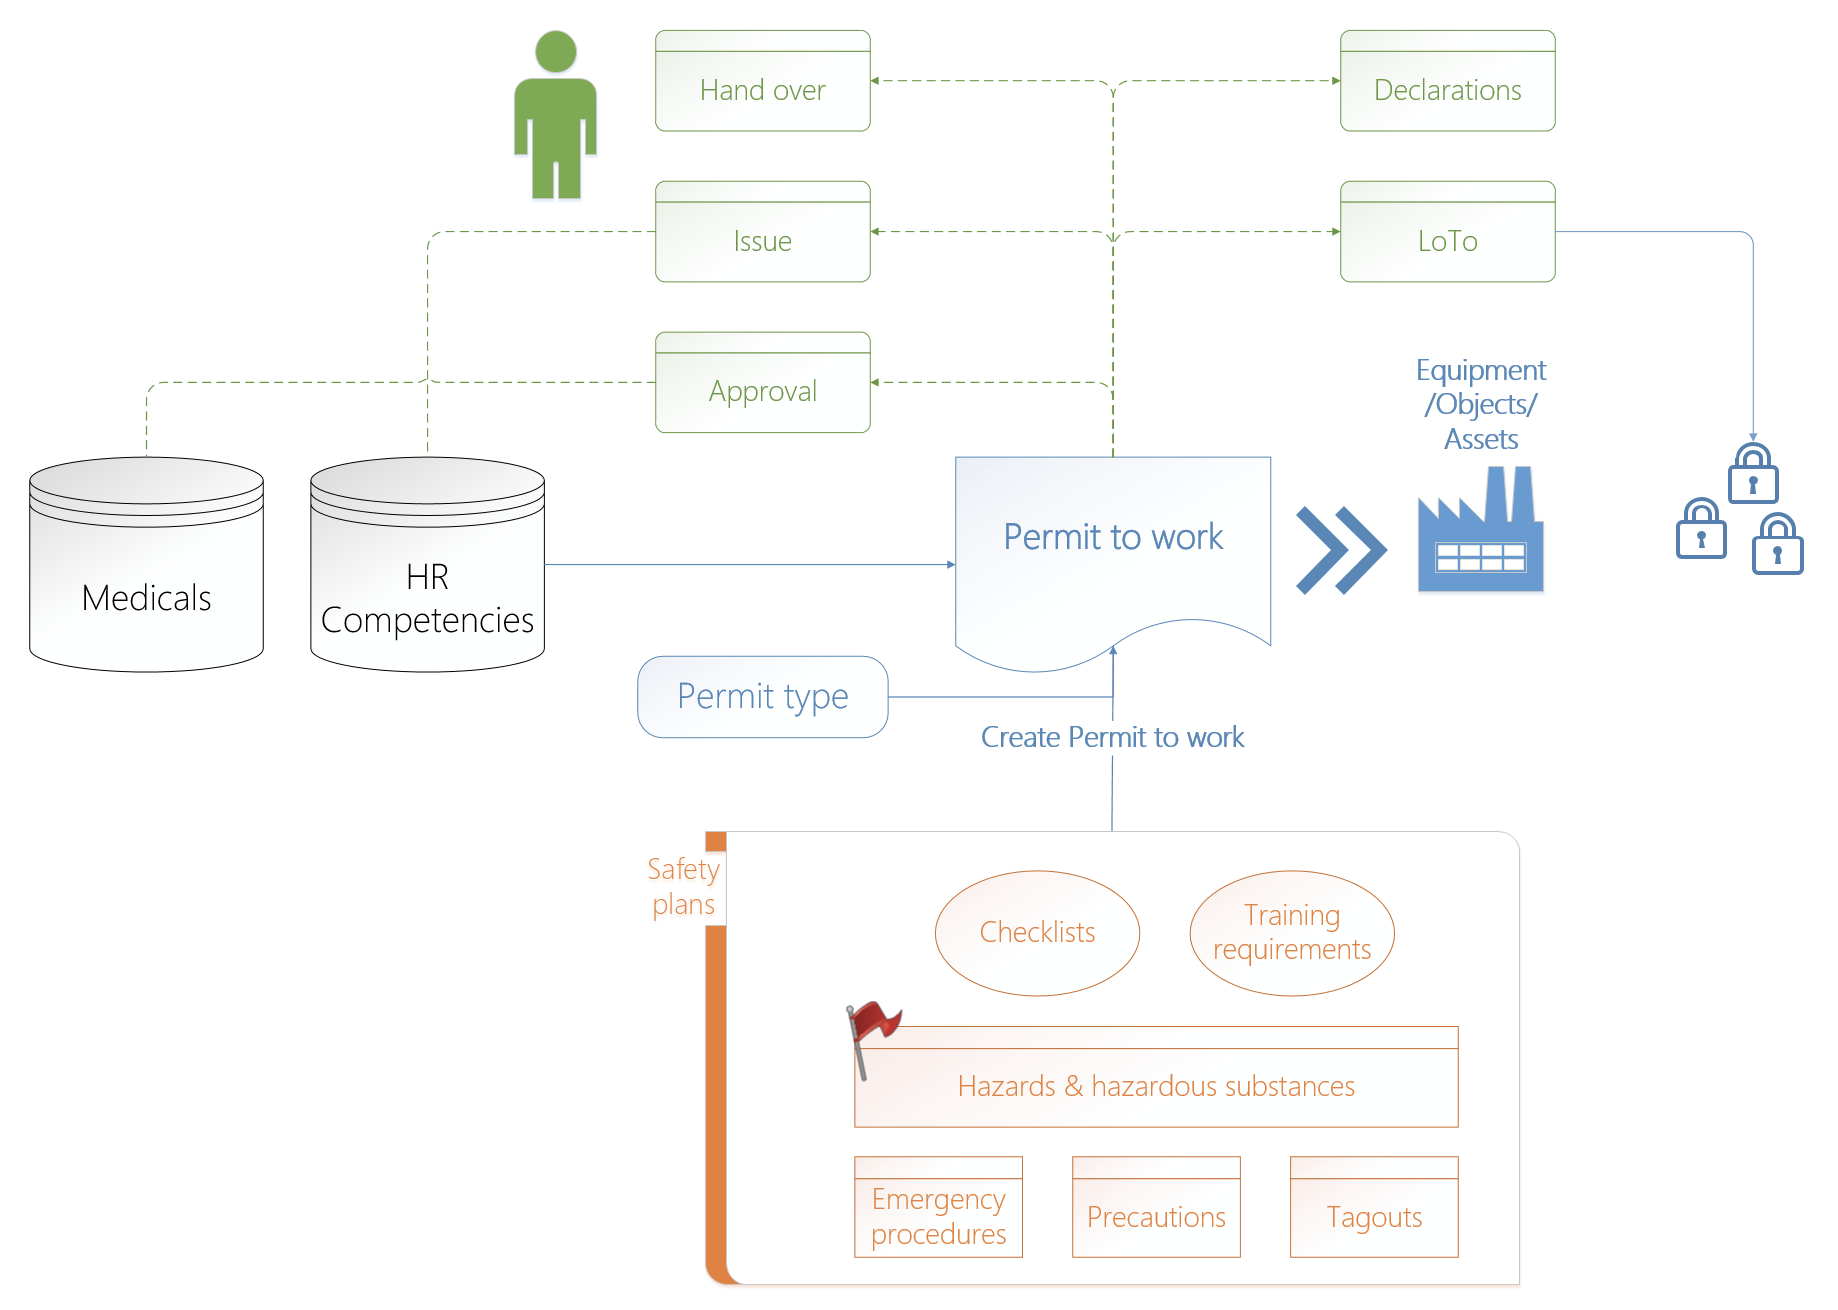
A typical Permit to work flow is depicted as follows:
The use of some of the features listed below is optional.
A hazard is a situation that poses a threat to life, health, property, or environment. Most hazards are dormant with only a theoretical risk of harm. However, once a hazard becomes active it can create an emergency situation. A hazardous situation that has come to pass is called an incident.
Hazard and possibility interact together to create risk.
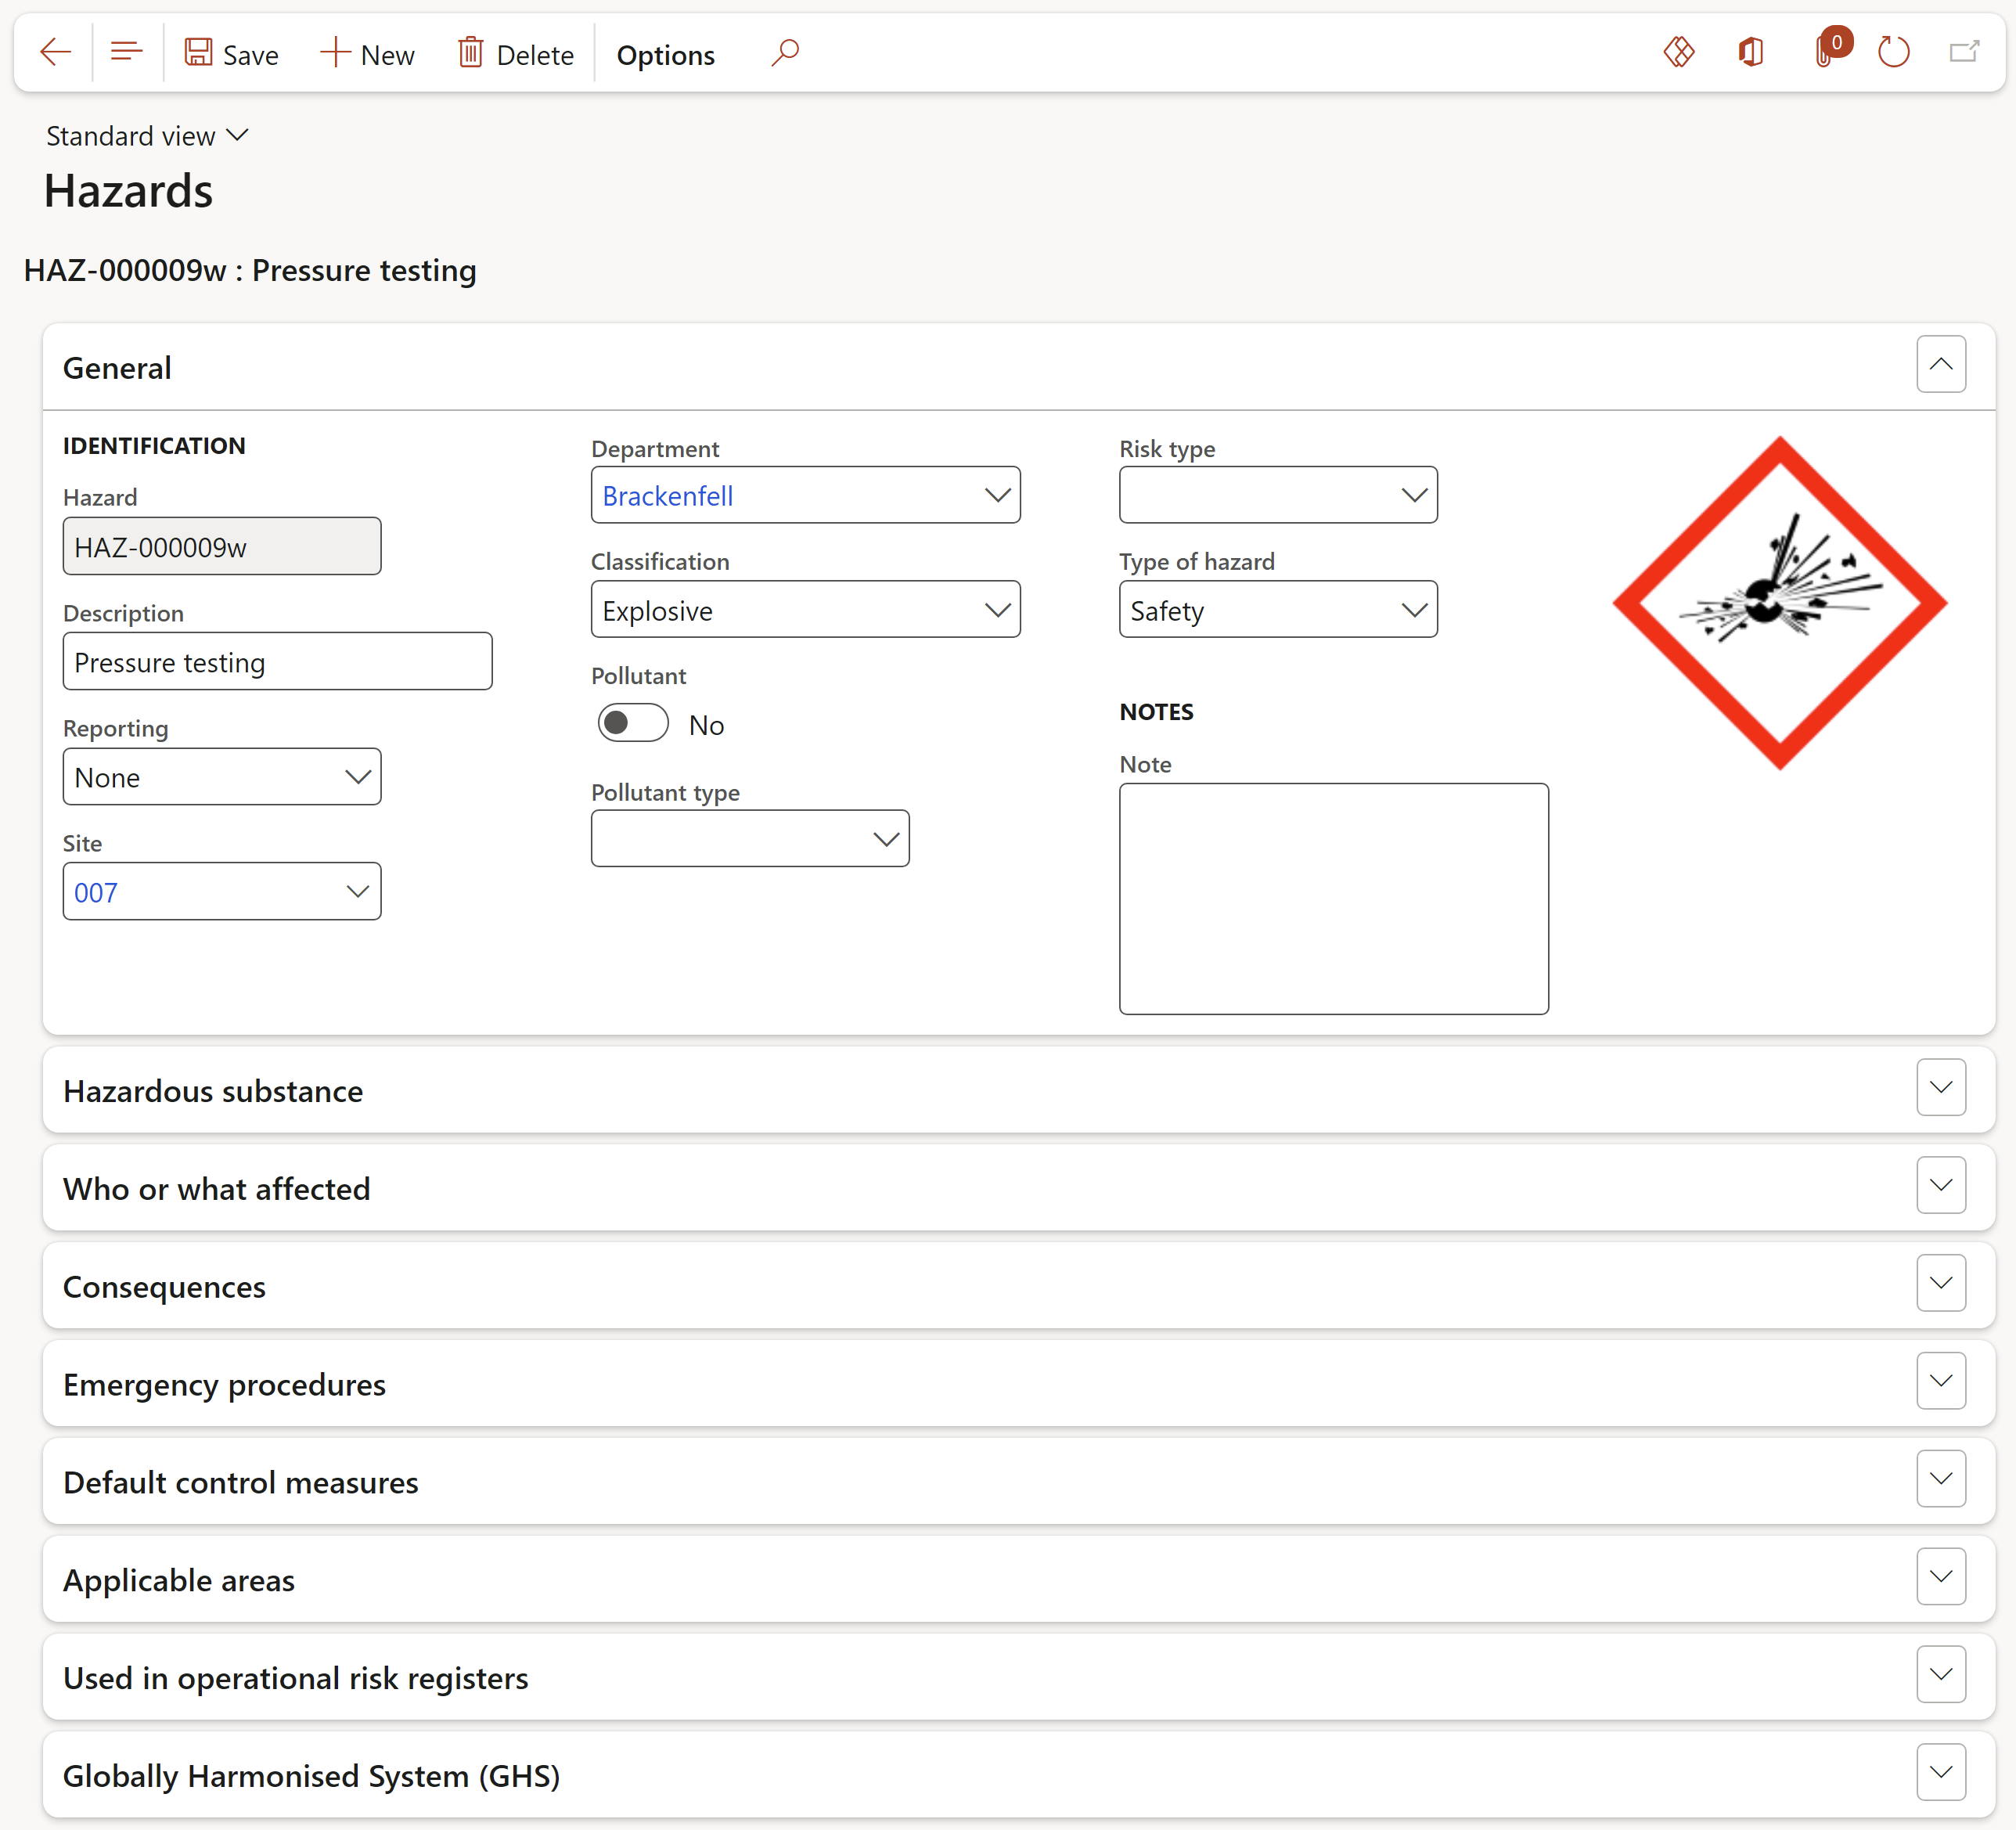
To create or add hazards to the list in HSE 365:
Go to: HSE > Safety and security > Hazards > Hazards
On the Action pane, click New
The unique Hazard ID is auto generated
Type a short Description of the hazard
Select the Site from the dropdown list
Select the relevant Classification from the dropdown list
If the hazard is a pollutant, make sure to tick the Pollutant tick box
The permit to work formalises the controls needed to mitigate Hazards and clearly sets out the responsibility for supervision and naming those operators involved. It's not just about checking that it is safe to start the work, but also that it is safe to continue the work, and is safe to return to normal operation after work (think maintenance) is completed. For example, work in confined spaces or at heights may need to be stopped if the weather changes.
A hazard control program consists of all steps necessary to protect workers from exposure to a substance or system, the training and the procedures required to monitor worker exposure and their health, to hazards such as chemicals, materials or substances, or other types of hazards such as noise and vibration.
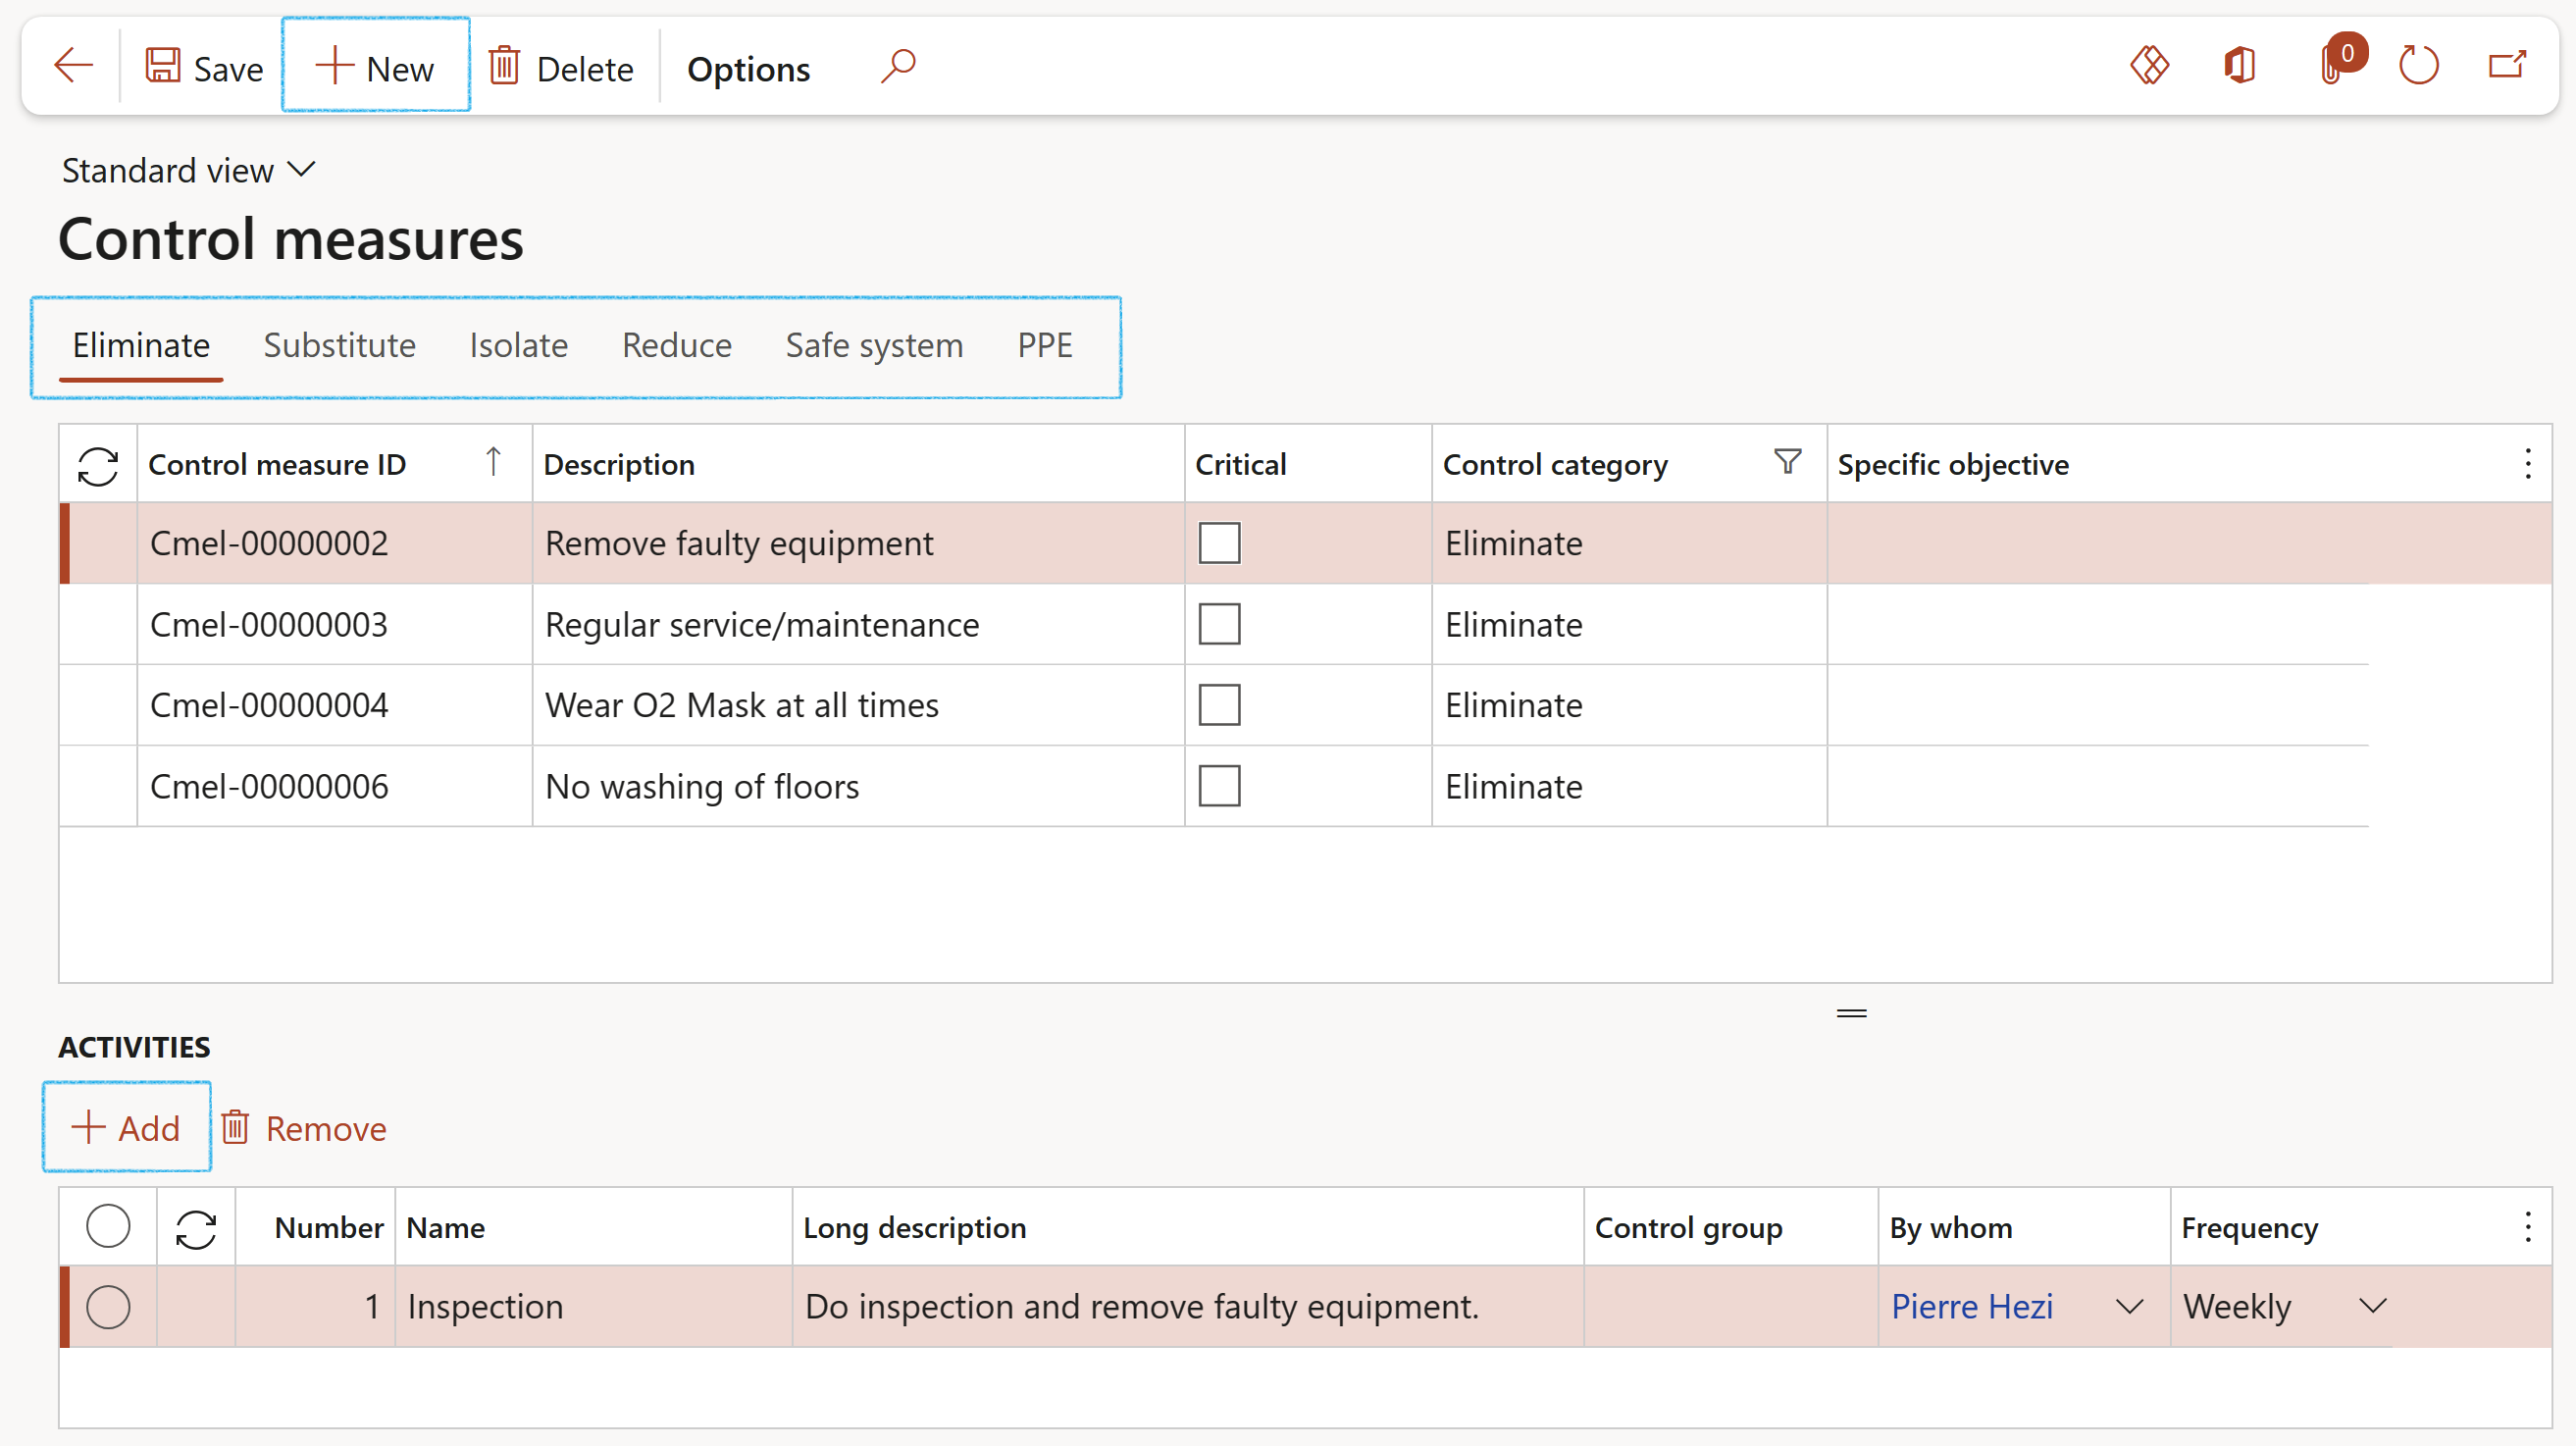
Go to: HSE > Permits to work > Setup for permits to work > Control measures
Open the Index tab of the type of control measure that you want to set up
Click on the New button in the Action pane
Enter the Control measure ID
Enter a Description for the control measure
Indicate whether the control measure is Critical
Enter a Specific objective (If applicable)
Activities can be added for each control measure in the bottom half of the form
Dynamics 365 HSE allows you to pre-configure your isolation procedures in the system. Each isolation procedure will contain all the details of the necessary isolations. The isolation procedure can be linked to a specific item of equipment, a certain type of equipment and/or activities that may be in progress at the time. The system will then help you to identify the correct isolation procedure to use as well as ensuring that all the necessary isolations are correctly detailed on the permit to work.
Go to: HSE > Permits to work > Setup for permits to work > Isolation points
On the Action pane, click on the New button
Under the the Isolation group Fast tab:
Enter an Isolation group ID
Enter a brief Description
Select either the relevant Object or Location from the dropdown list
Enter a unique Object ID and enter a Name for the object
Select the relevant Object type from the dropdown list
Select the Location where the object is being used
Select the Site where the object is being used
Select the Department where the object is being used
Tag outs are safety procedures that ensure that dangerous objects/equipment (or situations) are properly shut down. Also known as LOTO; this stands for lockout/tagout. When done properly before objects/equipment service or maintenance, lockout/tagout procedures control hazardous energy and protect workers from harm.
Without the use of proper LOTO safety procedures, the serviced objects/equipment can unexpectedly start up or otherwise release these forms of energy. This can lead to injuries and even death to the people working on the machine and even to others working in the area or living in the community.
Energy sources including electrical, mechanical, hydraulic, pneumatic, chemical, thermal, or other sources in machines and equipment can be hazardous to workers. During the servicing and maintenance of machines and equipment, the unexpected startup or release of stored energy can result in serious injury or death to workers.
A lockout/tagout procedure should include at least the following steps:
Preparation
Shutdown
Isolation
Lockout/tagout
Stored energy check
Isolation verification
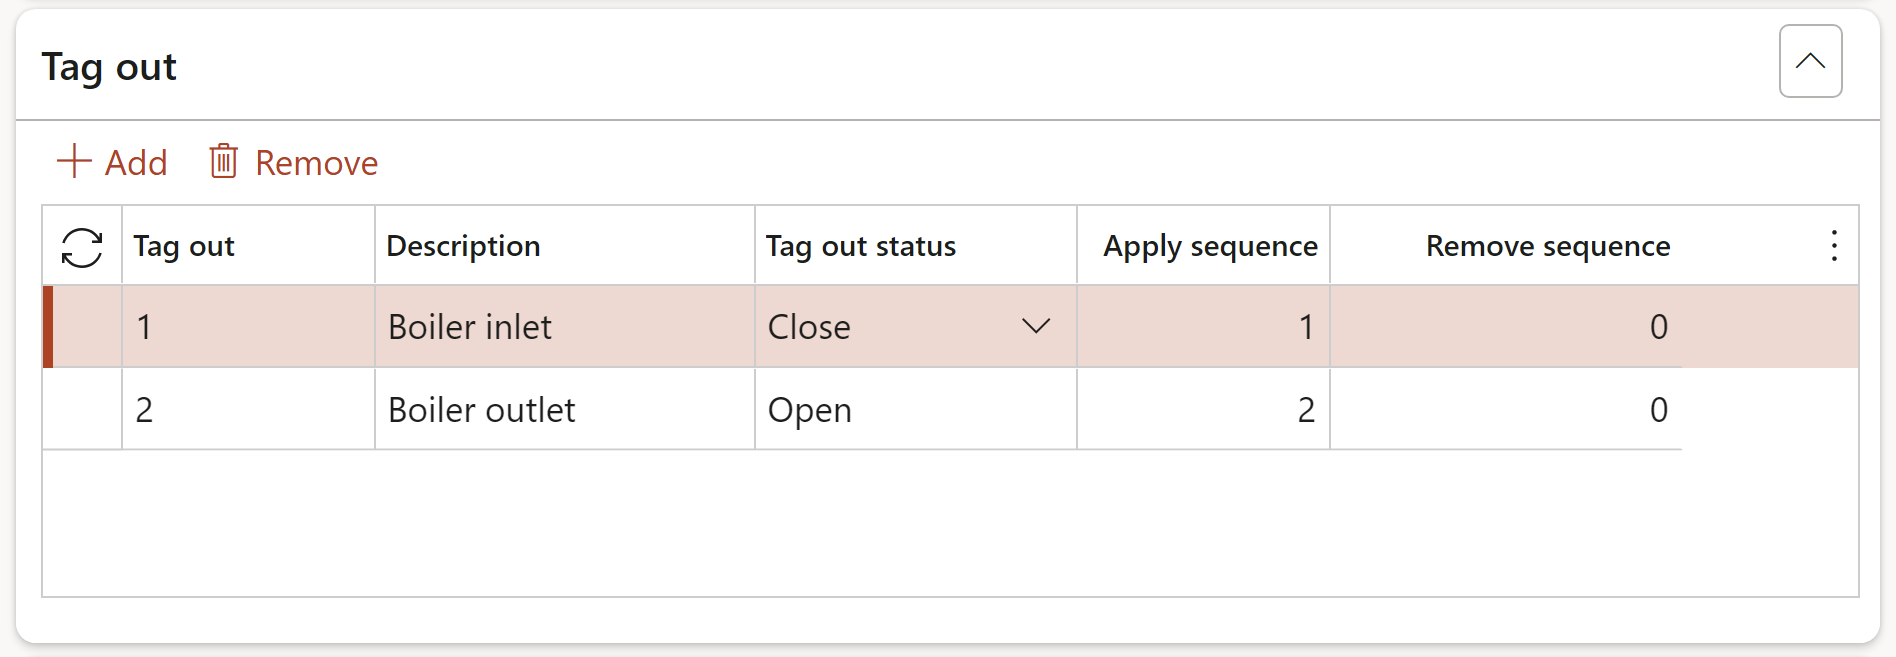
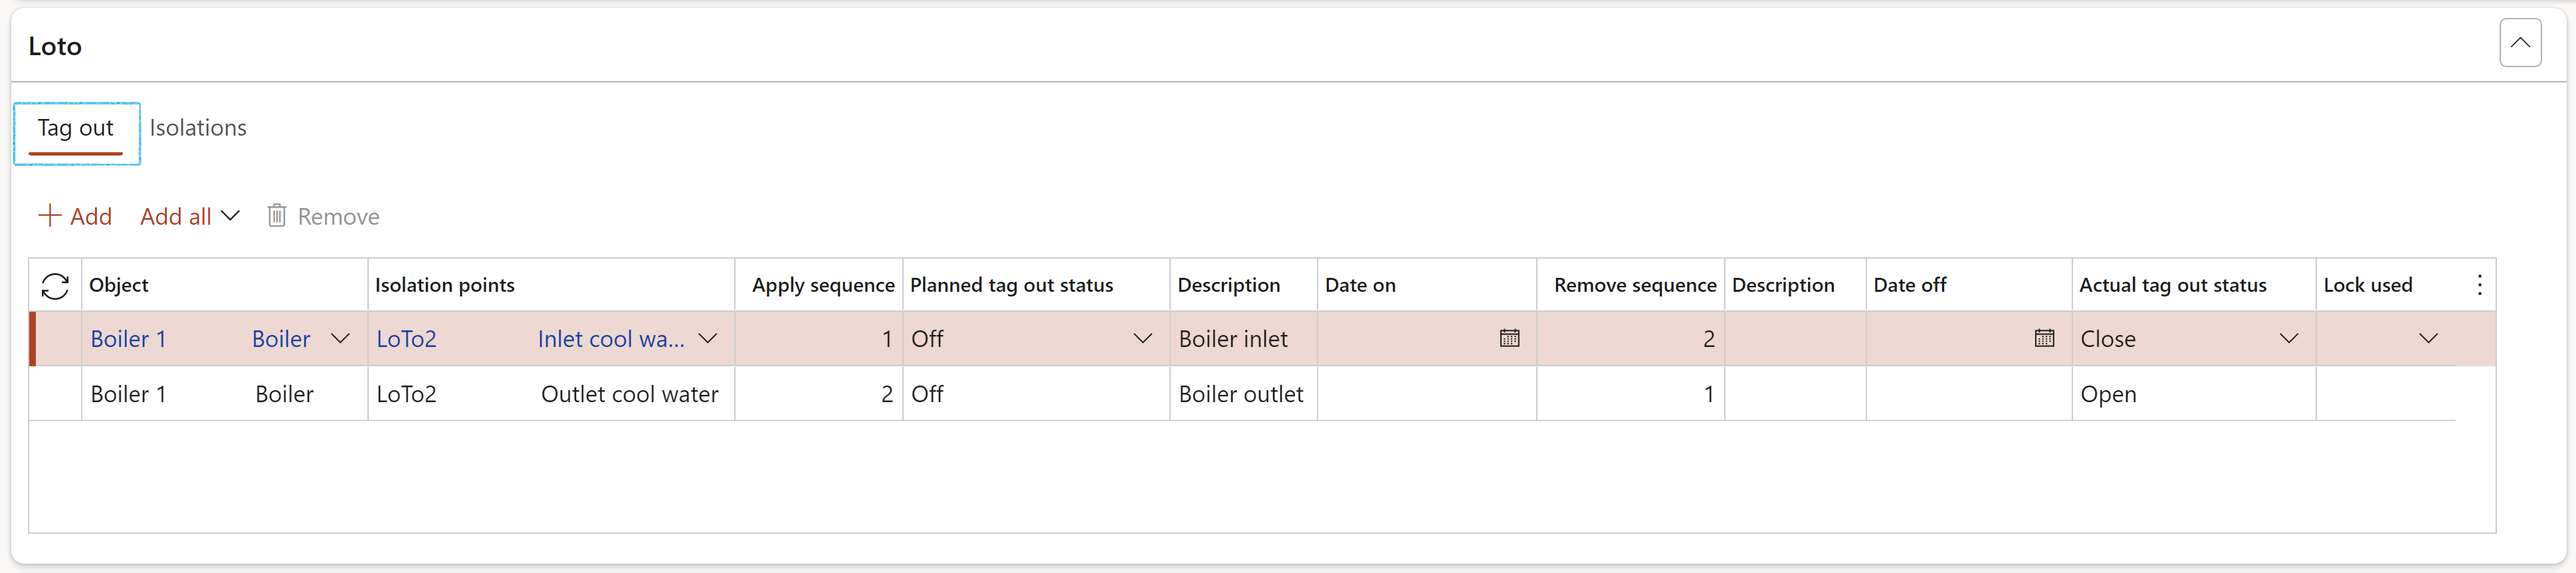
To do this inside Dynamics 365 users should go to Tag out Fast tab of the Object detail form as per above.
In the Button strip, click on the Add button
Enter a unique ID for the Tag out, as well as a short Description for the Tag out
Select the relevant Status of the Tag out from the dropdown list
Enter the sequence of application of the Tag out
Enter the sequence of removal of the Tag out
Repeat the above steps until the complete Tag out procedure has been captured
Job plans for PTWs outline what work will be done, how it will be done, what tools are required, what PPE is required, and the safety measures in place.
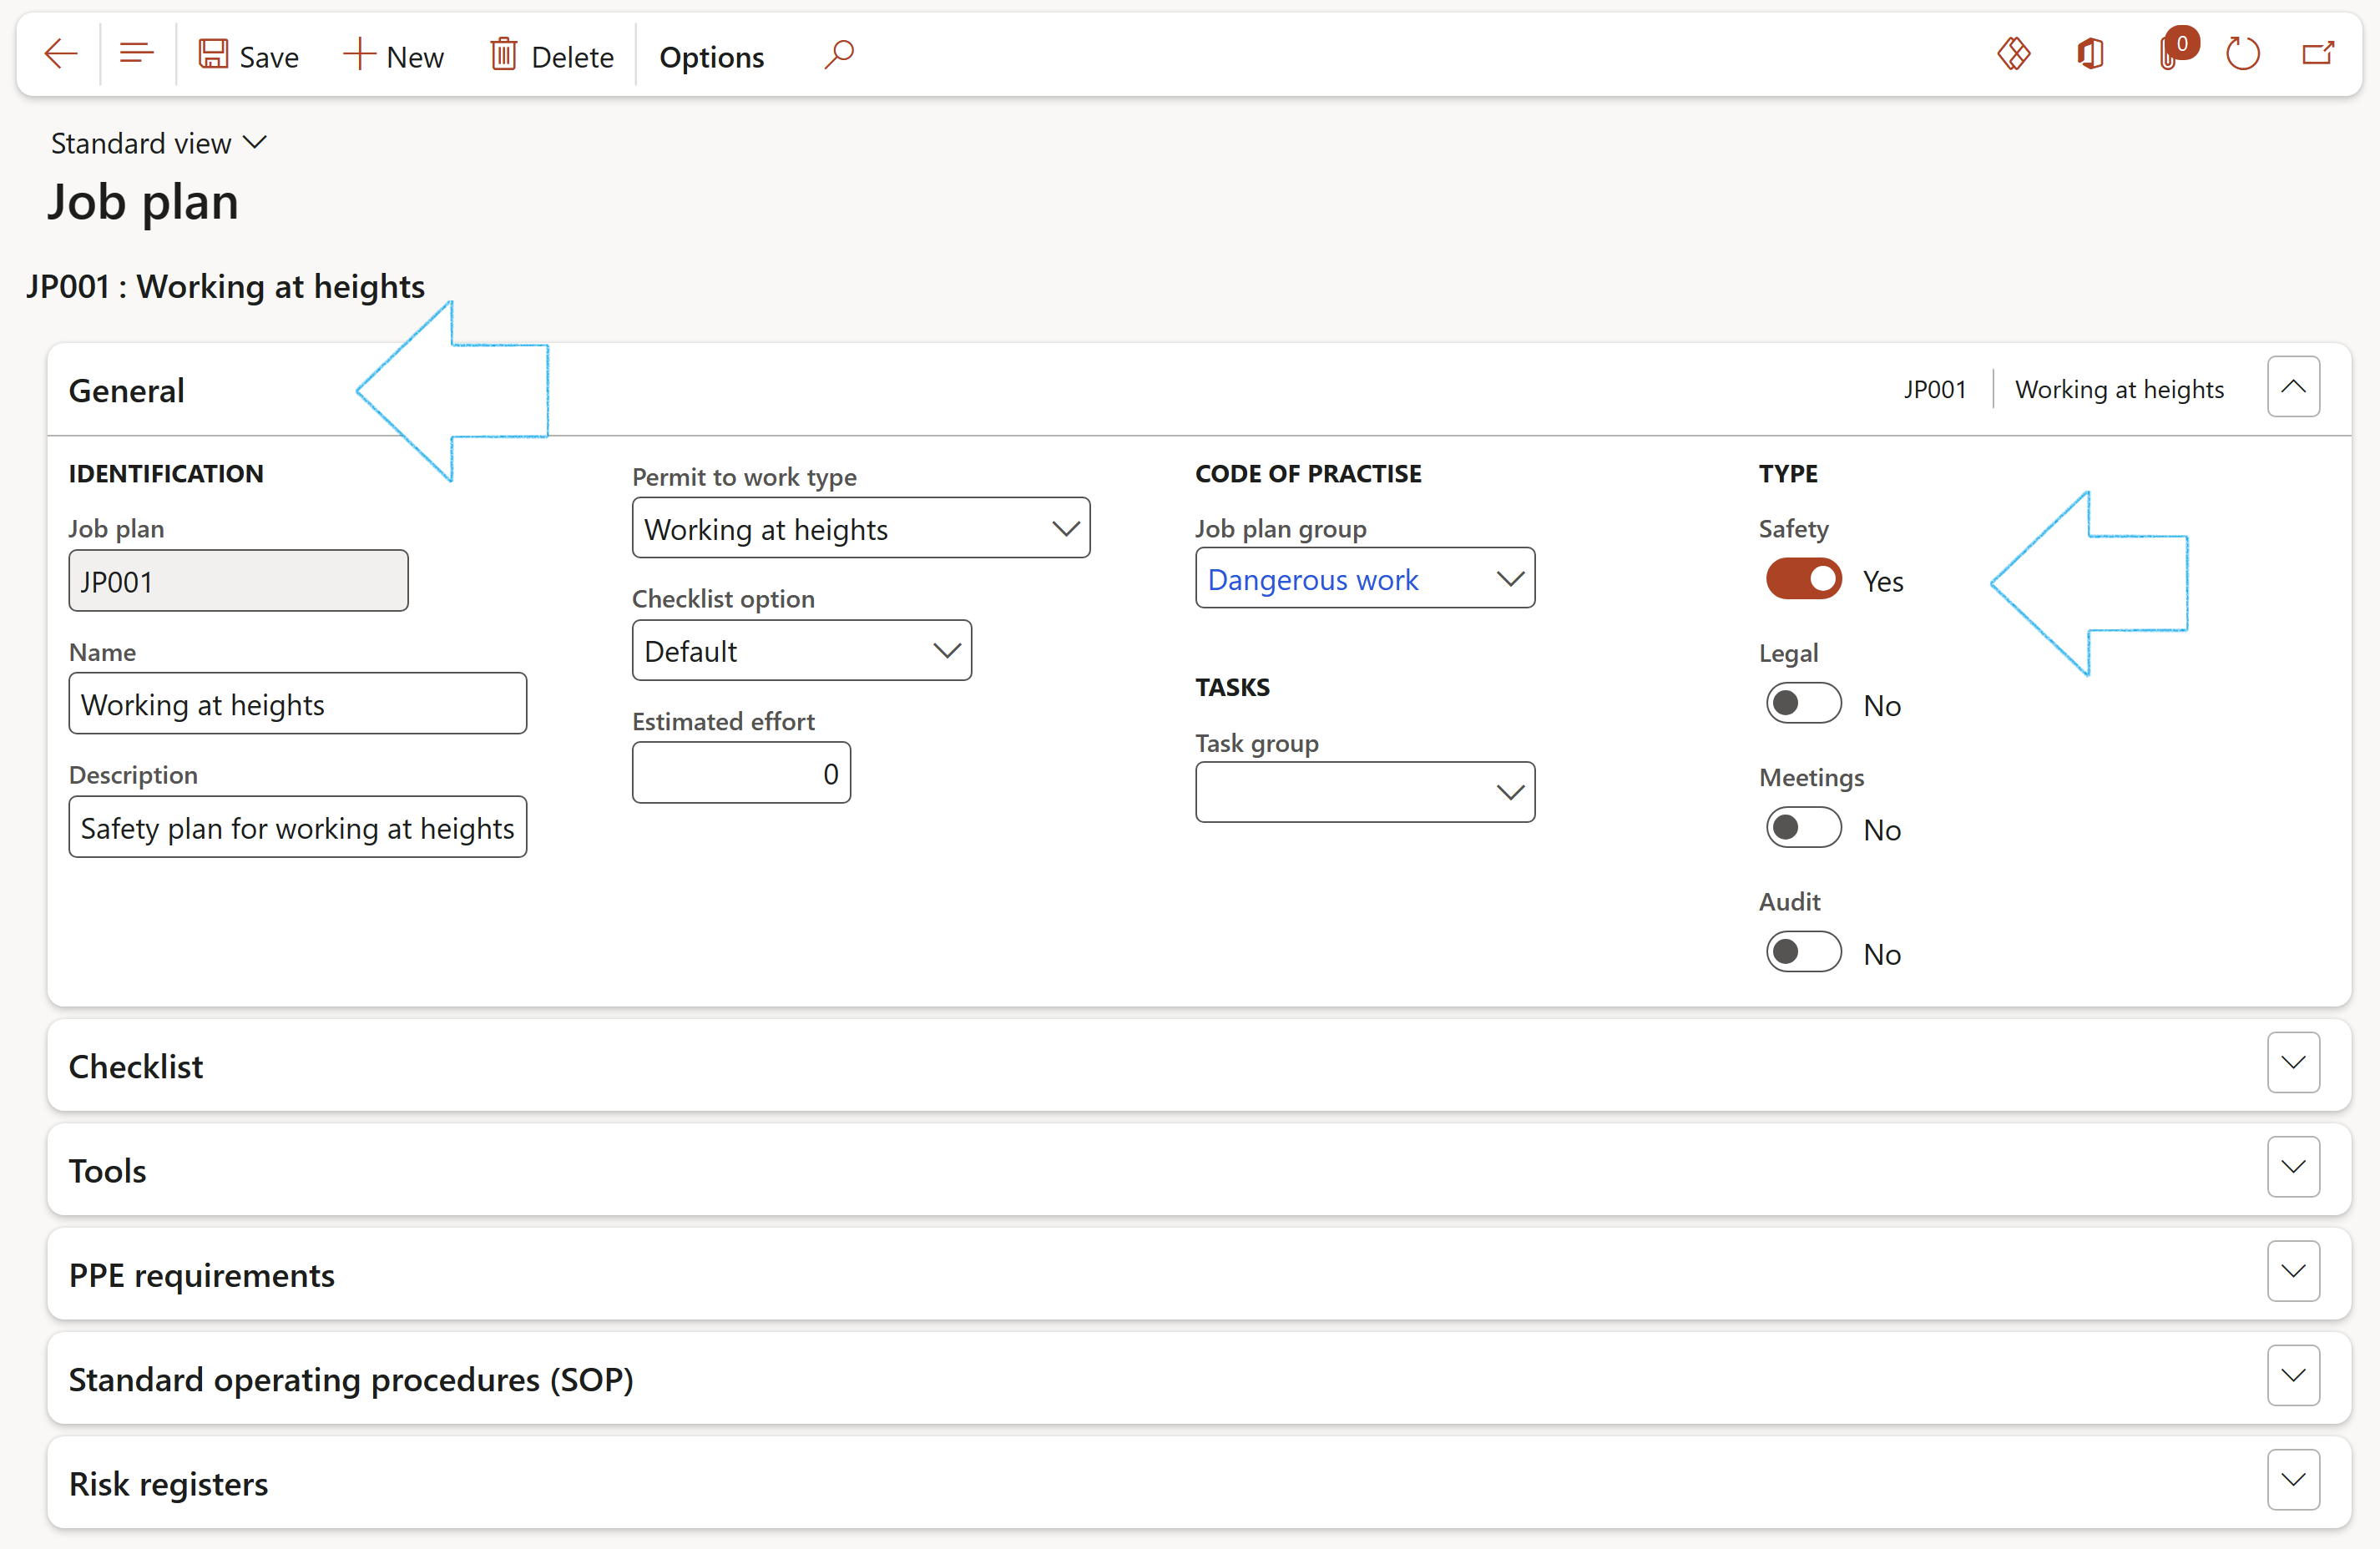
Go to: HSE > Setup > Work > Job plan
Expand the General Fast tab
Enter a Job plan identifier
Enter a Name for the job plan
Enter a Description for the job plan
Select the relevant Permit to work type from the dropdown list
Select the Checklist option to be used for the job plan. (Tick boxes or scoring)
Select the relevant Job plan group from the dropdown list
Select the relevant Task group from the dropdown list
Indicate what Type of job plan this is by moving the Safety slider to Yes
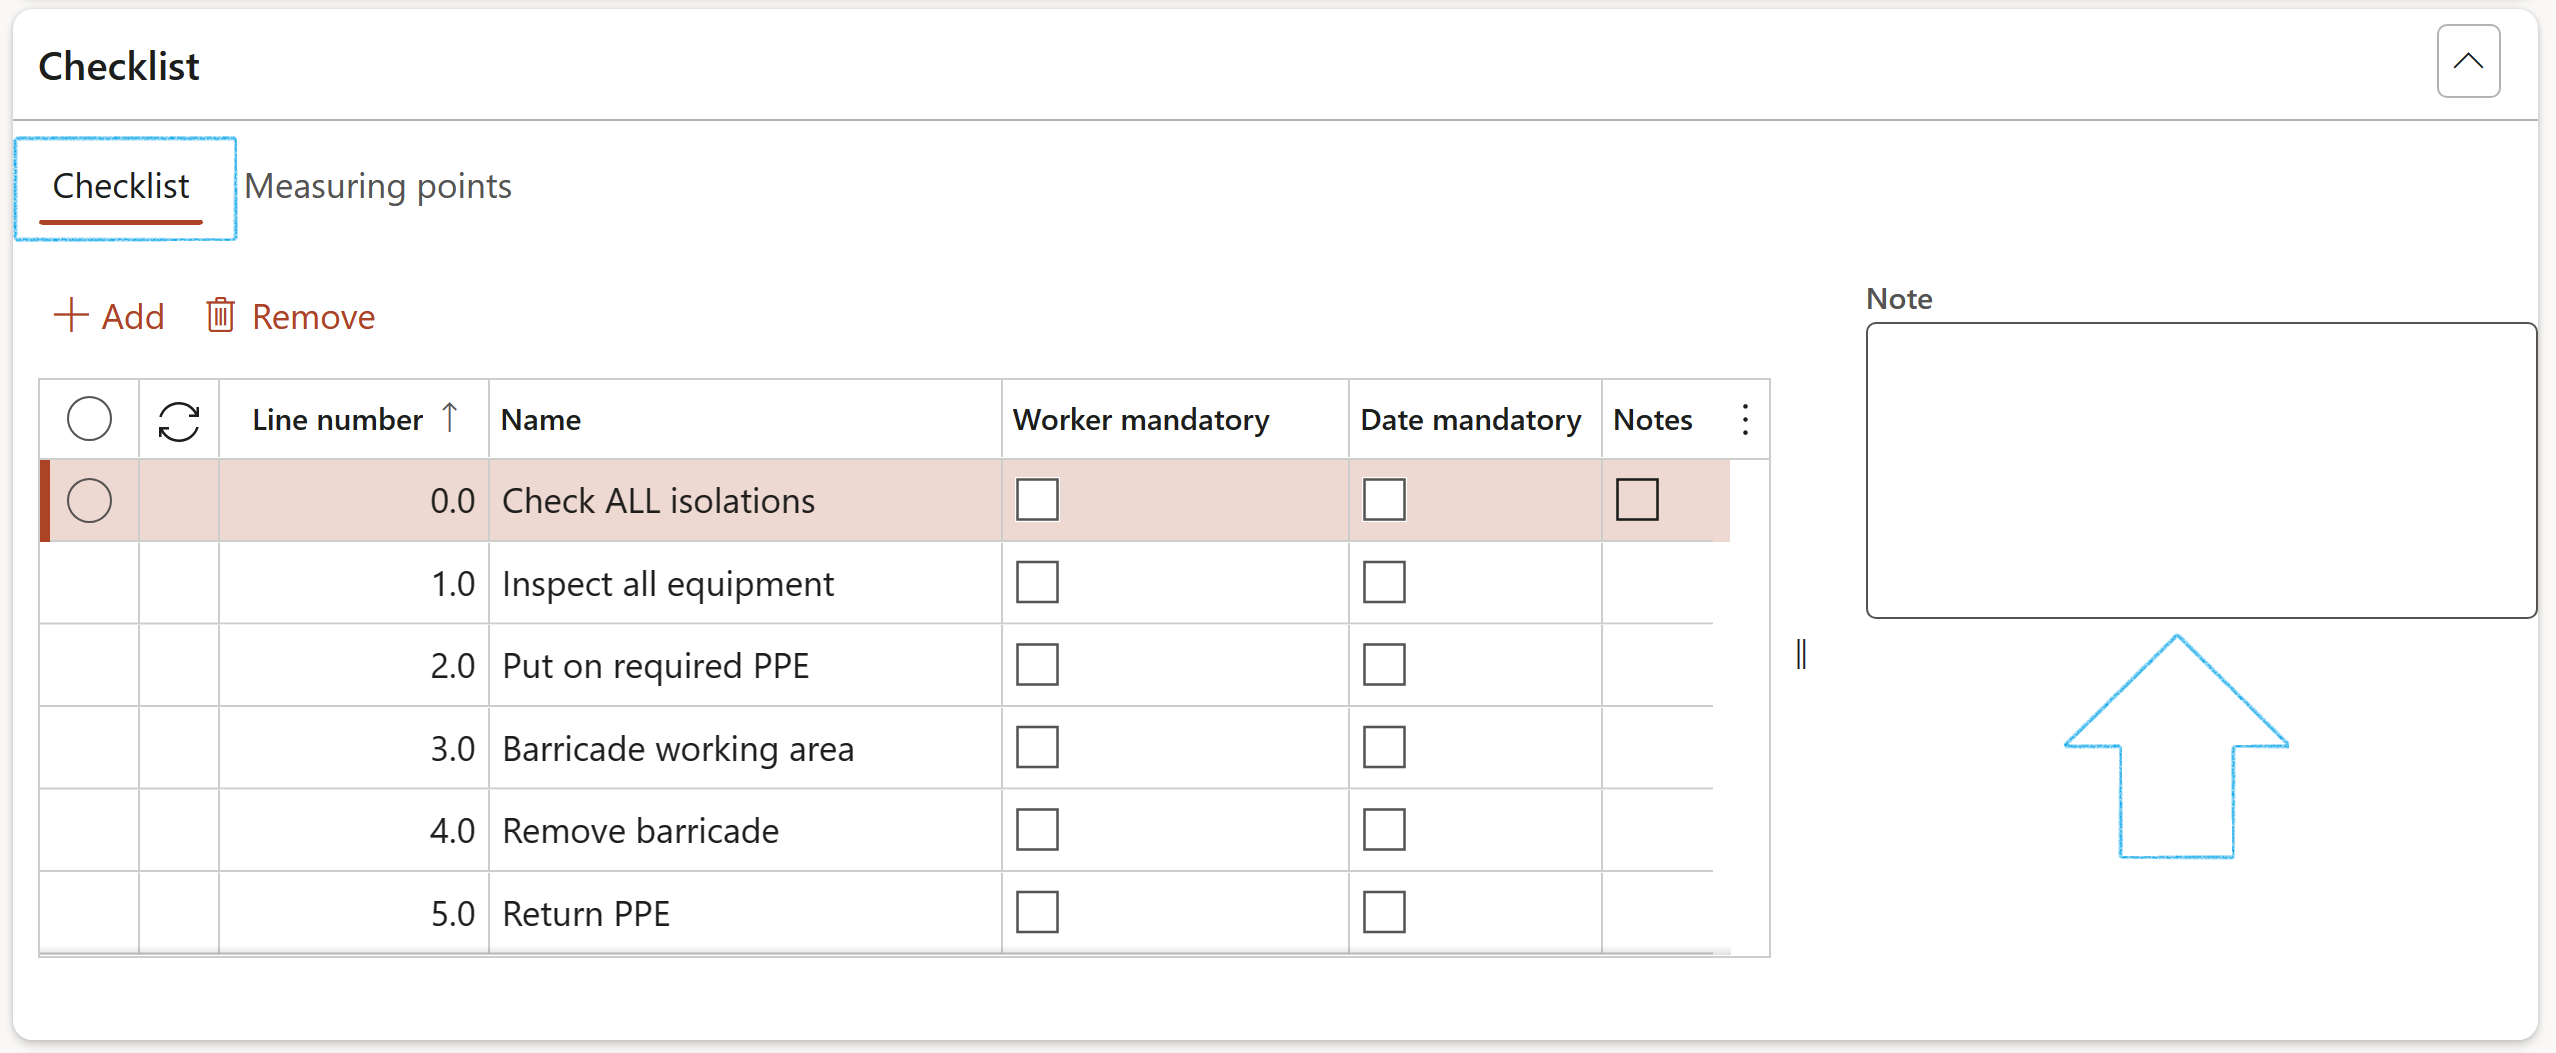
Expand the Checklist Fast tab
Under the Checklist Index tab, click on the Add button
In the Line number field, enter the number of the order in which the task should be done
In the Name field, enter a description of the task to be done
Indicate whether a Worker is mandatory
Indicate whether a Date is mandatory
Enter an additional Note in the box provided
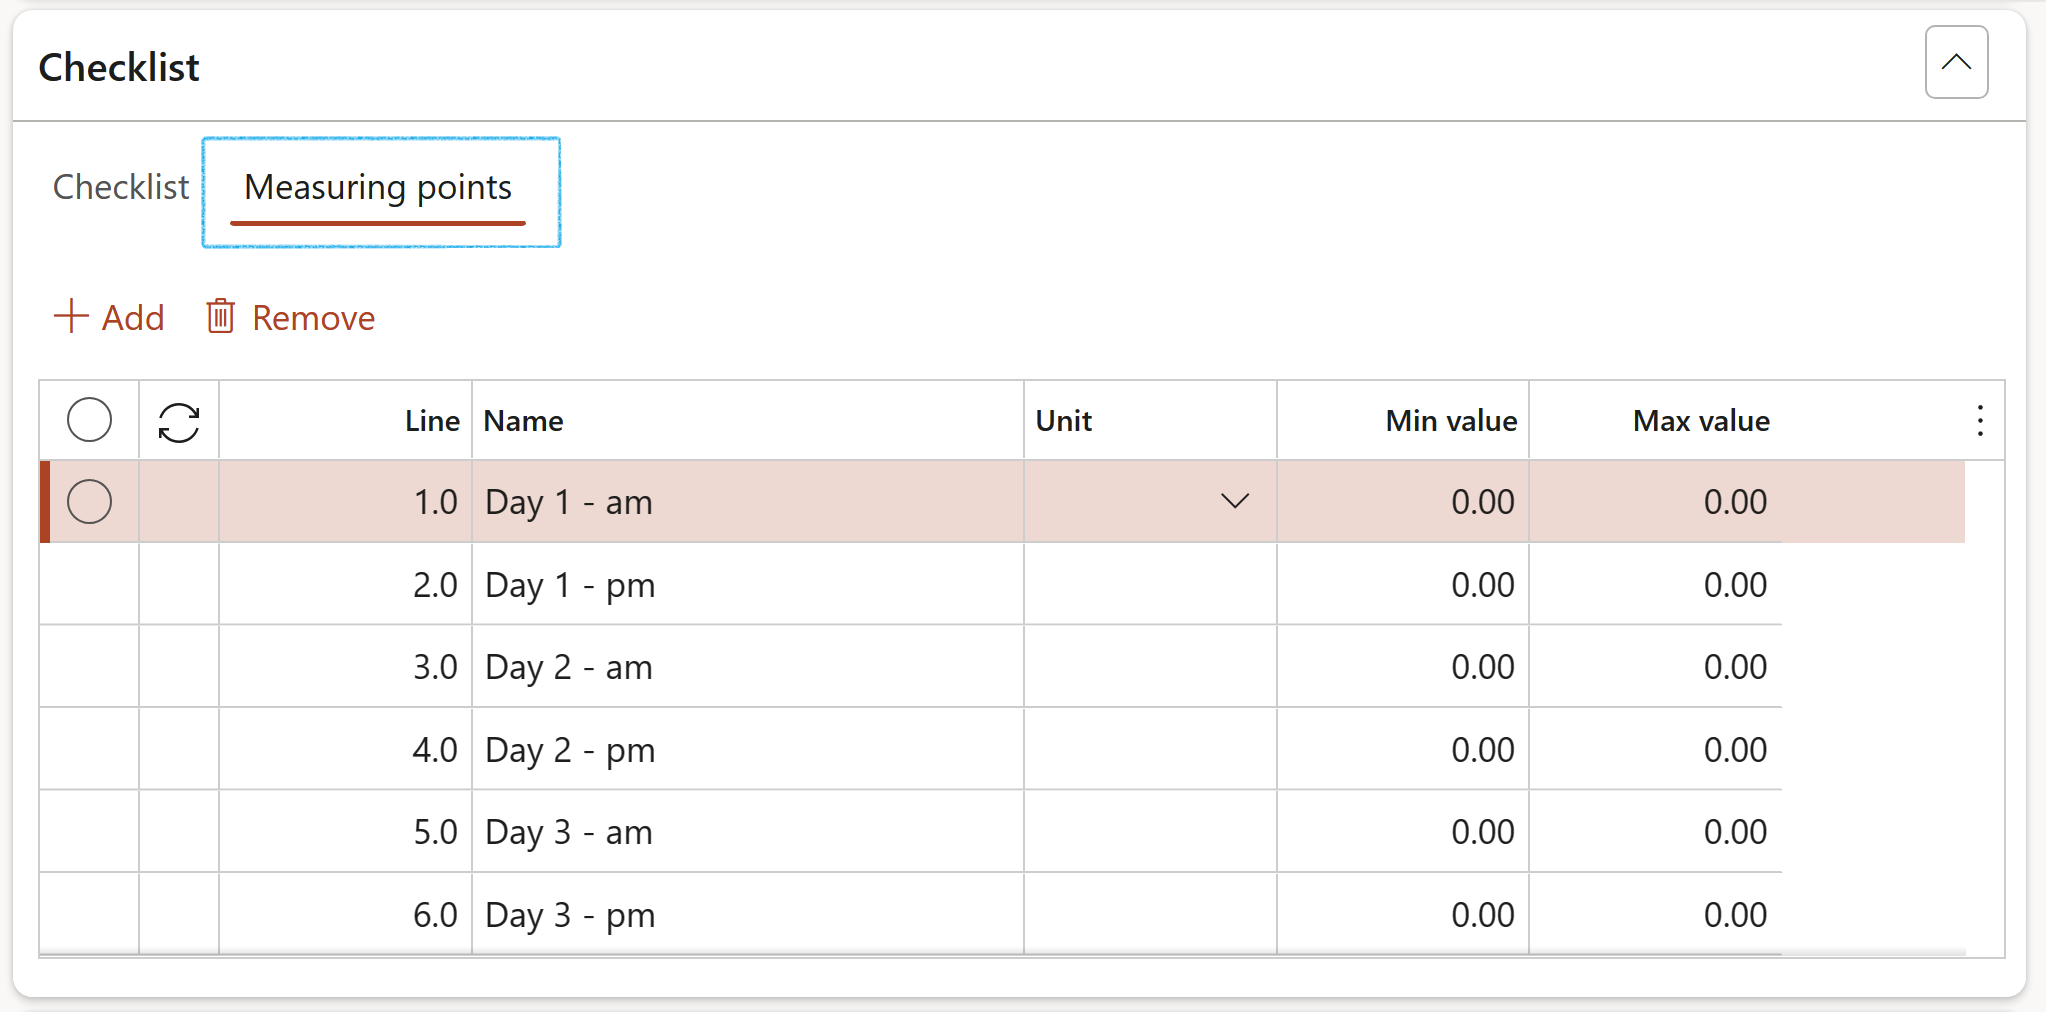
To add measuring points to checklist lines, select the relevant line and then open the Measuring points Index tab under the Checklist Fast tab
In the Button strip, click on the Add button
In the Line number field, enter the number of the order in which the measurement should be taken
In the Name field, enter a description of the task to be done
Select the relevant Unit of measure from the dropdownn list
Enter the expected Min value
Enter the expected Max value
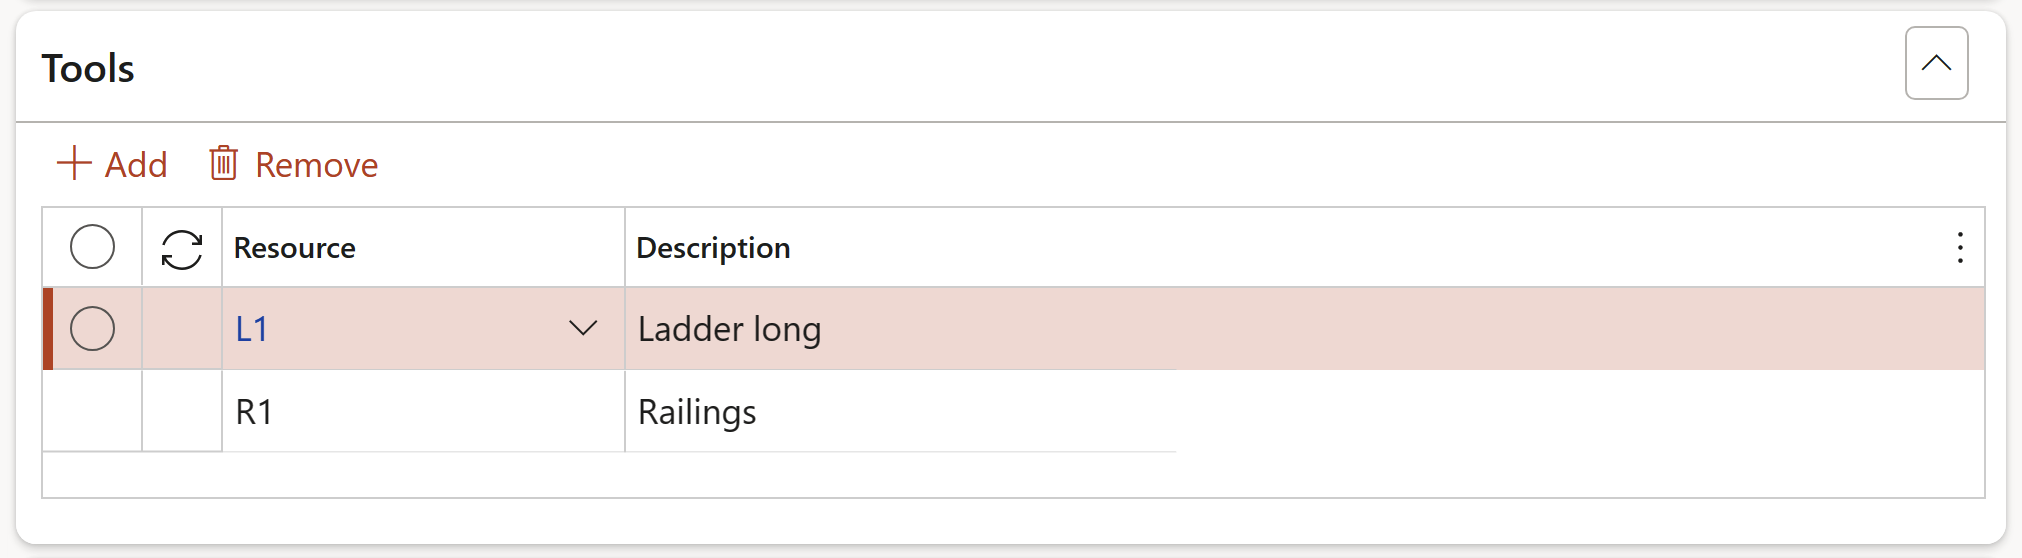
Expand the Tools Fast tab
In the Button strip, click on the Add button
Select the required Resource from the dropdown list
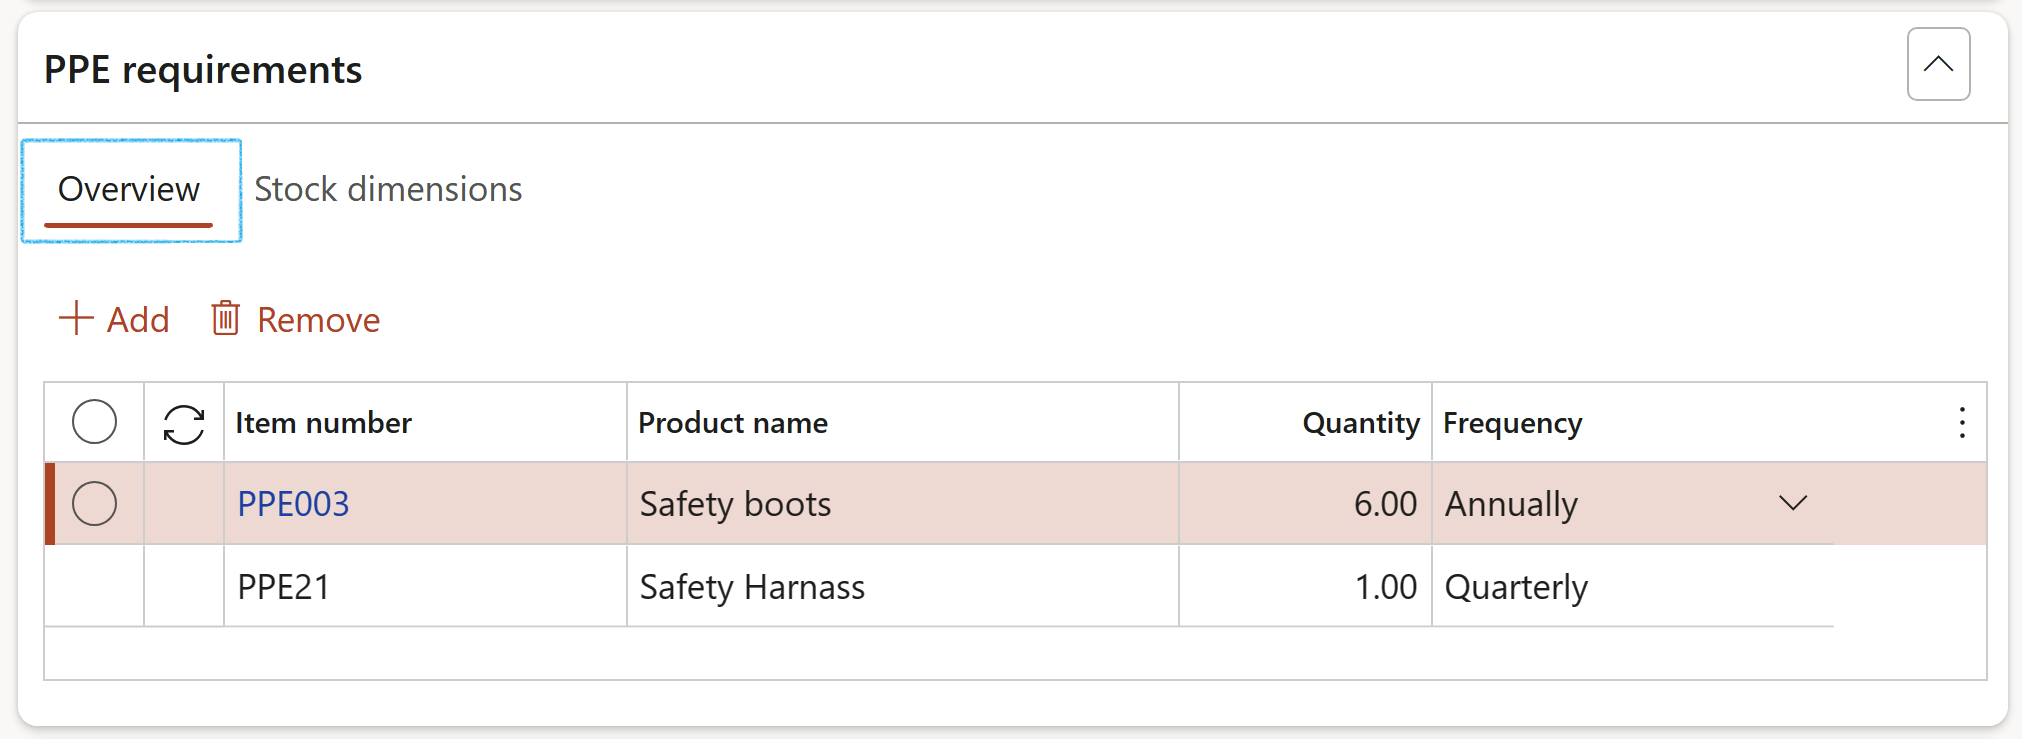
Expand the PPE requirements Fast tab
In the Button strip, click on the Add button
Select the Item number from the dropdown list
Enter the Quantity needed for the job plan
Select the Frequency with which the item will be needed
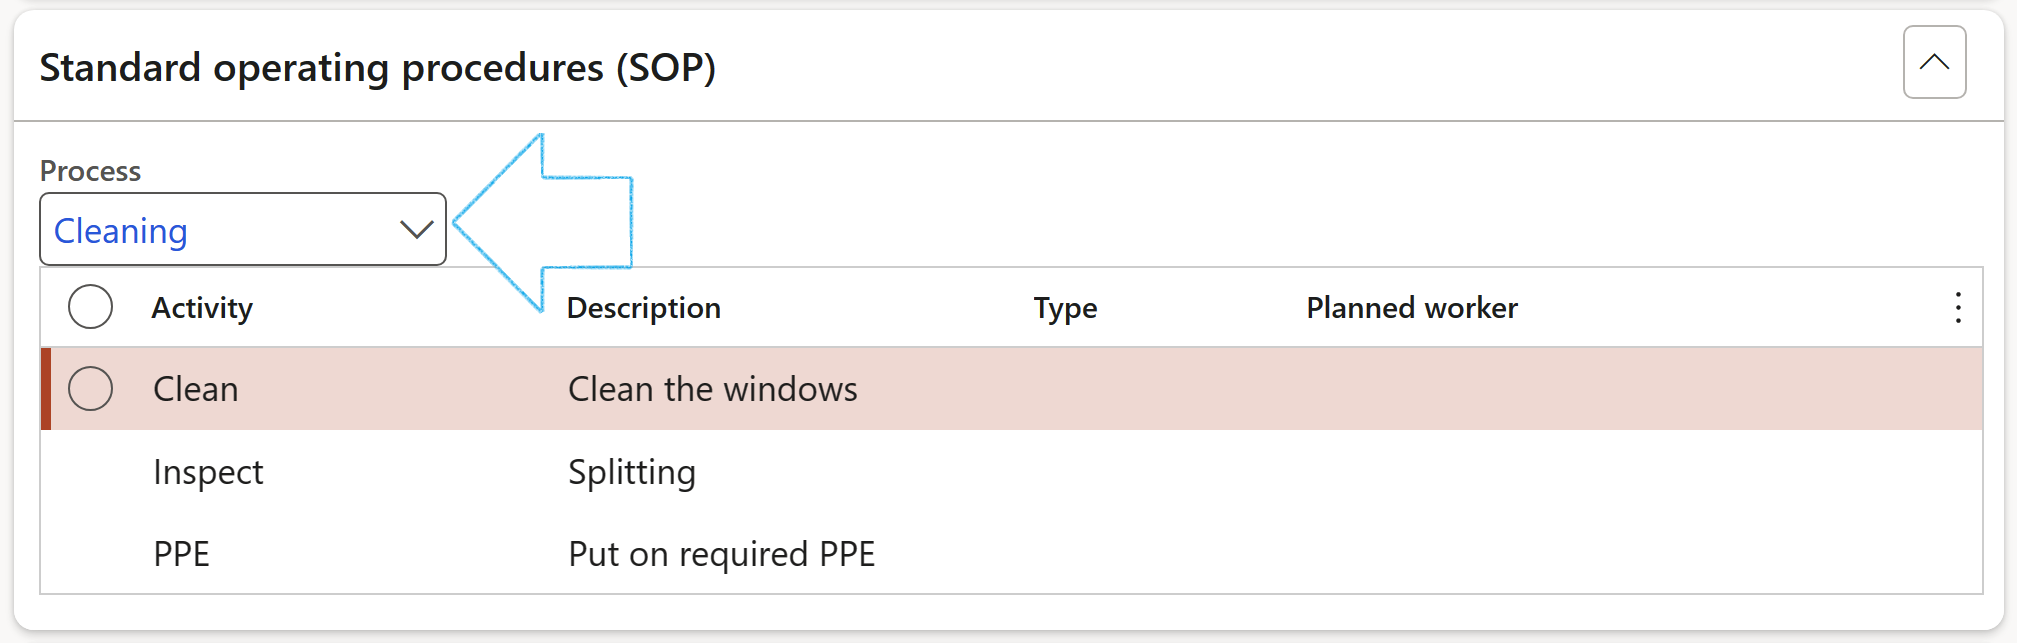
Expand the Standard operating procedures (SOP) Fast tab
Select the relevant Process from the dropdown list
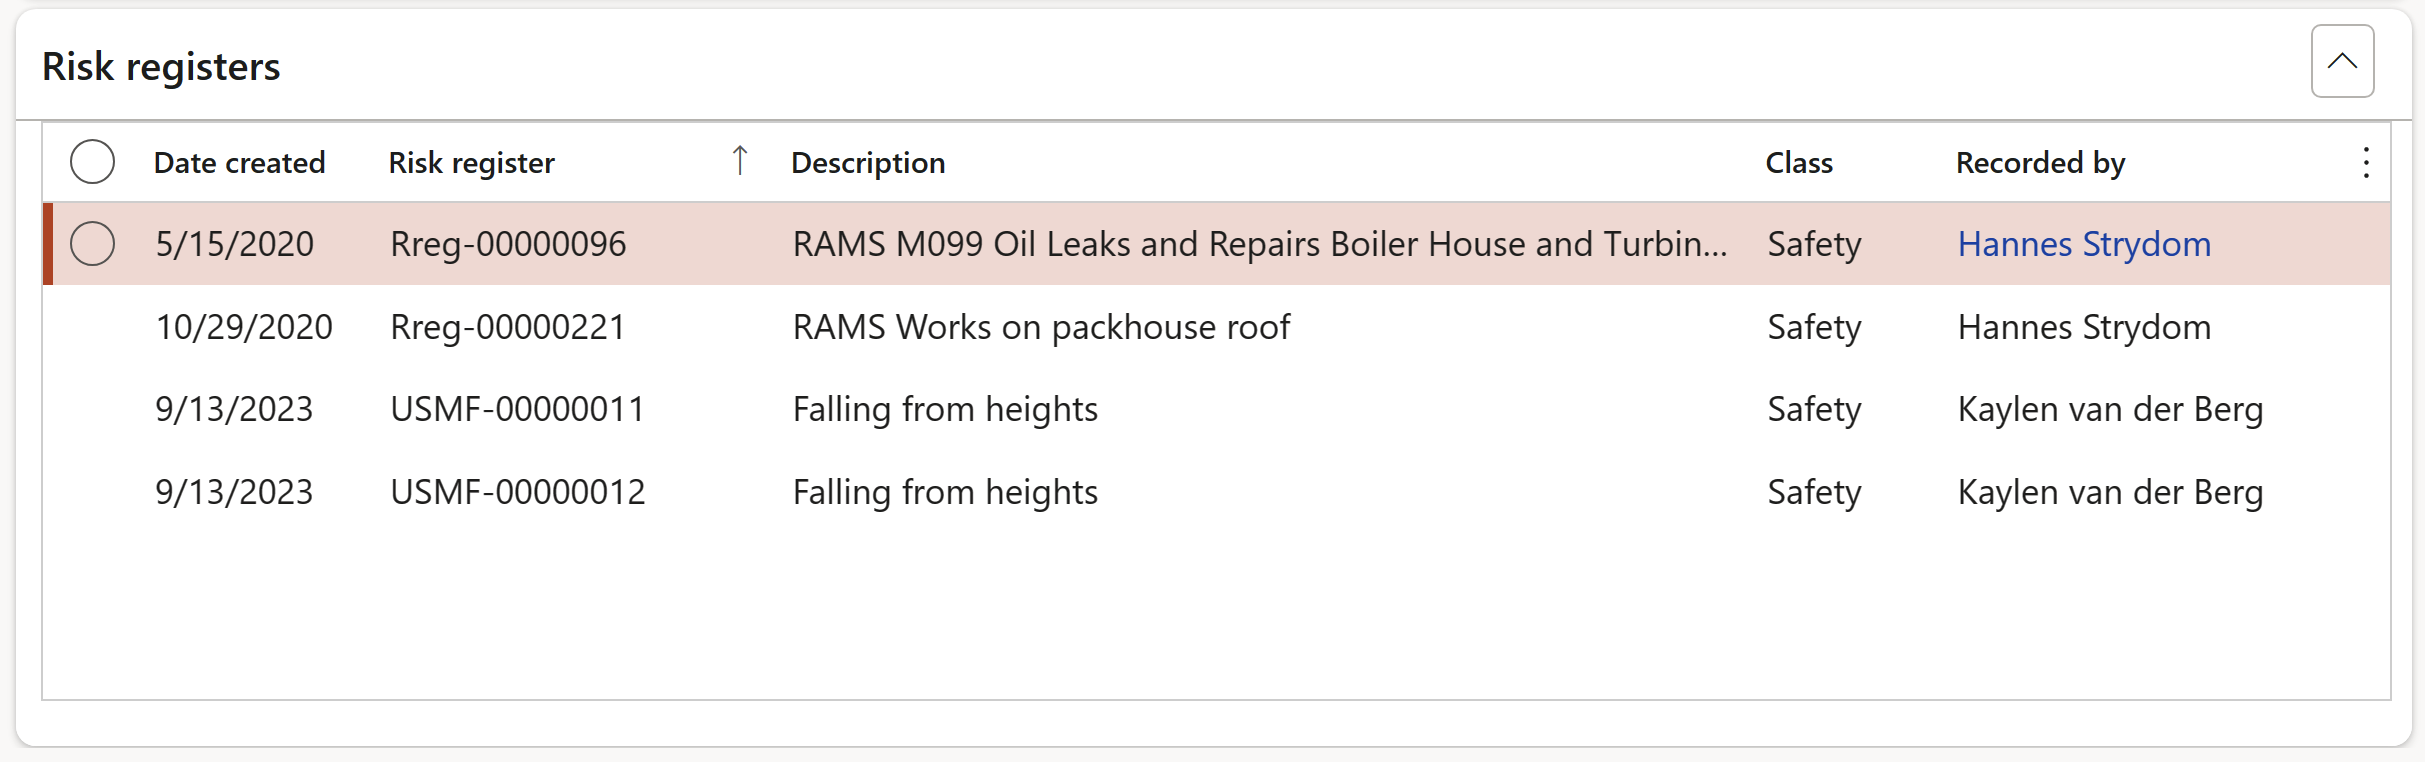
Expand the Risk register Fast tab to view a list of the risk registerd where the job plan has been used
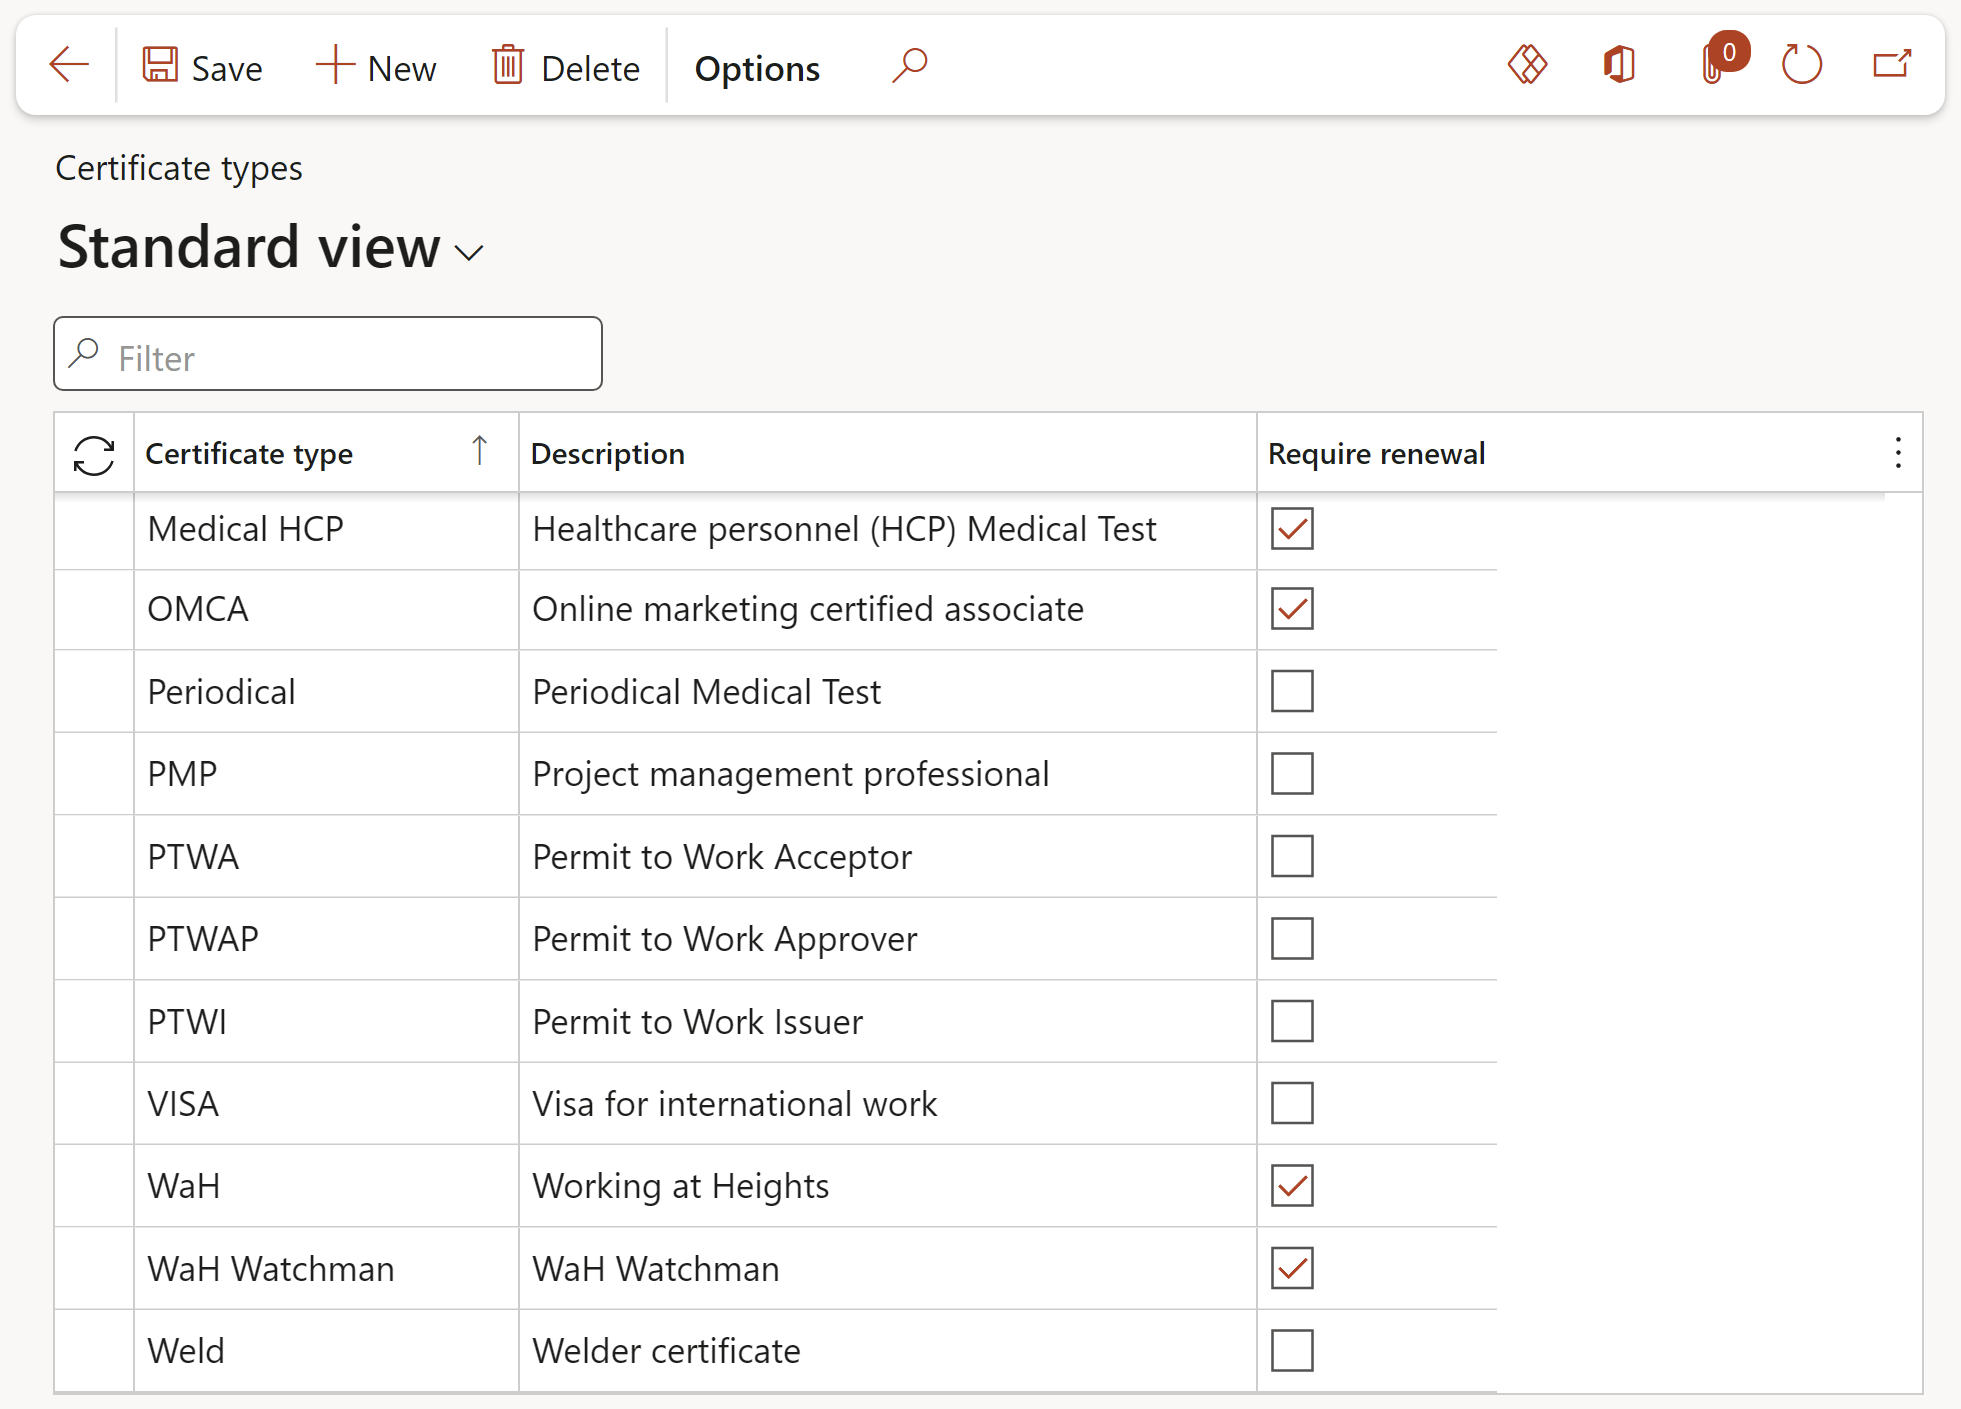
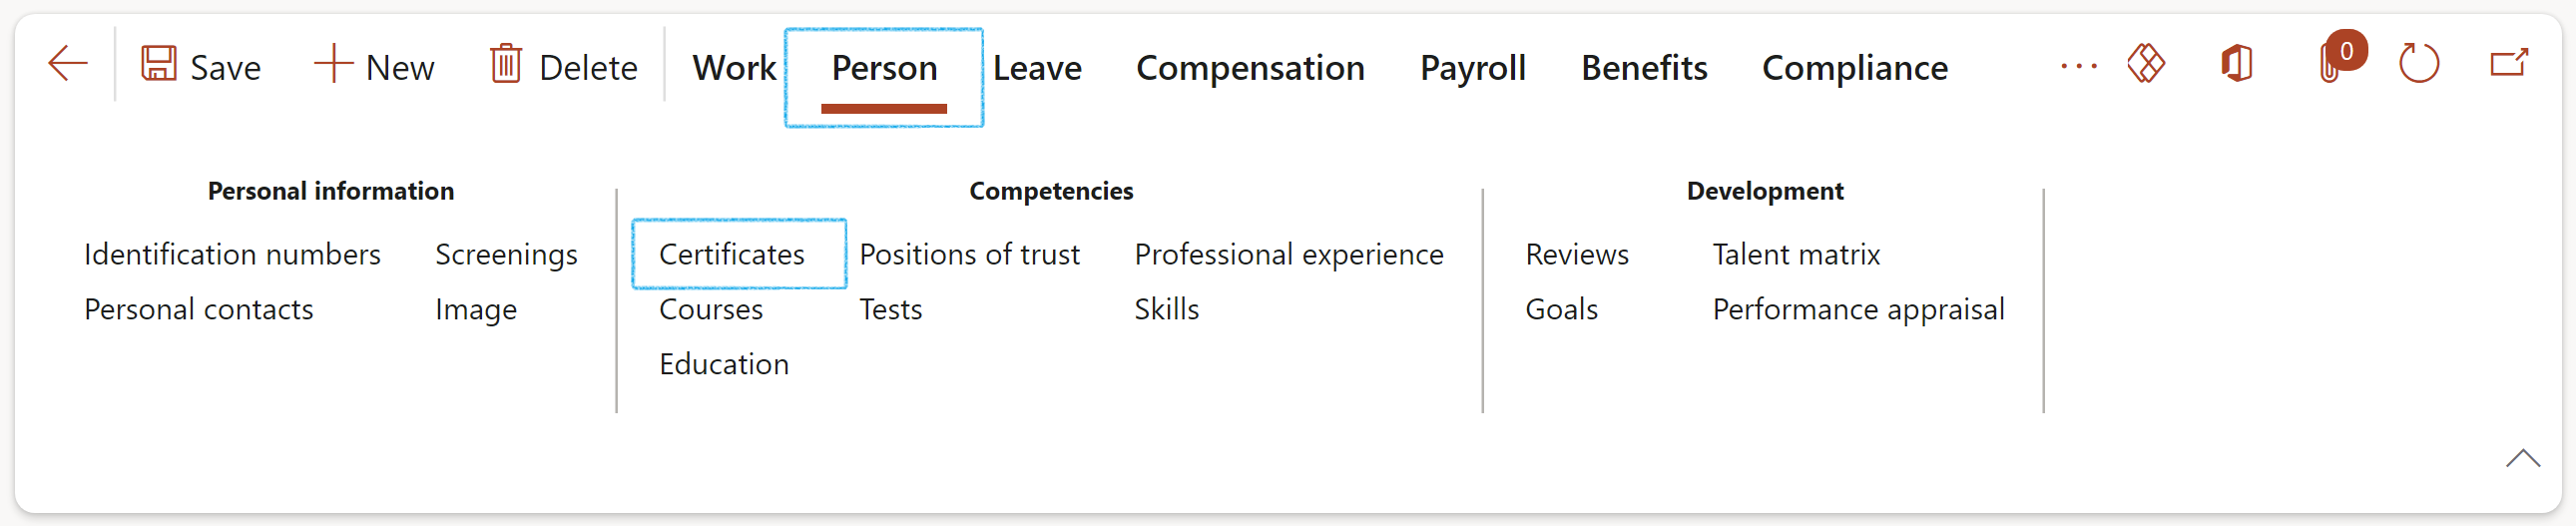
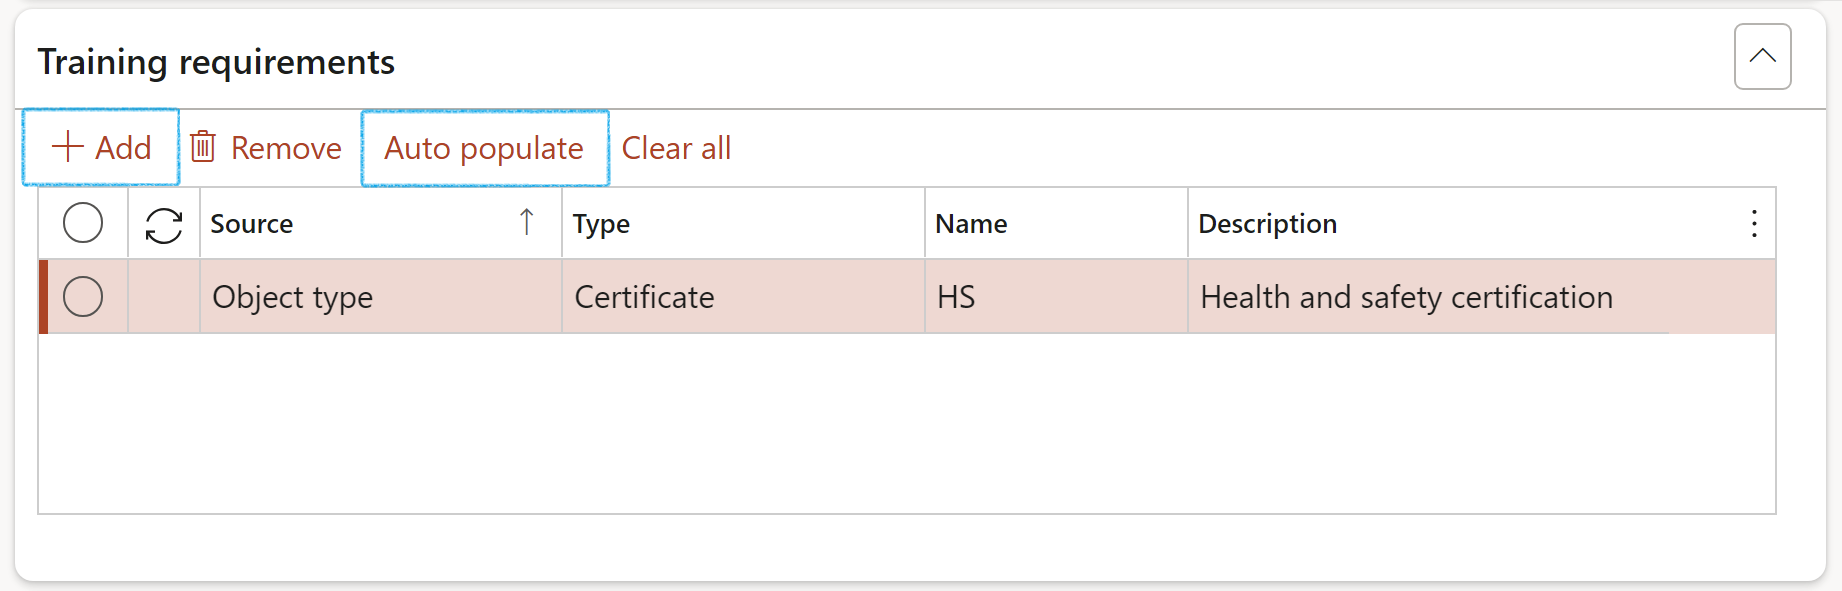
When signing actions are attempted on a Permit to work, a check is done to ensure that the worker has the necessary competencies (if competency checking is enabled). Certificates in the D365 Human resources module are used to define the competencies.
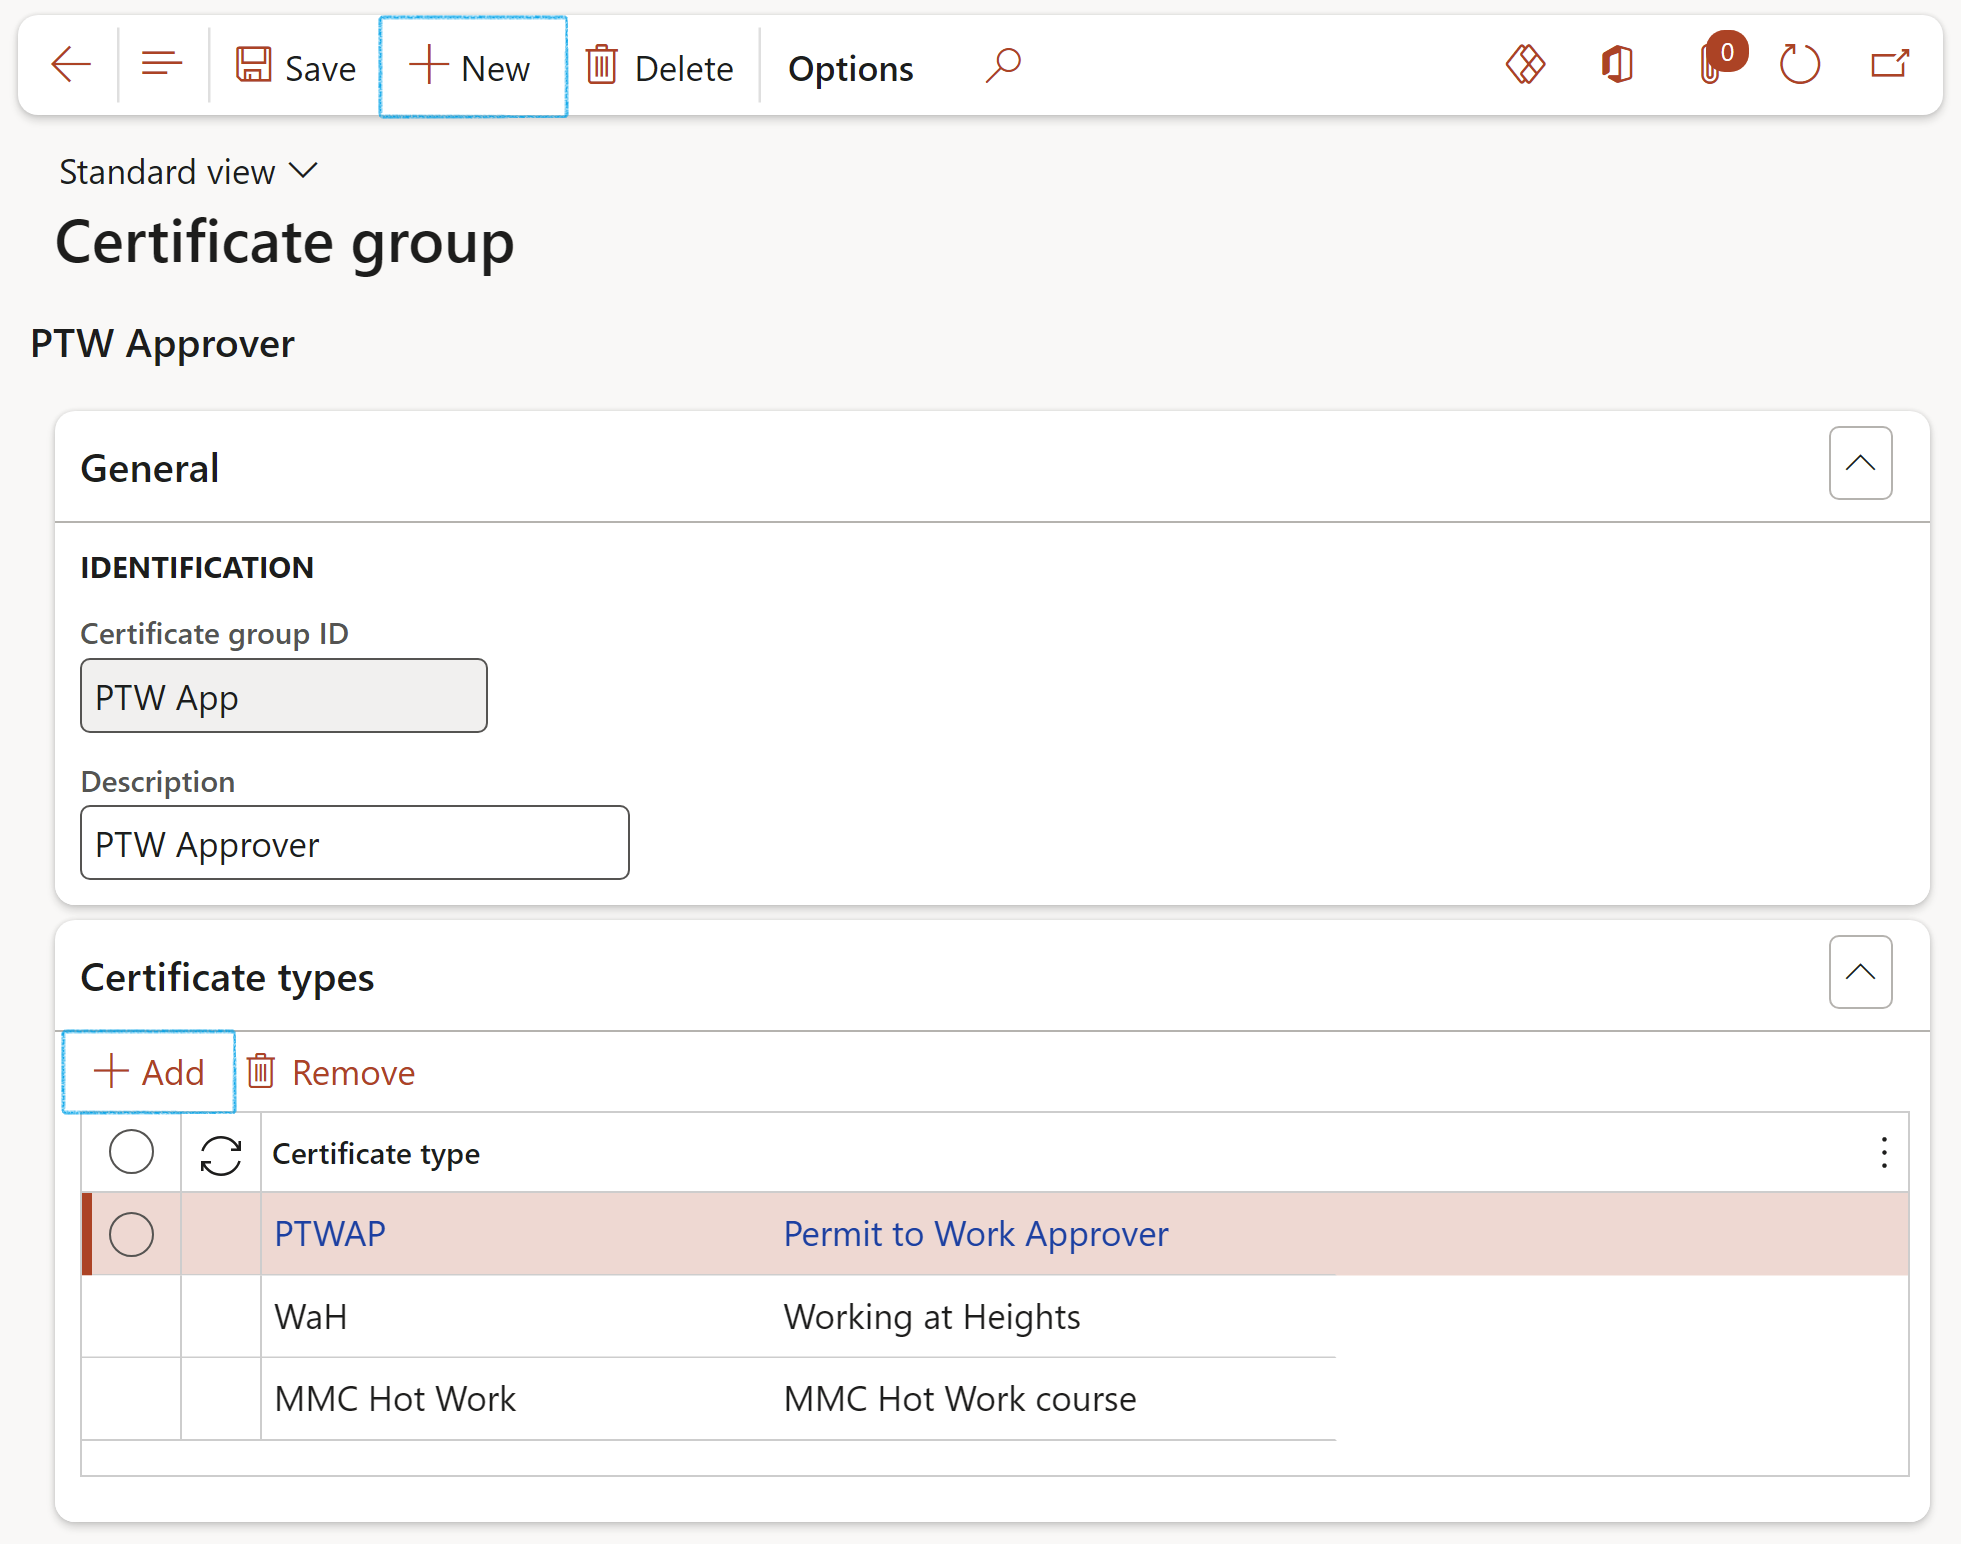
The required Certificate types are grouped in a Certificate group providing for multiple competencies to be selected.
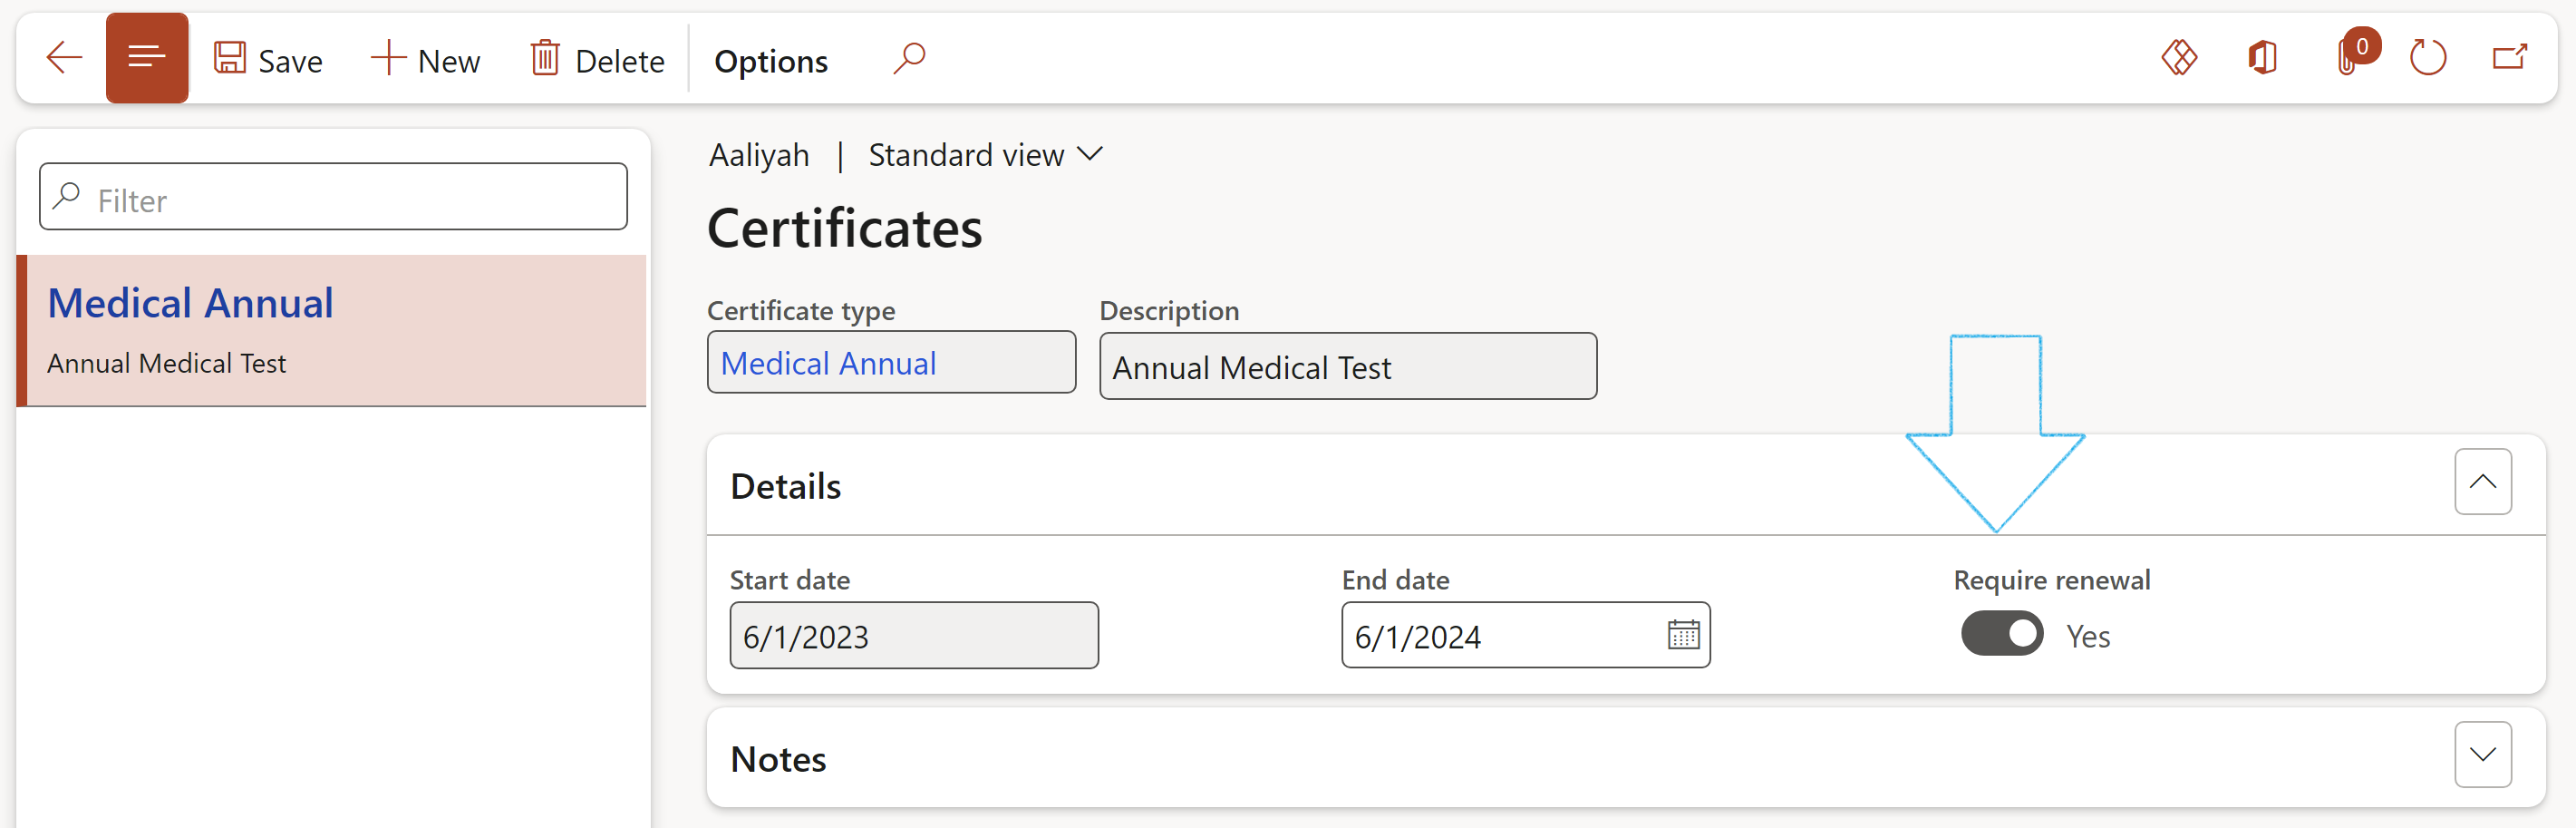
Certificates in the D365 Human Resources optionally provide for Certificate types that expire and require renewal.
Certificates must be allocated to the relevant workers in D365 so that the system can compare the required competencies against the workers' actual competencies.
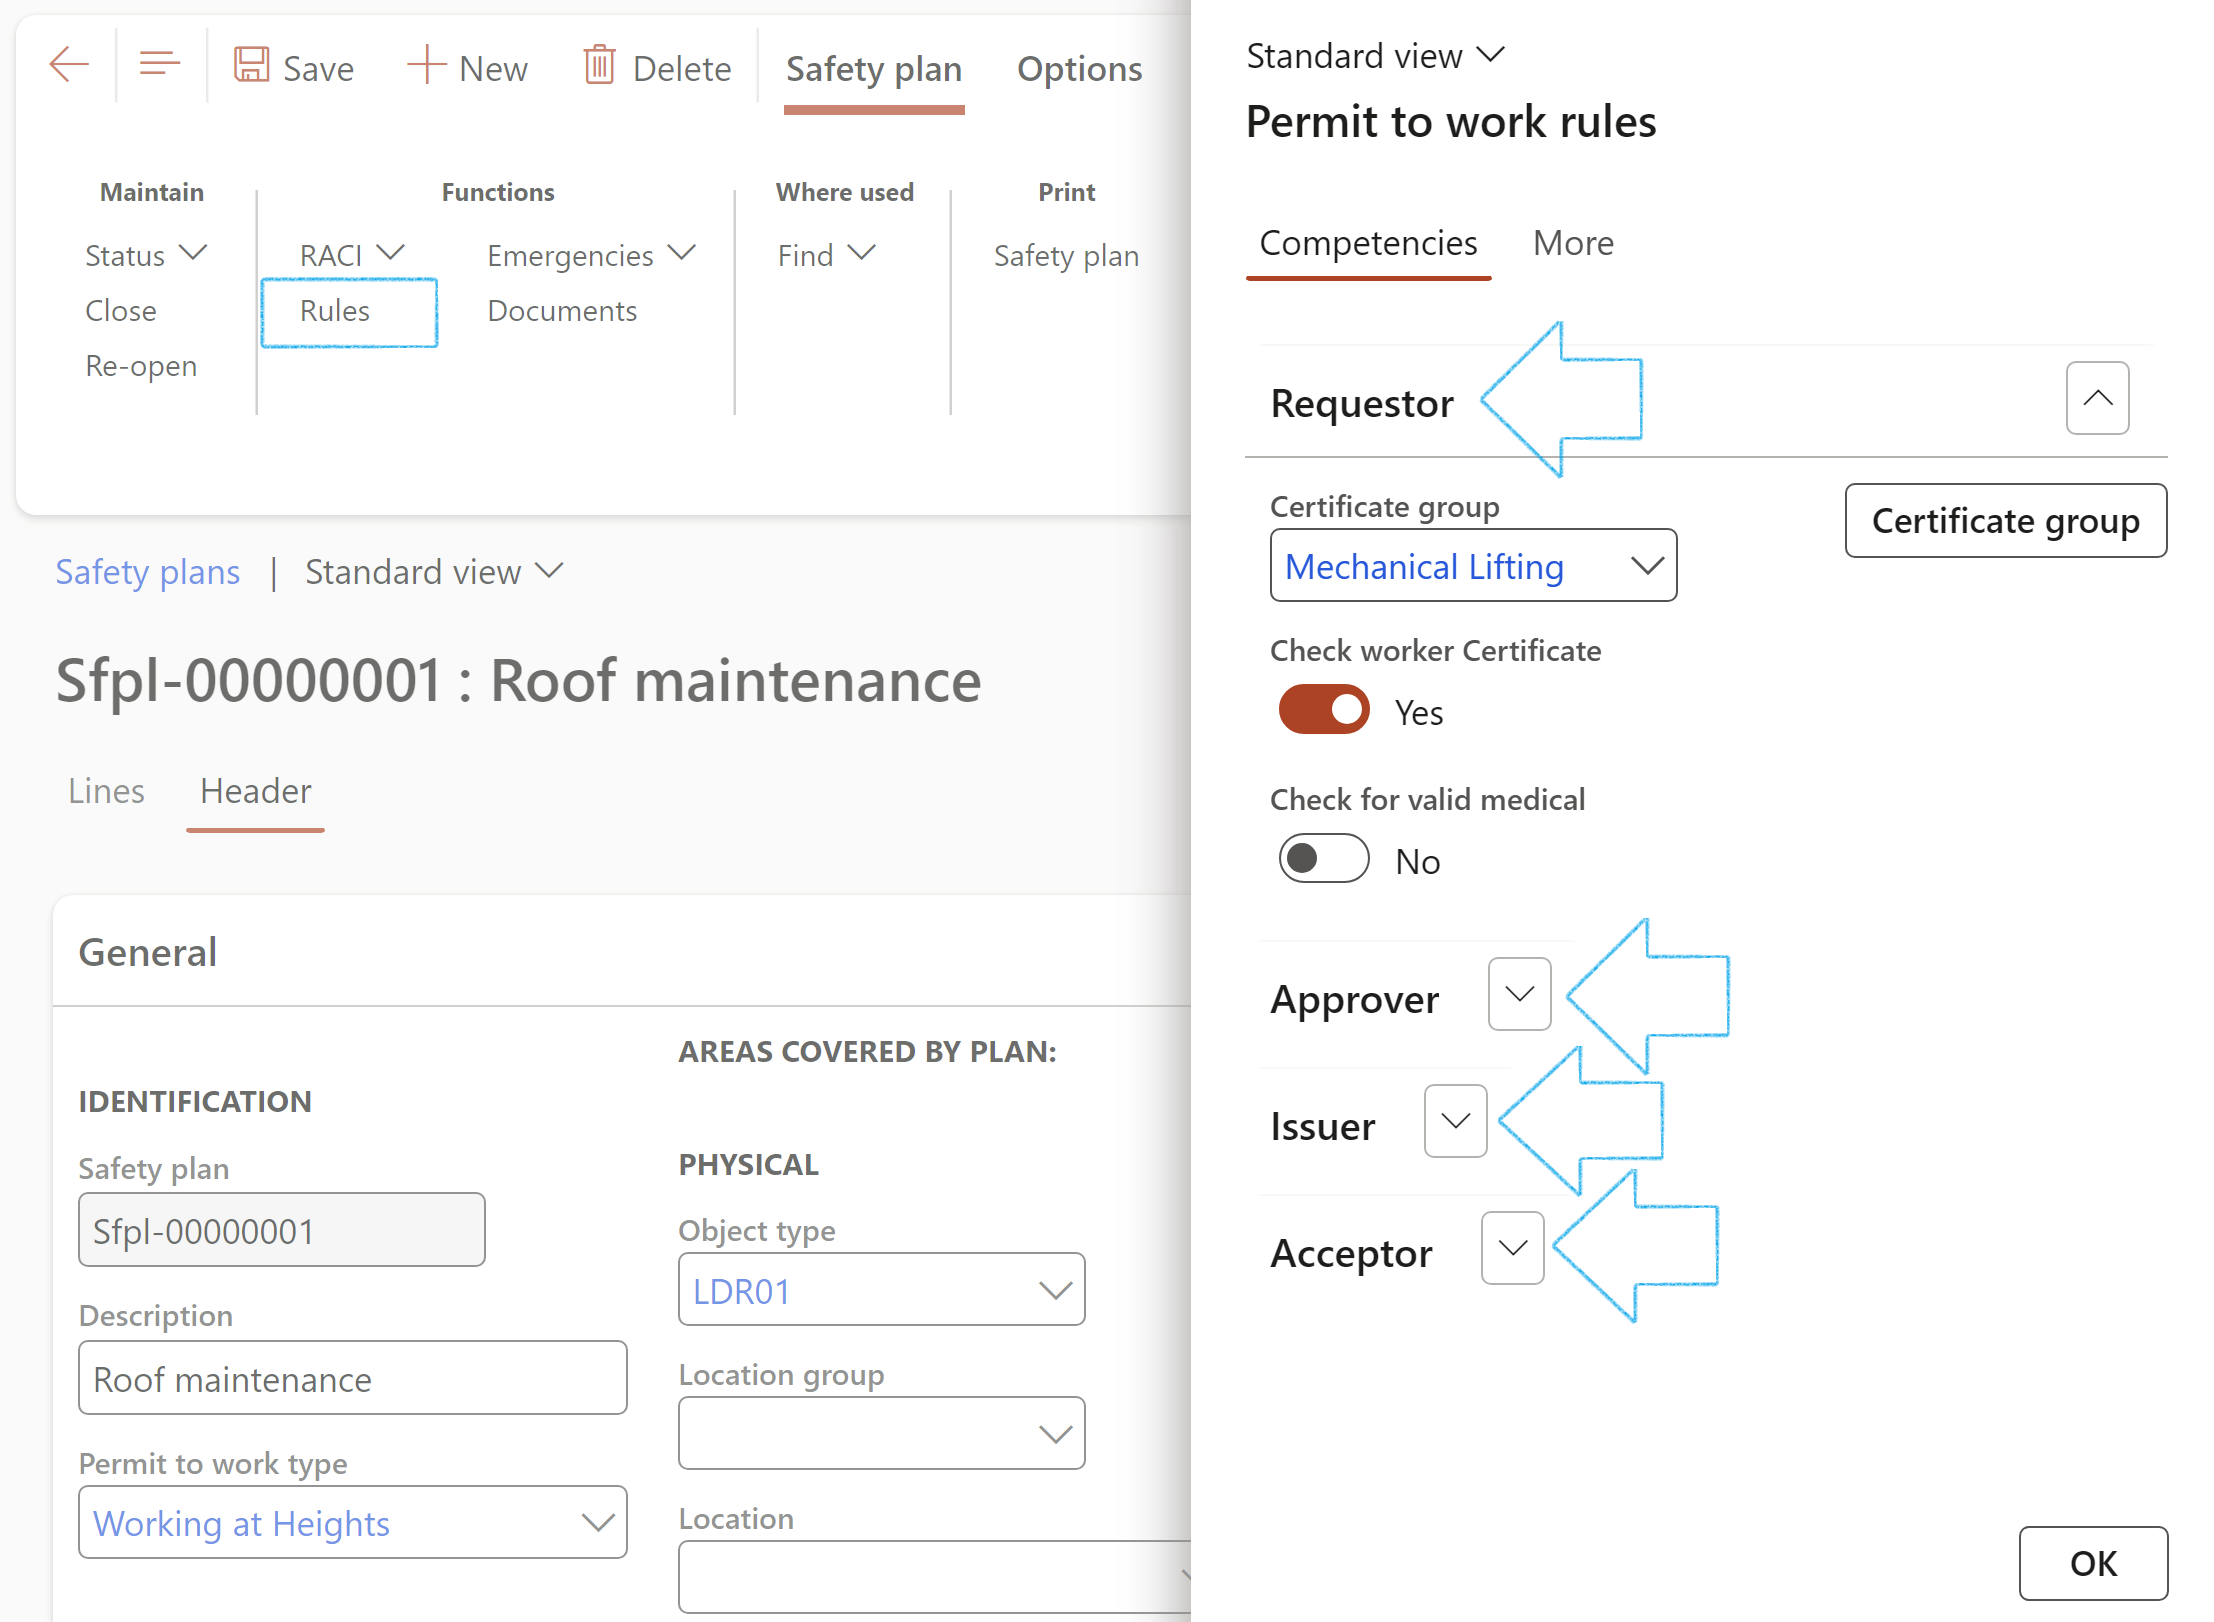
The competency checks (if active) are done as follows on the Safety plan:
PTW rules - Competencies tab:
Competency check done on:
Requestor
Submit
Approver
Approve/Reject/Cancel
Issuer
Issue/Receive back/File
Acceptor
Accept/Sign off
Competency checks cannot be performed if the Acceptor is not on D365 as a worker, for example where the permit is accepted by a vendor employee
When you use the same type of permit to work over and over again; users can choose to make use of a safety plan (template) to enable a consistent process, format and ensure productive use of time. Safety plans together with Permit to work types are the driving force and governance of the Permit to work "system". This setup is crucial and will determine important things such as:
Default values when creating a permit to work
Who can authorize the permit
For Issues and Hand overs - the Safety plan will govern (via the Competencies) who can receive a Permit to work as well as to whom the permit may be handed over
For additional detail please refer to the Wiki page on Safety plans
On the Action pane, in the Functions group, click on the Rules button
Under the Competencies index tab, do the following for the Requester, Approver, Issuer and Acceptor:
Select the required Certificate group from the dropdown list. To view the certificate types that belong to the selected Certificate group, click on the Certificate group button
Indicate whether a check should be done for valid Certificates
Indicate whether a check should be done for valid Medicals
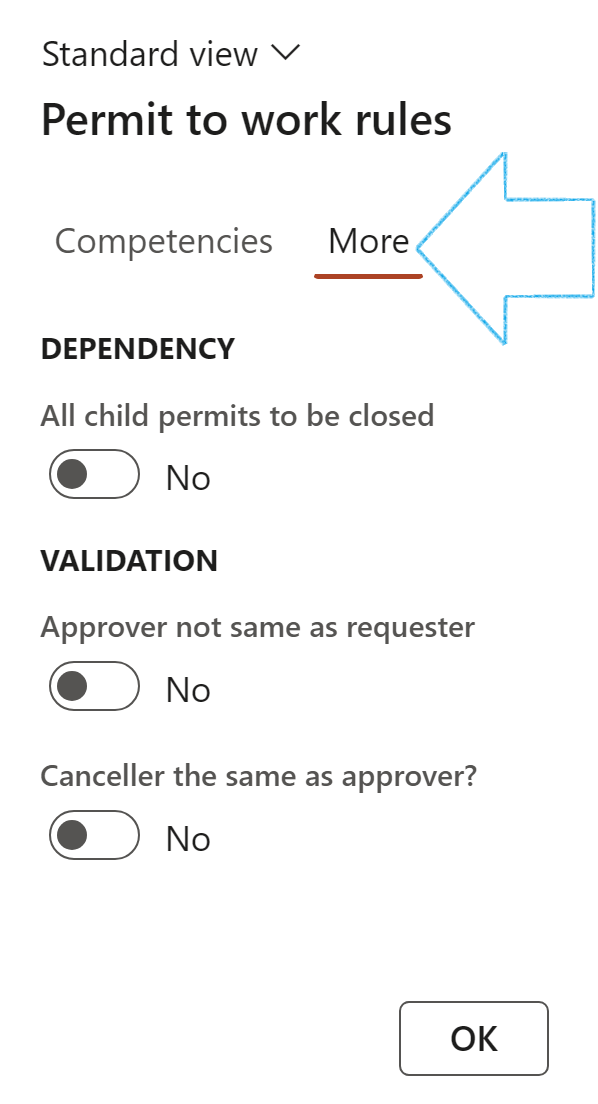
Under the More Index tab:
Under the Dependency field group, select Yes if all child permits have to be closed before a Parent permit can be closed
Under the Validation field group:
Select No if the Approver of a permit is the same as the Requester of the permit
Select No if the Canceller of a permit is not the same as the Approver of the permit
Safety plan - The unique ID for the Safety plan is auto generated by the system
Description - Description of the safety plan
Permit to work type – Select a Permit type for the permit
Project ID – Select the relevant project identification for the permit
Risk register – Select the Risk register relevant to the permit
Permit minimum workers – Indicates minimum number of workers where a “Watchman” or “Sentry” is also required, based on permit type
Watchman – Indicates whether a “watchman” or “sentry” is needed on the permit
Notes - Enter an optional “Goal and objective” comment about this record
Object type – Select the object type, if required
Location group - Group of similar production work centres resource where production activities normally happen
Location - Production work centres resource where production activities normally happen
Job plan group – Select the applicable Job plan group from the drop-down list
Permit to work type group – Select the applicable Permit to work type group from the dropdown list
Valid From and To - Validation dates of the safety plan
Status - Stages of the safety plan. (Status button on the Action pane)
Approved by - The name of the worker that approved the safety plan will be populated by the system once the plan is approved
Approved date - The date on which the safety plan was approved will be populated by the system once the plan is approved
Close - Once the Close button in the Action pane is clicked, the slider will be moved to Yes
When the satus is changed to Approved, the Approved by and Approved date fields will display the logged in user's name and the current date
¶ Step 6.3: The Areas covered by this plan Fast tab
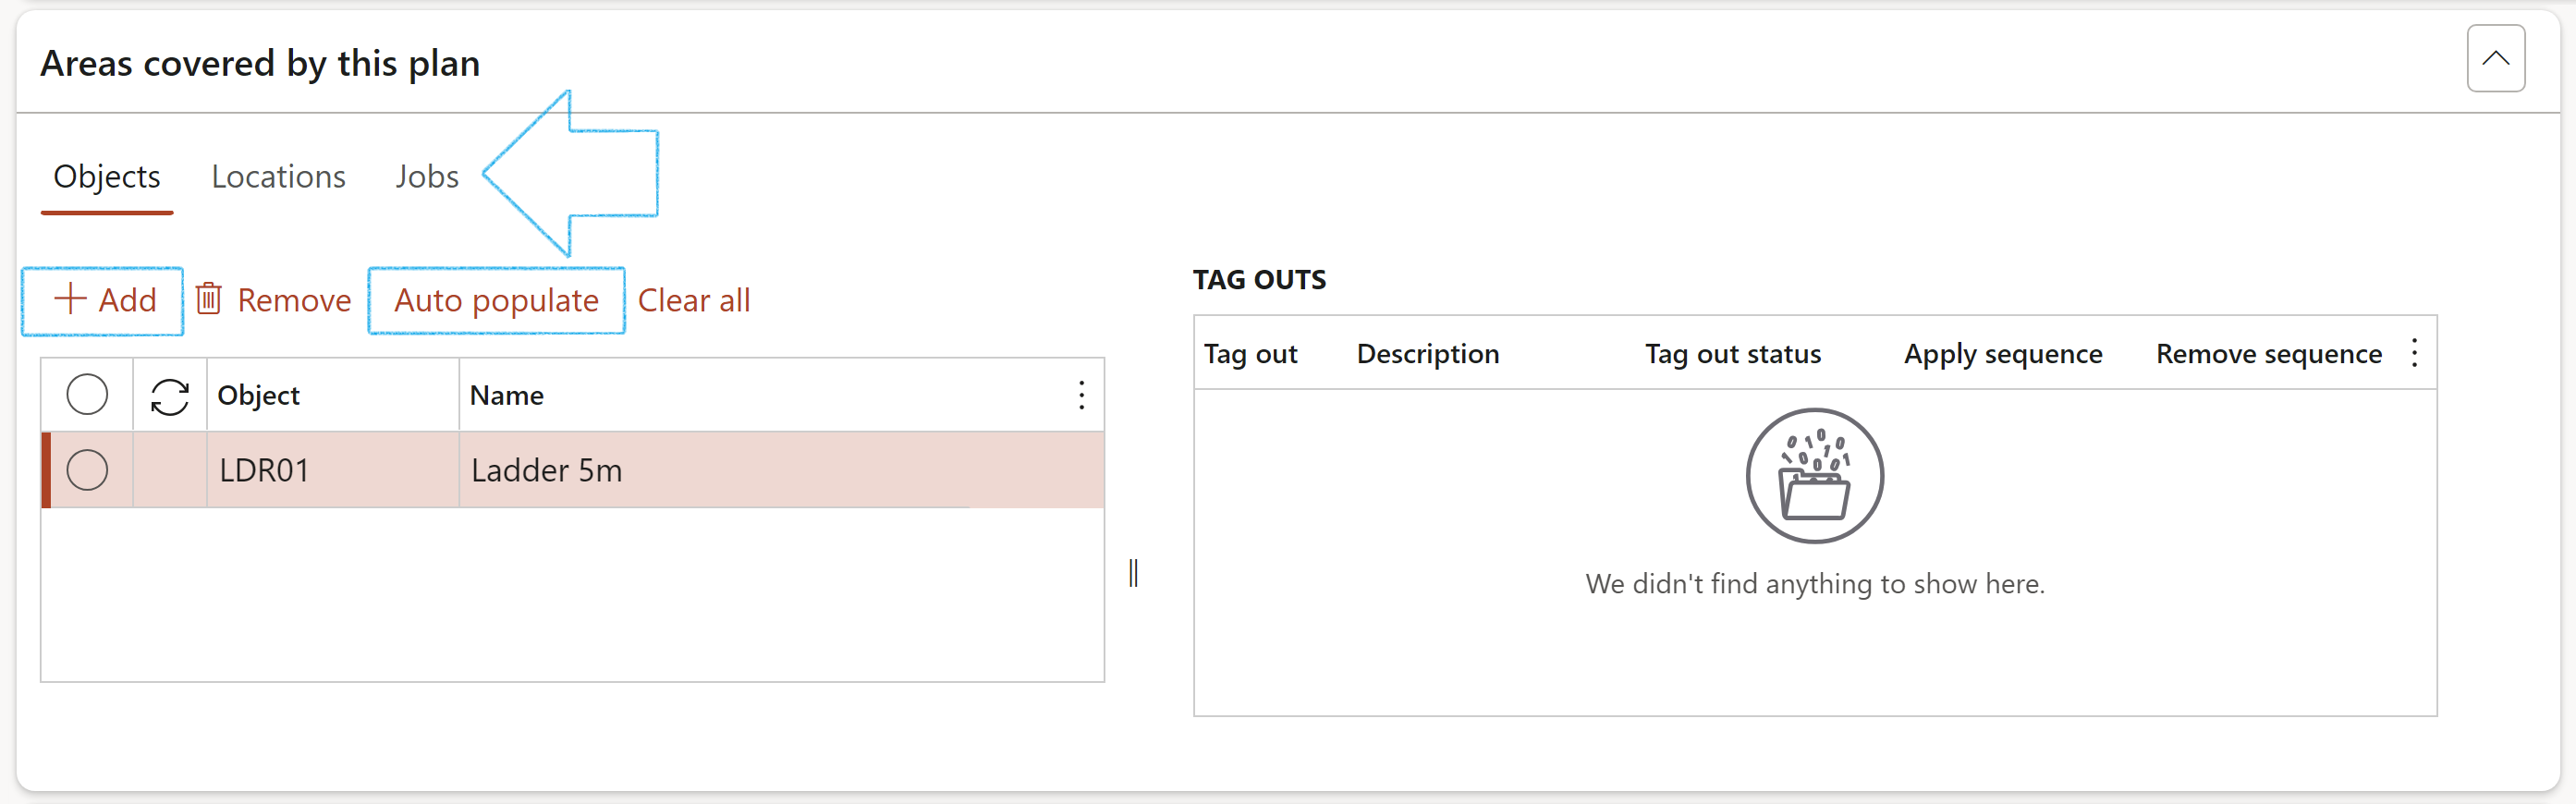
Expand the Areas covered by this plan Fast tab
In the Button strip, click Add
Select an object from the dropdown list
OR
Click on the Auto populate button to auto populate objects relevant to either object type or location selected
There are three index tabs that need to be opened and completed in order to provide all the necessary information for the safety plan: Object, Locations and Jobs
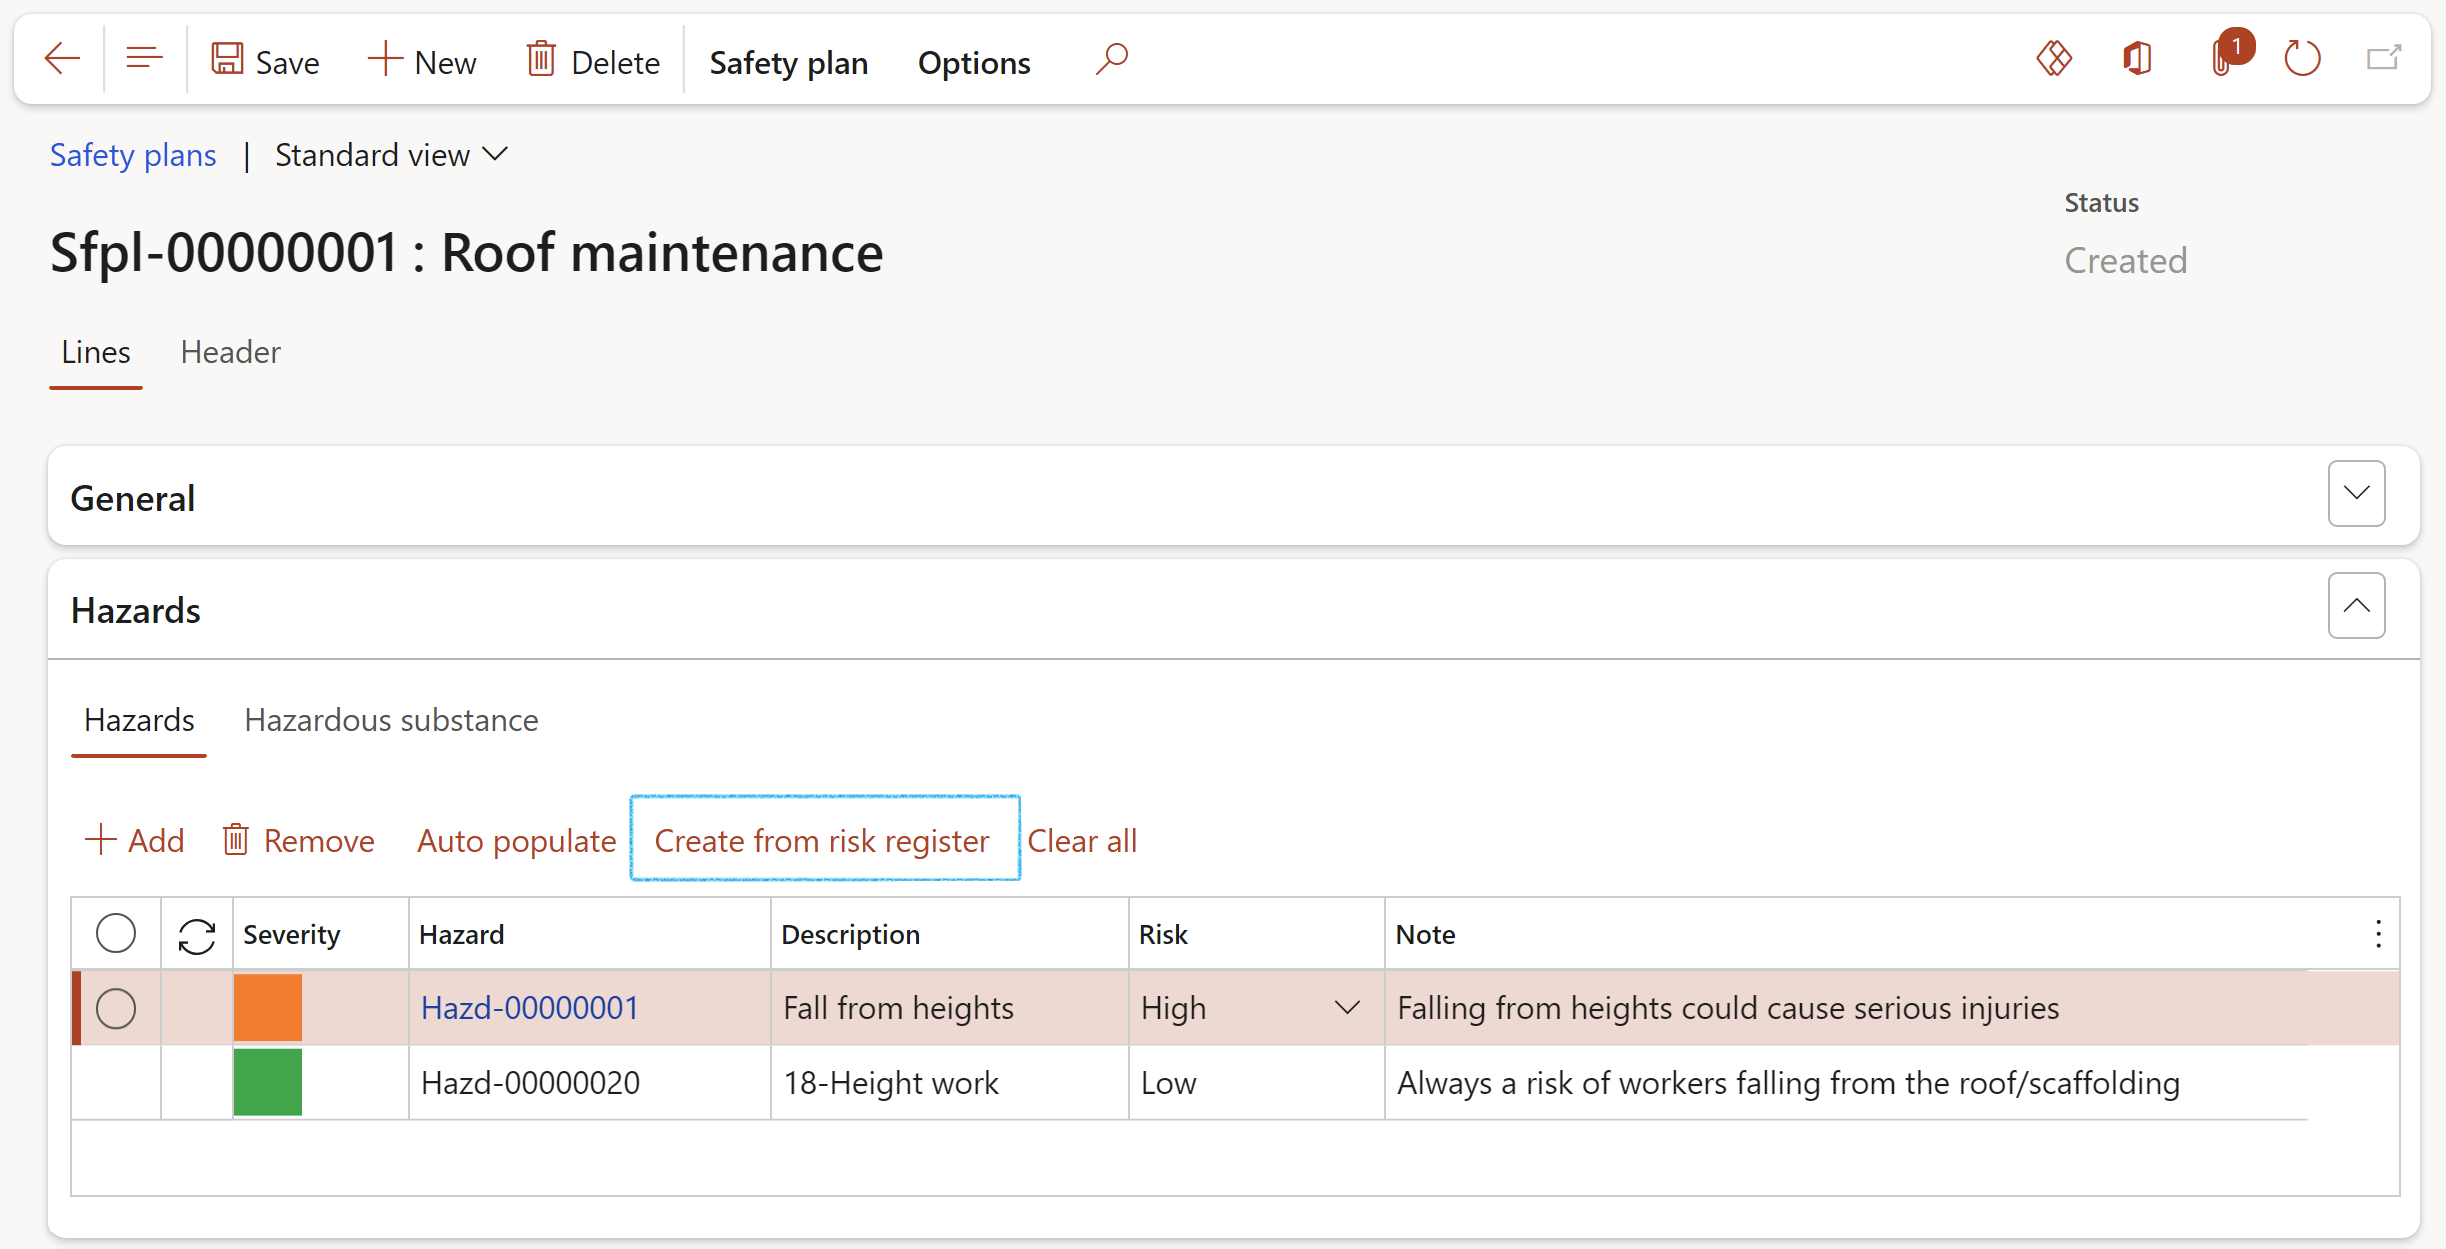
Under the Safety plan lines, expand the Hazards Fast tab
In the Button strip, click the Add button
Select the relevant Hazard from the dropdown list
OR
Click on the Auto populate button to auto populate hazards relevant to objects, locations and job plans selected on the Header (Step 5.2 above)
OR
Based on a risk assesment done before, users can "call up" a risk assessment method statement ('RAMS'). A RAMS is a written record of the potential hazards involved in certain tasks, the precautions put in place to reduce these risks and how to carry out these workplace activities safely. A method statement may not be required for every risk assessment, just those tasks or activities that are high risk eg some construction site tasks. The method statement helps manage any planned work and ensure that the necessary precautions have been communicated to all those involved. It’s becoming a standard requirement by third parties for tradespeople to produce RAMS should they wish to support larger jobs or projects.
To add Hazards from the Risk register selected on the Header, click on the Create from risk register button to add Hazards and all mitigations to reduce risks associated with the planned work.
When a Safety plan is selected for a Permit to work, all Hazards, controls and attachments on the Safety plan will be copied to the Permit to work
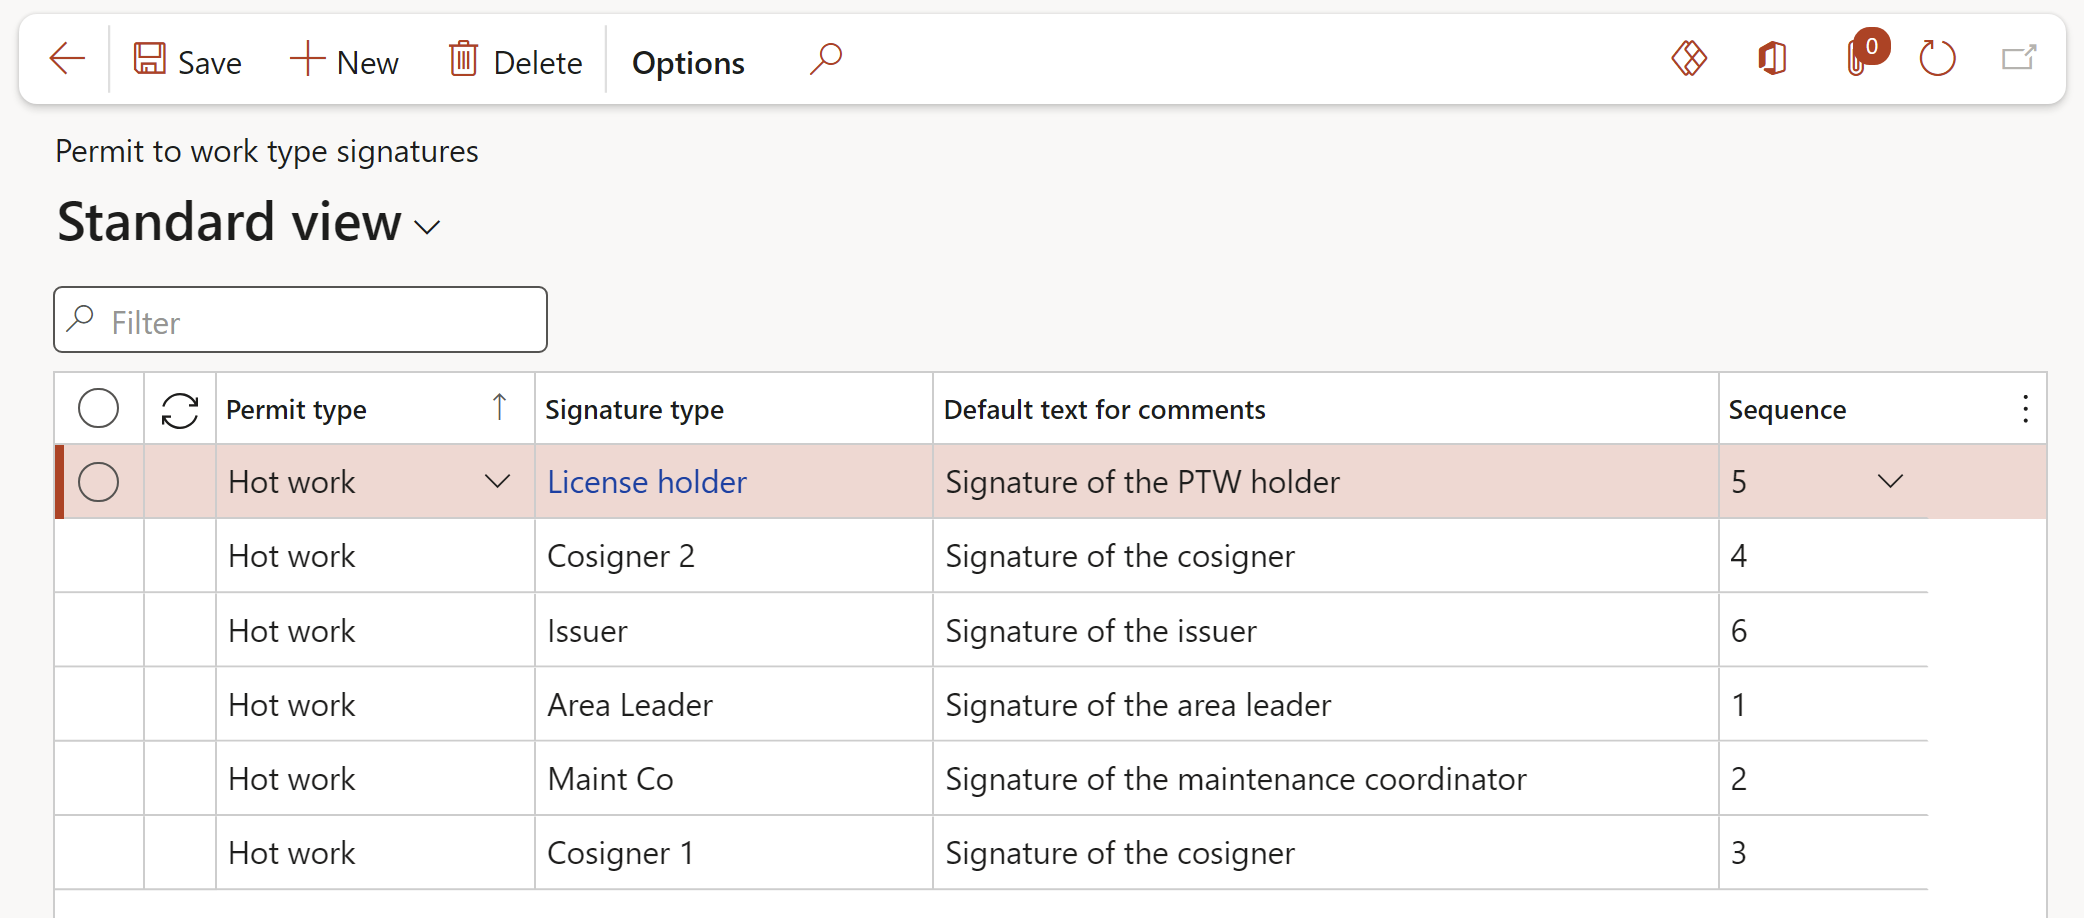
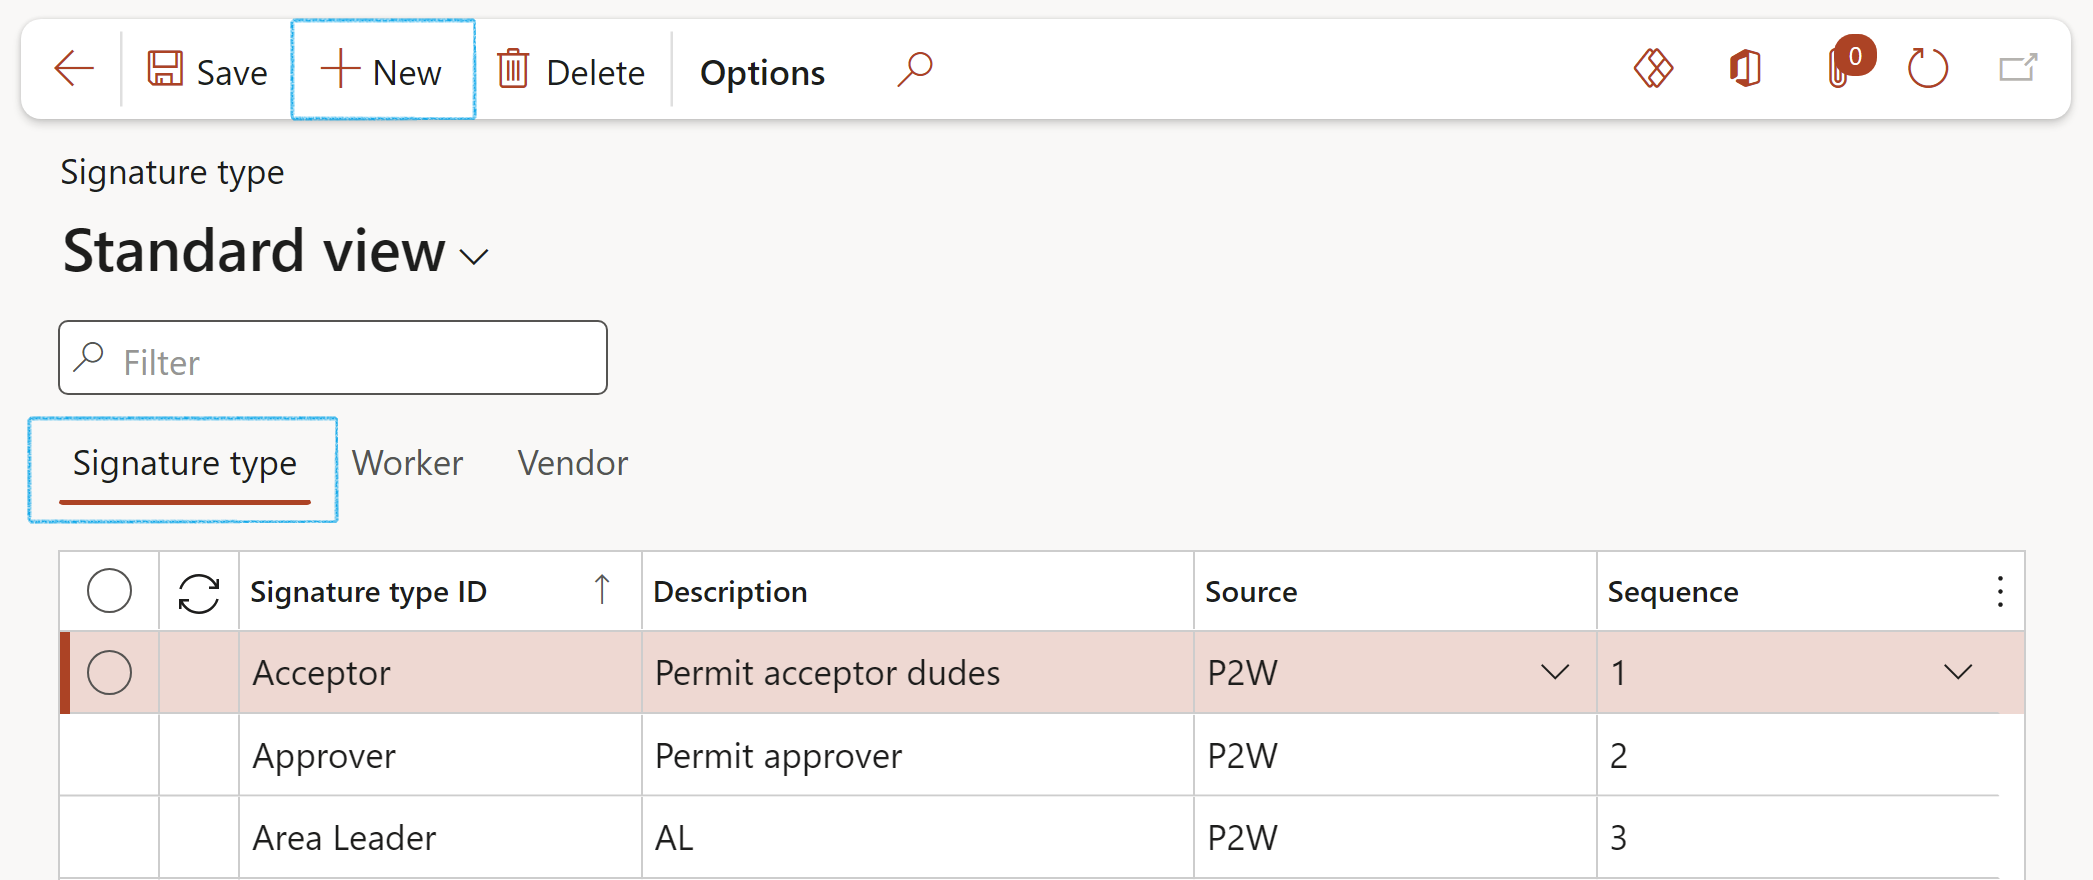
Everyone who carries out work, whether it is contractors, subcontractors, and all employees and managers, have responsibilities and duties under a permit to work system. It is therefore imperative that every role player is trained and that they know what their responsibilities are so that they can be carried out properly. To facilitate clear roles and responsibilities users should create Signature types and link them to related types of permits
Go to: HSE > Permits to work > Setup for permits to work > Permit to work type signatures
In the Action pane, click on the New button
Select the Permit type from the dropdown list
Select the Signature type from the dropdown list
Enter the Default text for comments. This text will be used as the default for the comments box when the user signs the permit
Select the Sequence number from the dropdown list. This is the position in the signing sequence/queue
Finally users can also indicate if a co-signature is required
Select the Sequence number in which the signature type is required
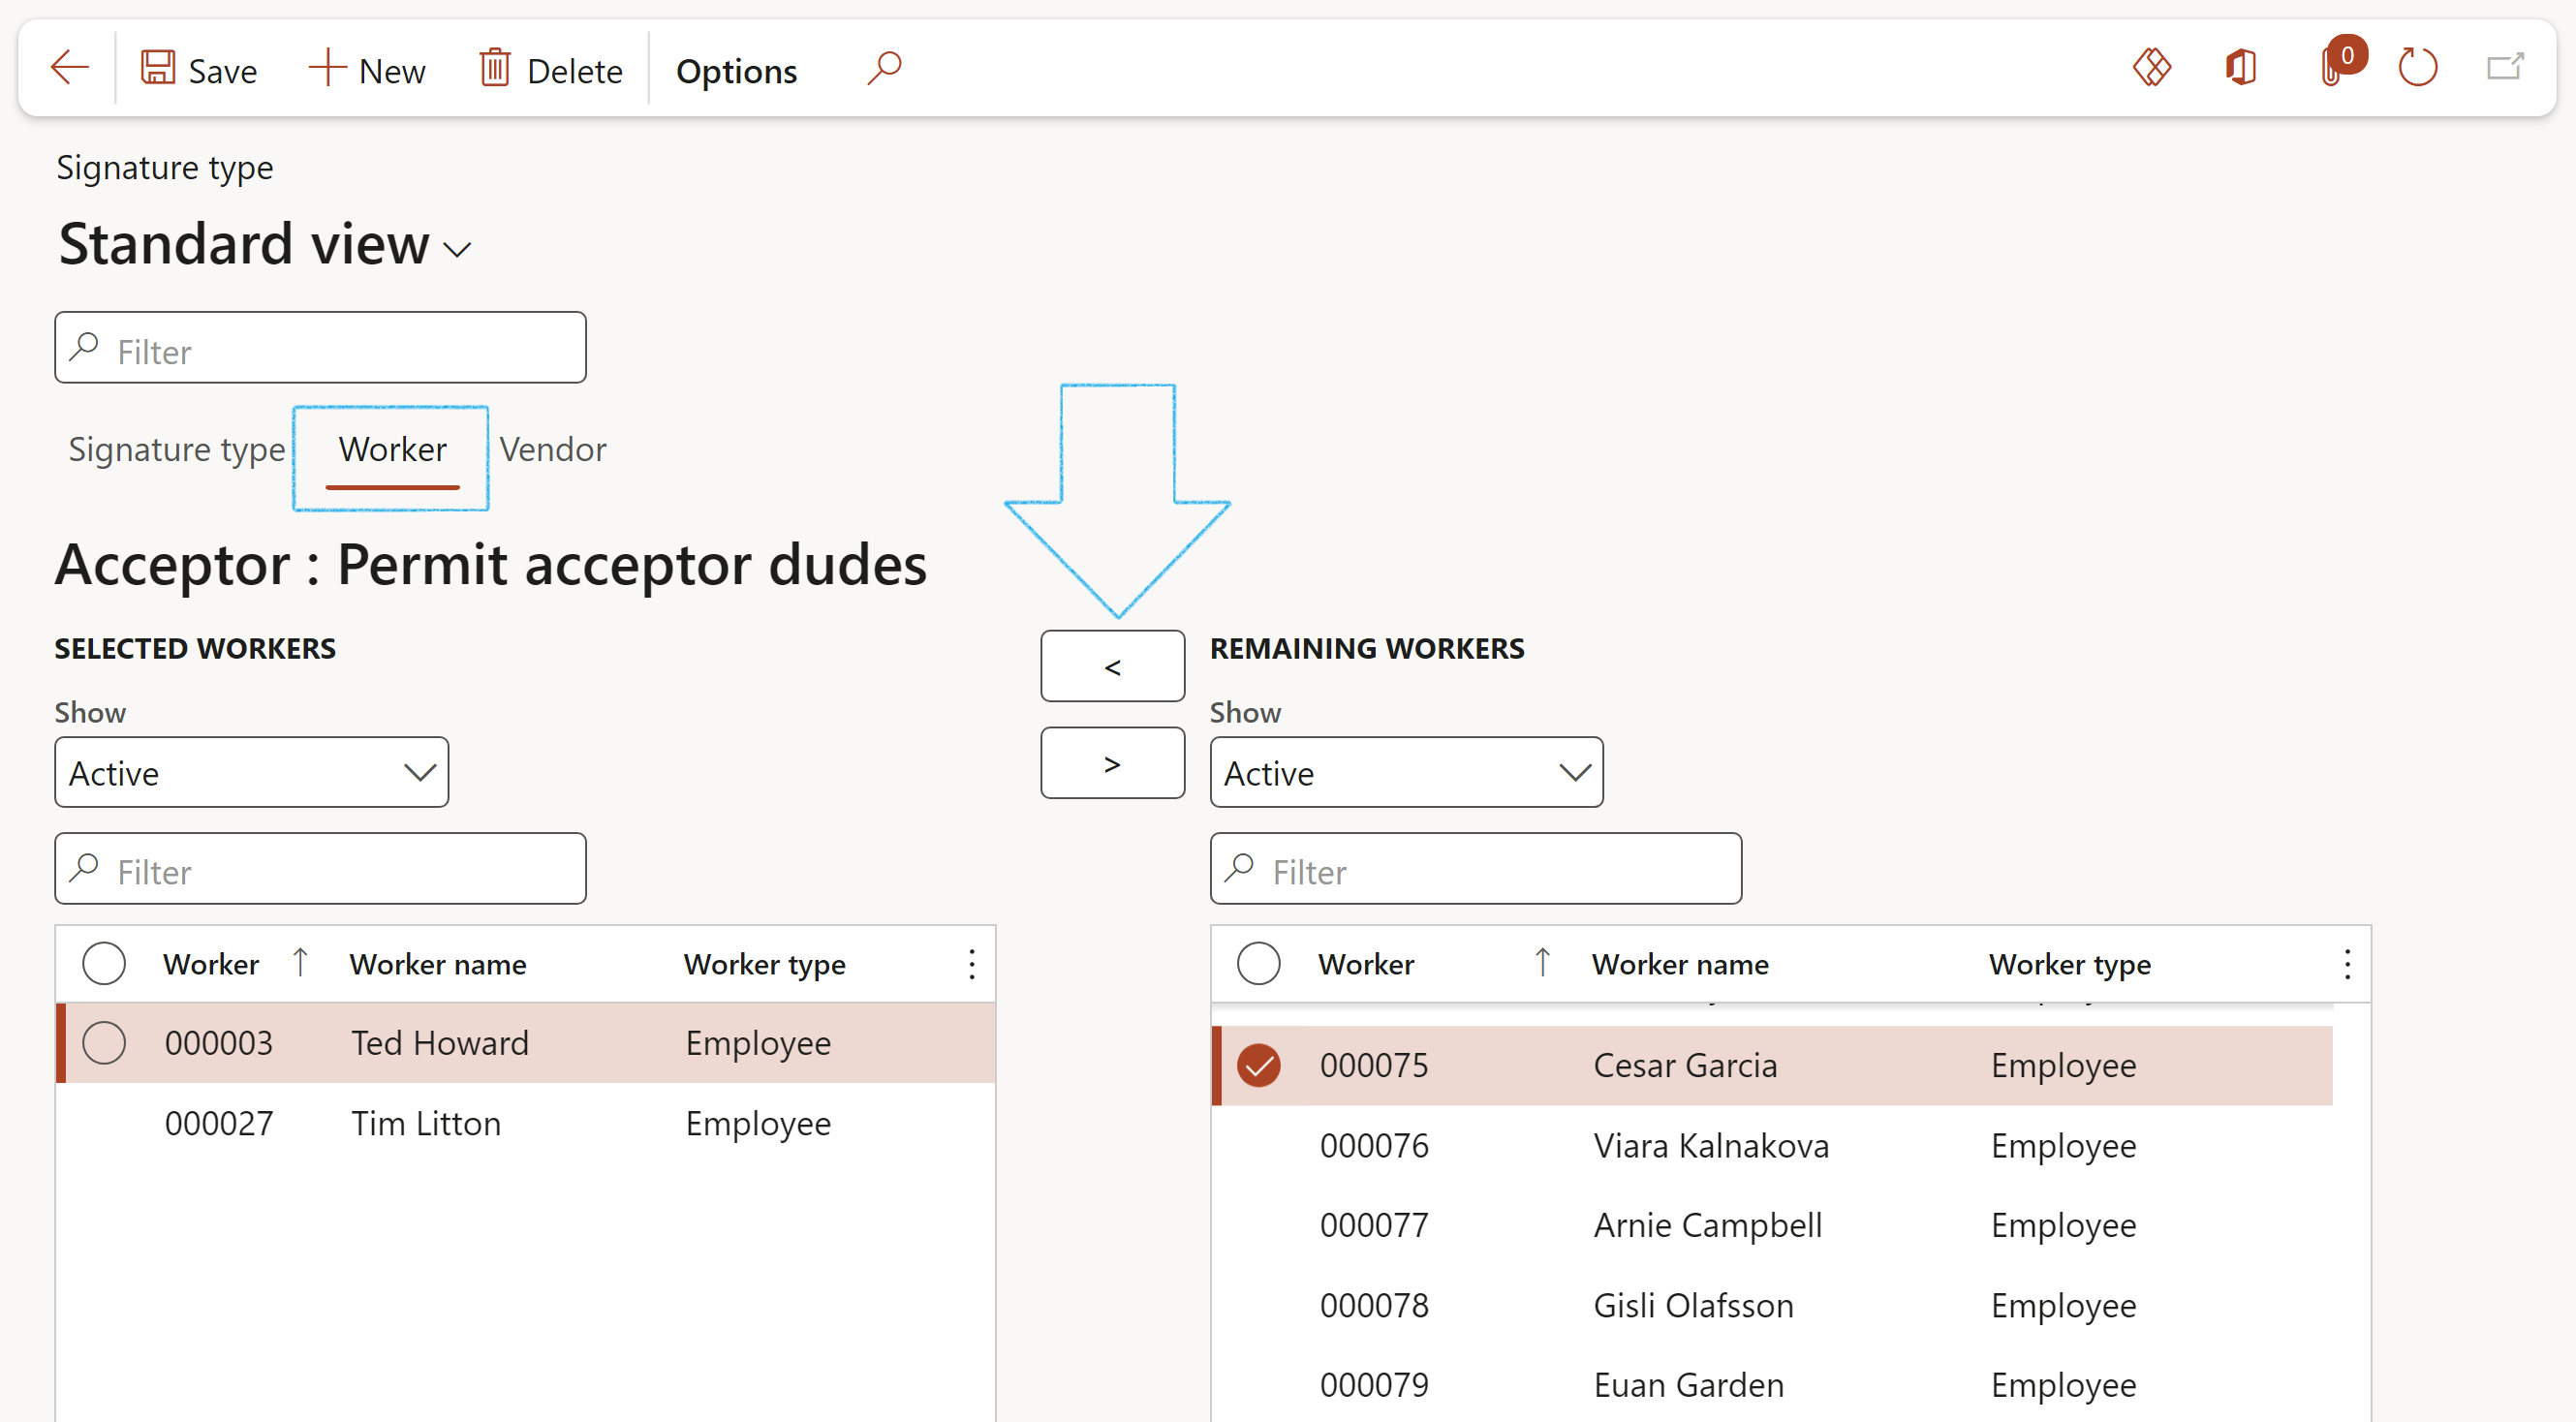
Open the Worker Index tab
Select the workers that you want to add to the signature type, under the Remaining workers column and click on the left arrow to move the worker to the Selected column
Many industries involve tasks that are considered to be high-risk or have workplaces that can be hazardous. For example, permits to work are common in the construction industry since building sites contain a variety of hazards and much of the work involved is high-risk. Permit to work types are defined and help to group related safety rules together for each type of work to be executed.
Go to: HSE > Permits to work > Setup for permits to work > Permit to work types
In the Action pane, click on the New button
Enter the Permit to work type ID
Enter a brief Description
Select the relevant permit Type from the dropdown list
Only Permit to work types that have been marked as Active, will be on the Permit to work type dropdown lists
Users can also reduce data entry by adding a Default site to the line
Indicate whether this is a High risk permit to work type
Enter additional Instructions in the note box below the grid
The Requires approved safety plan tick box gives the user the option to enable/disable the mandatory approval of Safety plans
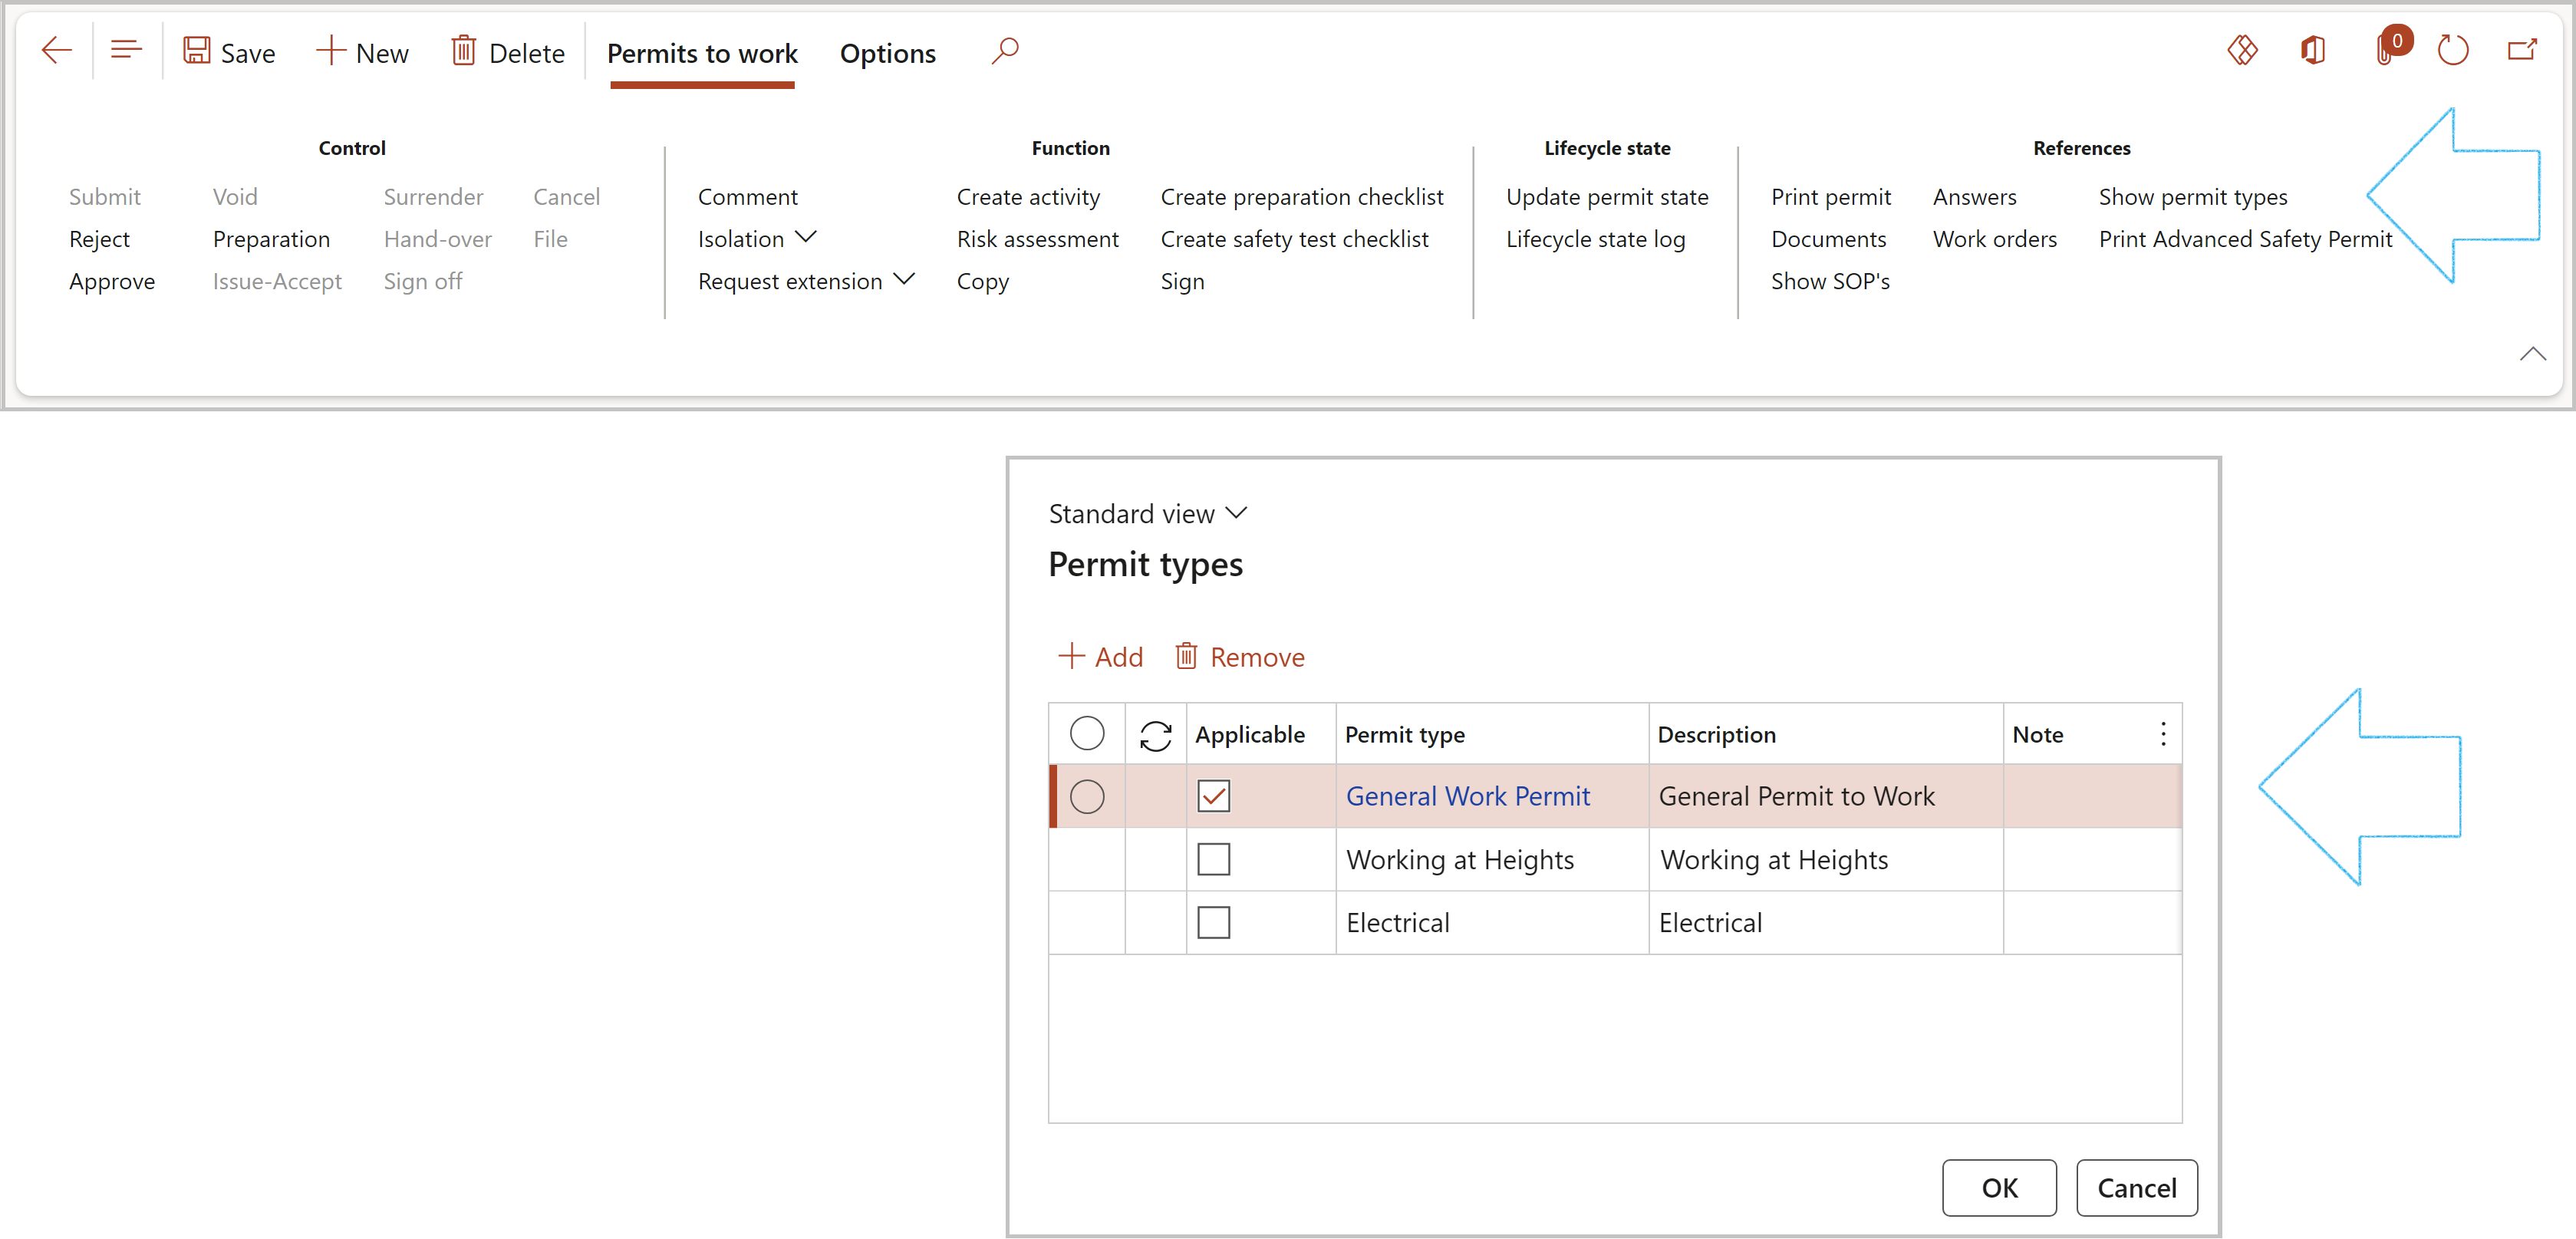
There are typically several types of permits, each addressing a specific type of job or work activity. Users can group different types of work (Permit type id) together.
Go to: HSE > Permits to work > Setup for permits to work > Permit to work type groups
On the Action pane, click on the New button
In the Group name field, enter the unique safety permit type group ID
Enter a brief Description of the permit to work group
The user can suppress the active filter on the Permit to work type dropdown list under the Permit types Fast tab, by moving the Include inactive slider to Yes
Under the Permit types Fast tab, click on the Add button
Select the relevant Permit to work type from the dropdown list
Once all the required permit types have been selected for the group, indicate which type is the Primary permit type for the group
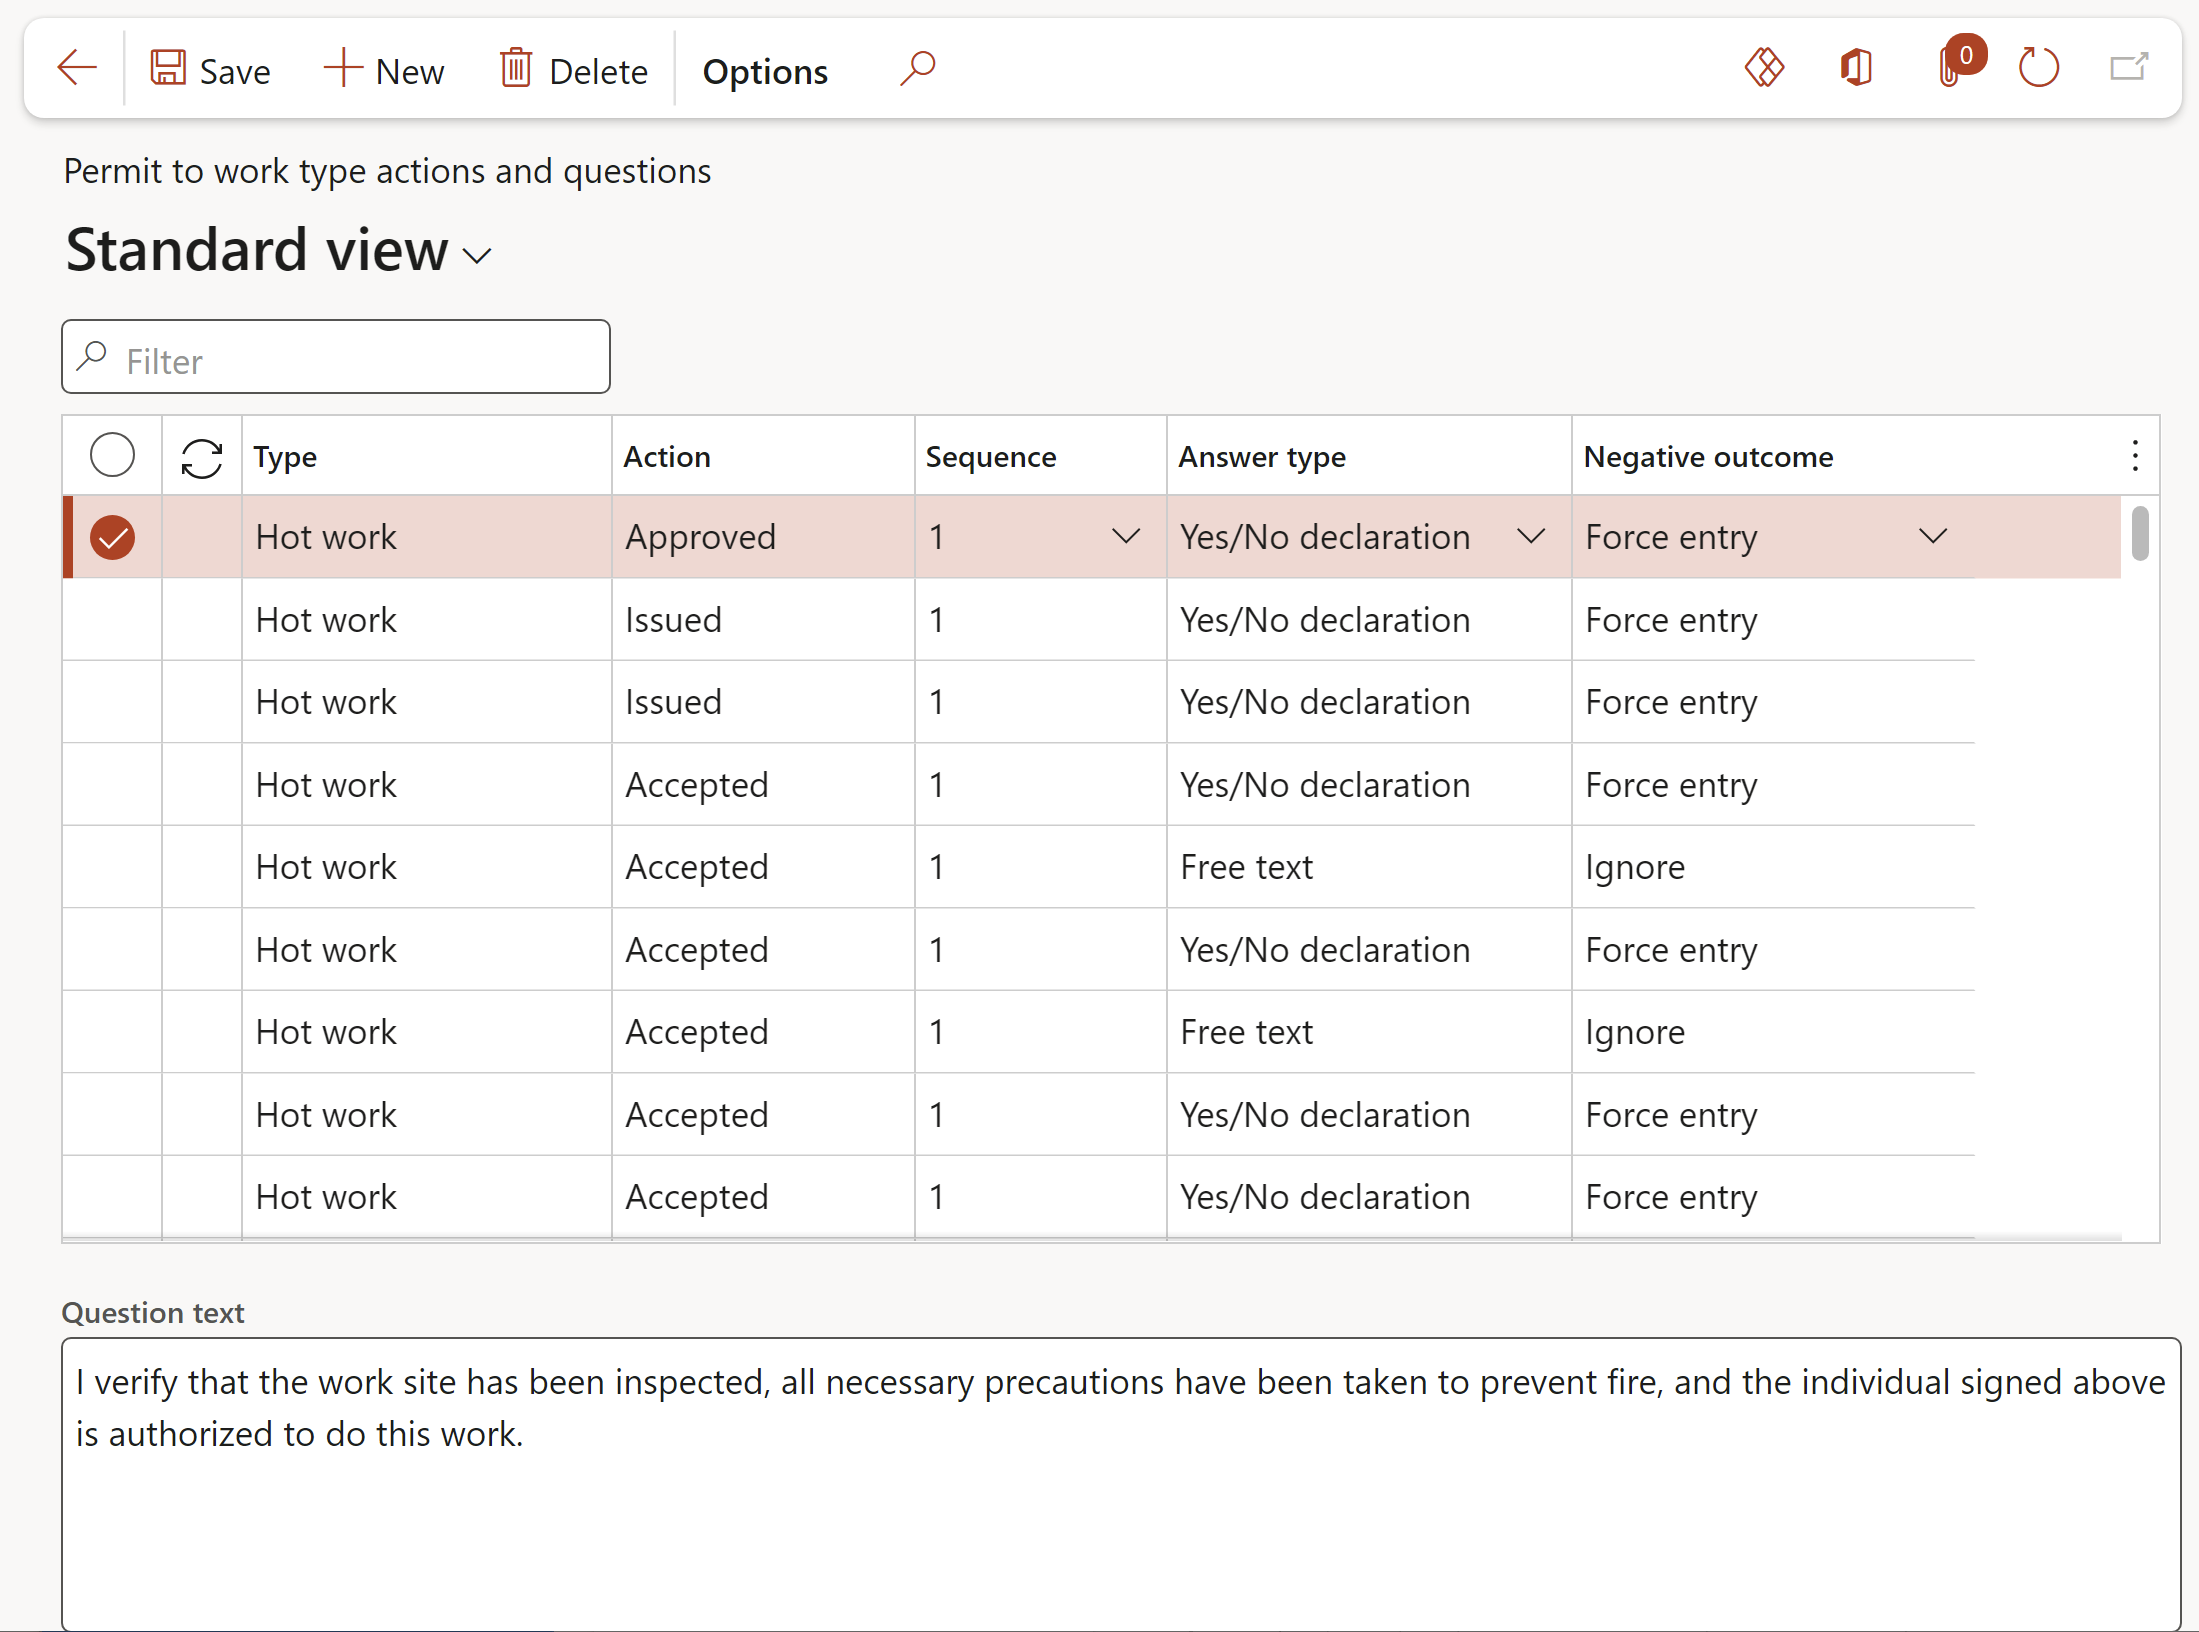
There are several signing actions associated with permits, and questions can be setup to appear on the signing action canvas/dialogue when performing a signing action. For example, a declaration must be done when Approving a permit, then the relevant question would be the declaration text.
The questions are setup per permit type (Type) and signing action (Action).
The Question text is the text that is displayed on the signing action dialogue.
A question must have an Answer type:
Yes/No declaration – this will display the Question text with a tick box on the signing action dialogue
Yes/No answer - this will display the Question text with a tick box on the signing action dialogue
Free text – this will display the Question text with a free text input box on the signing action dialogue
The response to the question is set by the Negative outcome setting:
Force entry – this requires that a response is required before the signing action can be completed, i.e. a Tick is required in the tick box, or text in the free text box
Warning – this will give a warning if there is no input against the question, but will allow the action to continue
Ignore – the action can continue if there is no response to the question
Go to: HSE > Permits to Work > Setup for permits to work > Permit to work type actions and questions
On the Action pane, click on the New button
In the Type field, select the Permit type that this question is being setup for, from the dropdown list
In the Action field, select the relevant signing action from the dropdown list
Enter the Question text in the box provided below the grid
In the Answer type field, select the relevant answer type for the specific question
In the Negative outcome field, select the relevant response to the question from the dropdown list
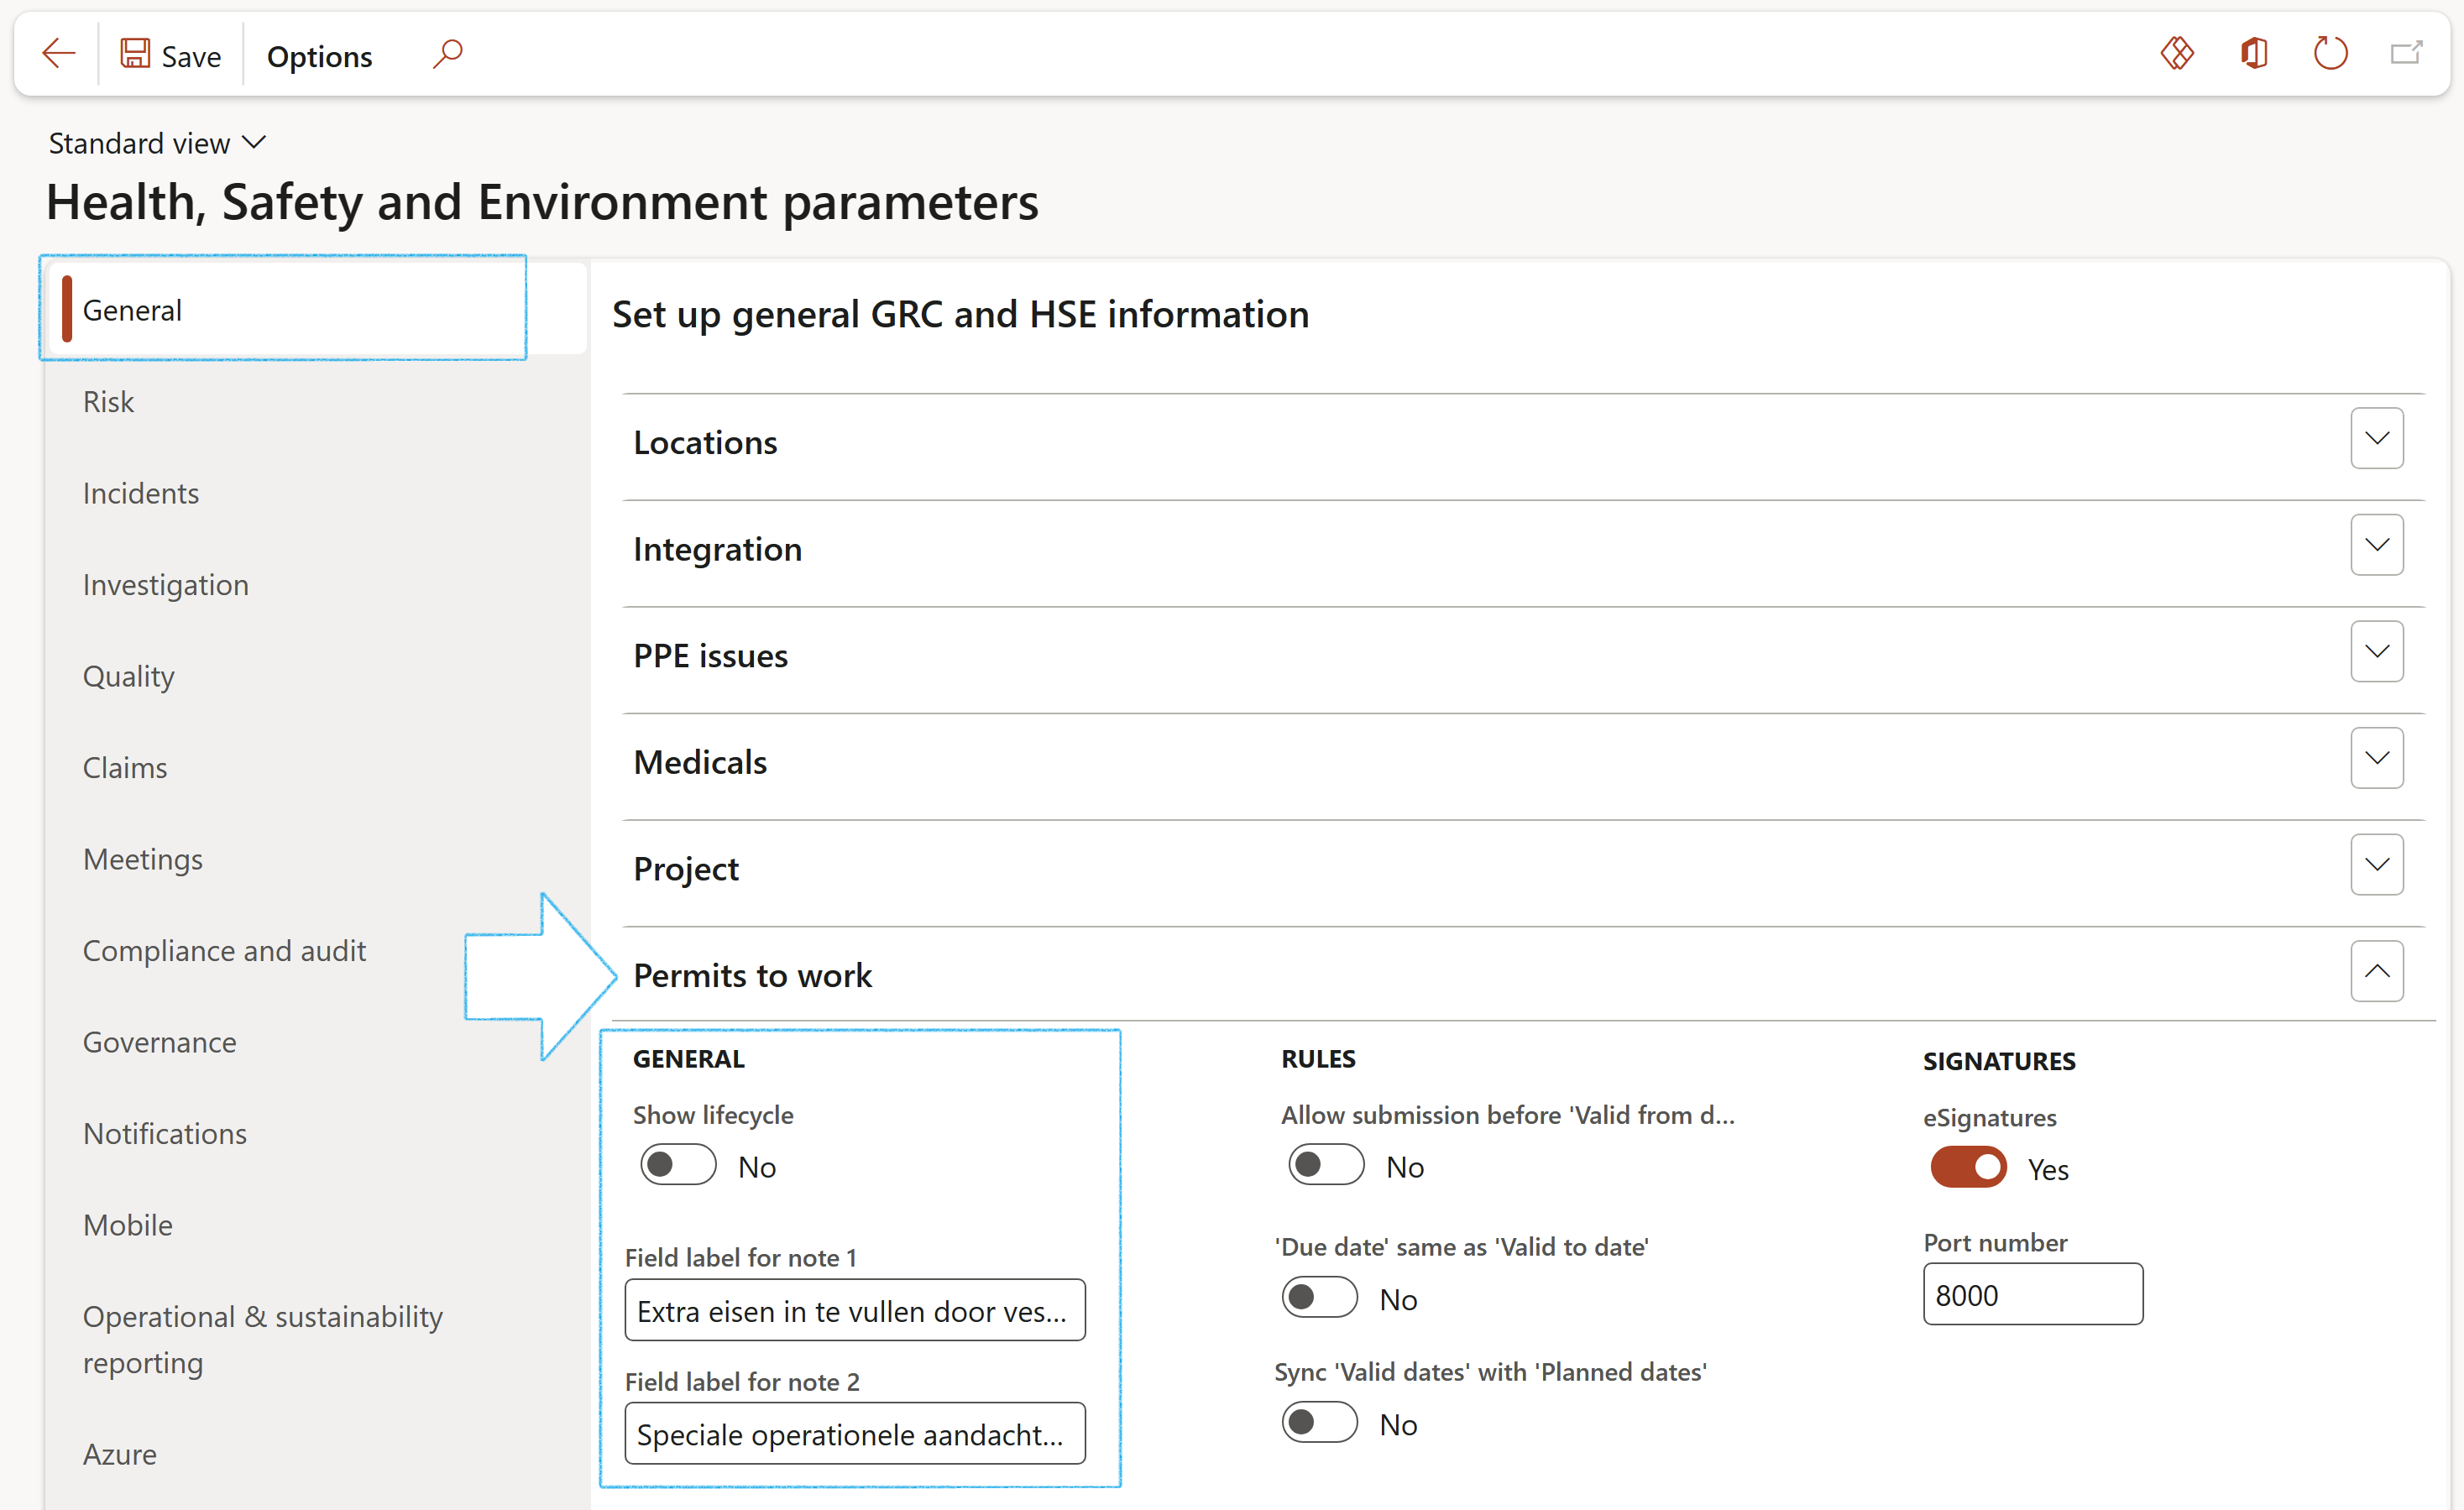
Users have the option to Show lifecycle related buttons and columns.
On the HSE parameters, under the General tab:
Expand the Permits to work Fast tab
When No is selected, the Lifecycle state button group on the PTW Action pane, will be hidden, as well as the Lifecycle column on the Permits to work type setup form.
Users have the option to change the labels of the two Note fields under the Other Fast tab on the Permit to work header view.
On the HSE parameters, under the General tab:
Expand the Permits to work Fast tab
Enter the labels of the two note boxes in the Field label for note 1 and 2 fields
These values will be the labels for the two note boxes on the Permit to work header, under the Notes Fast tab
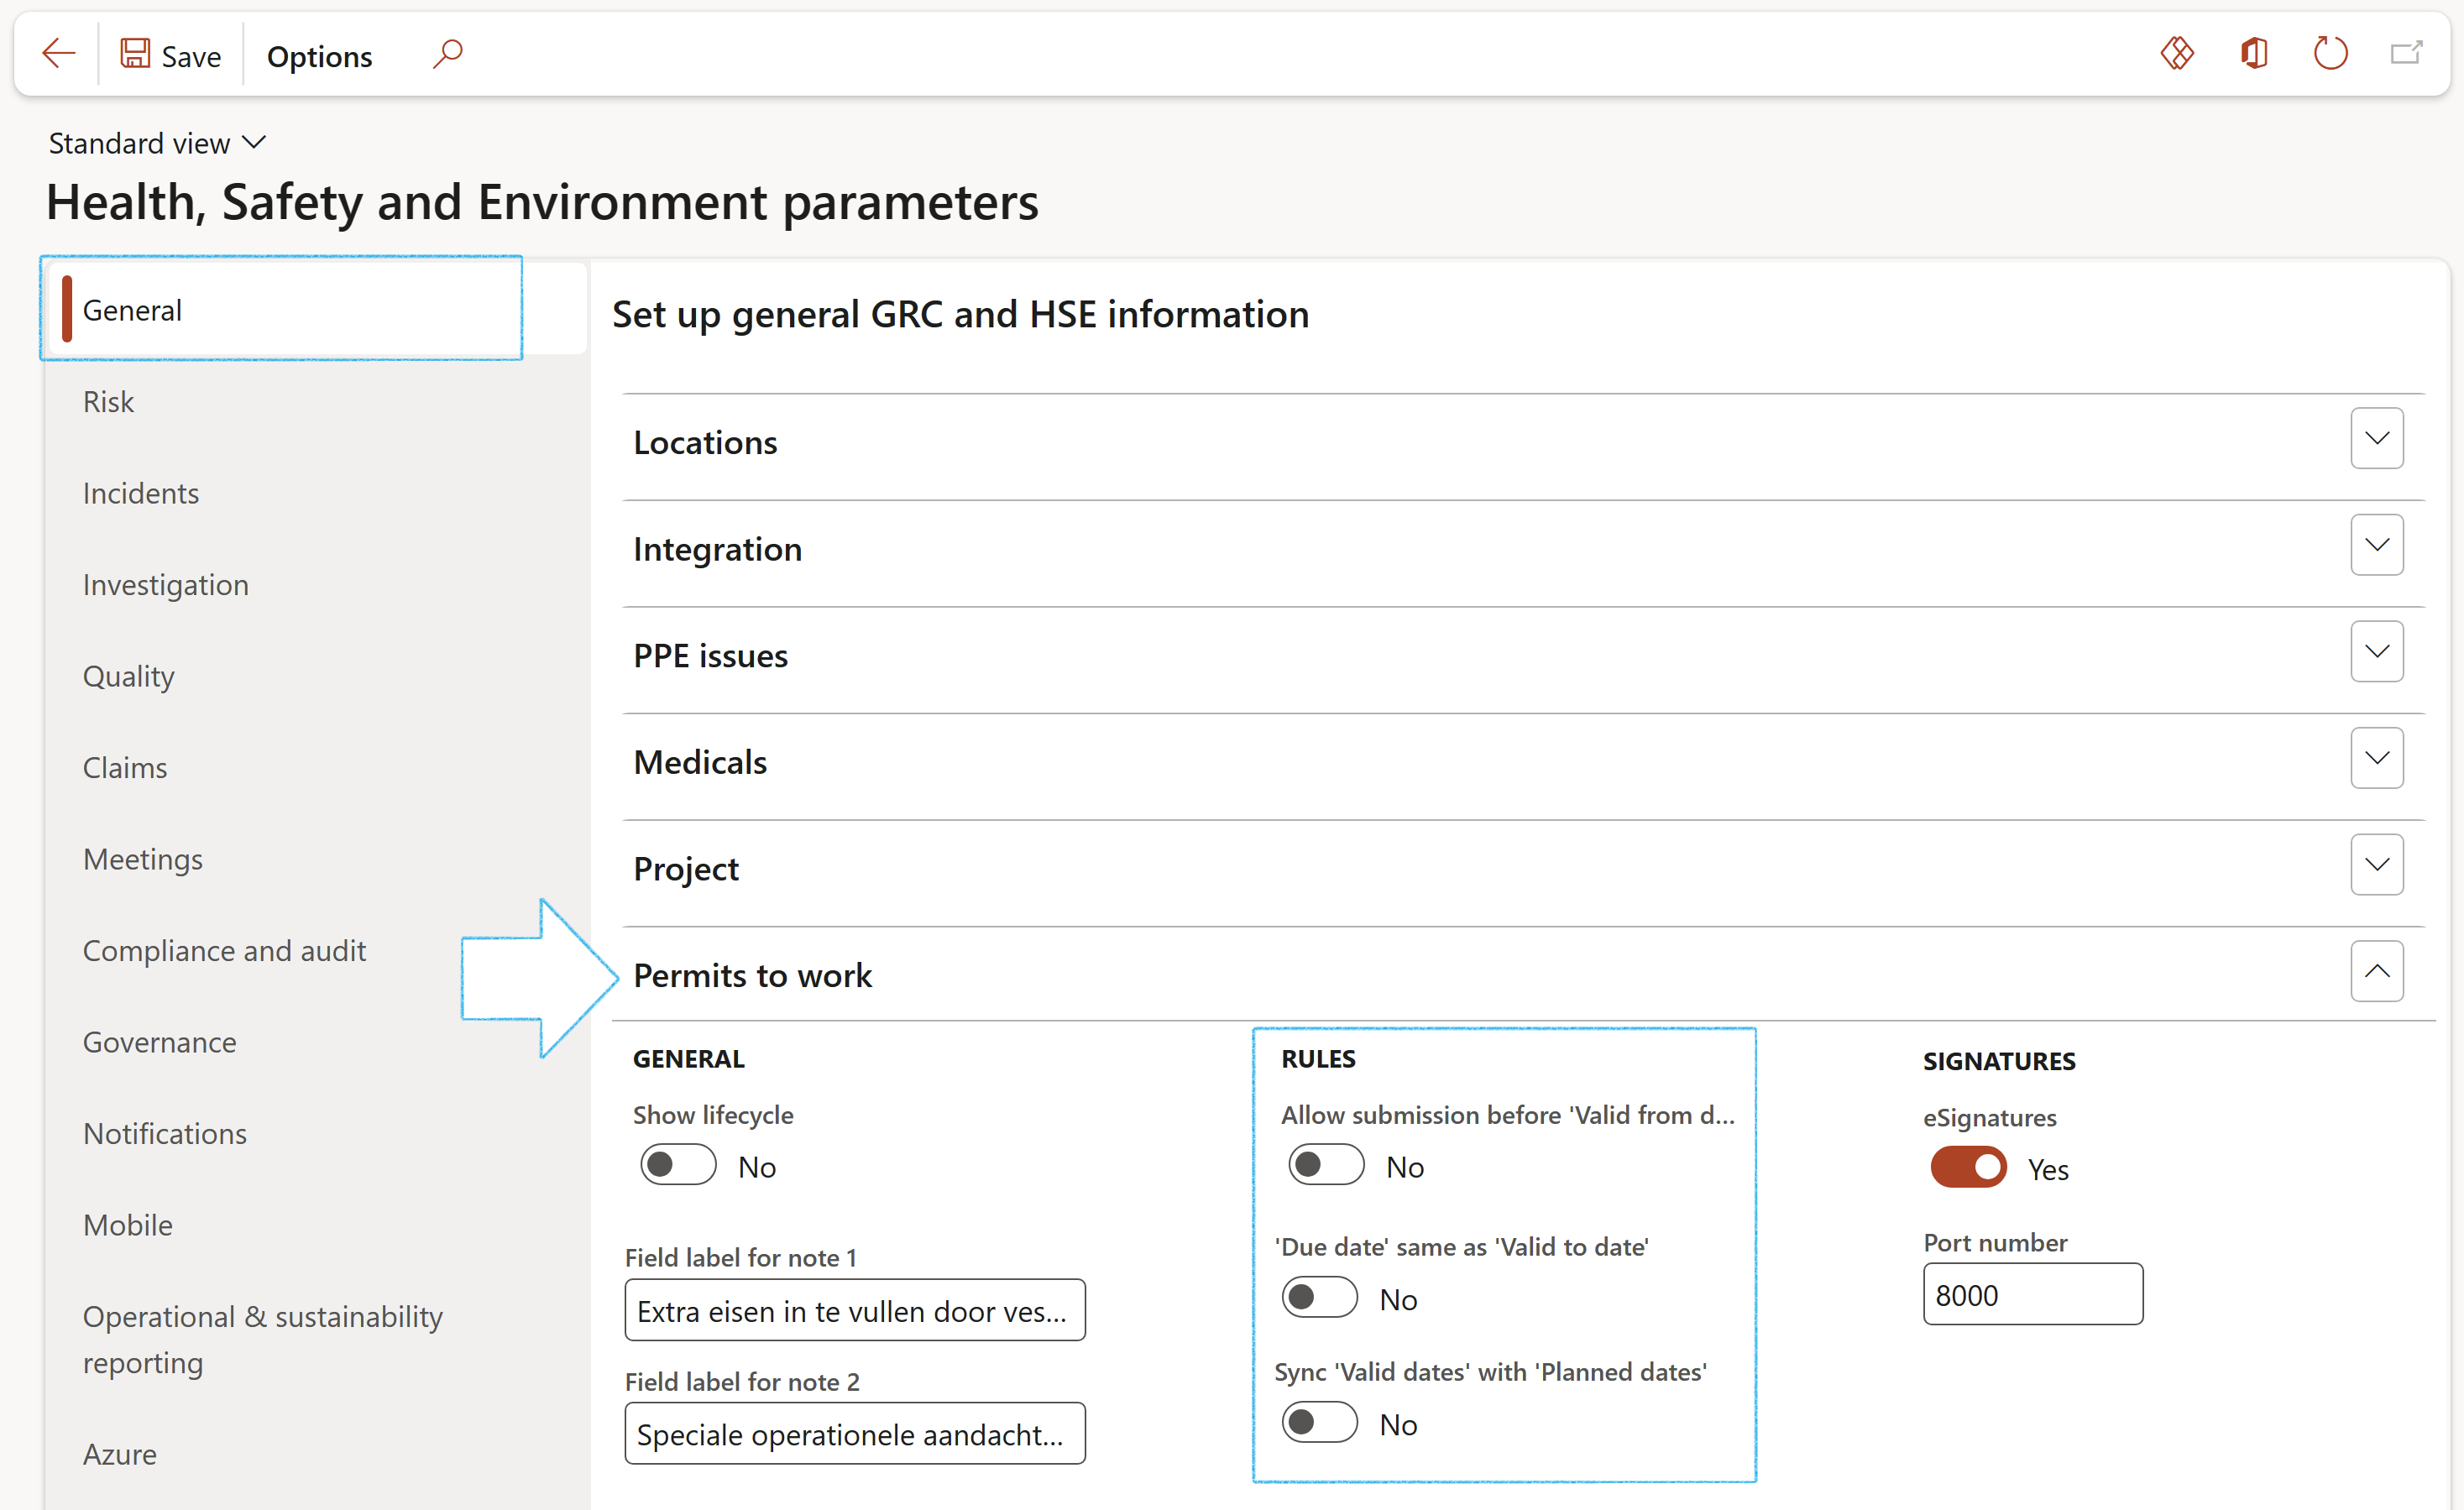
If the Allow submission before 'Valid from date' slider is moved to Yes, the Submit button on the Permit to work can be clicked, even if the current system date is before the specified Valid from date.
If the 'Due date' same as 'Valid to date' slider is moved to Yes, the Due date will be the same as the Valid to date on the Permit to work. The Due date field will also be editable via the 'Valid to date'.
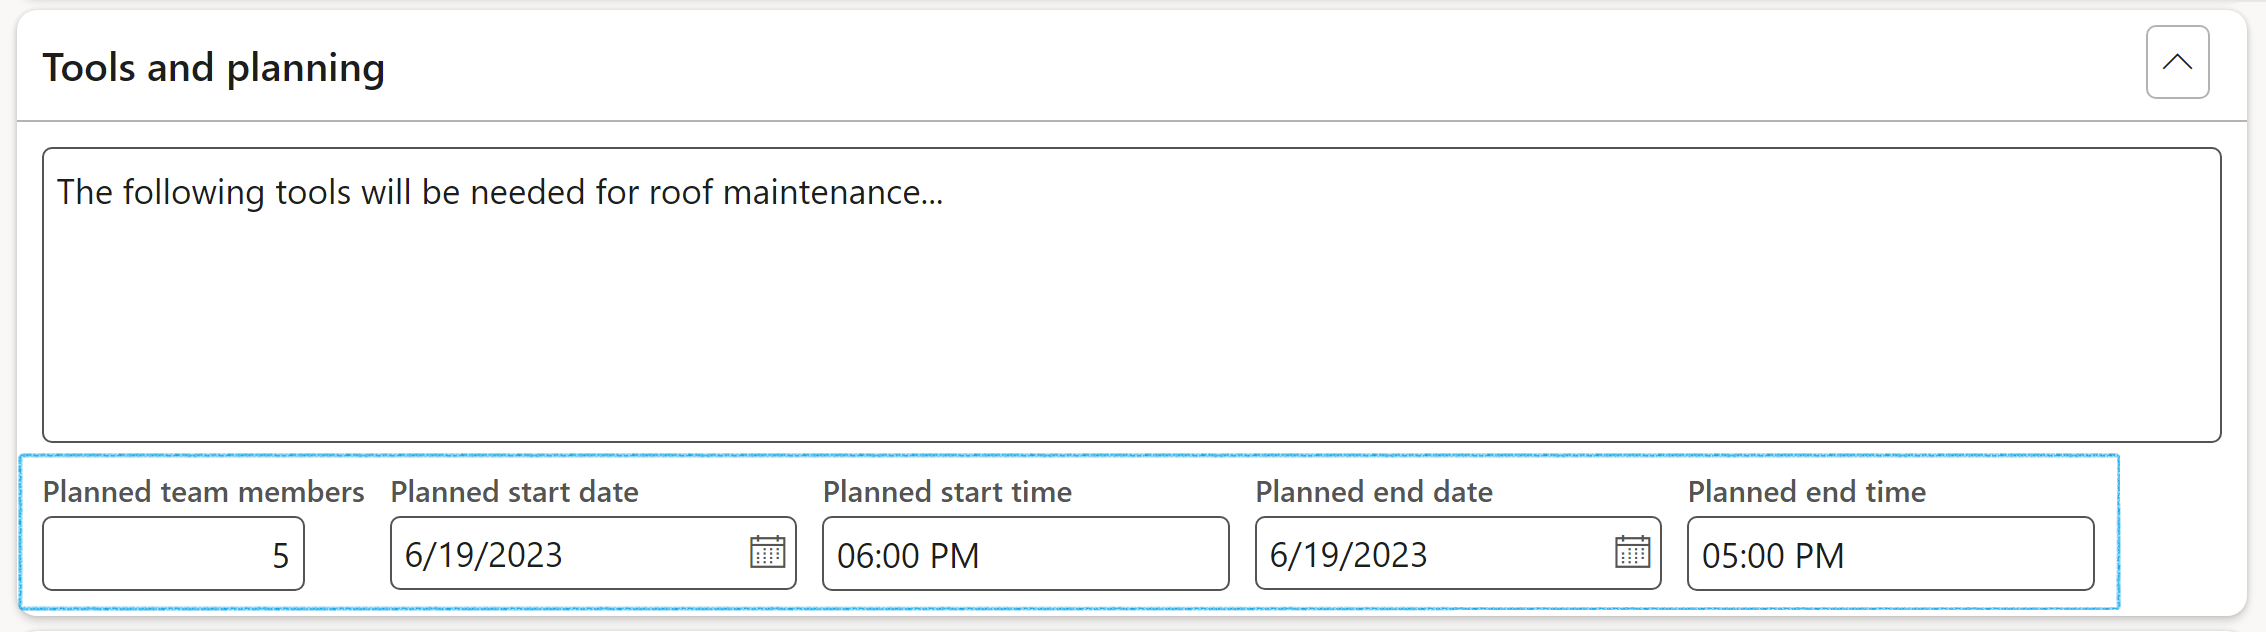
If the Sync 'Valid dates' with 'Planned dates' slider is moved to Yes, the Valid from/to date and time values will synchronize with the Planned start/end date and time values on the Permit to work. The 'Planned date/time' values become display only, and can be updated by updating the 'Valid date/time' values
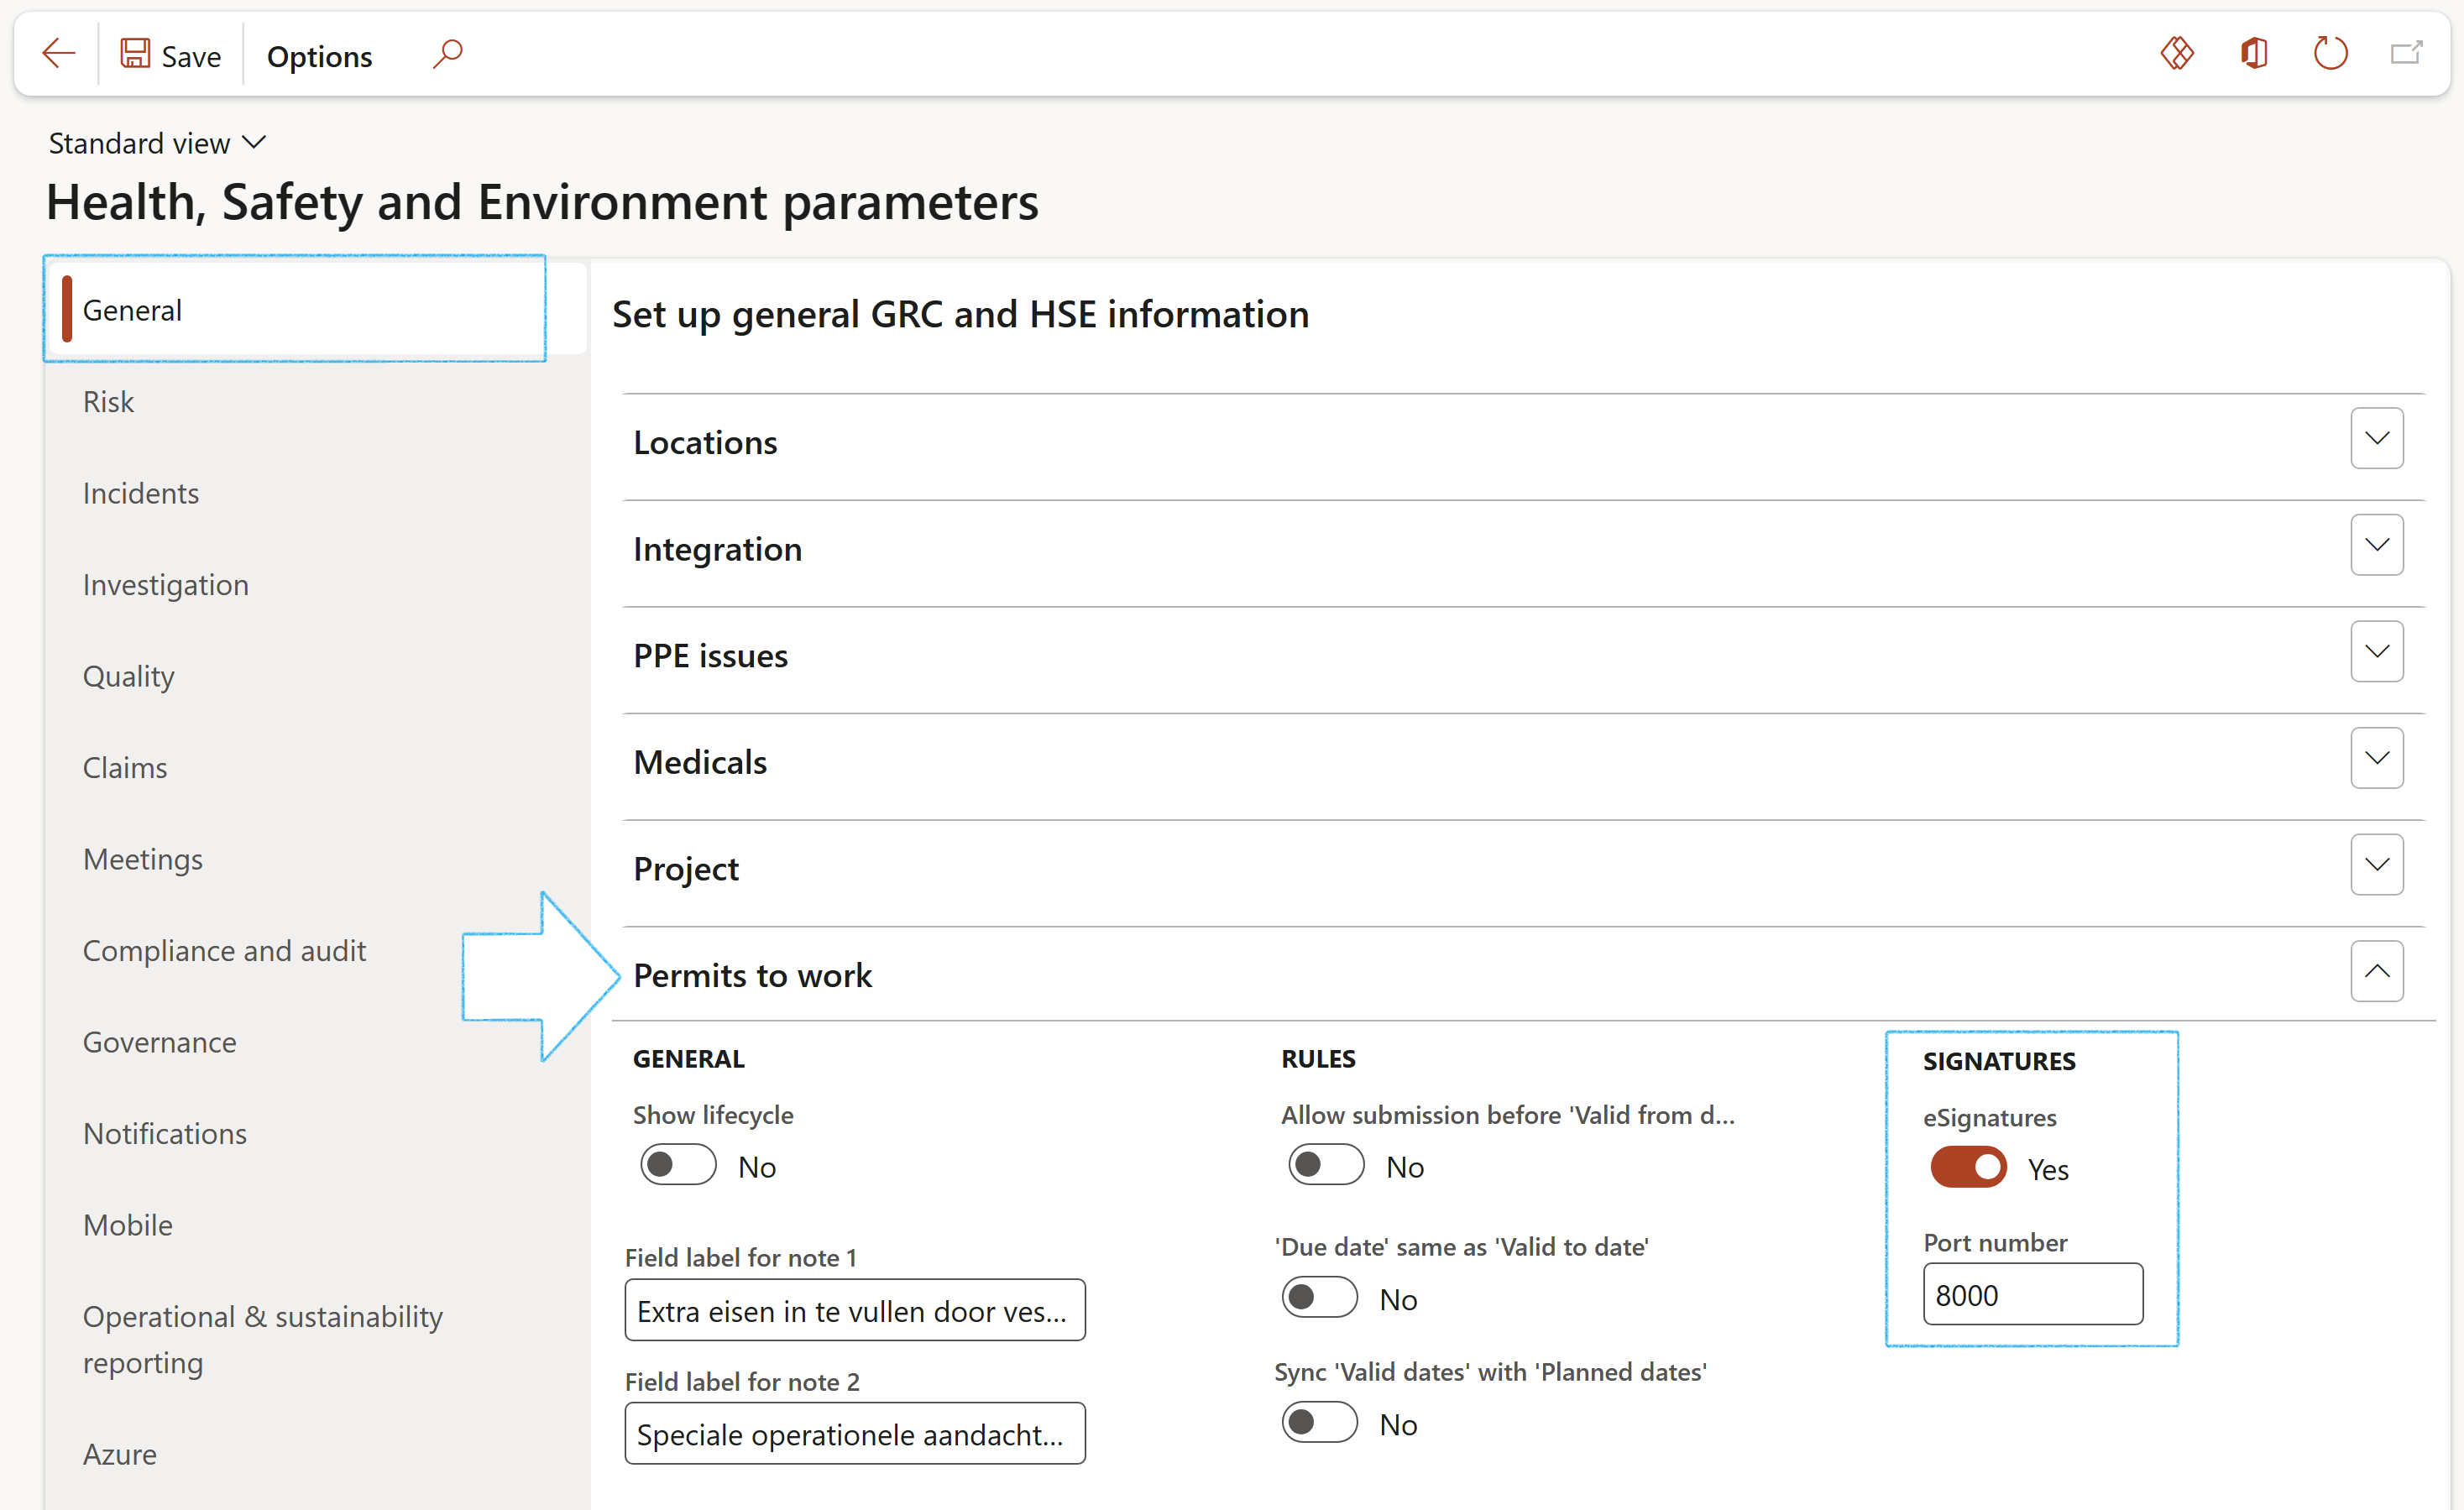
This setup must be done once to enable (or disable) the capturing of electronic signatures within D365 HSE from the signature pad.
Go to: HSE > Setup > Health, Safety and Environment parameters
Under the General tab:
Expand the Permits to work Fast tab
Select Yes in the eSignatures field
The Port number is the port that is setup for the Signature Pad during the installation of the Signature Pad software on a desktop or laptop
Click Save
A signature pad must be setup on the workstation where the signature is being captured.
Electronic signatures are used in the HSE module under Permits to Work to capture signatures made on the signature pad for some of the permit signing actions.
Locks can be set up to isolate a particular piece of machinery or object.
For example, repairs to electrical equipment may require switching off of supply - a physical lock will be used to isolate this item.
Certain items of equipment, particularly large and complex pieces of plant, will often have lengthy complicated isolation procedures. The safety of workers can depend on equipment being correctly isolated. Isolation procedures will often be documented and filed. Operational staff have to look up the correct procedures when issuing a permit. These procedures are time consuming and are subject to human-error. When permits are issued, operators may be tempted to rely on memory for the isolations instead of taking the time to look up and verify the correct procedures. There is also the chance that the wrong isolation procedure is used.
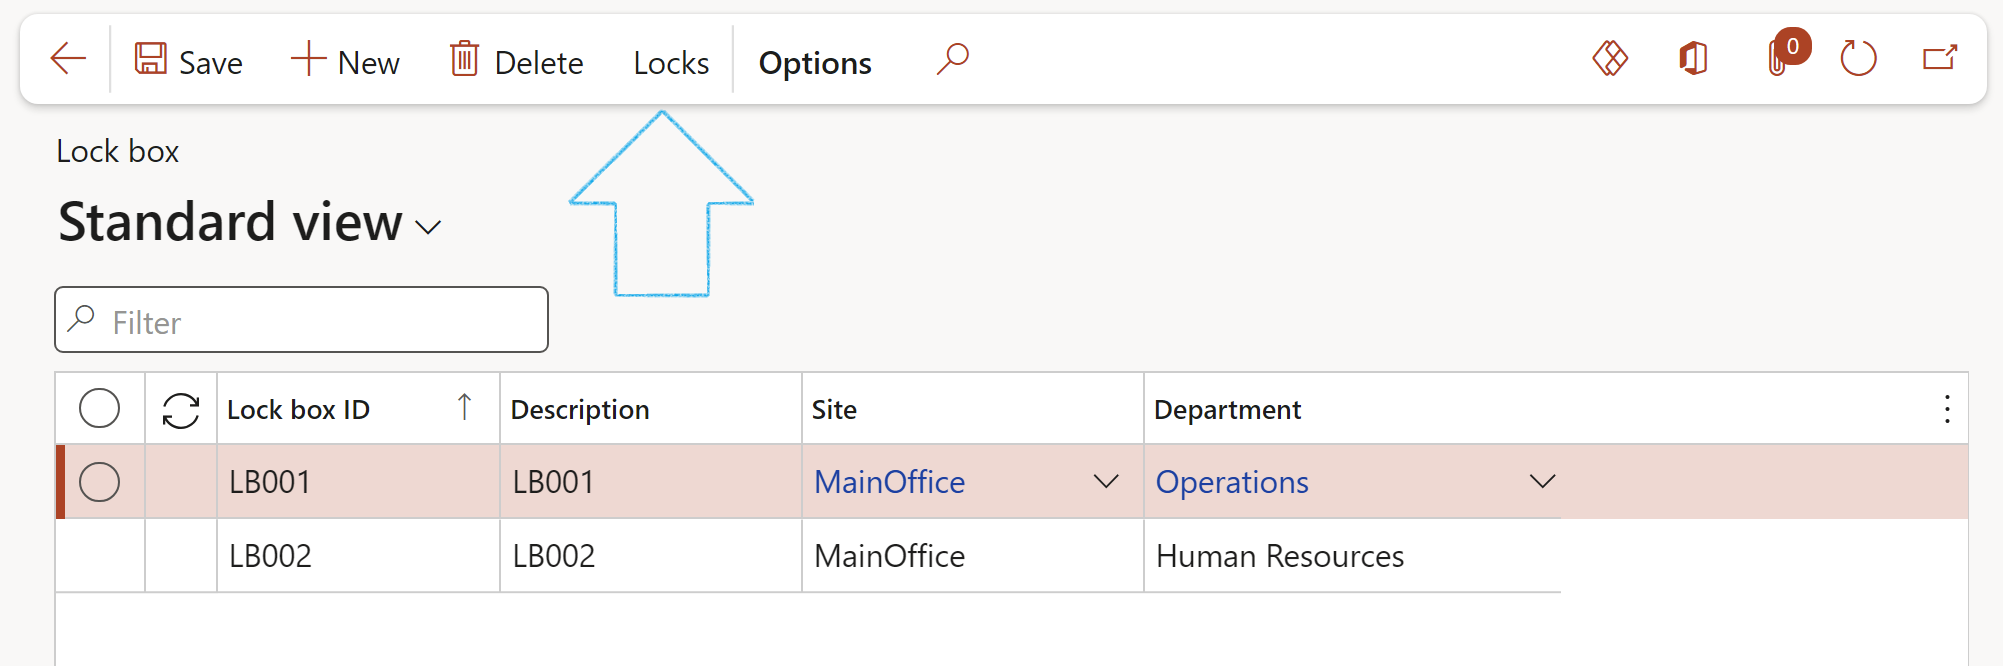
Go to: HSE > Permits to Work > Setup for permits to work > Locks
On the Action pane, click New
Under the General Fast tab:
The Lock number will automatically be generated
Enter a short Description for the lock
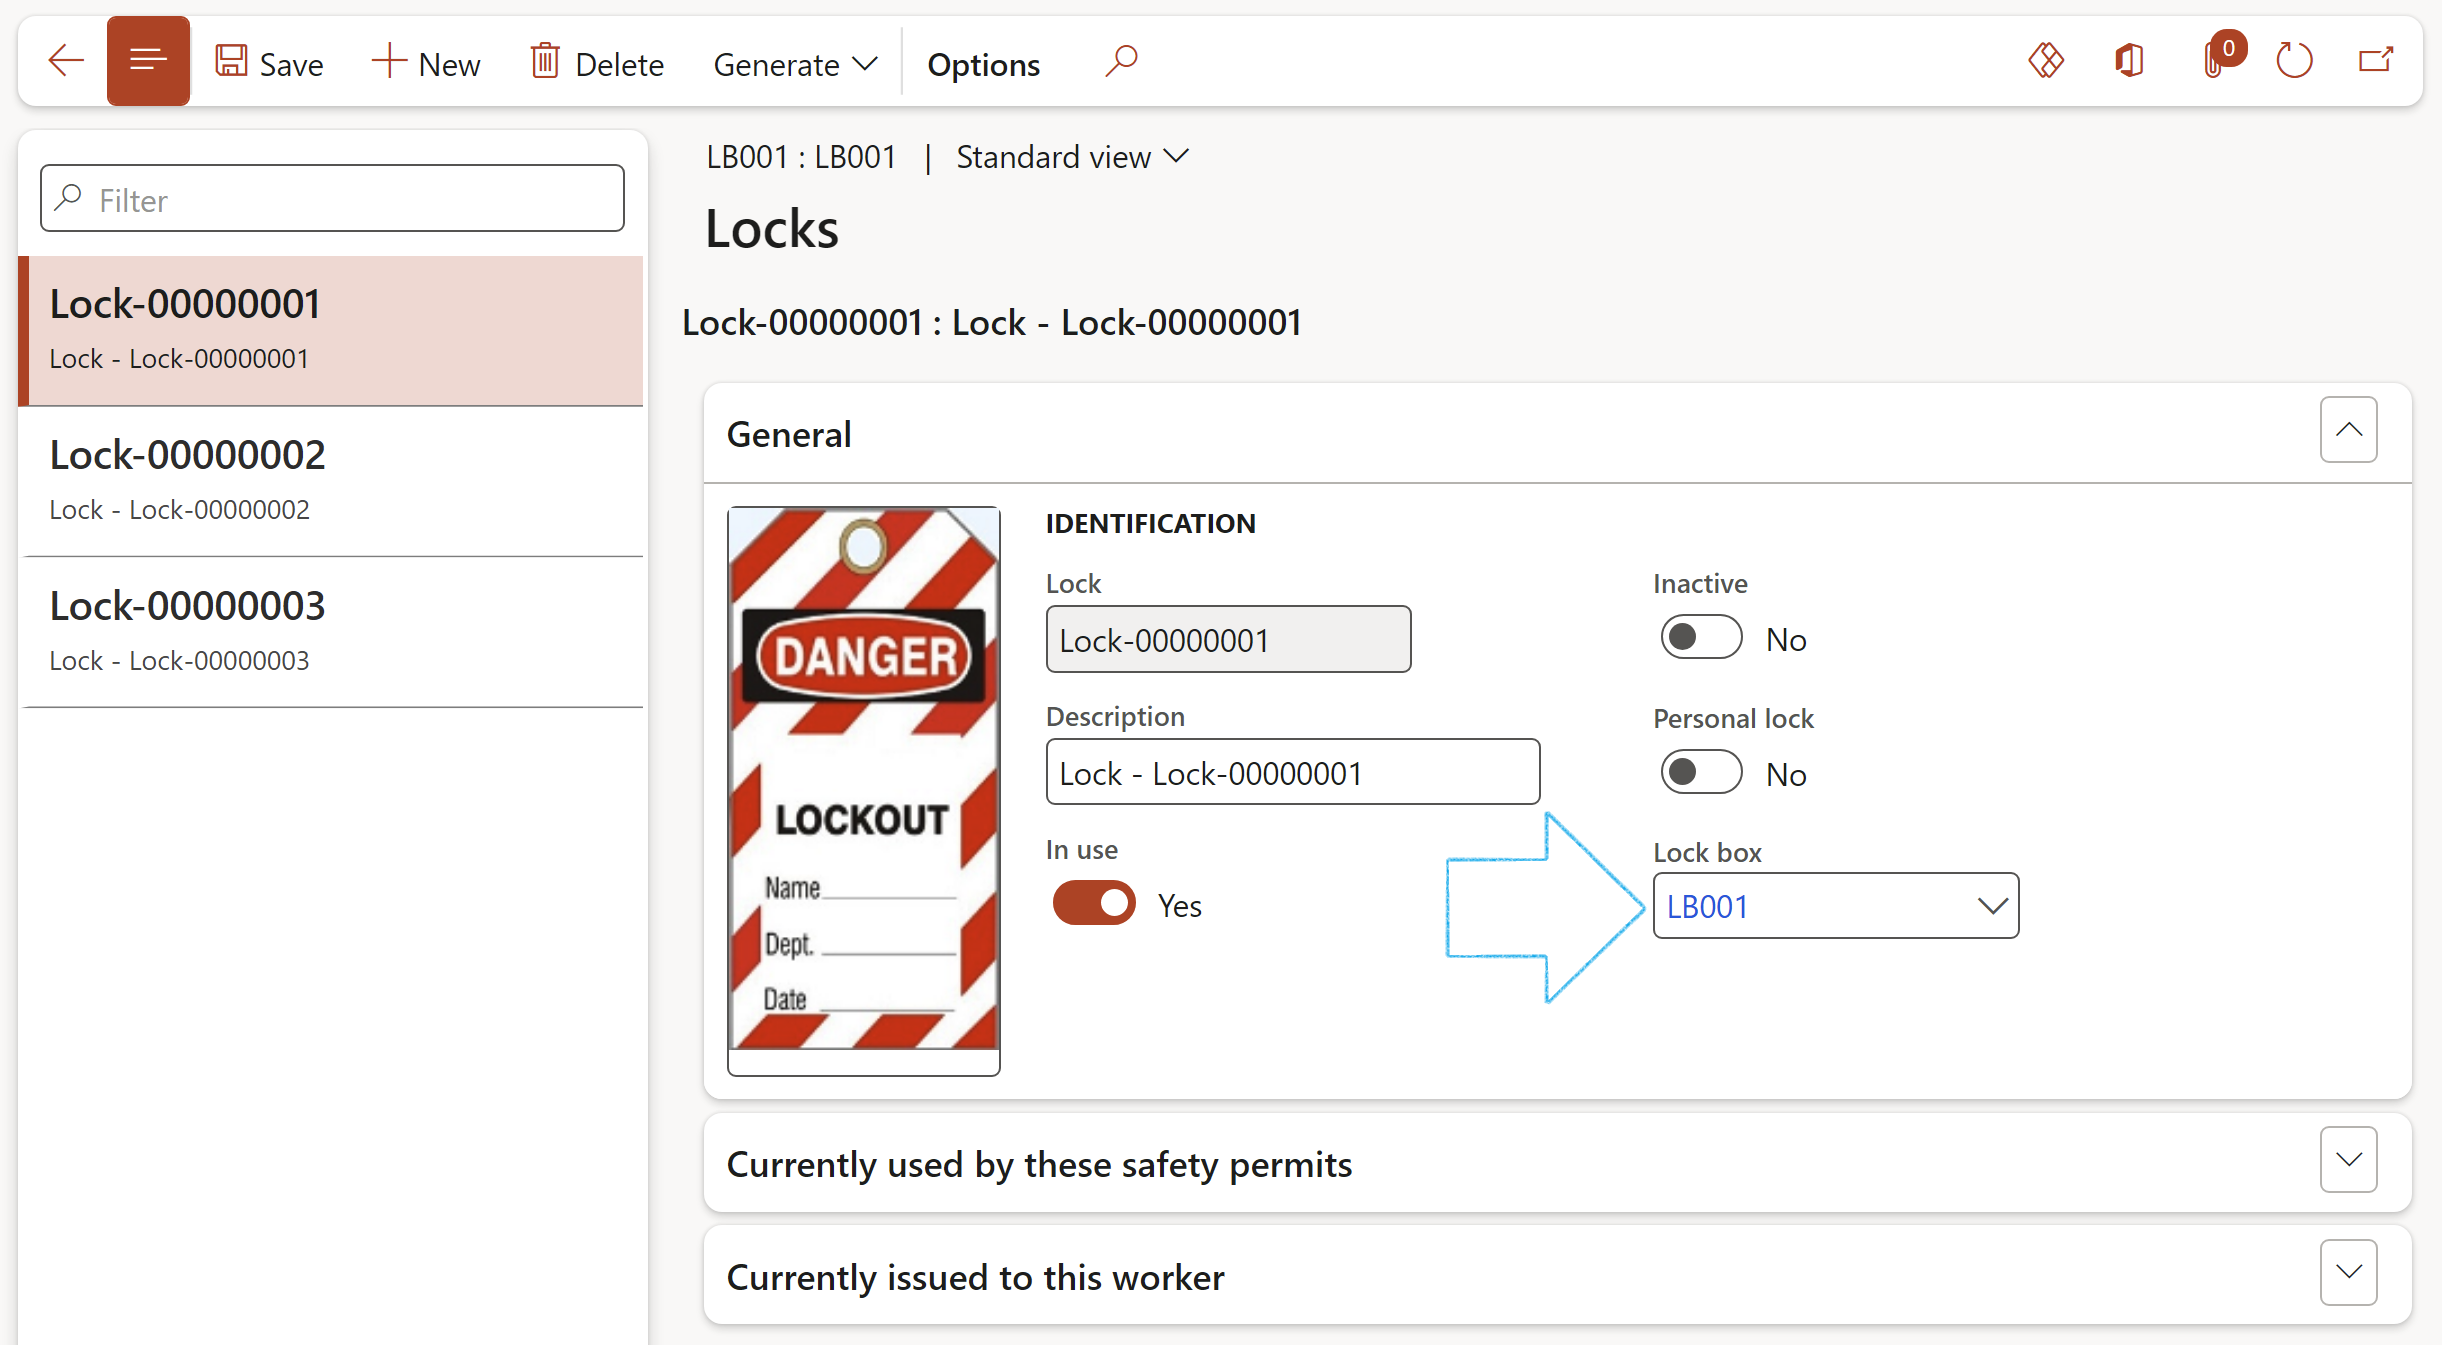
Inactive – Indicates whether the lock is active or not
When a lock is not being used any more it can be marked as Inactive, rather than deleting the lock. This ensures that historical records can reference back to the lock.
In use – Indicates whether the lock is in use or not
In the Lock box field, select the lock box that the lock should be linked to, from the dropdown list. (Optional)
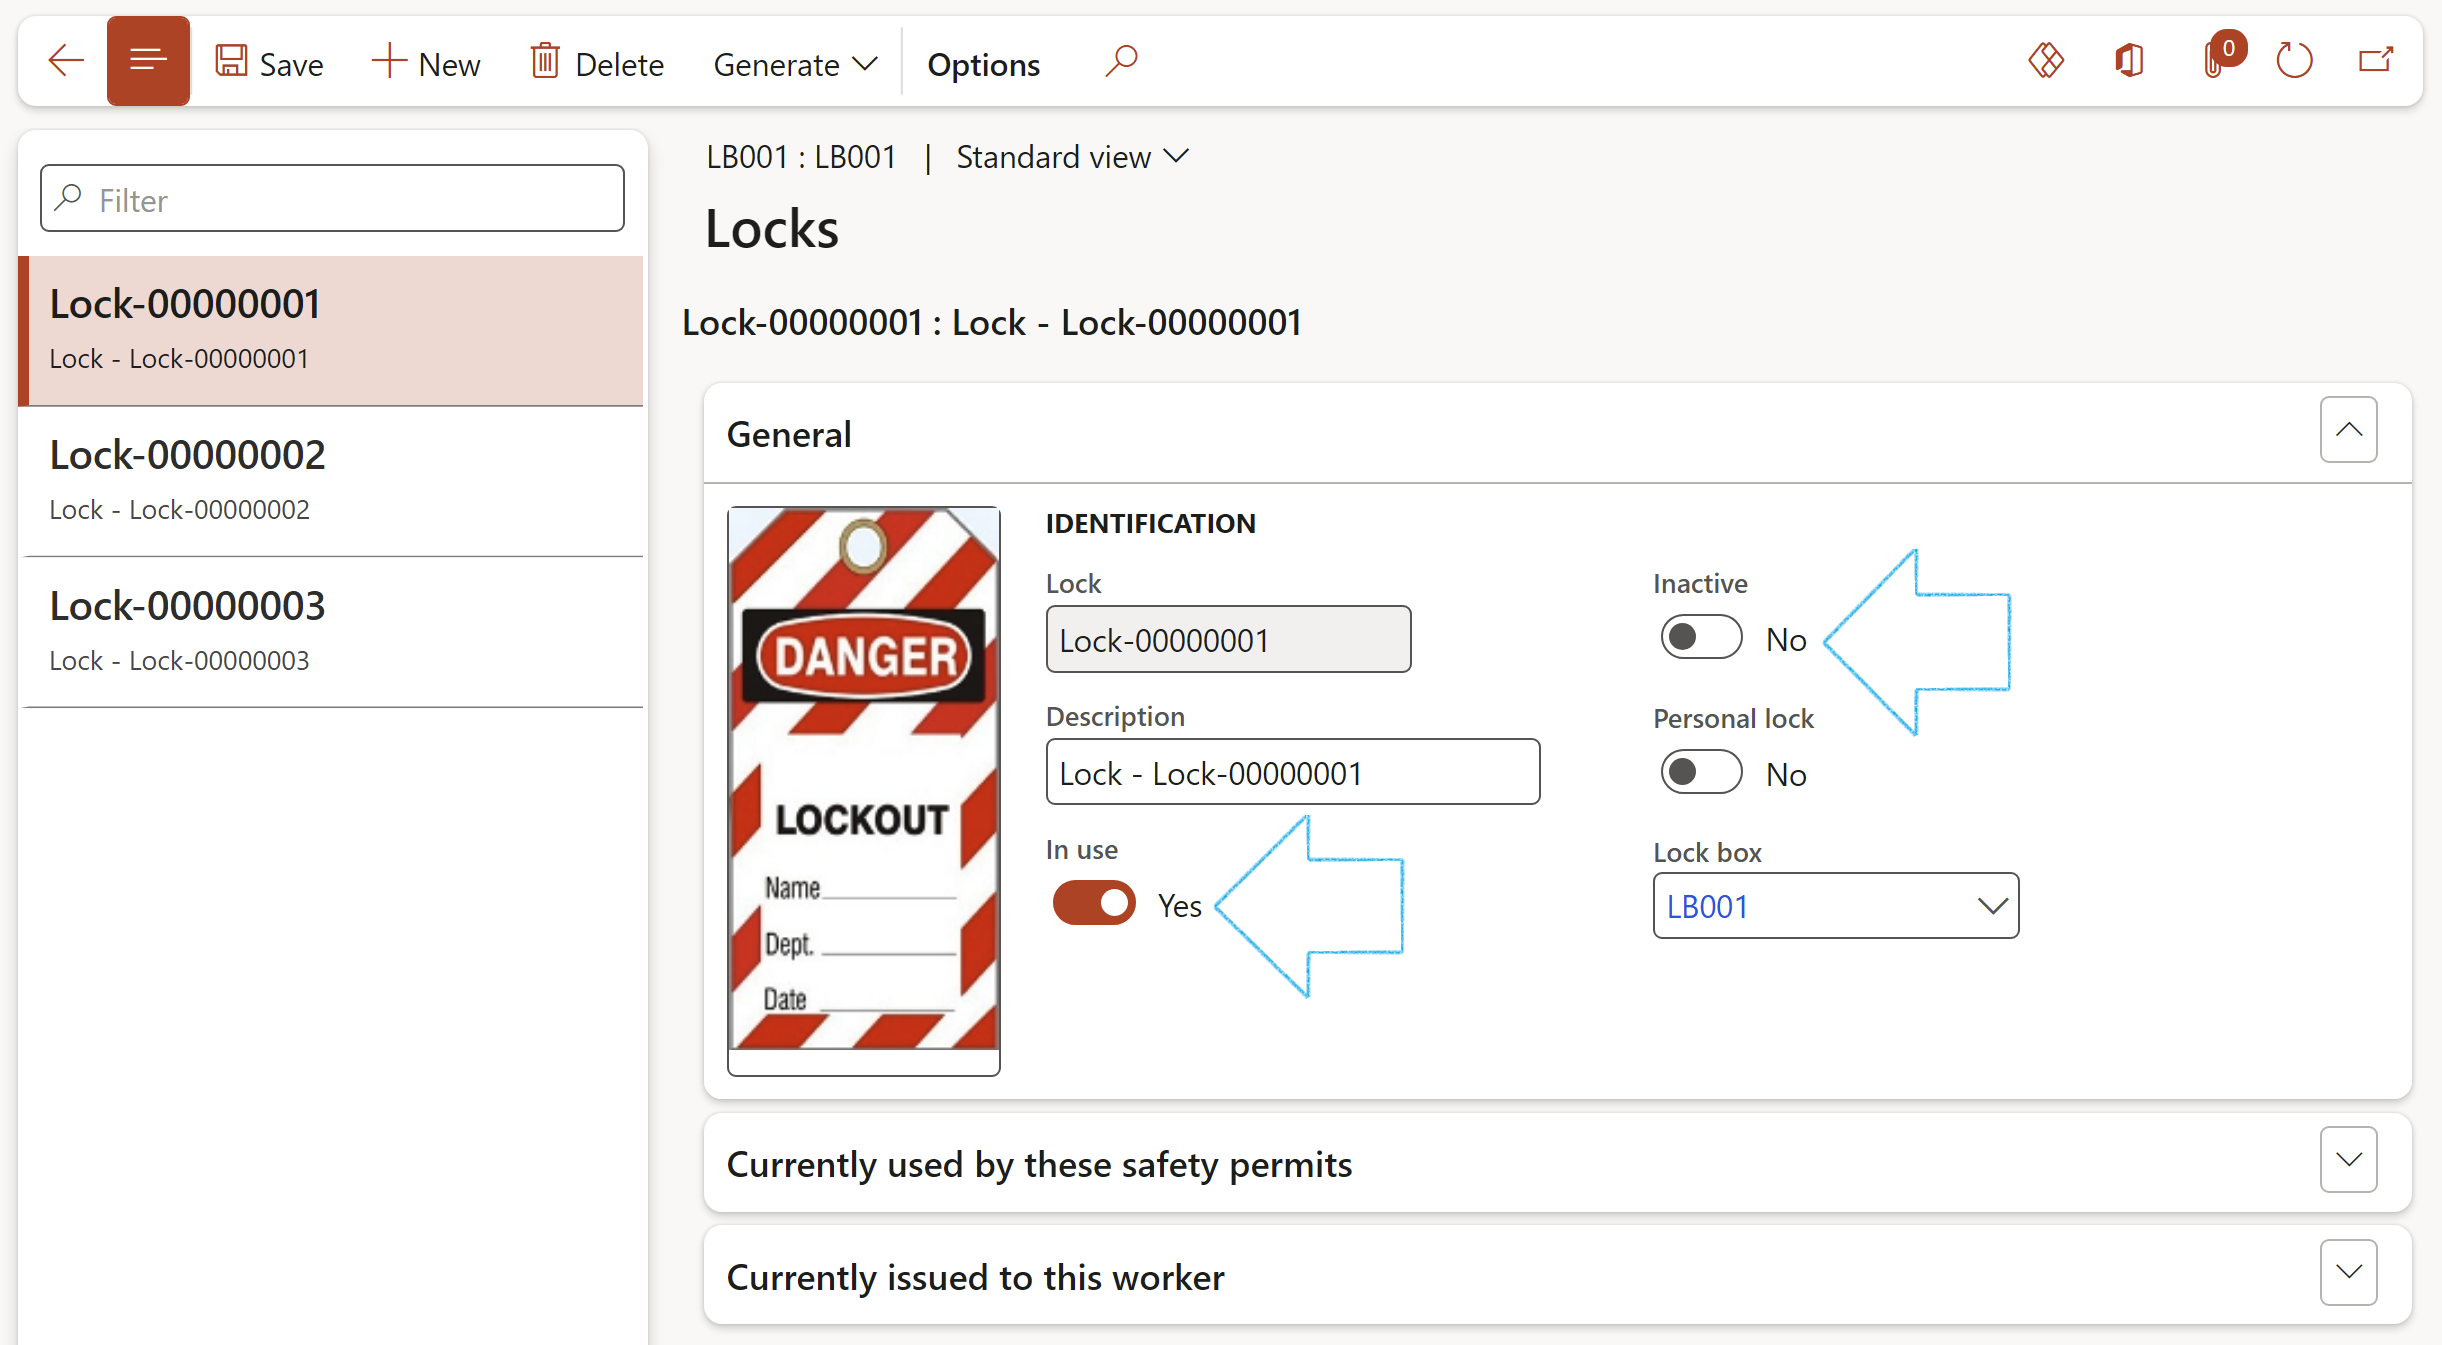
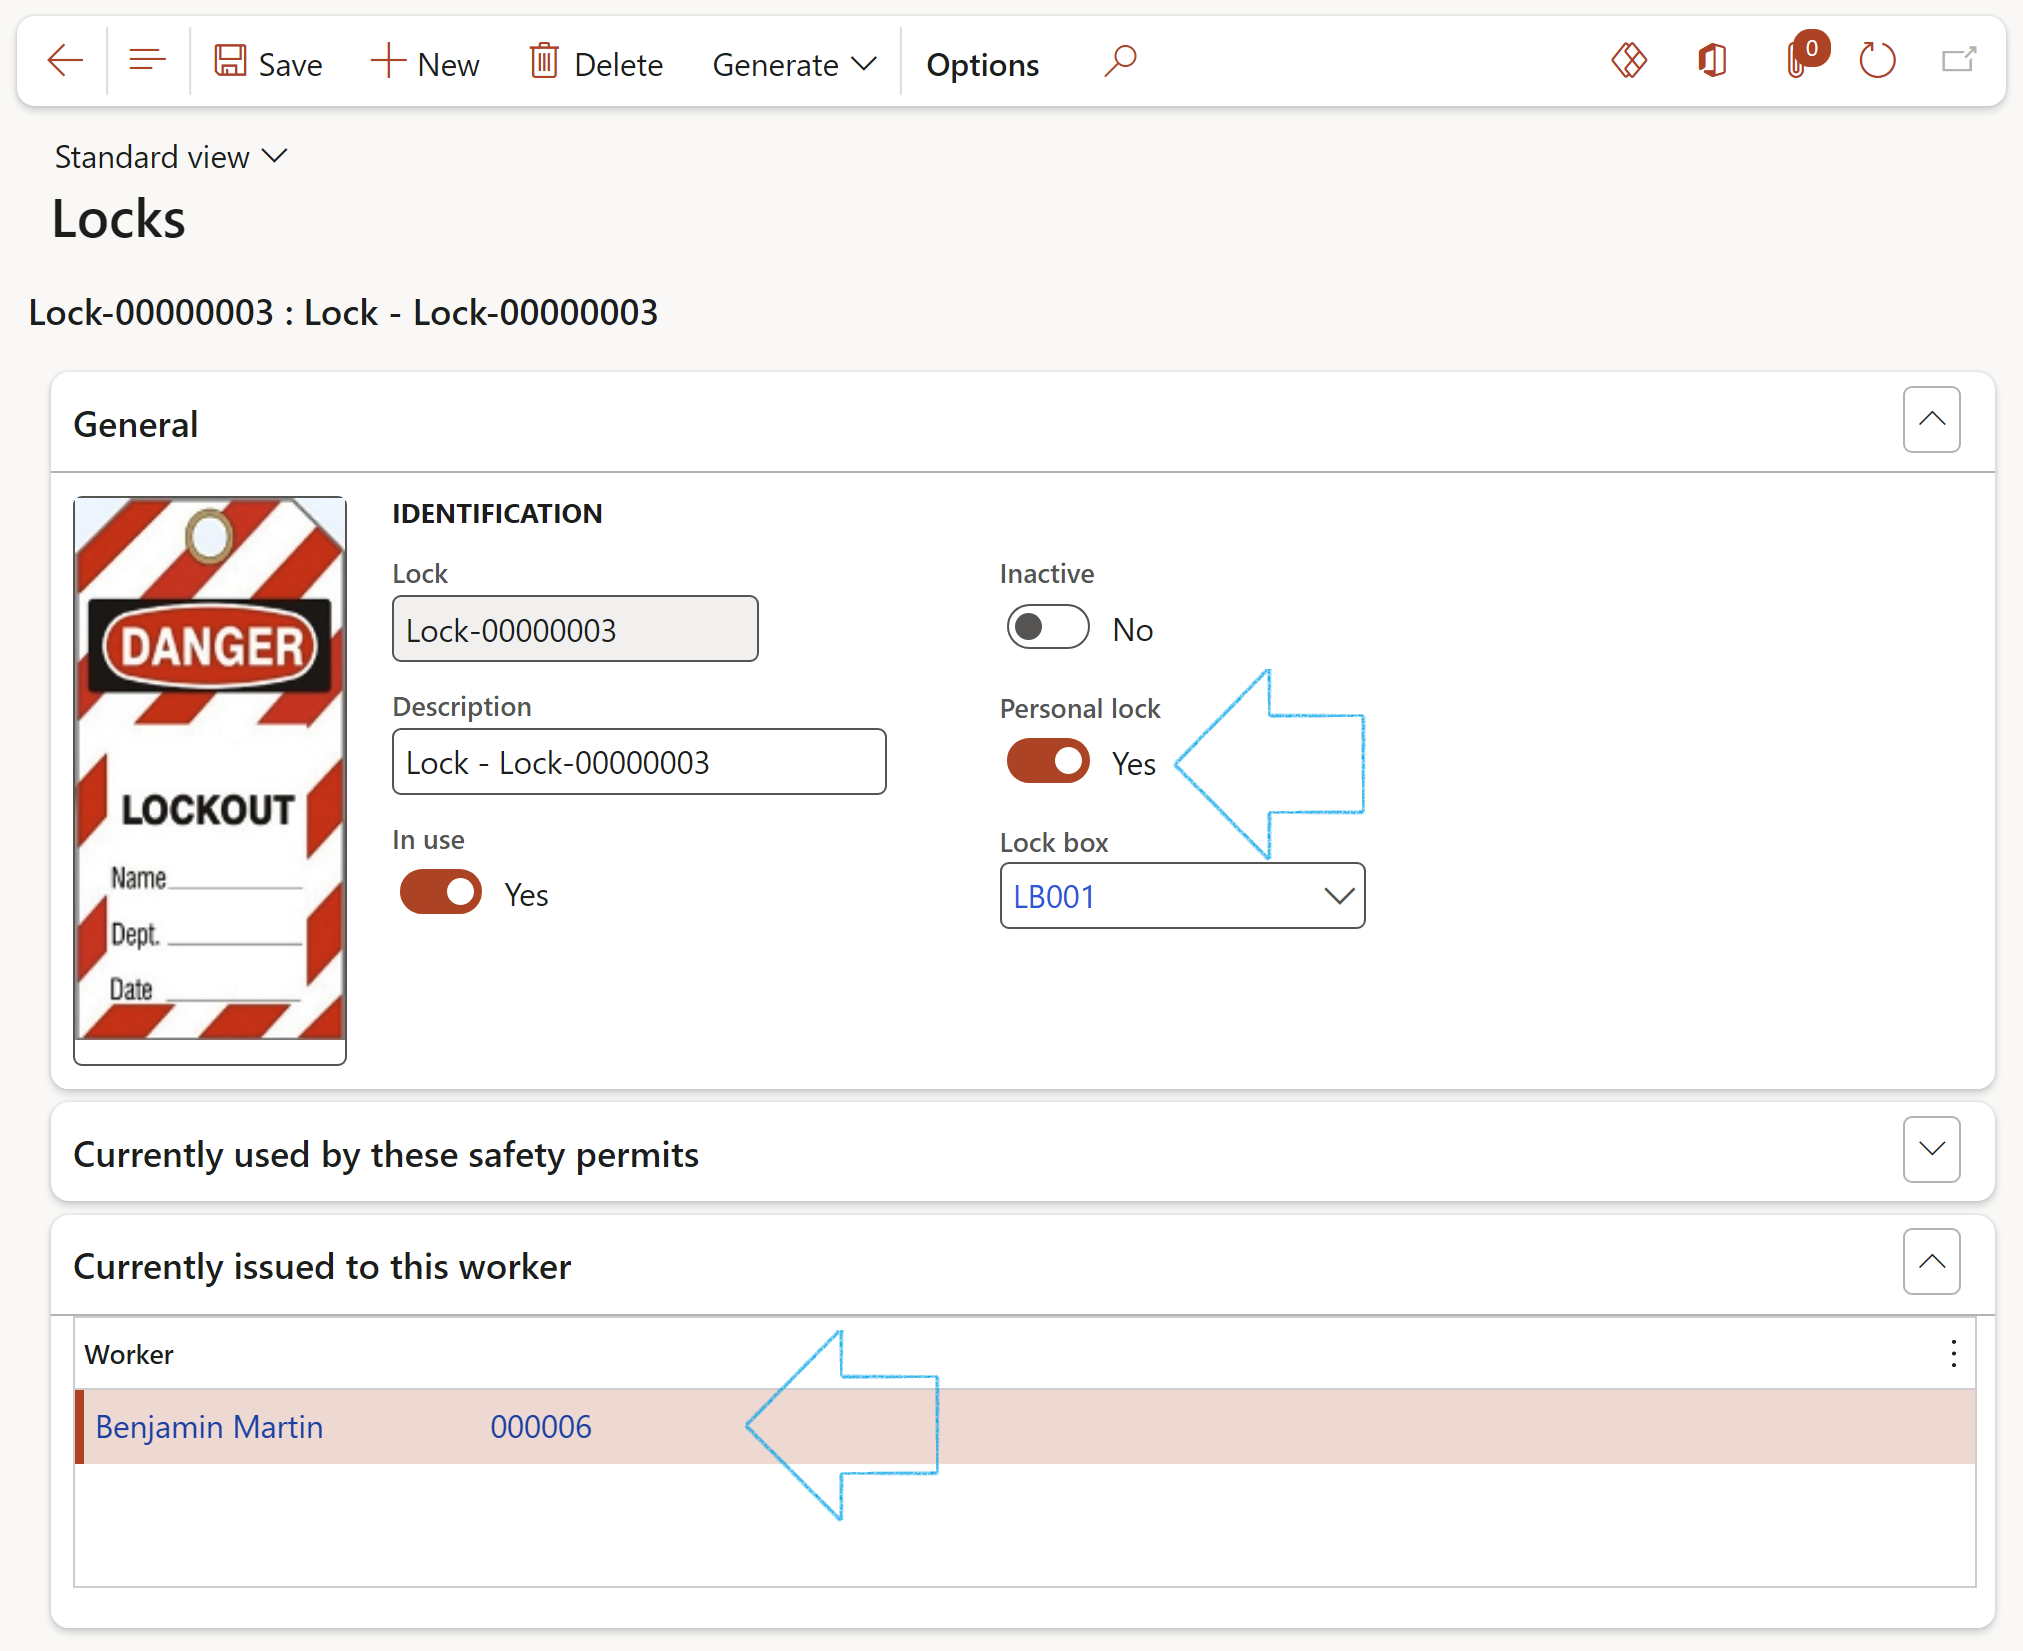
If this lock is being used on a Permit to work, the user can see the details under the Currently used by these safety permits Fast tab
If this lock has been issued to a worker on the Locks issue register, the user can see the details under the Currently issued to this worker Fast tab
The Personal lock slider under the General Fast tab will be on Yes
HSE 365 is a module inside Dynamics 365 FO which manages the process whereby permits to work (also known as clearances) are recorded, approved, issued and eventually filed. When recording and issuing of a permit to work, Dynamics 365 HSE will help with the safety preparations, identification of hazards, the PPE and proper lock out procedures. The result is clearance of high integrity done in a formal way.
The sub-module caters for all the formal procedures and rules surrounding hazardous materials, safety equipment, isolations and protective equipment. The system is set up to ensure that safety regulations established in your company are adhered to by either prohibiting any action that is contrary to these rules, or in special circumstances, by raising an “exception” in the system and ensuring that the user enters a reason for his actions. These matters can then be escalated to line management for follow up where needed.
The following statuses and sub-statuses (cycles) are supported:
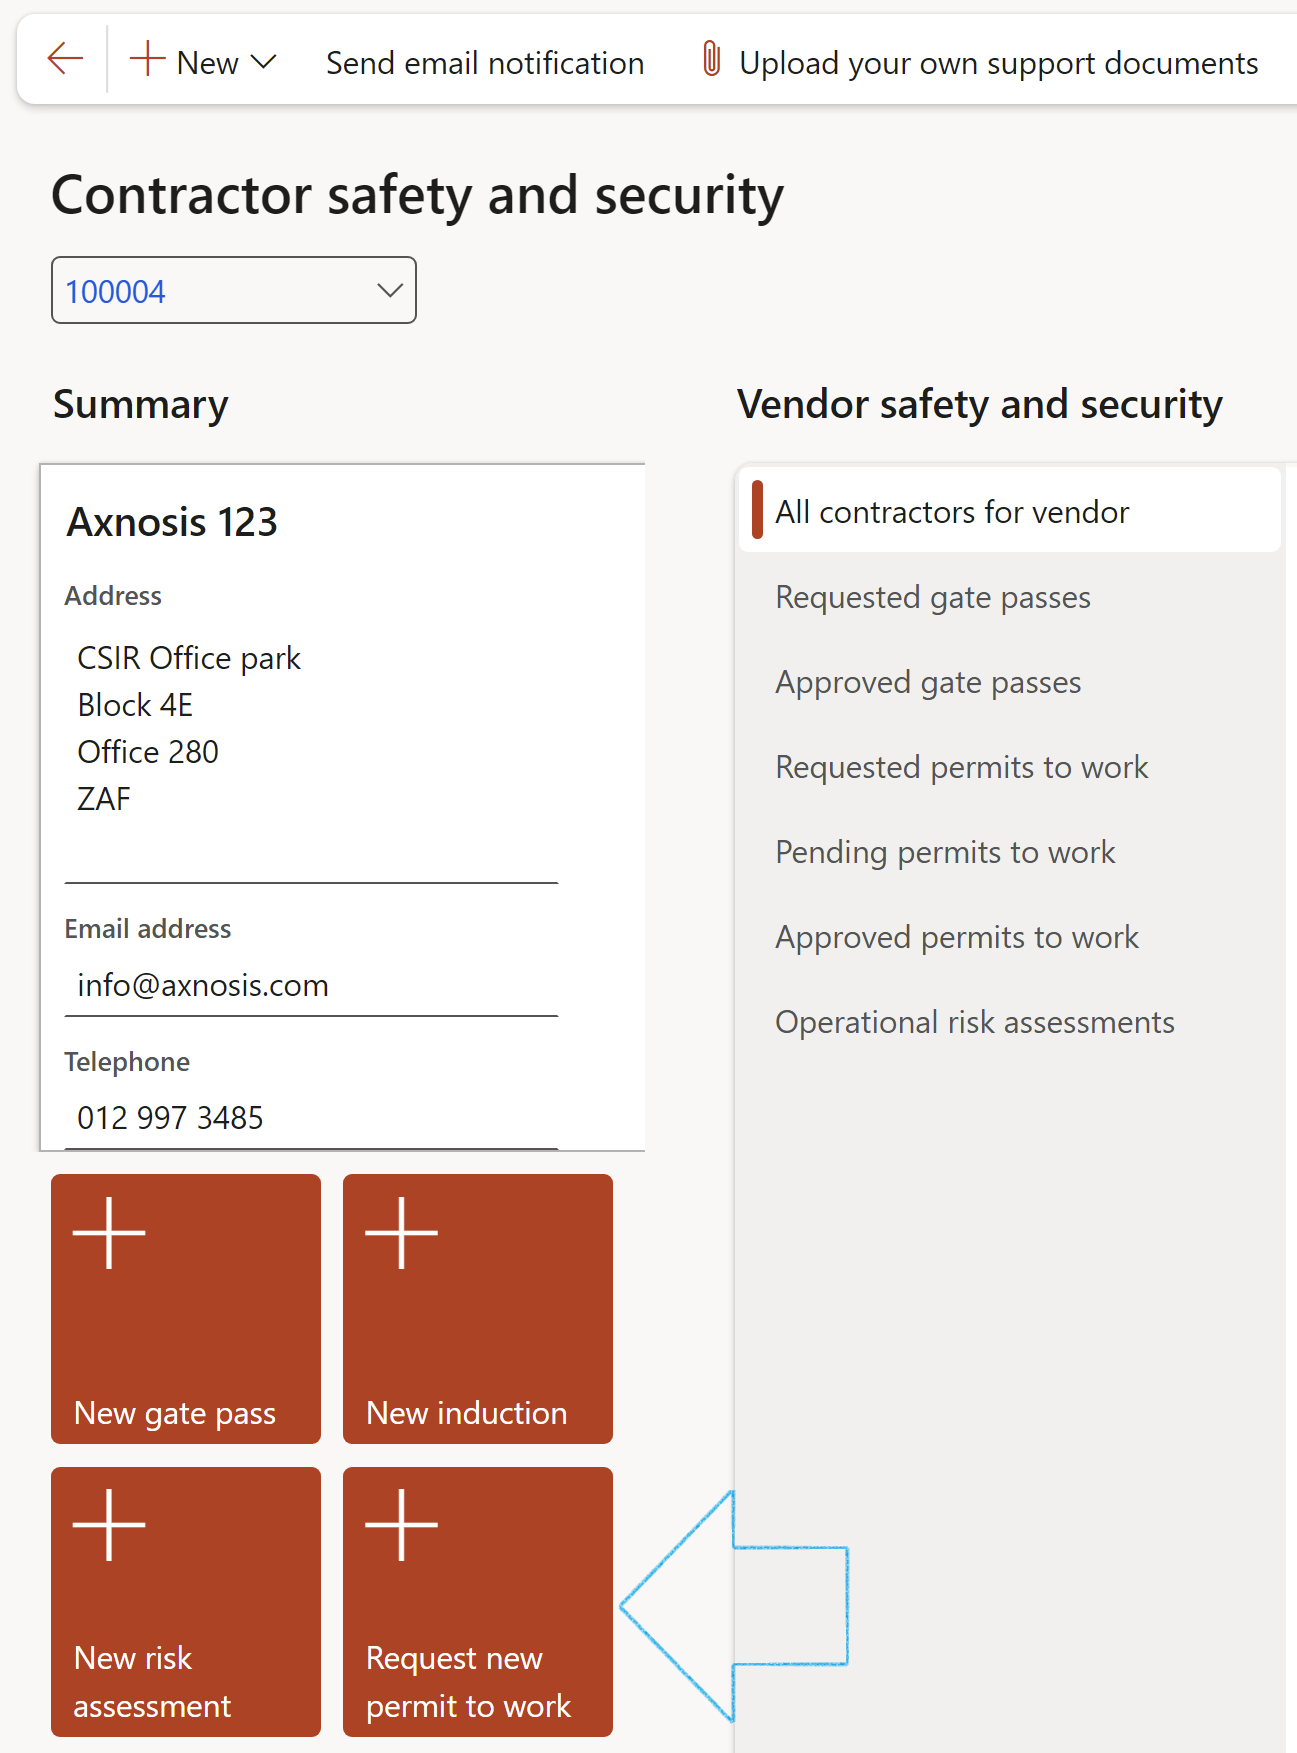
Contractors can request Permits to work on Dynamics 365 by using the Contractor safety and security workspace.
Please refer to Workspace and Reports & Inquiries guide to see how to enable a contractor to access Dynamics 365 without adding them as a system user.
From a contractor point of view in Dynamics 365 FO; contract workers can log into the portal and only see related information for the contractor (vendor):
Go to: Workspaces > Contractor safety and security
or
Vendor collaboration > Workspaces > Contractor safety and security
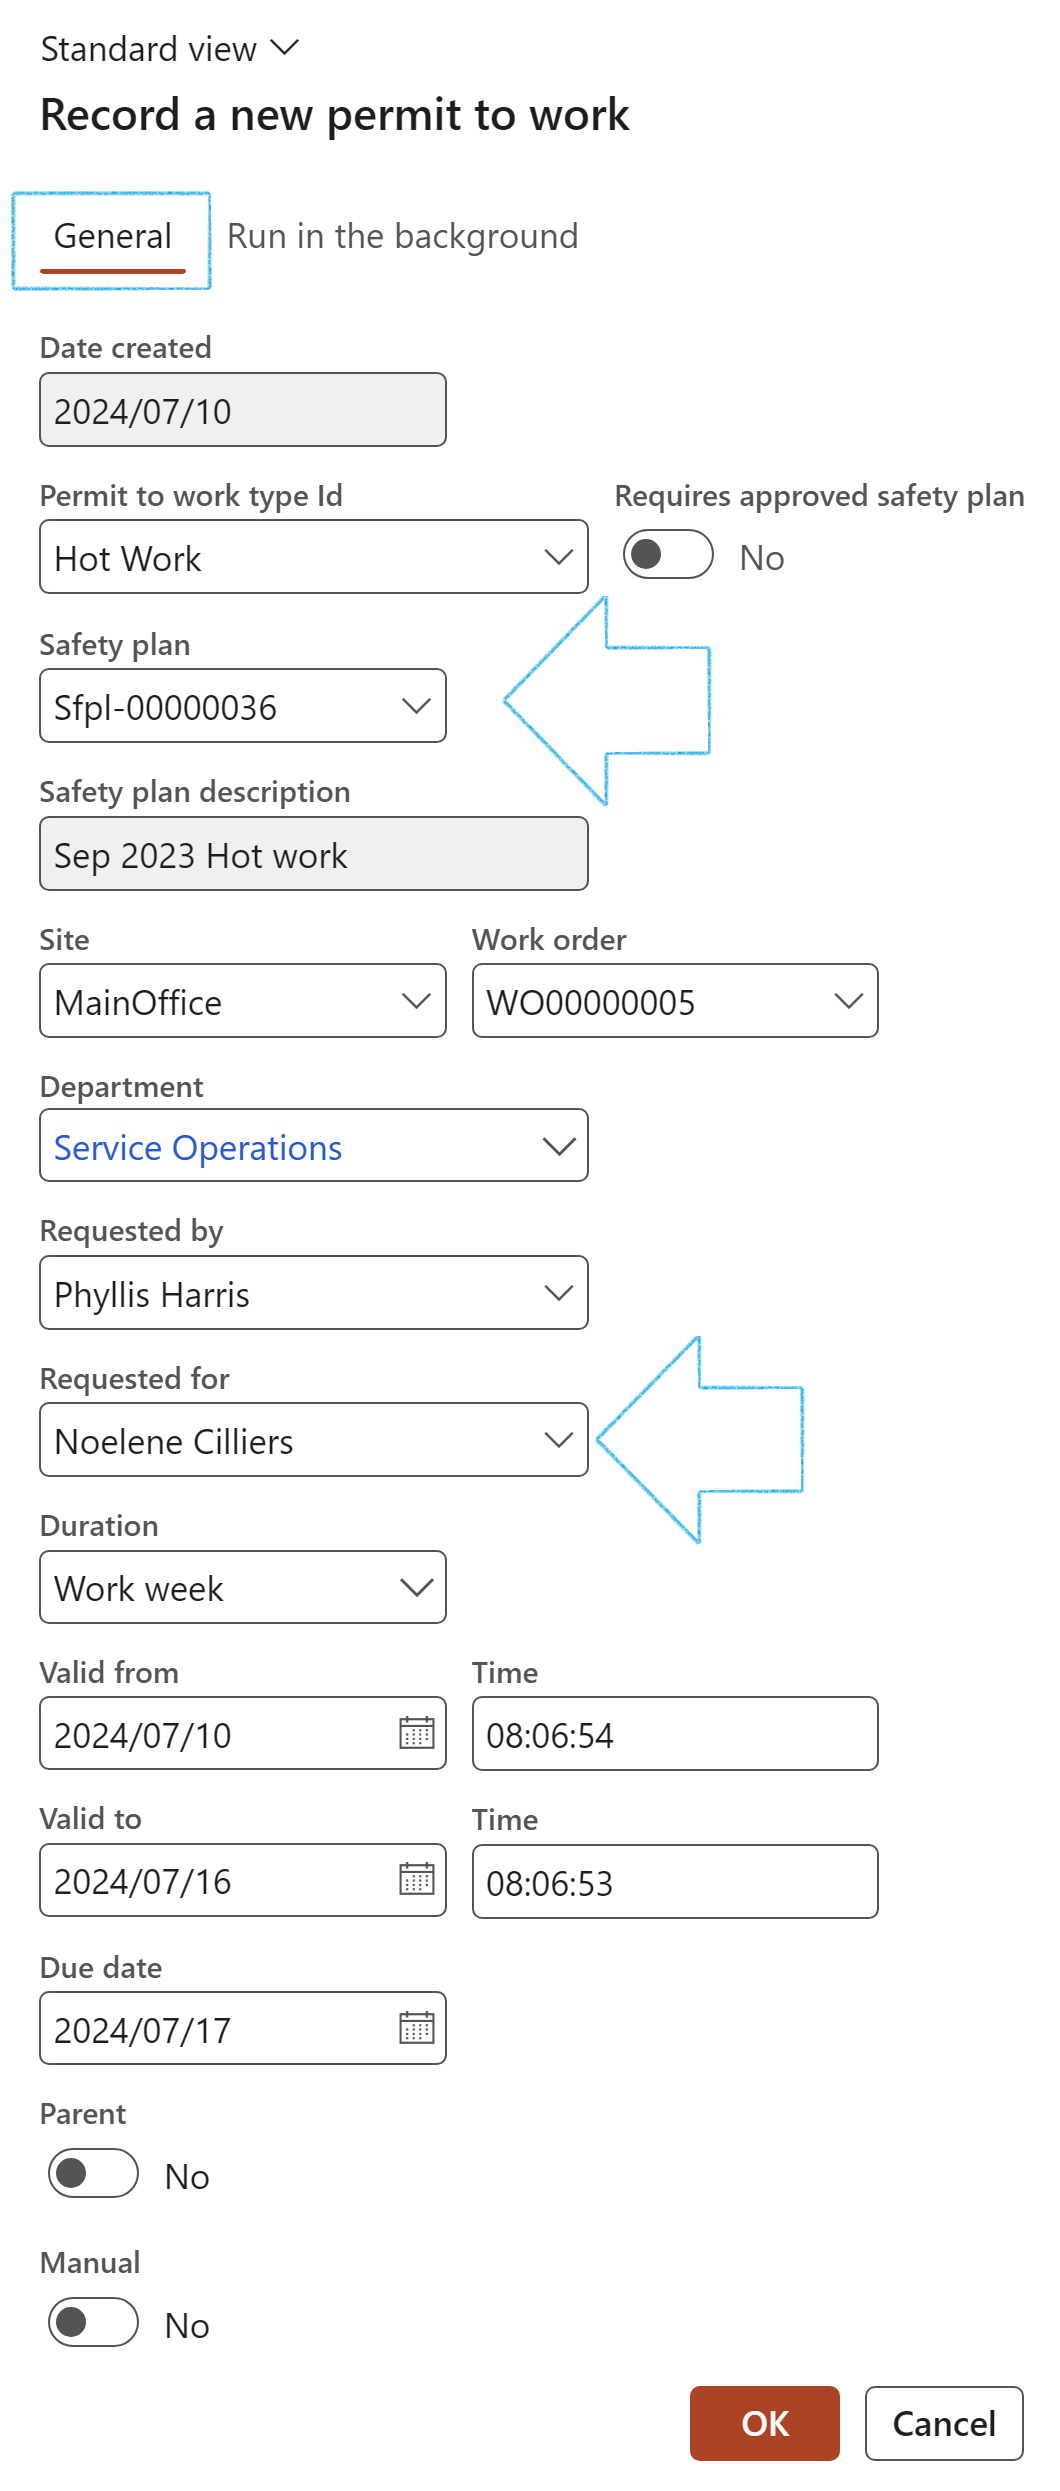
In the Action pane, click on the New button and select Request new permit to work from the list
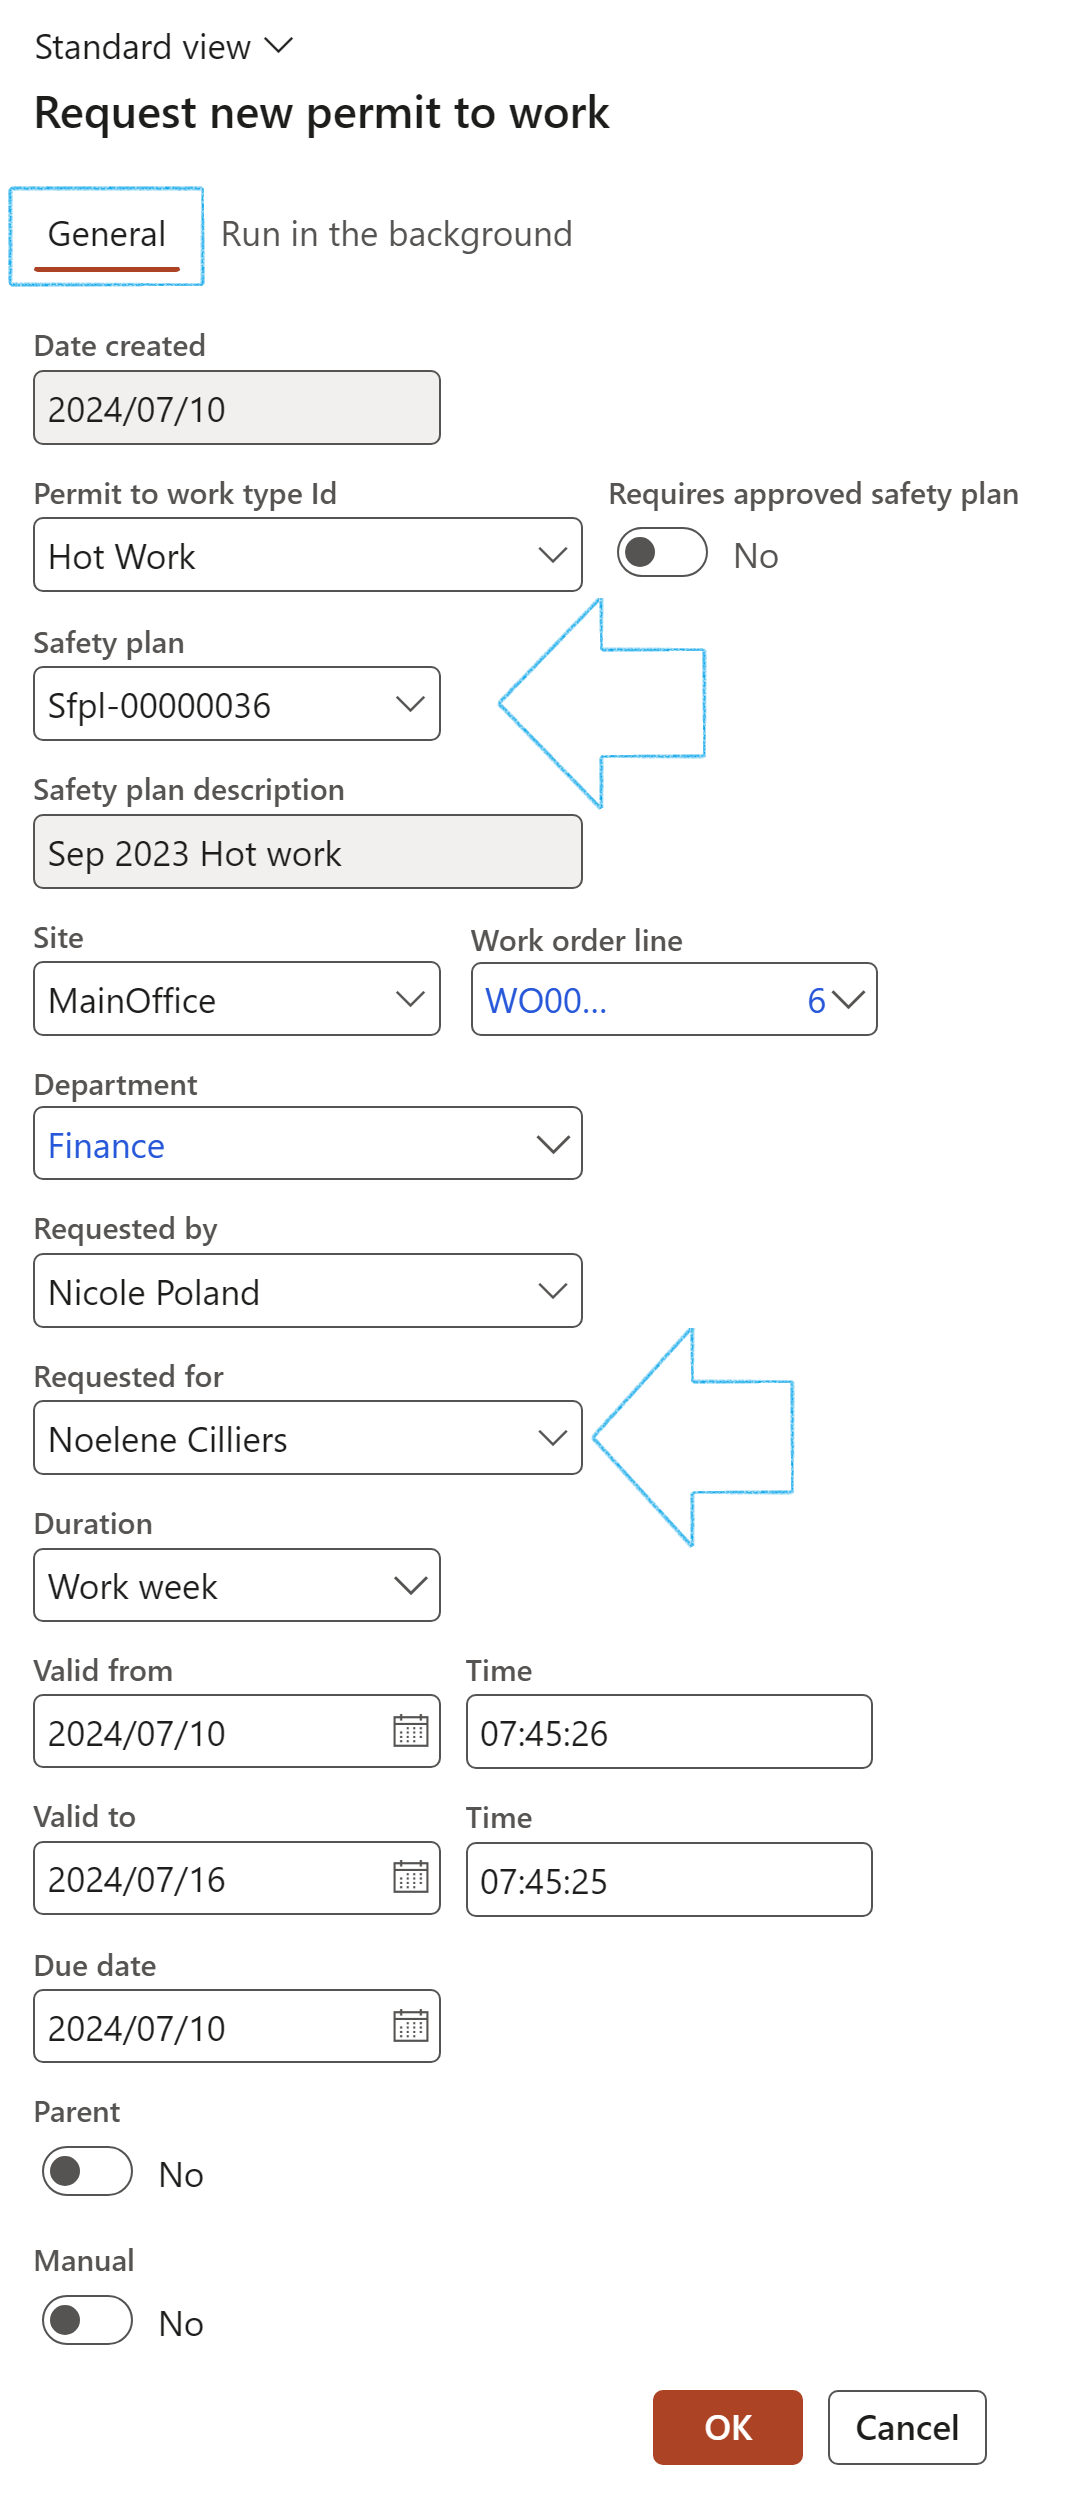
On the Request new permit to work dialog:
Select the relevant Permit to work type Id from the dropdown list
Select the relevant Safety plan from the dropdown list
Select the relevant Site from the dropdown list
Select the relevant Work order line from the dropdown list
Select the name of the worker who the permit is Requested for, from the dropdown list
Select the Duration period that the permit to work should be valid for
The Valid from and Valid to date and time fields will be populated according to the selection made in the Duration field. These values can be edited
If multiple permits are needed to ensure safe work, users can specify if the newly created permit is going to be a Parent permit by selecting Yes
If a Manual permit was issued from a printed book and you now want to create an electronic one, then flag the permit accordingly
Click OK
For a work order line to be selectable:
The Work order must be active
The Work order line has to have the following:
No Permit to work record already assigned to it
No preferred vendor, OR the preferred vendor has to be the same as the portal vendor (Refer to Contractor safety self-service workspace section in the Reports and inquiries Wiki page)
A site is specified, where the Functional location of the work order line's site, is the same as the filter site
For the maintenance job type on the work order line, the Permit to work slider has to be on Yes (Step 21 below)
A Permit to work with status Requested will be created
A few validations happen on creation of a Permit to work based on the Permit to work Type selected.
Go to: HSE > Permits to work > Record a permit to work
Select the relevant Permit type from the dropdown list
Select the relevant Safety plan from the dropdown list. (Only the valid safety plans of the same type will be displayed)
Select the relevant Site from the dropdown list
Select the worker who is Requesting the permit to work, from the dropdown list
Select the name of the worker who the permit is Requested for, from the dropdown list
Select the Duration period that the permit to work should be valid for
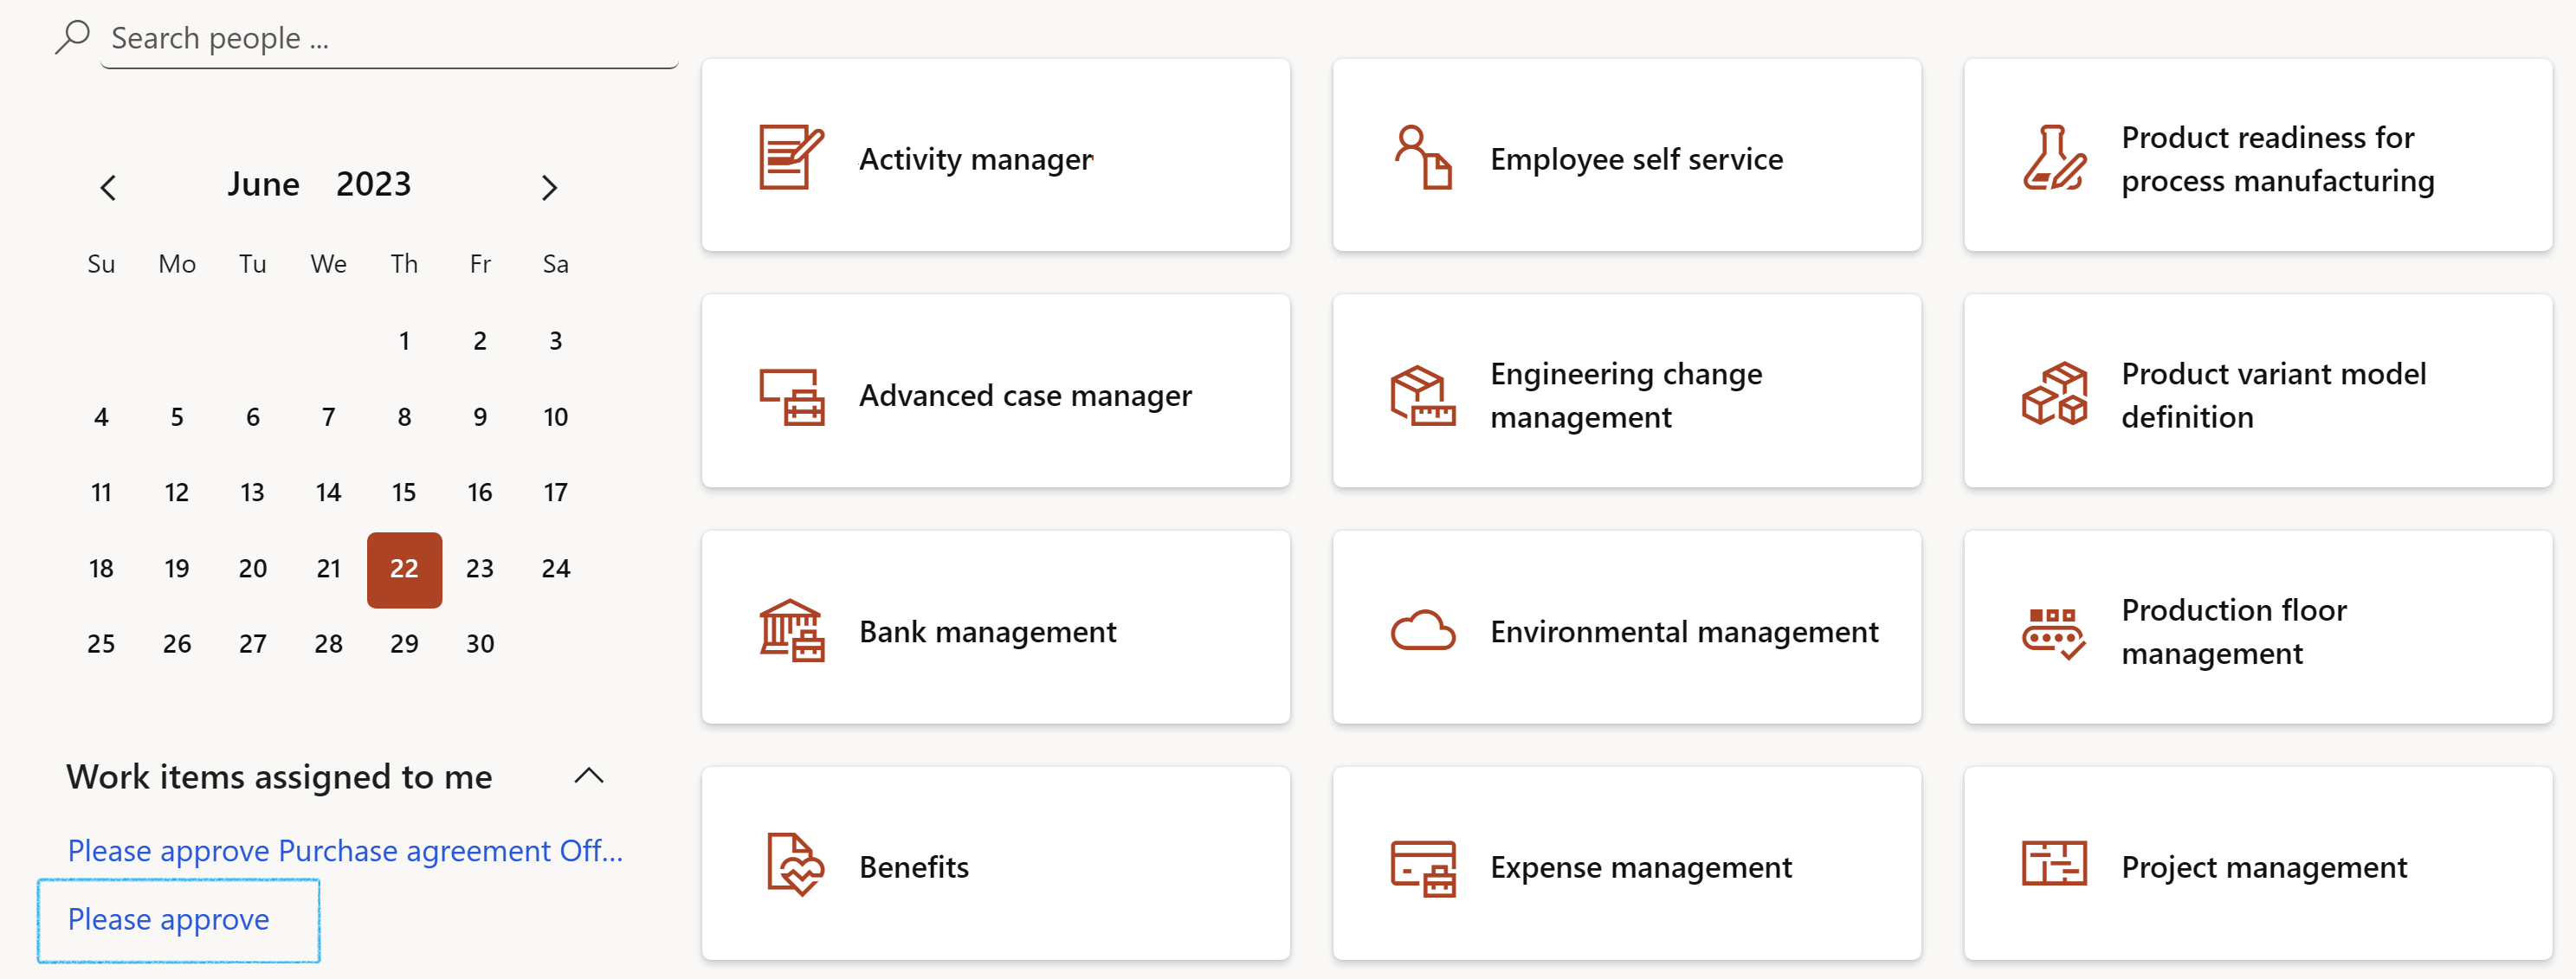
The worker selected in the Requested for field, will see the Permit to work on the Permits to work assigned to me list page
The Valid from and Valid to date and time fields will be populated according to the selection made in the Duration field. These values can be edited
If multiple permits are needed to ensure safe work, users can specify if the newly created permit is going to be a Parent permit by selecting Yes
If a Manual permit was issued from a printed book and you now want to create an electronic one, then flag the permit accordingly
The approver of the Permit to work is the one specified on the Header of the safety plan under Permit to work rules (Step 6.1 above)
The employees that can be issued with permits, as well as those to whom permits can be handed over to, are validated based on the rules specified on the Header of the safety plan under Permit to work rules
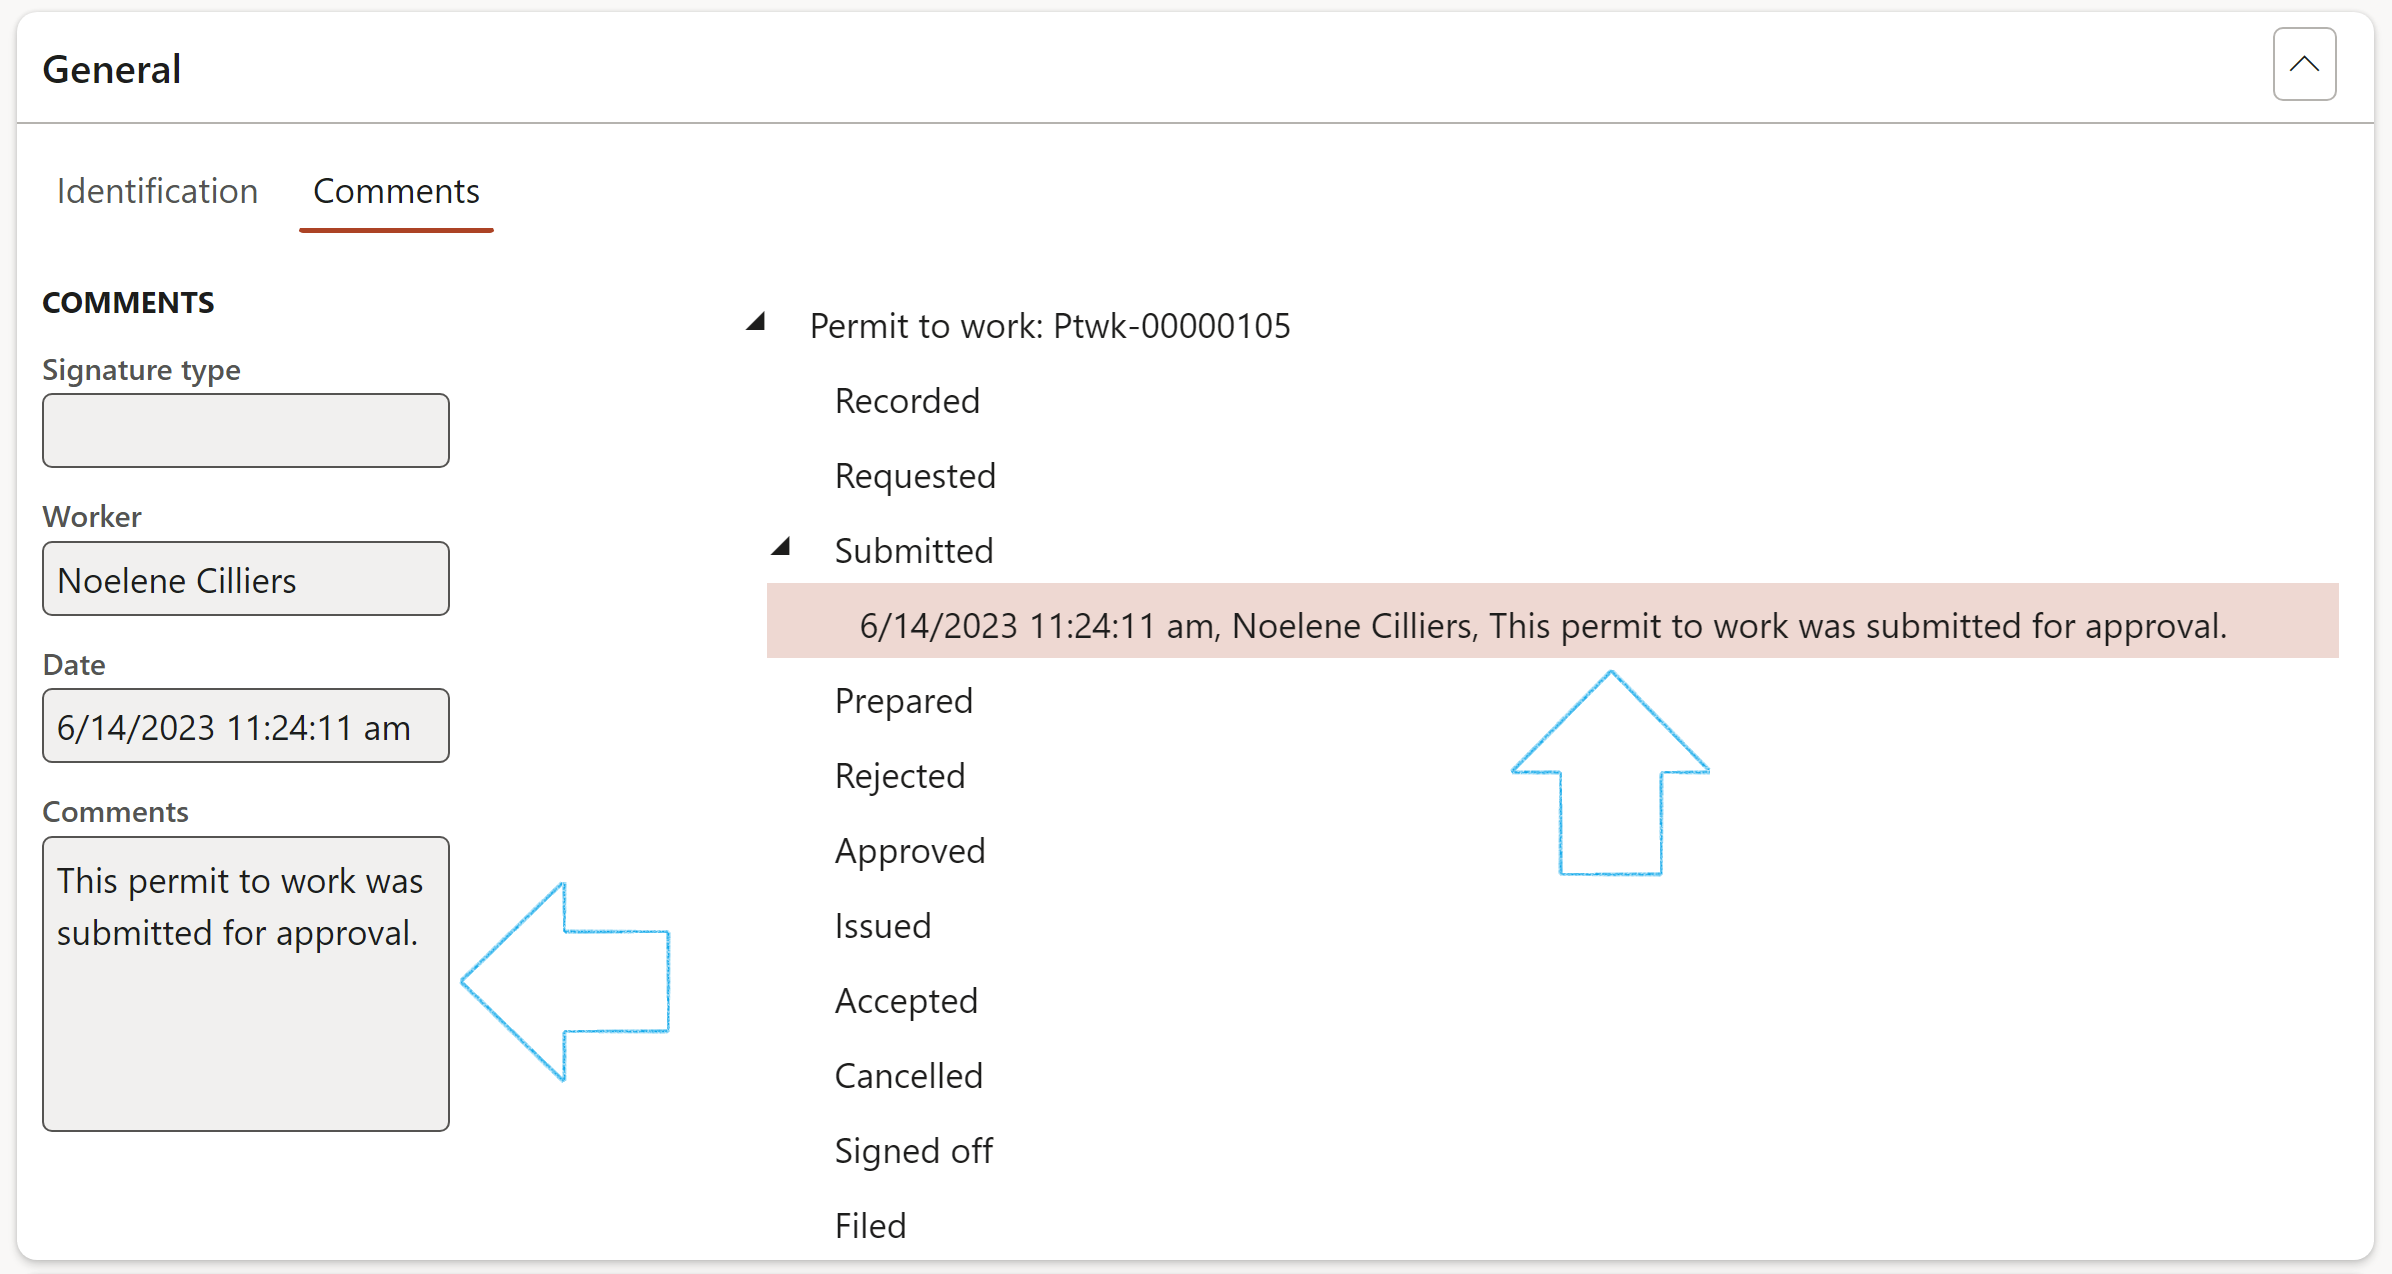
Permits to work allow for interactive comments to be added anywhere during the life cycle.
Under the General Fast tab, open the Comments Index tab
On the Action pane, in the Control group, click on the Comment button
Enter a comment in the box provided on the Parameters form
Click OK
The comment will automatically be entered on the status that the permit is currently on
¶ Step 14.2: Applicable areas to be covered by the Permit to work
Expand the Applicable areas Fast tab
Open the index tab that you want to add detail to
Click Add and add the detail
When creating a Permit to work from a Safety plan which has no Objects, Locations or Job plans linked to it, the following can be done:
Manually add Objects, Locations or Job plans.
The Hazards linked to the Objects, Locations or Job plans (as well as the Control measures linked to the hazards), will default in on the Permit to work
Add additional Hazards to the Objects, Locations or Job plans on the Permit to work.
The Control measures from the hazards will default in on the Permit to work
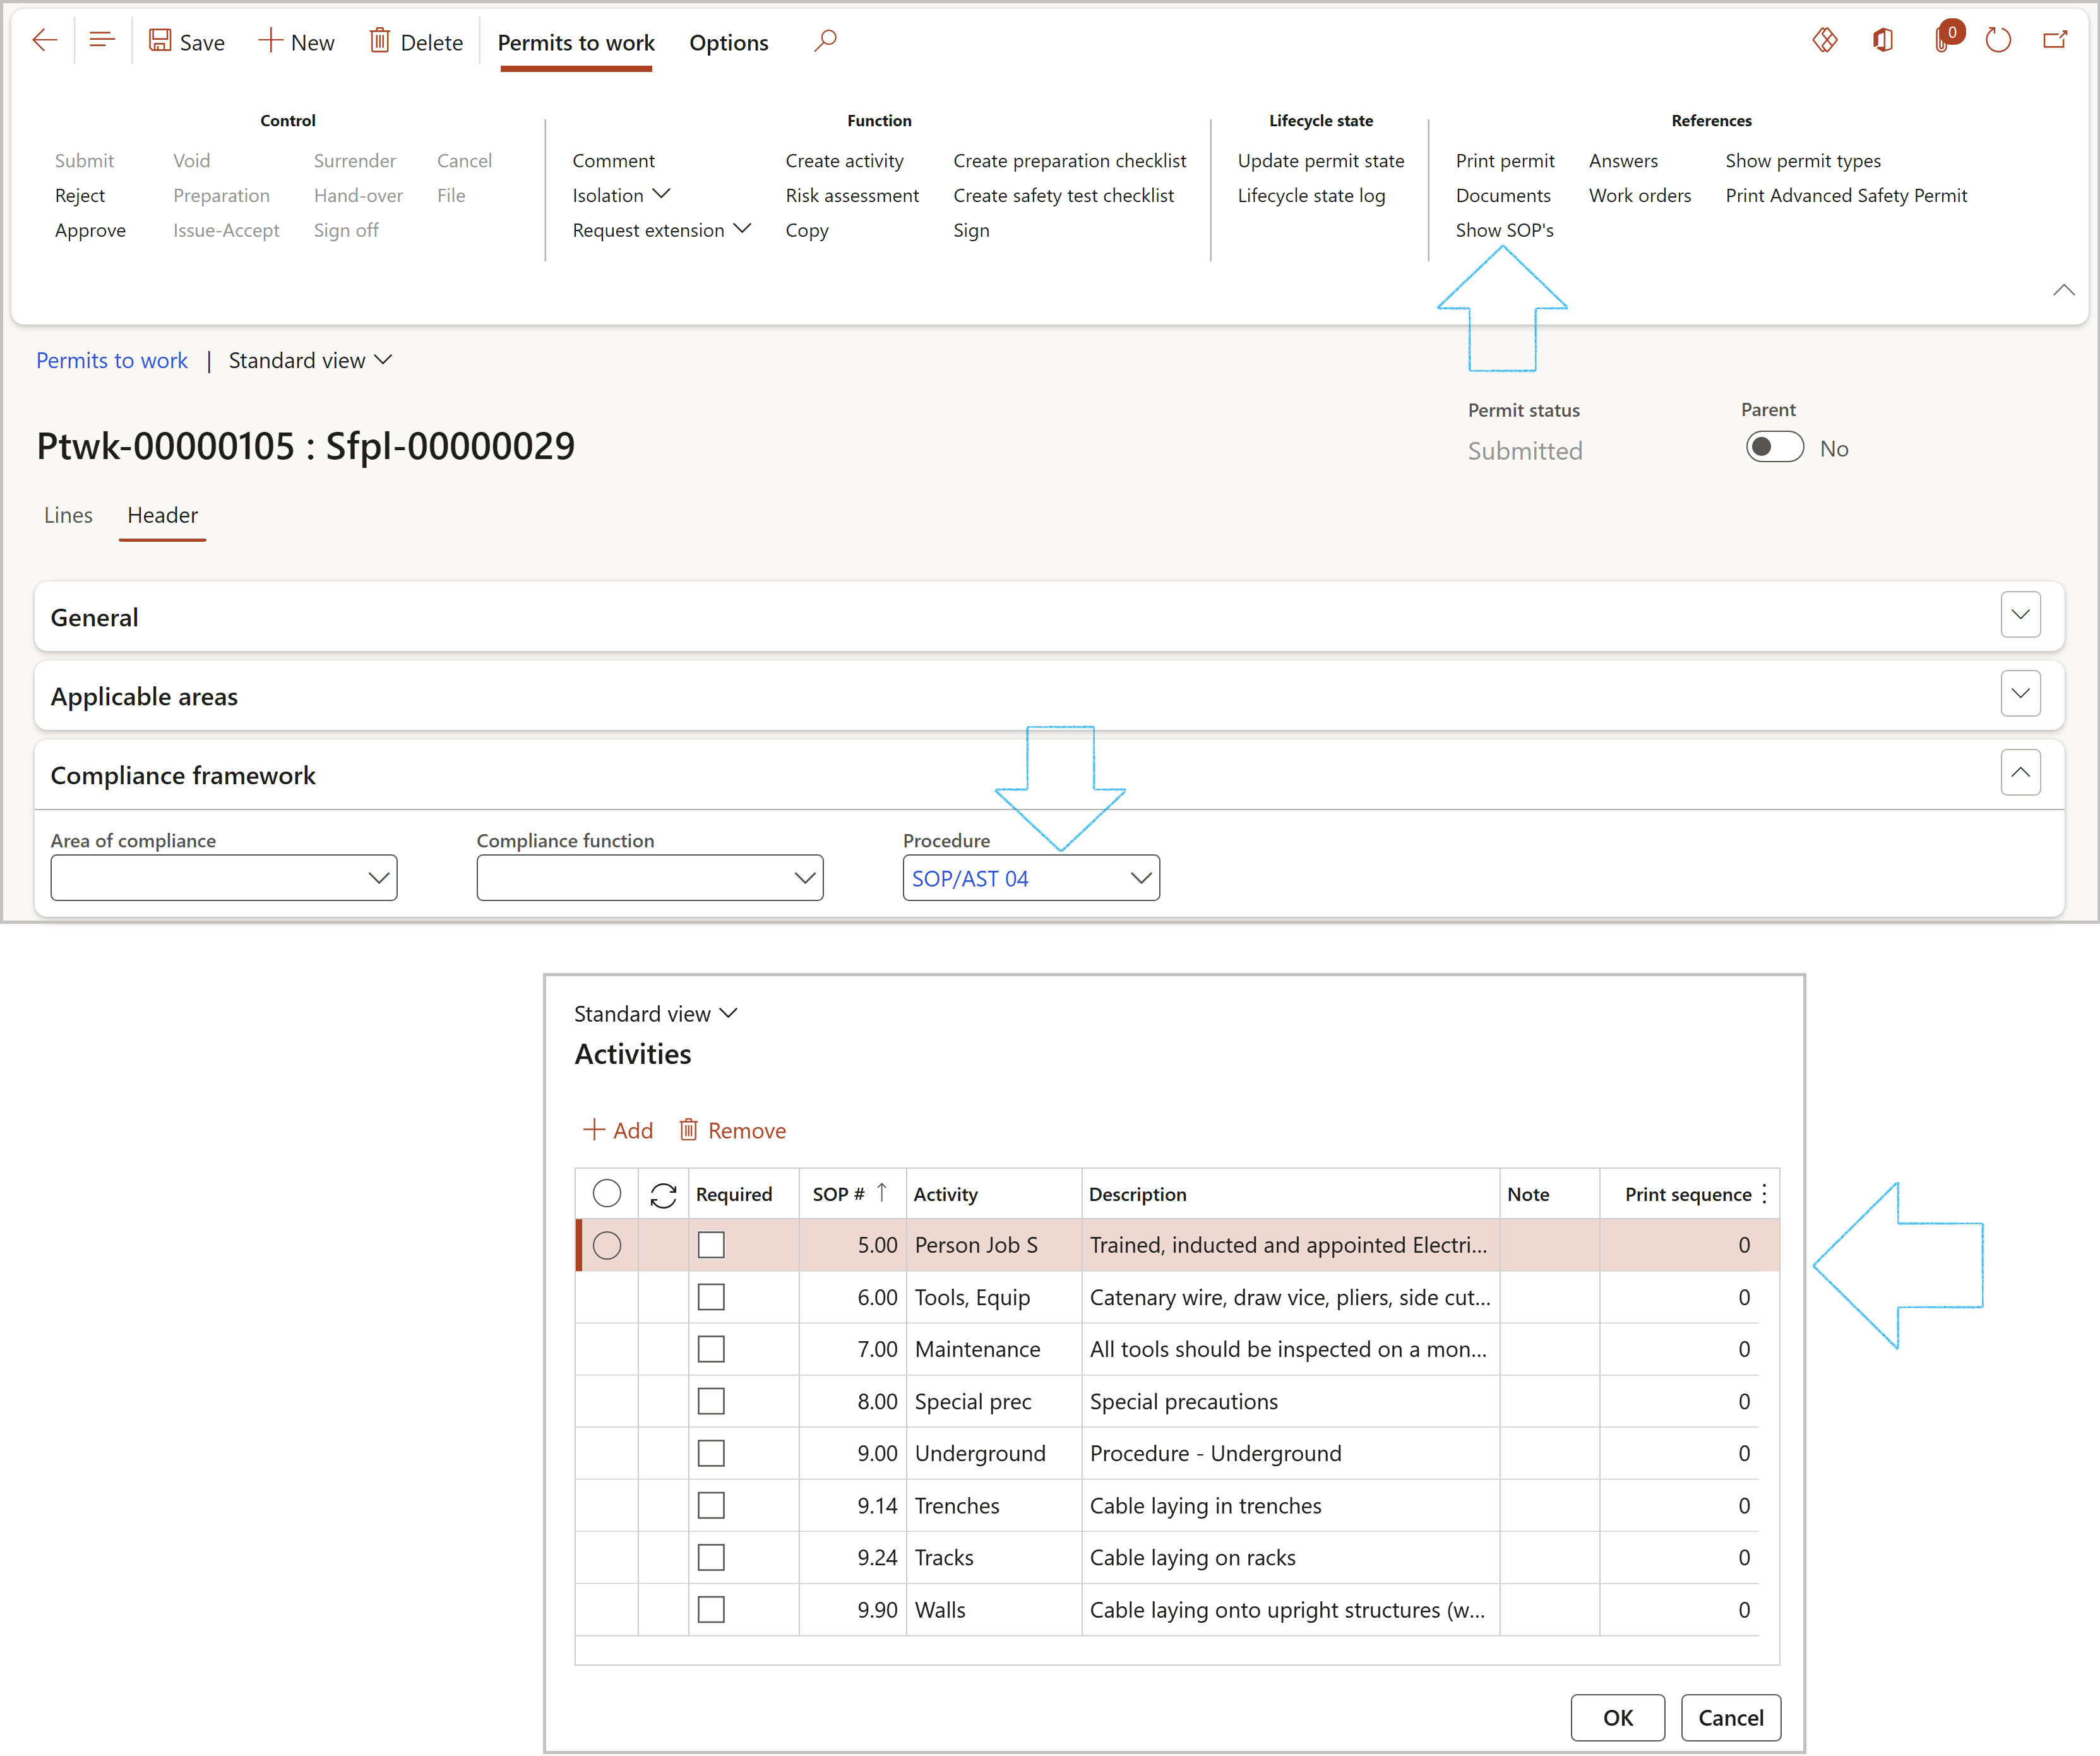
High risk work needs to be carried out in accordance with a company’s standard operating procedures relating to the work activities at hand in order to ensure compliance. These are recorded in Standard Operating Procedures (SOP’s) that can be referenced during the permit to work process.
Expand the Compliance framework Fast tab
Select the relevant Area of compliance from the drop down list (If applicable)
Select the relevant Compliance function from the drop down list (If applicable)
Select the relevant Procedure from the drop down list (If applicable)
To view the SOP's for the selected procedure, click on the Show SOP's button in the Action pane in the References group
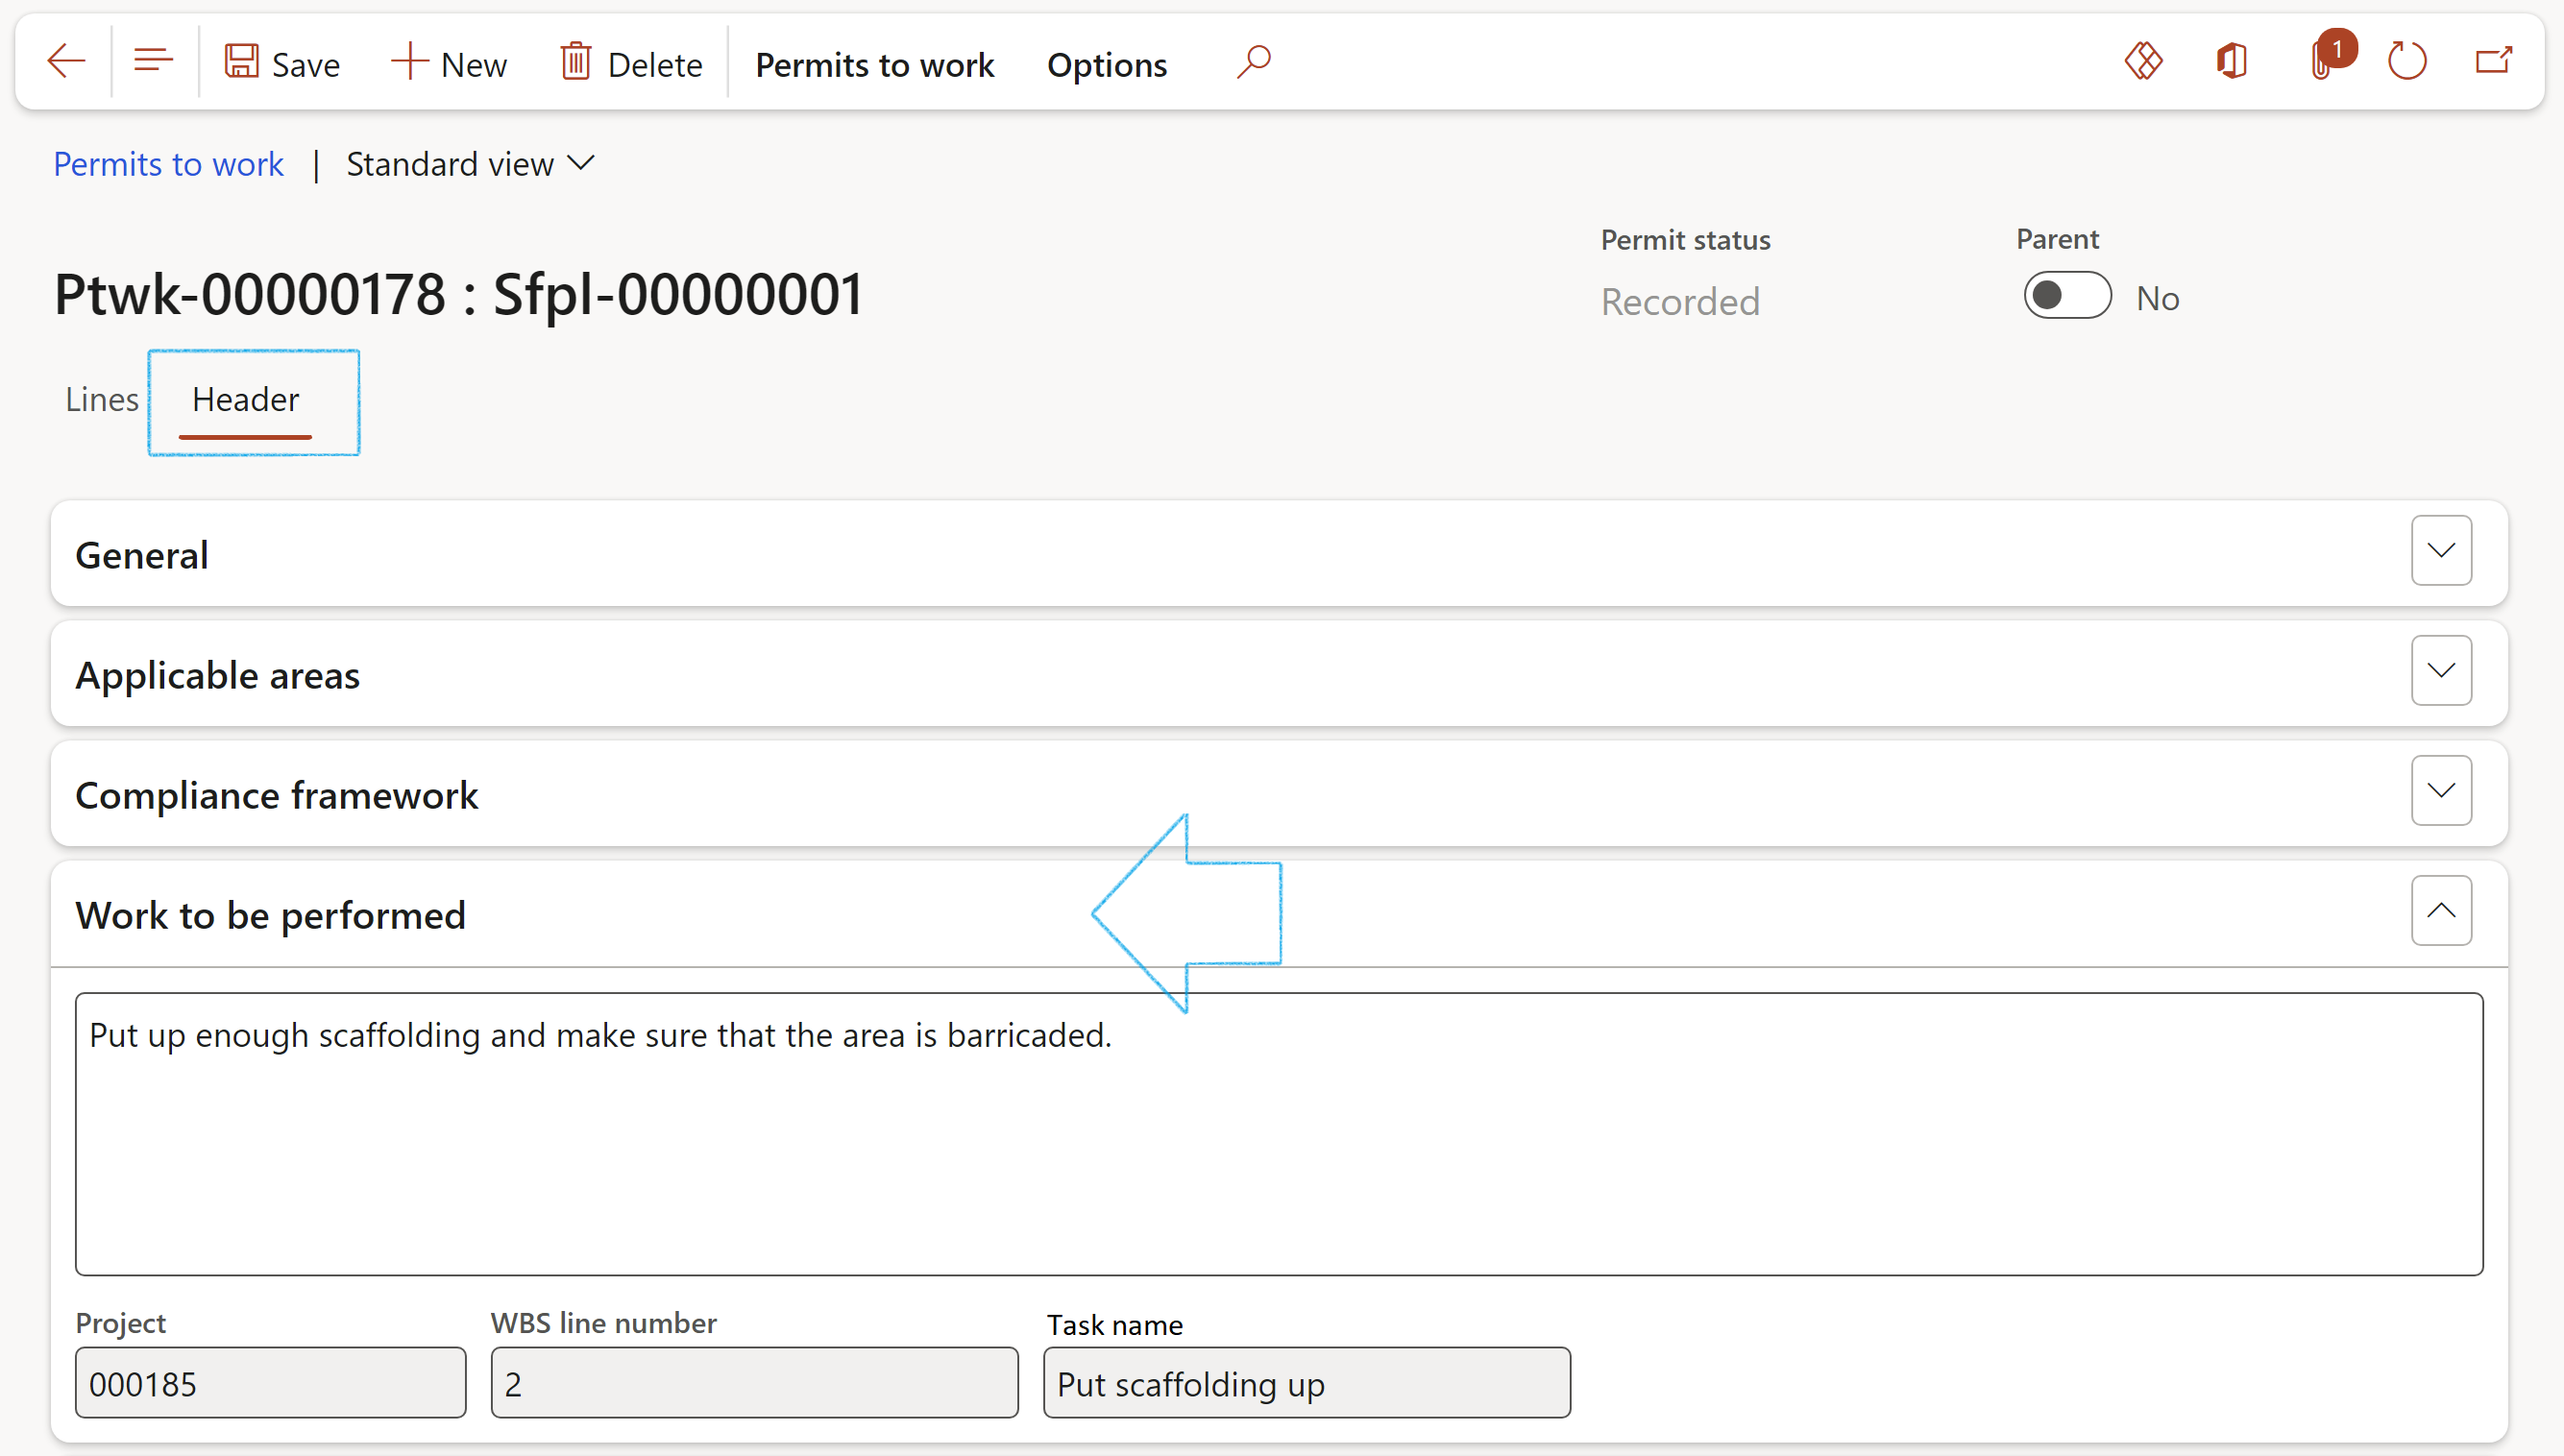
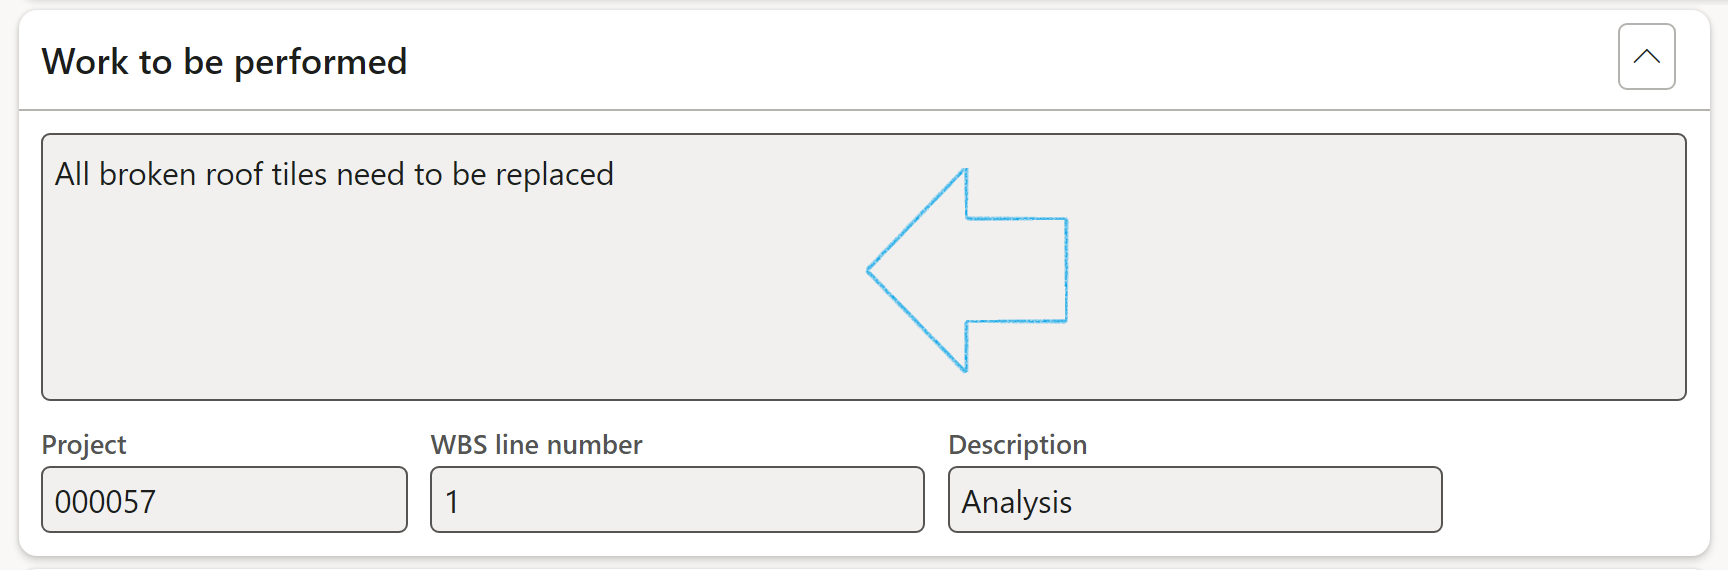
¶ Step 14.4: Work to be performed covered by Permit to work
Expand the Work to be performed Fast tab
Enter details of the work that has to be done in the box provided
The Permit to work has to be Approved for the following step
Go to: Project management and accounting > Projects > All projects
Select the relevant project
On the Action pane, open the Plan tab
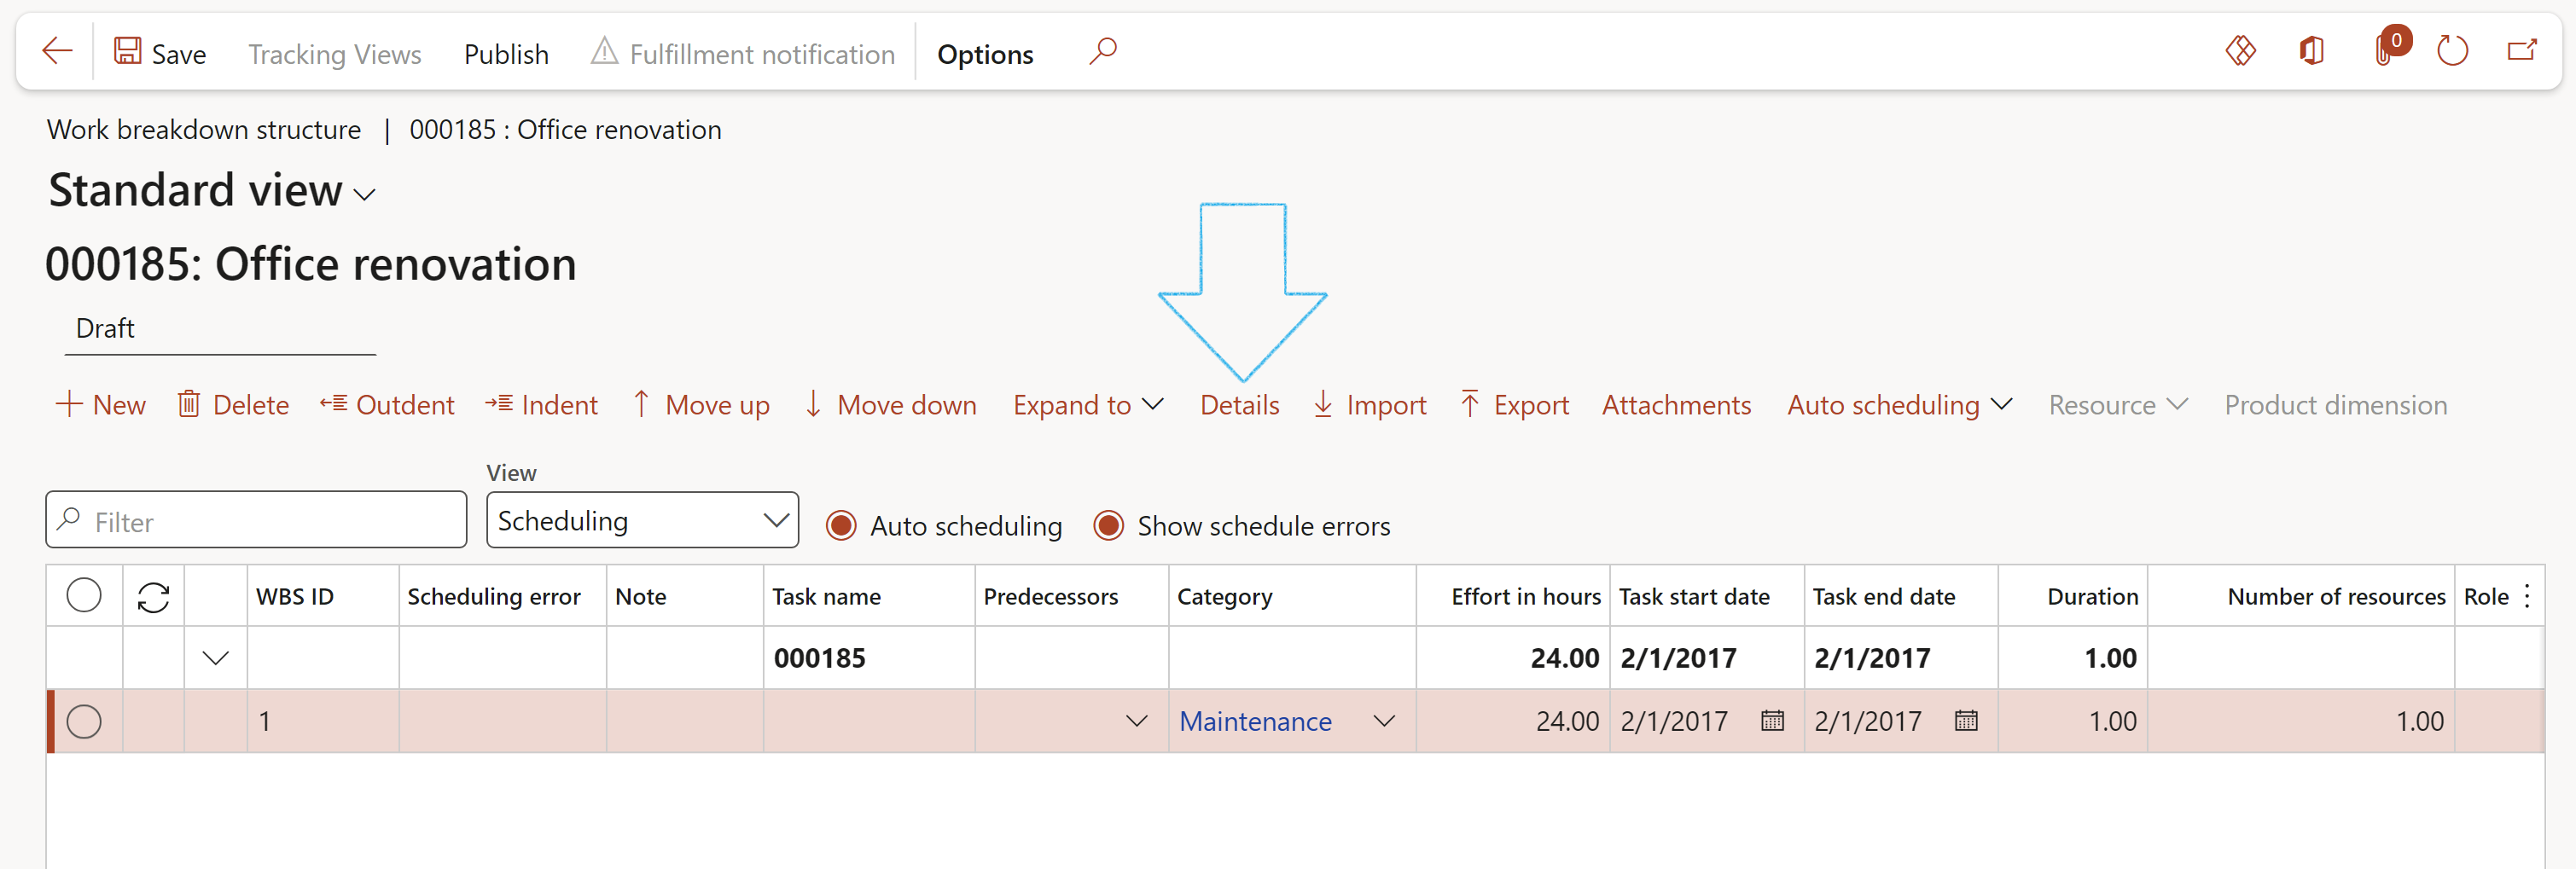
In the Activities button group, click on the Work breakdown structure button
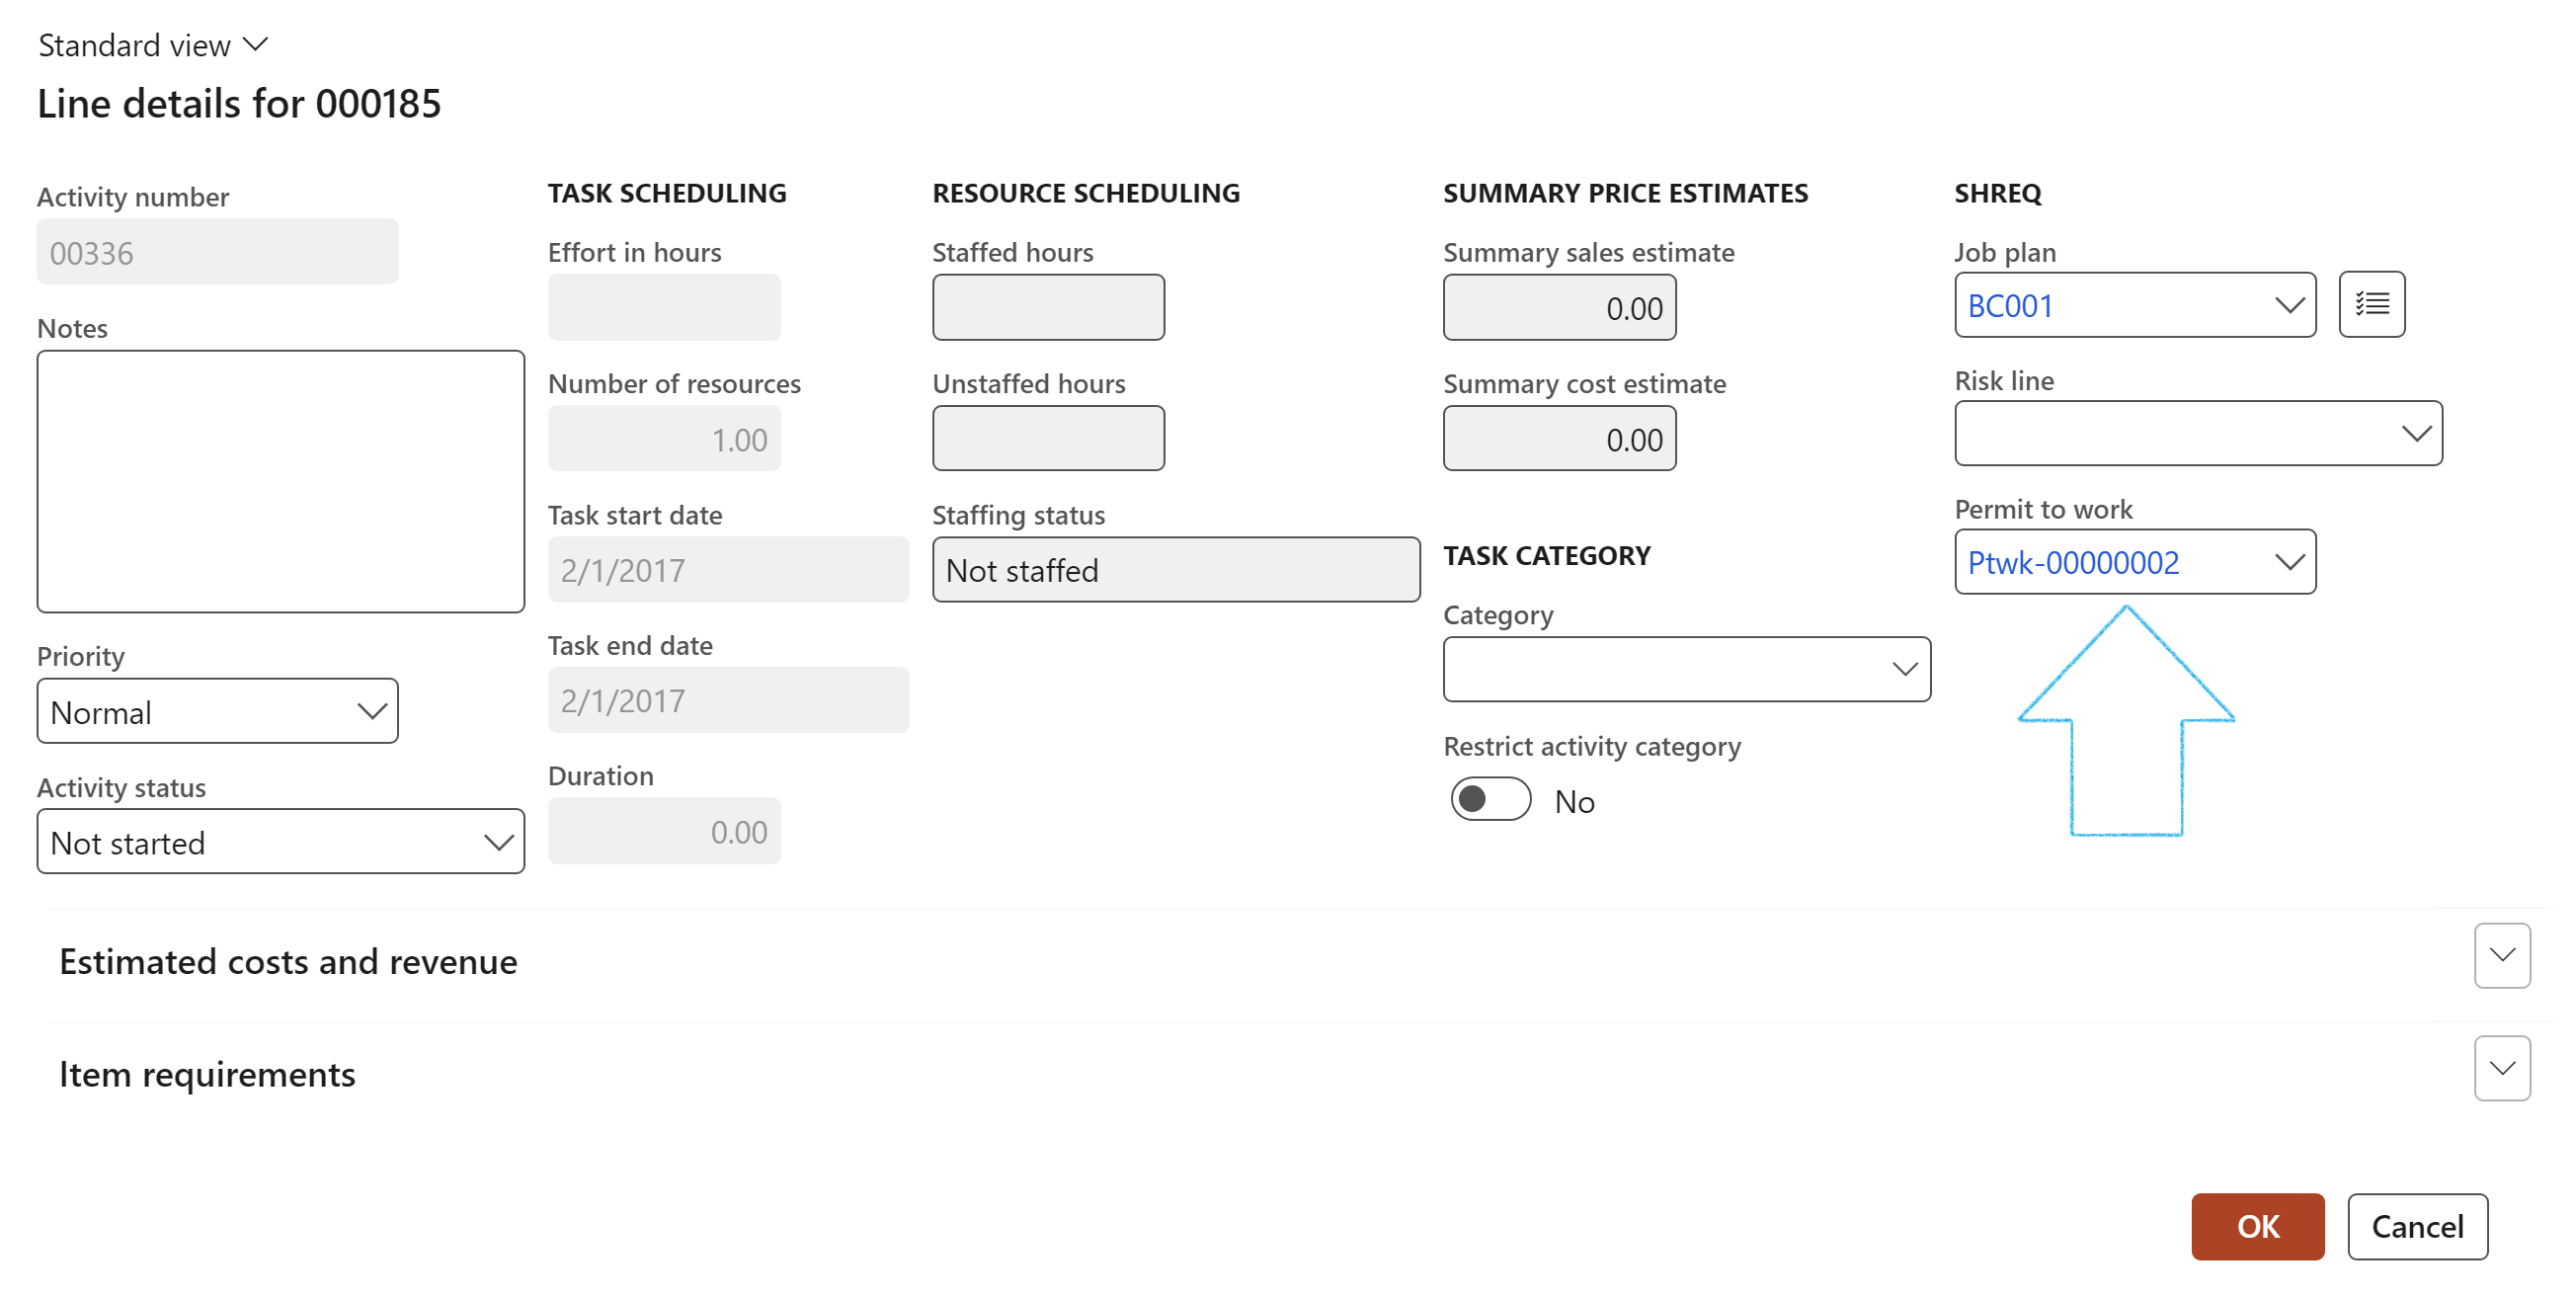
On the Work breakdown structure, select the relevant line and click on the Details button
On the Line details dialog, under the SHREQ field group, select the relevant Permit to work from the dropdown list
Click on OK
View the Project details on the Permit to work, under the Work to be performed Fast tab
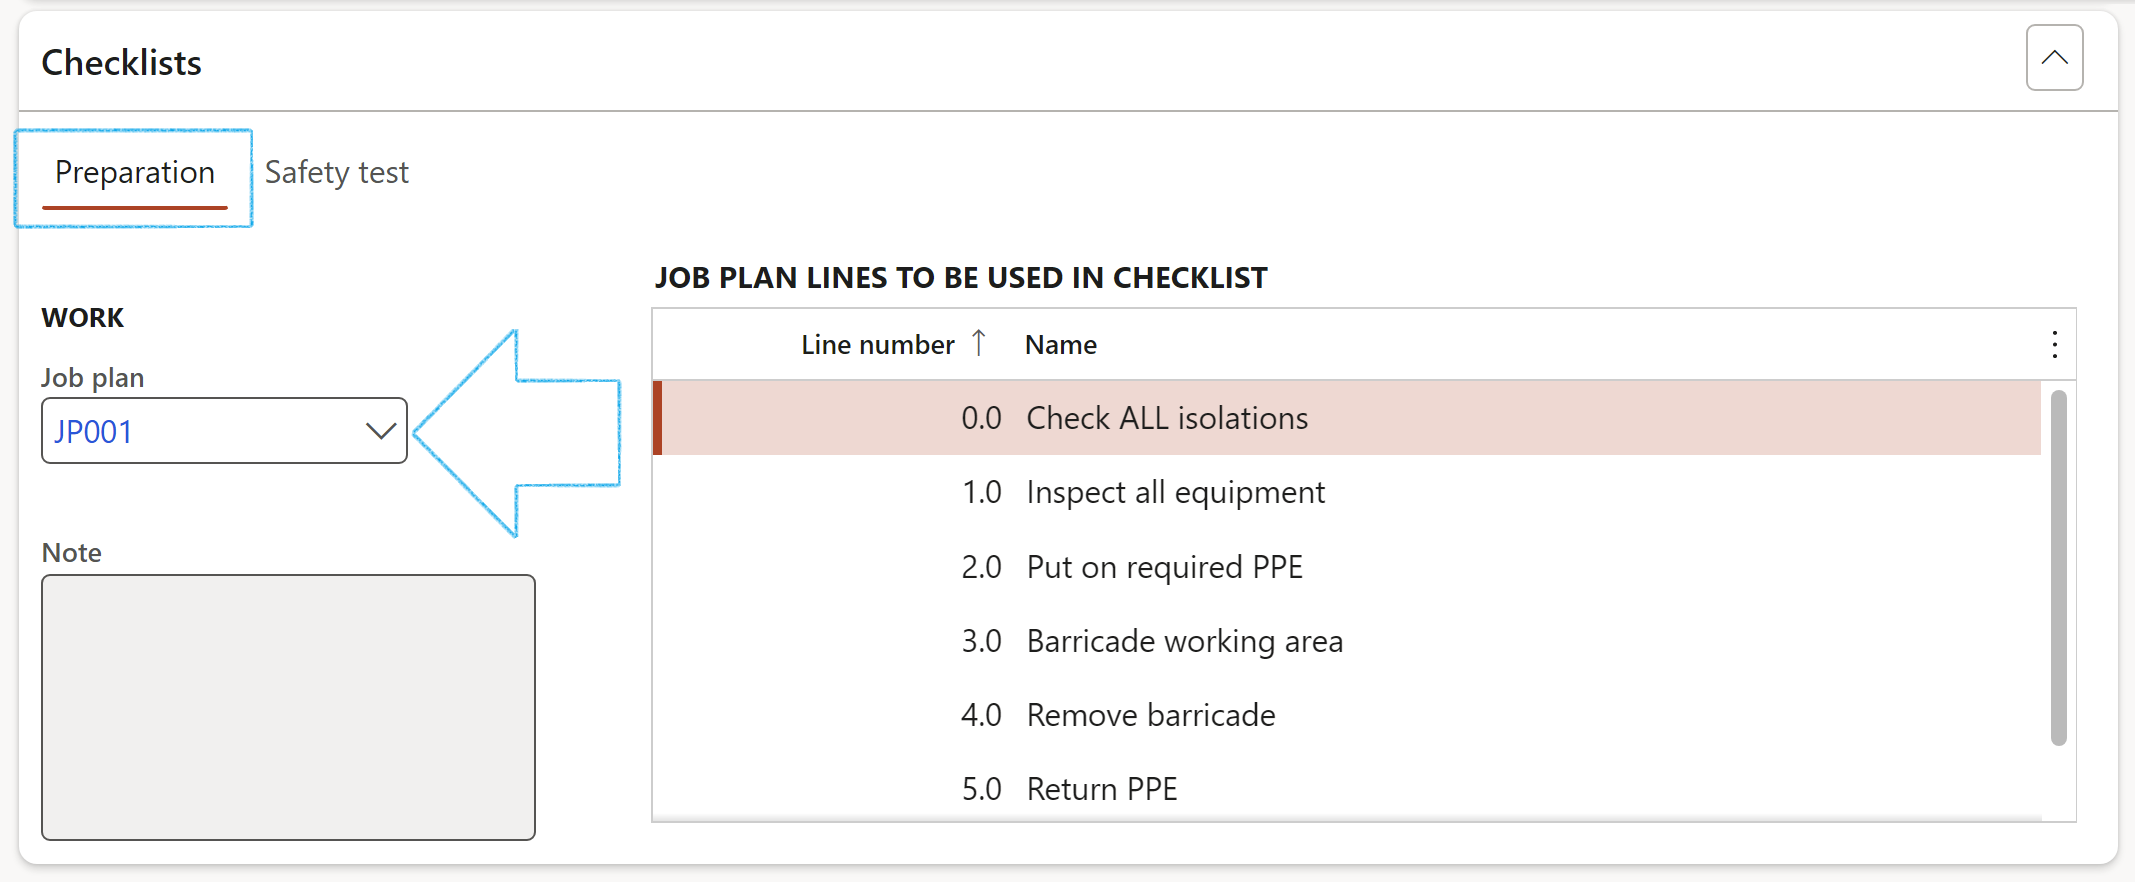
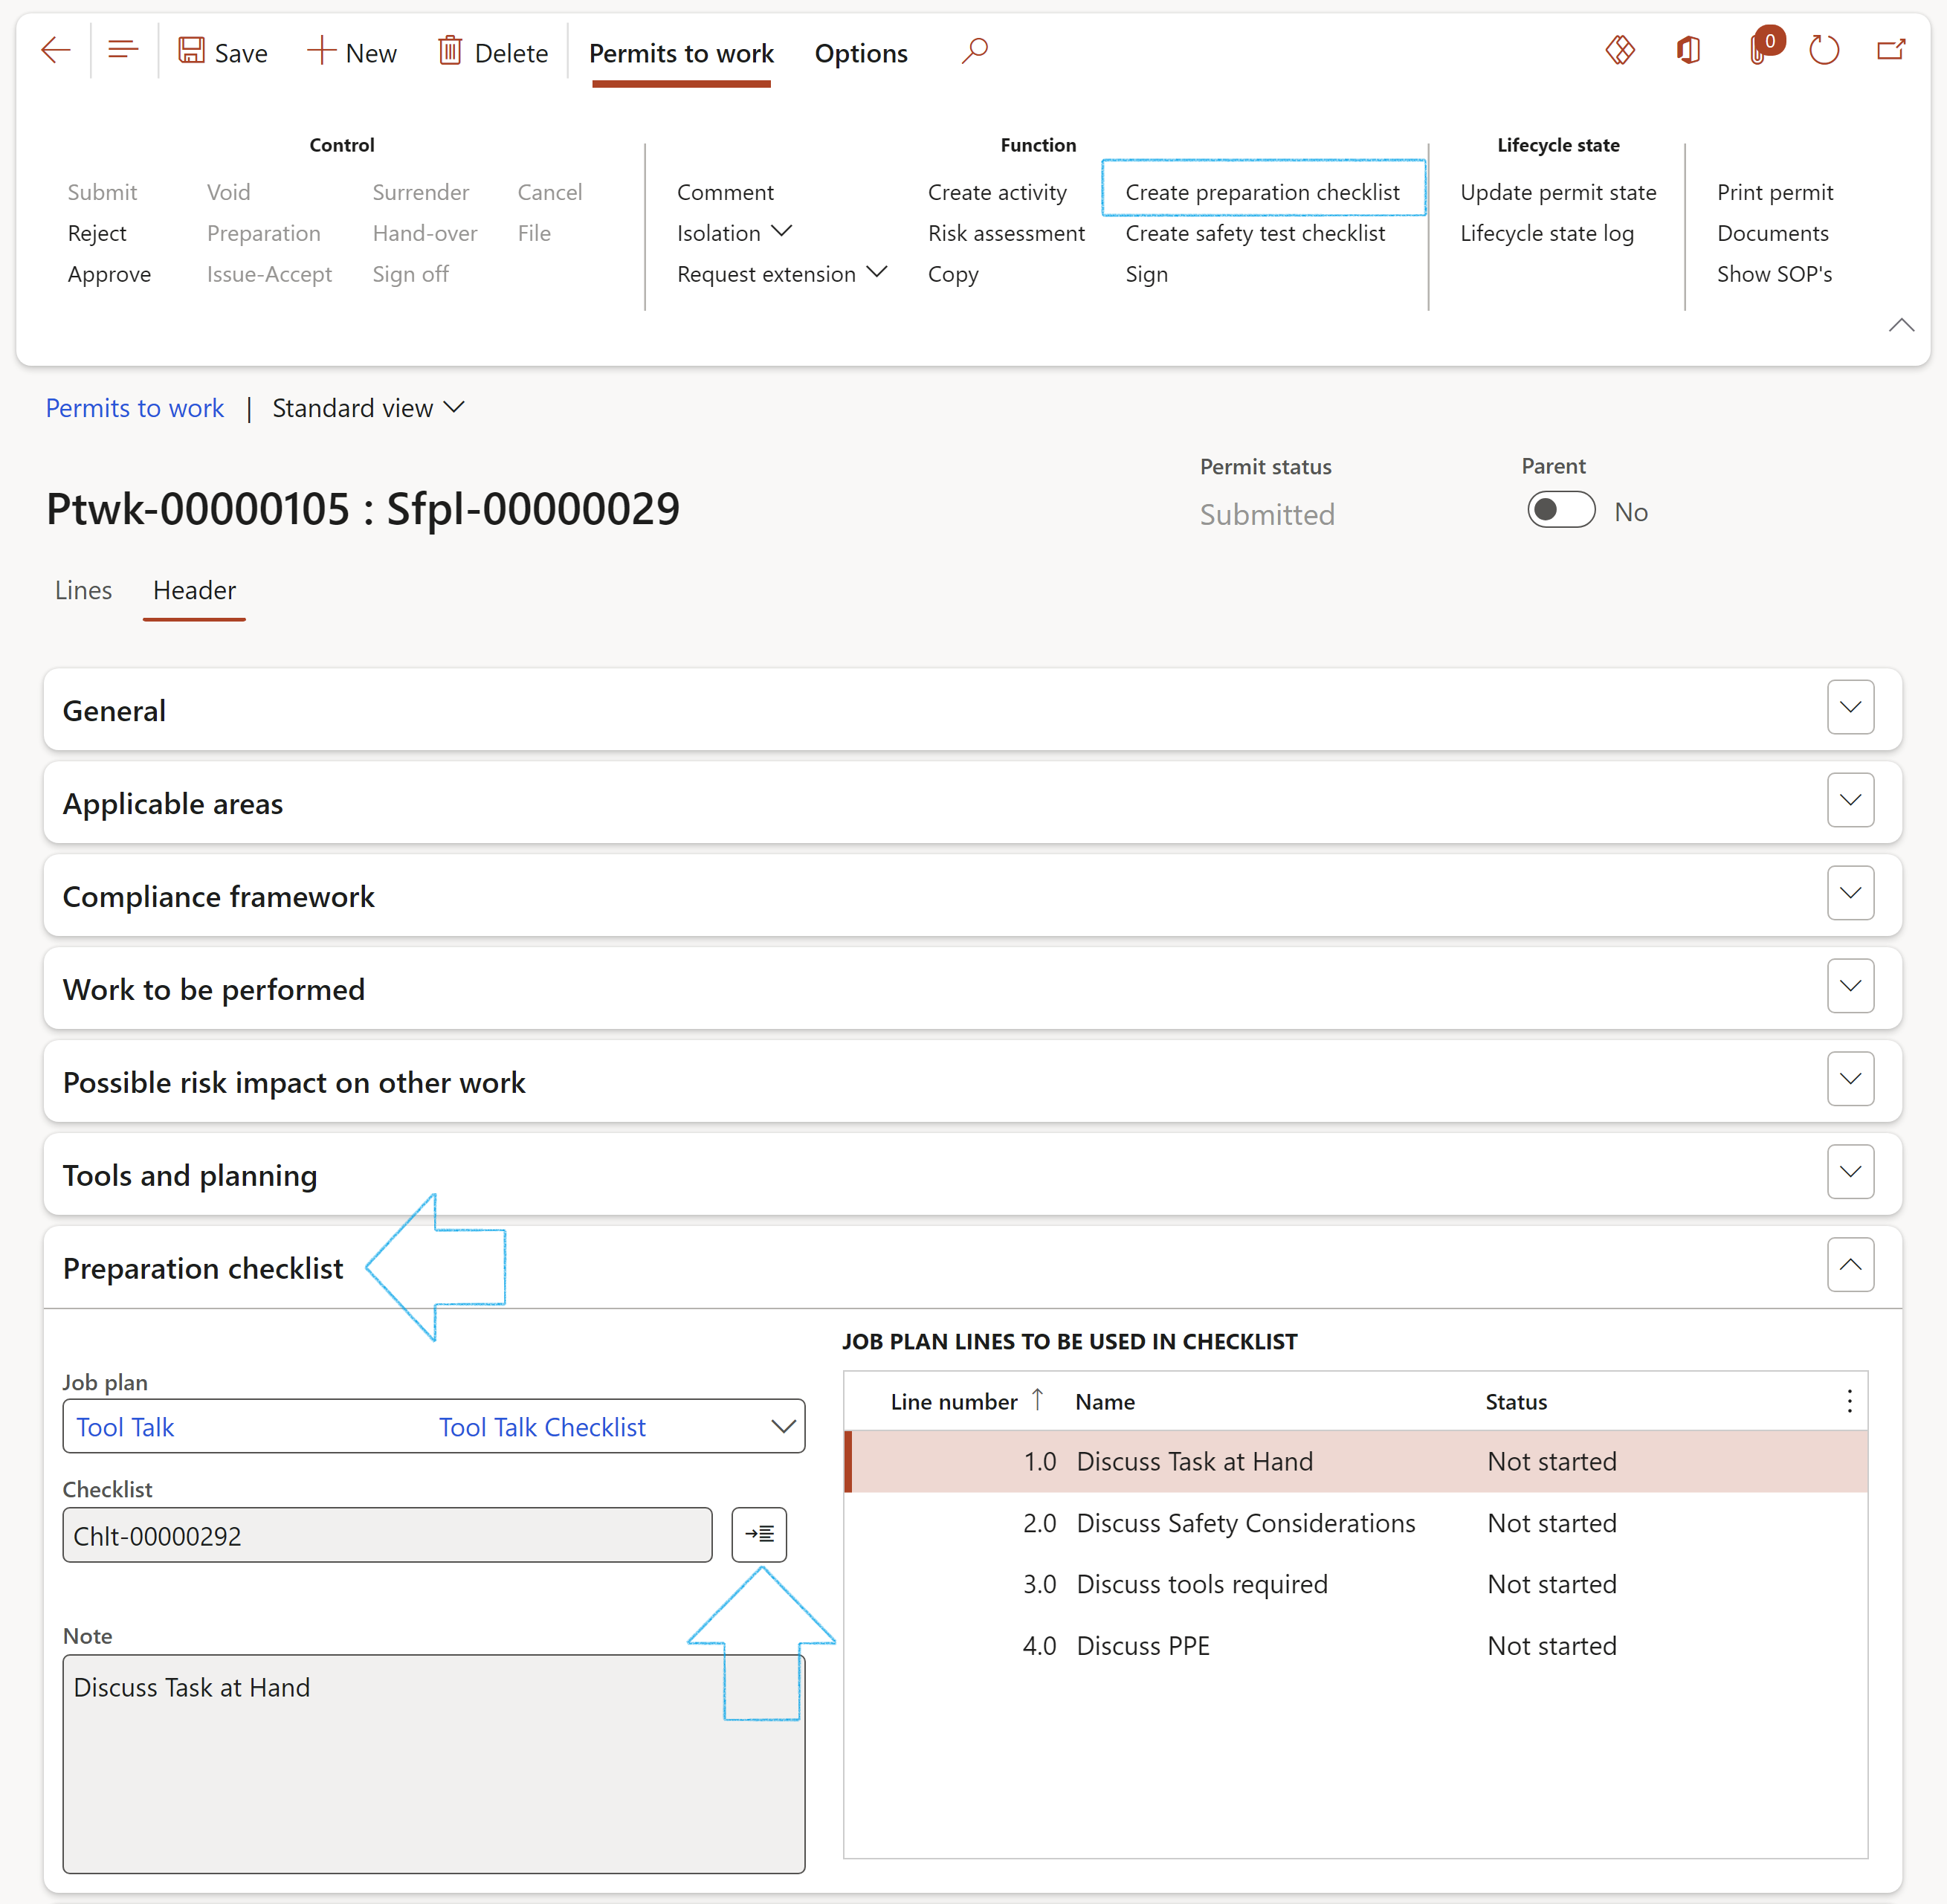
A Preparation checklist aims to help everyone concerned with the preparation of the work place, to decide whether the permit to work covers all the points that are considered essential. The checklist is intended for use when setting up a new permit to work.
Expand the Preparation checklist Fast tab
If a Job plan was not selected on the Safety plan, select the relevant Job plan from the dropdown list
Click Save
In the Action pane, in the Function group, click on the Create preparation checklist button
The new Checklist ID will be displayed in the Checklist field
Click on the Feedback button to do feedback on the checklist
Feedback can also be done on checklists by following this path: HSE > Permits to work > Checklists for permits to work
When you want to change the date and time that is needed to complete the tasks, you can extend the duration beyond the validity of the permit to work. Operational rules might dictate that a permit to work requires an extension.
Under the General Fast tab, note the Due date that was entered when the permit to work was created
Move the Allow due date extension slider to Yes
In the Action pane, in the Function group, click on the Request extension button
On the Request due date extension dialog:
Enter the New due date
Enter the Reason for the request
Click on the OK button
The Request extension button will only be available when the Allow due date extension slider is set to Yes
The Request extension button will not be available when the permit status = Cancelled or Suspended
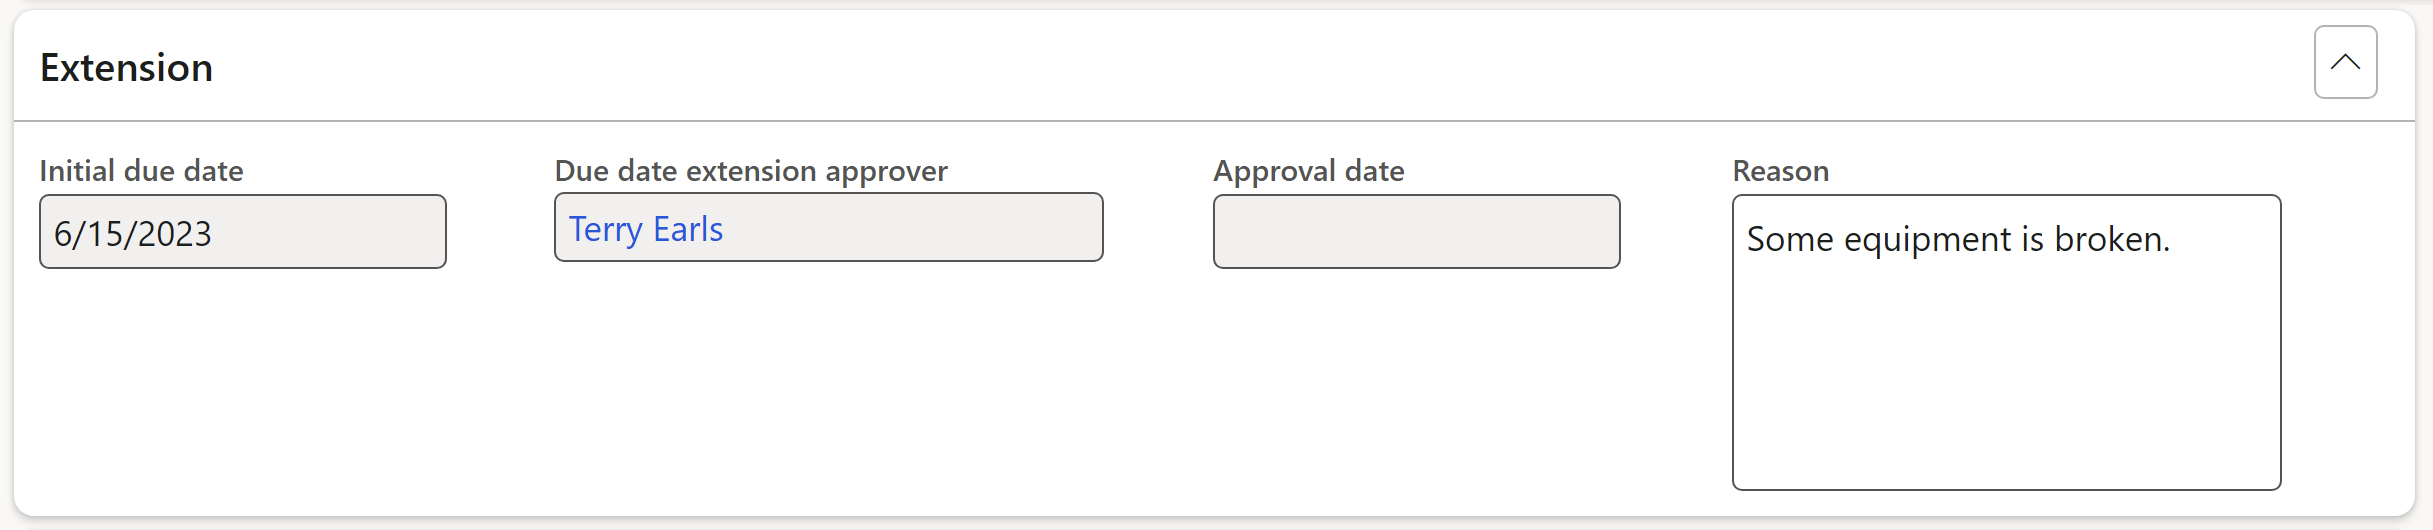
The Permit approver can now click on the Approve extension button in the Action pane
Expand the Extension Fast tab to view the entered data. The new Due date will be visible under the General Fast tab
It is imperative to control these Permits to work as they could save lives. For example:
The issuing, Hand-over and Surrendering of permits should only be to qualified workers.
Approvals of permits should be controlled by competent people.
It is of utmost importance to ensure that overlapping work group interactions are checked. If more than one open Permit to work exists, the system should check if teams could potentially step on each other’s toes. This overlapping check must flag additional Hazards on a permit to work.
All the controlling functions are accessible on the Action pane in the Control group of the Permits to work list page.
It is important to note that the Controls that are available for the various permits will depend on the Permit to work type actions and questions that were setup for the different Permit types.
This setup is covered under the Setups section of this document.
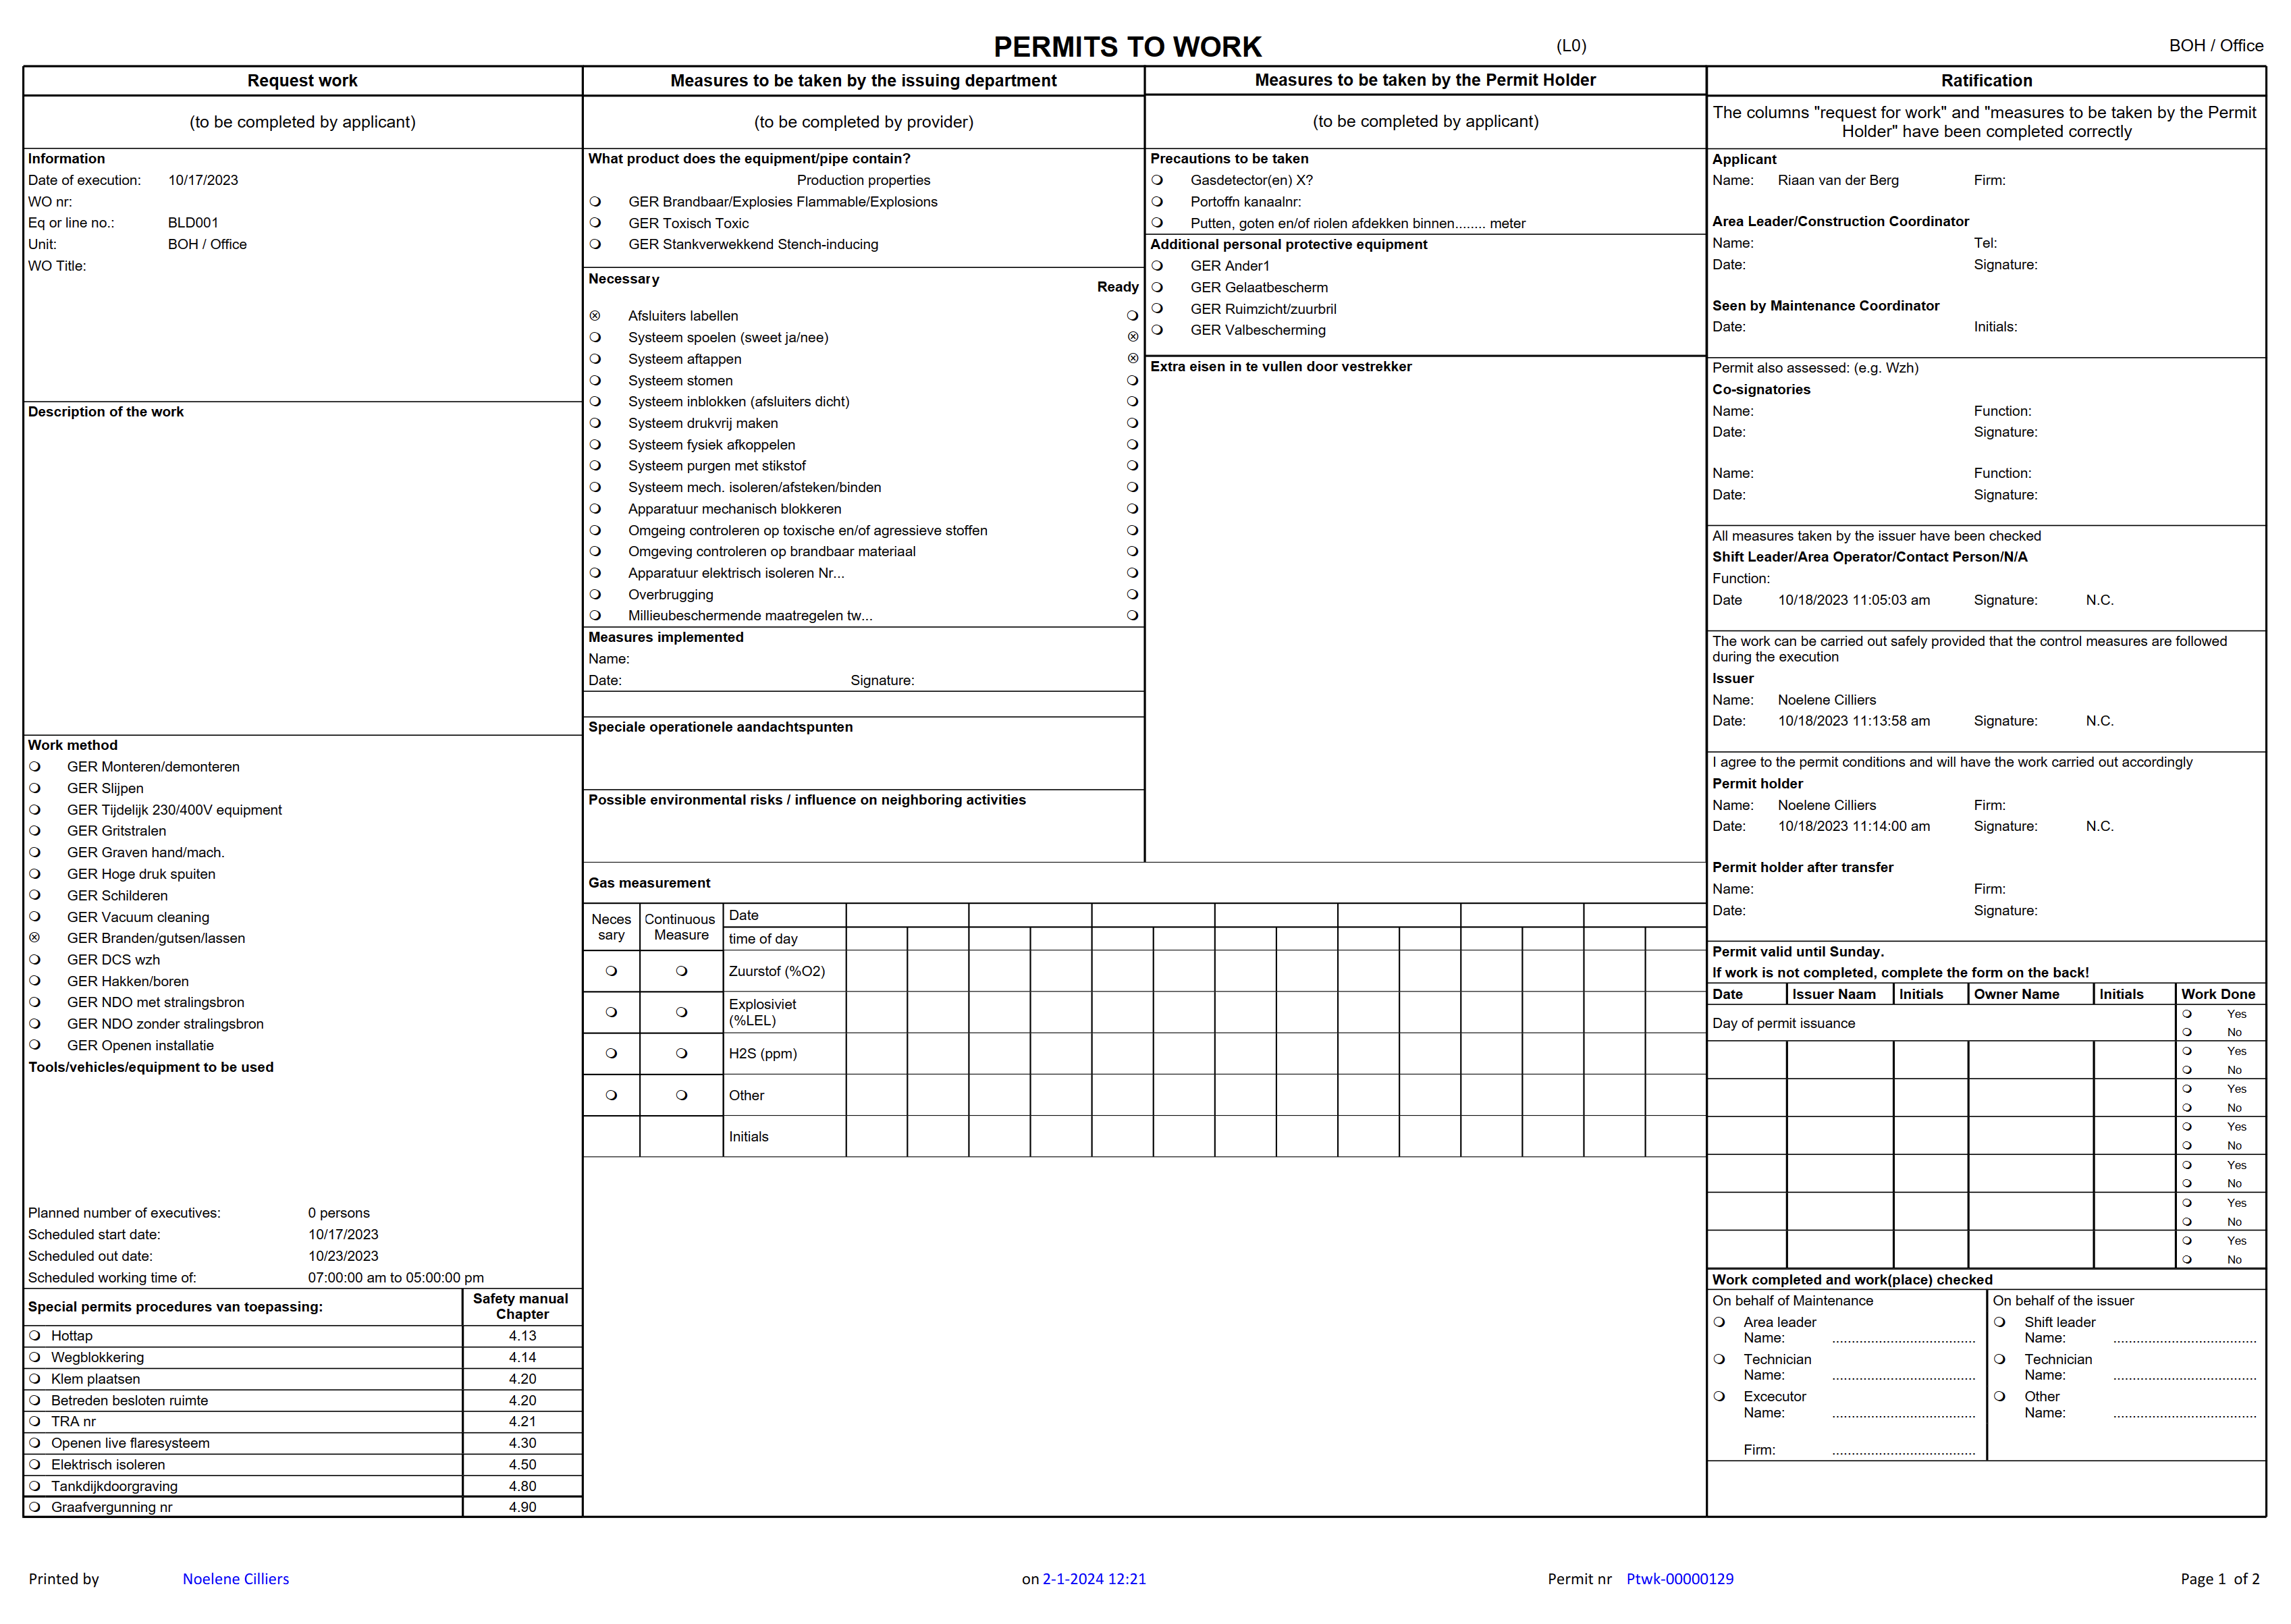
Below is an example of what the controls for the Permit type Hot work will implicate as setup in this specific environment:
Steps/Phases
Next step
Optional
1. Recorded
The permit has to be submitted
Can reject
2. Submit
The permit has to be approved
Can reject
3. Approve
Requires a signature
A declaration must be done
The permit has to be accepted
4. Void
The permit has to be Submitted
The permit has to be Approved
The permit cannot be voided after “Issue - Accept”
After recording a Permit to work, it has to be submitted and approved
On the Action pane, in the Status group, click on the Submit button
The Approve button will become available
Only APPROVED Permits to work can be issued to a worker with the relevant competencies
The permit can only be approved by the person specified on the Header of the safety plan under Permit to work rules
The permit can only be issued if it is still valid according to the date of the permit
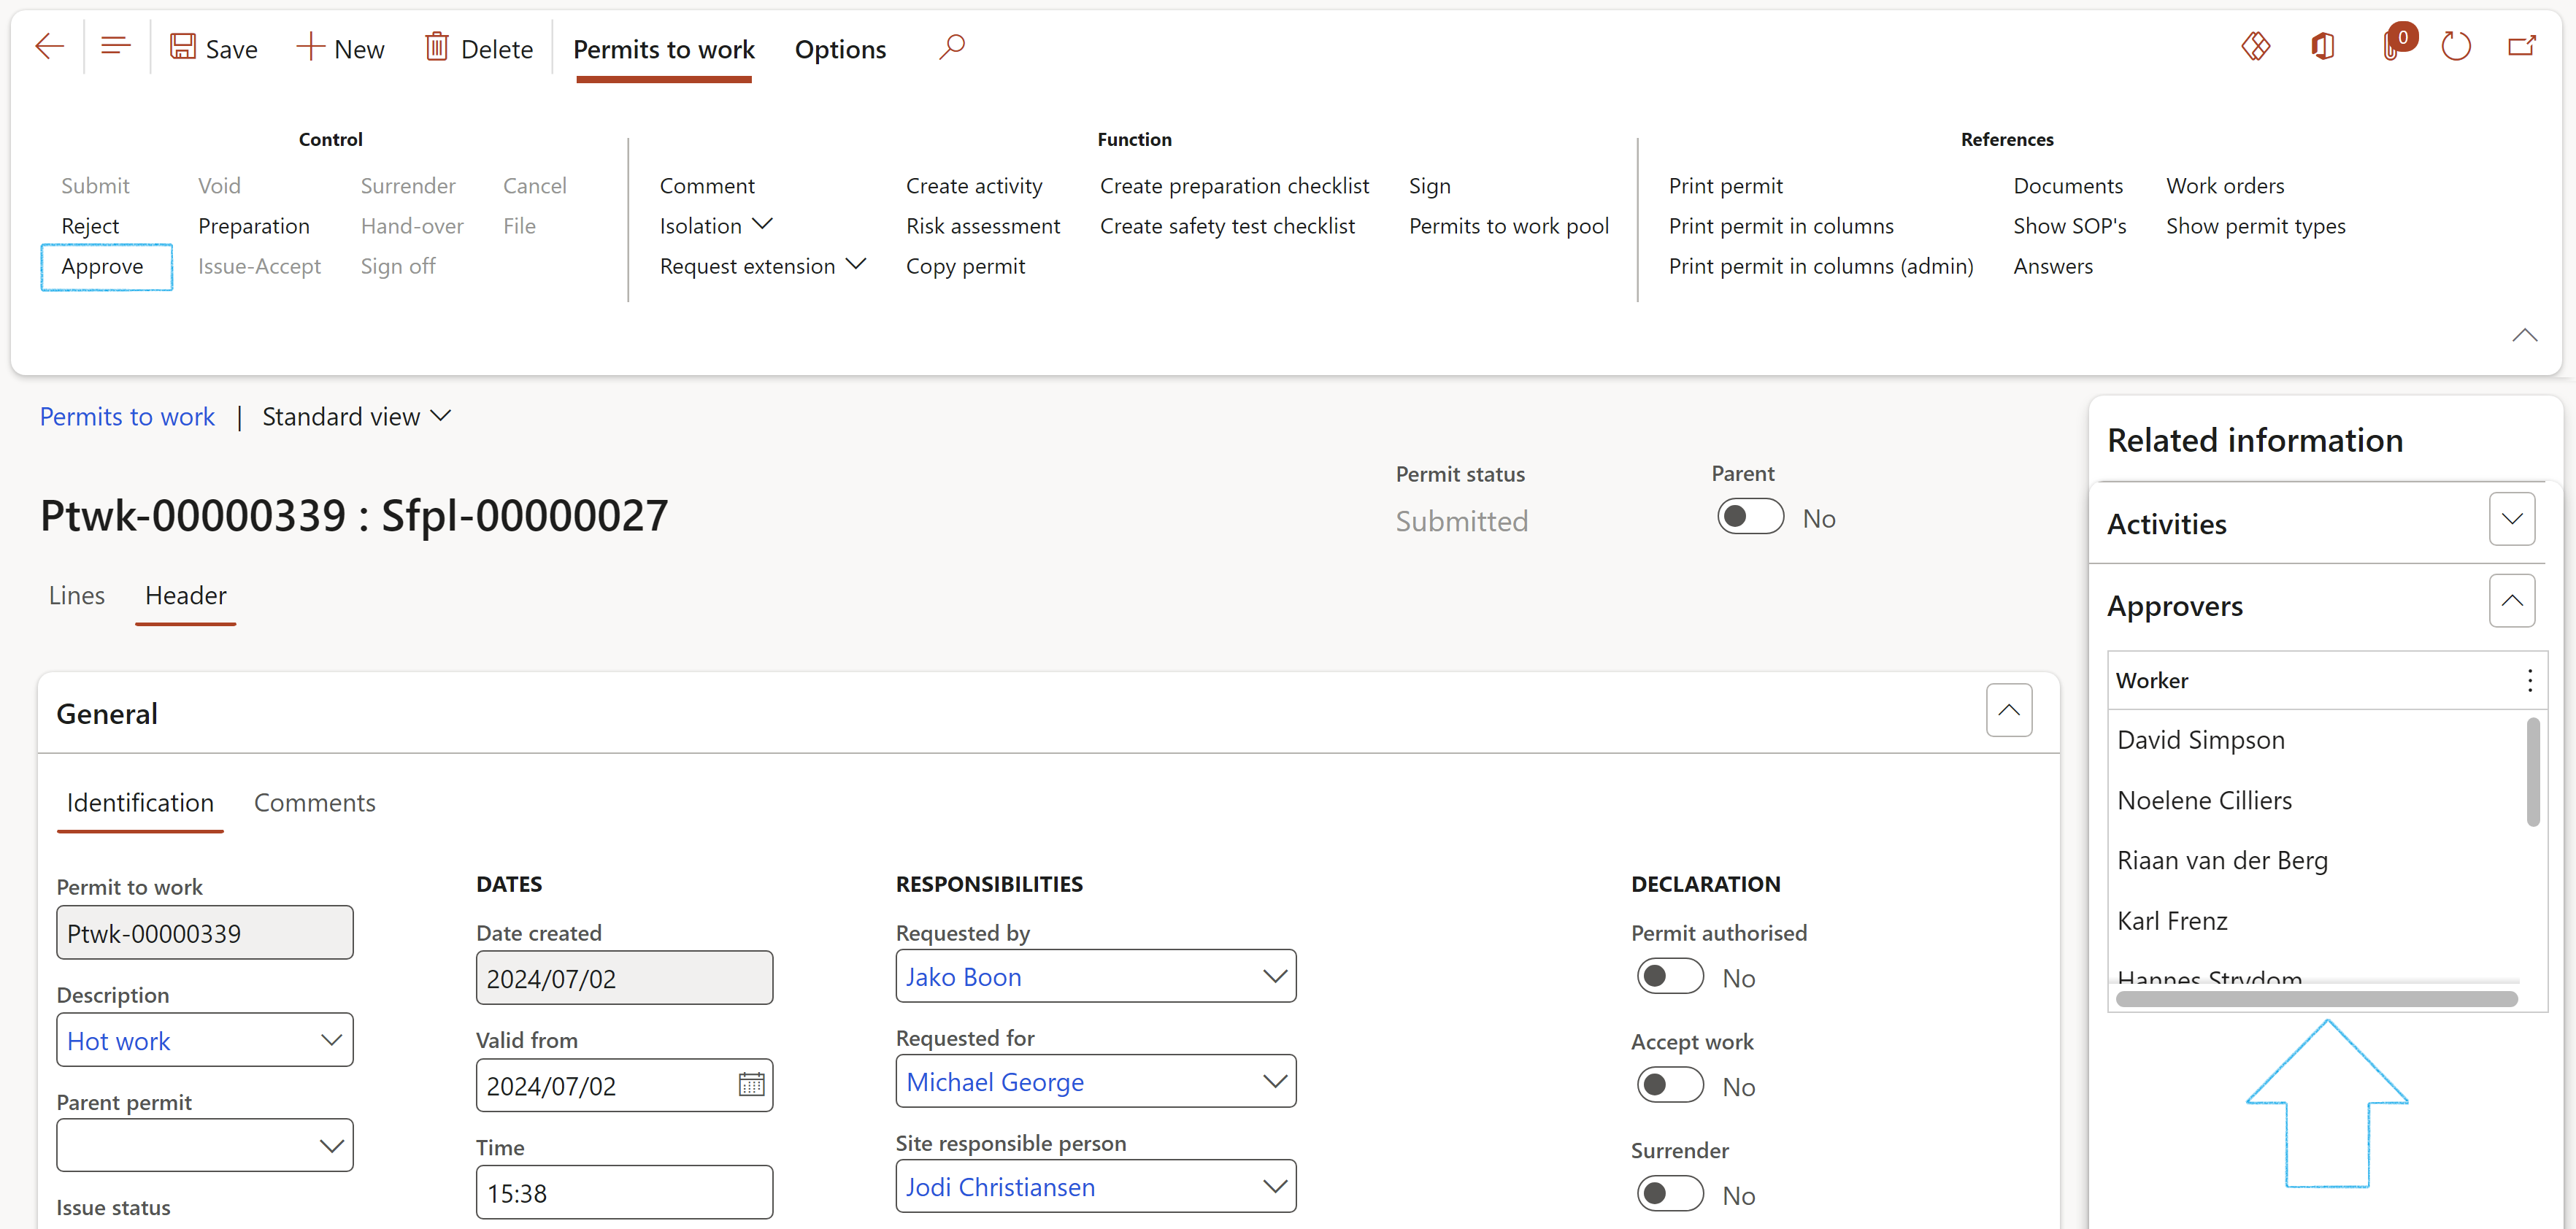
The list of workers that have been selected as Approvers on the Safety plan, can be viewed in the Related information pane under the Approvers Fact box
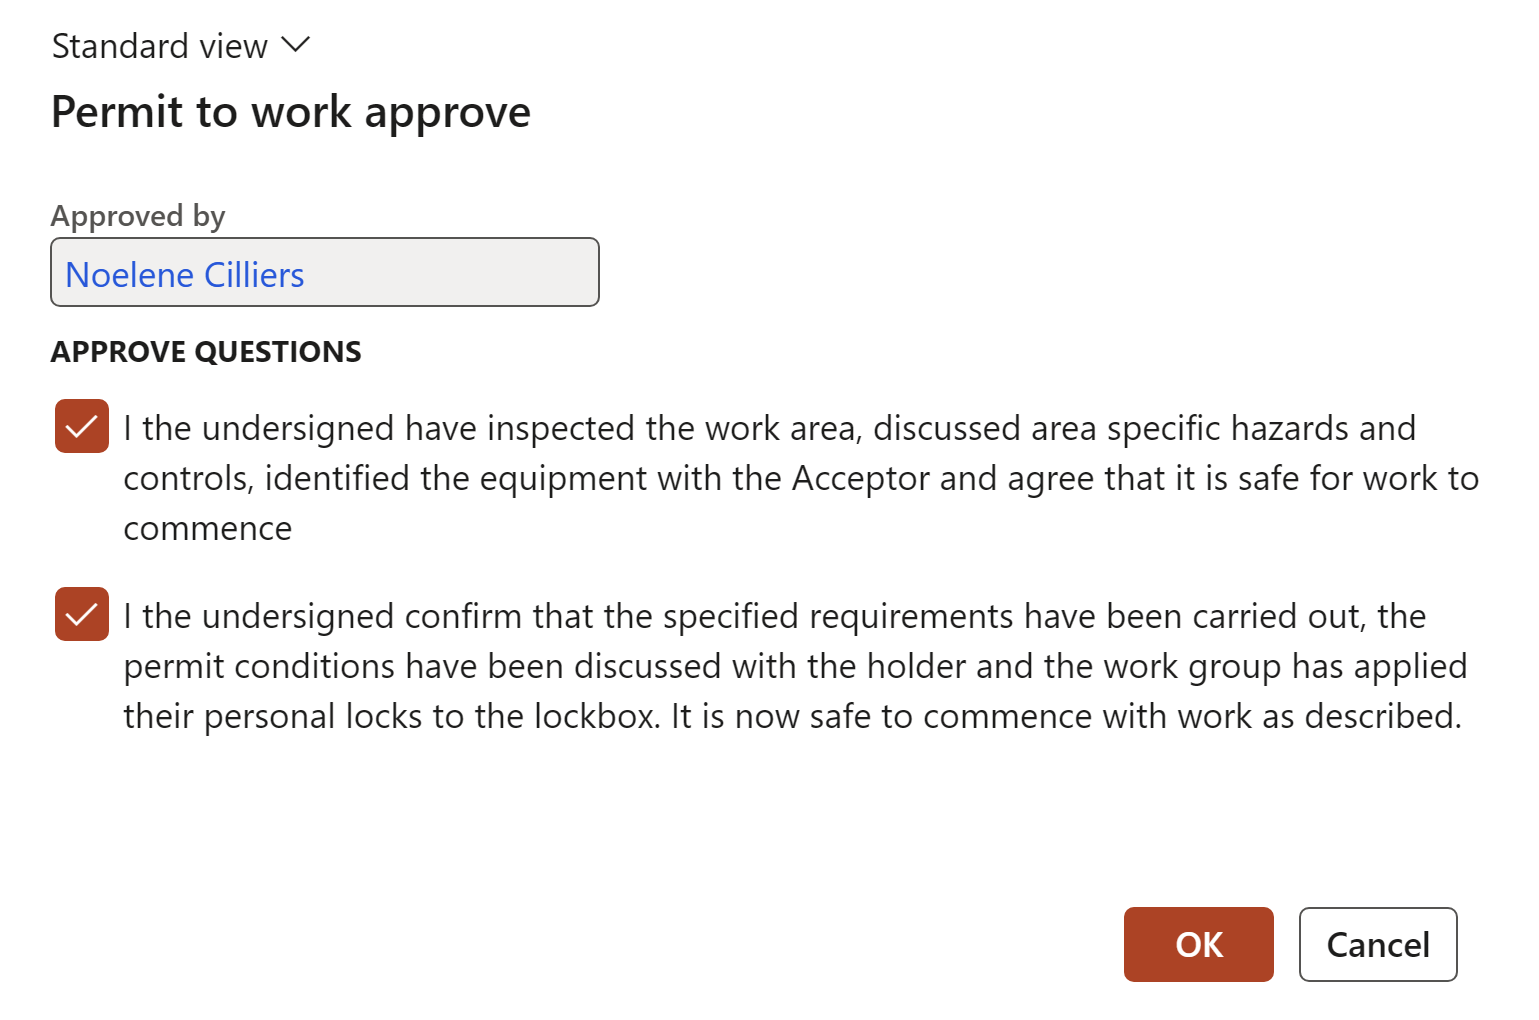
When the Approved button is clicked the Permit to work approve dialog appears
Tick the Approve questions boxes
The person approving the permit has to sign on the signature pad as proof of his approval of the permit (Optional)
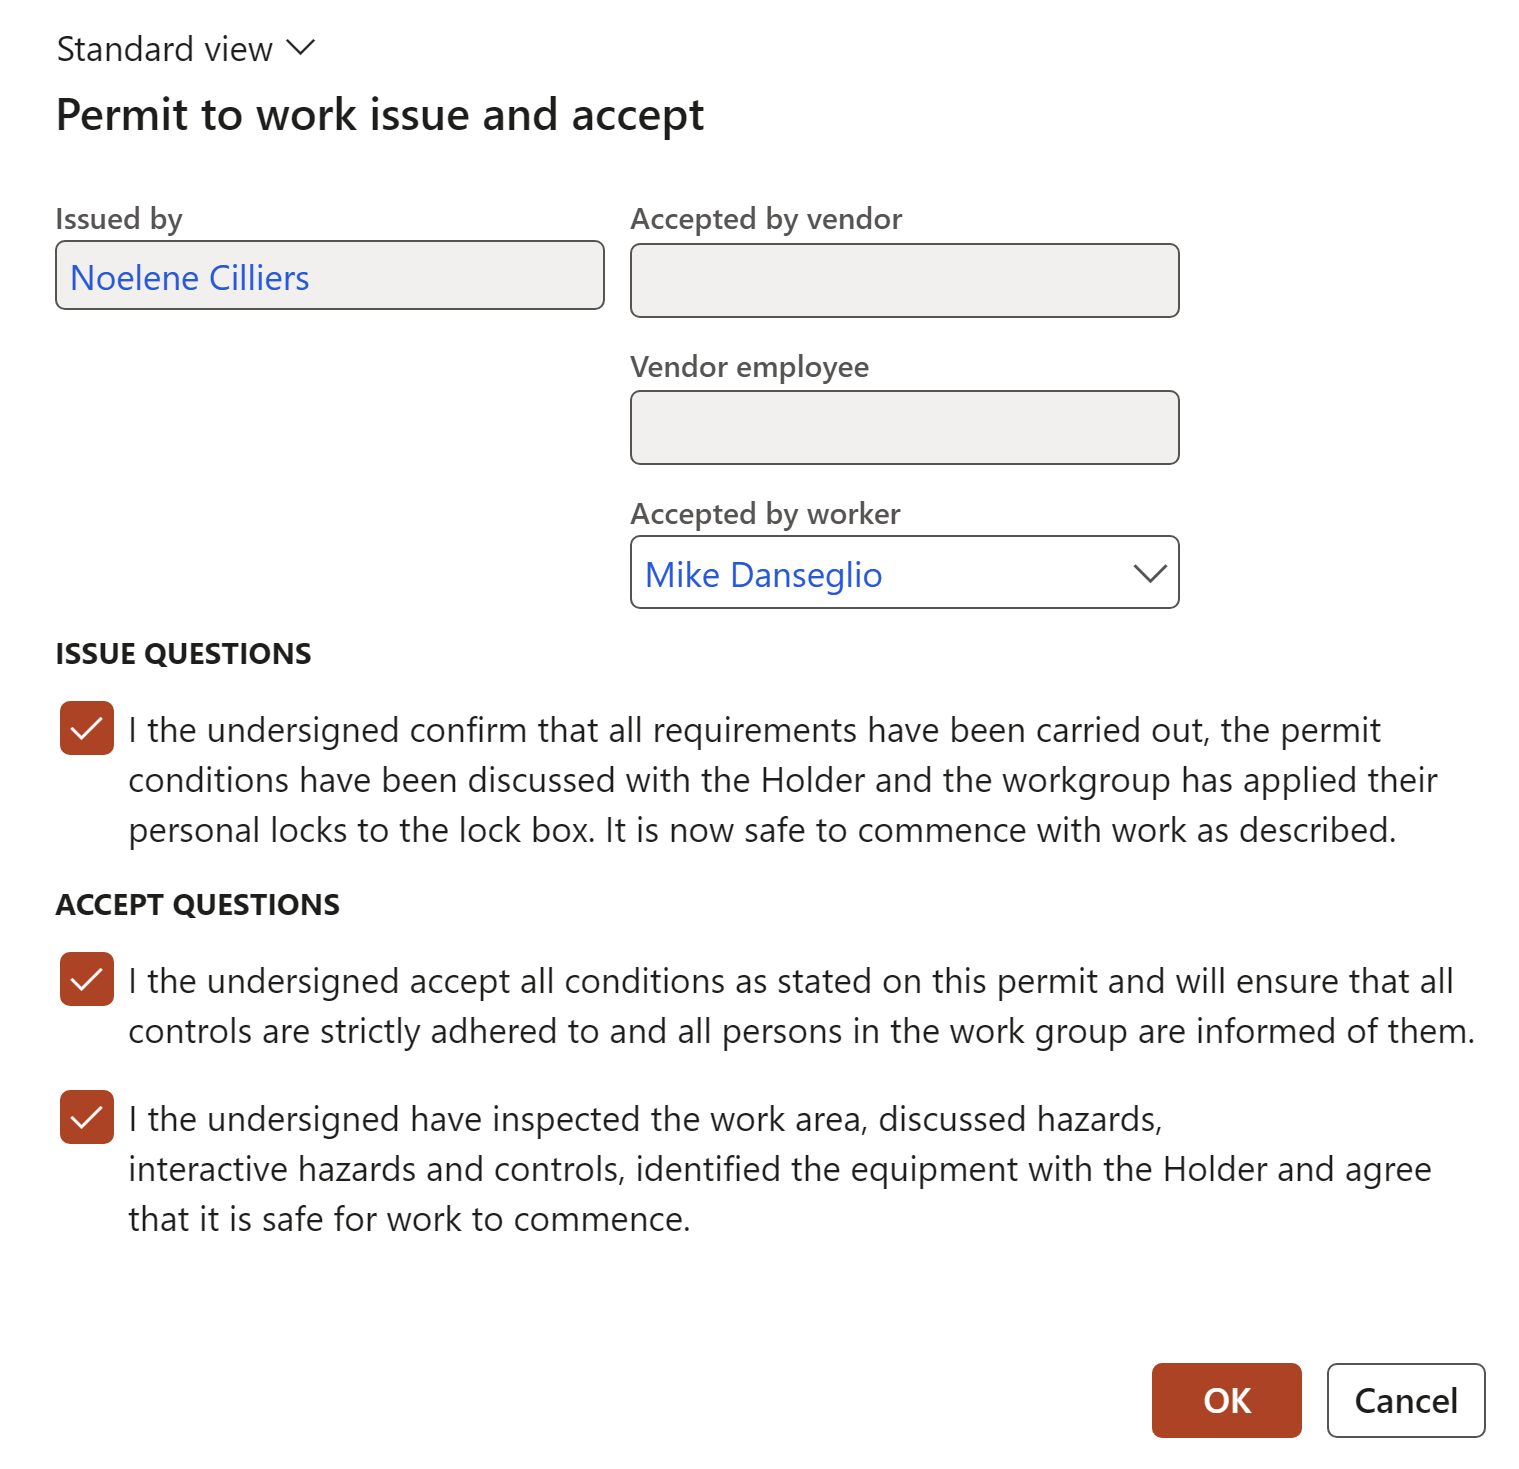
Once the Permit has been approved, the Issue-Accept button becomes available on the Action pane
On the Action pane, in the Control group, click on the Issue-Accept button
Tick the Accept questions boxes
The person accepting the permit has to sign on the signature pad as proof of his acceptance of the permit (Optional)
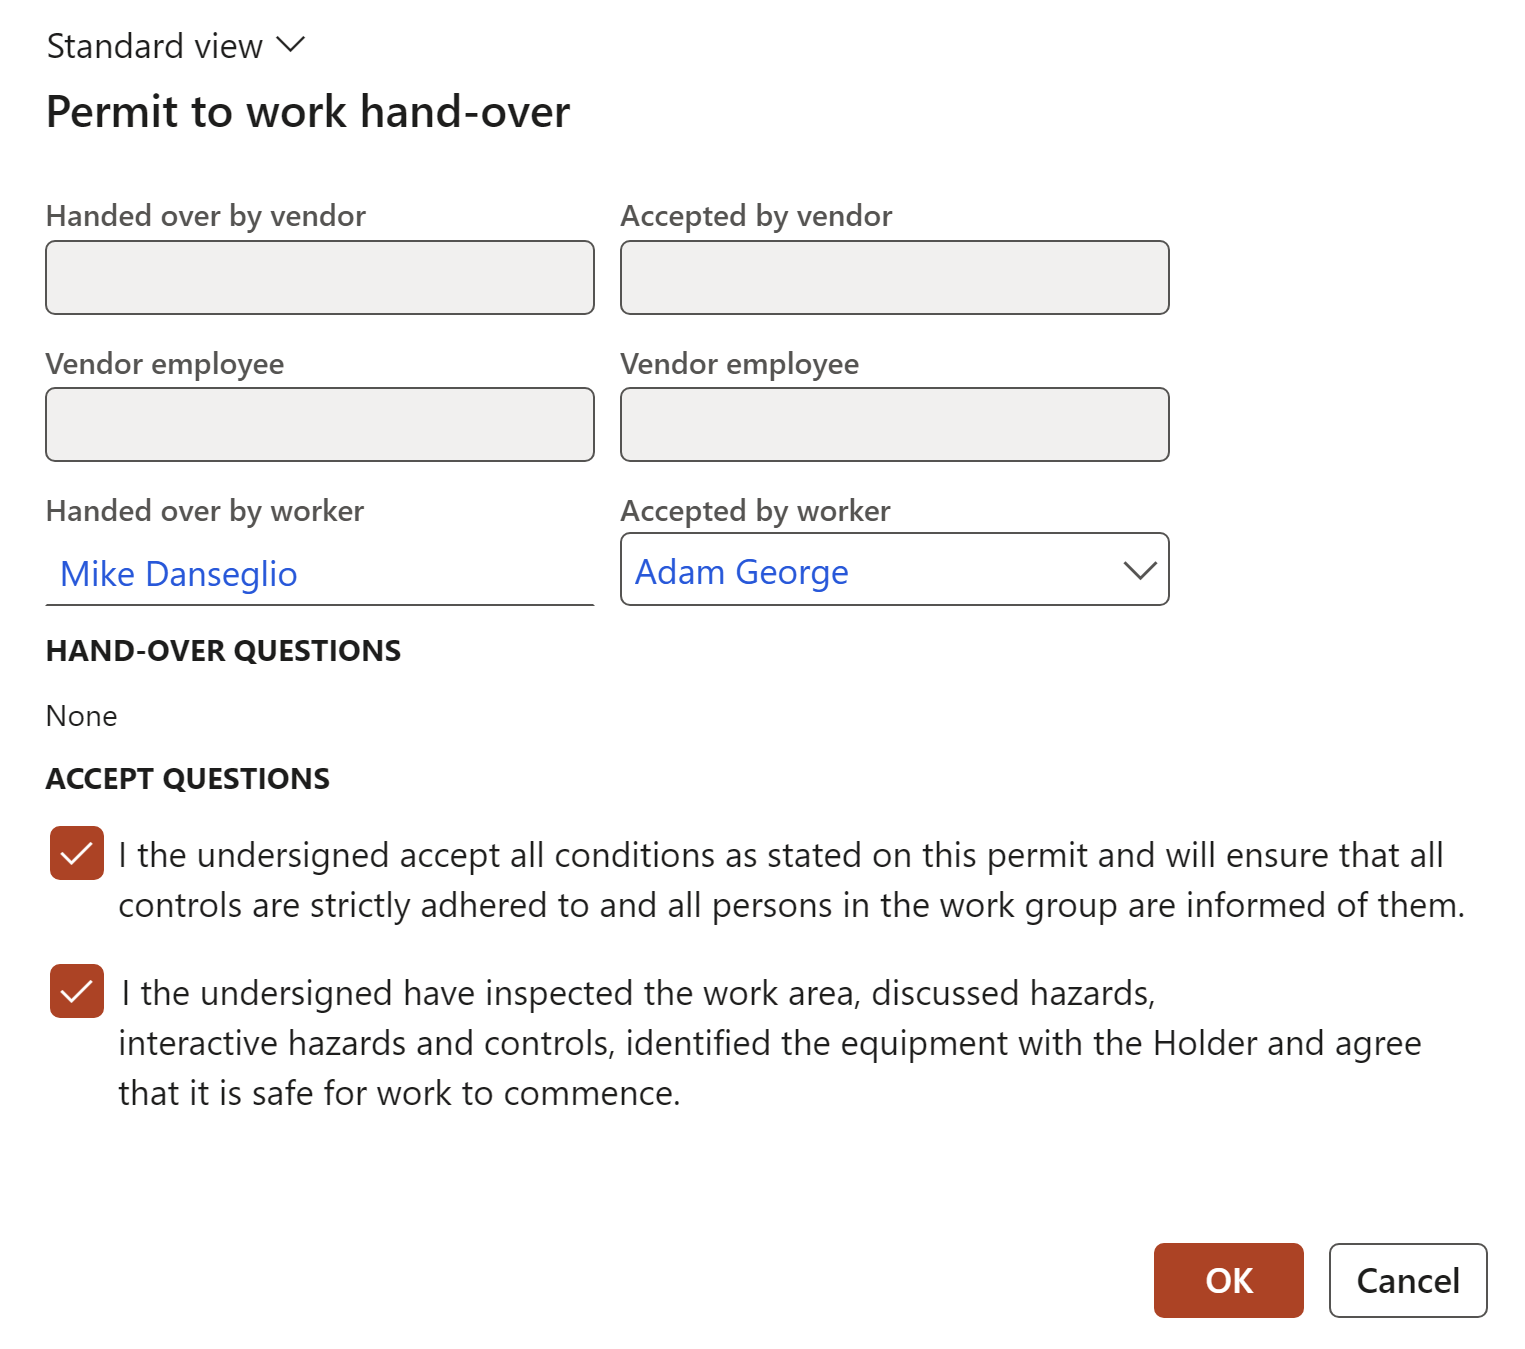
When a specific job is not completed at the end of a shift, another qualified worker/team has to take ownership of the work. It is important to formally hand over the Permit to work to the new worker/team.
On the Action pane, click on the Hand-over button. This means that the permit can now be re-accepted by another qualified person
When the next person accepts the permit, he/she has to sign as proof of acceptance of the permit (Optional)
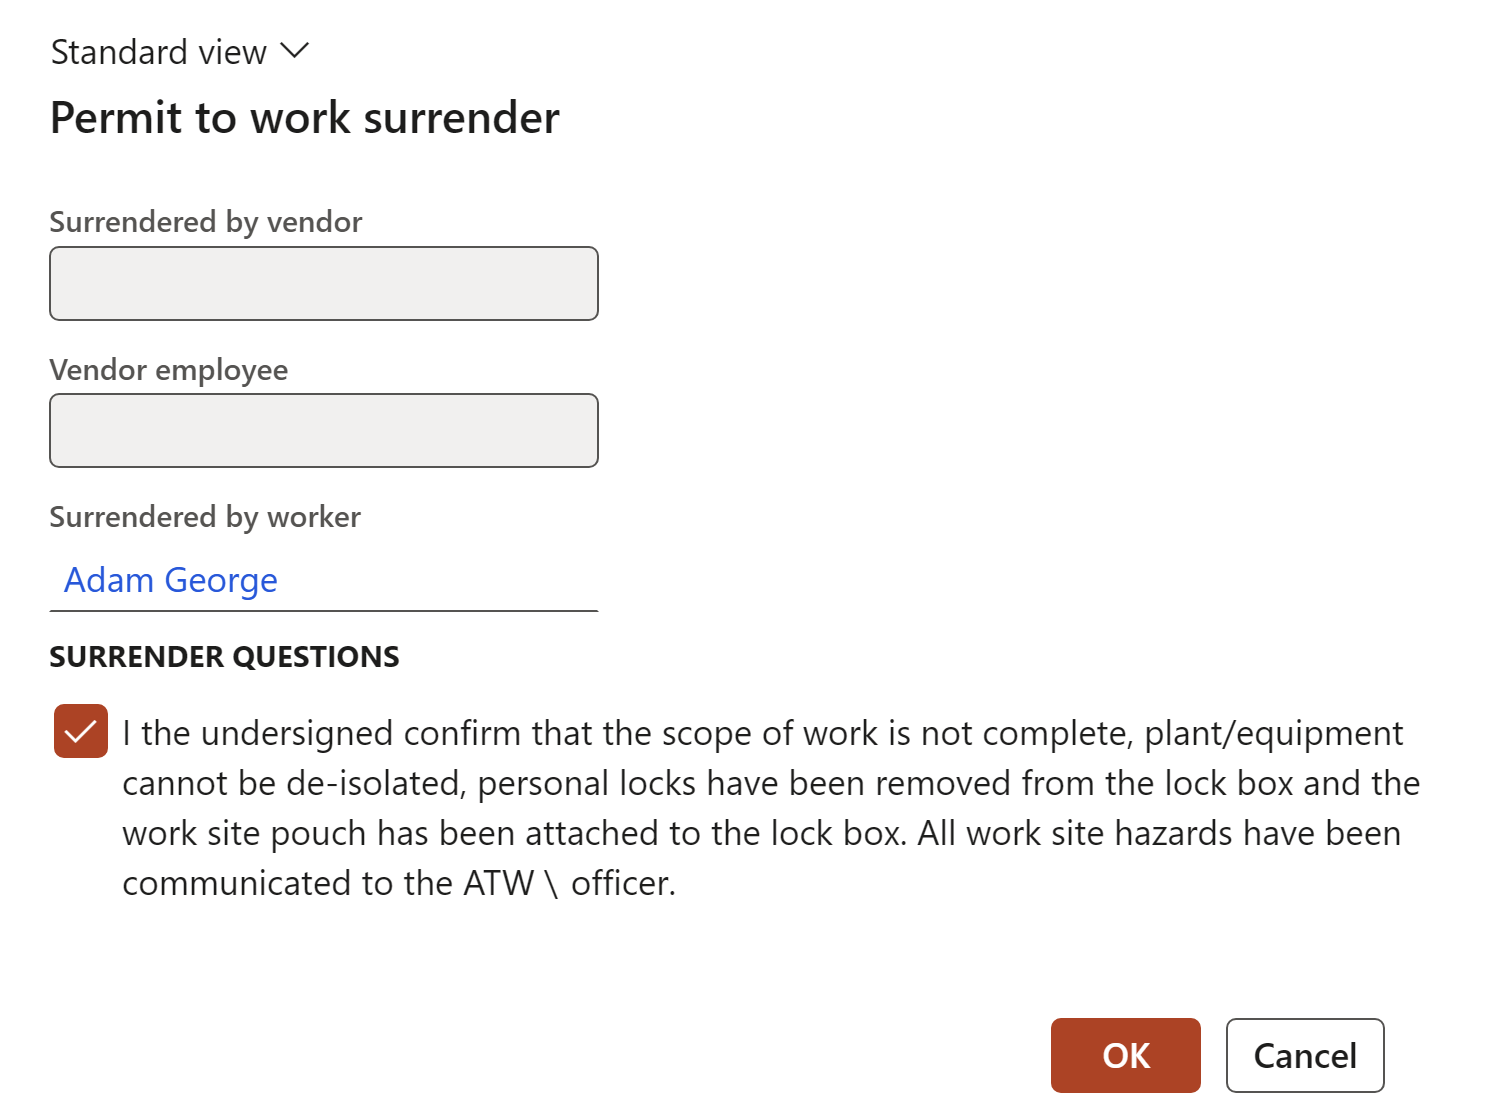
When a specific job is not completed at the end of a shift, the permit can be surrendered by the worker to be accepted by the same worker on the next day
On the Action pane, click on the Surrender button
The person surrendering the permit has to sign on the signature pad to confirm that he/she is surrendering the permit (Optional)
When the worker comes back on the next day, he/she has to sign on the signature pad to confirm that he/she is accepting the permit again.
The history of workers who had taken ownership of a Permit to work (either through issuing, hand-over, surrendering or re-issuing) will be displayed on the Headerview of the permit.
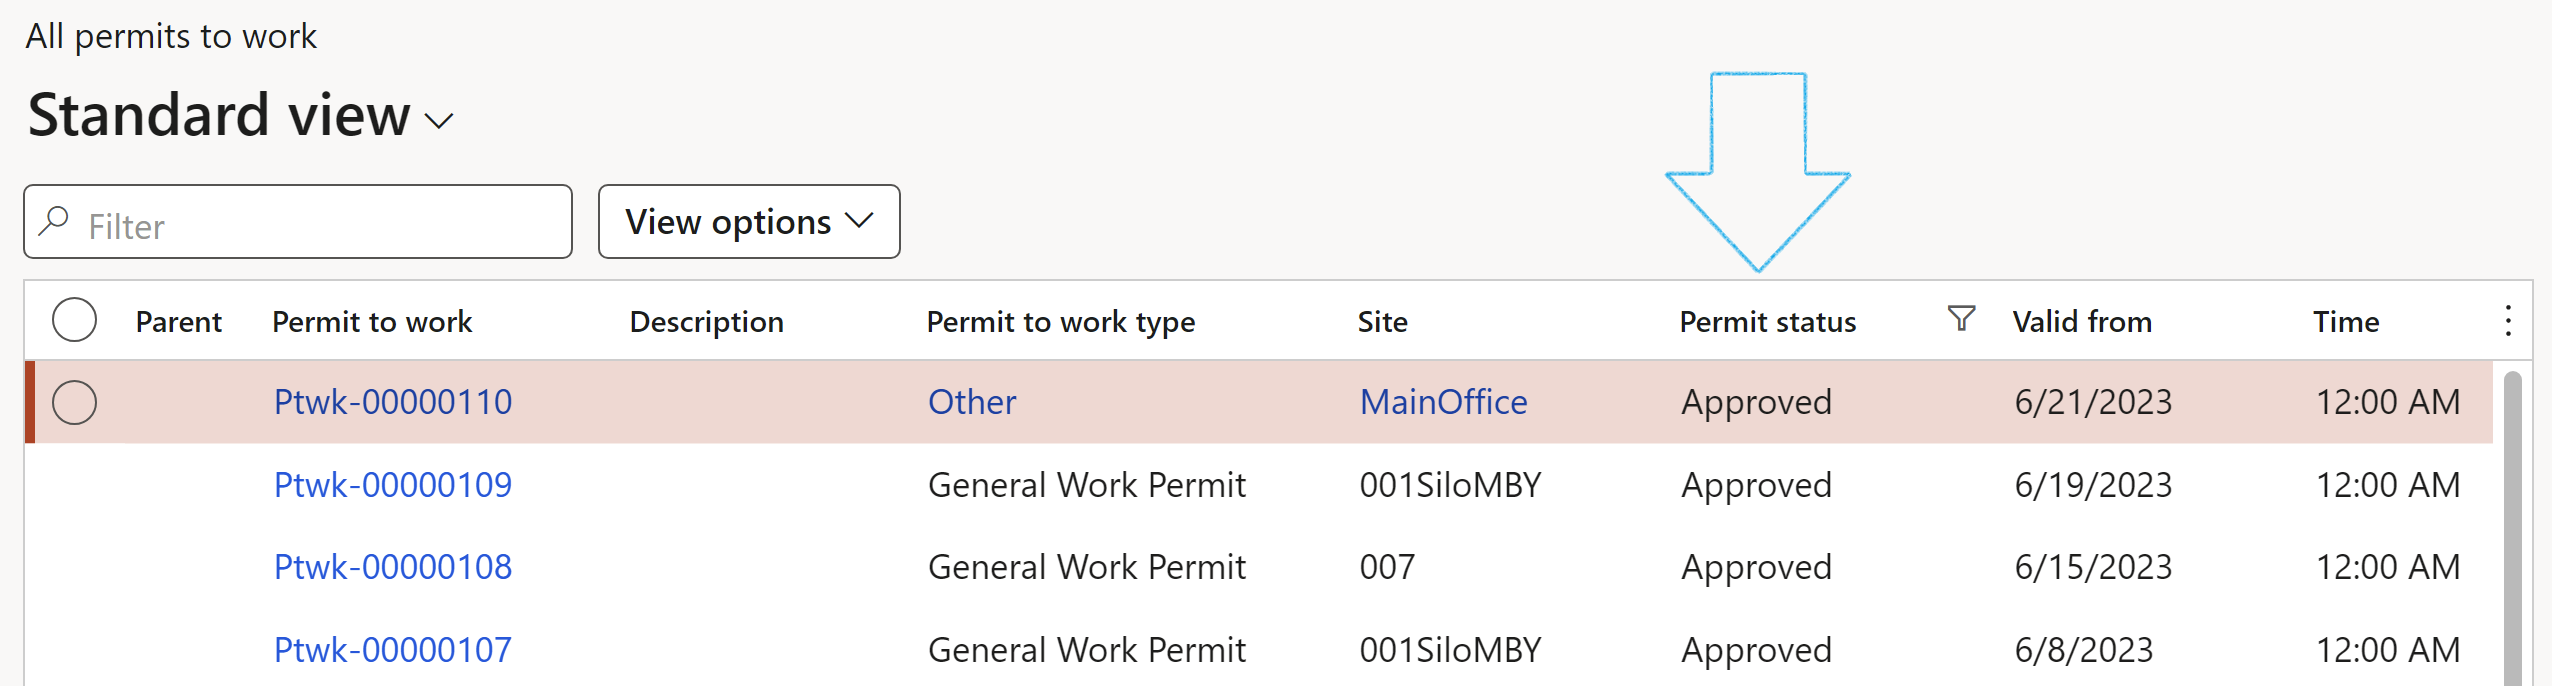
Go to: HSE > Permits to work > All permits to work
Select the permit that you want to view the history of
Open the Header view
Expand the Actions Fast tab
Ticked check boxes will indicate what actions have been taken
Qualified personnel must be authorized to review and approve permits to work. Before a permit to work can be issued, it must first be reviewed and then approved. This could include multiple pre-approvals. Dynamics 365 HSE has functionality for different roles and responsabilities and signature types to support pre-approvals.
Go to: HSE > Permits to work > All permits to work
Select the permit that you want to add your signature to
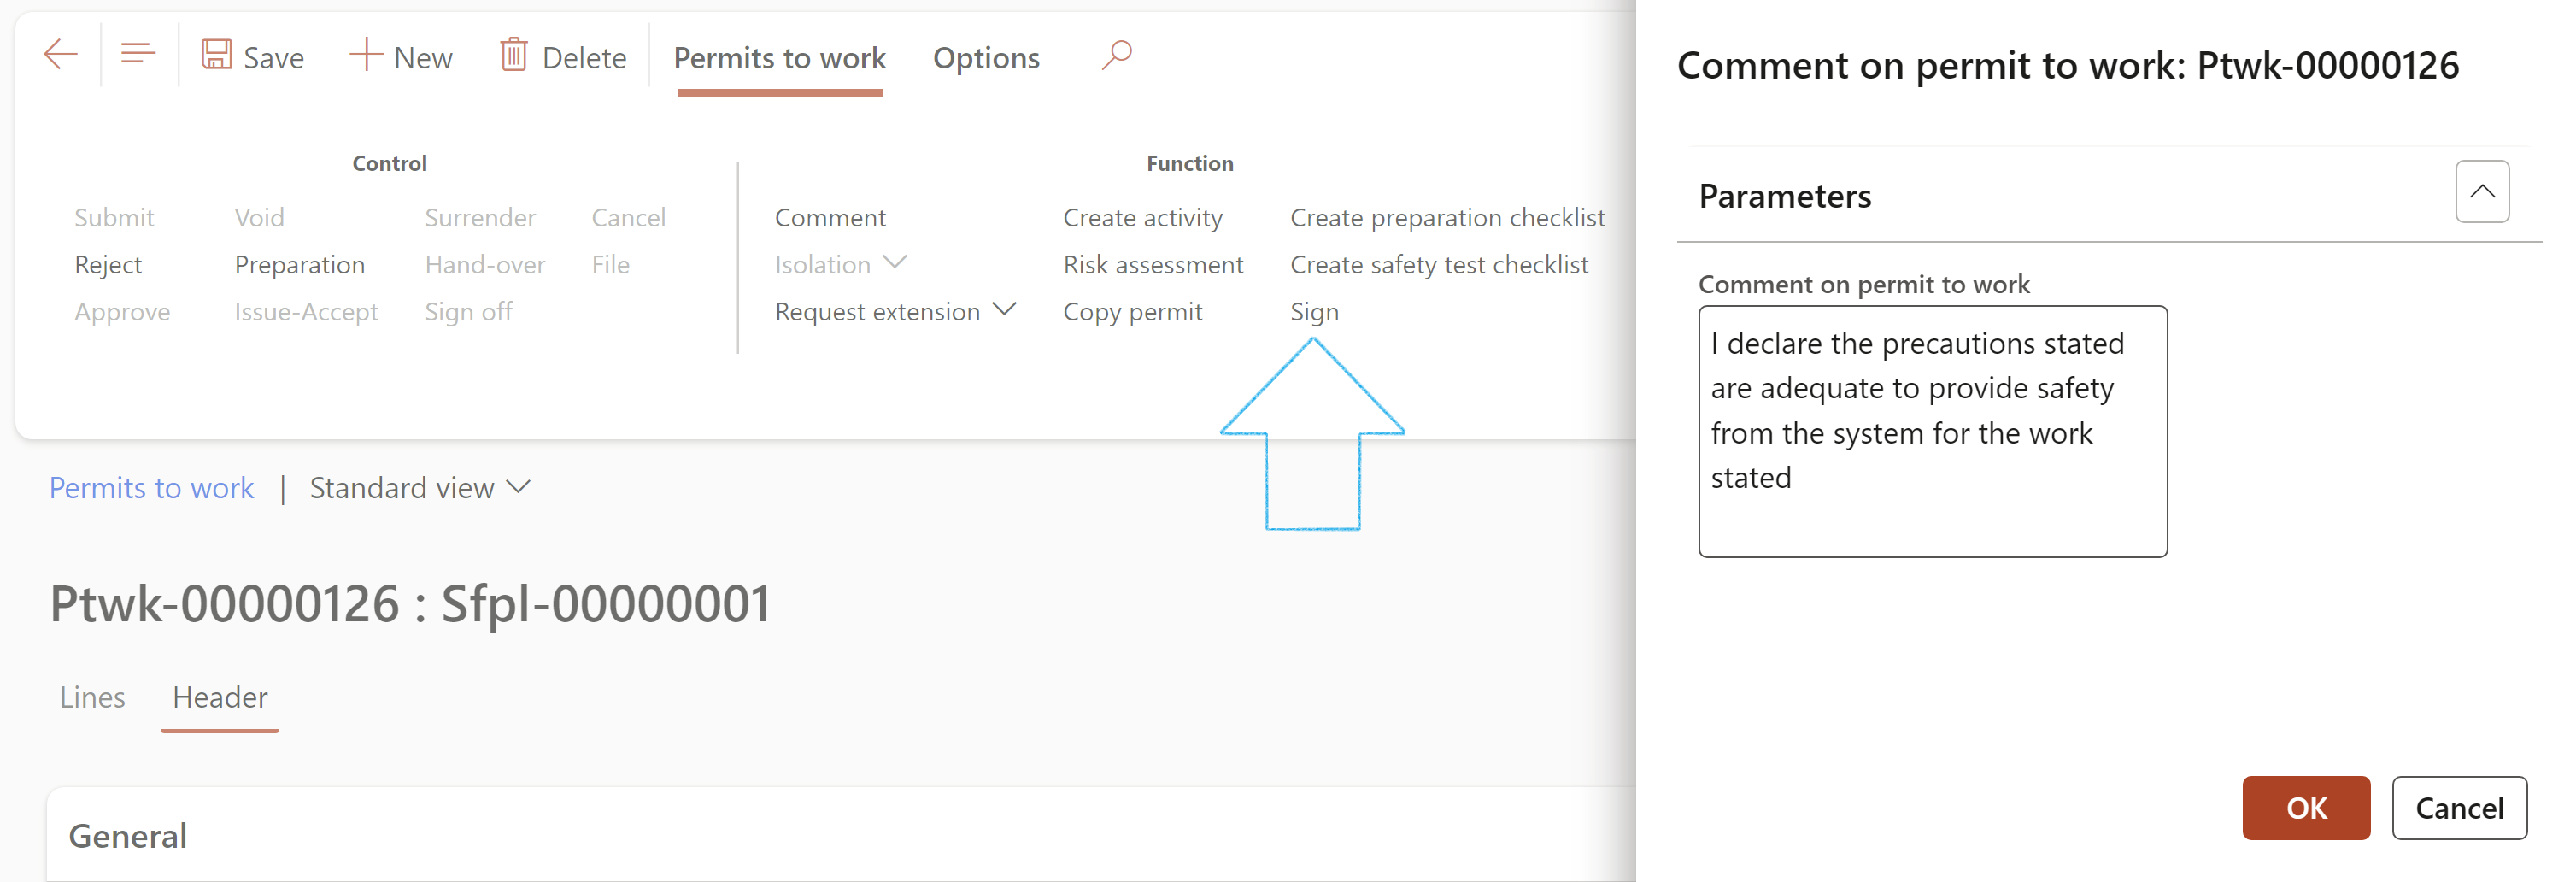
On the Action pane, in the Function group, click on the Sign button
On the Comment on permit to work dialog, the default text for comments, as setup on the Permit to work type signatures form, will be displayed in the Comment on permit to work comment box (if setup). This can be edited
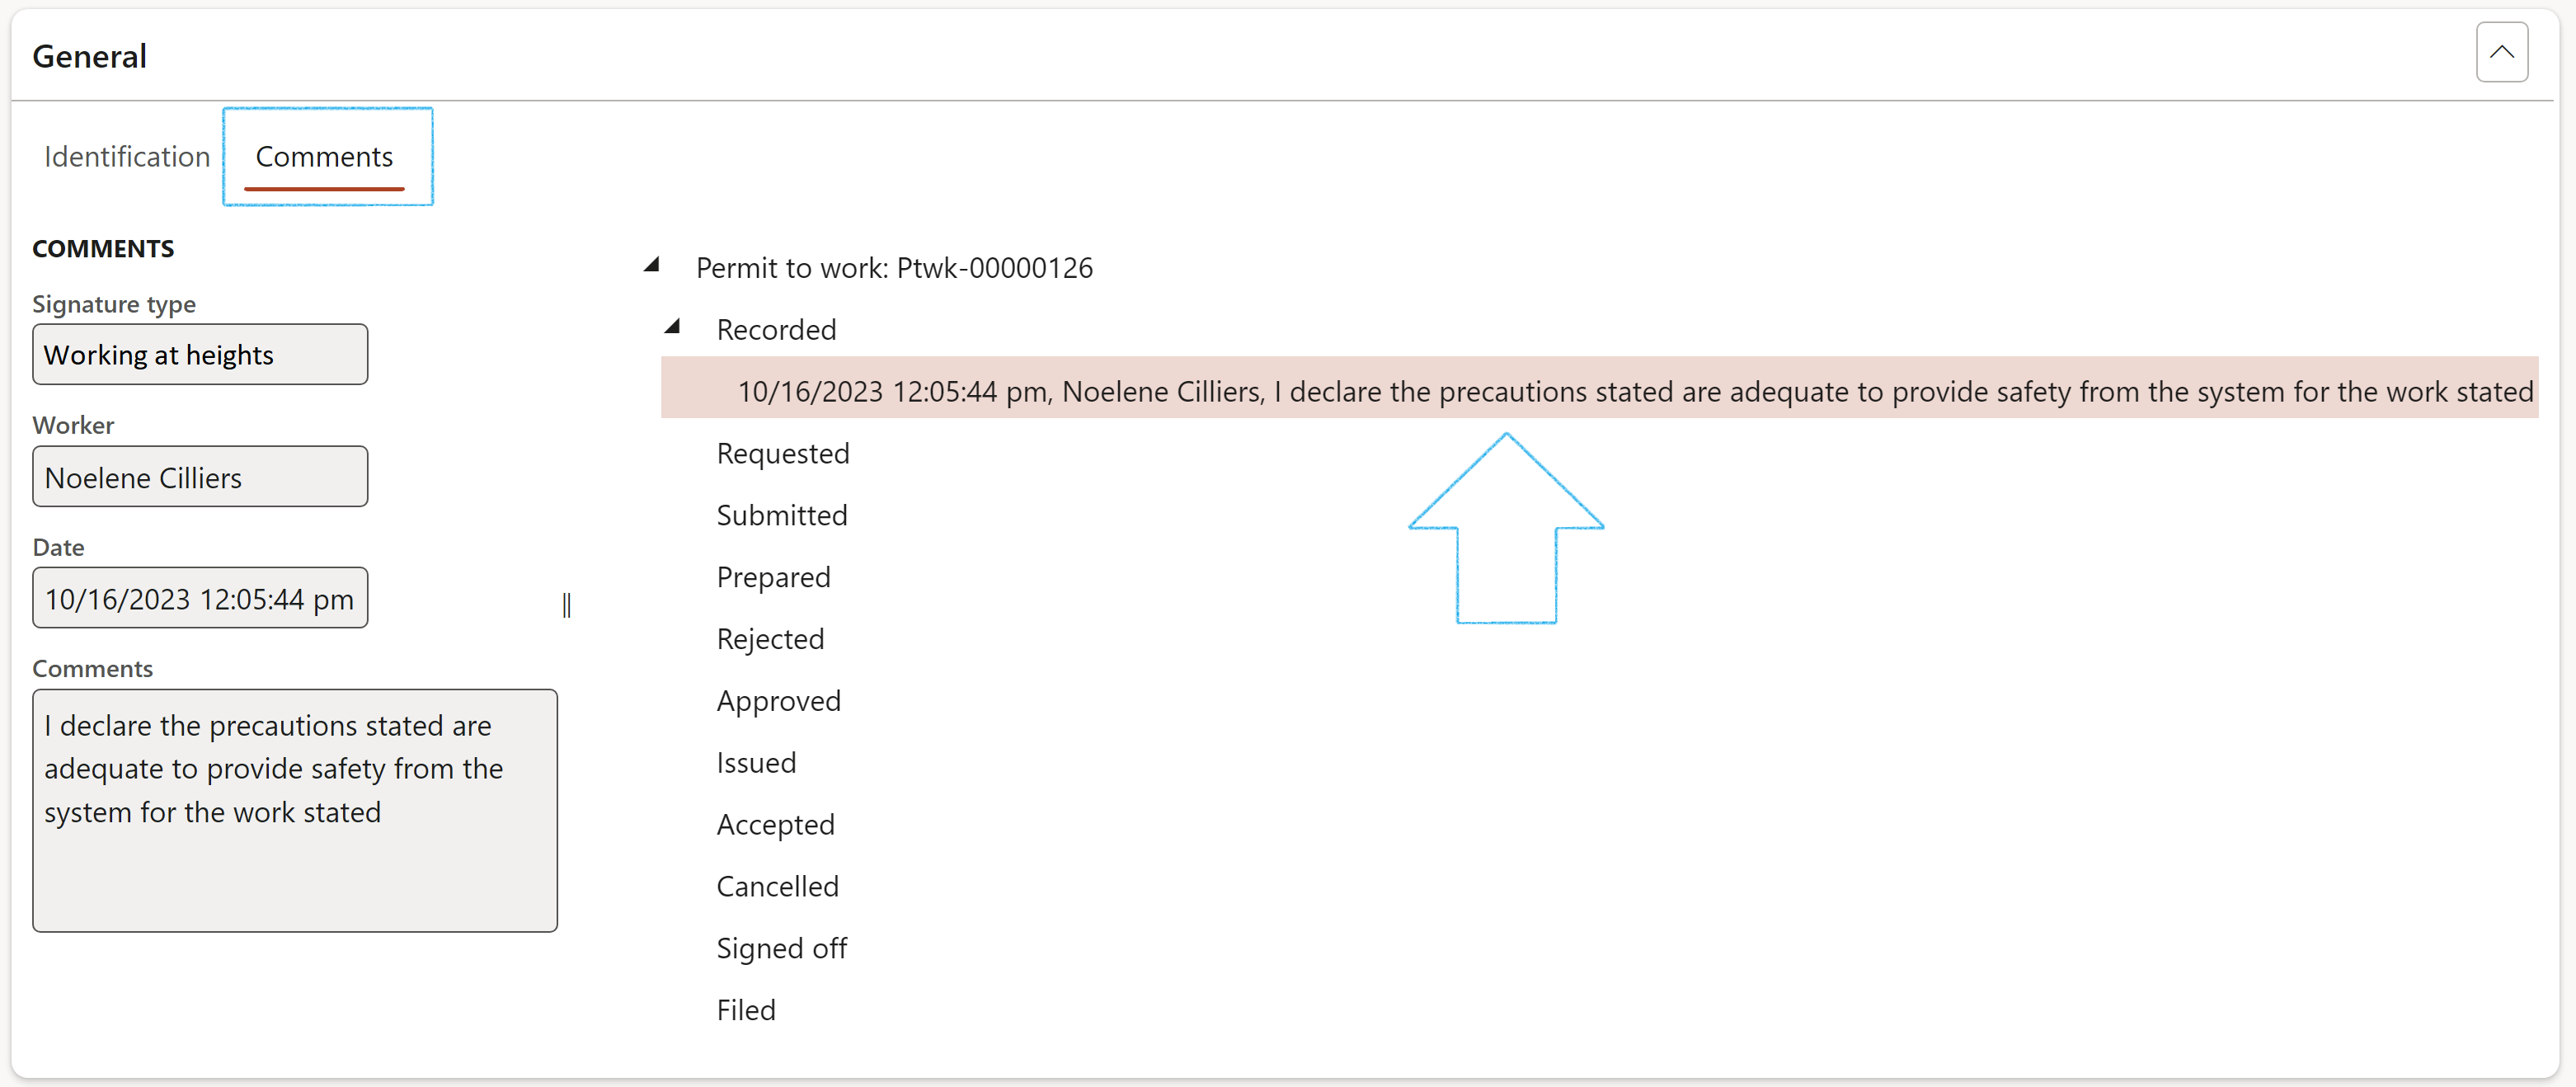
To view the comment entered by the user, open the Comments Index tab under the General Fast tab on the Permit header.
A log of all signatures done on the permit, is kept under the Actions Fast tab on the Permit header
The Permit to work is essential but not always sufficient. Another critical safety procedure is the job risk assessment (JRA). Depending on the industry and organisation terminology, the JRA is sometimes referred to as the point of work risk assessment (POWRA). Both the permit to work and the job risk assessment are critical procedures designed to mitigate risk and ensure that work takes place safely. Let us look at the Hazard identification and mitigation on the Permit to work.
The hierarchy of controls is a method of identifying and ranking safeguards to protect workers from hazards. They are arranged from the most to least effective and include elimination, substitution, engineering controls, administrative controls and personal protective equipment.
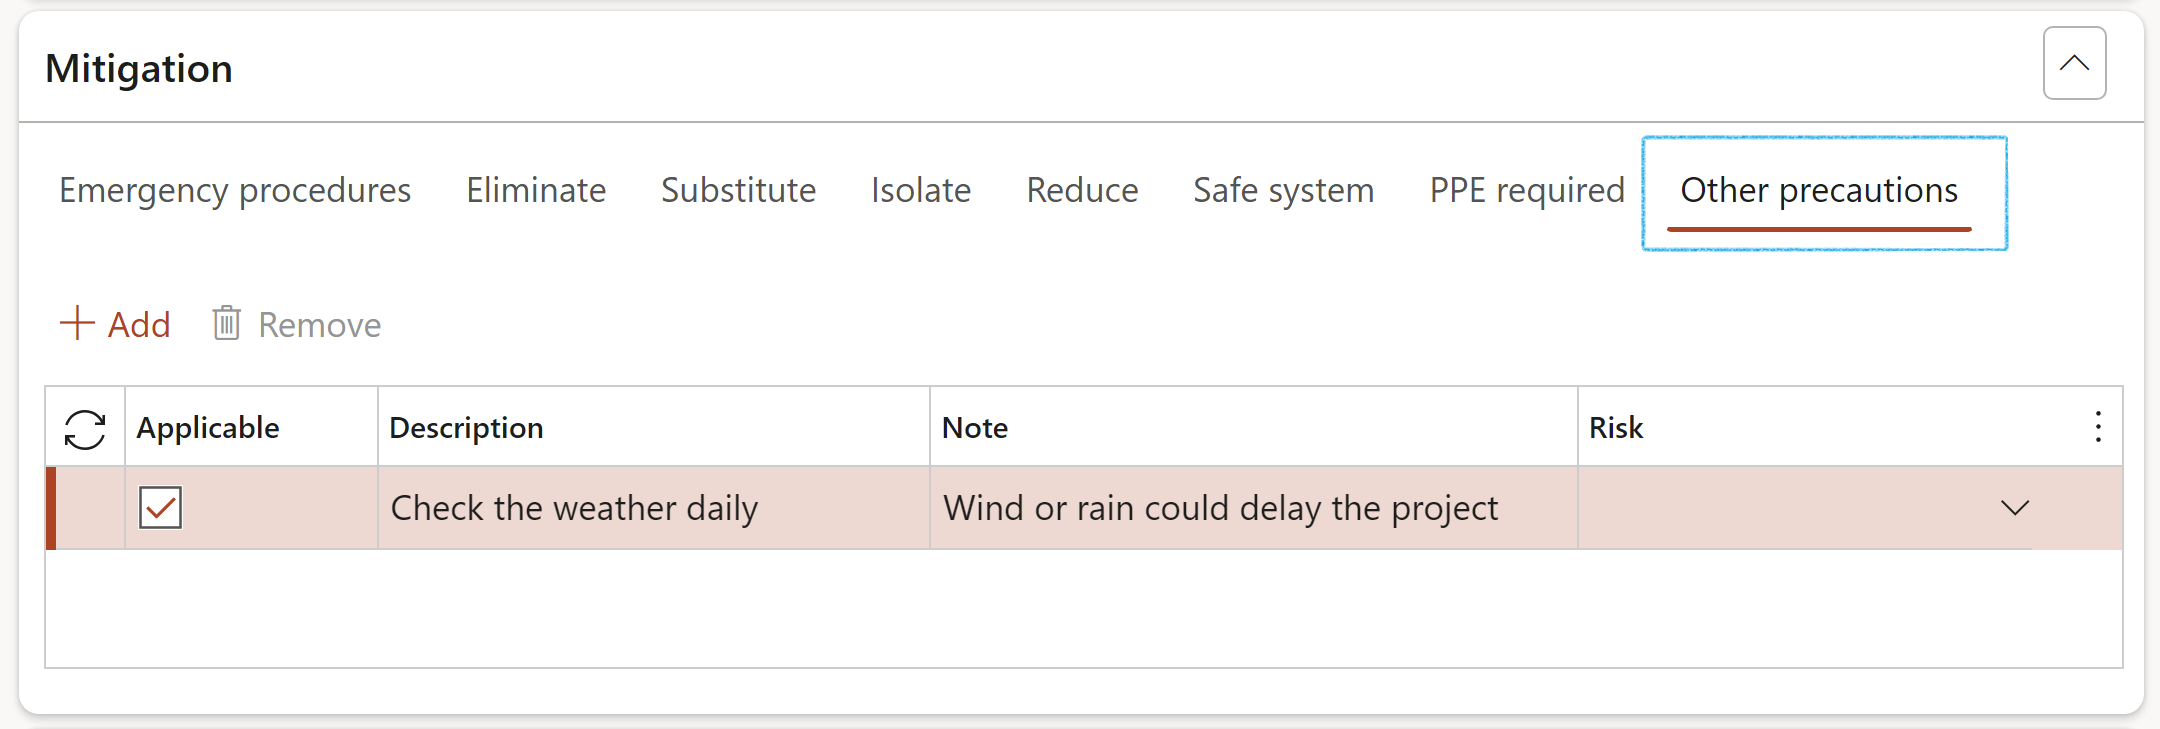
Expand the Mitigation Fast tab
The Emergency procedures will be populated from the Hazard selected for the Permit to work
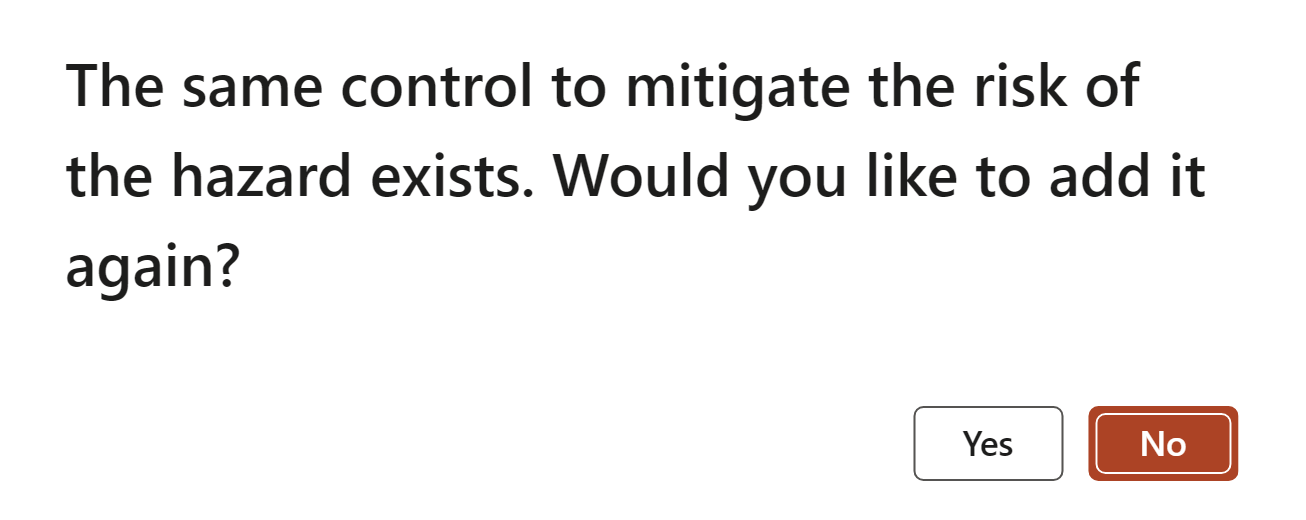
When Hazards are added to the Safety plan/Permit to work, a validation is done to check for mitigating controls. If the same control exists on a previously selected hazard, the user is presented with a pop-up message to warn them of the duplication of control measures.
The following Index tabs form the hierarchy of control measures used to mitigate safety risks:
Eliminate
Substitute
Isolate
Reduce
Safe system
PPE required
Any additional precautions can be added under the Other precautions Index tab
Tick the Applicable box to choose/indicate the applicable precaution from the default list, received from the Safety plan
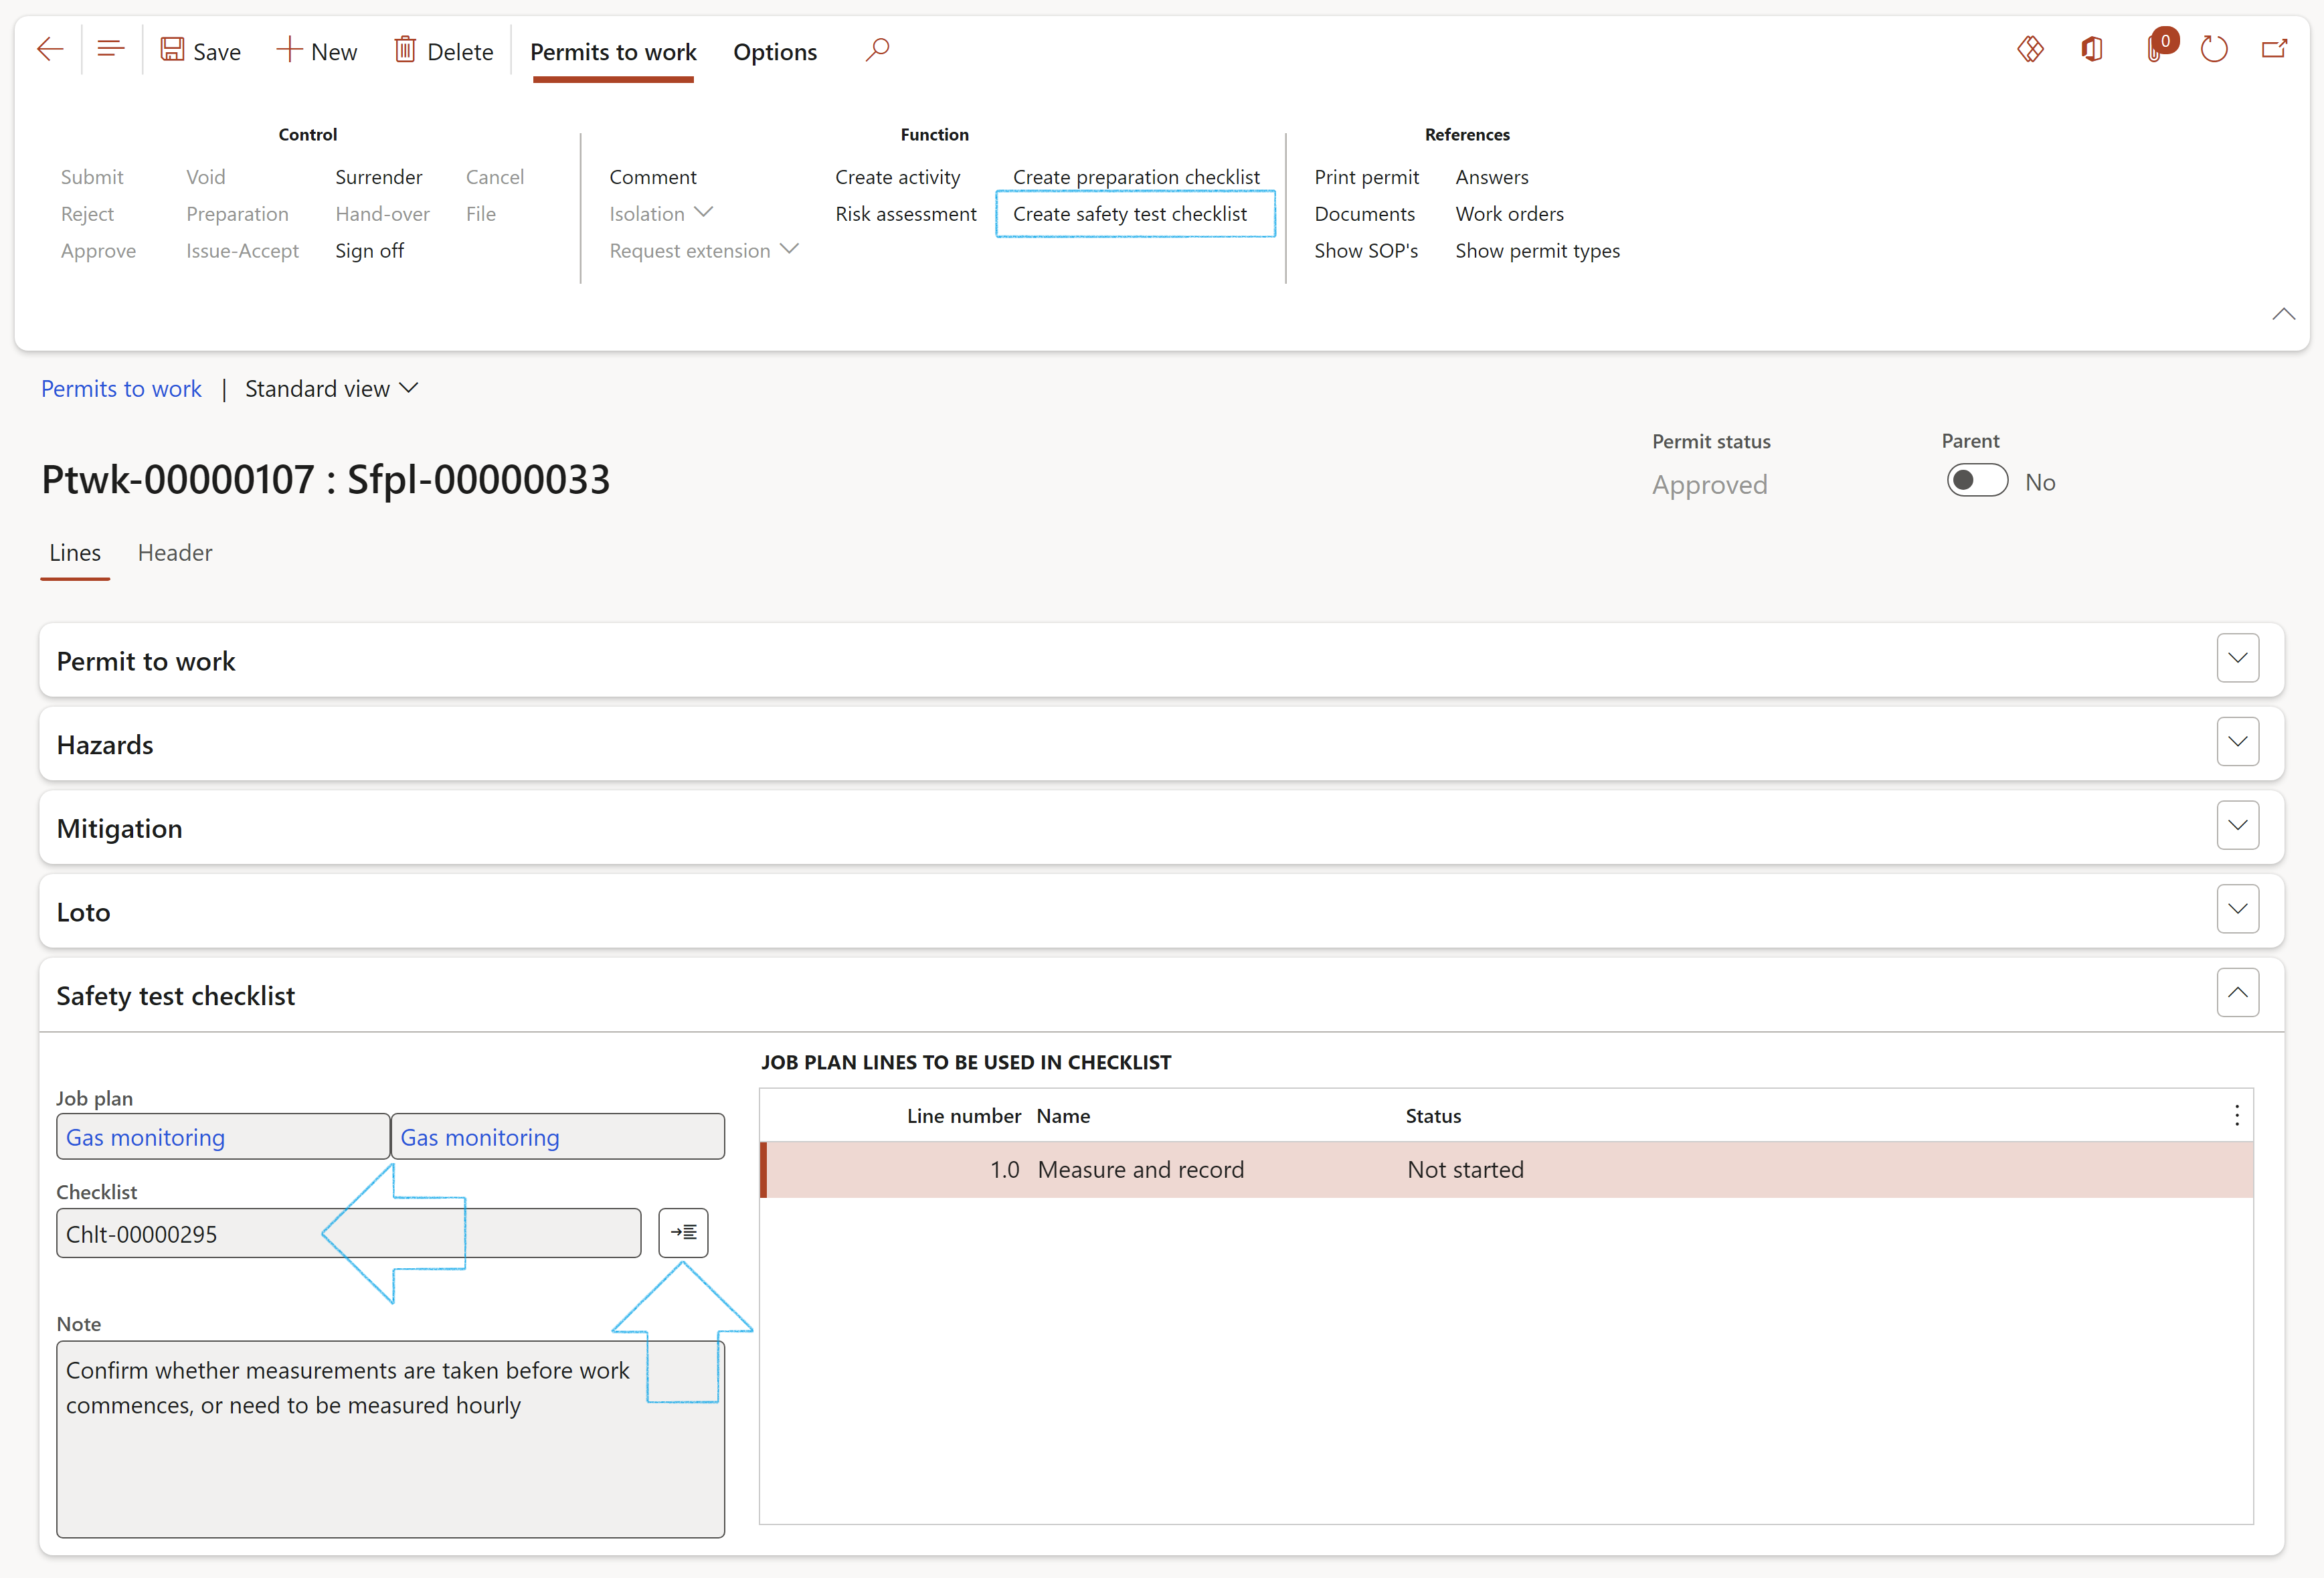
During the course of work execution under a valid permit to work, it may be necessary to record values, for example, hourly gas test measurements, etc. The safety checklist is a very valuable tool that is configurable for this purpose, and can be printed out with a permit when it is issued, for recording such values.
Expand the Safety test checklist Fast tab
If no Safety test job plan was selected on the Safety plan, select the relevant Job plan from the dropdown list
Click Save
On the Action pane, in the Function group, click on the Create safety test checklist button
Expand the Safety test checklist Fast tab
Click on the Feedback button to do feedback on the checklist lines
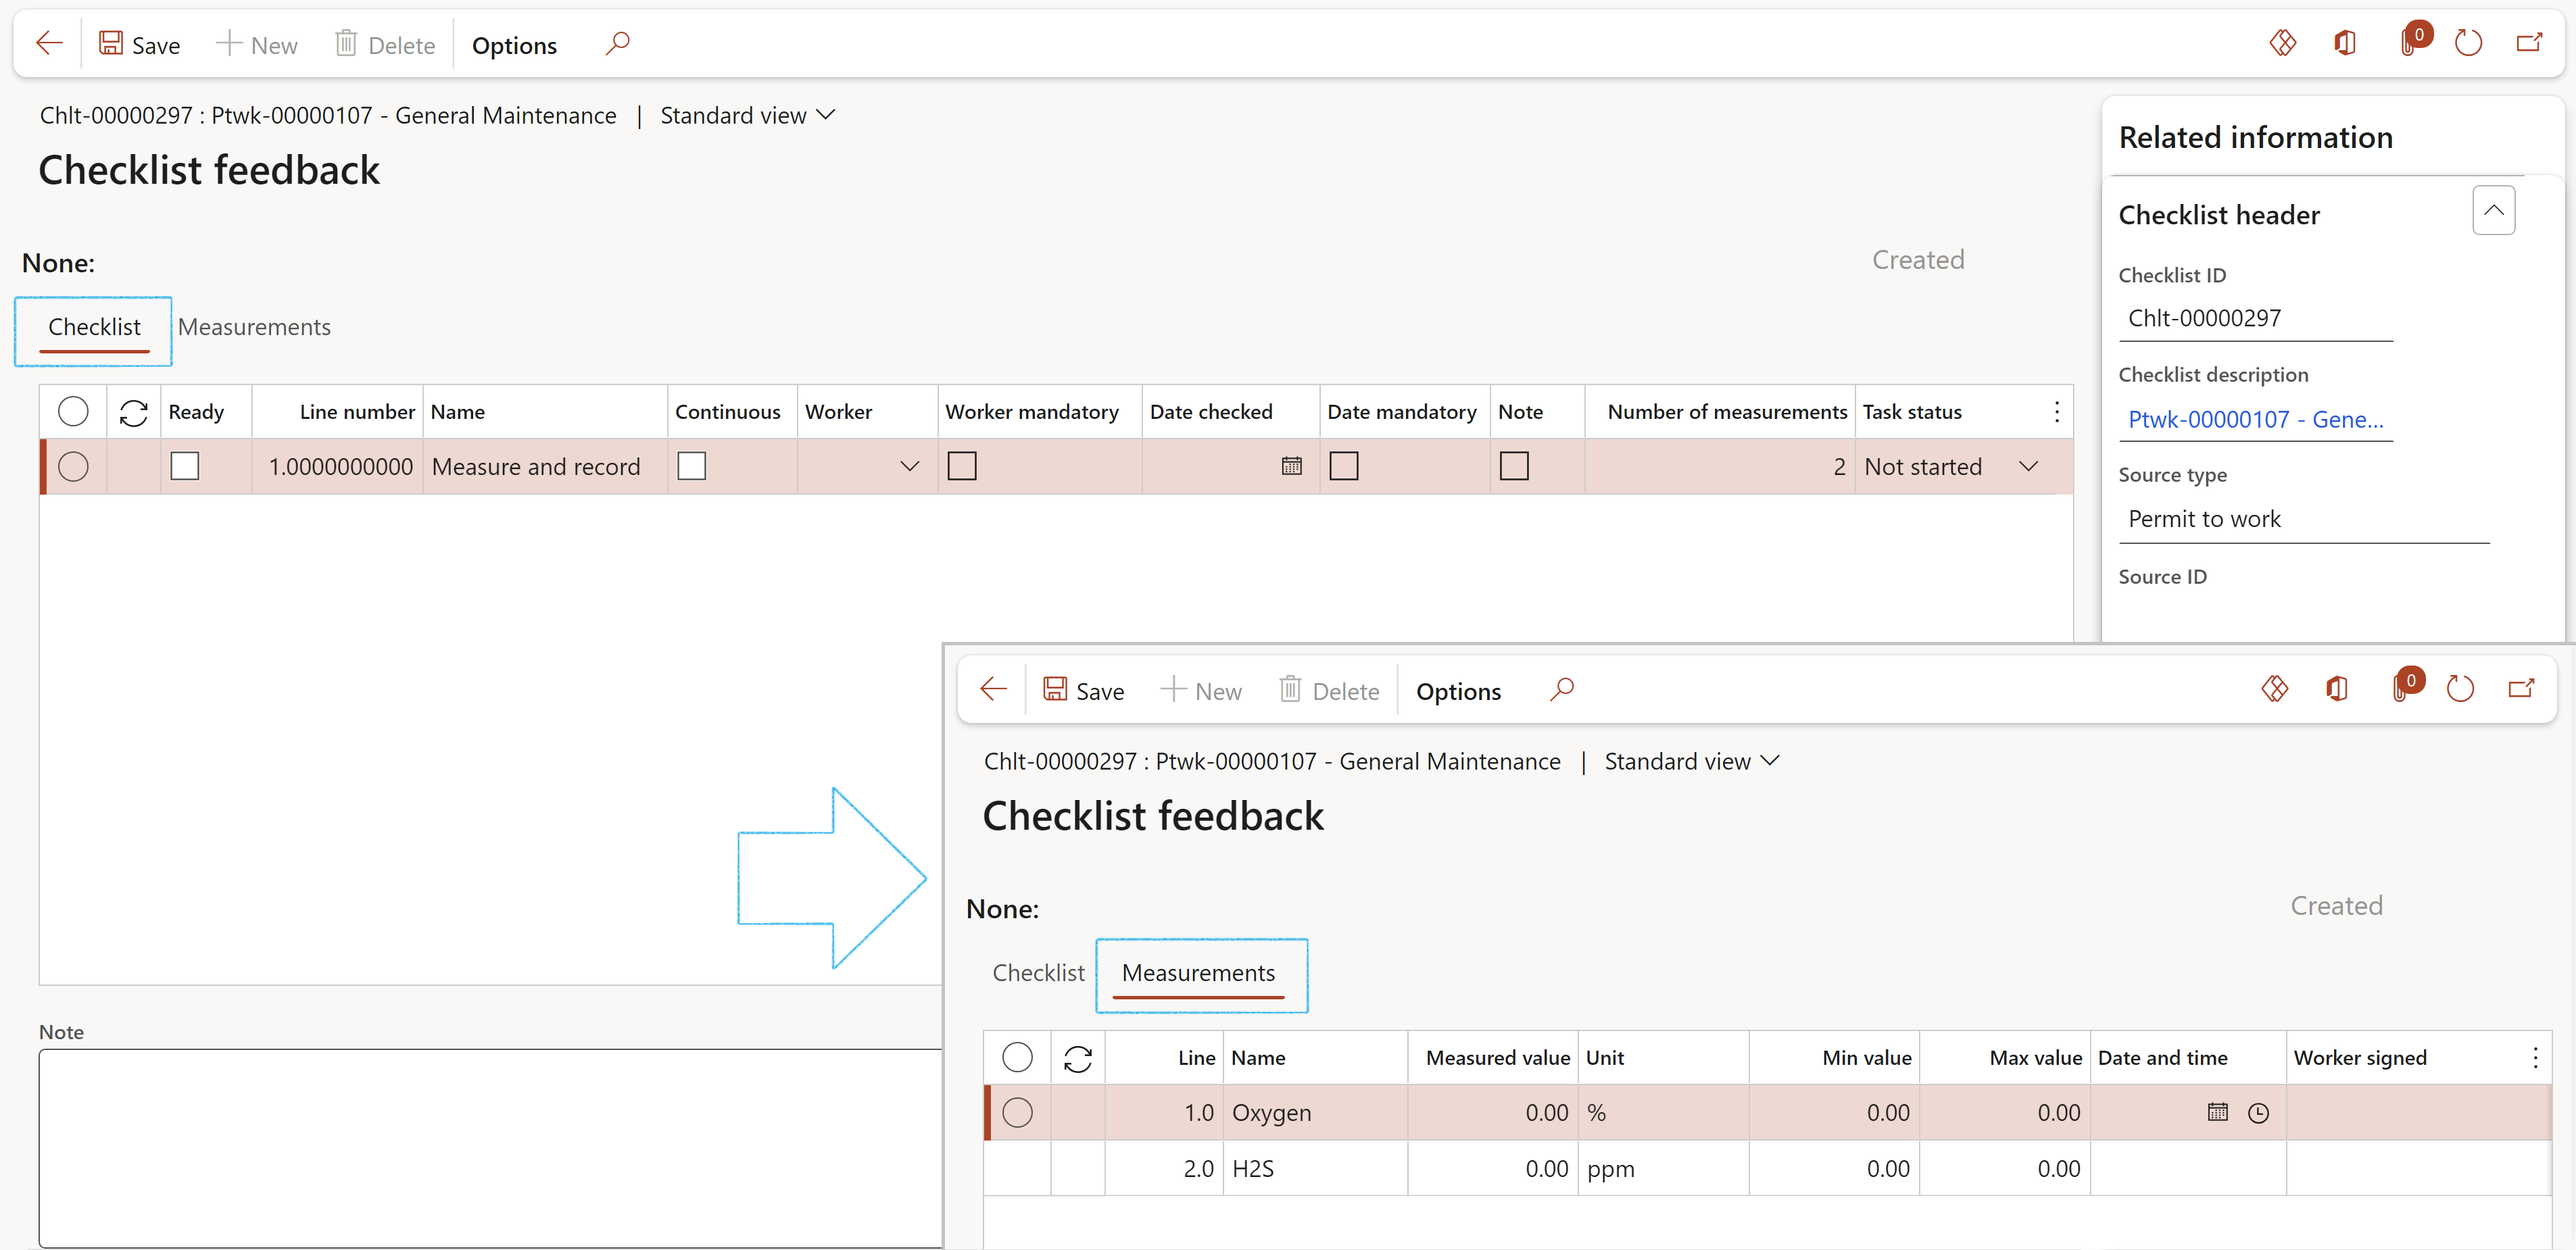
On the Checklist feedback form, do feedback on the checklist lines
Open the Measurements Index tab if the checklist lines require measurements to be entered
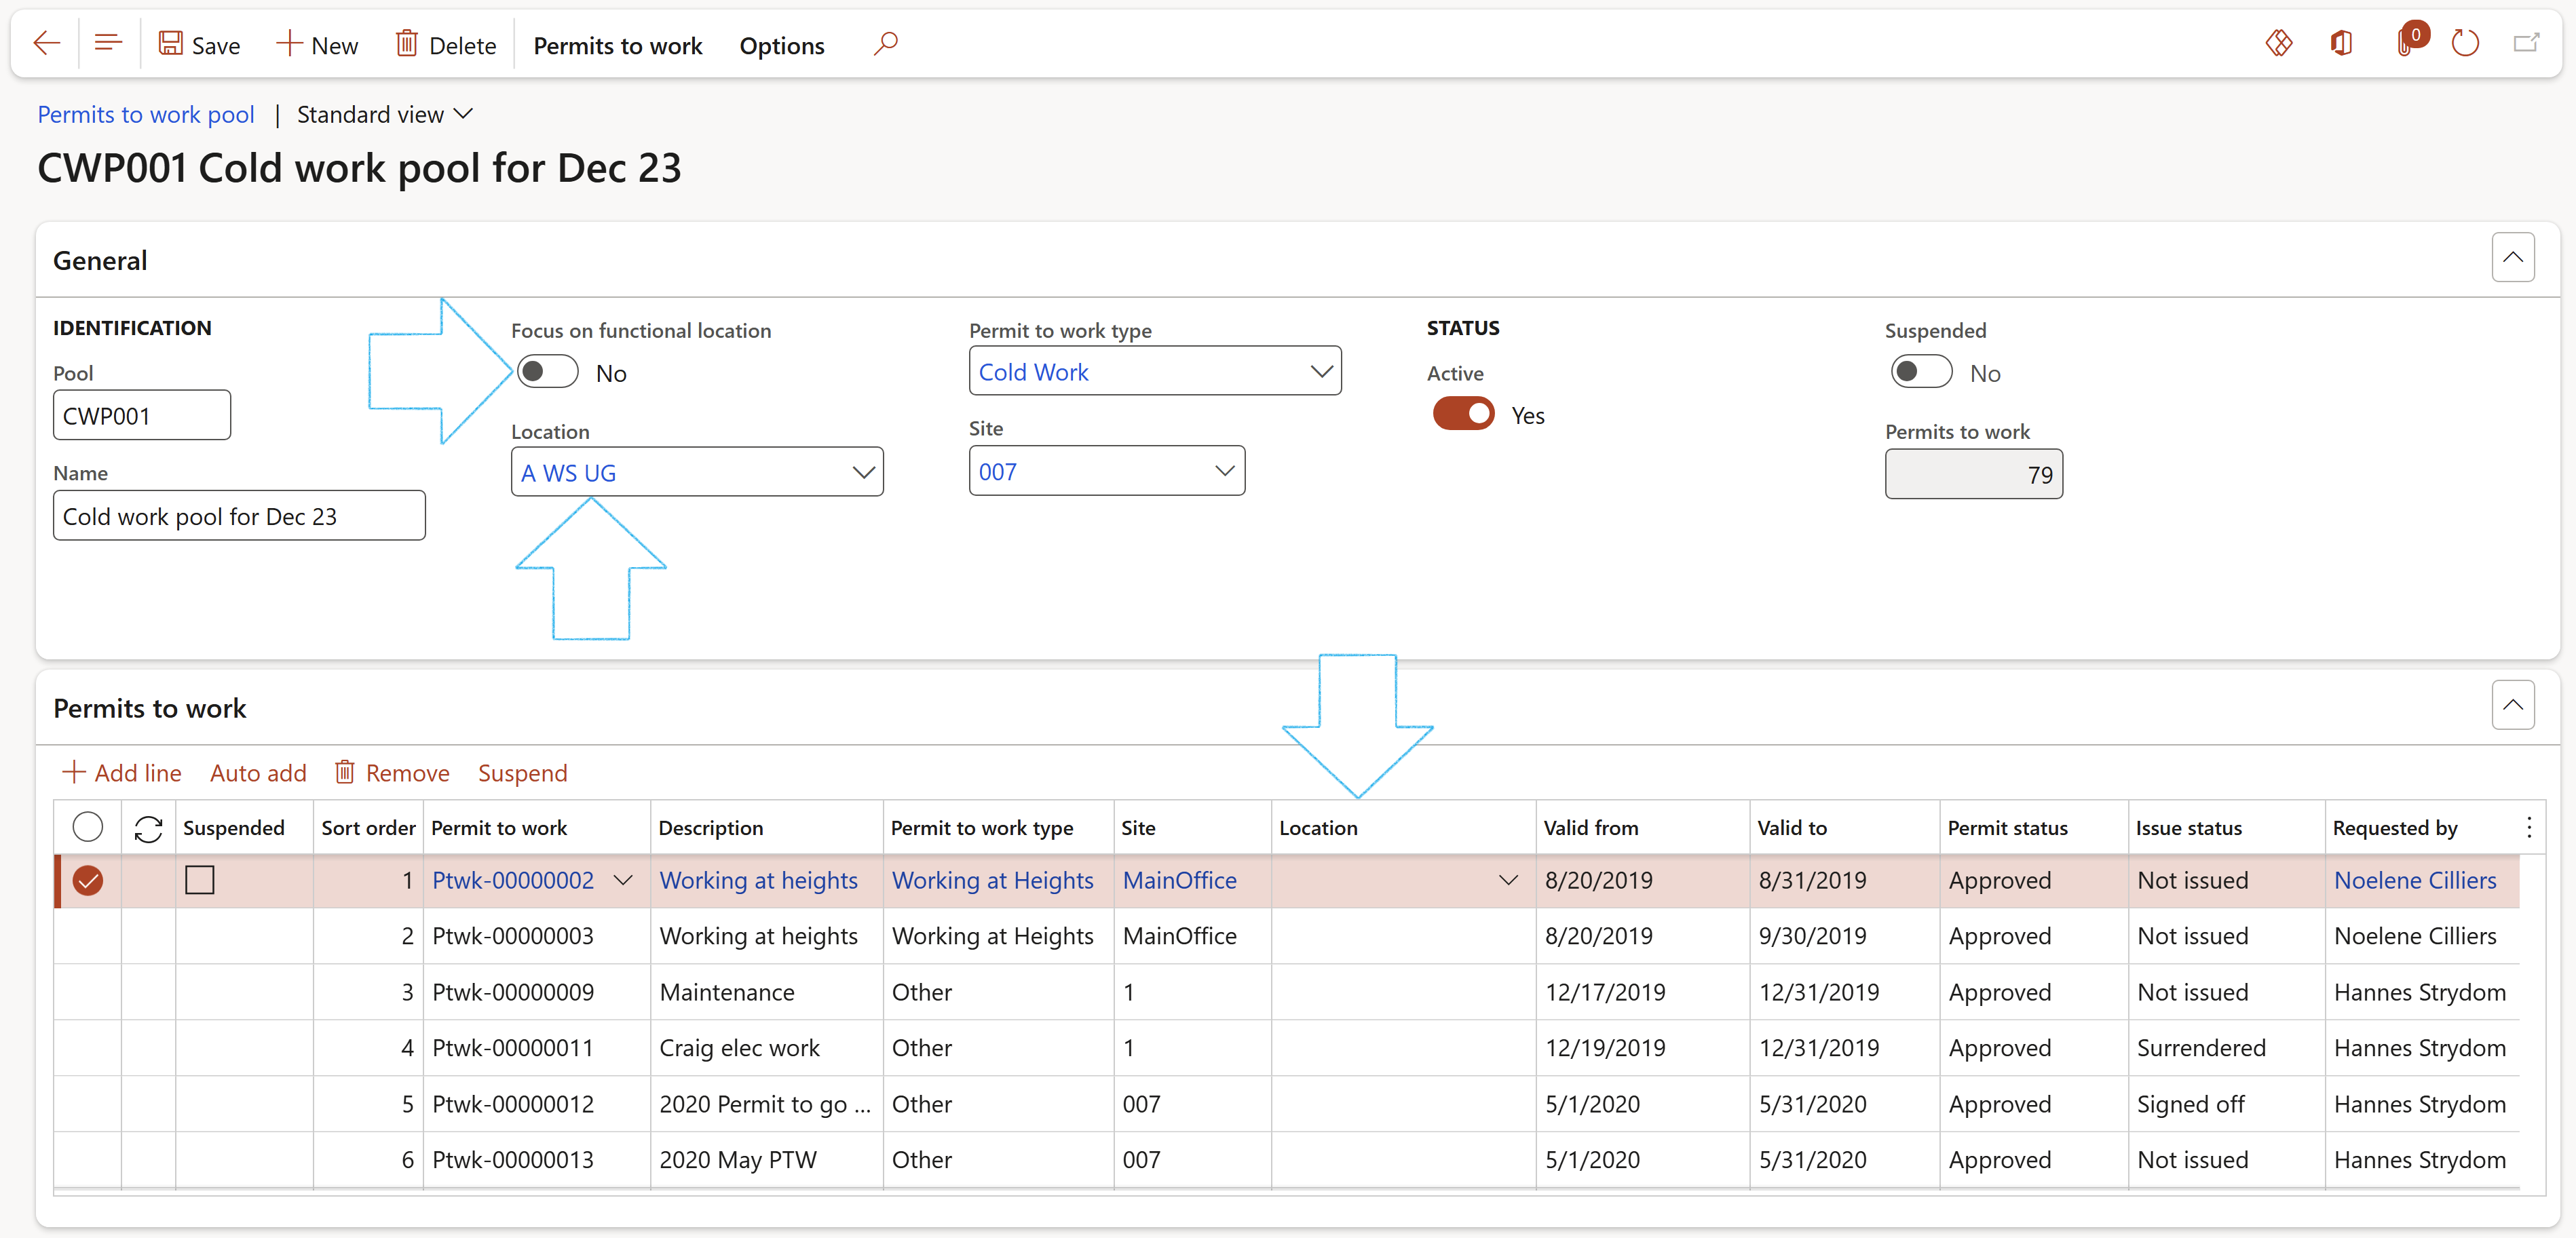
Permit to work pools are used to group permits together. This allows users to do bulk actions like Suspend. It allows users to have many permits linked/created to/from one Asset management work order line, or even many permits to one Project WBS (Future release).
Go to: HSE > Permits to work > Permits to work pool
In the Action pane, click on the New button
Under the General Fast tab:
In the Pool field, enter a Permit to work pool identifier
Enter a Name for the Permit to work pool
If the Focus on functional location slider is moved to Yes, the Location field will change to Functional location. Also note that the Location column under the Permits to work Fast tab will also change to Functional location.
Select the relevant Permit to work type from the dropdown list
Select the relevant Site from the dropdown list
Move the Active slider to No to disable the line functions and to exclude this pool for selection on work order line etc.
The Permits to work field displays the number of permits that are in the pool
Under the Permits to work Fast tab, click on the Add line button
Select the relevant Permit to work from the dropdown list
OR
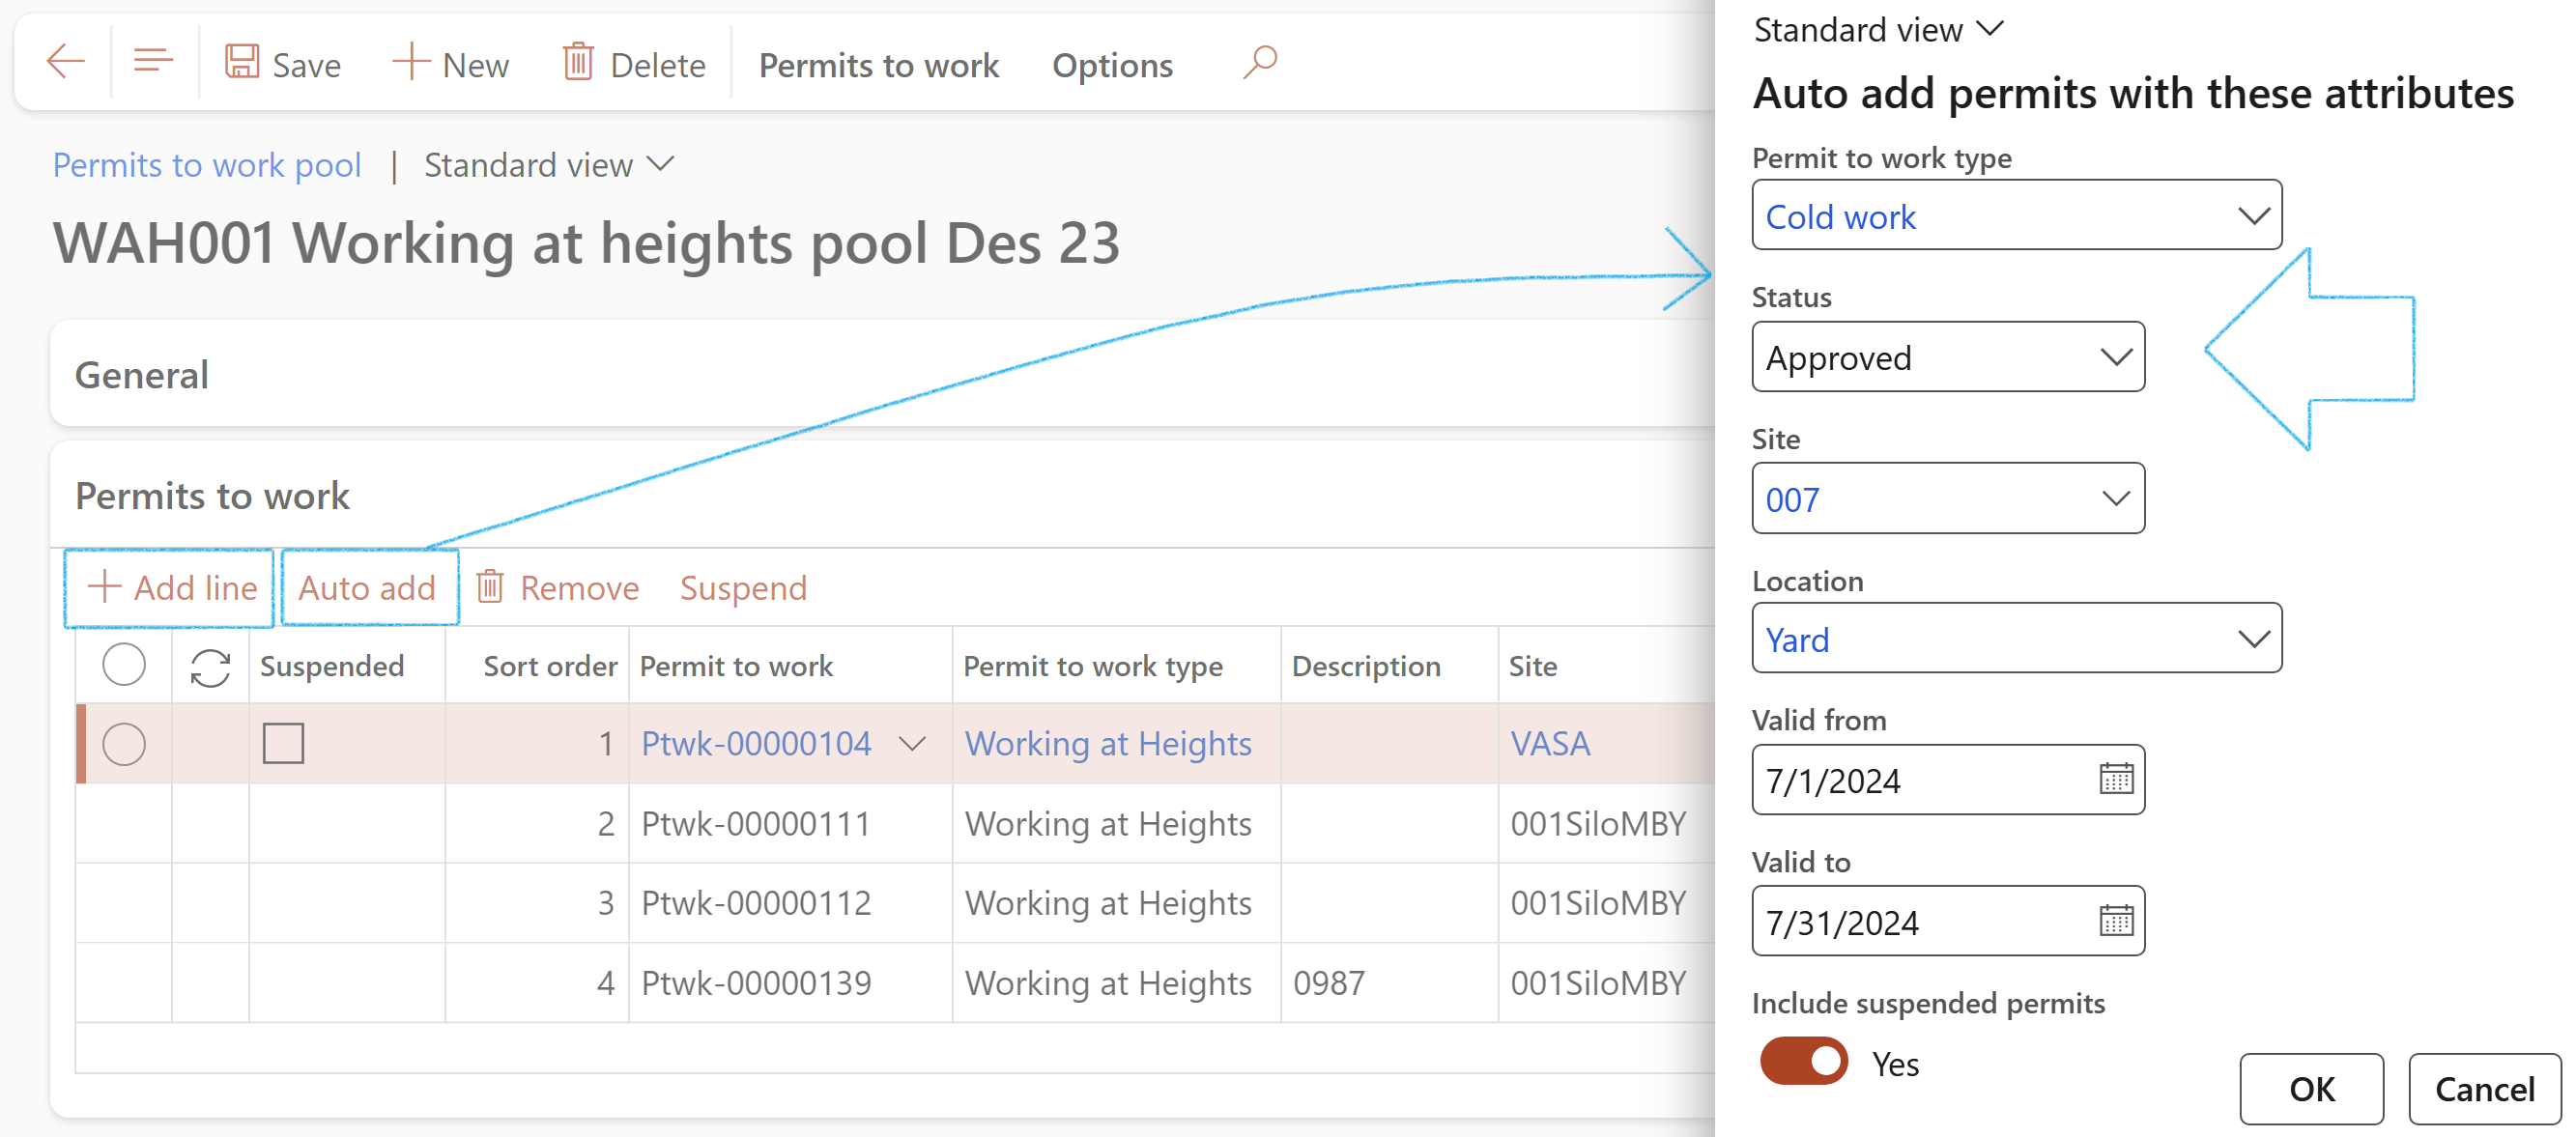
Under the Permits to work Fast tab, click on the Auto add button
On the Add permits with the attributes dialog, the following can be selected:
Permit to work type (The default value is the one selected under the General Fast tab)
Permit to work Status
Site (The default value is the one selcted under the General Fast tab)
Location (The default value is the one selcted under the General Fast tab). Note that if the Focus on functional location slider is on Yes, the functional location has to be selected in this field.
Valid from date
Valid to date
Move the Include suspended permits slider to No to exclude permits that have already been suspended
Click on OK
If you want to add all Permits to work to a pool, regardless of the permit to work type, leave the Permit to work type field on the dialog blank
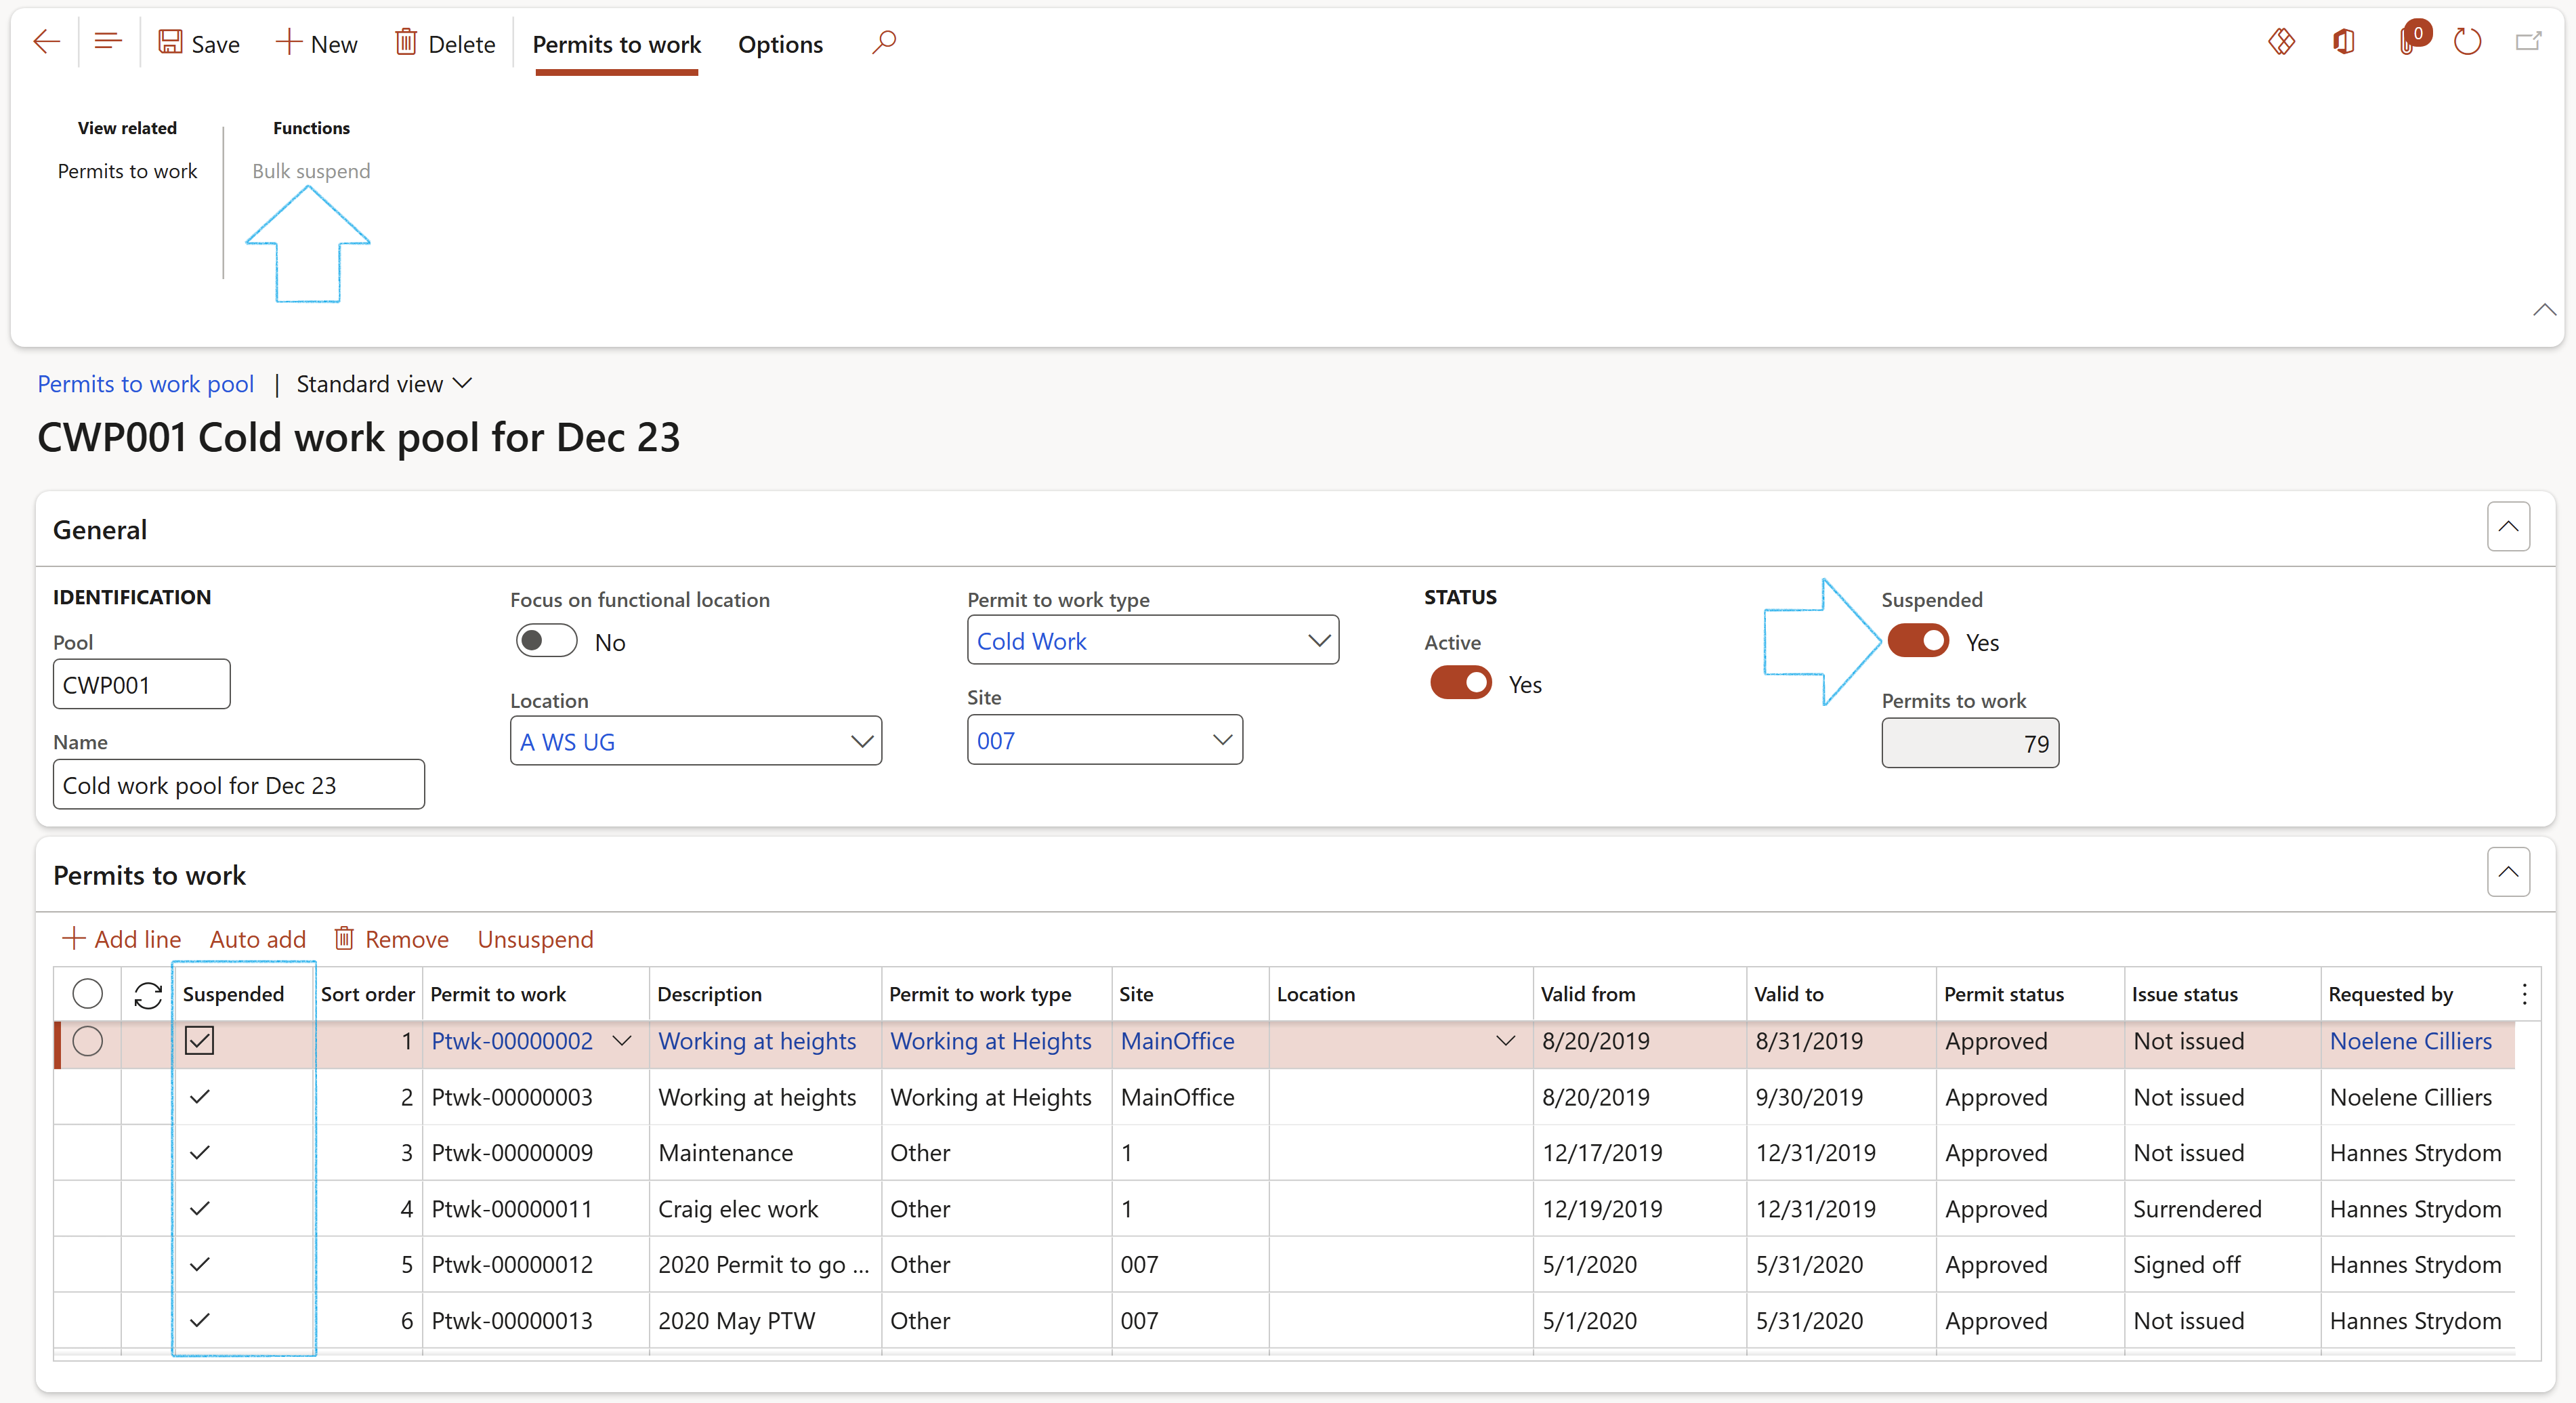
¶ Step 18.3: Suspending a Permit or Permit to work pool
Only permits with status Approved can be suspended.
On the Permits to work pool, on the Action pane, in the Functions button group, click on the Bulk suspend button
The Suspended slider under the General Fast tab will be moved to Yes
The Suspended box for all the lines under the Permits to work Fast tab will be ticked, and the status of these Permits to work will be changed to Suspended
If additional Permits to work were added to the pool after the Bulk suspend button was clicked, and these permits must be suspended too, the user can move the Suspended slider under the General Fast tab to Yes. This will enable the Bulk suspend button in the Action pane.
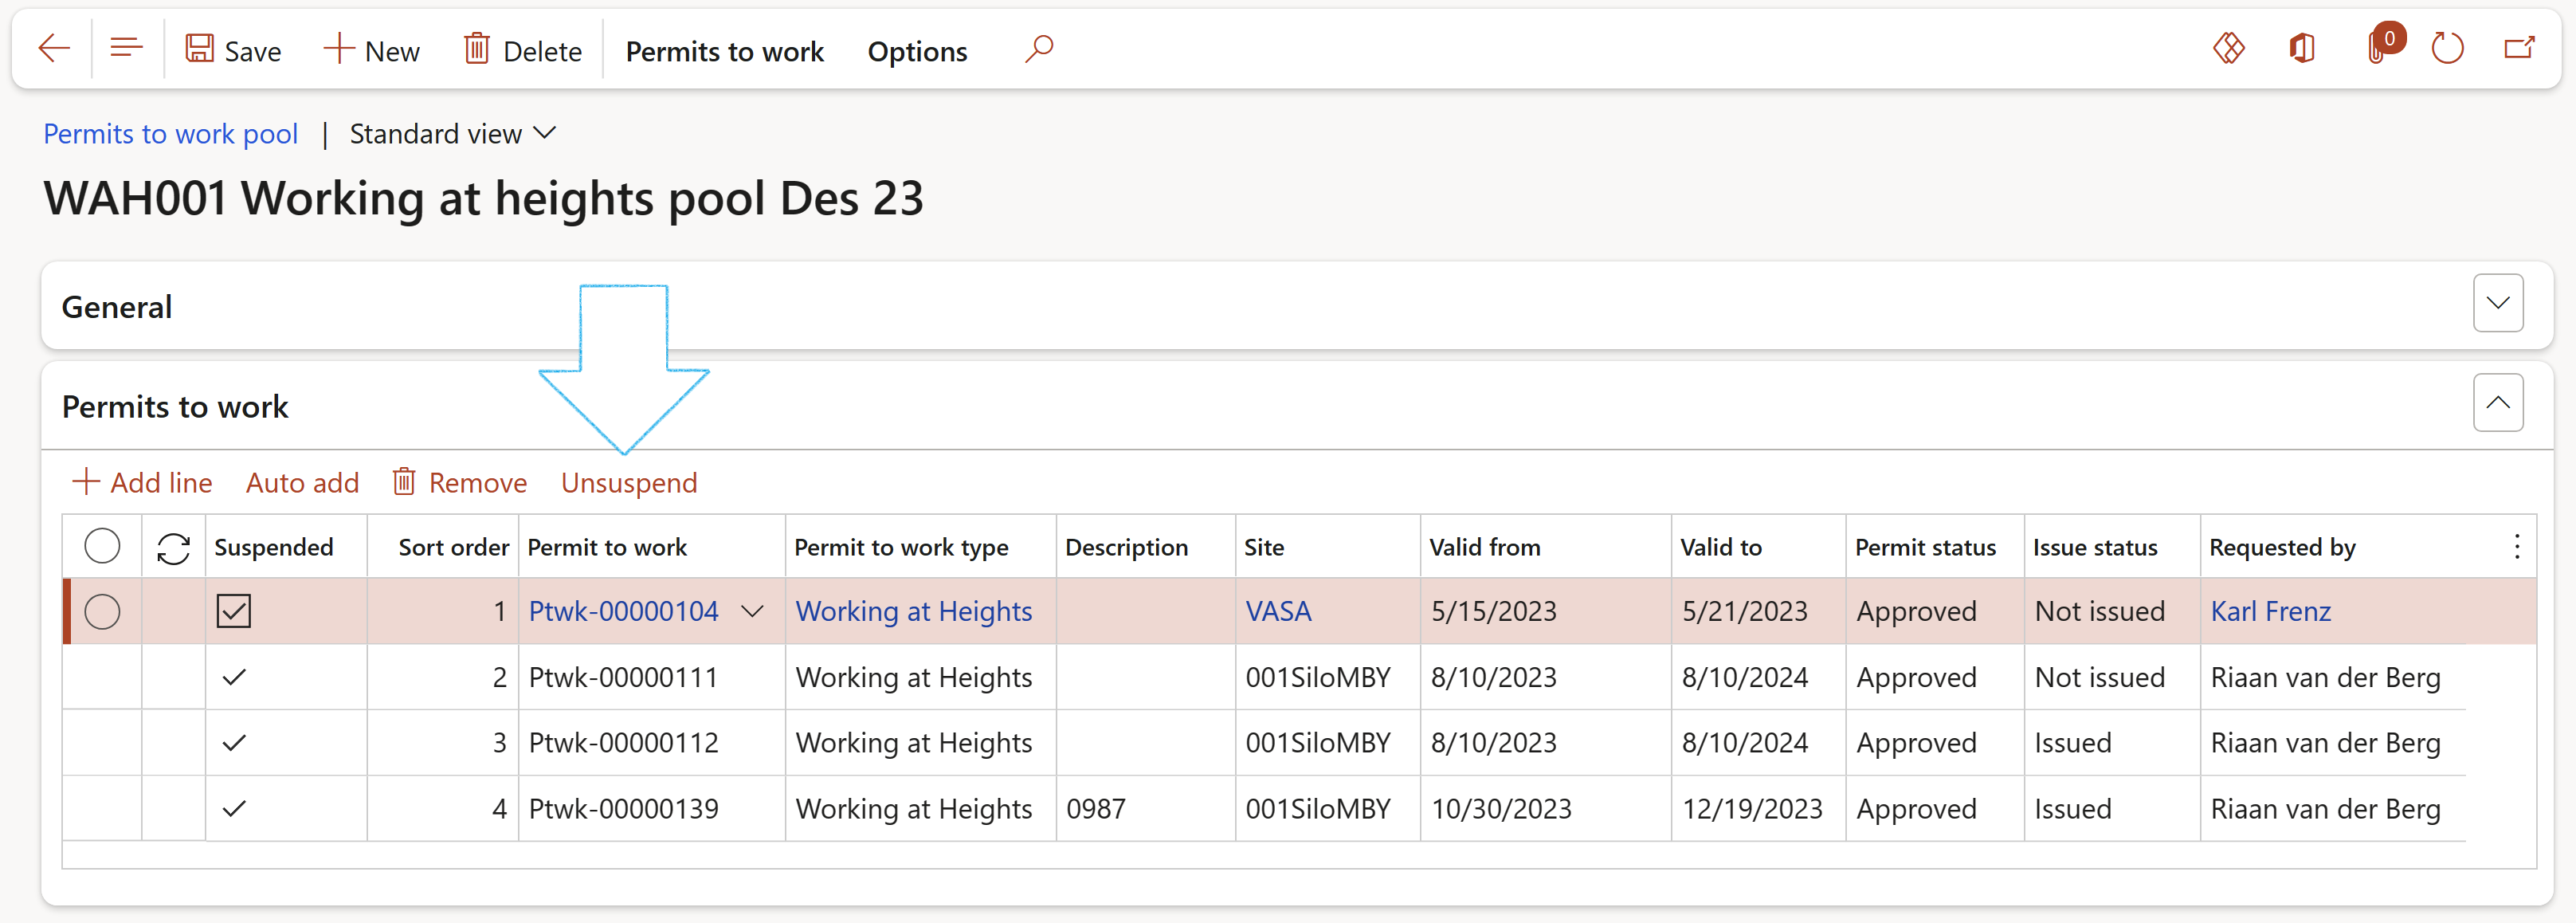
To unsuspend a Permit to work, select the Permit and click on the Unsuspend button under the Permits to work Fast tab.
Users can choose to copy an existing permit. This function is also available on the Asset management work order lines. This is usefull when a permit was created for example for a Monday and operations requires to copy this permit 4 times for the additional days of the week. Options exist to specify how many permits to be created as copies as well as how to cascade the valid from and valid to dates.
Go to: HSE > Permits to work > Permit to work list pages > All Permits to work
Select the Permit to work that you want to make a copy of
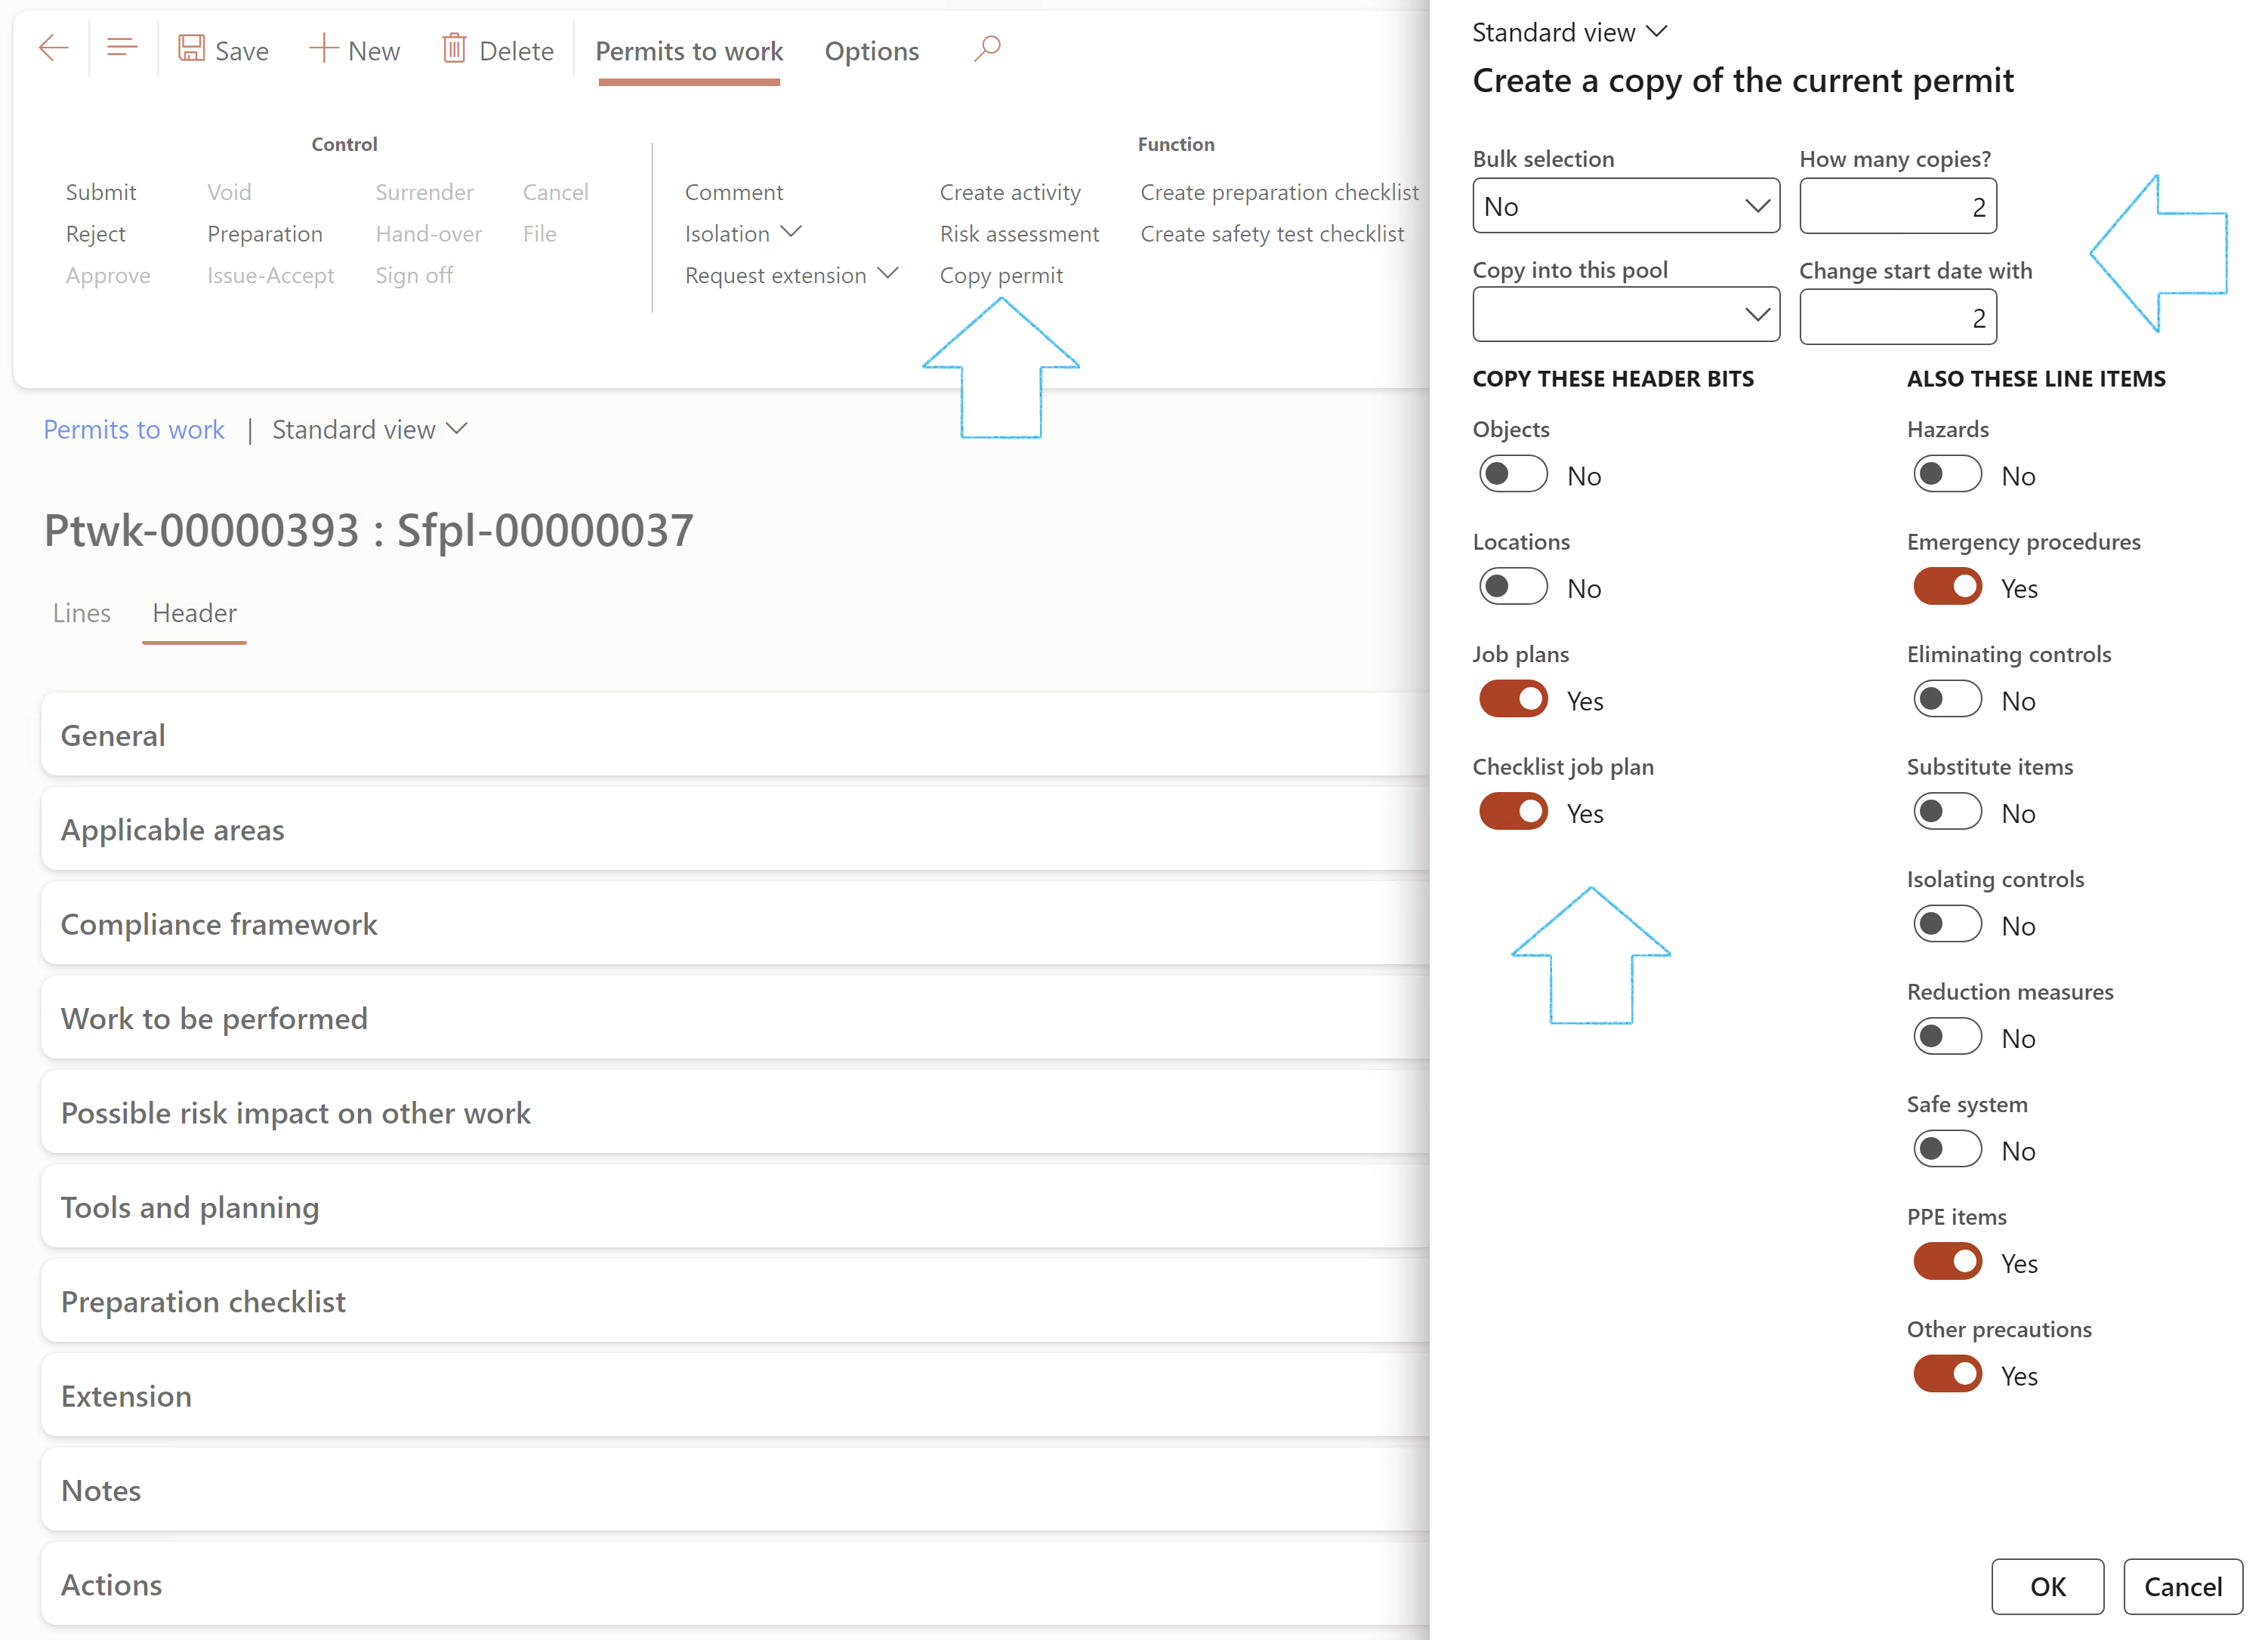
On the Action pane, in the Function group, click on the Copy permit button
On the Create a copy of the current permit dialog:
In the Bulk selection field the user can choose to copy all header and line details, only header details, only line details, or no details, to the new PTW
Choose a pool to copy the permits into (optional)
Specify how many permits copies to be made
And how the dates should be cascaded
Move the the sliders of the items that you want to copy from the current permit, to Yes
Click on OK
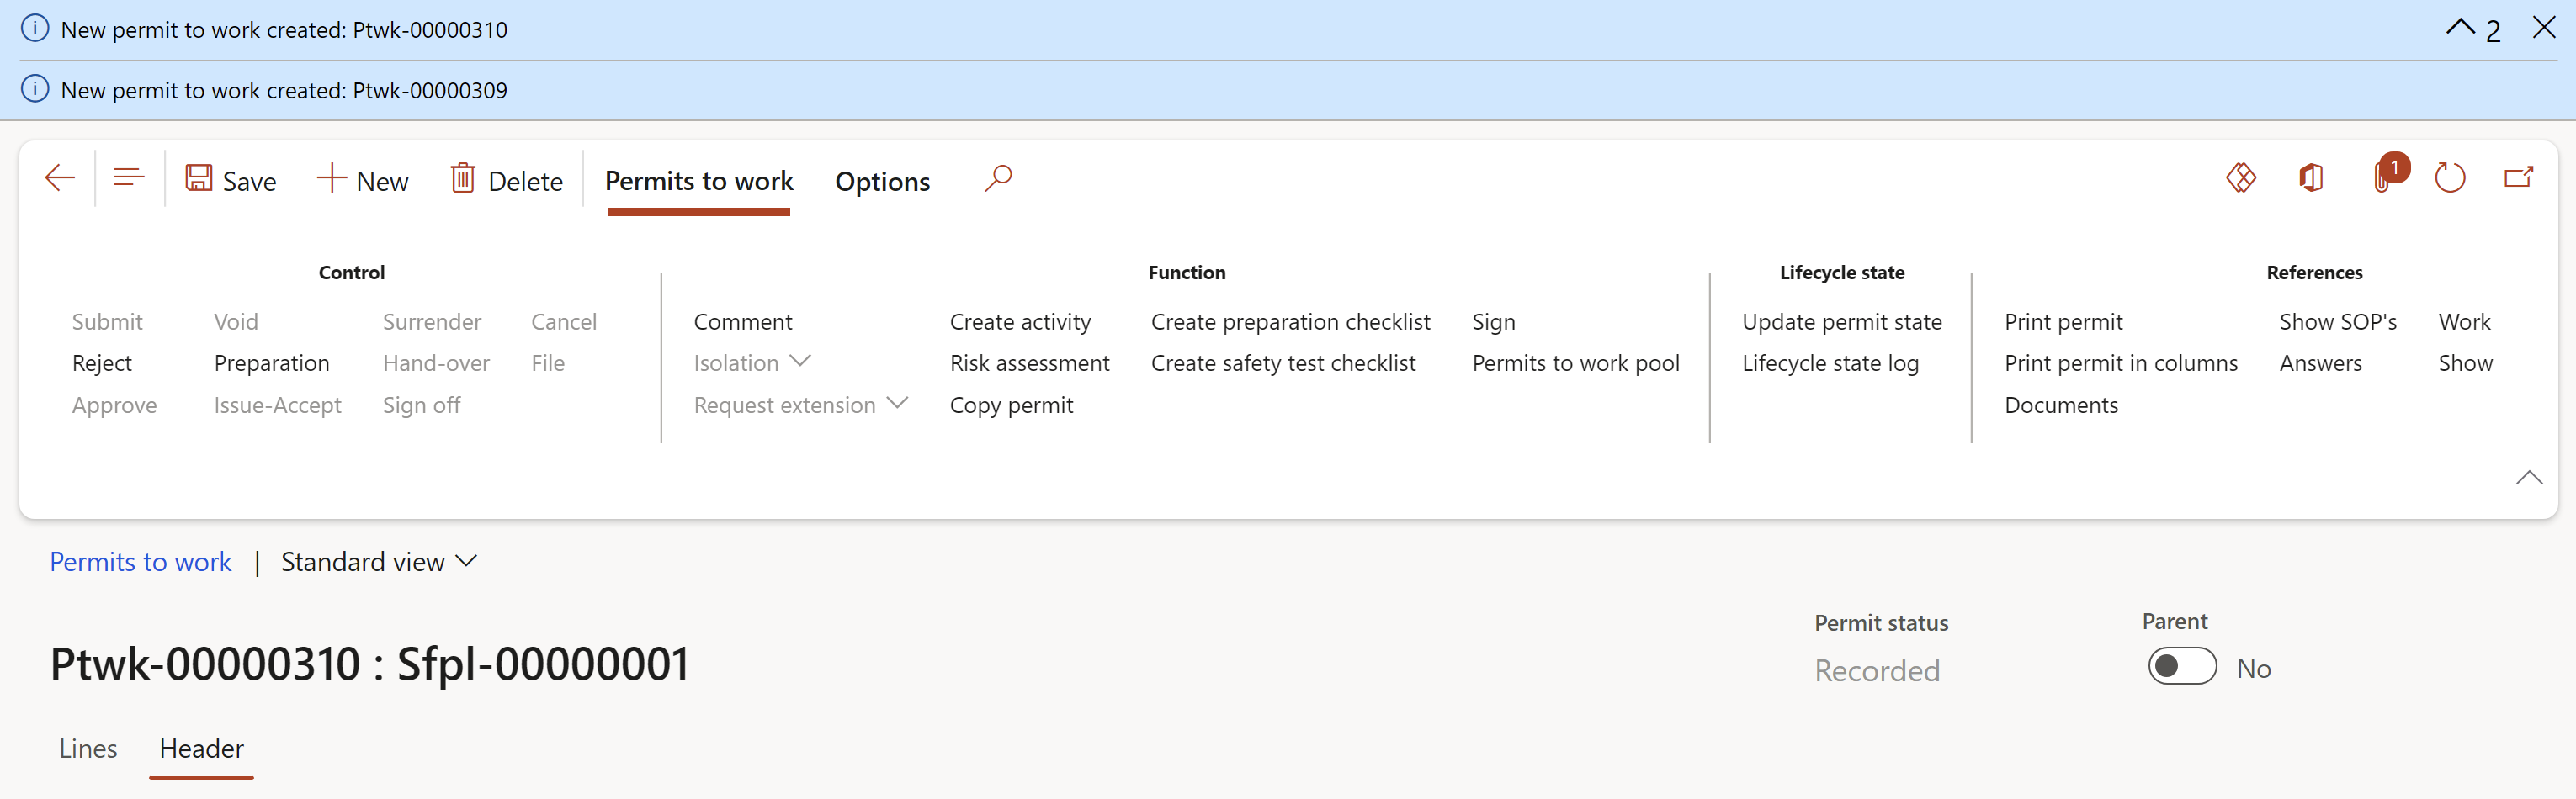
The copied permit will open with a new permit number
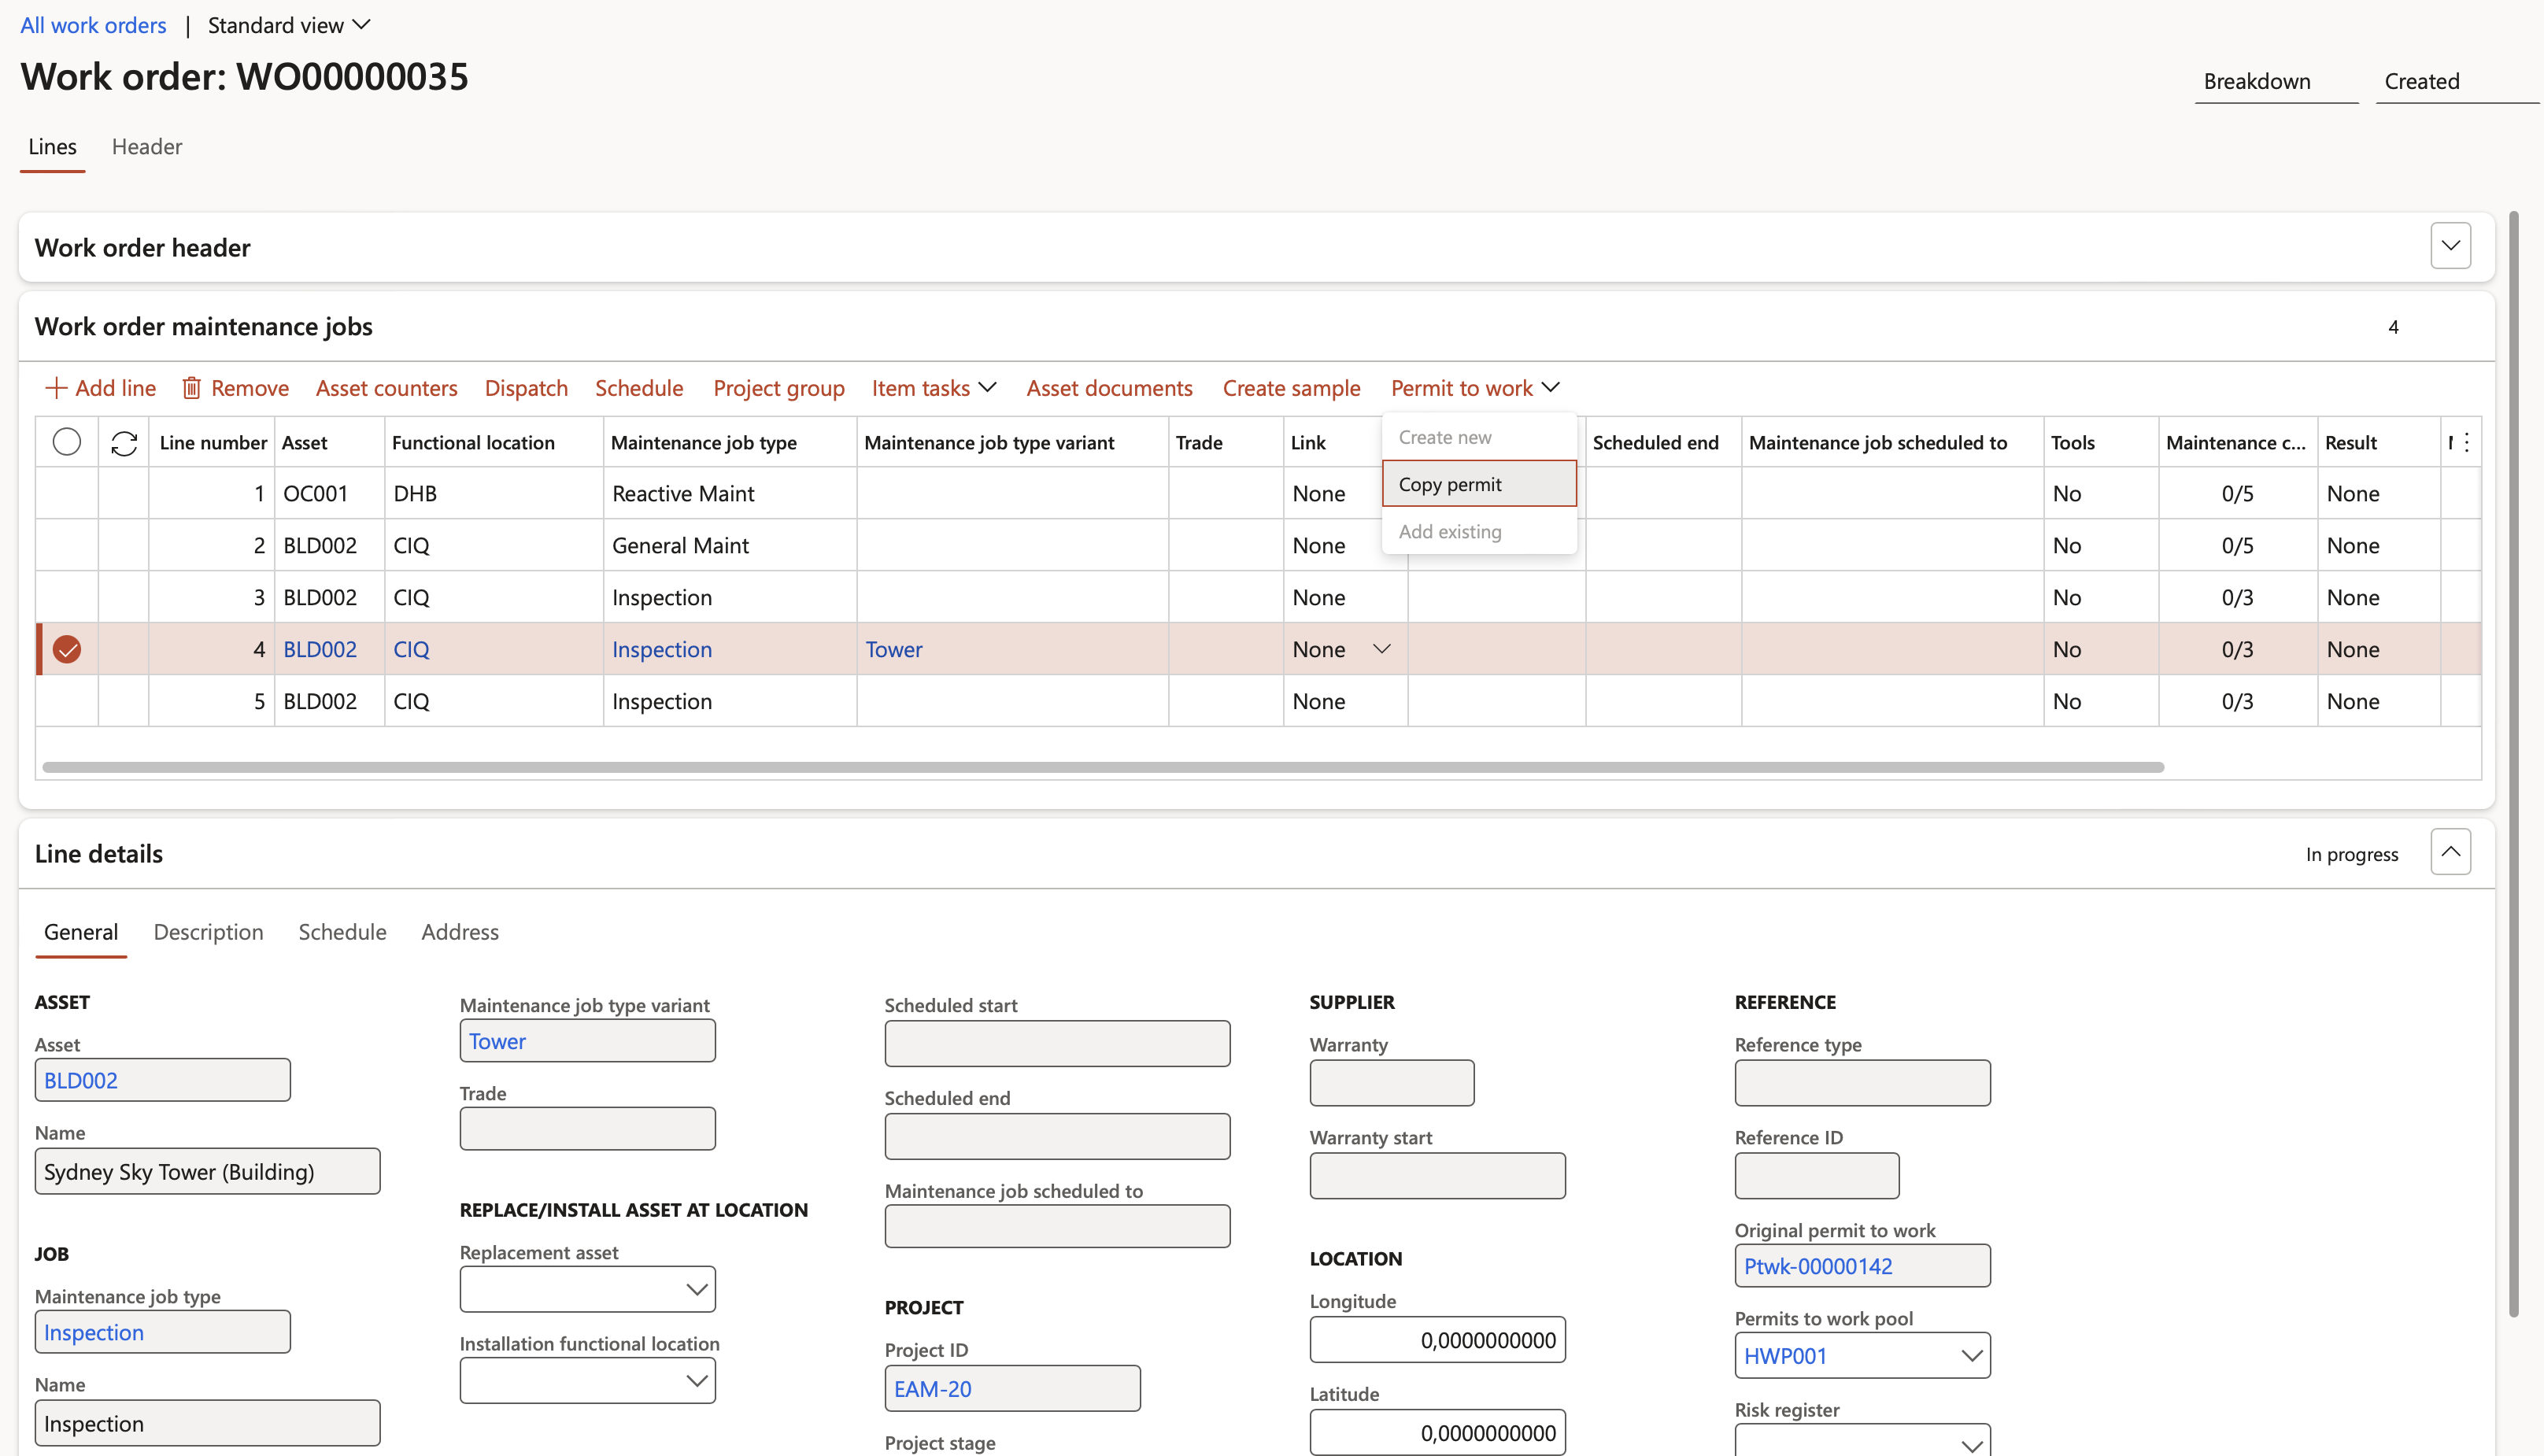
Go to: Asset management > Work orders > All work orders
Select the Work order that you want to have permits for
In the Work order maintenance jobs grid, on the Lines view, for the Line number
Ensure that a Permits to work pool is filled in on the Line details fast tab
Click on the Permit to work button group and choose Copy permit.
Use Bulk selection to "mass" select the header and line item options
Specify how many permits copies to be made
Choose another pool to copy the permits into (optional). A default will will be given to the user based on the Work order line details selection.
And how the dates should be cascaded
On the Create a copy of the current permit dialog, move the the sliders of the items that you want to copy from the current permit, to Yes
Click OK
All the copies as well as the Original Permit that was created initially against the Work order line, will be copied into the Permit to work pool.
Assuming the Asset management to Permit to work integration setup was done. In specific the rules on the Maintenance job types and the Work order lifecycle state. Refer to step 21 below.
Assets
It is possible to link Safety objects one-to-one with the Microsoft maintenance asset as well as Safety location with Microsoft maintenance functional location.
For completeness the Microsoft master (static) data elements will display the above reference.
Maintenance and safety users can choose to create rules on when and how to allow the creation and adding of existing permits to maintenance work orders (job cards). These include specifying which type of maintenance work (job type) must have a Permit to work and a risk assessment.
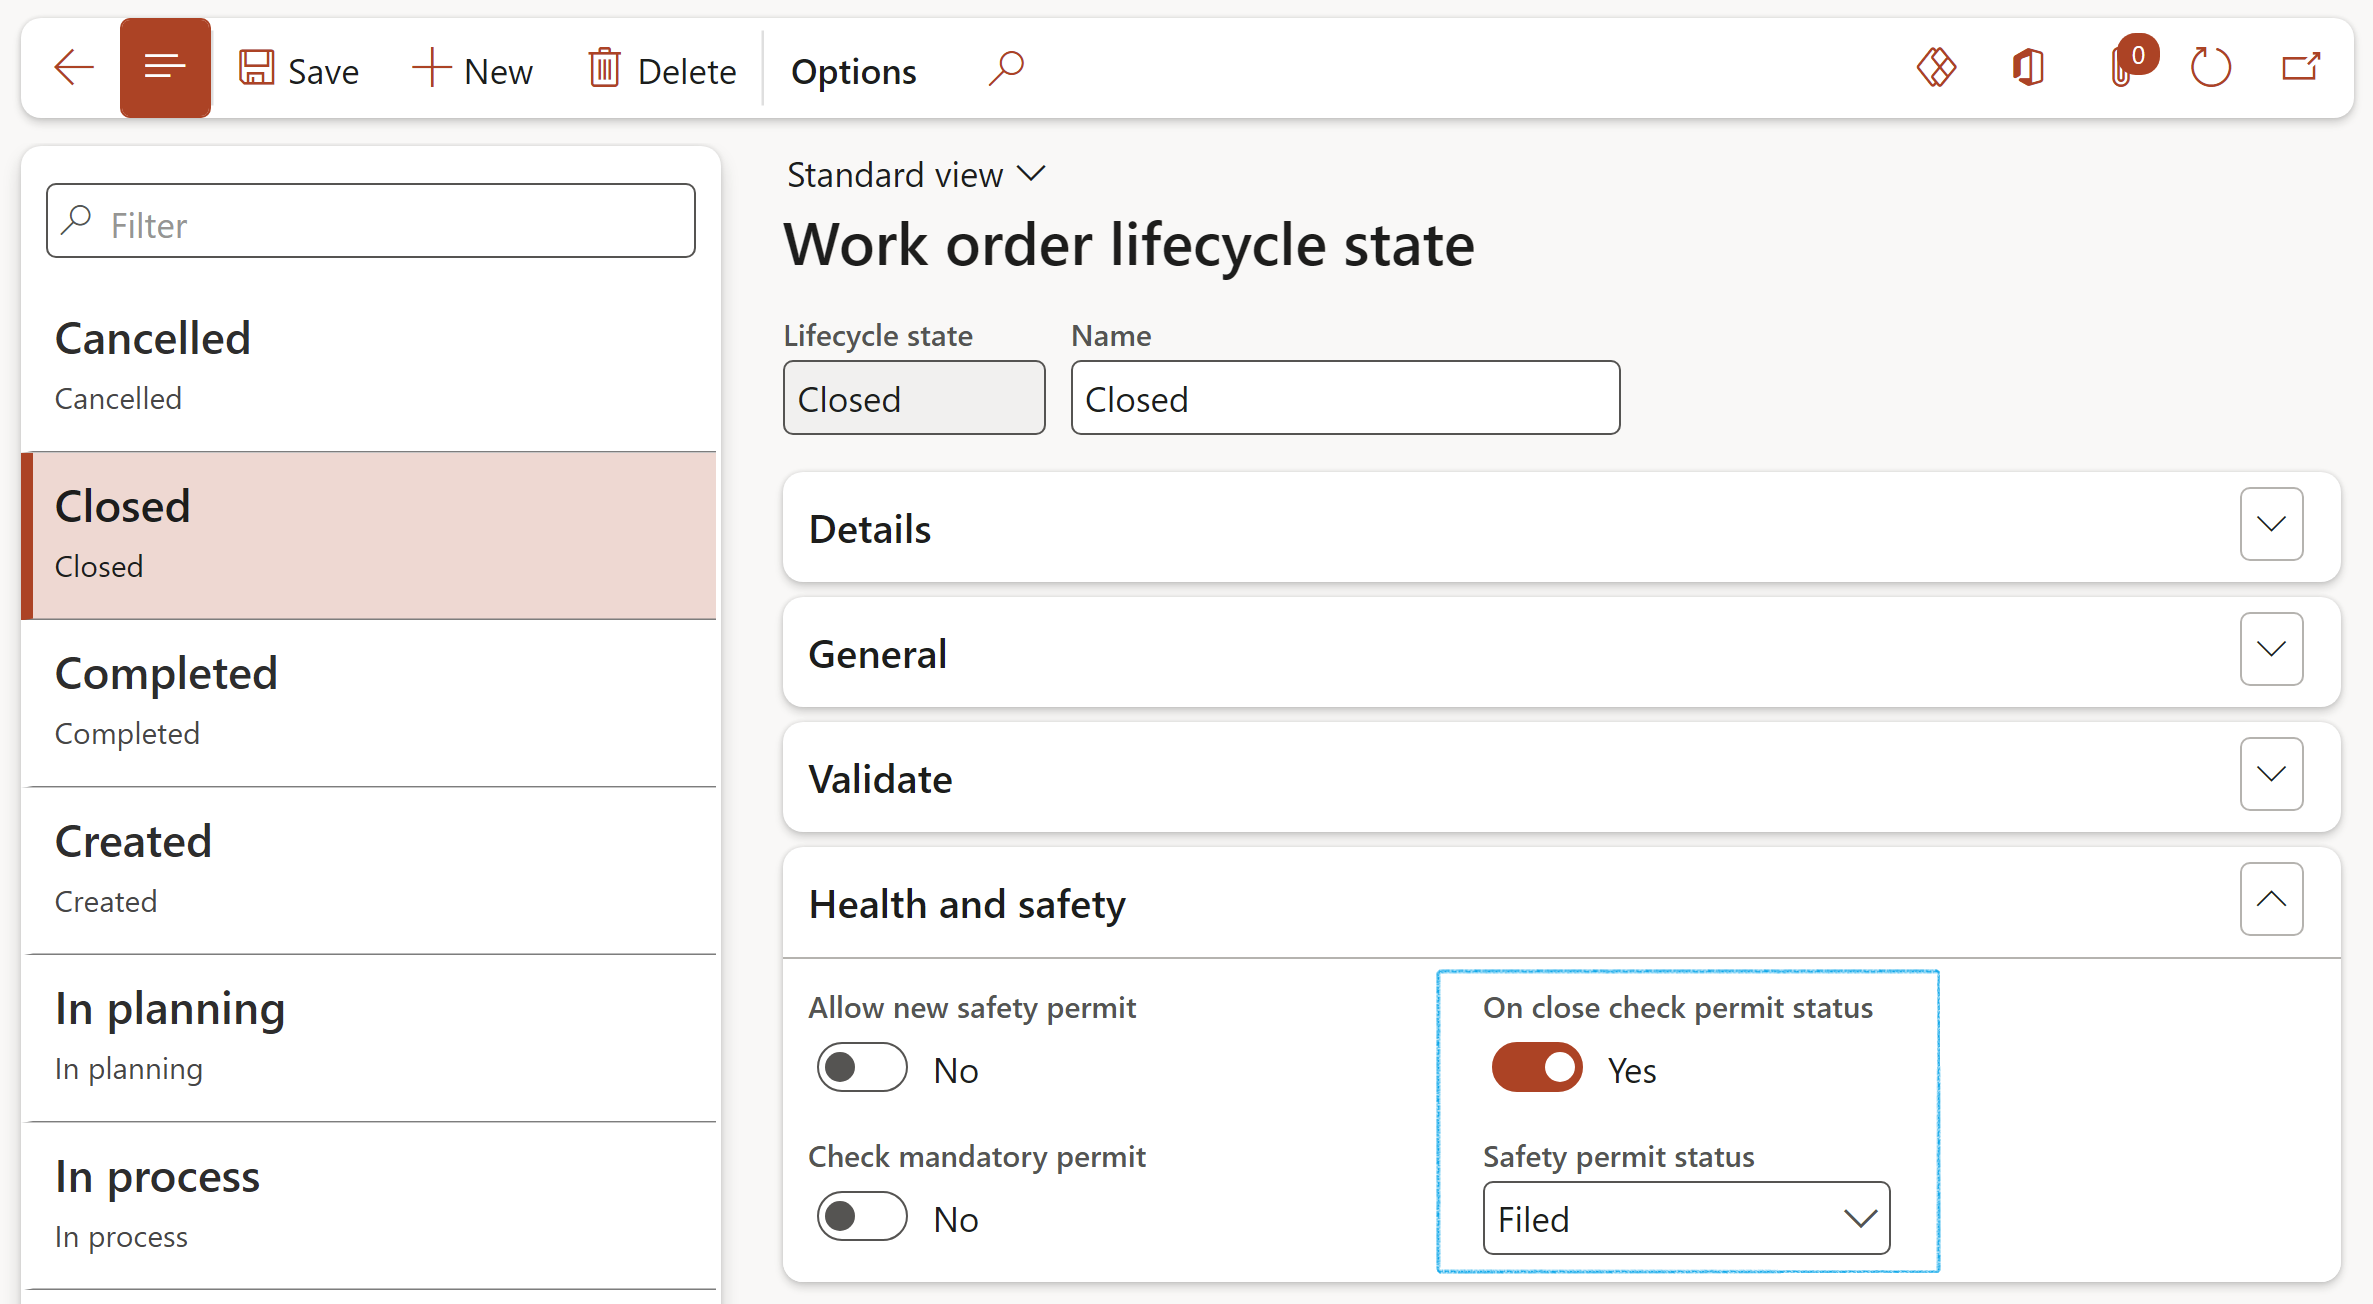
Work order life cycle state
In addition, users can control when (at which status) to:
Create or link an existing permit.
Check if one exists before moving to a new status.
Close a Work order by validating the underlying Permit to work status.
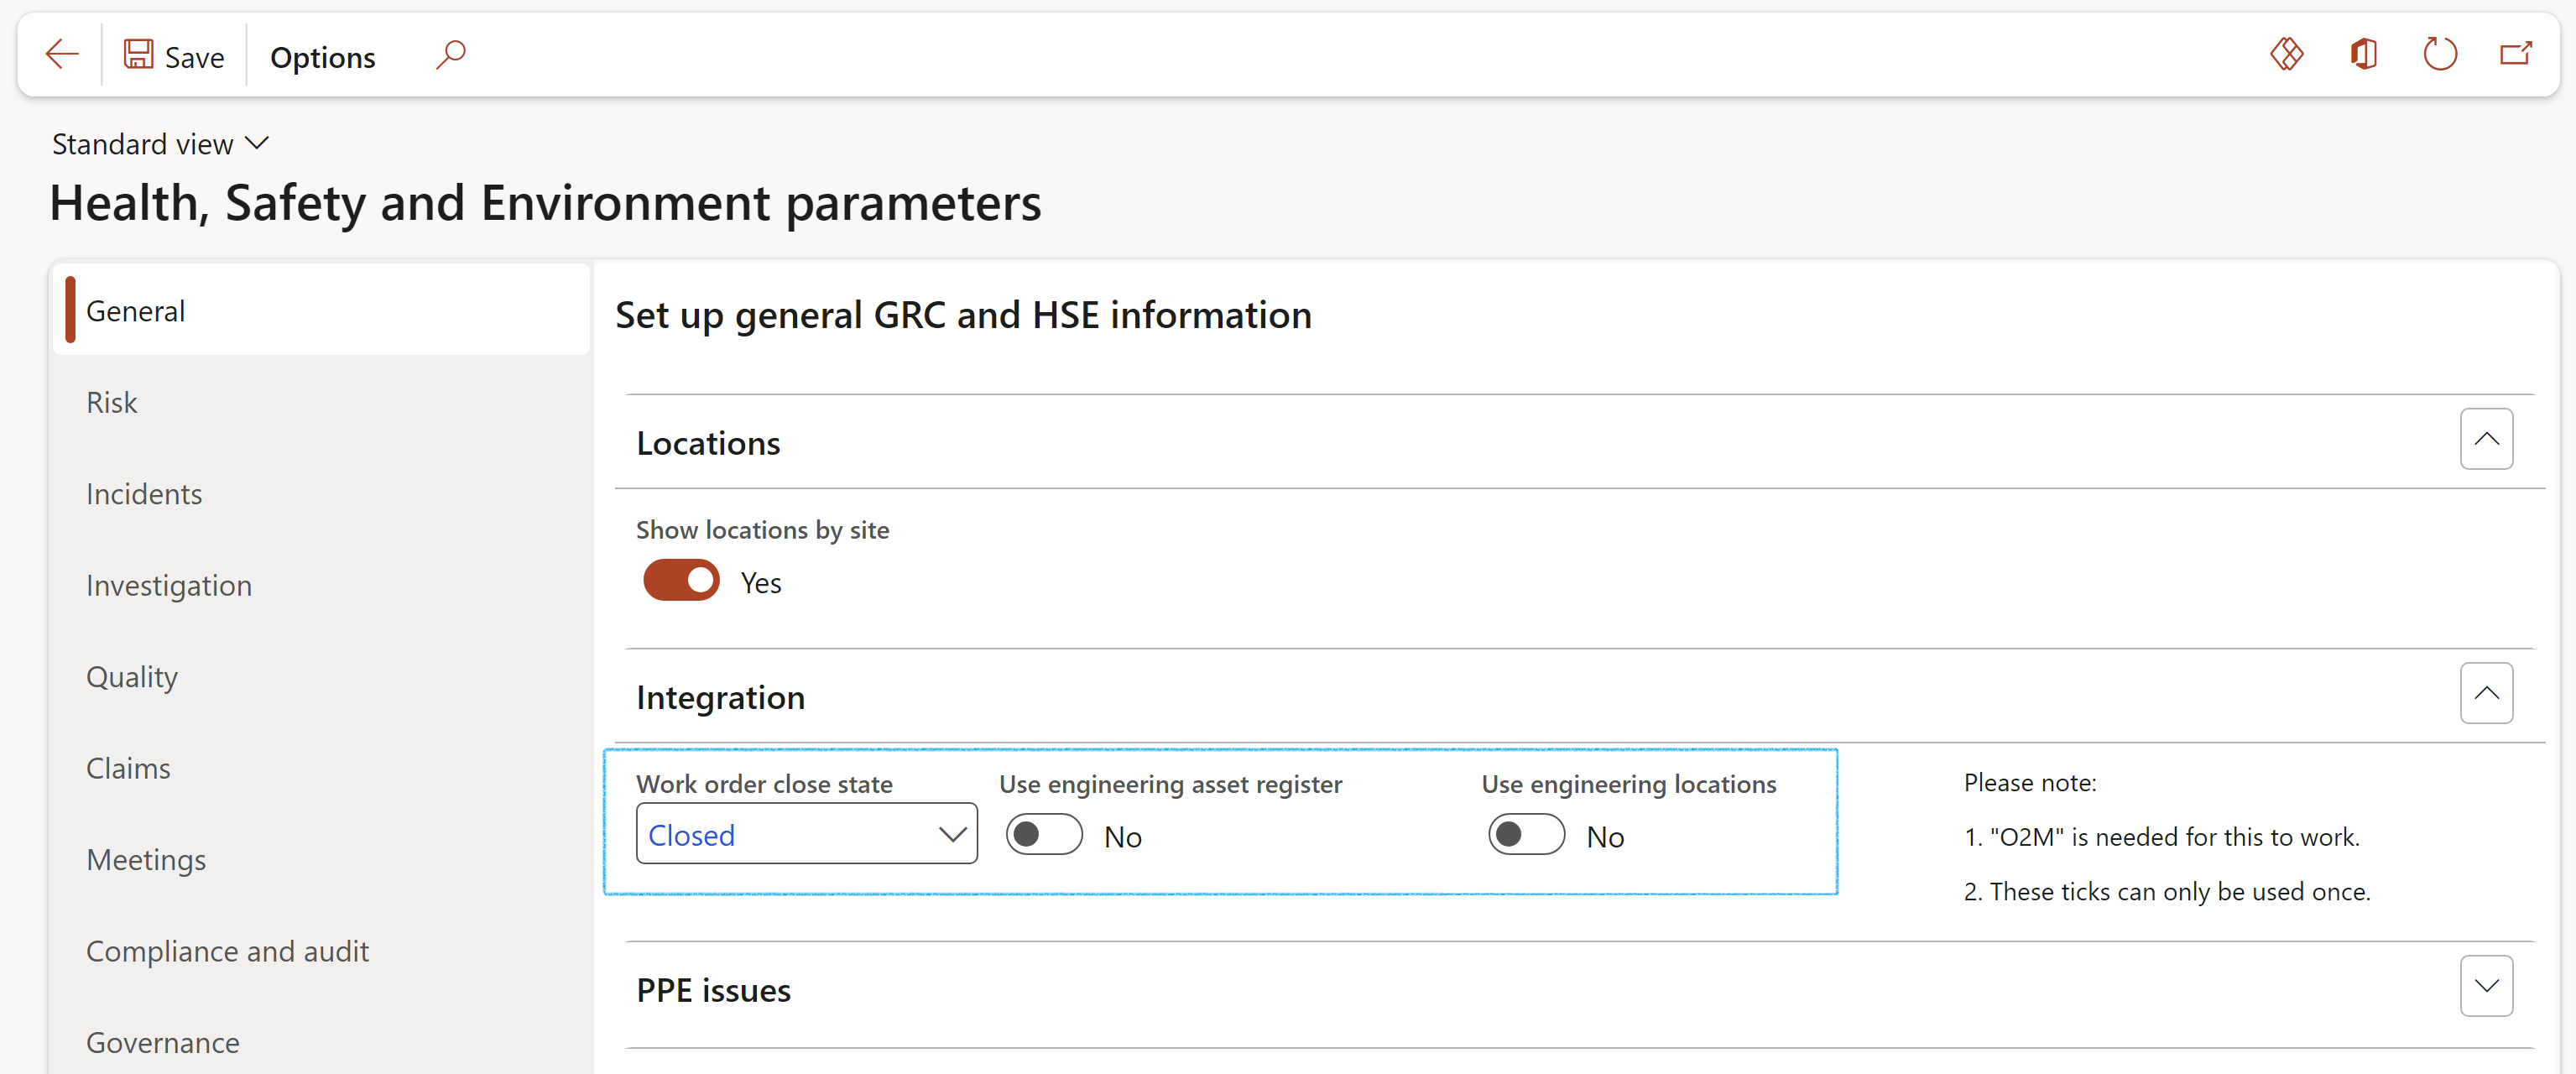
HSE parameters
When starting a Maintenance work order or assigning a maintenance job; HSE 365 can check if a risk assessment was done. To enable this, users must mark “Risk assessment” as mandatory on the Work order type and then choose a status where this check must be performed on the HSE parameters form.
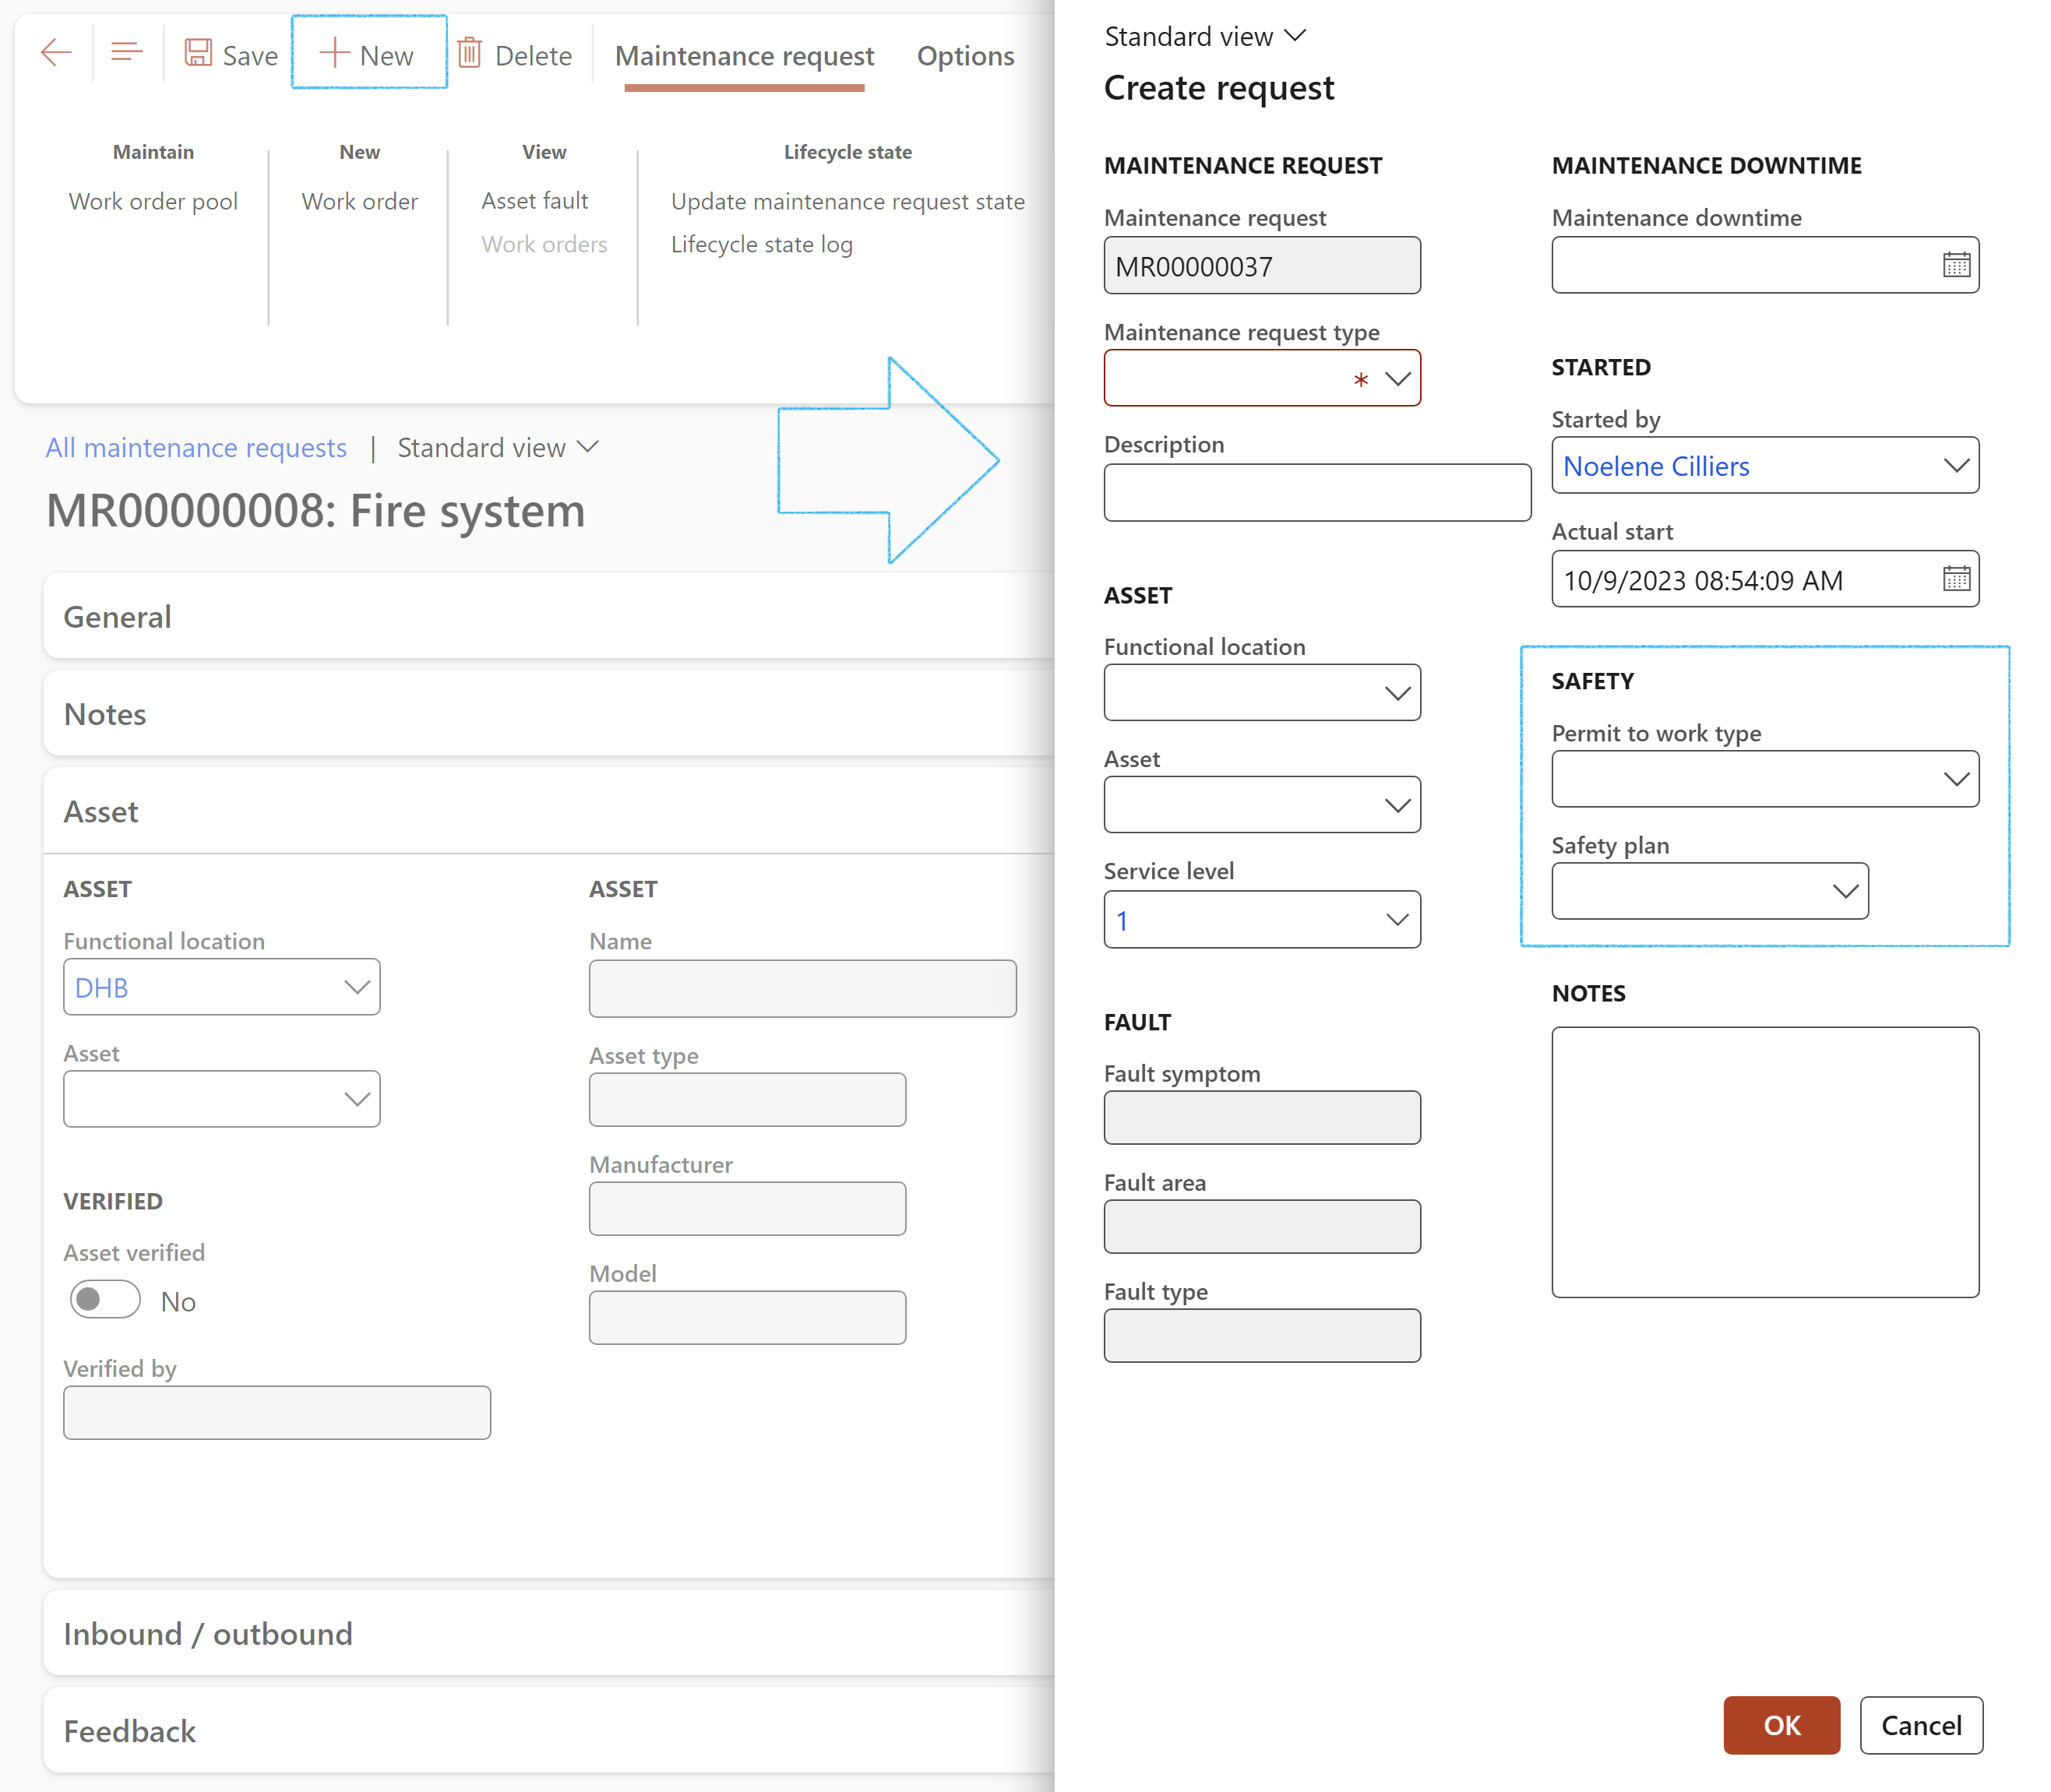
¶ Step 22.1: Maintenance request; auto create Permit to work
A request for a maintenance job could include the request to also have a Permit to work. This will be based on a safety plan that will mitigate any possible hazards.
HSE 365 supports the above. When users create a maintenance request, they can enter a permit to work type (e.g. working at heights, working at night etc.) as well as safety plan that uses the same type.
Then, when the request is approved and a work order is created, there is an option to automatically create a permit to work. These two transactions will be linked via a Permit to work reference on the work order line.
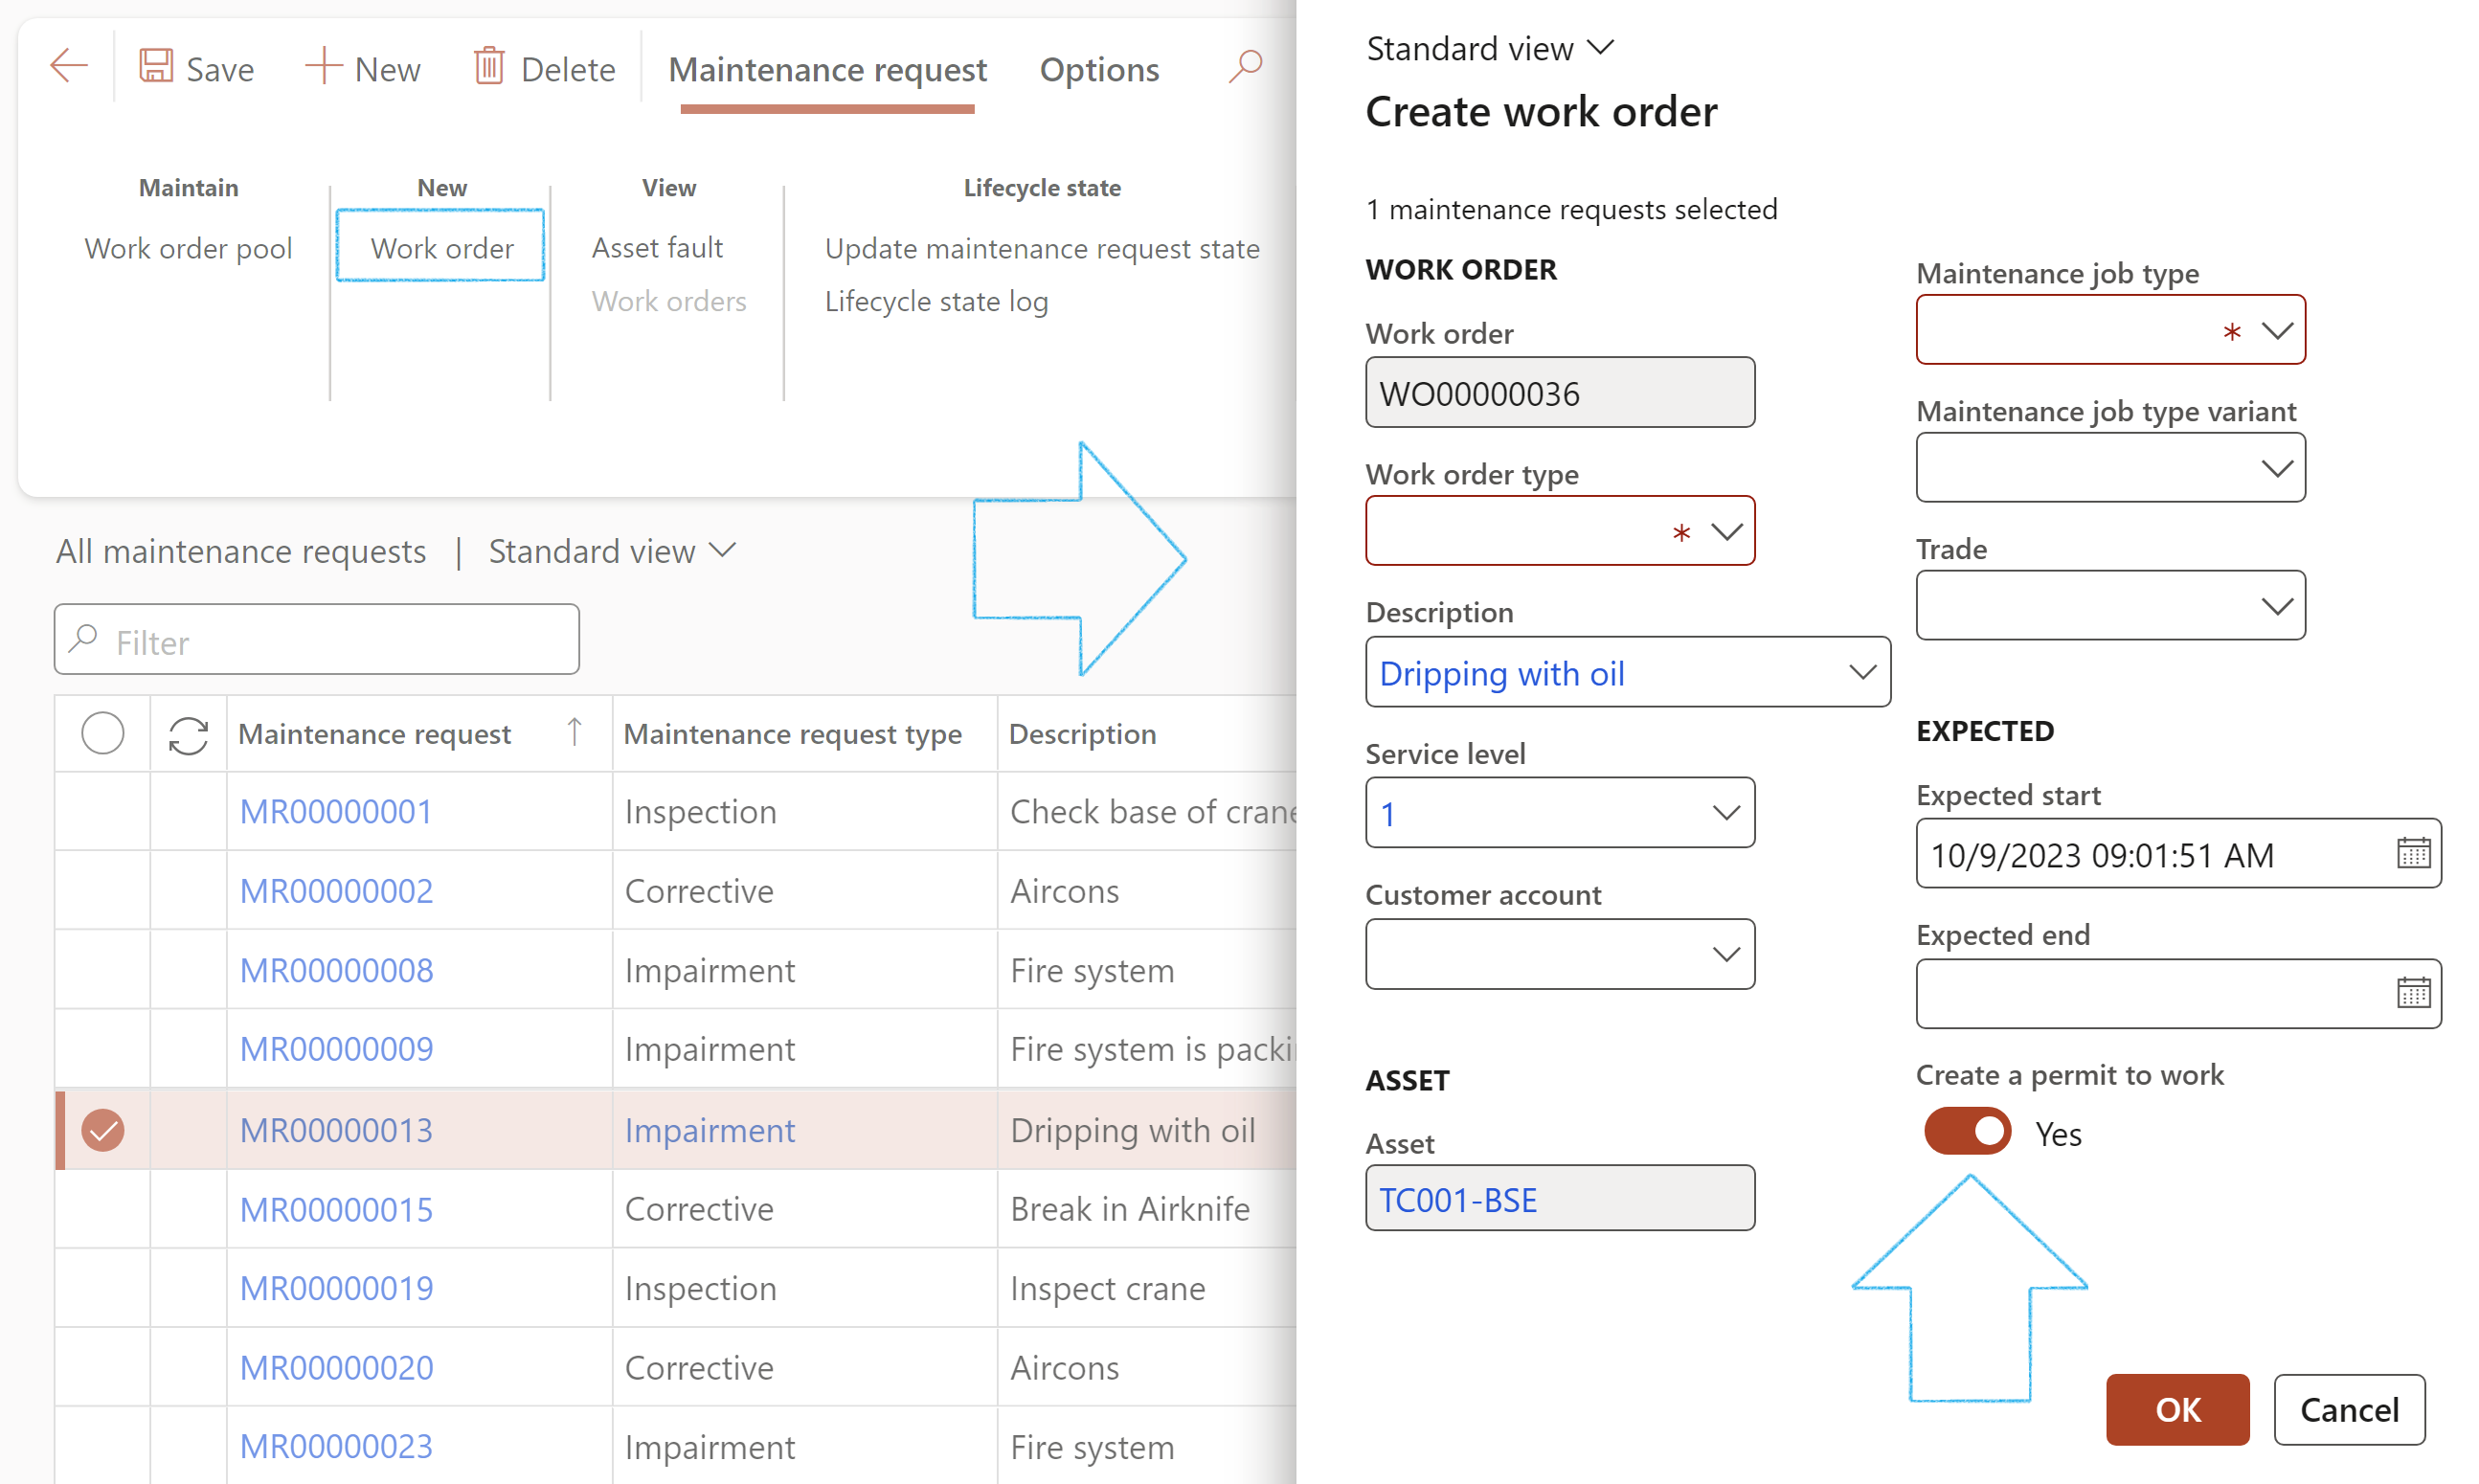
Then when users create ("convert") a Work order from an existing maintenance request, an option exists to also automatically create a new Permit to work.
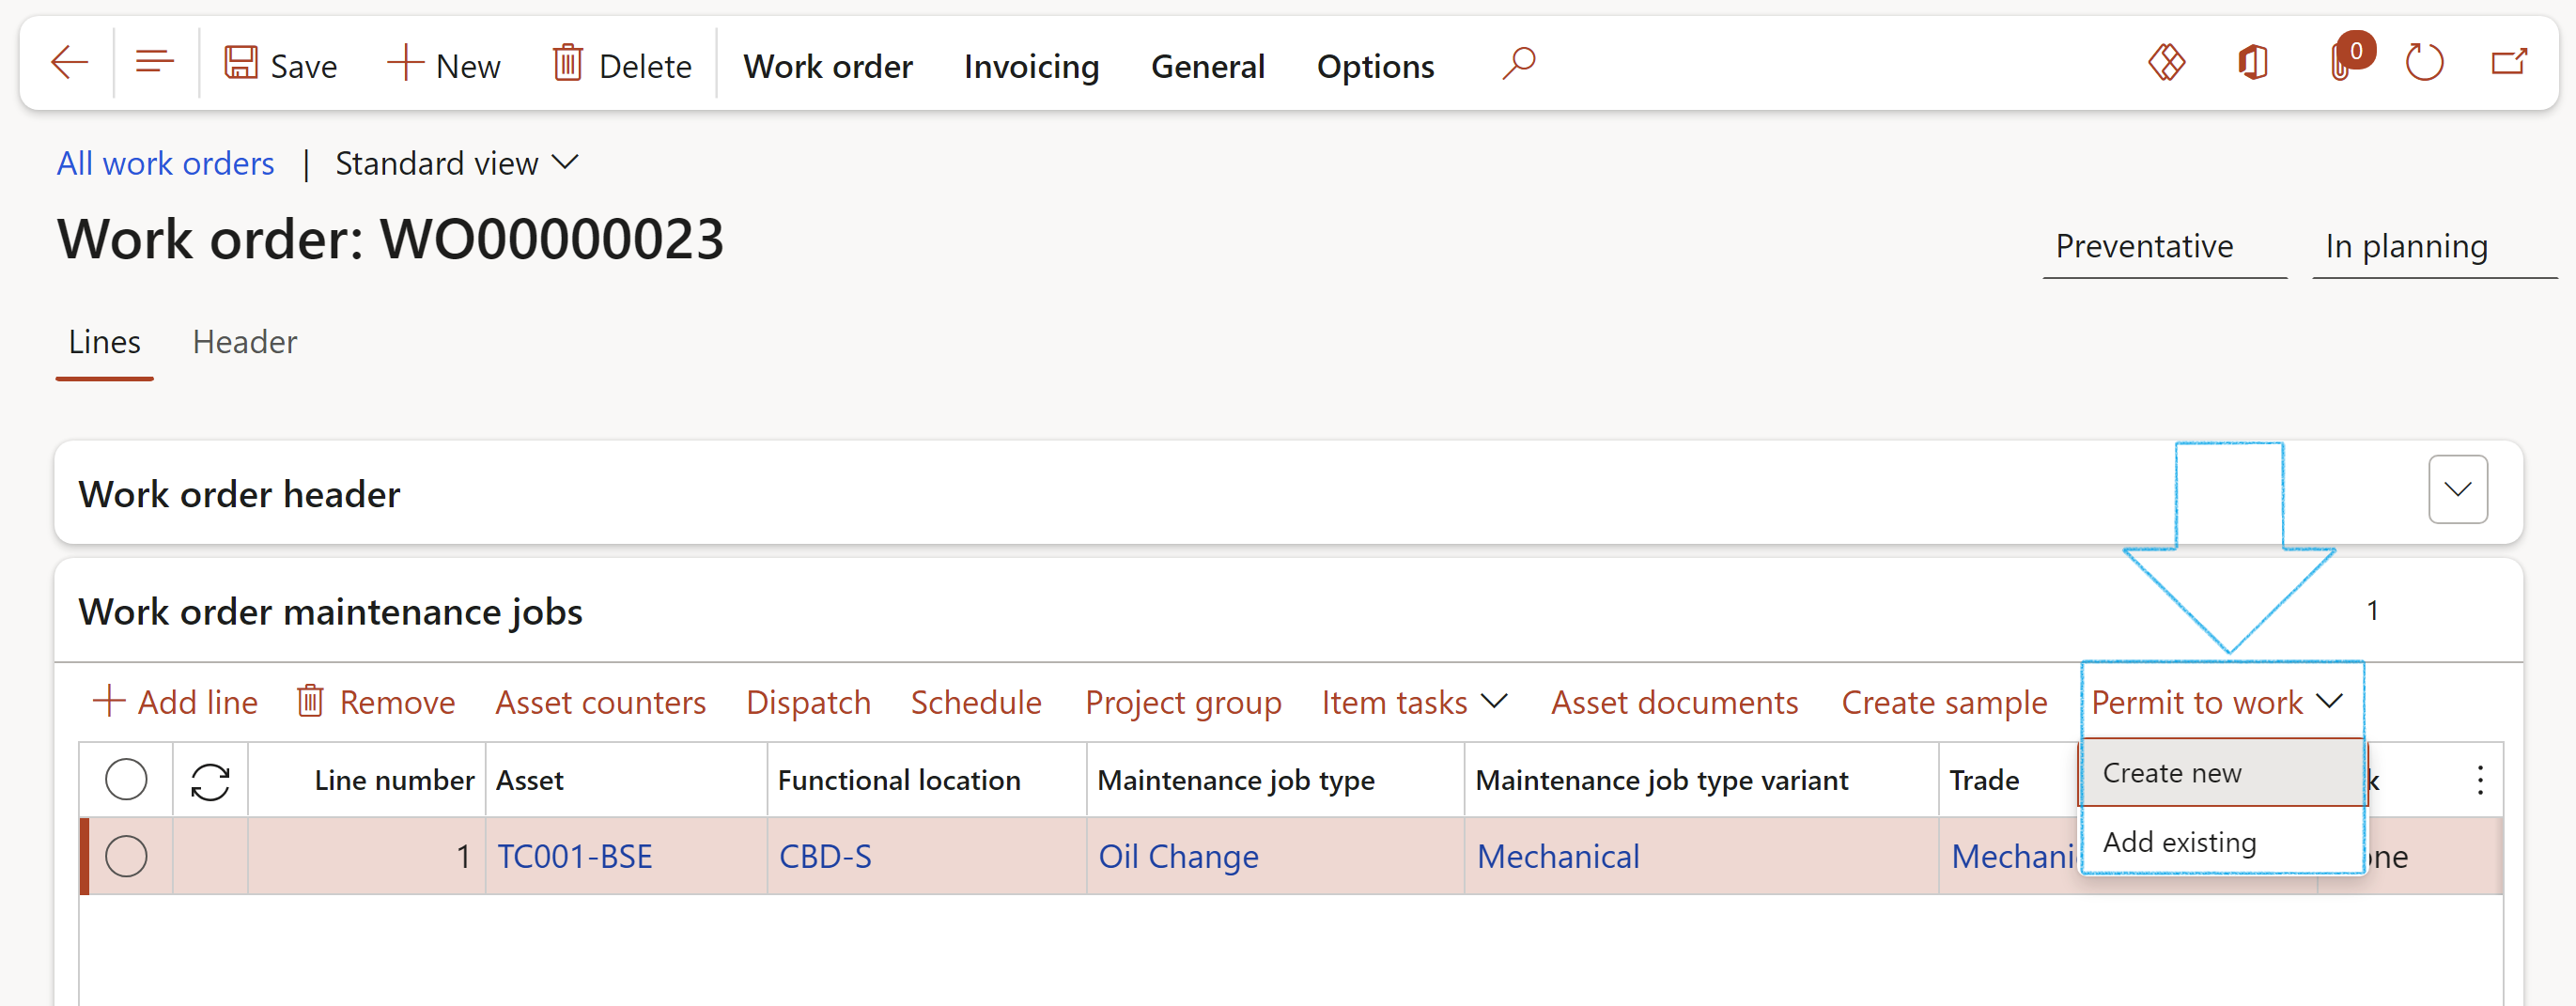
¶ Step 22.2: Work order: create, copy or choose existing Permit to work
Users have three options. They can create a new Permit to work directly on the Work order line, or users can copy a permit, or users can choose from an existing list of permits that were created in side HSE.
Creating a new safety permit:
Go to: Asset management > Work orders > All work orders
From the list page, open an existing (or create a new one) work order
In the Lines grid choose an existing line (or add a new one)
Ensure that a Maintenance job type variant is filled in
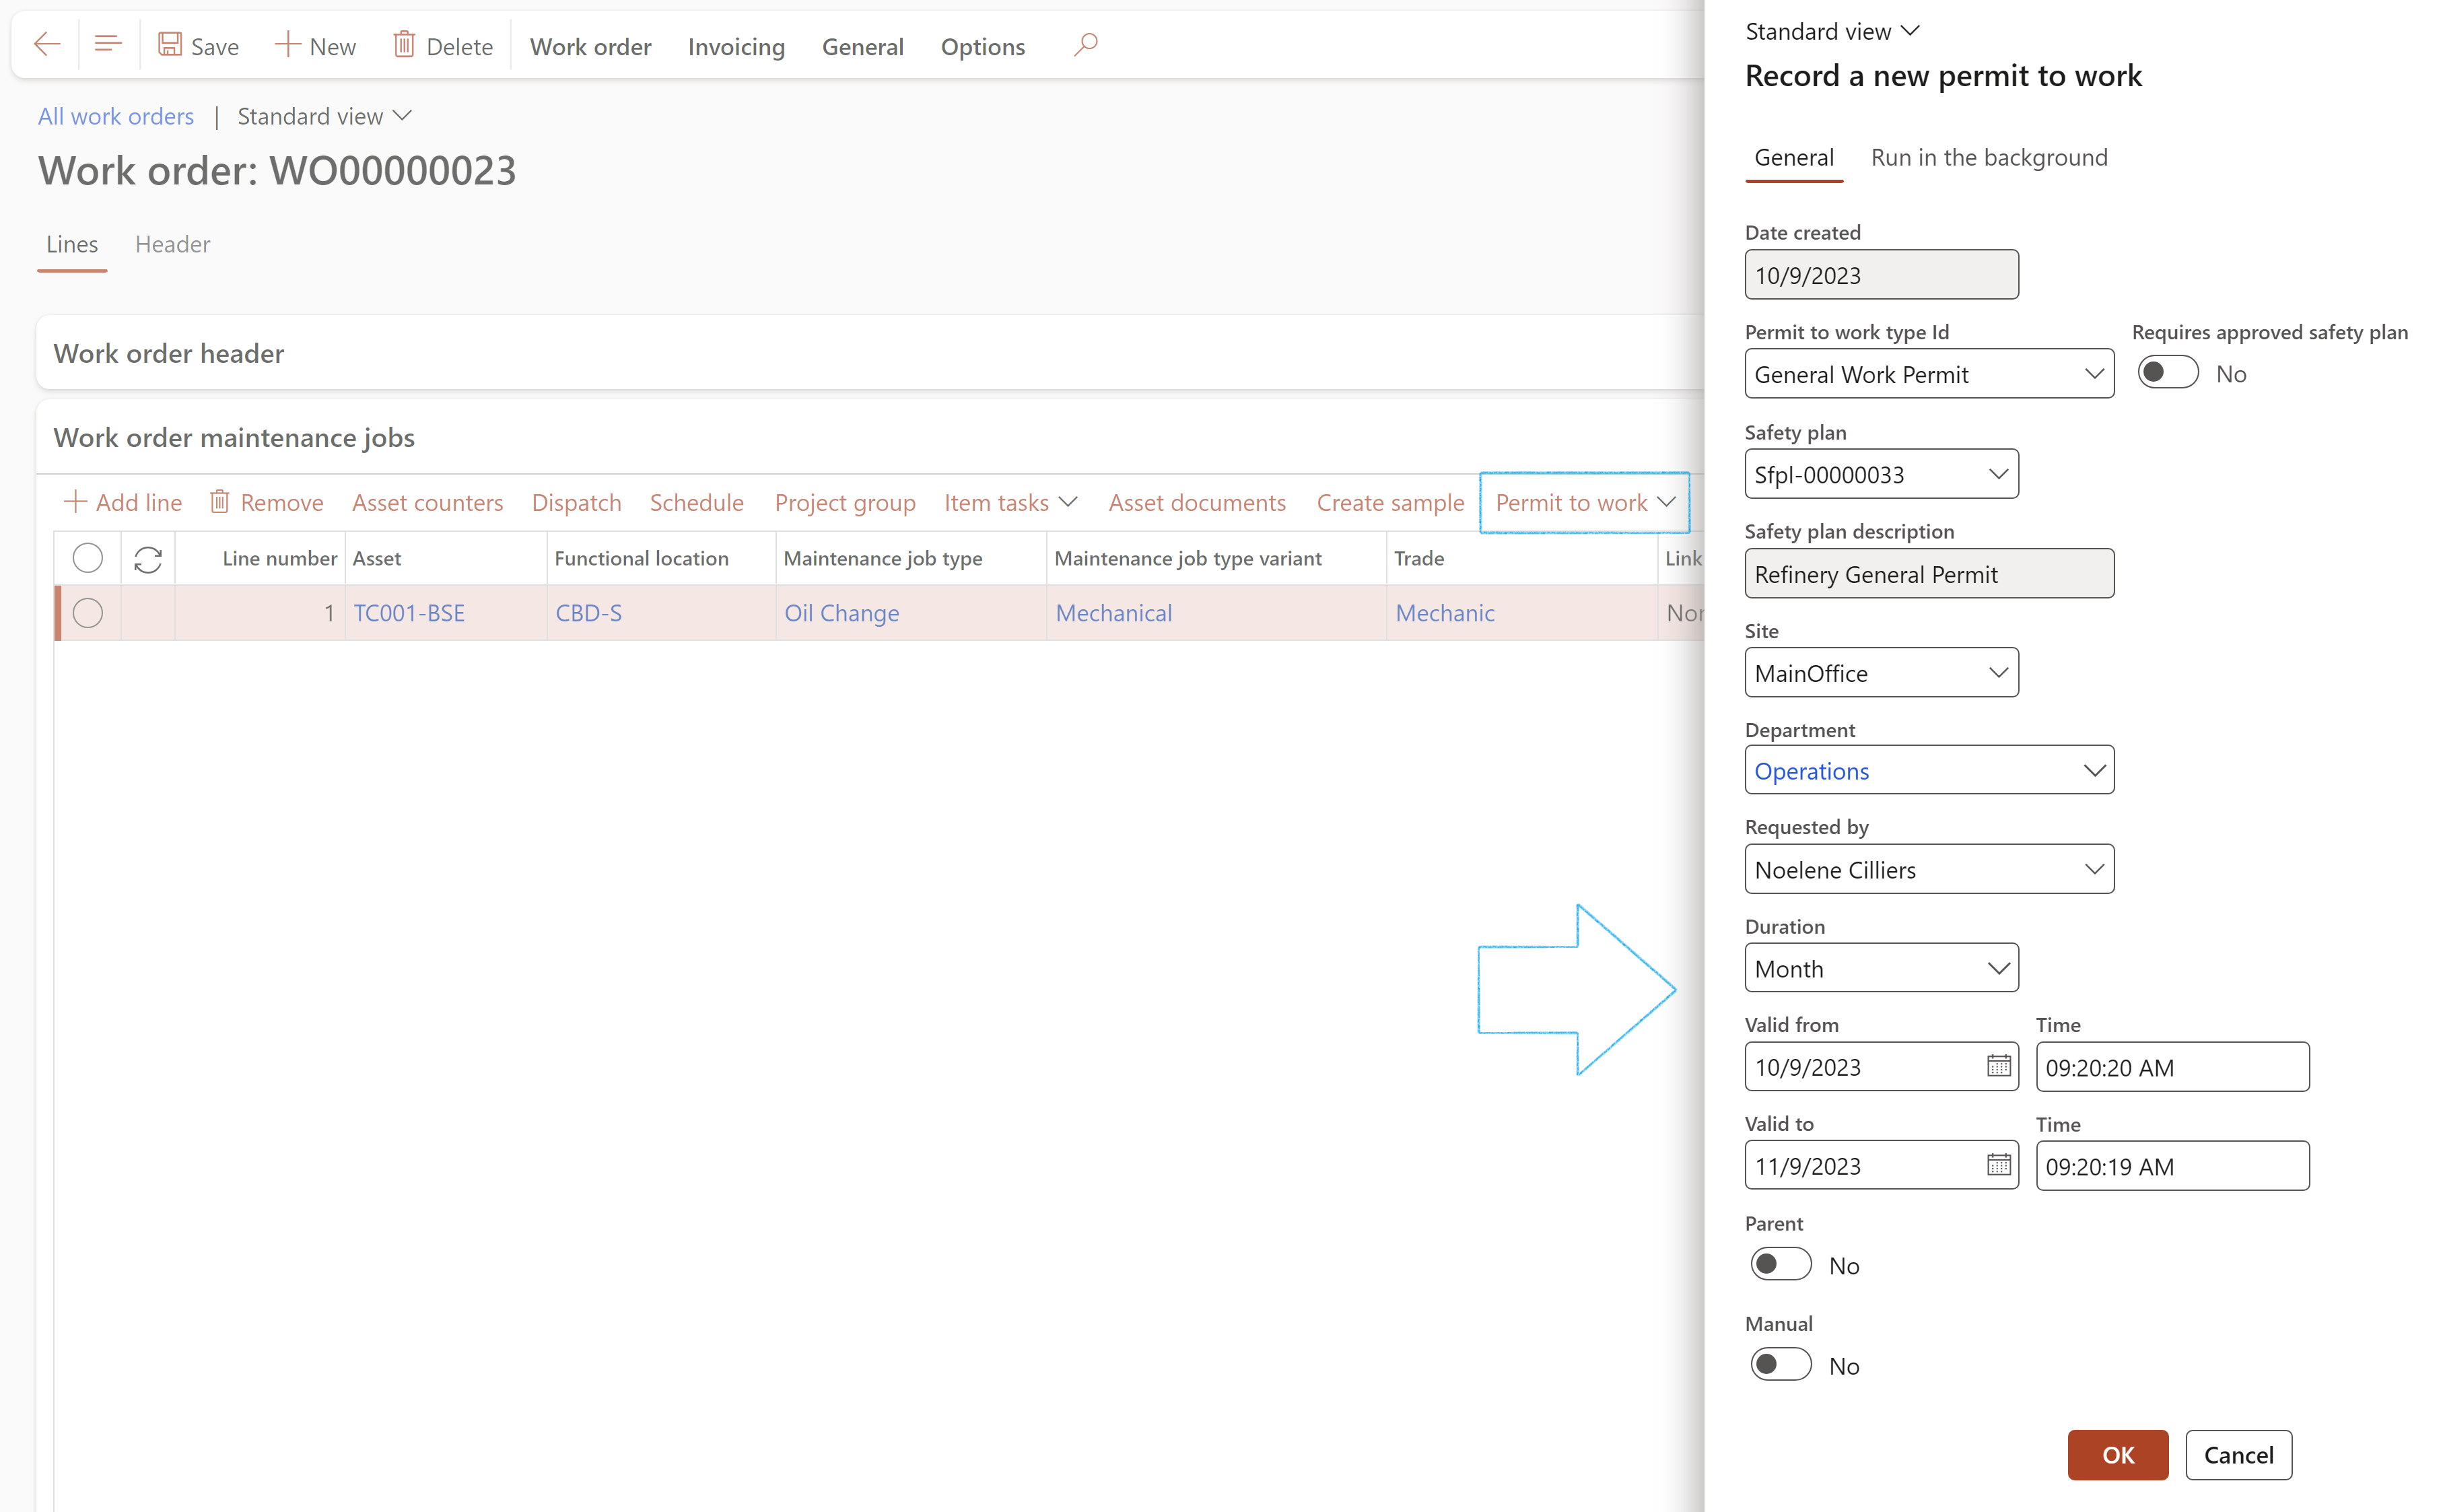
Click on the Permit to work button group and click on the Create new button
Fill in all the relevant fields and click OK
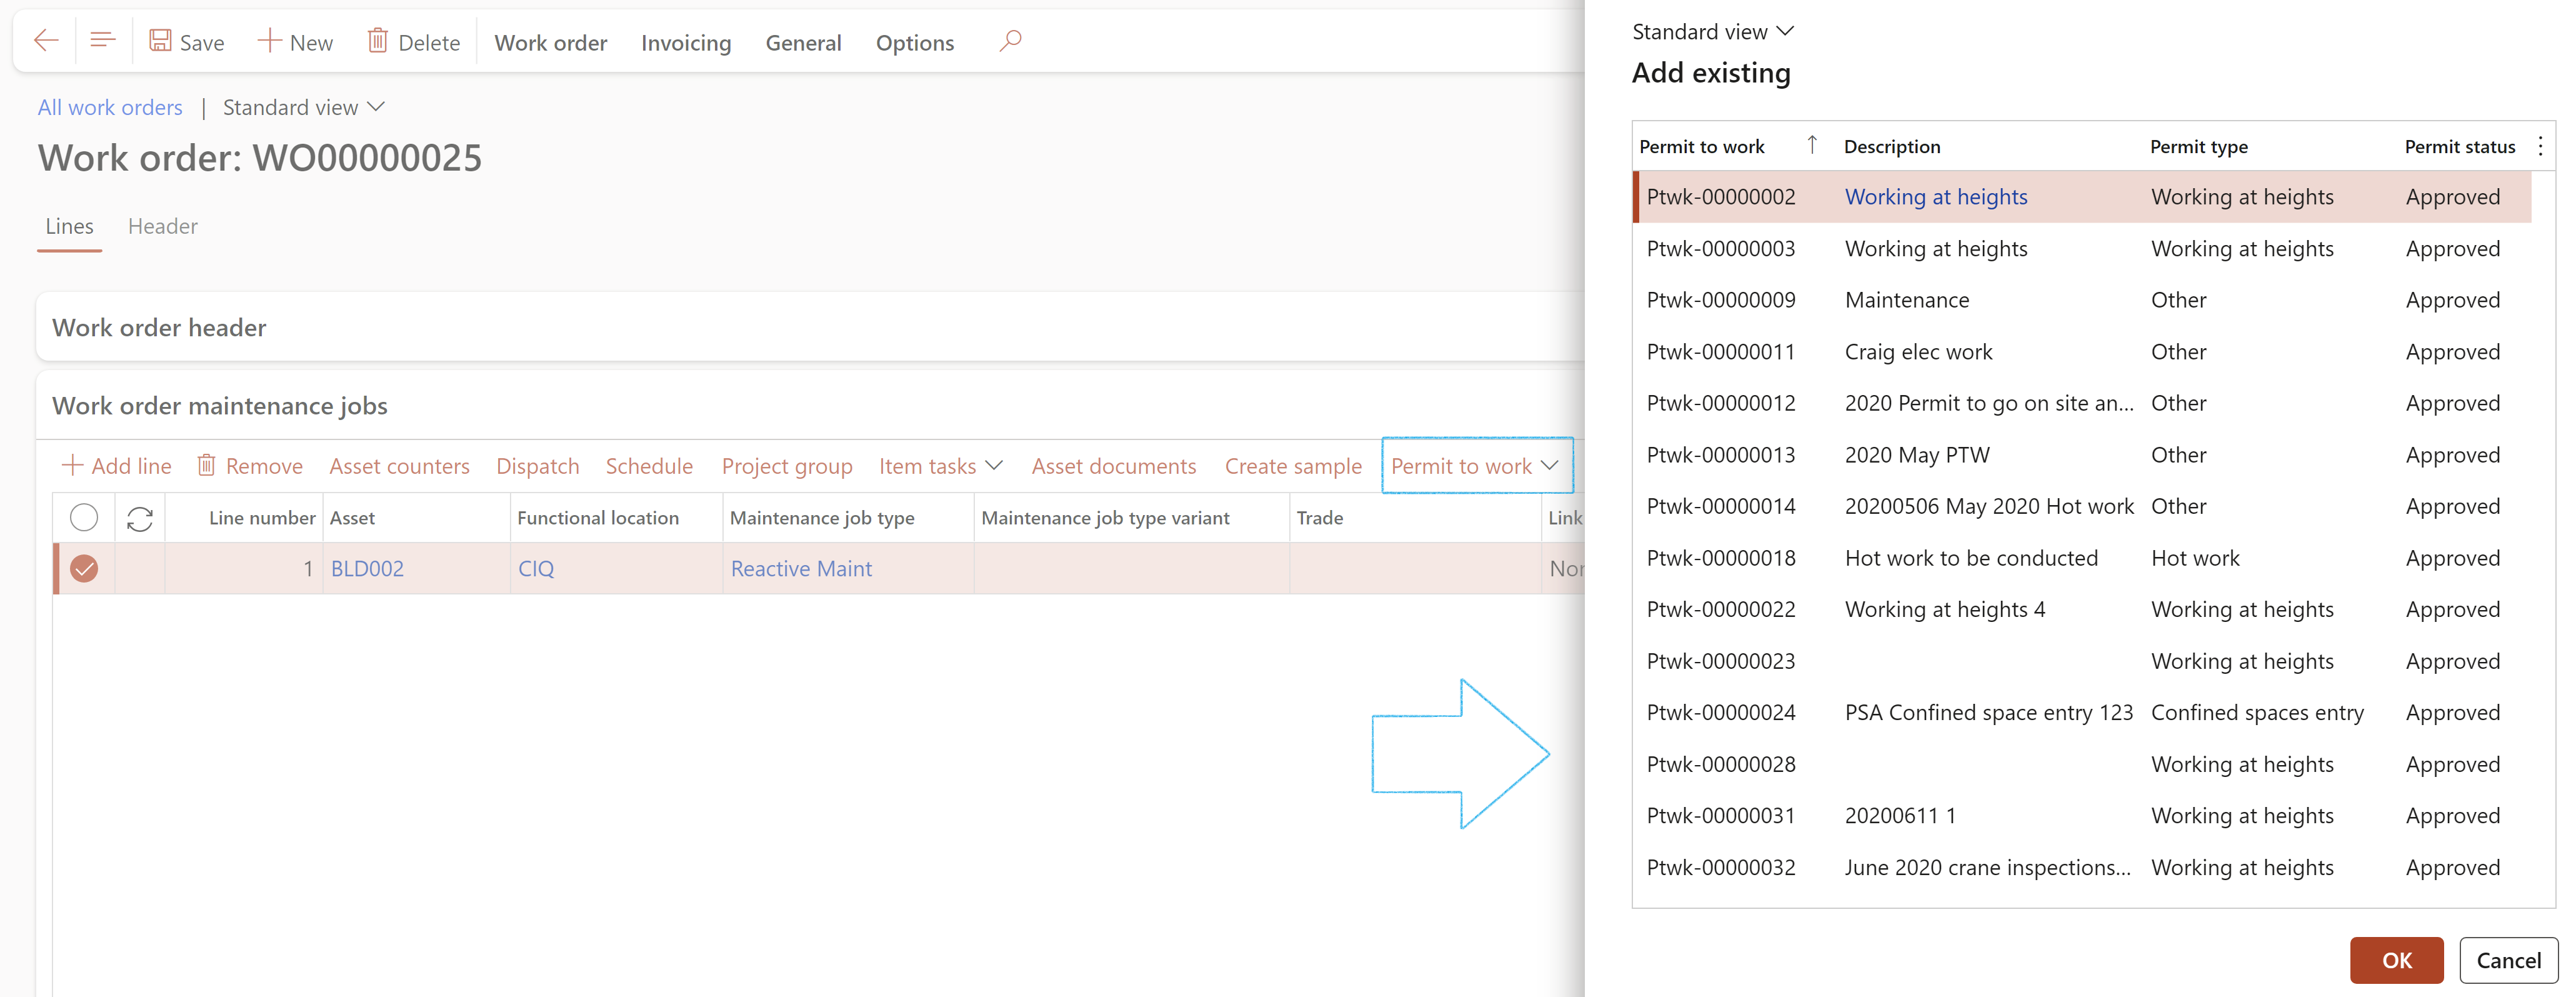
Adding an existing safety permit:
Go to: Asset management > Work orders > All work orders
From the list page, open an existing (or create a new one) work order
In the Lines grid choose an existing line (or add a new one)
Ensure that a Maintenance job type variant is filled in
Click on the Permit to work button group and click on the Add existing button
From the list given, choose the applicable permit and click OK
When creating a Permit to work from the Work order line, users will be given the option to copy the work description text, found on the Work order line details (Description Index tab) to the Work to be performed Fast tab (on the Permit to work header).
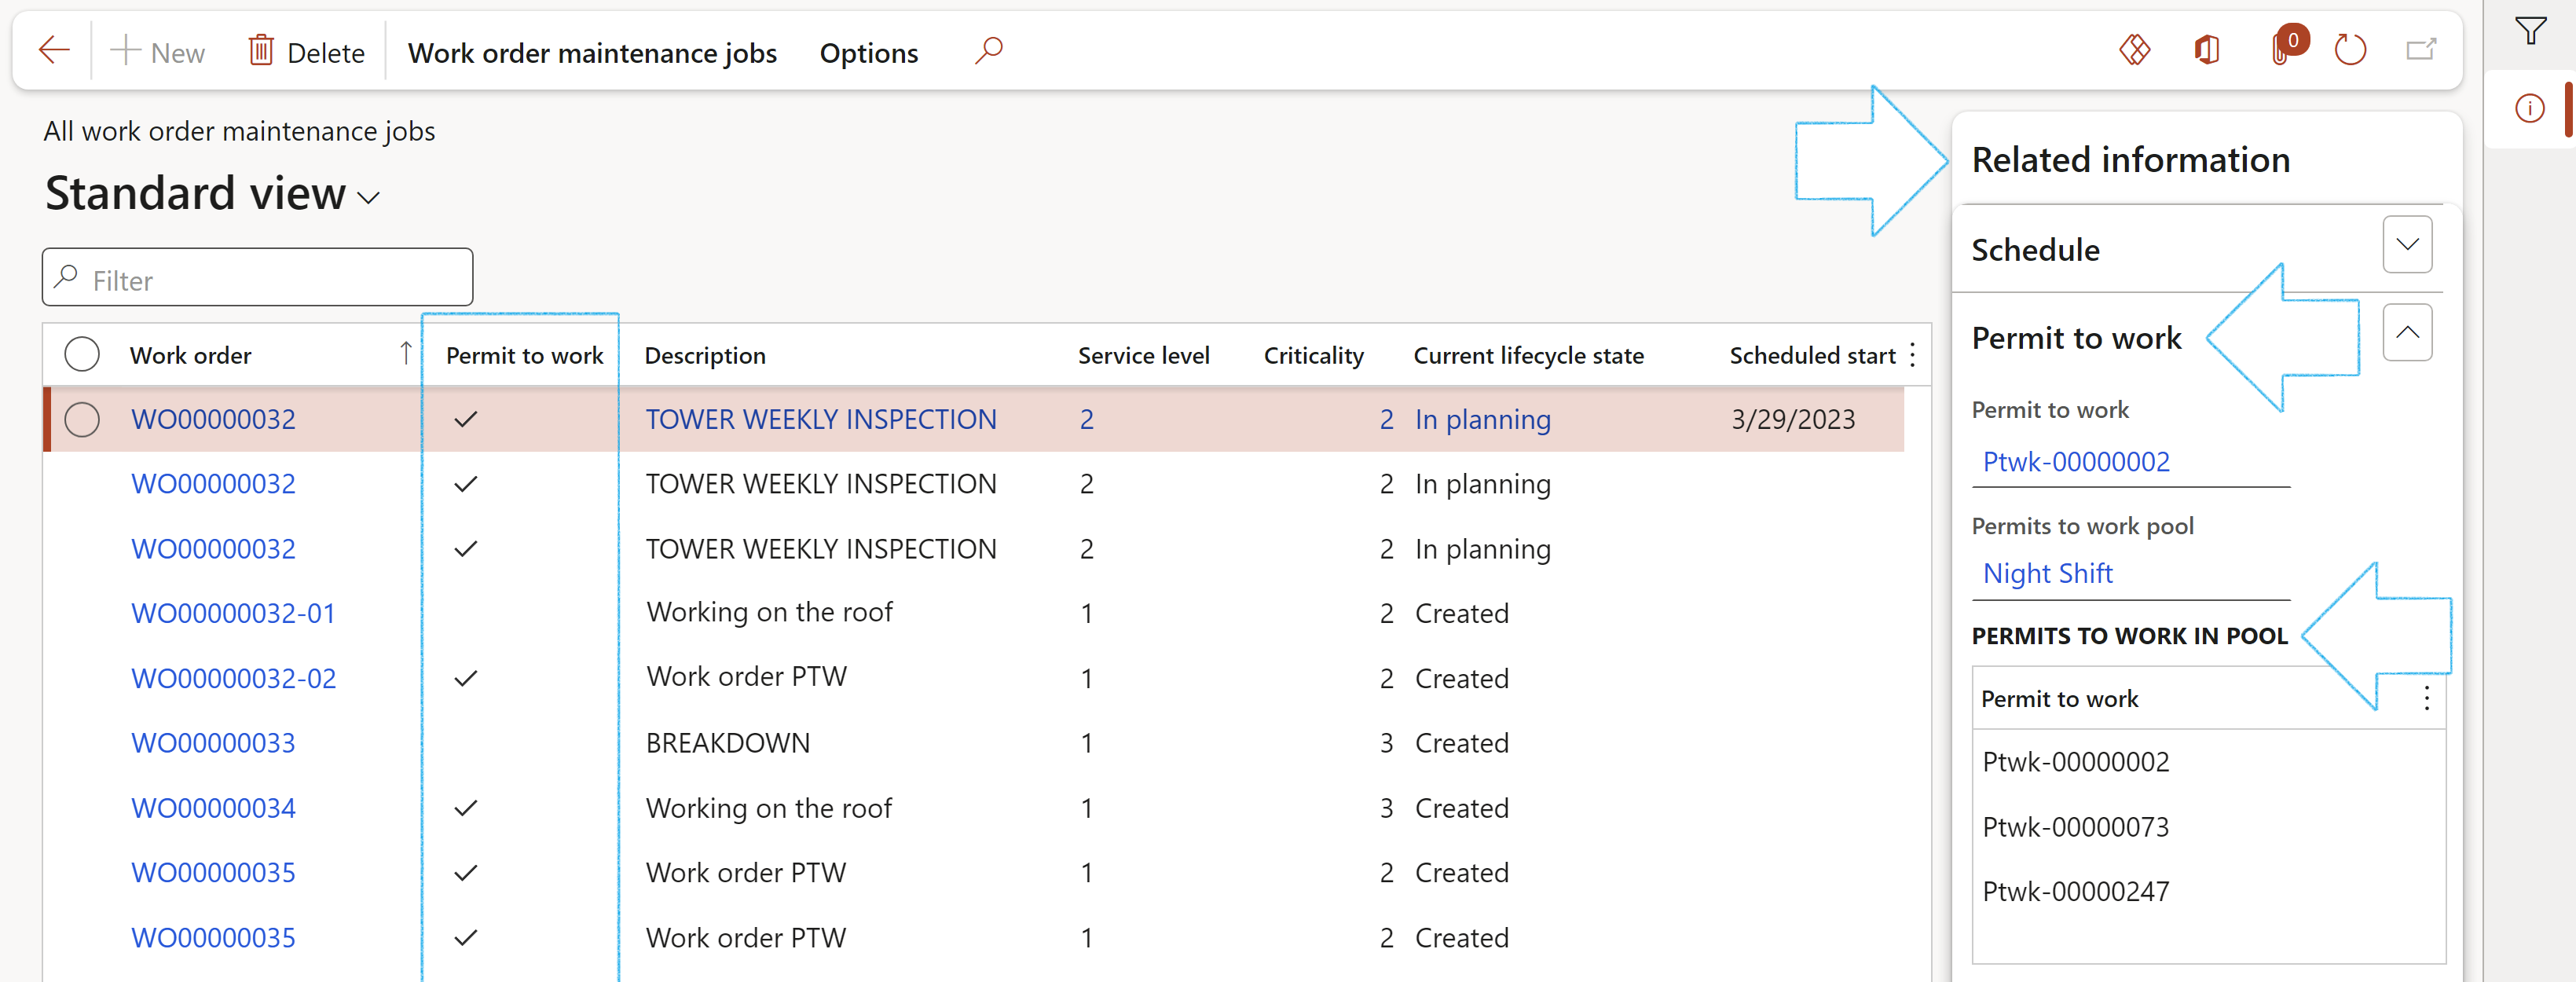
Permits to work linked to work order maintenance jobs can be viewed by following the path below.
Go to: Asset management > Work orders > All work order maintenance jobs
Records that have permits linked to them will have a tick in the Permit to work column
Select the record that you want to view the permit of, and expand the Related infomation pane. The Permit to work ID is displayed under the Permit to work Fast tab.
If the selected record is linked to a Permits to work pool, the detail can be viewed in the Related information pane under the Permits to work in pool Fast tab
OR
Go to: HSE > Permits to work > All work order maintenance jobs
On this list page the user has the option to change the view to Location focus
To view all related Maintenance work orders for a single Permit to work, users can click the Work orders button on the Permit to work.
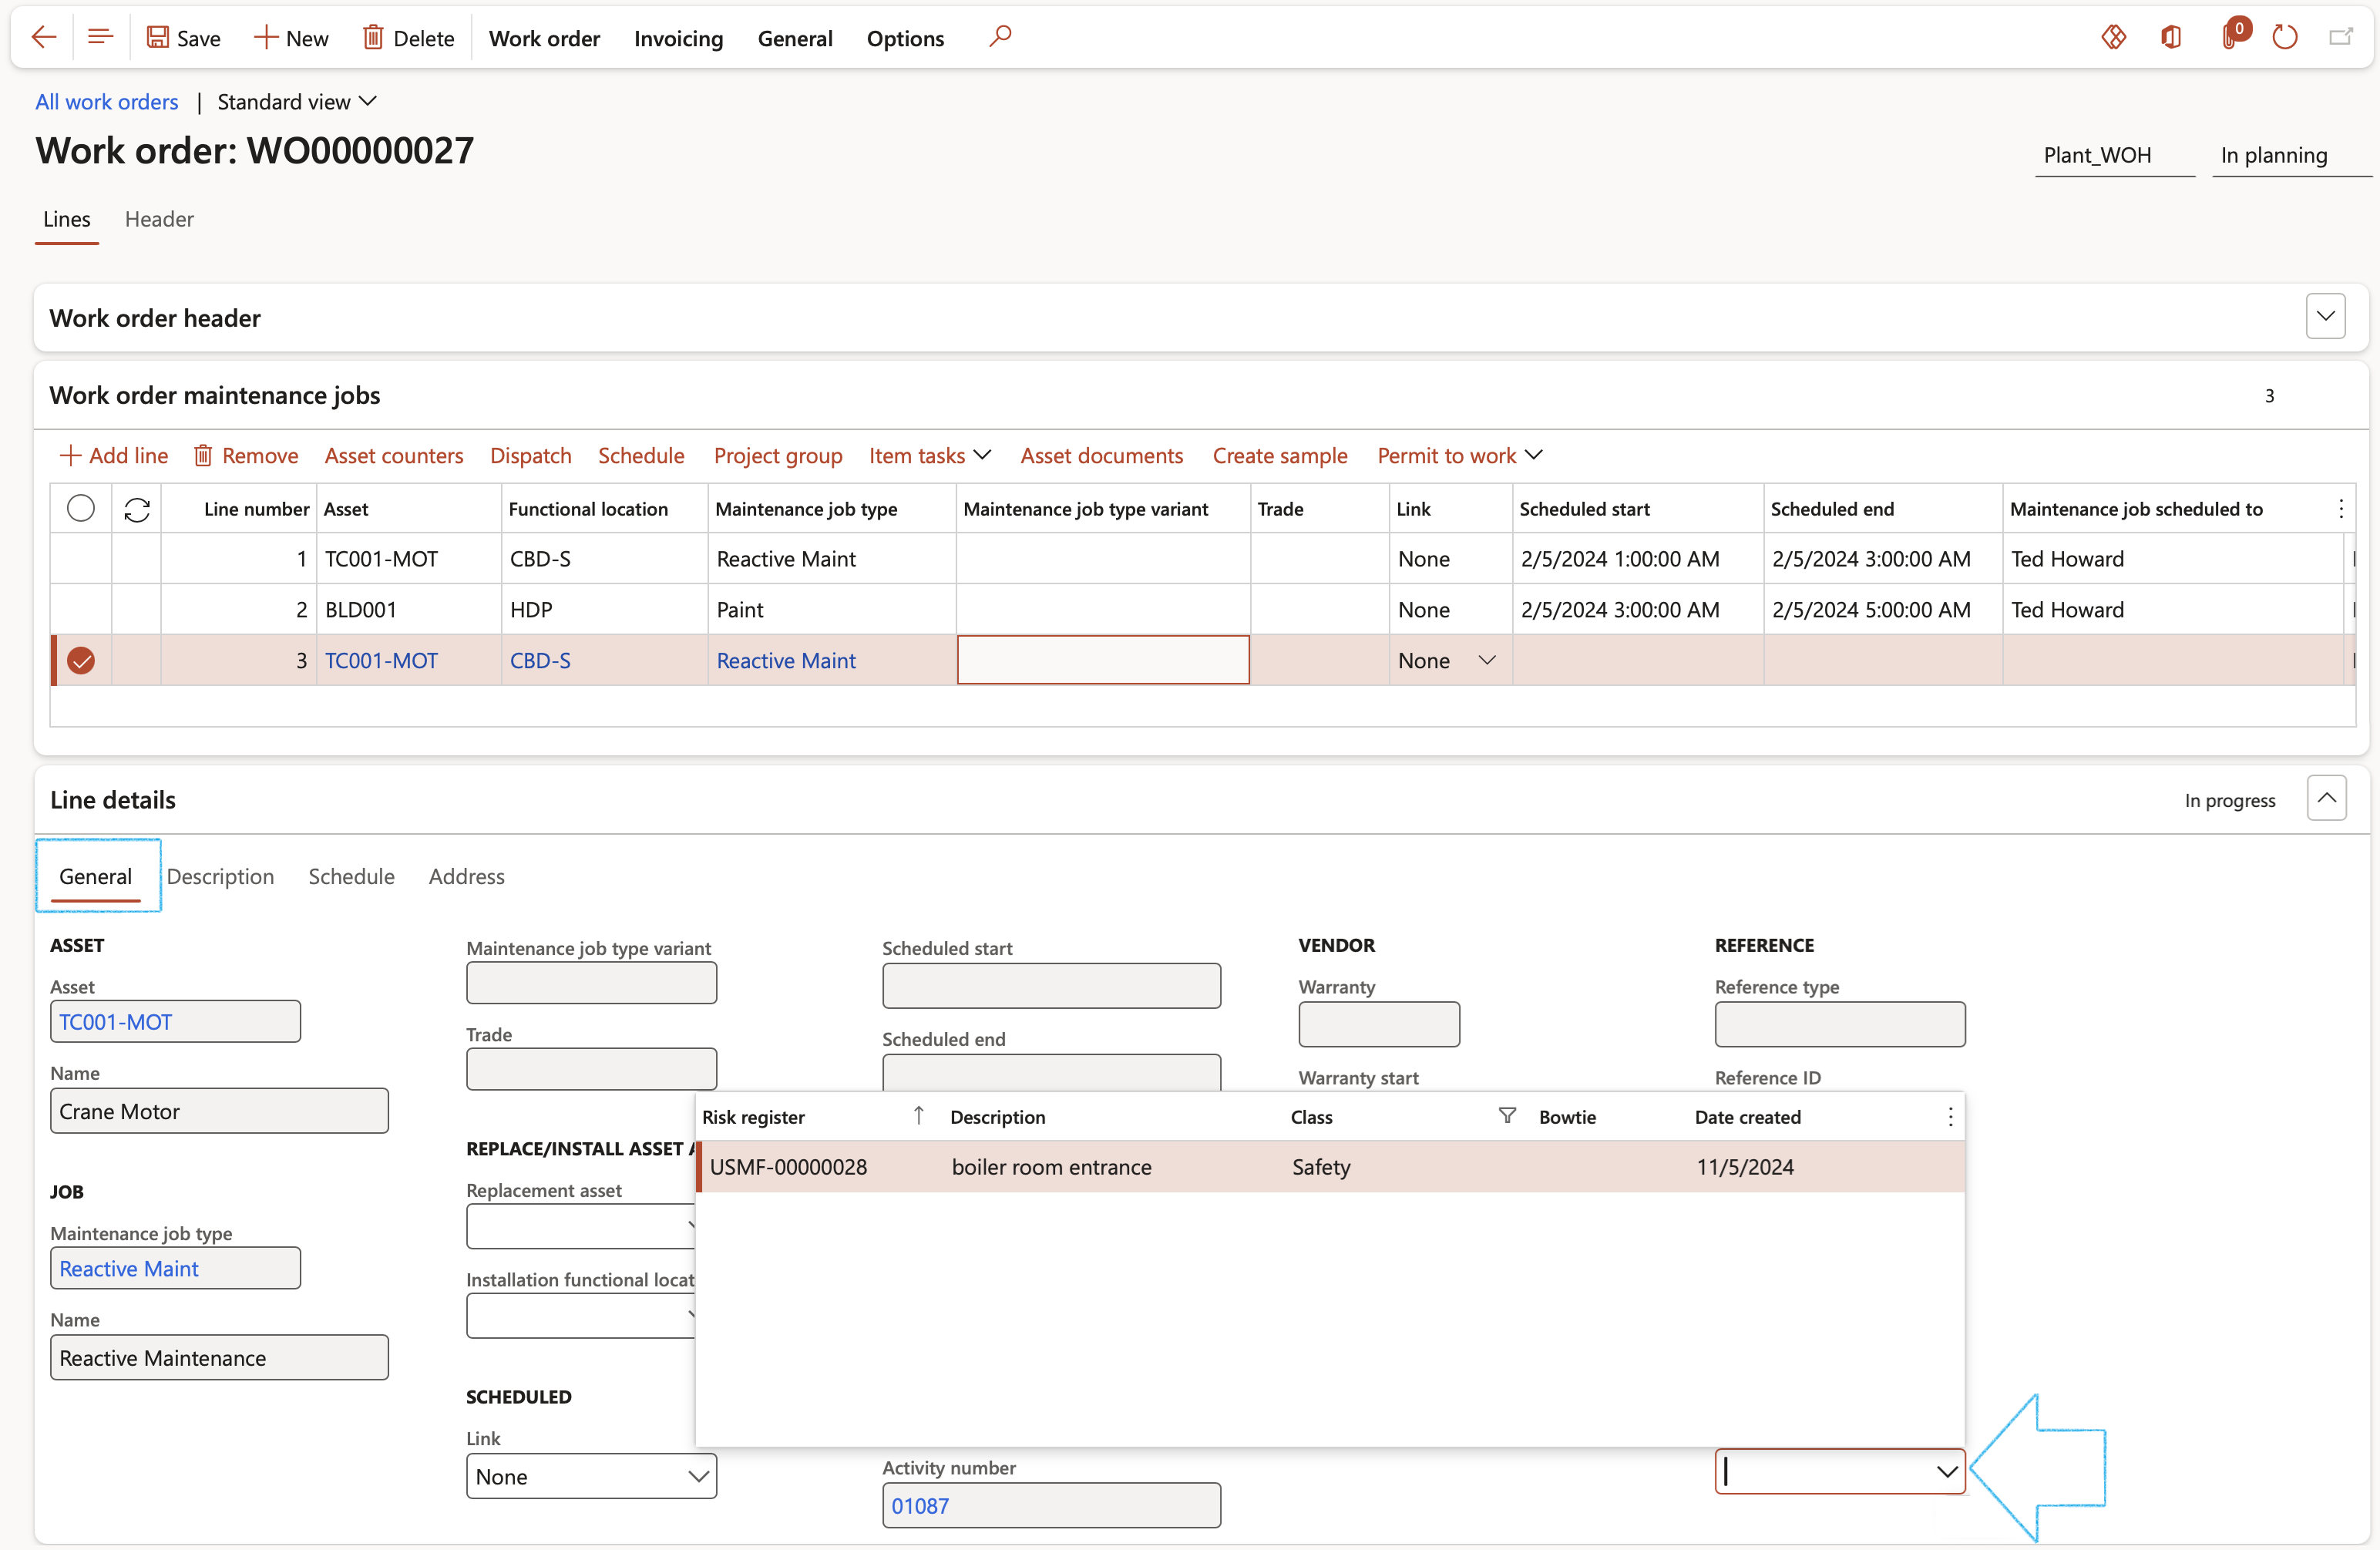
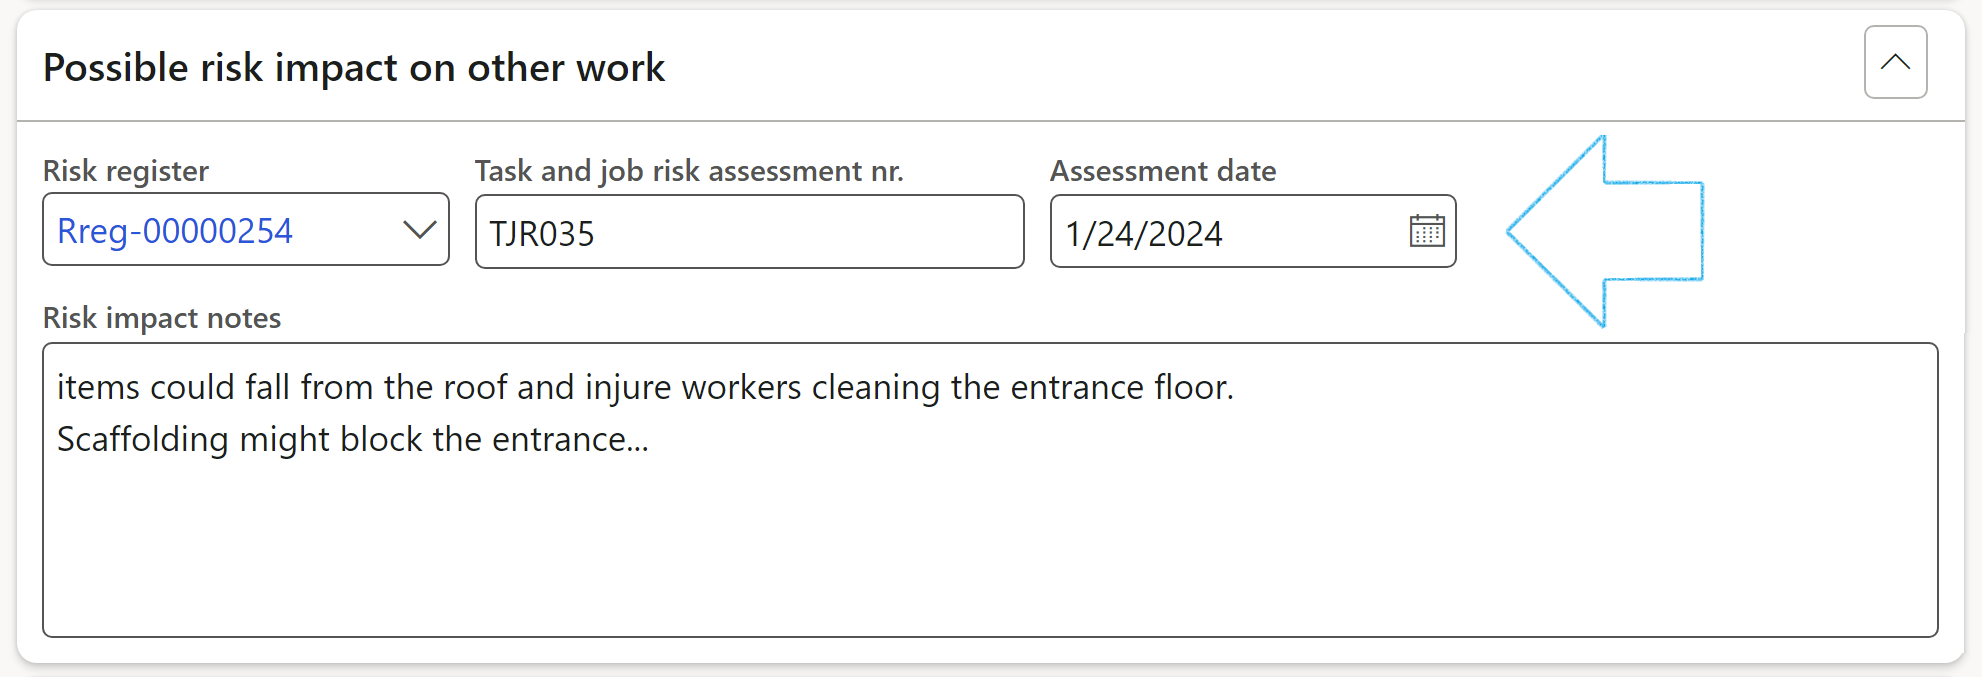
Link Risk register
On the Maintenance work orders line users can also choose non closed operational risk register. This lookup is filtered based on the work orders line asset and possible functional location.
The Risk Register record is filtered on OHS objects and OHS locations.
A focus and commitment to construction safety is critical. Workplaces are often high-risk, and workers are required to undertake tasks that could put them in harm's way if correct induction and safety procedures are not followed.
To keep construction sites safe, compliant, and to prevent employees and contractors from injuring themselves, a construction worksite should have permits.
¶ Step 23.1: Work breakdown structure; create or choose existing Permit to work
Users have two options. They can create a new Permit to work directly on the Work breakdown structure, or users can choose from an existing list of permits that were created inside HSE.
Creating a new safety permit:
Go to: Project management and accounting > Projects > All projects
From the list page, open an existing (or create a new one) project
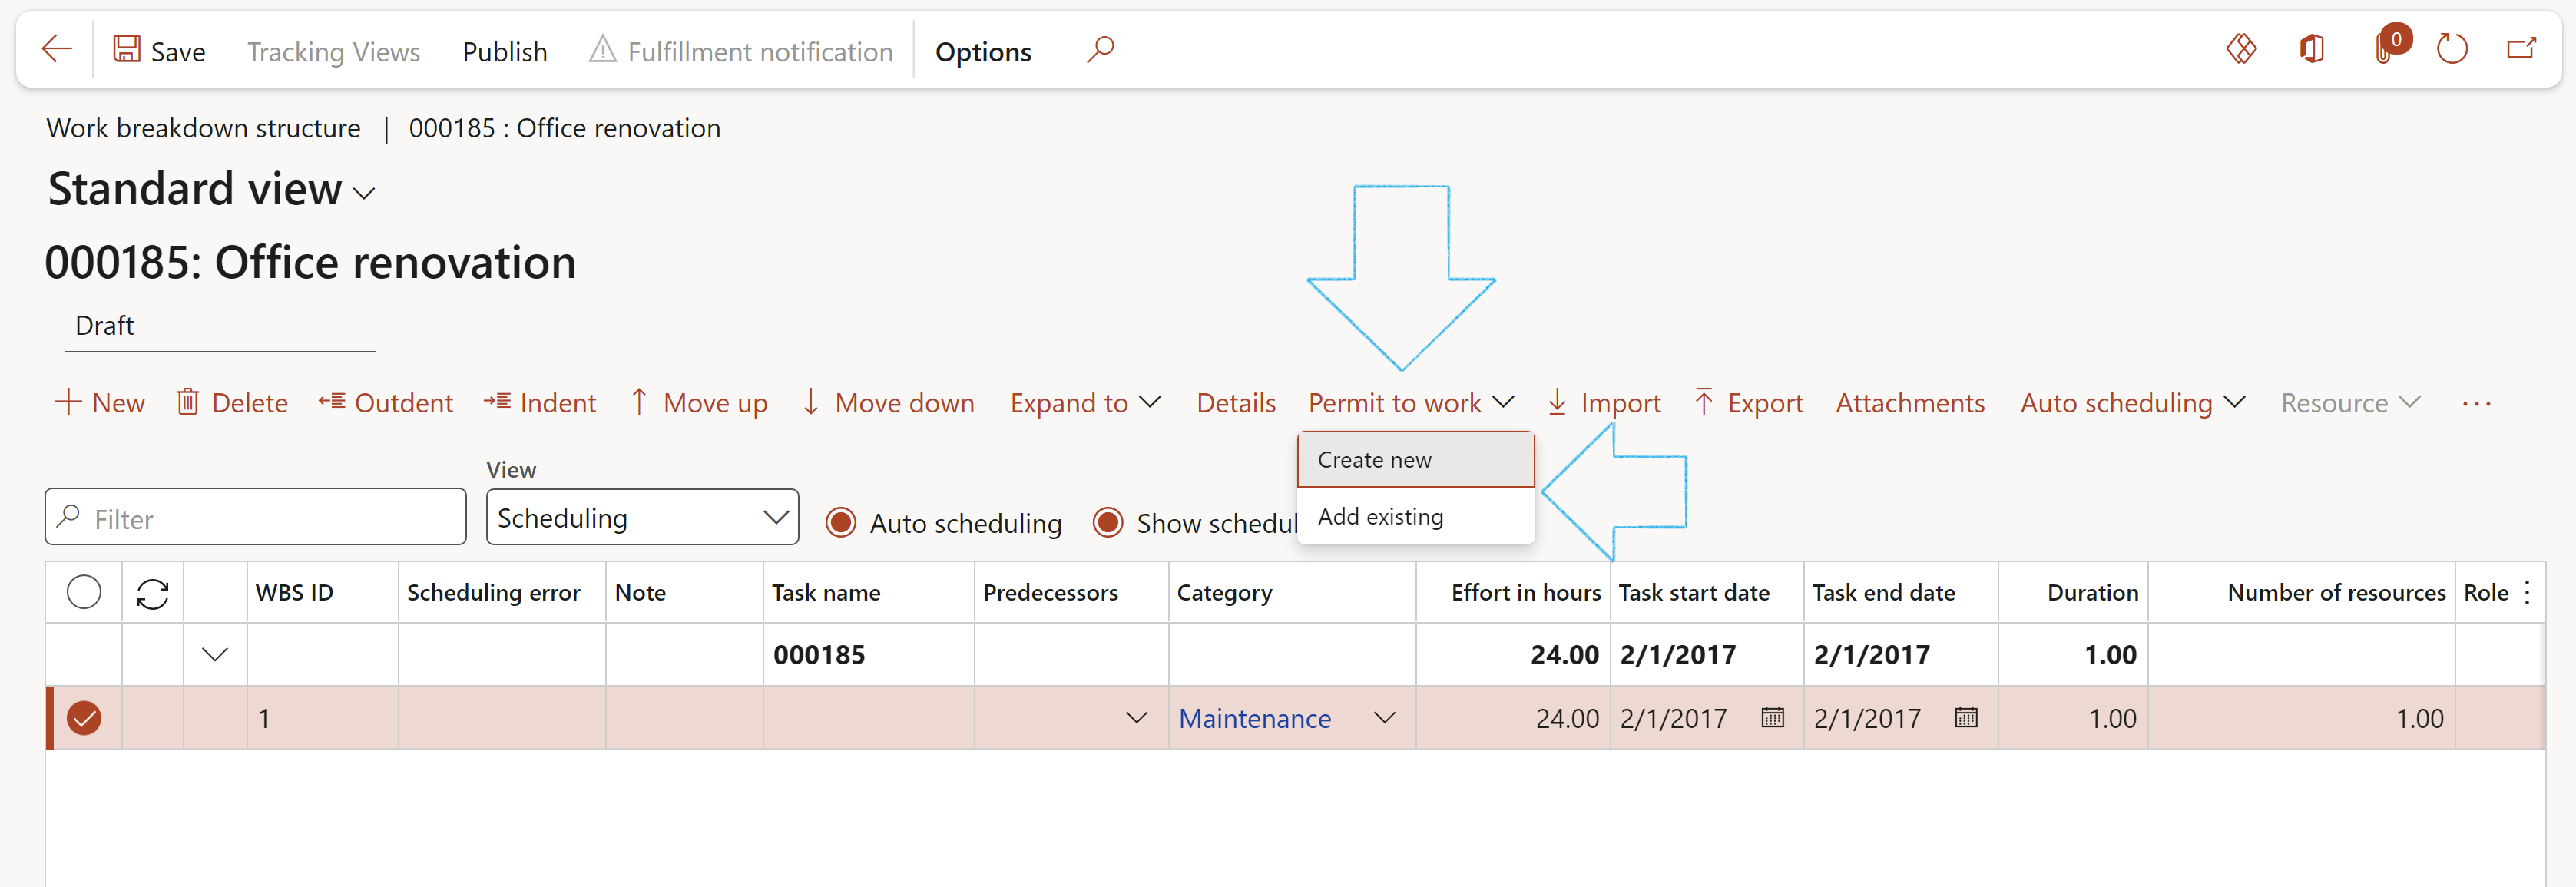
On the Action pane, under the Plan tab, click on the Work breakdown structure button in the Activities button group
On the Work breakdown structure, select the line that you need the permit to work for
Click on the Permit to work button group and select New from the dropdown list
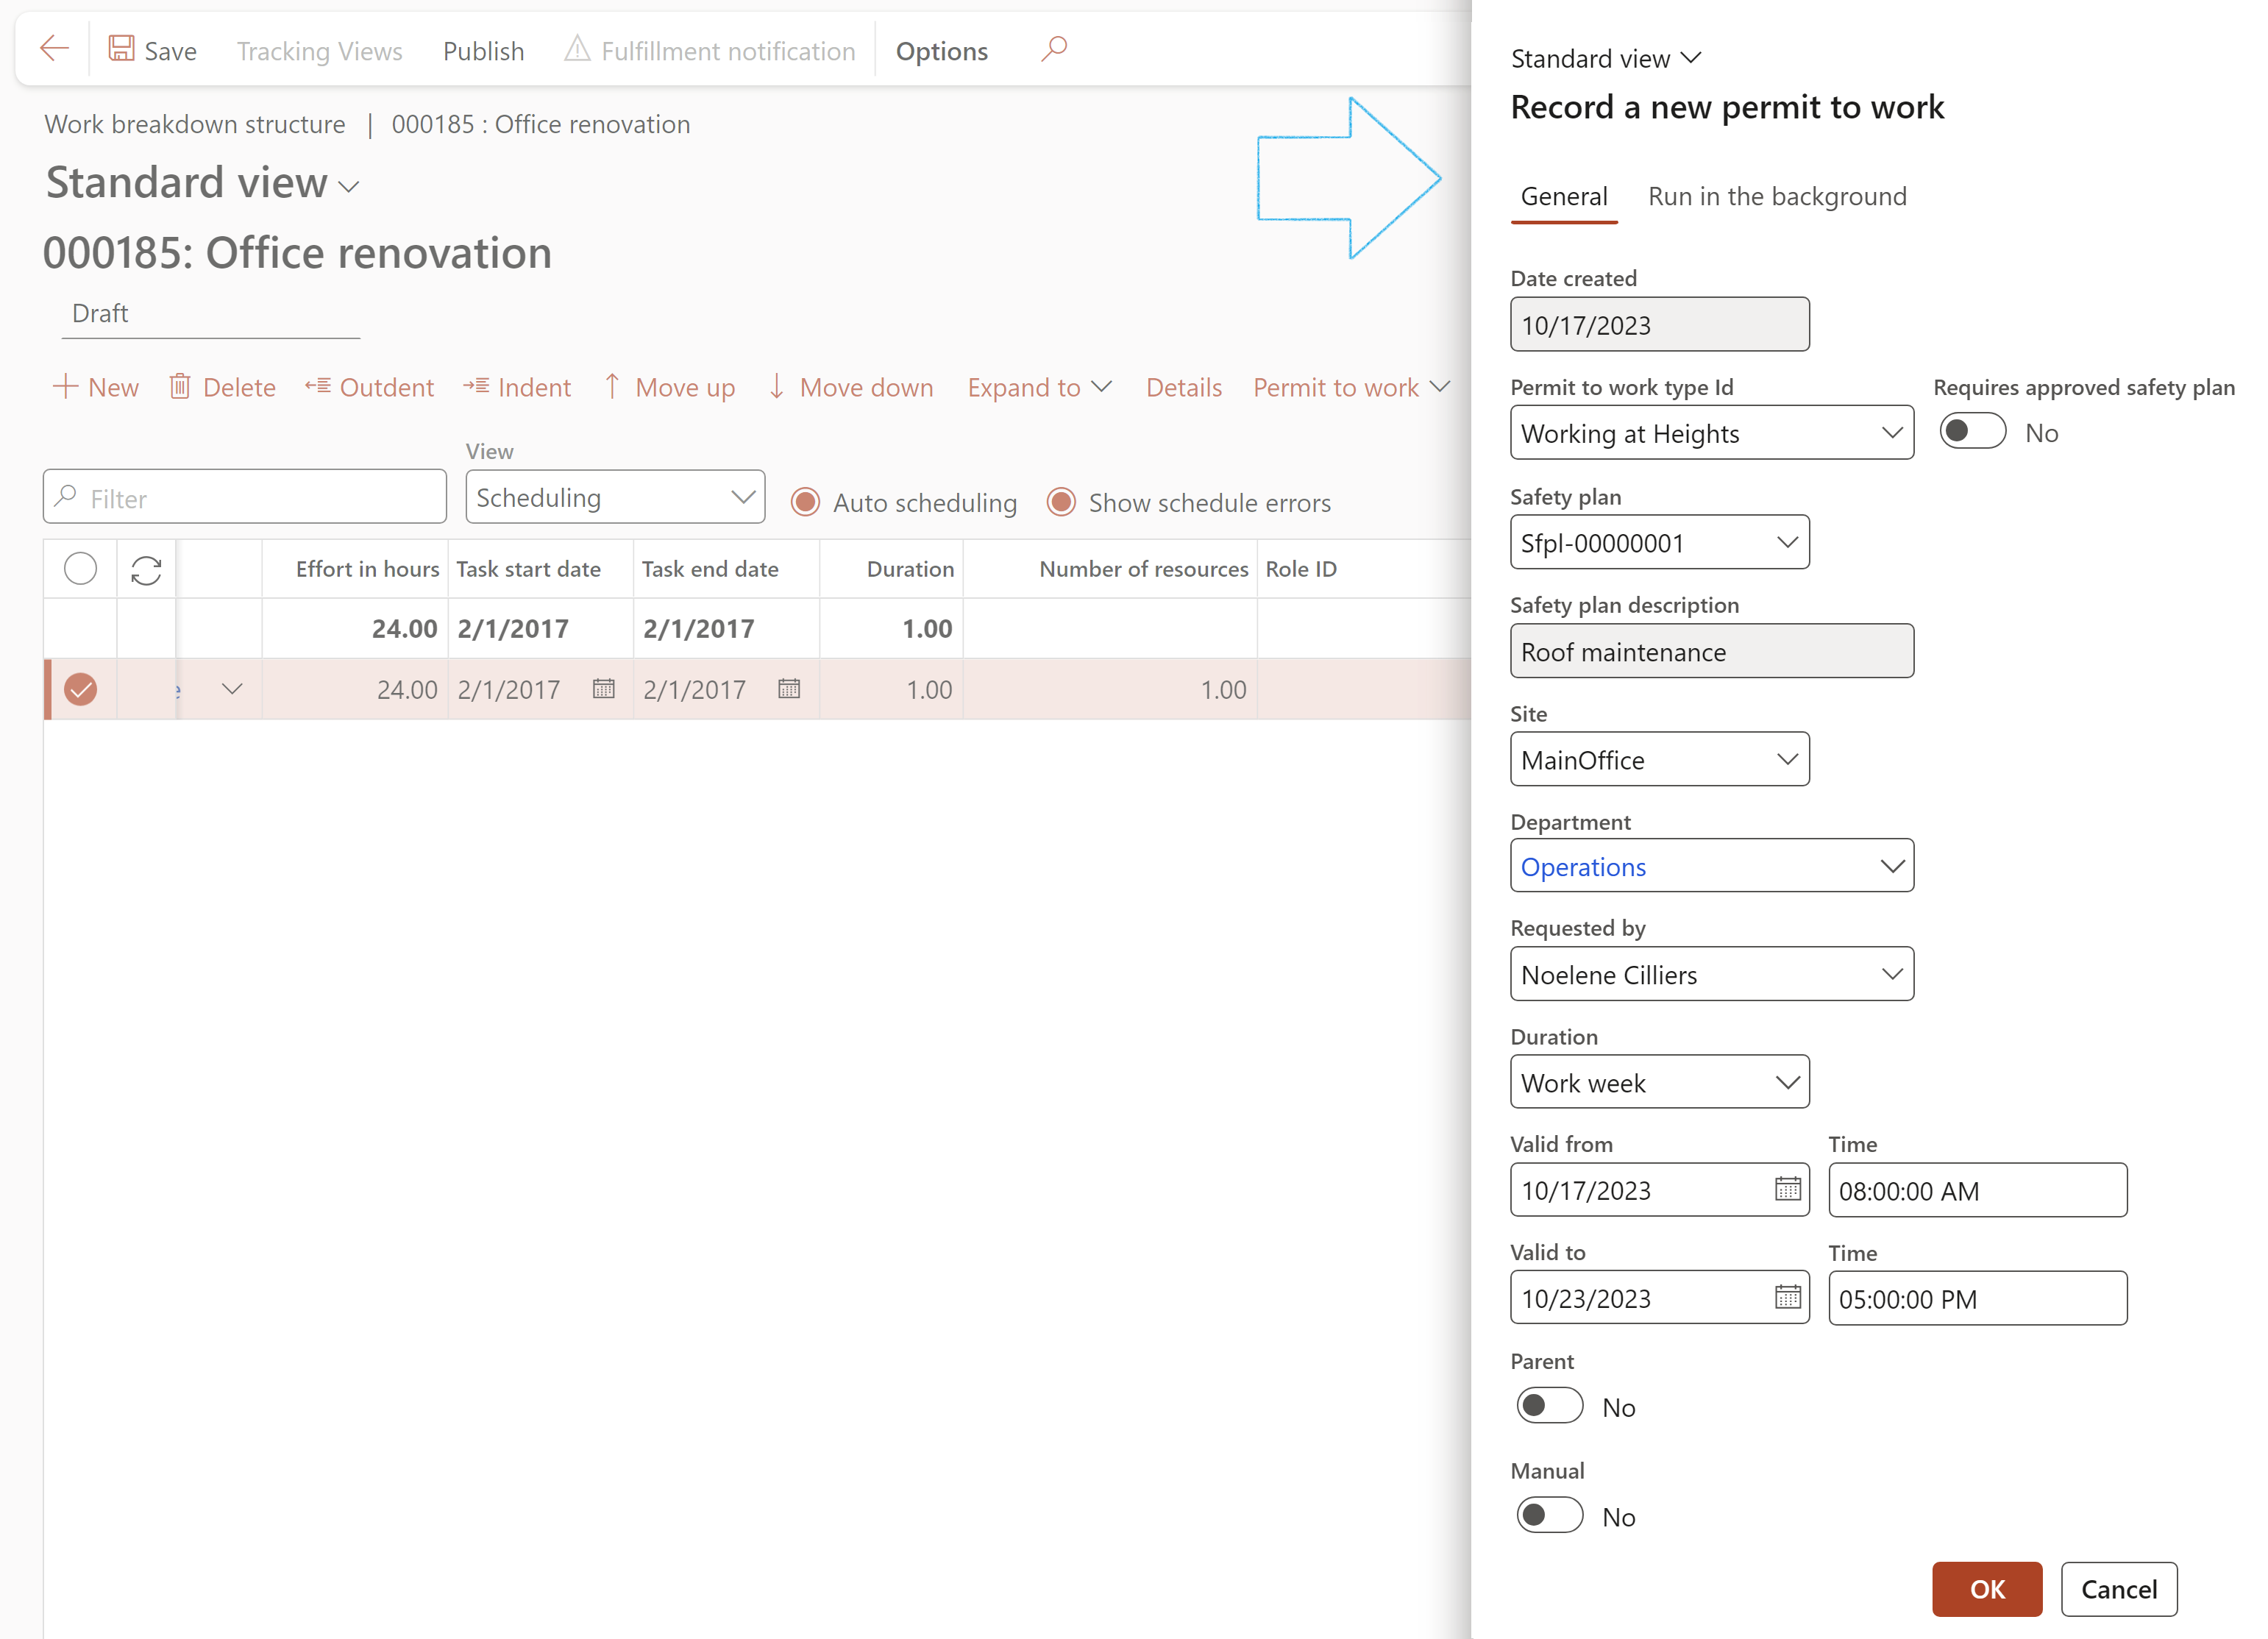
Fill in all the relevant fields and click OK
Go to: Project management and accounting > Projects > All projects
From the list page, open an existing (or create a new one) project
On the Action pane, under the Plan tab, click on the Work breakdown structure button in the Activities button group
On the Work breakdown structure, select the line that you need the permit to work for
Click on the Permit to work button group and select Add existing from the dropdown list
From the list given, choose the applicable permit and click OK
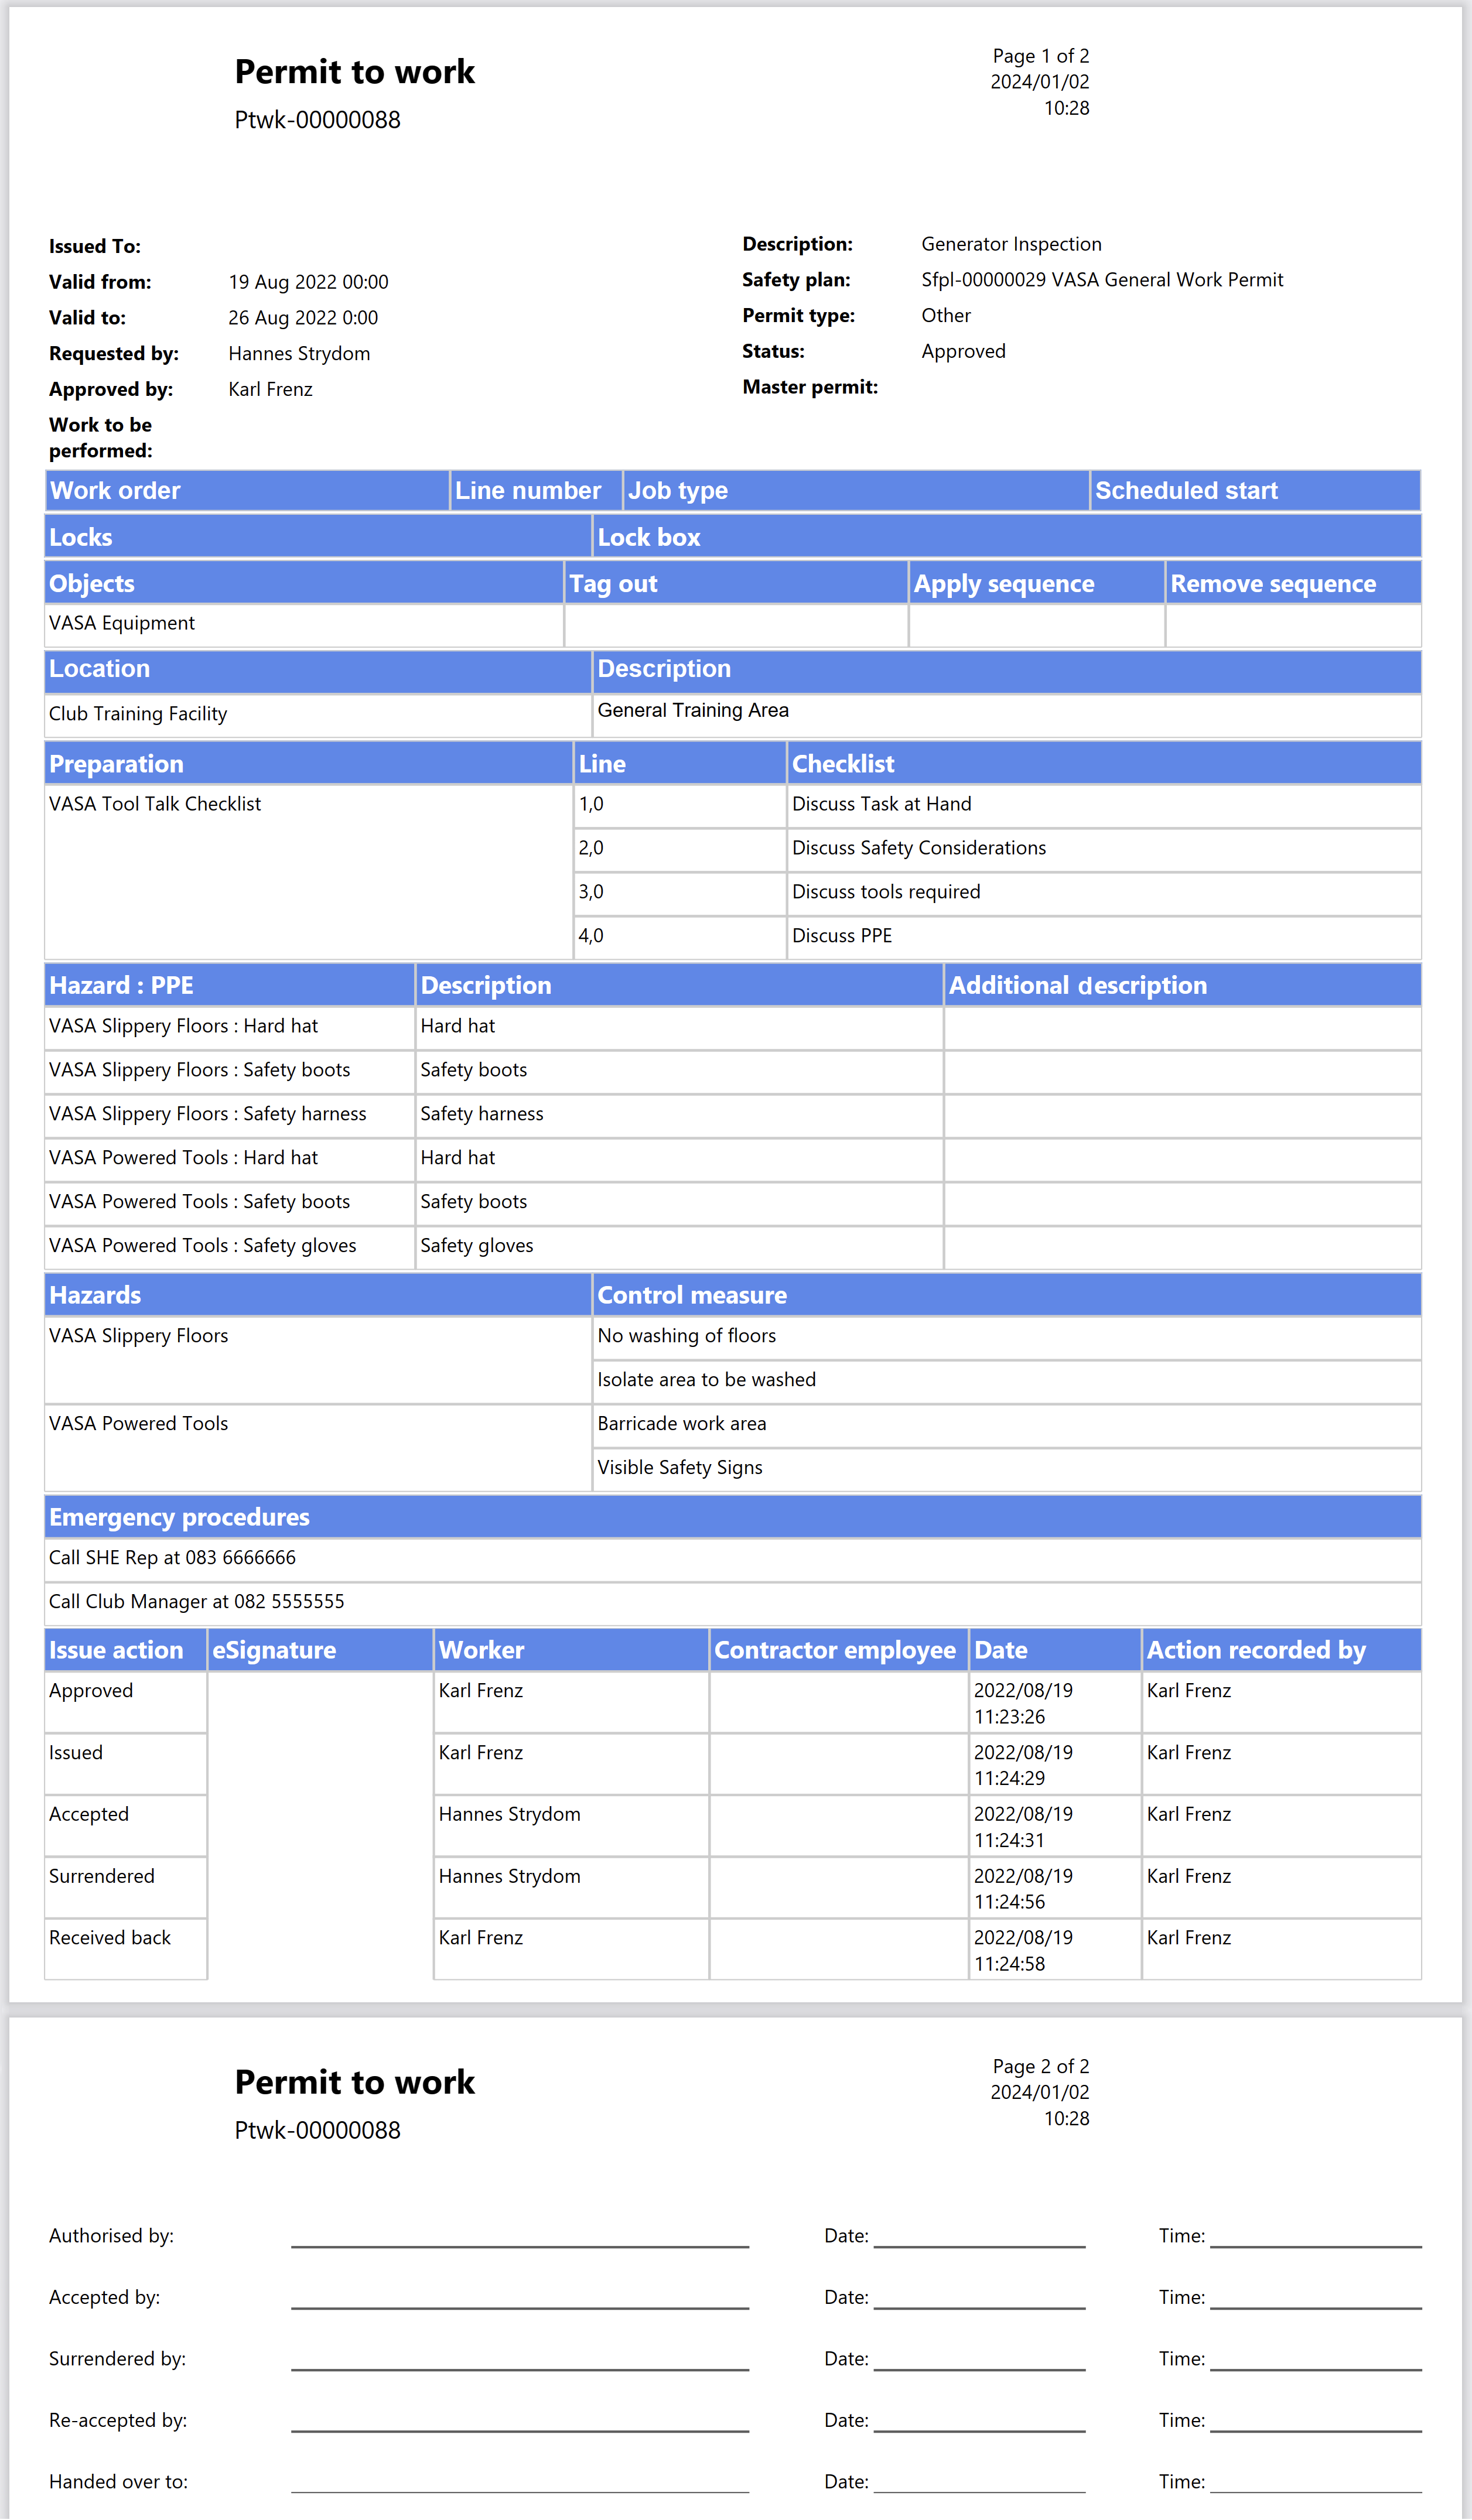
The HSE > Permits to work > Reports and Inquiries > Permit in columns menu will always print VIEW ONLY watermarked reports, regardless of permit or issue status, to prevent un-watermarked permits to be accidently circulated.
Go to: HSE > Permits to work > Permit to work list pages > All permits to work
Select the Permit to work that you want to print the report for
On the Action pane, in the References button group, click on the Print permit in columns button
The Print permit in columns button generates a DRAFT watermarked report until the report’s Permit Status = Approved, and the Issued field = Yes
Once the PTW becomes Permit Status = Approved and the Issued field = Yes, then an un-watermarked report is generated, but only for the first time after this print button is clicked! Every time it is printed again from this button, the report will print with a COPY watermark
To cater for printer jams or when a second reprint of an unwatermarked report is required, the Print permit in columns (admin) button on the Permit detail form, will generate unwatermarked reports, but the same conditions apply:
A DRAFT watermarked report is generated, until the report’s Permit Status = Approved and the Issued field = Yes
There is in essence no difference between the Print permit in columns, and Print permit in columns (admin) buttons, up until the report is Approved and Issued, thereafter this button continues to print un-watermarked reports
Access to the Print permit in columns (admin) button is controlled by security rights and roles to prevent general access to this feature


![eam_asset[6].png](/screenshots/ohs/hse007_p2w/eam_asset[6].png)
![eam_fl[61].png](/screenshots/ohs/hse007_p2w/eam_fl[61].png)
![wo_type[97].png](/screenshots/ohs/hse007_p2w/wo_type[97].png)
![wo_stage_1[83].png](/screenshots/ohs/hse007_p2w/wo_stage_1[83].png)
![wo_stage_2[95].png](/screenshots/ohs/hse007_p2w/wo_stage_2[95].png)