¶ Introduction
Guidelines:
It is highly desirable that a program be set up to monitor and inspect specific objects or locations.
Such an inspection program will:
- Enable control measures to be checked
- Enable work practices to be observed
- Permit the monitoring of risk management performance
- Provide a mechanism for identifying hazards
An inspection program:
- Should initially identify the areas and/or equipment to be inspected, as well as the frequency of inspection.
- Someone should be made responsible for carrying out inspections.
- A checklist should be prepared for each area to be inspected.
- The checklist should include the most significant hazards as well as the controls that are expected in the area.
- The inspection program should include:
- Physical features, such as checking that guards are in place and goods are being stored in the correct areas.
- Checks to see that the correct working practices are being followed.
- The checklist should be created to reflect a specific object and the hazards that it might contain.
Inspection records:
When inspections are carried out, a copy of the relevant checklist should be taken to the inspection site.
Each item should be ticked or crossed (as appropriate), and relevant comments recorded.
If the inspector sees something that is not on the inspection list that needs to be noted, he/she can use the Add lines button on the Inspection journal lines form to add this point when doing the inspection feedback.
¶ Types of inspections
Checklist inspections
A checklist is very useful for the regular inspection of specific items. However, they may not be as useful in identifying previously unrecognized hazards/problems. To accommodate this type of inspection, setup checklists.
Walk through inspections
An activity in which someone walks through an area, building, etc. in order to inspect it without using a checklist template. This method keeps you from getting stuck looking at the same things every time and noticing other things that might be out of place.
The effectiveness of this inspection method is dependent on the individual's level of knowledge about workplace related safety practices.
It is important to document the results of the inspection and any action taken in resolving or addressing safety hazards.
To accommodate this type of inspection, create an empty inspection list, then use the Add lines button on the Inspection journal lines form to add lines to the checklist when doing feedback on an inspection.
Risk mapping inspections
Risk mapping is used at safety meetings where everyone is familiar with the workplace and processes.
This technique uses a map/drawing of the workplace or a list of steps in a process.
People in the meeting then tell the leader what hazards they recognize, as well as where they are located in the workplace or process.
The leader uses different colors or symbols to identify different types of hazards on the map or steps in the process.
This type of inspection is ideal for involving all employees in identifying and resolving safety hazards.
To accommodate this type of inspection, create an empty inspection list, then use the Add lines button on the Inspection journal lines form to add lines to the checklist when doing feedback on an inspection.

¶ Navigation

¶ Specific setups
¶ Step 1: Parameters
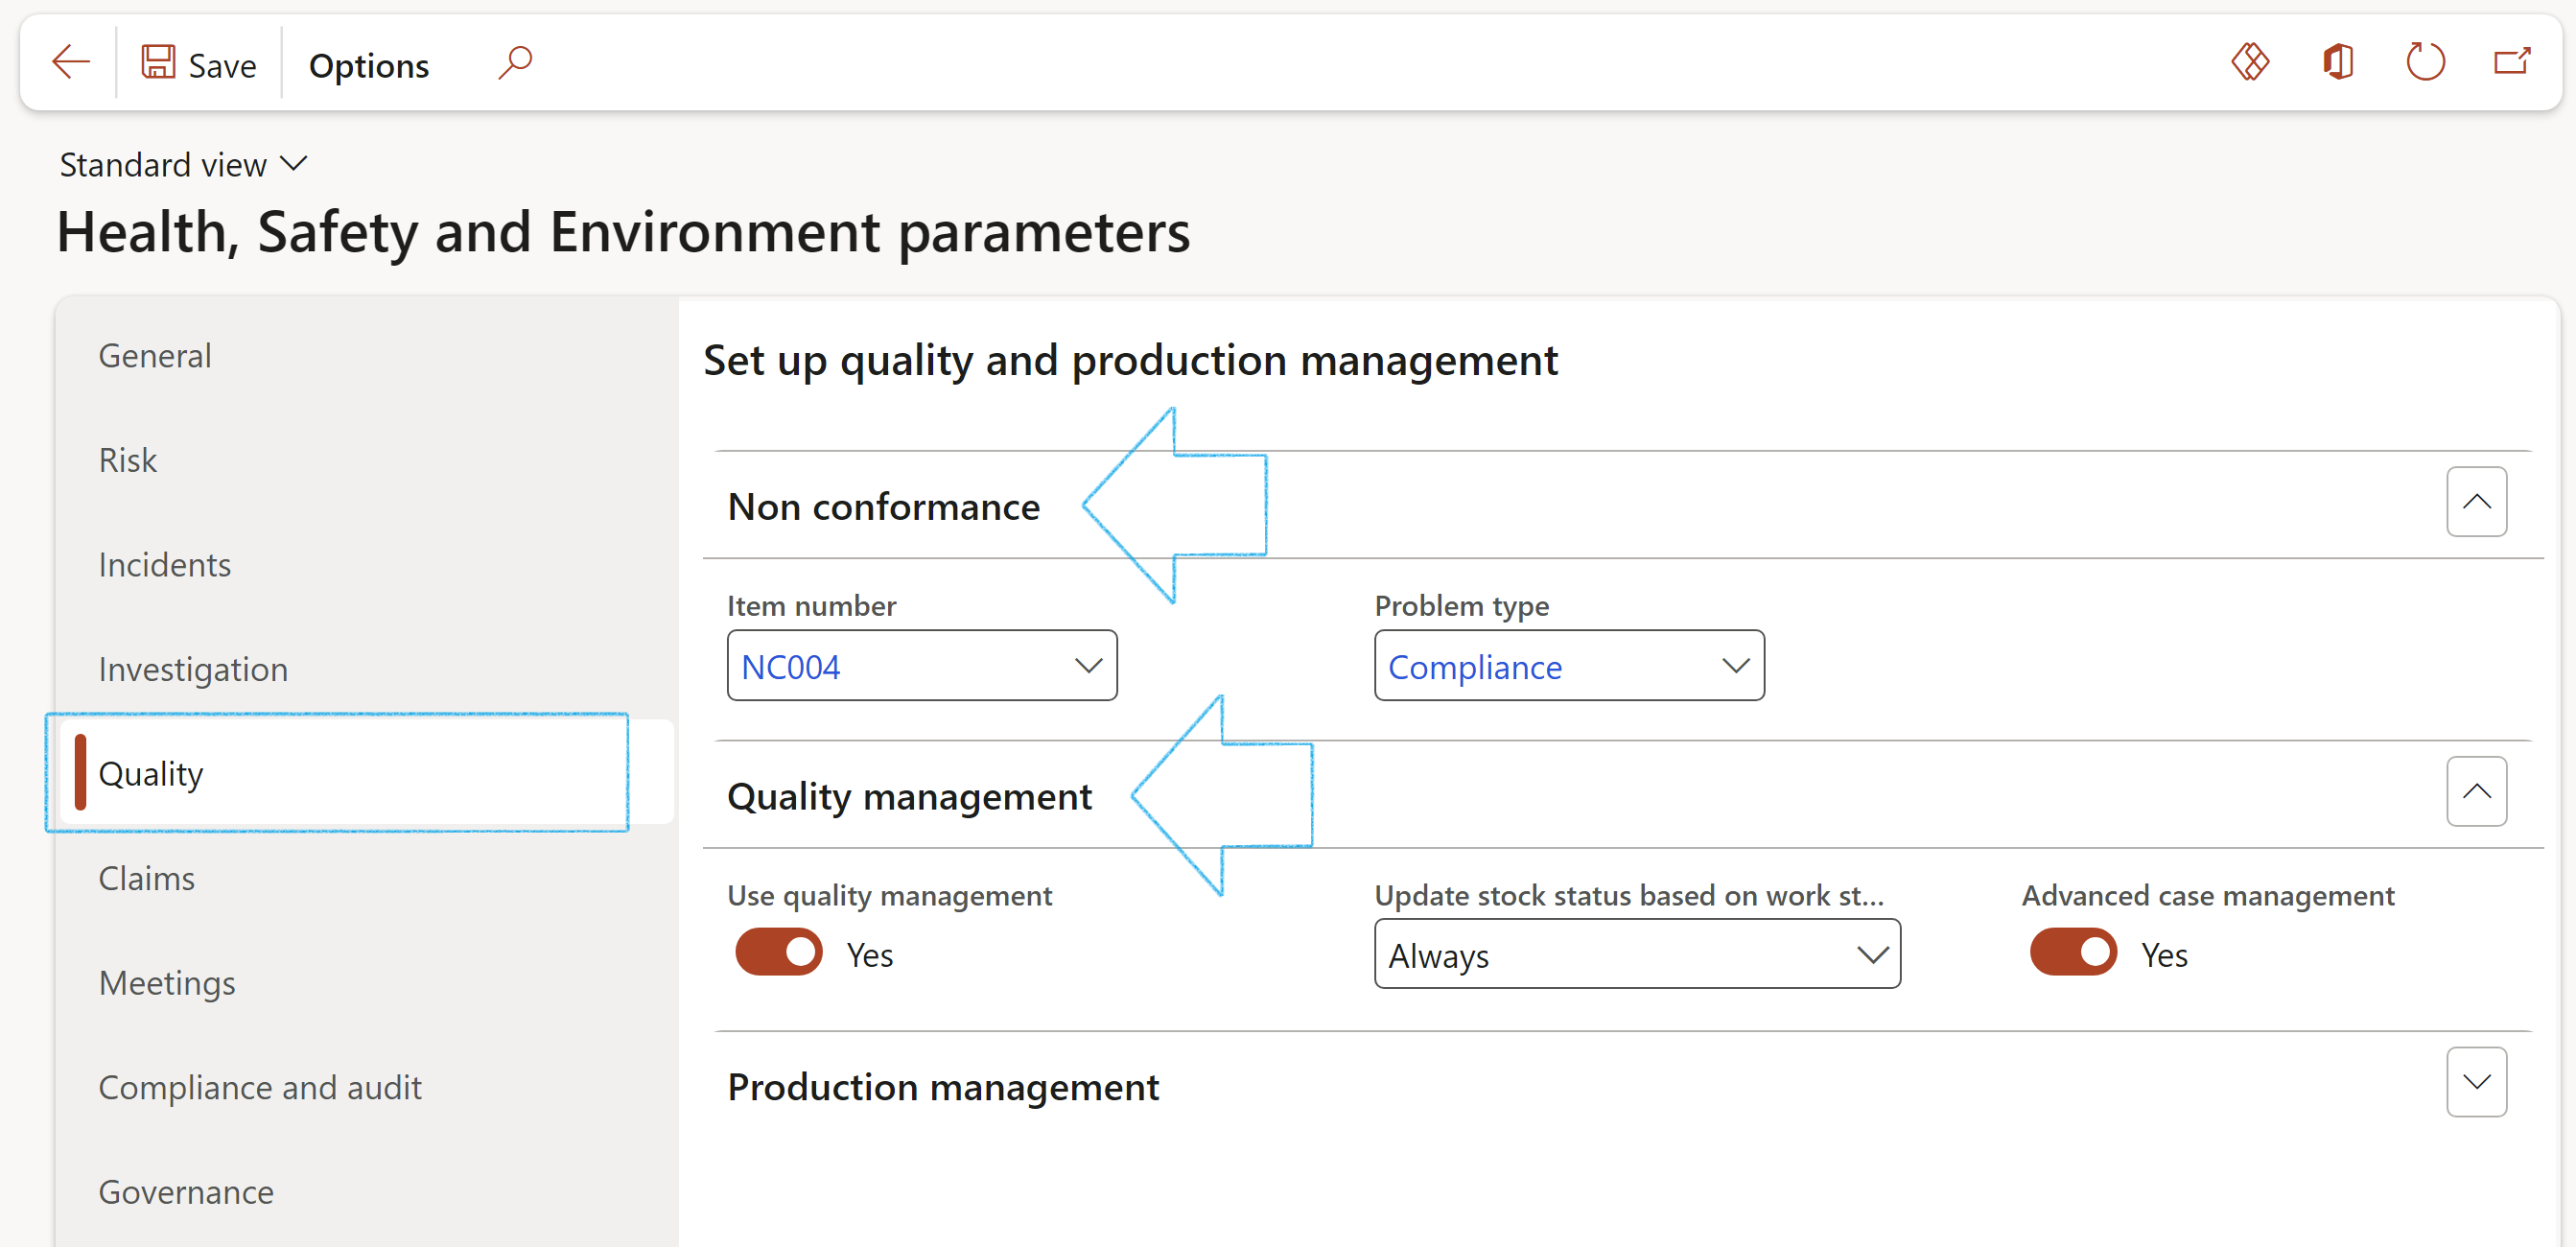
Go to: HSE > Setup > Health, Safety and Environment parameters
- Open the Quality tab
- Under the Non conformance Fast tab:
- Select the Item number for Non conformance from the dropdown list
- Select the Problem type (Compliance) from the dropdown list
- Under the Quality management Fast tab:
- Under Use quality management, select Yes
- Under Advanced case management, select Yes
¶ Step 2: Create Problem types
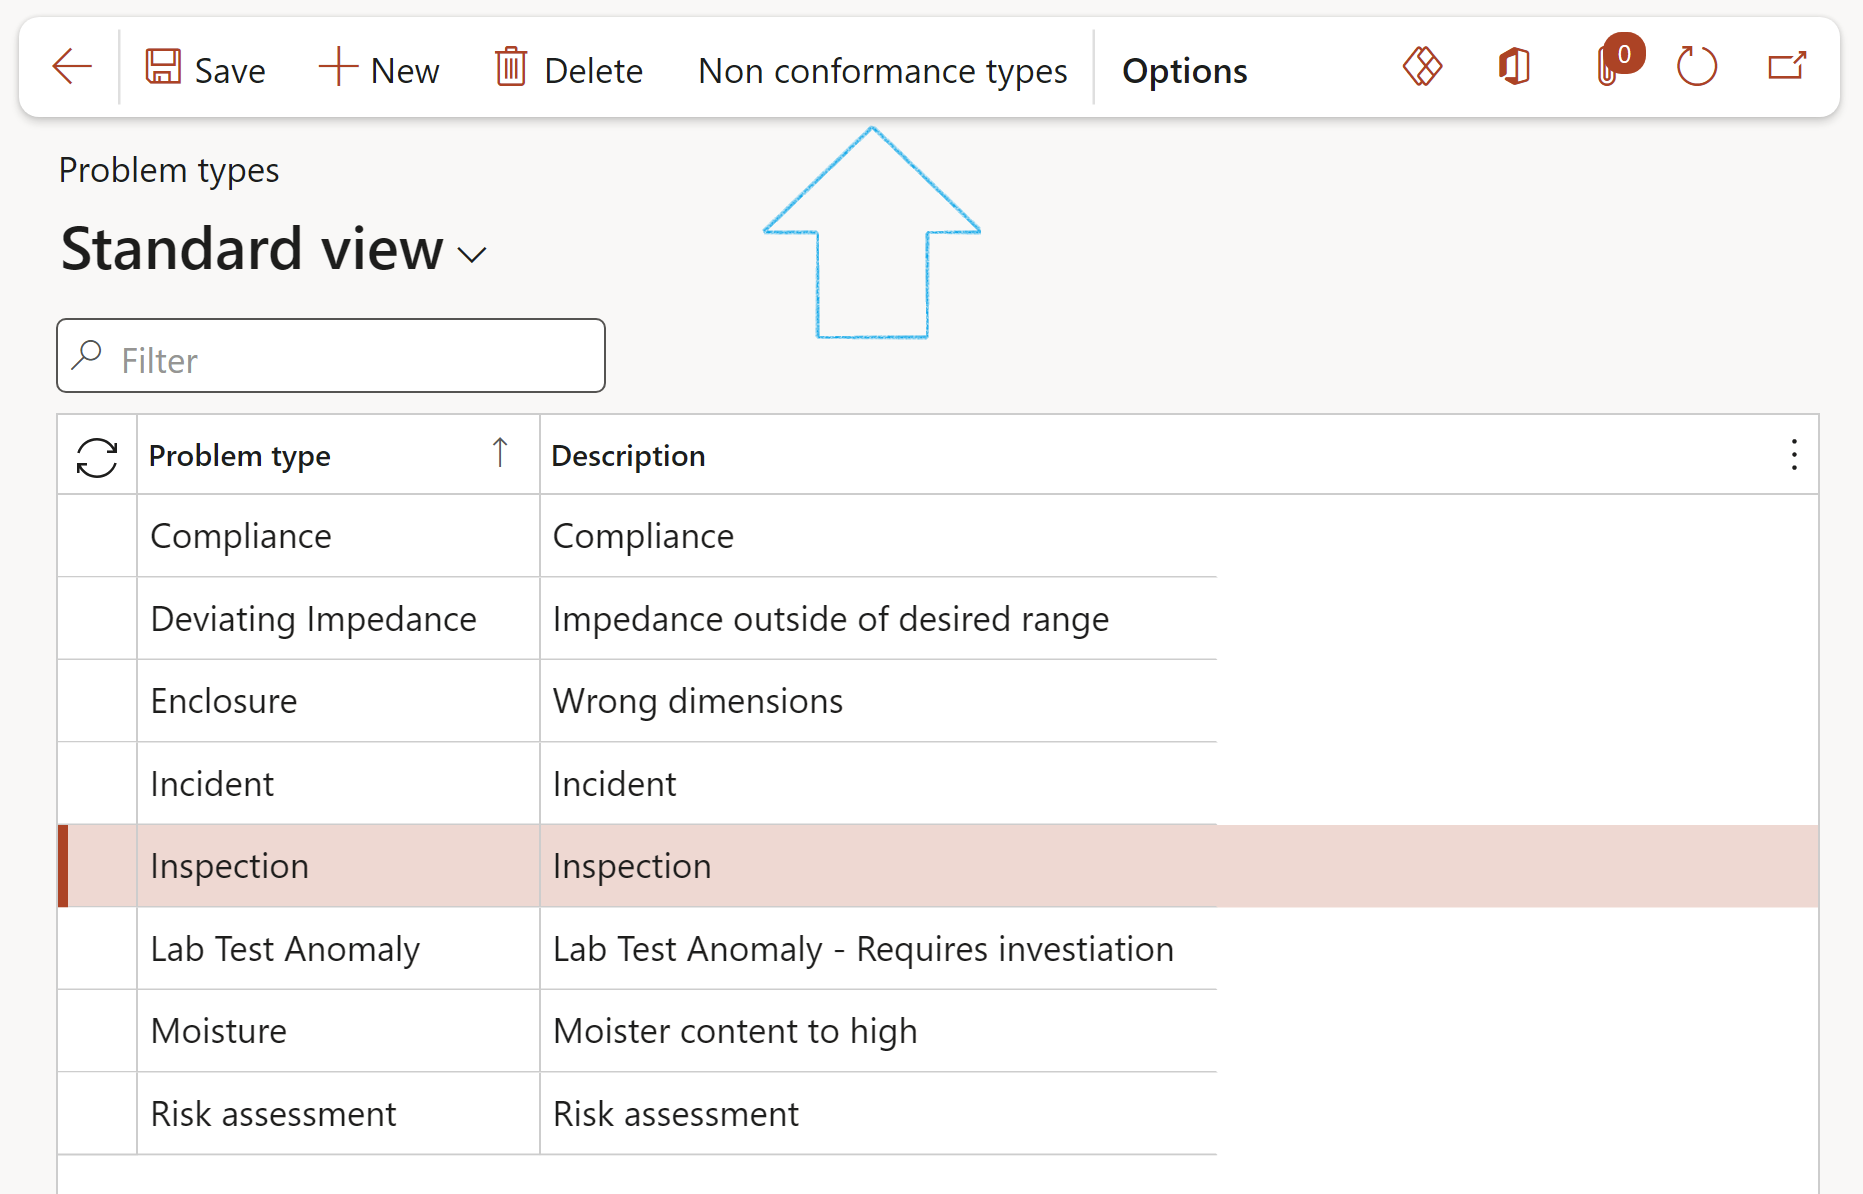
Go to: GRC > Internal audit > Setup for internal audit > Problem types
- In the Action pane, click onthe New button
- Enter a name for the new Problem type
- Type a brief Description of the problem type
¶ Step 3: Create Non conformance types
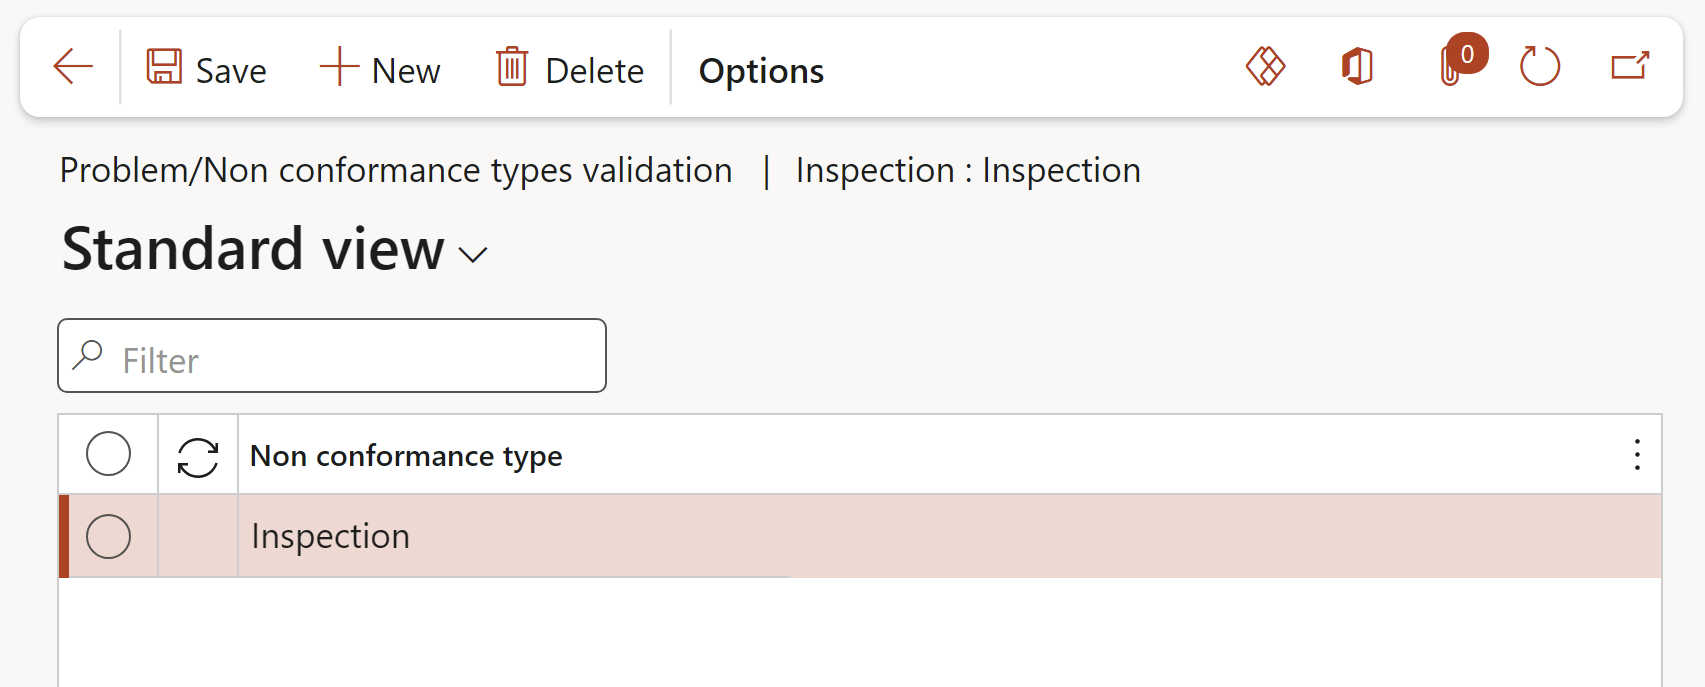
Go to: GRC > Internal audit > Setup for internal audit > Problem types
- Select the Problem type that you want to create the non conformance for
- In the Action pane, click on the Non conformance types button
- On the Action pane, click on the New button
- Select the relevant Non conformance type from the dropdown list
¶ Step 4: Inspection types
Go to: HSE > Inspections > Setup for inspections > Inspection types
- On the Action pane, click on the New button
- Enter the inspection Type name
- Enter a brief Description for the inspection type
- Select the relevant Type of inspection from the dropdown list
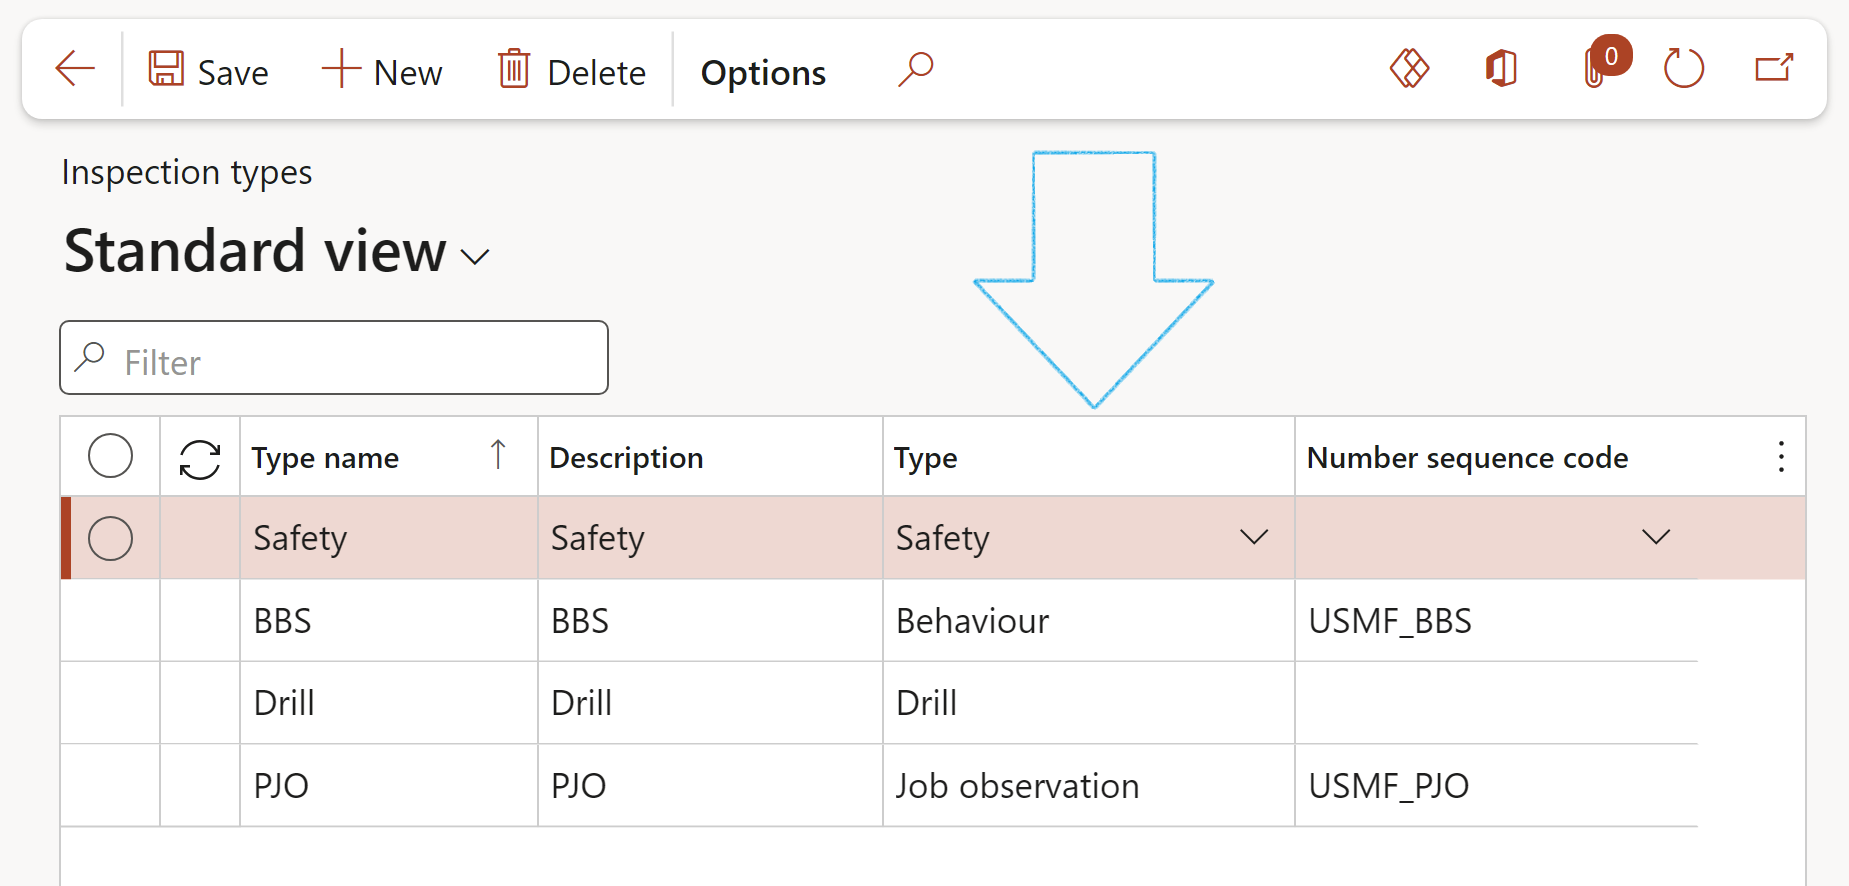
The Hazard column under the Lines Fast tab on the Inspection journal, will only be visible when the Inspection type = Behavior/Safety/Construction
¶ Step 5: Inspection list
An inspection list is the list of points that will be printed on the inspection sheet. The inspector will use this inspection list to score the object/location that is being inspected.
The user can choose to use simple Yes/No answers, or a more advanced answers with scores
For Simple Yes/No answers:
Go to: HSE > Inspections > Setup for inspections > Inspection list
- Under the General Fast tab:
- Enter an Inspection list name
- Enter an Inspection sheet notice that is to be printed at the top of the inspection sheet
- Enter the Passing %
- Select Yes to Allow Yes/No answers
Under the Lines Fast tab:
- The Skull and bone column is visible
- The Correct answer field is visible. (The user indicates whether the correct answer for the line is Yes or No)
On the Inspection journal lines:
- Yes/No/Not applicable dropdown list (If no hazard is selected)
- Safe/Unsafe dropdown list (If a hazard is selected)
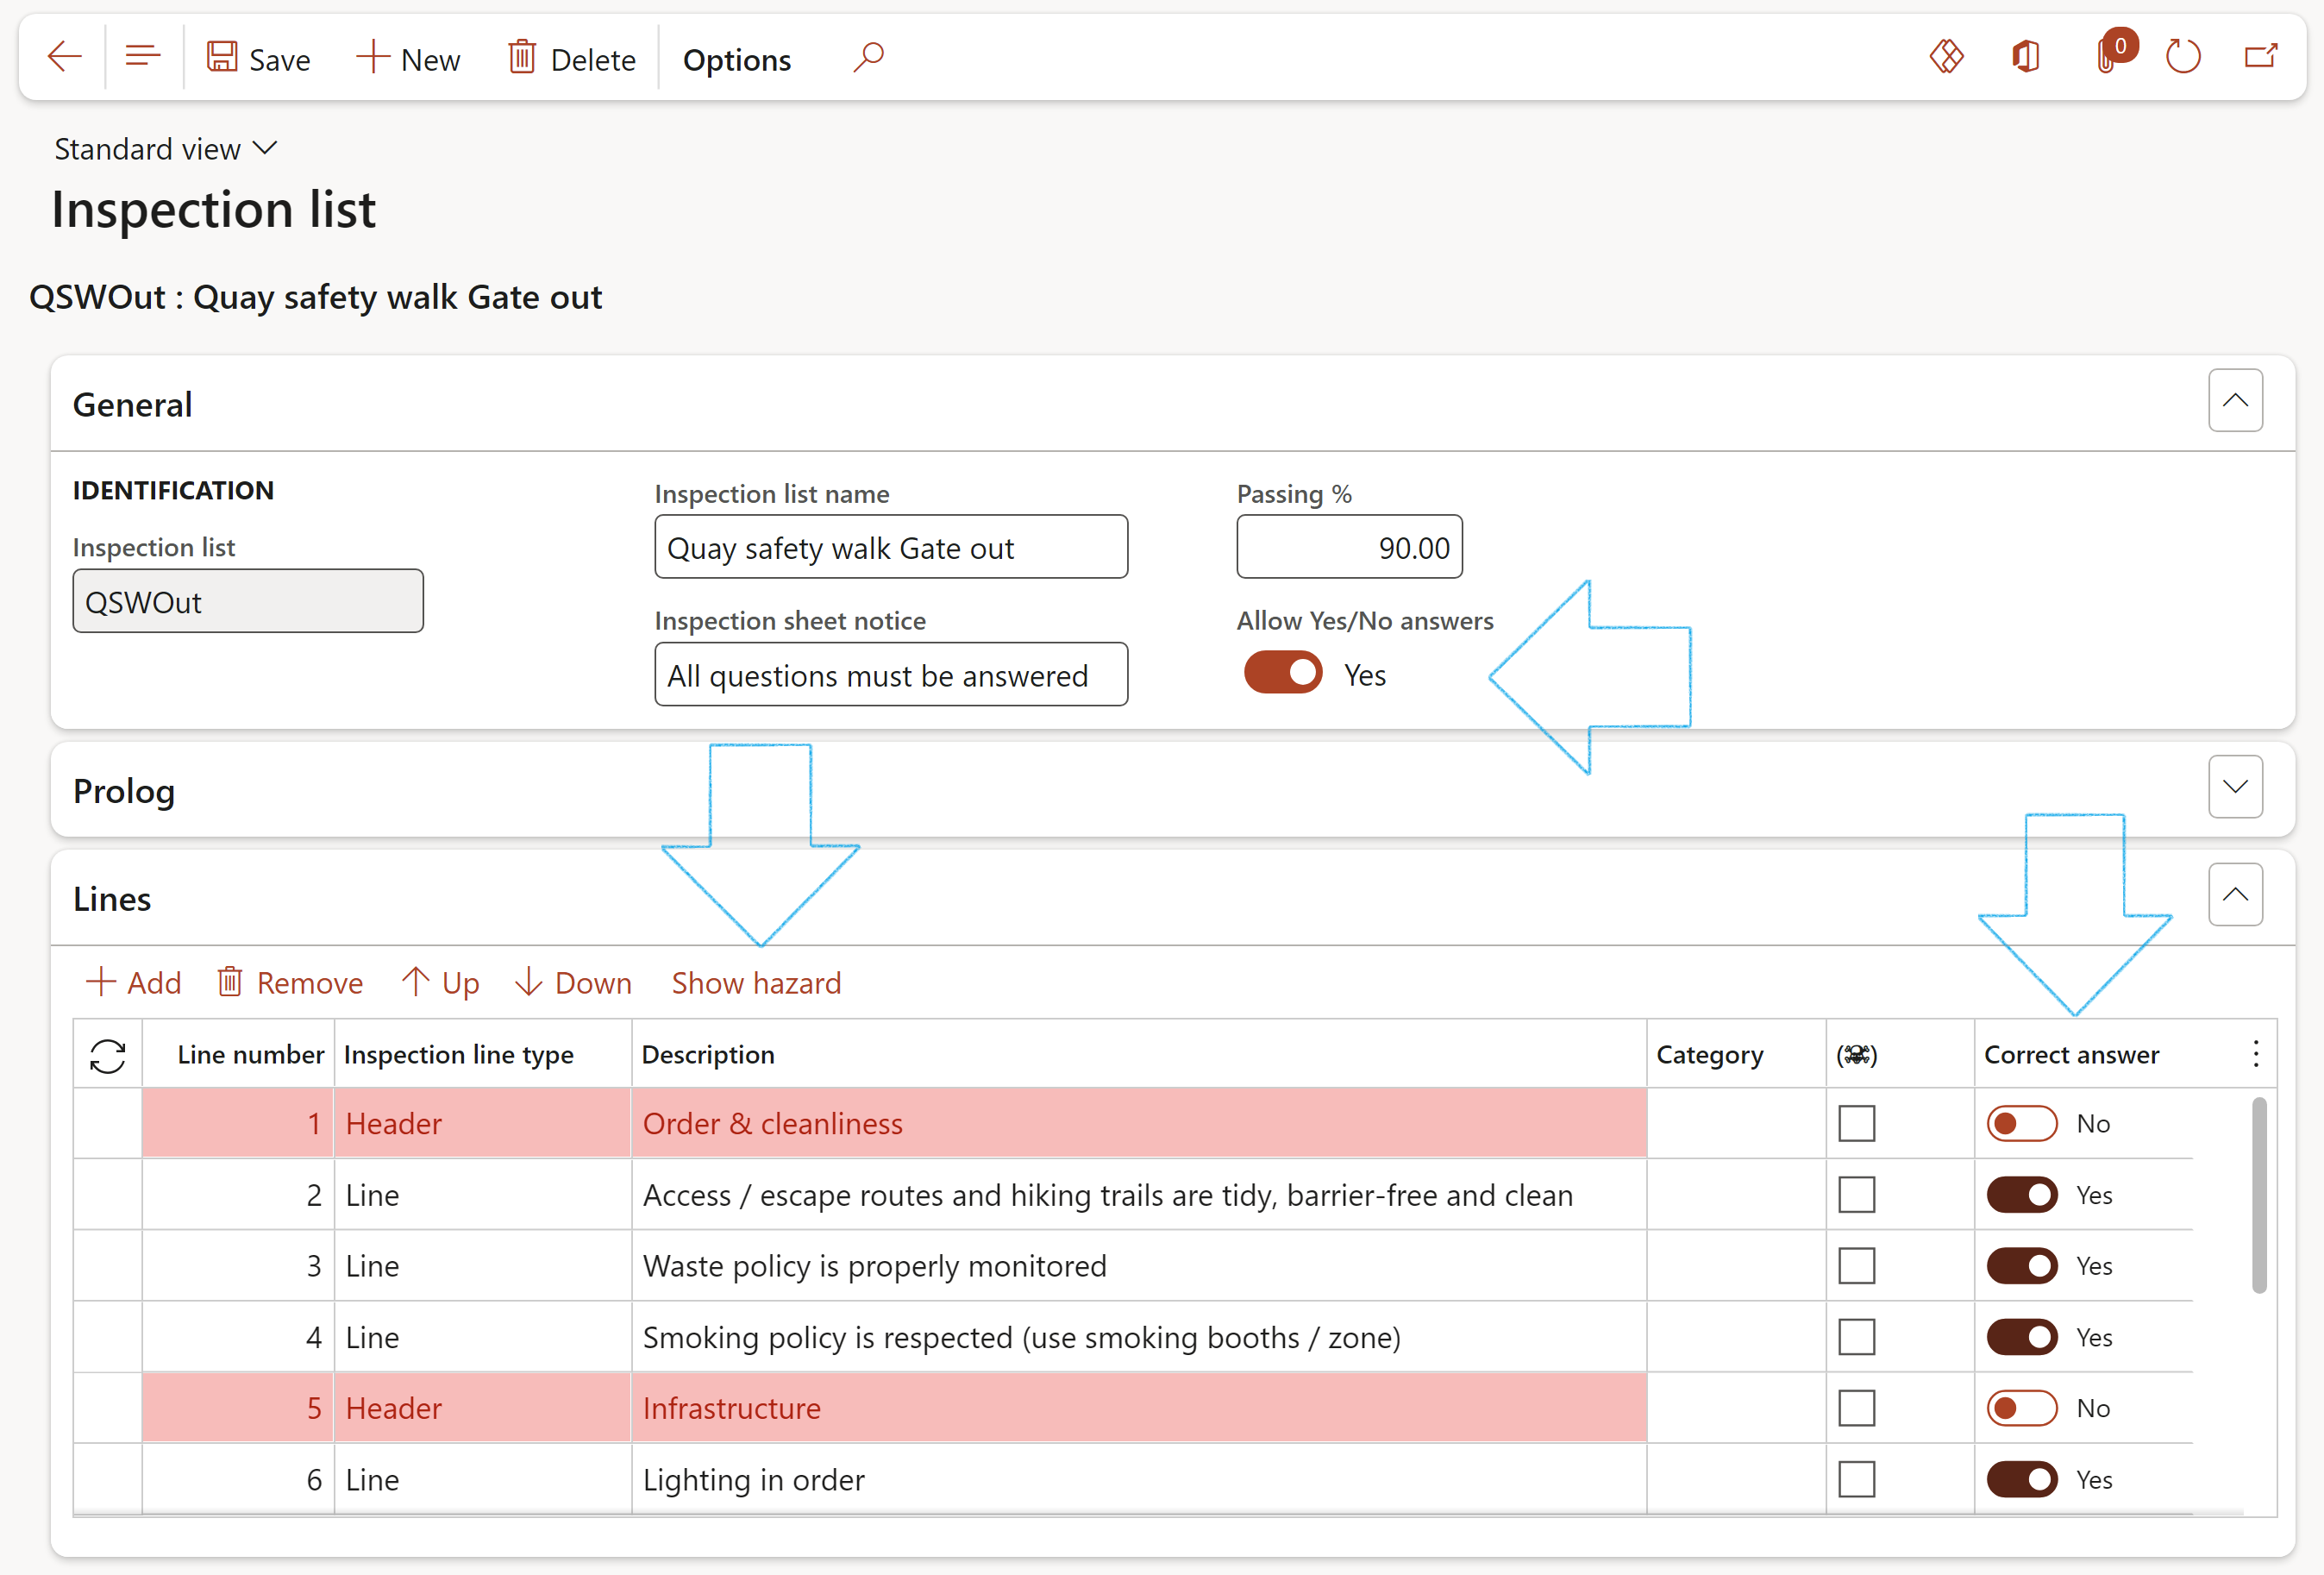
- The user can choose to show the Hazard column by clicking on the Show hazard button
- If the skull icon is ticked, the inspection will fail irrespective of the total correct answers. (Except where N/A is selected)
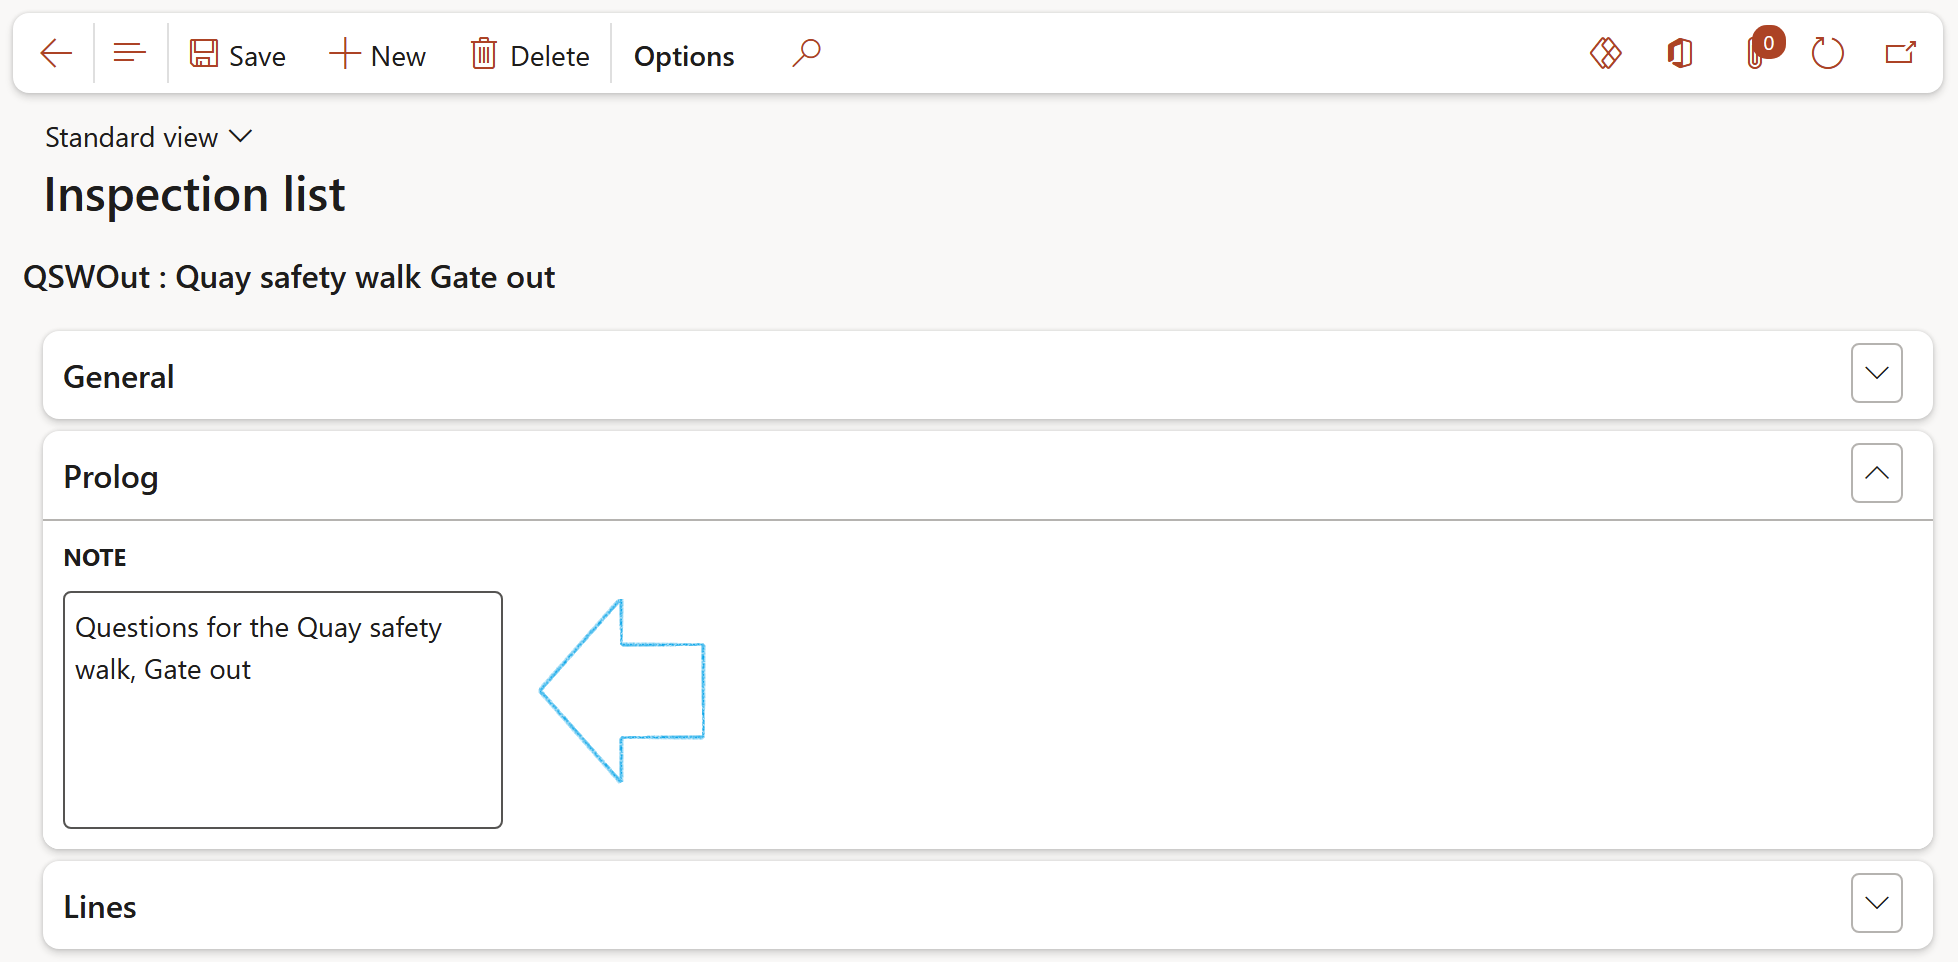
- Under the Prolog Fast tab, in the Note field, create and maintain a prolog to be printed on the front page of the inspection list
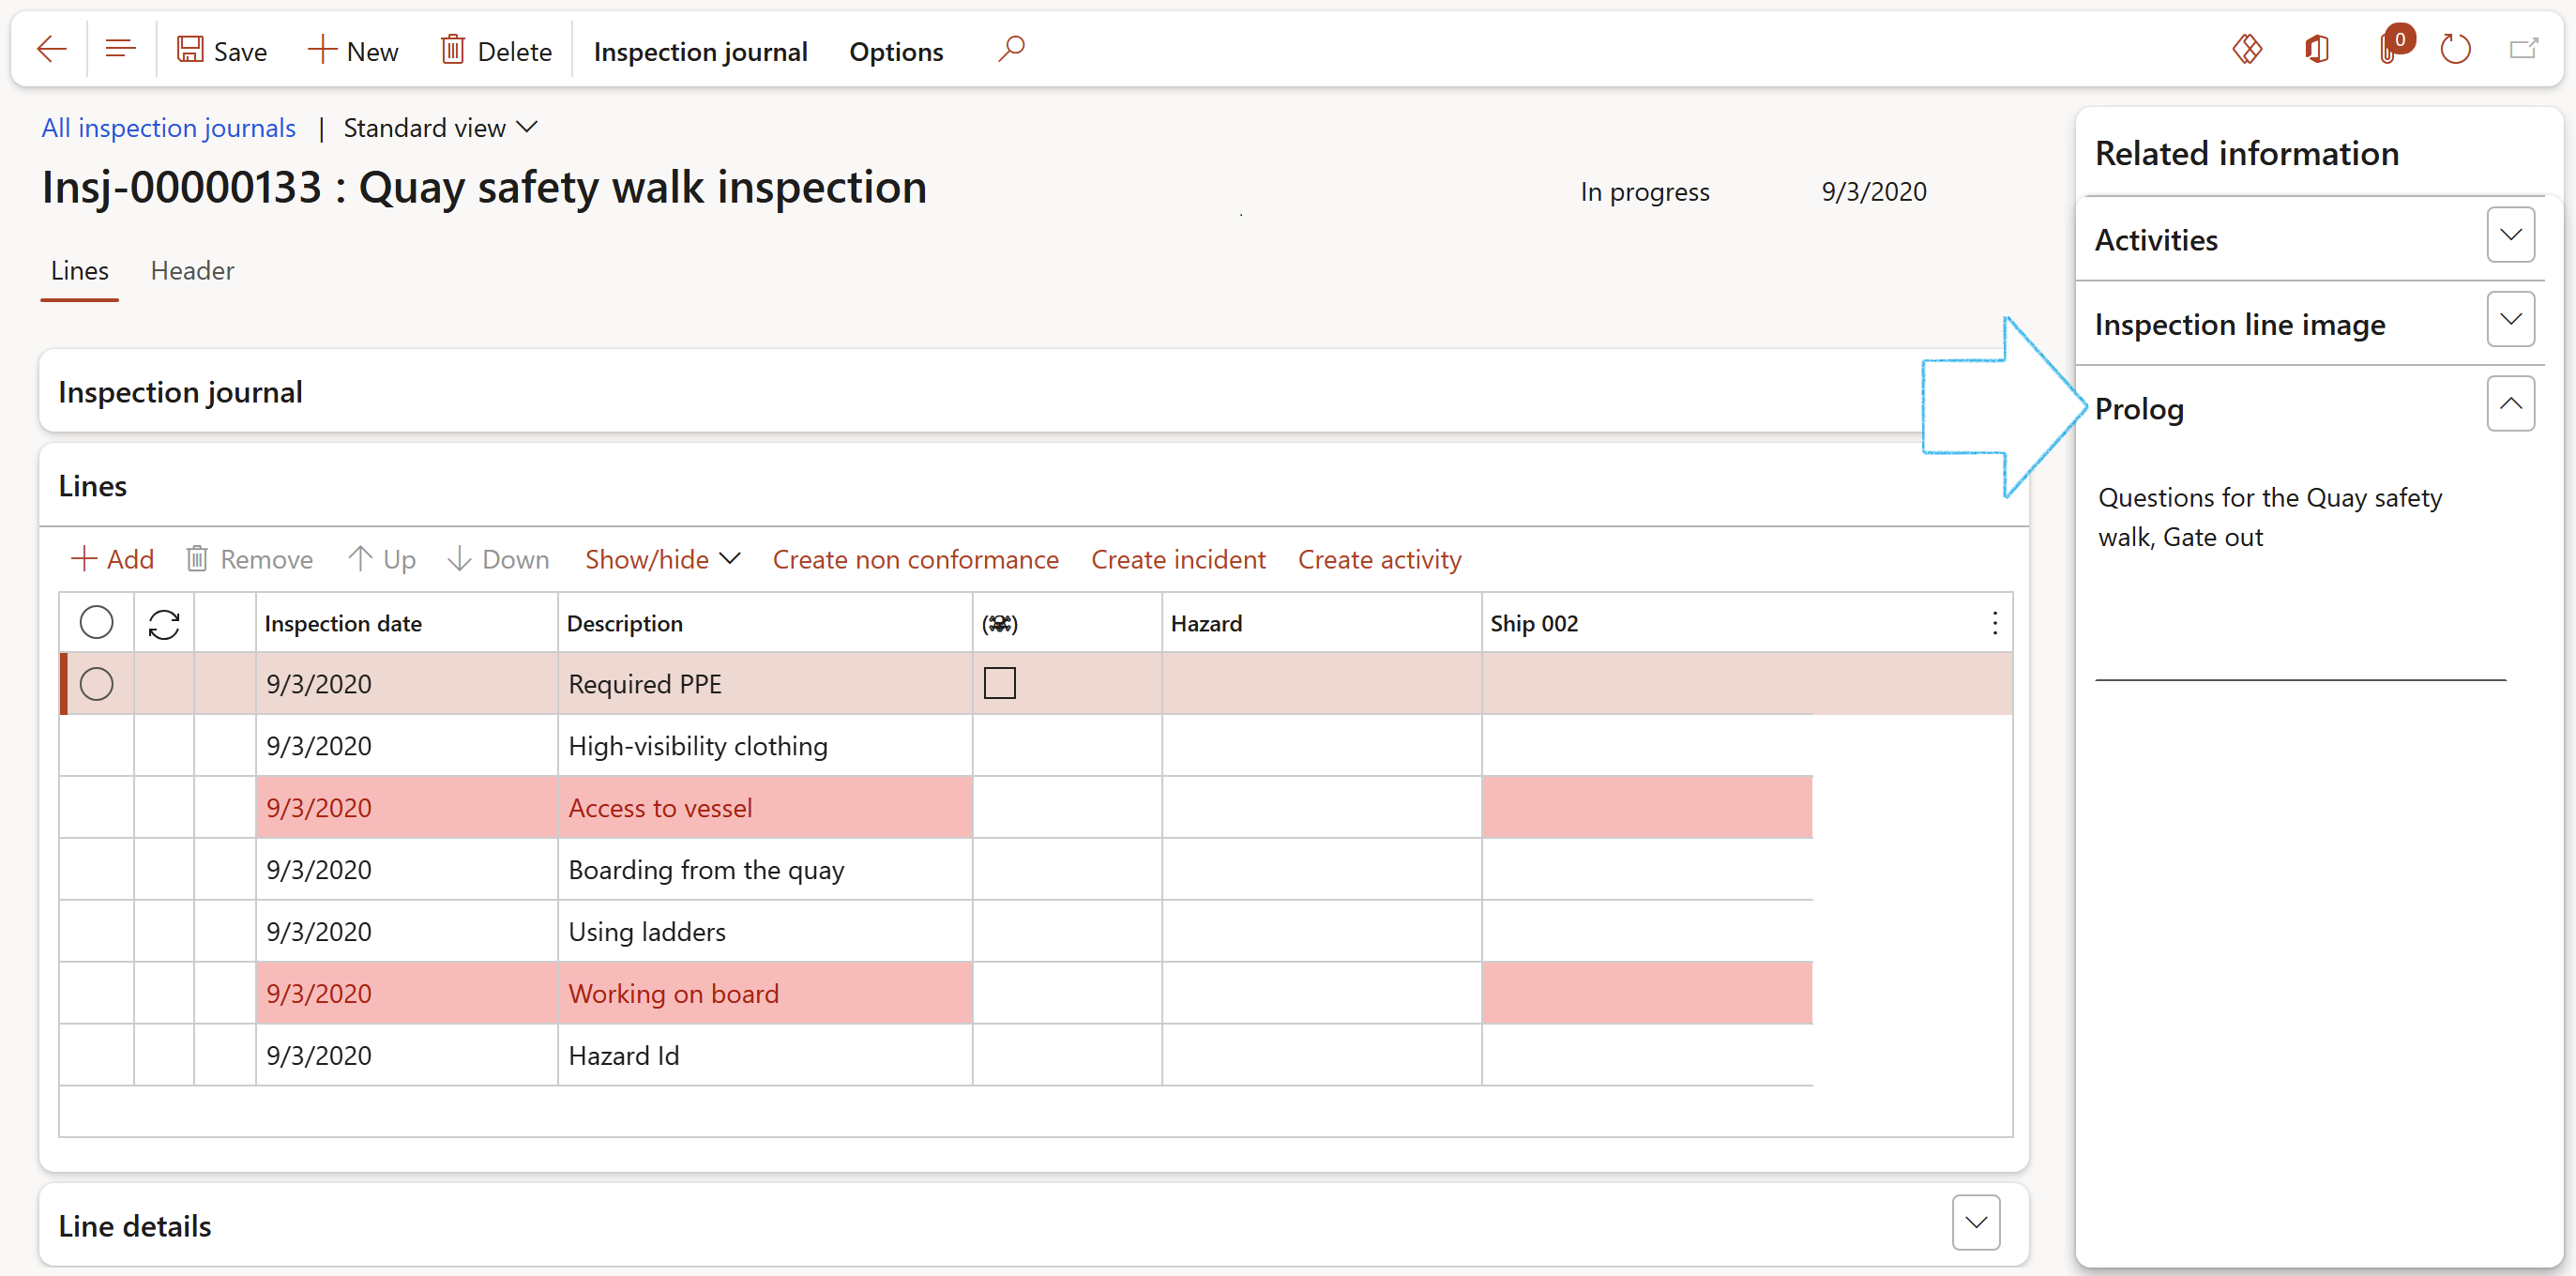
The Prolog can be viewed op the Inspection journal in the Related information pane, under the Prolog Fact box
For Scoring:
Go to: HSE > Inspections > Setup for inspections > Inspection list
- Under the General Fast tab:
- Enter an Inspection list name
- Enter an Inspection sheet notice that is to be printed at the top of the inspection sheet
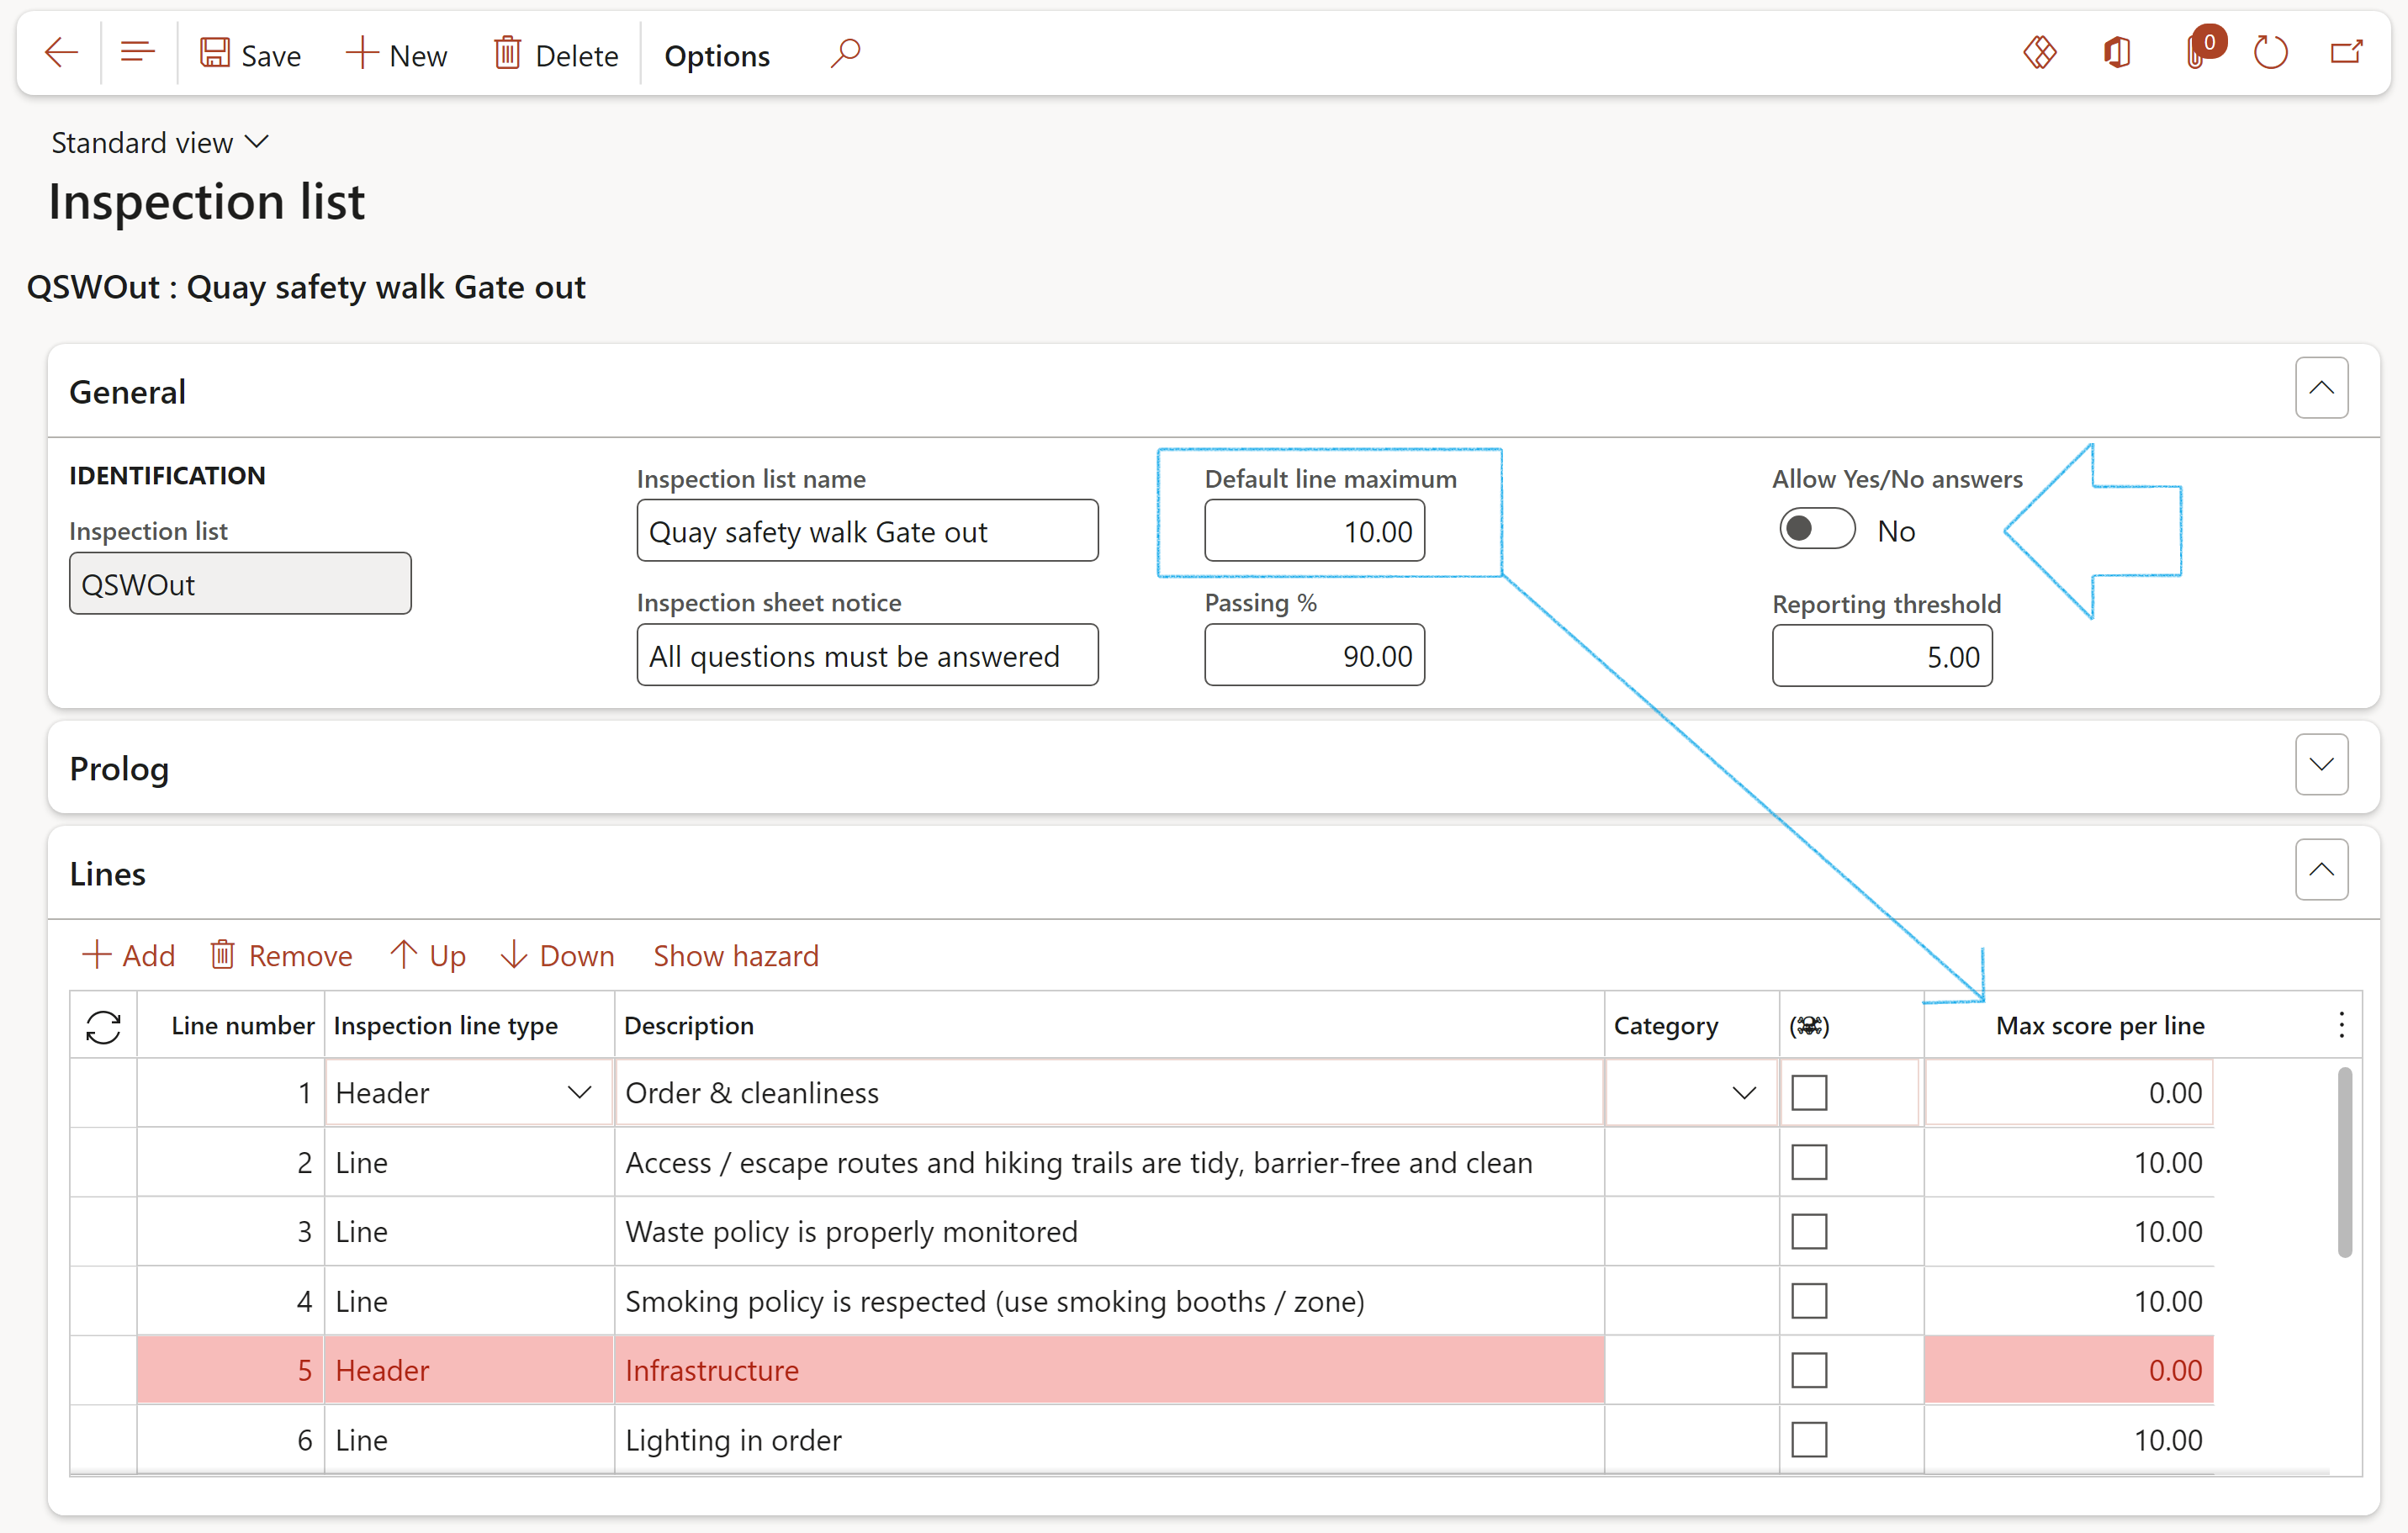
- Enter the Default line maximum (the default maximum score per line. When the user enters/changes the value, the user is asked whether the max score values on the inspection list lines should be updated)
- Enter the Passing %
- Select No to Allow Yes/No answers
- Enter the Reporting threshold
- Under the Lines Fast tab:
- The Maximum score per line field is visible
- On the Inspection journal lines:
- Scoring can be done on every line for every selected object/location
If the skull icon is ticked, the inspection will fail irrespective of the total score
¶ Step 5.1: Inspection list lines
The following buttons are used under the Lines Fast tab of the Inspection list form:
- In the Button strip, the Up button is used to move the selected line up in the list. The Down button is used to move the selected line down in the list
- The user can choose to show the Hazard column by clicking on the Show hazard button
- The Line number field is used to order the inspection lines. This number is automatically assigned and can be hidden if necessary
- In the Inspection line type field, a line can be marked as a header or a line. A header is a topic that group lines together
- Category - The category is selected on the "Header" type lines. When the Graphical inspection sheet is printed, the lines will be grouped under the selected categories
- Select the skull icon if the inspection must fail irrespective of the total score

¶ Step 5.1.1: Adding images to lines
- Select the line that you want to add the image to
- Open the Related information pane
- Click on the Change image button
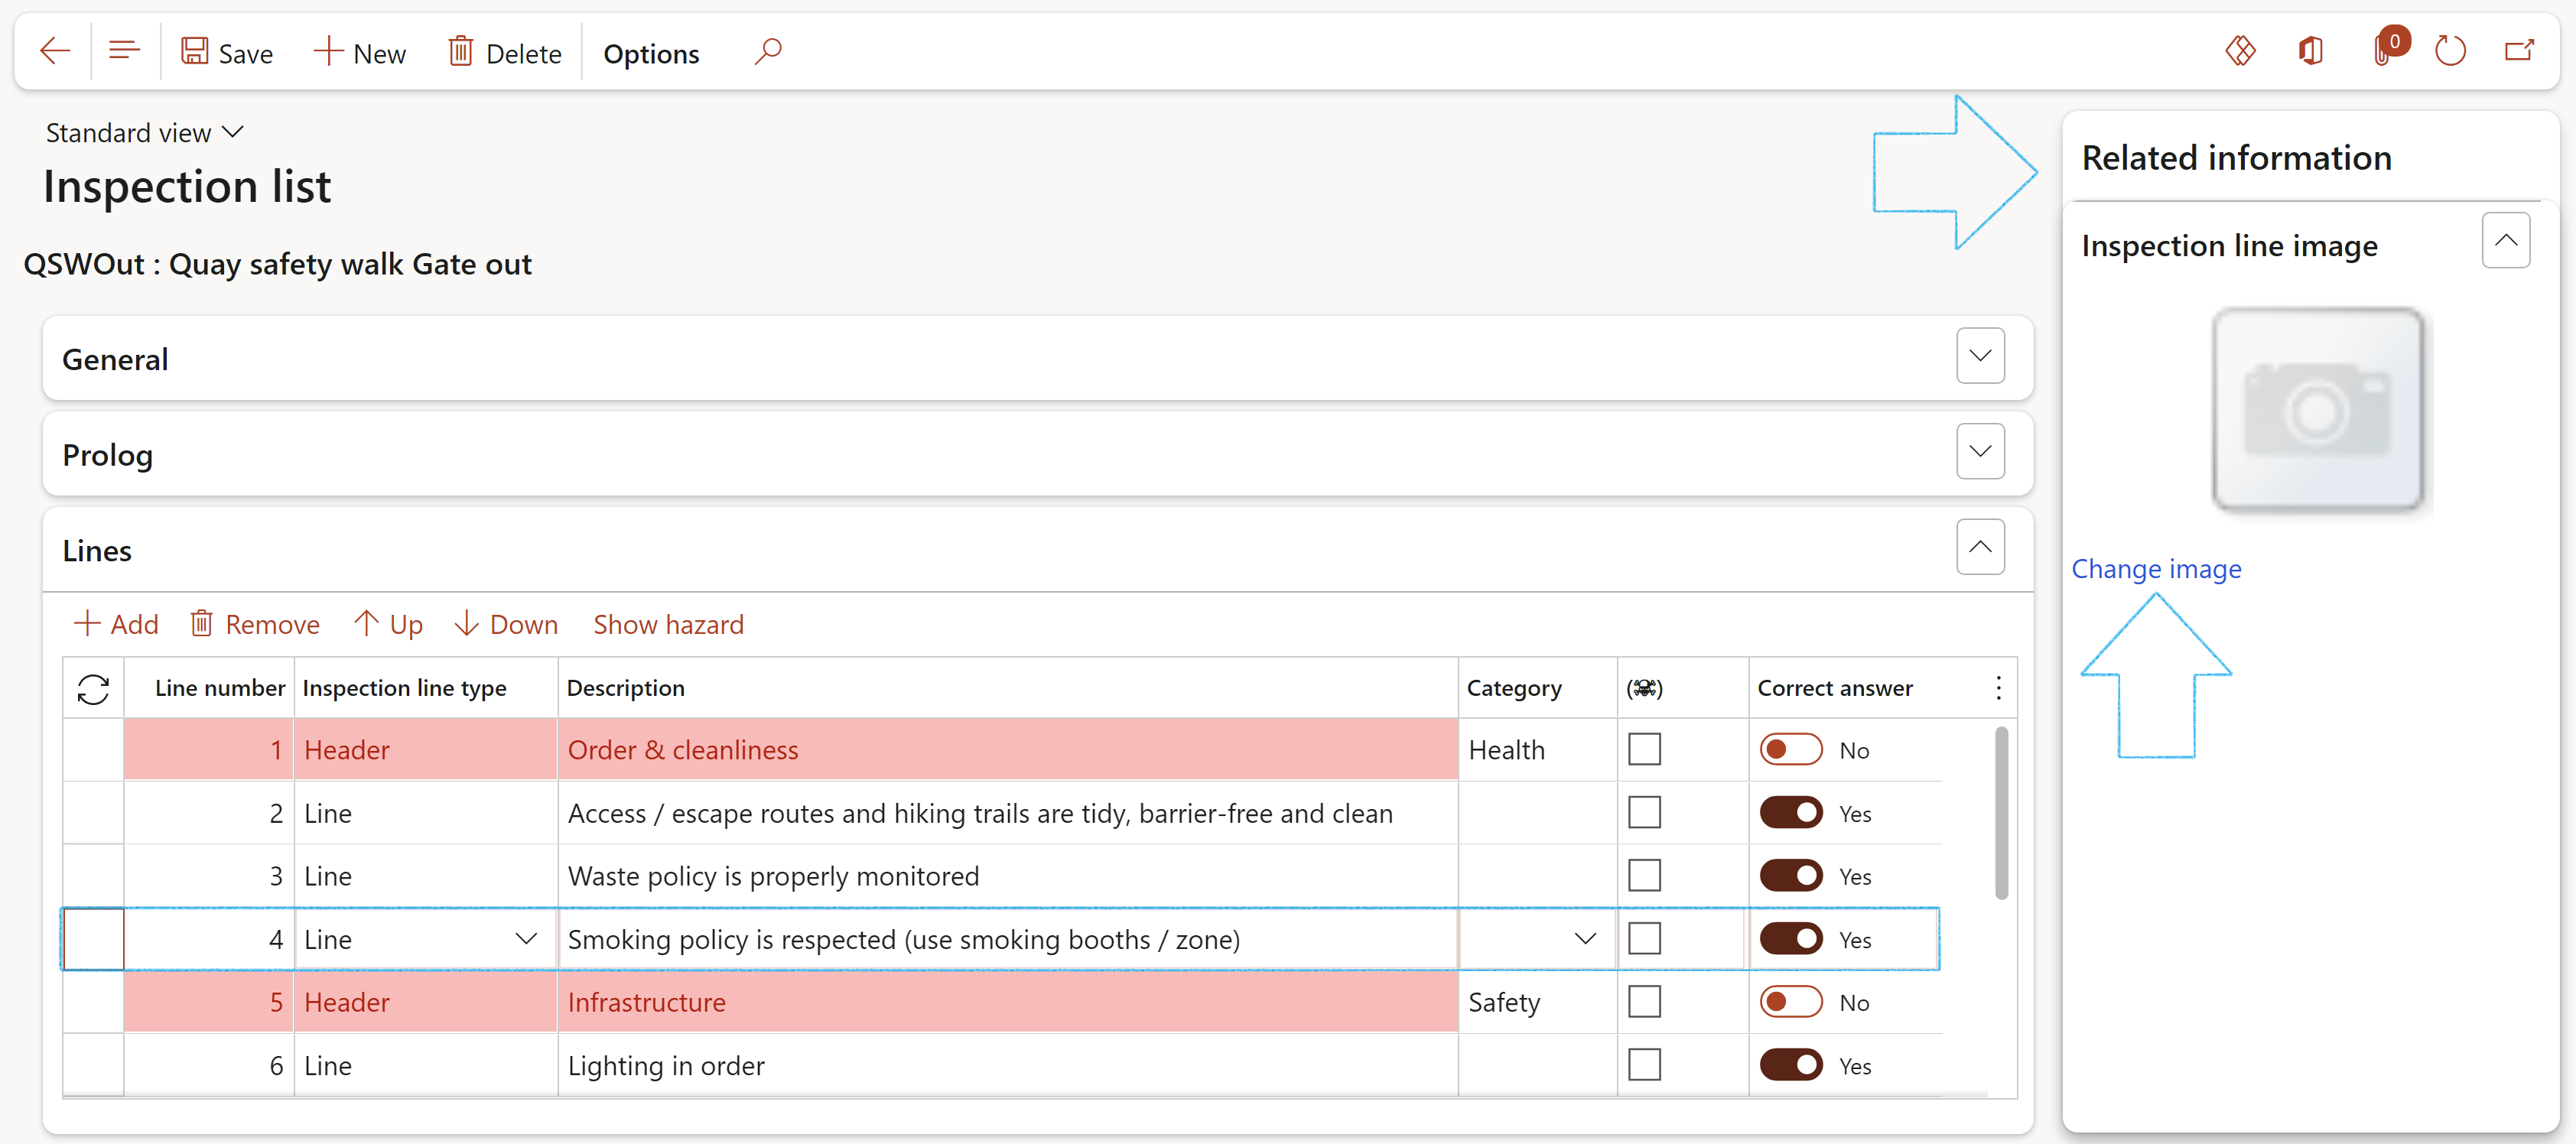
- On the dialog, click on the New button
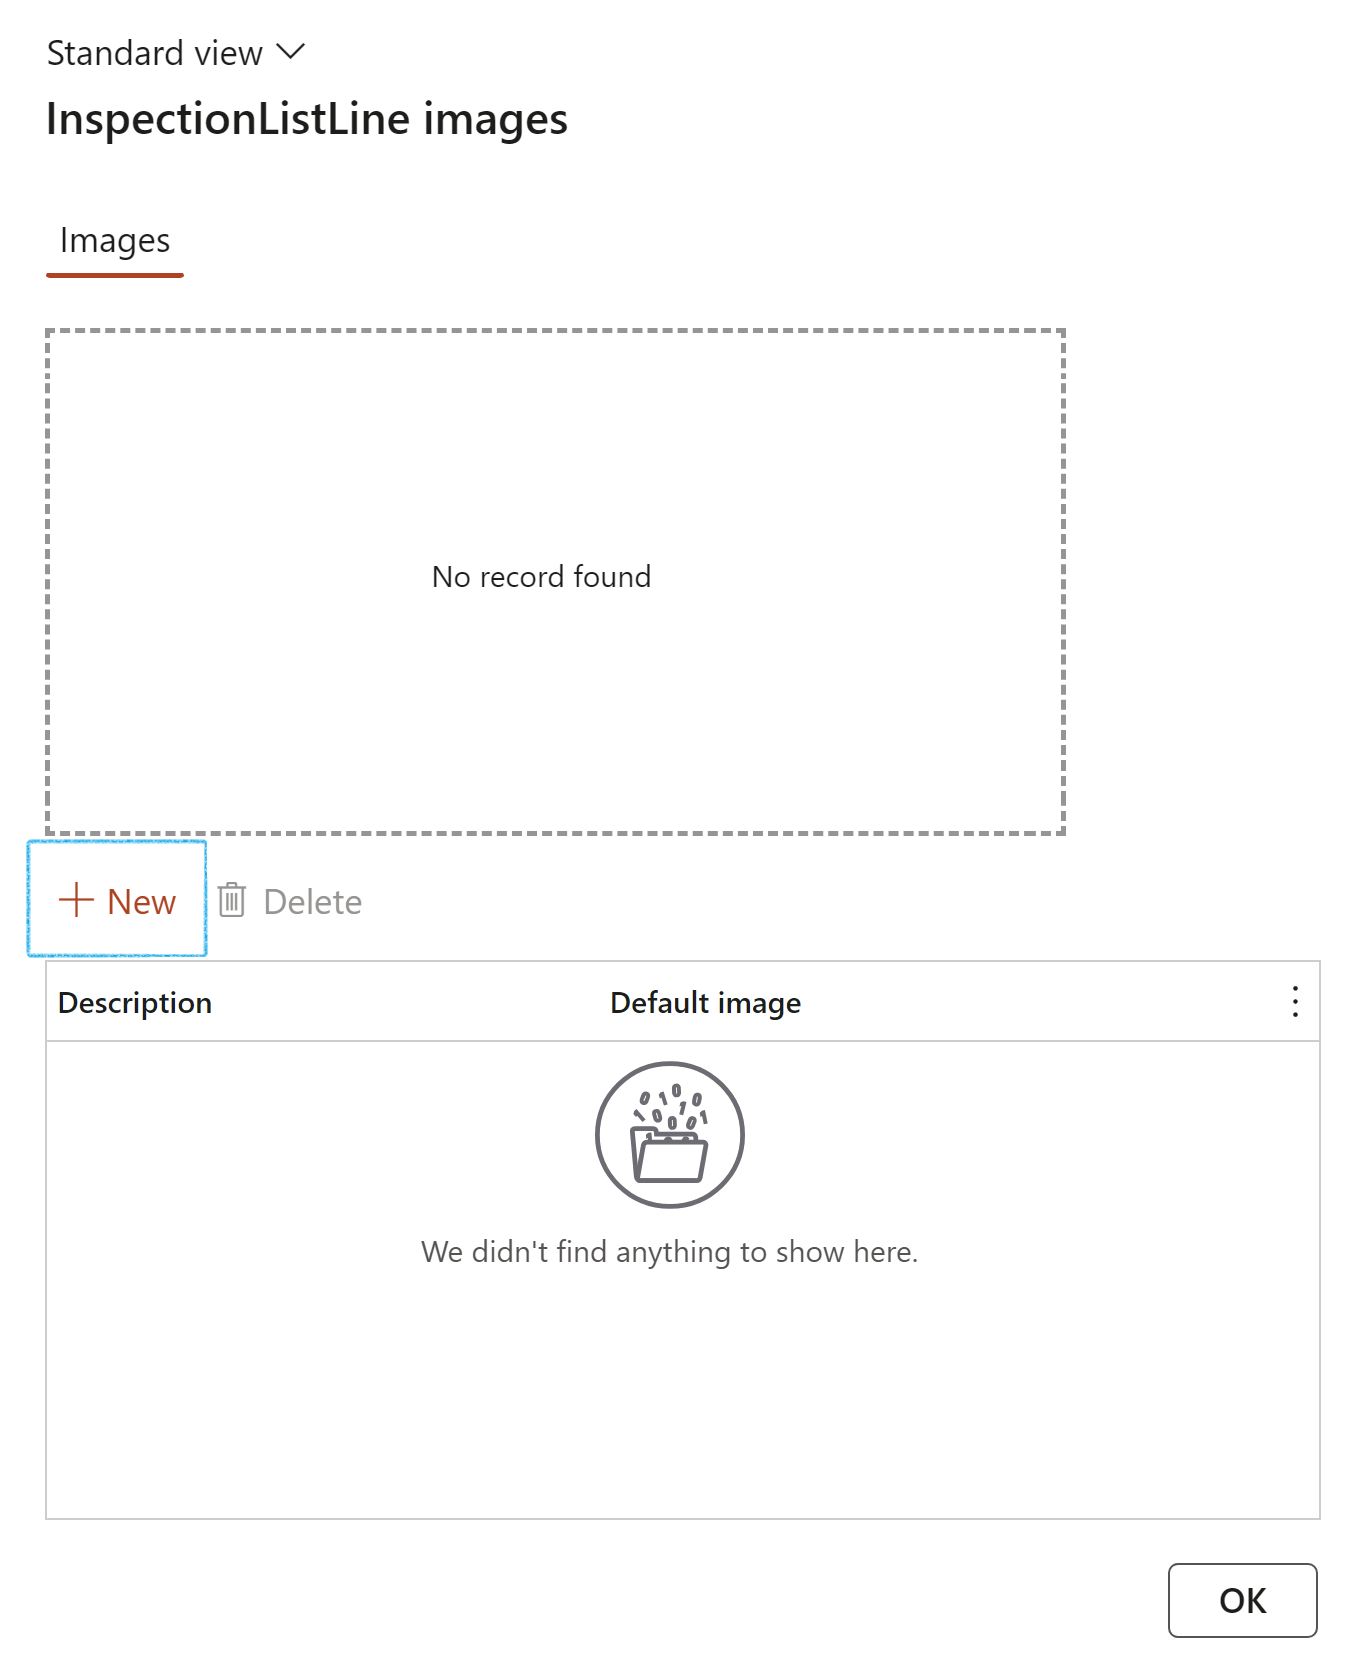
- Browse for the image that you want to add to the line
- Click OK
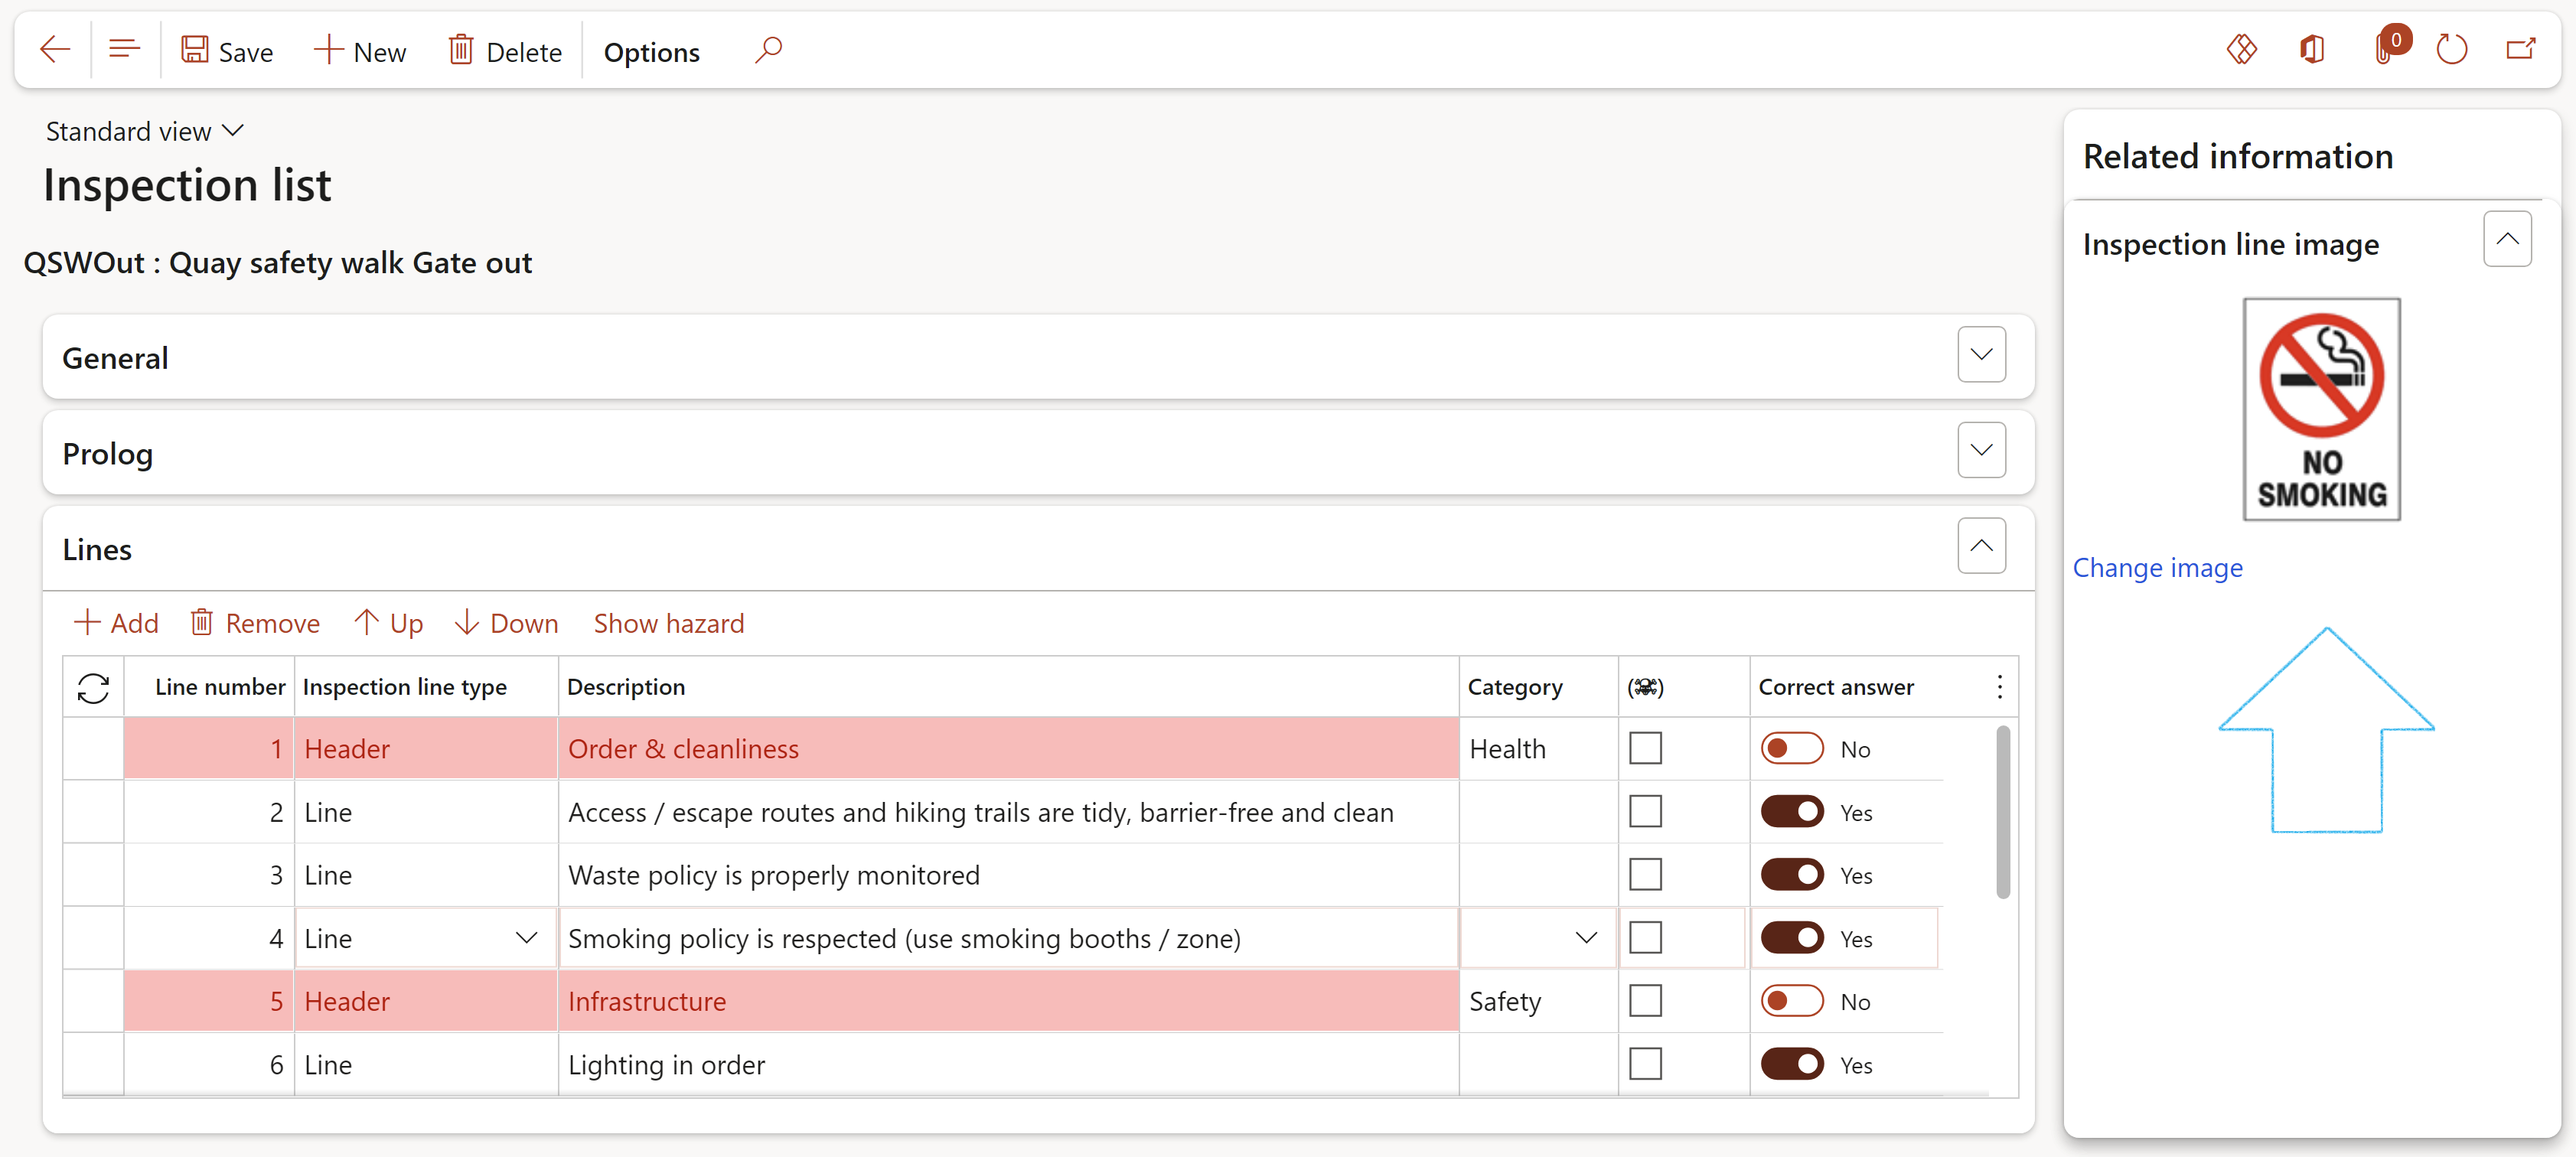
These images will be displayed on the Inspection journal lines
¶ Step 6: Inspection journal name
Each journal name contains information that is reflected in all the journals that are created based on that template. This form is used to create and manage templates for journals.
Go to: HSE > Inspections > Setup for inspections > Inspection journal name
- On the Action pane, click New
- Under the General Fast tab, enter the following information:
- Journal name - This name is used to refer to this journal throughout Dynamics 365
- Enter a brief Description of the journal
- Select the relevant Inspection list from the dropdown list
- Select the Default inspection focus from the dropdown list
- Select the inspection Type from the dropdown list
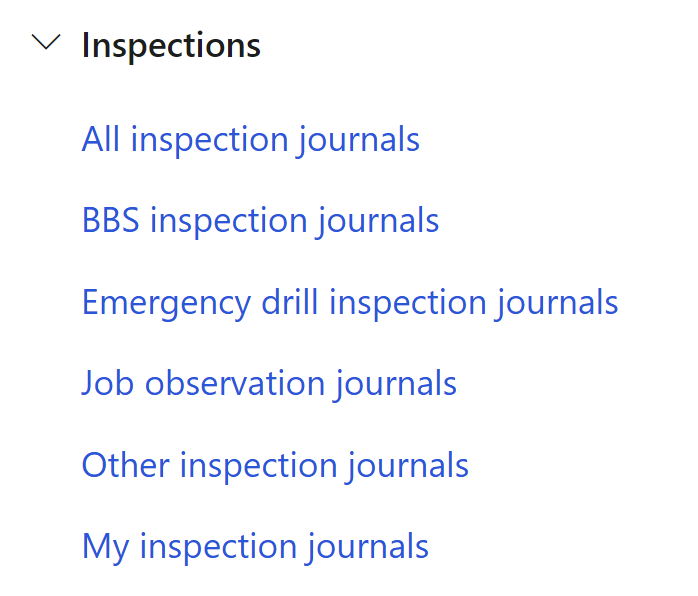
The Type of Inspection journal will determine under which menu item the journal can be found
The Hazard column under the Lines Fast tab on the Inspection journal, will only be visible when the Inspection type = Behavior/Safety/Construction
- If it is required that the inspection has to be completed before it can be posted, move the Active slider to Yes under the Validation Field group. (At least one comment has to be entered on the journal lines)
- Restrict the posting of the journal if not within the grace period of the scheduled date by selecting Yes under the Date restrictions Field group, and by entering the Grace period in days
- Select the Approval group that can approve the journal name in journals or journal lines. Only users in the group can approve the journal
- Select Yes under the Approval procedure Field group to activate the journal approval system for this journal name
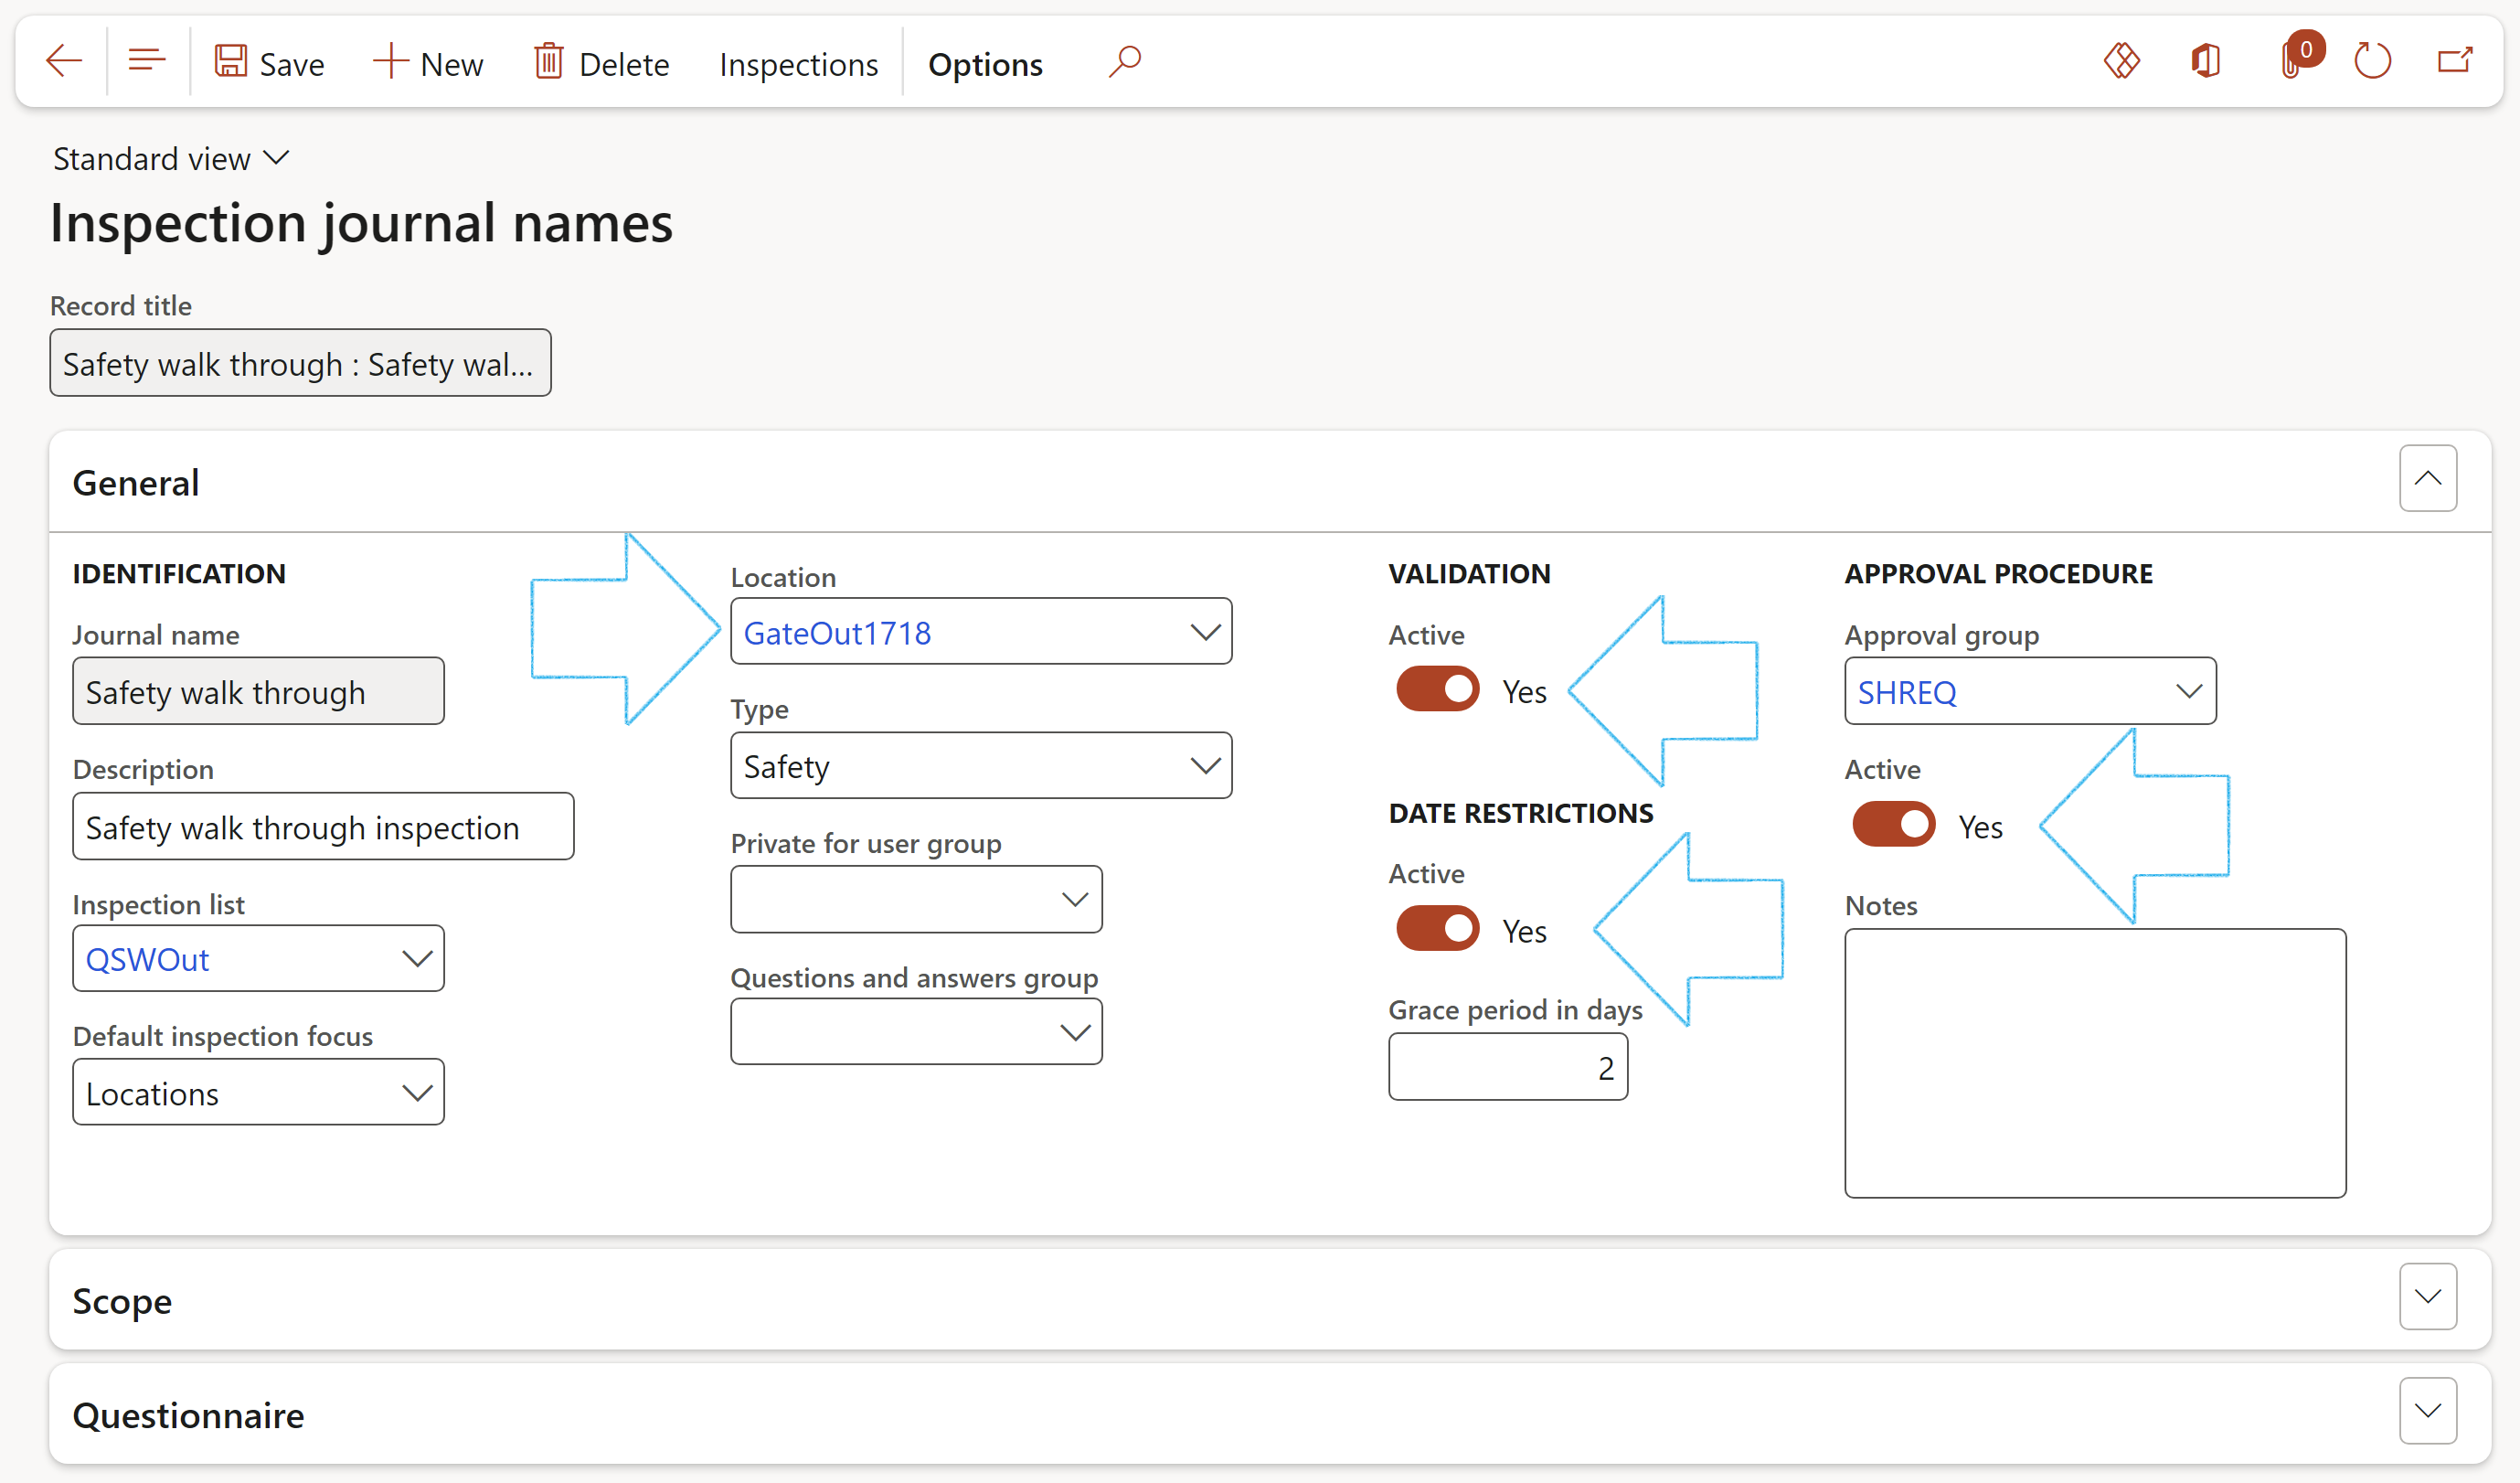
- The selected Default object/location will by default be selected on the Inspection journal
- The Active slider will only be available if an Approver group has been selected
- Under the Scope Fast tab, fill in the following information:
- Scheduling – Select the length of the period
- Site – Select the relevant site from the dropdown list
- Department - Select the relevant department from the dropdown list
- Budget hours – Enter the hours budgeted to execute the schedule

- Under the Questionnaire Fast tab:
- On the Button strip, click the Add button
- Select the relevant questionnaire from the dropdown list
- Select the type of questionnaire from the dropdown list
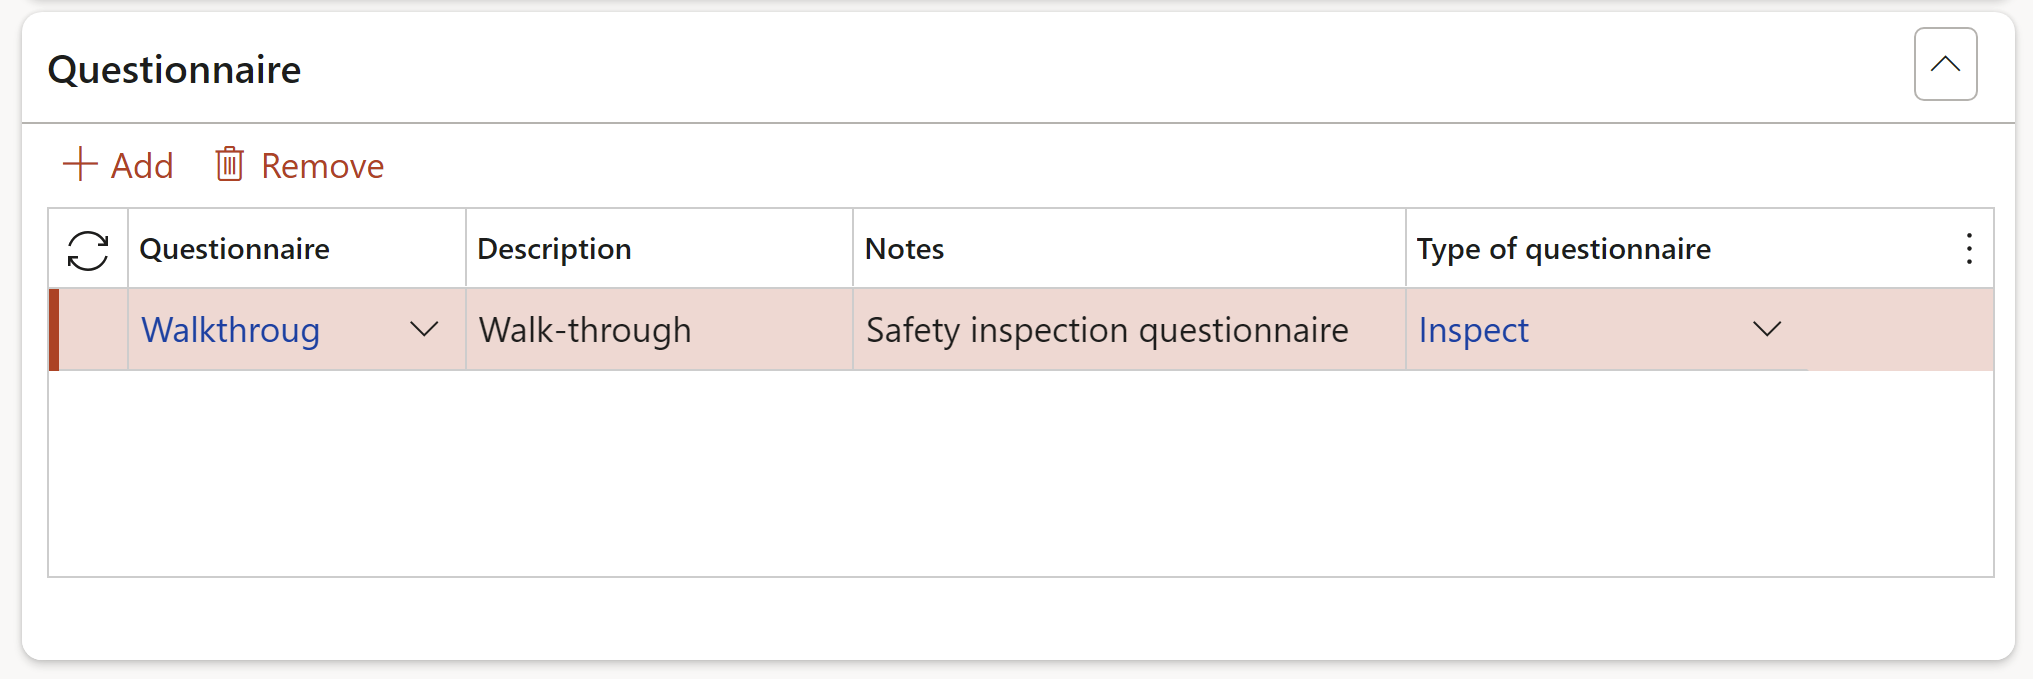
Questionnaires can be used instead of inspection lists when “branching” of questions is required
You can use one inspection journal name for all the different inspection journals, or you can create more than one inspection journal and choose the one you want to use
The Inspections button on the Action pane will open a list page of all Inspection journals relating to the Inspection journal name
¶ Step 7: Inspection reporting category
This form is used to setup inspection reporting categories. These categories will be selected when setting up the inspection lists.
When an inspection has been done and the journal posted, the items that need attention are then categorized into these categories.
Go to: HSE > Inspections > Setup for inspections > Inspection reporting category
- On the Action pane, click on the New button
- Enter the following information:
- Category – Enter a unique Inspection category ID
- Description – Enter a brief Description of the category
- Type – Select the relevant Inspection category Type from the dropdown list
- Responsible - Select the employee from the dropdown list that is responsible for this category
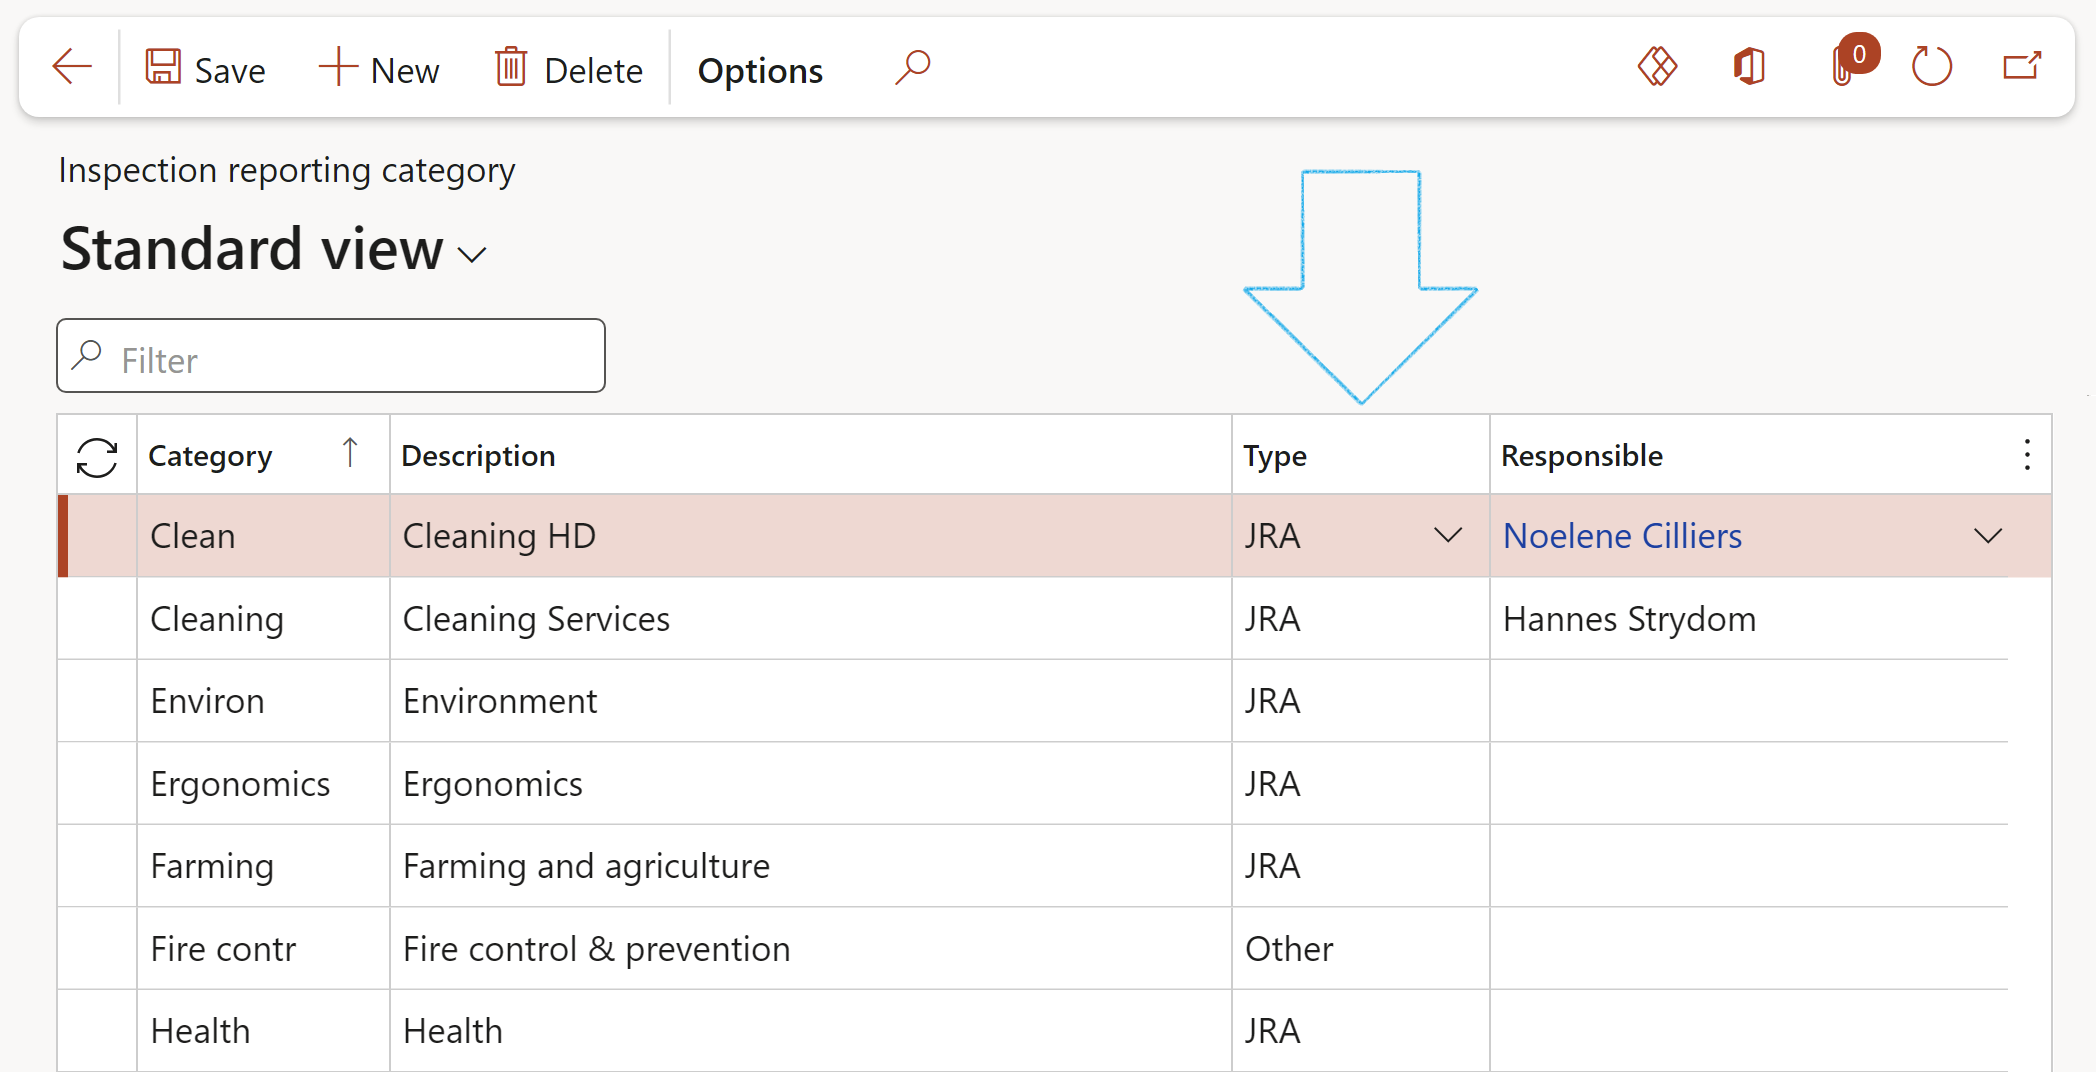
Where a category with type POWRA/JRA is selected on the Inspection list lines, the user will be forced to select a hazard for the line
¶ Step 8: Setup Signature types
Go to: HSE > Inspections > Setup for inspections > Signature type
- On the Action pane, click on the New button
- Under the Signature type Index tab:
- Enter a unique Signature type ID
- Enter a brief Description for the signature type
- In the Source field, select Other from the dropdown list
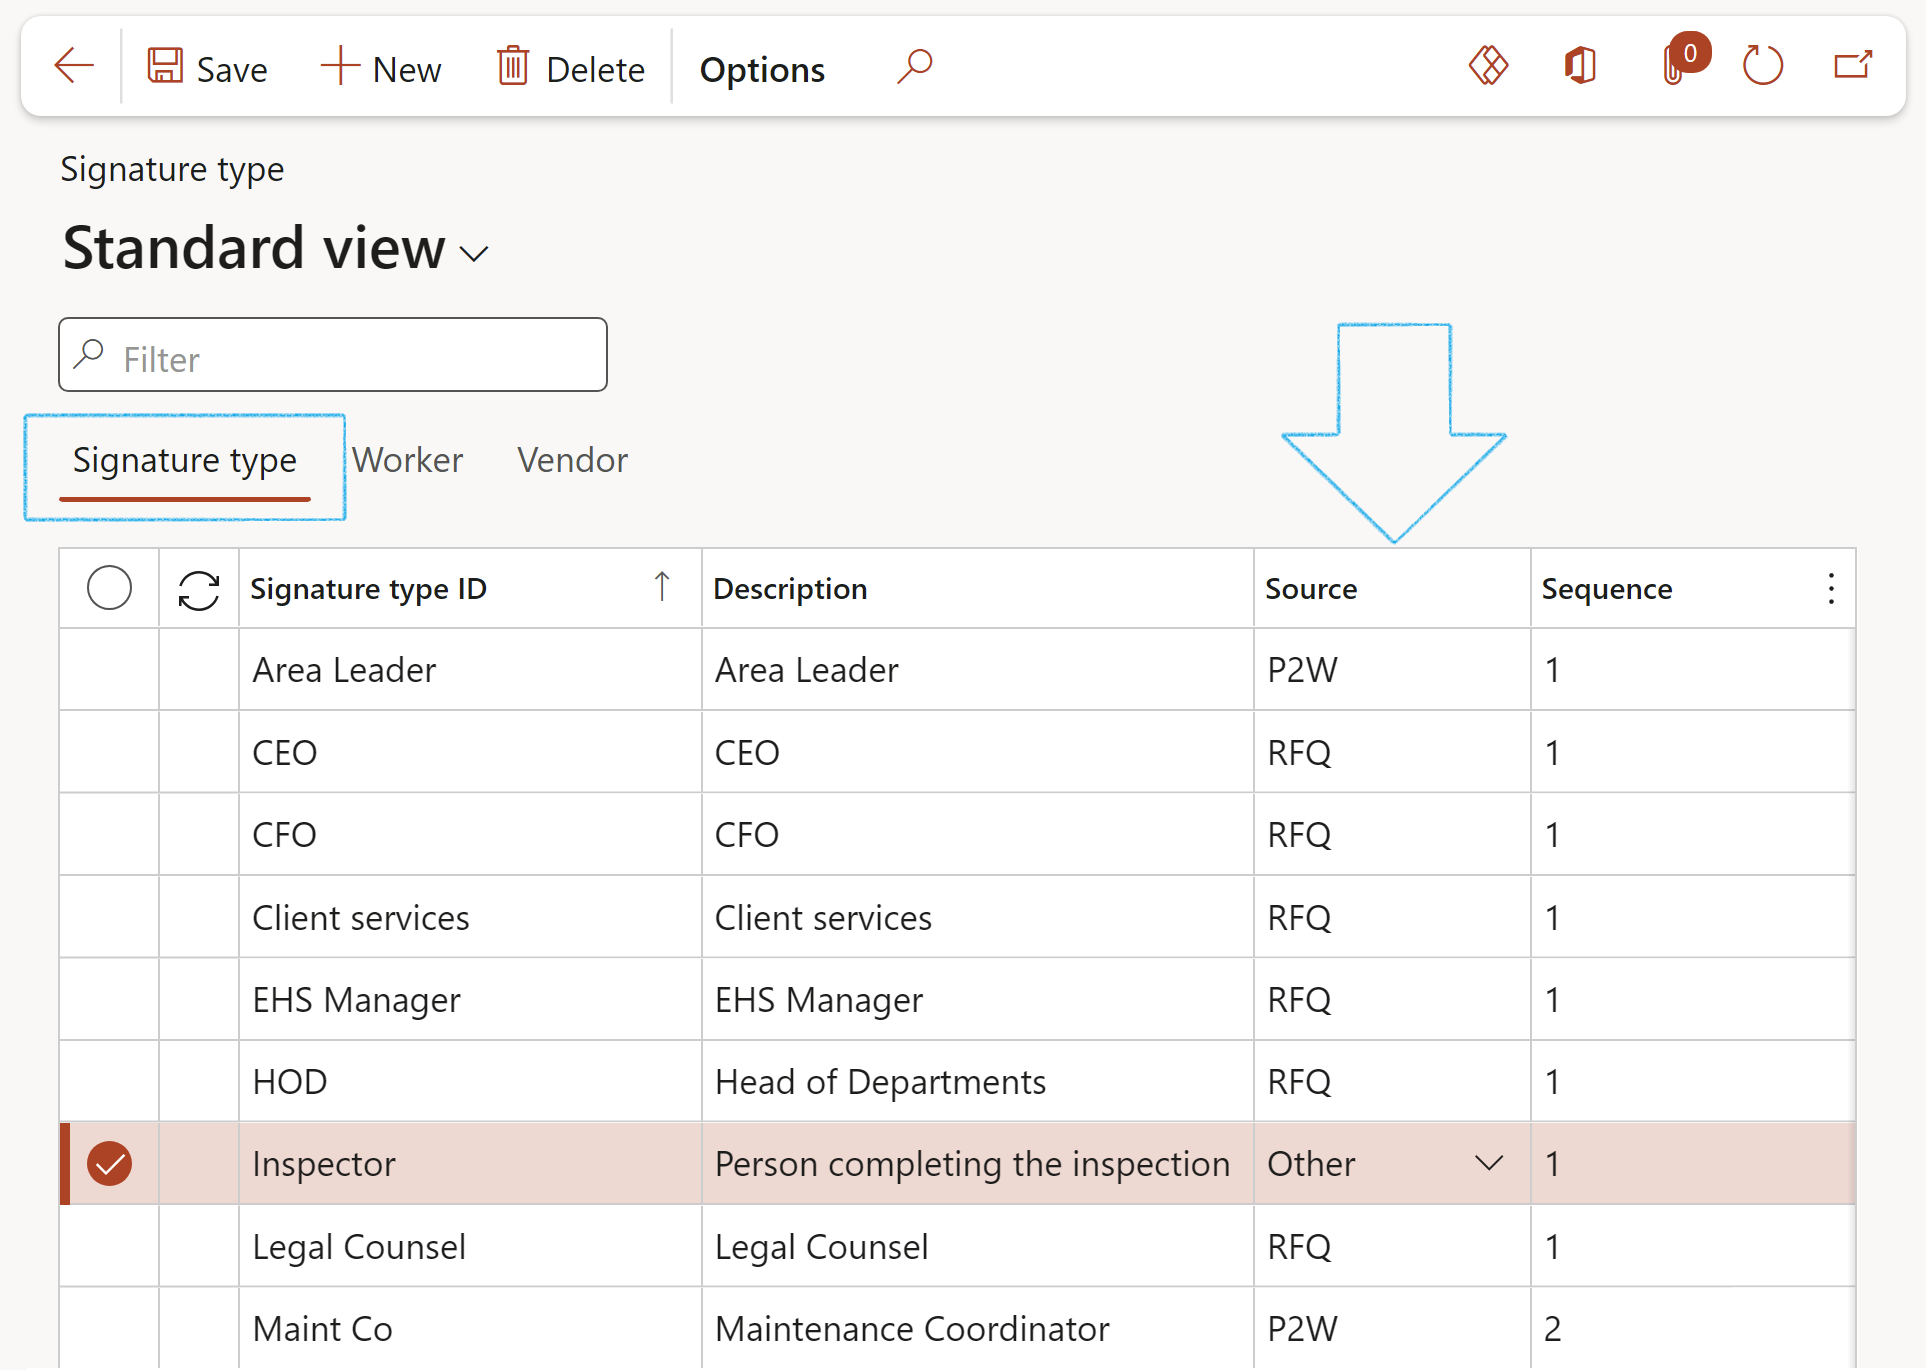
- Select the Signature type that you want to add workers to
- Open the Worker Index tab:
- In the REMAINING WORKERS column, select the Worker that you want to link to the Signature type
- Click on the < button to move the Worker across to the SELECTED WORKERS column
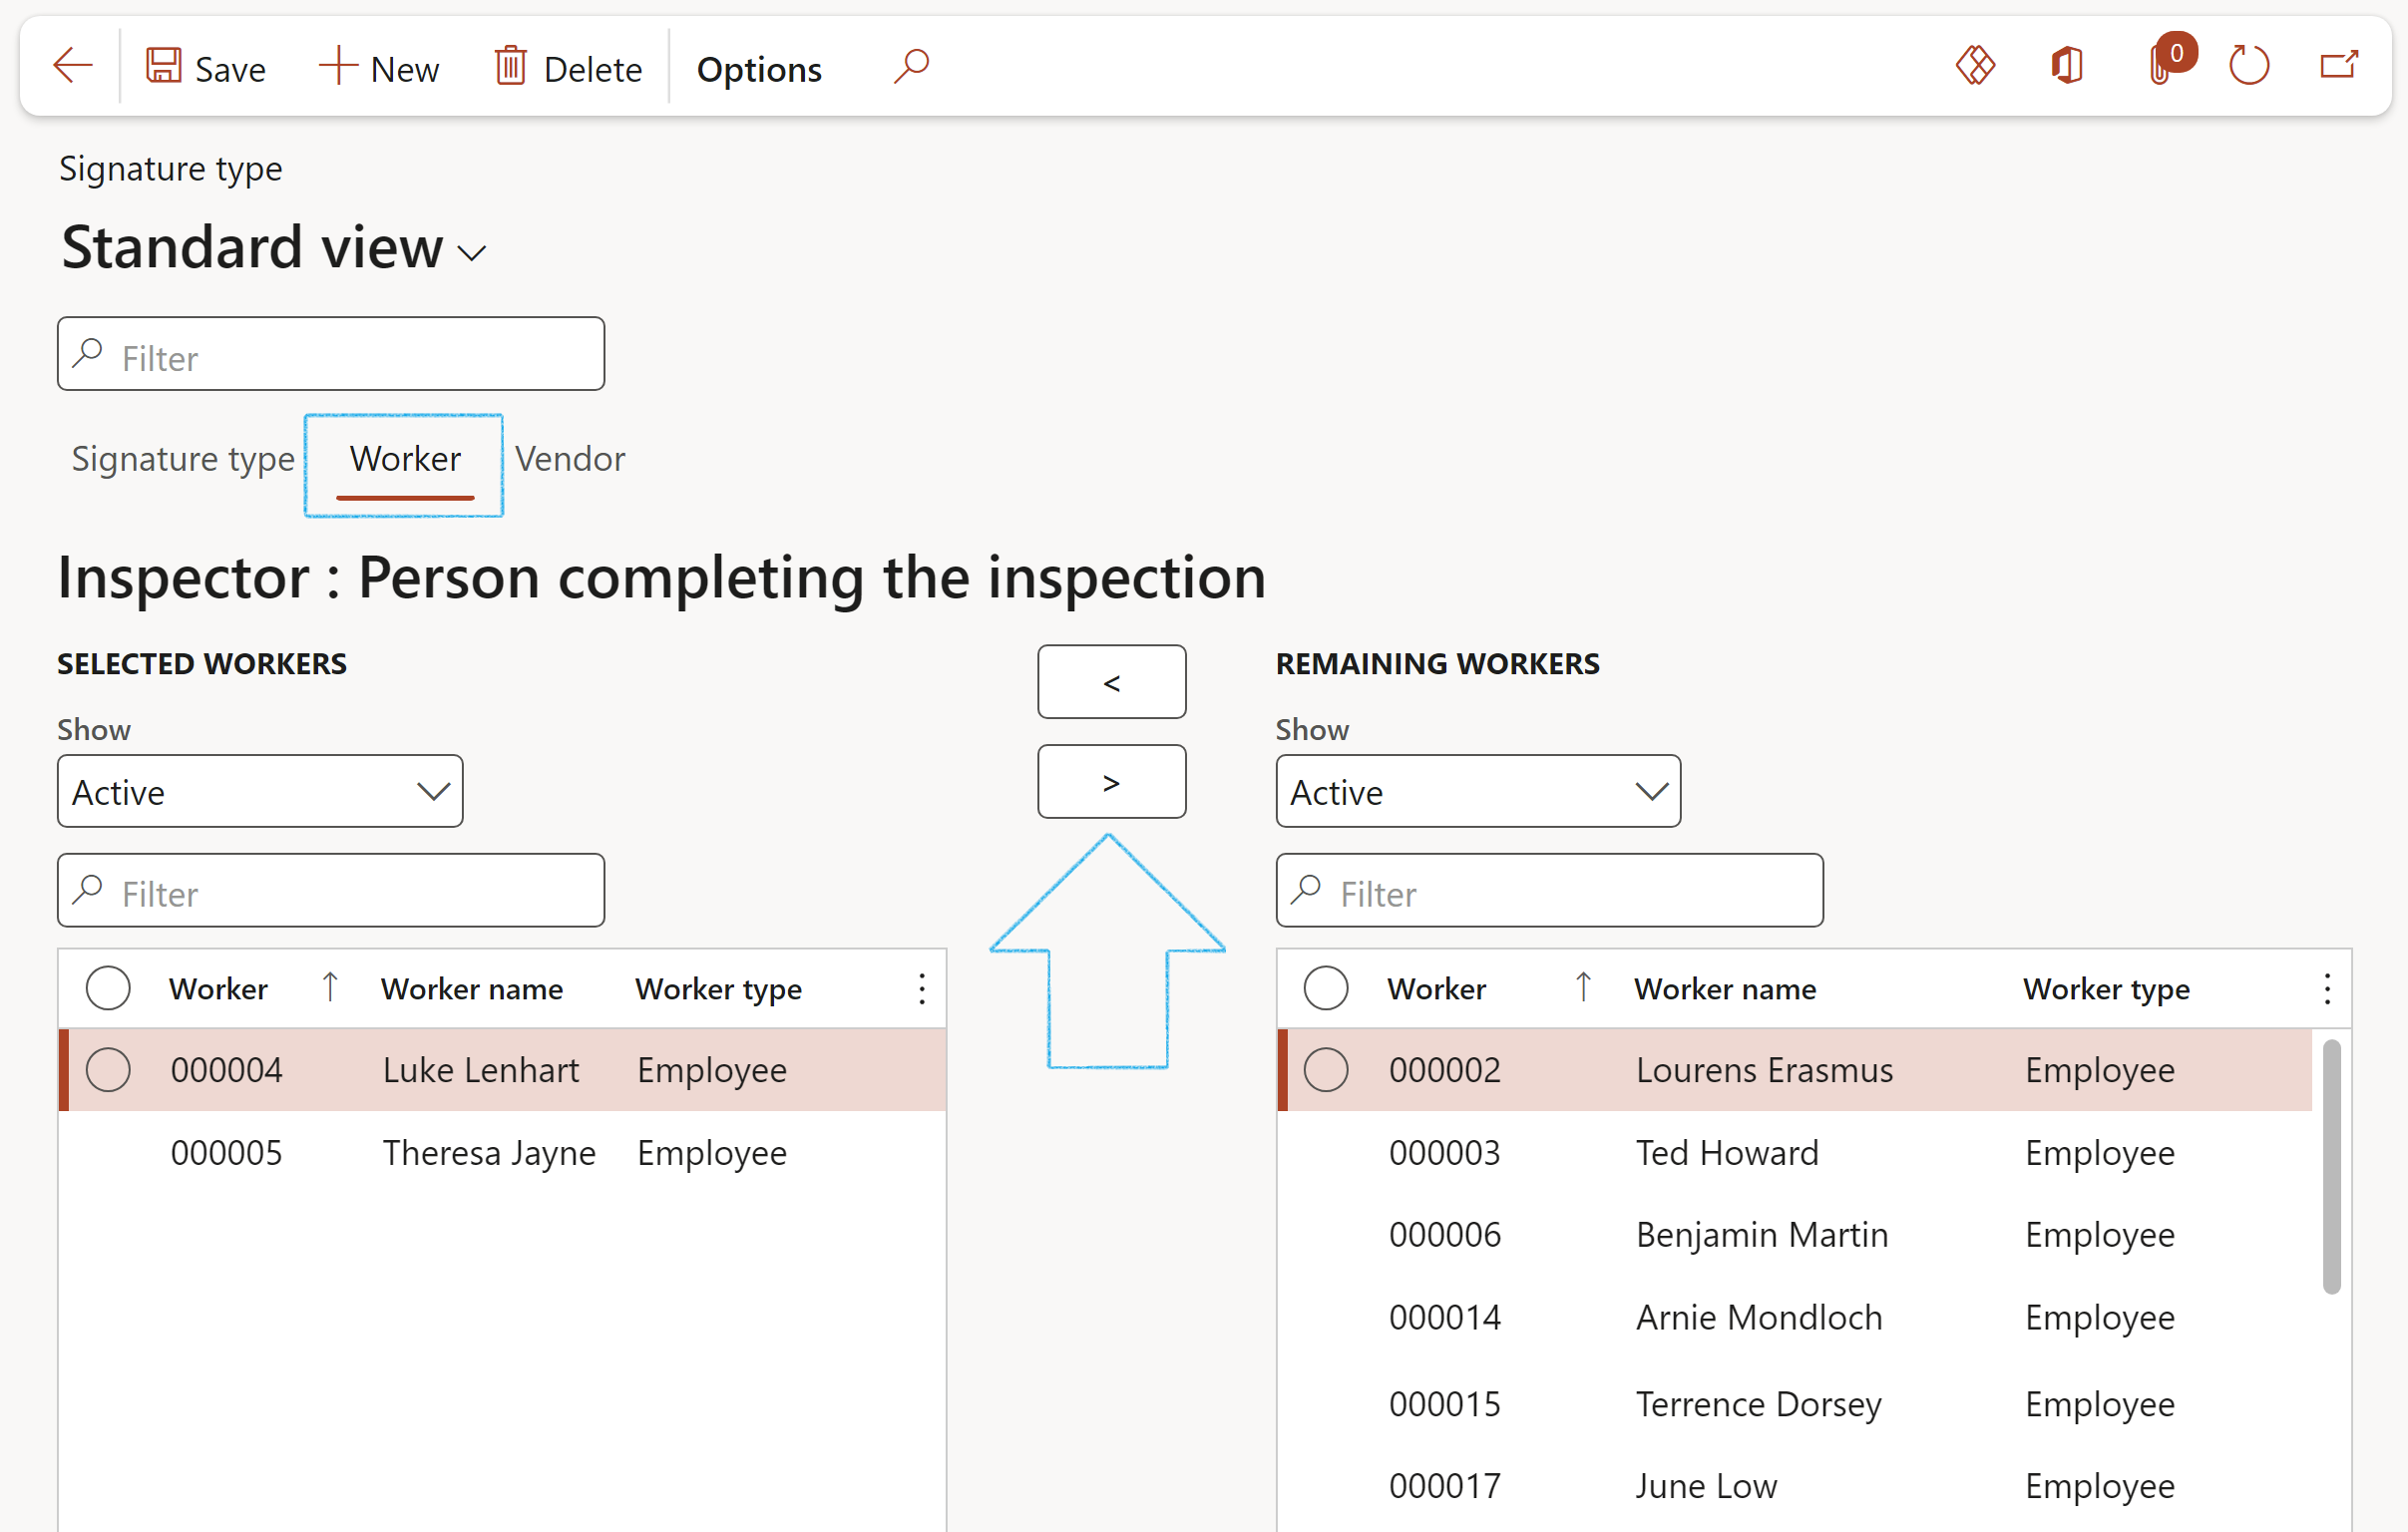
Only workers that have been linked to a Signature type can be selected under the Signatures Fast tab on the Inspection journal Header
¶ Step 9: Setup Objects
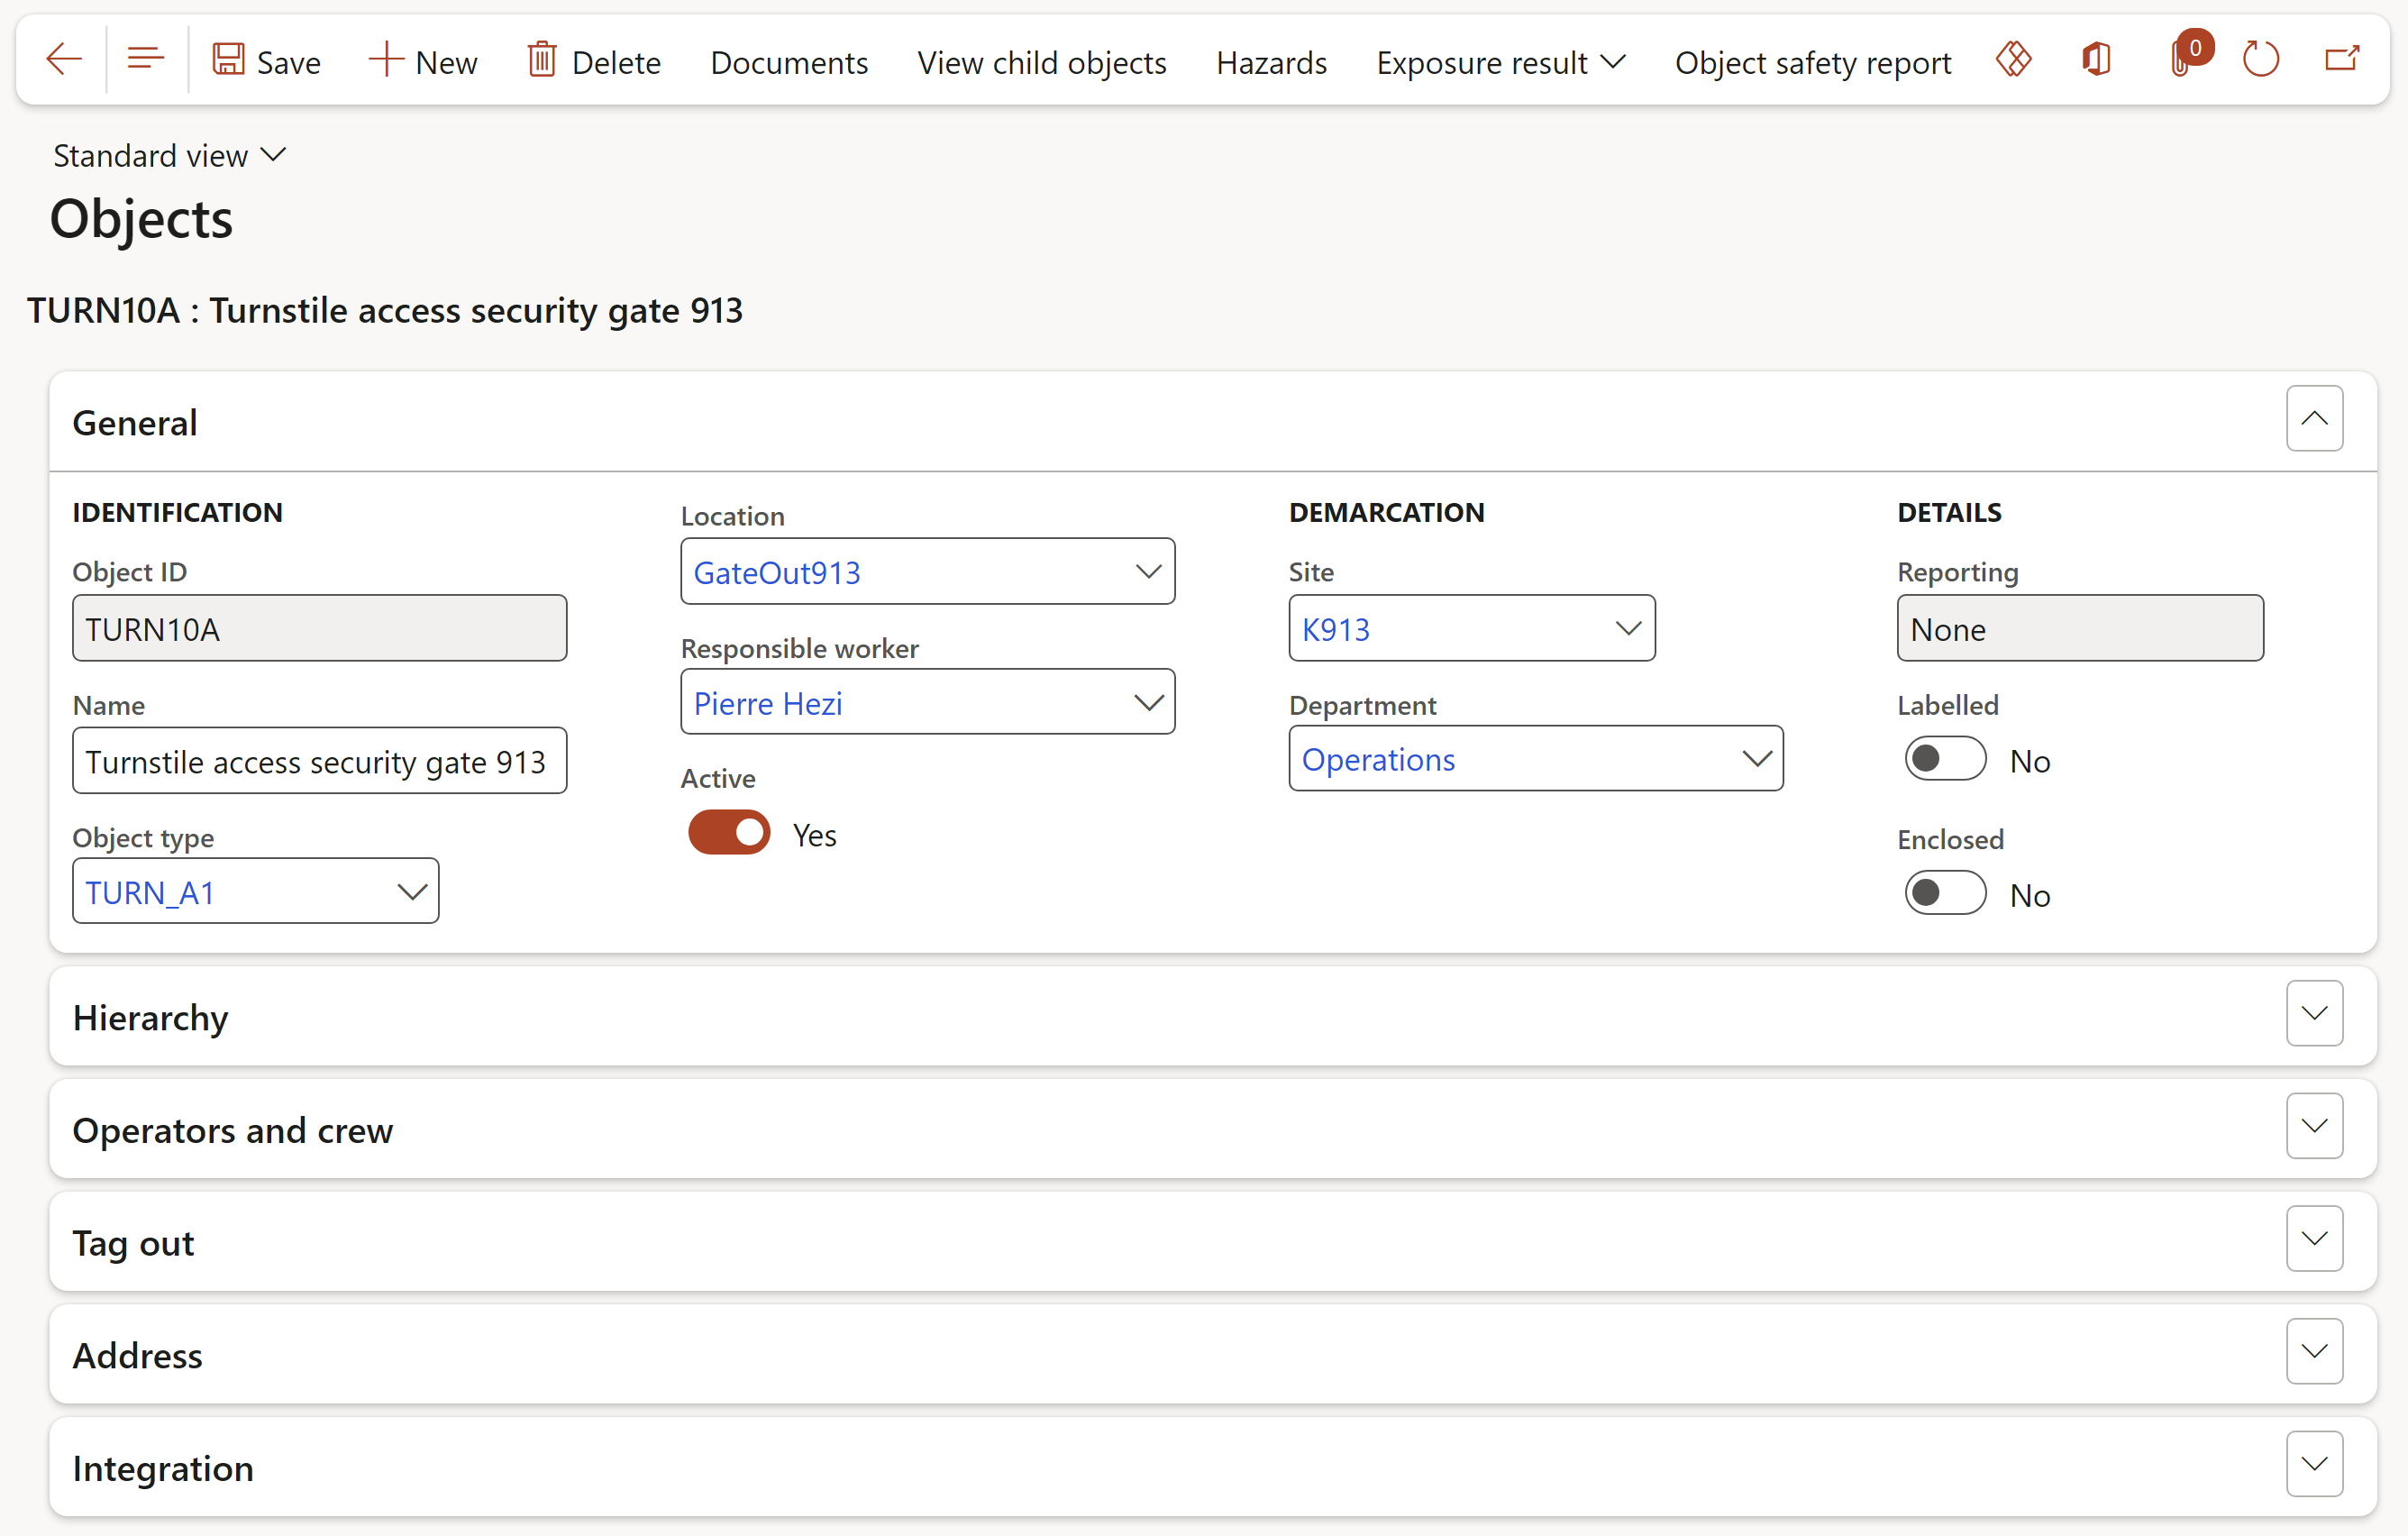
The inspection object is the object that will be inspected. This object can be a building, vehicle, plant, etc.
Use this form to create and setup the inspection objects.
Go to: HSE > Objects
- In the Object field, type a unique identification name for this inspection object
- In the Name field, type a short description or name for this inspection object
- Select the Object type from the dropdown list
¶ Step 10: Setup Locations
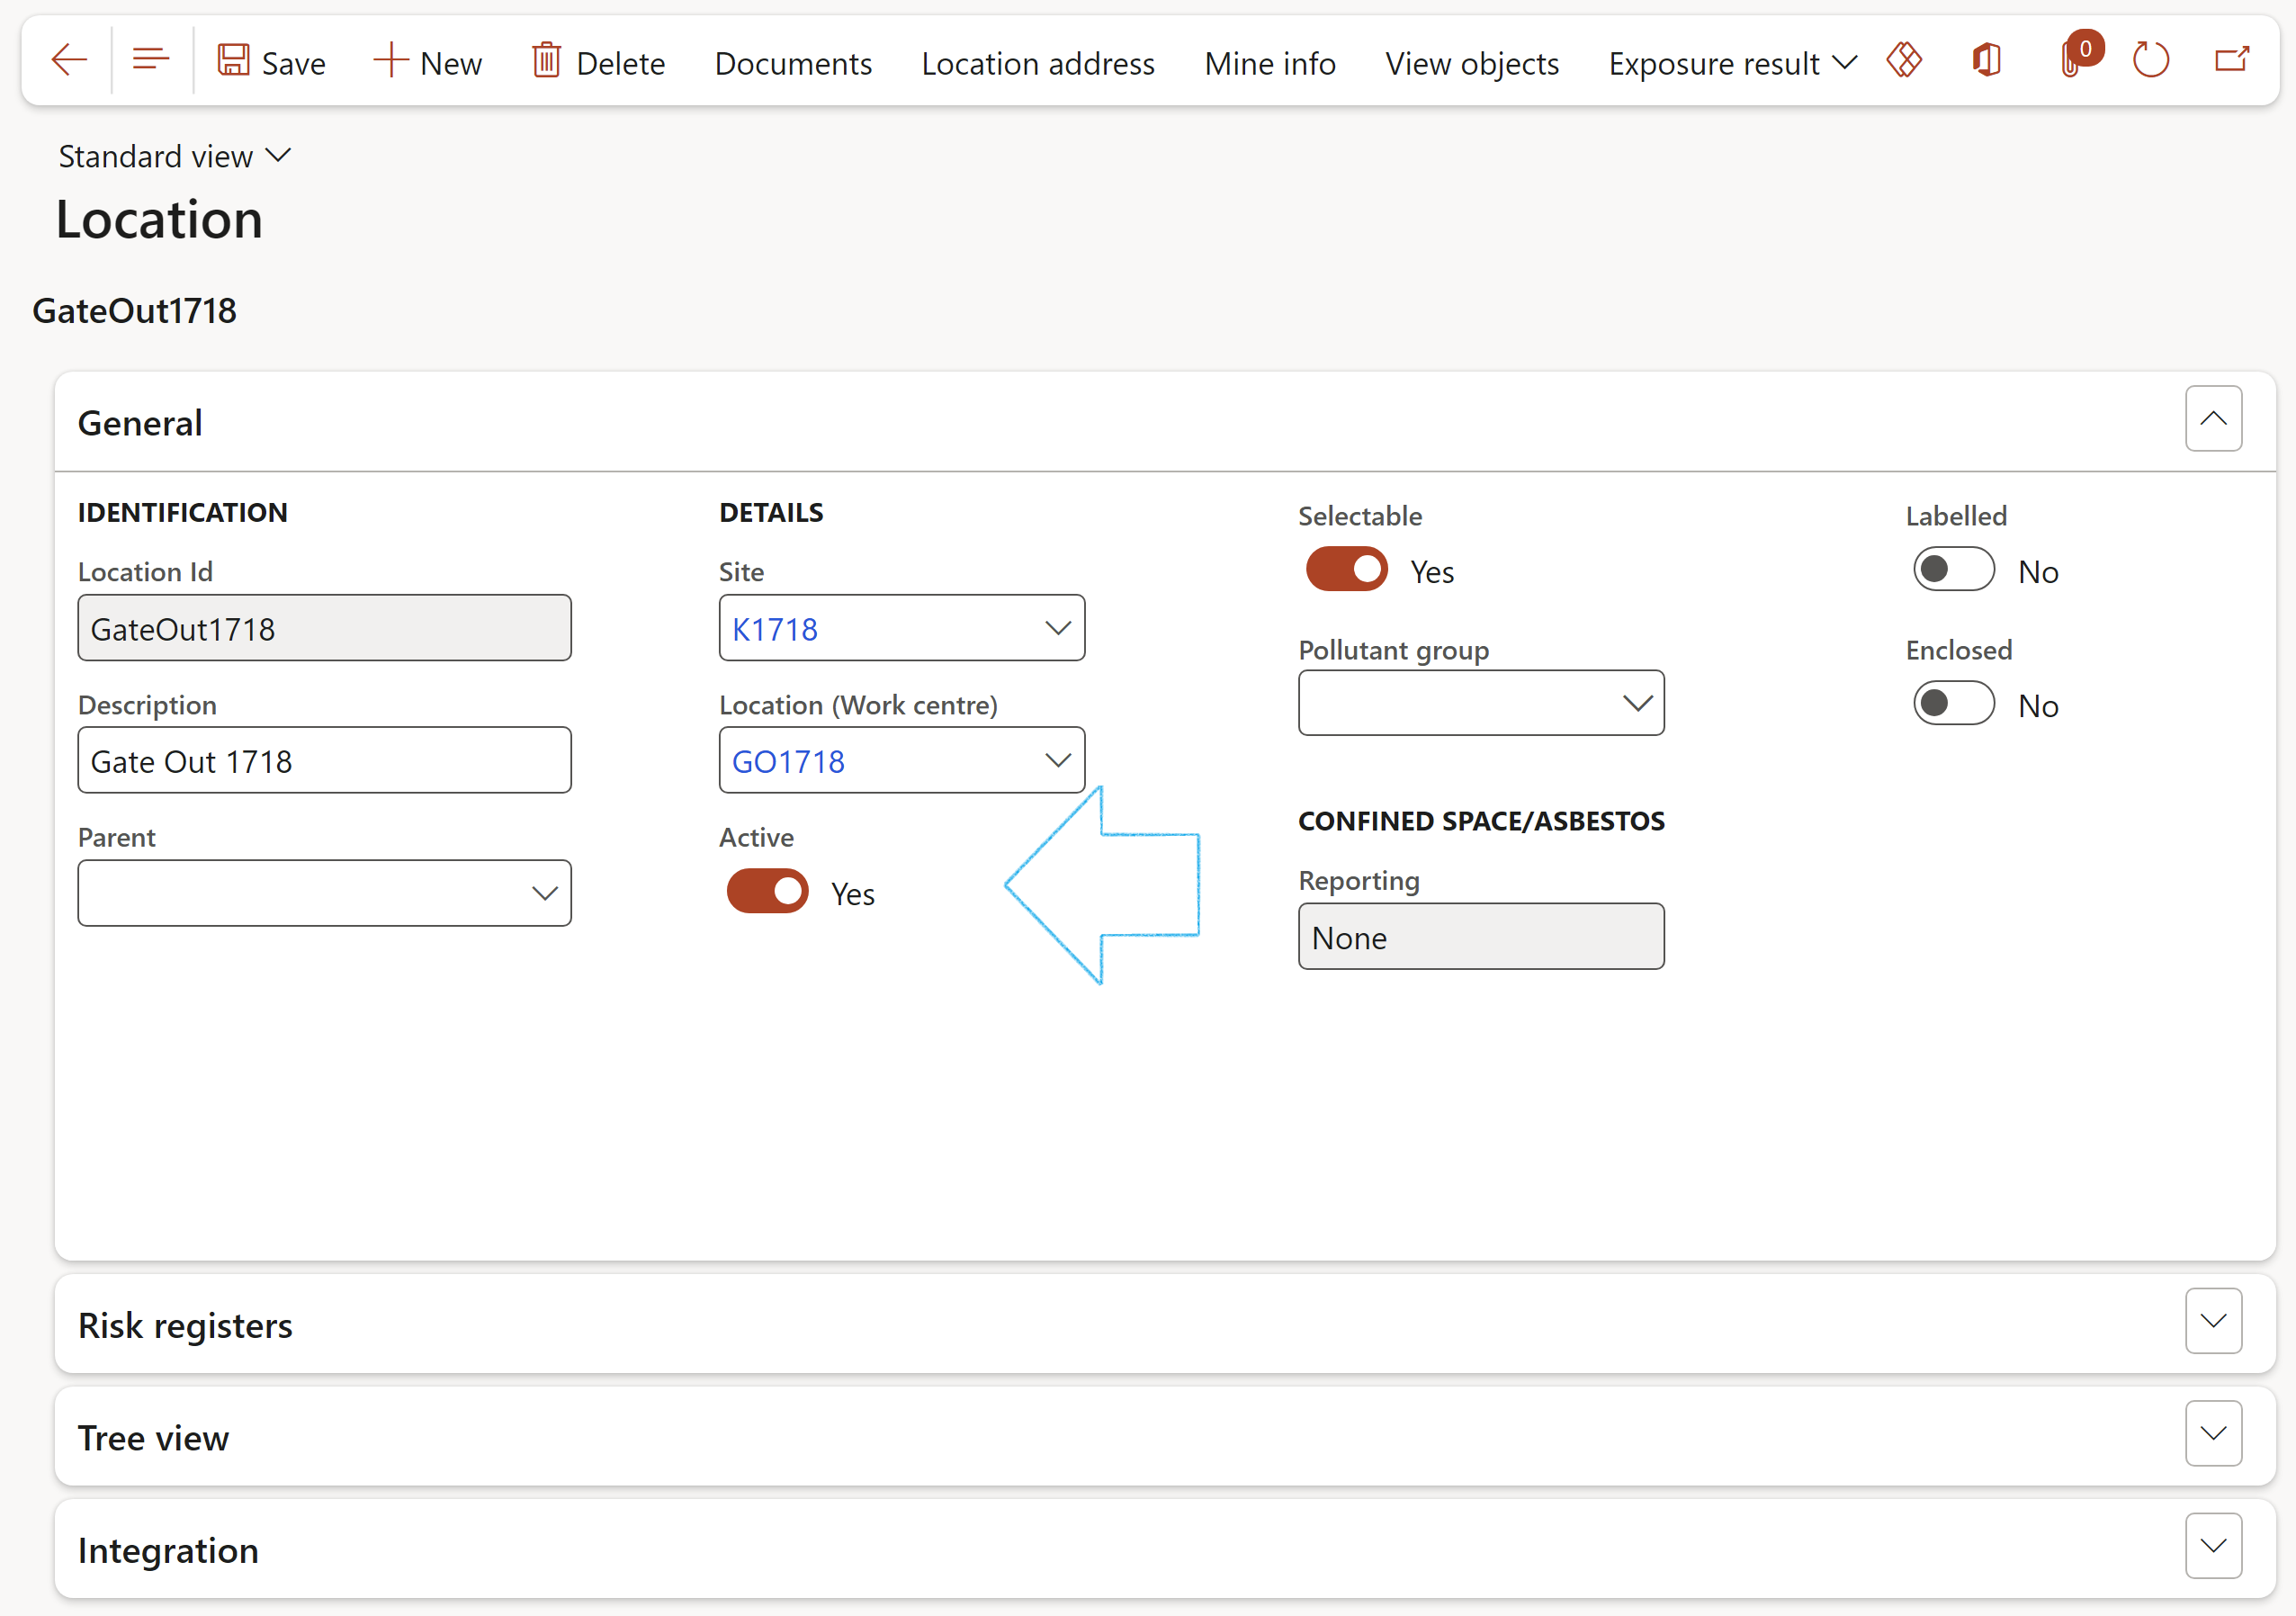
The inspection location is the location that will be inspected. Use this form to create and setup the inspection locations.
Go to: HSE > Location
- In the Action pane, click on the New button
- Expand the General Fast tab
- Enter the Location ID
- Enter a brief Description of the location
- Select the Parent HSE location from the dropdown list, if applicable
- Select the unique Pollutant group ID from the dropdown list, if applicable
- Move the Active slider to Yes for the location to be selectable on the Inspection
Where "Active" = Yes is selected on a location, this location will be displayed on the Location dropdown list on all HSE and GRC forms where Locations can be selected.
- Expand the Risk registers Fast tab to view the risk registers that are linked to this location
- Expand the Tree view Fast tab to view a hierarchy of the locations
¶ Step 11: Setup Tasks
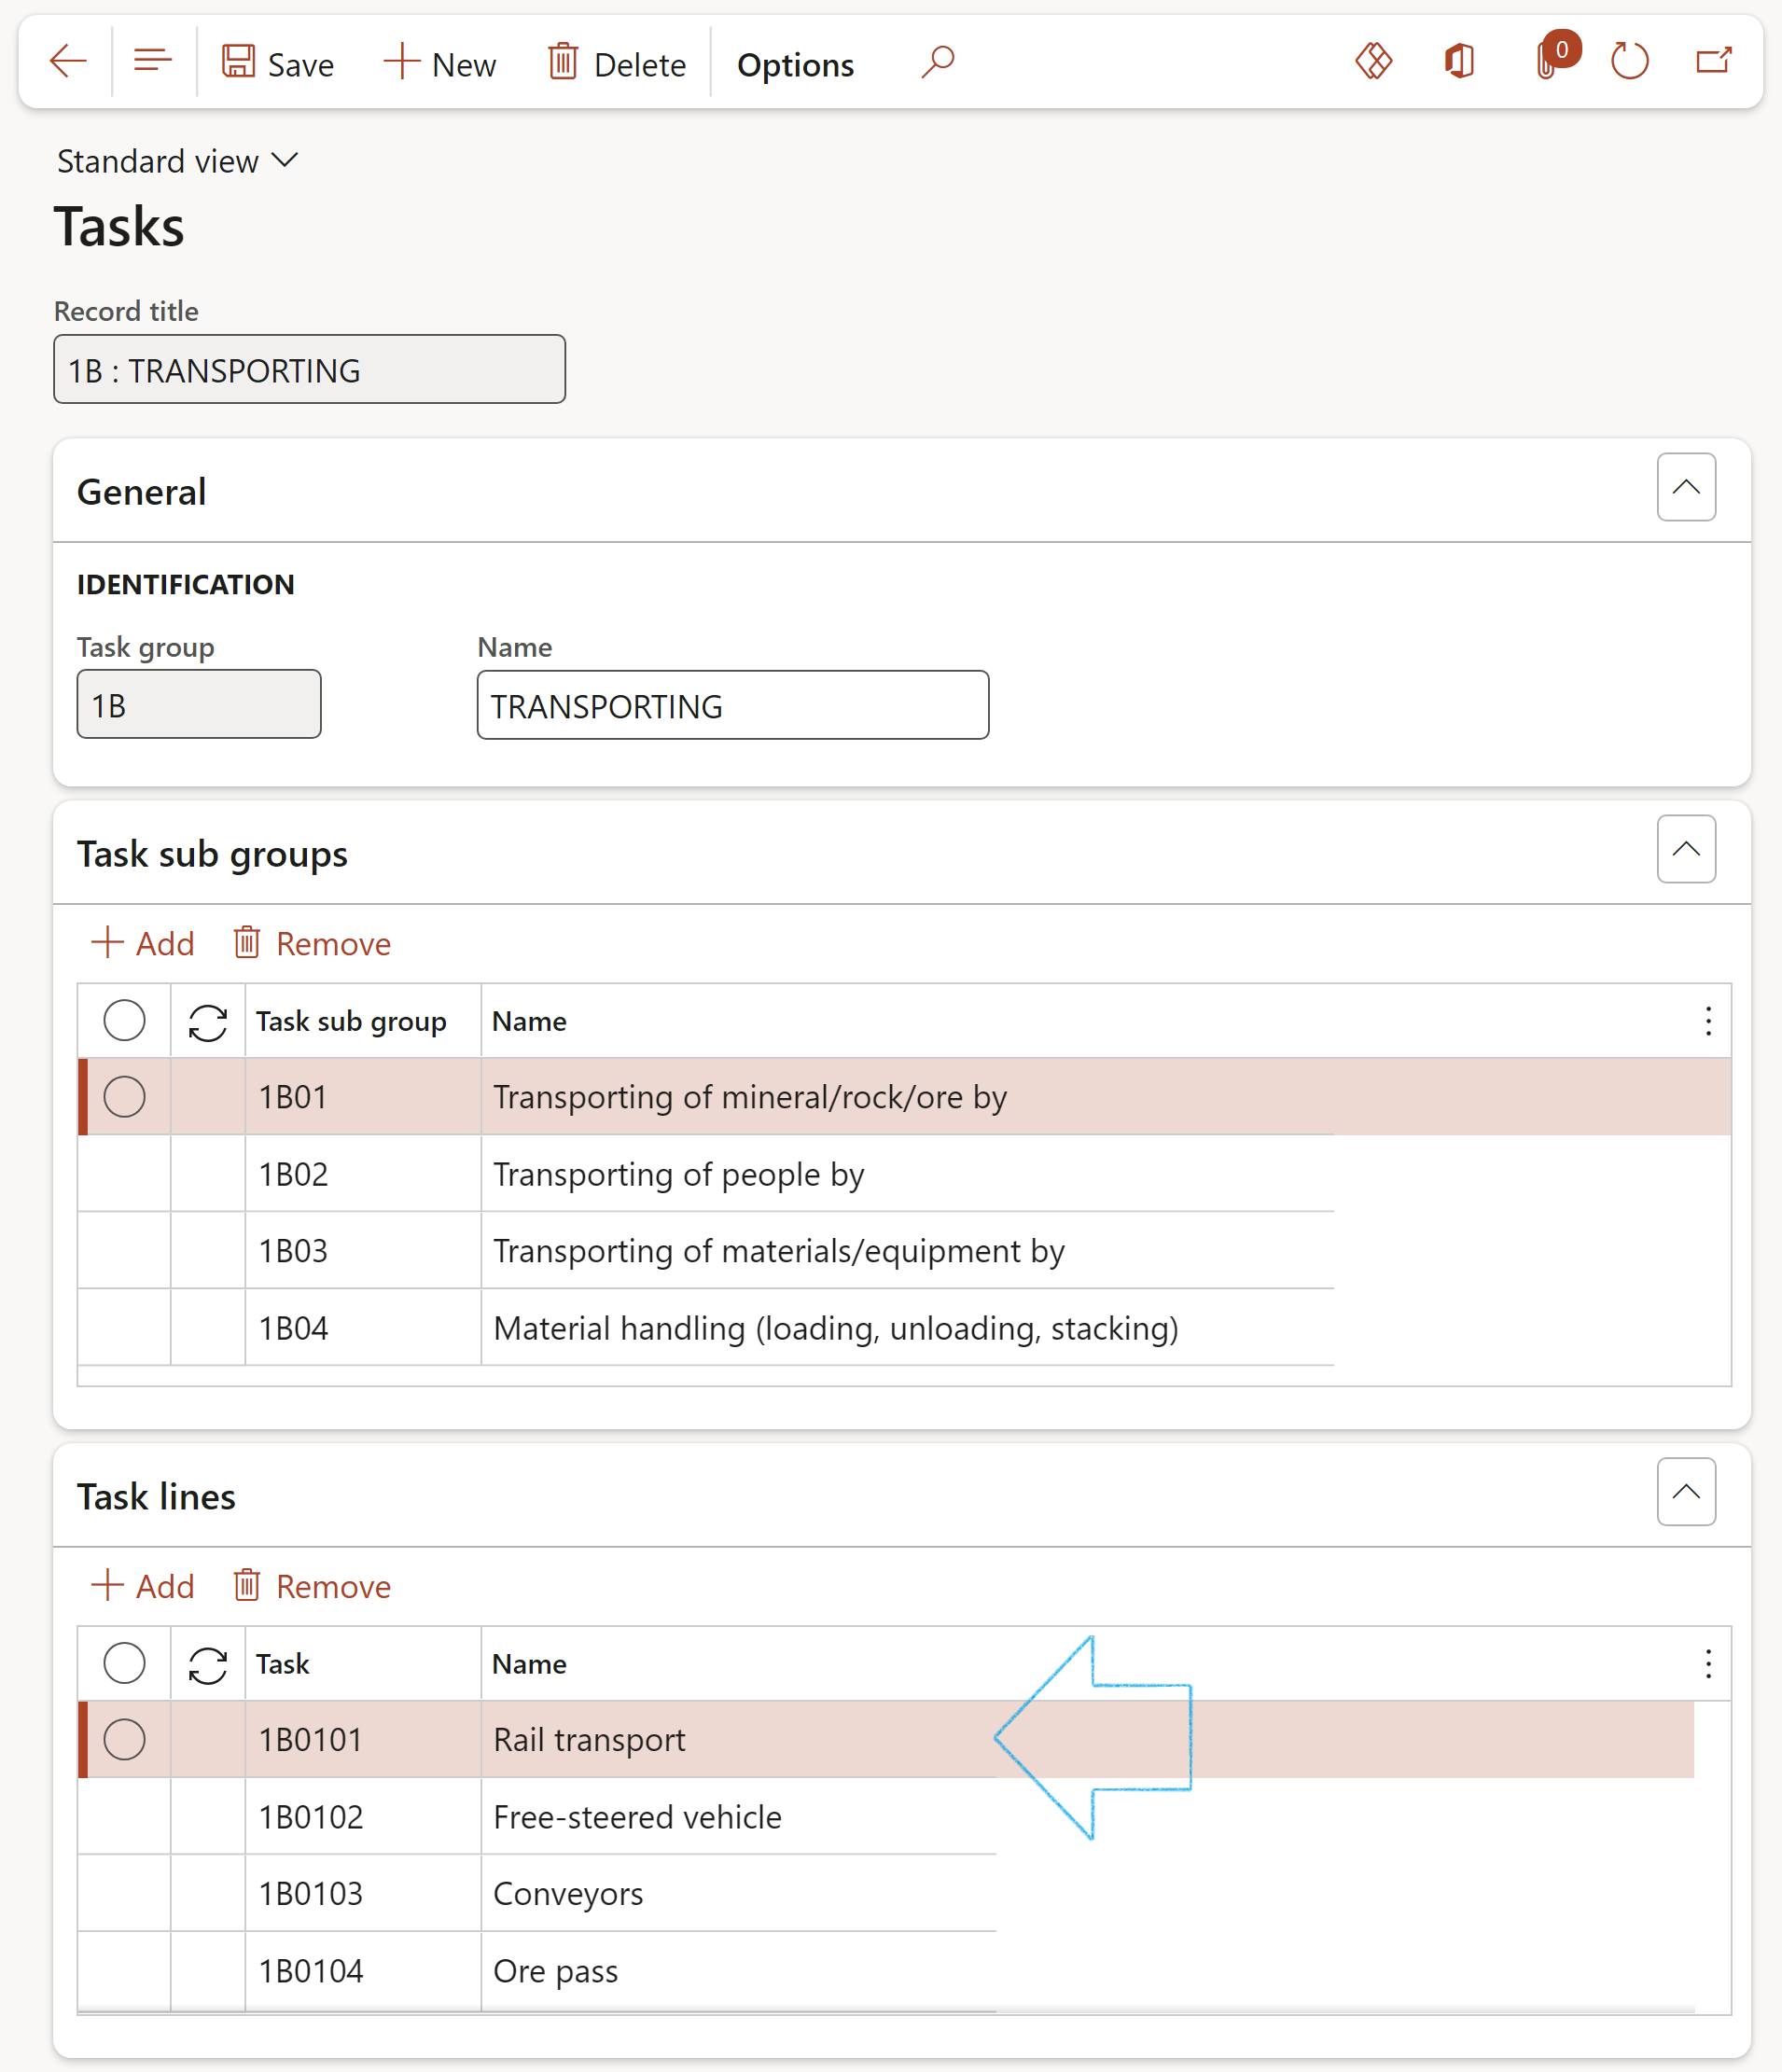
Go to: HSE > Setup > Work > Tasks
- On the Action pane, click on the New button
- Under the General Fast tab, enter the Task group (Grouping of tasks involved) and Name
- Expand the Task subgroups Fast tab
- In the Button strip, click on the Add button
- Enter a Task subgroup (Grouping of tasks involved) and Name
- Expand the Task lines Fast tab
- In the Button strip, click on the Add button
- Enter a unique Task code and Name
The lookup on the Inspection, Jobs and work Fast tab, points to the lines entered under Task lines described above
¶ Periodic use
¶ Step 12: Schedule future Inspections
Go to: HSE > Inspections > Schedules > All scheduled inspections
- On the Action pane, click on the New button
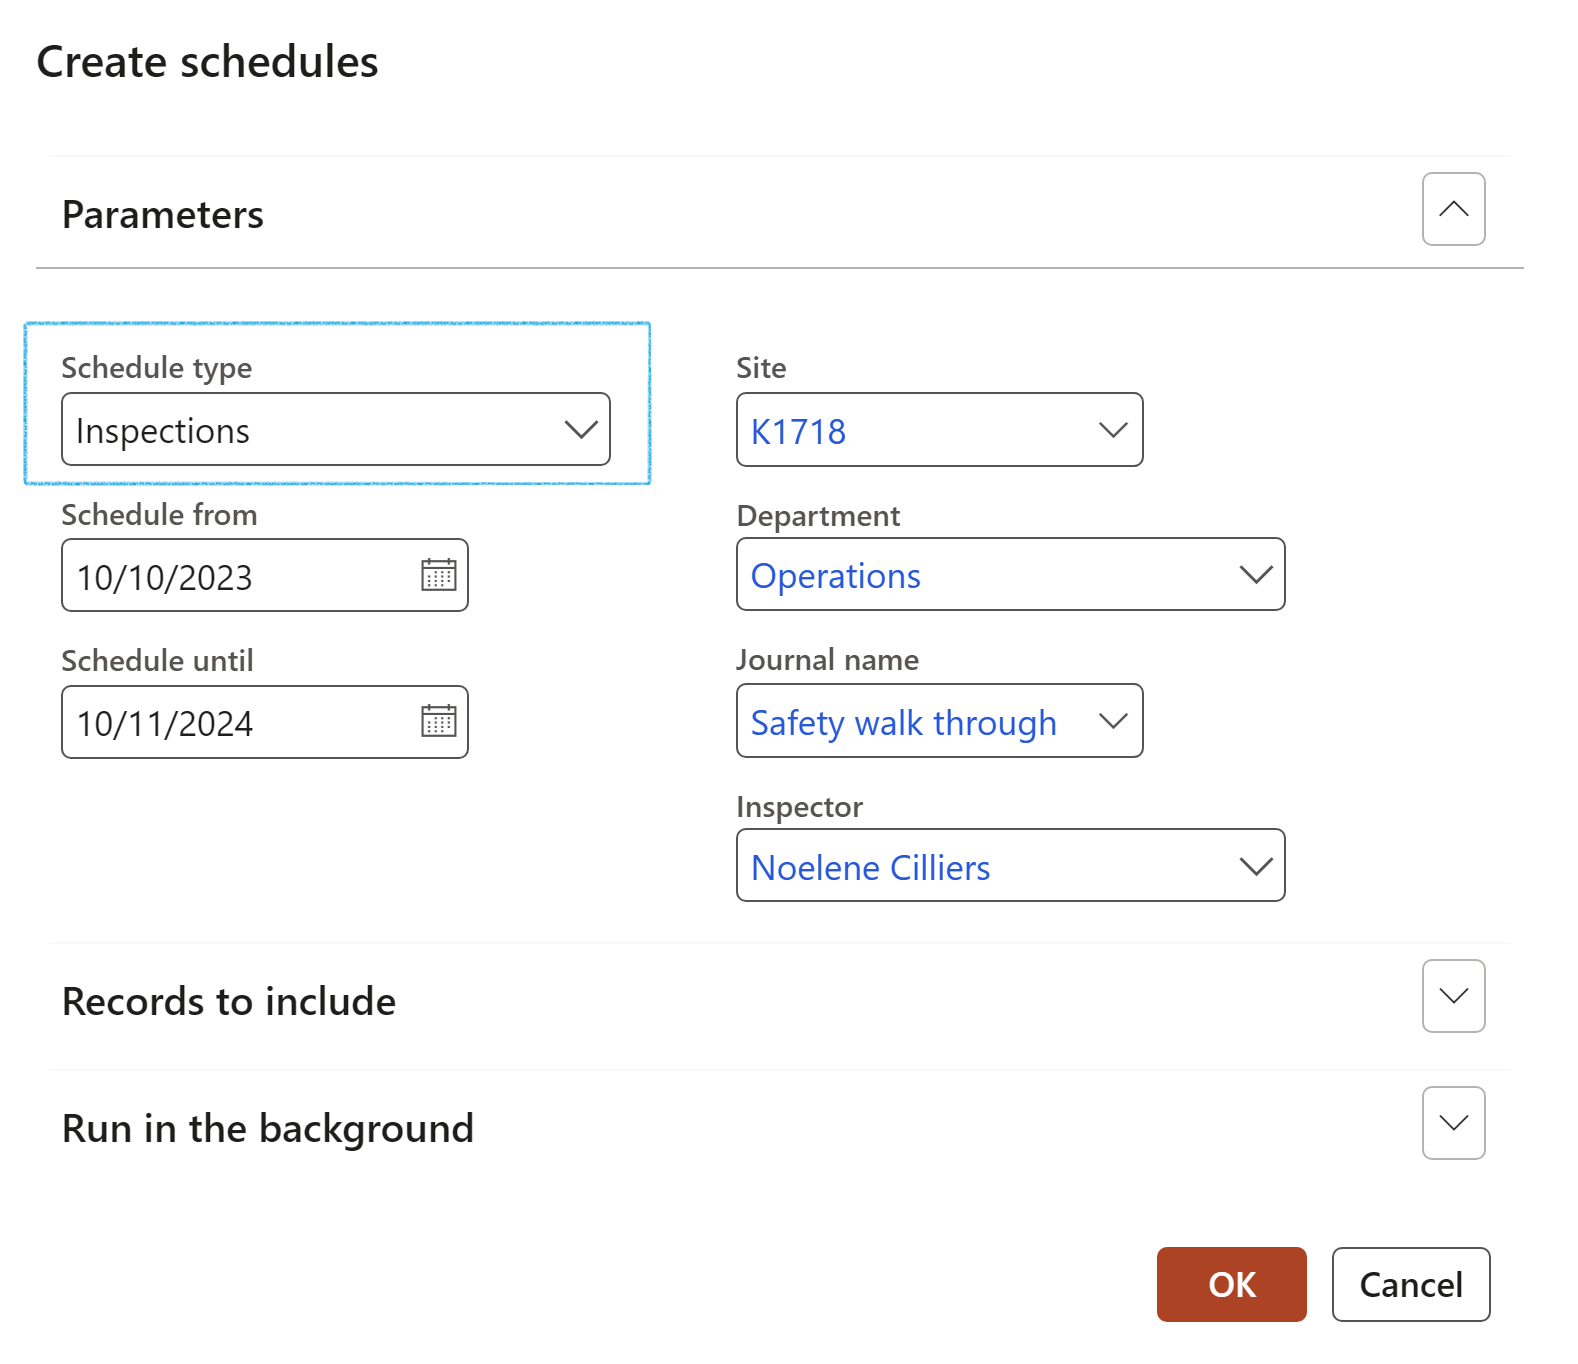
On the Create schedules dialogue:
- In the Schedule type field, select Inspection from the dropdown list
- Select the applicable criteria for the filters
- Click OK
Go to: HSE > Inspections > Schedules > All scheduled inspections
- Select the proposed inspection that you want to approve
- On the Action pane, in the Status group, click on the Approved button
- On approval, an inspection will be created for the Inspector selected on the Create dialog above, and the actual Inspection journal ID will be visible in the Inspection journal column
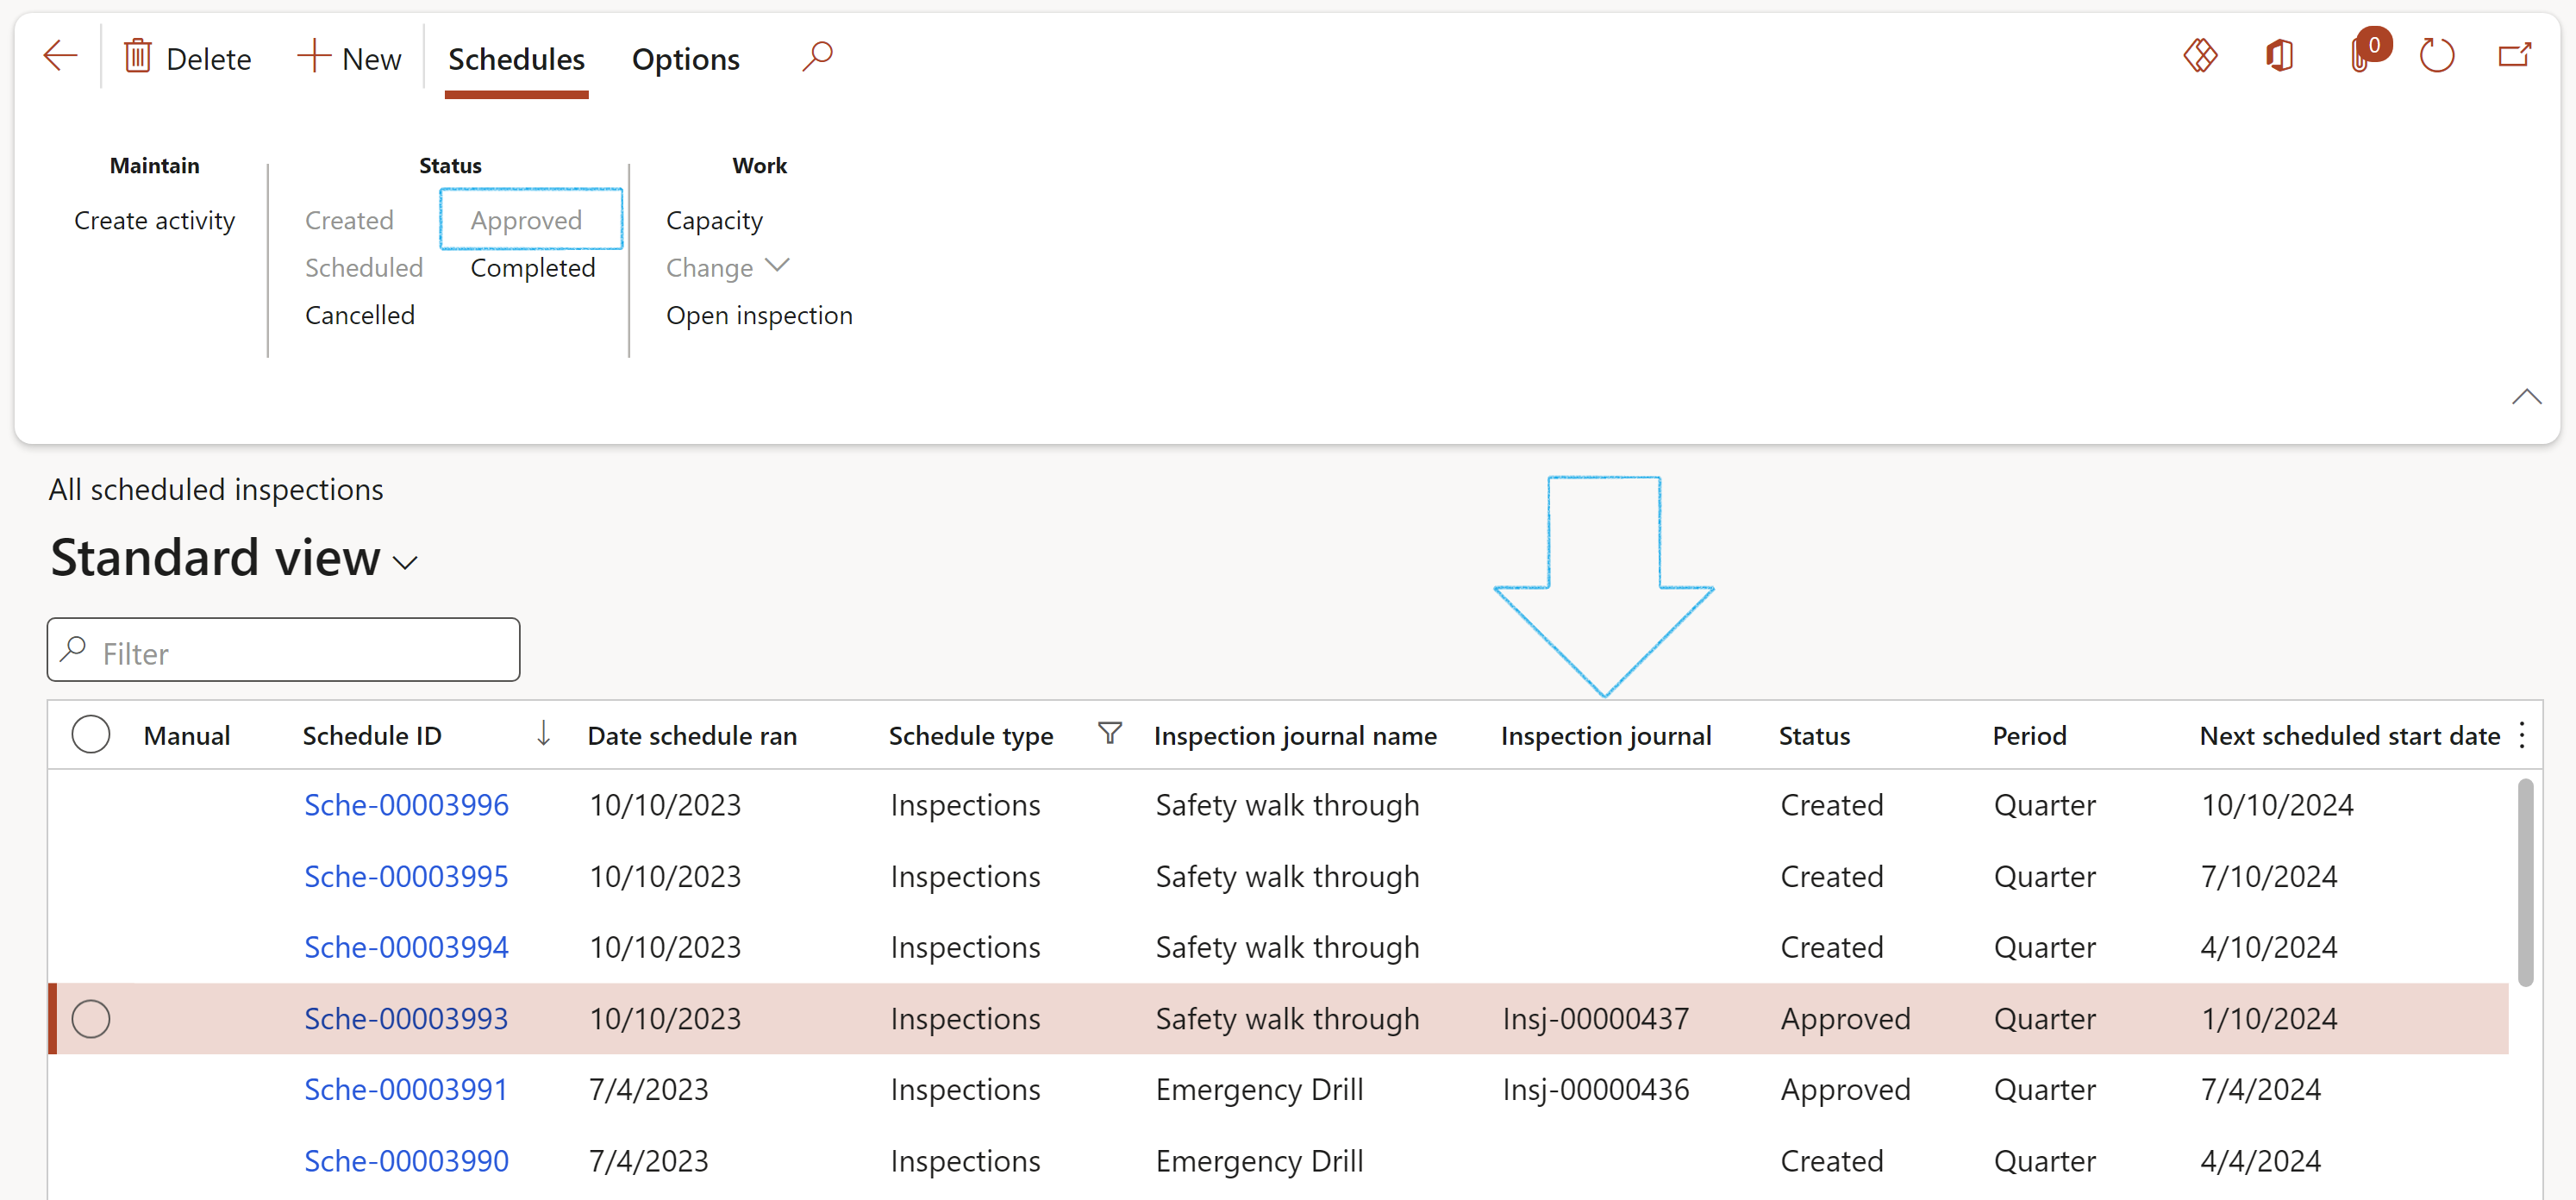
Multiple scheduled inspections can be approved at the same time by selecting the relevant records and the clicking on the Approved button
The following details on a scheduled inspection can be changed:
- Site
- Owner
- Department
- Team
Go to: HSE > Inspections > Schedules > All scheduled inspections
- Select the relevant Inspection
- On the Action pane, under the Work group, click on the Change button
- On the Change record dialog, enter the new values
- Type the Reason for making the changes (Optional)
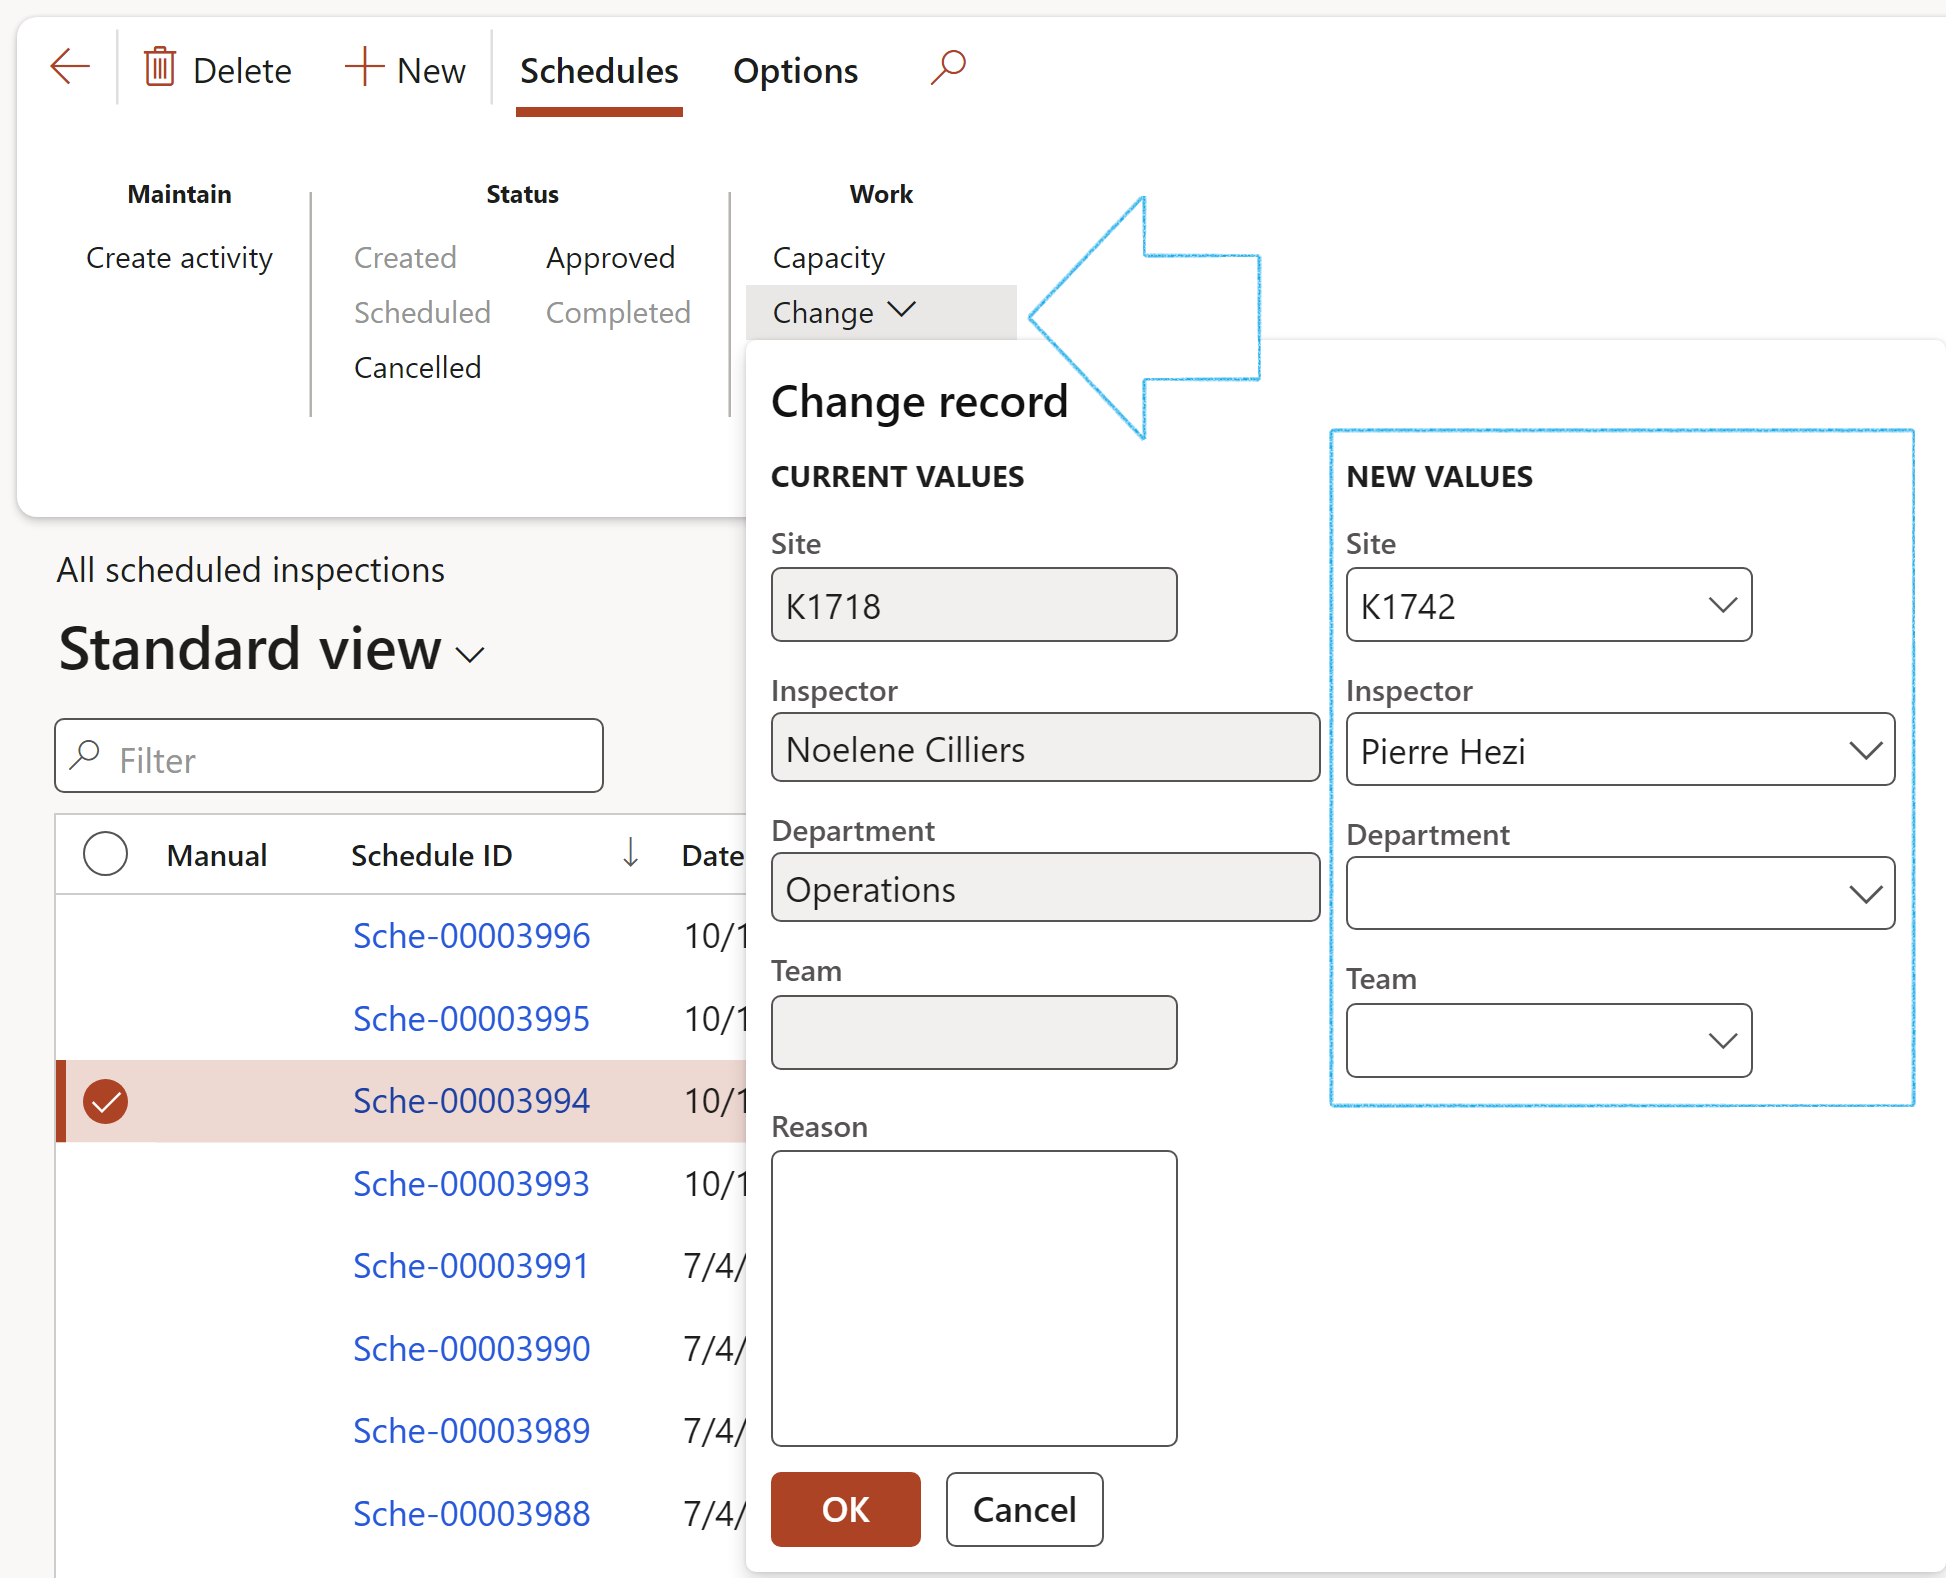
The Change button is only available when the status of the scheduled inspection is Created of Scheduled
¶ Daily use
¶ Step 13: Inspections
Go to: HSE > Inspections > Schedules > All scheduled inspections
- Select the inspection that you want to work with (The inspection has to be approved)
- On the Action pane, in the Work group, click on the Open inspection button
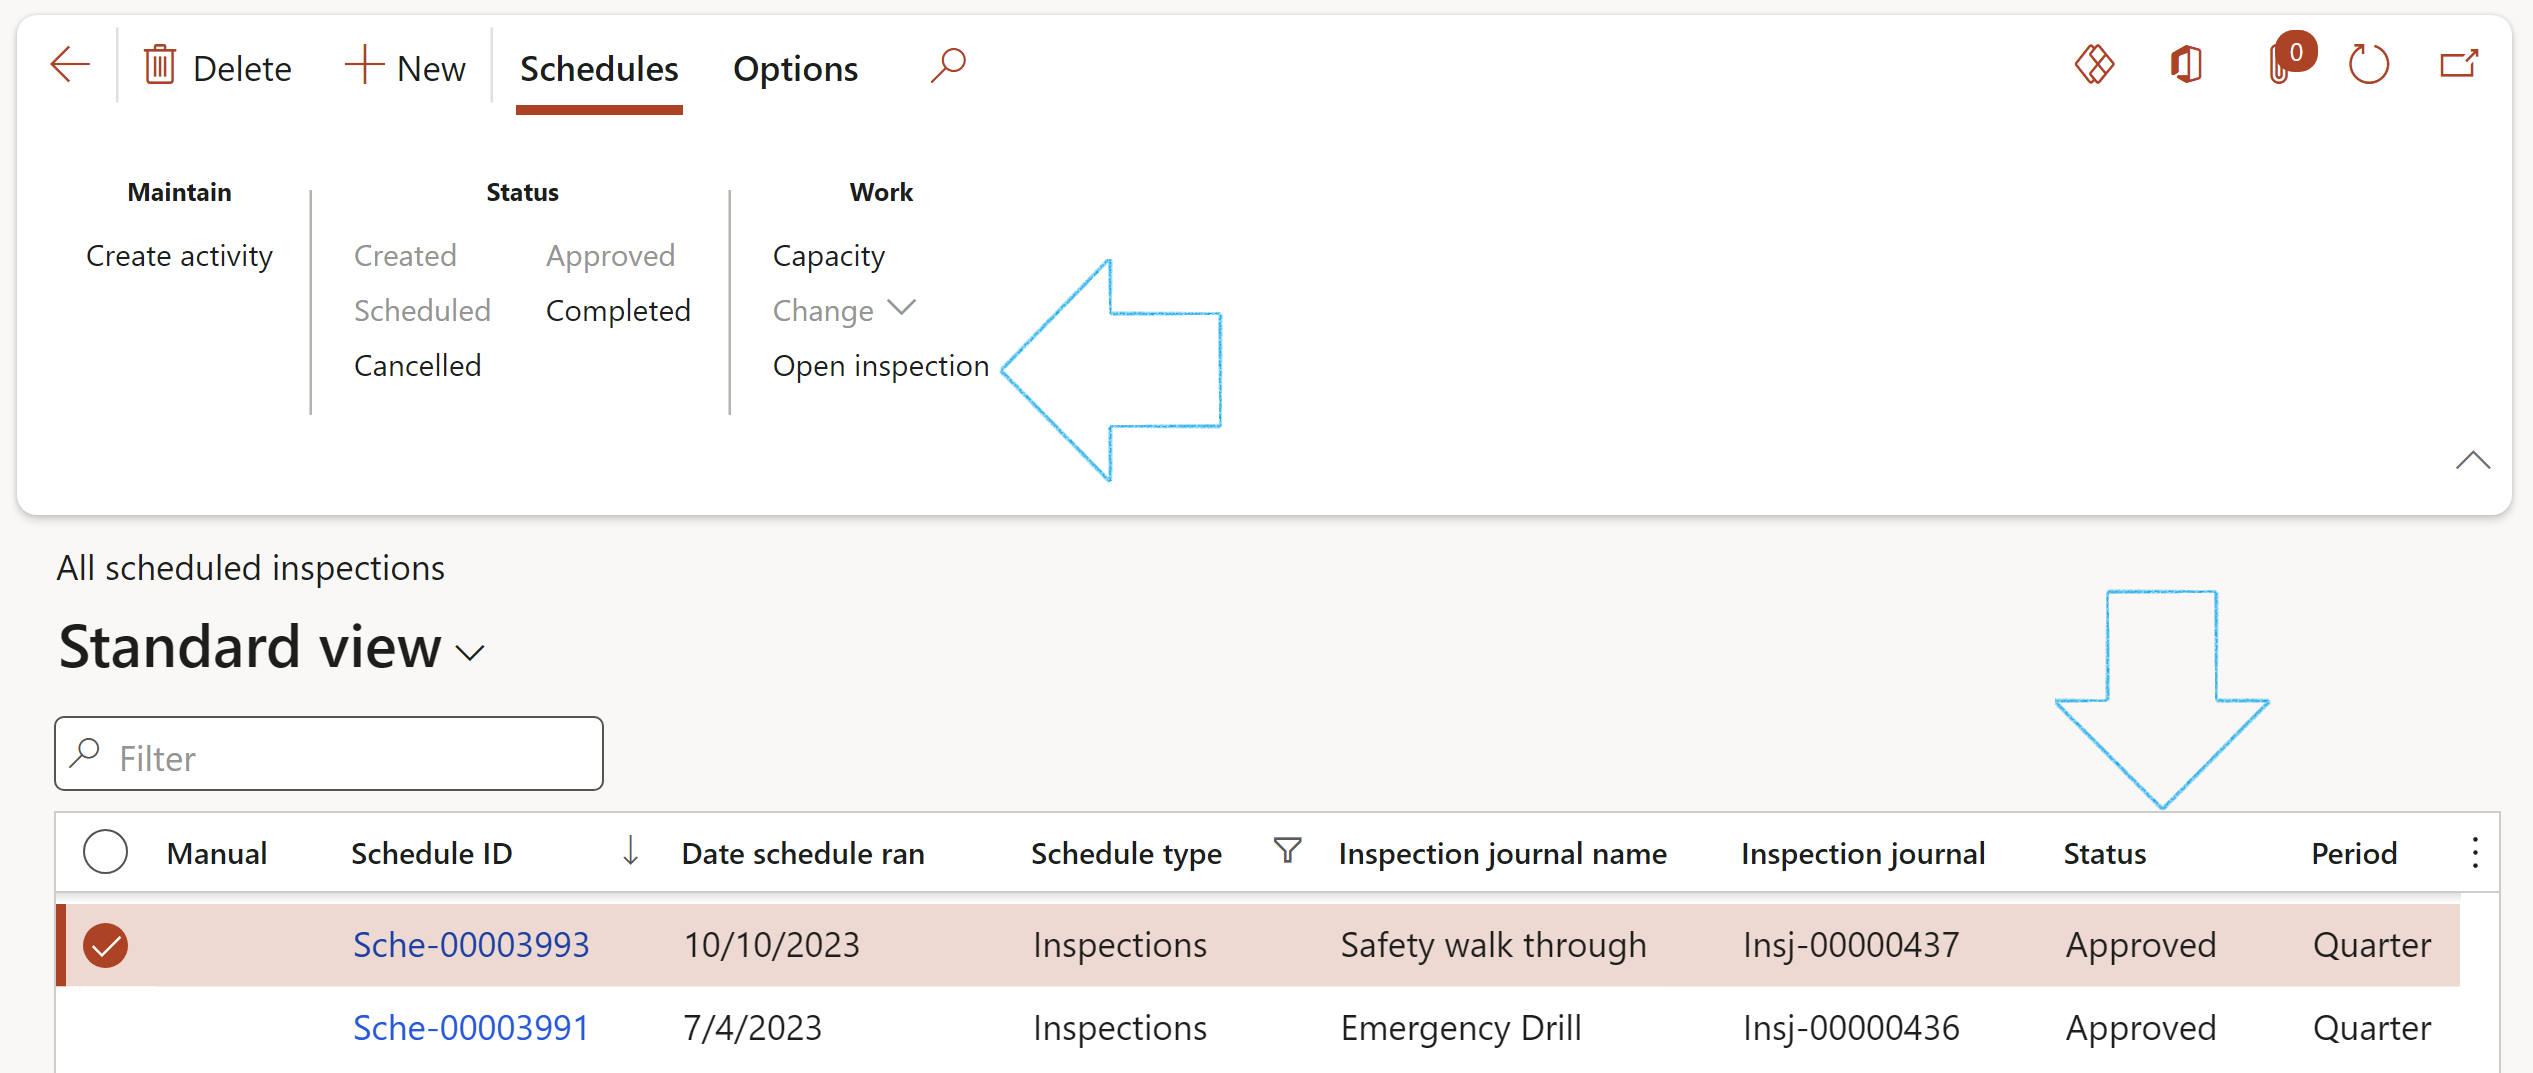
- Open the Header view of the Inspection journal
- Expand the Areas covered by this inspection Fast tab
- Select the relevant Objects/Locations/Inventory/Projects from the drop-down lists (The Default Object/location selected on the Inspection journal name will by default populate the 1st field. This can be edited)
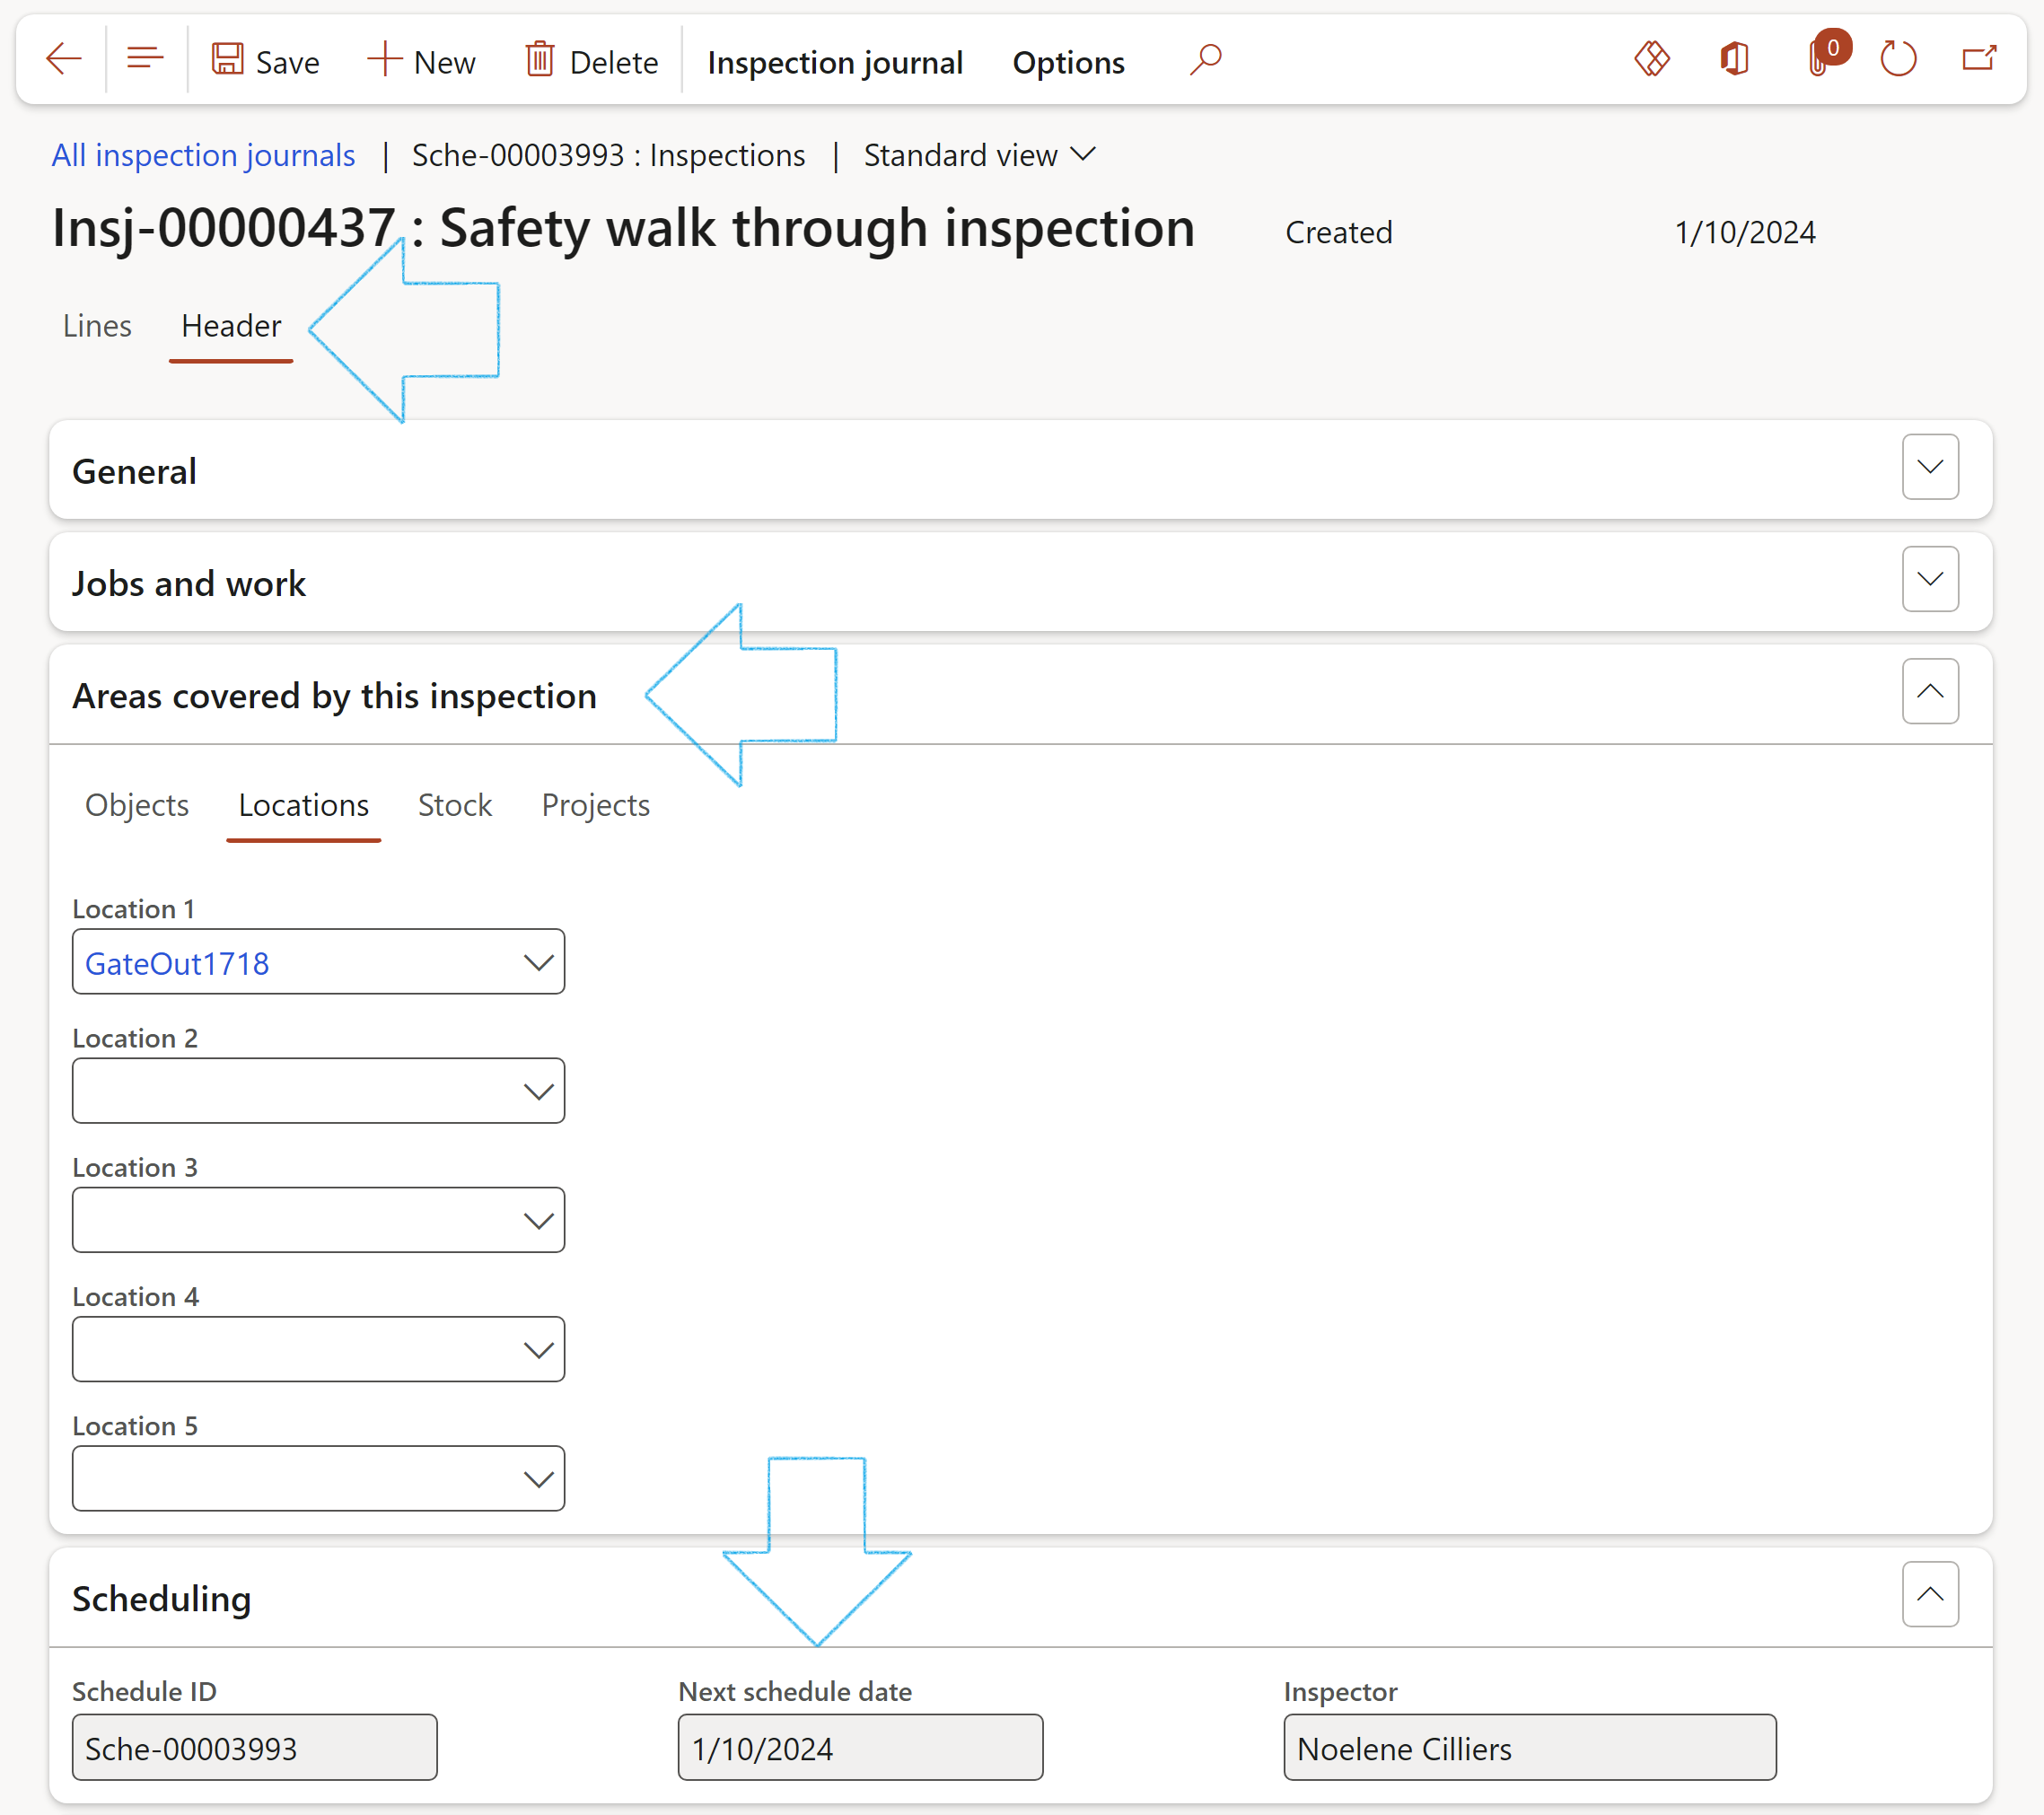
- You can have multiple lines with the same inspection object, but with different inspection lists, for example: A weekly and a monthly inspection list
- You can have multiple lines with the same inspection list, but with different inspection objects, for example: Every vehicle (object) can be linked to the same inspection list
Use the Next inspection date field under the Scheduling Fast tab to setup alerts.
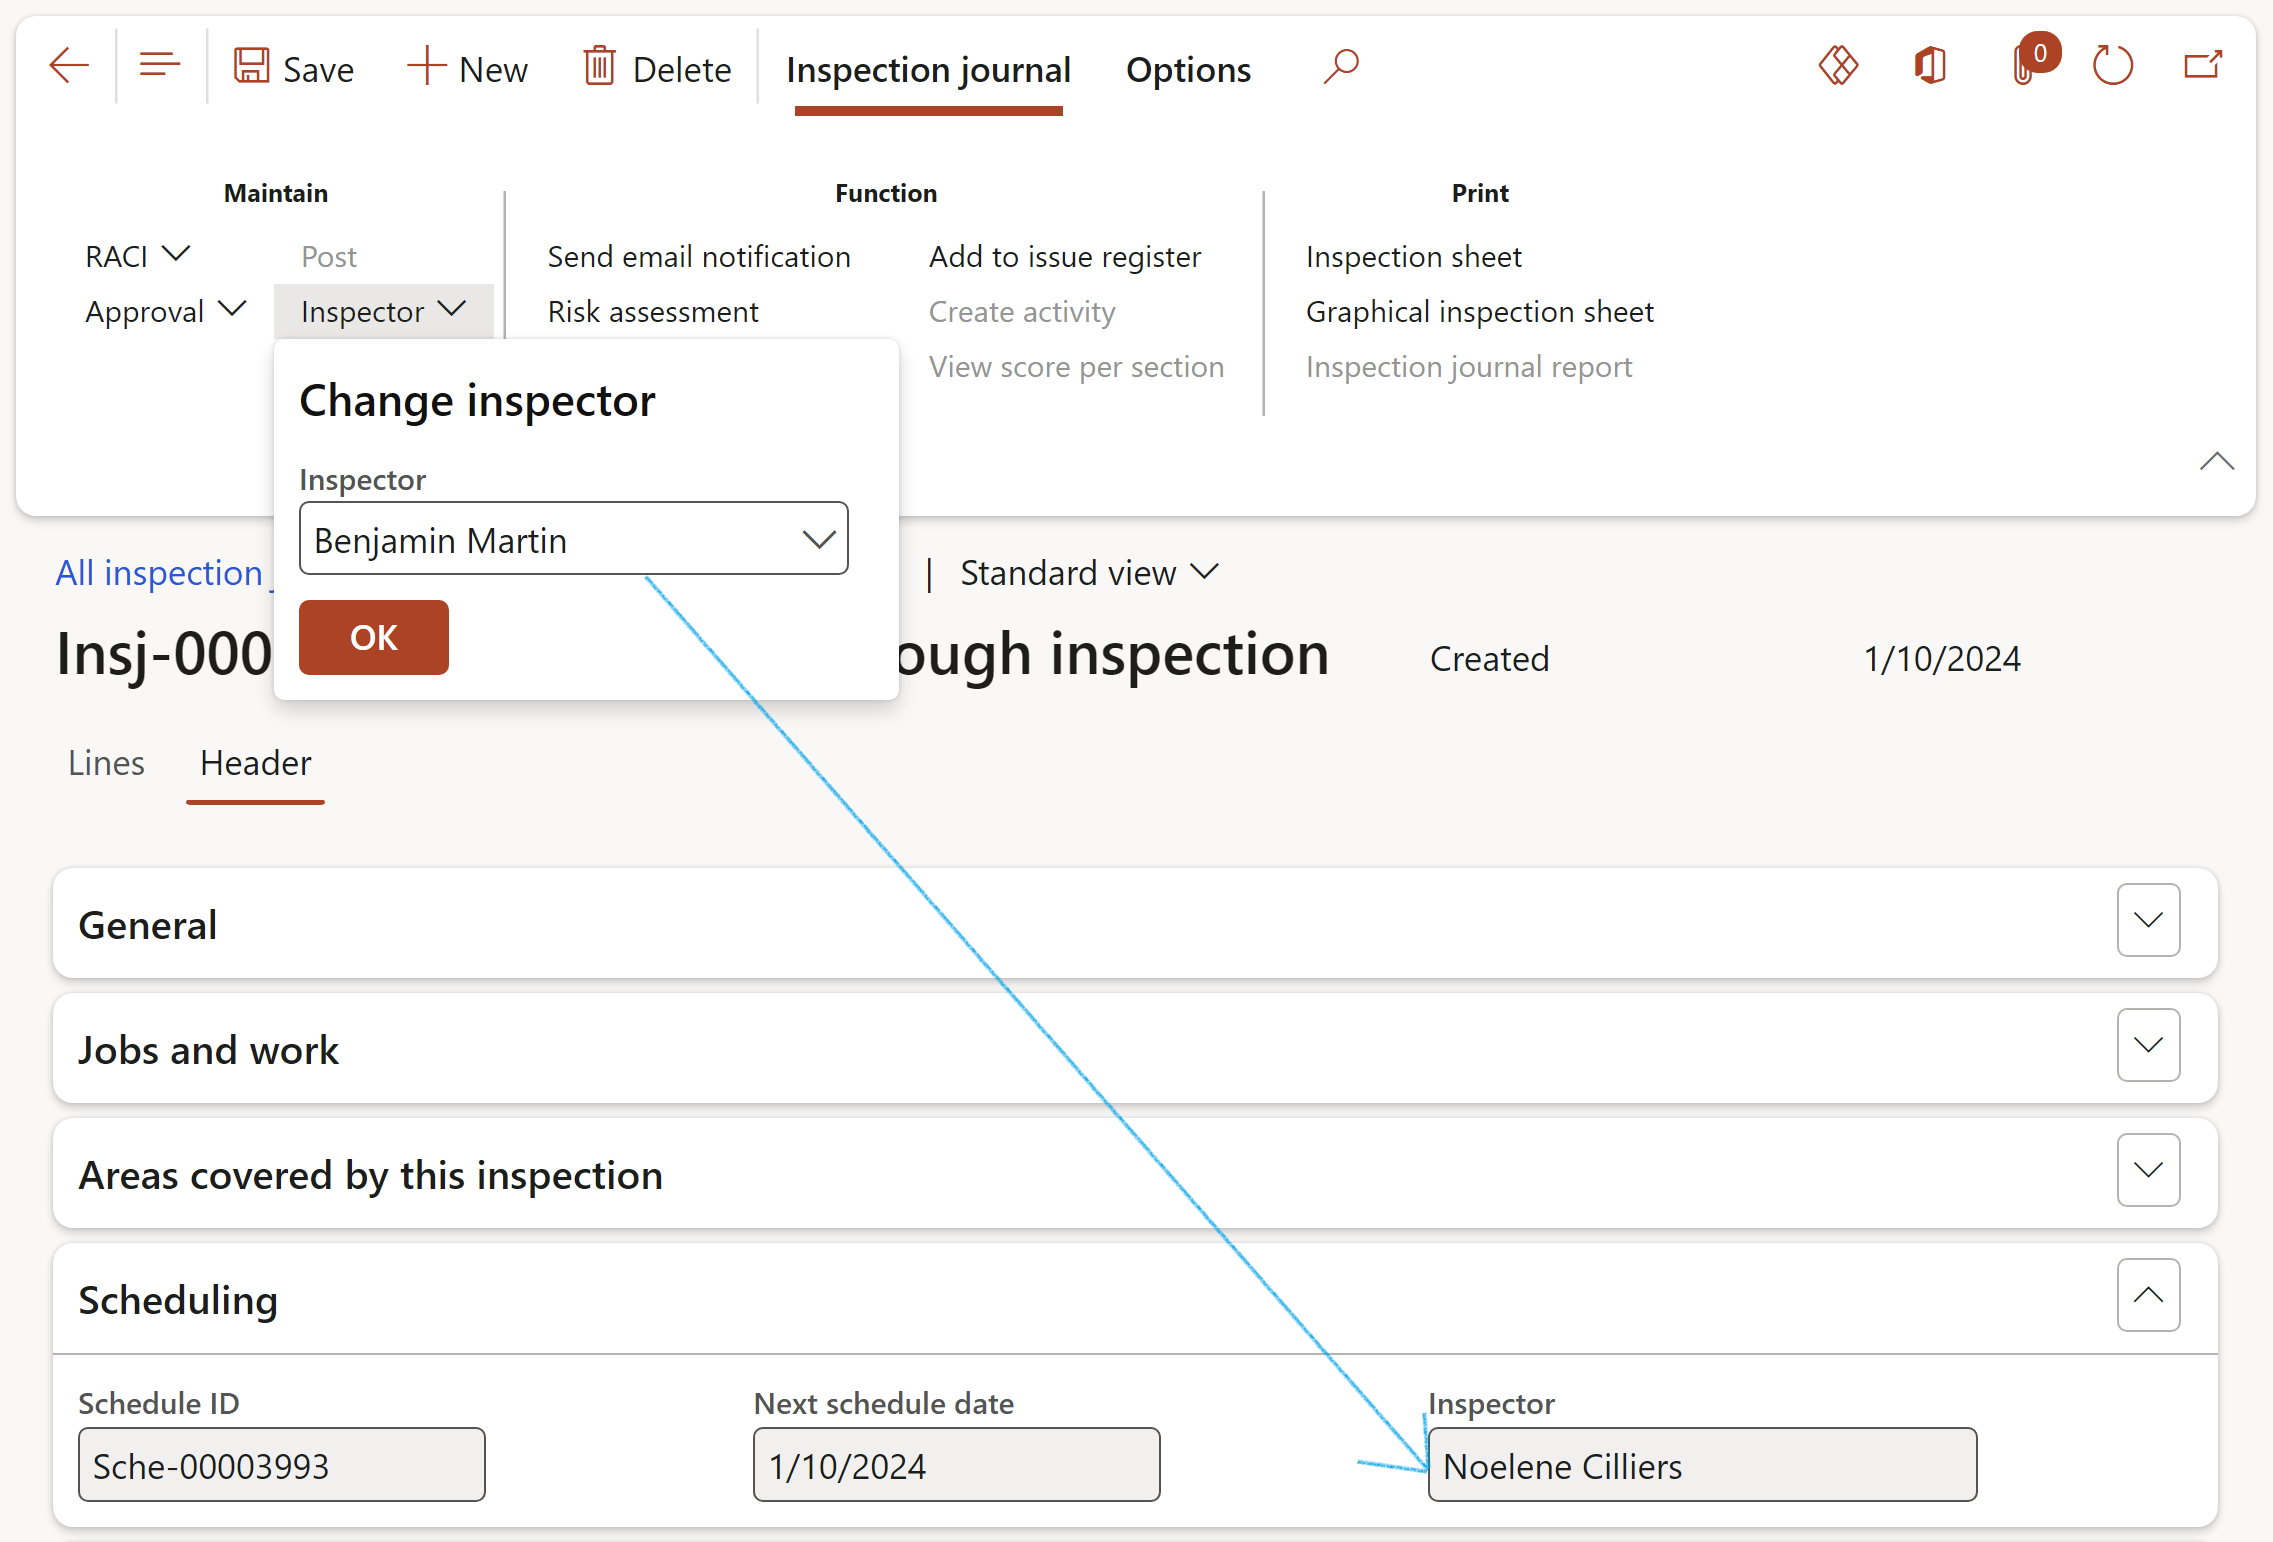
To change the Inspector:
- On the Action pane, in the Function group, click on the Inspector button
- Select the required Inspector from the dropdown list
- Click OK
¶ Step 14: The Inspection journal
Use this form to setup the actual inspection list
Go to: HSE > Inspections > Inspection journal
- Select one of the filter settings in the Show field:
- All: All transactions
- Not posted: Transactions that are not posted
- Posted: Posted transactions
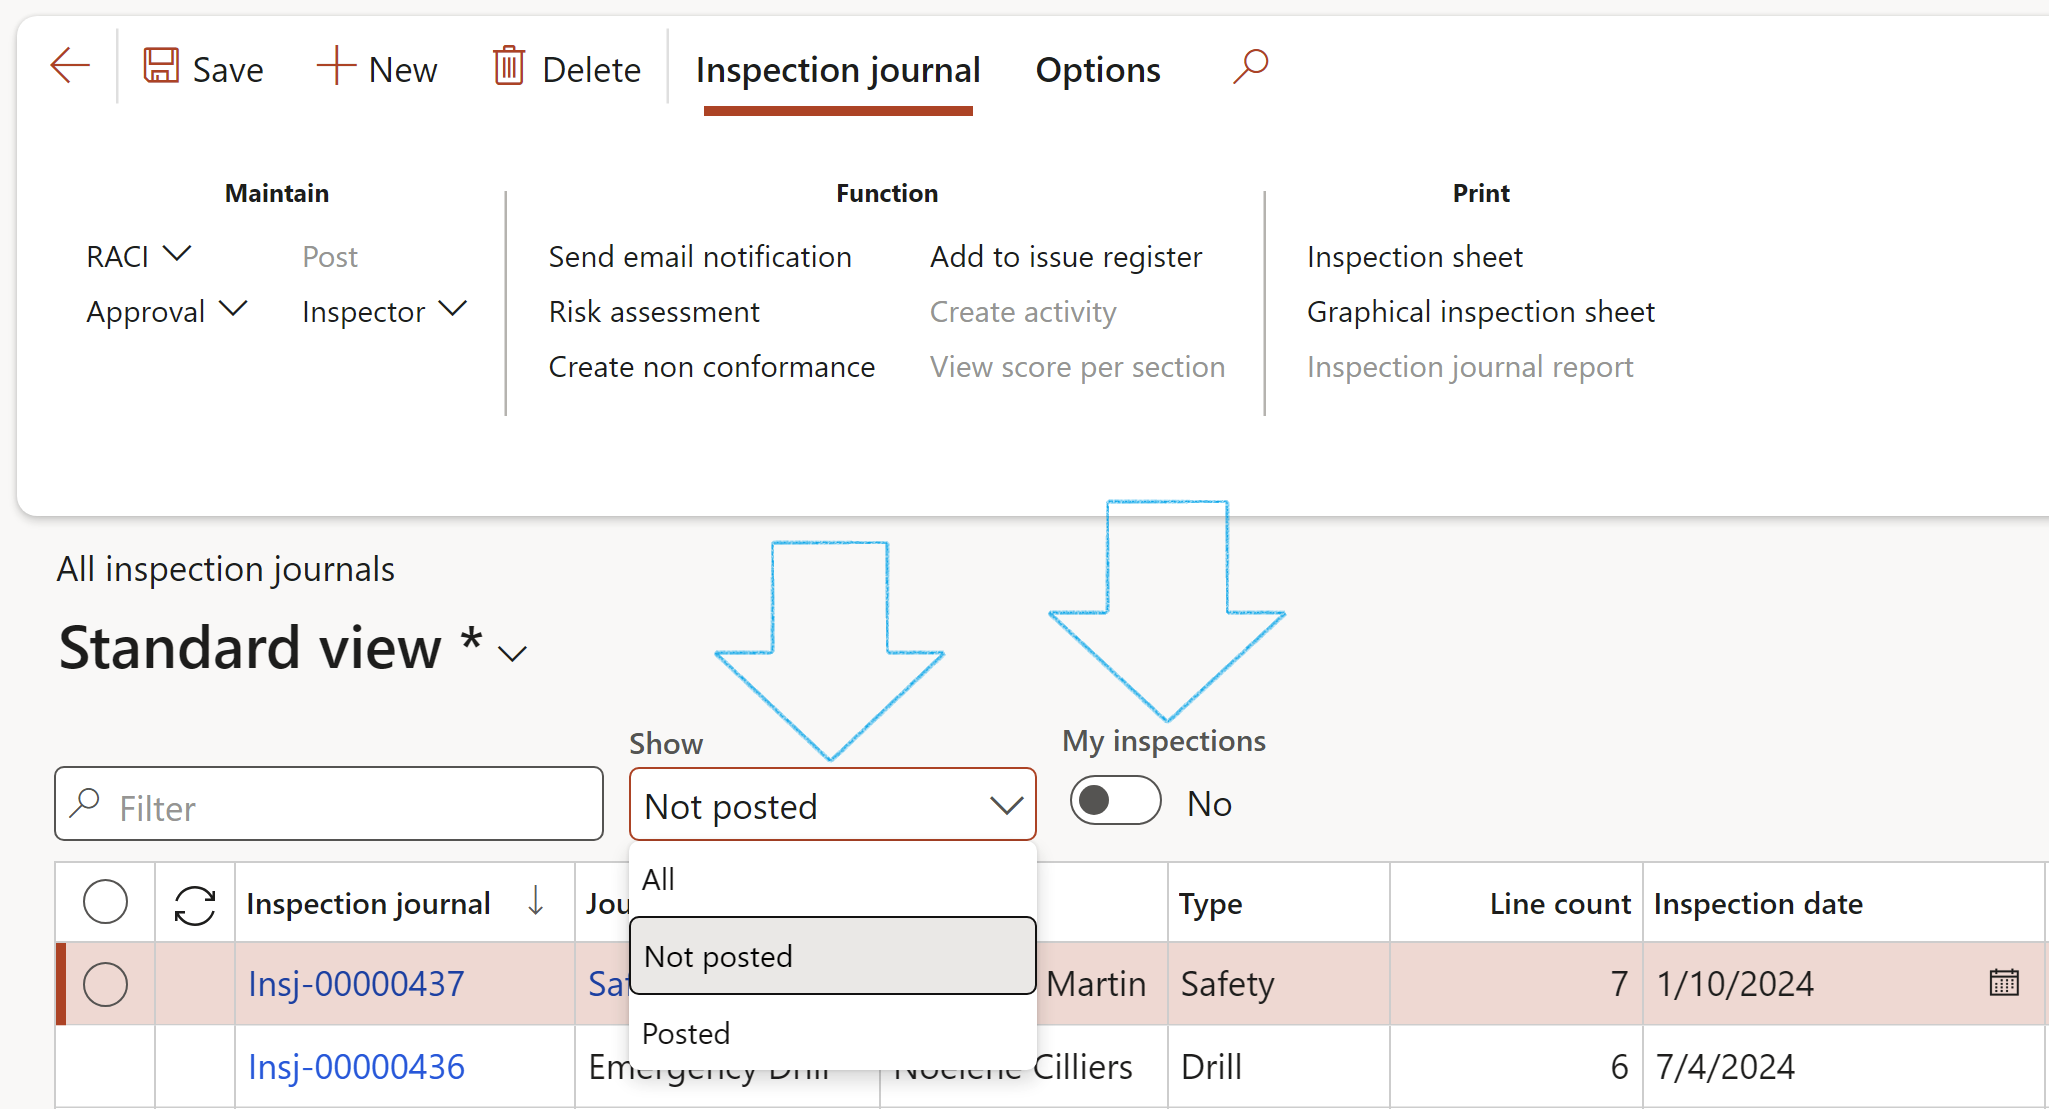
- The user can choose to only see his/her own inspections by selecting Yes under My inspections
- OR, the logged in user can go to: HSE > Inspections > My inspection journals
¶ Step 14.1: Create a new Inspection journal
- On the Action pane, click on the New button
- On the New inspection dialog, enter the following:
- Select the relevant Journal name from the dropdown list
- Enter a Due date for the inspection
- Click on OK
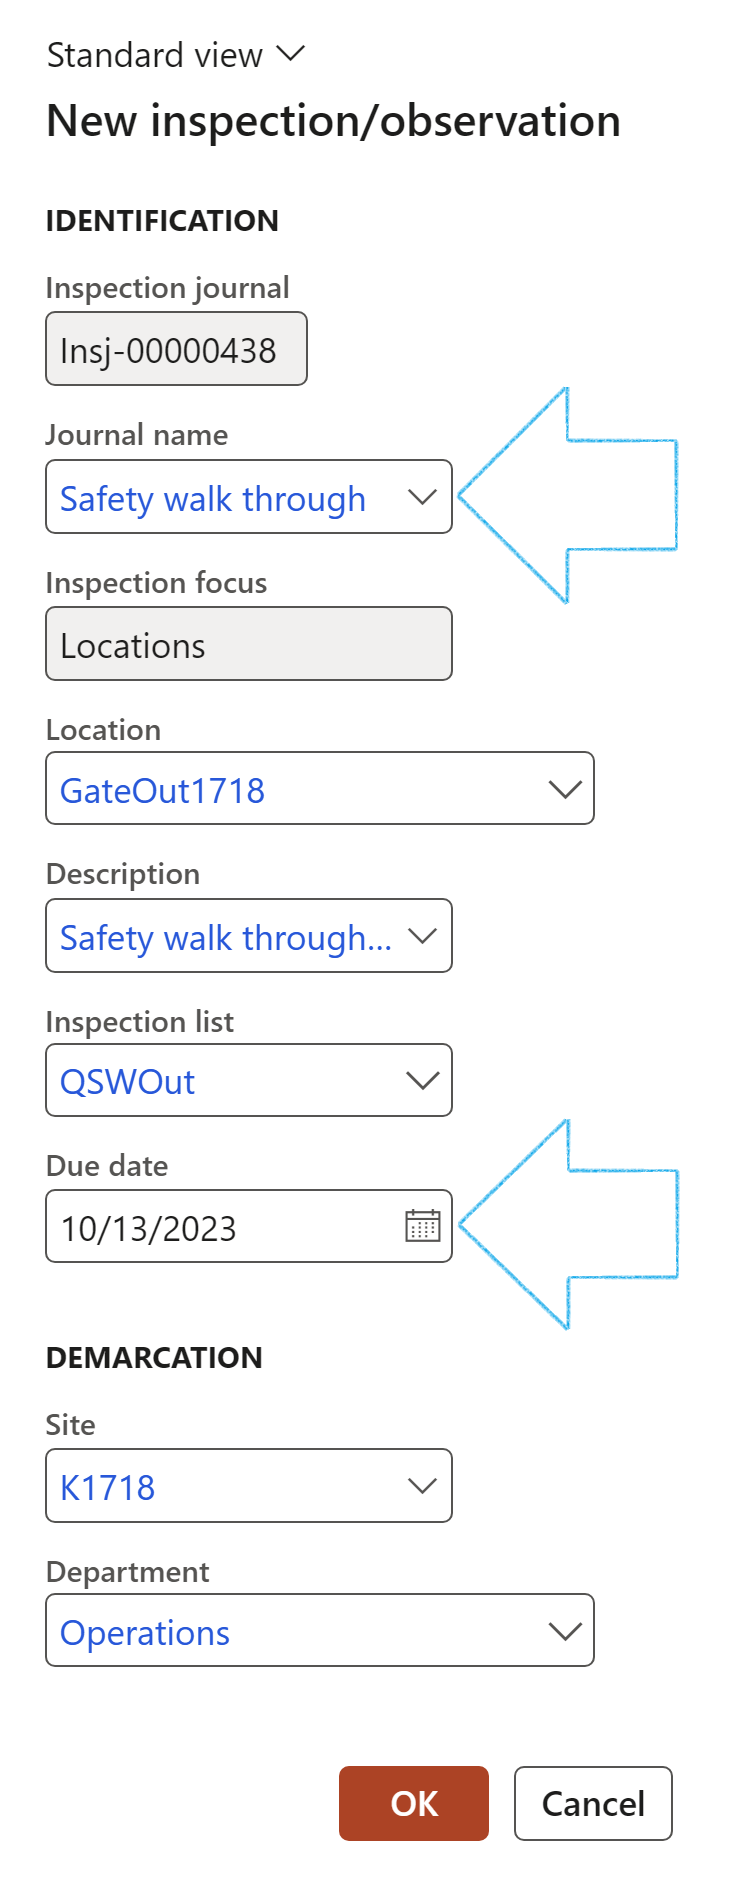
The following fields will be populated according to the selection made the Journal name field:
- Description
- Inspection list
- Site
- Department
¶ Step 14.2: Inspection journal Header
¶ Step 14.2.1: The General Fast tab:
- In the Inspection journal field, the journal number appears as setup on the number sequence
- The Journal name field, select the journal name from the dropdown list as setup in the Journal name form
Please note that only ONE Inspection focus can be selected per inspection
- Enter a Description of the inspection
- In the Due date field, select the date that this inspection will be done on
- Select the relevant Site from the dropdown list
- Select the relevant Department from the dropdown list
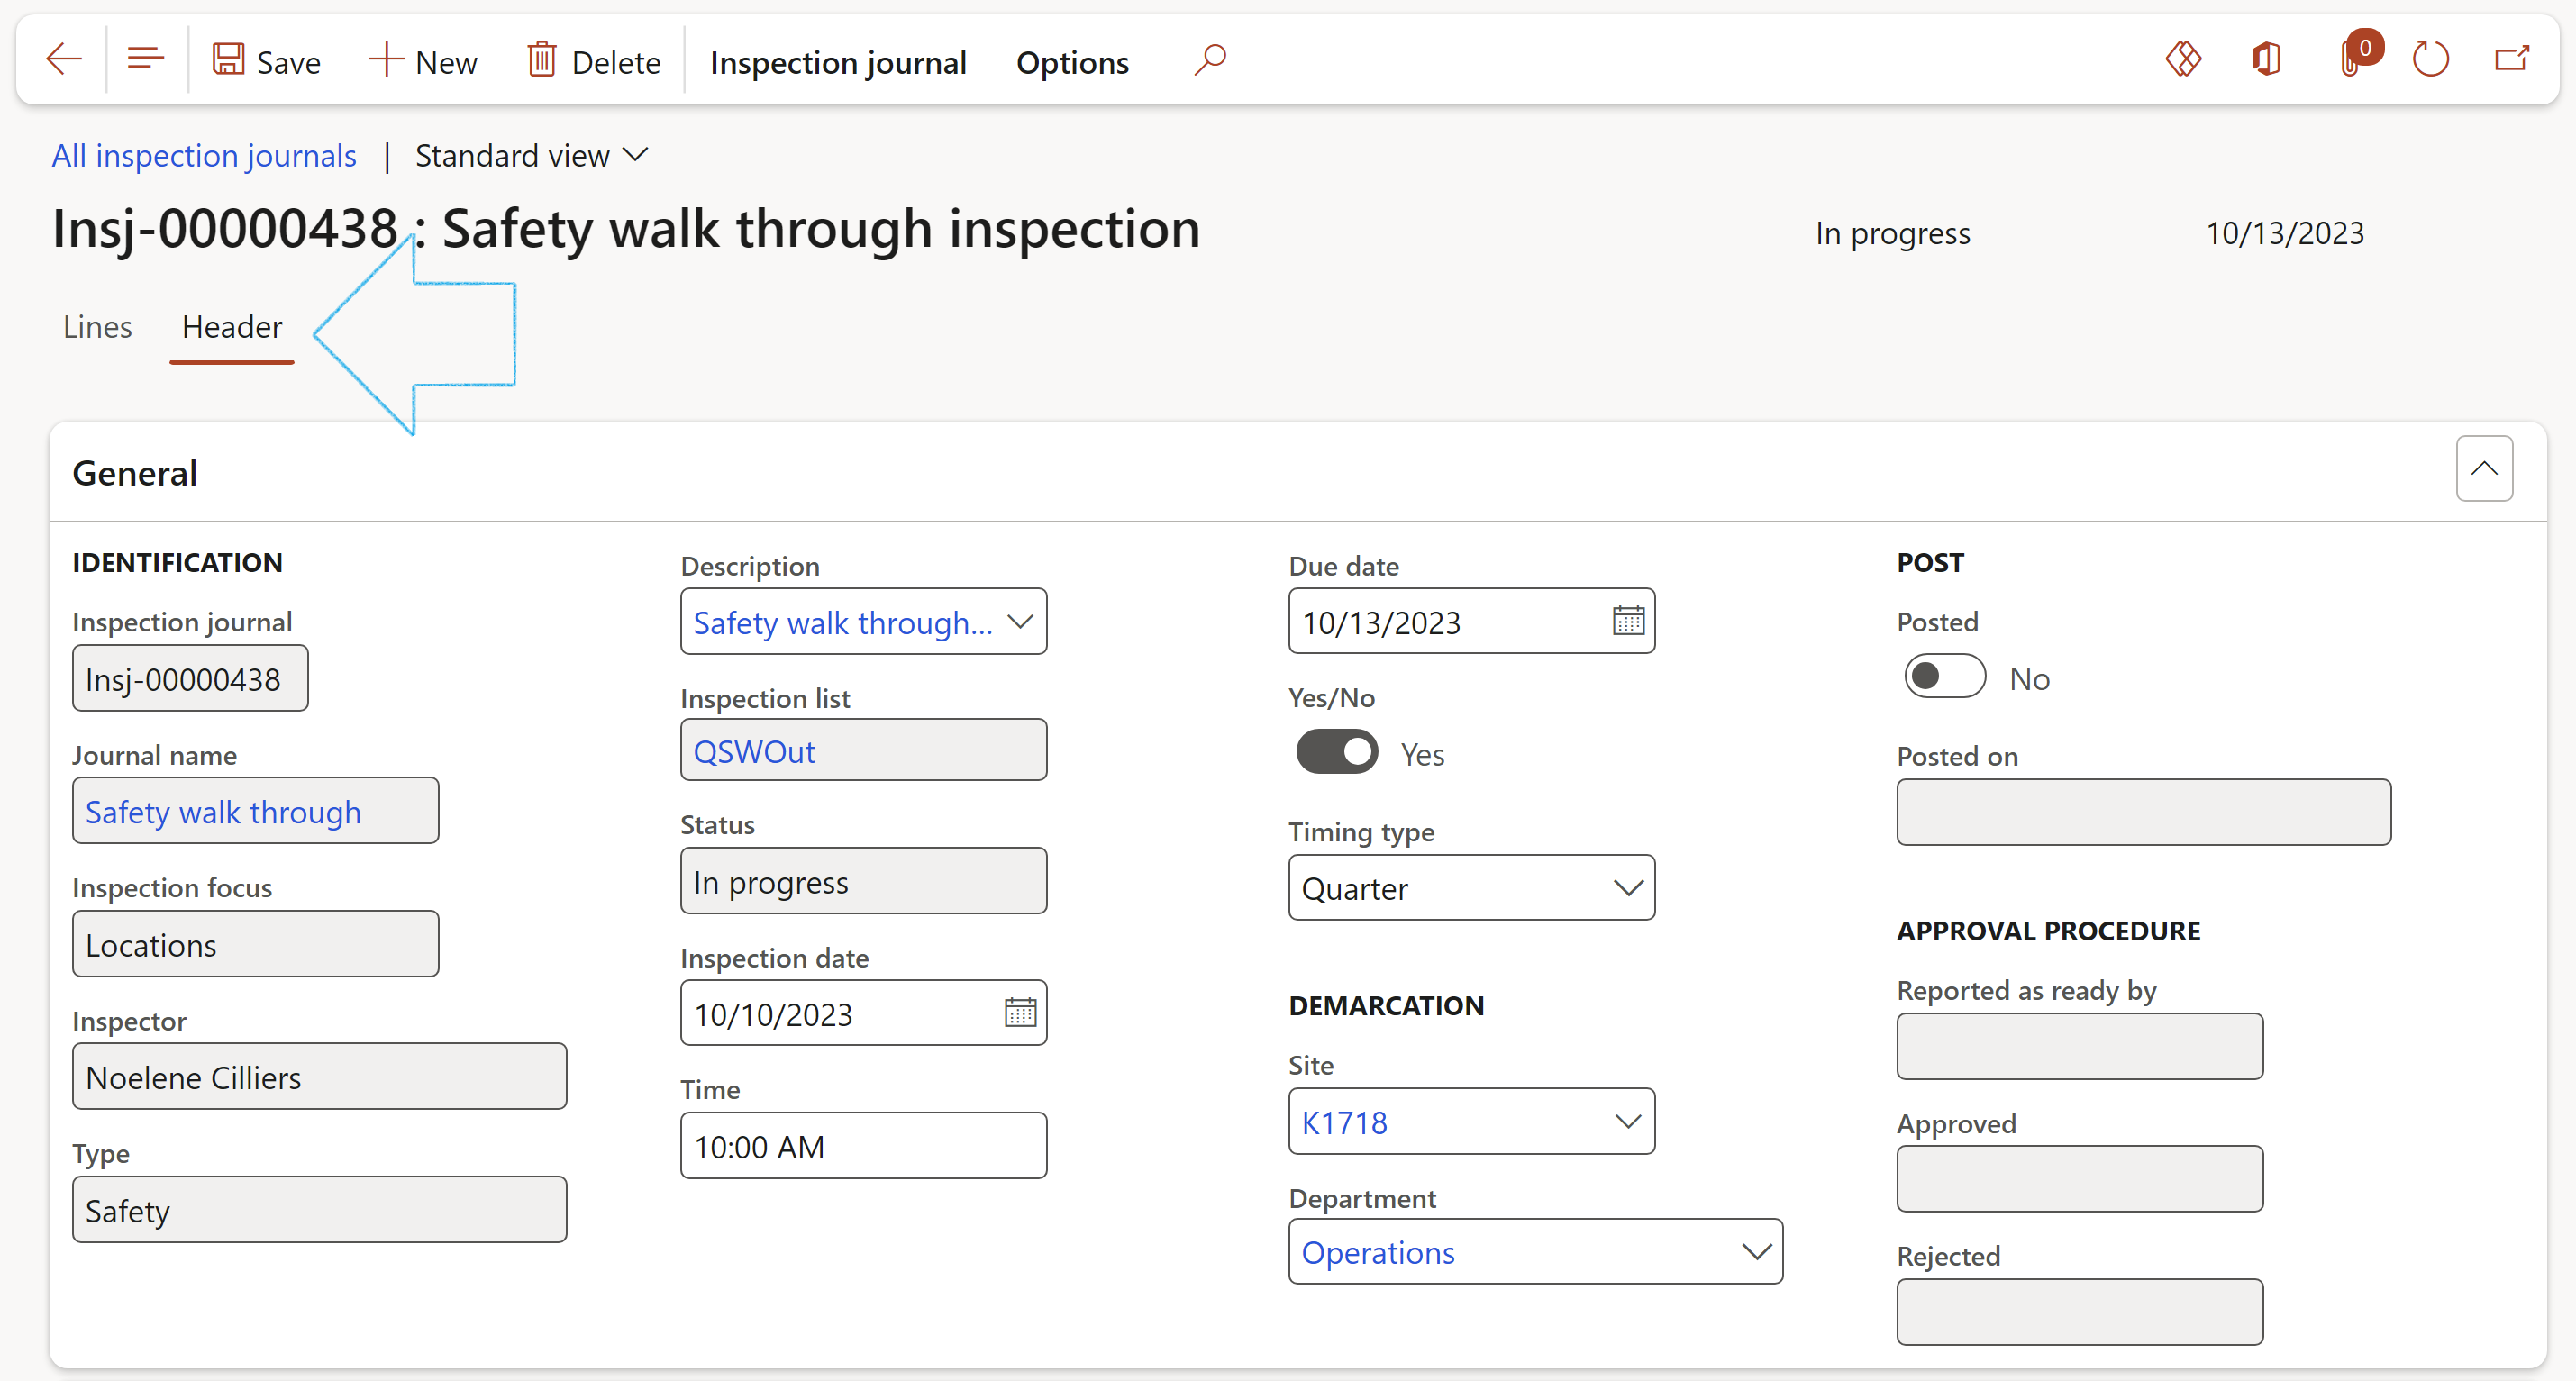
¶ Step 14.2.2: The Areas covered by this inspection Fast tab:
The fields that are available under the Index tabs on the Areas covered by this inspection Fast tab, are dependent on the Inspection focus selected under the General Fast tab
- Open the required Index tab
- Select the relevant Objects/Locations/Stock/Projects that are to be inspected from the dropdown lists
- In the Job plan field, select the job plan that is to be used for this inspection
- Select the Location where the inspection is going to take place
- Select the Project ID for this inspection from the dropdown list
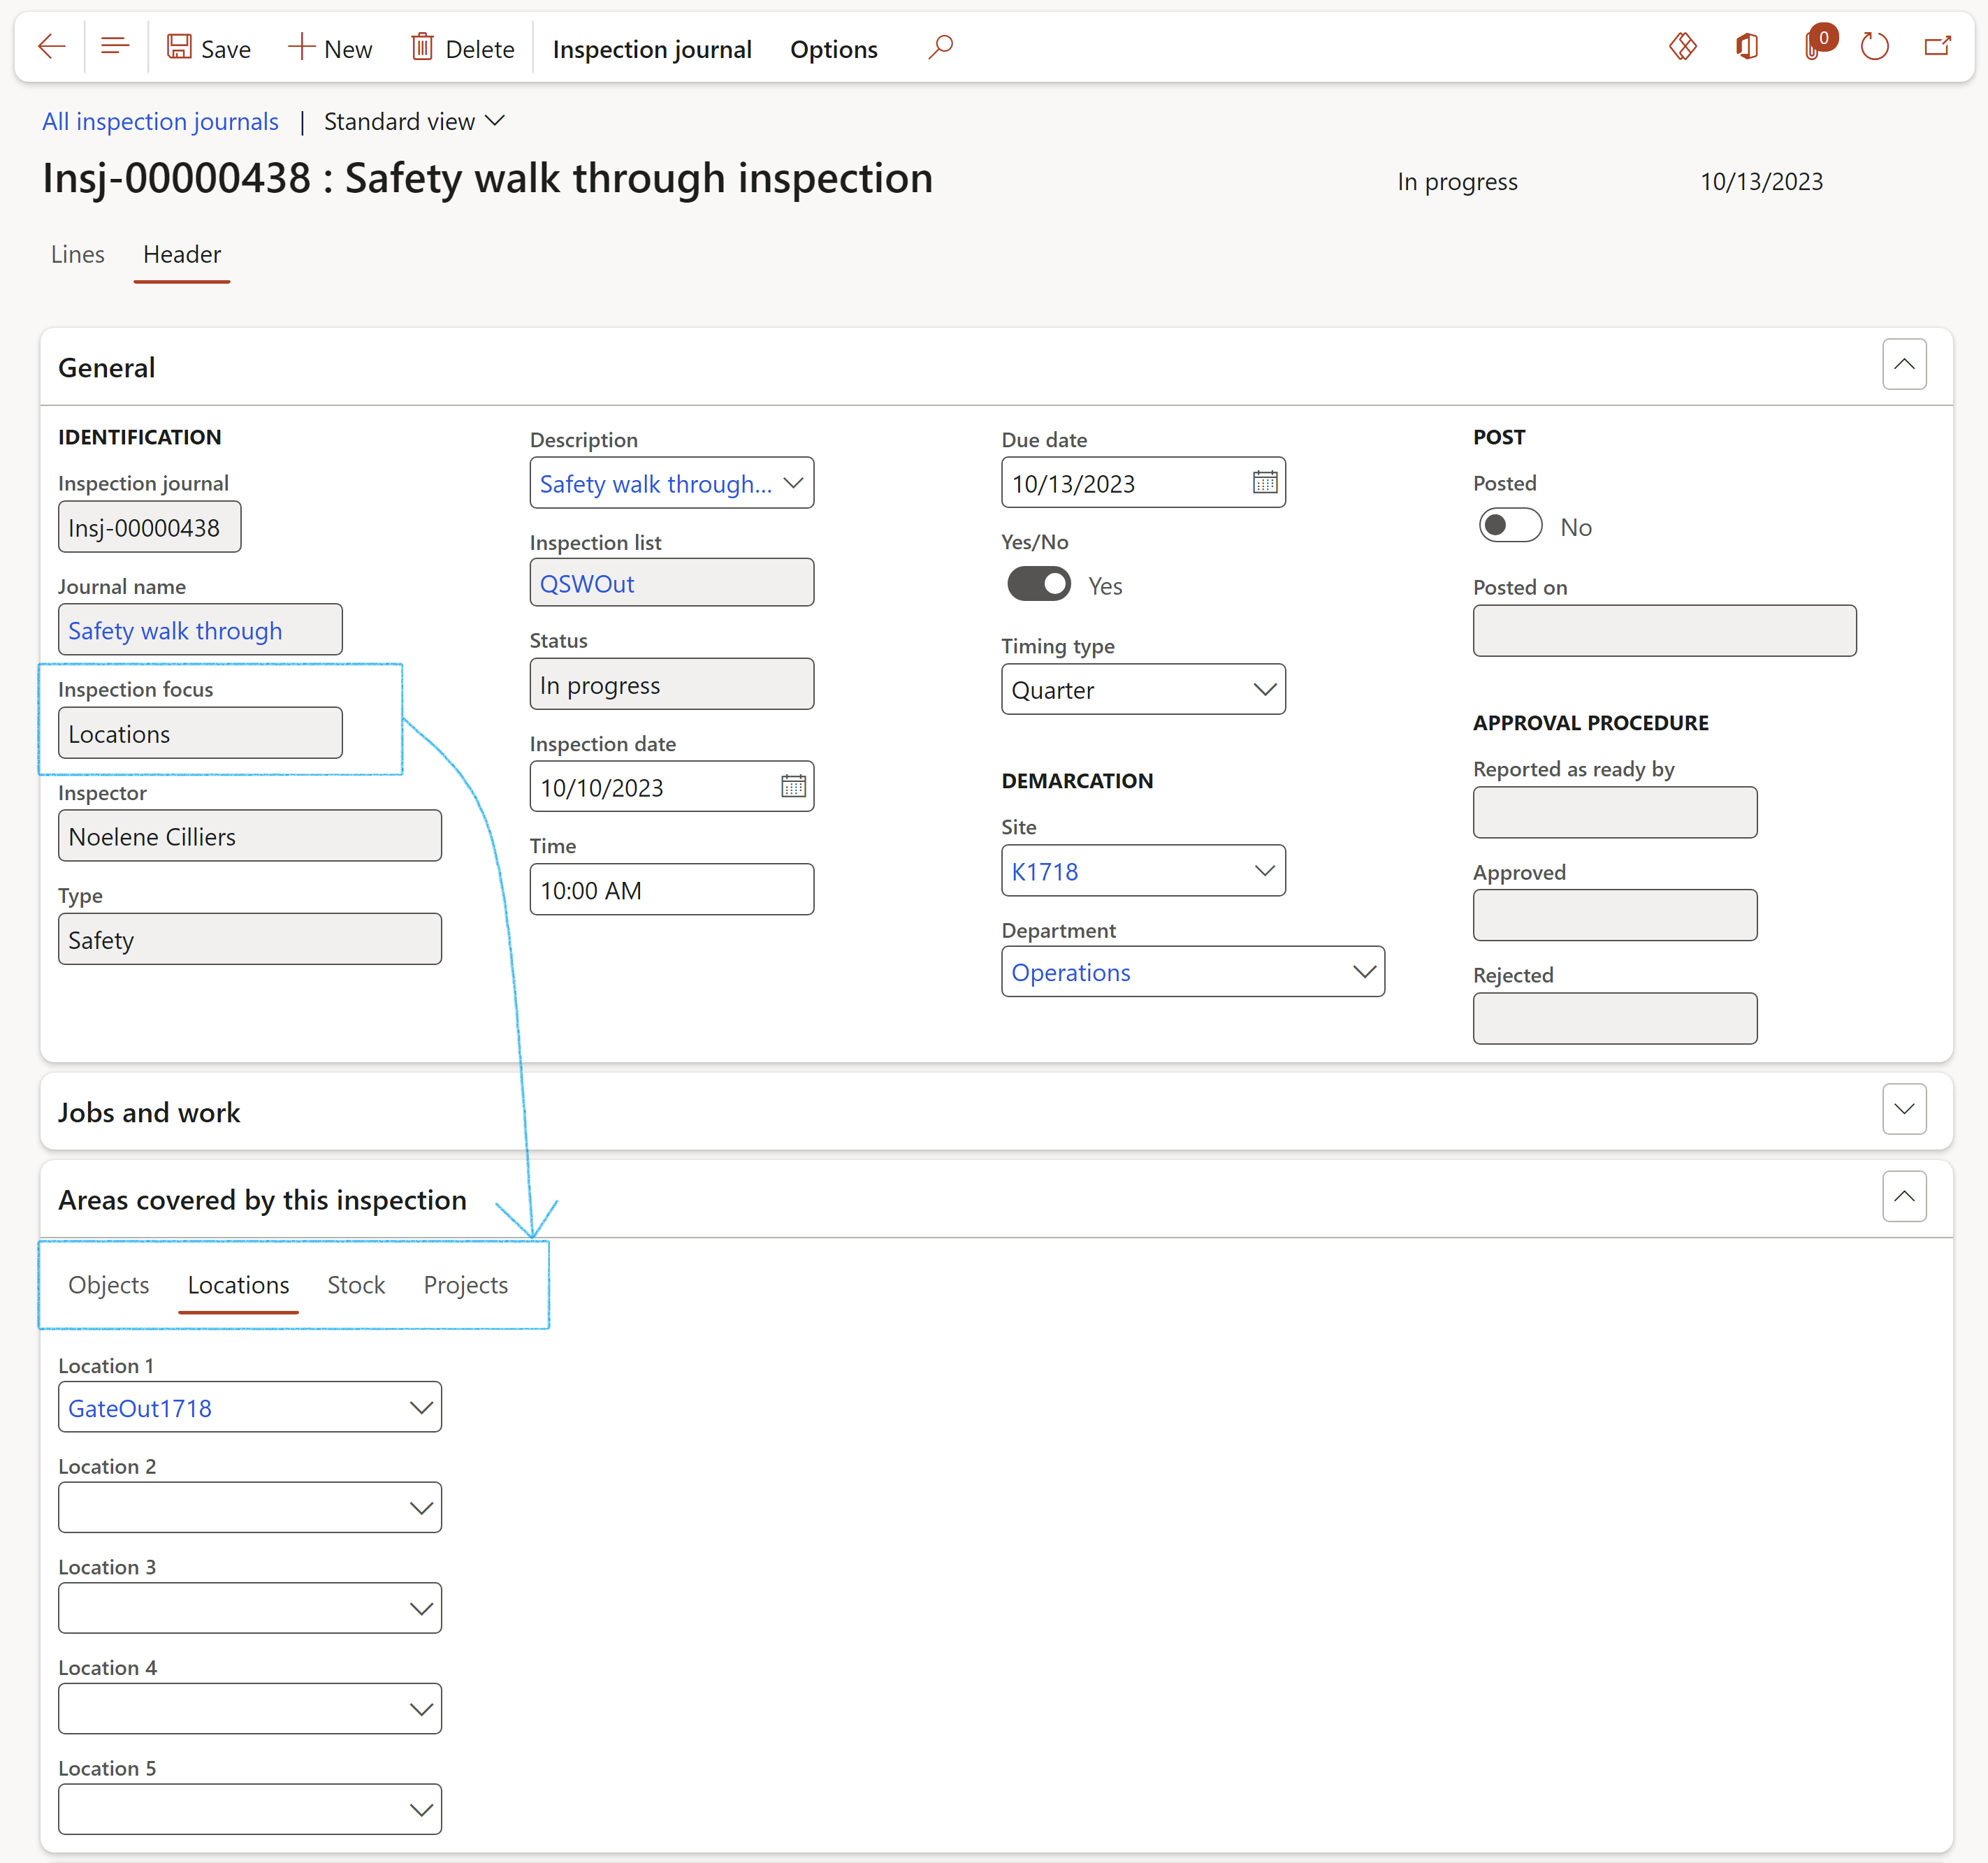
Only the first Object/Location will be used for determining the passing/failing of the inspection journal
¶ Step 14.2.3: The Jobs and work Fast tab
The Jobs and work Fast tab is used for Job observations. The Inspection focus selected on the Journal name must be Jobs.
- Select the relevant Activity number from the dropdown list
- Select the relevant Worker form the dropdown list
- Select the relevant Vendor account form the dropdown list
- Select the relevant Task from the dropdown list
- Enter additional Work activities in the note box provided

¶ Step 14.2.4: The Questionnaire Fast tab
The questionnaires that need to be completed for the selected inspection journal are listed here.
(The setup is done on the Inspection journal names form)
- To complete the selected questionnaire, click on the Complete questionnaire button in the Button strip
- To view the answers to the selected questionnaire, click on the View answers button in the Button strip

¶ Step 14.2.5: The Signatures Fast tab
- In the Button strip, click on the Add button
- Select the relevant Worker from the dropdown list
OR
- Select the relevant Vendor from the dropdown list
OR
- Enter the Contractor employee’s name
- Enter the Date on which the Inspection journal was signed
- Select the relevant Signature type from the dropdown list
- Tick the relevant boxes

¶ Step 14.2.6: The Conclusion Fast tab
It is normal to raise findings such as a non-conformance/issue when an inspection is executed. Thus, when an inspector does an inspection, he can then formally raise a non conformance/issue
- Open the Lessons learned index tab
- Enter the Lessons learned from this incident in the textbox provided
- Enter details of the Action taken by the employer to prevent the recurrence of a similar incident in the textbox provided
- On the Action pane, in the Findings group, click on the Add to issue register button
- When the lessons learnt have been submitted to an Issue register, the details can be found under the Issue register field group

Safety meetings that were held can be referenced under the Lessons learned Index tab
- Open the Non conformance Index tab
- Type comments in the note boxes for:
- Details of objective evidence received
- Root cause of non conformance
- Details of short-term solution
- Details of non conformance
- On the Action pane, in the Findings group, click on the Create non conformance button
- On the Create non conformance dialog, click on the OK button
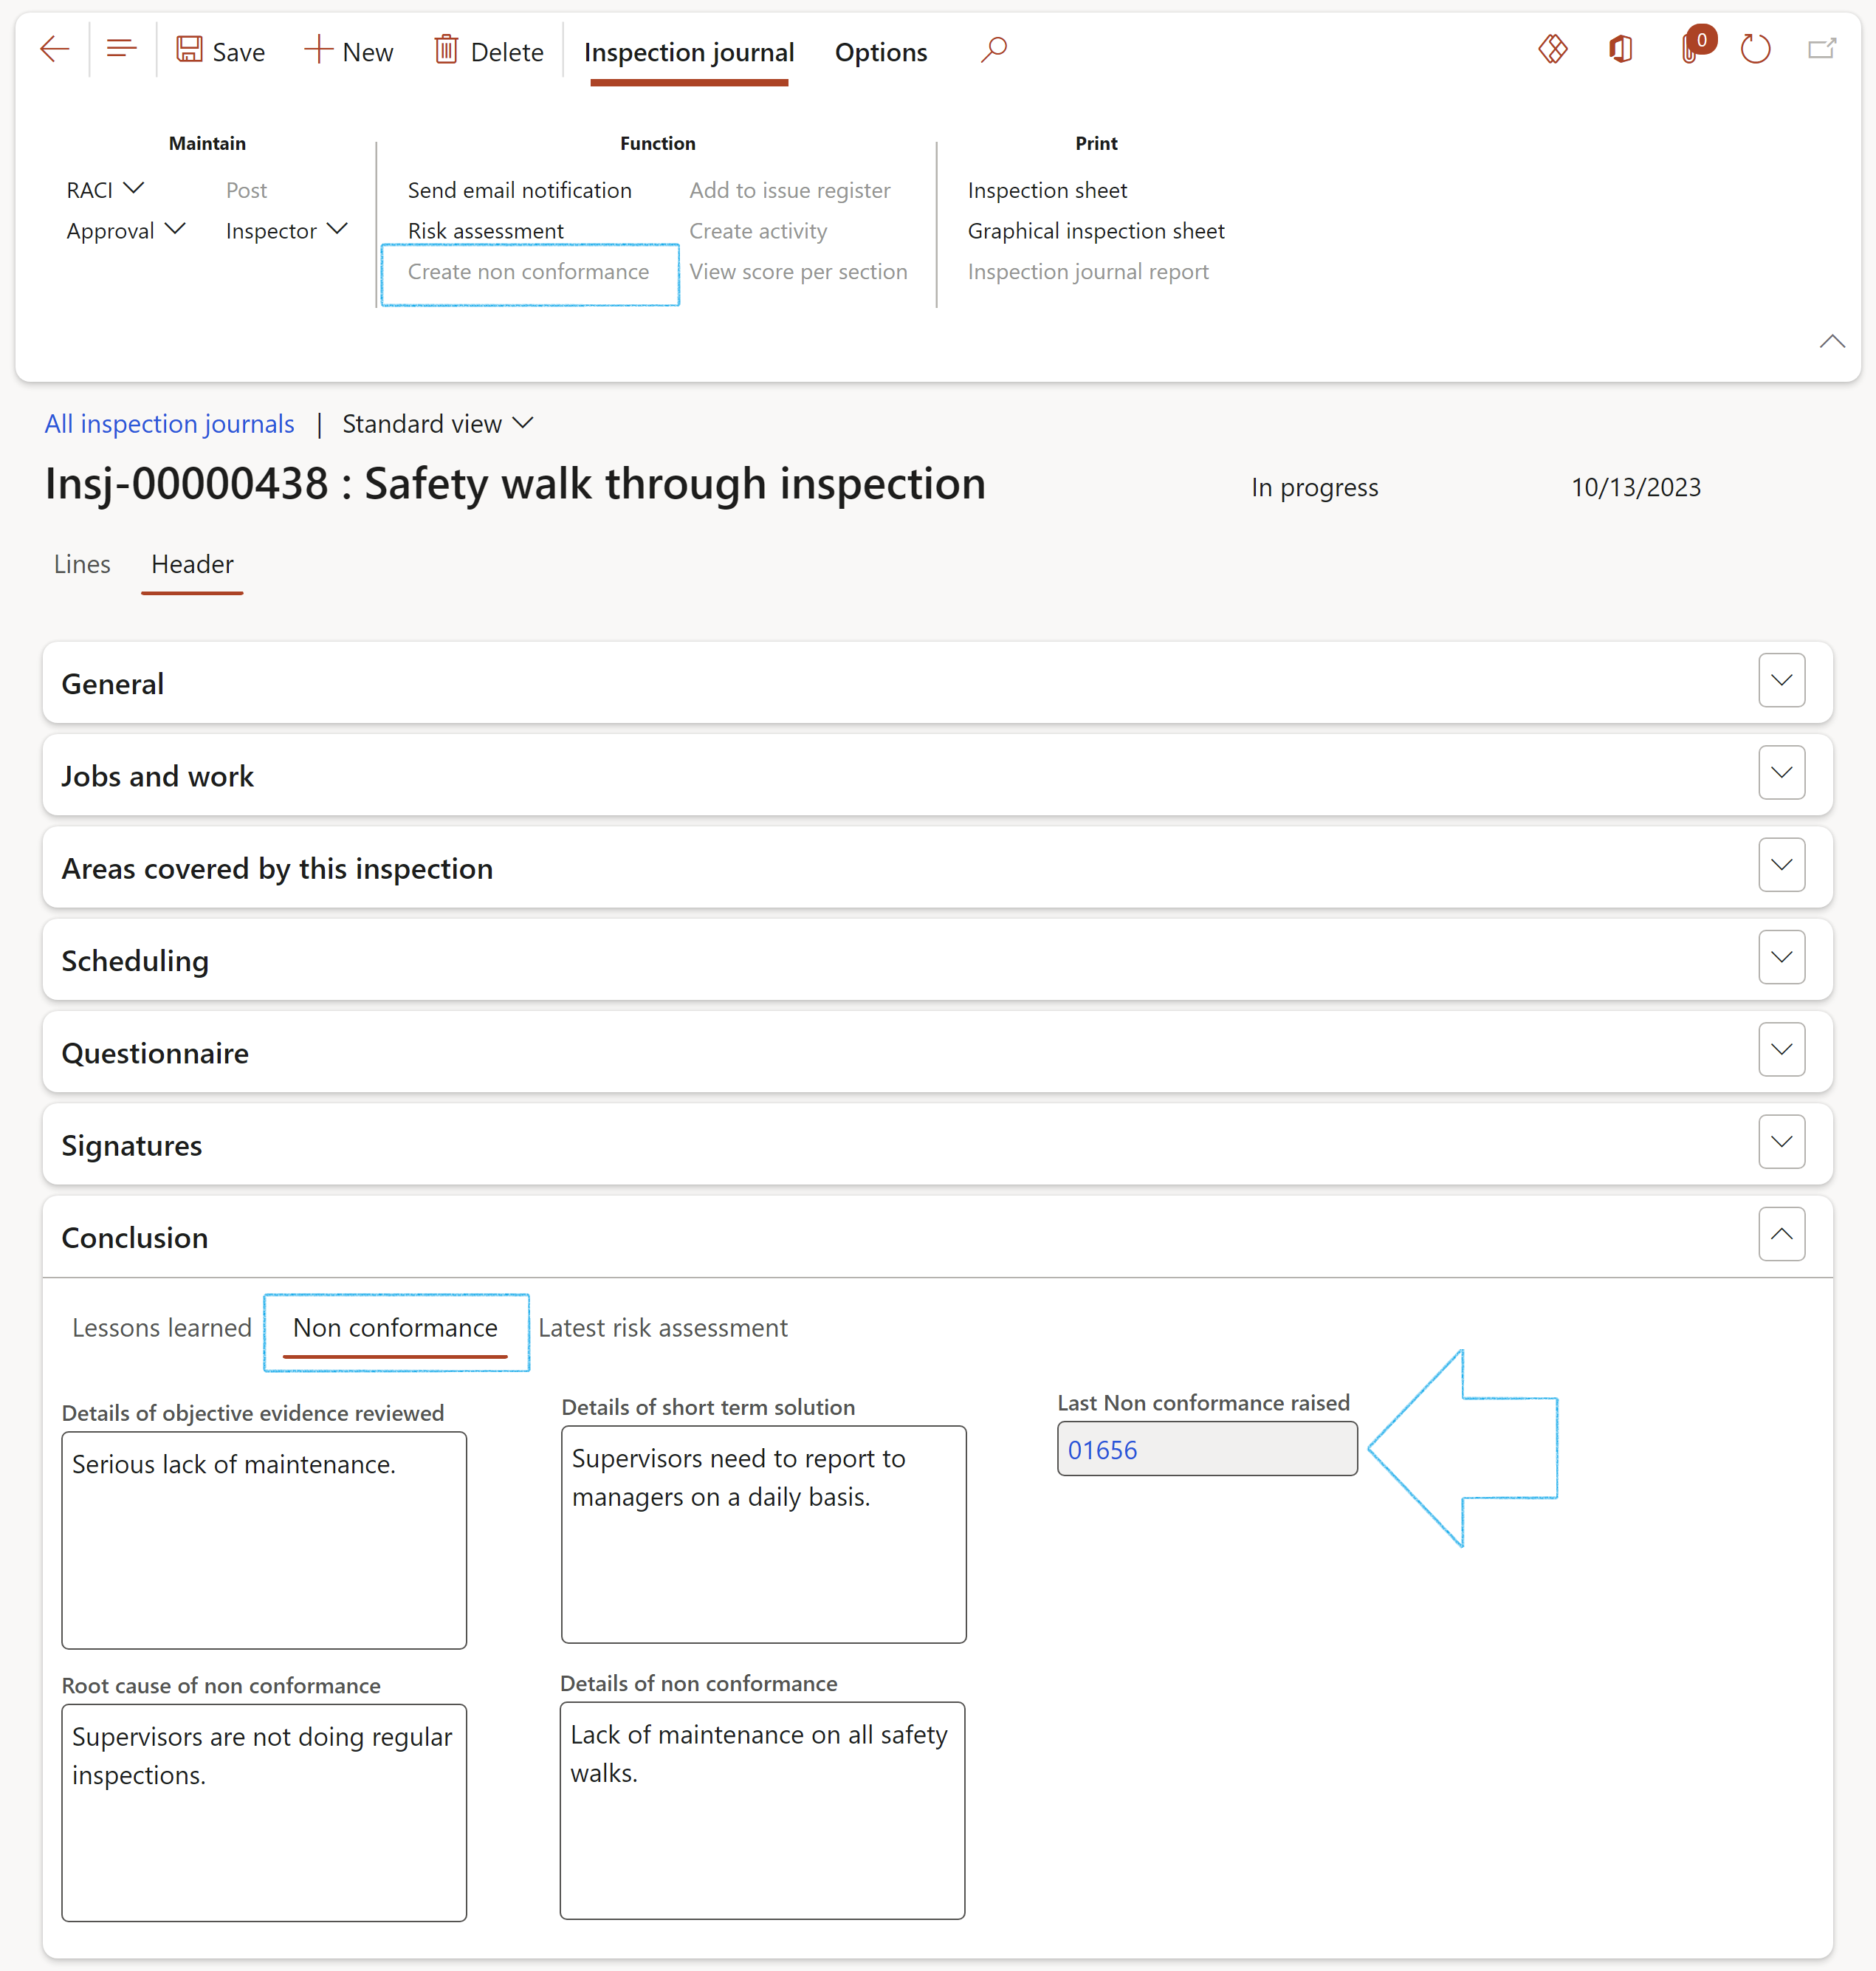
- Open the Latest risk assessment Index tab
If a Risk assessment was done, the Header details of the latest risk assessment will be displayed under the Latest risk assessment Index tab
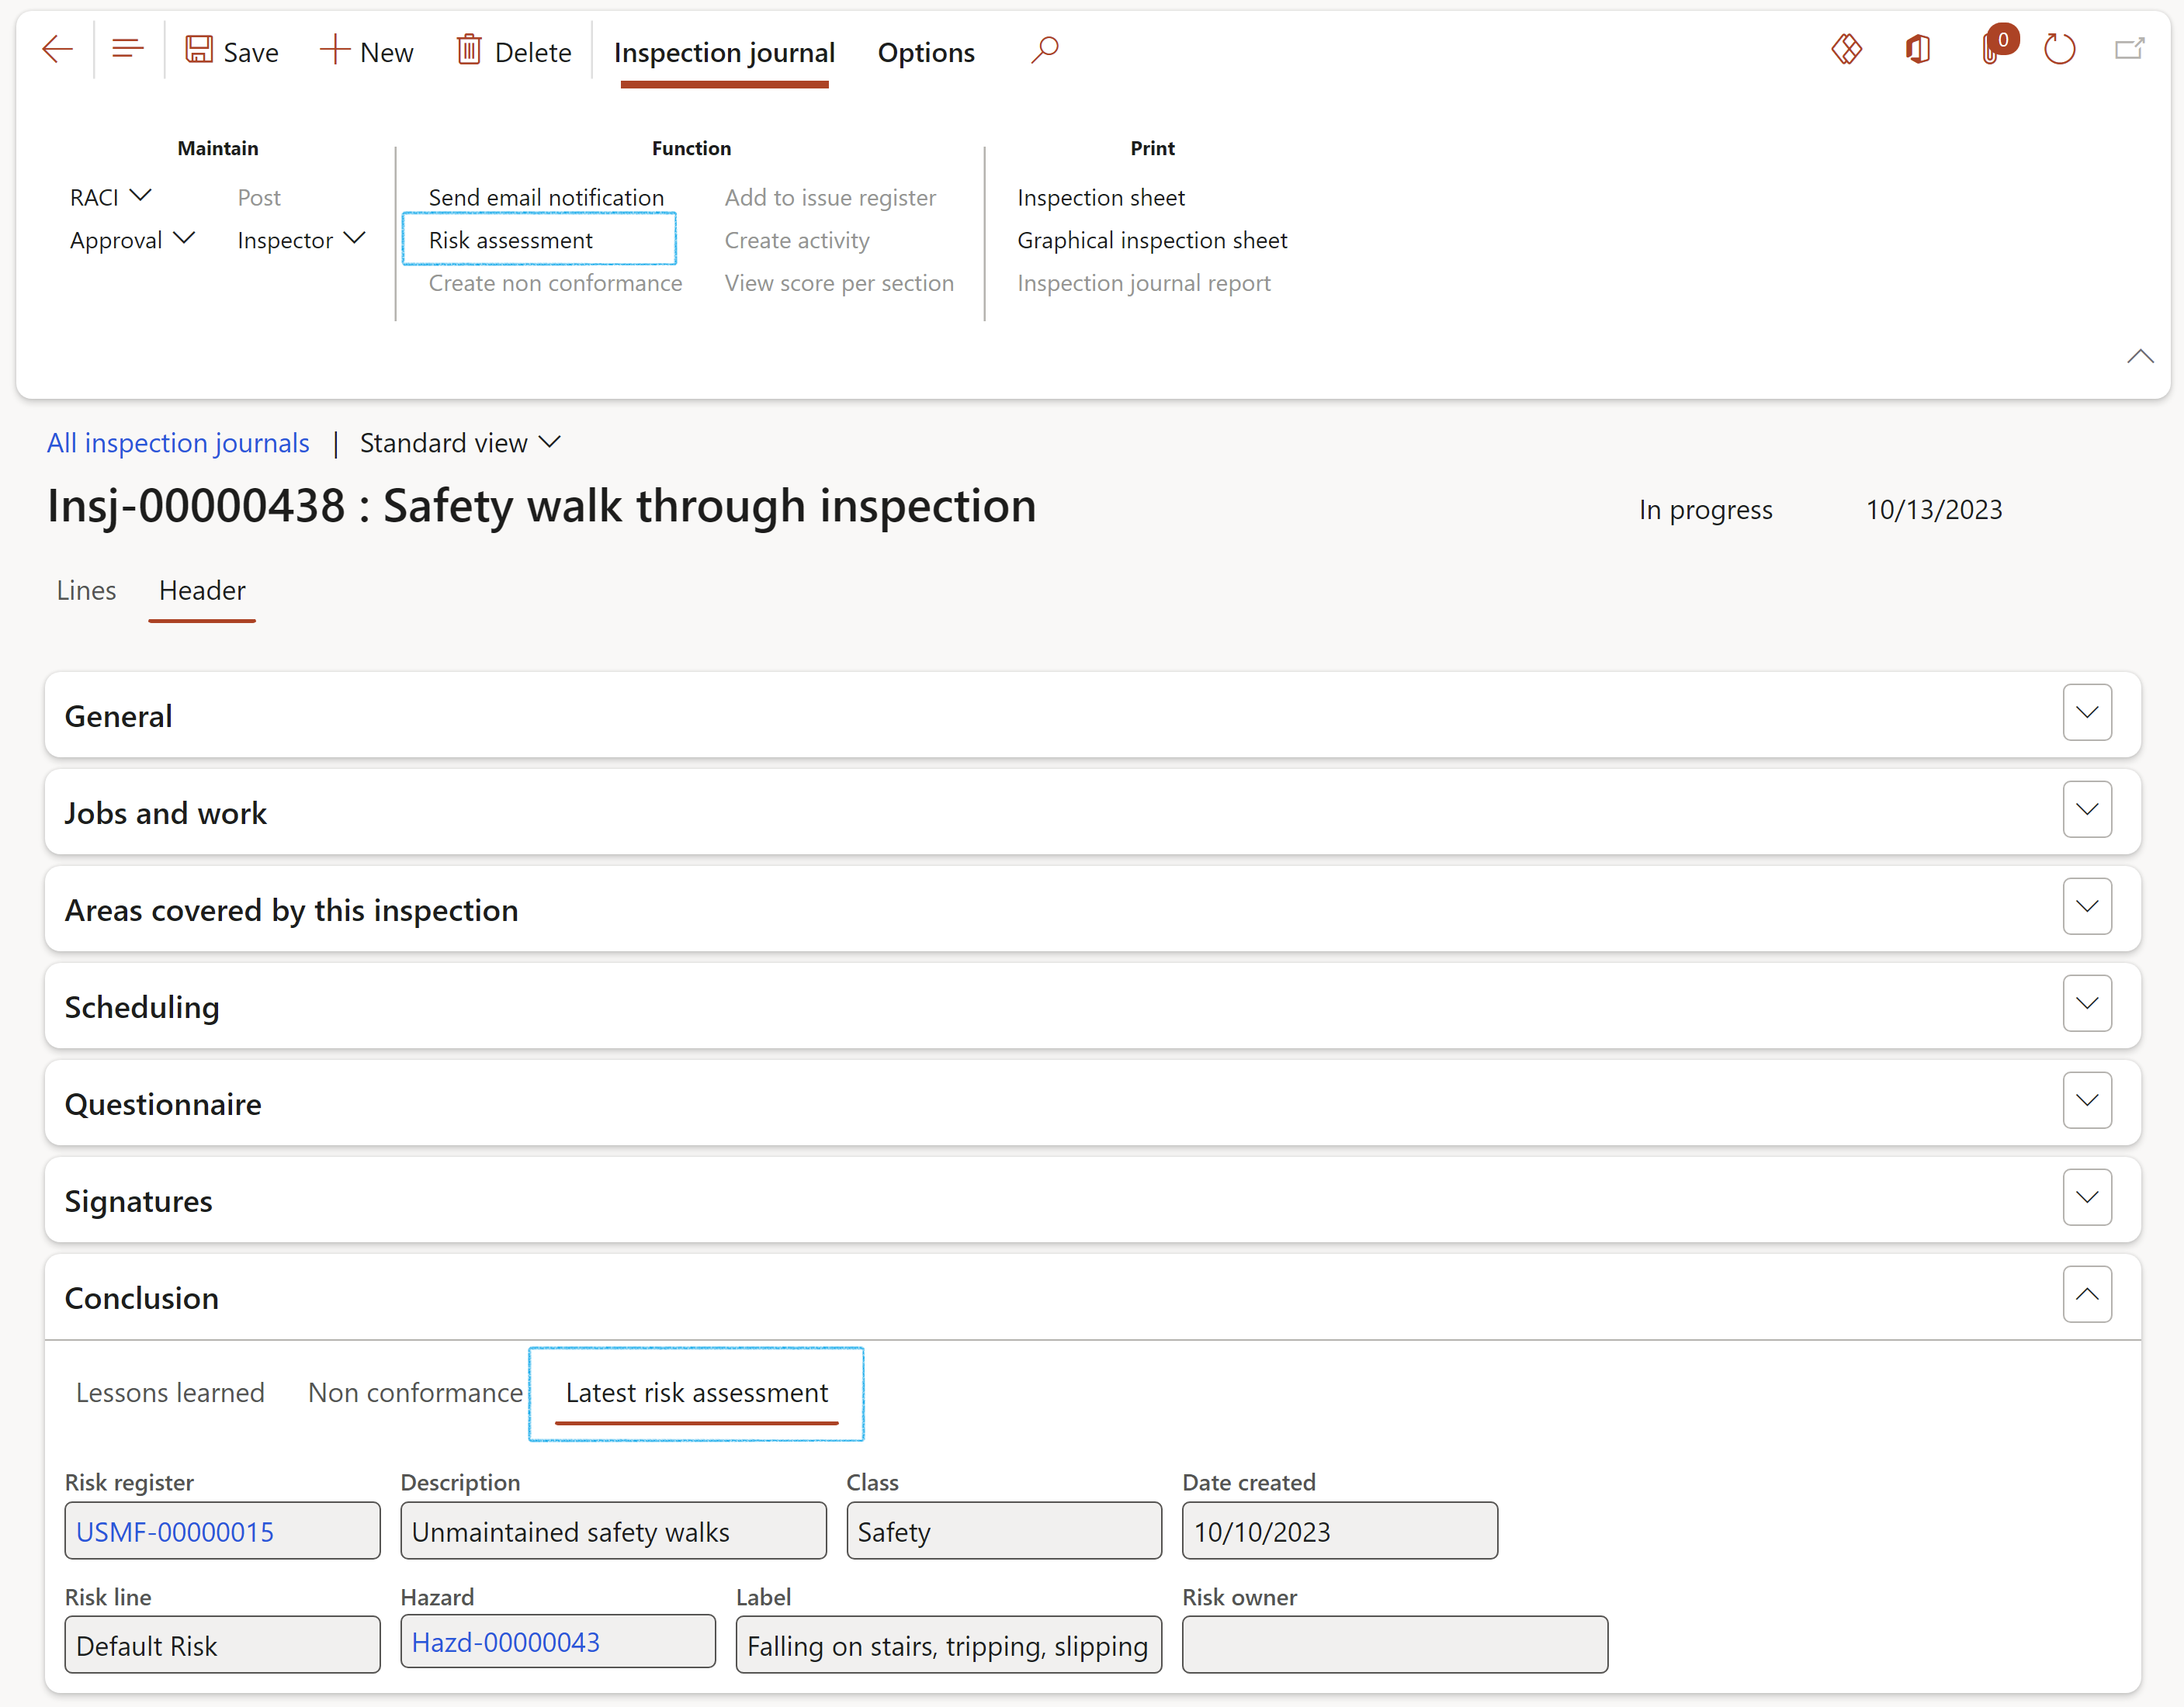
A record will also be added under the Signatures Fast tab with the Risk assessed box ticked
¶ Step 14.3: Inspection journal Lines
Use this form to do feedback on the inspection lines
- Open the Lines view
- Under the Lines section:
(The Inspection lines selected on the Journal name will be displayed here)
If you want to add lines:
- In the Button strip, click on the Add button
- Enter the Inspection date
- Enter the Start time and End time for the selected inspection line
- Enter a Description
- Select the relevant Hazard from the dropdown list
- If a Hazard is selected, choose Safe of Unsafe from the dropdown list
- If no Hazard is selected, choose Yes/No/Not applicable from the dropdown list

The user has the option to show/hide the following under the Lines Fast tab:
- Categories selected on the Inspection list
- Inspection date
- Start and end time
- Non conformance
To create a non conformance on an inspection line:
- Select the relevant line under the Lines section
- In the Button strip, click on the Create non conformance button
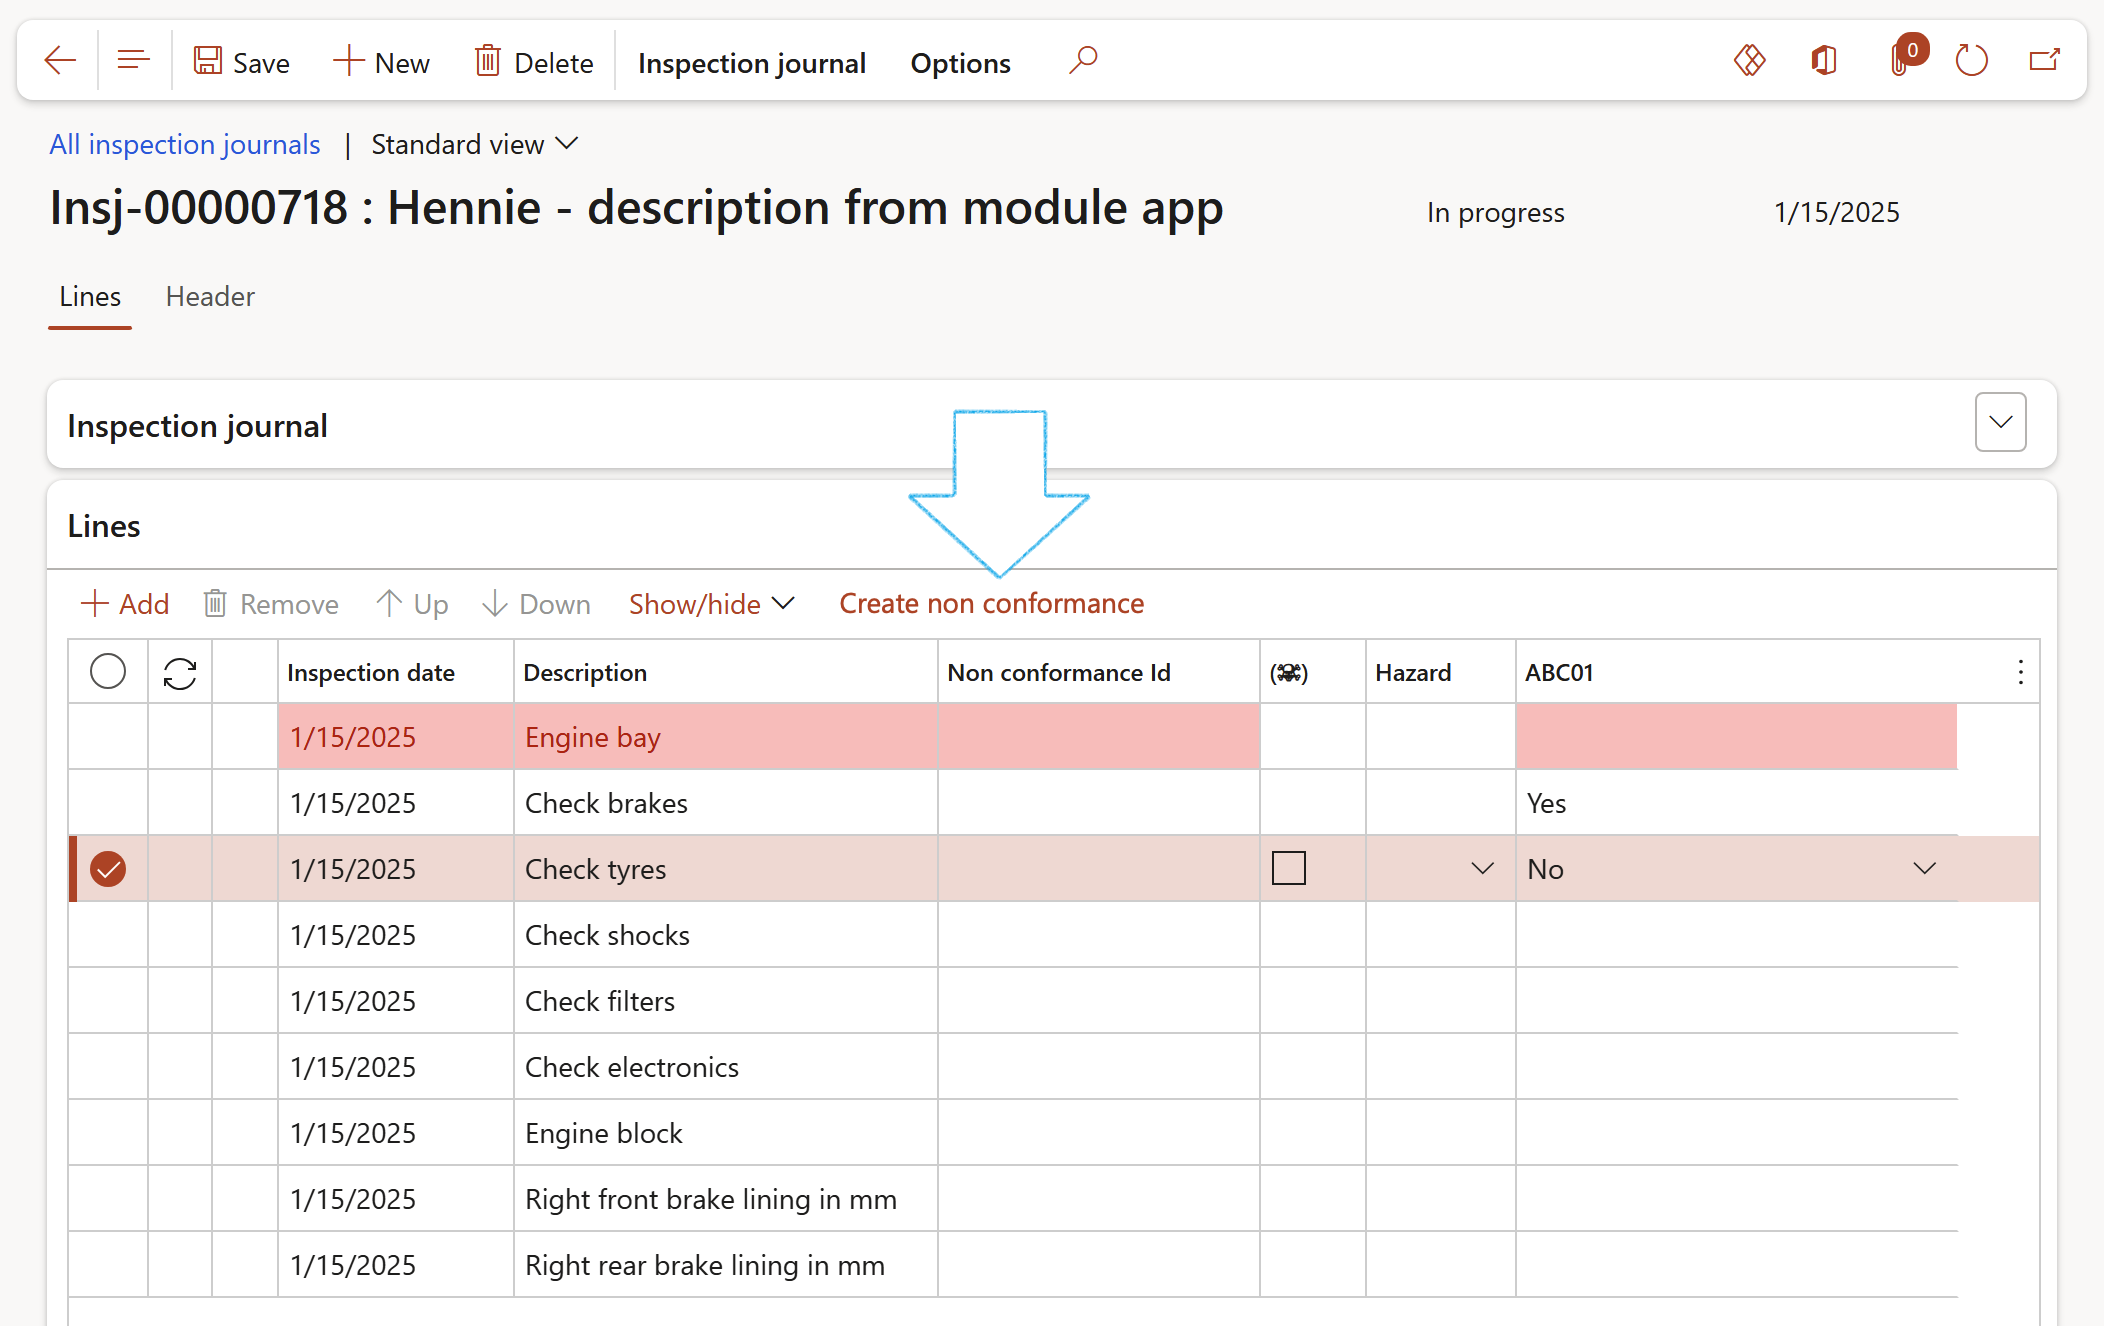
- Enter the relevant detail on the Create non conformance dialog
- Click on the OK button
- The non conformance will be referenced on the relevant line in the Non conformance ID column
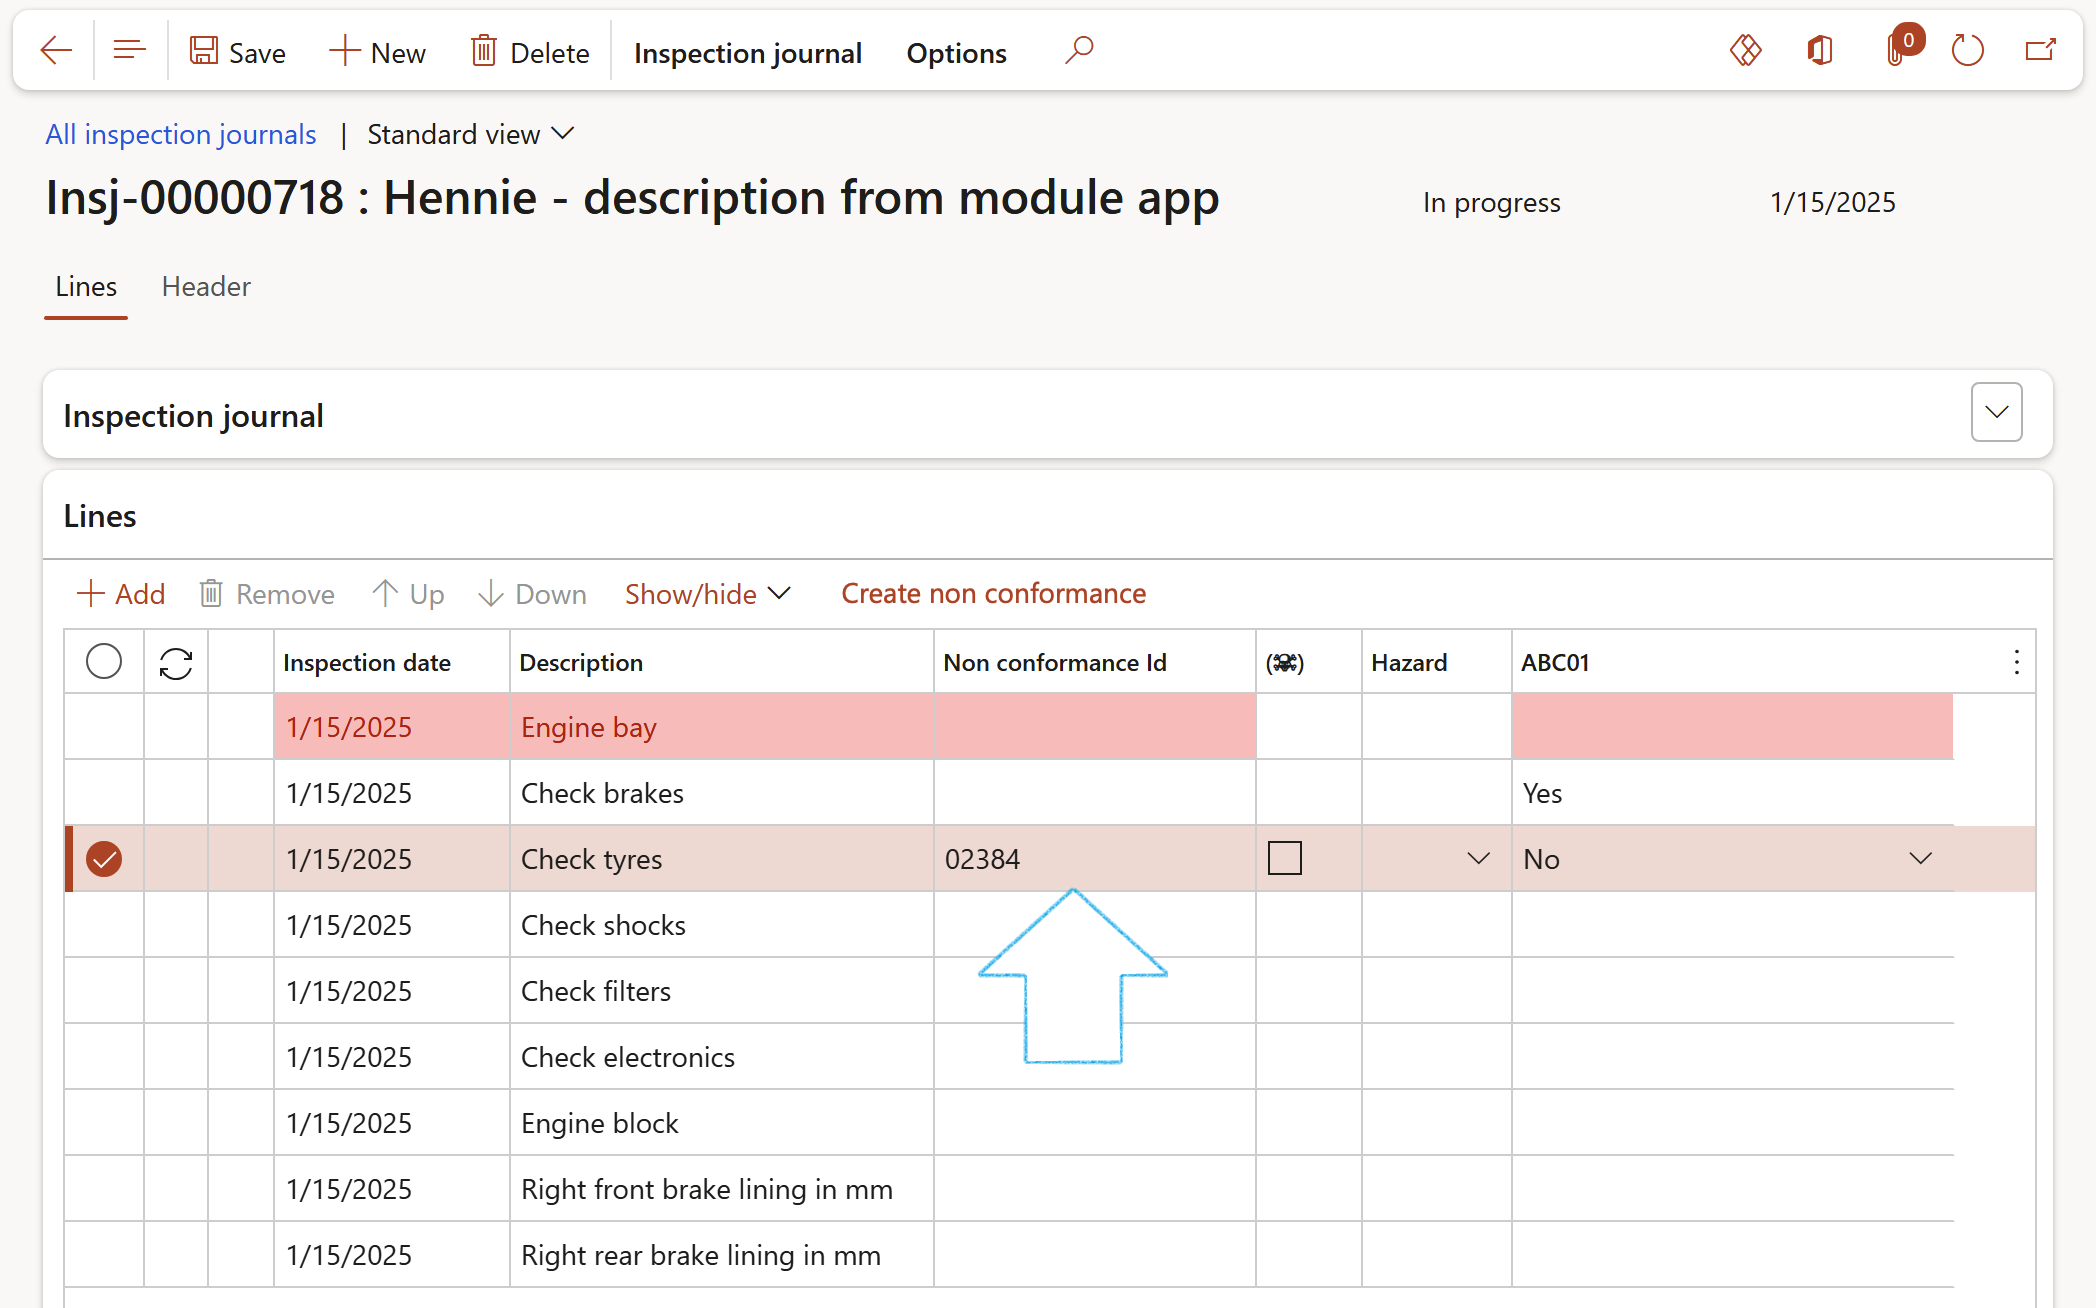
To approve and close a non conformance, go to HSE > Non conformances
¶ Step 14.3.1: The Line details Fast tab
Under the General Index tab:
- Information of the selected line under the Lines Fast tab, is displayed
- In the Comments/Observations field, comments can be added per inspection line
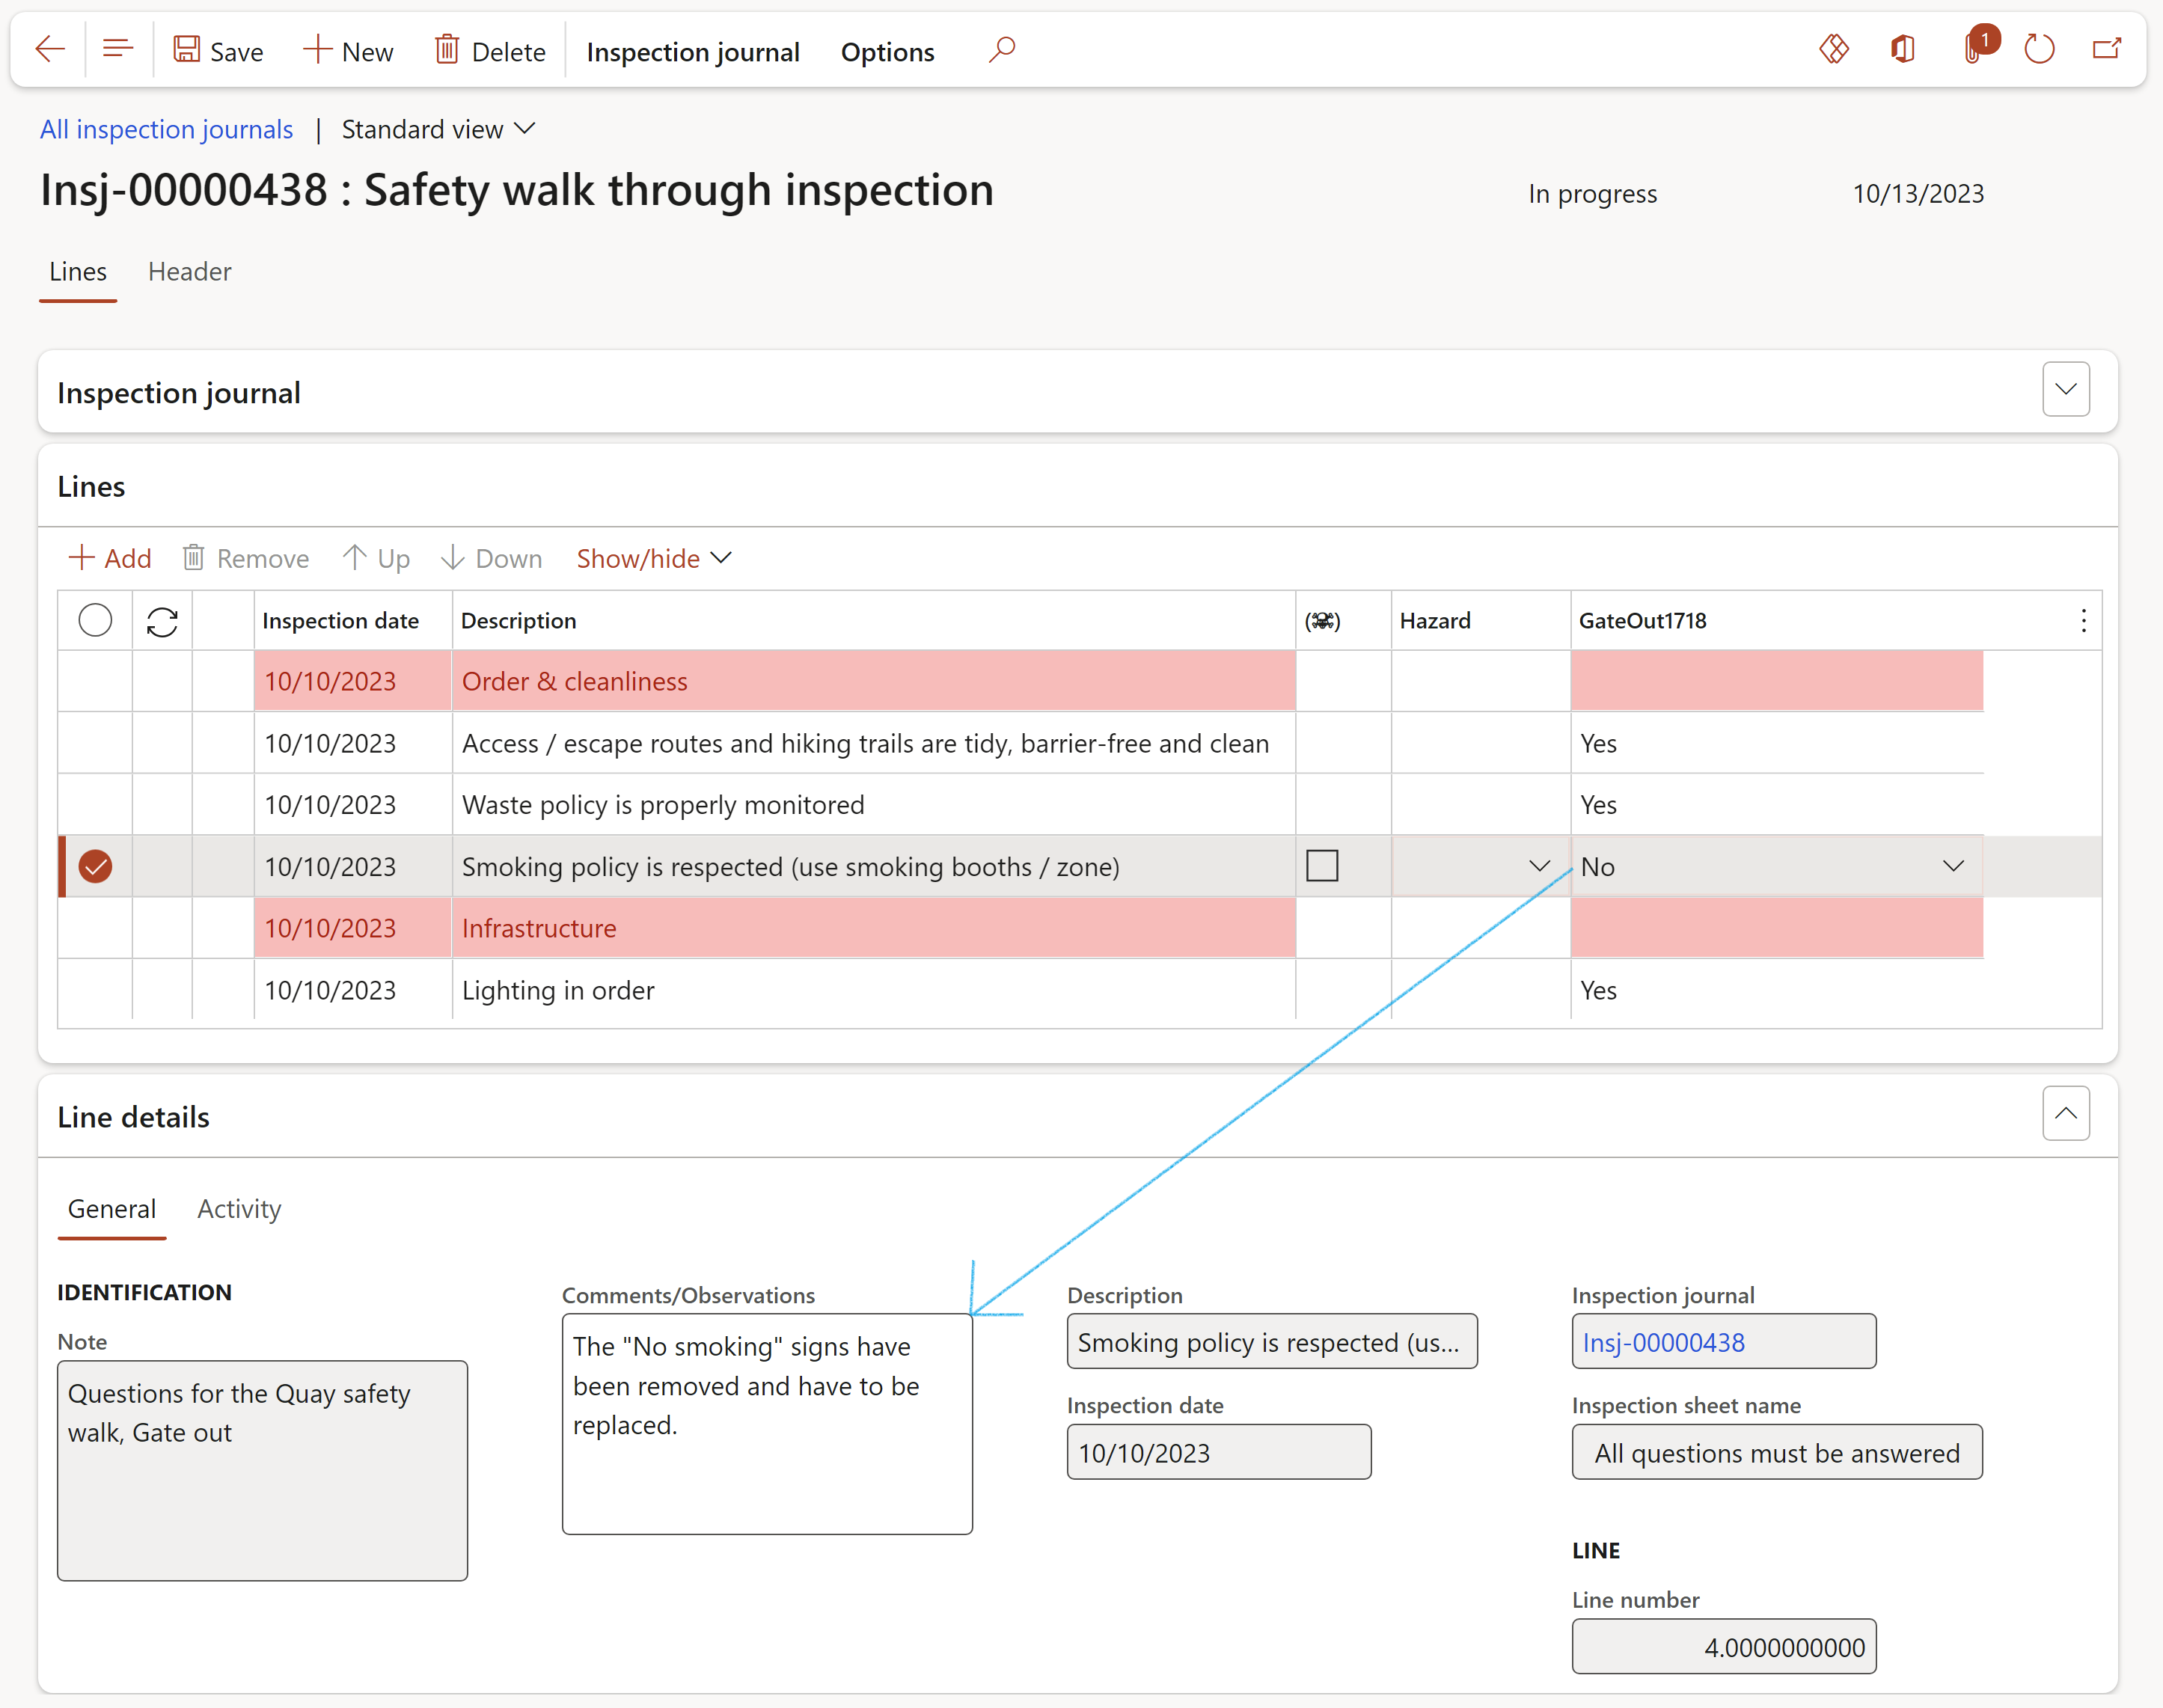
- To approve the journal, click on the Approval button on the Action pane in the Function group
- Select Approve inspection journal form the dropdown list

This journal can only be approved if the selected Journal name is setup to need approval
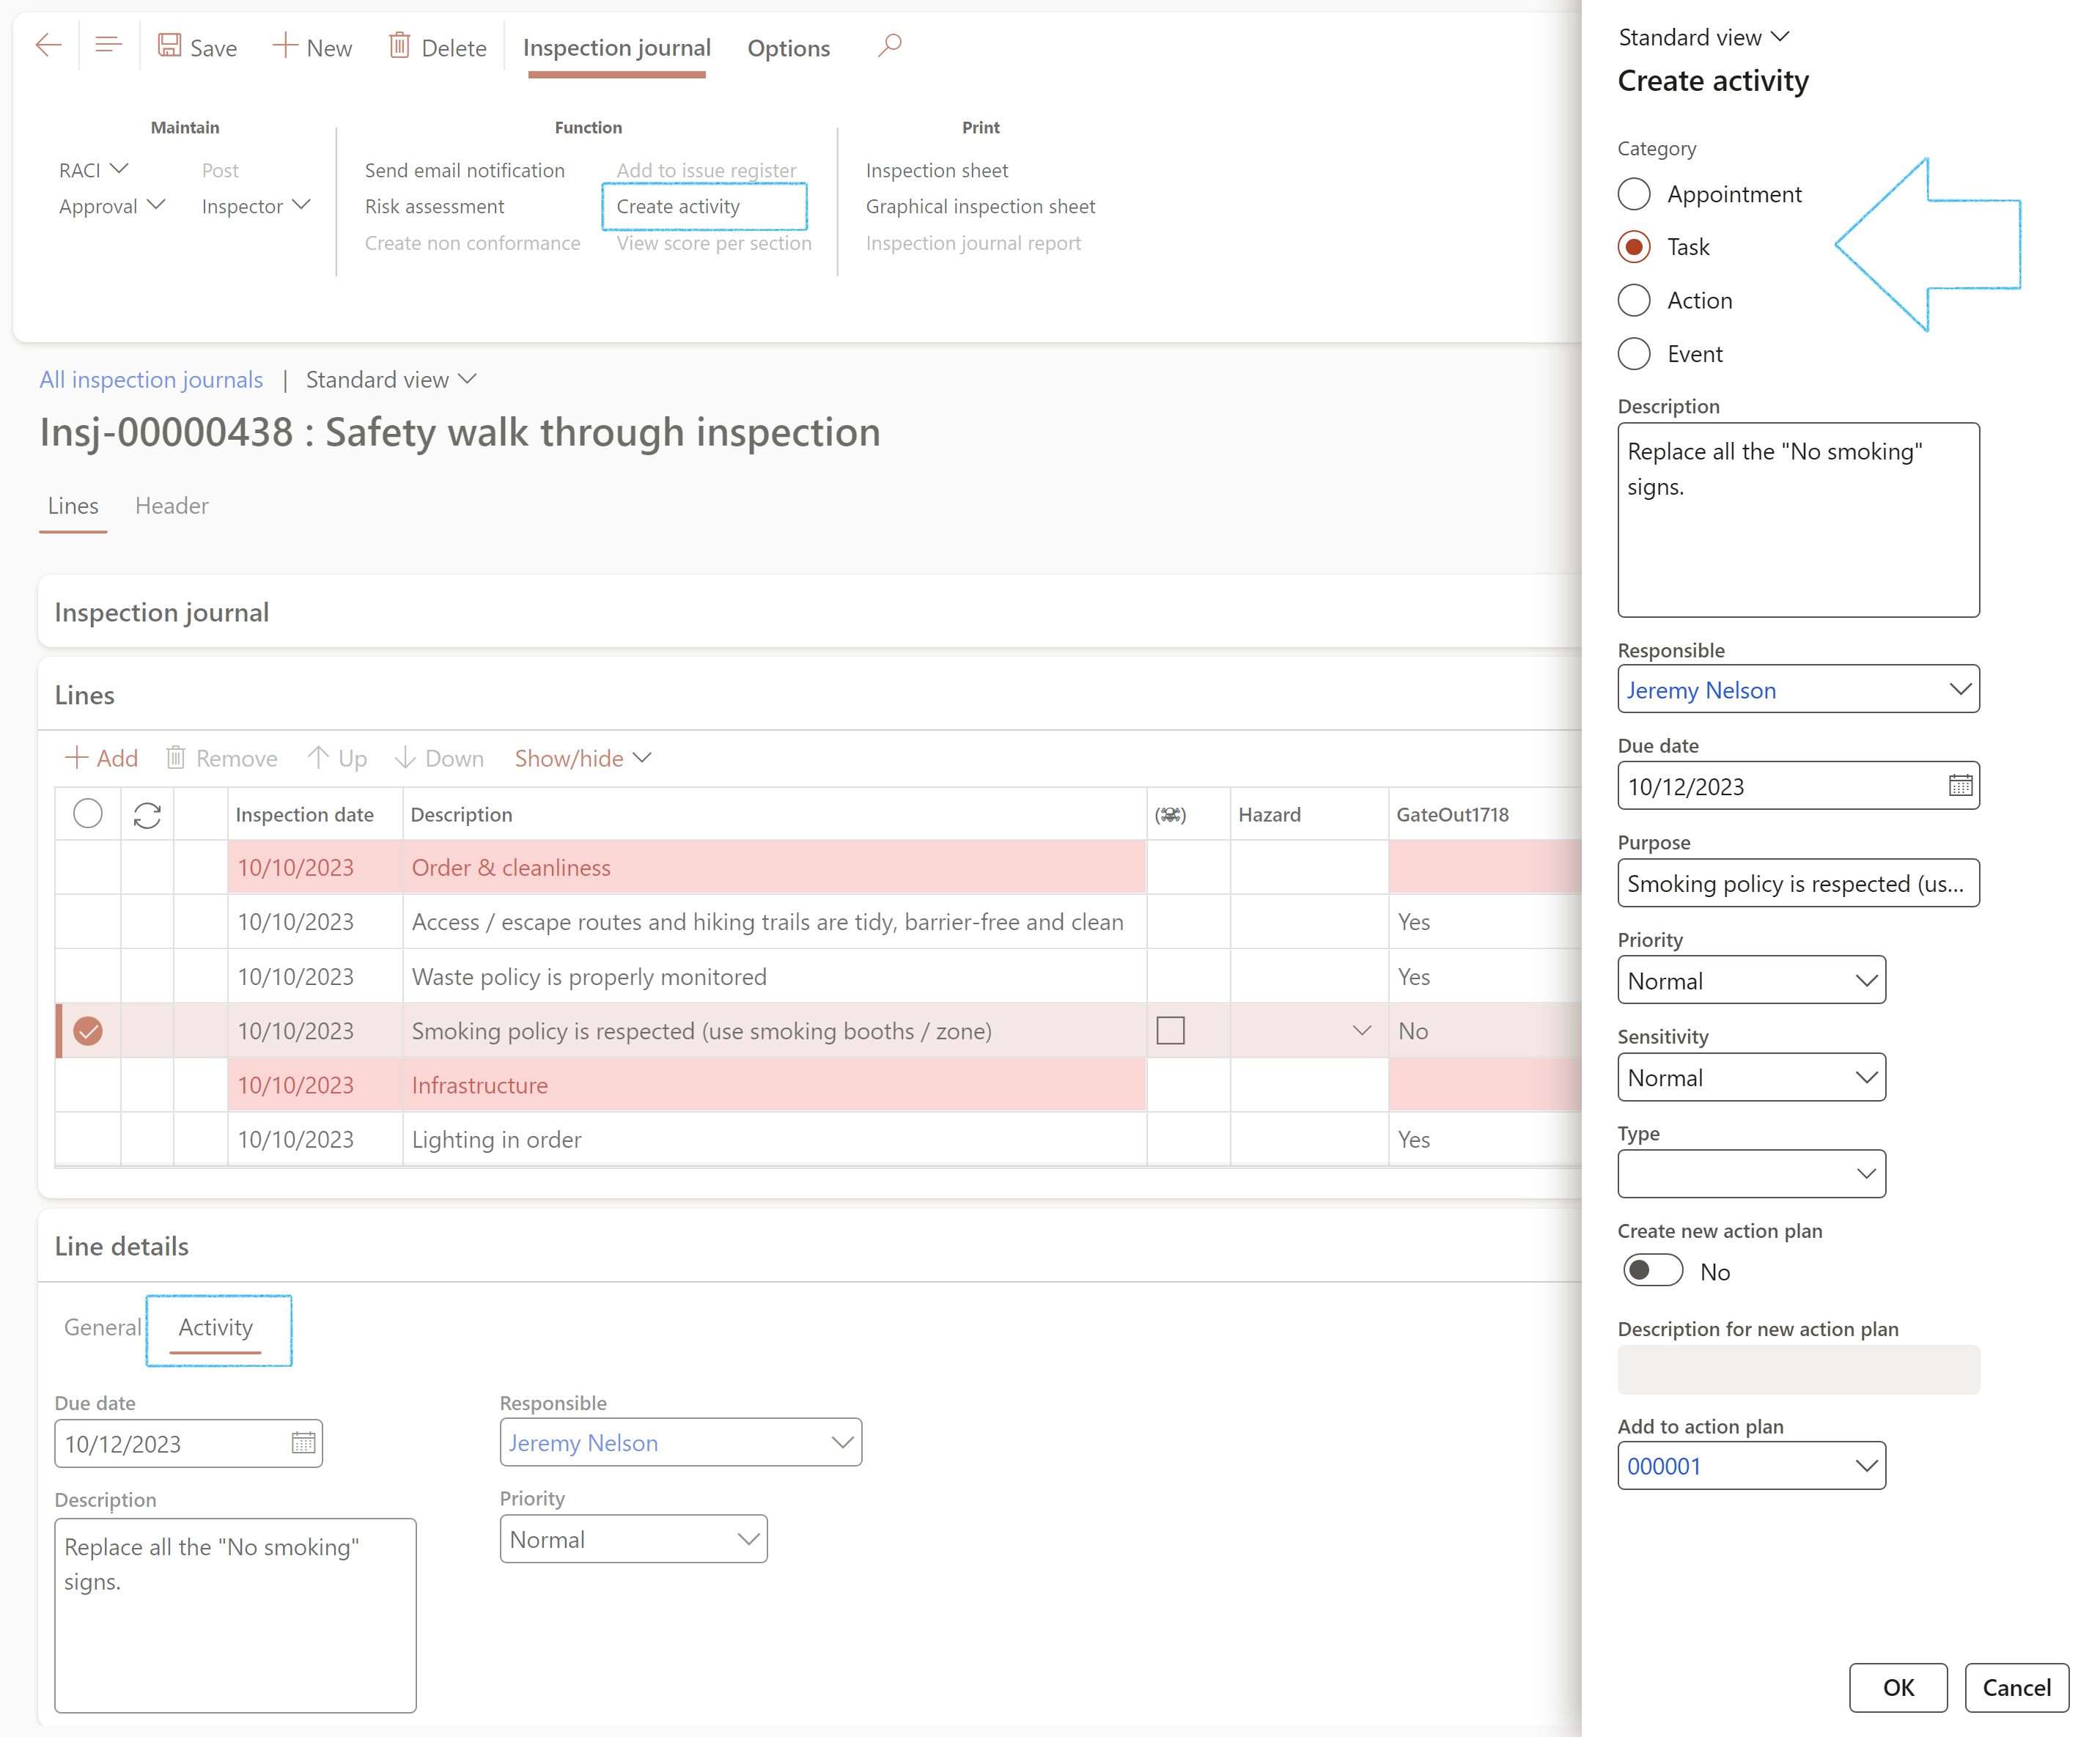
Under the Activity Index tab:
- Enter the Due date for the activity
- Enter a Description of the Activity that needs to be done
- Select the Responsible person for the activity
- Select the Priority
- Under the Lines Fast tab, click on the Create activity button
- Select the relevant activity Category
- Choose one of the following options (Optional)
- Create a new Action plan for this Activity, or
- Select the Action plan to which you want to add this activity
- Click on OK
¶ Step 15: Send email notification
Go to: HSE > Inspections > Inspection journal
- Select the inspection journal that you want to send the email notification for
- On the Action pane, in the Functions group, click on the Send email notification button

If an email template is set up for Inspections, the template will be displayed in the Layout note box
An Infolog will pop up confirming that an email notification was sent

If an Inspector was selected on the Inspection journal and the Responsible person option is selected on the dialog, the email notification will be sent to the Inspector’s email address
| Placeholder mappings | Field on form |
|---|---|
|
%JournalNumber% %JournalNameId% %InspectionType% %InspectionFocus% %InspectorName% %InspectionList% %NumberOfLines% %InspectionDate% %Duedate% %Description% %Investigationid% %Status% %Site% %Department% %urlLink% |
Journal Number Journal Name Inspection Type Inspection Focus Inspector Name Inspection List Number Of Lines Inspection Date Due Date Description Investigation Id Status Site Department Hyperlink functionality |
¶ Step 16: Create an incident
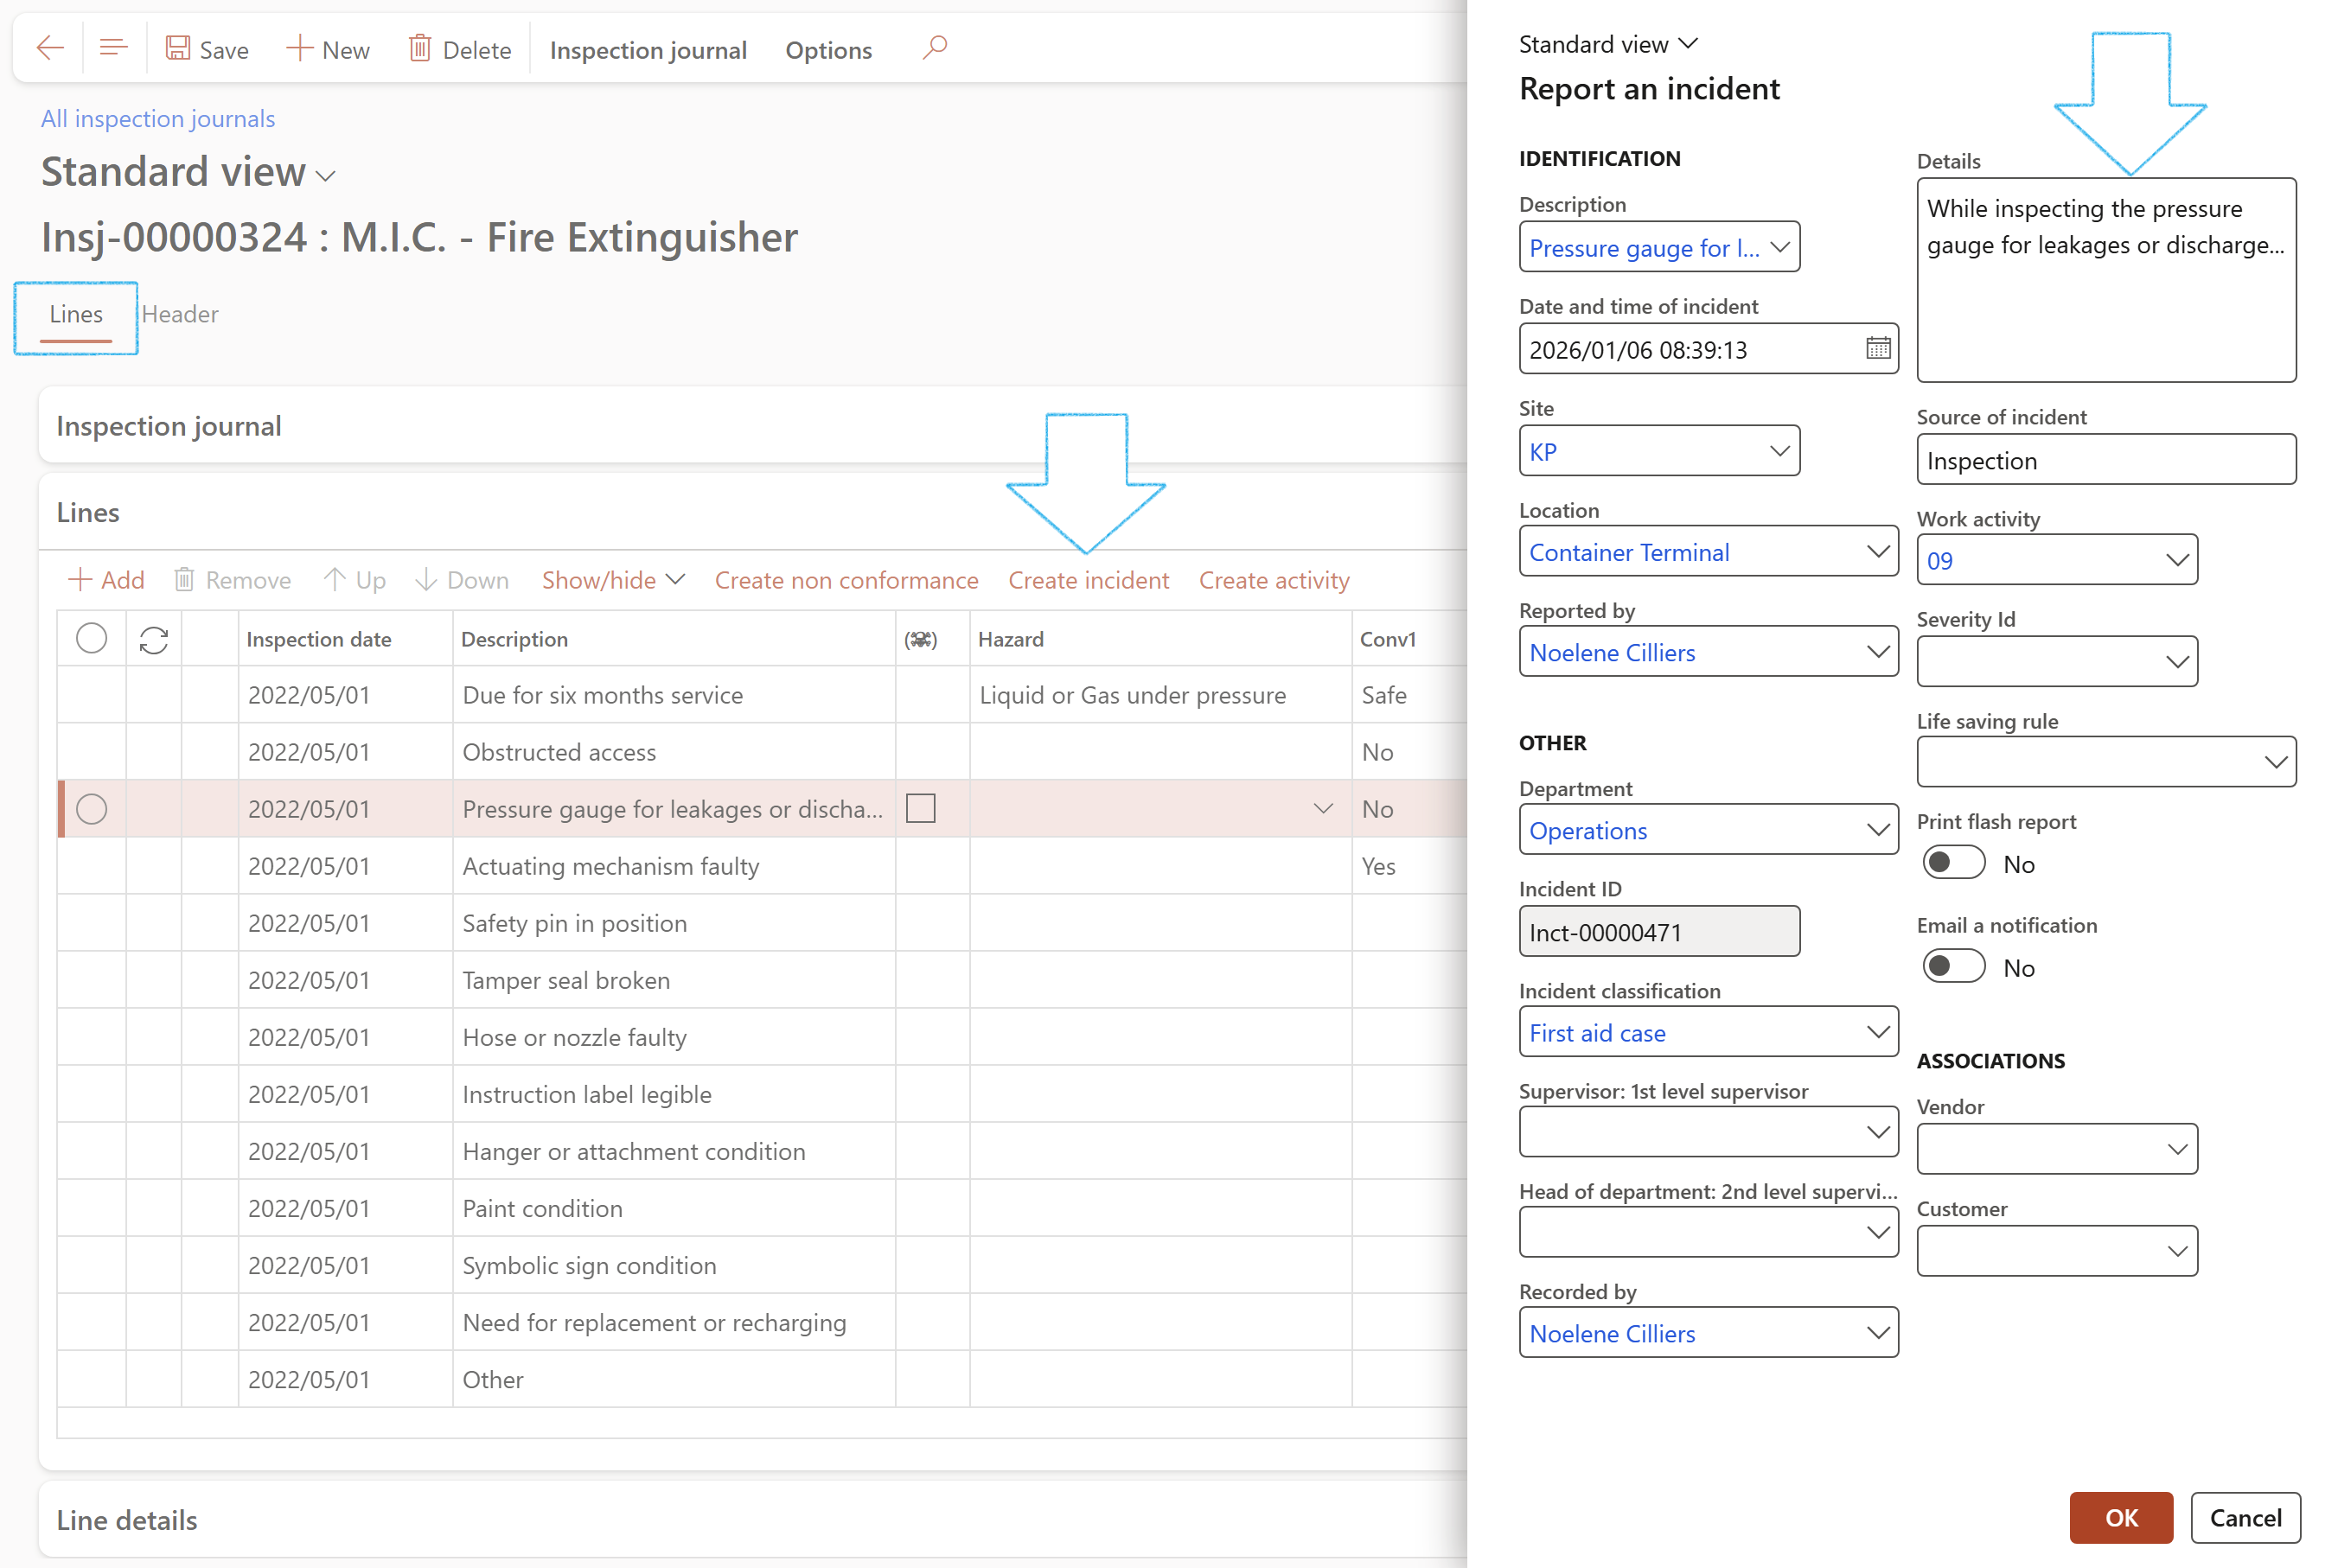
If an Incident should occur during an inspection, an Incident can be created from the relevant Inspection journal line
Go to: HSE > Inspections > Inspection journal
- Select the relevant inspection journal and open the Lines view
- Select the relevant inspection journal line and click on the Create incident button in the button strip
- Enter the incident details on the Report an incident dialog
- Click on the OK button
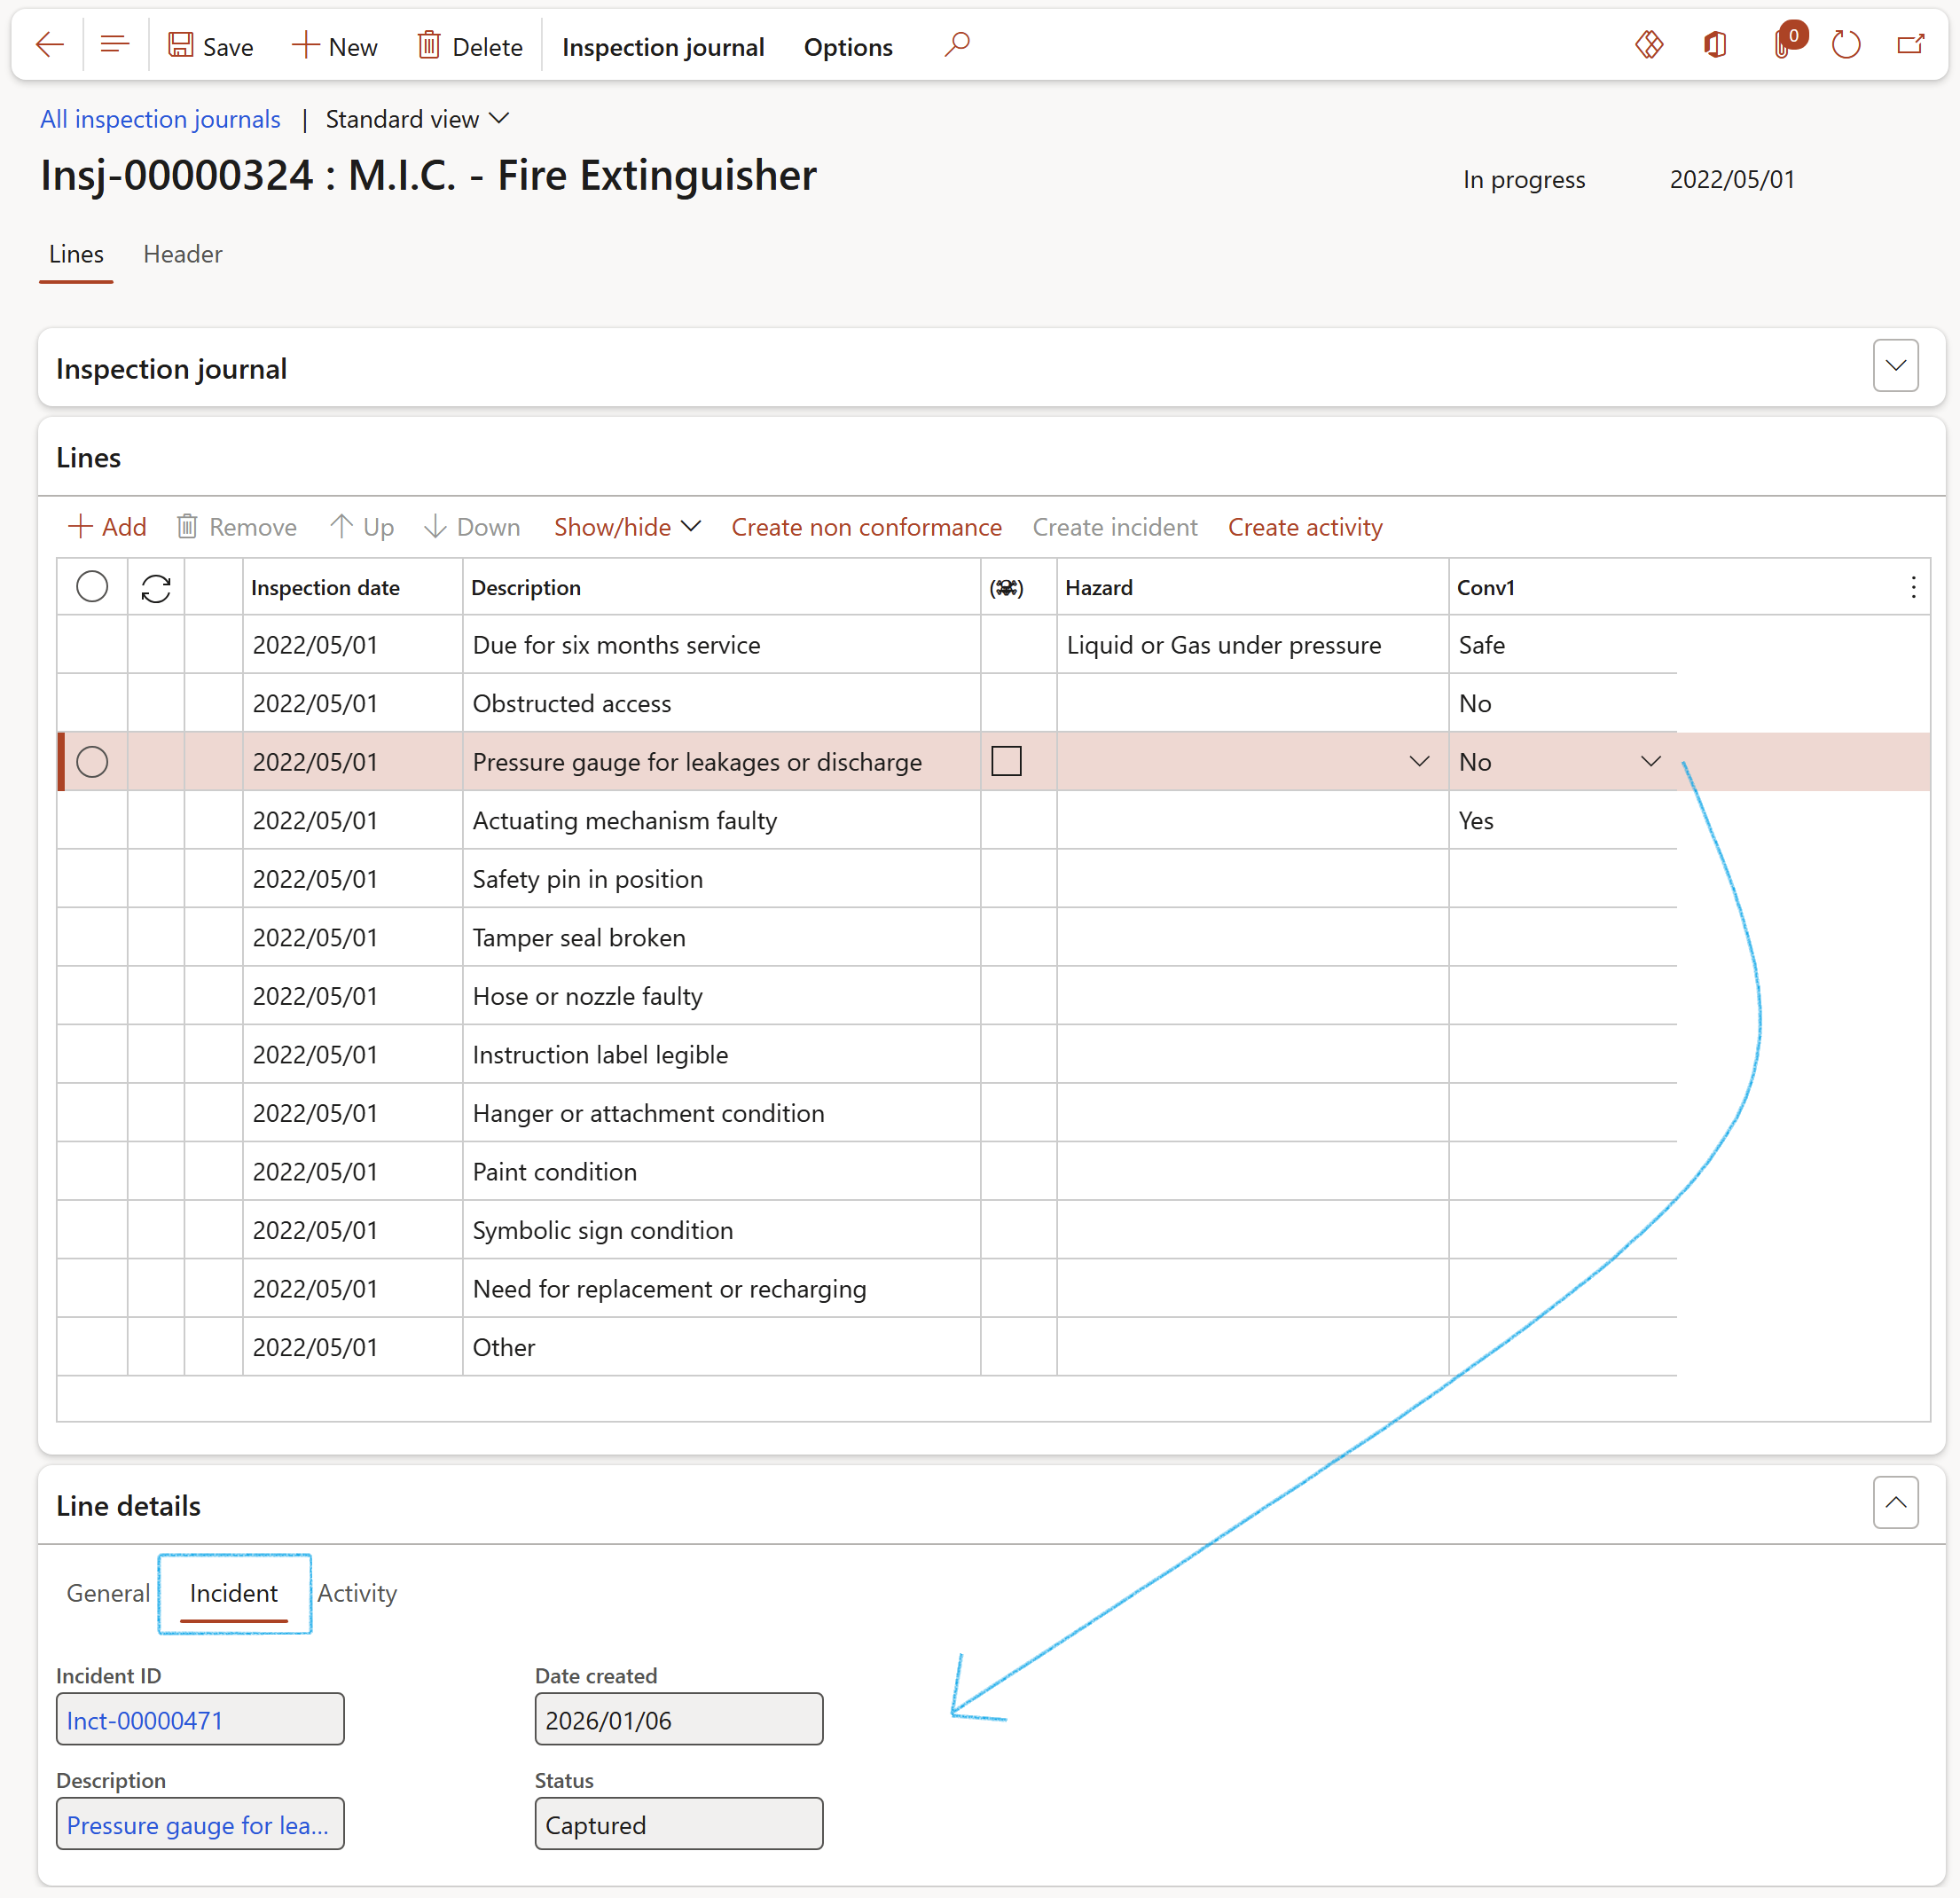
To view the details of the Incident that was created:
- Select the line that the incident was created from
- Expand the Line details Fast tab and open the Incident Index tab
¶ Step 17: View score per section
The scoring per section (Line type = Header) can be viewed
Go to: HSE > Inspections > Inspection journal
- Select the inspection journal that you want to view the scoring per section of
- On the Inspection journal Action pane, in the Function group, click on the View score per section button
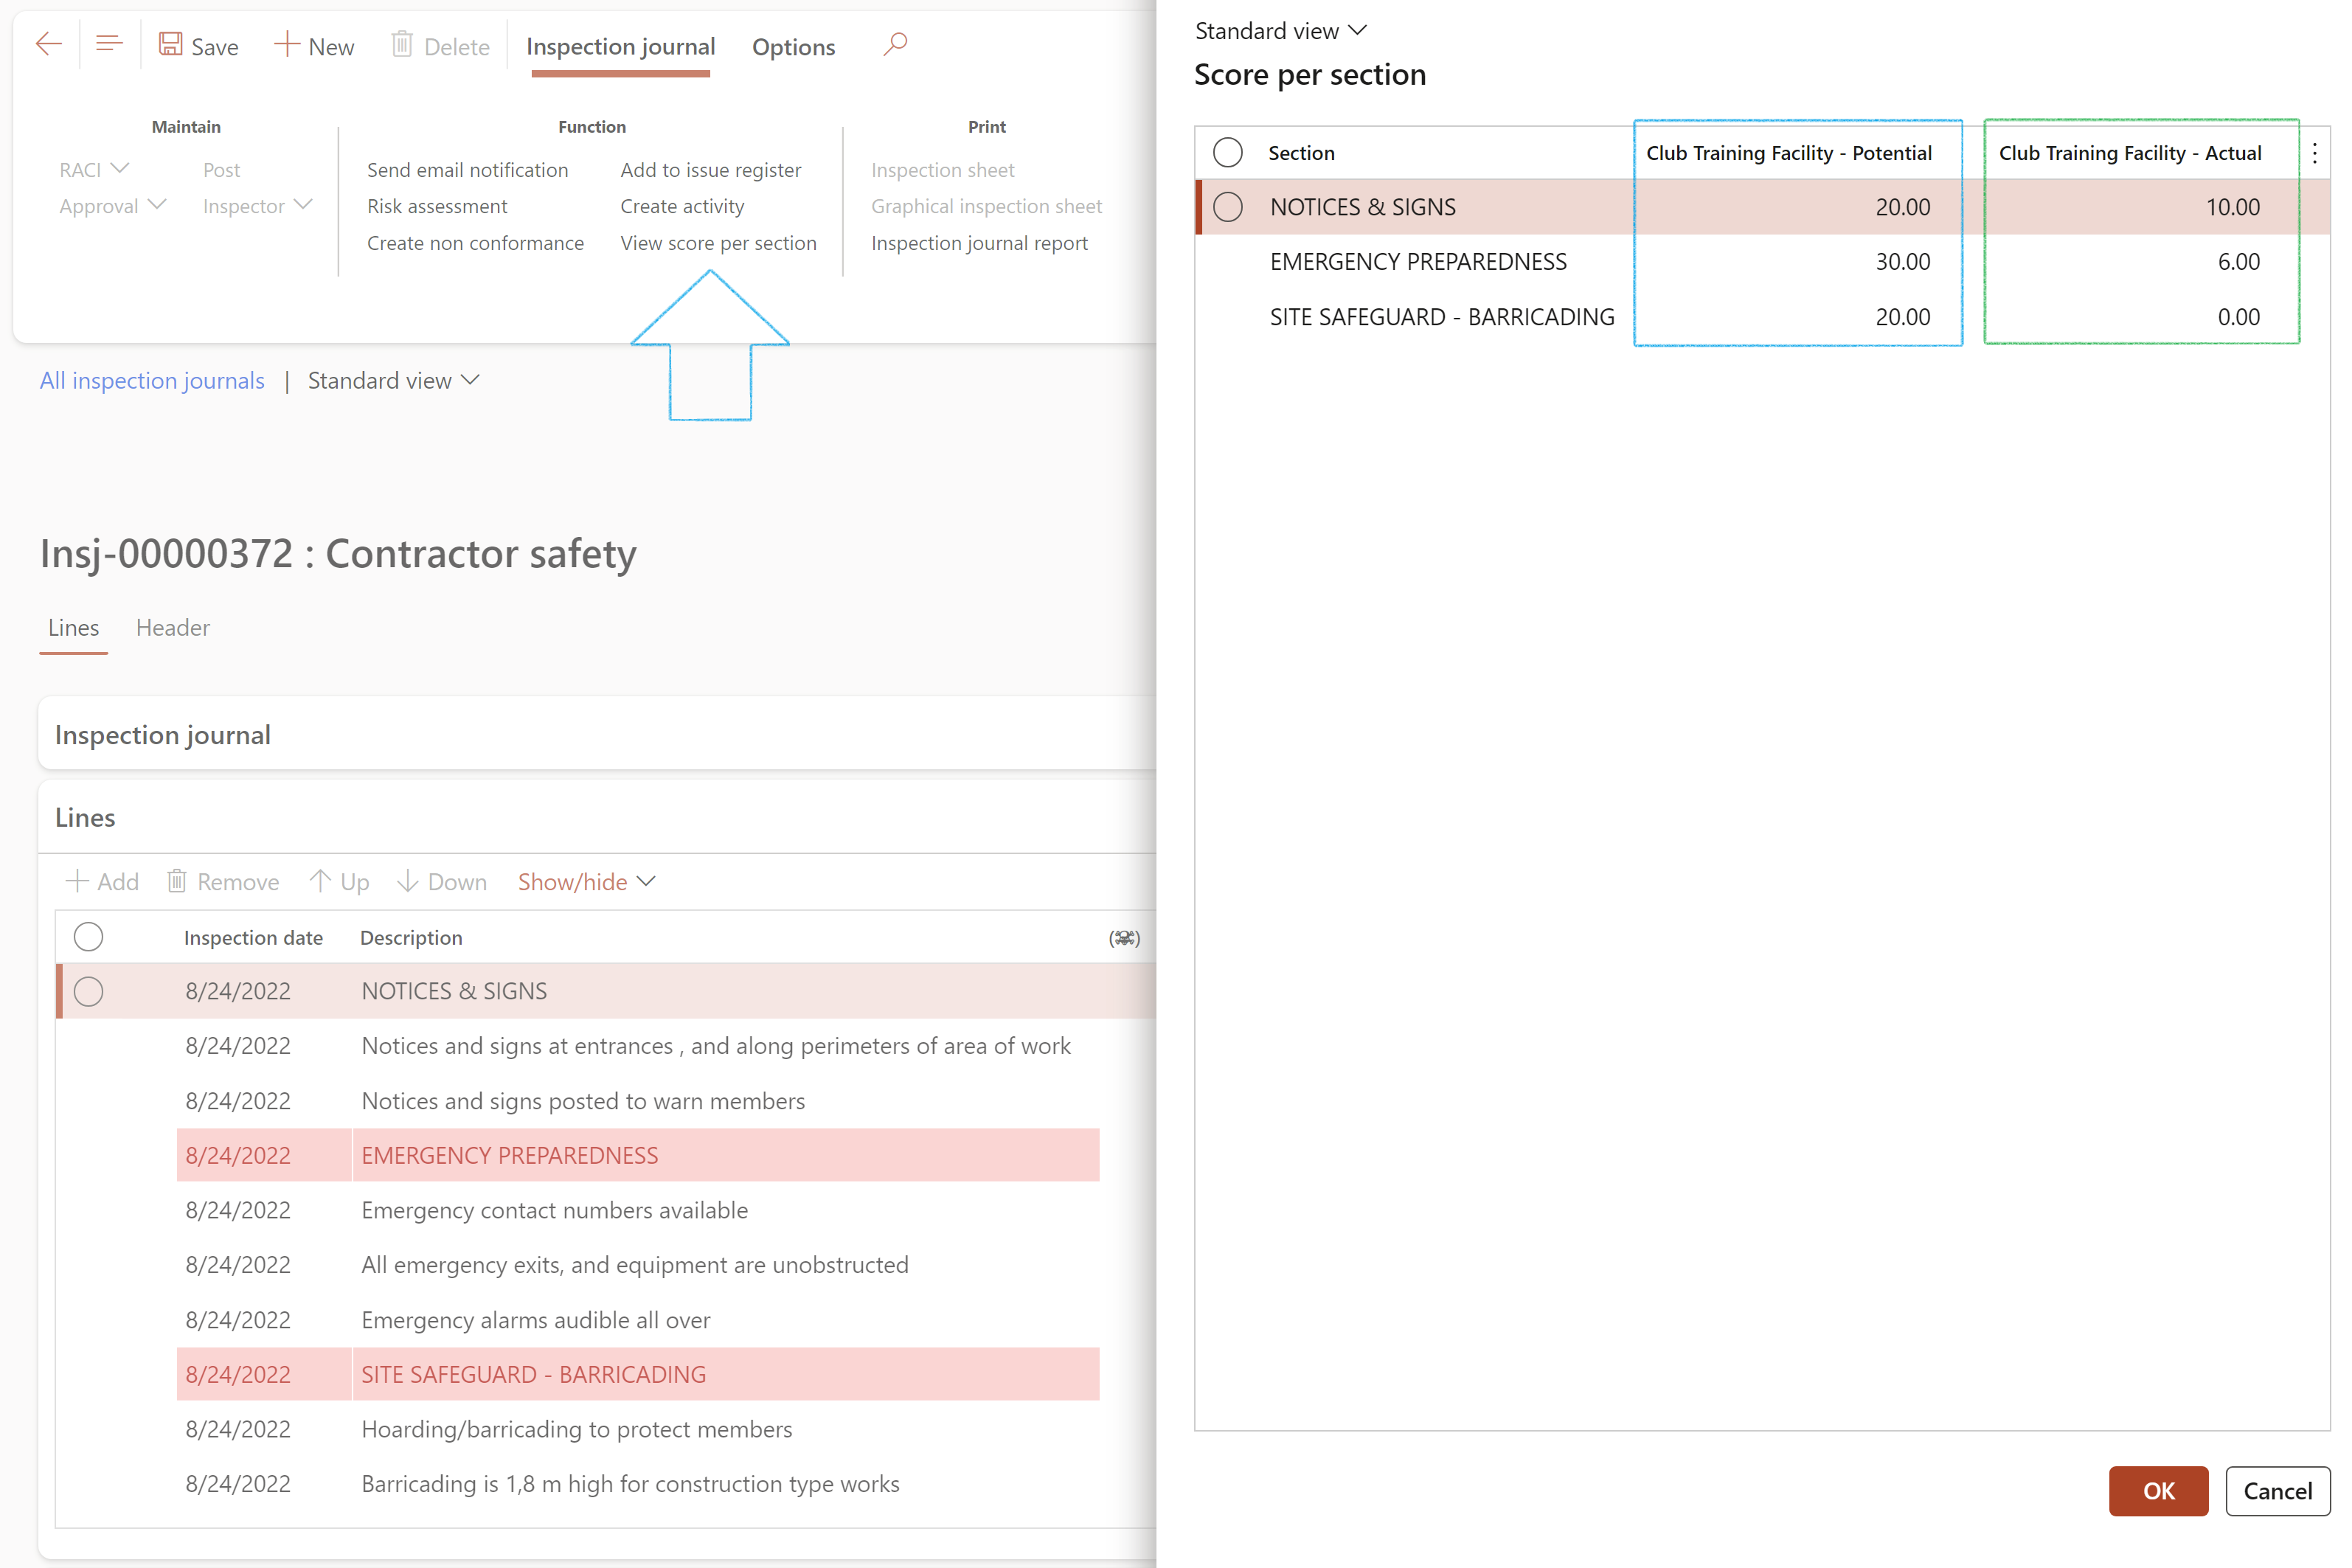
The View score per section button is only available for scoring type inspections
¶ Step 18: Posting the Inspection journal
For the Inspection history report to display details of the inspection observations, the Inspection journal has to be posted.
The Inspection journal can be posted from three forms:
- The Inspection journal list page:
- On the Action pane, in the Function group, click on the Post button
OR
- The Inspection journal
- On the Action pane, in the Function group, click on the Post button

The journal cannot be posted if it is incomplete. Add a comment to at least one journal line.
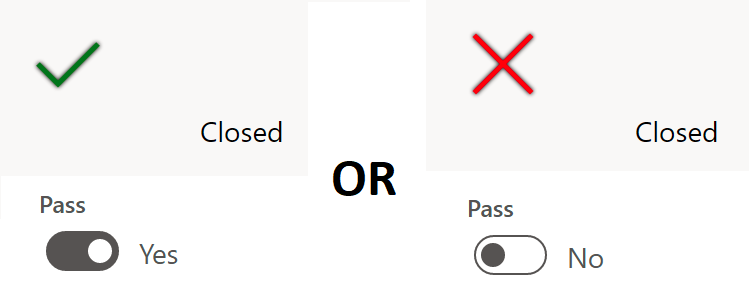
When the journal has been posted, the user can see whether it has passed/failed by opening the General Fast tab on the Journal Header
¶ Step 19: Print the Inspection list
Go to: HSE > Inspections > Inspection journal
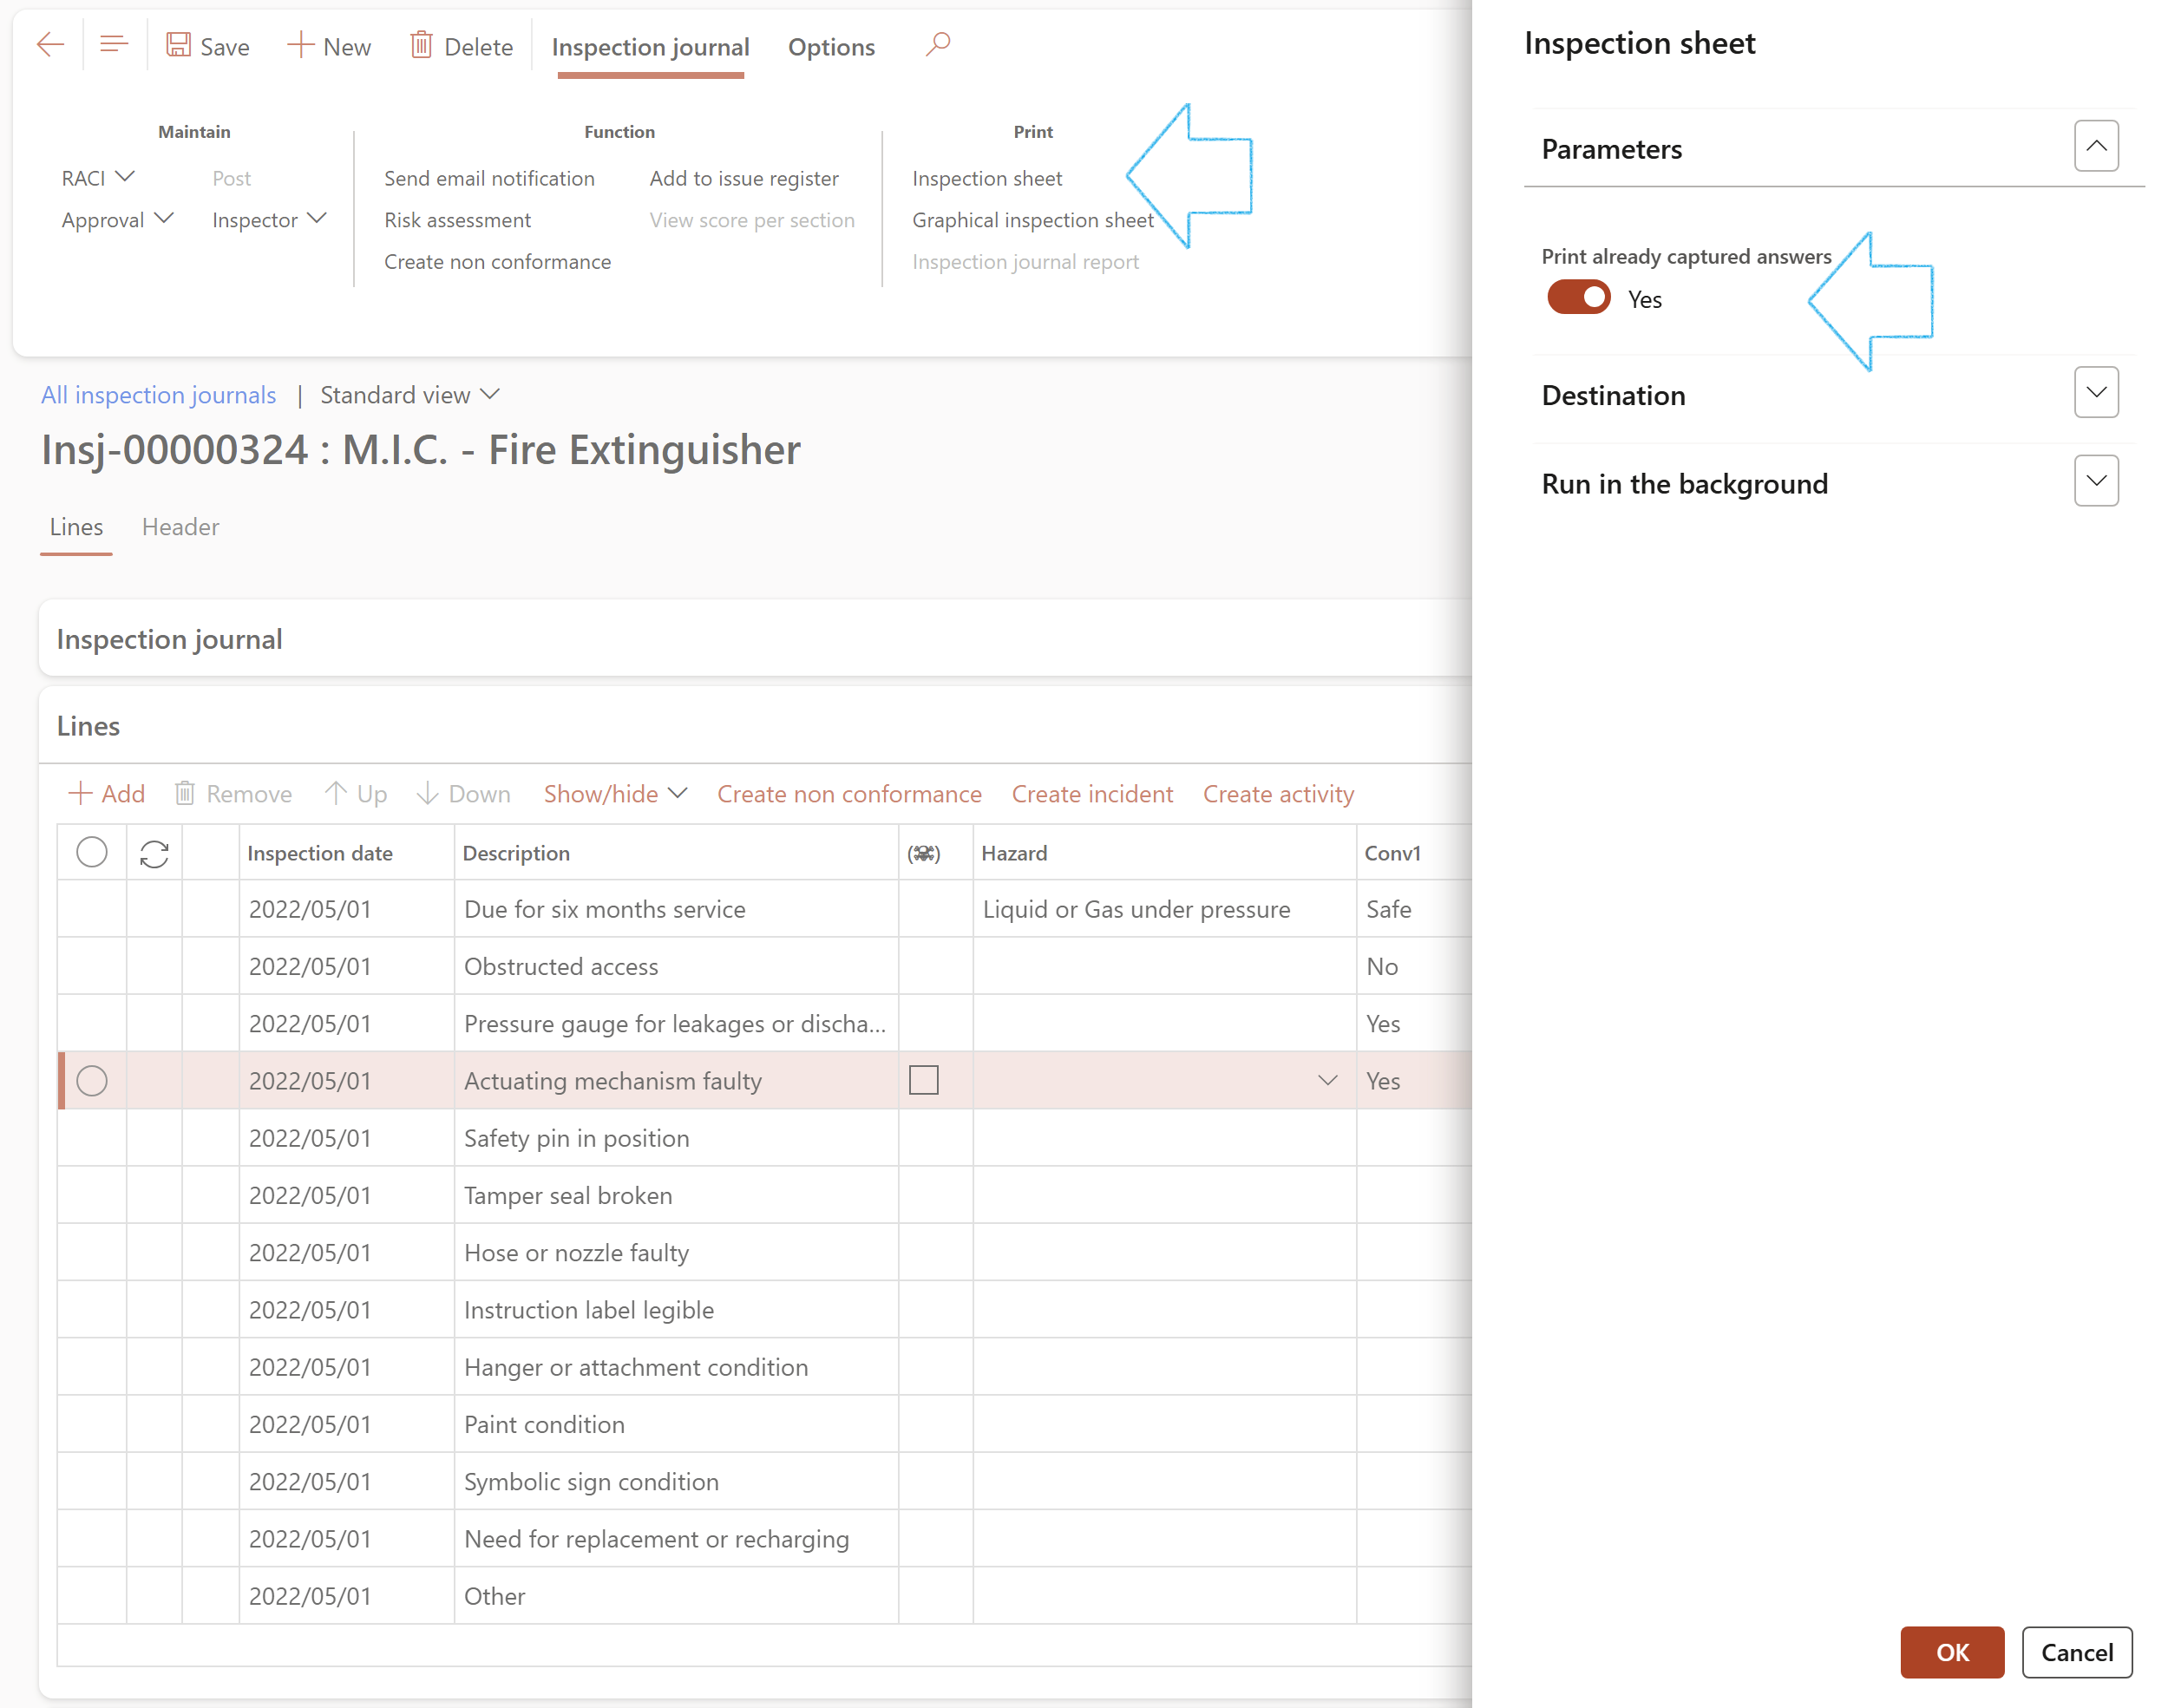
- Select the inspection journal that you want to print the inspection sheet of
- On the Action pane, in the Print group, click on the Inspection sheet button
- On the Inspection sheet dialog, move the Print already captured answers slider to Yes if you want to print the already captured answers on the report
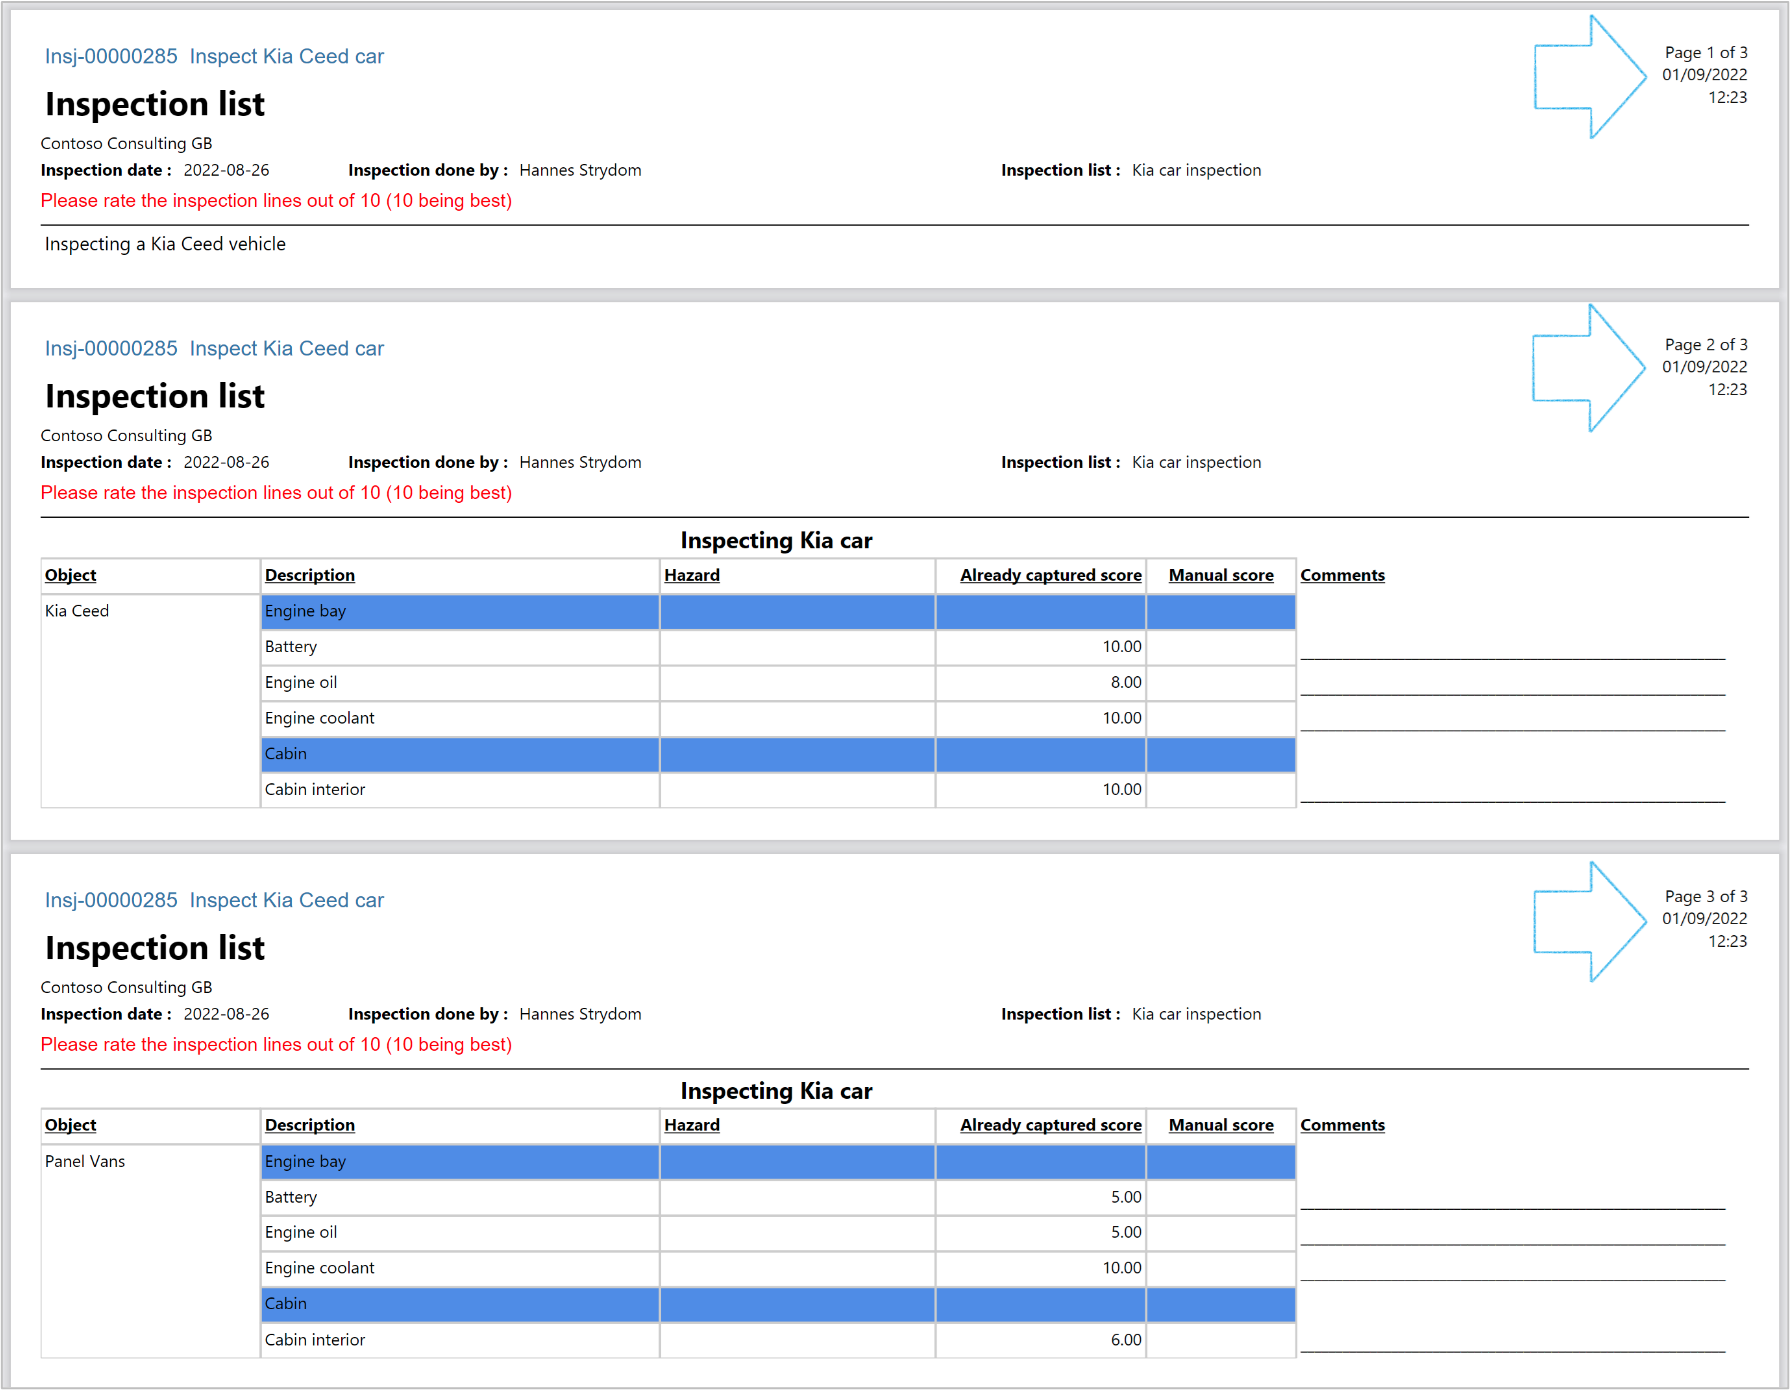
If there is a prolog for the Inspection list, the inspection lines are printed on Page 2
¶ Step 20: Print the Graphical inspection sheet
Go to: HSE > Inspections > Inspection journal
- Select the inspection journal that you want to print the inspection sheet of
- On the Action pane, in the Print group, click on the Graphical inspection sheet button
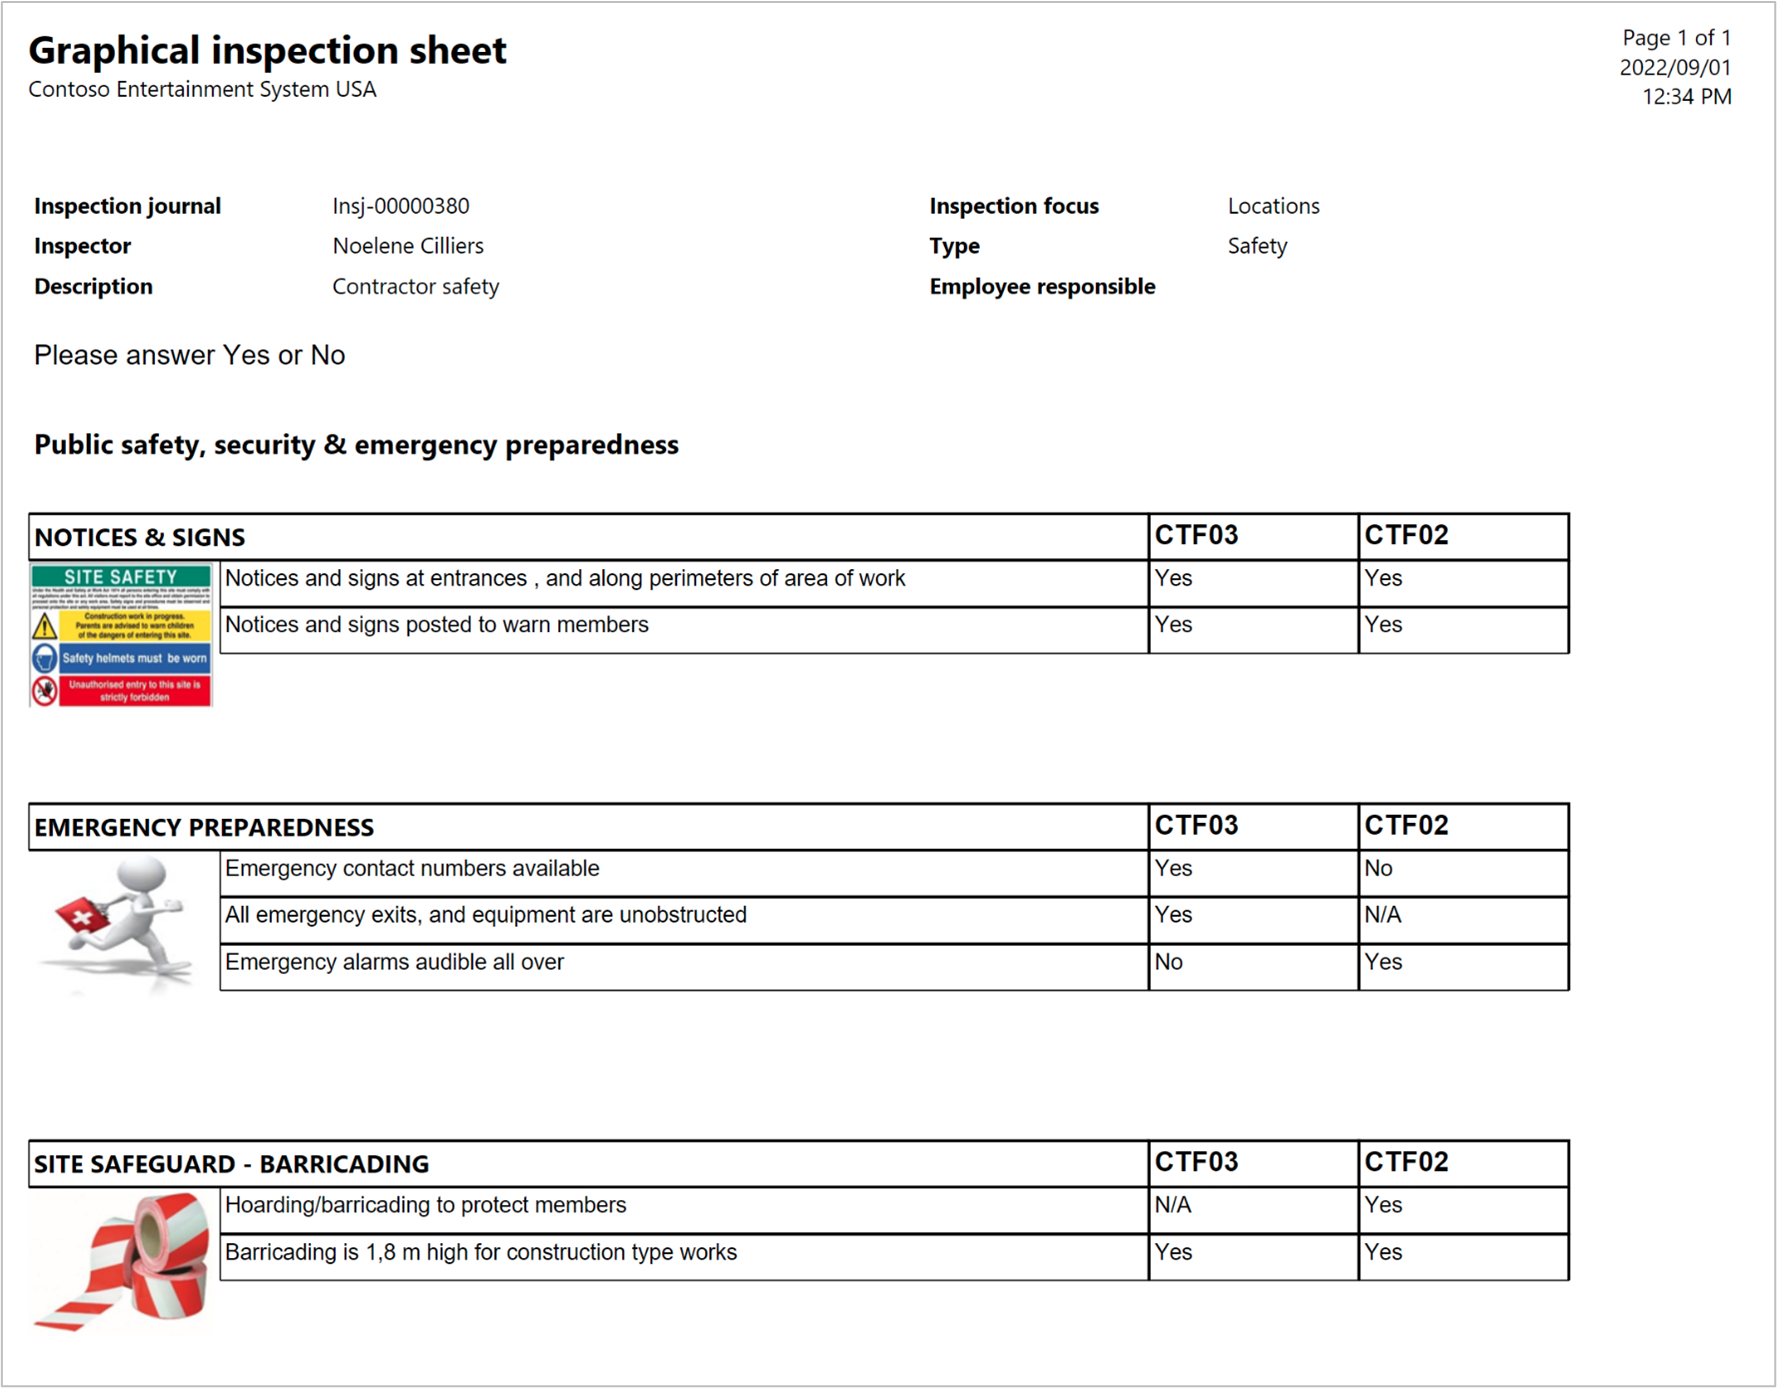
The Graphical inspection sheet can only be printed for Yes/No type inspections
¶ Reporting
¶ Step 21: Inspection journal report
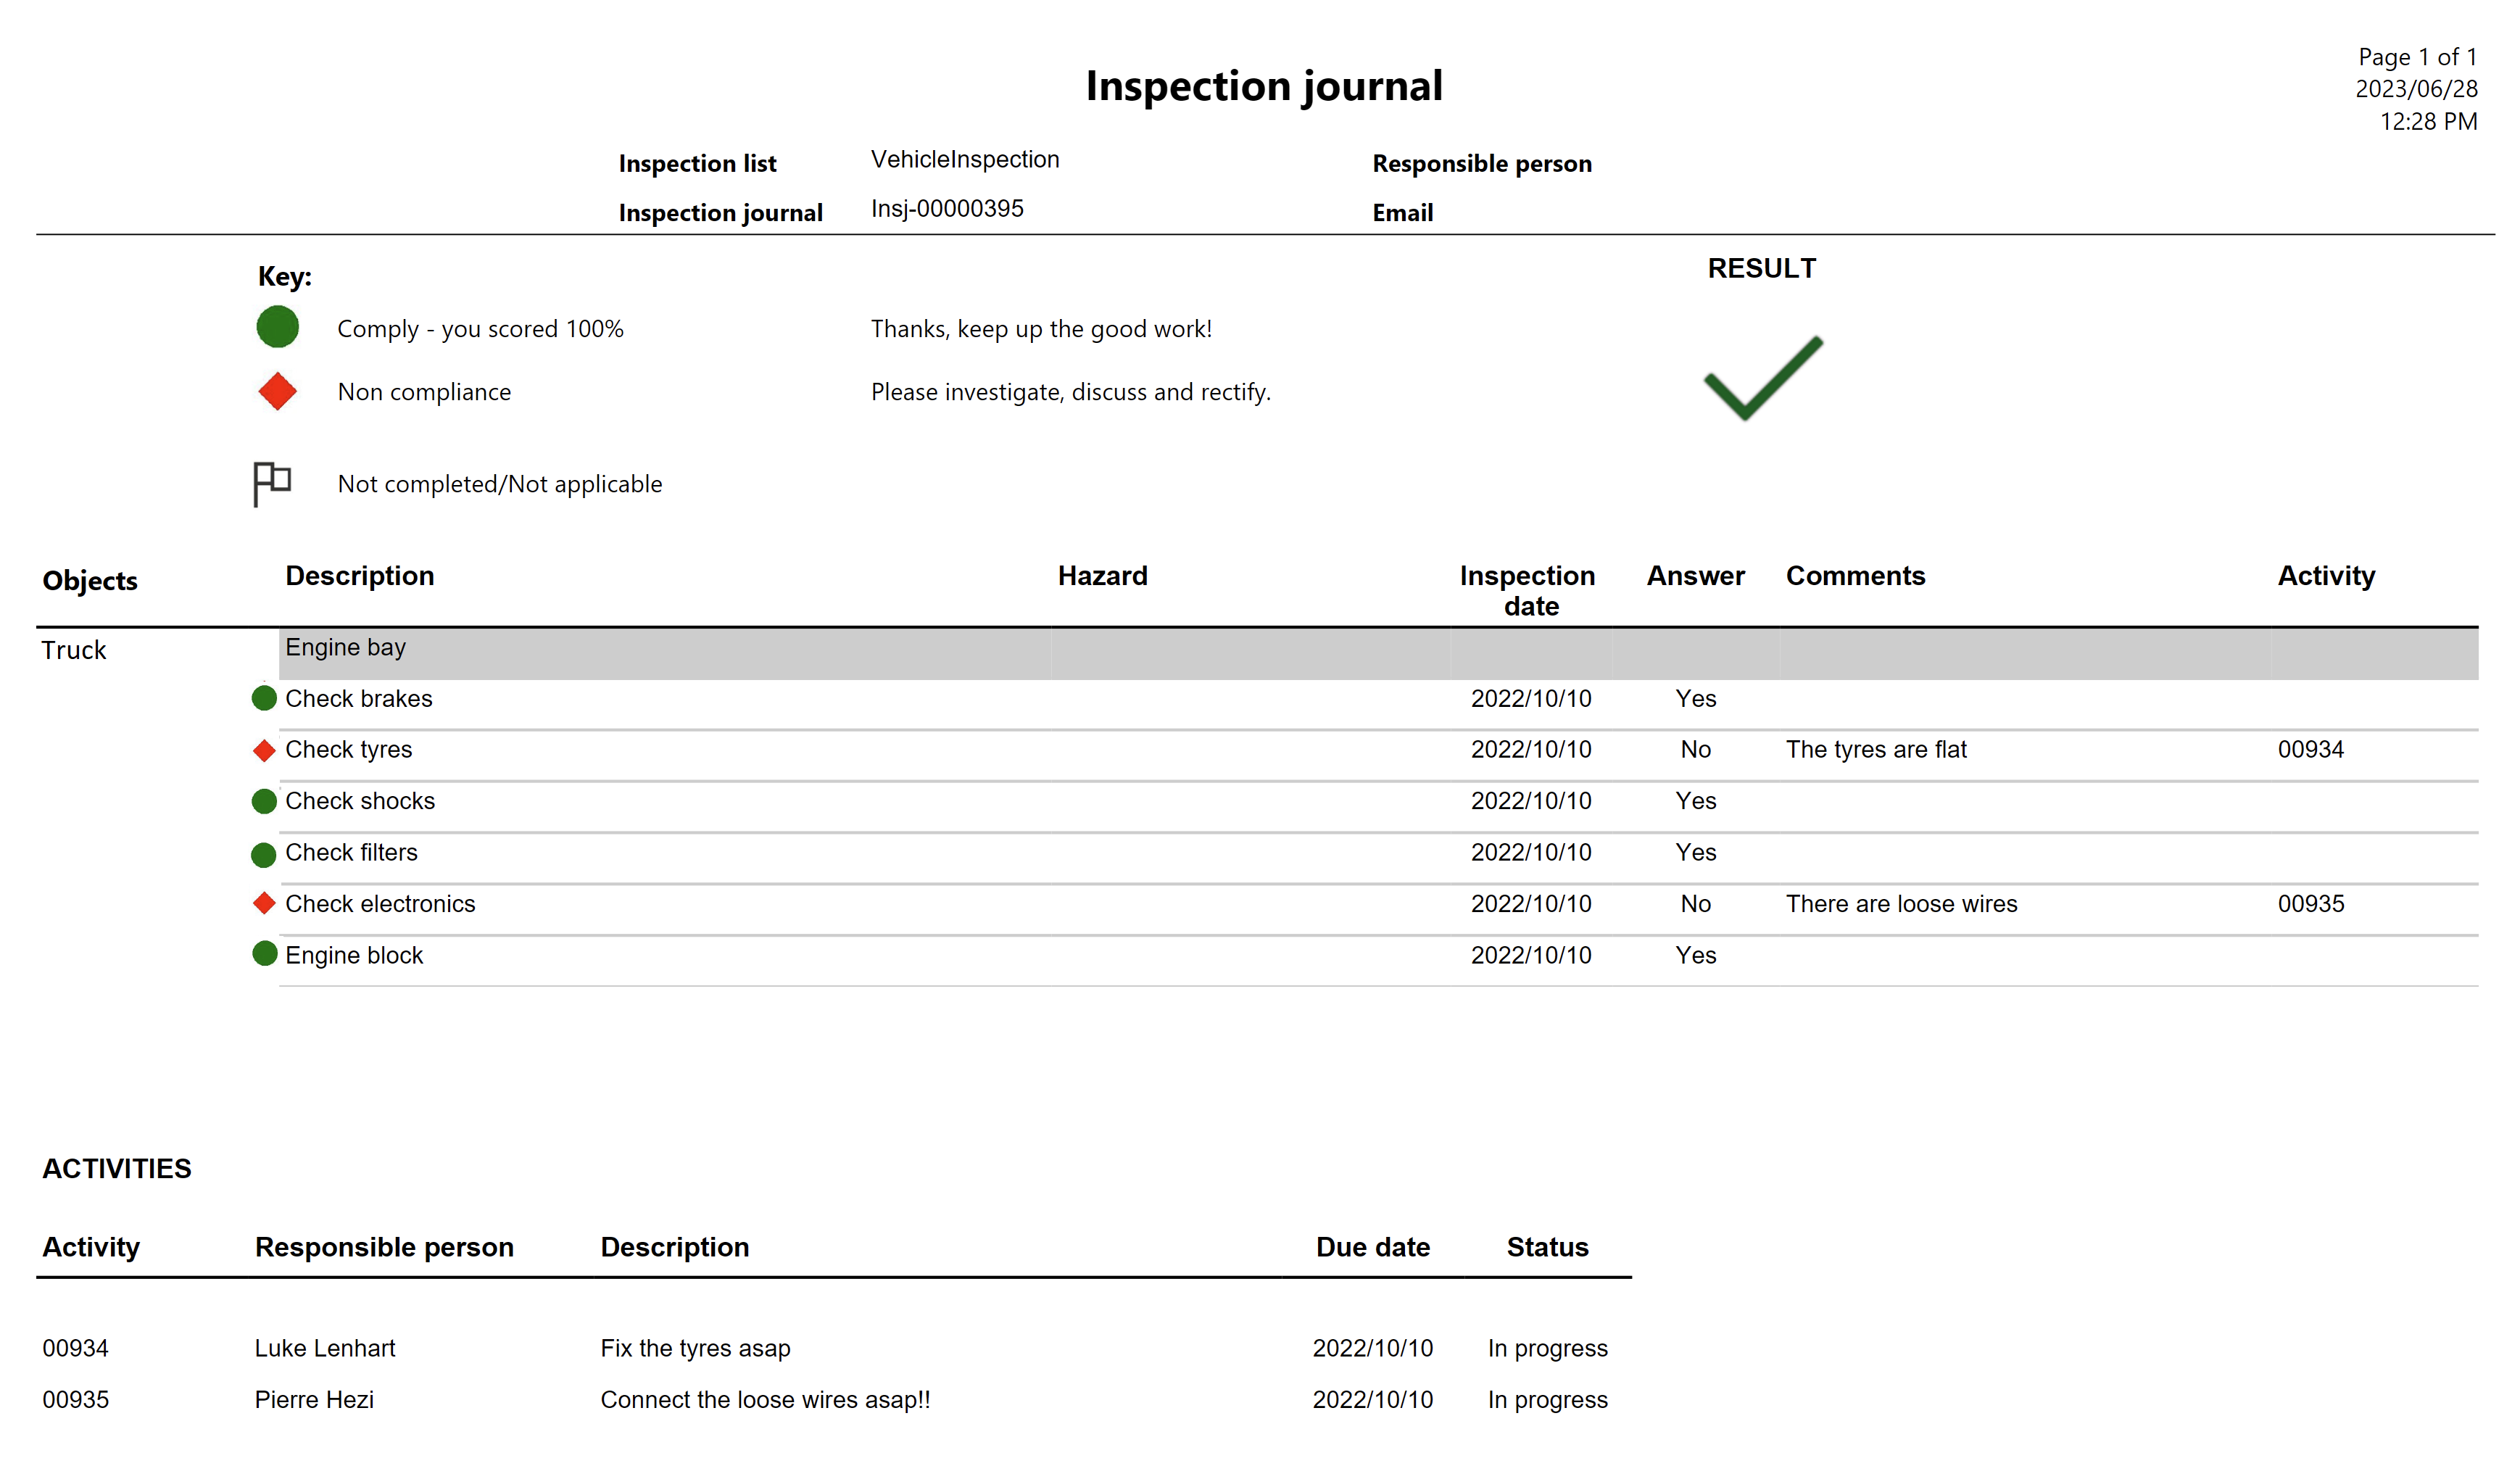
The Inspection journal report can only be printed for posted inspection journals.
There are three paths to print this report:
Path 1:
Go to: HSE > Inspections > All inspection journals
- Select the inspection journal that you want to post
- On the Action pane, in the Function group, click on the Post button
- On the dialog, under the Display report?, select Yes and then click OK
Path 2:
Go to: HSE > Inspections > All inspection journals
- Select the posted inspection journal that you want to print the report of
- On the Action pane, in the Print group, click on the Inspection journal report button
Path 3:
Go to: HSE > Inspections > Reports and Inquiries > Inspection journal report
- On the dialog, select the parameters (Journal number) and then click OK
¶ Step 22: Posted inspections per line header inquiry
Go to: HSE > Inspections > Reports and Inquiries > Posted inspections per line header
- Use the filters to narrow down your search

