
¶ Introduction
Entry to a company’s sites is restricted and is subject to appropriate entry authorization in the prescribed format of a Gate Pass or any other entry authorization with reference to approval and possible verification as per instruction to a Safety & security policy.
A safety induction is conducted to welcome new workers and visitors to the company and prepare them for their new role. It ensures workers are fully informed about the organization and are aware of their work and responsibilities. It serves as a starting point for an organization to introduce a culture of safety in the workplace.
OHS have these as well as a versatile mobile checklist app that can be used to perform digital inspections and audits. Use the mobile app to confirm safety induction topics were discussed to all employees. Generate on-the-spot reports and assign corrective actions to other safety officials.
¶ Navigation

¶ Specific setups
¶ Step 1: Setup Job plan group
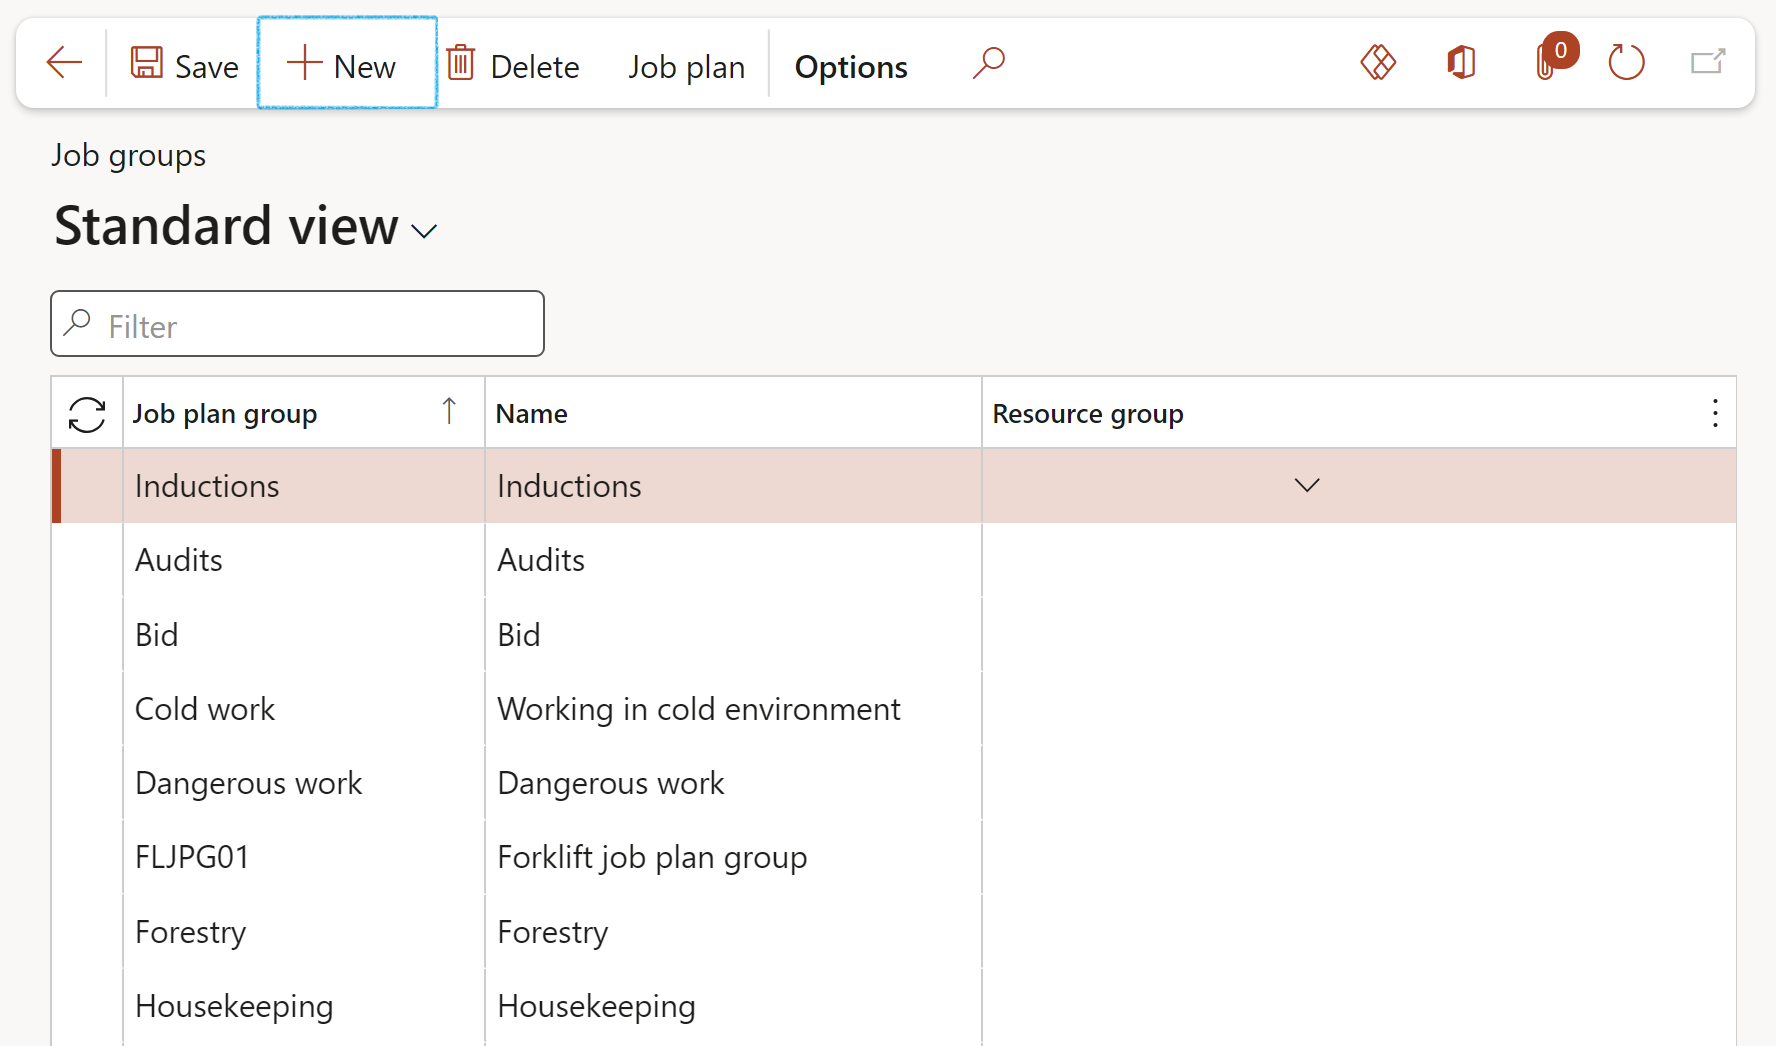
Go to: HSE > Setup > Work > Job plan group
- On the Action pane, click on the New button
- Enter a Job plan group identifier
- Enter a Name for the job plan group
¶ Step 2: Setup Job plan
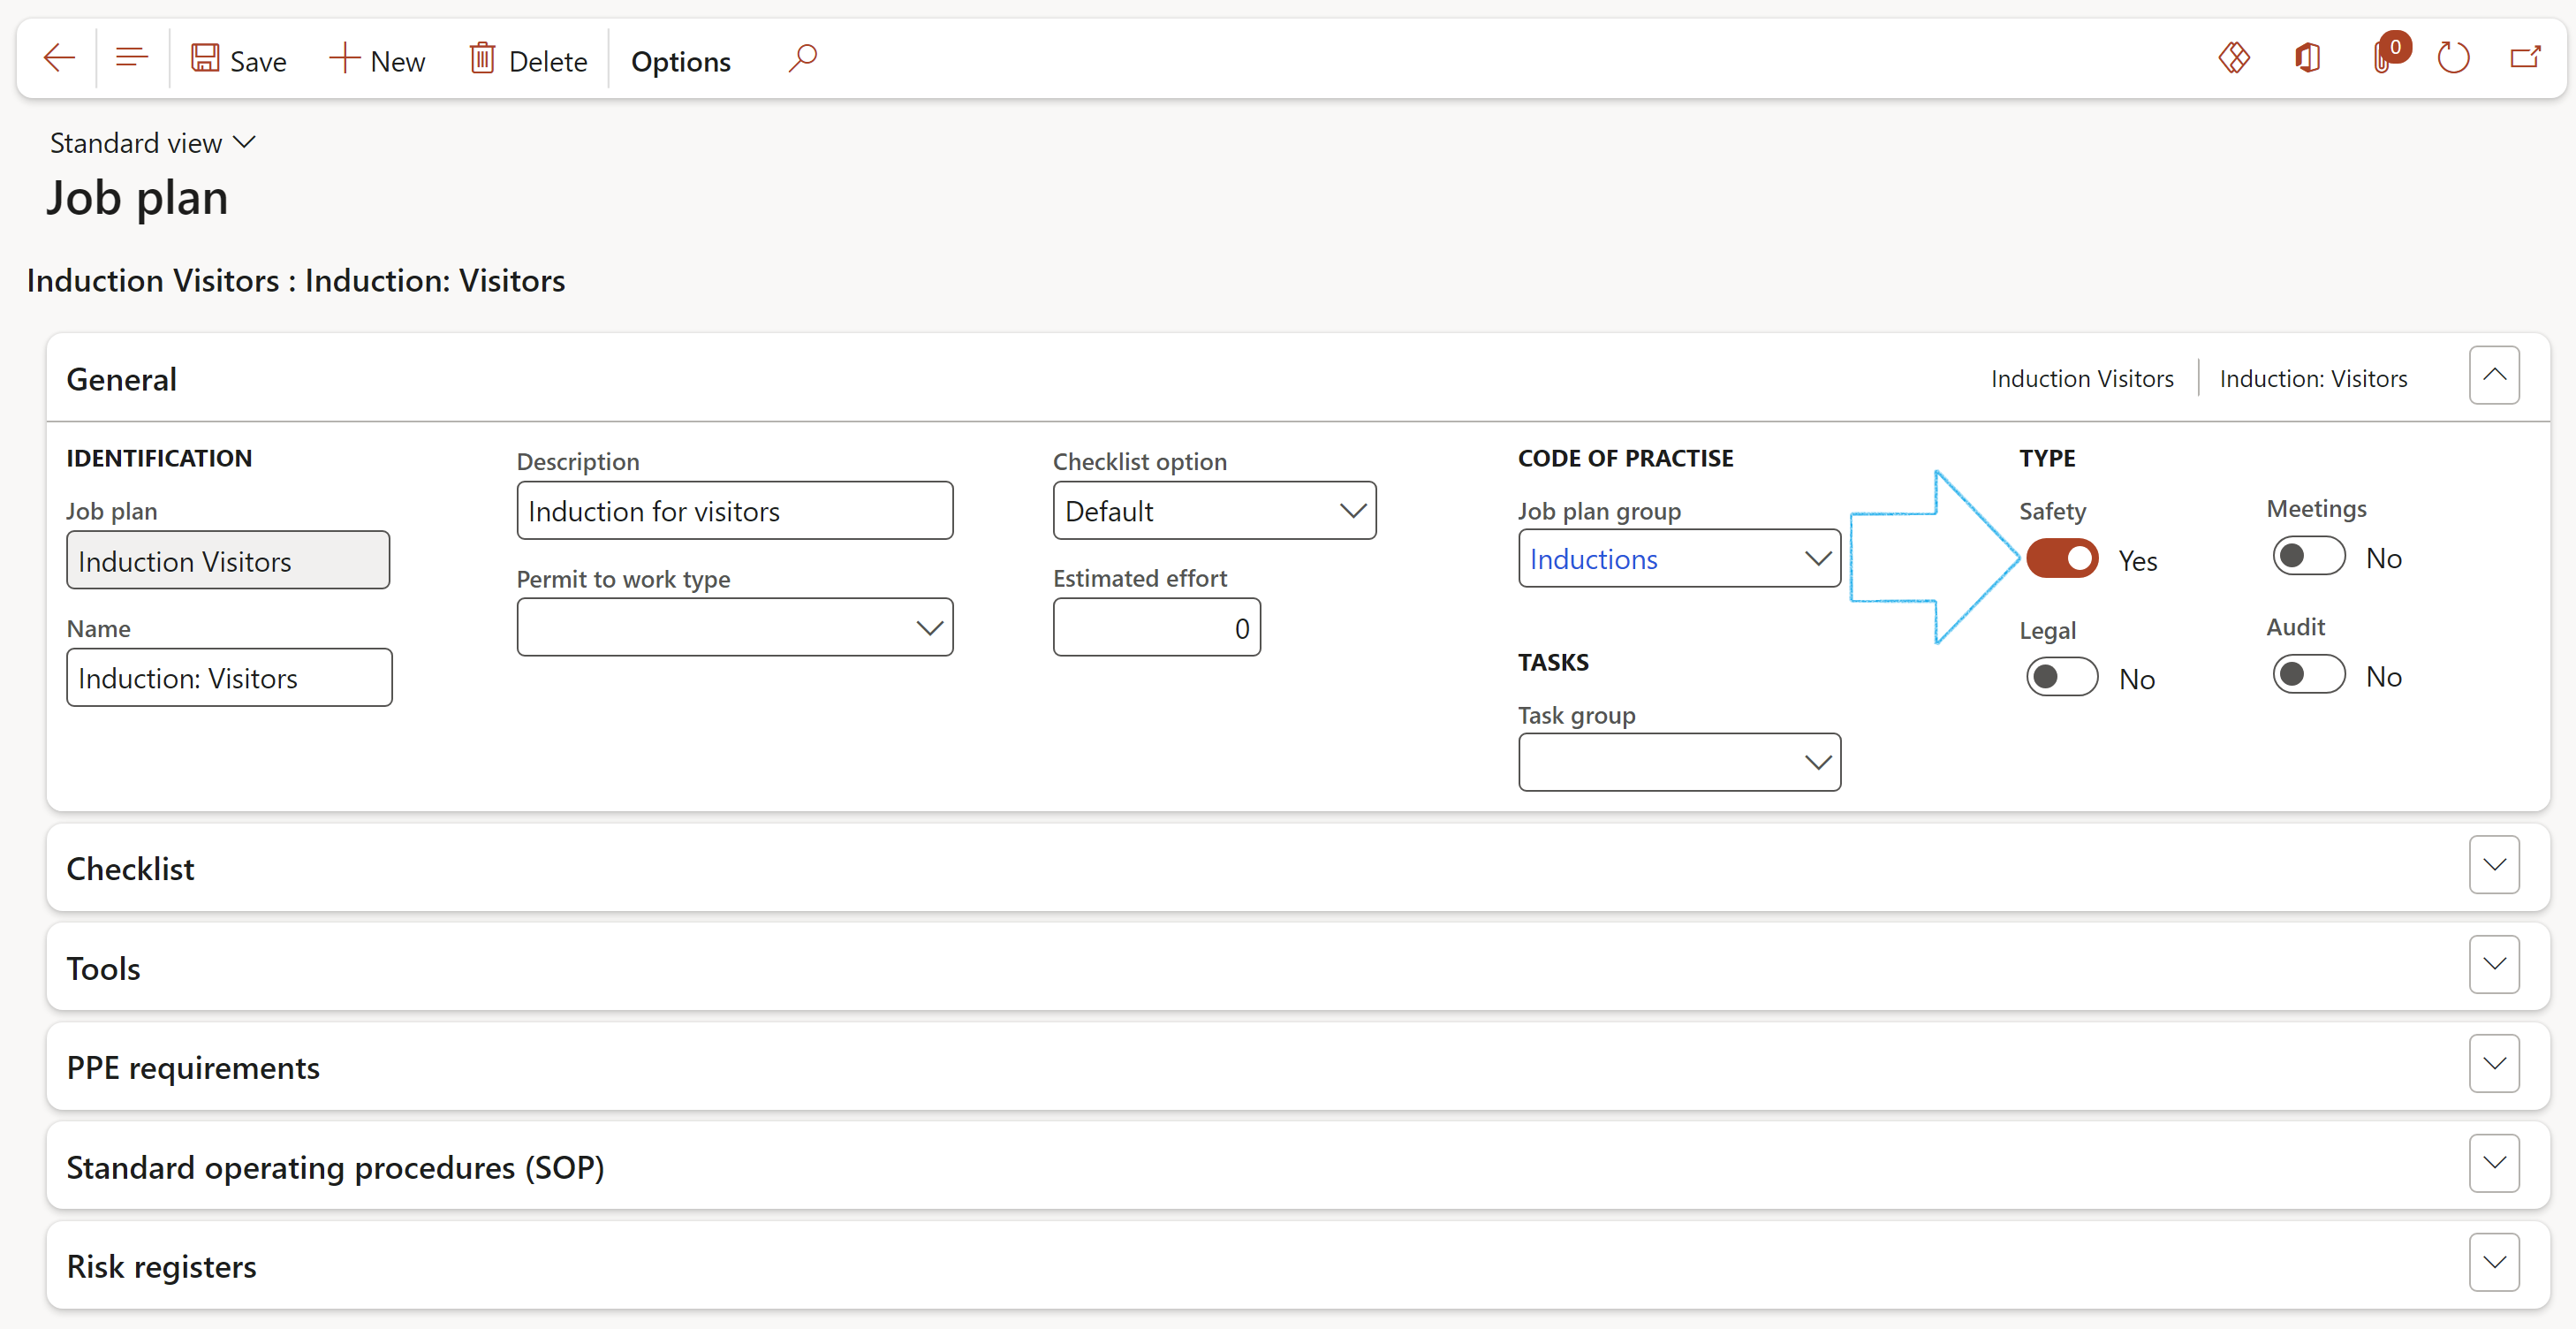
Go to: HSE > Setup > Work > Job plan
- On the Action pane, click on the New button
- Expand the General Fast tab
- Enter the Job plan identifier
- Enter a Name for the job plan
- Enter a brief Description of the job plan
- Select the relevant Job plan group from the dropdown list
- Indicate that this job plan is of type Safety
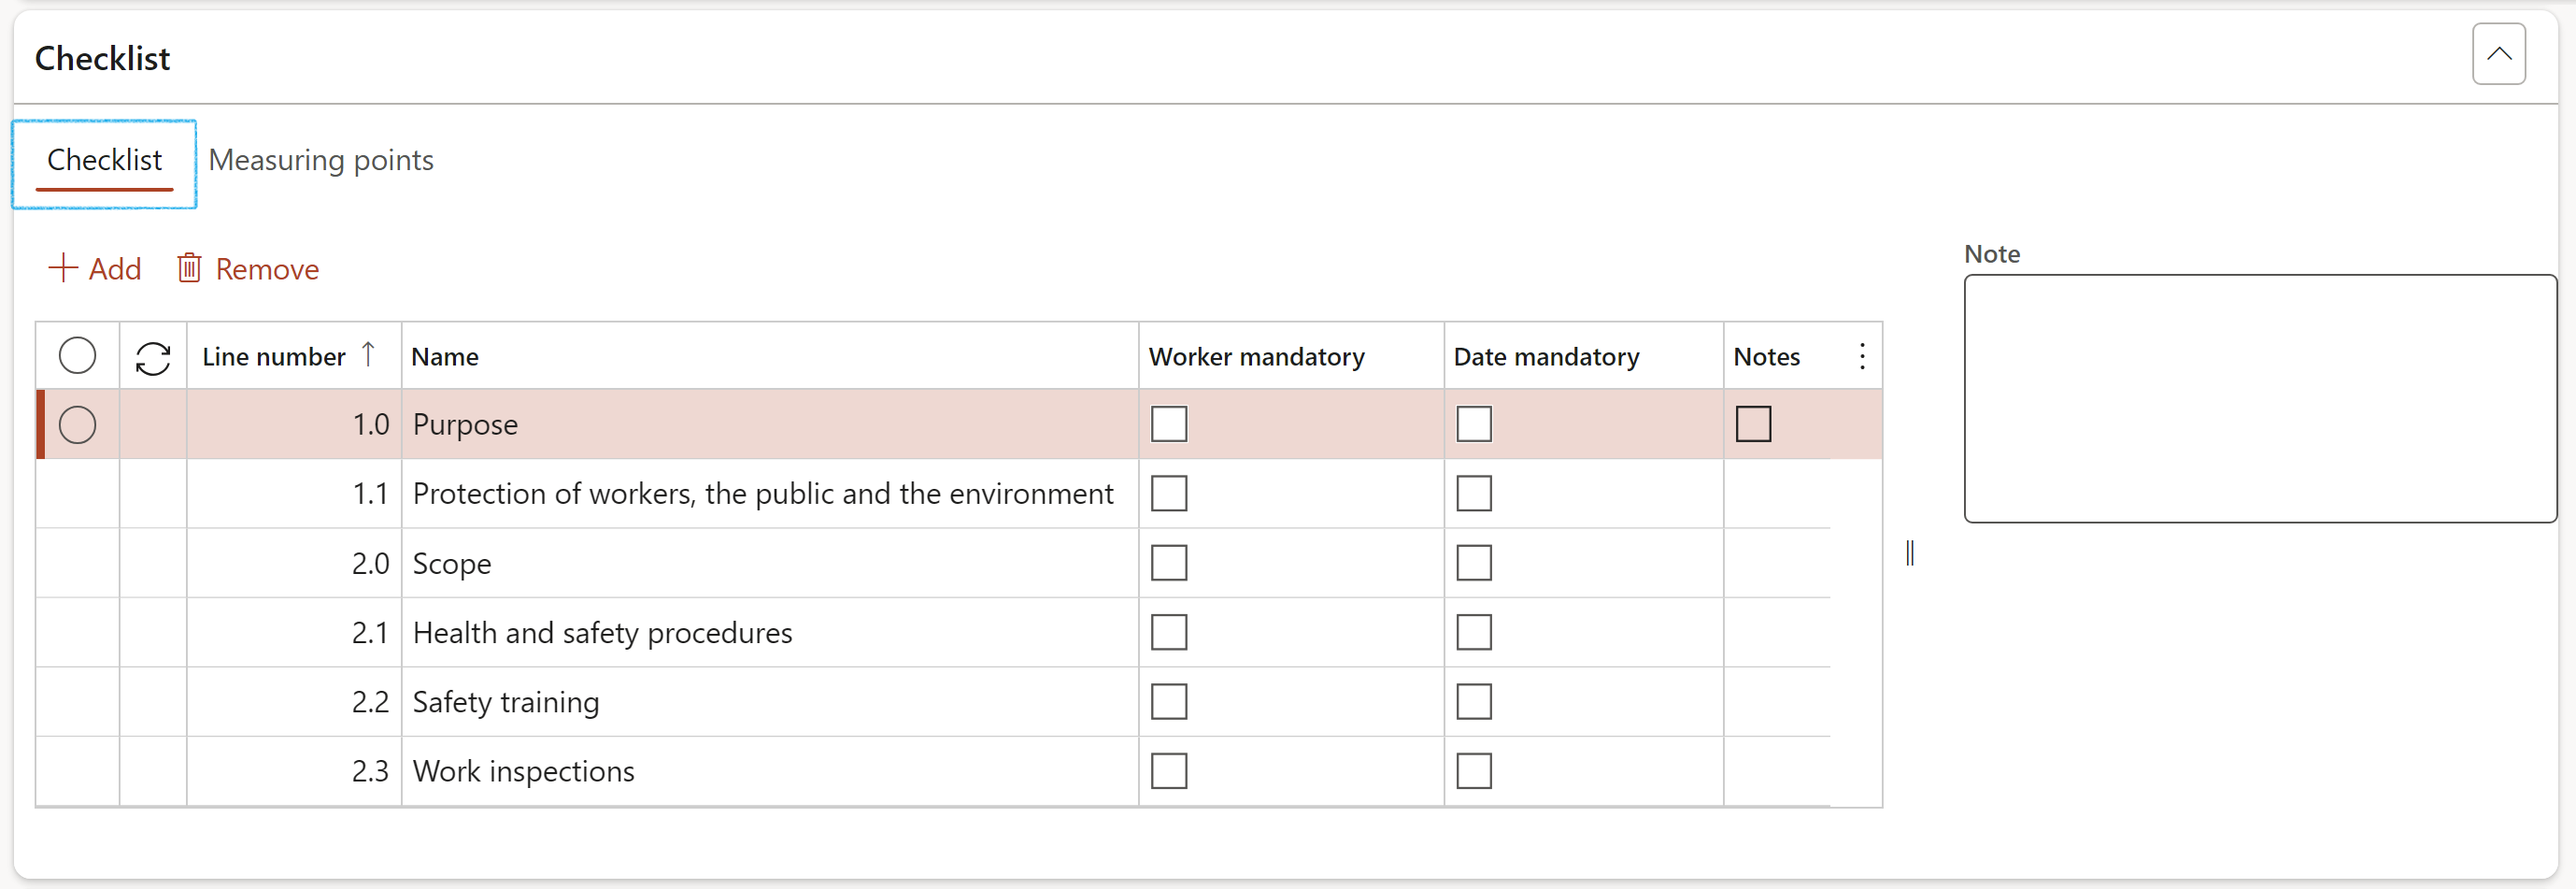
- Expand the Checklist Fast tab
- Under the Checklist Index tab, in the Button strip, click on the Add button
- Enter the Line number
- In the Name field, type the details of the checklist point
- Enter additional Notes in the box provided
- Indicate whether a Worker and/or Date is mandatory for the selected point
¶ Step 3: Setup Induction type
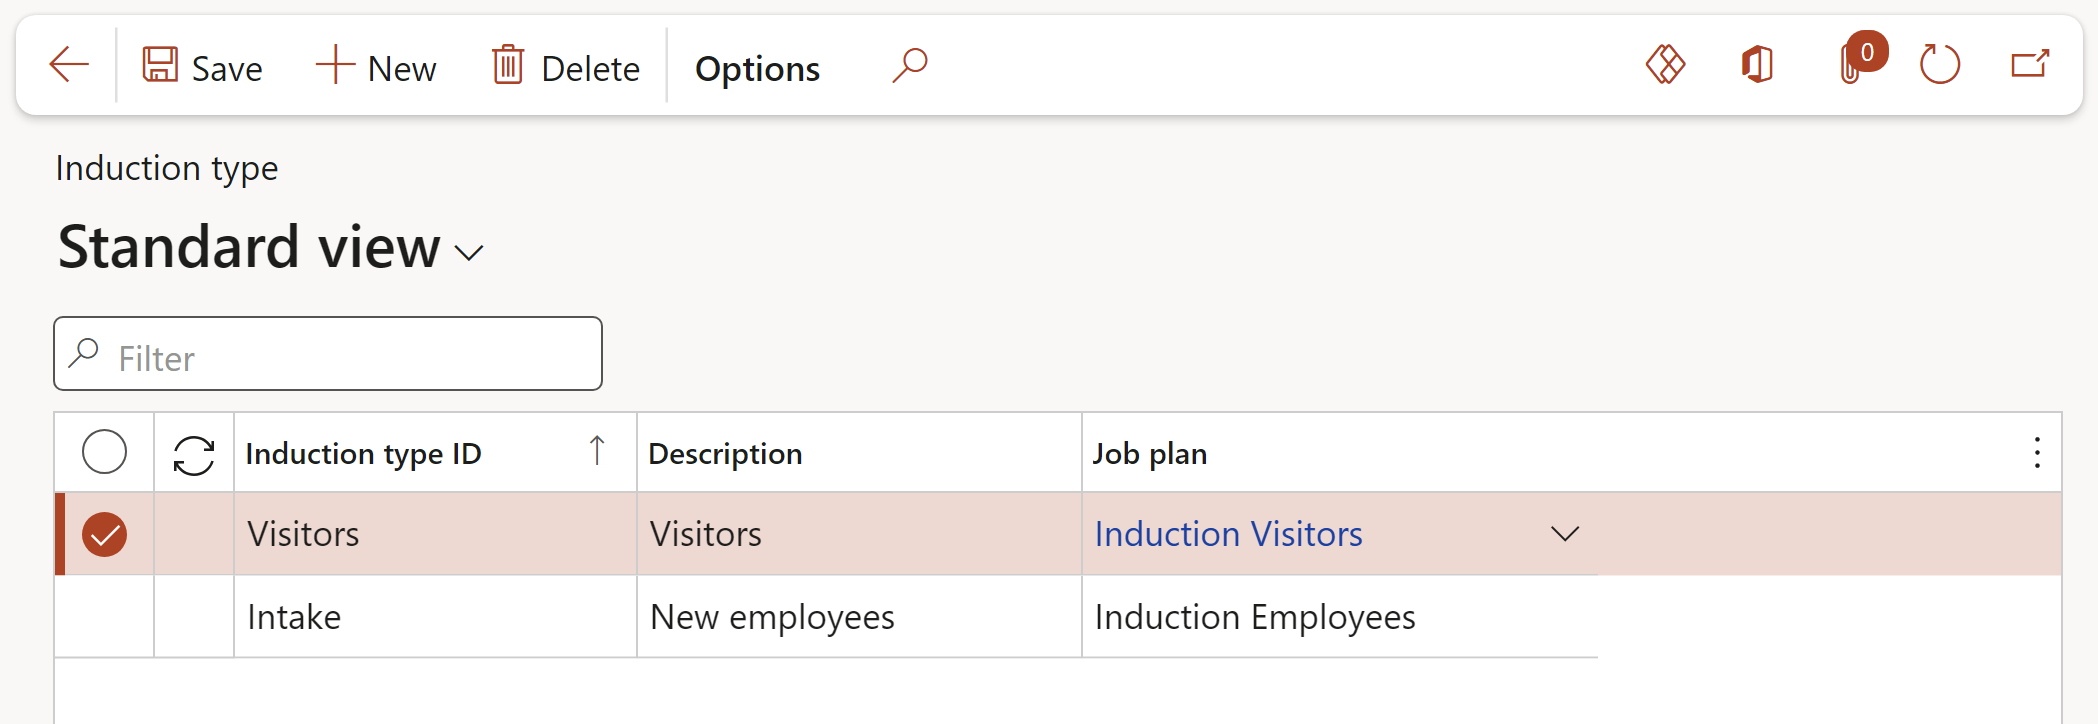
Go to: HSE > Safety and security > Setup for safety and security > Induction type
- On the Action pane, click on the New button
- Enter the Induction type ID
- Enter a brief Description of the induction type
- Select the relevant Job plan from the dropdown list
¶ Daily use
¶ Step 4: Gate pass
Go to: HSE > Safety and security > Gate passes
- On the Action pane, click on the New button
- Expand the General Fast tab
- Under the Request detail Field group:
- Select the relevant Type of gate pass from the drop-down list
- Select the name of the person Requesting the Gate pass
- Enter the area that is to be visited in the Area of visit field
- Indicate whether the area to be visited is the Primary facility
- Under the Visiting Field group:
- Select the name of the person being Visited from the dropdown list
- Enter the Request date of the Gate pass
- Enter the date on which the visit is to take place
- If a meeting was held concerning the Gate pass, select the Meeting ID from the dropdown list
- Select the relevant Site from the dropdown list
- Select the relevant Department from the dropdown list
- Enter the Longitude and Latitude decimal values
- Enter the Expiration date of the Gate pass
- Enter the Purpose of the Gate pass
- Select the relevant Project from the dropdown list (If applicable)
- Under the Approval Field group:
- Select the name of the person who Approved the gate pass
- Enter additional Notesif required
- Indicate whether Photography is allowed by the visitor(s)
The Status of the Gate pass should be changed after the Identification Fast tab has been completed
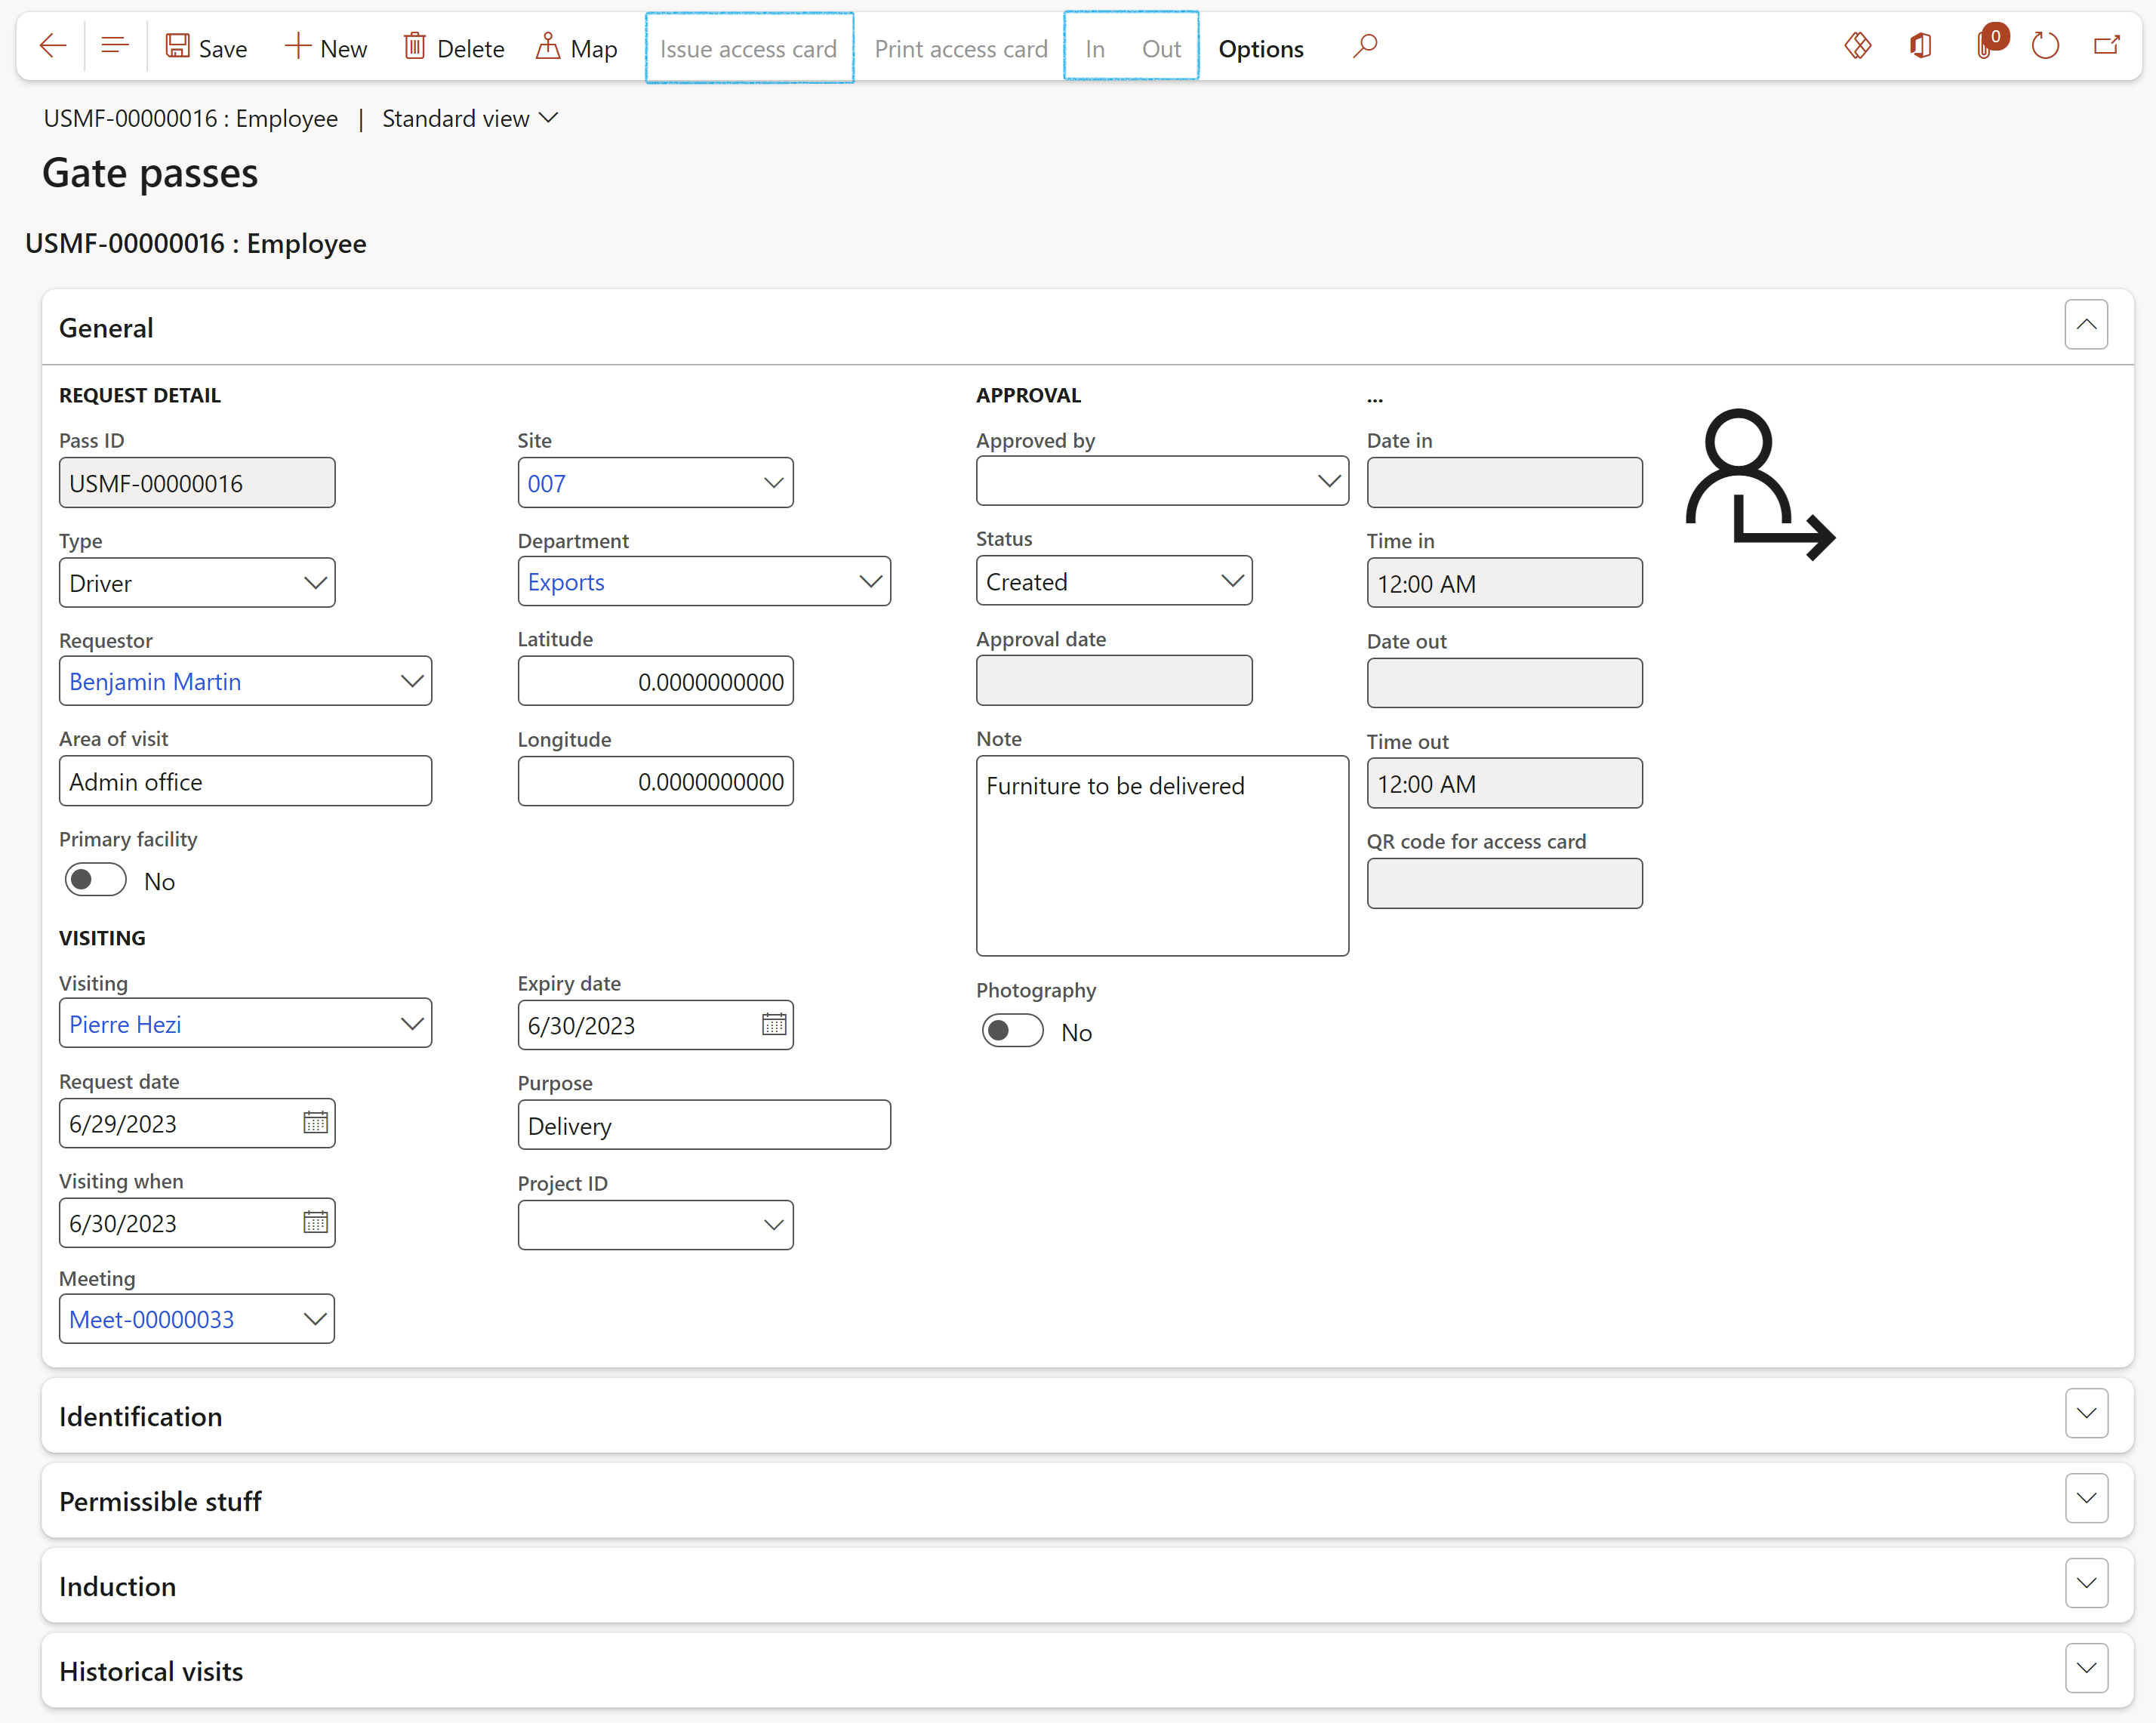
- The record cannot be Approved if no lines have been added under the Identification Fast tab
- The In/Out buttons are only available when the status of the Gate pass is Approved
- Access cards can only be issued after the Gate pass has been Approved
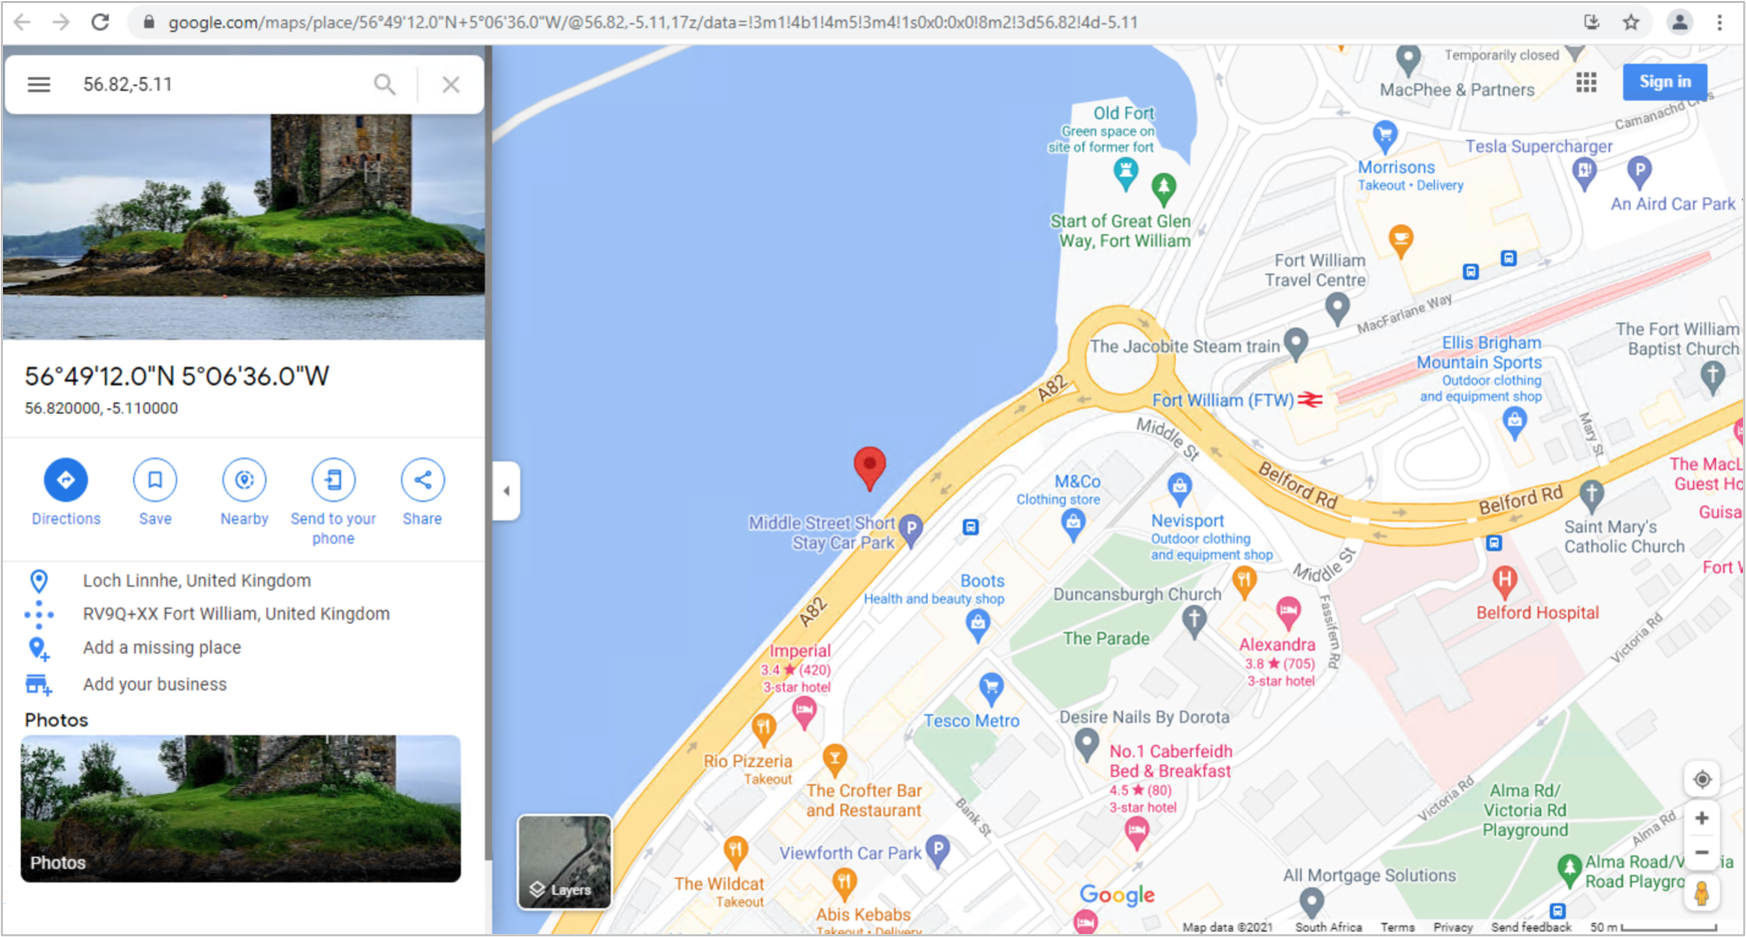
To view a map of the location:
- On the Action pane, click on the Map button
- Expand the Identification Fast tab
- In the Button strip, click on the Add button
- Select the name of the Worker who is requiring the Gate pass, from the dropdown list
OR
- Select the name of the Supplier who needs a Gate pass, from the dropdown list
- Enter the Contractor employee’s name
- Select the Gender of the person visiting from the dropdown list
- Enter the Identification number of the person visiting
- Enter the Telephone number of the person visiting
- Enter the Email address of the person visiting
- Enter the Vehicle registration number of the person visiting
- Indicate the Primary record under the Identification Fast tab
- On the Action pane, click on the Issue access card button
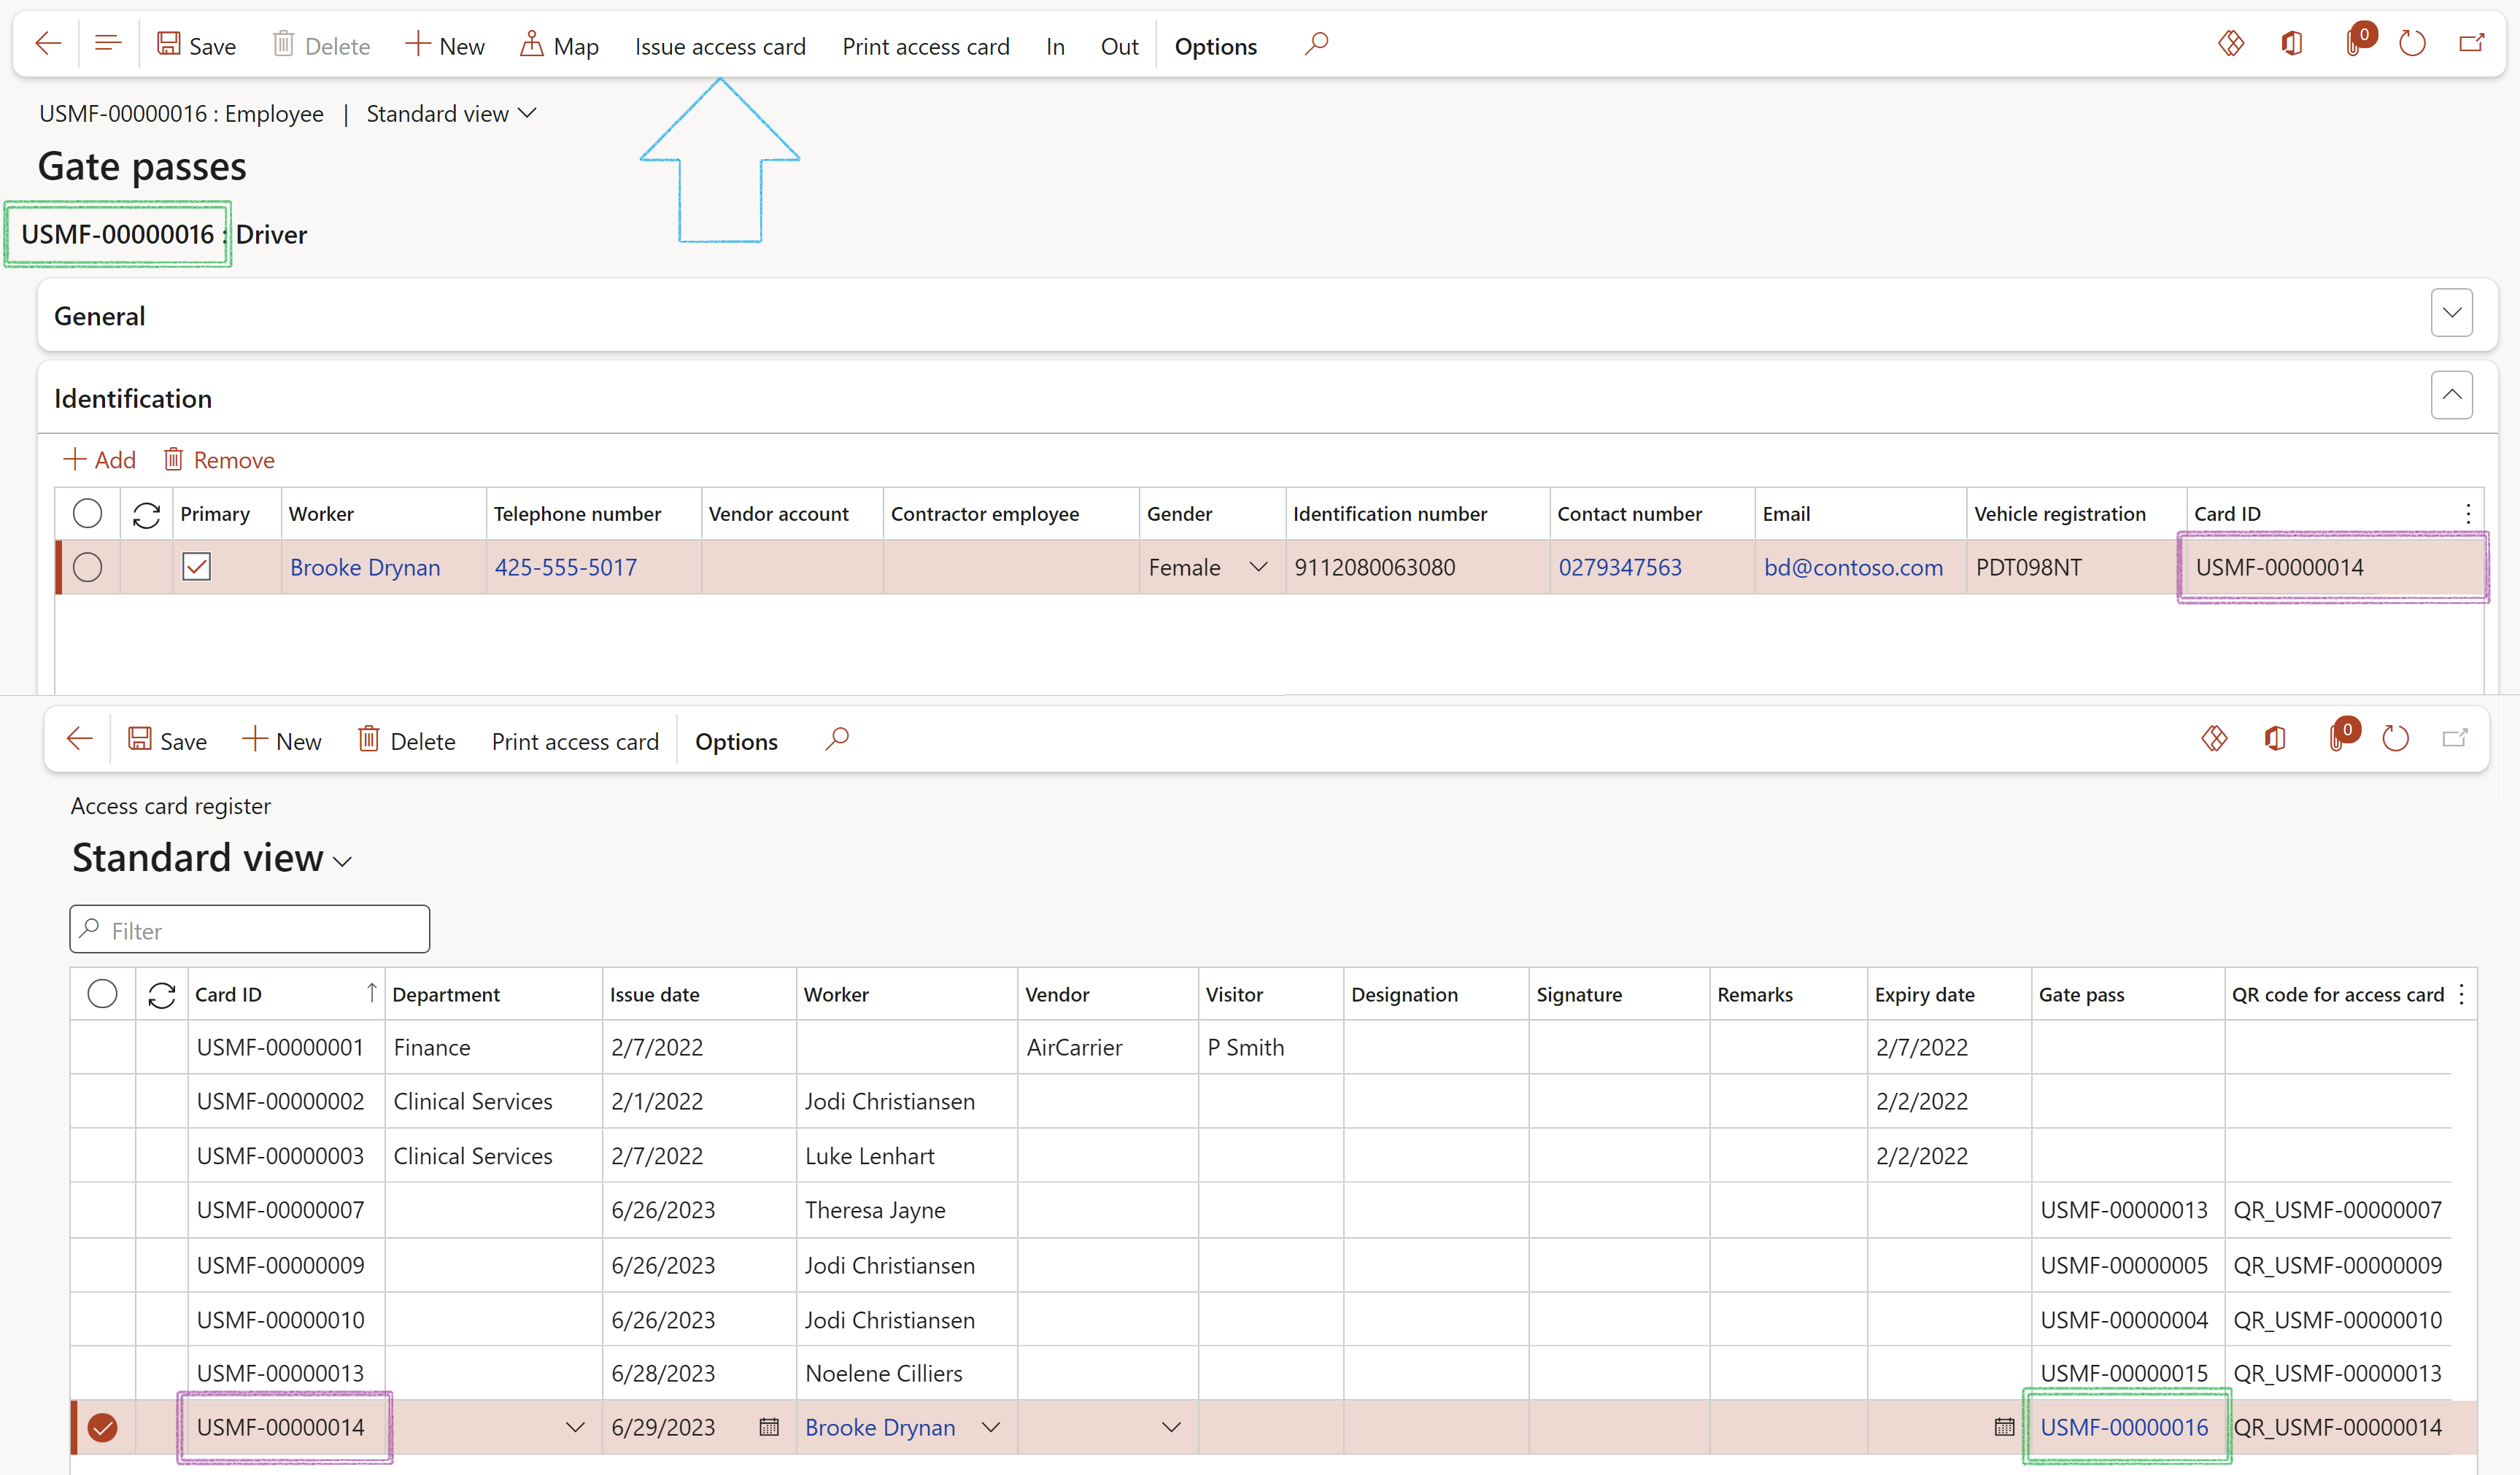
- Access cards can only be issued after the Gate pass has been approved
- The numbers of the issued Access cards will be populated under the Identification Fast tab
- The Gate pass number will be referenced on the Access card register
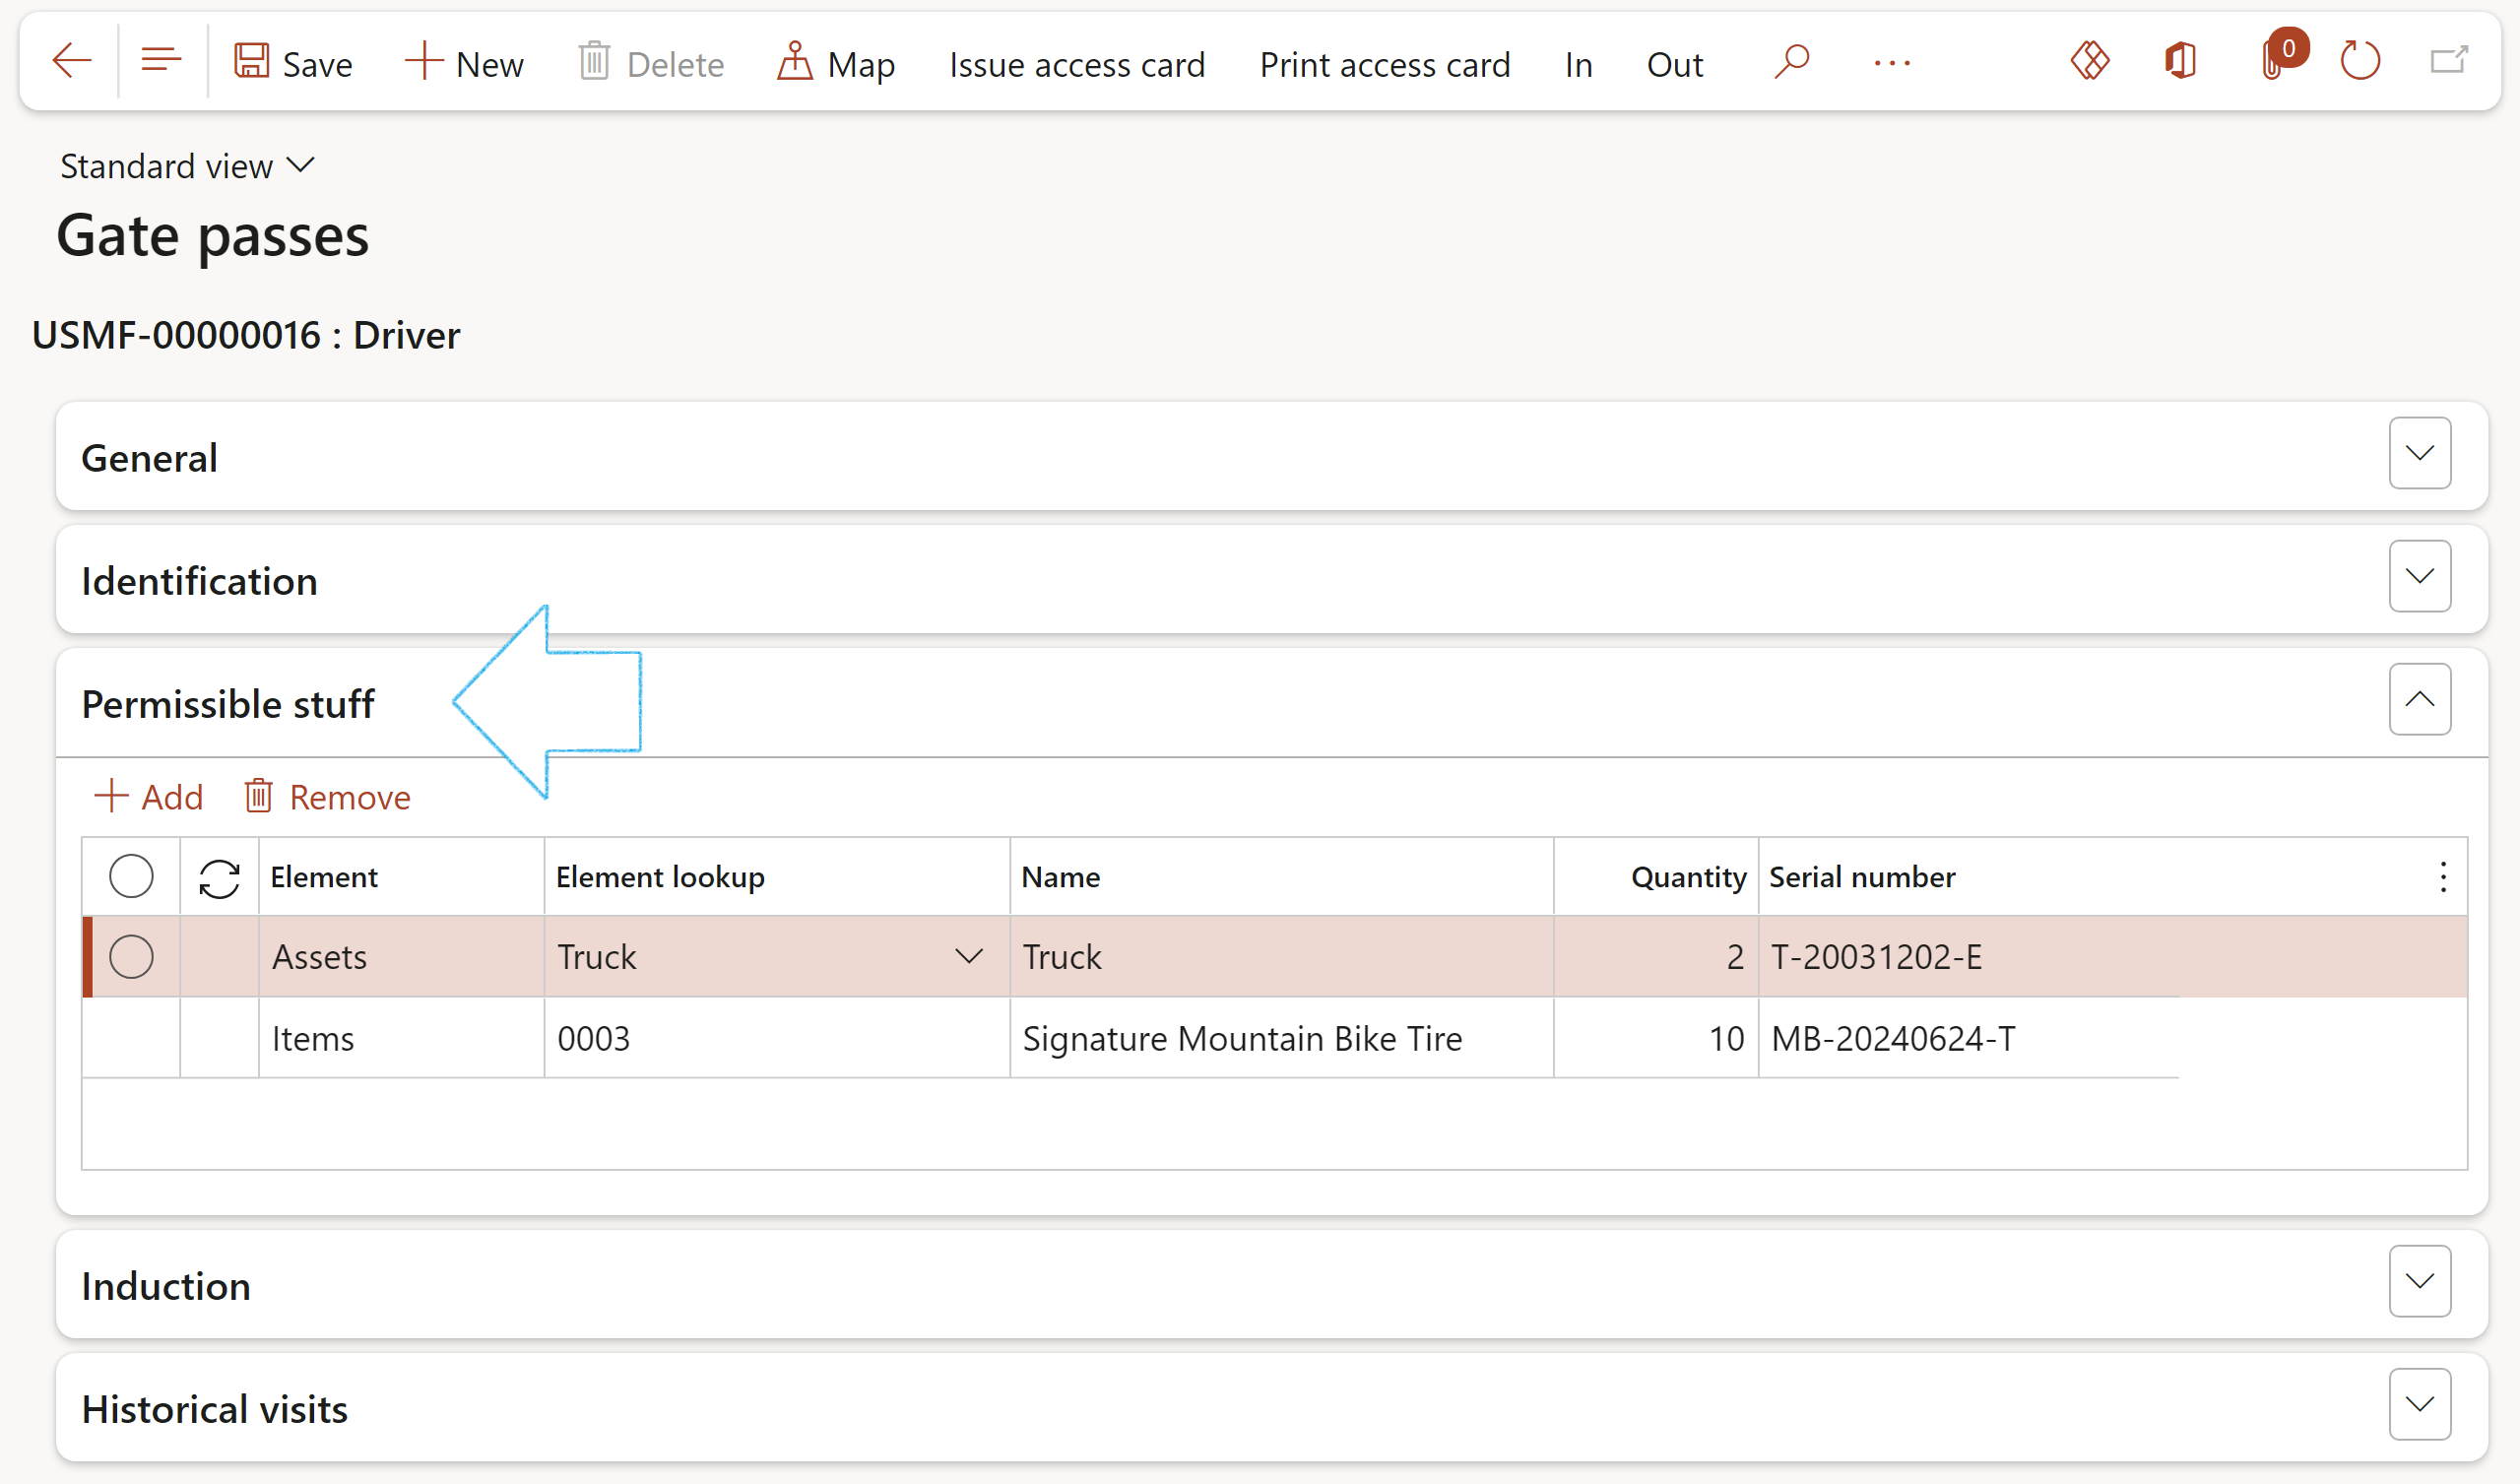
- Expand the Permissible stuff Fast tab
- In the Button strip, click on the Add button
- In the Element field, select one of the following elements from the dropdown list:
- Assets
- Fixed assets
- Items
- Other
- In the Element lookup field, select the relevant value from the dropdown list
- Enter the relevant Quantity allowed
- Enter the Serial number of the element
- Expand the Induction Fast tab
- Induction details of the Worker/Vendor selected under the Identification Fast tab, will be displayed here
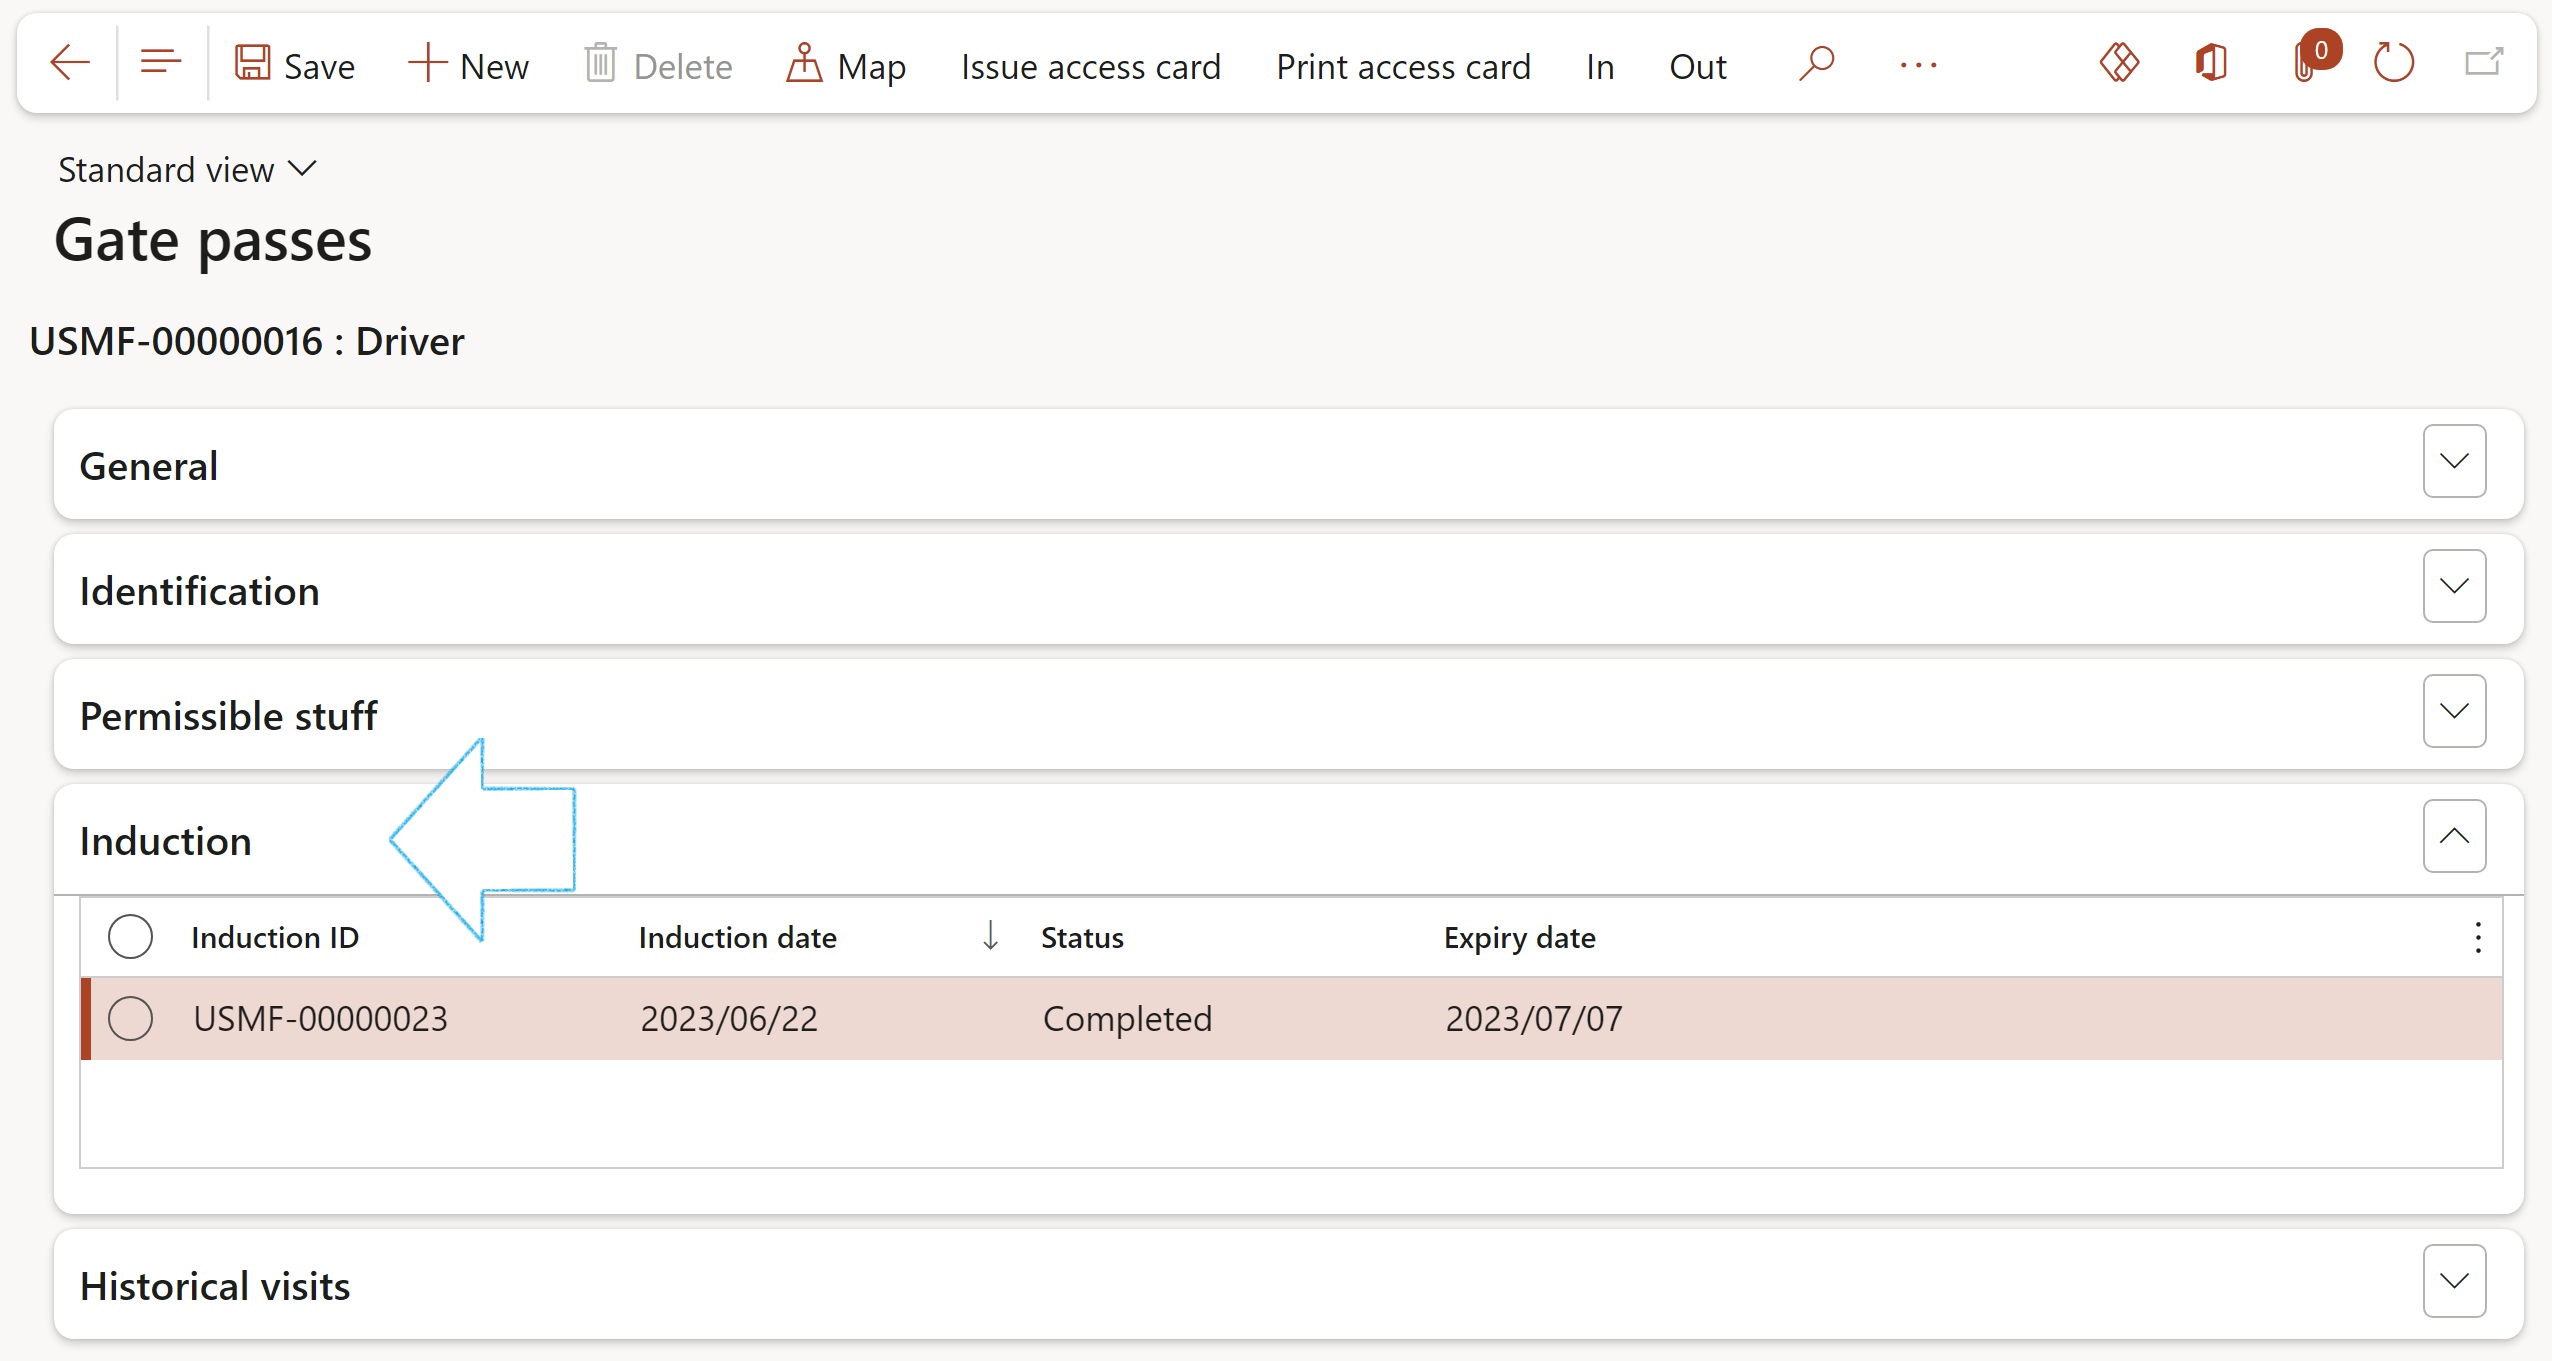
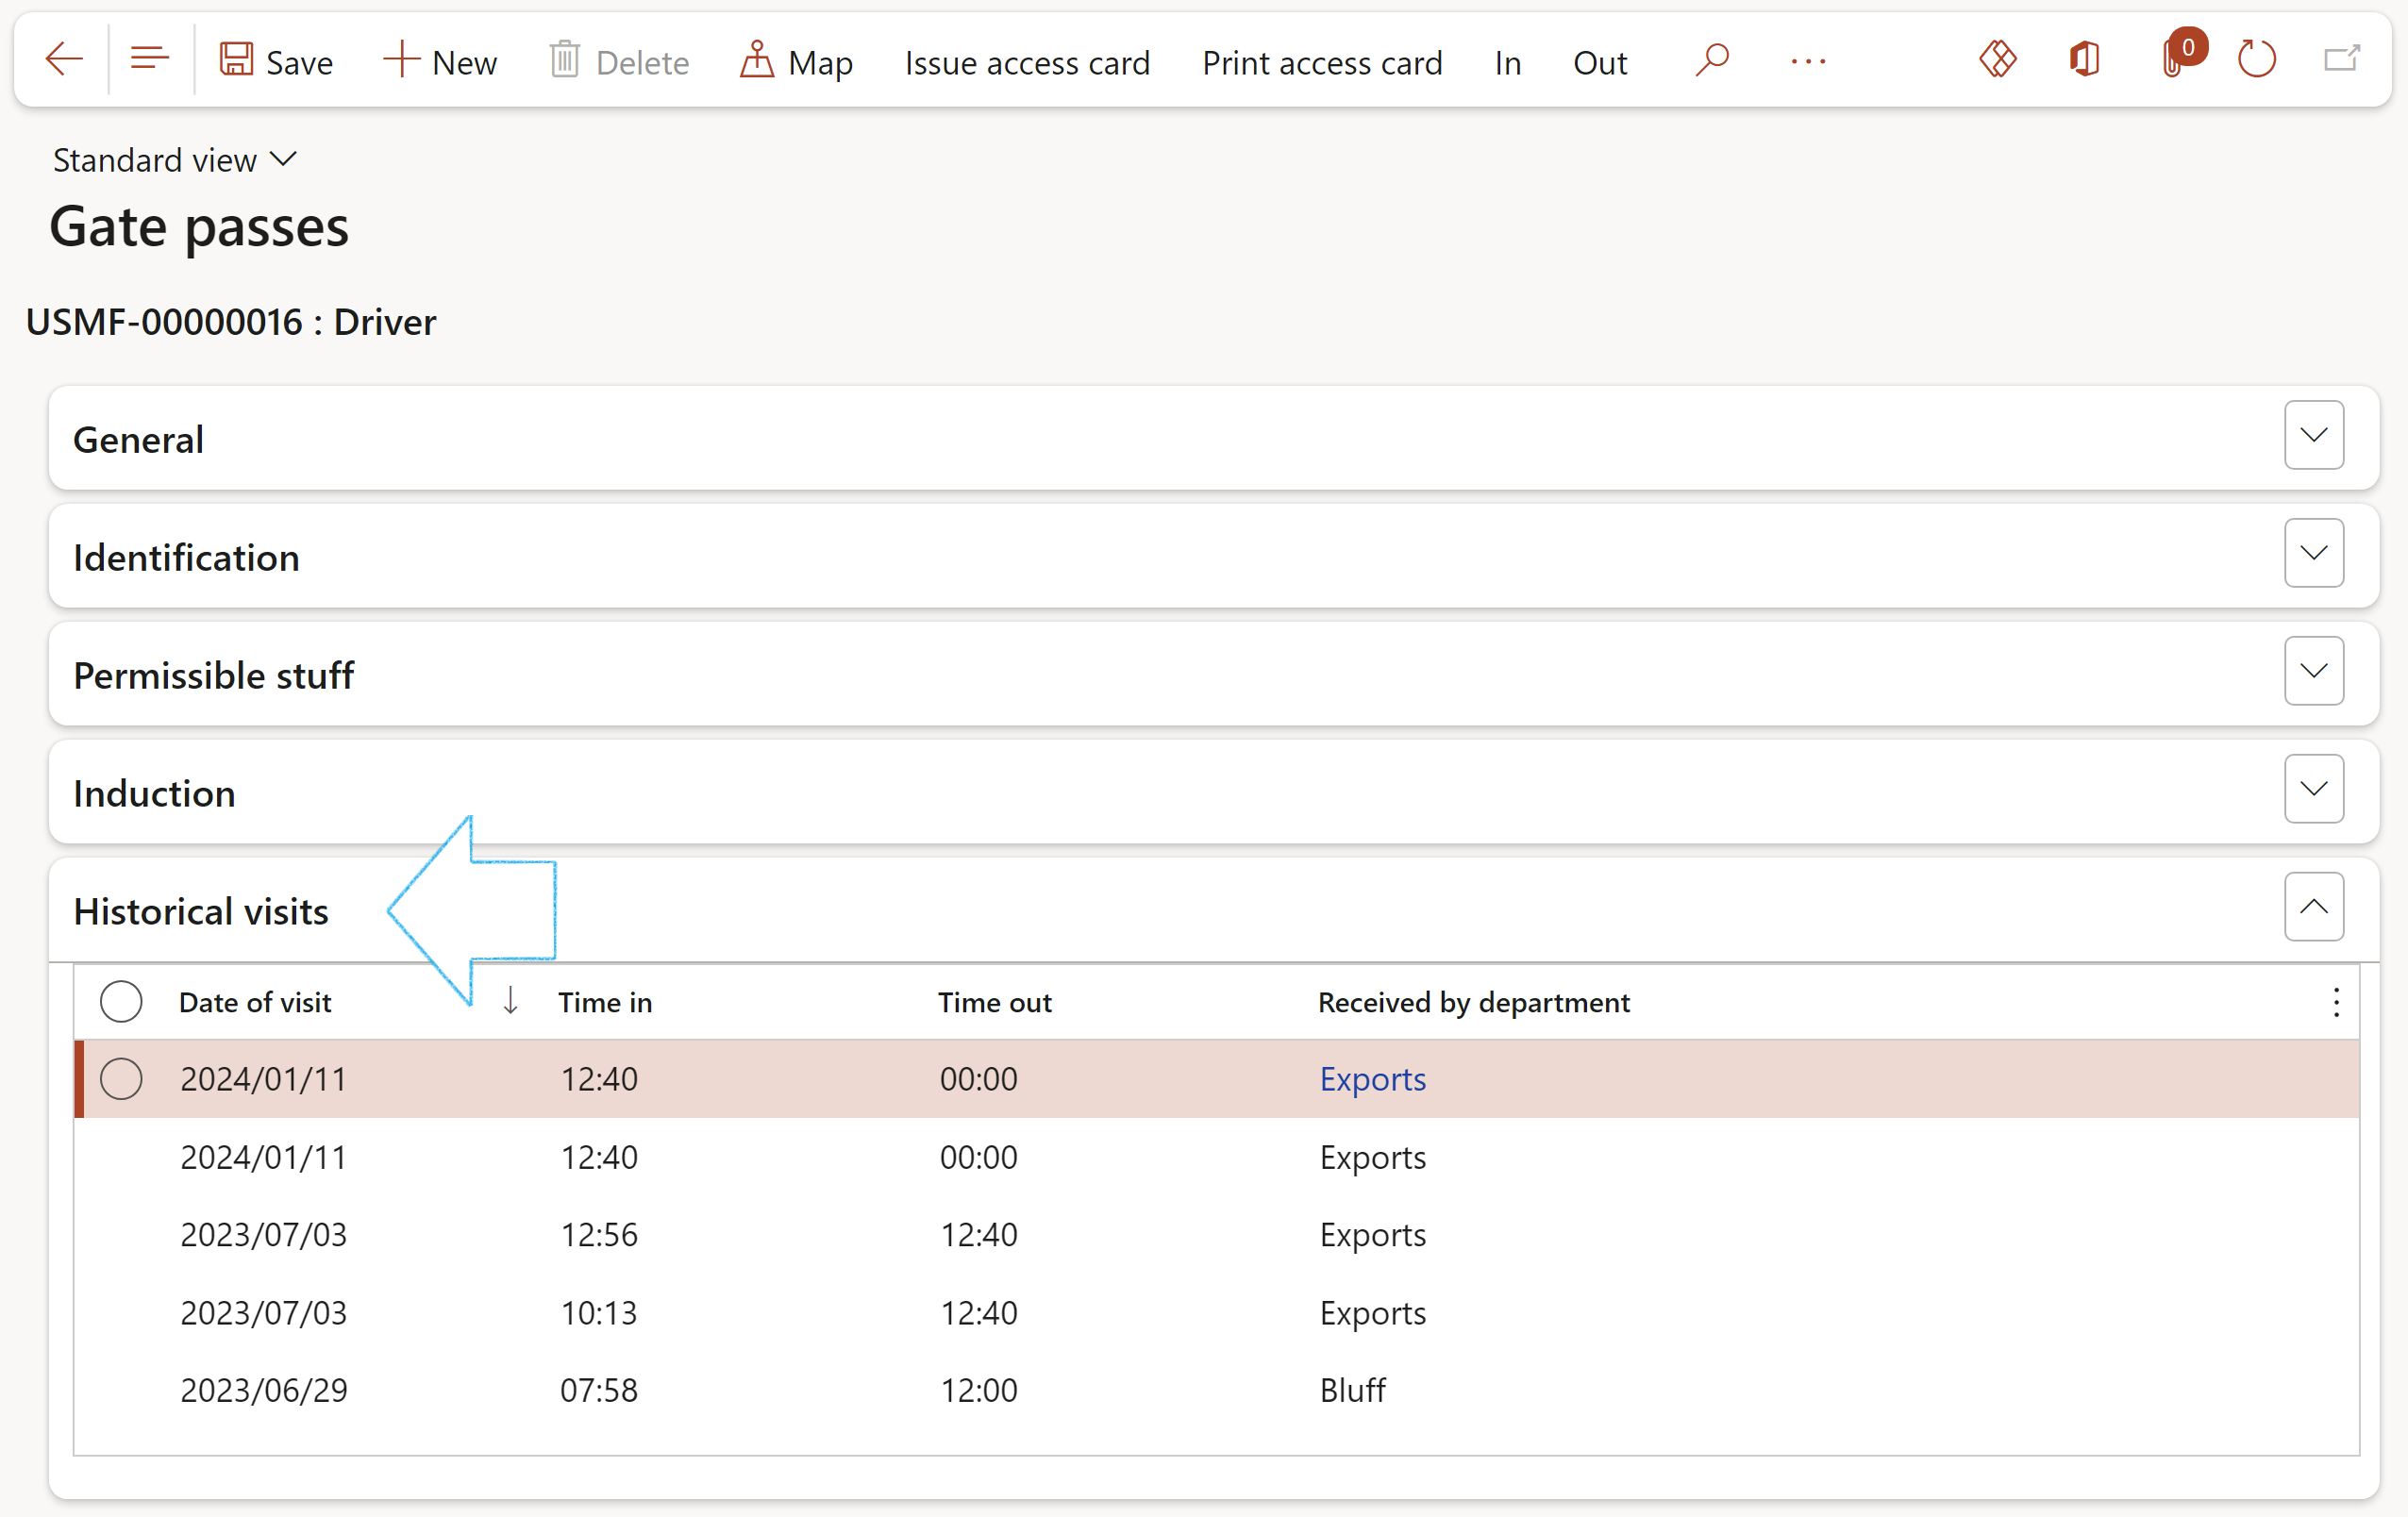
- Expand the Historical visits Fast tab
- All historical visits of the Worker/Vendor selected under the Identification Fast tab, will be displayed here
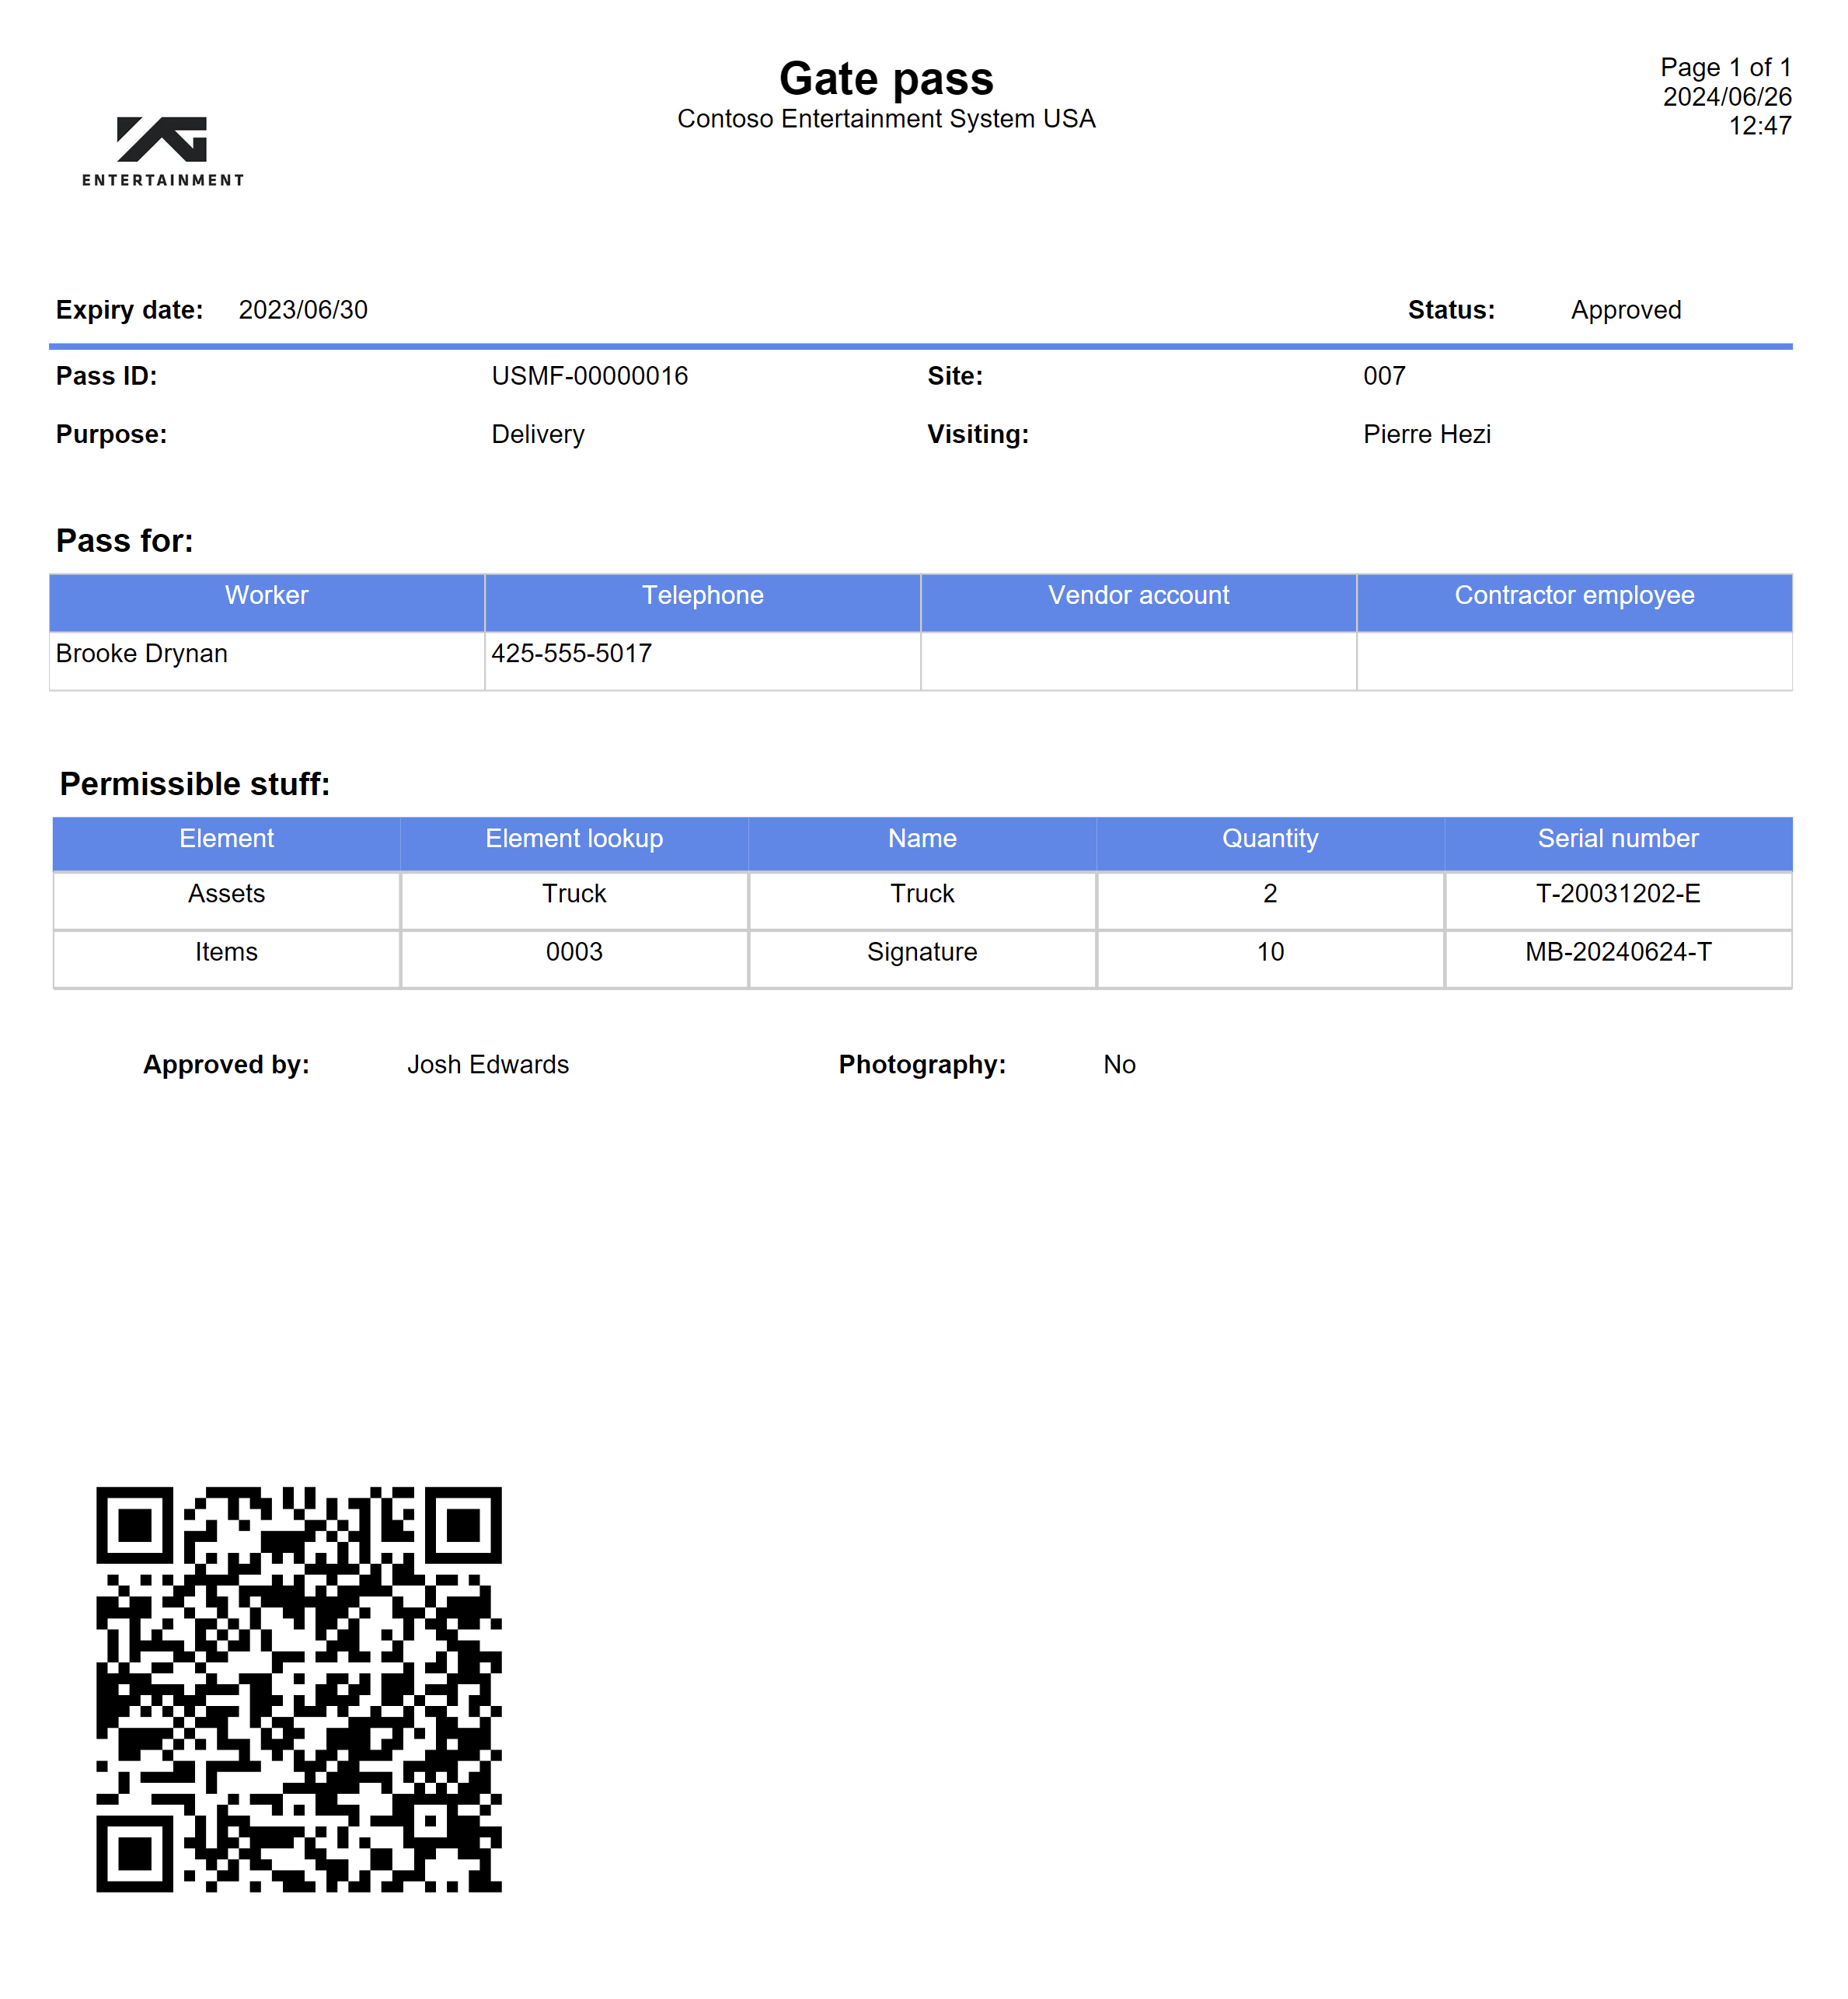
To print the access card:
- On the Action pane, click on the Print access card button

¶ Step 5: Visitor log sheet
Keeping track of all the visitors each day enables the organization to filter the visitors so that only legitimate people can visit. This Visitorlog sheet can efficiently keep the information such as date of each visit, time, contact details and the purpose of the visit.
When the In/Out buttons on the Gate pass are clicked, a record with the relevant information from the Gate pass, is created on the Visitor log sheet.
OR, if Gate passes are not used, follow the steps below:
Go to: HSE > Safety and security > Visitor log sheet
- On the Action pane, click on the New button
- Select the Site that was visited form the dropdown list
- Select the Department that was visited form the dropdown list
- Enter the Date on which the visit took place
- Enter the Time in and Time out of the visit
- Select the visitor’s name from the Worker or Supplier account dropdown list
- Enter the Contractor employee’s name
- Enter the visitor’s Vehicle registration number
- Enter the Reason for the visit
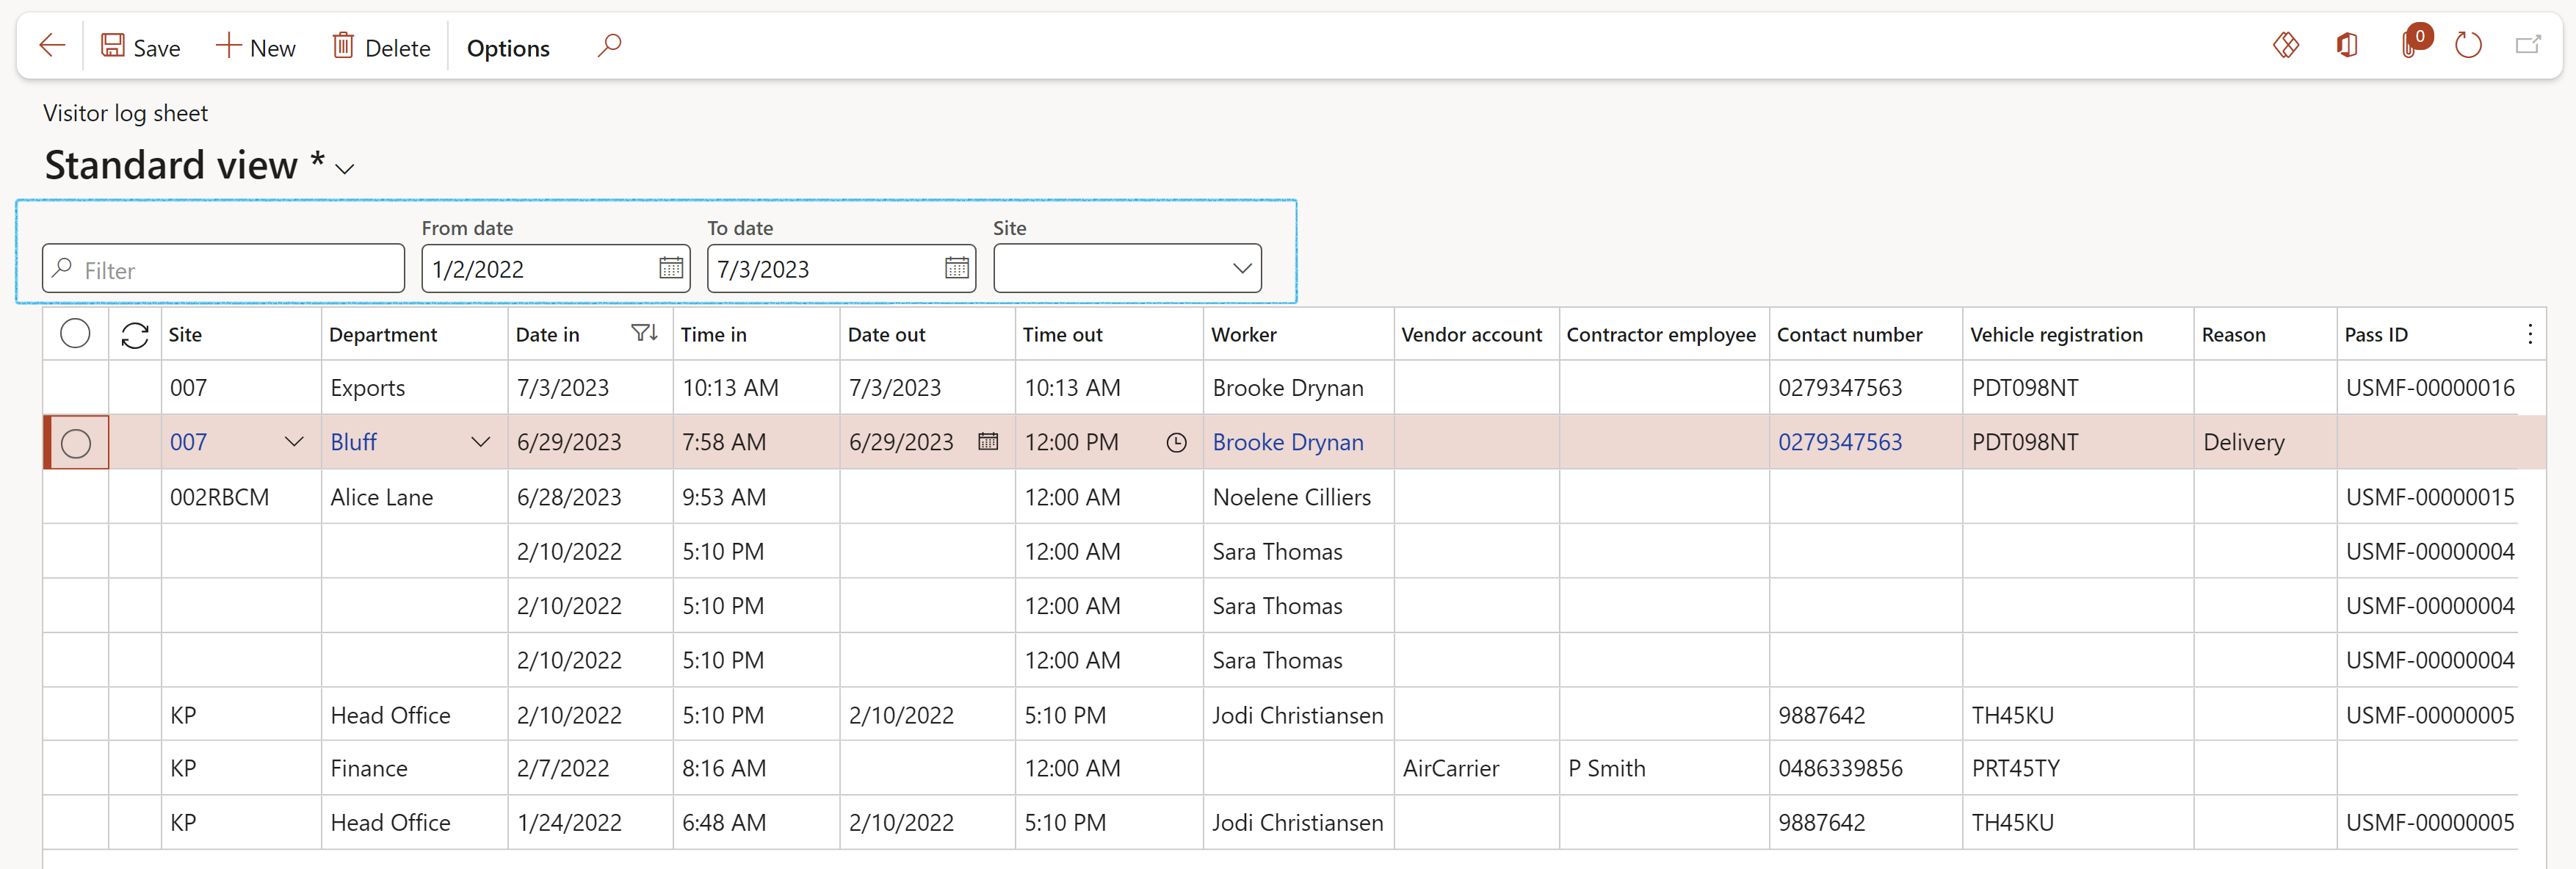
Use the filters to search for a specific record
¶ Step 6: Registering Safety inductions
Go to: HSE > Safety and security > Safety inductions
- On the Action pane, click on the New button
- On the New induction dialog, select the relevant Worker from the dropdown list
OR
- Select the relevant Supplier/Vendor from the dropdown list
- If a Supplier/Vendor was selected, enter the name of the Contractor employee
- Enter the following information of the selected Worker or Contractor employee:
- Identification number
- Date of birth
- Contact number
- The Induction date is by default today’s date
- Select the relevant Status of the induction
- Enter the Expiry date of the induction
- Select the relevant Site from the dropdown list
- Select the relevant Induction type from the dropdown list
- Select the relevant Job plan from the dropdown list
- Select the relevant Email notification template from the dropdown list

The following filters can be used to find a specific record:
- Site
- Year
- Month
¶ Step 6.1: Send email notification
Go to: HSE > Safety and security > Safety inductions
- Select the relevant Induction record
- On the Action pane, click on the Send email notification button
- On the Send email notification dialog, select Responsible person (The email will be sent to the Worker selected for the safety induction)
- If Free text Email is selected, then enter the relevant email address
- Click OK
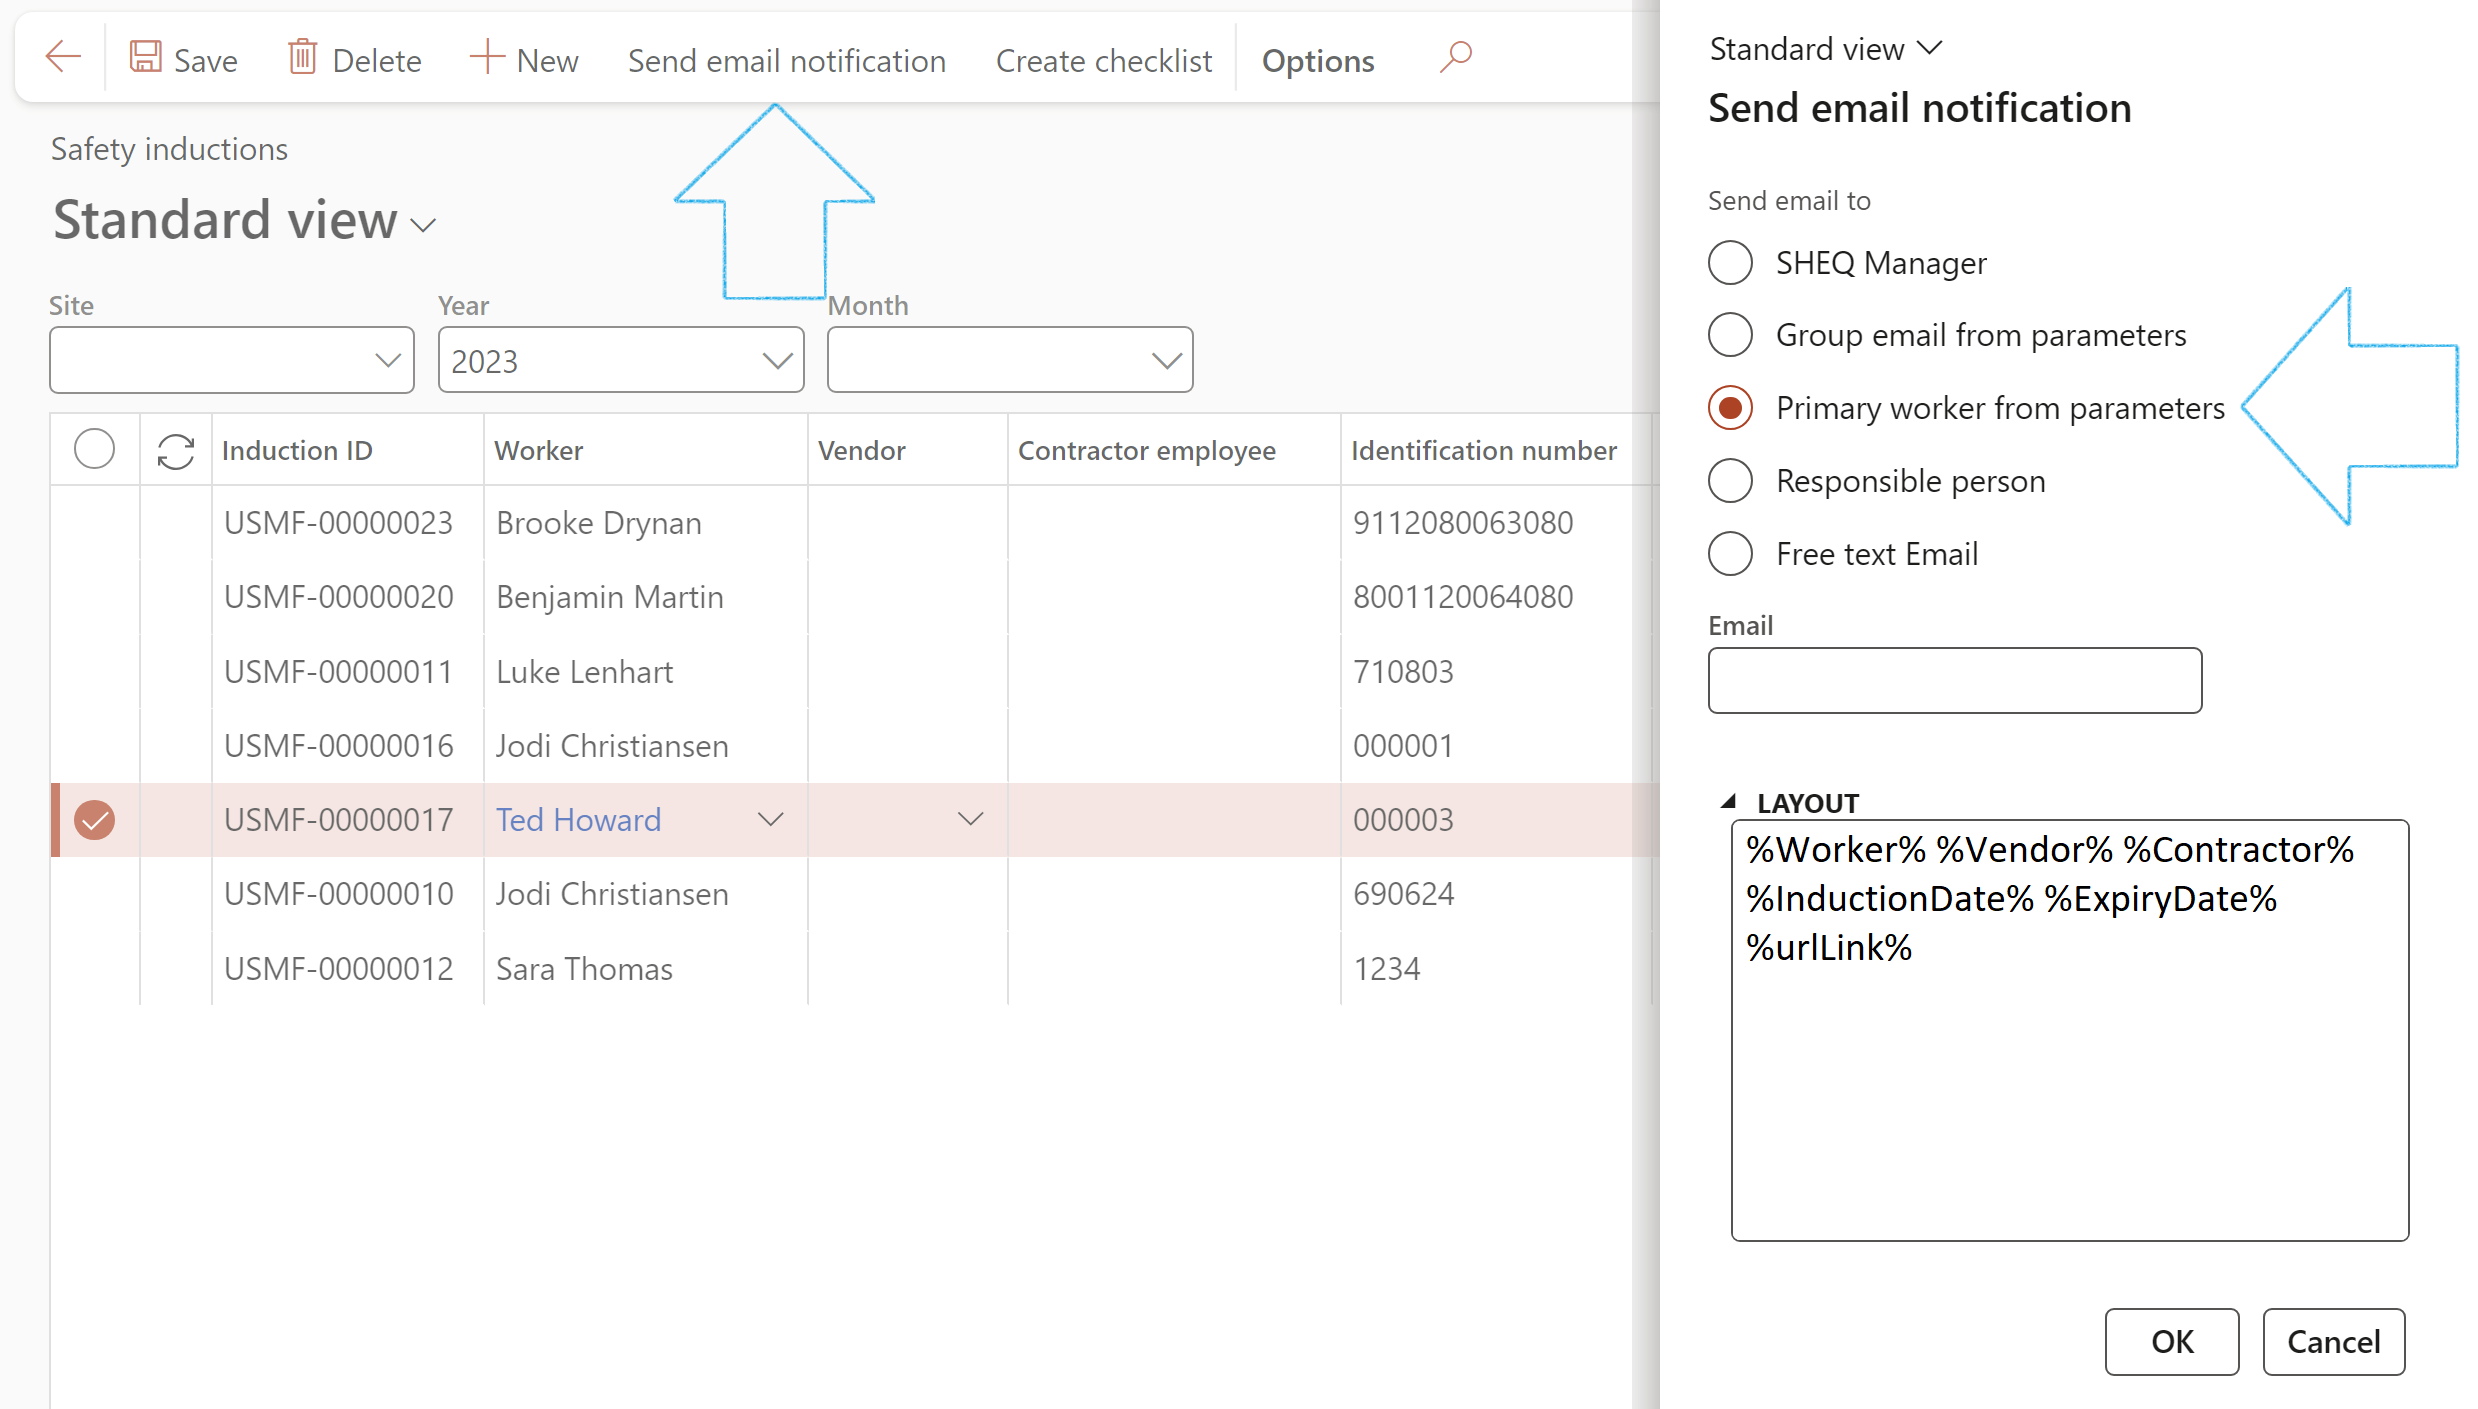
The email template that is set up for Inductions will be displayed in the Layout note box
¶ Step 6.2: Create a checklist for the induction
Go to: HSE > Safety and security > Safety inductions
- Select the Induction that you want to create the checklist for
- On the Action pane, click on the Create checklist button

- A blue line will confirm the creation of the checklist
- The checklist number will be displayed in the Checklist ID field
¶ Step 7: Access card register
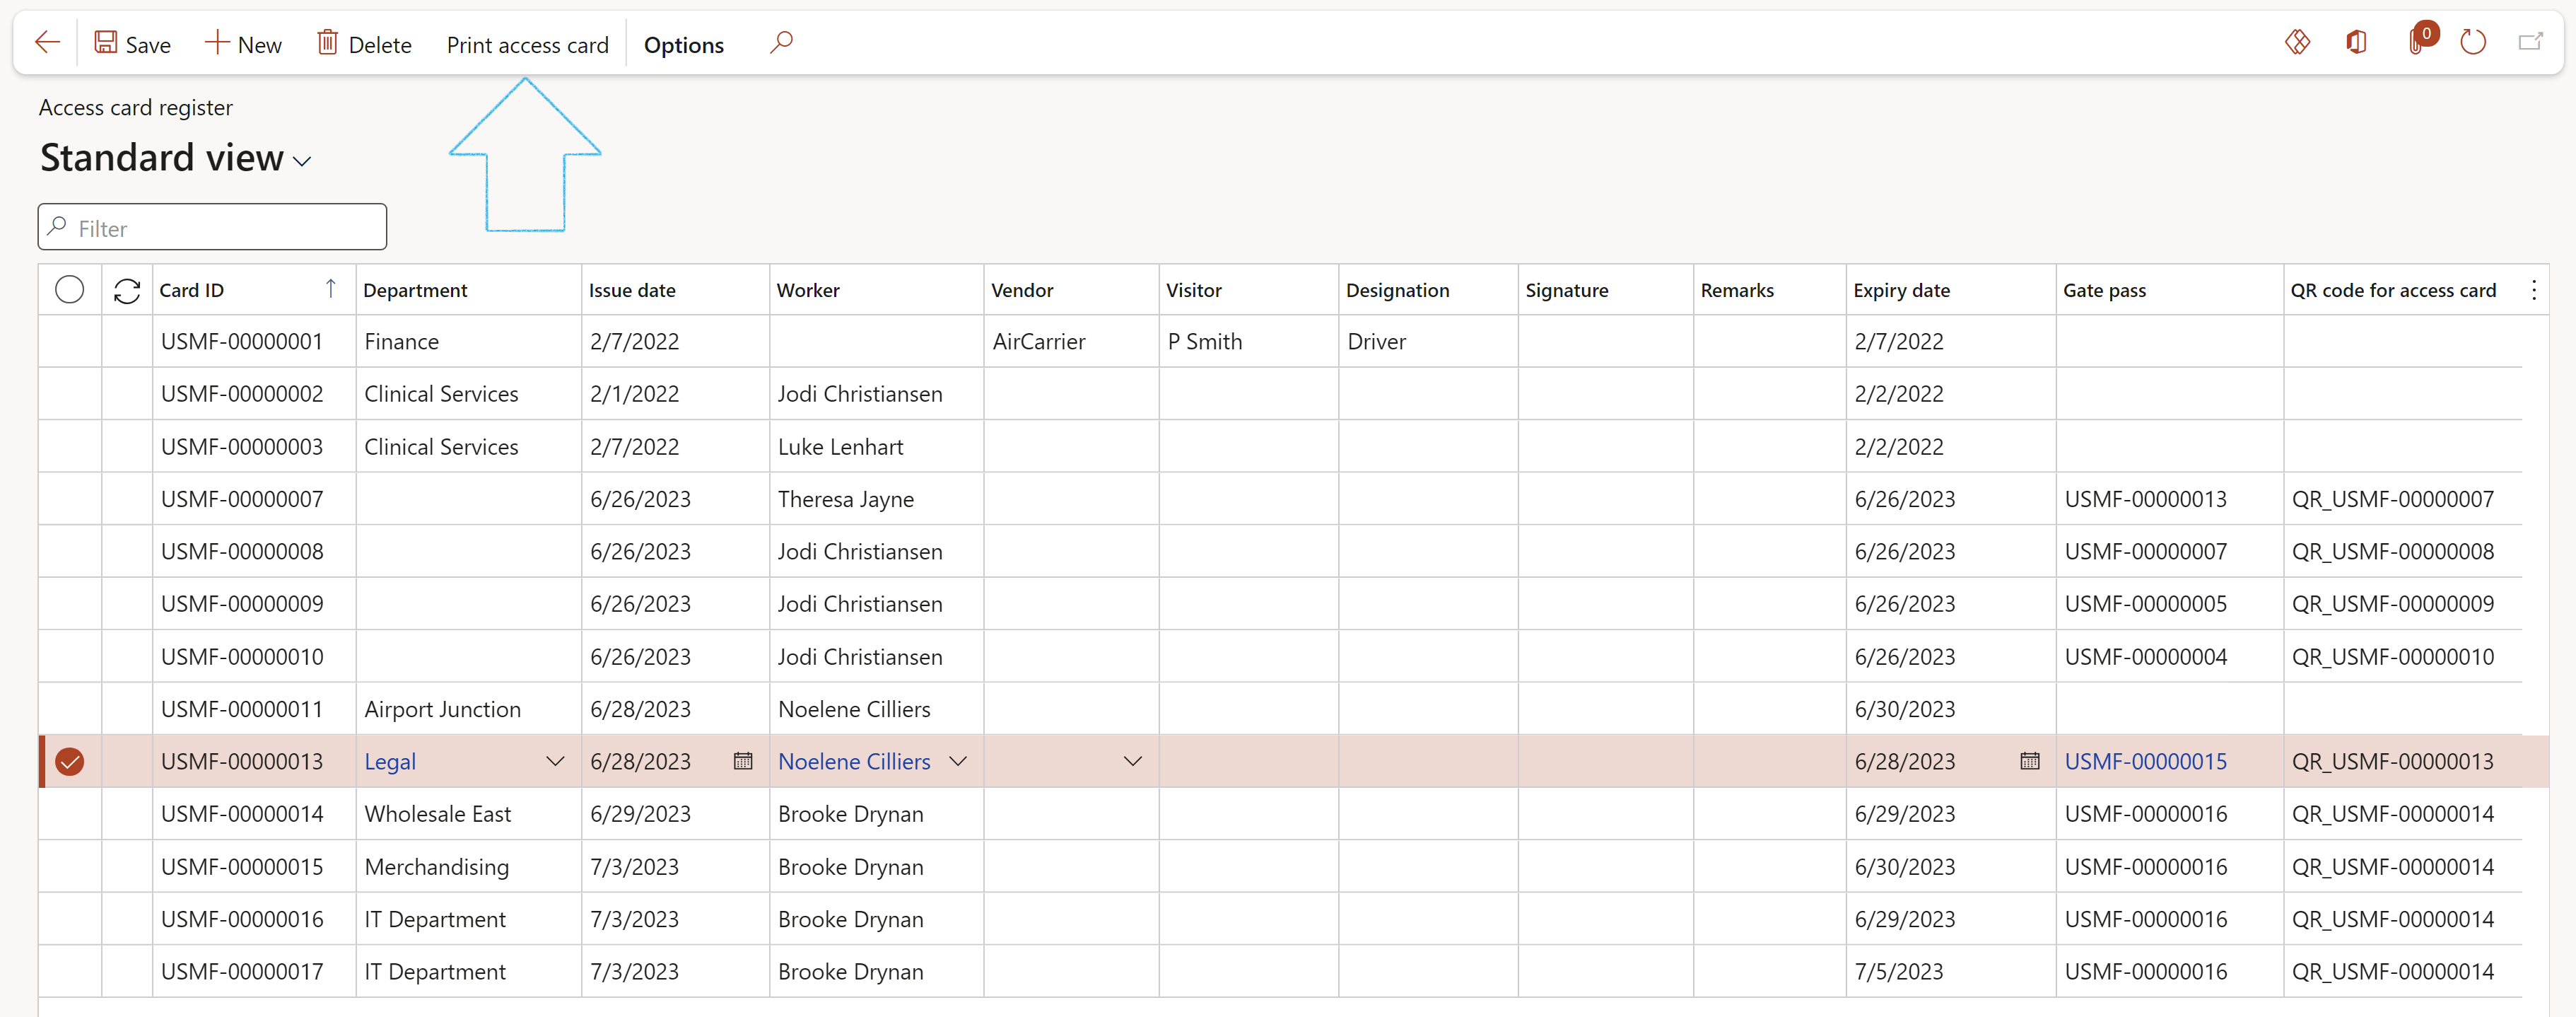
Go to: HSE > Safety and security > Access card register
- On the Action pane, click on the New button
- Select the Department that the access card is for, form the dropdown list
- Enter the Issue date of the access card
- Select the name of the Worker or Supplier who the card is issued to
OR
- Enter the name of the Visitor to whom the card is issued to
- Enter the person’s Designation
- Enter any Remarks
- Enter the Expiry date of the access card
- Click on the Print access card button to print the Access card with QR code
¶ Step 8: Key log register
Go to: HSE > Safety and security > Key log register
- On the Action pane, click on the New button
- Enter the Date on which the key was requested
- Select the Name of the person requesting the key
- Enter the person’s Contact number
- Enter the person’s Reason for requesting the key
- Enter the Time on which the key was taken
- Enter the Time on which the key was returned
- Enter the Key number
- Indicate whether this is a copy of the original key
