
¶ Introduction
Definition of Environmental sustainability
The maintenance of the factors and practices that contribute to the quality of environment on a long-term basis. This includes monitoring of environmental resources such as water.
Environmental management system (EMS) refers to the management of an organization's environmental programs in a comprehensive, systematic, planned and documented manner. It includes the organizational structure, planning and resources for developing, implementing and maintaining policy for environmental protection.
The most widely used standard on which an EMS is based is International Organization for Standardization (ISO) 14001.
An environmental management information system is an information technology solution for tracking environmental data for a company as part of their overall environmental management system.
Water quality monitoring
| Step | Activity | Responsibility |
|
1 |
Preparation of a monitoring plan to ensure that all the requirements for monitoring are met | Head of monitoring team |
|
2 |
Collection of water samples from rivers or streams lakes, ponds or similar water bodies | Sampling team |
|
3 |
Field tests and measurements e.g., ph., temperature, dissolved oxygen, flow measurements sample preservation | Sampling team |
|
4 |
Record field observations, on-site test results and field activities on the field book, field data form | Sampling team |
|
5 |
Pre-treatment, preservation, storage, and transport of samples to the laboratory Packing and Transport | Sampling team |
|
6 |
Analysis of samples in the laboratory | Laboratory personnel |
|
7 |
Data processing, interpretation, analysis, and storage | Head of monitoring team |
|
8 |
Preparation of report | Head of monitoring team |
Air quality monitoring program
- Identify all possible sources of dust within the affected site.
- Detail the best practicable measures to be undertaken to mitigate dust emissions.
- Detail an implementation schedule.
- Identify the line management responsible for implementation.
- Incorporate the dust fallout monitoring plan.
- Establish a register for recording follow up actions and responses to the complainants.
Dust monitoring methods:
Introduction
The monitoring of fall-out dust utilizing the bucket collection is internationally recognized and documented as an accepted method of determining fall-out dust from various sources.
Natural particulate classification variables affecting fugitive dust
While many factors affect the precipitation rate, the main factors are related to wind velocity, air humidity, particulate size and dynamic shape, and prevailing ground cover.
Once the dust is airborne the factors are simplified to wind velocity and turbulence. Dust particulate of a size greater than 80µm is unlikely to be carried any great distance unless a severe windstorm is being experienced, while dust of a 30µm diameter will only be transported about 300m by a wind velocity of 5,0m/sec in about 60 seconds.
Bucket fall-out monitoring
The combination of factors we have seen determine the range of particulate sizes constituting the bulk mass of settleable dust range.
Normally the bucket lip should be located 2,2 meters above the ground to prevent thermal interference with the precipitation phenomenon.
The buckets are partly filled with distilled water, to which a biocide is added to prevent the growth of algae.
Assessment of results
To assess the results, the collected dust is filtered through a sub-micronic pre-weighed filter using a vacuum filter bench. Once the wet filtrate has been desiccated by evaporation of any retained moisture, the filter is reweighed to ascertain the collected mass. (Insoluble particulate)
Soluble particulate is assessed by evaporating the catch media and weighing the resulting solids.
To give an idea of the relevant mass classifications refer to the table below:
Units are normally monitored weekly and particulate collected fortnightly or monthly if continuous monitoring is undertaken or shorter periods if localized assessment needs to be considered.
Conclusion
As the outlined method of fall-out dust monitoring on an ongoing basis is internationally accepted, the results of an assessment of your facility will offer an accurate credible result.
¶ Navigation

¶ Specific setups
- Substance categories
- Substances
- Analytical requirements
- Monitoring points
- Monitoring type
¶ Step 1: Setup Substance categories
The Substance categories setup form is used to group the substances
Go to: HSE > Environmental > Setup for environmental > Substance categories
- On the Action pane, click on the New button
- In the Substance category ID field, enter a name for the category
- Select a substance Category type from the dropdown list
- Enter a brief Description of the substance category
- Select a Colour to represent the substance category
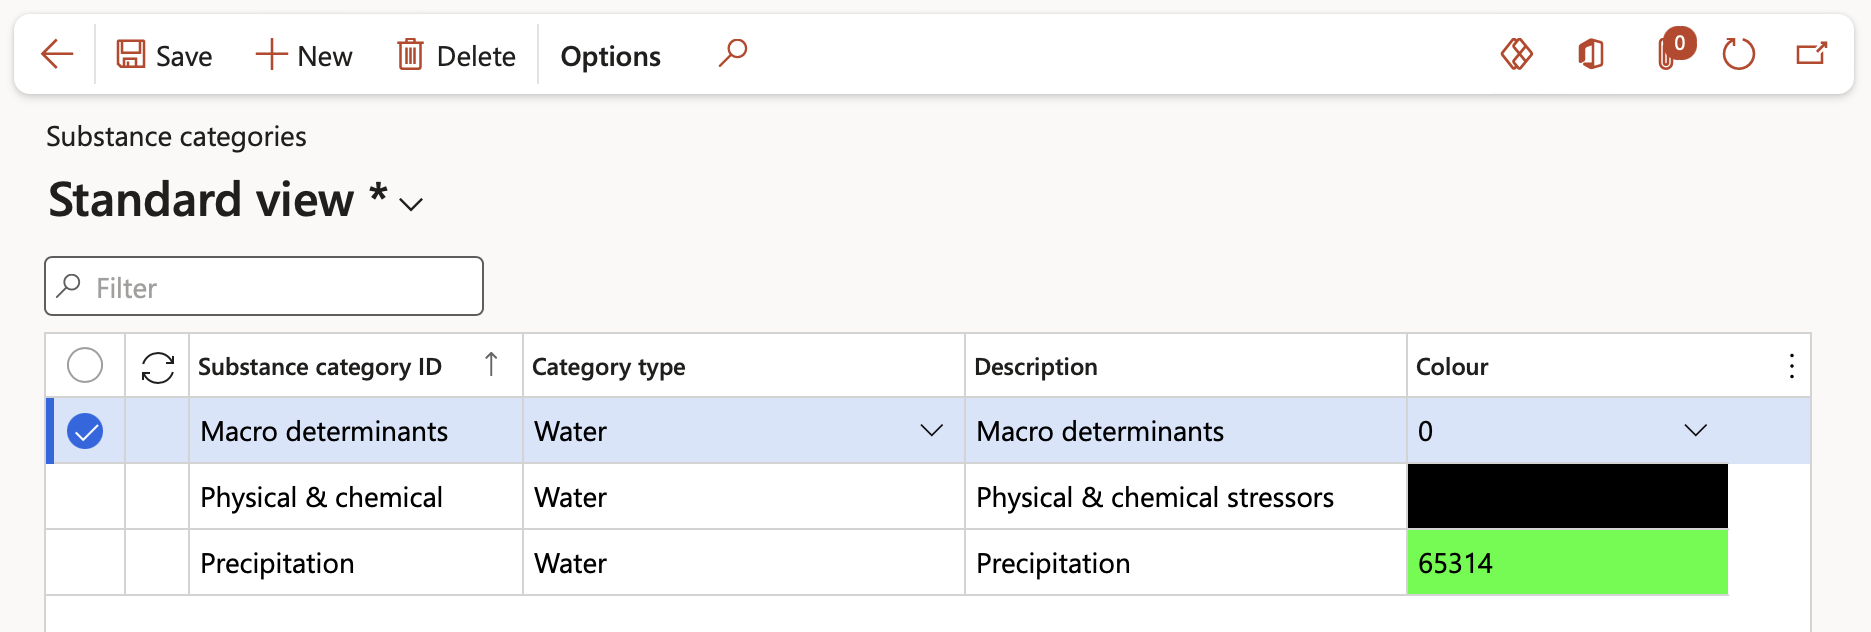
Selecting a category will restrict the units of the substance
¶ Step 2: Setup Substances
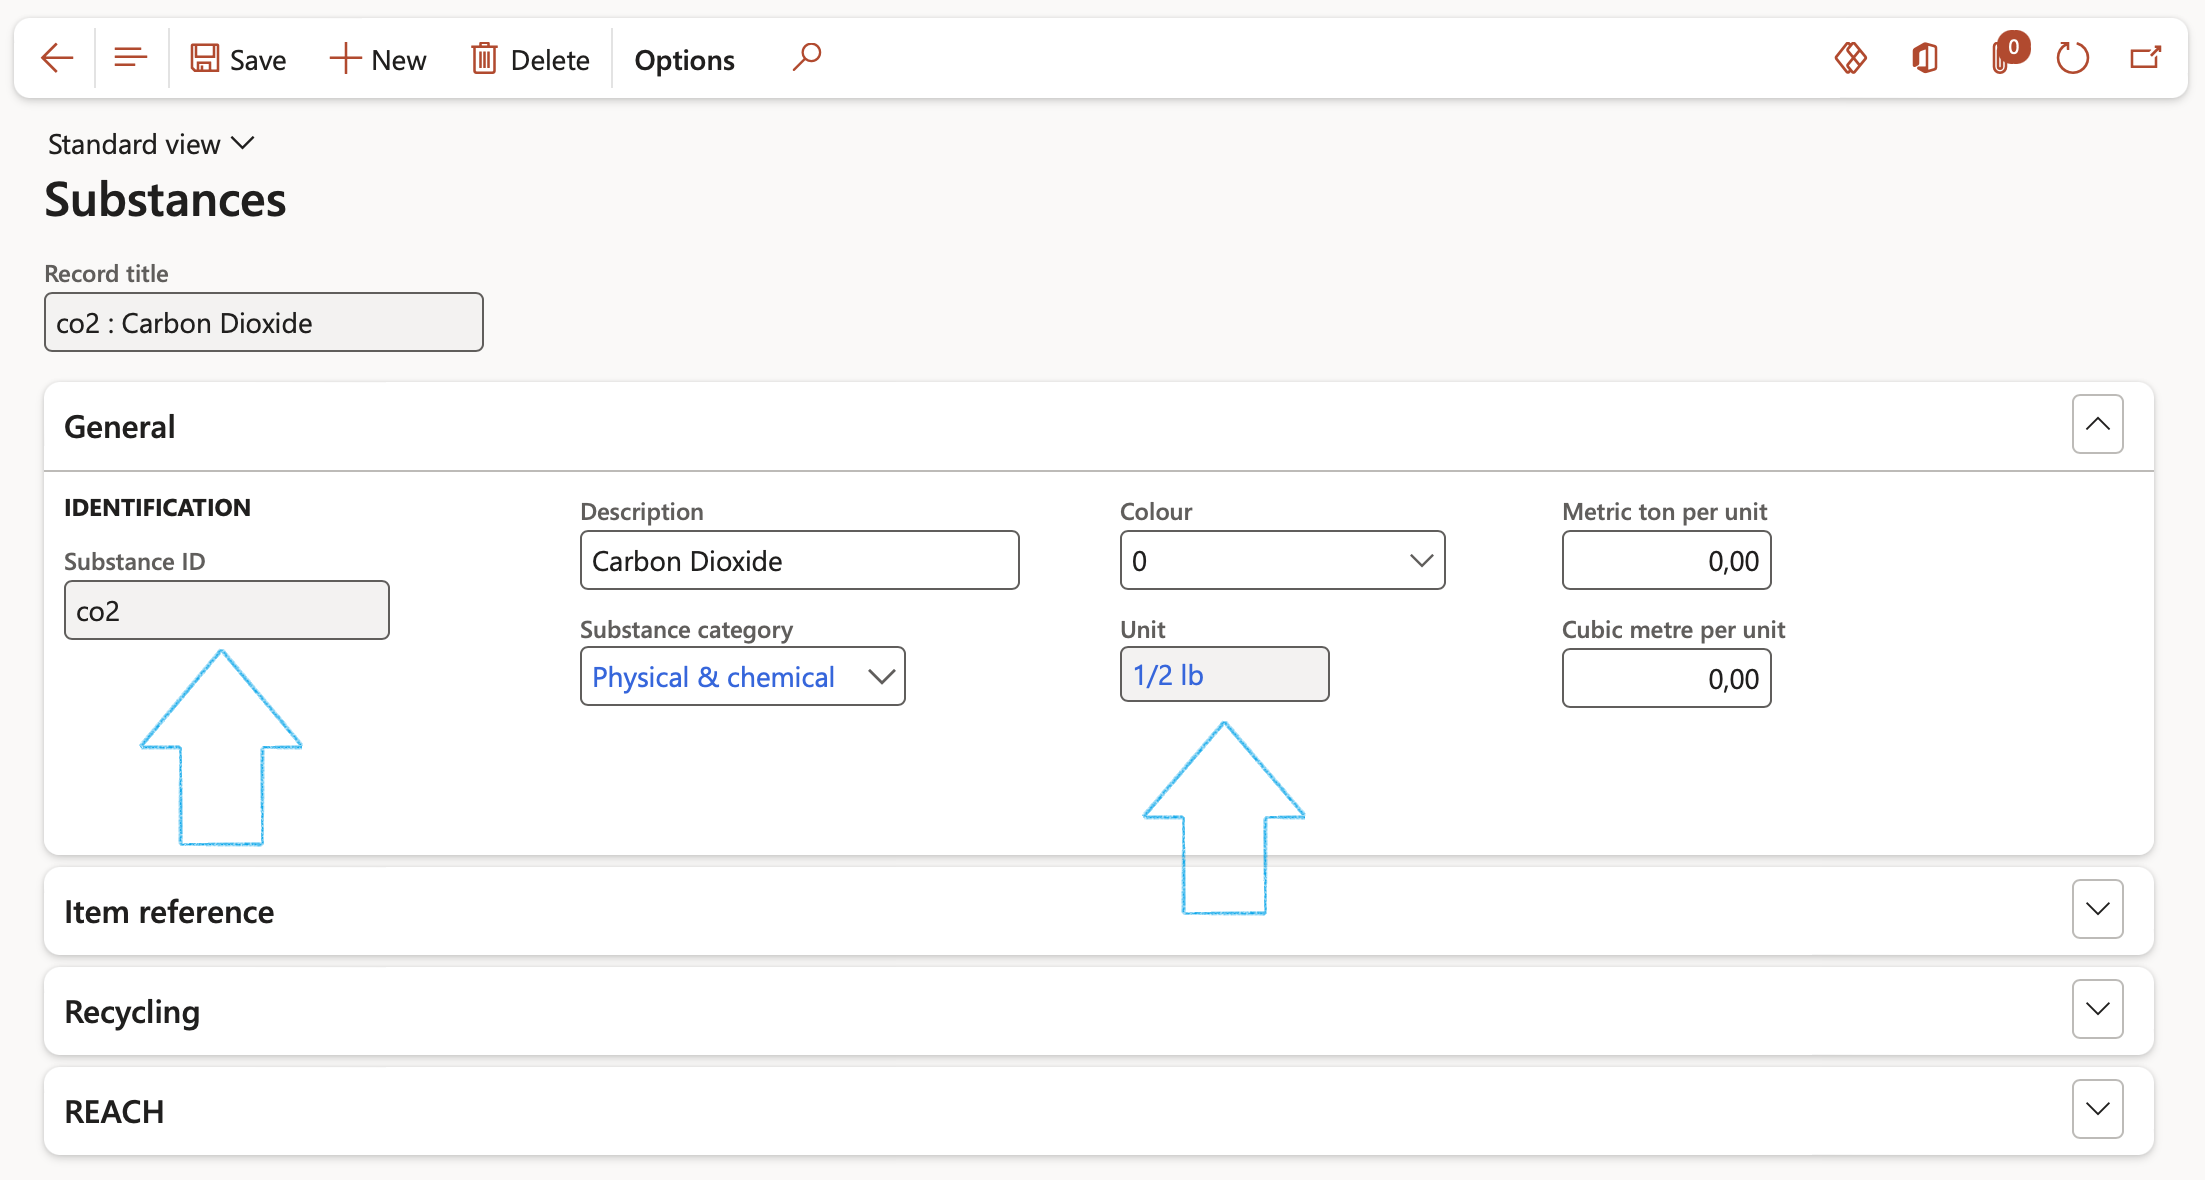
Any material that possesses physical properties is called a substance. Substances are not only limited to chemical elements, but also include things like Conductivity and ph.
Go to: HSE > Environmental > Substances
- On the Action pane, click on the New button
- In the Substance ID field, enter the name of the substance used in the process
- Enter a brief Description of the substance
- Select a Colour to represent the substance
- Select the Category that the substance belongs to
- Select the Unit of measurement for the substance
¶ Step 3: Setup Analytical requirements detail
The Analytical requirements detail form lists substances that need to be tested for in a sample that is sent to be analyzed for monitoring purposes. The required quality measurements (min and max limits) of these substances are captured on this form, and displayed on the Monitoring form under the Results Fast tab
Go to: HSE > Environmental > Setup for environmental > Analytical requirements detail
- On the Action pane, click on the New button
- Enter the unique Analytical requirement ID
- Enter a brief Description of the analytical requirement
- Specify the Container type and size to use when a sample is taken
- Specify how this sample must be Preserved
- Expand the Requirements Fast tab
- In the Button strip, click on the Add button
- Select the relevant Substance used in the process, from the dropdown list
- The Description, Substance category ID and Unit fields will be populated according to the selected Substance
- If required, tick the Statute box as indicator
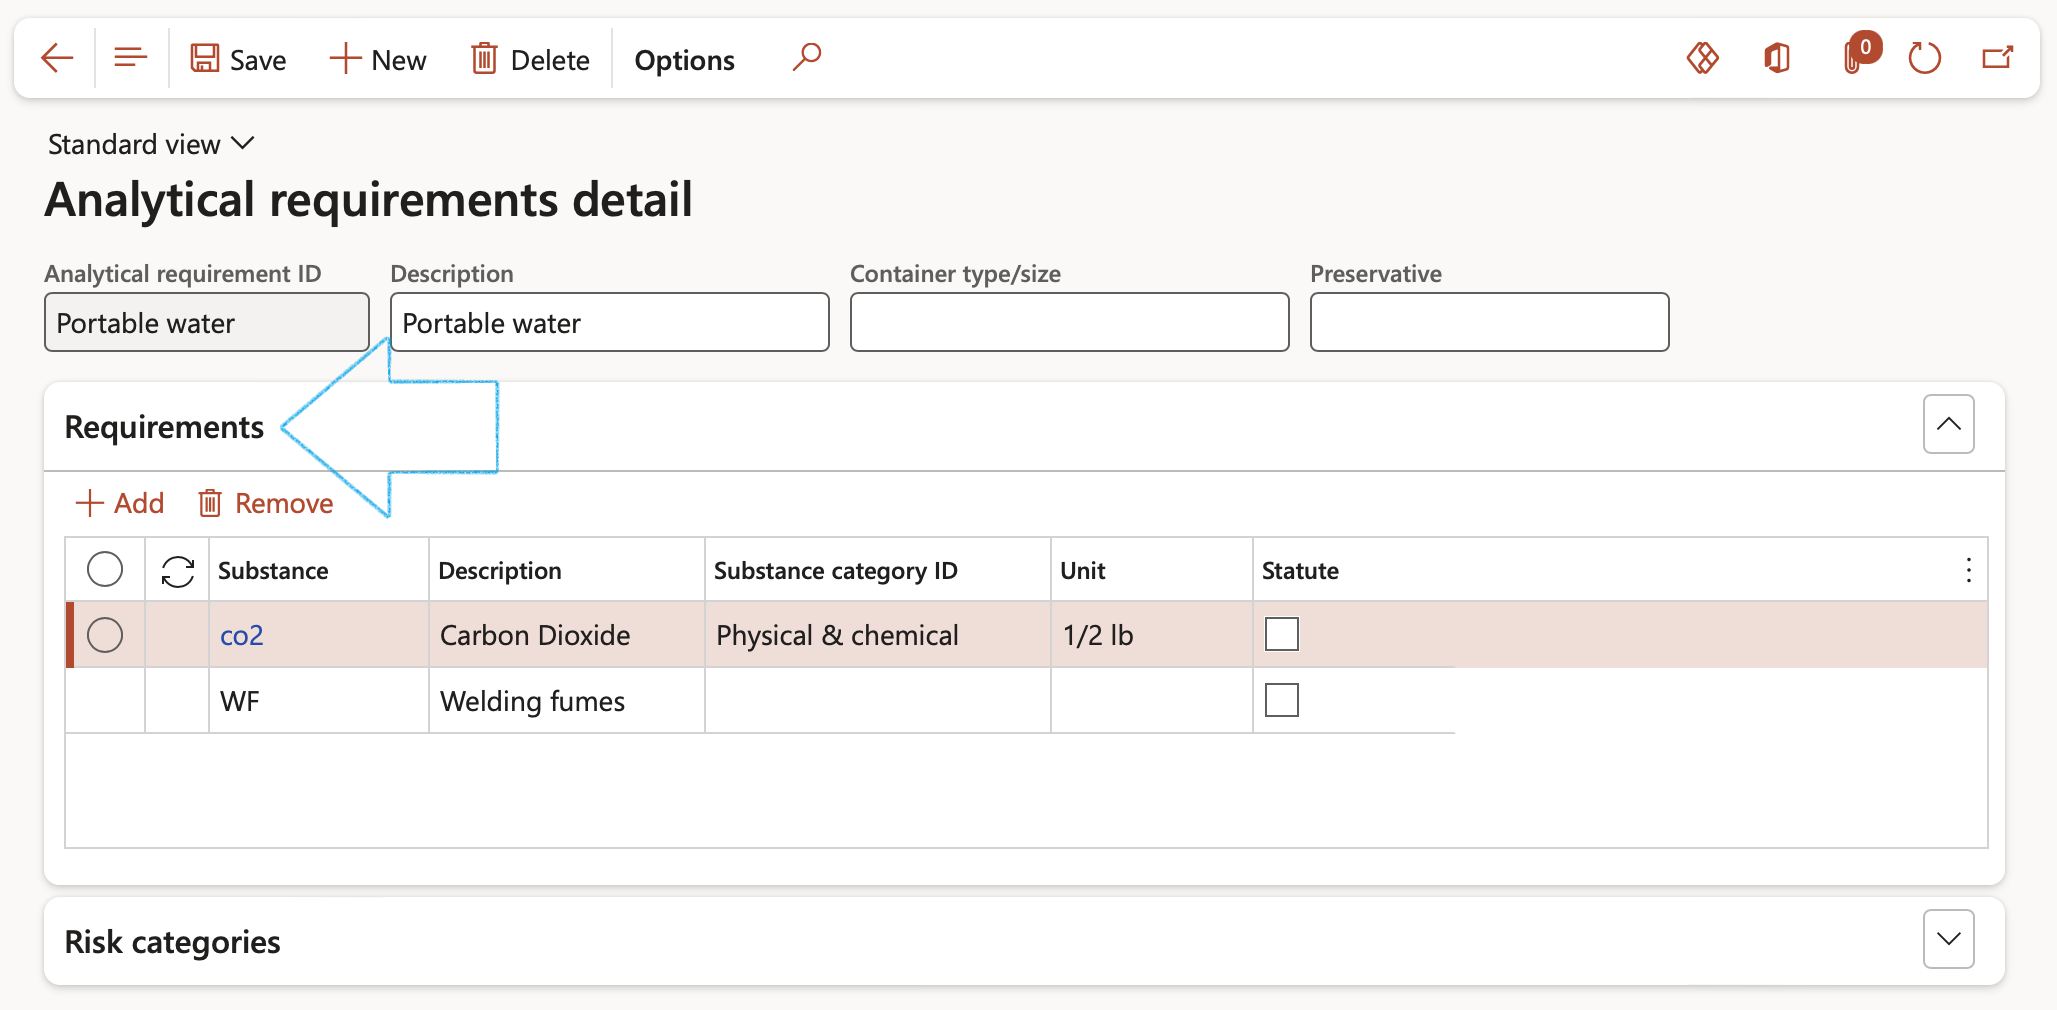
Risk categories are added per selected Substance under the Requirements Fast tab above
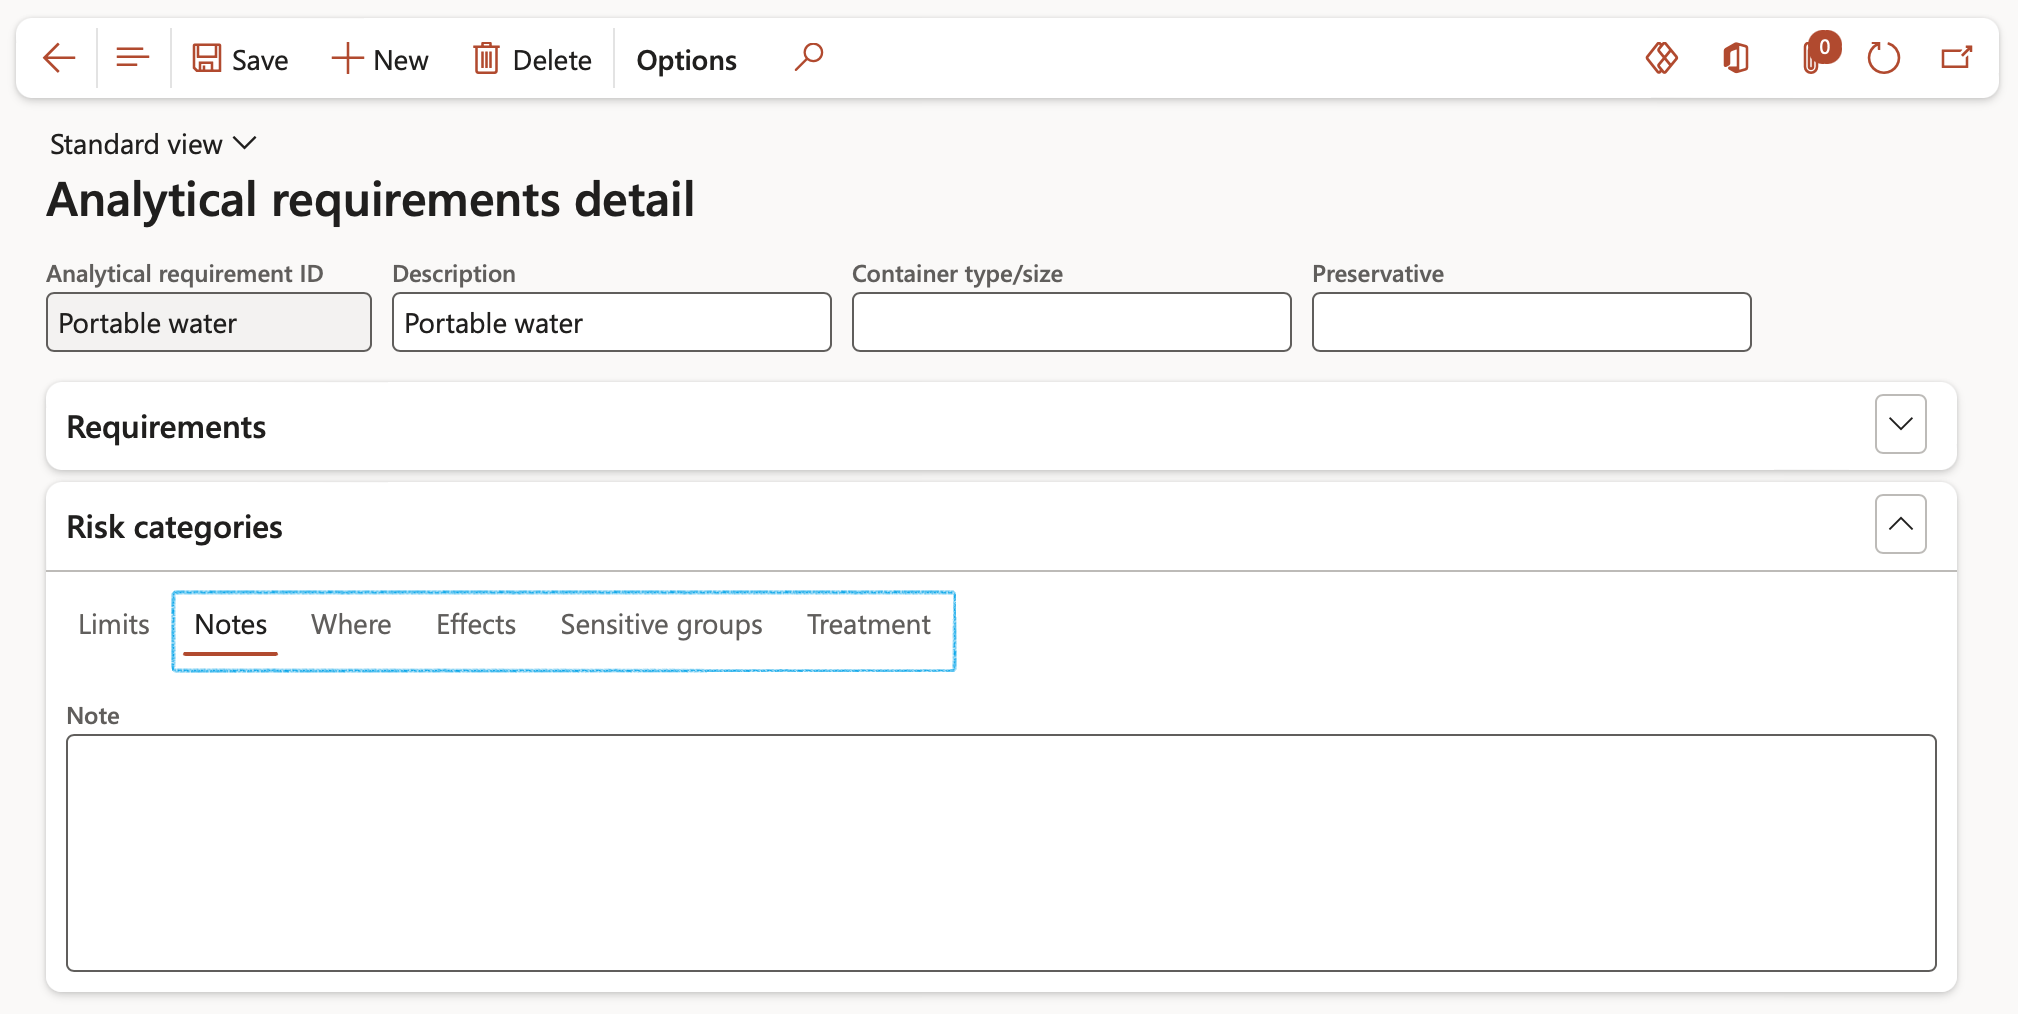
- Expand the Risk categories Fast tab
- Open the Limits Index tab
- In the Button strip, click on the Add button
- Select the relevant Risk category from the dropdown list
- Select the relevant Operation from the dropdown list
- Enter the set Limit value
- The value in the “…” field will depend on the selection made in the Operation field
- Enter the set Limit 2 value
- Select the relevant Color for the risk category

- Open the Notes Index tab
- Enter additional Notes in the box provided
- Open the Where Index tab
- Enter details on where the risk is found
- Open the Effects Index tab
- Enter what effects are caused by this substance
- Open the Sensitive groups Index tab
- Enter the individuals affected
- Open the Treatment Index tab
- Enter details of the treatment that will rectify the problem
¶ Step 4: Setup Sample types
The Sample type form groups similar sample types together for reporting purposes
Go to: HSE > Environmental > Setup for environmental > Sample types
- On the Action pane, click on the New button
- Enter a Sample type ID
- Enter a brief Description for the sample type
- Select the relevant Interval type from the dropdown list
- In the Interval type field, select the interval type at which the sampling should take place
- In the Interval field, enter a value
- Select the Analytical requirements associated with this type
Example: If the Interval type is set to month and the Interval field has a value of 2, this means that monitoring for this type will occur every second month

¶ Step 5: Water and dust sampling points
Go to: HSE > Environmental > Water and dust sampling points
- On the Action pane, click on the New button
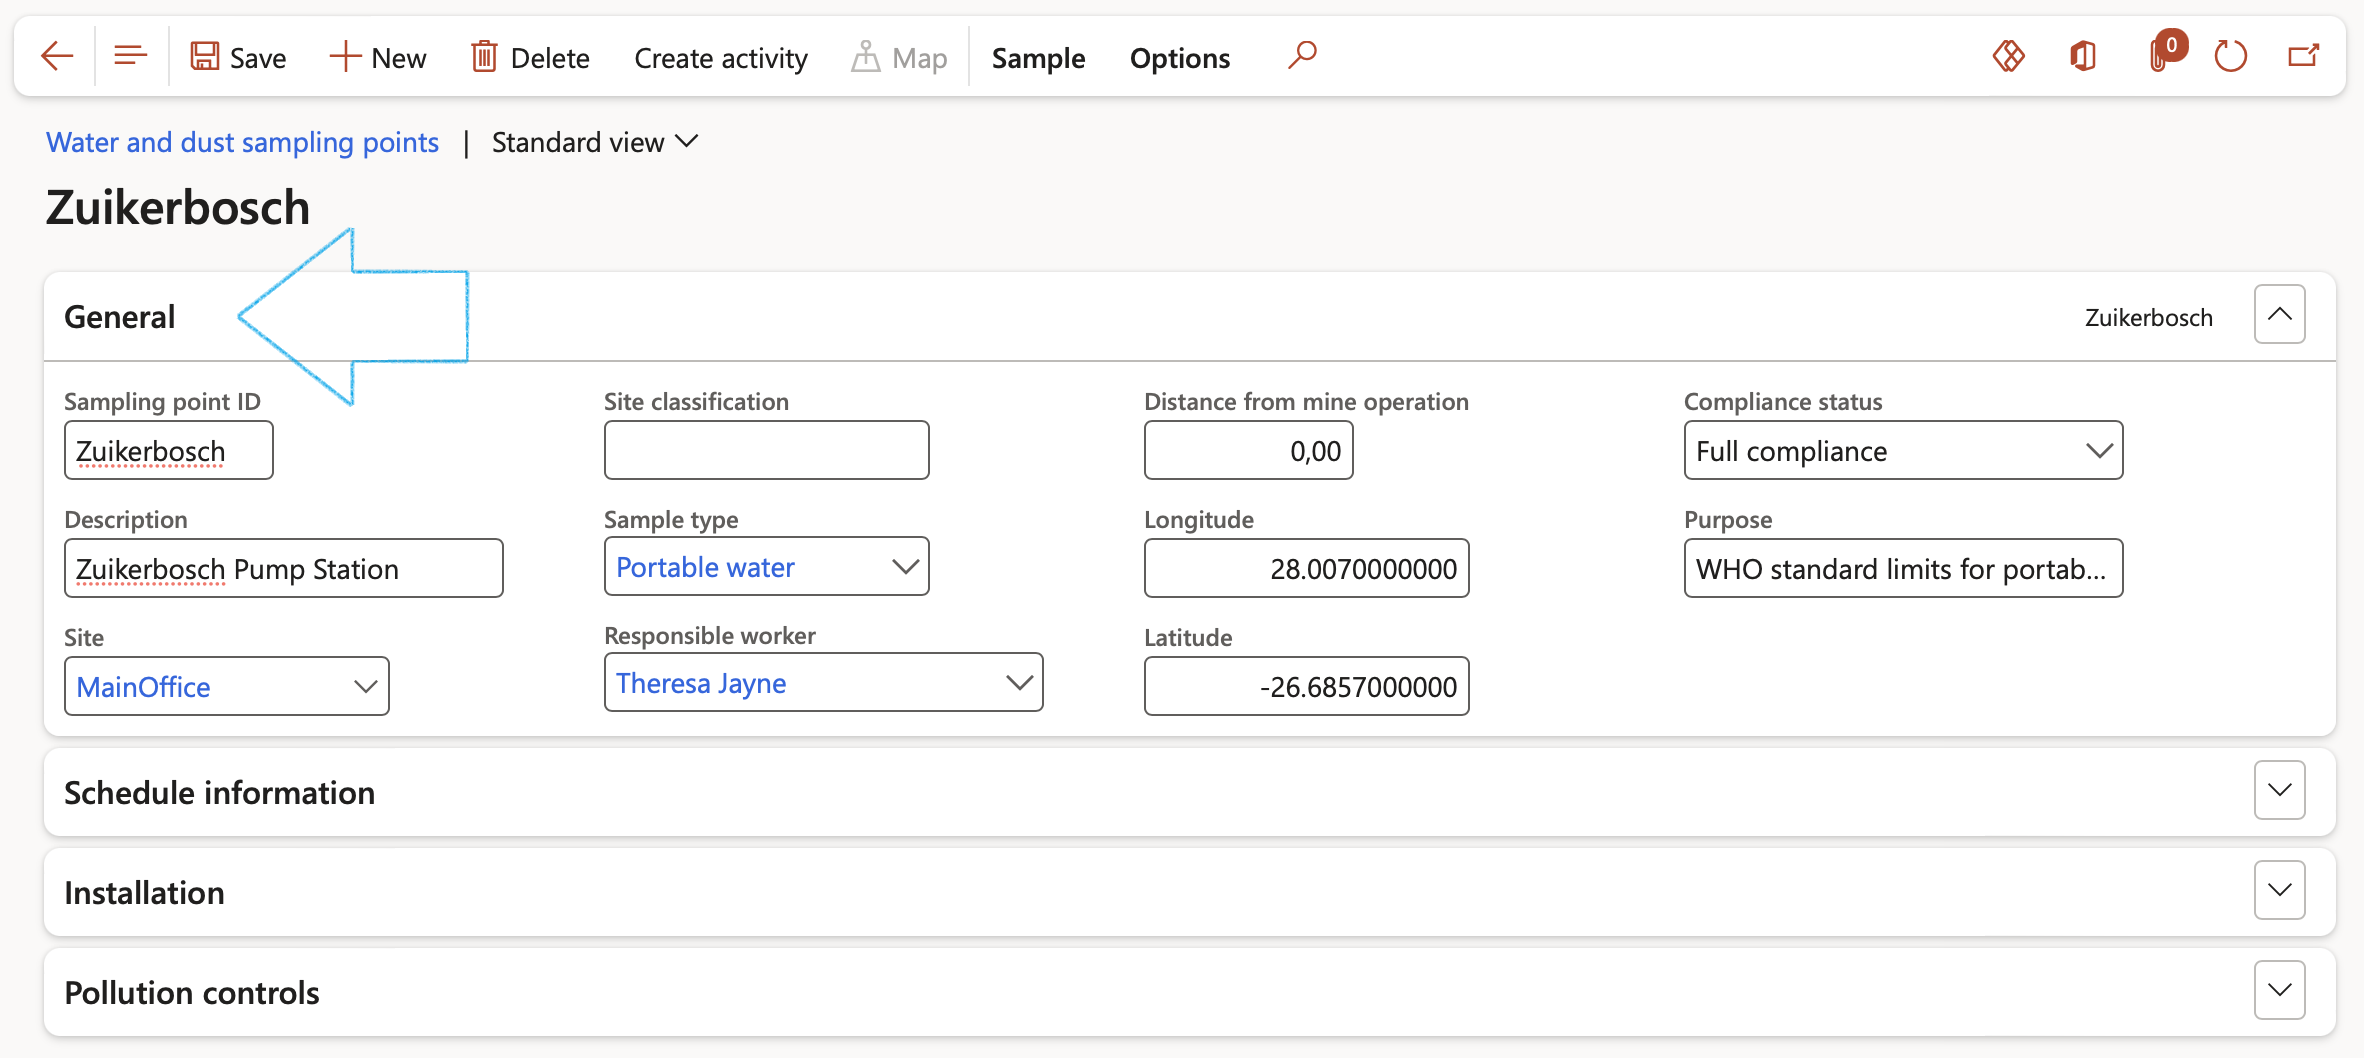
- Under the General Fast tab:
- Enter the unique Sampling point ID
- Enter a Description of the sampling point
- Select the relevant Site from the dropdown list
- Select the Sample type from the dropdown list
- Select the person Responsible for the sampling from the dropdown list
- Enter the Latitude as well as the Longitude decimal values
- Select the Compliance status from the dropdown list
- Enter the Purpose for the sampling
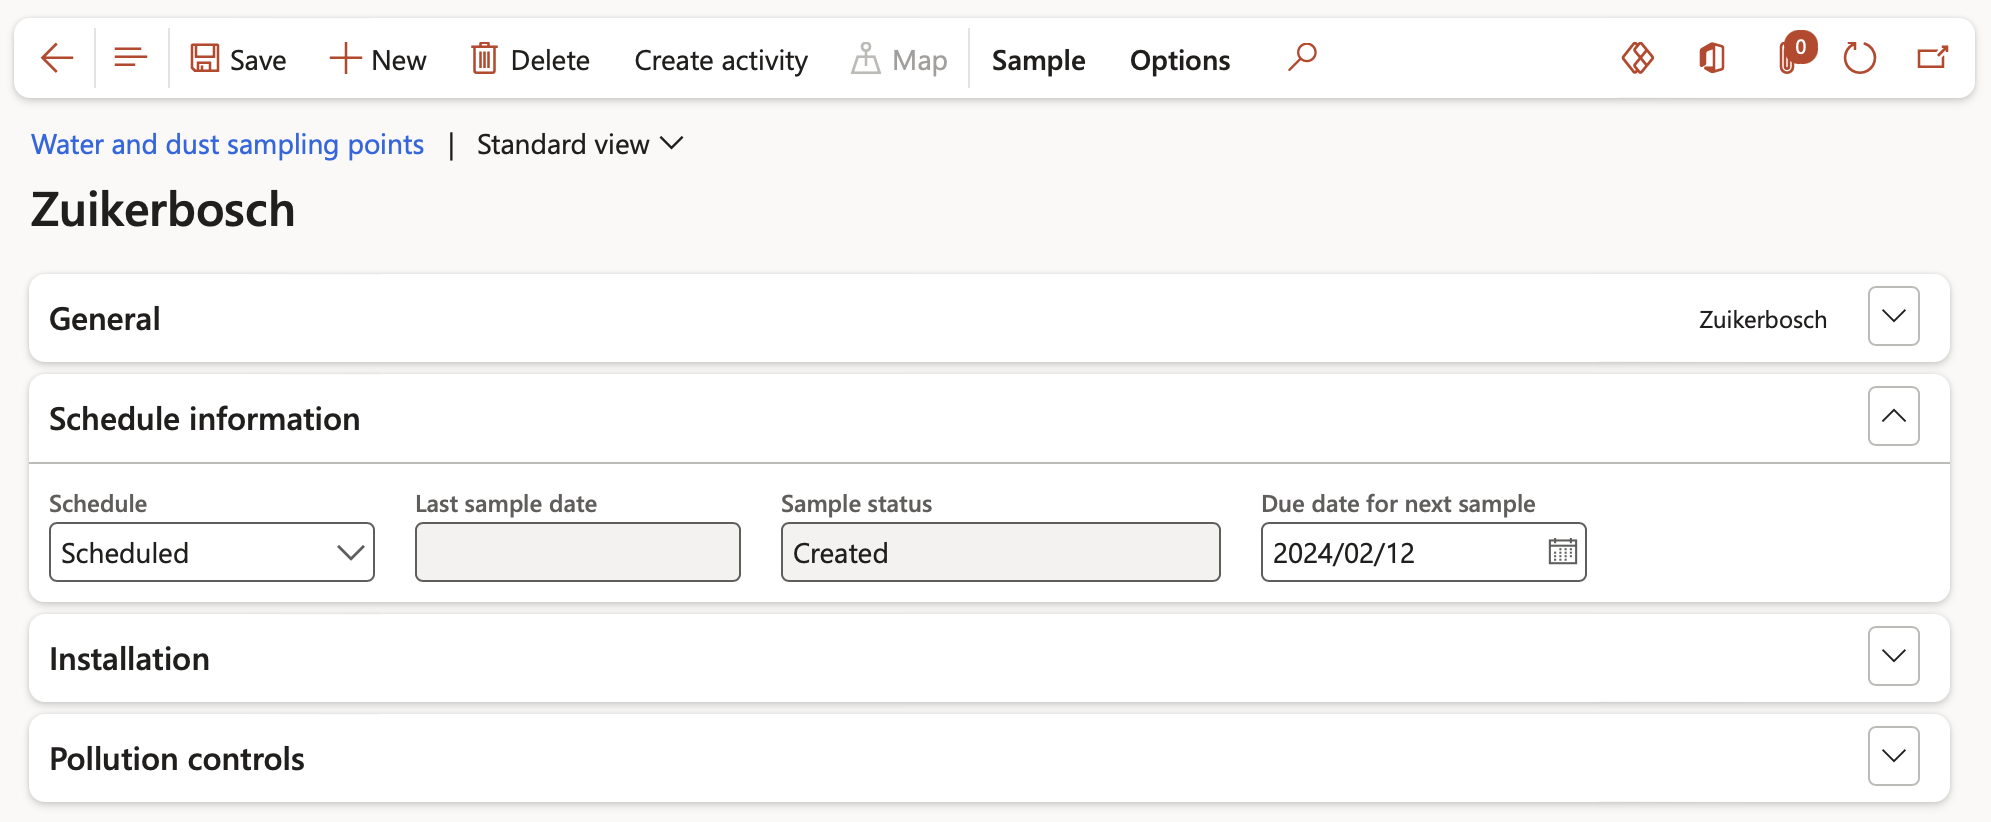
- Under the Schedule information Fast tab:
- Select the relevant Schedule from the dropdown list
- The Last sample status and Sample status are displayed
- The Due date for next sample can be changed if required
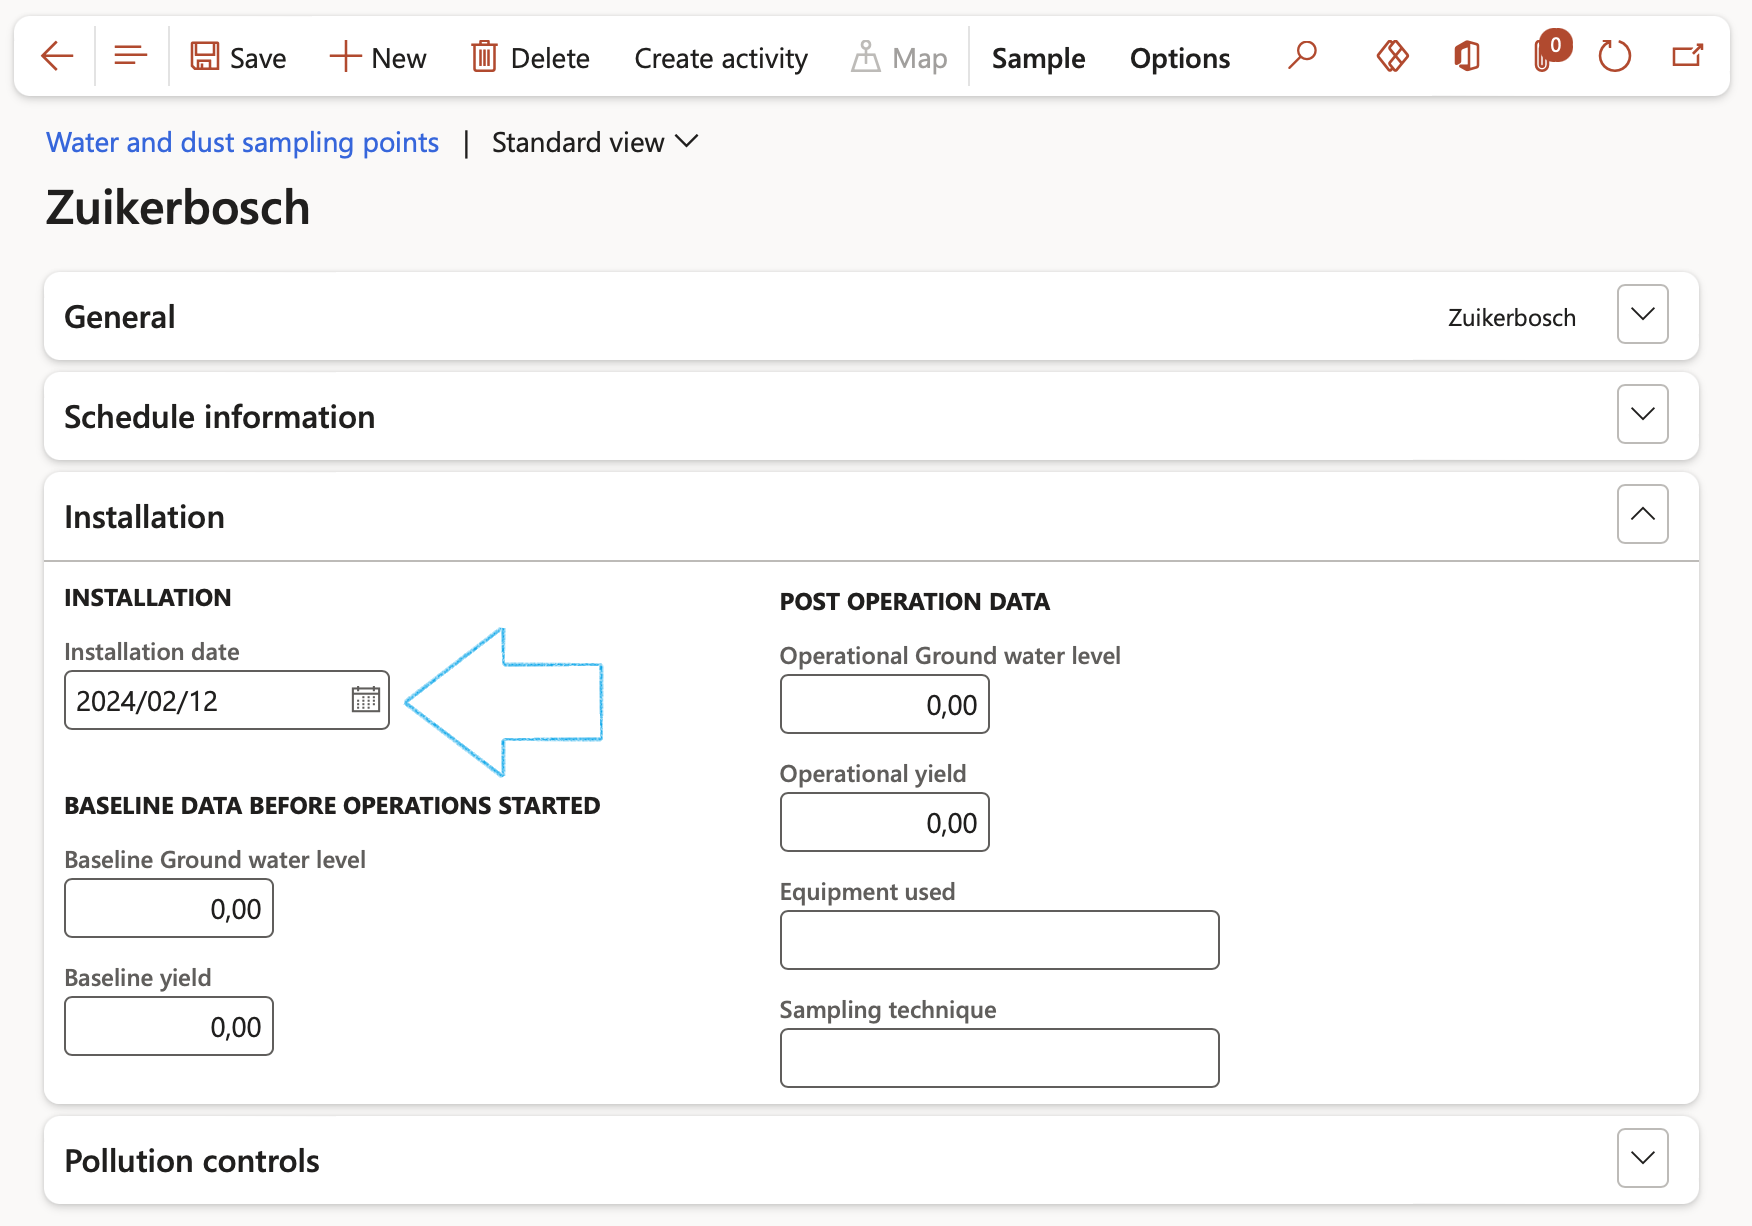
- Under the Installation Fast tab:
- Select the Installation date
- Under the Baseline data before operations started field group:
- Enter the Baseline Ground water level
- Enter the Baseline yield if applicable
- Under the Post operation data field group:
- Enter the Operational Ground water level
- Enter the Operational yield
- Enter Equipment used
- Enter Sampling technique if applicable
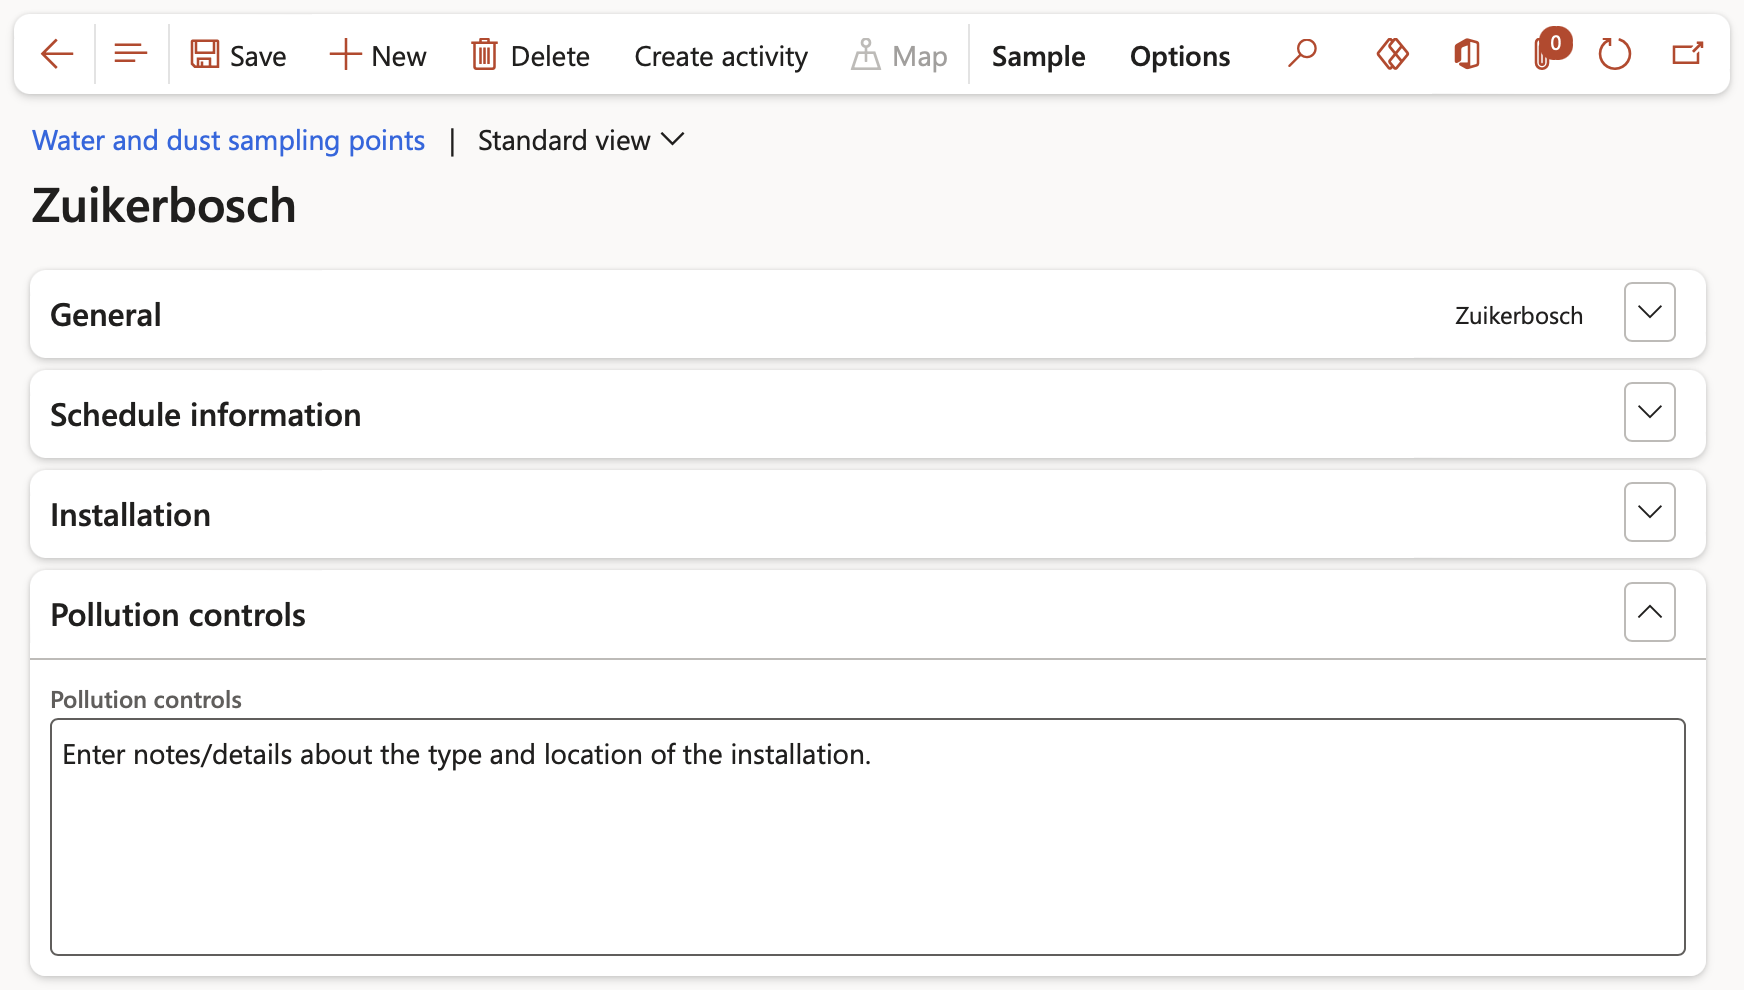
- Under the Pollution controls Fast tab:
- Enter the pollution control that is in place at this installation
If the Longitude and Latitude decimal values are populated, one can make use of the Map button to view the point on Google maps.
- On the Action pane, click on the Map button


¶ Daily use
¶ Step 6: Water and dust sampling point schedules
The schedule can have the following statuses:
- Stopped – This is used if a sampling point is no longer in use, if a sampling point have this status, a ‘Due date for next sample’ will not be calculated.
- Scheduled - This is used if a sampling point is actively in use, if a sampling point have this status, a ‘Due date for next sample’ will be calculated. The ‘Due date for next sample’ will be calculated as follows, when a sample is taken, the ‘Last sample date’ will be updated, the system will then use this date, the ‘Interval type’ and ‘Interval’ that is specified on the ‘Samplig type’ to calculate the ‘Due date for next sample’.
- Ad hoc - This is used if a sampling point is active but there is no fixed schedule for it. (an example might be a rain gage, one will only take a reading after it had rained) If a sampling point have this status, a ‘Due date for next sample’ will not be calculated.
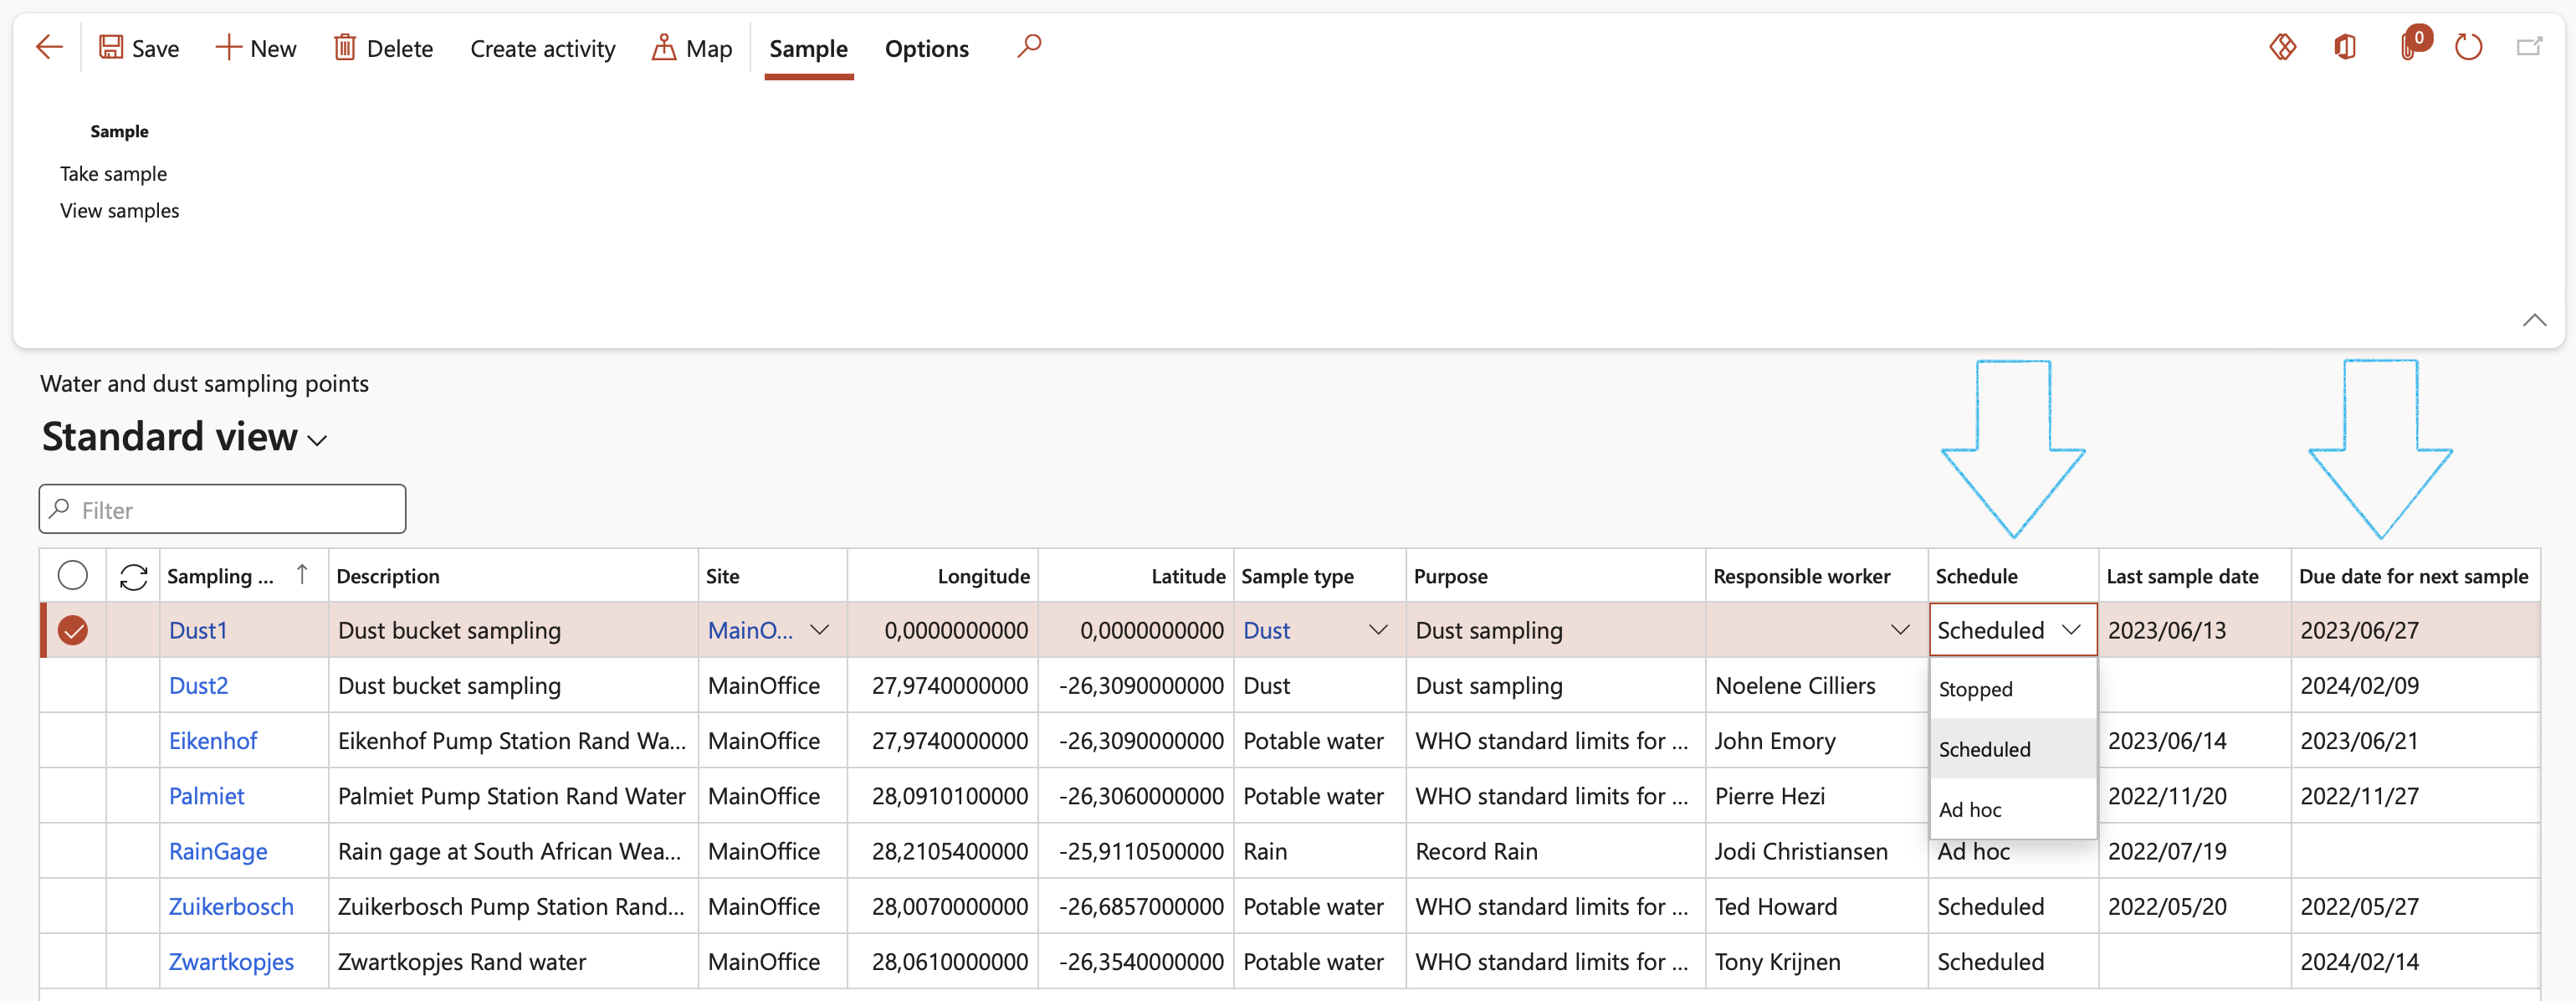
The Due date for next sample can be used to set an alert to notify the user when a sample is due
¶ Step 7: Take a sample
Go to: HSE > Environmental > Sampling points
- Select the relevant Sampling point
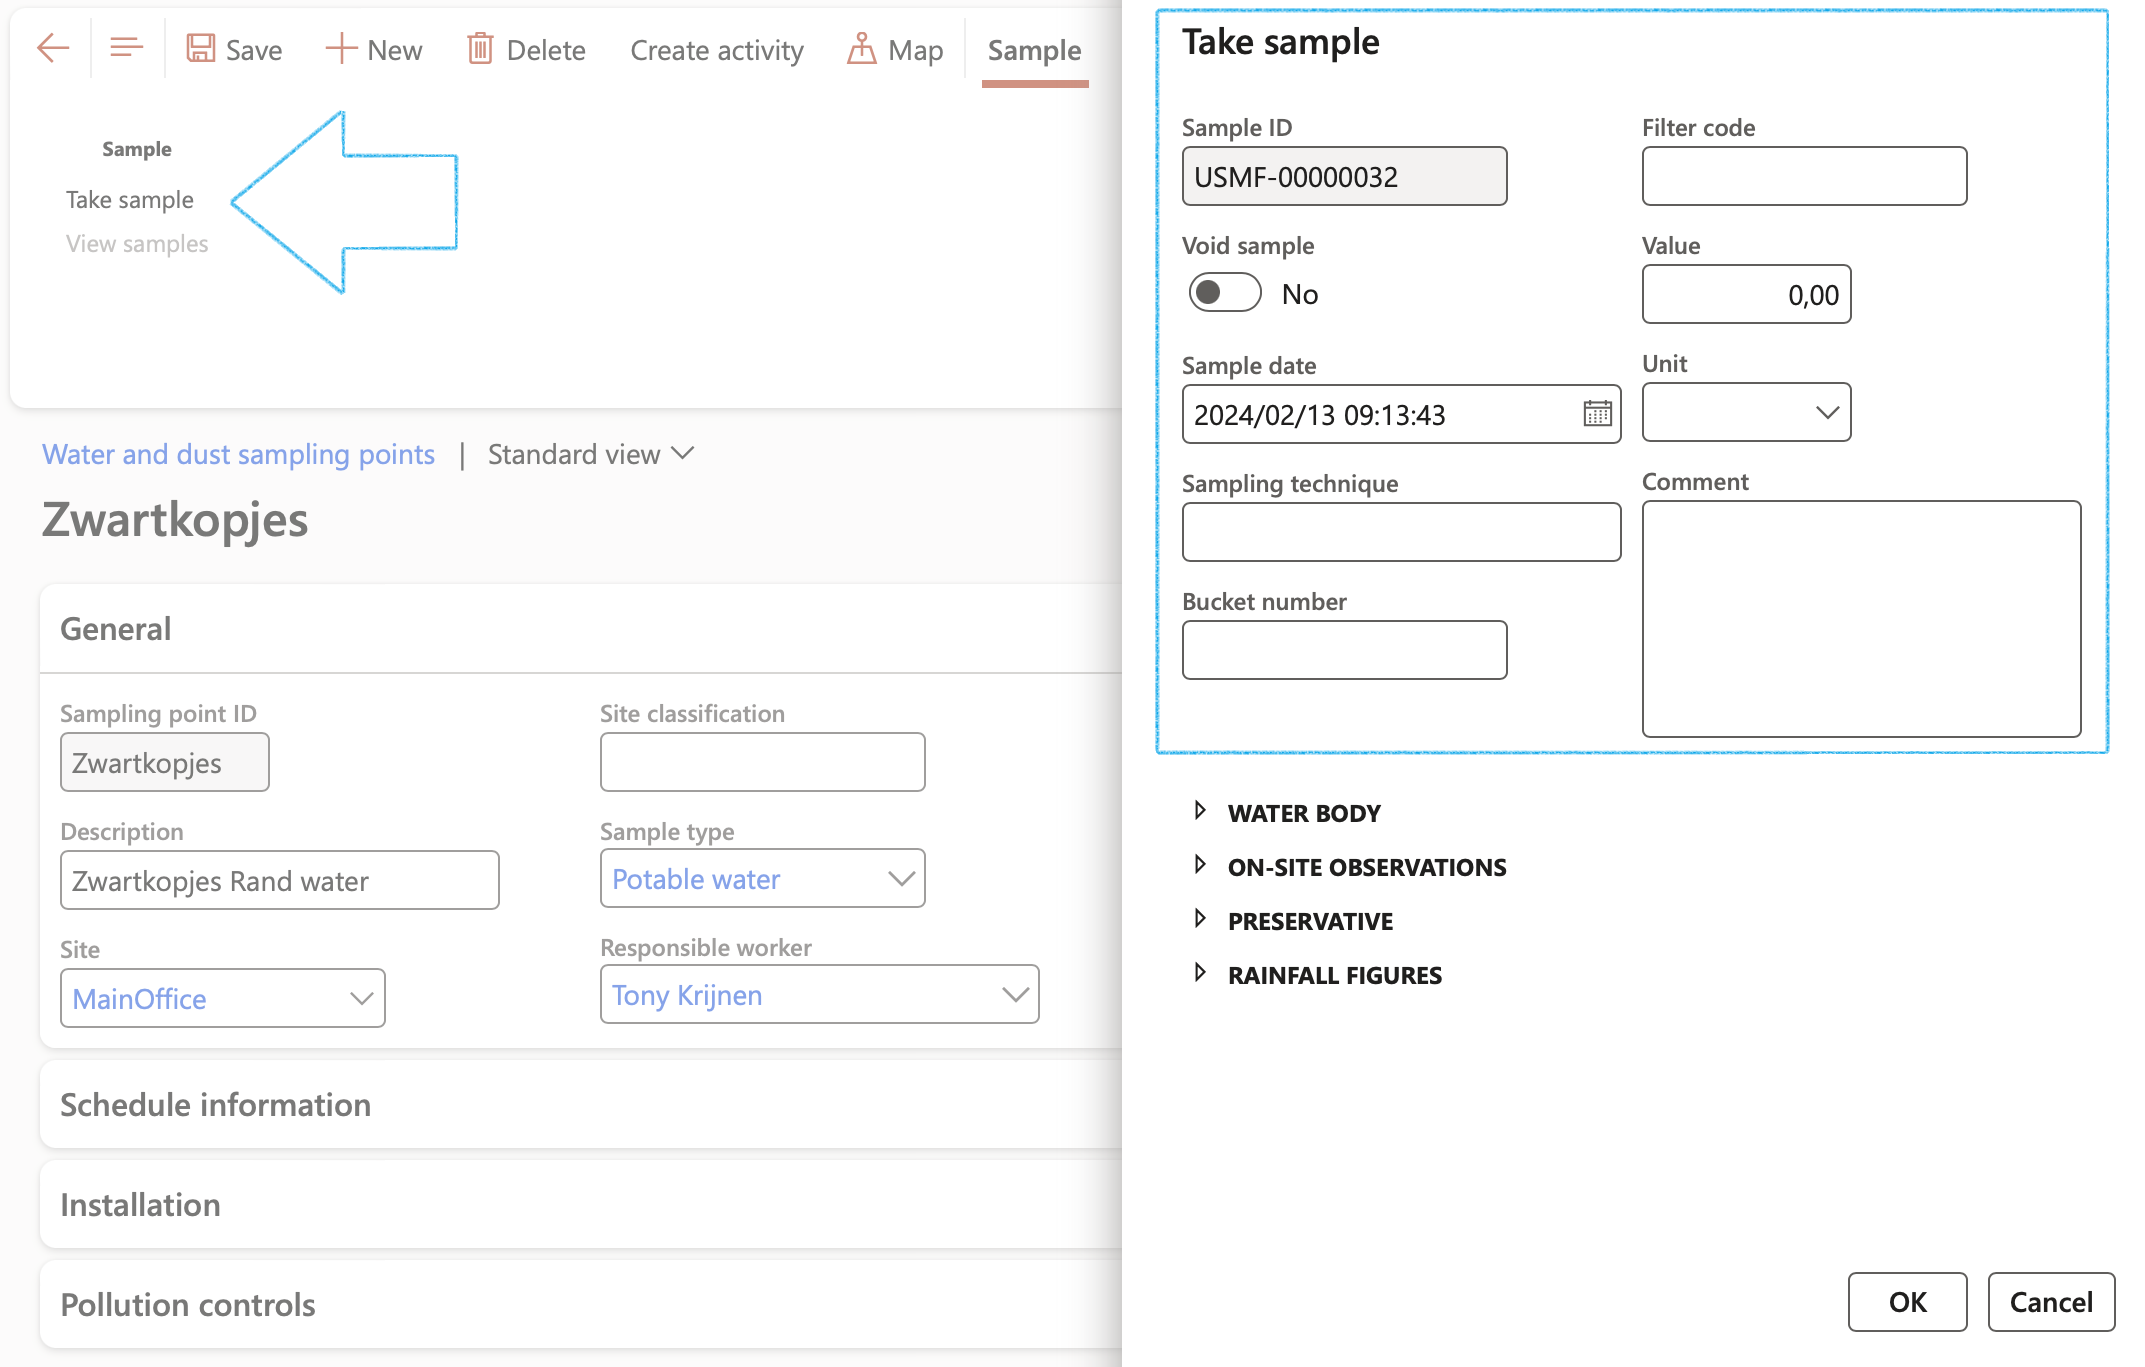
- On the Action pane, click on the Take sample button
- On the Take sample dialog that opens:
- The Sample ID will automatically be assigned by the system
- The sample can be marked as Void if needed
- The Sample date will by default be populated with today’s date. This can be edited
- The Sampling technique can be specified
- The Bucket number can be specified
- The Filter code can be specified
- A Value can be entered
- The Unit of measure can be selected from the dropdown list
- A Comment regarding the sample can be entered
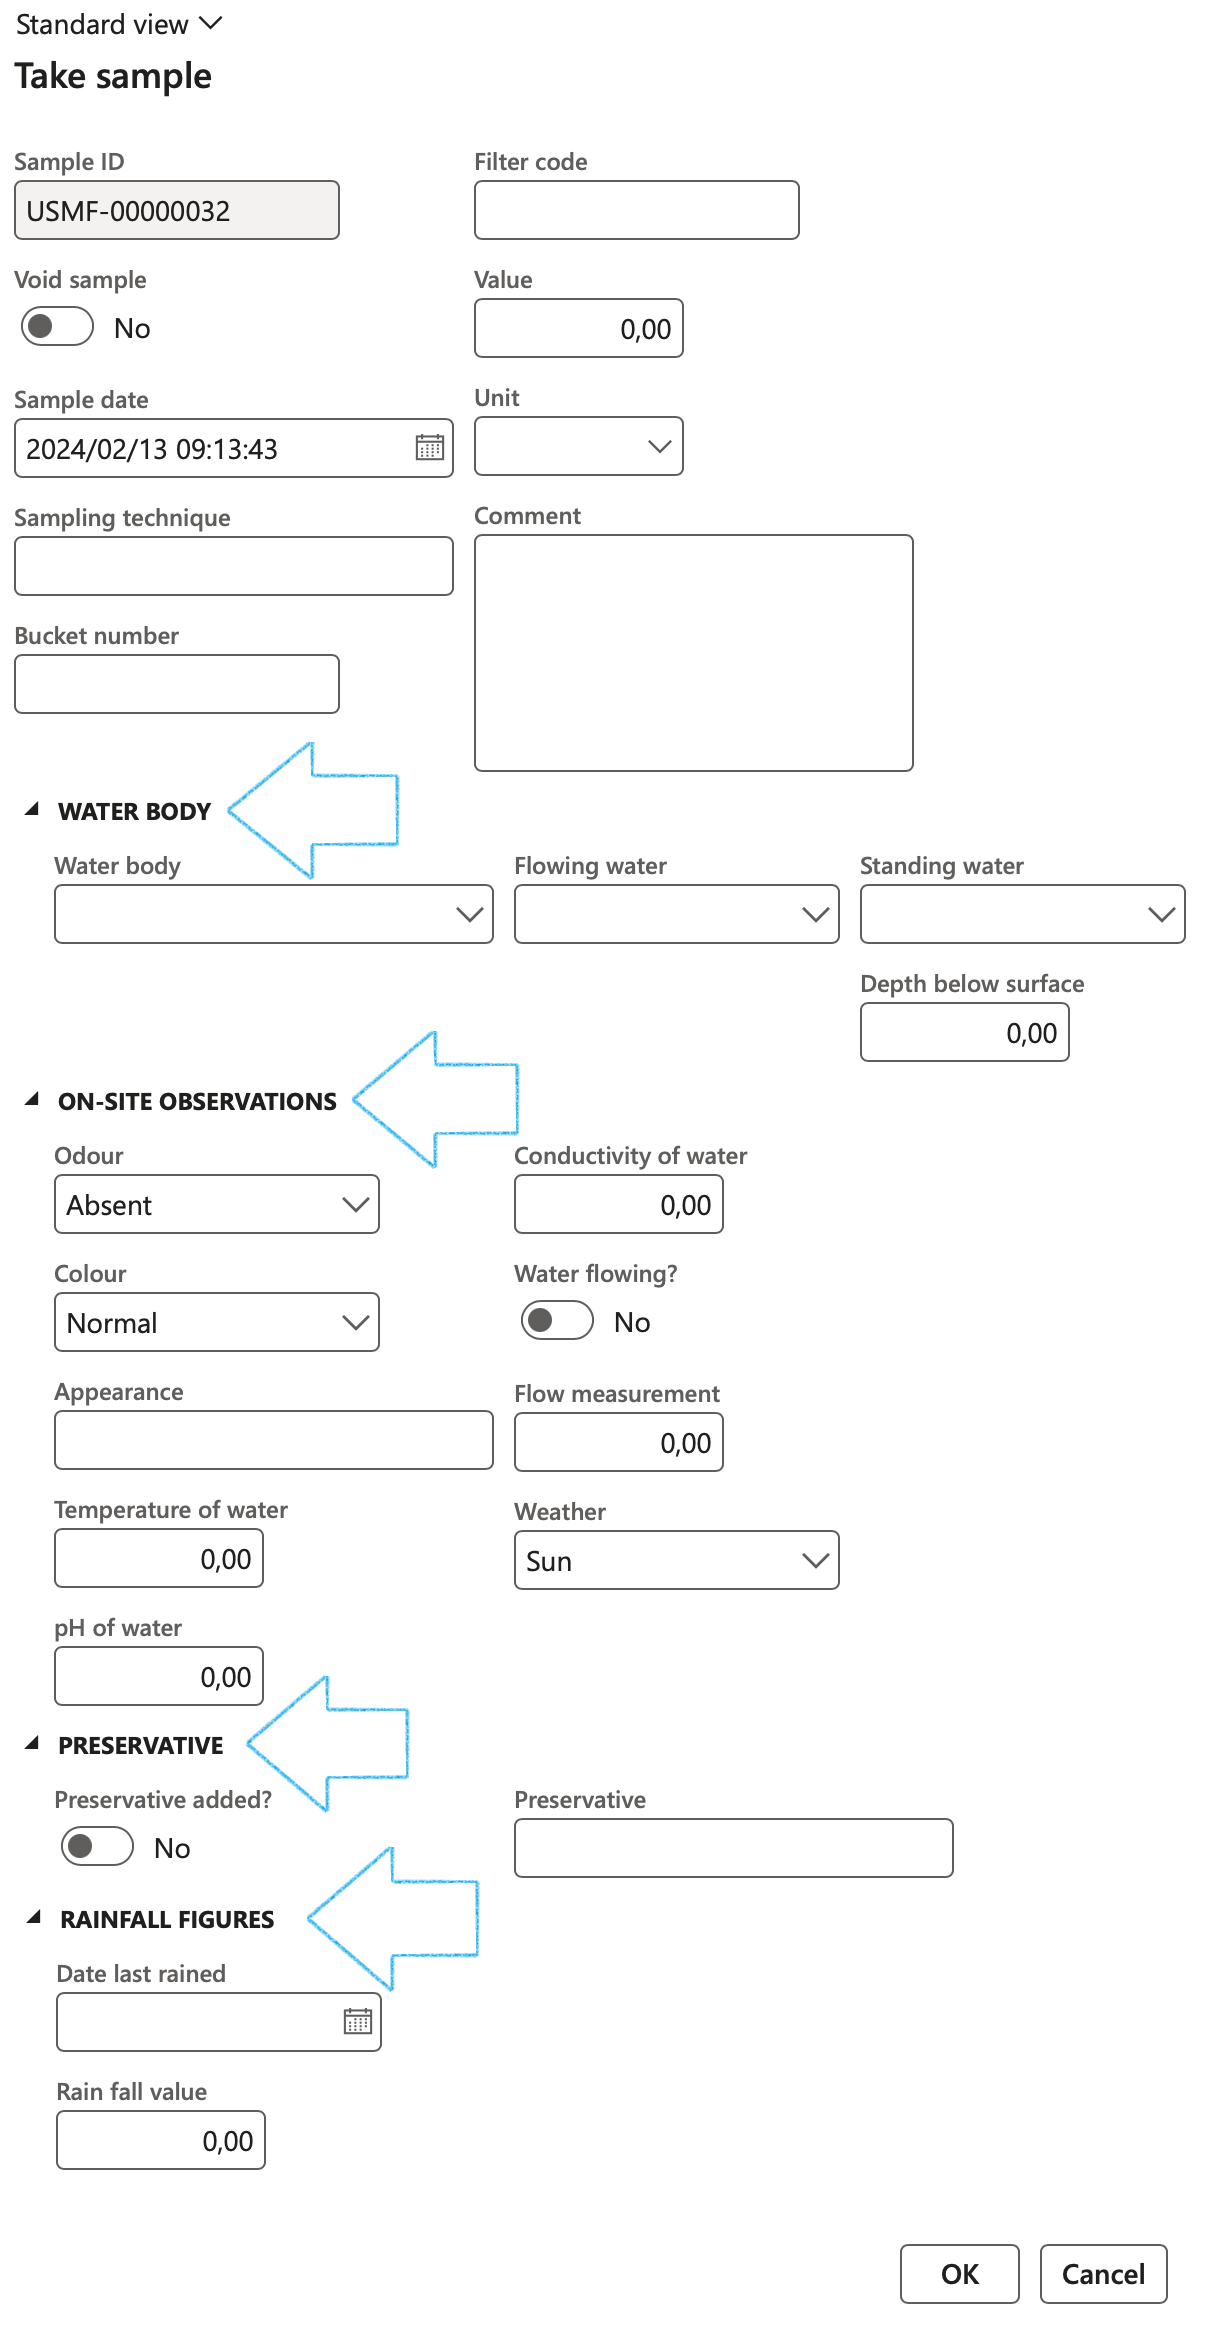
- Under the Water body tab, the user can enter information regarding the Water body if relevant:
- The Water body type can be selected from the dropdown list
- The Flowing water type can be selected from the dropdown list
- The Standing water type can be selected from the dropdown list
- The Depth below surface can be entered
- Under the On-site observations tab, the user can enter information regarding the observations if relevant:
- The absence or presence of Odor can be selected from the dropdown list
- The Colour can be specified as Normal or Abnormal by selecting it from the dropdown list
- The Appearance can be described
- The Temperature of the water can be entered
- The pH of the water can be entered
- The Conductivity of the water can be entered
- Indicate whether the water is flowing with the Water flowing slider
- The Flow measurements can be entered
- The Weather condition can be selected from the dropdown list
- Under the Preservative tab, the user can enter information regarding the preservative used for this sample if relevant:
- Indicate whether a Preservative was added to the sample
- Specify the Preservative used
- Under the Rainfall figures tab, the user can enter information regarding the Rainfall if relevant:
- The Date last rained can entered
- The Rain fall value can be entered
¶ Step 8: Send sample for analysis
Go to: HSE > Environmental > Water and dust sampling points
- Select the relevant Sampling point
- On the Action pane, click on the View samples button

A list page will open showing all the samples taken at this monitoring point
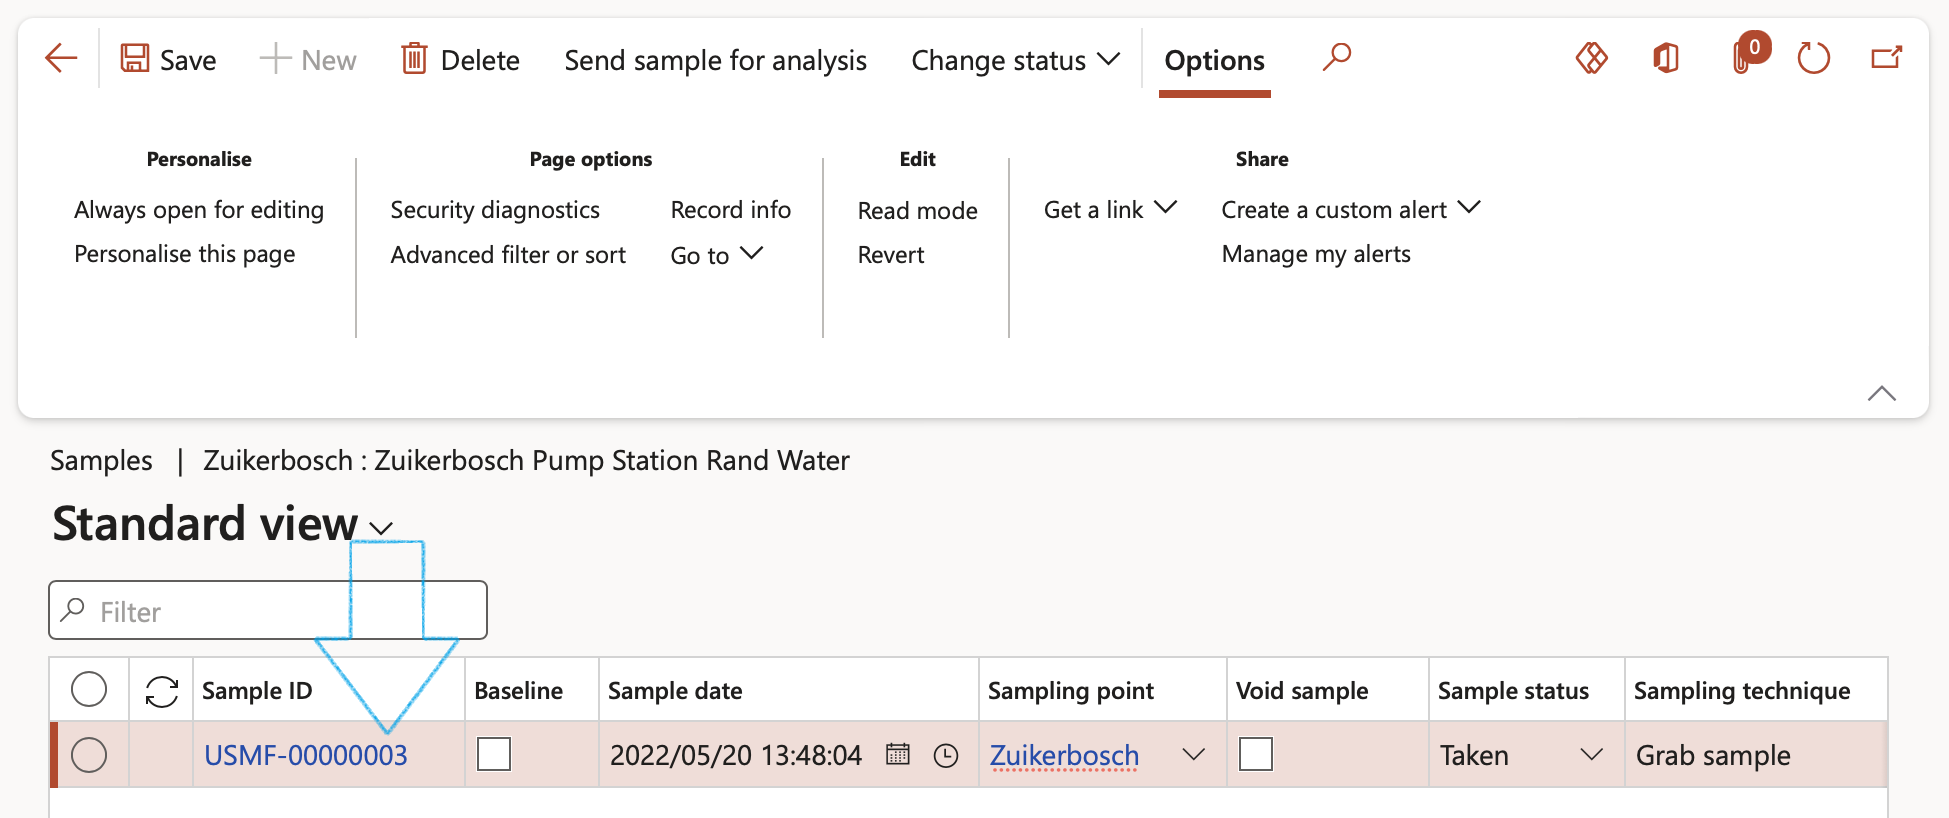
- Select the relevant sample by clicking on the Sample ID (Hyper link)
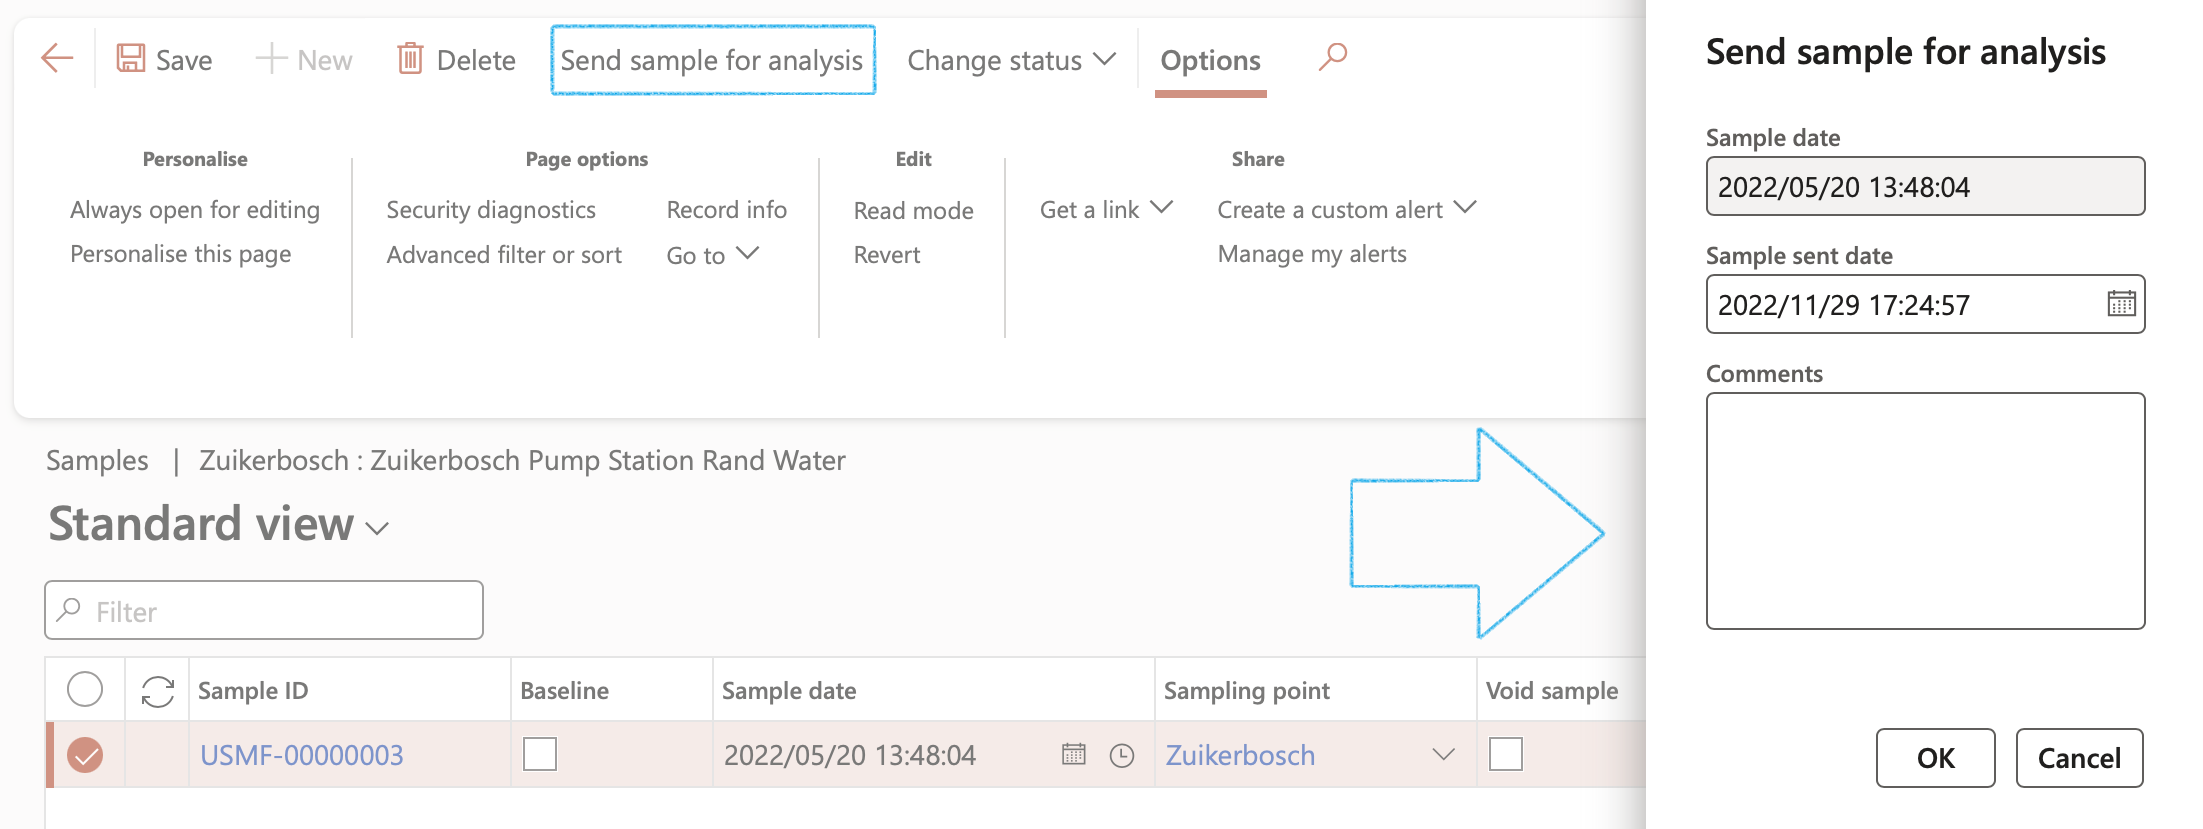
- On the Action pane, click the Send sample for analysis button
- On the Send sample for analysis dialog:
- The Sample date is displayed
- Enter the Sample sent date
- The user can optionally add a Comment
- Click on the OK button
¶ Step 8.1: Enter Sample analytical values
Go to: HSE > Environmental > Water and dust sampling points
- Select the relevant Monitoring point
- In the Action pane, click on the View samples button
- A list page will open showing all the samples taken at this monitoring point
- Select the relevant sample by clicking on the Sample ID (Hyper link)
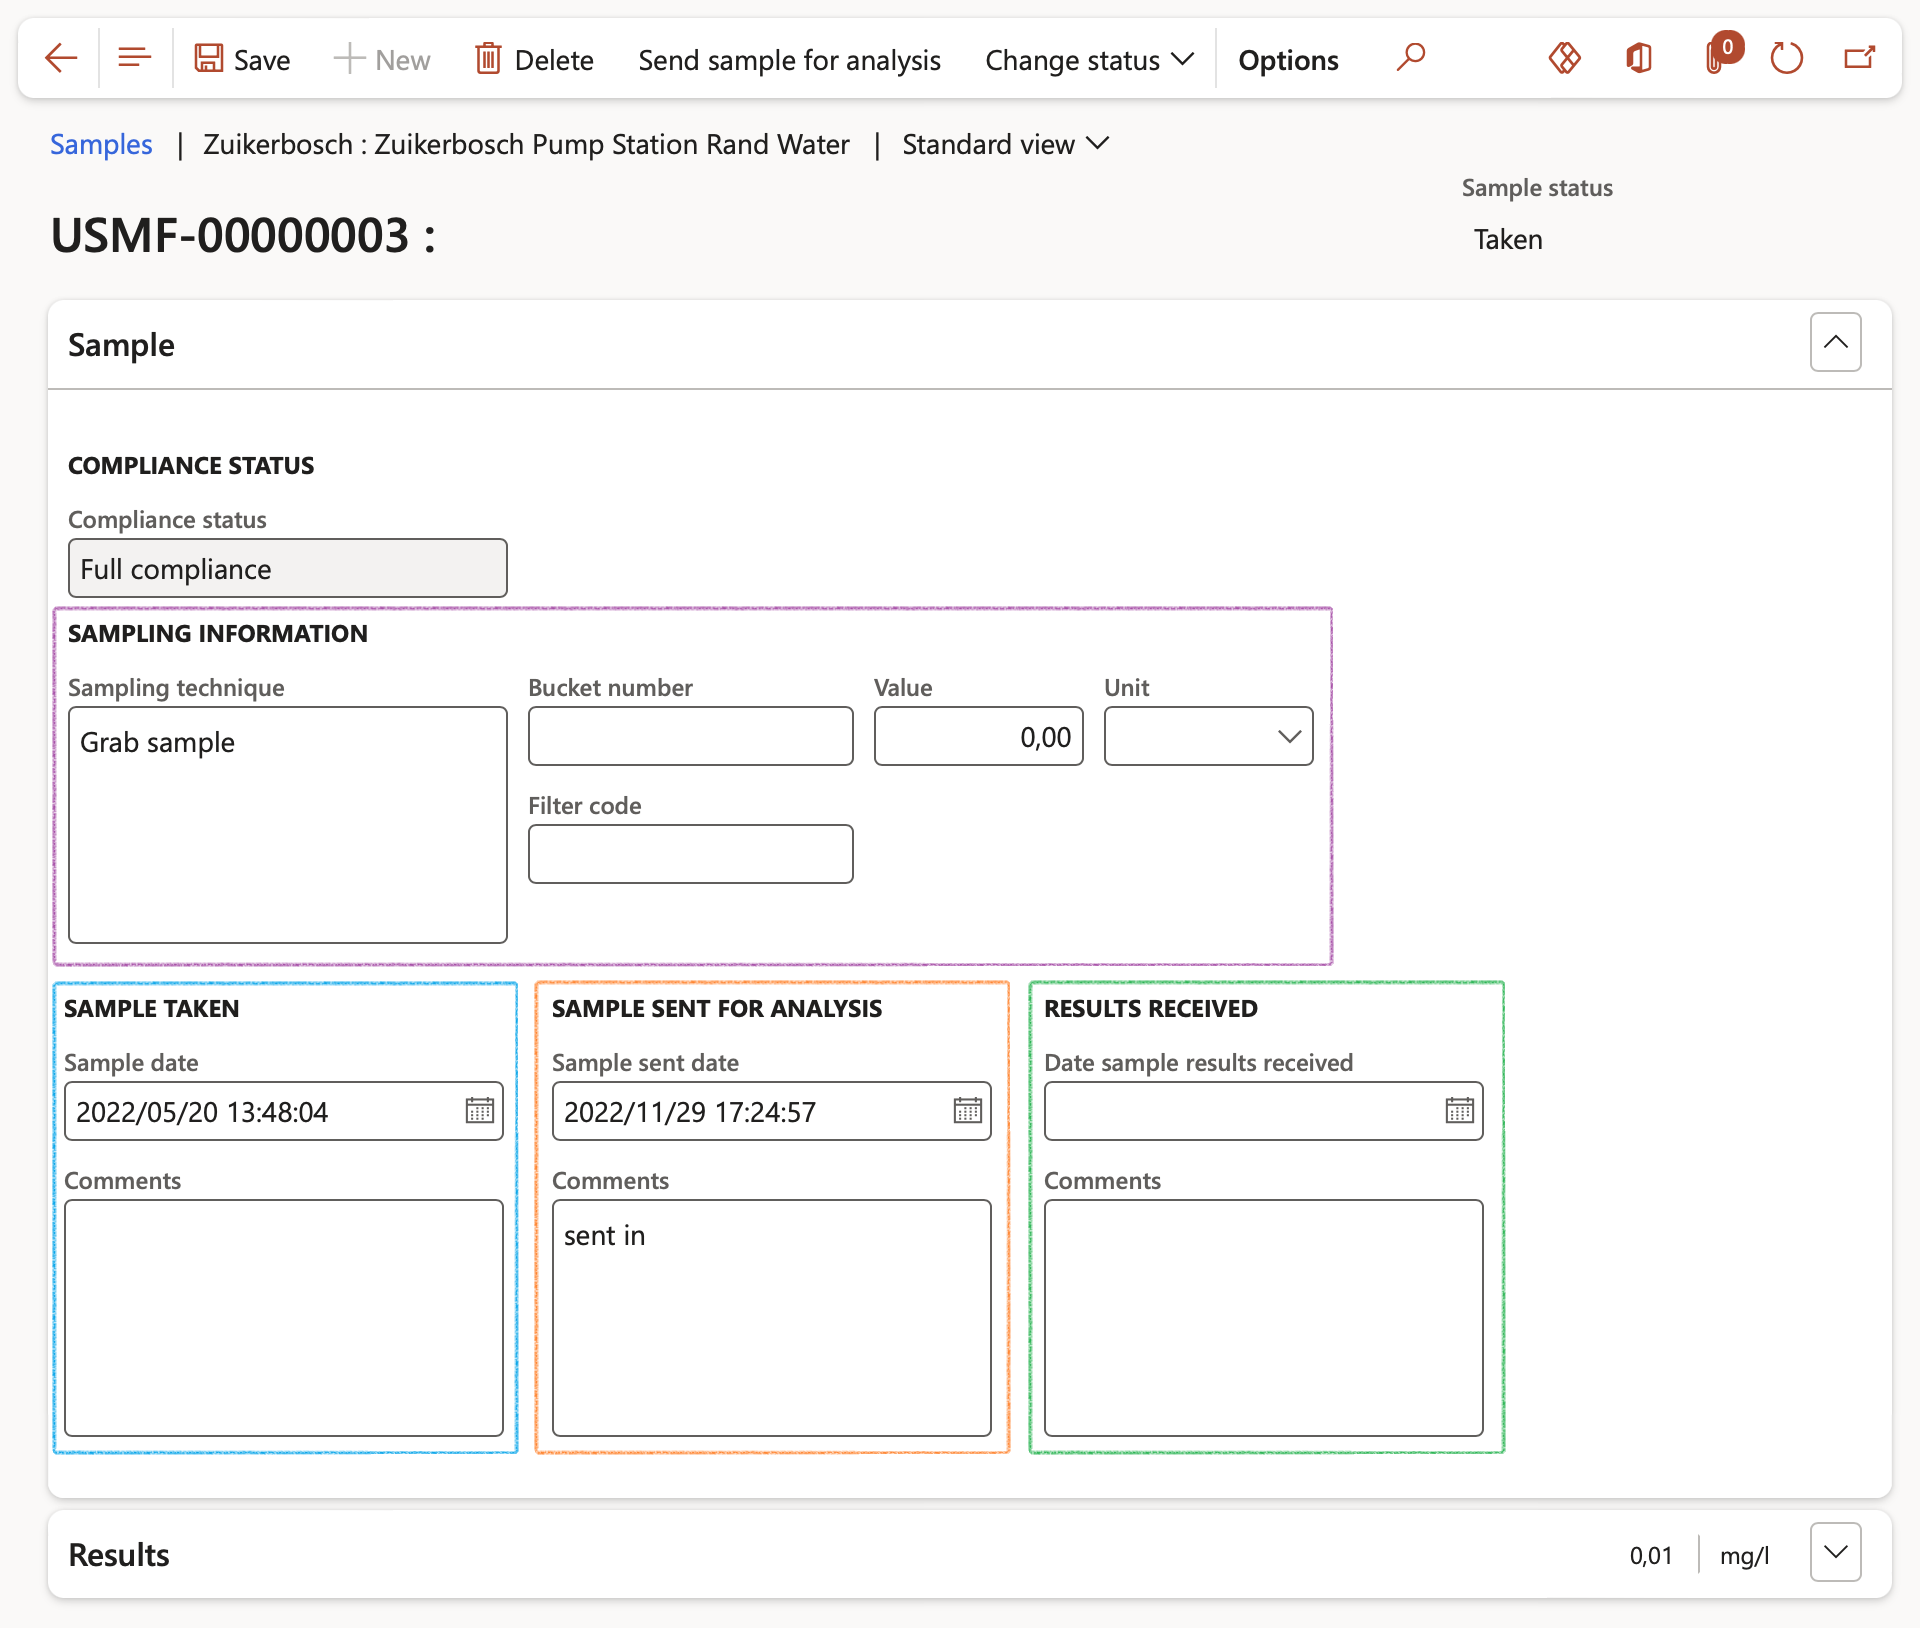
- Under the Sample Fast tab, all information previously entered can be viewed:
- Under the Compliance status Field group, the Compliance status that was selected is displayed
- Under the Sampling information Field group, relevant sampling information can be viewed
- Under the Sample taken Field group, the information entered when the sample was taken can be viewed
- Under the Sample sent for analysis Field group, the information entered when the sample was sent for analysis can be viewed
- Under theResults received Field group the user can:
- Enter the Date sample results were received
- Add Comments about the sample results received
- Under the Results Fast tab:
- Results can be entered
- The Substance ID is a read only field
- Enter the Value
- The Unit of measure is a read only field
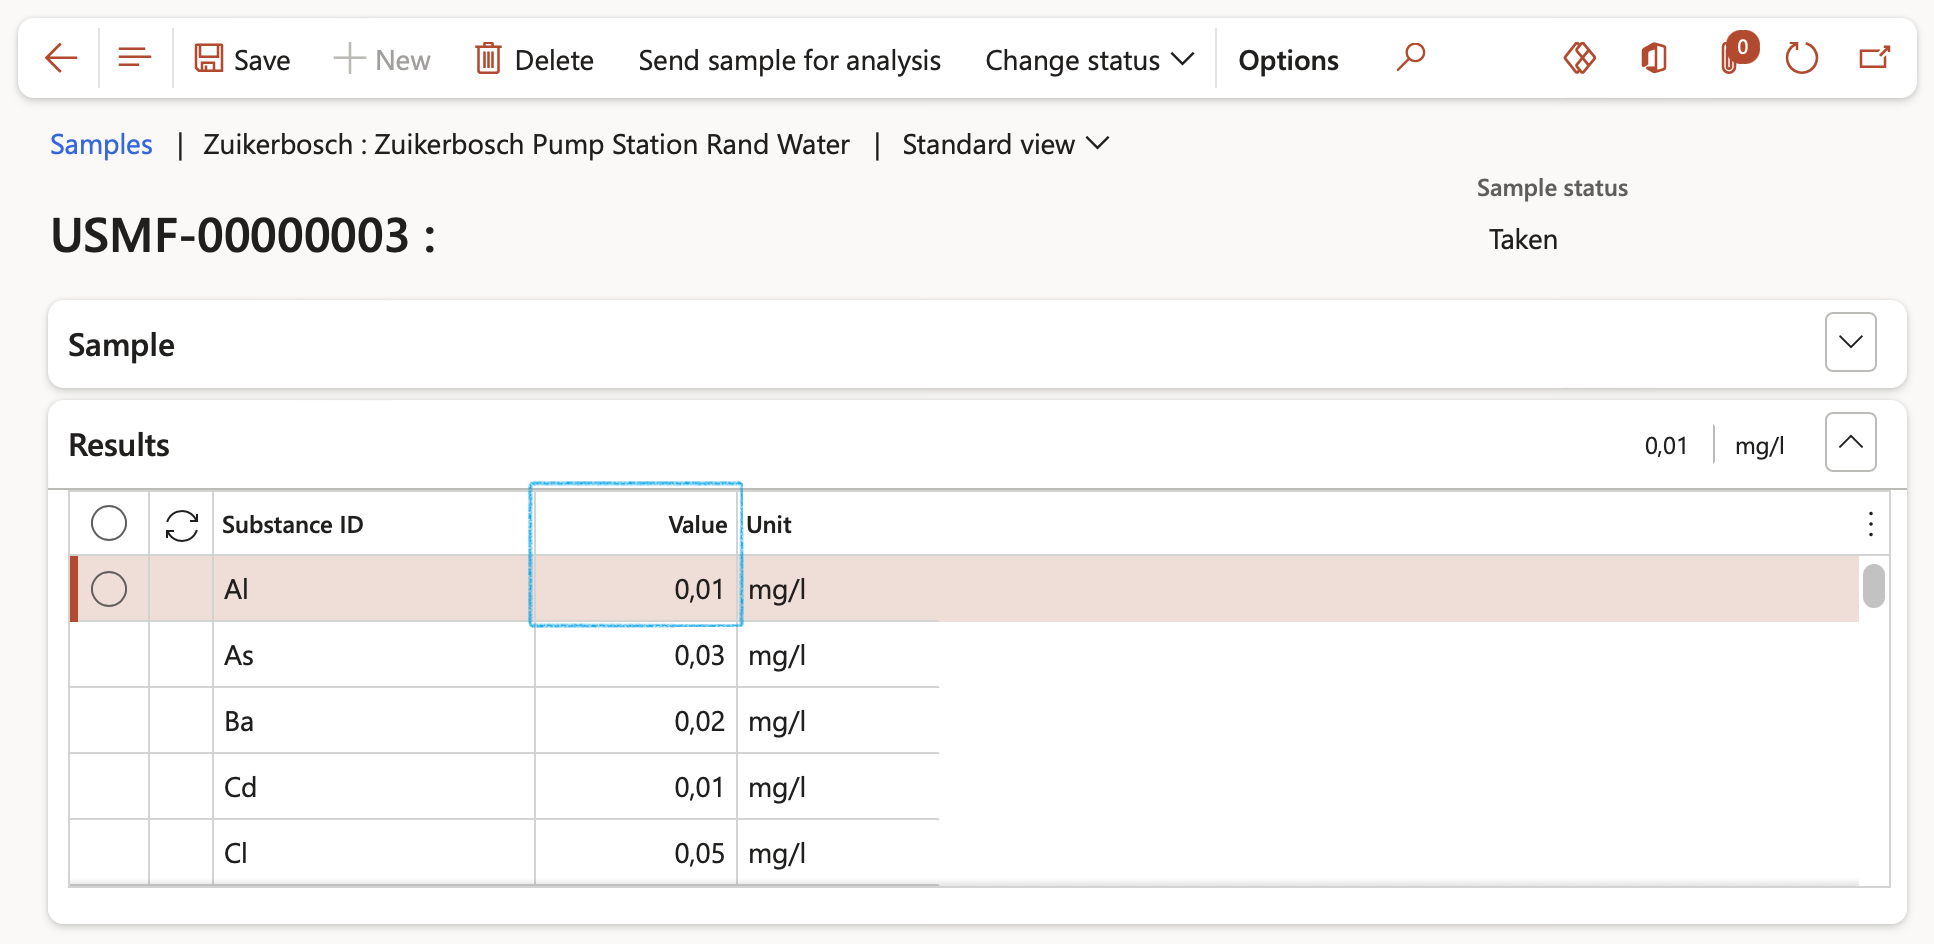
The Substances listed will depend on the Analytical requirements linked to this monitoring point under Monitoring type
After the sample information has been captured, the status of the sample can be changed.
- On the Action pane, click on the Change status button and select the relevant status from the drop-down list

¶ Step 9: Create activities
The following activities can be created for the Waste register:
- Action
- Appointment
- Event
- Task
- Select the Waste register that you want to create the activity for
- On the Action pane, click on the Create activity button
- Select the relevant activity from the dropdown list
- A blue line will confirm that the activity has been created
- Expand the Related information to view the activities created for the Waste register

¶ Reporting
¶ Step 10: Water and dust sampling point graph
Go to: HSE > Work places > Environmental management
- Open the Water and dust sampling point Index tab
- In the Filter section of the form, select the following criteria for the graph:
- Sampling point
- Substance
- Risk category(optional)
