
¶ Introduction
An environmental incident is any non-routine event or occurrence that may have an effect on the environment or have legal and ethical obligations. It includes complaints about noise, environmental mismanagement or outcomes made by personnel, people engaged under a contract, employees, and members of the public. A near miss is an event or set of circumstances that does not result in an incident, but highlights a lack of controls, responses, or preventative actions, which if put in place, could prevent future incidents from occurring.
¶ Navigation

¶ Specific setups
¶ Step 1: HSE parameters
The setup form below is used to select the fields that need to be displayed on the simple Report an incident form when an incident is being recorded.
Users may choose to only have a few fields on the simple form to make it easy to use, while others might prefer more fields. Dynamics 365 HSE allows users to specify which fields to display.
Go to: HSE > Setups > HSE Parameters
- Open the Incidents tab
- Select the fields to be displayed on the Incident form from the Remaining column and move them to the Selected column by using the < arrow button.
(If fields need to be removed from the Selected column, use the > arrow)
- Click on the Update list button
- Select the default Site from the dropdown list
- Select the default Department from the dropdown list
- The Include external parties slider has to be set to Yes in order to include witnesses and visitors in incident summary calculations

- Expand the Activity due date Fast tab
- In the Days field, enter the number of days to be added to the current date when calculating the activity due date
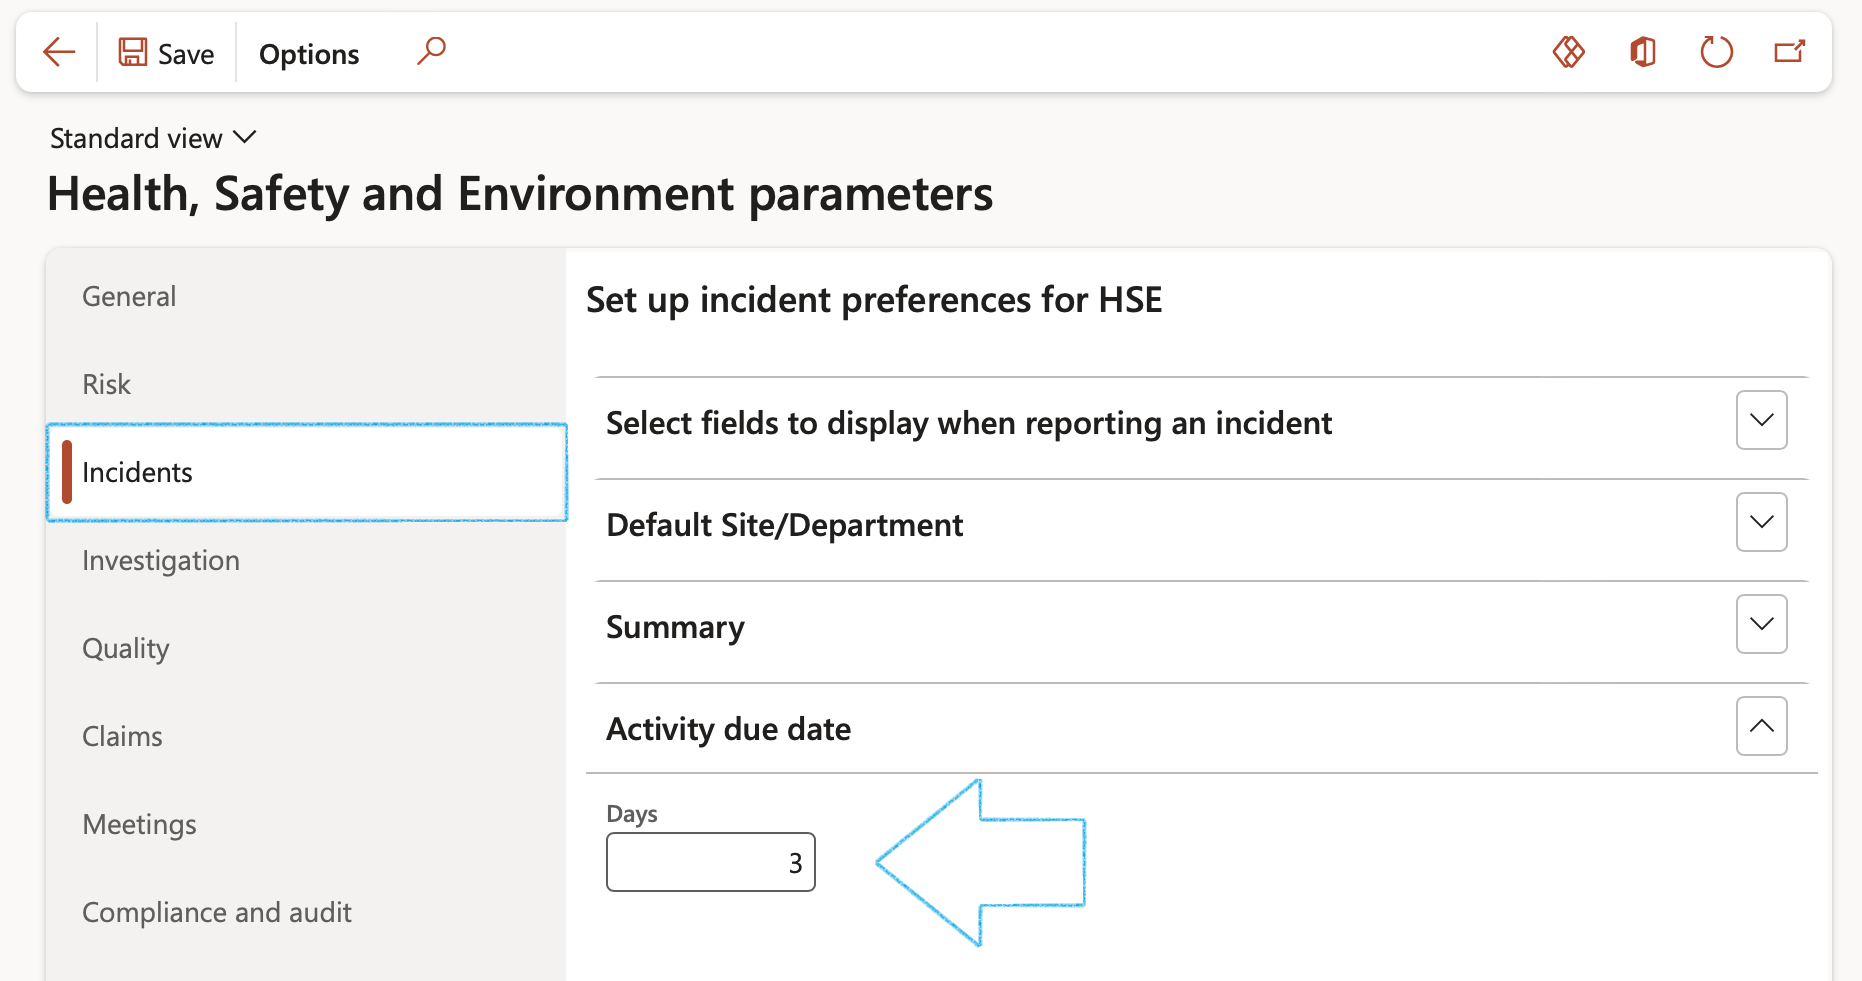
Please note that this is not the date on which an investigation is due to start
Email notifications can be created manually. Please refer to the page on Alerts and notifications
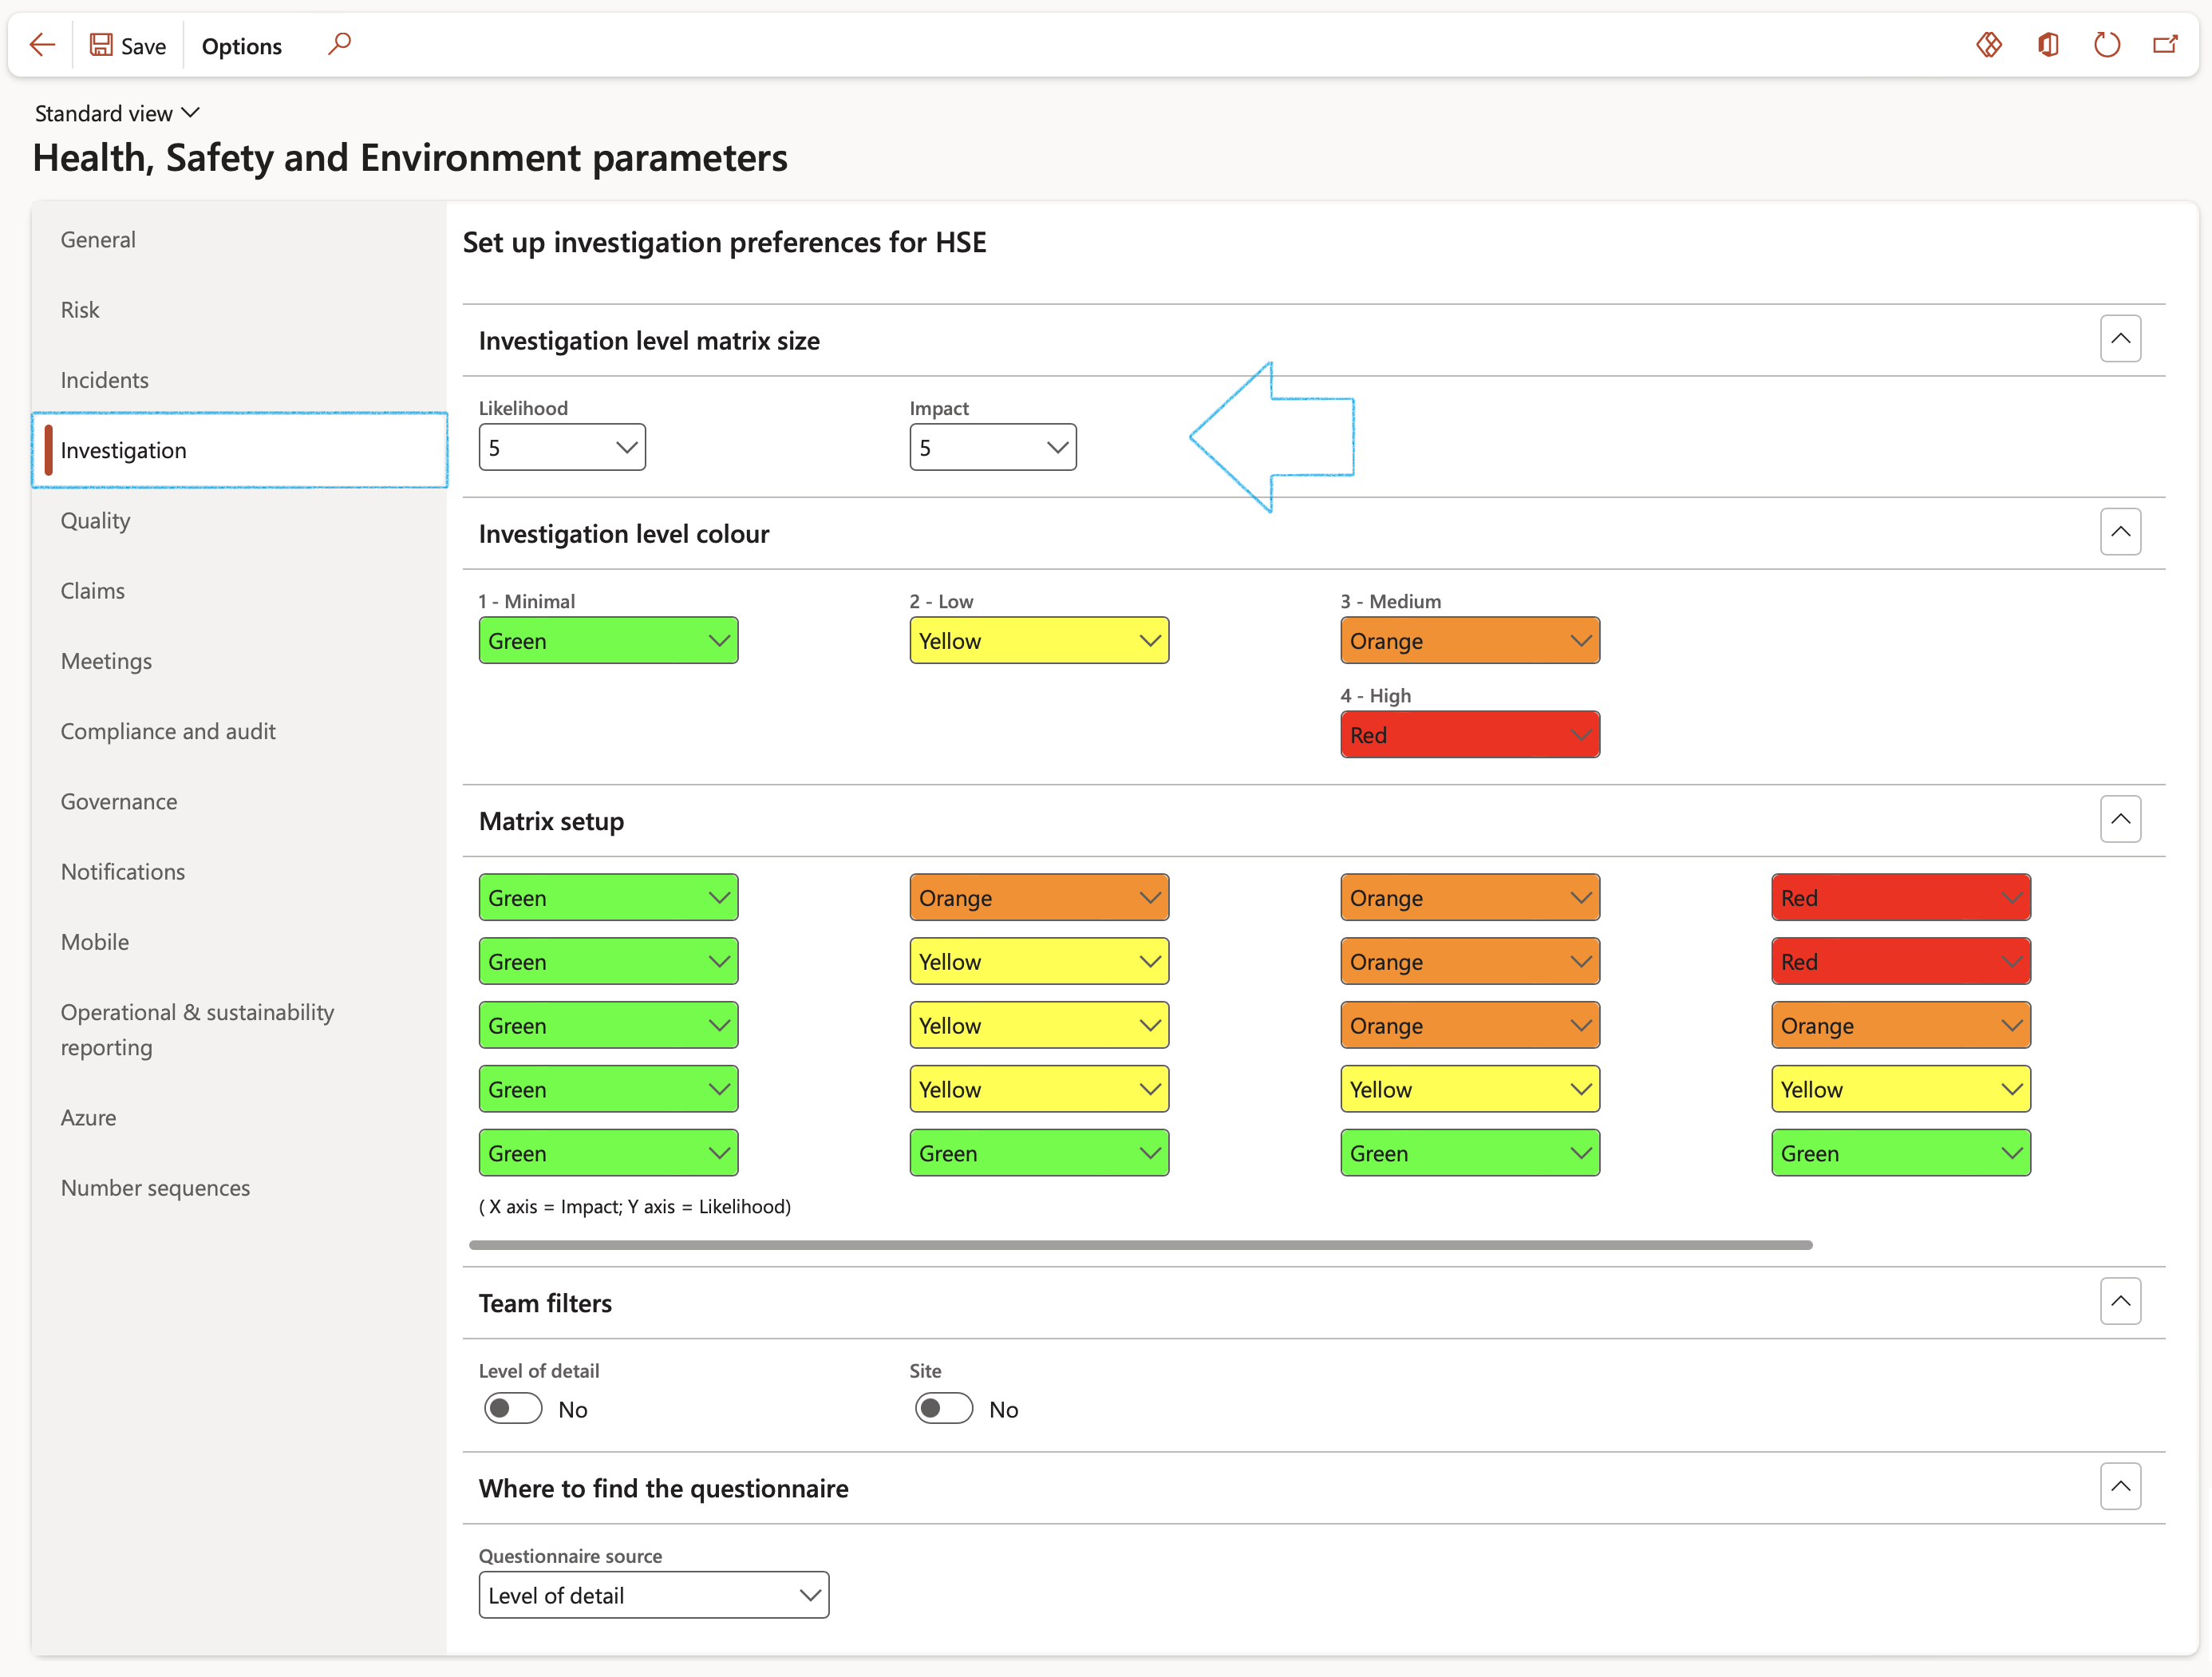
- Open the Investigation tab
- Under the Investigation level matrix size field group, select the required levels for Likelihood and Impact
¶ Step 2: Setup Substance categories
Go to: HSE > Environmental > Setup for environmental > Substance categories
- On the Action pane, click on the New button
- In the Substance category ID field, enter a name for the category
- Select a substance Category type from the dropdown list
- Enter a brief Description of the substance category
- Select a Colour to represent the substance category
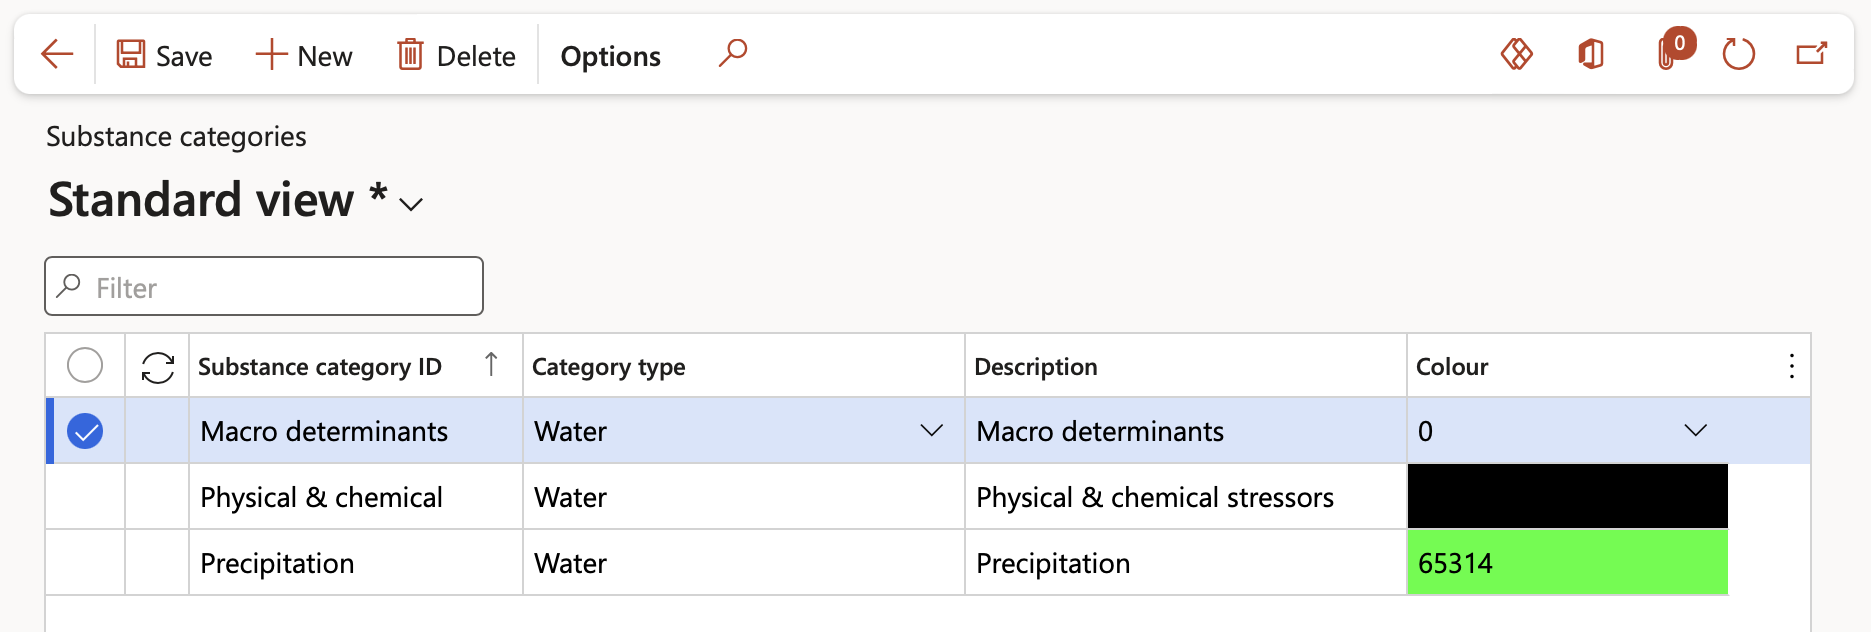
Selecting a category will restrict the units of the substance
¶ Step 3: Setup Substances
Any material that possesses physical properties is called a substance
Go to: HSE > Environmental > Substances
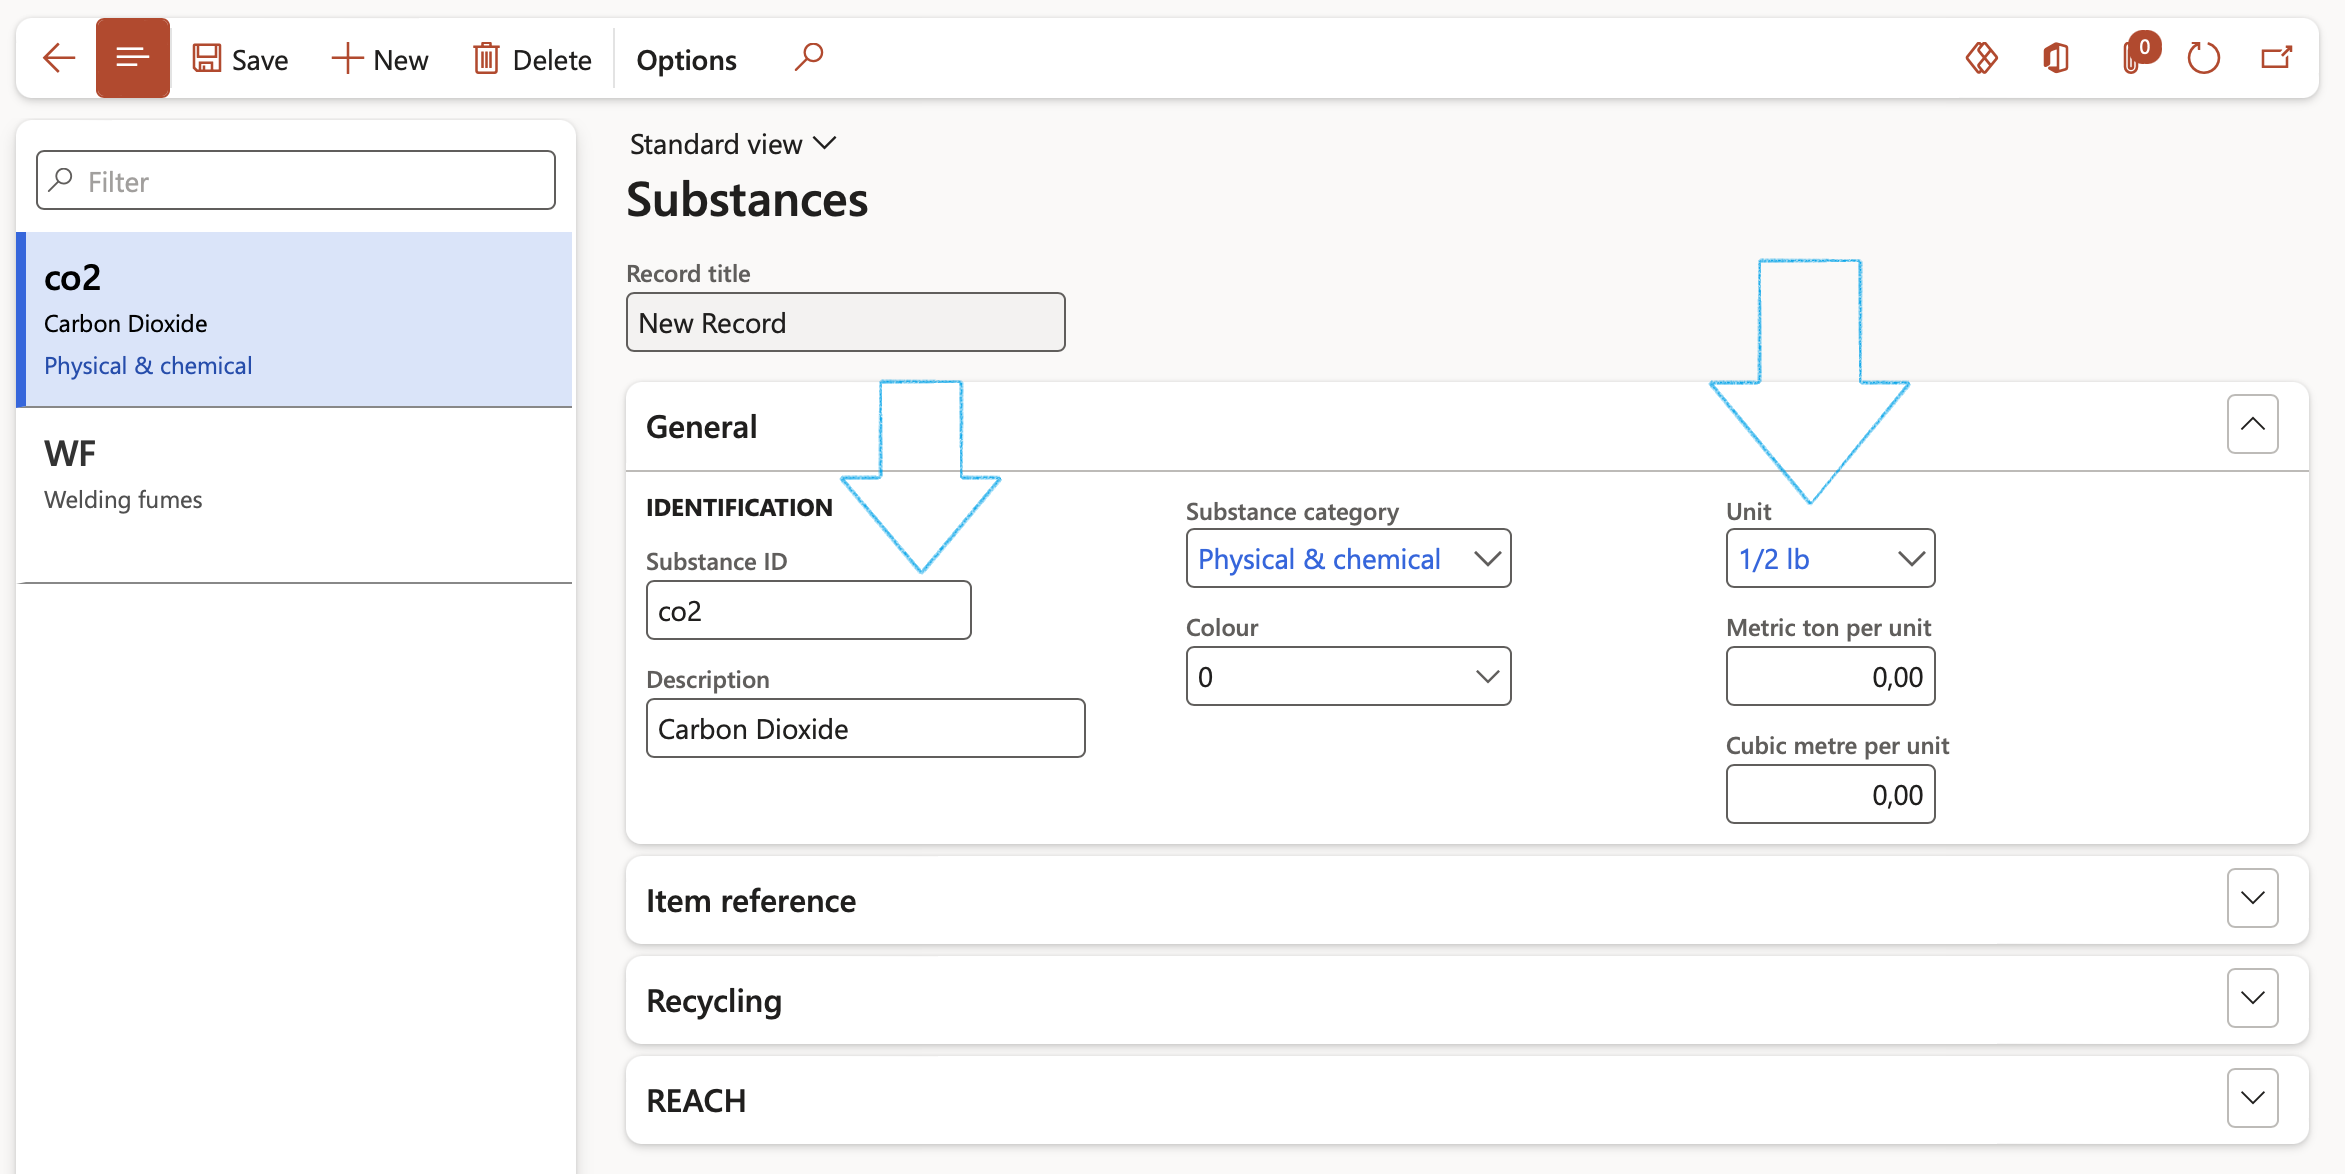
- On the Action pane, click on the New button
- In the Substance ID field, enter the name of the substance used in the process
- Enter a brief Description of the substance
- Select a Colour to represent the substance
- Select the Category that the substance belongs to
- Select the Unit of measurement for the substance
¶ Step 4: Setup Analytical requirement detail
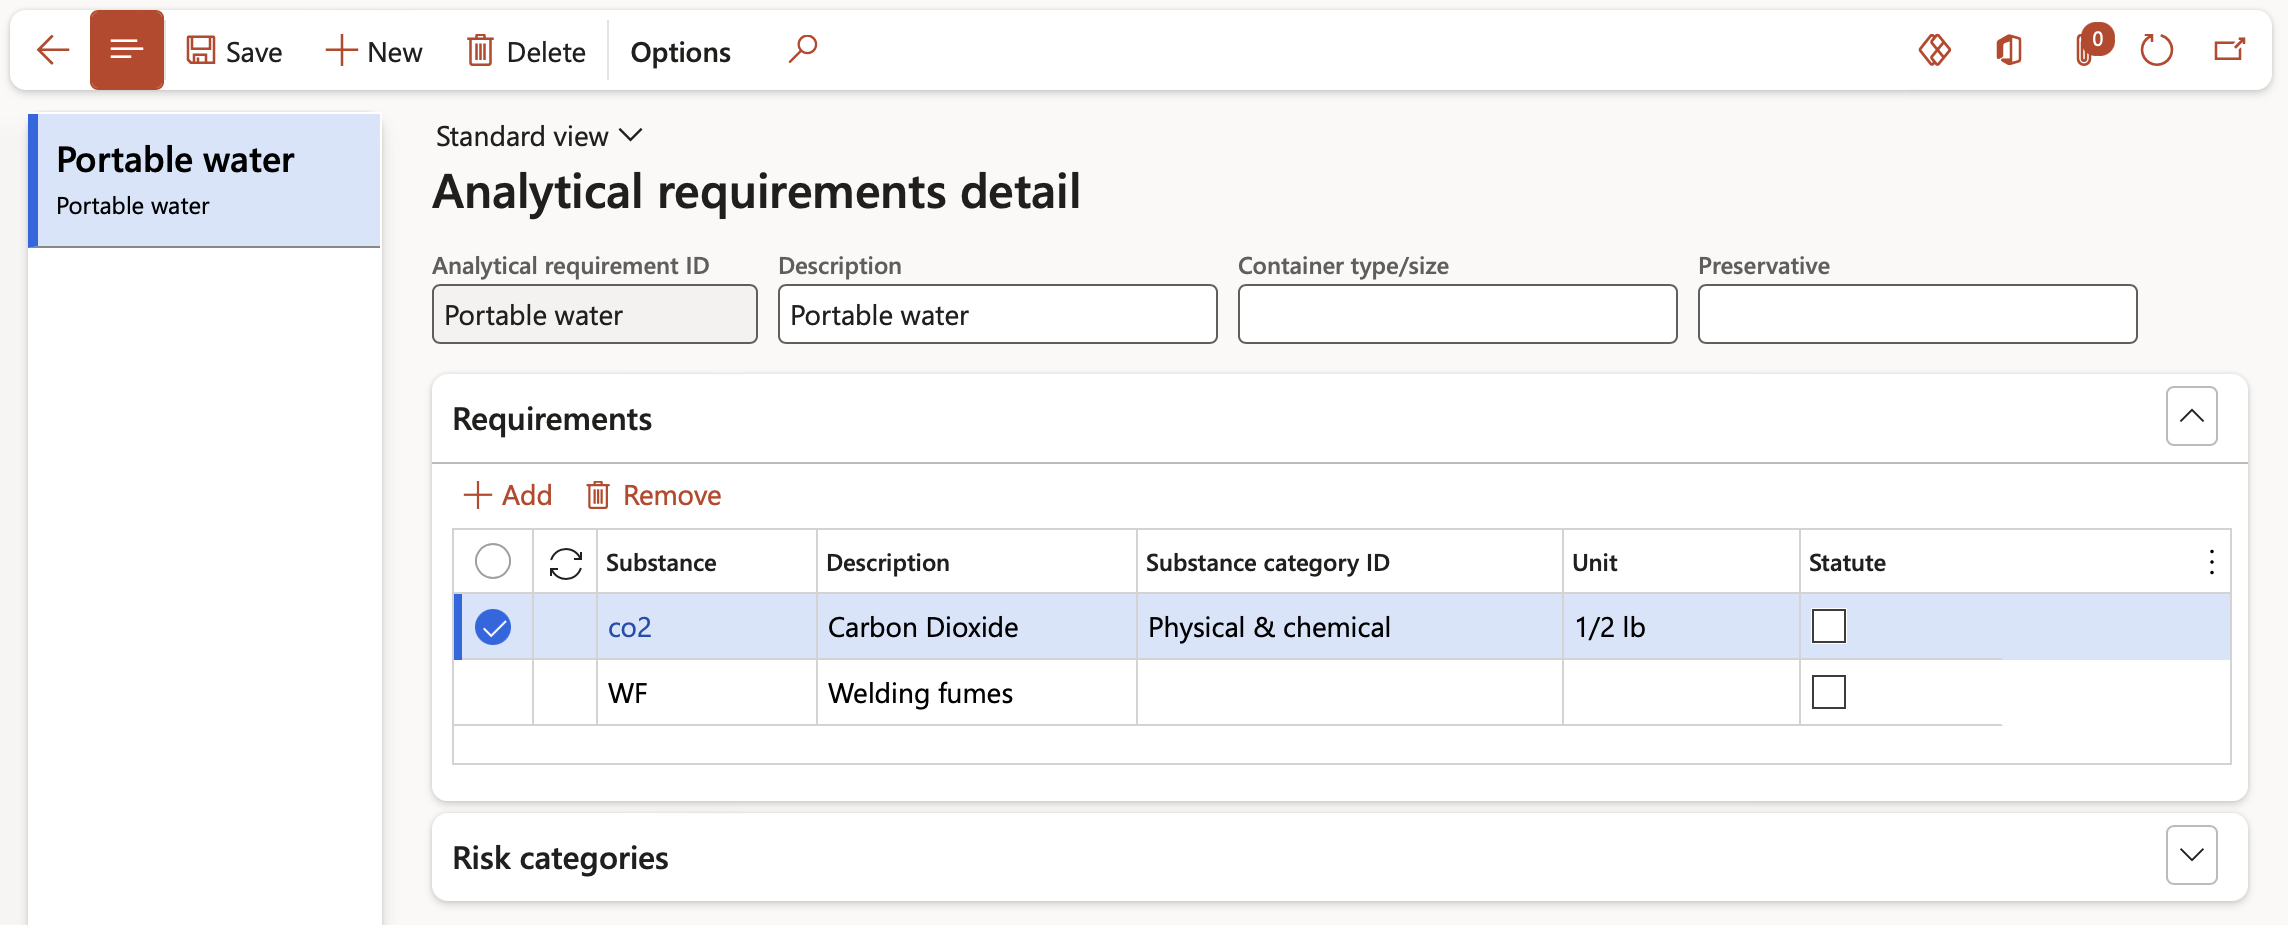
The Analytical requirements detail form lists substances that need to be tested for in a sample which is sent to be analyzed for monitoring purposes. The required quality measurements (min and max limits) of these substances are captured on this form, and displayed on the Monitoring form under the Results Fast tab
Go to: HSE > Environmental > Setup for environmental > Analytical requirements detail
- On the Action pane, click on the New button
- Enter the unique Analytical requirement ID
- Enter a brief Description of the analytical requirement
- Specify the Container type and size to use when a sample is taken
- Specify how this sample must be Preserved
- Expand the Requirements Fast tab
- In the Button strip, click on the Add button
- Select the relevant Substance used in the process, from the dropdown list
- The Description, Substance category ID and Unit fields will be populated according to the selected Substance
- If required, tick the Statute box as indicator
Risk categories are added per selected Substance under the Requirements Fast tab above
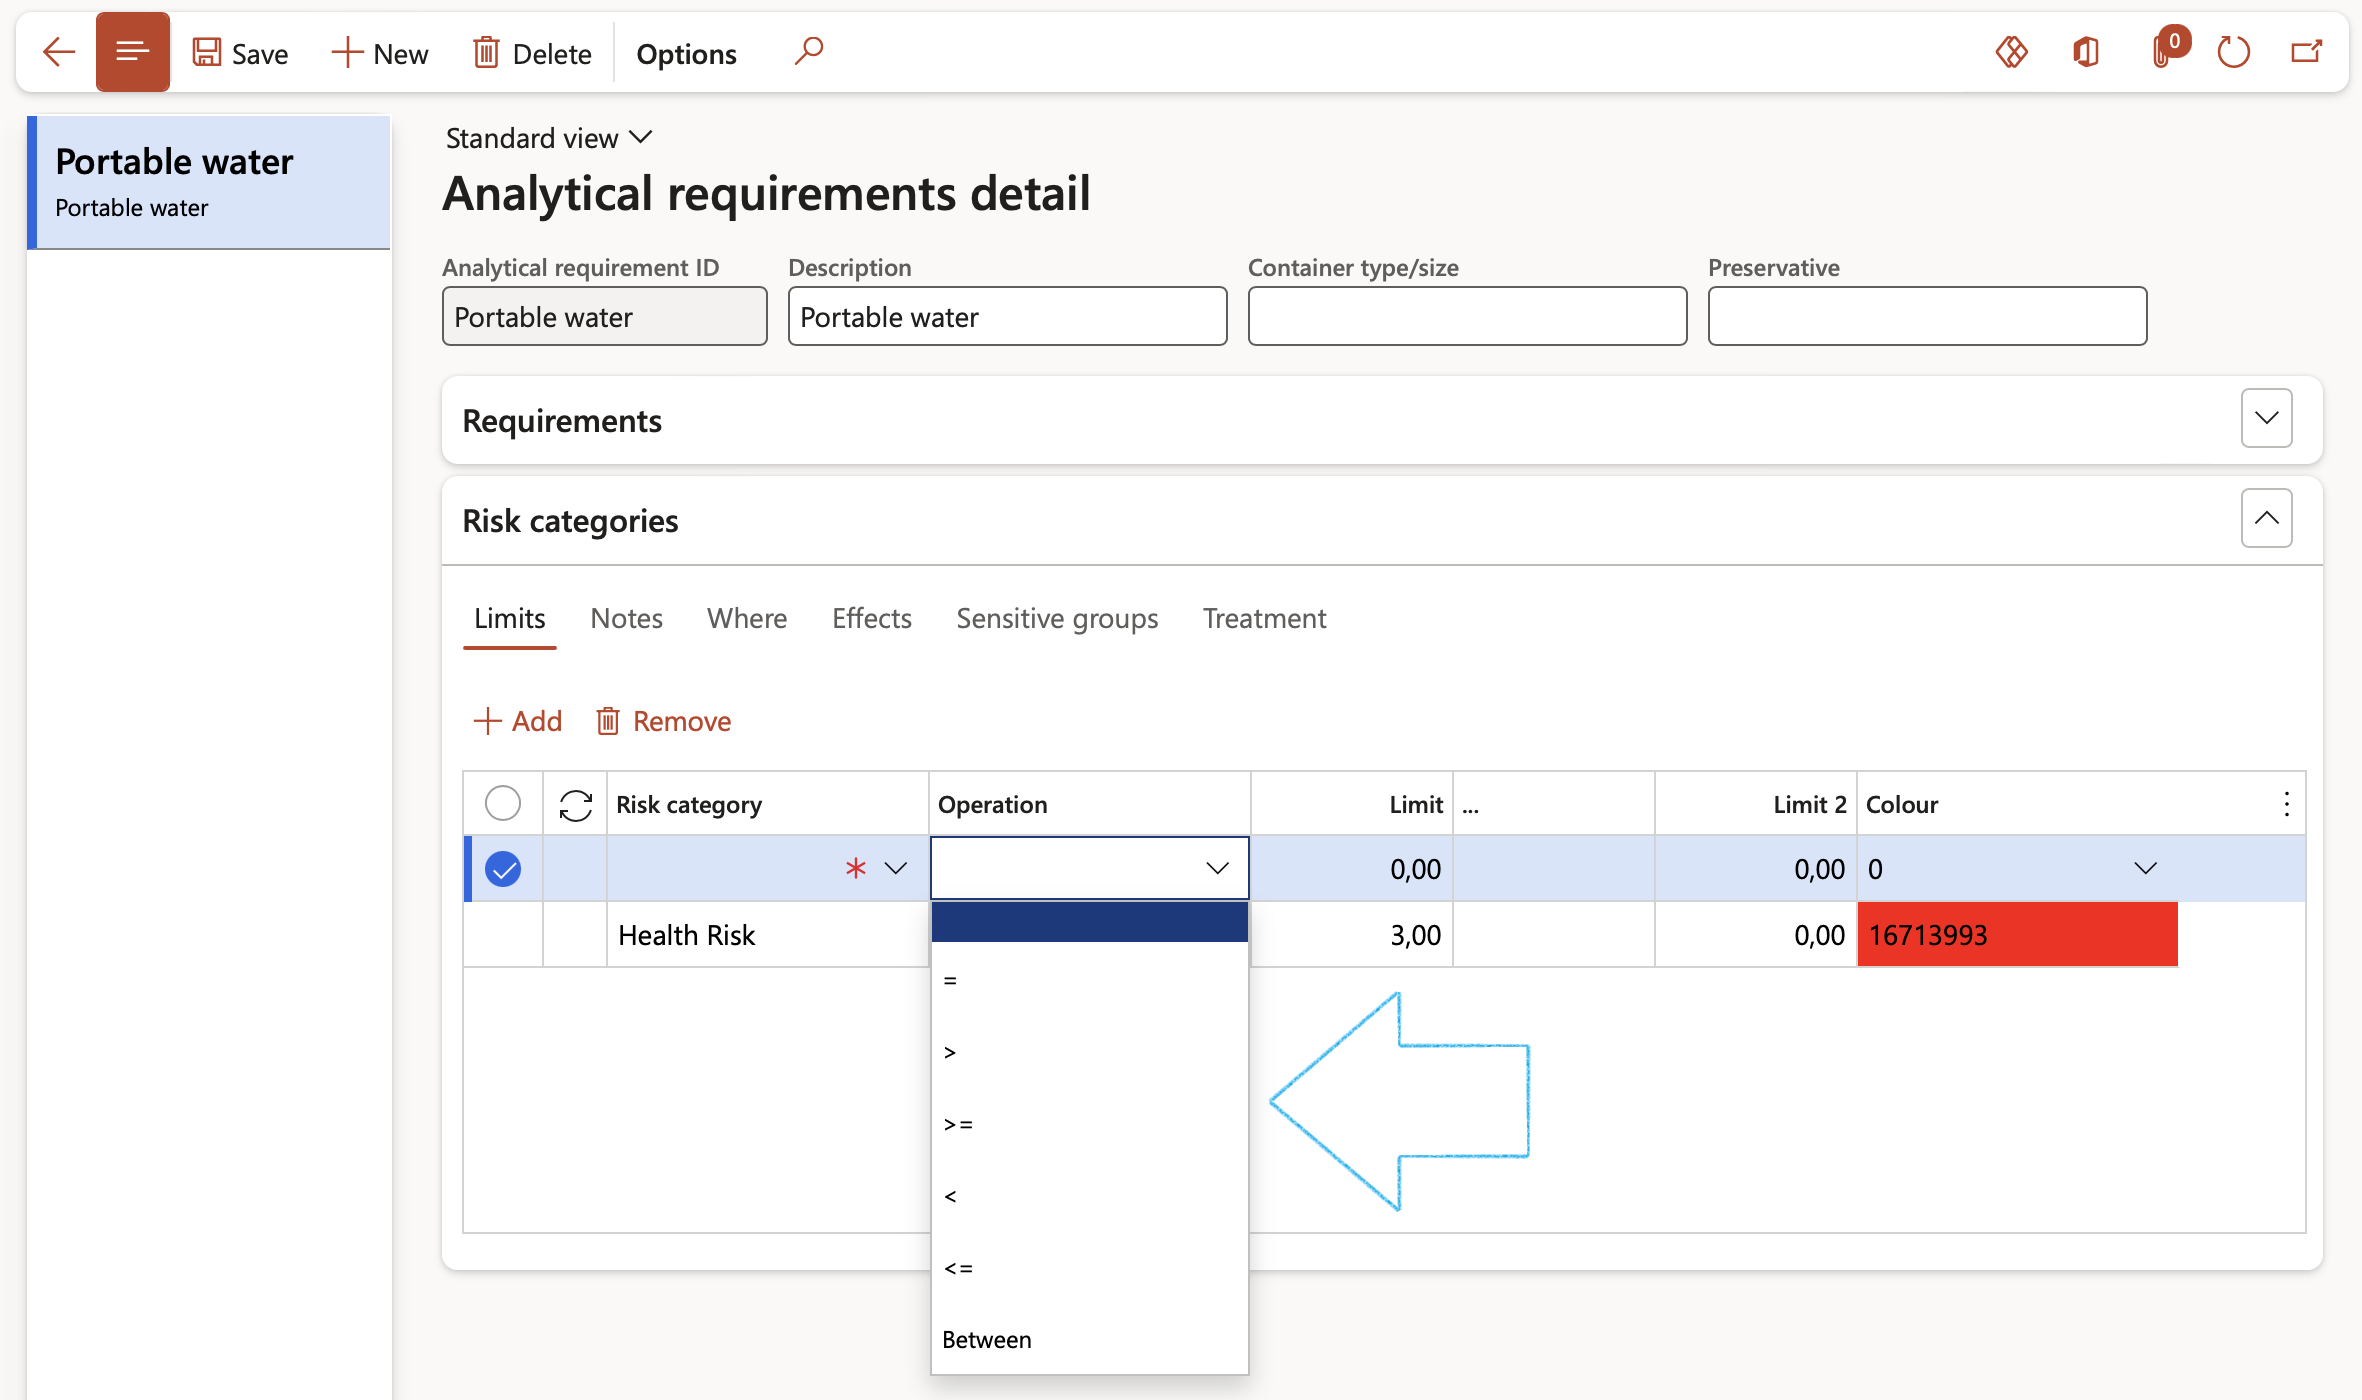
- Expand the Risk categories Fast tab
- Open the Limits Index tab
- In the Button strip, click on the Add button
- Select the relevant Risk category from the dropdown list
- Select the relevant Operation from the dropdown list
- Enter the set Limit value
- The value in the ”…” field will depend on the selection made in the Operation field
- Enter the set Limit 2 value
- Select the Colour if applicable
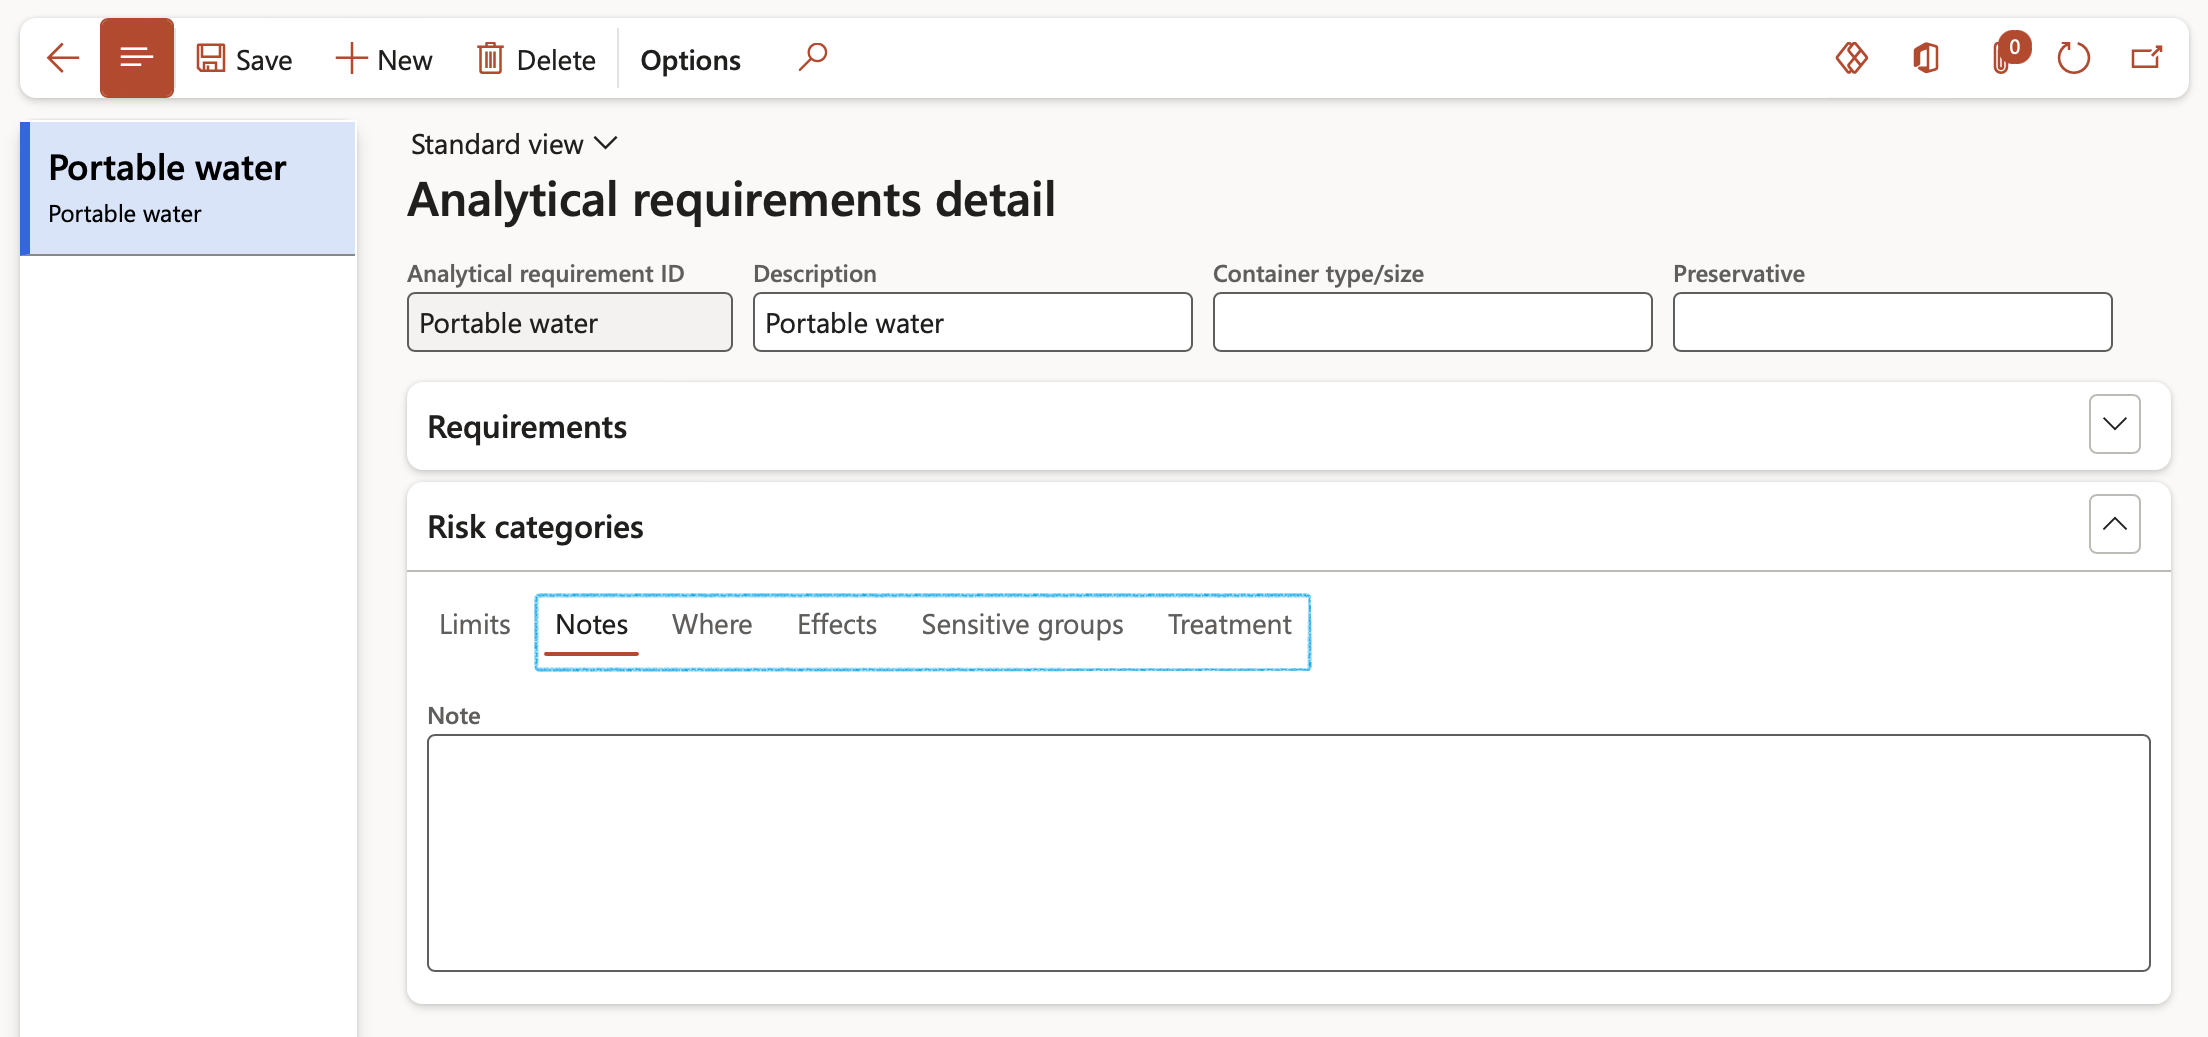
- Open the Notes Index tab and enter additional Notes in the box provided
- Open the Where Index tab and enter details on where the risk is found
- Open the Effects Index tab and enter the effects caused by this risk category
- Open the Sensitive groups Index tab and enter the individuals affected by the risk category
- Open the Treatment Index tab and enter details of the treatment that will rectify the problem
¶ Step 5: Setup Sample types
Go to: HSE > Environmental > Setup for environmental > Sample types
- On the Action pane, click on the New button
- Enter a Sample type ID
- Enter a brief Description for the sample type
- Select the relevant Interval type from the dropdown list
- In the Interval type field, select the interval type at which the sampling should take place
- In the Interval field, enter a value
- Select the relevant Analytical requirement from the dropdown list
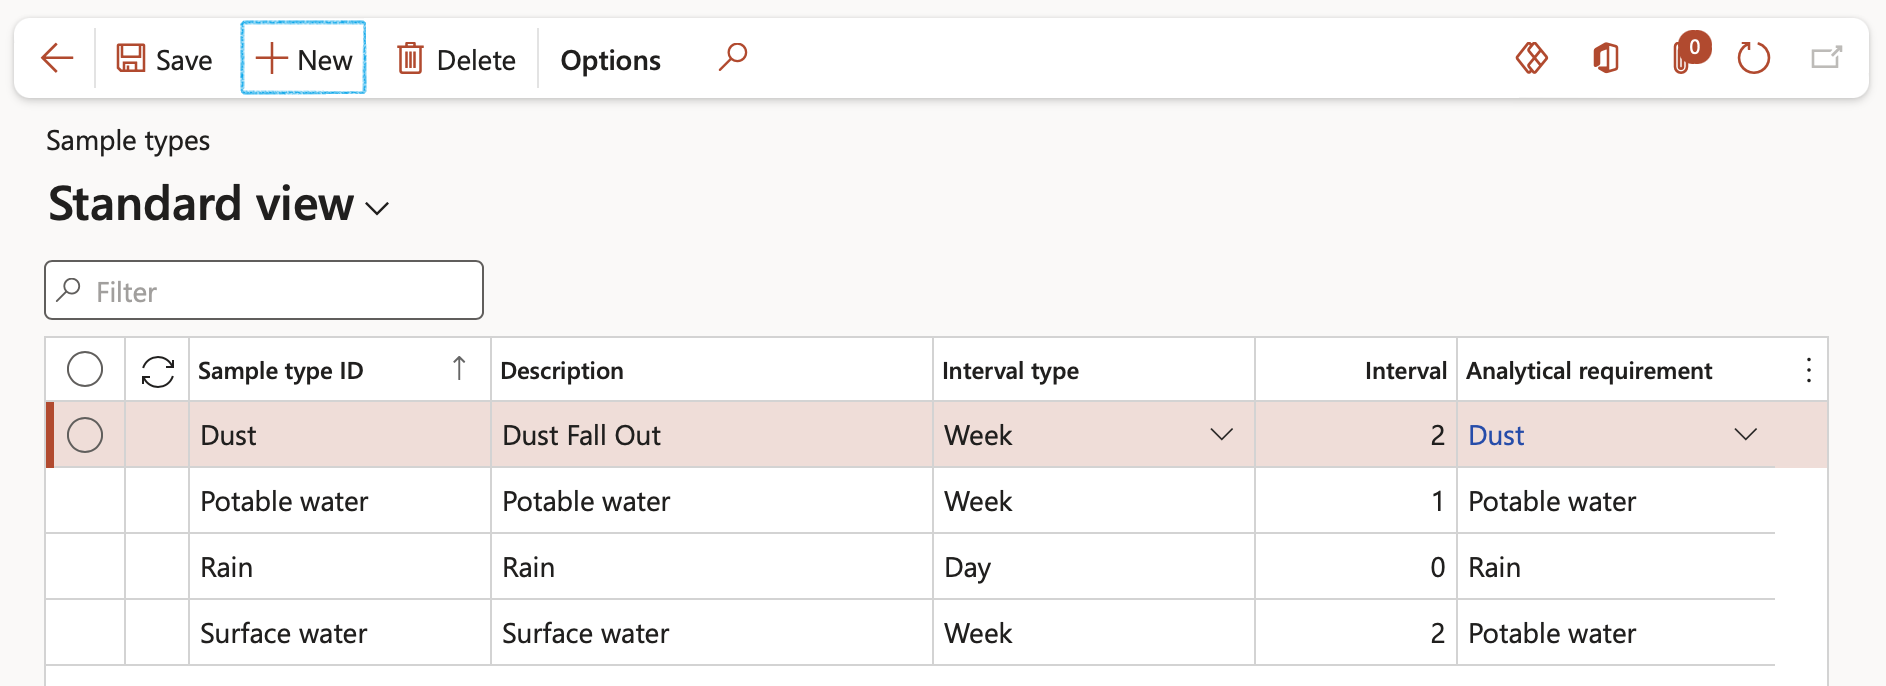
Example: If the Interval type is set to month and the Interval field has a value of 2, this means that monitoring for this type will occur every second month
¶ Step 6: Setup Monitoring points
Go to: HSE > Environmental > Water an dust sampling points
- On the Action pane, click on the New button
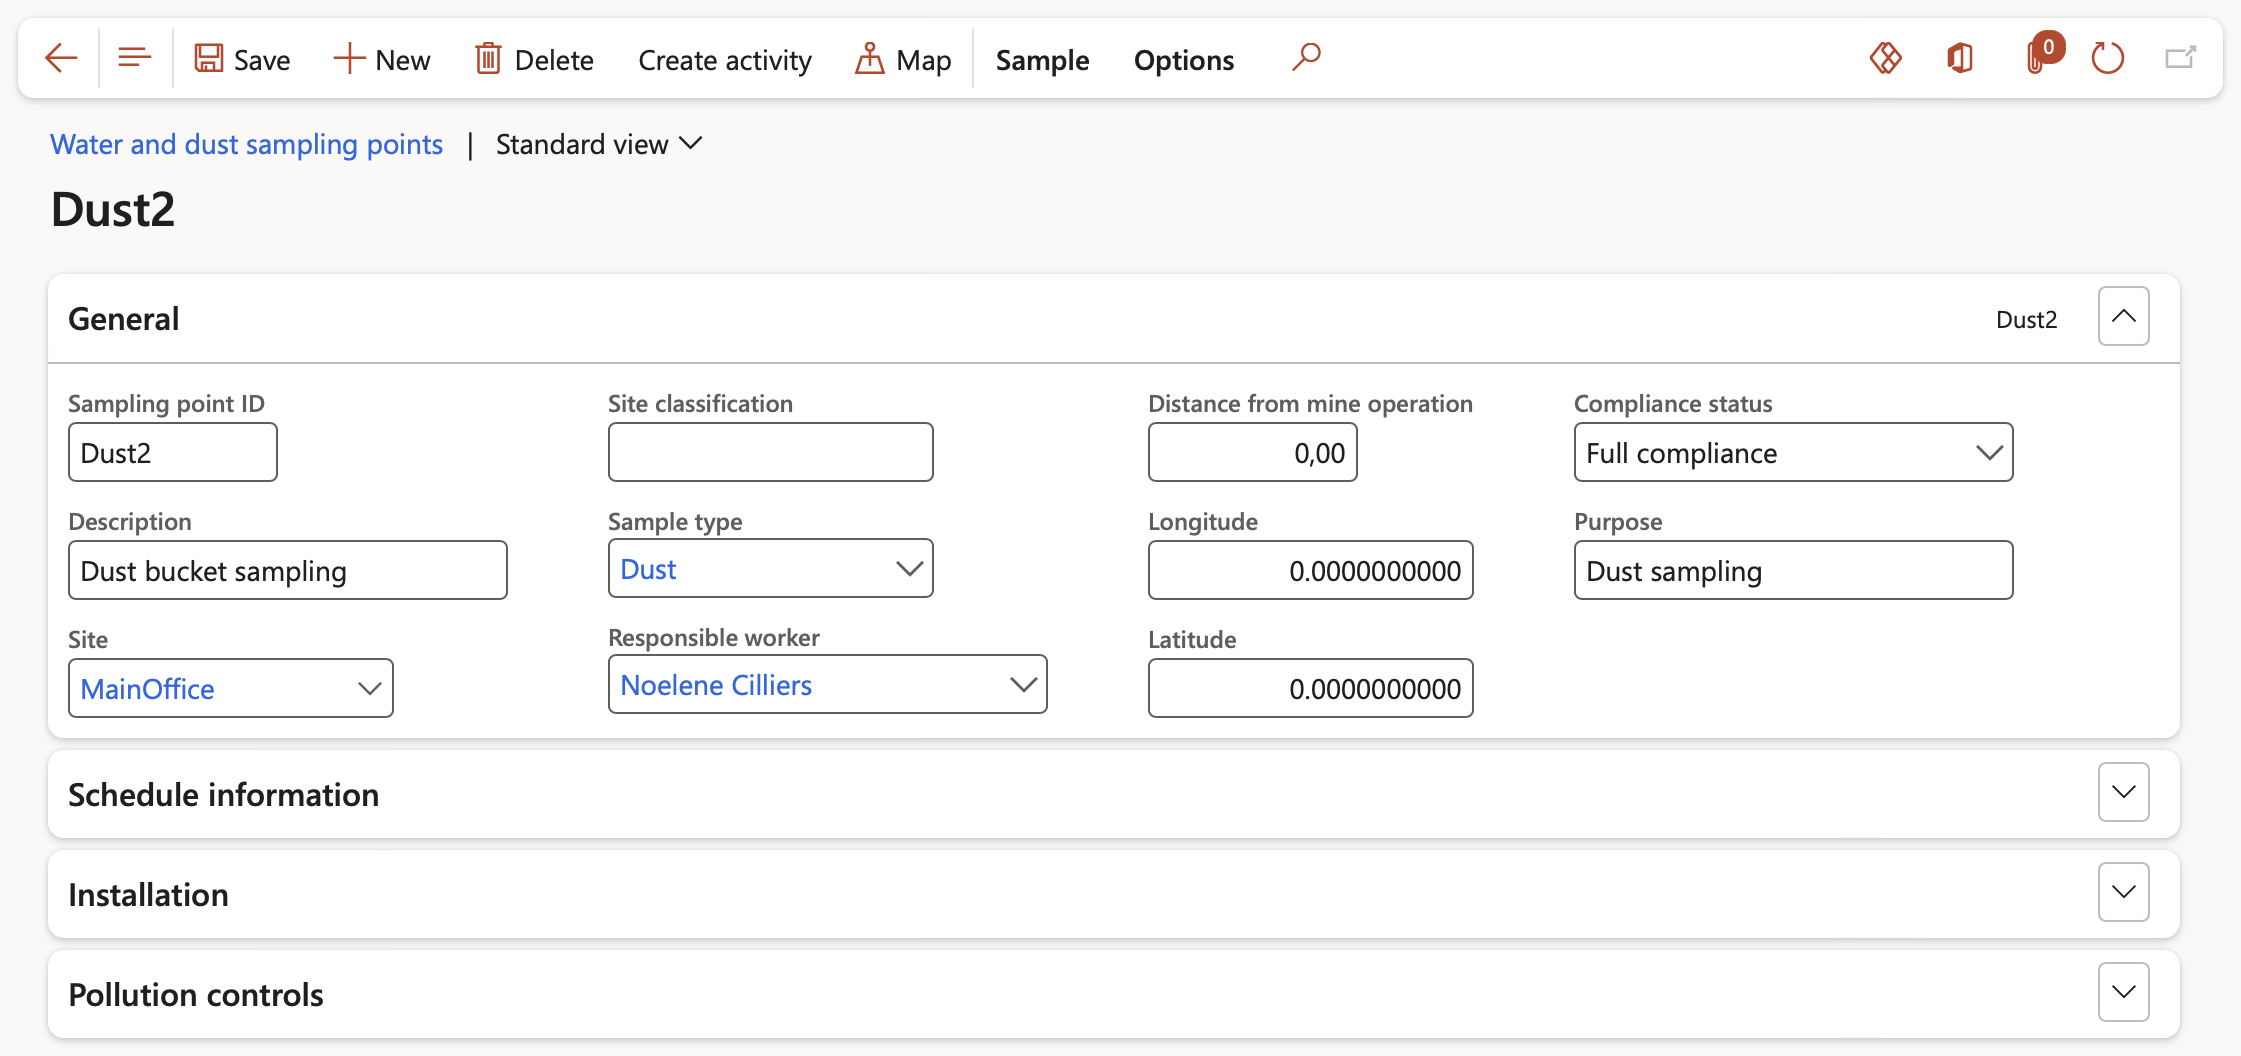
- Under the General Fast tab:
- Enter the unique Sampling point ID
- Select the relevant Site from the dropdown list
- Select the Sample type from the dropdown list
- Select the person Responsible for the sample from the dropdown list
- Enter the Latitude as well as the Longitude decimal values
- Select the Compliance status from the dropdown list
- Enter a Description of the sample point
- Enter the Purpose for the sample
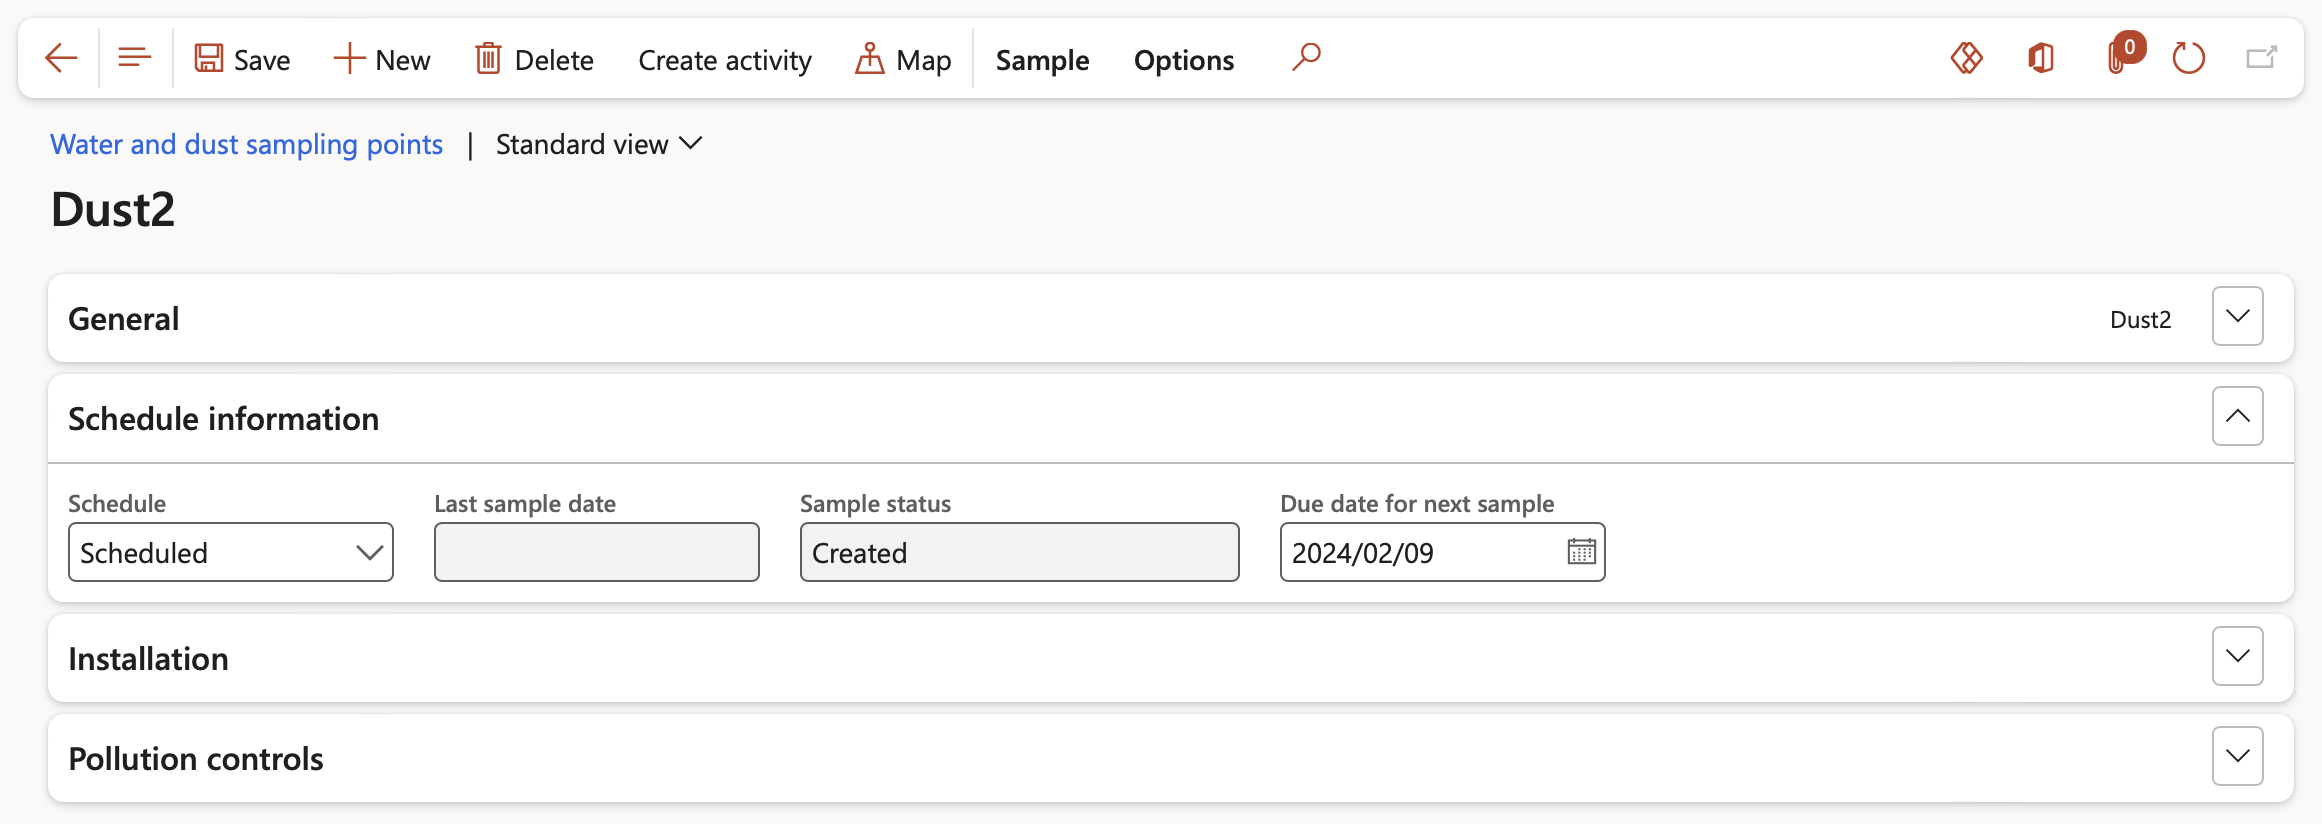
- Under the Schedule information Fast tab:
- Select the relevant Schedule from the dropdown list
- The Last sample status and Sample status are displayed
- The Due date for next sample can be changed if required
- Under the Installation Fast tab:
- Select the Installation date
- Under the Baseline data before operations started field group:
- Enter the Baseline Ground water level
- Enter the Baseline yield if applicable
- Under the Post operation data field group:
- Enter the Operational Ground water level
- Enter the Operational yield
- Enter Equipment used
- Enter Sampling technique if applicable

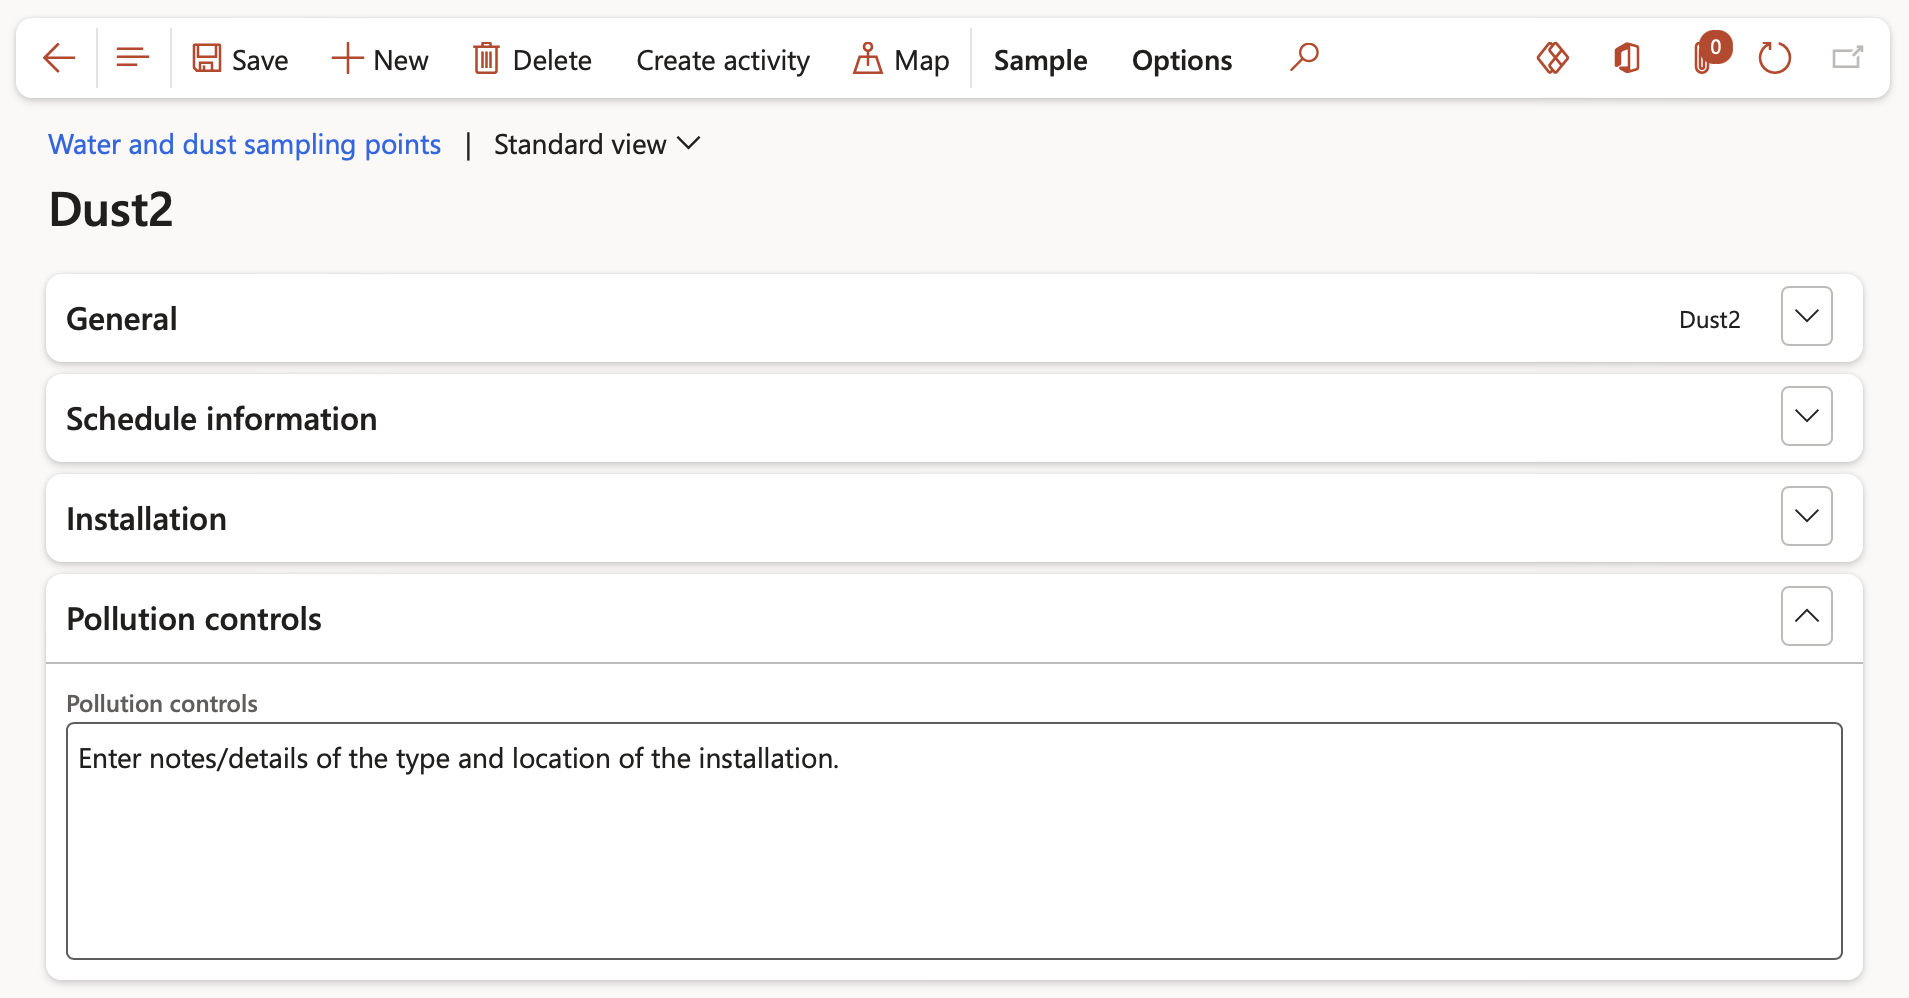
- Under the Pollution controls Fast tab:
- Enter the pollution control that is in place at this installation
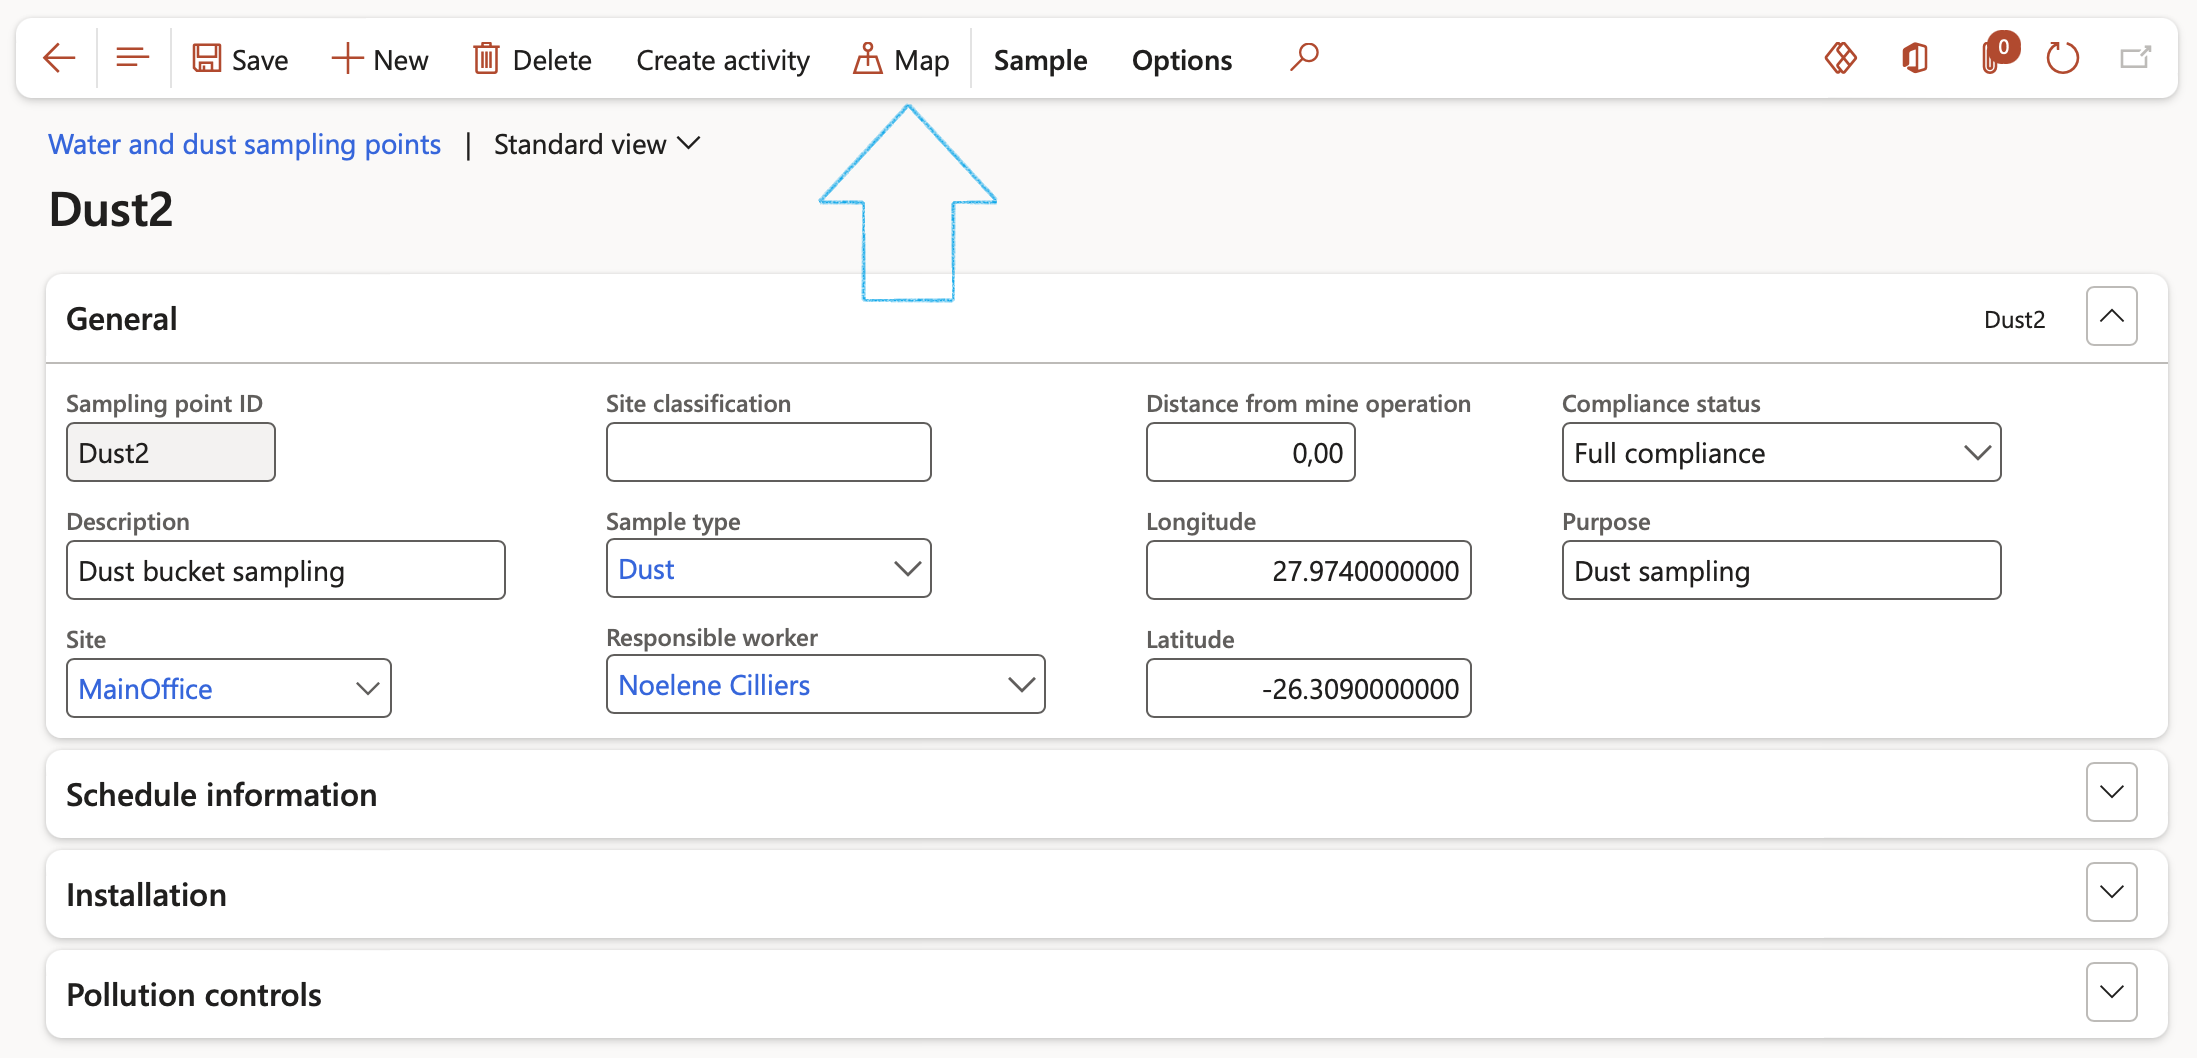
If the Longitude and Latitude decimal values are populated, one can make use of the Map button to view the point on Google maps.
To view a map of where the Sample point is located:
- On the Action pane, click on the Map button

¶ Step 7: Create the Causes
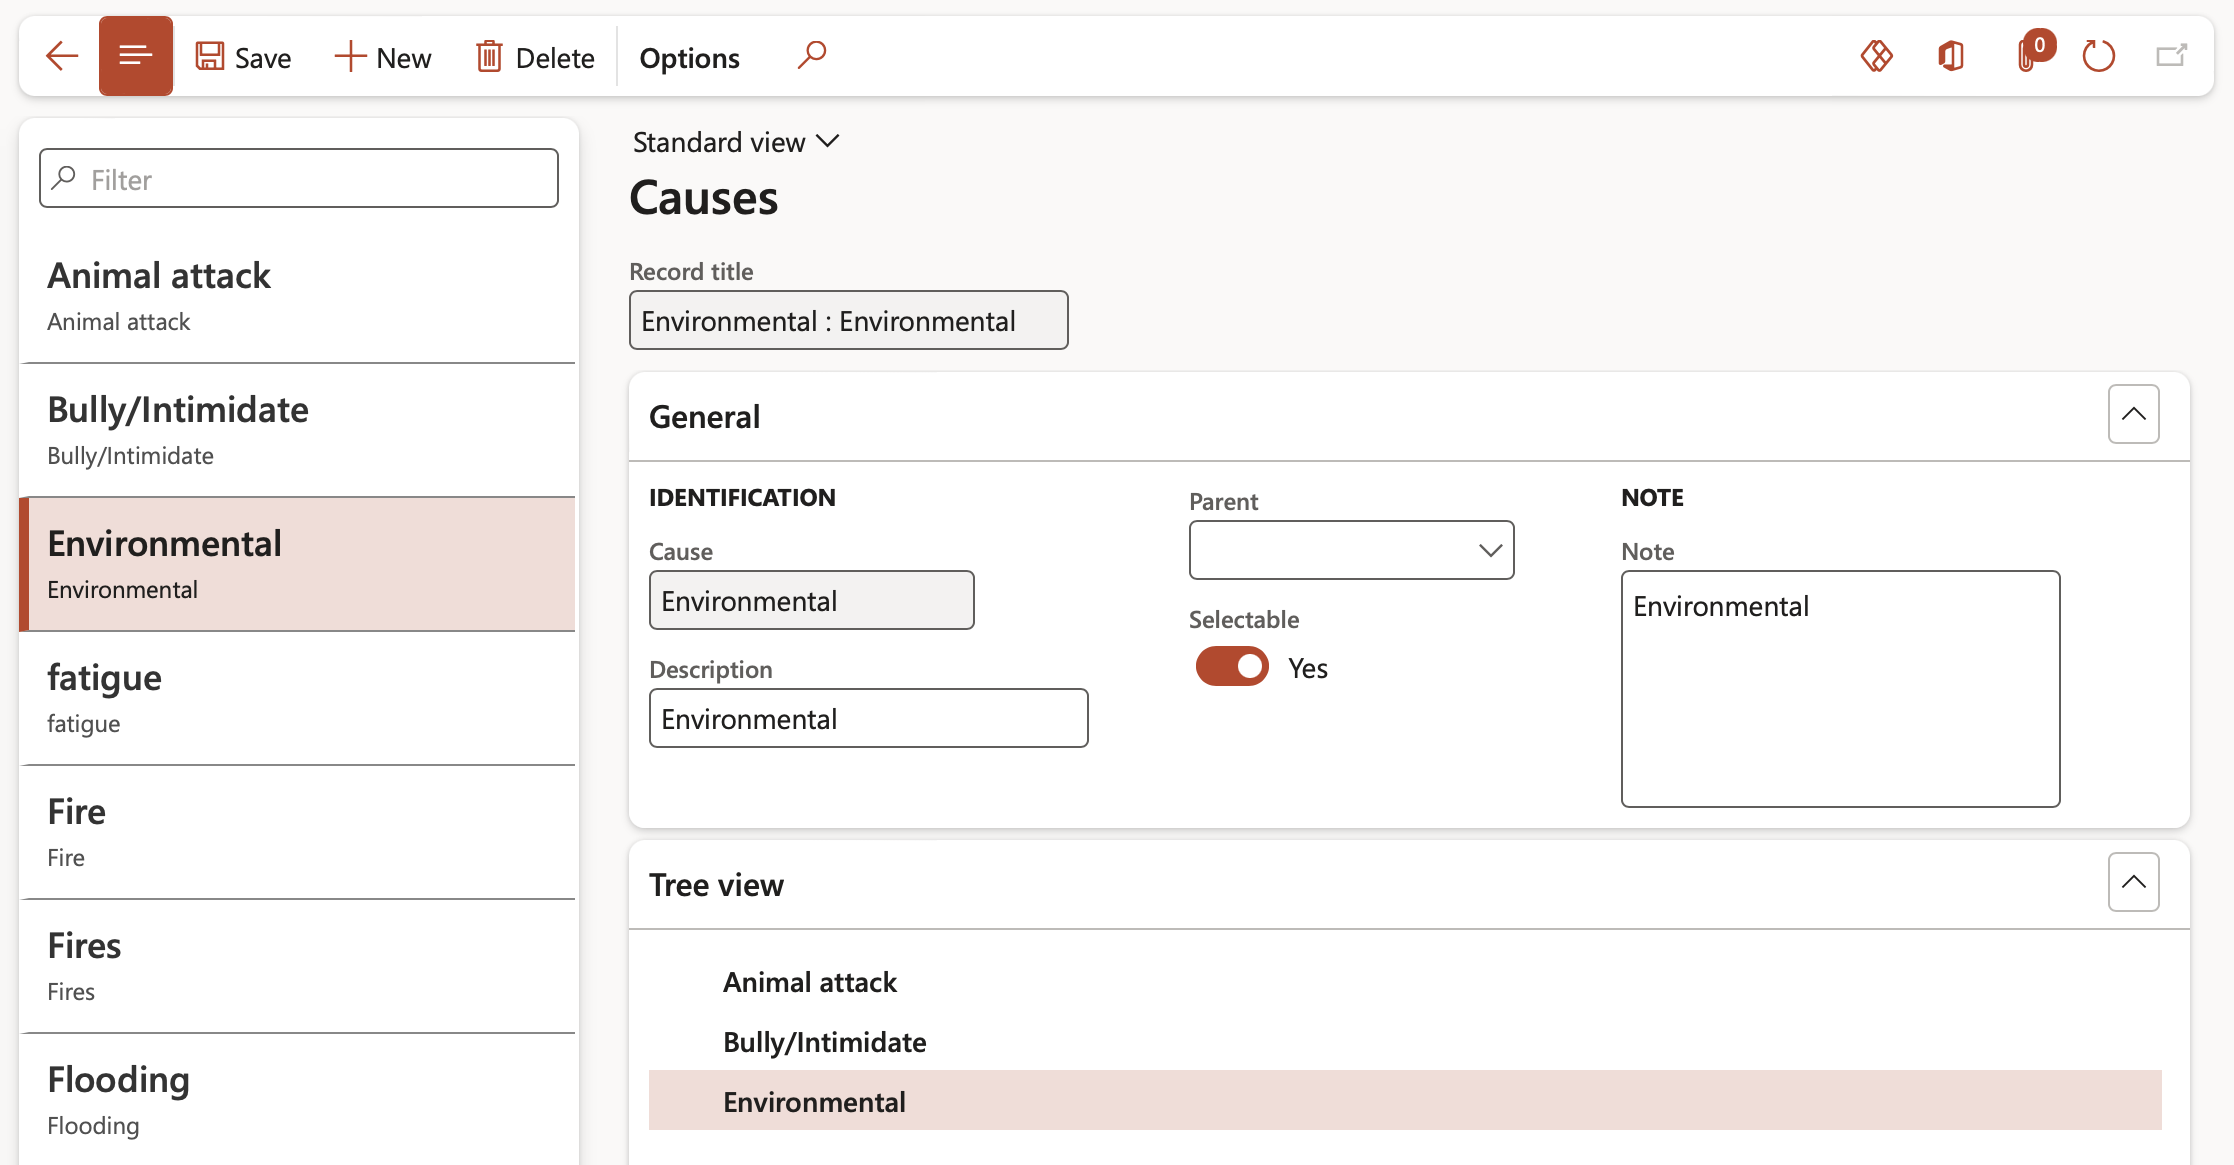
Causes are the possible reasons of why things went wrong. These are used when recording an incident, and also when changing them during an investigation.
Go to: HSE > Incidents > Setup for incidents > Causes
- Click New
- Add a Cause and Description
- Select the Parent if applicable
- If the tree node has to be selectable on defining an incident, move the Selectable slider to Yes
¶ Step 8: Define Nature of injury
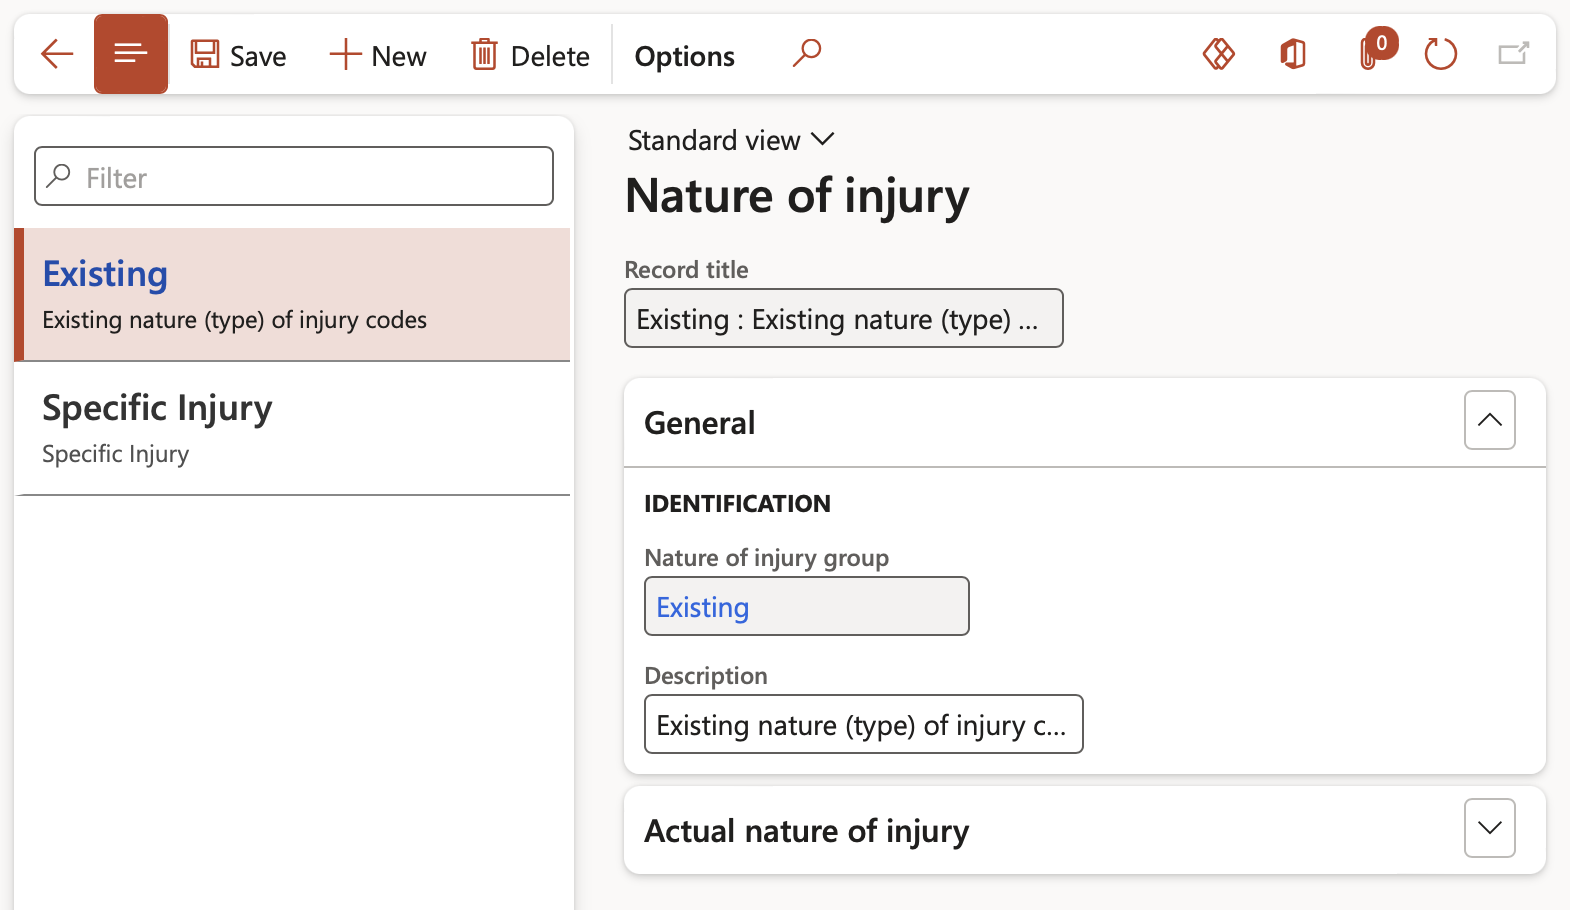
The nature of injury or illness identifies the principal physical characteristic(s) of the injury or illness.
Go to: HSE > Incidents > Setup for incidents > Nature of injury
¶ Step 9: Specify the Injury and illness details
To specify the Injury and illness details furthermore, the user should:
¶ Step 9.1: Define Injury or illness types
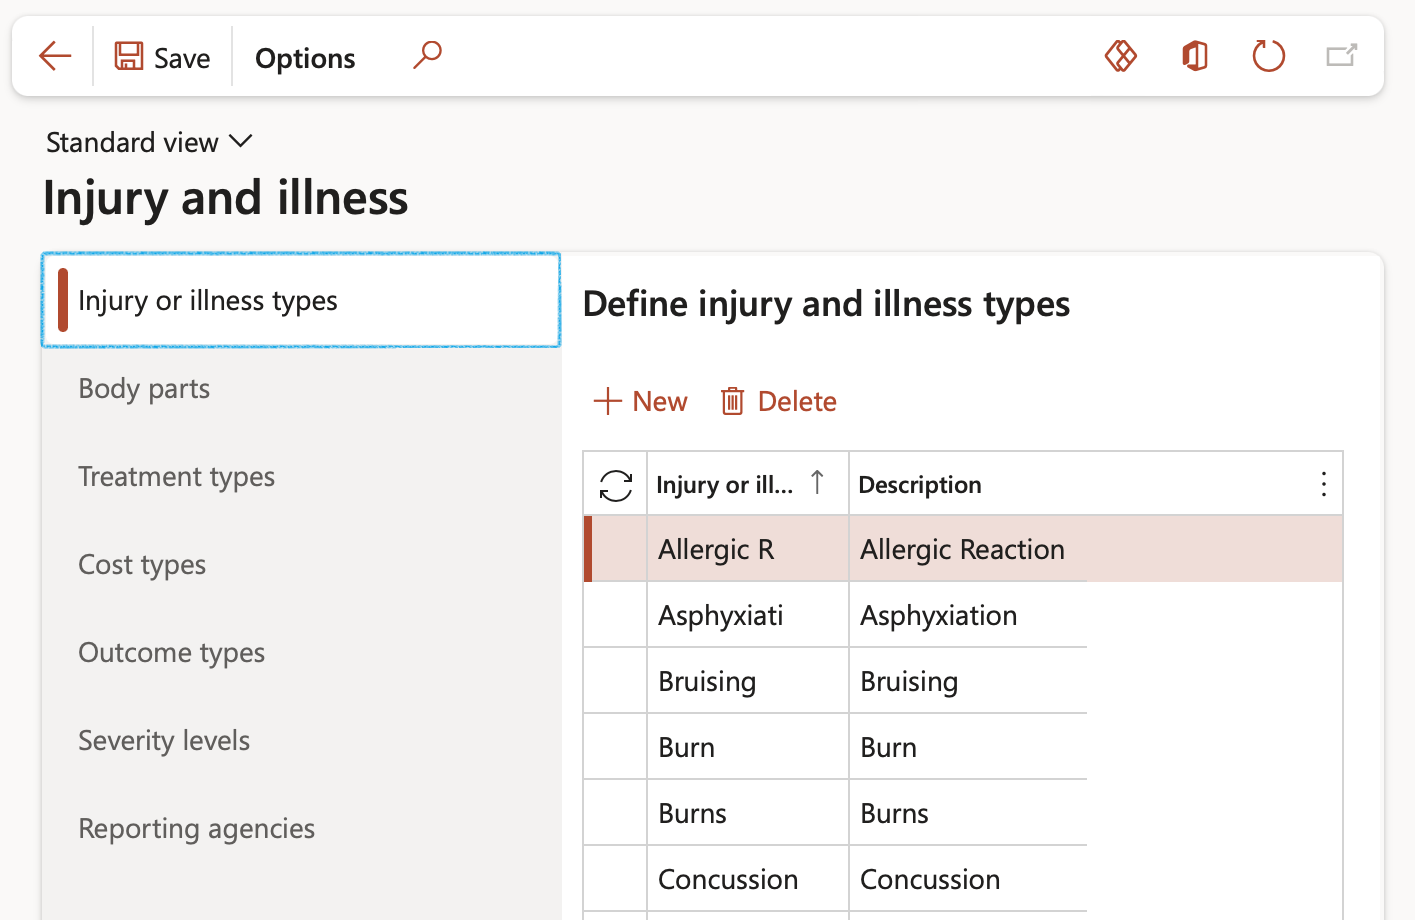
Go to: Human resources > Workers > Injury and illness > Injury and illness setup
- Open the Injury or illness types tab
- Click New
- Enter the Injury or illness type
- Enter a Description of the injury or illness type
¶ Step 9.2: Define Body parts
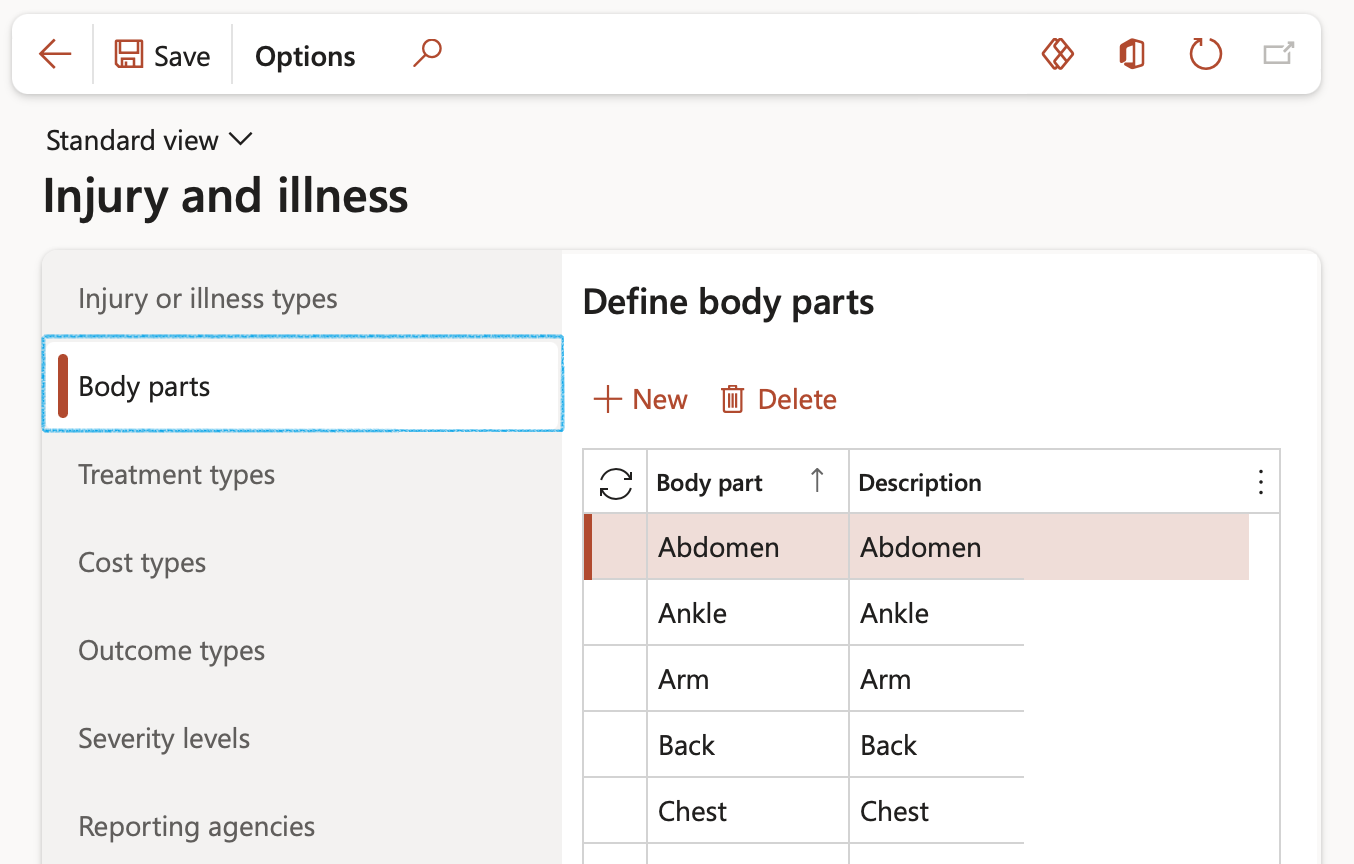
Go to: Human resources > Workers > Injury and illness > Injury and illness setup
- Open the Body parts tab
- Click New
- Enter the Body part
- Enter a Description of the body part
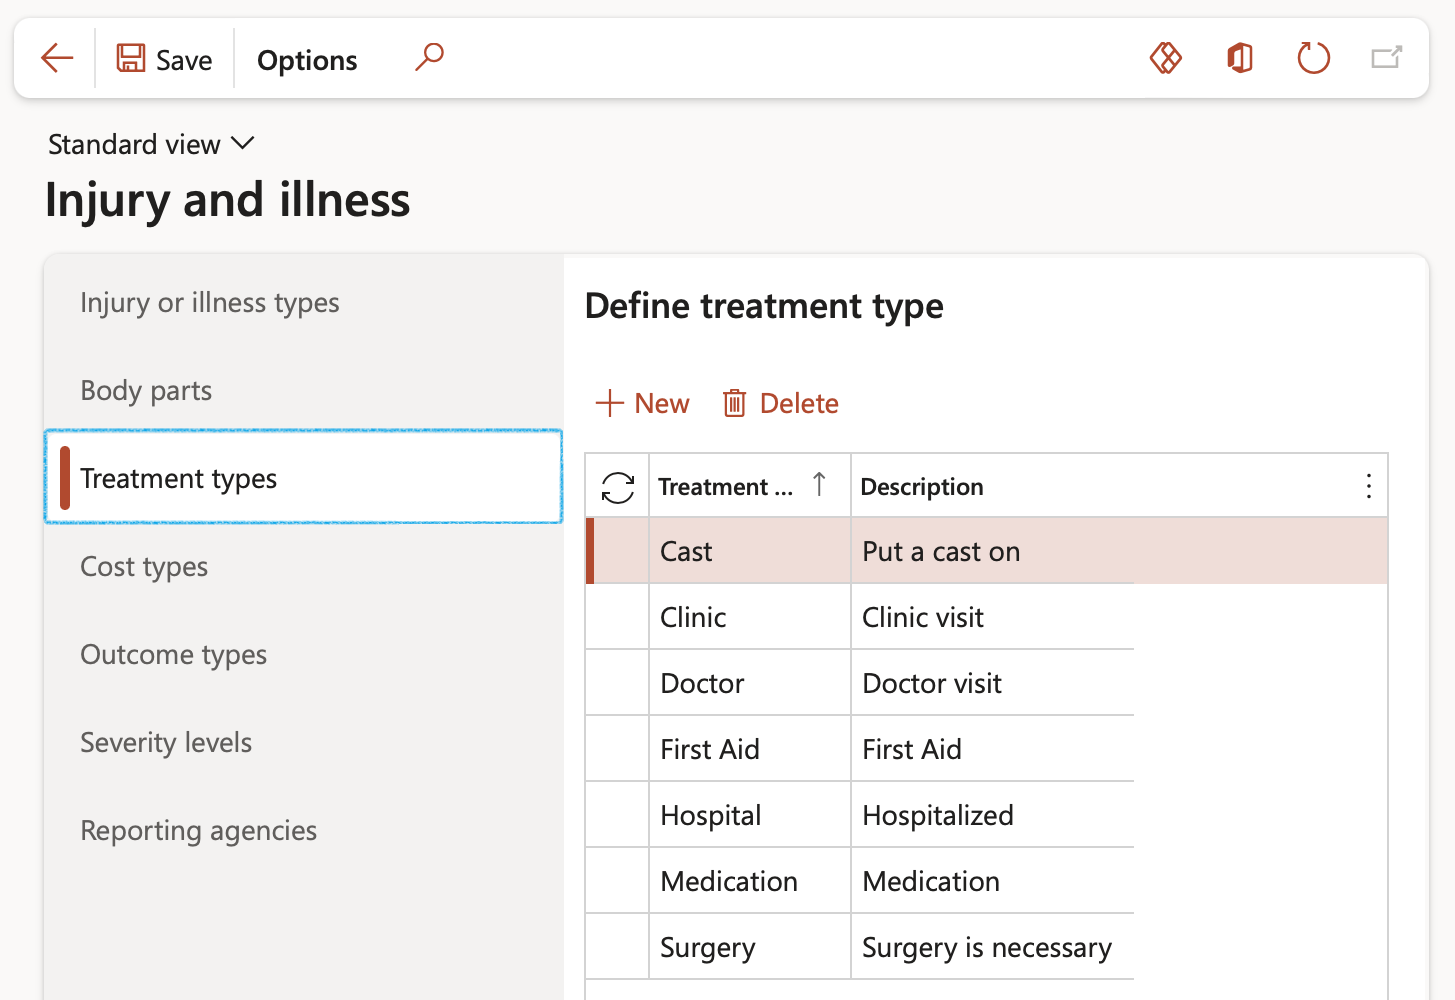
¶ Step 9.3: Define Treatment types
Go to: Human resources > Workers > Injury and illness > Injury and illness setup
- Open the Treatment types tab
- Click New
- Enter the Treatment type
- Enter a Description of the treatment type
¶ Step 9.4: Define Cost types
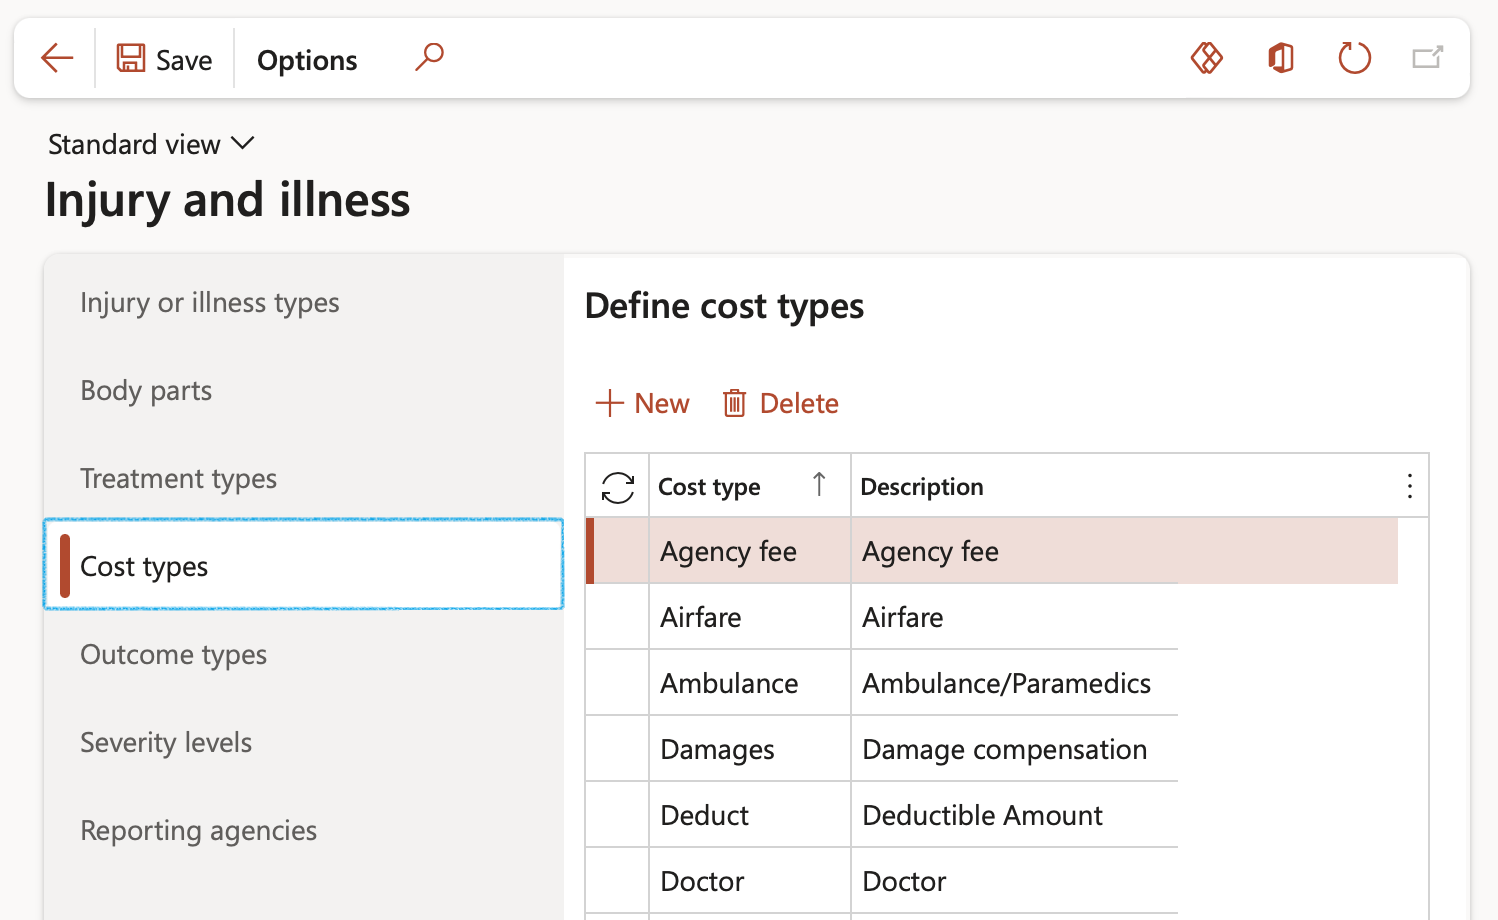
Go to: Human resources > Workers > Injury and illness > Injury and illness setup
- Open the Cost types tab
- Click New
- Enter the Cost type
- Enter a Description of the cost type
¶ Step 9.5: Define Outcome types
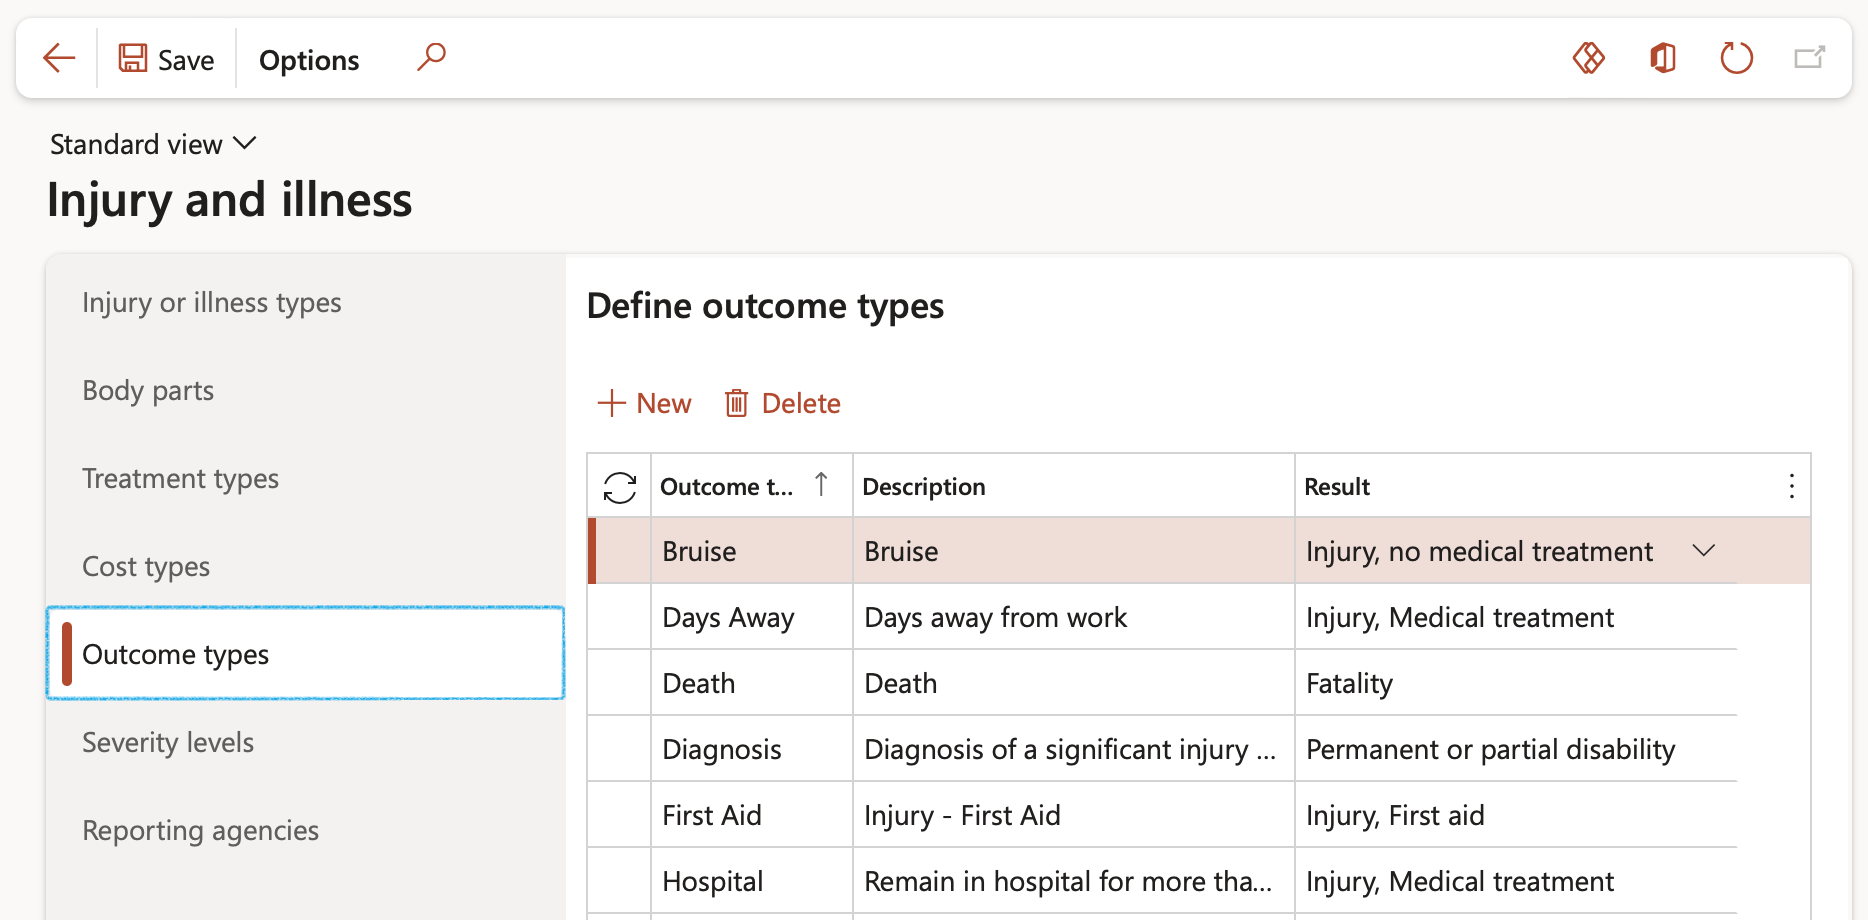
Go to: Human resources > Workers > Injury and illness > Injury and illness setup
- Open the Outcome types tab
- Click New
- Enter the Outcome type for the injury or illness
- Enter a Description of the injury or illness outcome type
- Select the relevant Result from the dropdown list
¶ Step 9.6: Define Severity levels
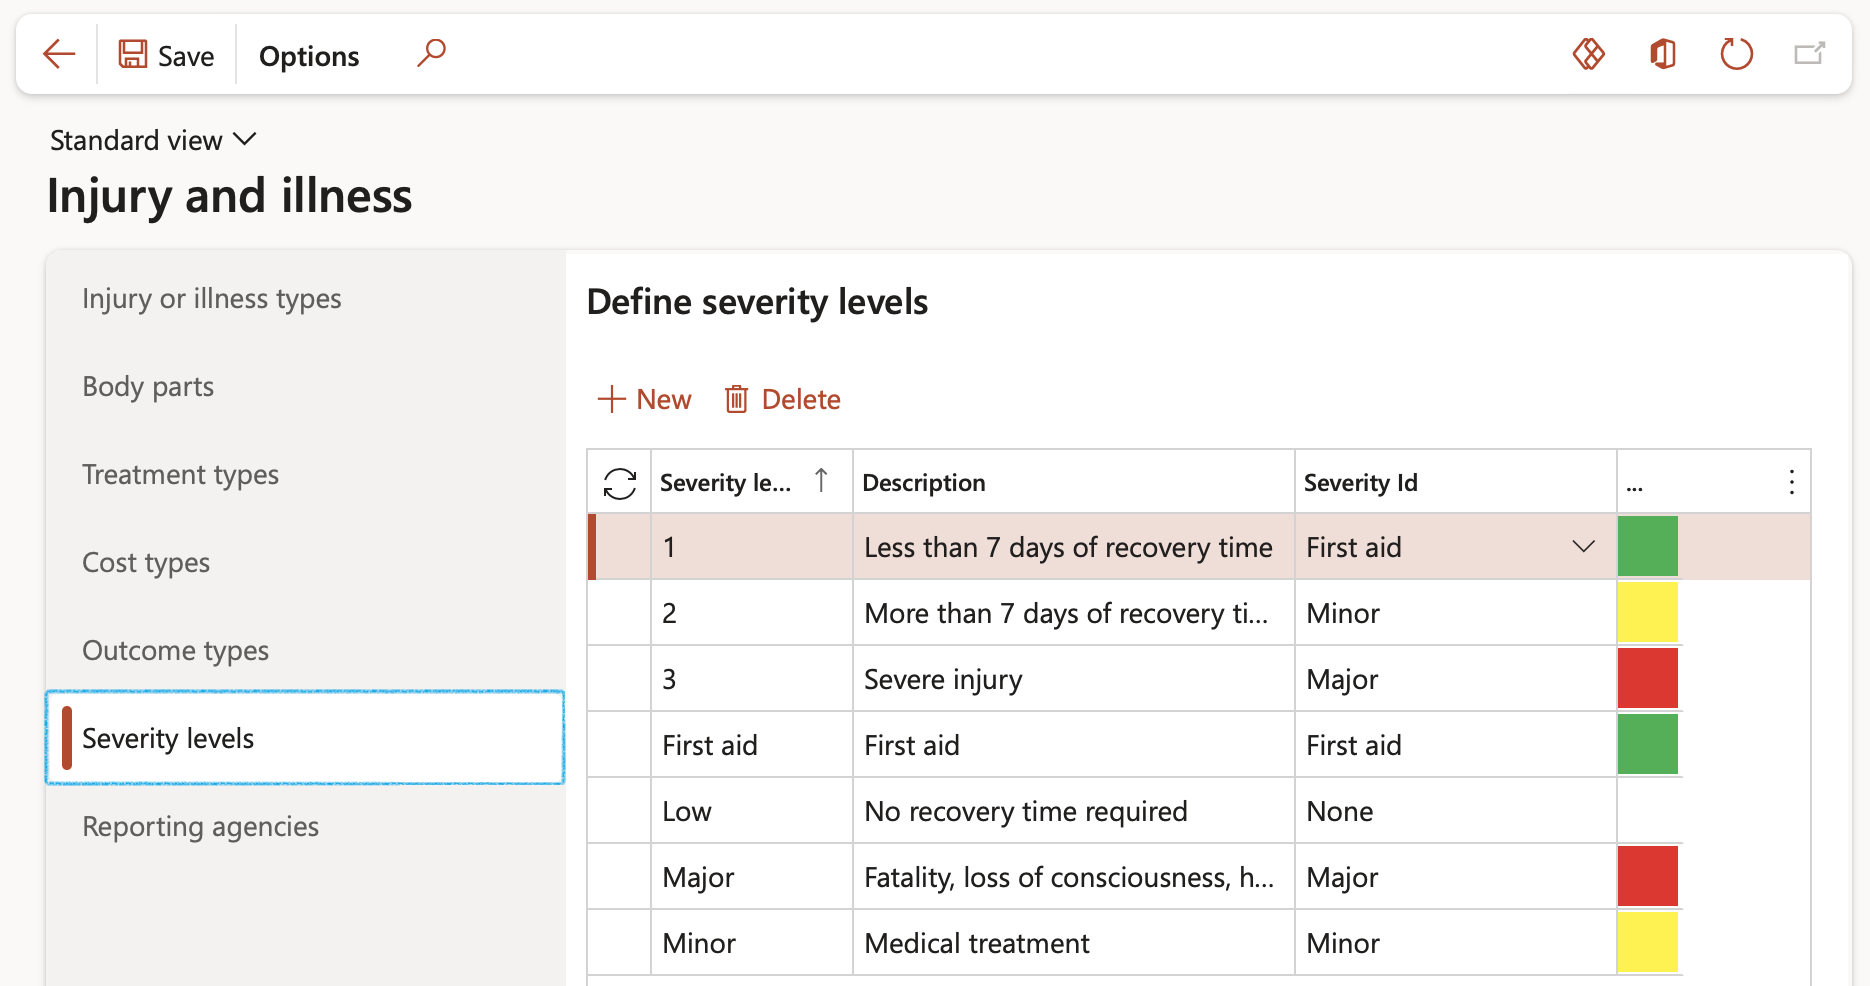
Go to: Human resources > Workers > Injury and illness > Injury and illness setup
- Open the Severity levels tab
- Click New
- Enter the Severity level for the injury or illness
- Enter a Description of the injury or illness severity level
- Select the relevant Severity ID from the dropdown list
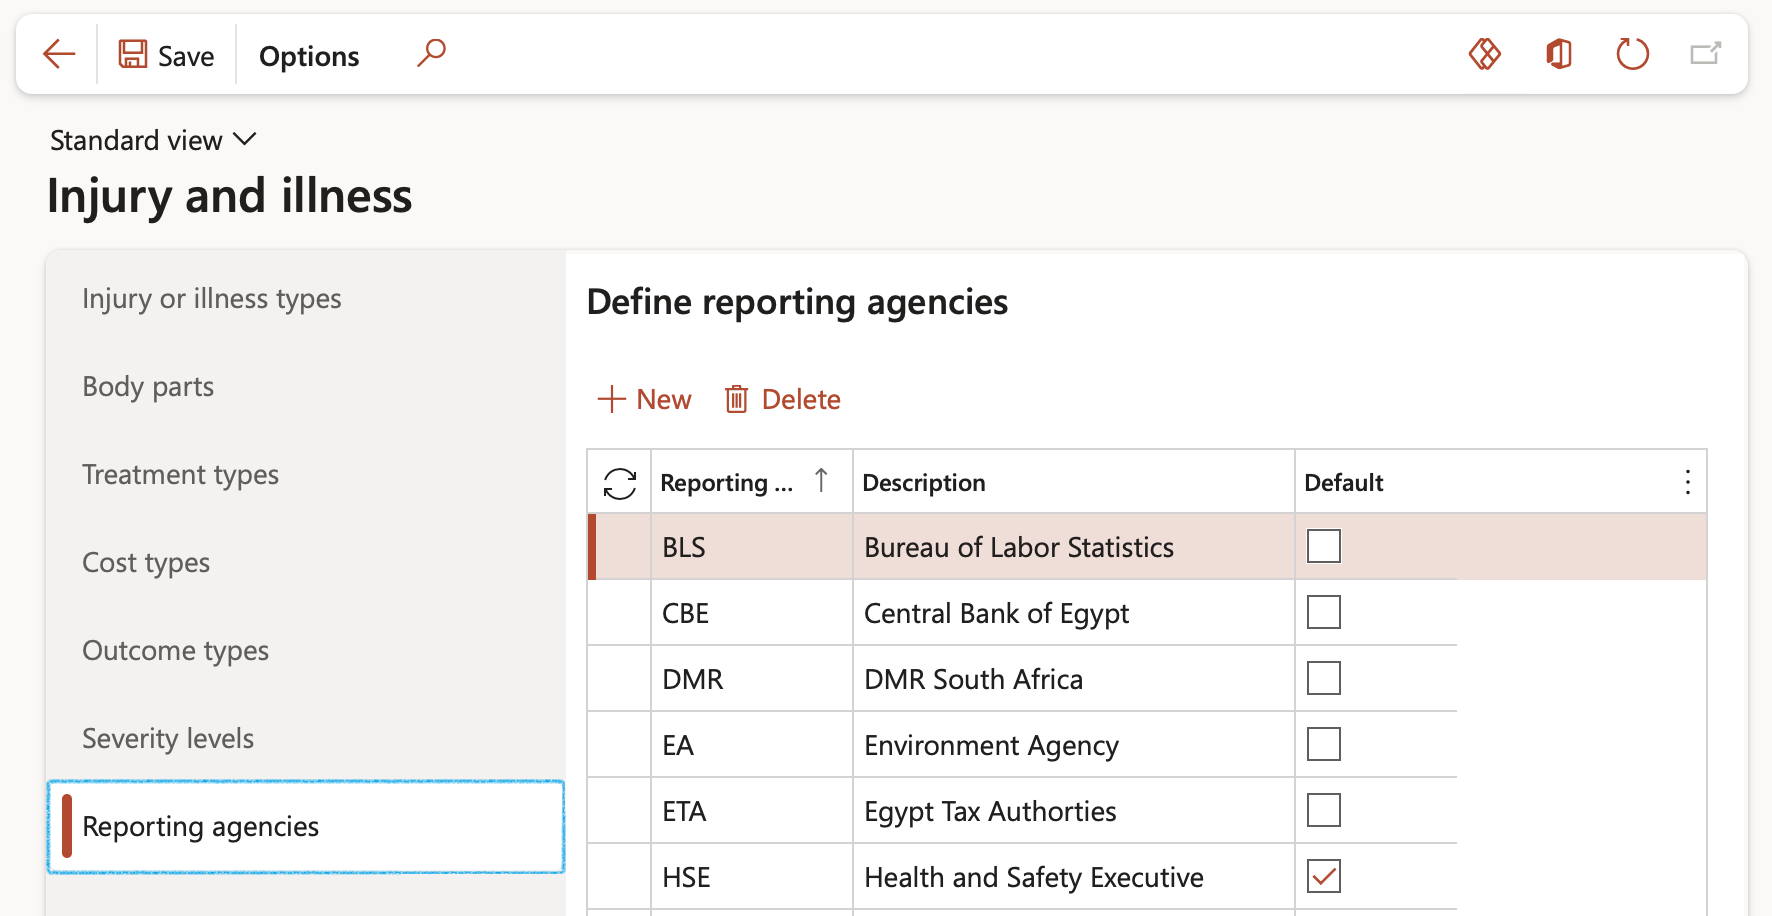
¶ Step 9.7: Define Reporting agencies
Go to: Human resources > Workers > Injury and illness > Injury and illness setup
- Click on the Reporting agencies bullet
- In the top section of the form, click on the New button
- Enter the name of the Reporting agency
- Enter a brief Description of the reporting agency
- Mark the Default checkbox if you would like the reporting agency to be automatically assigned to an injury and illness incident that is a compliance recordable case
- In the bottom section of the form, click on the New button
- Enter the Reporting category linked to the selected reporting agency
- Enter a brief Description of the reporting category
¶ Step 10: Define Unsafe acts and conditions
ISO 9001:8 requires that organizations formally document what went wrong, and what corrective actions are taken to ensure better quality. This is known as a “Non-conformance”.
Non-conformances may be found in a service, a product, a process, from a supplier, or in the system itself. It occurs when something does not meet the specifications or requirements in some way. Those requirements might be defined by the customer, a regulatory body, or in the internal procedures of the company.
Proper incident reporting allows for the recording of non-conformance codes.
A non-conformance is created from the Findings button on the Investigation form. The information used to create the finding is from the Unsafe acts and conditions memo field.
For more information, refer to the page on Investigations
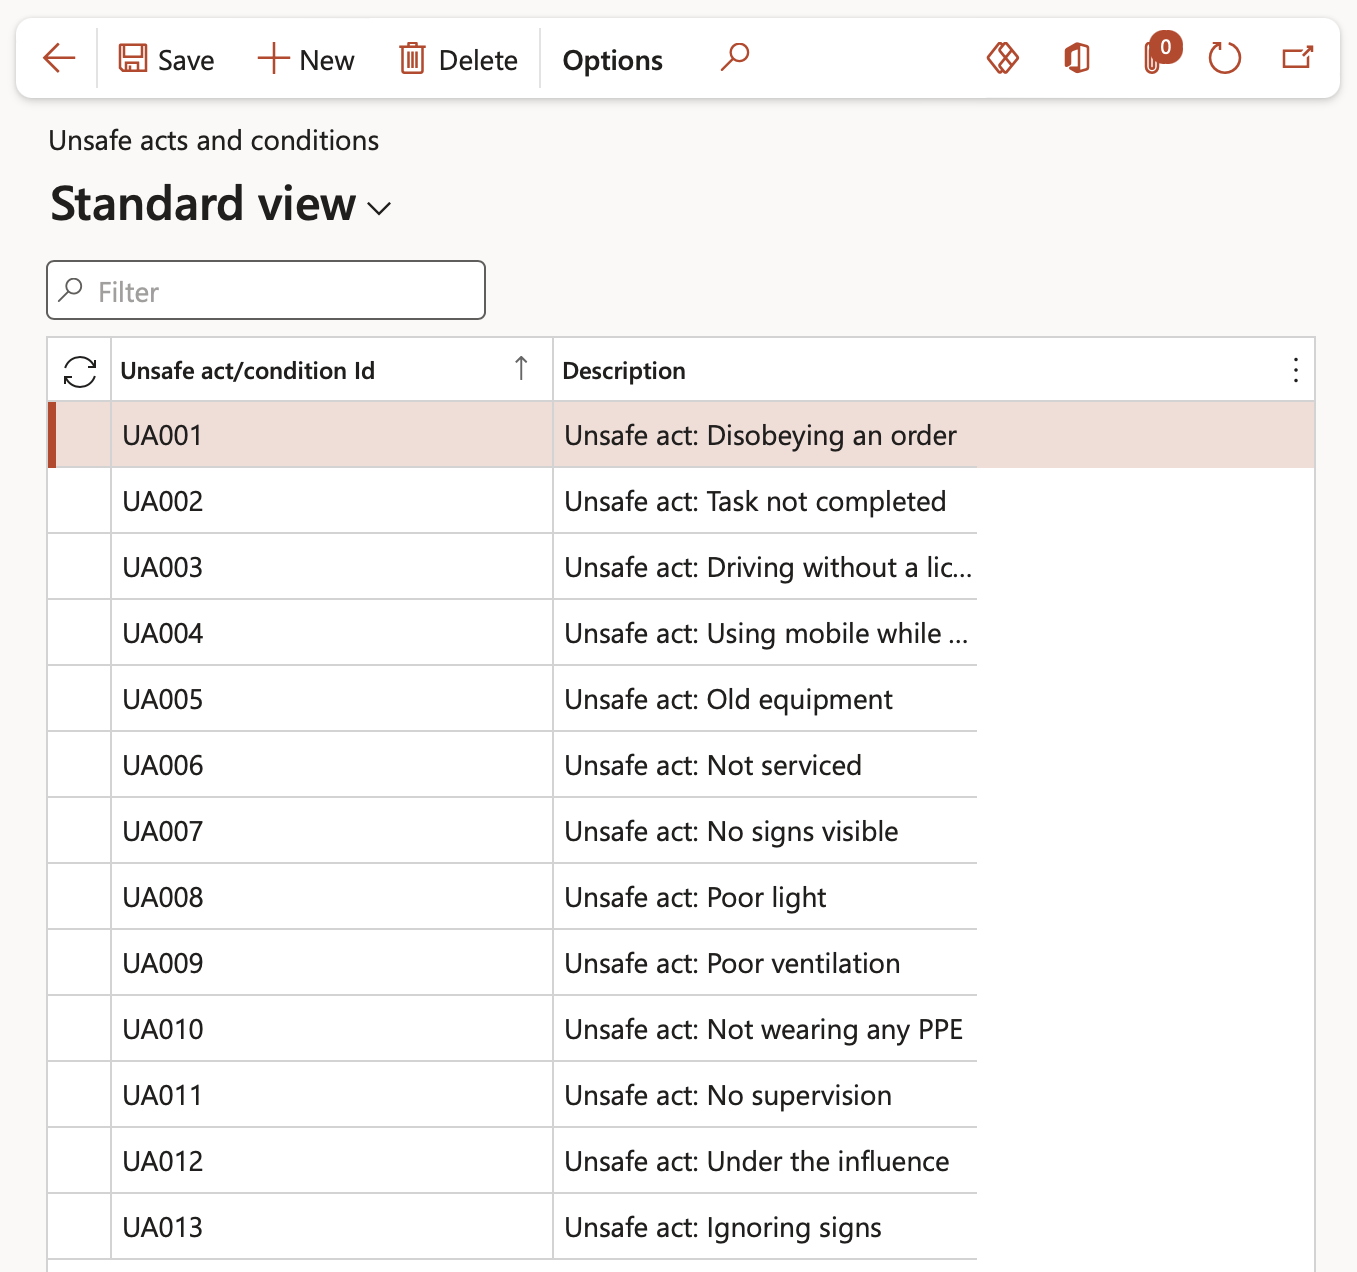
Go to: HSE > Incident > Setup for incidents > Unsafe acts and conditions
- On the Action pane, click on the New button
- Enter the unique Unsafe acts and condition ID
- Enter a brief Description of the Unsafe acts and condition
¶ Step 11: Enter the Incident classifications
On a high-level, incidents are grouped into two categories: reportable (to authorities), and non-reportable (internal use only). It is wise to classify incidents further into types so that appropriate actions can be taken. These types are known as Incident classifications.
Go to: HSE > Incident > Setup for incidents > Incident classification
- On the Button strip, click New
- Enter the classification of the incident
- Enter a brief Description of the incident classification
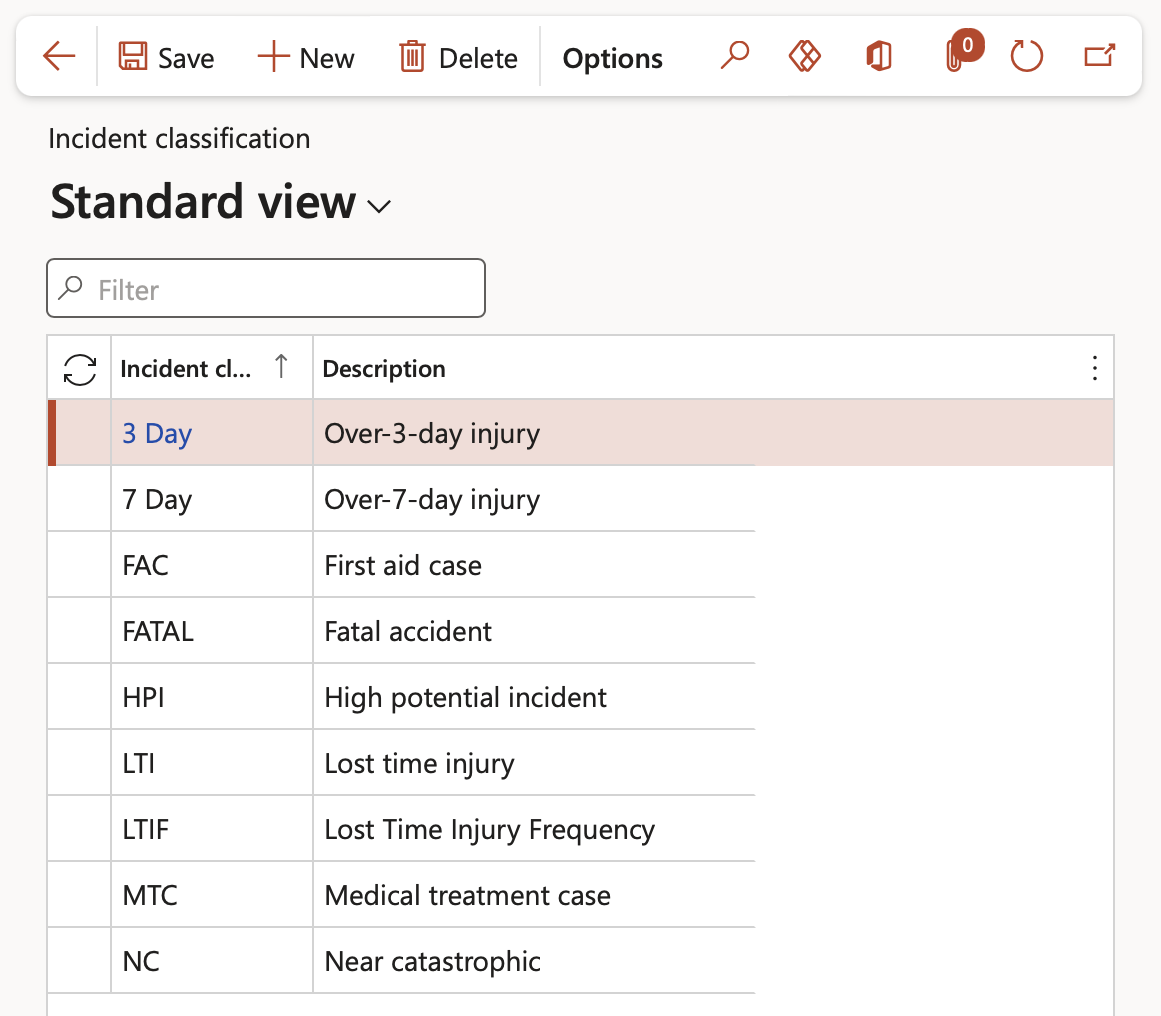
This useful guide shows typical classifications

¶ Step 12: Enter the Accident classification codes
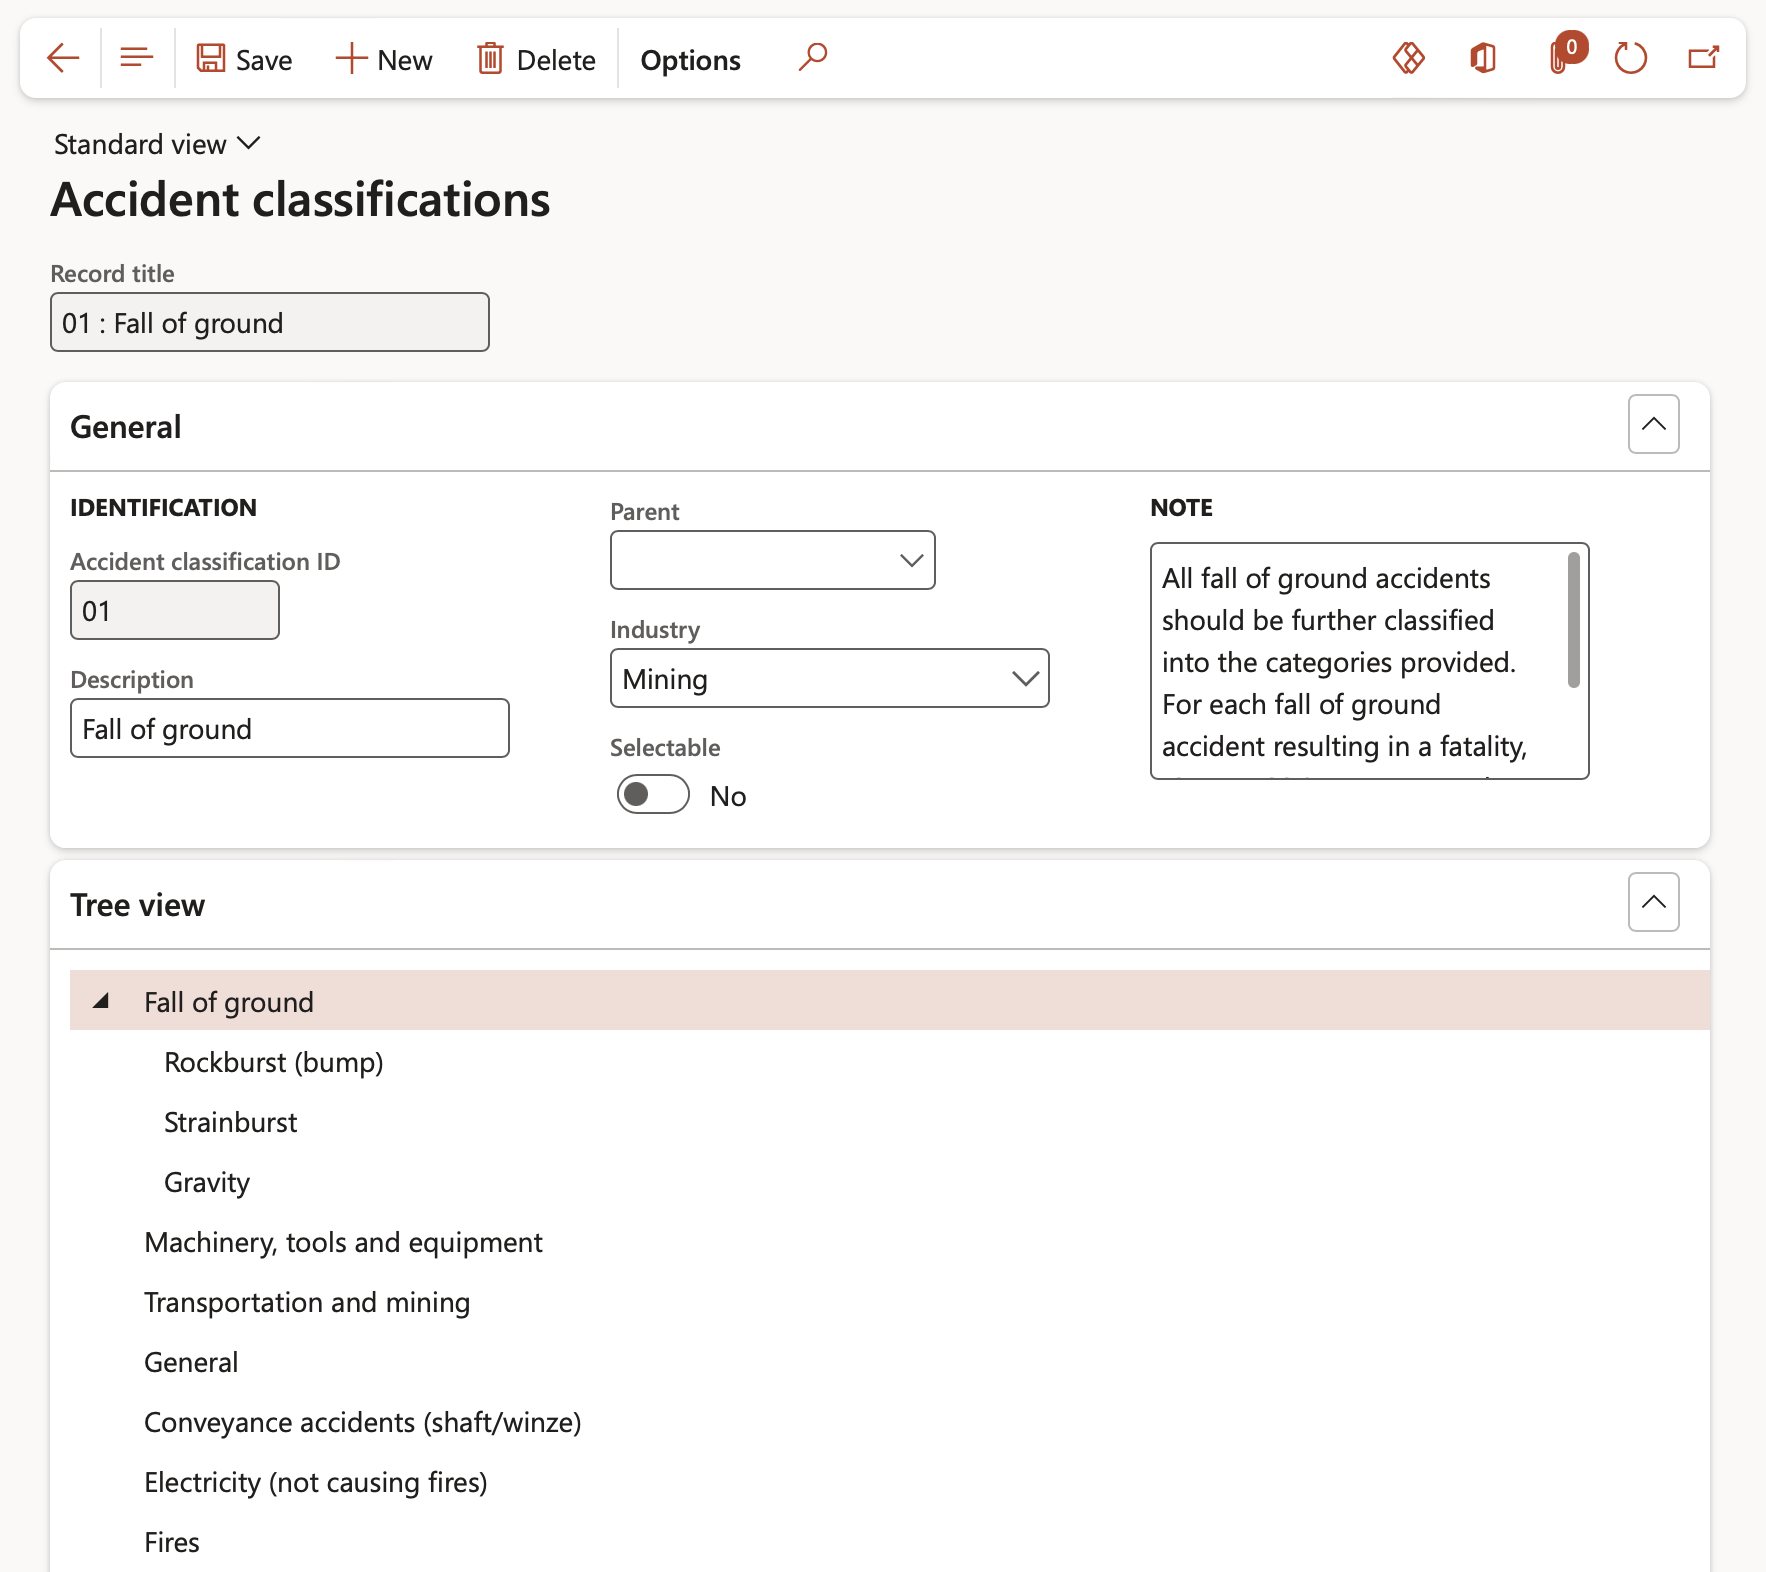
Accident classification is a standardized method by which the causes of an accident, including the root causes, are grouped into categories. Accident classification is well known in aviation but is expanded into other areas, such as railroad or health care.
Go to: HSE > Incident > Setup for incidents > Accident classification
- On the Action pane, click New
- Enter the relevant details of the Accident classification
- To create the Tree view: If this Accident classification belongs to a certain “group” then, in the Parent field, select the relevant Accident classification from the dropdown list
¶ Step 13: Define Dangerous occurrence classification codes
A dangerous occurrence is an unplanned and undesired occurrence (incident) which has the potential to cause injury, which may or may not cause damage to property, equipment, or the environment.
Go to: HSE > Incident > Setup for incidents > Dangerous occurrence classification
- On the Action pane, click New
- Enter the relevant details of the Dangerous occurrence classification
- Use the Selectable slider to indicate whether the tree node will be selectable on defining an incident
- To create the Tree view: If this Dangerous occurrence classification belongs to a certain “group” then, in the Parent field, select the relevant Dangerous occurrence classification from the dropdown list

¶ Step 14: Create local statutory content
Above we have described all the needed setup data. To setup the data could prove to be a laborious task. A “short cut” exists. Dynamics 365 HSE has a default data wizard.
Go to: HSE > Setup > Create local statutory content
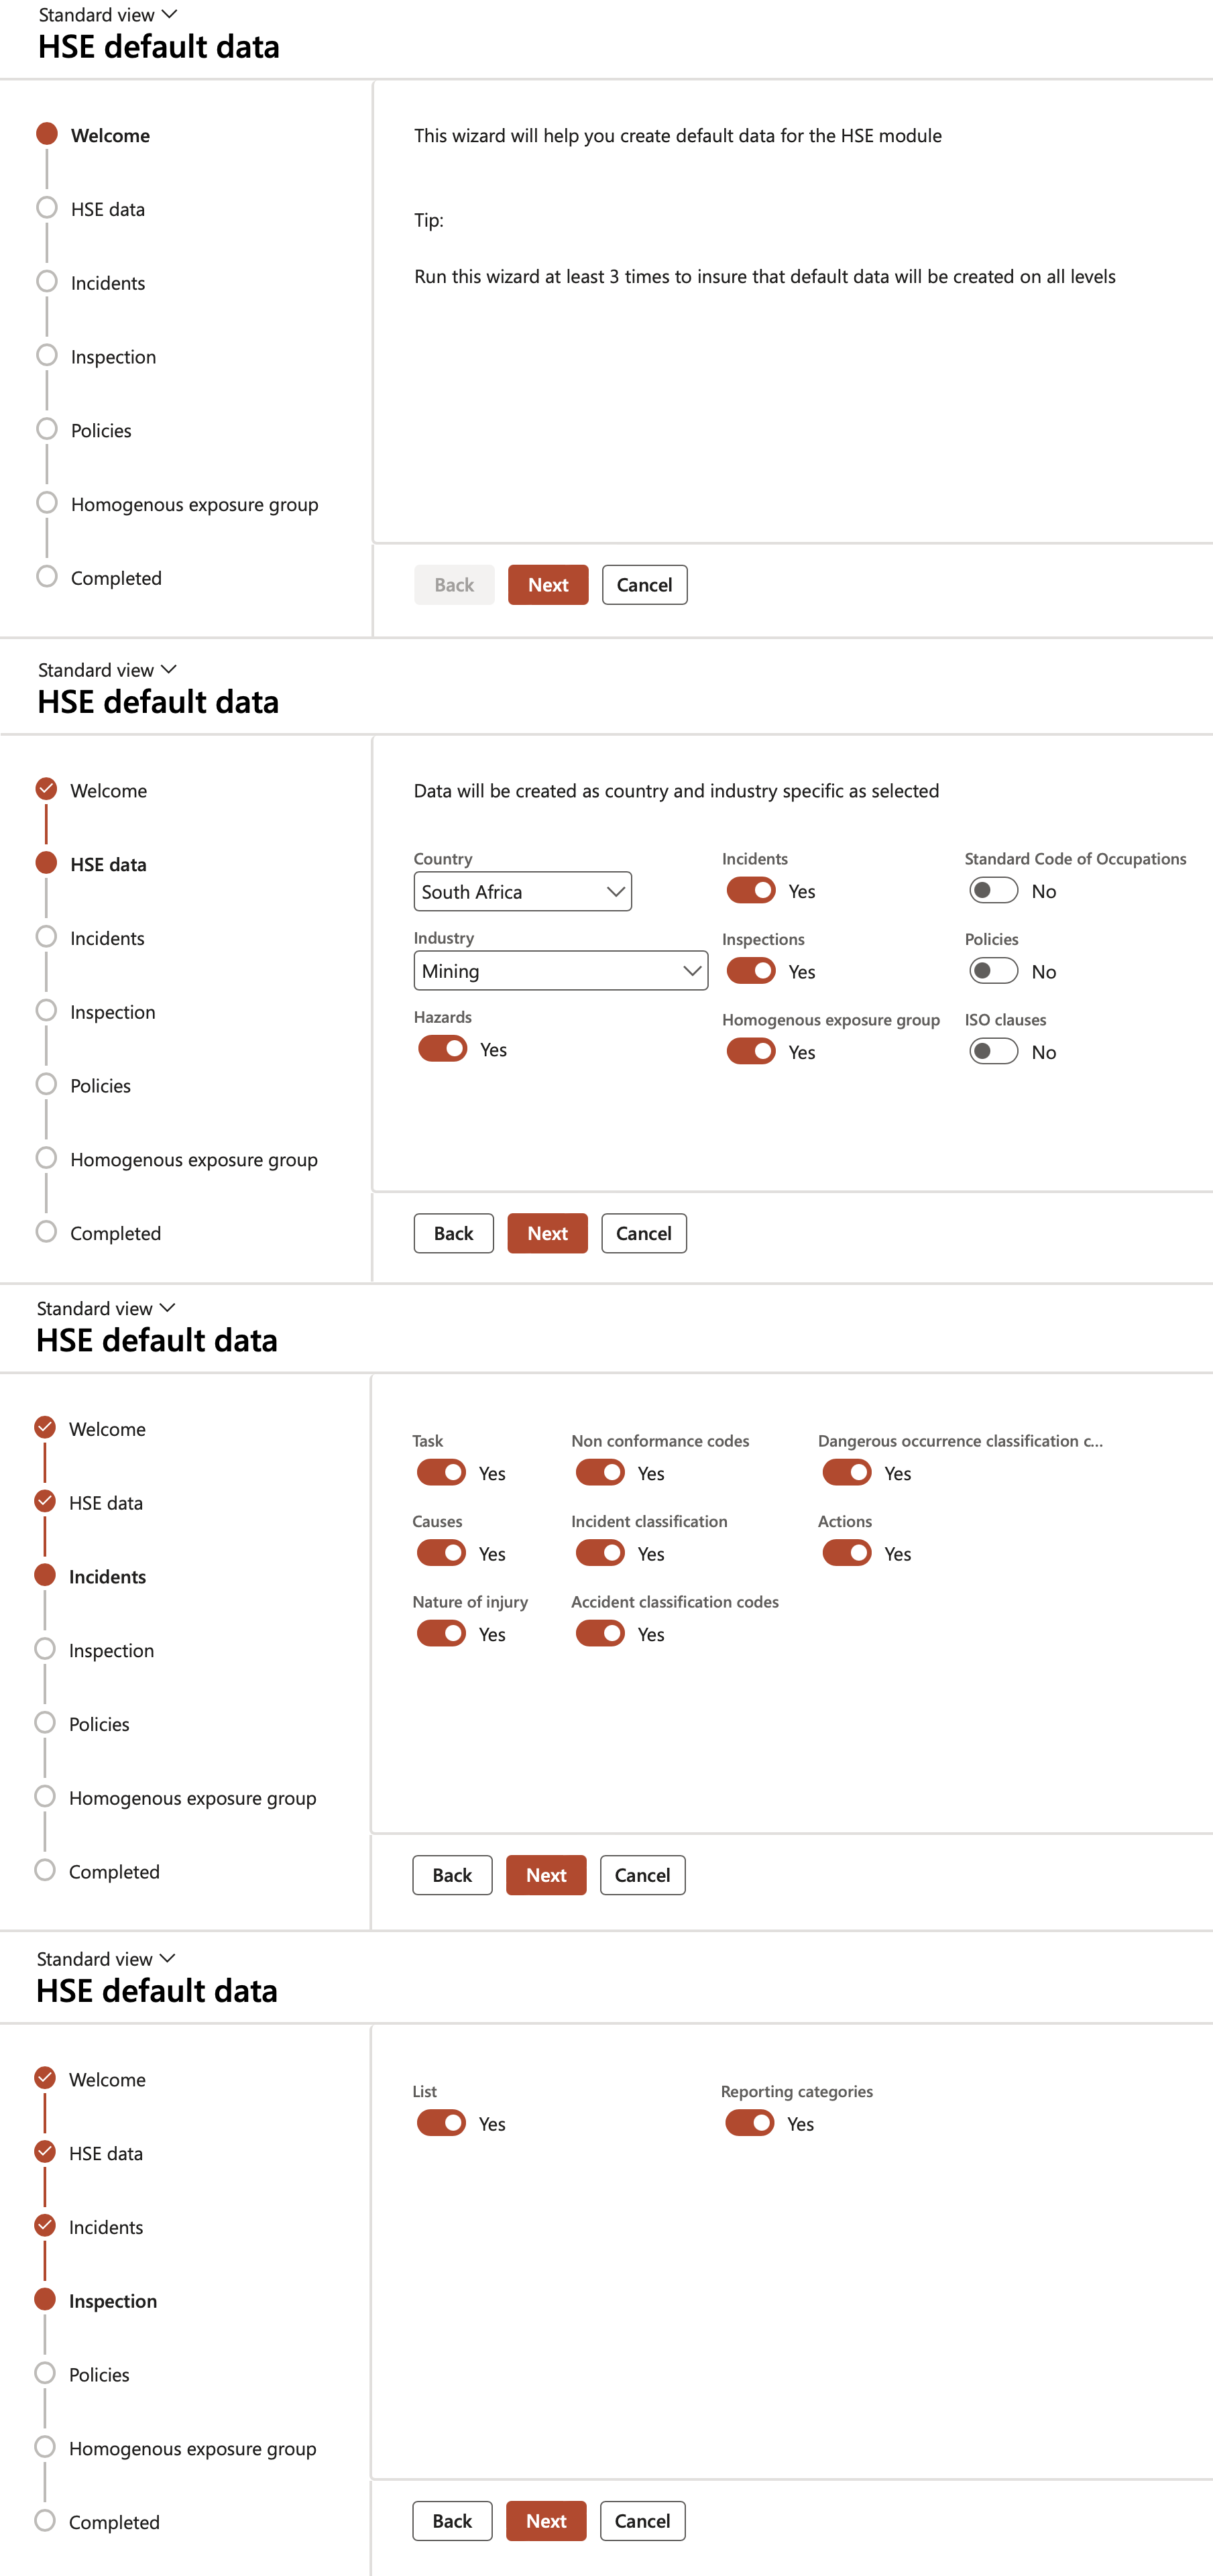
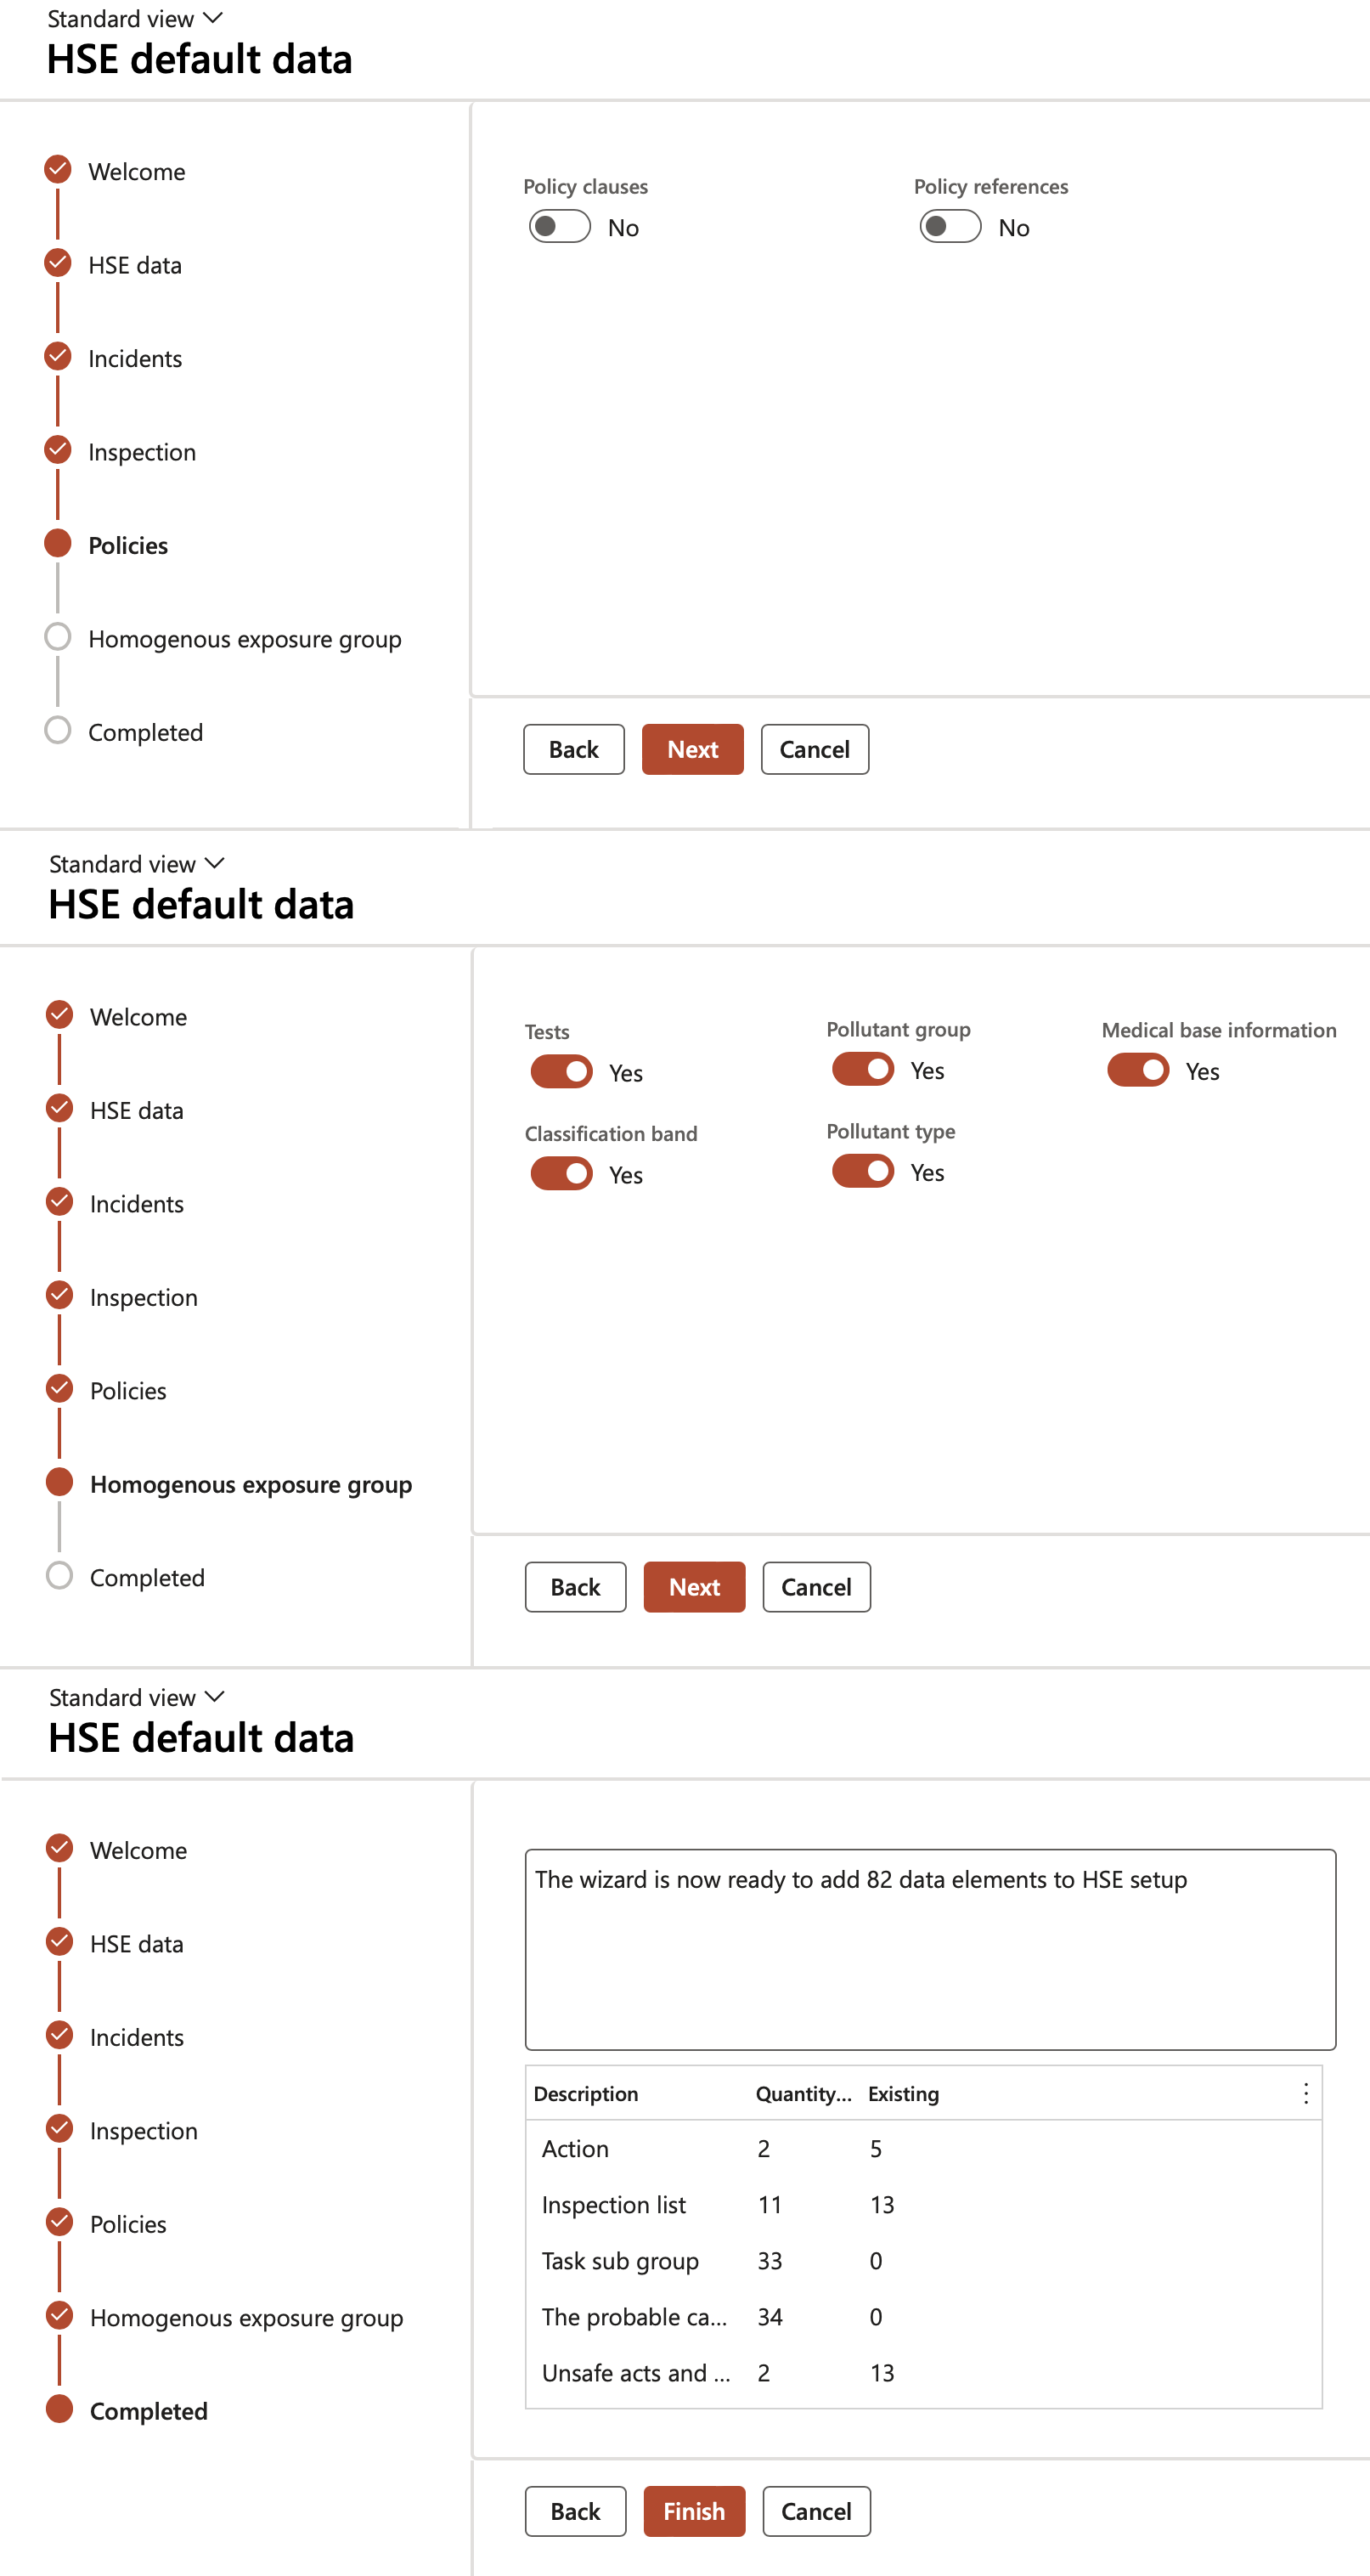
The outcome from running the wizard, is that a consistent and legally accurate set of reporting lookup data is made available to the users.
All previous setups dealt with incident reporting content (“Lookups”). The final setups relate to user experience.
¶ Step 15: Setup Incident type and Incident rules
Incident type
When users record an incident, the first item to report on involves the type of incident.
When a type is selected, users will have more or less fields to enter data into.
For example: Type Environmental will allow access to the Environmental button.
Go to: HSE > Incident > Setup for incidents > Incident type
- The Incident types will be listed
- To add a new Incident type, click on the Add button
- Enter the Incident type ID and a brief Description
- Select the relevant Incident type from the dropdown list
- Indicate whether the Incident type should be selectable on the Incident detail form or not
- Expand the Incident type specific setup Fast tab
- In the Incident rule field, select the relevant rule from the dropdown list
- In the Questionnaire field, select the relevant questionnaire if applicable

The Questionnaire field is used for the investigation methodology, for example: ICAM, RCAT and Fishbone
Incident rules
Incident rules give super users “power” over which fields to show/hide on the Incident detail form. Using these rules with Type (see previous page), the user will be presented with only the relevant fields. These fields are setup under incident rules, each incident type will have different rules reflecting a different number of fields.
Go to: HSE > Incident > Setup for incidents > Incident rules
- In the Button strip, click New
- Under the General Fast Tab:
- In the Incident rule field, enter a unique incident ID
- Enter a brief Description of the incident rule
- Under the Setup Fast tab:
- Click the Update list button
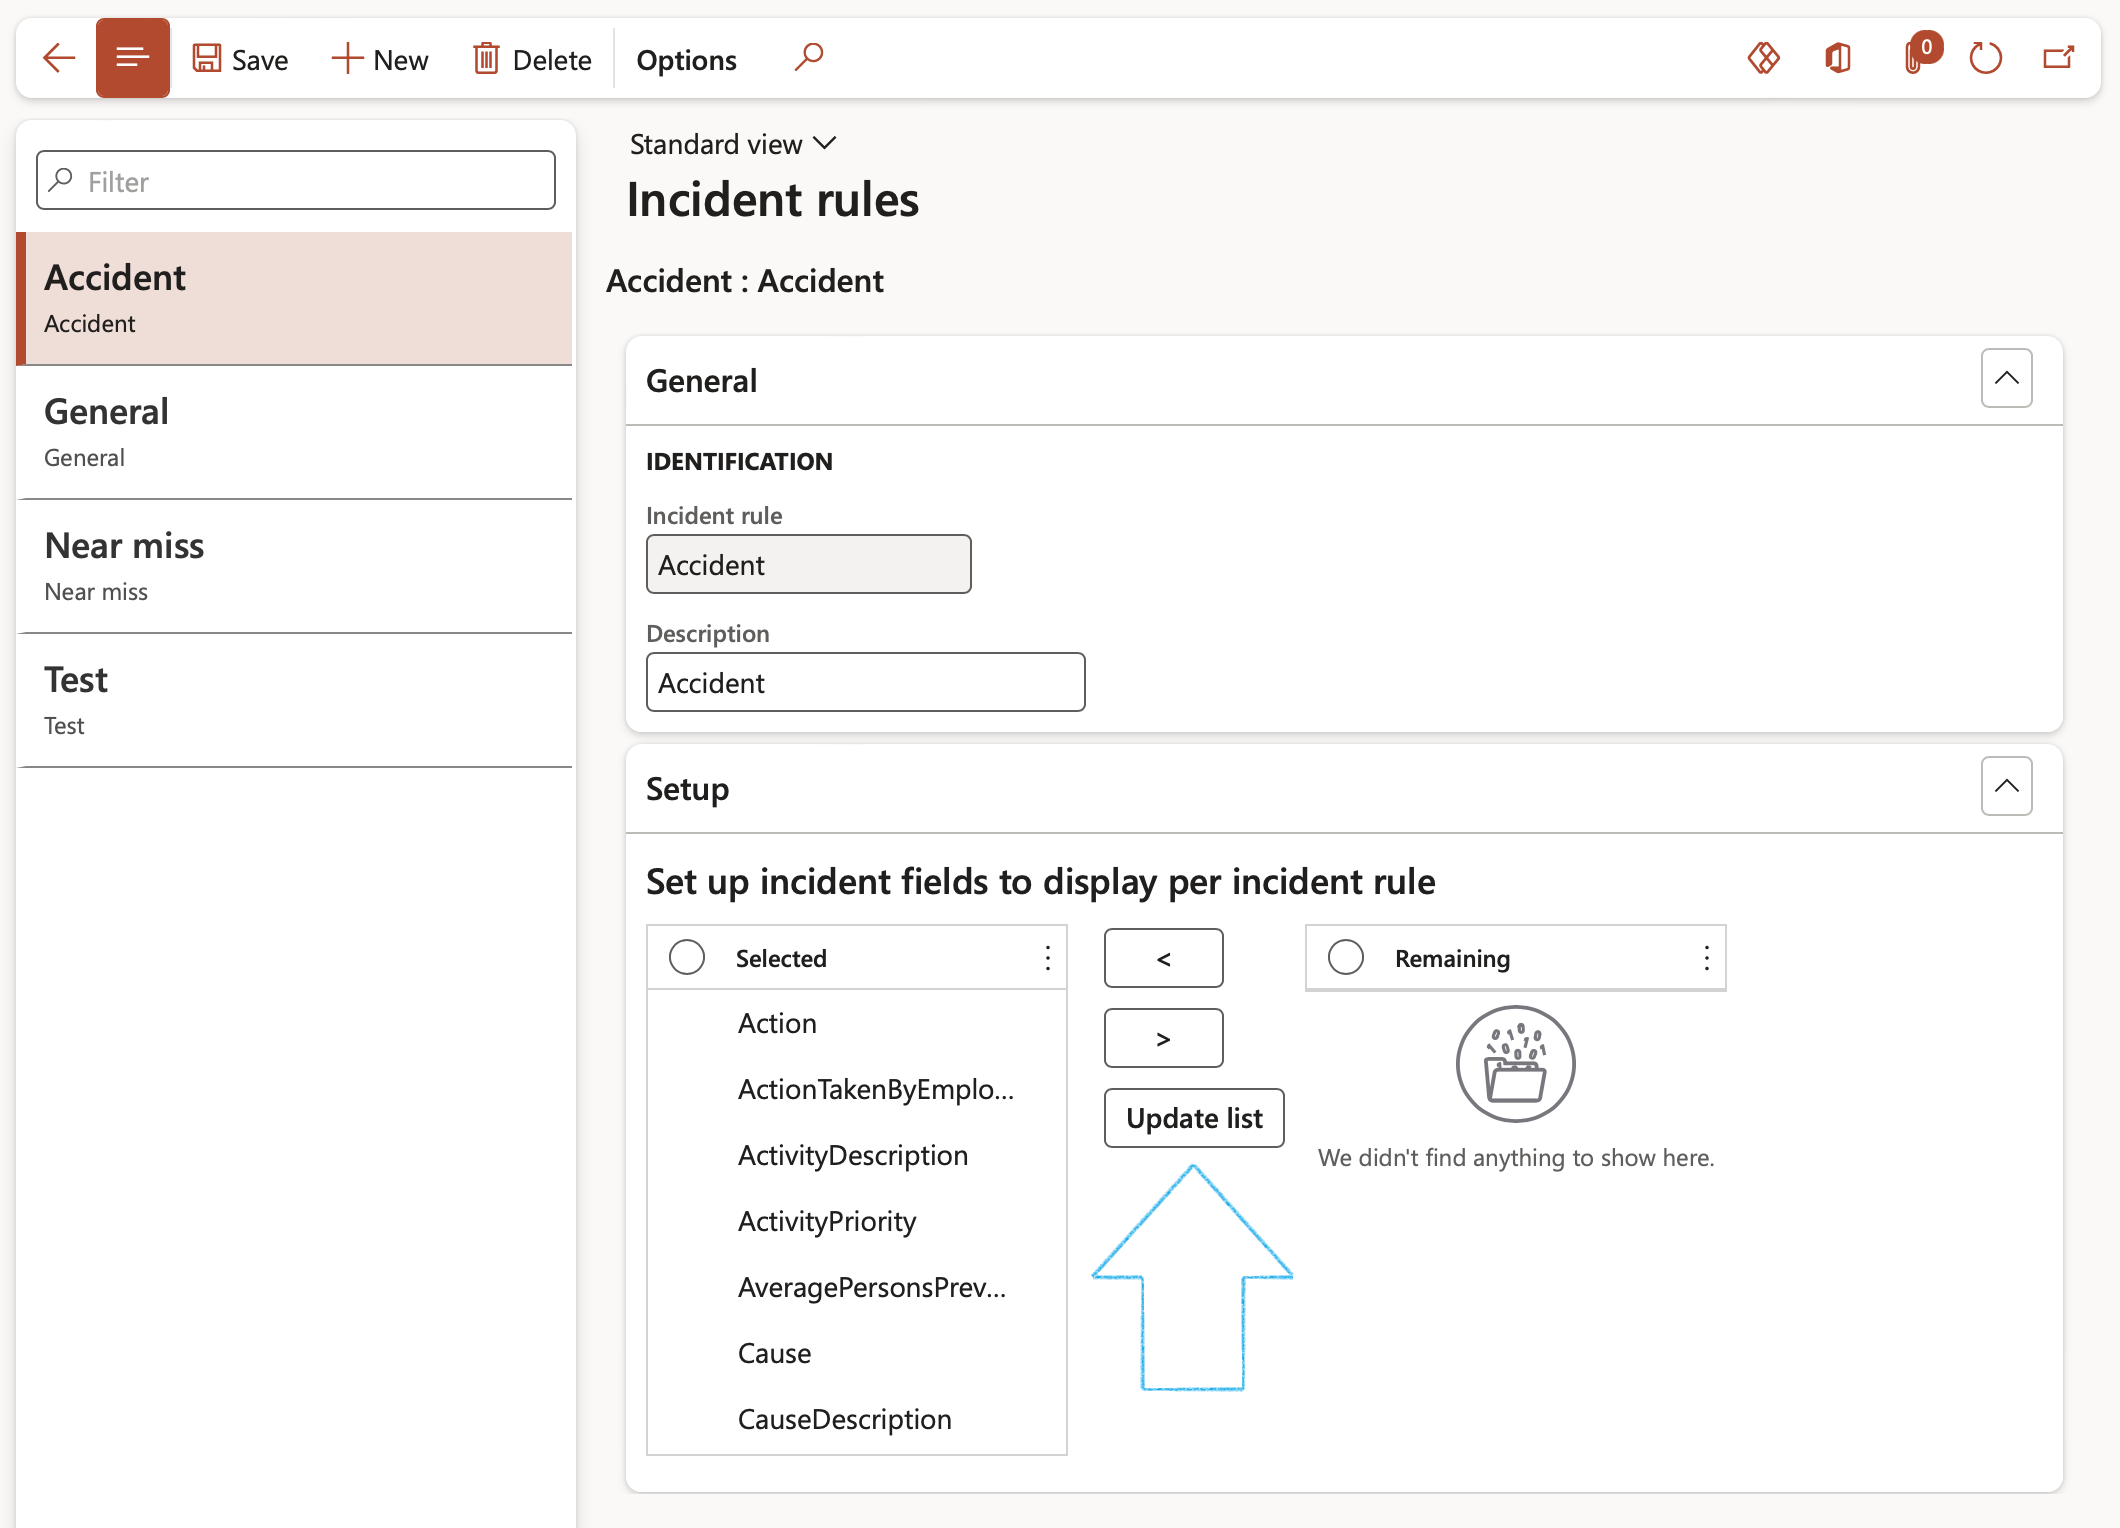
Select the fields to be displayed on the Incident detail form from the Remaining column, and move them to the Selected column by using the < arrow button.
(If fields need to be removed from the Selected column, use the > arrow)
Use the Shift key to select multiple fields.
The Incident detaiform will display the fields in the Selected column.
¶ Step 16: Setup the Work locations
The final component in the setup chain involves the Work location link. The definition of the work location includes Section and Place. On the lowest of the 3 levels, the user can choose to map the workplace to standard Dynamics 365 Work centre/resource of type location.
Go to: HSE > Setup > Work location > Locations
- In the Action pane, click on the New button
- Enter the Location ID
- Enter a brief Description of the location
- Select the Parent HSE location from the drop down list, if applicable
- Select the relevant Site from the dropdown list
- Select the relevant Location (Work centre) from the dropdown list
- Mark the location as Active
- Indicate whether the location should be selectable in the Incident detail form
- Select the Pollutant group from the dropdown list (If applicable)
- Indicate whether the location is appropriately Labelled for the present hazards
- Indicate whether the location is Enclosed

Where "Active" = Yes is selected on a location, this location will be displayed on the Location dropdown list on all HSE and GRC forms where Locations can be selected.
¶ Step 17: Setup Claim types
Go to: HSE > Incidents > Setup for incidents > Claim types
- On the Action pane, click the on New button
- Enter the Claim type name
- Enter a brief Description of the claim type
- In the Type field, select the relevant category of the claim type
- Select the relevant Action and question group from the dropdown list

For information on how to setup Action and question groups, please refer to the page on Claims
¶ Step 18: Setup Targets and goals
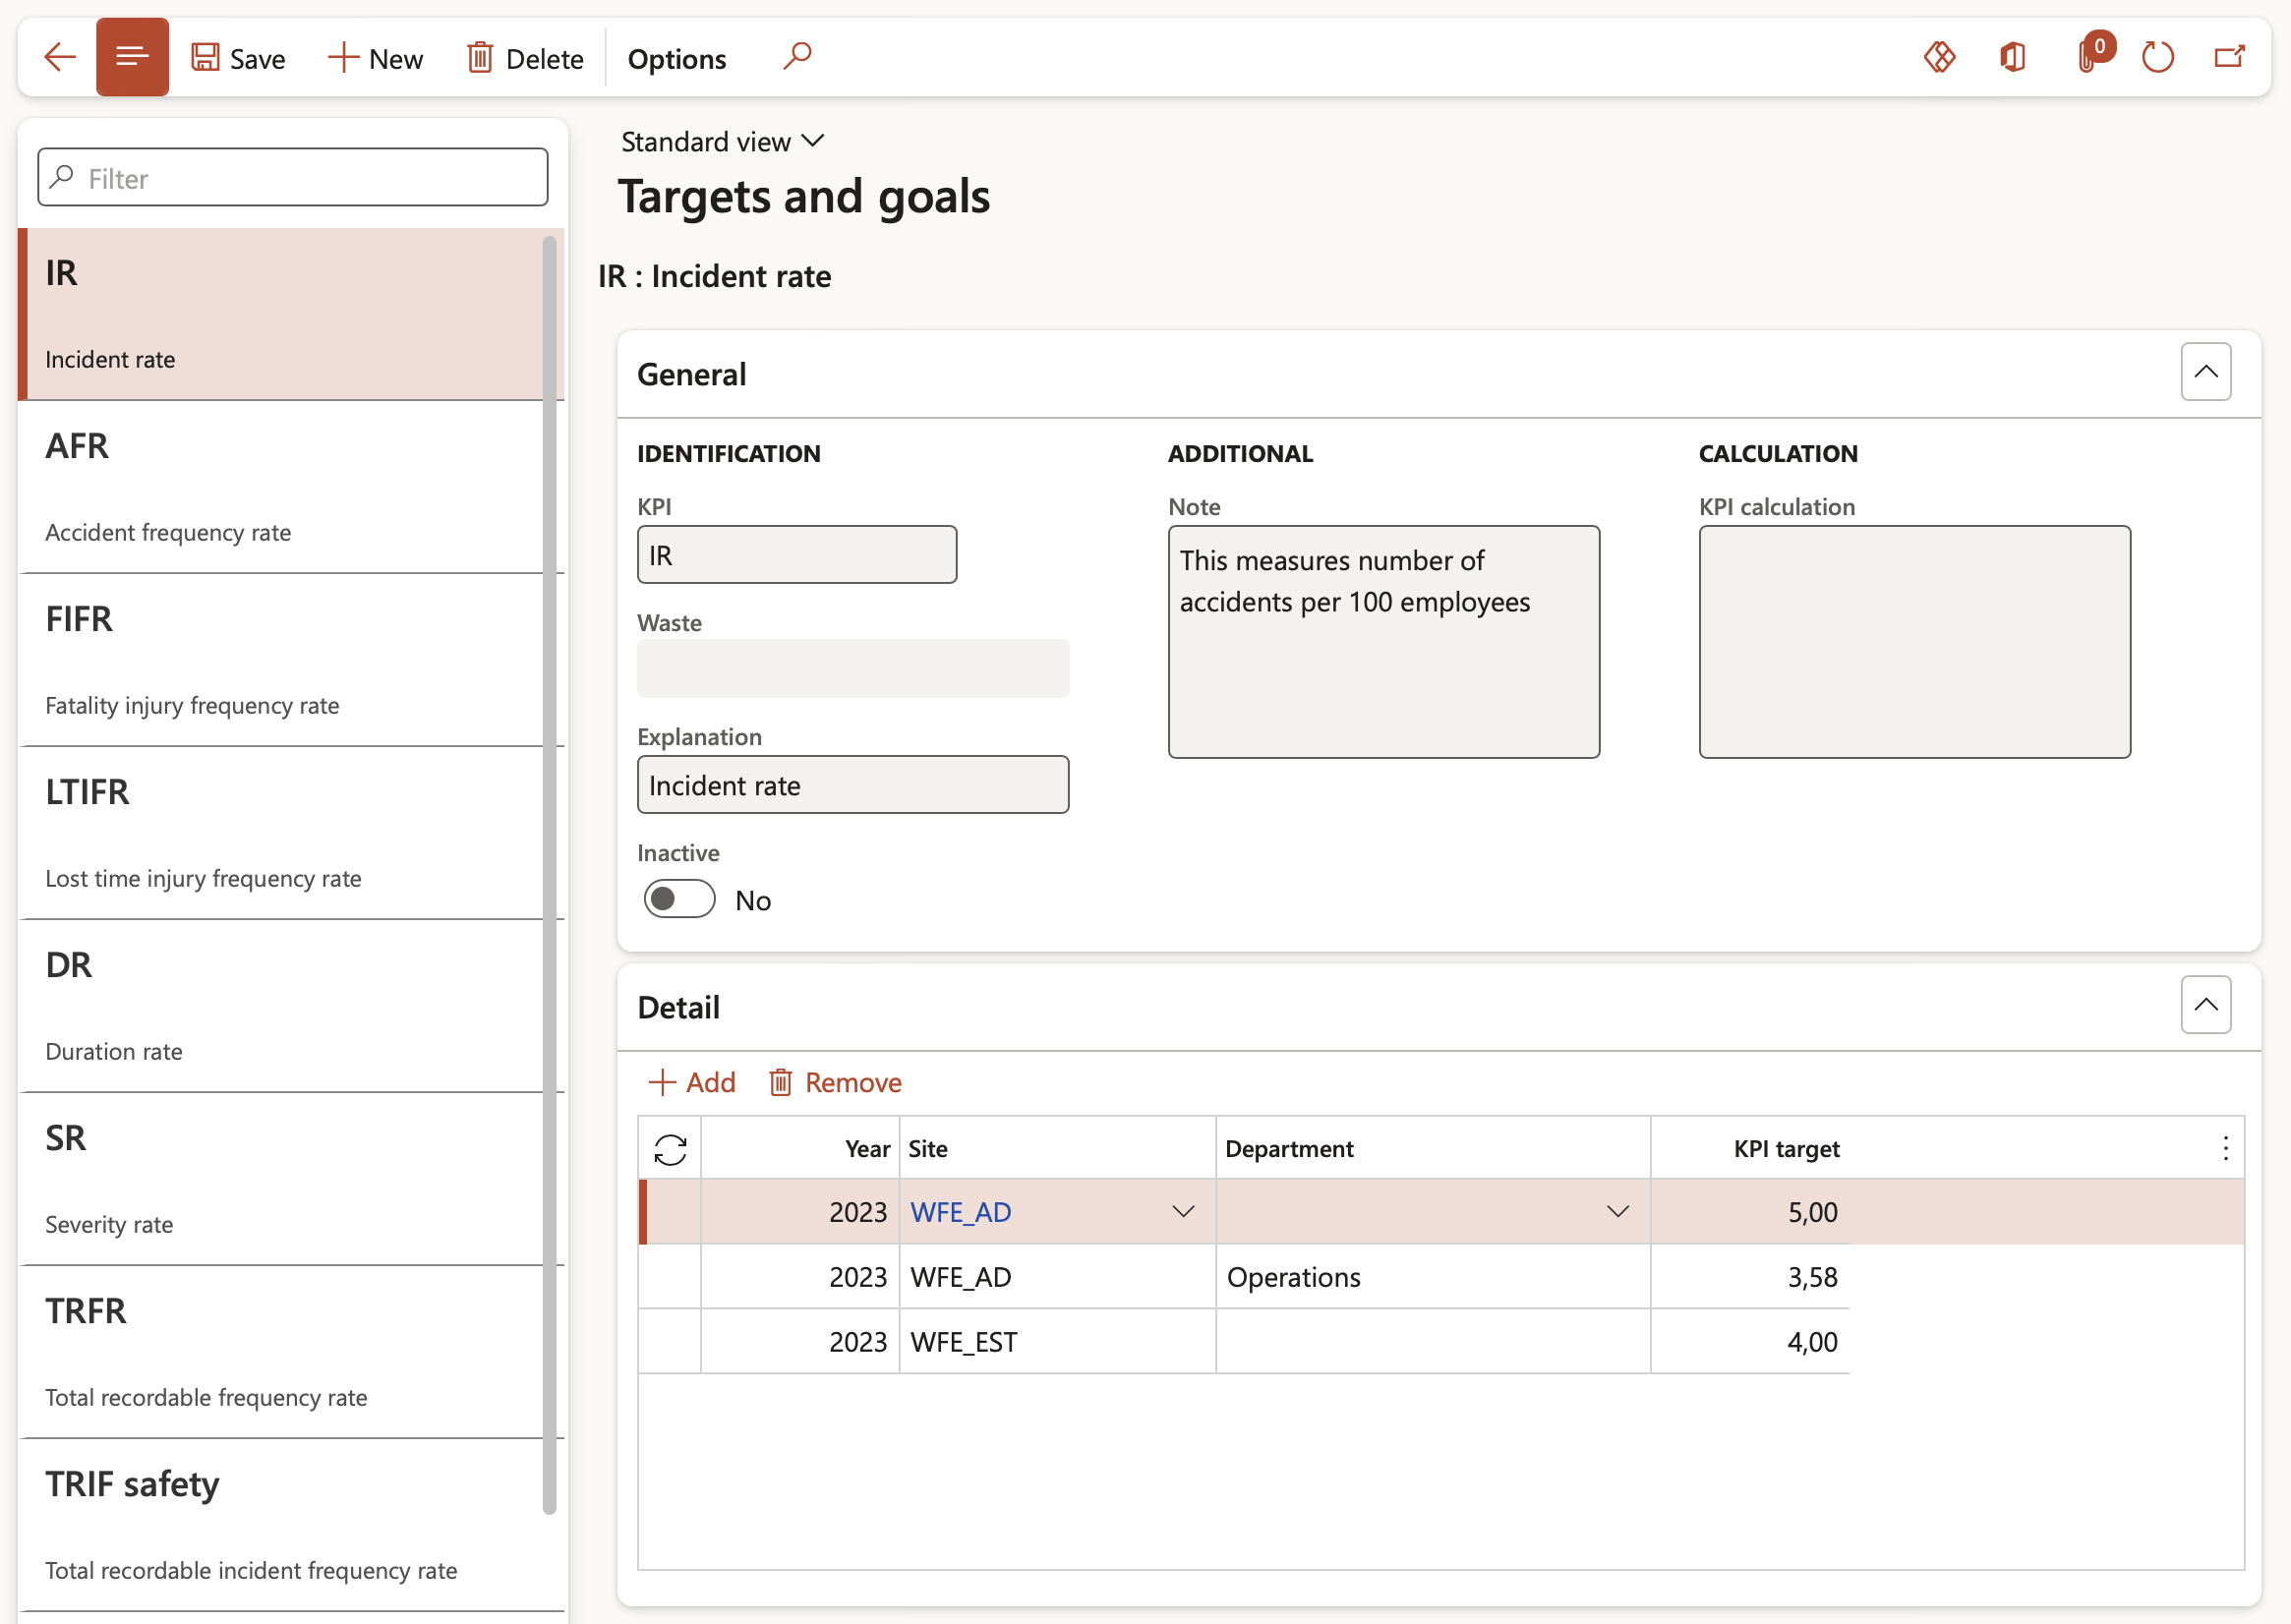
Companies setup Targets and goals to reduce workplace injuries, illnesses, and fatalities and to change the workplace culture to increase employer and worker awareness of, commitment to, and involvement in safety and health.
Go to: HSE > Incidents > Setup for incidents > Targets and goals
- On the Action pane, click the on New button
- In the KPI field, select the relevant KPI from the dropdown list
- The following fields will be populated with the relevant data:
- Explanation
- Note
- KPI calculation
- Mark the KPI as active/inactive
- Expand the Detail Fast tab
- In the Button strip, click on the Add button
- In the Year field, enter the Target year
- In the Site field, select the relevant Site from the dropdown list
- In the KPI target field, enter the KPI target value
¶ Daily use
¶ Step 19: Reporting the Environmental incident
There is more than one entry point for people to record an incident into Dynamics.
Inside Dynamics 365 HSE we have two forms that the users can use:
- A simple/quick form
- A more involved and detailed form for typical back office use
The menu item for this function is:
- All environmental incidents in legal entity (the legal entity that you are currently logged into)
¶ Step 19.1: The simple form for reporting an incident
Go to: HSE > Environmental > Record an environmental incident
- Enter a Description for the incident
- Select the Date and time of the incident
(The default is Today’s date. A warning will pop up if a future date is selected)
- The Incident type will be Environmental
- Select the name of the person who reported the incident
- Enter relevant details of the incident under the Other field group
- Print a Flash report of the incident by selecting Yes (see screenshot of the Flash report below)
- An email notification will be sent to the selected 1st level supervisor if the Email notification tick box is ticked
- Click OK
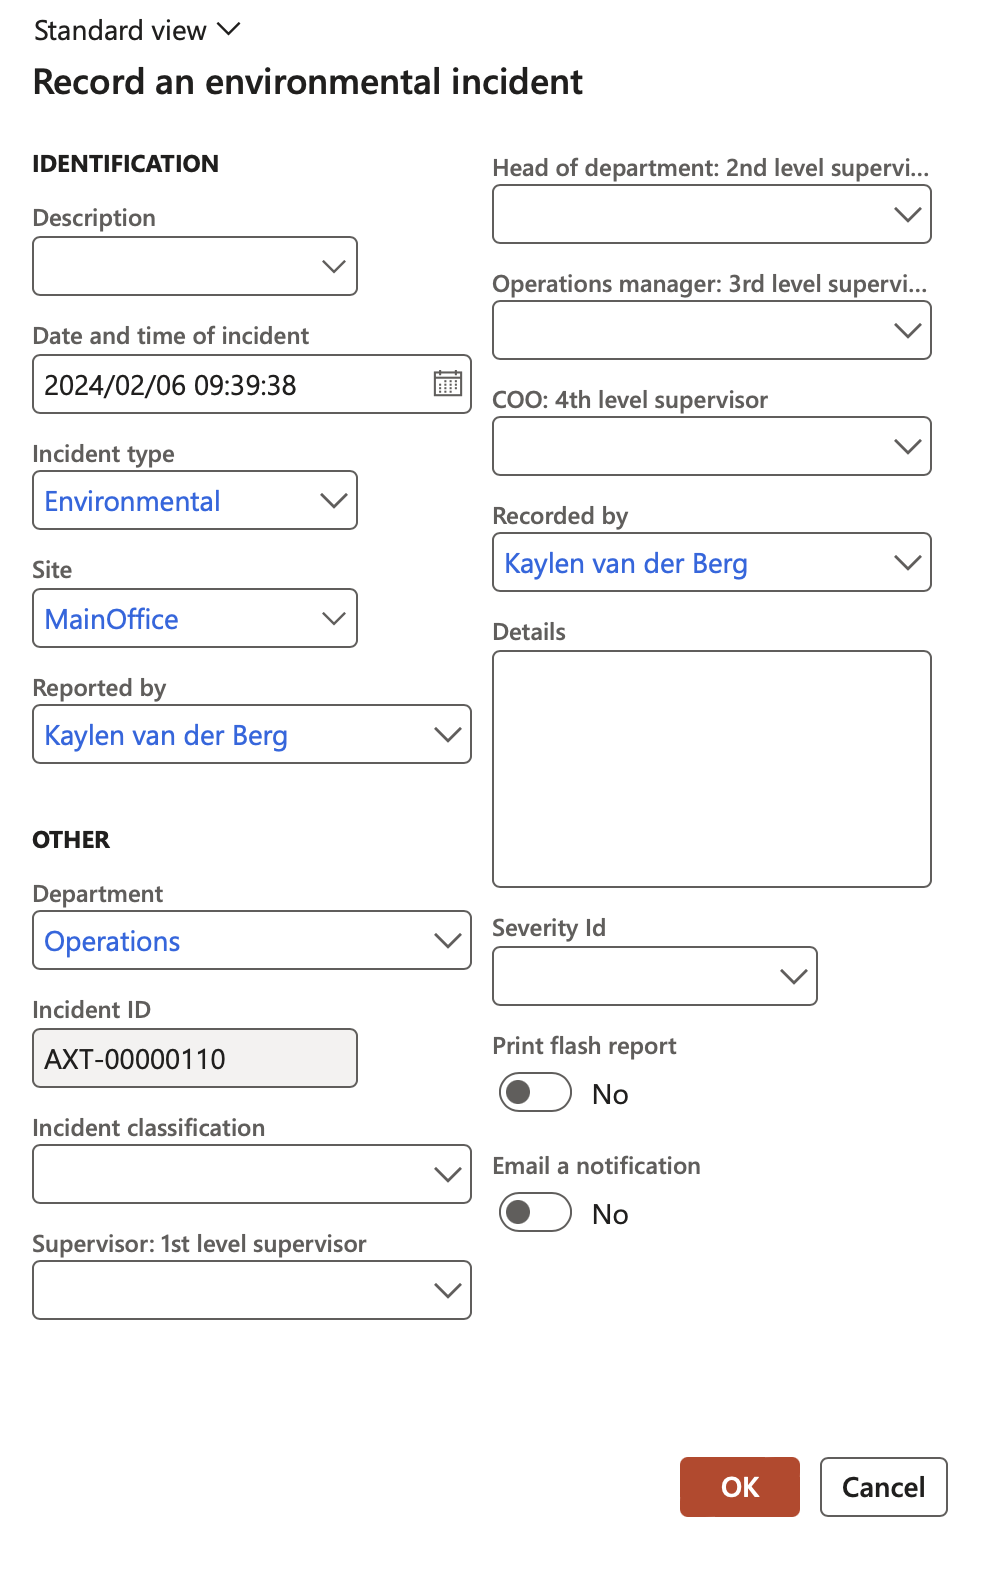
Note that the fields displayed on this dialog are based on the setups done on the HSE parameters under the Incidents tab
If it is required that the Print flash report and Email notification fields should not be visible on this form, Go to: HSE parameters > General tab, Other Fast tab, leave the Admin user group field blank.
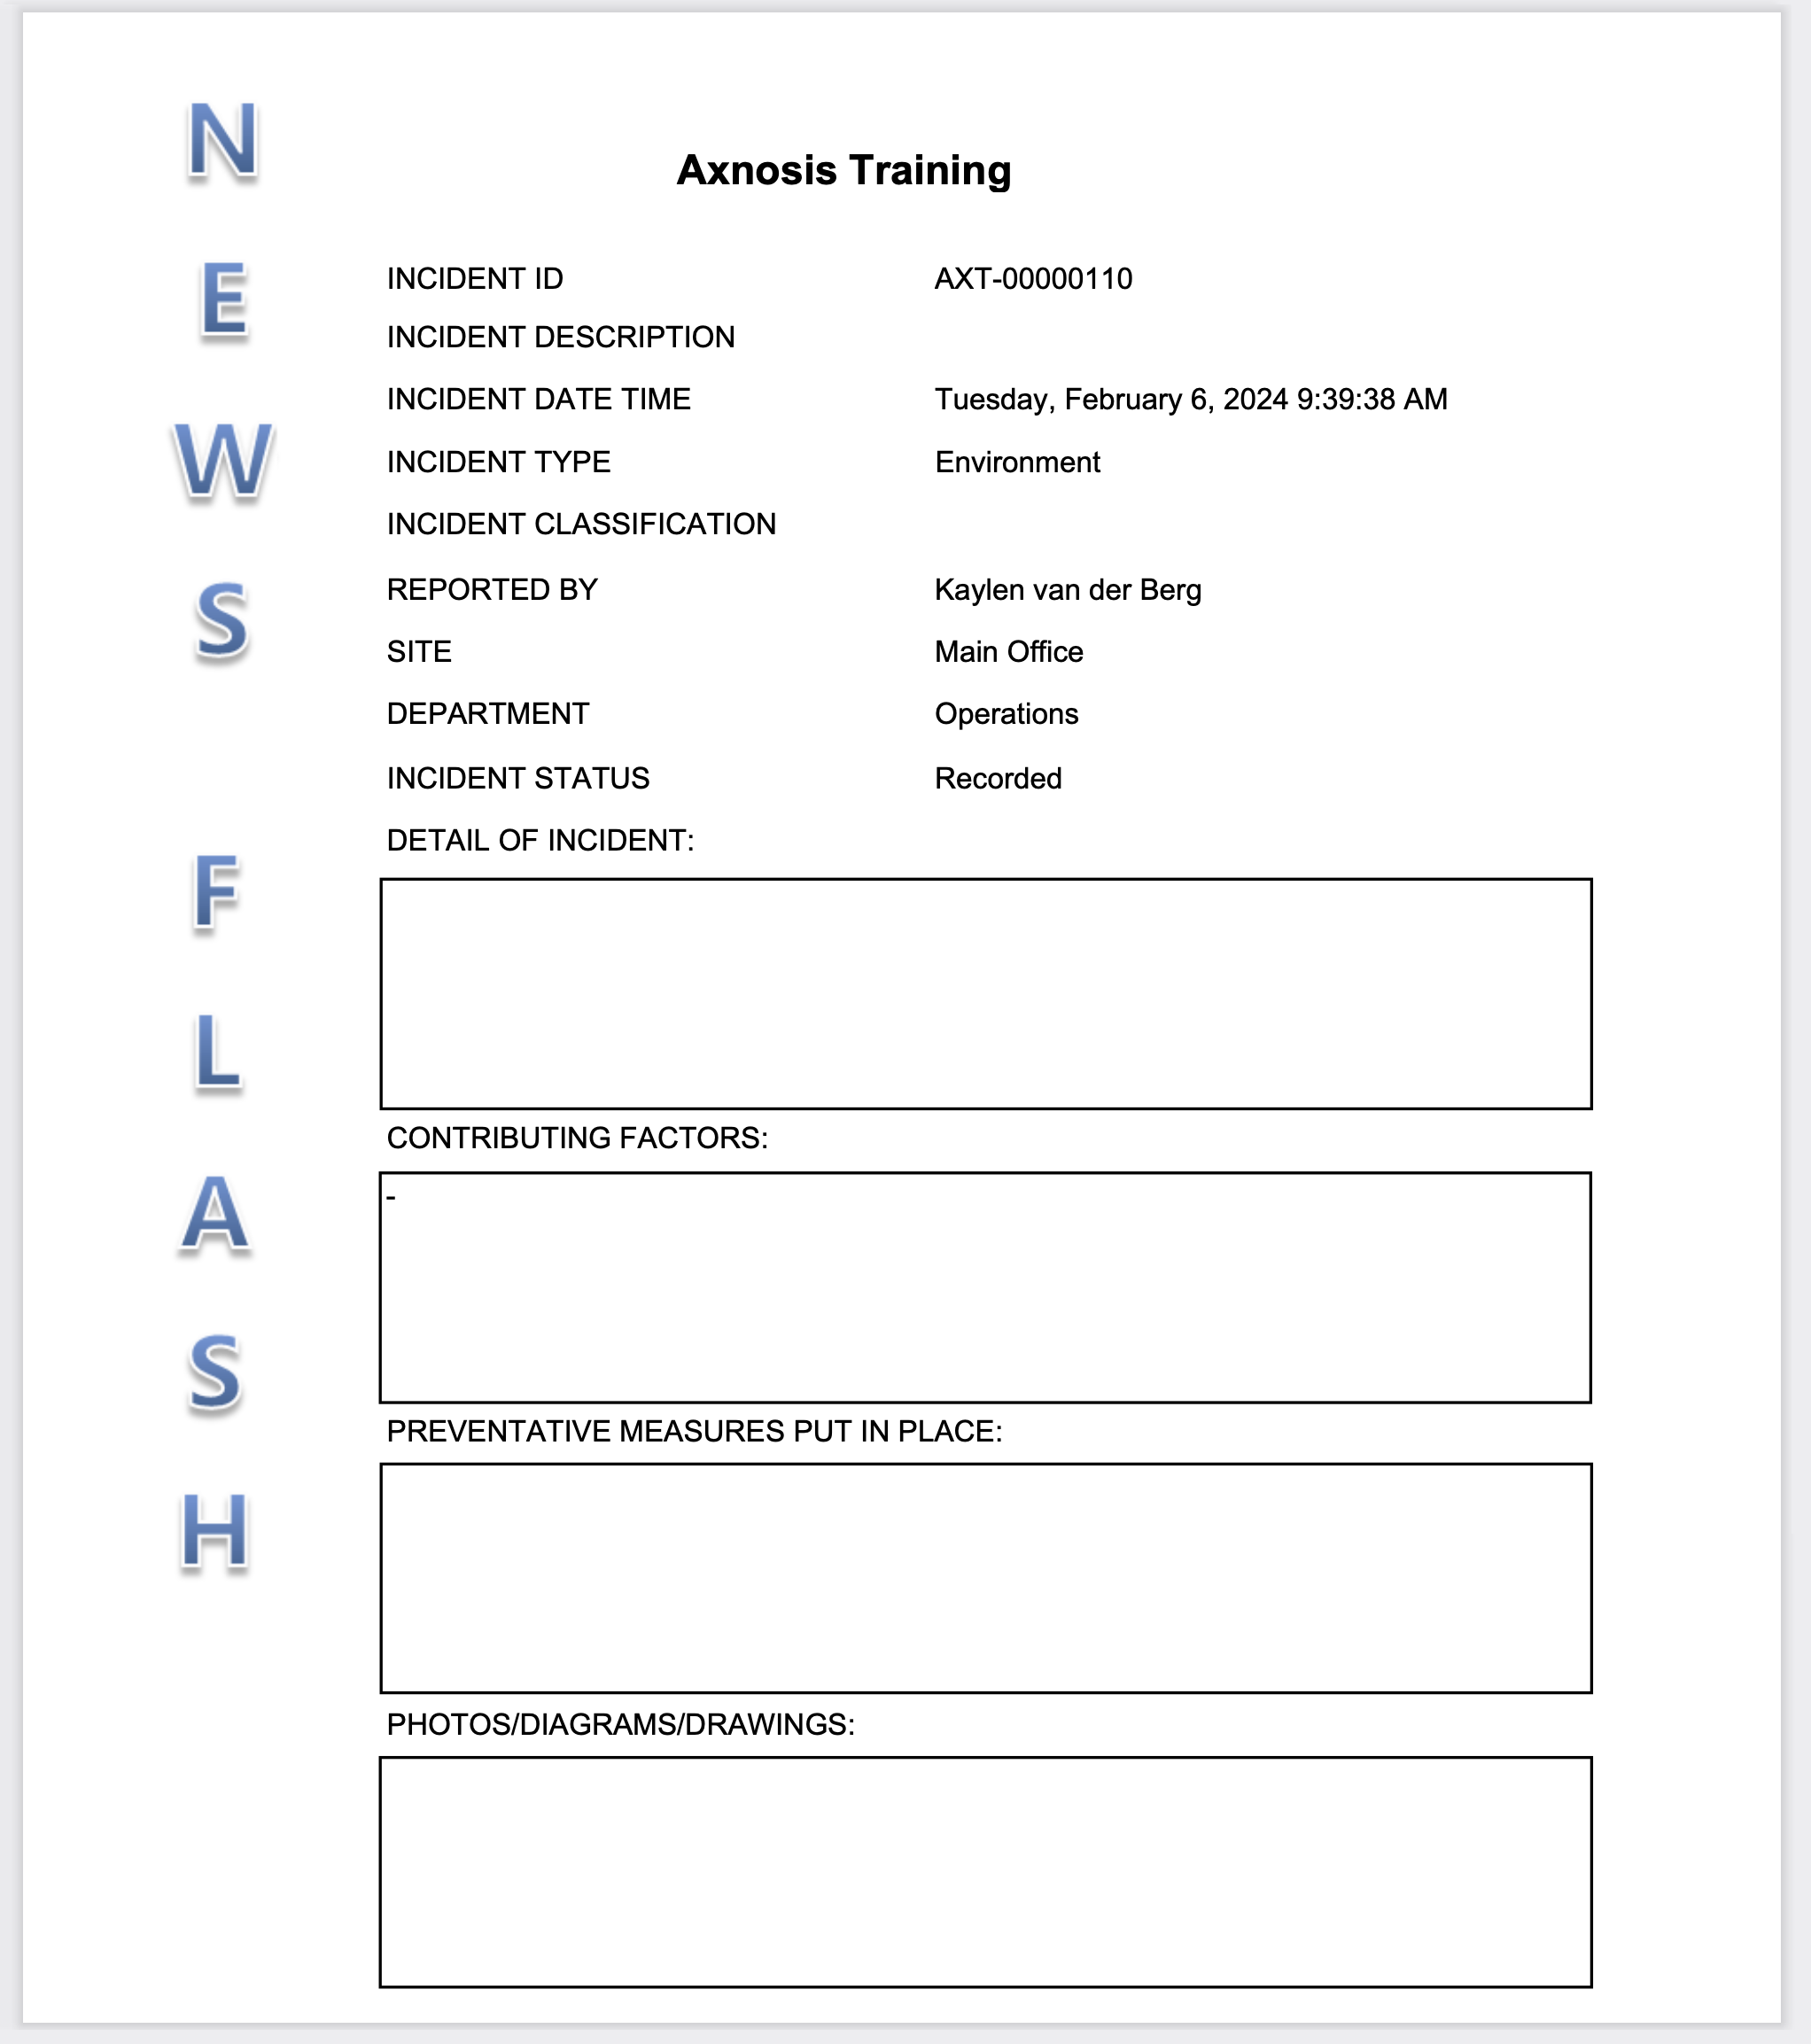
When a new incident is being reported, Dynamics 365 will check for duplicates of the following 4 fields:
- Incident type
- Site
- Department
- Incident classification
A blue line will appear to warn the user that a similar incident already exists

¶ Step 19.2: The projects list page
When an incident has to be reported on a project, the quick create form can be accessed from the Project management and accounting module
Go to: Project management and accounting > Projects > All projects
- On the Action pane, open the Manage tab
- In the New group, click the Incident button

¶ Step 20: View the recorded incidents for ALL companies
Go to: HSE > Incidents > All reported incidents
- On this list page all incidents regardless of company/legal entity are listed
- Filters can be applied by selecting Site, Department, Location, Incident type and Legal entity

The buttons on the All reported incidents list page:

- Go to incident: Opens the Incident detail form for the selected incident
- Find duplicates: Opens the Find duplicates inquiry
- Incident summary report: Prints the Incident summary report
- Create investigation: Opens the Investigations form which is populated with the data from the selected incident
- Export to Microsoft Excel: Exports the All reported incidents list page to Microsoft Excel
- Export to Word: Exports the selected reported incident to Microsoft Excel
¶ Step 21: Report/record an incident
Go to: HSE > Incidents > Report an incident
- Complete the Report an incident form
- Click OK
The Incident detail form will open
¶ Step 21.1: Update incident details
- On the Incident detail form, expand the General Fast tab
- The Incident ID is auto generated
- Select the relevant Description from the dropdown list
- Select the Date and time of the incident
- Select the Incident type from the dropdown list
- In the Date recorded field, select the date on which the incident was recorded
If the date entered in the Date recorded field is after the current system date, the following warning message is displayed

- The name of the logged in user will be displayed in the Reported by field. It can be edited
- In the Reference number field, enter the relevant accident of dangerous occurrence number
- Select the relevant Incident classification from the dropdown list
- The Status will be Captured
- Select the Severity ID from the dropdown list
- In the Work activity field, select the activity/action that the worker was busy doing when the incident occurred
- Enter the relevant information under the Main area field group
- Enter the relevant information under the Line management field group
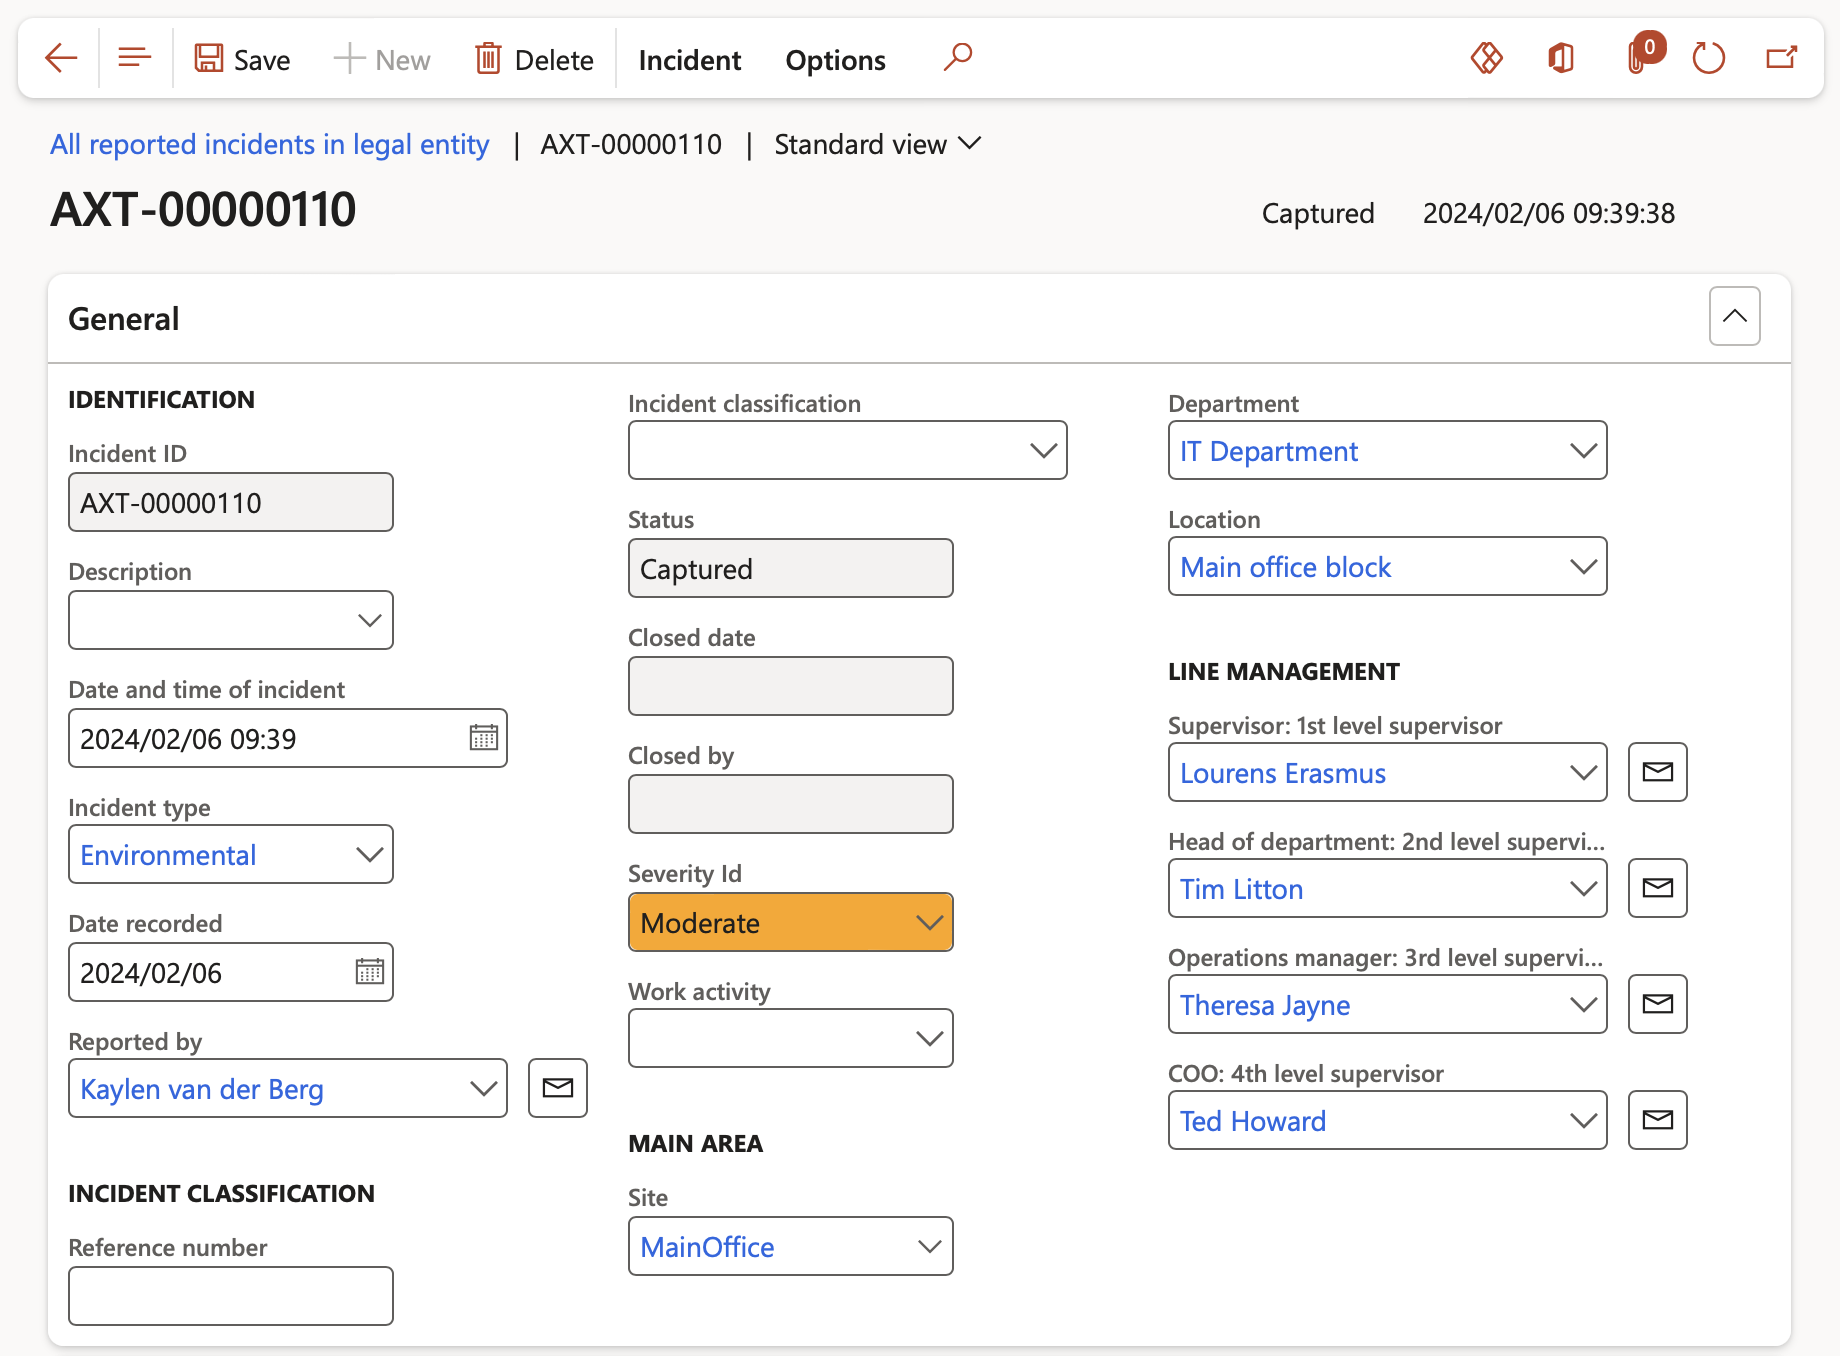
The buttons on the Incident detail form:

- Delete: removes the selected record permanently
- Report an incident: Creates a new incident
- Triage: Changes the status of the incident to Triage
- Close: Changes the status of the incident to Closed and the record cannot be edited
- Re-open: Changes the status to In process
The Re-open button is only available for users with the following roles:
- Incident administrator
- Incident manager
- Incident address: The user can add additional physical and/or GPS location details for the place of incident

- Send email notification: Send an email notification to the selected stakeholders

- Flash report: To print a Flash report of the incident. This report can be printed on the basic form as well
- Risk assessment
- Risk details can be added
- a new risk register can be created
- select an existing risk entry
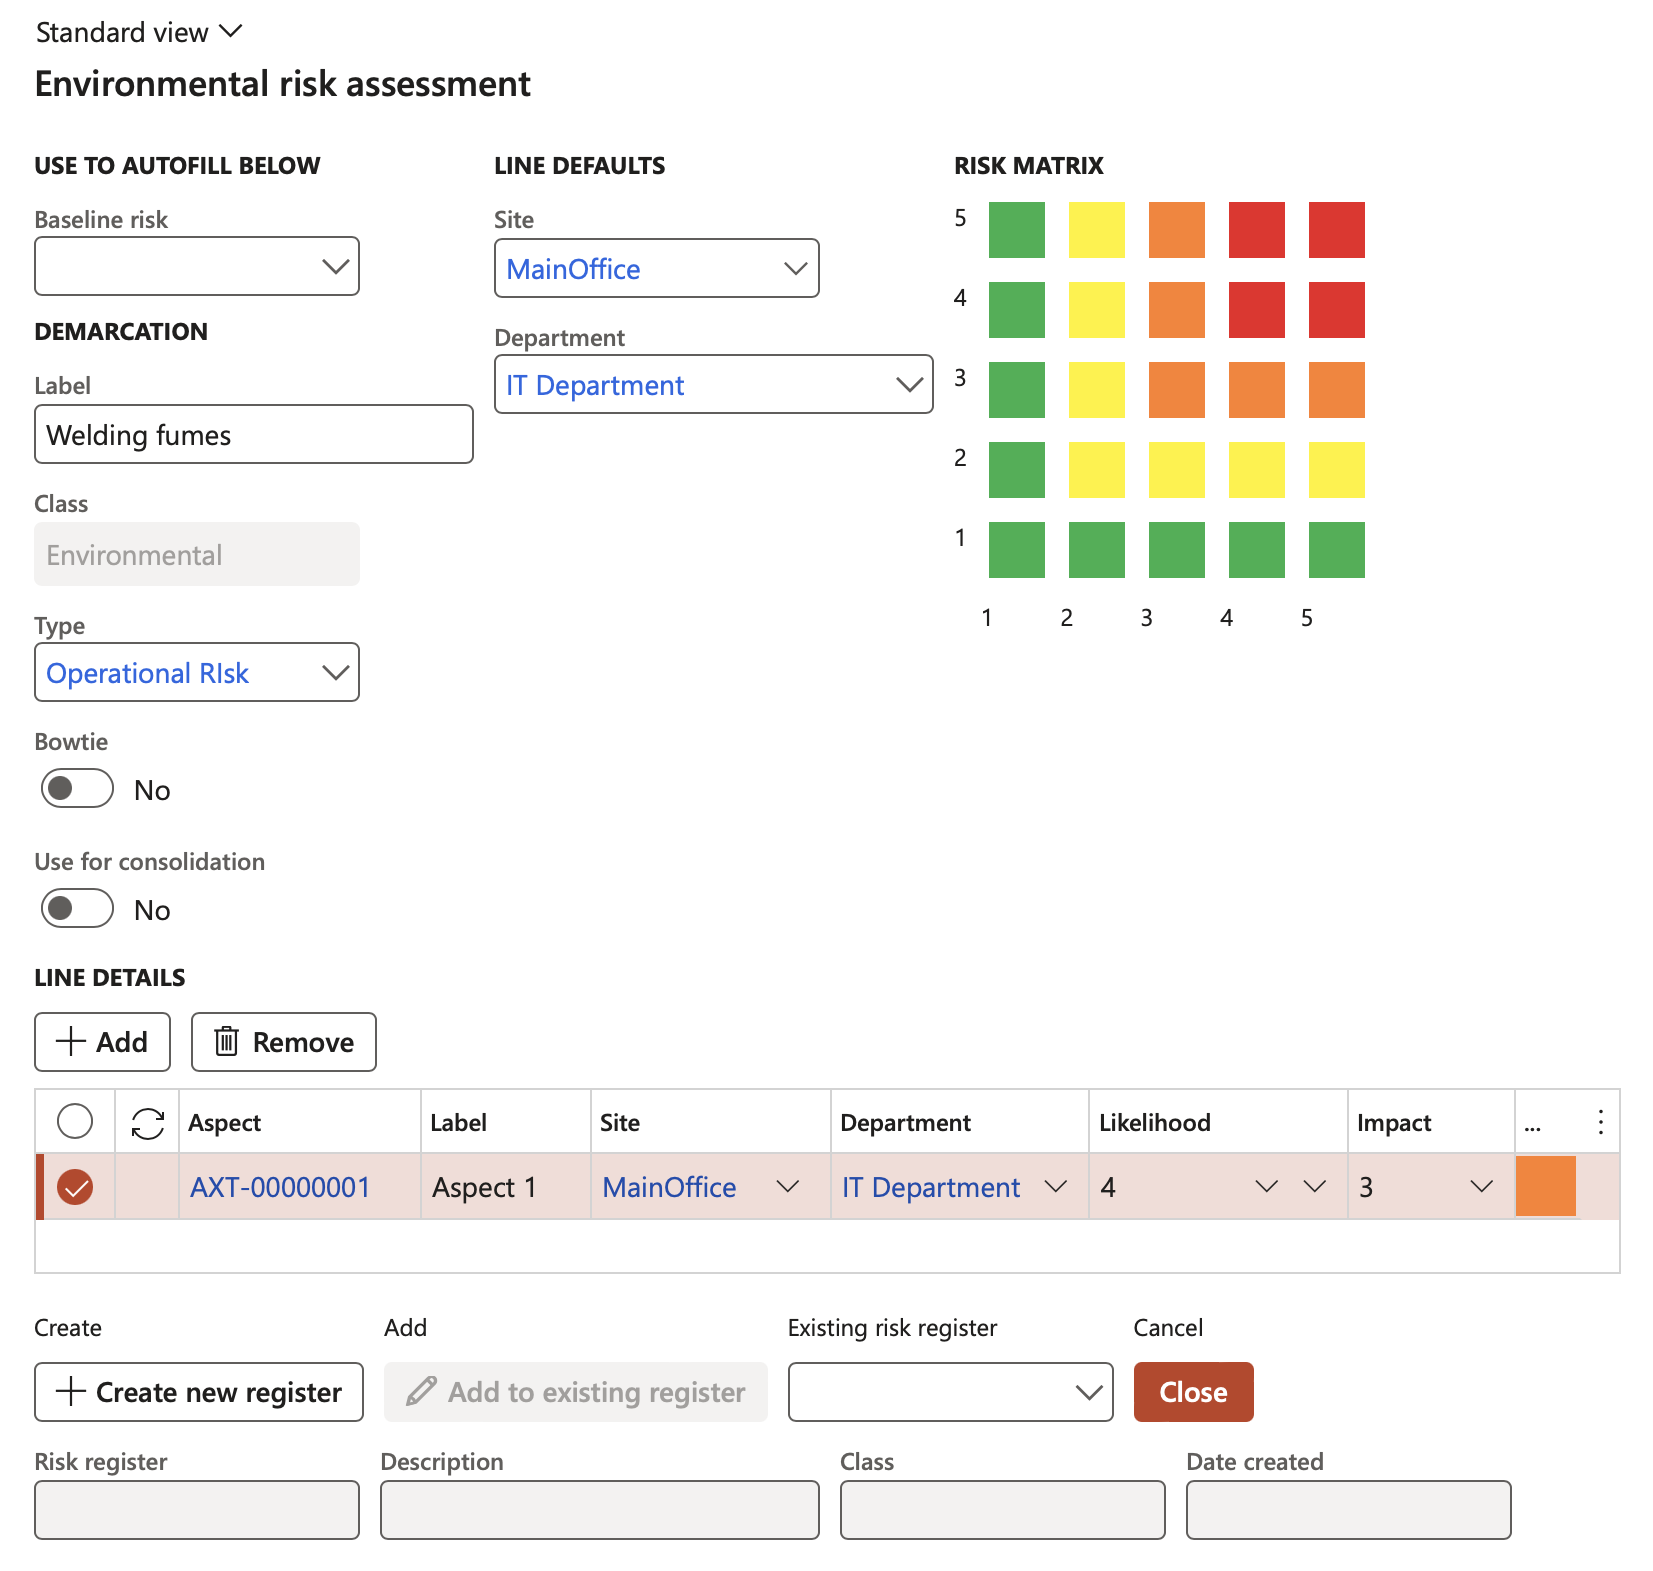
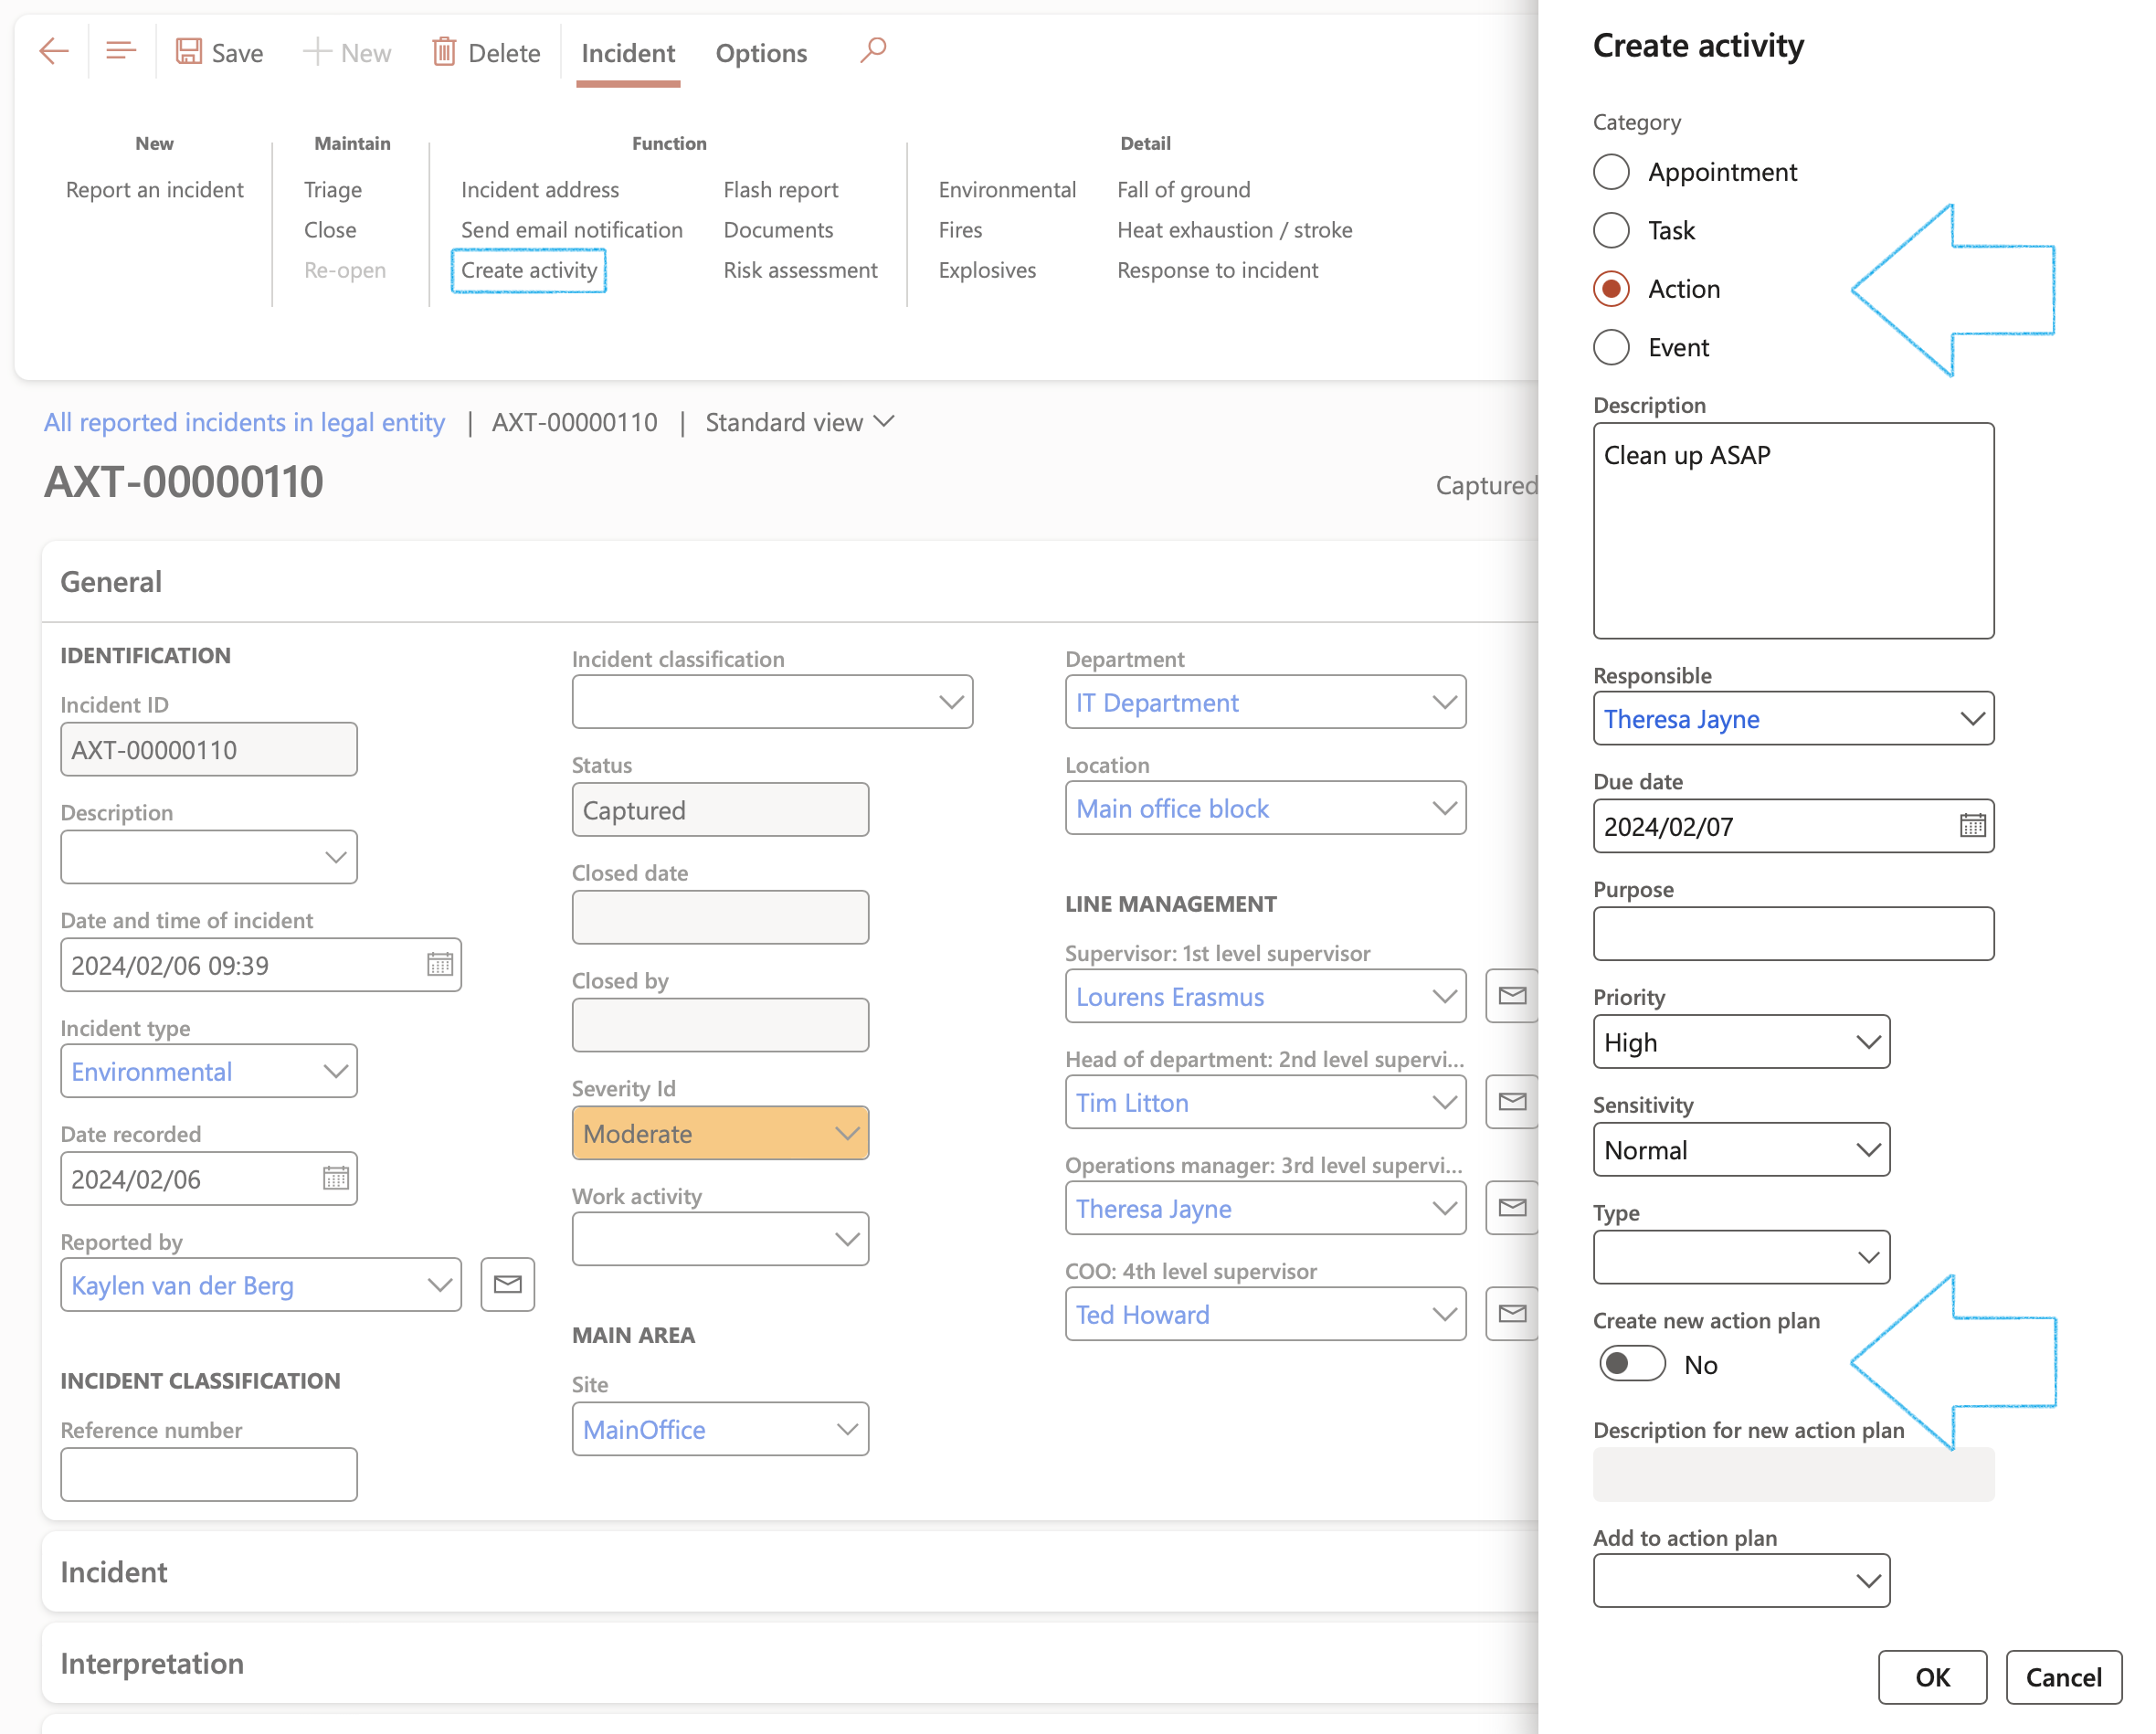
- Create activity
- On the Action pane, in the Function group, click on the Create activity button
- Select the required activity category
- Enter a Description for the activity
- Select the Responsible person from the drop-down list
- Enter the Due date for the activity
- The user can choose to Create a new action plan for the activity
- Enter a Description for the new action plan
OR
- Add the activity to an existing Action plan
- Click on OK
- Attachments: The document handling functionality can be used to attach files/pictures/documents or notes that are applicable to the investigation
Buttons relating to details of the incident:

¶ Step 21.2: View the recorded incidents for the CURRENT company
Go to: HSE > Incidents > All reported incidents in legal entity
- Select the incident
- Expand the Incident Fast tab
This is where the core data of the incident is recorded
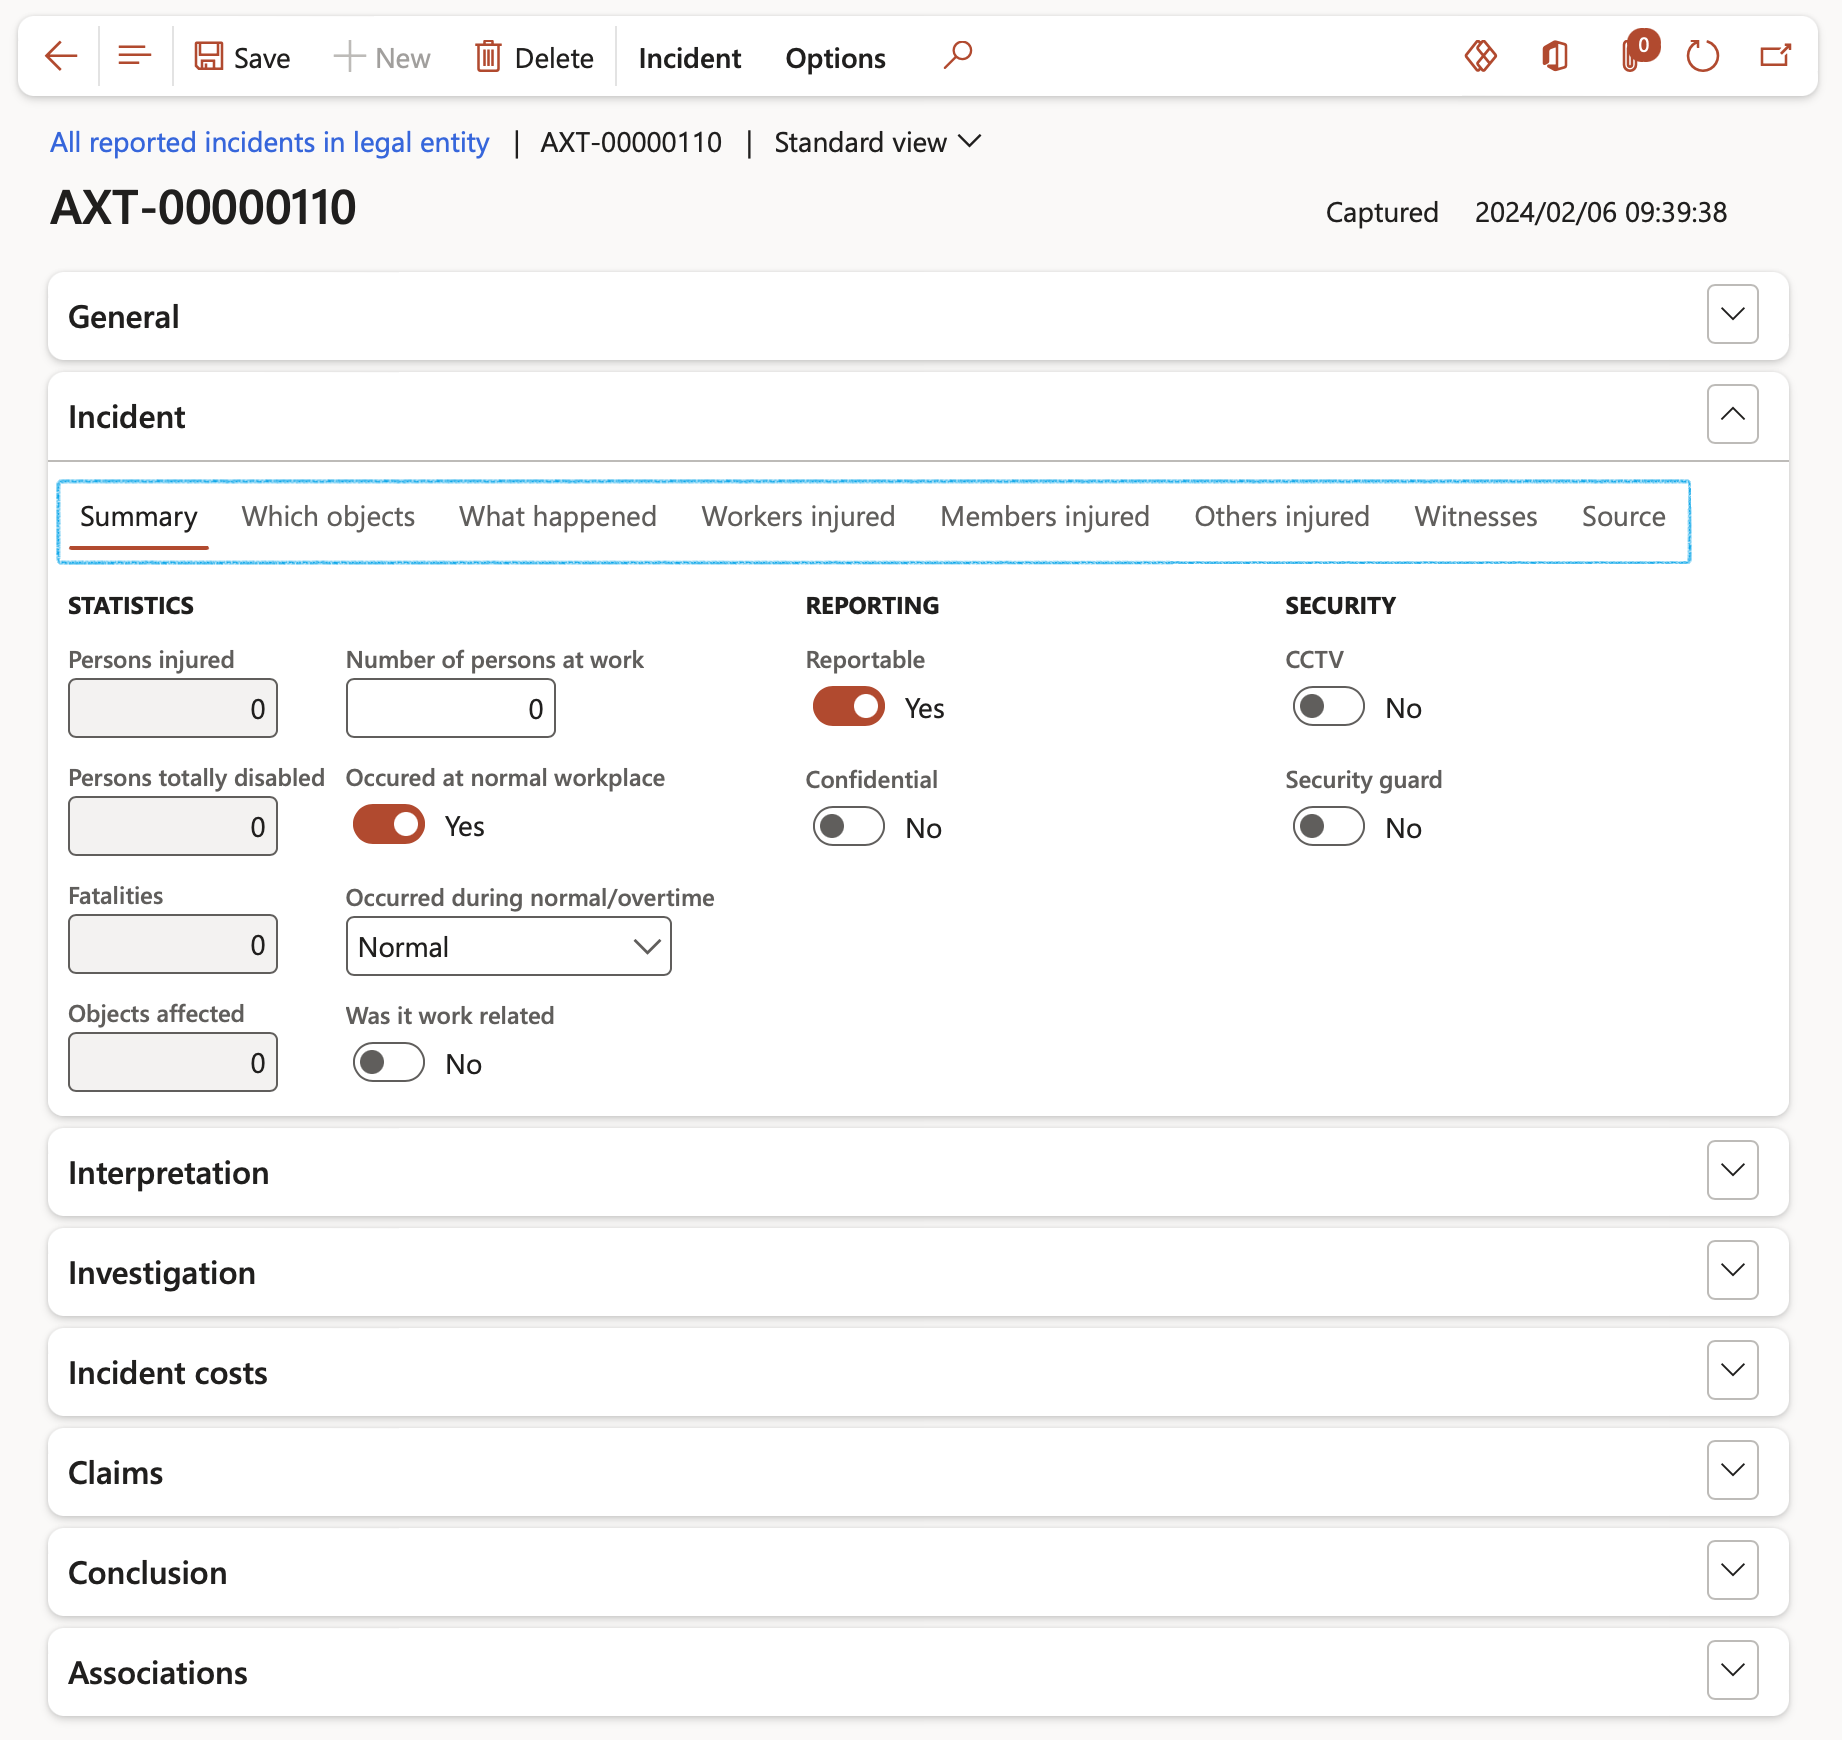
The Index tabs under the Incident Fast tab provide fields for adding additional details that will aid the investigators and the management teams to do detailed analysis
¶ Step 23: Incident Fast tab
- The Summary Index tab provides a summary of the statistics of the incident
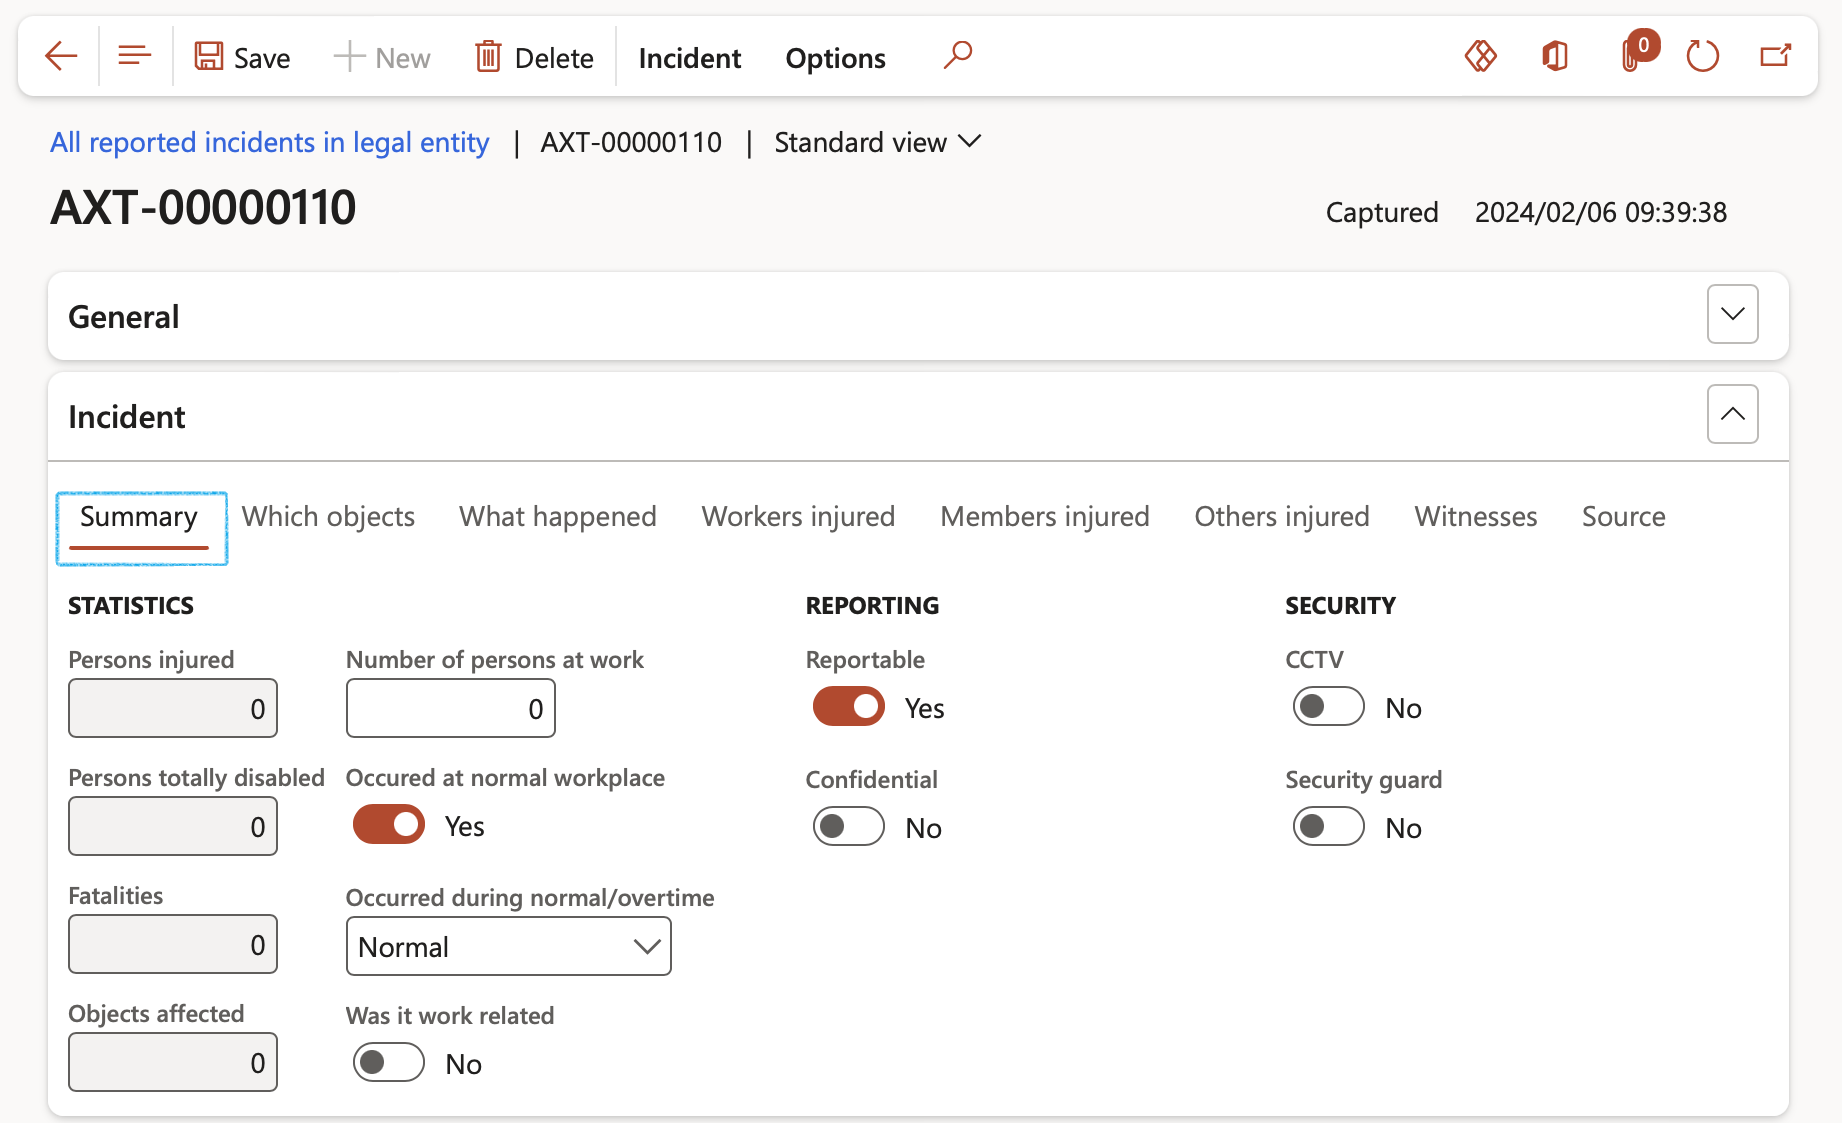
The accuracy of the statistics depend on the correct setup on the Injury and illness setup form. Please refer to the setup above.
The Include external parties slider on the HSE parameters, Incidents tab, Summary Fast tab, has to be set to Yes in order to include witnesses and visitors in incident summary calculations.
- Details of the objects affected by the incident are entered in the Which objects index tab
- External objects affected by the incident can be entered
- Internal objects affected by the incident can be listed
- Additional information such as Serial number and Make and model of the object can be entered
- The user can indicate whether the object was correctly used
- The user can indicate whether the object Is/was in good working order
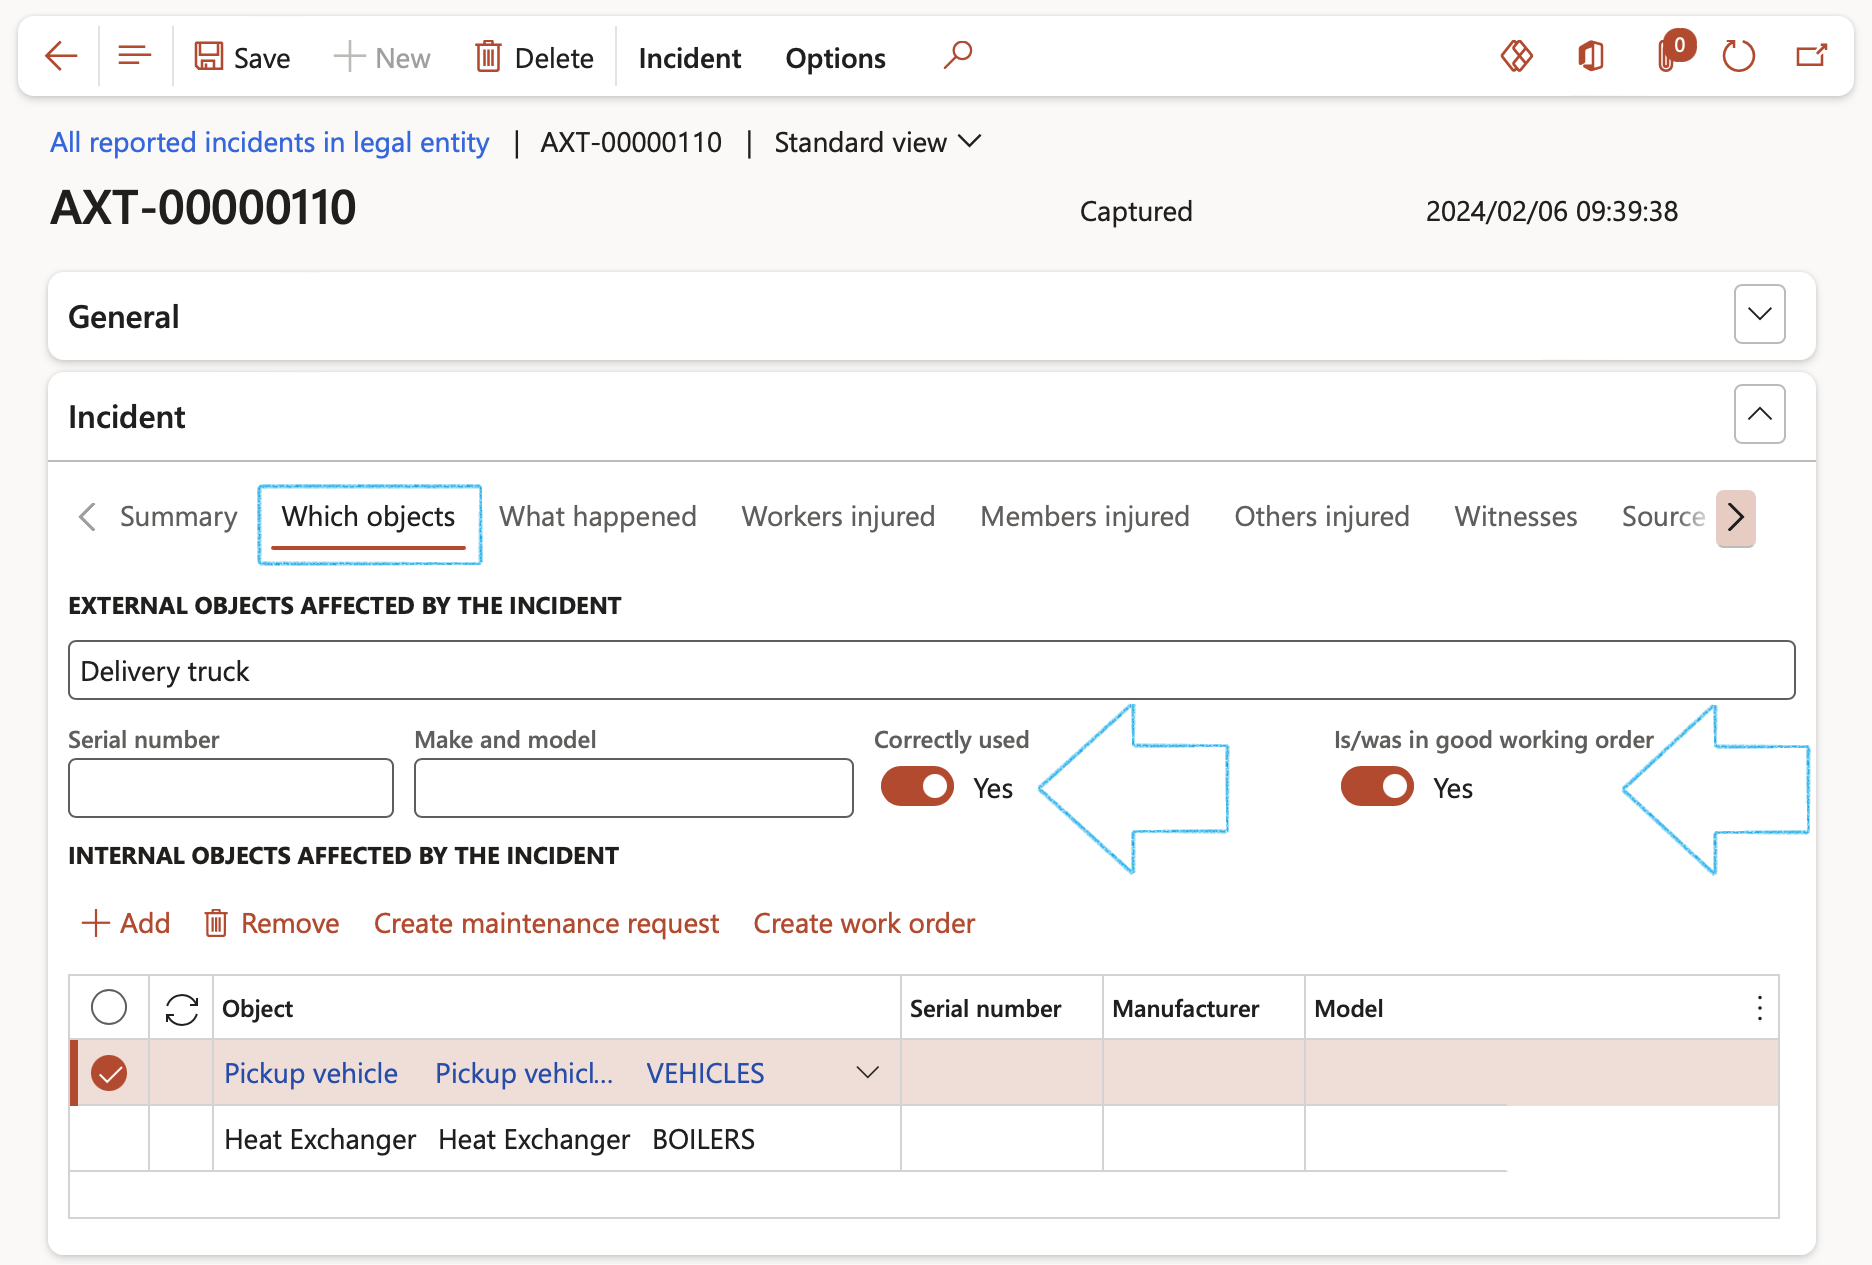
Internal objects affected by the incident might have to be repaired. The repair job might require a work order.
- Select the object that you want to create the work order for
- In the Button strip, click on the Create work order button
- Complete the Create work order dialog with the relevant detail
- Click on the OK button
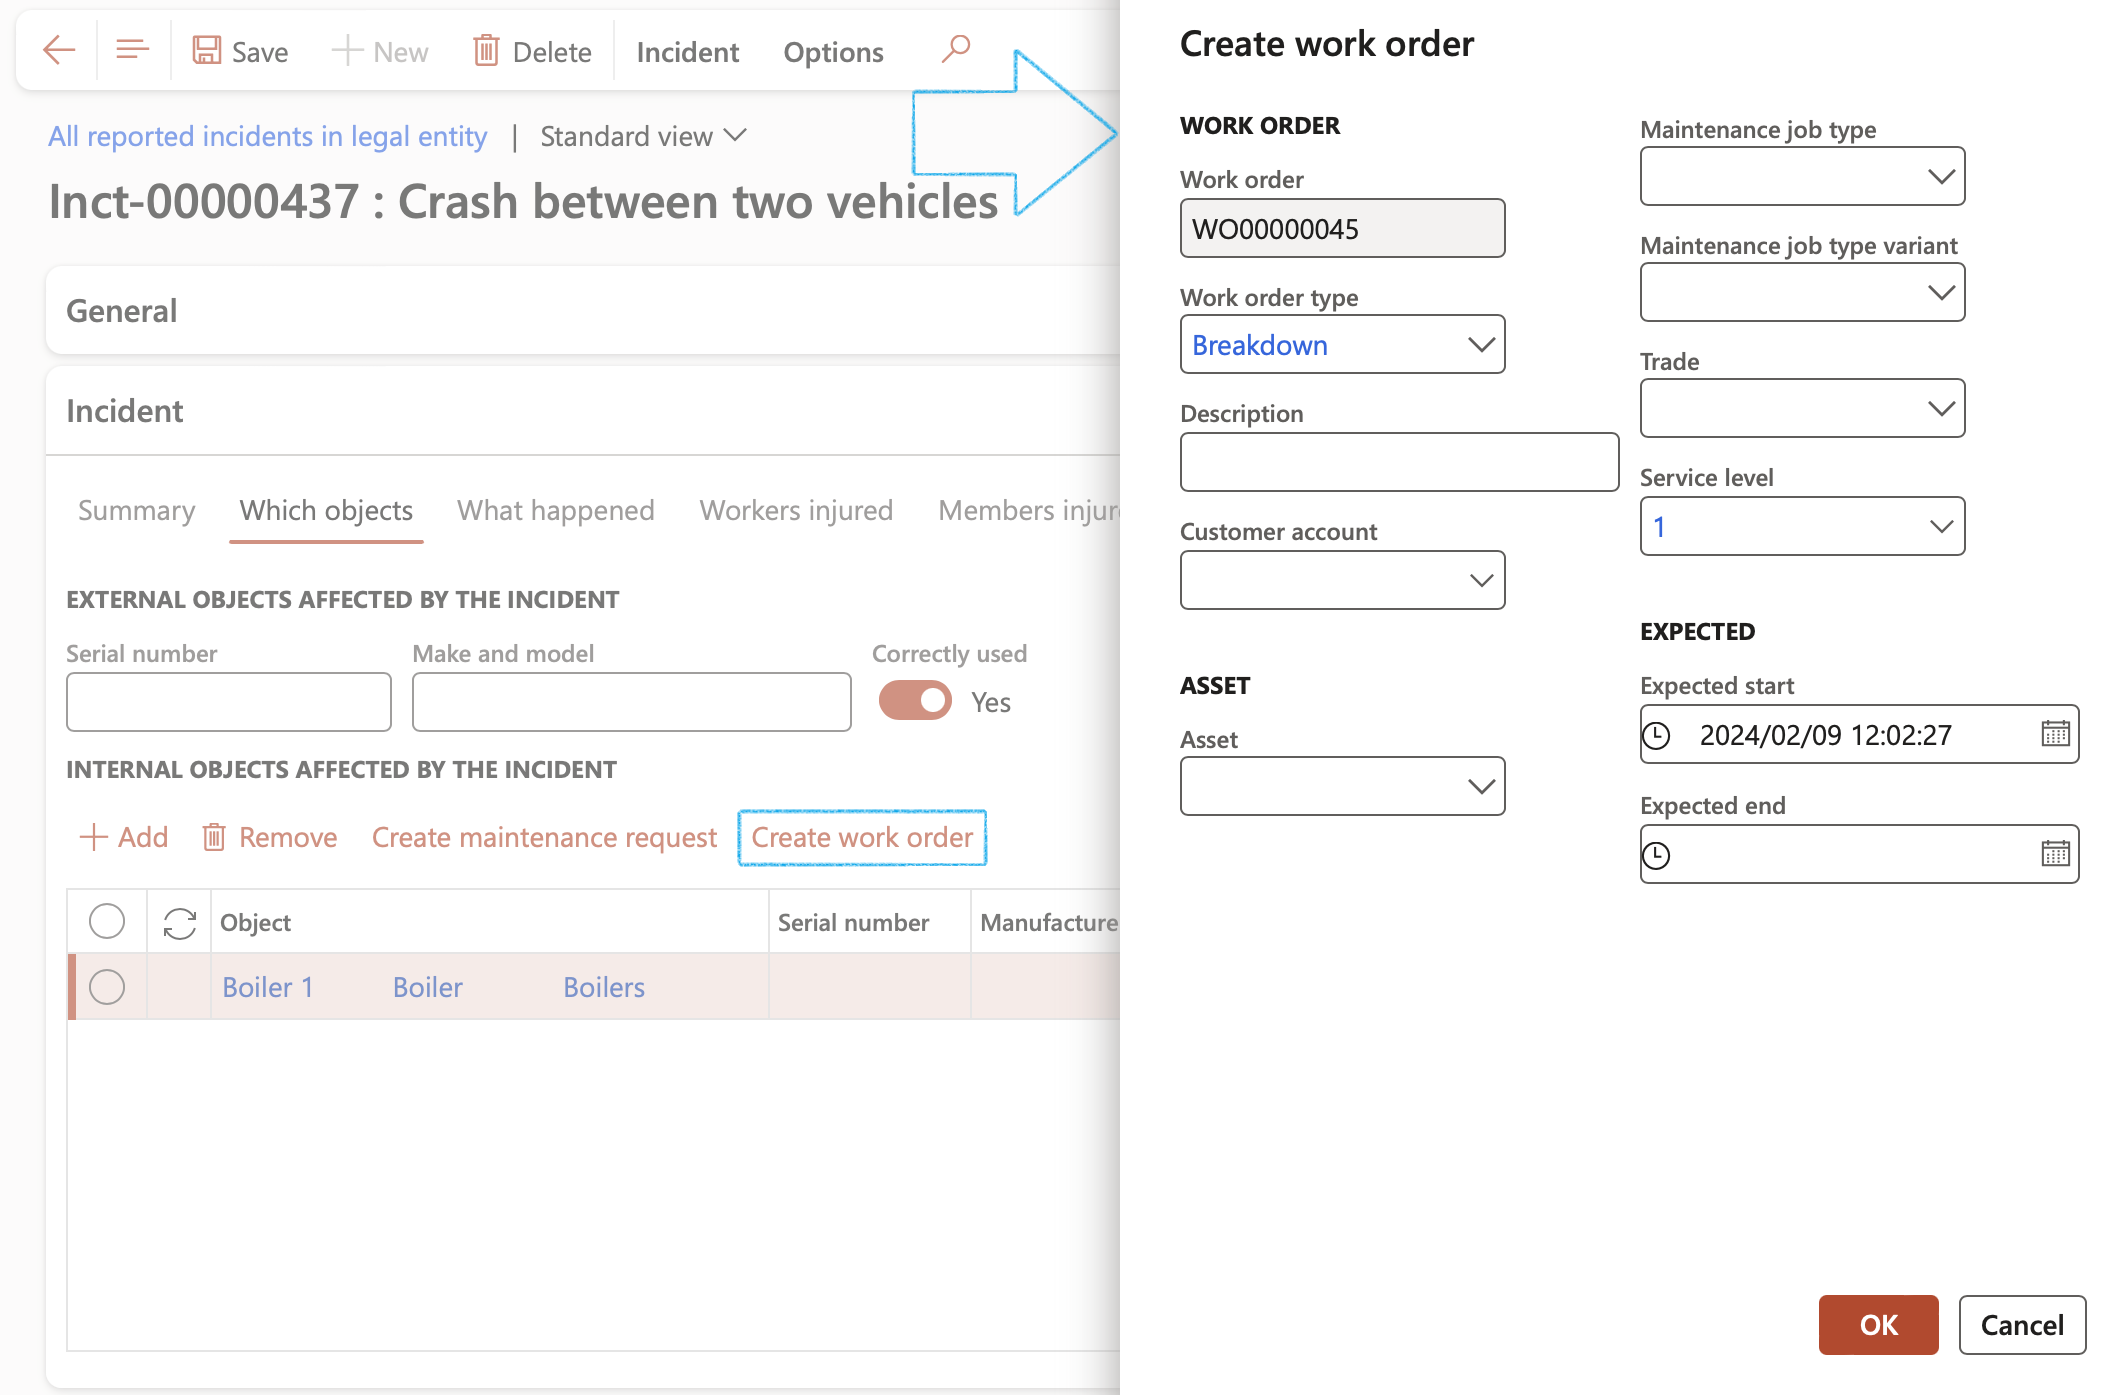
The Work order detail form will open for the user to enter additional detail
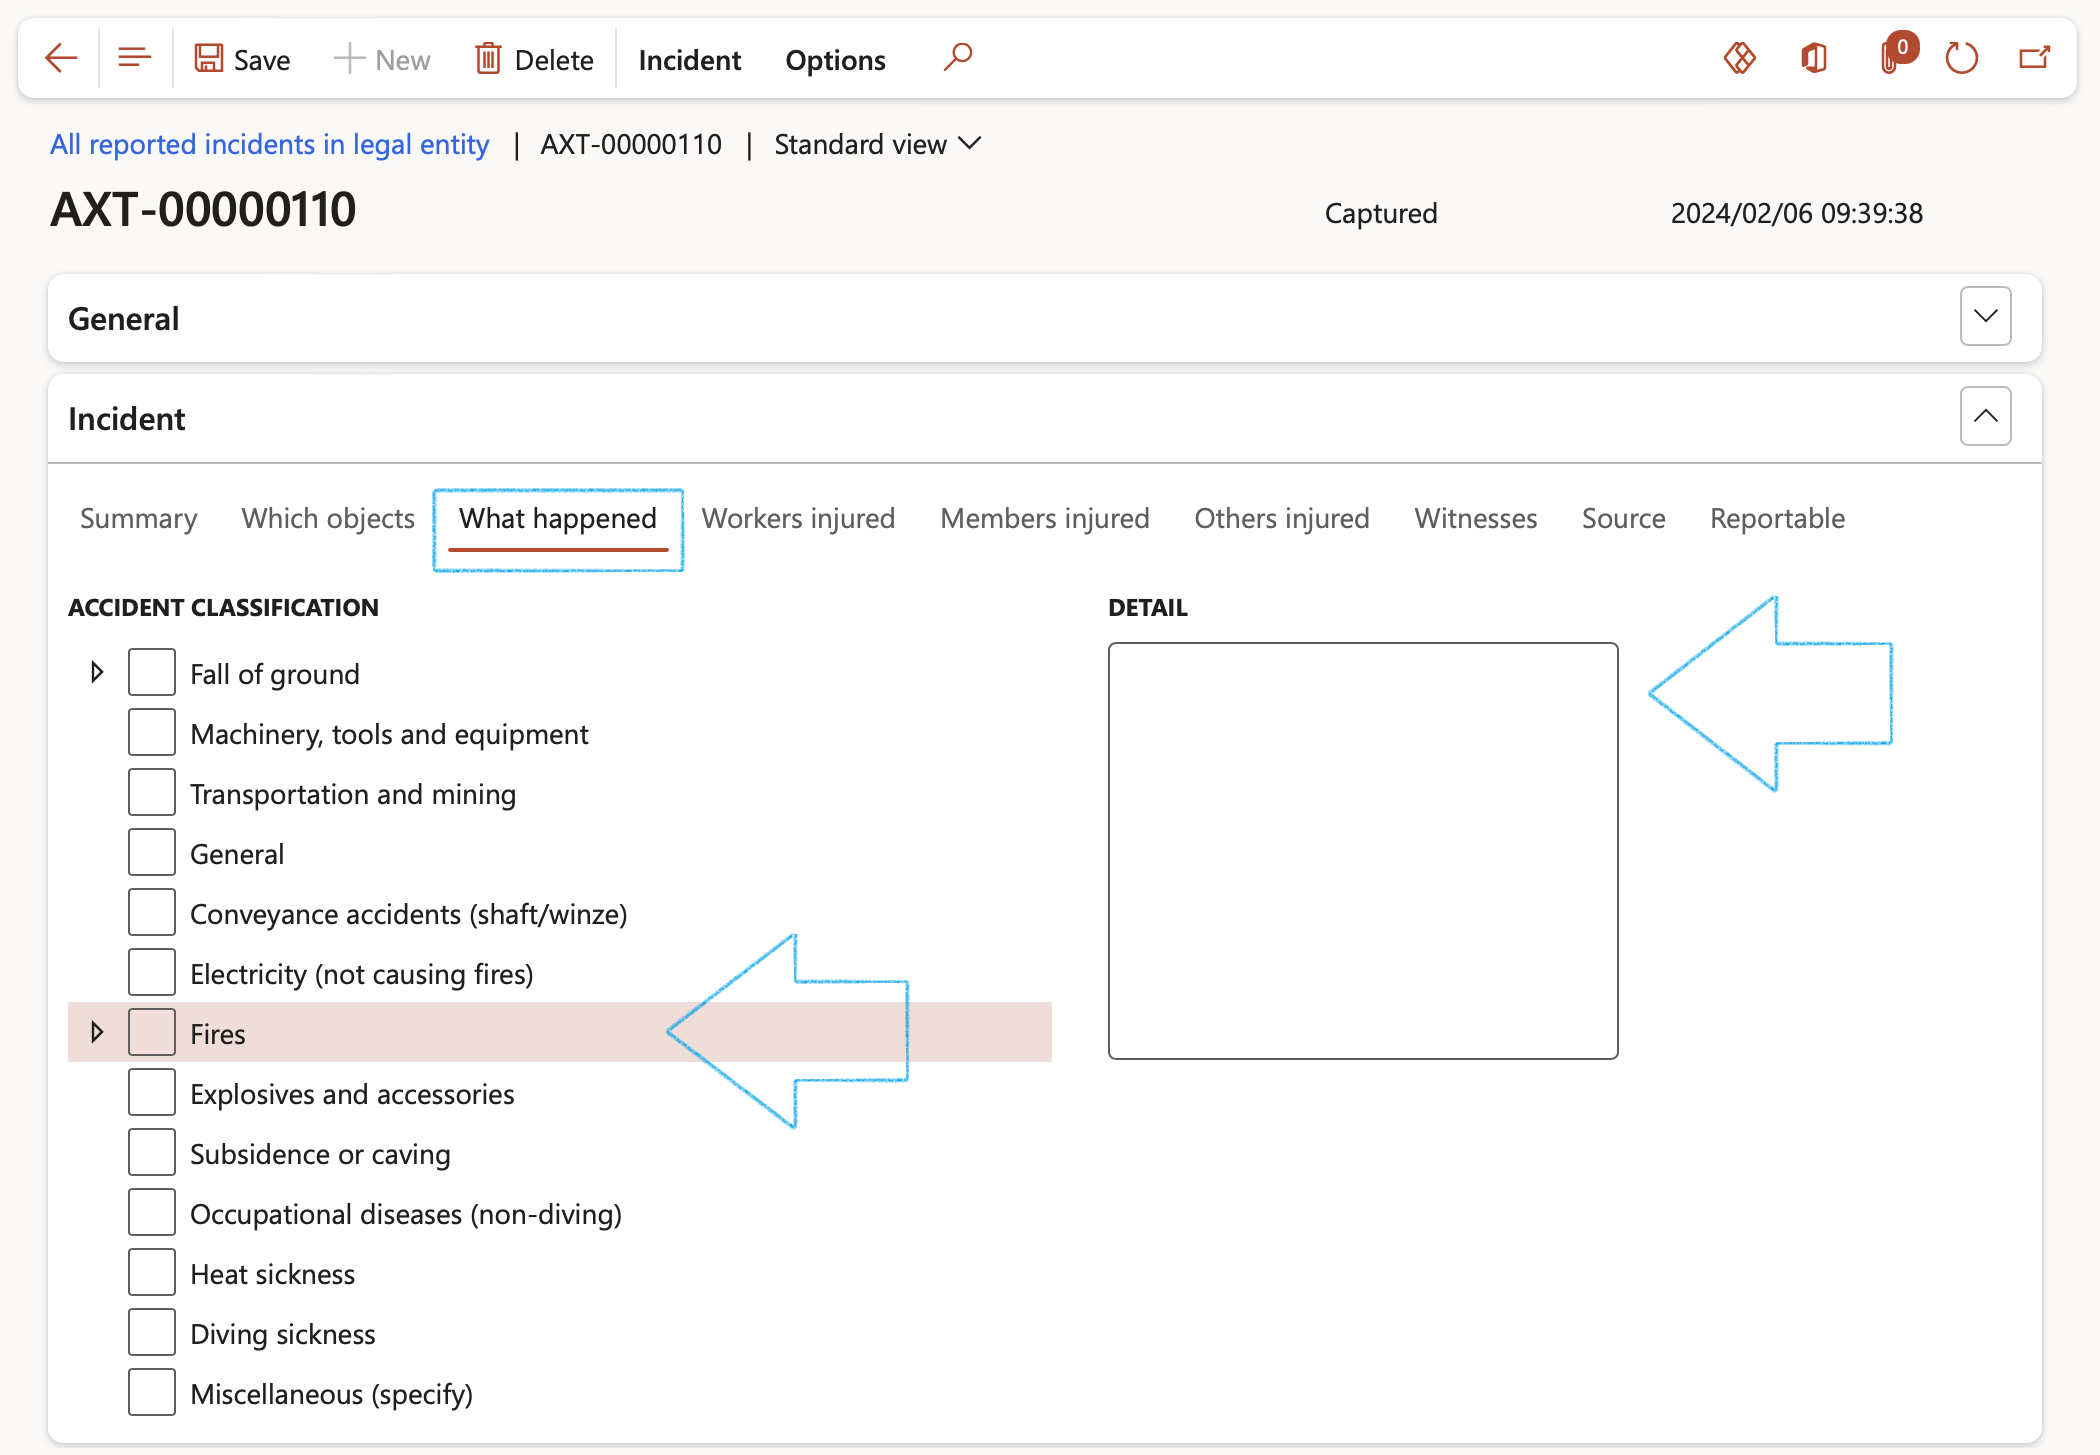
- Under the What happened index tab, the Accident classification can be selected by clicking on the arrow next to the relevant phrase. This will open up the different levels to choose from. Multiple Accident classifications can be selected.
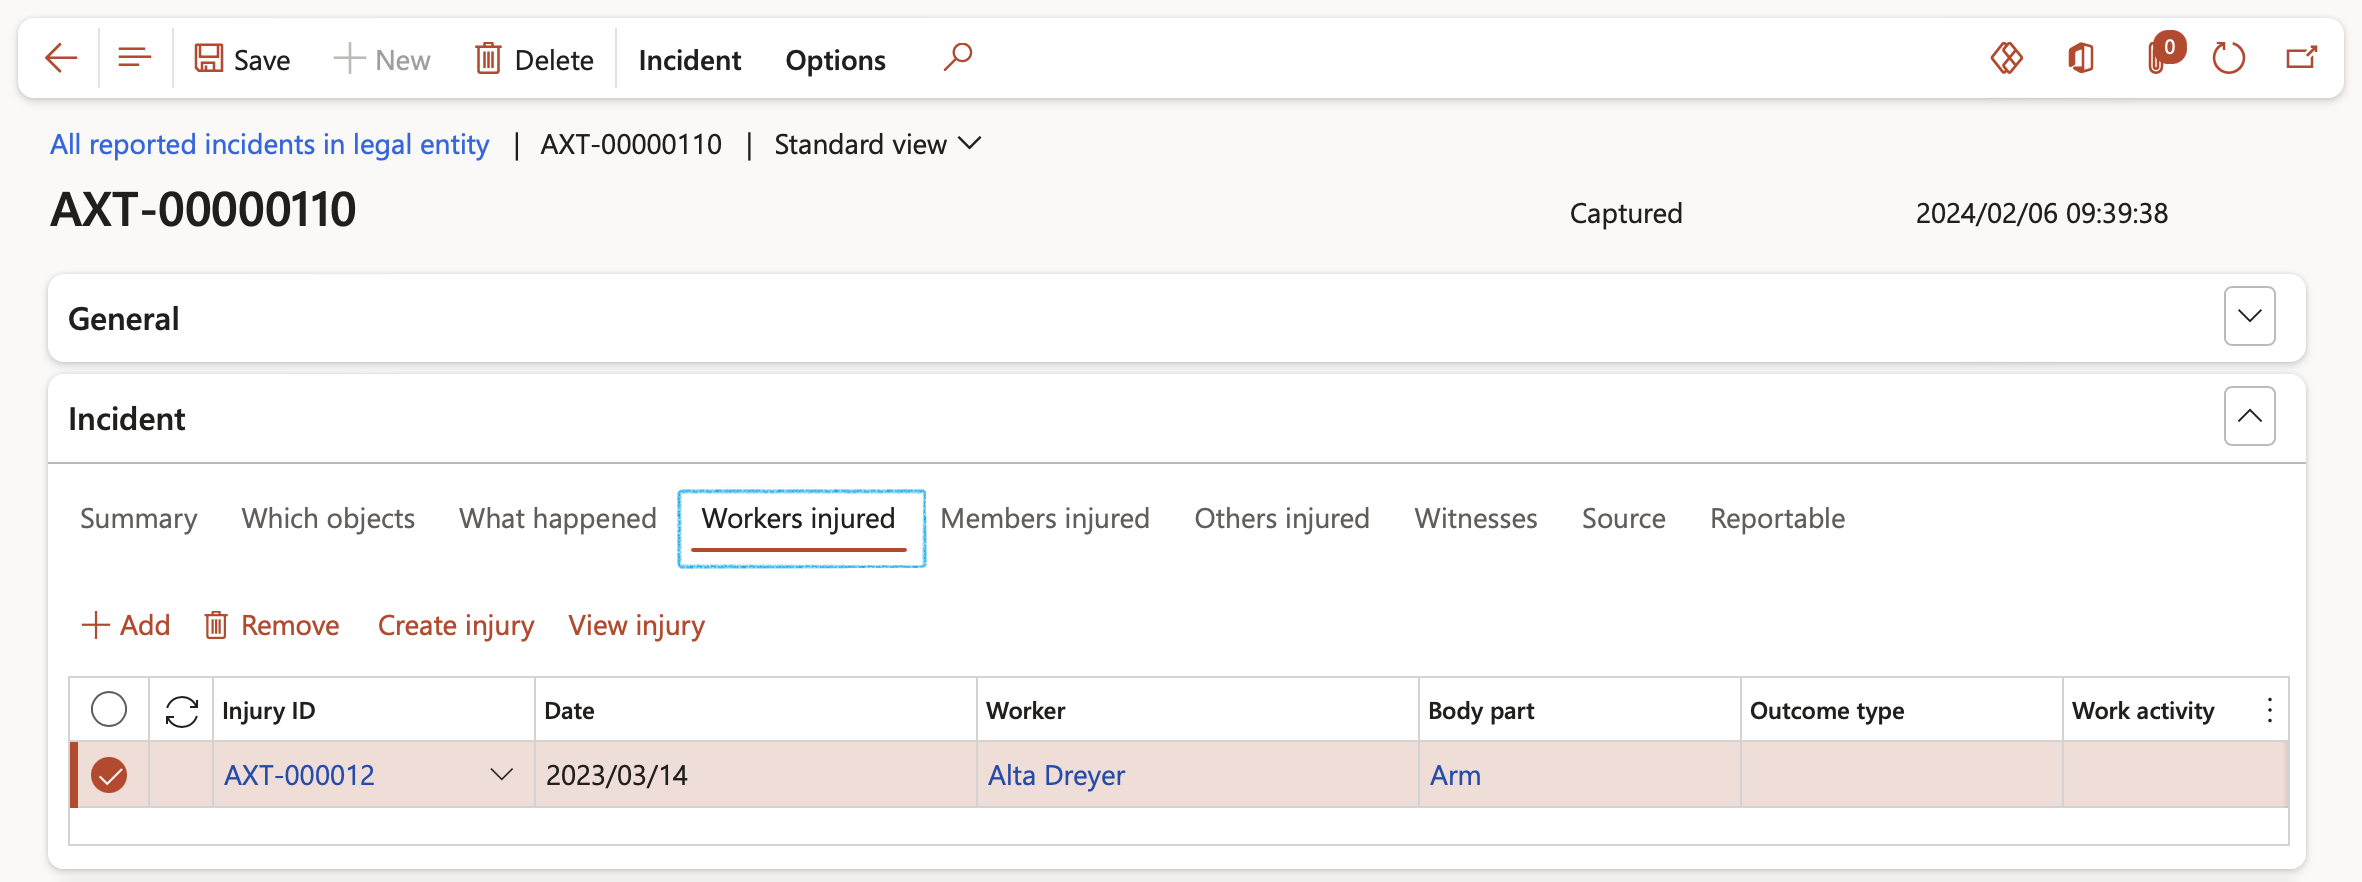
- In the Workers injured index tab, details of the injured worker can be recorded for example:
- The unique ID for the record in the database
- The outcome type of the incident
- What action the worker was doing when the incident occurred
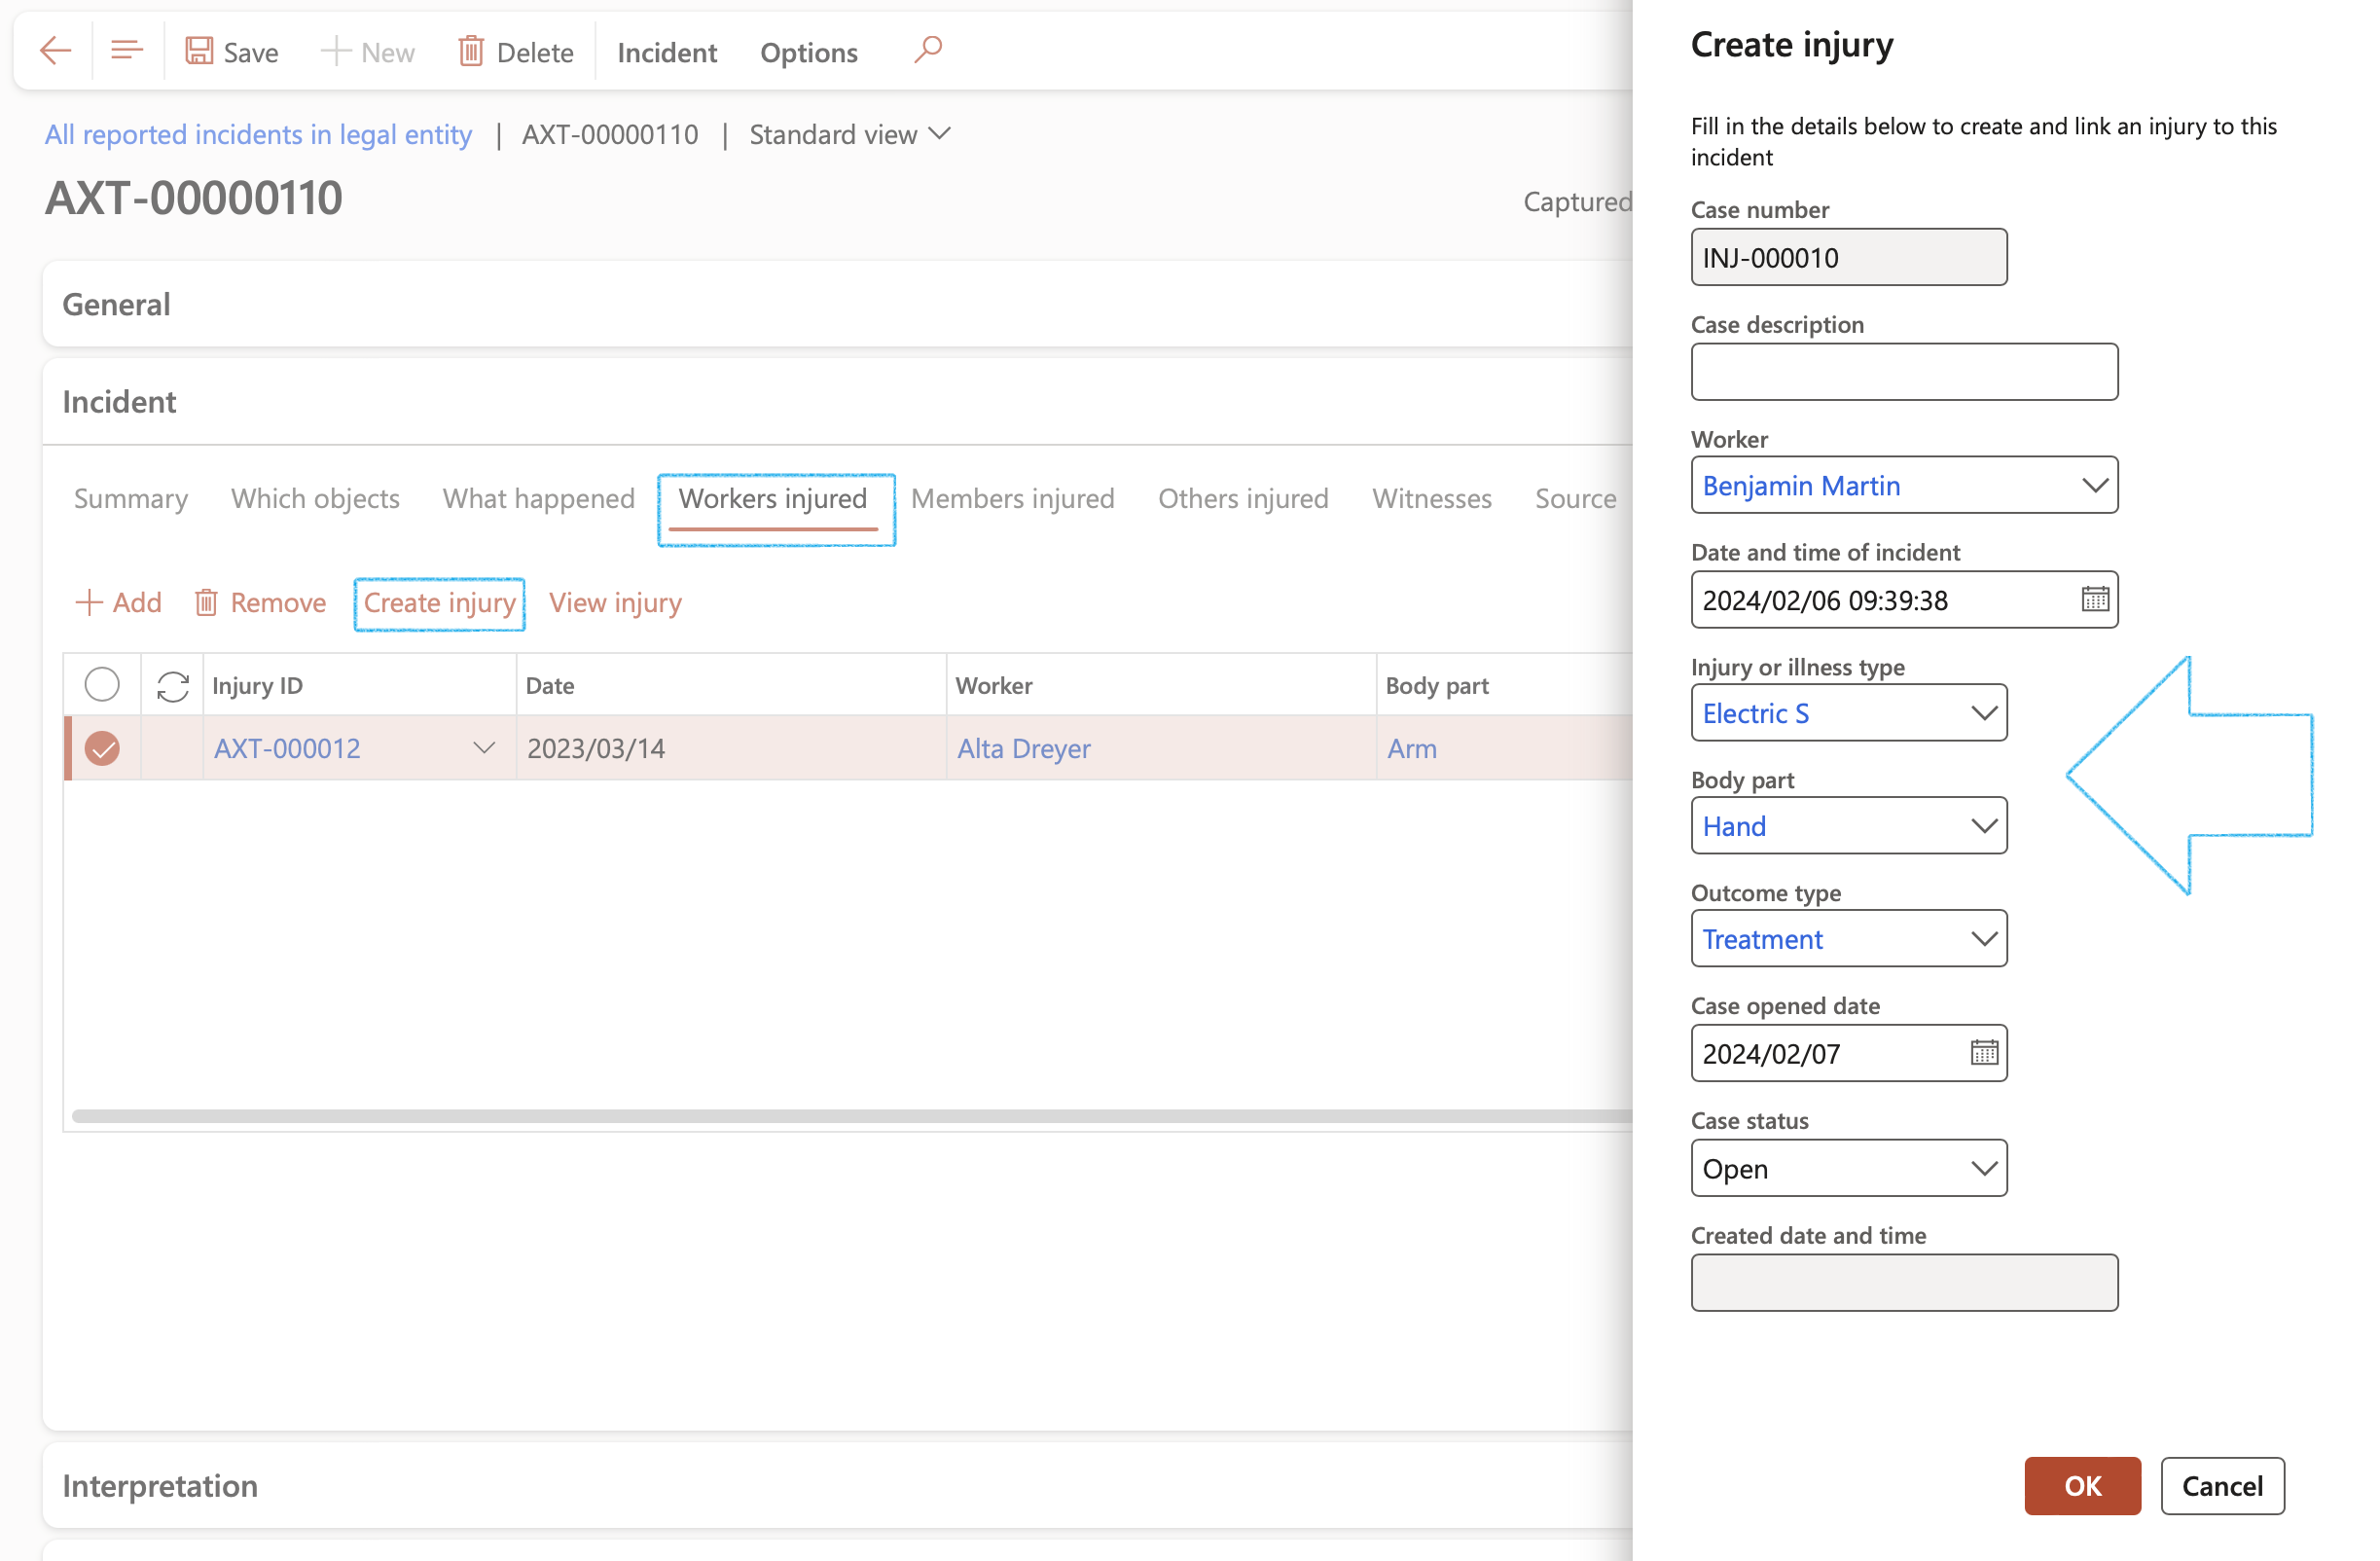
- To create an injury from this form, click on the Create injury button in the Button strip
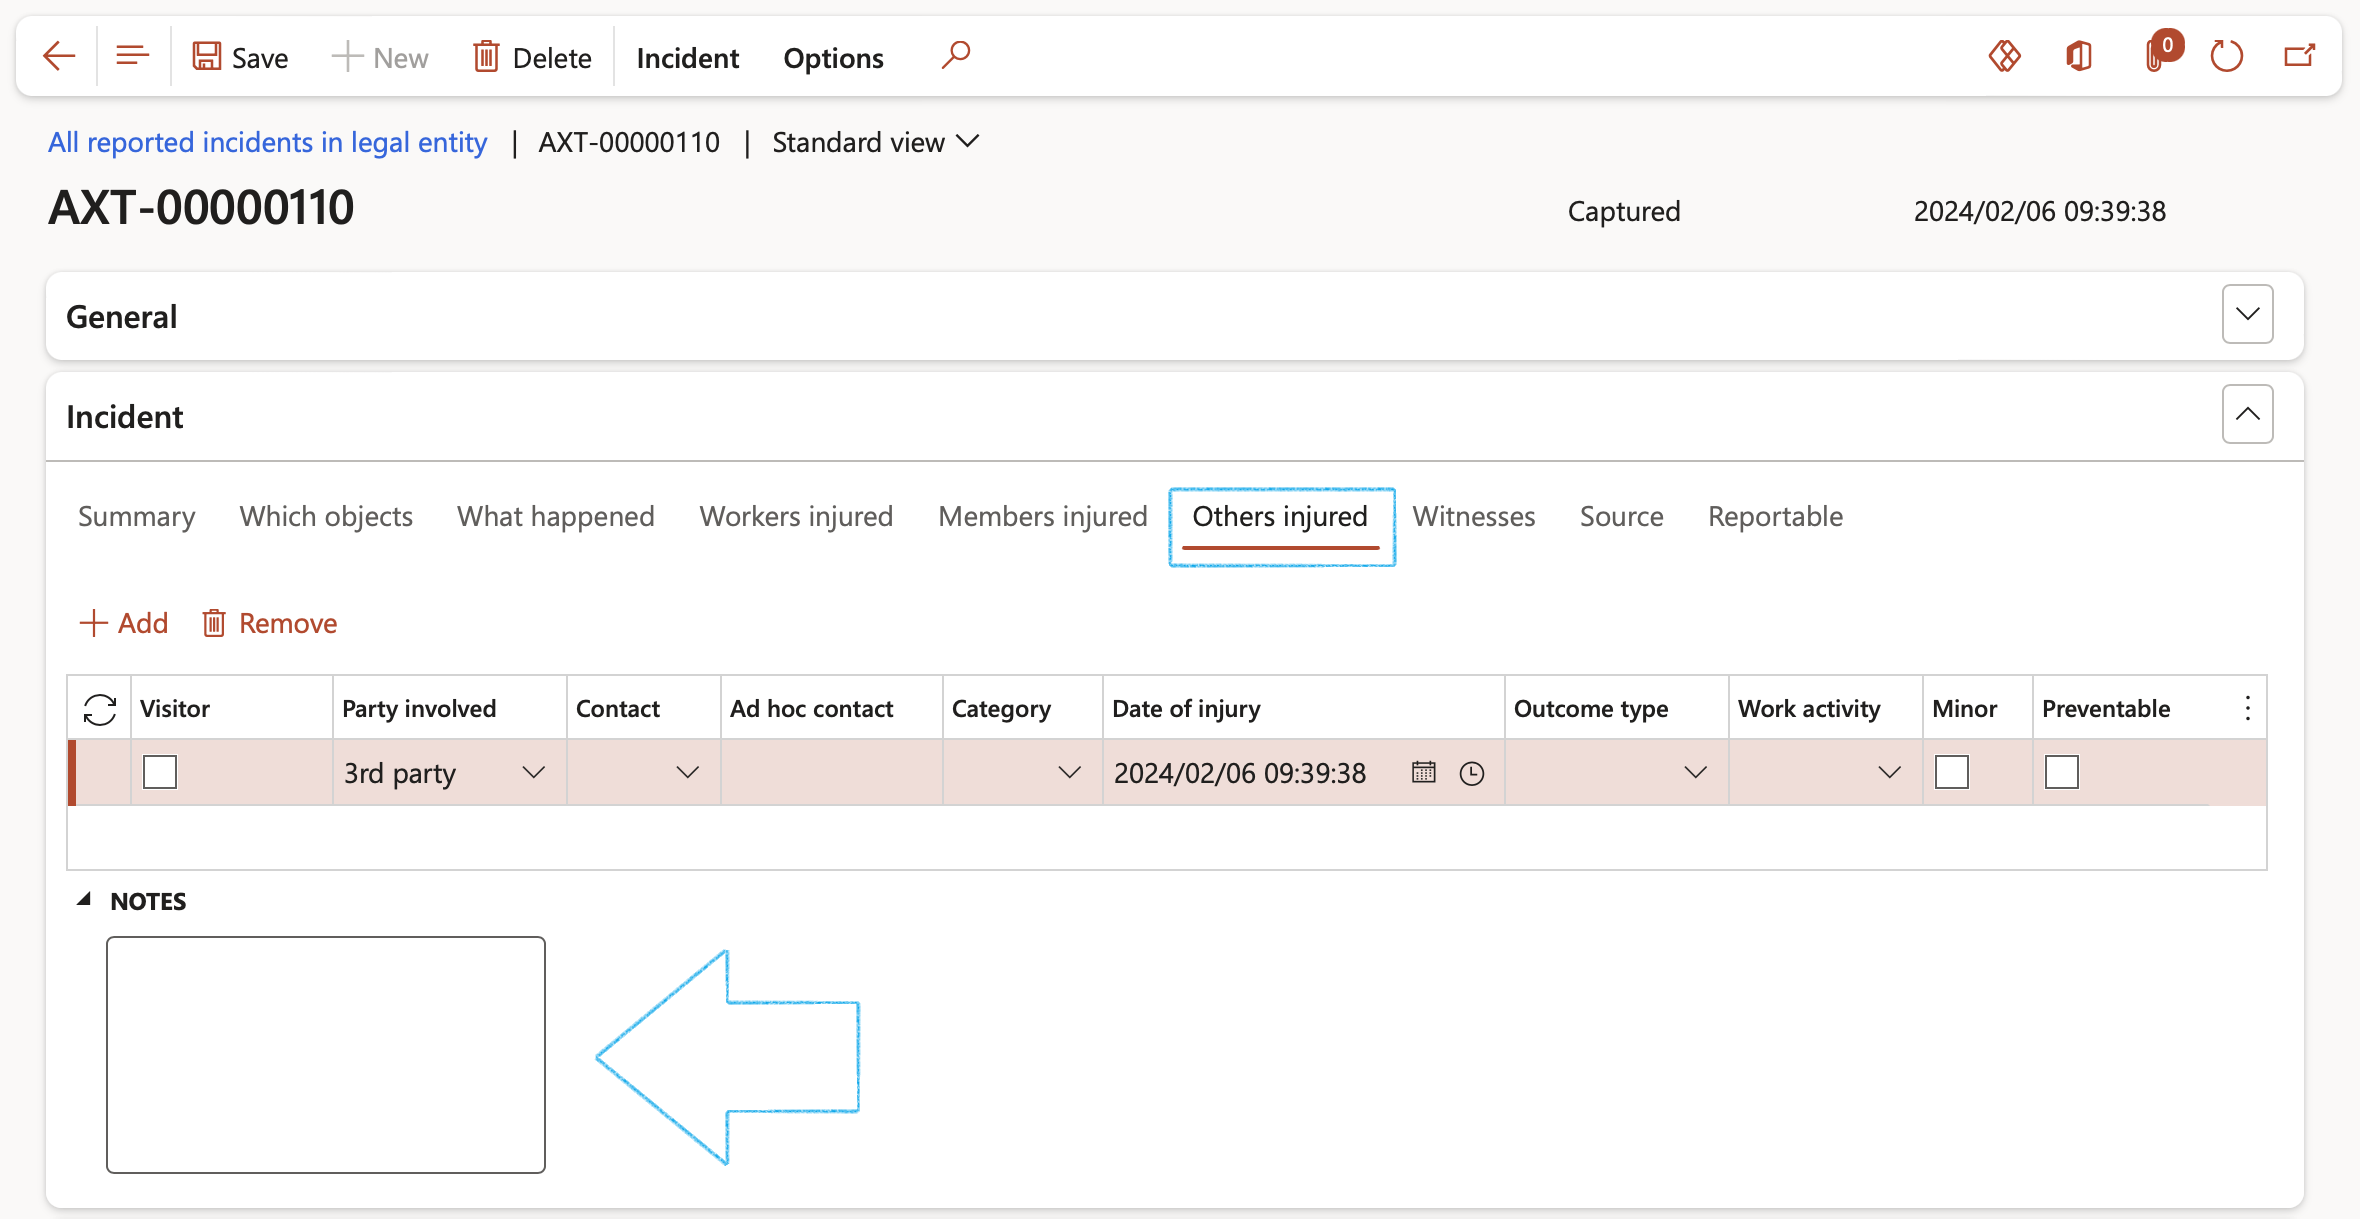
- The Others injured Index tab allows you to capture information of injured people that are not necessarily workers at your company. They could be contractors or visitors, which means they are a 3rd party involved in the incident.
- Select the relevant Outcome type from the drop-down list
- Indicate whether the injured person was a Minor (under 18 years old)
- Indicate whether the injury was Preventable
- Enter additional information in the Note box provided
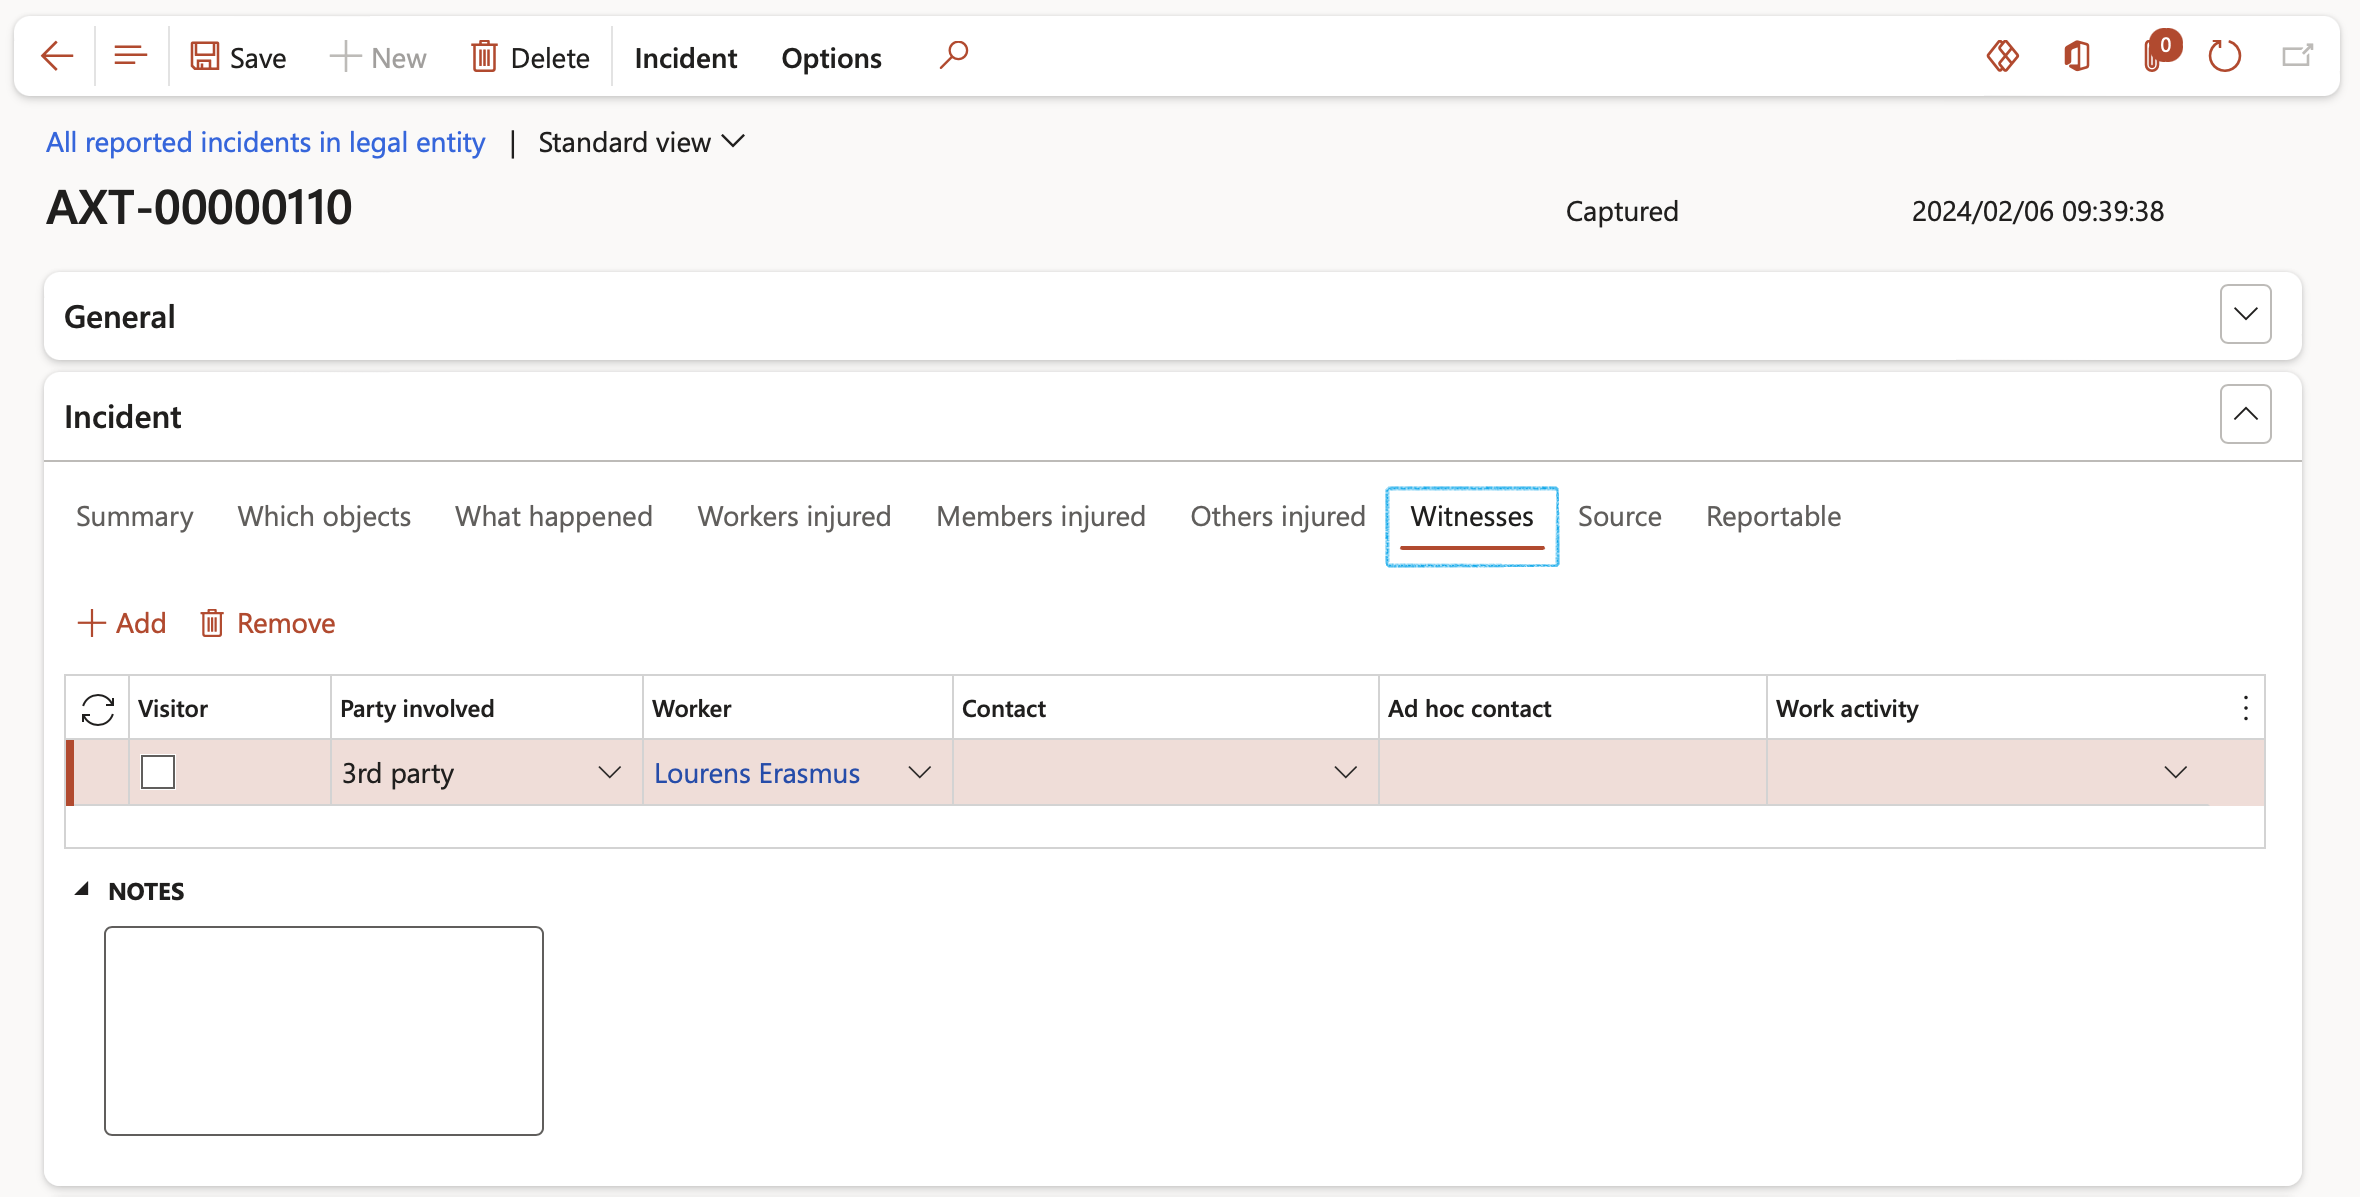
- The Witnesses Index tab allows you to capture information of witnesses that are not necessarily workers at your company. They could be contractors or visitors, which means they are a 3rd party who witnessed the incident.
- The Source index tab provides a free text field where the user can enter a brief description of the source of the incident
- If the incident was created from a project, the Project ID and Project name will be displayed

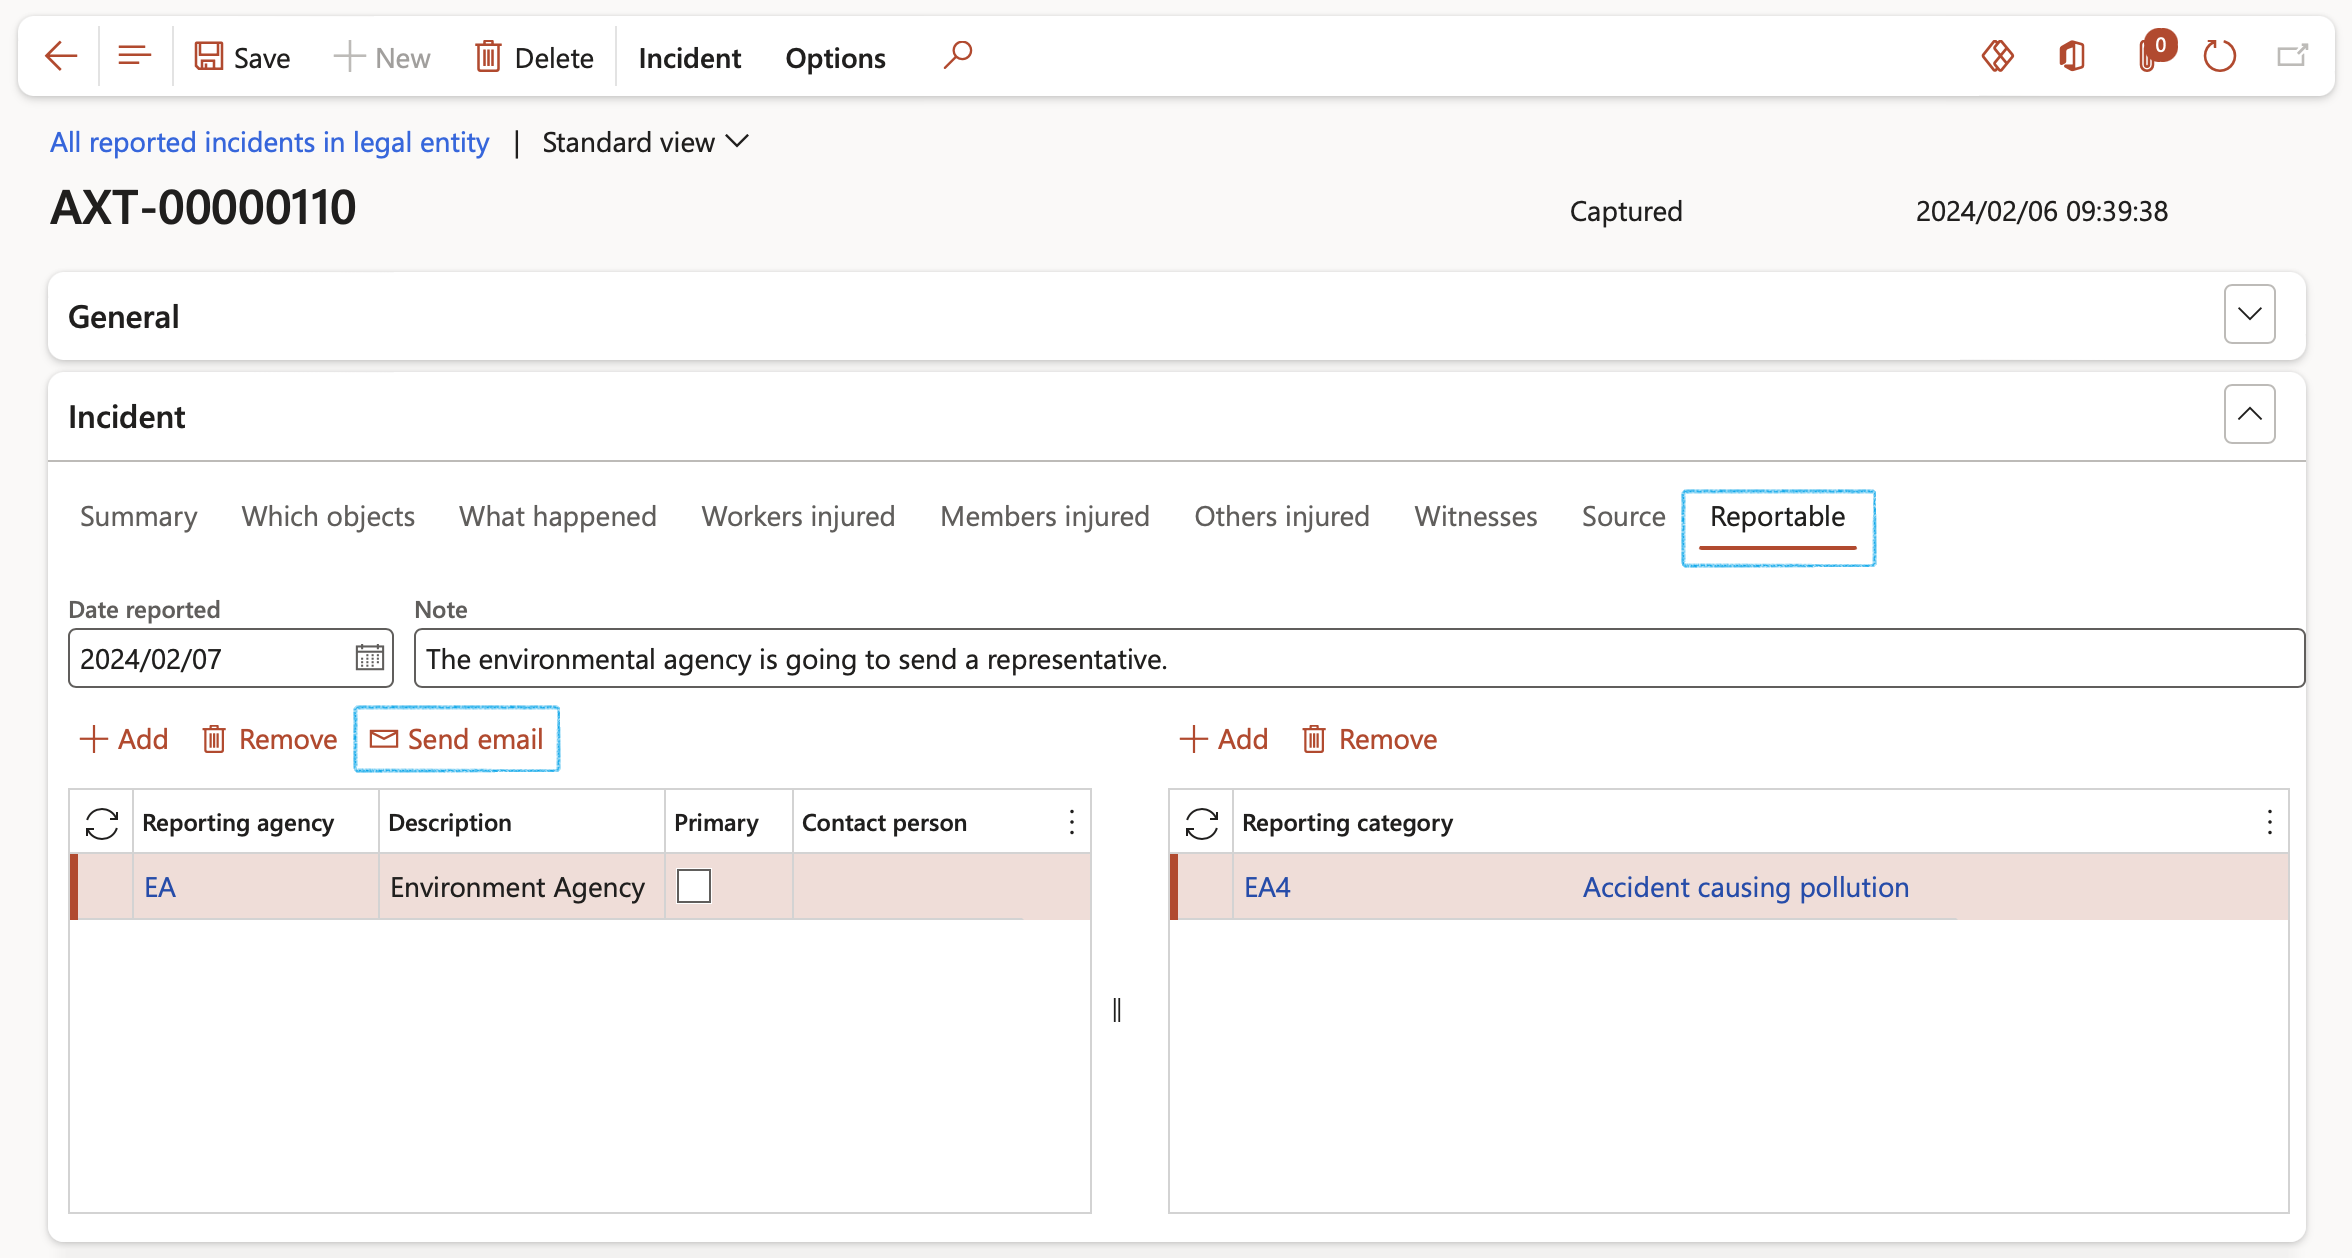
- The Reportable index tab will only be available if Yes is selected for reportable on the Summary index tab. Multiple Reporting agencies can be added but only ONE can be marked as Primary
- An email can be sent to the Contact person selected on the Reporting agency
- The Reporting category for the selected Reporting agency is displayed. Reporting categories can be added/removed
- The Dangerous occurrence Index tab allows the user to select multiple dangerous occurrences per incident. The Dangerous occurrence index tab is only available if the user has selected a Primary reporting agency under the Reportable index tab.

Some of the relevant fields populated under the Incident detail form (as described above) will be passed to the relevant workers' injury records (Injury or illness incidents form) in the HR module
¶ Step 24: The Interpretation Fast tab
The Basic probable cause as well as the Underlying causes of the incident are recorded by specifying Cause and Non-conformance by using the index tabs at the top of this Fast tab. All the selections are made in the Tree view.
To select the Primary cause:
- Open the Cause Index tab
- Select the cause of the incident under the Cause field group
- Under the Cause mode field group, click on the Primary radio button
- If there was a secondary cause for the incident, add it under the Secondary causes field group
- To update to another cause, select another lowest child record and click on the Tree refresh button

Only one Basic cause can be selected for an incident
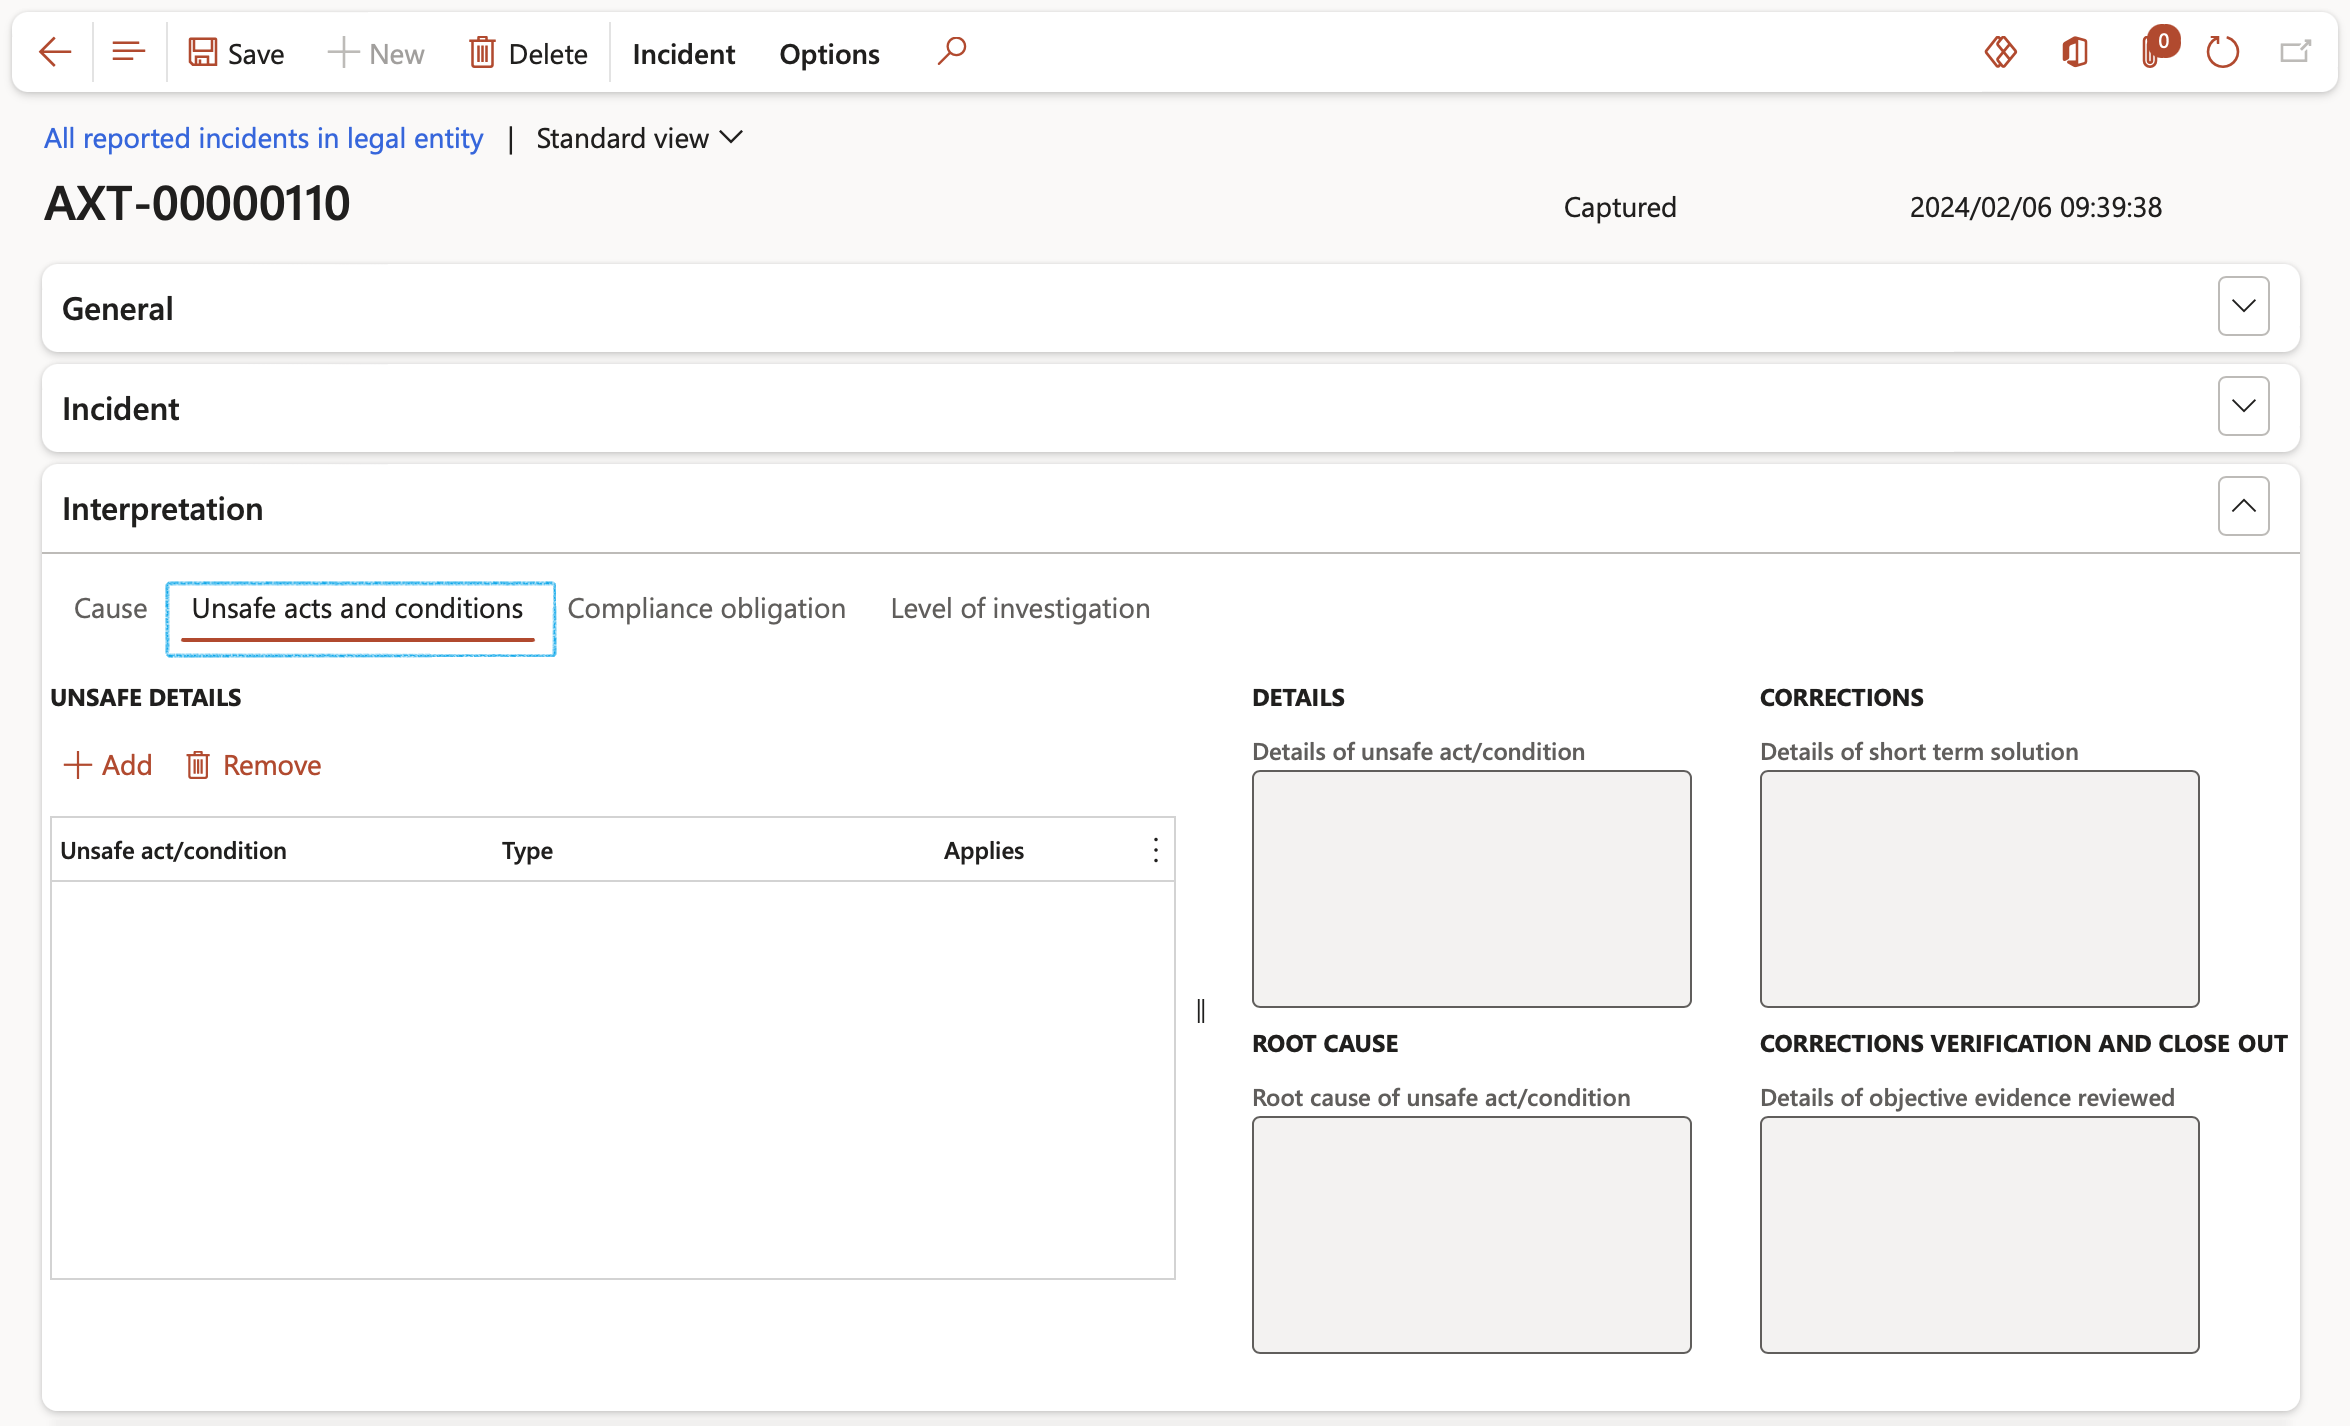
- The Unsafe acts and conditions index tab allows the capturing of the following details:
- Details of the non-conformance
- Root cause of non-conformance
- Corrections (solutions)
- Corrections verification and close out
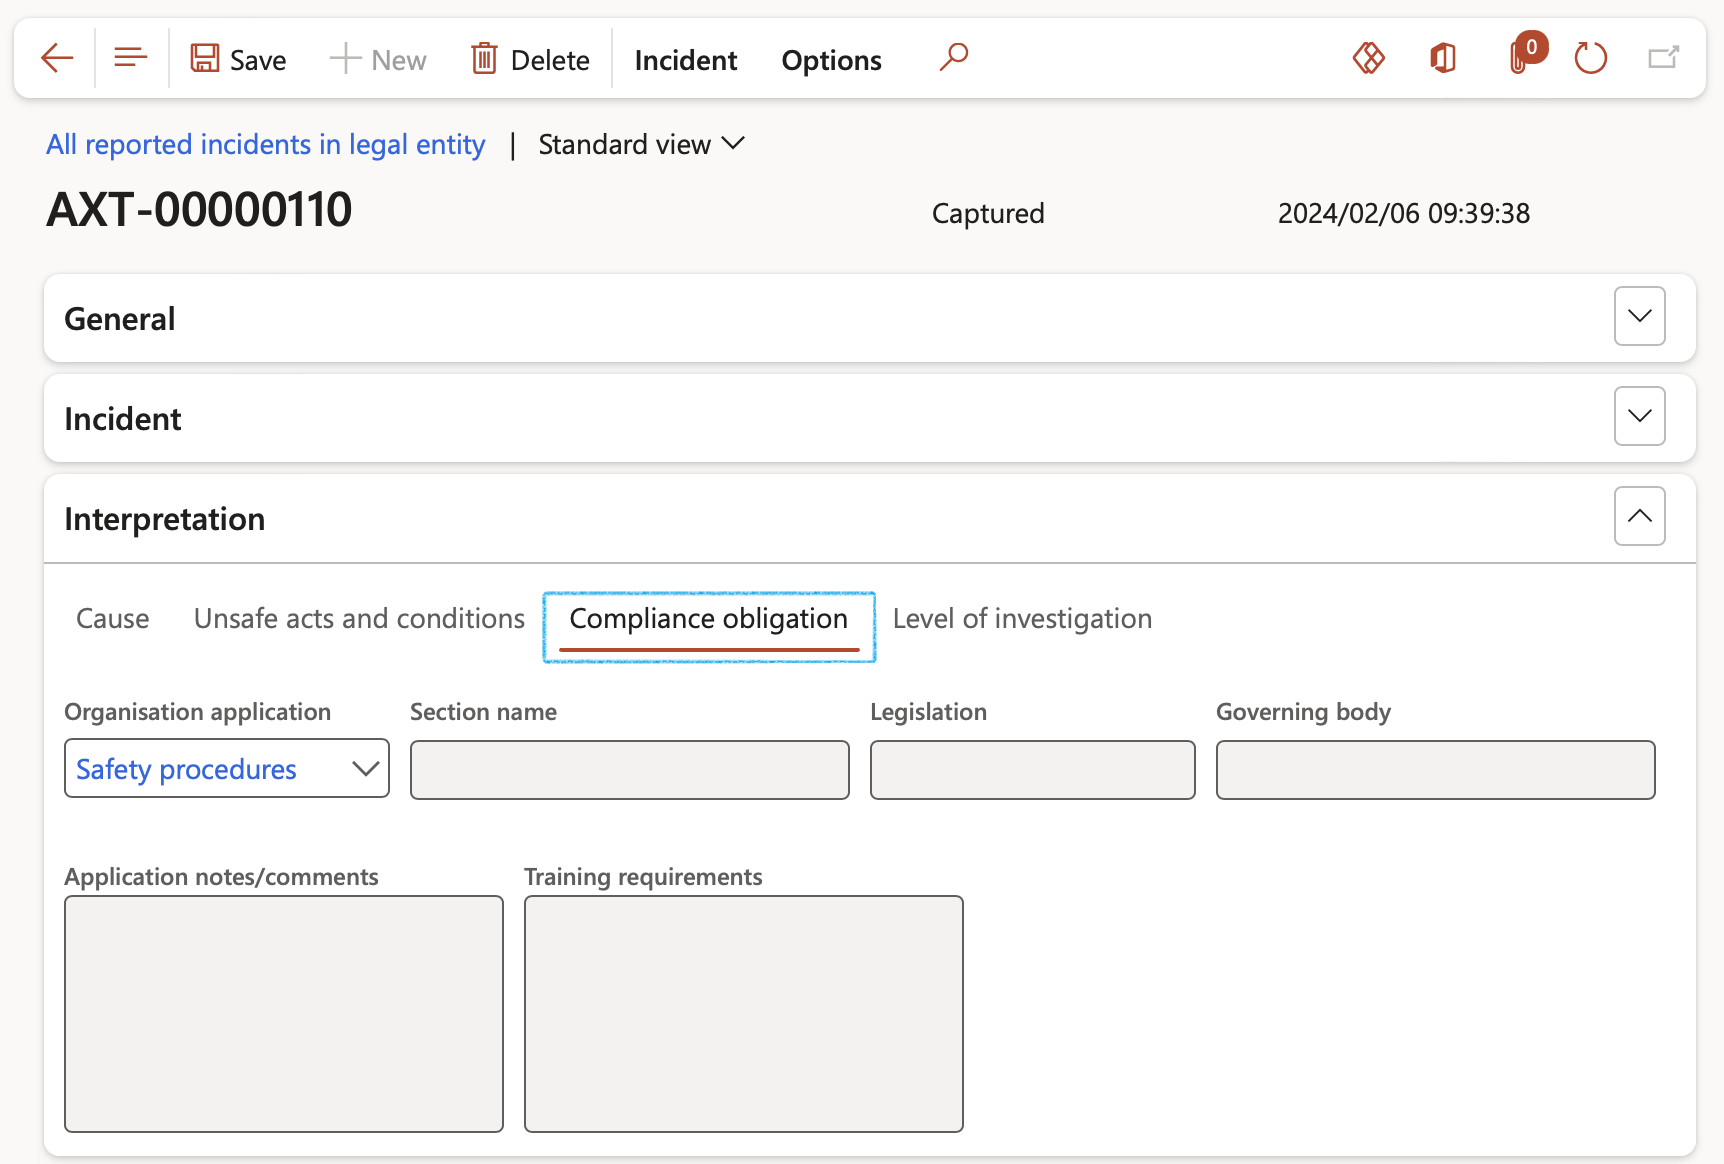
- Under the Compliance obligation index tab:
- Select the relevant Organization application (if applicable)
- The Level of investigation index tab allows the capturing of the following details:
- Likelihood of the incident occurring
- Impact if the incident does occur
The level of investigation is displayed
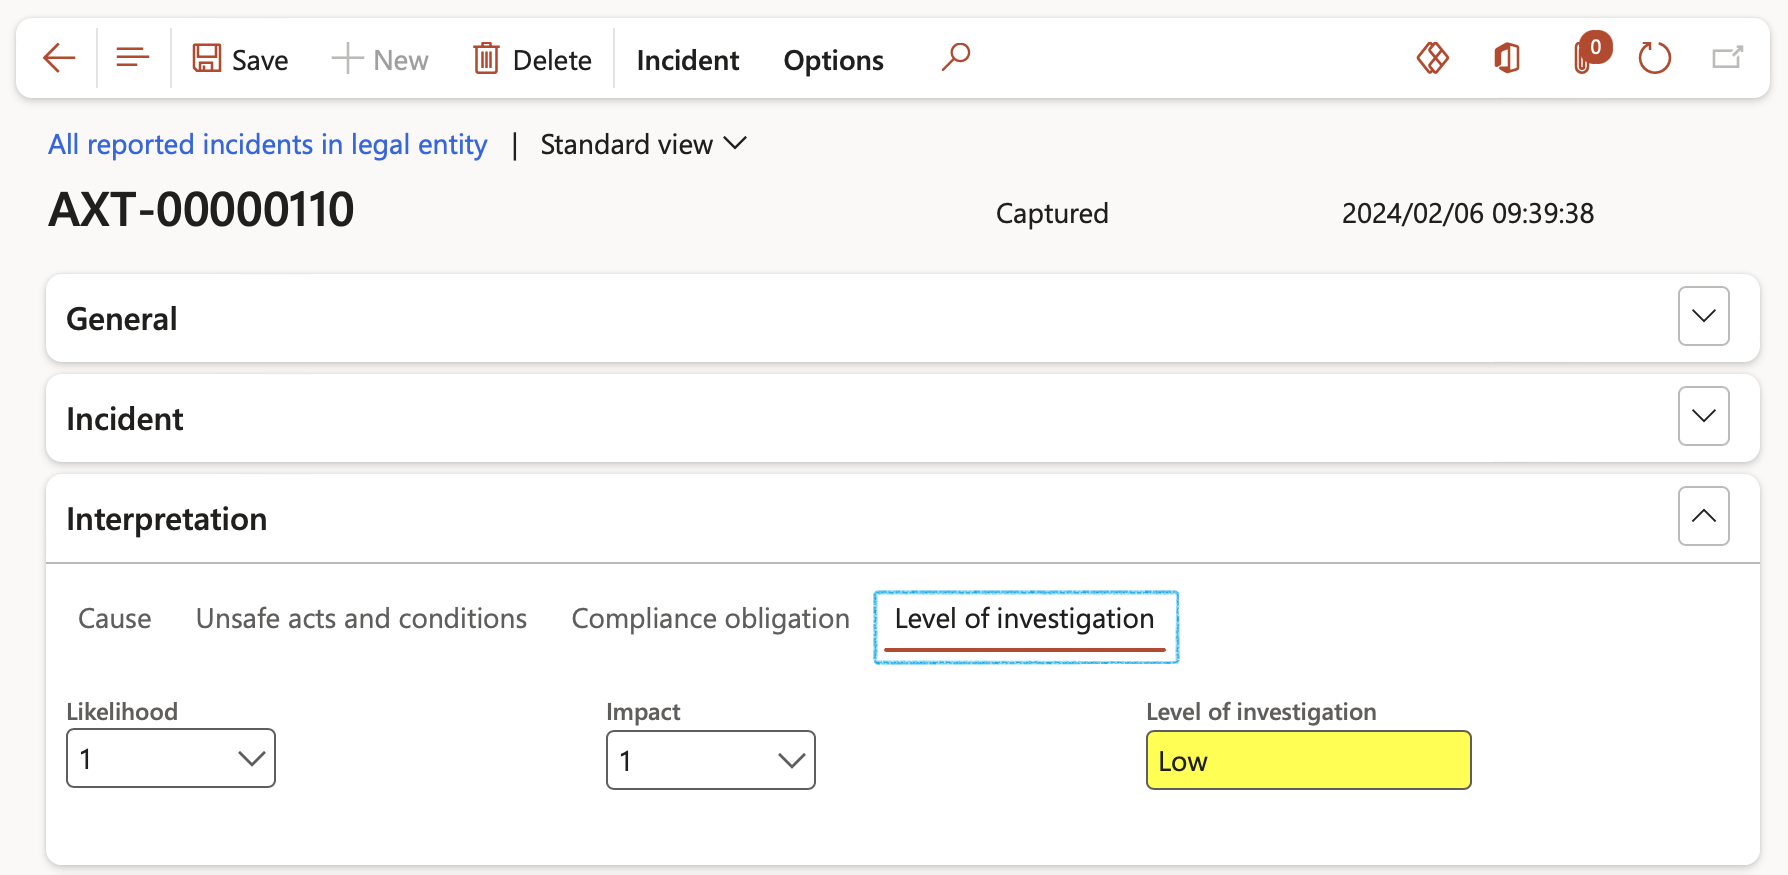
Based on the reason and consequence, Dynamics 365 HSE will decide (based on the rules on the parameter form) what the Level of investigation details should be.
¶ Step 25: The Incident costs Fast tab
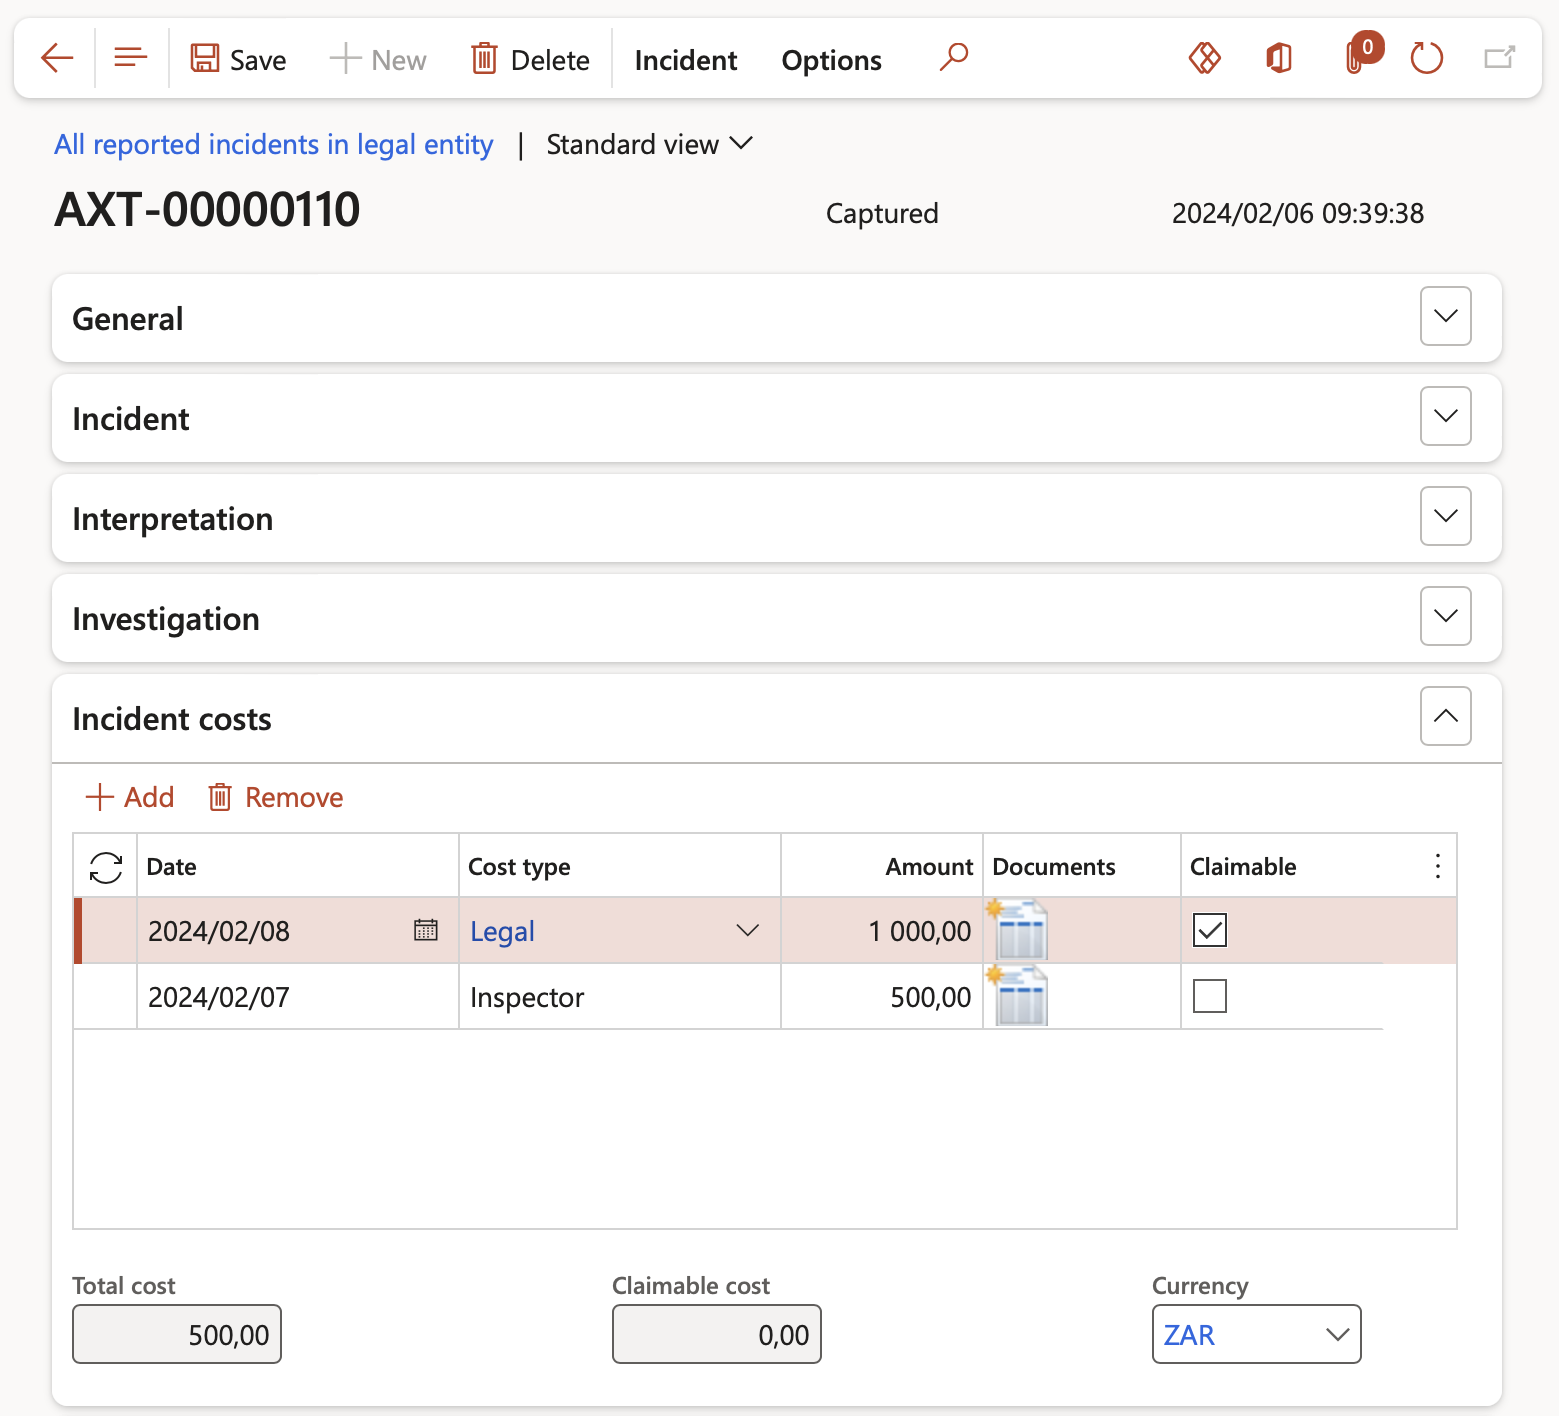
- Click the Add button to add details about the costs relating to the incident.
- Select the Date on which the costs of the injury or illness was acquired
- Select the Cost type for the injury or illness
- Enter the cost Amount of the incident
- The documents/attachments icon in the Documents field will indicate whether a document has been attached
- Tick the Claimable tick box if the costs of the incident may be claimed back
¶ Step 26: The Claims Fast tab
- In the Button strip, click on the Create claim button
- Enter a Description for the claim
- Select the relevant Policy from the drop-down list
- Select the relevant Claim type from the drop-down list
- Enter the Claimable cost
- Click on OK
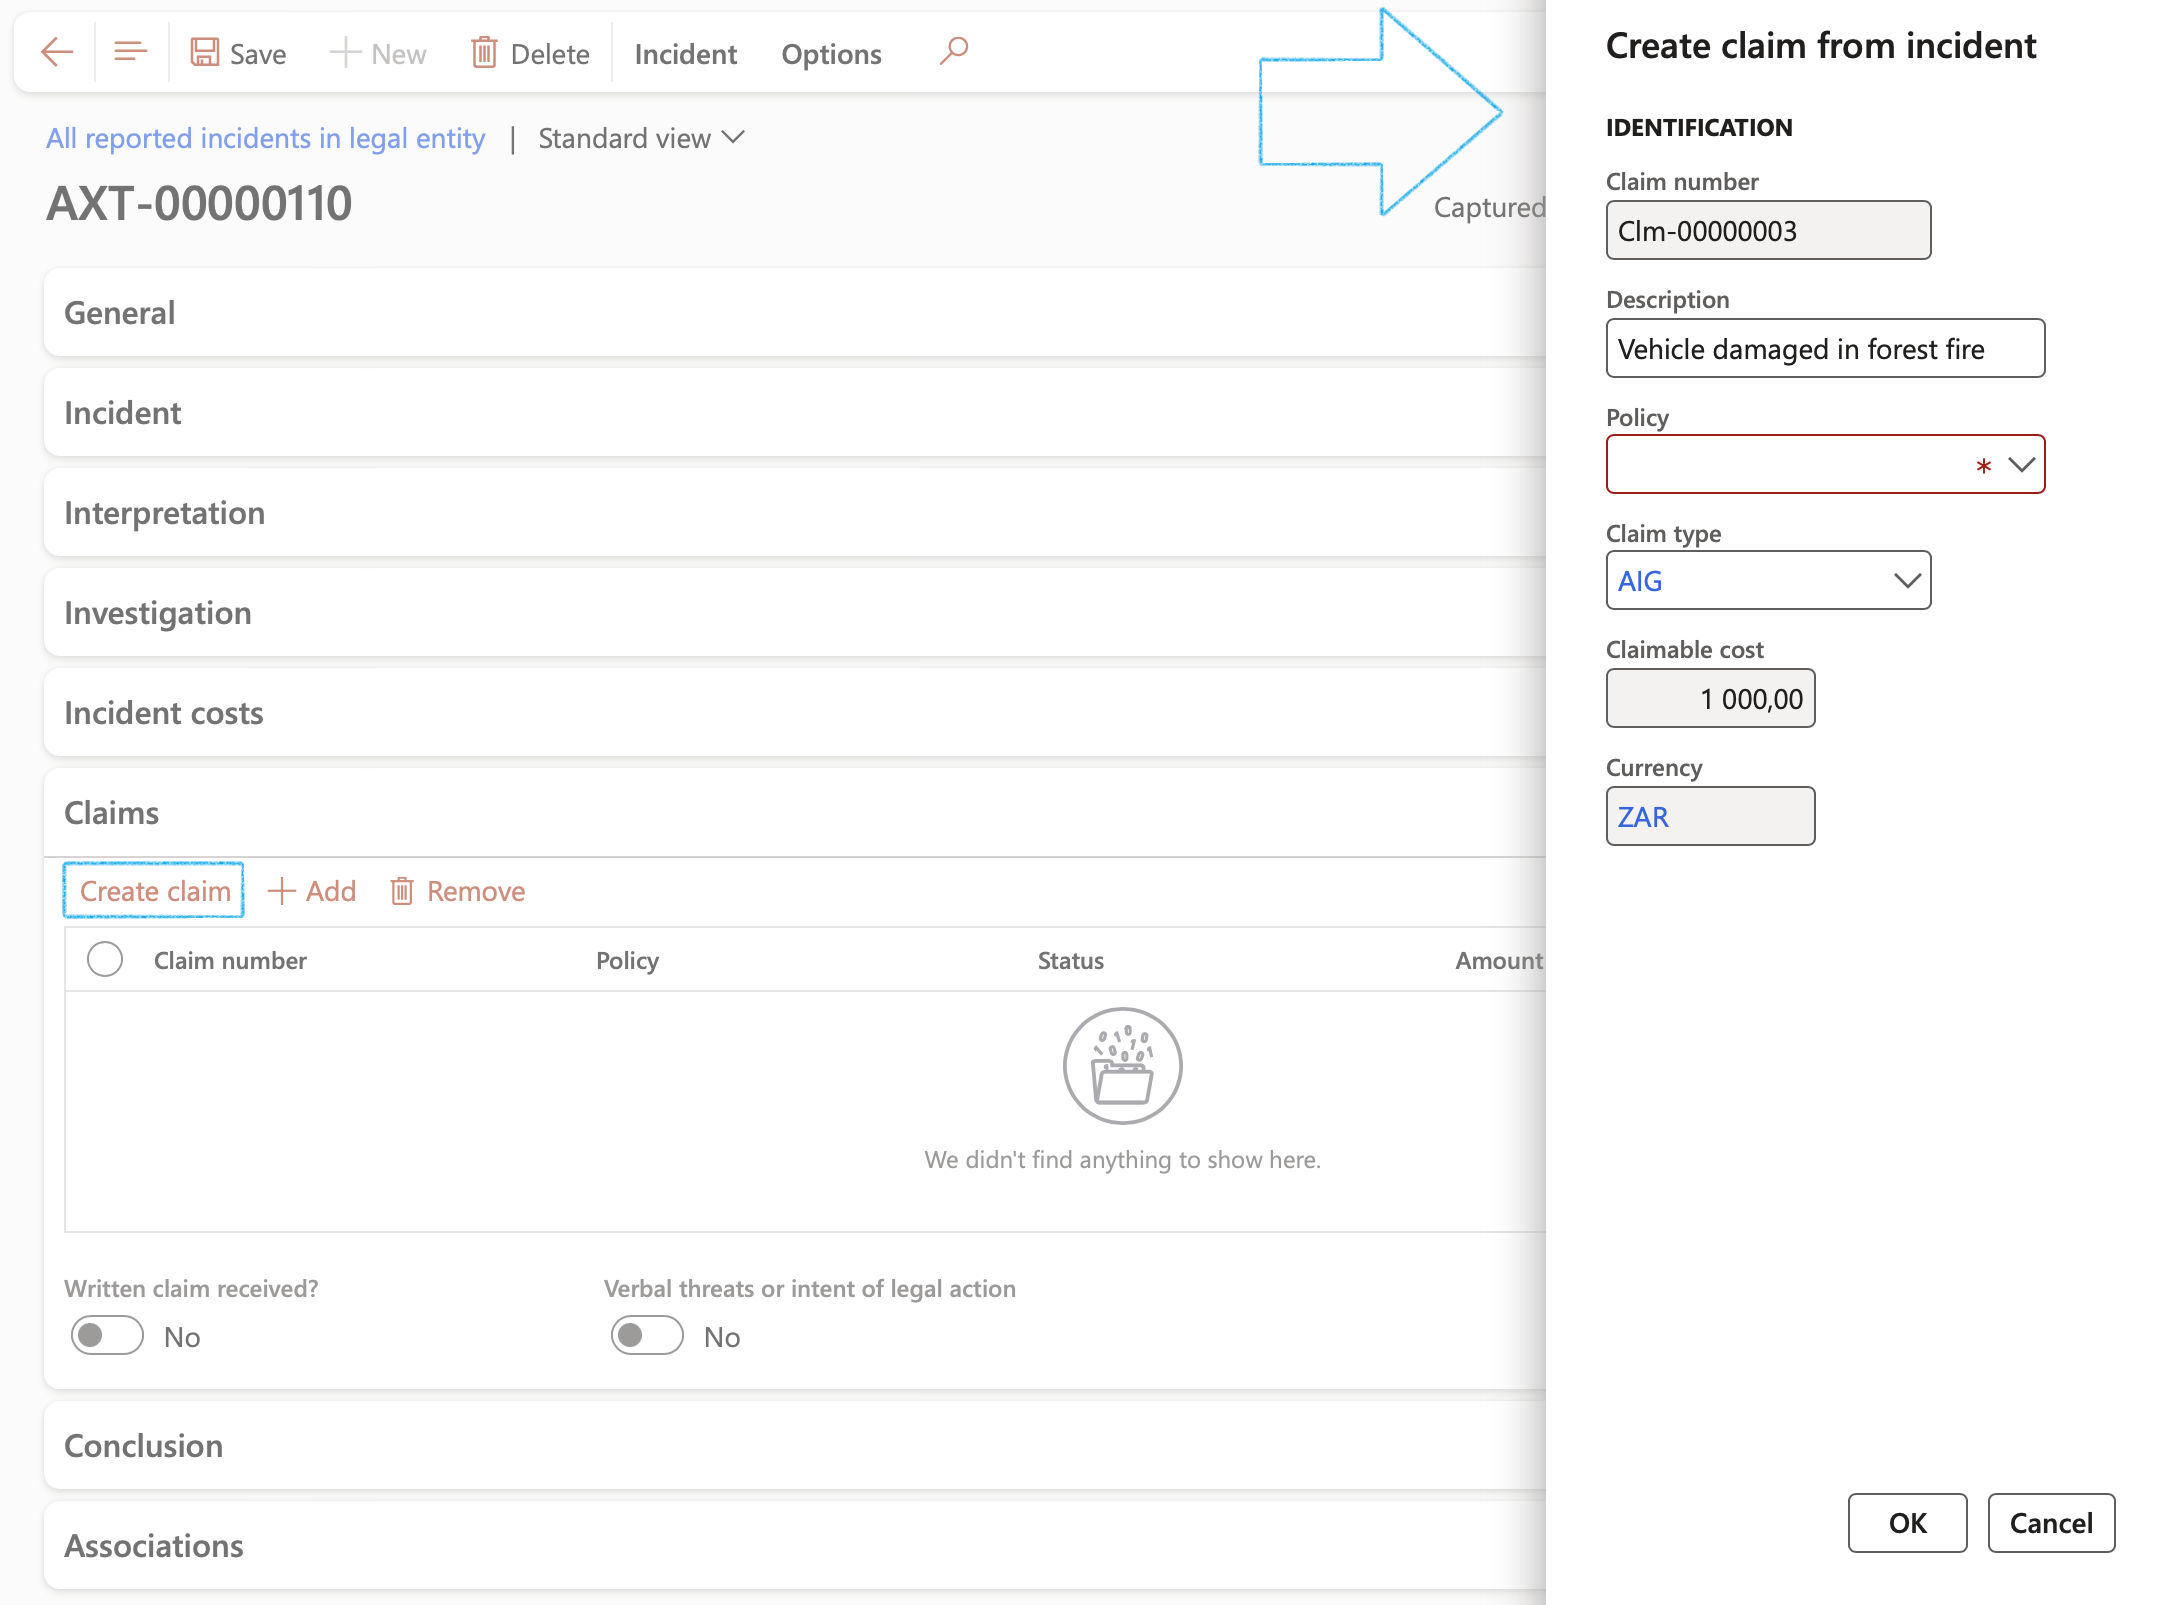
If a claim has already been created from this incident, a message will pop up to inform the user of it

OR
- Click on the Add button
- Select the relevant Claim number from the drop-down list
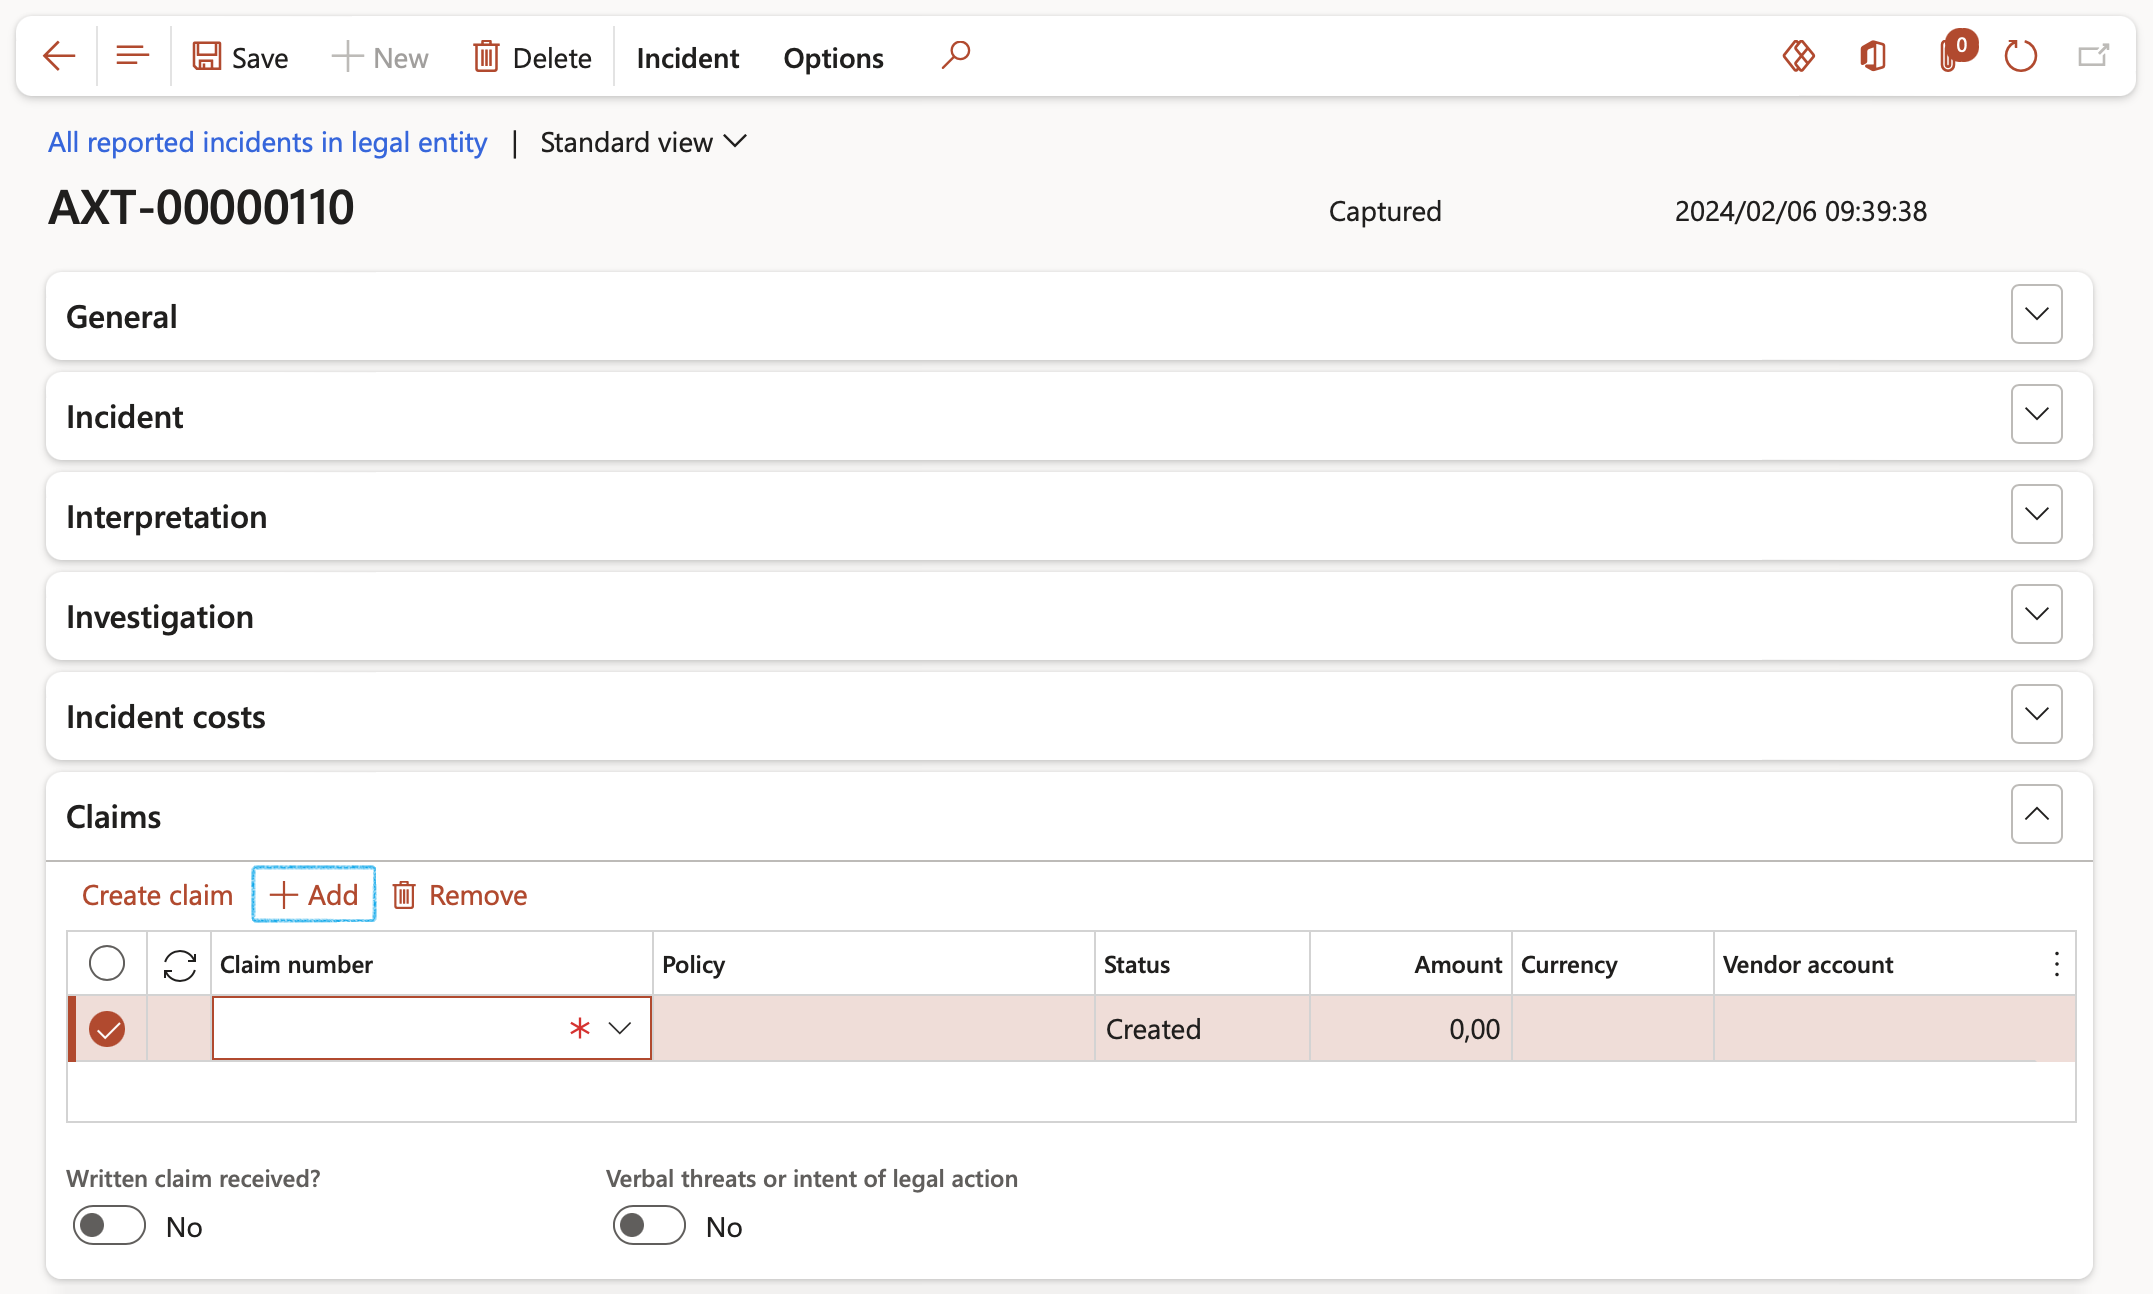
The detail of the selected claim will be displayed when you refresh the page or click on Save
¶ Step 27: The Conclusion Fast tab
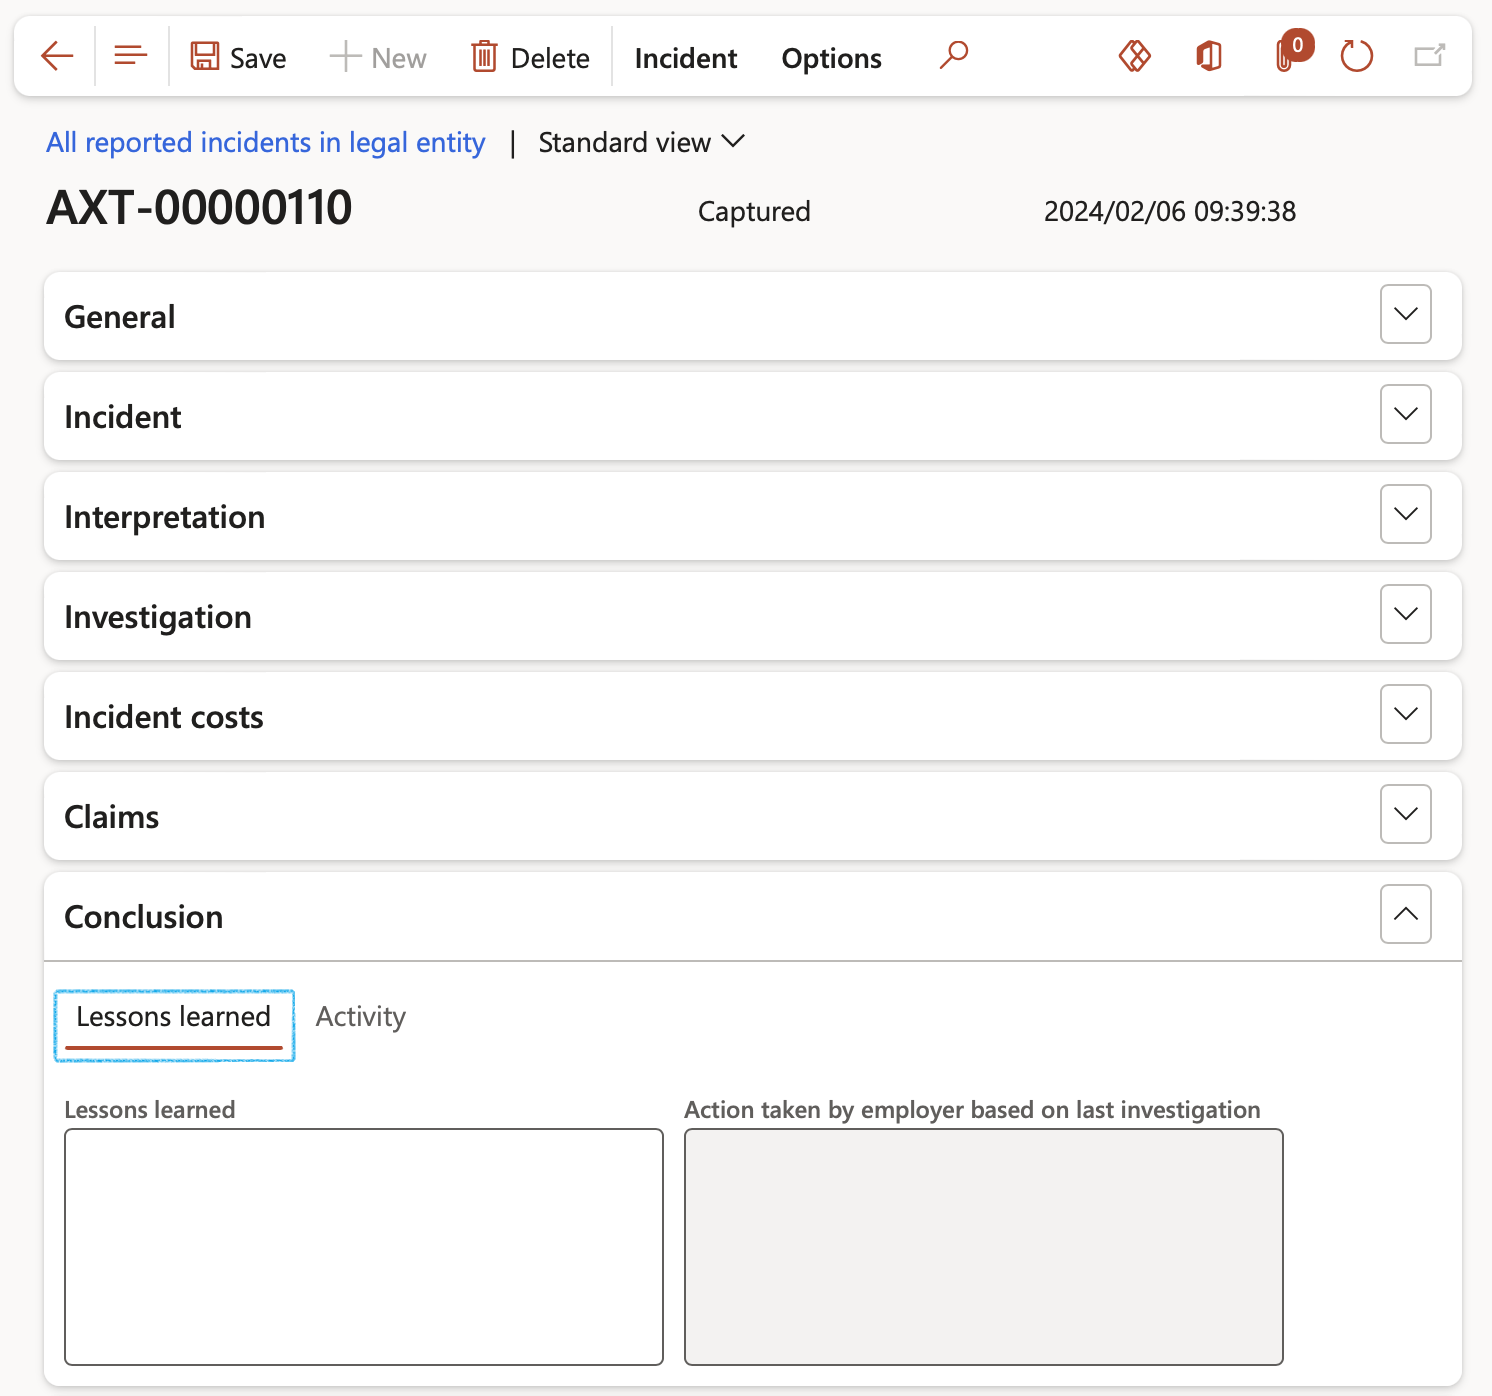
- Open the Lessons learned Index tab
- Enter Lessons learned in the box provided
- The Action taken by employer based on last investigation will be displayed
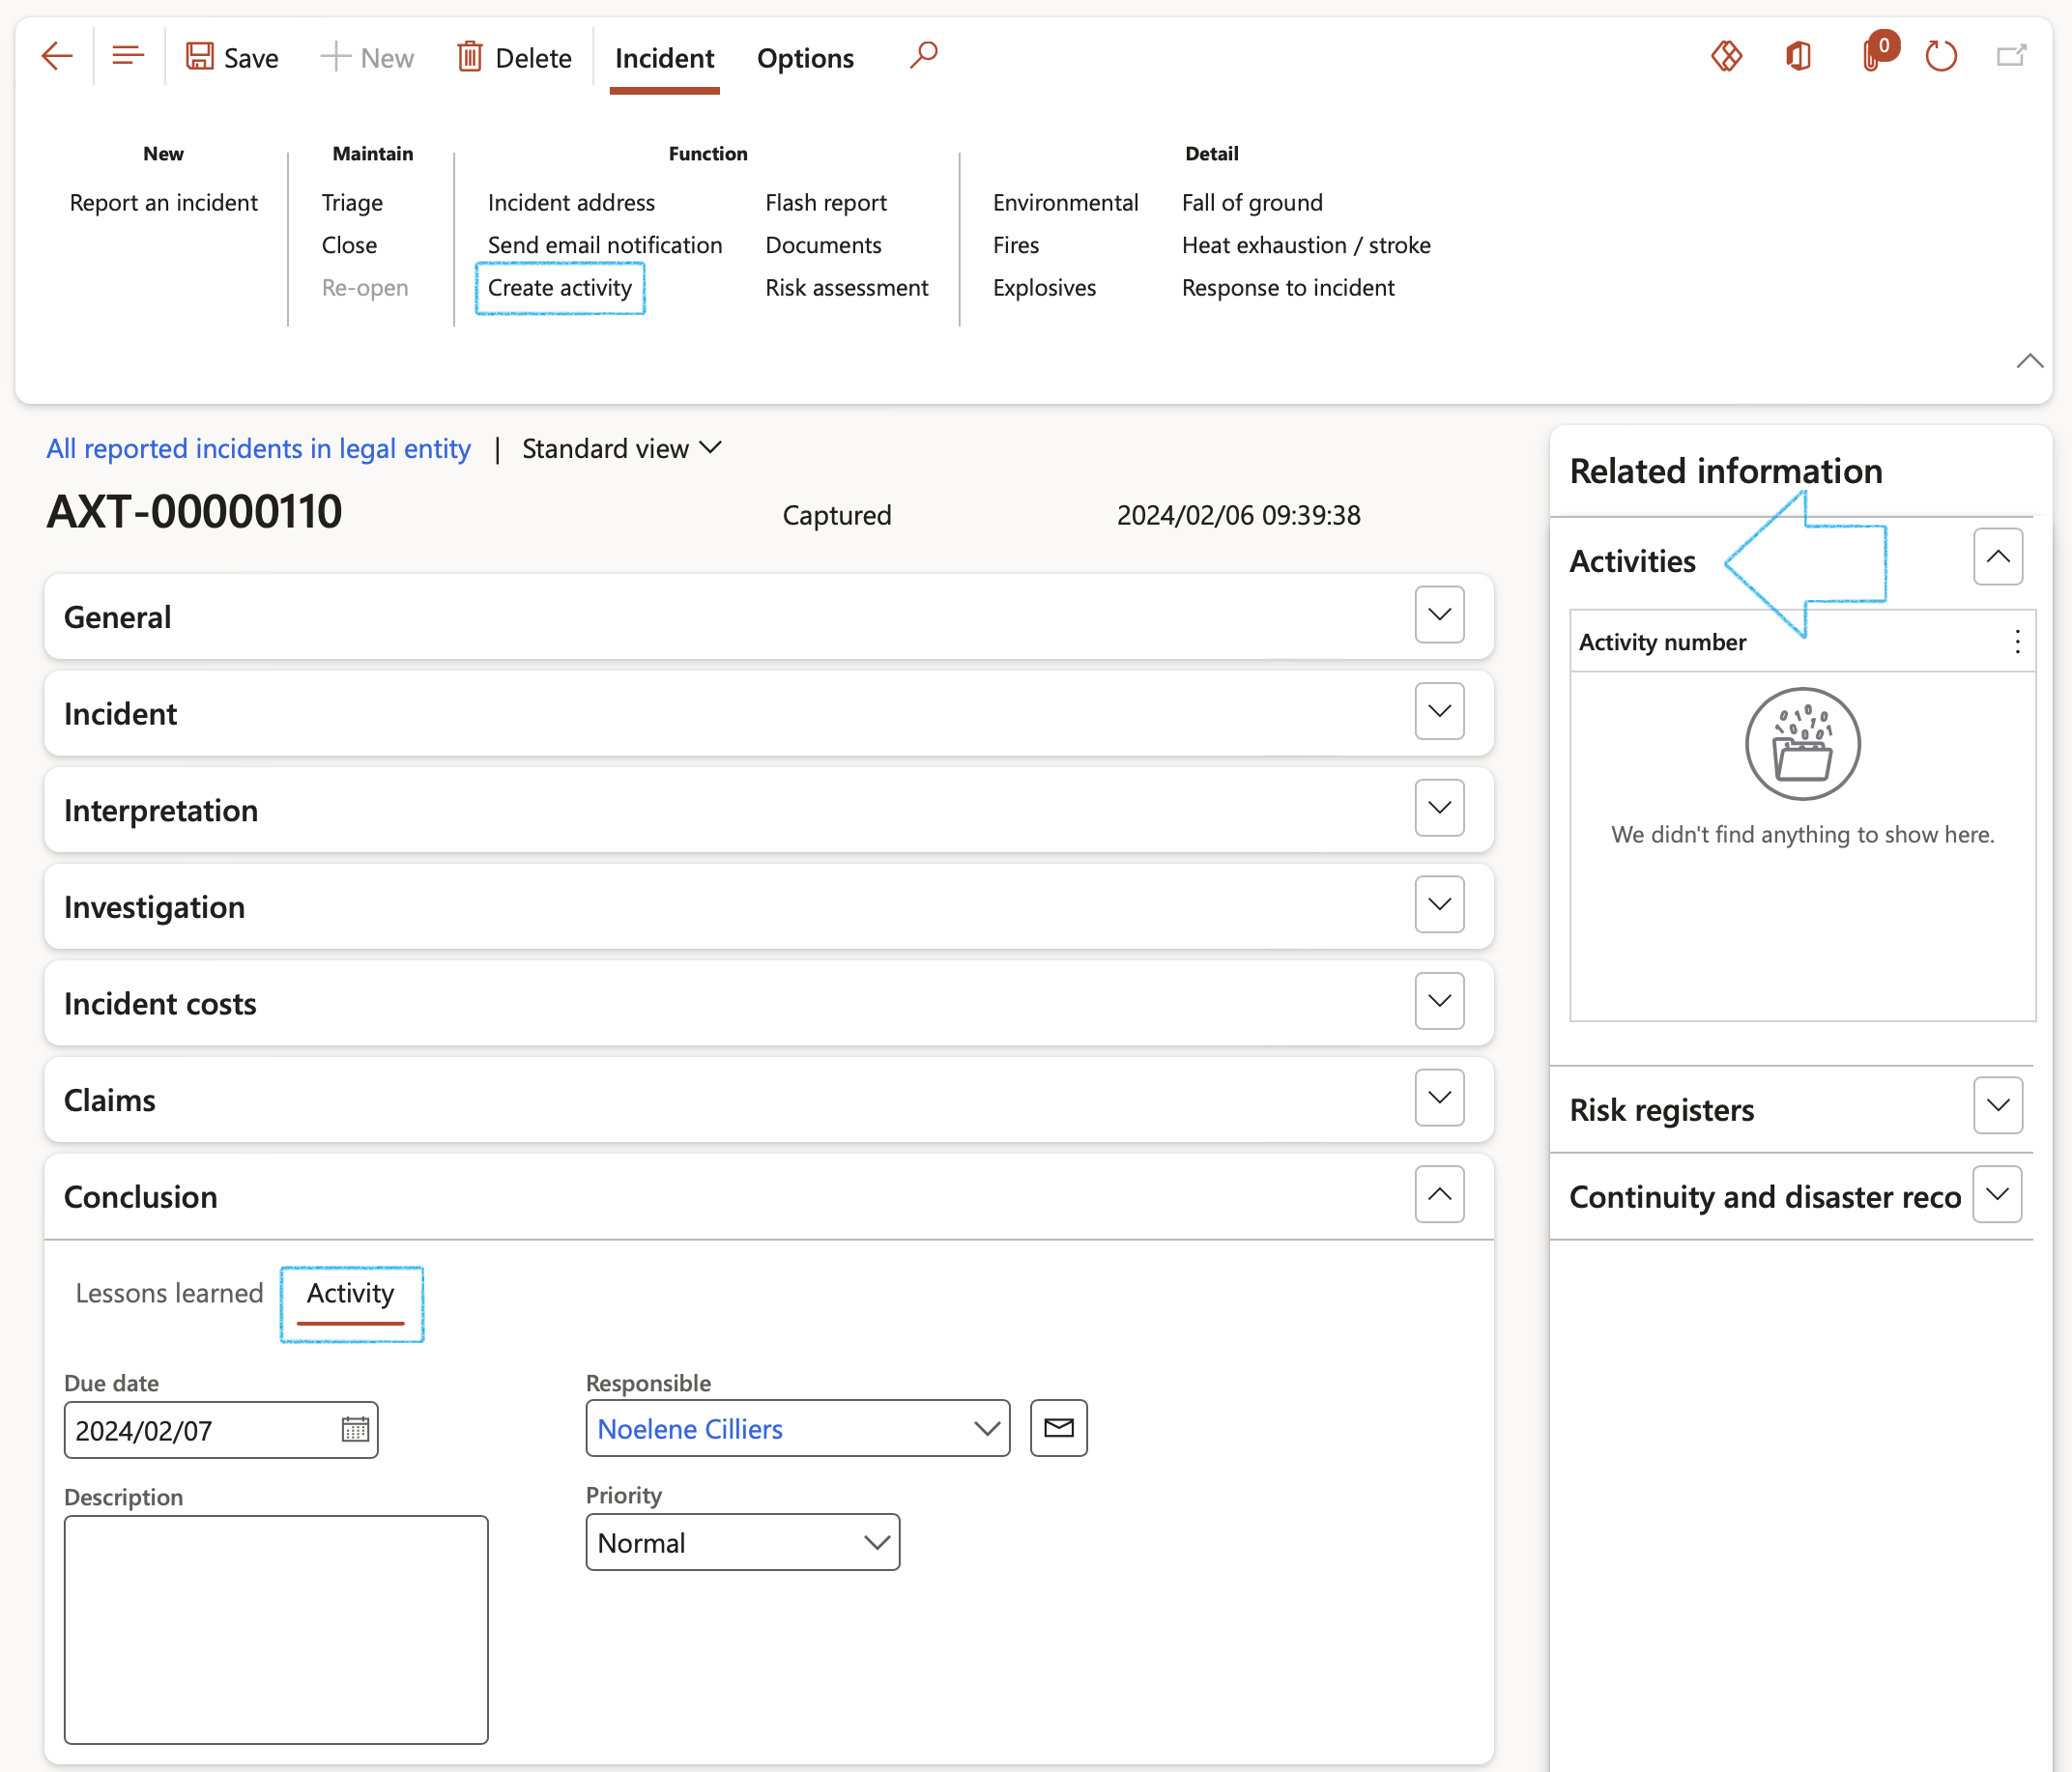
- Open the Activity Index tab
- Enter the Due date for the activity
- Select the Responsible person for the activity
- Enter a Description
- Select the Priority
- On the Action pane, click on the Create activity button and select the relevant action from the dropdown list
¶ Step 28: The Associations Fast tab
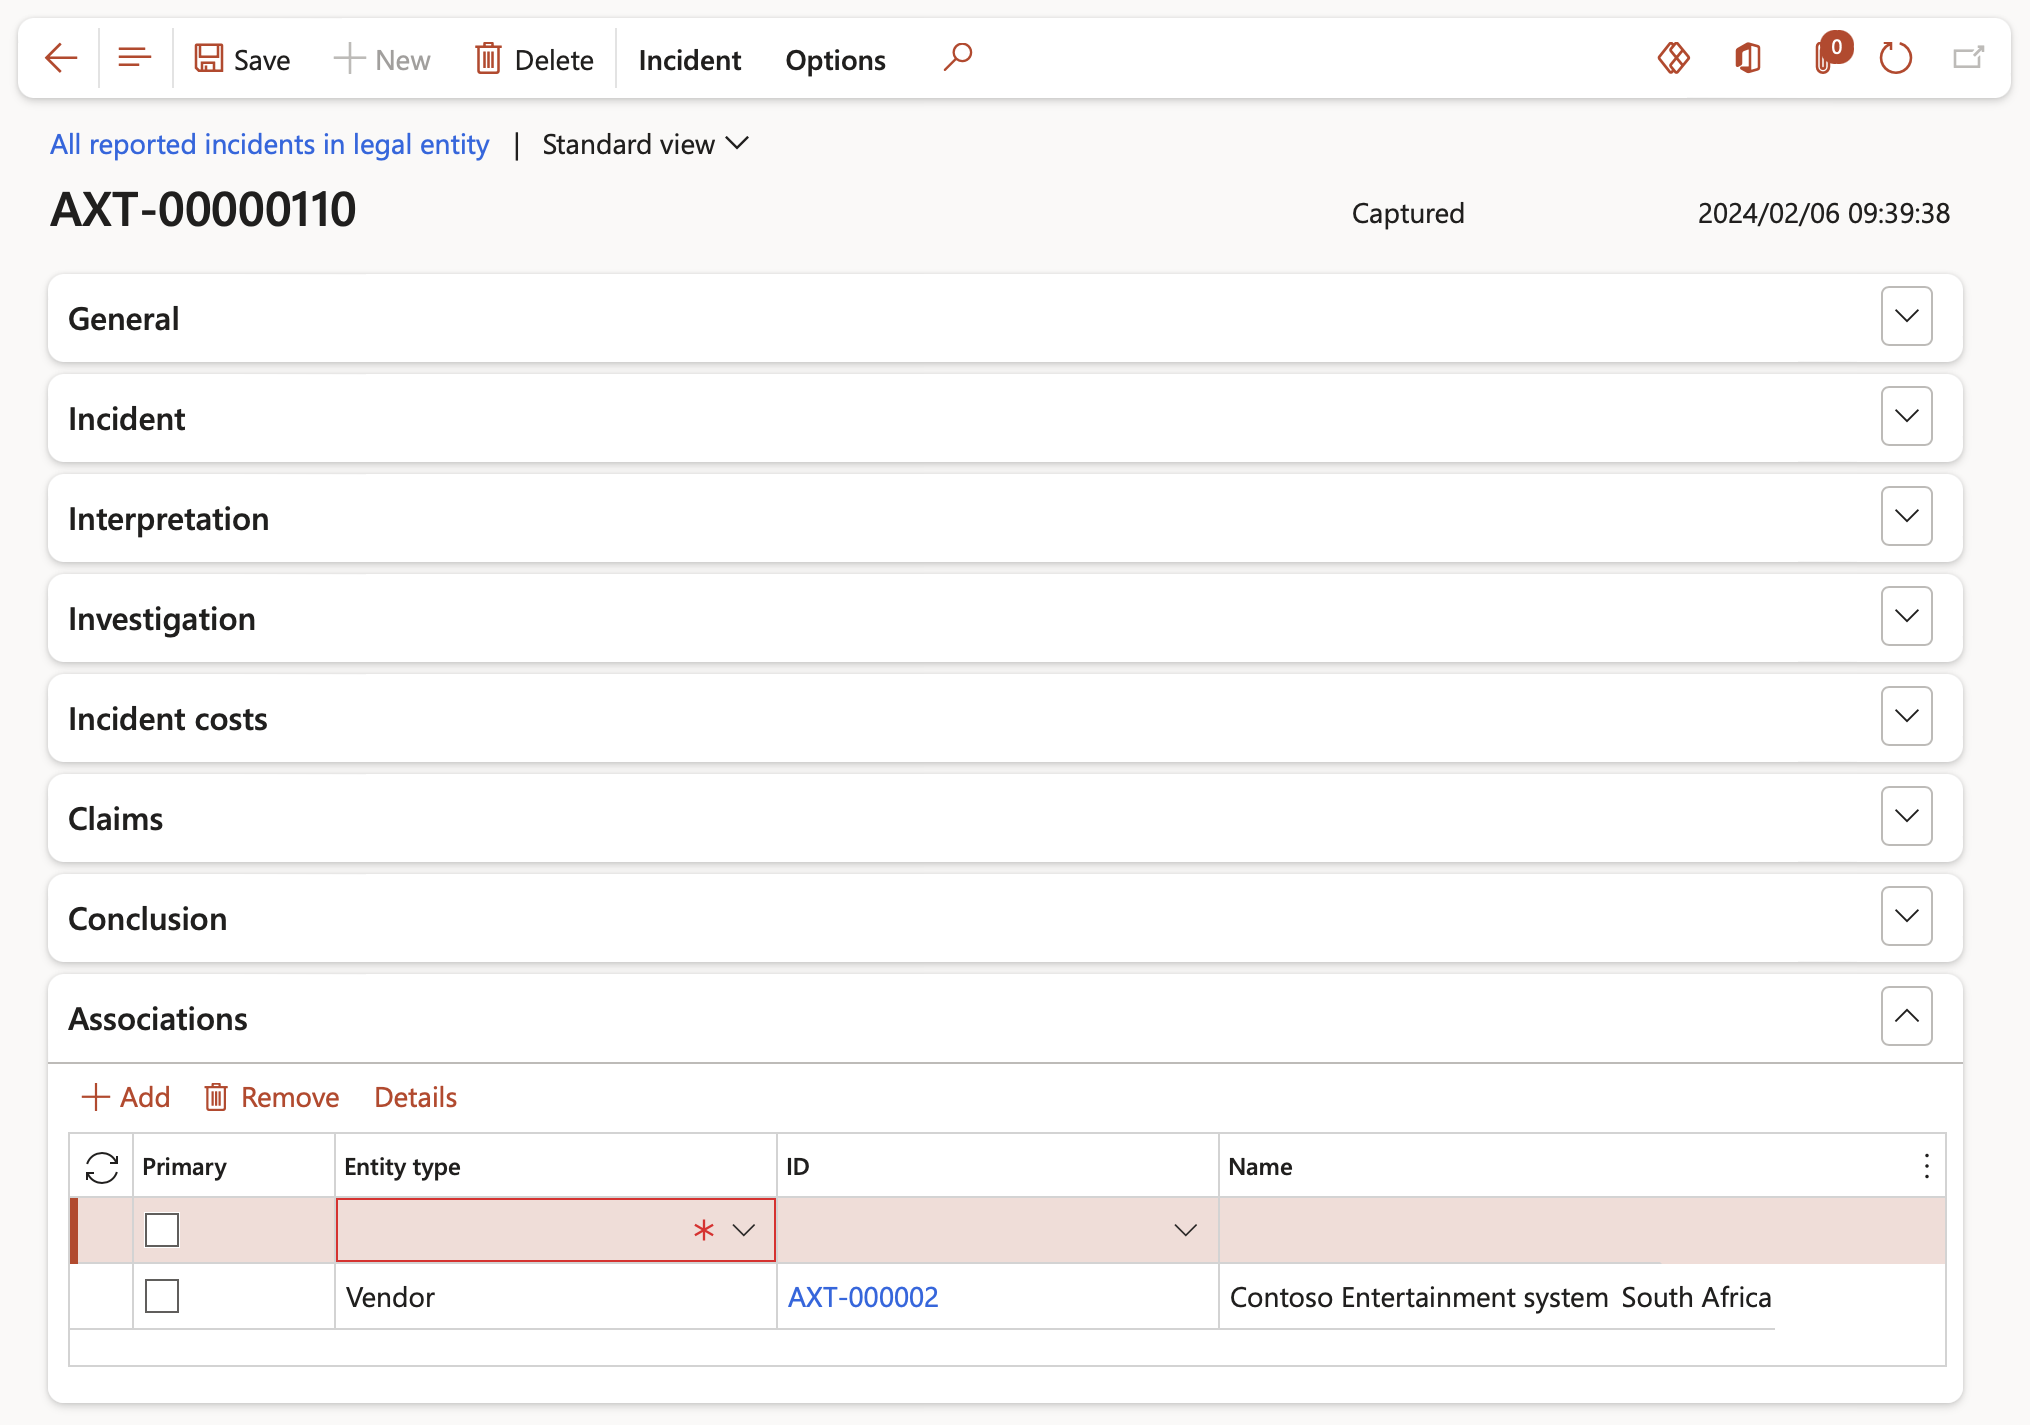
The Associations offers the user the option to add items or other entity types to be linked to the incident. There might be a lost air pump on board a boat during the incident which can be accounted for.
¶ Step 29: Close the incident
- On the Action pane, in the Maintain group, click on the Close button

- The Status of the incident changes to Closed
- The Closed date is automatically populated with today’s date
- The logged in user’s name will populate the Closed by field
- Once the incident is closed, the recorded information cannot be edited
When the linked Investigation is Closed, the above-mentioned points will also occur
¶ Next steps
¶ Step 30: Create an investigation
An investigation can be created directly from the Incident detail form:
Go to: HSE > Incidents > All reported incidents in legal entity
- On the Action pane, click New
- Enter the new record information
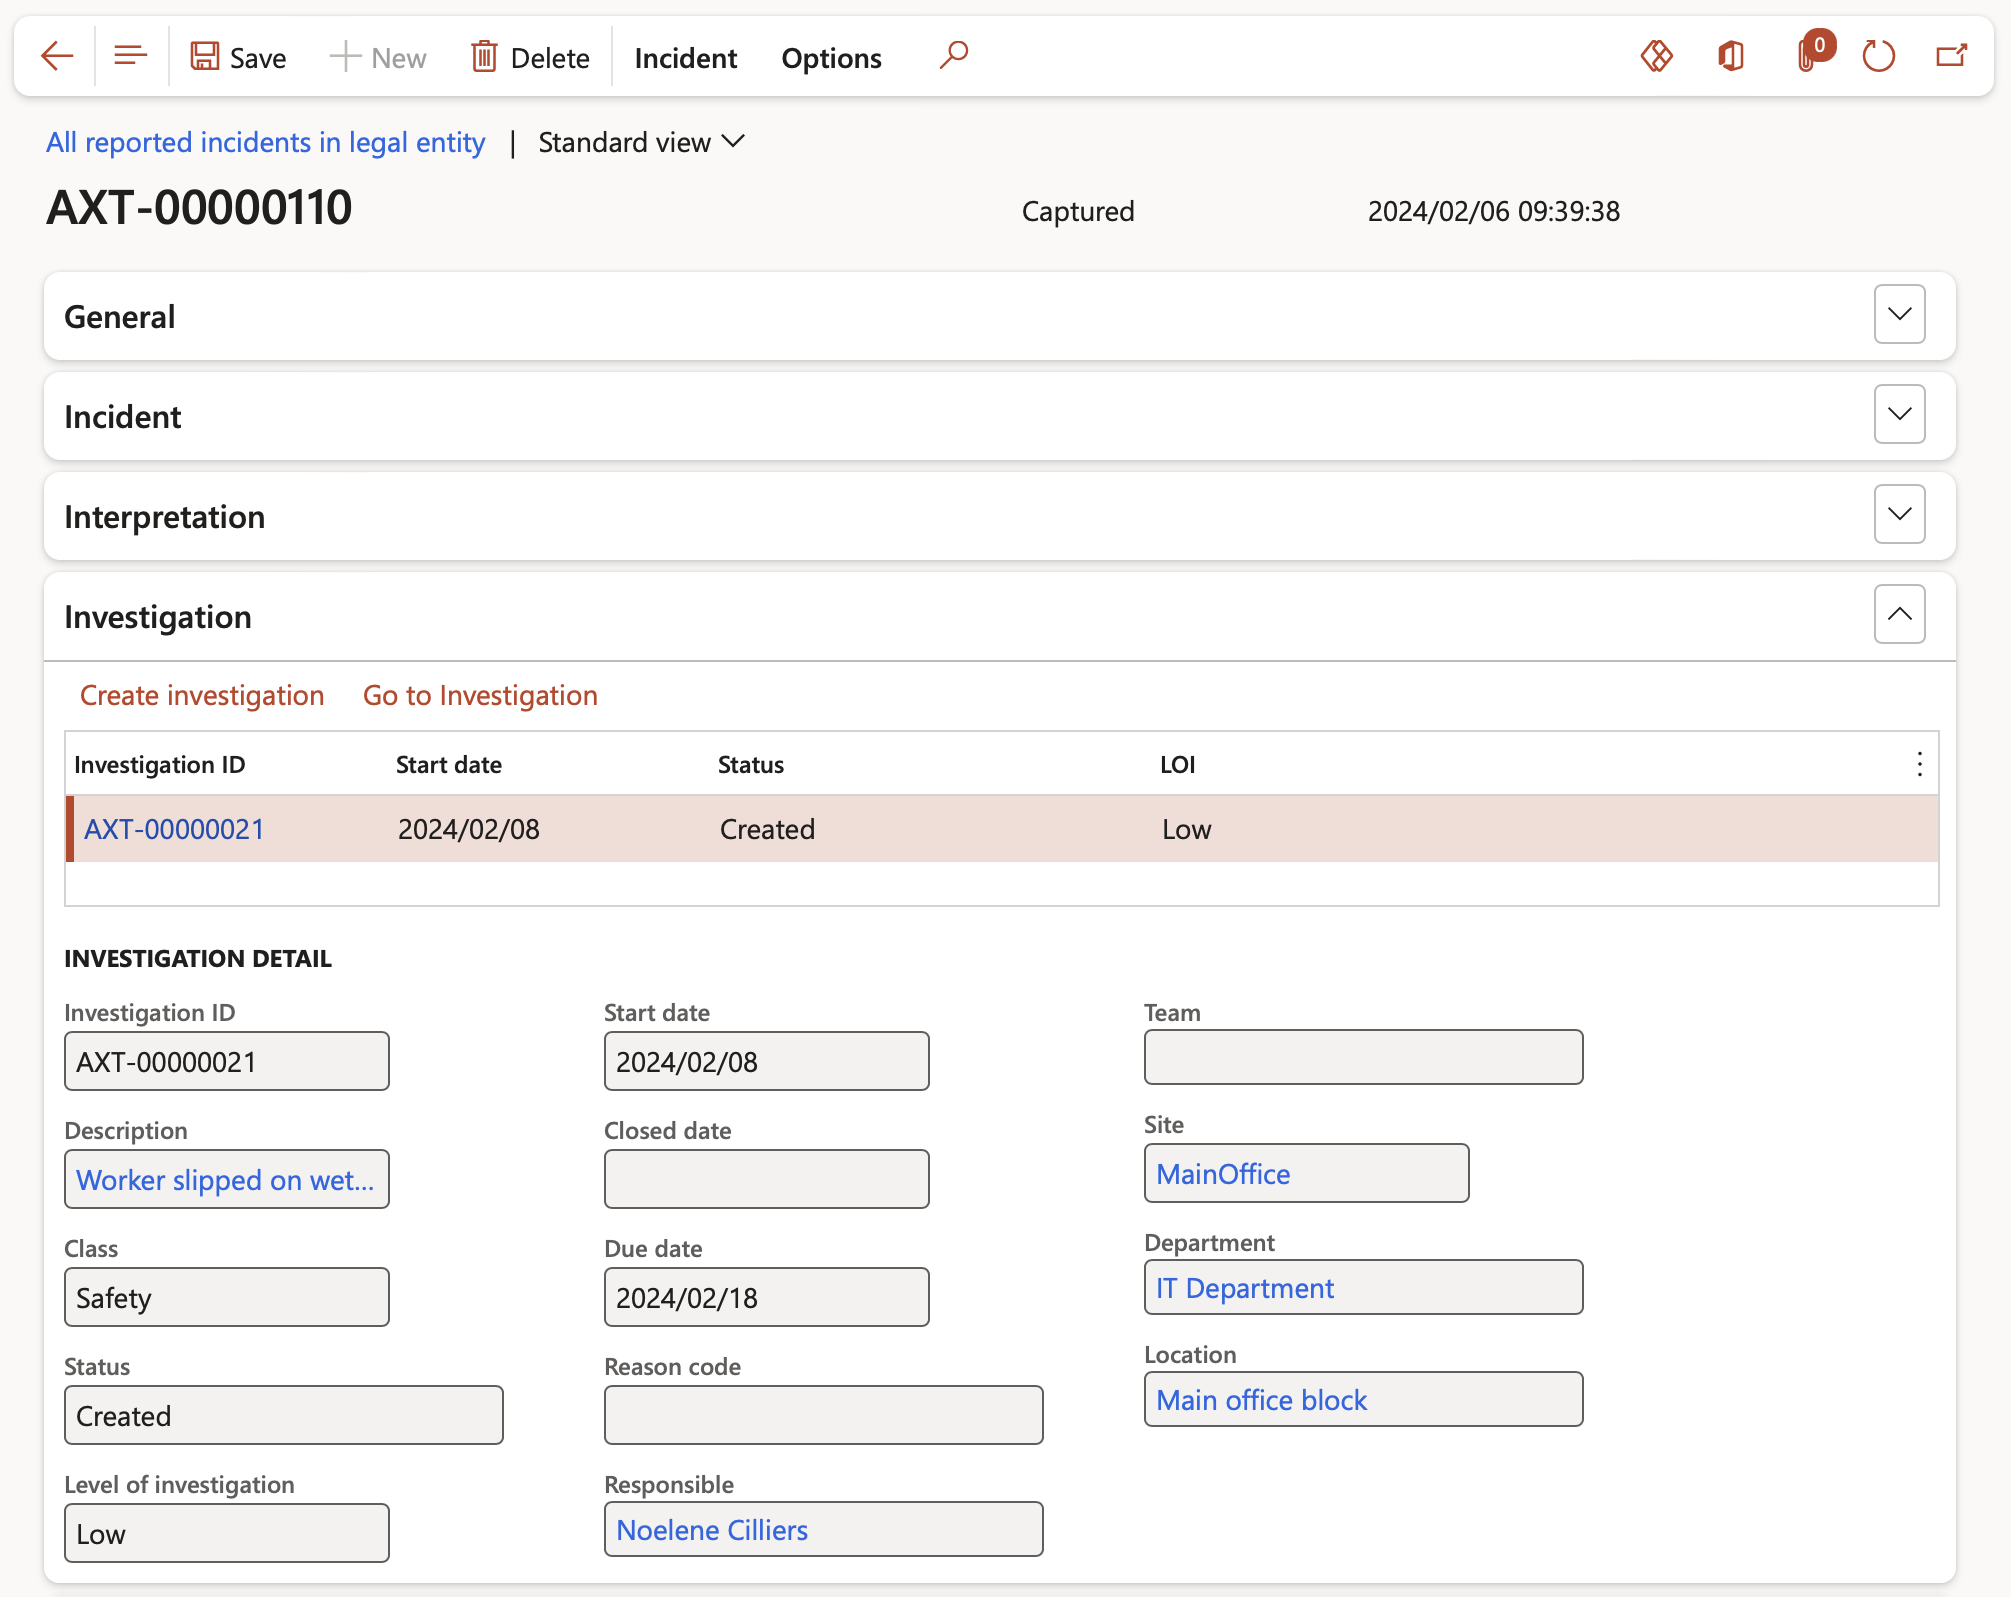
- Expand the Investigation Fast tab
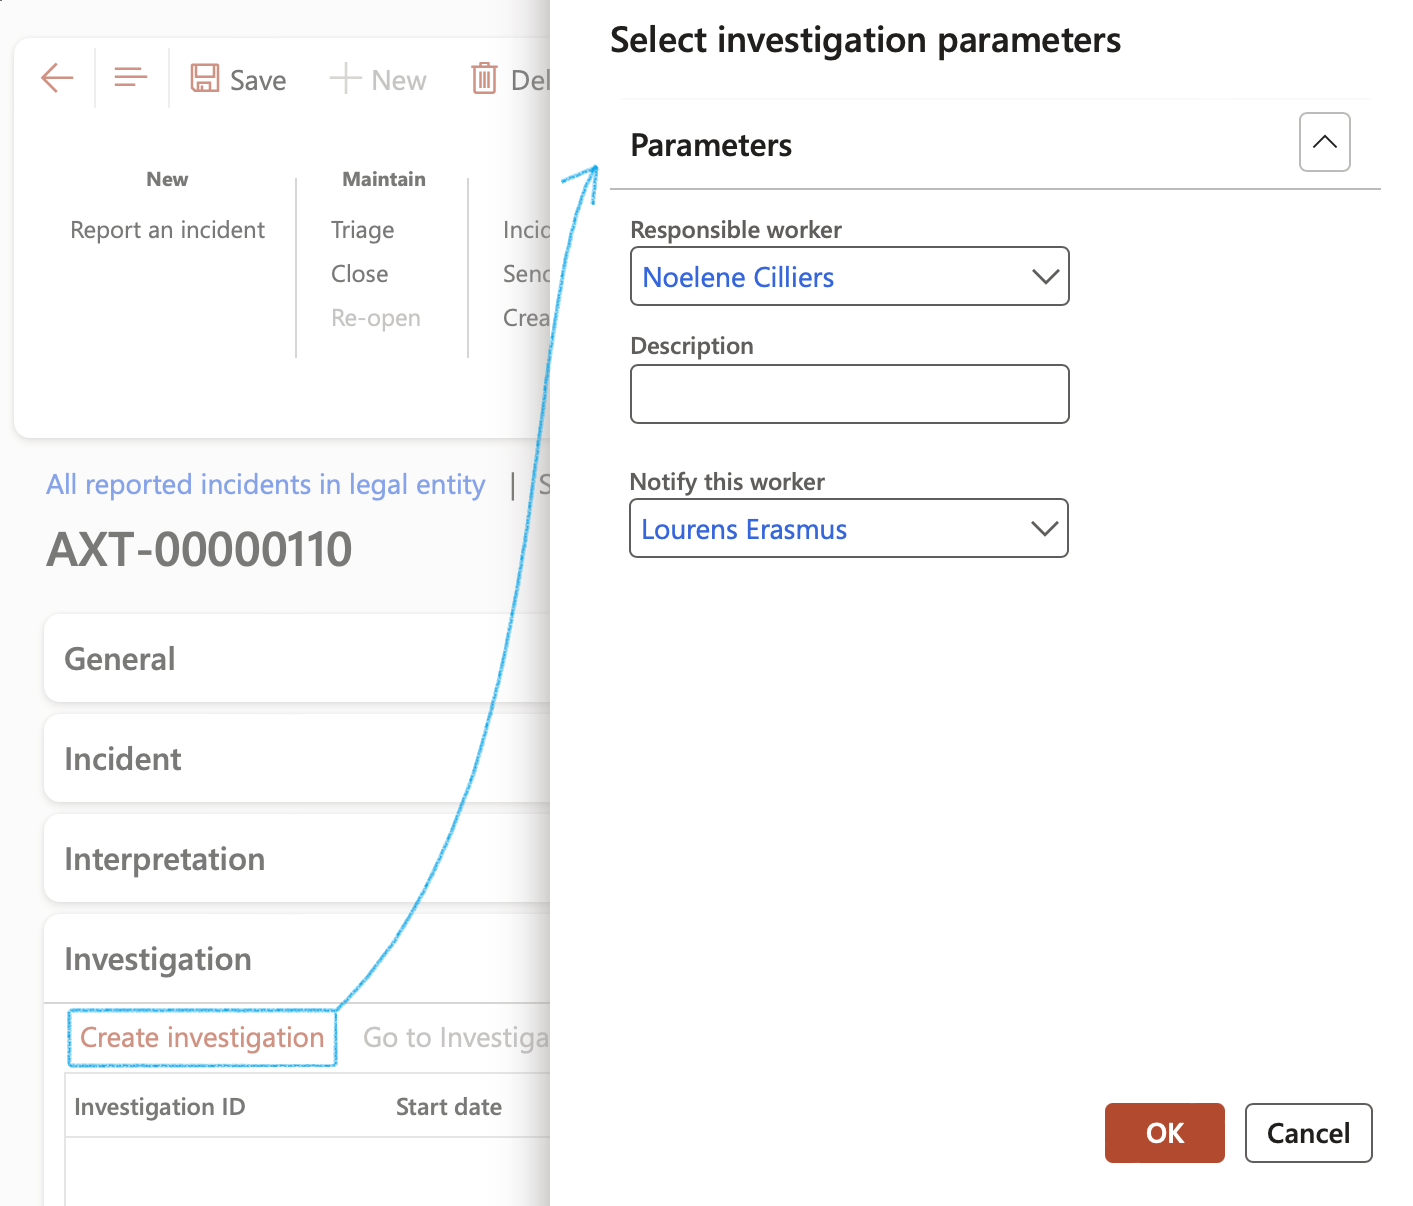
- In the Button strip, click on the Create investigation button
The Select investigation parameter dialog will open
- In the Responsible field, select the worker responsible for the investigation from the list
- Enter a brief Description
- Select the worker who has to be notified of the investigation, from the dropdown list
- Click OK
¶ Step 31: Using the HR Injury or illness incident form
Go to: Human resources > Workers > Injury and illness > Injury or illness incidents
The Action pane offers additional actions and functions:
- New – Opens up a new investigations form where the details of a new case can be captured.
- Delete– Removes the selected record.
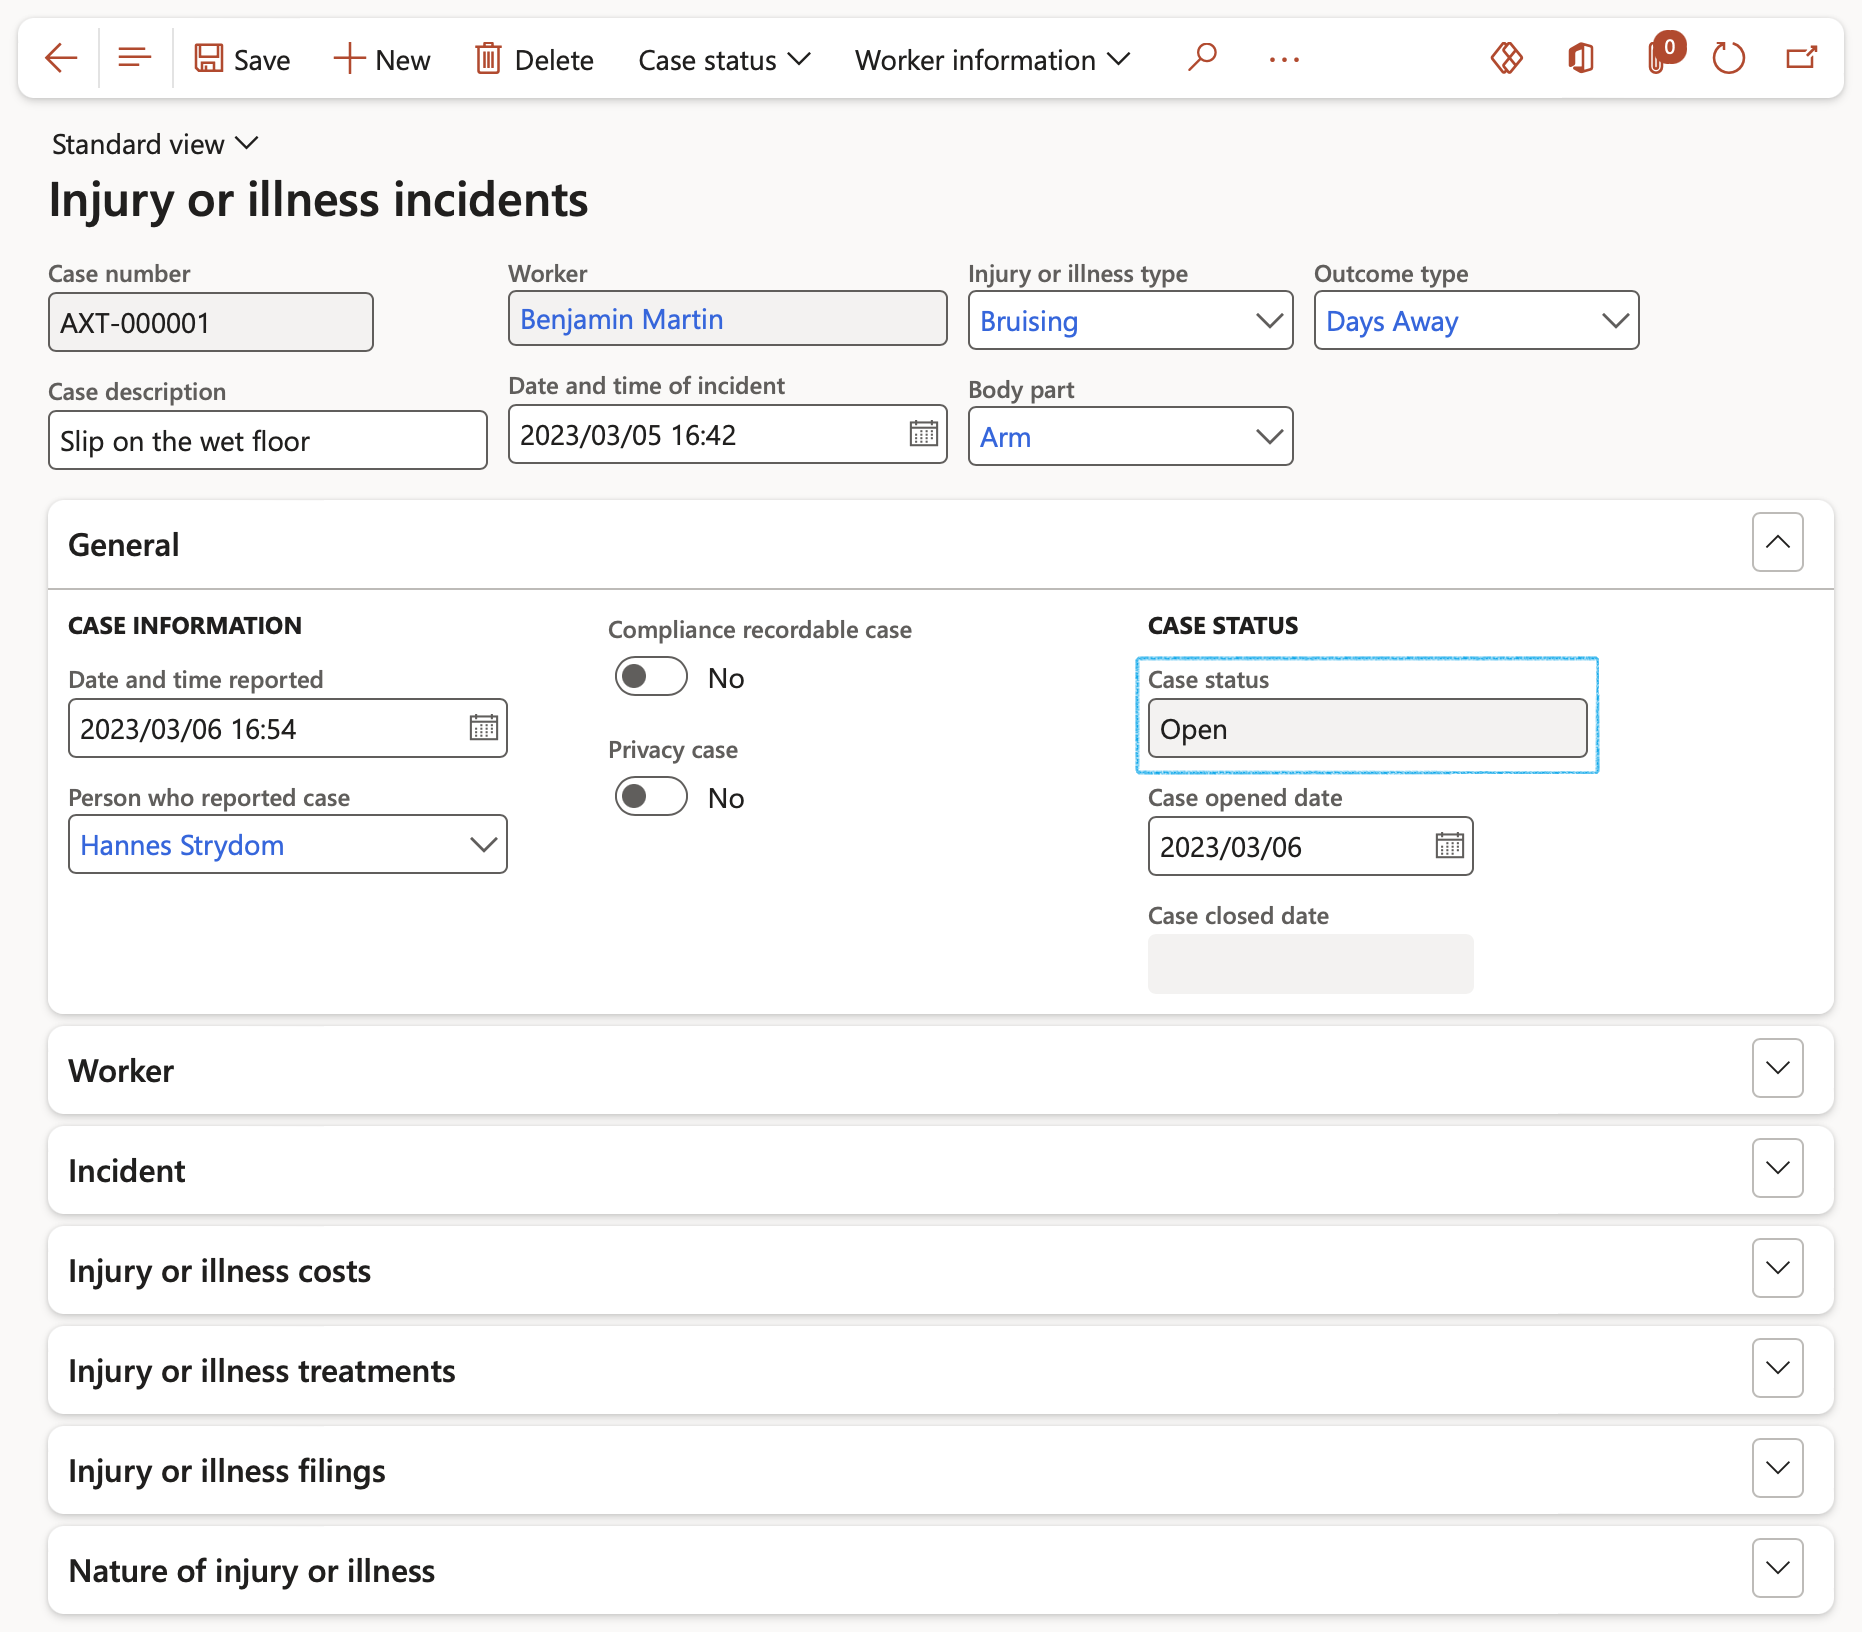
- Case status – Update the status of the injury by selecting the relevant status from the drop down list when you click on the Case status button.
The updated status can be seen in the General Fast tab
Attachments – The document handling functionality can be used to attach files/pictures/documents or notes that are applicable to the investigation
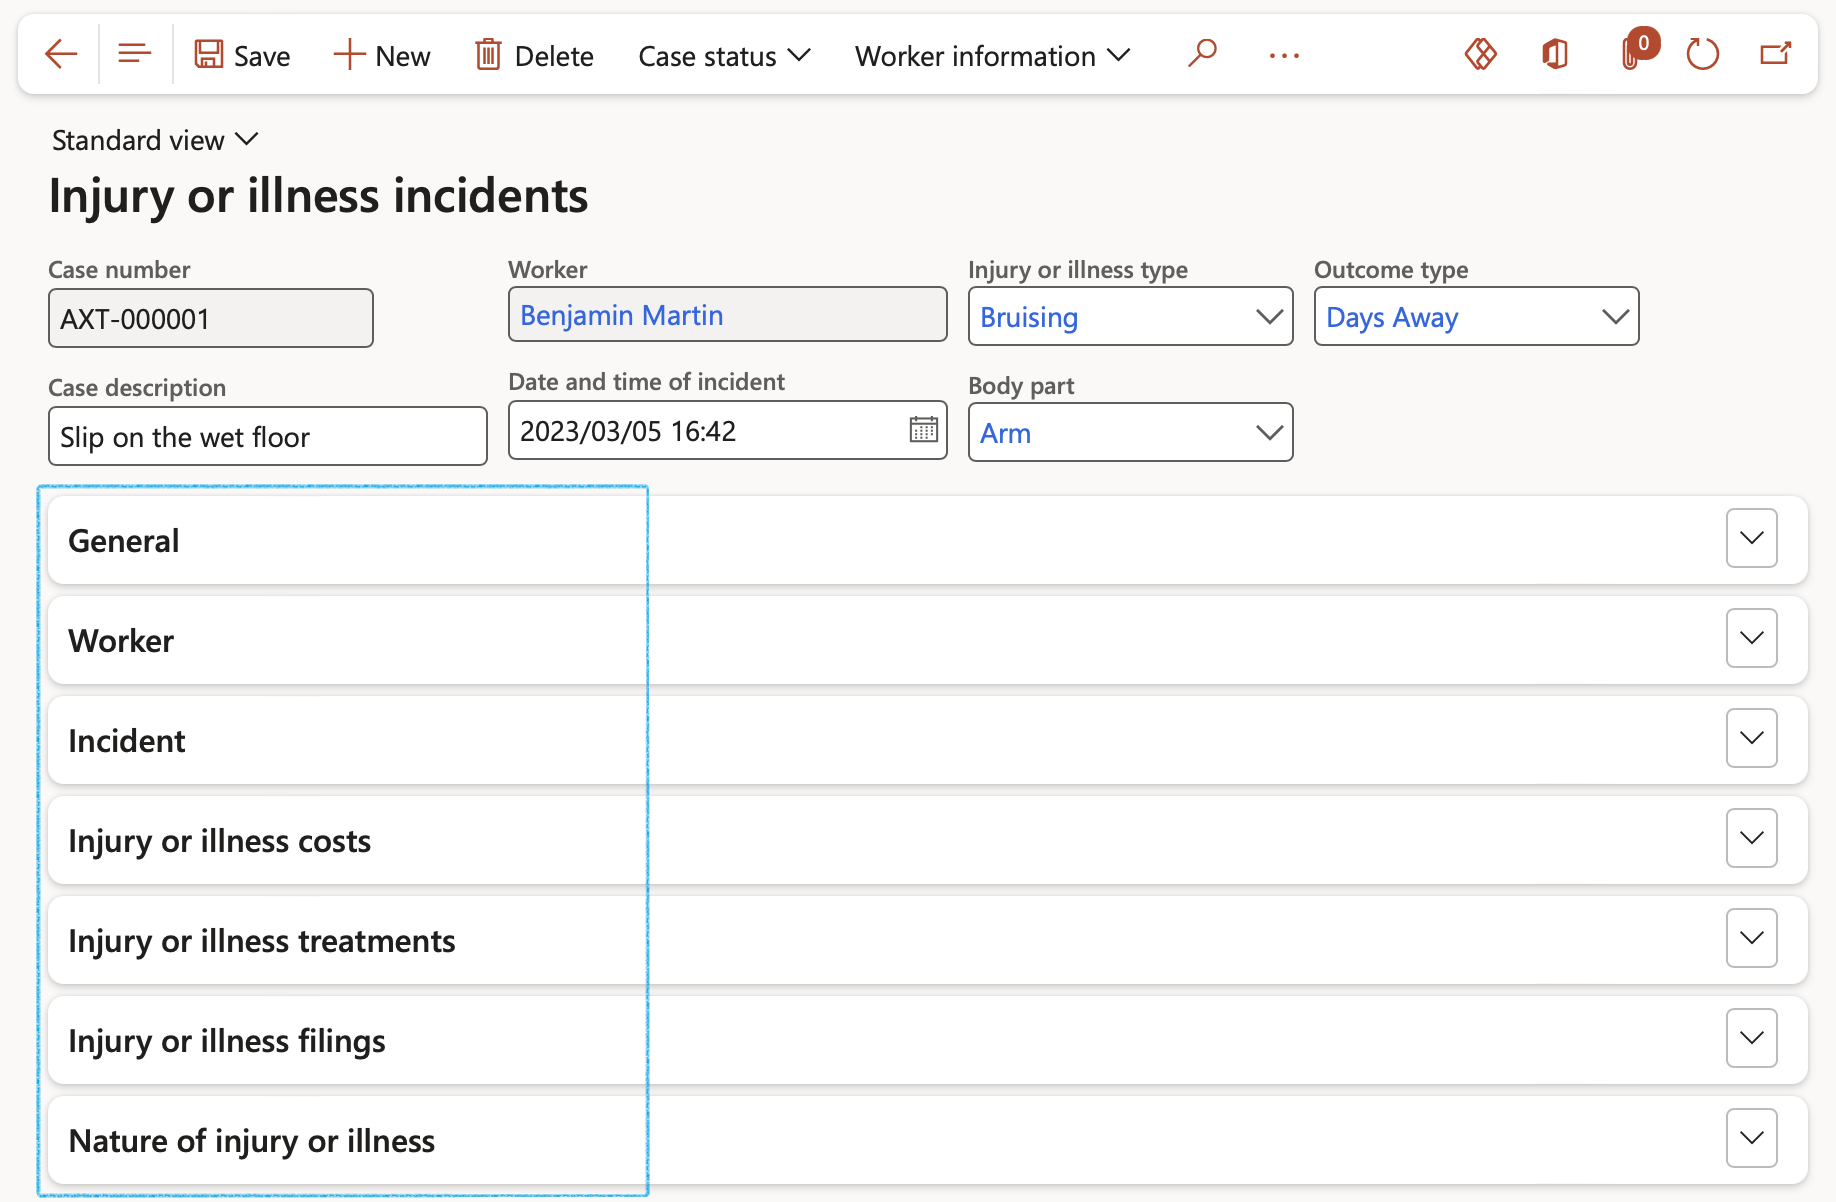
The Injury/illness Fast tabs
Expand one or more Fast tabs to see the additional fields that you can work with on the form. In addition, you can collapse Fast tabs to hide fields that are not relevant to you.
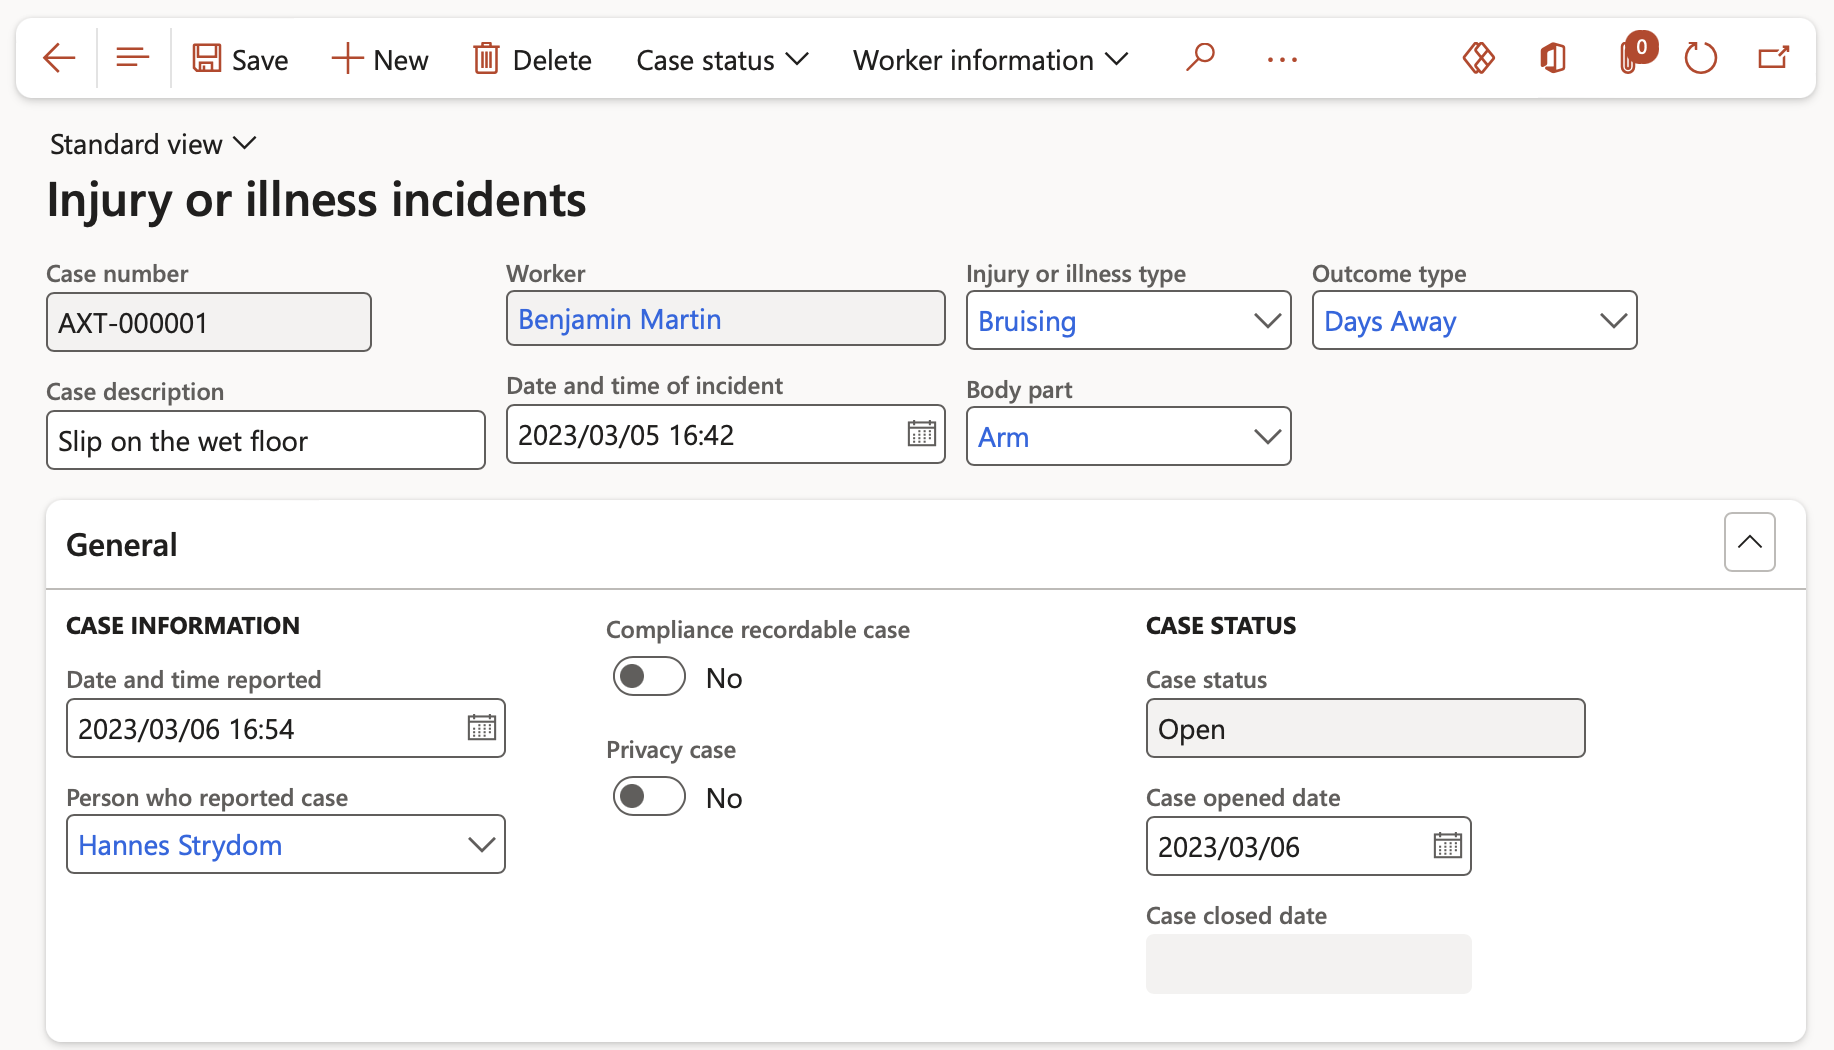
¶ Step 31.1: The General Fast tab
- Enter the case information:
- Date and time reported
- Person who reported the case
- The case status
- The status is displayed as selected in the Action pane
- Enter the Case opened date
If the status is Closed, the date cannot be edited, and the Case closed date field will be populated.
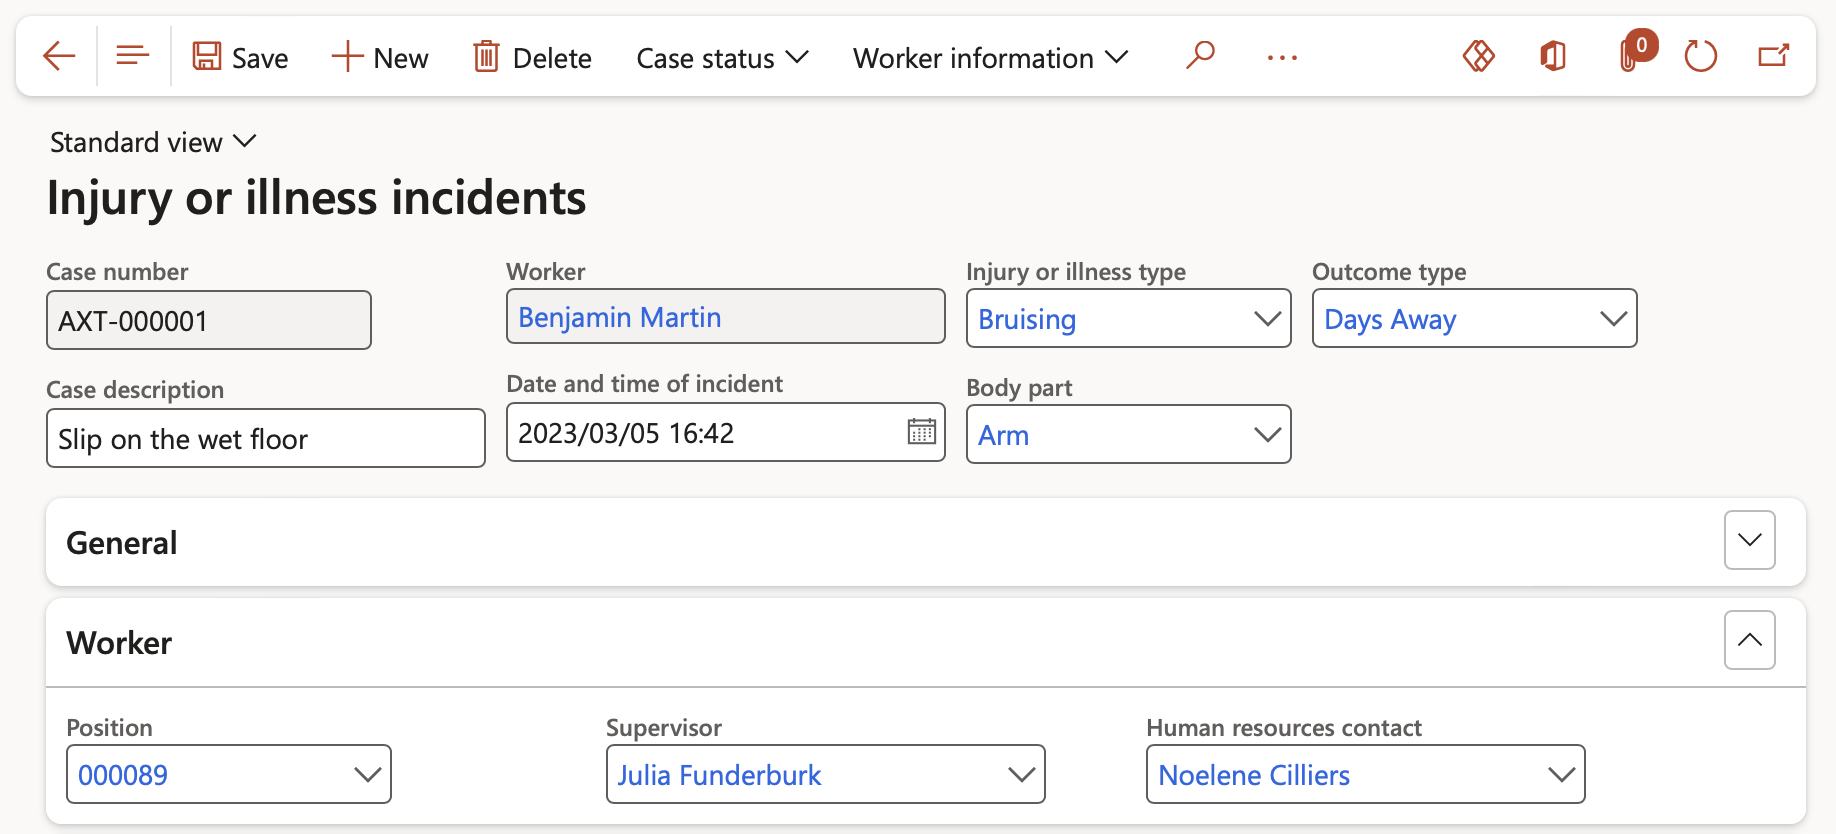
¶ Step 31.2: The Worker Fast tab
- Select the injured worker’s information from the drop down lists:
- Position
- Supervisor
- HR contact
¶ Step 31.3: The Incident Fast tab
- Summary information about the injury or illness can be entered here:
- The Date and time that the worker started work, on the date that the injury occurred
- Severity level
- Safeguards that were provided
- Actions to be taken, etc.
- If this kind of incident has happened before, the incident can be selected from the dropdown list
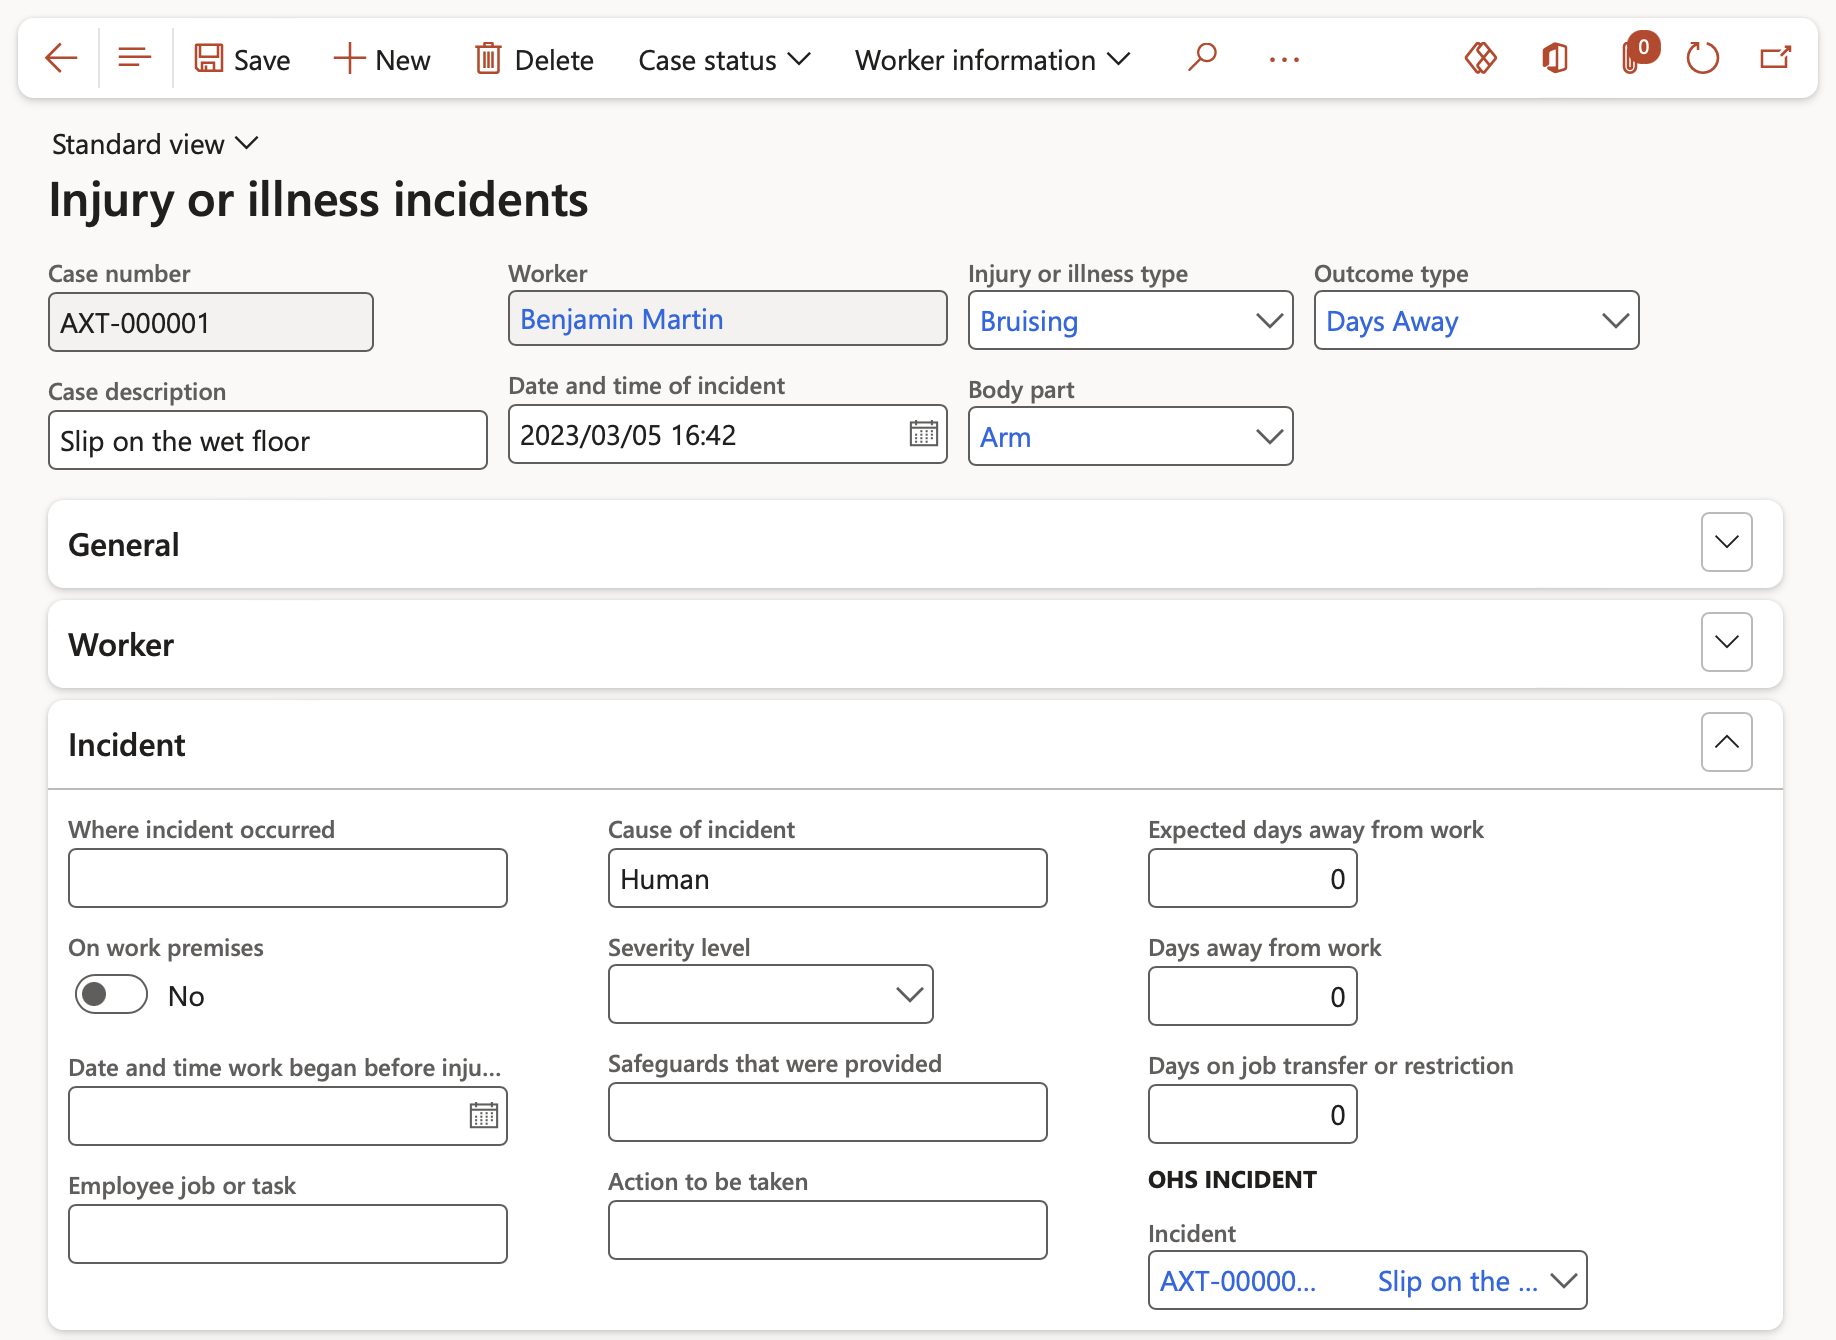
- If this is an incident that has not occurred before, click on the Create incident button on the Action pane

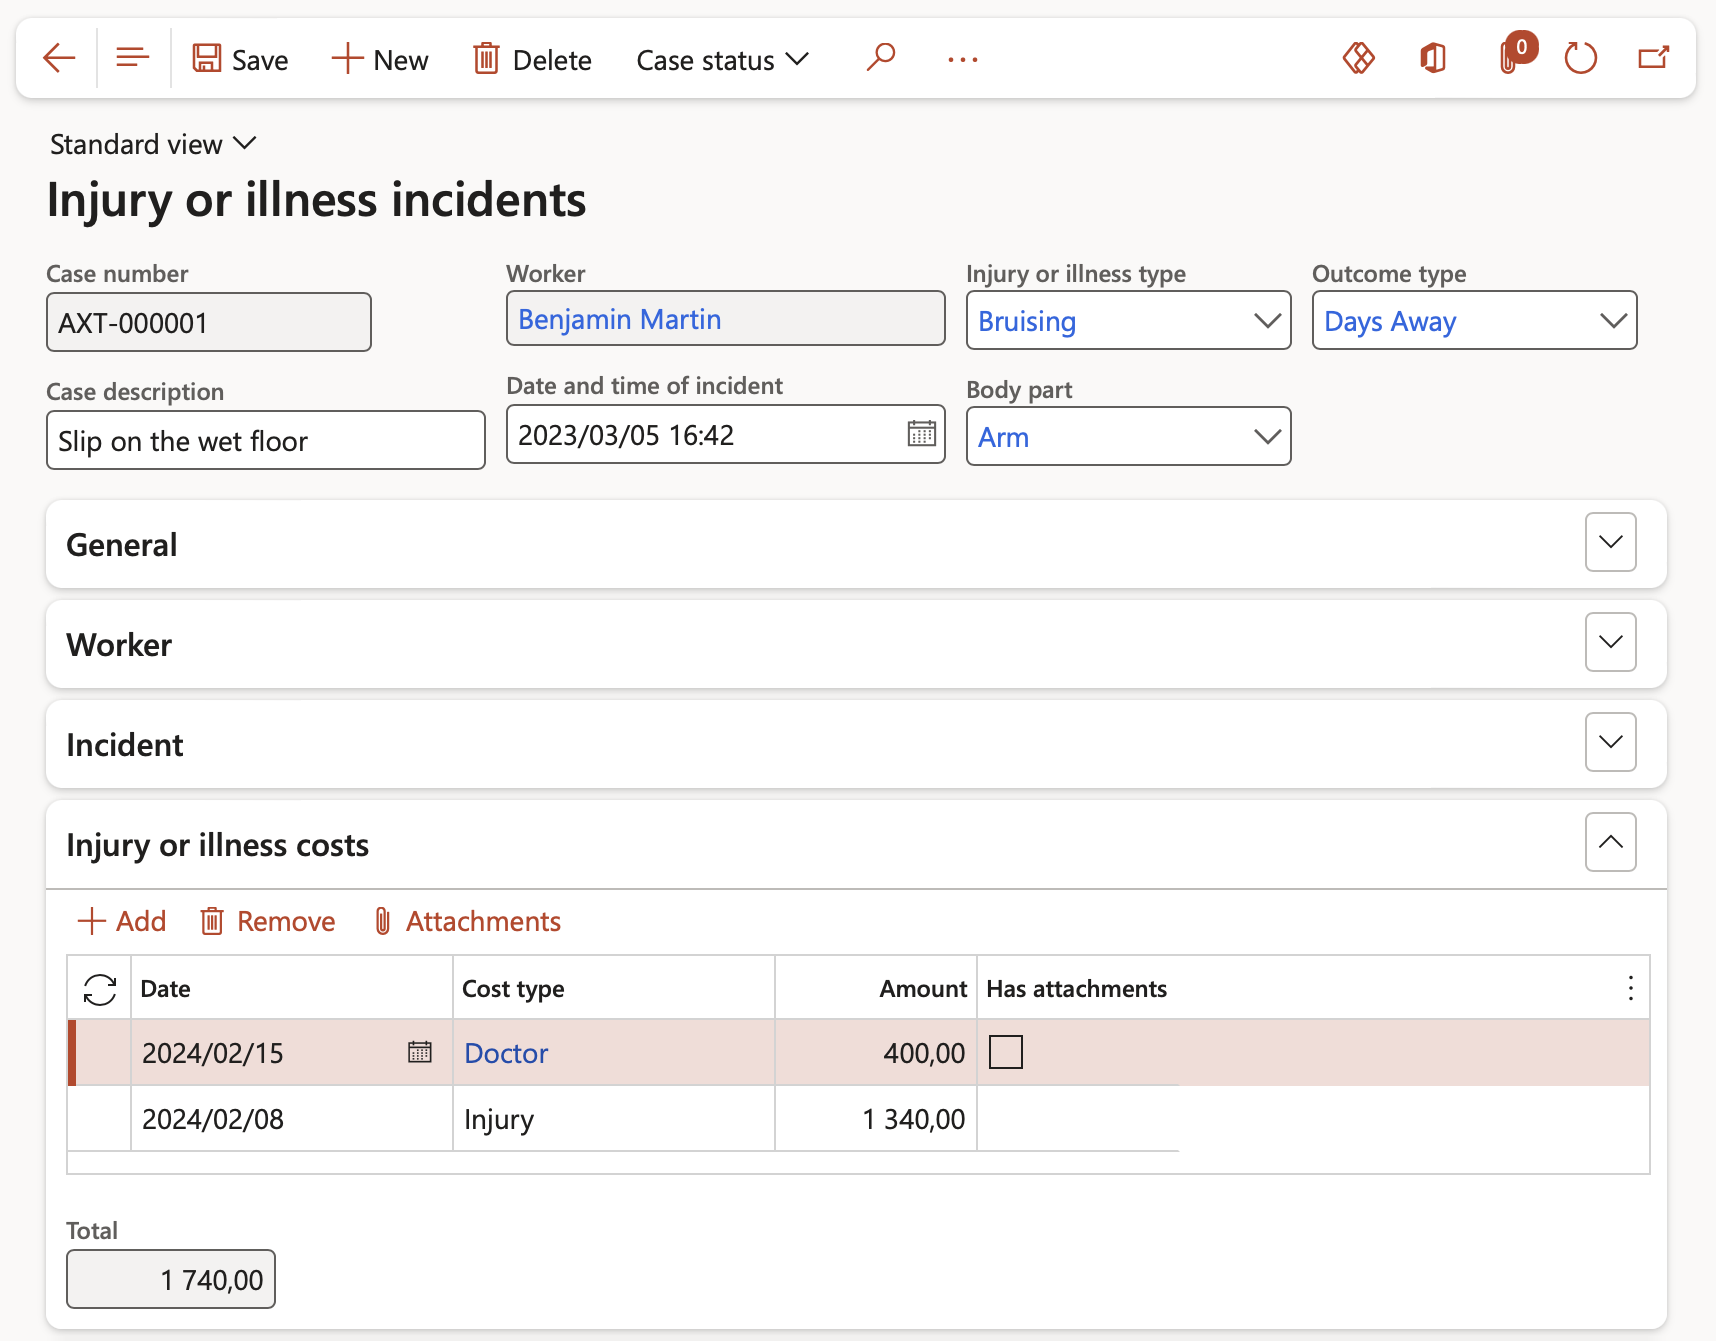
¶ Step 31.4: The Injury or illness costs Fast tab
- Information about the costs involved with the incident can be entered under this Fast tab
- Date
- Cost type (doctor, hospital…)
- Amount
- Documents (invoices, doctor’s notes…)
- The total of the costs is displayed in the Total field at the bottom of the Fast tab
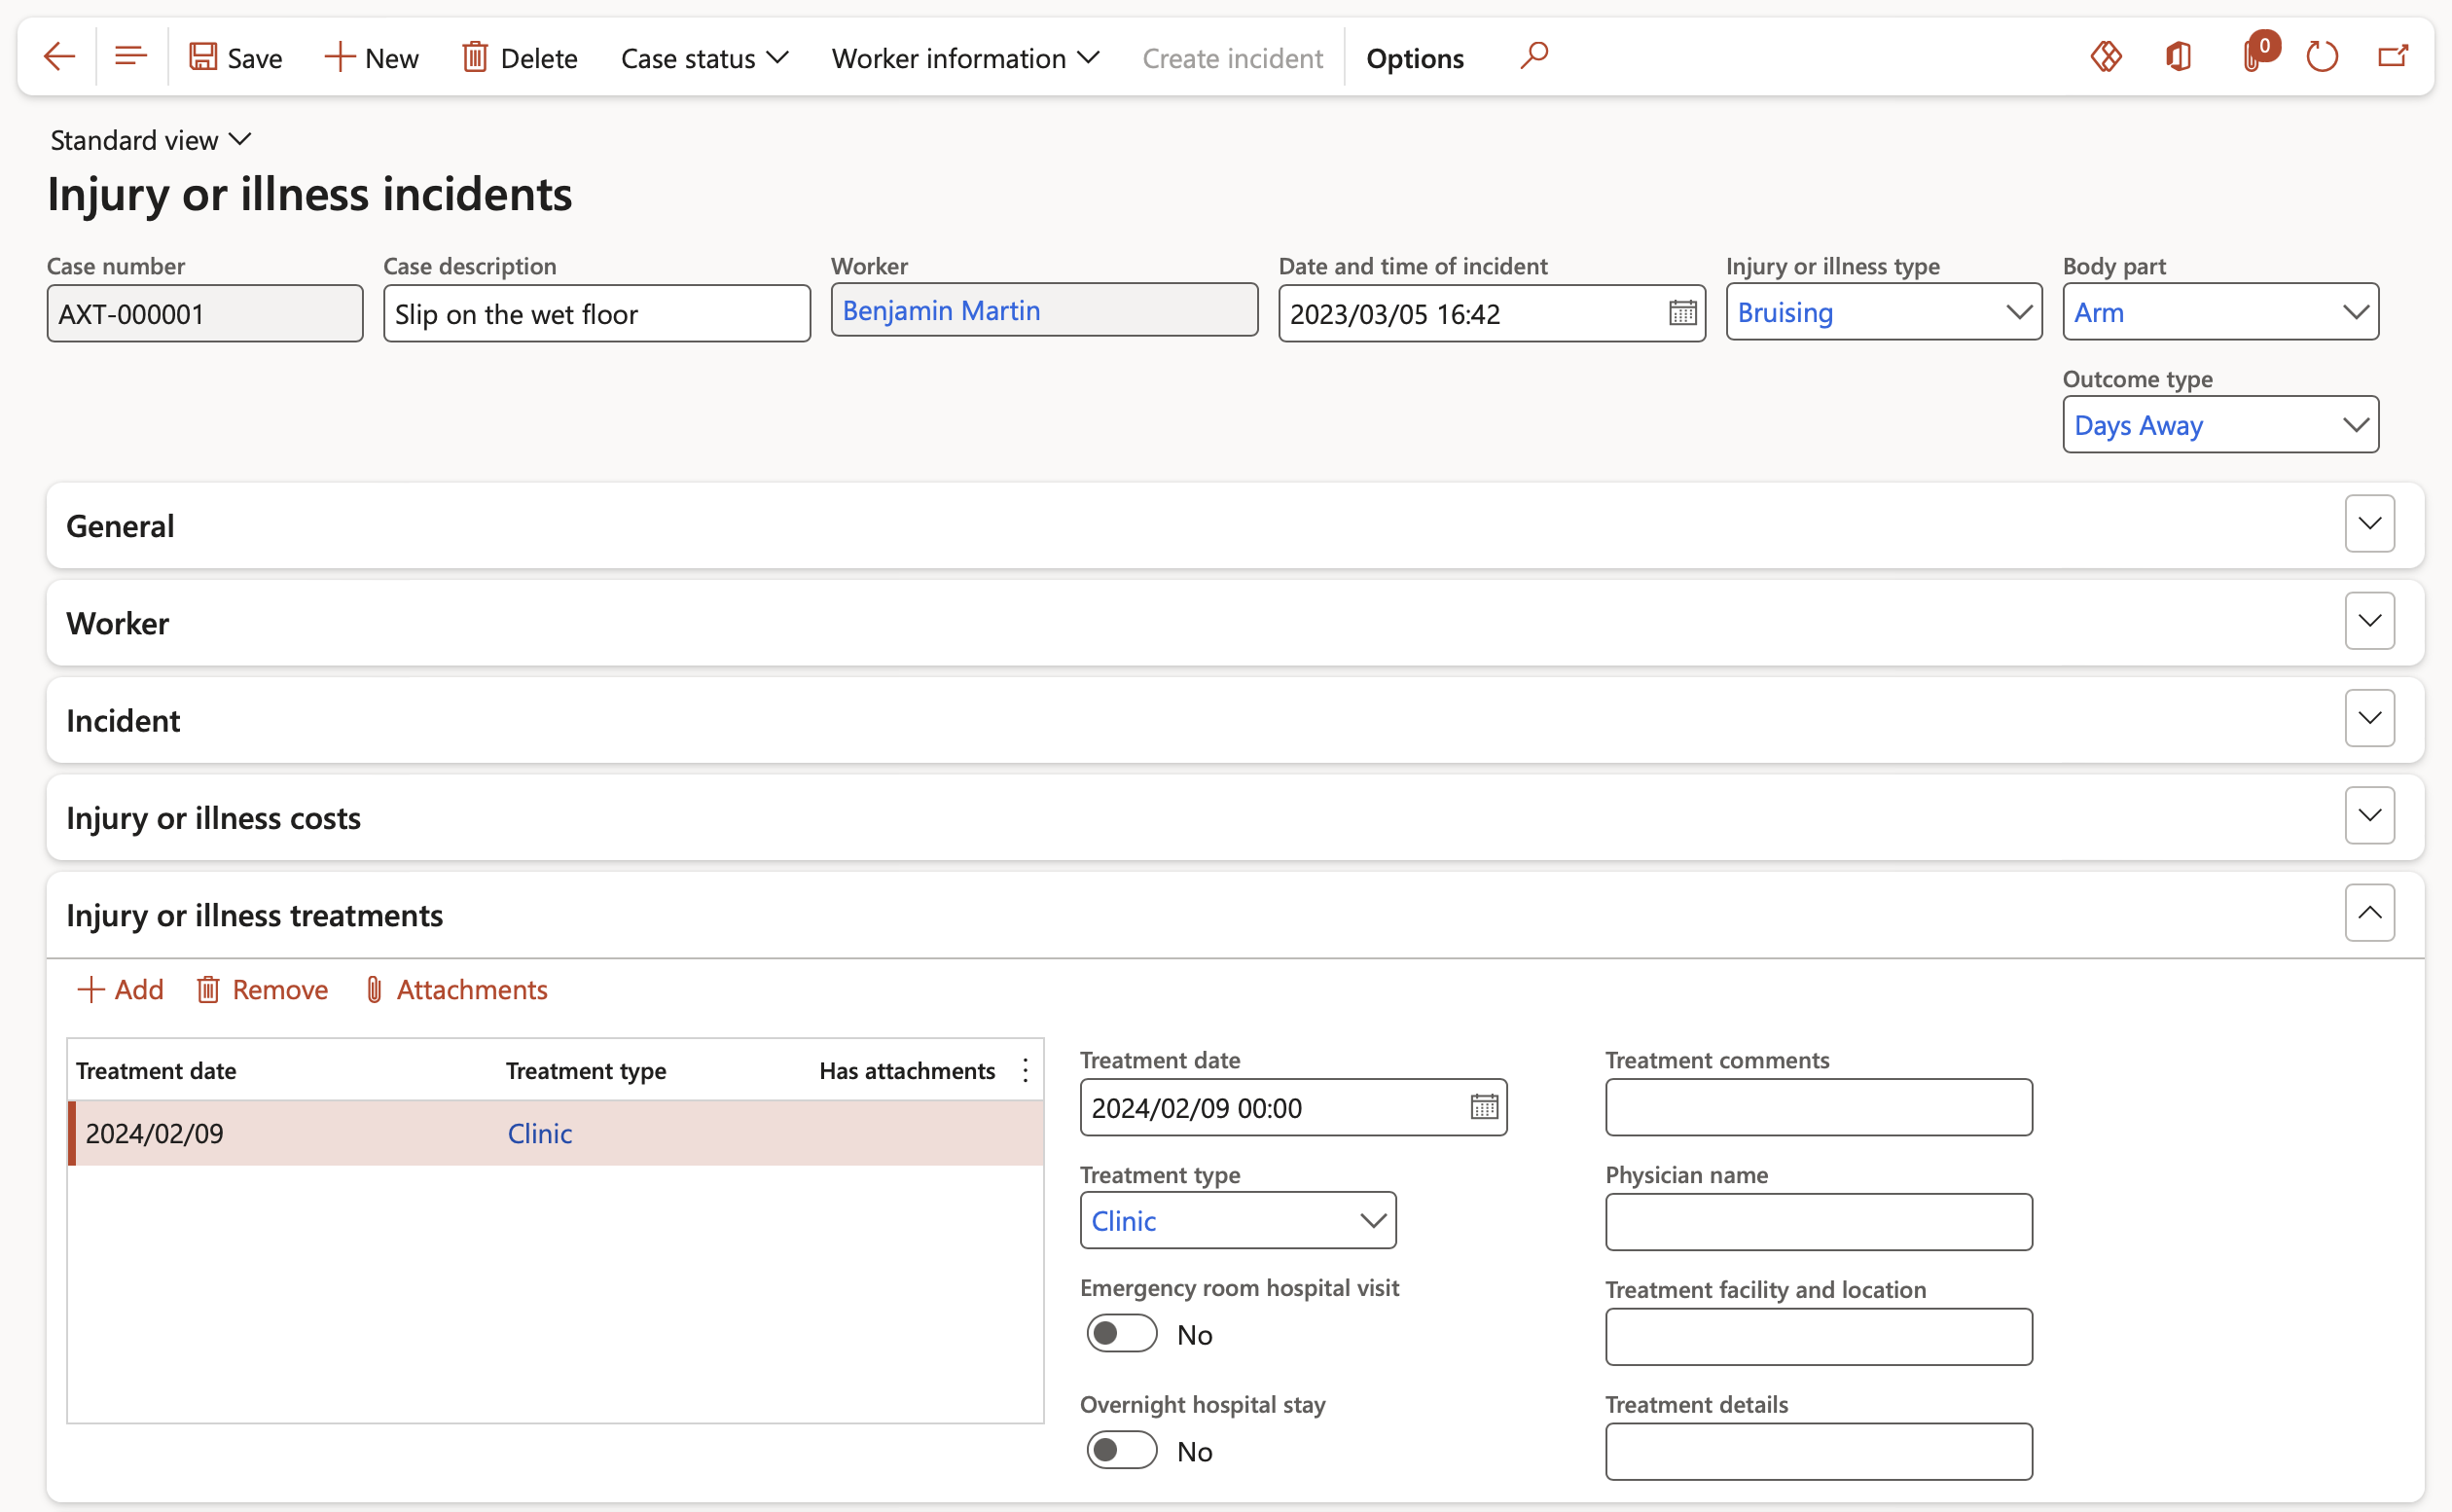
¶ Step 31.5: The Injury or illness treatments Fast tab
- The following information about the treatment that the worker received can be entered under the Treatment group
- Treatment date
- Treatment type
- Treatment comments
- Information about the physician that attended to the worker can be entered under the Primary physician information group
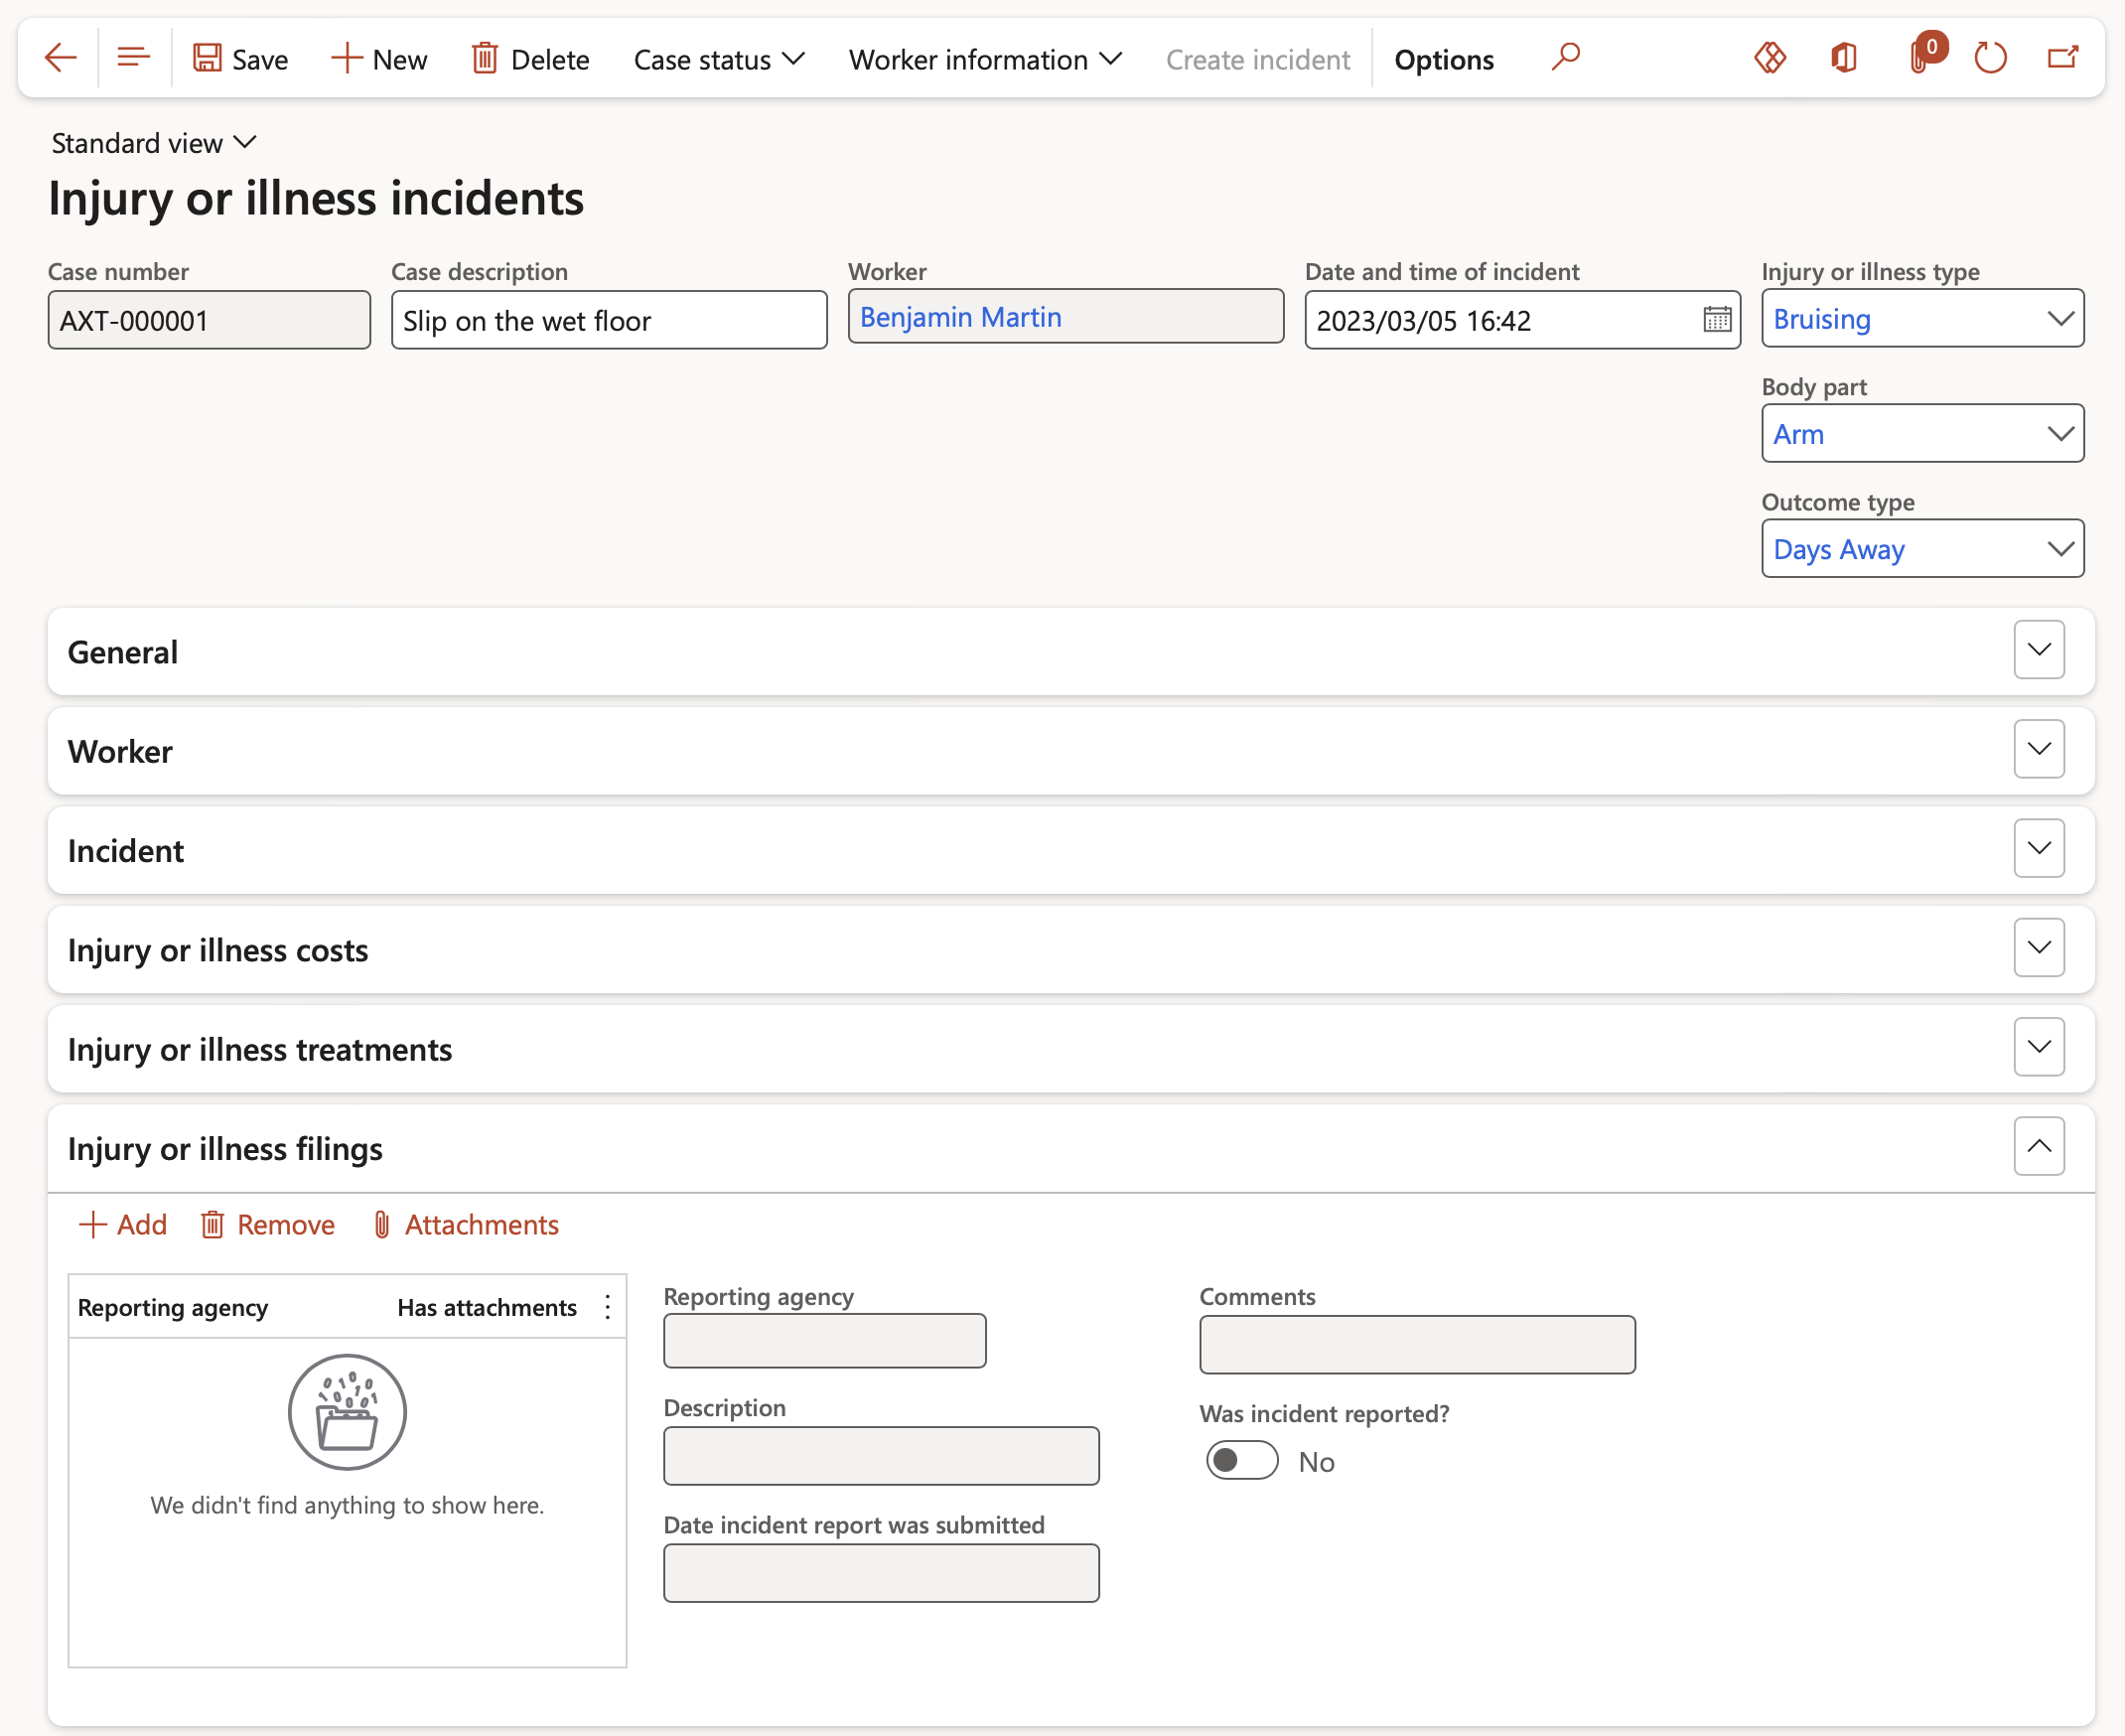
¶ Step 31.6: The Injury or illness filings Fast tab
- Details about the reporting agency are entered here
- Relevant documentation can be attached to this form
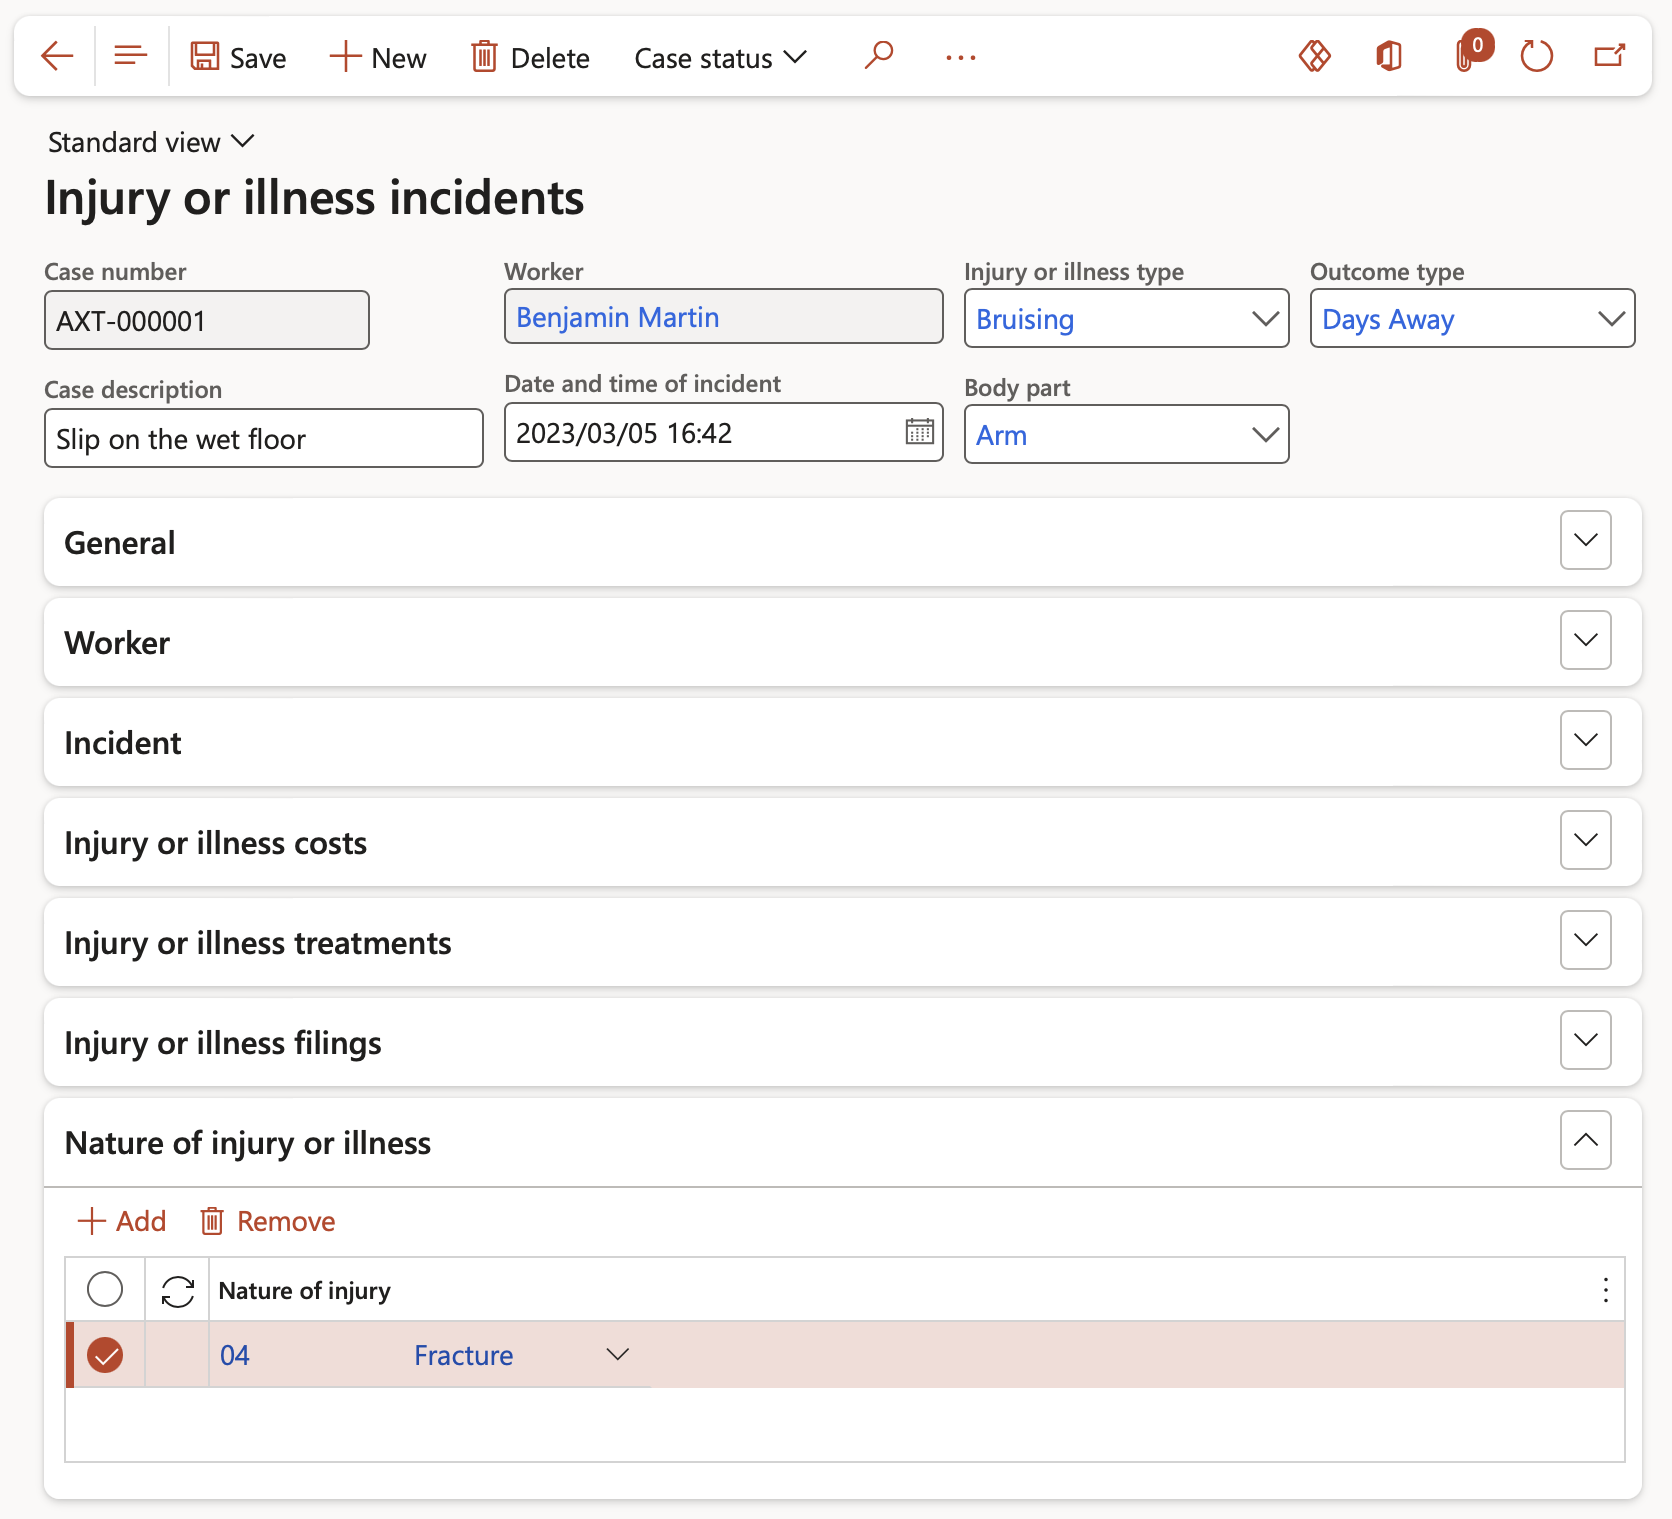
¶ Step 31.7: The Nature of Injury or illness Fast tab
- Details about the nature of the injury or illness is entered here
¶ Step 32: Environmental incident
** Environmental** – This button remains greyed-out until the user creates an environmental incident record, and selects Environmental in the Incident type field
Refer to the Incident type setup form where Incident type = Environmental

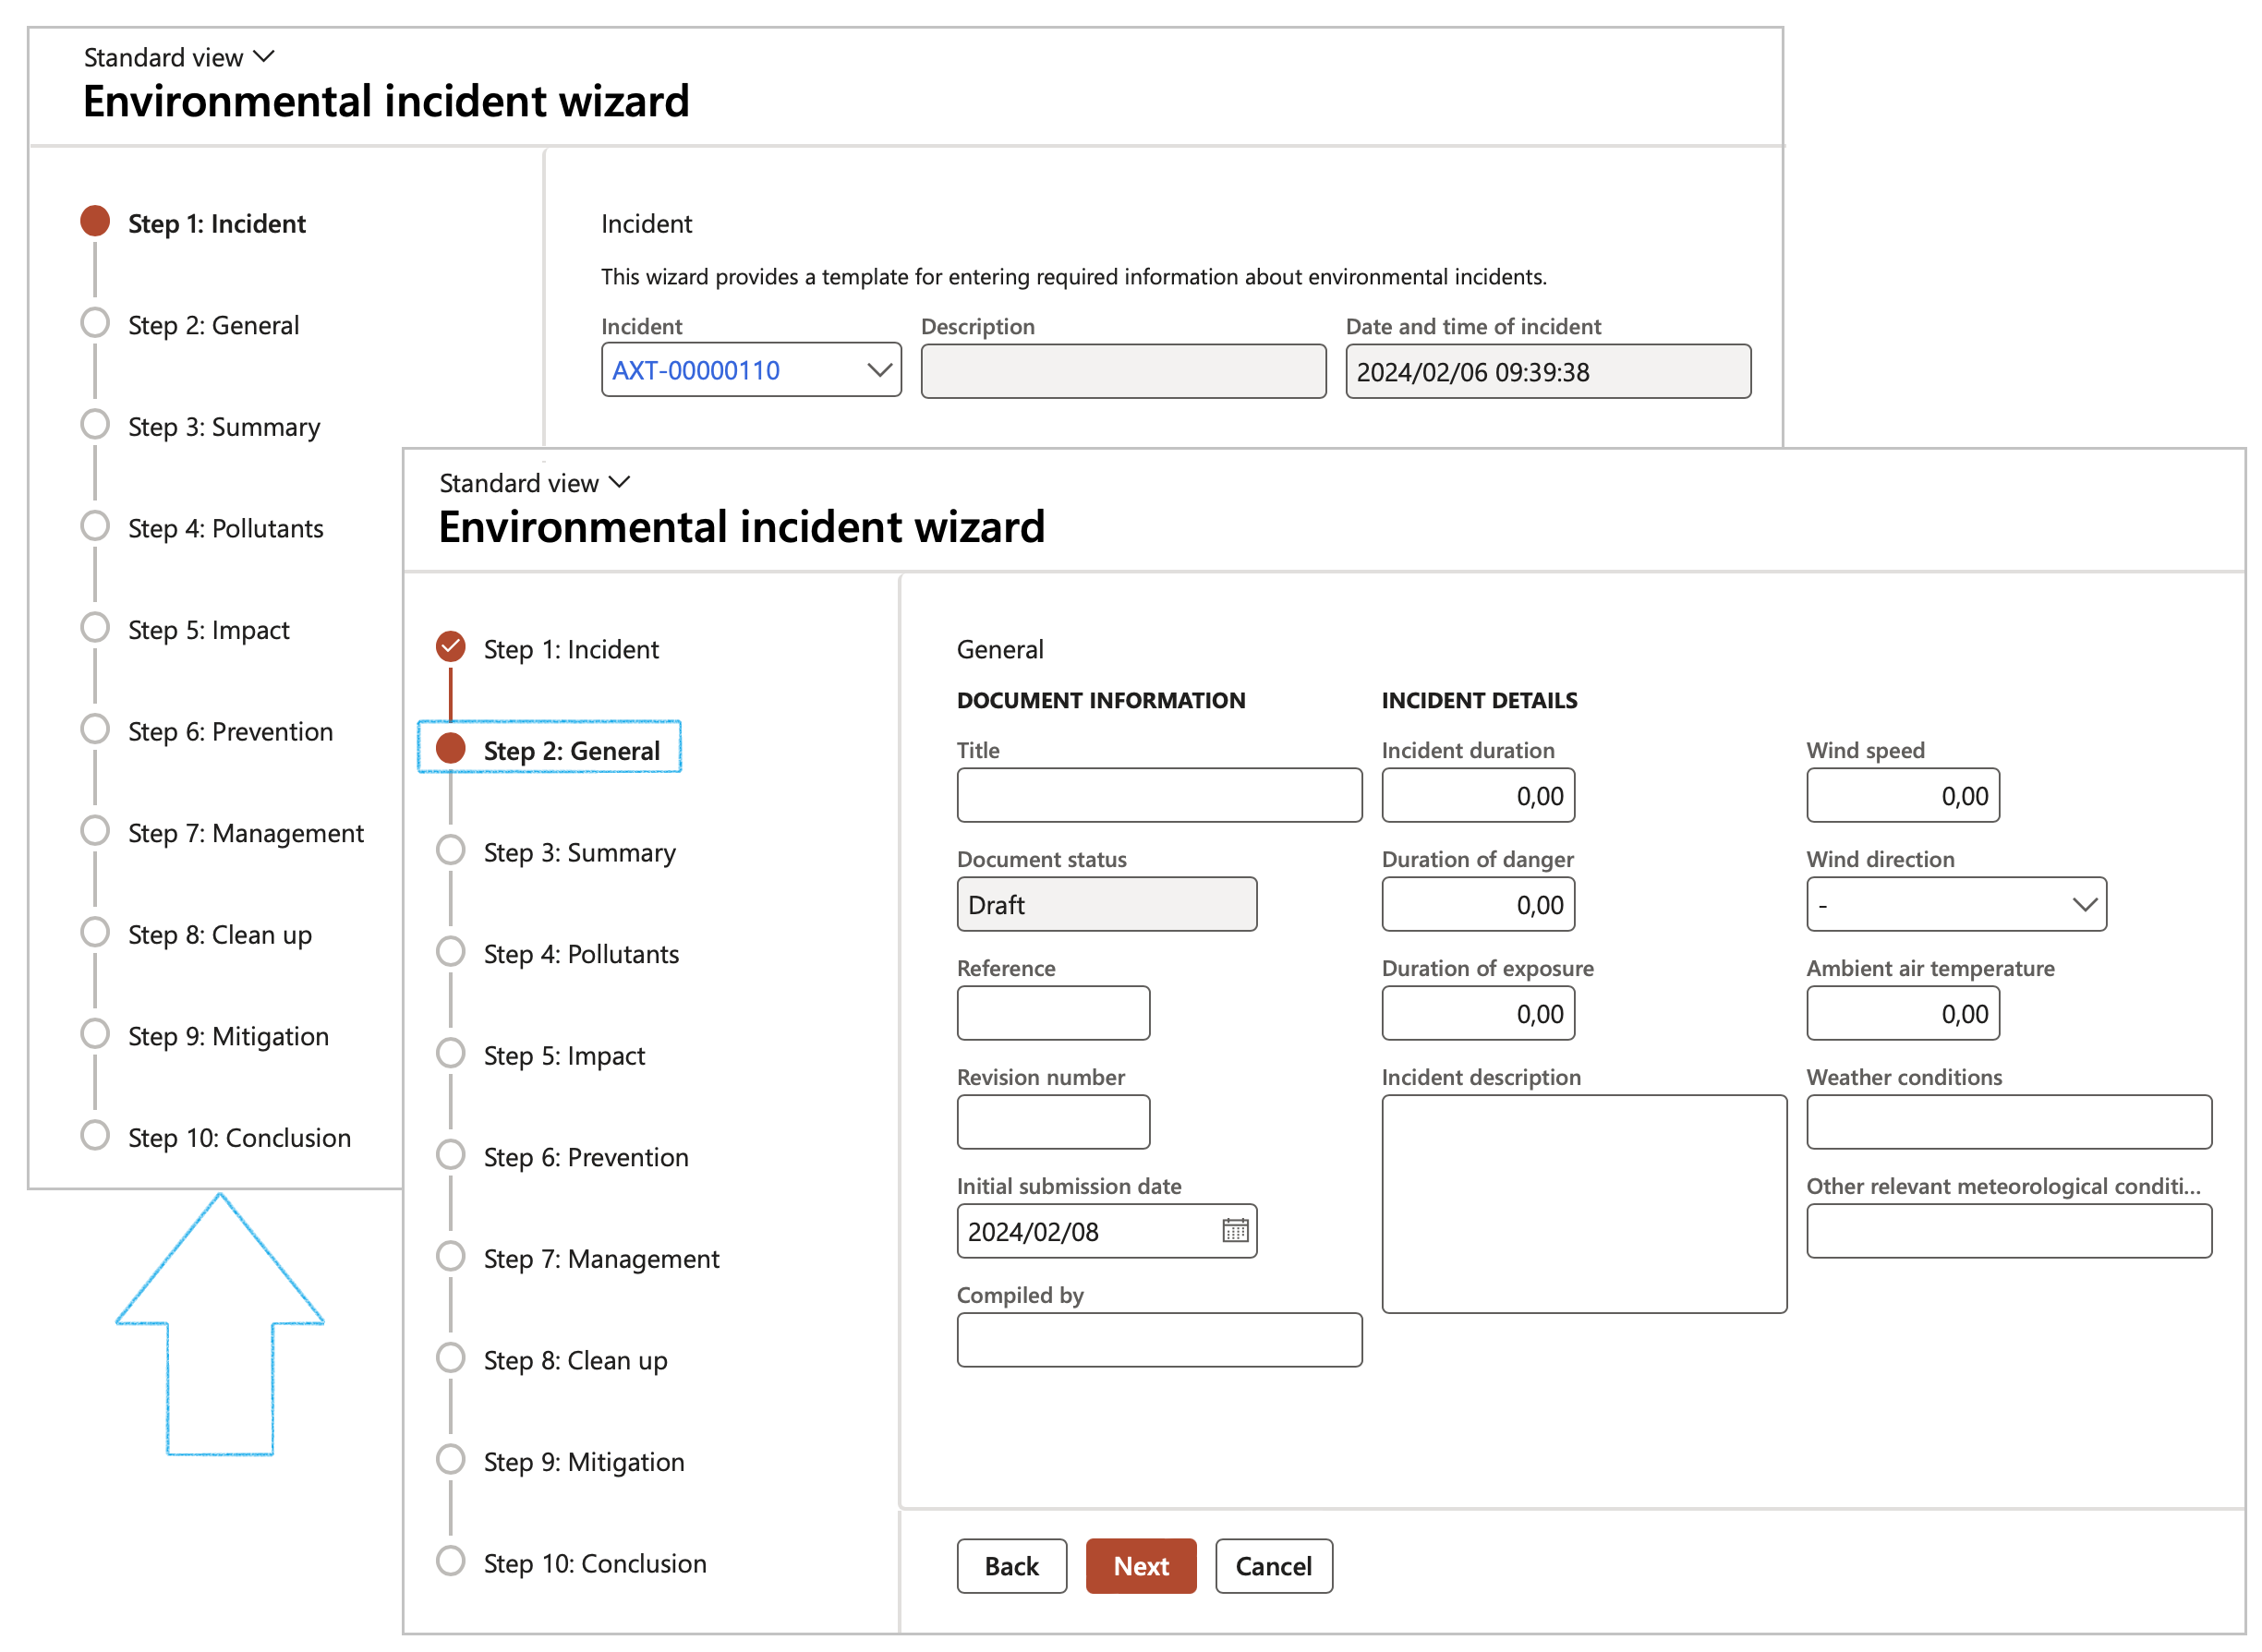
- Use the Environment incident wizard to enter environmental incident details
Click on the Next button after completing each step
- Step 1: Incident - The Incident number, Description, and Date and time of incident, pull through from the Incident detail form.
- Step 2: General – Enter Document information and Incident details
- Step 3: Summary - Tick the boxes relevant to the incident
- Step 4: Pollutants - List all the pollutants directly released during the incident (i.e., exclude those pollutants that resulted from mitigation measures, e.g., flaring, treatment, dilution etc.).
- Step 5: Impact – Enter the environmental impact of the incident
- Step 6: Prevention - Describe whether the incident could have been foreseen
- Step 7: Management - Enter information describing evacuation activities, technical measures taken by management to address the incident, measures taken to minimize the impact, emergency services involvement
- Step 8: Cleanup - Provide details of the cleanup/decontamination activities
- Step 9: Mitigation - Enter details on the measures taken to be taken to avoid a recurrence of such incident
- Step 10: Conclusion - Provide detail on all authorizations (including permits, licenses, certificates, etc.) in respect of the activity to which the incident relates
- Click on the Finish button
¶ Step 33: Hours worked
Go to: HSE > Setup > Work force > Hours worked
- Under the General Fast tab, enter the following details:
- In the Year field, enter the annual year value
- Select the relevant Site and Department from the dropdown lists
- In the Months active field, enter the number of operationally active months in the year
- In the Average staff complement field, enter the average number of staff employed during the year
- In the Estimate hours field, enter the estimated number of hours worked during the year
- In the Actual hours worked field, enter the number of actual hours worked during the year
- In the Hours lost field, enter the estimated number of hours lost during the year
- Expand the Actual hours worked Fast tab
- Enter the number of hours worked per month
- Click on the Daily quantity button
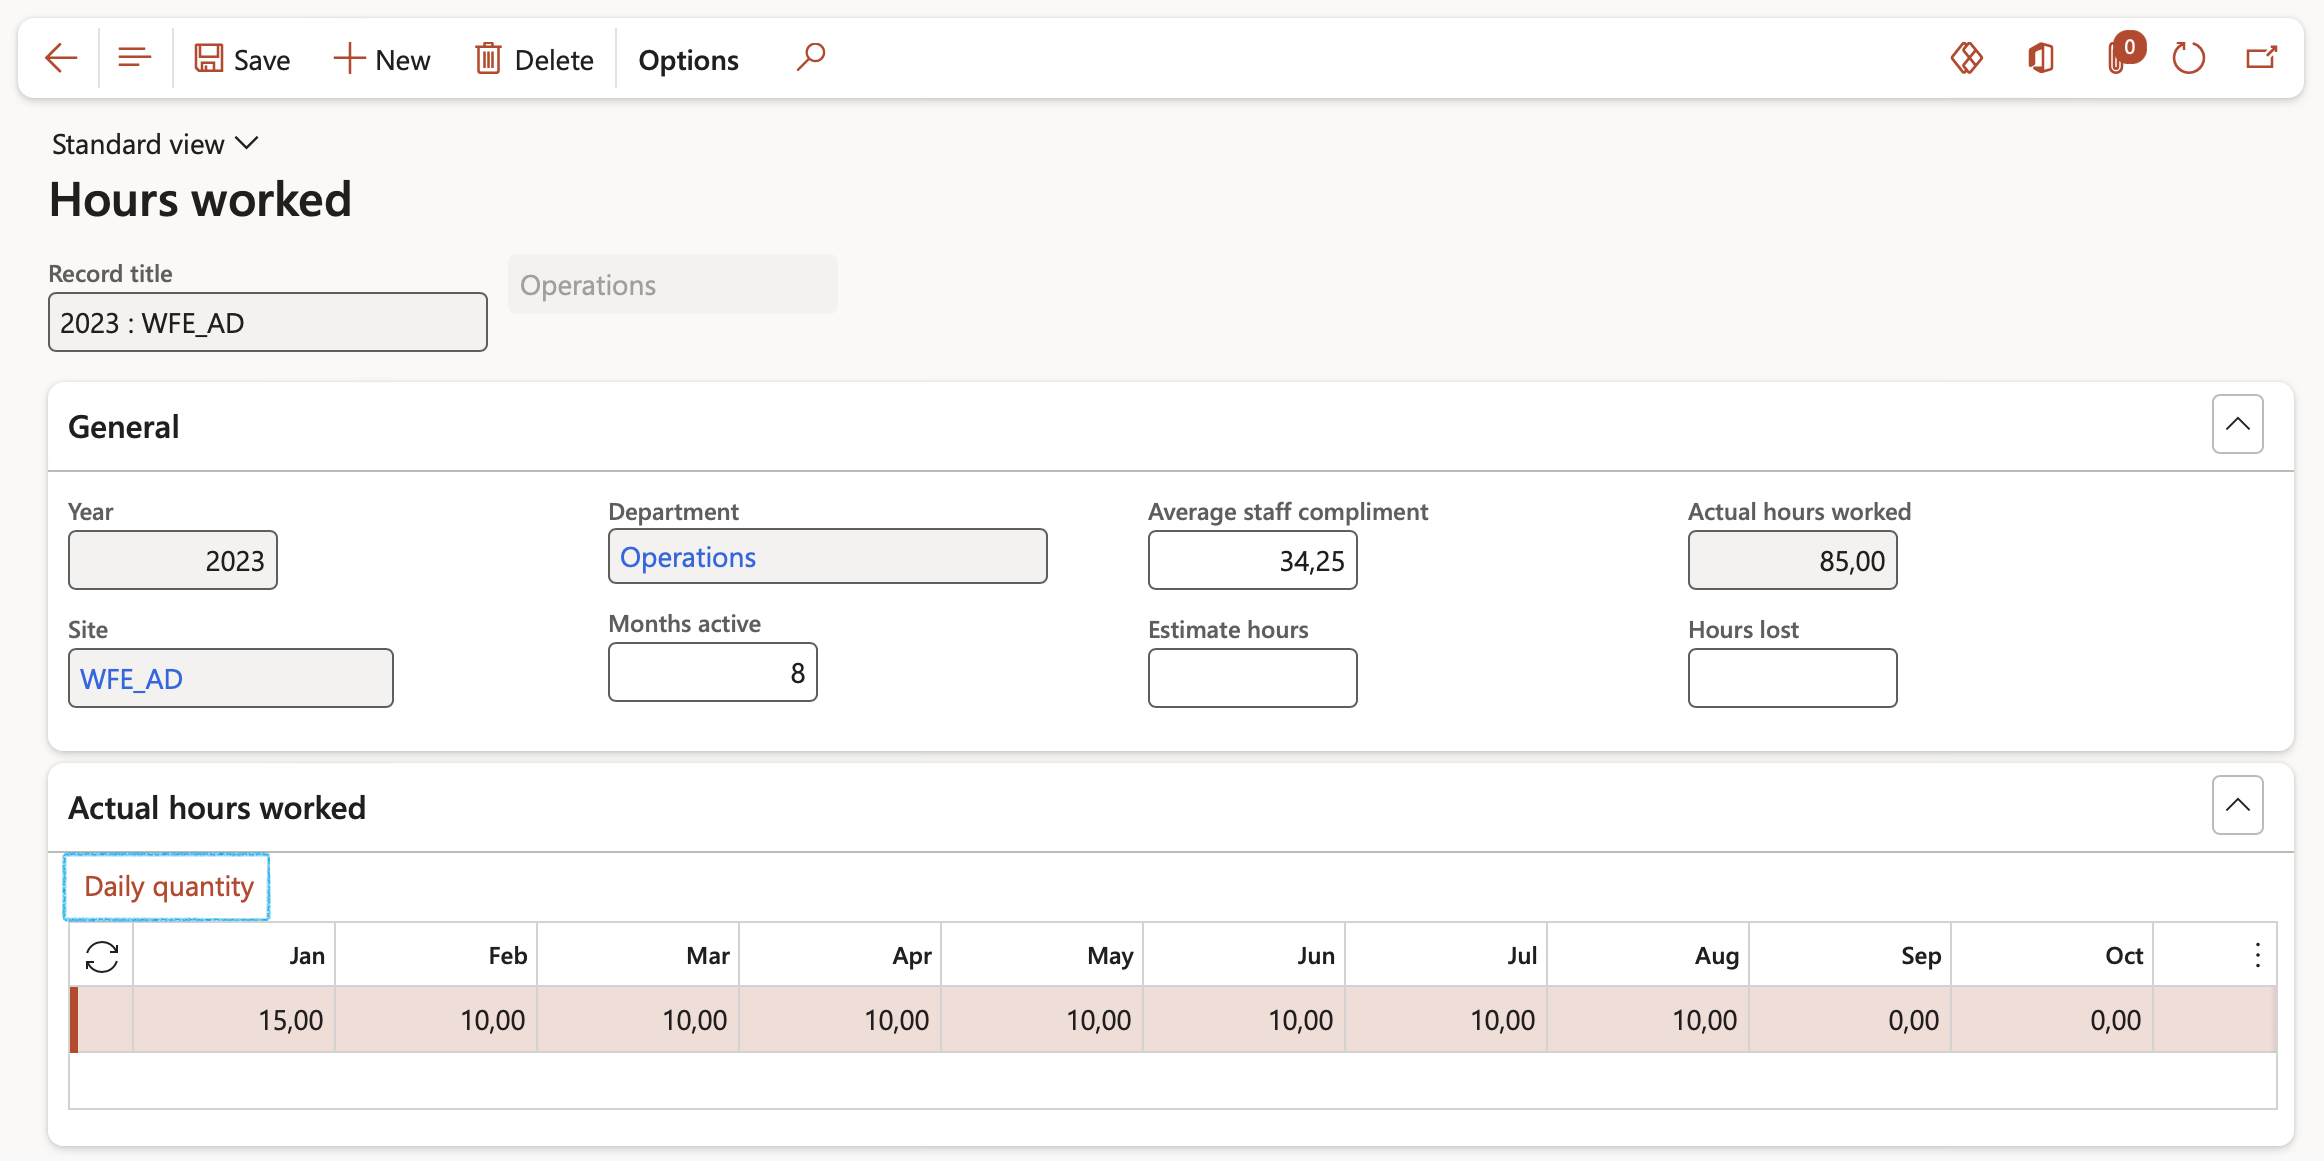
The Hours worked – Daily form will open
- Select the month that you want to update the daily hours worked for
- On the Action pane, click New
- Select the Date that needs to be updated
- Enter the correct quantity of hours worked on that date
- Enter a description of, for example, “Data from the time and attendance”
- Click on the Calculate/update button
- Close the form

The updated value of actual hours worked will be displayed
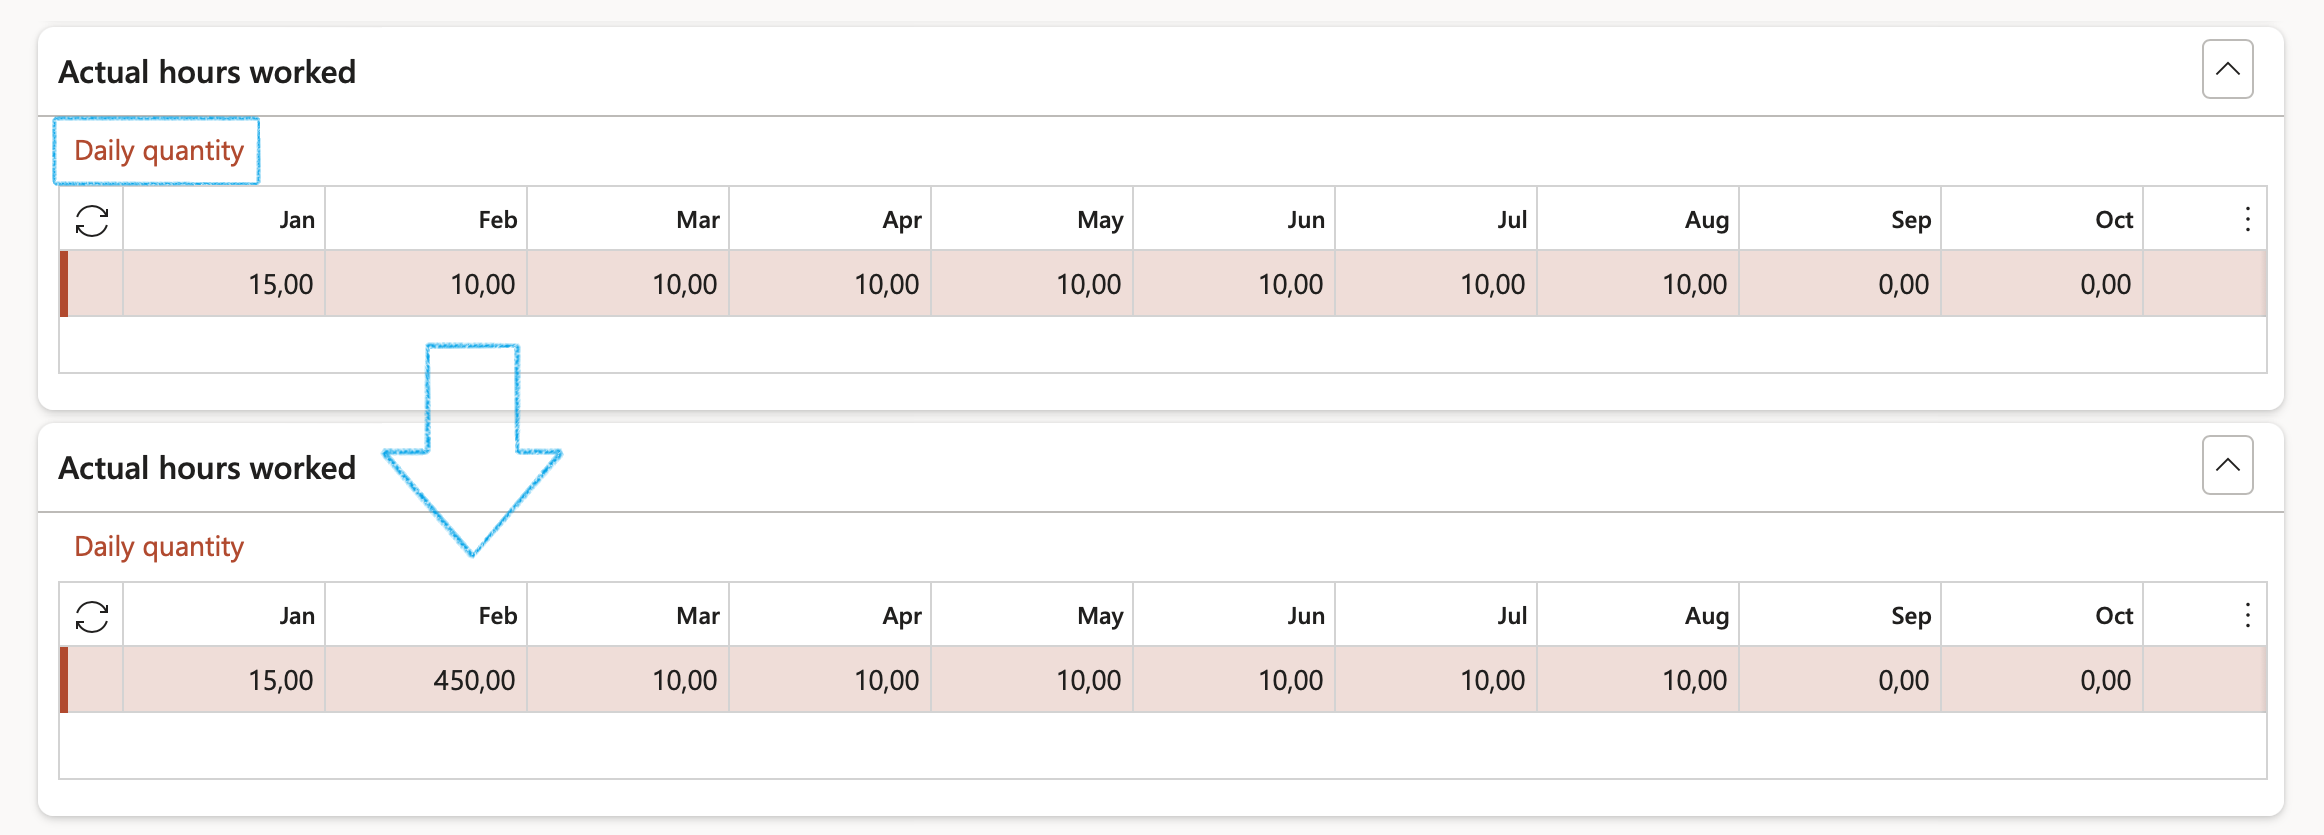
¶ Reporting
Before closing the incident or launching into an investigation, users can print some reports like the cost report.
¶ Step 34: Print Injury cost report
Go to: HR > Workers > Injury and illness > Incident costs report
- Enter the required parameters
- Click OK
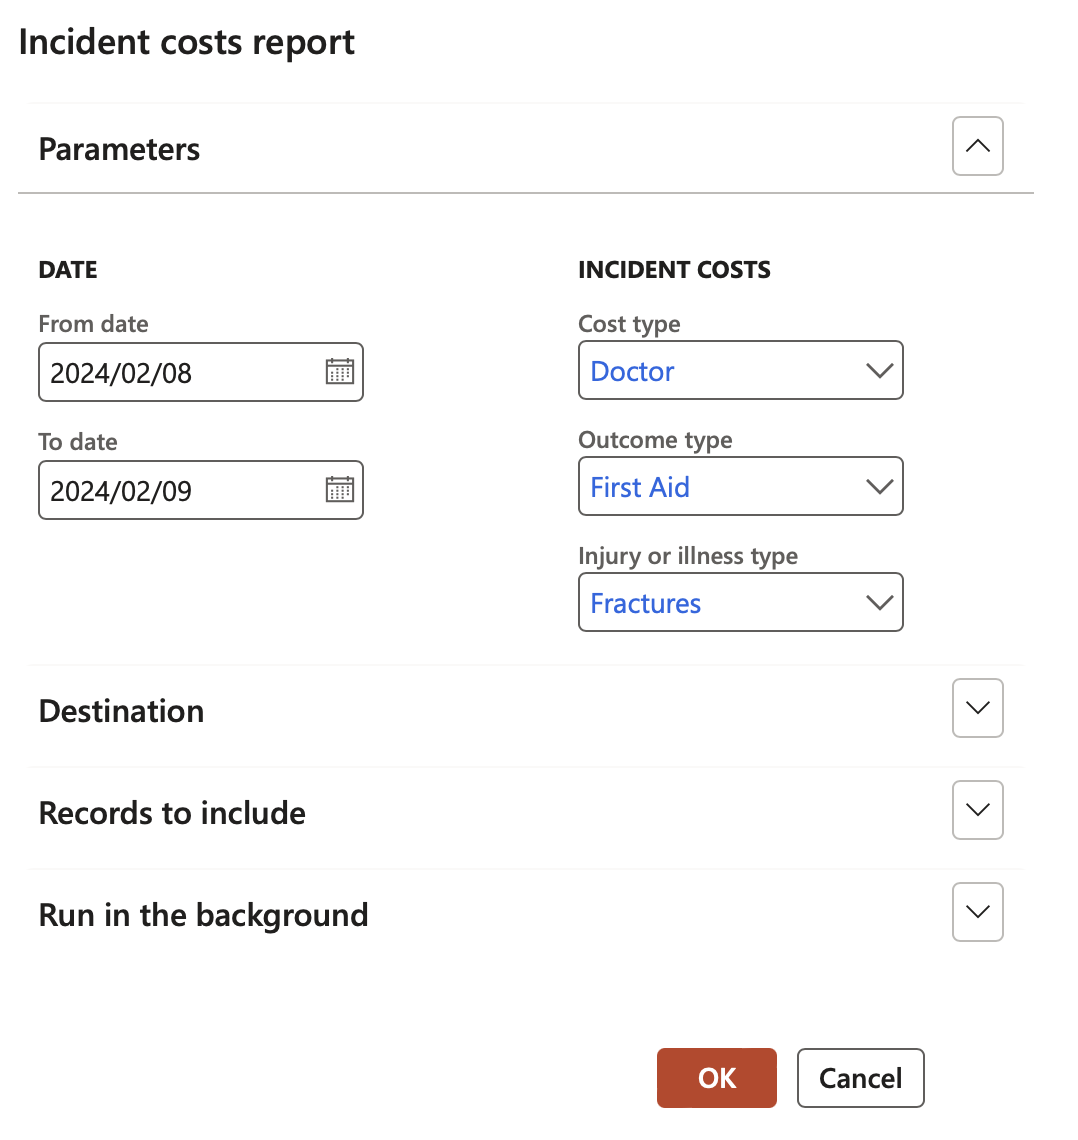

¶ Step 35: Find duplicate incidents inquiry
Go to: HSE > Incidents > Reports and Inquiries > Find duplicate incidents
- Select the Search criteria by:
- ticking the relevant boxes under Incident types
- selecting the relevant site and/or Department under Demarcation
- in the Containing text field, only text fulfilling this regular expression will be part of the result
- Click the Find now button
- Duplicate incidents can be closed by clicking on the Close button on the Action pane
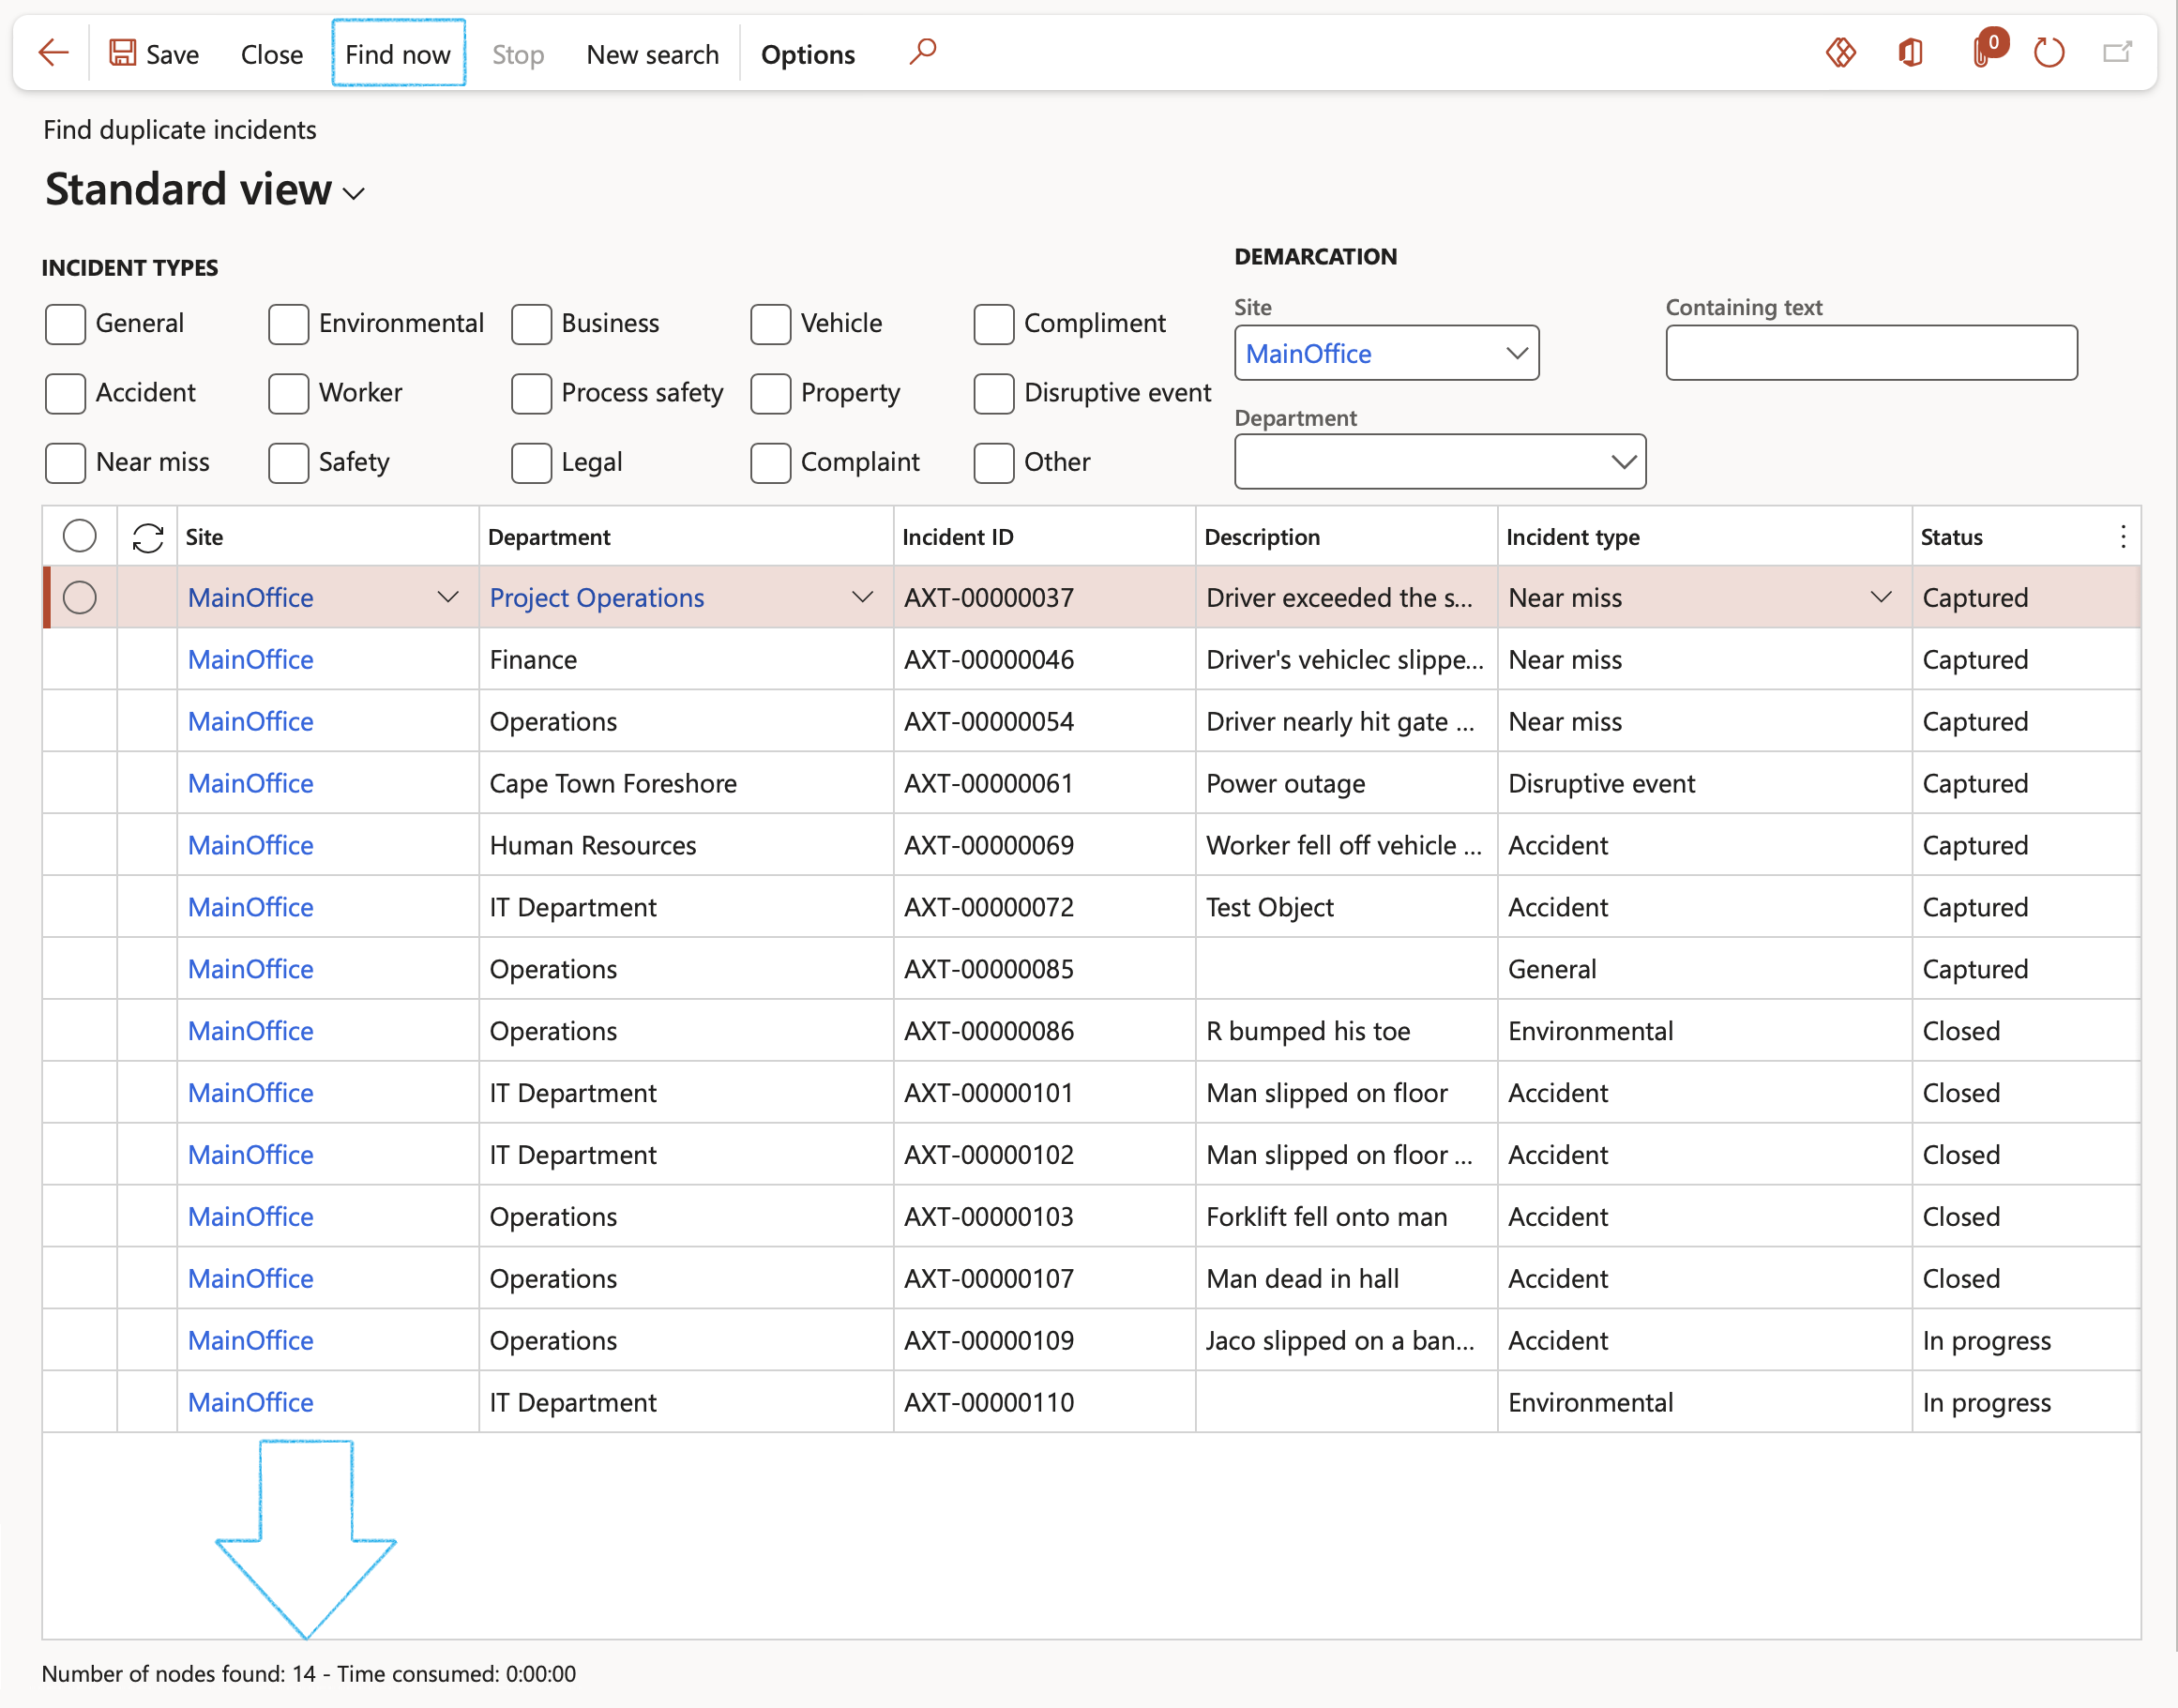
The results of the search will populate the grid
The number of nodes found will be displayed below the grid
¶ Step 36: Report of an injury
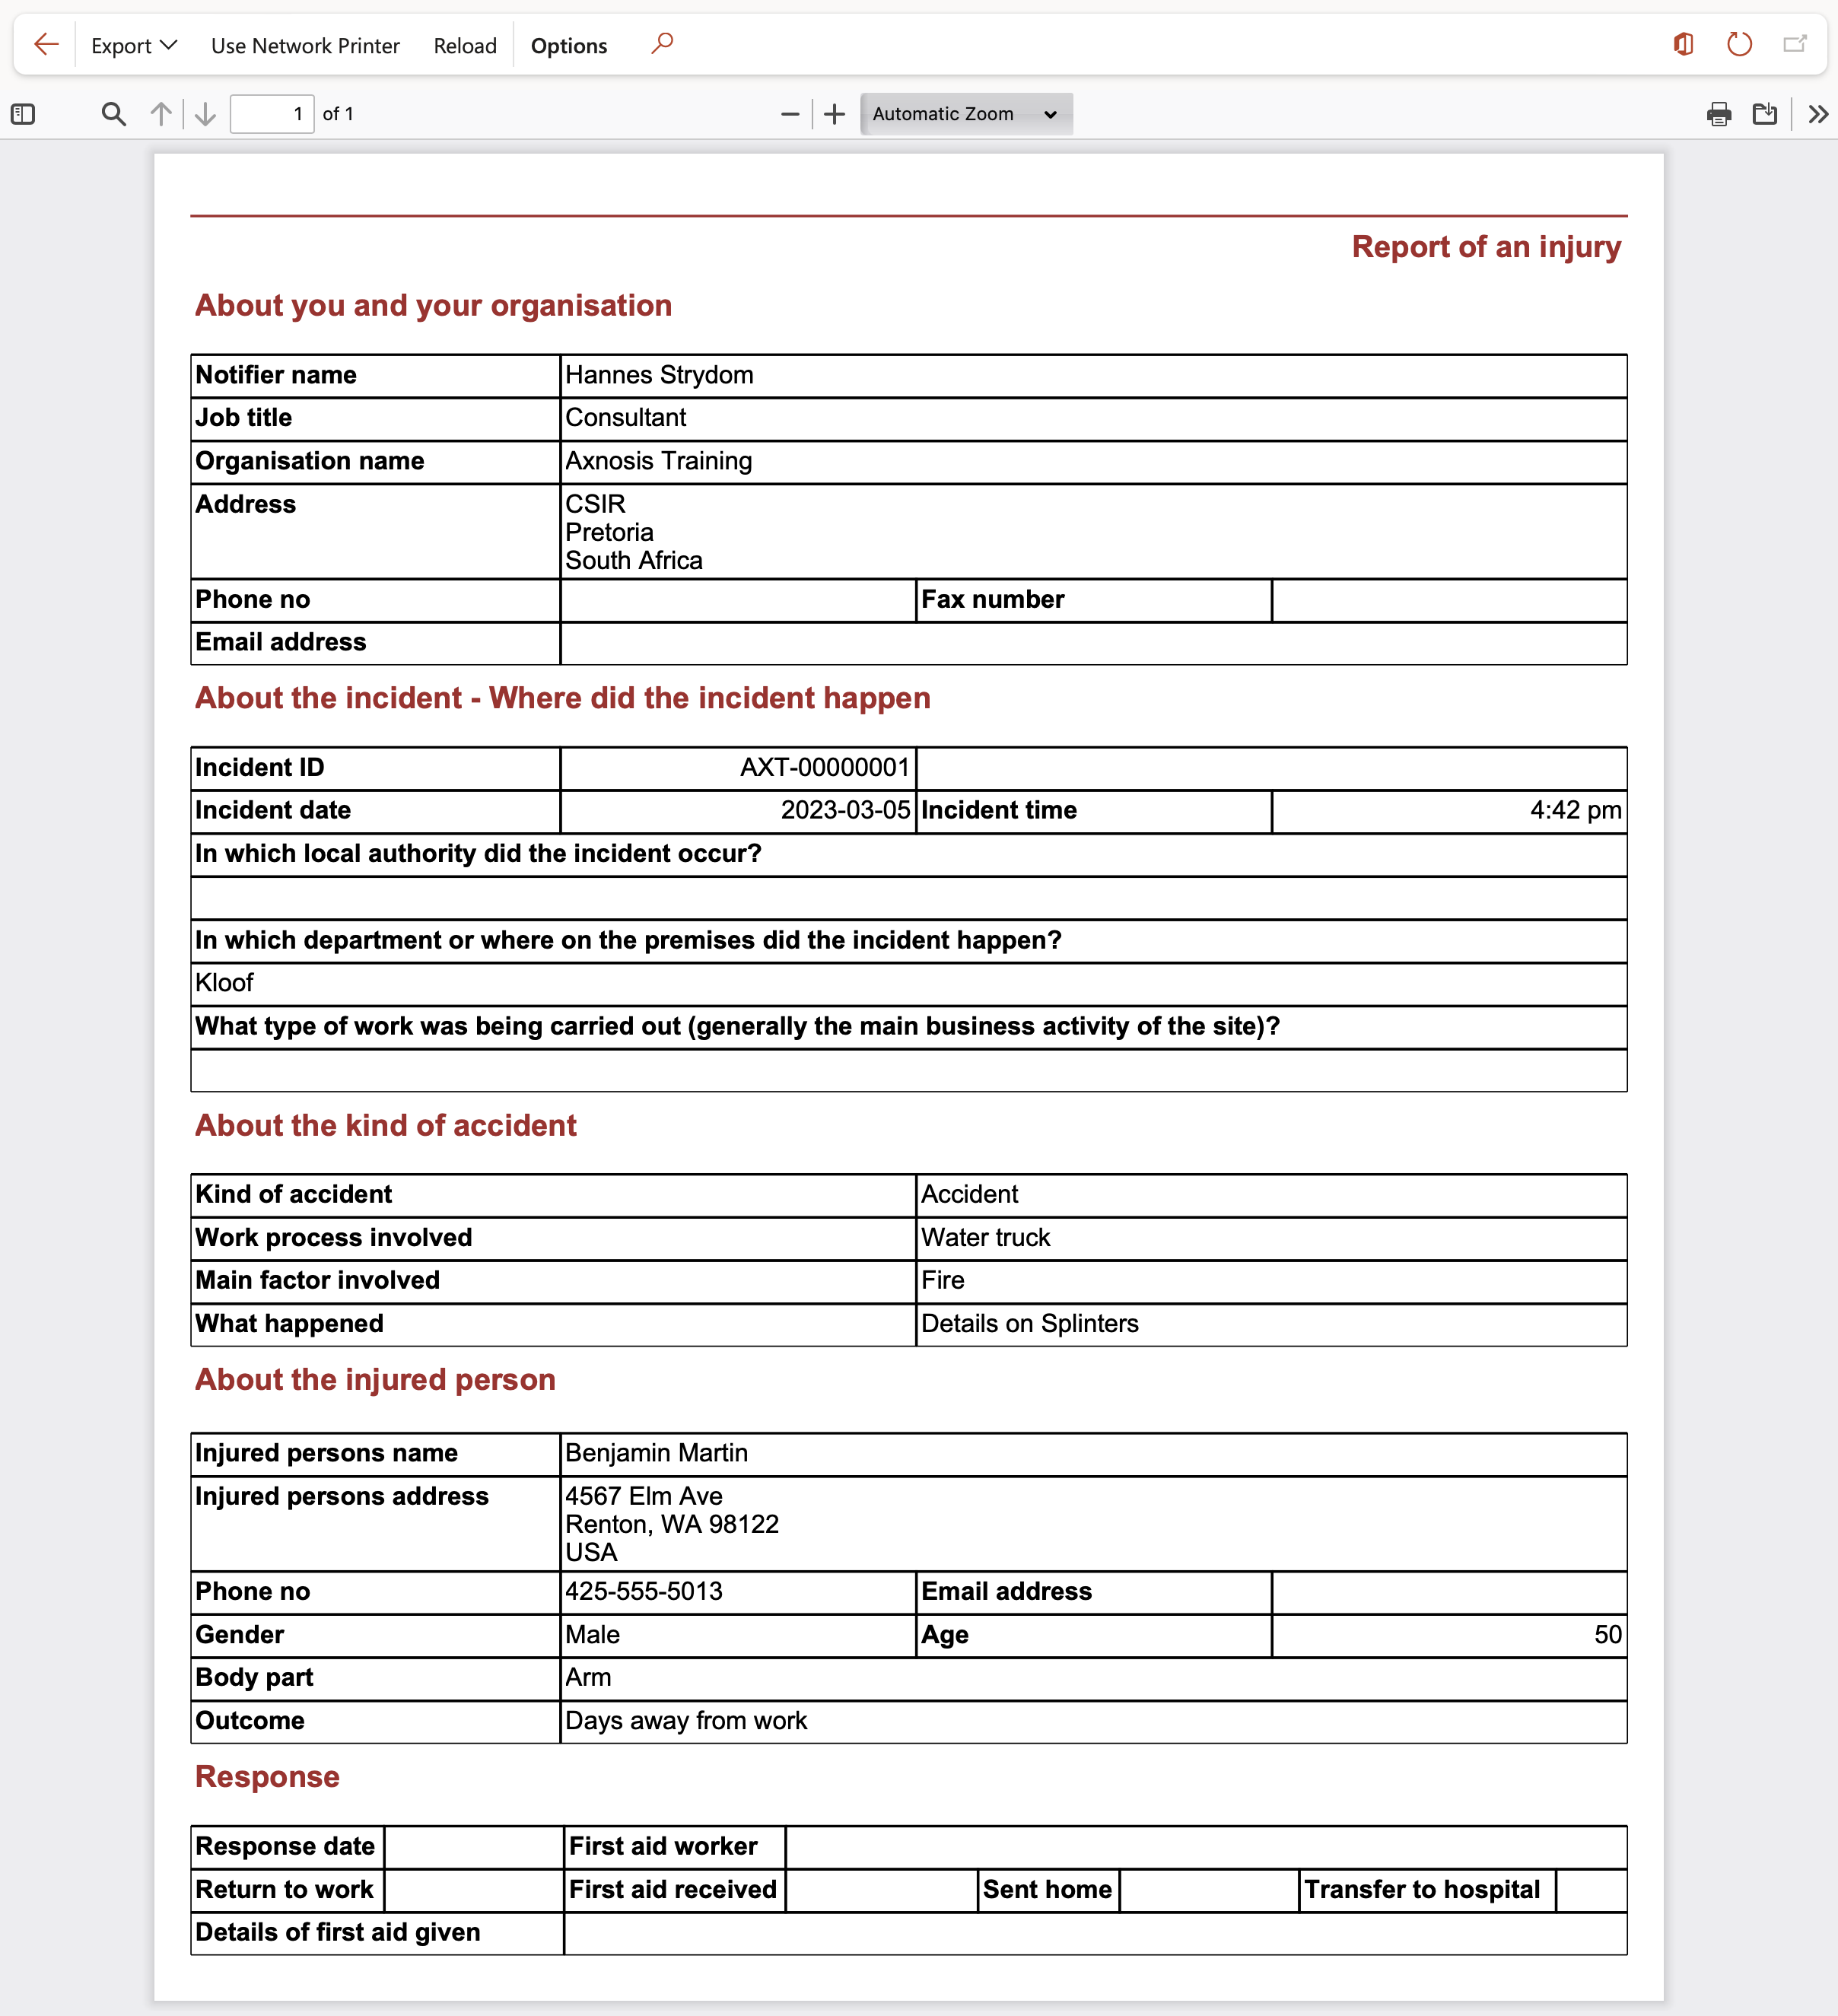
This report is a complete summary of the selected injury/incident
Go to: HSE > Incidents > Reports and inquiries > Report of an injury
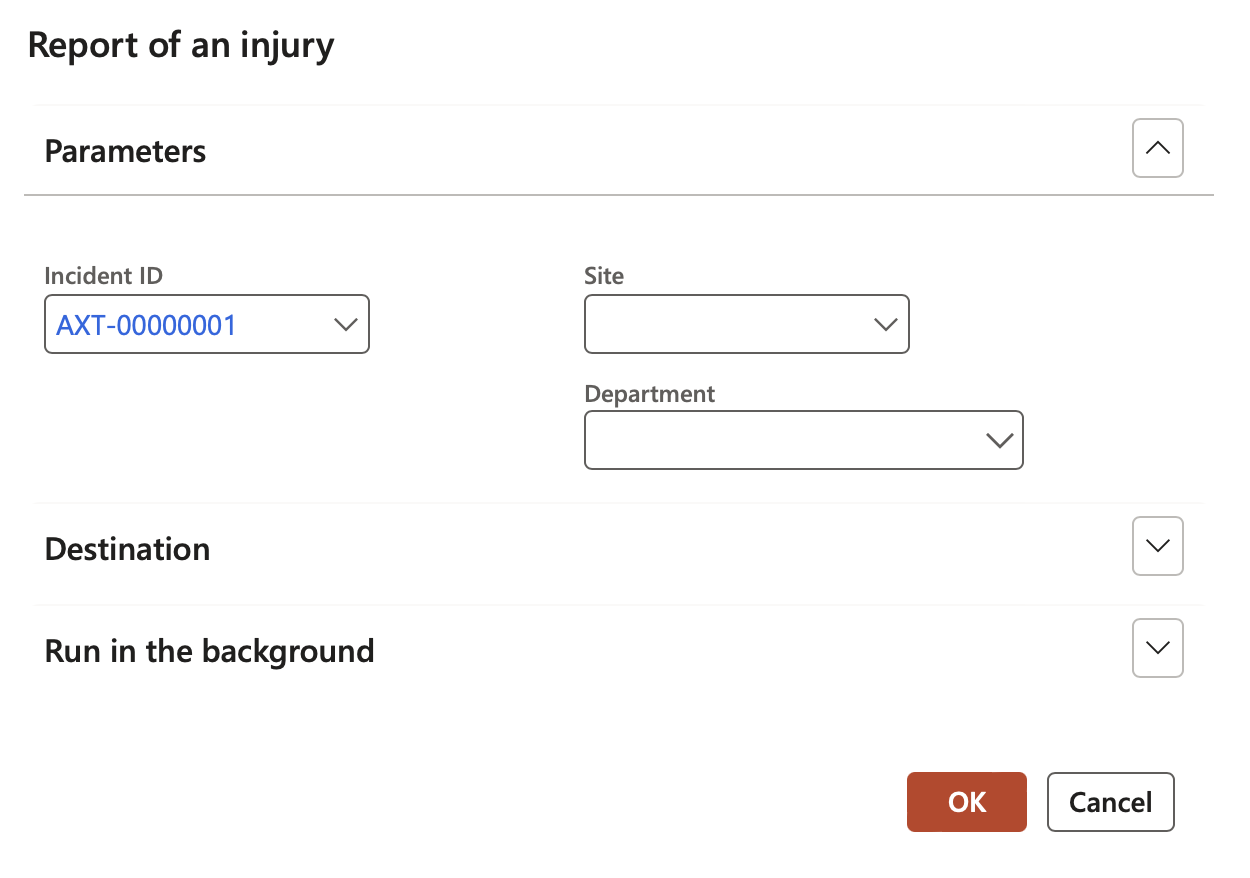
- On the Report of an injury parameters form:
- Select the Incident ID of the injury that you want to see the report of, from the dropdown list
- Select the relevant Site from the dropdown list
- Select the relevant Department from the dropdown list
- Click OK
¶ Step 37: Global incident report
When an Occupational Health and Safety incident or near miss has occurred, it is important that it is reported and managed properly in order to remedy the damage and prevent recurrence.
Go to: HSE > Incidents > Reports and inquiries > Global incident report
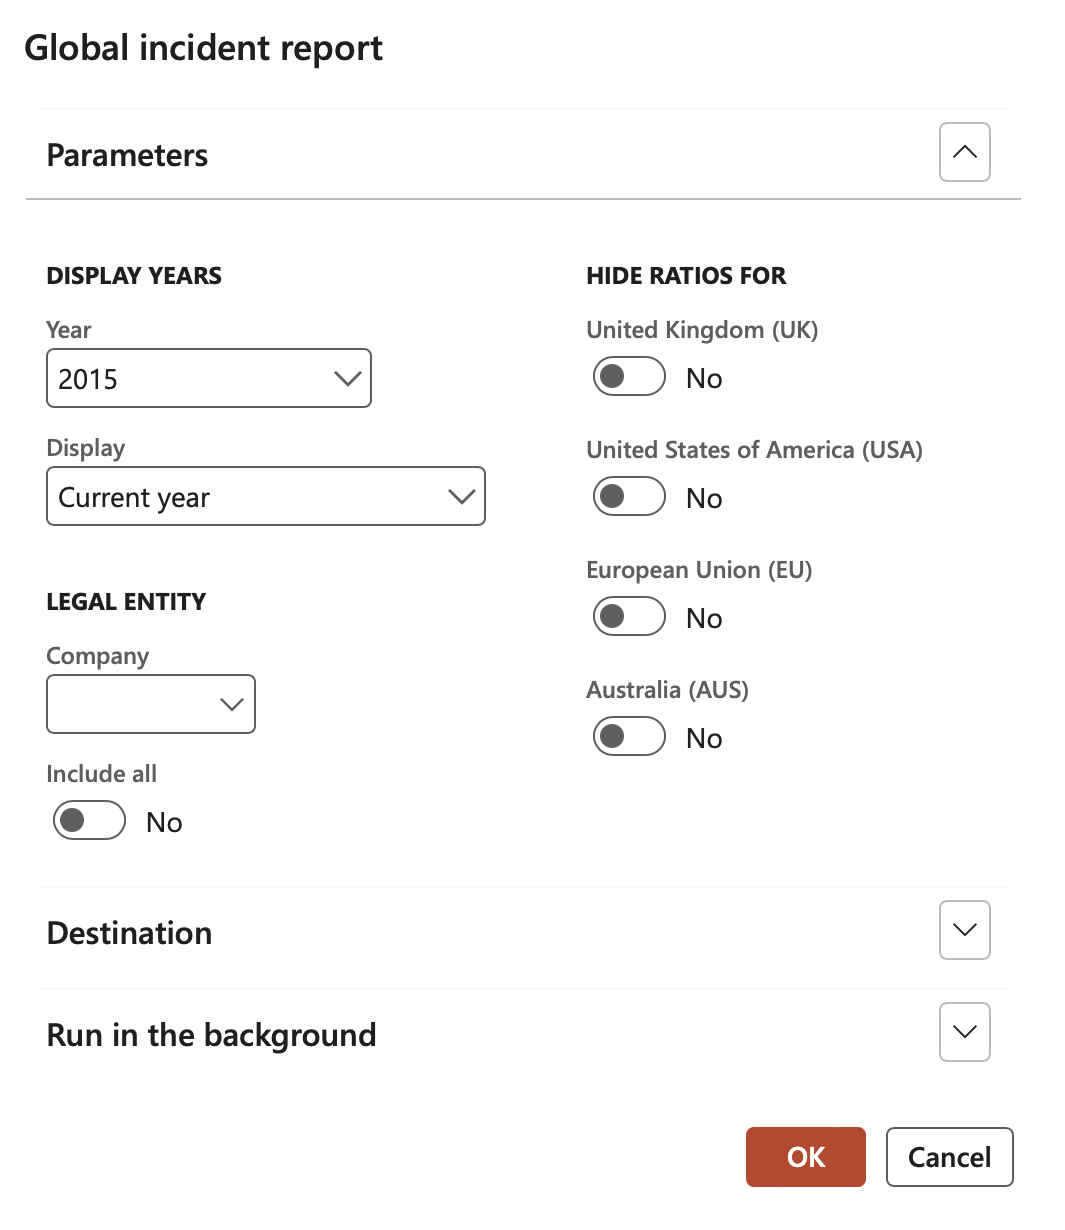
- On the Global incident report parameters form:
- Select the applicable Year from the dropdown list
- In the Display field, elect the range of years to display
- Select the relevant Company from the dropdown list
- If you want all the Companies’ details printed in this report, select Yes under the Include all field
- The user can choose to display/not display rates for specific companies under the Hide rates for field group
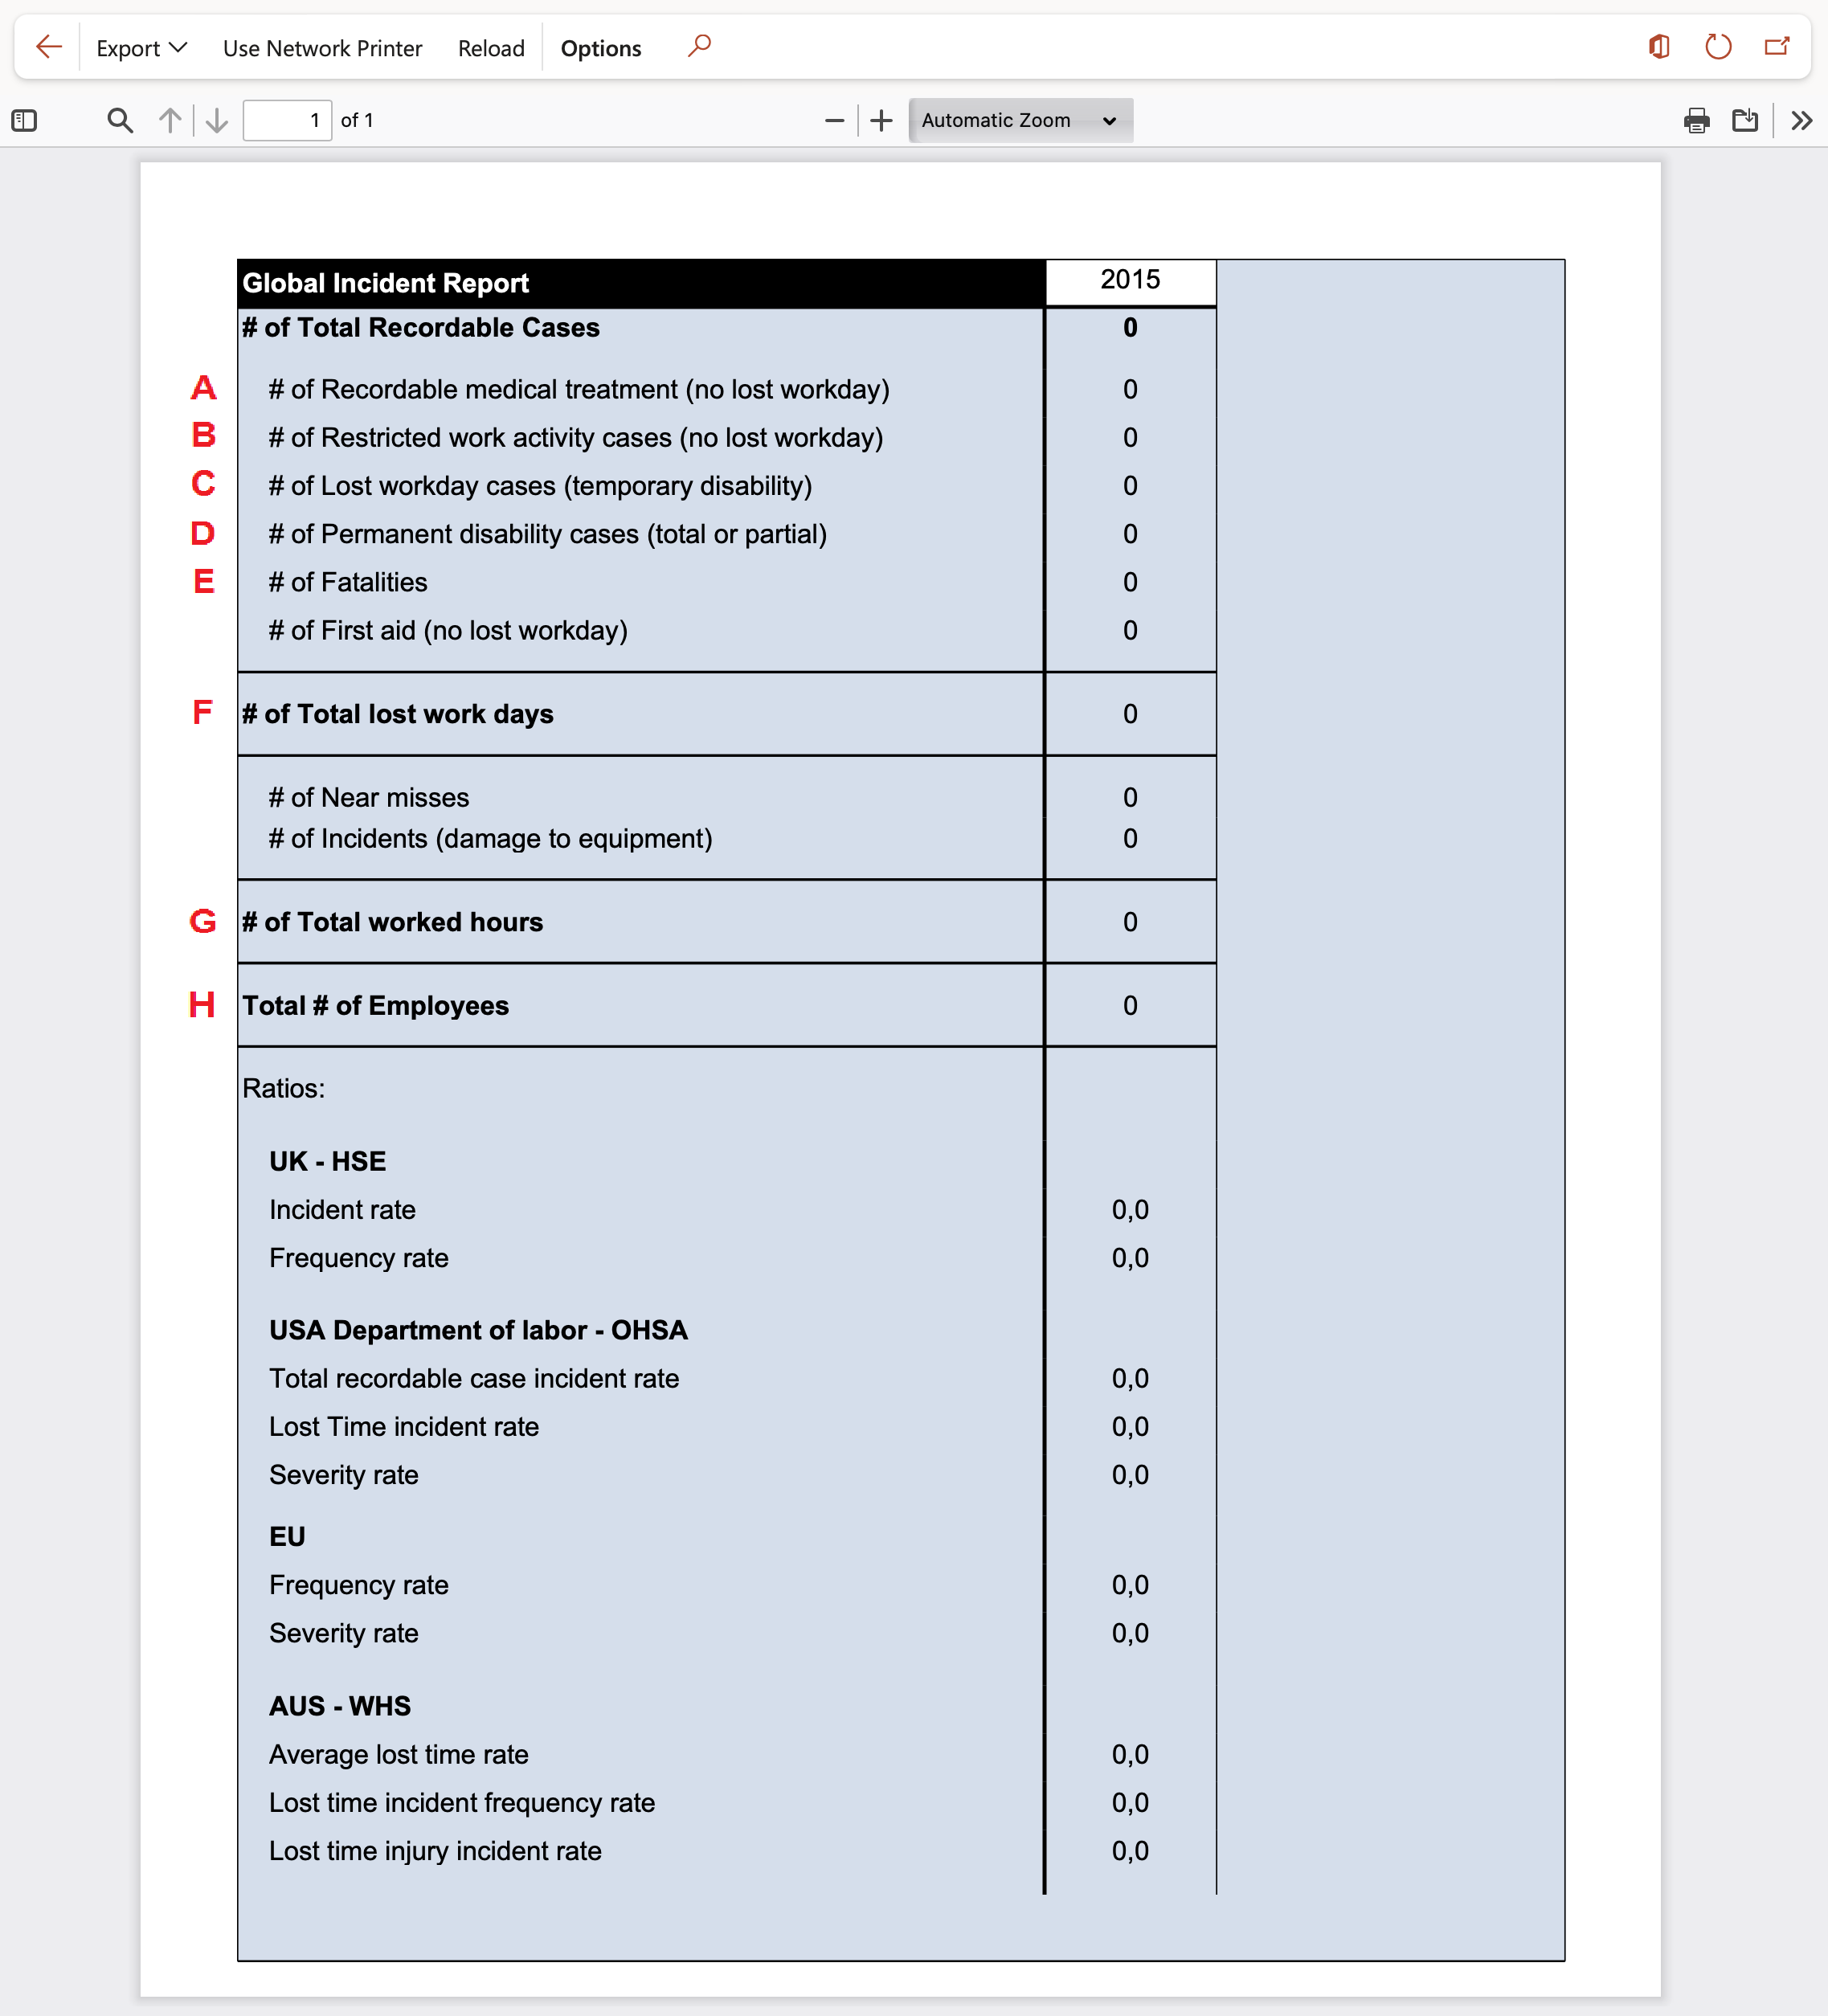
UK – HSE
- Incident rate = (A+B+C+D+E) x 100,000 / (H)
- Frequency rate = (A+B+C+D+E) x 1,000,000 / (G)
USA Department of labour - OHSA
- Total recordable case incident rate = (A+B+C+D+E) x 200,000 / (G)
- Lost time incident rate = (C+D+E) x 200,000 / (G)
- Severity rate = (F) x 200,000 / (G)
EU
- Frequency rate = (C+D+E) x 1,000,000 / (G)
- Severity rate = (F) x 1,000 / (G)
AUS - WHS
- Average lost time rate = (F) / (C) + (D) + (E)
- Lost time incident frequency rate = (C+D+E) x 1,000,000 / (G)
- Lost time injury incident rate = (C+D+E) x 100 / (H)
Statutory
Additional tailor-made reports for external reporting exist and are being expanded.
These reports can be exposed and added to the core Dynamics 365 HSE installation.

¶ Step 38: Three-year injury stats
Go to: HSE > Incidents > Reports and inquiries > Three year injury stats
- On the Annual injury stats report parameters form:
- Select the Injury or illness type from the dropdown list
- OR
- Select Yes to view All injury types
- Select the relevant Year from the dropdown list
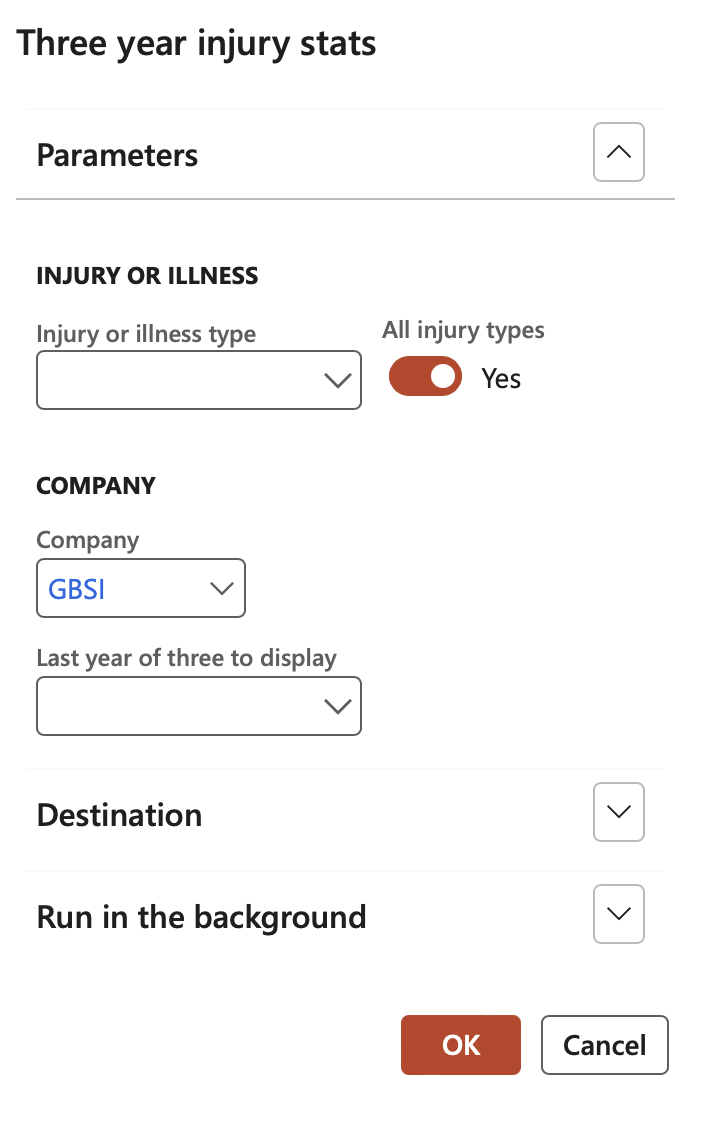
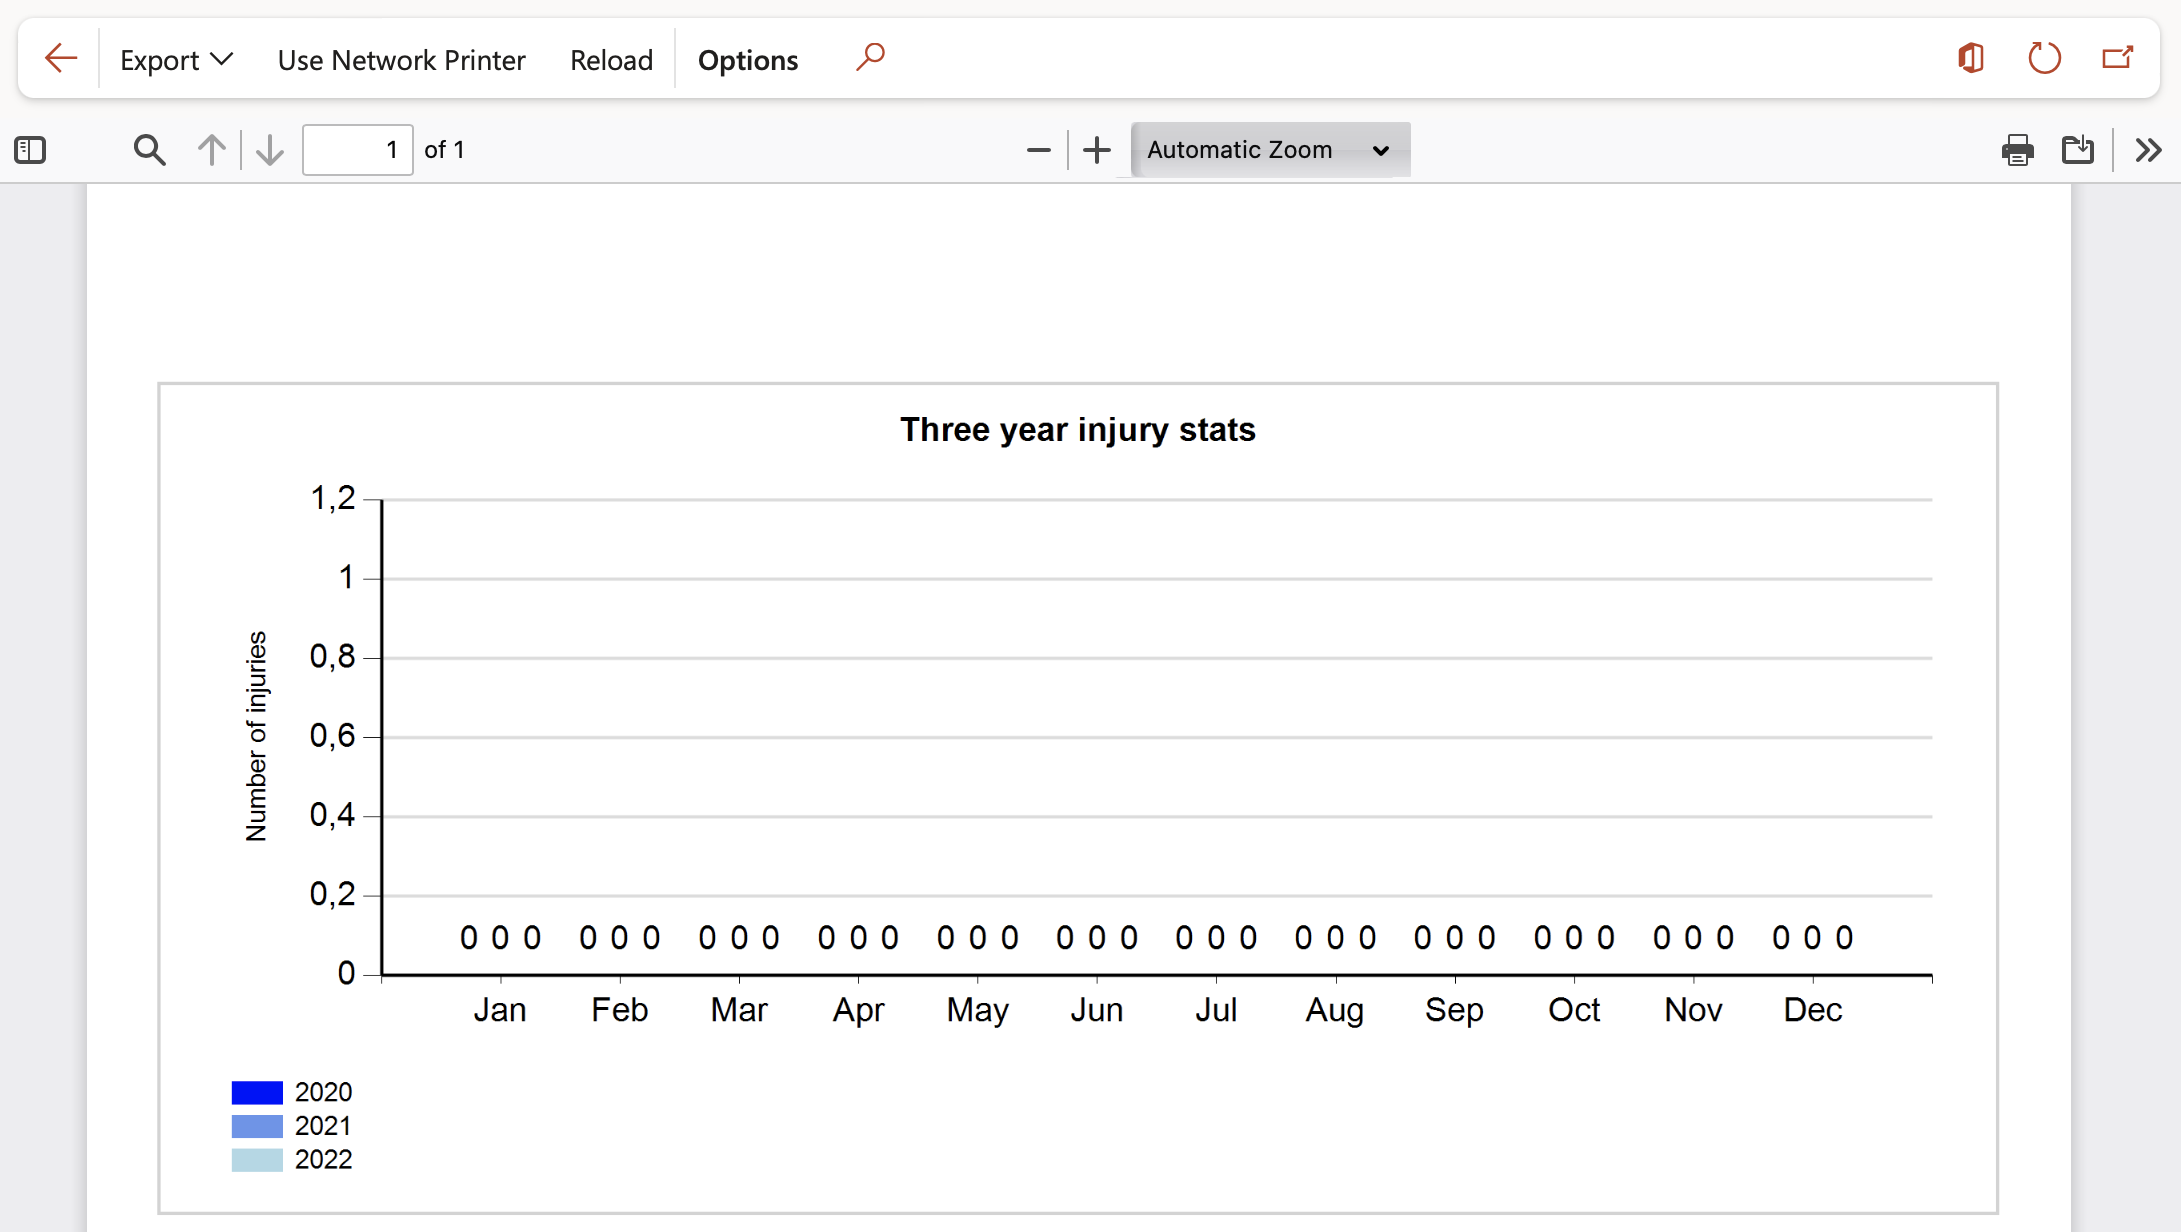
The Three year injury stats graph displays stats for three years. The Year selected on the Parameters dialog will be the last year of tree displayed on the graph.
¶ Step 39: Incidents by country and severity report
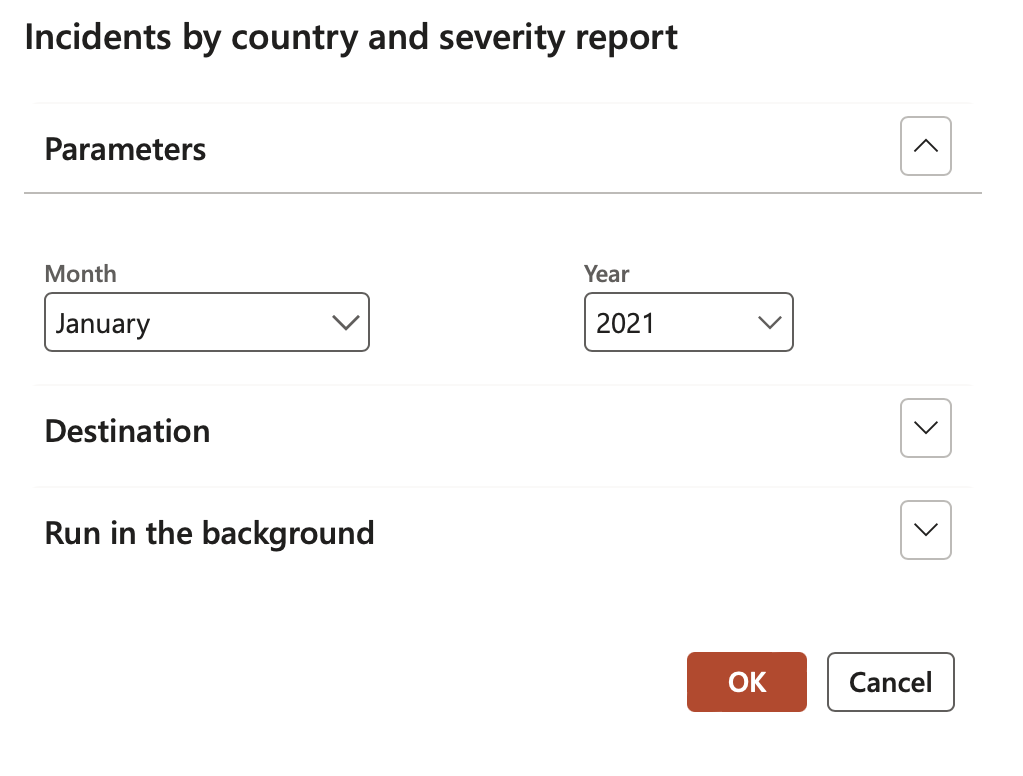
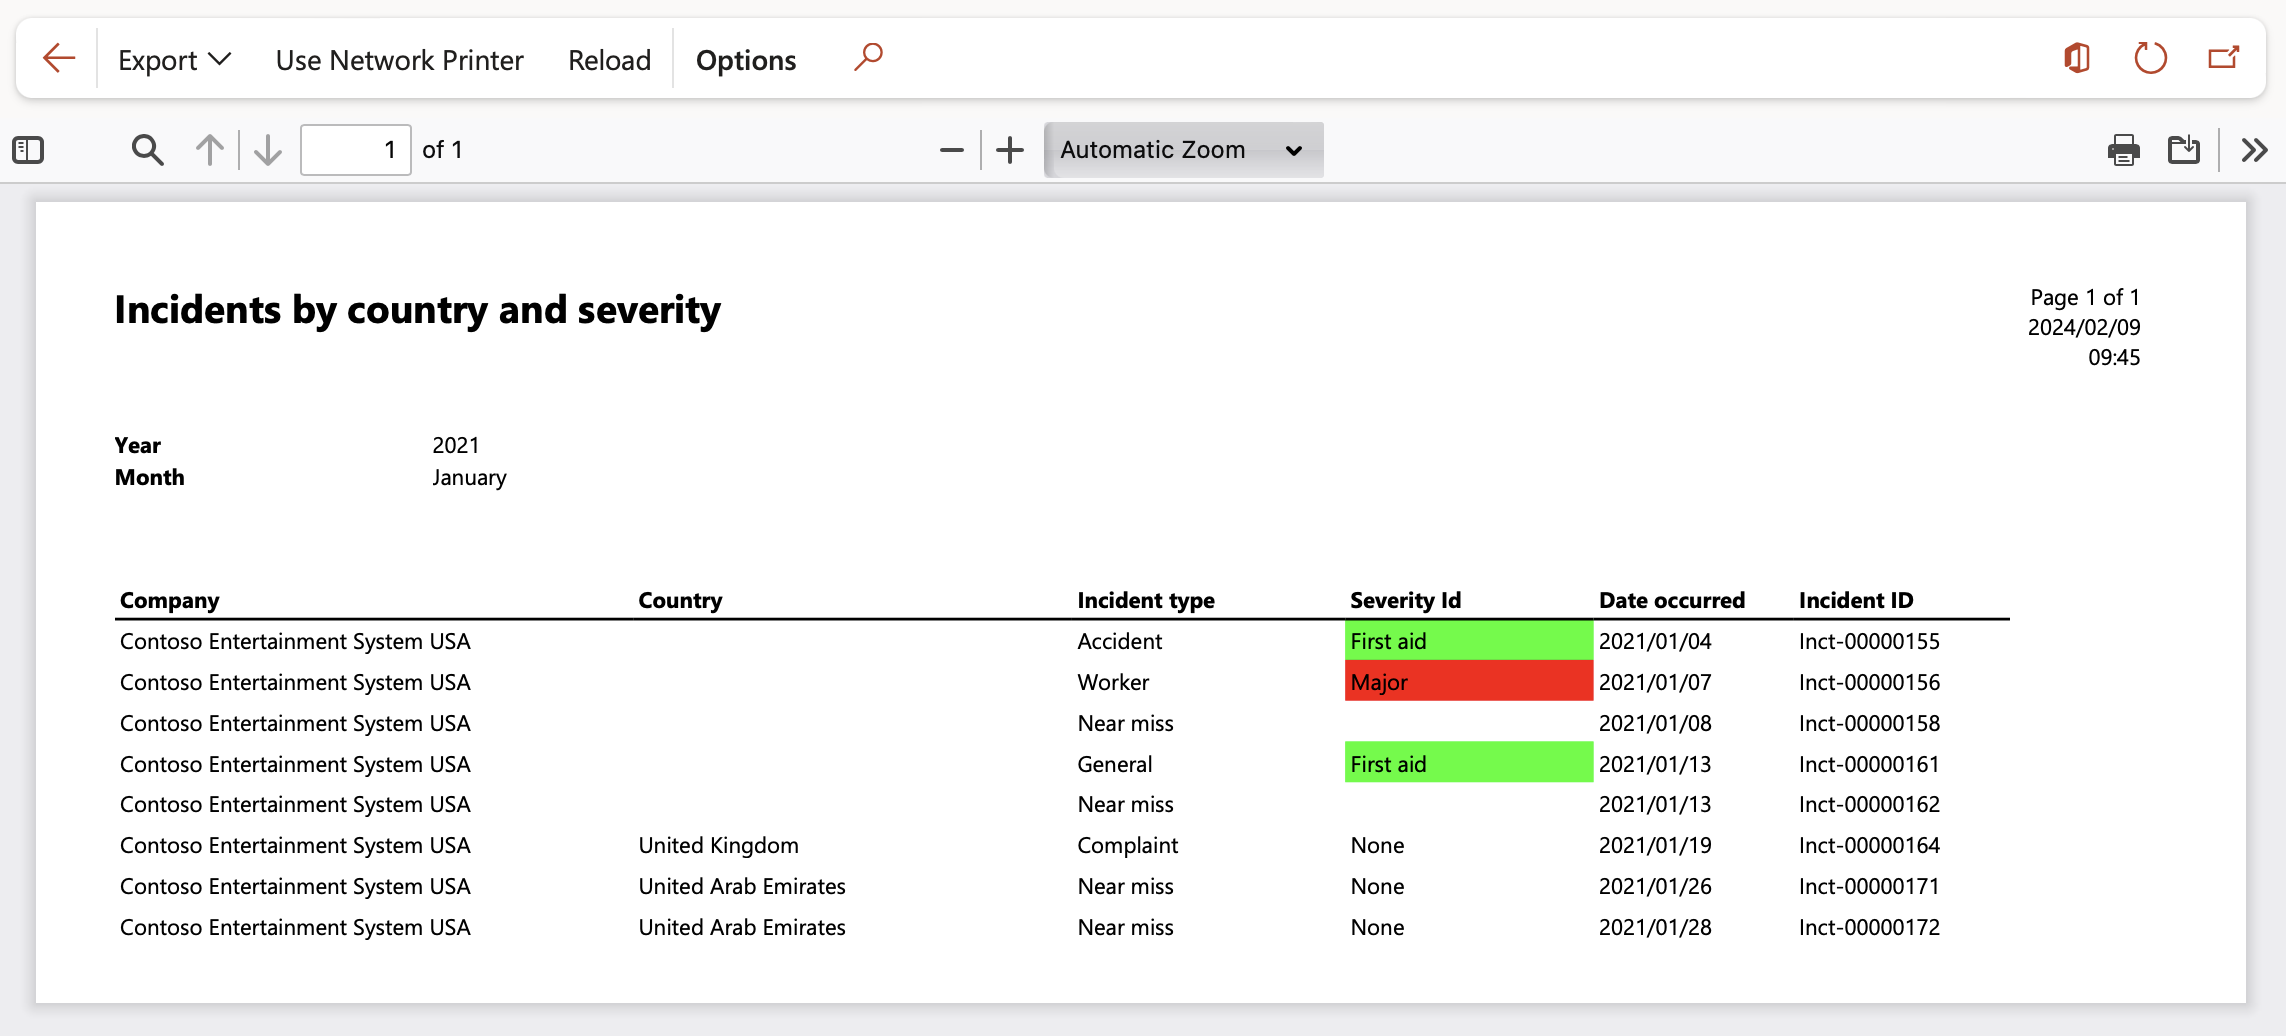
Go to: HSE > Incidents > Reports and inquiries > Incidents by country and severity report
- On the Incidents by country and severity report dialog:
- Select the Year and Month from the dropdown list
- Click OK
¶ Step 40: Incident graphs
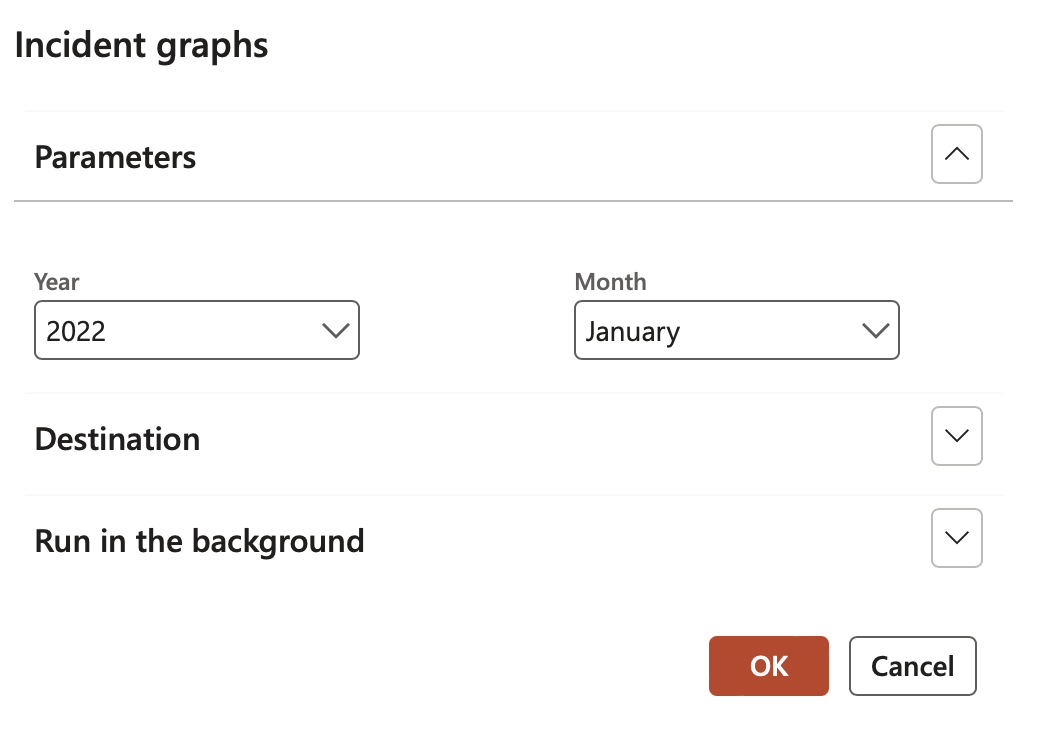
Go to: HSE > Incidents > Reports and inquiries > Incident graphs
- On the Incident graphs report parameters form:
- Select the Year and Month from the dropdown list
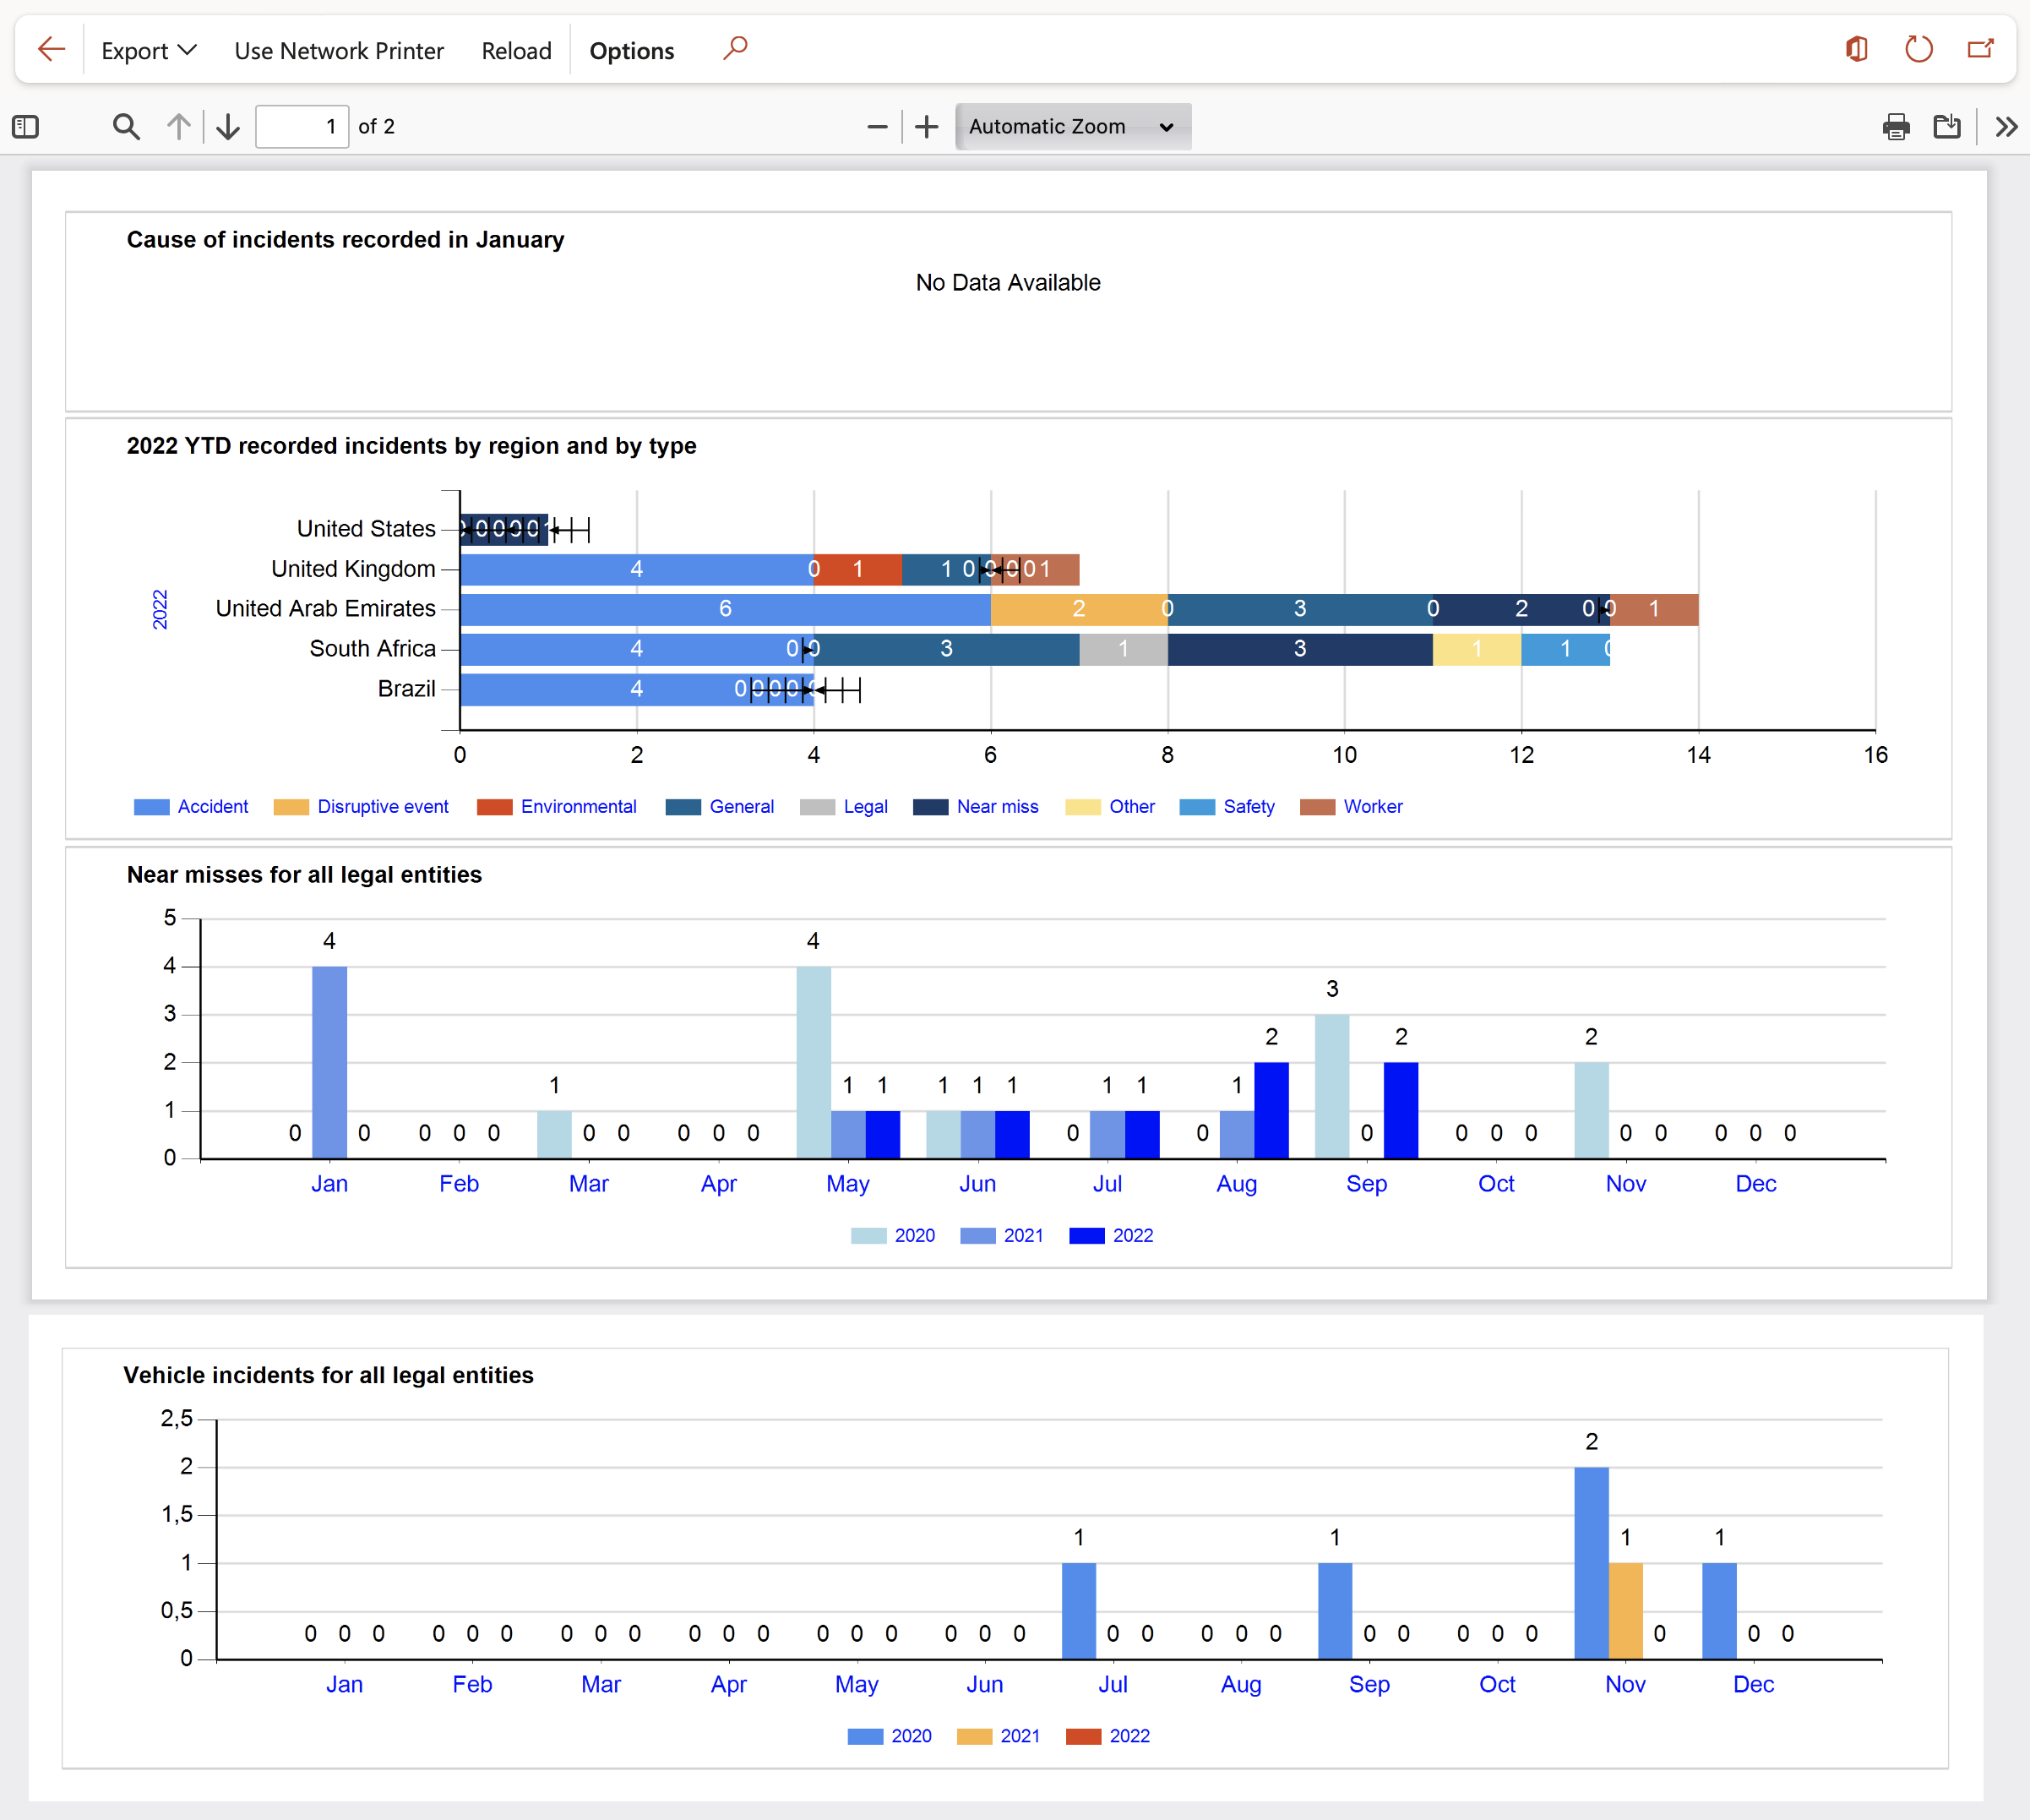
The Near misses graph as well as the Vehicle incidents global graph, displays stats for three years. The Year selected on the Parameters dialog will be the last year of tree displayed on the graphs.
¶ Reference table
Definitions
| Incident: | An unplanned event resulting in, or having potential for injury, ill health, damage, or other loss. Incidents may involve actual or potential injury/illness, property/environment damage, motor vehicle accidents or near-misses. |
| Hazard: | Any source or situation with a potential for harm in terms of injury/illness, damage to property/plant/equipment, or damage to the environment. |
| Near misses: | Near Misses may be incidents that involve very minor losses or no loss as such, and when there is no injury/illness involved. Near-misses, however, highlight workplace hazards and the need to initiate corrective action, e.g.: tripping without falling. |
| Staff: | Staff refers to any persons employed by the Institute, whether employment is ongoing, fixed term, part-time or casual/sessional. |
| Supervisor: | An Institute Staff member with supervisory responsibilities, either of students or other staff. Staff supervisors will include Commercial Managers, Support Managers, and Executive Officers. Student Supervisors will include teaching staff, as well as the listed staff supervisors. |
| Risk: | A risk is the likelihood that exposure to a hazard will result in injury or disease. |
| Risk assessment: |
The process of analyzing all of the risks associated with hazards and evaluating them to determine steps for risk control and priorities. Risk Assessment considers two (2) main factors:
|
| Risk score: | The risk score is the number allocated following risk assessment, which describes the level of risk, ranging from H (very high risk) to L (very low risk). The risk score is also used to identify the priority and timeframe of response to the identified hazard. |
| Notifiable incident: |
Notification is required to the Victorian Work cover Authority where an incident at a workplace or equipment site results in:
|
| Notifiable dangerous occurrence: |
A Dangerous occurrence is an incident at a workplace which may seriously endanger the health and safety of people in the immediate vicinity:
|