¶ Introduction
Behaviour Based Observation (BBO) is a process that informs management and employees of the overall safety of the workplace through safety observations. BBO is intended to focus workers' attention on their own and their peers' daily safety behaviour. The goal of a BBO program is to improve the employee safety of the organization.
The Basics of an Observation
When implementing a BBO program, observers (employees trained to conduct on-site safety reviews) conduct reviews of other employees with an eye on their behaviour. These observers record safe and unsafe behaviour, in addition to noting safe and unsafe workplace conditions. The observer then shares the findings with the worker and provides feedback. Positive feedback is encouraged. Discussing the ways in which employees can perform their tasks in a safer manner helps workers and observers to become more aware of their behaviour. BBO programs are based on a continuous feedback loop where employees and observers provide input on improving safety to each other and safety professionals utilize the data collected in conducting the observations to continually improve the BBO program.
The Behavior Based Safety Checklist
Organizations who implement a BBO program determine the appropriate list of behaviours to observe, based on the unique behaviours and risks of their organization. Safety professionals usually develop a checklist format that is easy and quick for observers to complete in the field and lists the target behaviours.
For example, for organizations that operate a vehicle fleet, you might develop a behaviour-based safety checklist focused on common driver behaviours, such as use of seat belts or signals. Checklists often include the basics of the observation (time, date, location, behaviours observed, and observer) and the number of safe and unsafe observations of the reviewer. The checklist also includes fields for any feedback and comments provided to the employee.
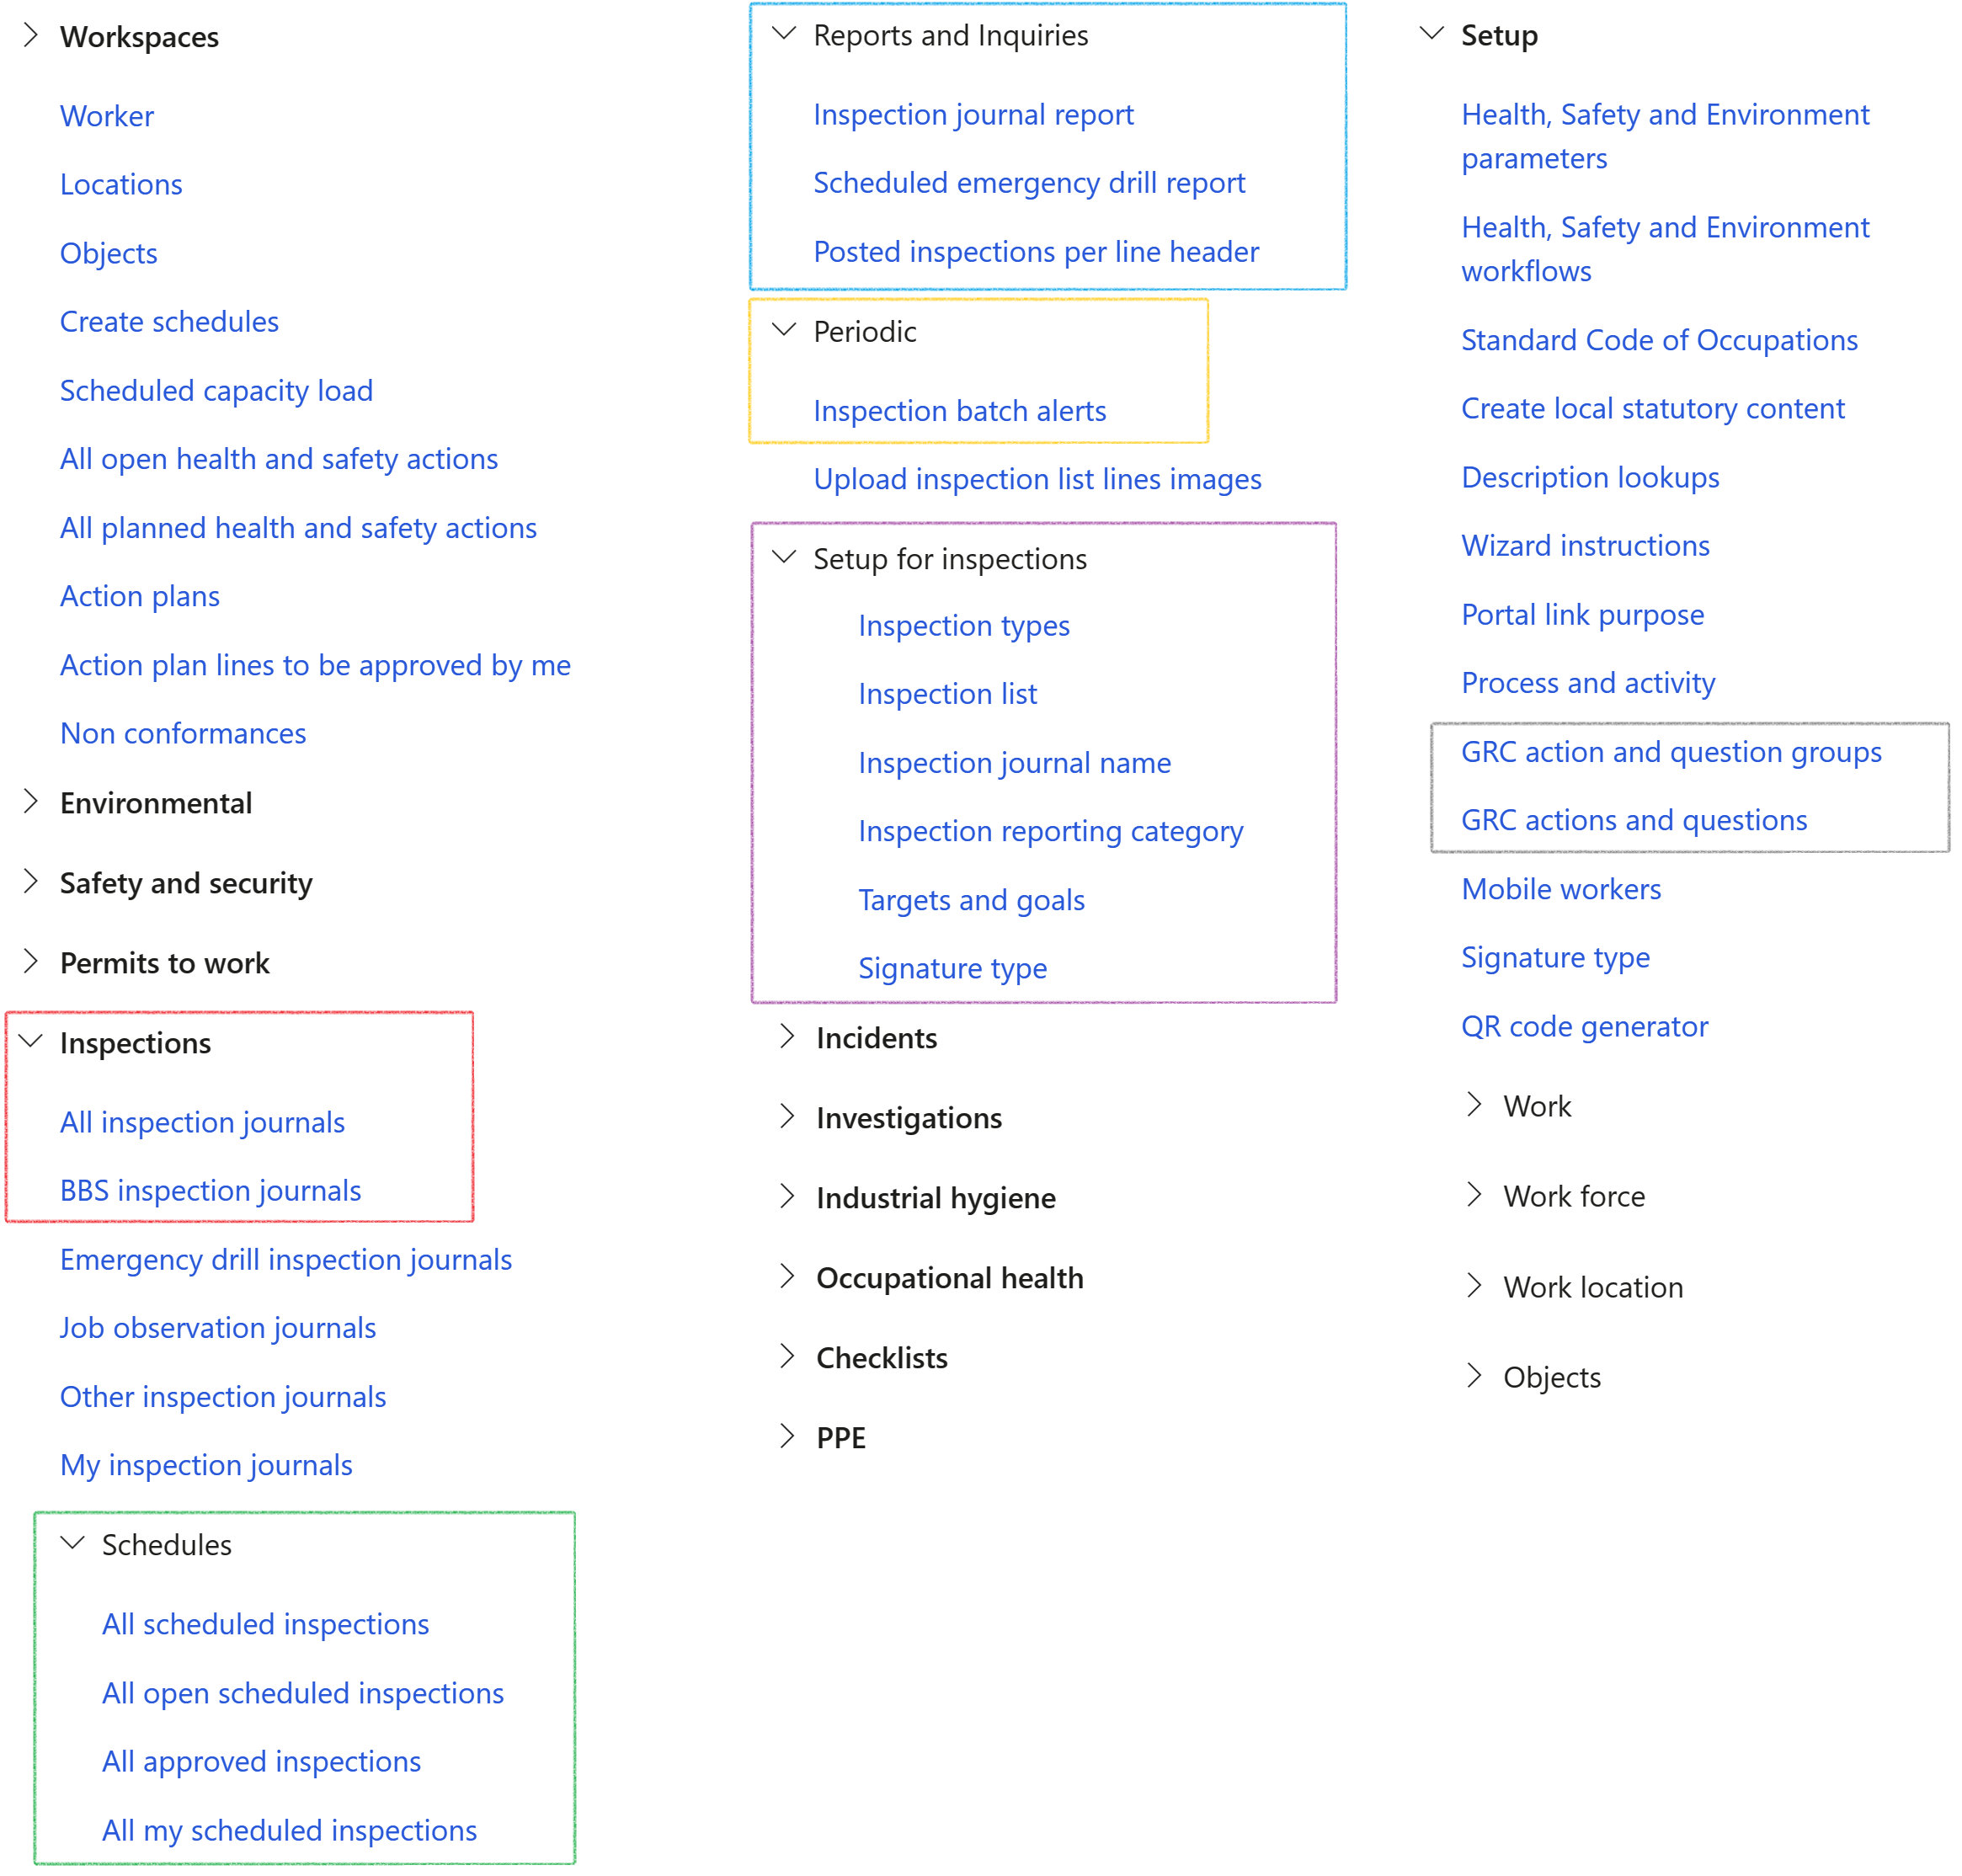
¶ Navigation
¶ Specific setups
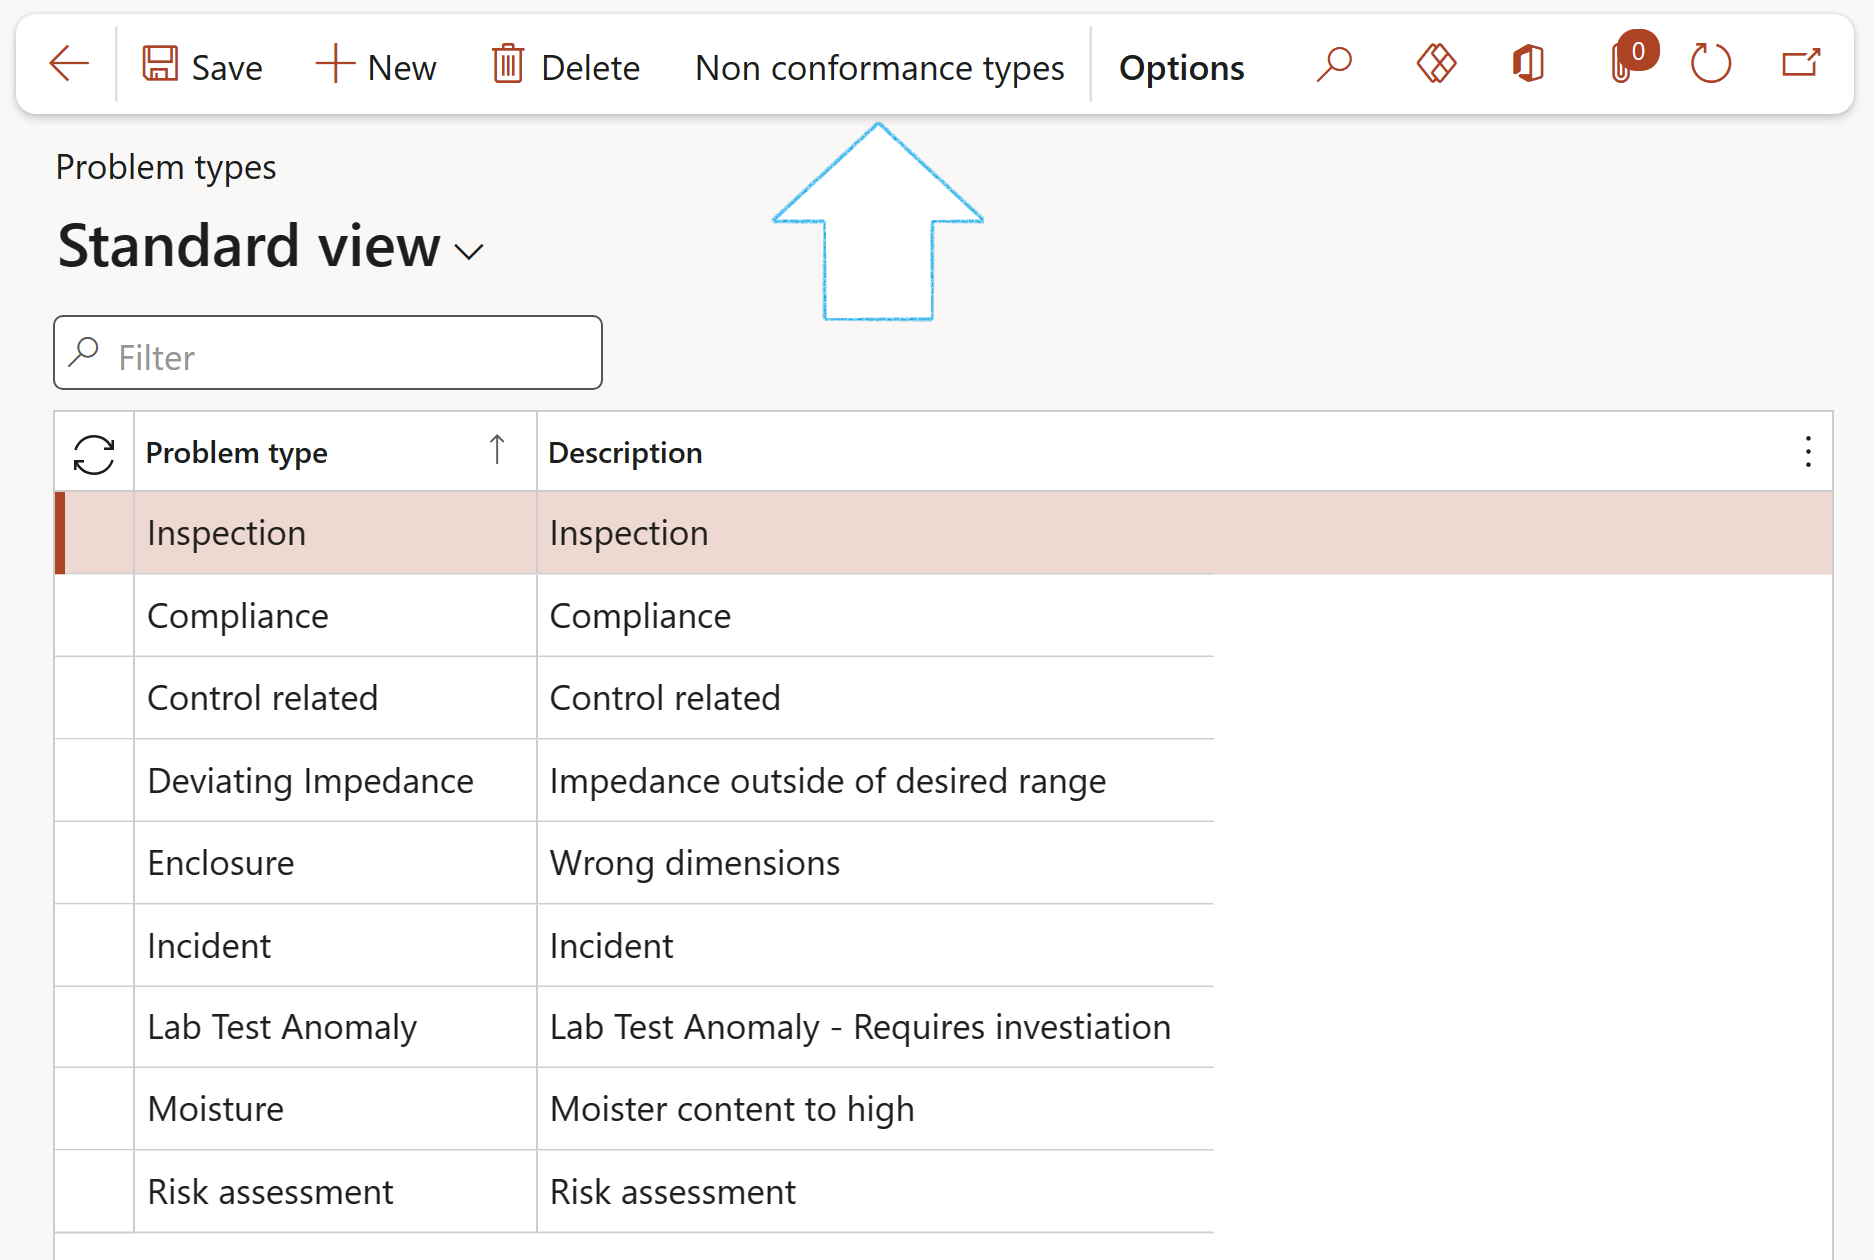
¶ Step 1: Create Problem types
Go to: GRC > Internal audit > Setup for internal audit > Problem types
- In the Action pane, click on the New button
- Enter a name for the new Problem type
- Type a brief Description of the problem type
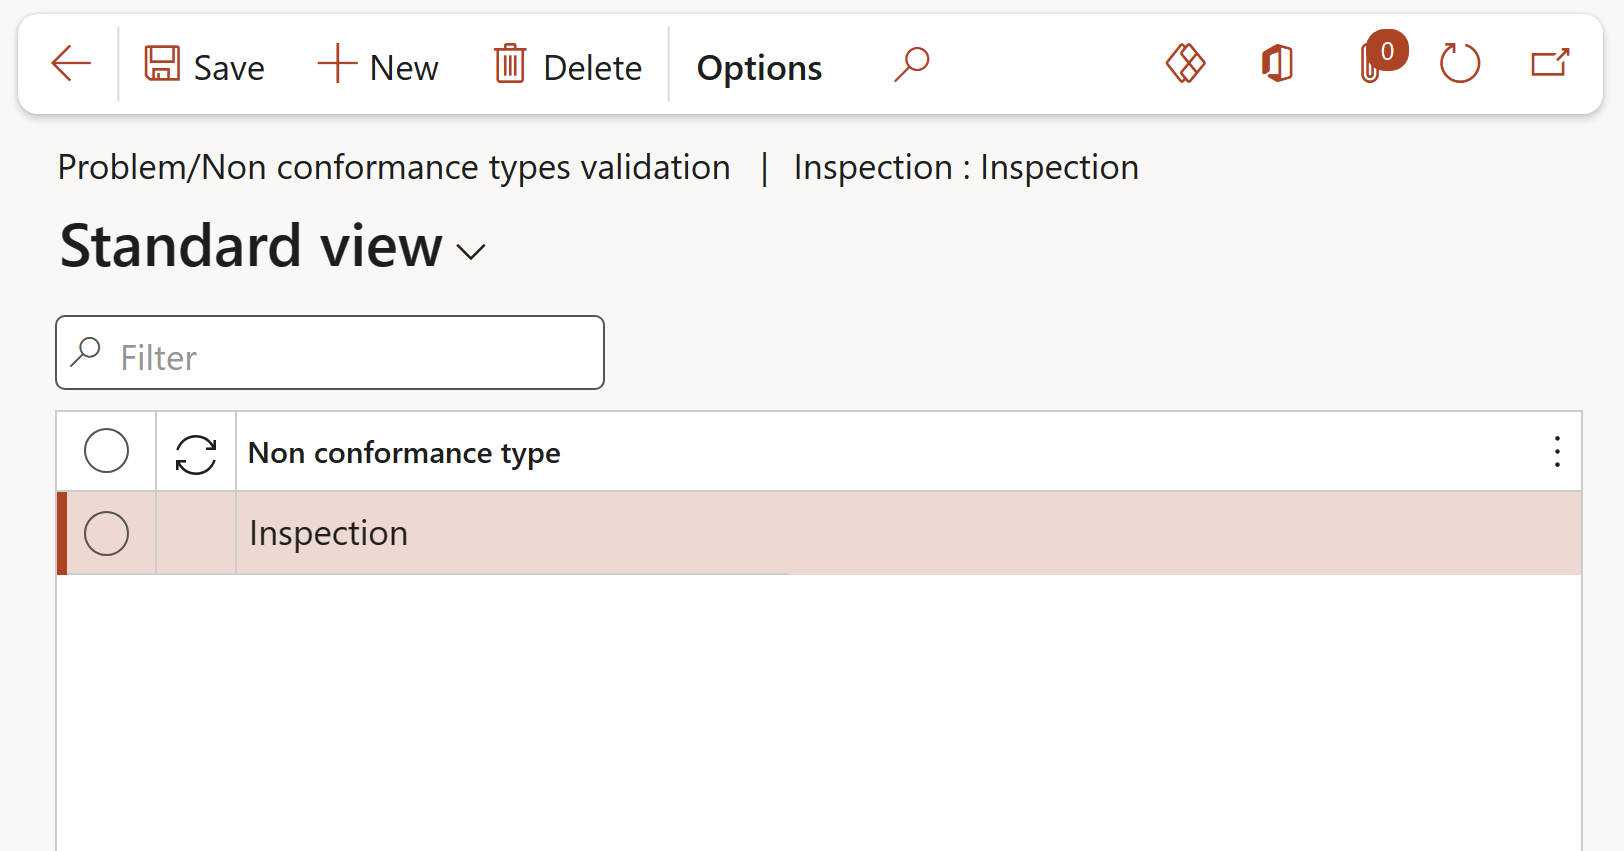
¶ Step 2: Create Non conformance types
Go to: GRC > Internal audit > Setup for internal audit > Problem types
- Select the Problem type that you want to create the non conformance for
- In the Action pane, click on the Non conformance types button
- On the Action pane, click on the New button
- Select the relevant Non conformance type from the dropdown list
¶ Step 3: Setup Parameters
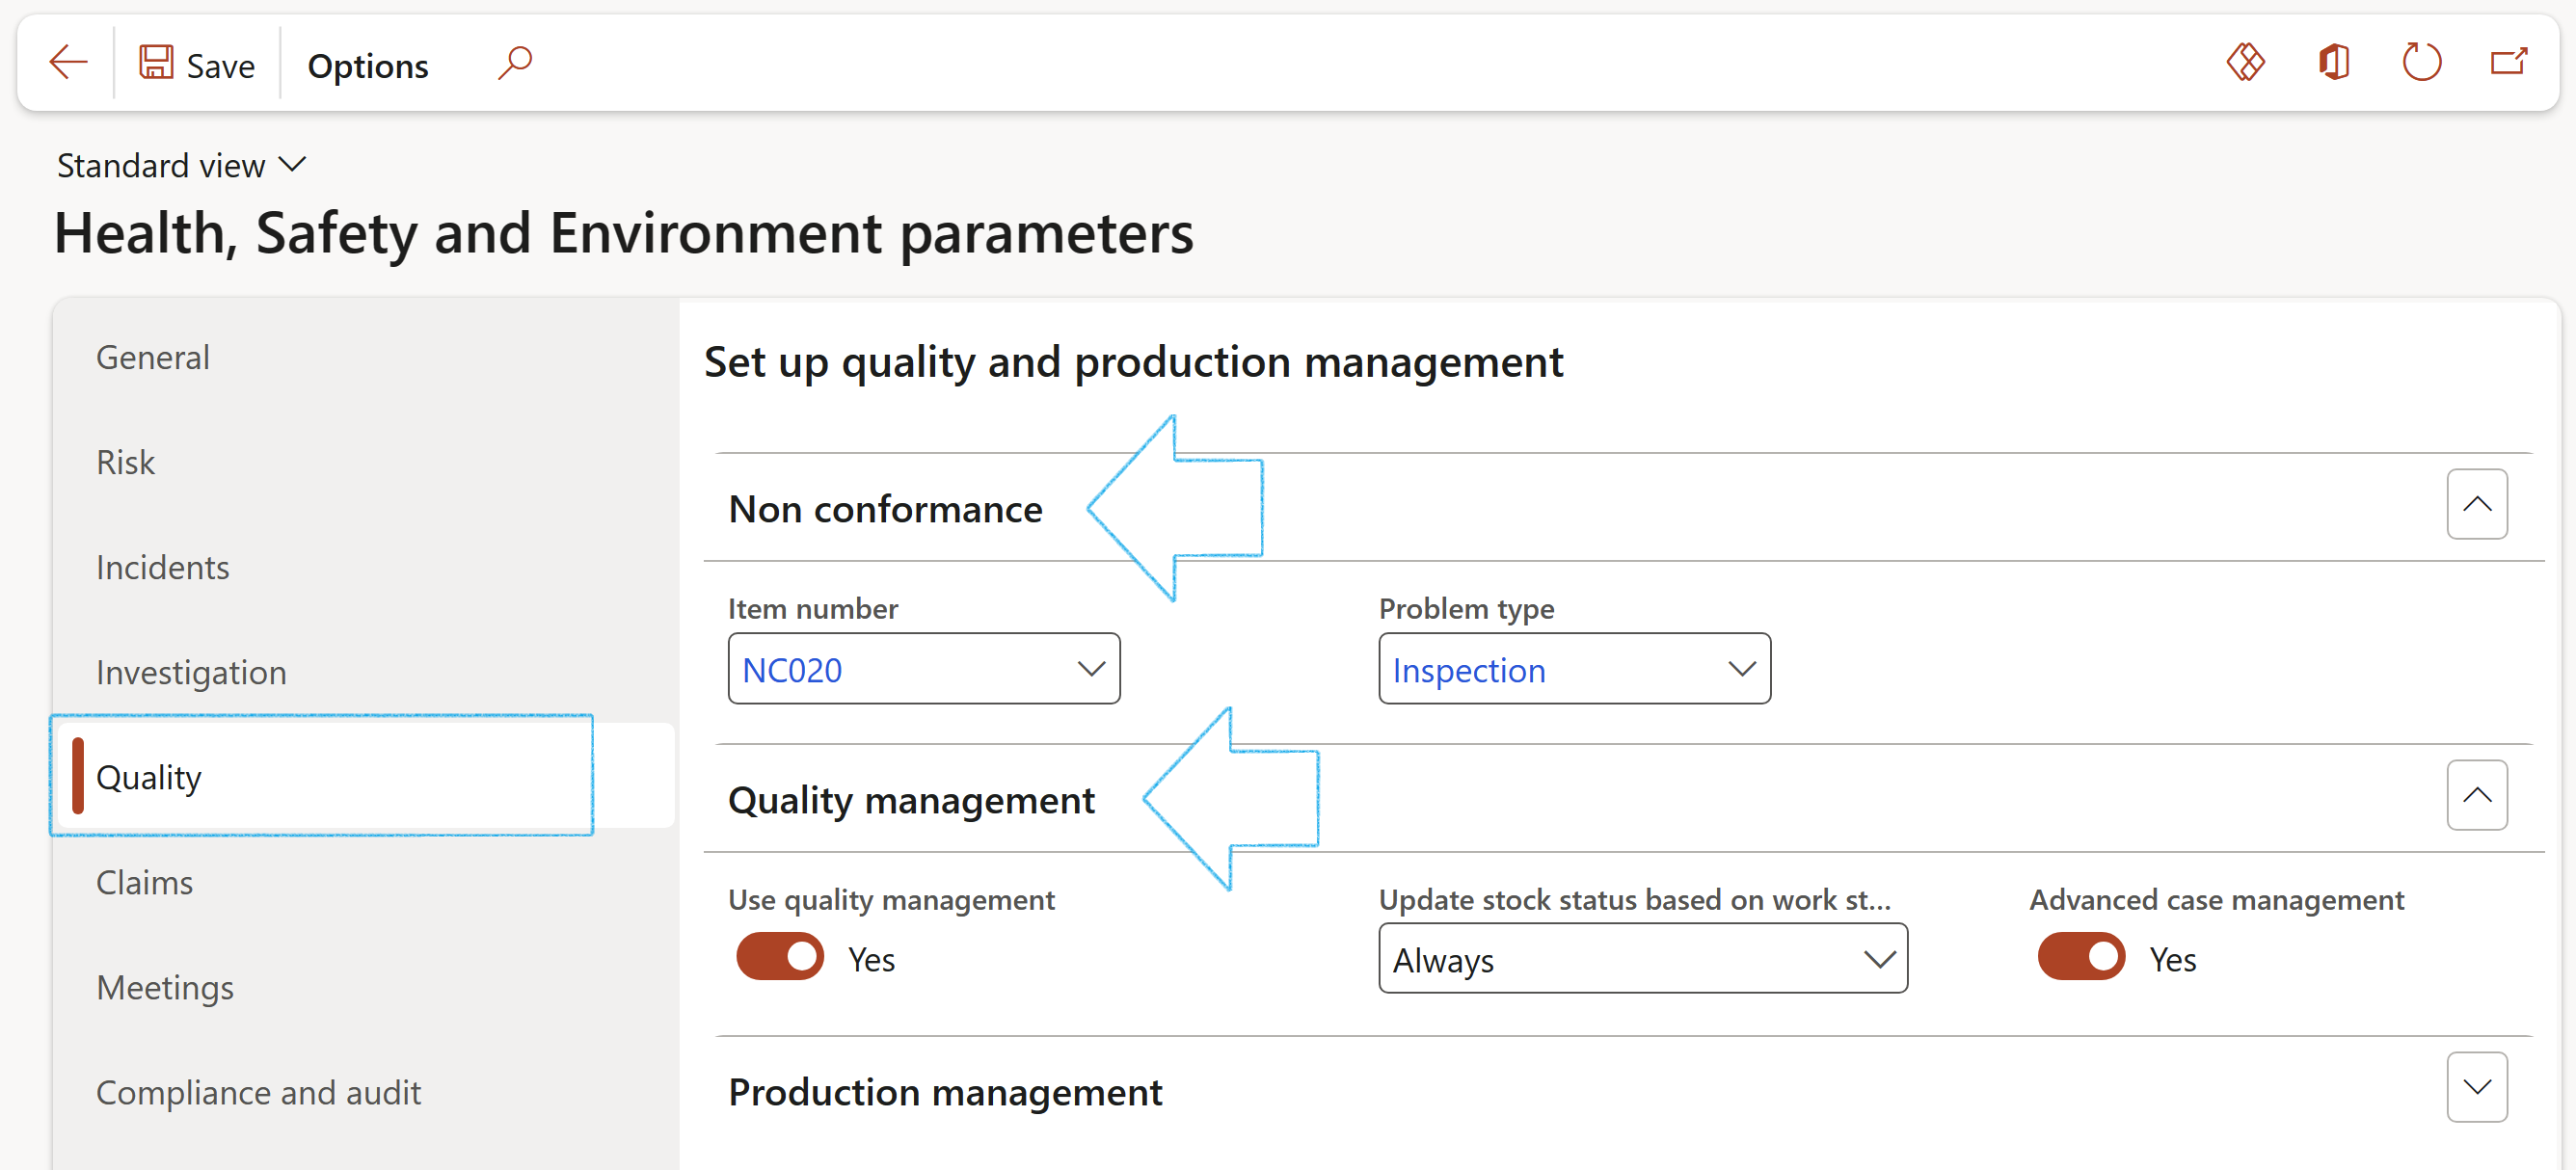
Go to: HSE > Setup > Health, Safety and Environment parameters
- Open the Quality tab
- Under the Non conformance Fast tab:
- Select the Item number for Non conformance from the dropdown list
- Select the Problem type (Compliance) from the dropdown list
- Under the Quality management Fast tab:
- Under Use quality management, select Yes
- Under Advanced case management, select Yes
¶ Step 4: Inspection reporting category
This form is used to setup inspection reporting categories. These categories will be selected when setting up the inspection lists.
When an inspection has been done and the journal posted, the items that need attention are then categorized into these categories.
Go to: HSE > Inspections > Setup for inspections > Inspection reporting category
- On the Action pane, click on the New button
- Enter the following information:
- Category – Enter a unique Inspection category ID
- Description – Enter a brief description of the category
- Type – Select the relevant Inspection category Type from the dropdown list
- Responsible - Select the employee from the drop down list that is responsible for this category
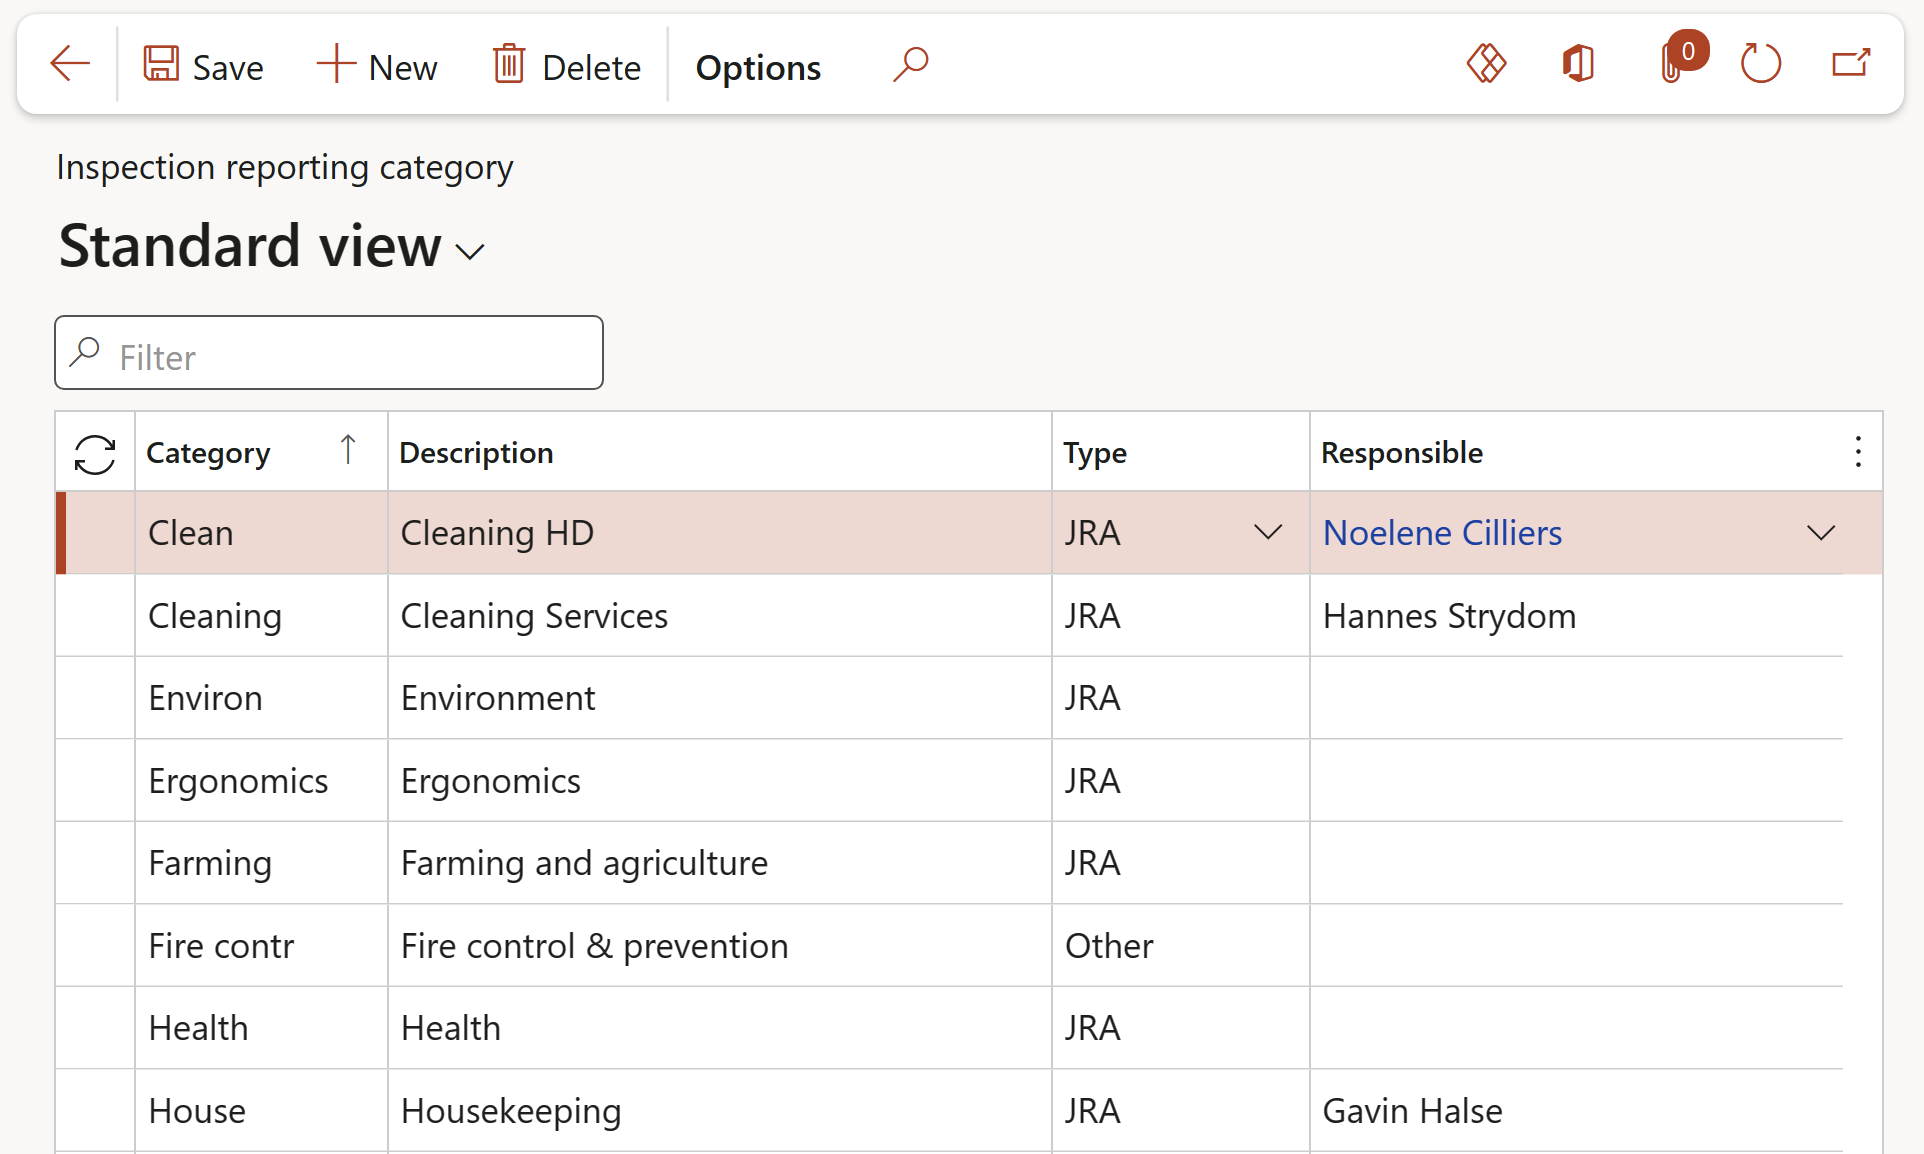
- Where a category with type POWRA/JRA is selected on the Inspection list lines, the user will be forced to select a hazard for the line
- This employee’s name will be associated with items that need action
¶ Step 5: Inspection list
An observation list is the list of points that will be printed on the inspection sheet.
The inspector will use this observation list to flag the object/location of behaviour as safe or unsafe.
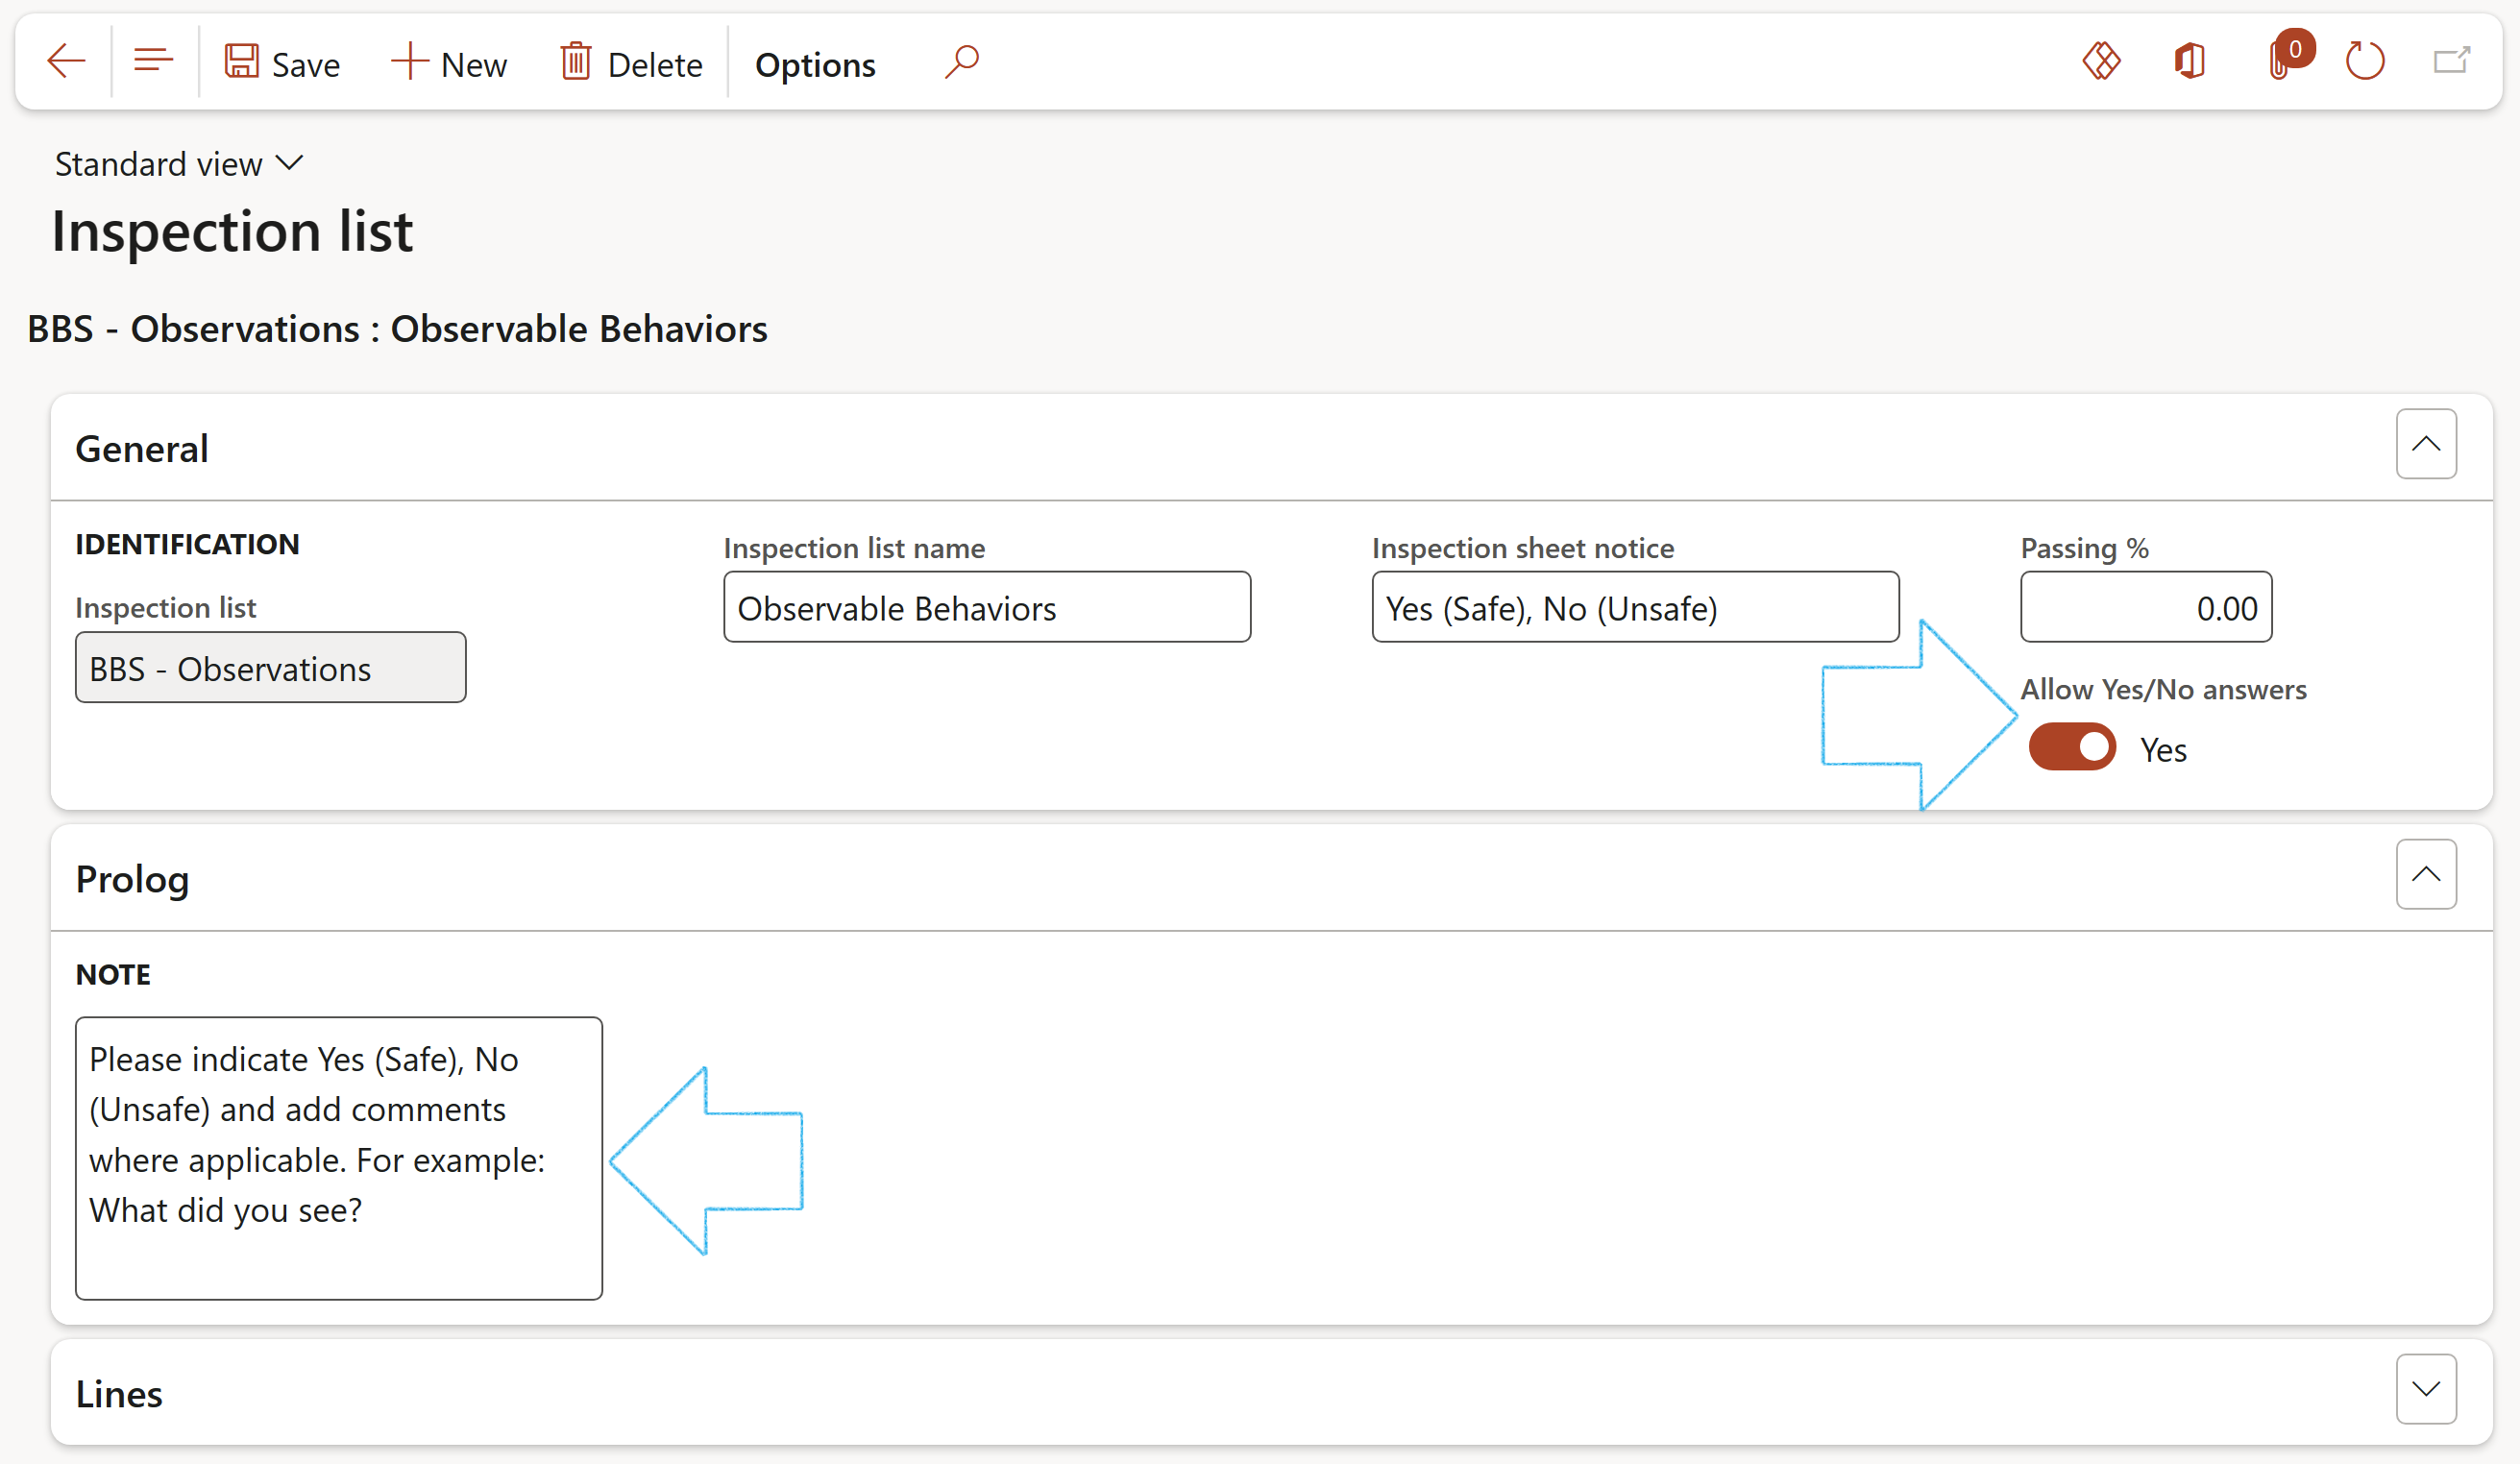
Go to: HSE > Inspections > Setup for inspections > Inspection list
- Under the General Fast tab, fill in the following:
- Inspection list name - Short description or name for this inspection list.
- Inspection sheet notice - A notice to be printed on the top of the inspection sheet.
- Tick boxes – By selecting Yes, the scores column will be replaced by tick boxes (The user can choose to use simple Yes/No answers, or a more advanced answer with scores and weightings)
- Under the Prolog Fast tab, in the Note field:
- Create and maintain a prolog to be printed on the front page of the inspection list.
¶ Step 5.1: Inspection list lines
The following buttons are used under the Lines Fast tab of the Inspection list form:
- In the Button strip: the UP button is used to move the selected line up in the list. The Down button is used to move the selected line down in the list
- The Line number field is used to order the inspection lines. This number is automatically assigned and can be hidden if necessary
- In the Inspection line type field, a line can be marked as a header or a line. A header is a topic that group lines together
- Category: This category is used when setting up an inspection list to assign different lines on the inspection list to different categories
When an inspection has been done and the journal posted, the points that need attention (below the report threshold) are then categorized into these categories for attention
- Hazard: Select the hazard that is relevant to the line
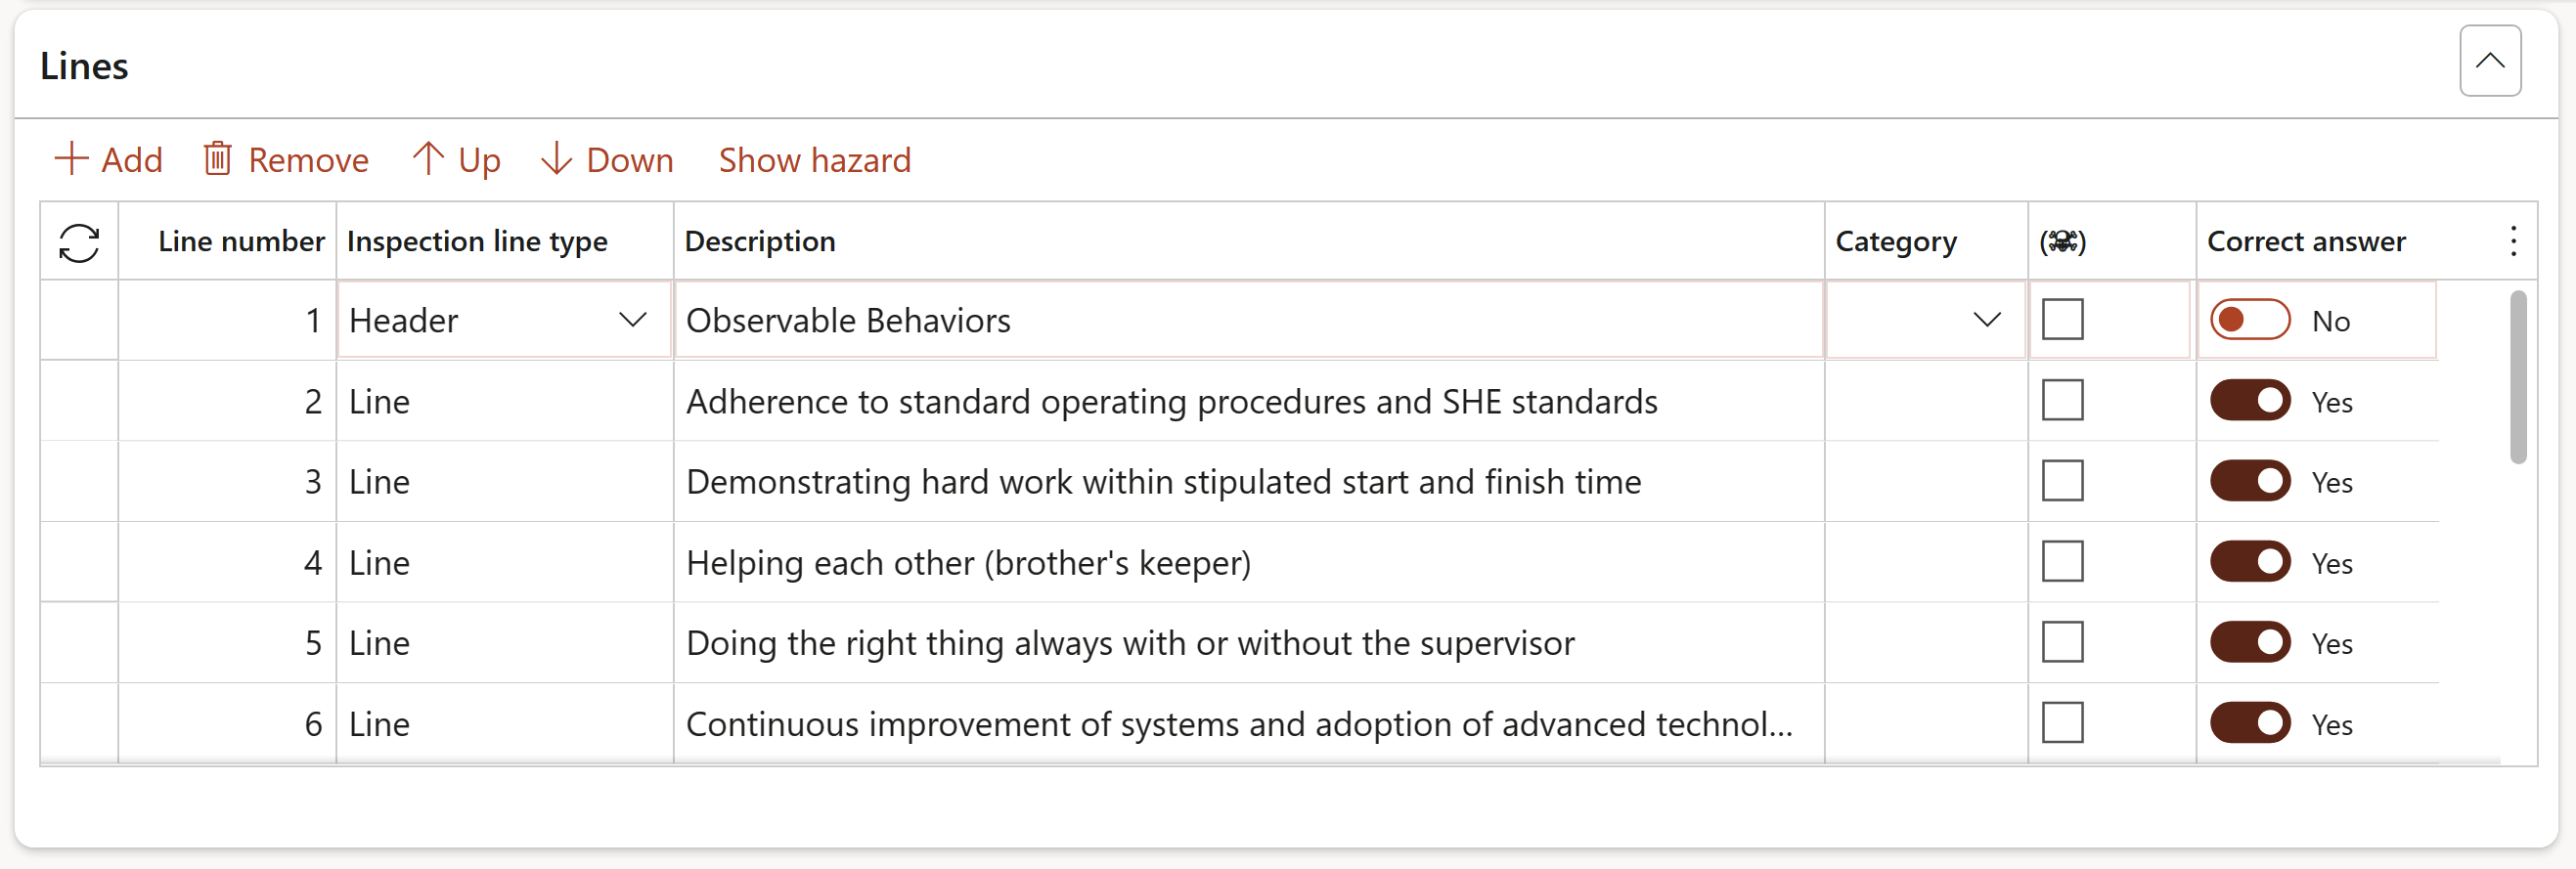
Where a category with type POWRA/JRA is selected on the Inspection list lines, the user will be forced to select a hazard for the line
¶ Step 6: GRC actions and questions
Go to: HSE > Setup > GRC actions and questions
- On the Action pane, click on the New button
- In the Question ID field, enter the unique question ID
- In the Source field, select BBS
- In the Action field, select Inspections
- Specify under which field group the question should be displayed on the Inspection journal, by selecting the relevant value from the Field group dropdown list
- Select the relevant Answer type from the dropdown list
- Select the relevant Negative outcome from the dropdown list
- Enter the Question text in the note box provided under the grid
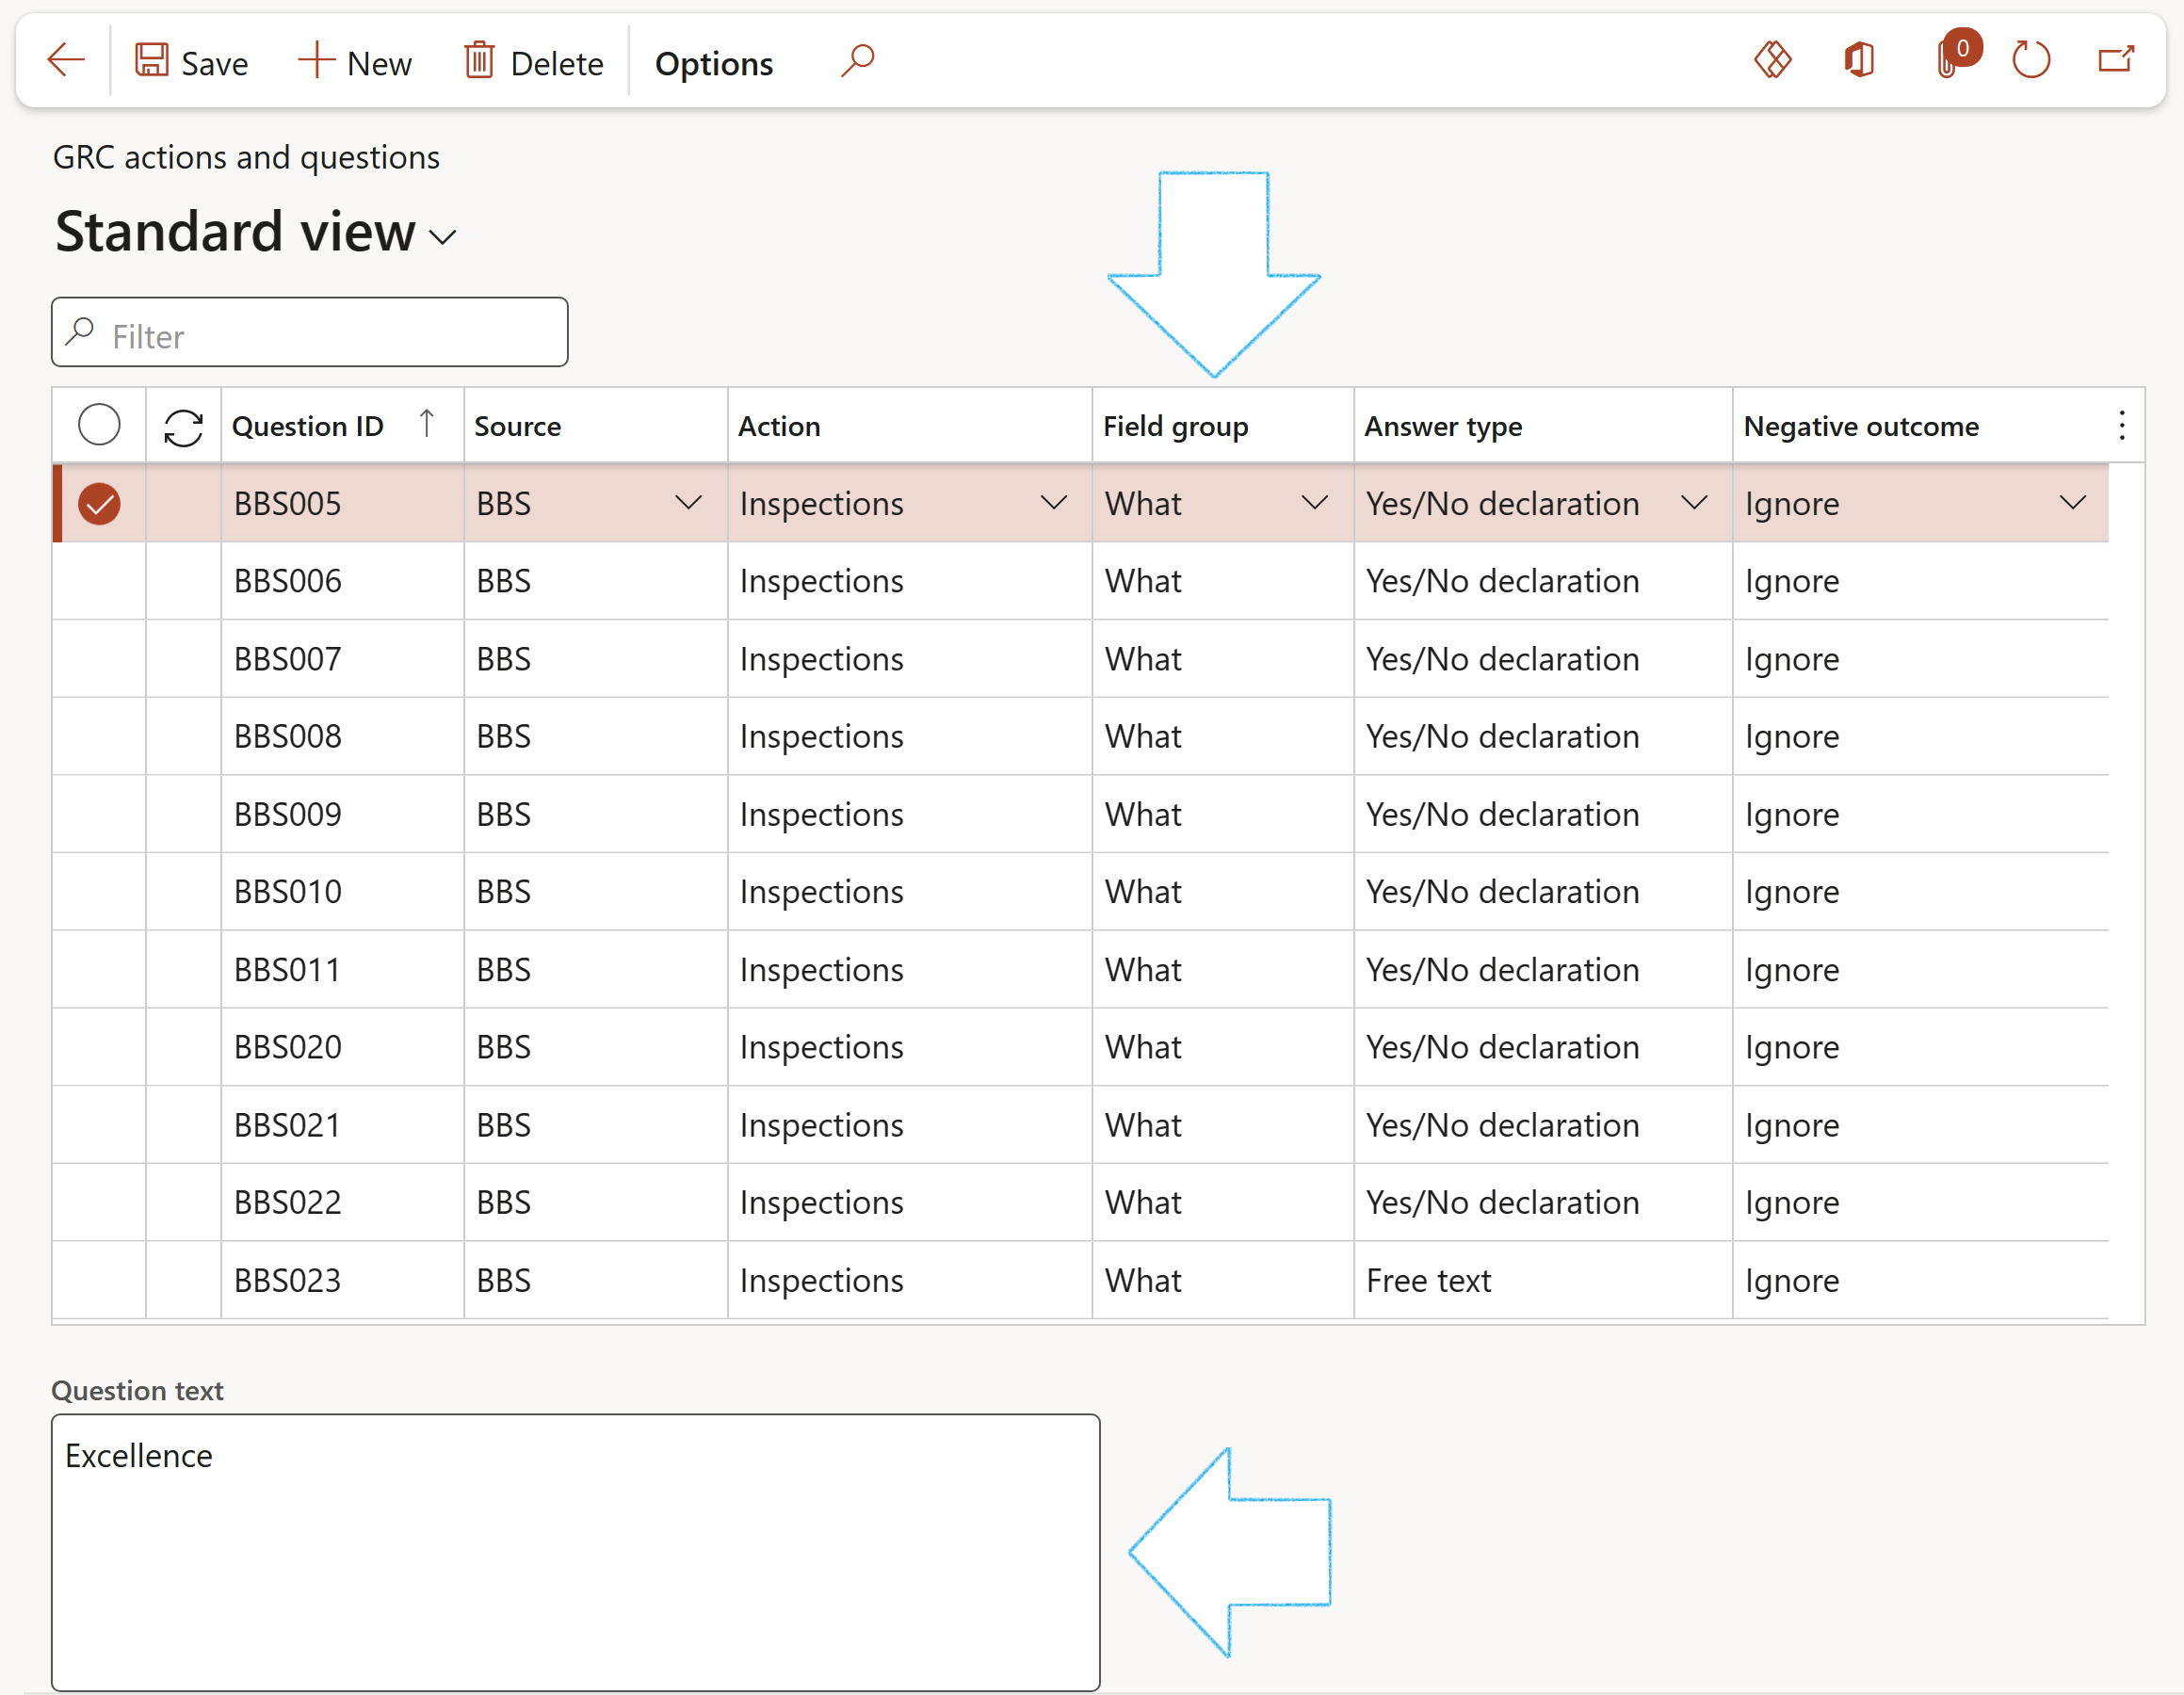
The Question text is the text that is displayed on the Inspection journal Header
A question must have an Answer type:
- Yes/No declaration – this will display the Question text with a tick box on the Inspection journal header
- Yes/No answer - this will display the Question text with a tick box on the Inspection journal Header
- Free text – this will display the Question text with a free text input box on the Inspection journal Header
The response to the question is set by the Negative outcome setting:
- Force entry – The Inspection journal will not be able to be closed if this field is not completed i.e., a Tick is required in the tick box, or text in the free text box
- Warning – this will give a warning if there is no input against the question, but will allow the action to continue
- Ignore – the action can continue if there is no response to the question
¶ Step 7: GRC action and question groups
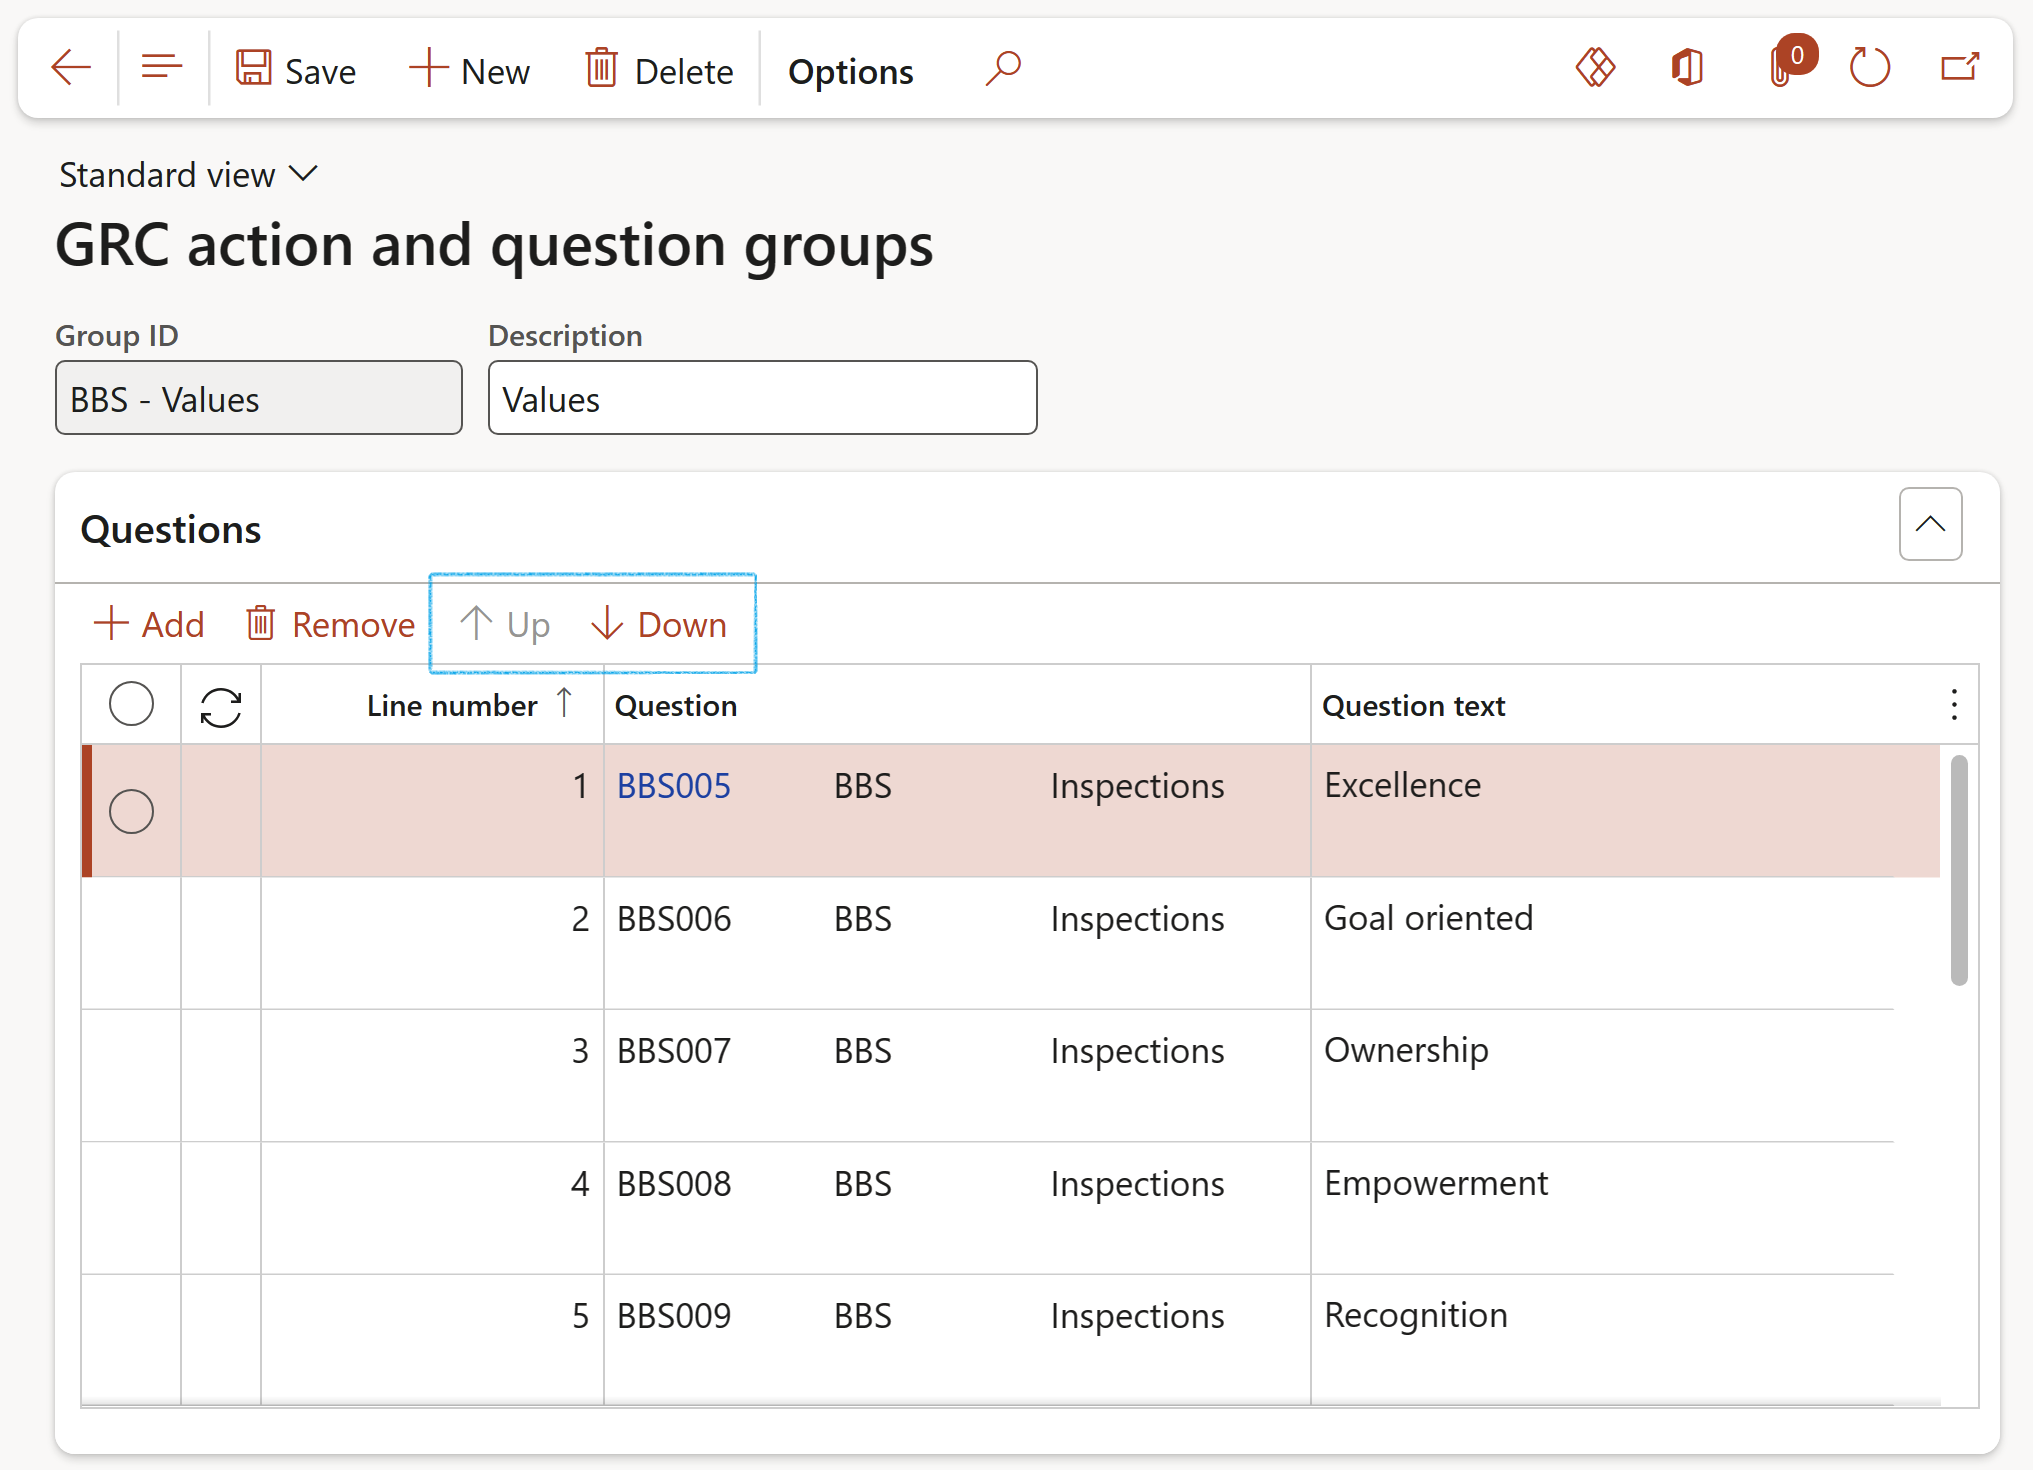
Go to: HSE > Setup > GRC action and question groups
- On the Action pane, click on the New button
- Enter a Group ID
- Enter a brief Description for the group
- Under the Questions Fast tab, click on the Add button
- Select the relevant Question from the dropdown list
- Use the Up and Down buttons to change the order of the questions
¶ Step 8: Inspection journal name
Each journal name contains information that is reflected in all the journals that are created based on that template. This form is used to create and manage templates for journals.
Go to: HSE > Inspections > Setup for inspections > Inspection journal name
- On the Action pane, click New
- Under the General Fast tab, enter the following information:
- Journal name - This name is used to refer to this journal throughout Dynamics 365
- Enter a brief Description of the journal
- Select the relevant Inspection list from the dropdown list
- In the Default inspection focus field, select Locations from the dropdown list
- Select the default Location from the dropdown list (if required)
- In the inspection Type field, select Behaviour from the dropdown list
- Select the relevant Questions and answers group from the dropdown list
- If it is required that the inspection has to be completed before it can be posted, move the Active slider to Yes under the Validation Field group. (At least one comment has to be entered on the journal lines)
- Restrict the posting of the journal if not within the grace period of the scheduled date by selecting Yes under the Date restrictions Field group, and by entering the Grace period in days
- Select the Approval group that can approve the journal name in journals or journal lines. Only users in the group can approve the journal
- Select Yes under the Approval procedure Field group to activate the journal approval system for this journal name
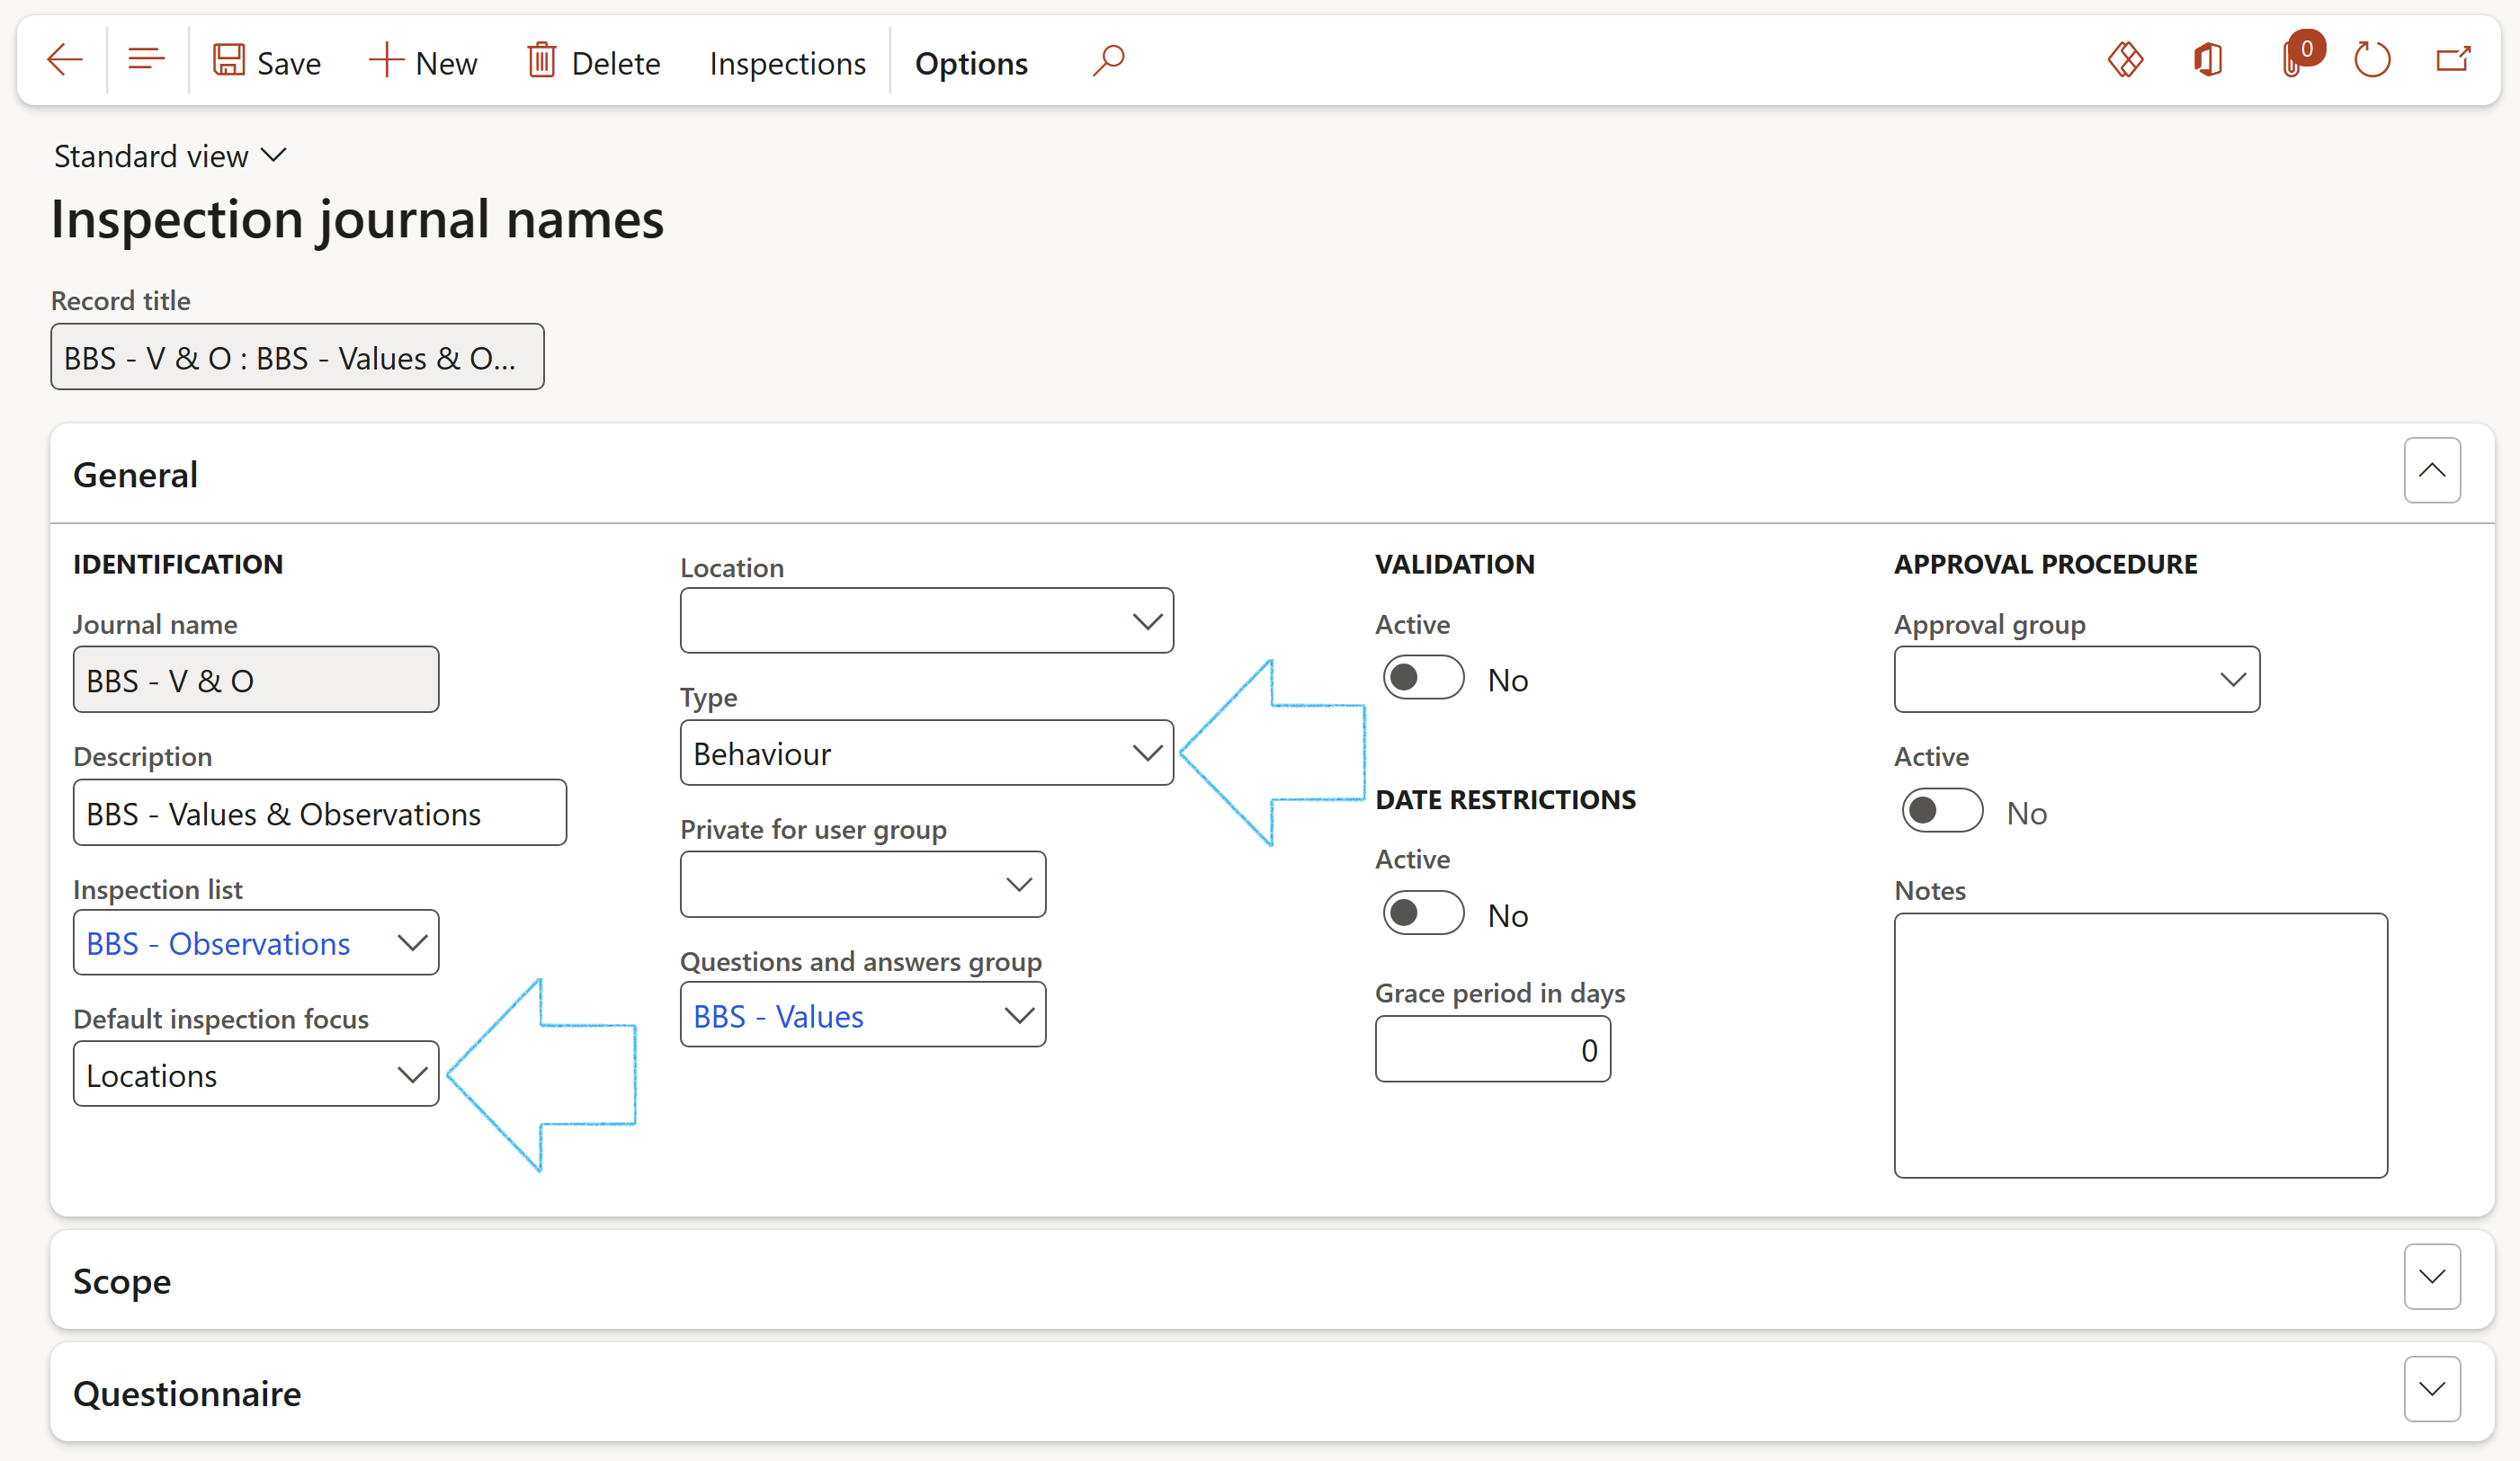
The Active slider under the APPROVAL PROCEDURE field group will only be available if an Approver group has been selected
- Under the Scope Fast tab, fill in the following information:
- Scheduling – Select the length of the period
- Site – Select the relevant site from the dropdown list
- Department - Select the relevant department from the dropdown list
- Budget hours – Enter the hours budgeted to execute the schedule

- You can use one Inspection journal name for all the different inspection journals, or you can create more than one inspection journal name and choose the one you want to use
- The Inspections button on the Action pane will open a list page of all Inspection journals relating to the Inspection journal name
¶ Step 9: Targets and goals
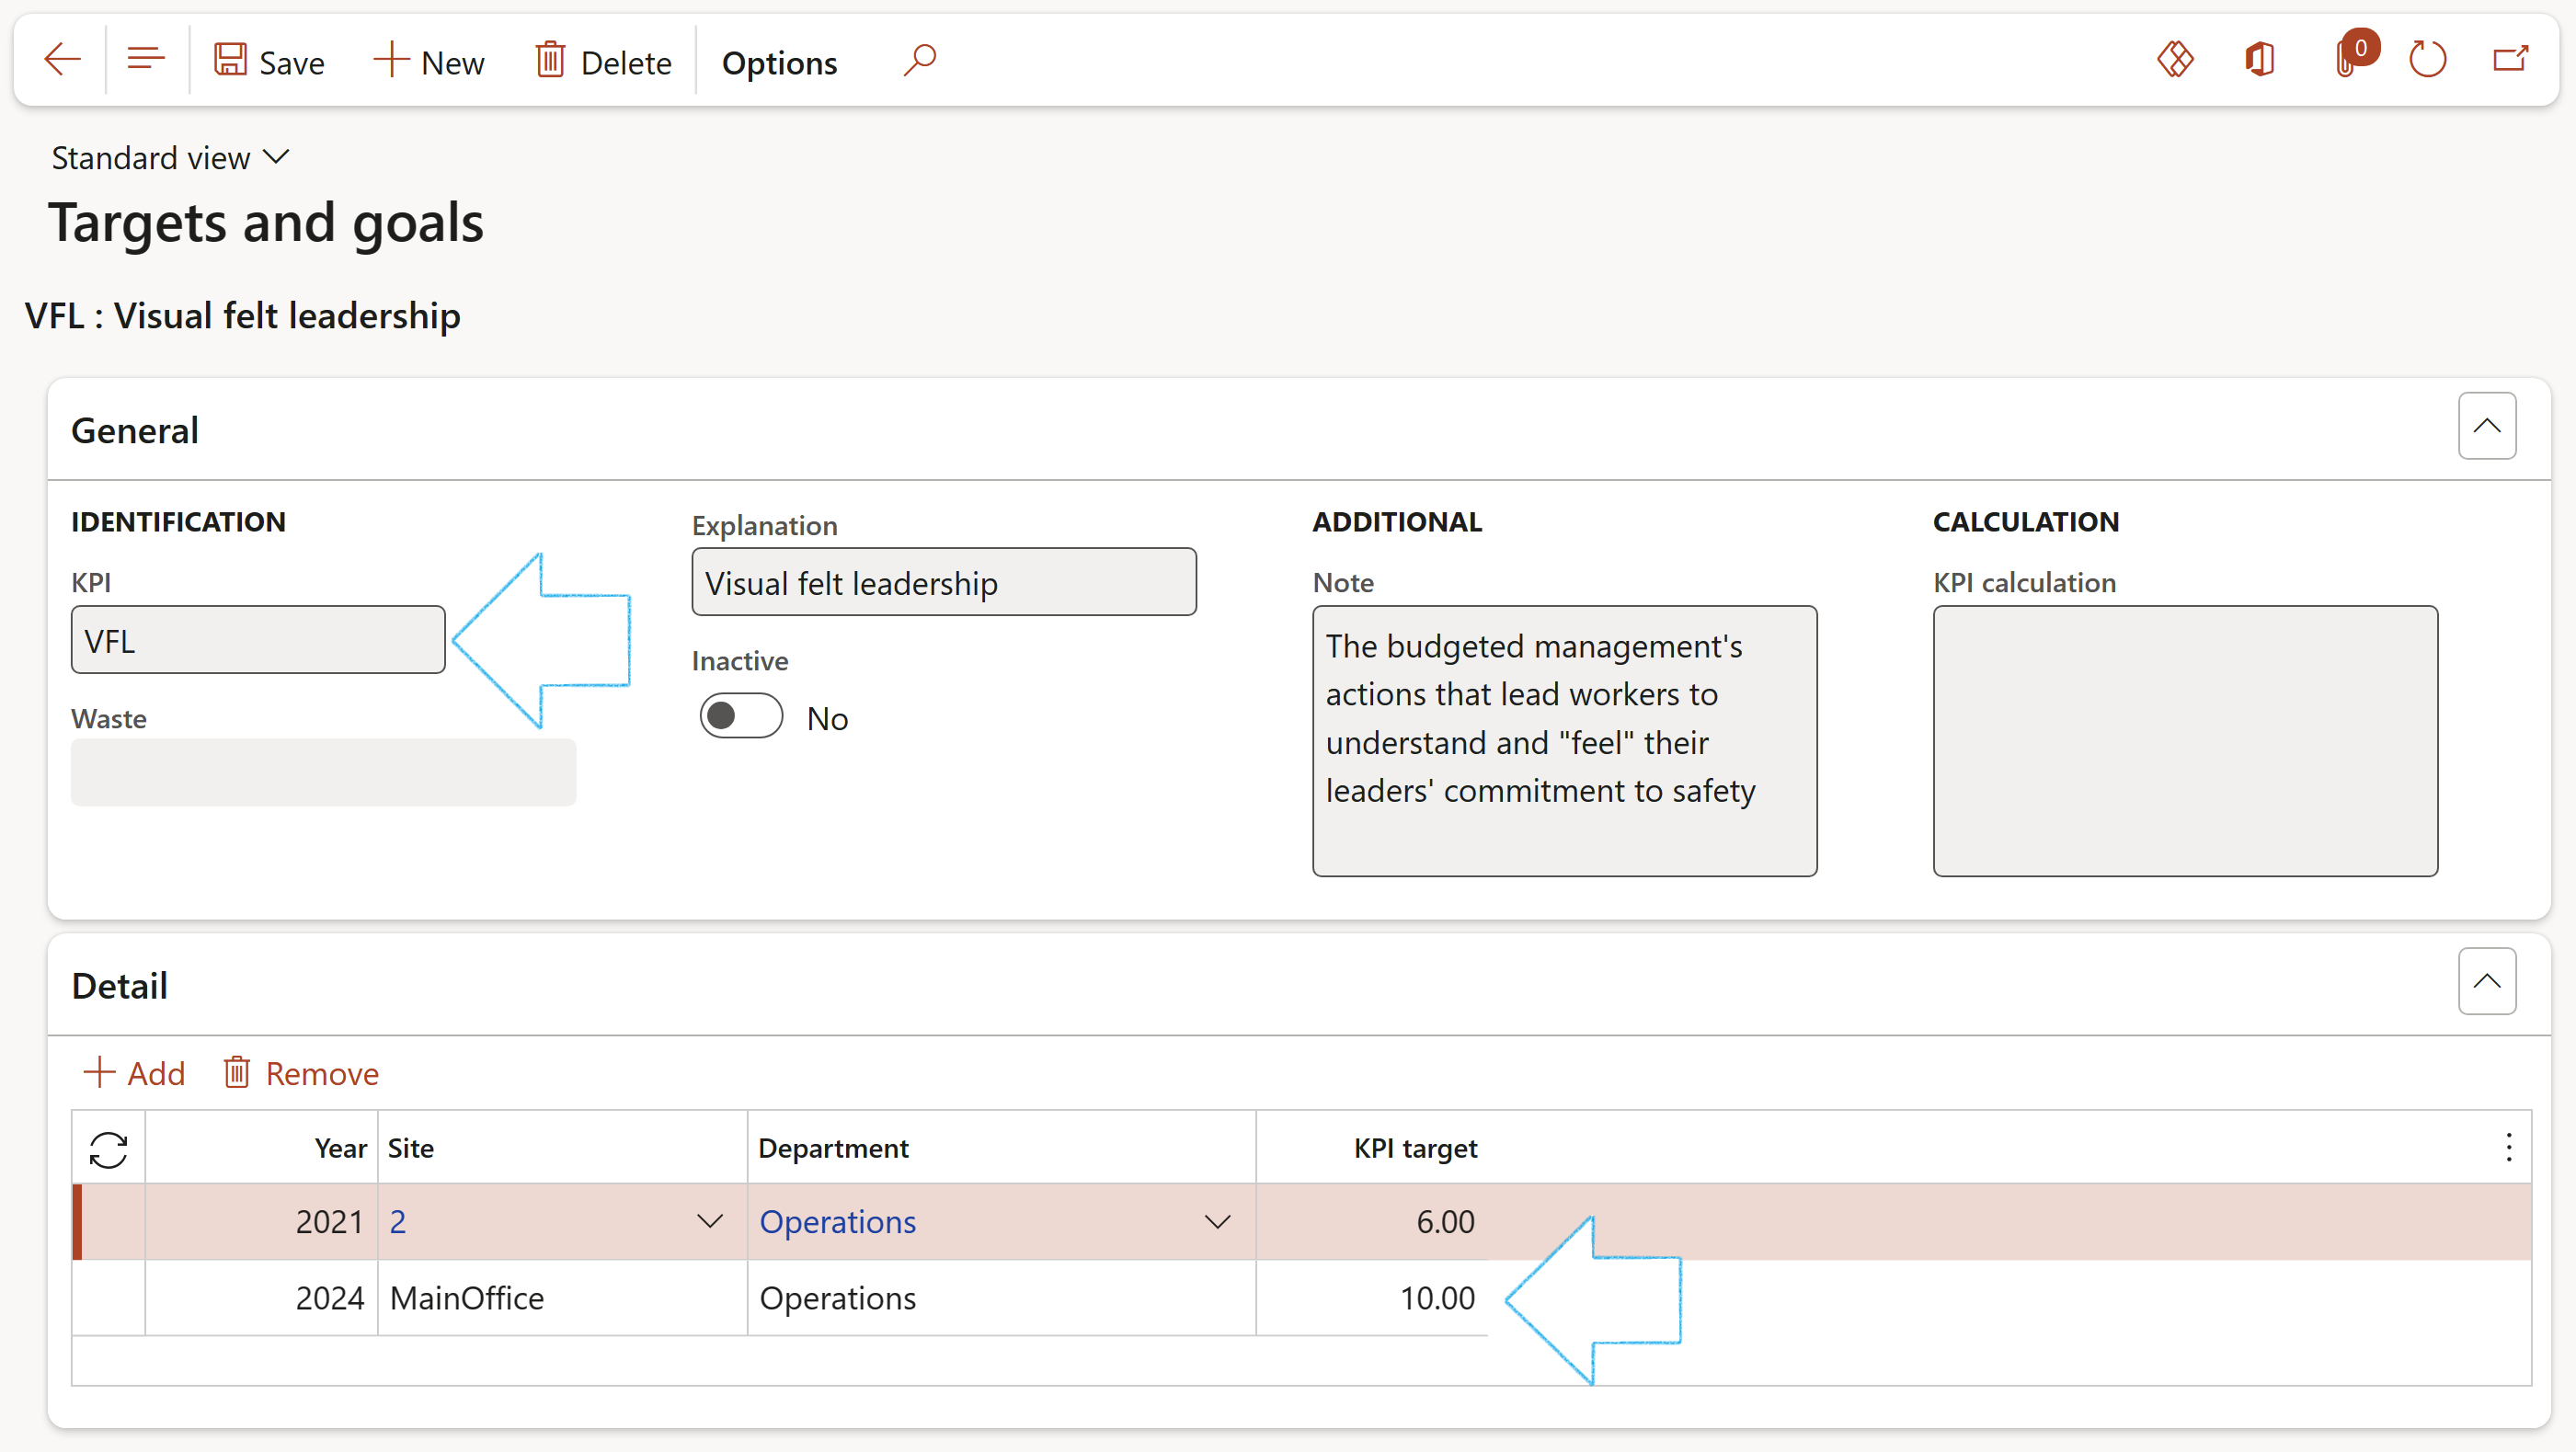
Go to: HSE > Inspections > Setup for inspections > Targets and goals
- On the Action pane, click on the New button
- Expand the General Fast tab
- In the KPI field, select the relevant KPI from the dropdown list
- Indicate whether this is an active or inactive KPI
- Expand the Detail Fast tab
- In the Button strip, click on the Add button
- Enter the target Year
- Select the relevant Site from the dropdown list
- Select the relevant Department from the dropdown list
- Enter the KPI target value
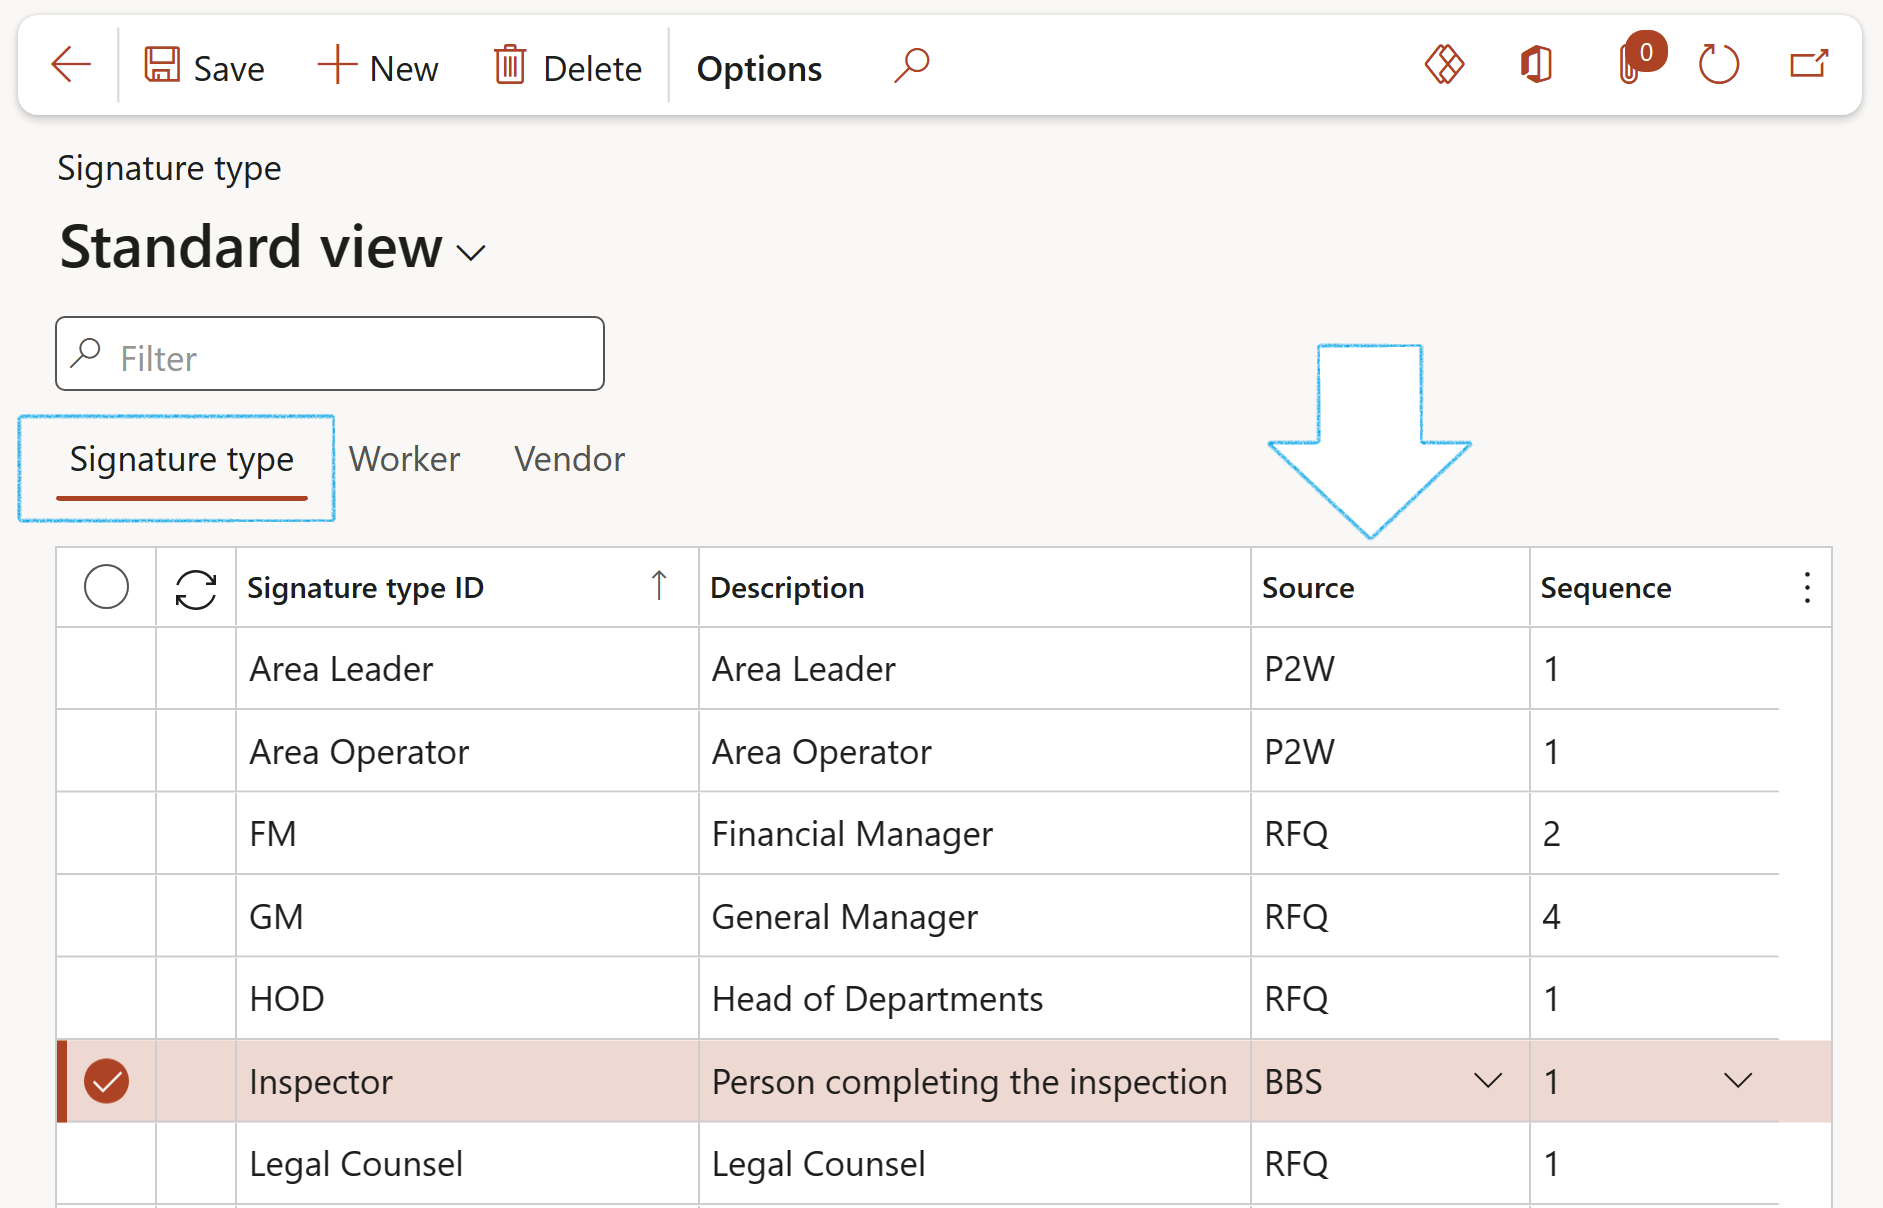
¶ Step 10: Setup Signature types
Go to: HSE > Inspections > Setup for inspections > Signature types
- On the Action pane, click on the New button
- Open the Signature type Index tab
- Enter the Signature type ID
- Enter a brief Description for the signature type
- In the Source field, select BBS from the dropdown list
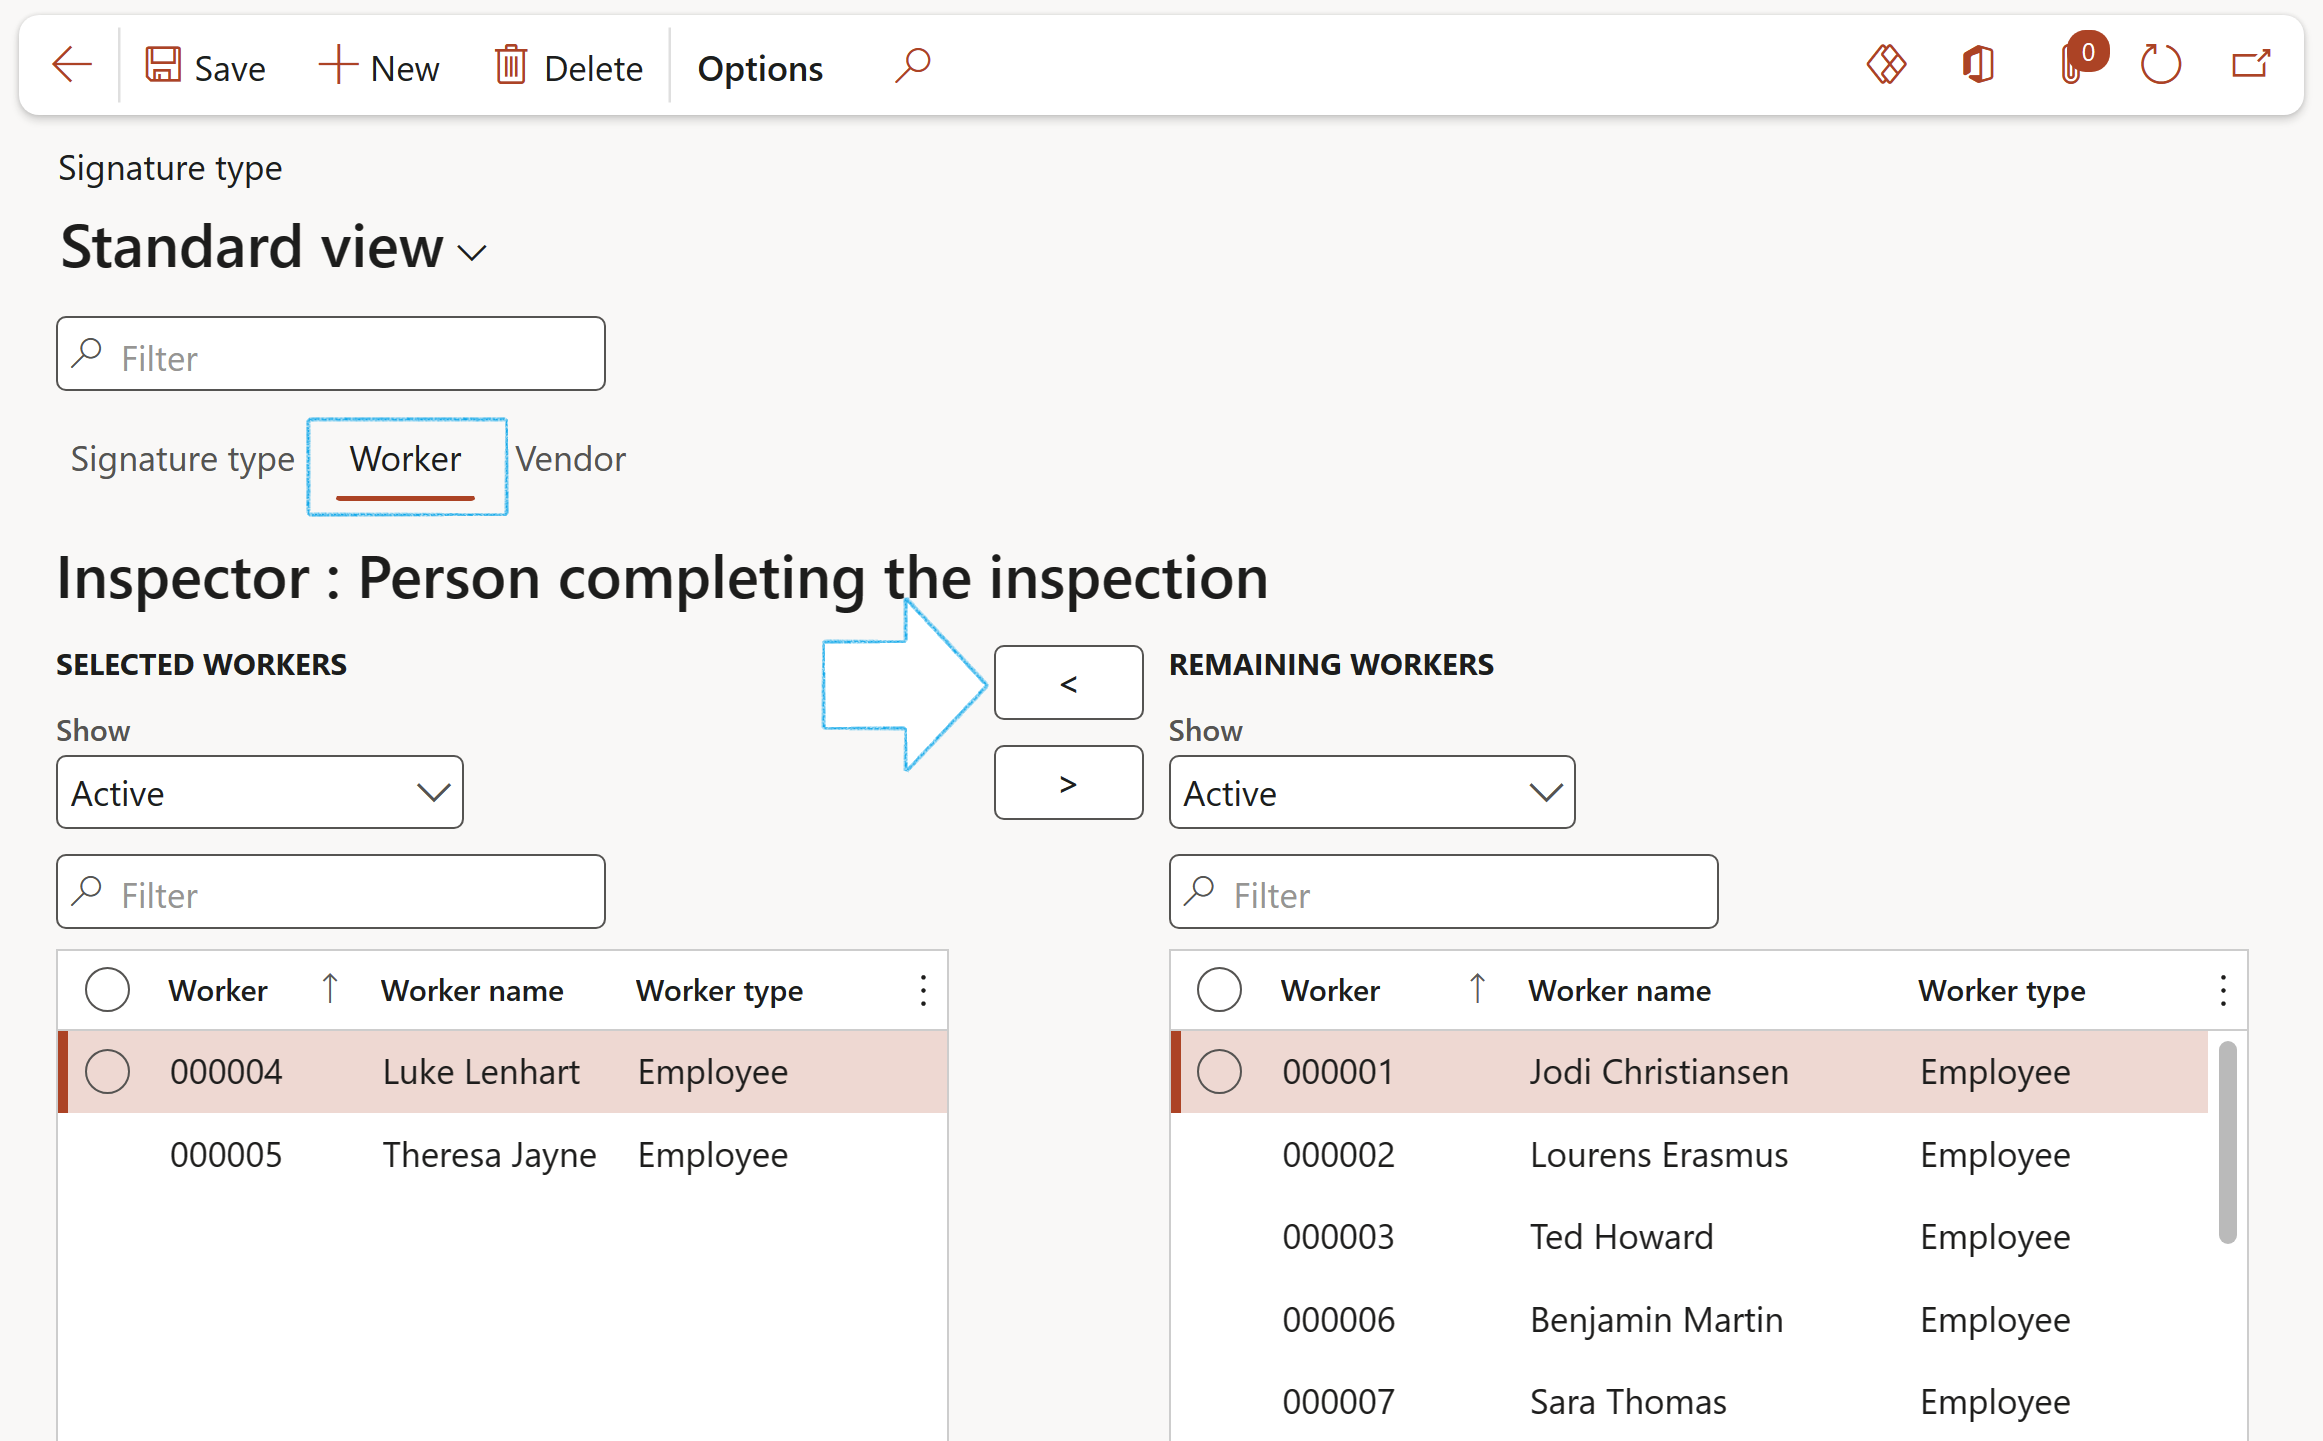
To add Workers to the Signature type:
- Open the Worker Index tab
- Select the worker that you want to add to the group from the REMAINING WORKERS field group
- Click on the < arrow button
- All the workers that belong to the group will be under the SELECTED WORKERS field group
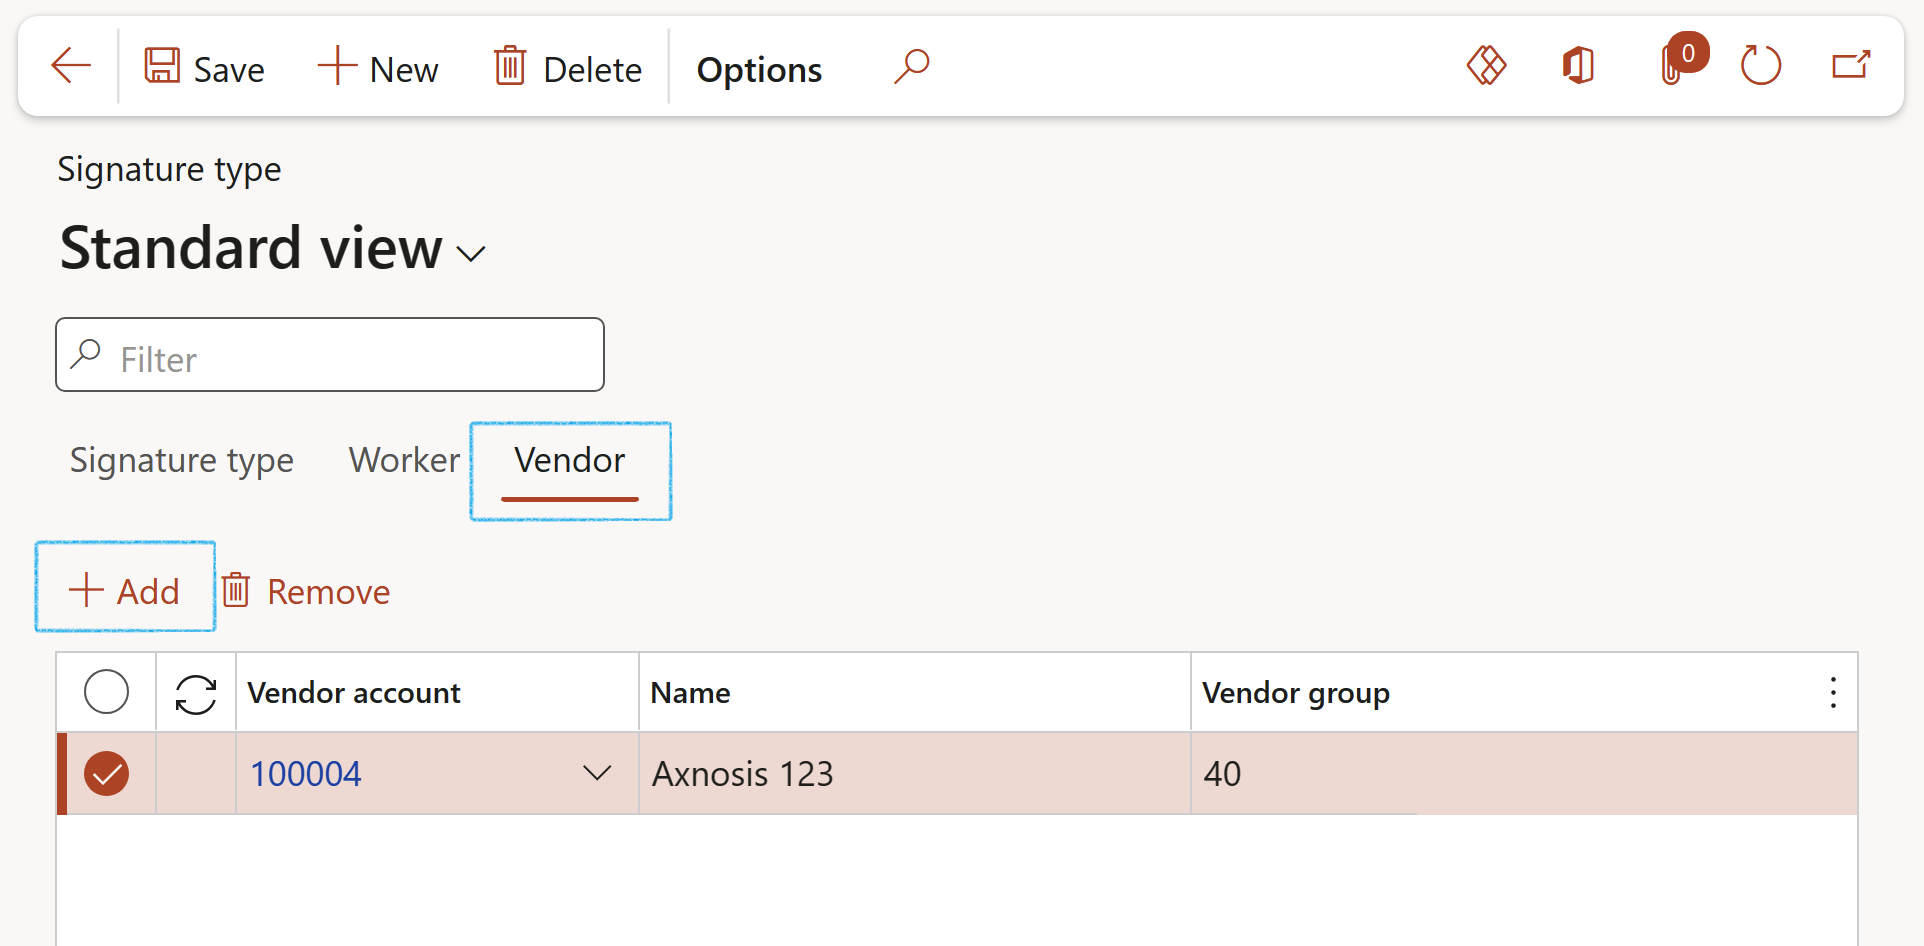
To add Vendors to the Signature type:
- Open the Vendor Index tab
- Click on the Add button
- Select the relevant Vendor account from the dropdown list
¶ Step 11: Locations
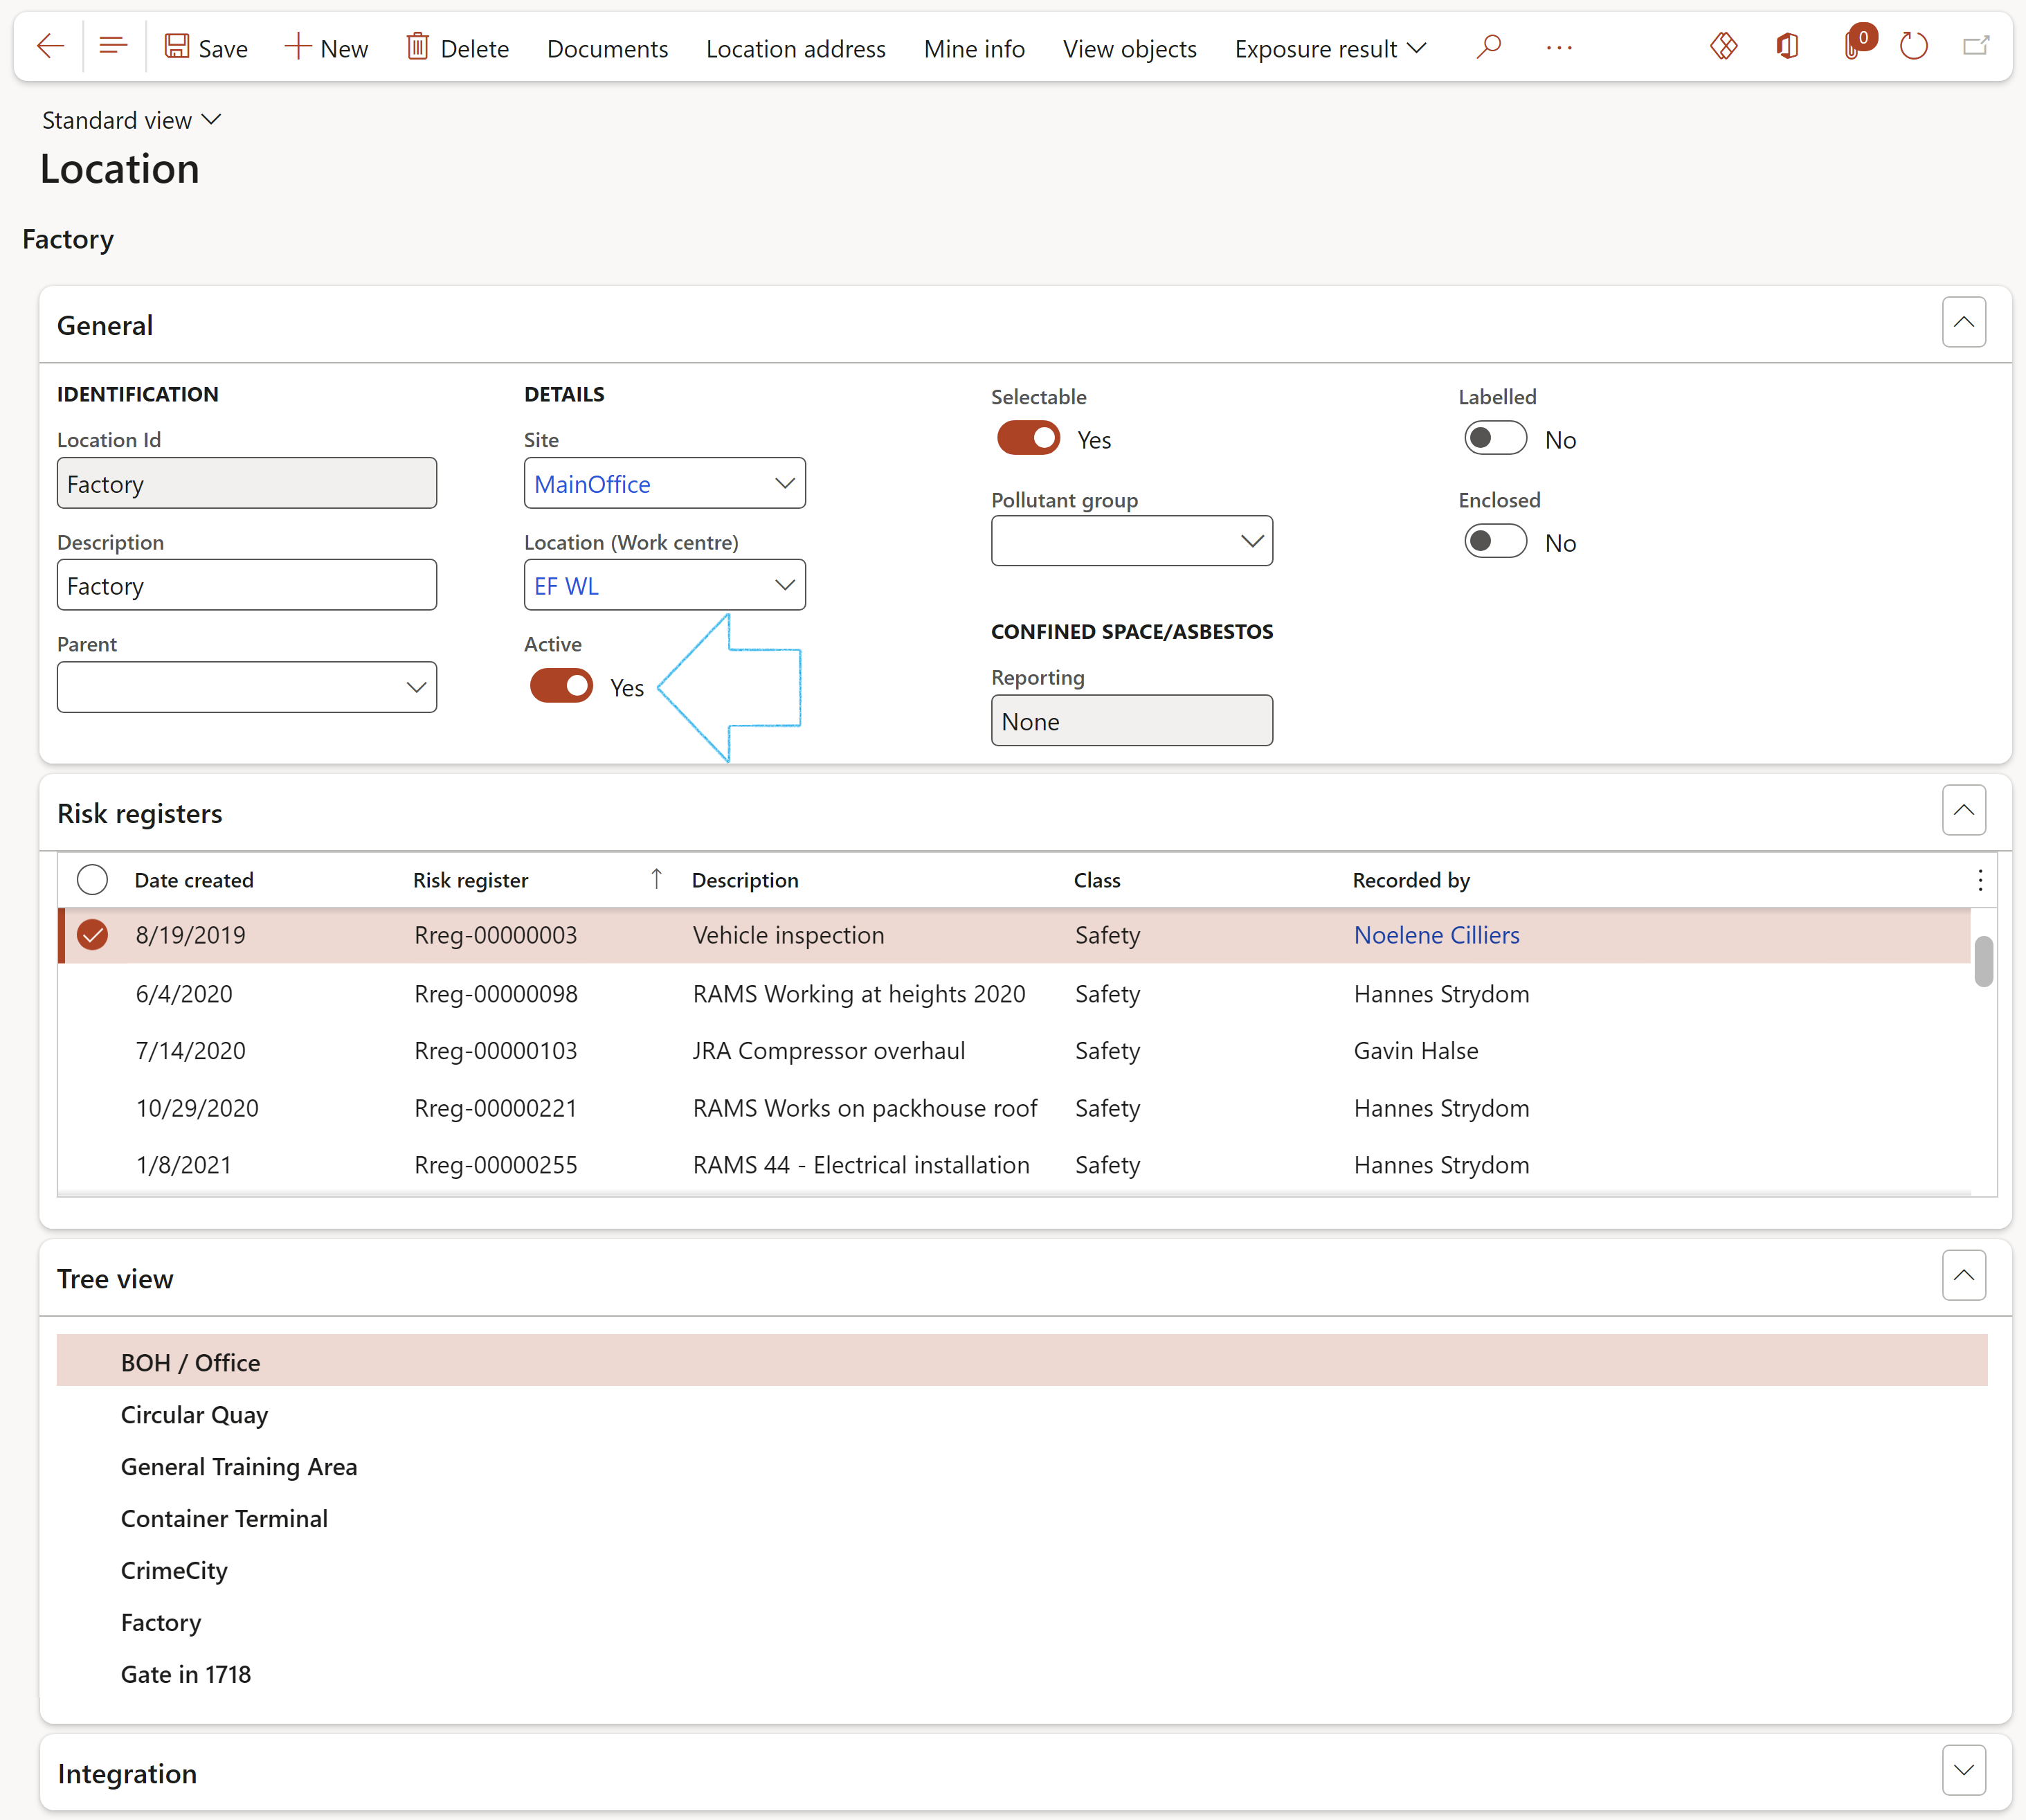
Go to: HSE > Location
- In the button strip, click New
- Expand the General Fast tab
- Enter the Location ID
- Enter a brief Description of the location
- Select the Parent OHS location from the dropdown list, if applicable
- Select the unique Pollutant group ID from the dropdown list, if applicable
- Under Selectable, set the slider to Yes if the tree node will be selectable on defining an incident
Where "Active" = Yes is selected on a location, this location will be displayed on the Location dropdown list on all HSE and GRC forms where Locations can be selected.
- Expand the Risk registers Fast tab to view the risk registers that are linked to this location
- Expand the Tree view Fast tab to view a hierarchy of the locations
¶ Periodic use
¶ Step 12: Schedule future Inspections
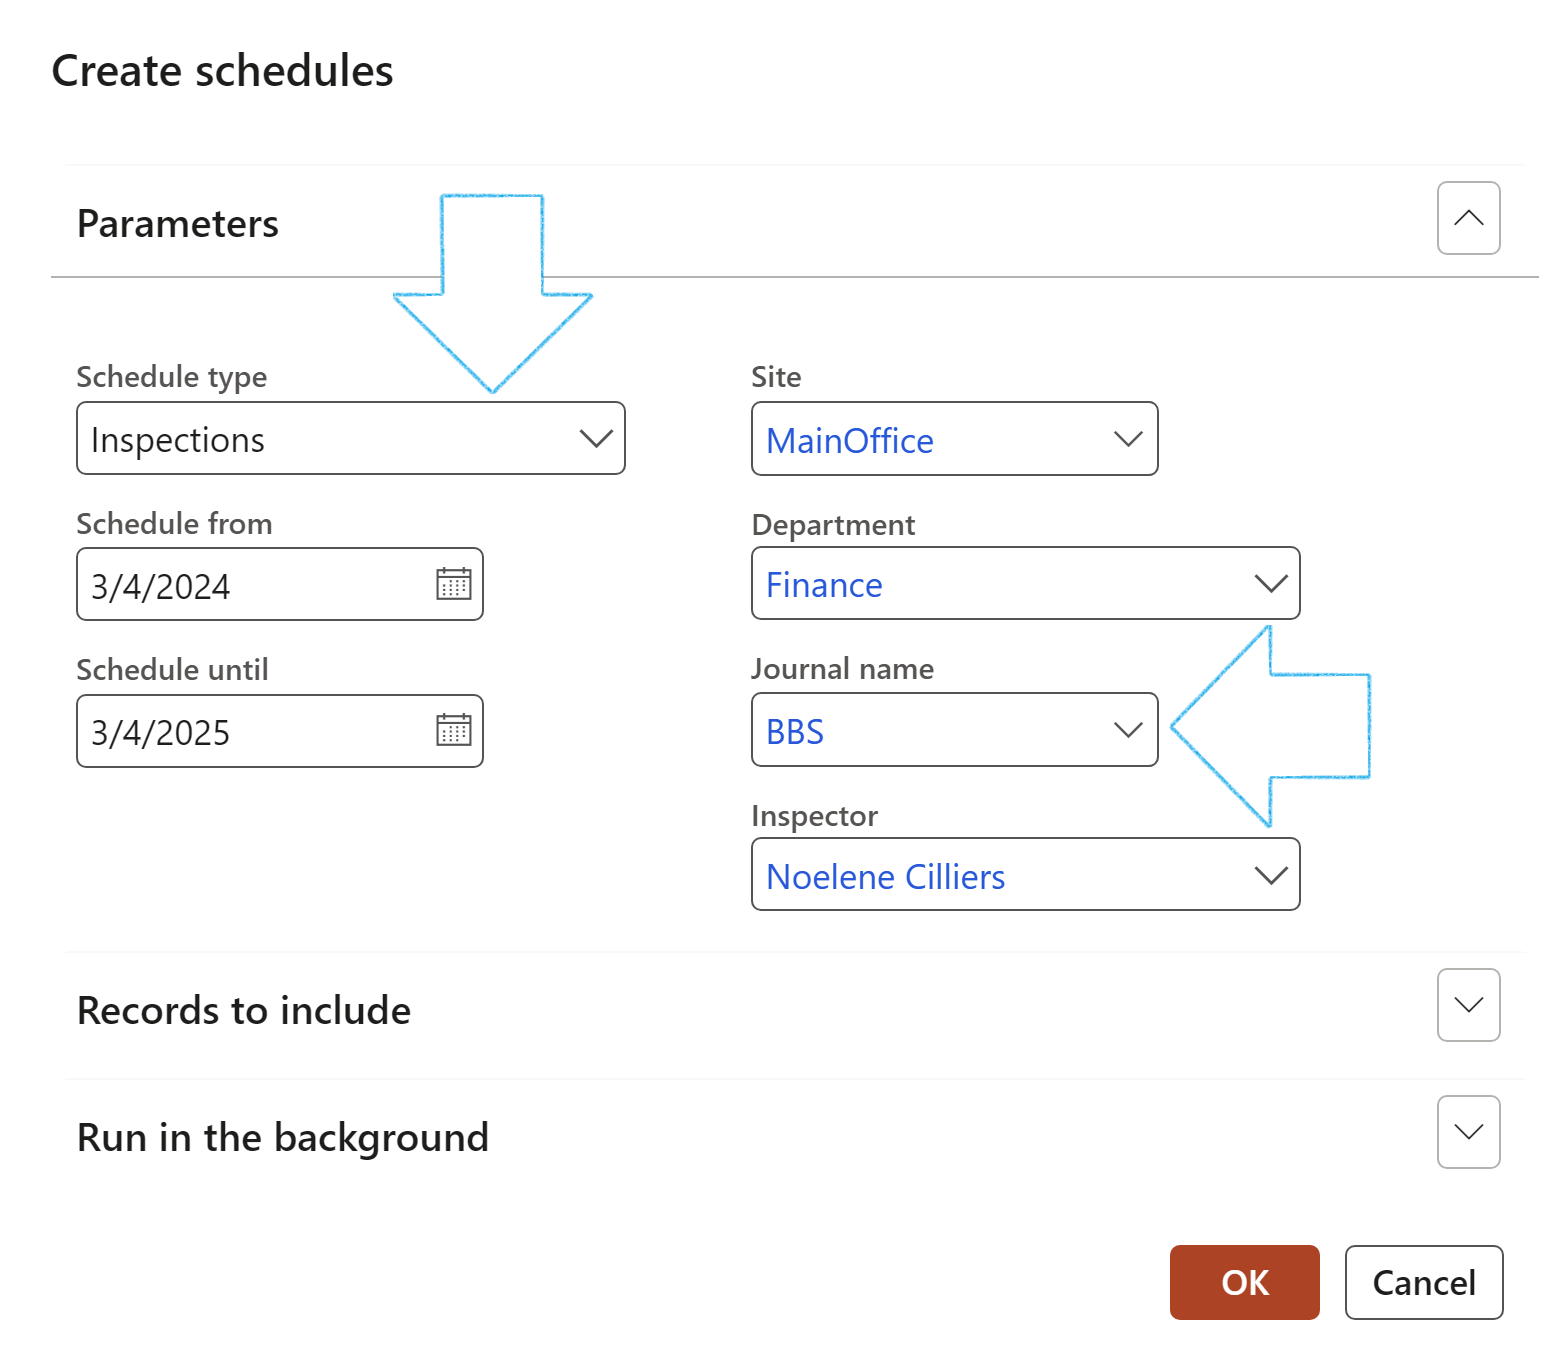
Go to: HSE > Create schedules
On the Create schedules dialogue:
- In the Schedule type field, select Inspection from the dropdown list
- Select the applicable criteria for the filters
- Click OK
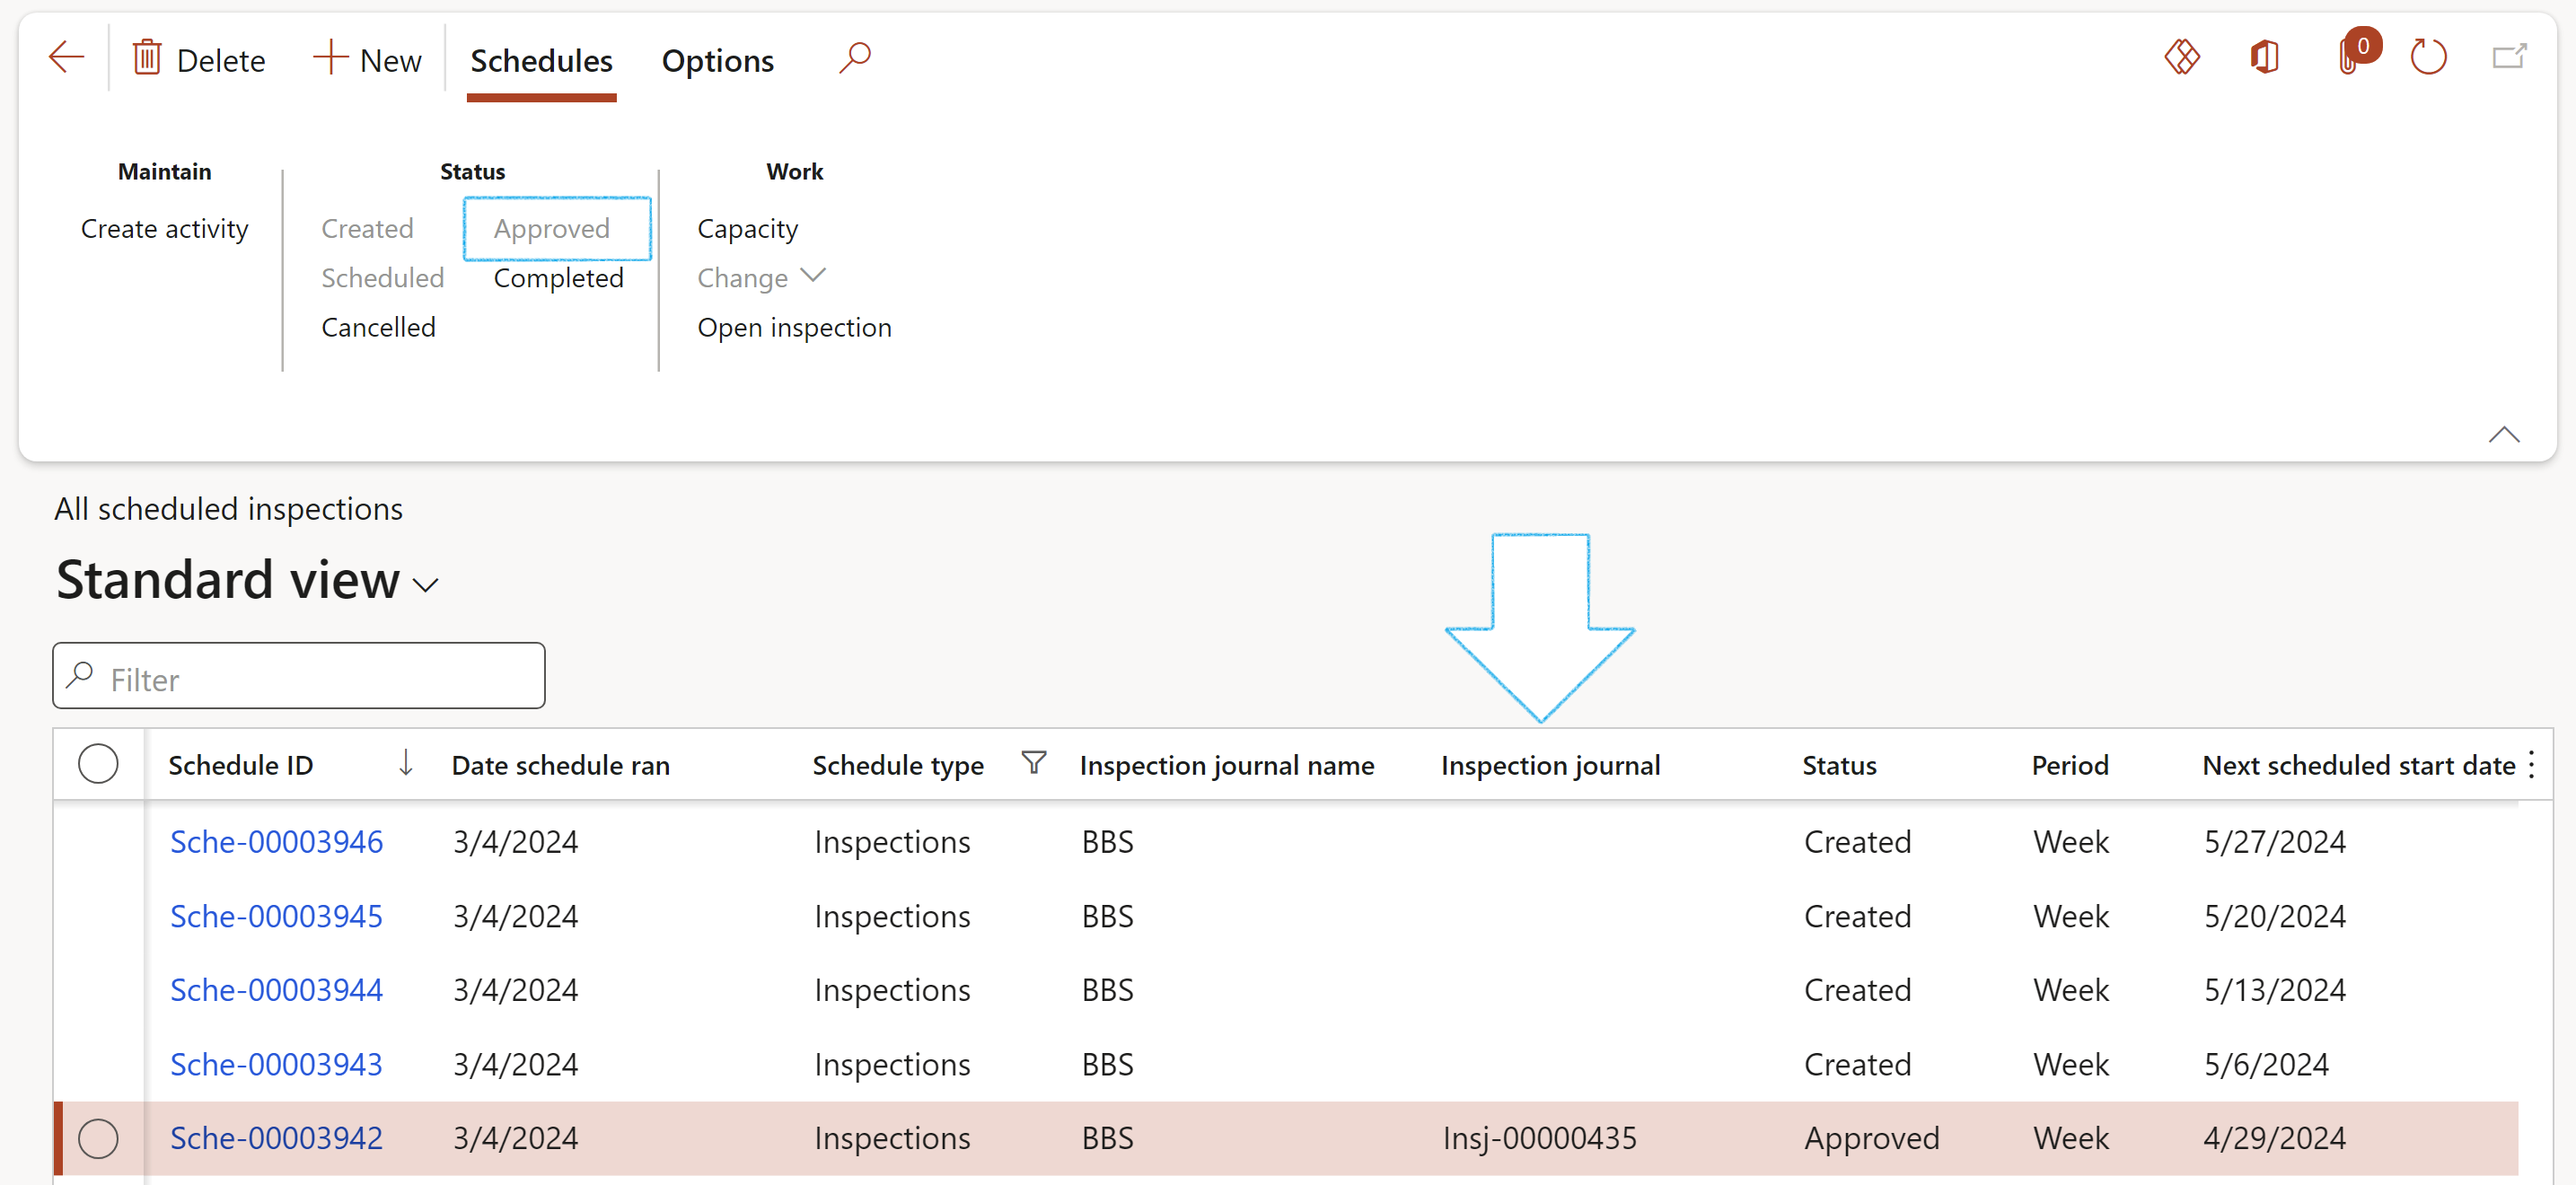
Go to: HSE > Inspections > Schedules > All scheduled inspections
- Select the proposed inspection that you want to approve
- On the Action pane, in the Status group, click on the Approved button
- On approval, an inspection will be created, and the actual Inspection journal ID will be visible in the Inspection journal column
The following details on a scheduled inspection can be changed:
- Site
- Owner
- Department
- Team
Go to: HSE > Inspections > Schedules > All scheduled inspections
- Select the relevant Inspection
- On the Action pane, under the Work group, click on the Change button
- On the Change record dialog, enter the new values
- Type the Reason for making the changes (Optional)
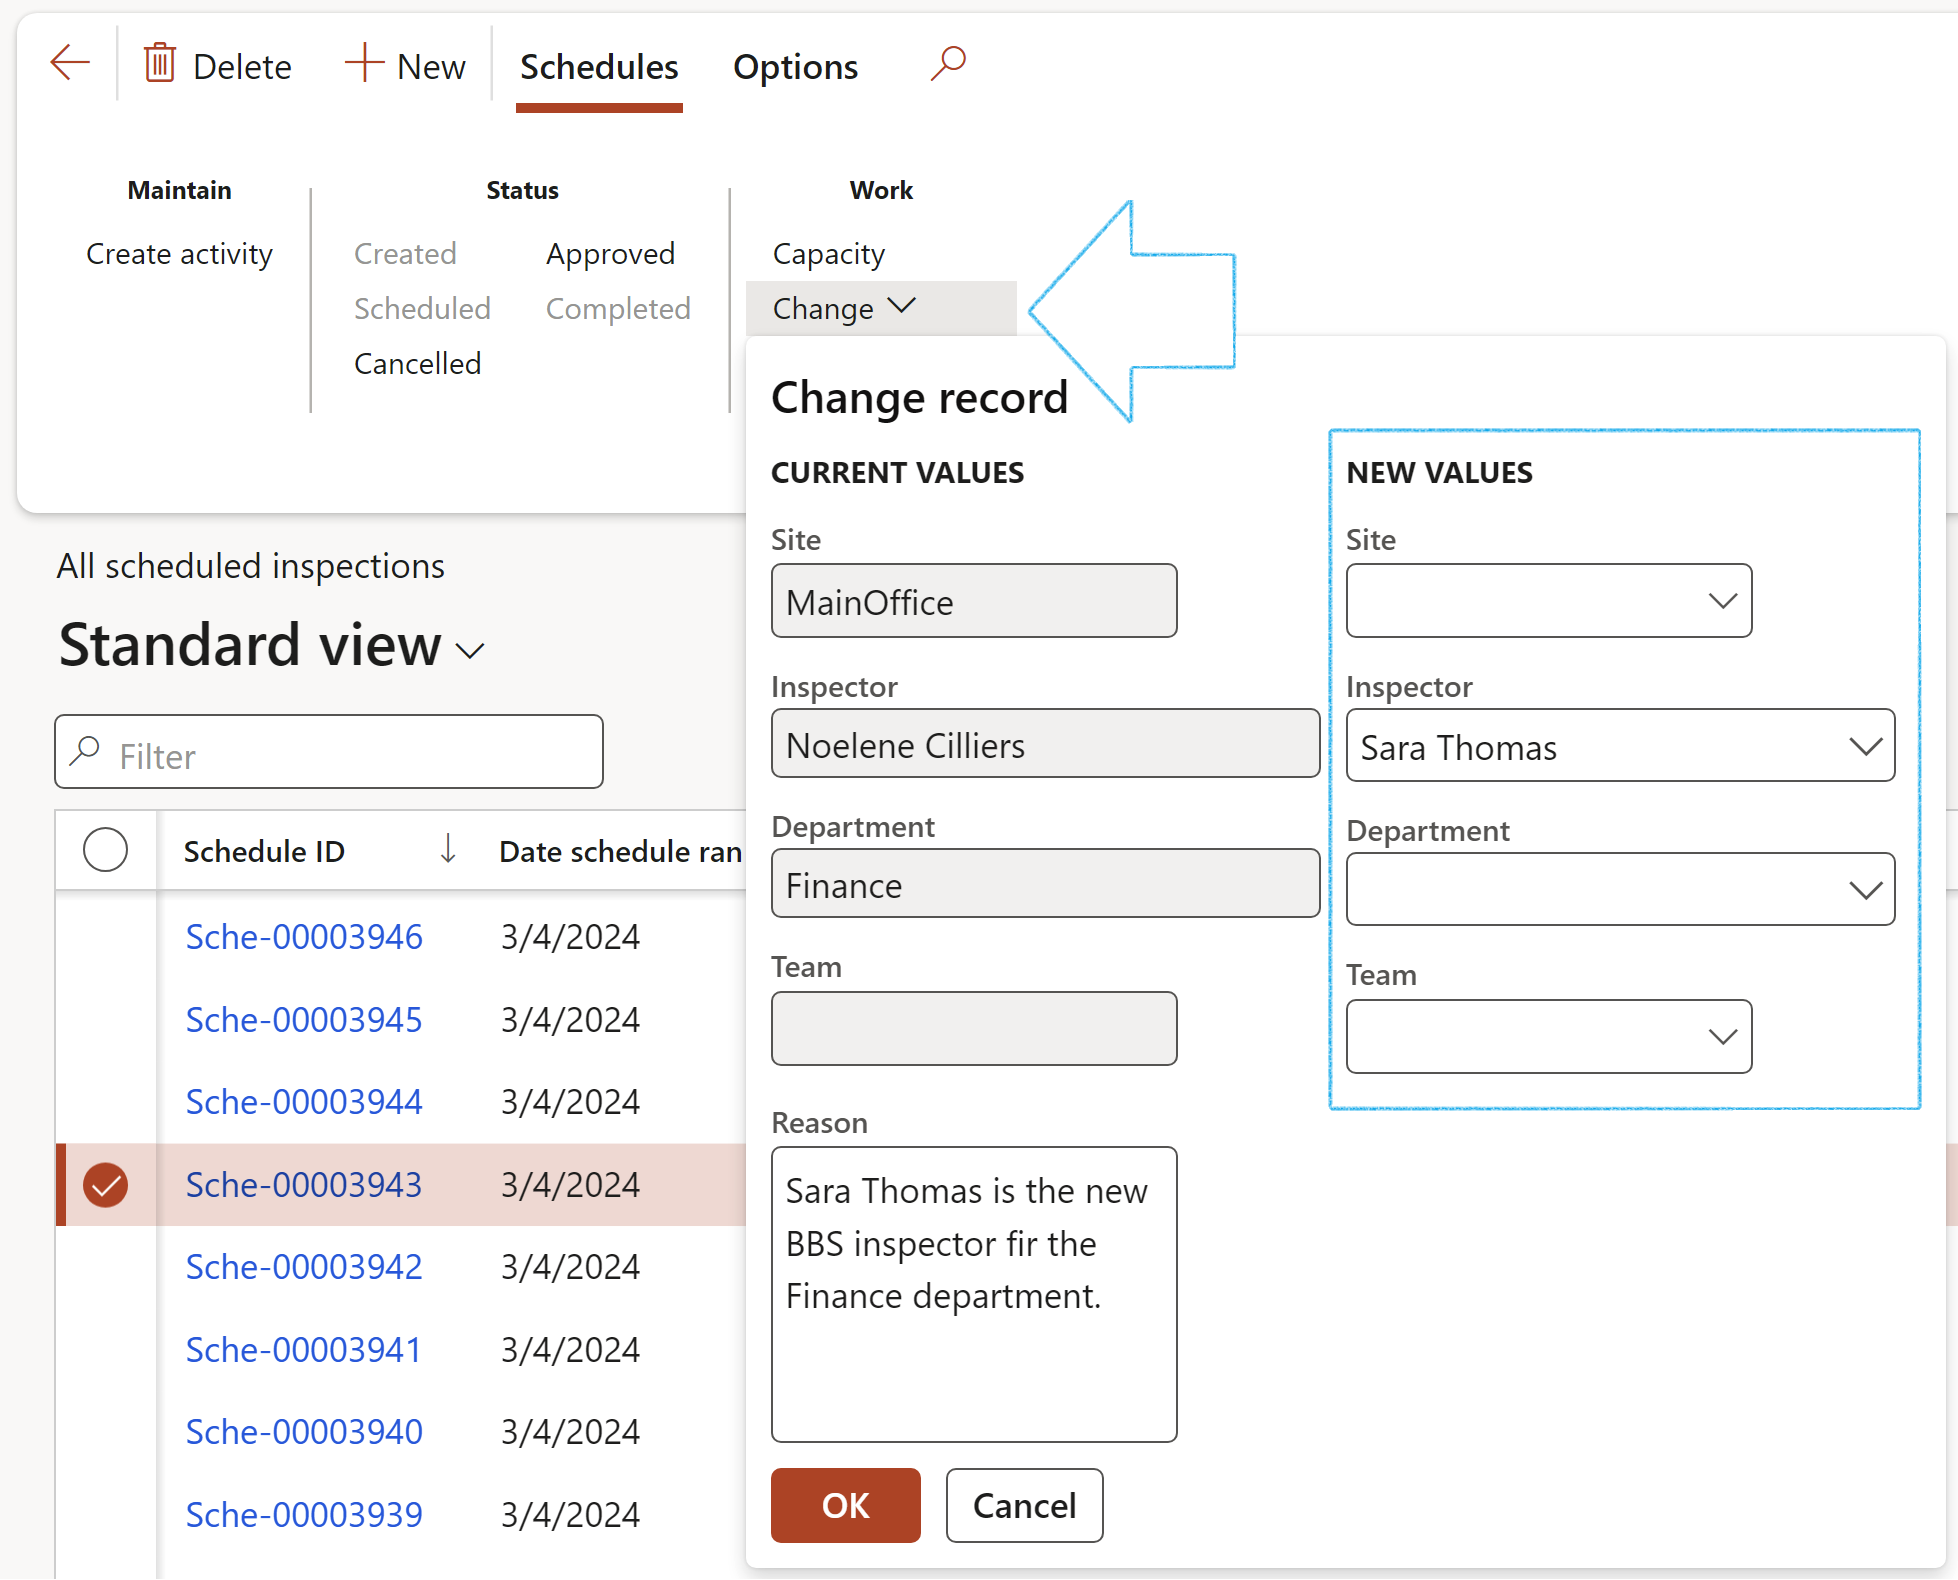
The Change button is only available when the status of the scheduled inspection is Created of Scheduled
¶ Daily use
¶ Step 13: Inspections
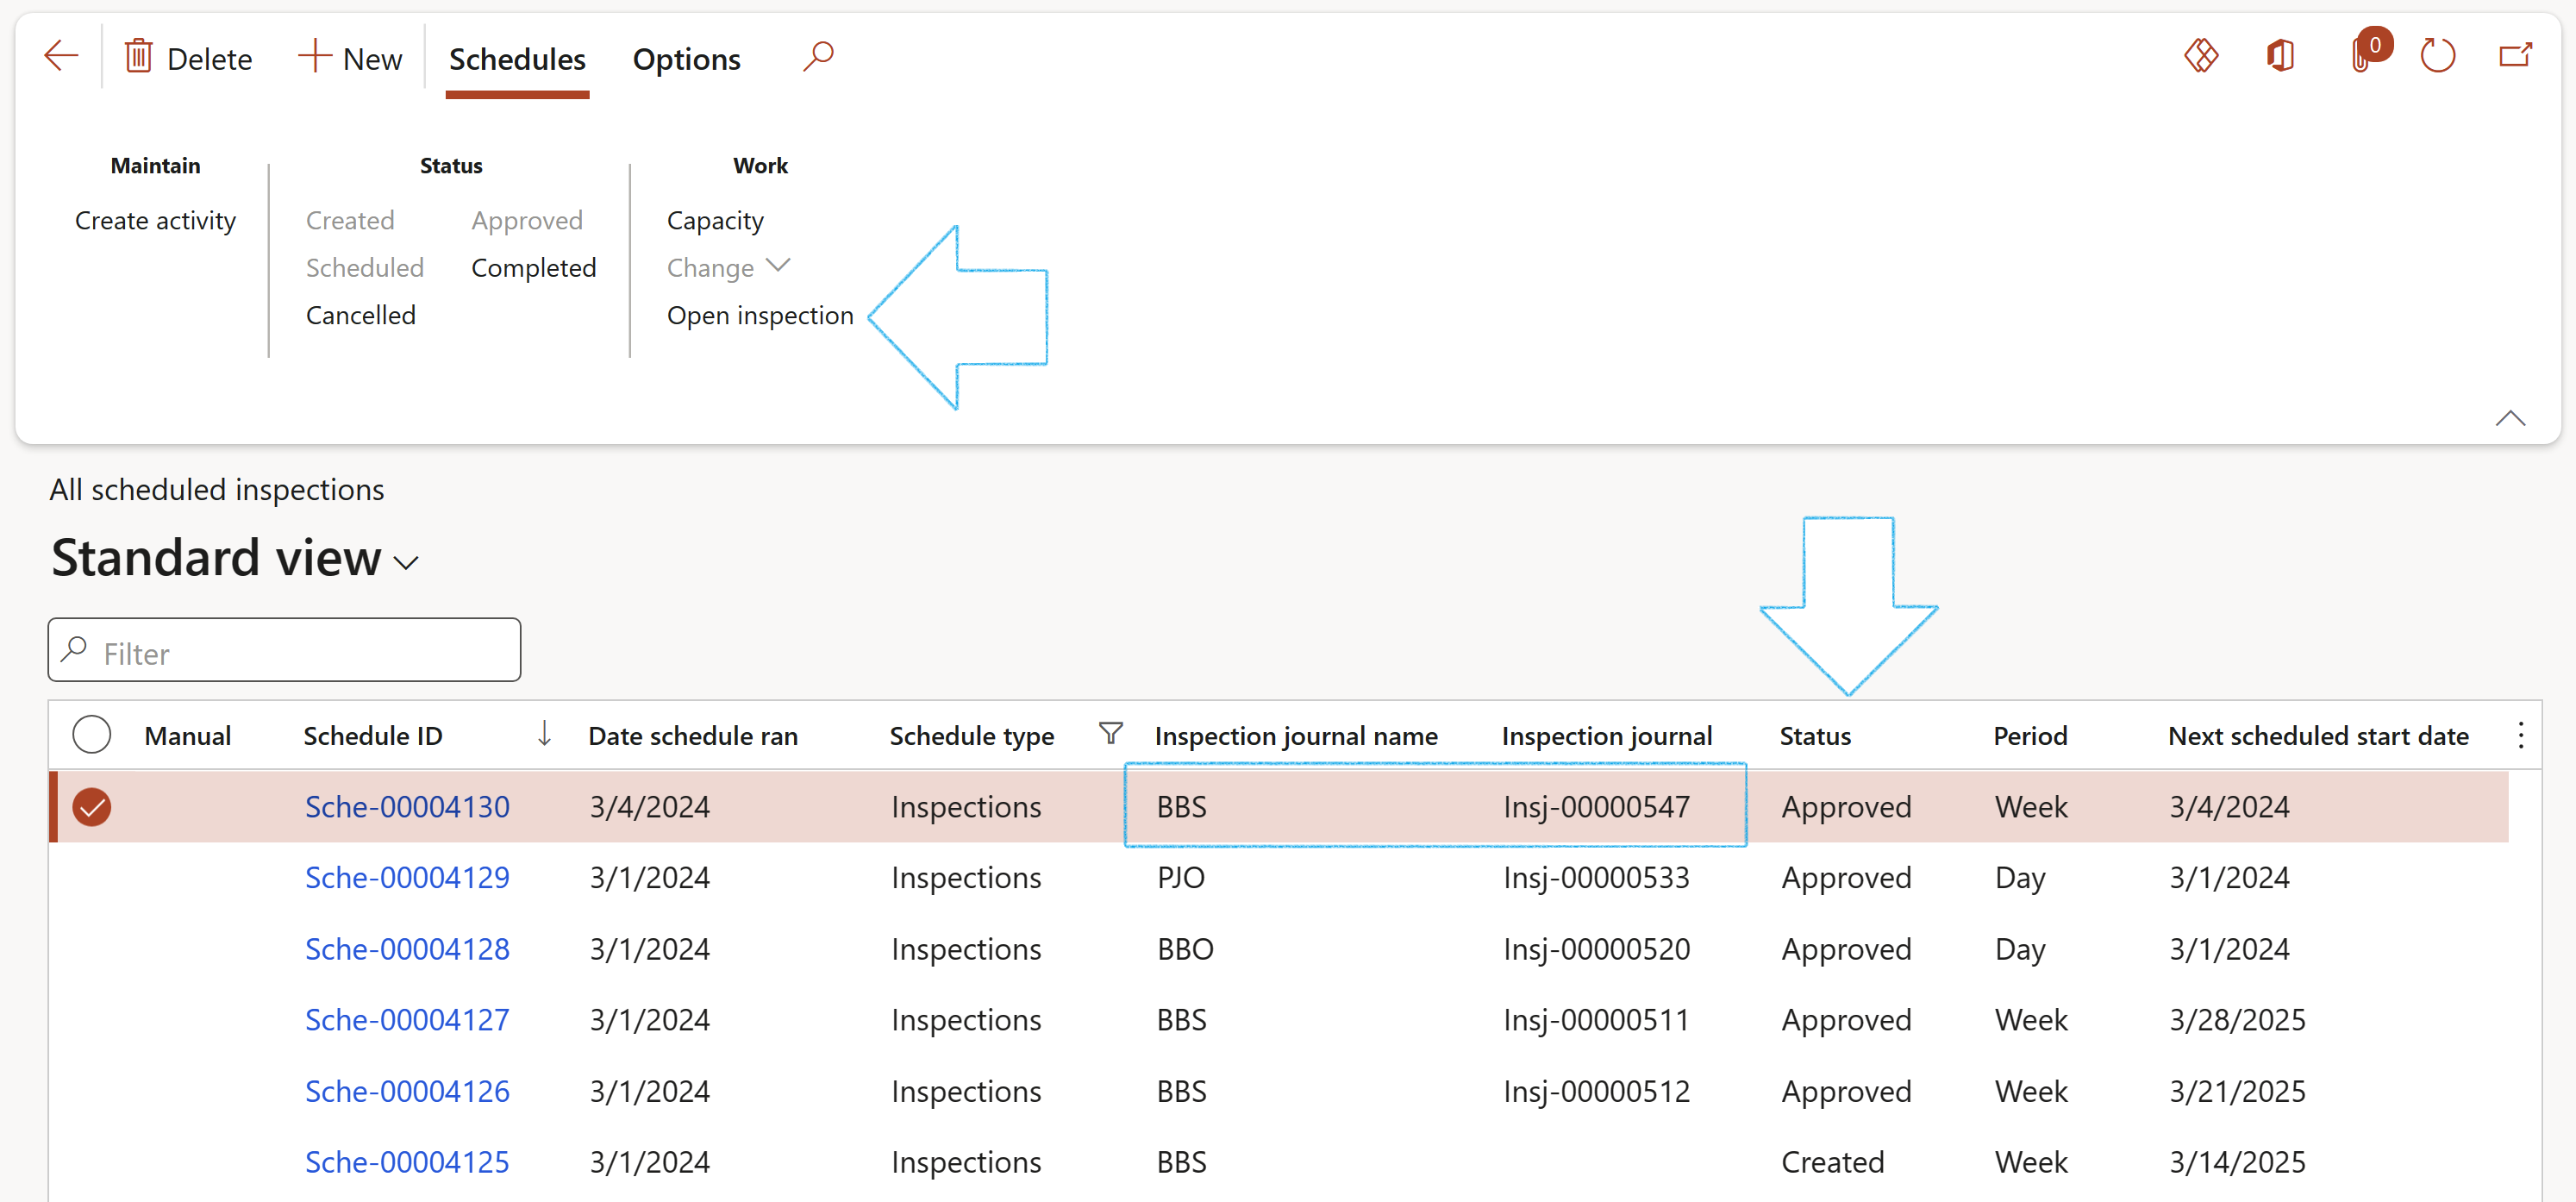
Go to: HSE > Inspections > Schedules > All scheduled inspections
- Select the inspection that you want to work with (The inspection has to be approved)
- On the Action pane, in the Work group, click on the Open inspection button
OR
Go to: HSE > Inspections > BBS inspection journals
- Select the inspection that you want to work with

¶ Step 14: The Inspection journal
Go to: HSE > Inspections > BBS inspection journals
- Select one of the filter settings in the Show field:
- All: All transactions
- Not posted: Transactions that are not posted
- Posted: Posted transactions
- On the Action pane, click on the New button

The user can choose to only see his/her own inspections by moving the My inspections slider to Yes
¶ Step 14.1: Create a new (ad-hoc) Inspection journal
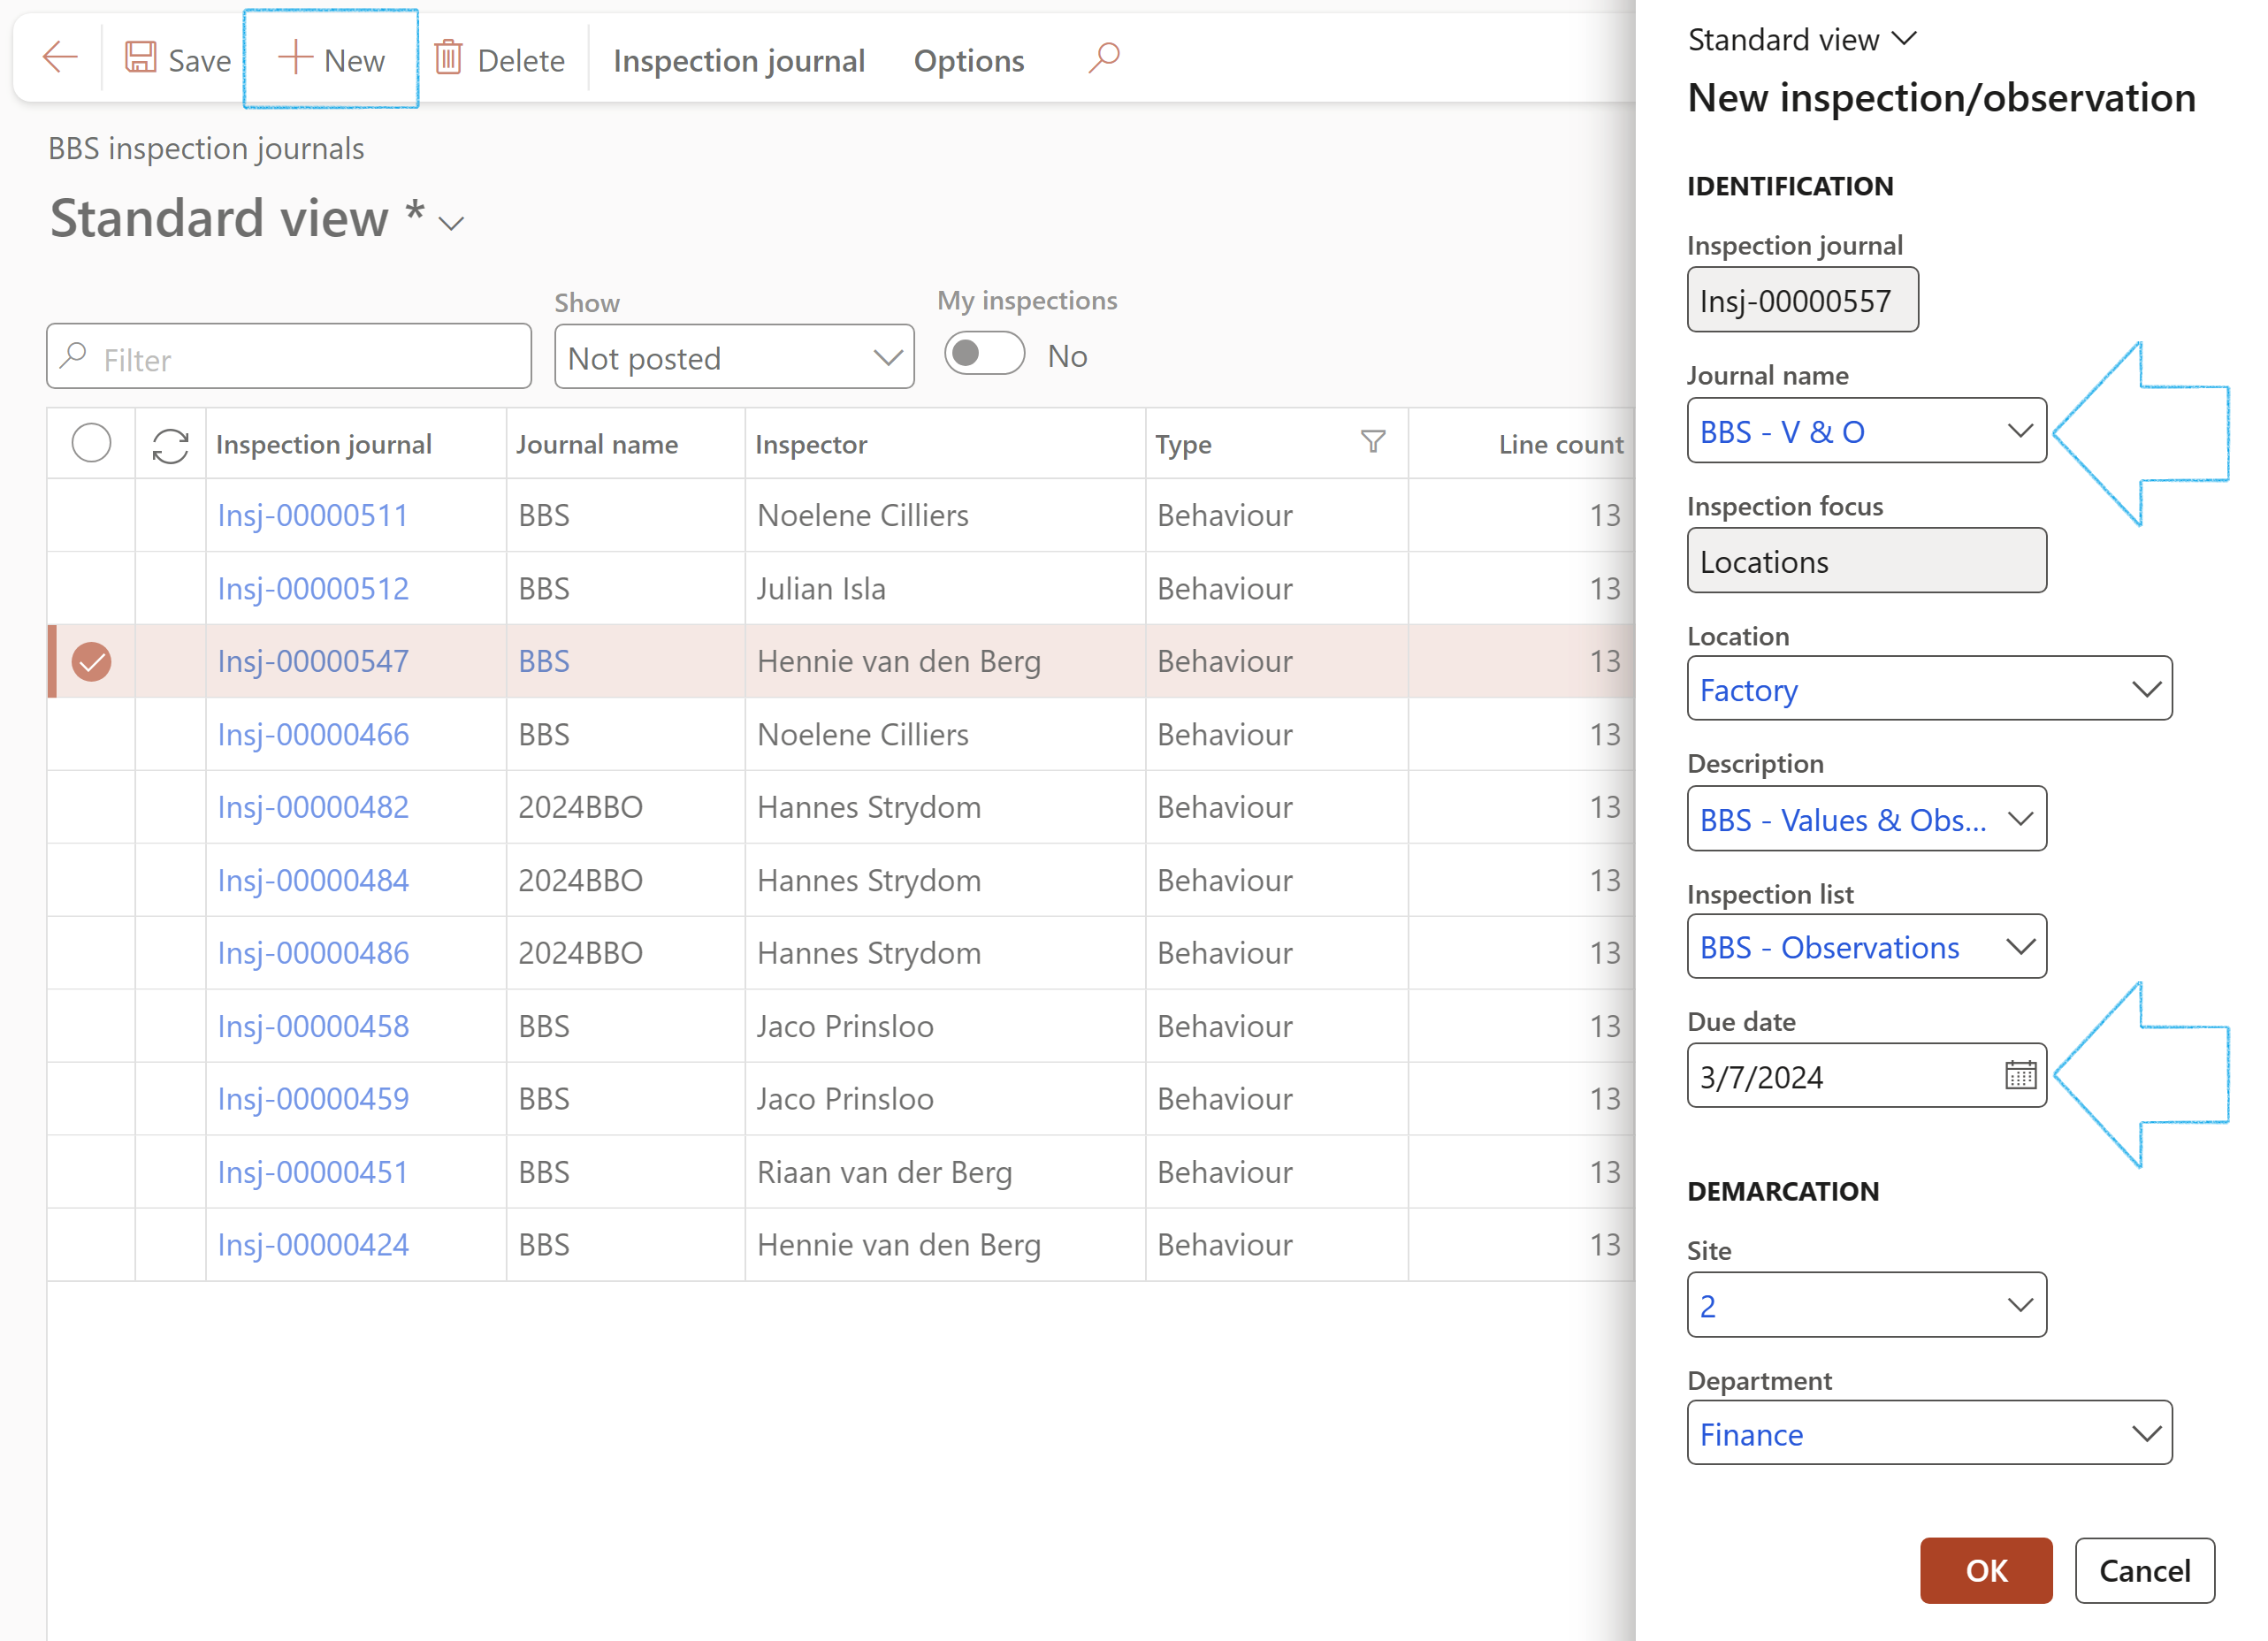
- On the Action pane, click on the New button
- On the New inspection dialog, enter the following:
- Select the relevant Journal name from the dropdown list
- Select the name of the Worker that is to be observed, from the dropdown list
- Select the Due date that this inspection will be done on
- Click on OK
The following fields will be populated According to the selection made in the Journal name field:
- Inspection focus
- Description
- Inspection list
- Site
- Department
¶ Step 14.2: Inspection journal Header
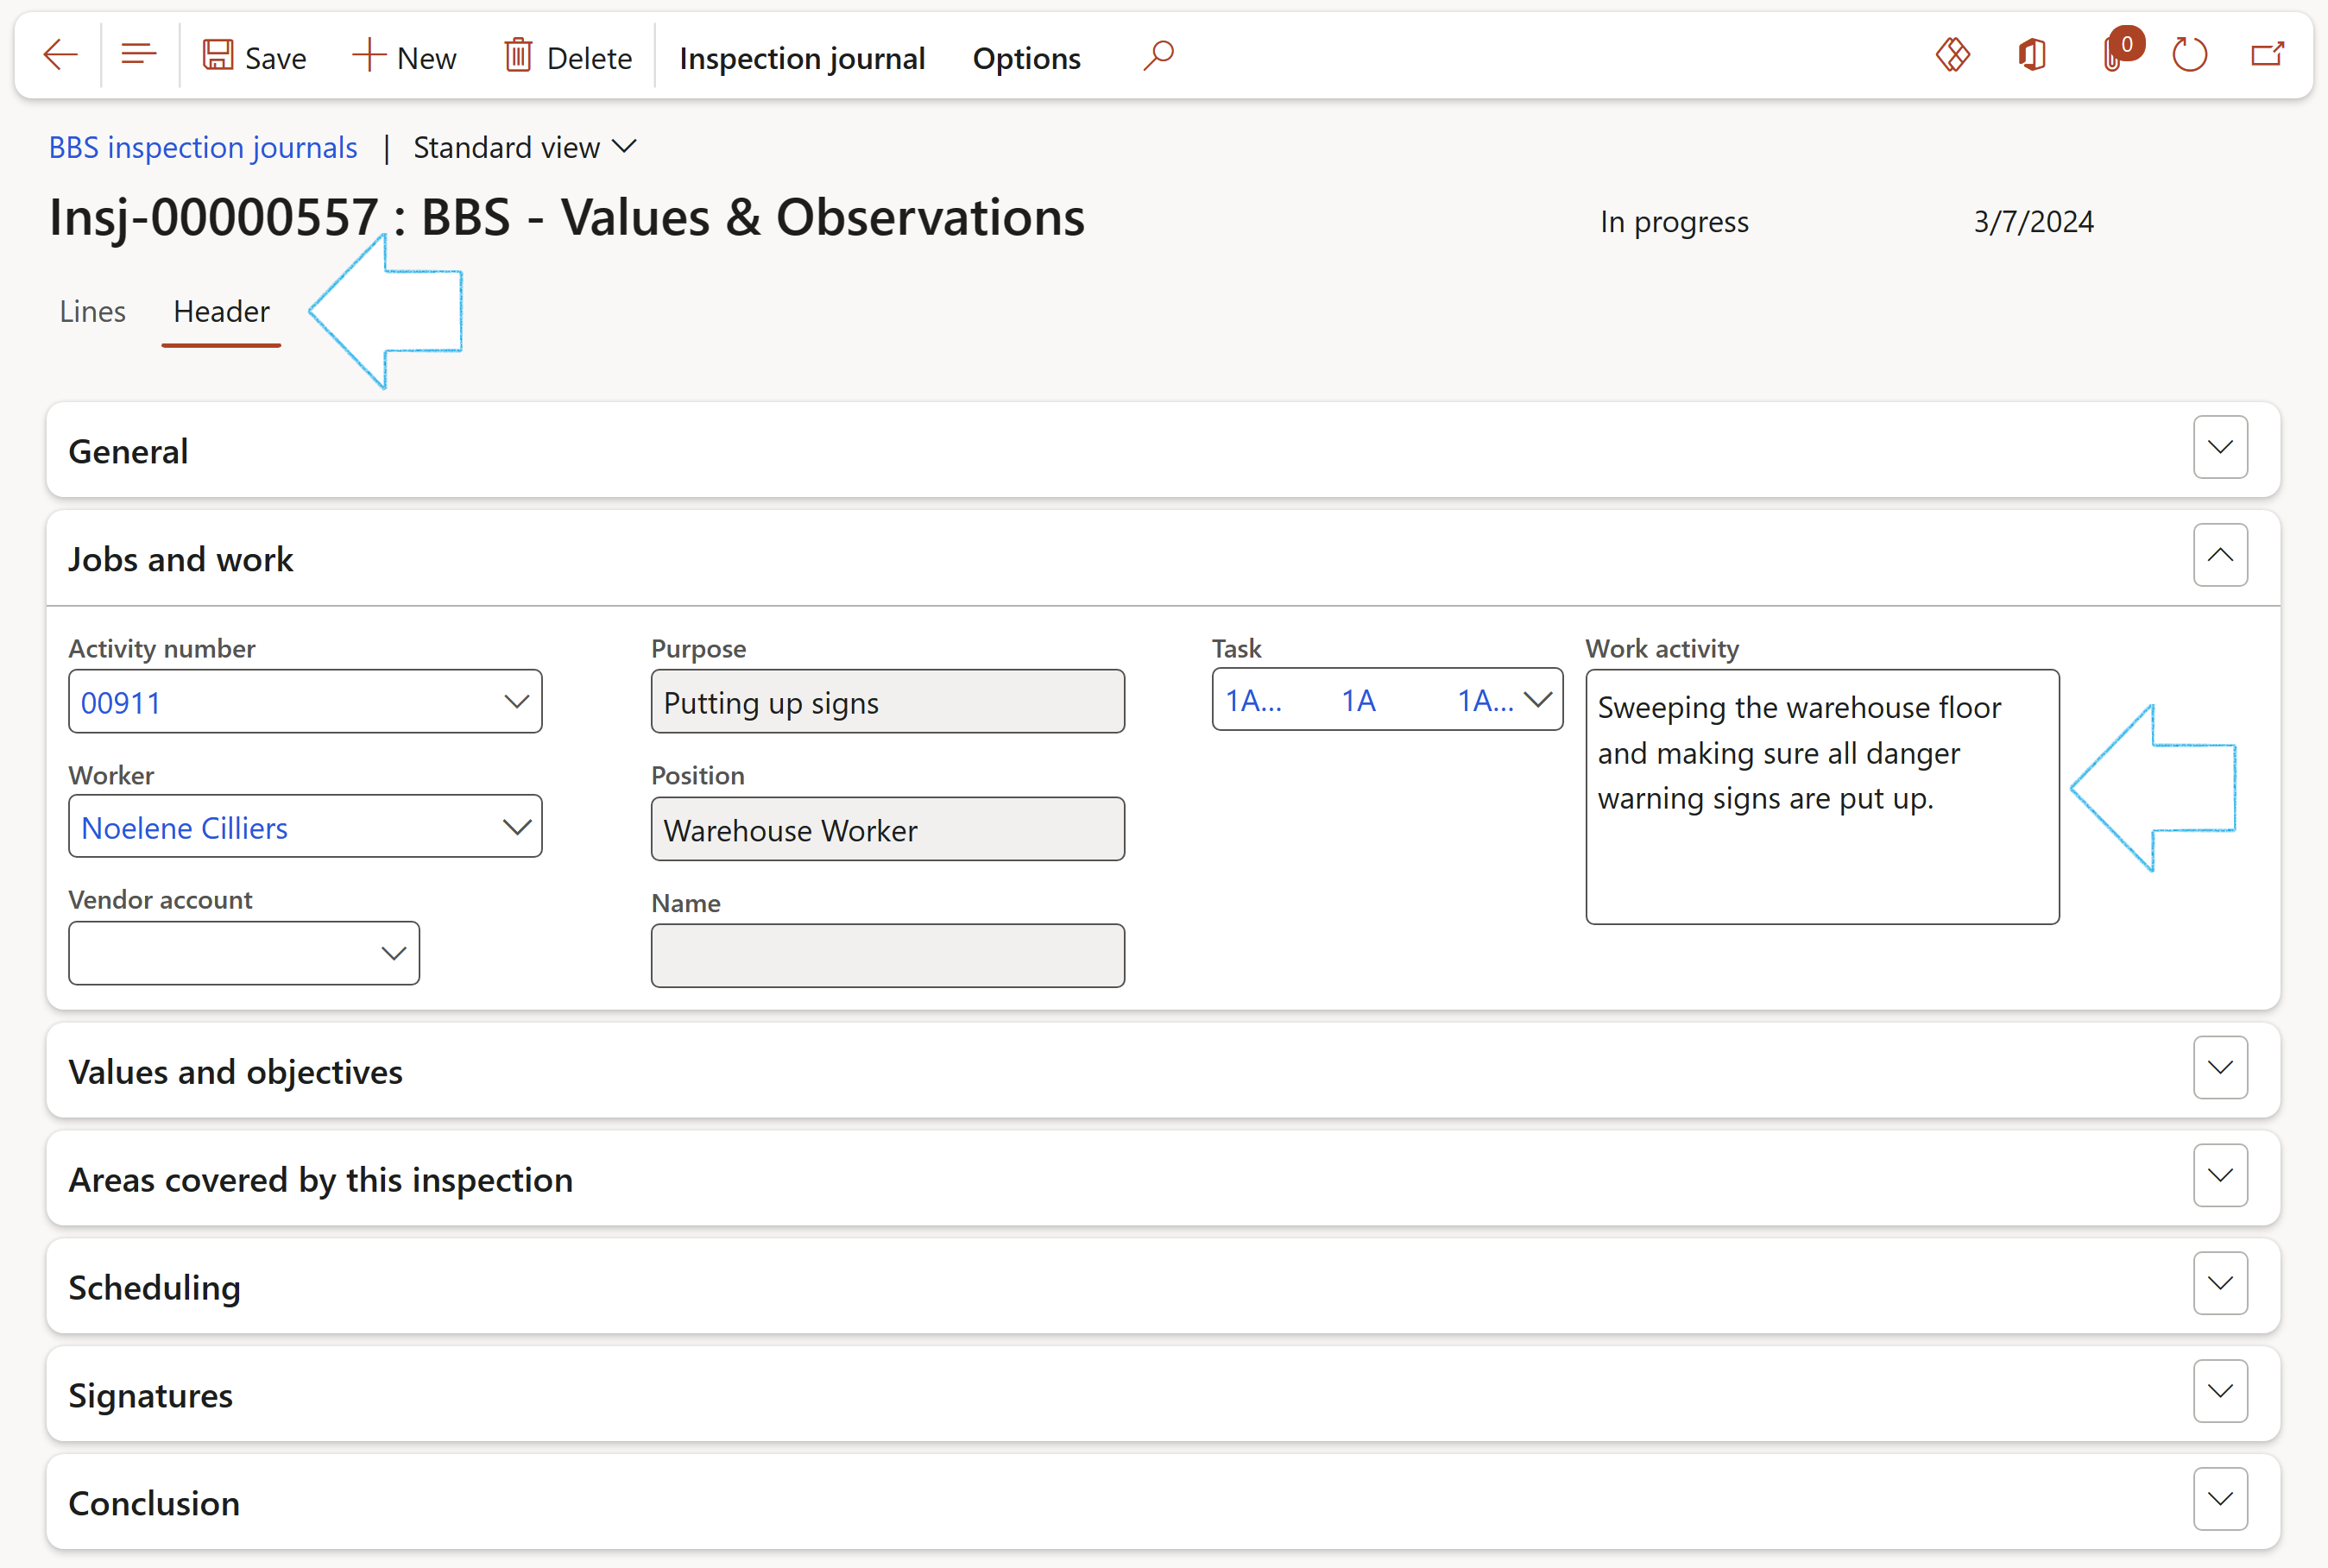
The data entered on the create dialog (described above) will populate the relevant fields on the Inspection journal Header, under the General Fast tab
- Open the Header view of the Inspection journal
- Expand the Jobs and work Fast tab
- Select the relevant Activity number from the dropdown list (Optional)
- Select the Worker responsible for the work, from the dropdown list (Optional)
- Select the relevant Task from the dropdown list (Optional)
- Enter details of the Work activity in the box provided
- Expand the Values and objectives Fast tab
- Answer the questions
- Select the relevant Behaviour KPI from the dropdown list
- Click on the Commit button to commit the answers to the database
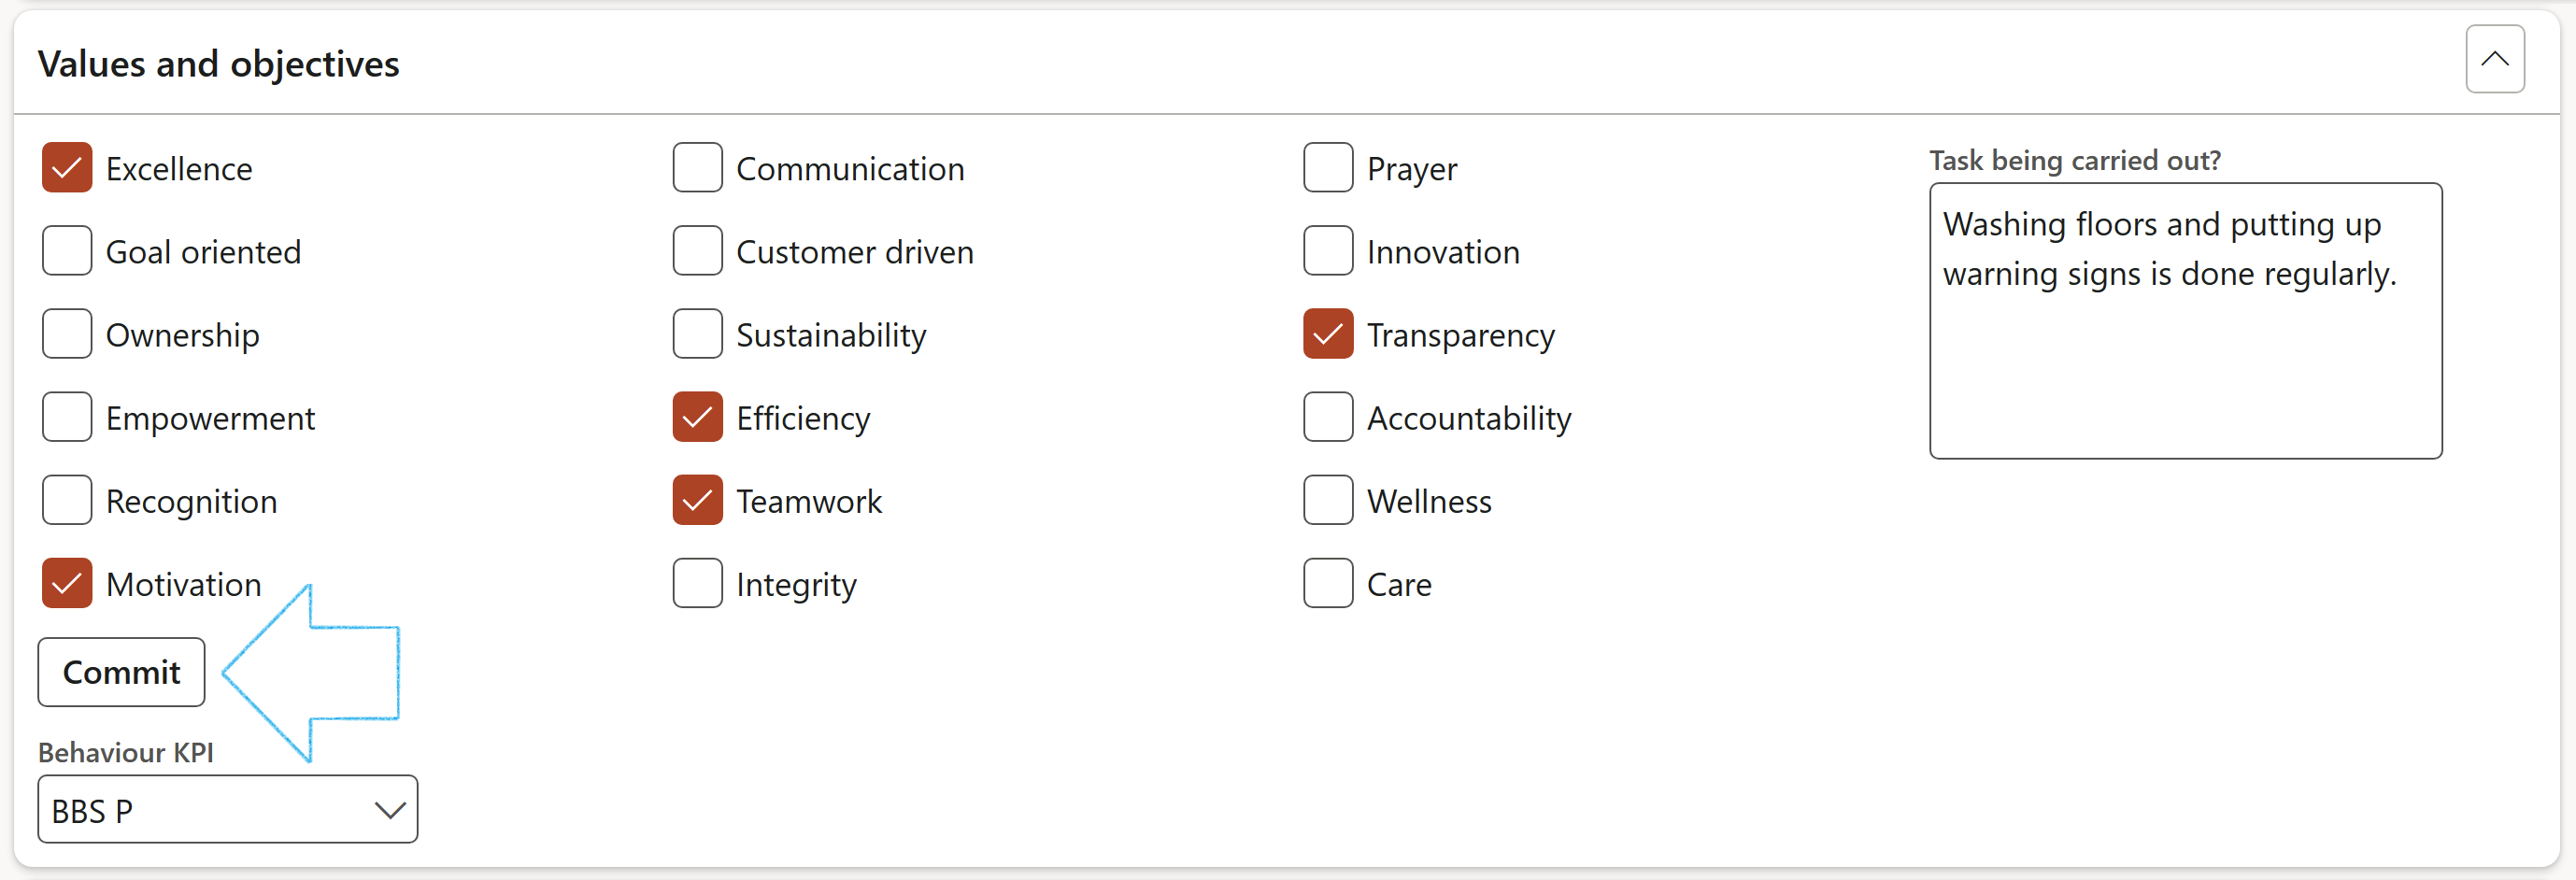
The questions displayed under this Fast tab are the ones selected on the Journal name, General Fast tab, in the Questions and answers group field
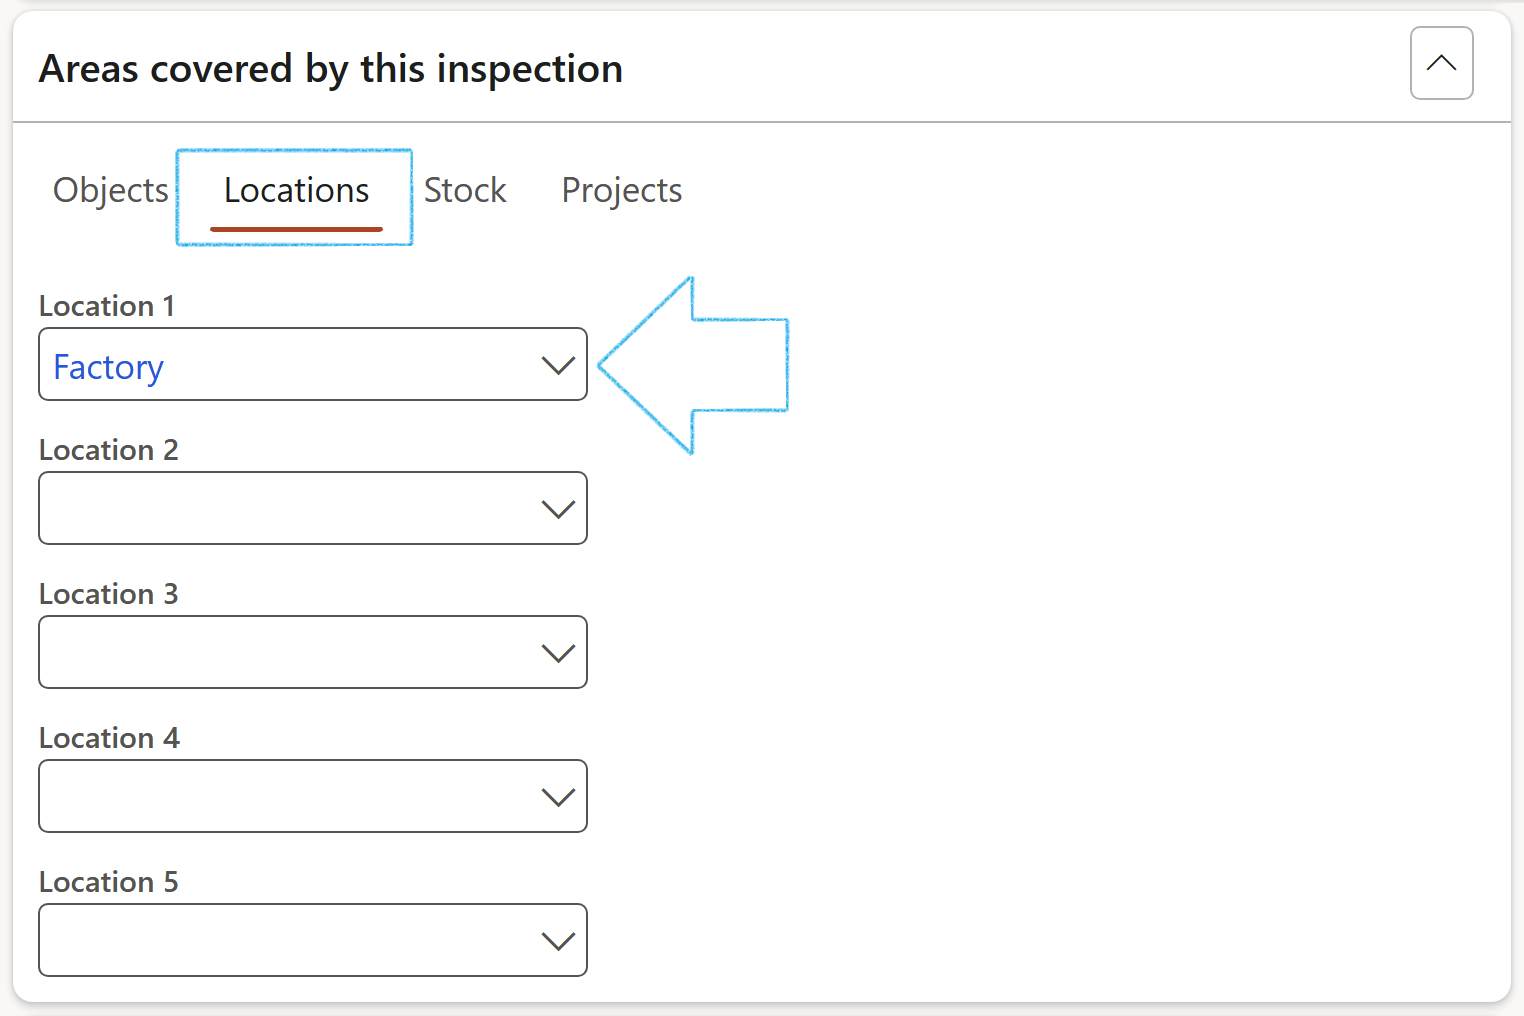
- Expand the Areas covered by this inspection Fast tab
- Open the Locations Index tab
- In the Location 1 field, select the relevant location from the dropdown list (If the location was specified on the Journal name, it will default to this field)
The Inspector is by default the logged in user
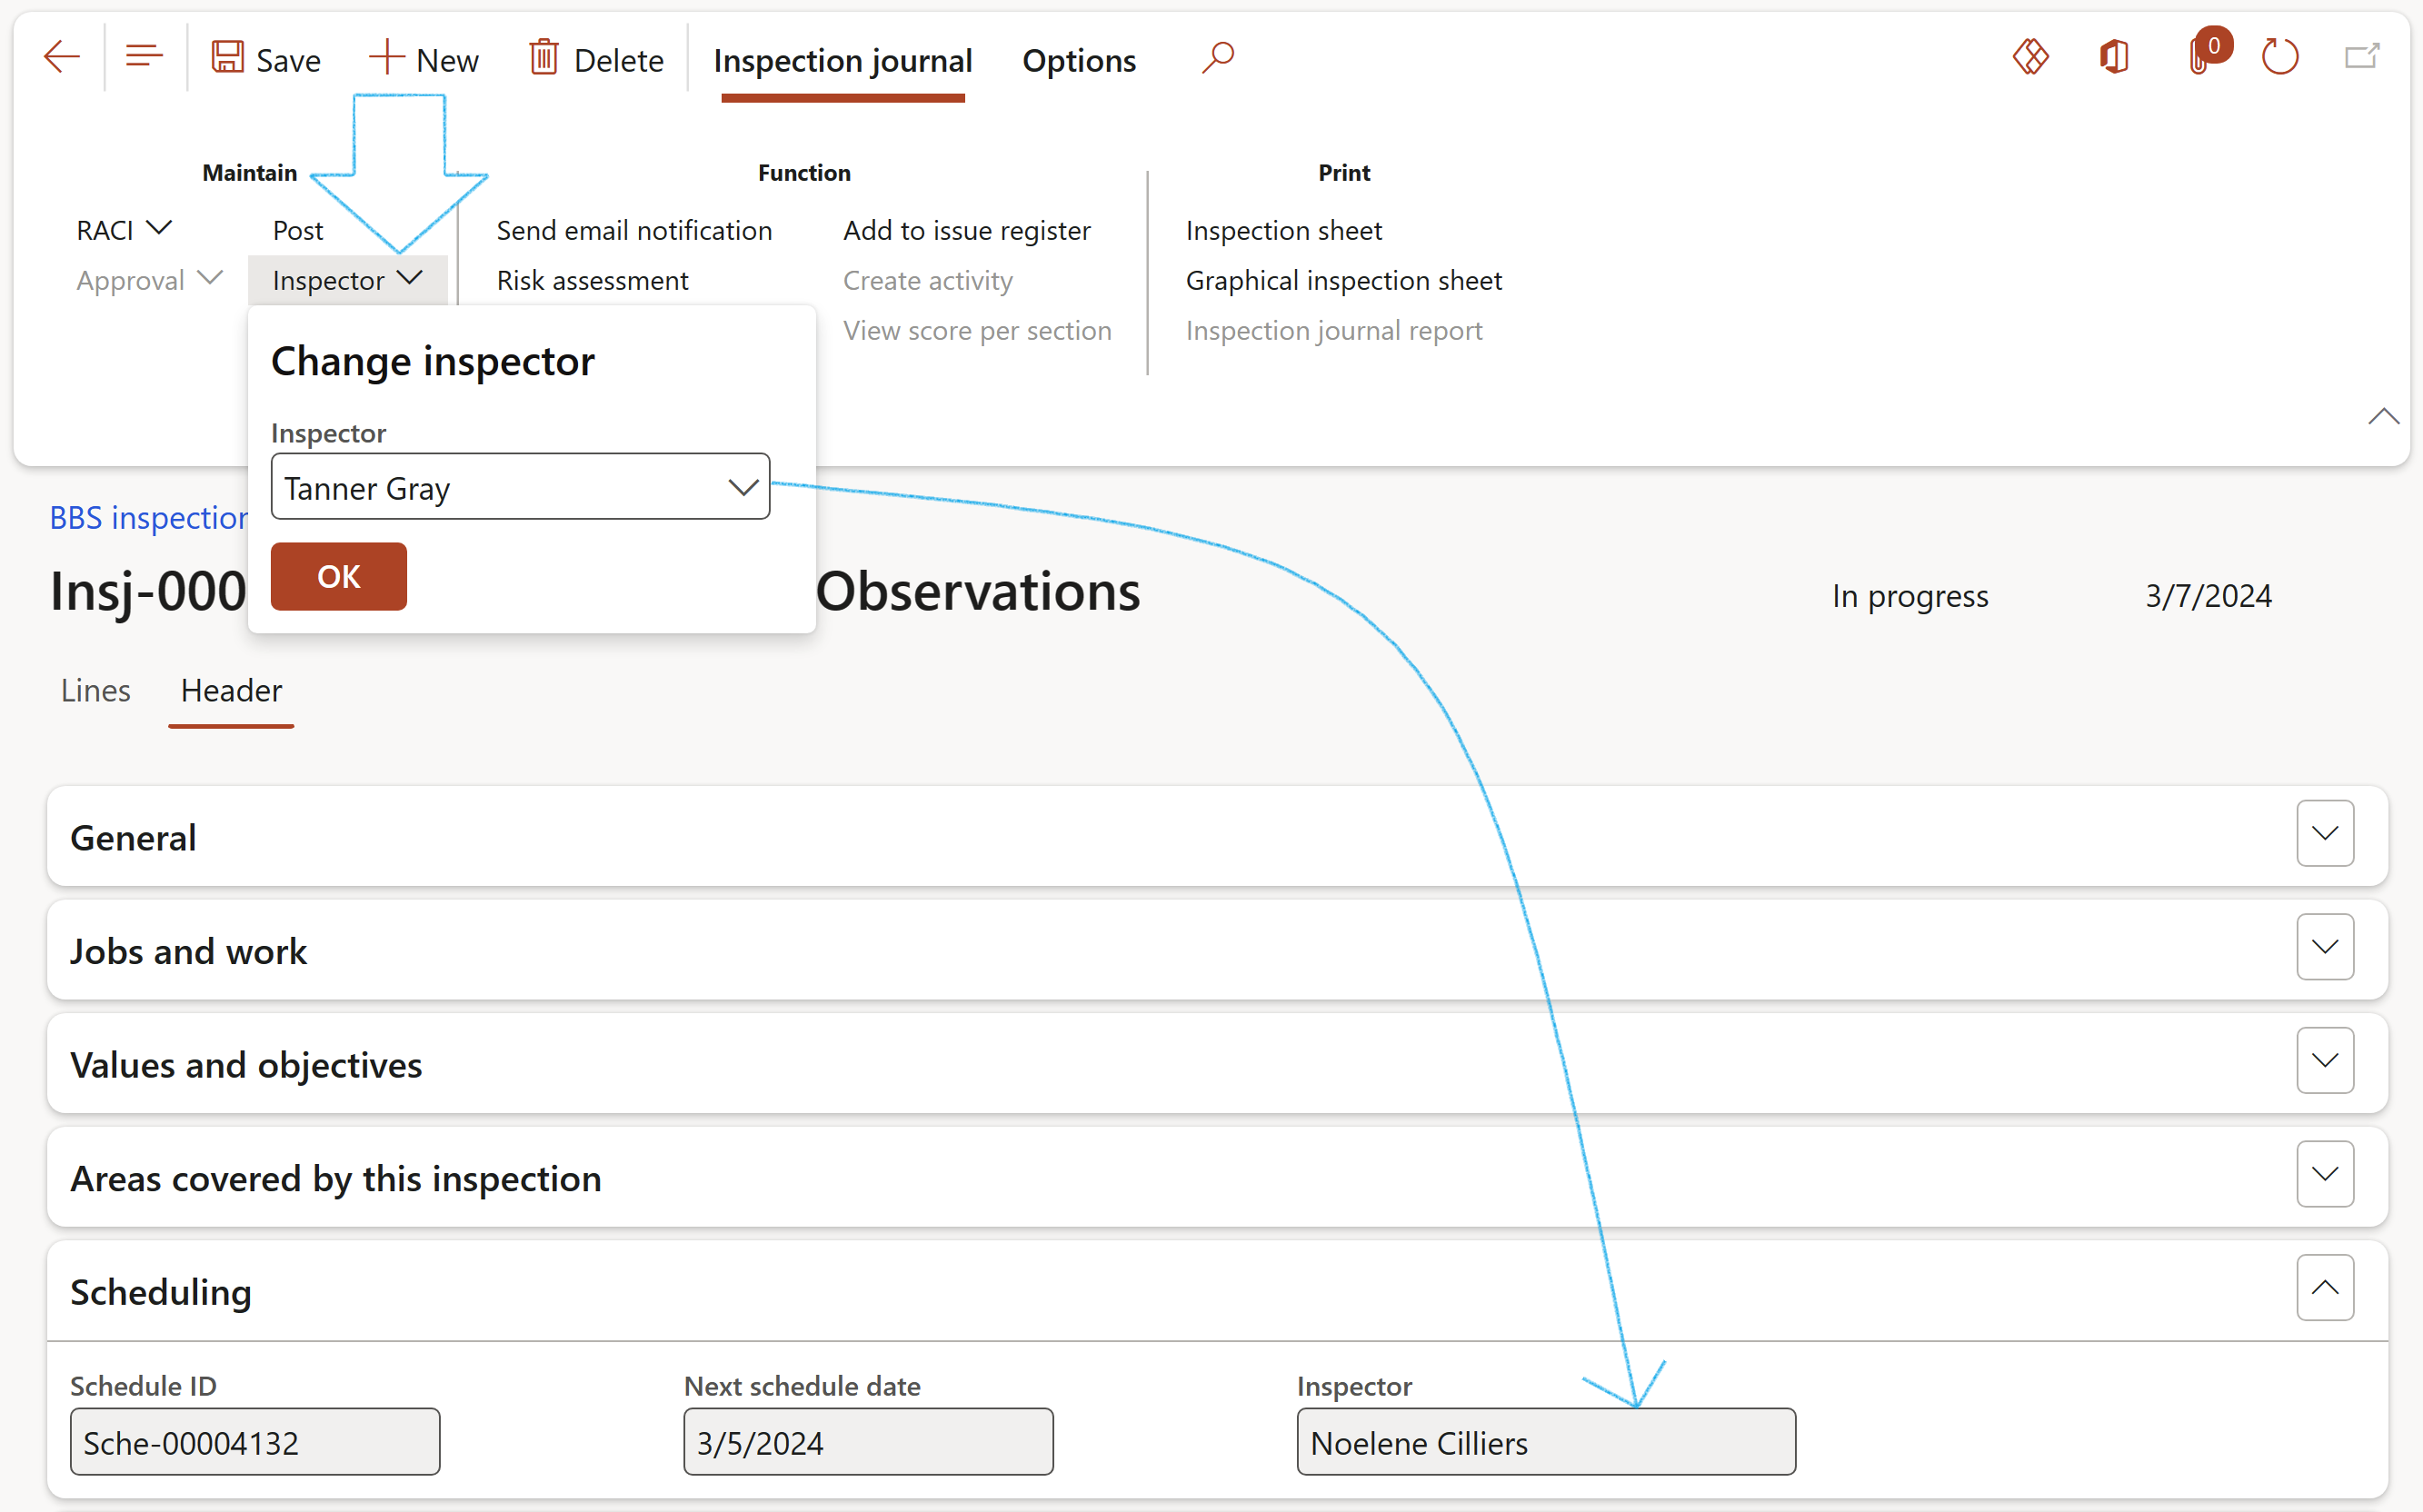
To change the Inspector:
- Expand the Scheduling Fast tab
- On the Action pane, in the Function group, click on the Inspector button
- Select the required Inspector from the dropdown list
- Click OK
- Expand the Signatures fast tab
- In the Button strip, click on the Add button
- Select the relevant Signature type from the dropdown list
- Select the relevant Worker from the dropdown list
OR
- Select the relevant Vendor from the dropdown list
- Enter the Contractor employee name
- Enter the date on which the inspections journal was signed
- Indicate whether the following has been done:
- Notified (Email sent)
- Risk assessed
- Findings checked
- Inspection completed
- Activities completed

It is normal to raise findings such as a non-conformance/issue when an inspection is executed. Thus, when an inspector does an inspection, he can then formally raise a non-conformance/issue
- Expand the Conclusion Fast tab
- Open the Lessons learned index tab
- Enter the Lessons learned from this incident in the textbox provided
- Enter details of the Action taken by the employer to prevent the recurrence of a similar incident in the textbox provided
- On the Action pane, in the Findings group, click on the Add to issue register button
- When the lessons learnt have been submitted to an Issue register, the details can be found under the Issue register field group
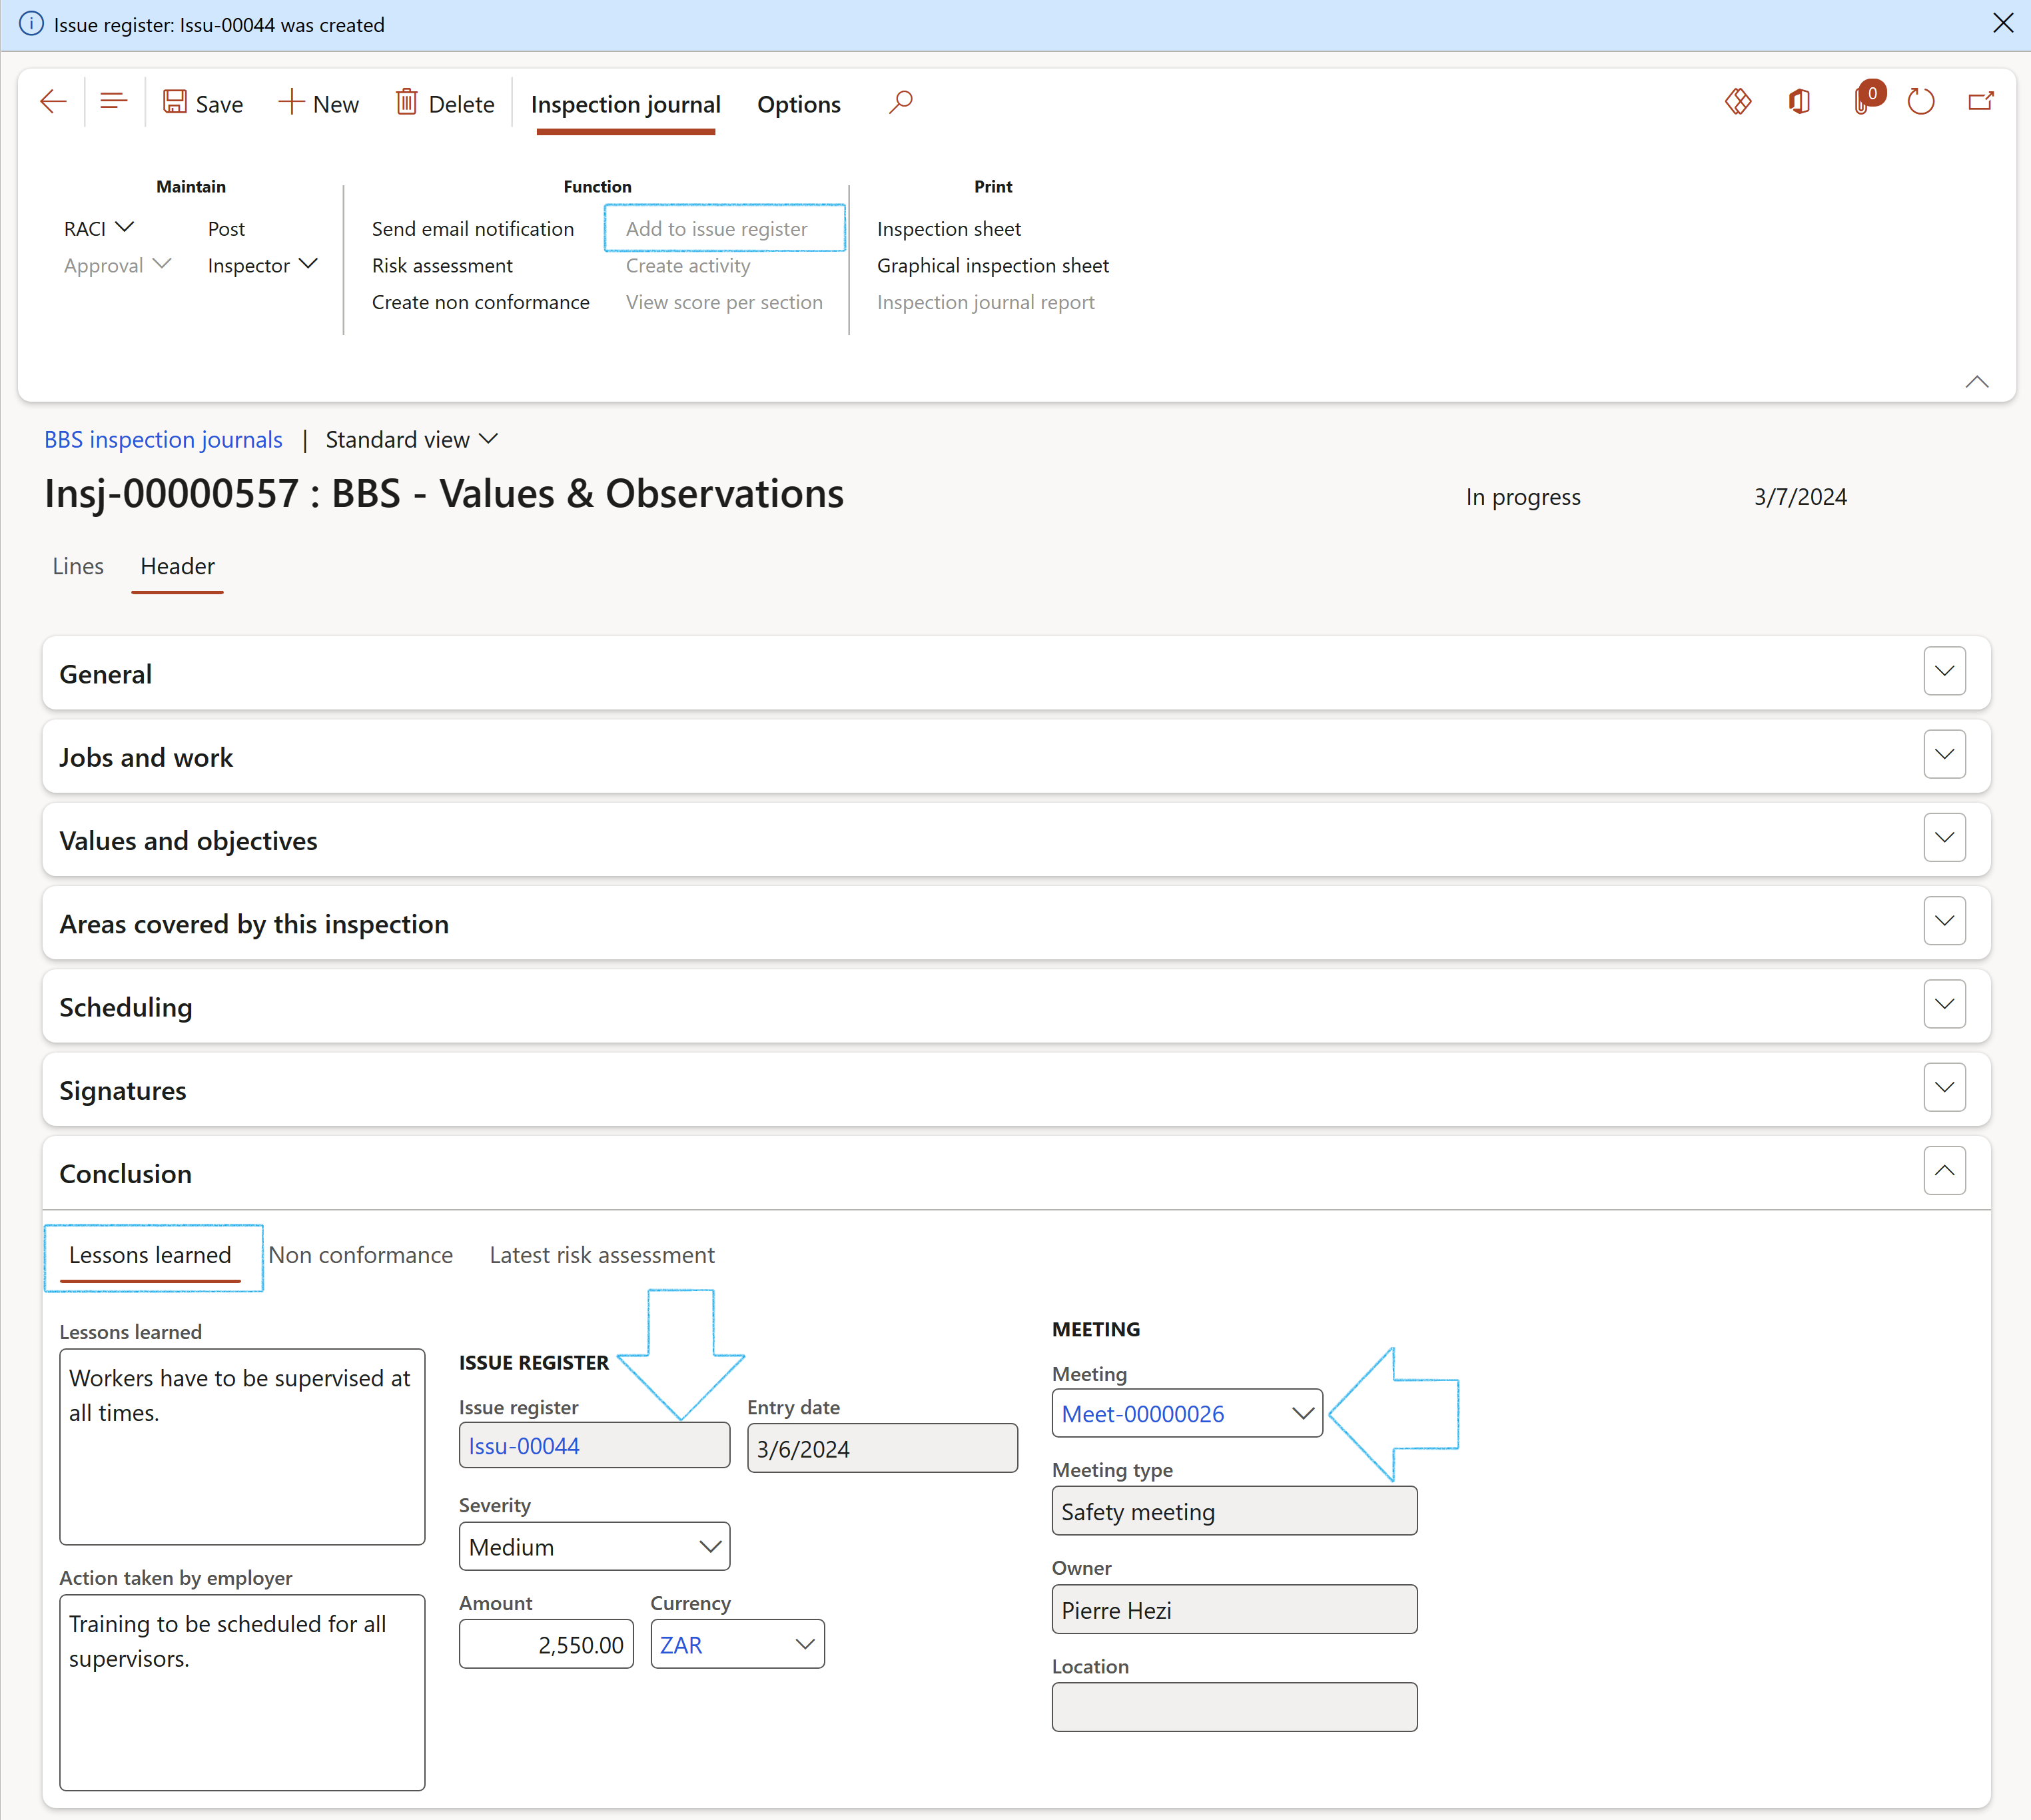
Safety meetings that were held can be referenced under the Lessons learned Index tab
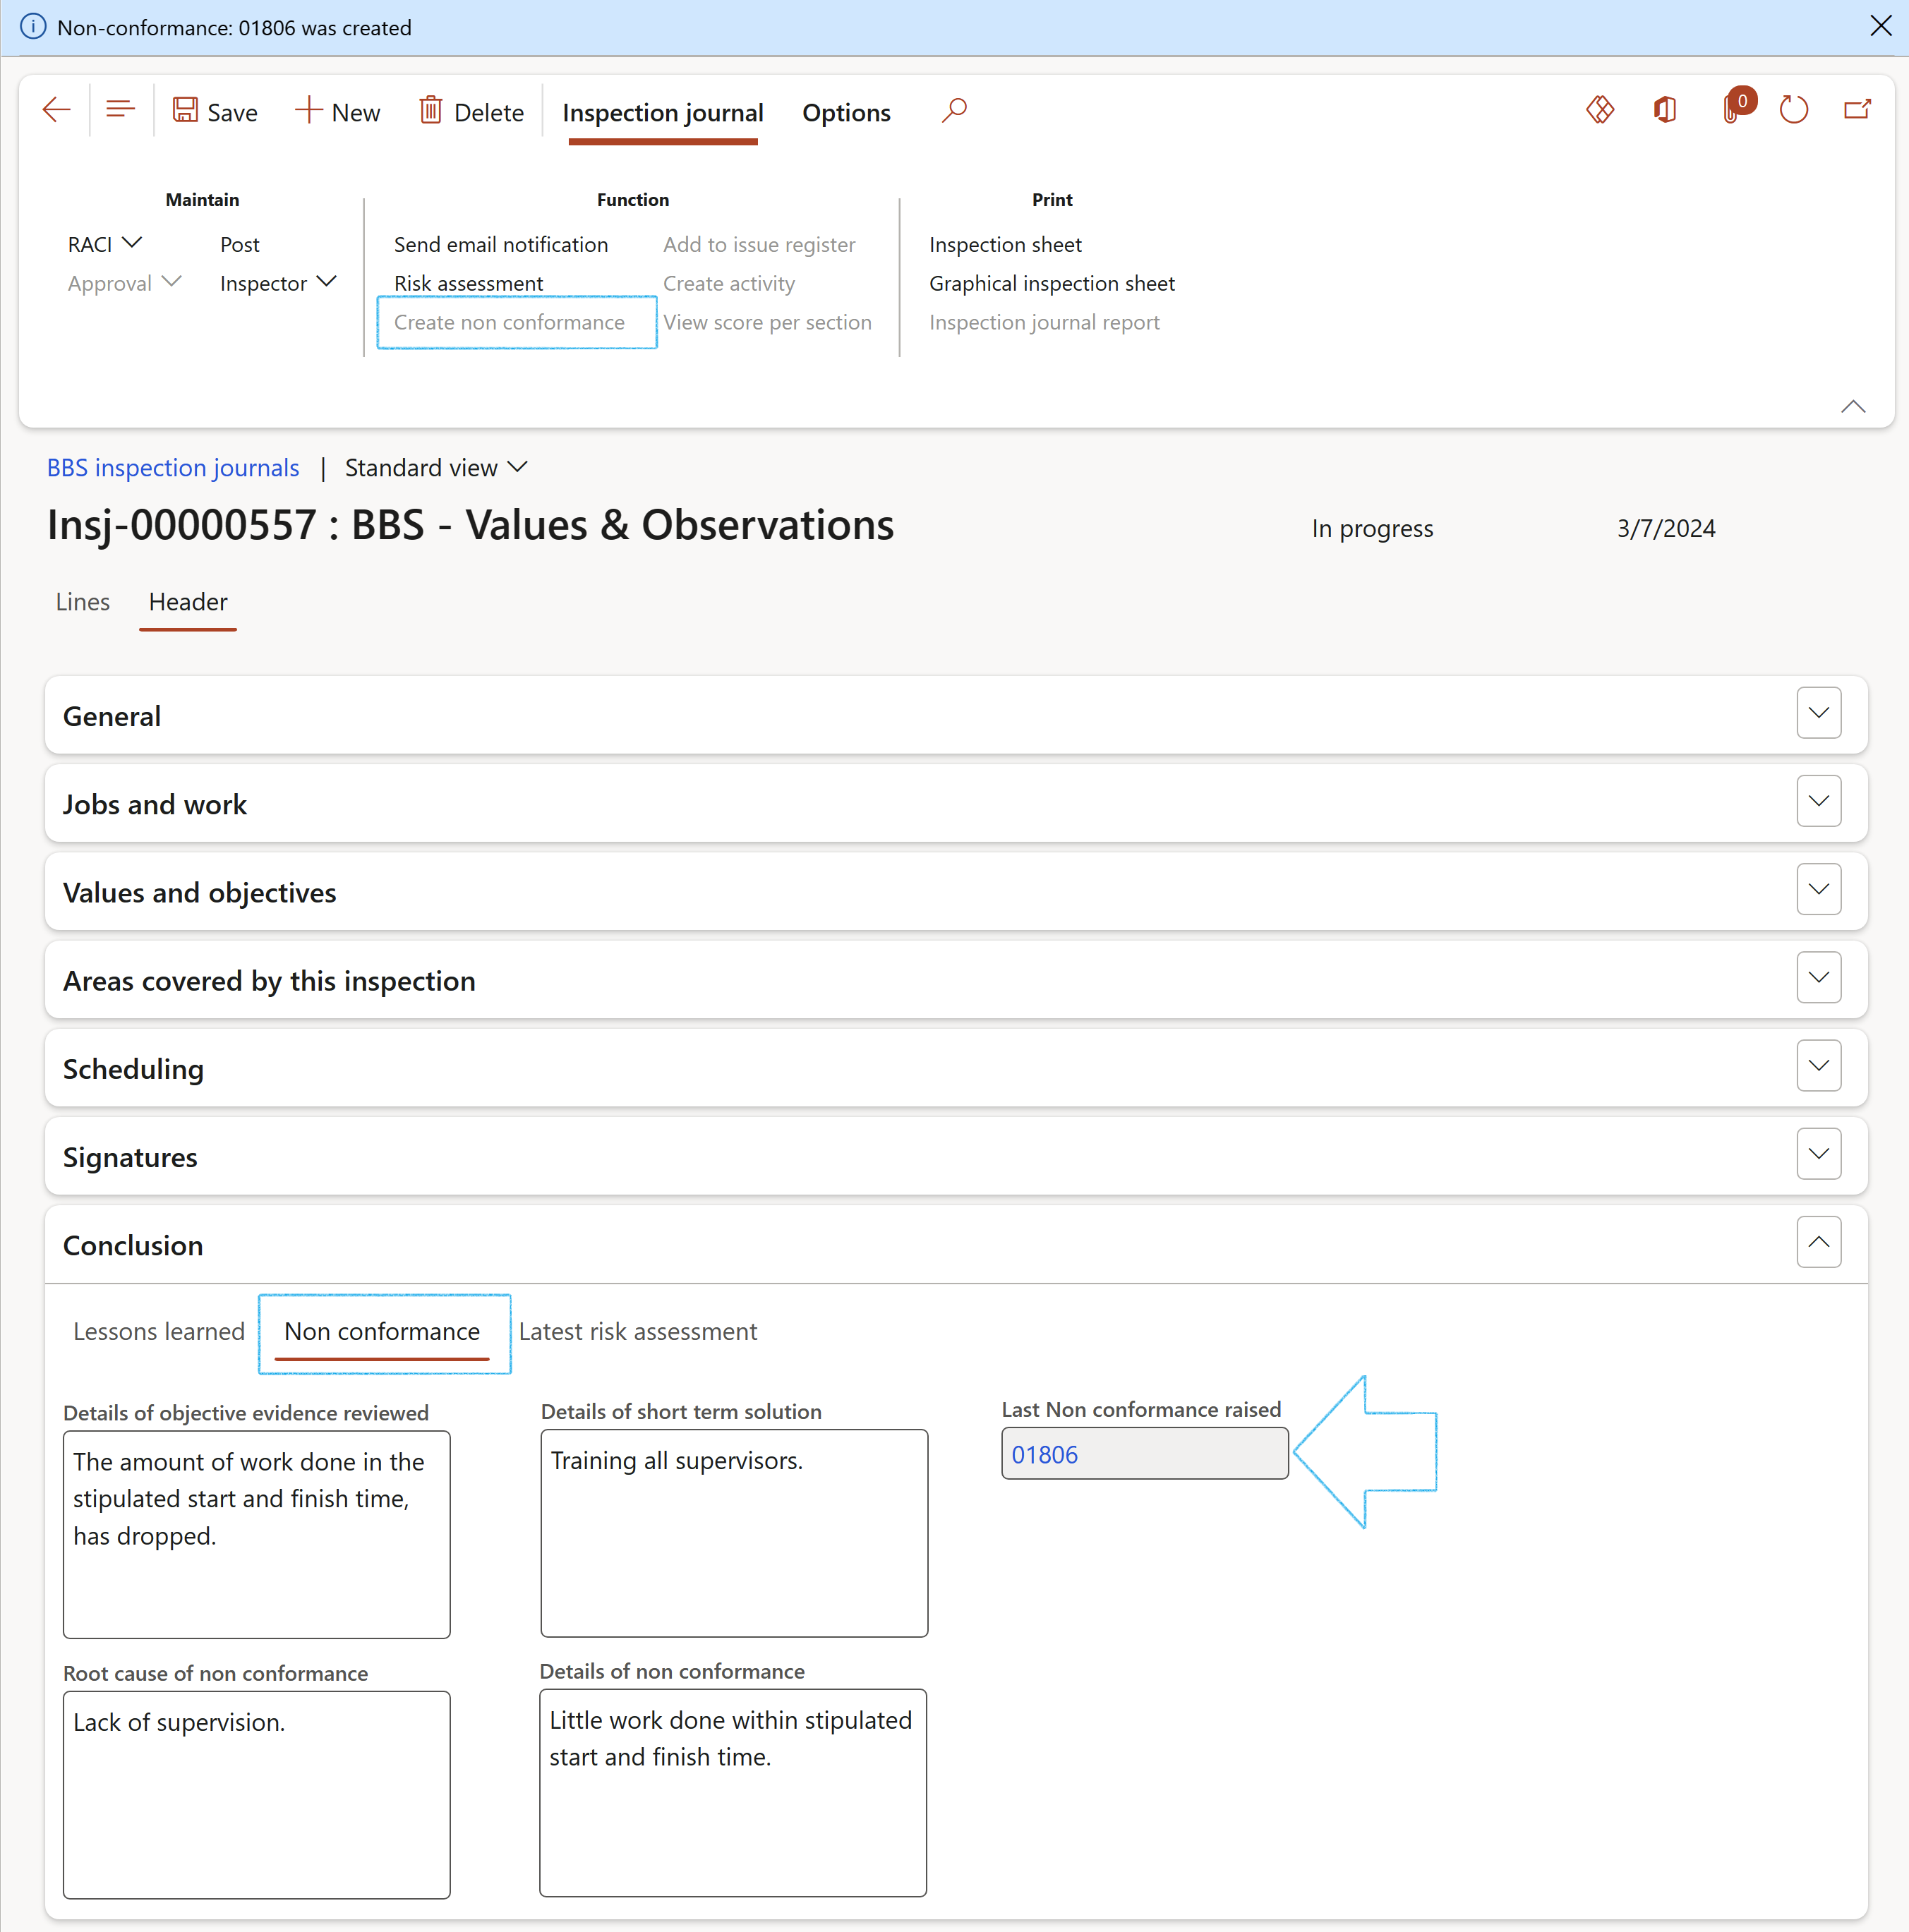
- Open the Non-conformance Index tab
- Type comments in the note boxes for:
- Details of objective evidence received
- Root cause of non conformance
- Details of short-term solution
- Details of non conformance
- On the Action pane, in the Findings group, click on the Create non conformance button
- Open the Latest risk assessment Index tab
Details of the latest risk assessment done on the inspection, will be displayed here.
To perform a risk assessment, click on the Risk assessment button in the Action pane.

¶ Step 14.3: Inspection journal Lines
Use this form to do feedback on the inspection lines
- Open the Lines view
- Under the Lines Fast tab:
The Inspection lines selected on the Journal name will be displayed here
Use the Show/hide button in the Button strip to show/hide certain columns in the grid

The user has the option to show/hide the following under the Lines Fast tab:
- Categories selected on the Inspection list
- Inspection date
- Start and end time
- Non conformance
If you want to add lines:
- In the Button strip, click on the Add button
- Enter the Inspection date
- Enter the Start time and End time
- Enter a Description
- Select the relevant Hazard from the dropdown list
- Do the feedback for each line

For the feedback:
- If a Hazard is selected on a line, the feedback dropdown list will give the user the option to select Safe or Unsafe
- If a Hazard is not selected on a line, the feedback dropdown list will give the user the option to select Yes / No / N/A
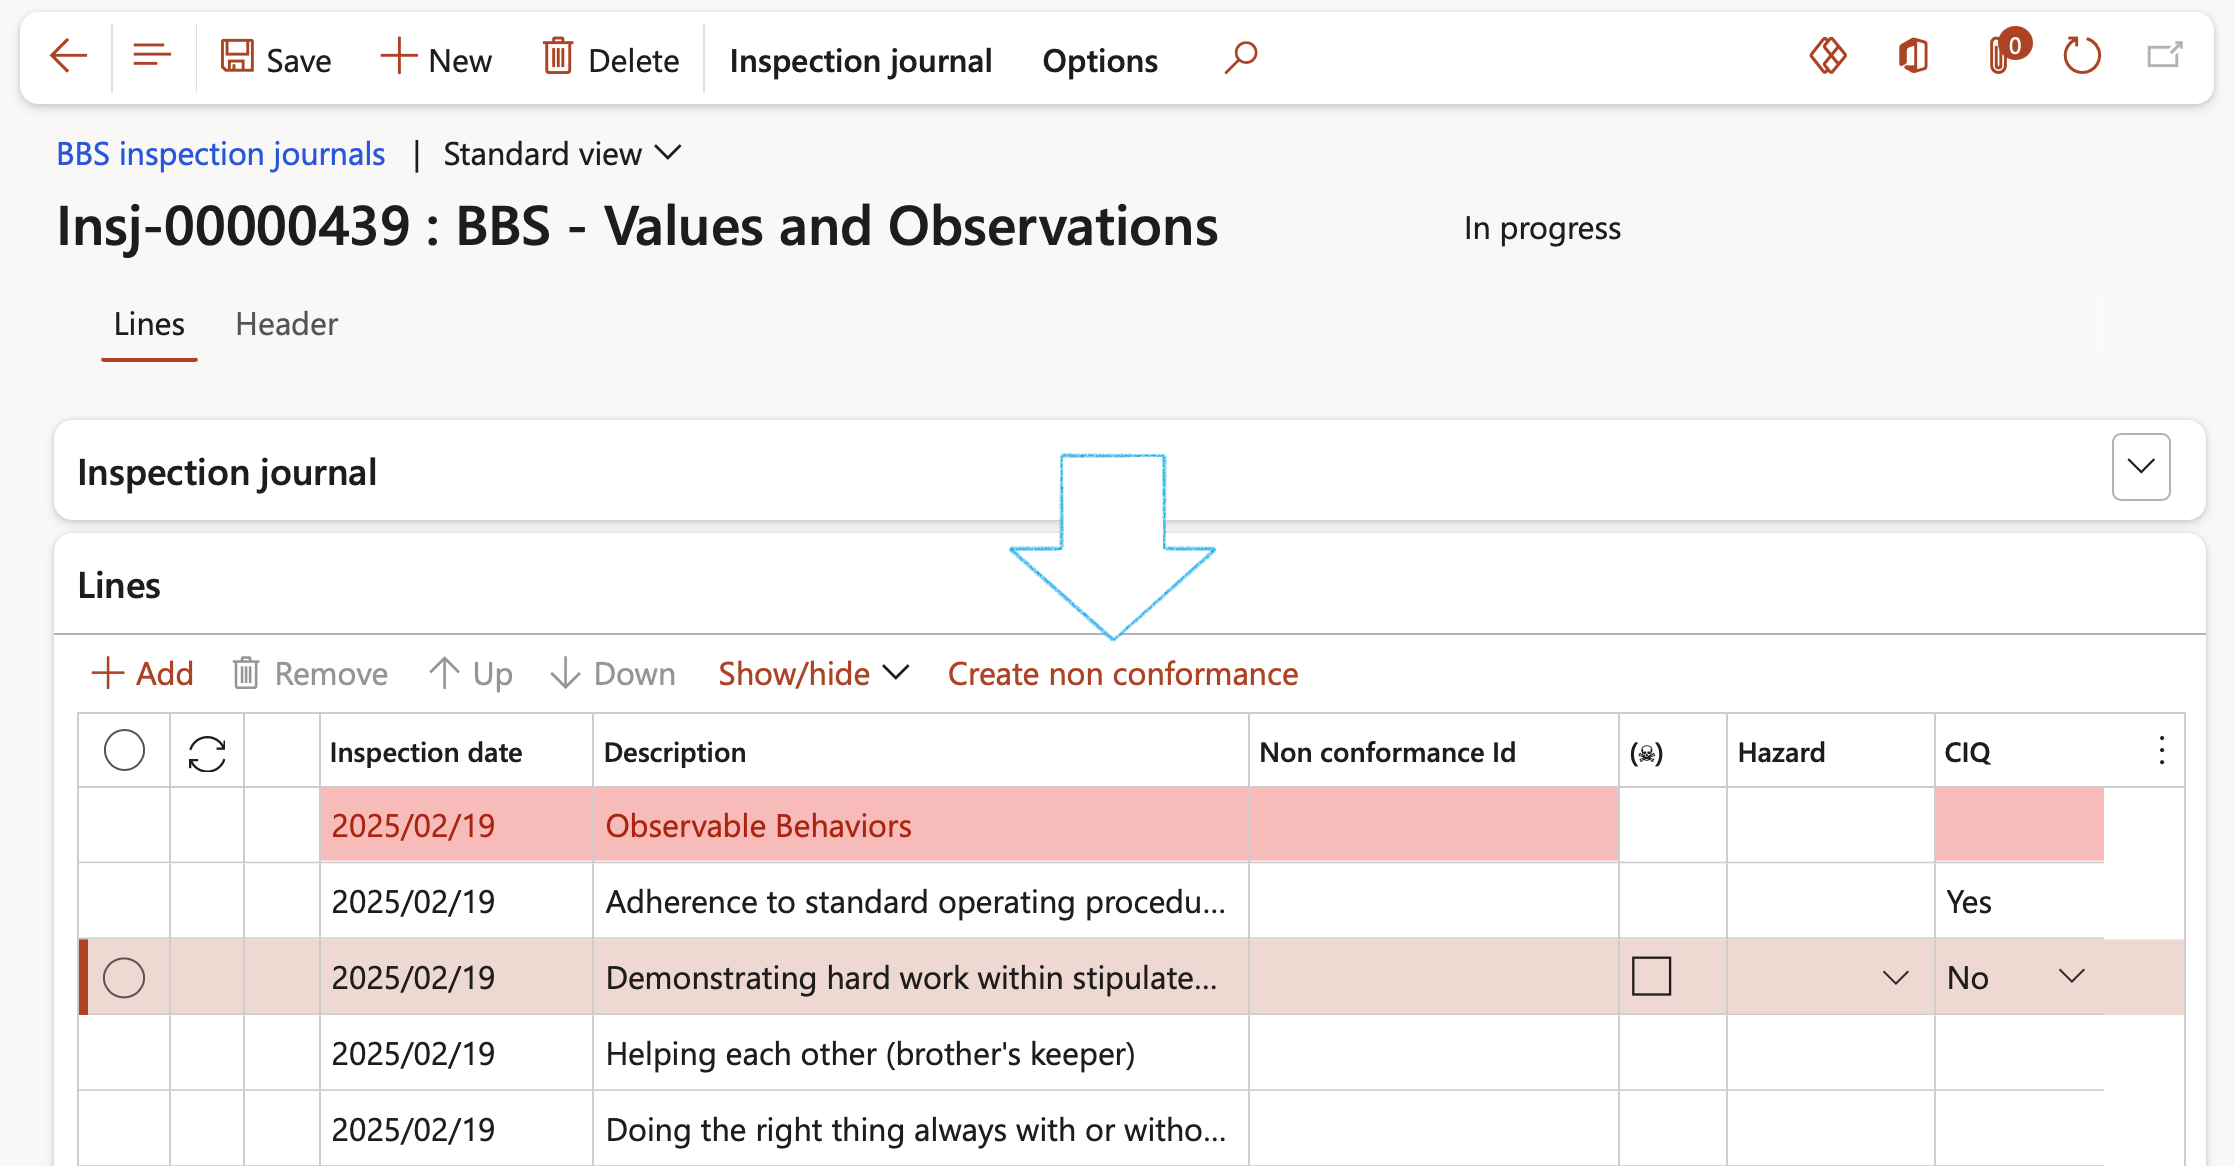
To create a non conformance on an inspection line:
- Select the relevant line under the Lines section
- In the Button strip, click on the Create non conformance button
- Enter the relevant detail on the Create non conformance dialog
- Click on the OK button
- The non conformance will be referenced on the relevant line in the Non conformance ID column
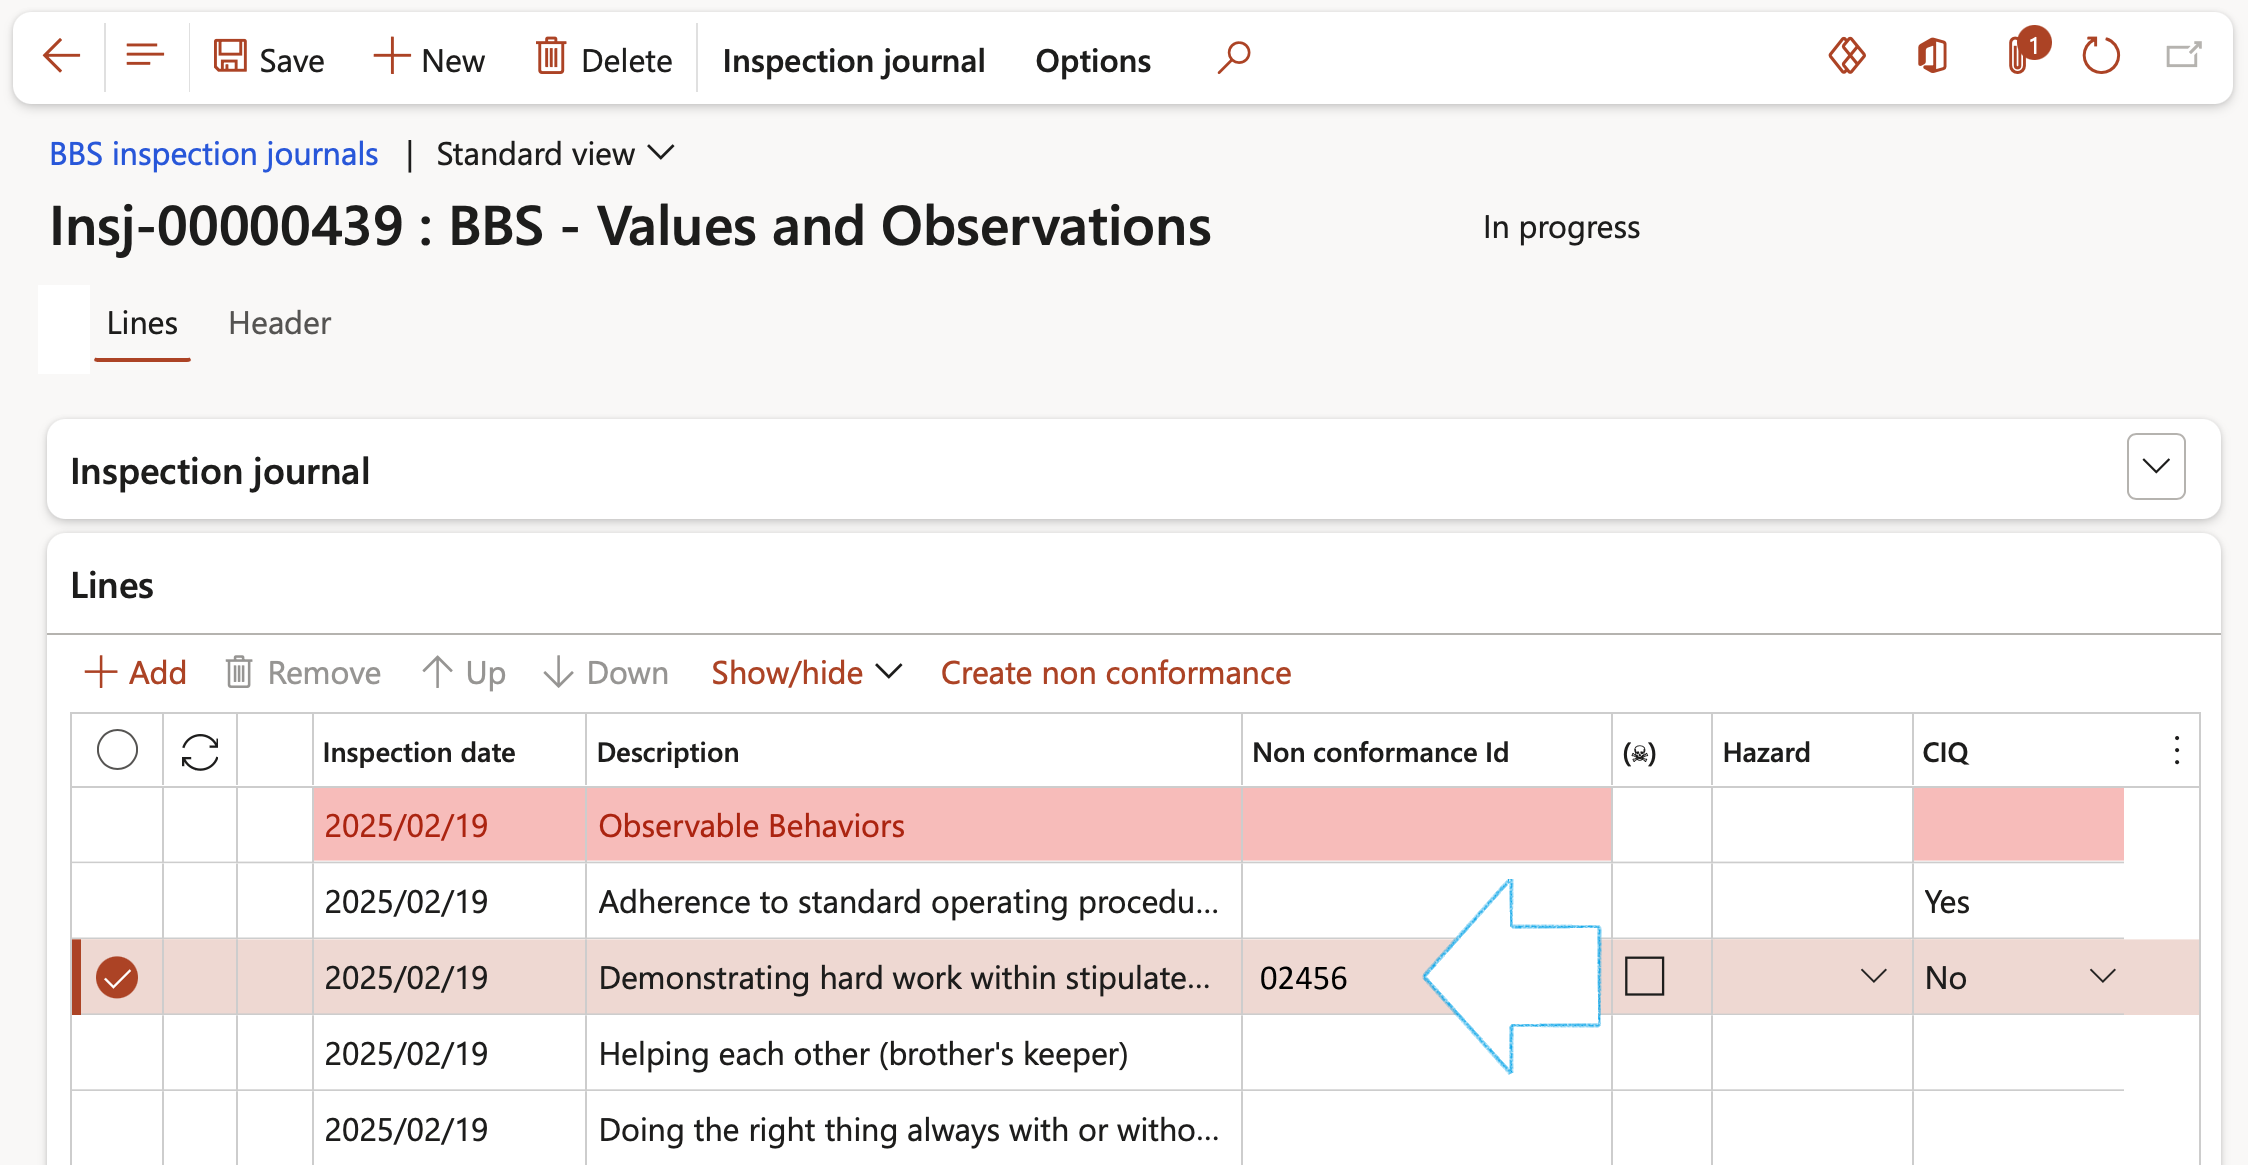
To approve and close a non conformance, go to HSE > Non conformances
¶ Step 14.3.1: The Line details Fast tab
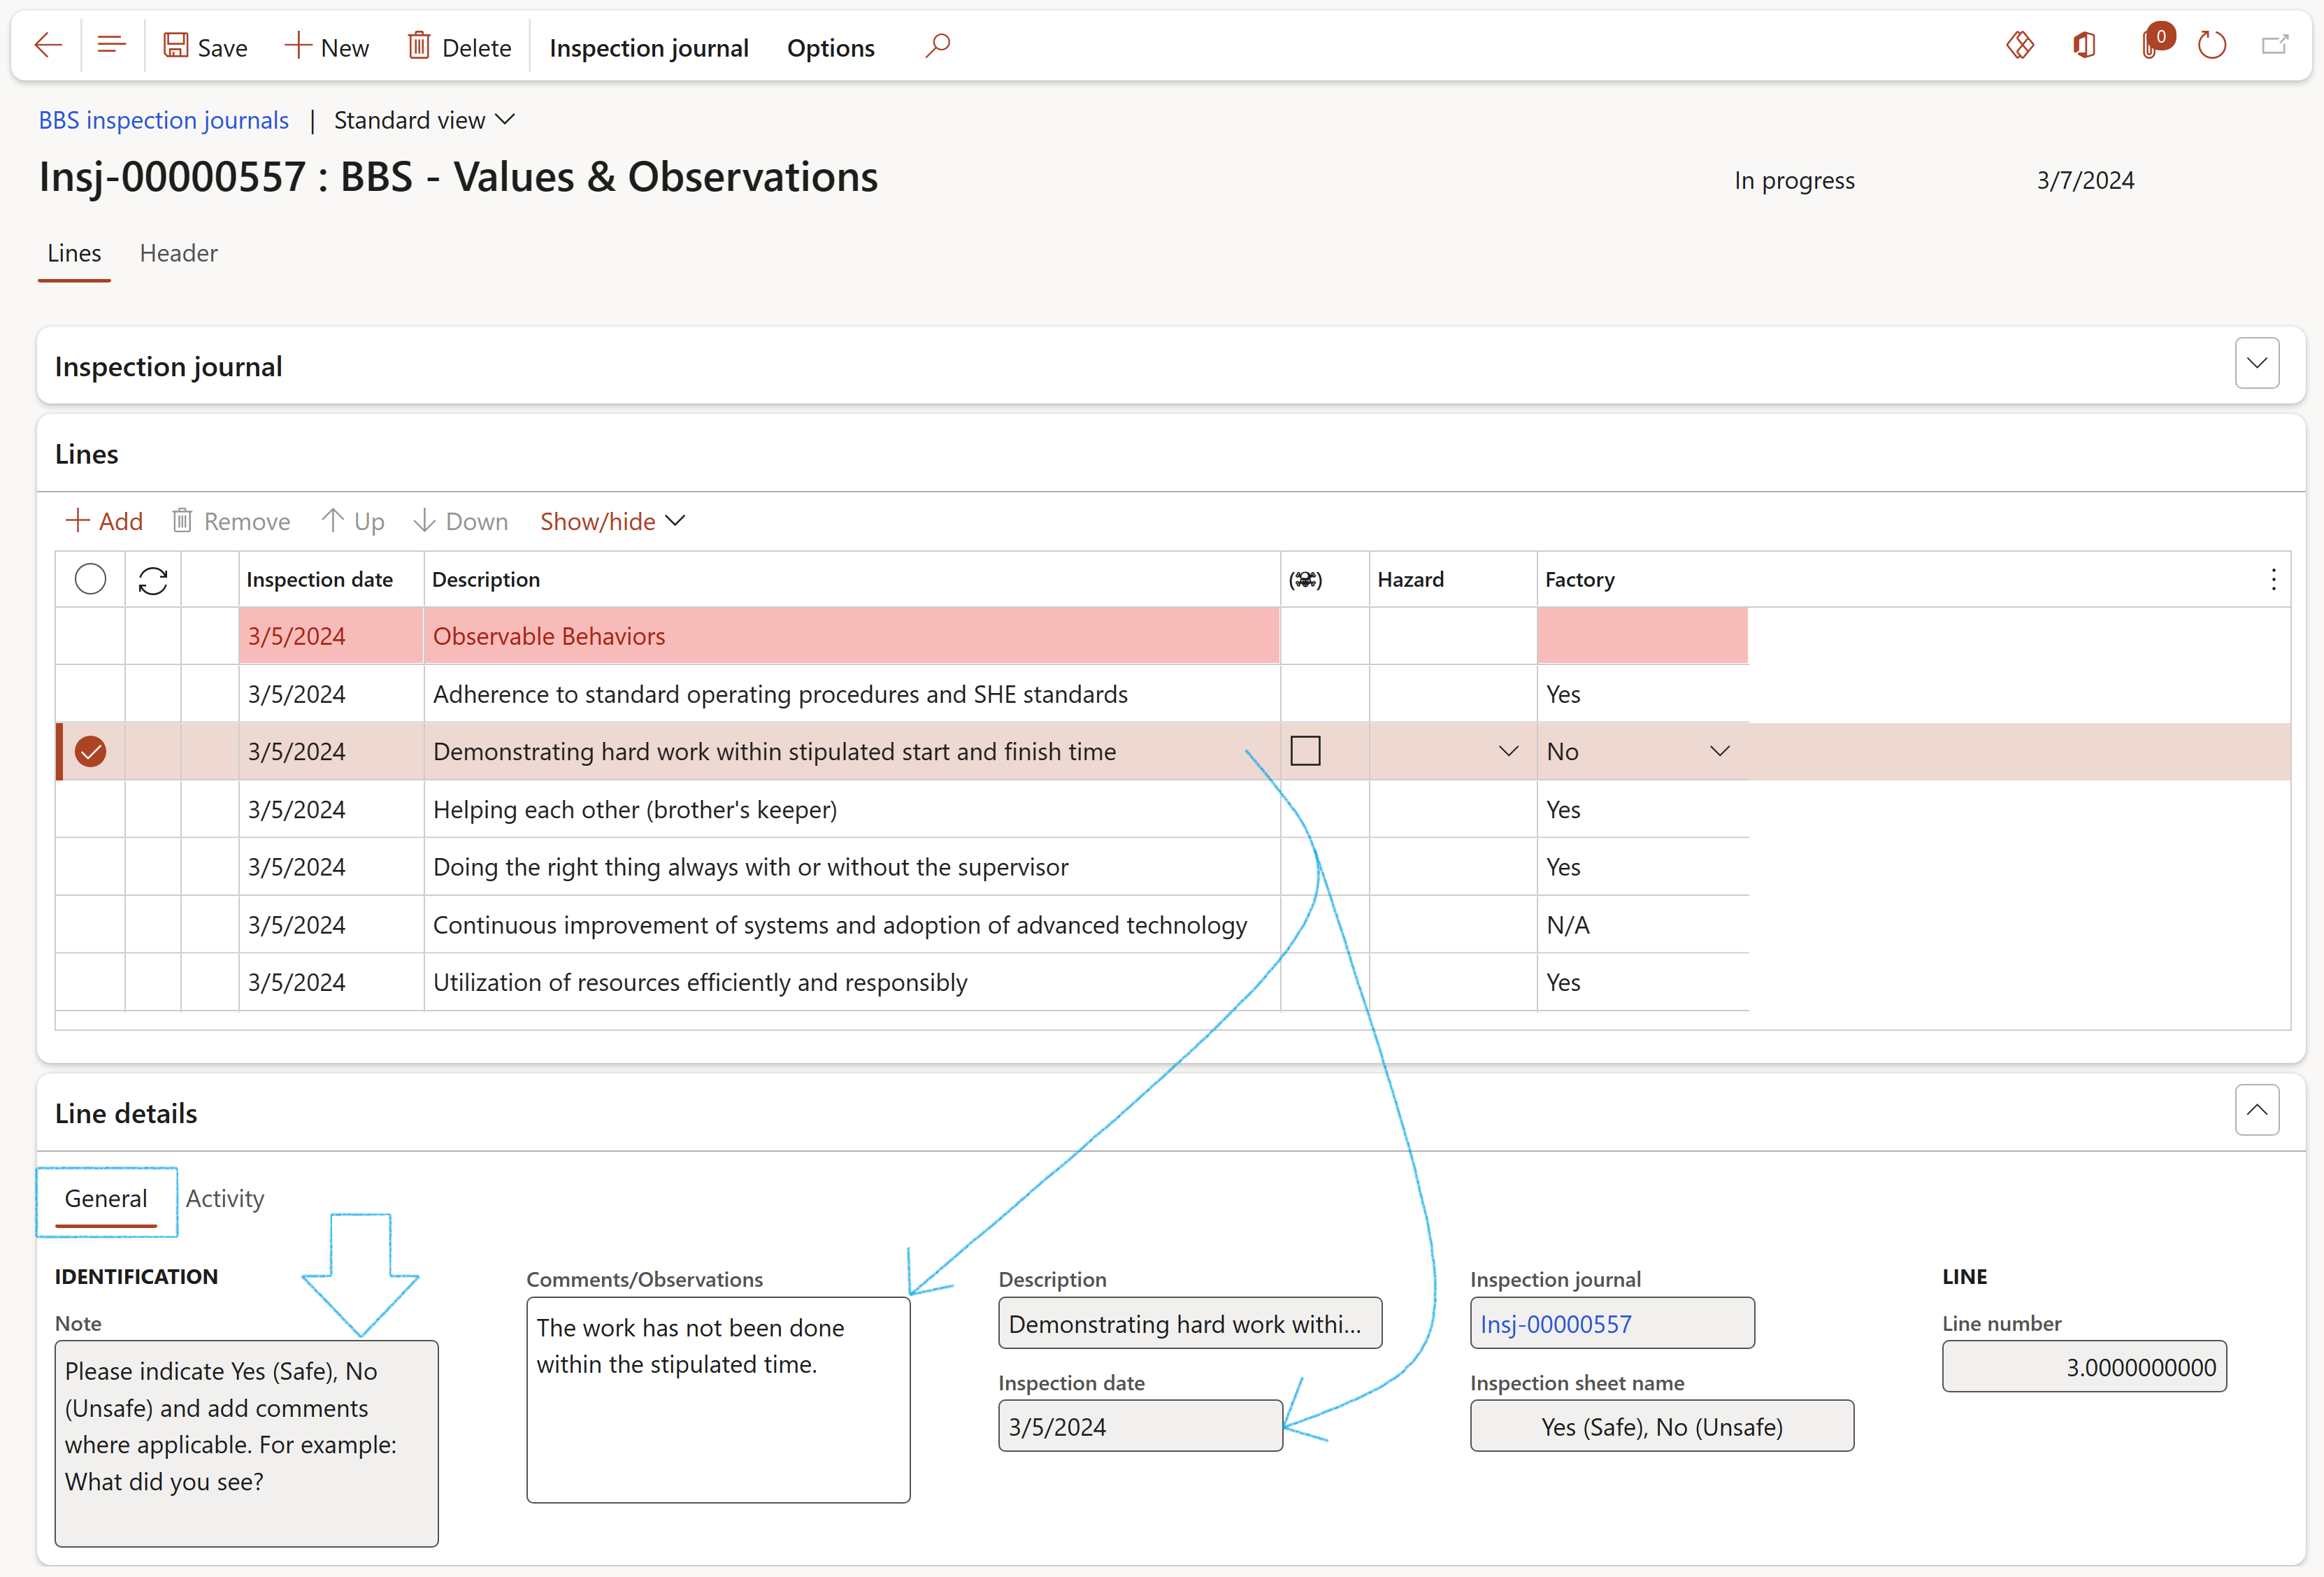
The line details Fast tab displays the following:
- Under the General Index tab:
- In the Note field, the prolog that will be printed on the inspection sheet
- Information of the selected line under the Lines Fast tab
- In the Comments/Observation field, a comment can be added per inspection line
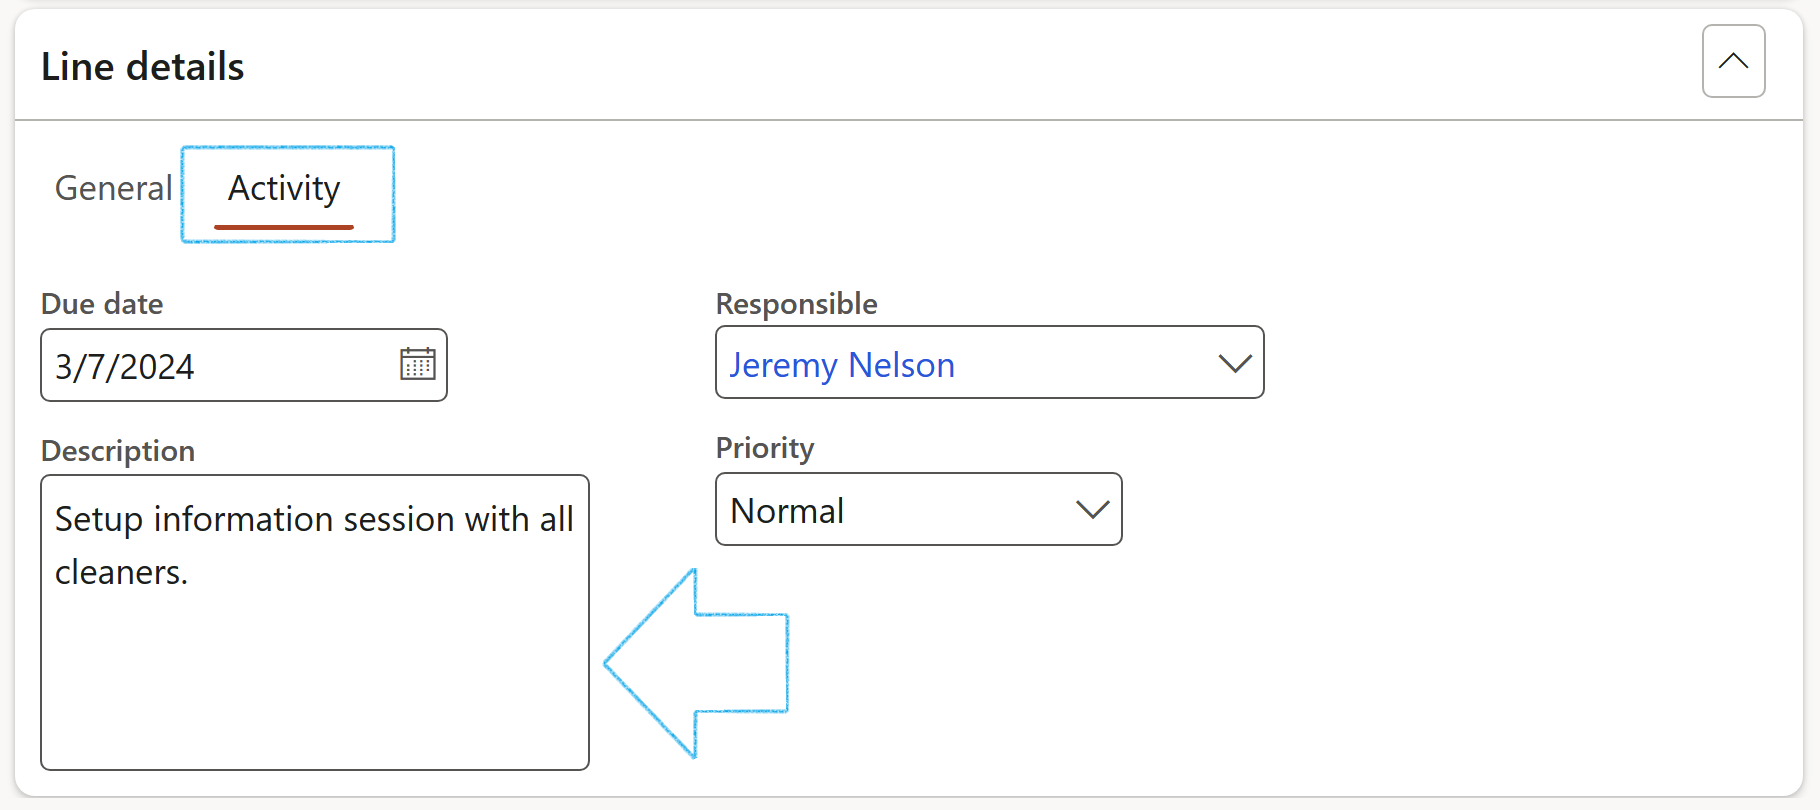
- Under the Activity Index tab:
- Select the inspection line that you want to create the activity for
- Enter the Due date for the activity
- Enter a Description for the activity
- Select the Responsible person from the dropdown list
- Select the relevant Priority for the activity from the dropdown list
- On the Action pane, in the Function group, click on the Create activity button
- On the Create activity dialog, select the relevant activity
- The user has the option to Create a new action plan for the activity, or to add the activity to an existing action plan
- Click on OK
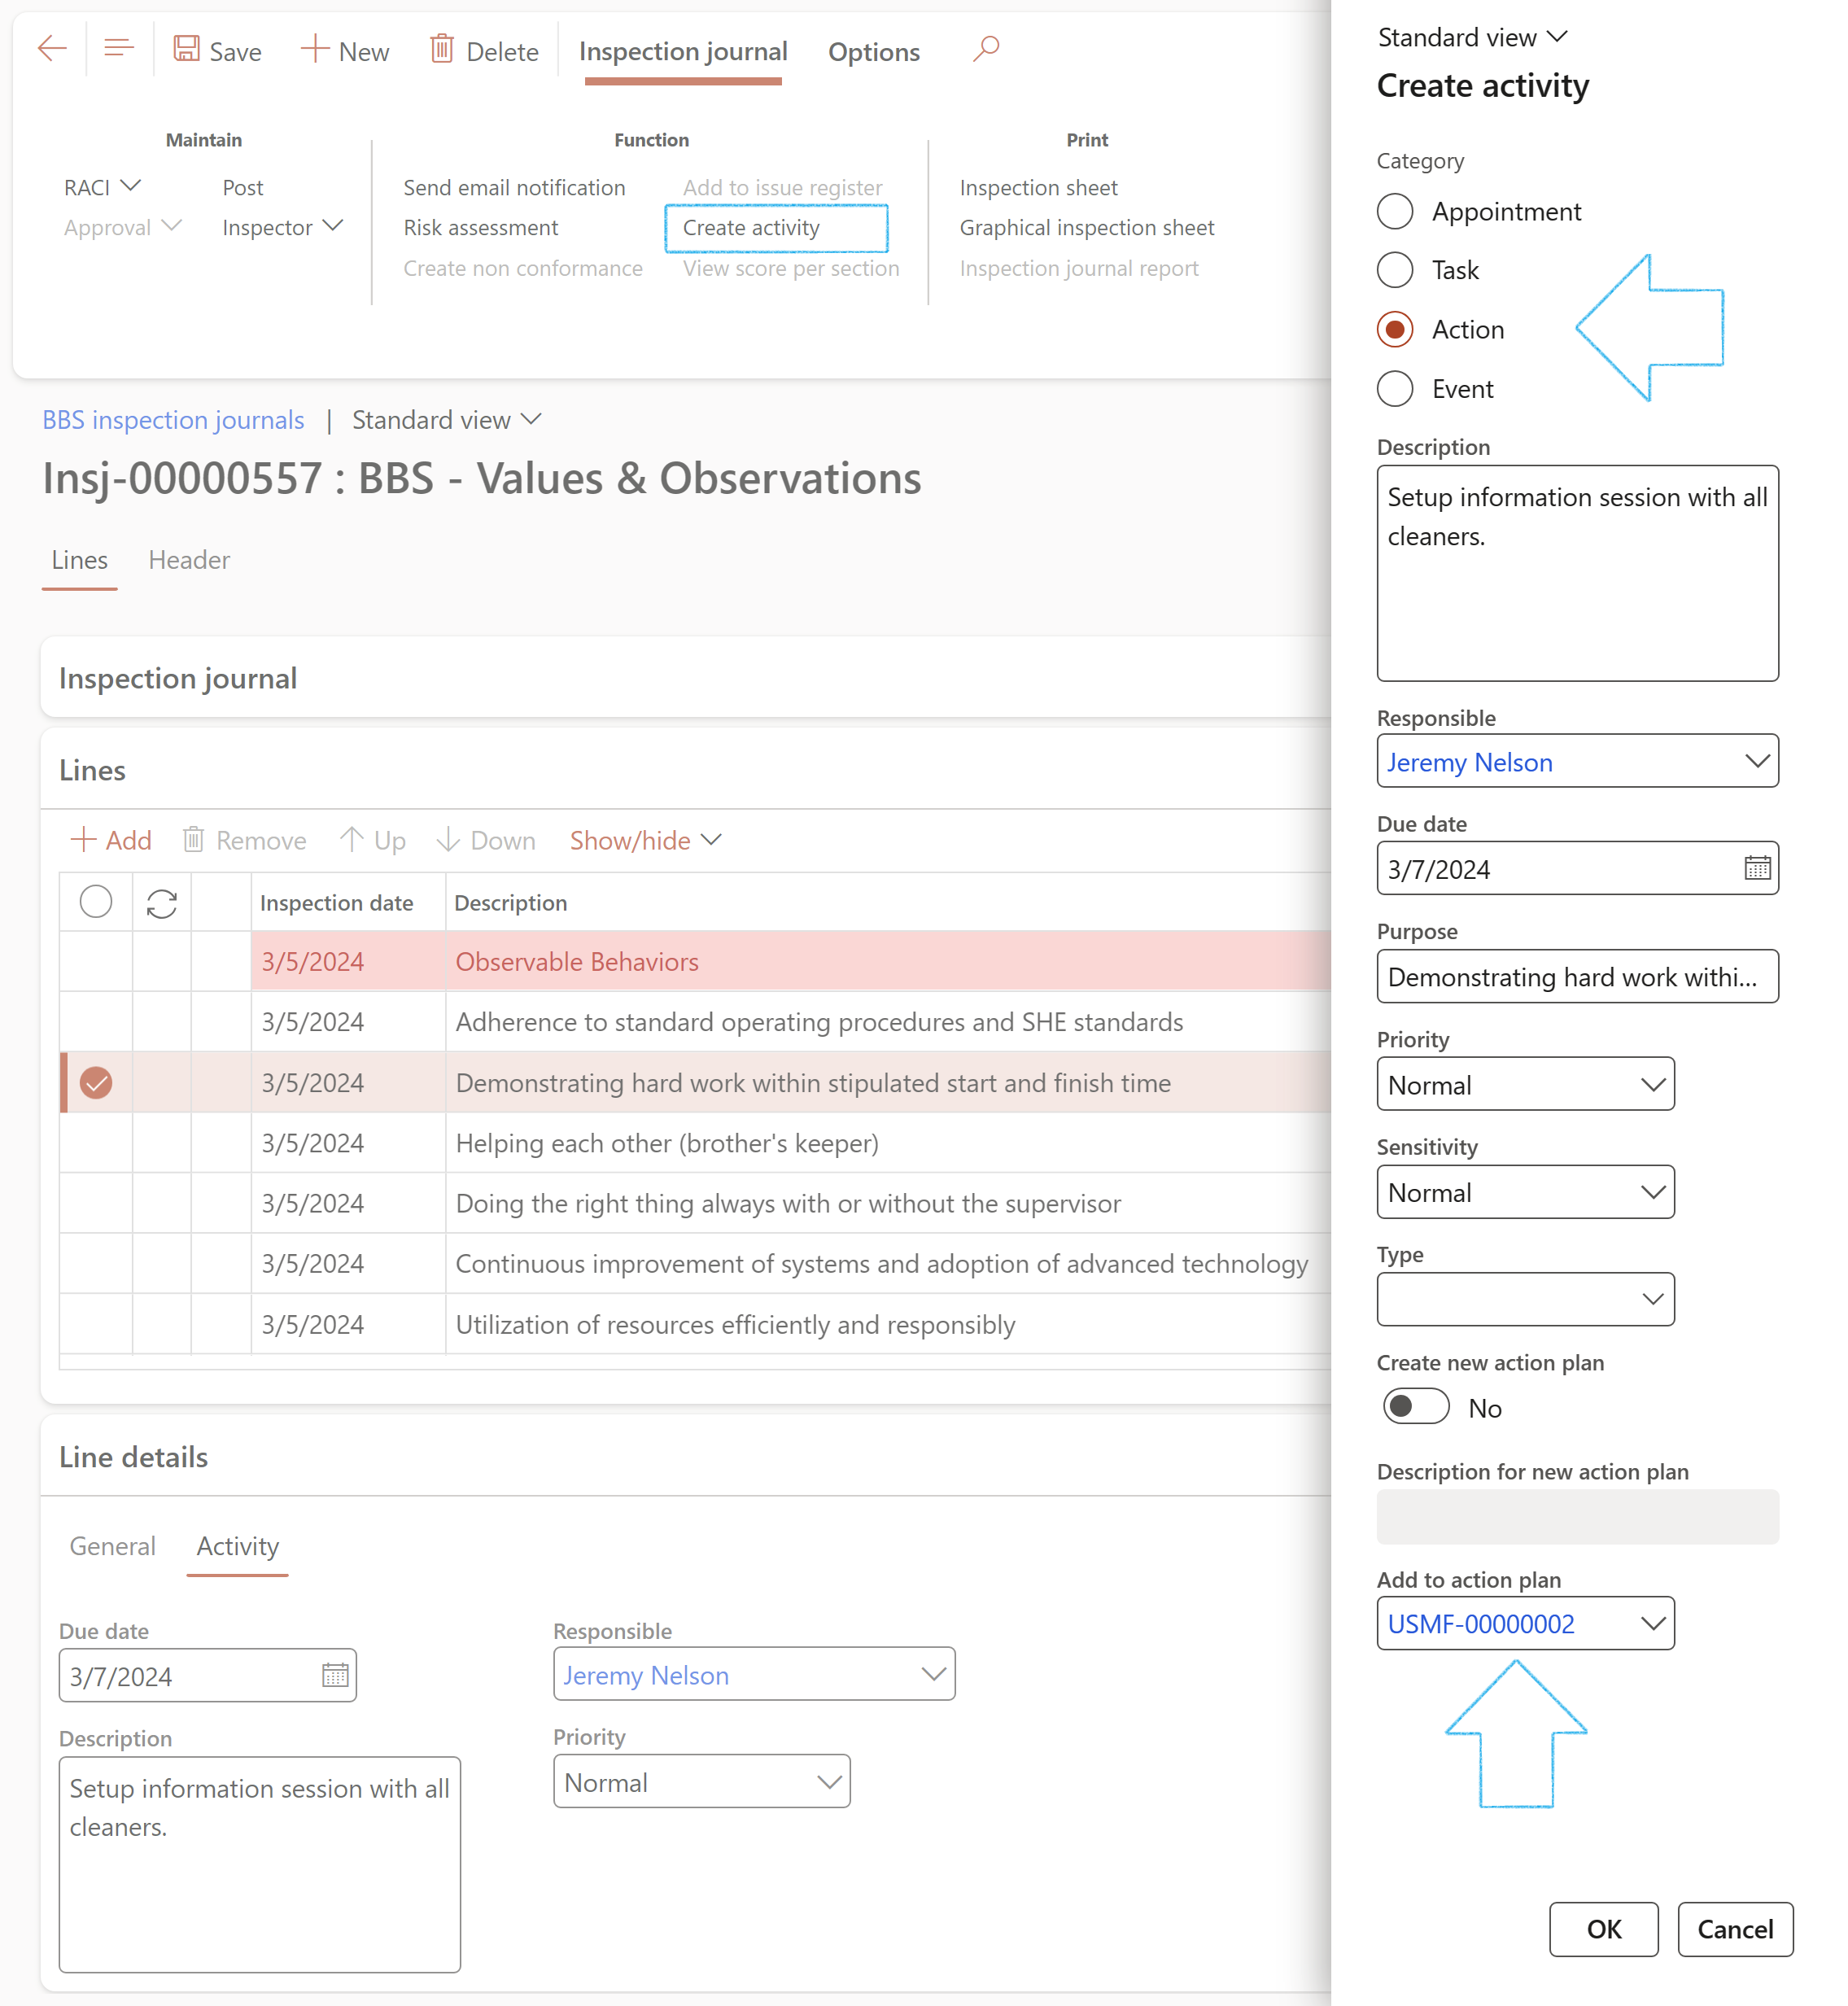
A blue line will confirm that the activity has been created
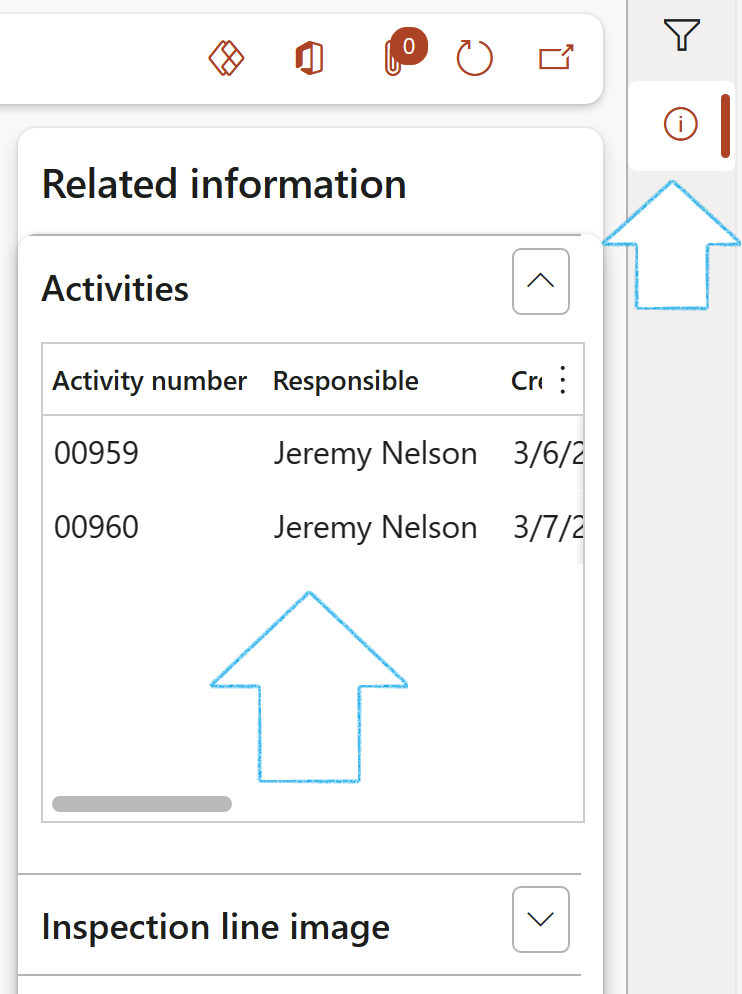
Expand the Related information fact boxes to view the activities created for the Inspection journal
- To approve the journal, click on the Approval button on the Action pane in the Function group
- Select Approve inspection journal form the dropdown list

This journal can only be approved if the selected Journal name is setup to need approval
¶ Step 15: Send email notification
Go to: HSE > Inspections > Inspection journal
- Select the inspection journal that you want to send the email notification for
- On the Action pane, in the Functions group, click on the Send email notification button
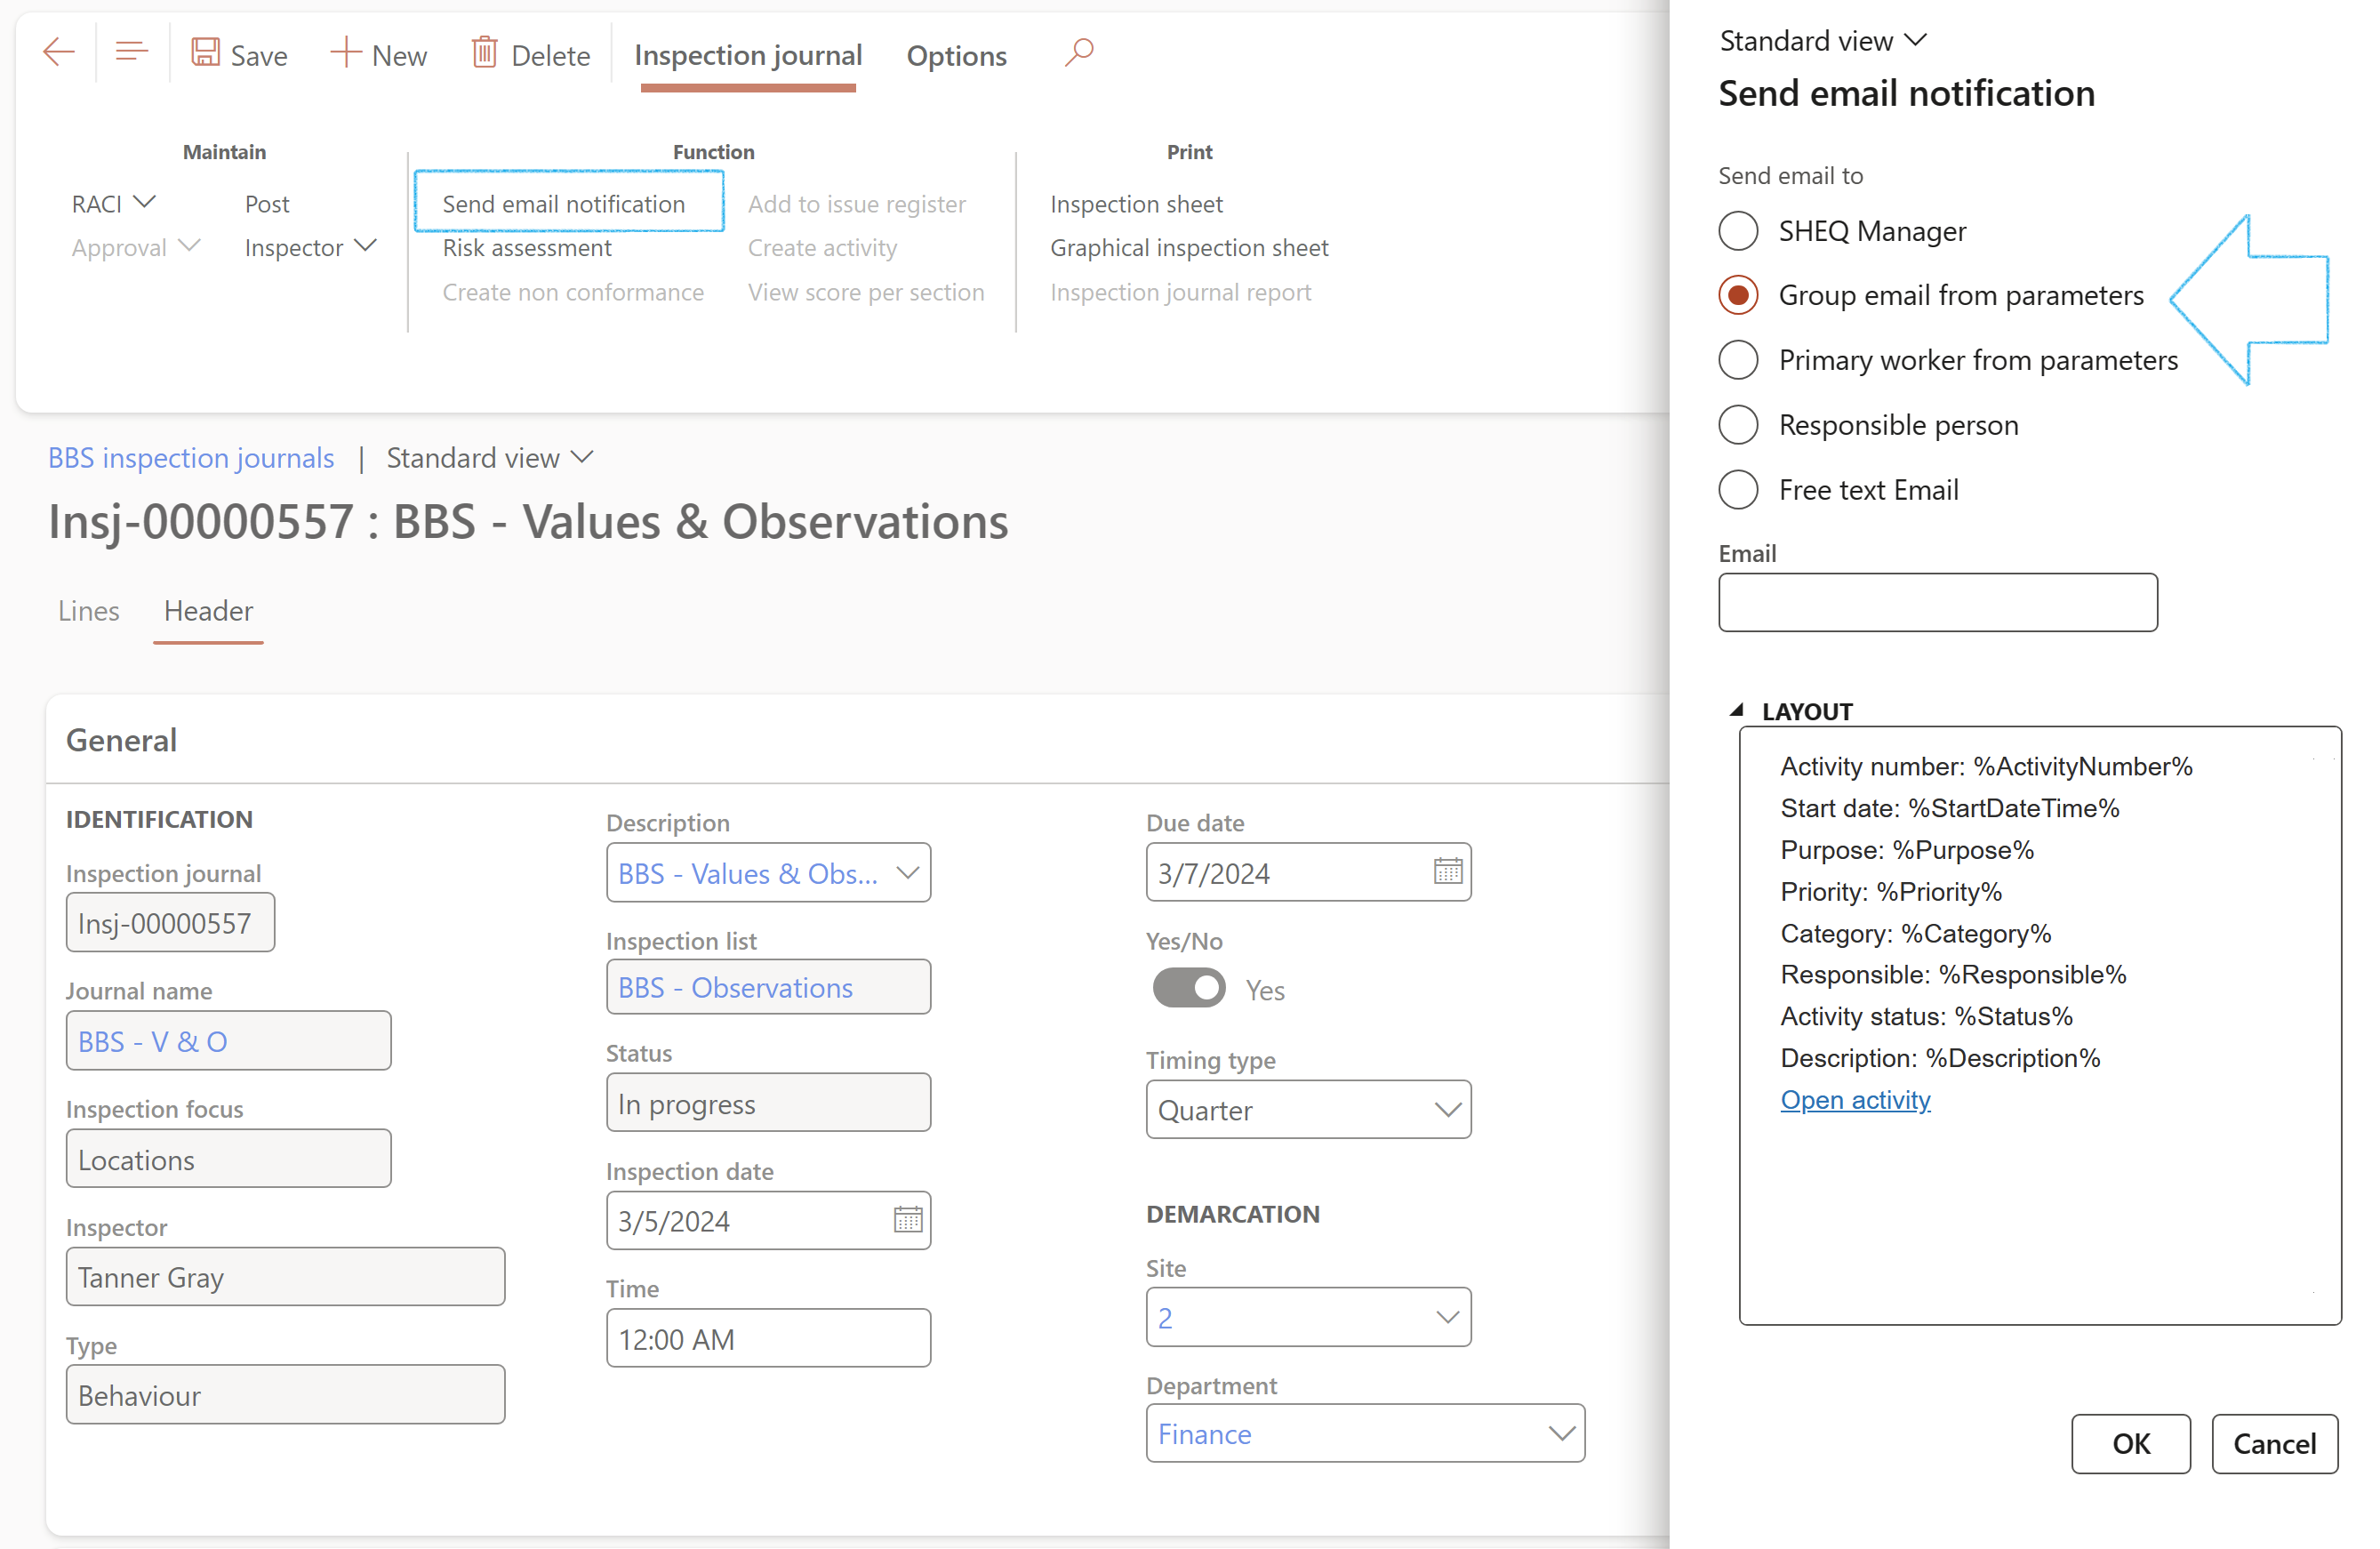
If an email template is set up for Inspections, the template will be displayed in the Layout note box
A blue line will pop up at the top of the form, confirming that an email notification was sent
If an Inspector was selected on the Inspection journal and the Responsible person option is selected on the dialog, the email notification will be sent to the Inspector’s email address
| Placeholder mappings | Field on form |
|---|---|
|
%JournalNumber% %JournalNameId% %InspectionType% %InspectionFocus% %InspectorName% %InspectionList% %NumberOfLines% %InspectionDate% %Duedate% %Description% %Investigationid% %Status% %Site% %Department% %urlLink% |
Journal Number Journal Name Inspection Type Inspection Focus Inspector Name Inspection List Number Of Lines Inspection Date Due Date Description Investigation Id Status Site Department Hyperlink functionality |
¶ Step 16: Do a Risk assessment
- On the Action pane, in the Function group, click on the Risk assessment button
- Enter as a minimum the:
- Hazard
- Initial likelihood
- Impact
- Click Create new register
OR
- Choose an Existing risk register from the dropdown list
- Click Add to existing register
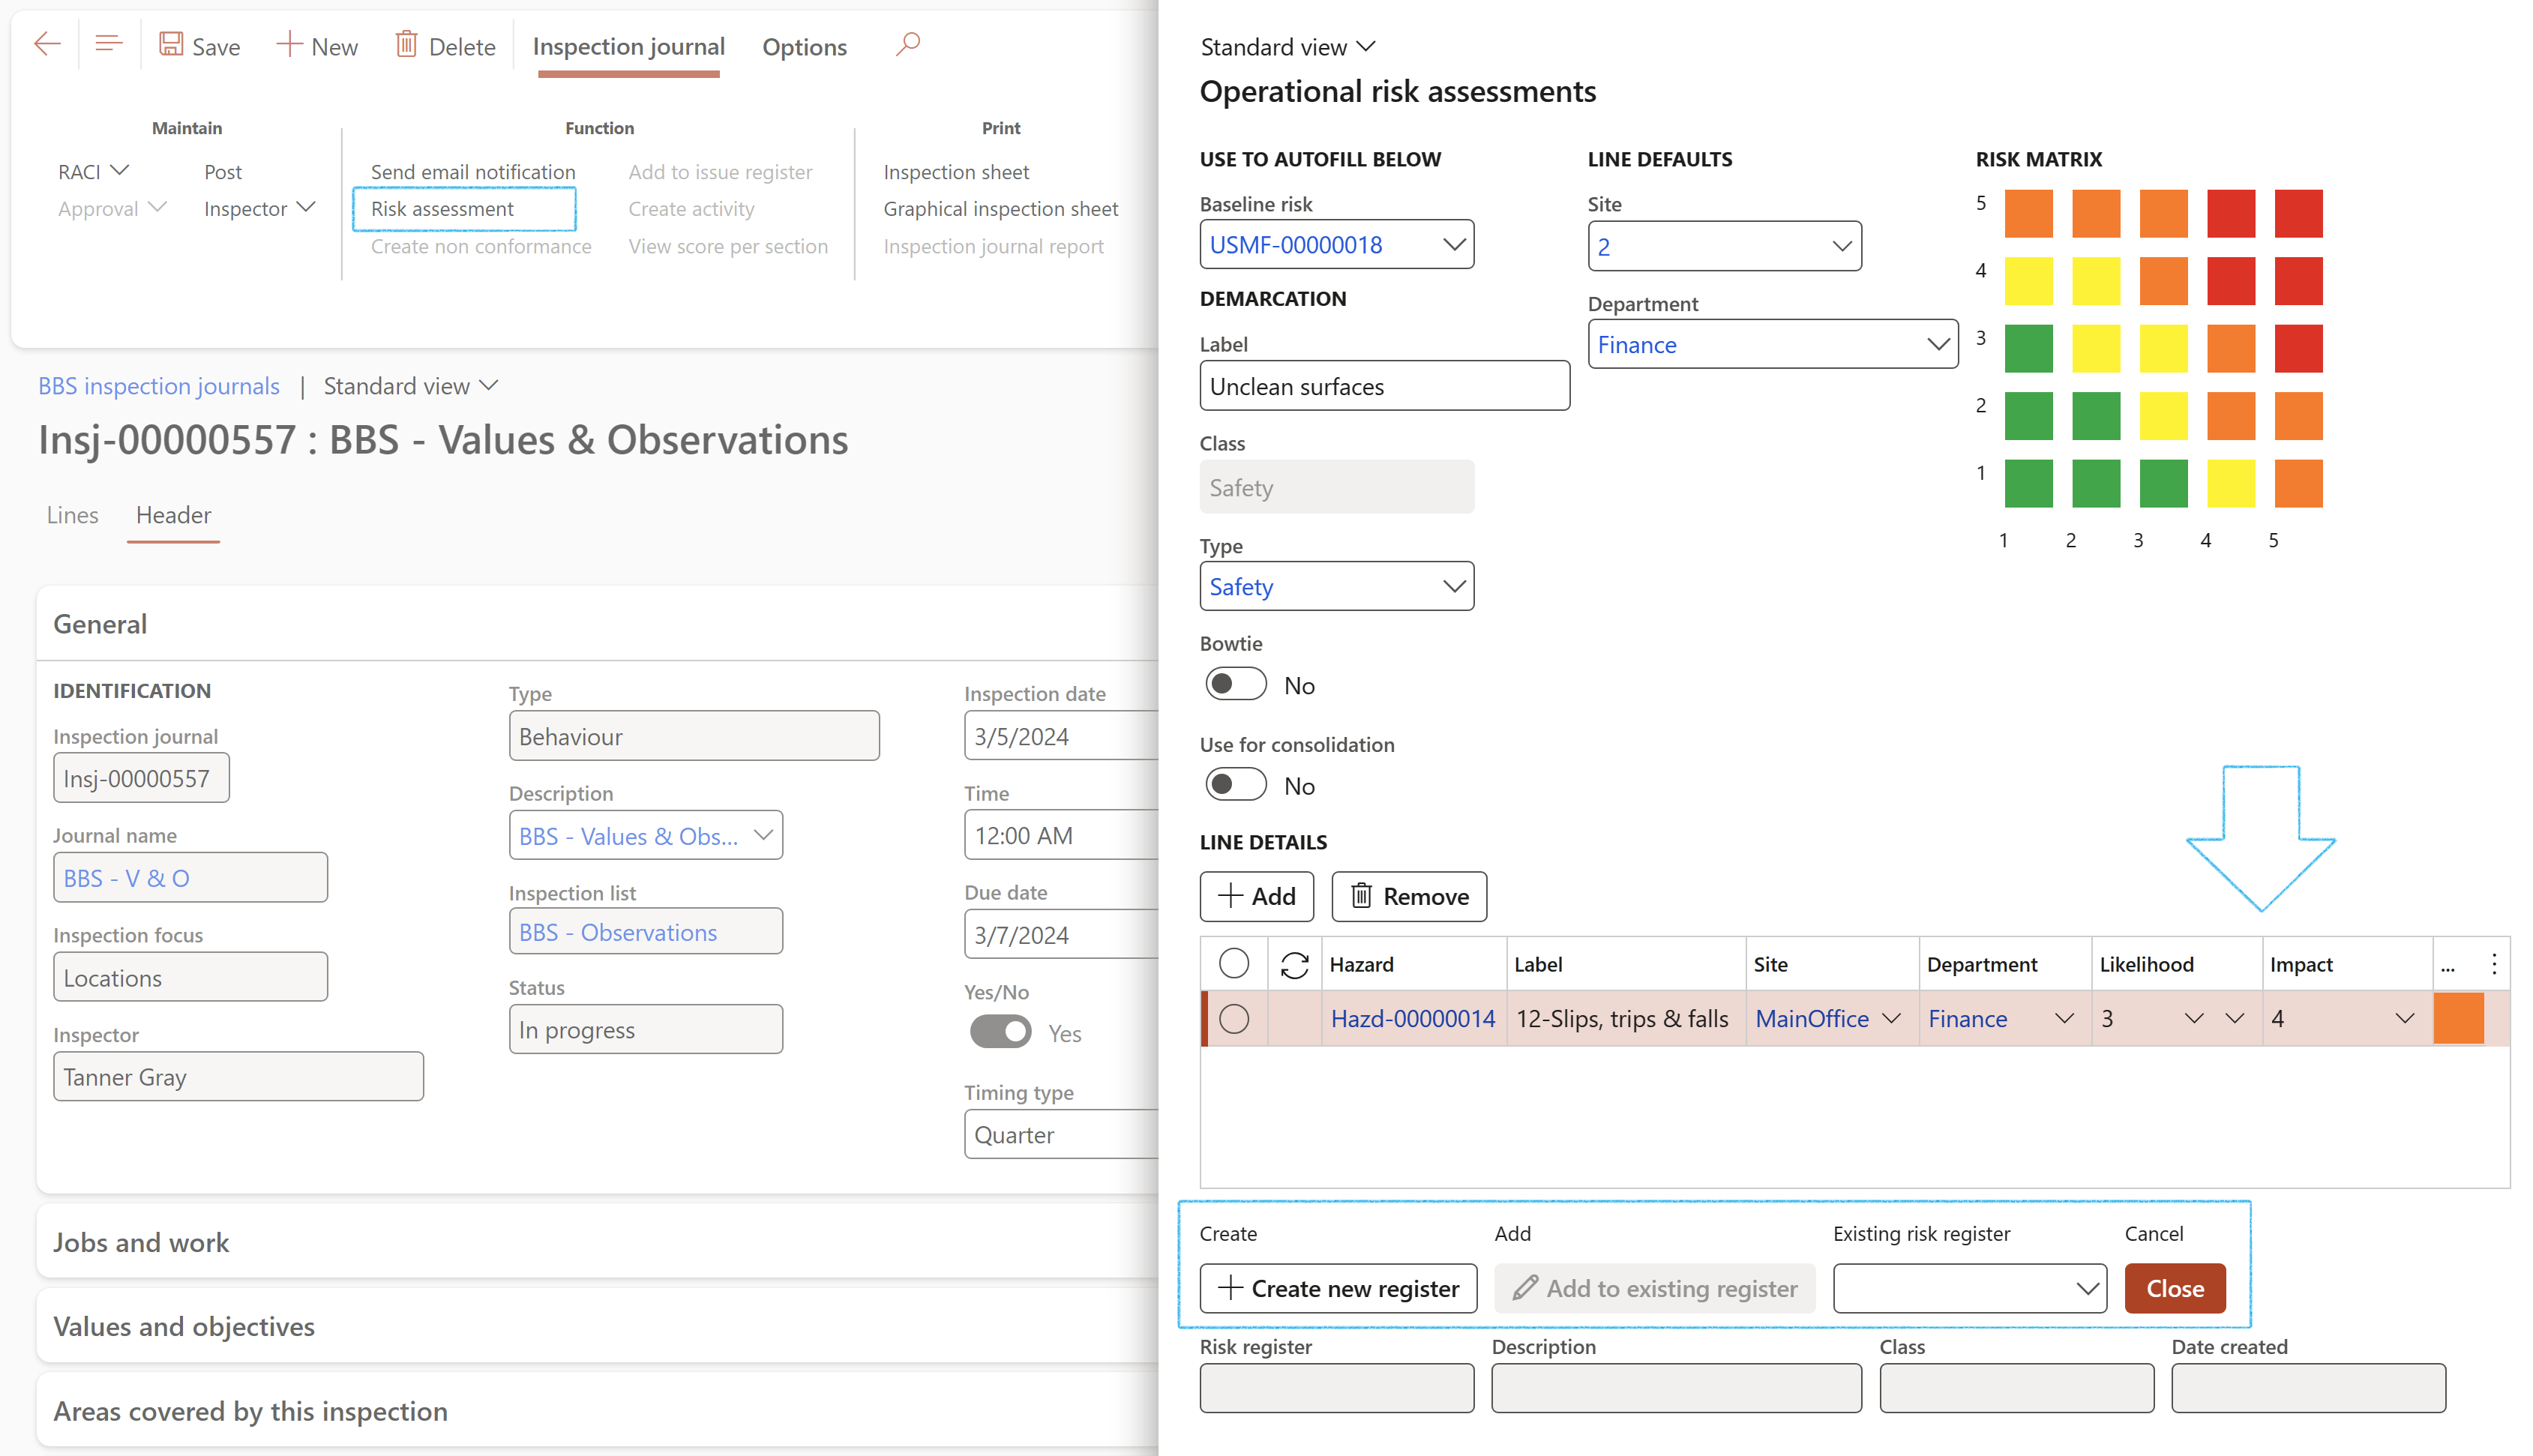
A summary of the risk assessment is displayed under the Conclusion Fast tab, Last risk assessment Index tab

¶ Step 17: Print the Inspection sheet
Go to: HSE > Inspections > BBS inspection journals
- Select the inspection journal that you want to print the inspection sheet for
- On the Action pane, in the Print button group, click on the Print inspection sheet button

If there is a prolog for the Inspection list, the inspection lines are printed on Page 2
¶ Step 18: Posting the Inspection journal
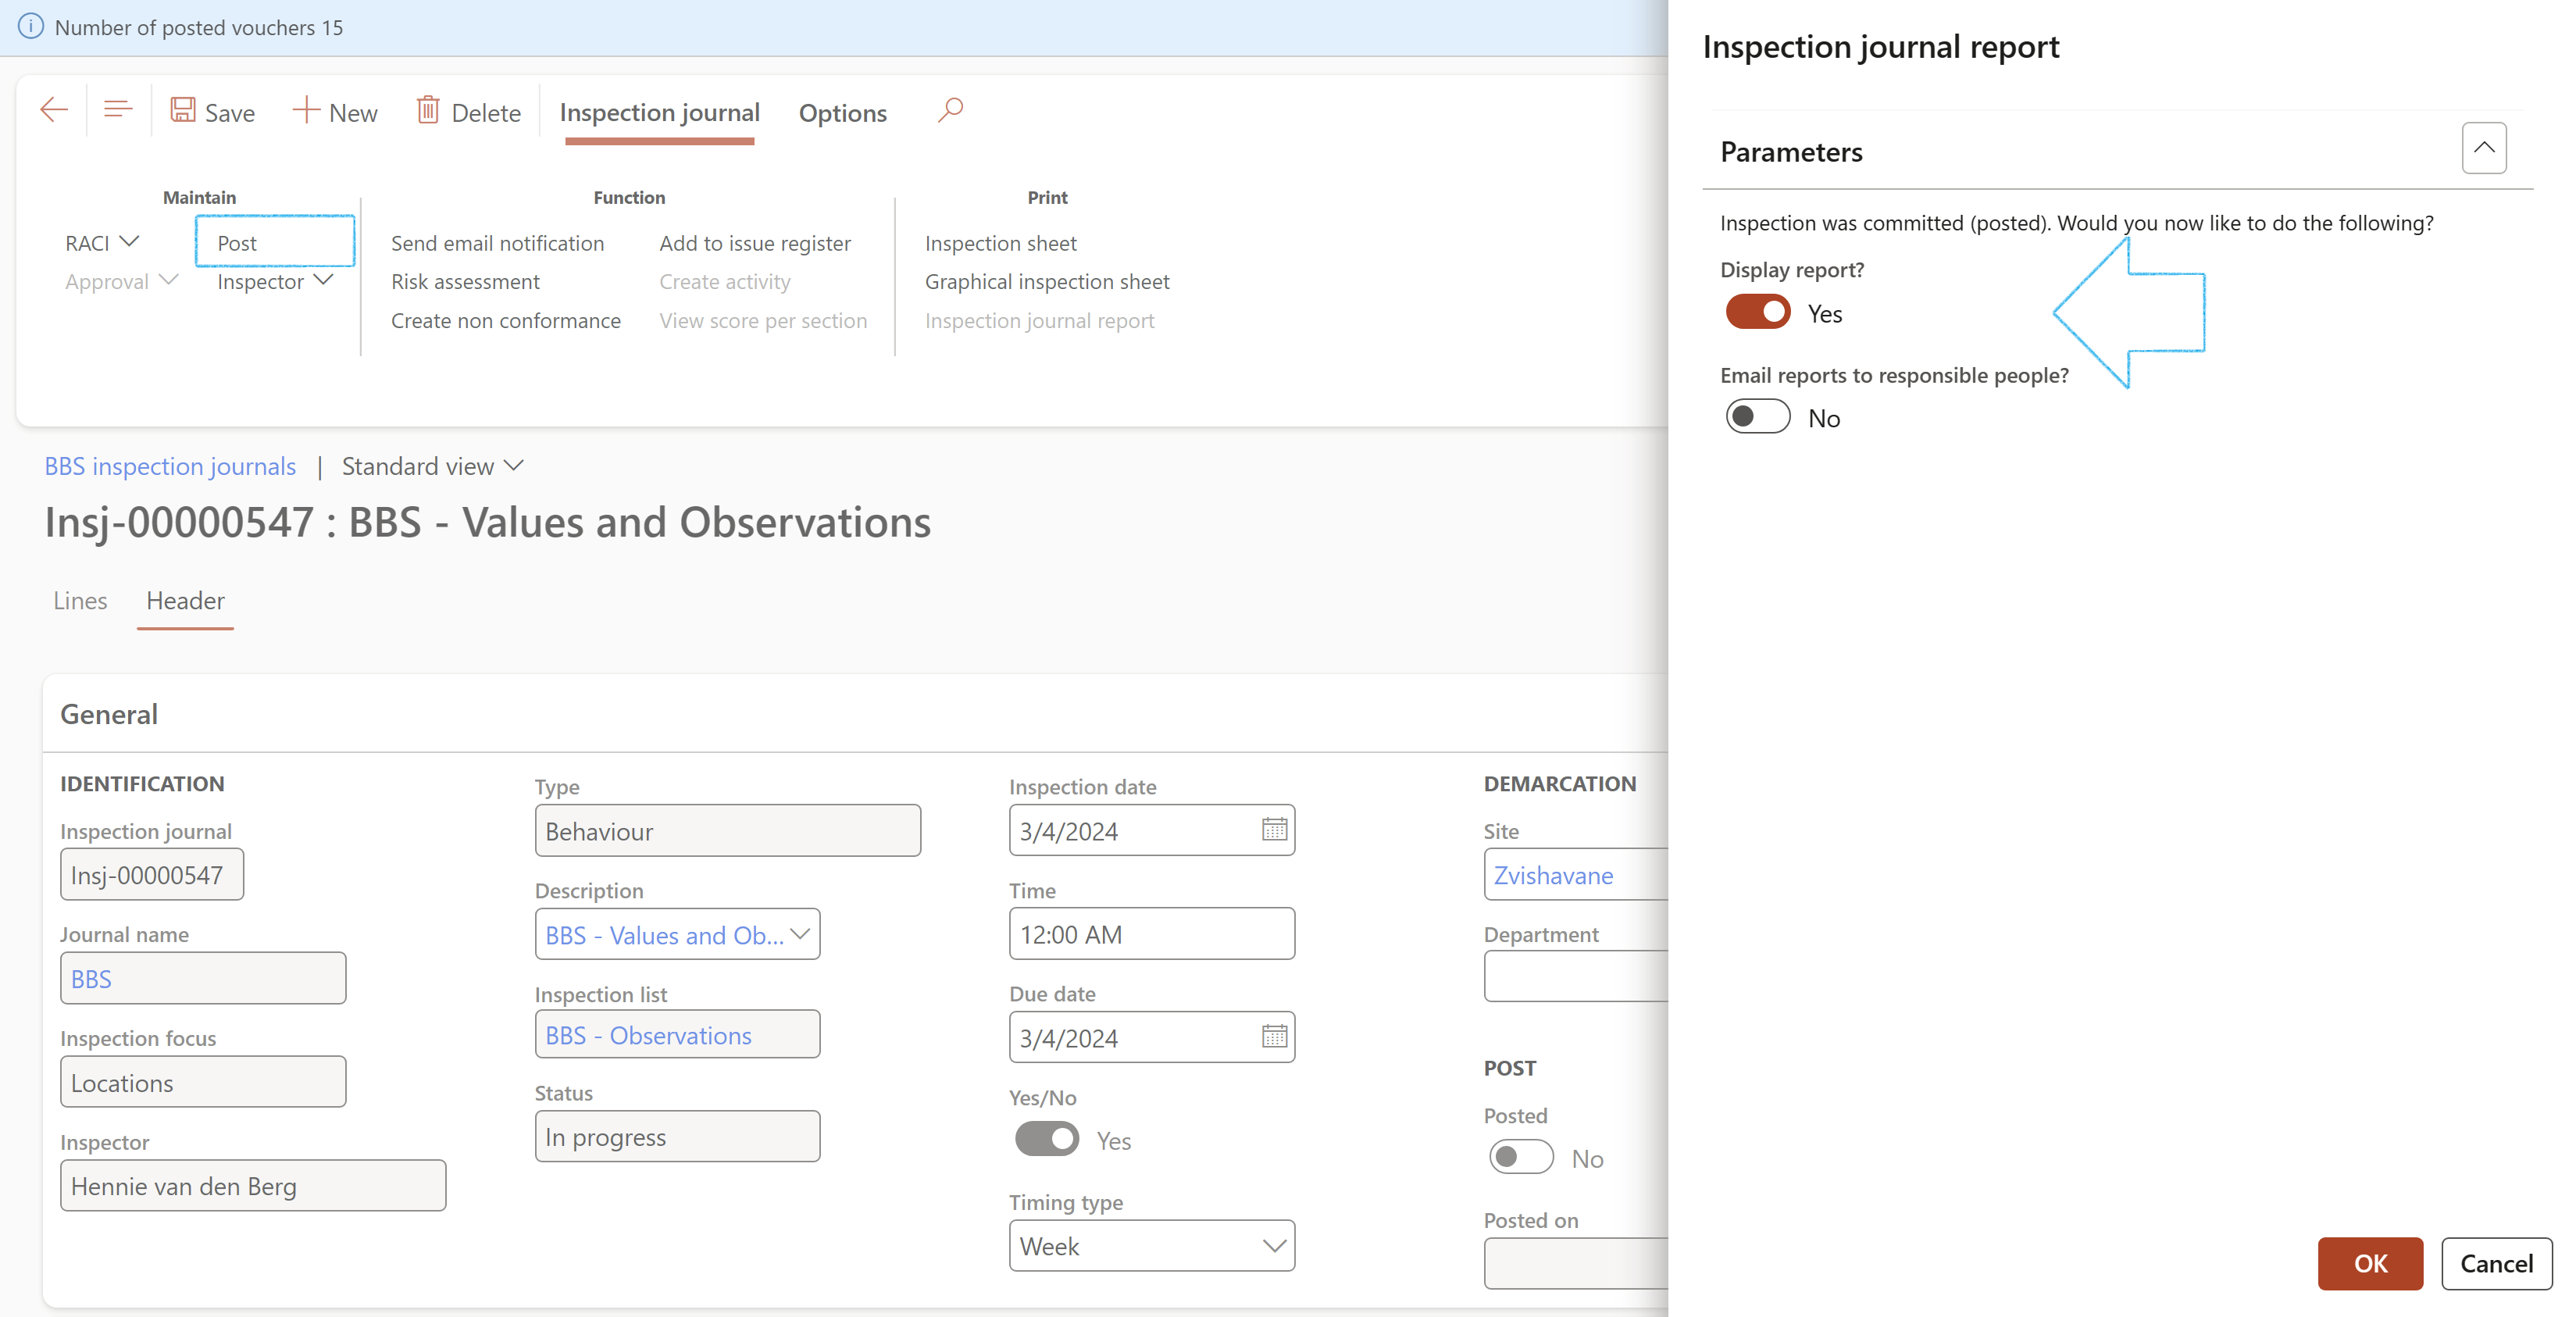
For the Inspection history report to display details of the inspection observations, the Inspection journal has to be posted
The Inspection journal can be posted from:
- The Inspection journal list page or from the Inspection journal detail form
- On the Action pane, in the Maintain button group, click on the Post button
¶ Reporting
¶ Step 19: Inspection journal report
This report can be printed when the journal is being posted as described above, or by going to: HSE > Inspections > Reports and inquiries > Inspection journal report

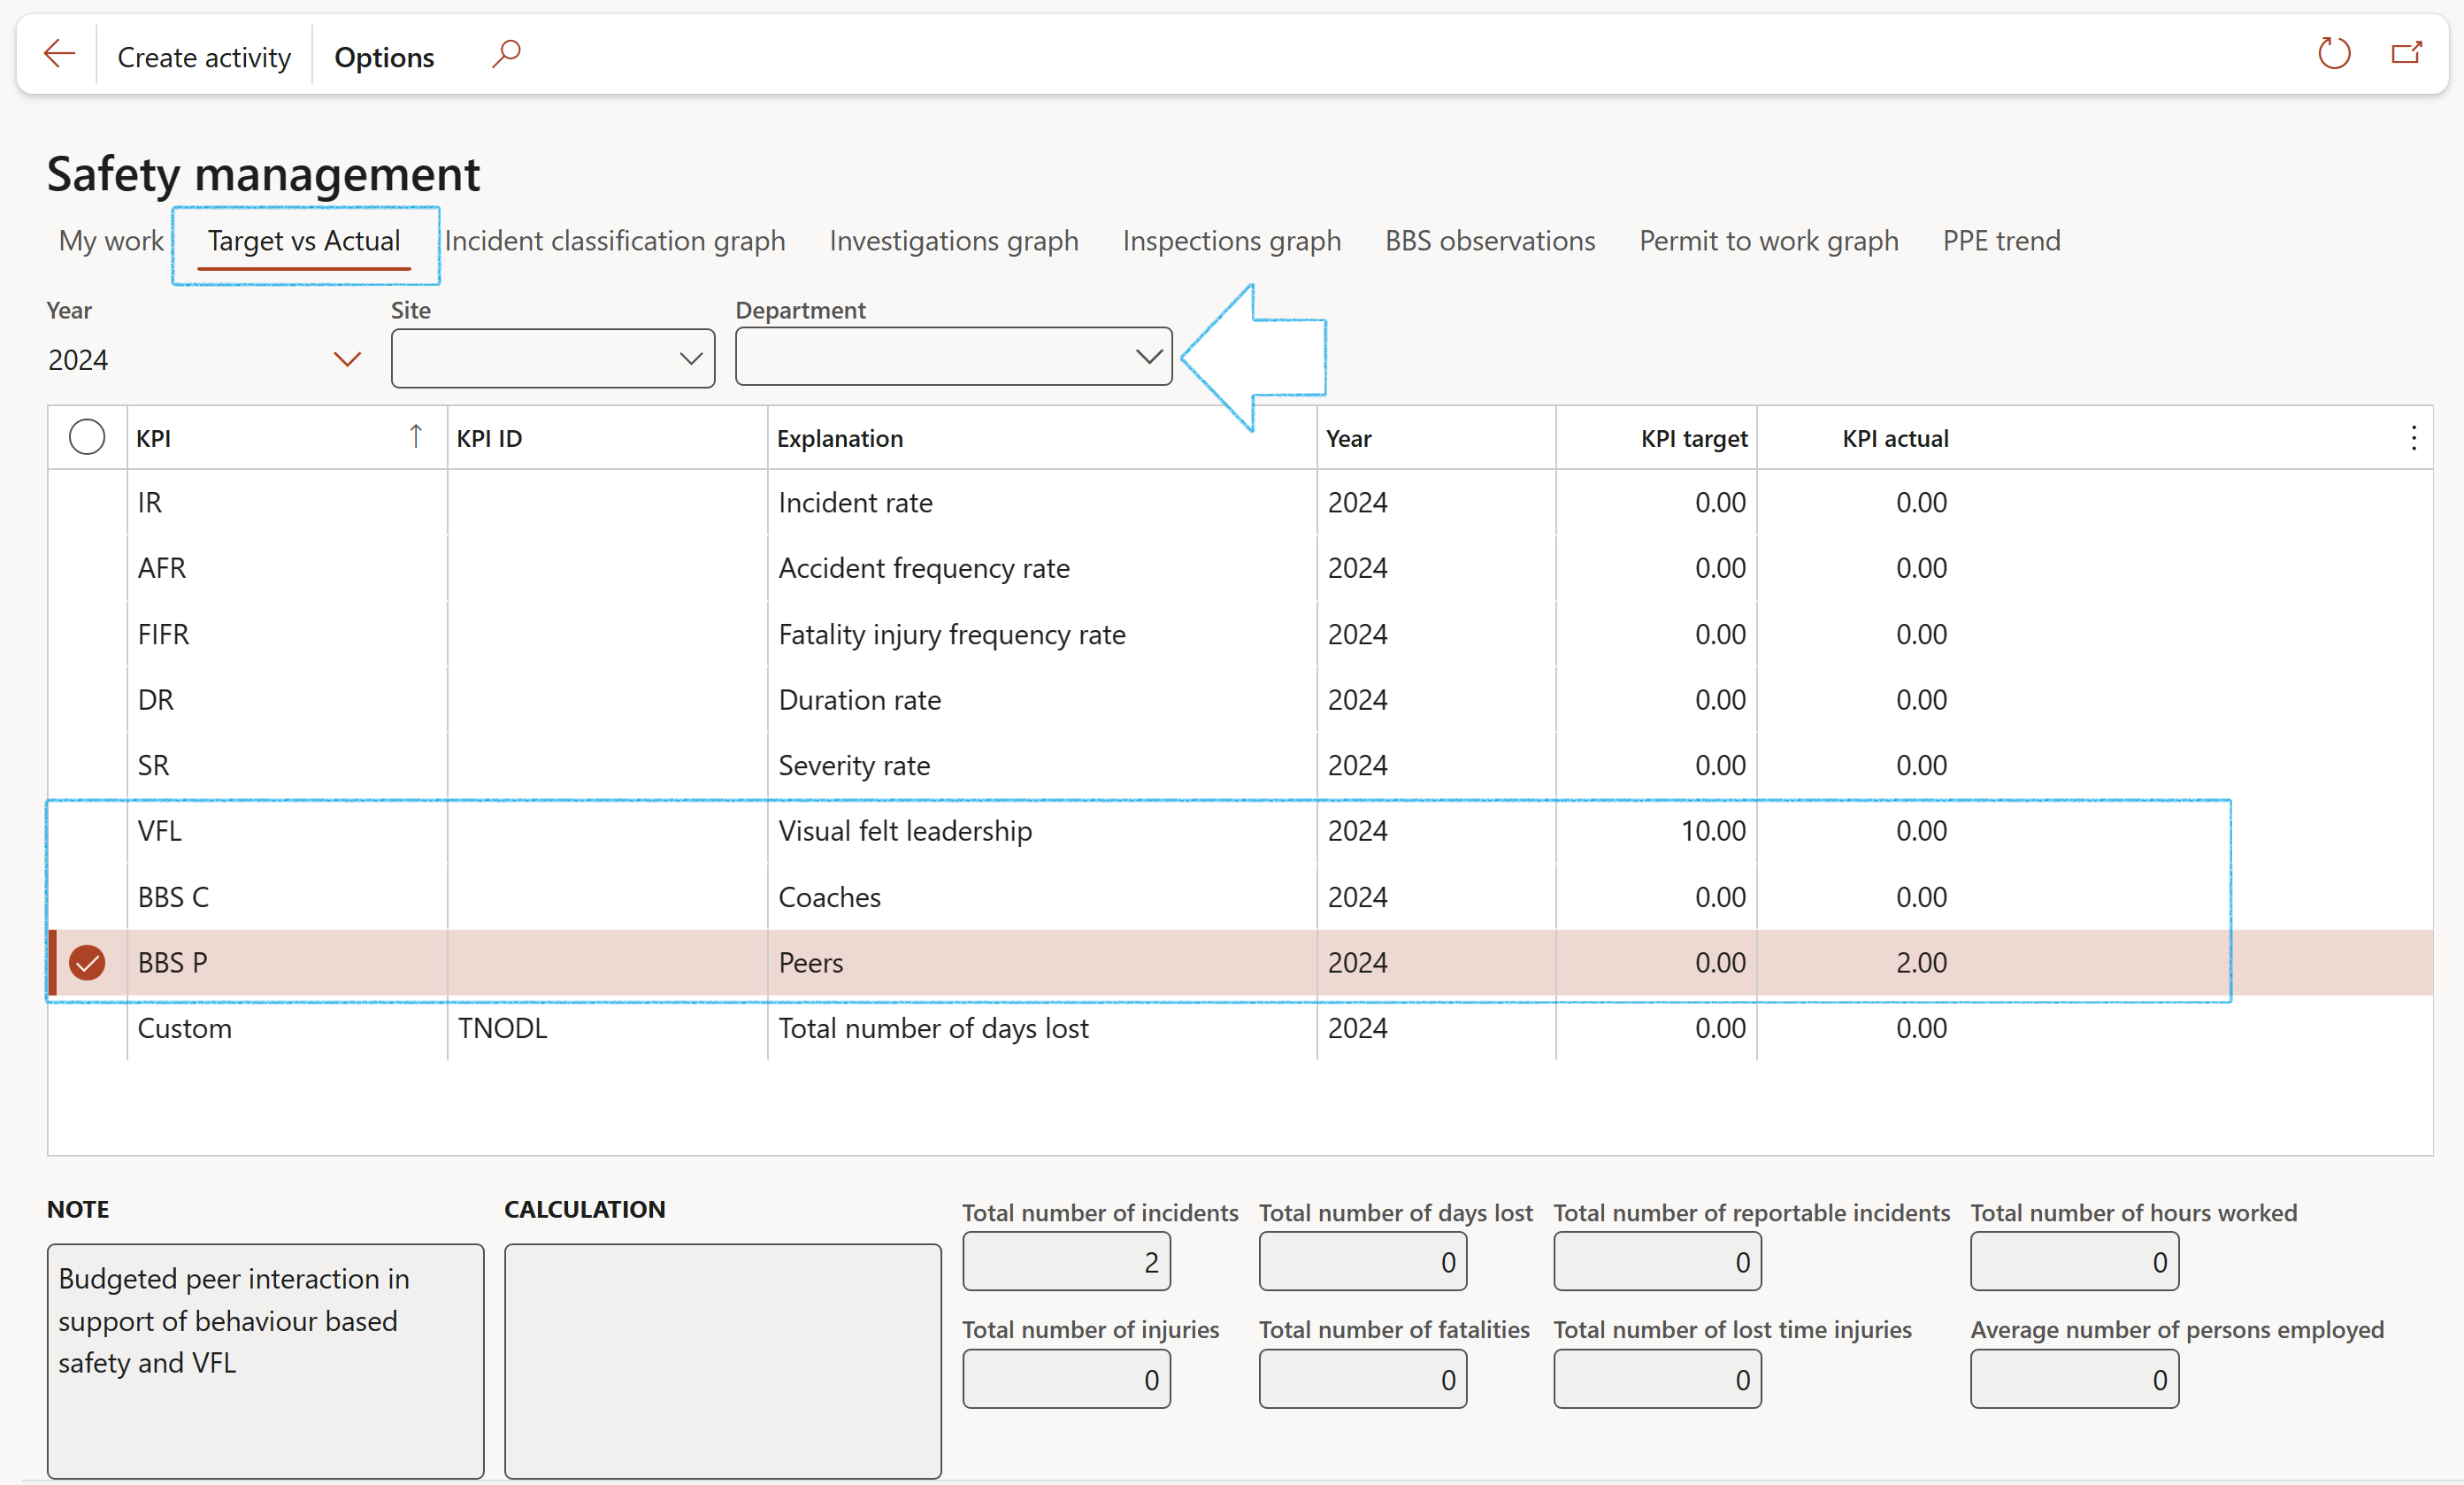
¶ Step 20: Target vs Actual
Go to: HSE > Workspaces > Safety management
- Open the Target vs Actual Index tab
- Use the Year, Site and Department filters to display the required data
