
¶ Introduction
To enable integration between the Third-party Human Resources/Payroll software and Dynamics 365. The integration allows for employee and worker data as well as payroll transactions to be shared between these software solutions. The Axnosis ISV solution utilises the following two modules:
- System administration
- Payroll
¶ Navigation
- System Administration
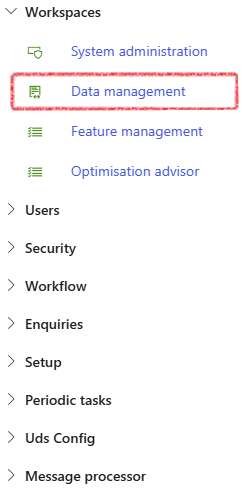
- Payroll
¶ Setups
Assumed setups to be completed and data to be configured:
- Accounts
- Dimenion values for cost centres
- Payroll type journal
- Personal titles
- Worker status
- Address Provinces/States; cities and locations
¶ Step 1: Setup Payroll parameters
- Go to: Payroll > Setup > Parameters > Payroll parameters
- Open the Integration tab
- In the Journal name field, select the appropriate Payroll journal from the dropdown list
- In the Financial dimension field, select the appopriate Cost centre dimension from the dropdown list for which, cost centre dimension values have been created.

¶ Daily use
¶ Step 2: Worker import
Worker data may be imported to D365 via an Excel spreadsheet as exported from the 3rd party software. The data includes custom worker fields which is part of the Axnosis HRM ISV module.
¶ Step 2.1: Prepare worker data for import
The import file allows for workers to be create or detail of existing workers to be updated including:
|
Import column |
Description |
|
PersonnelNumber |
Employee number |
|
LastName |
Employee surname |
|
FirstName |
Employee first name |
|
PersonalTitle |
Employee title |
|
IdentificationNumber |
Identification number of employee |
|
IsDisabled |
Yes or No answer indicating if the employee is disabled or not |
|
EthnicOrigin |
Ethnic origin of employee |
|
Gender |
Employee gender |
|
EmploymentFromDate |
Employment start date |
|
EmploymentToDate |
Employment end date if any |
|
WorkerStatus |
Status of worker e.g. Employed or Terminated |
|
PrimaryContactEmail |
Email address of employee if any |
|
AddressState |
Province/State of worker office address |
|
AddressCity |
City of worker office address |
|
OfficeLocation |
Location of employee office address |
The import file should preferrably only contain a single sheet else the user will have to select the appropriate sheet during the import process.
¶ Step 2.1: Import worker data
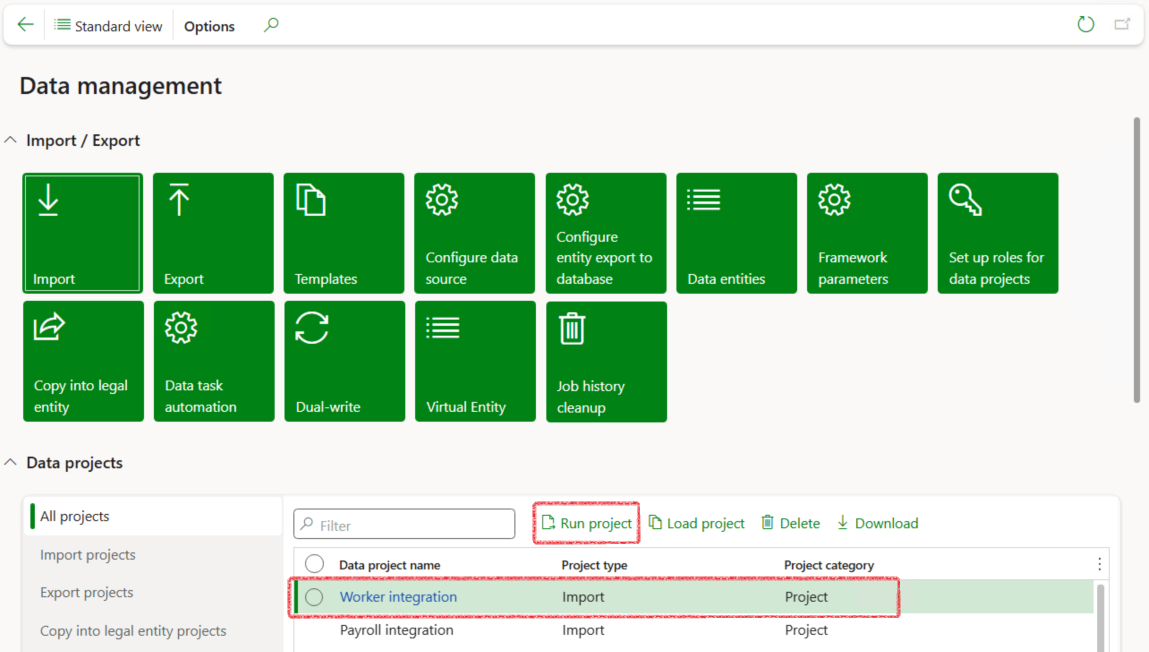
- Go to: System administration > Workspaces > Data management
- Under Data projects, select the relevant Worker import project
- Click on the Run project button
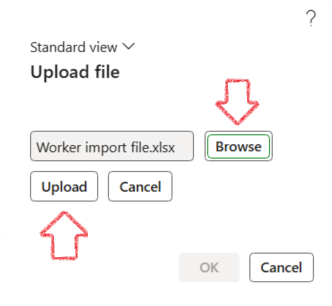
- On the Job execution form, click on the Upload file button
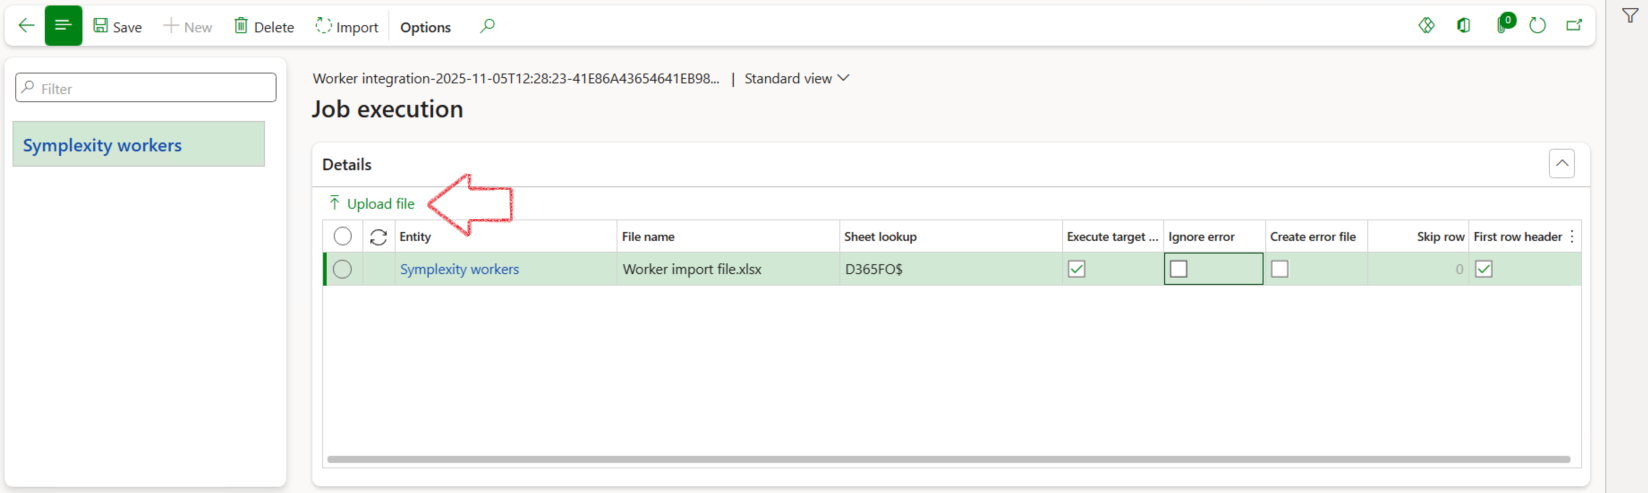
- In the Upload file dialogue, click on the Browse button
- Locate and select the worker import file to be imported from your device
- Click on the Upload button
- Click OK
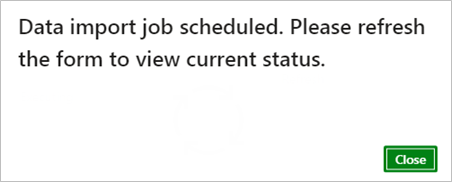
- In the Action pane, click on the Import button
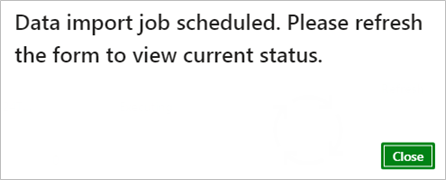
- In the popup notification message, click on the Close button
- In the Execution summary form, click on the Refresh button
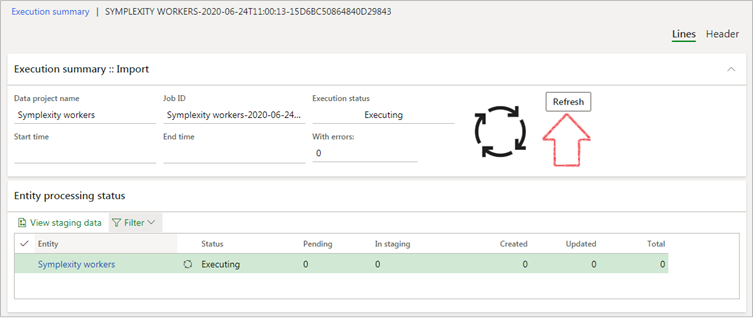
- If the import succeeded, the status will be indicated as such:

- If the status is Failed/Partially succeeded:
- Click on the View staging data button
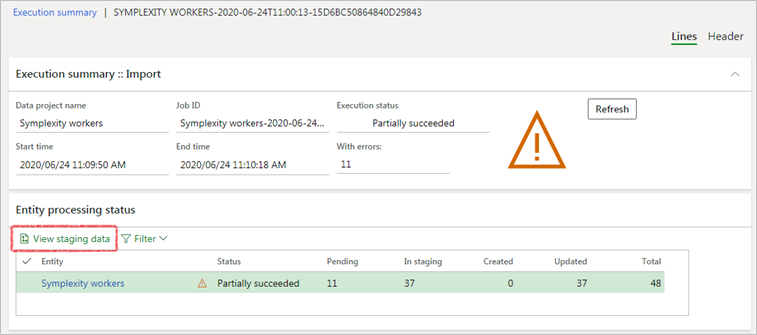
- Locate the line with Staging status Error
- The Message (reason for failing) will be displayed at the bottom of the screen
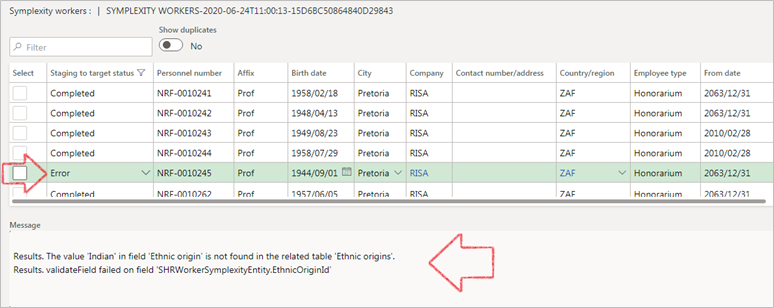
- Locate the offending line in the import spreadsheet, correct the data then reimport the sheet.
Verify that the workers have been successfully imported (or whether the data has been updated/adjusted accordingly) by accessing the relevant HR workers in D365 and confirming the data as per the import file.
¶ Step 3: Payroll import and journal
This process allows for payroll data to be imported via an Excel spreadsheet exported from the 3rd party software. Once successfully imported in D365, data may be validated and a payroll journal may then be generated and posted.
¶ Step 3.1: Prepare payroll data
The import file may include the following data:
|
Import column |
Description |
|
AccountCode |
Account identifier |
|
AccountGroup |
Optional account group if required |
|
BatchID |
Optional batch identification |
|
CostCentre |
Cost centre dimension value |
|
DebitCredit |
Either Debit or Credit |
|
ElementDescription |
Description of the payroll journal line item |
|
ElementType |
Identifies the type of line item:
|
|
MonthProcessed |
Month value i.e. 1 |
|
PayGroup |
Optional payment group if required |
|
PeriodEndDate |
Payment period end date |
|
Amount |
Amount value |
|
Reference |
Optional additional reference number if required |
A line item for the same account and same period may only be repeated for different element descriptions OR if the same element description, then it may only be repeated where one item is a debit and the other a credit.
The import file should preferrably only contain a single sheet else the user will have to select the appropriate sheet during the import process.
¶ Step 3.2: Import payroll data
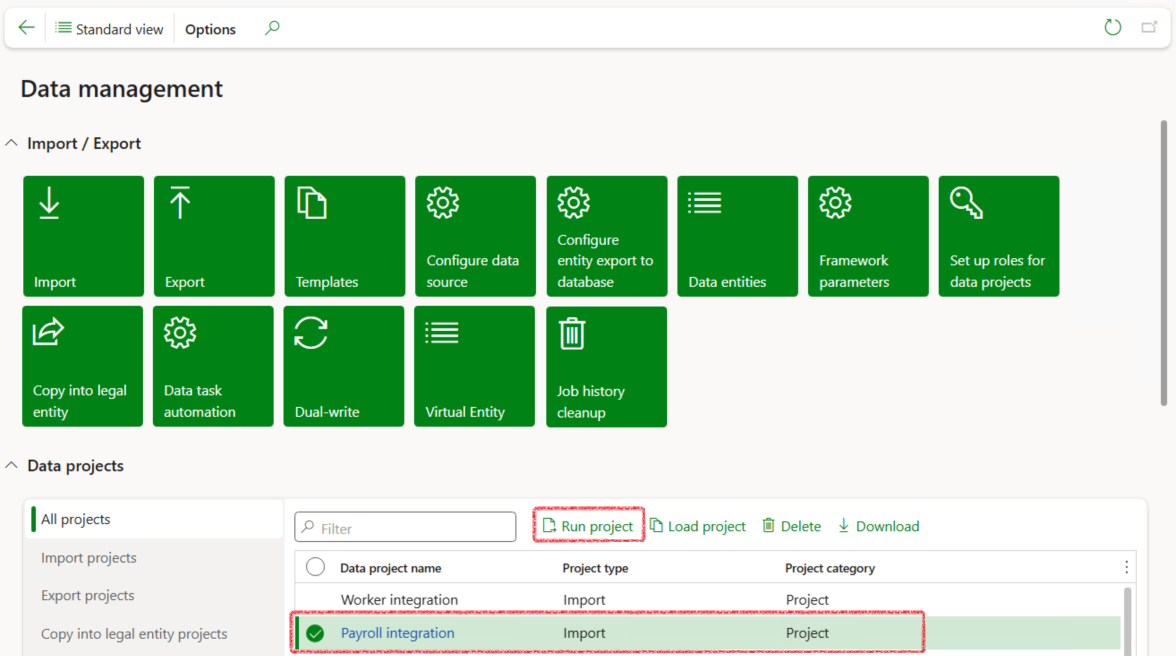
- Go to: System administration > Workspaces > Data management
- In the Data projects list, select the appropriate Payroll import project
- Click on the Run project button
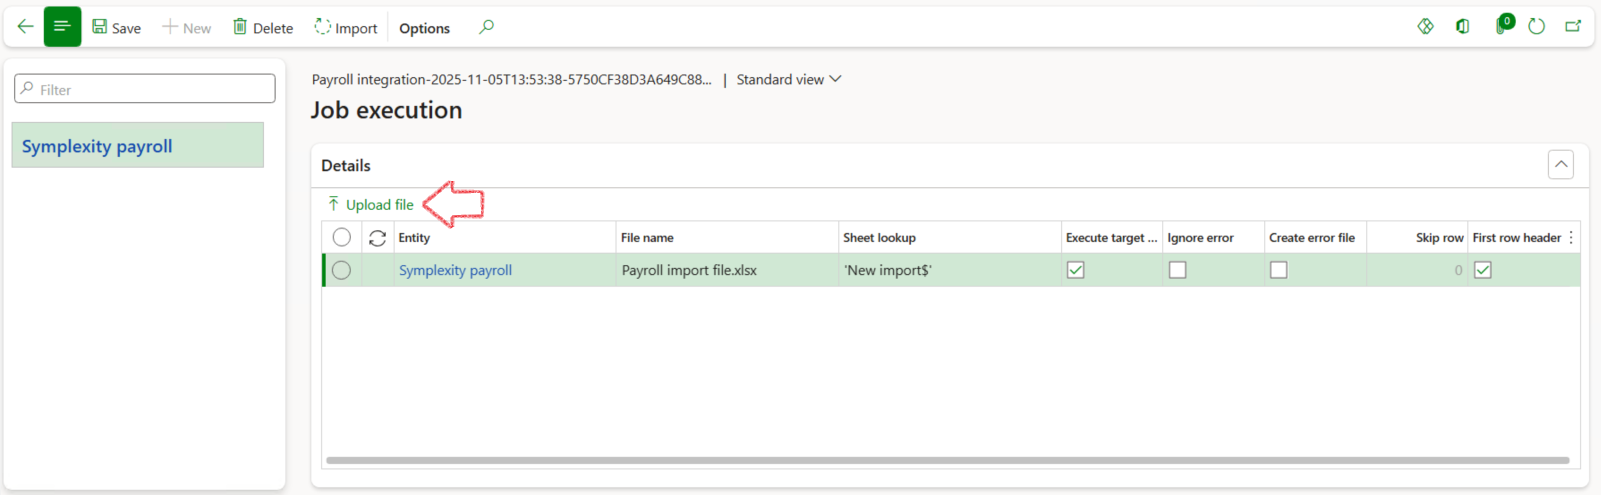
- In the Job execution form, click on the Upload file button
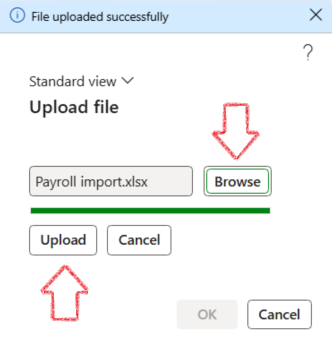
- In the Upload file dialogue, click on the Browse button
- Select the Worker import file that you want to upload from your device
- Click on the Upload button
- Click OK
- In the Action pane, click on the Import button
- In the popup notification message, click on the Close button
- In the Execution summary form, click on the Refresh button
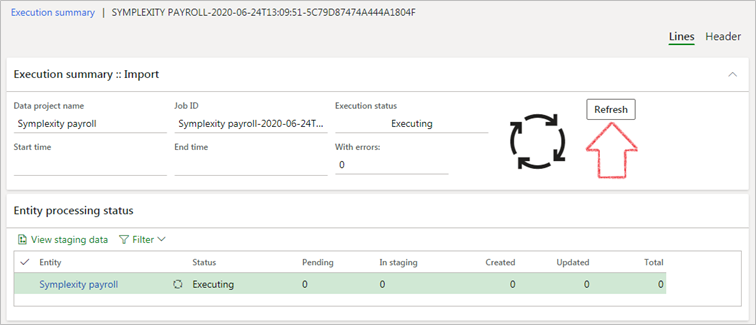
- If the import Succeeded, the status will be indicated as such.
- If the status is Failed/Partially succeeded, click on the View staging data button and locate the error so that the spreadsheet may be corrected before importing. (See steps explained in Worker import steps above)
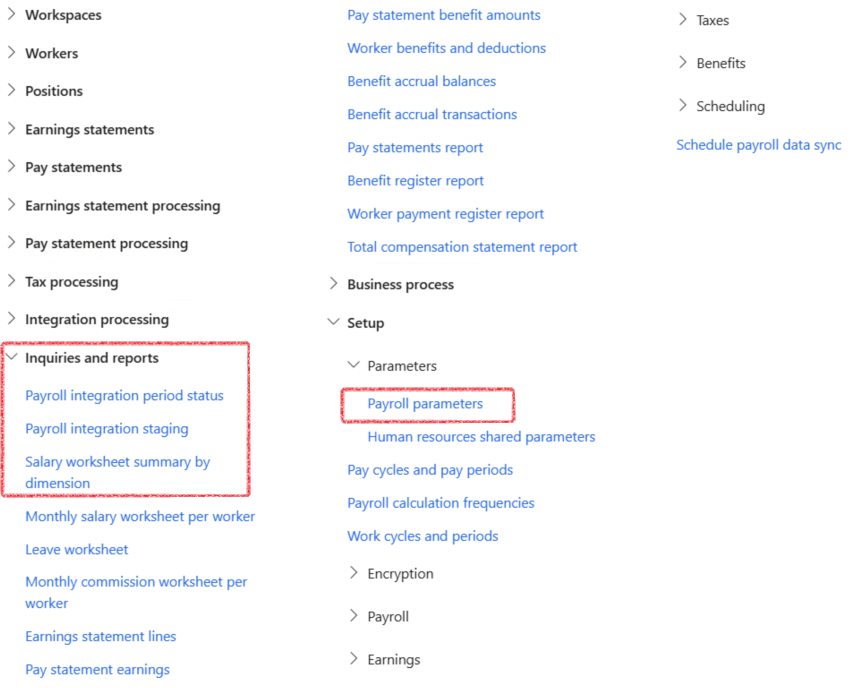
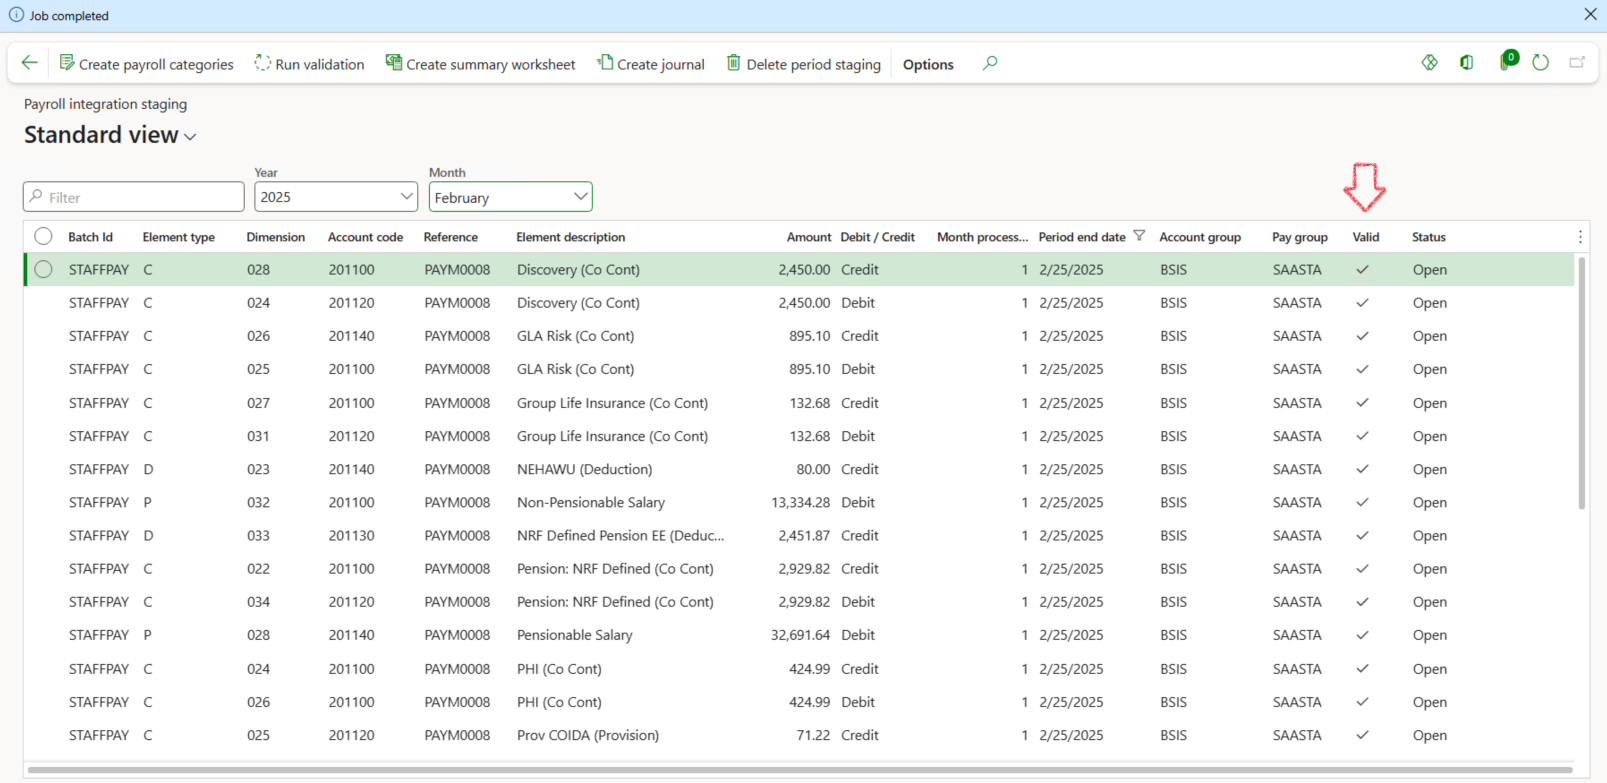
¶ Step 3.3: Create payroll categories
- Go to: Payroll > Inquiries and reports > Payroll integration staging
- Select the Year and Month in the filters to list the imported payroll data
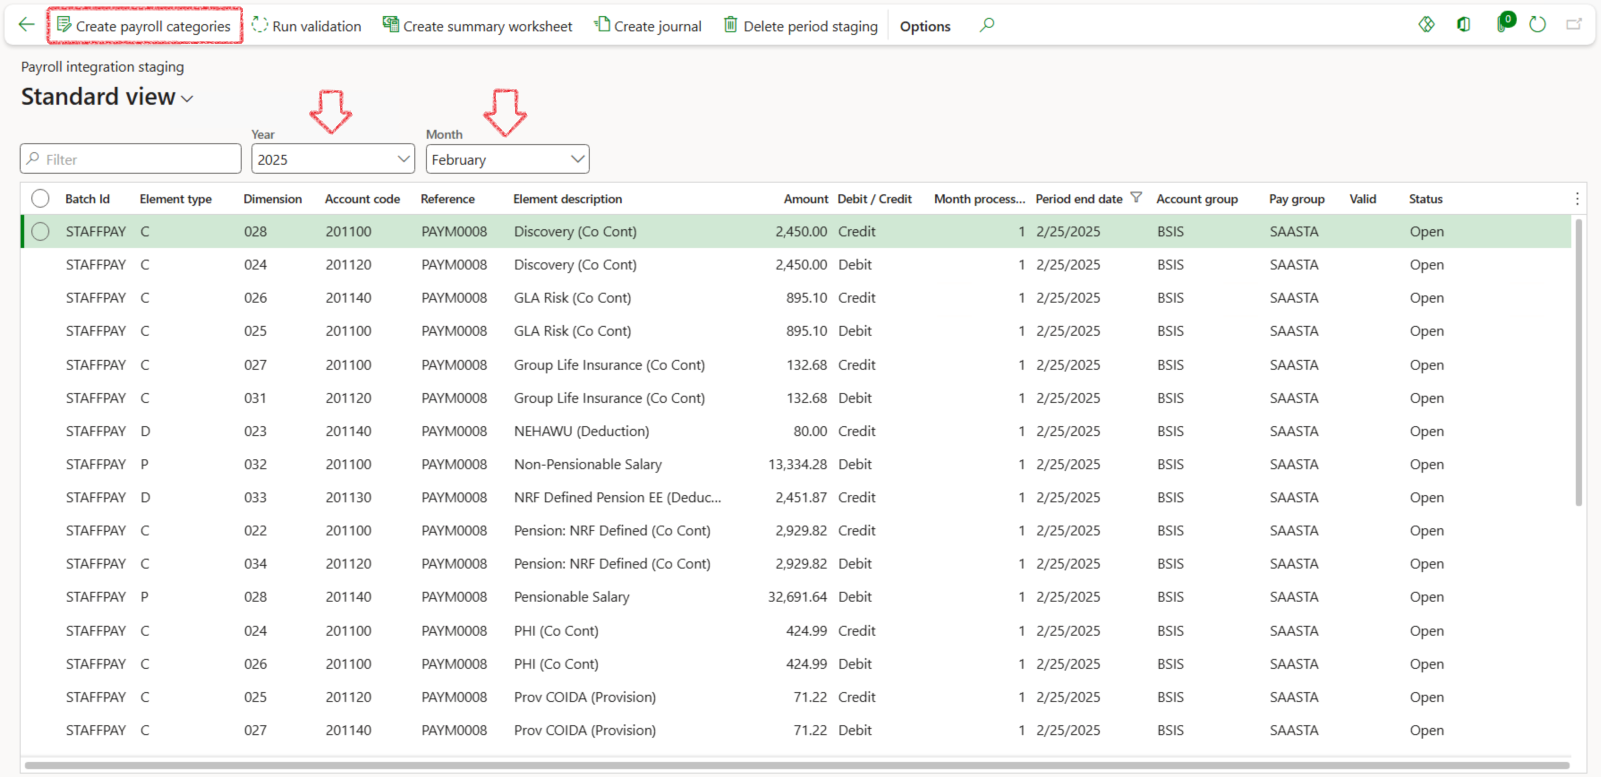
- In the Action pane, click on the Create payroll categories button
- In the Create payroll categories dialogue, specify the relvenat Month and Year
- Click OK
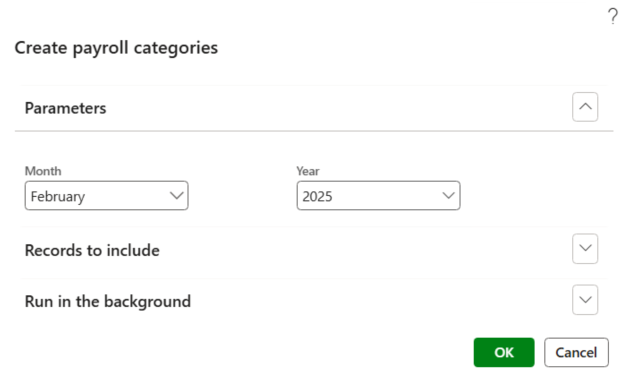
This step will create any additional categories (if applicable) in D365 ensuring synchronization between the two software systems.
¶ Step 3.4: Validate the payroll data
This step will validate the imported (raw) data from for accuracy to match data residing in D365.
- In the Action pane of the payroll integration staging list, click on the Run validation button
- In the Validate payroll staging dialogue, specify the Month and Year period
- Click OK
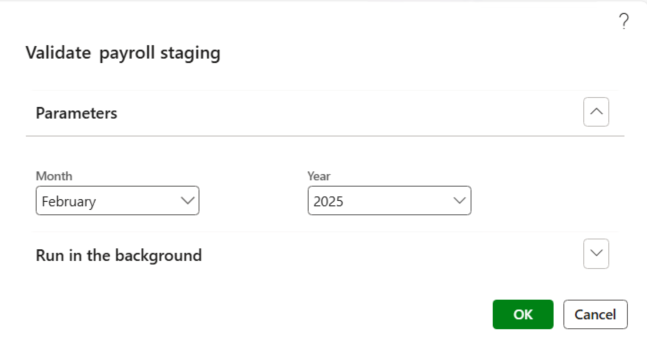
- A blue confirmation line should appear at the top of the form indicating the job was completed. Refresh the form to see the Valid column now updated as such.
¶ Step 3.5: Create a summary worksheet
- In the Action pane of the Payroll integration staging data list, click on the Create summary worksheet button
- In the Create summary worksheet dialogue, select the appropriate Month and Year
- Click OK
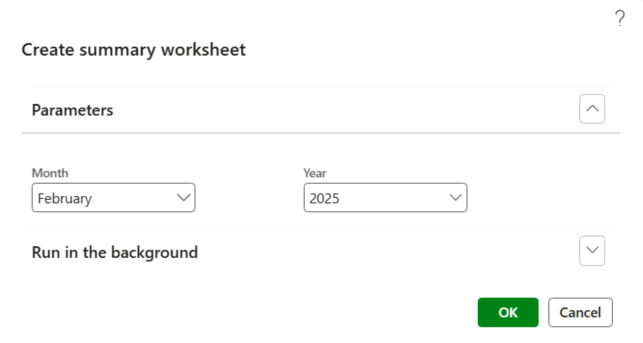
- A blue confirmation line should appear at the top of the form indicating the job was completed.
¶ Step 3.6: Create a journal
- In the Action pane of the Payroll integration staging data list, click on the Create journal button
- In the Create summary worksheet dialogue, select the appropriate Month and Year
- Click OK

- A blue confirmation line should appear at the top of the form indicating the job was completed.
¶ Step 3.7: Delete staging data
If the validation of staging data or journal creation fails due to incorrect data, the staging data needs to be deleted before importing updated data by following the previous steps.
- In the action pane of the Payroll integration staging list, click on Delete period staging
- In the Delete period staging dialogue, select the relevant Month and Year
- Click OK
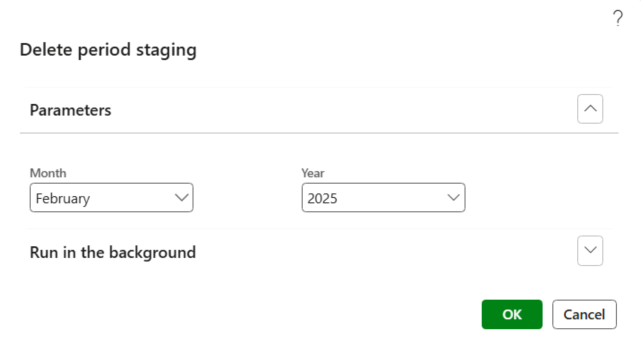
This functionality can only be executed before the system created payroll journal has been posted.
¶ Step 3.8: Post the journal
- Go to: Payroll > Inquiries and reports > Payroll integration period status
- The period, for which payroll data was imported, should be listed with the status Journal created. A journal voucher should be displayed and the summary worksheet indicated as having been created
- Click on the Journal voucher of the relevant payroll period to access the payroll journal
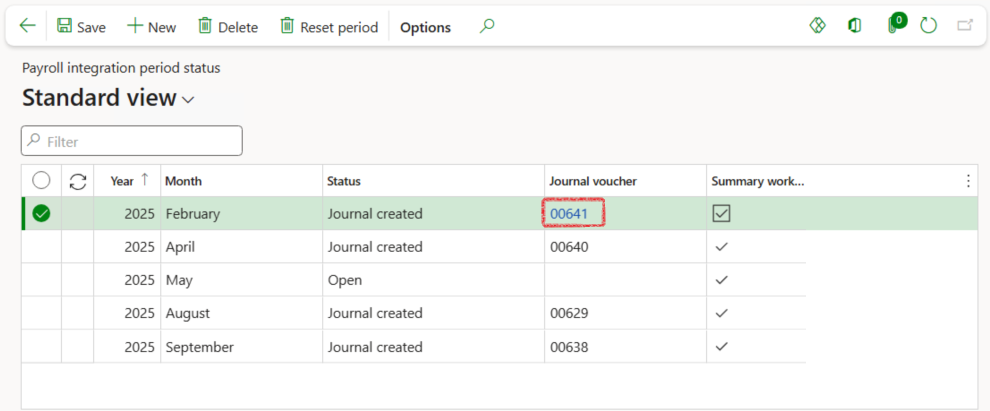
- Click on the Journal batch number to view the lines of the payroll journal
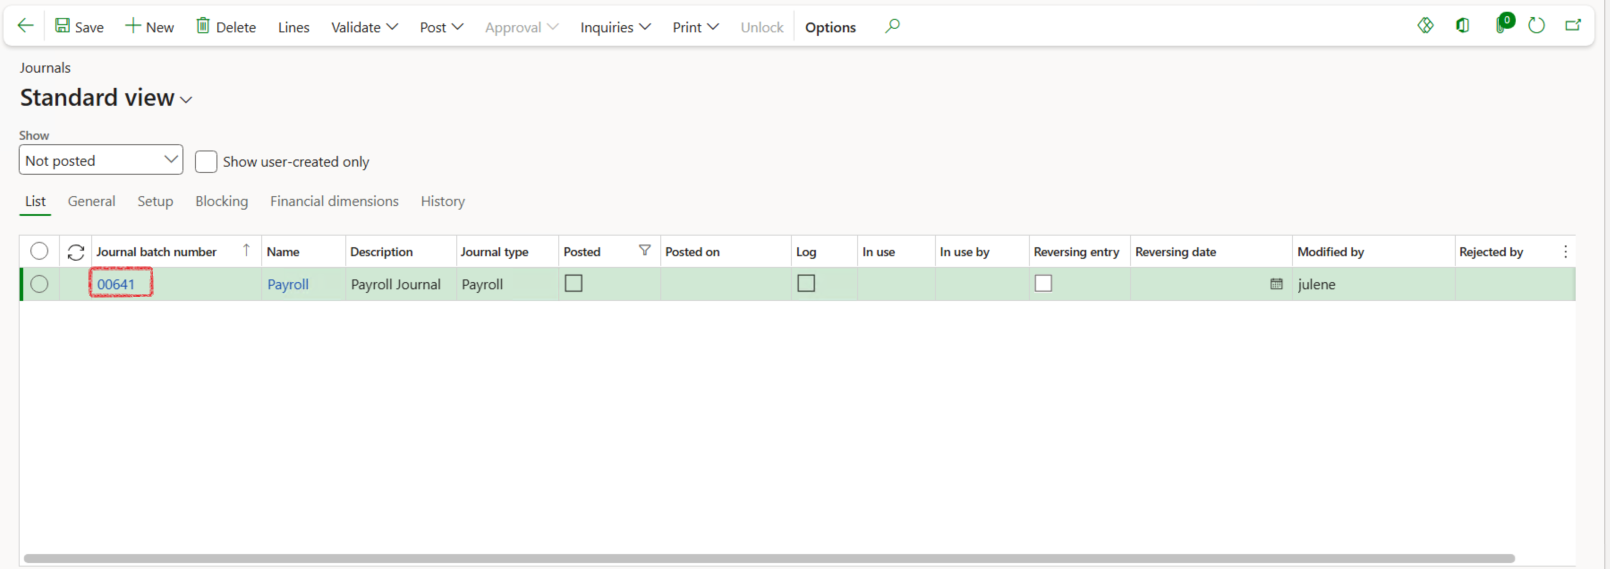
- Review the journal lines to ensure all is as axpected and correct.
- Click on Post in the action pane
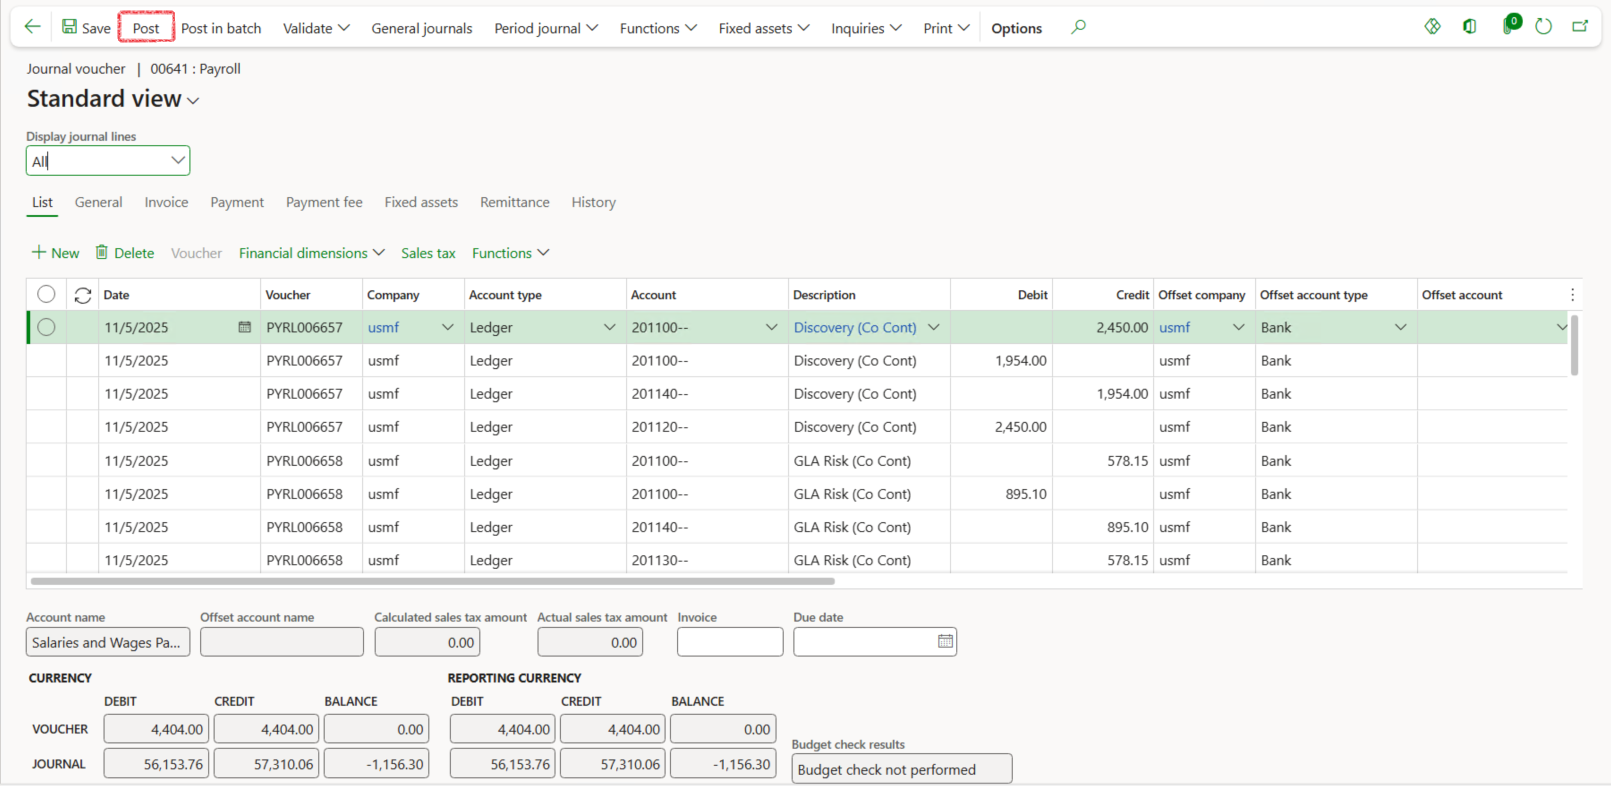
- A blue confirmation line should appear at the top of the form indicating the journal was posted. If the posting failed, review the results messages to identify the data to be corrected. Correct the data then try to repost the journal or alternatively delete the staging data en reimport the corrected data
¶ Reporting
¶ Step 4: Salary worksheet summary by dimension
- Go to: Payroll > Enquiries and reports > Salary worksheet summary by dimension
- Select the relevant Year and Month in the filters
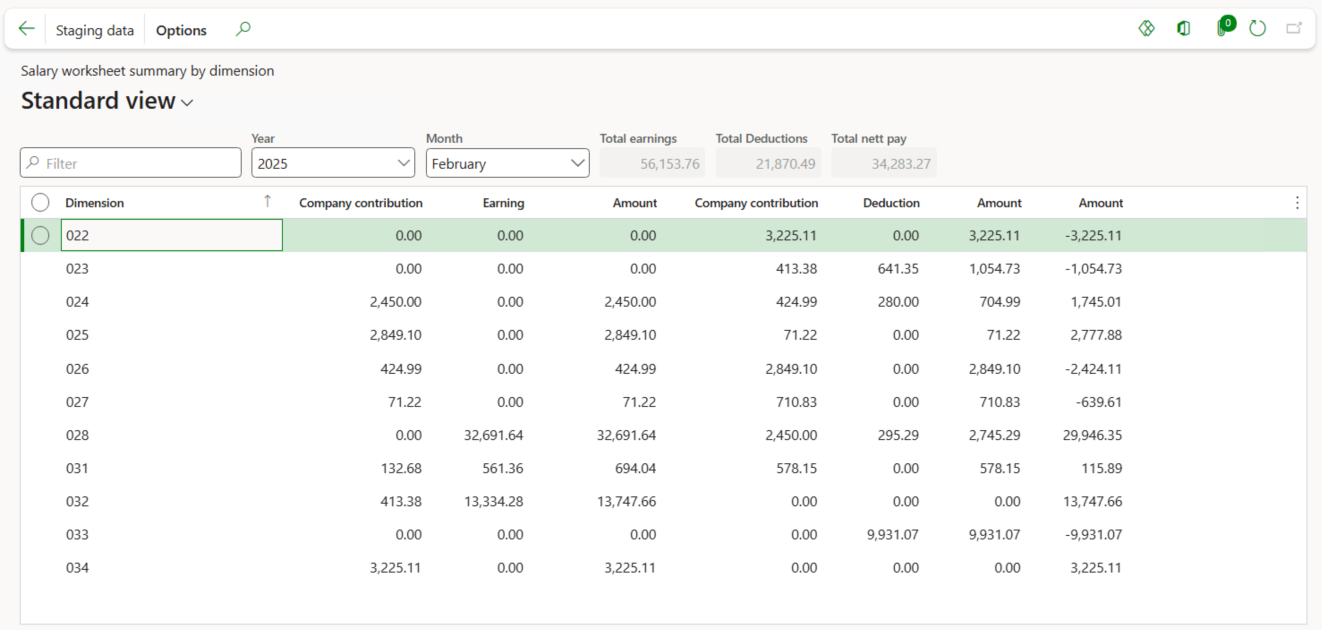
- A summary is provided of the staging data imported for the selected period