¶ Introduction
The amount of data organizations handles each year grows exponentially as their business expands, as does the number of users who require access to this data in the form of reports. The complexity of reports is also increasing as management at all levels demand access to up-to-the minute information on which to base business-critical decisions.
It is no wonder then that reporting is increasingly demanding more time and resources; and as a result, contributing additional costs to a business.
Organizations that embark on a custom developed system are in a unique position to ensure they get access to the essential reports they need to better manage their business. But often, although mentioned at the start of a project, the details surrounding reporting is not considered until the system is built. The consequence of this is that often the data required to produce these reports is not captured and the system requires additional work.
On this wiki page we will cover:
- Workspaces in Dynamics 365 FO are a collection of commonly used links, tiles, lists and jobs that a specific user would perform in their role in the organization.
- Inquiries; these are forms used for quickly and easily reporting transactions where the transactions are listed. Advanced filtration allows the facility to reduce the inquiry results to a number of specific results. If it is required that you show all the transactions, don't identify any filter.
- Reports; can be defined simply as any static visualization of a structured data set. This may include transactional data presented in a tabular layout and advanced graphical views of aggregate information. To account for this broad definition, the application offers several tools to produce reports to satisfy complex business requirements. One of these tools is SQL Server Reporting Services.
¶ Navigation
¶ Workspaces
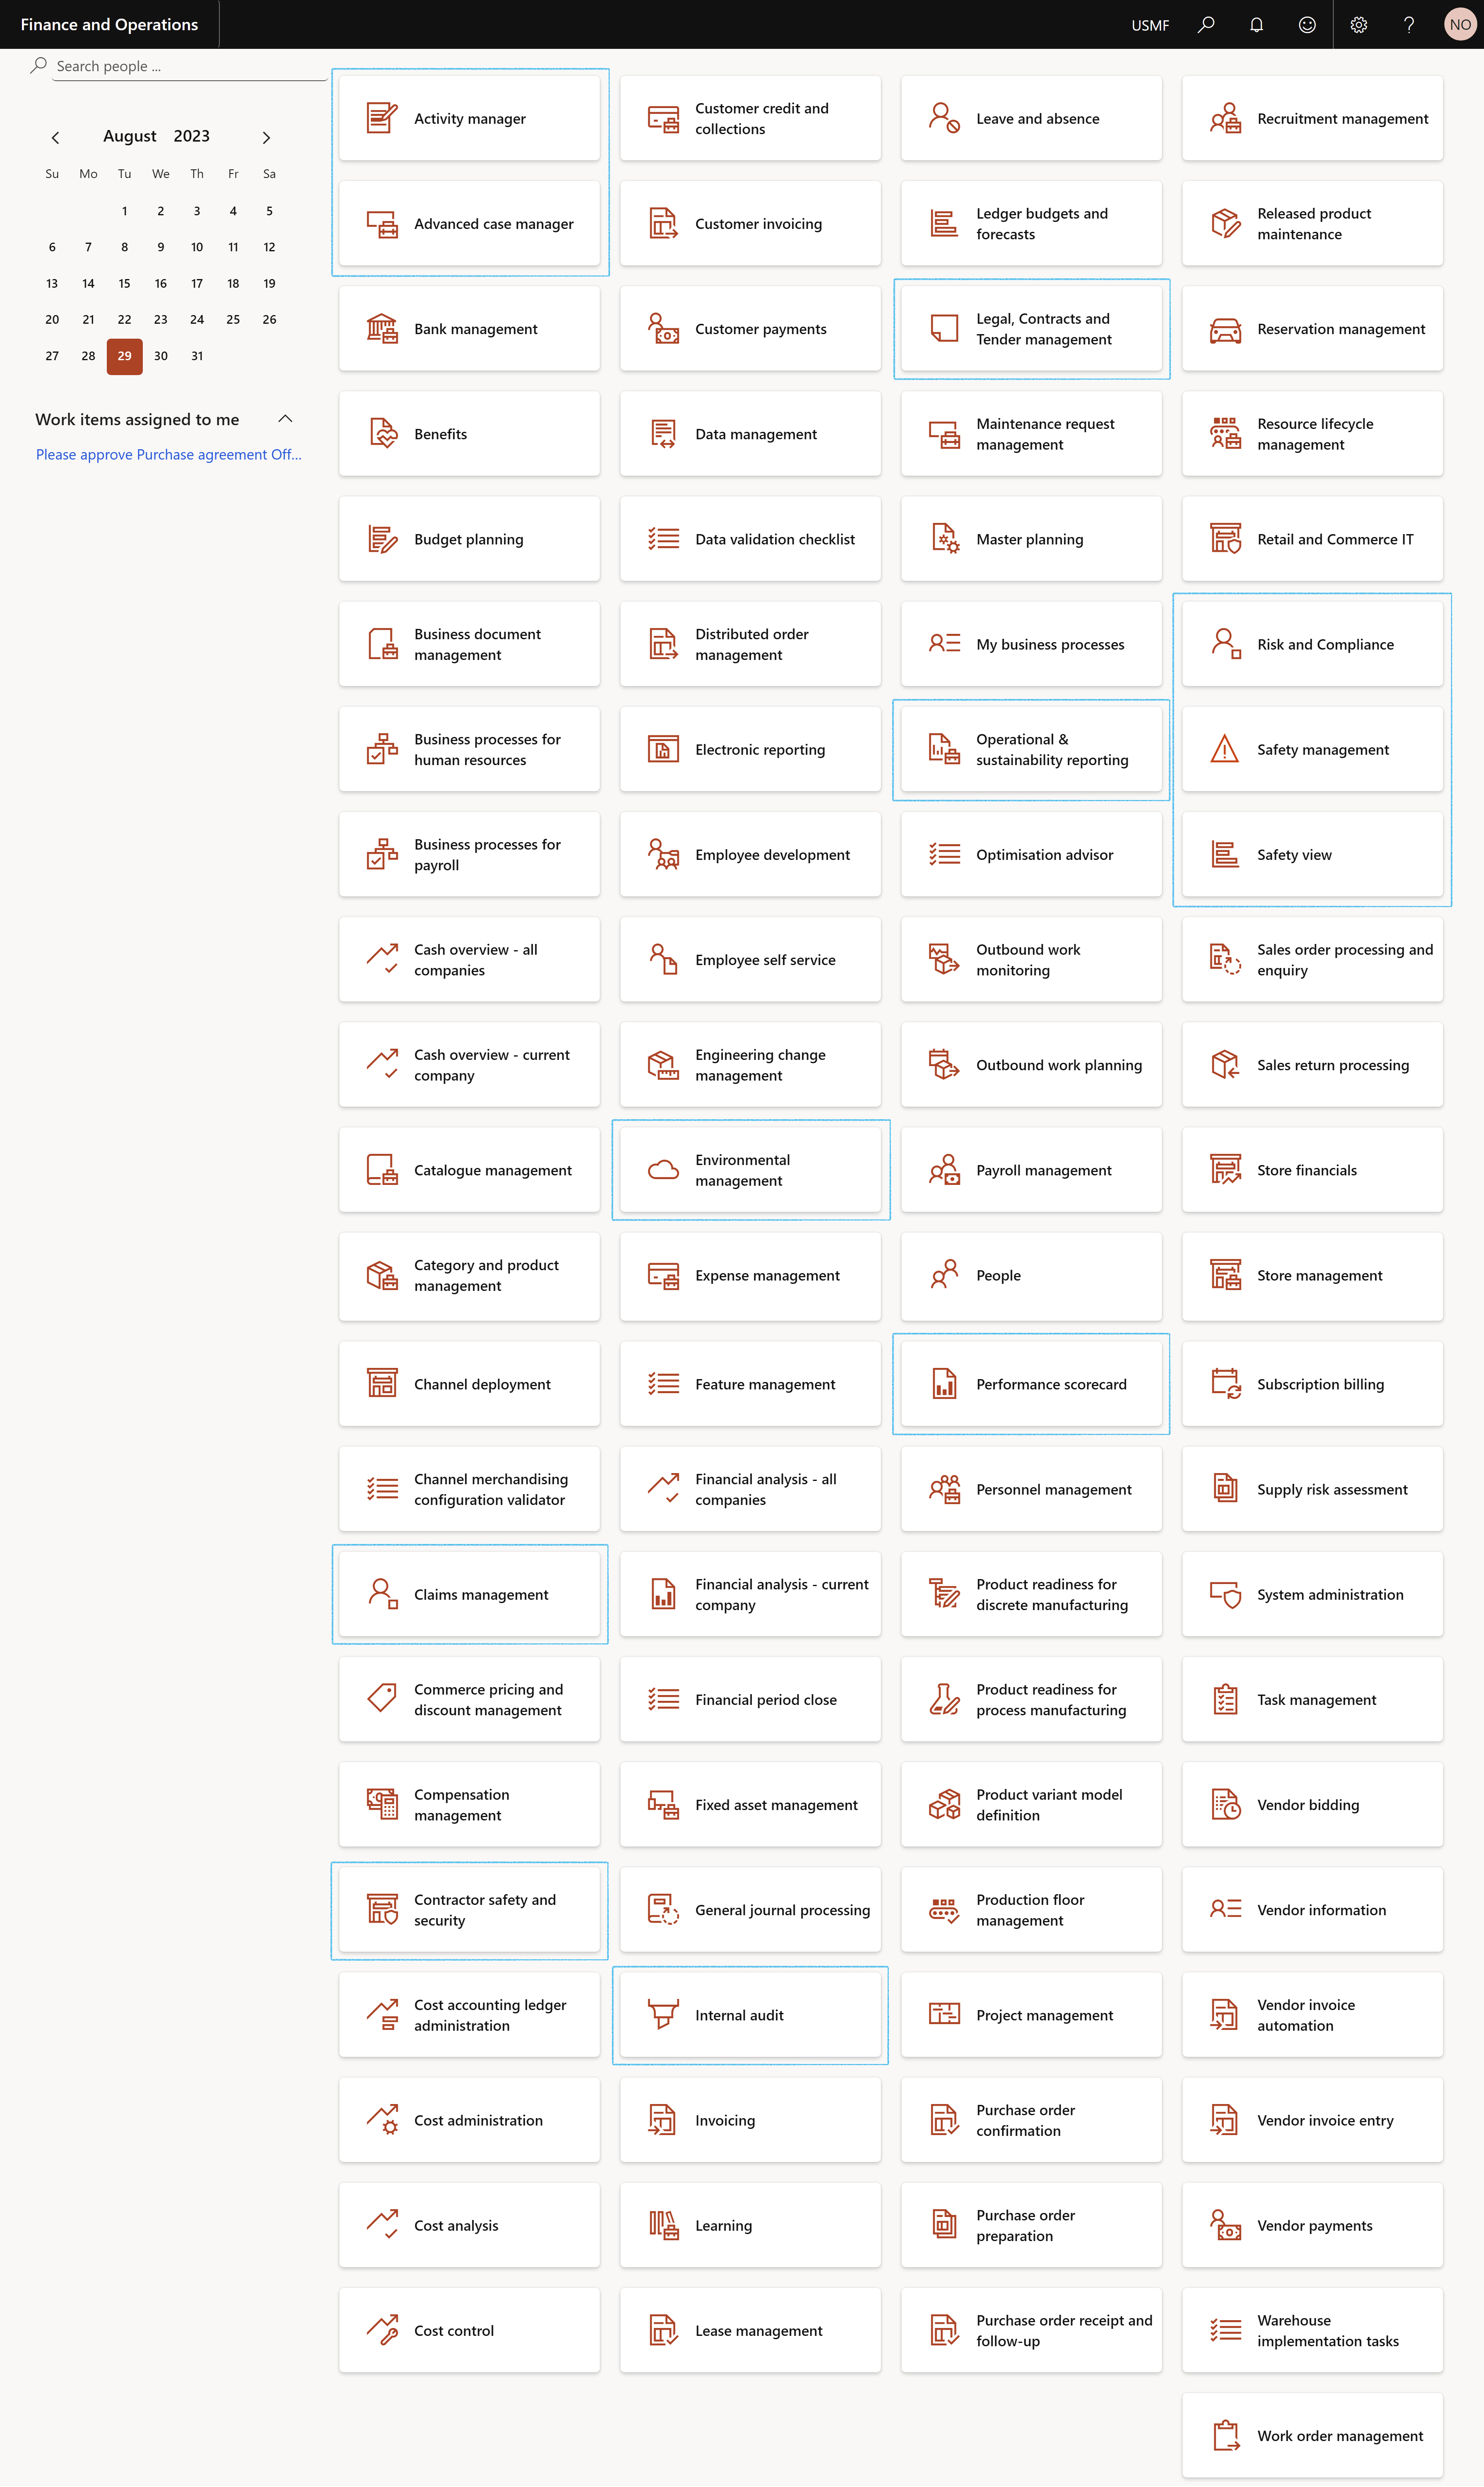
Each workspace is geared toward and optimized for common roles within the organization. Workspaces are intended to be the single point of entry into the application and where the user will spend the majority of their time as they complete various tasks, monitor specific reports and KPIs, and manage their day to day responsibilities. In this article I’ll take you through all you need to know to take full advantage of this excellent productivity feature in Dynamics 365 Finance and Operations.
¶ Activity manager Workspace
¶ My work tab
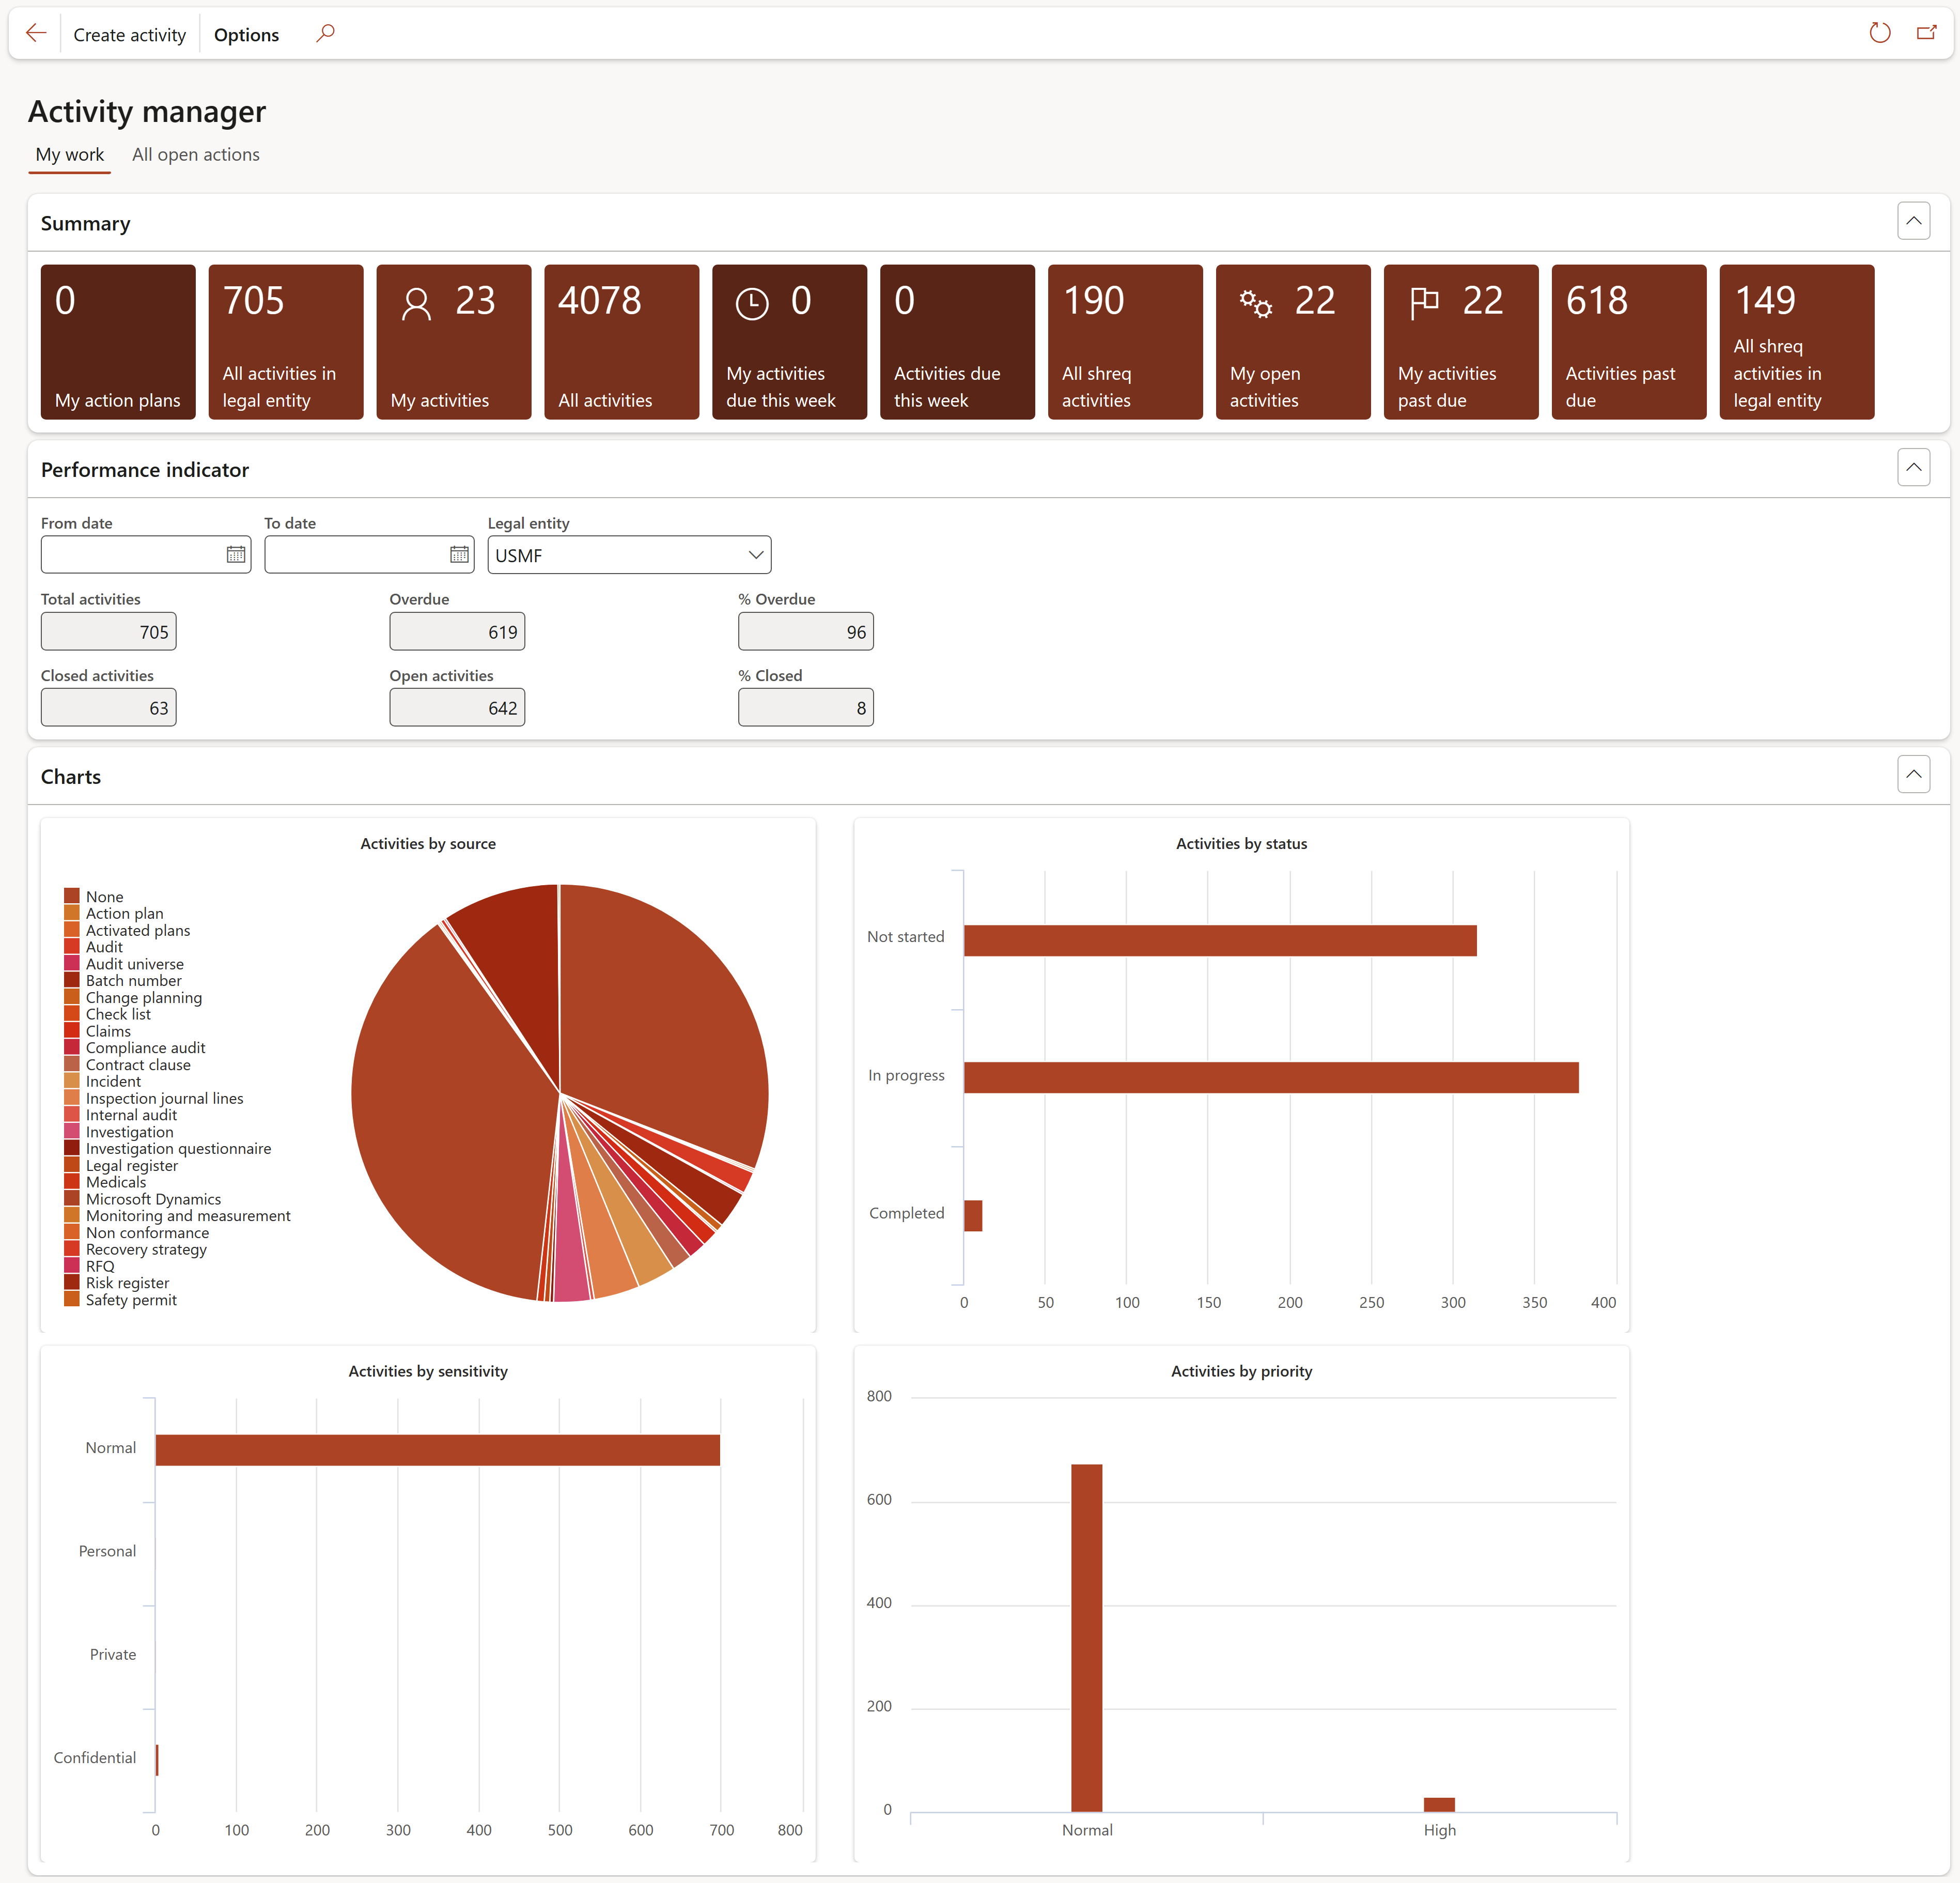
Functions of the Summary tiles:
- My action plans:
- Displays the number of Action plans where the logged in user is the manager of the selected department on the Action plan
- Opens up a list page of all the Action plans where the logged in user is the manager of the selected department on the Action plan
- All activities in legal entity:
- Displays the number of activities that have been created in the current legal entity
- Opens up the All activities in legal entity form
- My activities:
- Displays the number of activities that have been created by the logged in user
- Opens up the My activities form
- All activities:
- Displays the number of all the activities that have been created
- Opens up the All activities form
- My activities due this week:
- Displays the number of activities of the logged in user that are due for the current week
- Opens up the My activities due this week form
- Activities due this week:
- Displays the number of all the activities that are due for the current week
- Opens up the Activities due this week form
- All shreq activities:
- Displays the number of all the shreq activities that have been created
- Opens up the All shreq activities form
- My open activities:
- Displays the number of open activities that have been created by the logged in user
- Opens up the My open activities form
- My activities past due:
- Displays the number of past due activities that have been created by the logged in user
- Opens up the My activities past due form
- Activities past due:
- Displays the number of all past due activities
- Opens up the Activities past due form
- All shreq activities in legal entity:
- Displays the number of all the shreq activities that have been created in the current legal entity
- Opens up the All shreq activities in legal entity form
The Performance indicator Fast tab:
The filters can be used to display the following information:
- Total activities
- Closed activities
- Overdue
- Open activities
- % Overdue
- % Closed
The Charts Fast tab:
The charts display the following:
- Activities by source
- Activities by status
- Activities by sensitivity
- Activities by priority
¶ All open actions tab
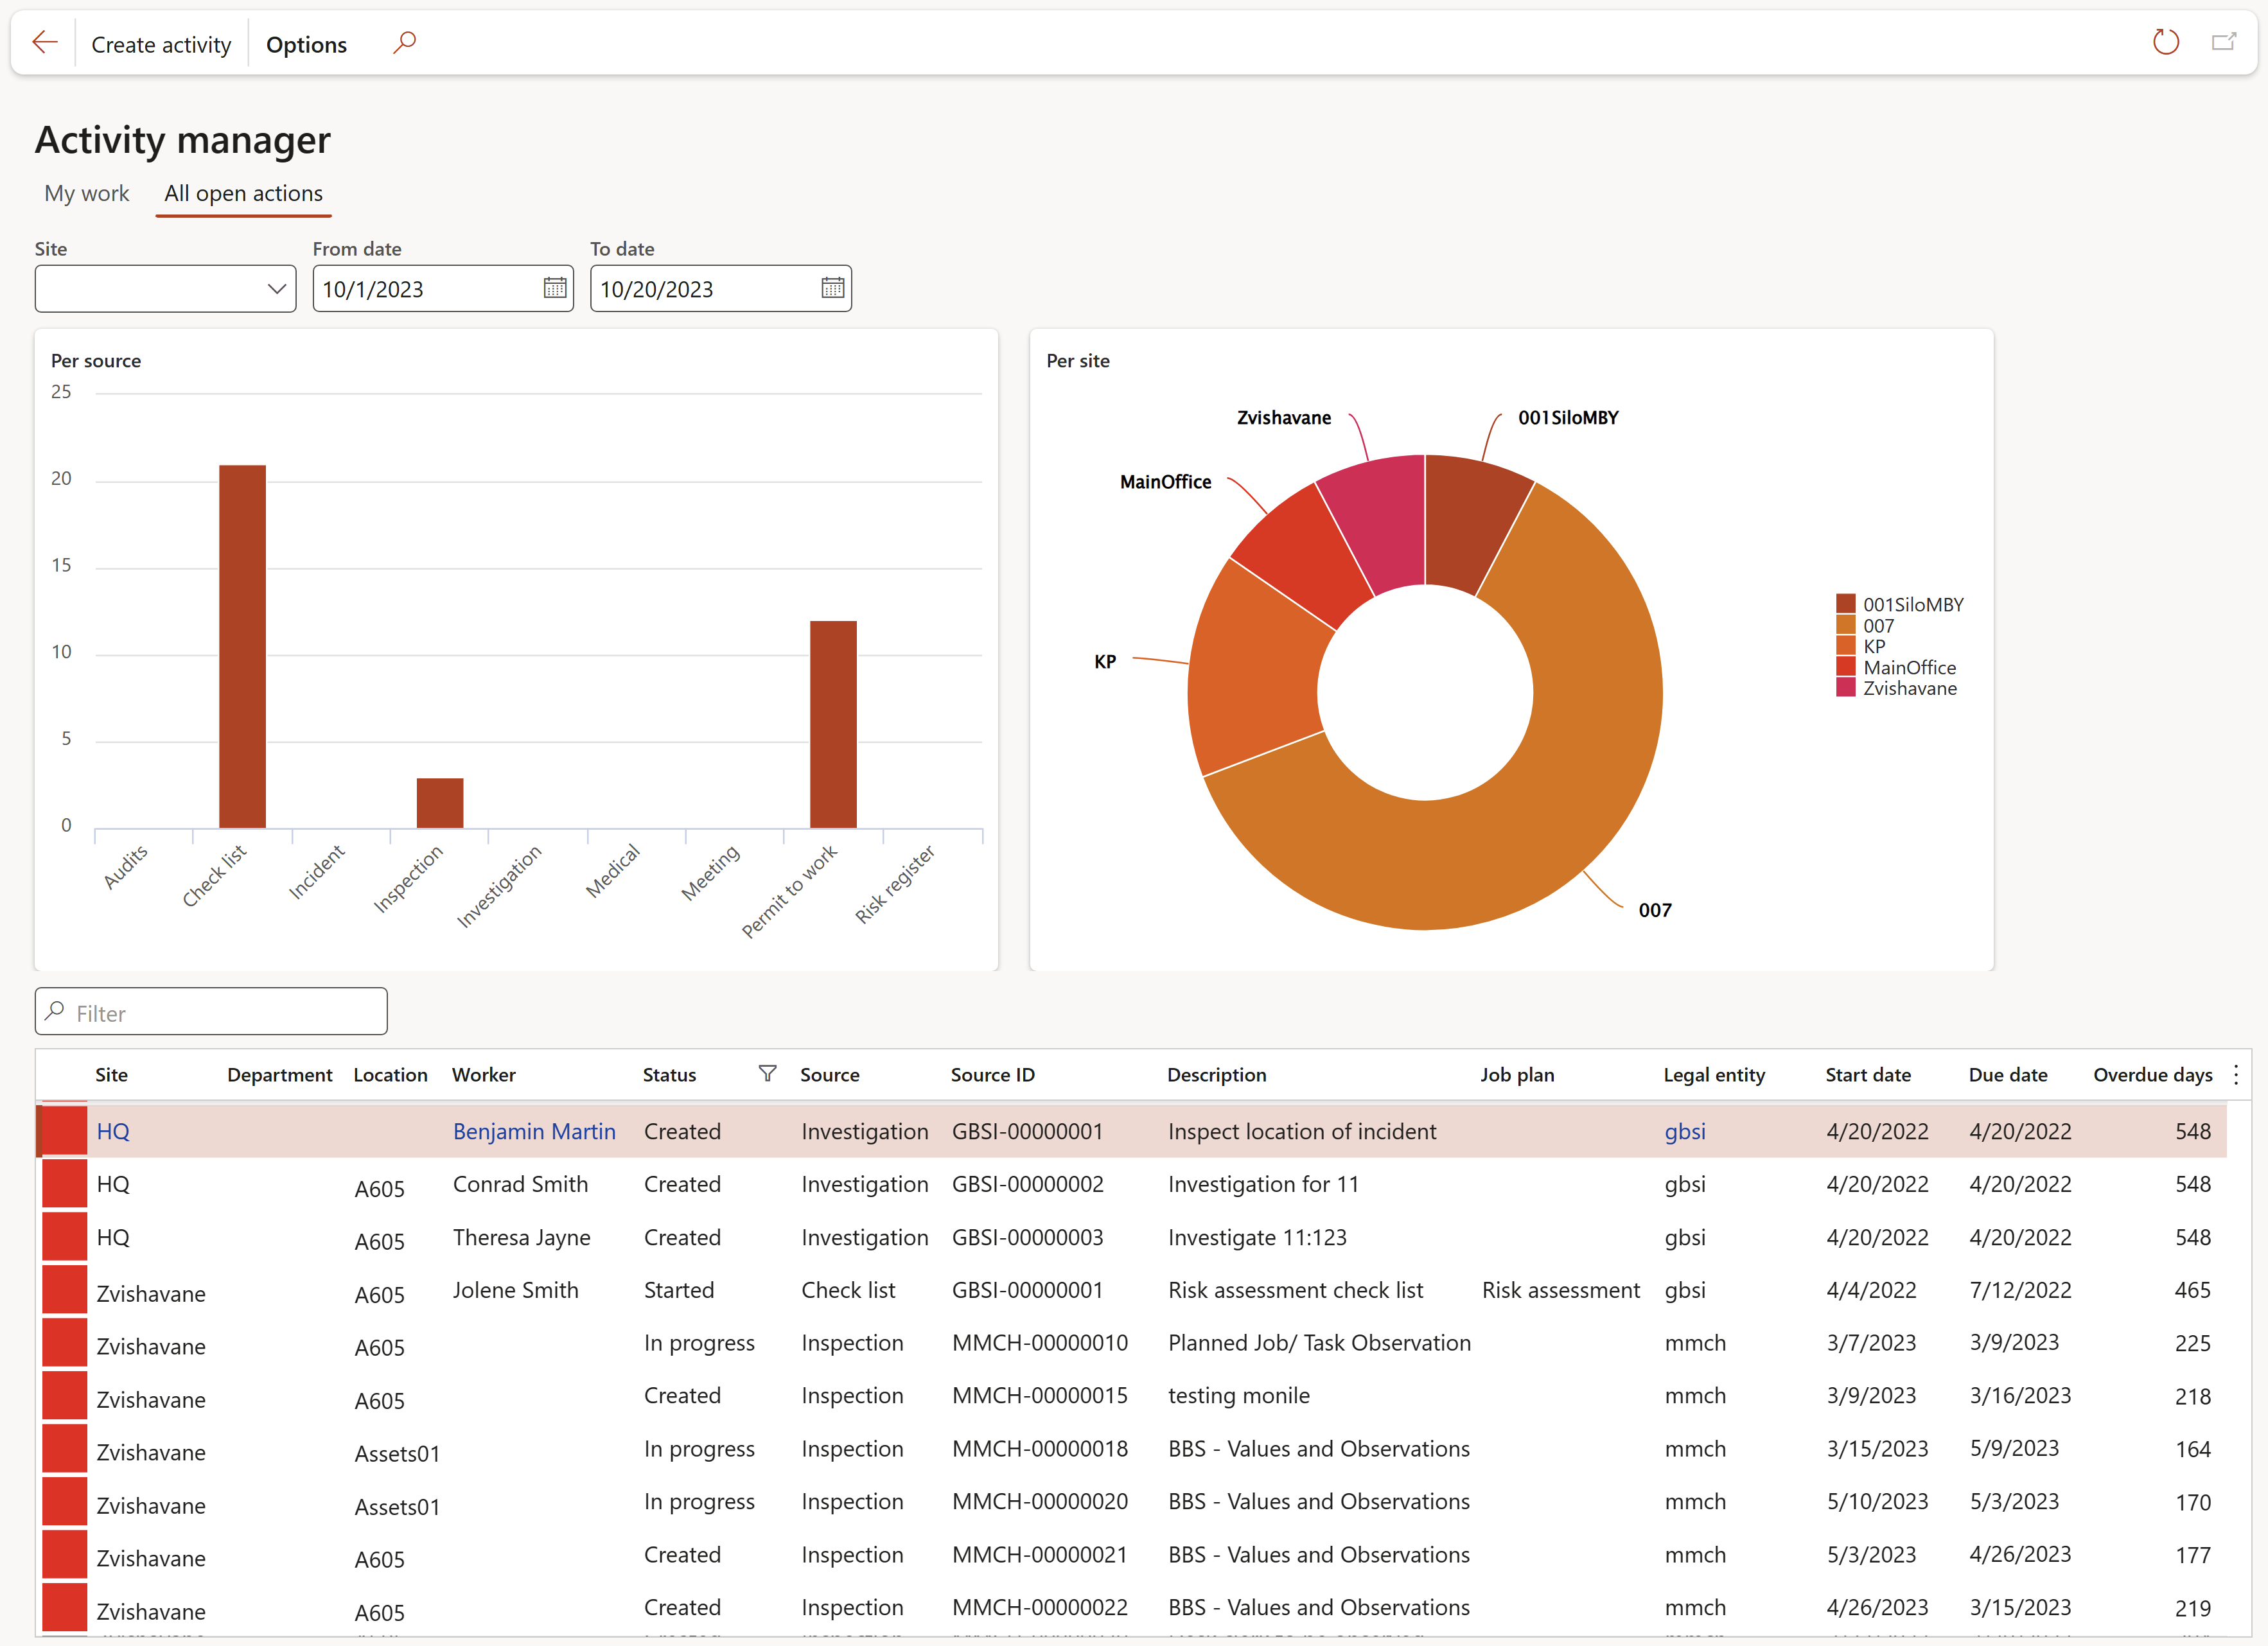
This inquiry provides a list of HSE and GRC actions displaying the site, department, location, source job plan, legal entity, and relevant dates. The graph provides a summary of the Actions status count and the Actions source count.
Graph legend:
| Color |
Referent |
| Red: | More than 15 days overdue |
| Yellow: | Between 5 and 15 days overdue |
| Green: | Between 0 and 5 days overdue |
| Blank: | Not overdue |
The total amount of days overdue are displayed in the far-right hand side column
A flat list of all the open GRC actions can be accessed by following this path: GRC > All open Governance, Risk and Compliance actions
¶ Advanced case management Workspace
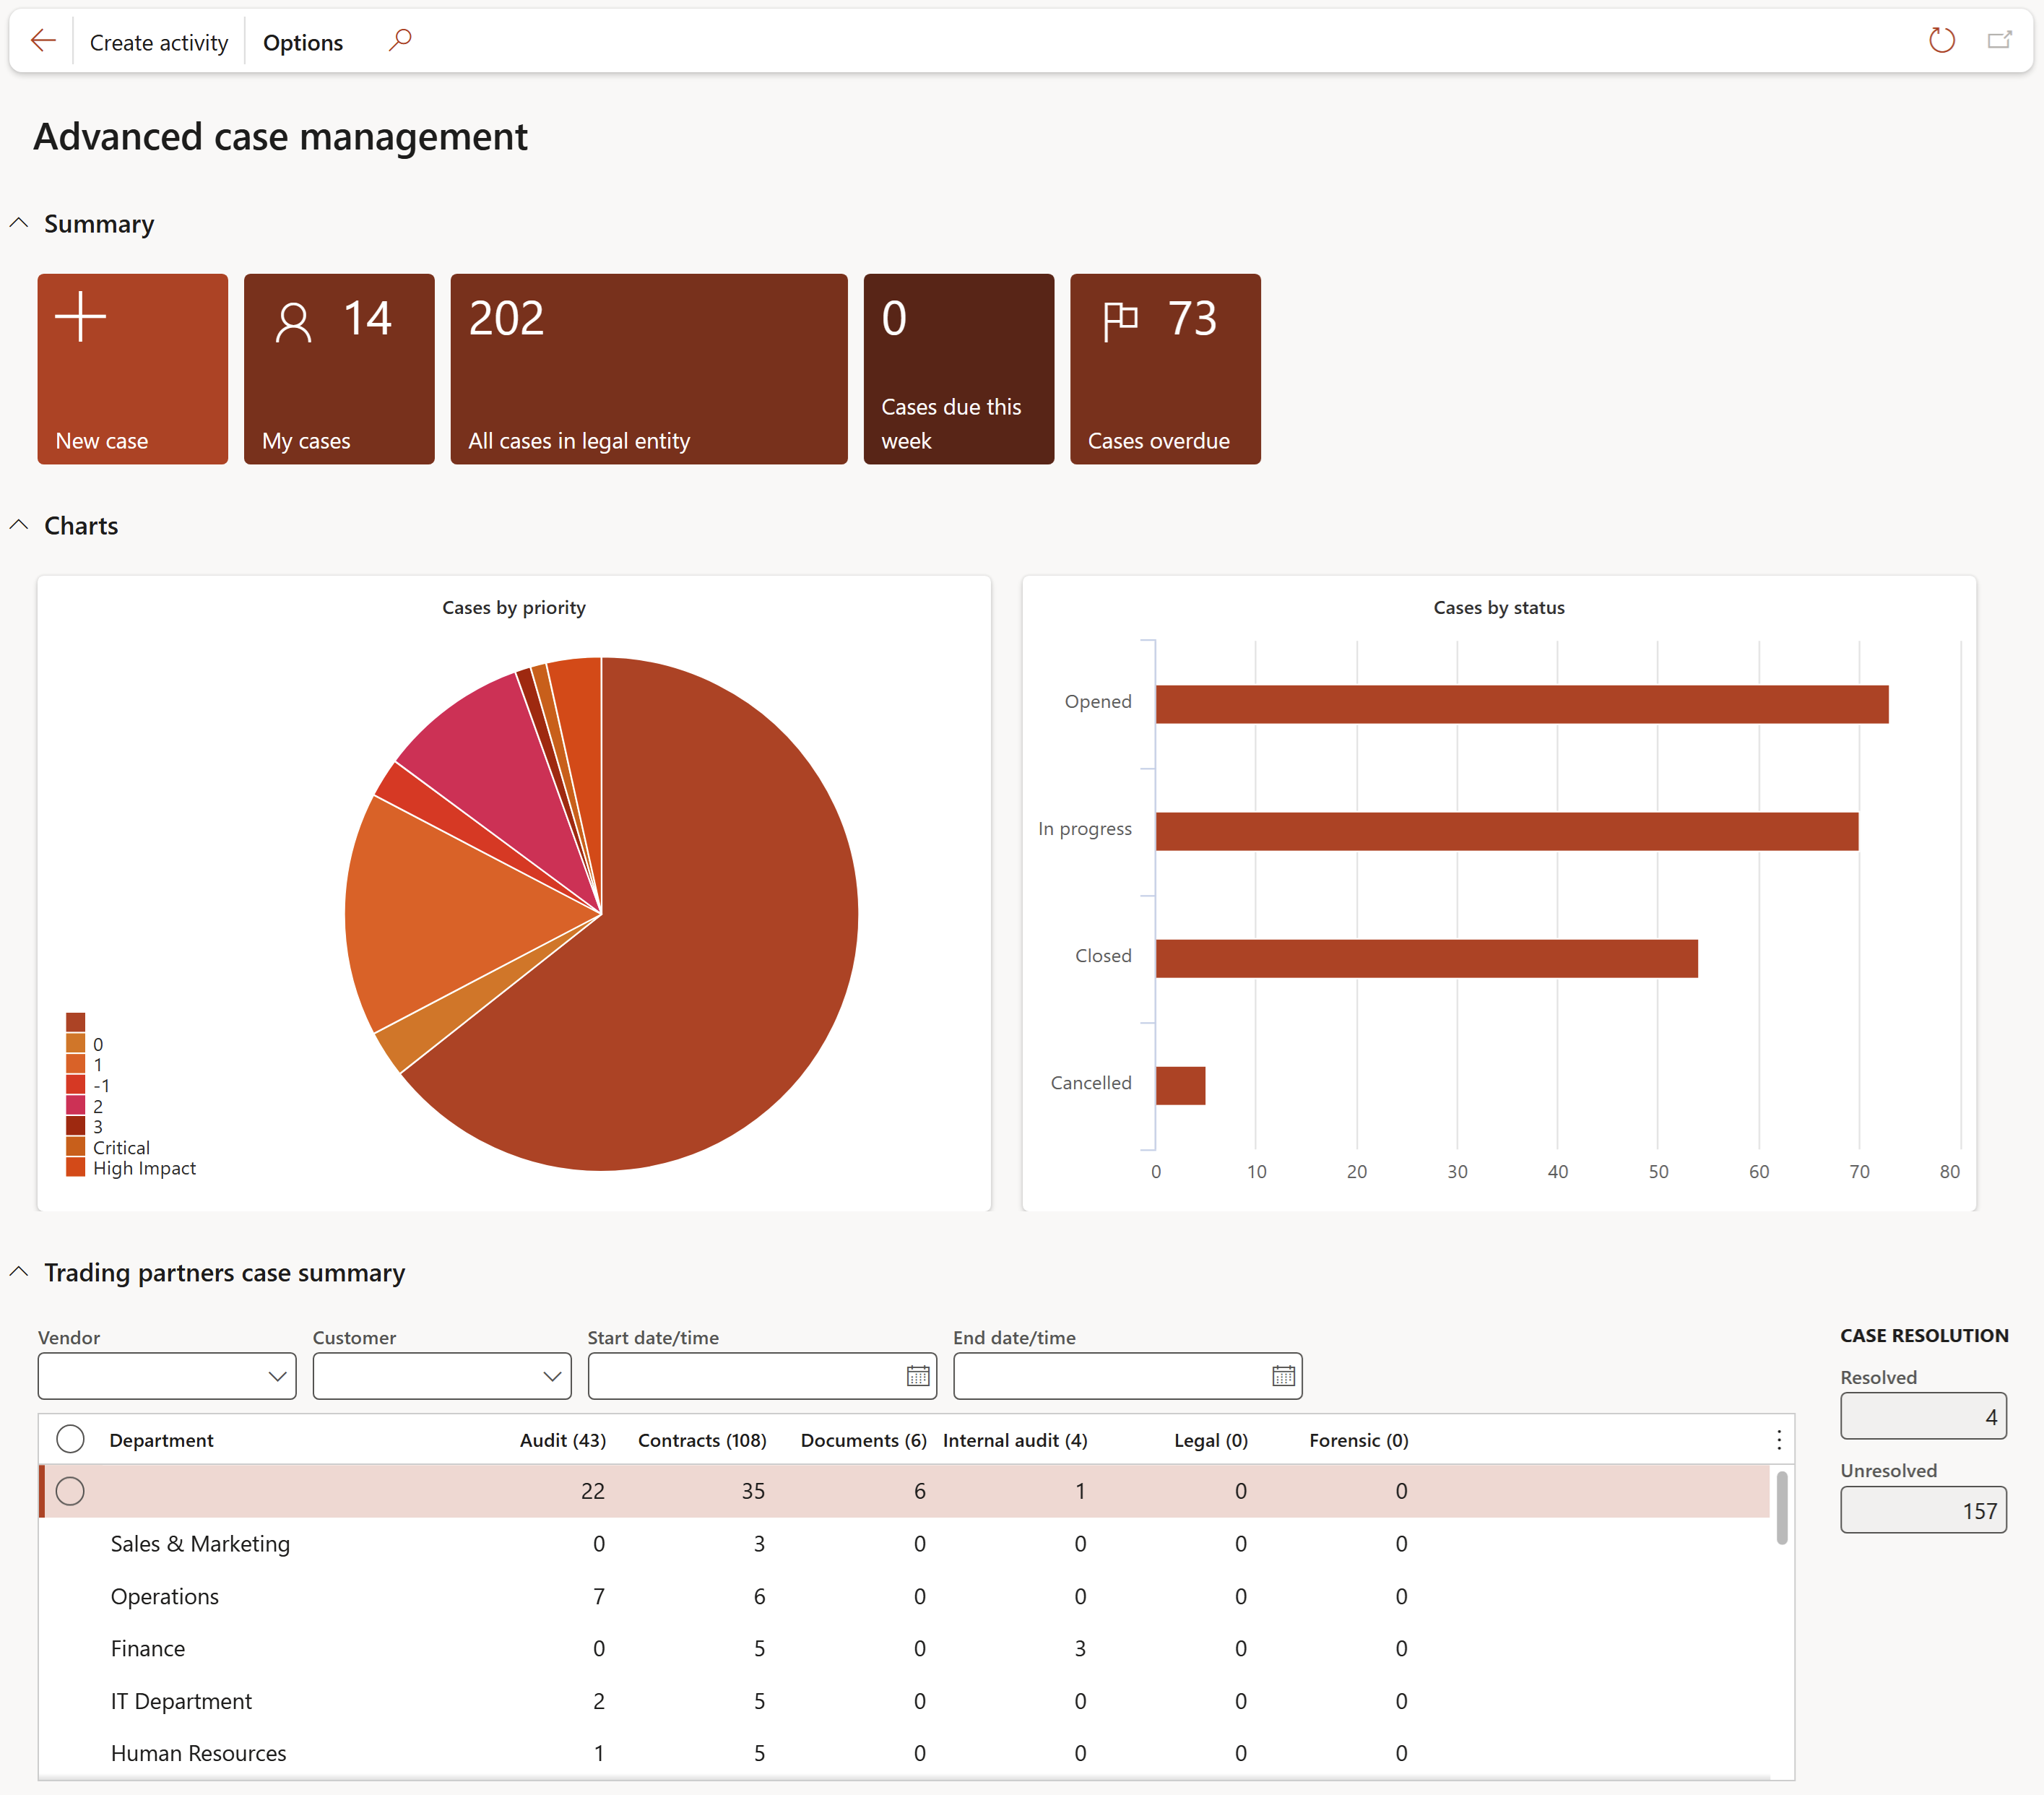
Functions of the Summary tiles:
- New case:
- Creates new case
- My cases:
- Displays all cases assigned to me
- All cases in legal entity:
- Shows all cases created for this company
- Cases due this week:
- All cases that needs to be resolved this week
- Cases overdue:
- All cases past their resolved date
The charts:
- Cases by priority: Displays the cases by priority
- Cases by status: Displays the cases by status
The Trading partners case summary grid:
- The Vendor and Customer filters can be used to narrow down your search
- Displays cases by department and also by resolved and unresolved
- The headings of the columns in the grid come from the Case category type enum
¶ Business continuity workspace
The following reports can be printed from the workspace:
- Impact assessment; downtime report
- Recovery strategy per department
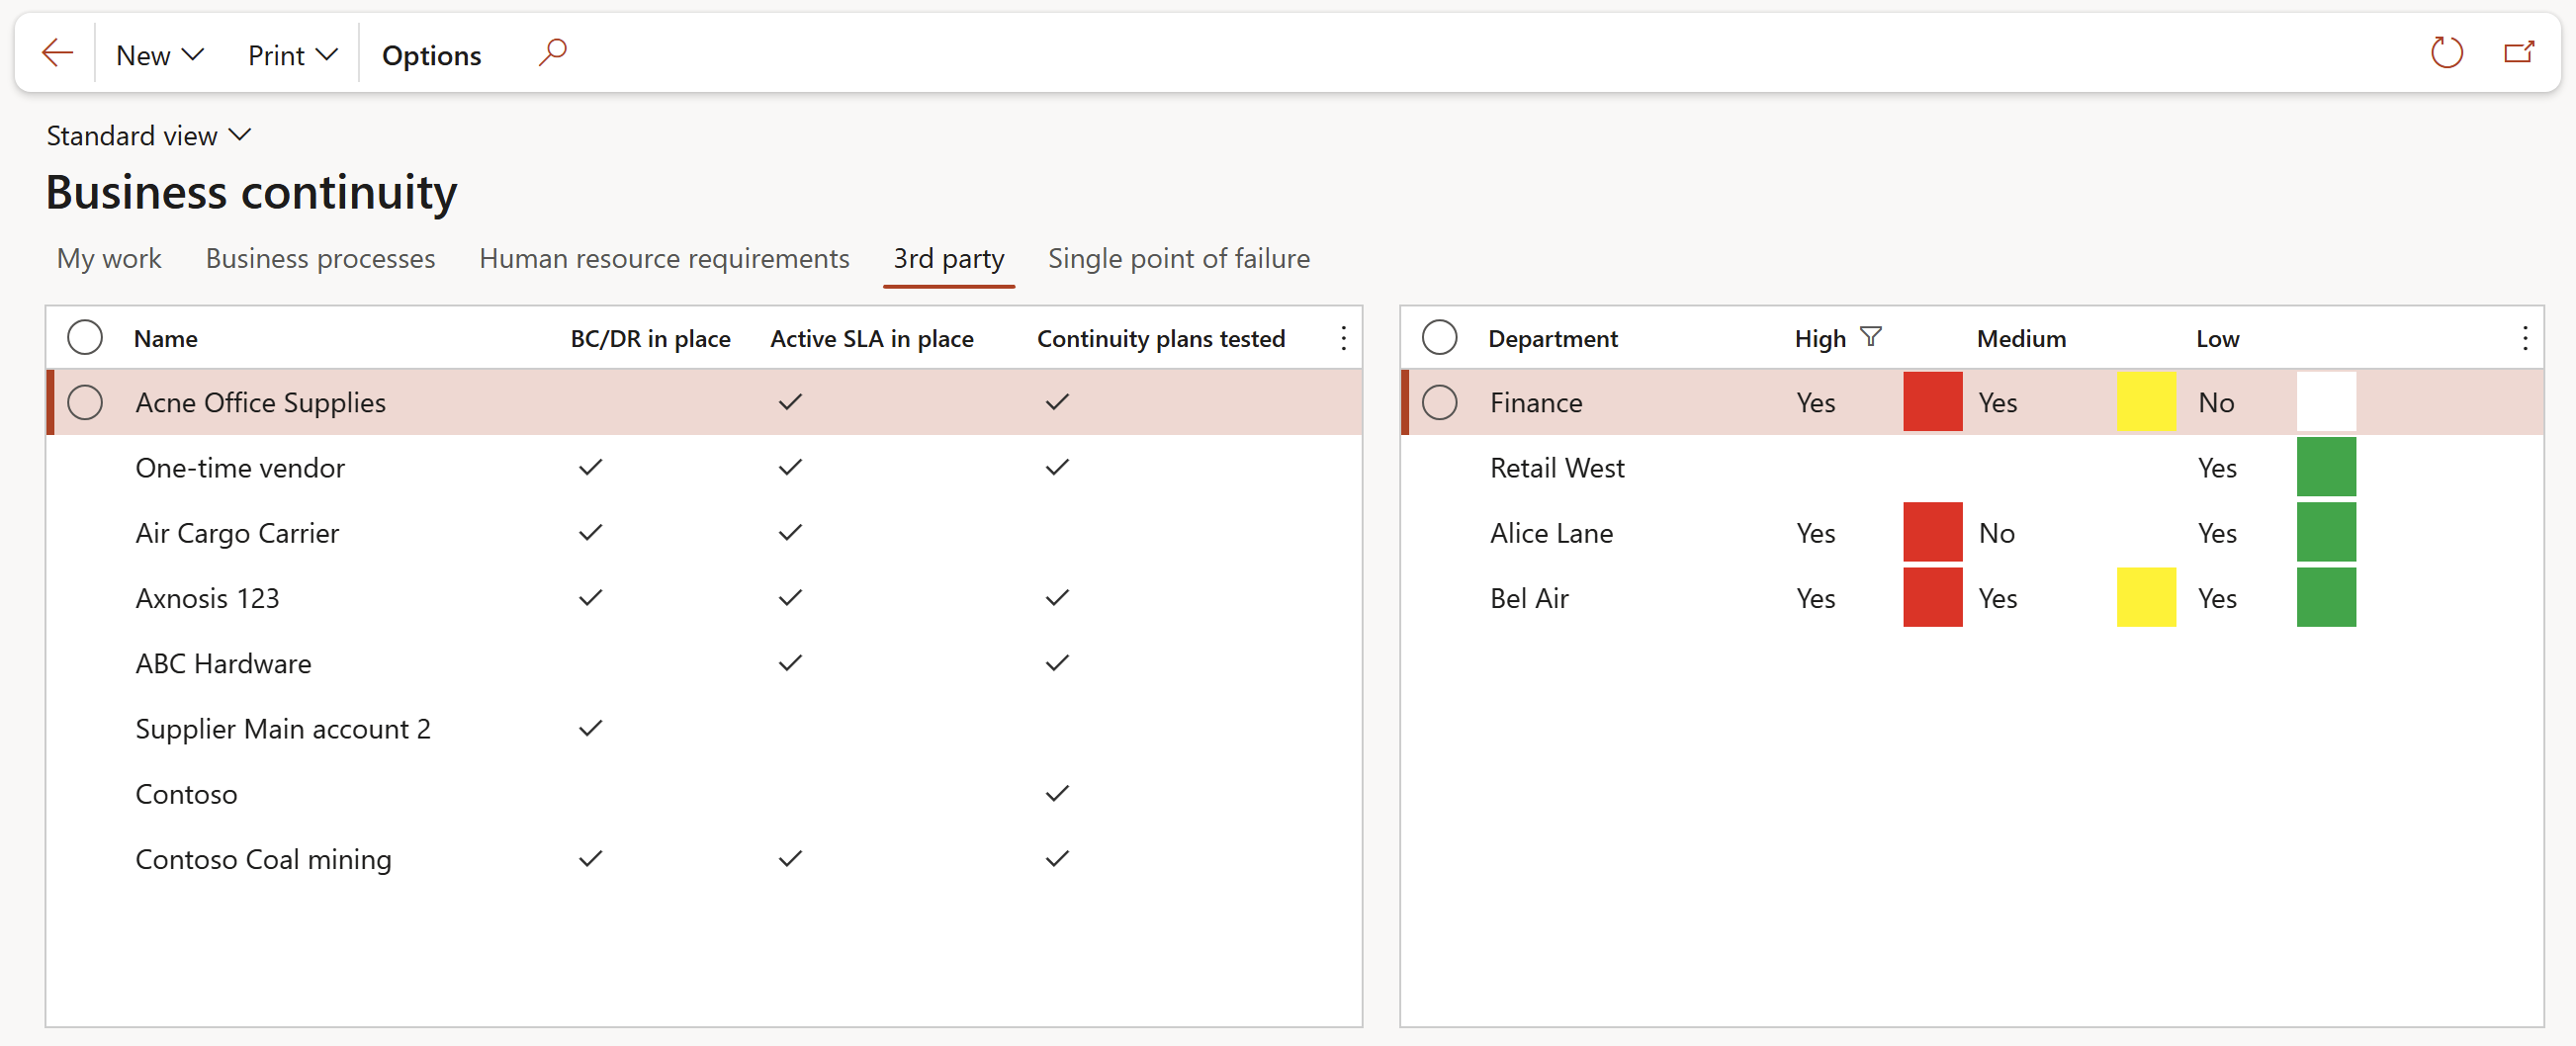
- 3rd party per department
- Software applications per department
¶ My work tab
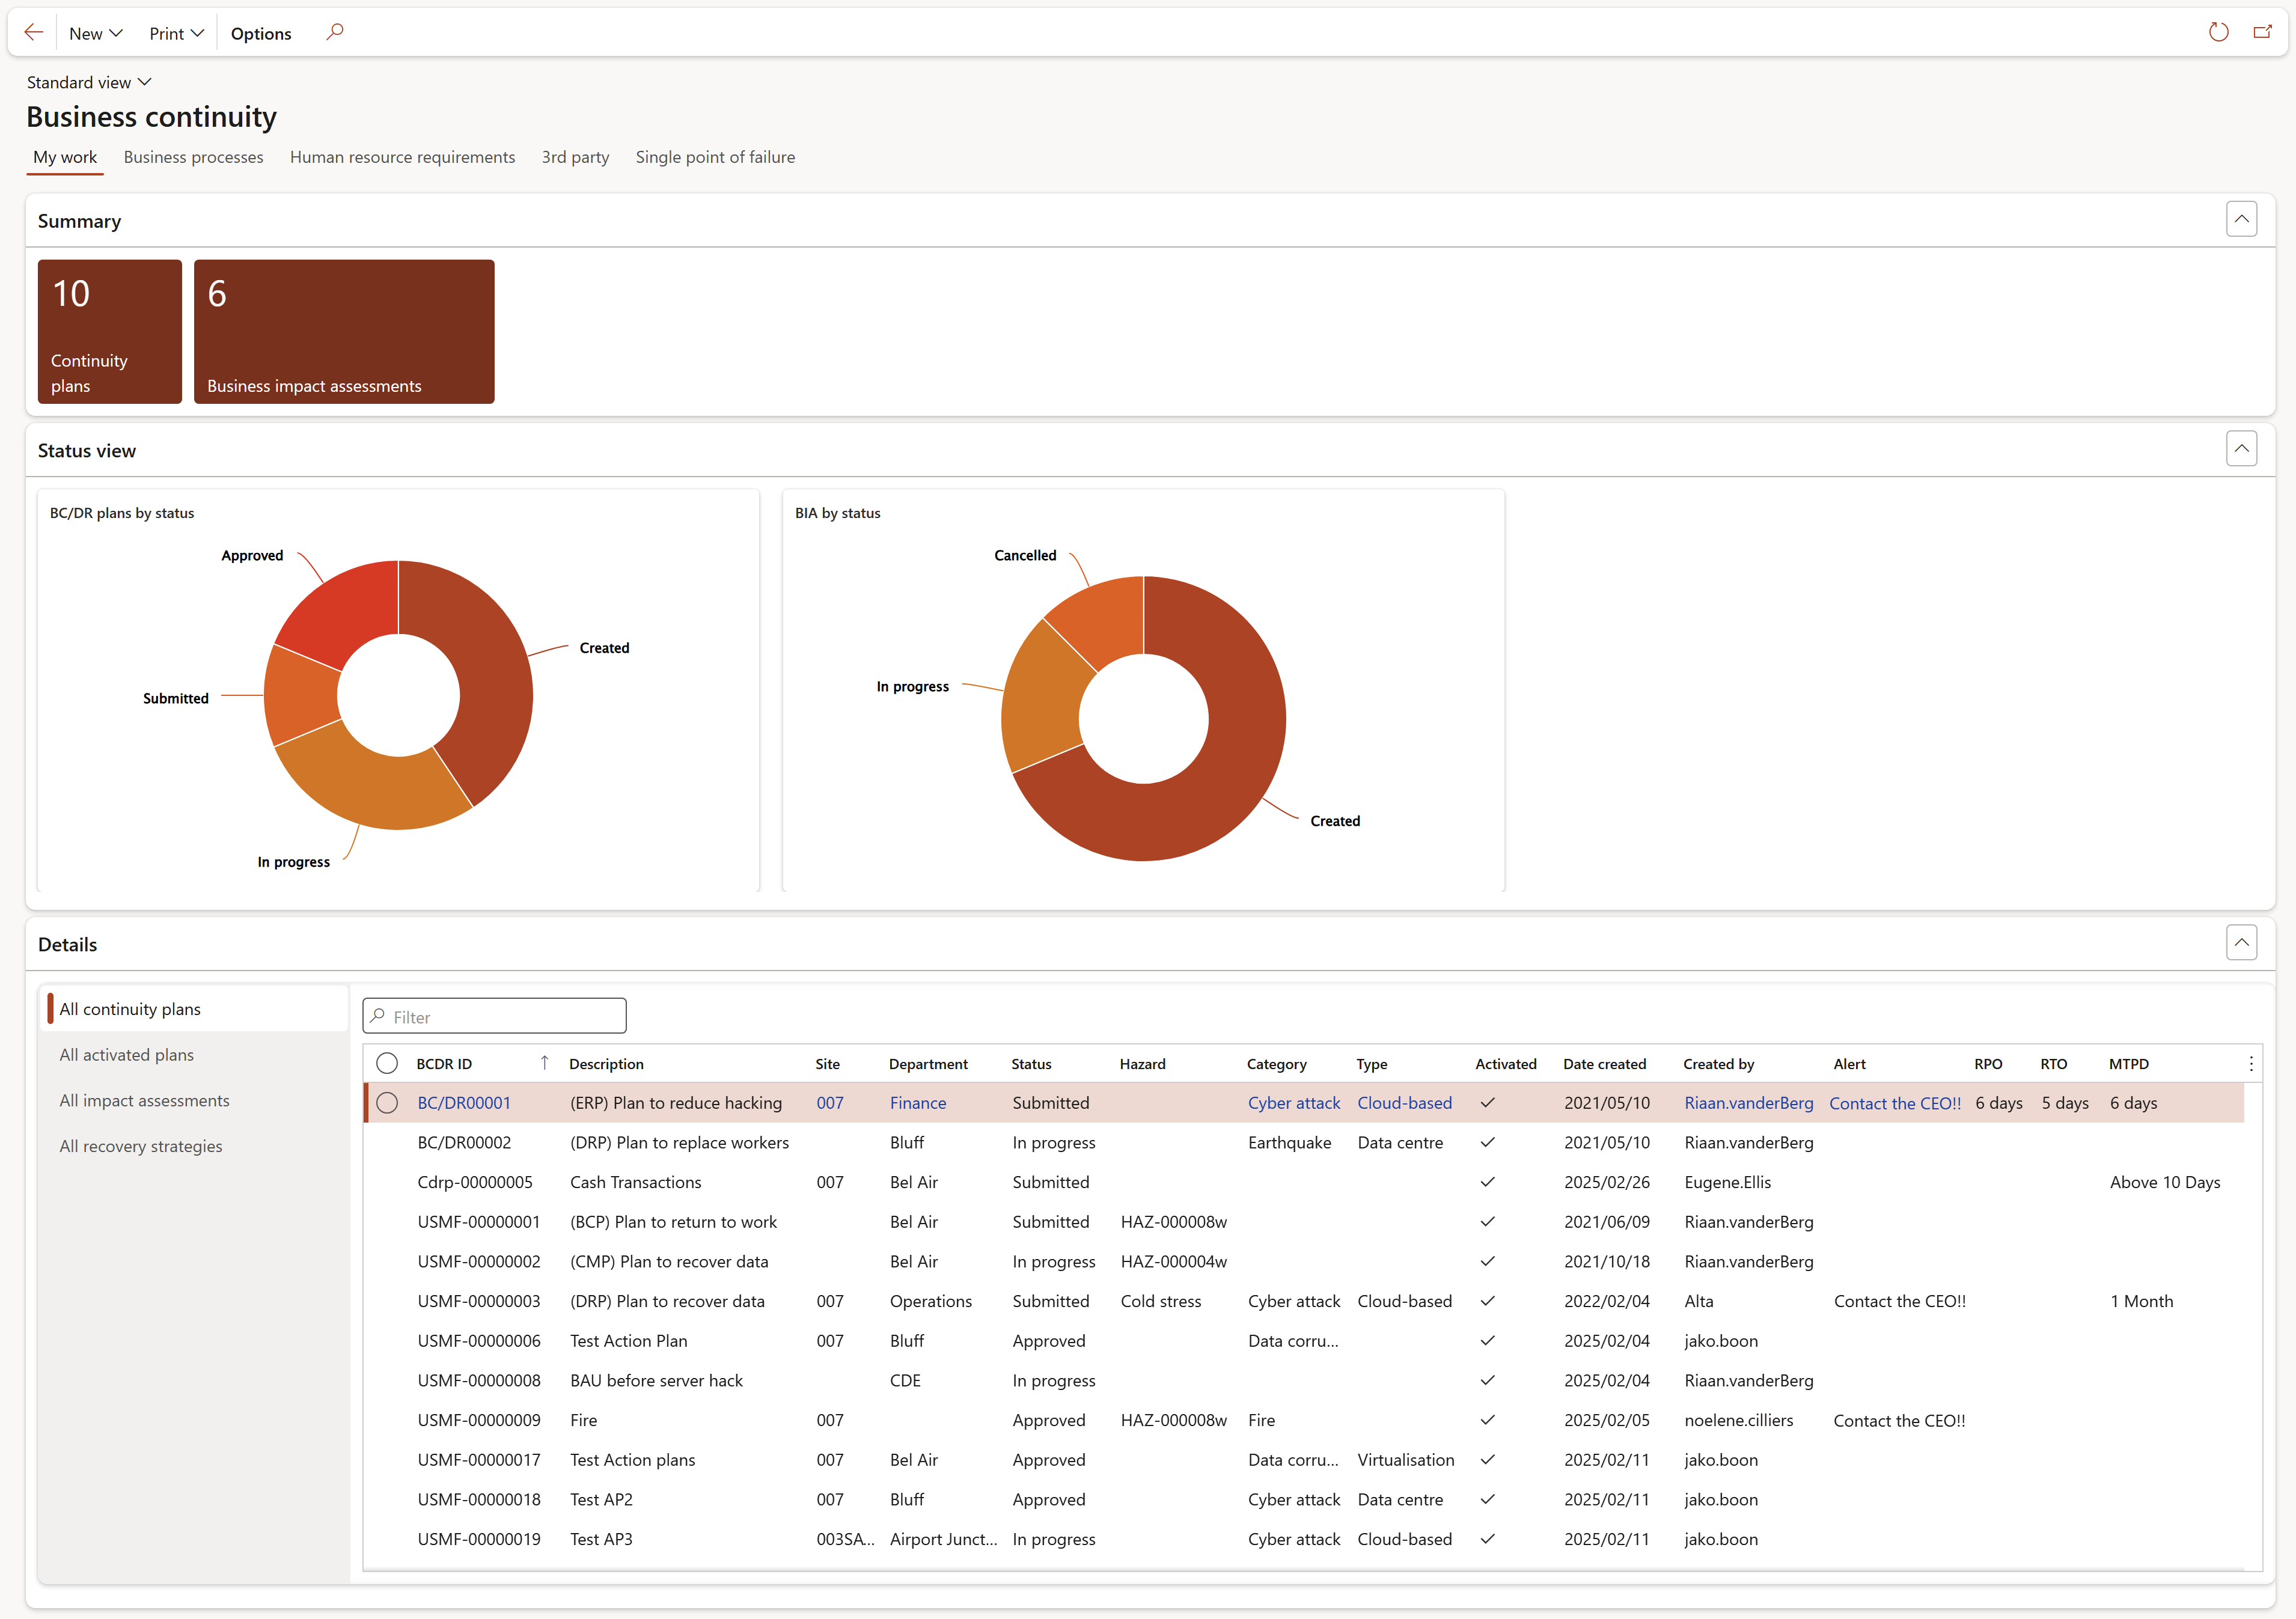
Functions of the My continuity items tiles:
- Continuity plans:
- Displays the number of Continuity plans created by the logged-in user
- Opens the Continuity plans list page, filtered on the records created by the logged-in user
- Business impact assessments:
- Displays the number of Business impact assessments created by the logged-in user
- Opens the Business impact assessments list page, filtered on the records created by the logged-in user
- Disruptive events:
- Displays the number of Disruptive events recorded by the logged-in user
- Opens the Disruptive events list page, filtered on the records reported by the logged-in user
- Review actions:
- Displays the number of Review actions assigned to the logged-in user
- Opens the Review actions list page, filtered on the records to be actioned by the logged-in user
Charts under the Status view:
- BC/DR plans by status: Displays the number of BC/DR plans per status
- BIA status: Displays the number of impact assessments by status
Functions of the Detail tabs:
- All continuity plans: Displays all BC/DR plans
- All activated plans: Displays all activated BC/DR plans
- All impact assessments: Displays all impact assessments
- All recovery strategies: Displays all recovery strategies
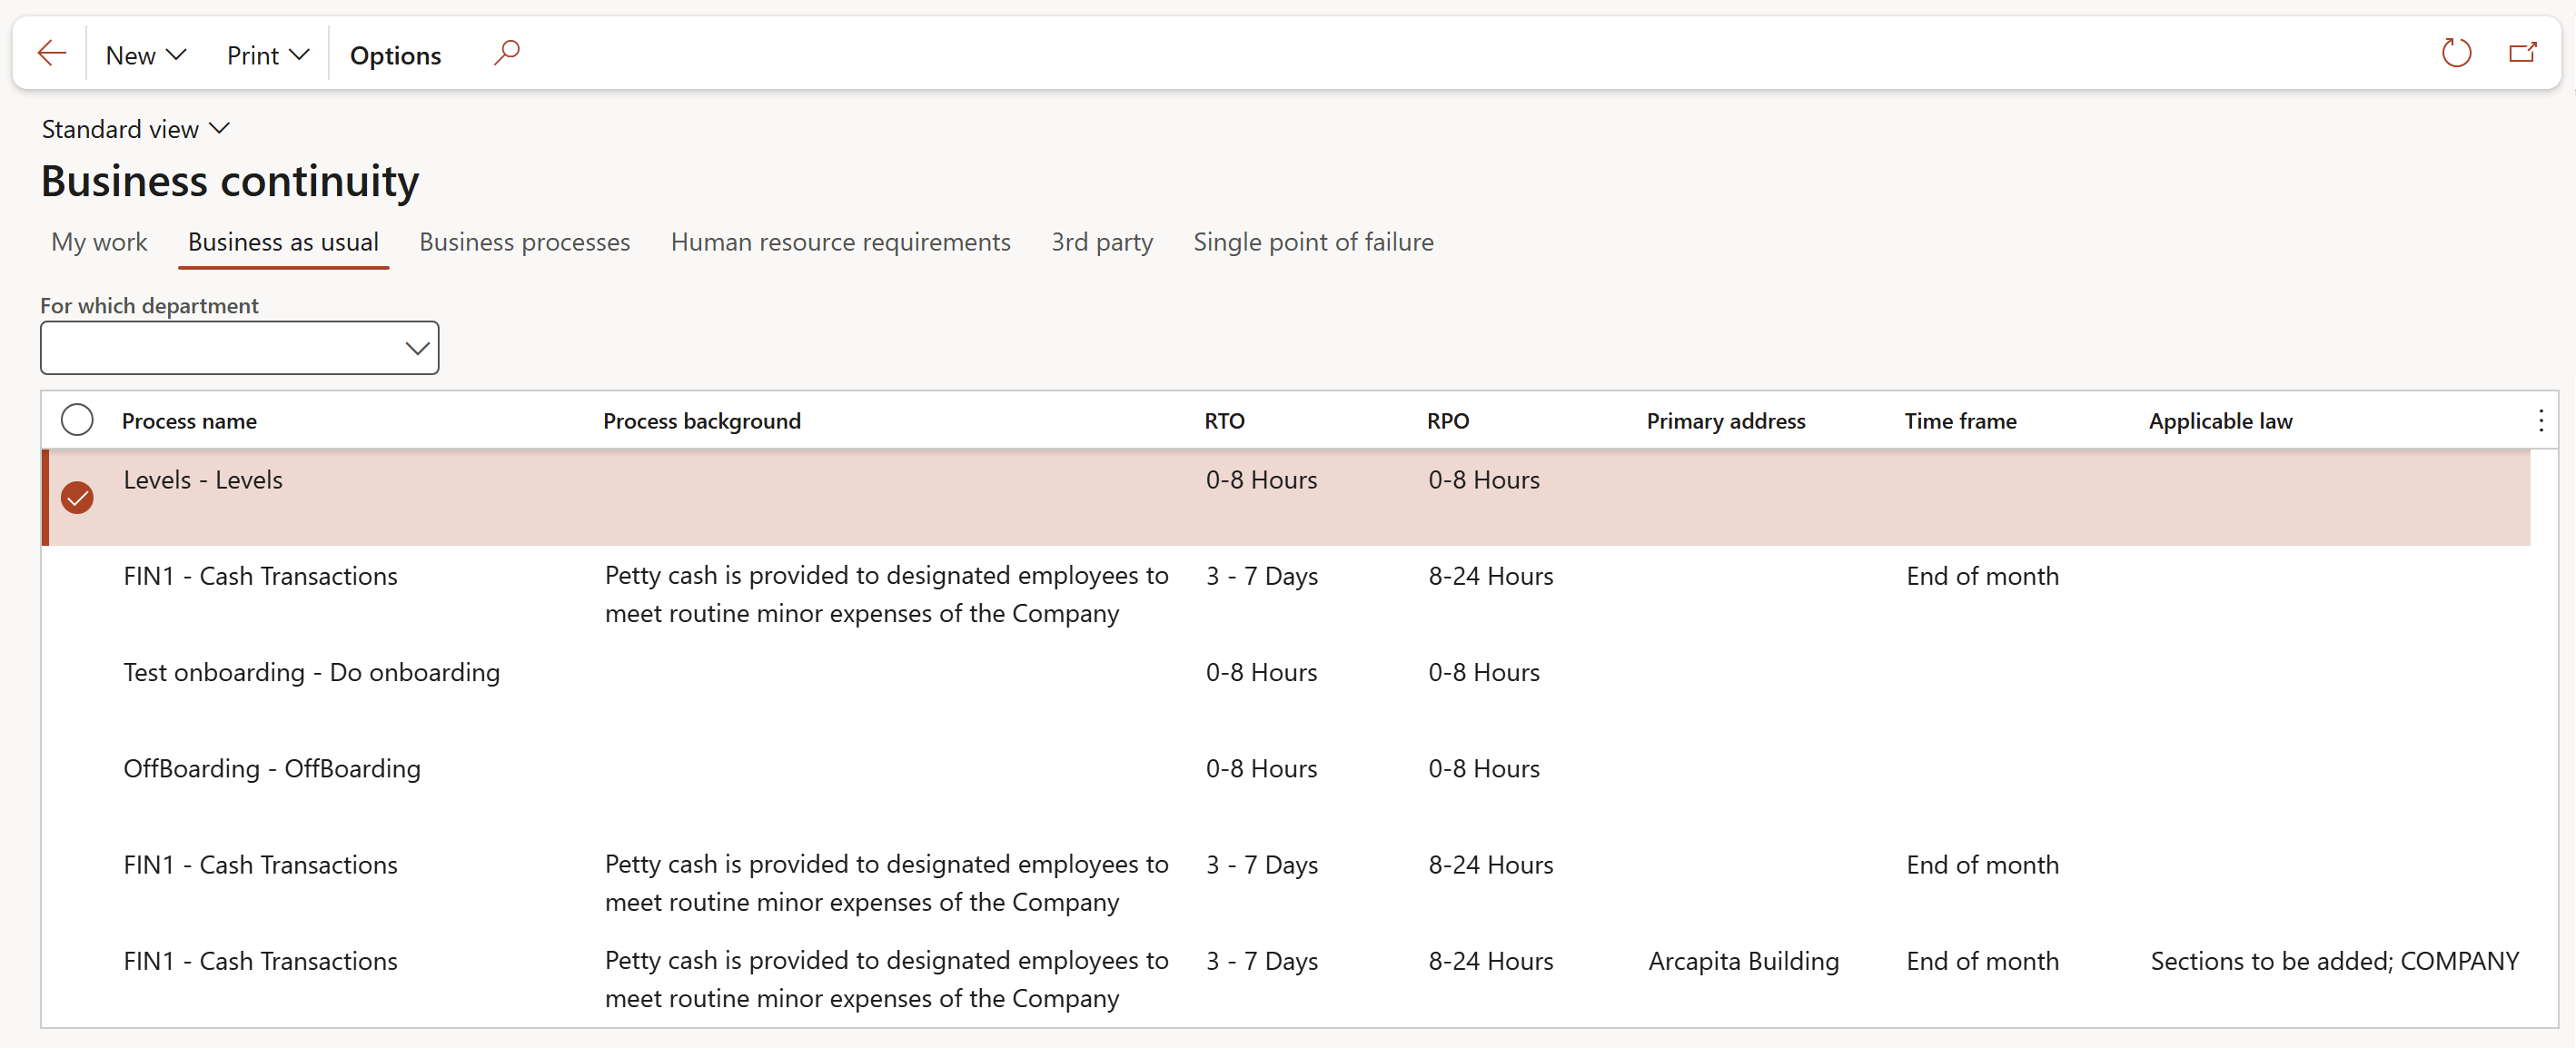
¶ Business as usual tab
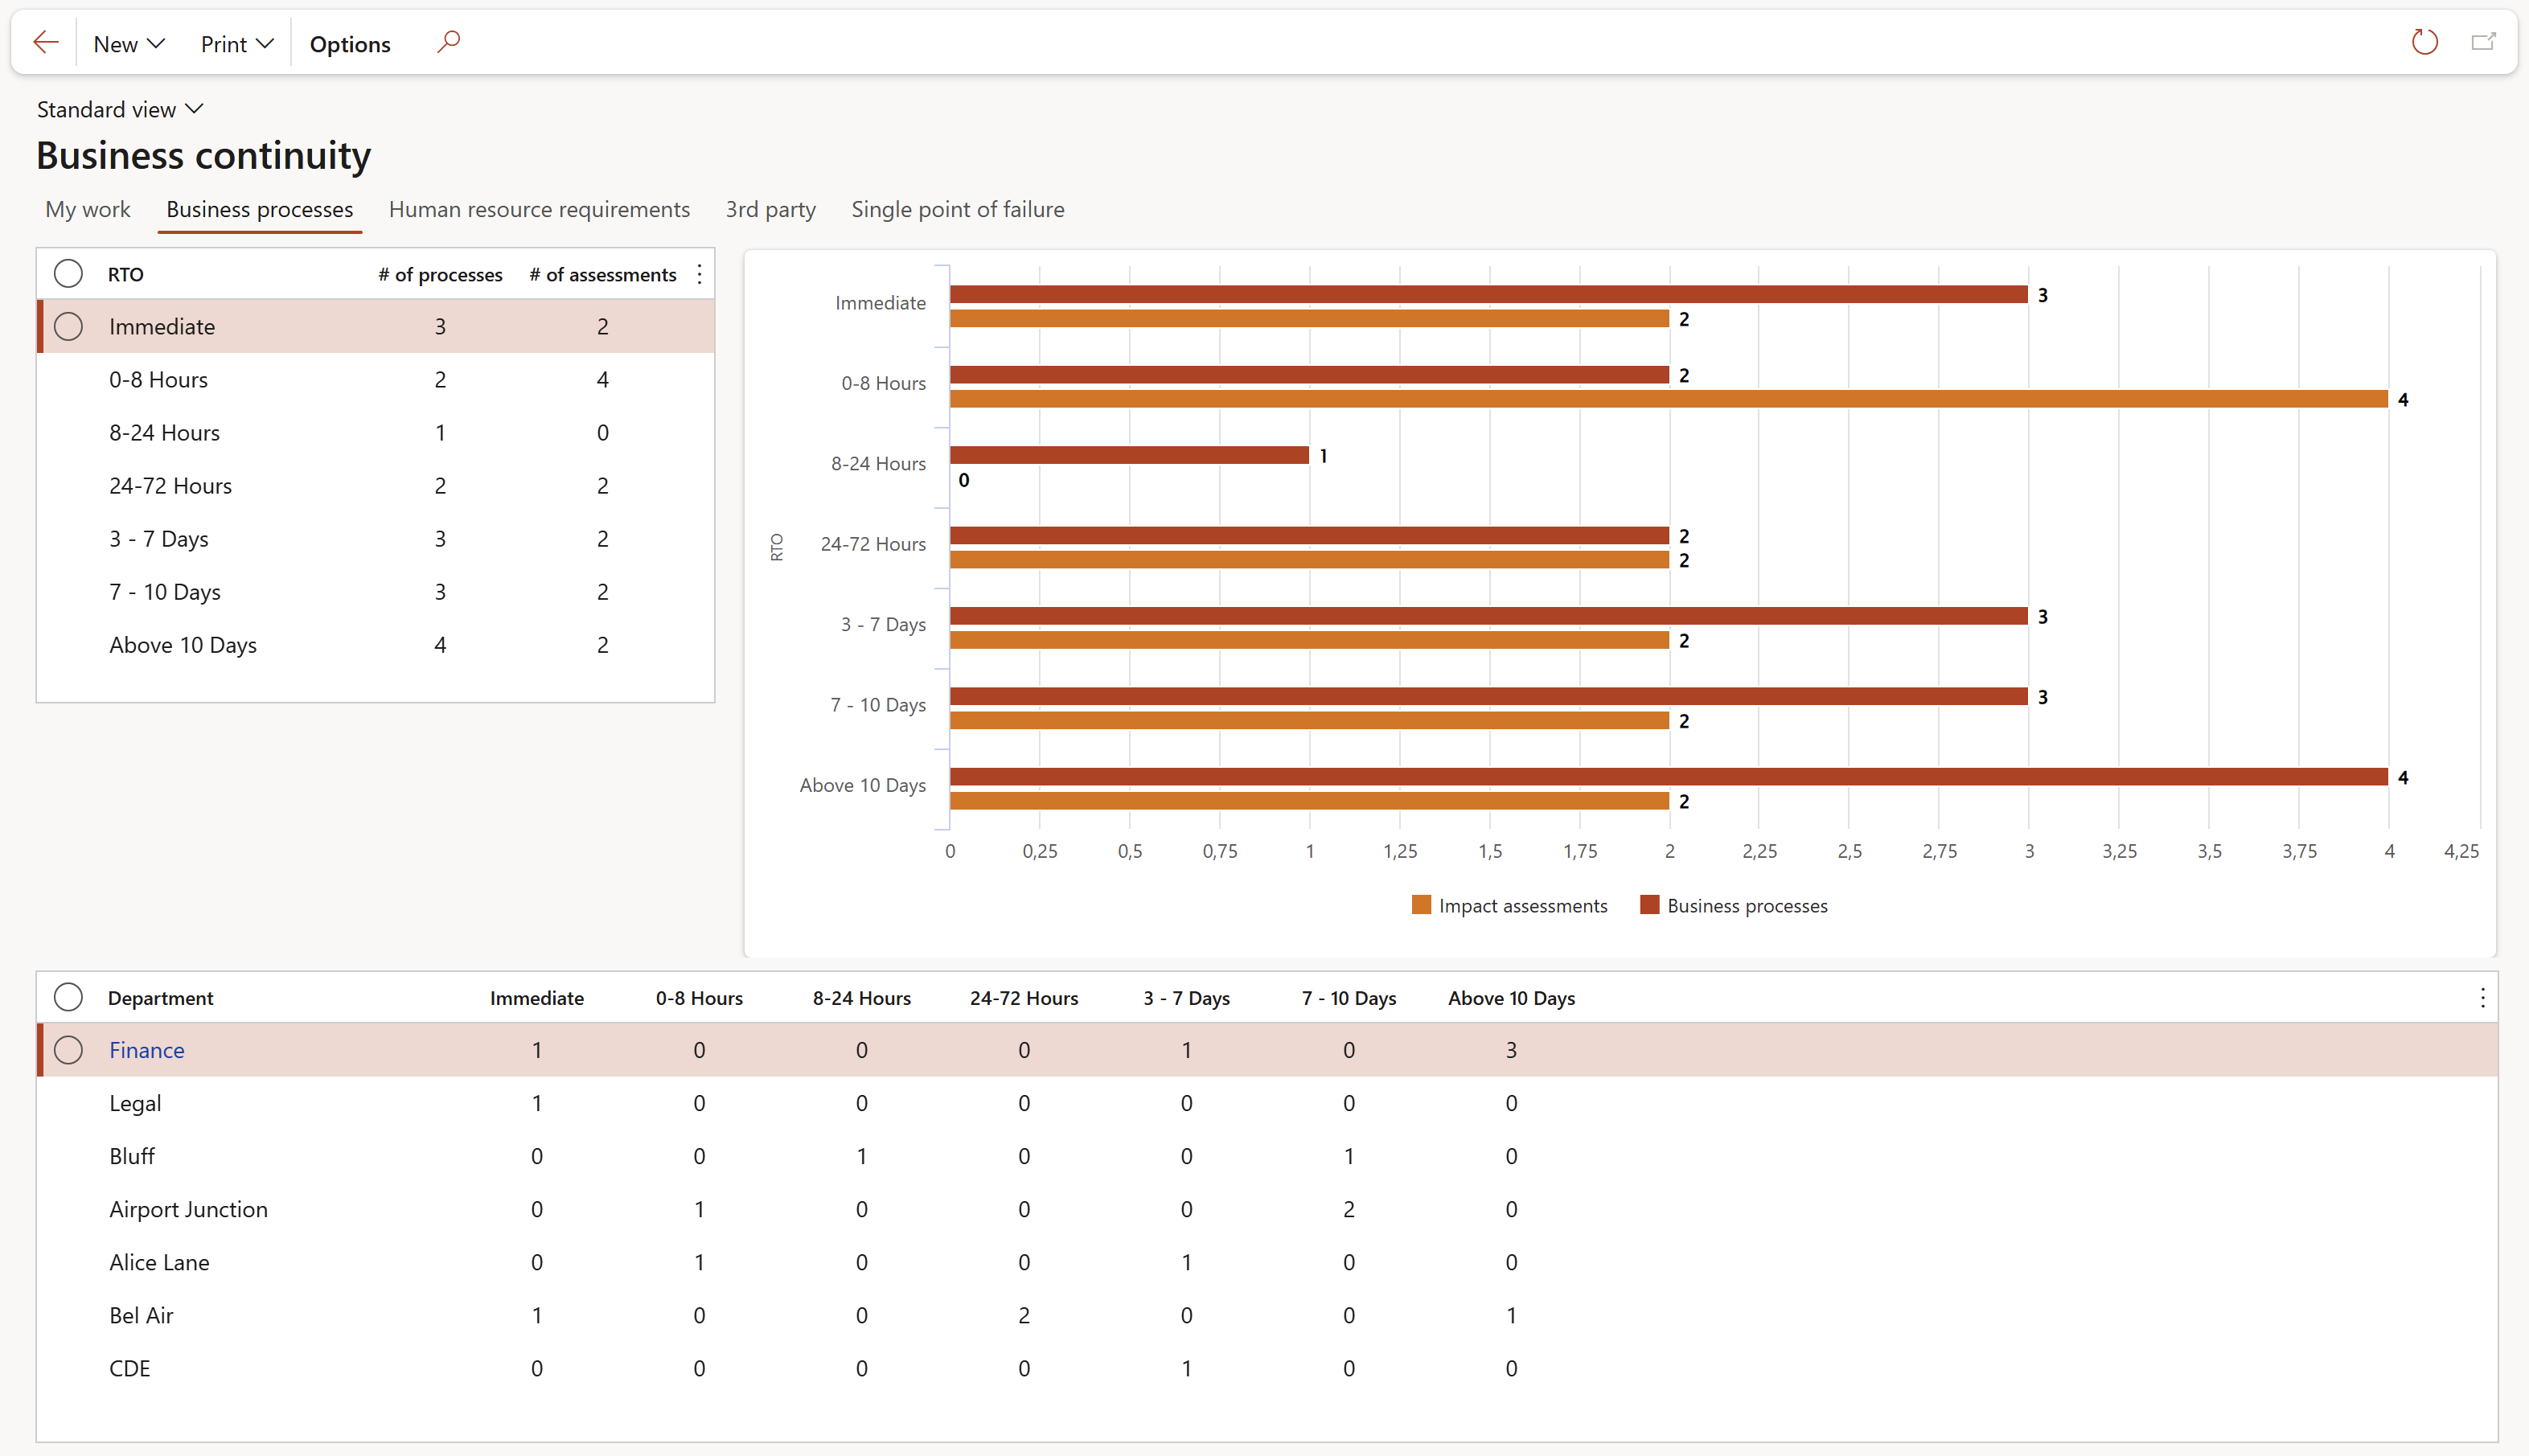
¶ Business processes tab
¶ Human resource requirements tab
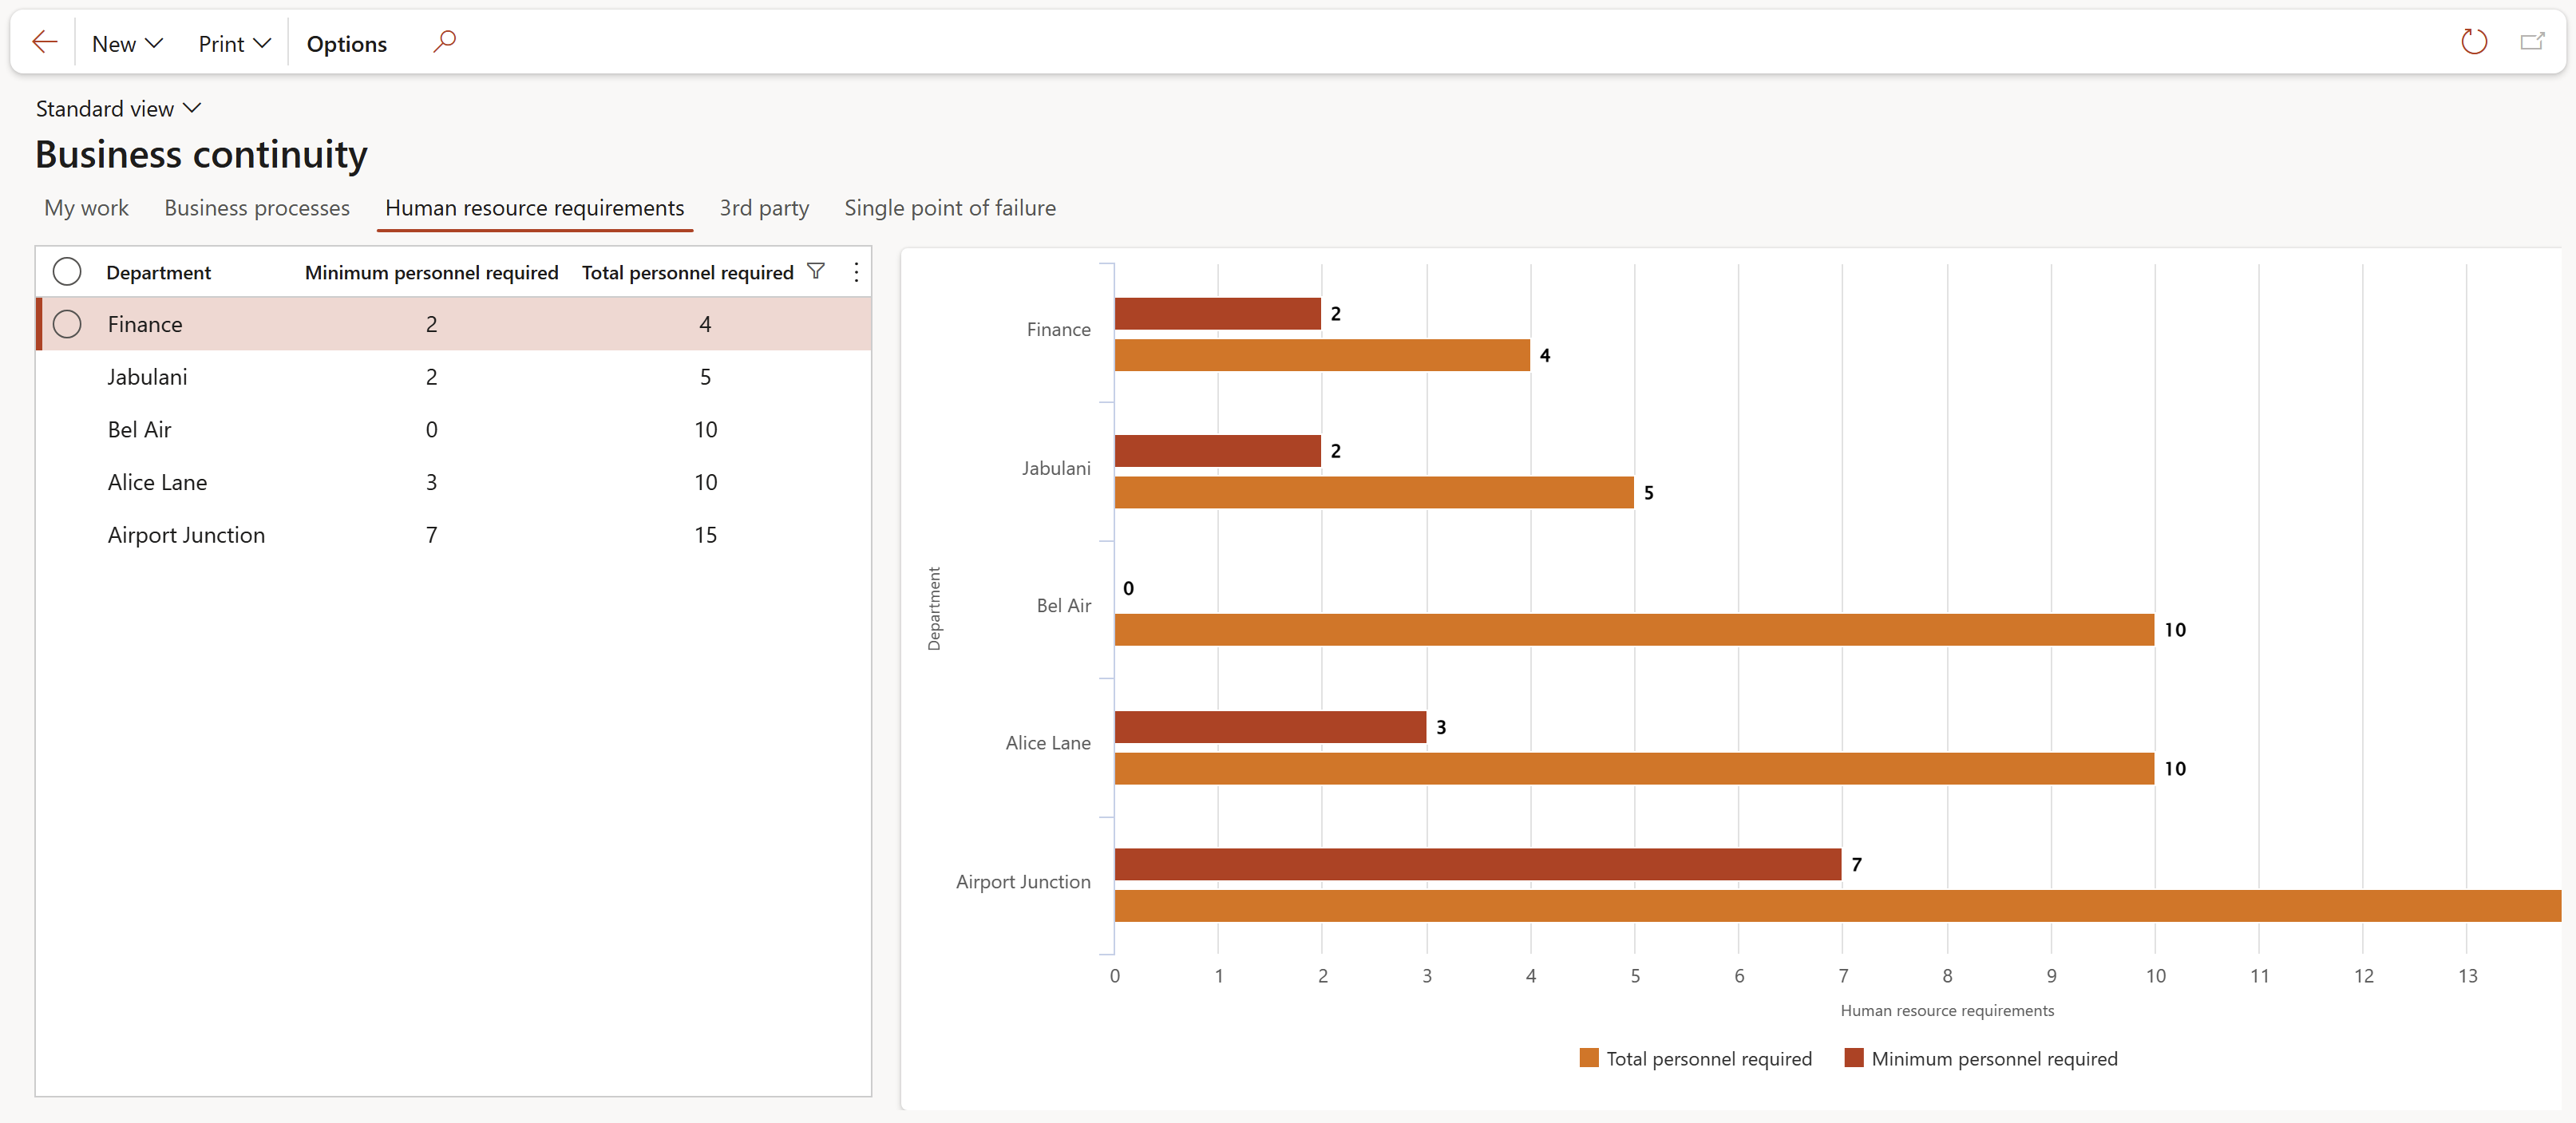
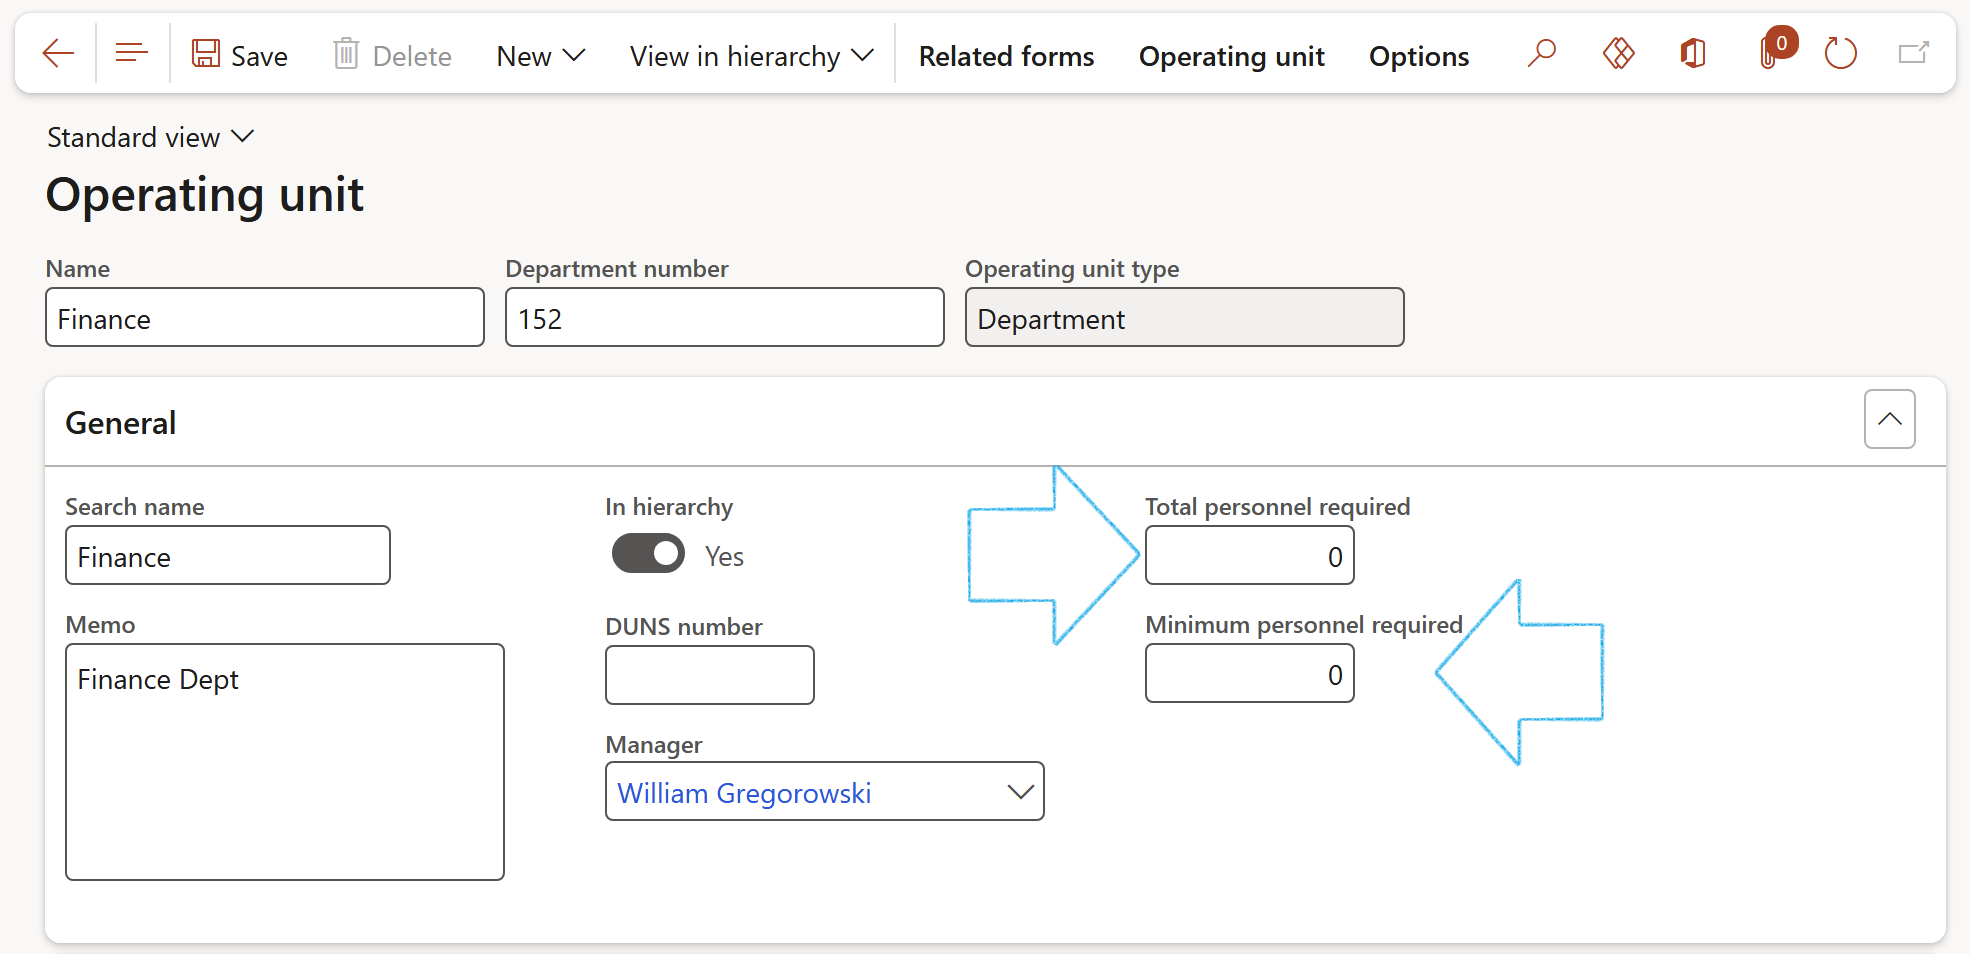
The Human resource requirements chart and grid displays summary information for minimum and total personnel required for each department
Departments where both, Total personnel required and Minimum personnel required have a value = 0, will not be displayed on the above chart and grid
¶ 3rd party tab
¶ Single point of failure tab
¶ Claims management Workspace
¶ My work tab
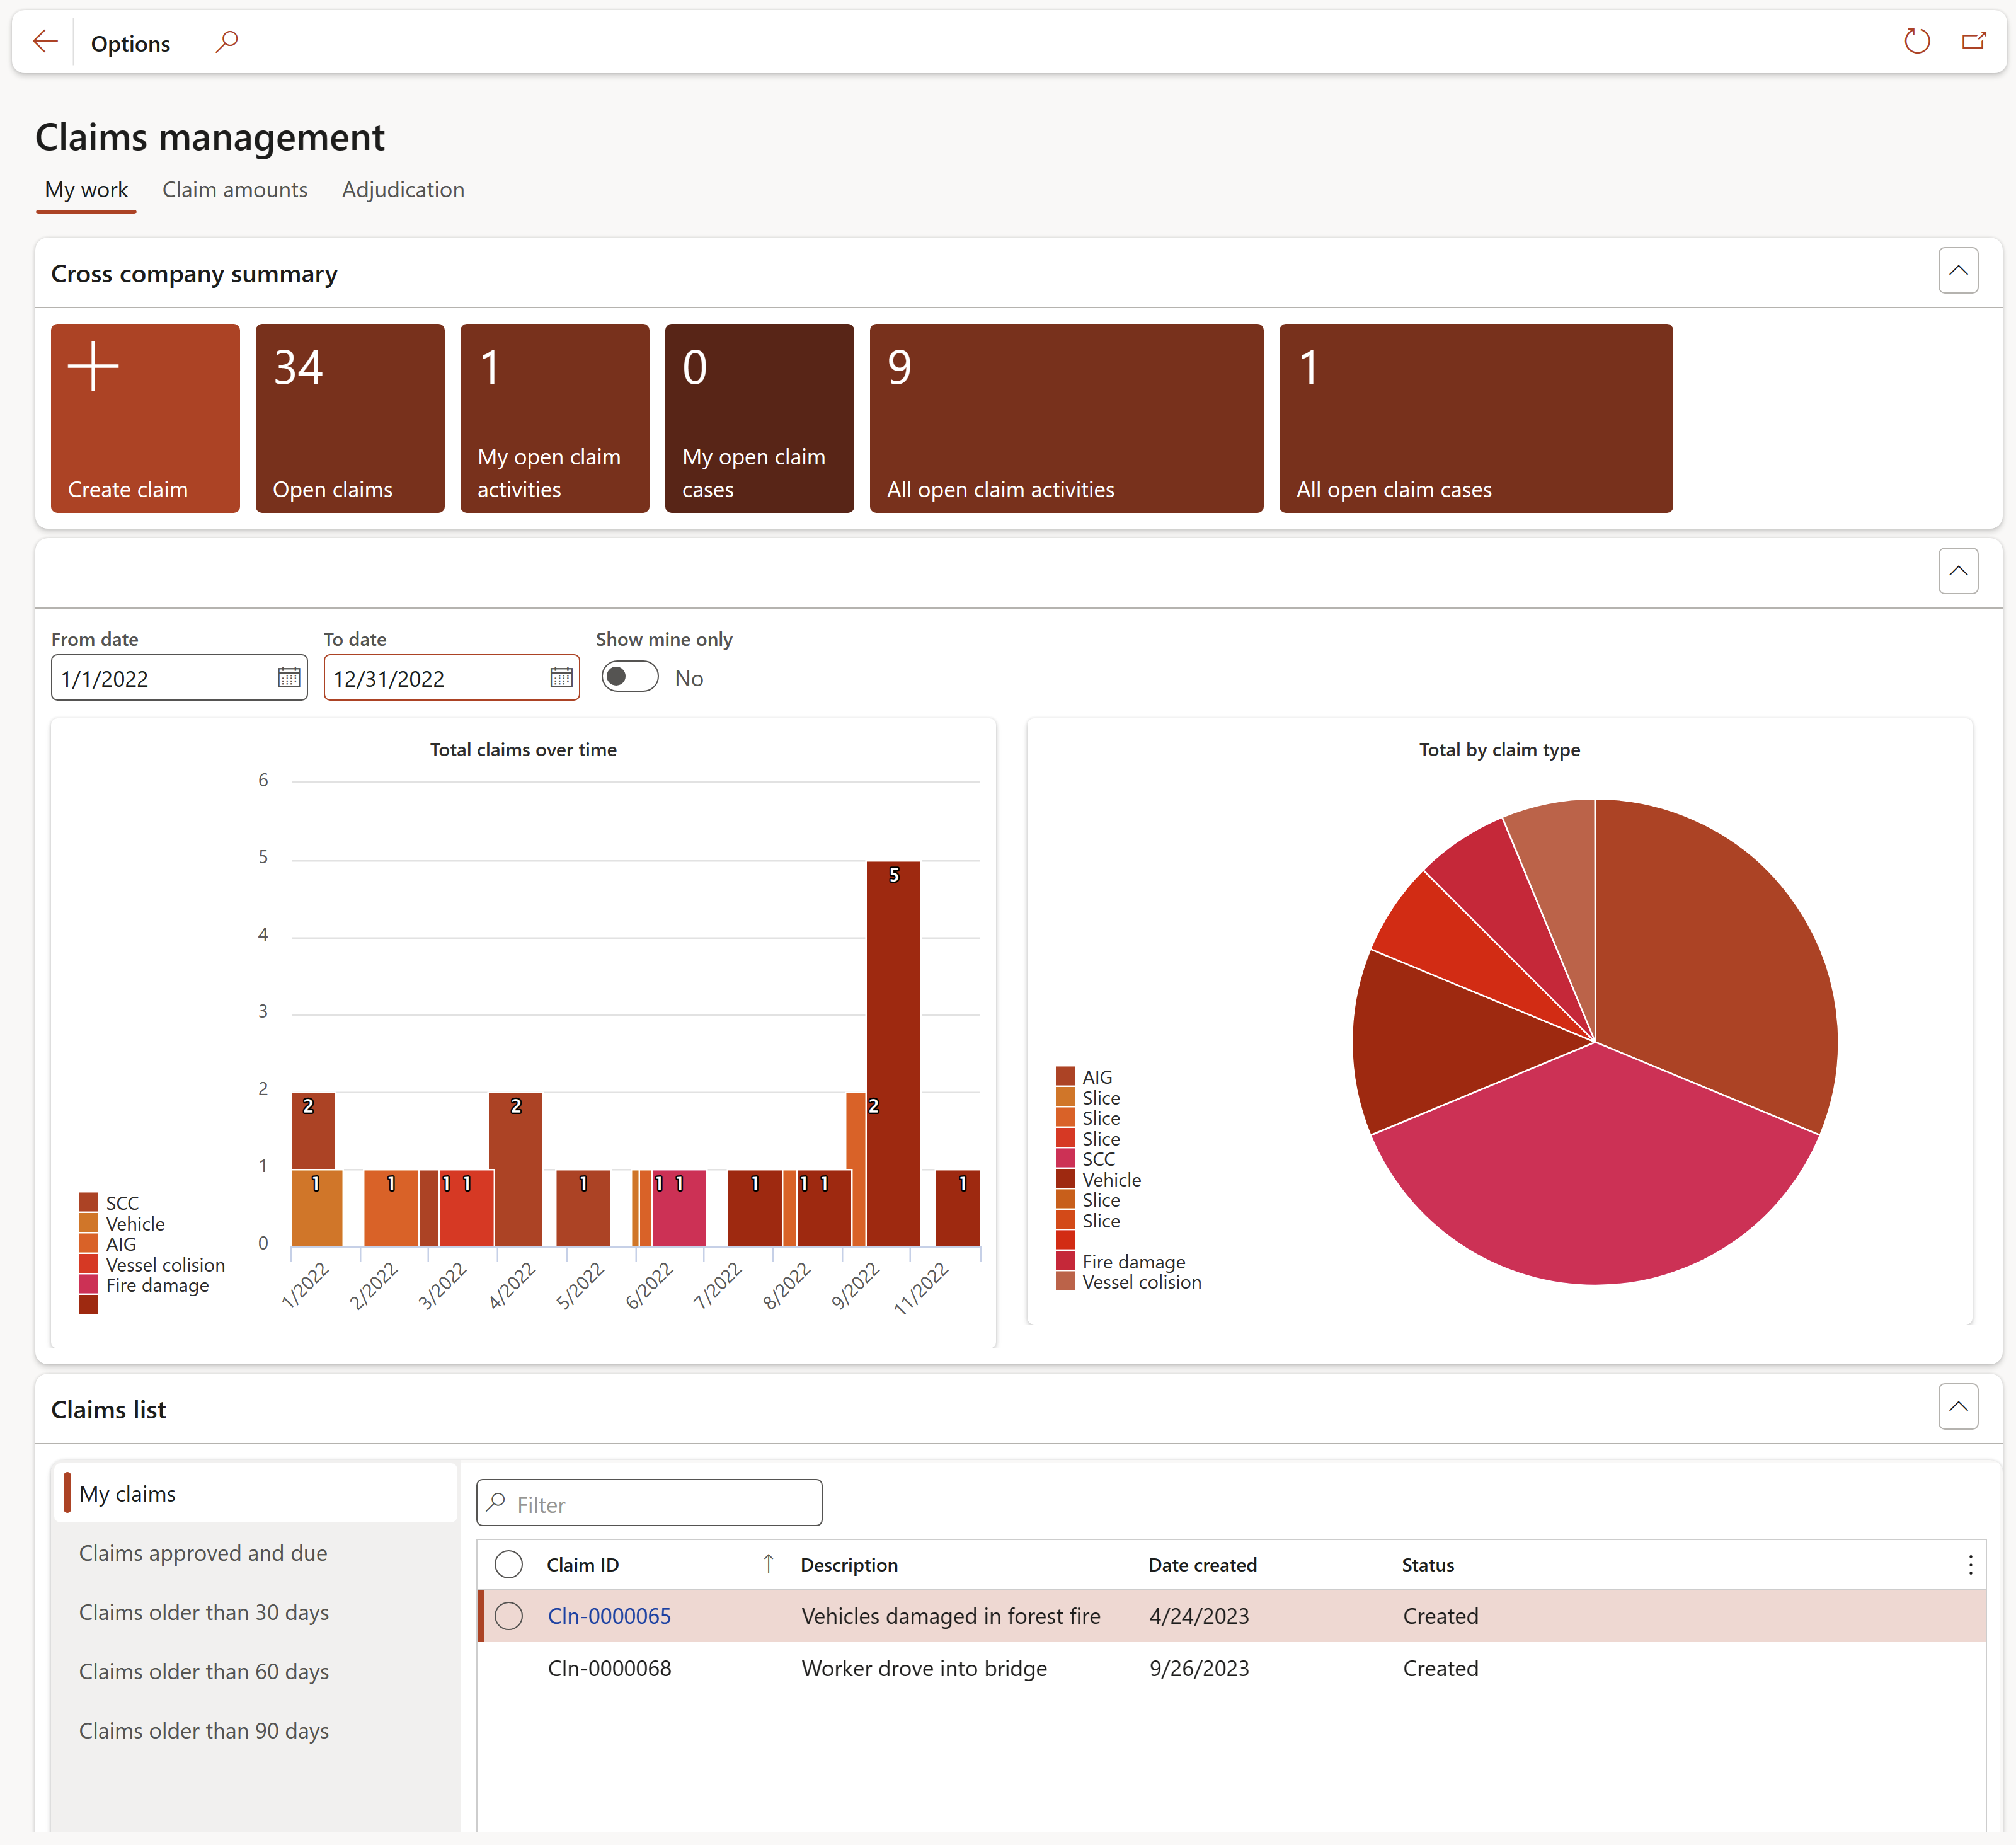
Functions of the Cross-company summary tiles:
- Create claim:
- Opens the Create claim dialog
- Open claims:
- The number on the tile indicates the number of open claims
- My open claim activities:
- The number on the tile indicates the number of open claim activities for the logged in user
- My open claim cases:
- The number on the tile indicates the number of open claim cases for the logged in user
- All open claim activities:
- The number on the tile indicates the number of all open claim activities
- All open claim cases:
- The number on the tile indicates the number of open claim cases
The bar chart displays the Total claims over time
The pie chart displays the Total claims by claim type
Functions of the Claims list tabs:
- All my claims: Displays all recorded claims that the logged in user is responsible for
- Claims approved and due: Displays all approved claims
- Claims older than 30 days: Displays claims that are older than 30 days
- Claims older than 60 days: Displays claims that are older than 60 days
- Claims older than 90 days: Displays claims that are older than 90 days
¶ Claim amounts tab
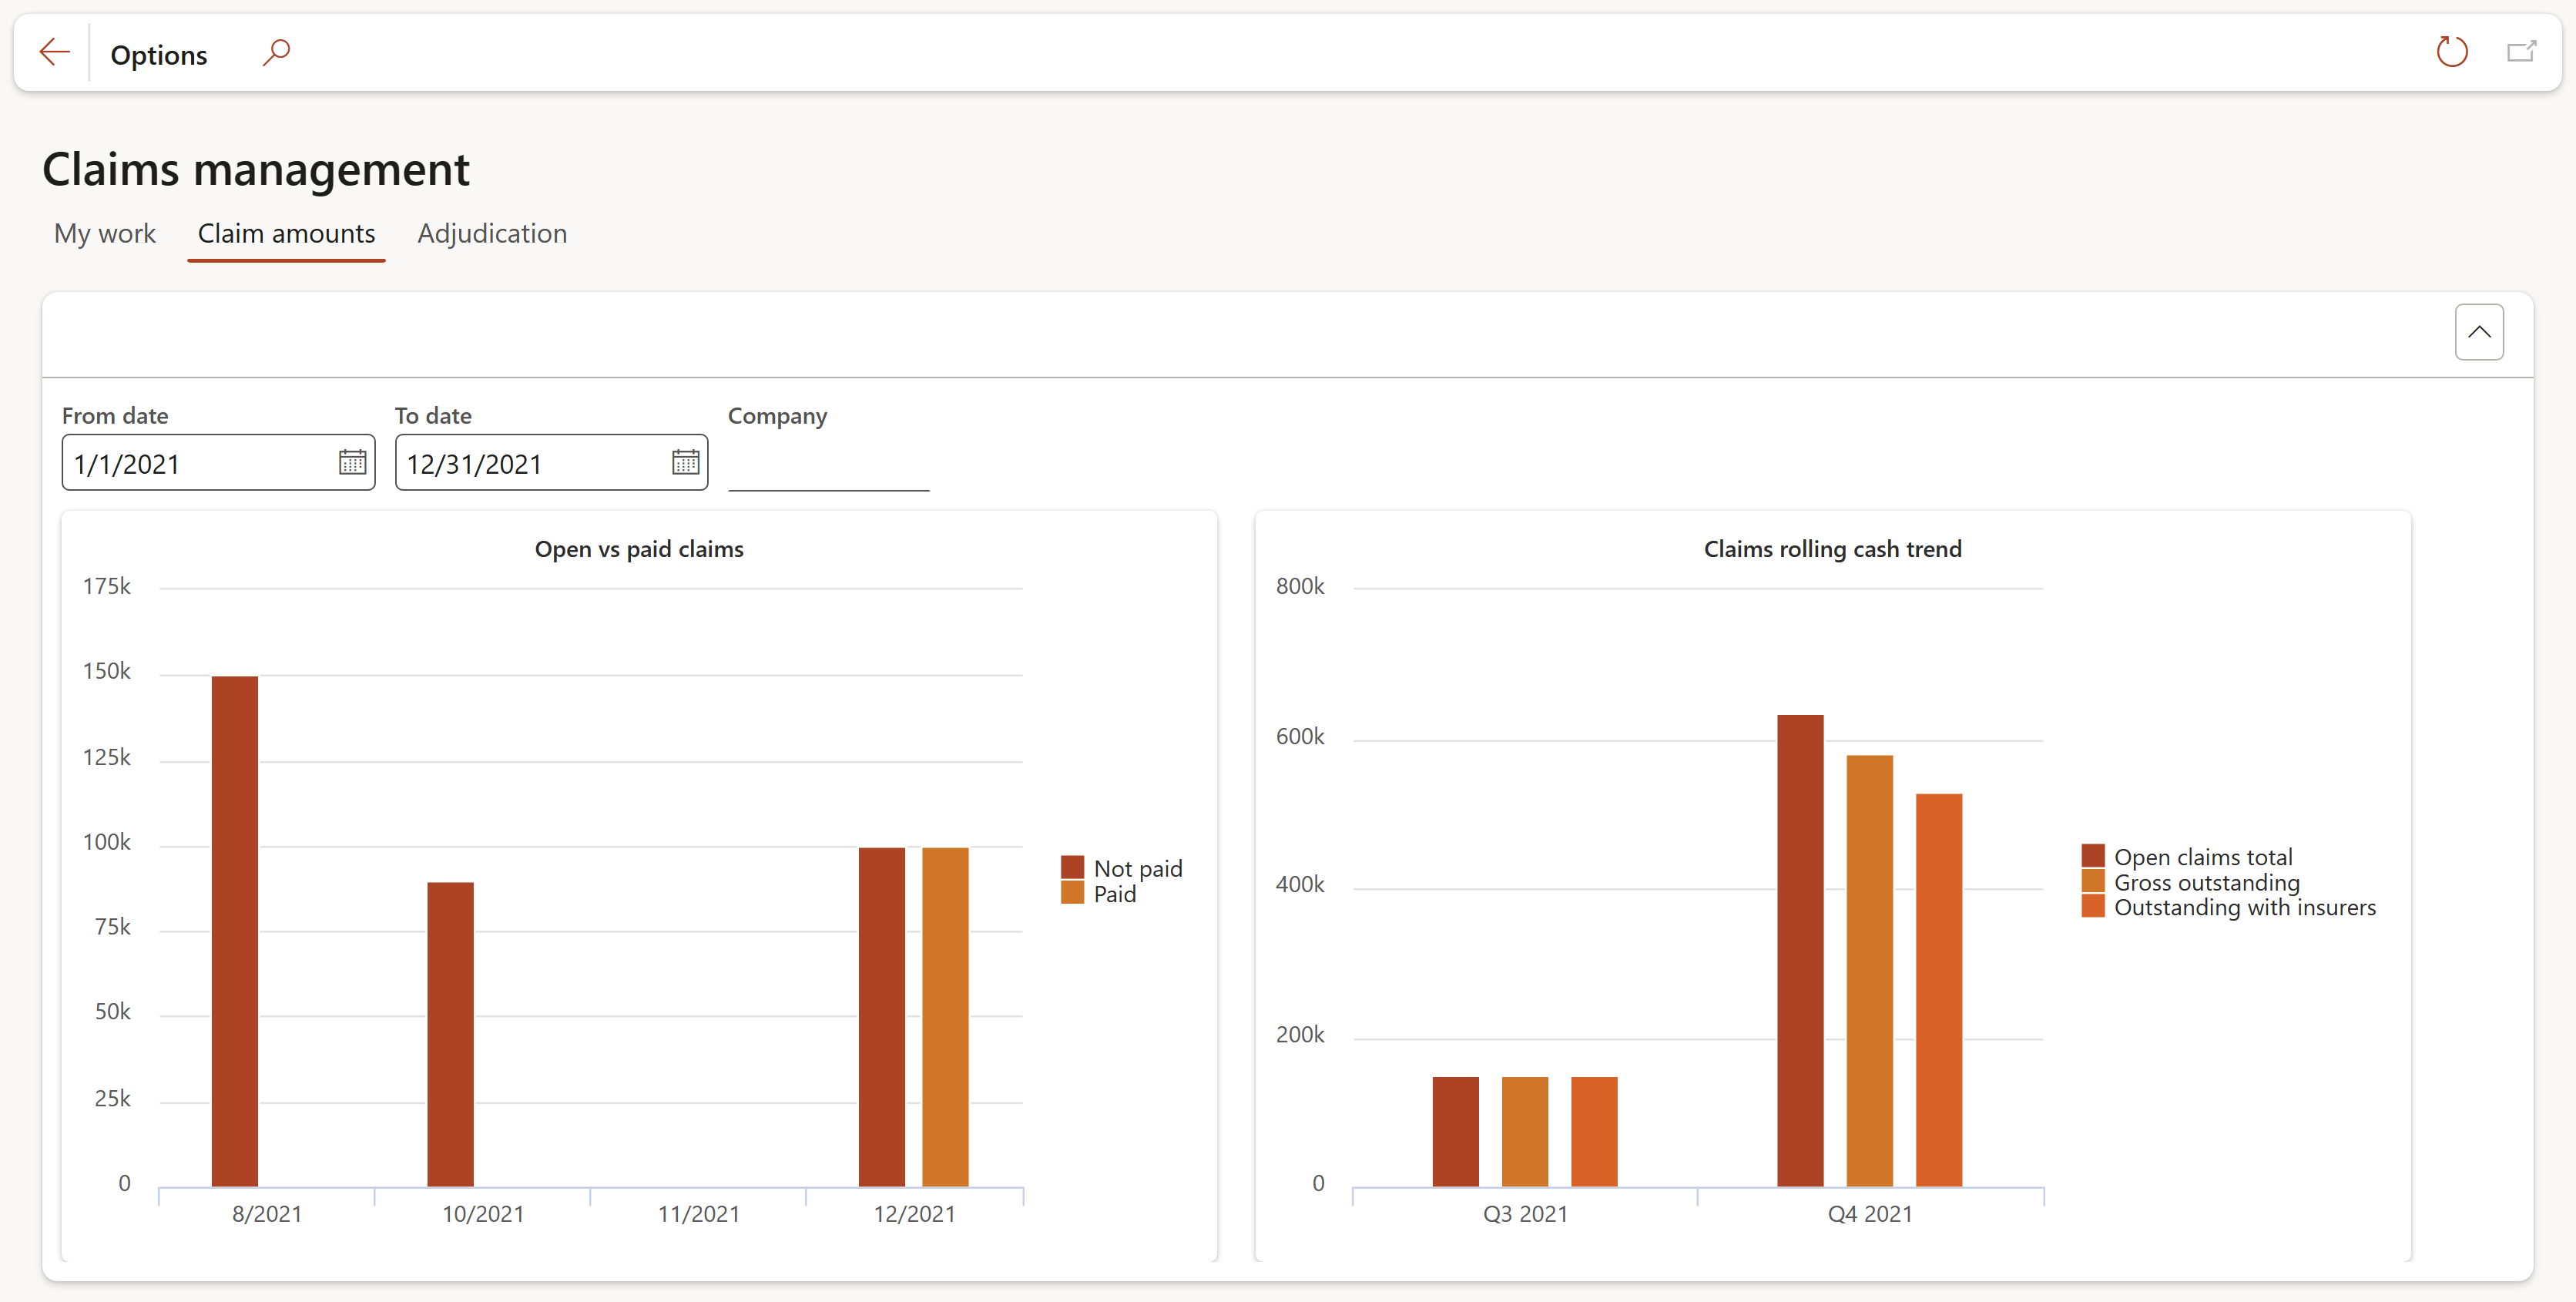
The charts display the following:
- Open vs paid claims for the selected period and/or Legal entity
- Claims rolling cash trend for the selected period and/or Legal entity
The date filters as well as the Company filter can be used to specify the view
¶ Adjudication tab
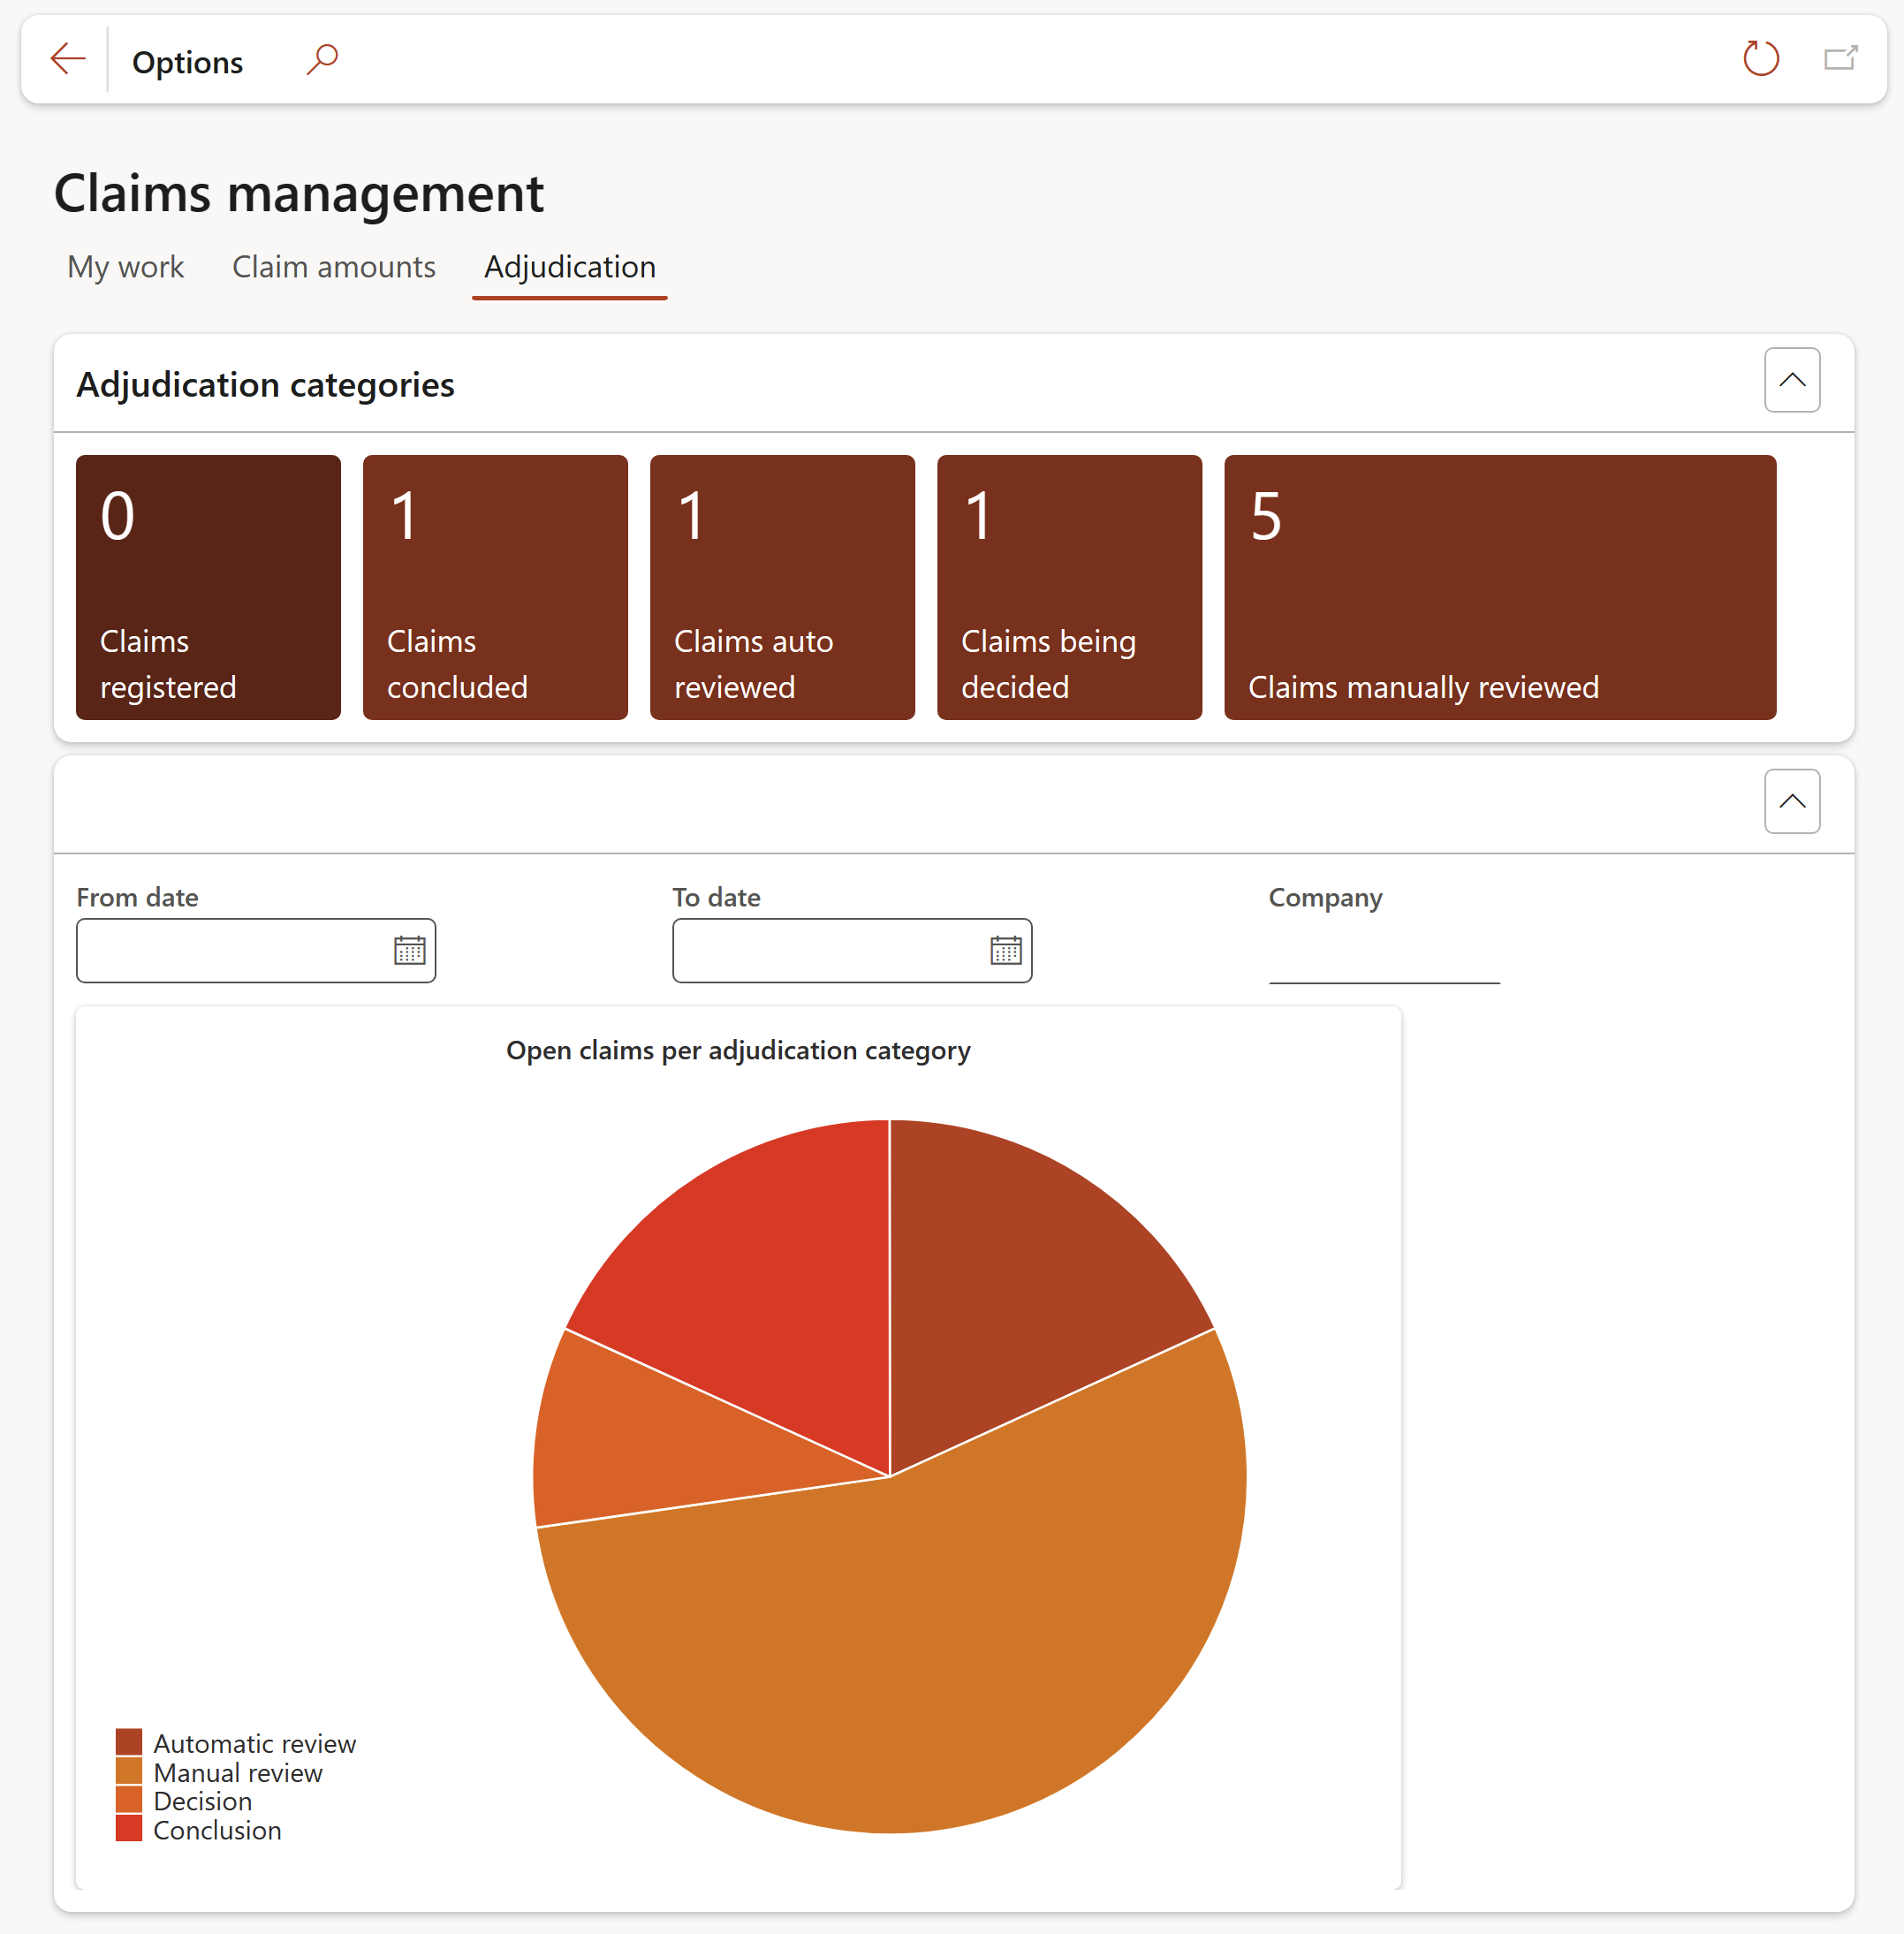
Functions of the Adjudication categories tiles:
- Claims registered:
- The number on the tile indicates the number of claims that are registered
- Clicking on the tile opens the Claims registered list page
- Claims concluded:
- The number on the tile indicates the number of claims that are concluded
- Clicking on the tile opens the Claims concluded list page
- Claims auto reviewed:
- The number on the tile indicates the number of claims that are auto reviewed
- Clicking on the tile opens the Claims auto reviewed list page
- Claims being decided:
- The number on the tile indicates the number of claims that are being decided
- Clicking on the tile opens the Claims being decided list page
- Claims manually reviewed:
- The number on the tile indicates the number of claims that are manually reviewed
- Clicking on the tile opens the Claims manually reviewed list page
The chart displays the Open claims per adjudication category
The date filters as well as the Company filter can be used to specify the view
¶ Contractor safety self-service workspace
¶ Daily use
¶ Enabling document management
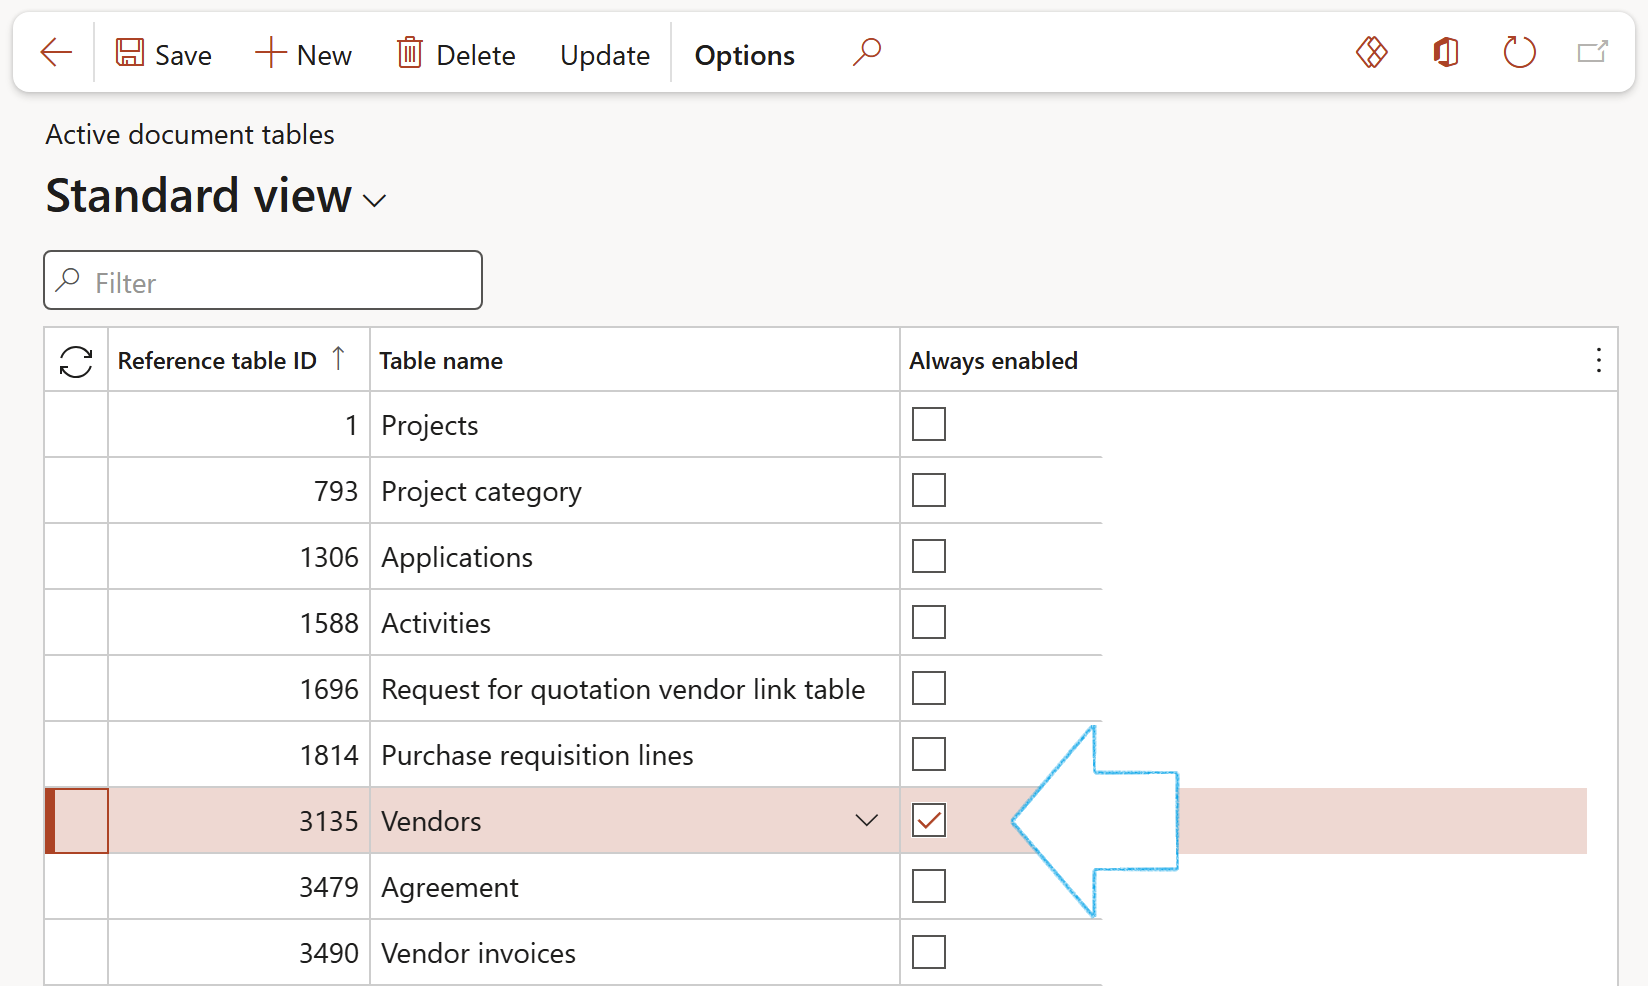
Document management must be activated for the Vendors table to enable Vendors to upload attachments via the Contractor safety and security workspace
- Go to: Organisation administration > Document management > Active document tables
- Look for Vendors in the Table name column and tick the Always enabled tick box
¶ Setting up a Vendor portal user
Before you create a user account for someone who will use the Vendor portal, you must set up the vendor to allow for Vendor portal collaboration. Use the Purchase order collaboration field on the General tab on the Vendors page.
- Go to: Purchase ledger > Vendors > All vendors
- Select the relevant Vendor
- Under the General Fast tab, Under the Vendor collaboration Field group, select Yes to activate Vendor collaboration
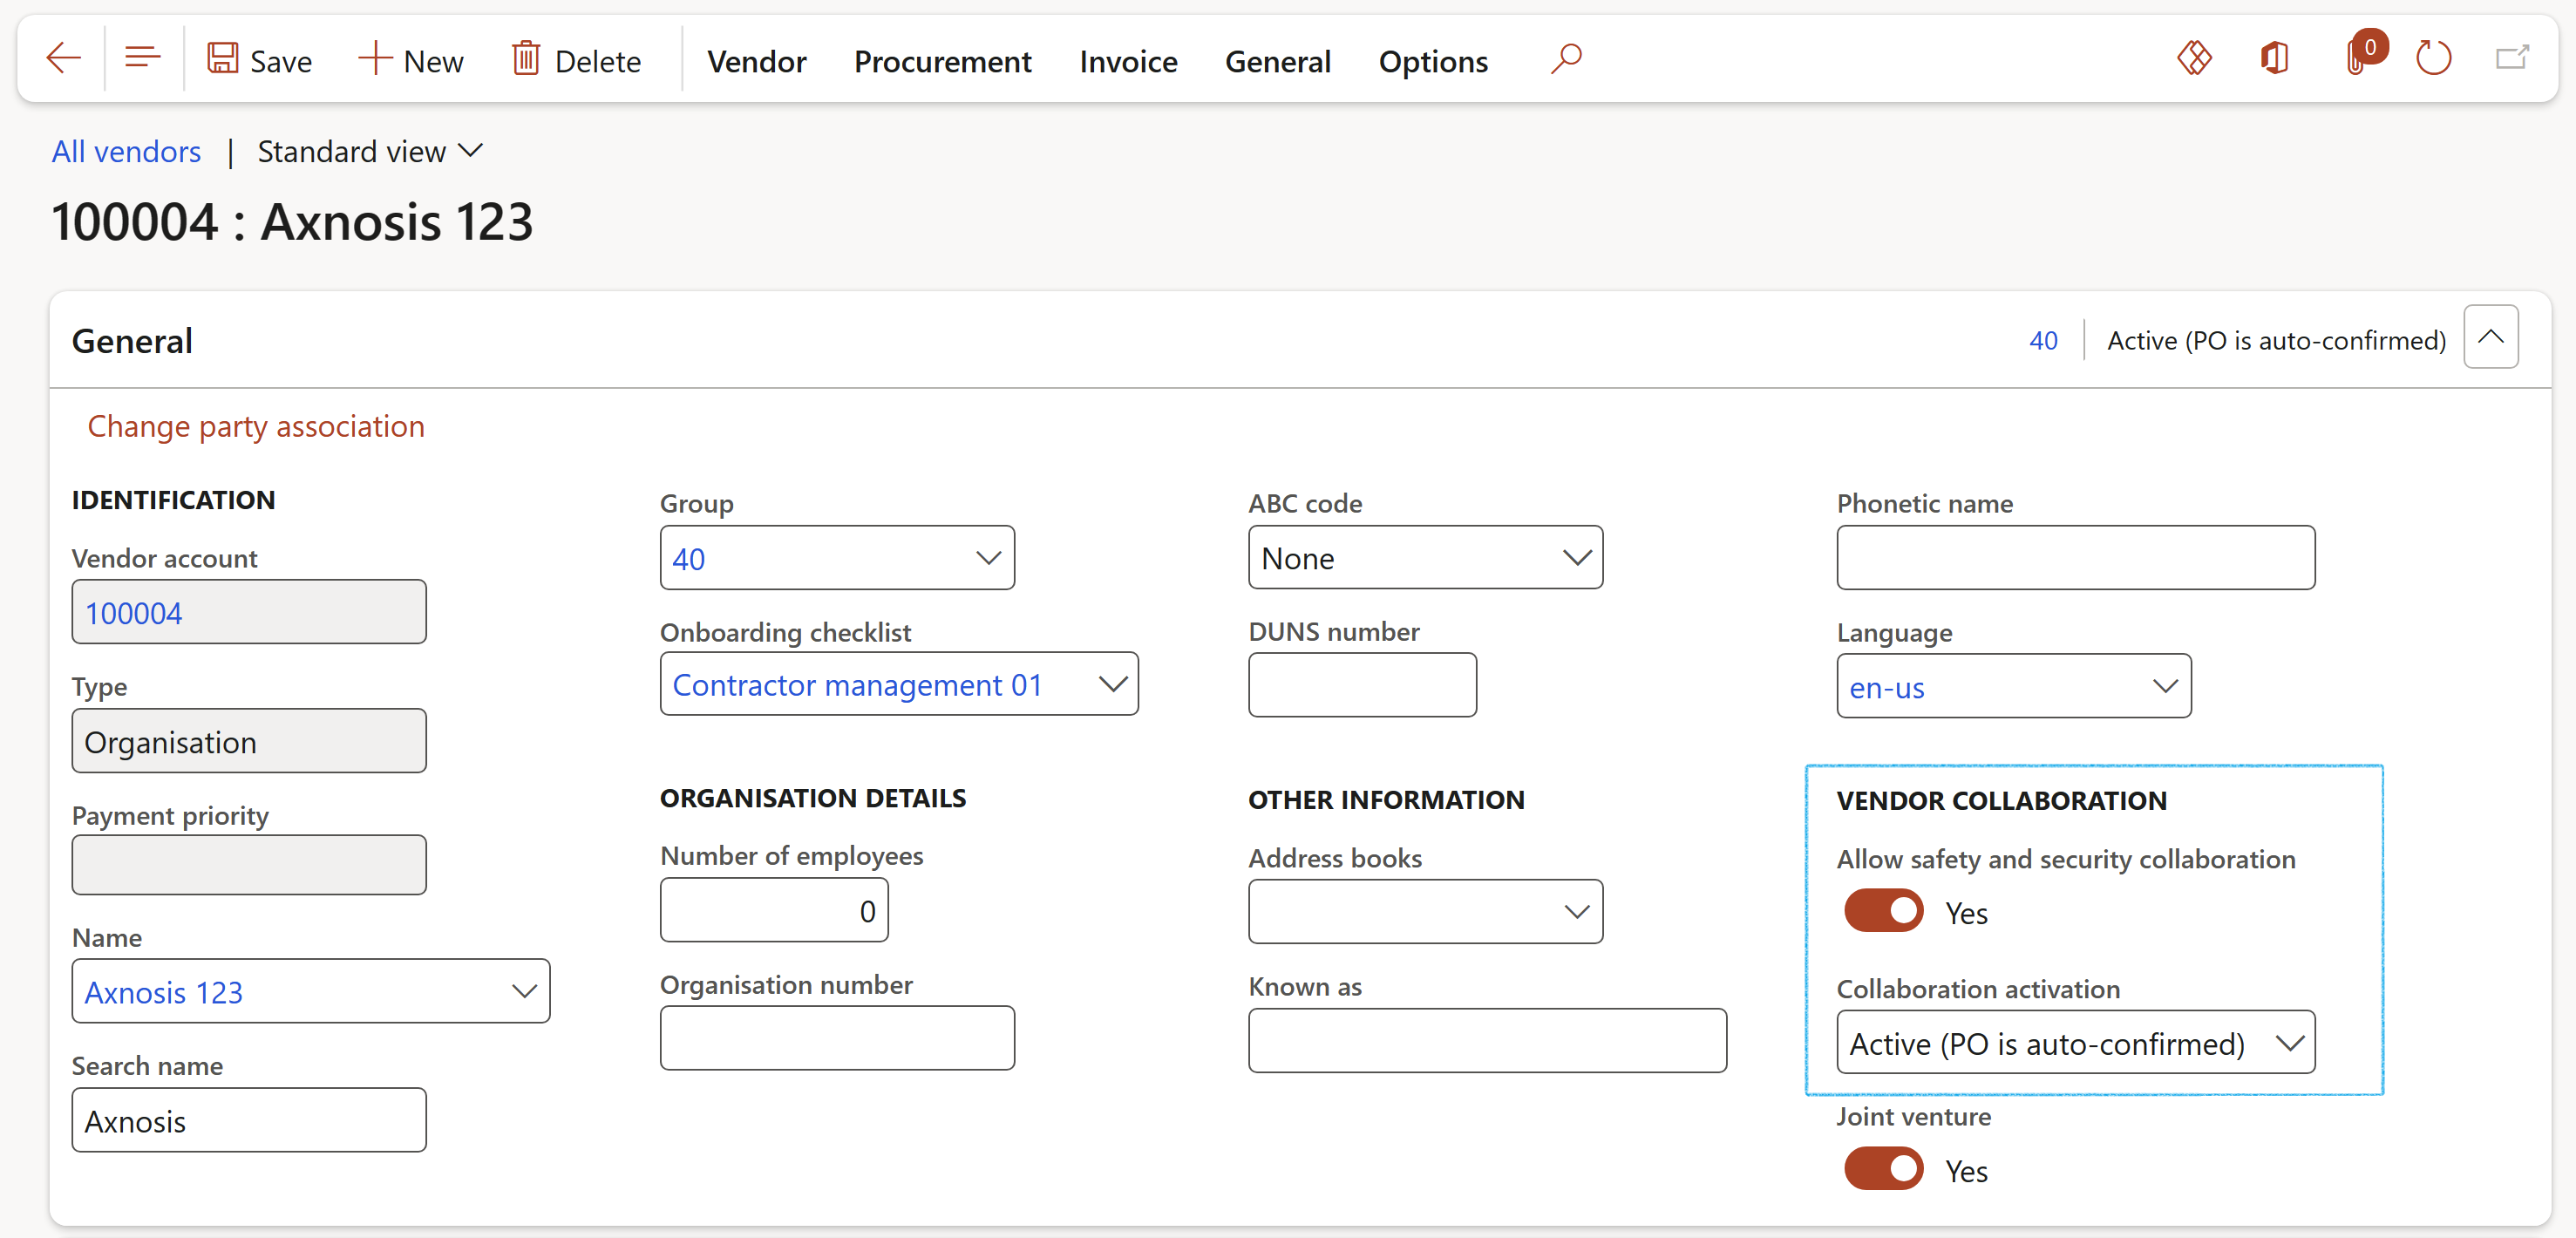
External vendors that use the Vendor portal must have the following setup:
- A Microsoft Azure Active Directory (AAD) user account must be registered for the vendor on the Users page in Dynamics 365.
- The vendor must have the Vendor (external) security role, not the SystemUser role.
NOTE: The SystemUser role is automatically granted when you create a new user account in Dynamics 365. Therefore, you must remove that role and acknowledge the warning message that you receive.
- The vendor user should not be granted permission to add additional fields from the PO tables to their view of the PO. On the Personalization tab, on the Users tab, set the Explicit personalization allowed option for the user to No.
- The user account must be associated with a registered contact person. On the Users page, select a contact person in the Name field. The person that you select should have the Contact role for the relevant vendor.
If the same person requires access to the Vendor portal for multiple vendor accounts (for different legal entities, perhaps), each of that person's user accounts must be associated with the same registered contact person. The Vendor (external) role includes all the basic capabilities that are required in order to use the functionality that is available in the Vendor portal. This setup helps guarantee that the user interface that the external user sees, is focused on the intended scenario only.
¶ Add new vendor collaboration contacts
If you want someone to have access to vendor collaboration, they first have to be added as a vendor collaboration contact. You may also want to add contacts for employees in your company who won't use vendor collaboration. For example, they could be the point of contact for other kinds of procurement information. New contacts are added on the All contacts page.
- Go to: Vendor collaboration > Contacts > All contacts
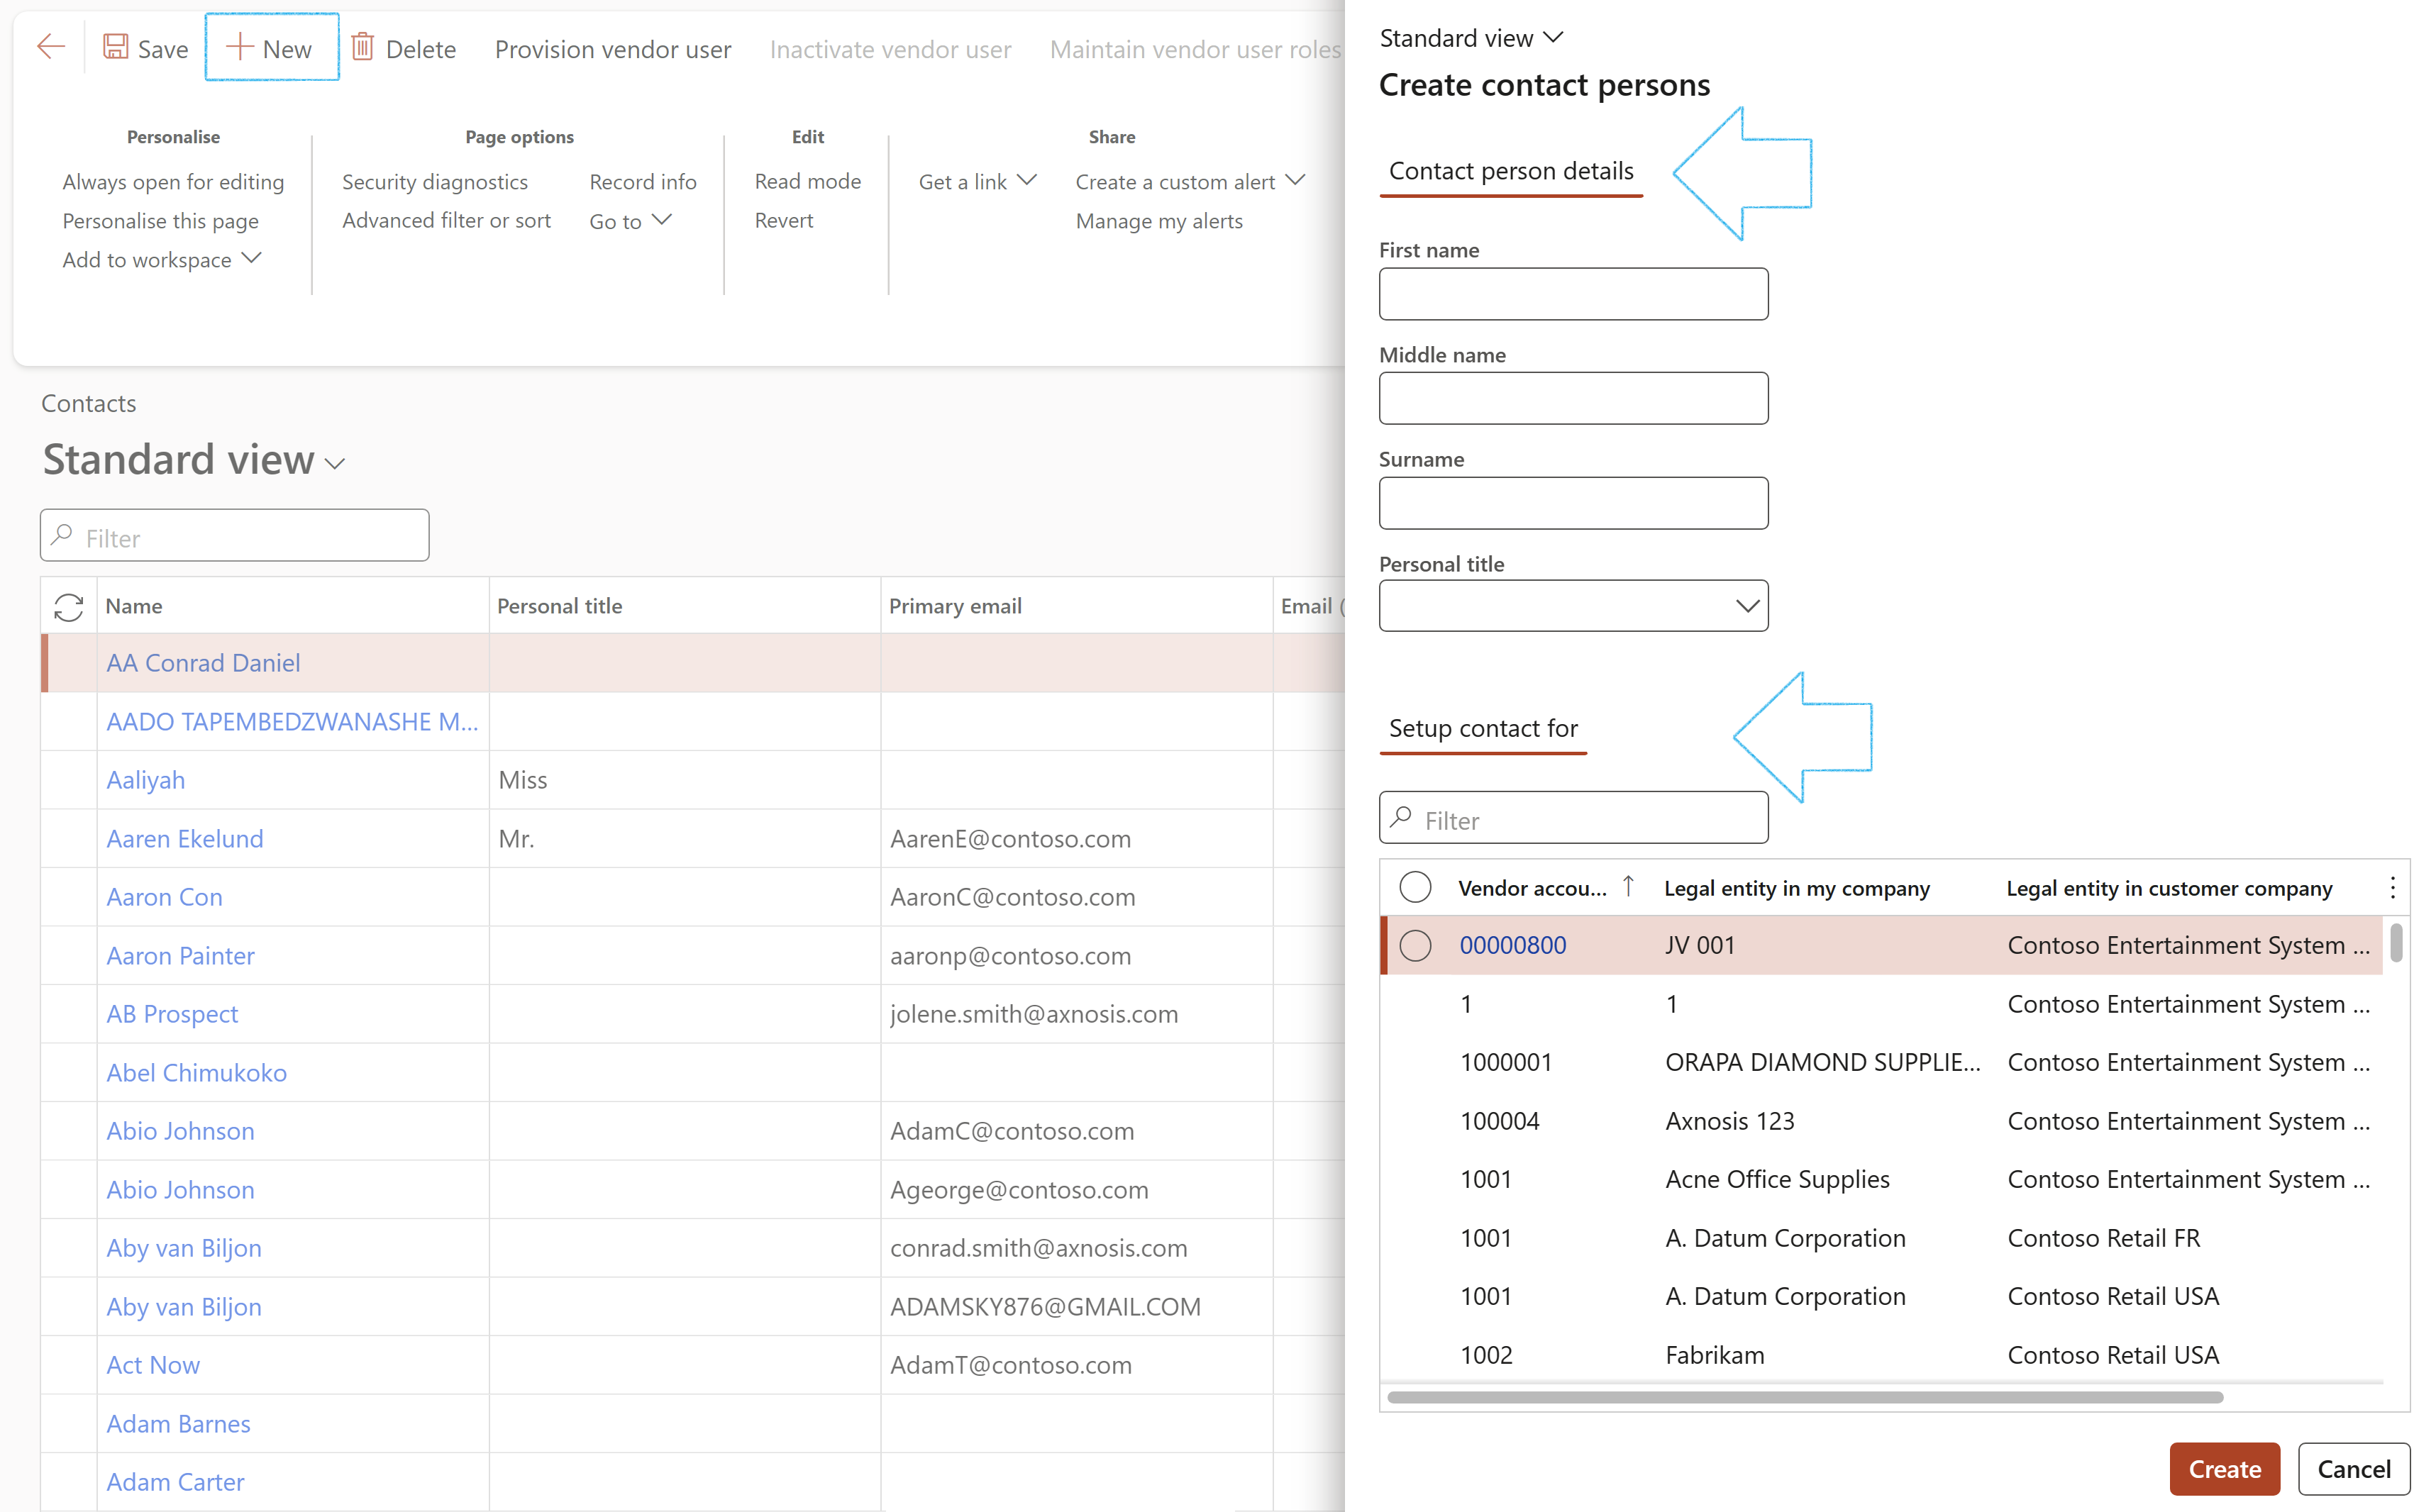
- On the Action pane, click New
- On the Create contact persons dialog, enter the contact person details
- Choose which legal entity they're representing in your company, and which legal entity they'll work within the company that they'll collaborate with. You do this by selecting a Legal entity in my company/Legal entity in customer company pair.
- Click Create
It is only possible to delete the contacts that you have created
¶ Add contacts to vendors
- Go to: Purchase ledger > Vendors > All vendors
- Select the relevant Vendor
- On the Action pane, under the Vendor Tab, in the Set up group, click on the Contacts button and select Add contacts from the dropdown list

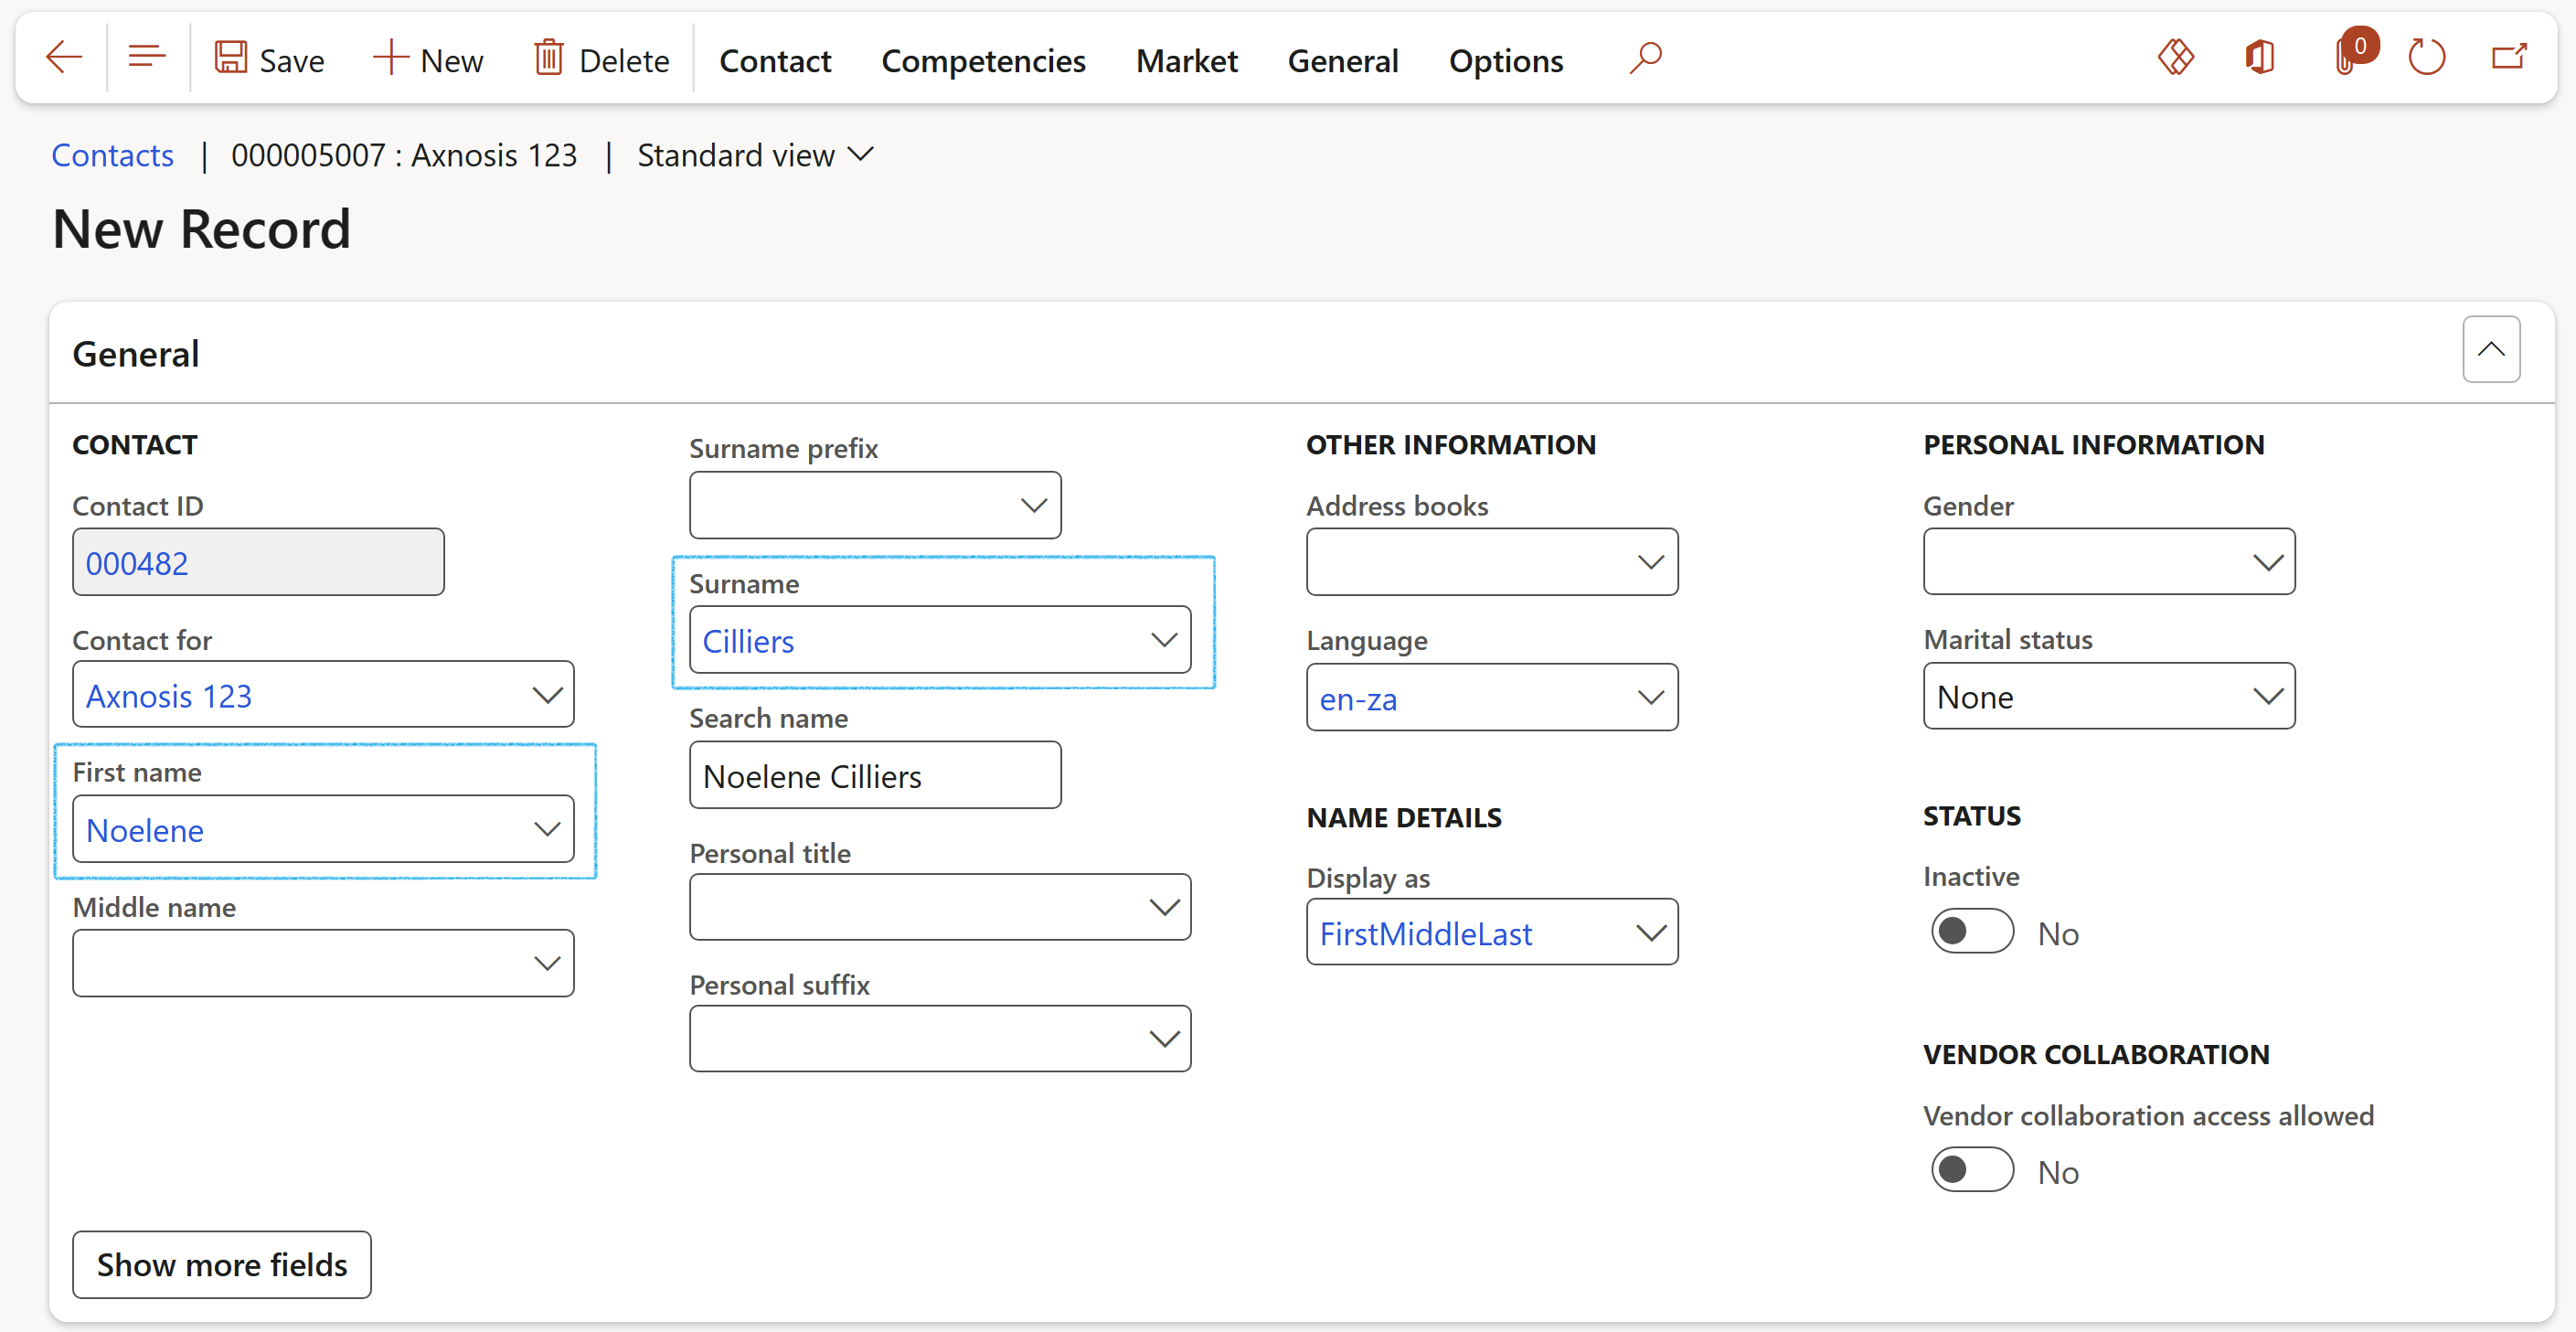
- The Contacts detail form will open
- Enter the contact person’s details
- Click Save
- Only information relevant to the logged in Vendor, will be displayed
- The following can be created by clicking on the New button on the Action pane:
- New Work request
- New Work order
- Create activity
- New risk assessment
- Request new permit to work
- Email notification can be sent to the selected vendor’s primary email address
- Support documents can be uploaded by clicking on the Upload your own support documents button on the Action pane
¶ My details tab
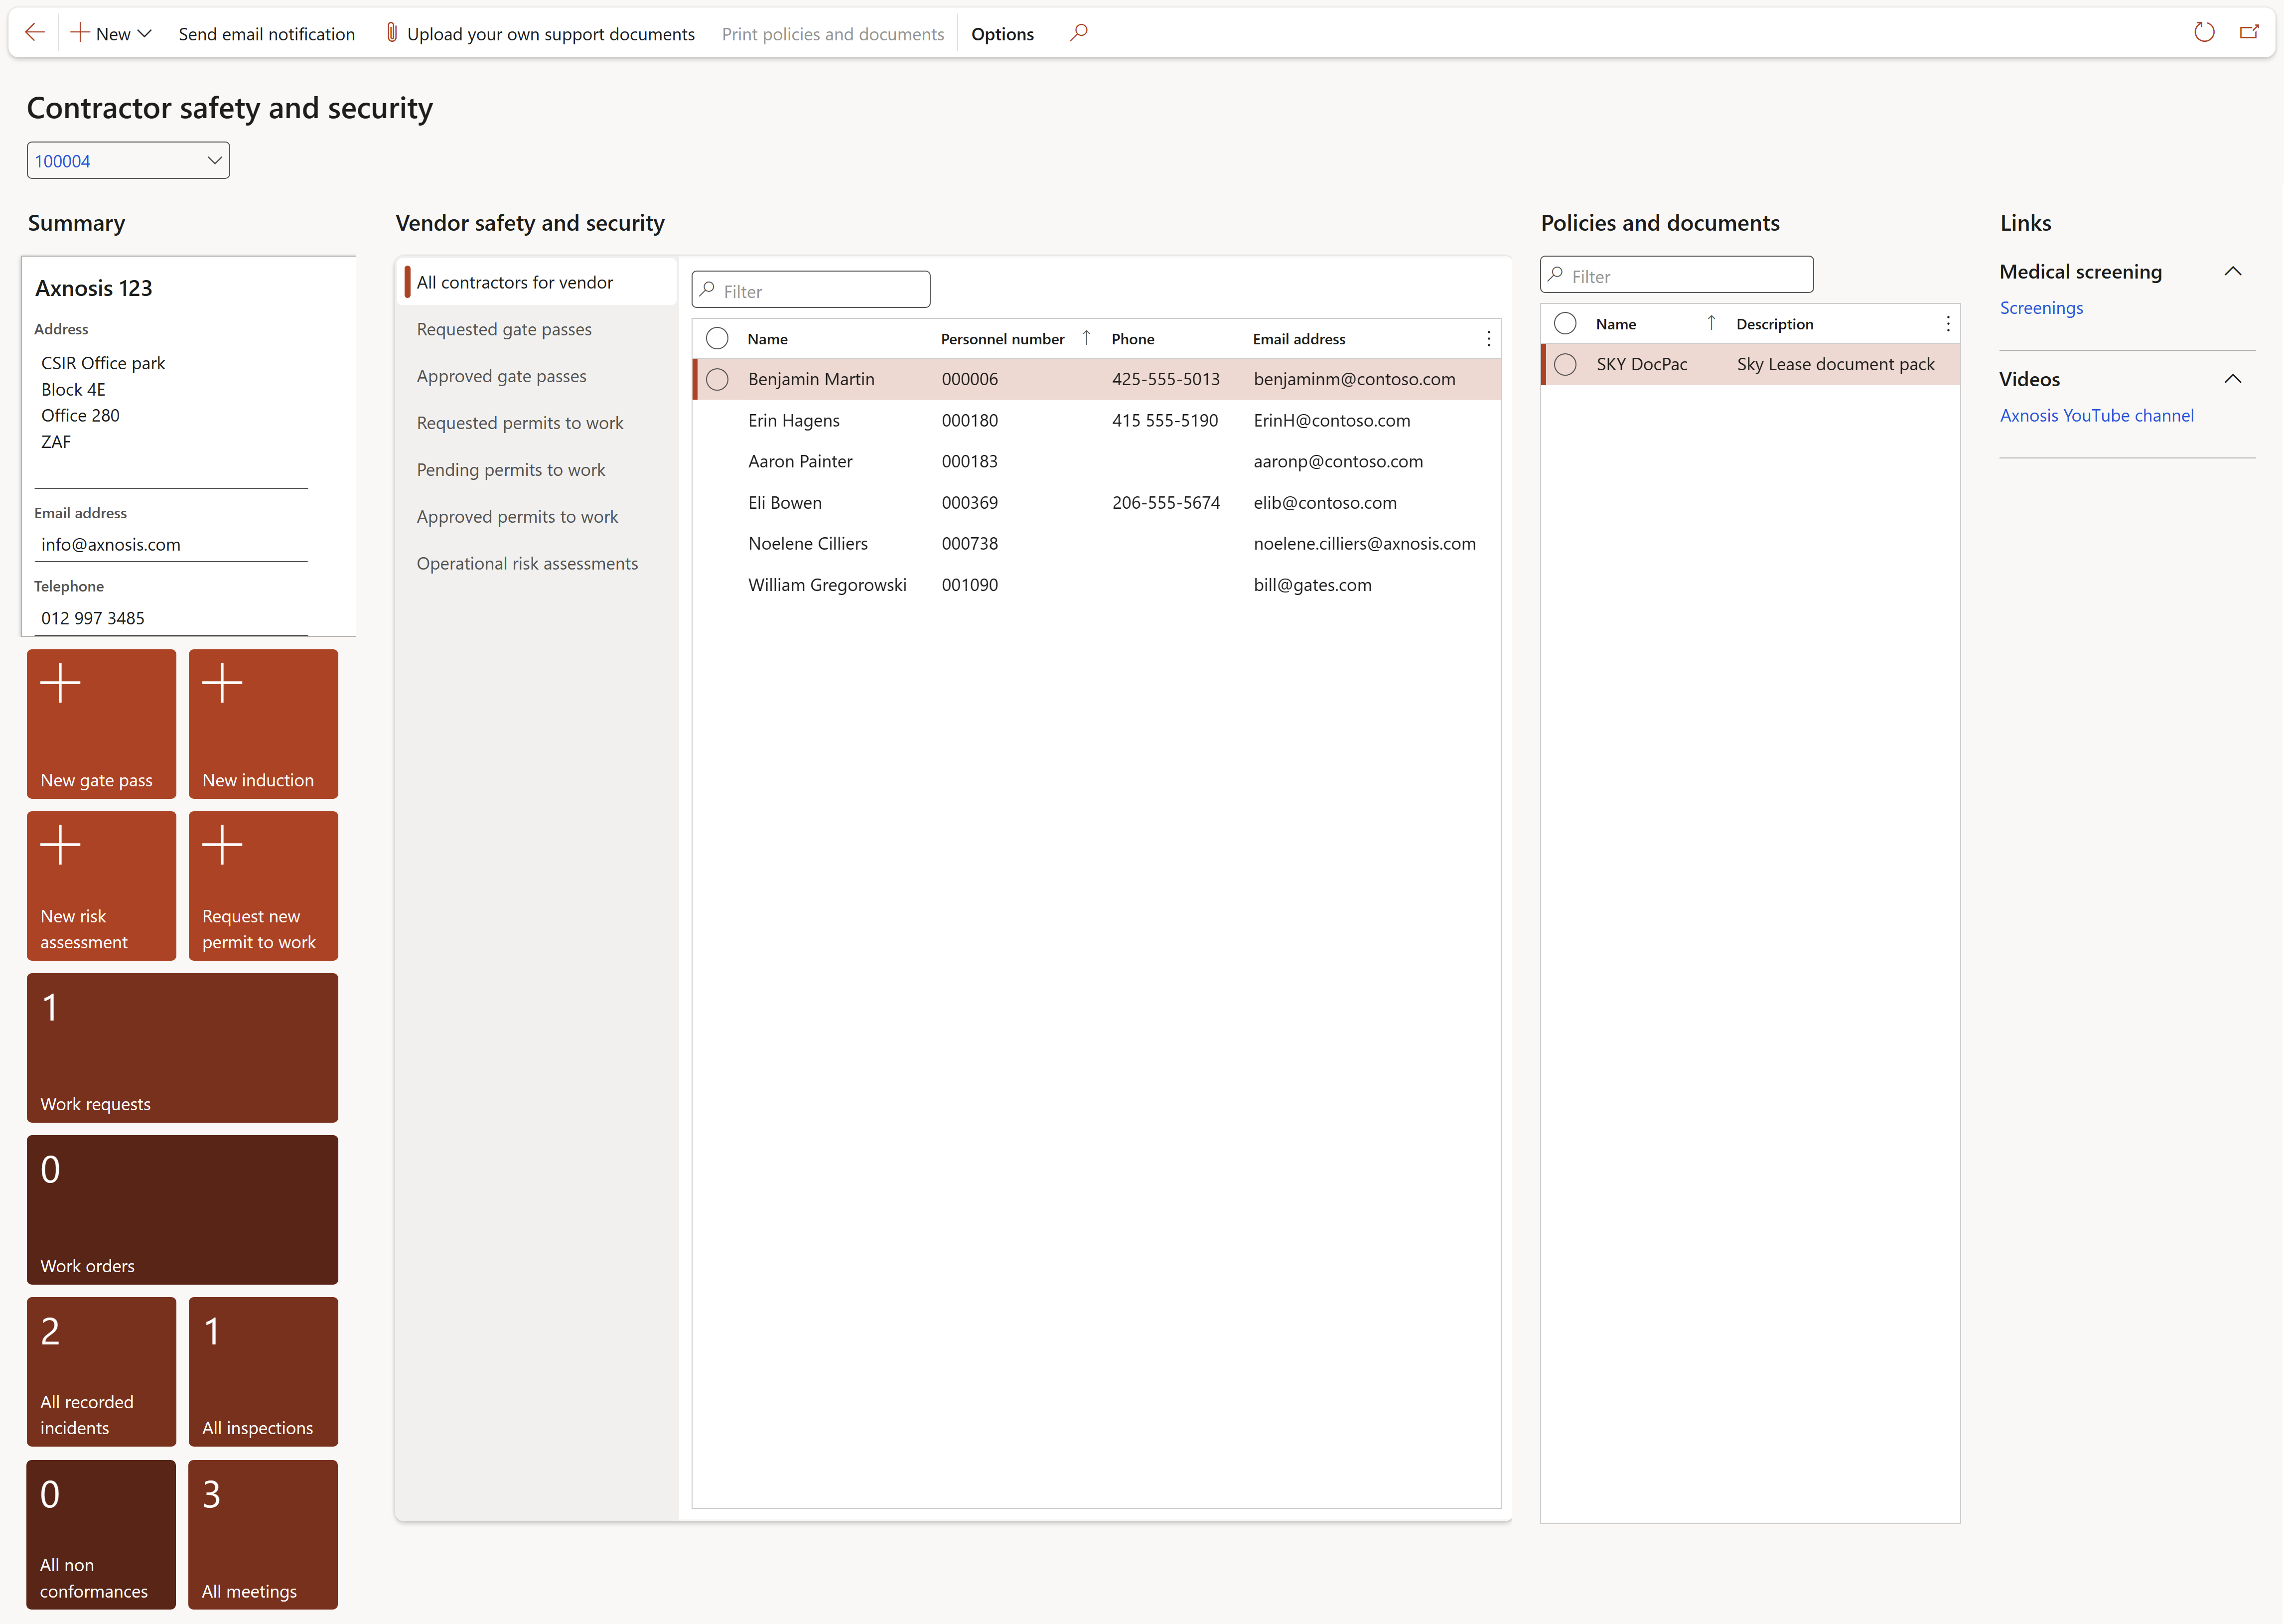
Functions of the My details tiles:
- New gate pass: Opens the request New gate pass dialog
- New induction: Opens the Request induction dialog
All contractors for supplier section: Displays a list of all contractors for the selected vendor
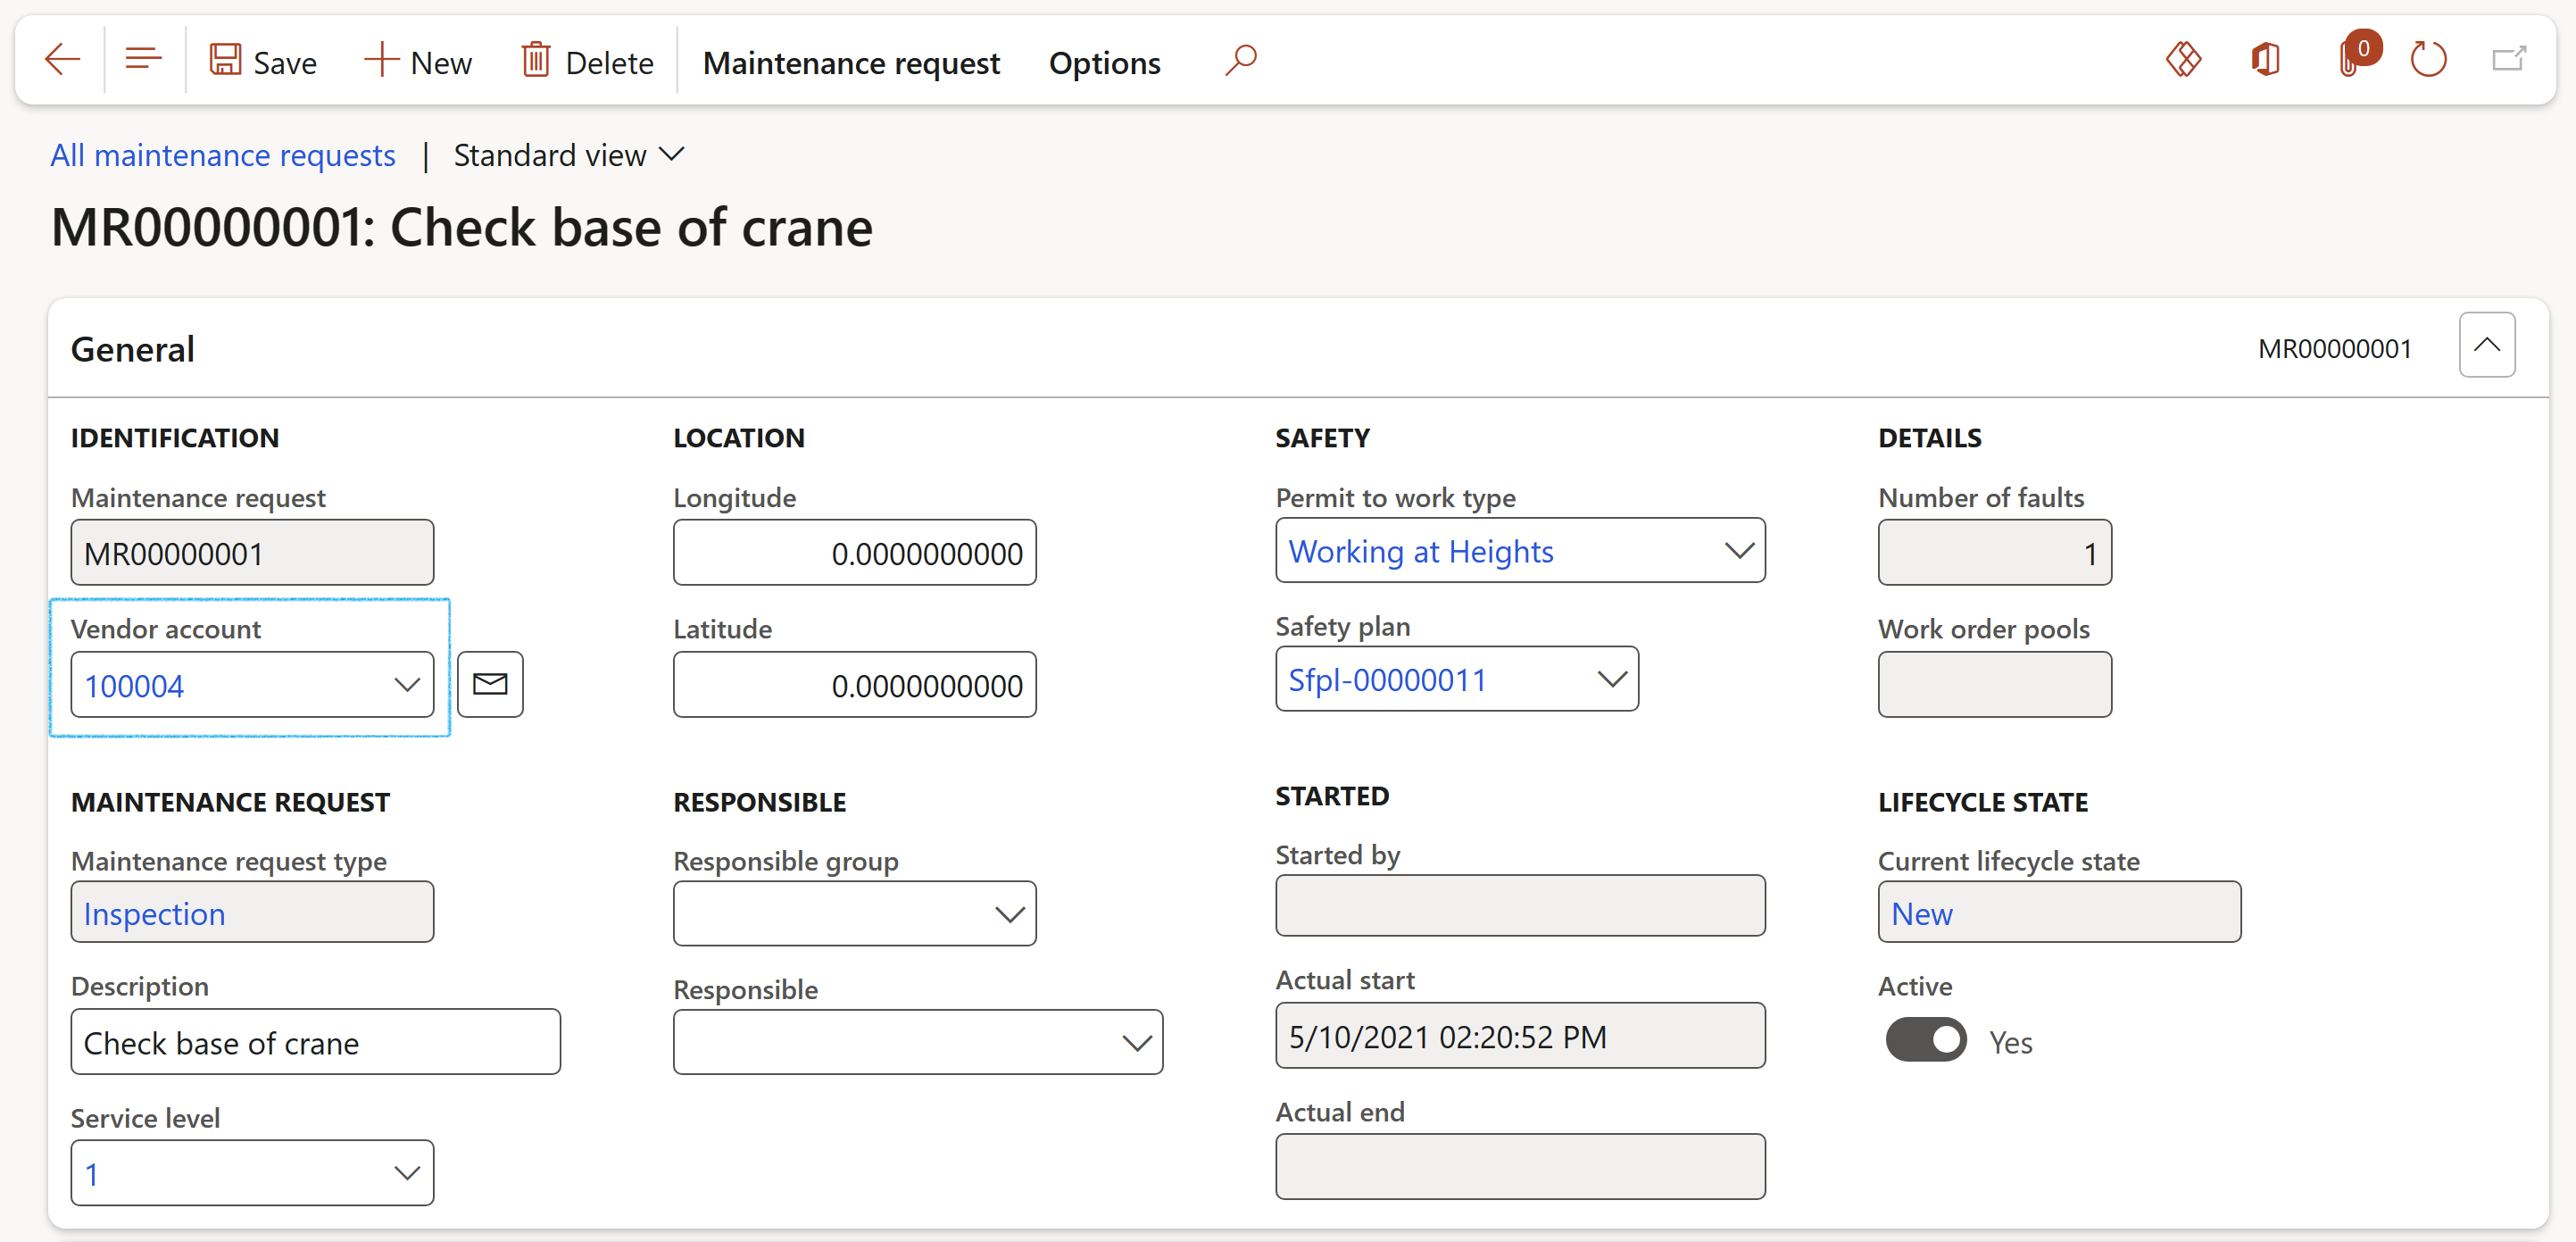
For Maintenance requests to display on this workspace:
- Go to: Asset management > Maintenance requests > All maintenance requests
- Select the relevant maintenance request
- Under the General Fast tab, select the relevant Preferred service provider from the dropdown list
¶ My work tab
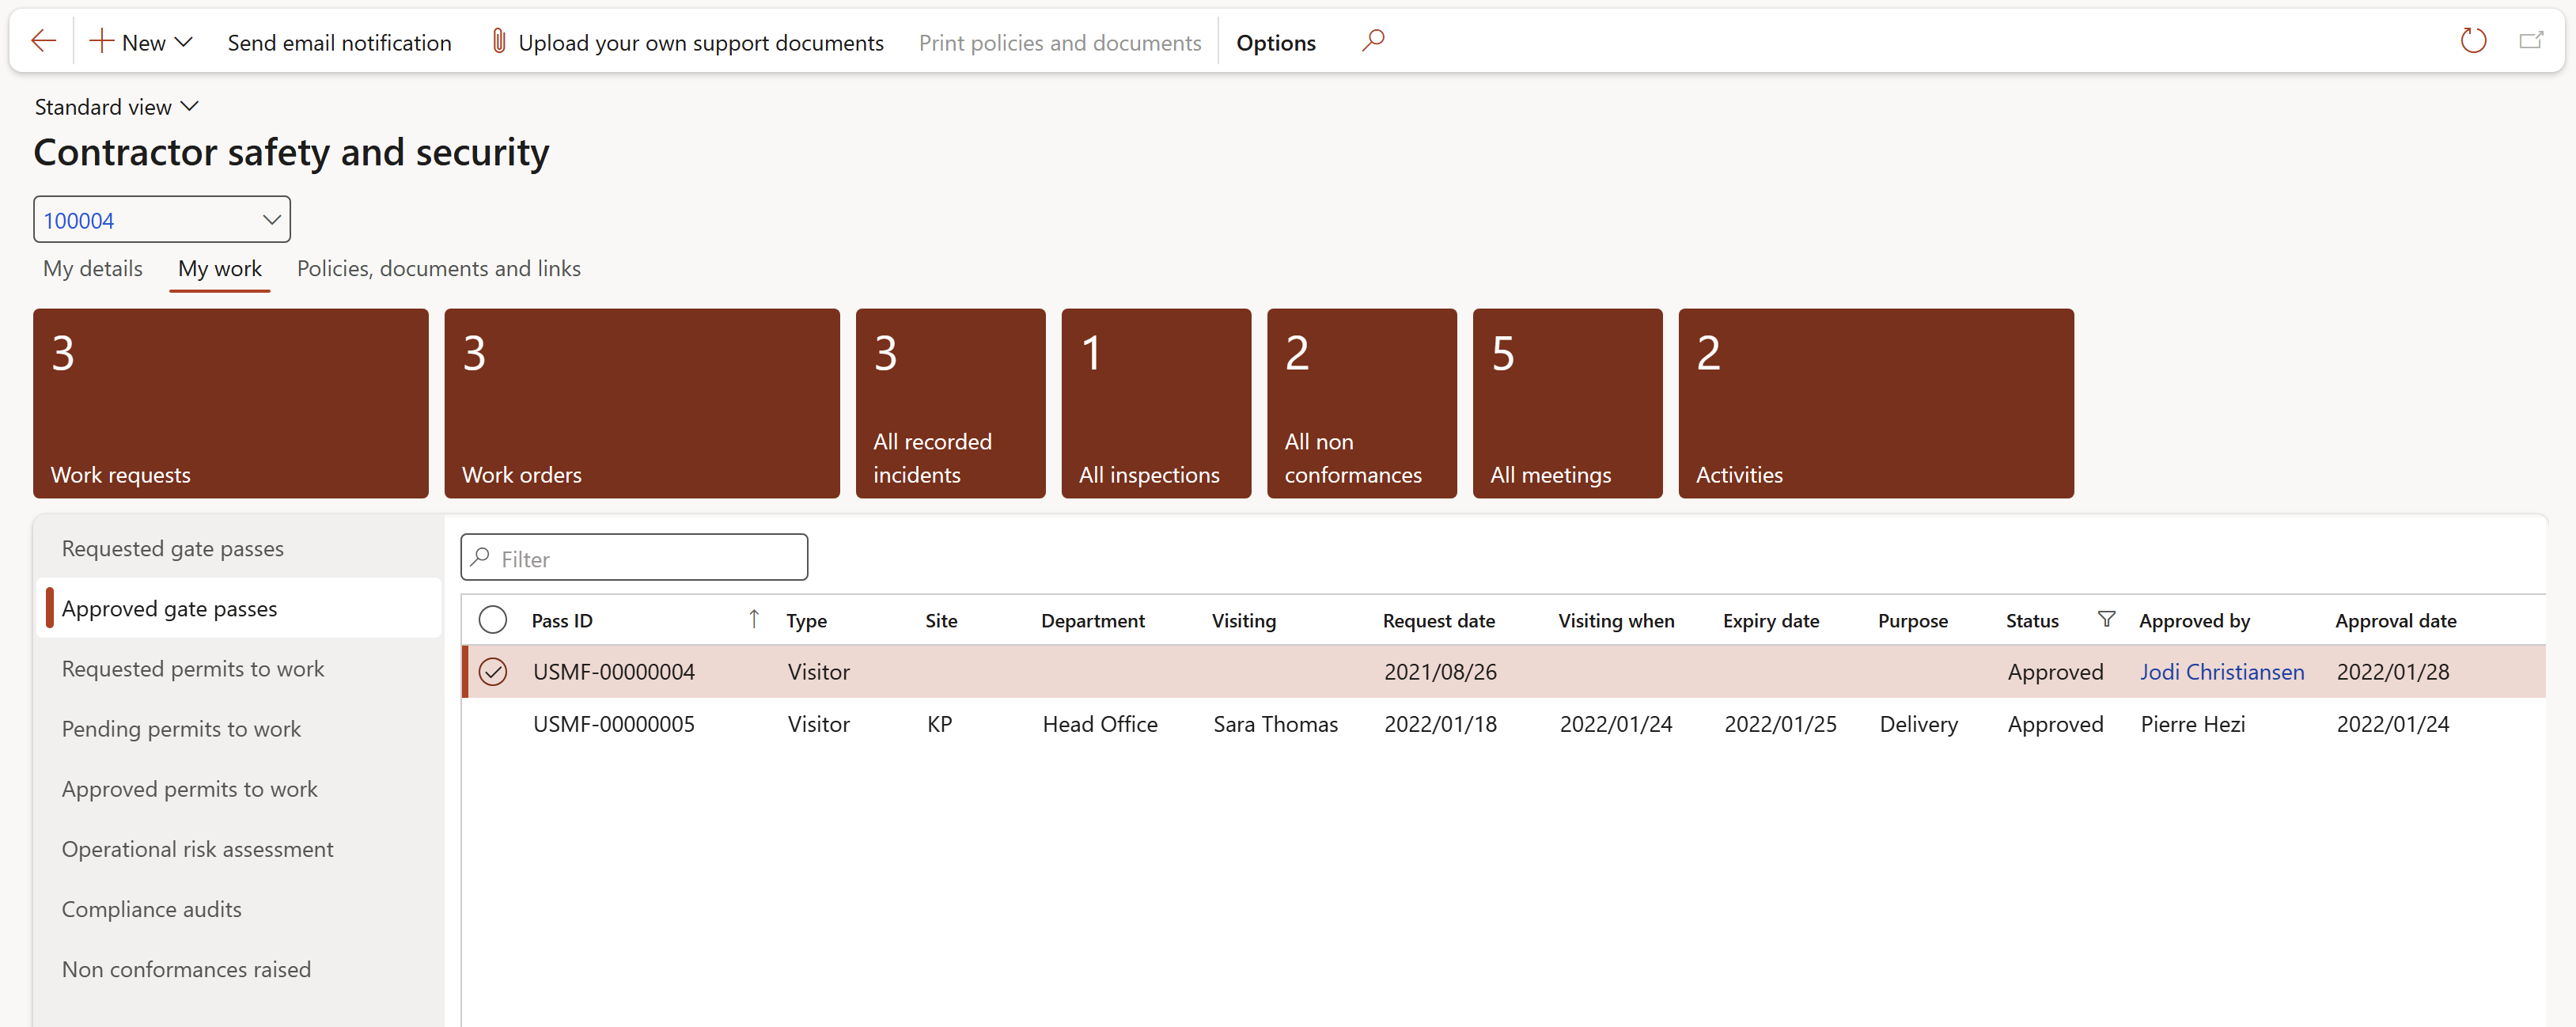
Functions of the My work tiles:
- Work requests: Opens the Maintenance requests list page
- Work orders: Opens the Work order list page
- All recorded incidents: Opens the All reported incidents in legal entity list page
- All inspections: Opens the All inspection journals list page
- All non-conformance: Opens the Non-conformances list page
- All meetings: Opens the Meetings list page
- Activities: Opens the Activities list page
Functions of the My work tabs:
- Requested gate passes: Displays a list of all requested gate passes
- Approved gate passes: Displays a list of all approved gate passes
- Requested permits to work: Displays a list of all requested permits to work
- Pending permits to work: Displays a list of all pending permits to work
- Approved permits to work: Displays a list of all approved permits to work
- Operational risk assessments: Displays a list of all operational risk assessment lines
- Compliance audits: Displays a list of all compliance audits
- Non conformances raised: Displays a list of all non conformances raised
¶ Policies, documents and links tab
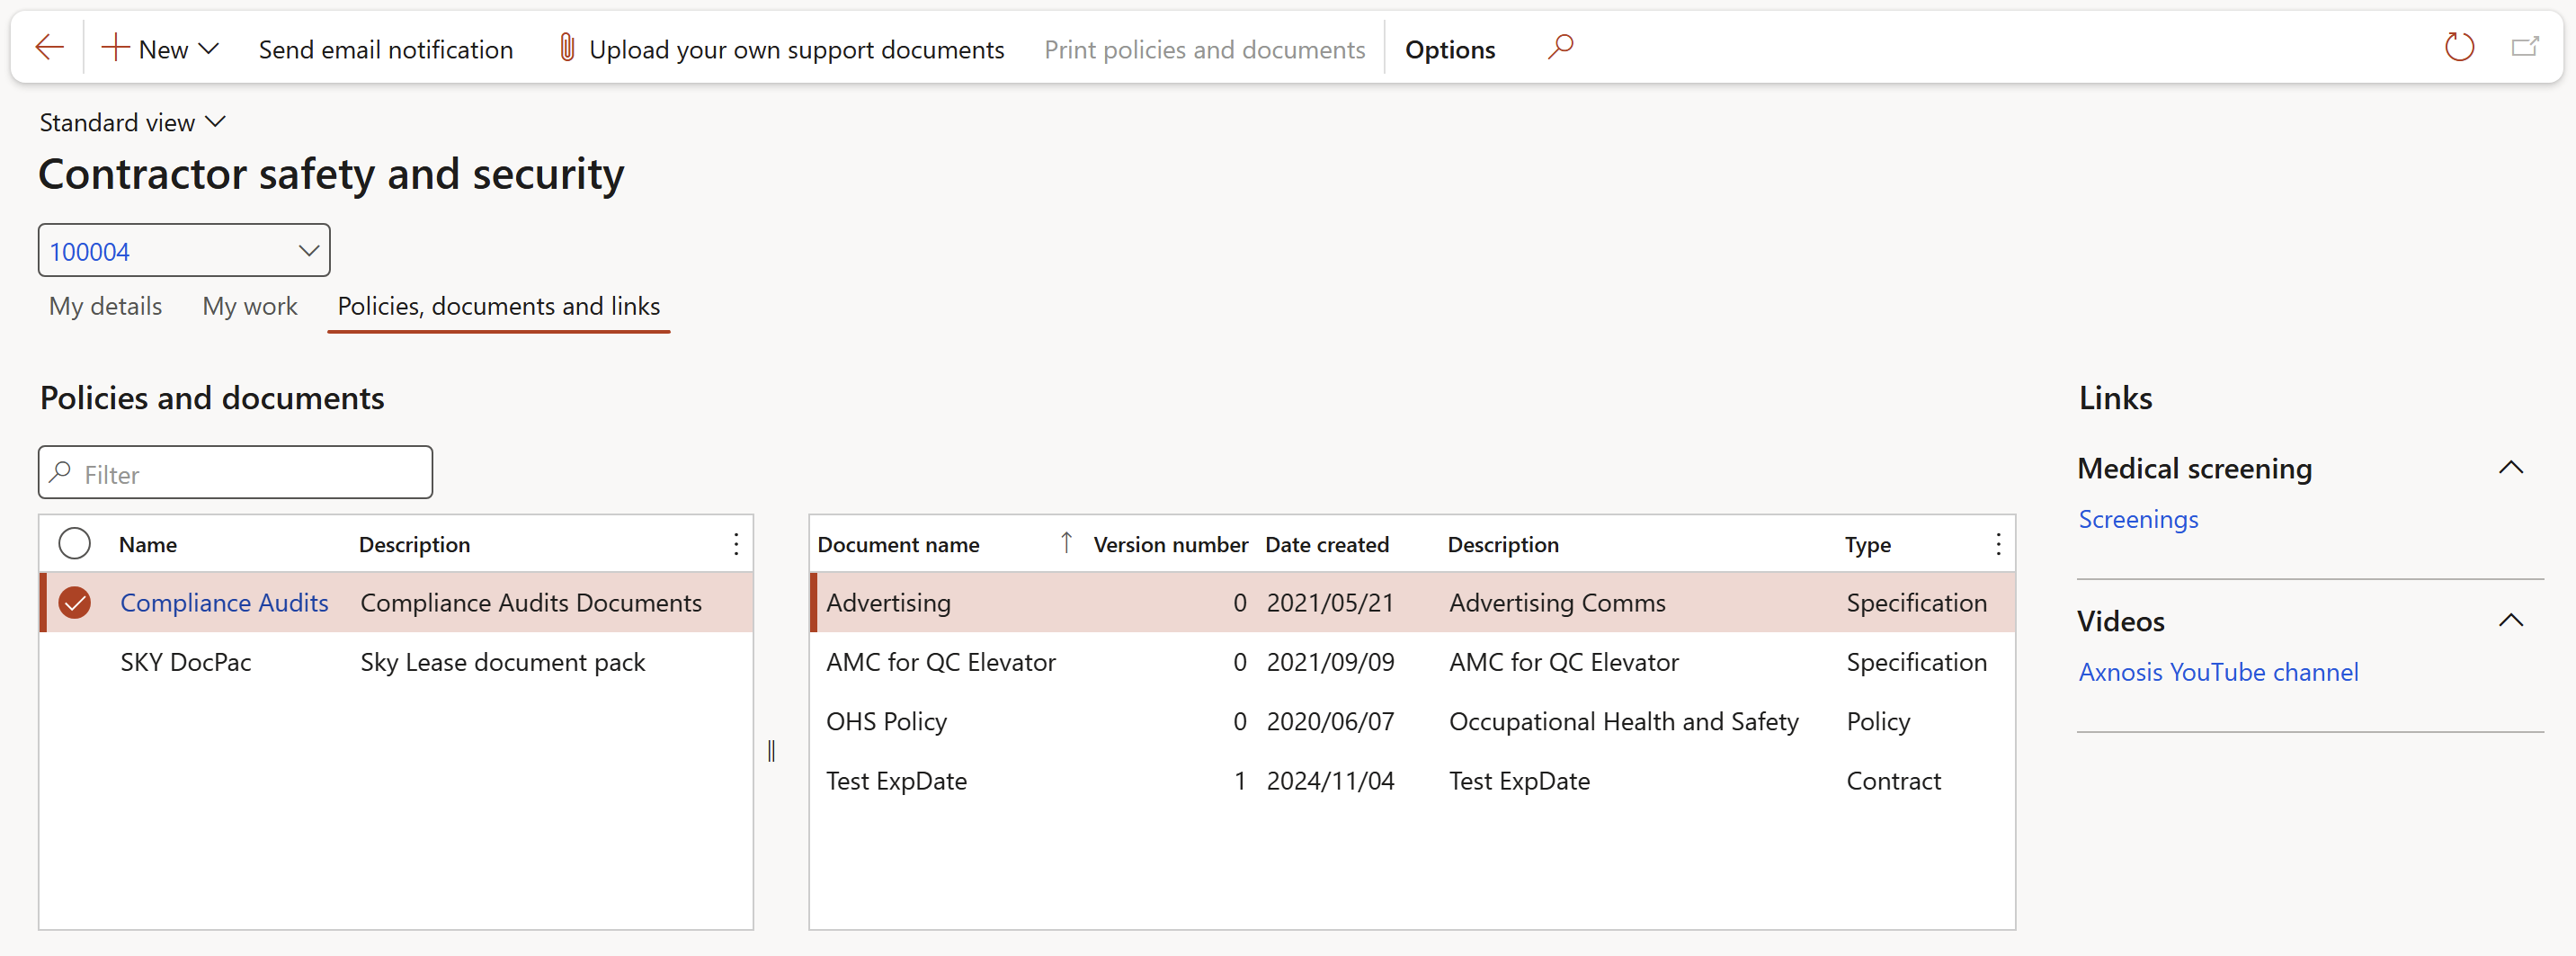
- Displays a list of all Document packs containing policies and documents in D365, for the selected vendor
- These documents or policies can be printed by clicking on the Print policies and documents button on the Action pane
- The logged in user can upload documents by clicking on the Upload your own support document button on the Action pane
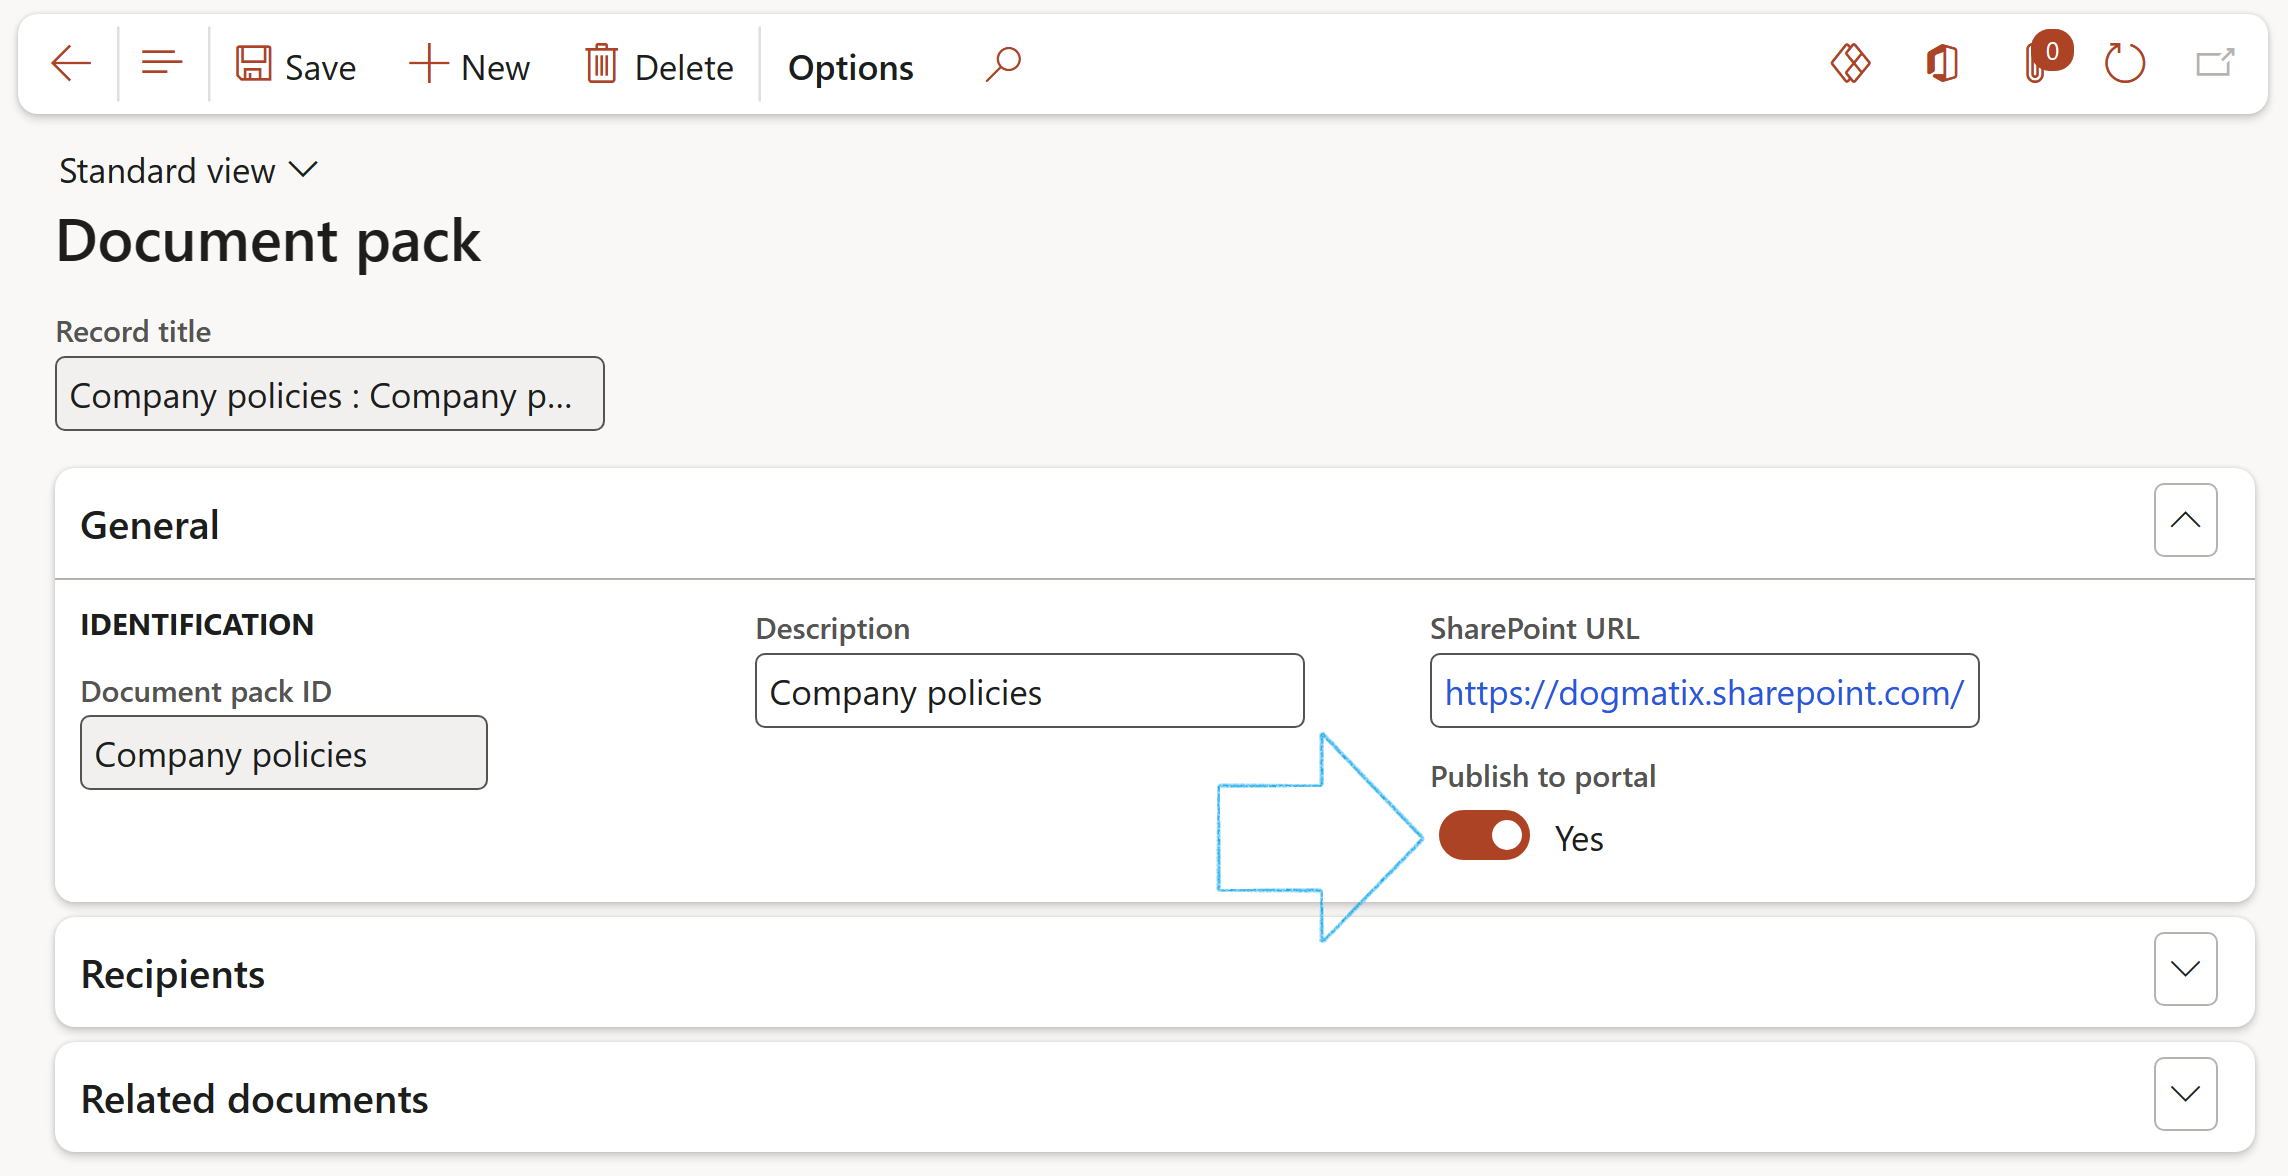
For Document packs to display on this workspace:
- Go to: HSE > Safety and security > Setup for safety and security > Document pack
- Under the General Fast tab, move the Publish to portal slider to Yes
The Links section:
- Medical screening: Opens the Screening form for the logged in Vendor to complete
- Videos: Provides access to an induction video
For the Video link to display on this workspace:
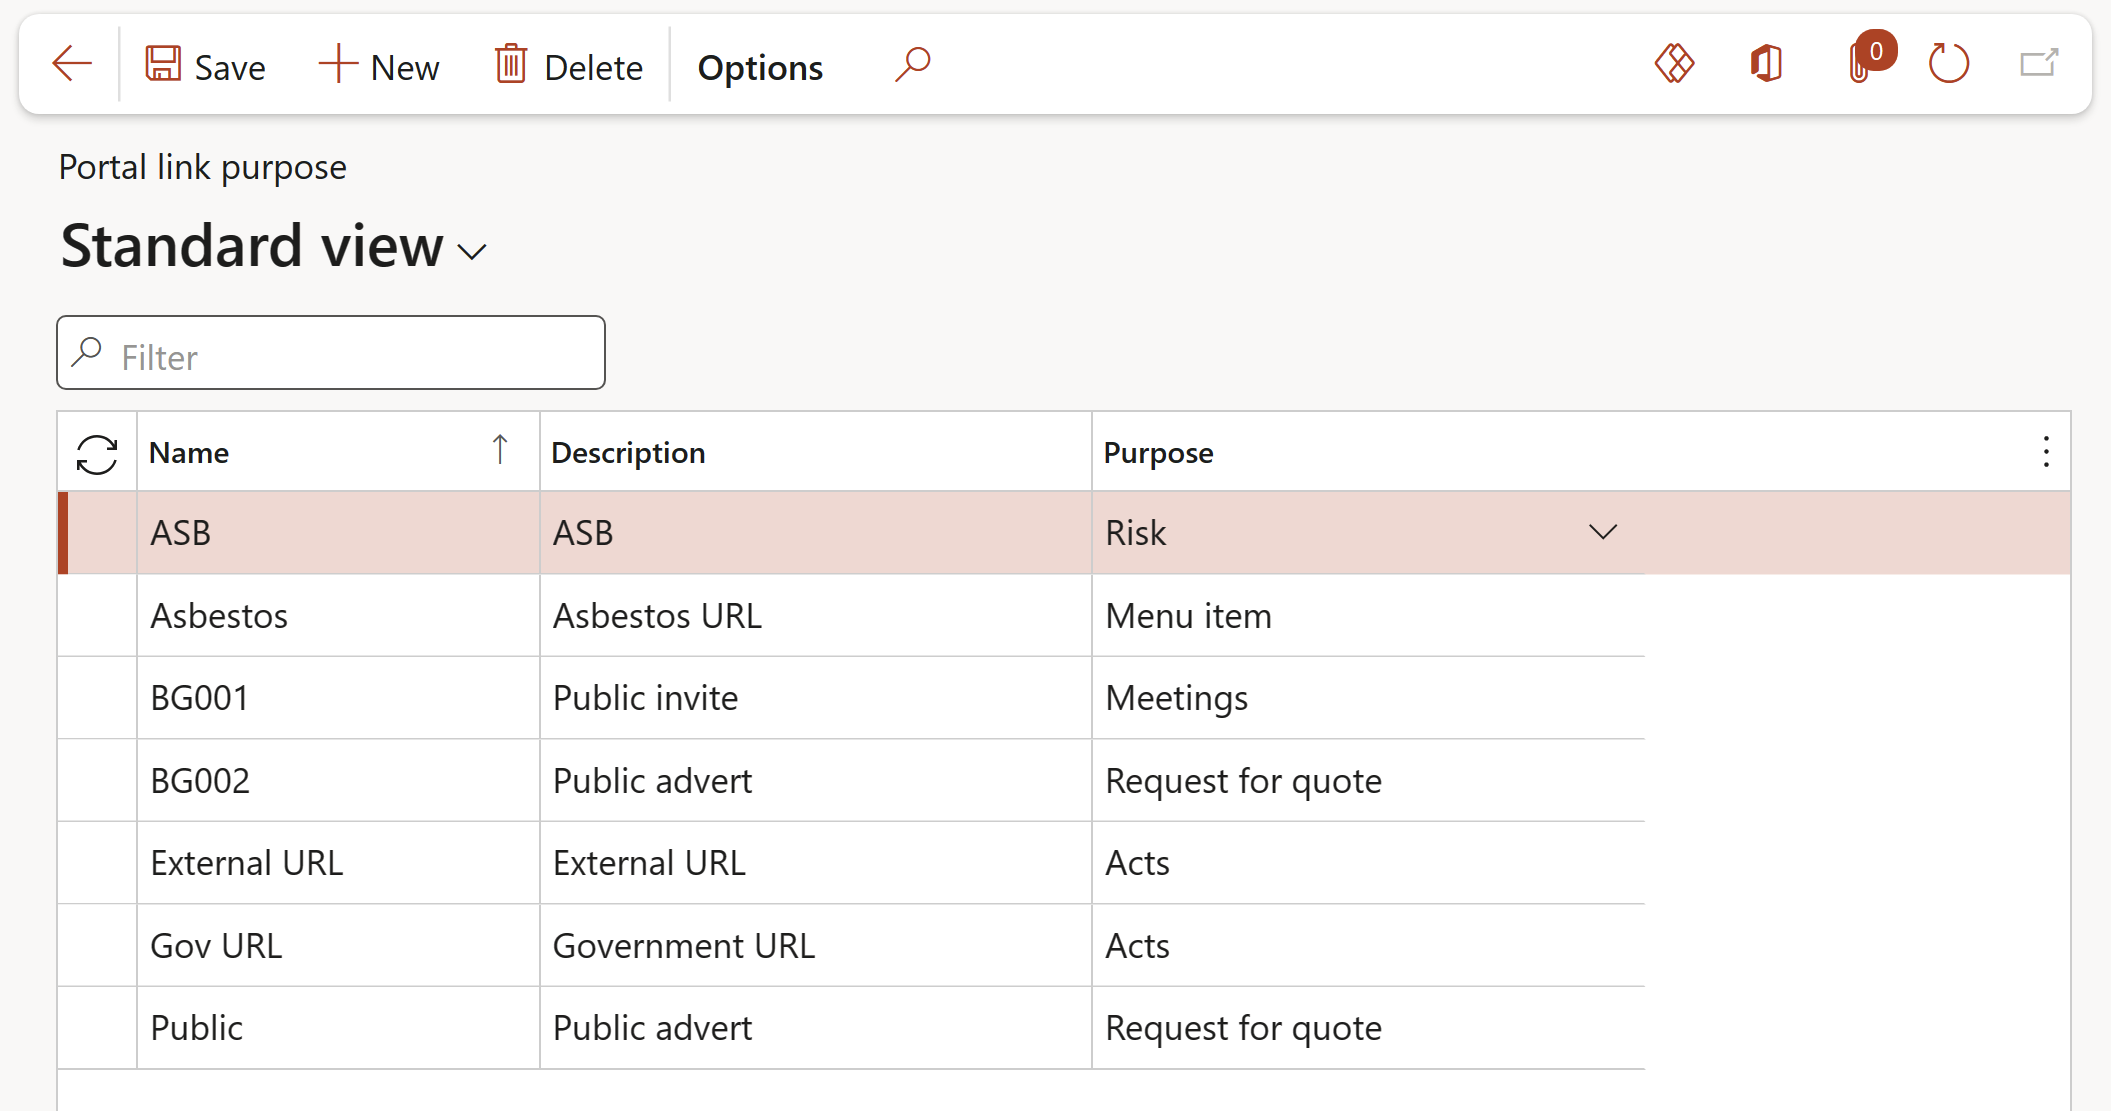
- Go to: HSE > Setup > Portal link purpose
- On the Action pane, click on the New button
- Enter the unique portal purpose Name
- Enter a brief Description
- In the Purpose field, select purpose of the portal link from the dropdown list
¶ Environmental management Workspace
¶ My work tab
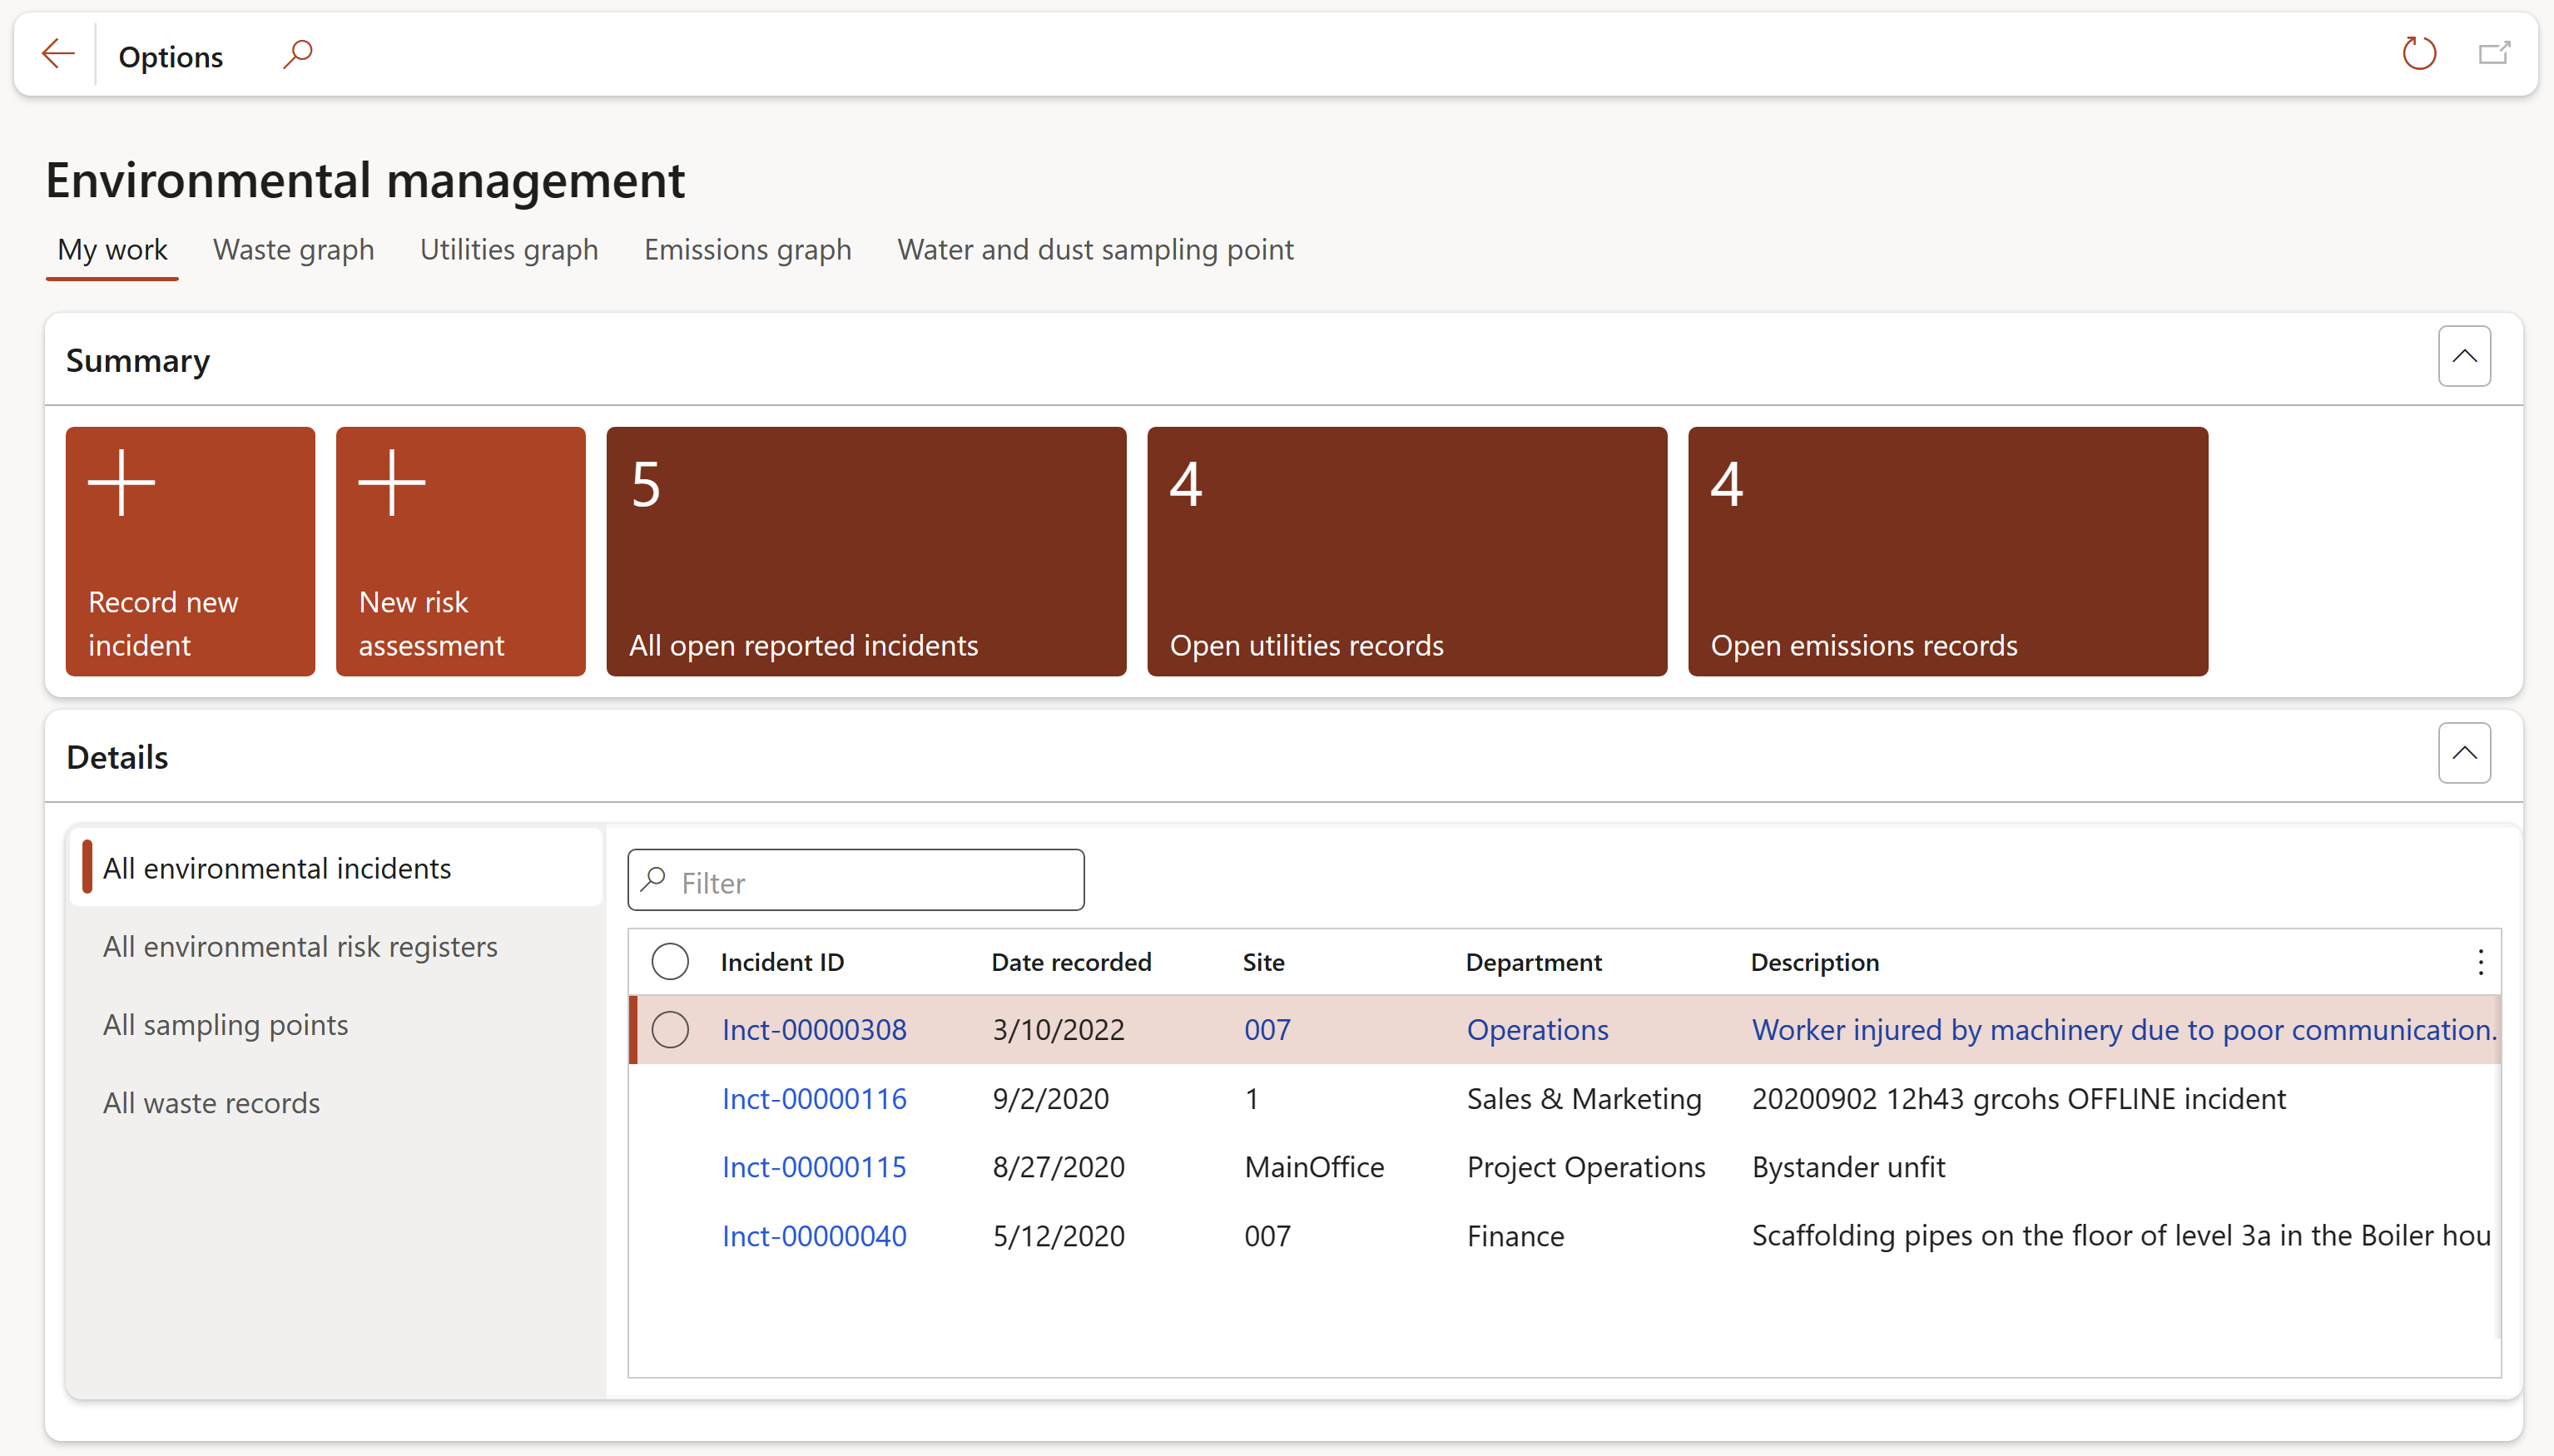
Functions of the Summary tiles:
- Record new incident:
- Opens the Record an environmental incident dialog
- New risk assessment:
- Opens the Environmental risk assessment dialog
- All open reported incidents:
- Opens a list page of all open reported environmental incidents
- Open utilities records:
- Opens a list page of all open utilities records
- Open emissions records:
- Opens a list page of all open emissions records
Functions of the Details tabs:
- All environmental incidents: Displays all recorded environmental incidents
- Environmental risk registers: Displays all environmental risk registers
- All sampling points: Displays all sampling points
- All waste records: Displays all waste records
¶ Waste graph tab
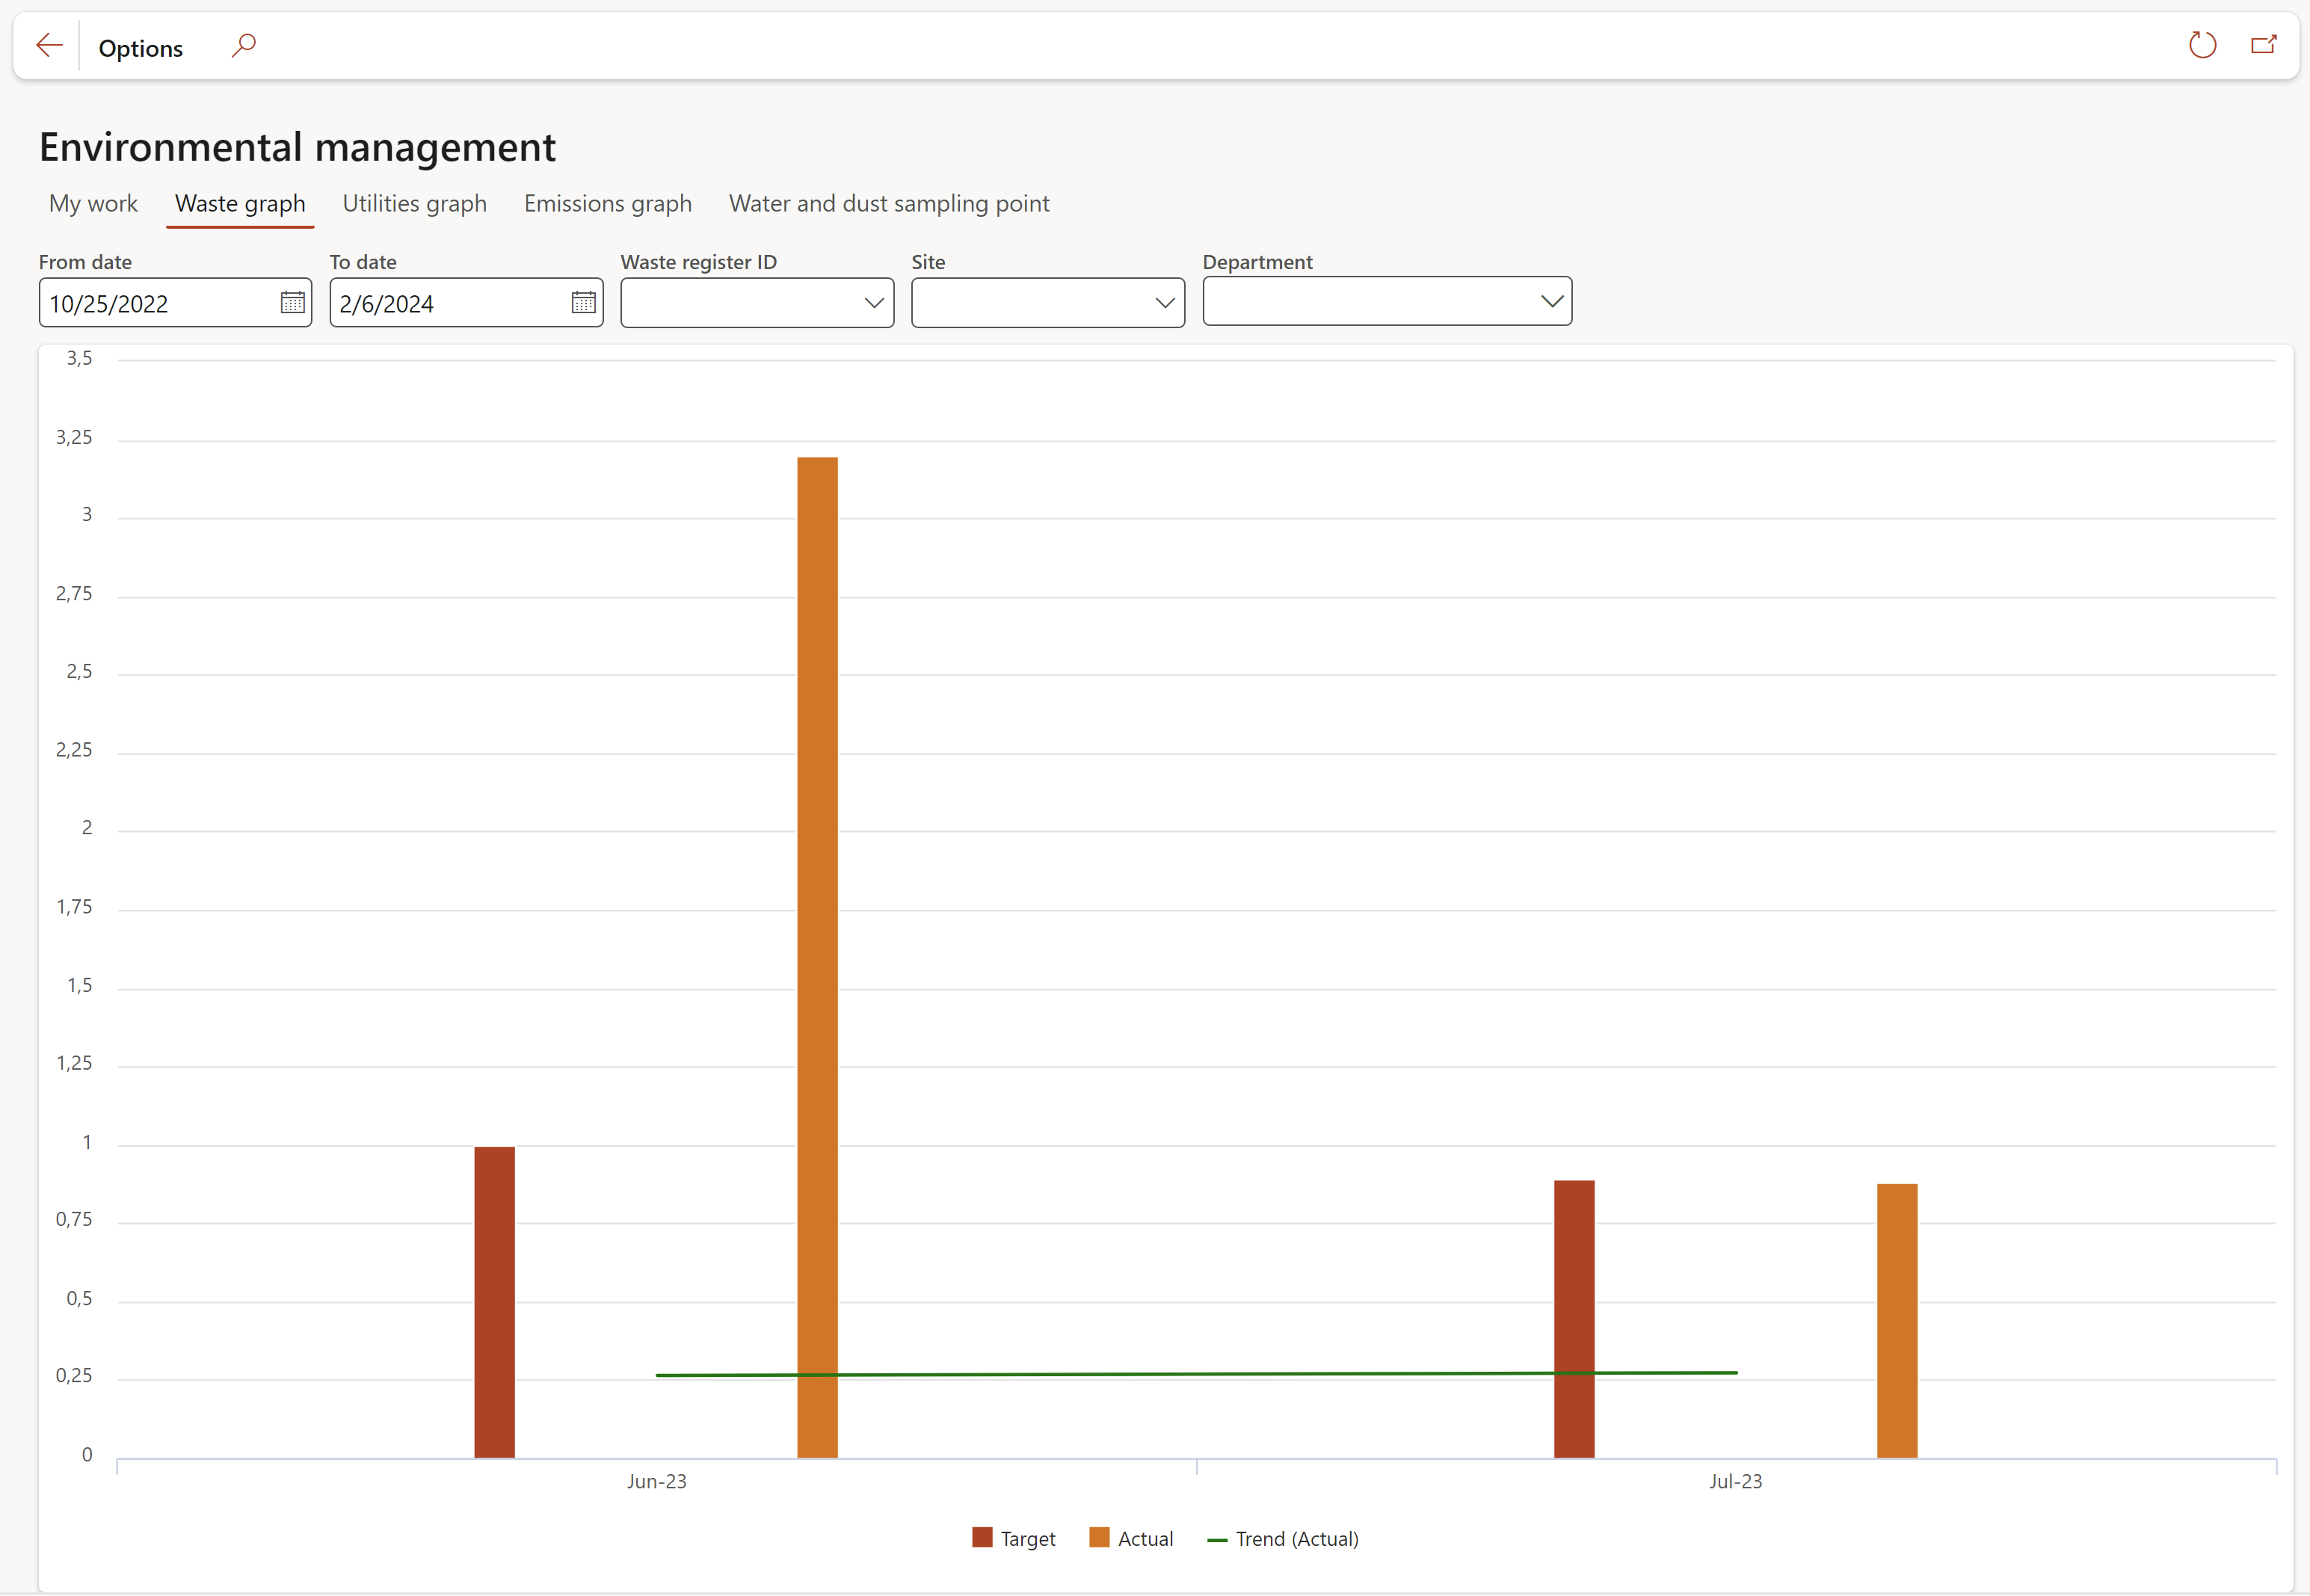
The graph displays the following:
- Target vs Actual vs Trend (actual) vs Trend
The filters can be used to specify the view
¶ Utilities graph tab
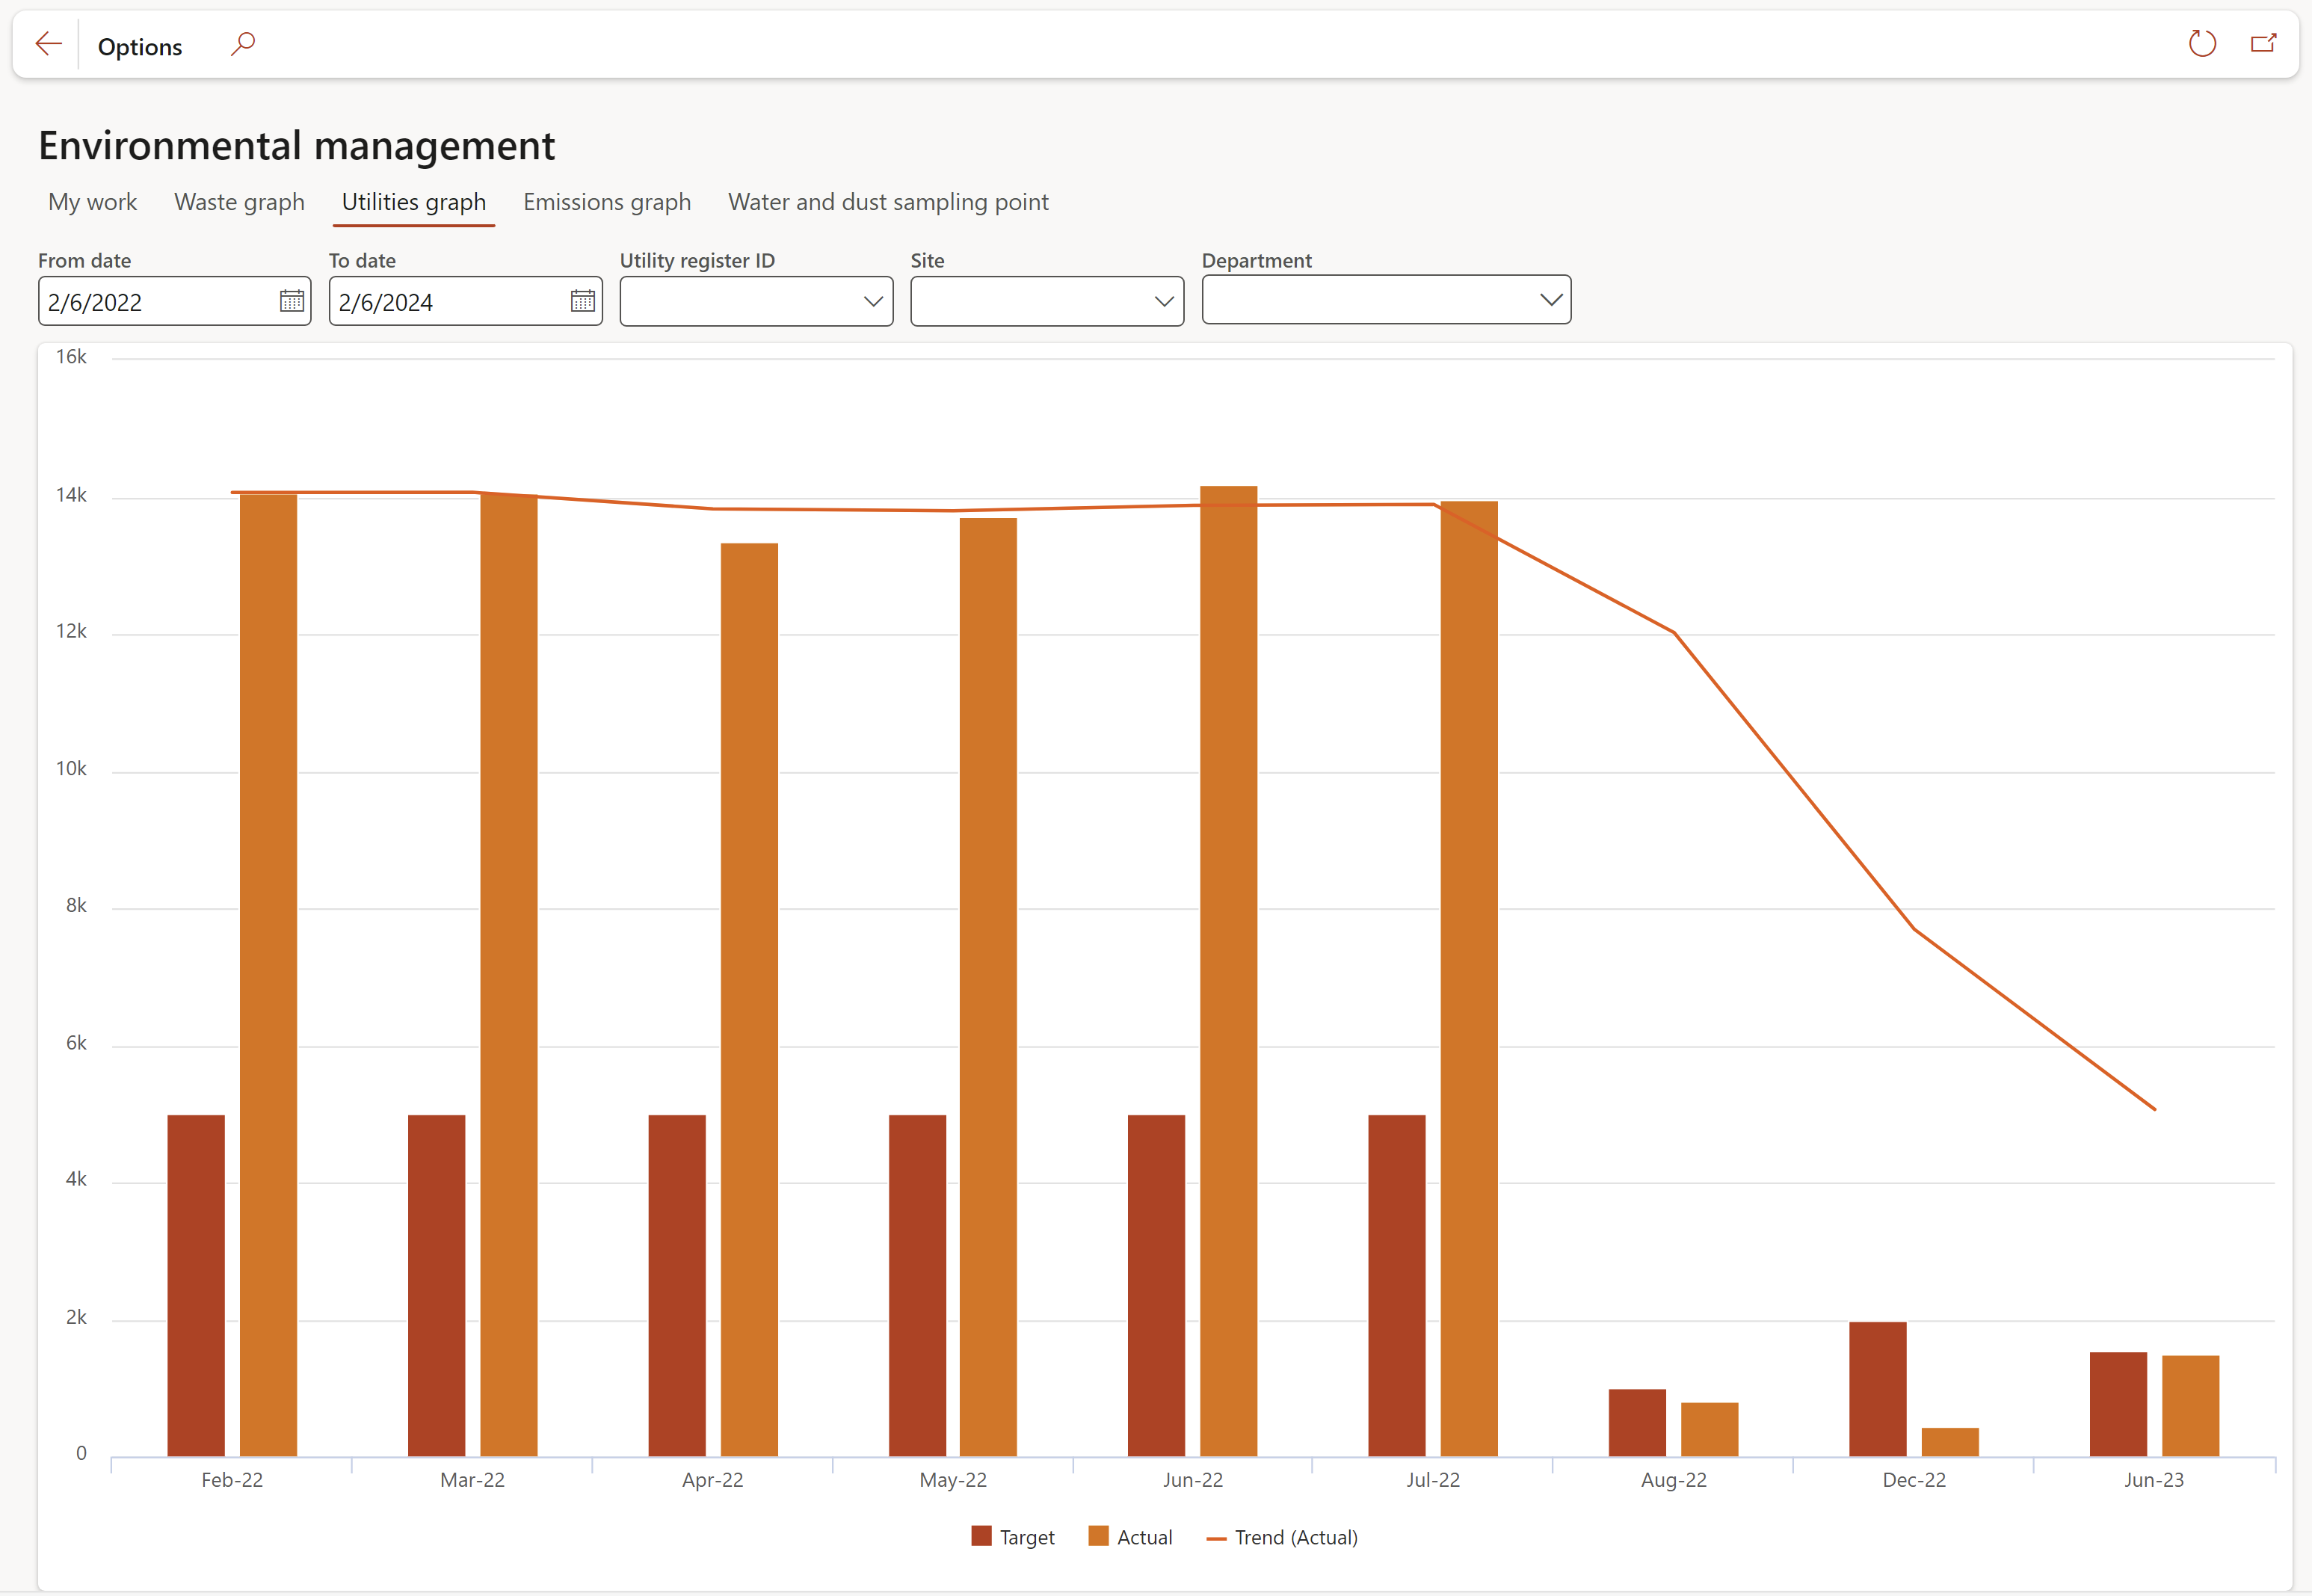
The graph displays the following:
- Target vs Actual vs Trend (actual)
The filters can be used to specify the view
¶ Emissions graph tab
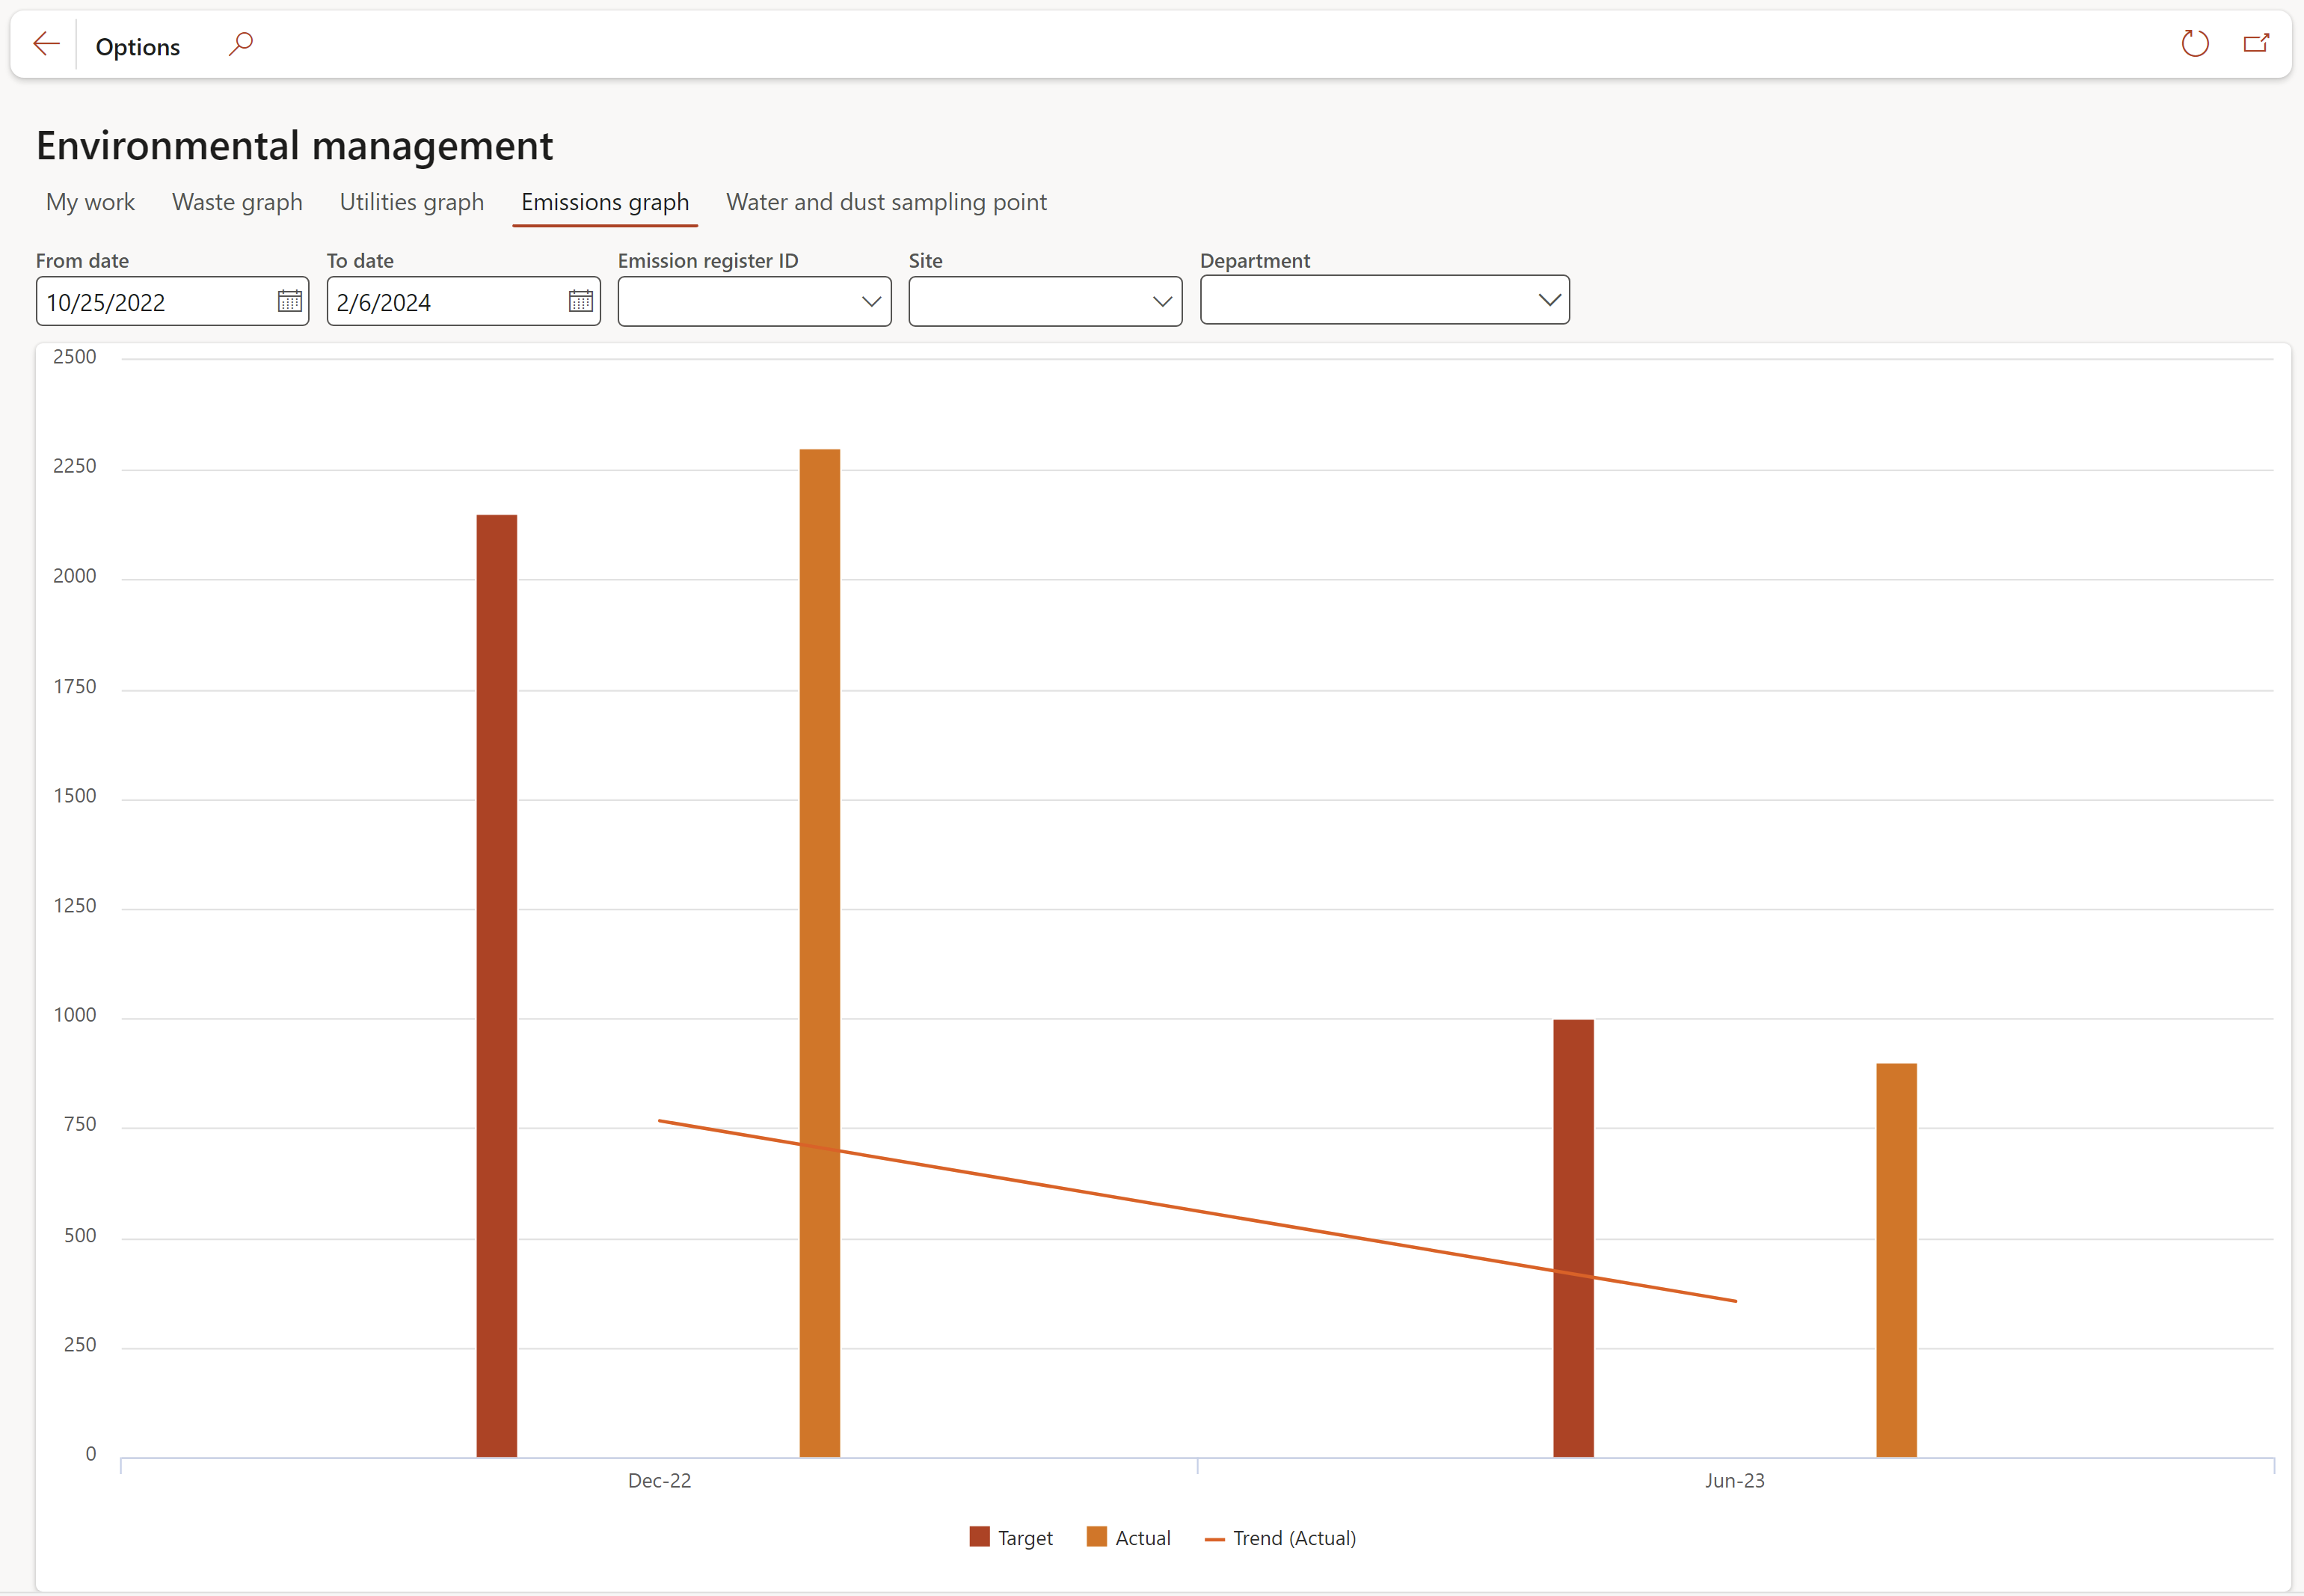
The graph displays the following:
- Target vs Actual vs Trend (actual)
The filters can be used to specify the view
¶ Water and dust sampling point
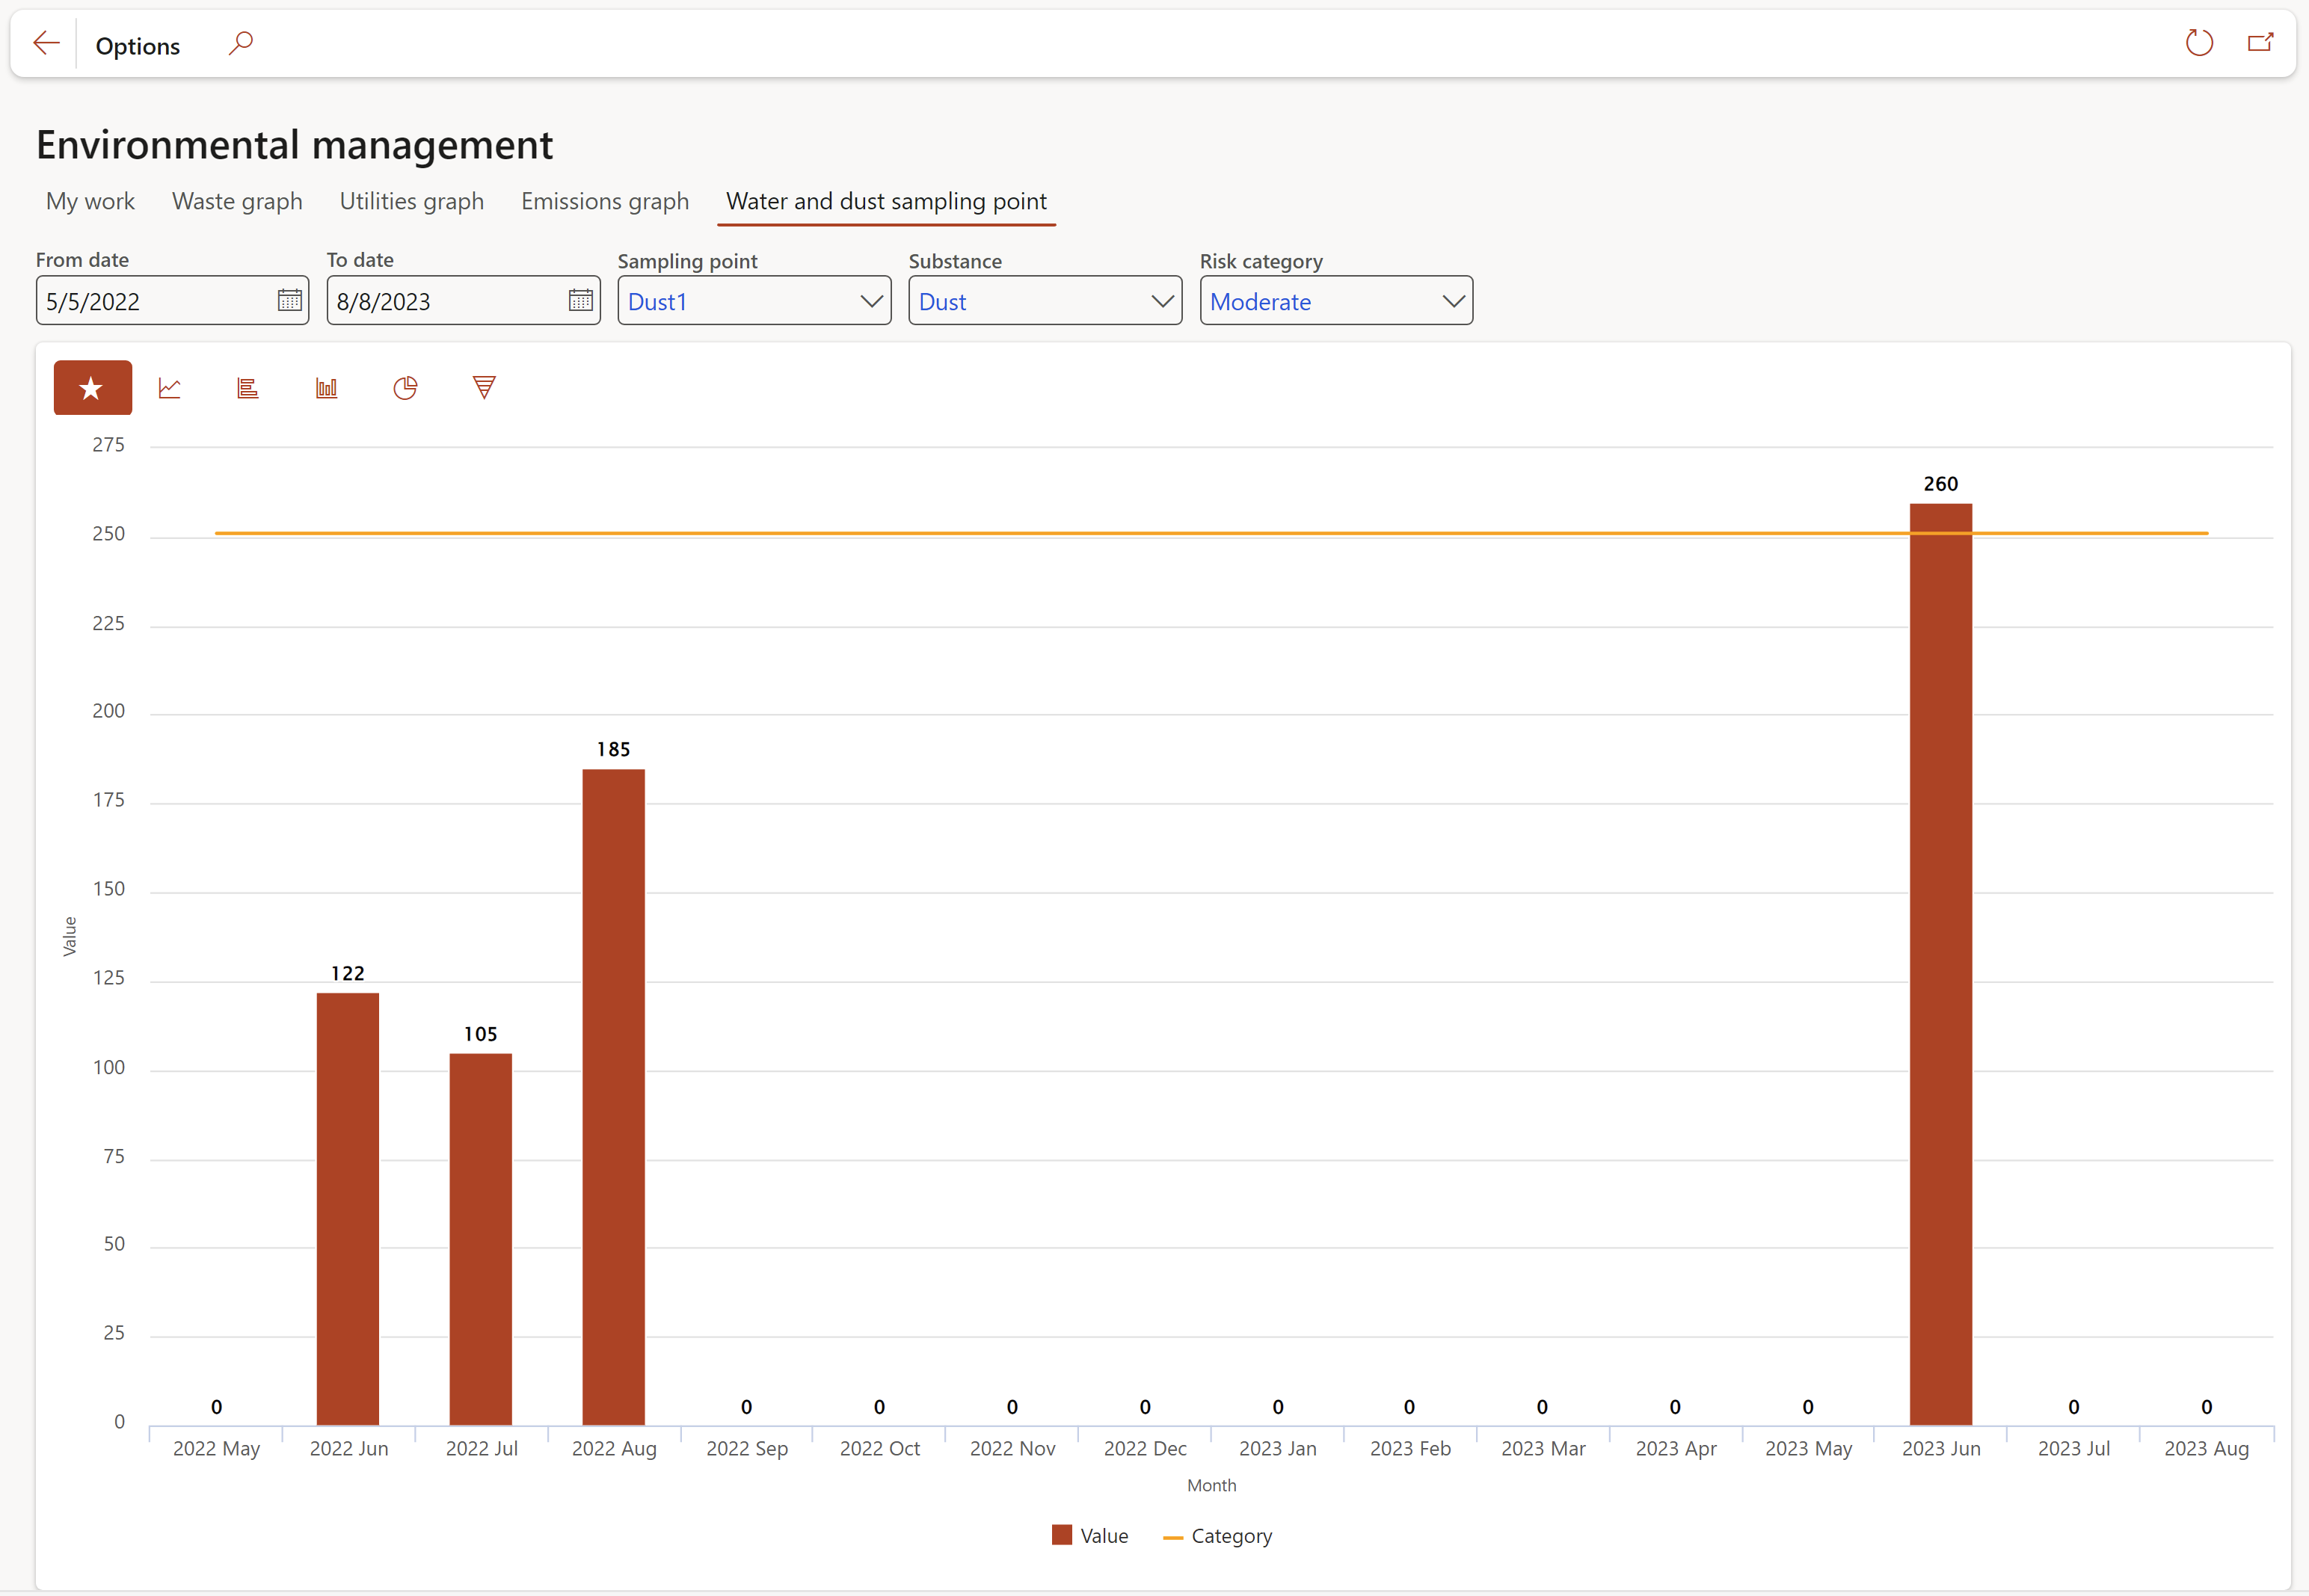
The graph displays the following:
- Value vs Category
The filters can be used to specify the view
¶ Internal audit Workspace
¶ My work tab
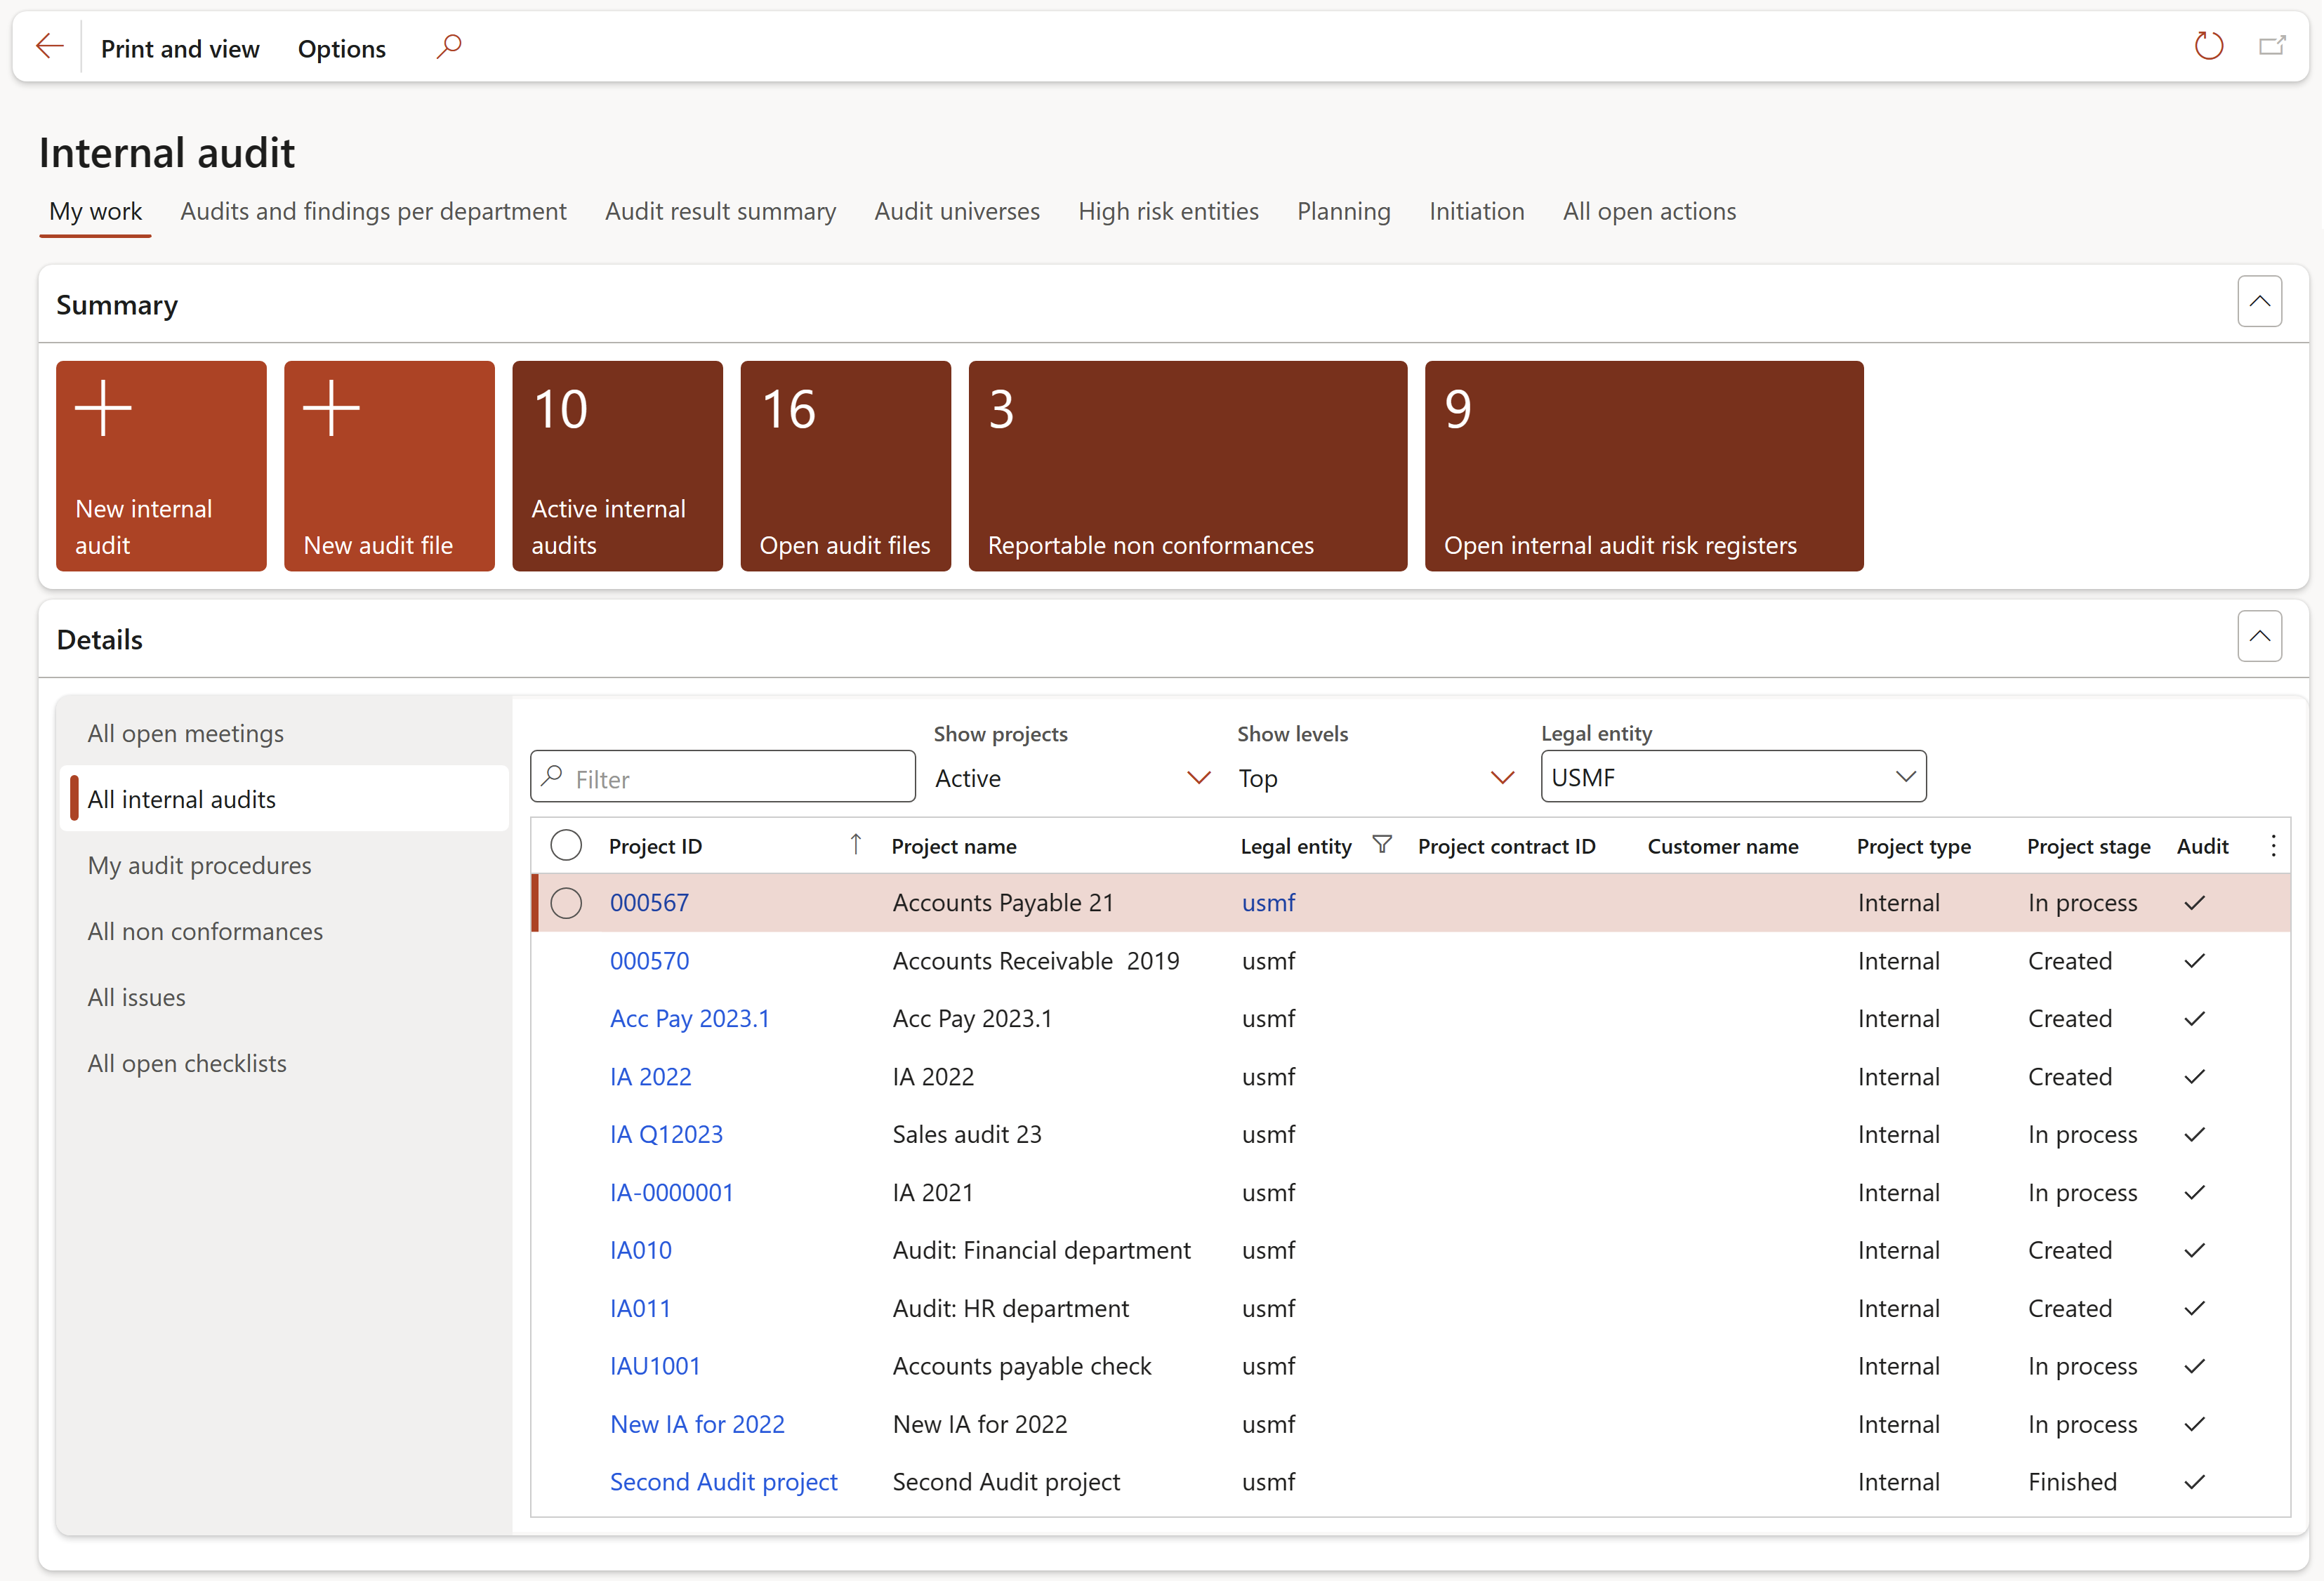
Functions of the Summary tiles:
- New internal audit:
- Opens the New project (audit) dialog from where a new internal audit can be created
- New audit file:
- Opens the Internal audit file detail from where a new internal audit file can be created
- Active internal audits:
- The number on the tile indicates the number of active internal audits
- Clicking on the tile opens the All internal audits list page and only the active internal audits will be displayed
- Open audit files:
- The number on the tile indicates the number of open internal audit files
- Clicking on the tile opens the All internal audit files list page and only the open internal audit files will be displayed
- Reportable non conformances:
- The number on the tile indicates the number of reportable non conformances
- Clicking on the tile opens the Non conformances list page and only the reportable non conformances will be displayed
- Open internal audit risk registers:
- The number on the tile indicates the number of open internal audit risk registers
- Clicking on the tile opens the Open internal audit risk registers list page and only the open internal audit risk registers will be displayed
Functions of the Detail tabs:
- All open meetings: Displays all open audit meetings
- All internal audits: Displays all internal audits
- My audit procedures: Displays all audit procedures created from the RCM and assigned to the loggedin user
- All non conformances: Displays all internal audit non conformances
- All issues: Displays all internal audit issues
- All open checklists: Displays all open checklists. Feedback on checklists can be done by clicking on the Feedback button in the Button strip.
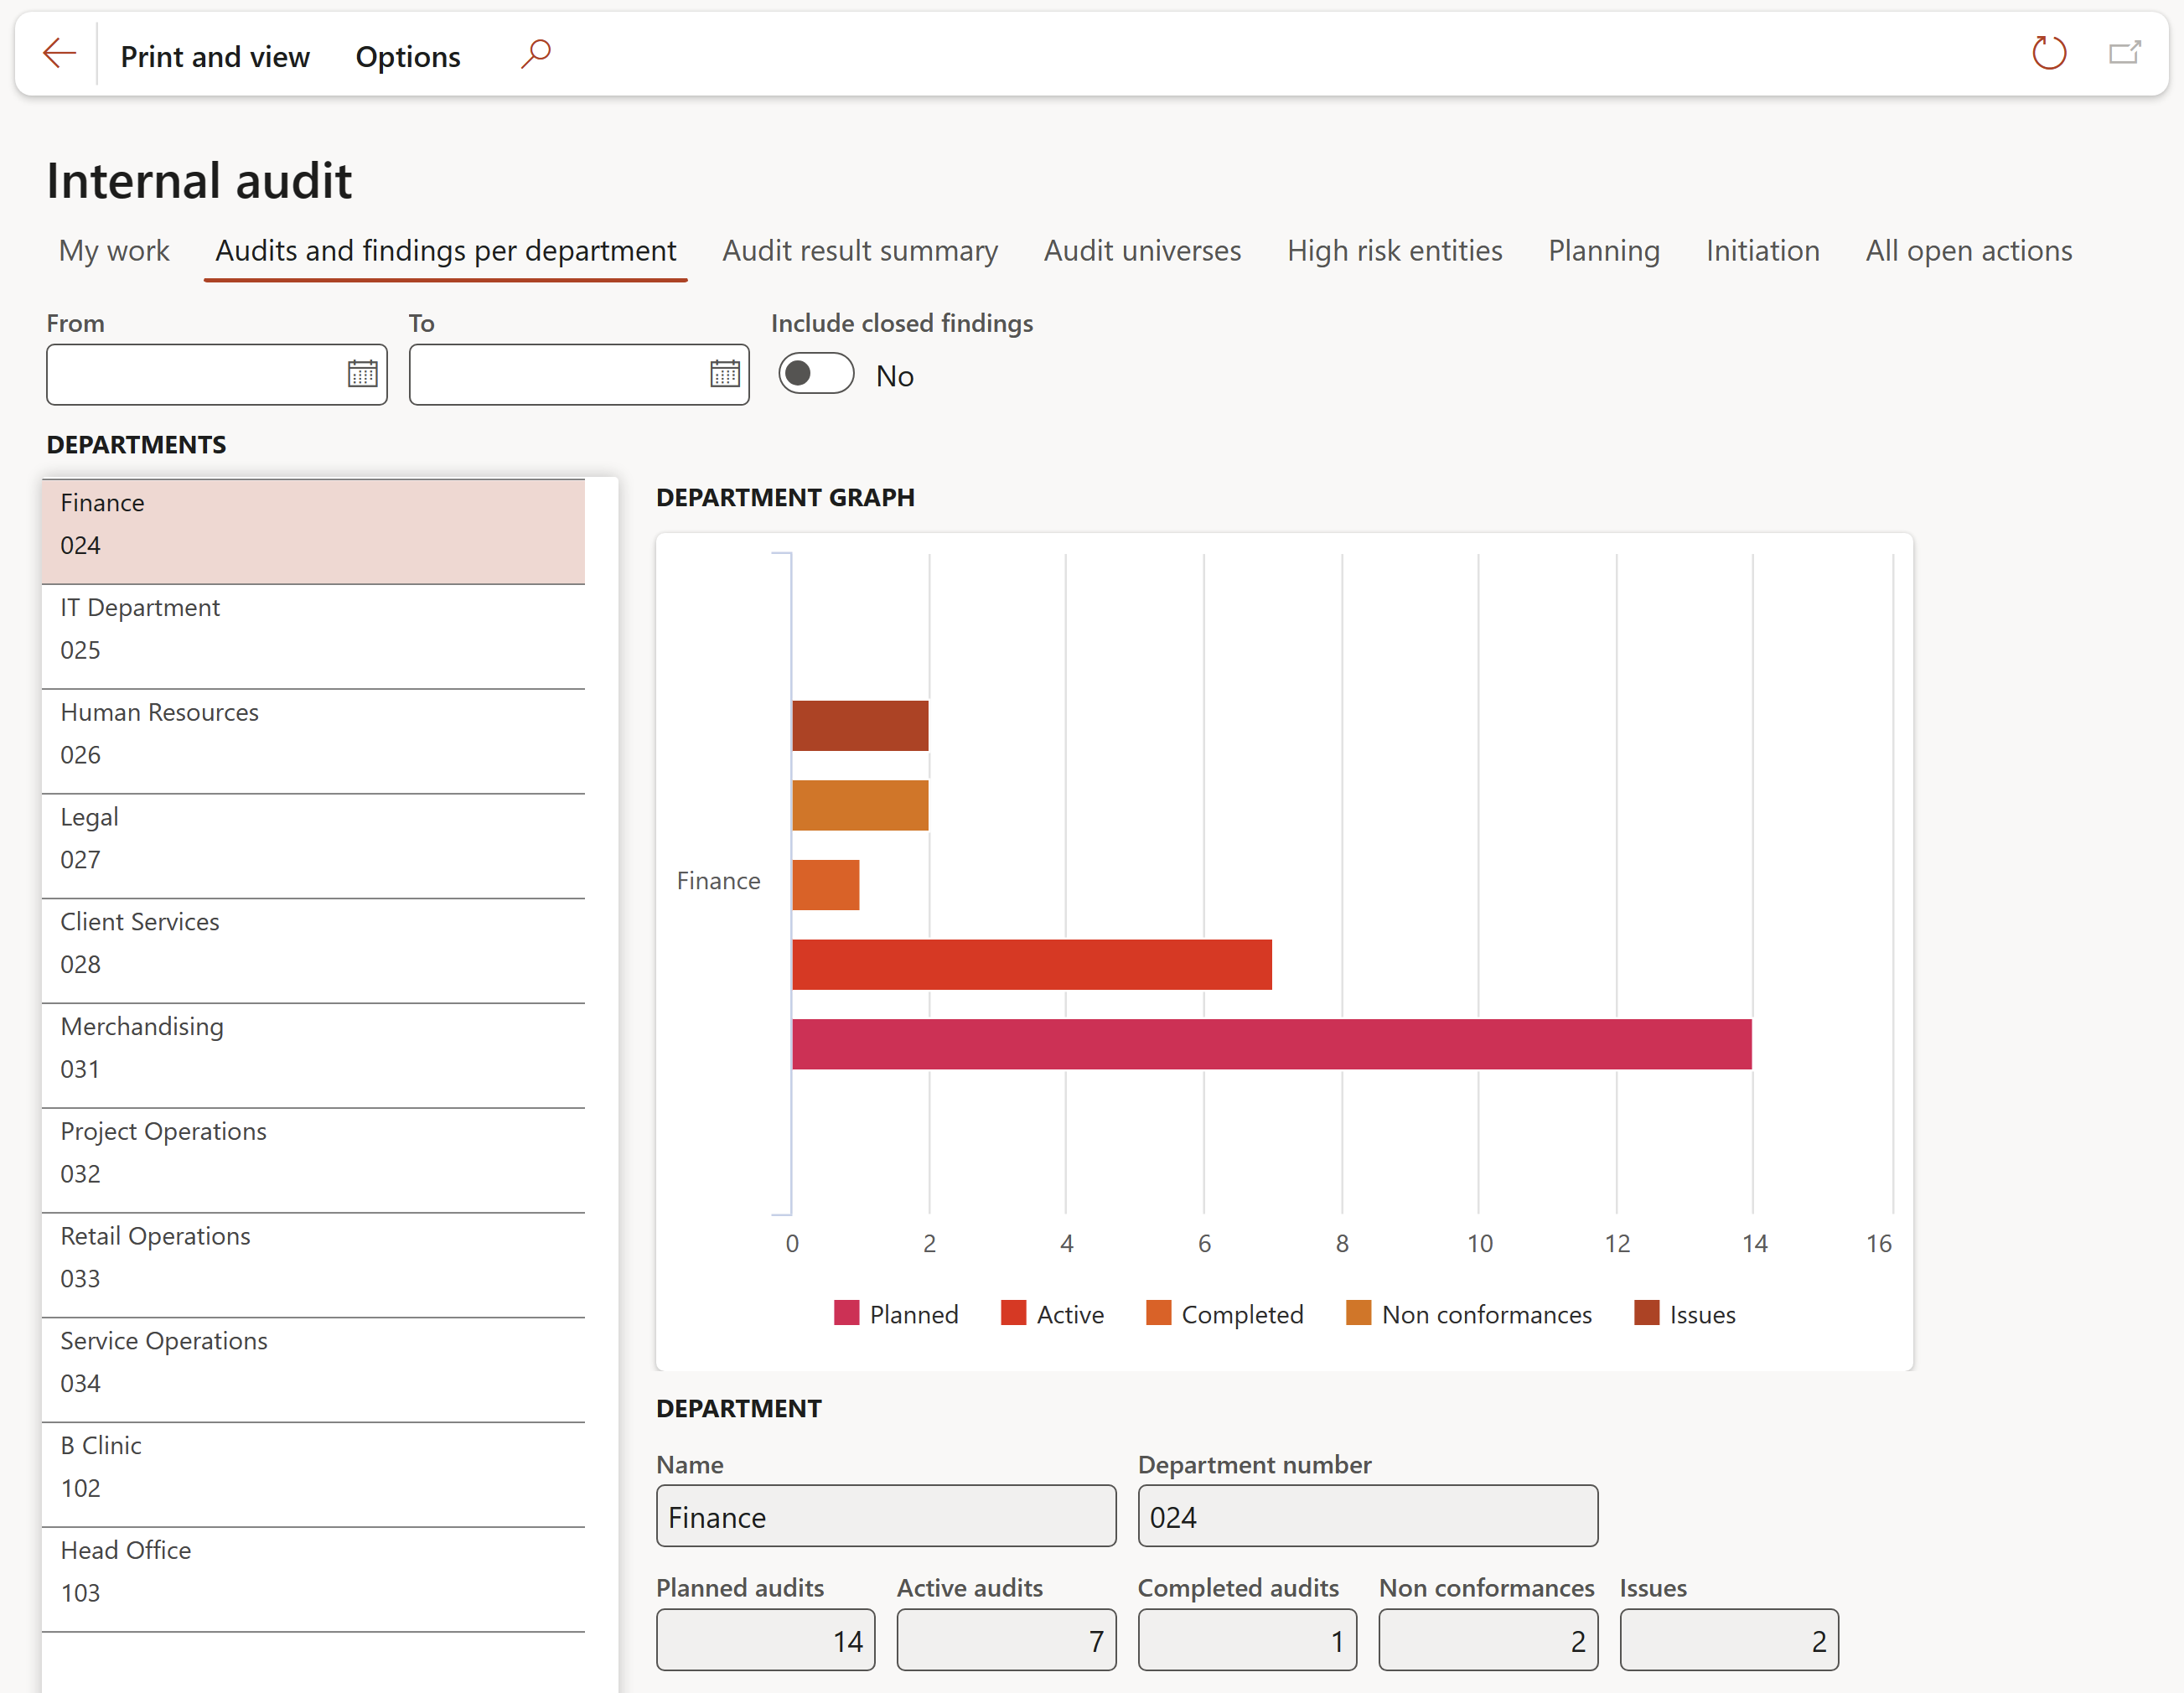
¶ Audits and findings per department tab
¶ Audit result summary tab

This inquiry displays the number of non conformances by category per department.
¶ Audit universes tab

Displays the Audit universe list page, from where the relevant Audit universe can be selected
¶ High risk entities tab

The filters can be used to display only records for a specific inherent risk level
¶ Planning tab
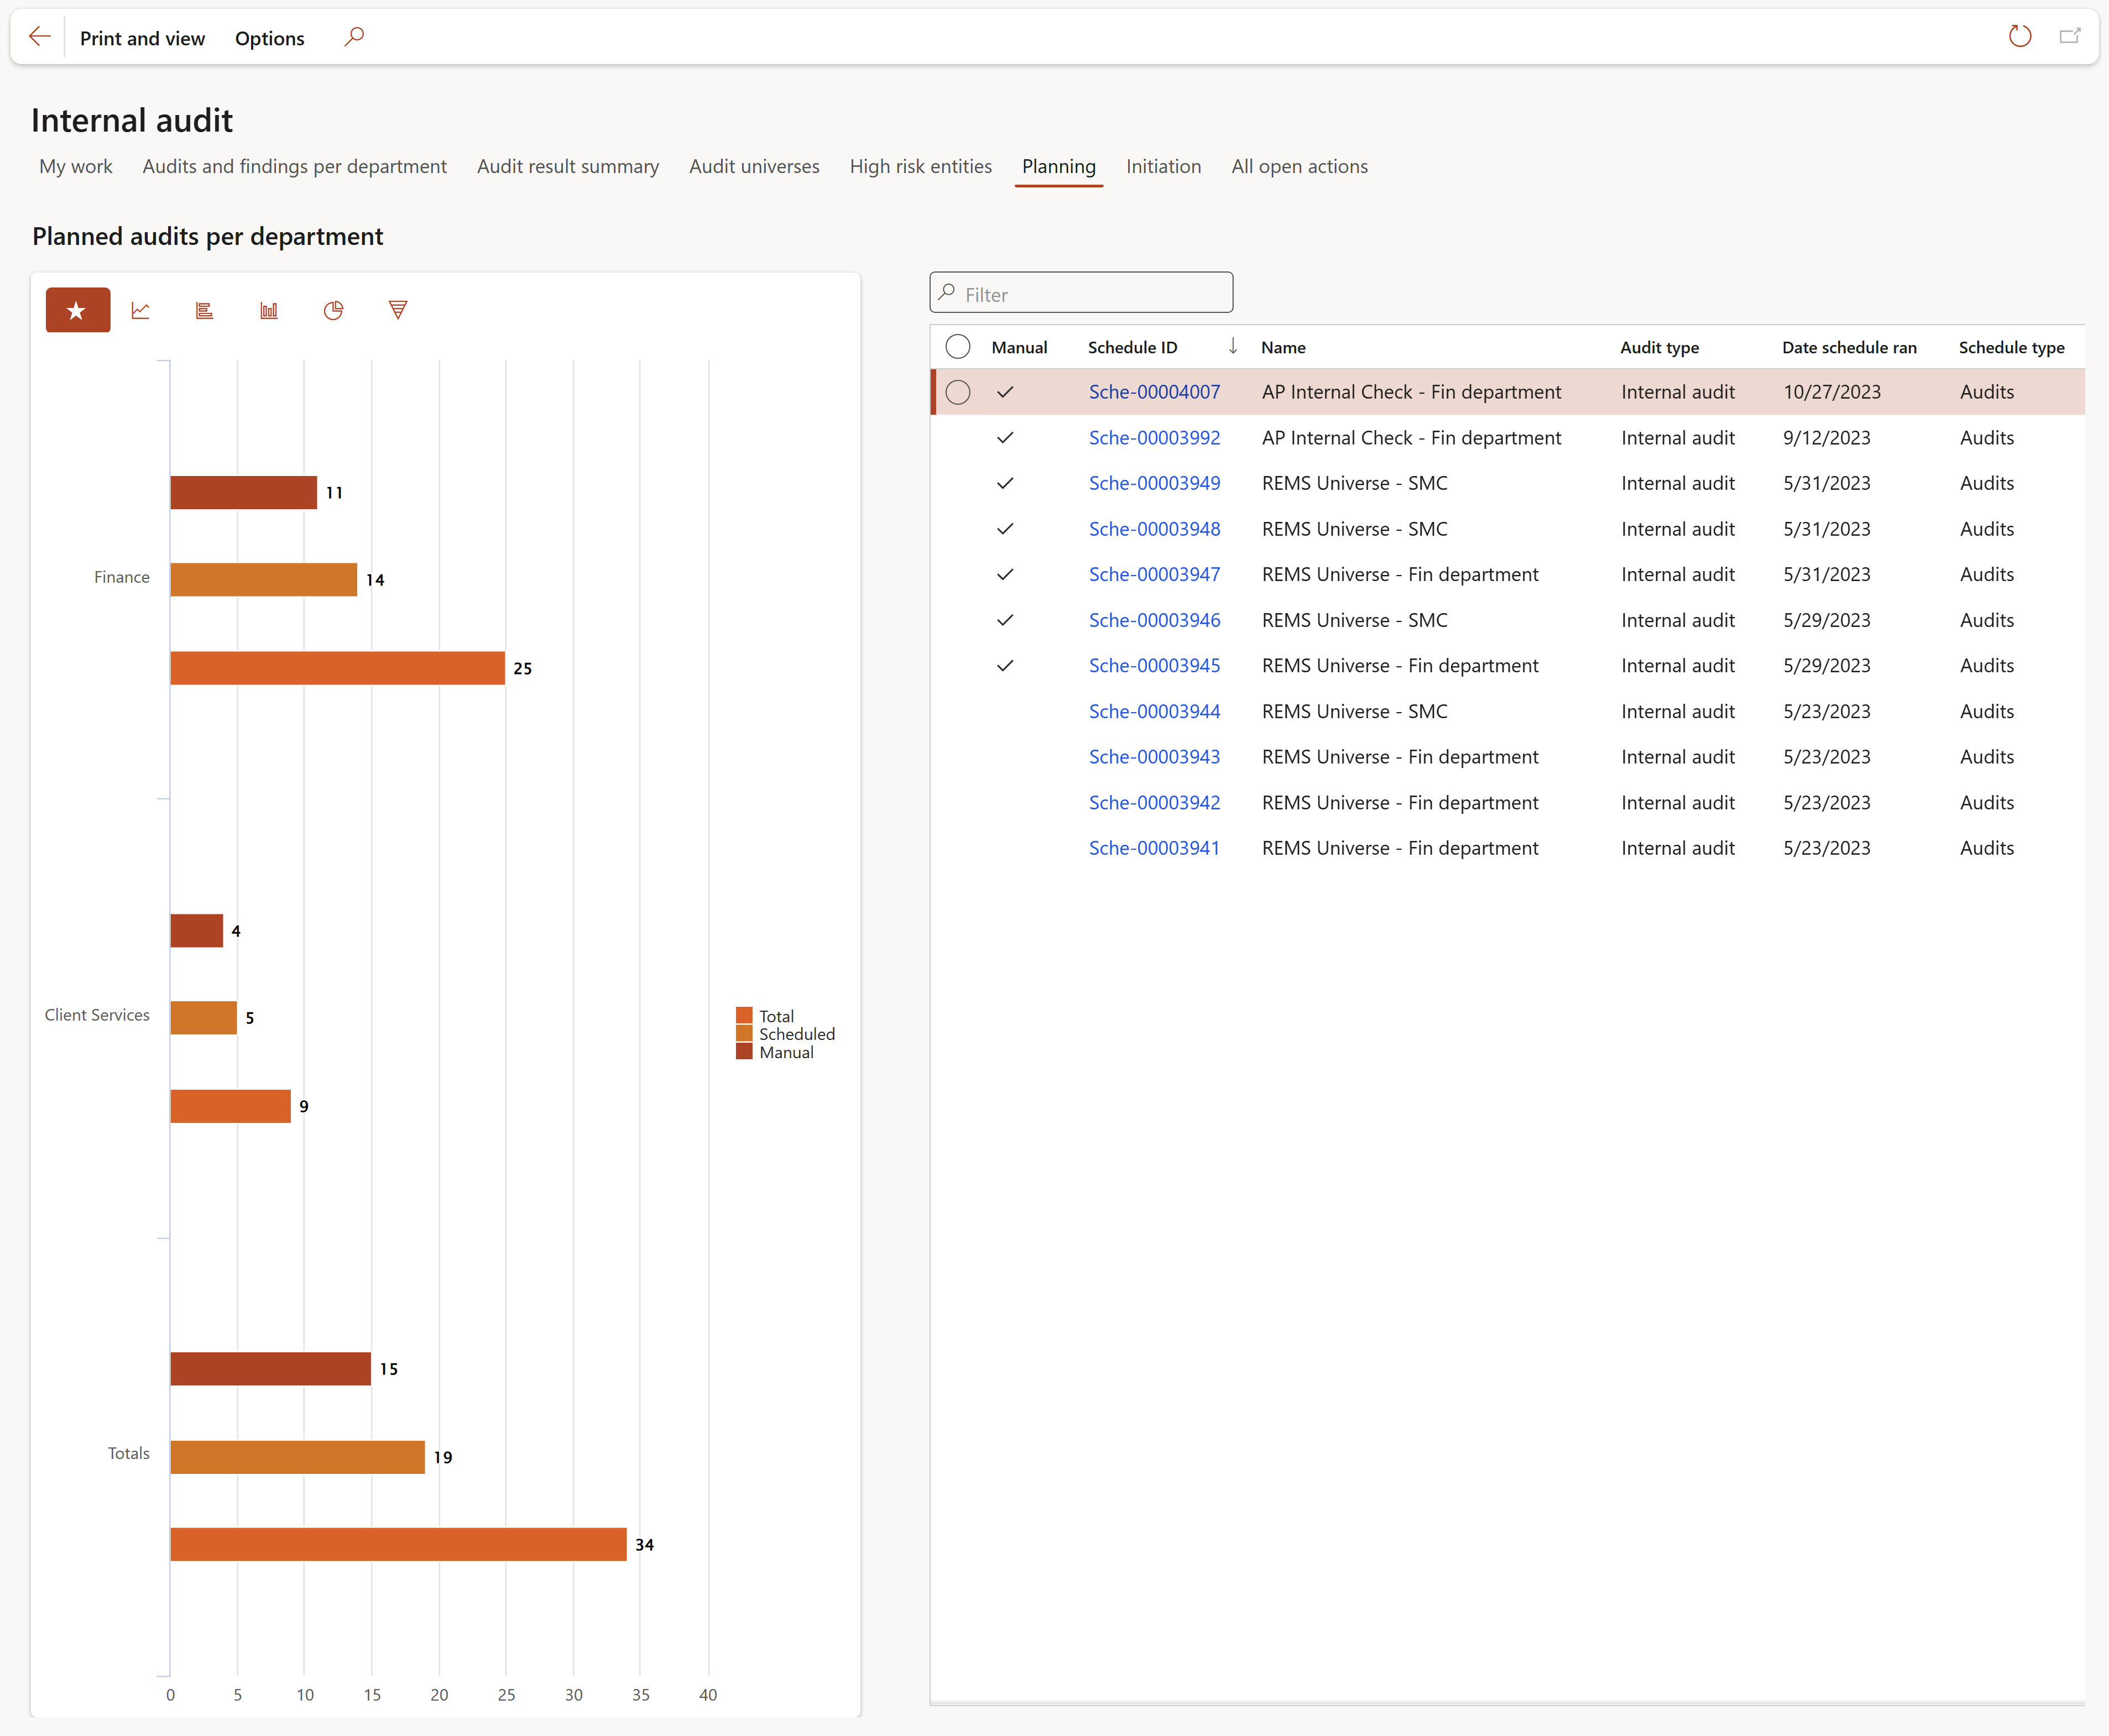
Displays all scheduled Internal audits
The Audit plan (Not approved) report, can be printed from the workspace
¶ Initiation tab

Displays all Internal audits (projects)
The following filters can be applied:
- Show projects: All or Active
- Show levels: All or Top
- Legal entity
¶ All open actions tab
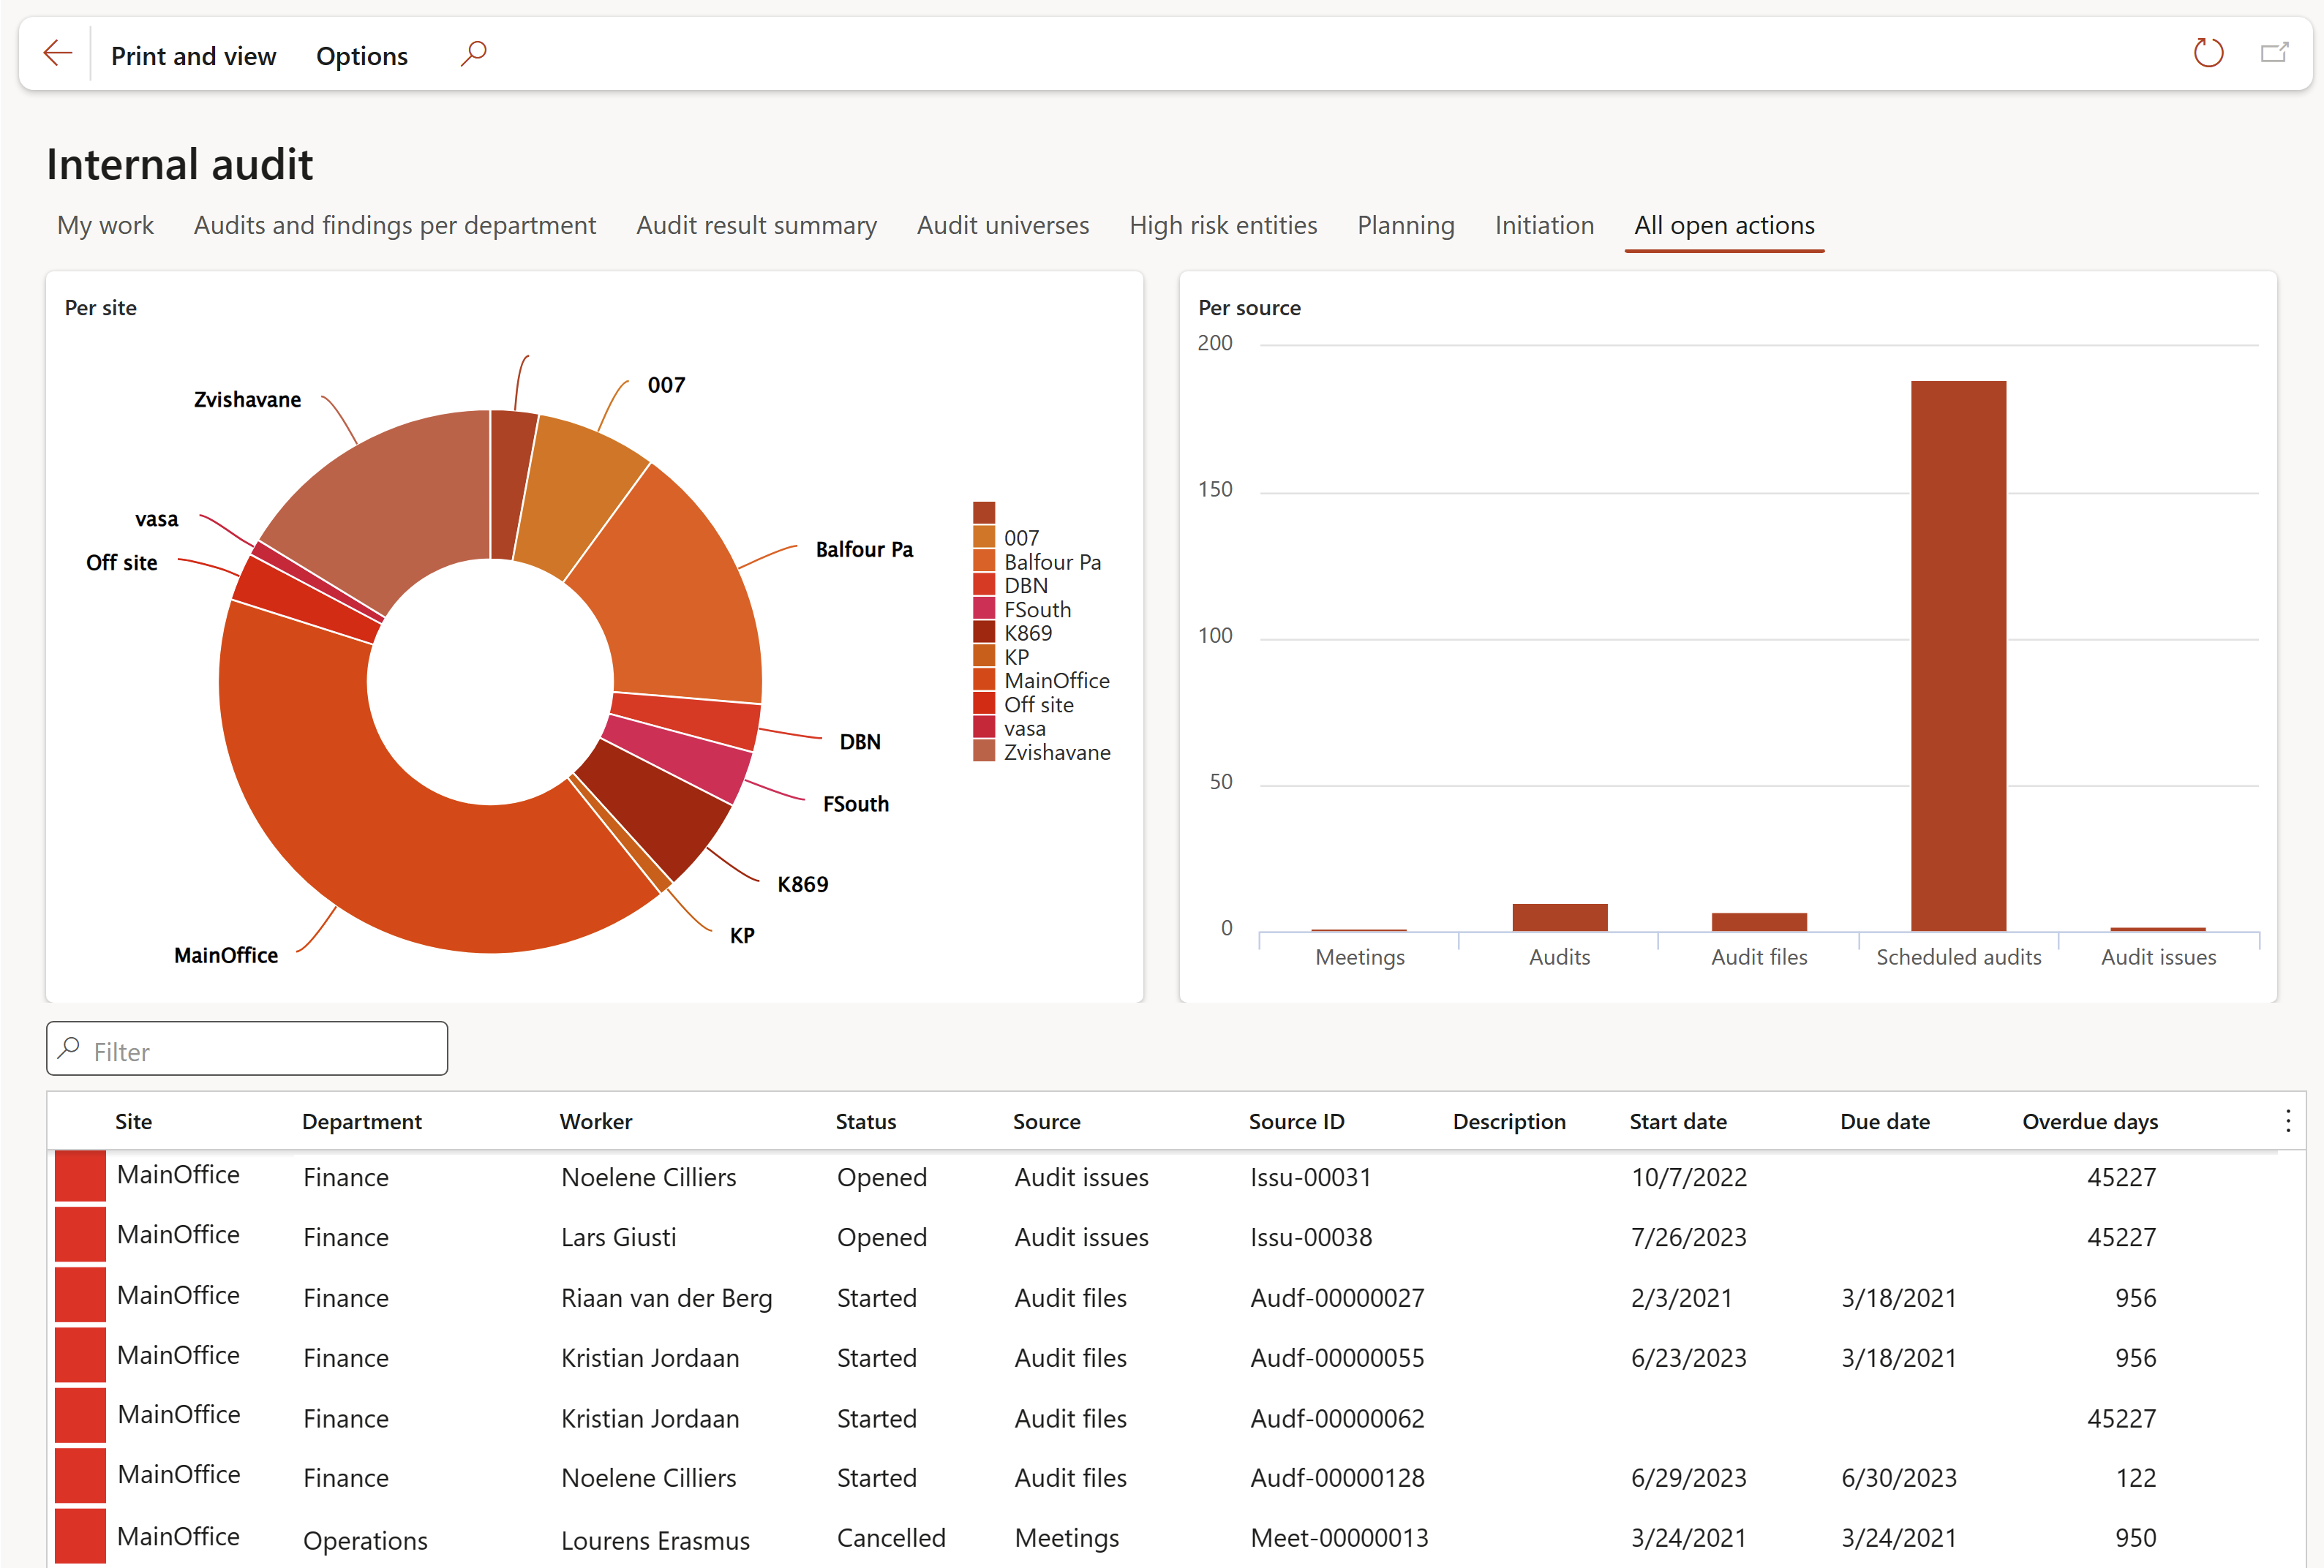
The charts:
- Per site: Displays the percentages of open actions per site
- Per source: Displays the percentages of open actions per source
The grid displays all open actions
¶ Legal, Contracts and Tender management Workspace
¶ About to expire tab
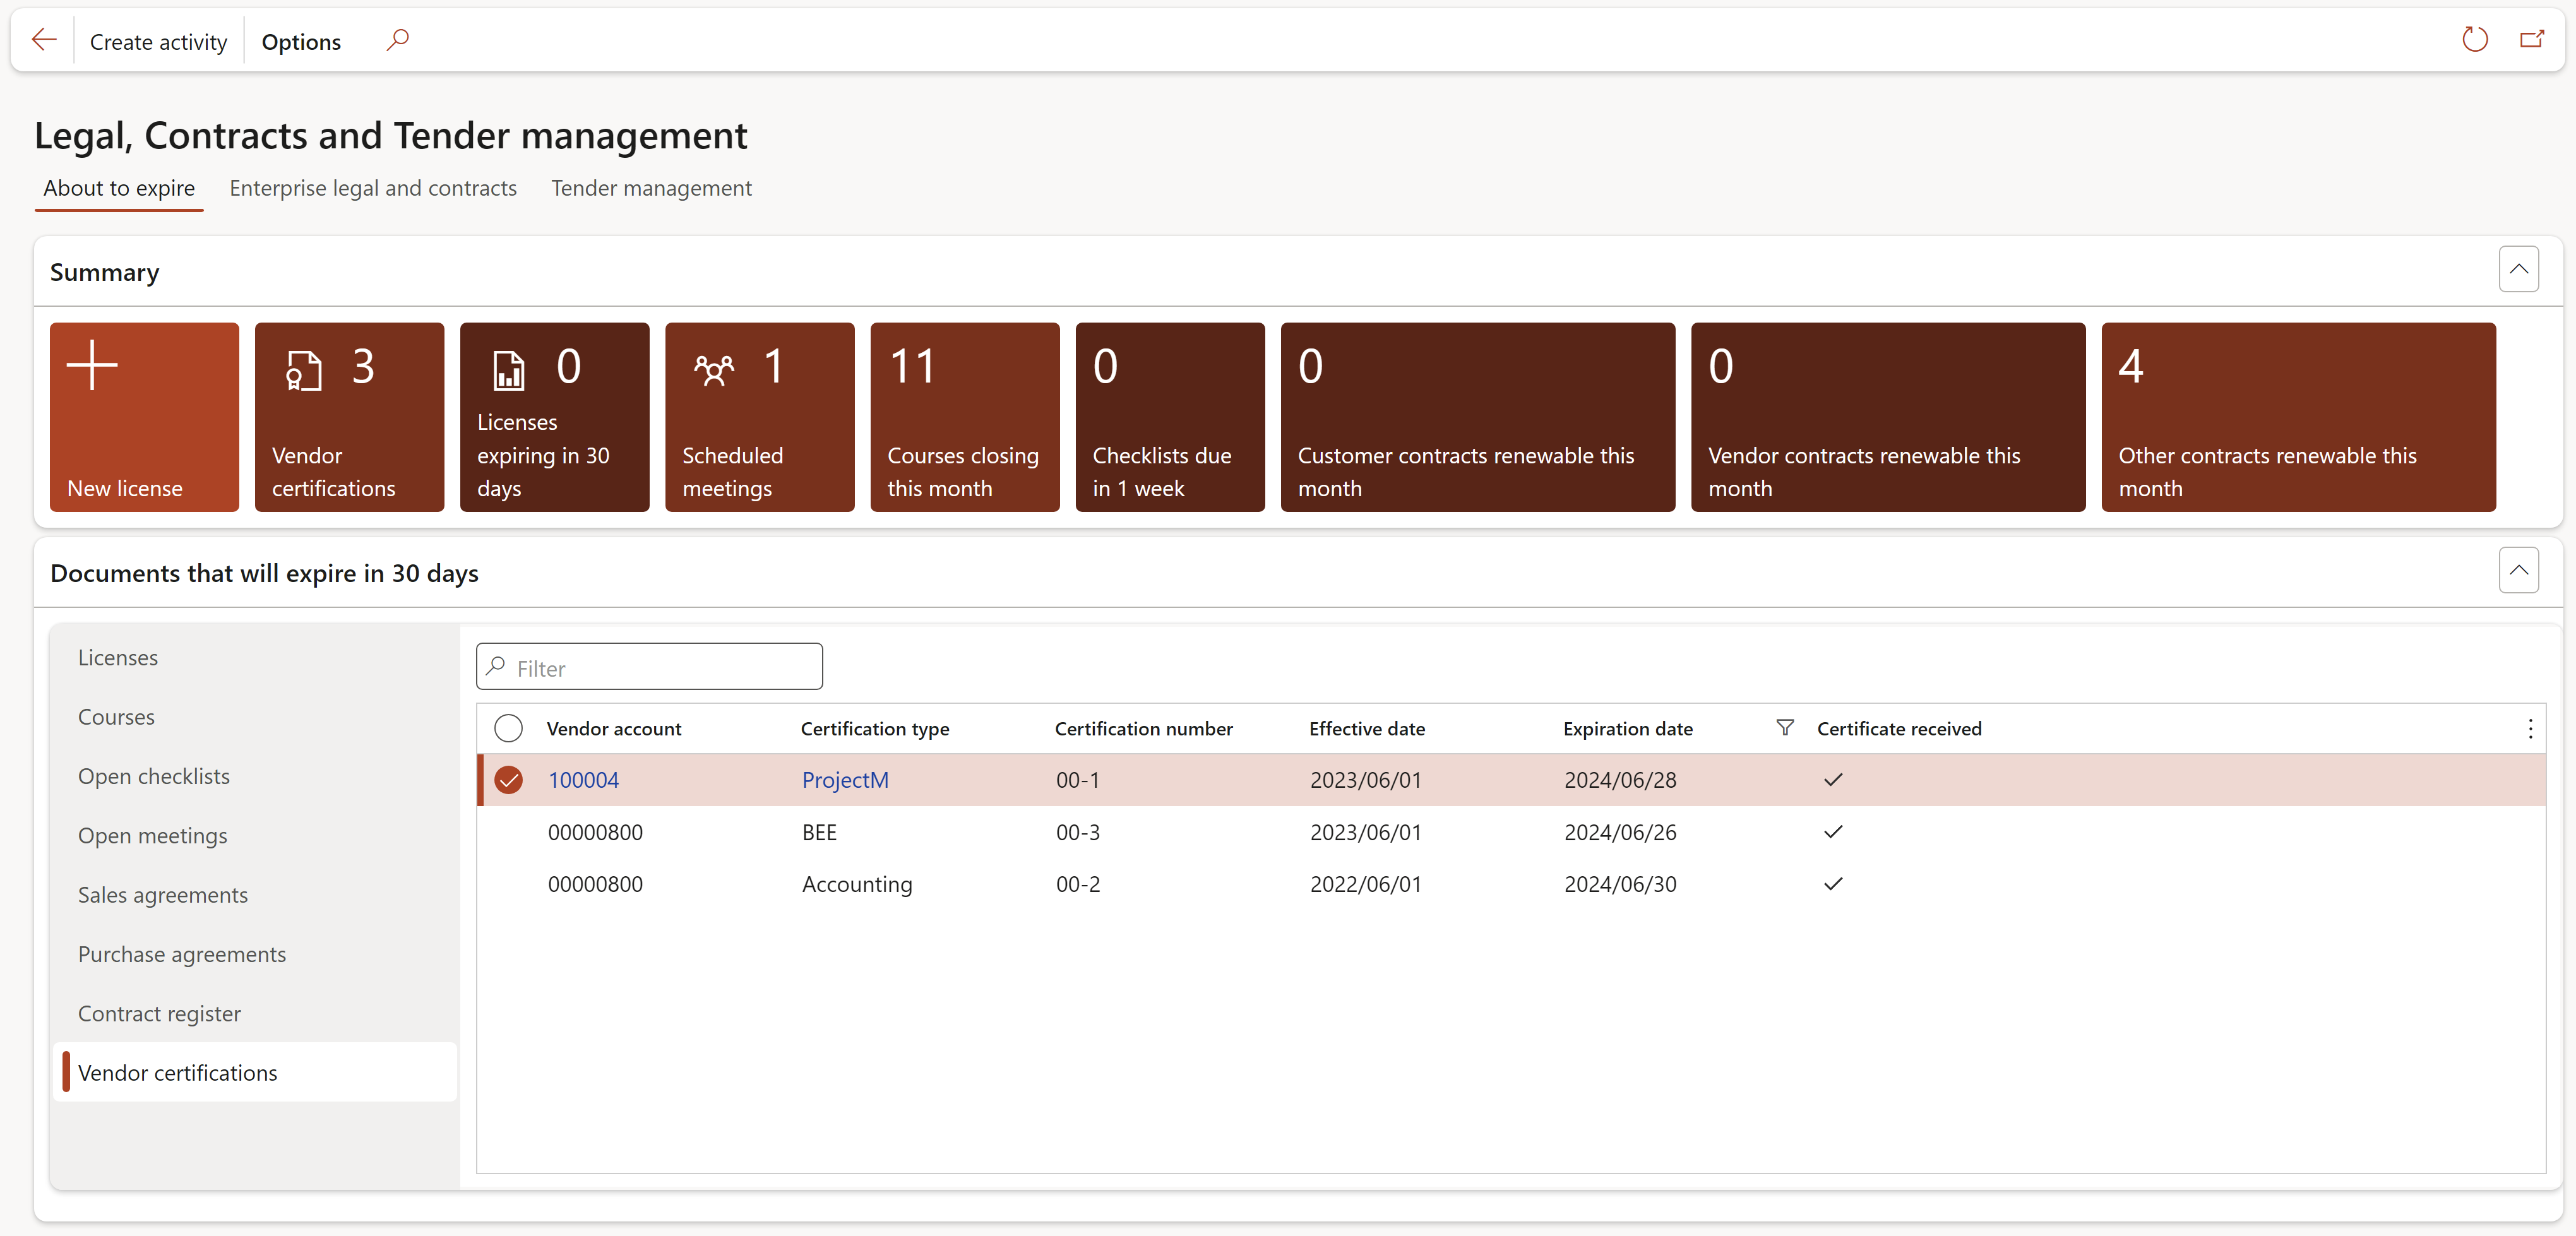
Functions of the Summary tiles:
- New license:
- Opens the New license dialog from where a new license can be created
- Vendor certifications:
- The number on the tile indicates the number of vendor certificates that will expire in 30 days from the current date
- Clicking on the tile opens up a list of all vendor certificates that will expire in 30 days from the current date
- Licenses expiring in 30 days:
- The number on the tile indicates the number of licenses that will expire in 30 days from the current date (If the status is not Expired)
- Clicking on the tile opens up a list of licenses that will expire in 30 days from the current date (If the status is not Expired)
- Scheduled meetings:
- The number on the tile indicates the number of scheduled meetings
- Clicking on the tile opens the All open scheduled meetings list page
- Courses closing this month:
- The number on the tile indicates the number of courses closing in the current month
- Clicking on the tile opens the Courses list page and only the courses that will be closing in the current month are displayed
- Checklists due in 1 week:
- The number on the tile indicates the number of checklists that are due in 1 week from the current date
- Clicking on the tile opens the All checklists list page and only the checklists that are due are displayed
- Customer contracts renewable this month:
- The number on the tile indicates the number of Customer contracts that are up for renewal in the current month
- Clicking on the tile opens the Sales agreements list page and only the contracts/sales agreements that are up for renewal in this month are displayed
- Vendor contracts renewable this month:
- The number on the tile indicates the number of Vendor contracts that are up for renewal in the current month
- Clicking on the tile opens the Purchase agreements list page and only the contracts/purchase agreements that are up for renewal in the current month, are displayed
- Other contracts renewable this month:
- The number on the tile indicates the number of other contracts that are up for renewal in the current month
- Clicking on the tile opens the Policies, contracts and reports list page and only the records that are up for renewal in the current month, are displayed
Functions of the Documents that will expire in 30 days tabs:
- Licenses: Displays all recorded licenses that will expire in 30 days
- Courses: Displays all recorded courses that will expire in 30 days
- Open checklists: Displays all open checklists that will expire in 30 days
- Open meetings: Displays all open meetings that will expire in 30 days
- Sales agreements: Displays all recorded sales agreements that will expire in 30 days
- Purchase agreements: Displays all recorded purchase agreements that will expire in 30 days
- Contract register: Has an additional filter for Document type
- Vendor certifications: Displays all vendor certificates that will expire in 30 days
- Open tender events: Displays all open tender events that will expire in 30 days
¶ Enterprise legal tab
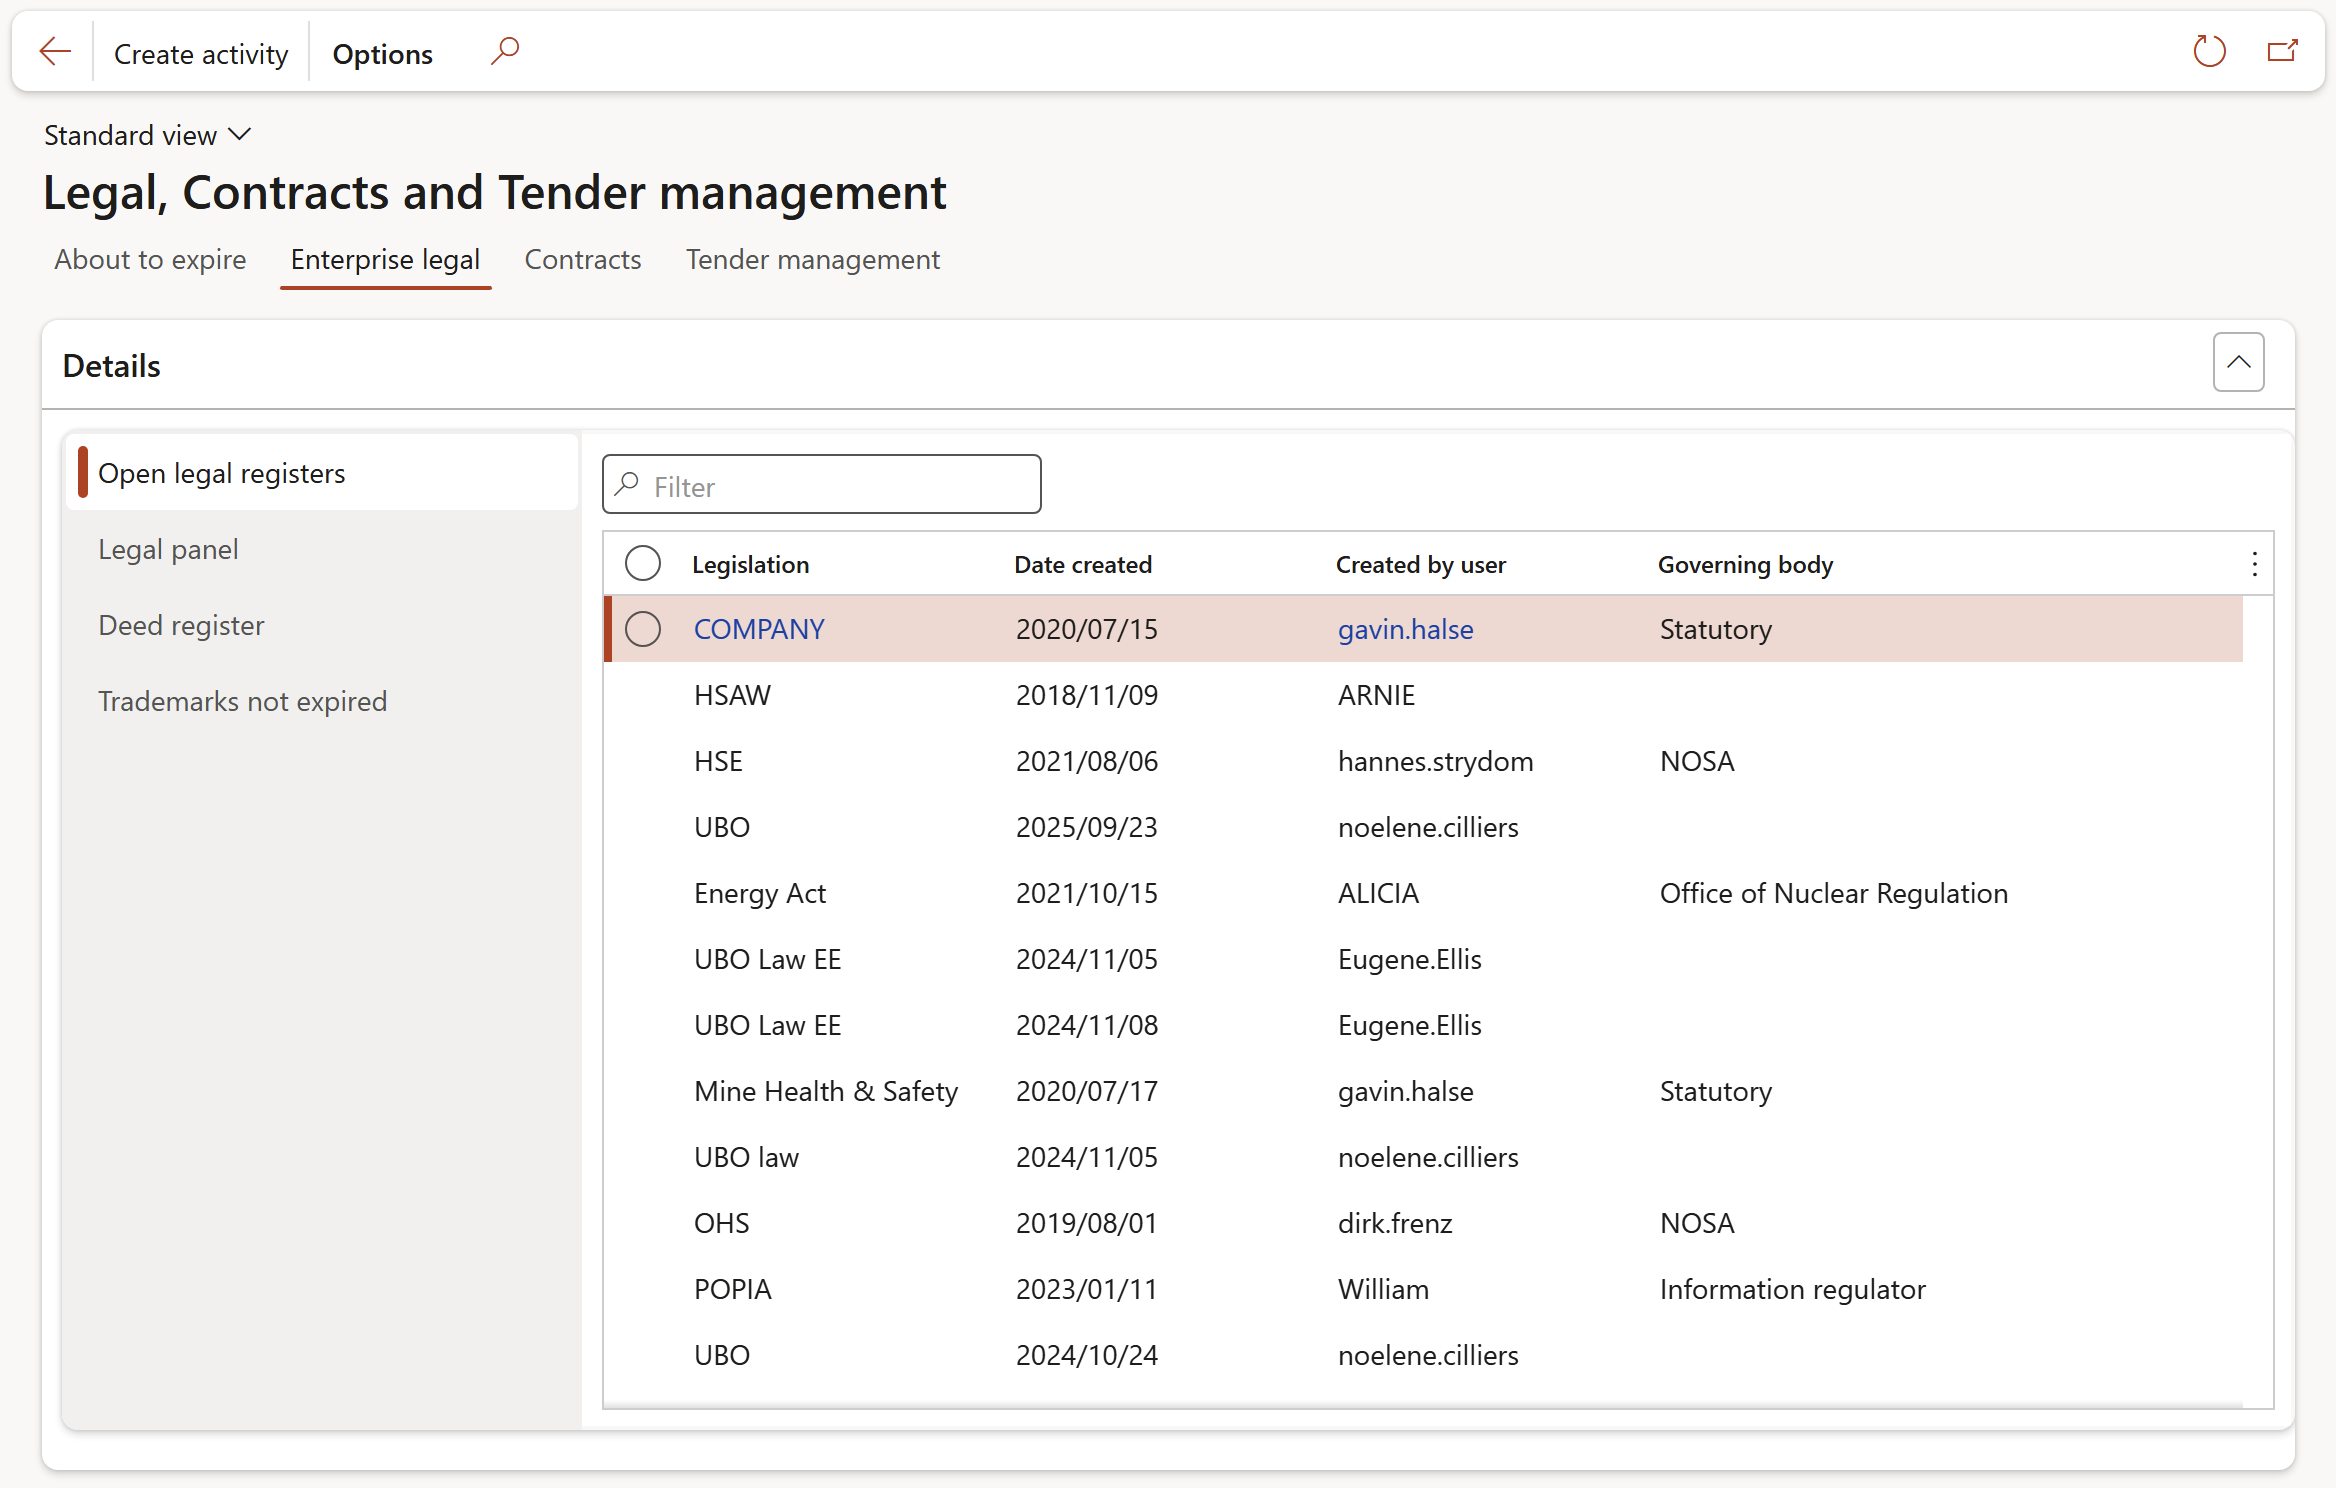
Functions of the Summary tiles:
- New self-assessment:
- Opens the New self-assessment dialog for creating a self-assessment
- New rights register:
- Opens the New rights register dialog for creating a rights register
- Shareholders:
- Opens the Shareholder register
- Executives:
- Opens the Executives register
- Non executives:
- Opens the Non executives register
- Title deeds:
- Opens the Deeds register
Functions of the Details tabs:
- Open legal registers: Displays all open legal registers
- Legal panel: Displays all recorded Legal panels
- Deed register: Displays all recorded Deed registers
- Trademarks not expired: Displays all recorded Trademarks that have not expired
- Shareholder register: Displays the Shareholder register
- Board of directors: Displays a list of the directors
- Rights register: Displays the rights register
¶ Contracts tab
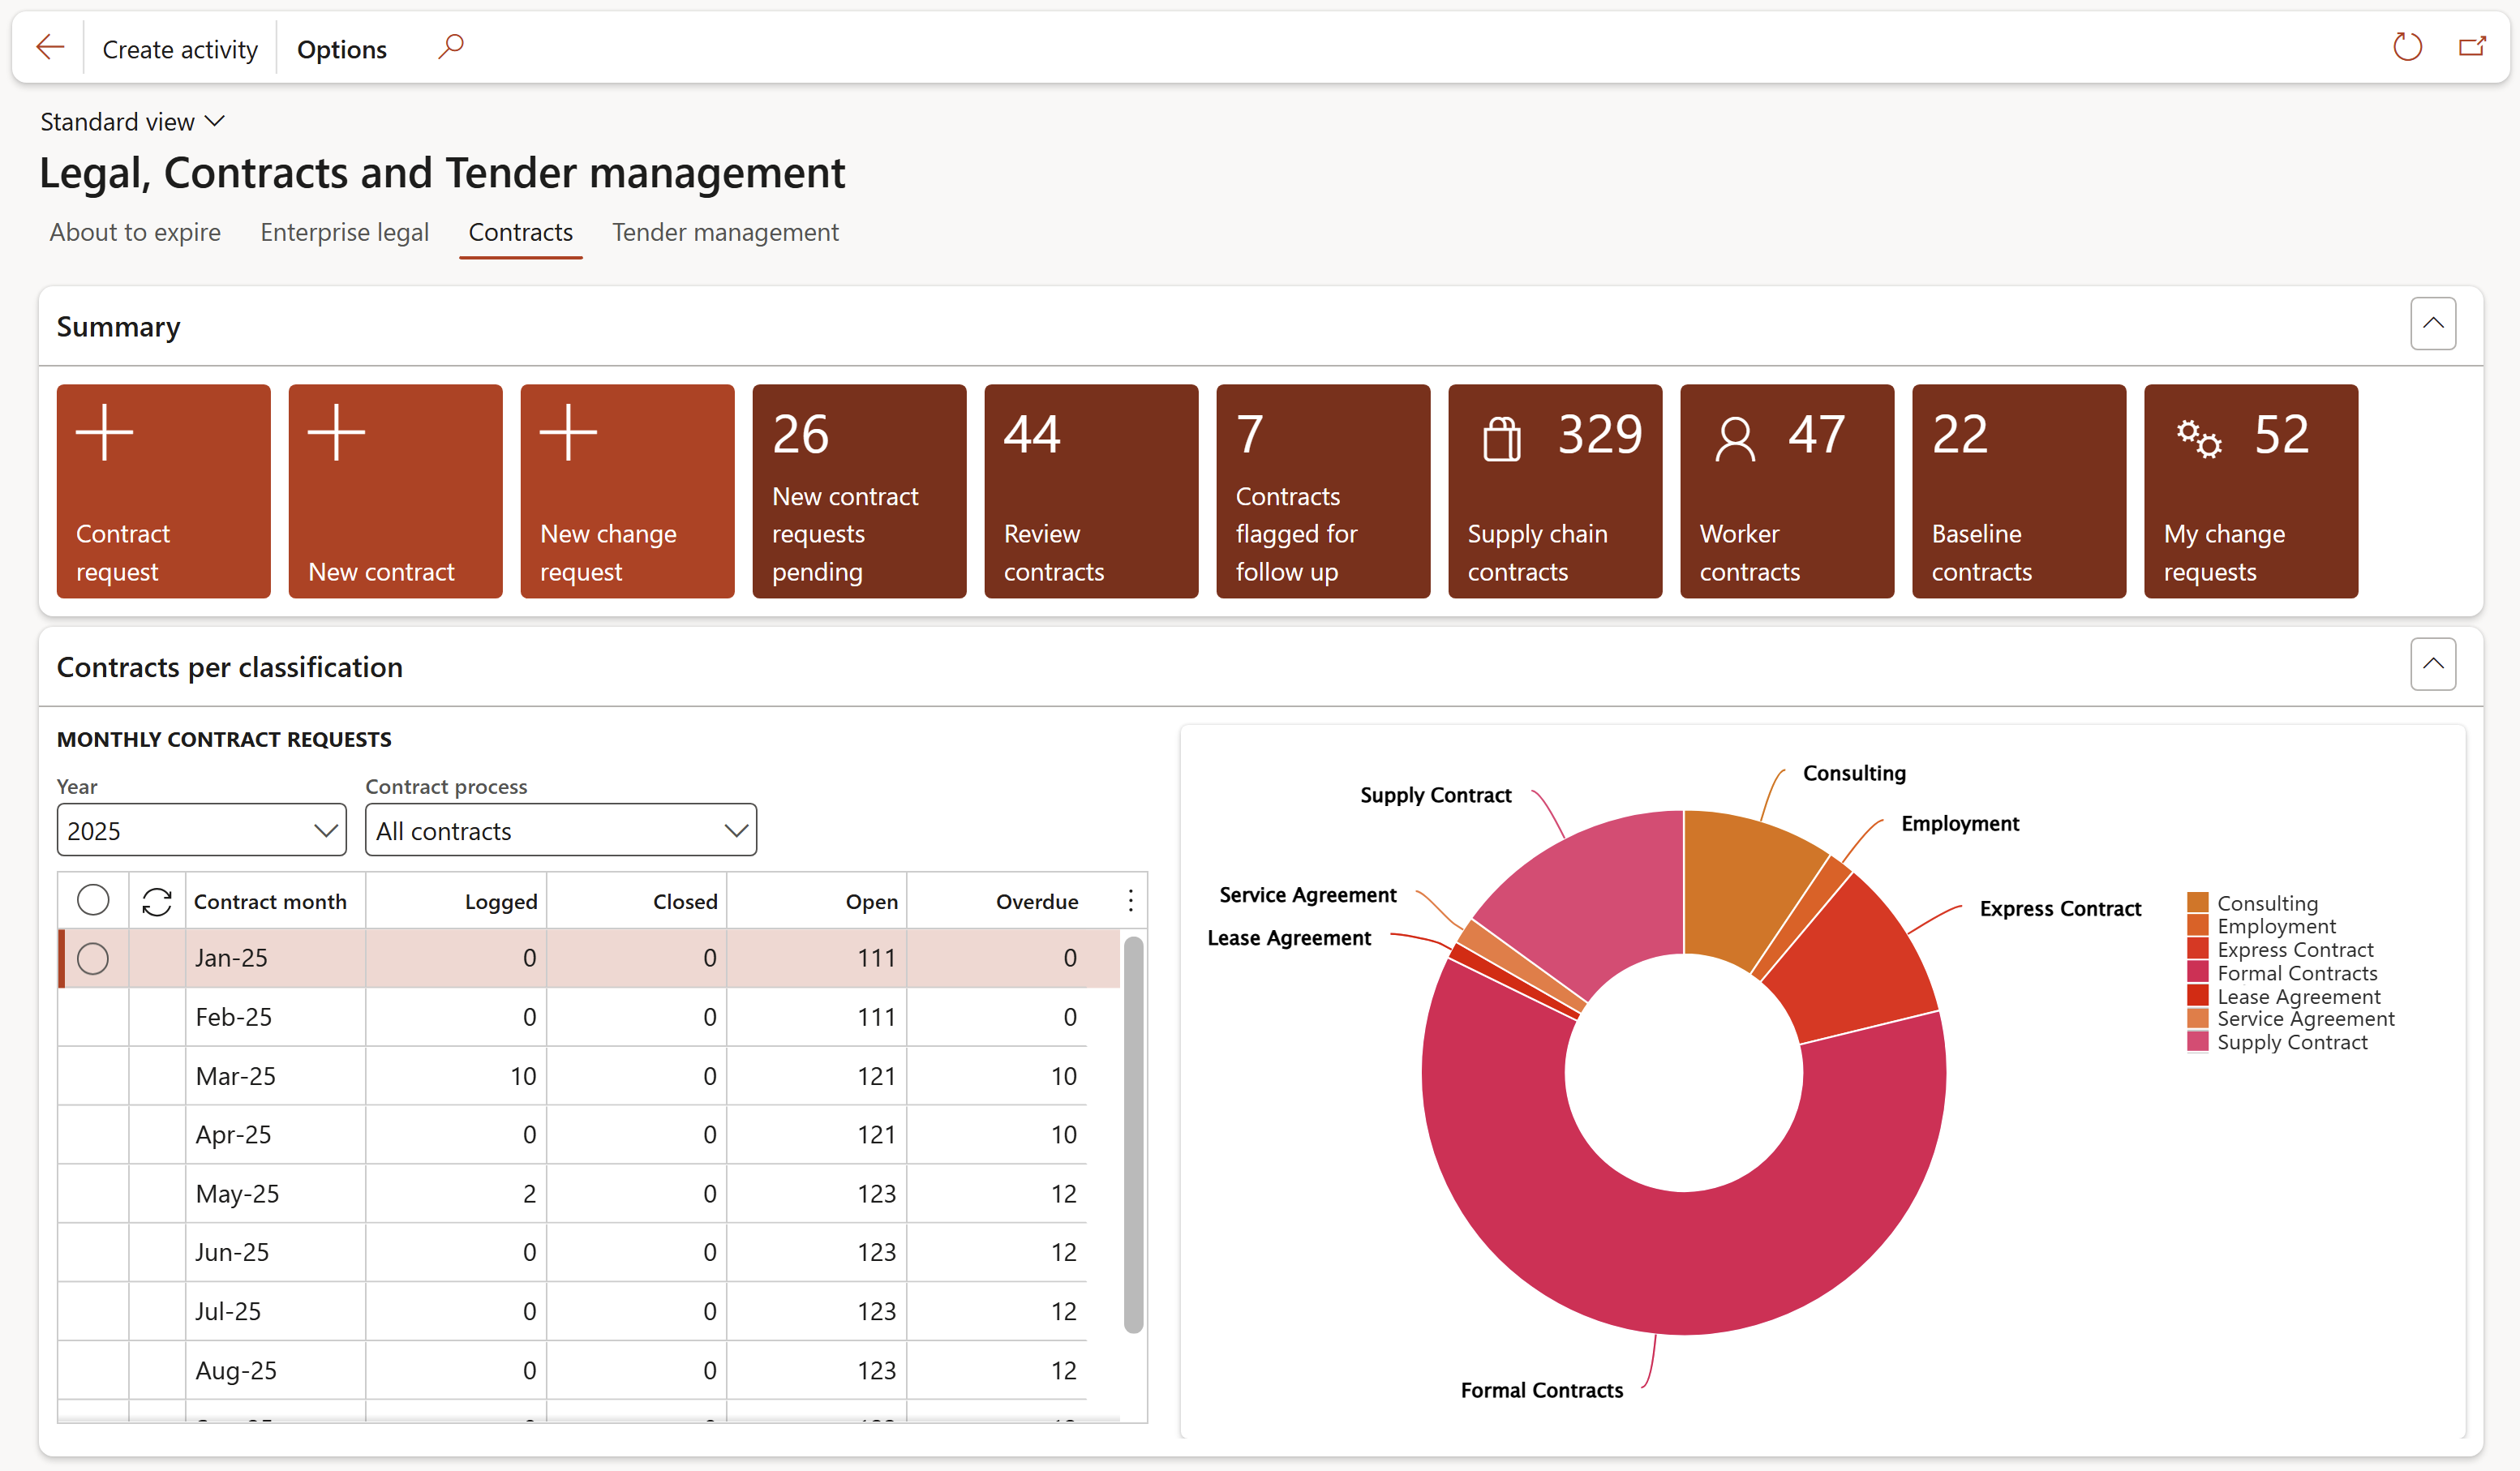
Functions of the Summary tiles:
- Contract request:
- Opens the New case dialog for creating a contract request
- New contract:
- Opens the New contract dialog for creating a contract
- New change requests:
- Opens the New change requests dialog for creating a change request
- New contract requests pending:
- Displays the number of pending requests for new contracts
- Opens the New contract requests pending list page
- Review contracts:
- Displays the number of open Contract requests to be reviewed
- Opens the Contract requests to be reviewed list page
- Contracts flagged for follow up:
- Displays the number of Contracts flagged for follow up (Excluding Baseline contracts)
- Opens the Contracts flagged for follow up list page
- Supply chain contracts:
- Displays the number of Supply chain contracts (Excluding Baseline contracts)
- Opens the Supply chain contracts list page
- Worker contracts:
- Displays the number of Worker contracts (Excluding Baseline contracts)
- Opens the Worker contracts list page
- Baseline contracts:
- Displays the number of Baseline contracts
- Opens the Baseline contracts list page
- My change requests:
- Displays the number of Change requests requested by the logged in user
- Opens the My change requests list page
The Contracts per classification chart:
- Displays the percentage of contracts created according to Contract classification
(Excluding: Baseline contracts and contracts with status Rejected/Archived)
The Monthly contract requests grid displays the following data:
Use the Year filter and the Contract process filter to display specific data
- Contract month
- Logged contracts
- Closed contracts
- Open contracts
- Overdue contracts
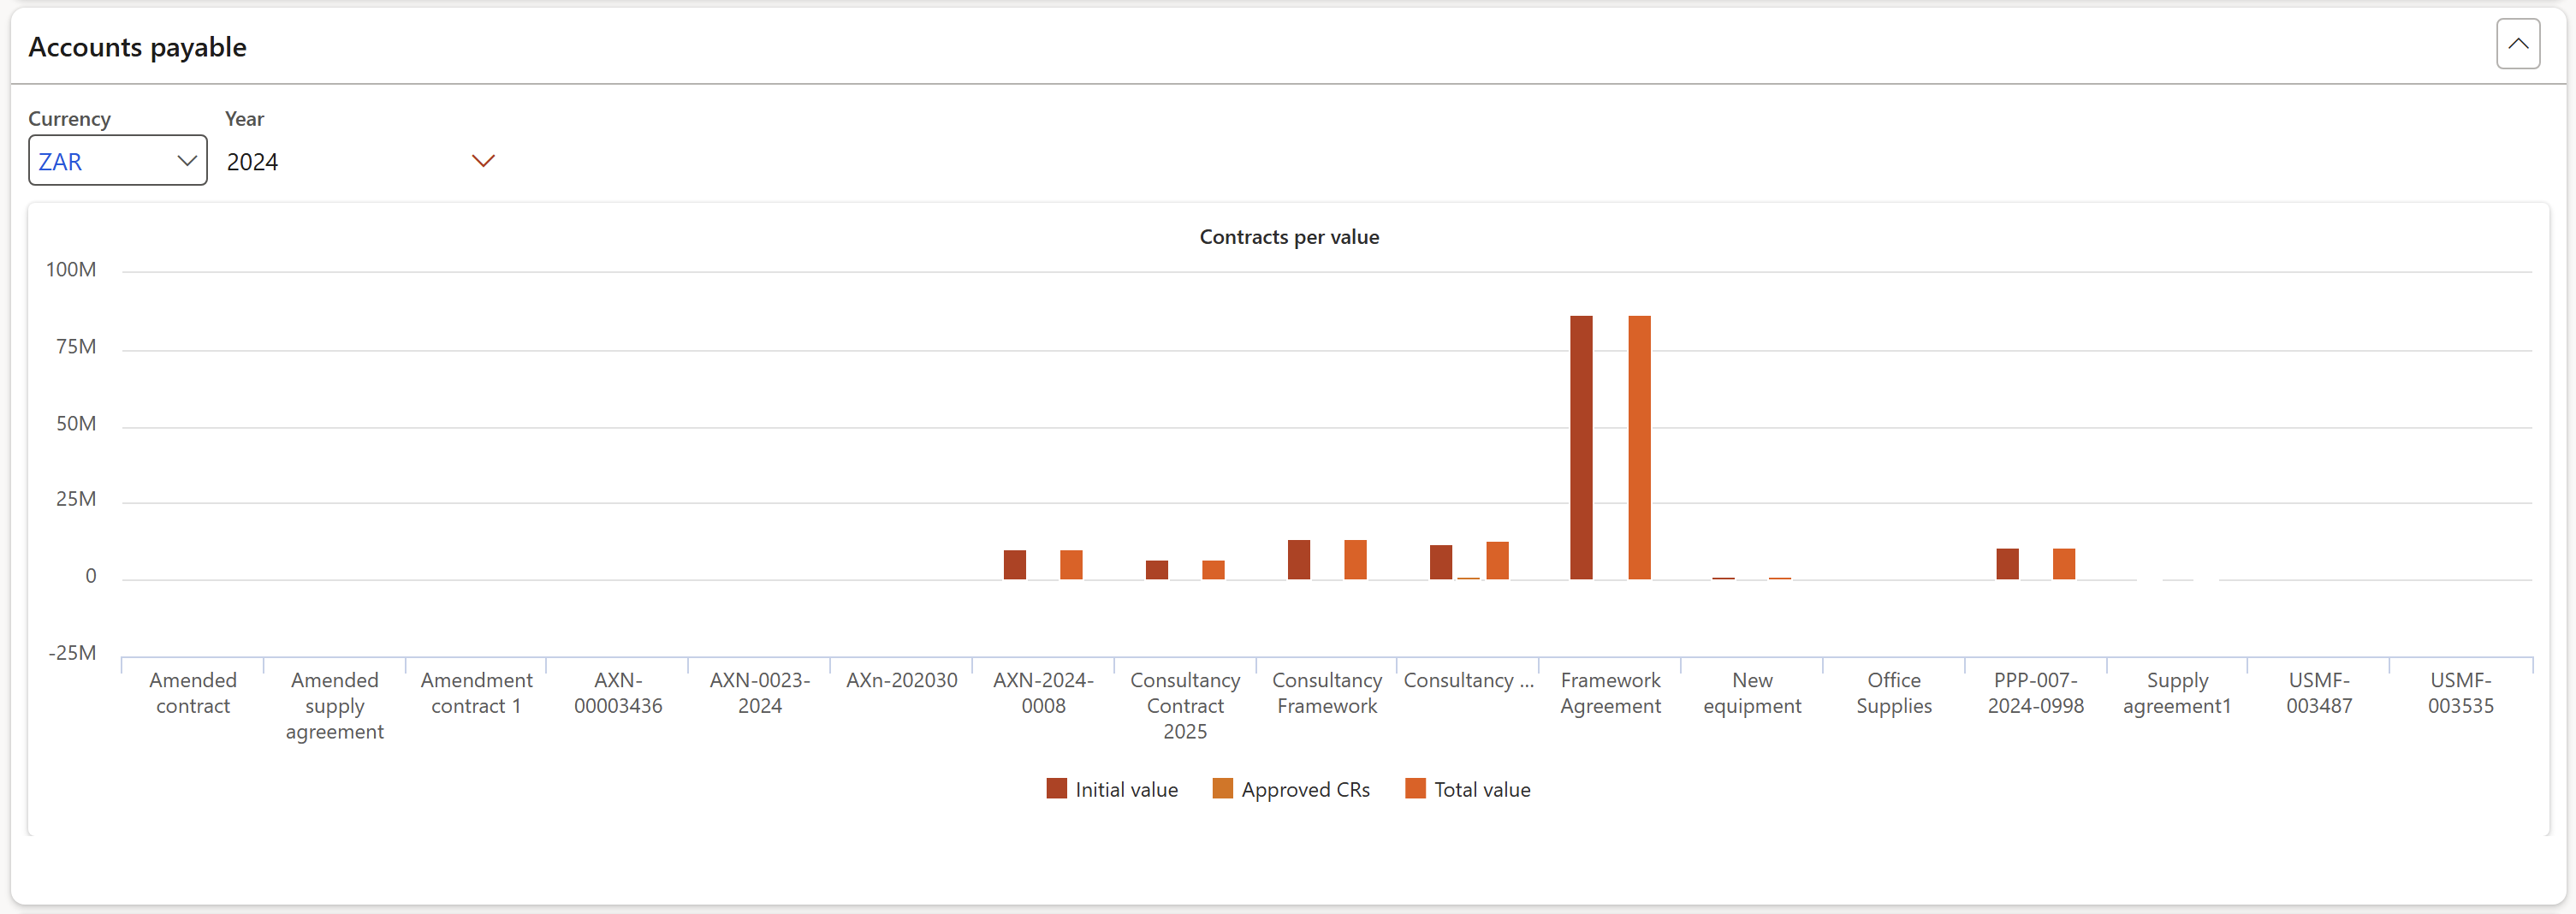
The Accounts payable Fast tab:
The Contracts per value chart:
- Displays contracts per value according to the selected Currency and Year
- Displays only contracts where the selected Contract classification has the Enforce for AP tick selected
¶ Tender management tab
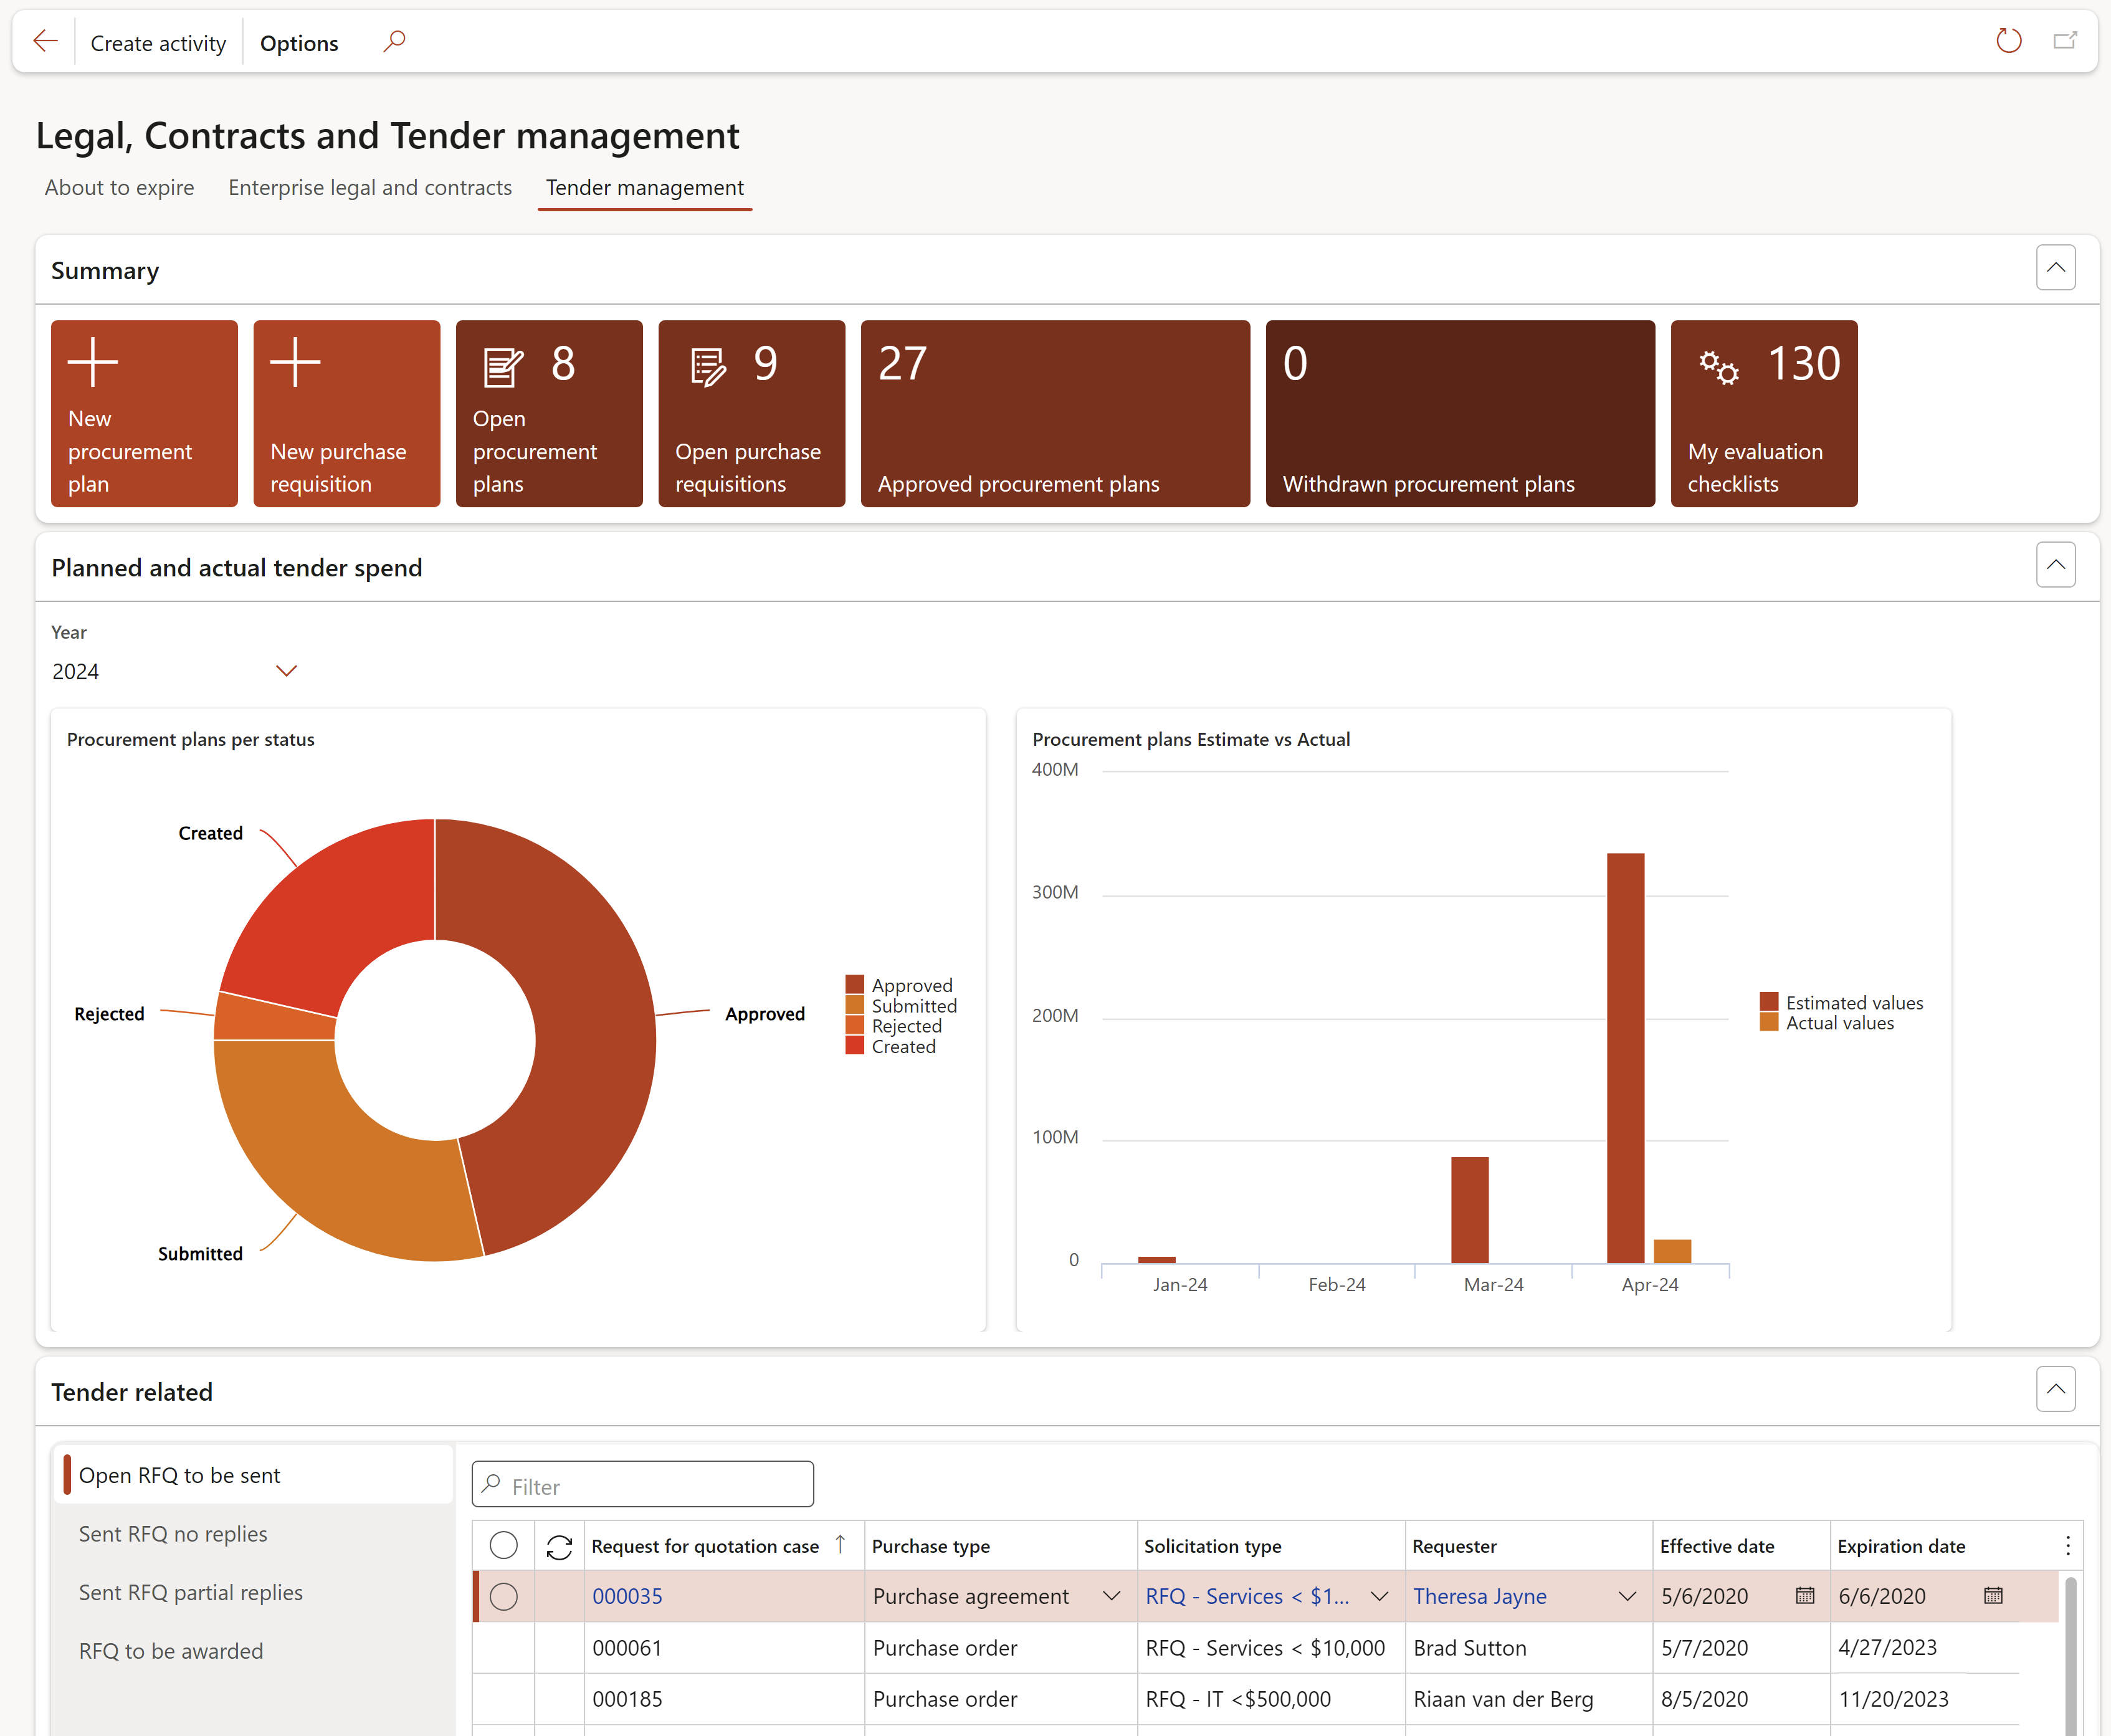
Functions of the Summary tiles:
- New procurement plan:
- Opens the Create procurement plan dialog from where a new procurement plan can be created
- New purchase requisition:
- Opens the Create purchase requisition dialog from where a new purchase requisition can be created
- Open procurement plans:
- The number on the tile indicates the number of open procurement plans
- Clicking on the tile opens the Procurement plan list page and only the open procurement plans will be displayed
- Open purchase requisitions:
- The number on the tile indicates the number of open purchase requisitions
- Clicking on the tile opens the Open purchase requisitions list page and only the open purchase requisitions will be displayed
- Approved procurement plans:
- The number on the tile indicates the number of approved procurement plans
- Clicking on the tile opens the Procurement plan list page and only the approved procurement plans will be displayed
- Withdrawn procurement plans:
- The number on the tile indicates the number of withdrawn procurement plans
- Clicking on the tile opens the Procurement plan list page and only the withdrawn procurement plans will be displayed
- My evaluation checklists:
- The number on the tile indicates the number of open evaluation checklists assigned to the logged in user
- Clicking on the tile opens the All my tender checklists list page
The graphs:
Use the Year filter to display specific data
- The Procurement plan per status chart displays the percentages of procurement plans in the various statuses
- The Procurement plans Estimate vs Actual graph displays the monthly values
Functions of the Tender related tabs:
- Open RFQ to be sent: Displays all RFQs that still need to be sent
- Sent RFQ no replies: Displays all sent RFQs that have not been replied to
- Sent RFQ partial replies: Displays all sent RFQs that have been partially replied to
- RFQ to be awarded: Displays all RFQs that still need to be awarded
¶ Operational and sustainability reporting Workspace
¶ Workspace setup
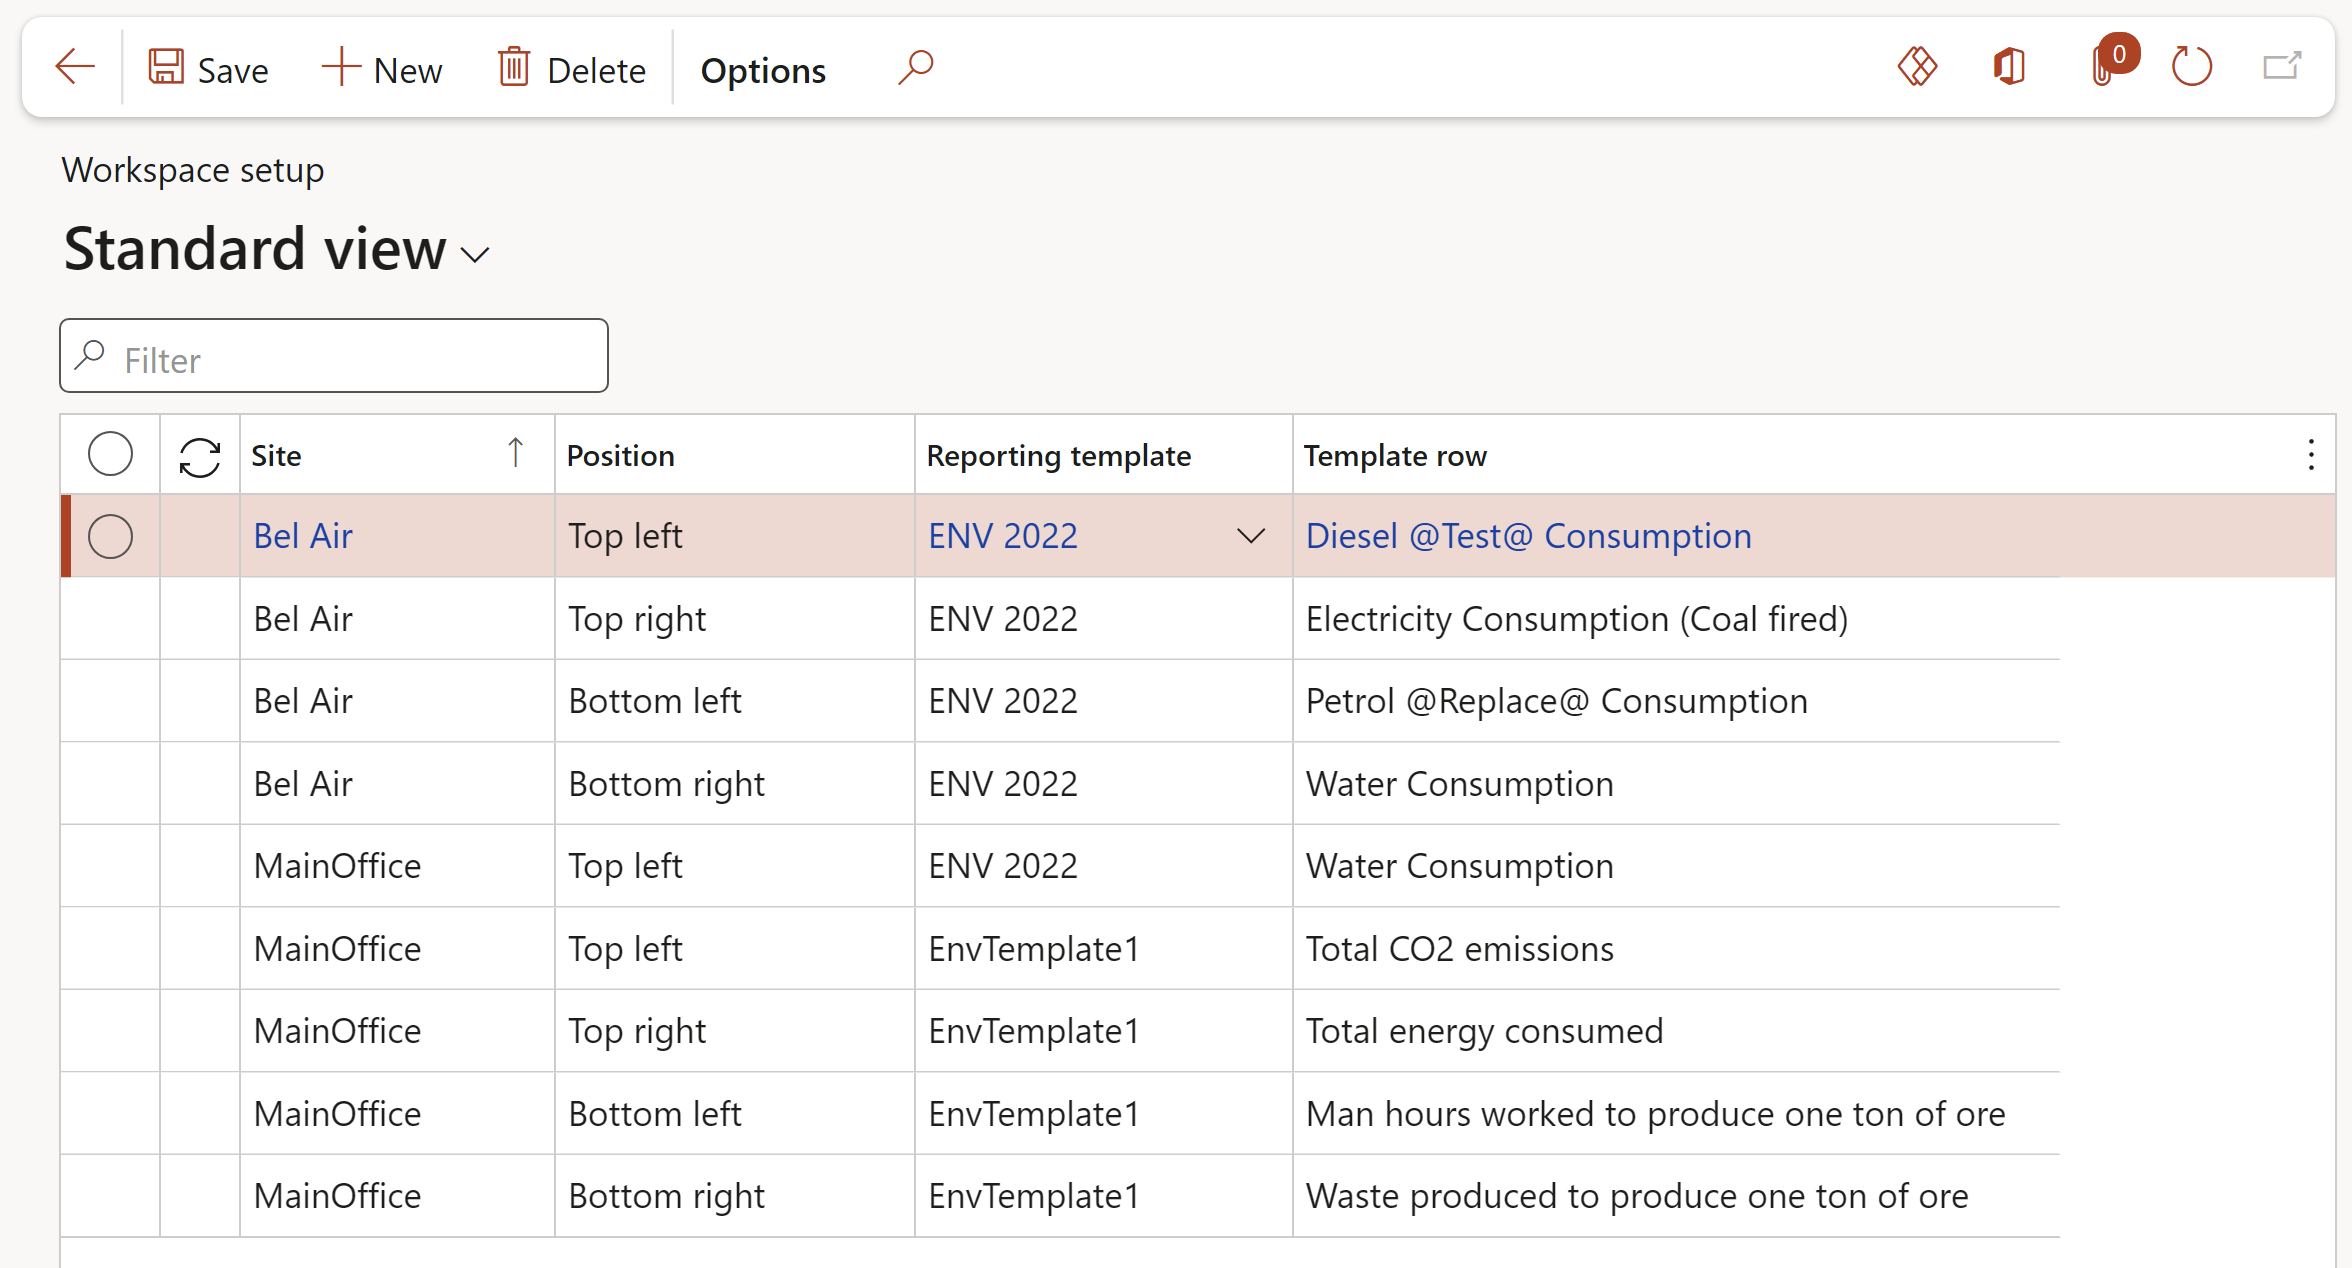
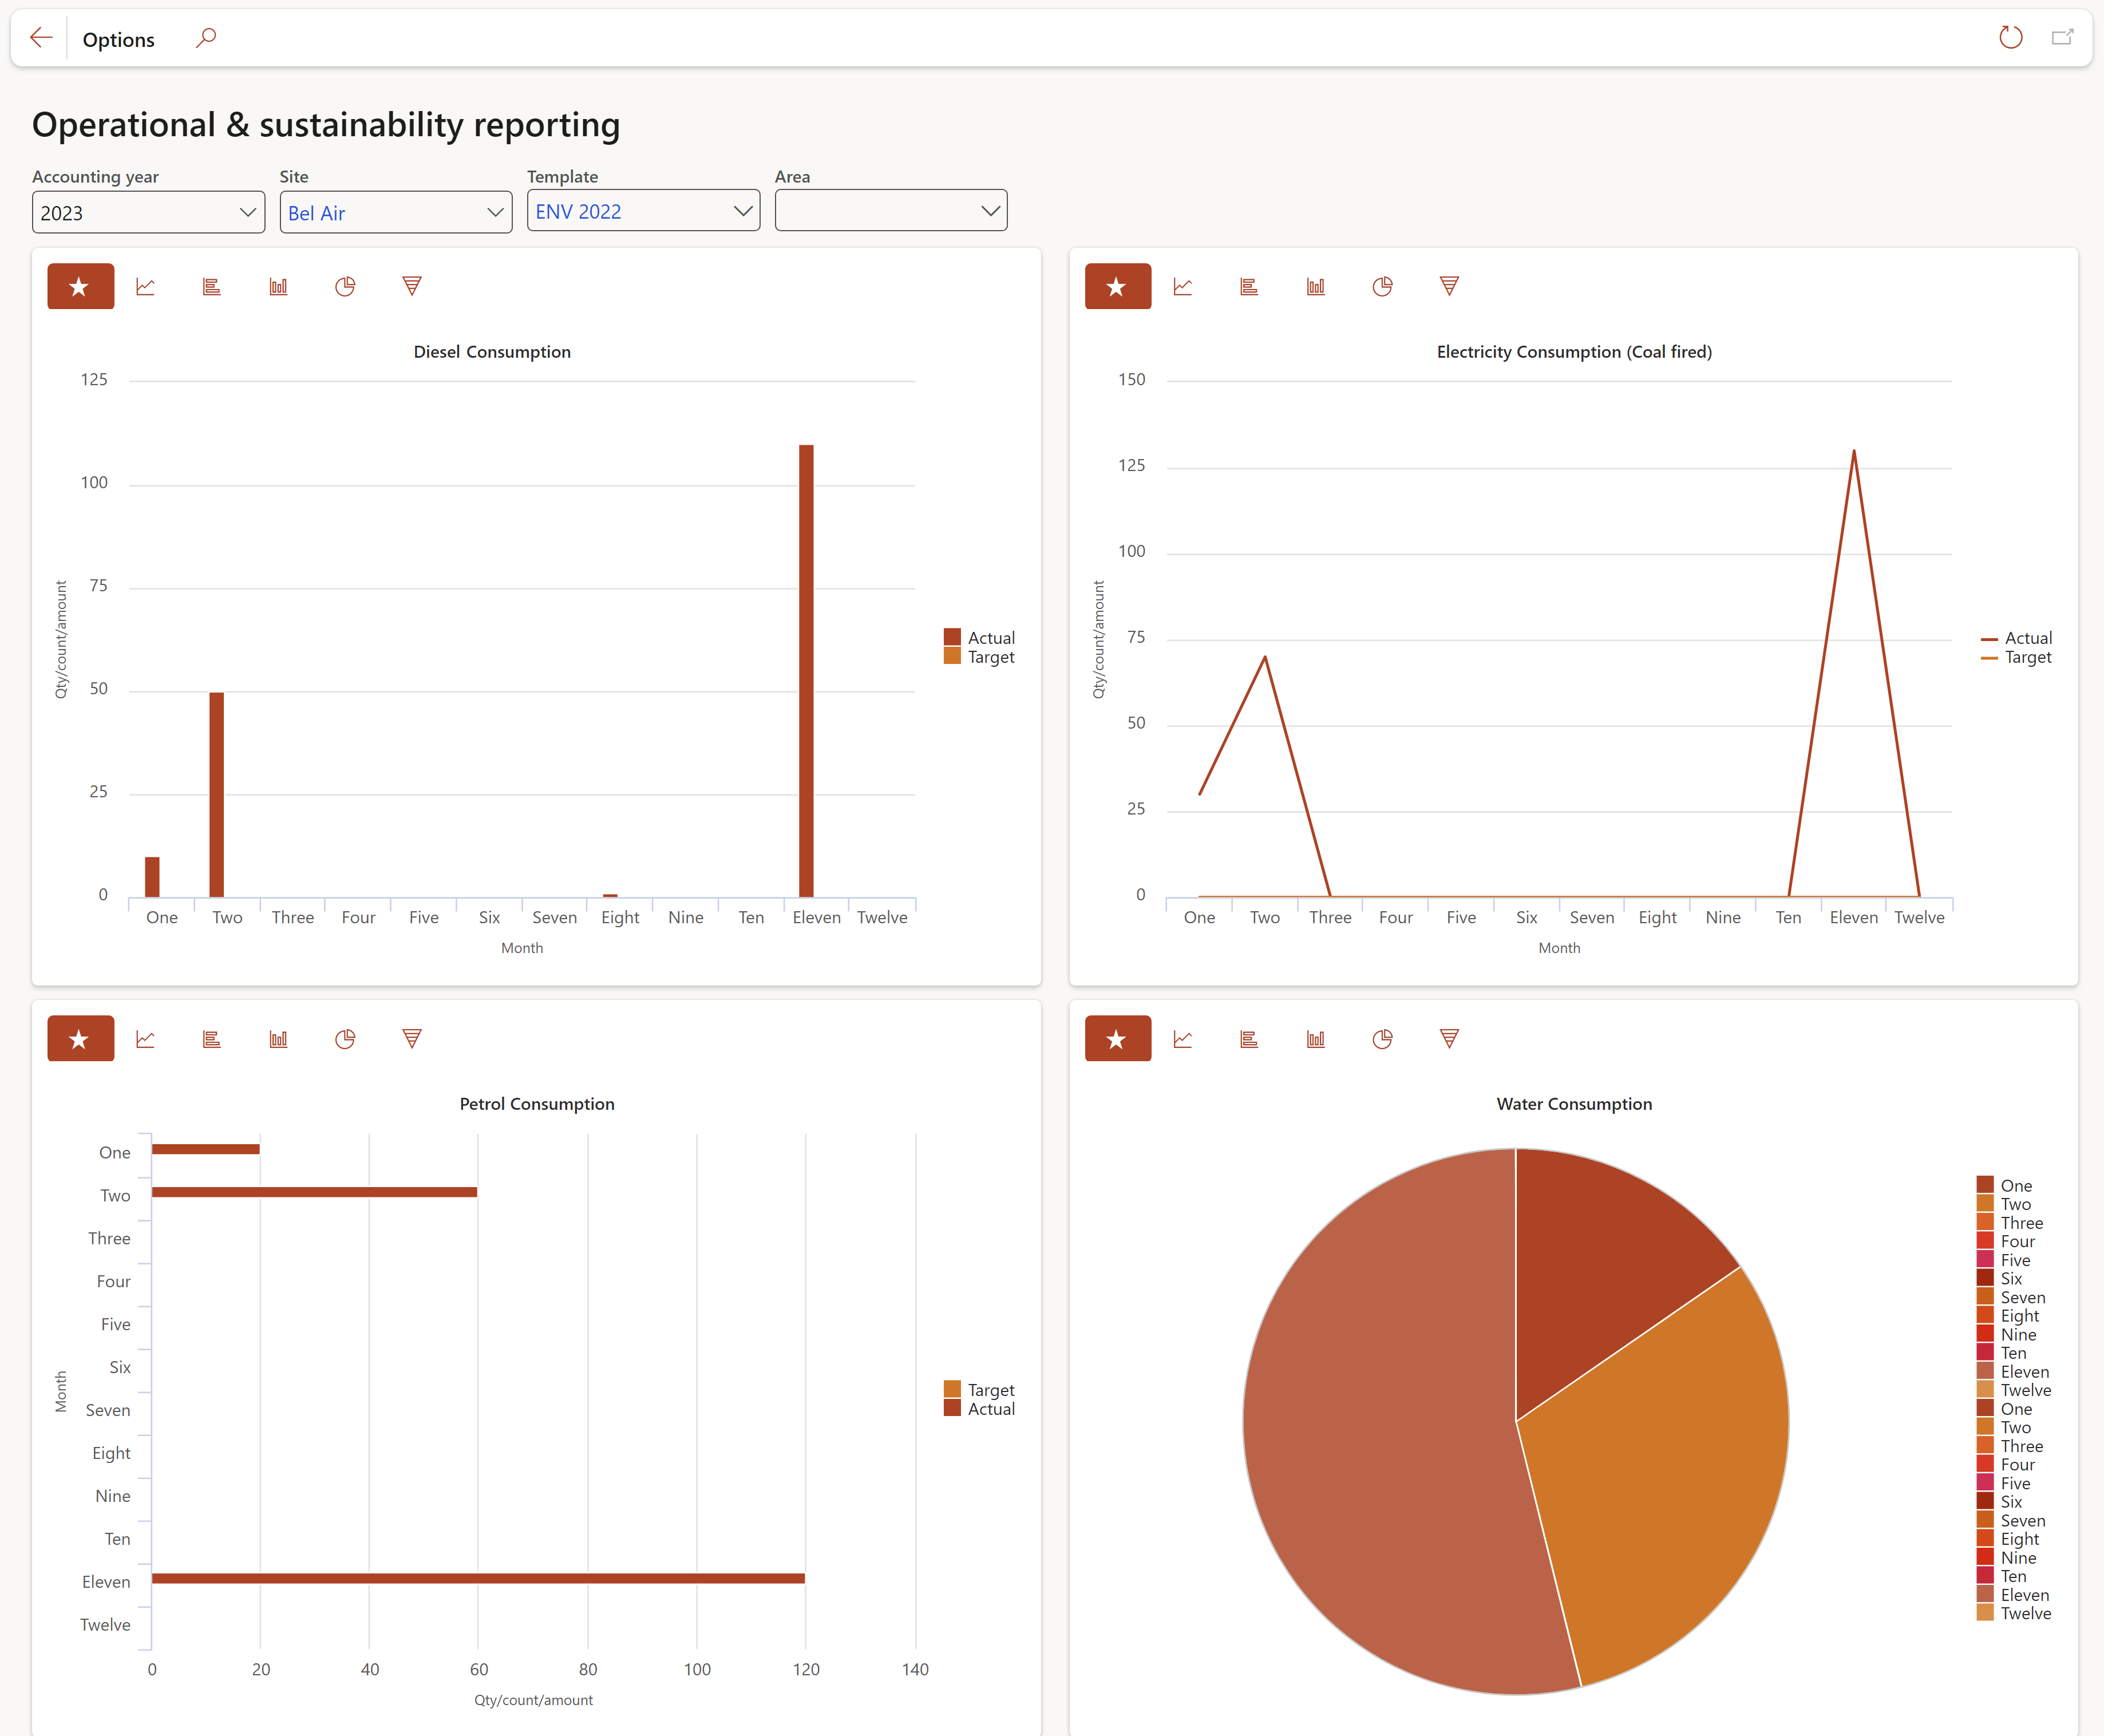
The Workspace setup form gives the user the ability to specify how the Operational & sustainability reporting workspace should be displayed
Go to: GRC > Operational & sustainability reporting > Setup for operational & sustainability reporting > Workspace setup
- In the Action pane, click on the New button
- Select the Site for which you want the data to be displayed, from the dropdown list
- Select the Position where on the workspace where the graph should be displayed, from the dropdown list
- Select the Reporting template for which the data should be displayed, from the dropdown list
- Select the Template row for which the data should be displayed, from the dropdown list
Go to: GRC > Workspaces & Operational & sustainability reporting
Use the filters to select the data that you want to display
¶ Performance scorecard Workspace
¶ Balanced scorecard grid tab
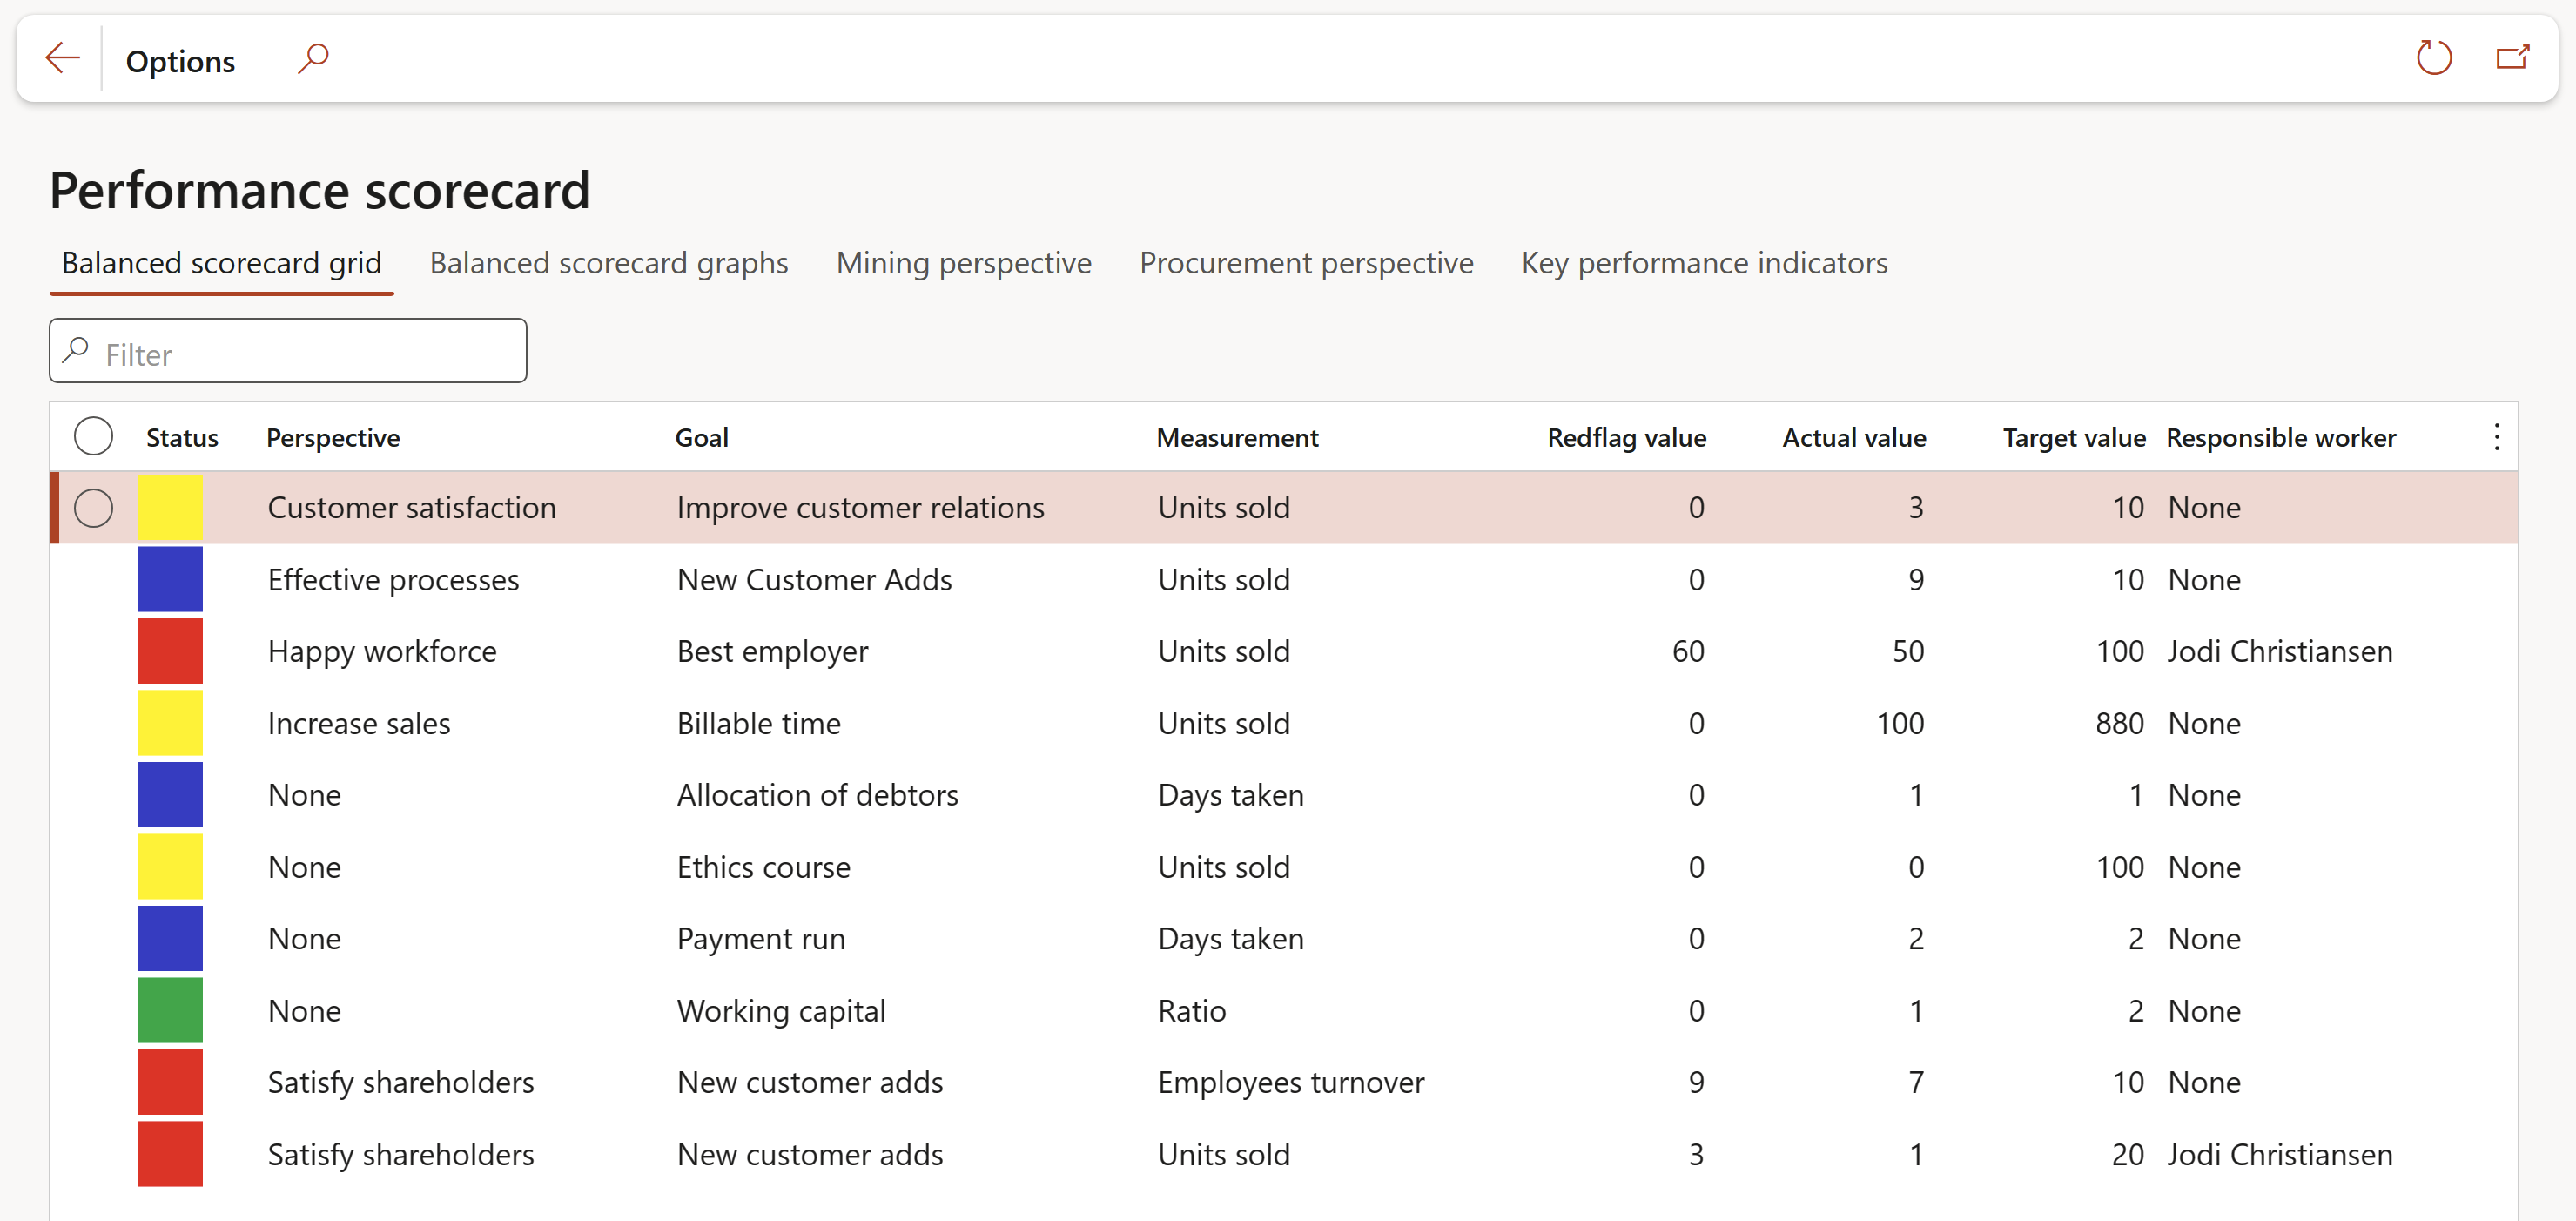
A grid will show with all Balance scorecard perspectives, goals, linked measurements and the values (Redflag, Actual and Target).
The source of these values are the Measurement lines from the Goals under the Period section.
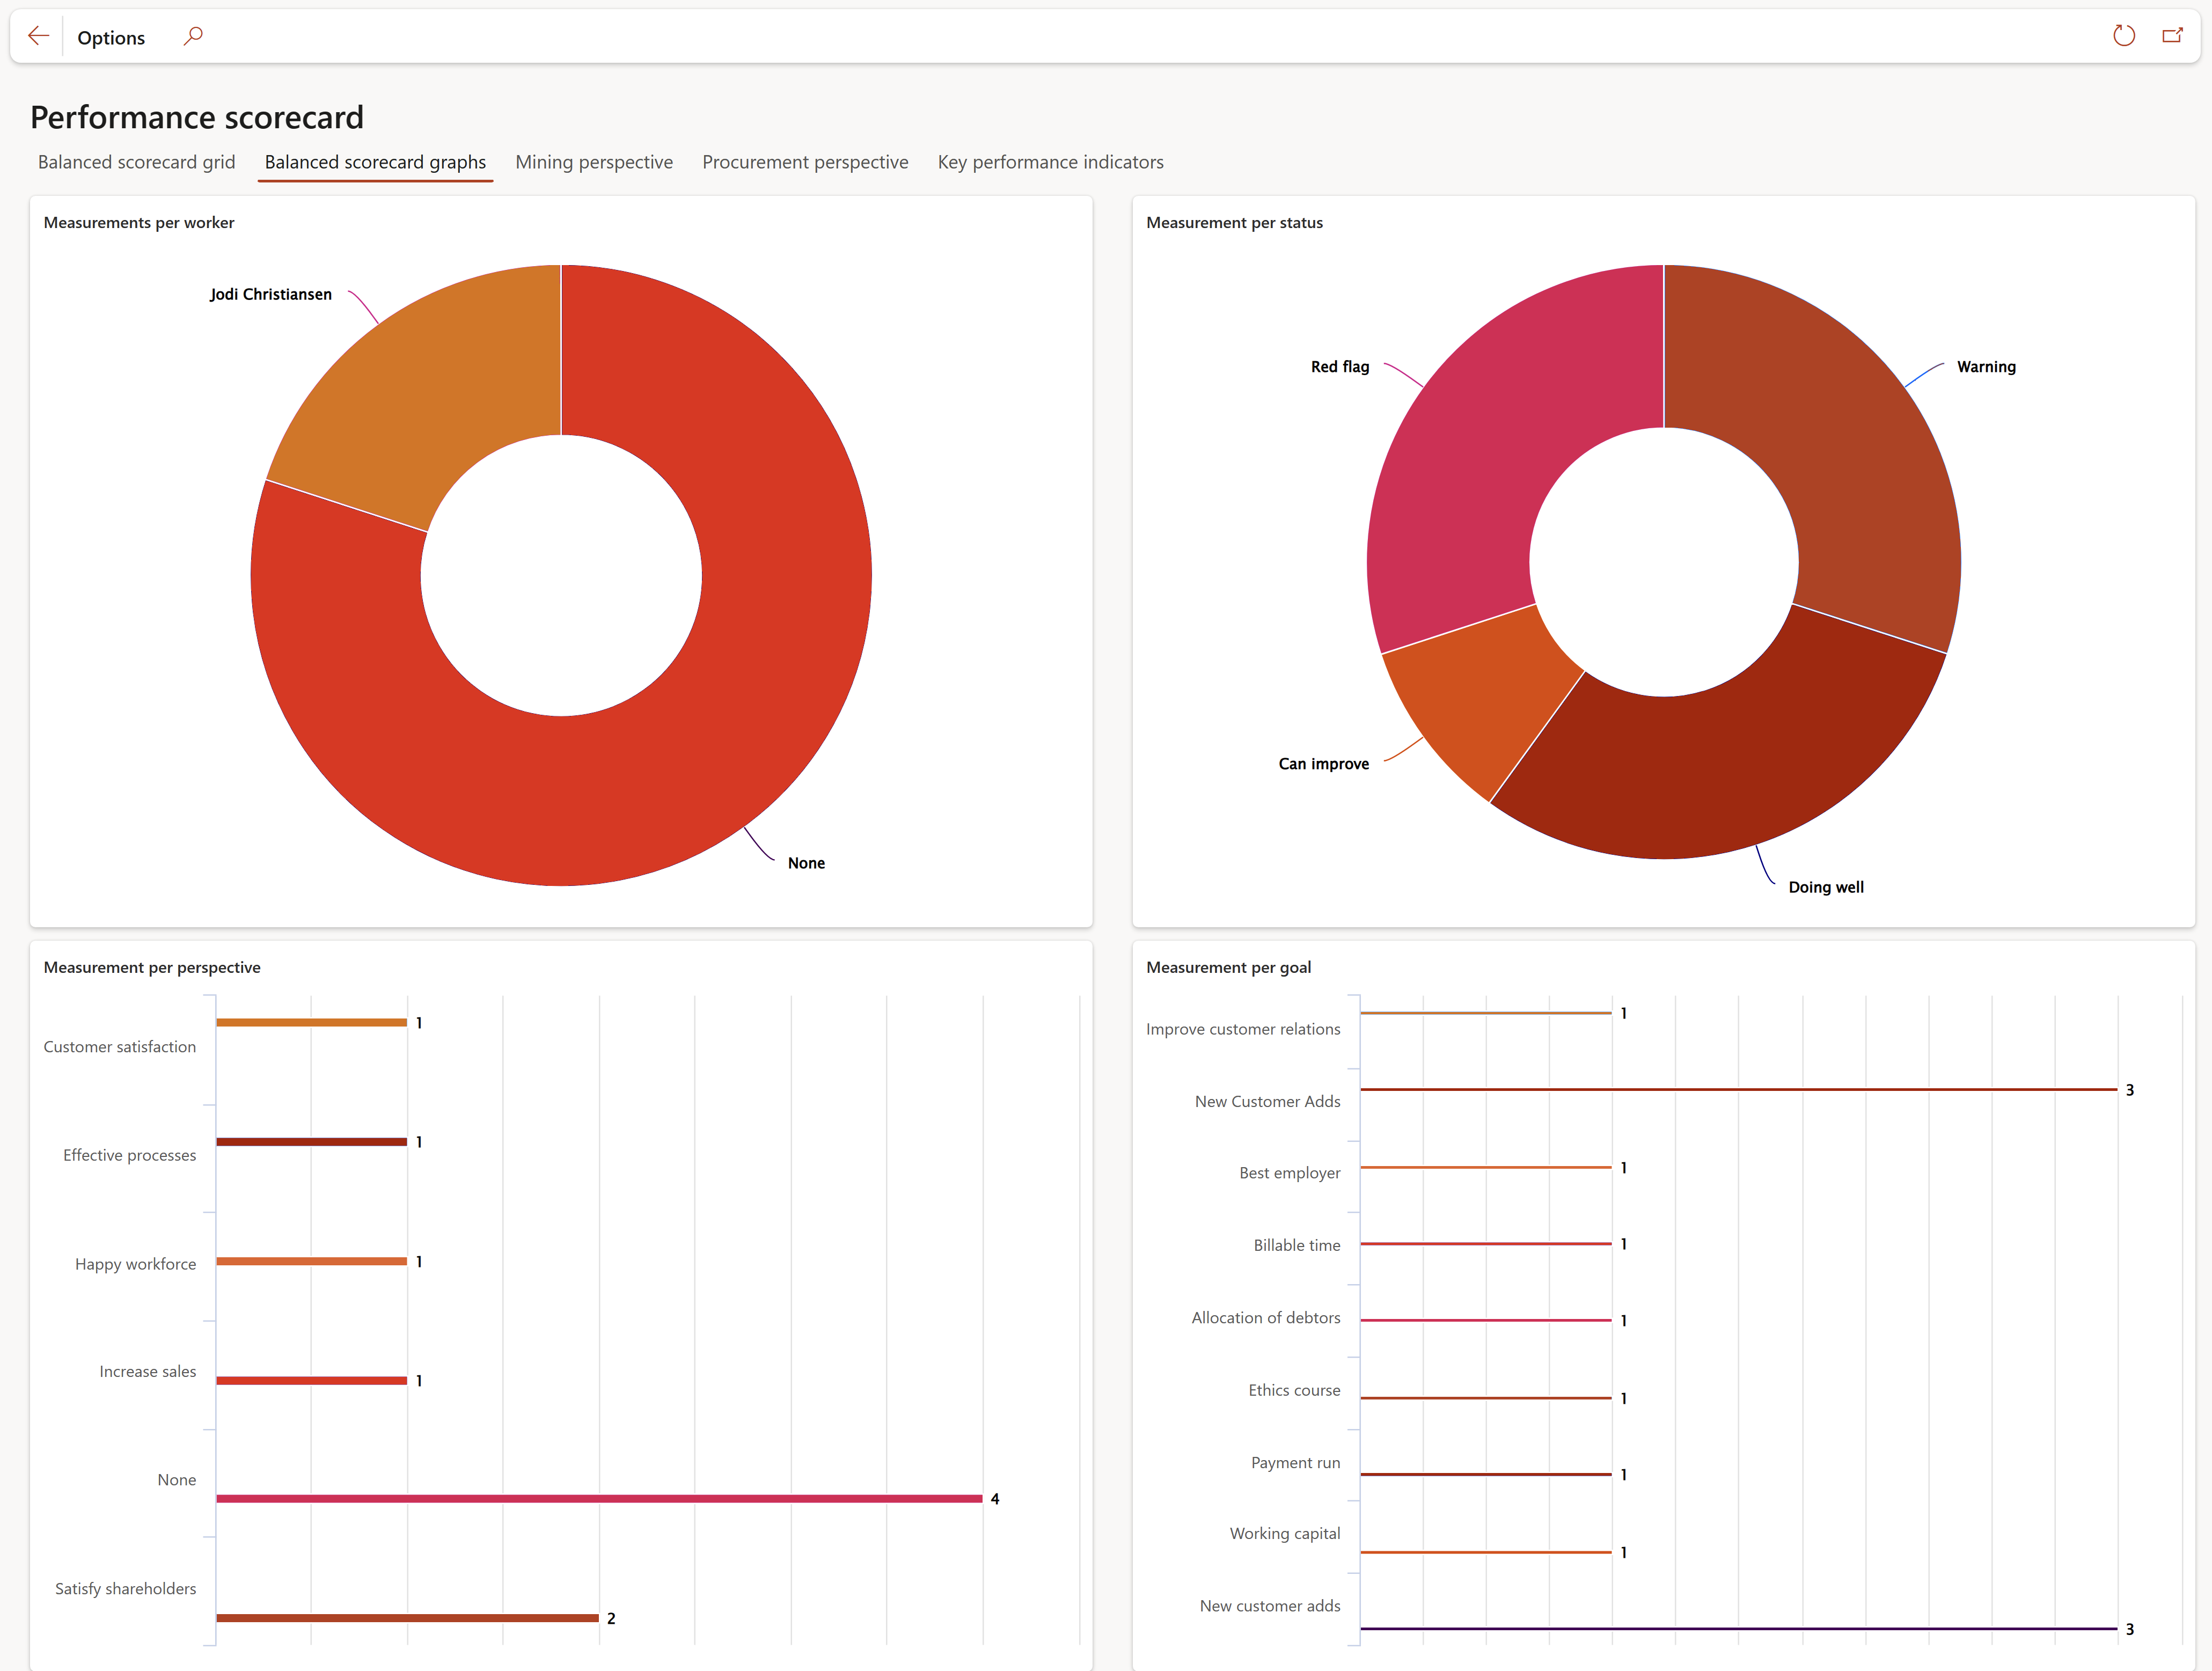
¶ Balanced scorecard graphs tab
¶ Mining perspective tab
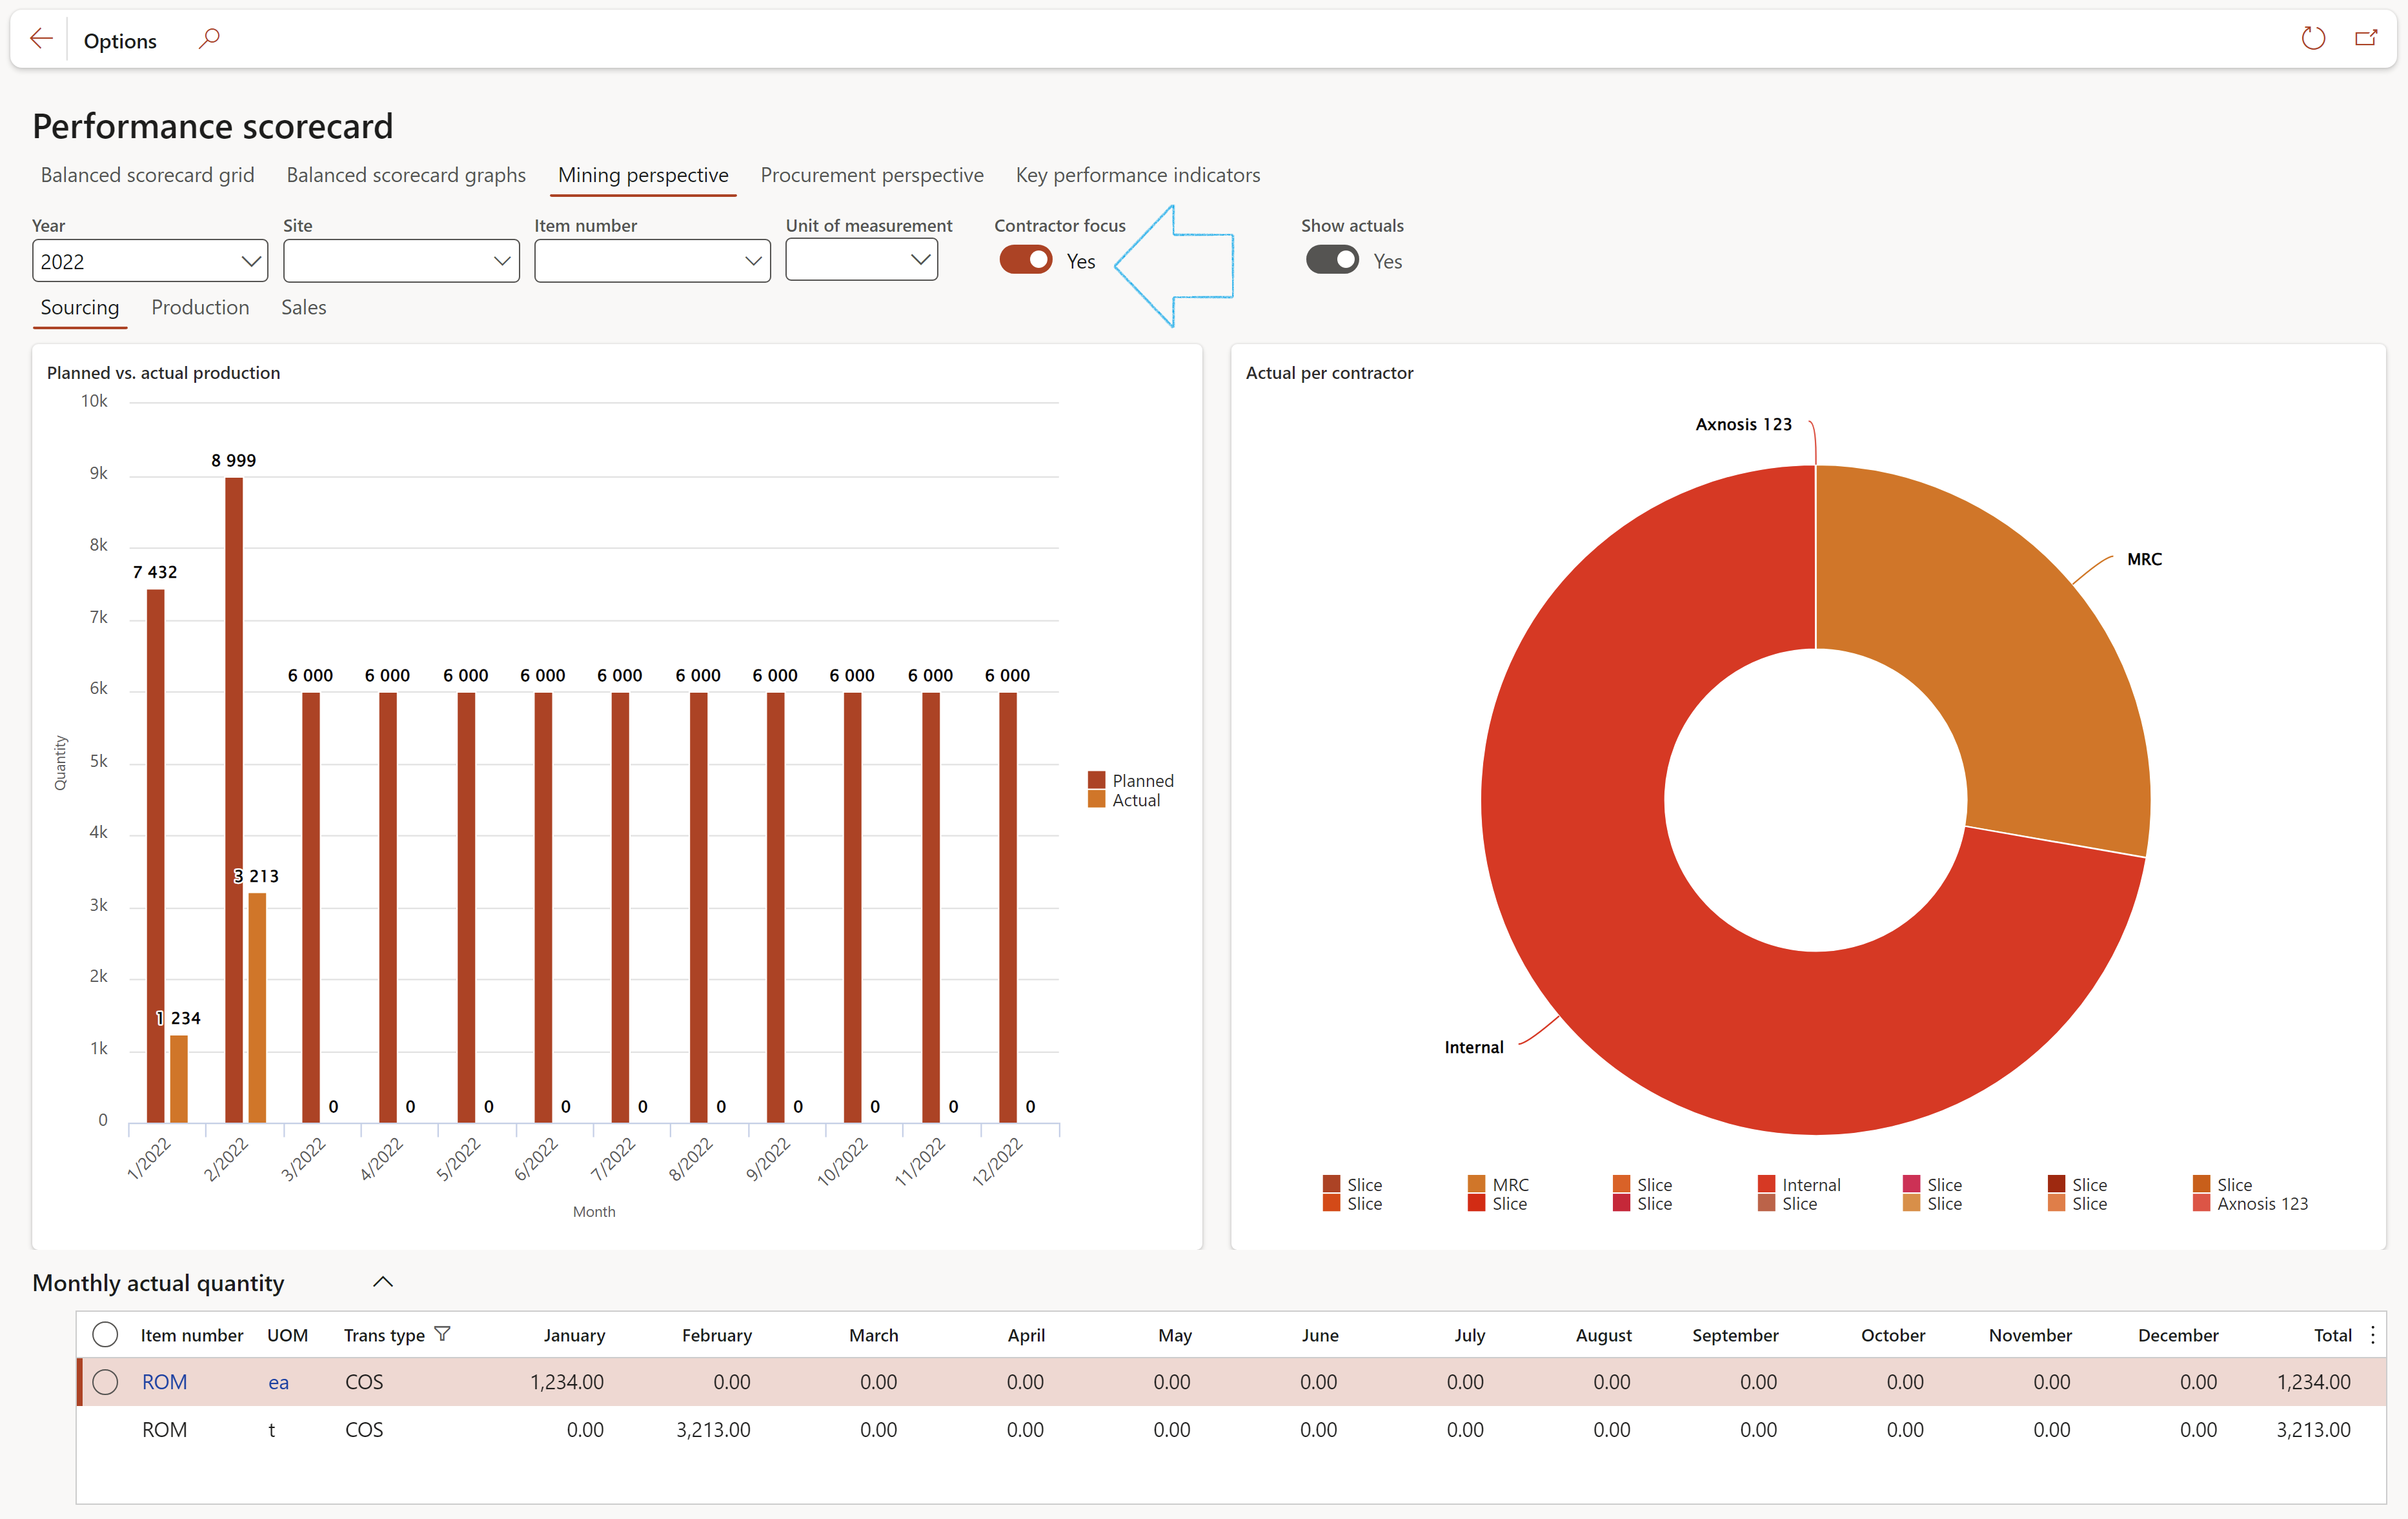
Move the Contractor focus slider to Yes to view the Actual per contractor graph
Sourcing Index tab
Production Index tab
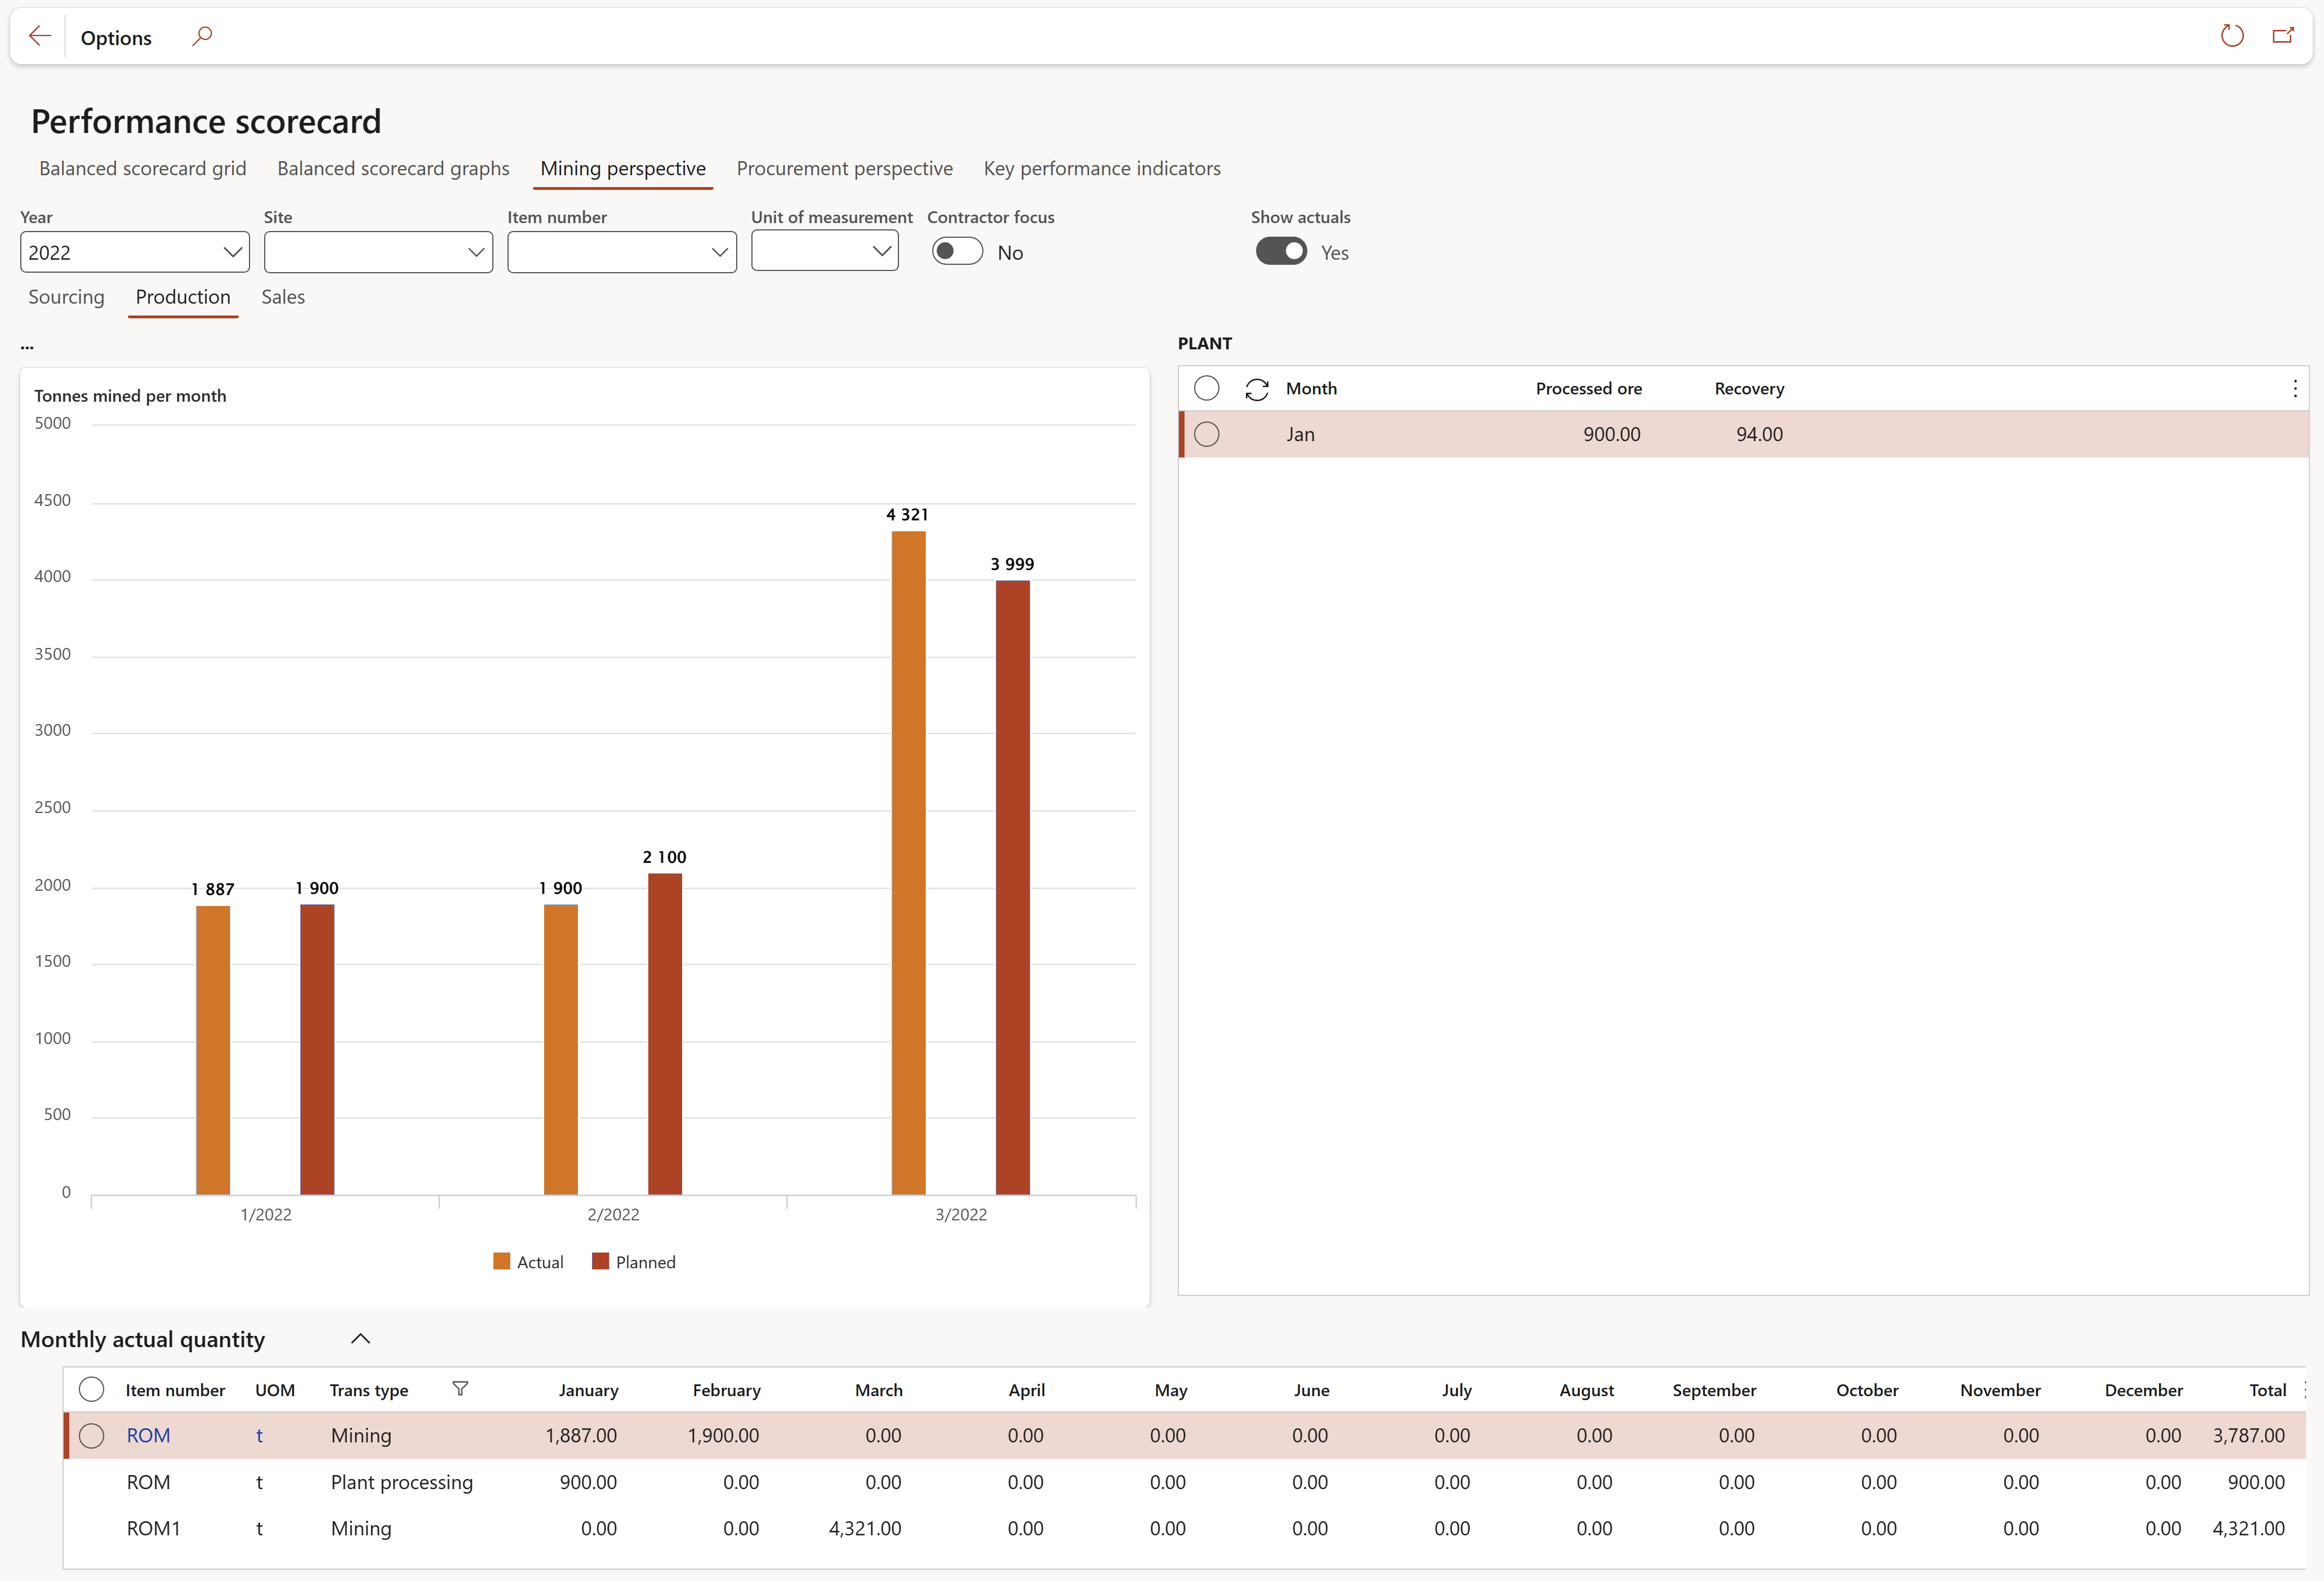
Sales Index tab
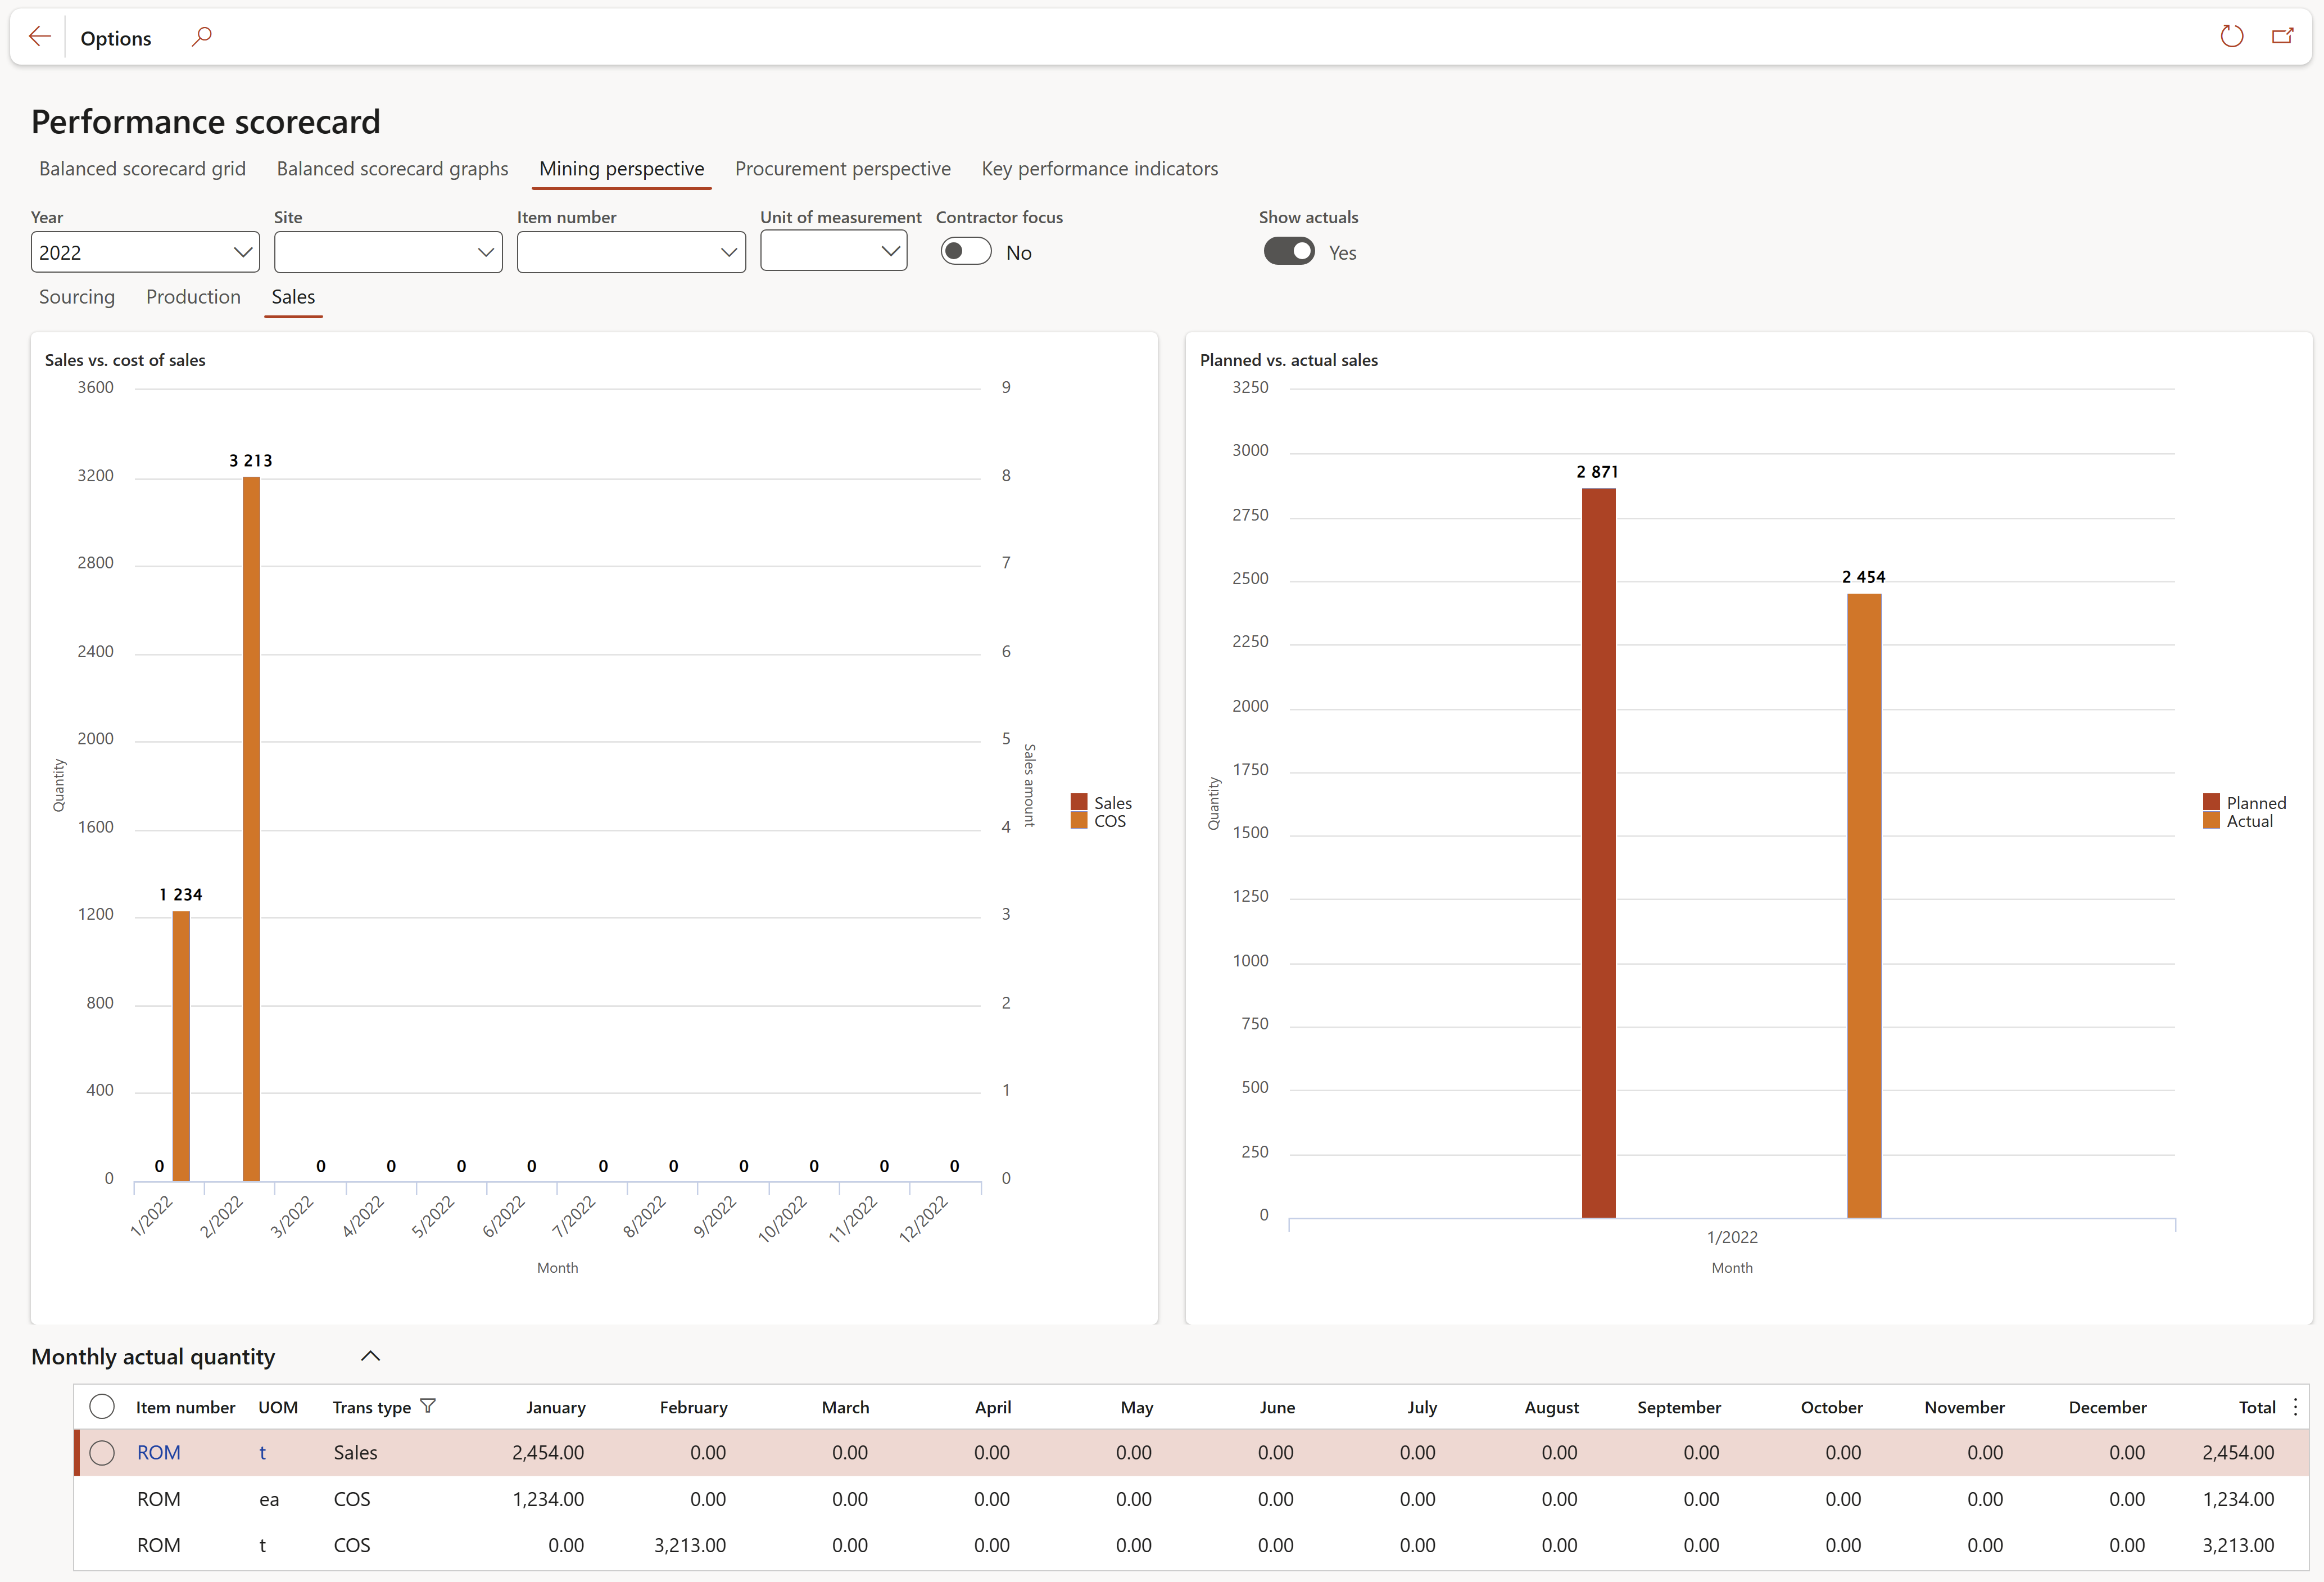
¶ Procurement perspective tab
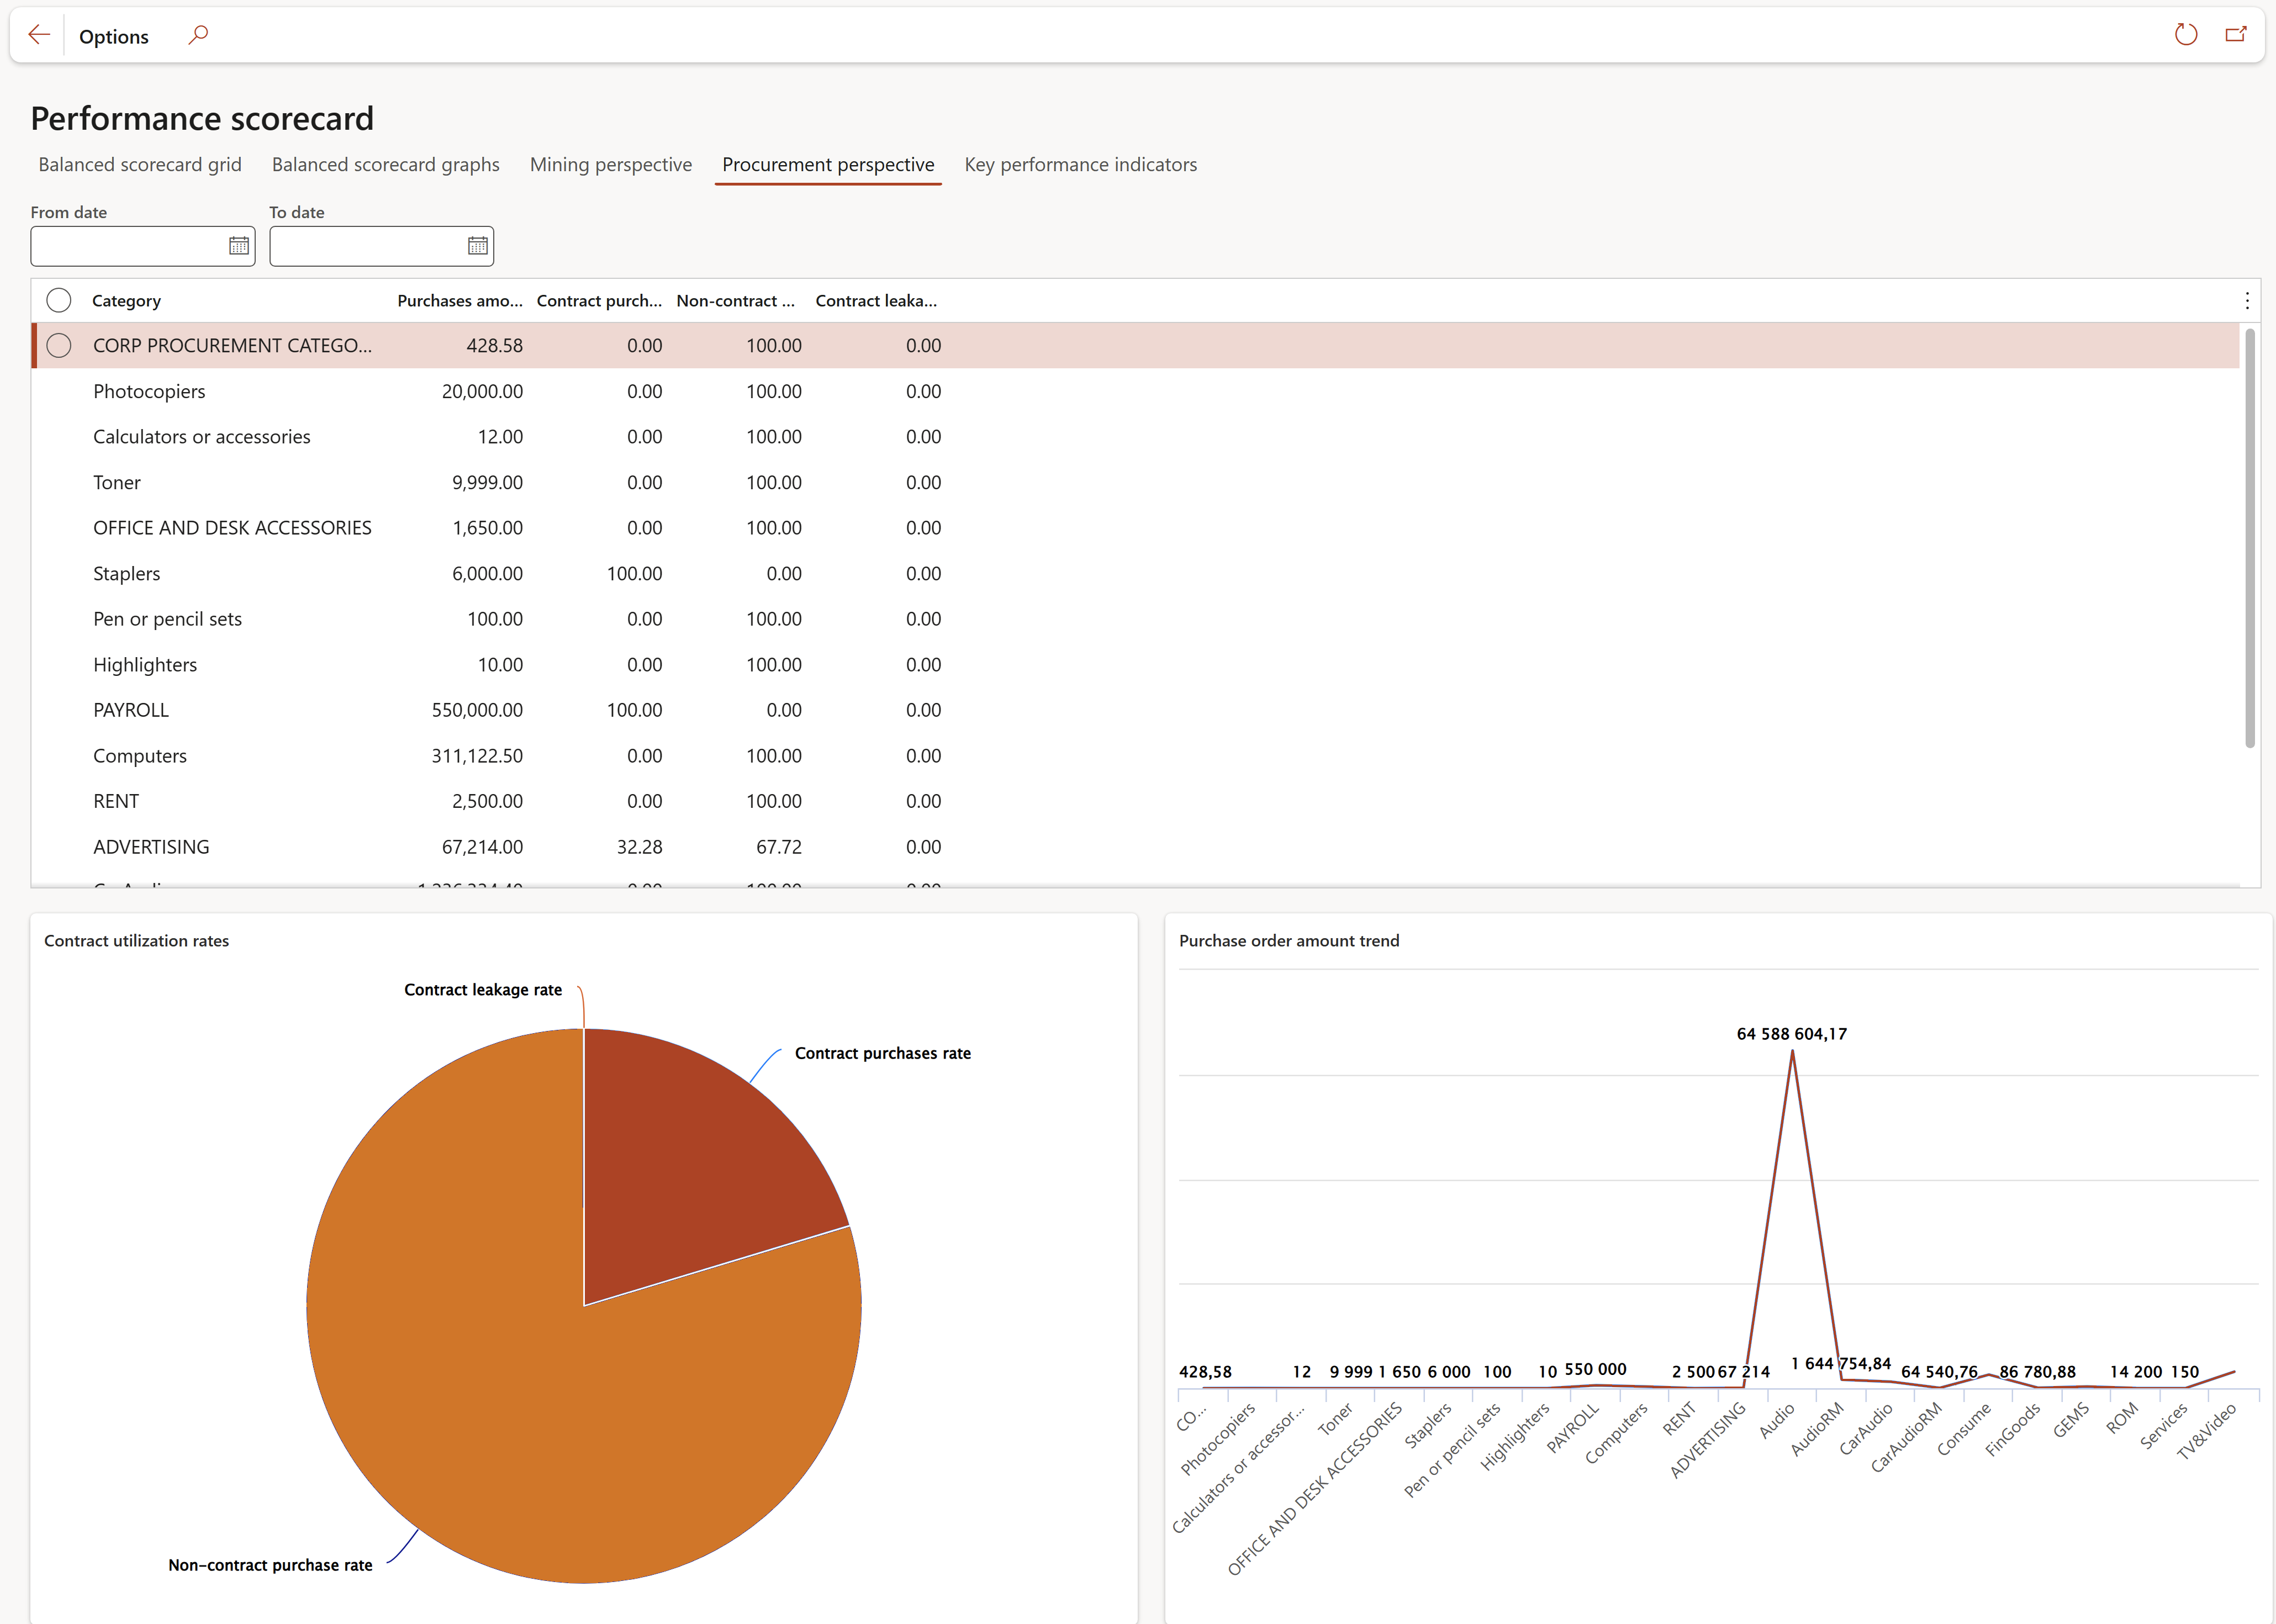
¶ Key performance indicators list tab
The following filters are for future use: Vendor, Customer and Asset
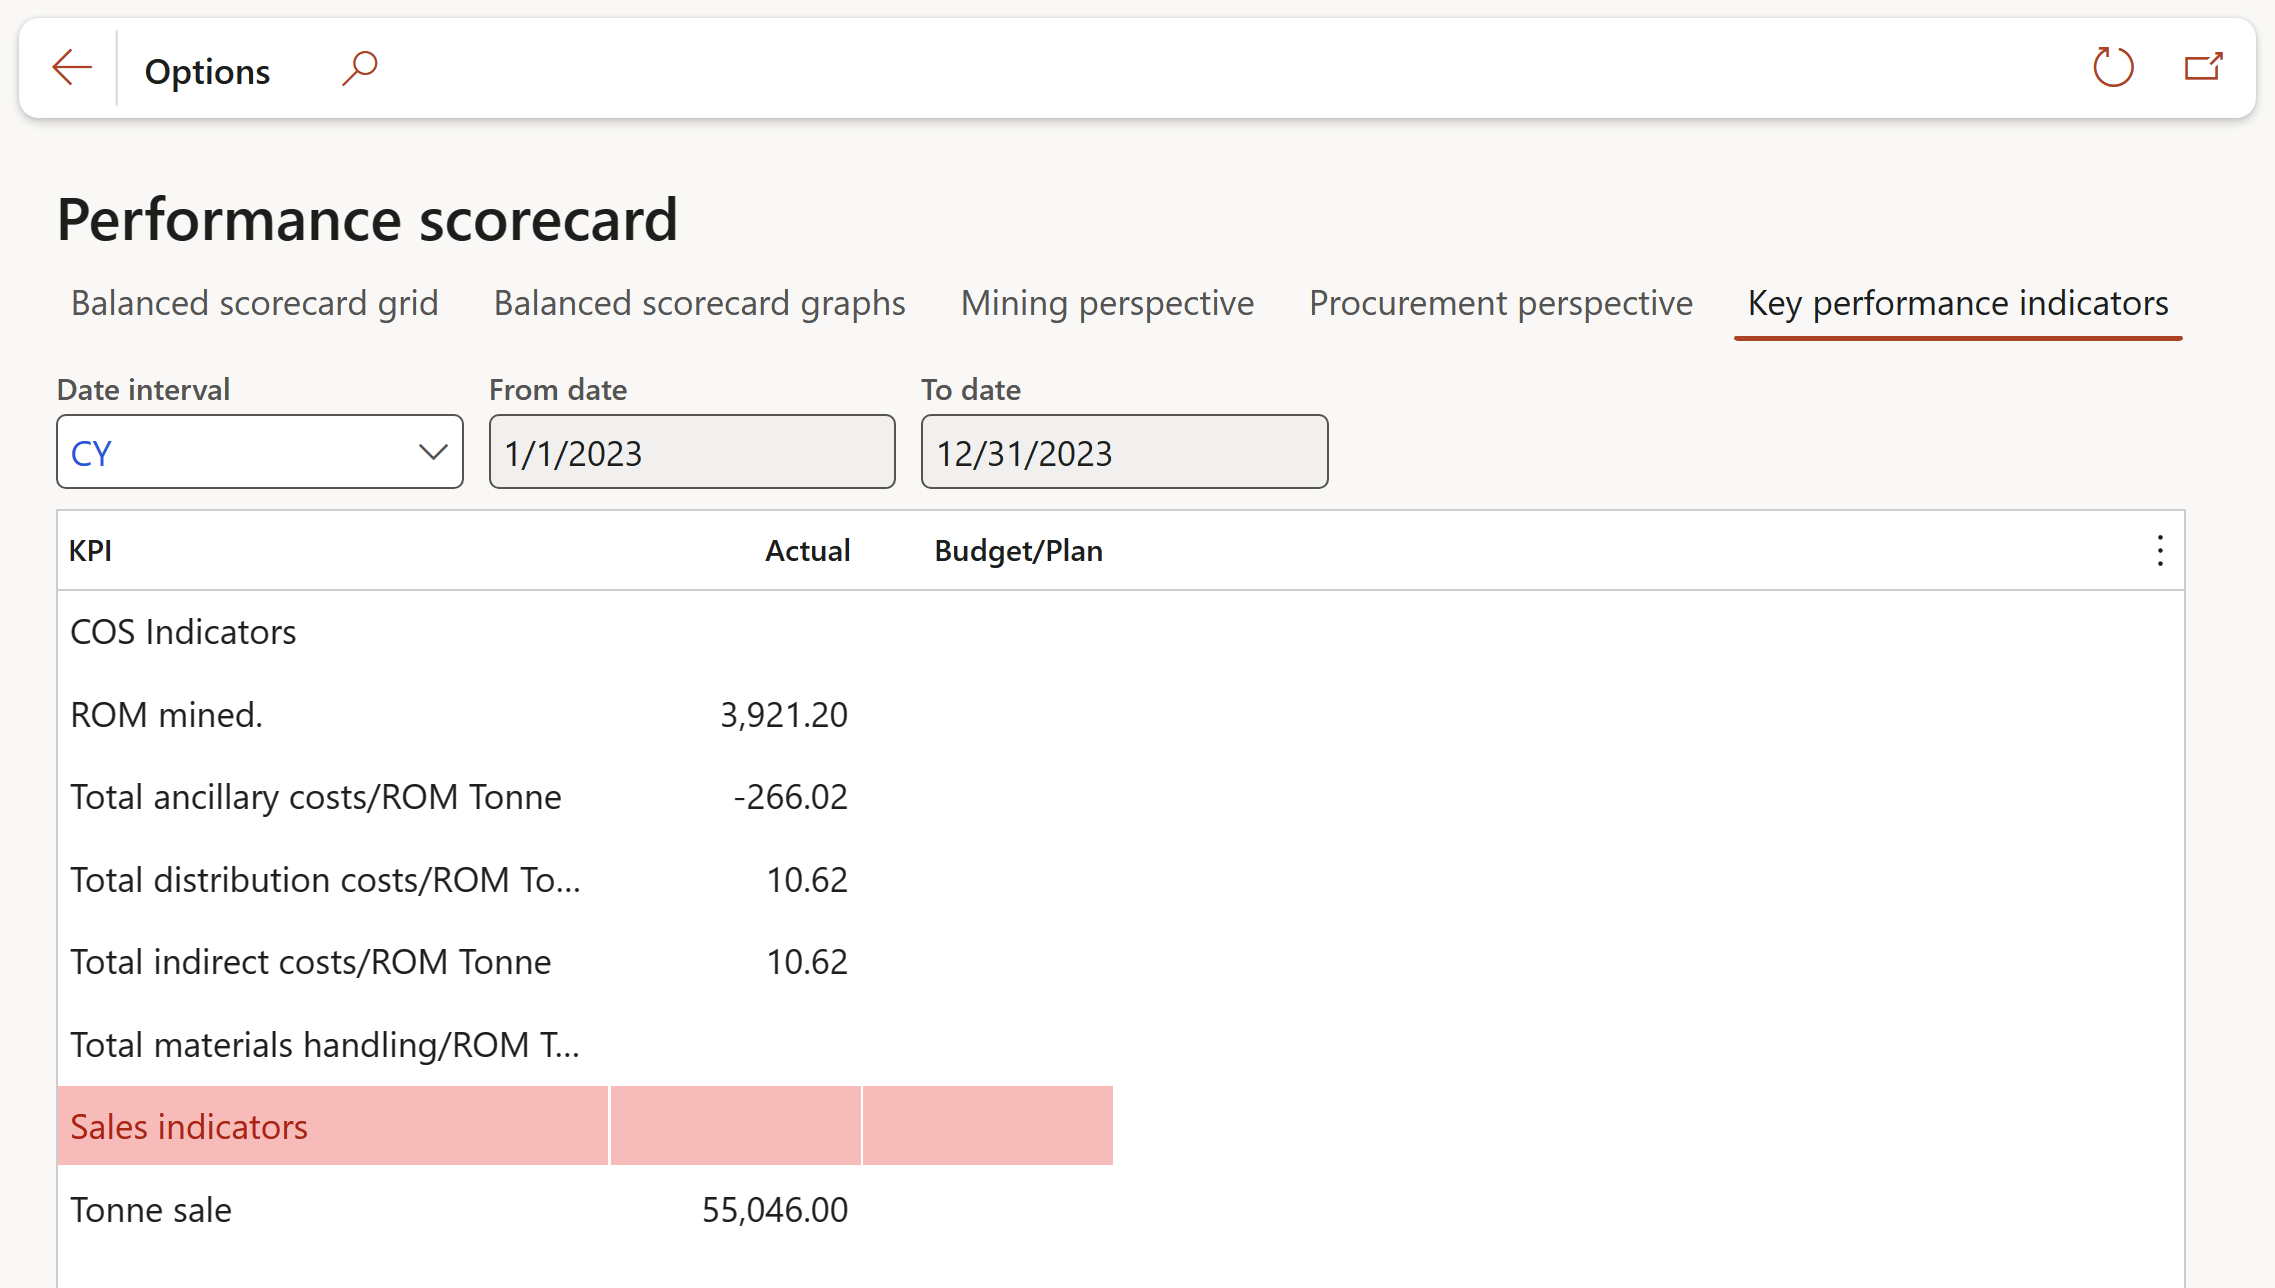
Only KPI list elements that have tick Publish box ticked, will be visible under the Key performance indicators list Index tab
¶ Risk and Compliance Workspace
¶ My work tab
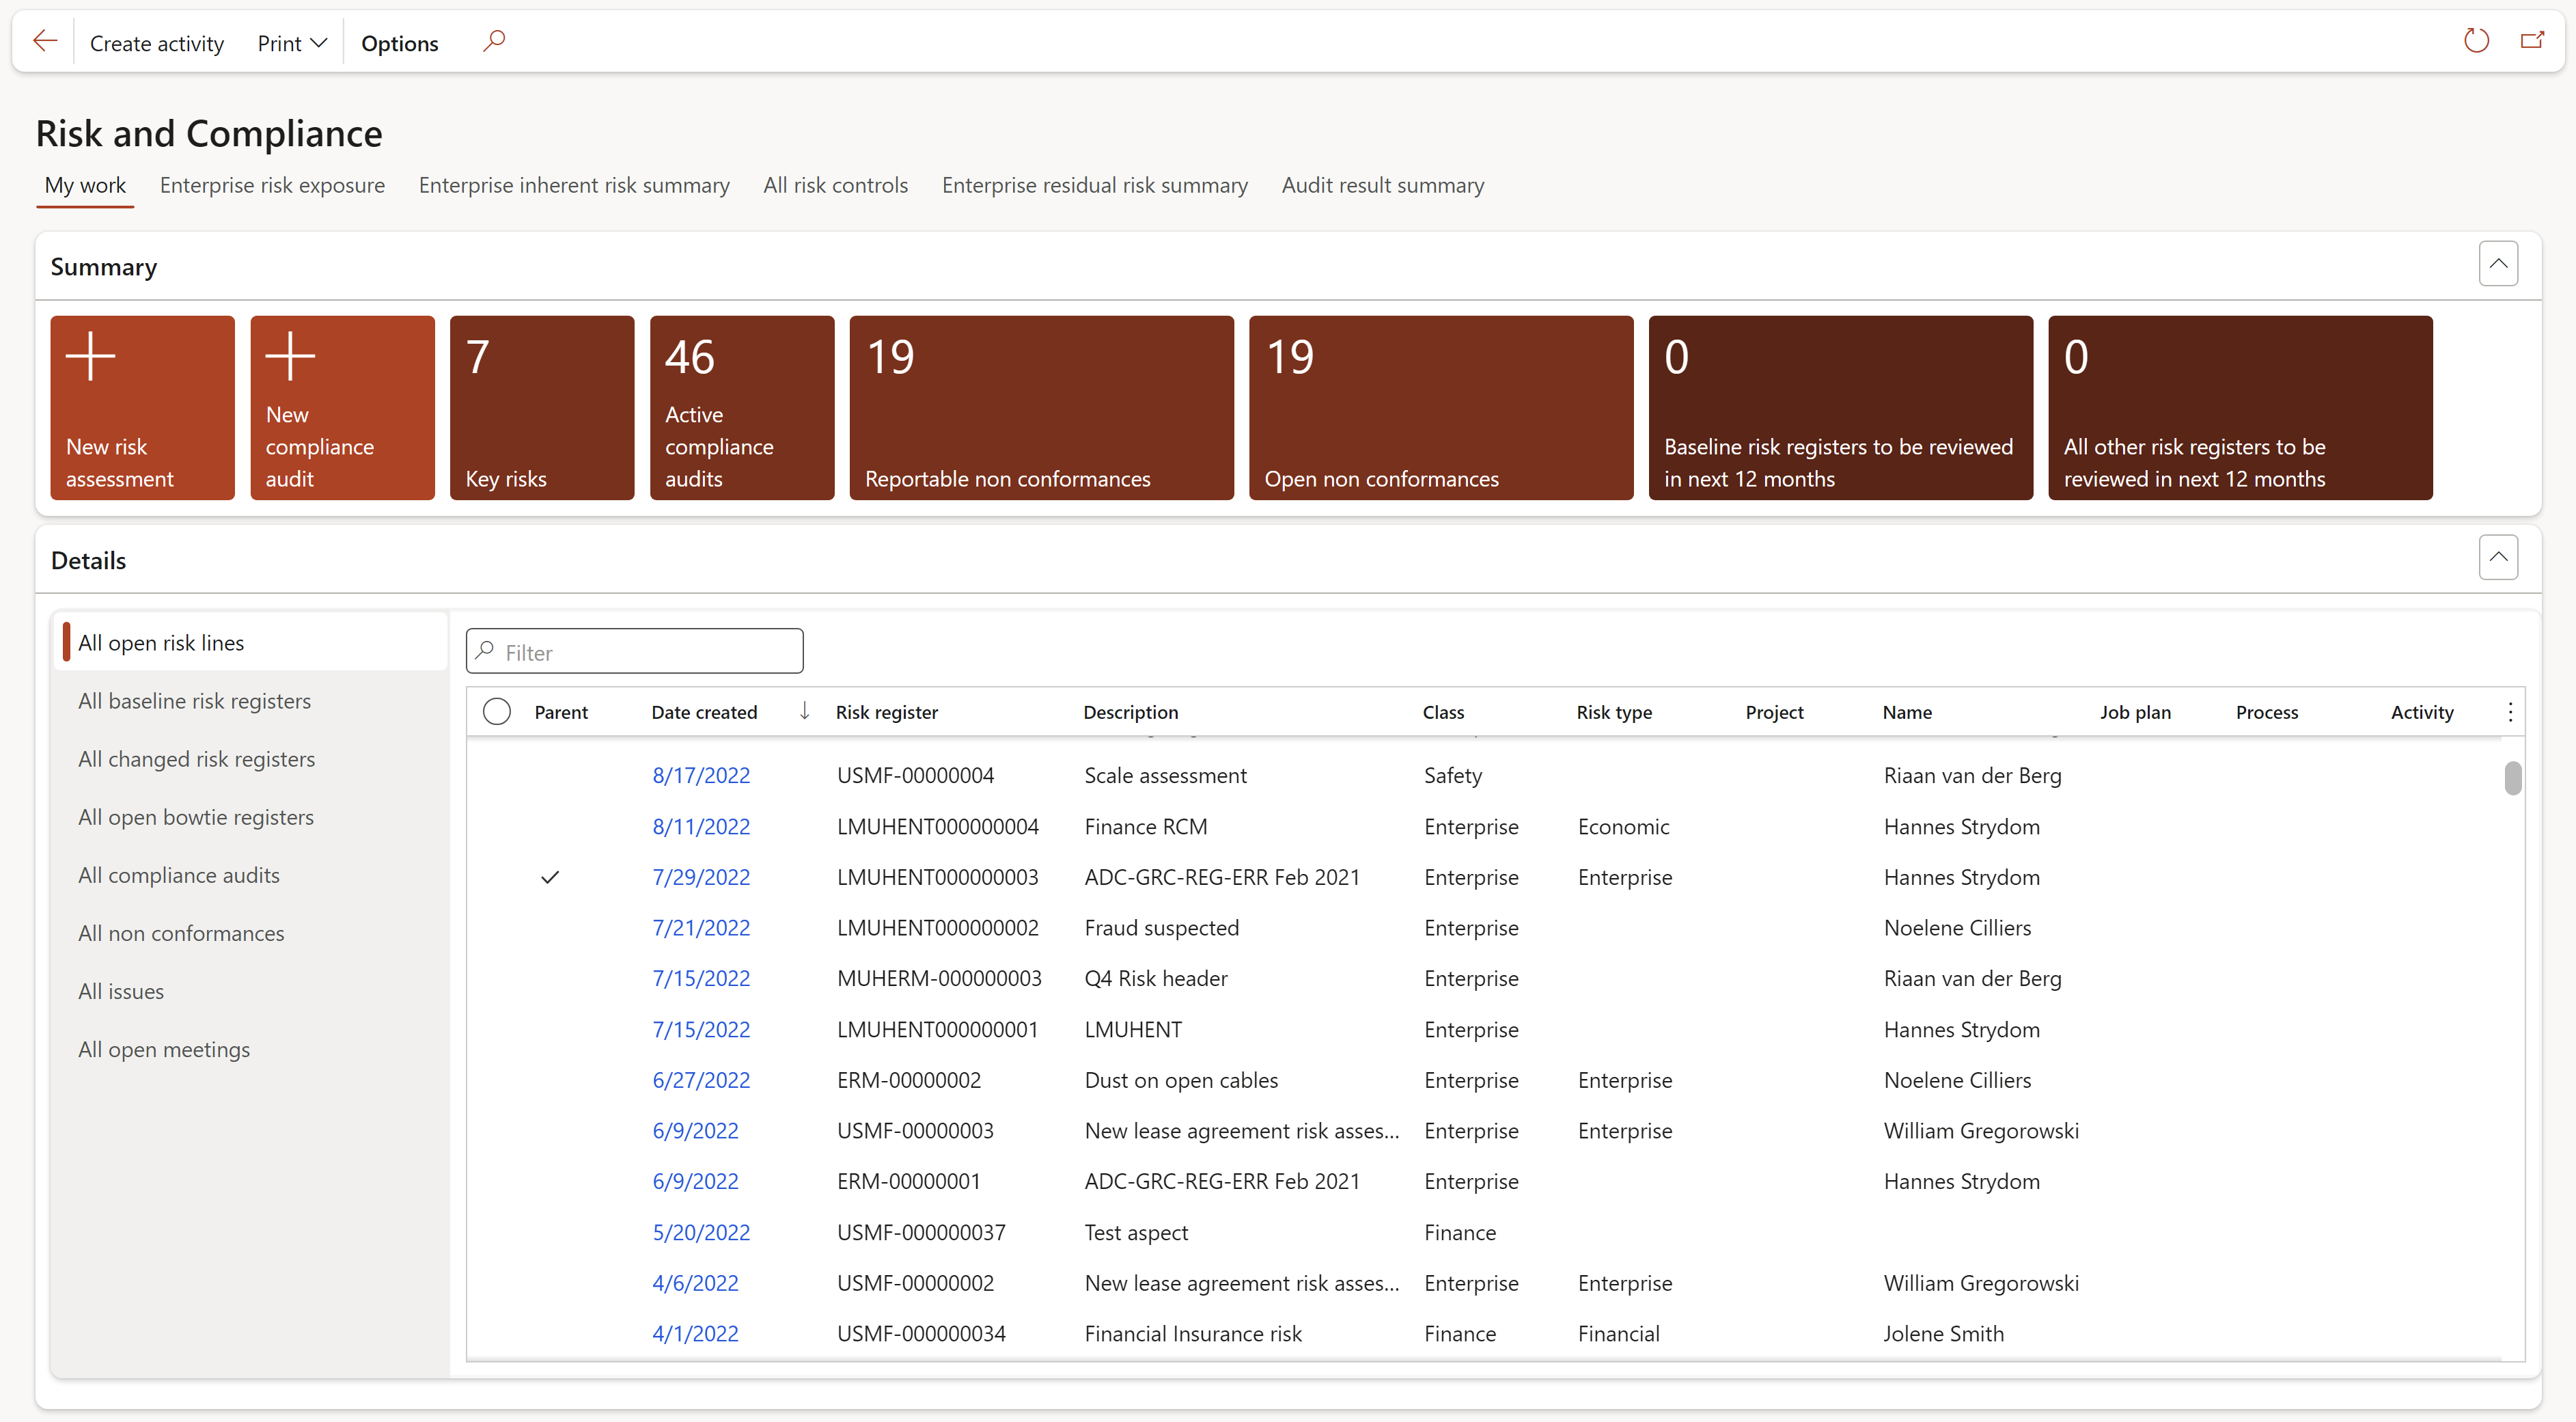
Functions of the Summary tiles:
- New risk assessment: Opens the Risk assessment form
- Key risks:
- The number on the tile indicates the number of recorded key risks
- Clicking on the tile opens the Key risks list page
- New compliance audit: Opens up the Create new audit form
- Active compliance audits:
- The number on the tile indicates the number of active compliance audits
- Clicking on the tile opens the Active compliance audits list page
- Reportable non-conformances:
- The number on the tile indicates the number reportable non conformances
- Clicking on the tile opens the Non conformances list page and only the reportable non conformances are displayed
- Open non-conformances:
- The number on the tile indicates the number of open non conformances
- Clicking on the tile opens the Non conformances list page and only the open non conformances are displayed
- Active internal audits:
- The number on the tile indicates the number of all active audits
- Clicking on the tile opens the All audits list page
- Baseline risk registers to be reviewed in the next 12 months:
- The number on the tile indicates the number of baseline risk registers that need to be reviewed in the next 12 months
- Clicking on the tile opens the Baseline risk registers that need to be reviewed in the next 12 months list page
- All other risk registers to be reviewed in the next 12 months:
- The number on the tile indicates the number of all other risk registers that need to be reviewed in the next 12 months
- Clicking on the tile opens the All other risk registers that need to be reviewed in the next 12 months list page
Functions of the Detail tabs:
- All open risk lines: Displays all recorded open risk lines
- All baseline risk registers: Displays all recorded baseline risk registers
- All changed risk registers: Displays all risk registers that have been changed (The status of the risk registers will be “Changed”)
- All open bow tie registers: Displays all recorded bow tie risk registers
- All compliance audits: Displays all recorded compliance audits
- All non-conformances: Displays all recorded non-conformances
- All issues: Displays all recorded issues
- All licenses: Displays all recorded licenses
- All open meetings: Displays all recorded open meetings
¶ Enterprise risk exposure tab
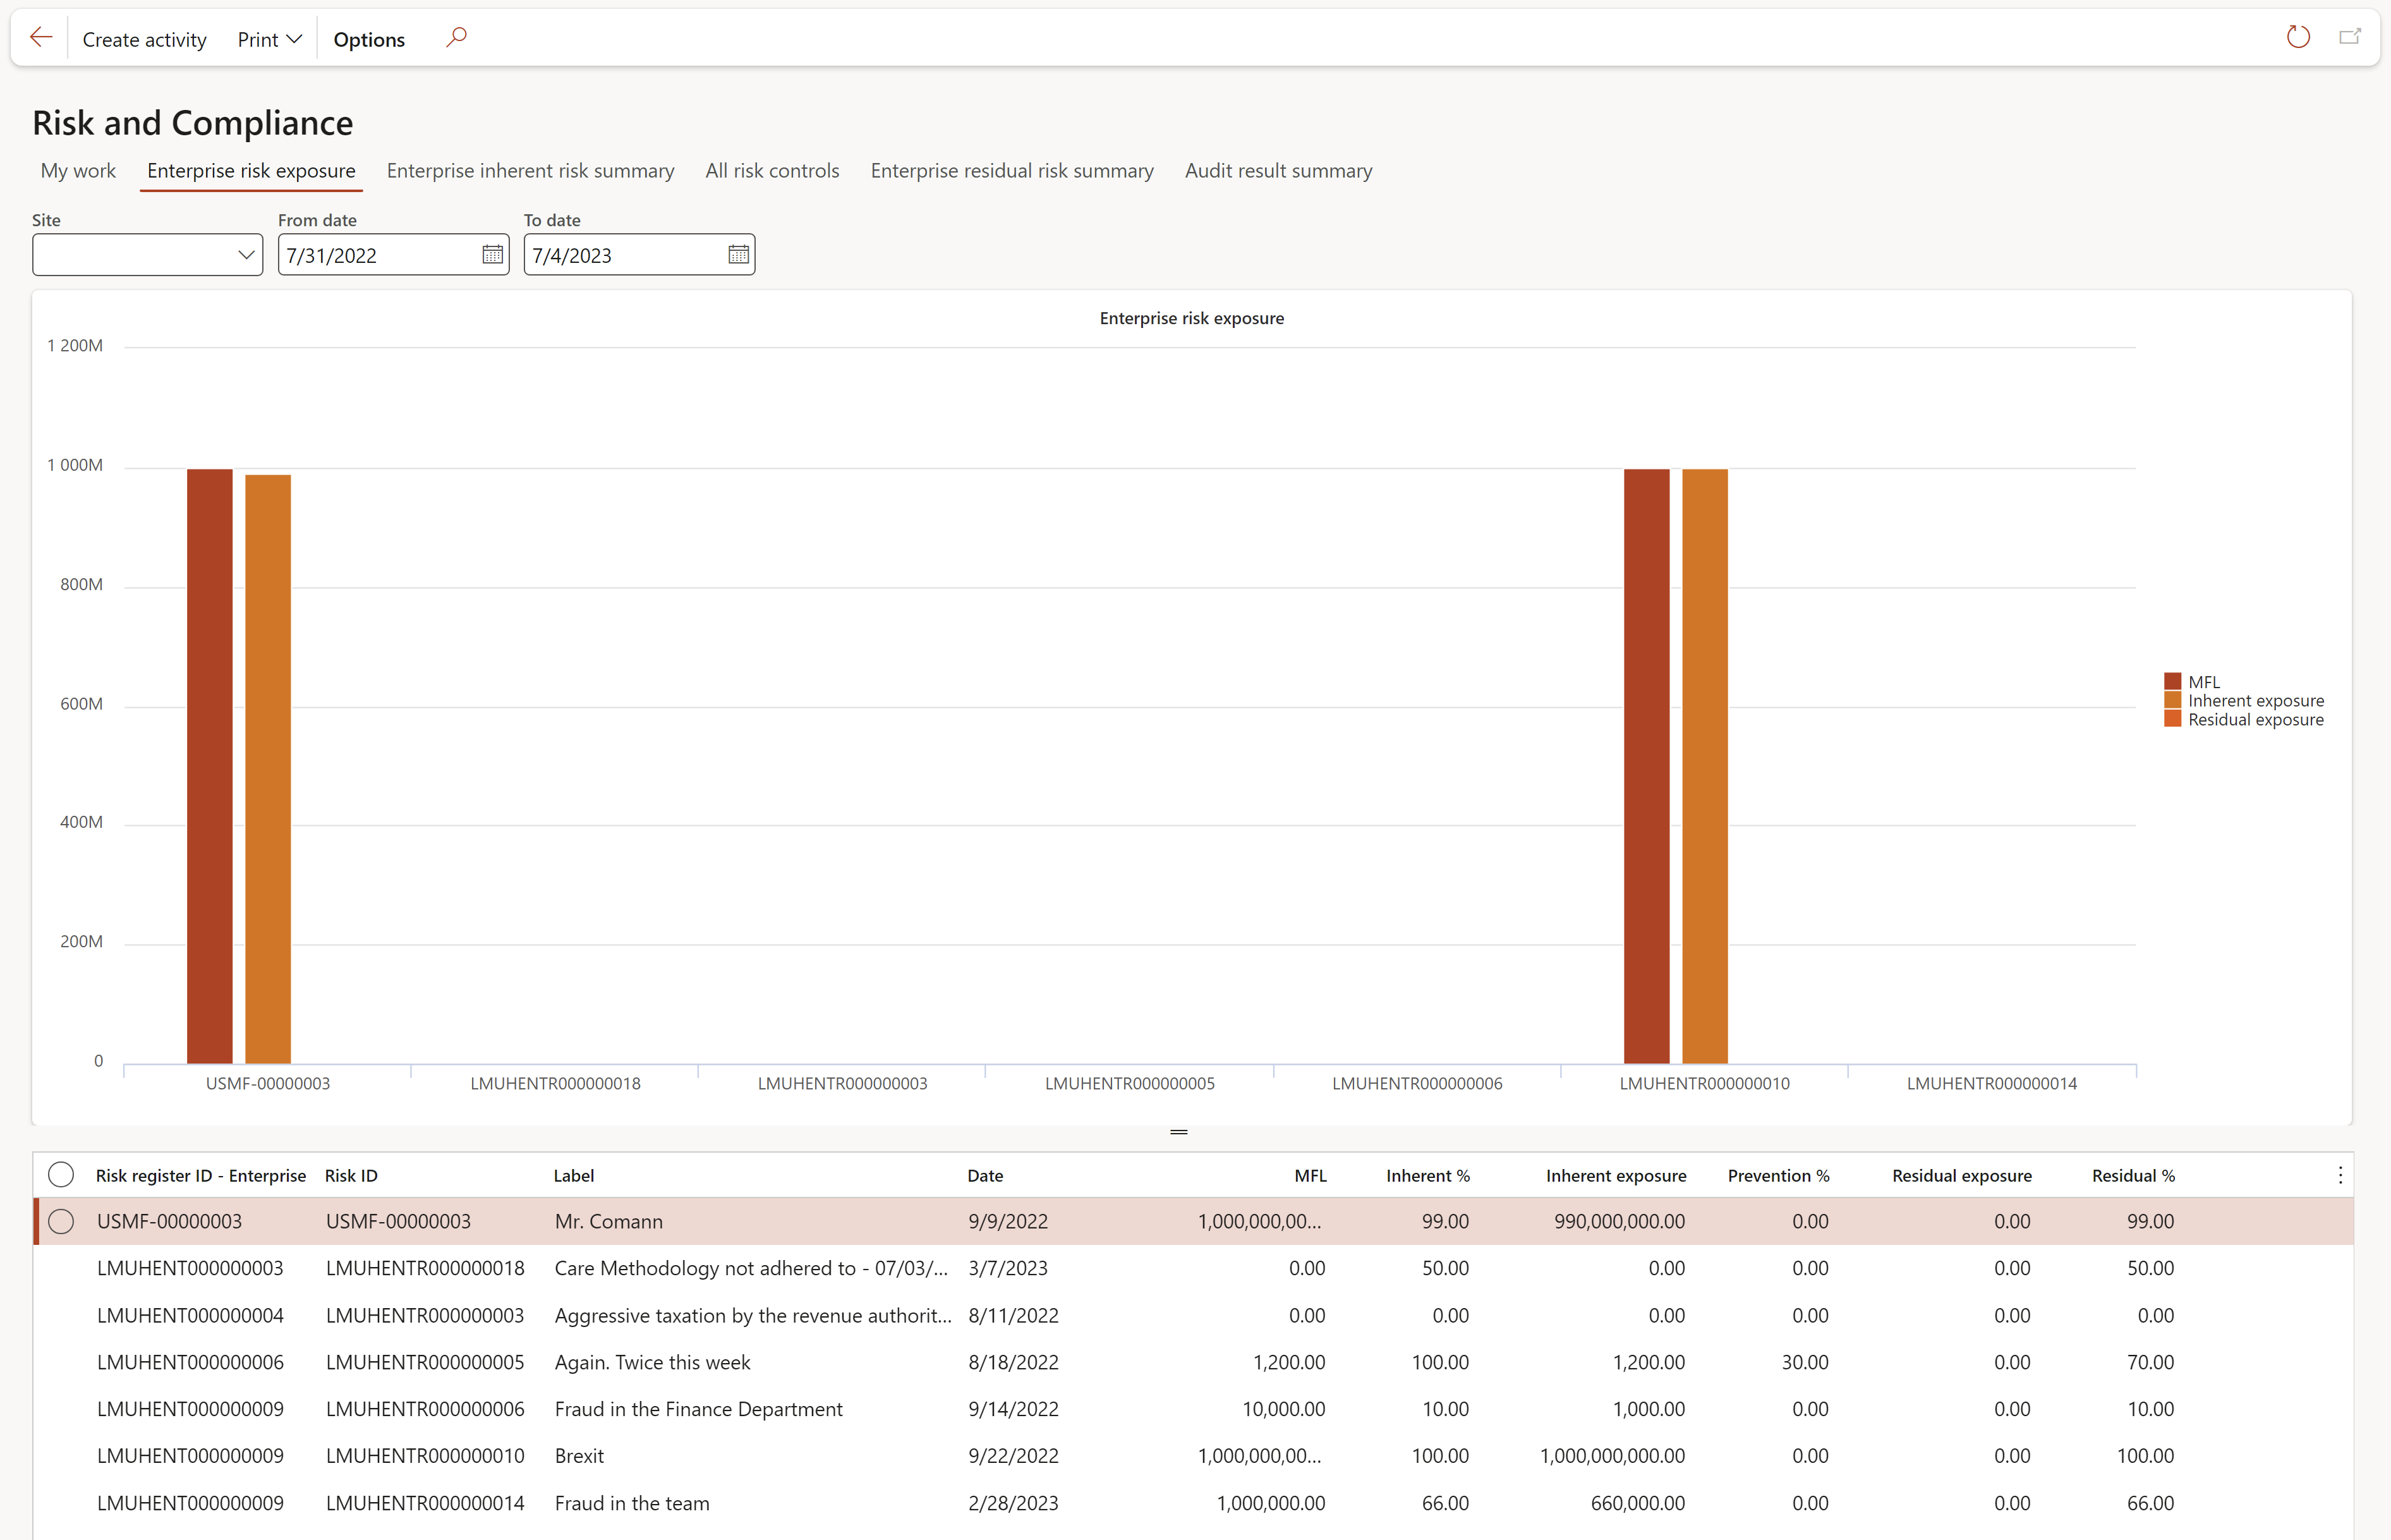
The Enterprise risk exposure grid displays the following for open risks:
(The Site, From date and To date fields are filters on this form)
- Risk register ID
- Risk ID
- Maximum foreseeable loss (MFL)
- Inherent %
- Inherent exposure
- Prevention %
- Residual exposure
- Residual %
¶ Enterprise inherent risk summary tab
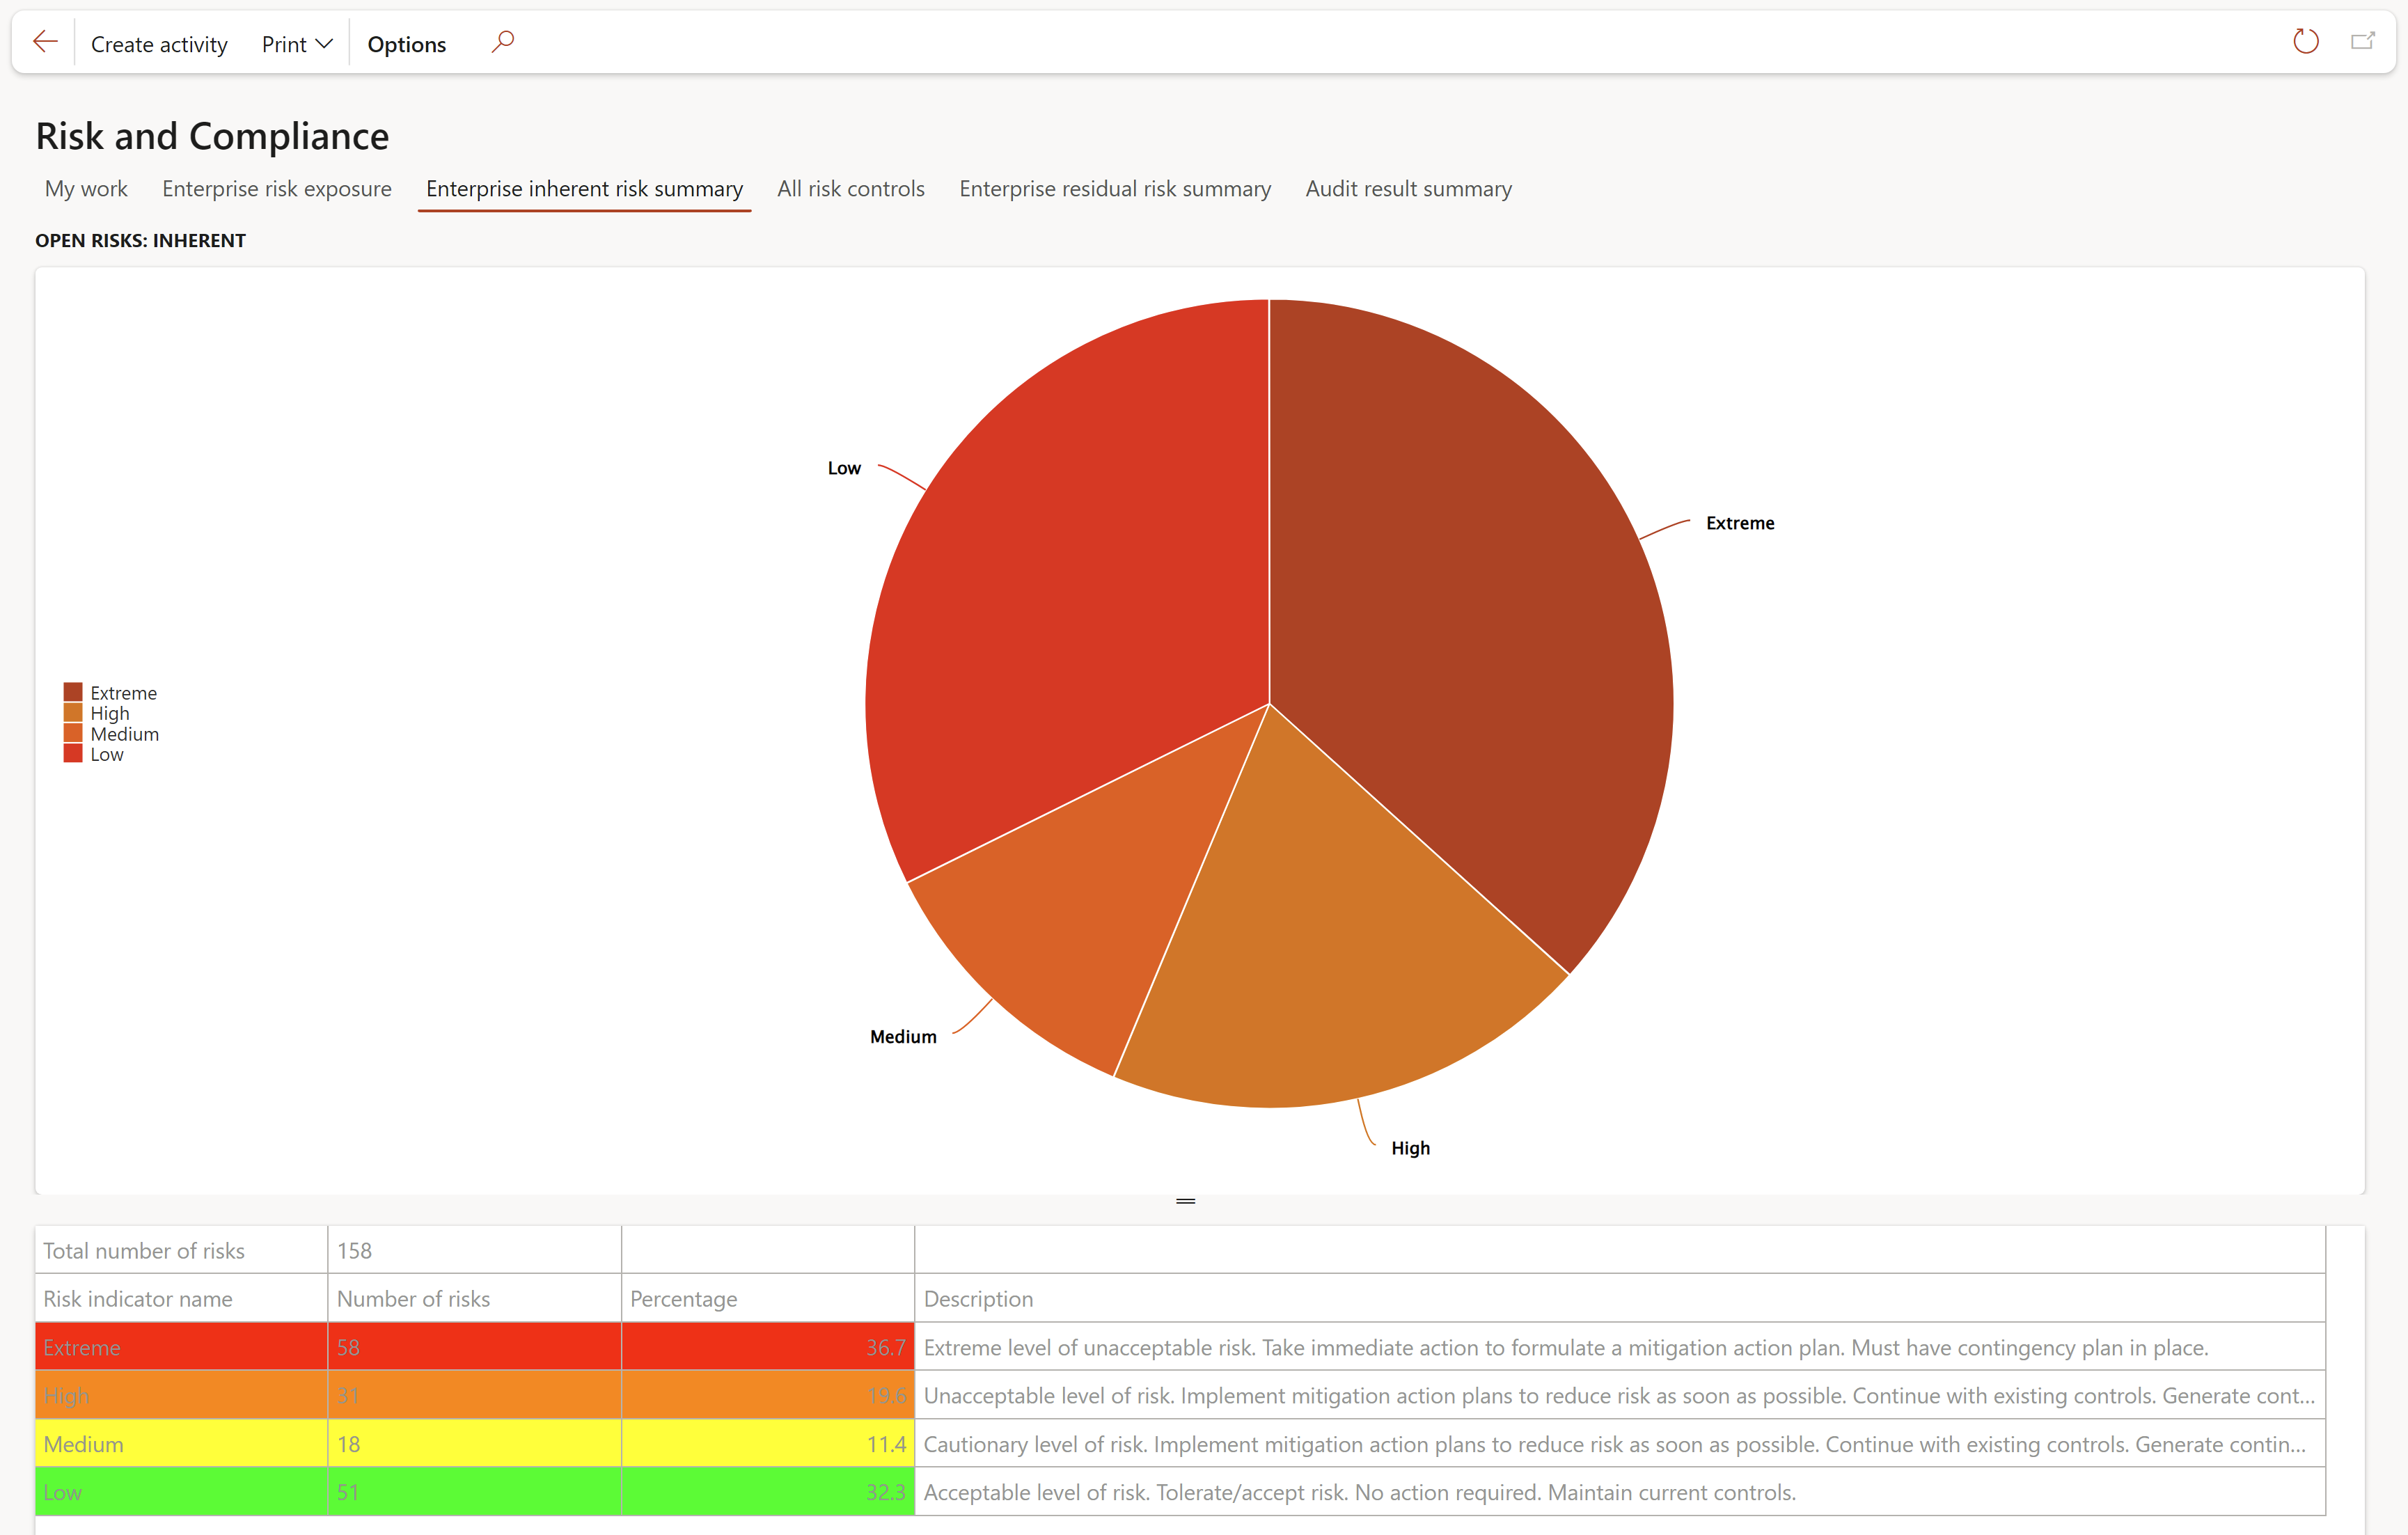
The Enterprise inherent risk summary chart and grid displays summary information for open risks
¶ All risk controls tab
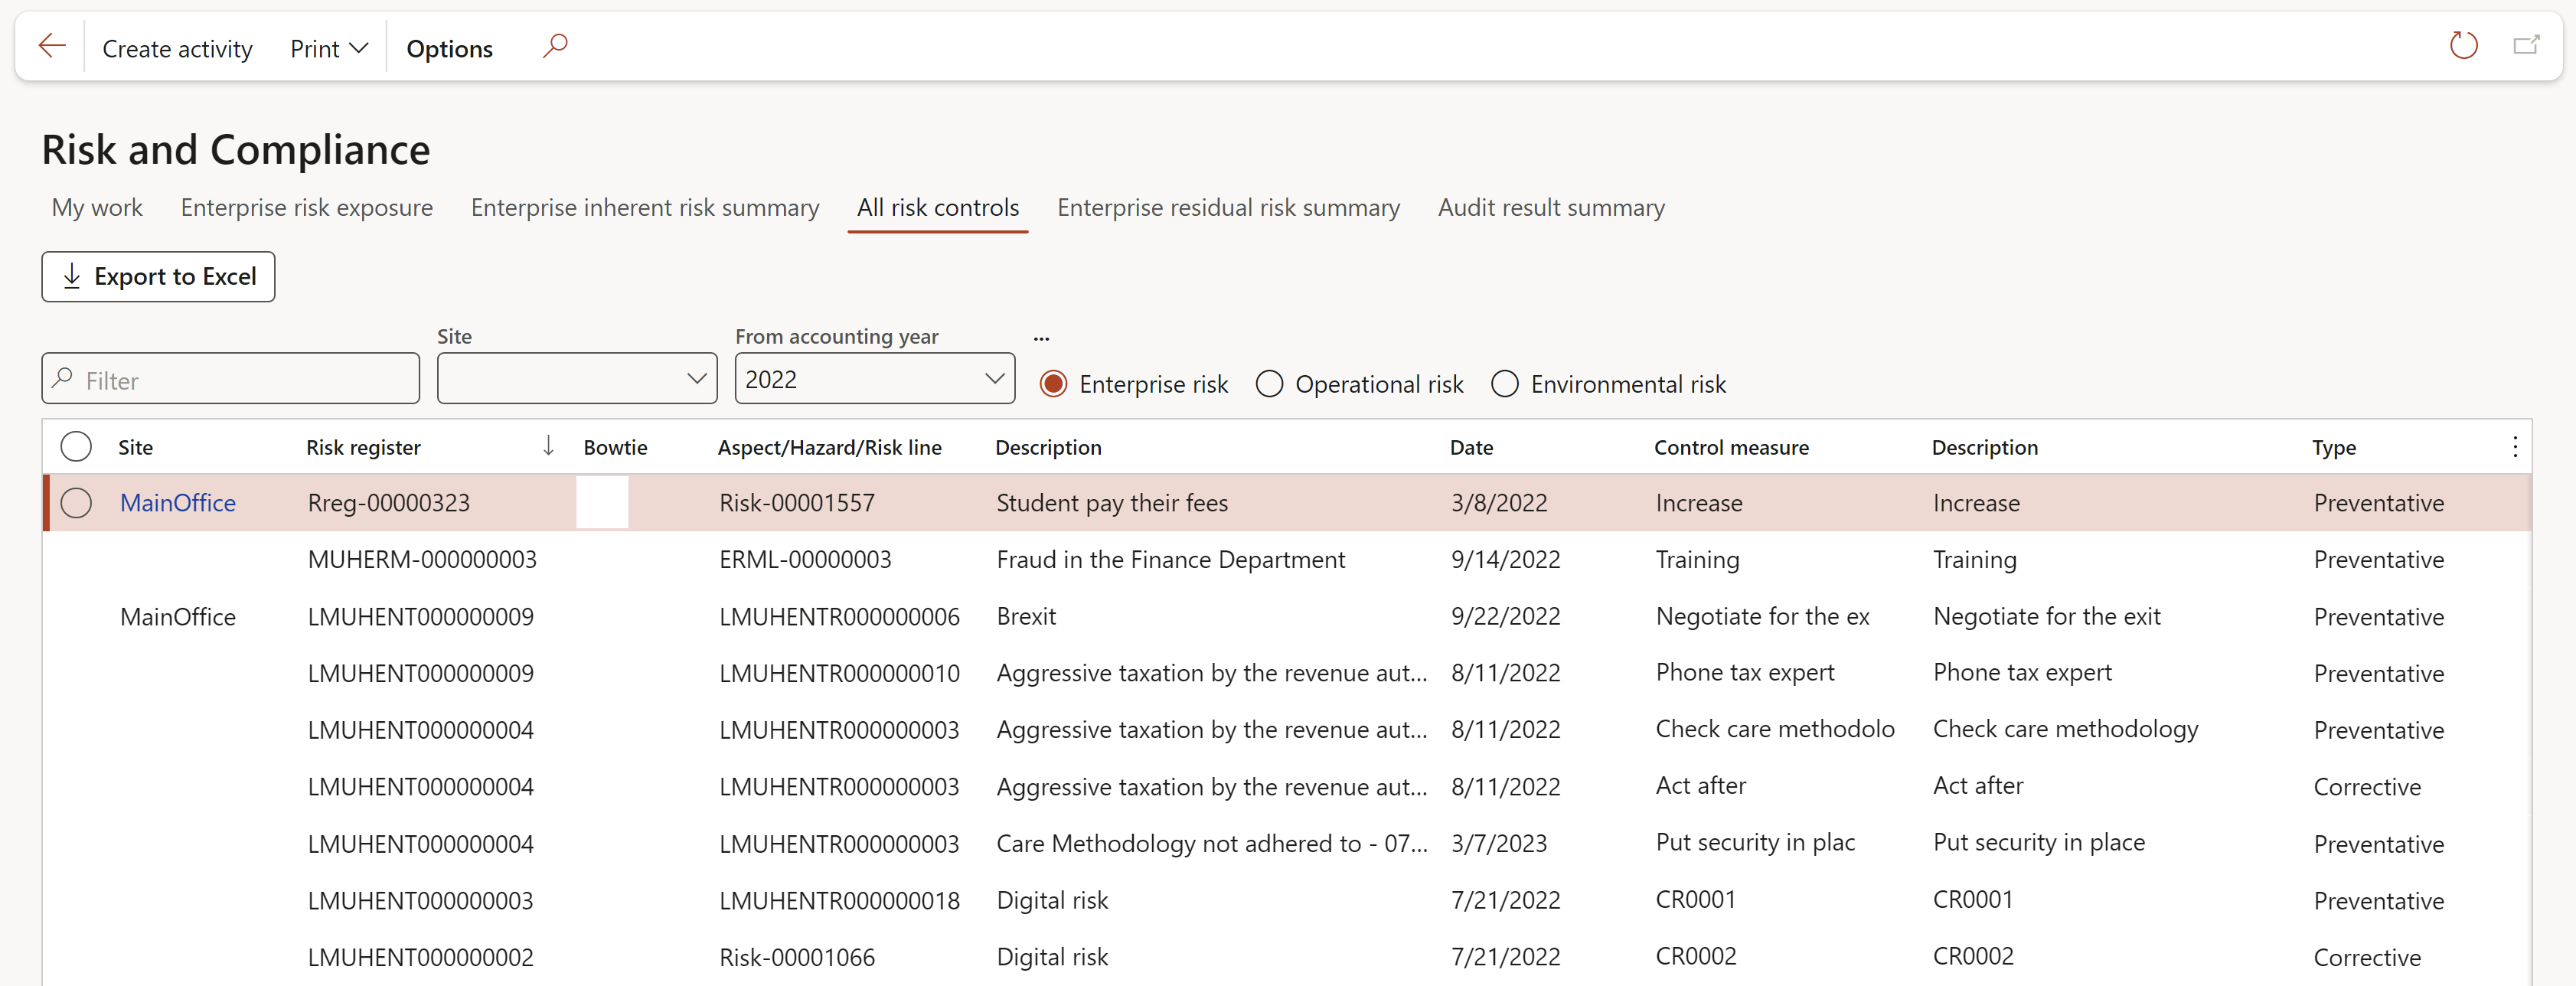
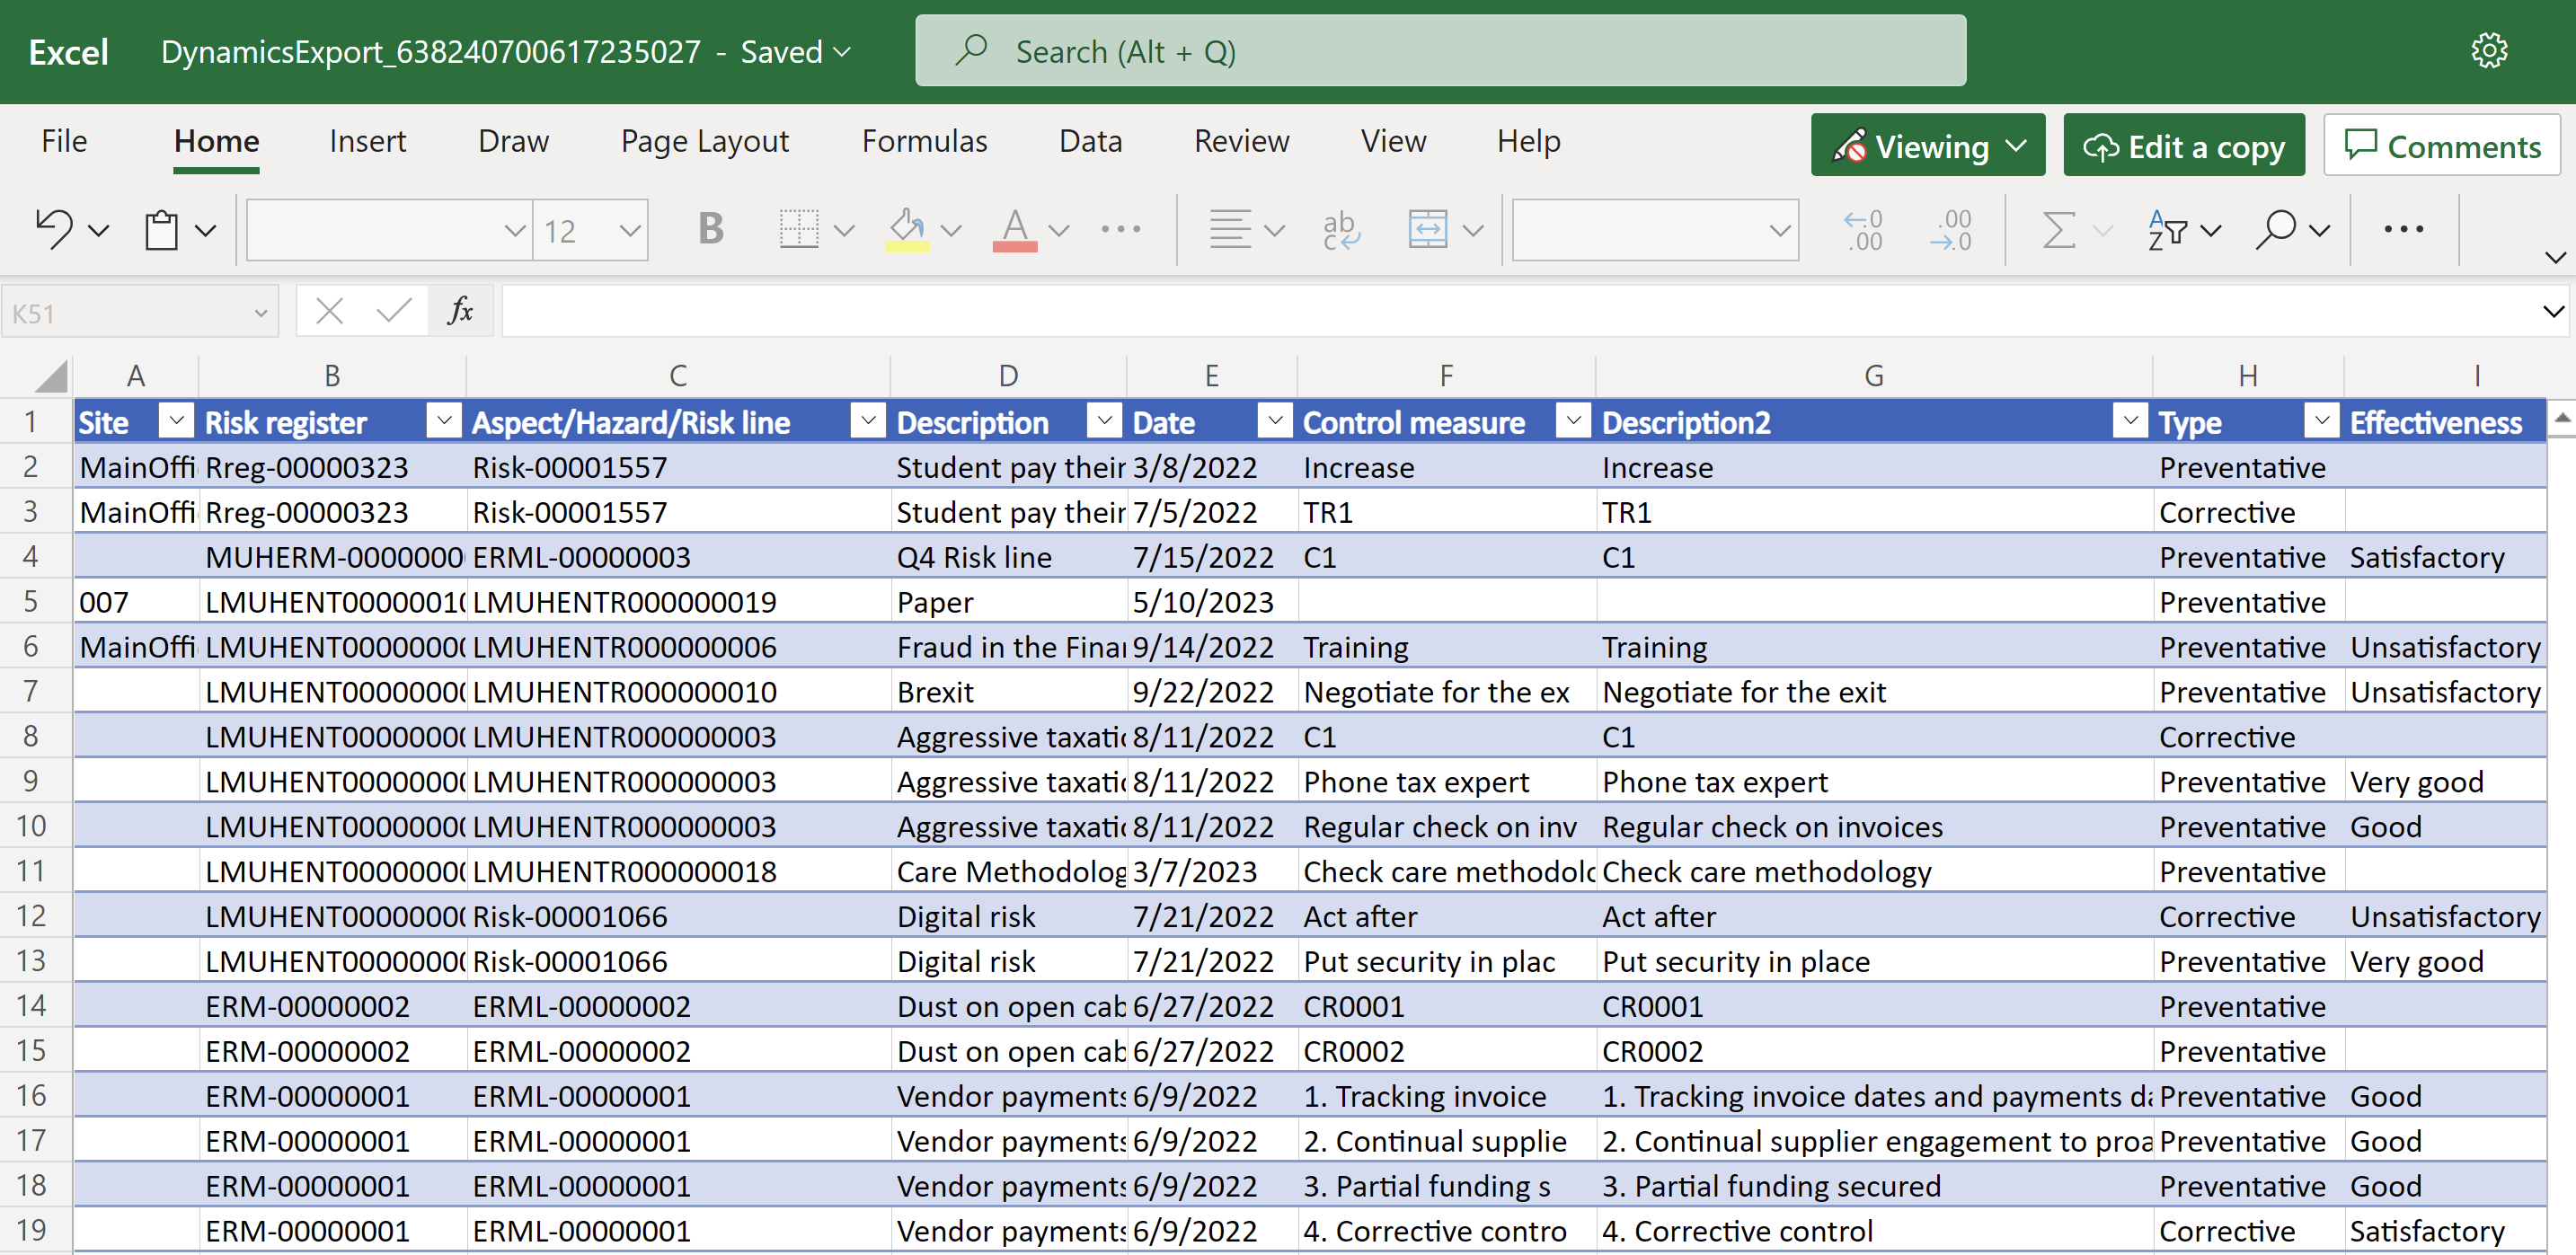
The user can choose to view all controls for either Enterprise risks, Operational risks, Environmental risks, or all the risk controls combined, for the selected” From accounting year” and/or selected “Site”.
The grid can also be exported to Excel.
¶ Enterprise residual risk summary tab
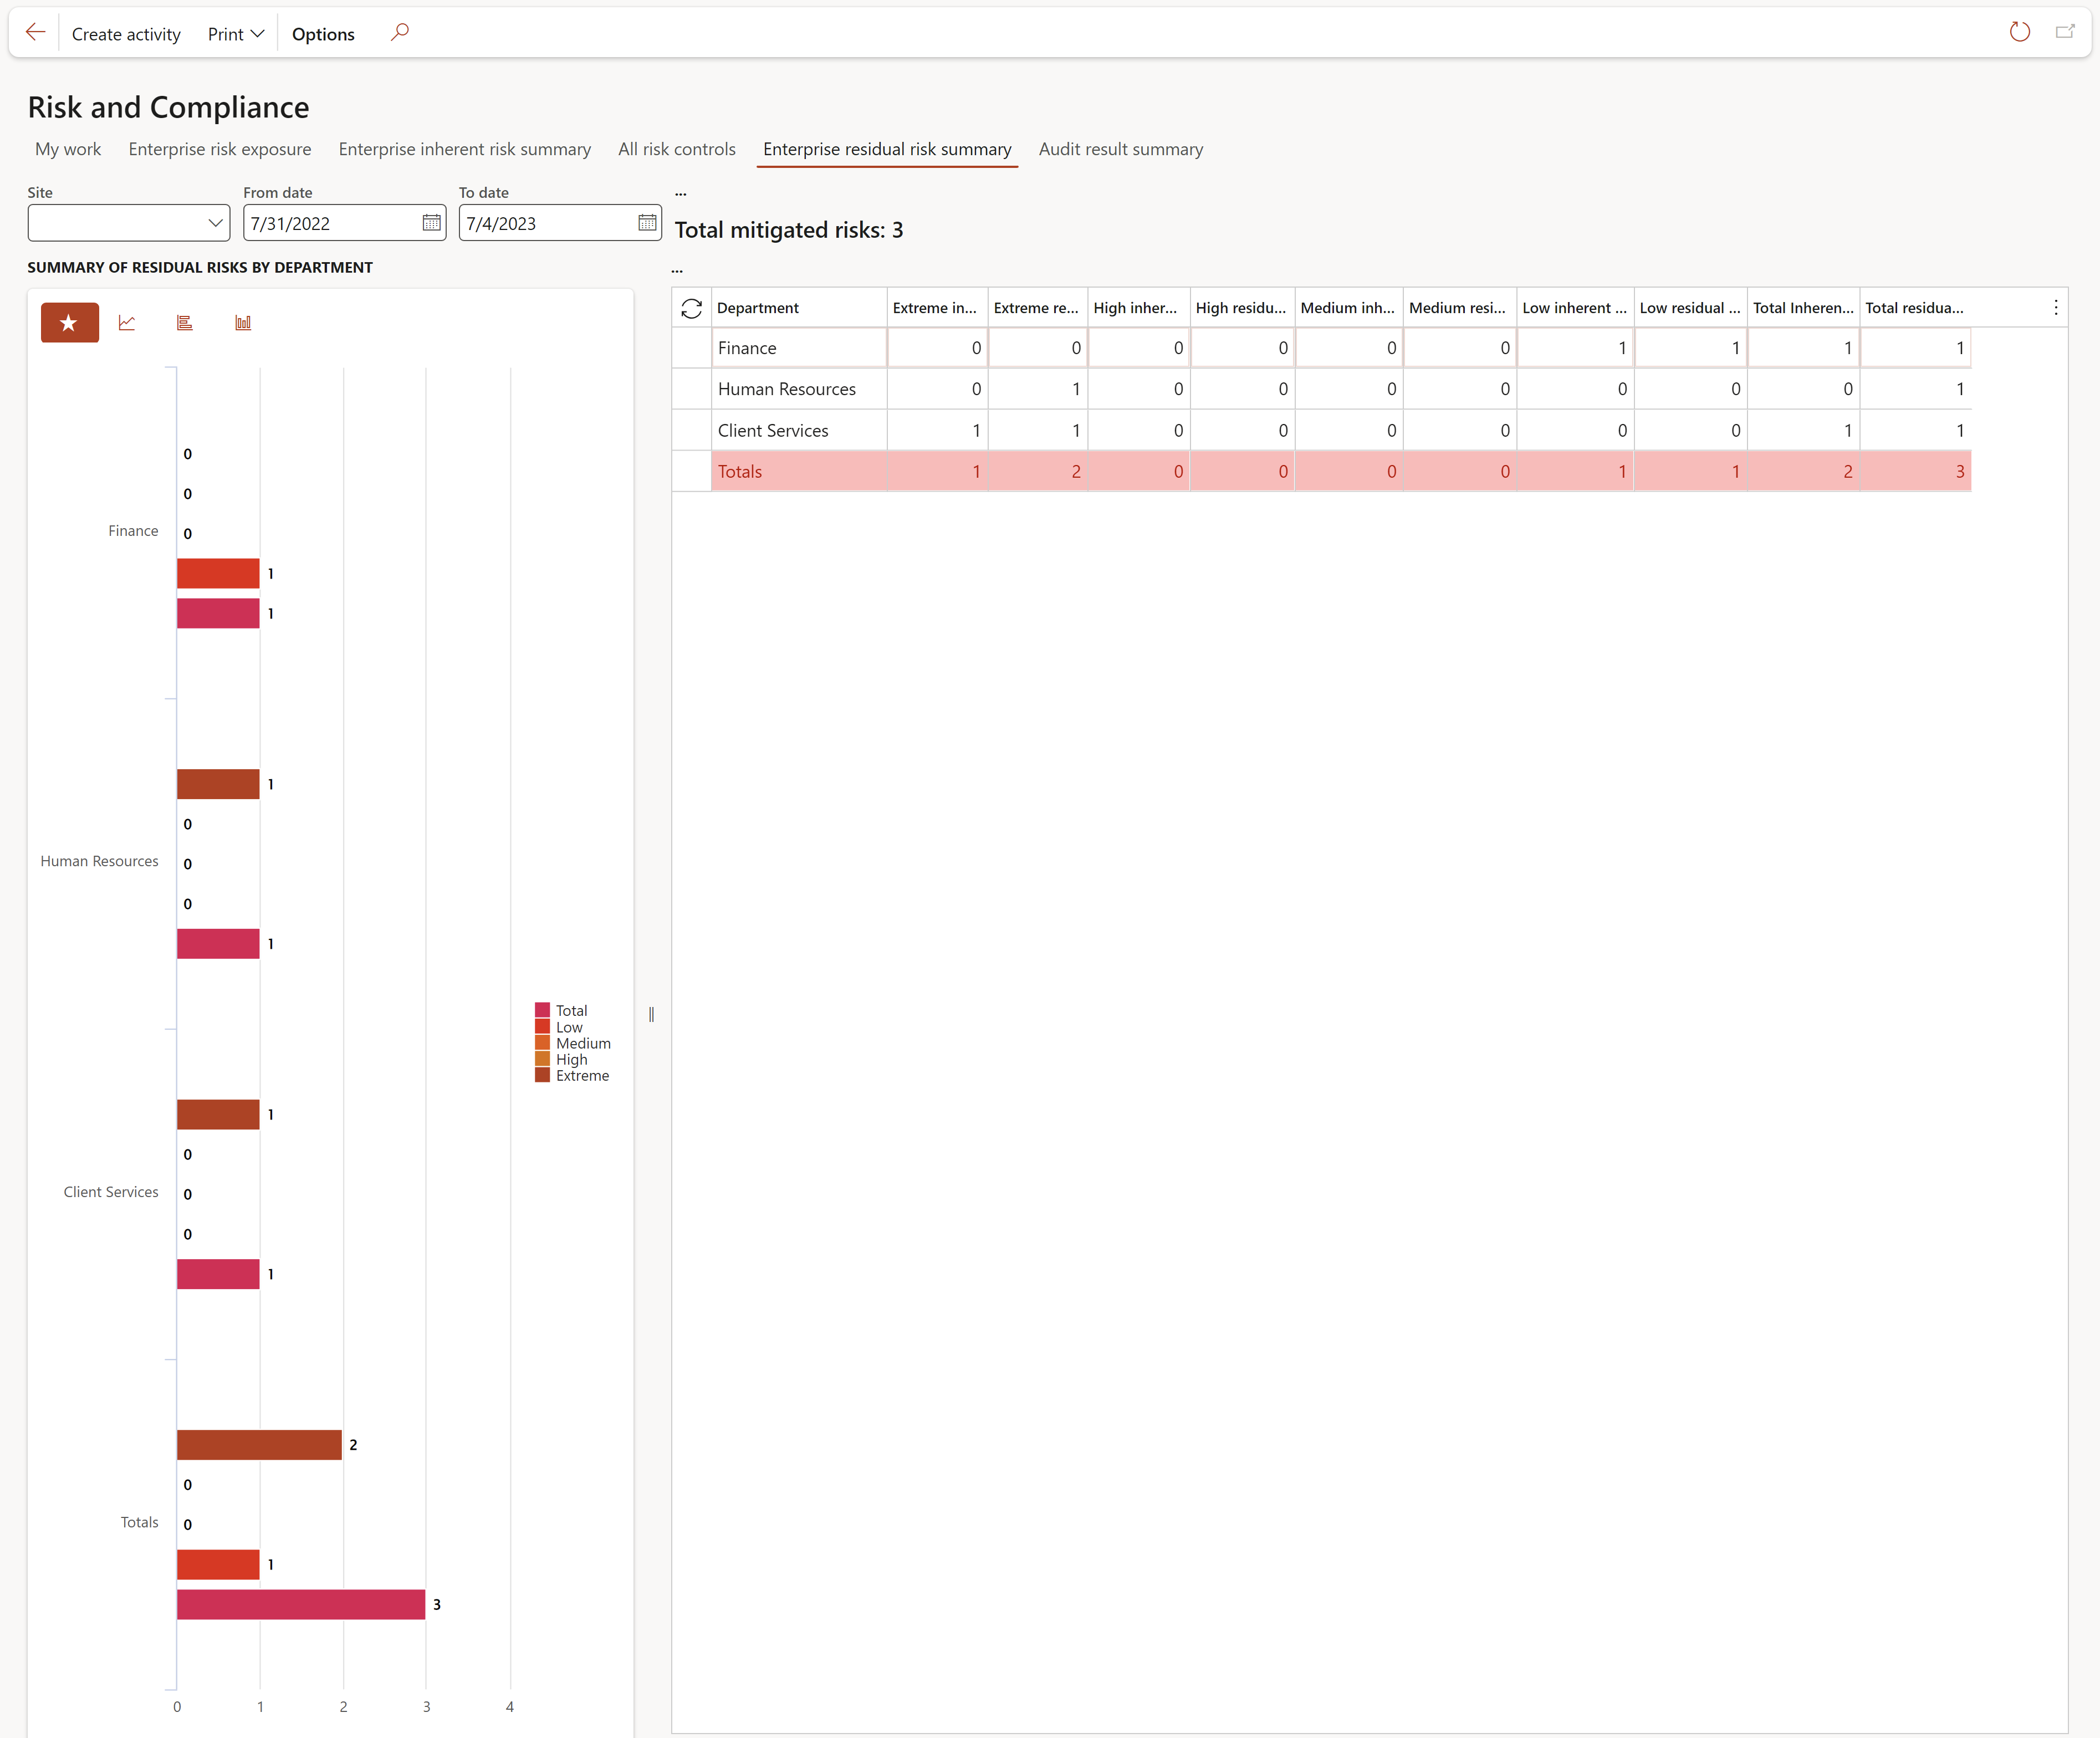
The Enterprise residual risk summary grid displays the following per department:
(The From date and To date fields are filters on this form)
|
|
¶ Audit result summary tab

This inquiry displays the number of non-conformances by category per department
¶ The Print button
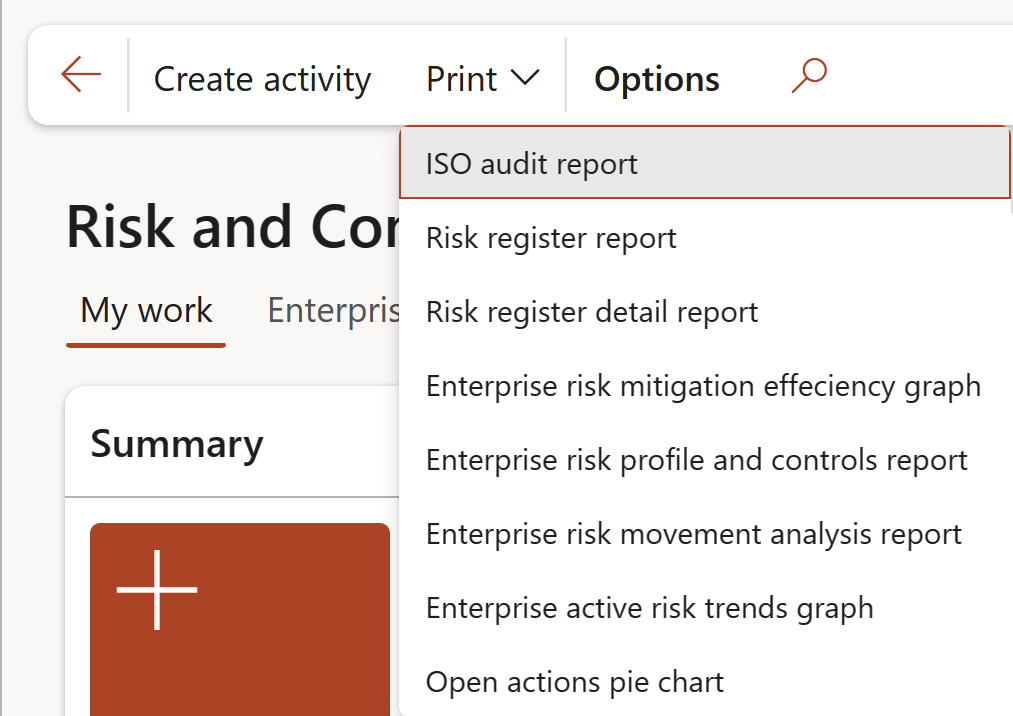
The reports listed in the dropdown list can be printed from the workspace
¶ Safety management Workspace
¶ My work tab
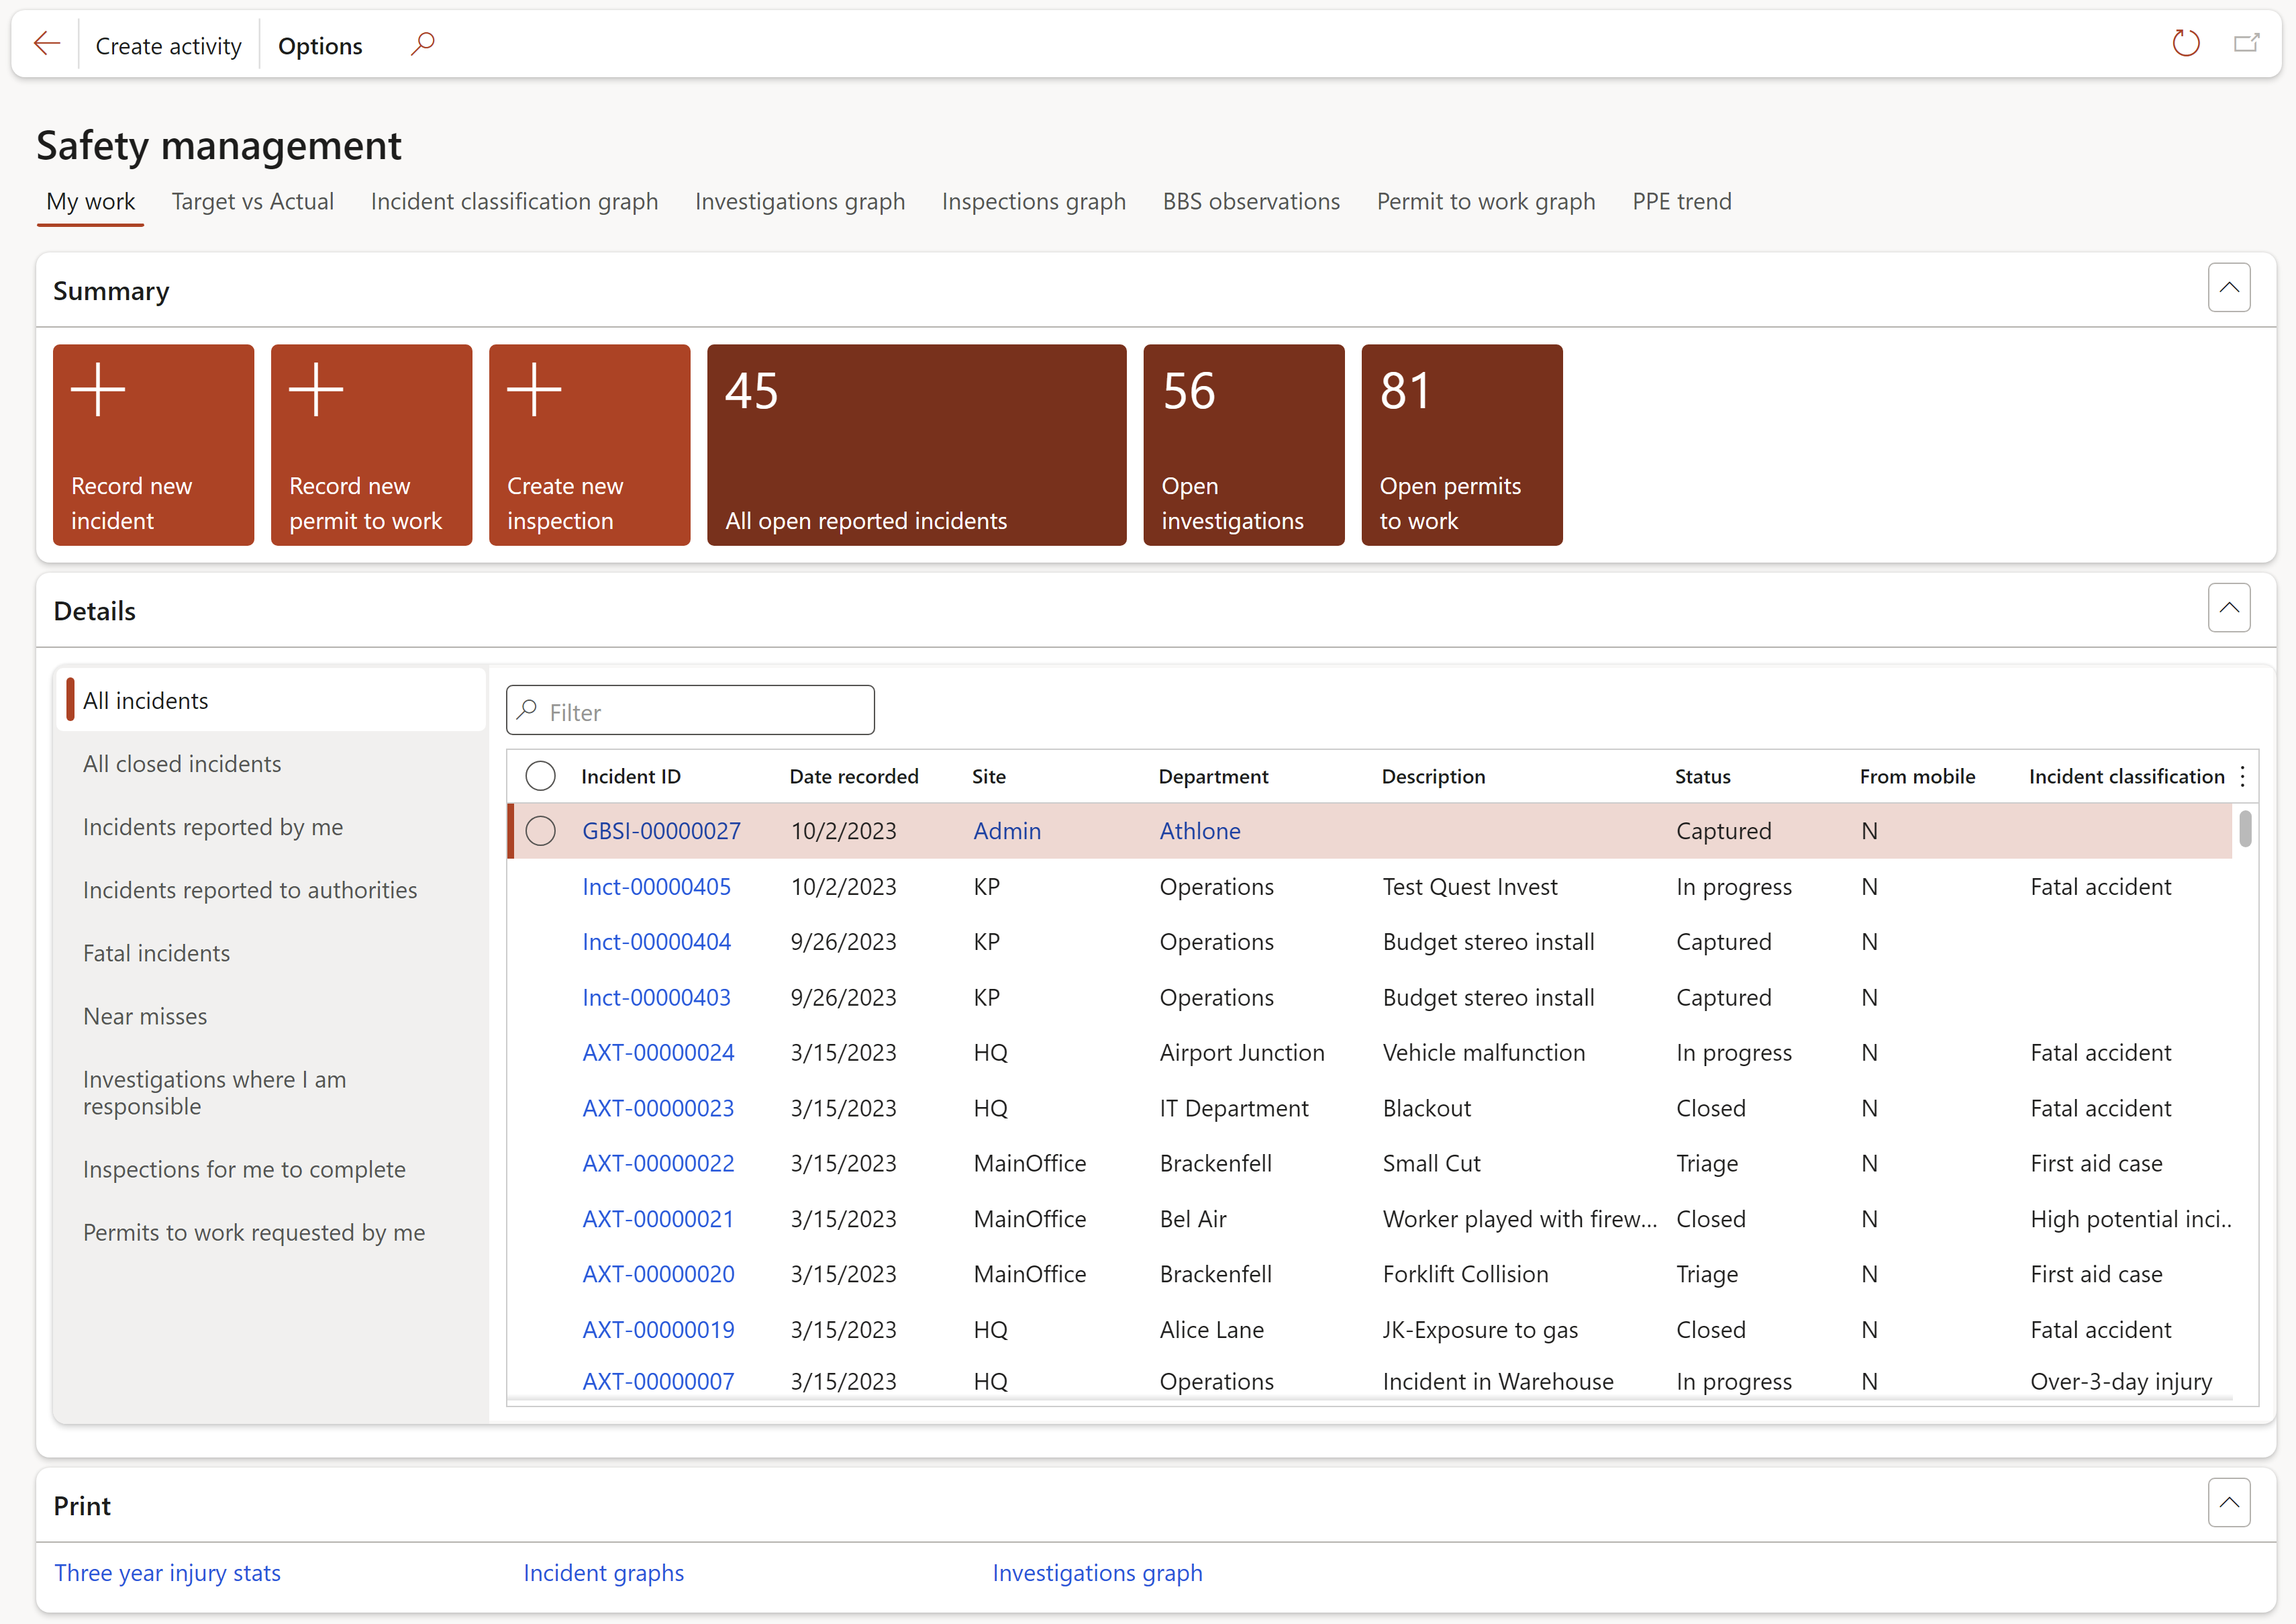
Functions of the Summary tiles:
- Record new incident: Opens up the Report an incident form
- Record new permit to work: Opens up the Record a new permit to work form
- Create a new inspection: Opens up the Inspections form
- All open reported incidents:
- The number on the tile indicates the number of open reported incidents
- Clicking on the tile opens the All open reported incidents list page
- Open investigations:
- The number on the tile indicates the number of open investigations
- Clicking on the tile opens the Open investigations list page
- Open permits to work:
- The number on the tile indicates the number of open permits to work (Permit status = Recorded)
- Clicking on the tile opens the Open permits to work list page
Functions of the Details tabs:
- All incidents: Displays all recorded incidents
- All closed incidents: Displays all closed incidents
- Incidents reported by me: Displays all incidents reported by the logged in user
- Incidents reported to authorities: Displays all incidents reported to the relevant authorities
- Fatal incidents: Displays all incidents that were reported with fatalities
- Near misses: Displays all recorded incidents that were near misses
- Investigations where I am responsible: Displays all recorded investigations that the logged in user is responsible for
- Inspections for me to complete: Displays all recorded inspections that the logged in user has to complete
- Permits to work requested by me: Displays all recorded permits to work requested by the logged in user
Buttons under the Print Fast tab:
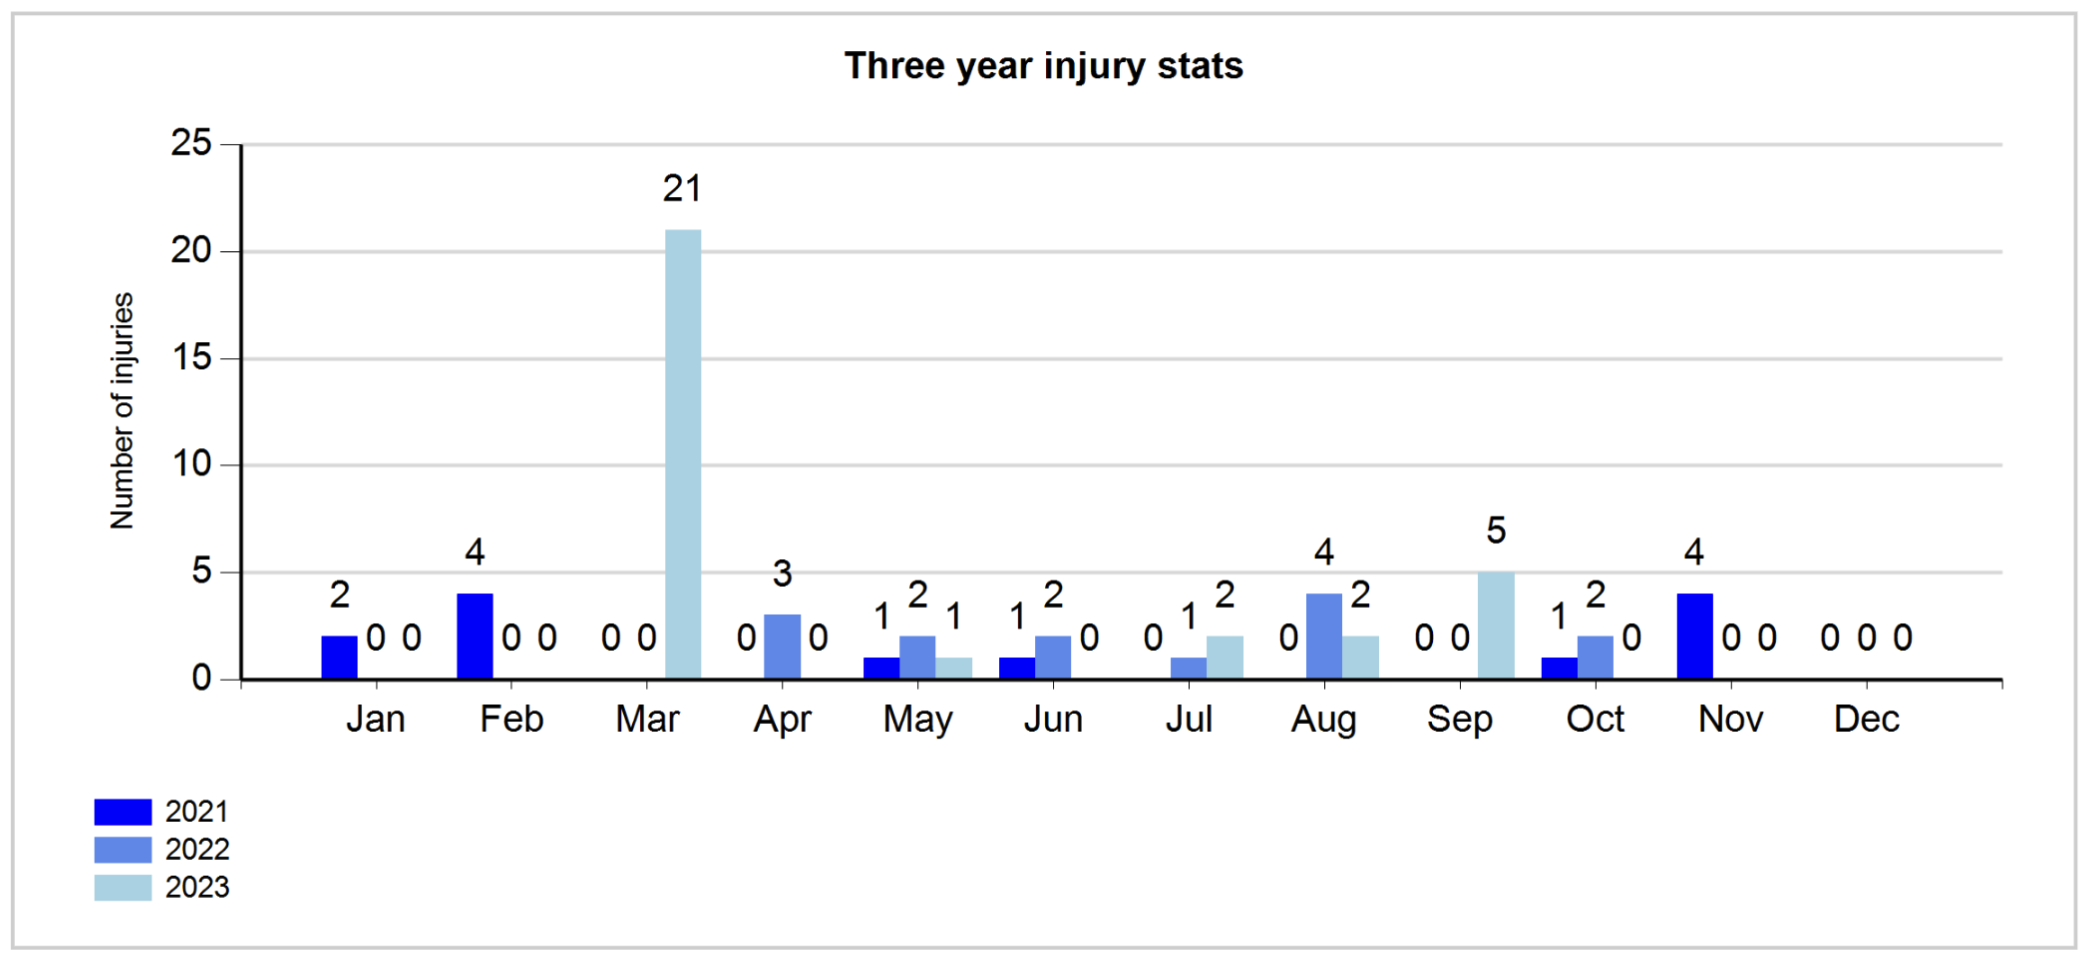
- Three year injury stats: Displays stats for three years. The Year selected on the Parameters dialog will be the last year of tree displayed on the graph.
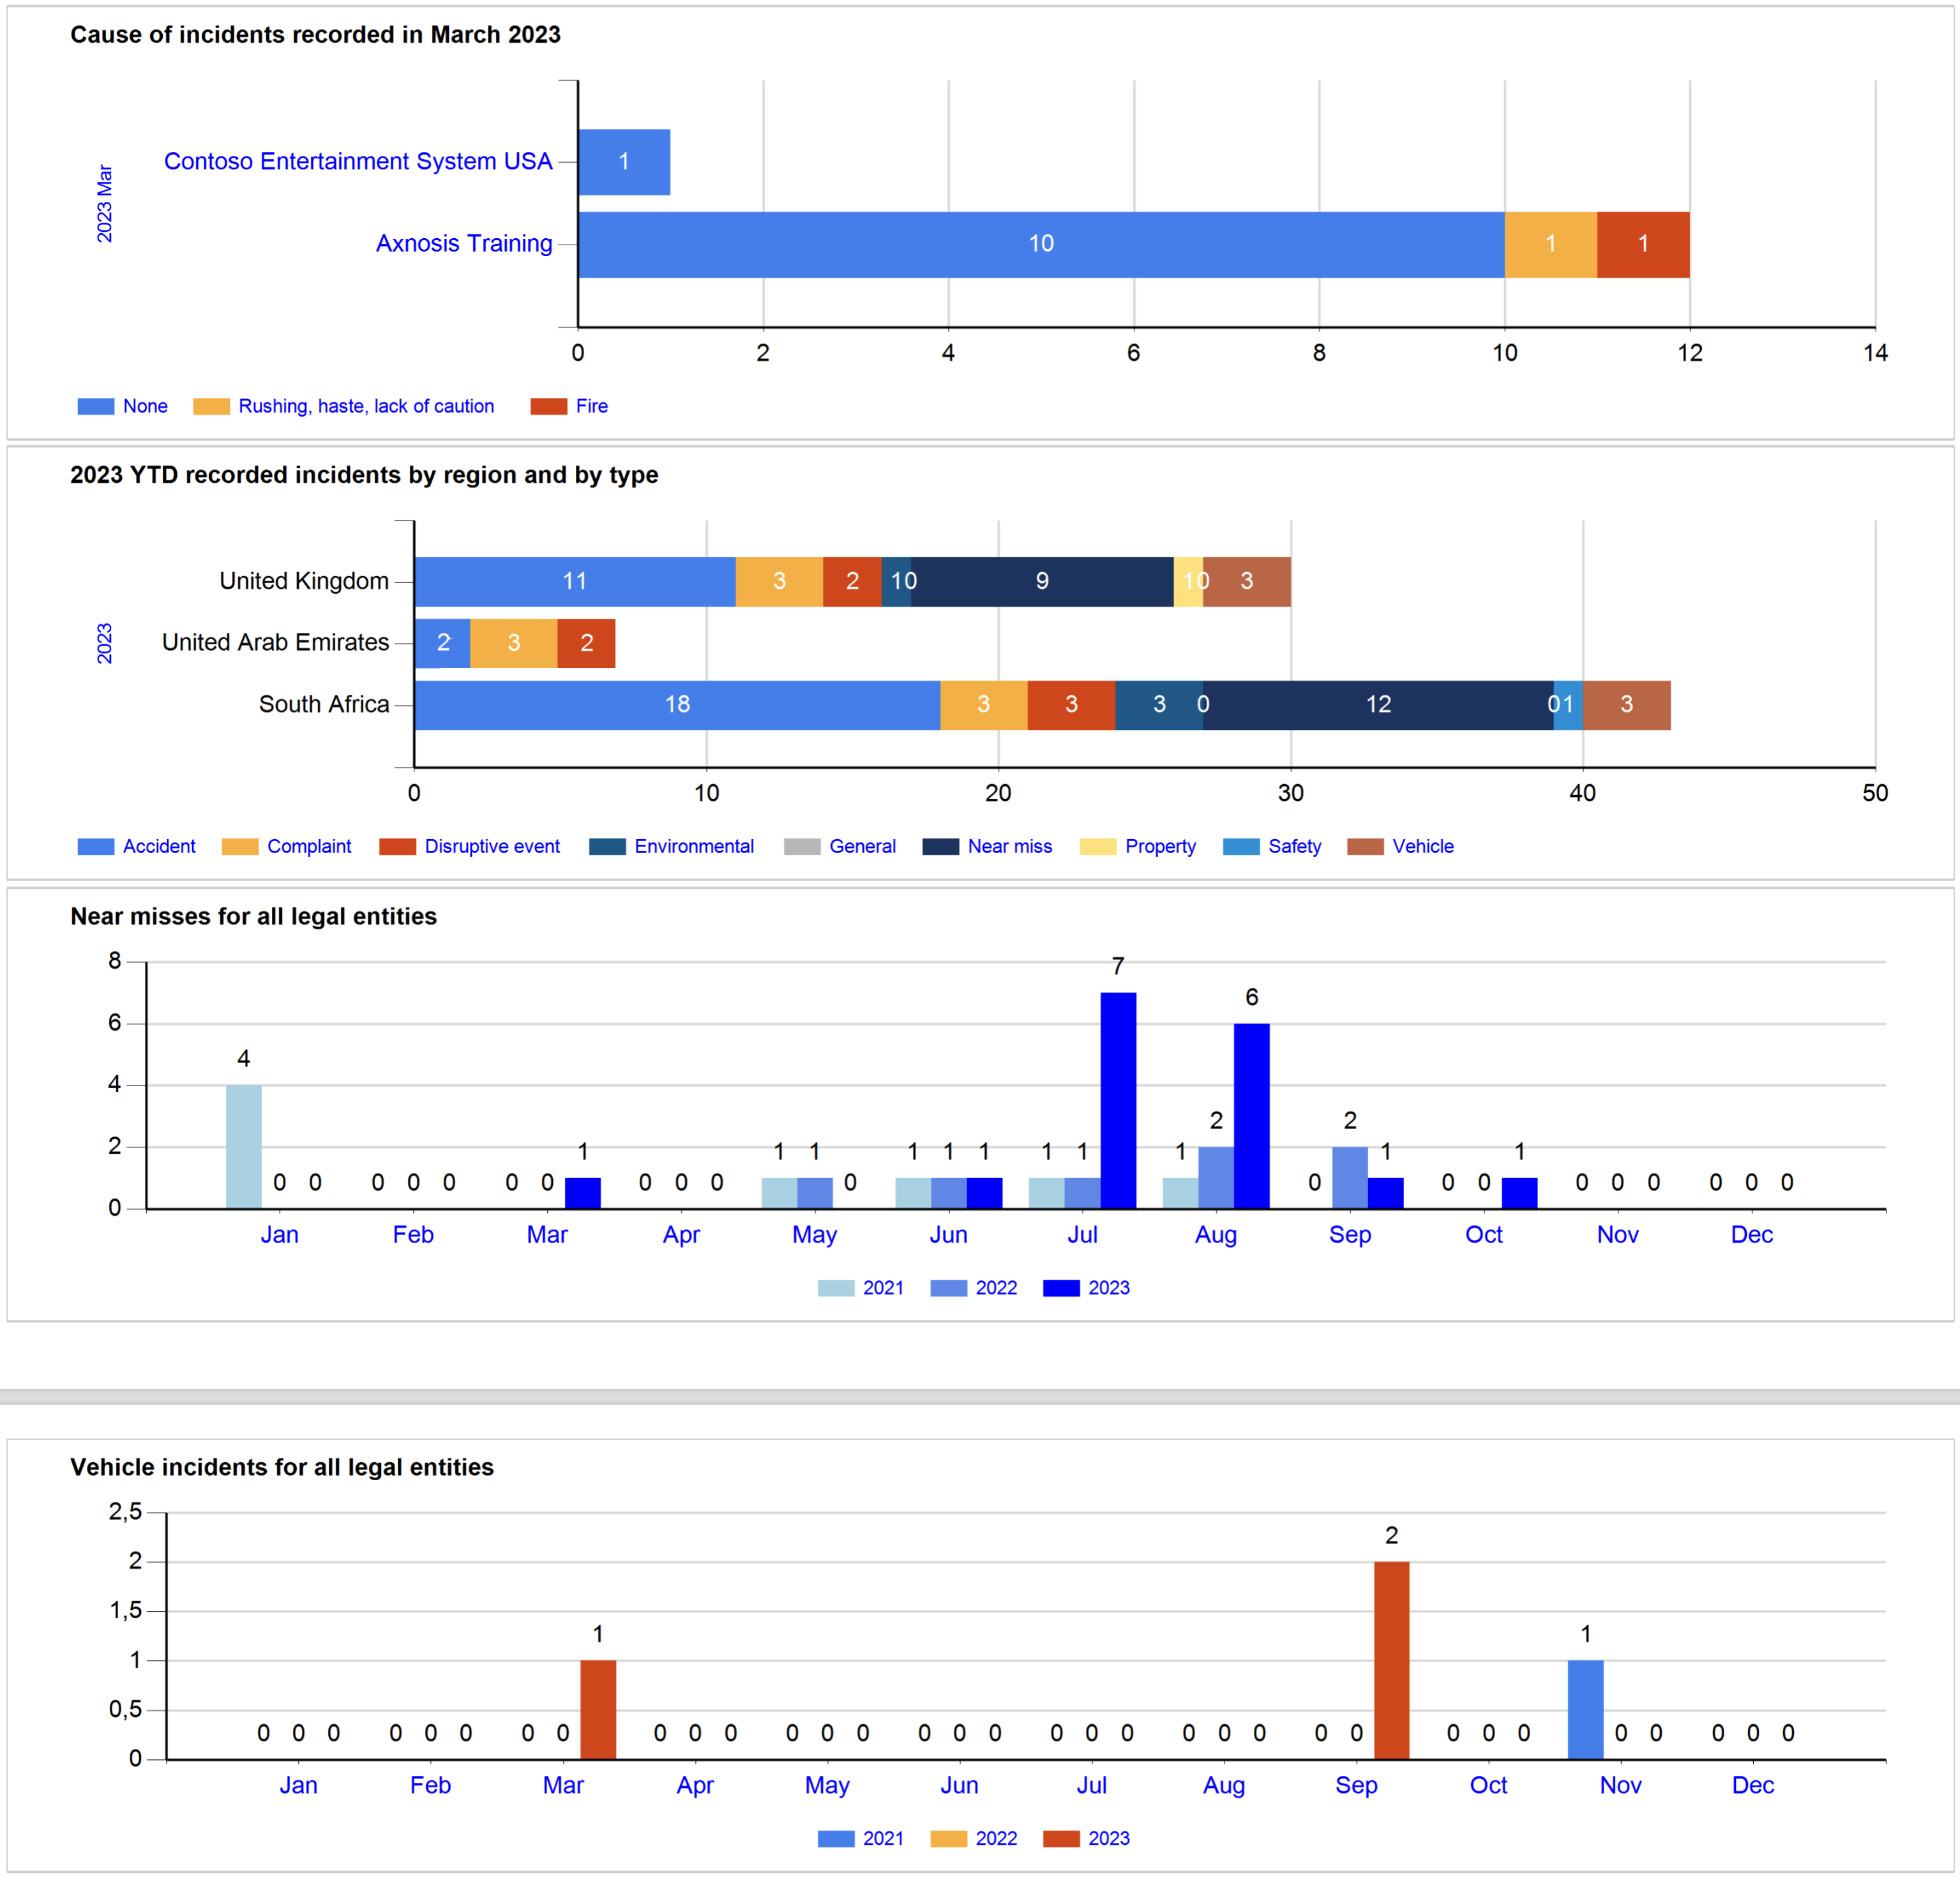
- Incident graphs: The Near misses graph as well as the Vehicle incidents global graph, displays stats for three years. The Year selected on the Parameters dialog will be the last year of three displayed on the graphs.
- Investigations graph: The Investigations graph is used to display the status of investigations.
¶ Target vs Actual tab
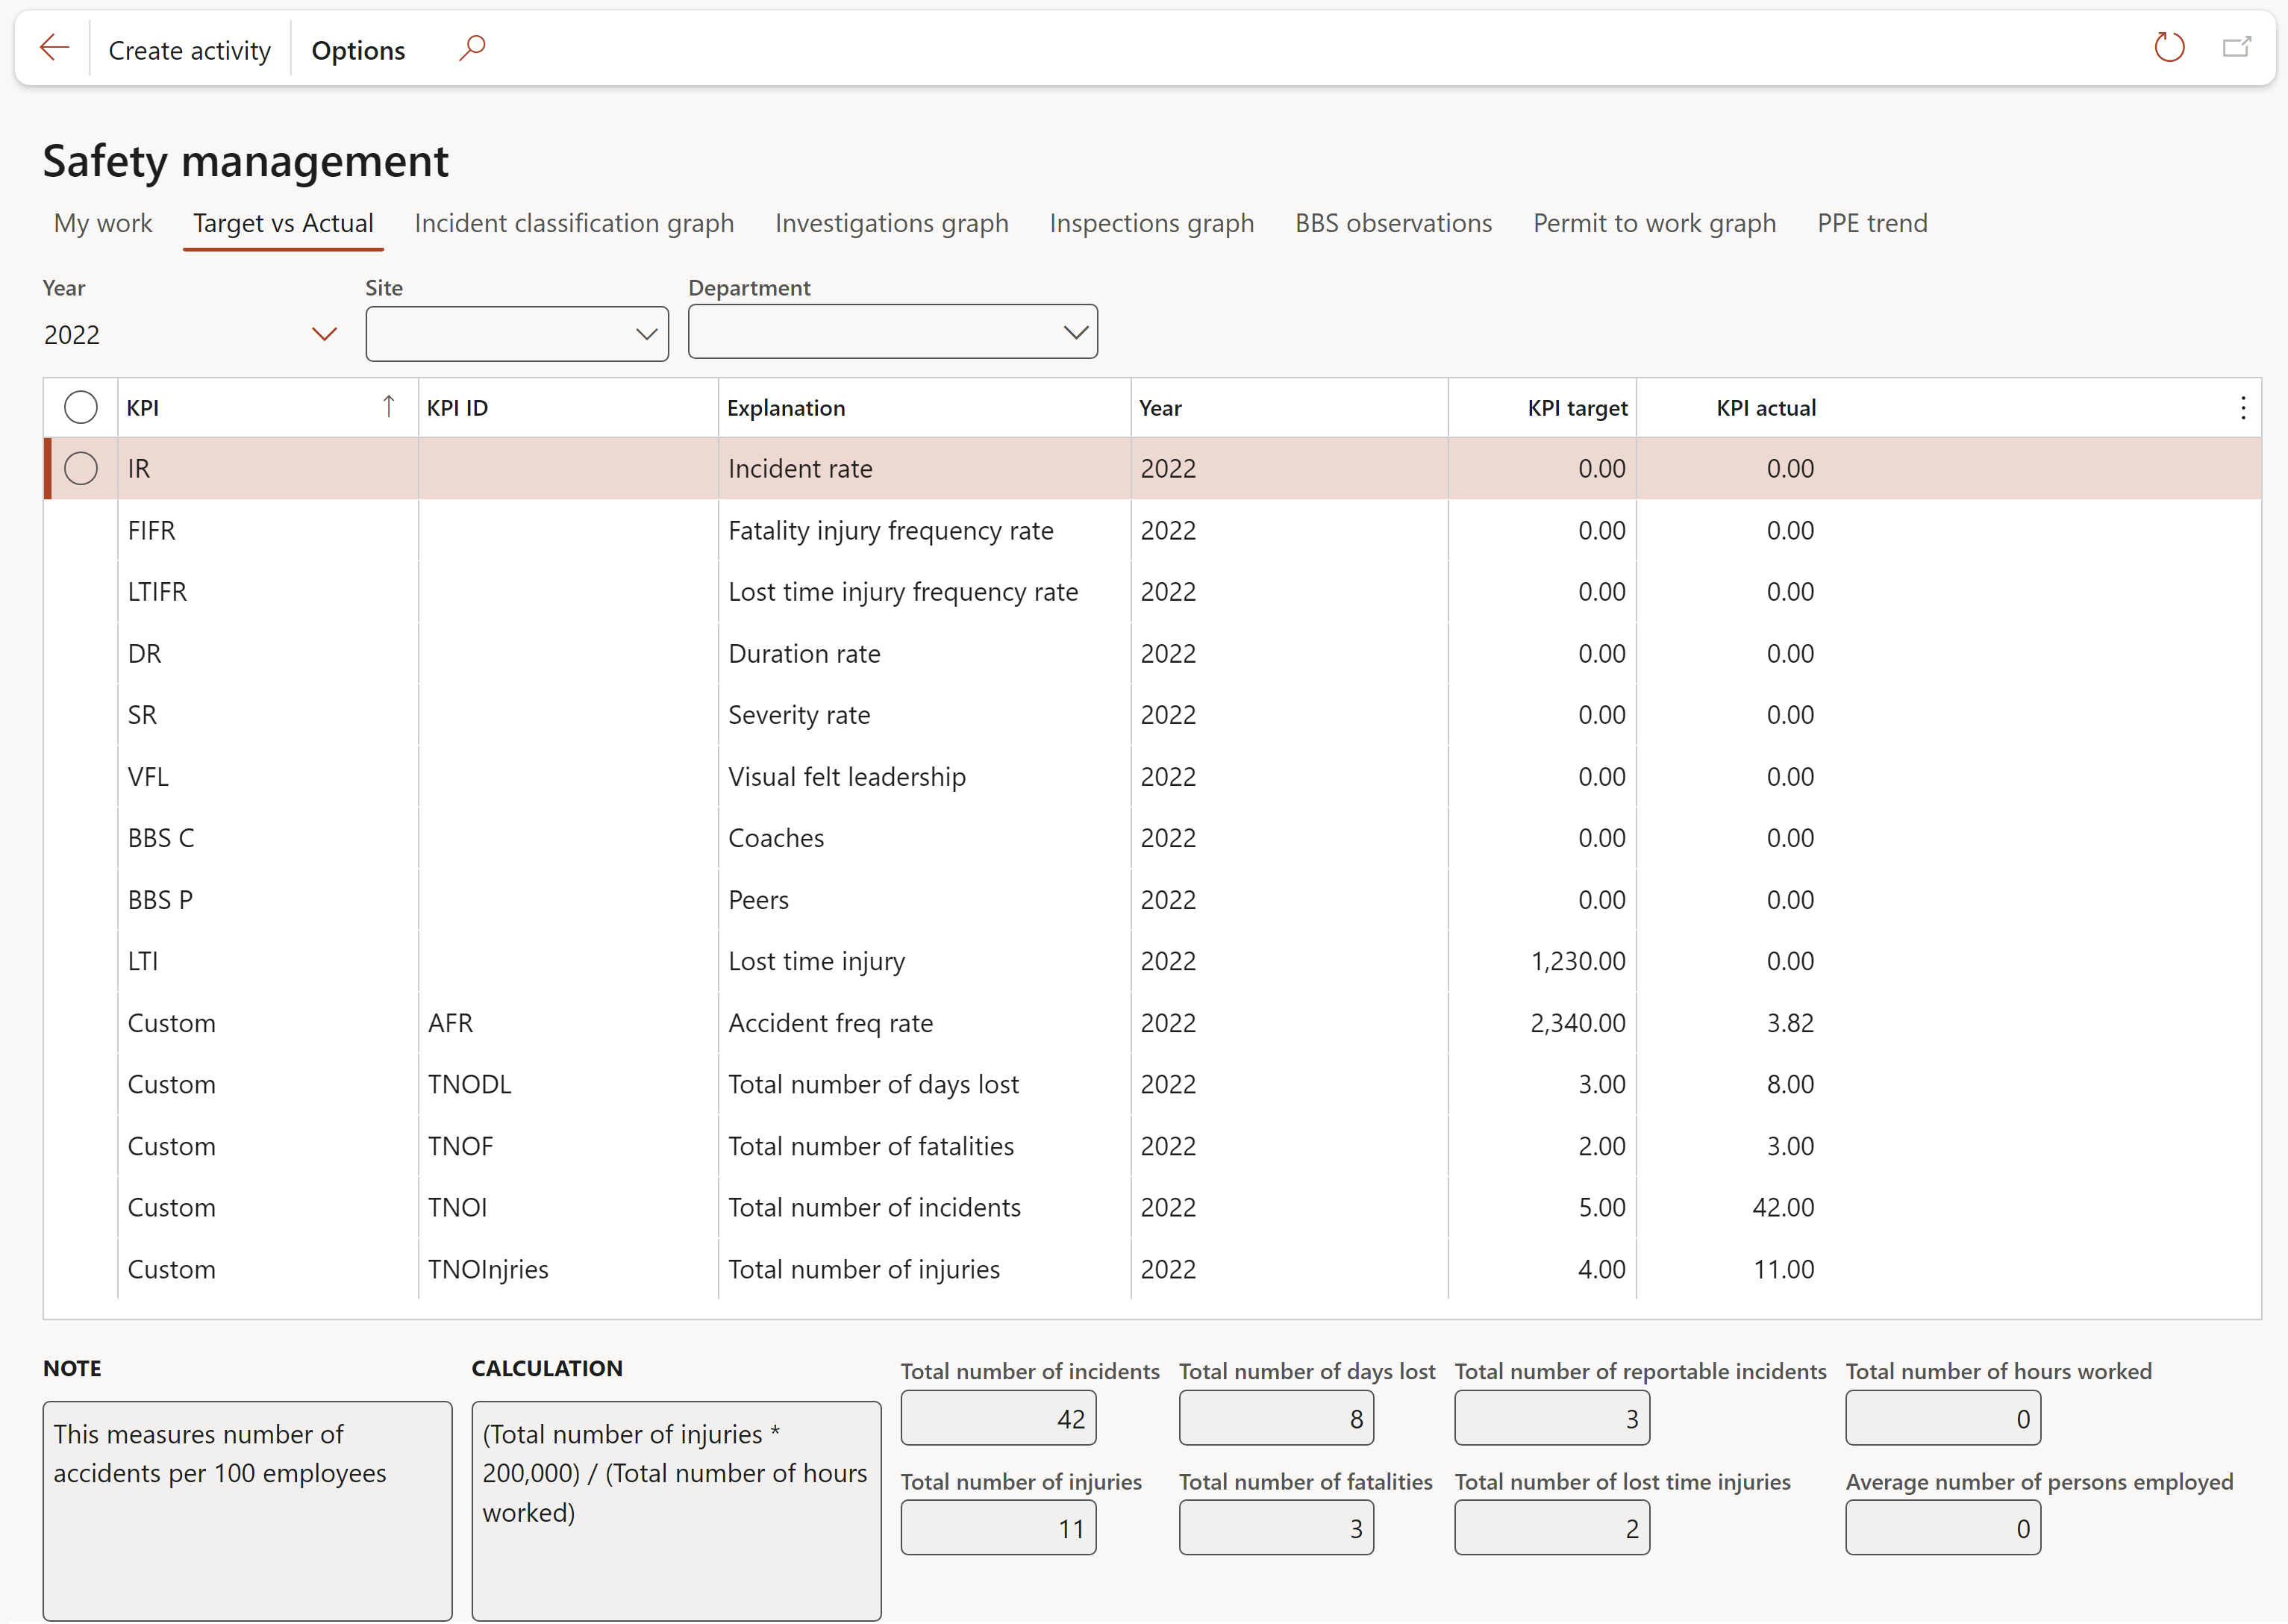
KPI targets as well as KPI actuals are displayed.
The KPI name, Target, and Actual values as well as the Budget model used, is displayed in the grid. A detailed summary of the selected record is also displayed in the bottom section of the screen. Under Calculation, the formula that was used to calculate the selected KPI is displayed.
¶ Incident classification graph tab
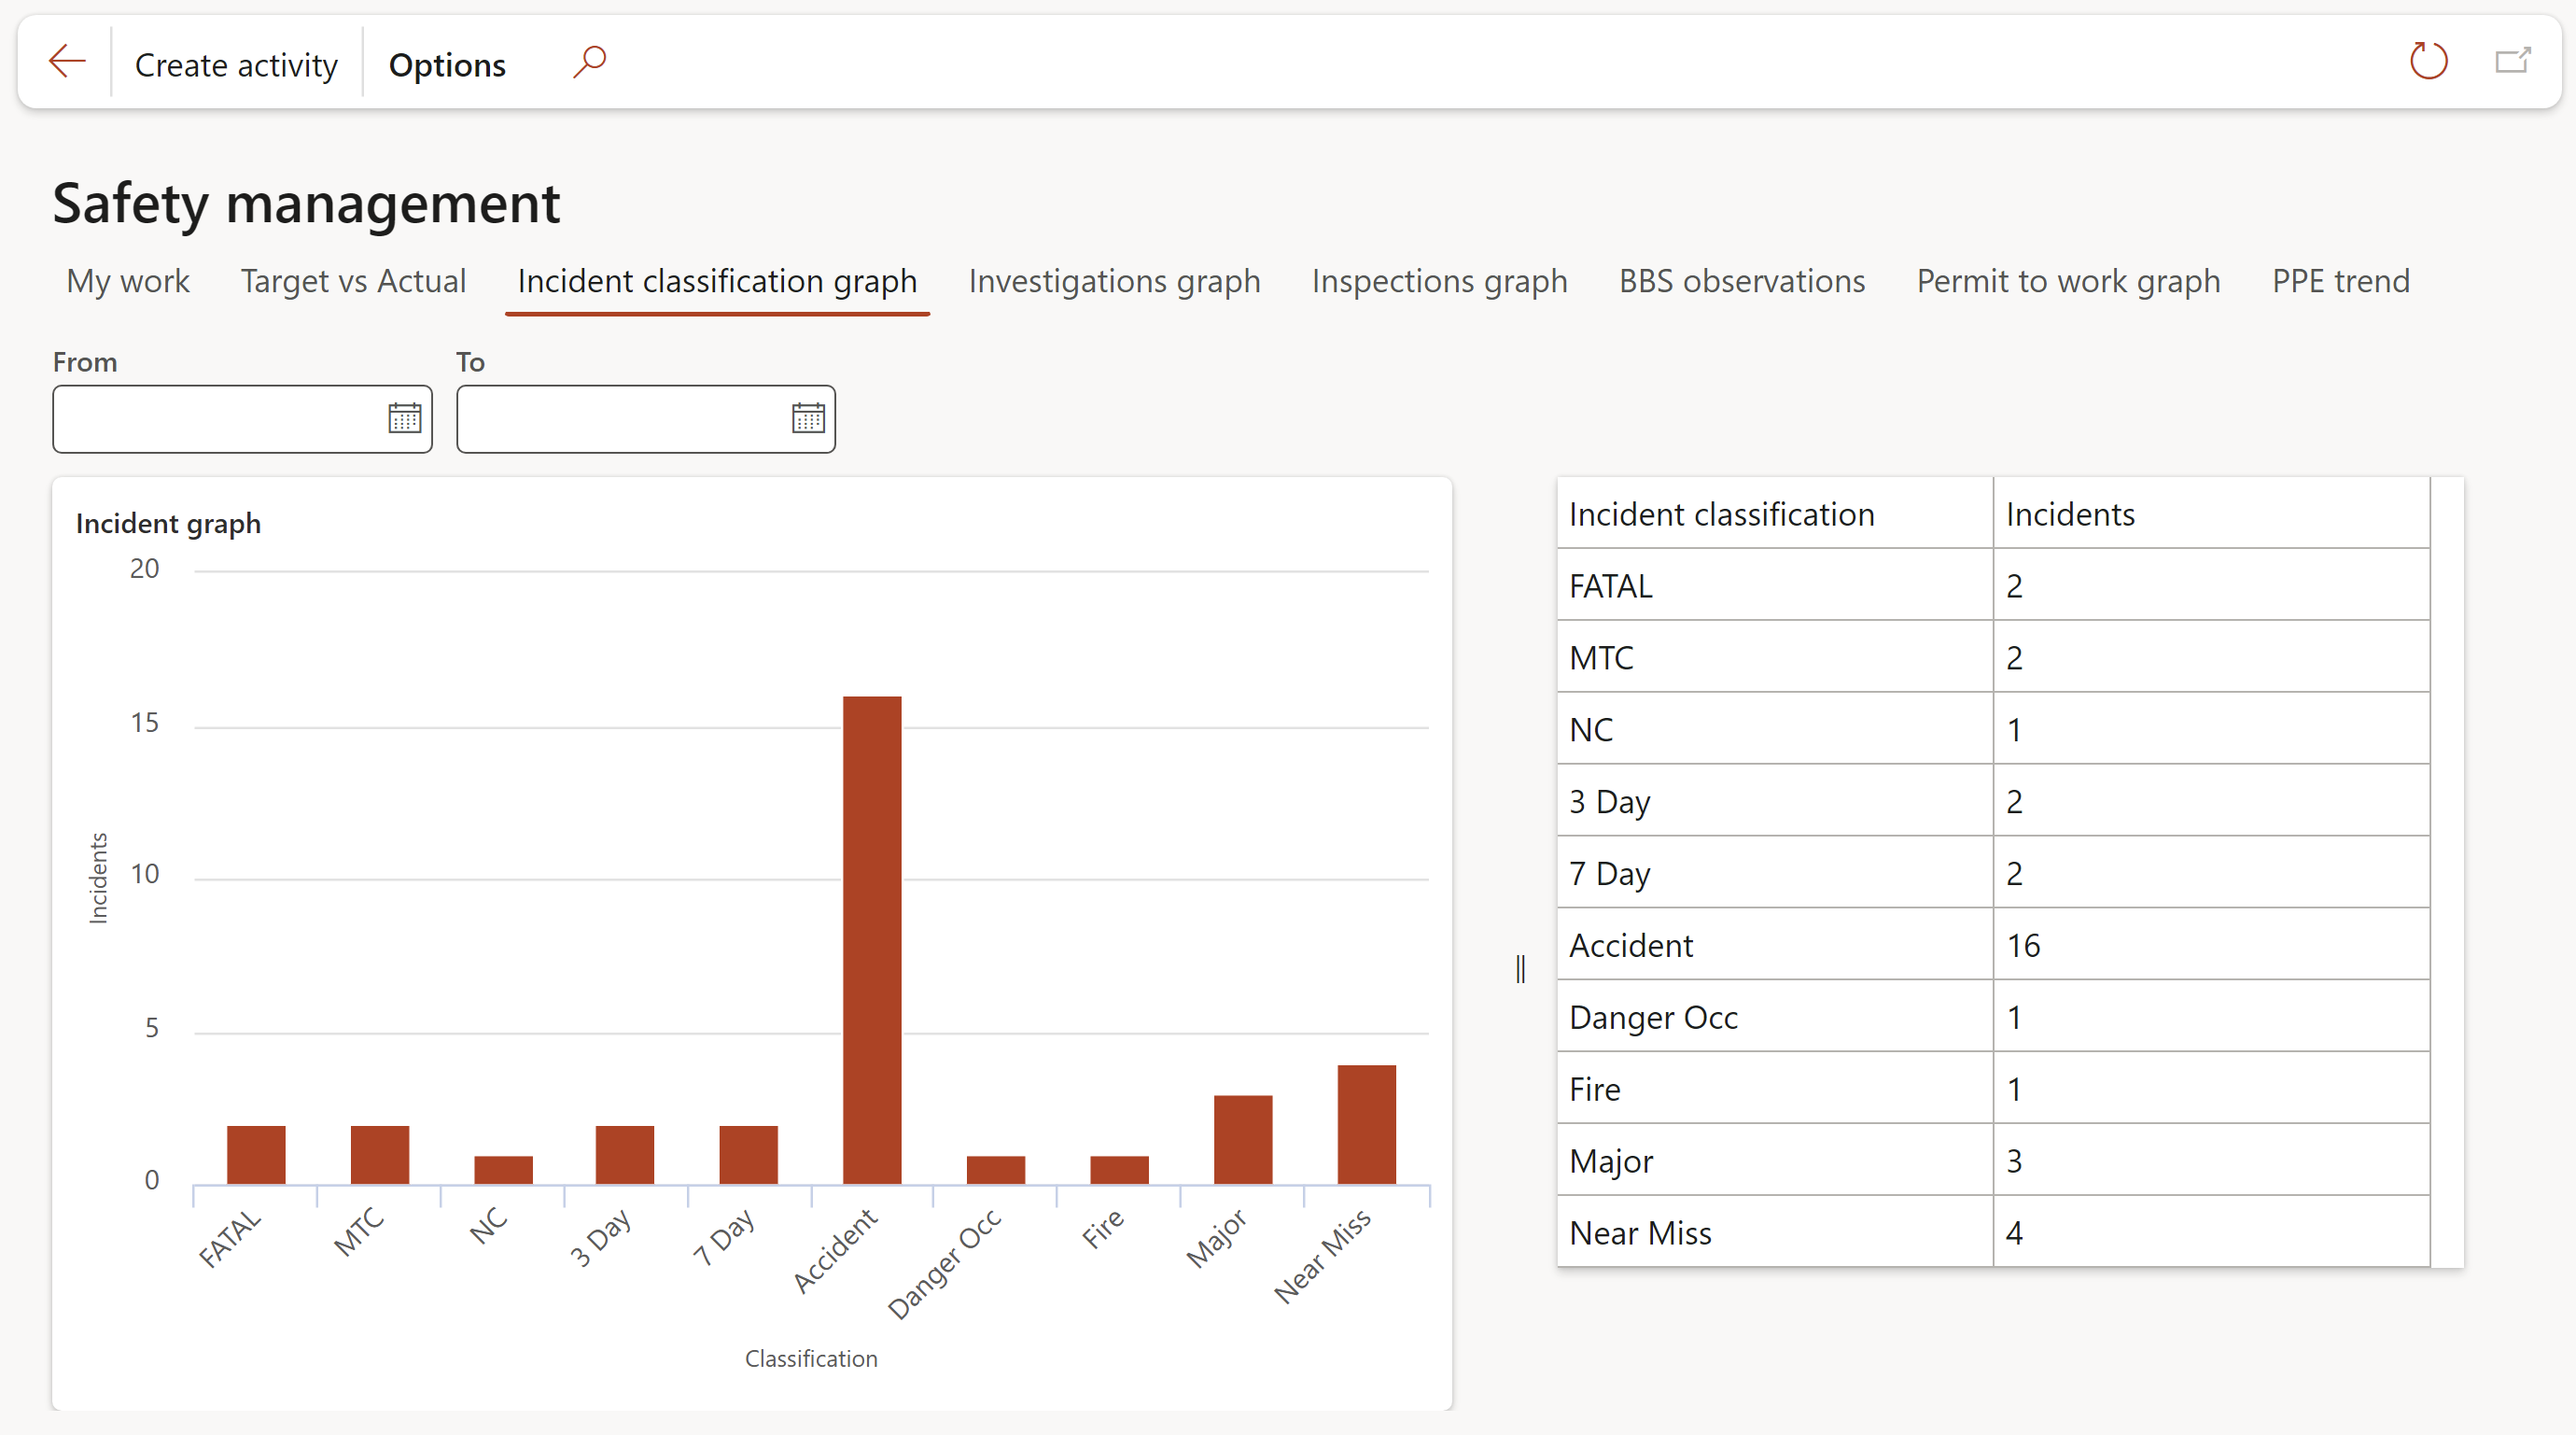
Specific results can be viewed on the Incident graph by clicking on/hovering over the required pillar. The table on the right-hand side displays the actual number of incidents per classification that are viewed on the graph.
¶ Investigations graph tab
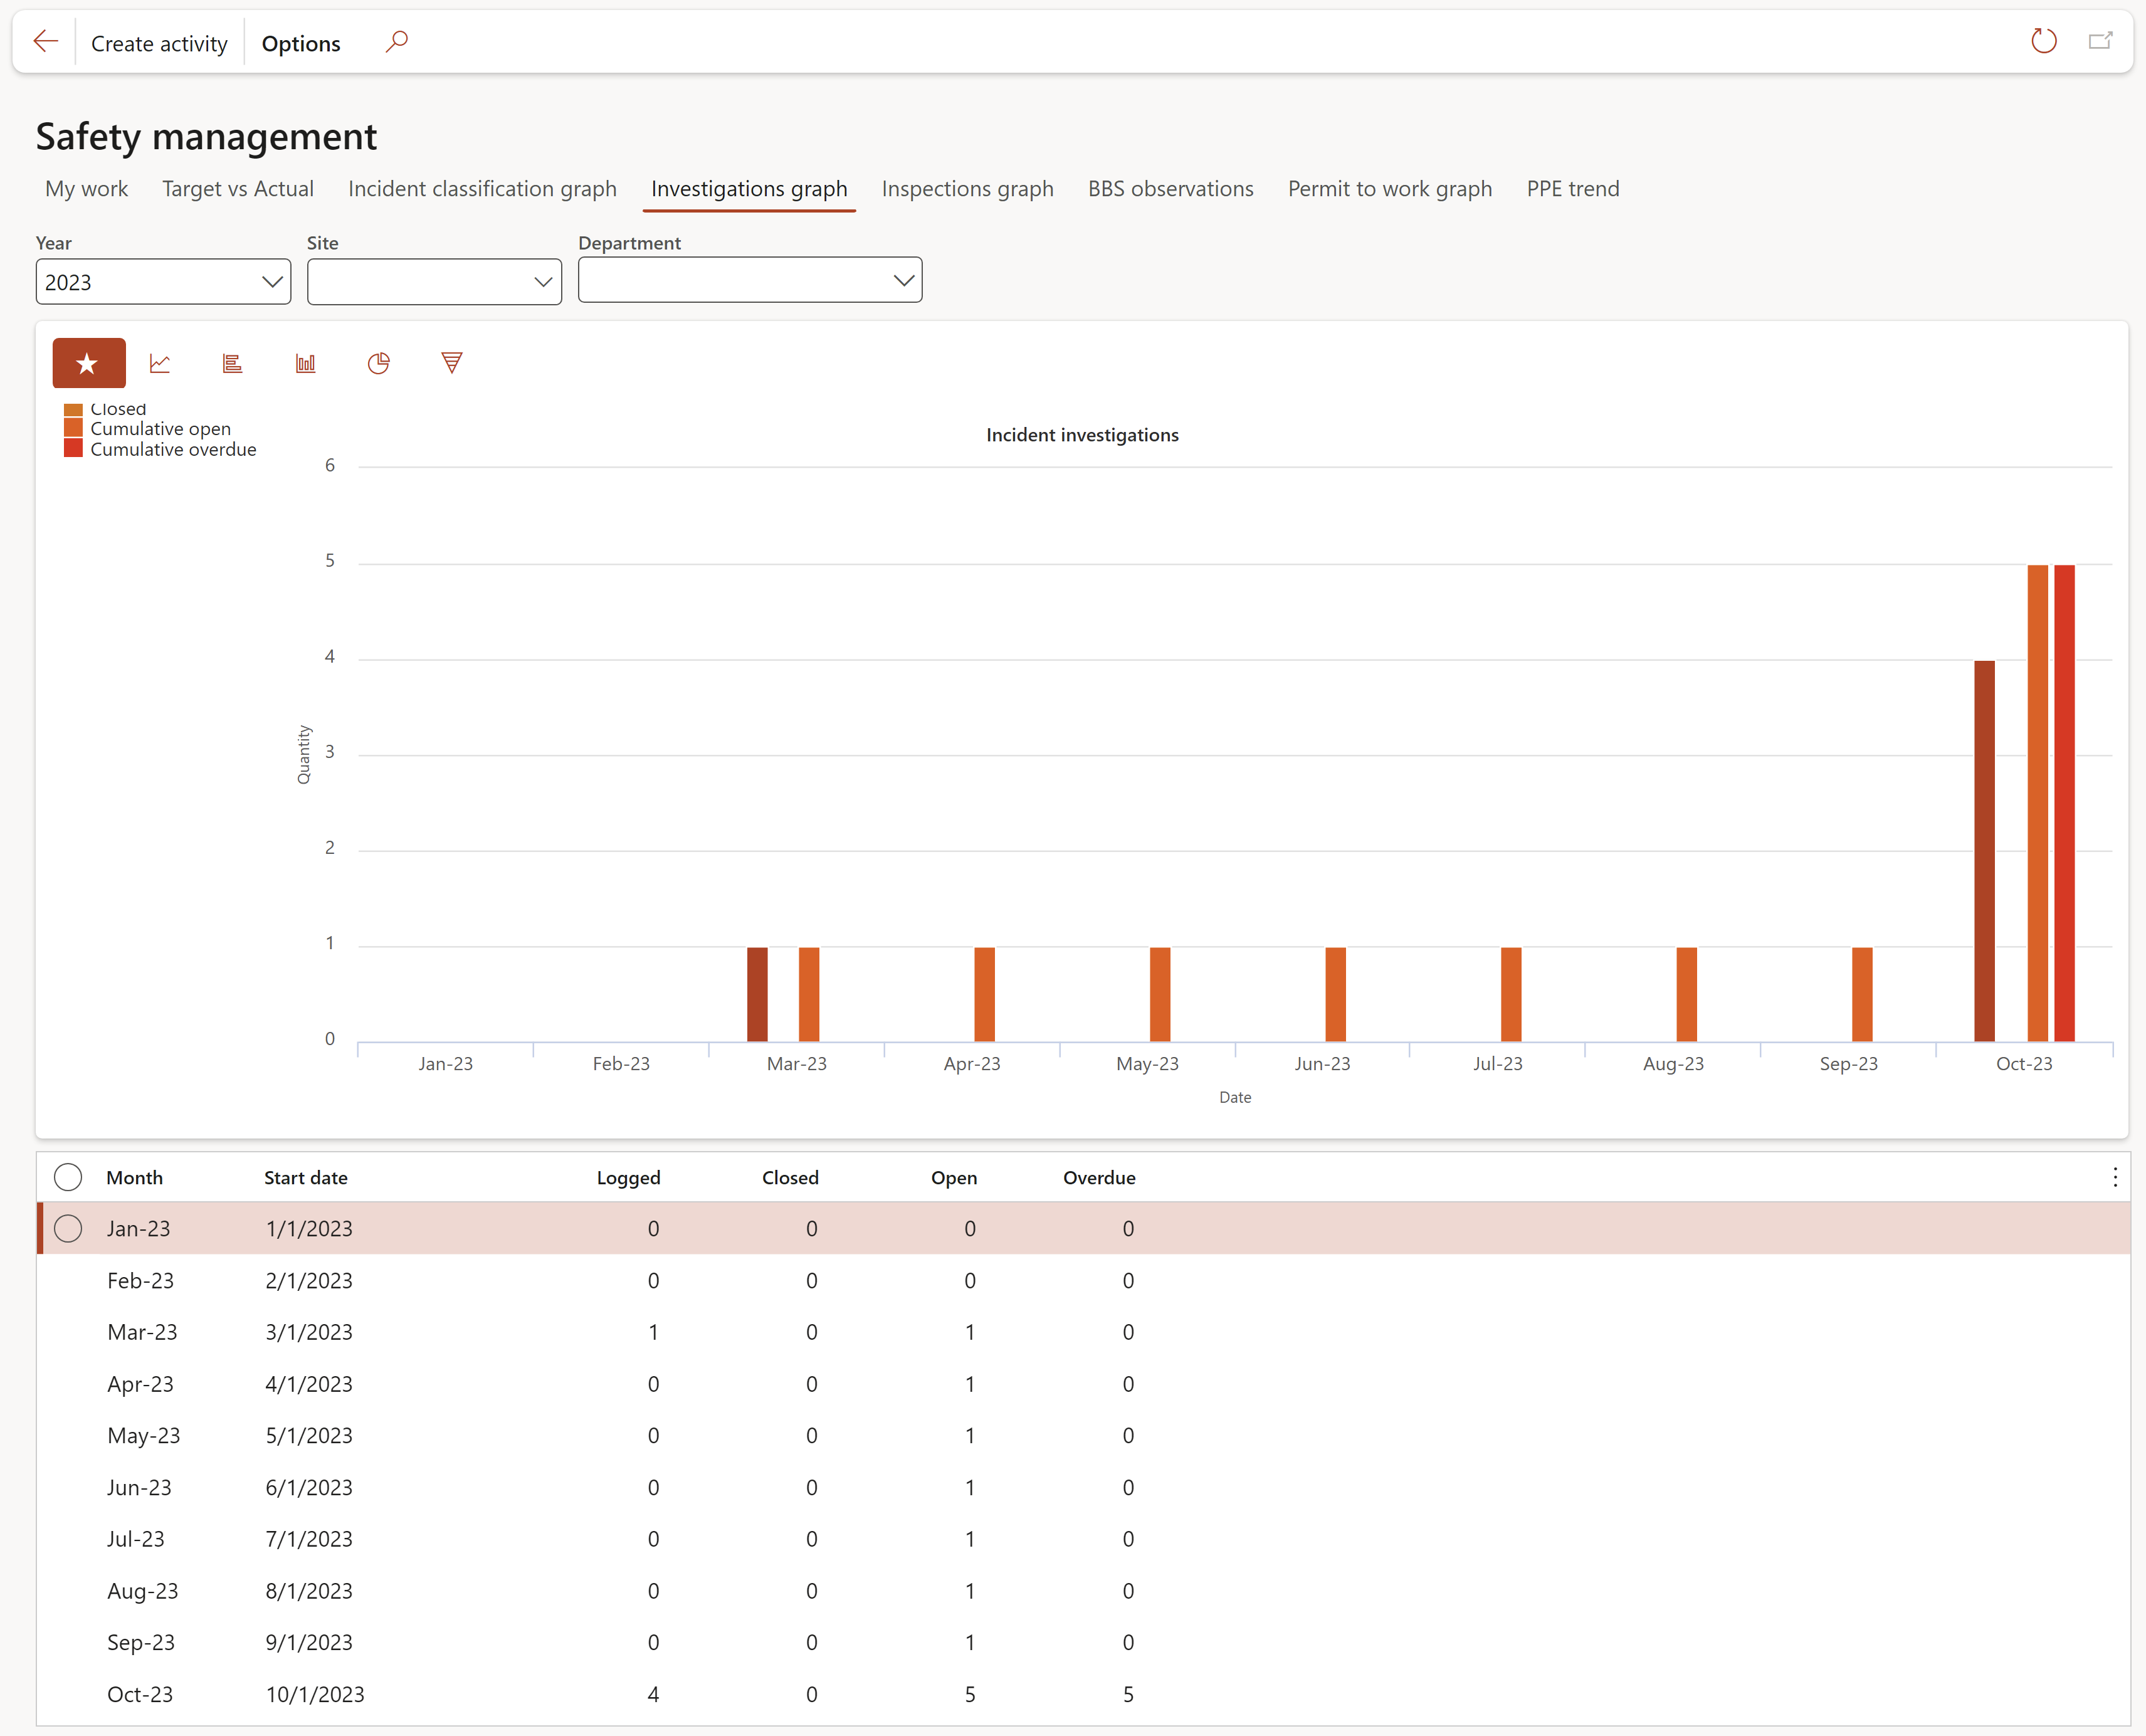
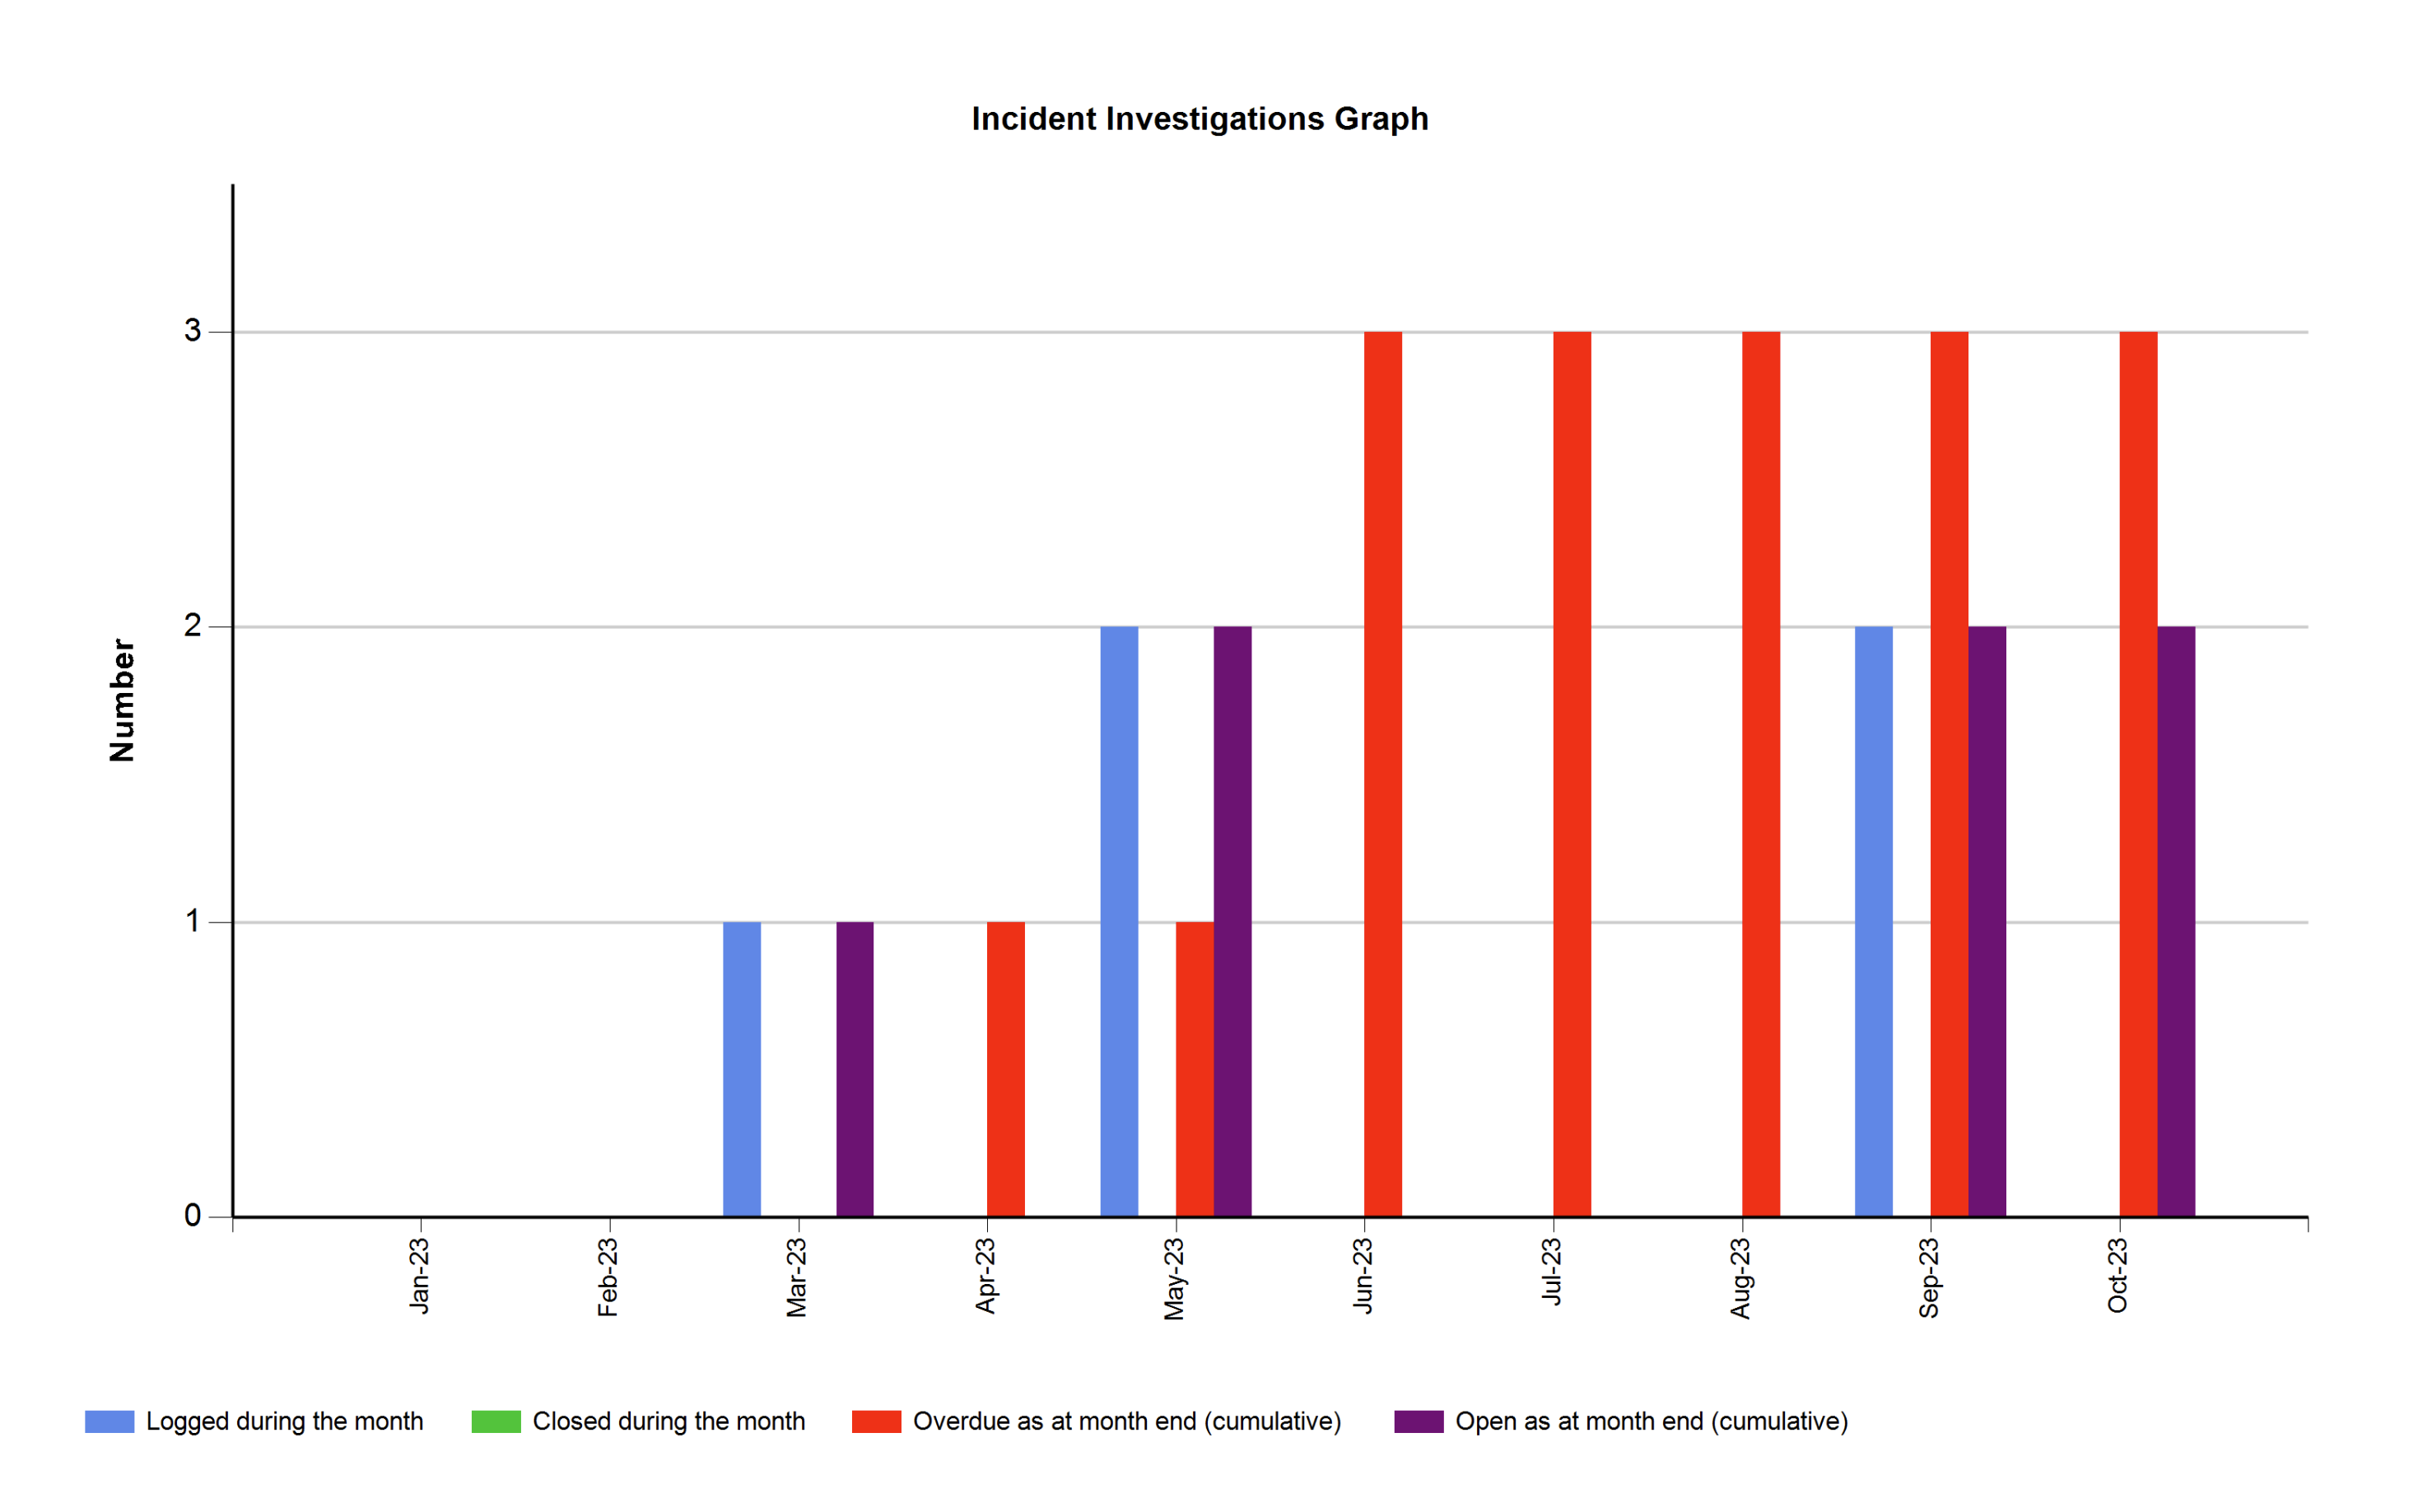
On this progressive graph the number of investigations logged, closed, open and overdue, are displayed per month for a fiscal year.
Please note that the investigations displayed on the graph will not go beyond the current system/session date.
¶ Inspections graph tab
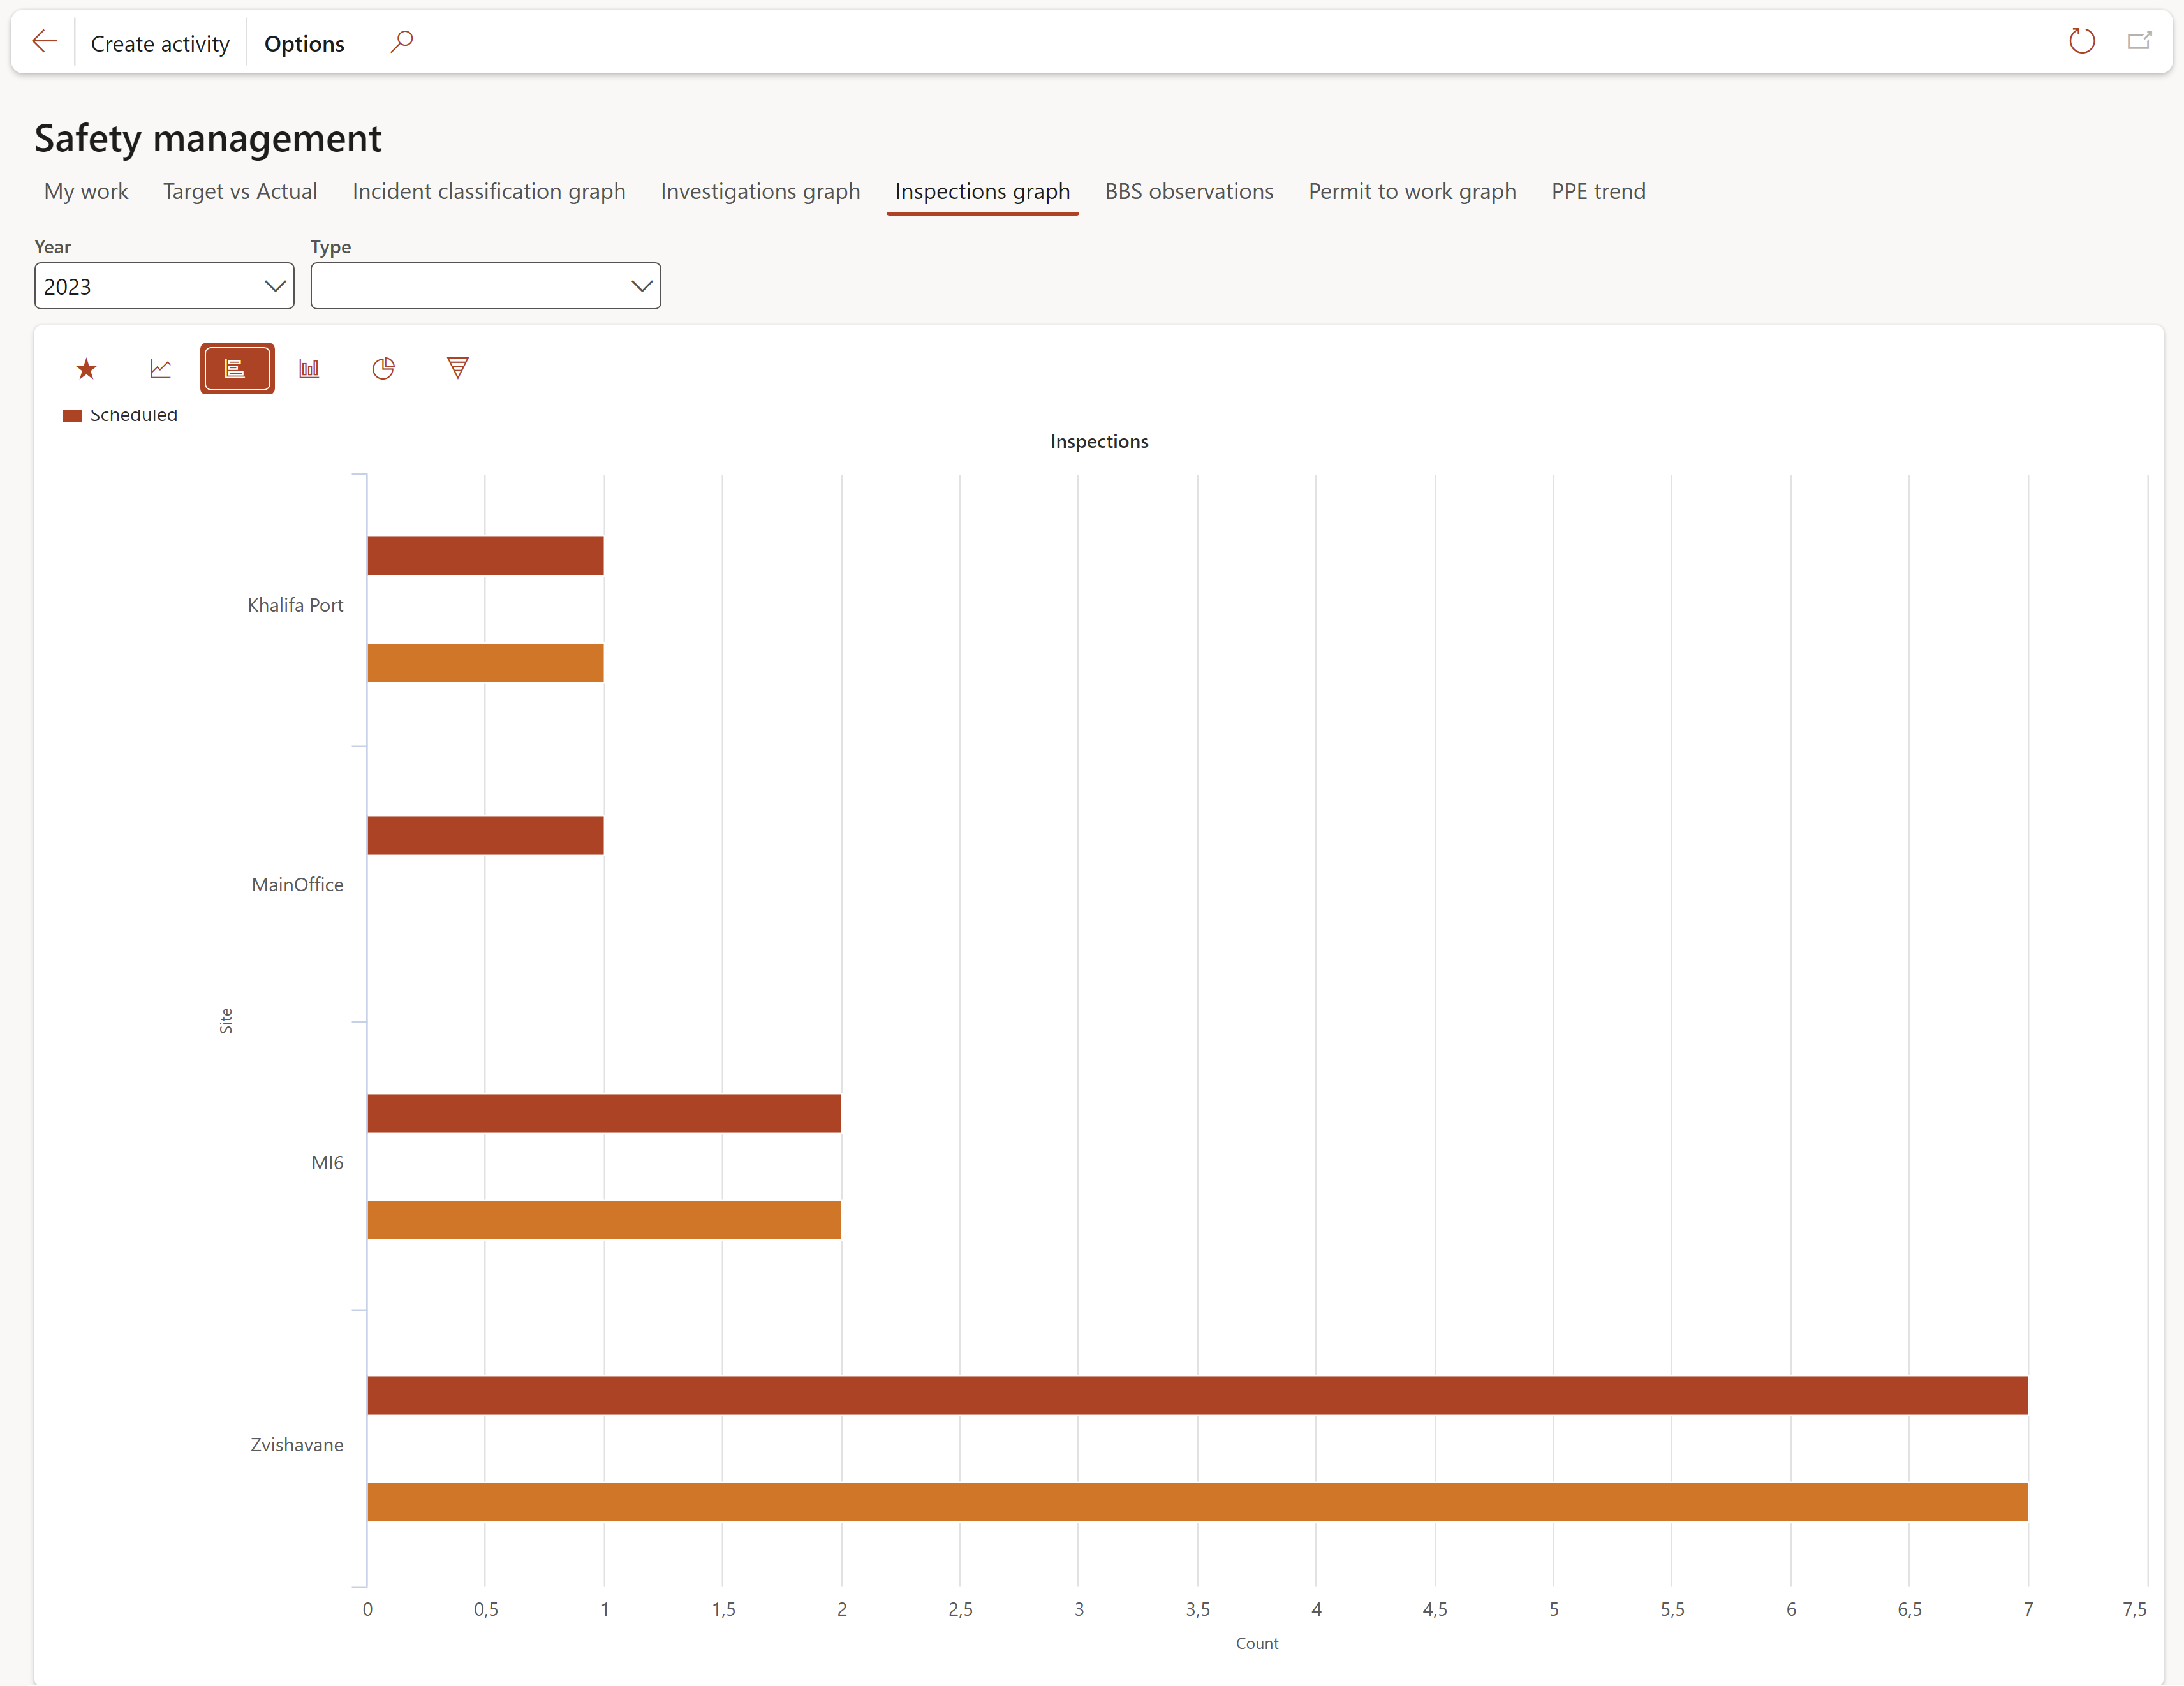
On this graph the number of scheduled as well as the number of actual inspections are displayed per site.
Use the Type filter if you only want to see the graph for a specific type of inspection.
¶ BBS observations tab
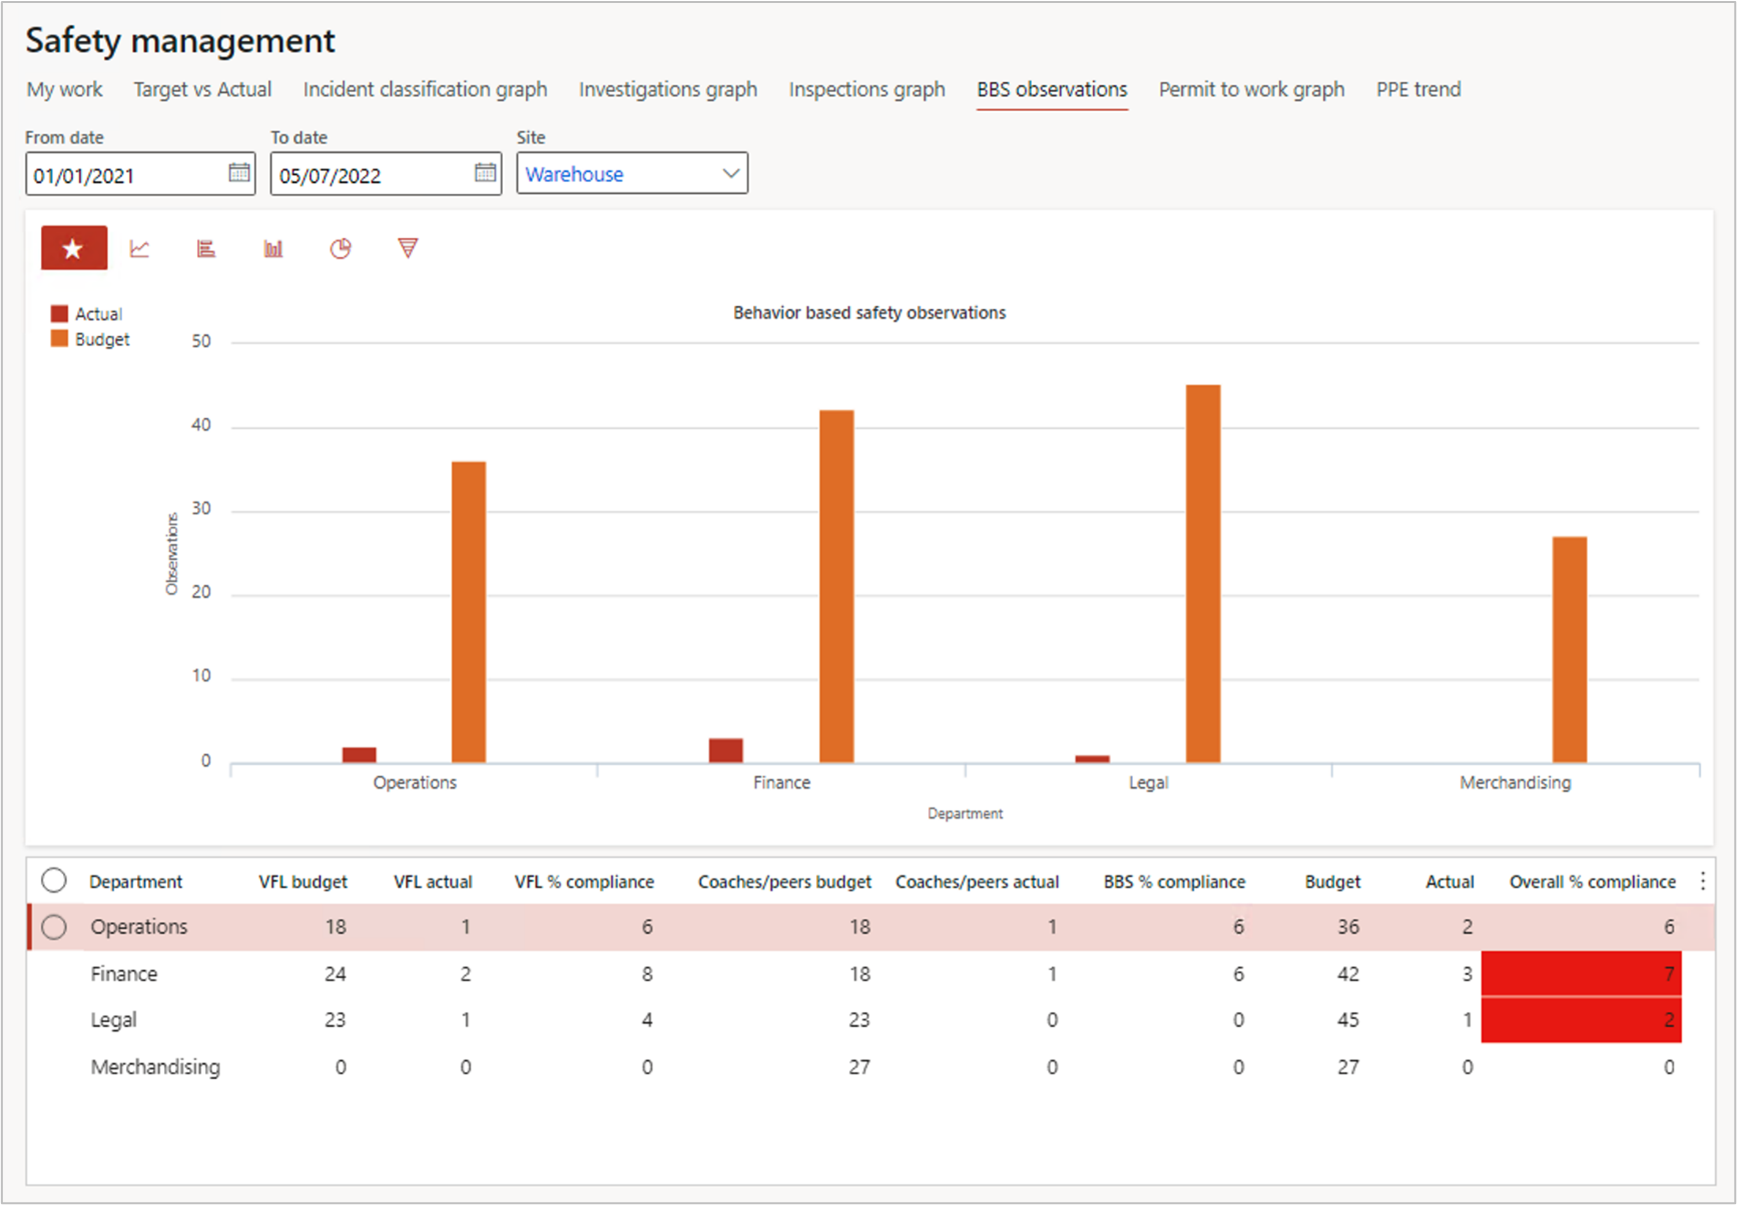
The graph displays budget and actual observations per Department.
¶ Permit to work graph tab
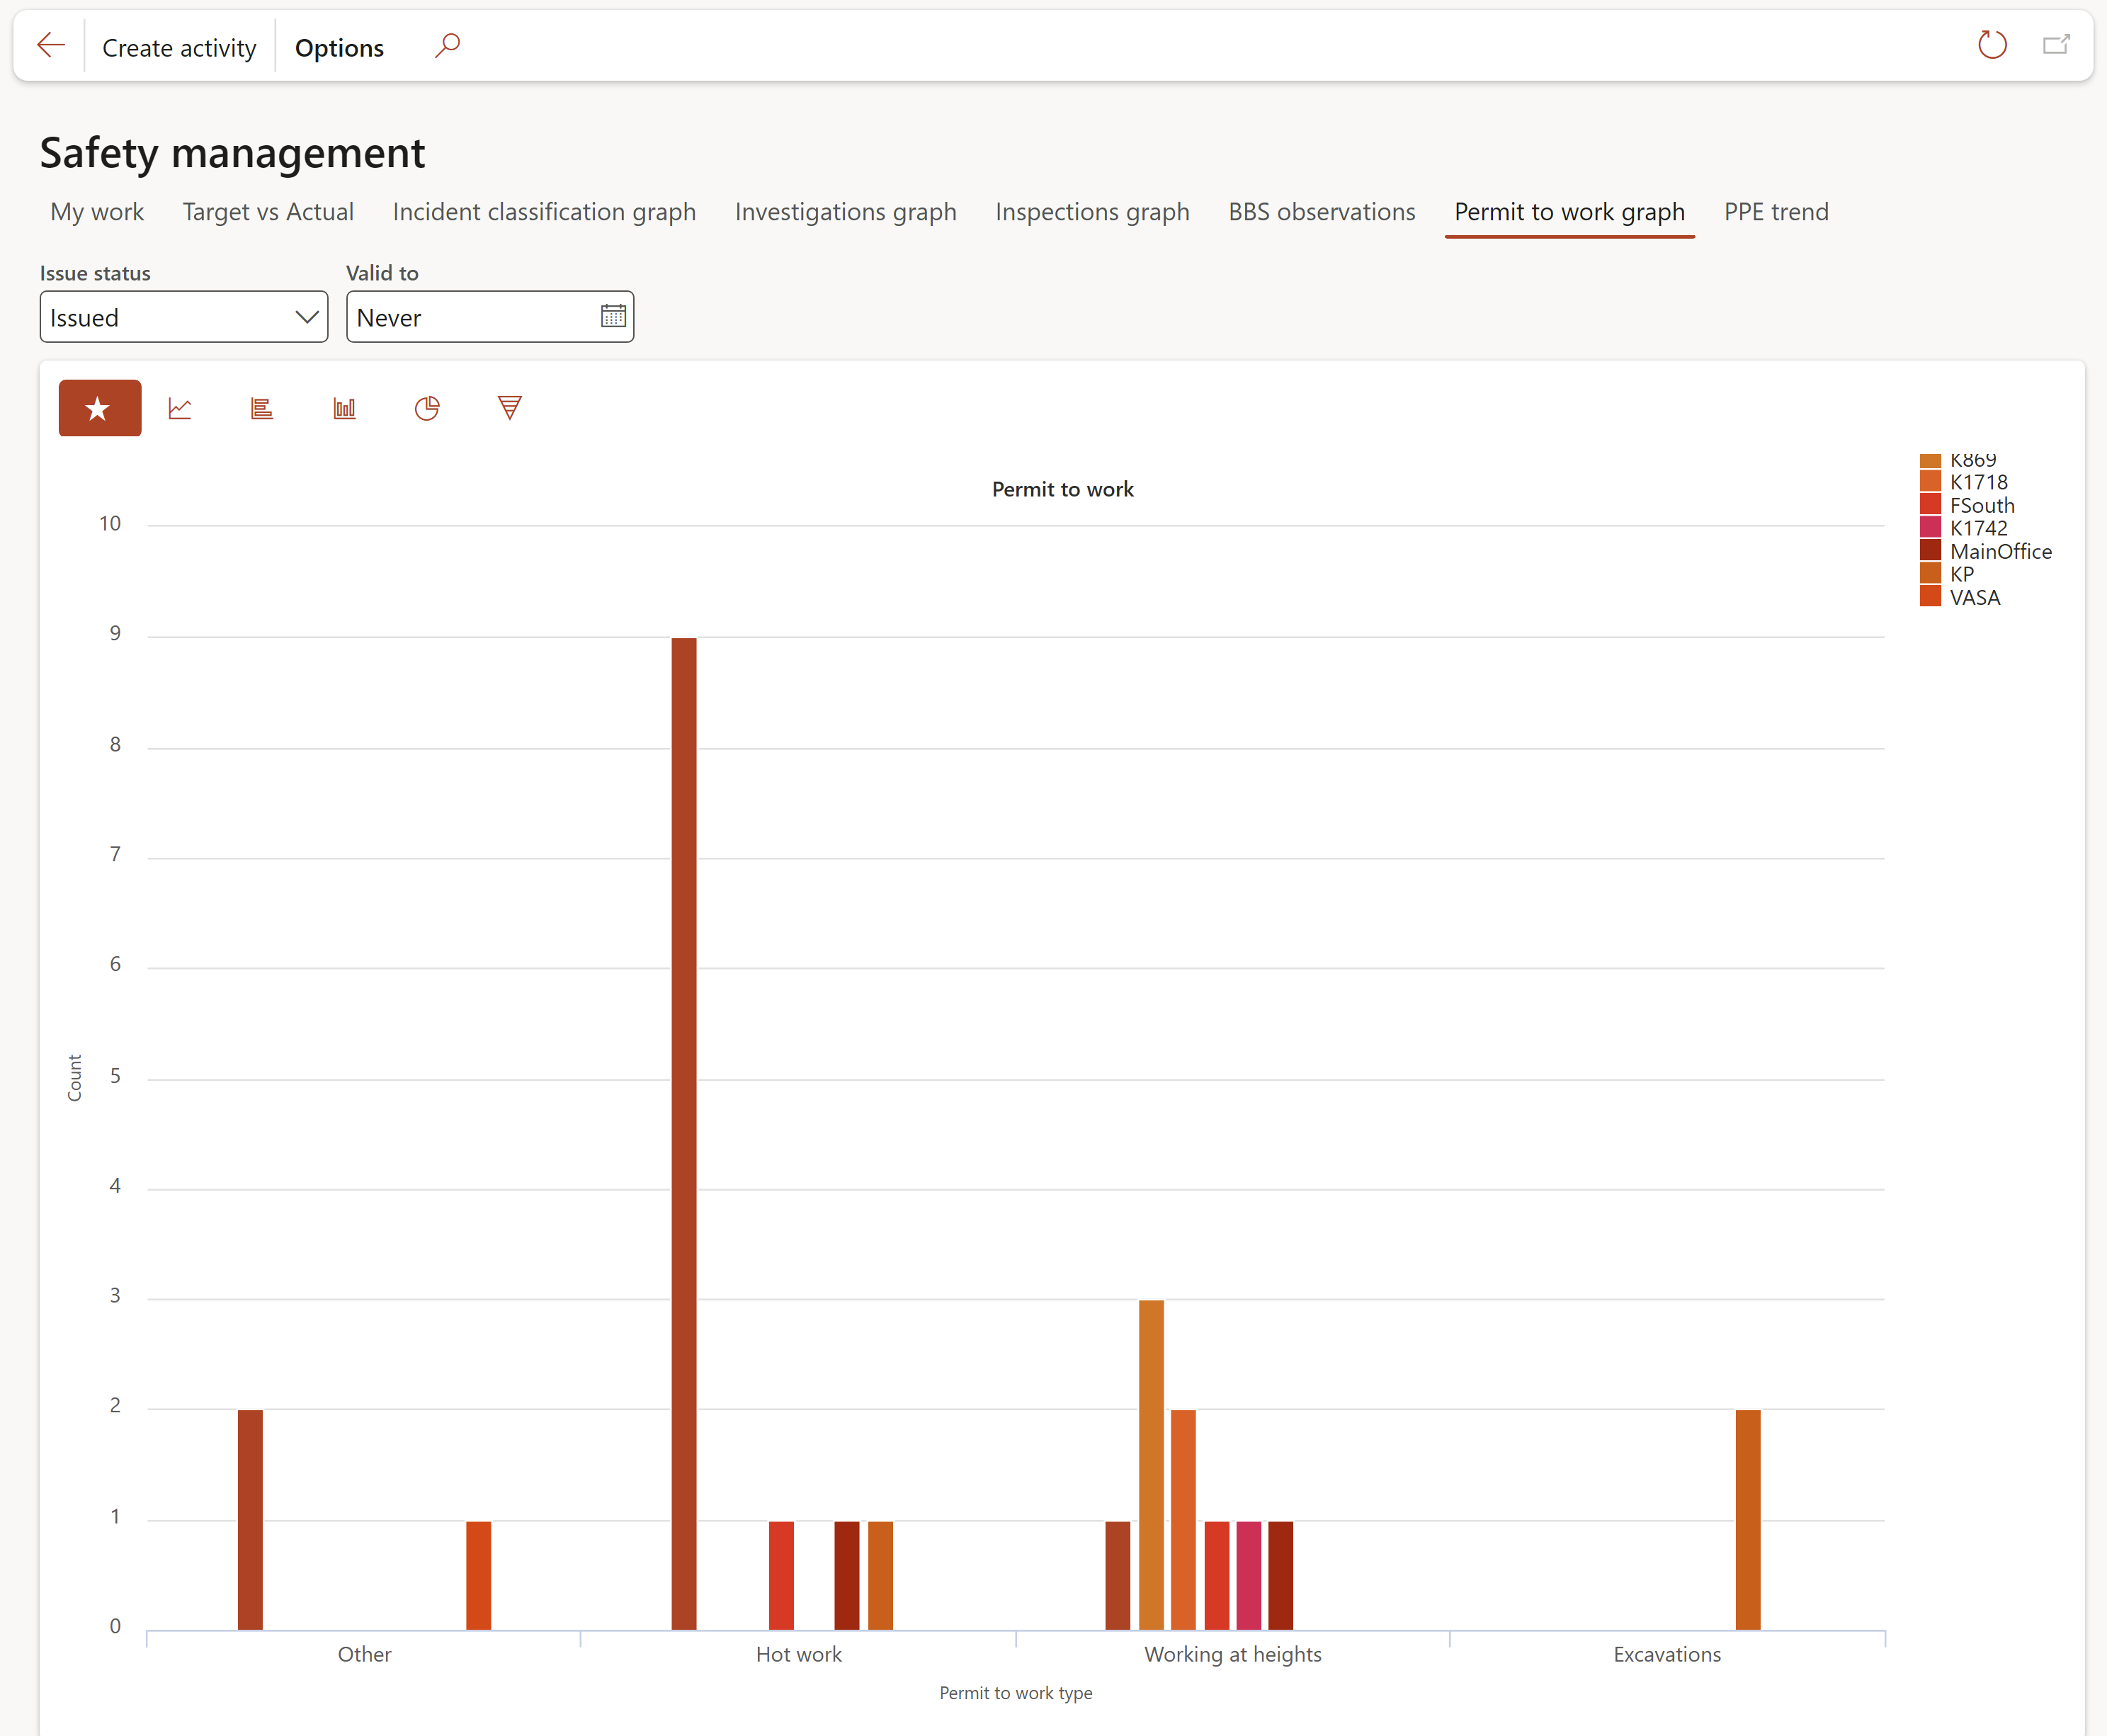
On this progressive graph the number of created permits to work are displayed per site and type.
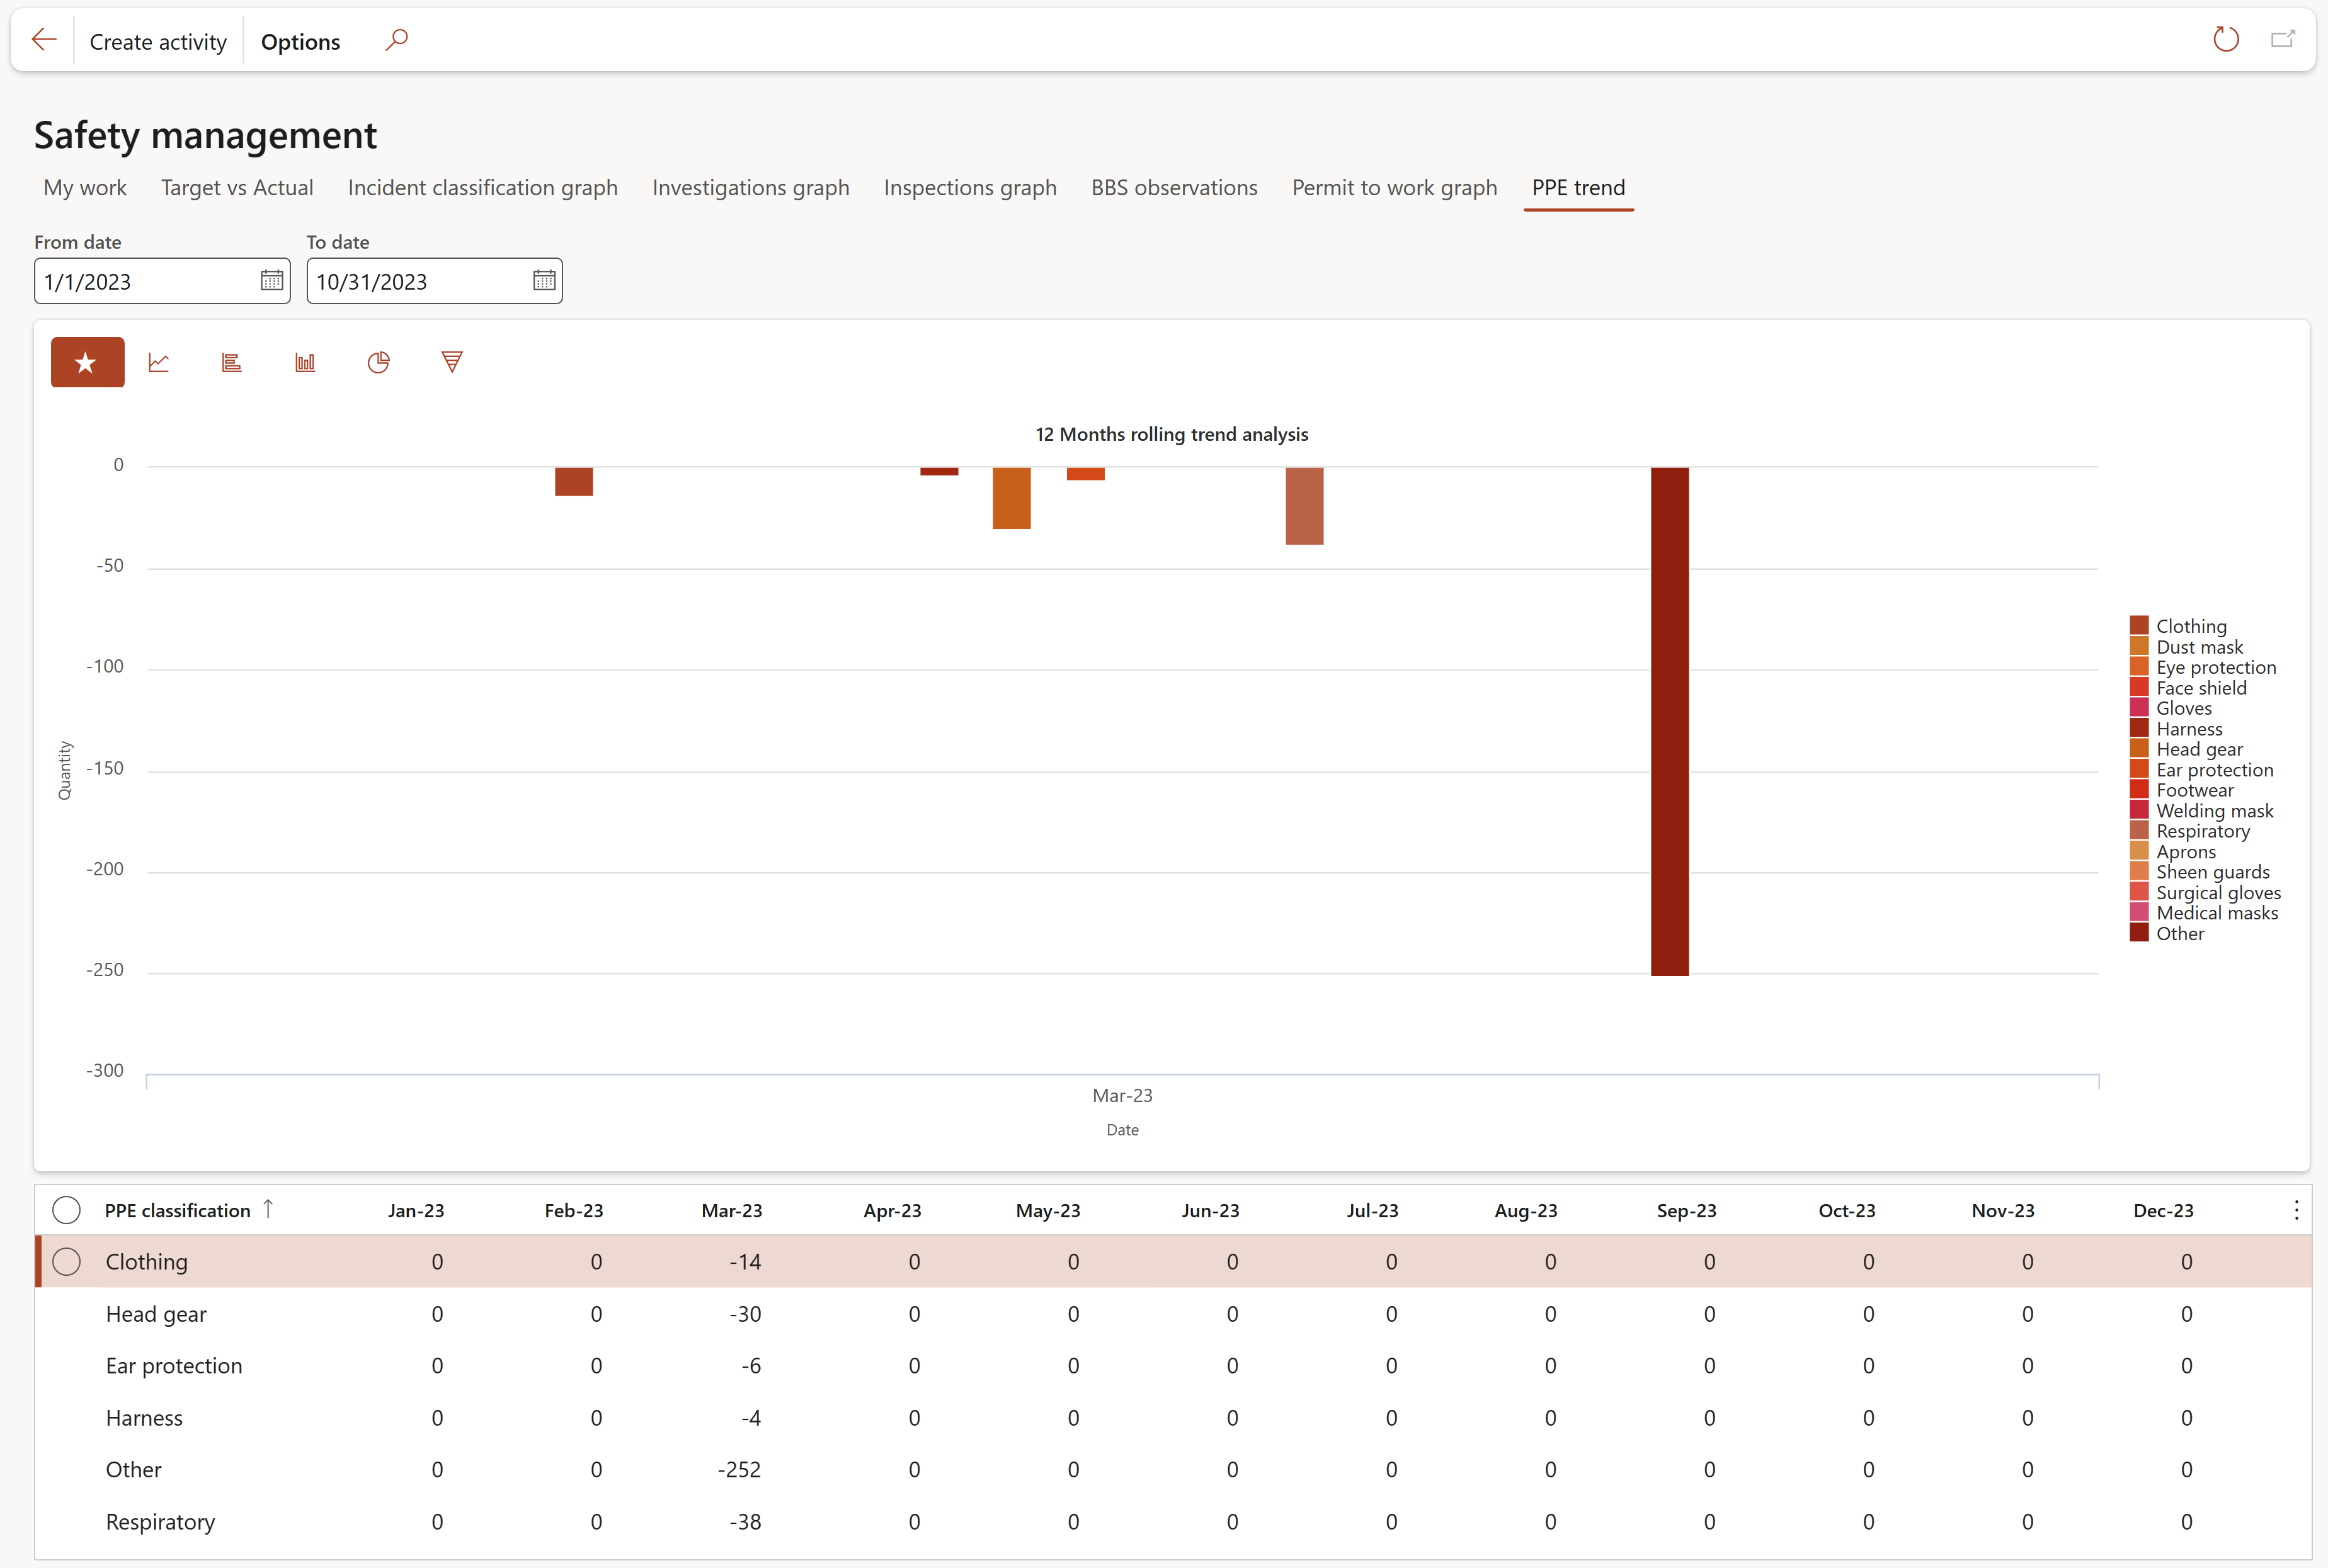
¶ PPE trend tab
¶ Safety view Workspace
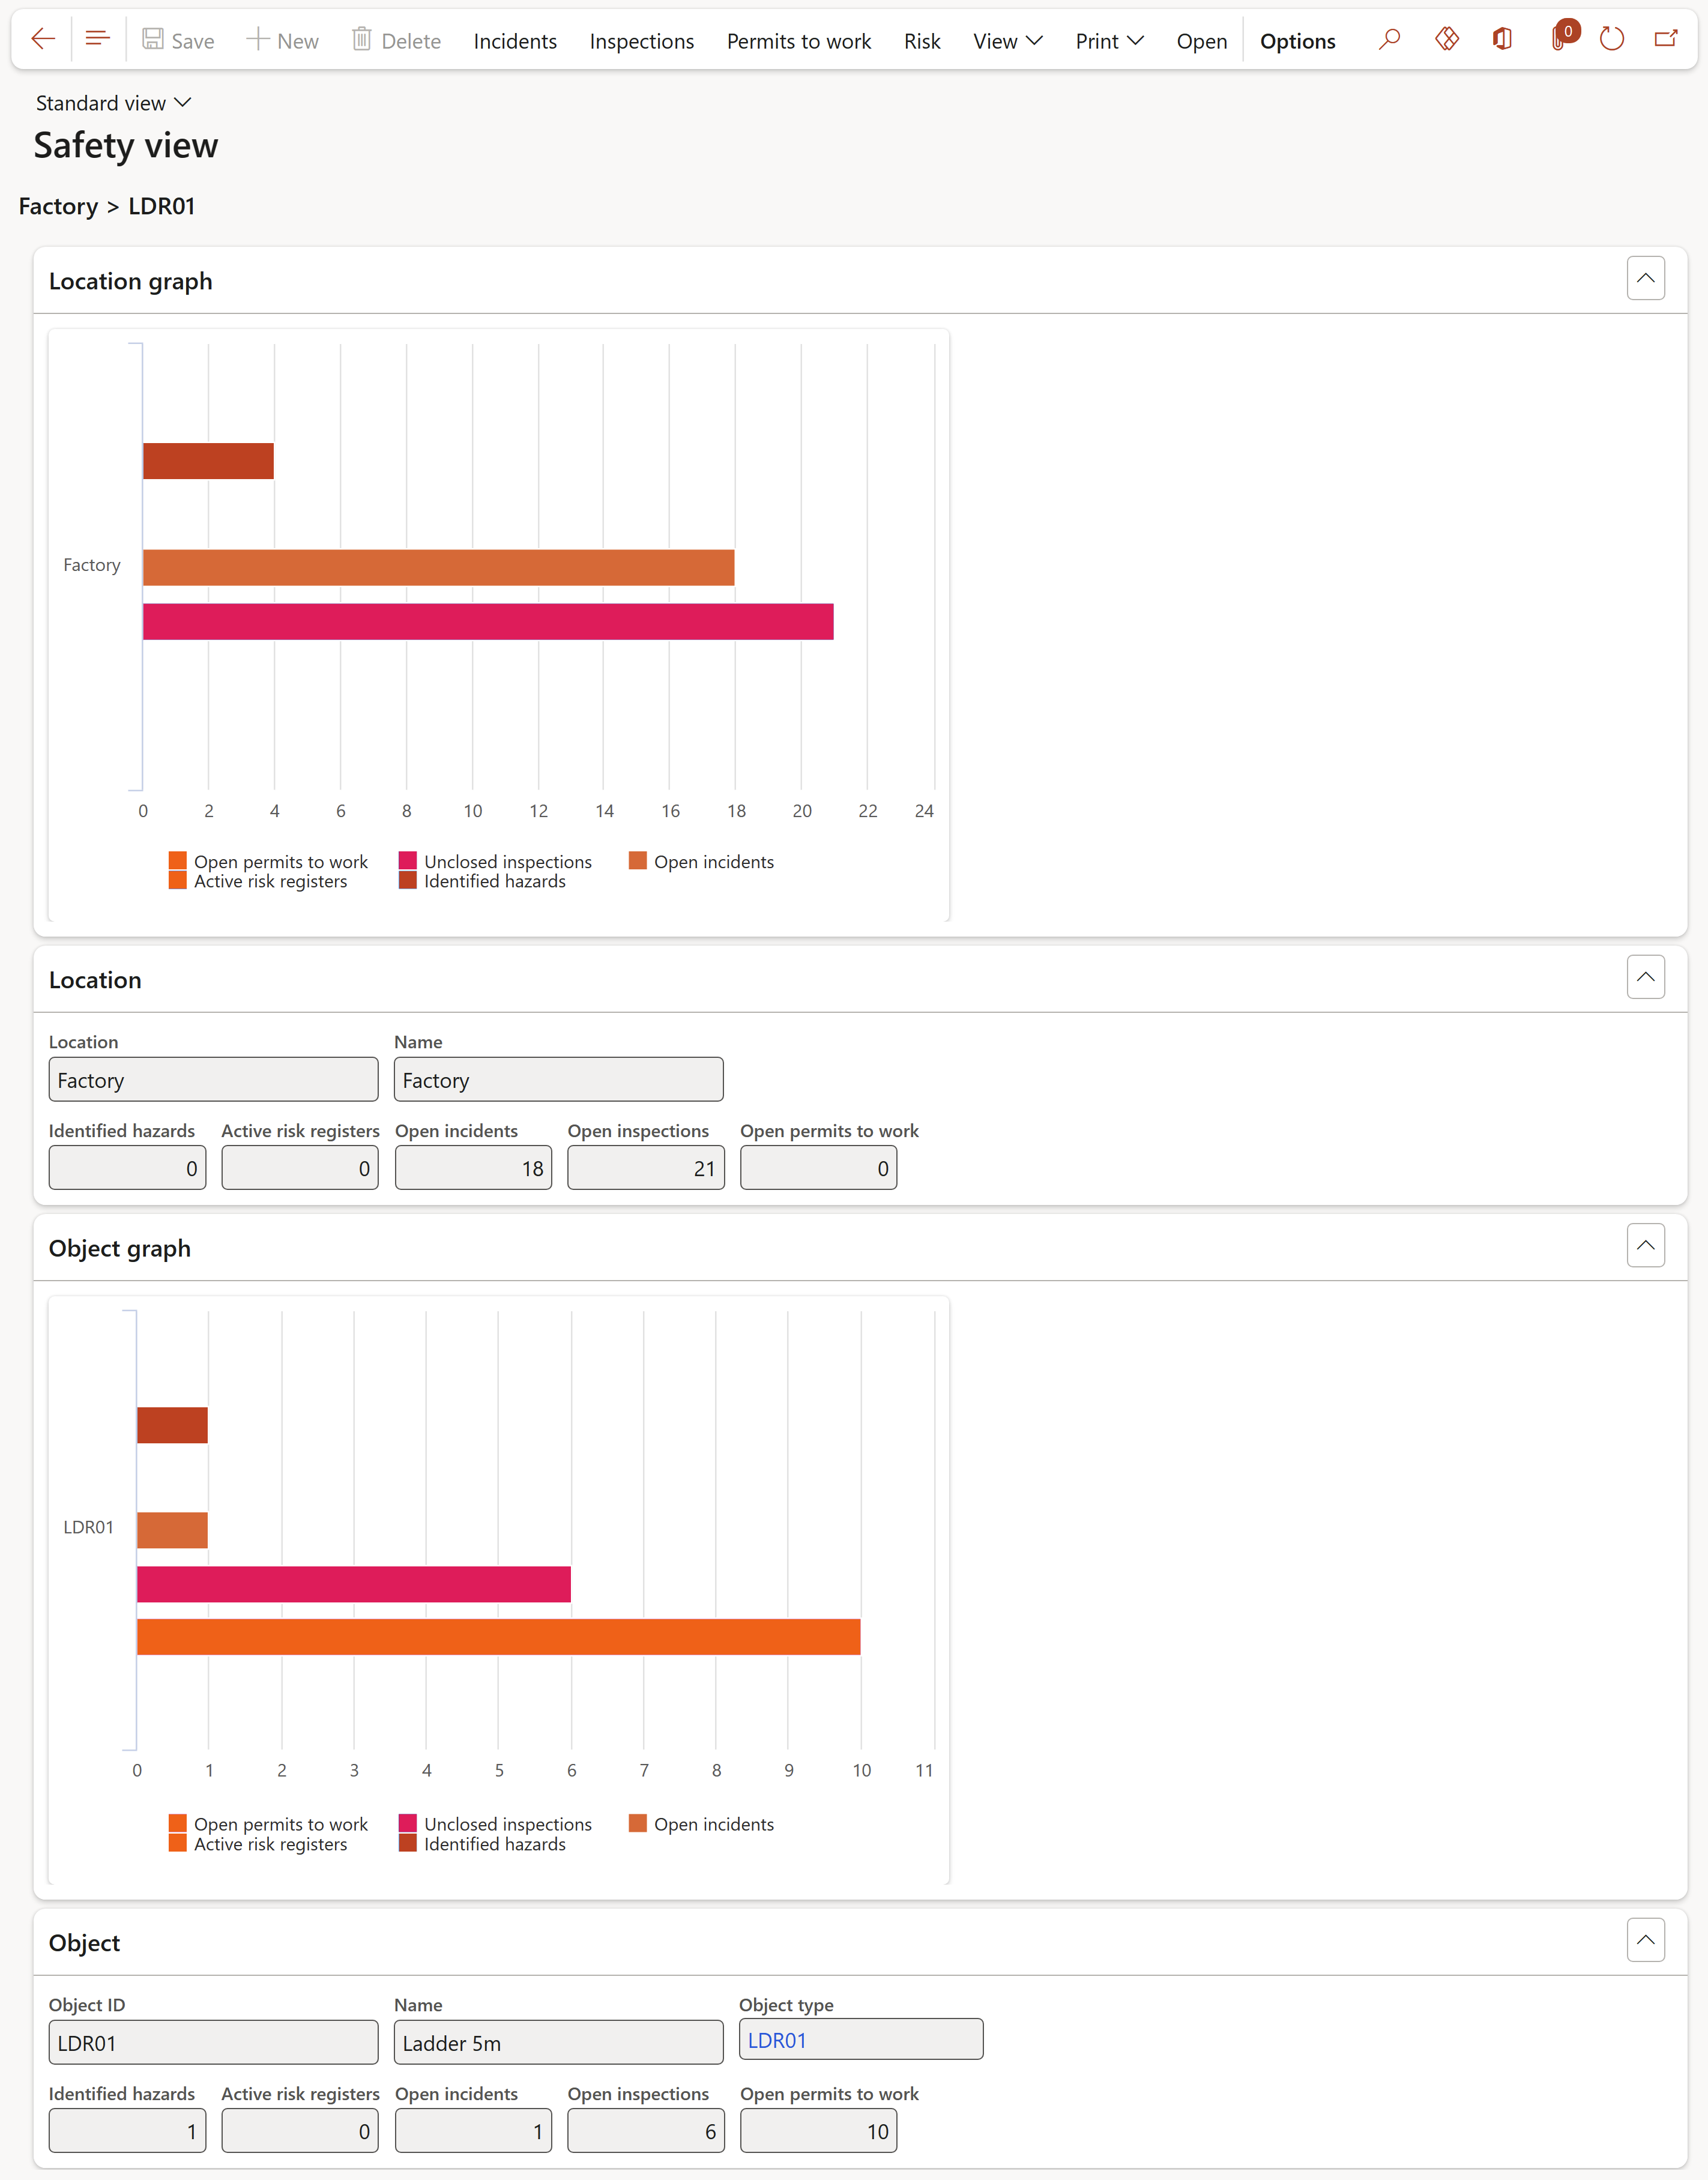
Buttons on the Safety view workspace
- Incidents – Takes the user to the incidents that are relevant to the selected site
- Inspections - Takes the user to the inspections that are relevant to the selected site
- Permits to work - Takes the user to the permits to work that are relevant to the selected site
- Work orders - Takes the user to the list of open work orders created for the selected object
- Risks – View the Risk registers associated with the object/location
- View – Provides a dropdown list of the details that can be viewed for the selected site
- Print - Provides a dropdown which gives the user the option to print either the Location safety report or the Object safety report for the selected site

This inquiry provides a complete view of all safety aspects for the selected location and related objects. This includes their hazards and risks, then by using the buttons as described below users can view reported incidents, inspection and permits to work.
Select the relevant Location/Object from the left-hand side of the form.
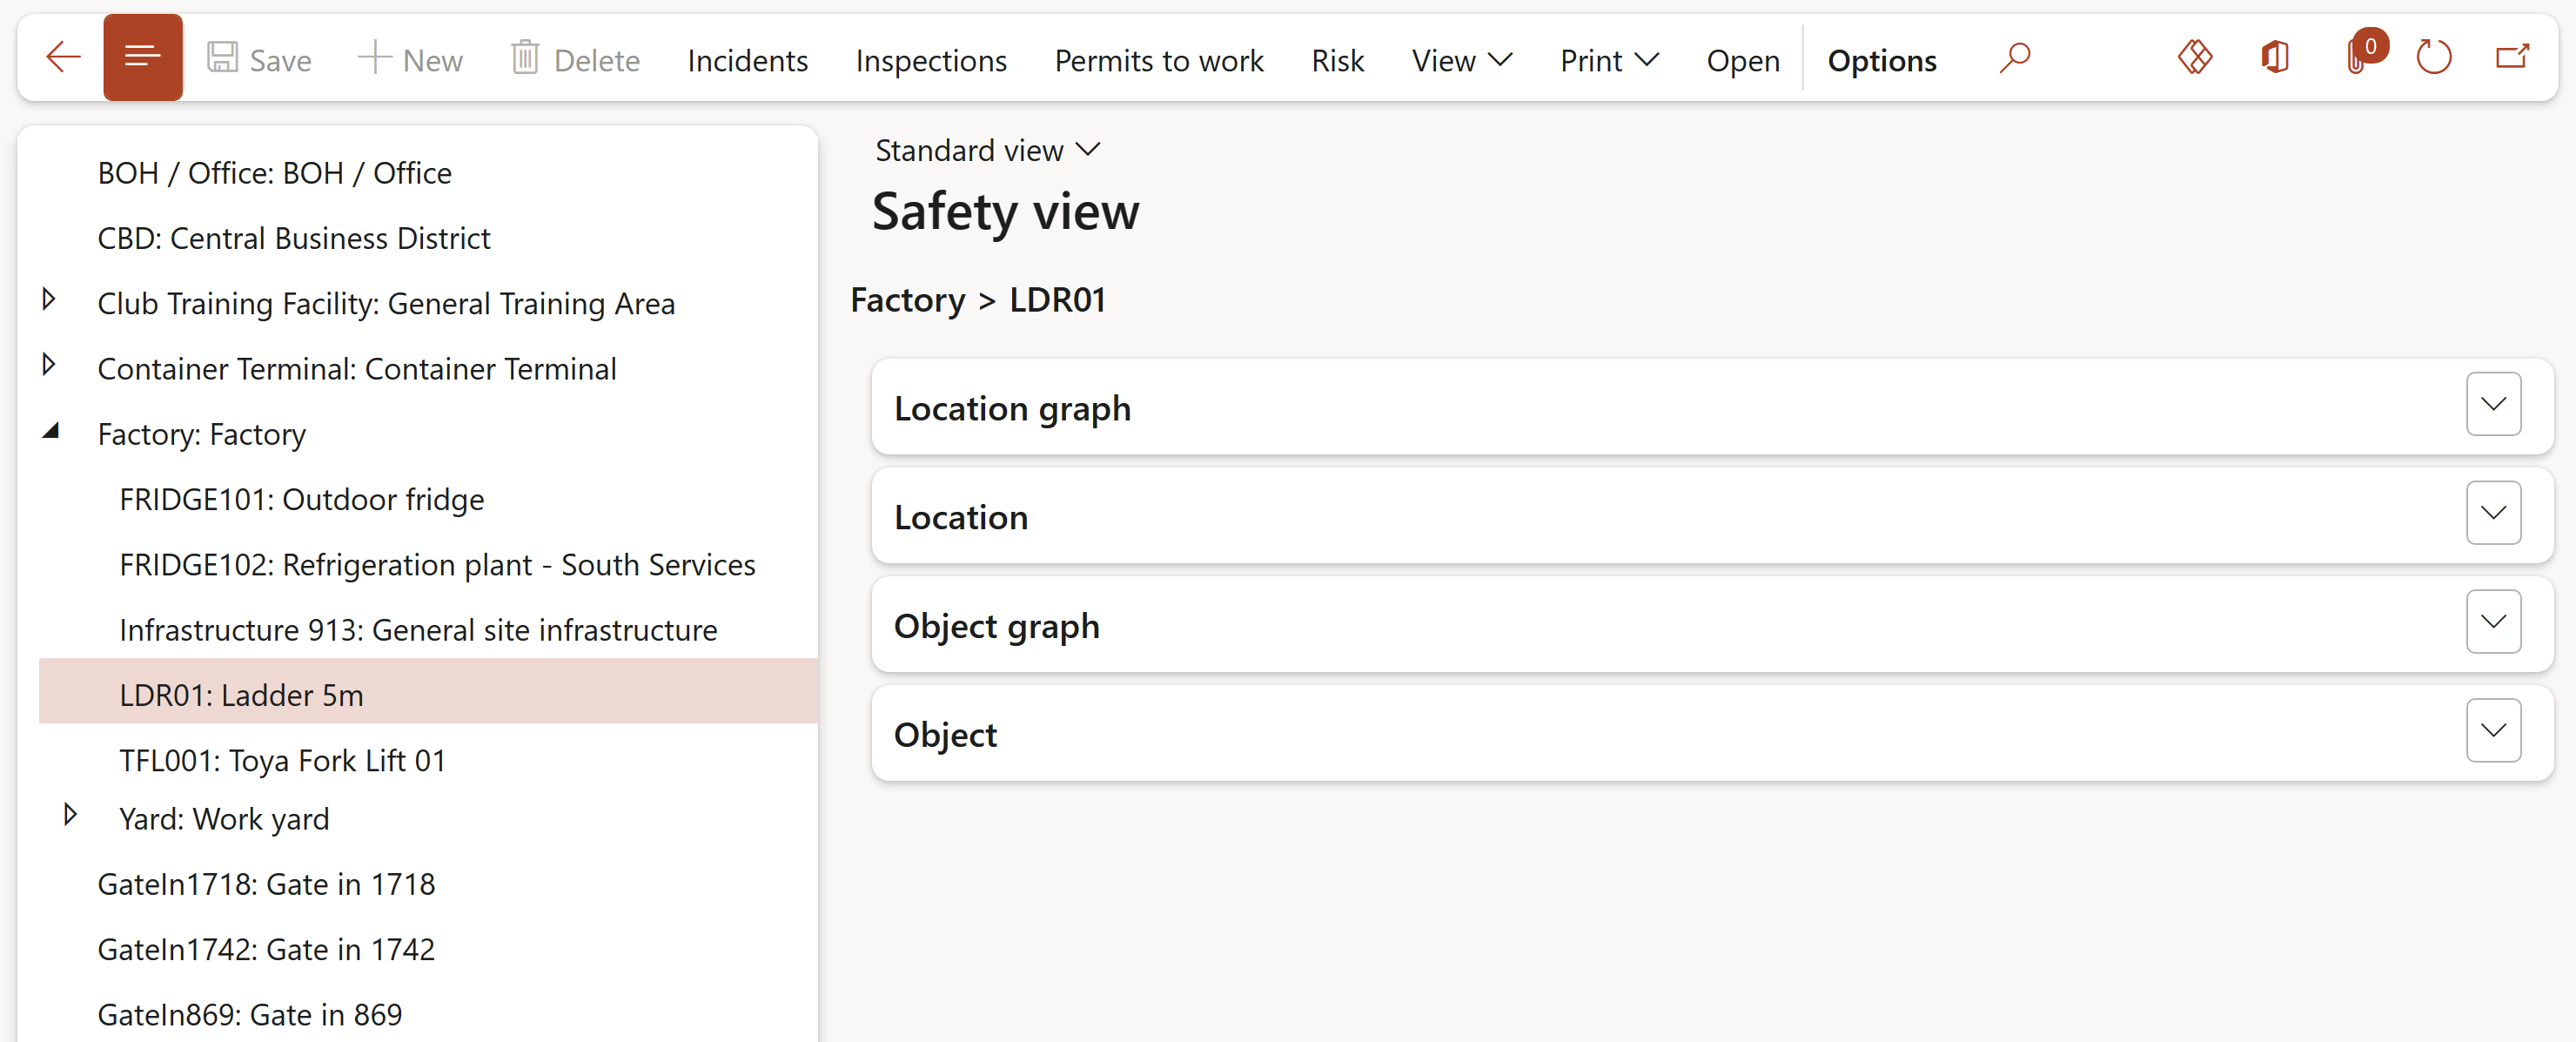
Expand the Fast tabs on the right-hand side of the form to view the graphs and details
¶ Sales order processing and enquiry
The detail displayed on this enquiry is for the selected worker
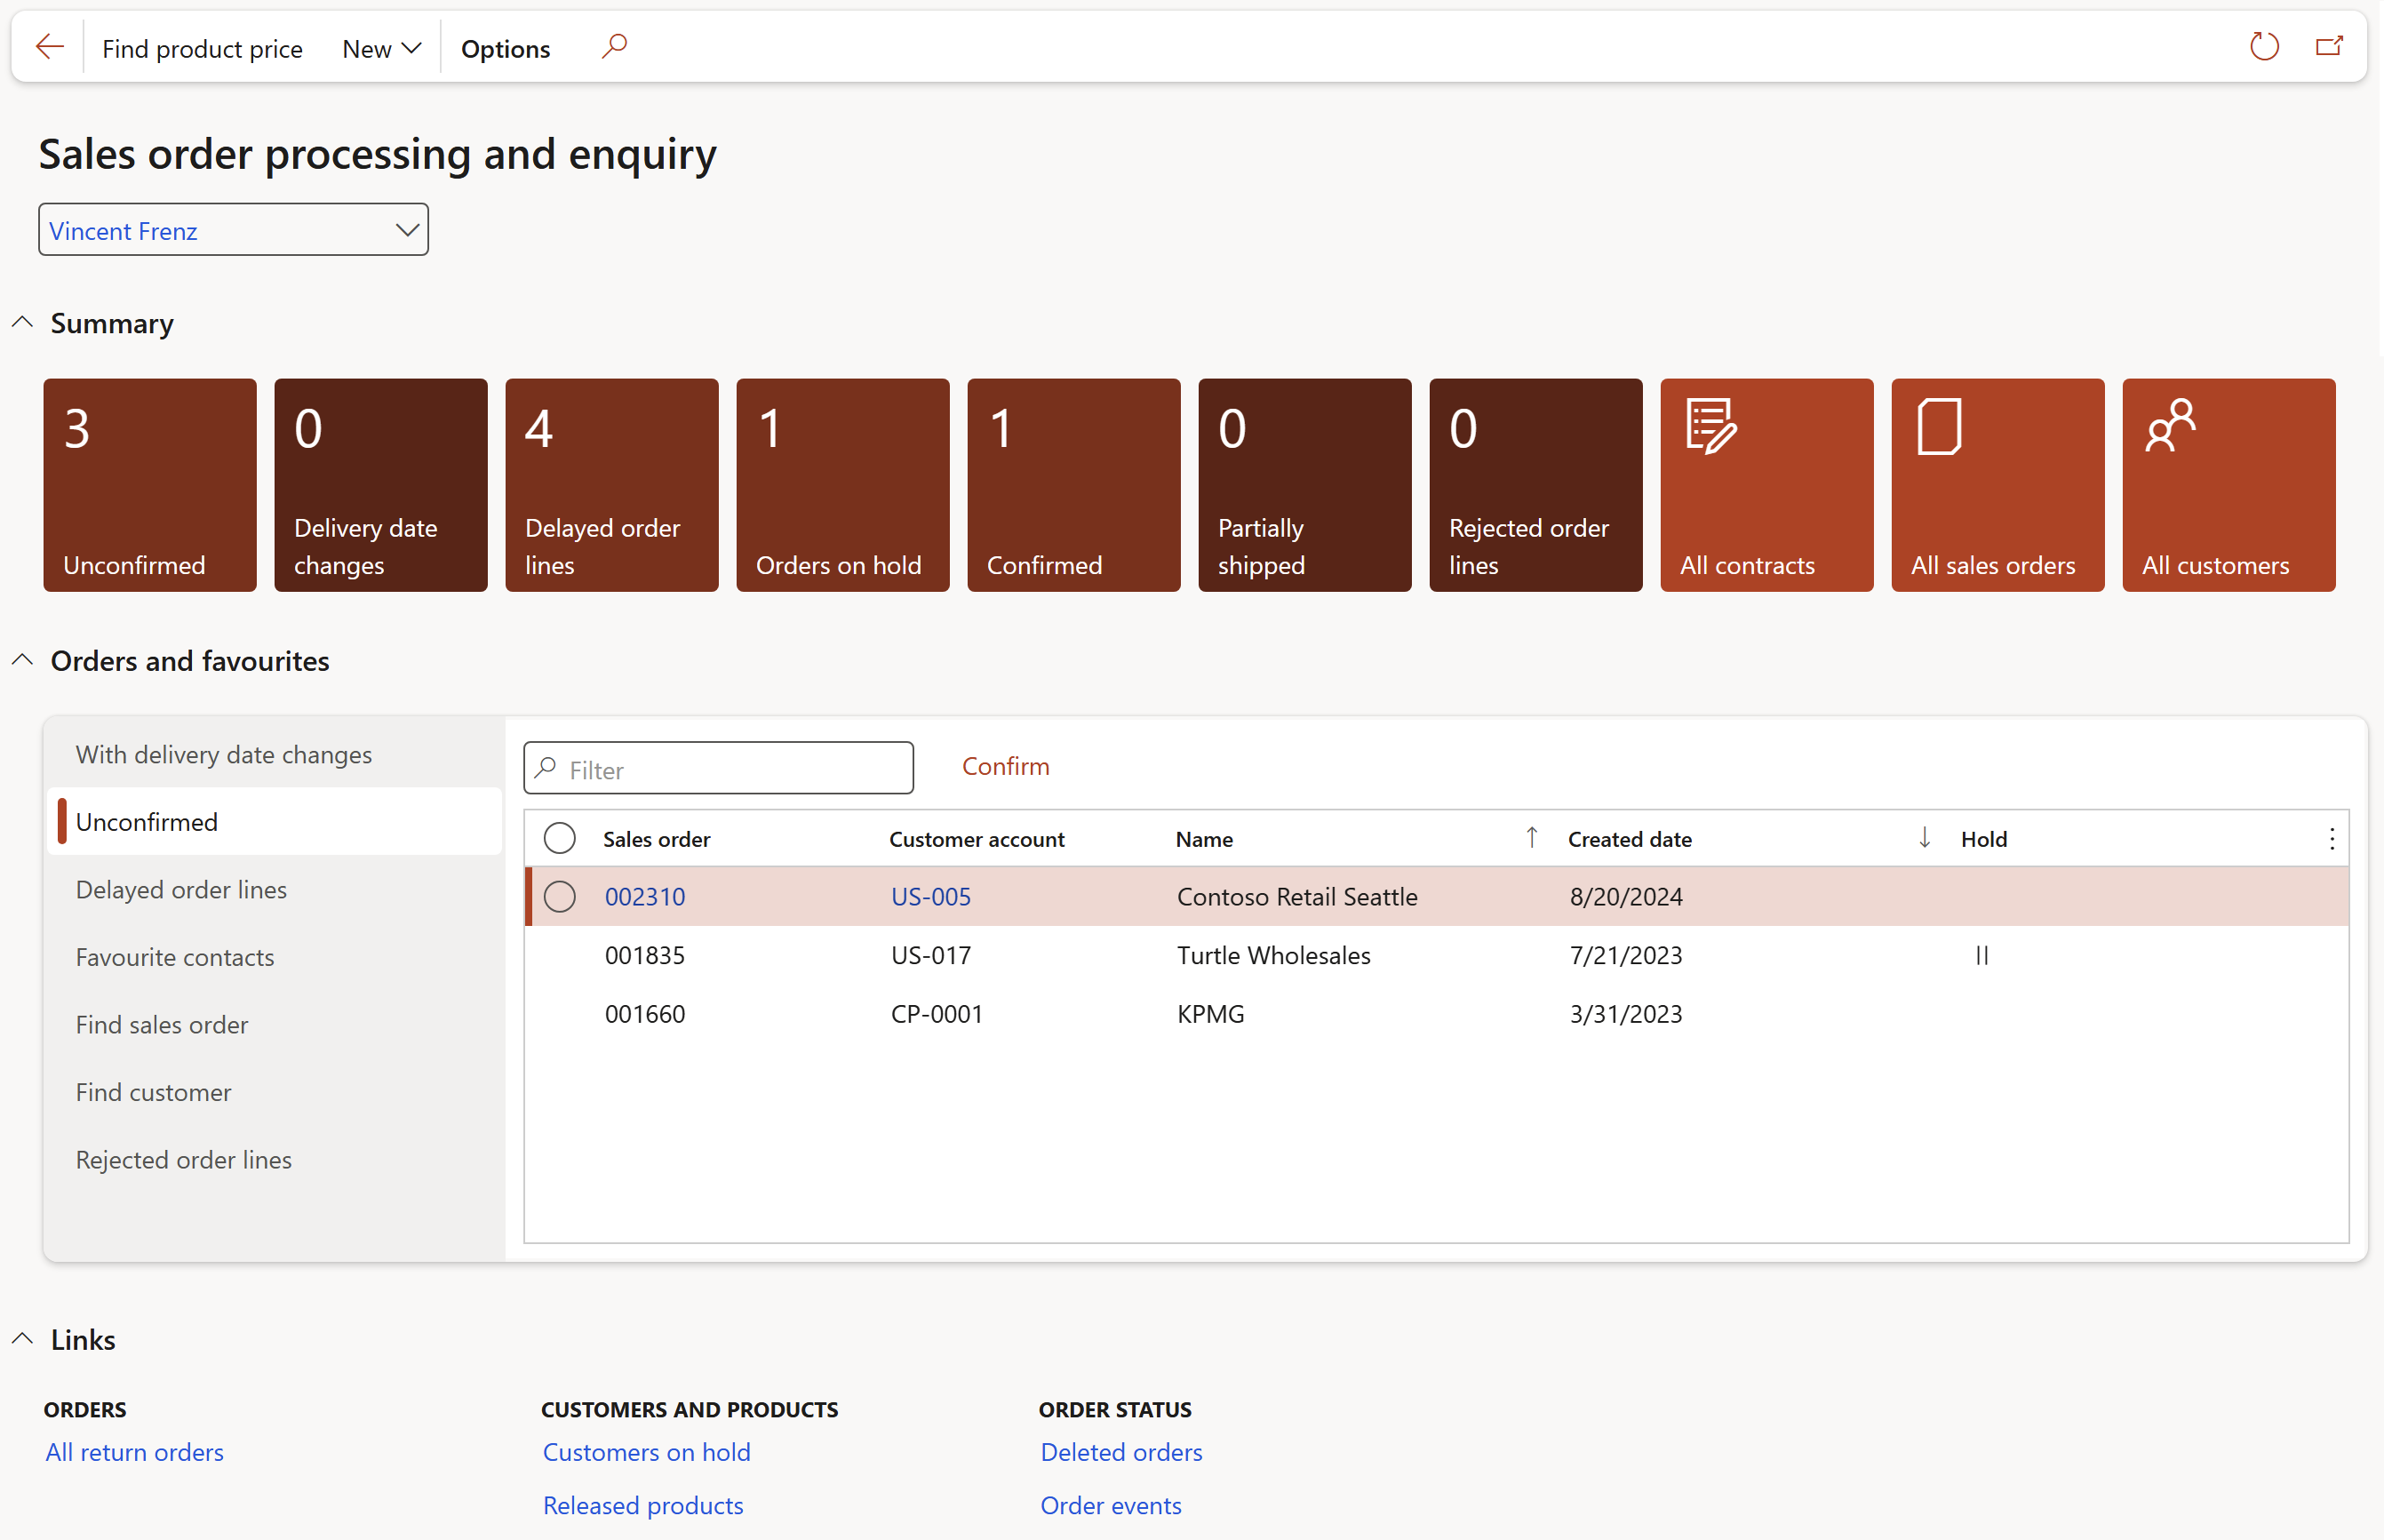
Functions of the Summary tiles:
- All contracts: Opens the All accounts receivable contracts in legal entity list page where the selected worker is the Employee responsible selected under the RACI and other contacts Fast tab on the contract
¶ The Print button
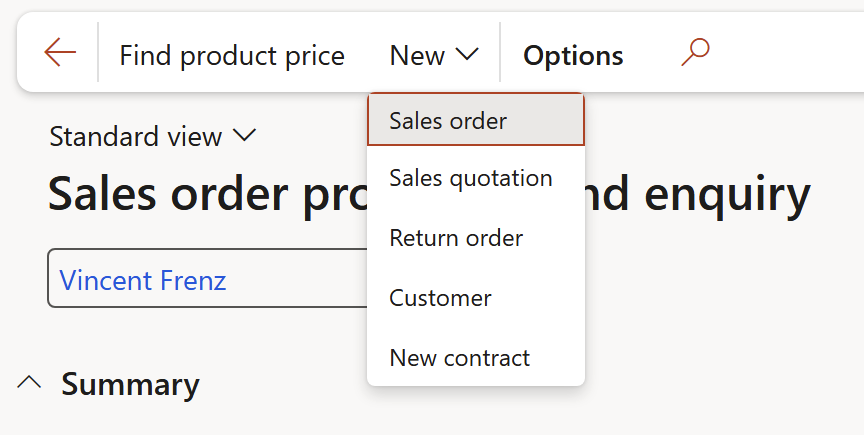
New contracts can be created by clicking on the New button and selecting New contract from the list
¶ Governance Reports & Inquiries
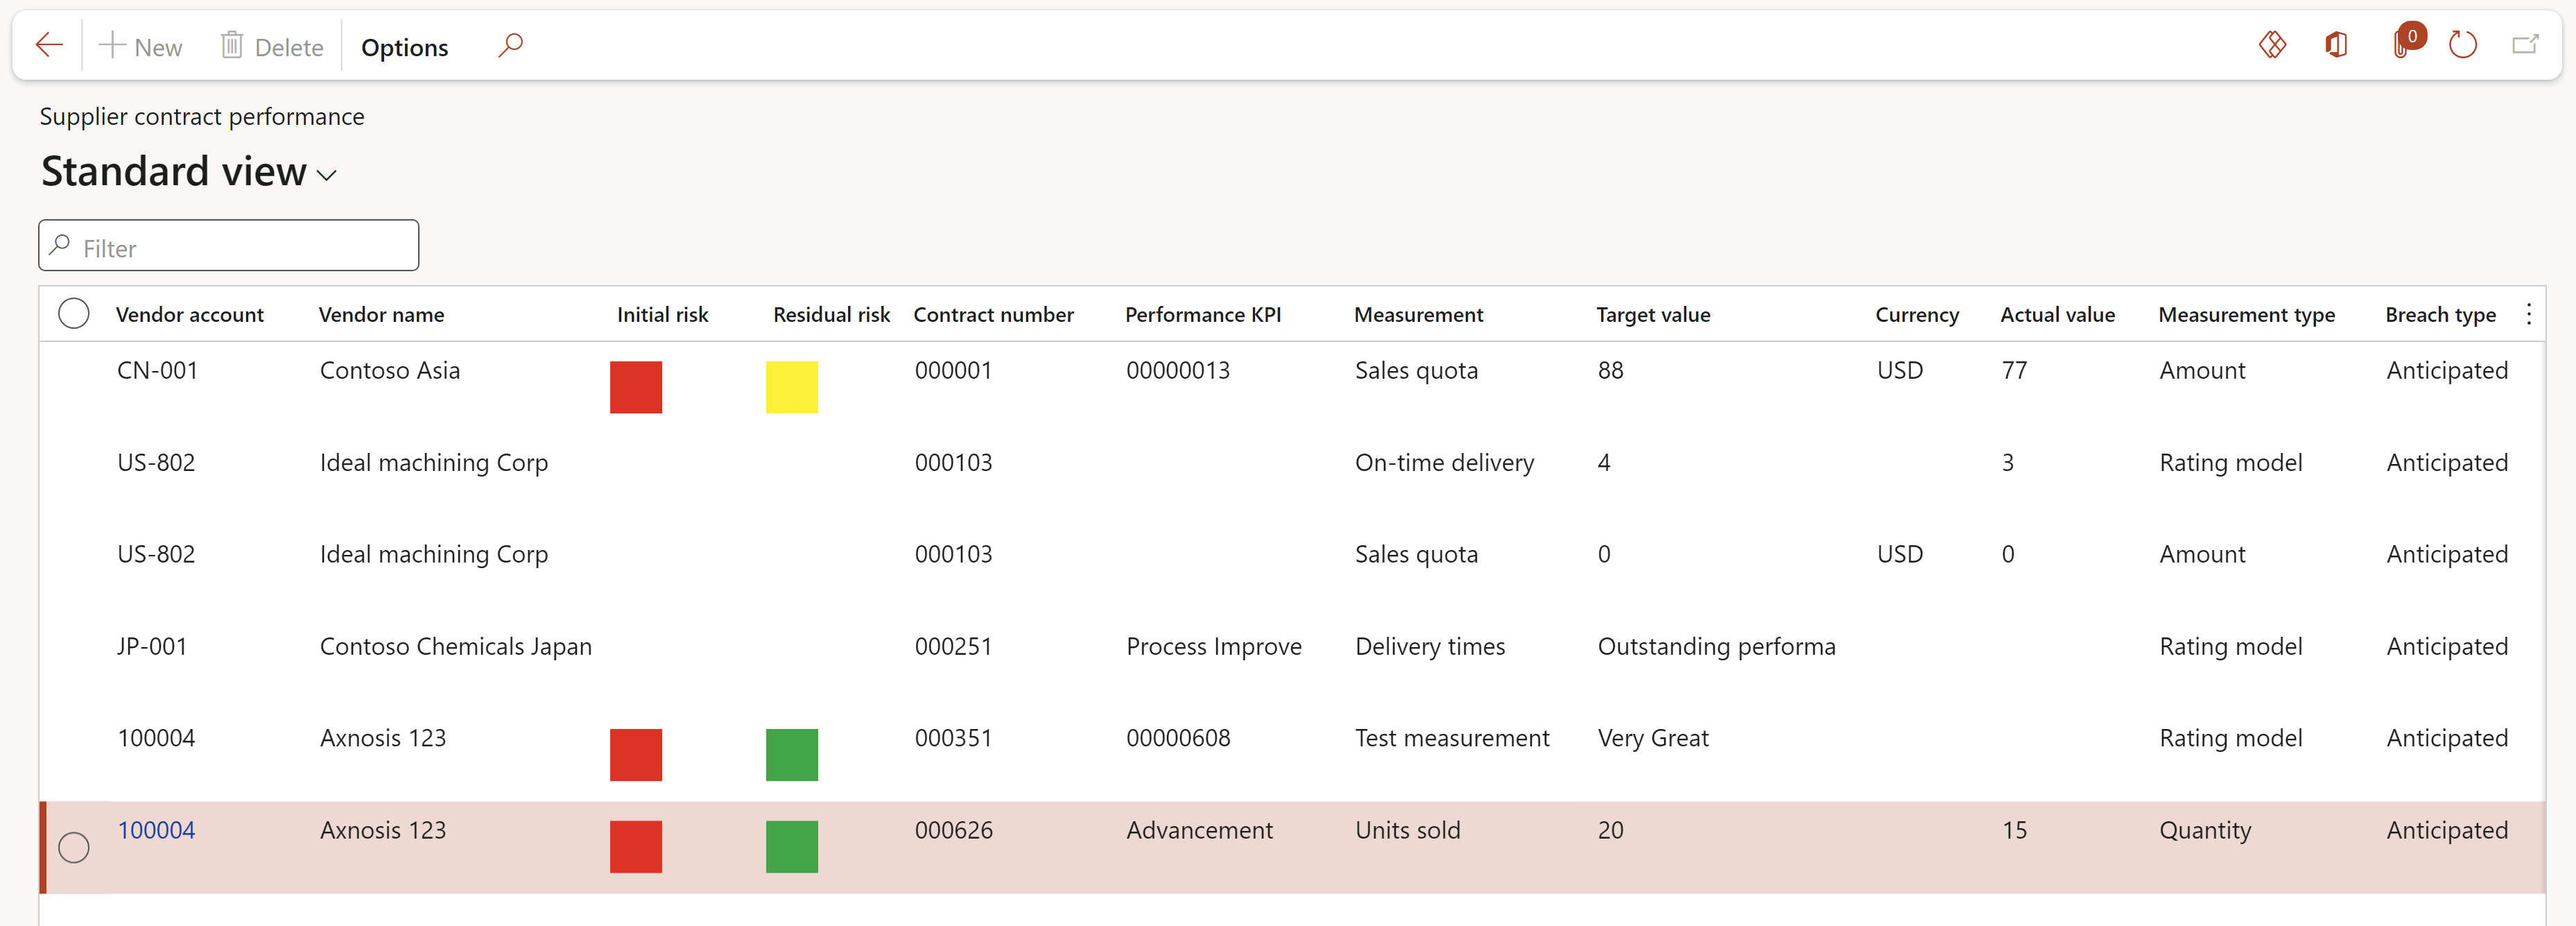
¶ 1. Vendor/Supplier contract performance inquiry
GRC > Governance > Reports and inquiries > Vendor/Suppliers contract performance
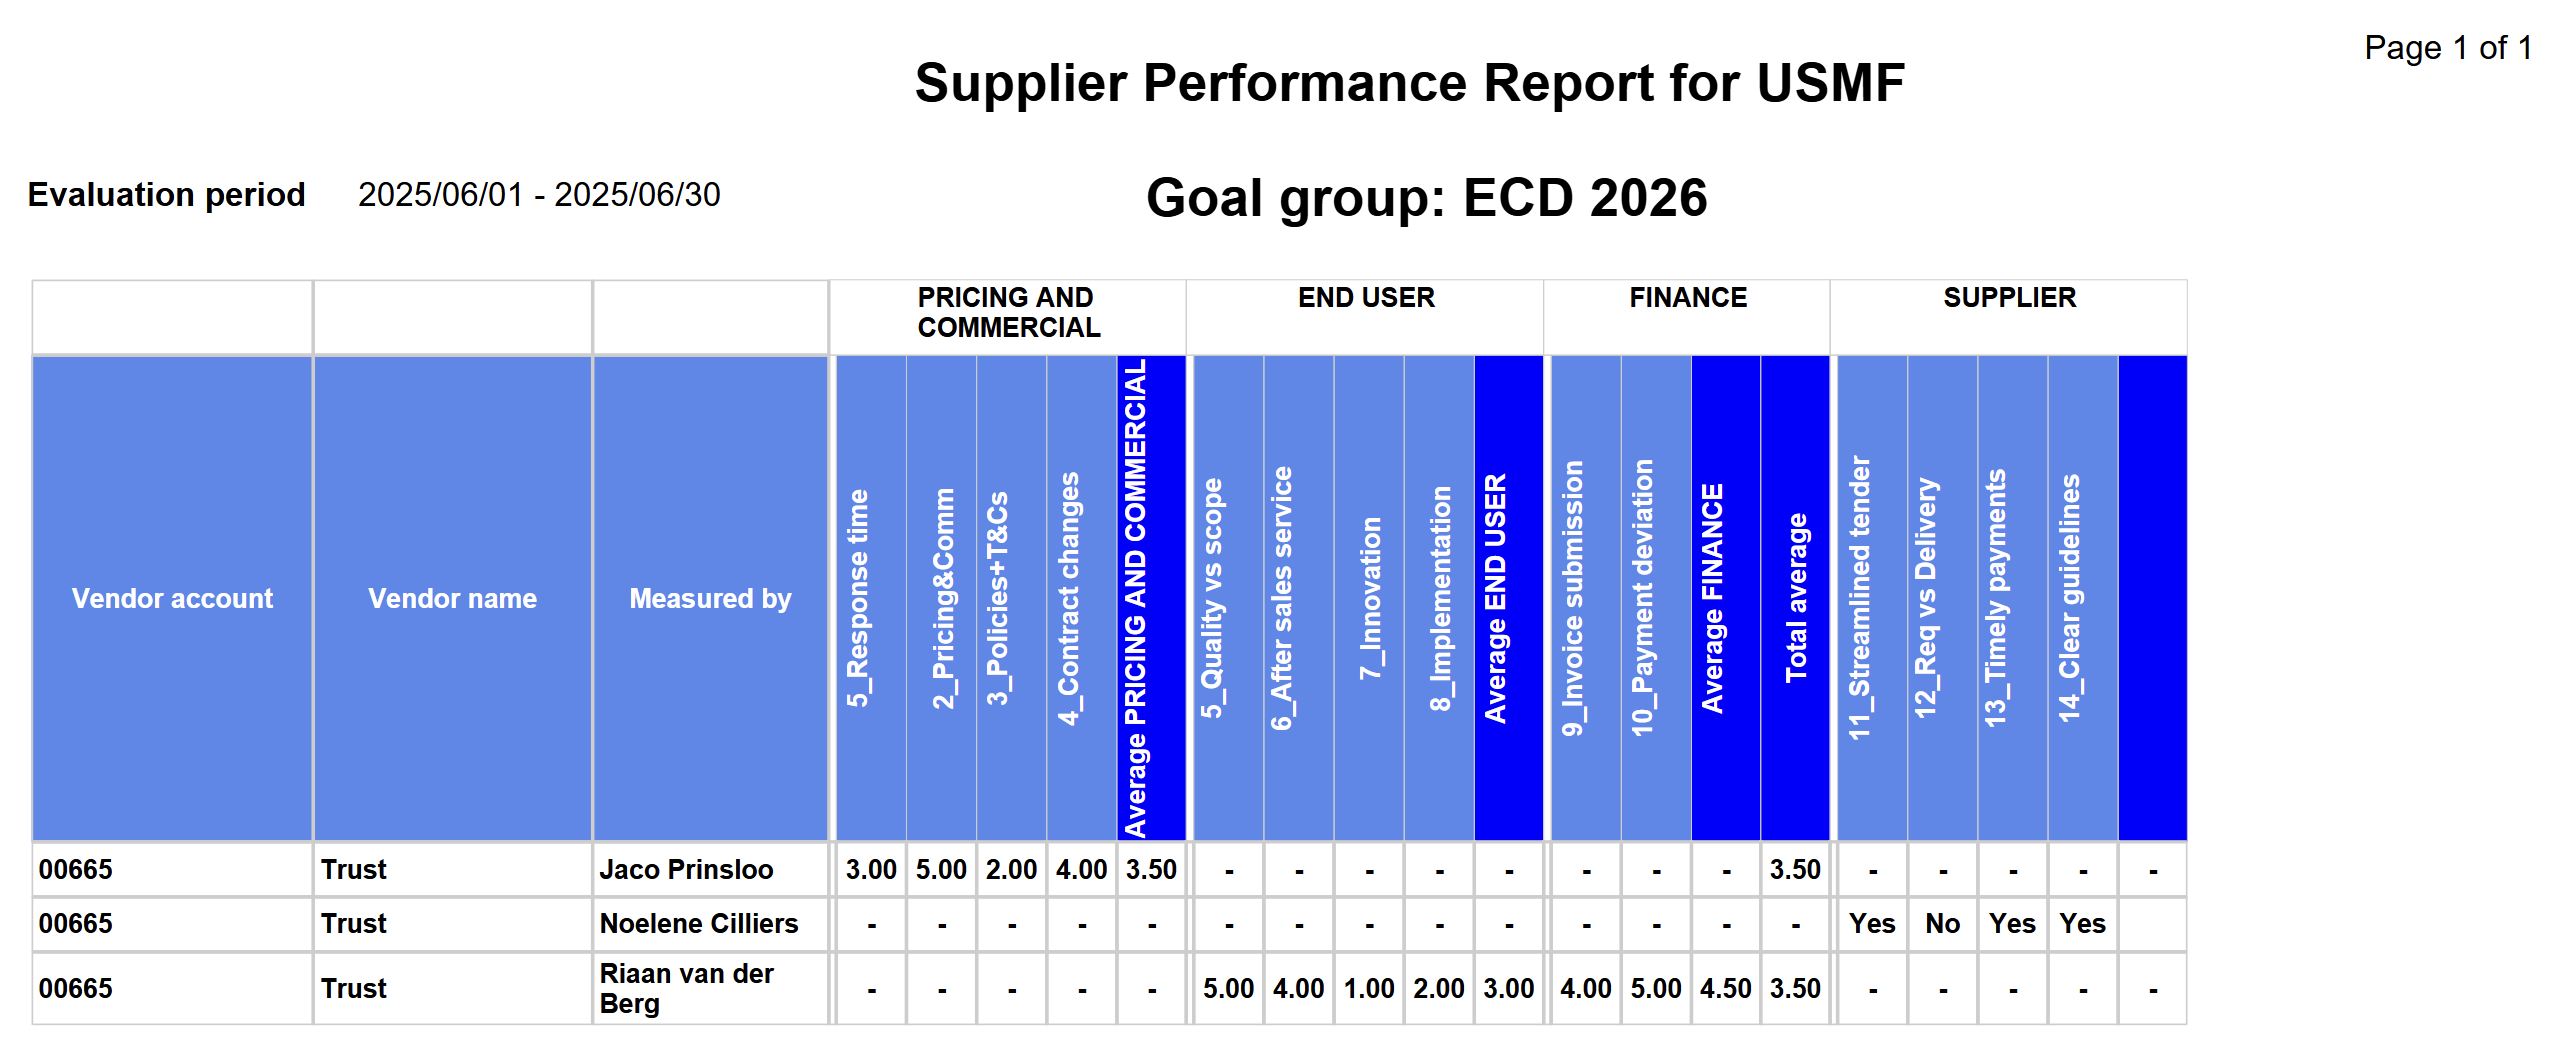
¶ 2. Supplier performance report
GRC > Governance > Reports and inquiries > Supplier performance report
- Select the relevant parameters on the Supplier performance report dialog
- Click on the OK button
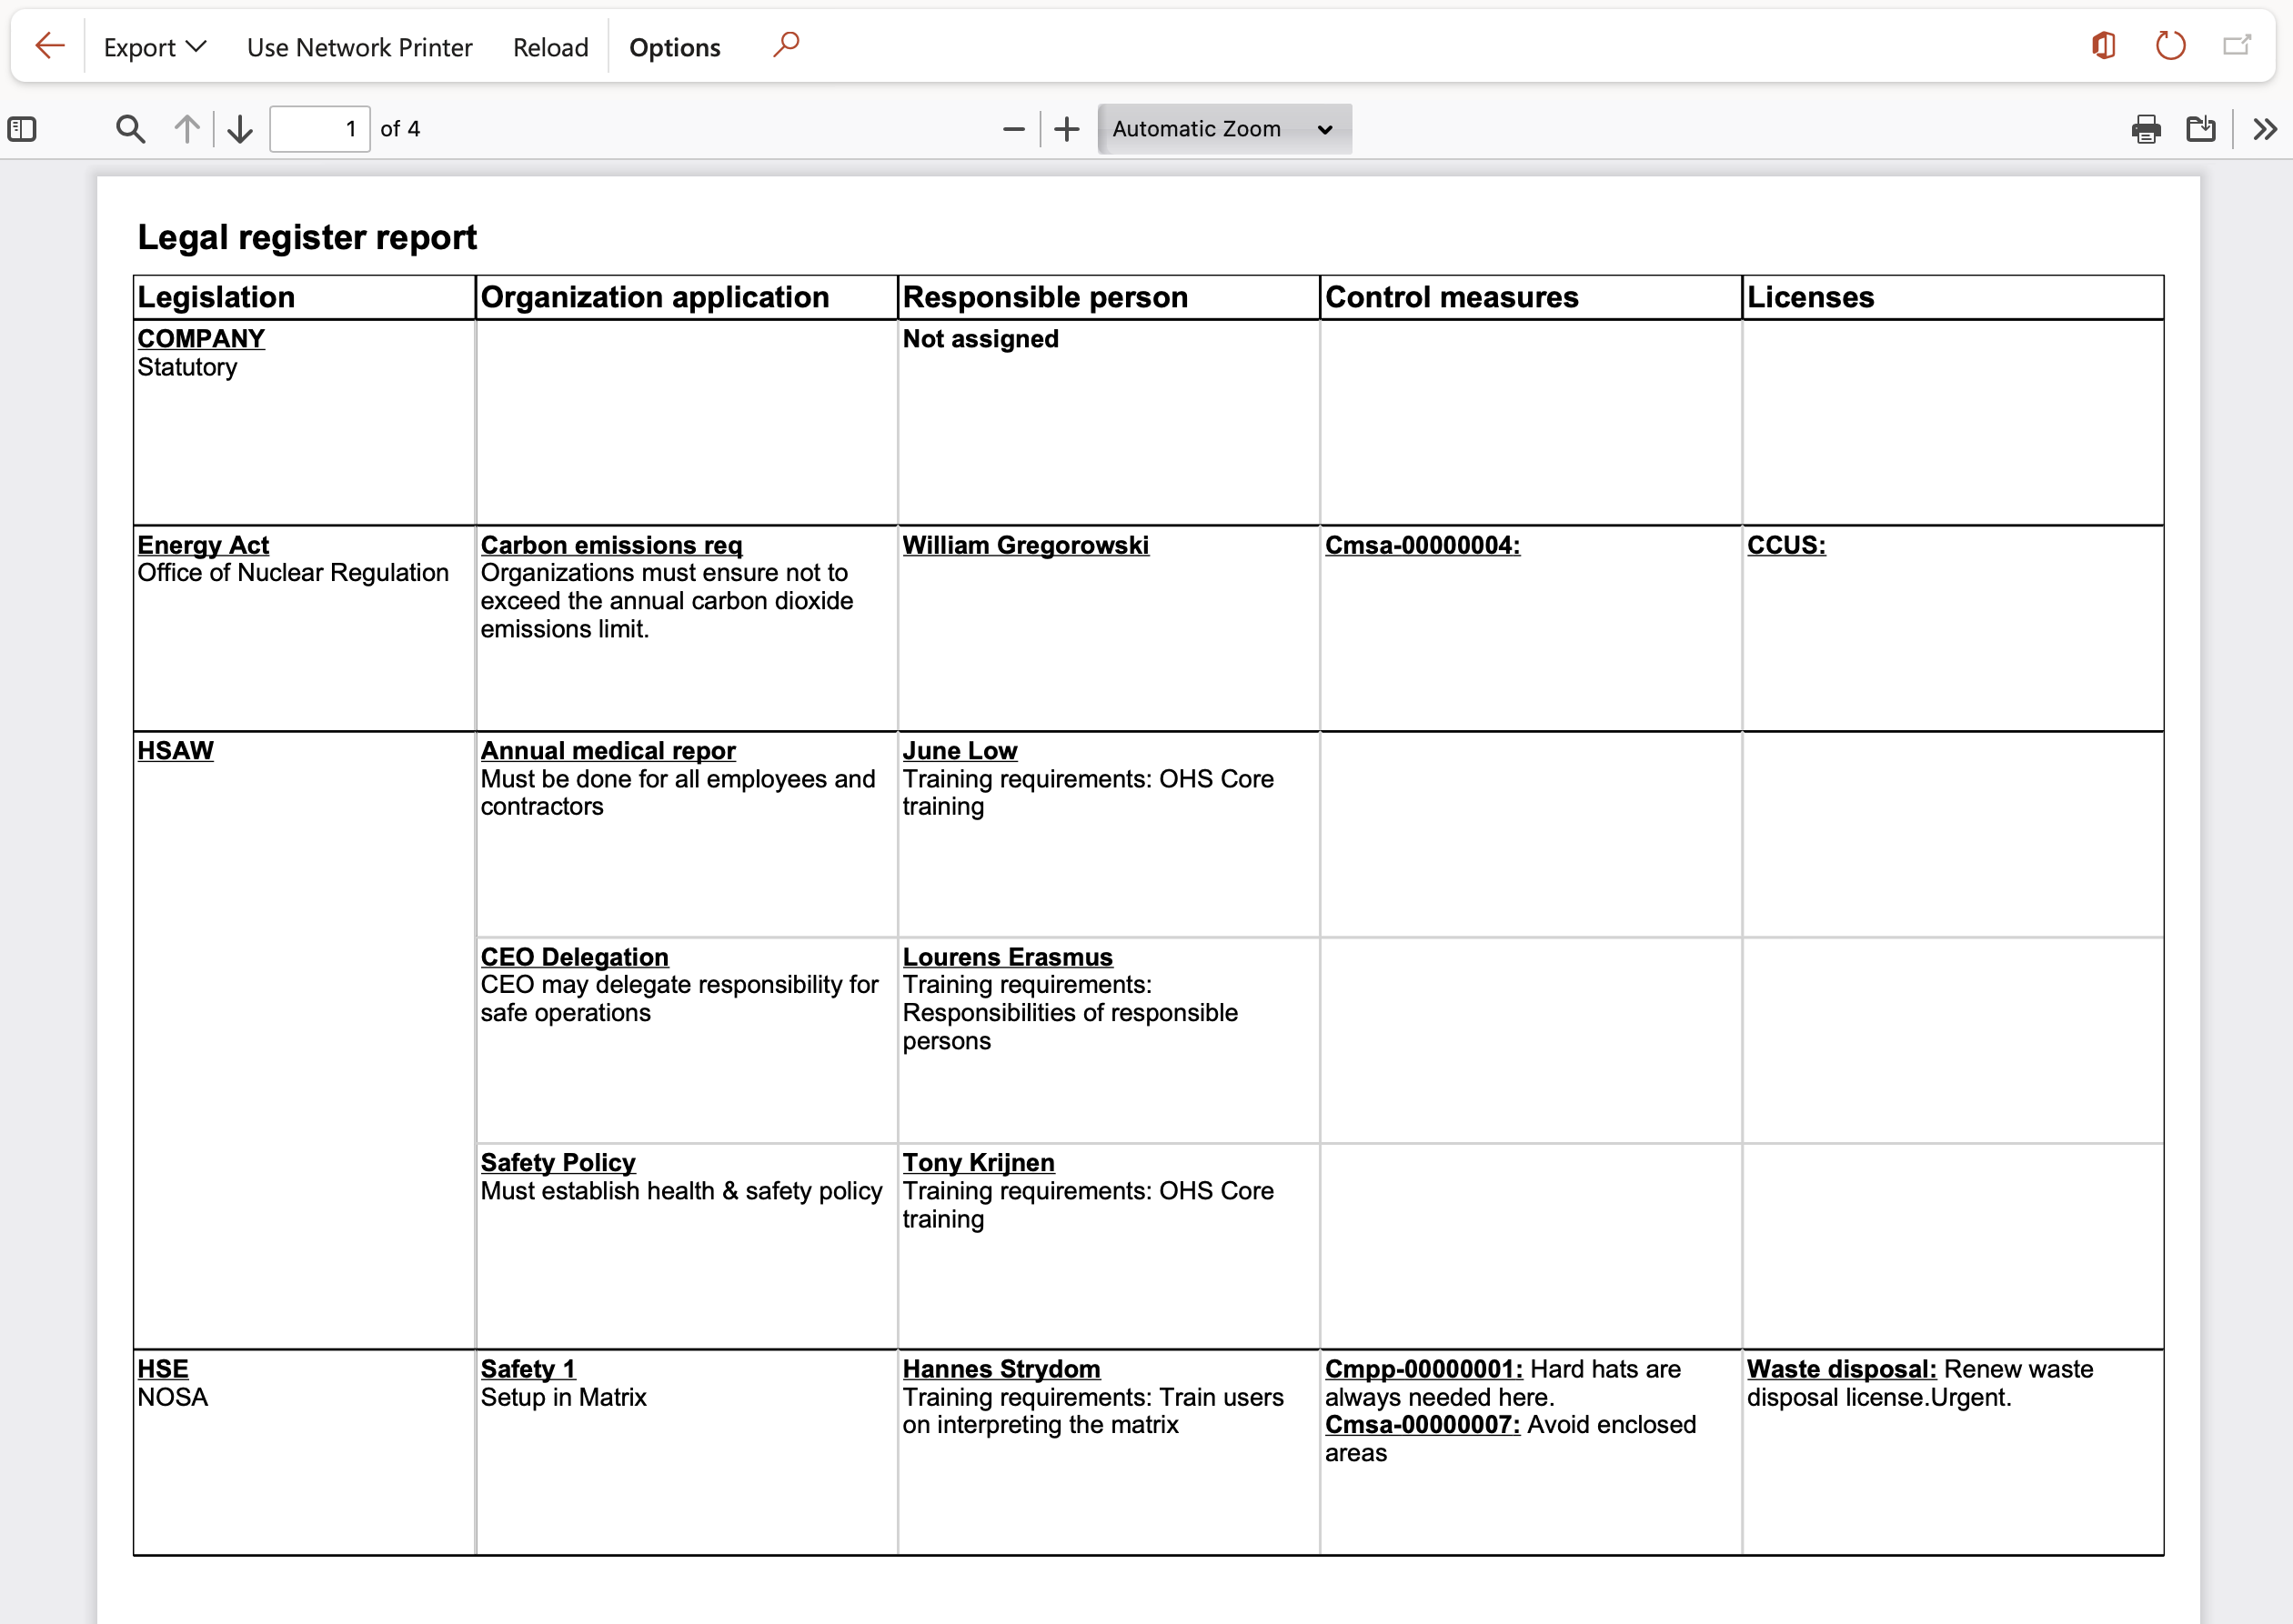
¶ 3. Legal register report
Go to: GRC > Governance > Reports and inquiries > Legal register report
OR
GRC > Compliance > Legal register
On the Action pane, click on the Print legal register report button
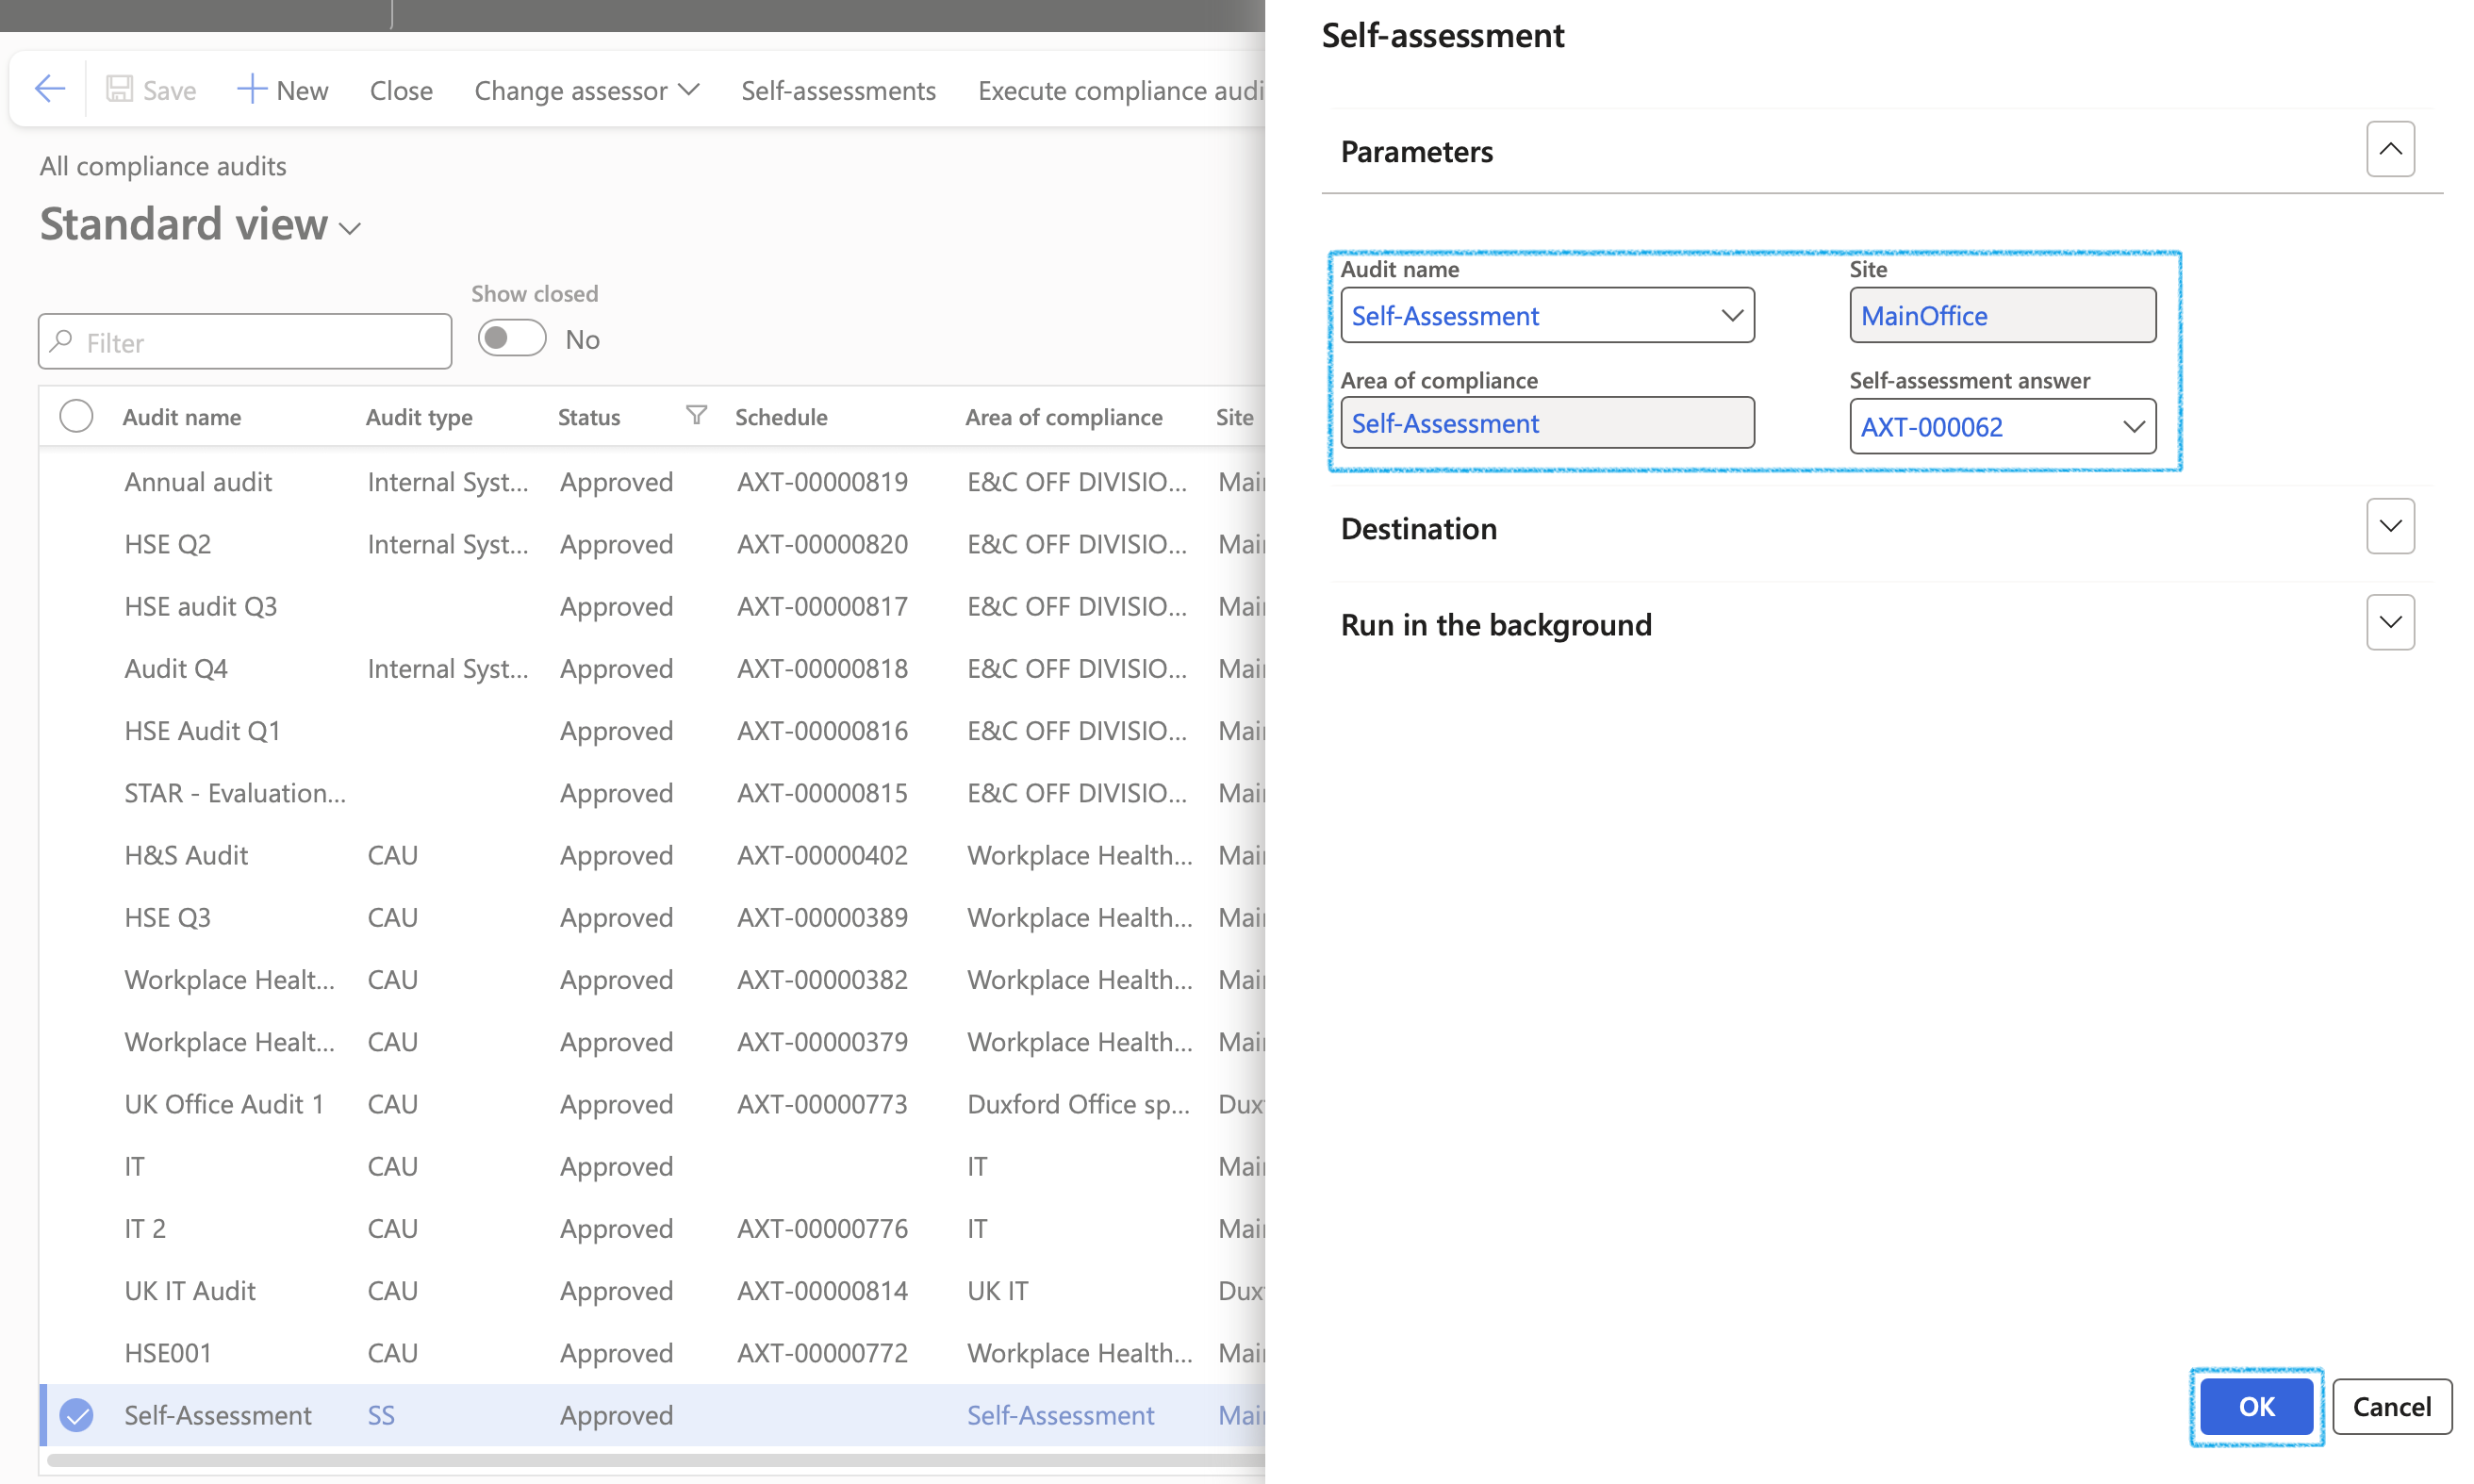
¶ 4. Compliance audit self-assessment report
GRC > Compliance > All compliance audits
- Select the relevant audit (record)
- In the Action pane, click on the Print button and select Self-assessment from the list
The Self-assessments button will open a list of all the questionnaires/self-assessments linked to the selected audit

- On the Self-assessment dialog:
- Select the Self-assessment answer group that you want to print
- Click on the OK button

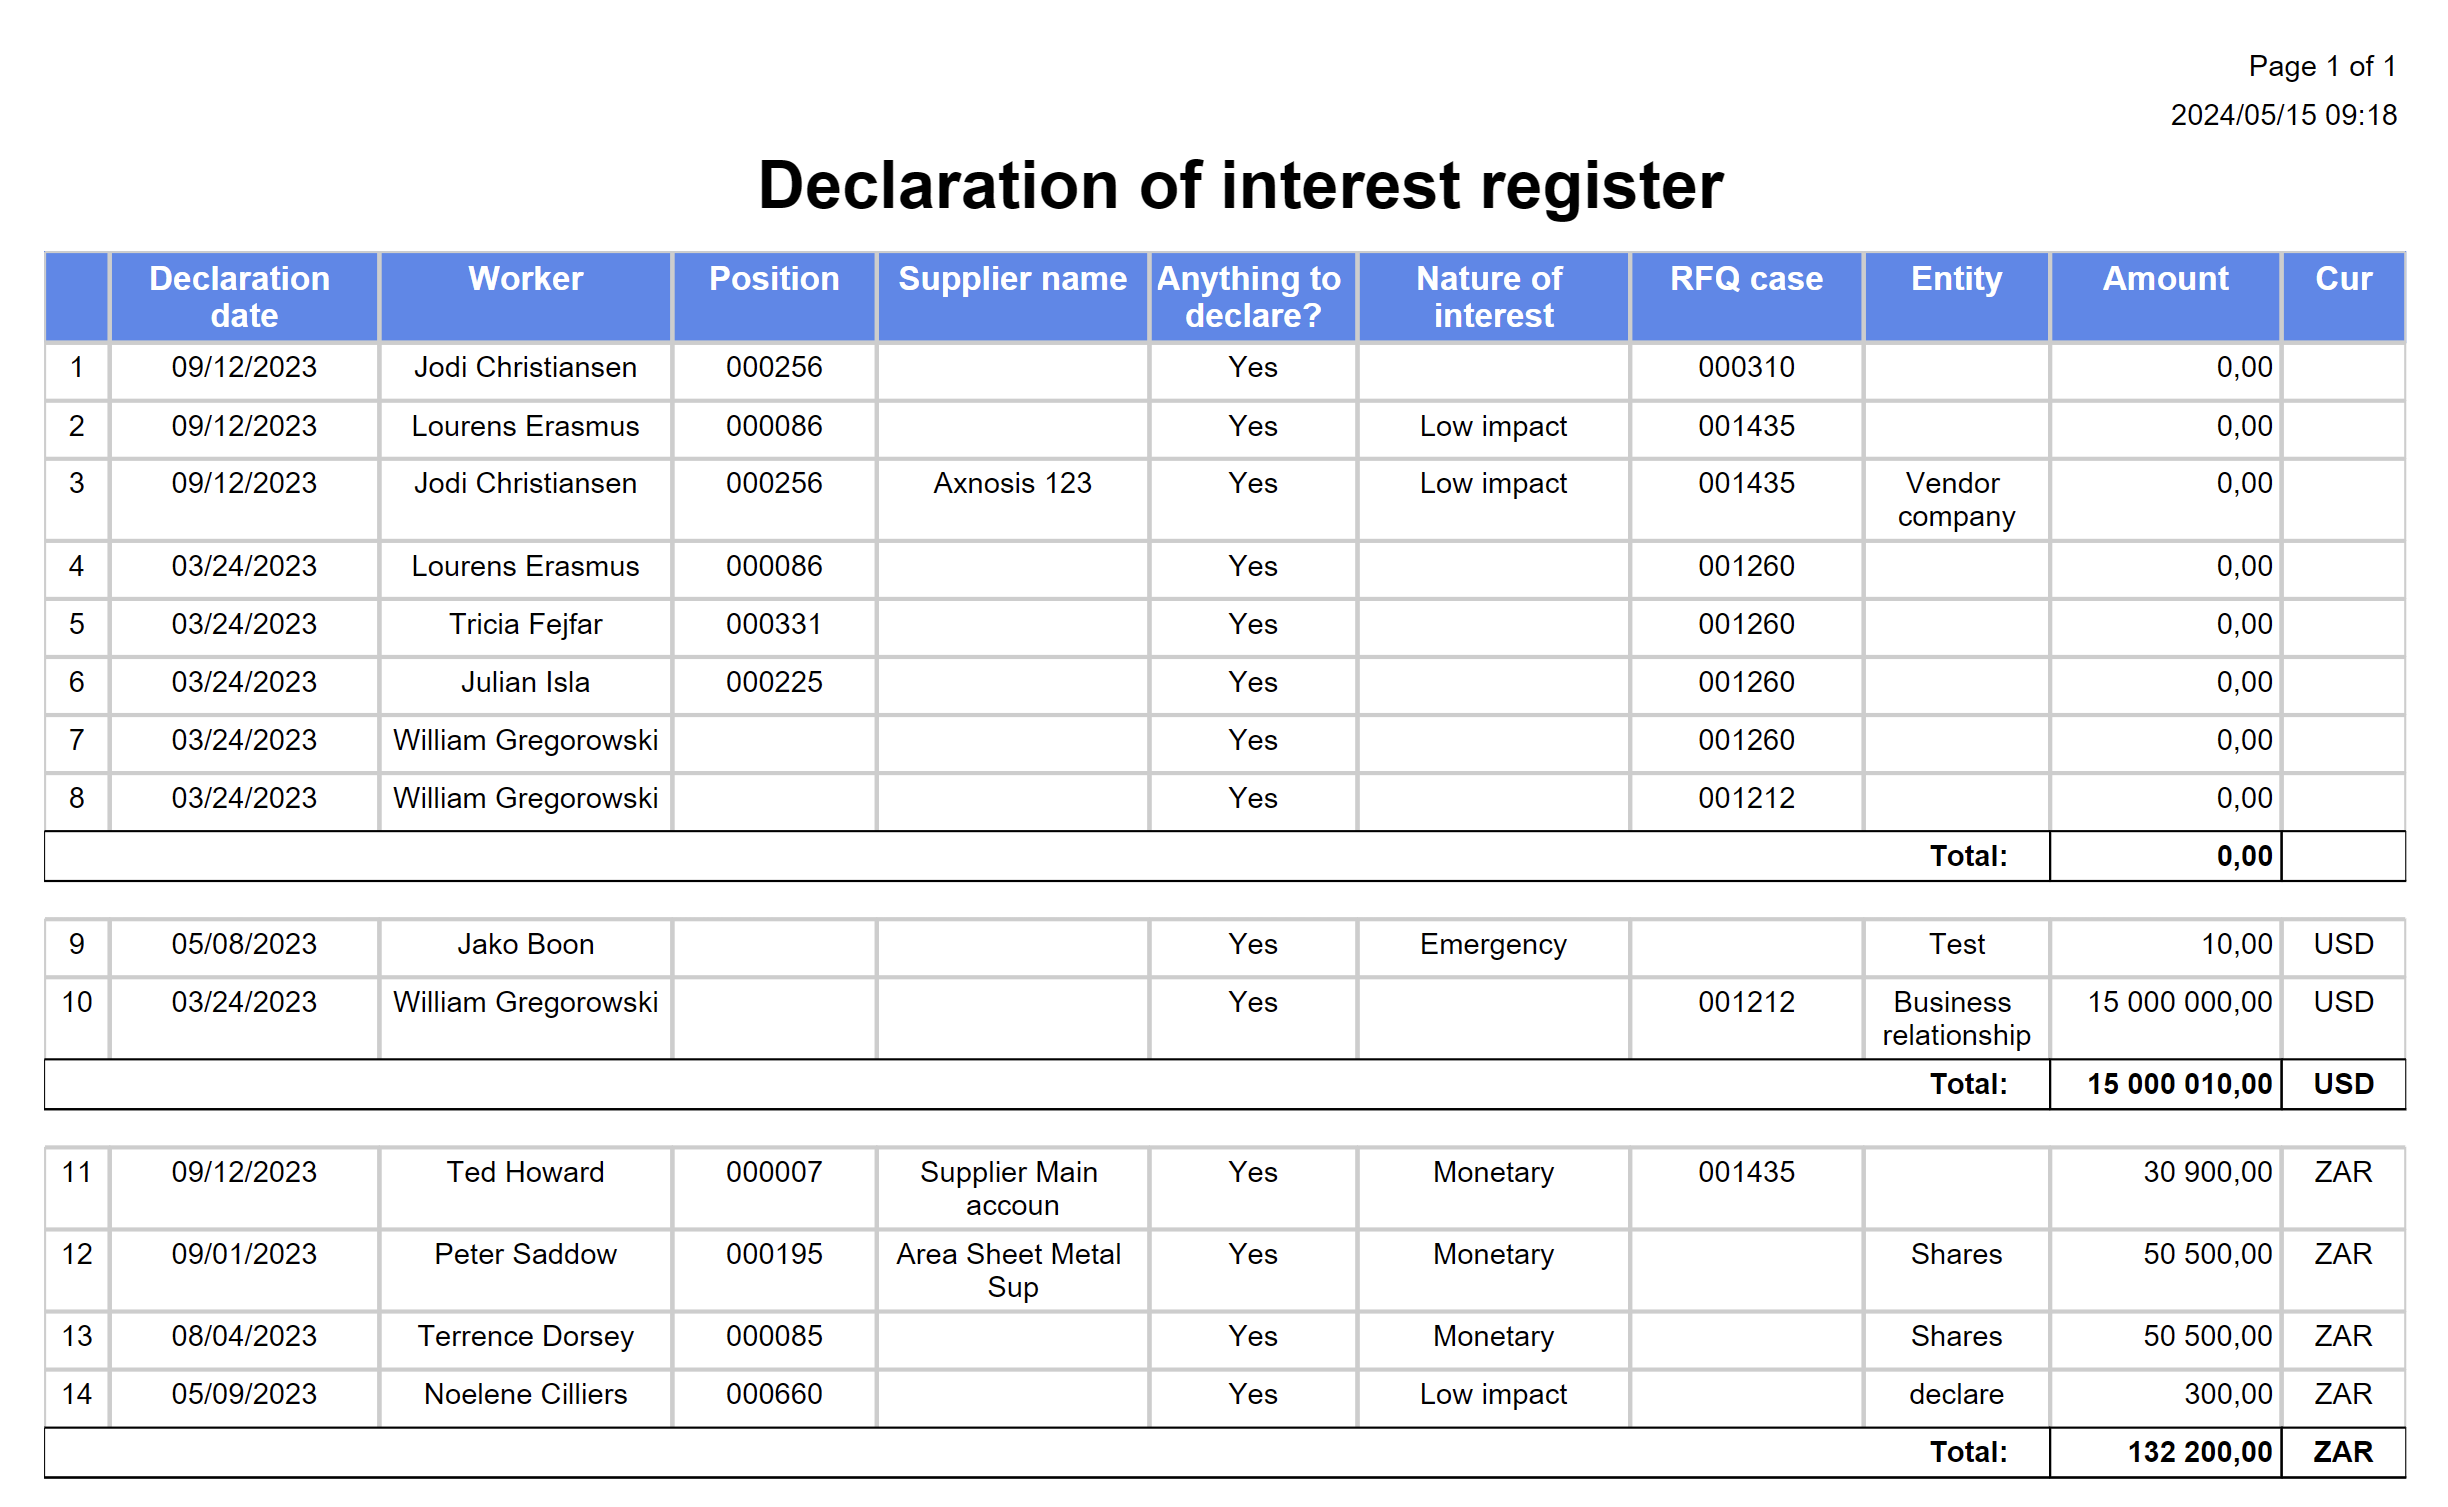
¶ 5. Declaration of interest report
Gp to: GRC > Governance > Legal > Declaration of interest register
- On the Action pane, click on the Print button
- Select the relevant parameters for the report
- Click OK
¶ 6. Tender register
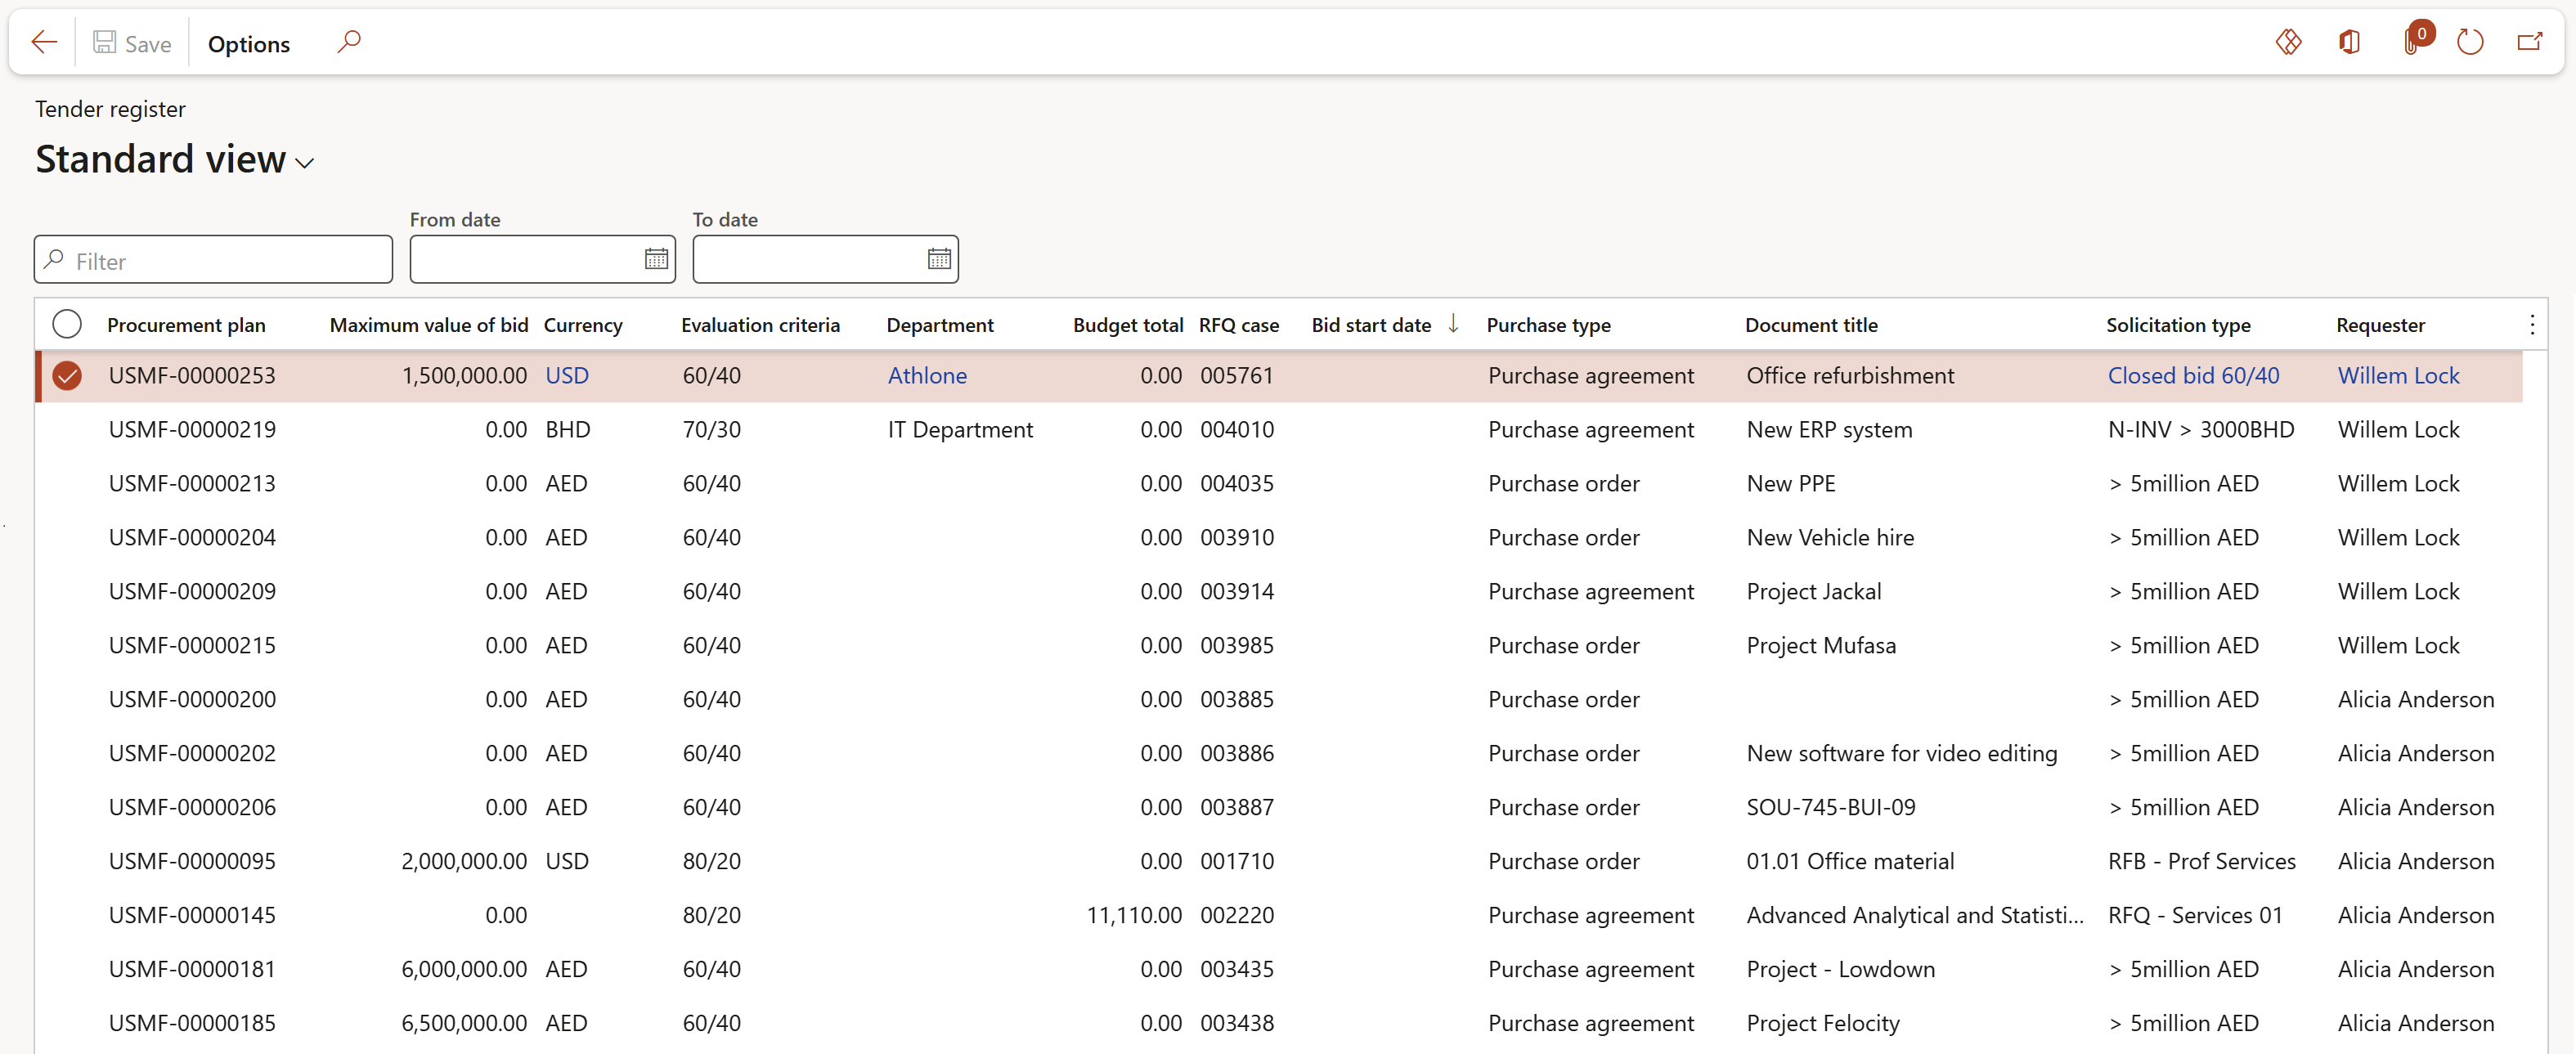
Additional columns displayed:
| Vendors | Expiry date | Recommended supplier |
| Evaluation start date | Evaluation end date | Award date |
| Contract | Amount | Currency |
| Contract start date | Purchase agreement | PA status |
| Project ID | Status |
¶ 7. Tender evaluation report
Go to: GRC > Governance > Tender management > All requests for quotations
- Select the RFQ that you want to print the report for
- In the Action pane, in the View group, click on the Evaluation report button

¶ 8. Purchase agreement register inquiry
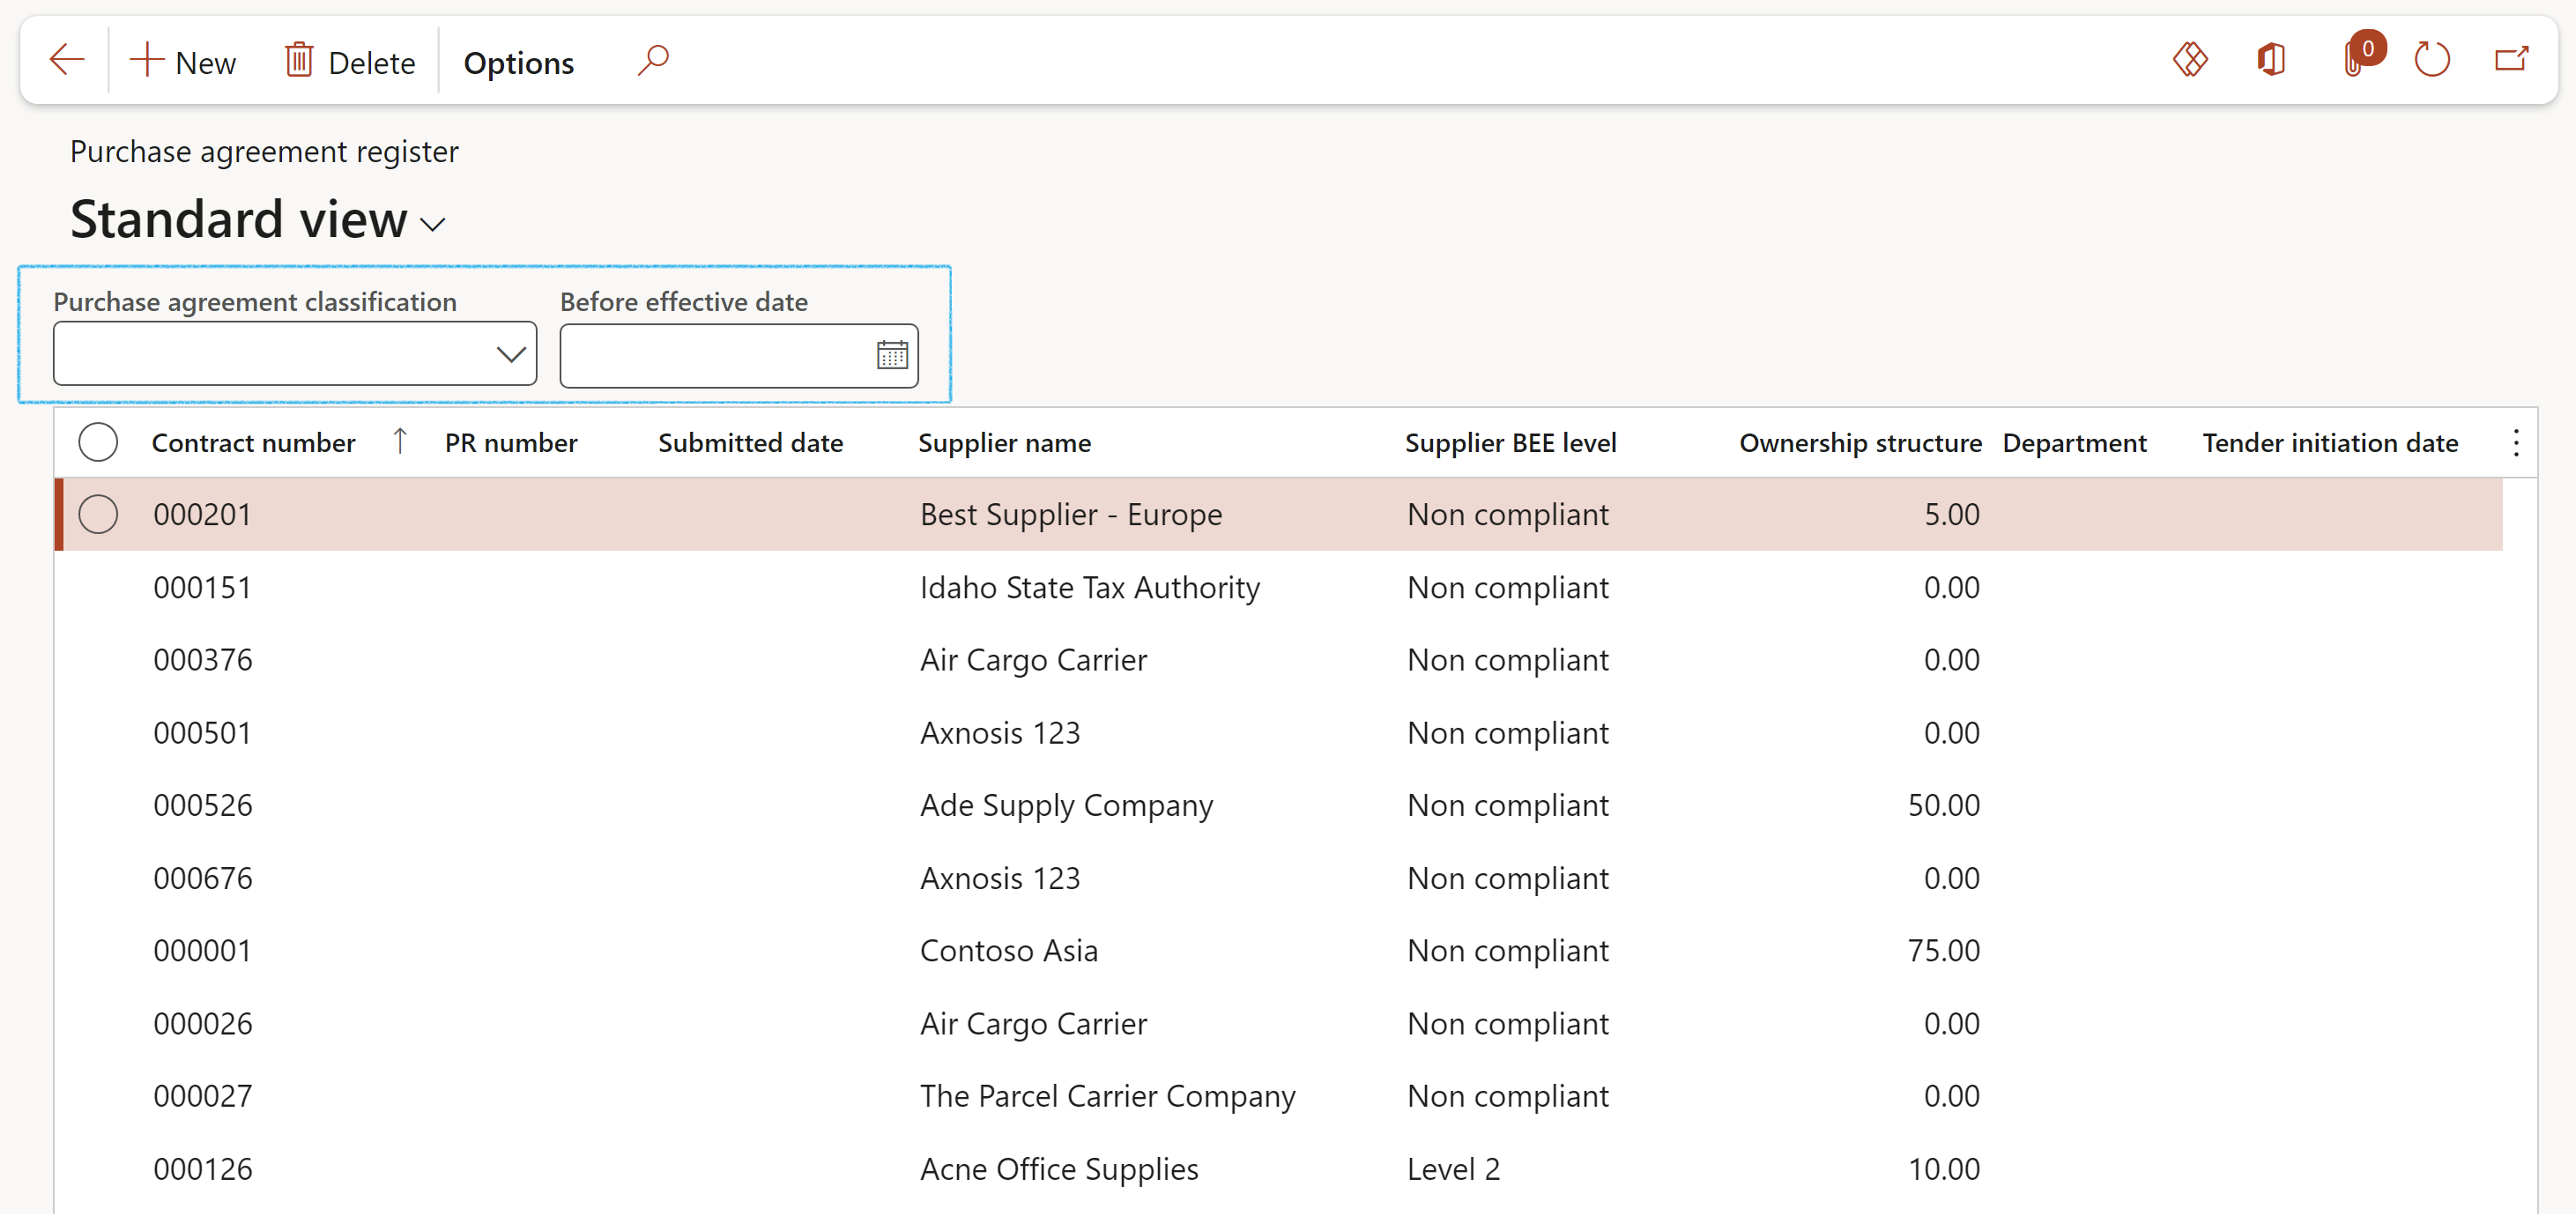
The Purchase agreement register tracks the current status of each Purchase agreement within your organization.
The following is displayed:
| Contract number | PR number | Submitted date |
| Supplier name | Supplier BEE level | Ownership structure |
| Department | Tender initiation date | Total item value |
| Statement of work value | Total commercial value | Commencement date |
| Expiry date |
GRC > Governance > Reports and Inquiries > Purchase agreement register
- Use the filters to search for the required register
¶ 9. Tender and procurement plan dates inquiry
The following is displayed:
| Procurement plan number | Reference number | Planned start date year |
| Supplier account | Name | Request for quotation case |
| Maximum value of bid | Planned method of procurement | Bid advertisement date |
| Bid closing date | Evaluation start date | Evaluation end date |
| Effective date | Expiration date |
GRC > Governance > Reports and Inquiries > Tender and procurement plan dates
- Use the filters to search for the required Procurement plan

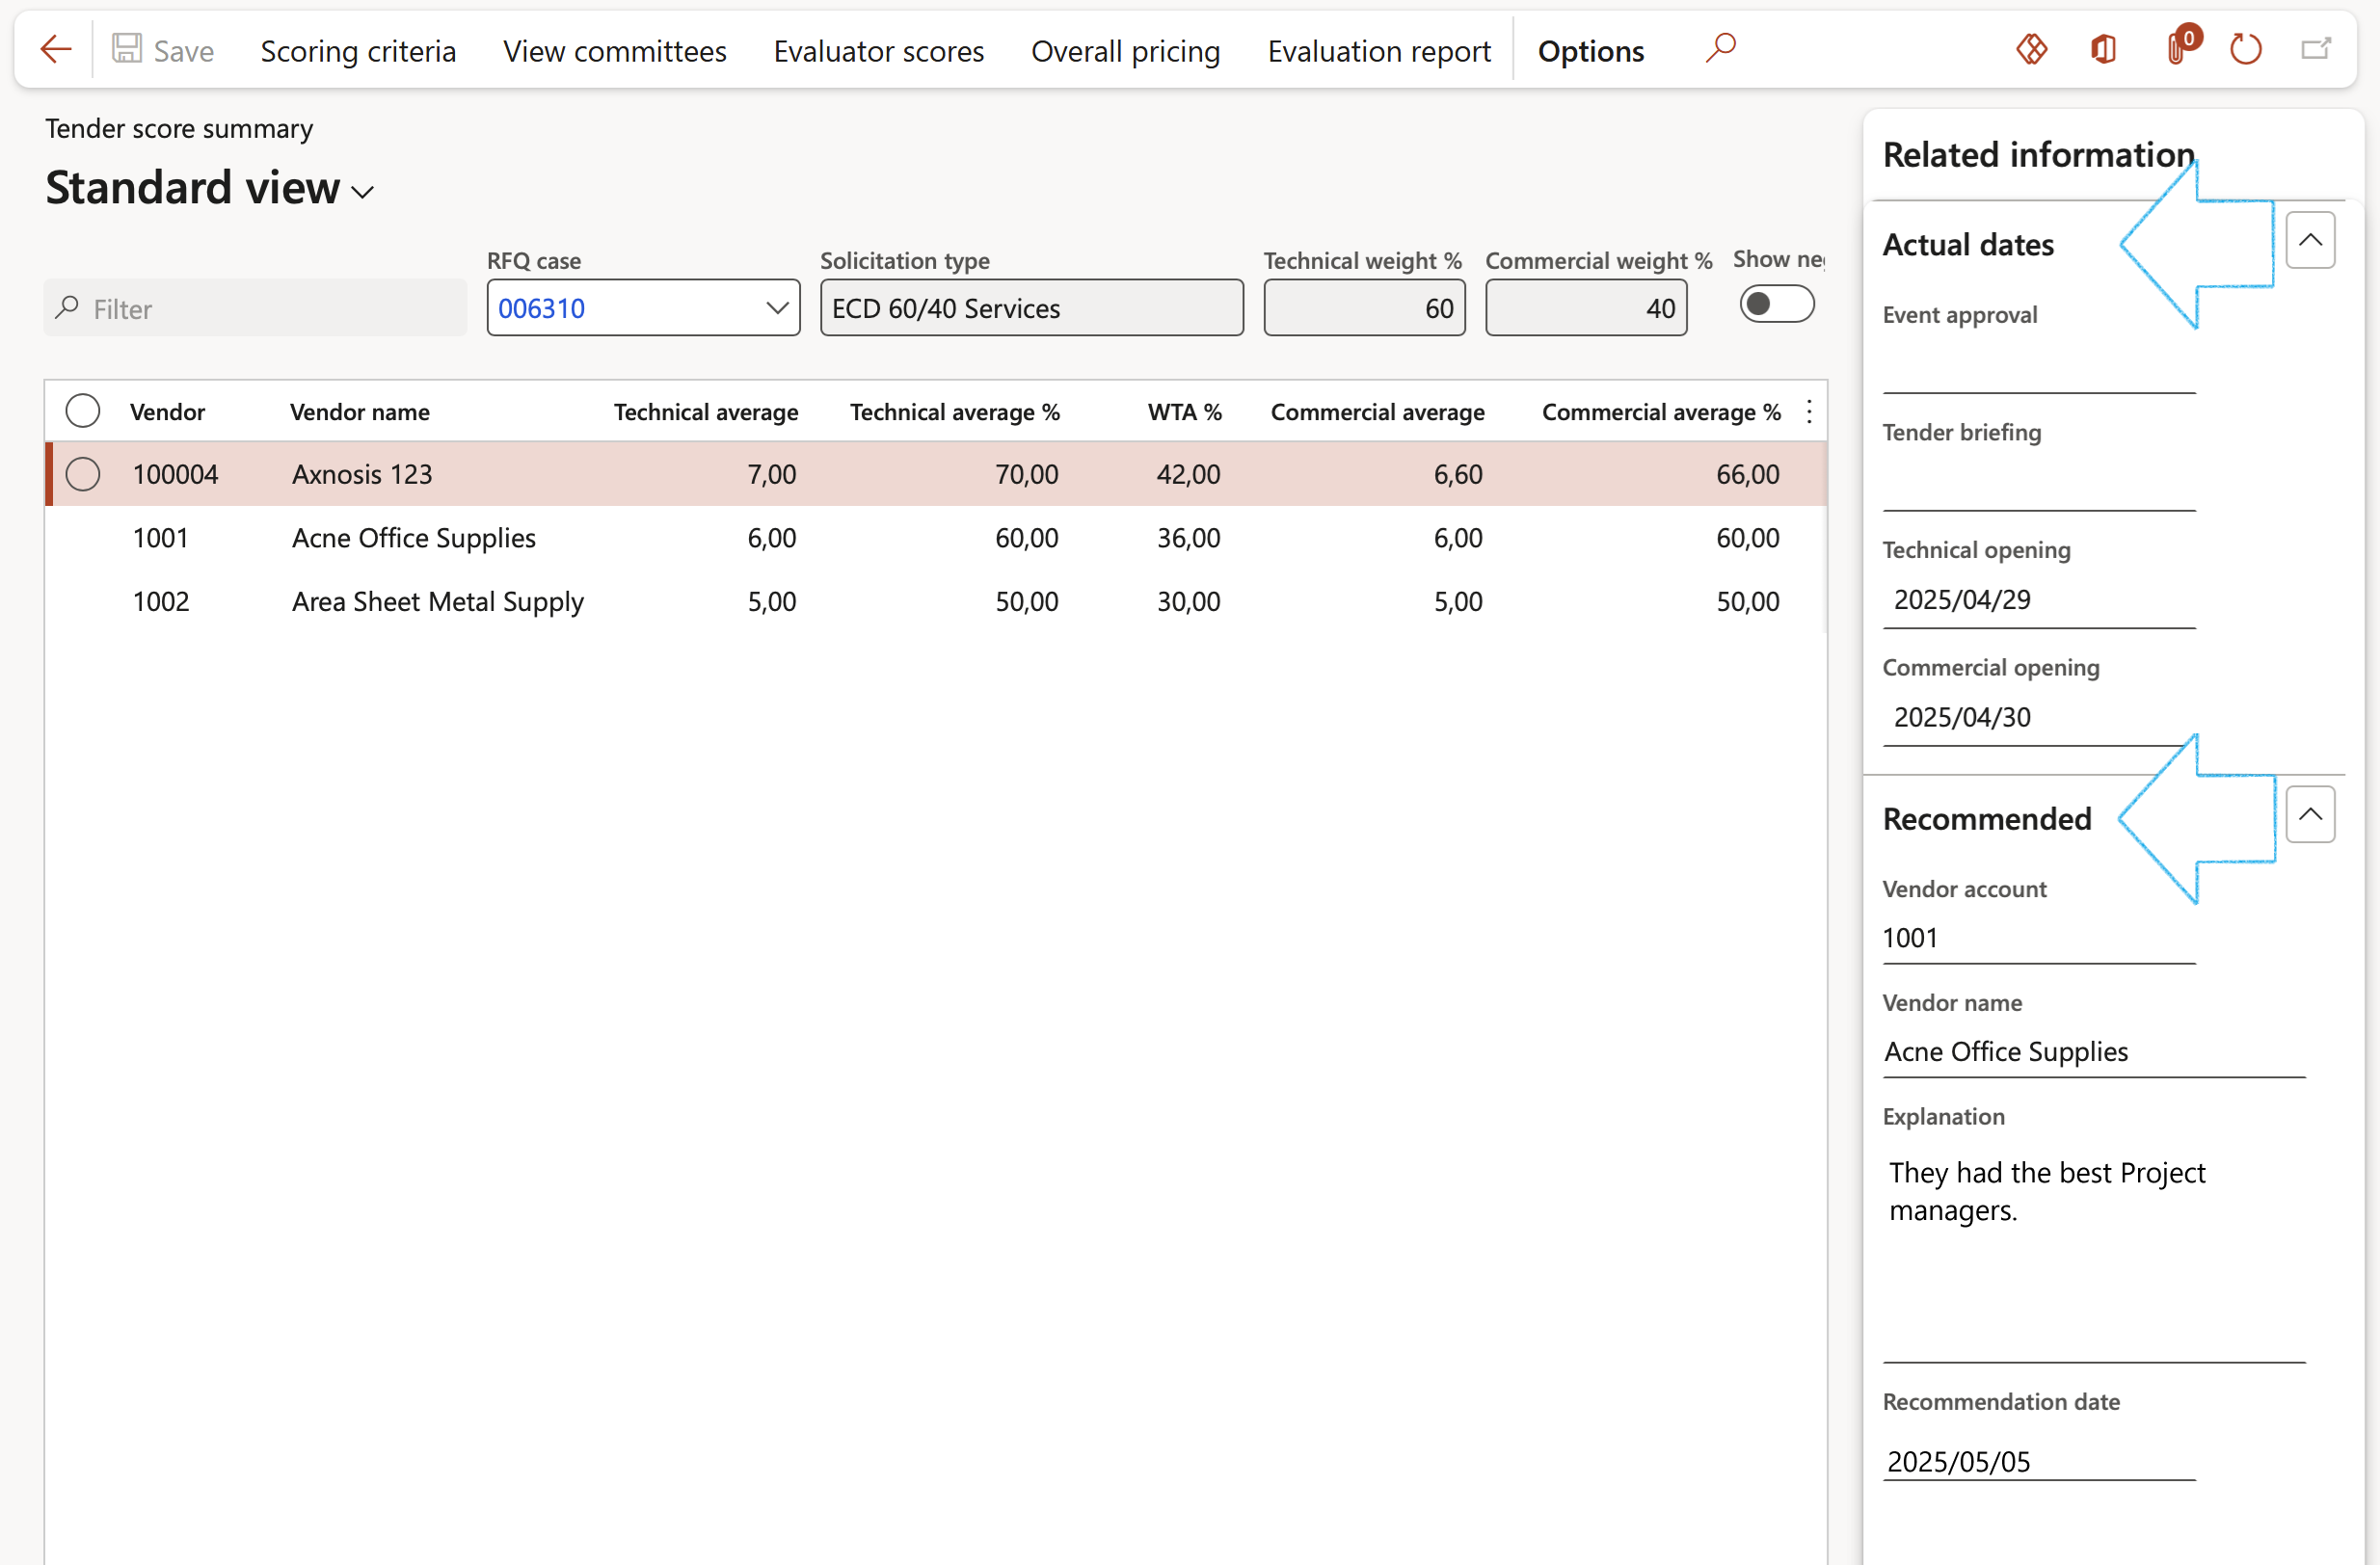
¶ 10. Tender score summary
Go to: GRC > Governance > Reports and Inquiries > Tender score summary
- Select the relevant RFQ case from the dropdown list
- To view negotiation detail, move the Show negotiation slider to Yes
- To view prices, move the Show prices slider to Yes

¶ 10a. Buttons on the Tender score summary
- Click on the Scoring criteria button to view the Scoring criteria used on the RFQ. Choose one of the following:
- Technical evaluation
- Commercial evaluation
- Risk evaluation
- Safety evaluation

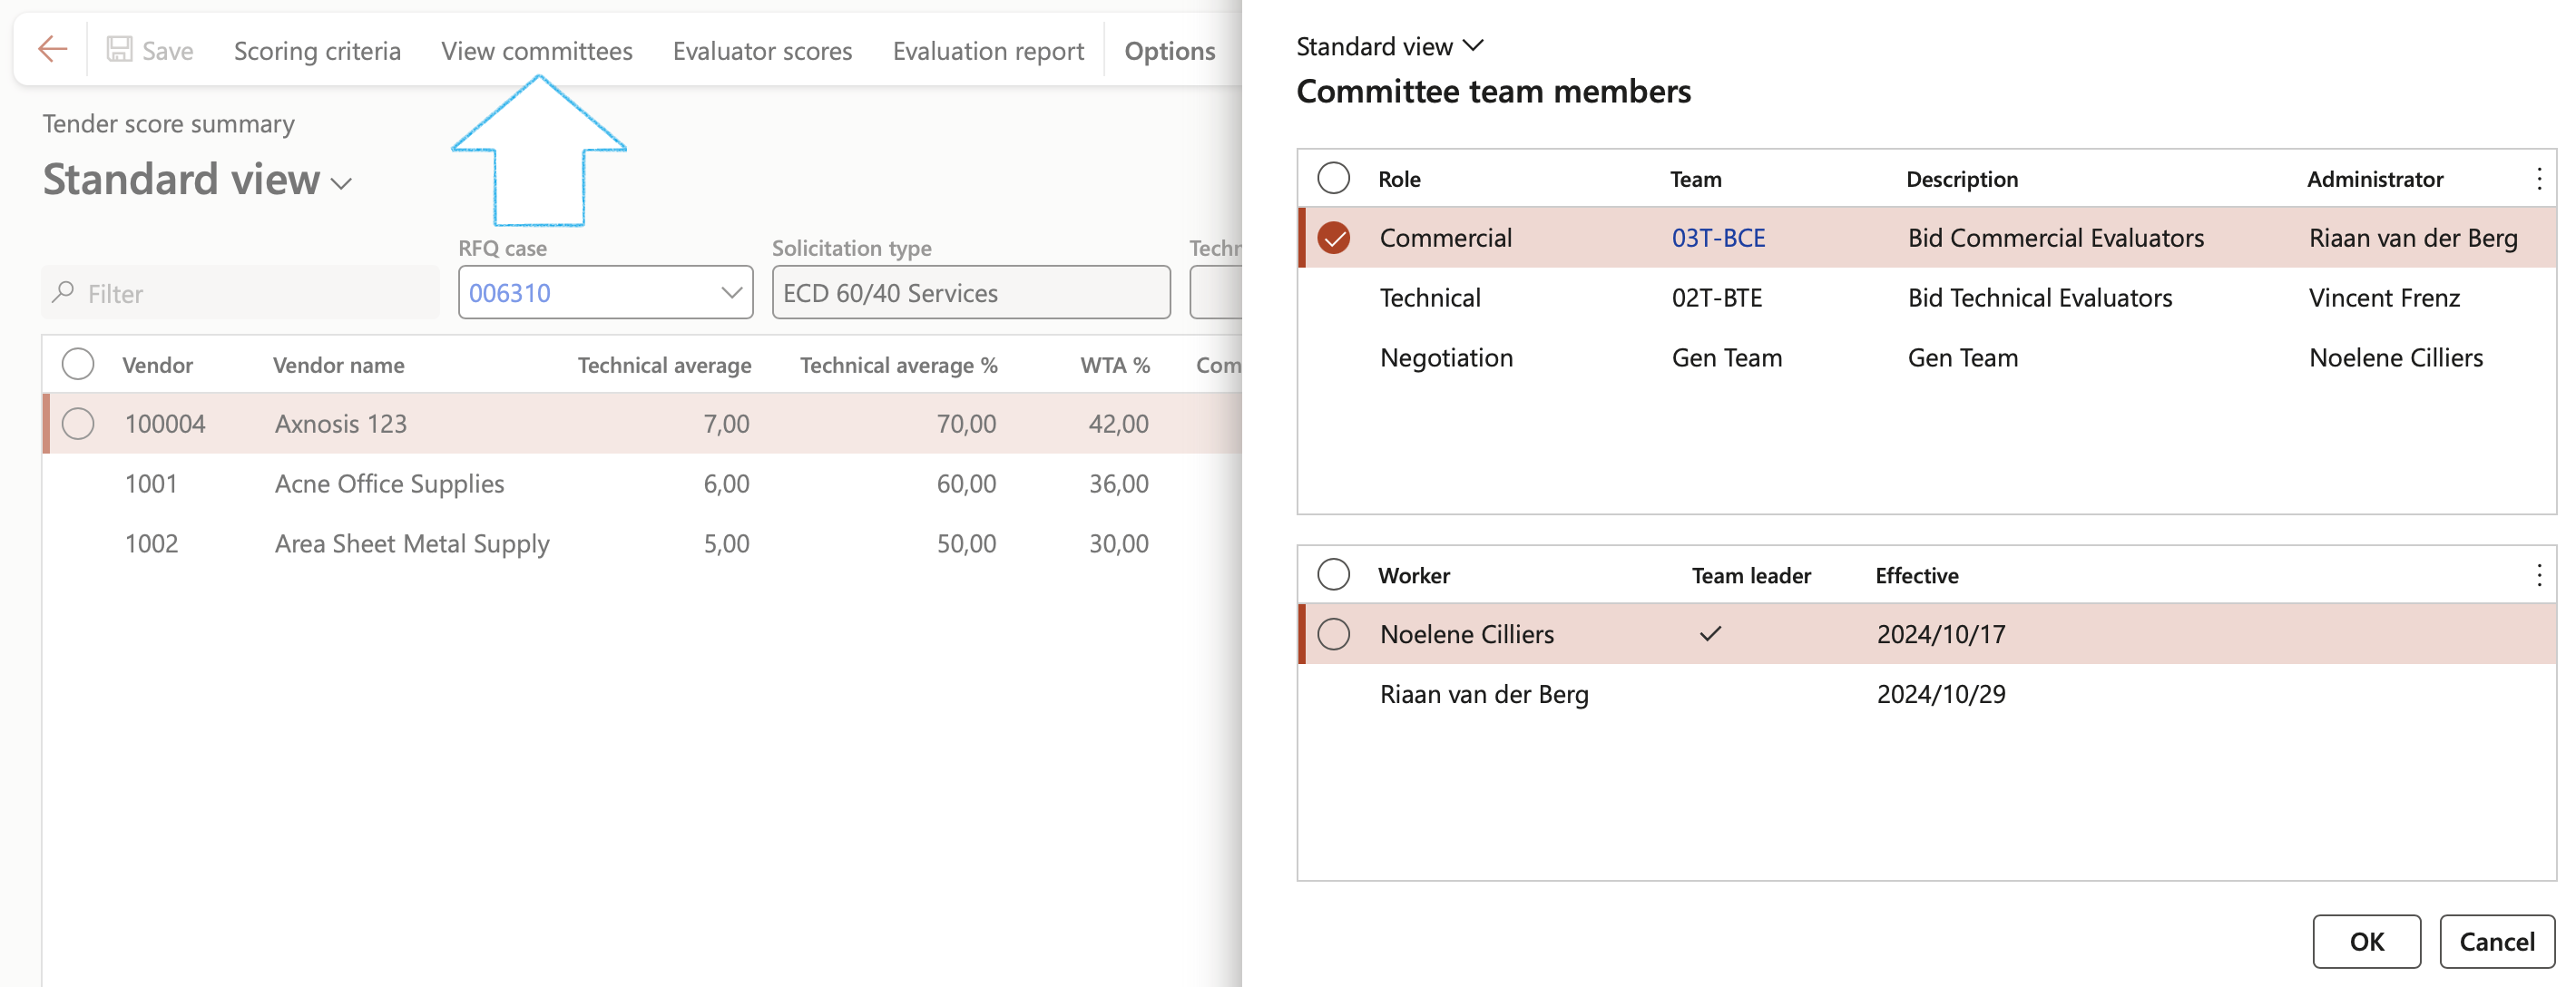
- Click on the View committees button to view the Committees and committee members on the RFQ
- In the Action pane, click on the Evaluator scores button
- On the Tender evaluation matrix dialog, click on the Export to Excel button

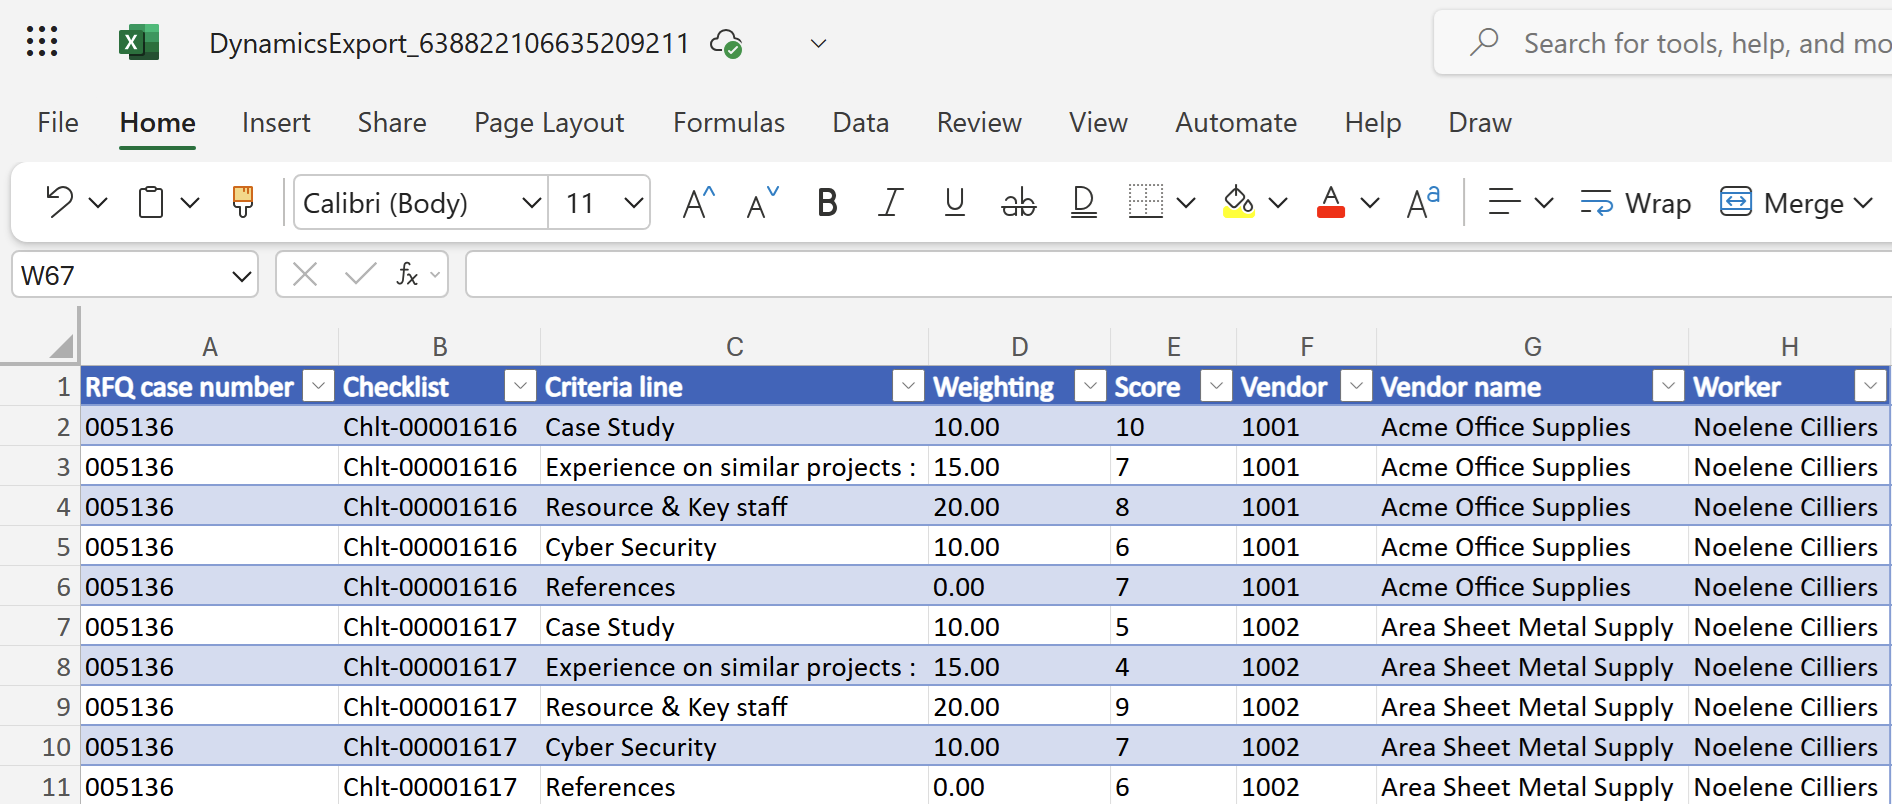
- Insert a pivot
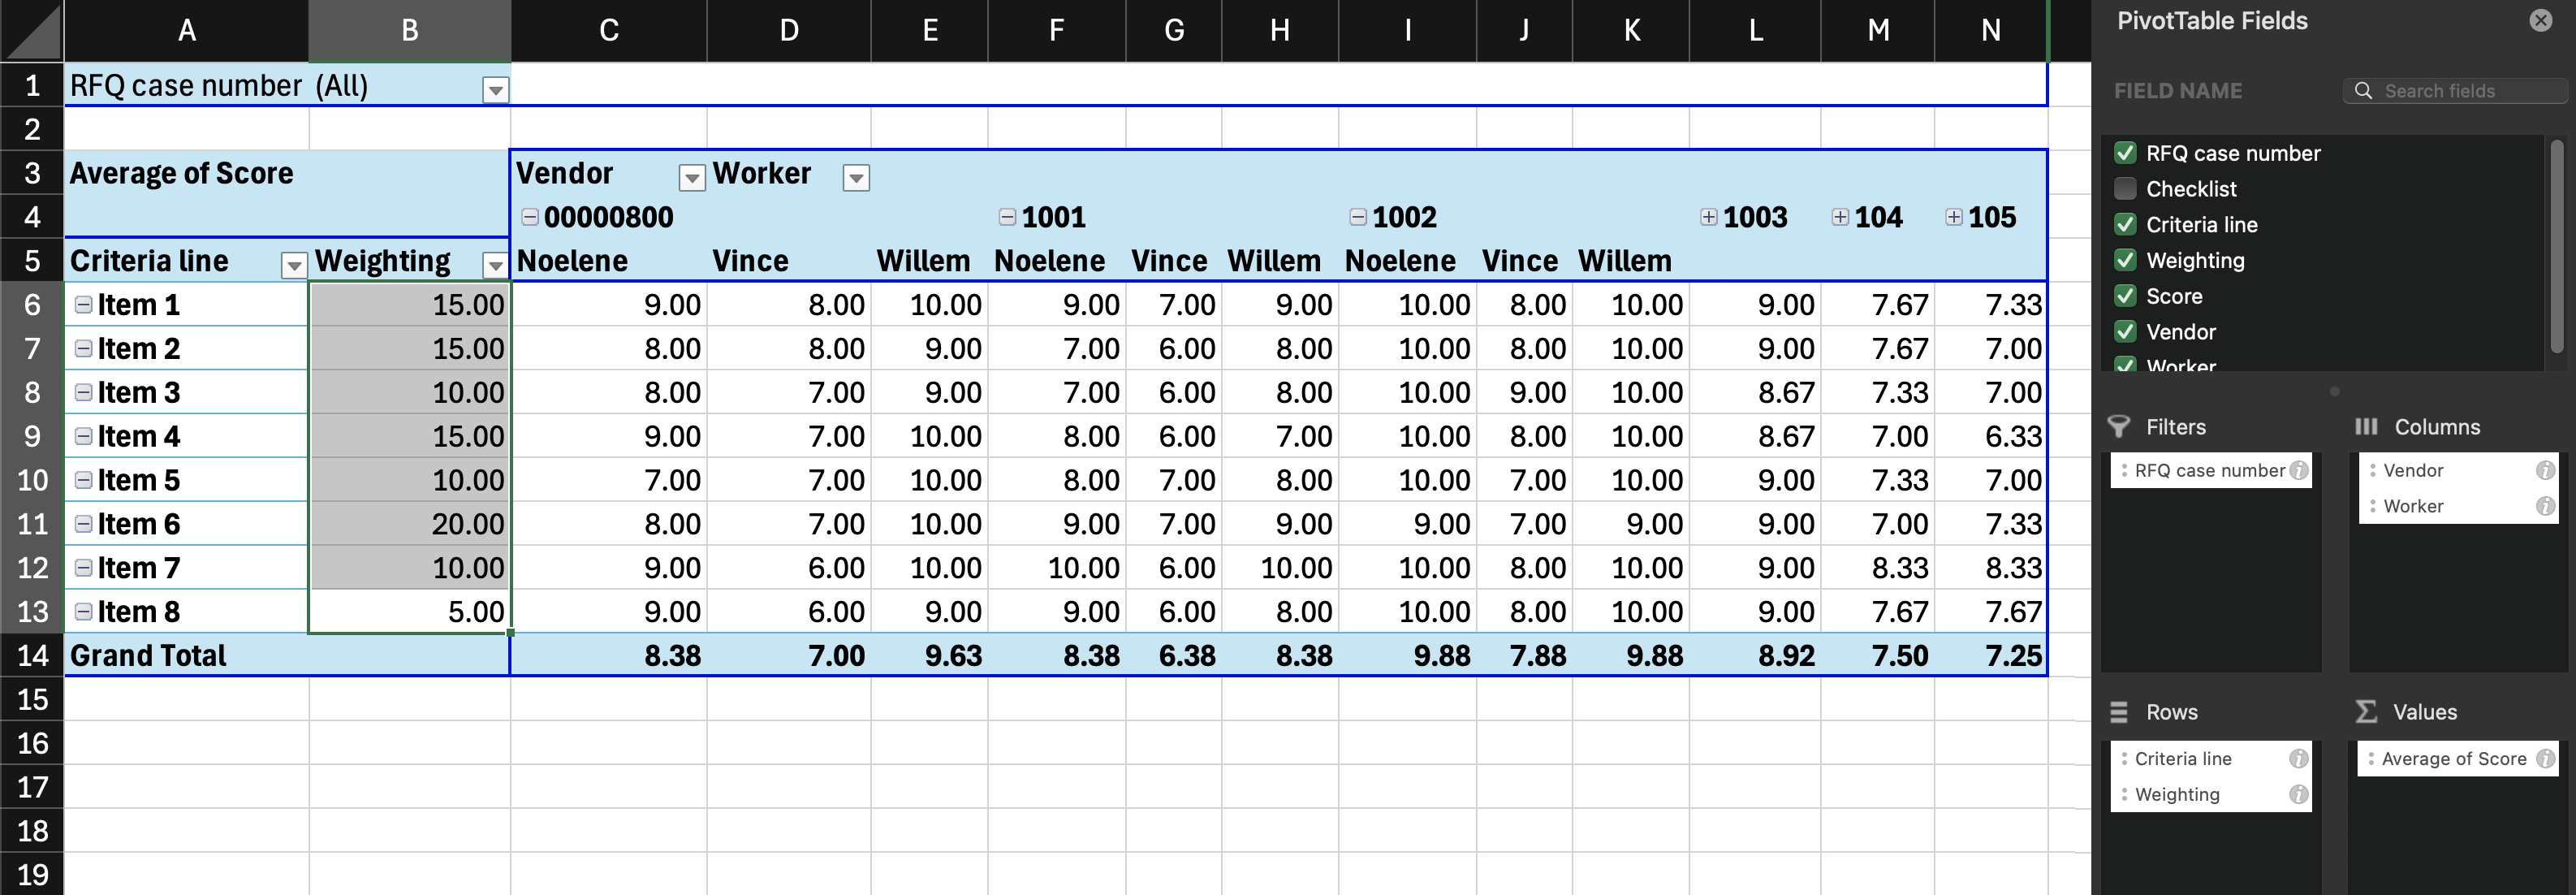
- Click on the Overall pricing button to view the pricing on the RFQ

- Open the Related information pane
- Expand the Actual dates and Recommended Fact boxes
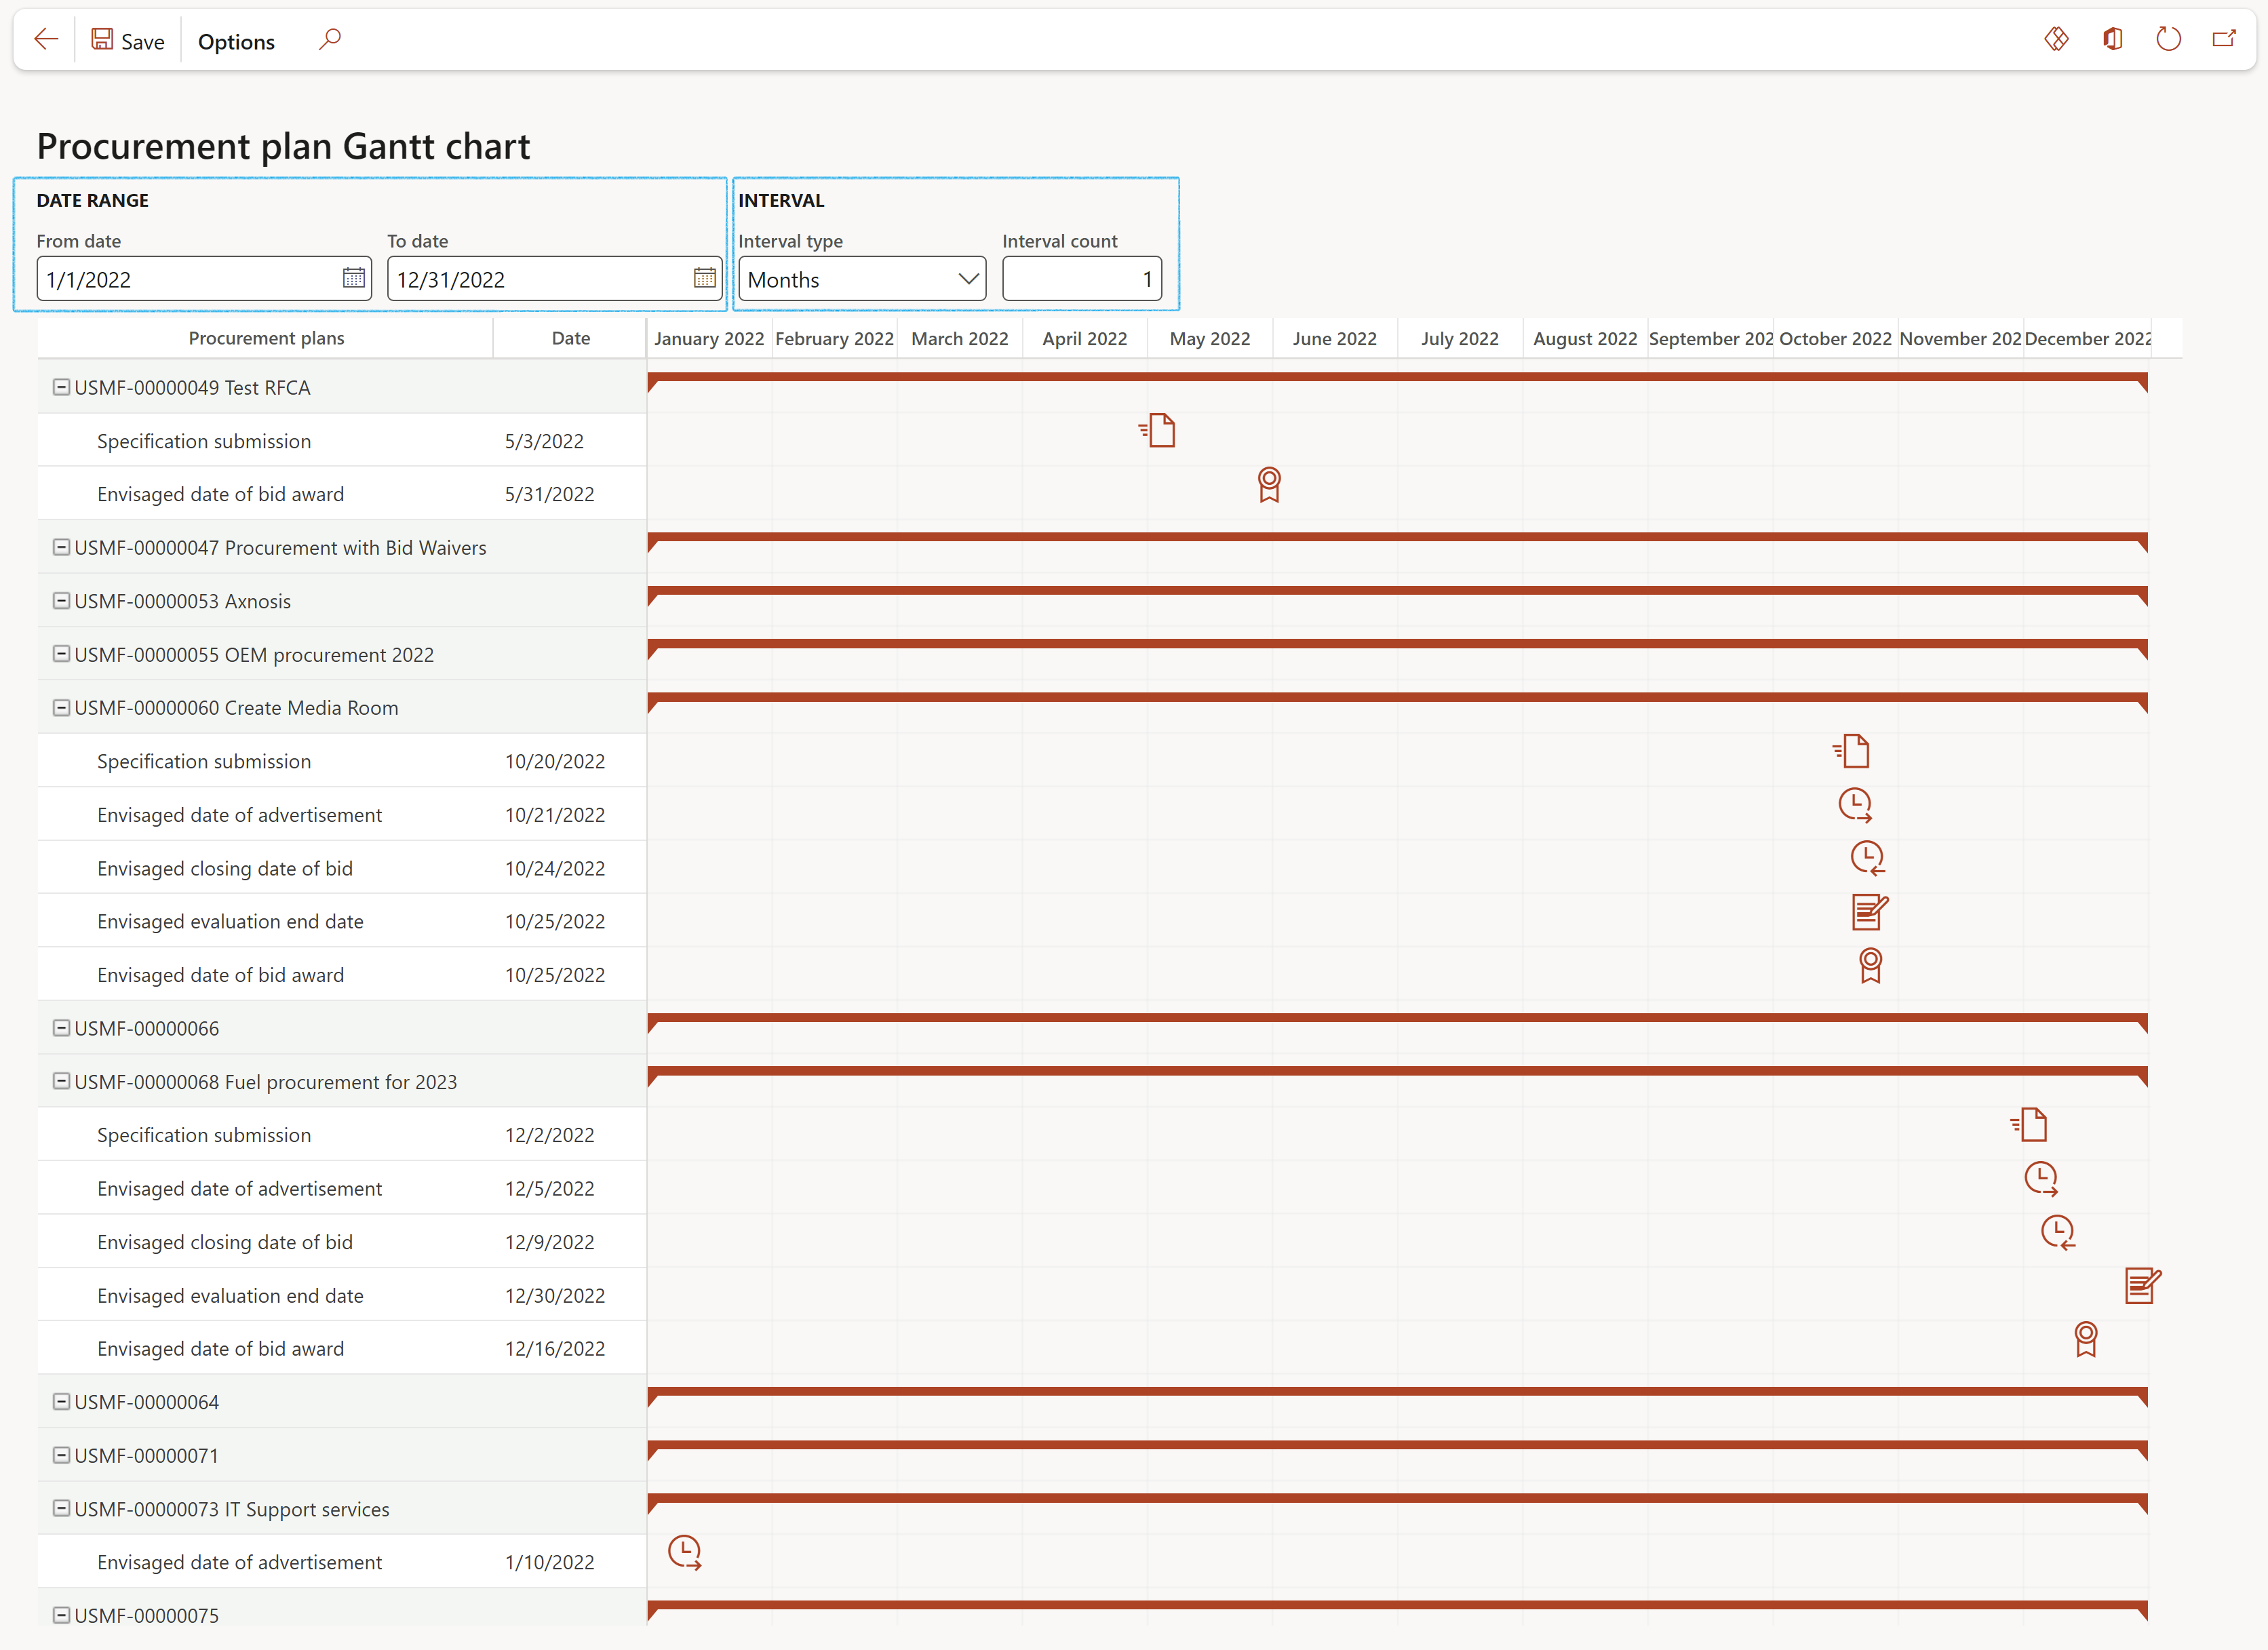
¶ 11. Procurement plan Gantt chart
GRC > Governance > Reports and Inquiries > Procurement plan Gantt chart
- Use the Date range and Interval filters to search for the required Procurement plan calendar
¶ 12. Procurement savings type inquiry
GRC > Governance > Reports and inquiries > Procurement savings type inquiry>
The following is displayed:
| PO number | Document created date | Request for quotation case |
| Package ID | Vendor account | Name |
| Cost centre | Department | Procurement manager |
| Savings? (Y/N/NA/NG) | Additional comments | Planned estimated value / Pre-negotiated cost |
| Final negotiated price | Savings | Savings % |
| Currency | Initial offer | Final negotiated price |
| Savings | Savings % | Currency |
| Prior contract value | Final negotiated price | Savings |
| Savings % | Currency |
¶ 13. Bid waivers
This inquiry displays all bid waiver records
GRC > Governance > Reports and Inquiries > Bid waivers

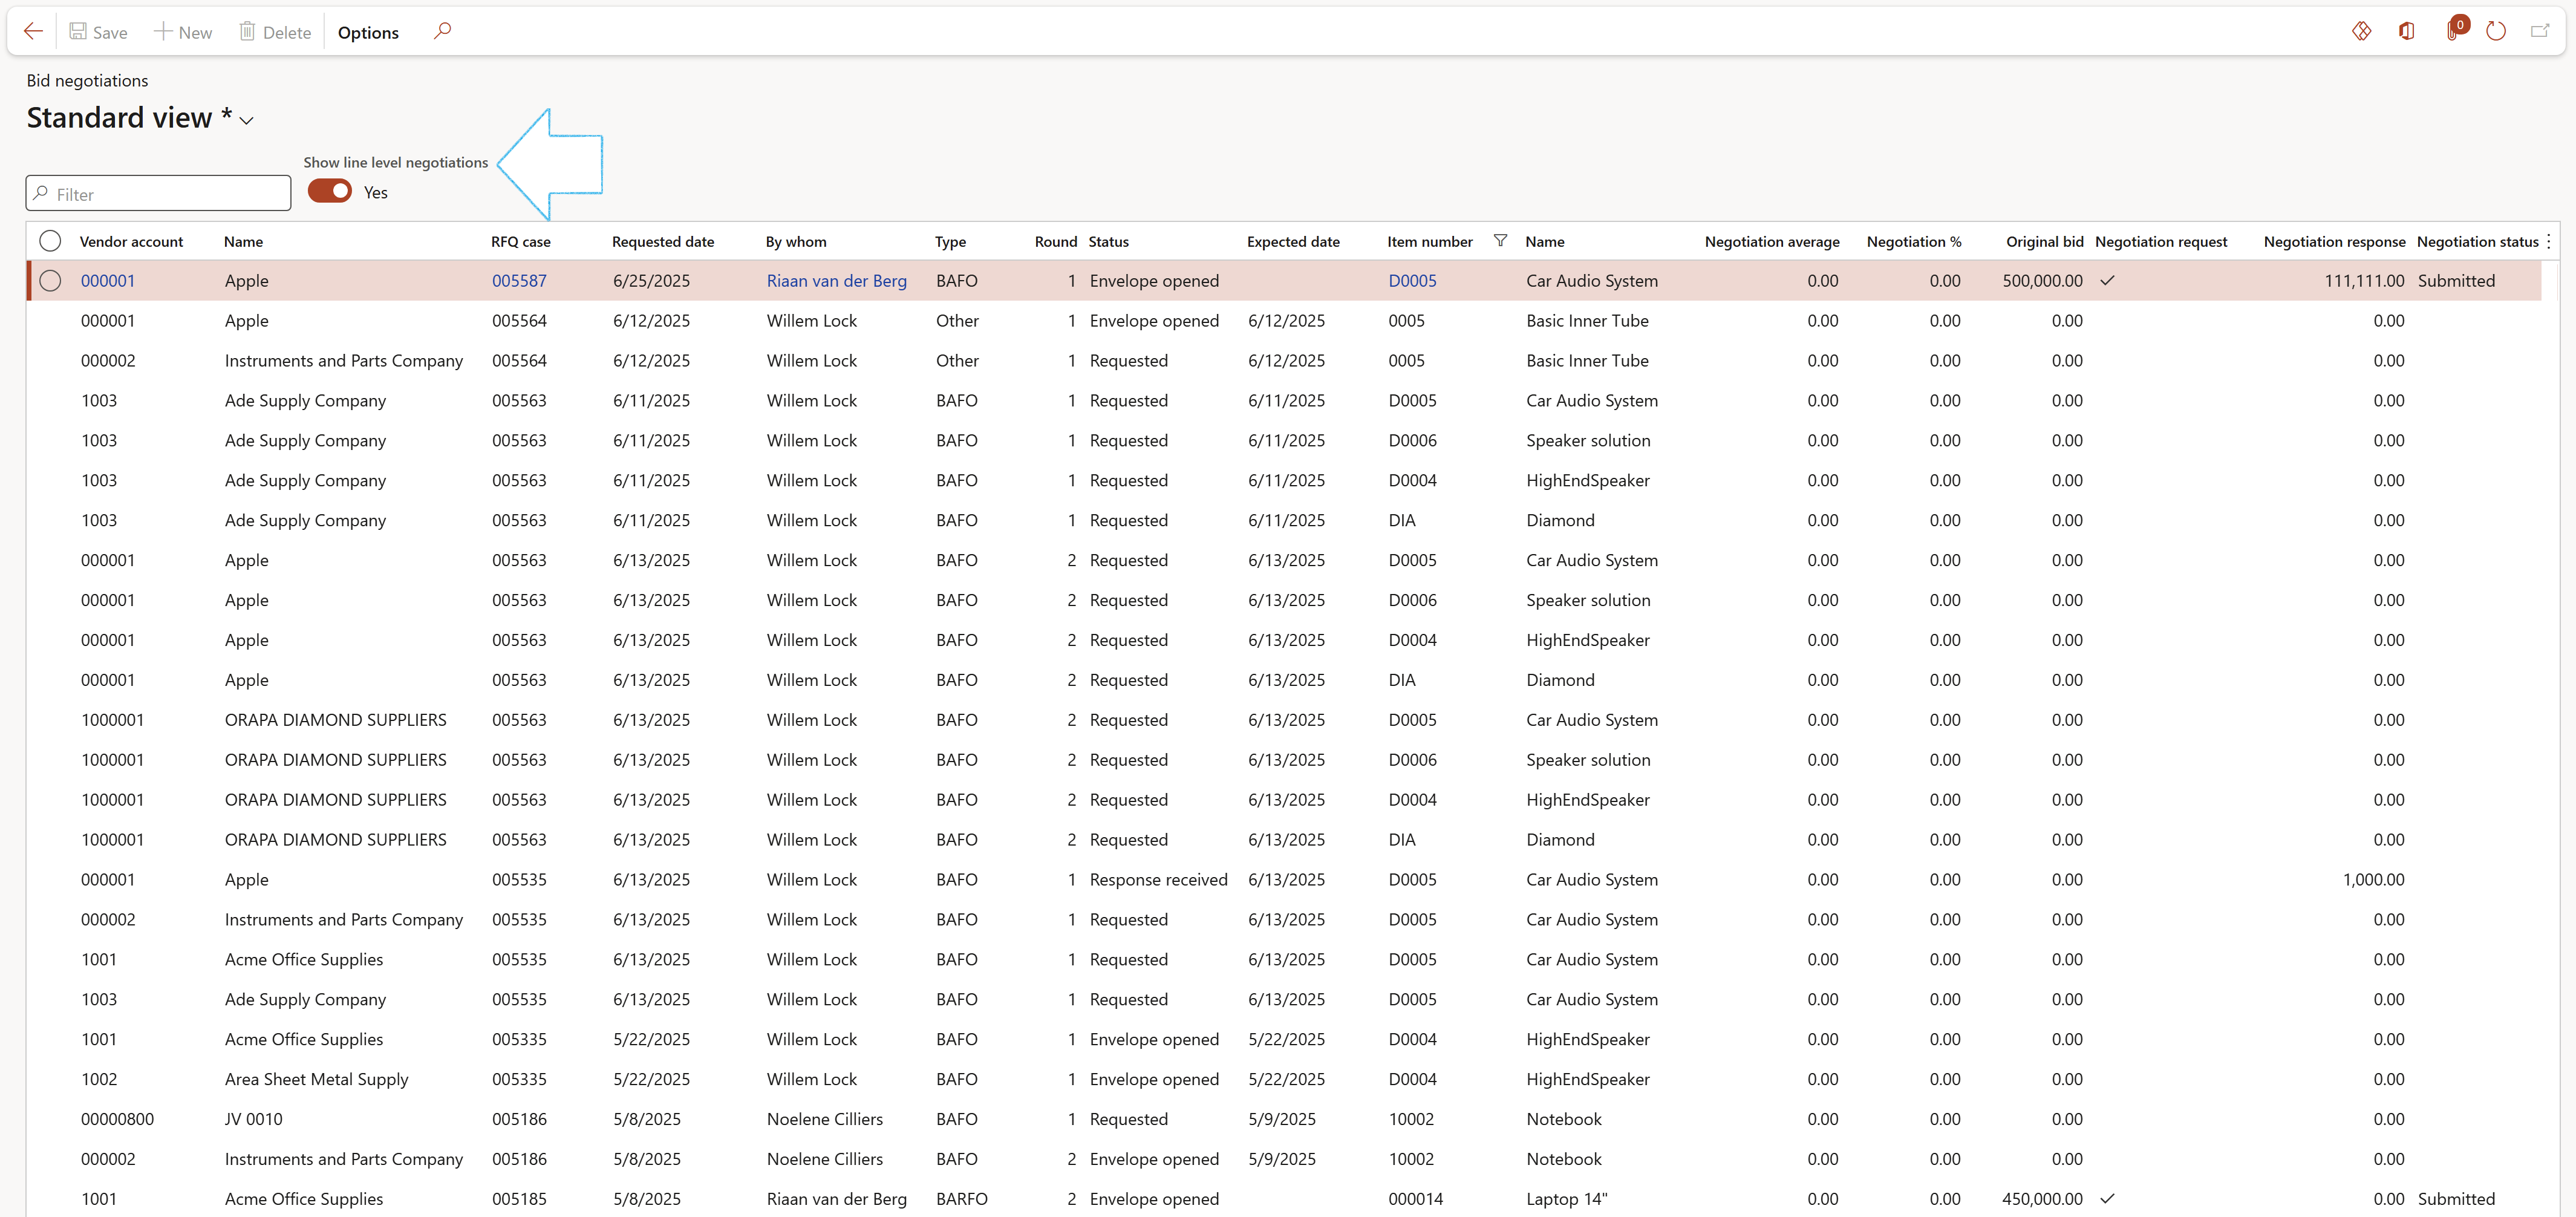
¶ 14. Bid negotiations inquiry
Go to: GRC > Governance > Reports and Inquiries > Bid negotiations inquiry
The default view of the inquiry is header level negotiations
To view line level negotiations, move the Show line level negotiations slider to Yes
Users can also filter on the RFQ case column if required
¶ 15. Tender cycle inquiry
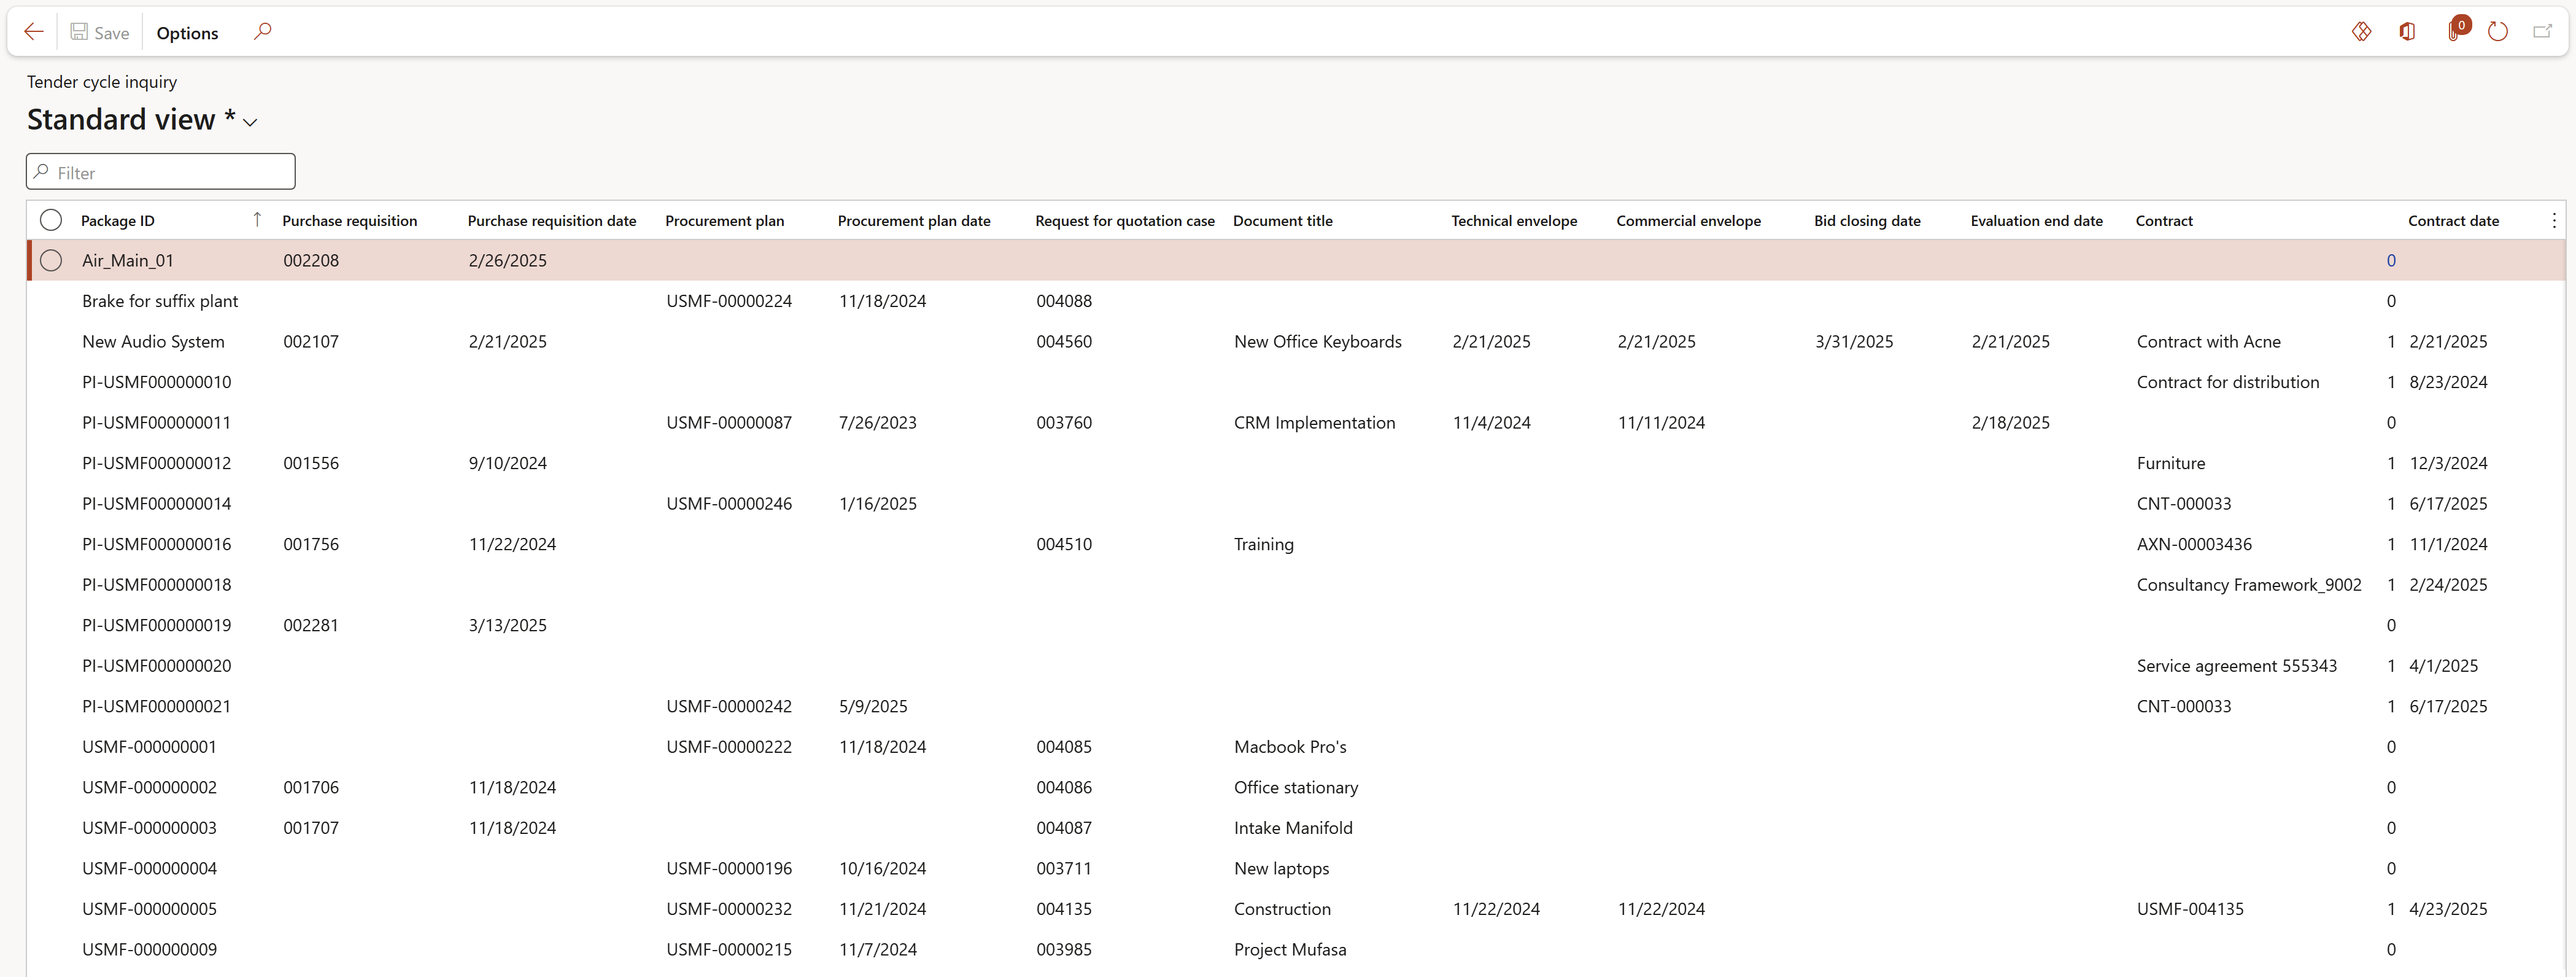
This inquiry displays all records with a Package ID from these three sources:
- Purchase requisitions
- Procurement plans
- Contracts
GRC > Governance > Reports and Inquiries > Tender cycle inquiry
The following columns are displayed in the top grid:
| Package ID | Purchase requisition | Purchase requisition date |
| PR submitted date | PR approved date | Procurement plan |
| Procurement plan date | PP submitted date | PP approved date |
| Request for quotation case | Document title | Technical envelope |
| Commercial envelope | Bid closing date | Evaluation end date |
| Contract | Contract date |
Purchase orders that have the same Package ID as the RFQ/Contract, are displayed below the grid for the selected Tender cycle line
¶ 16. Contracts register report
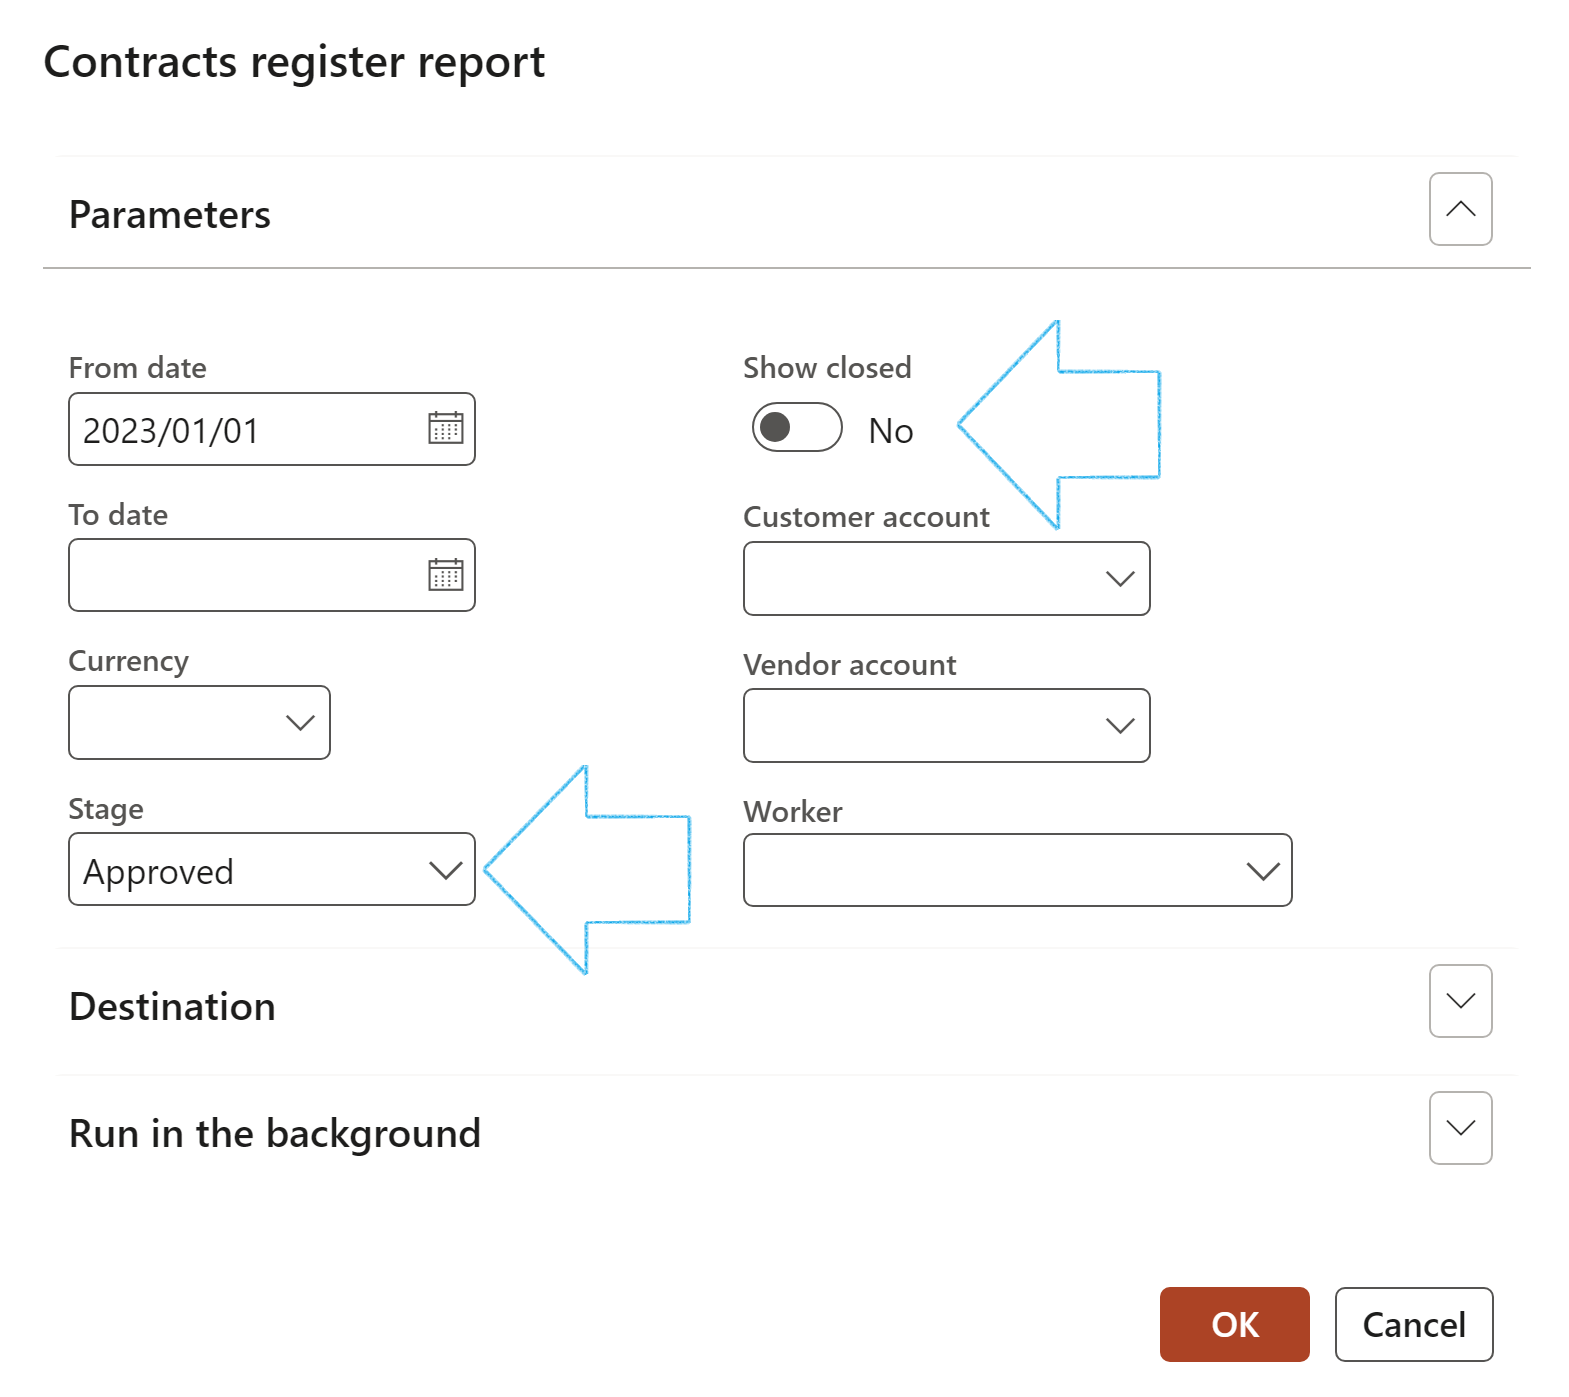
GRC > Governance > Reports and Inquiries > Contracts register report
- Select the relevant parameters on the Contracts register report dialog
- Click on the OK button
If the Stage filter is left blank, the Show closed slider will have an effect
If a value is selected in the Stage filter, the Show closed slider will not have an effect

¶ 17. Contracts sofa register report
GRC > Governance > Reports and Inquiries > Contracts sofa register report
- Select the relevant paramenters on the Contracts sofa register report dialog
- Click on the OK button

¶ 18. Contract expiry report
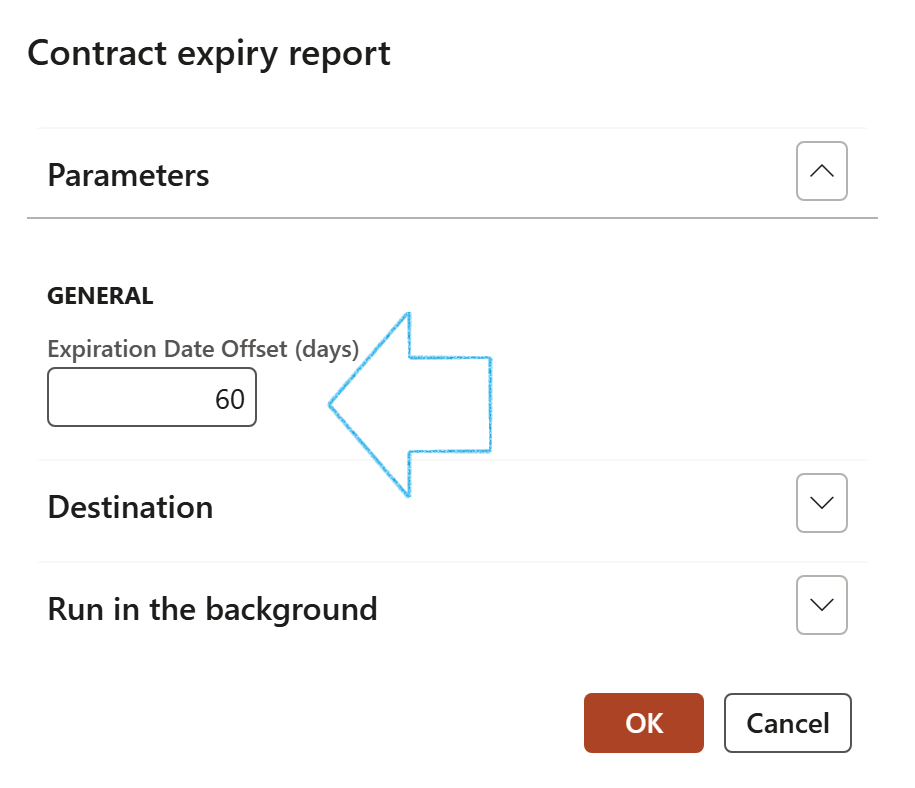
GRC > Governance > Reports and Inquiries > Contract expiry report
- On the Contract expiry report dialog, in the Expiration date offset (days) field, enter the number of days relative to today to filter contracts by expiry. Positive values show upcoming expiries, negative values show past expiries, and 0 shows all contracts expiring today.
- Click on the OK button

¶ 19. Contract expiry and consumption inquiry
GRC > Governance > Reports and Inquiries > Contract expiry and consumption
The Invoice journals linked to a contract can be viewed by clicking on the Linked invoices button

¶ 20. Open purchase orders per contract inquiry
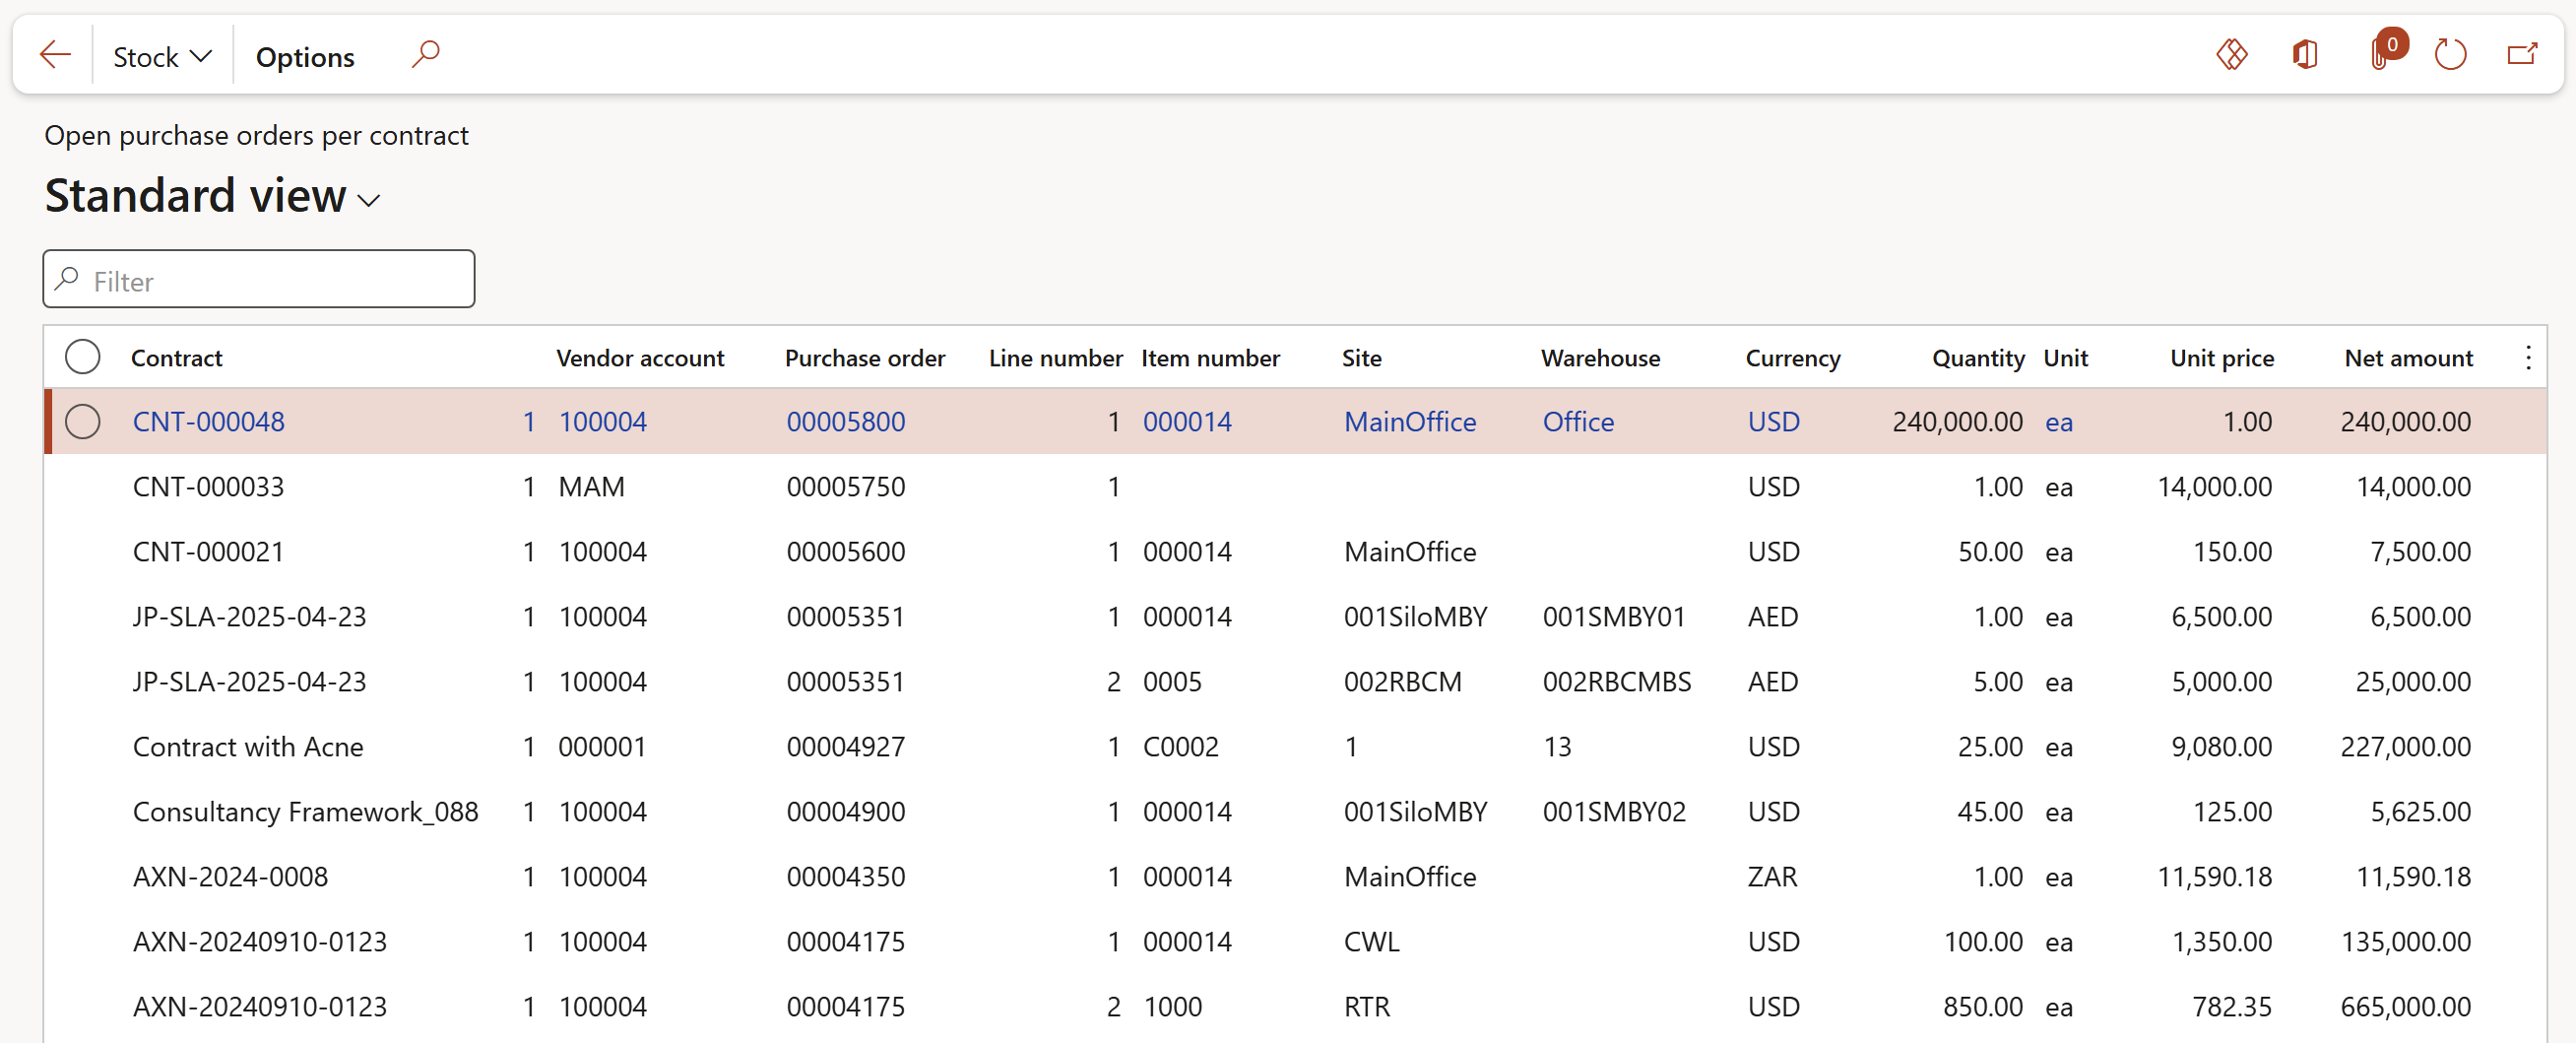
GRC > Governance > Reports and Inquiries > Open purchase orders per contract
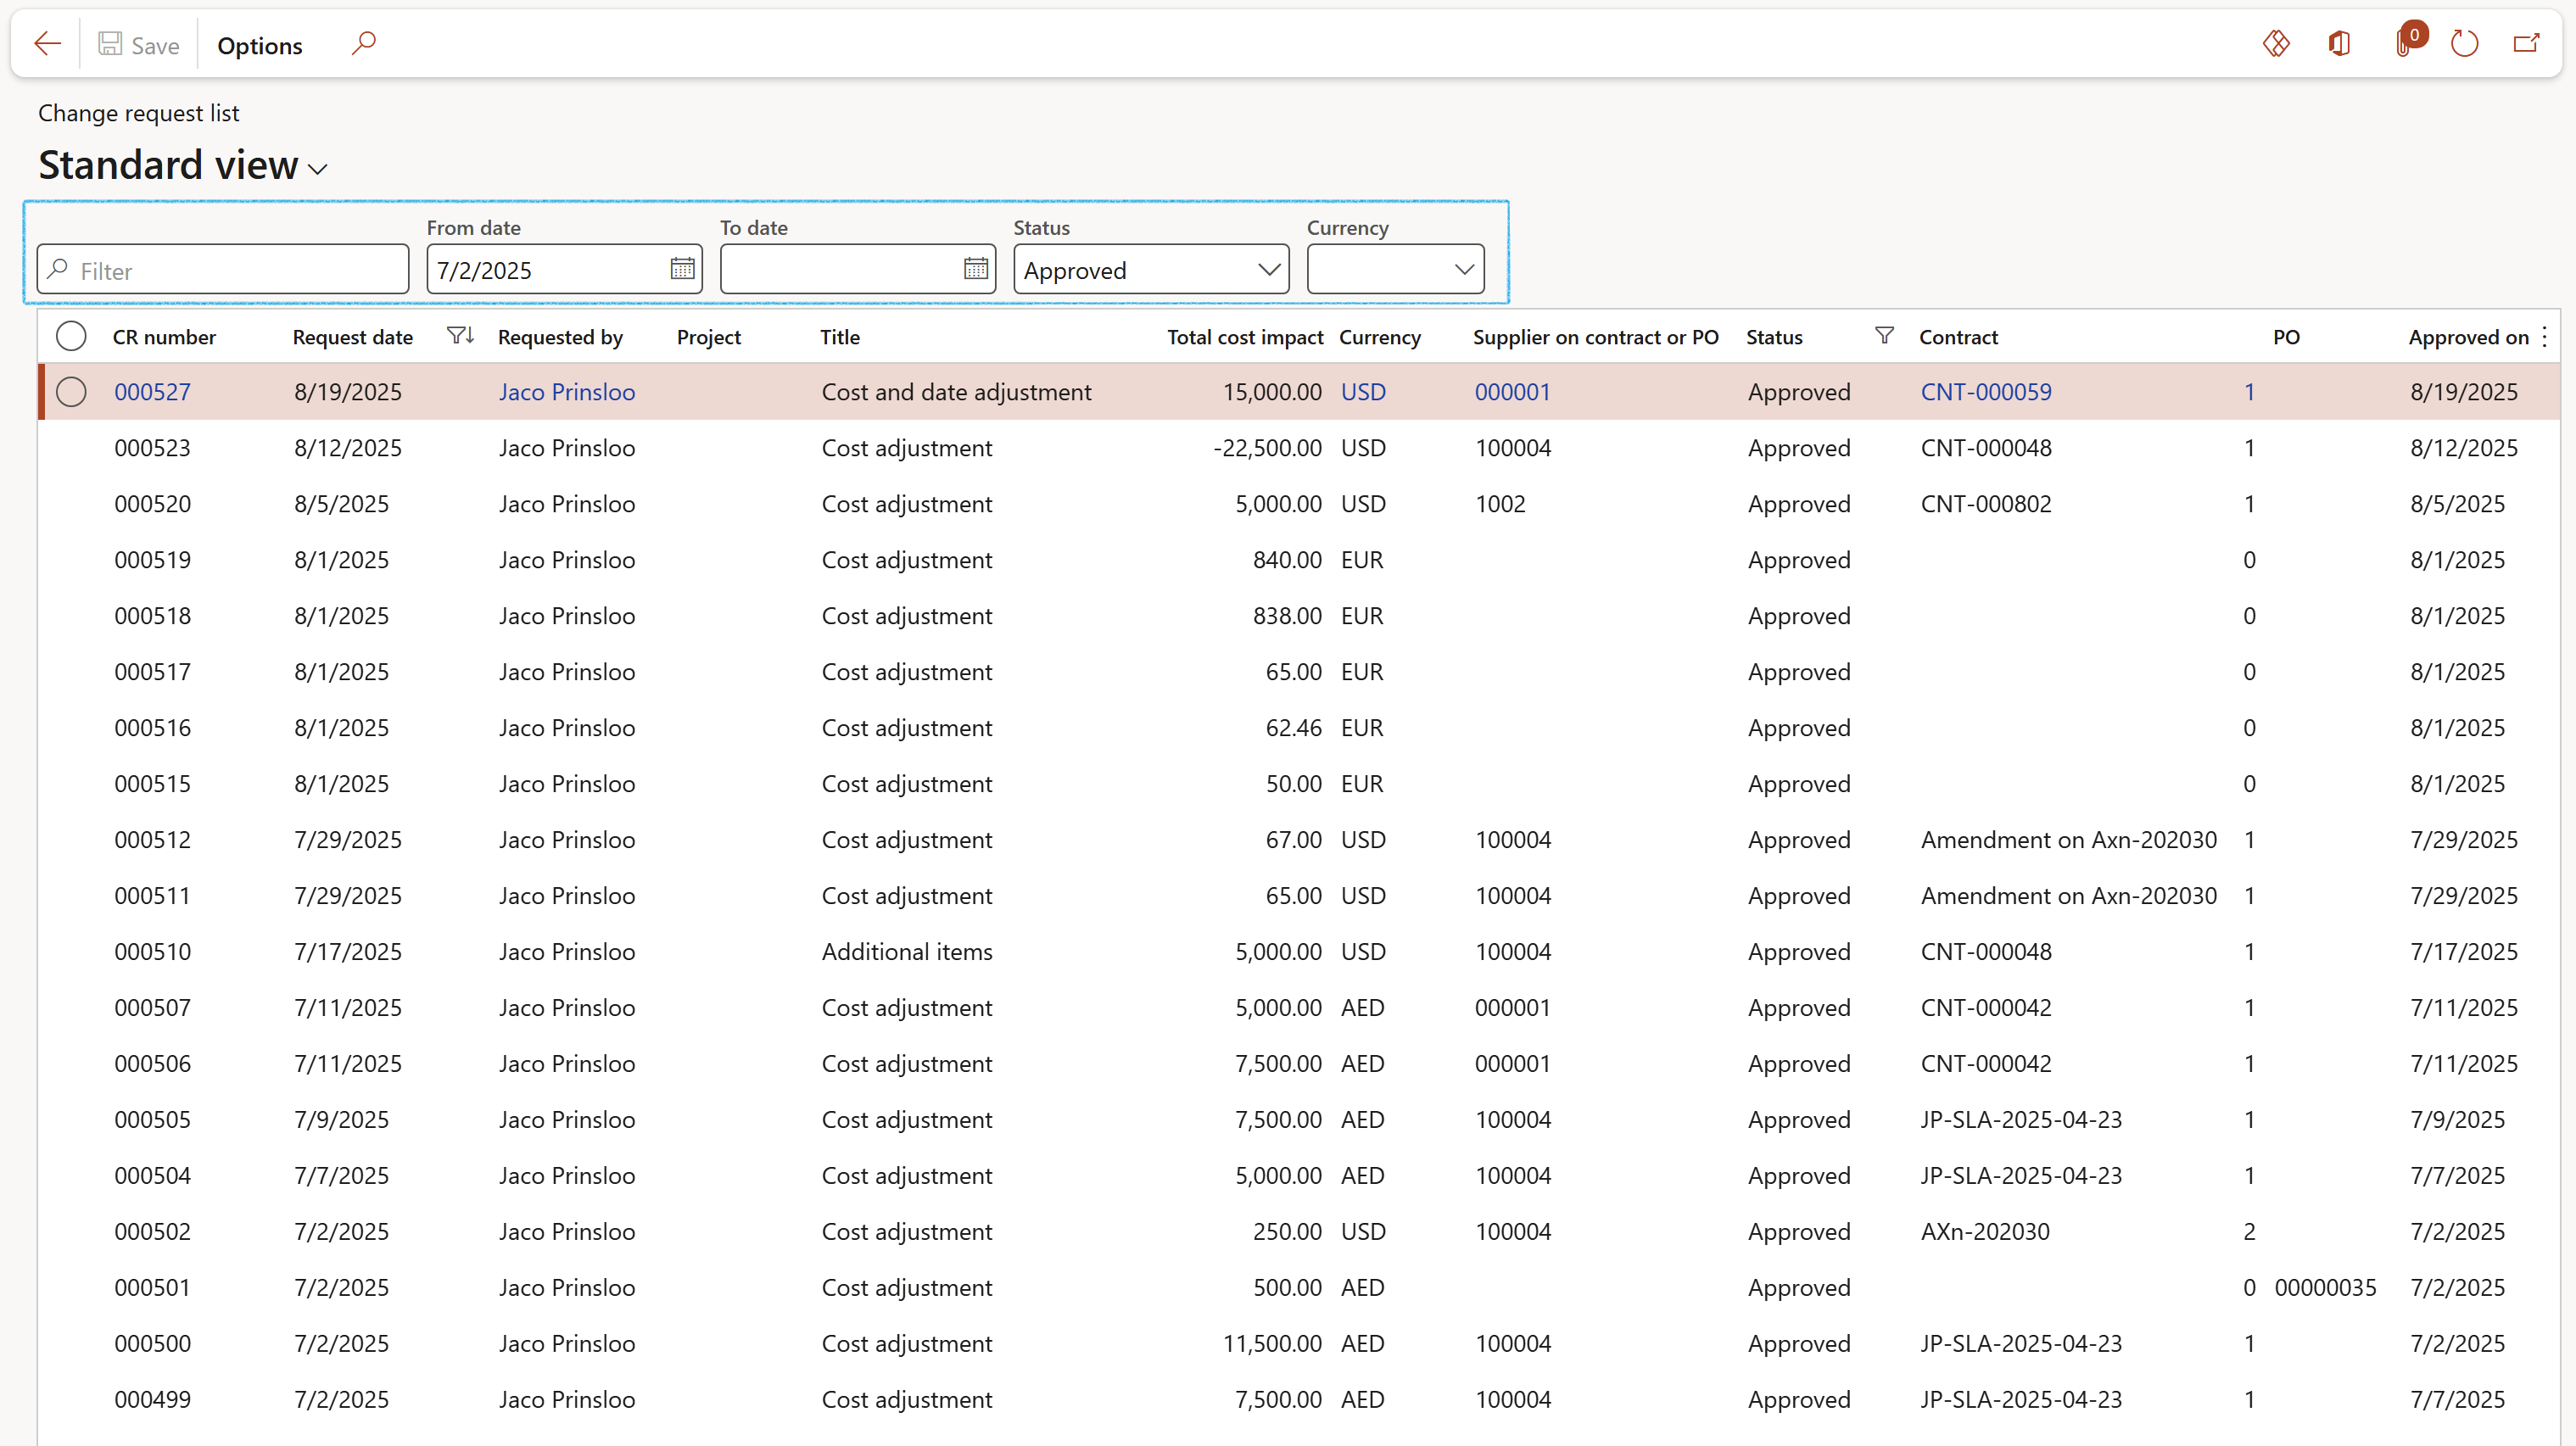
¶ 21. Change request list
GRC > Governance > Reports and Inquiries > Change request list
Use the filters to narrow down your search
¶ Risk Reports & Inquiries
¶ 22. Risk register report
GRC > Risk > Reports and Inquiries > Risk register report
Select the parameters and then click OK
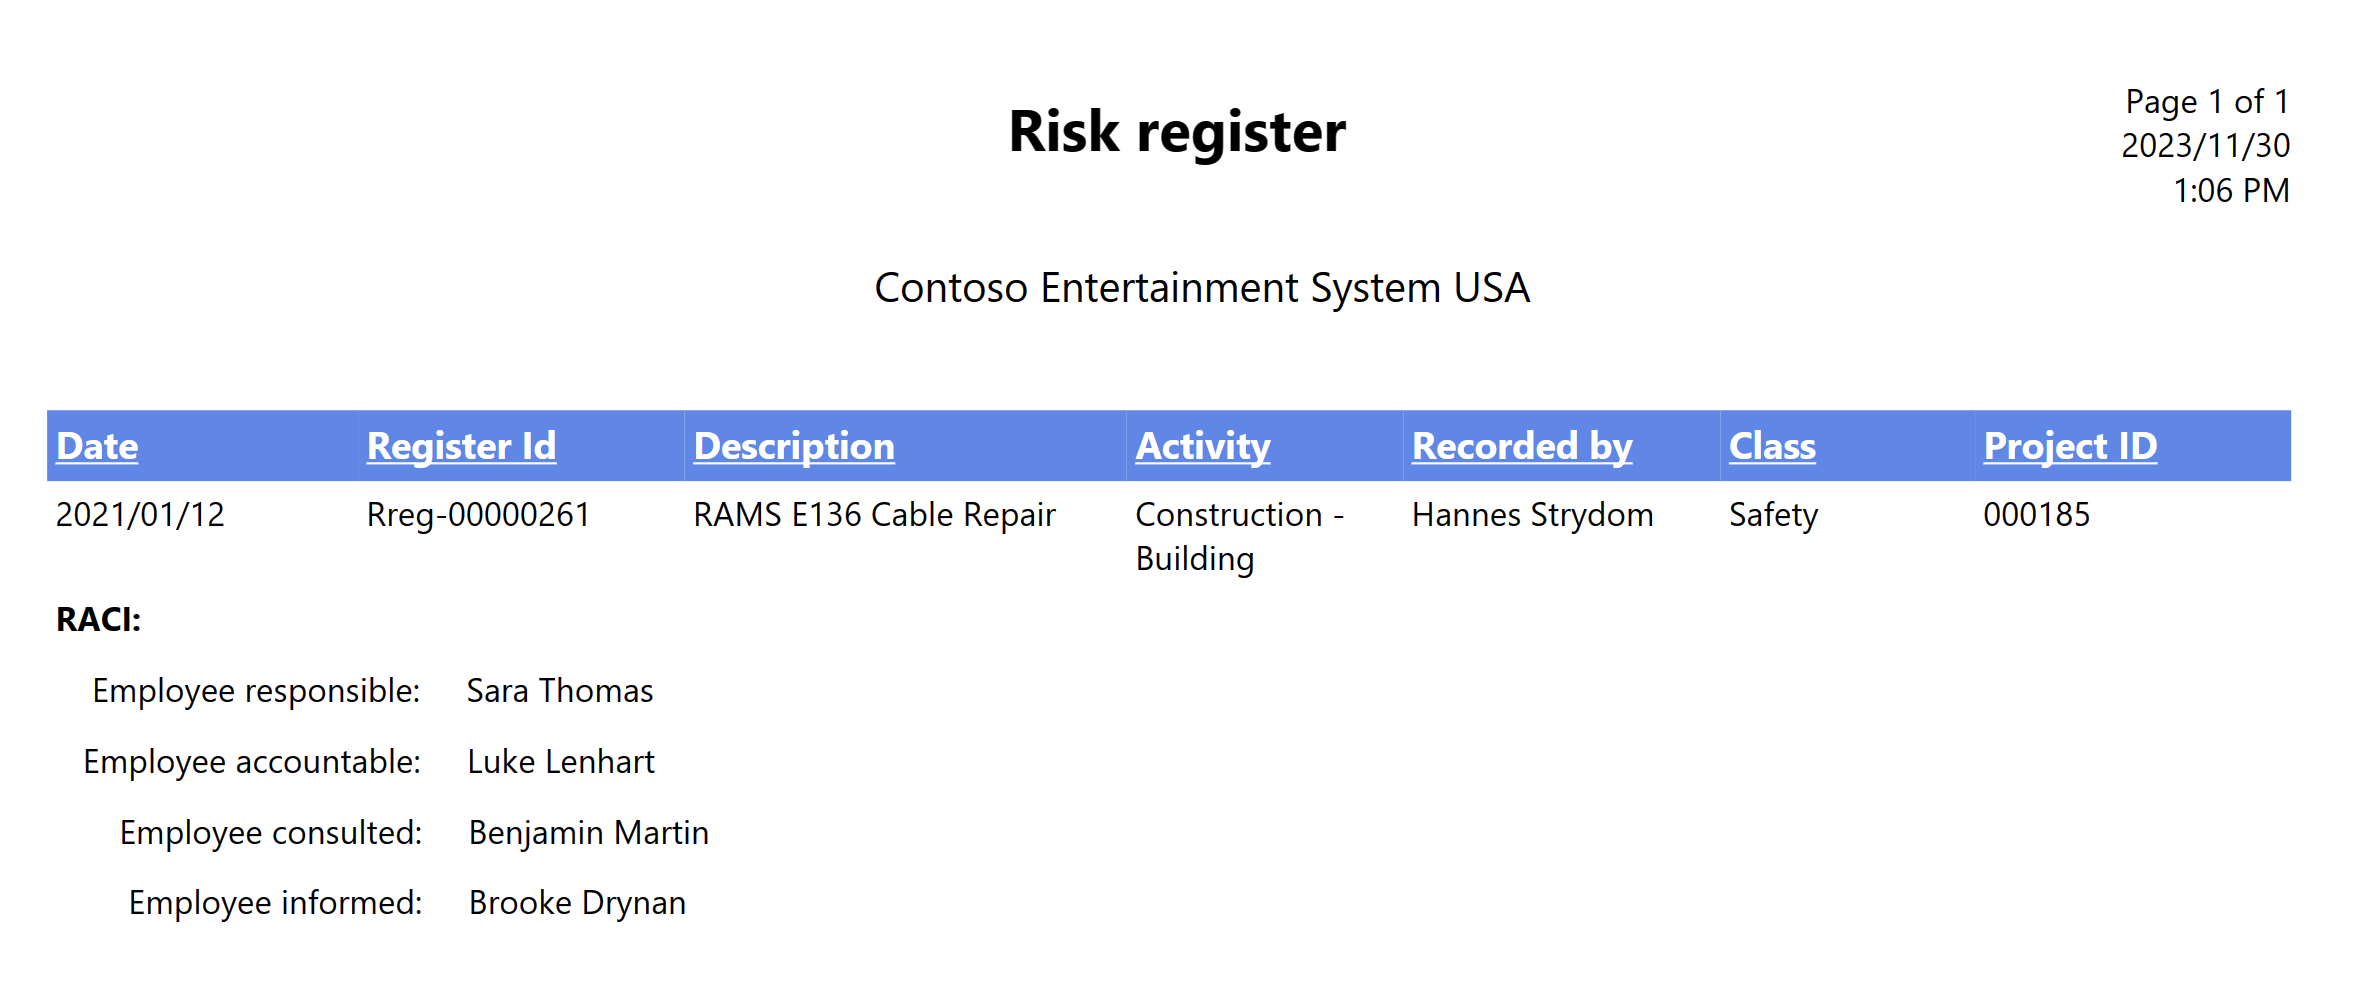
The Risk register report gives an overview of a specific risk register.
¶ 23. Risk register detail report
GRC > Risk > Reports and Inquiries > Risk register detail report
Select the parameters and then click OK
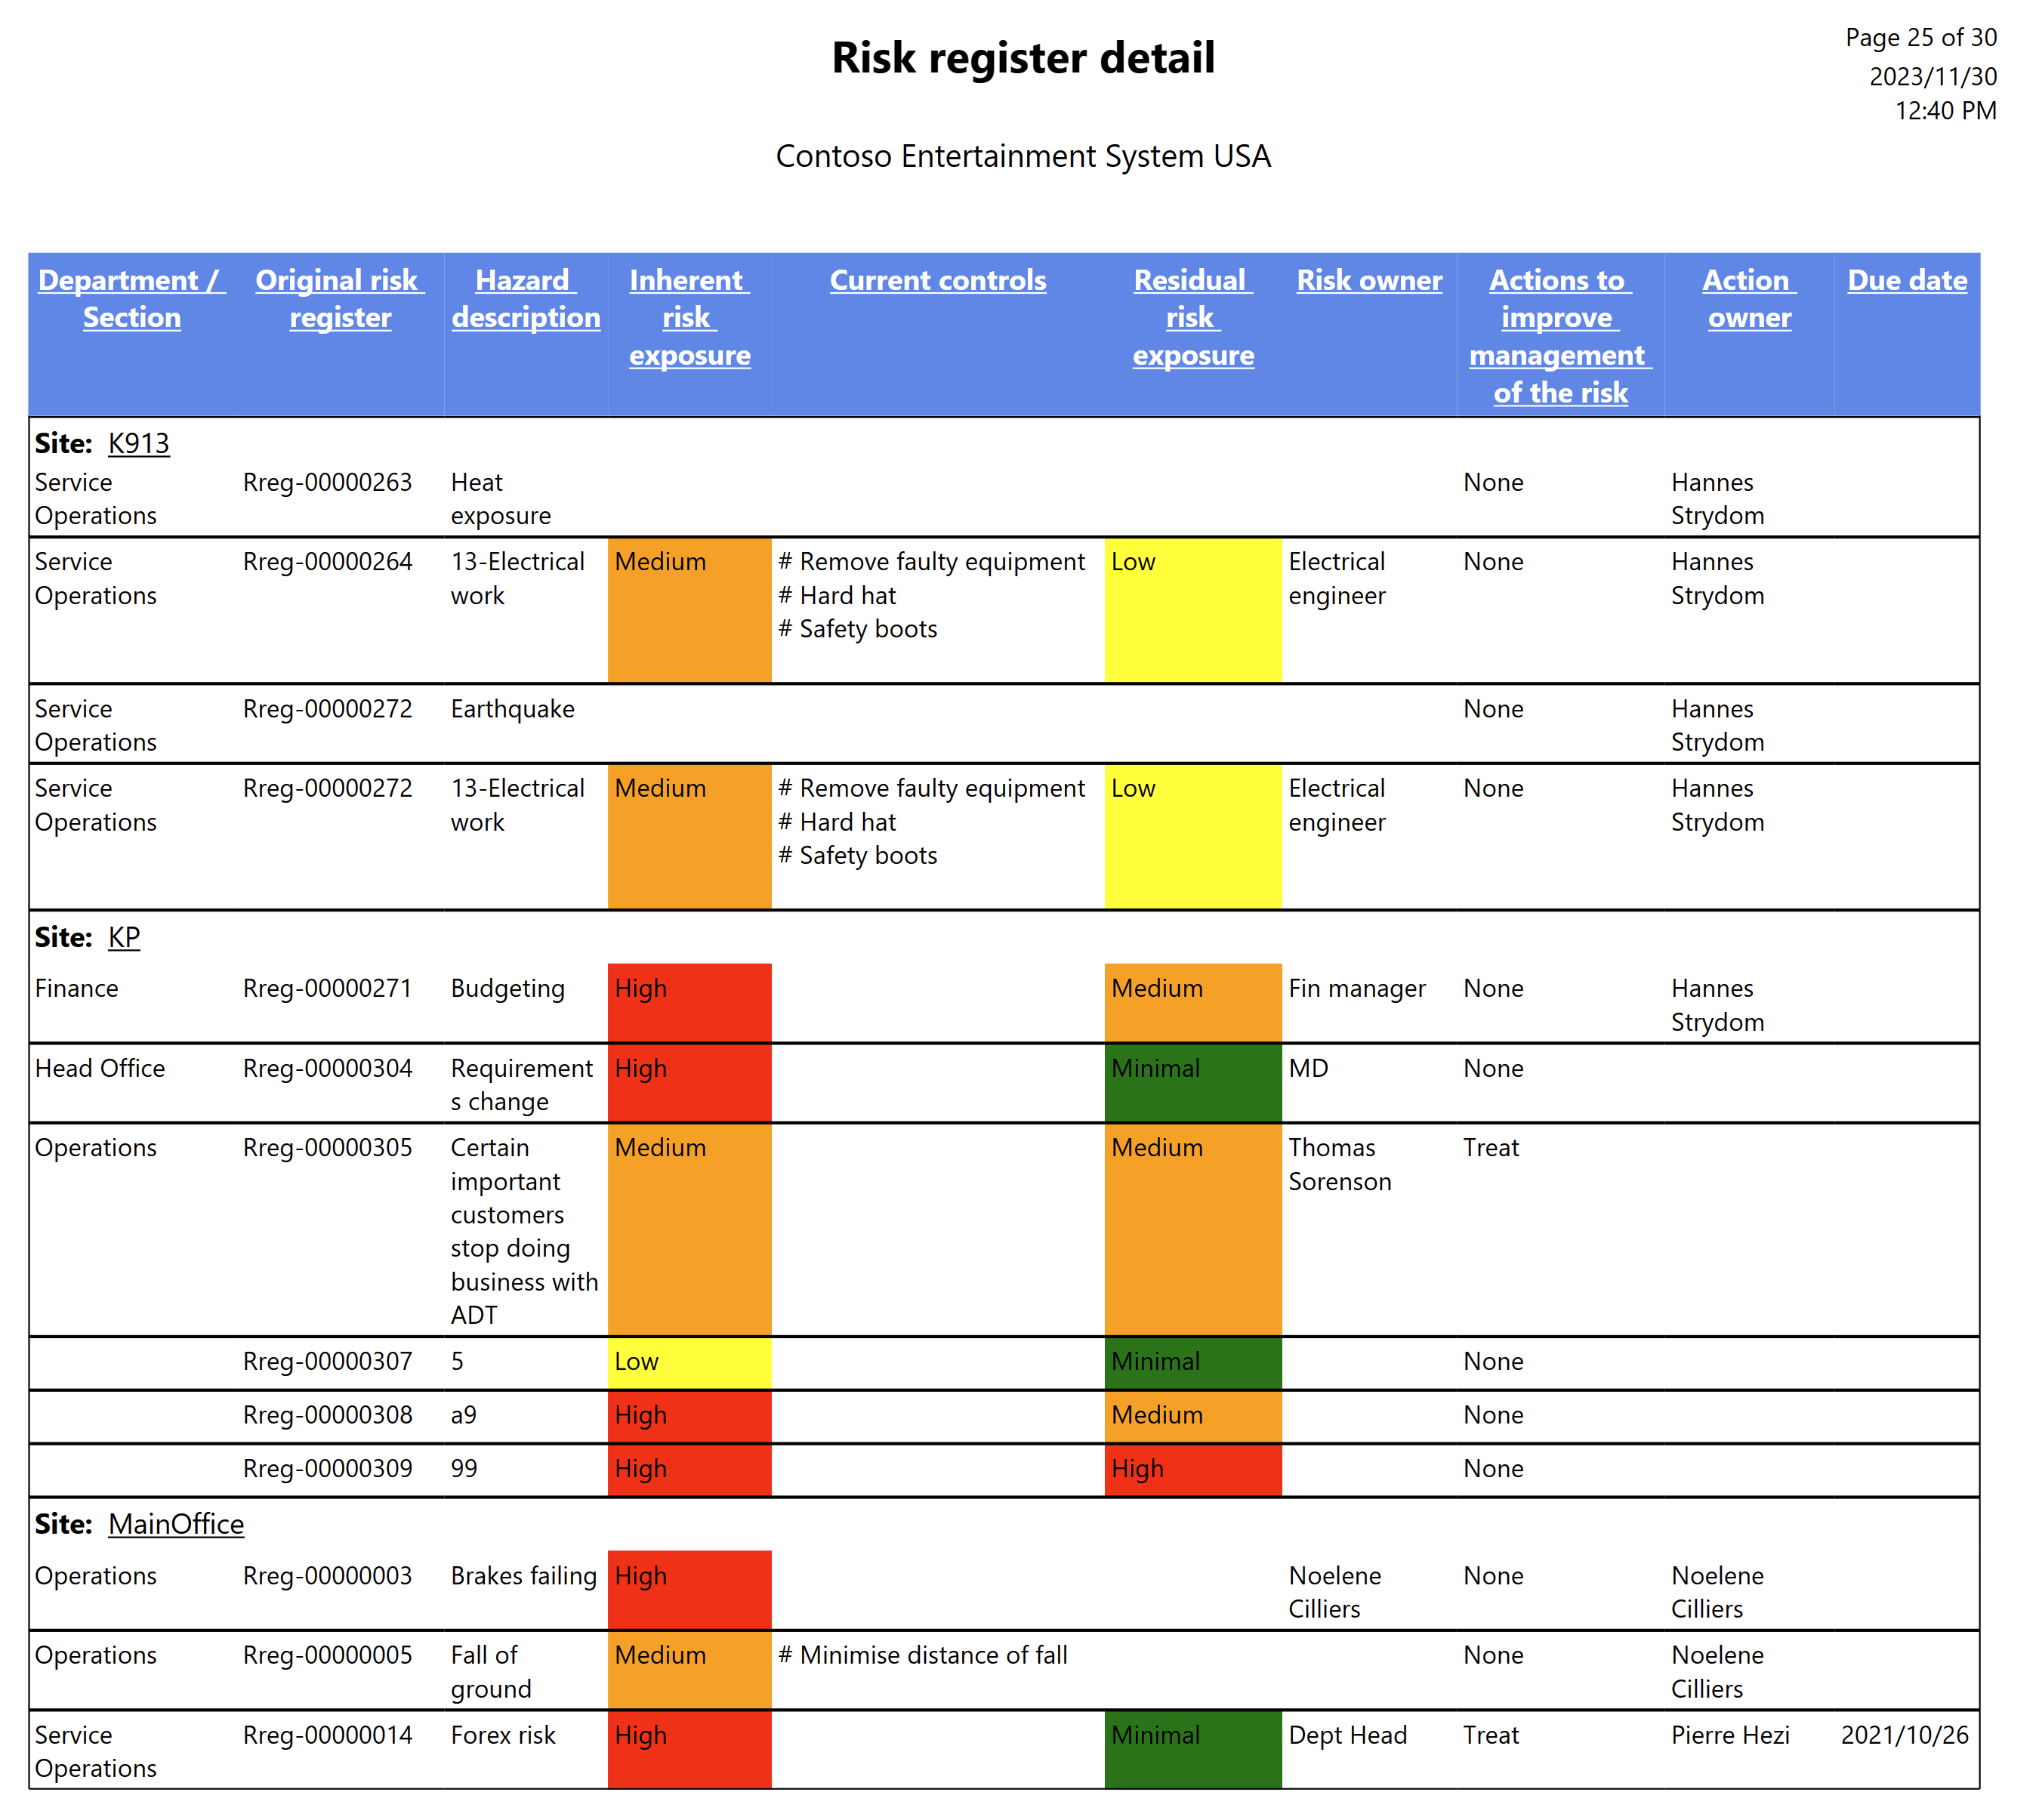
The Risk register detail report provides a more detailed overview of a specific risk register. The inherent risk exposure and residual risk exposure, as well as their controls are displayed.
¶ 24. Enterprise risks
GRC > Risk > Reports and inquiries > Enterprise risks
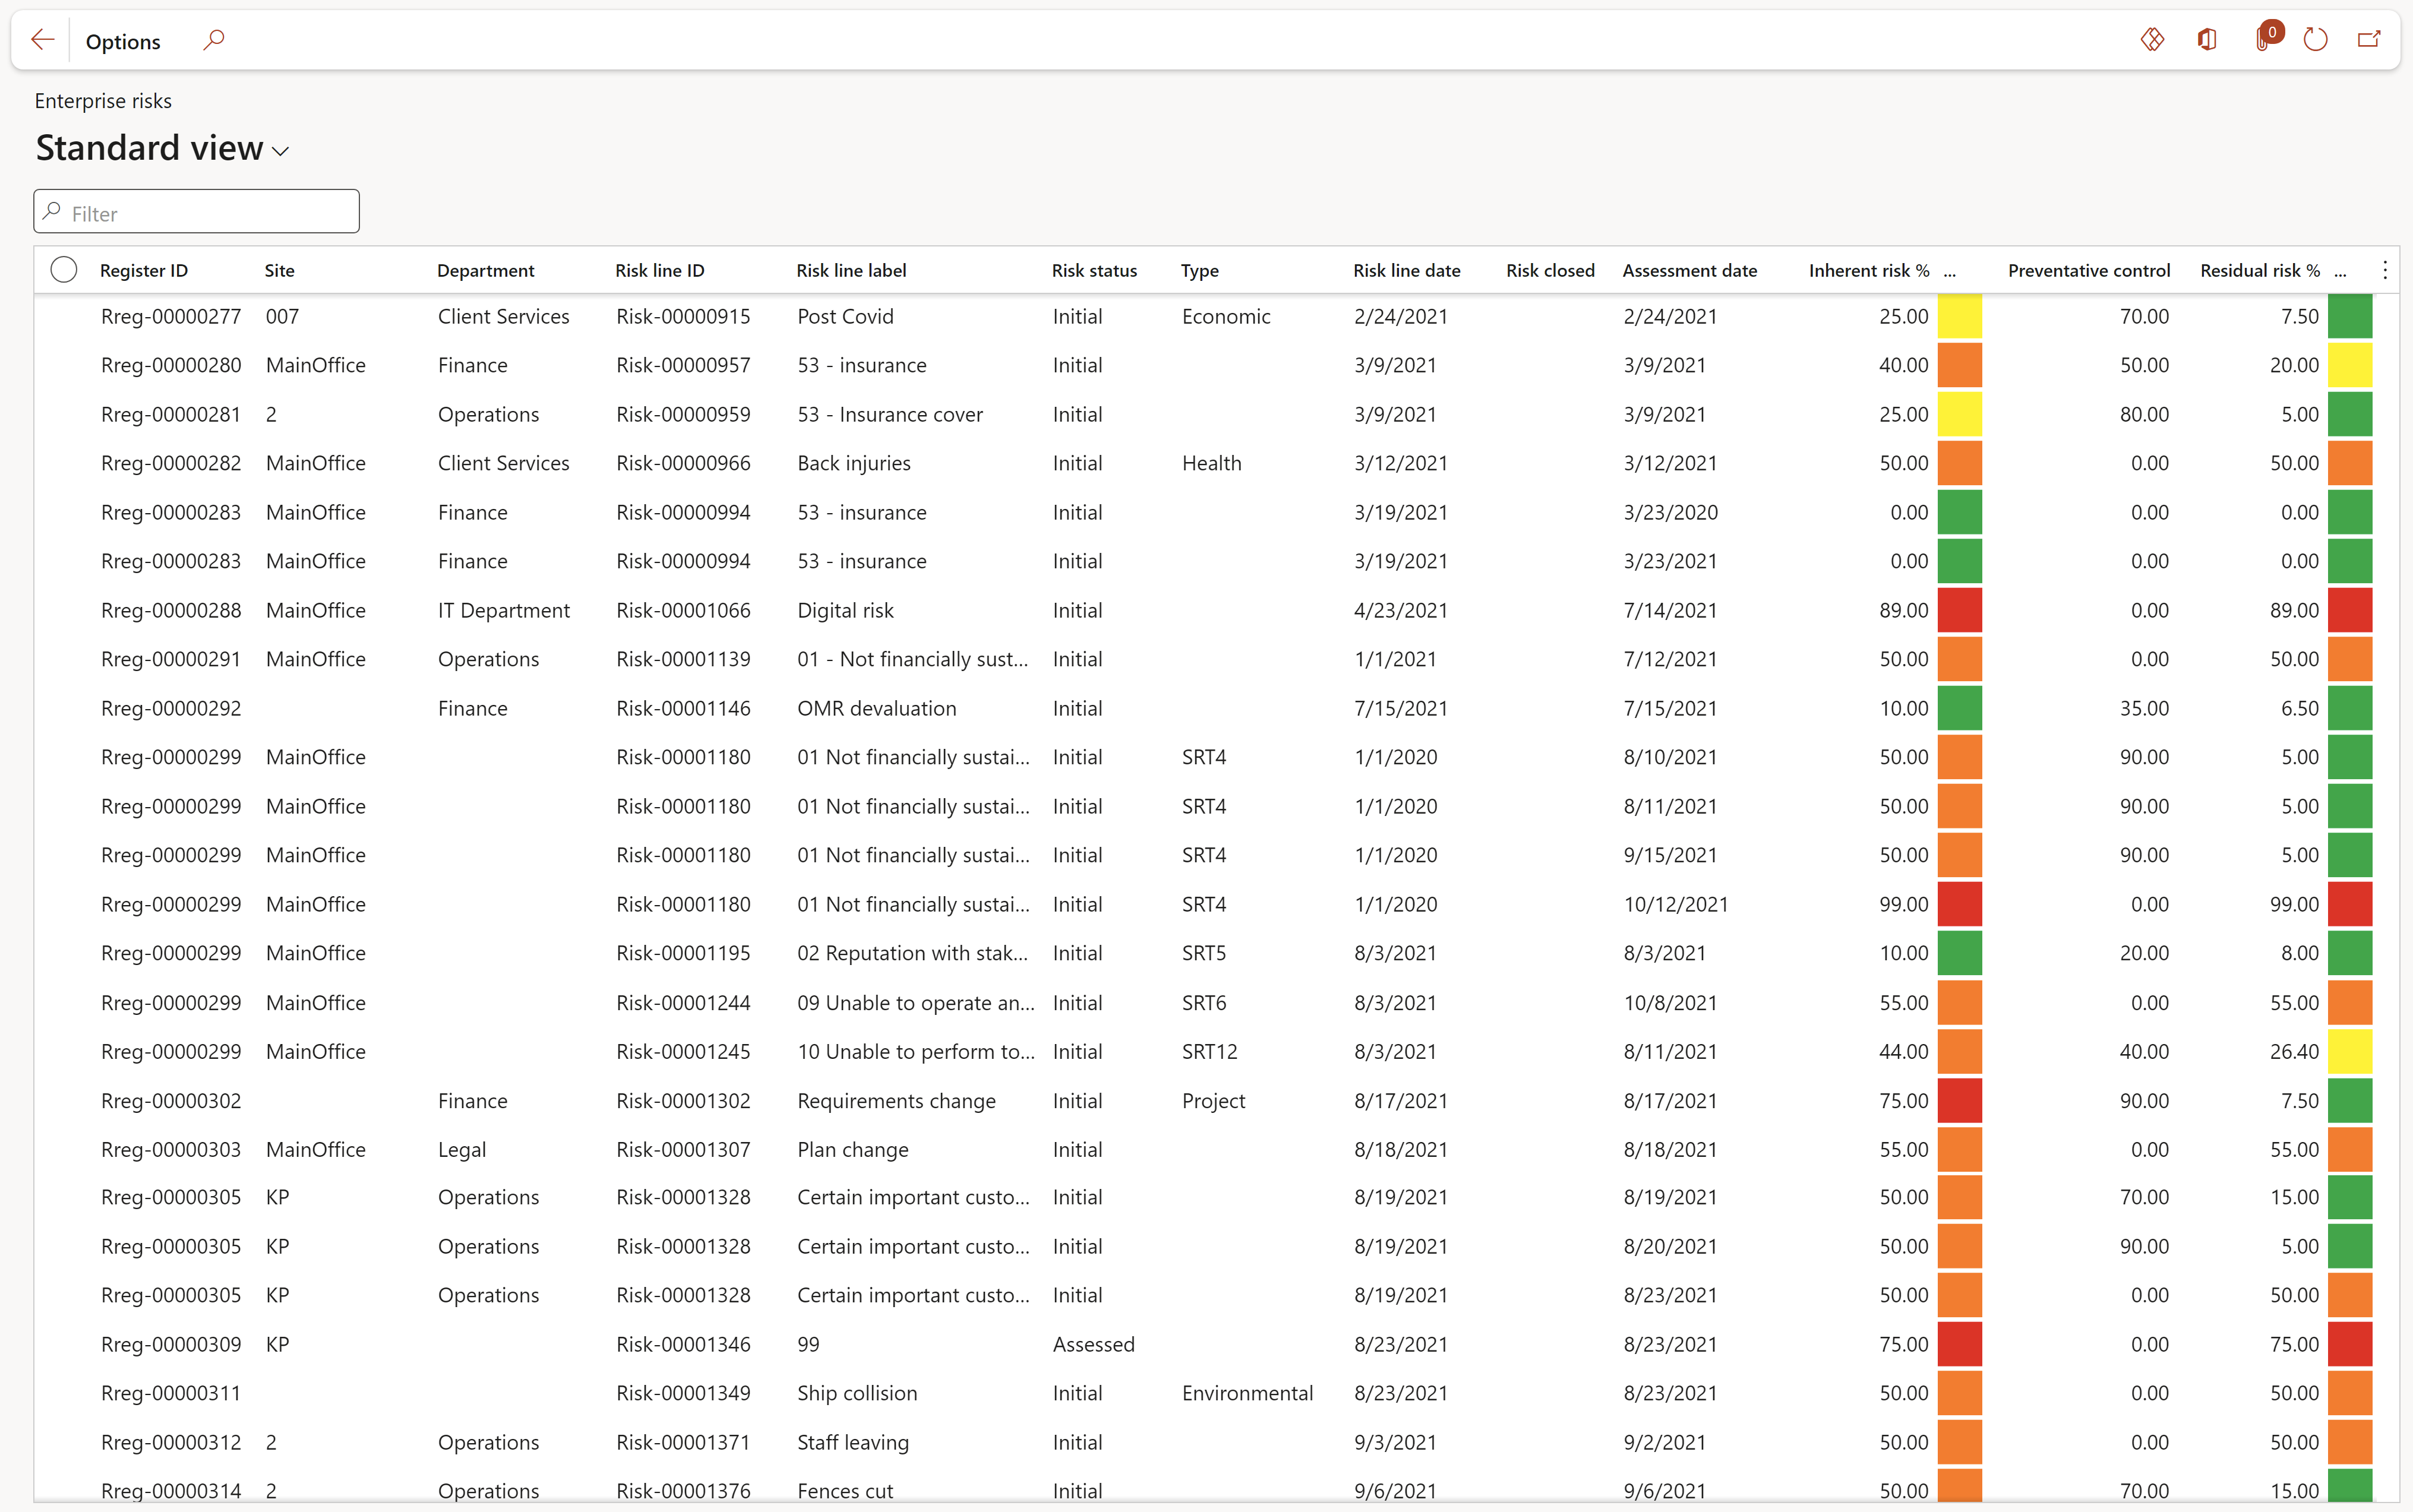
This is an inquiry of all Enterprise risk registers
¶ 25. Enterprise risk profile and controls report
GRC > Risk > Reports and inquiries > Enterprise risk profile and controls report
Select the parameters and then click OK

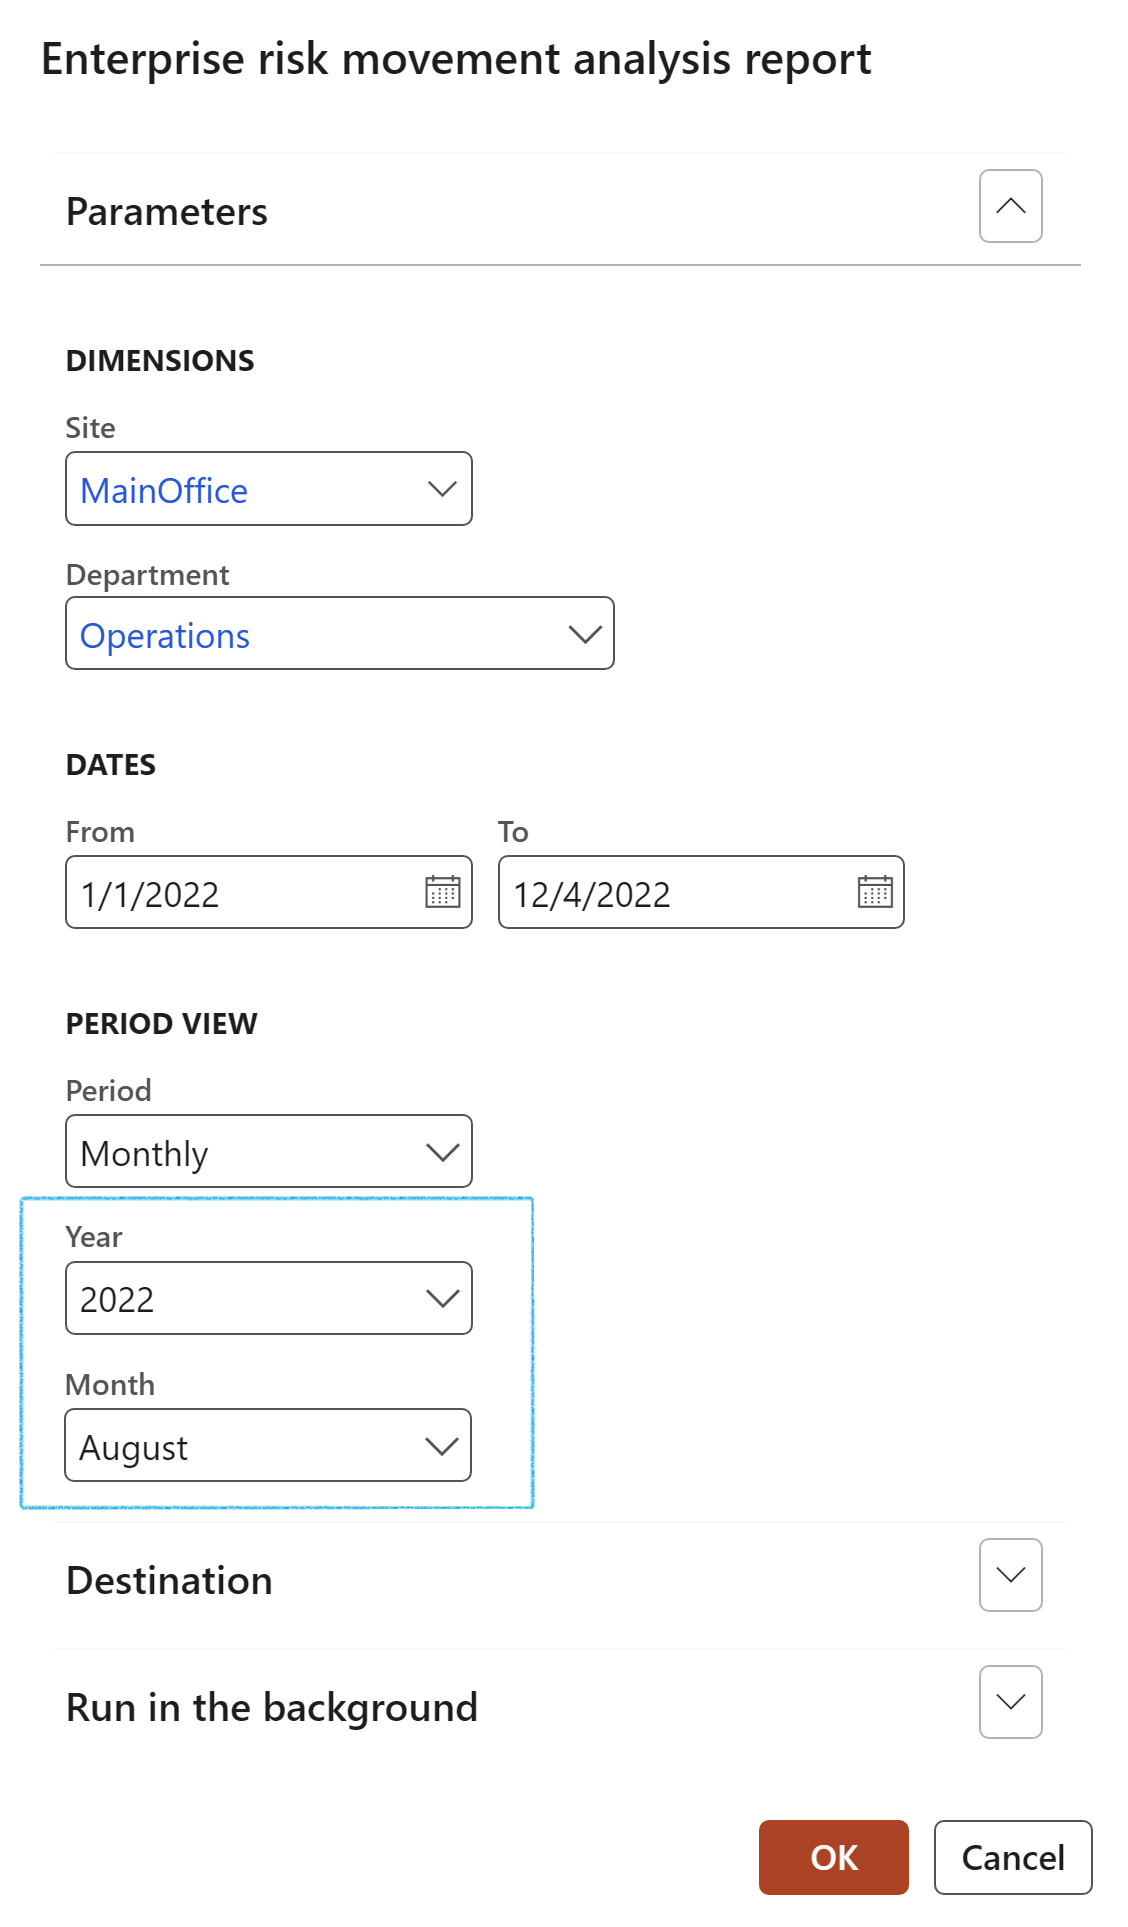
¶ 26. Enterprise risk movement analysis report
GRC > Risk > Reports and inquiries > Enterprise risk movement analysis report
Select the parameters and then click OK
It is important that the combination for Month and Year selected under the Period view field group, is correct. If there are no transactions for the selected period, the report will be empty.

¶ 27. Enterprise active risk trends graph
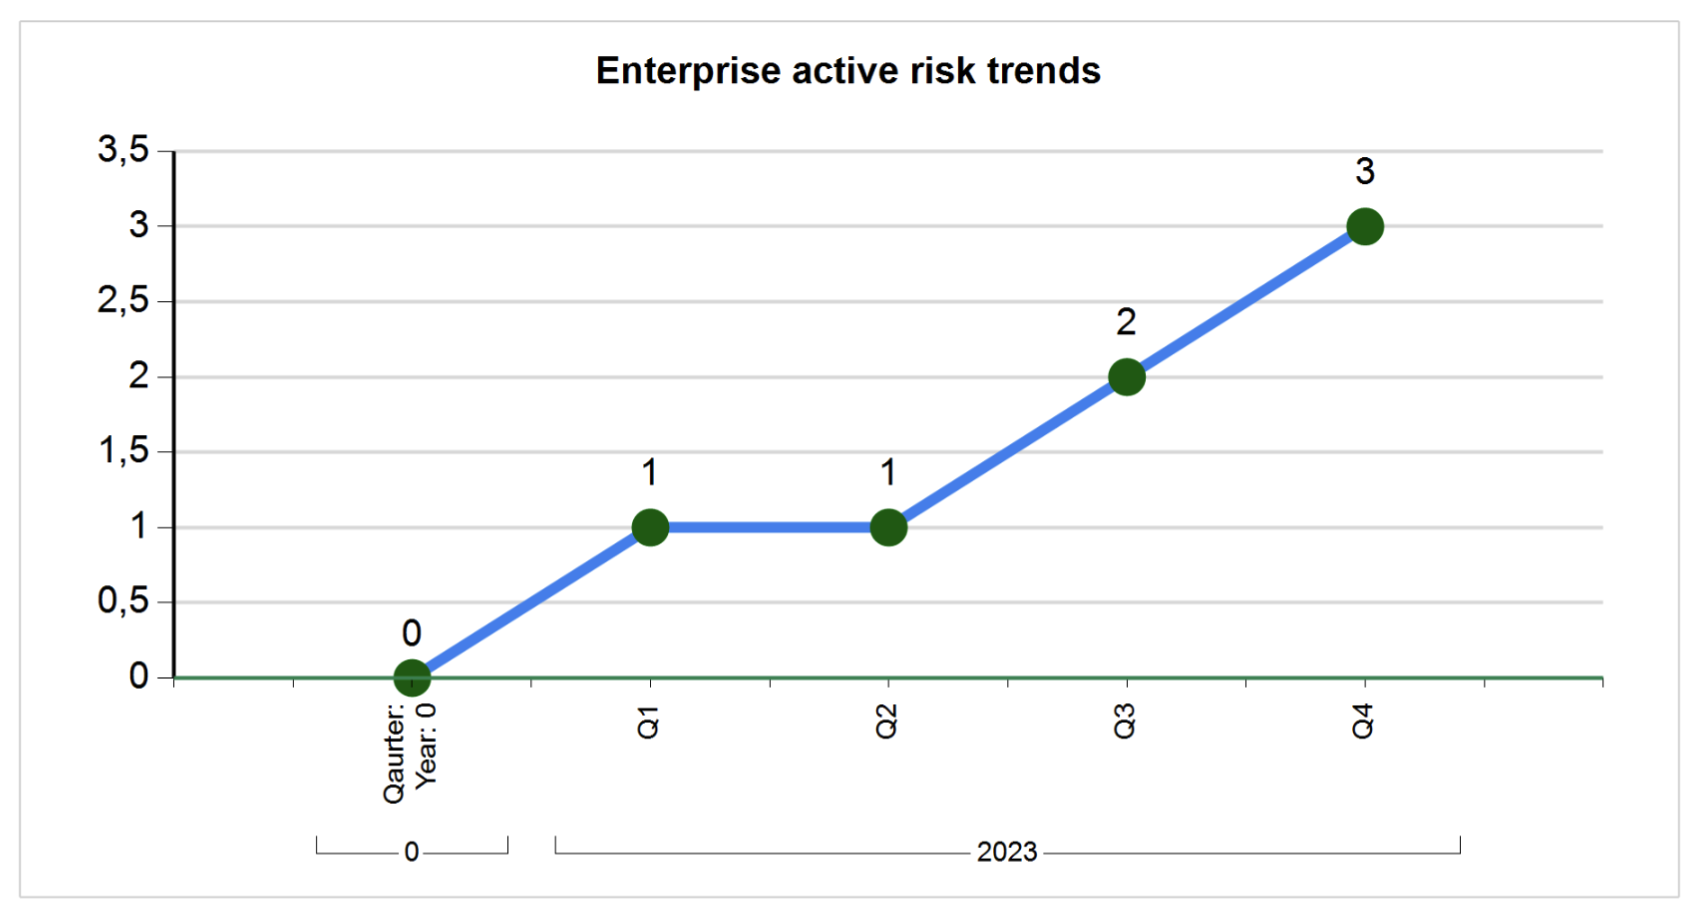
This graph displays the count of open risk lines per quarter for the selected site
¶ 28. Enterprise risk mitigation efficiency graph
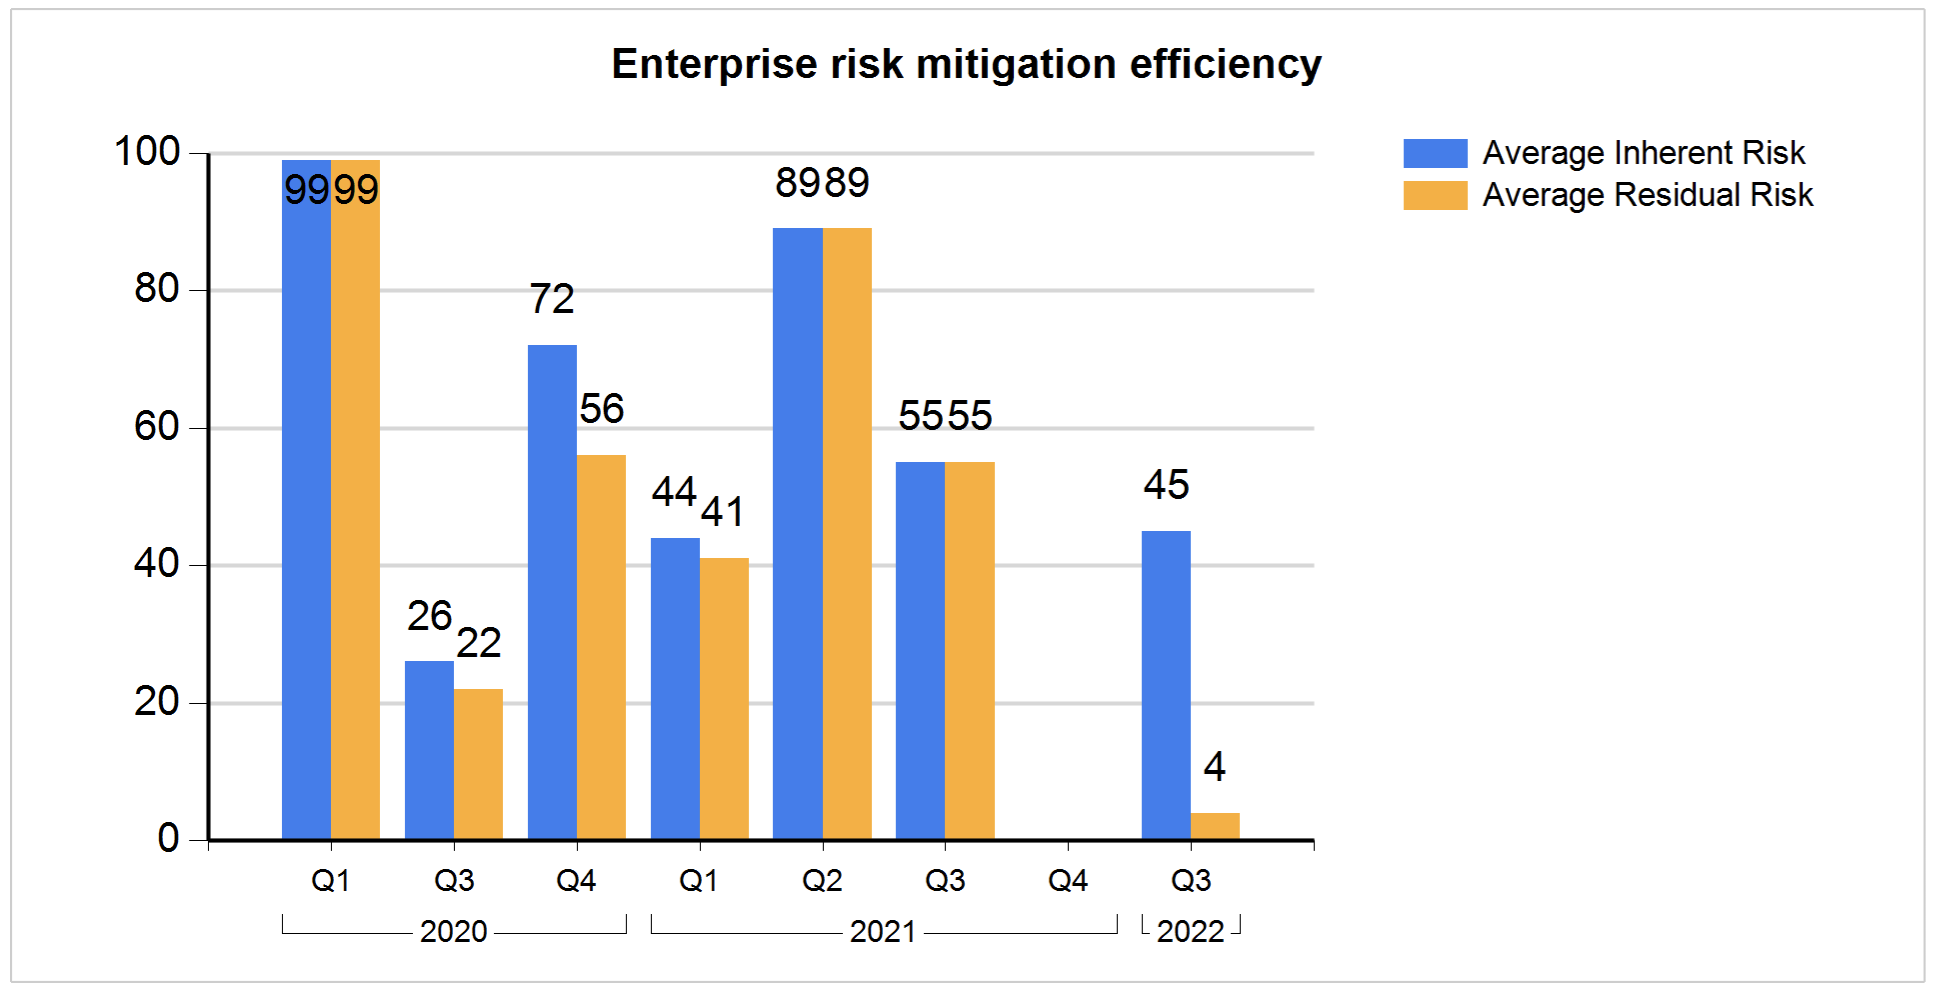
This graph displays the average mitigation efficiency of the risk lines per quarter for the selected site
¶ 29. Risk hazard analysis

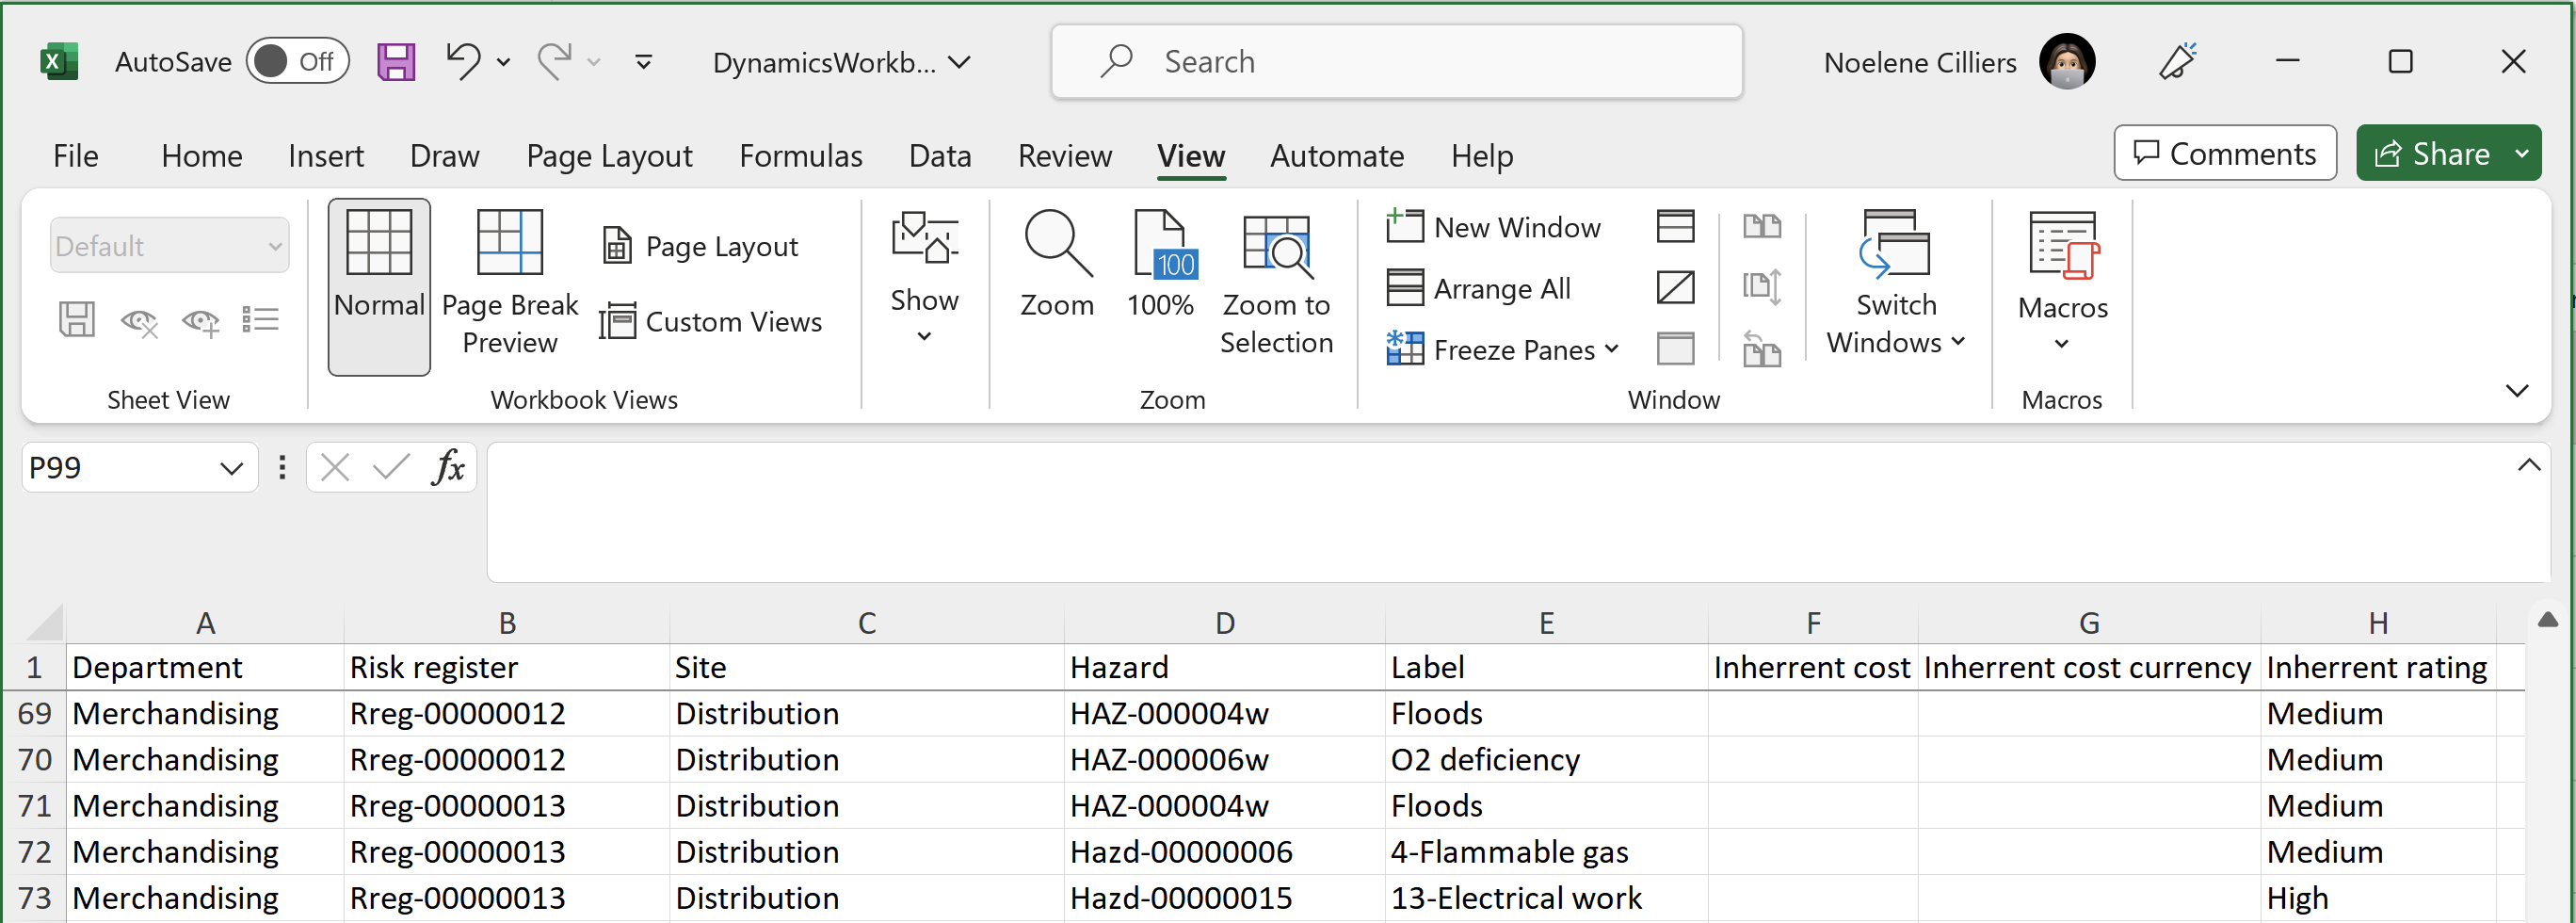
The Risk analysis inquiry displays Inherent as well as Residual risks. Values are shown using percentages as well as colors to identify and evaluate risks.
A pivot template with the graphs can be created in Excel, for example, “Inherent exposure by profile”
¶ 30. Risk hazard lines graph
GRC > Risk > Reports and inquiries > Risk hazard lines graph
Select the parameters and then click OK
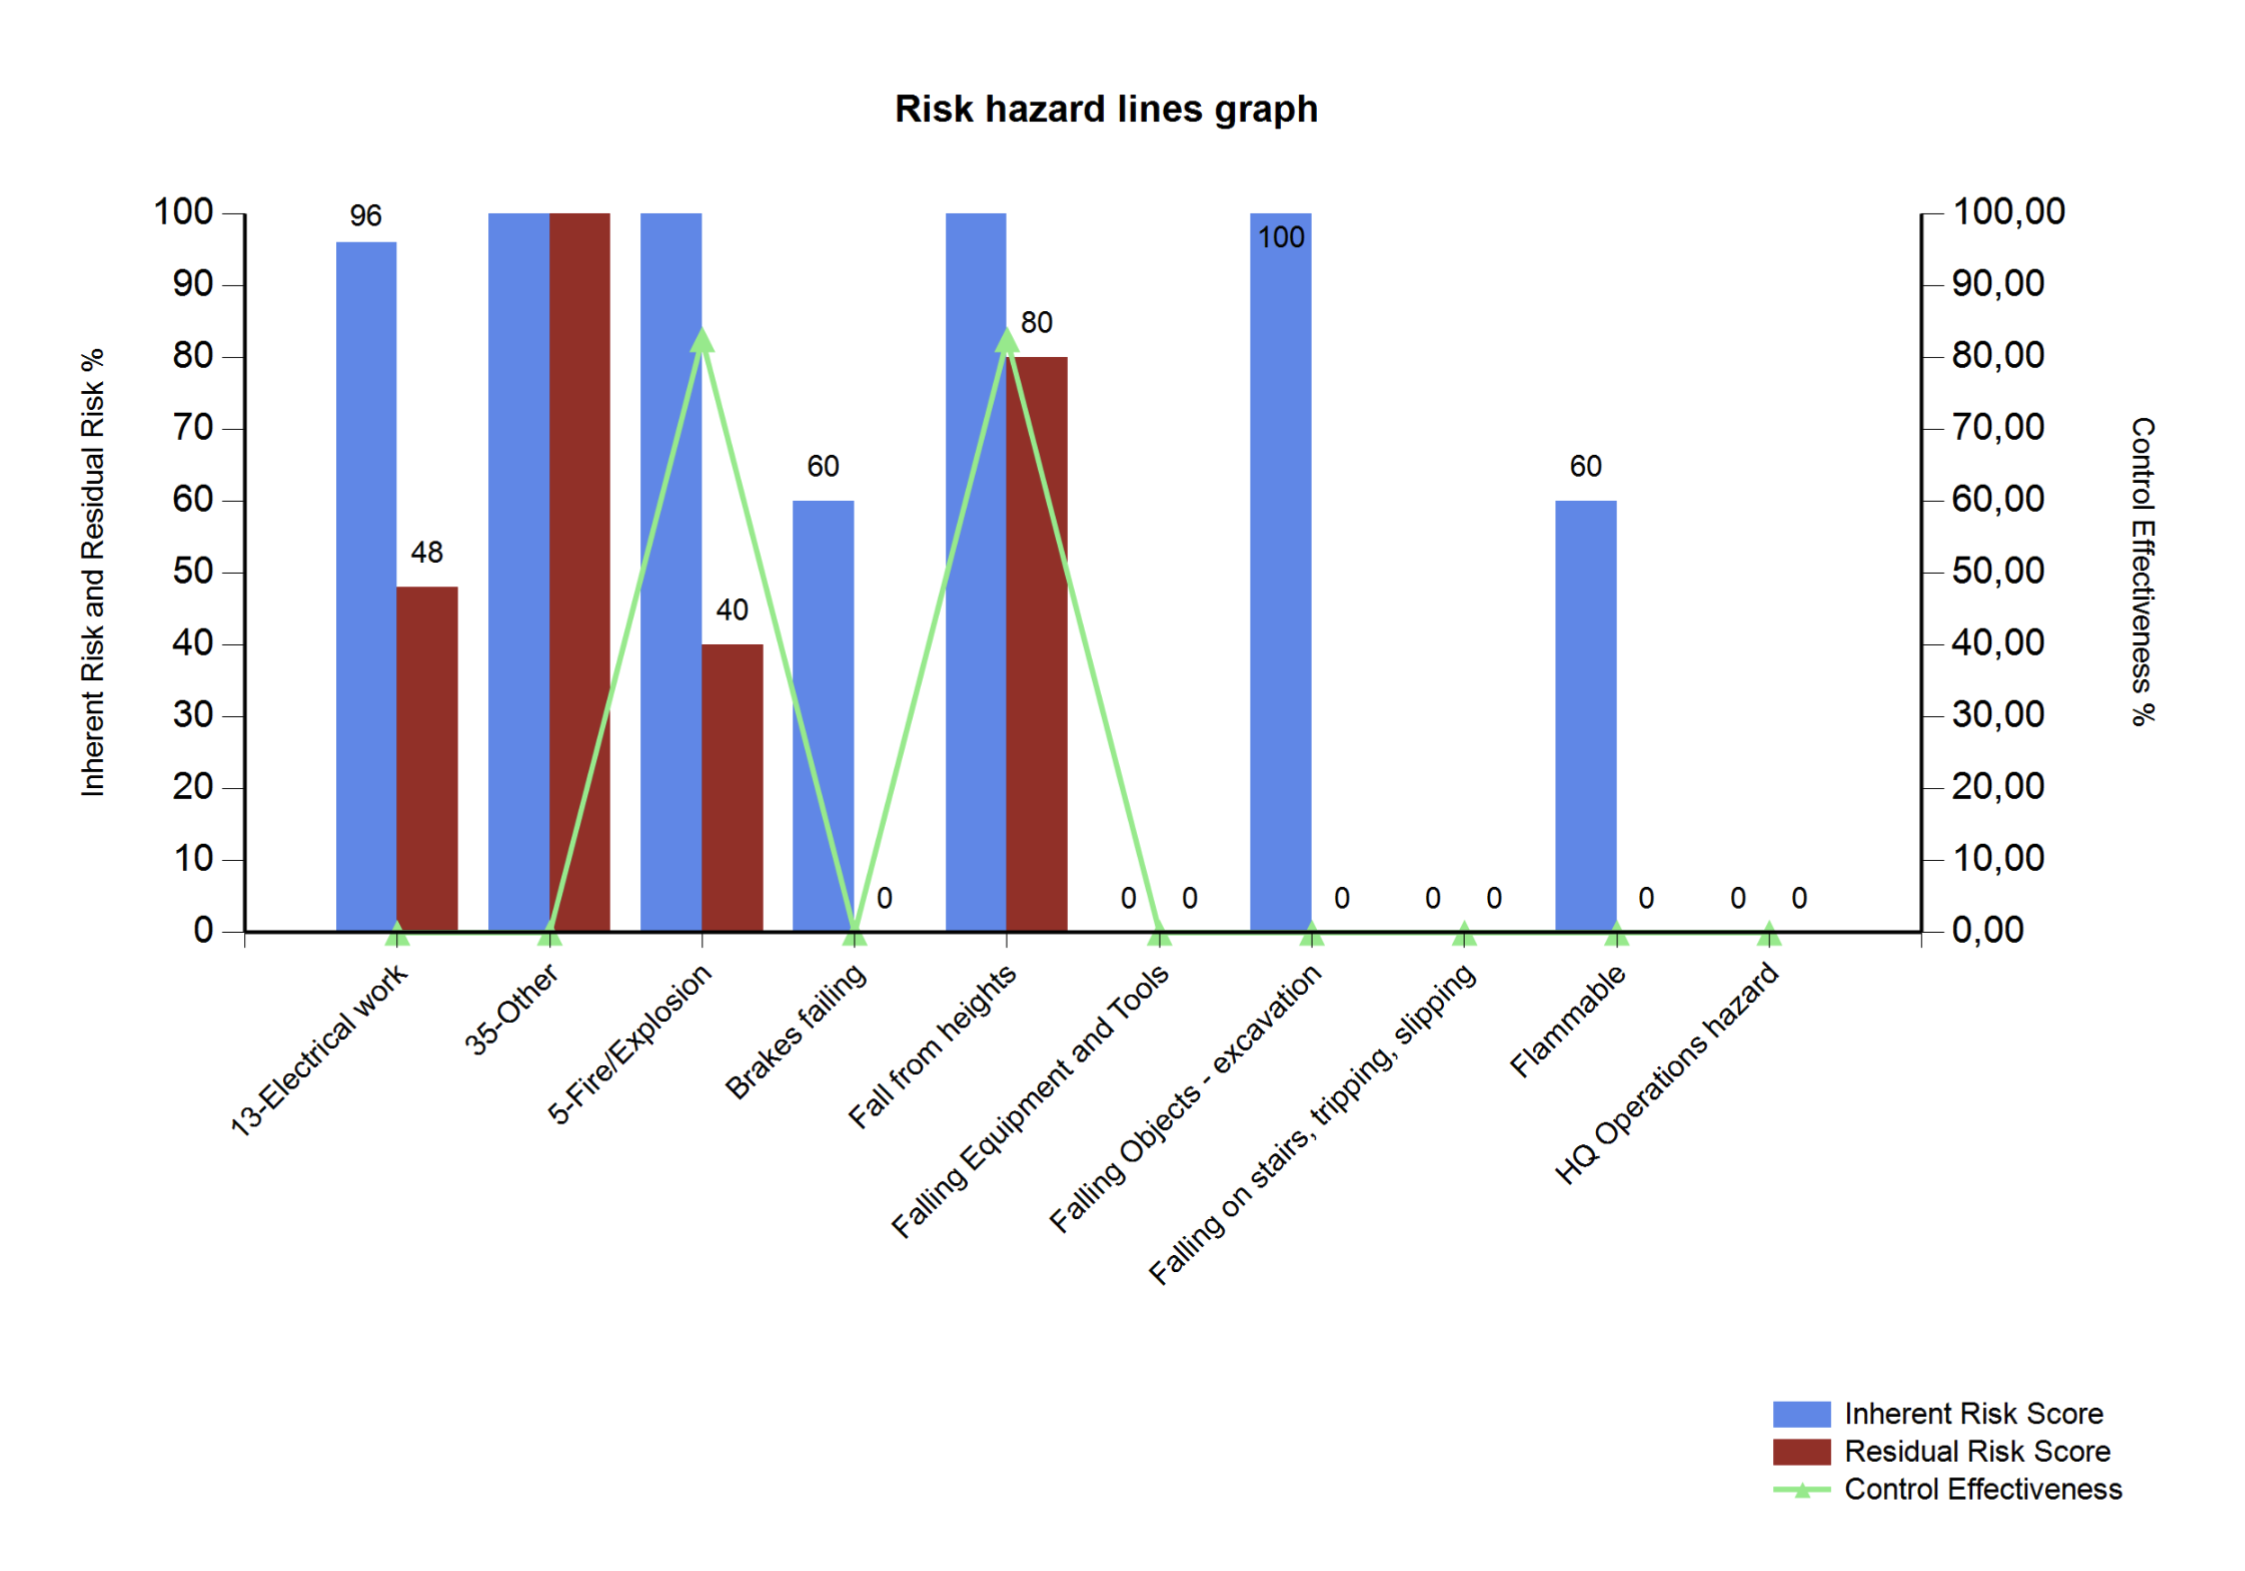
A column graph showing inherent and residual risk as well as effectiveness rating.
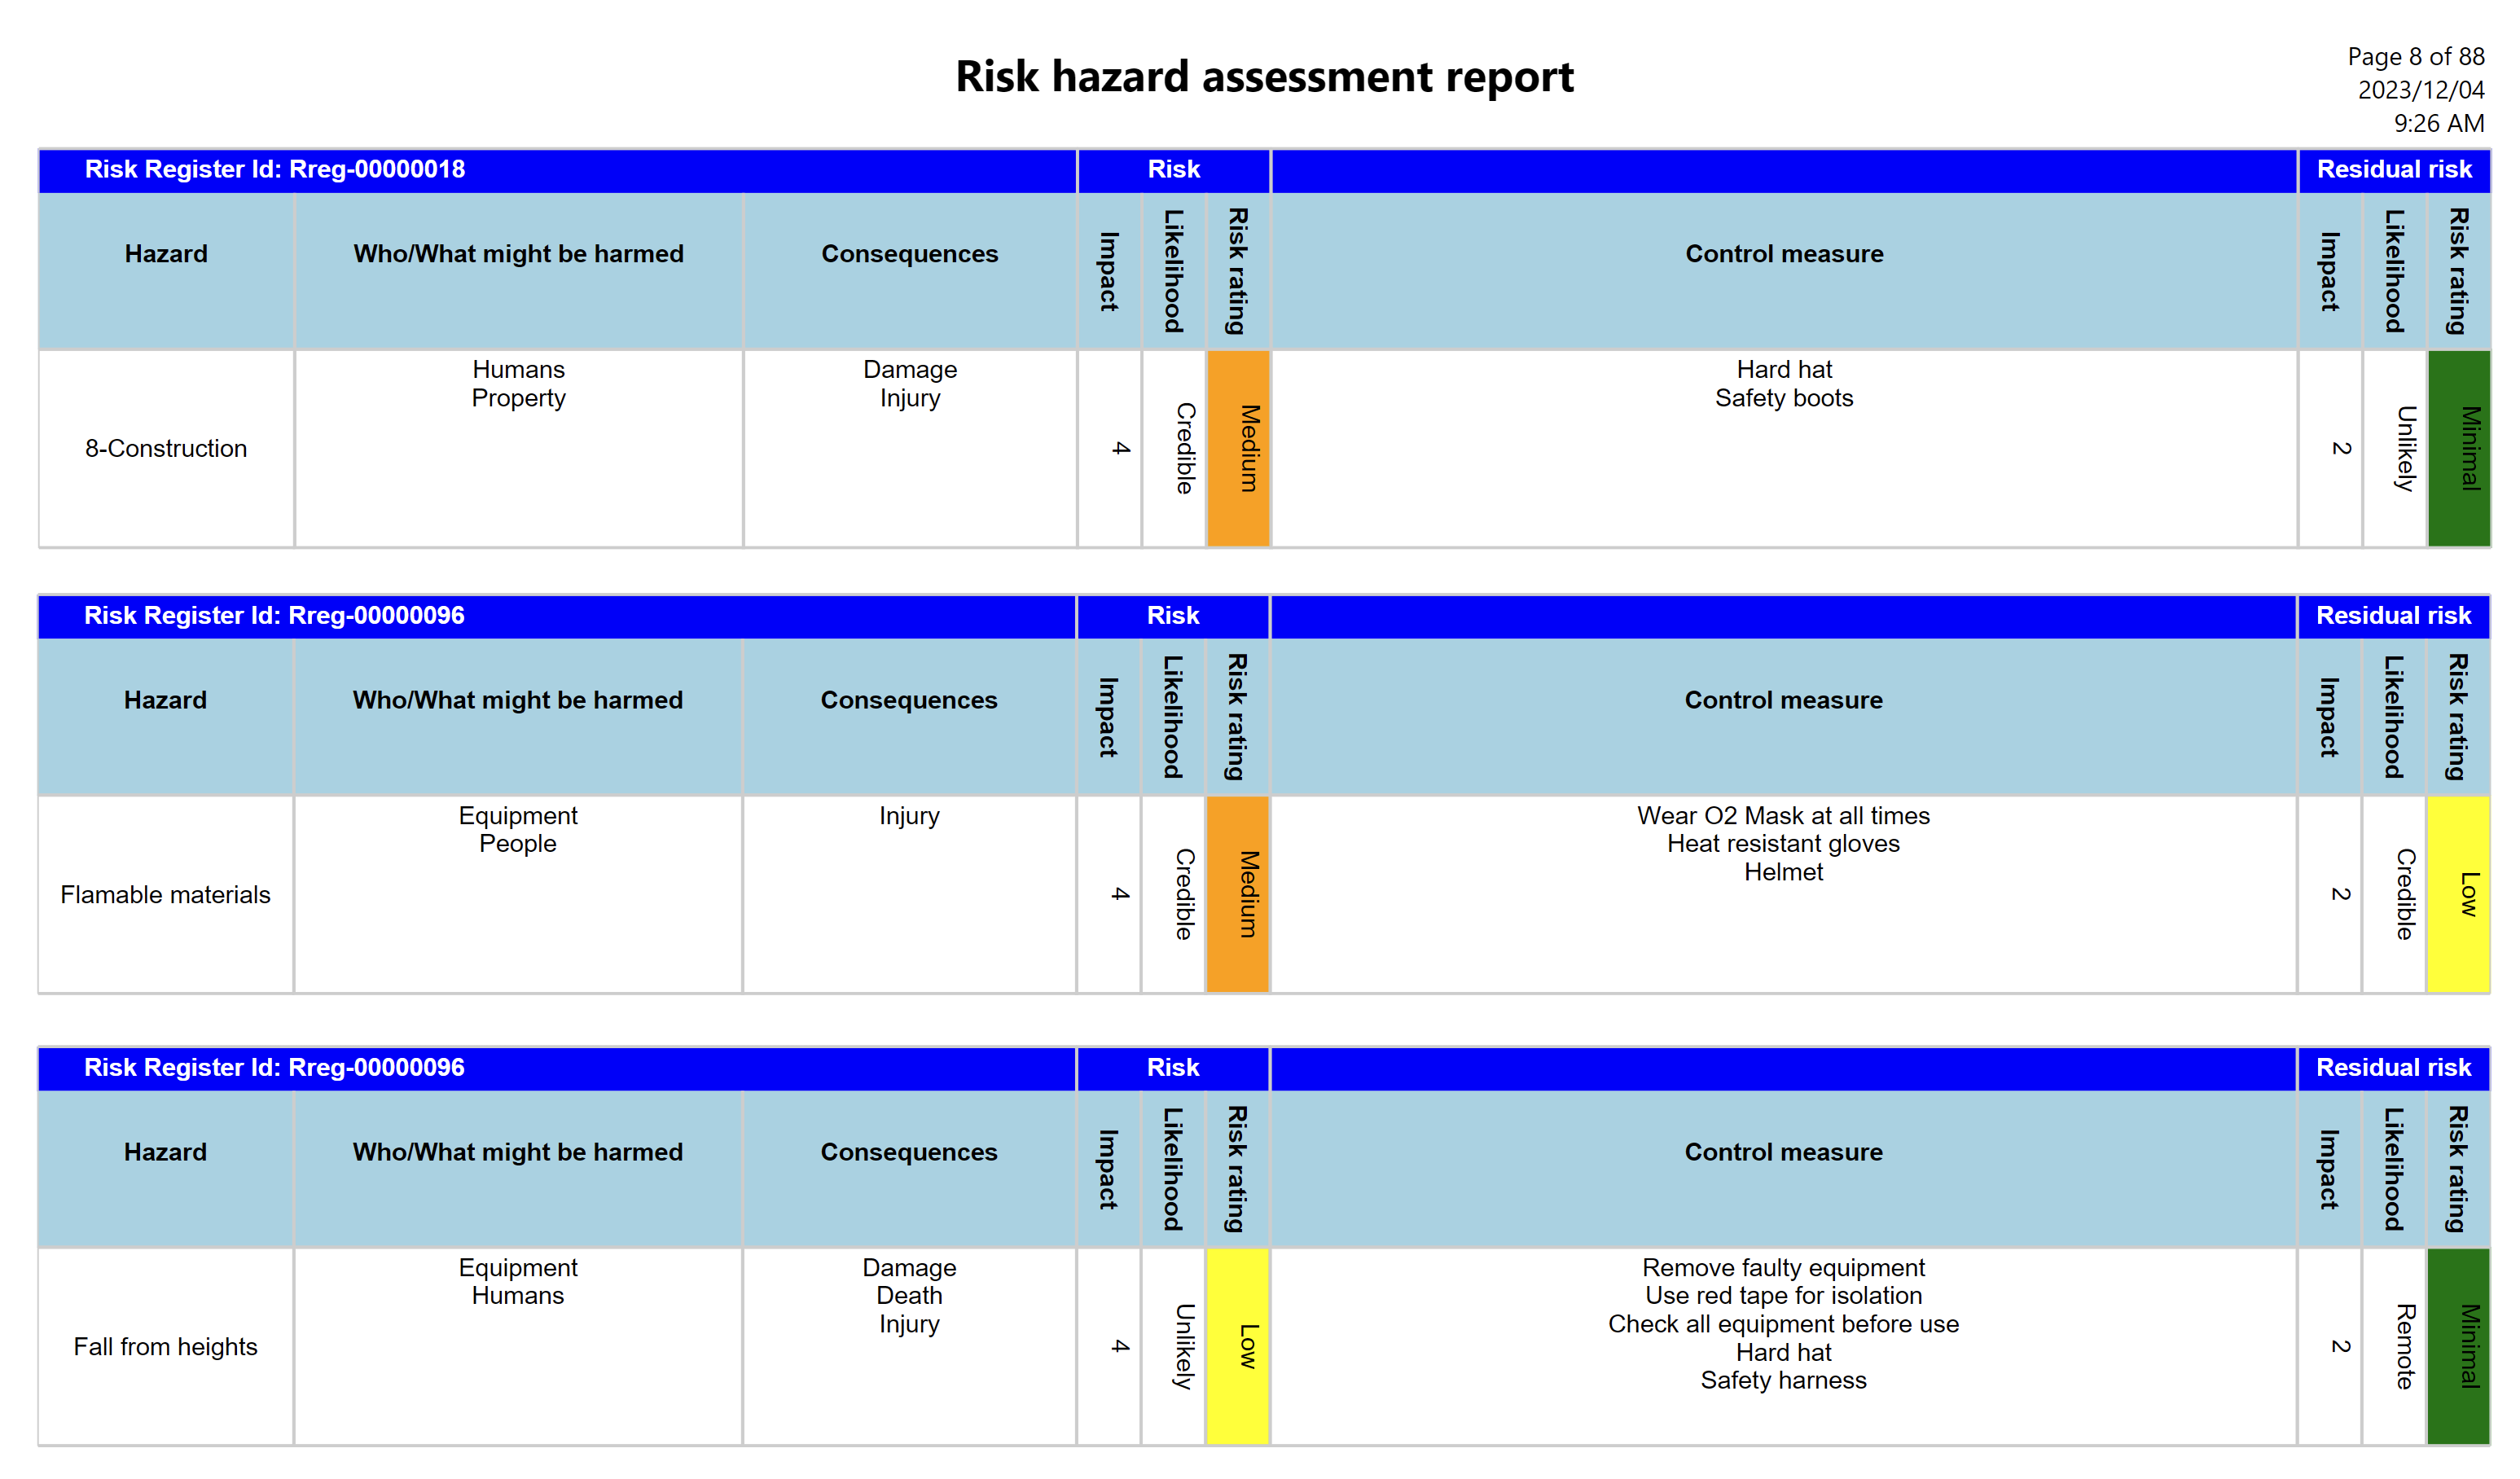
¶ 31. Risk hazard assessment report
GRC > Risk > Reports and Inquiries > Risk hazard assessment report
Select the parameters and then click OK
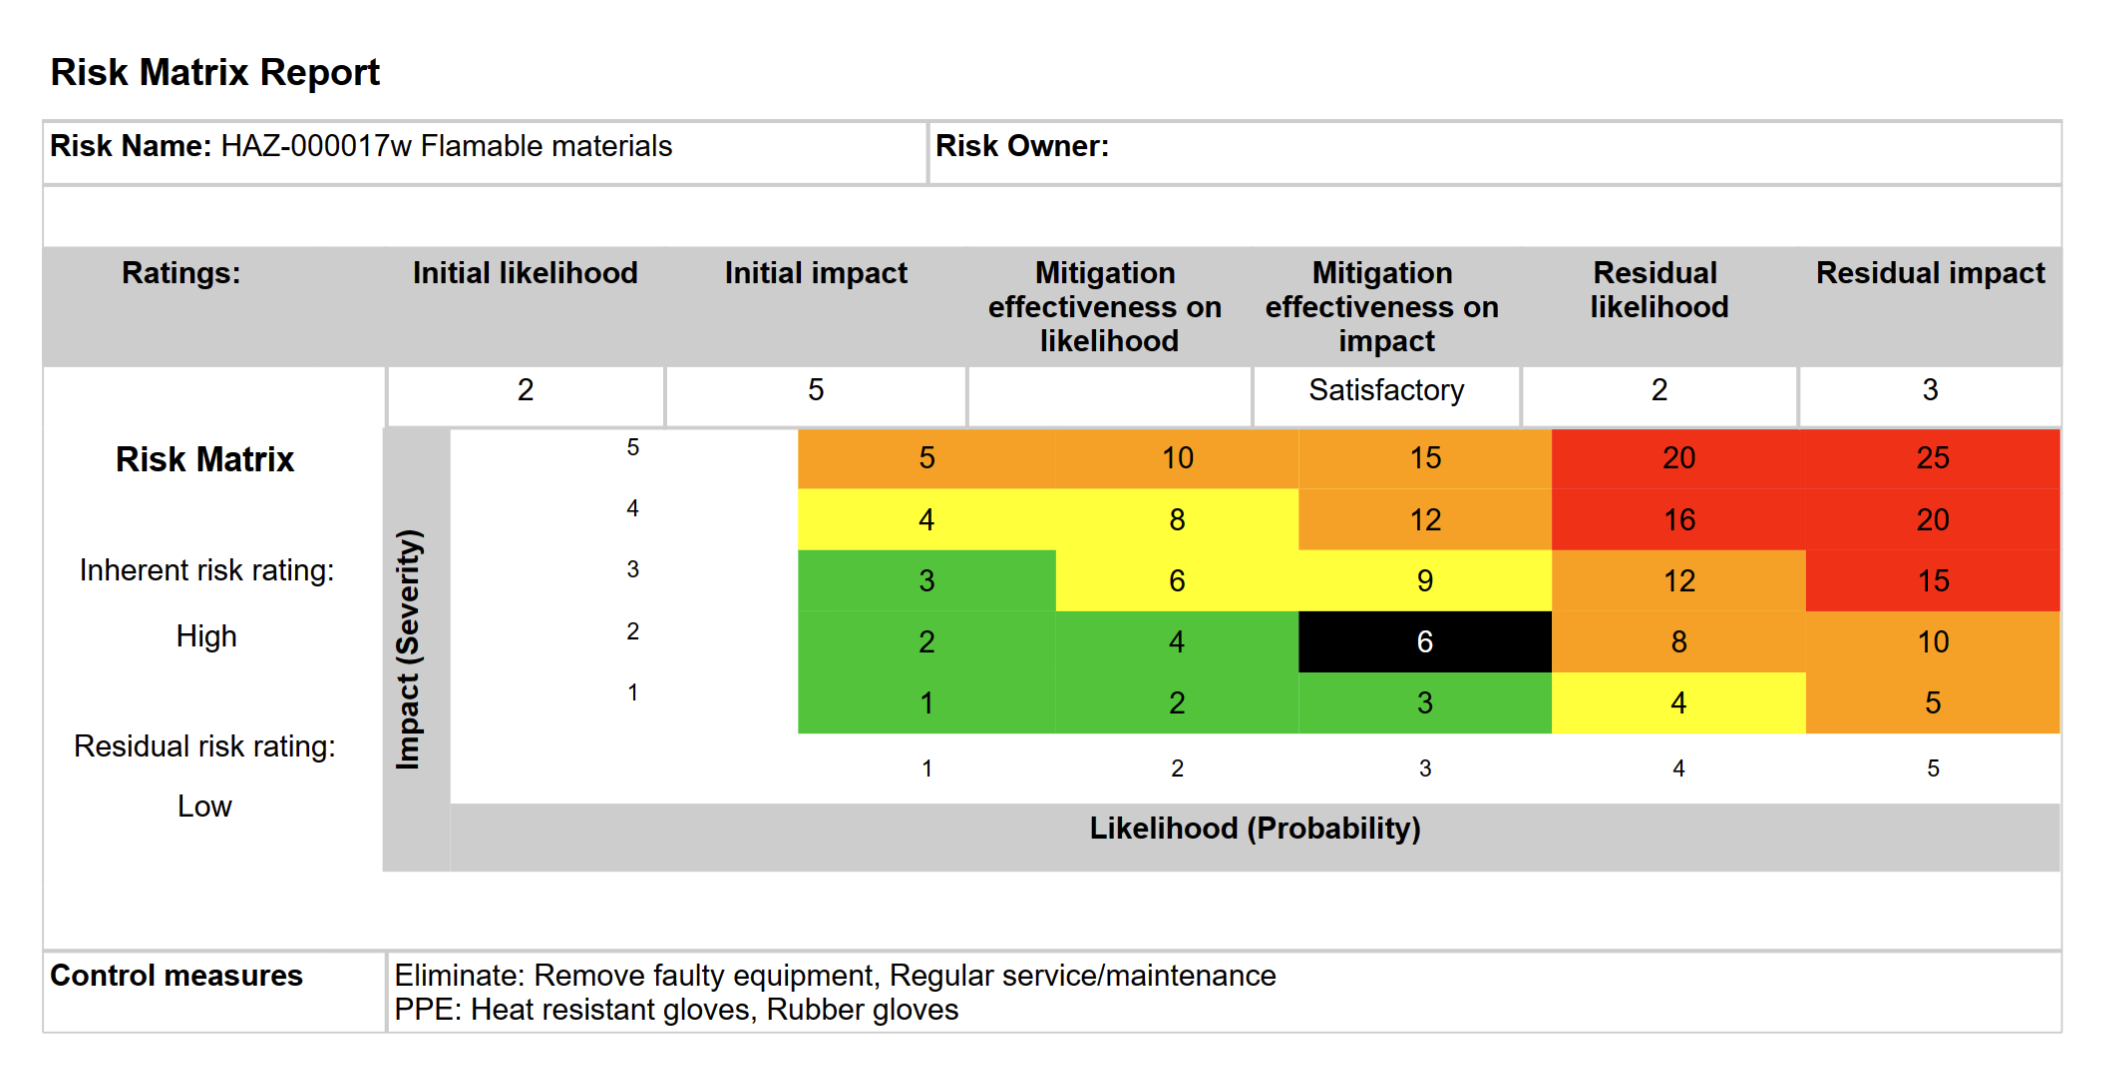
¶ 32. Risk hazard matrix report
GRC > Risk > Reports and Inquiries > Risk hazard matrix report
Select the parameters and then click OK
¶ Compliance Reports & Inquiries
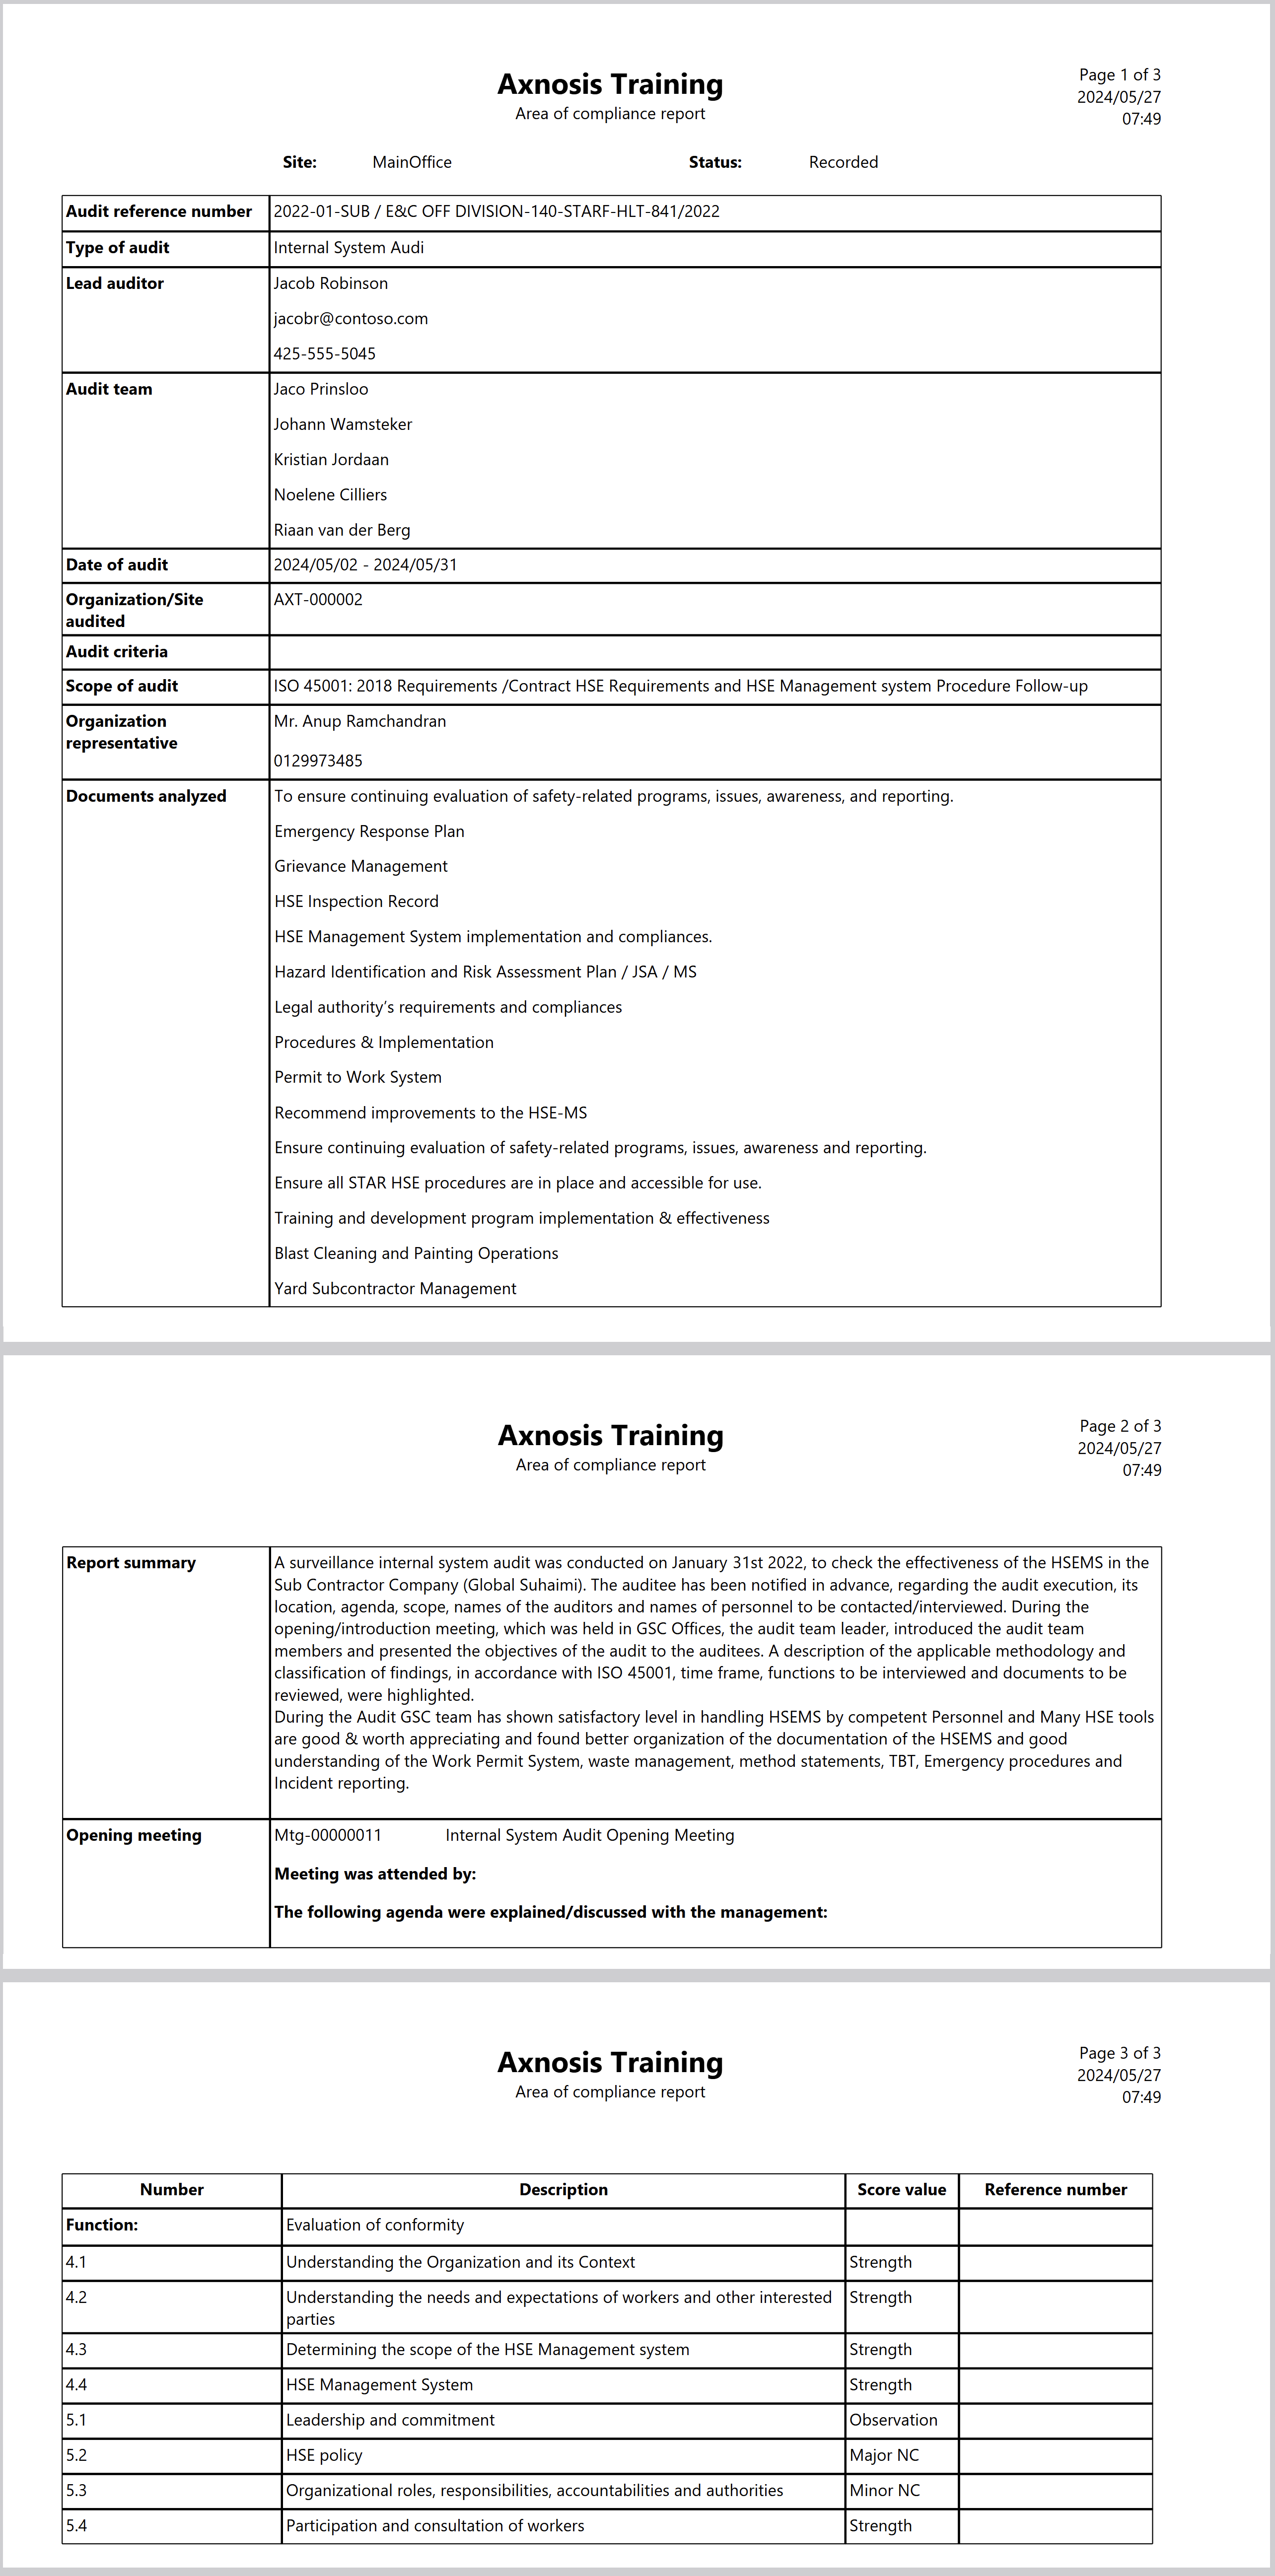
¶ 33. Area of compliance report
GRC > Compliance > Reports and Inquiries > Area of compliance report
- Select the Parameters for the report
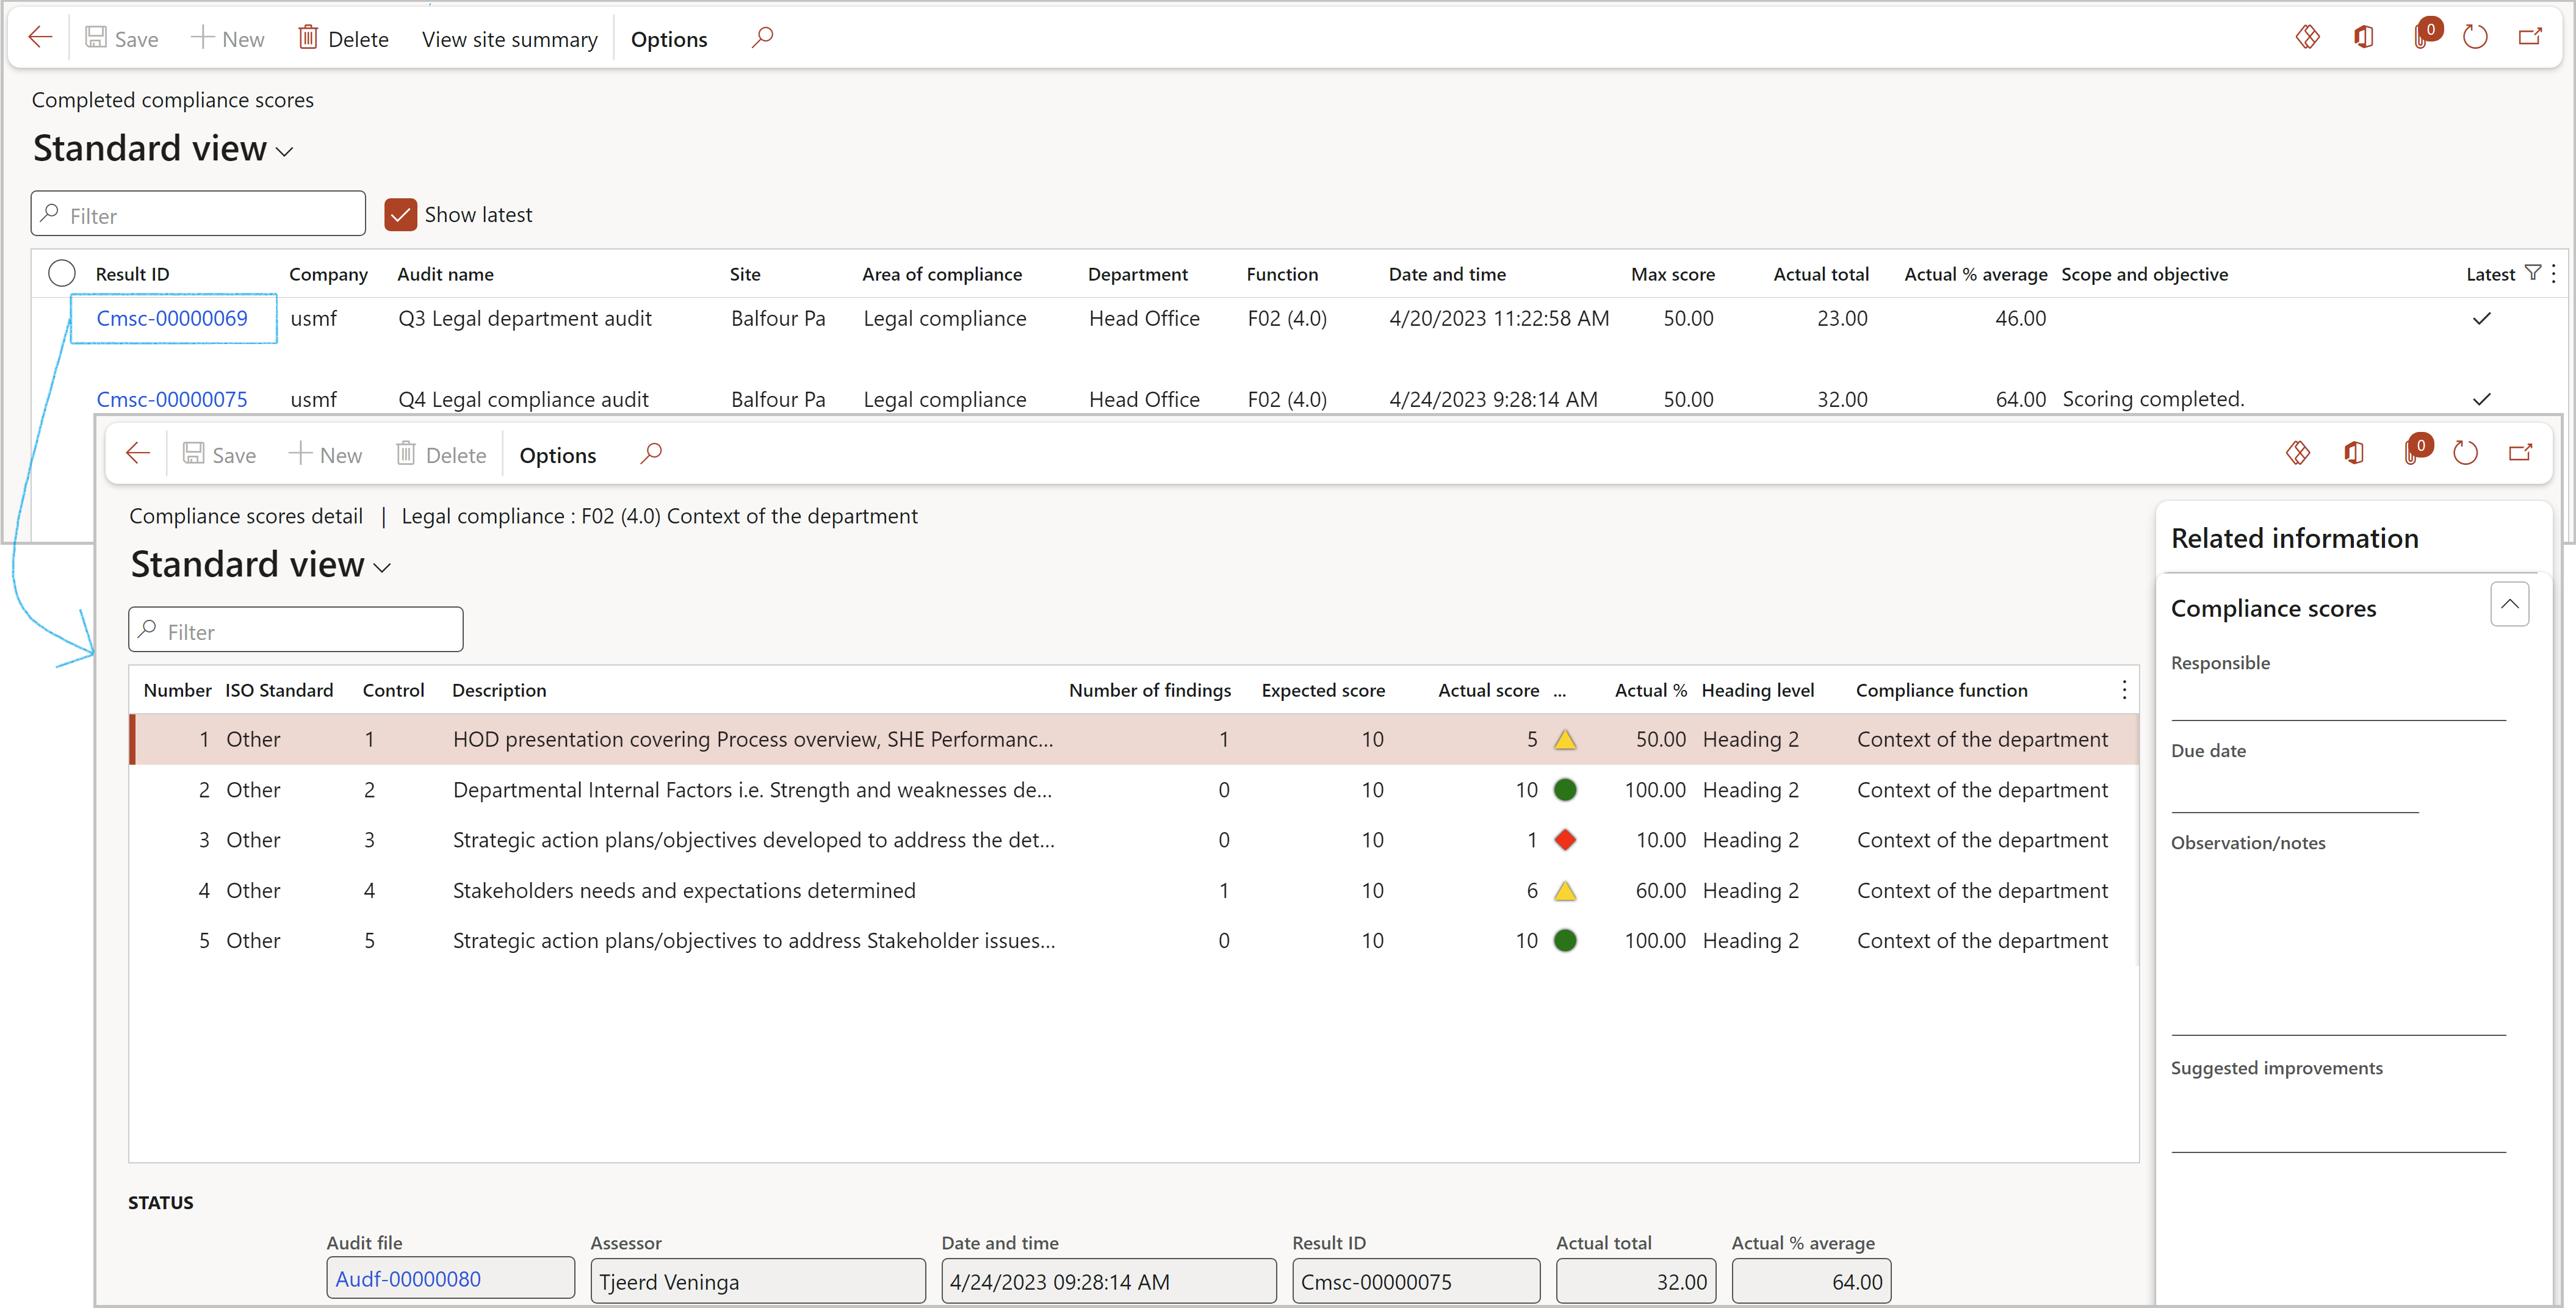
¶ 34. Completed compliance scores
GRC > Compliance > Reports and Inquiries > Completed compliance scores
Click on the Result ID of the record that you want to see the details of
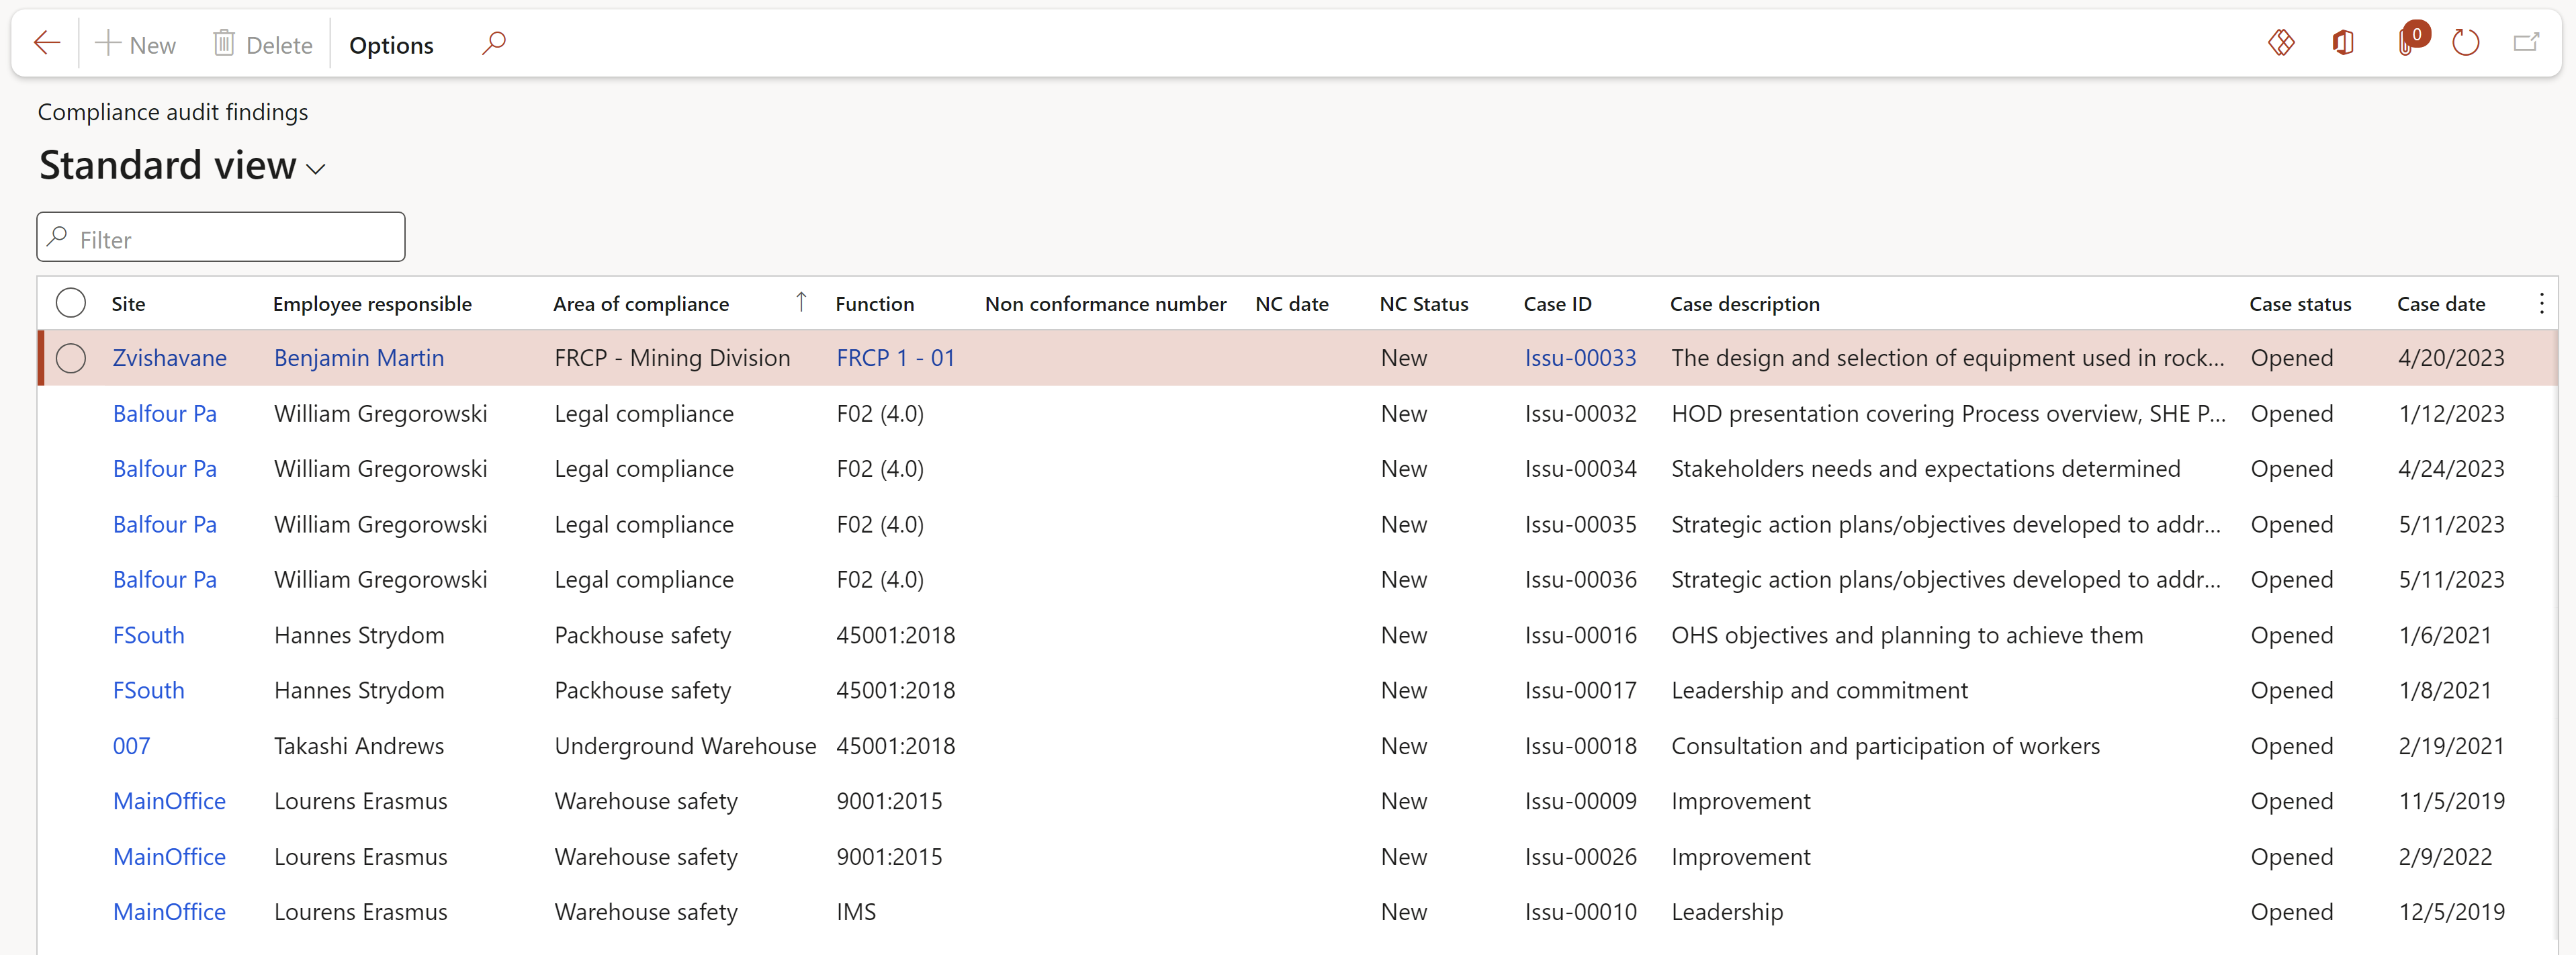
¶ 35. Compliance audit findings
GRC > Compliance > Reports and Inquiries > Compliance audit findings
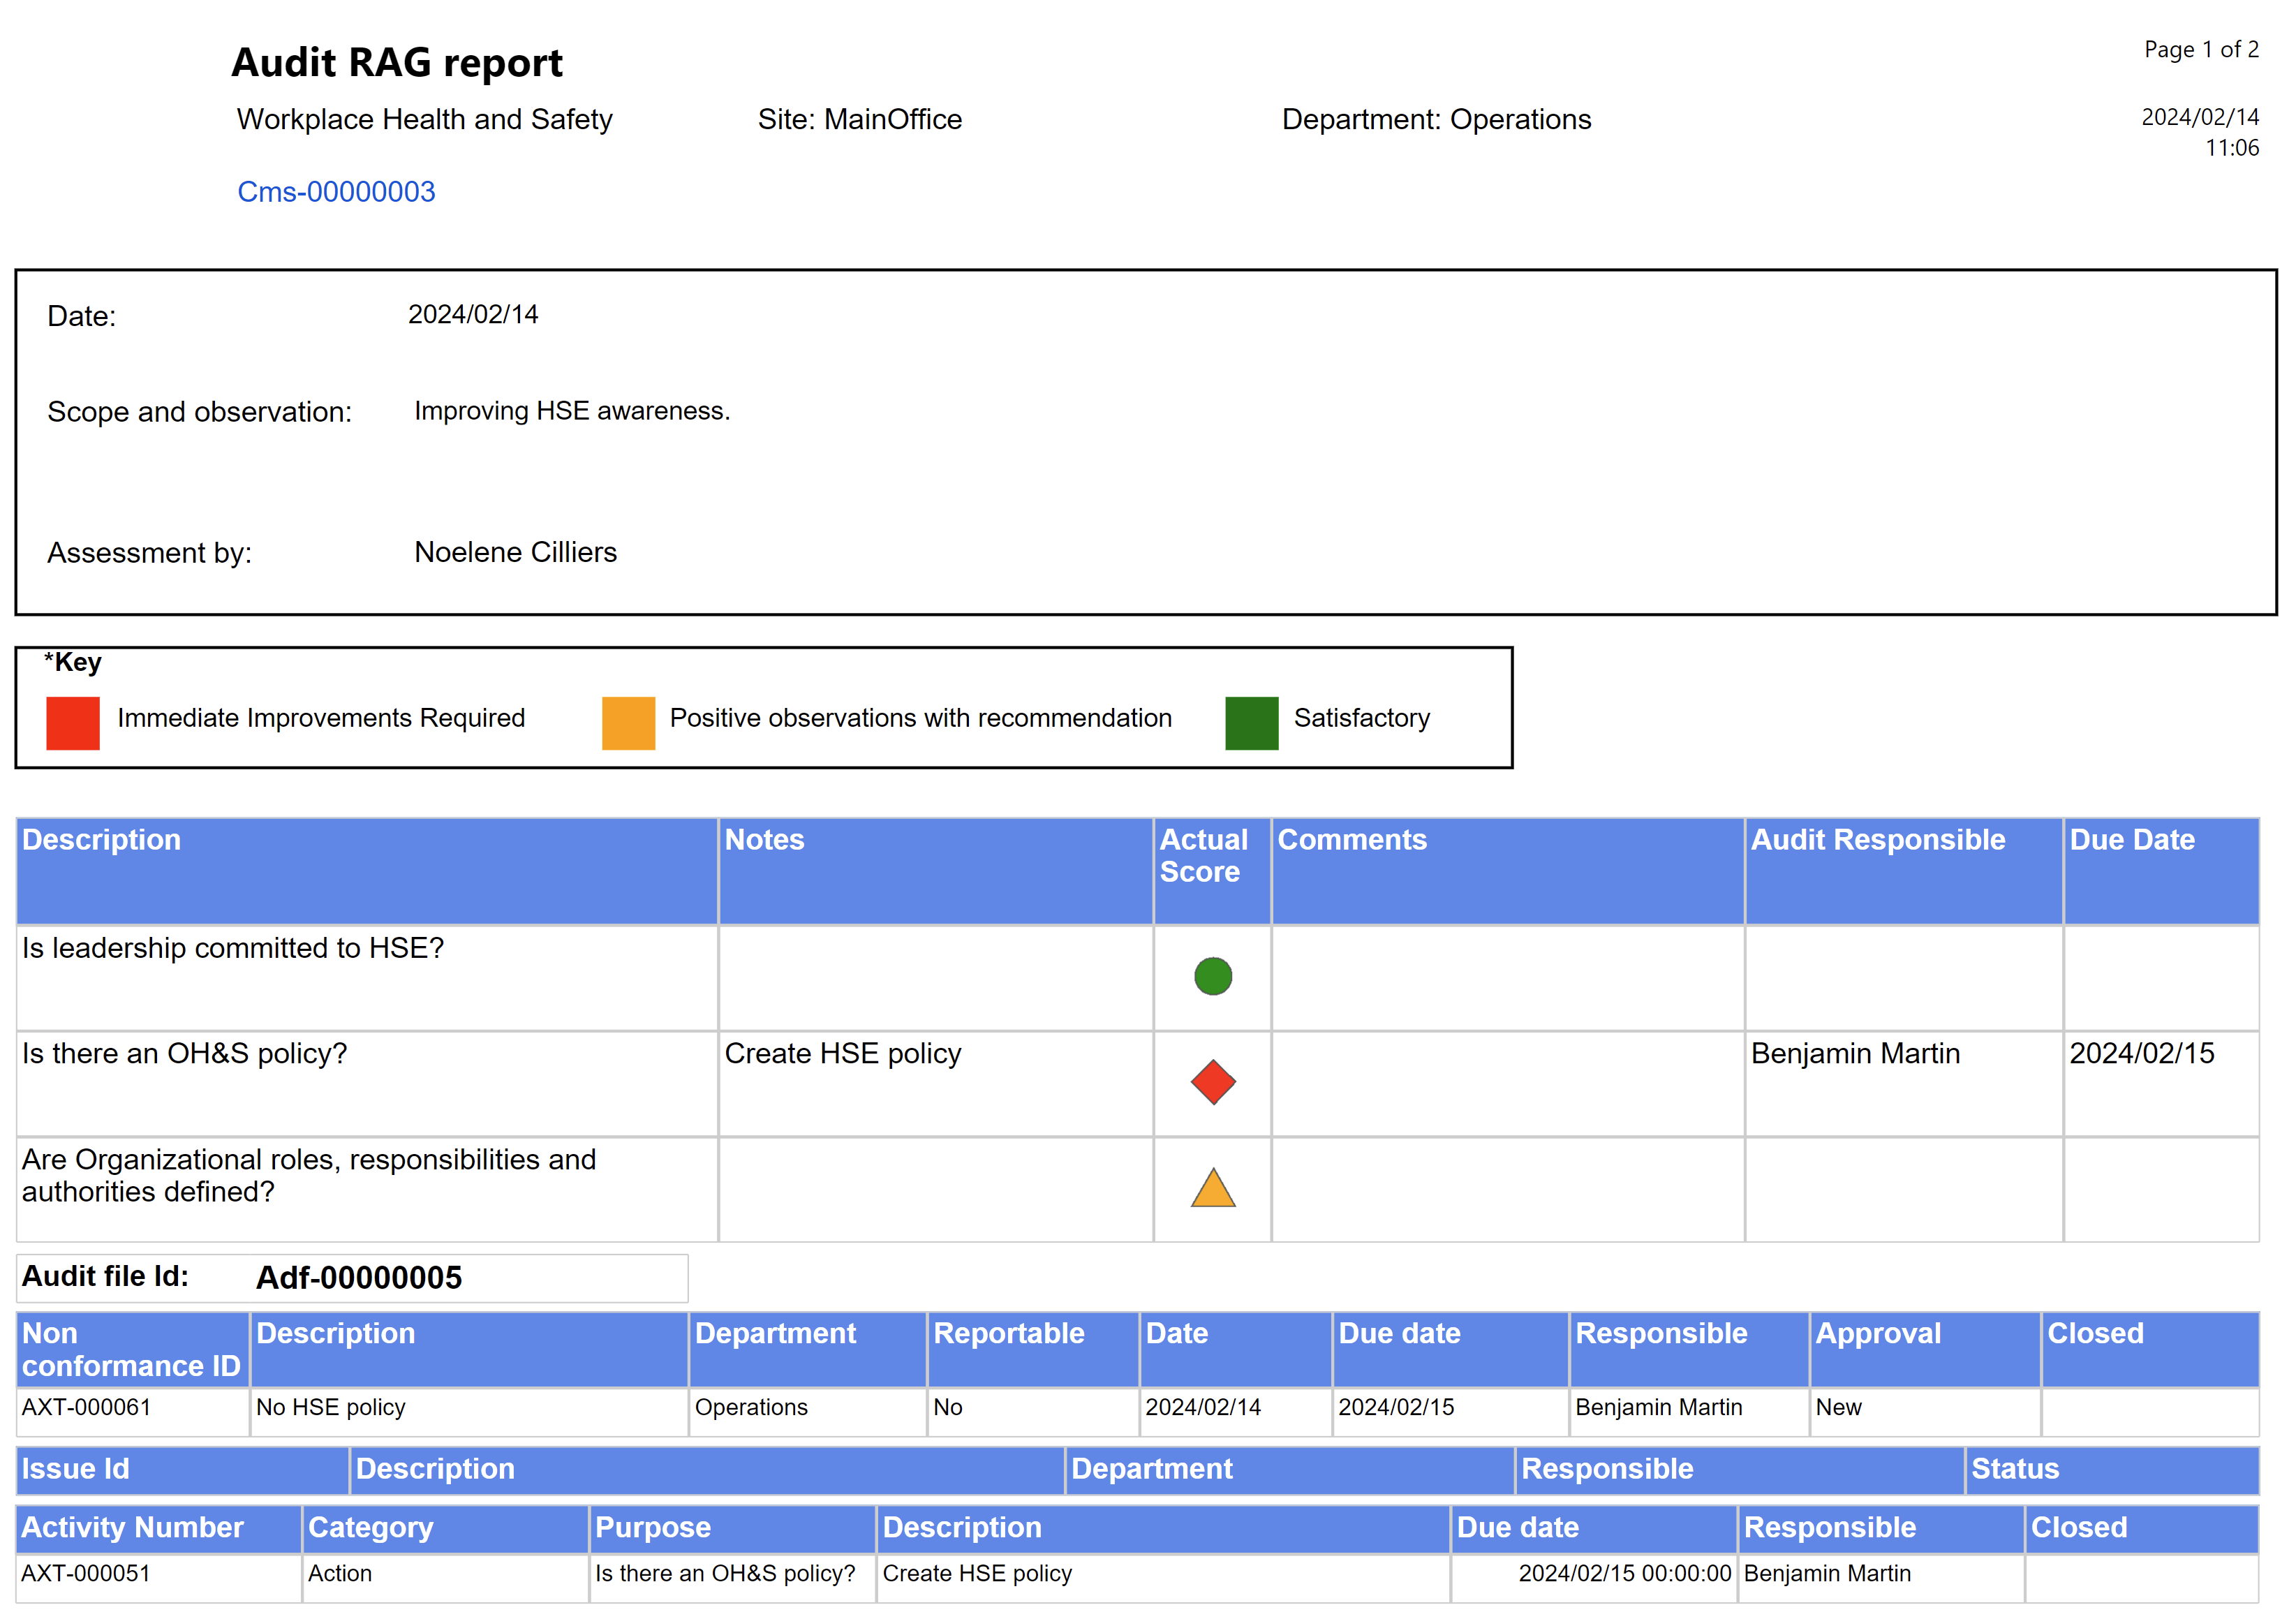
¶ 36. Audit RAG report
GRC > Compliance > Reports and inquiries > Audit RAG report
Select the parameters and then click OK
¶ 37. Audit findings per ISO standard report
GRC > Compliance > Reports and Inquiries > Audit findings per ISO standard report
Select the parameters and then click OK
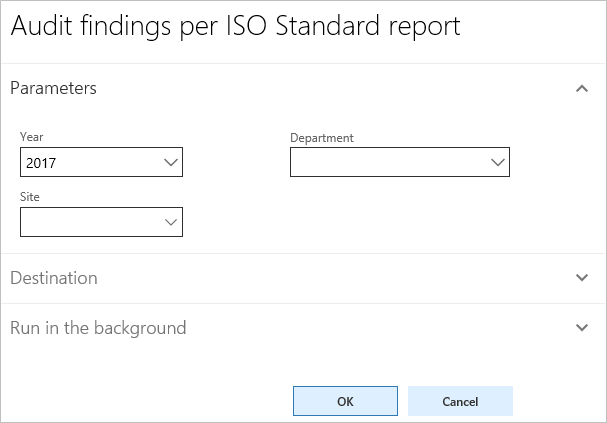

The Audit findings report is an important tool in demonstrating that organizations are satisfying the requirements of the relevant ISO Standards.
¶ 38. Audit findings per ISO standard graph
GRC > Compliance > Reports and Inquiries > Audit findings per ISO standard graph
Select the parameters and then click OK
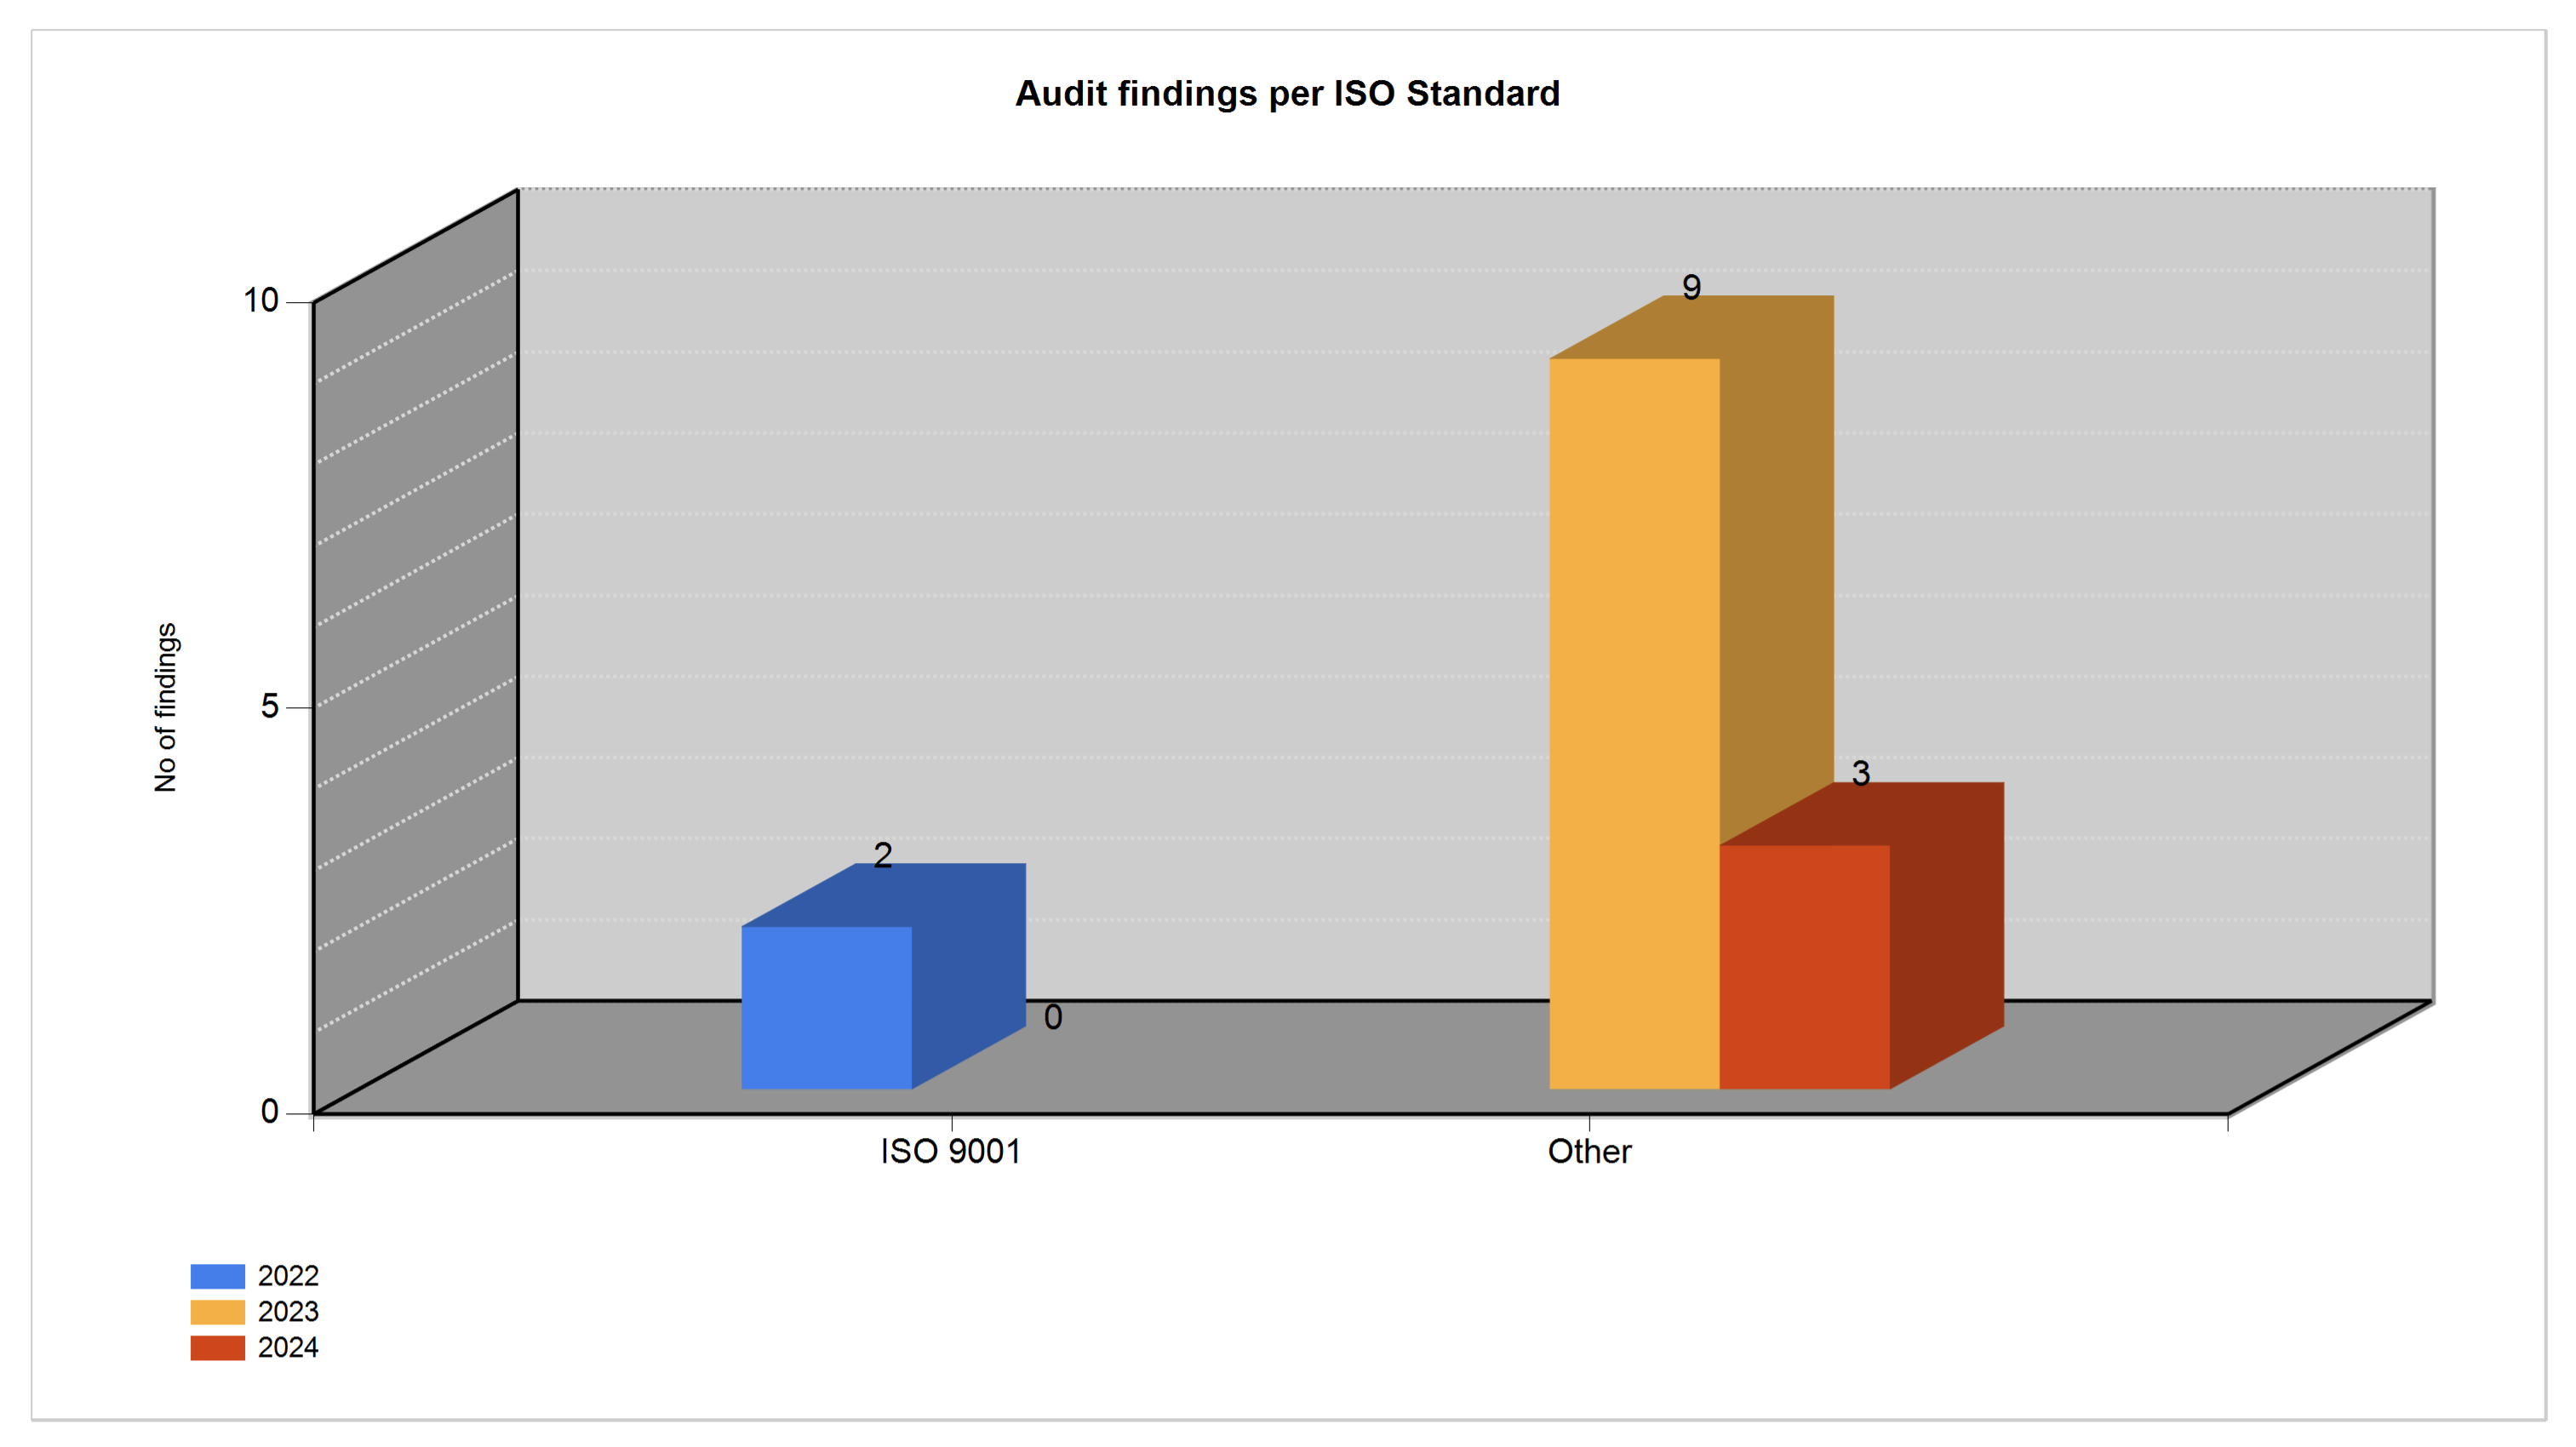
This graph gives a summary of the audit findings per ISO standard for the years selected on the parameters form.
¶ 39. ISO audit report
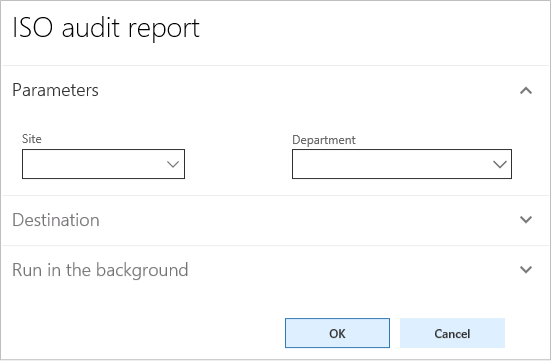
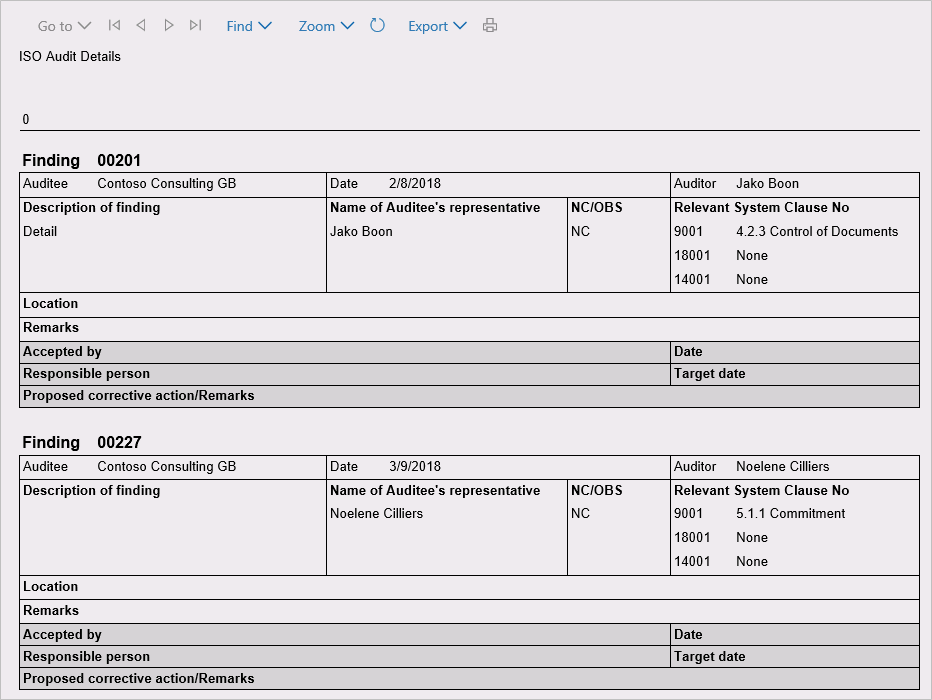
GRC > Compliance > Reports and Inquiries > ISO audit report
Select the parameters and then click OK
¶ 40. Audit non conformance
GRC > Compliance > Reports and inquiries > Audit non conformance report
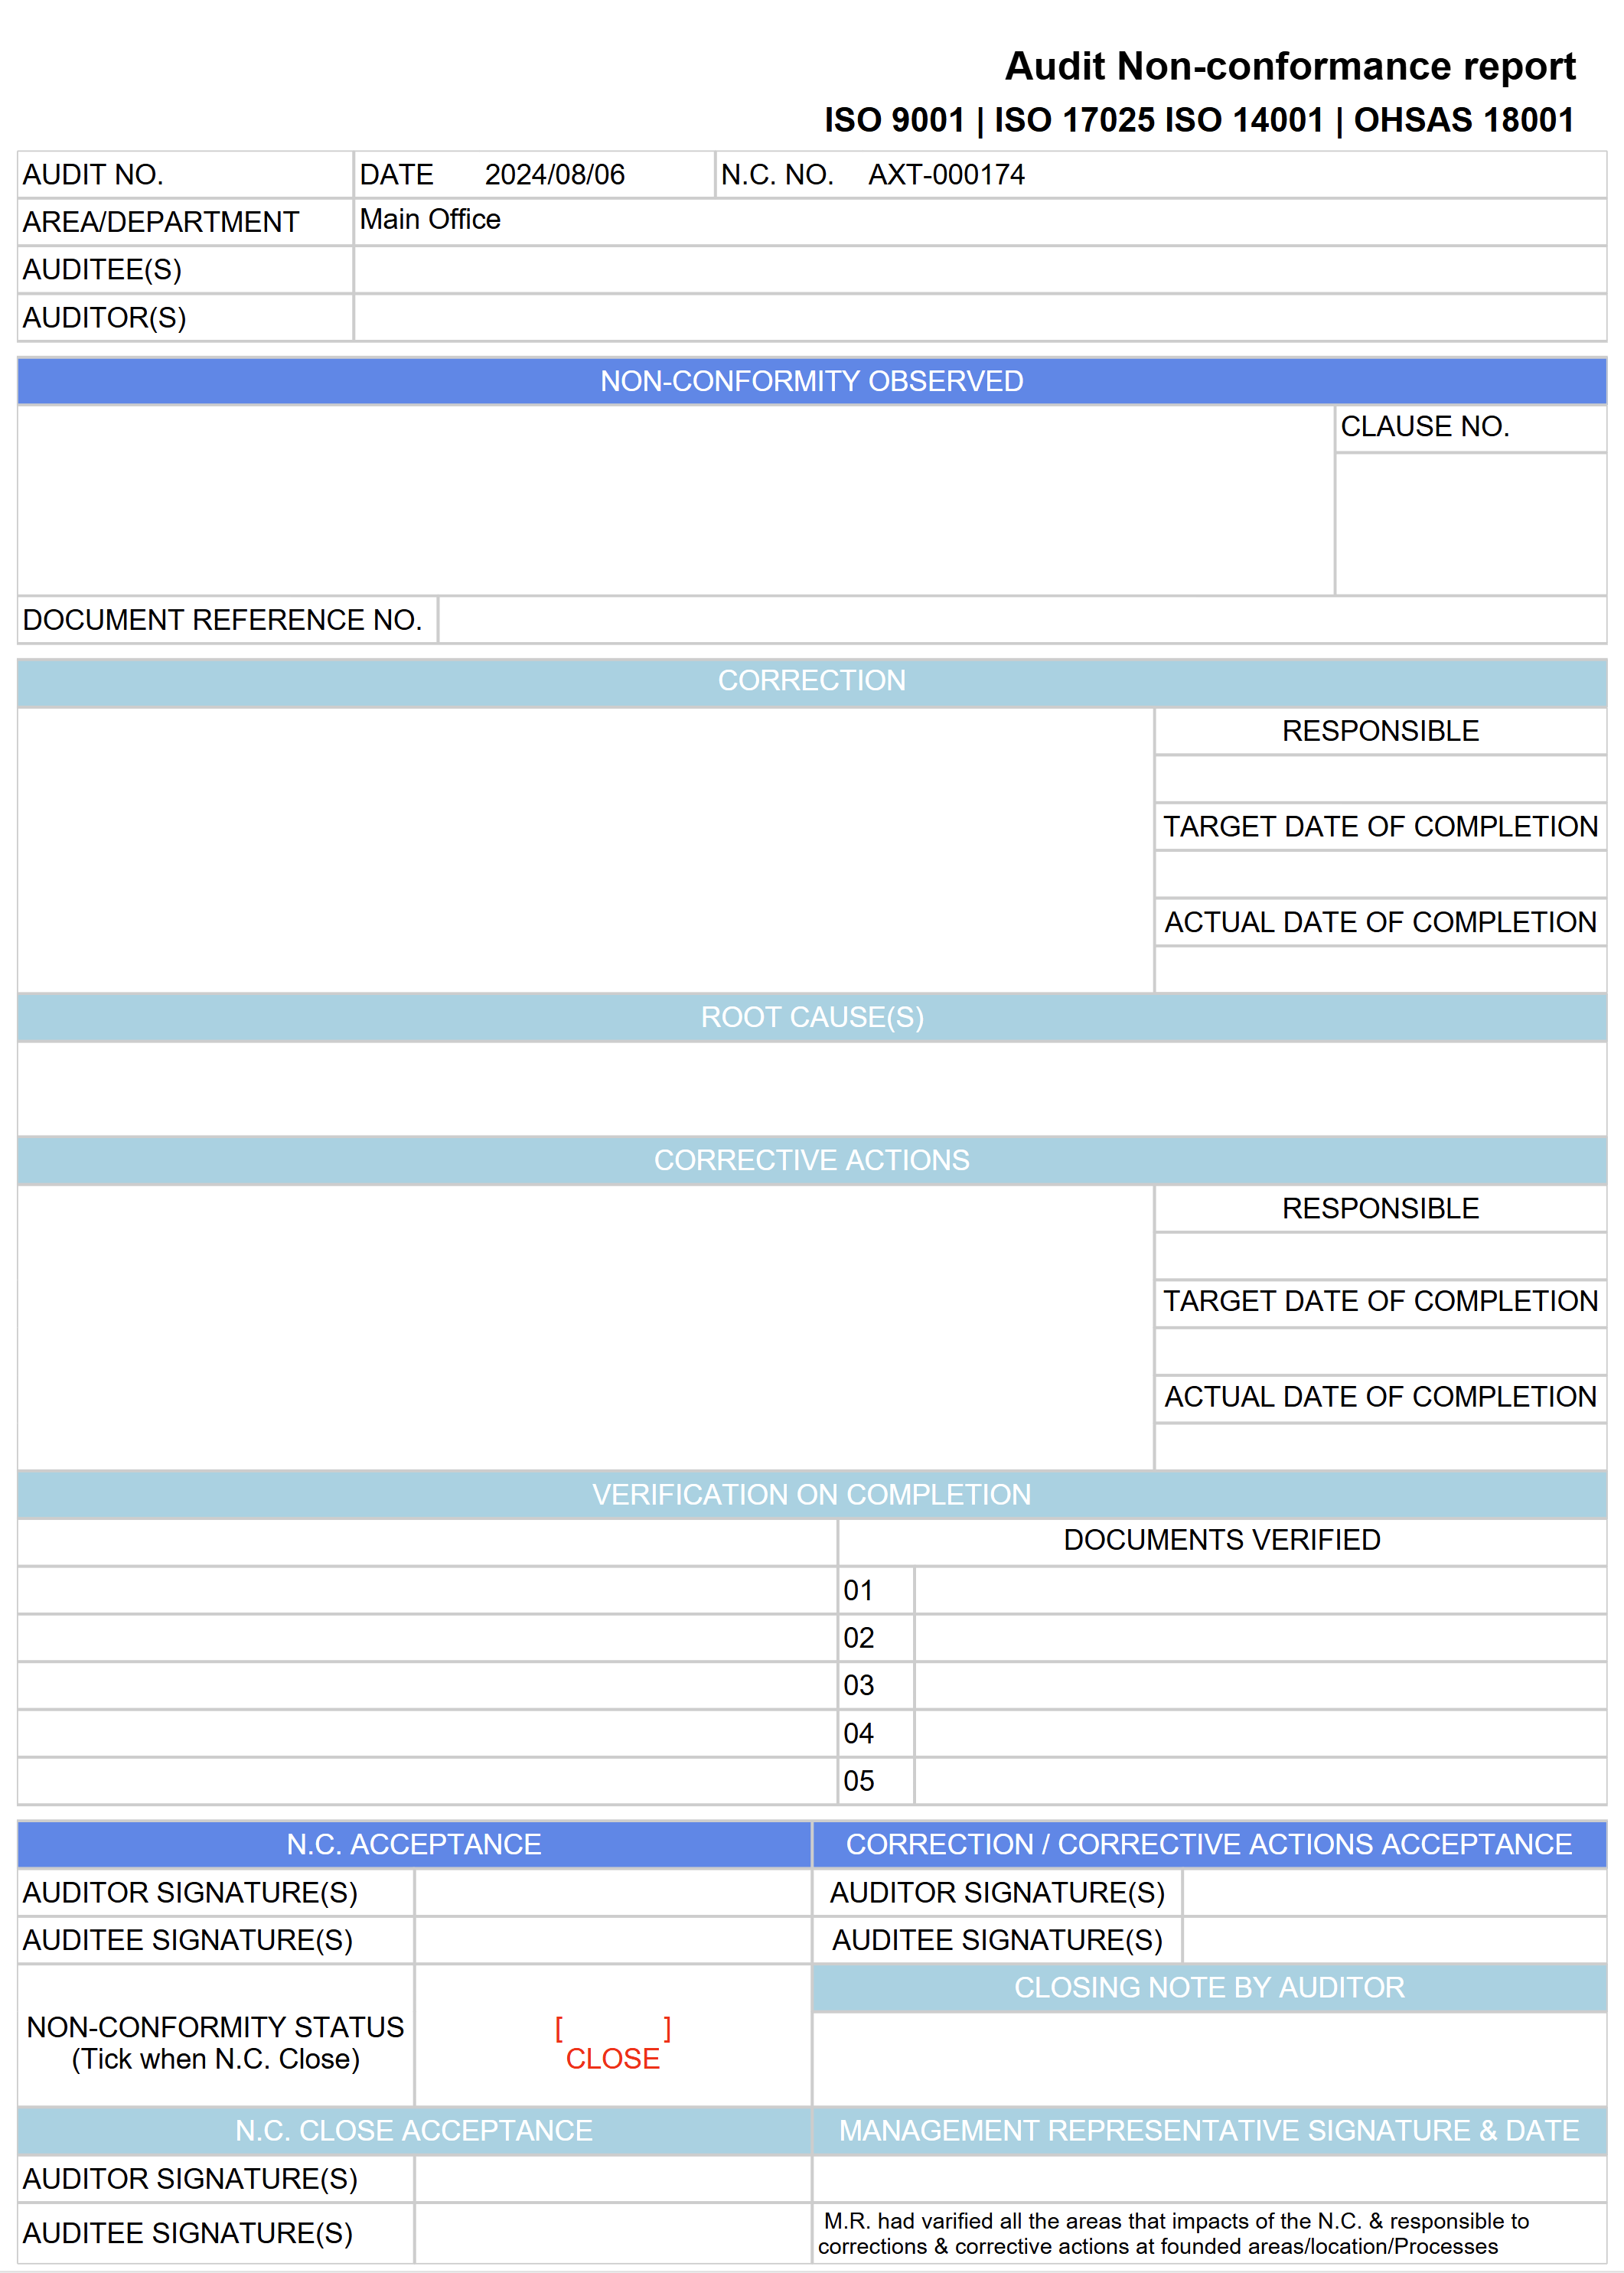
Select the parameters and then click OK
A non-conformance means that something went wrong – a problem has occurred and needs to be addressed. Non-conformances are addressed with corrective actions. The Audit non-conformance report gives a summary of the selected non-conformance which can be printed and signed by the parties involved.
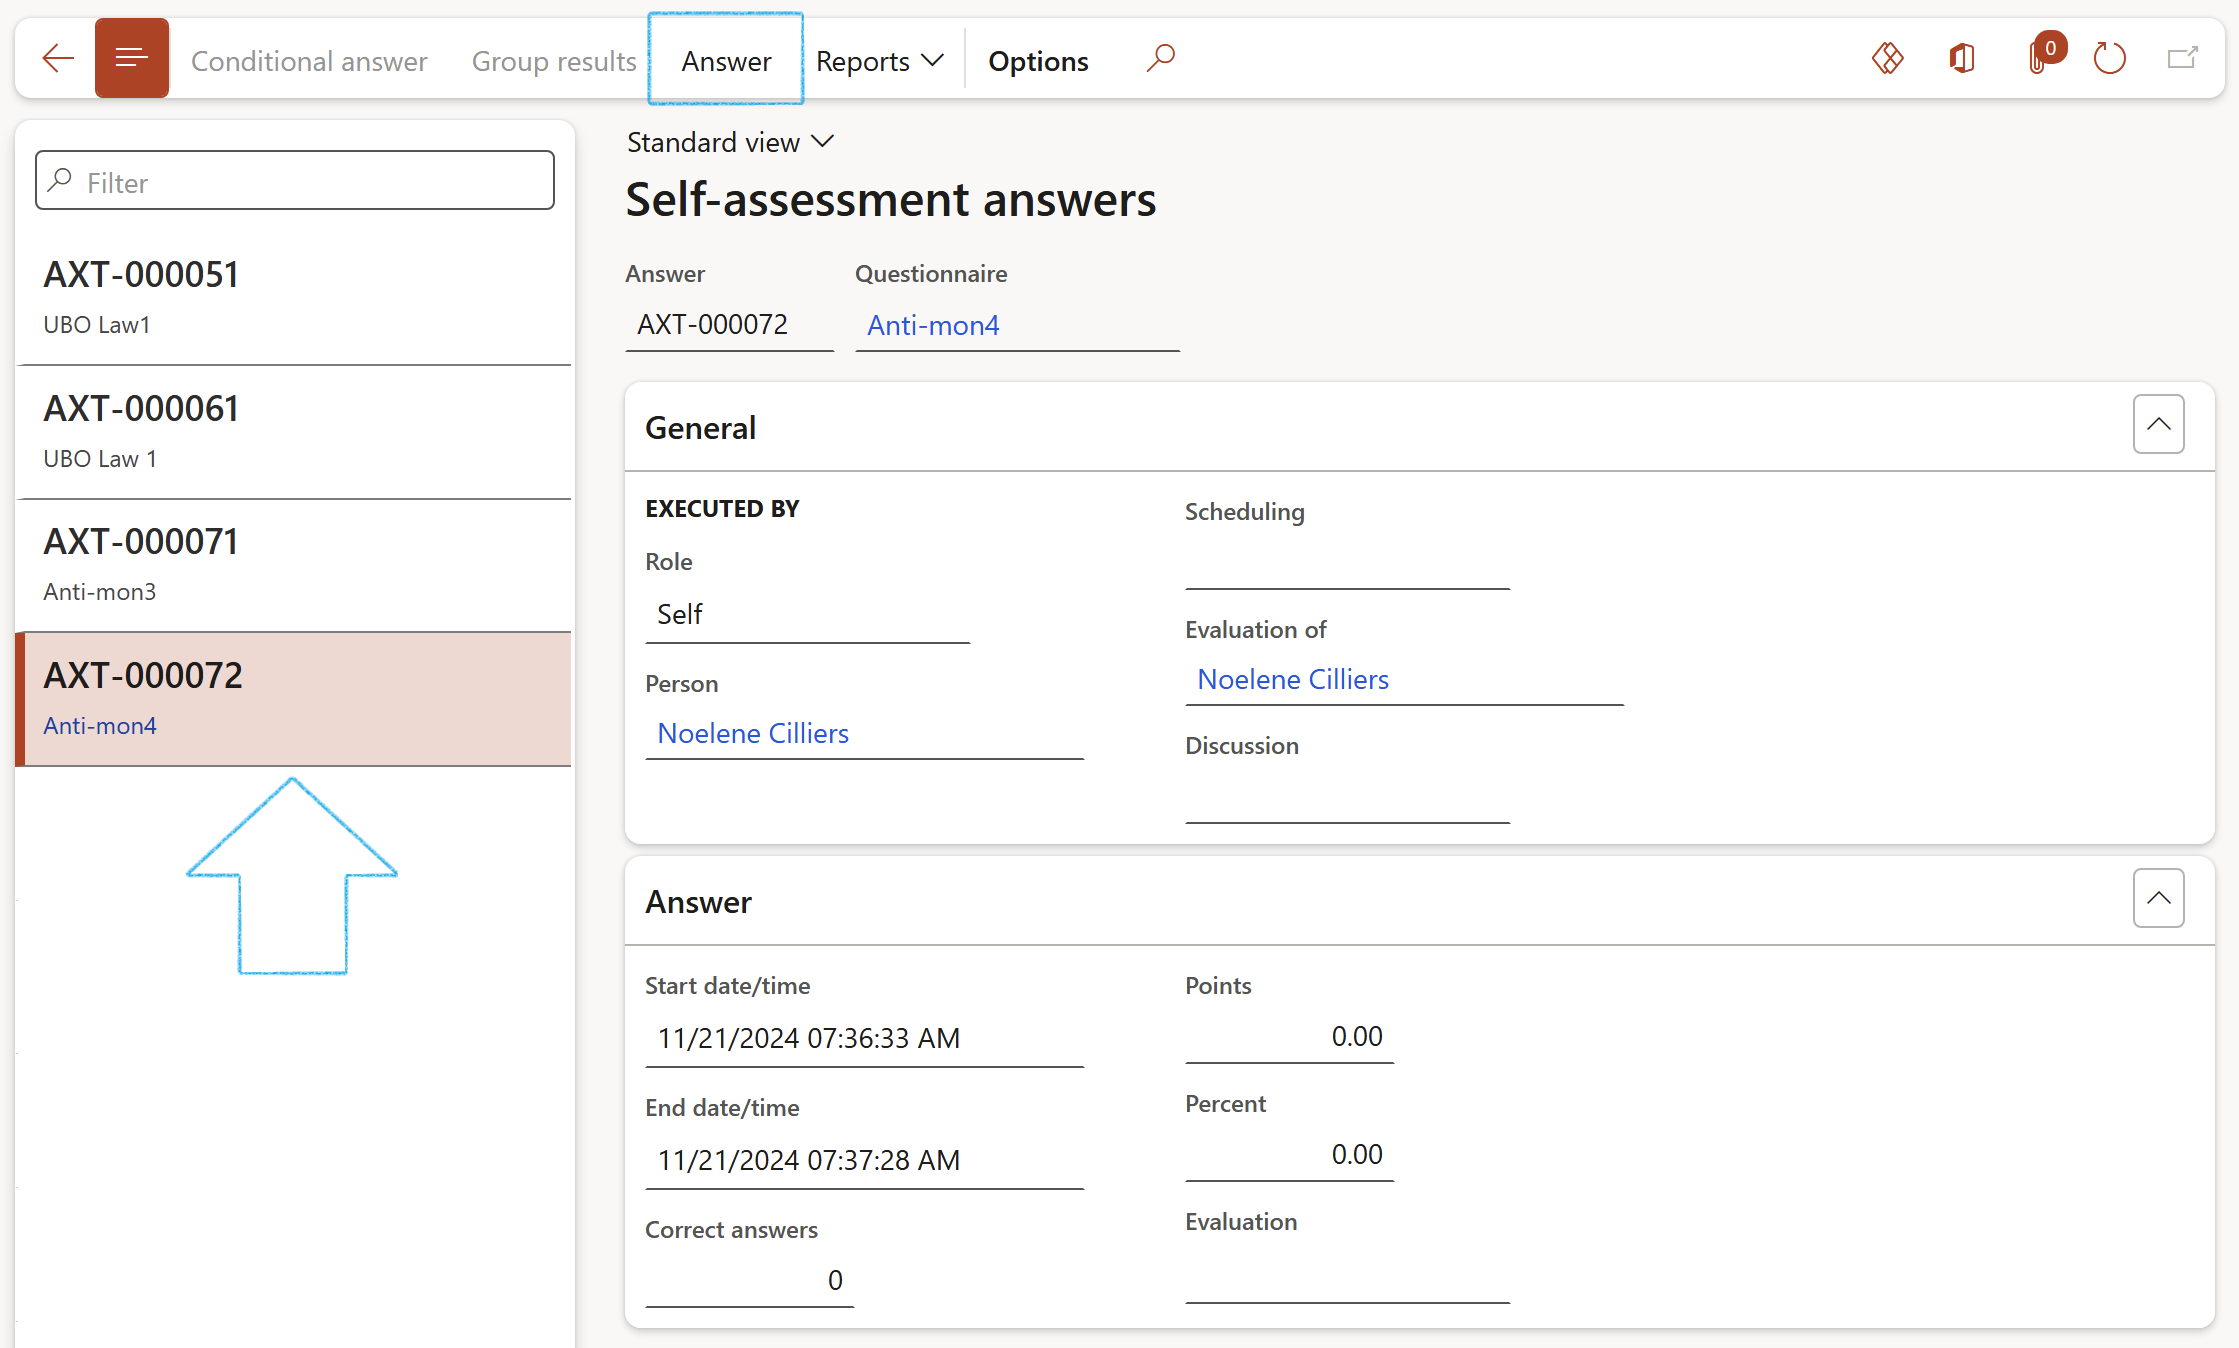
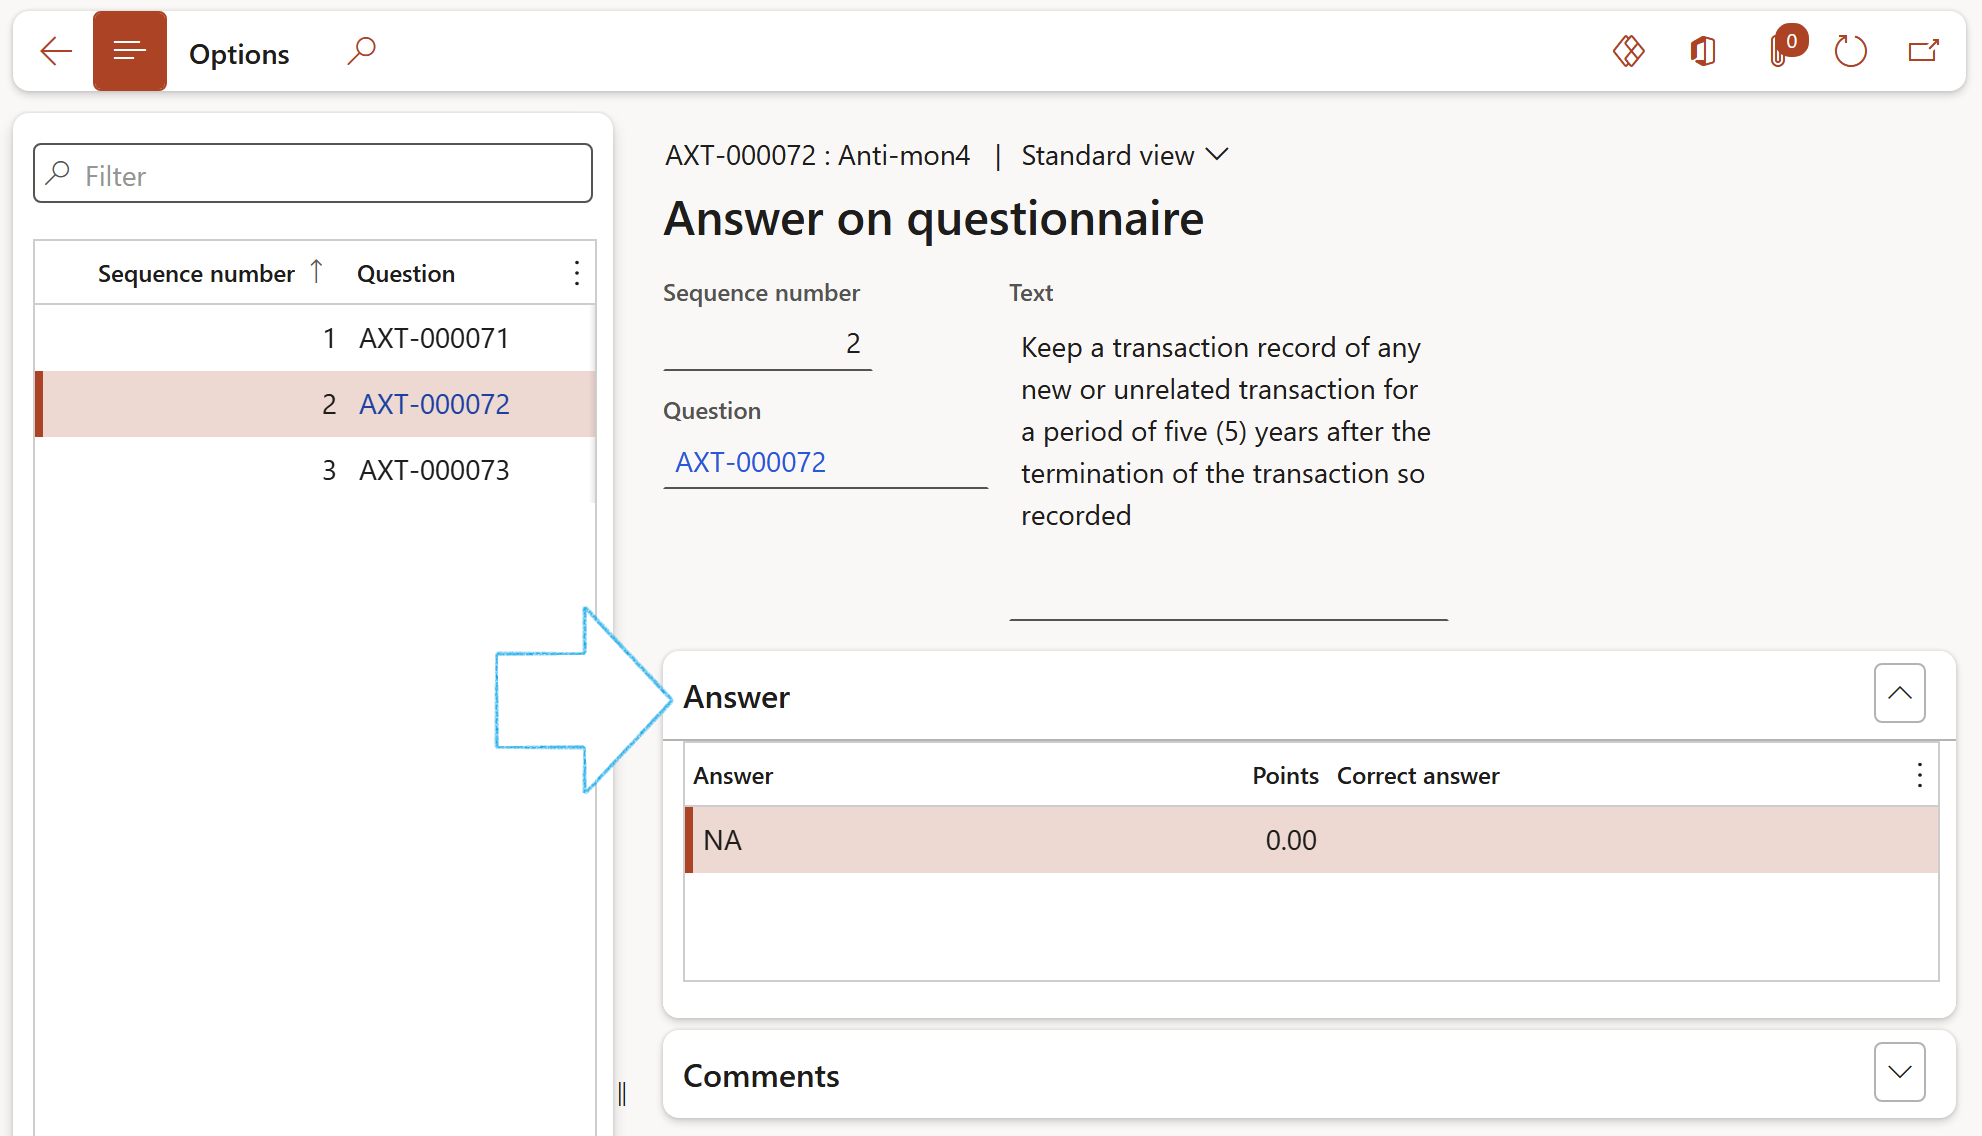
¶ 41. Self-assessment answers
GRC > Compliance > Reports and inquiries > Self-assessment answers
Select the record that you want to view the answers for on the left-hand side, and click on the Answer button in the Action pane
¶ Business continuity Reports & Inquiries
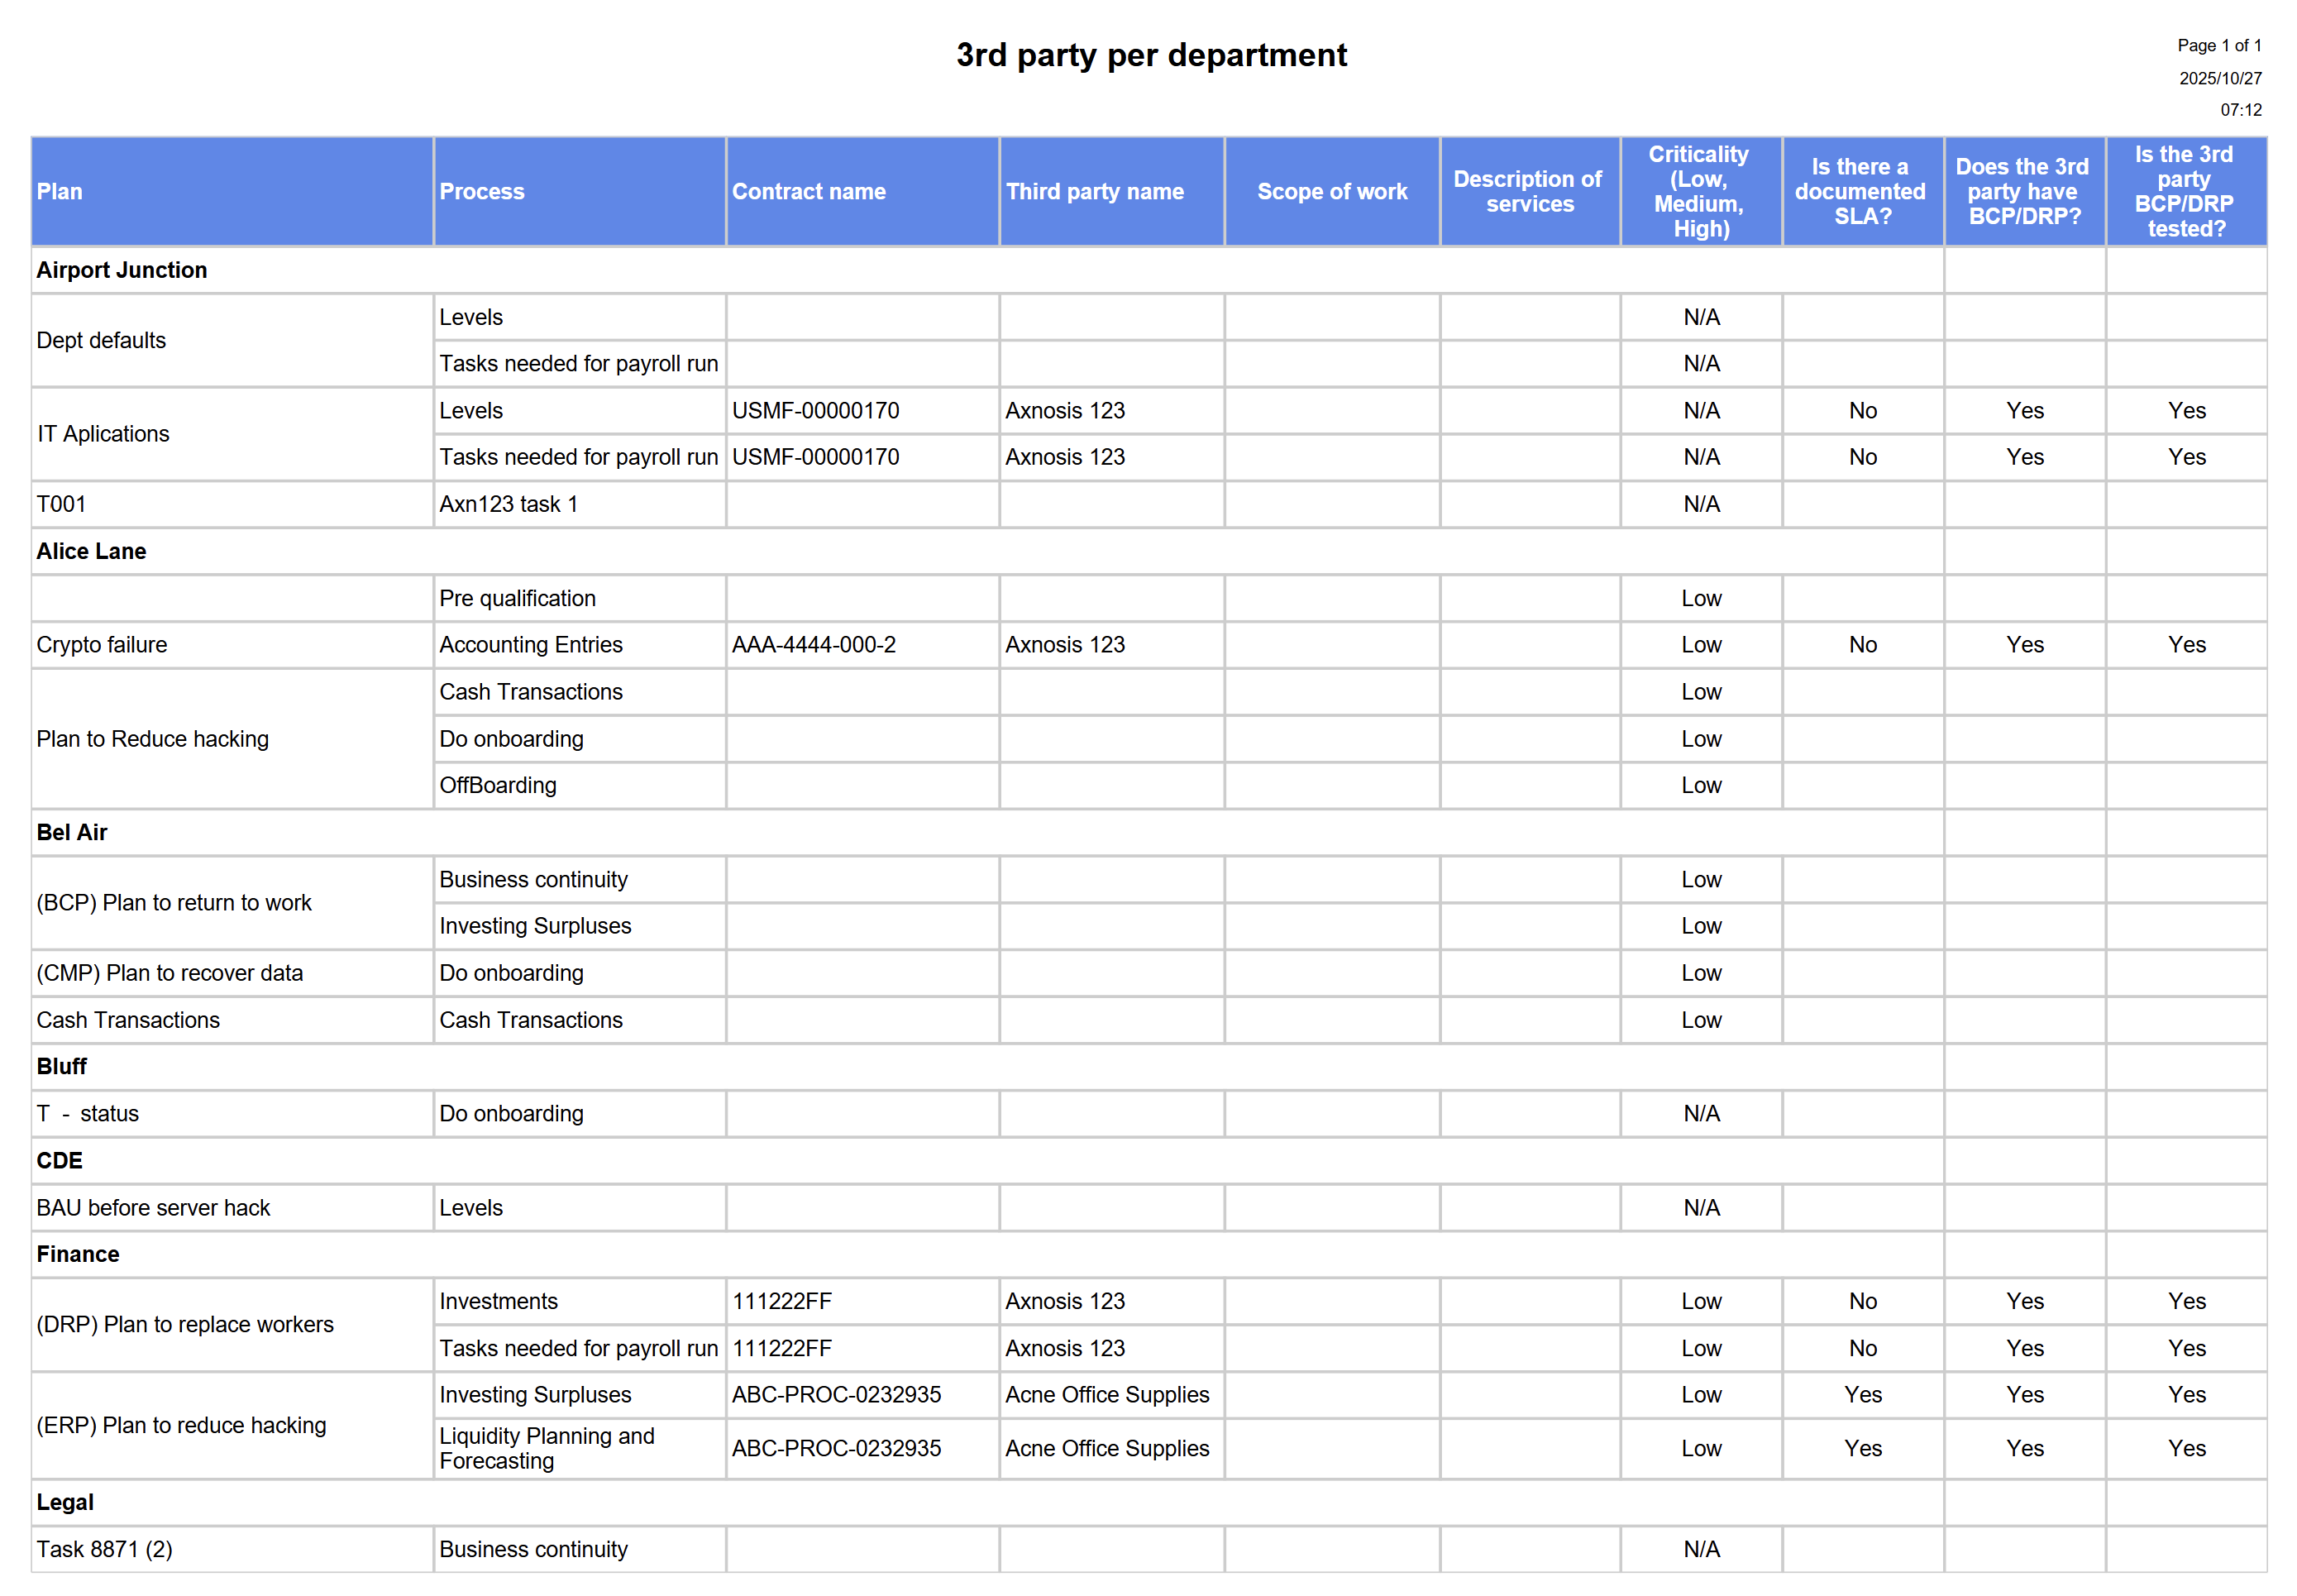
¶ 42. 3rd party per department report
GRC > Business continuity > Reports and Inquiries > 3rd party per department report
- Enter the relevant parameters for printing the report
- Click on OK
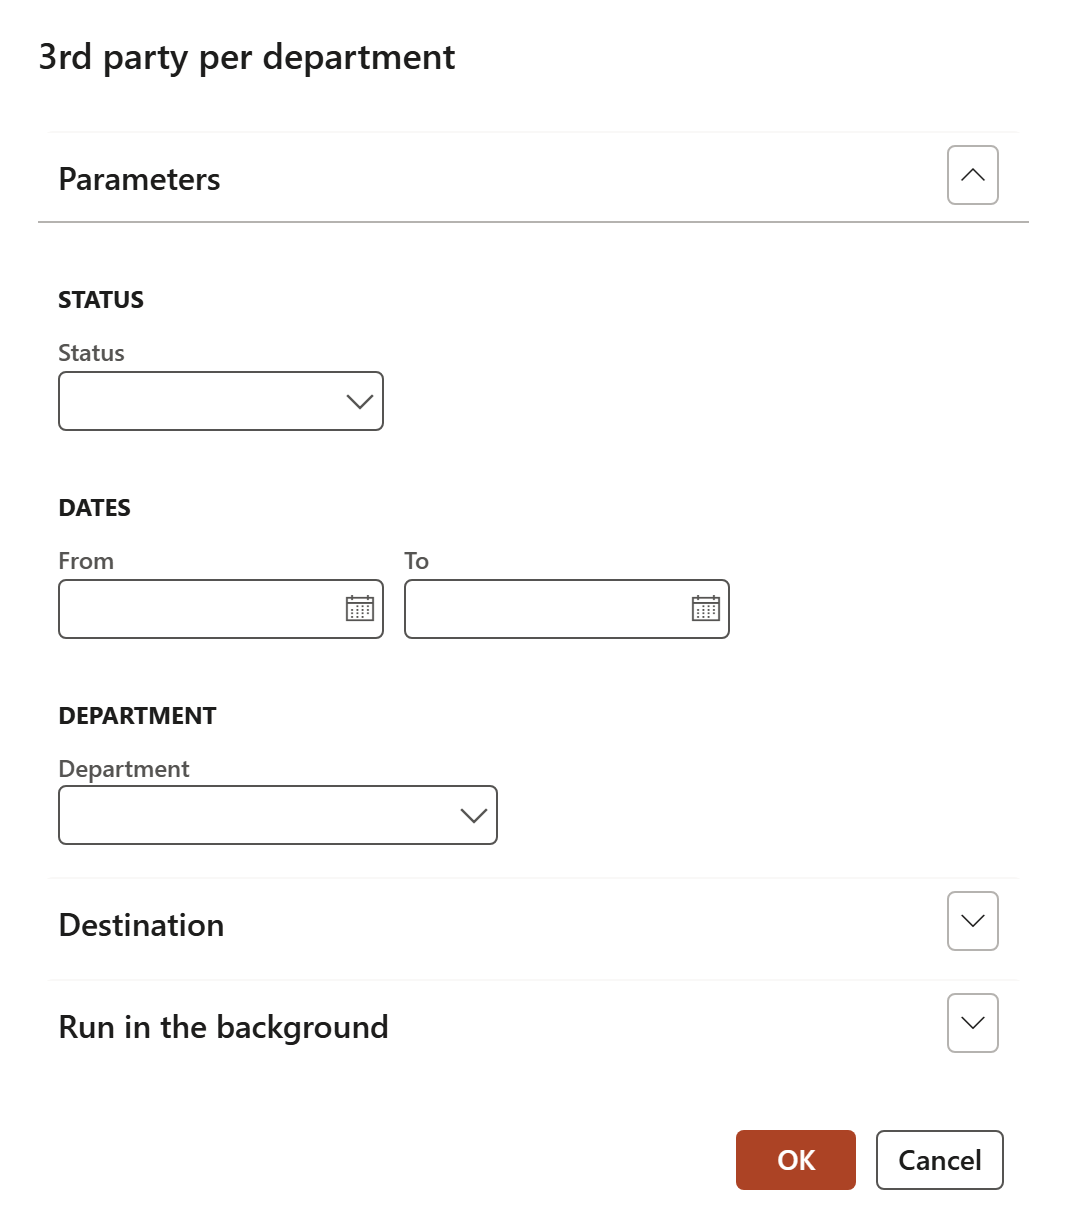
If all the parameters are left empty, all the details of all the departments will be printed
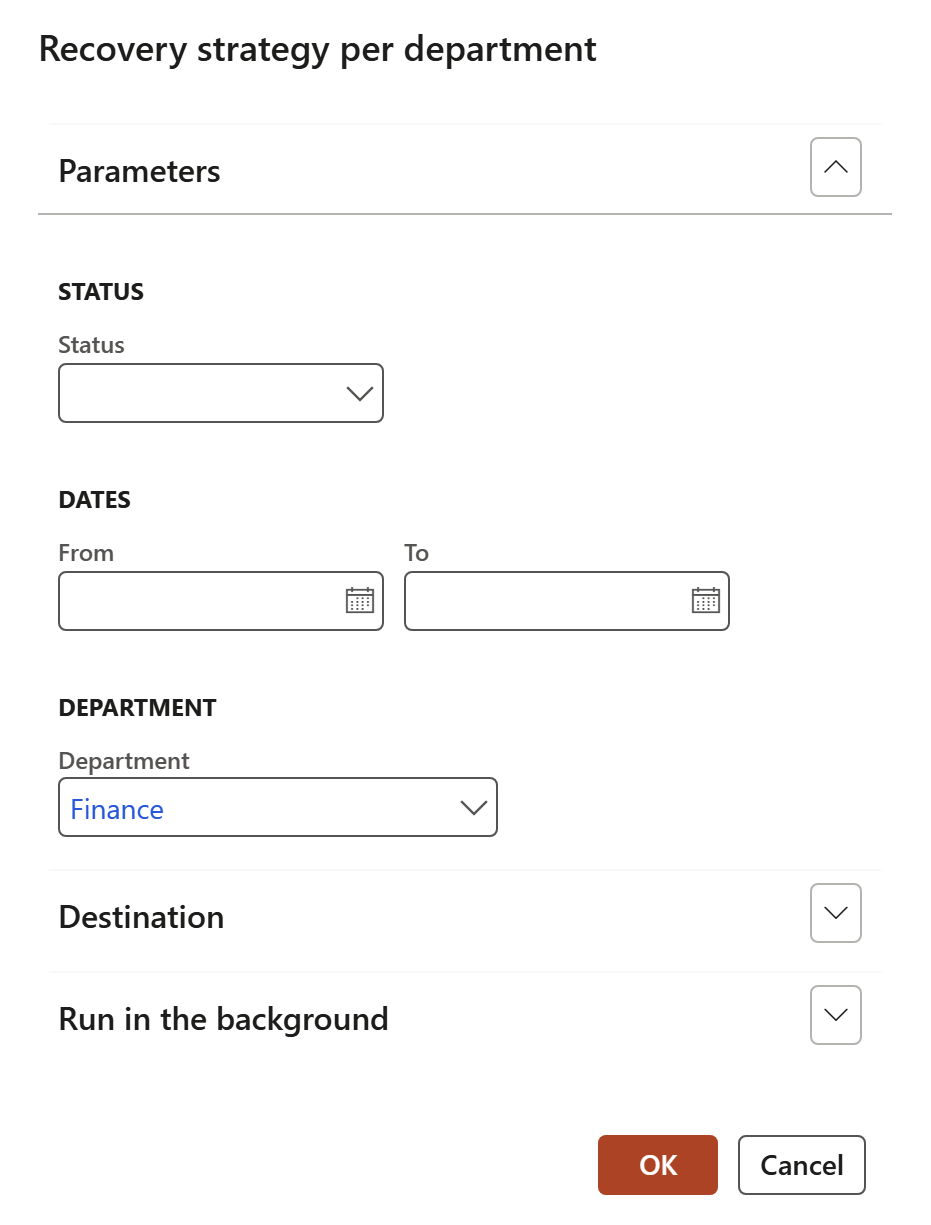
¶ 43. Recovery strategy per department report
GRC > Business continuity > Reports and Inquiries > Recovery strategy per department report
- Enter the following on the Recovery strategy per department dialog:
- Select the Status of the records that you want to print the report for, from the dropdown list
- From and To dates
- Select the relevant Department from the dropdown list
- Click on OK

¶ 44. Impact assessment: downtime report
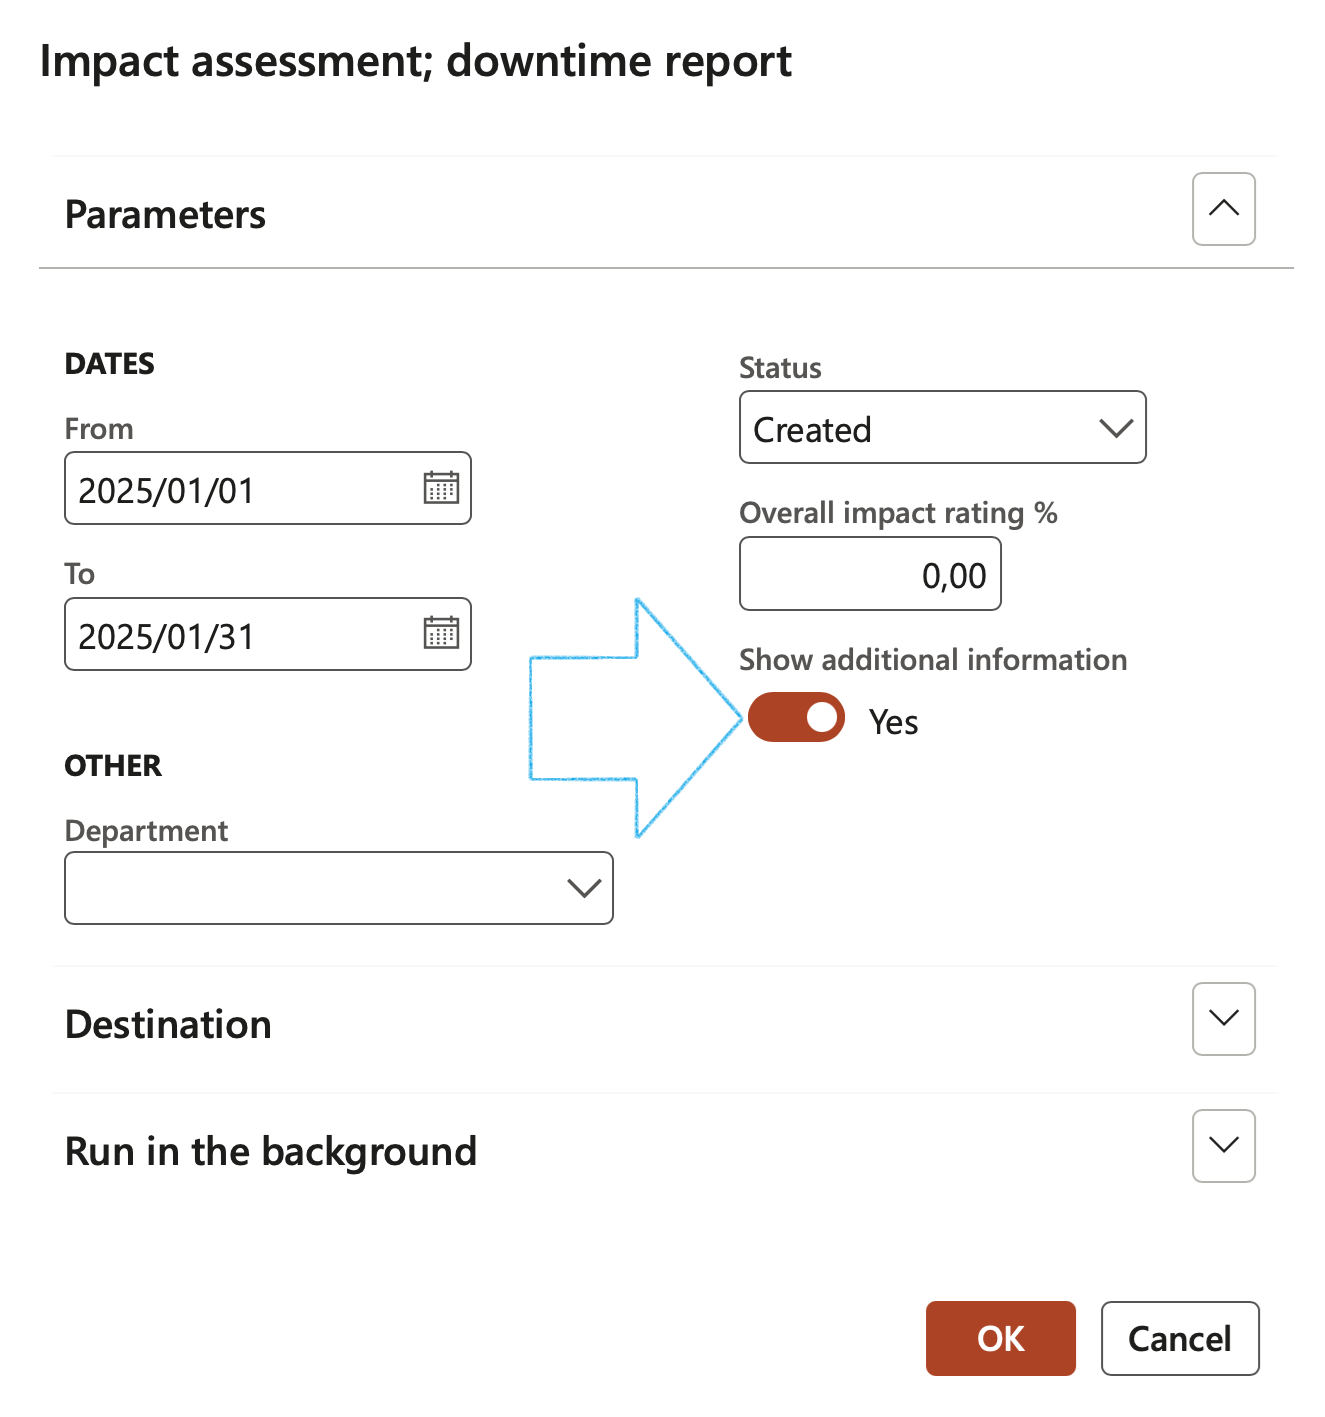
GRC > Business continuity > Reports and Inquiries > Impact assessment: downtime report
- Enter the relevant parameters for printing the report
- Move the Show additional information slider to Yes if you want the report to print the following columns:
- Total workers required
- Minimum workers
- Type
- Click on OK

¶ 45. Software applications per department report
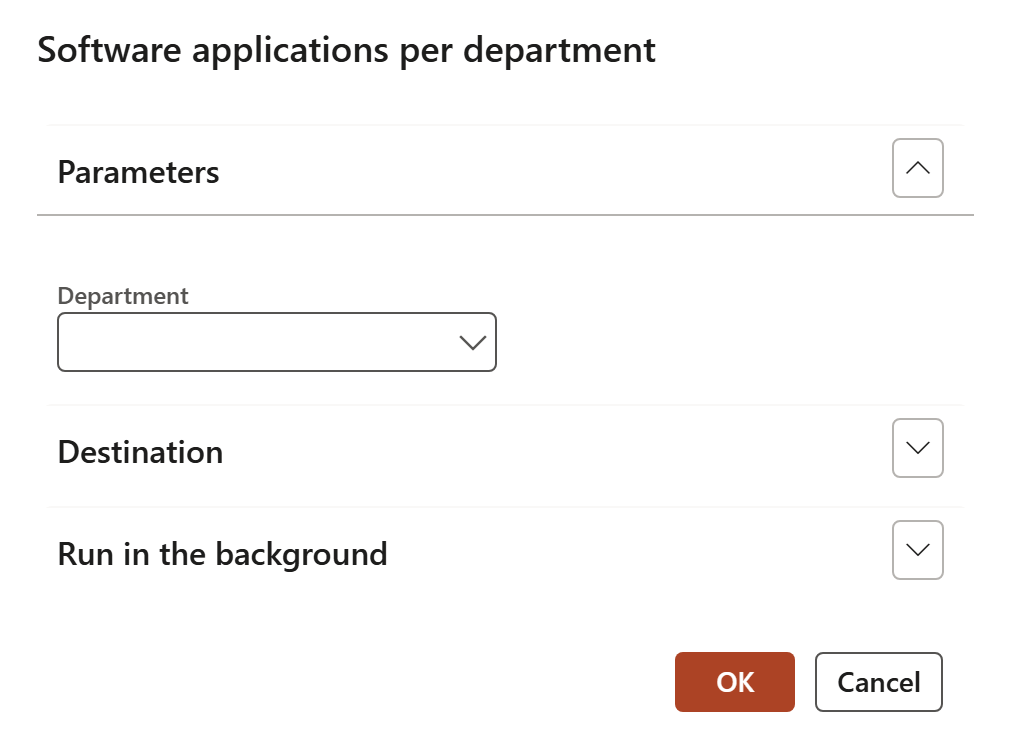
GRC > Business continuity > Reports and Inquiries > Software applications per department
- Select the relevant department for printing the report

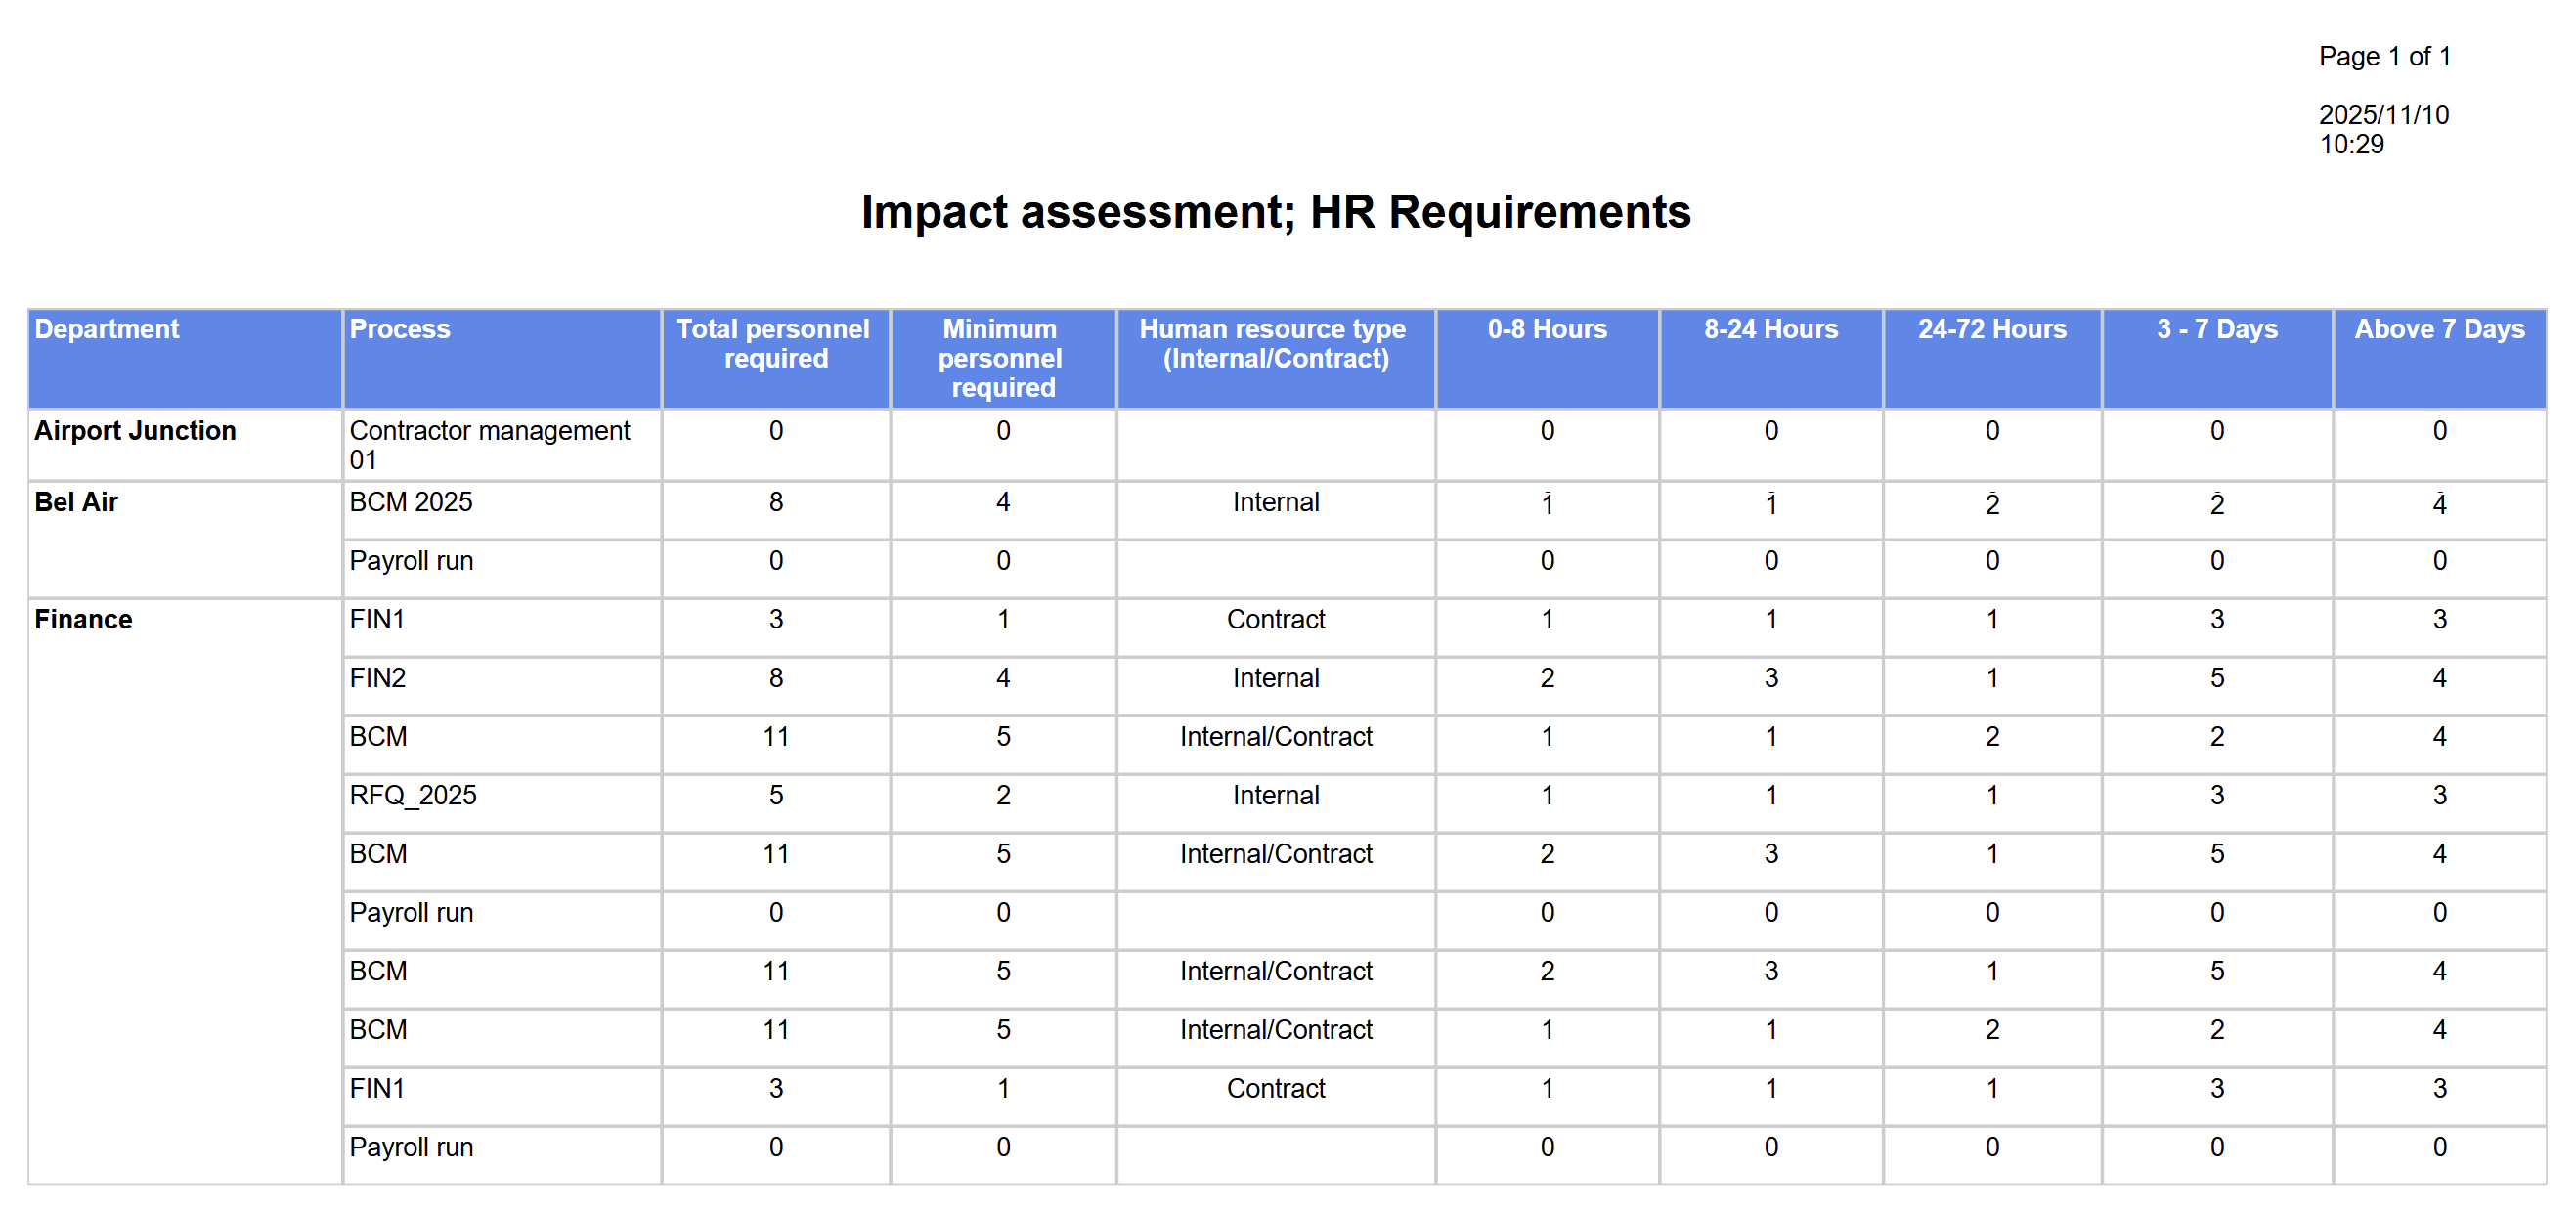
¶ 46. Impact assessment: HR requirements report
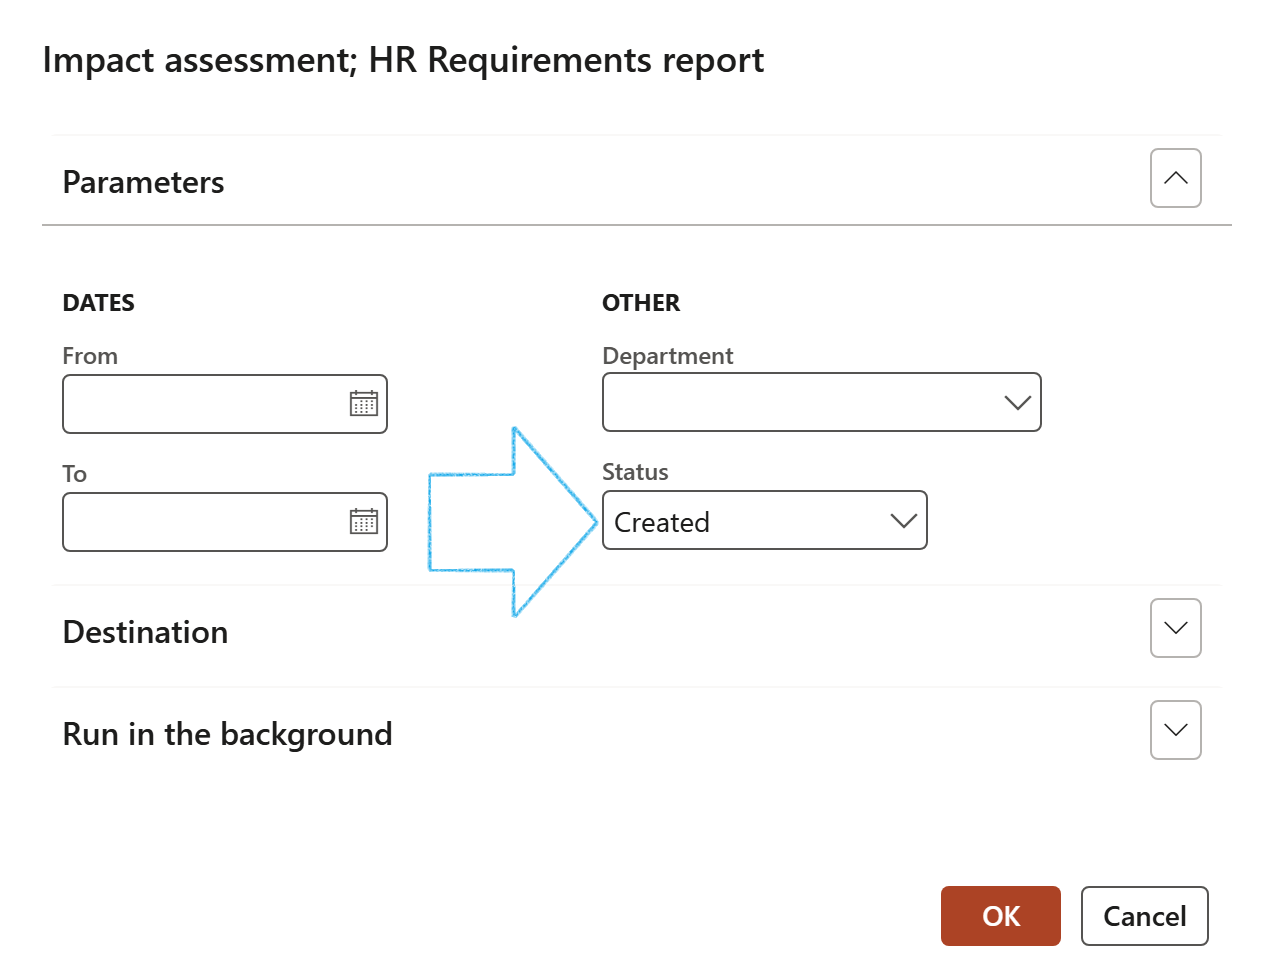
GRC > Business continuity > Reports and Inquiries > Impact assessment: HR requirements report
- Select the parameters for printing the report
- Select the Status of the impact assessments for HR requirements that you want to print the report for
- Click on the OK button
¶ Business exellence and strategy Reports & Inquiries
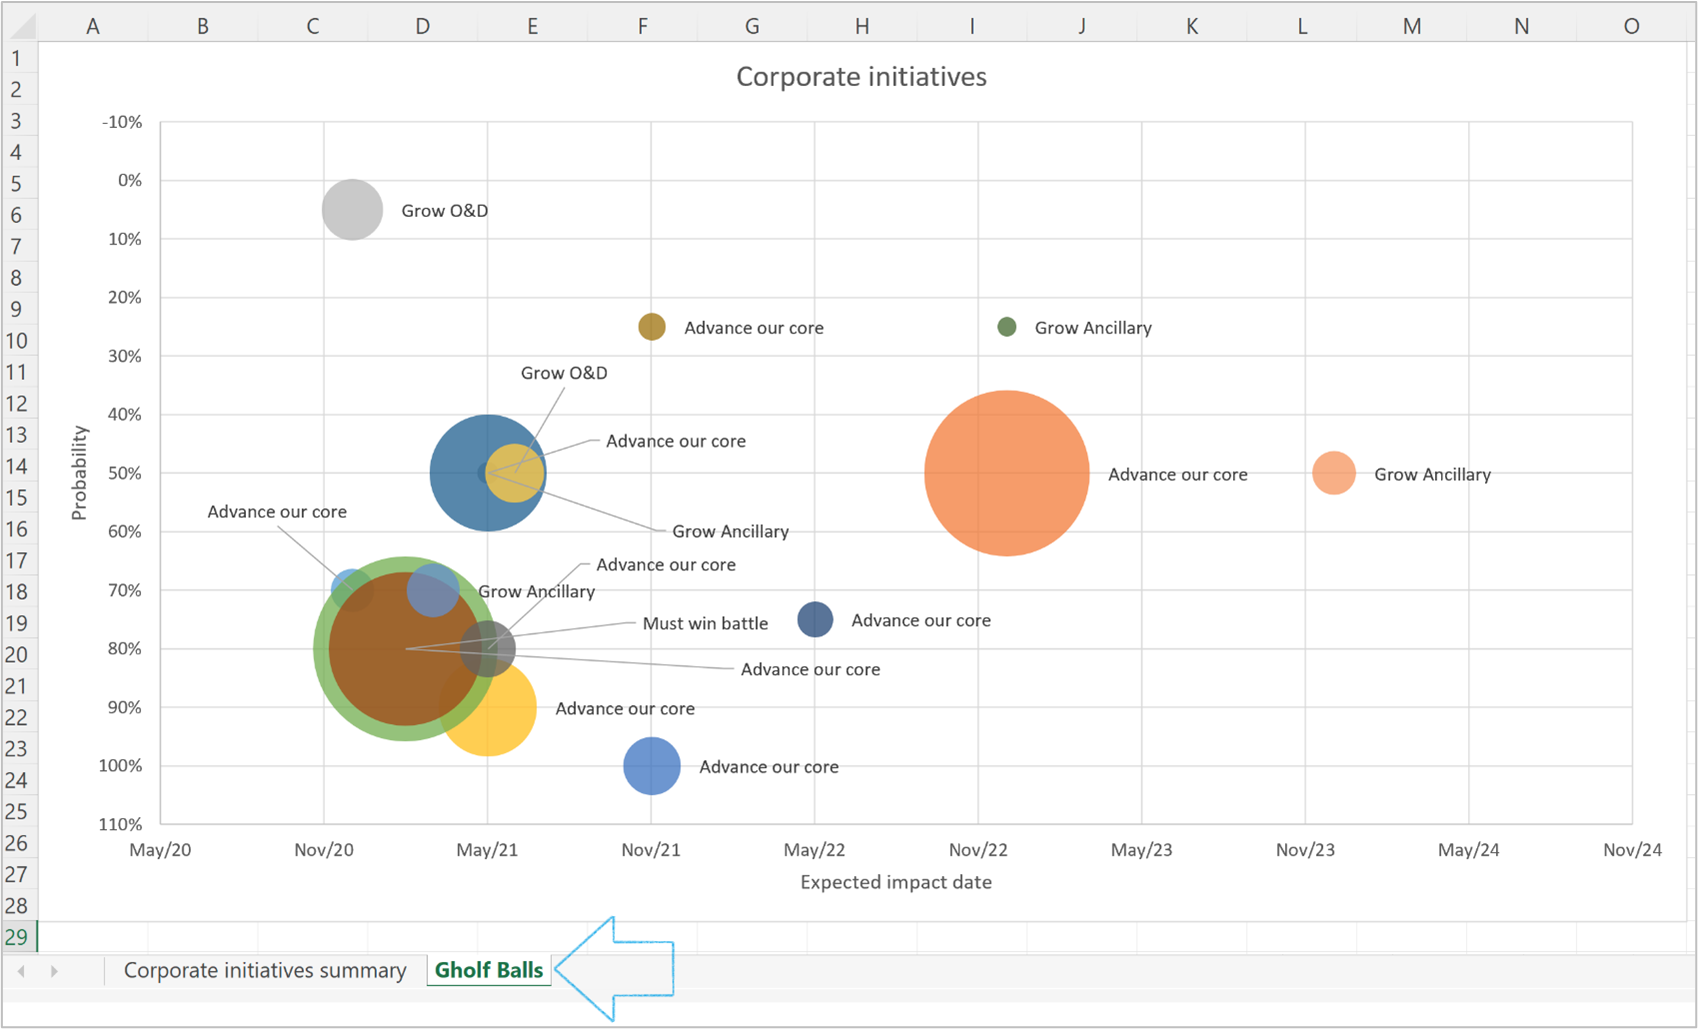
¶ 47. Corporate initiatives summary
To print the Initiatives Bubble chart:
Go to: GRC > Business excellence and strategy > Reports and Inquiries > Corporate initiatives summary
- On the Action pane, click on the Microsoft Office icon
- Under Open in Excel, select Initiatives – Bubble Chart

- Click on the Download button
- Open the spreadsheet and then open the Golf Balls tab
¶ Operational & sustainability reporting Reports & Inquiries
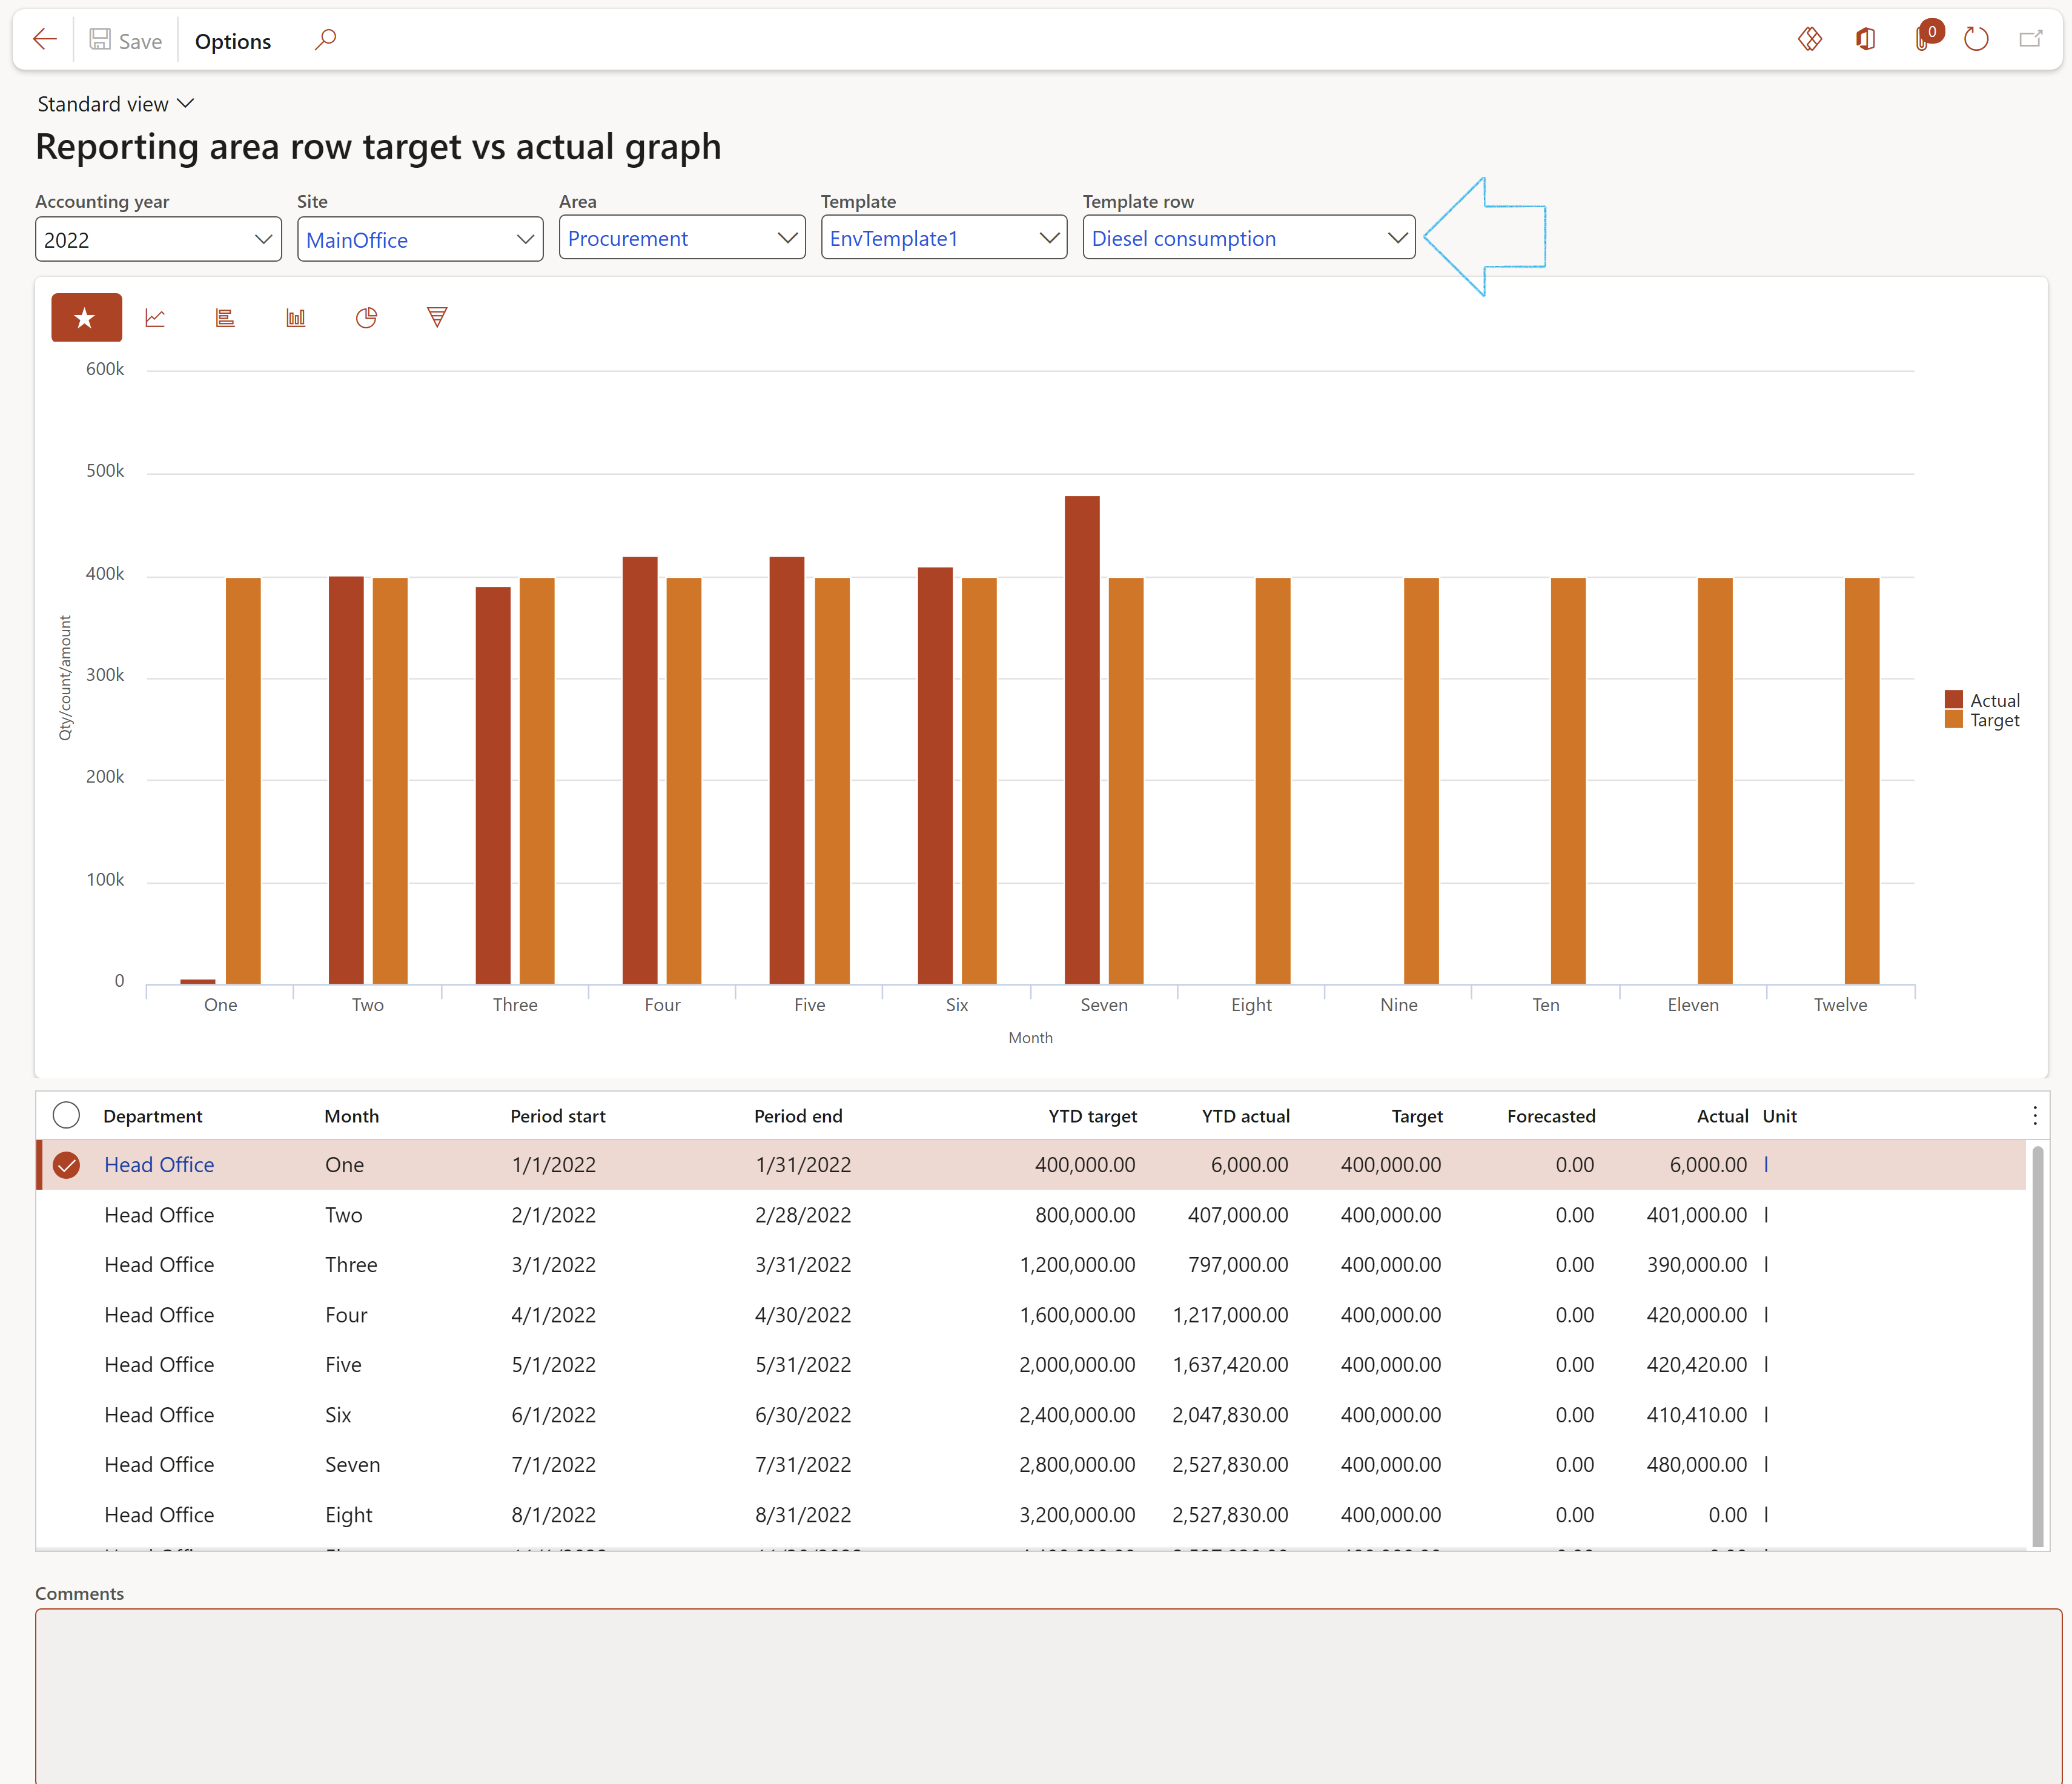
¶ 48. Target vs actual graph
This graph will display the Actual vs target values of a specific row in a graphical form as well as in a table form, for all twelve months of the fiscal year.
GRC > Operational & sustainability reporting > Reports and inquiries > Reporting area row target vs actual graph
- Use the filters to select the data that you want to display
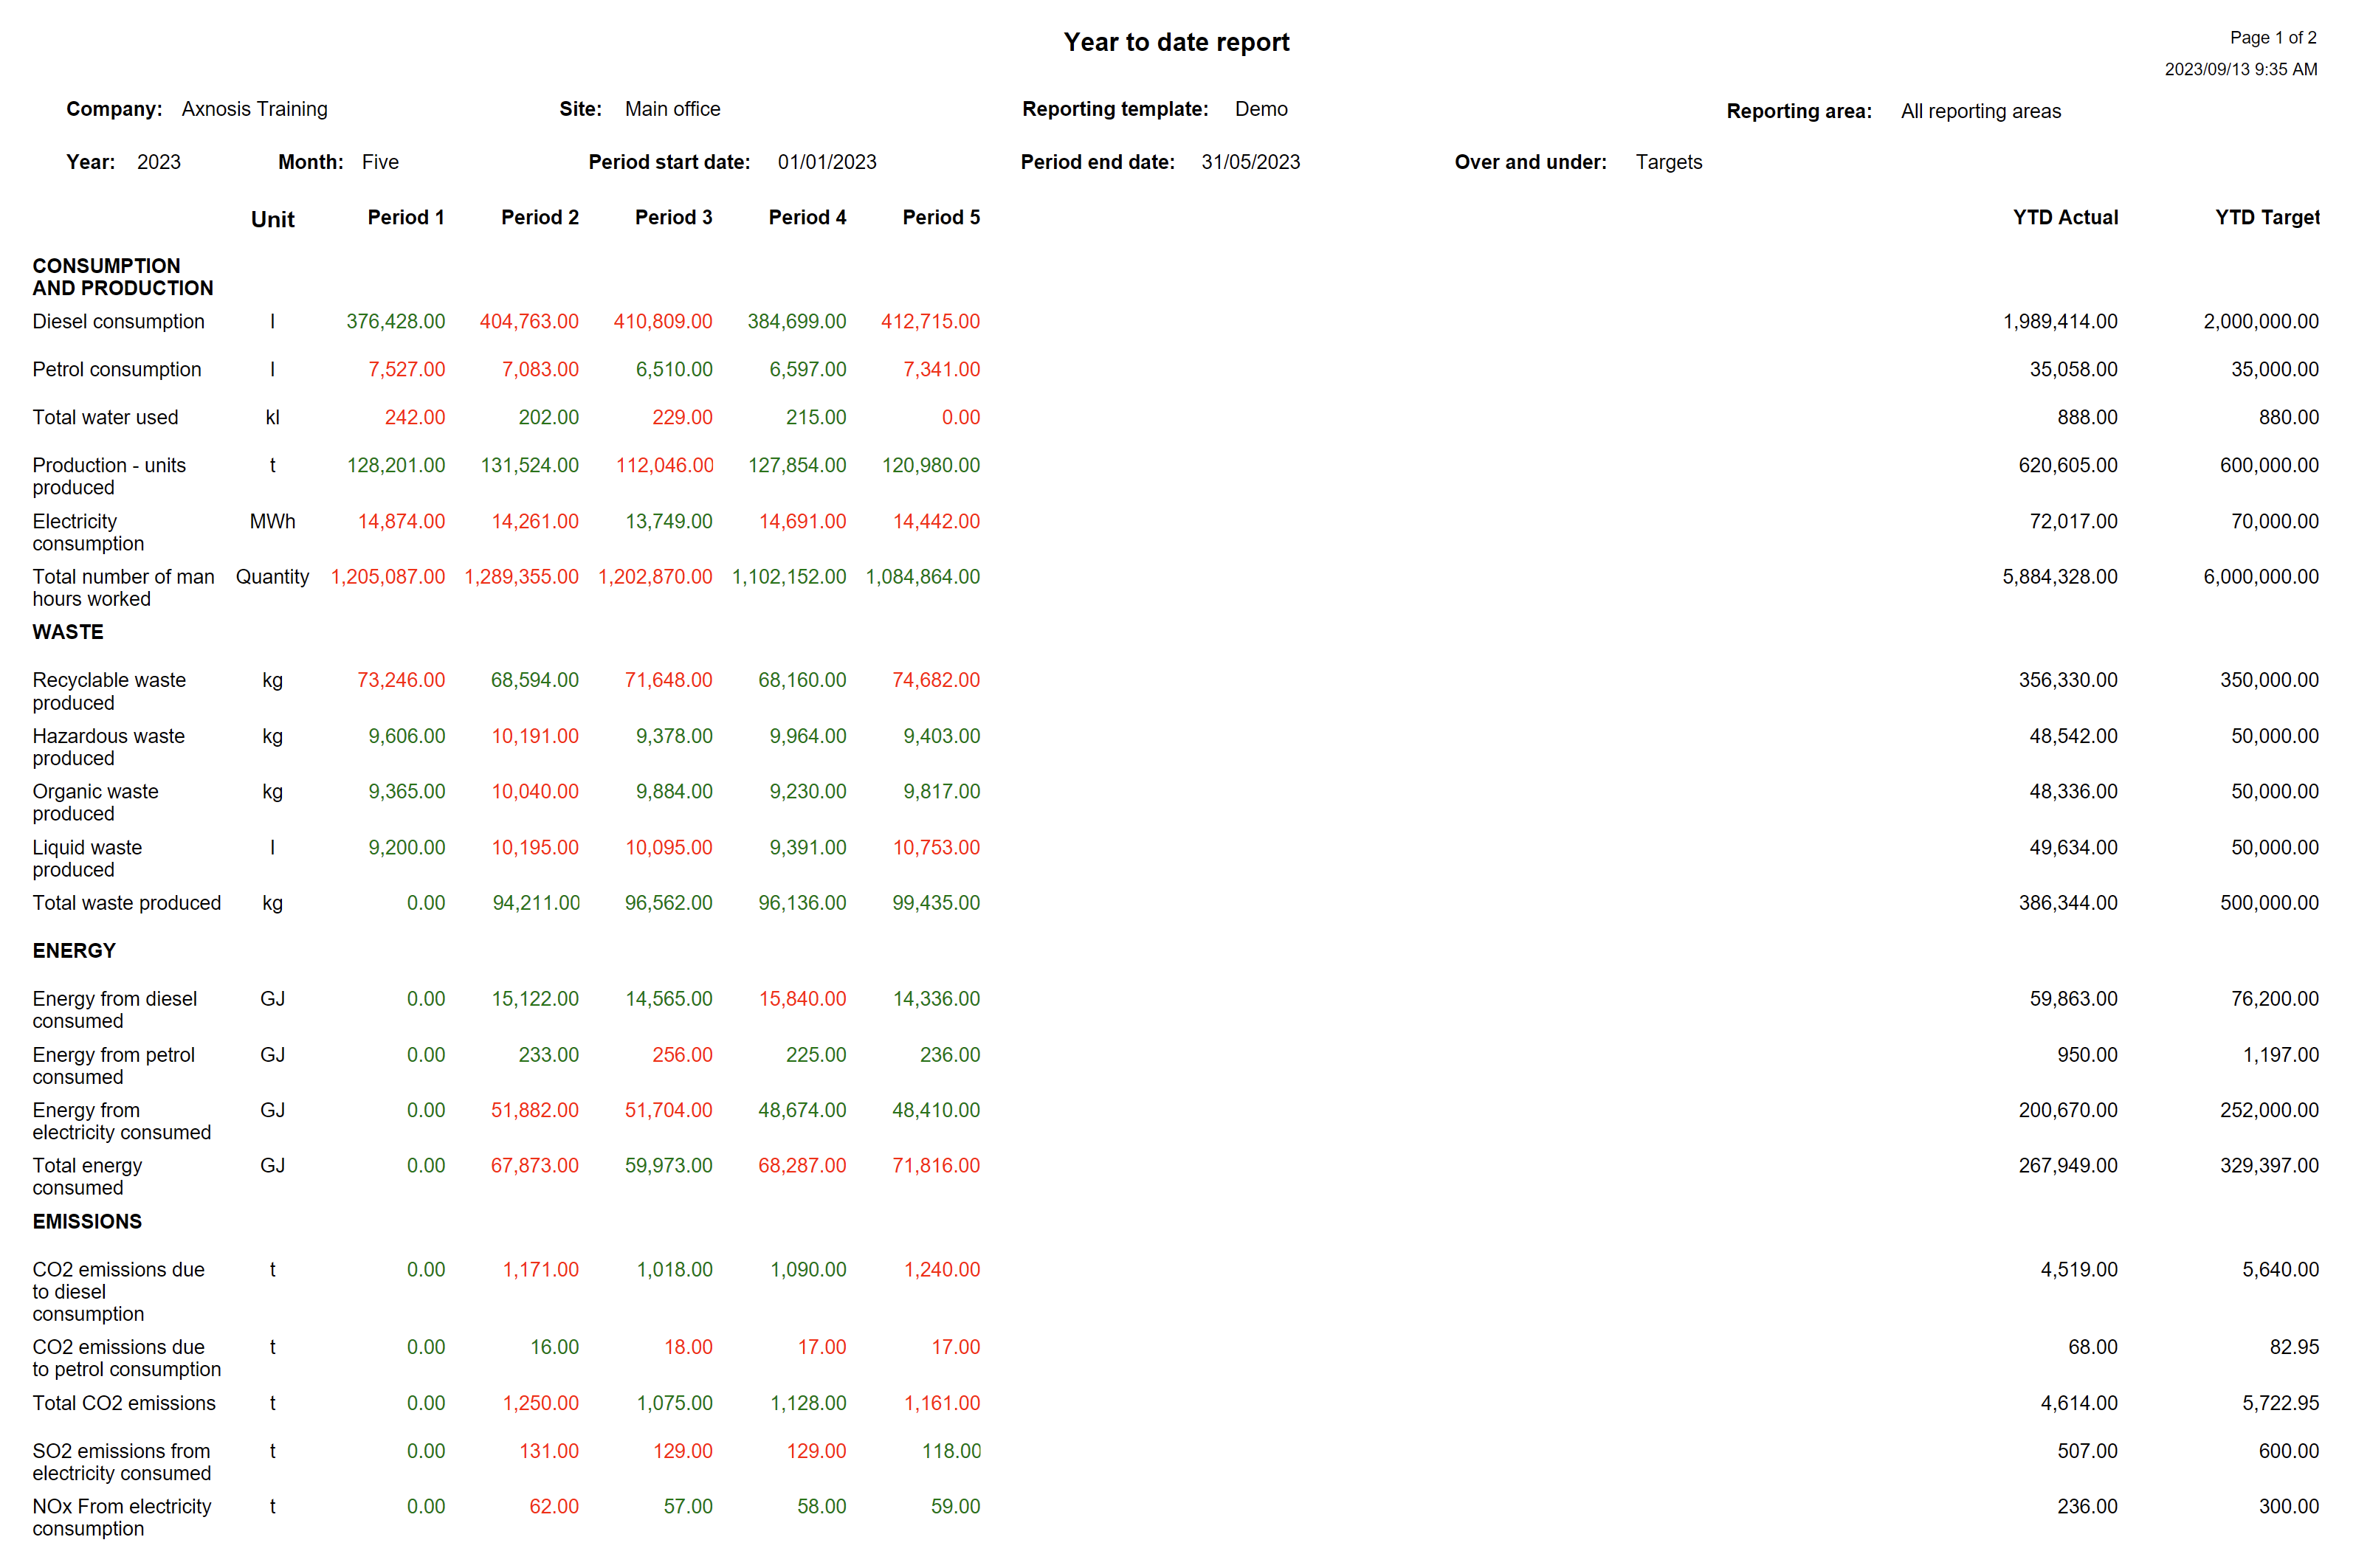
¶ 49. Year to date report
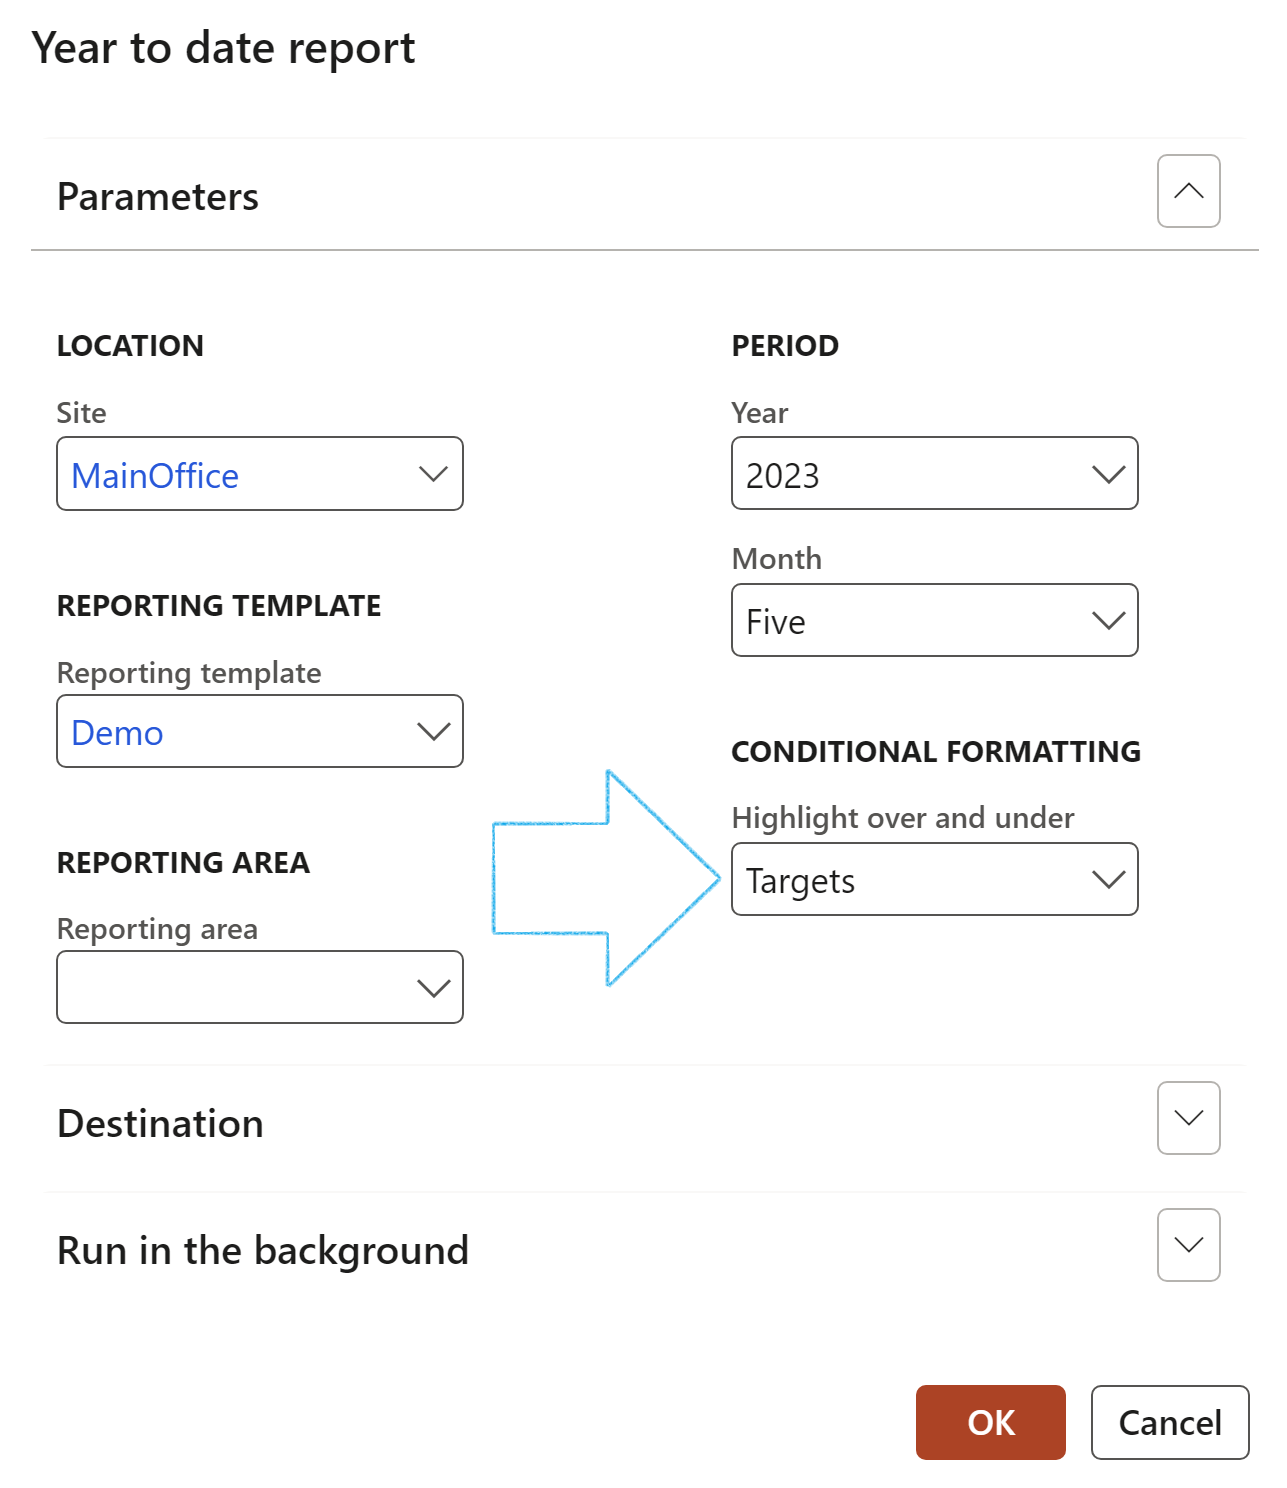
GRC > Operational & sustainability reporting > Reports and inquiries > Year to date report
- Select the relevant information for the report that you want to run on the Year to date report dialog
- In the Highlight over and under field, the user can choose to have the Min/Max values, of the Target values highlighted on the report
- Click OK
¶ 50. Monthly report
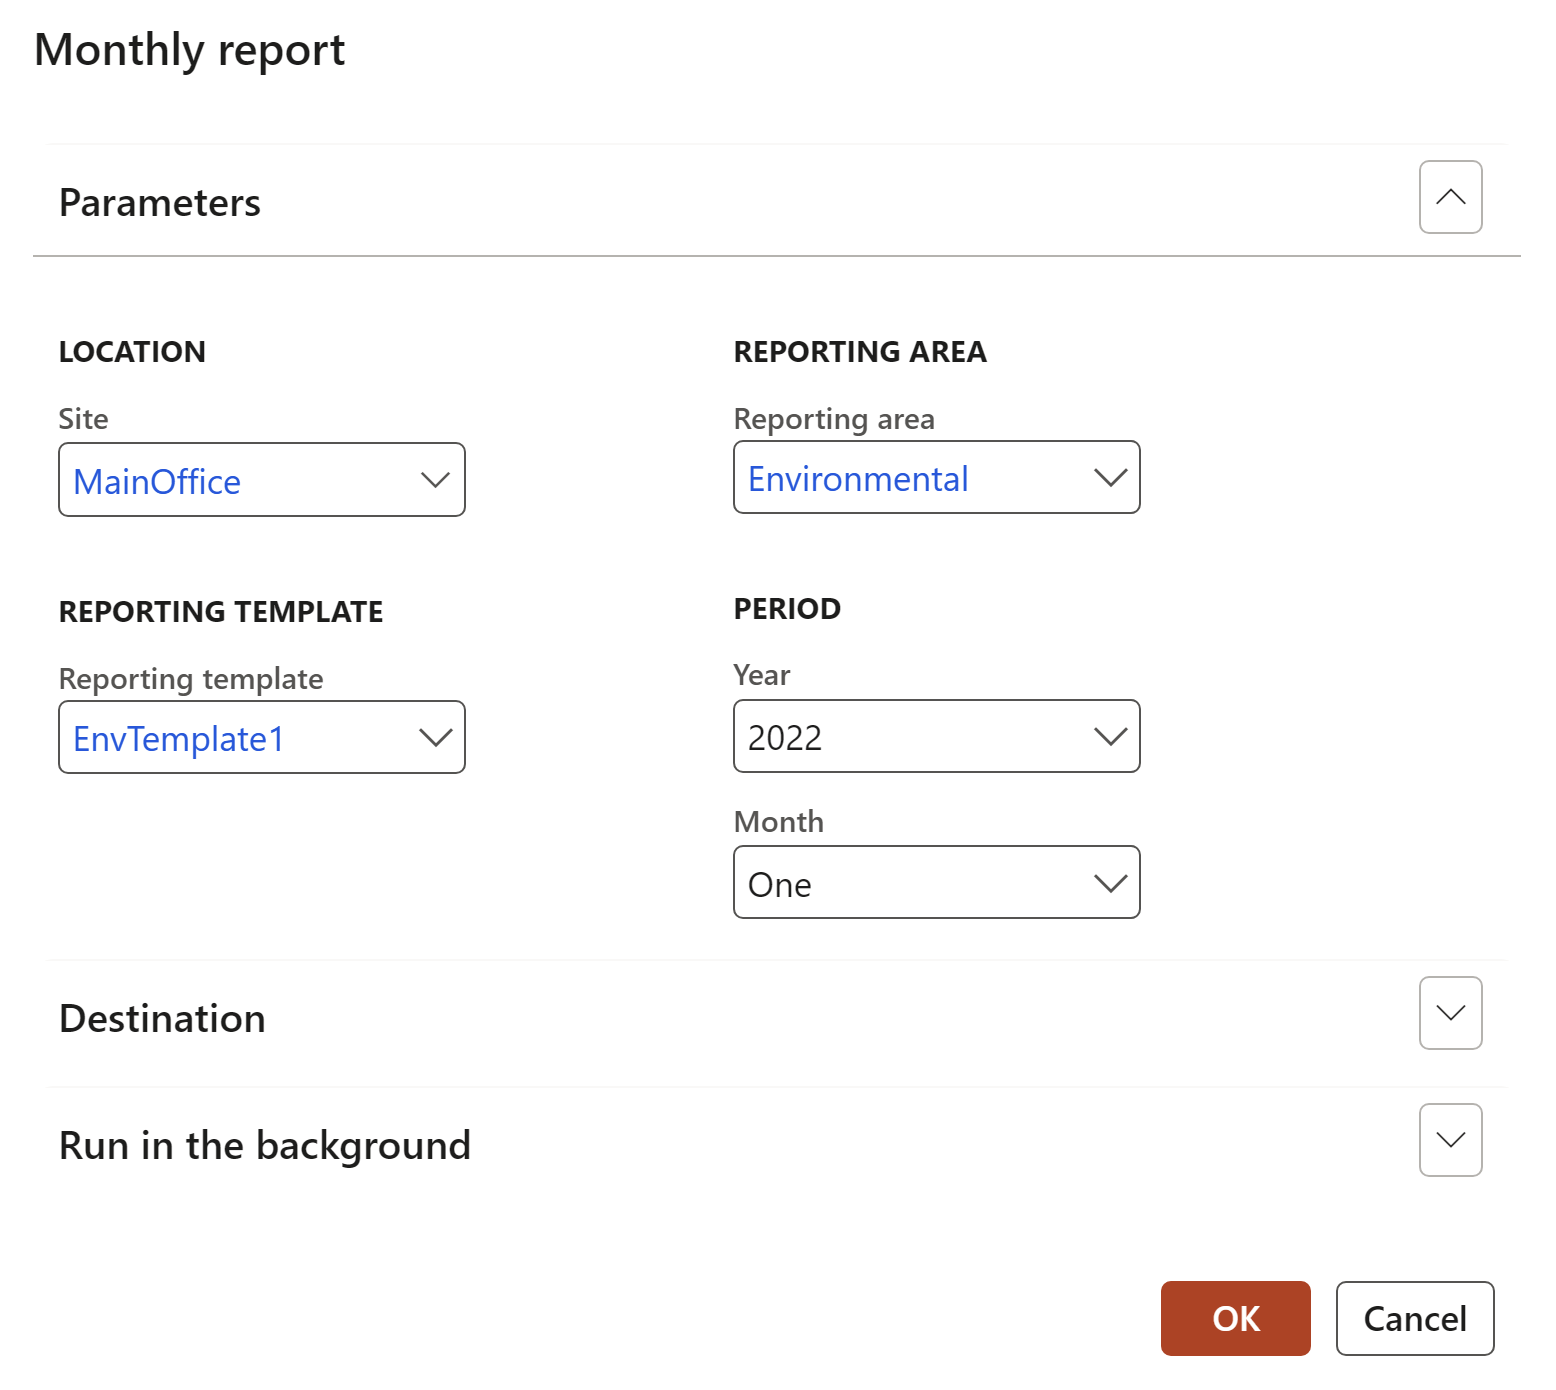
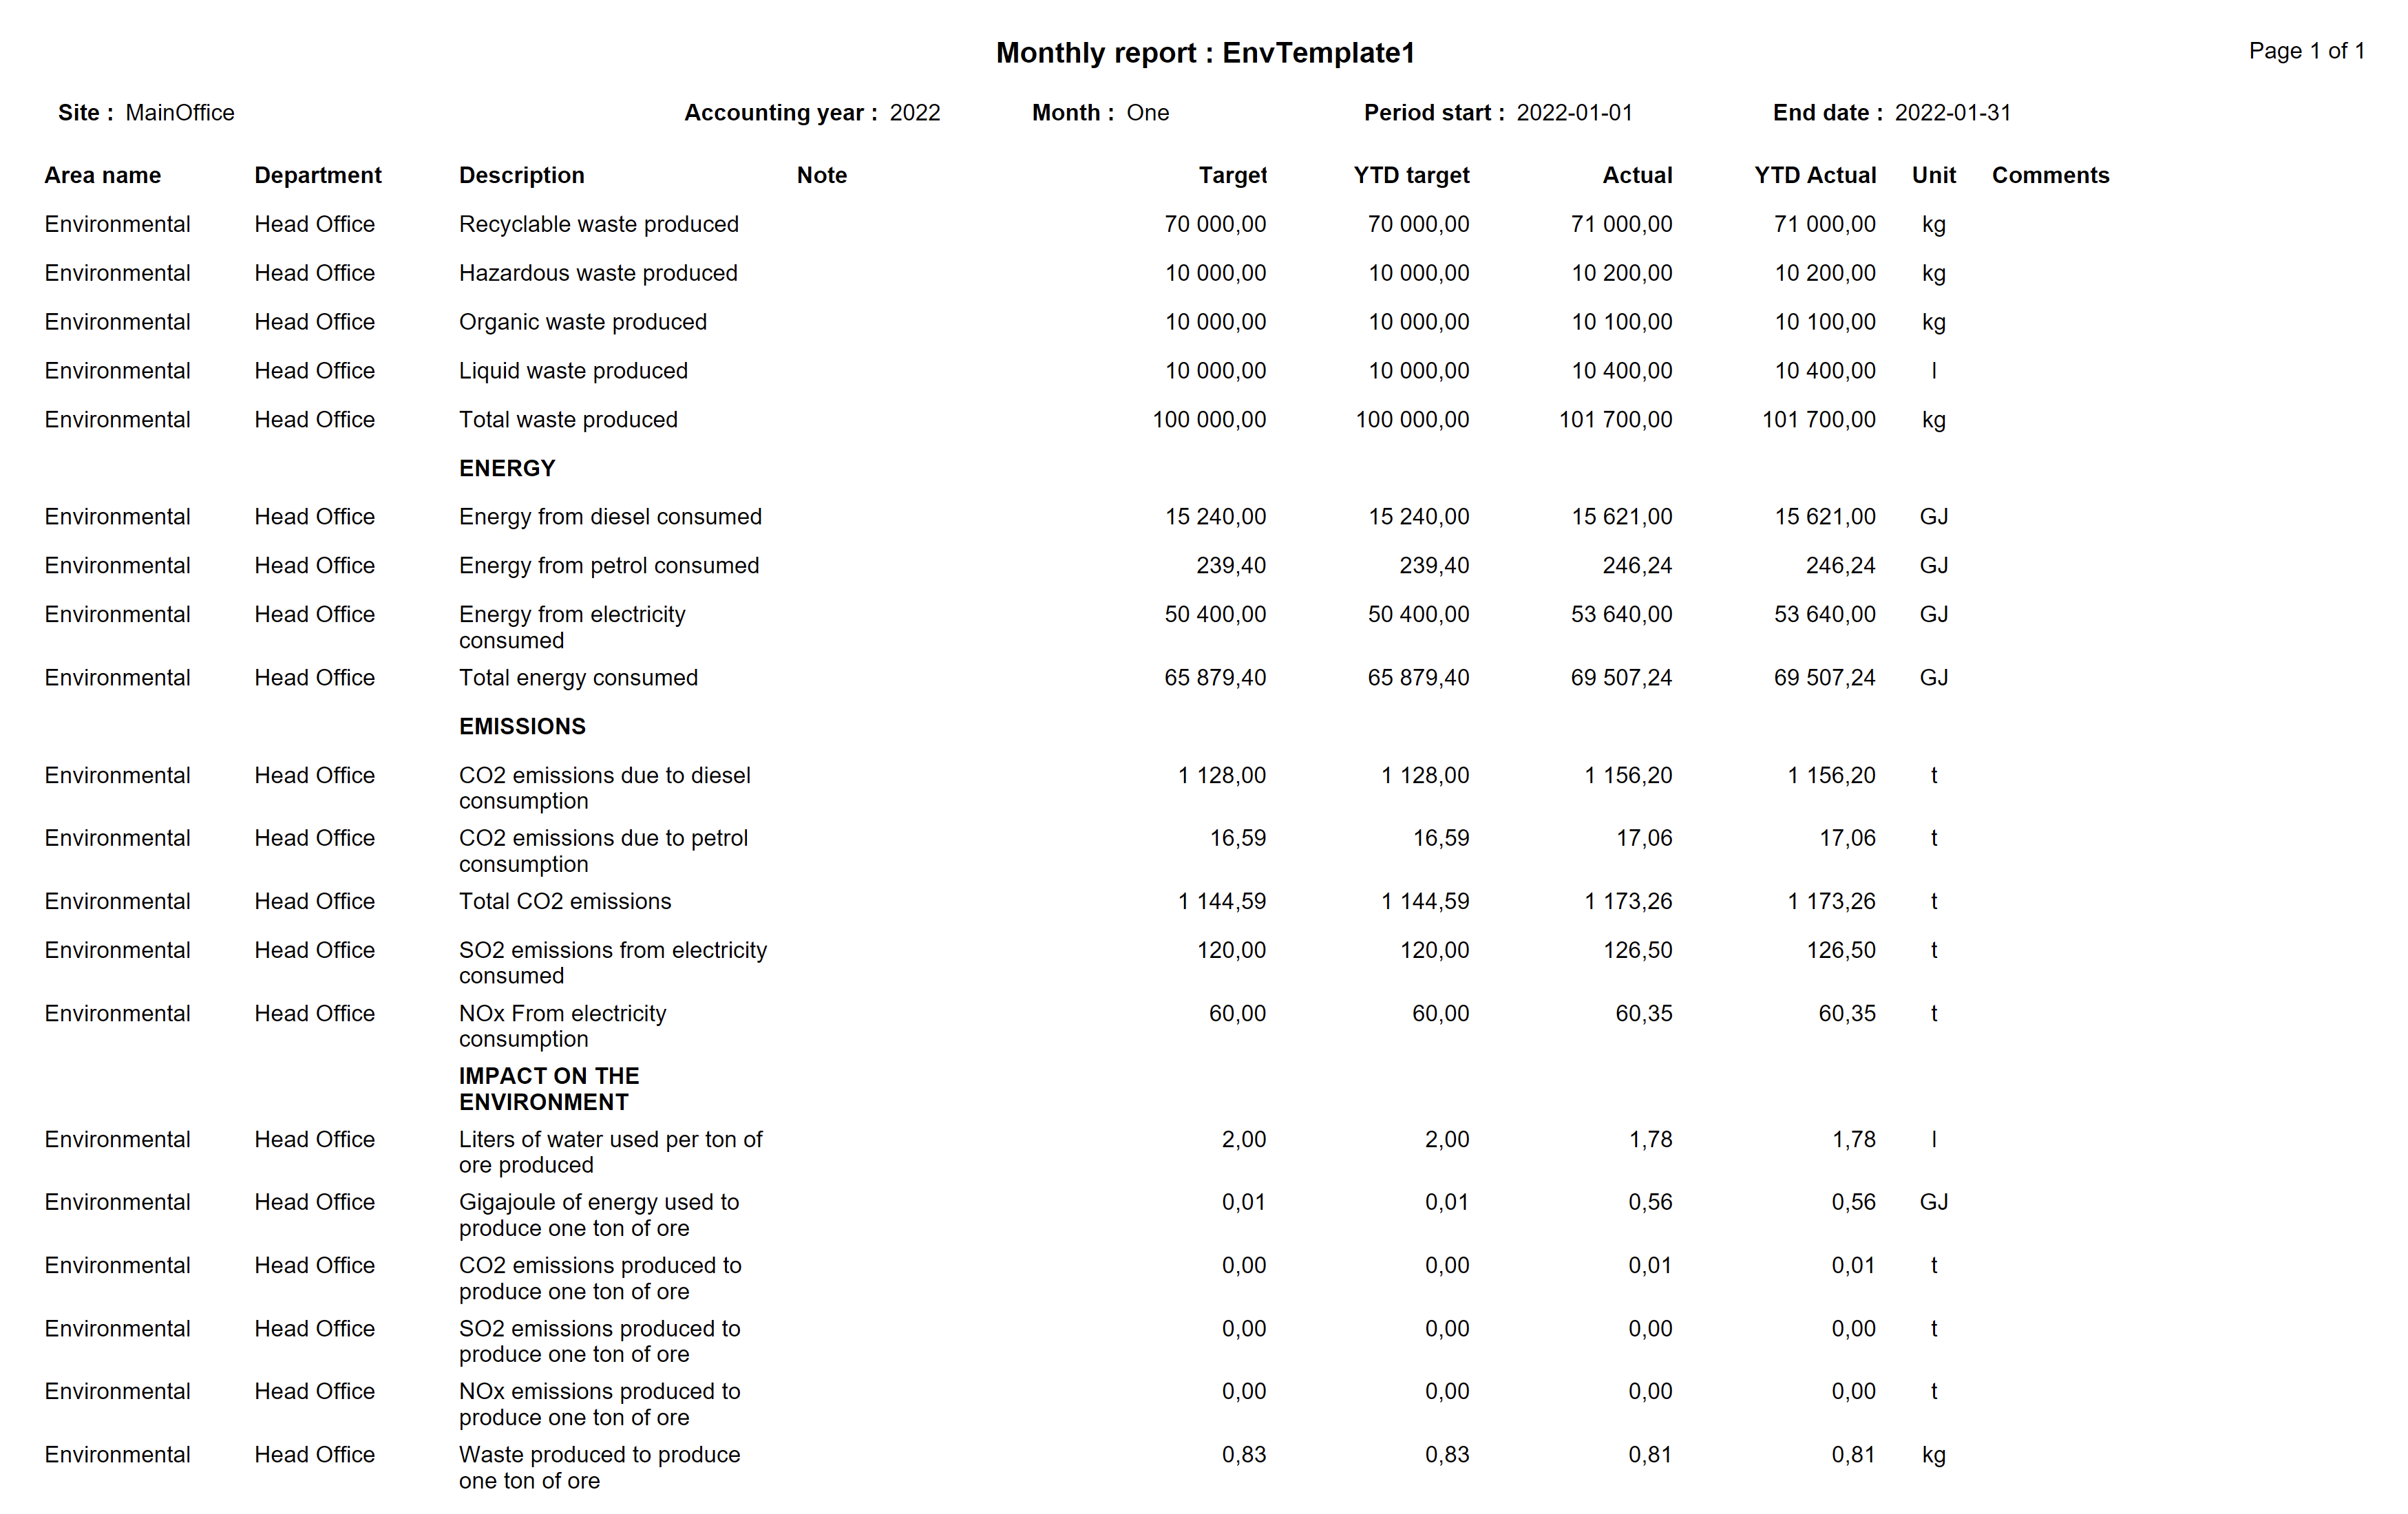
The Monthly report shows the monthly data for all the records that are not hidden for this site
GRC > Operational & sustainability reporting > Reports and inquiries > Monthly report
- Select the relevant information for the report that you want to run on the Monthly report dialog
- Click OK
The order of the records in the report is the same as it is setup on the template.
Records that are marked as header records are printed in bold.
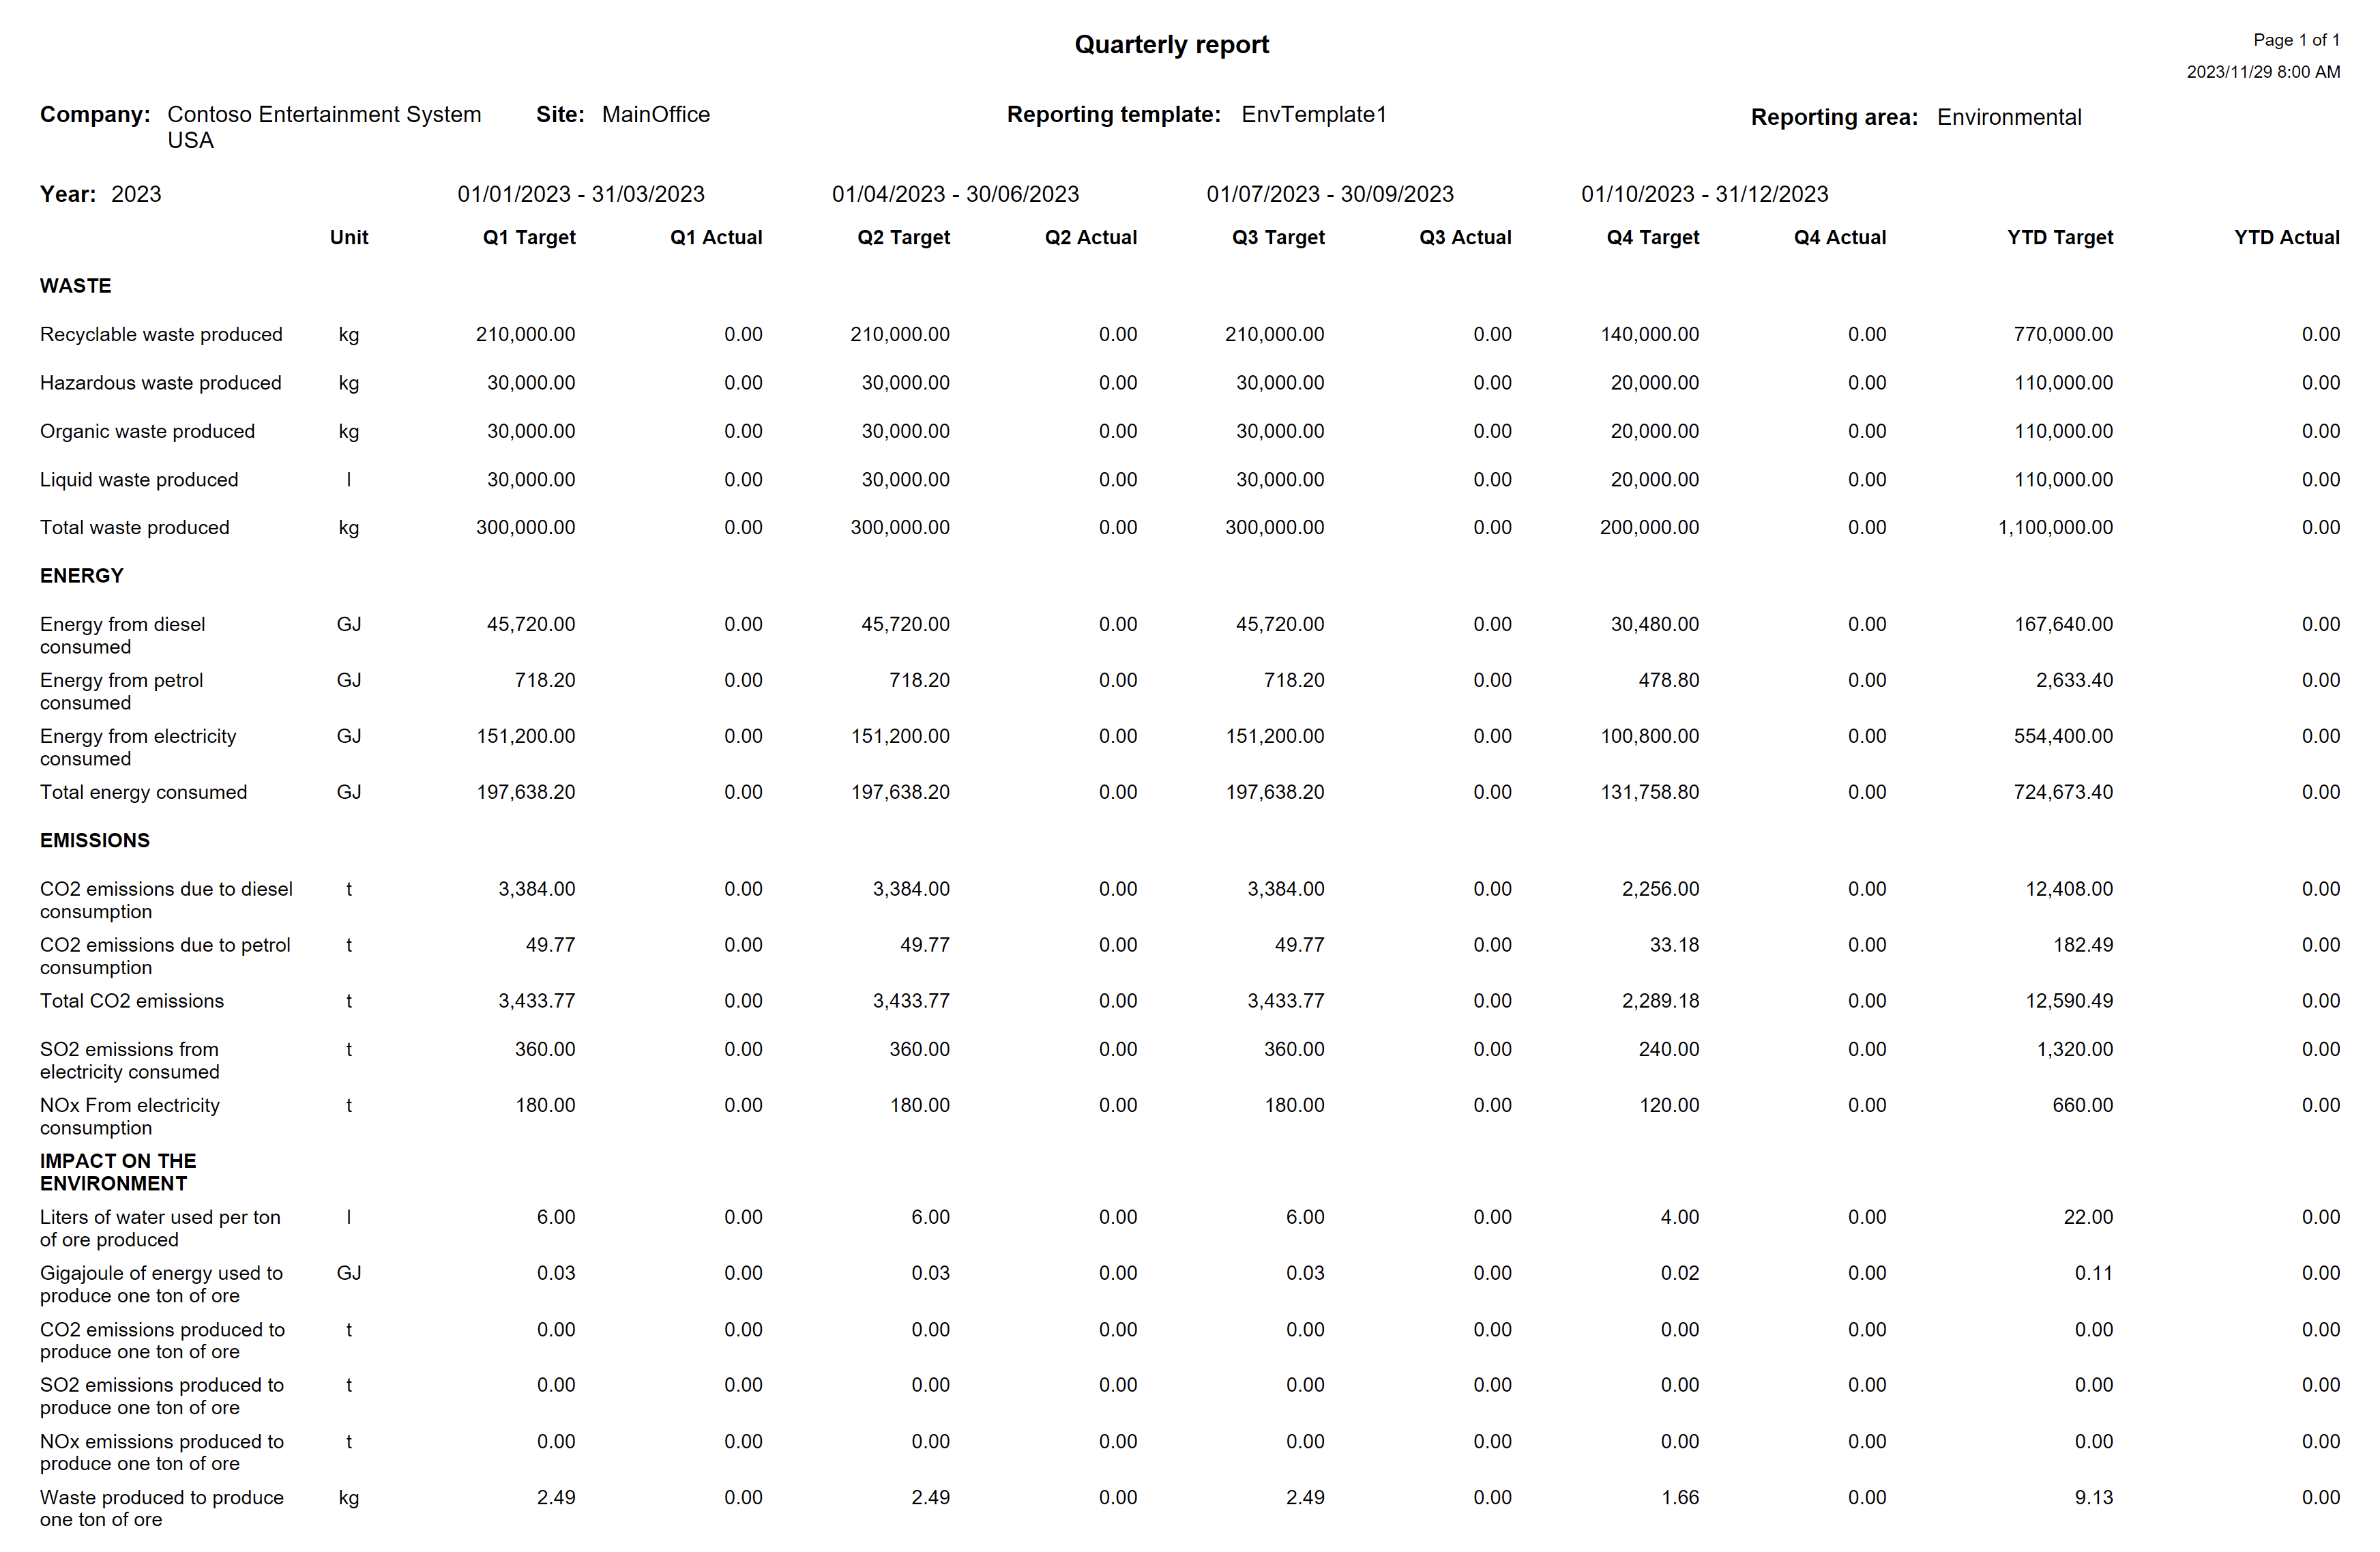
¶ 51. Quarterly report
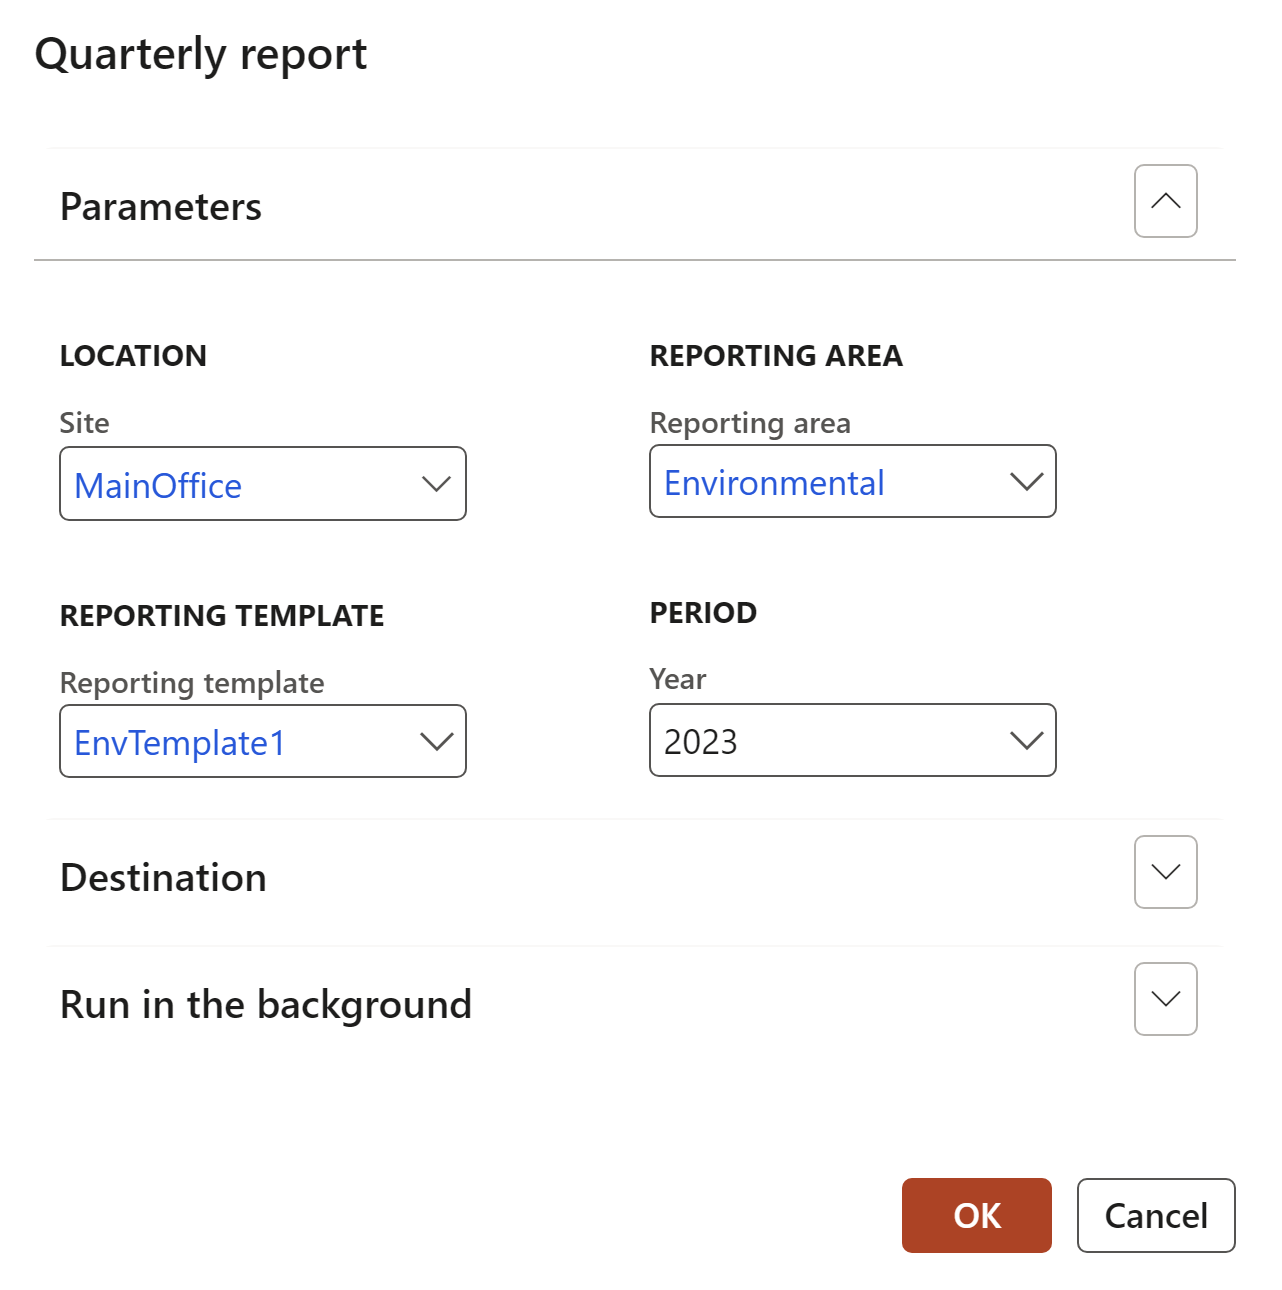
GRC > Operational & sustainability reporting > Reports and inquiries > Quarterly report
- Select the relevant information for the report that you want to run on the Quarterly report dialog
- Click OK
¶ Internal audit Reports & Inquiries
¶ 52. Audit three year plan report
GRC > Internal audit > Reports and inquiries > Audit three year plan report
Select the parameters and then click OK

¶ 53. Audit schedule report
GRC > Internal audit > Reports and inquiries > Audit schedule report
Select the parameters and then click OK

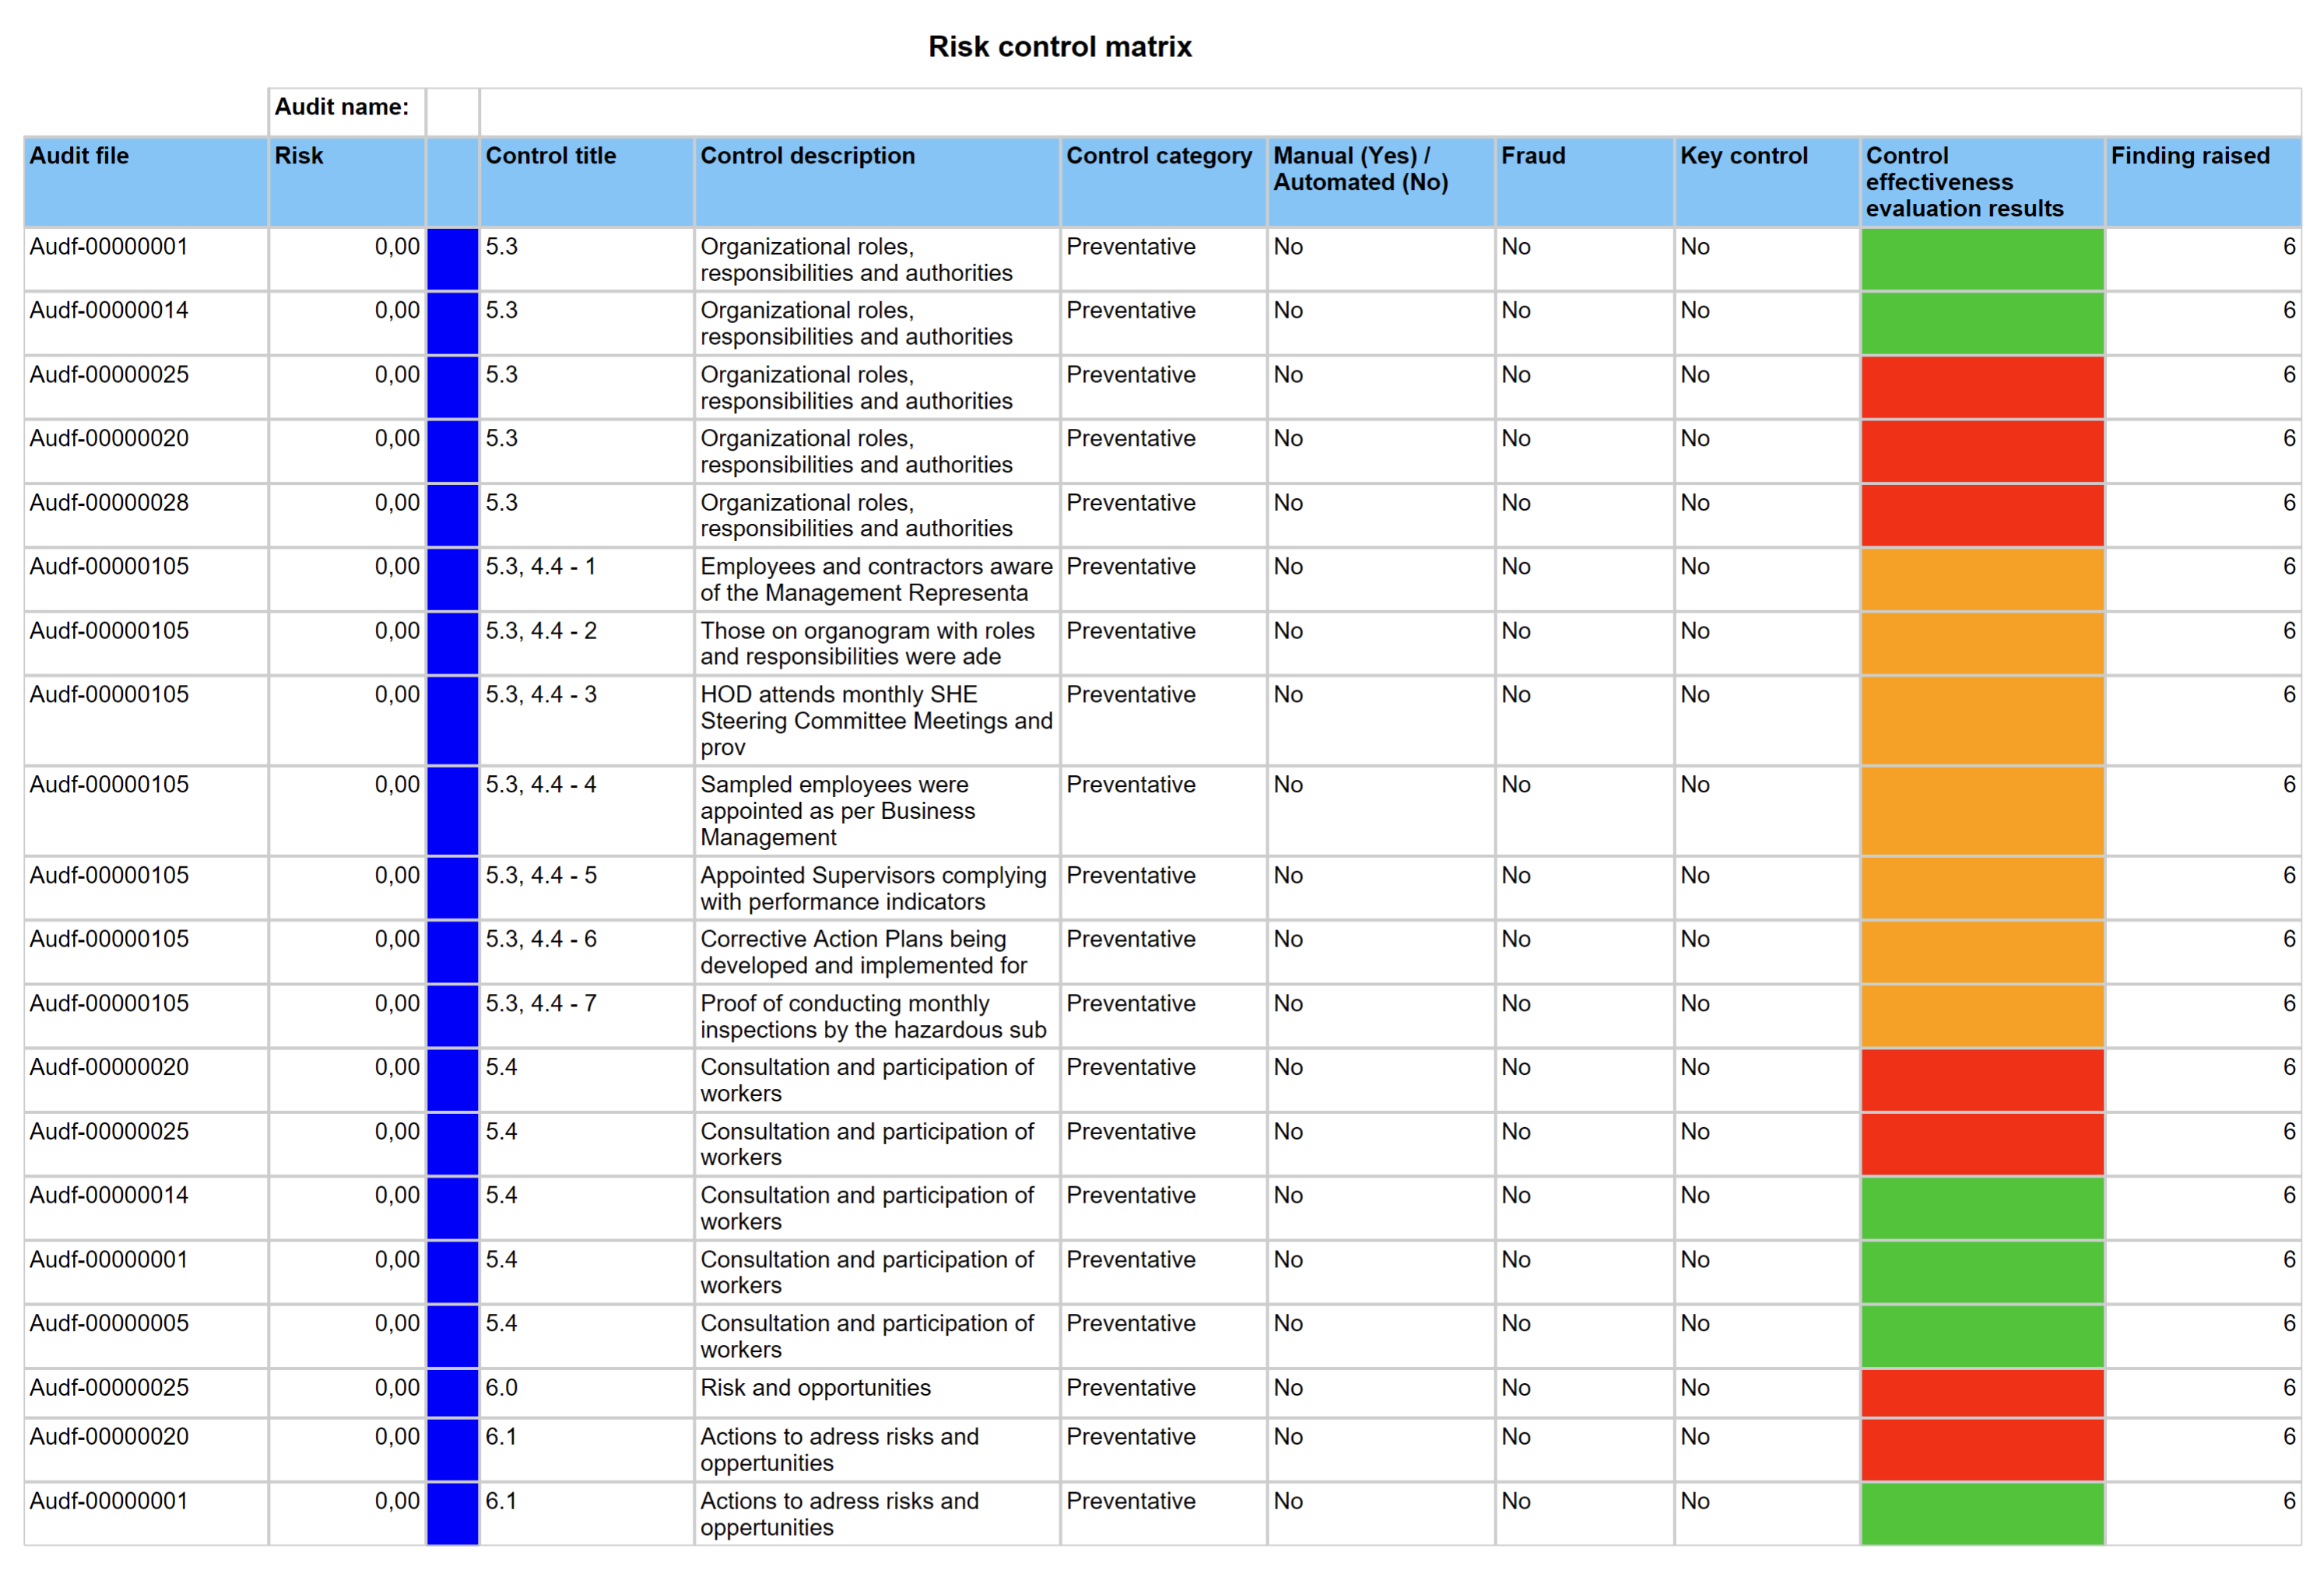
¶ 54. Risk control matrix per audit file report
GRC > Internal audit > Reports and inquiries > Risk control matrix per audit file report
Select the parameters and then click OK
¶ 55. Risk assessments for internal audit
GRC > Internal audit > Reports and Inquiries > Risk assessments for internal audit

¶ 56. Detailed findings and action plans report
GRC > Internal audit > Reports and Inquiries > Detailed findings and action plans report
Select the parameters and then click OK

¶ 57. Findings age analysis report
GRC > Internal audit > Reports and Inquiries > Findings age analysis report
Select the parameters and then click OK

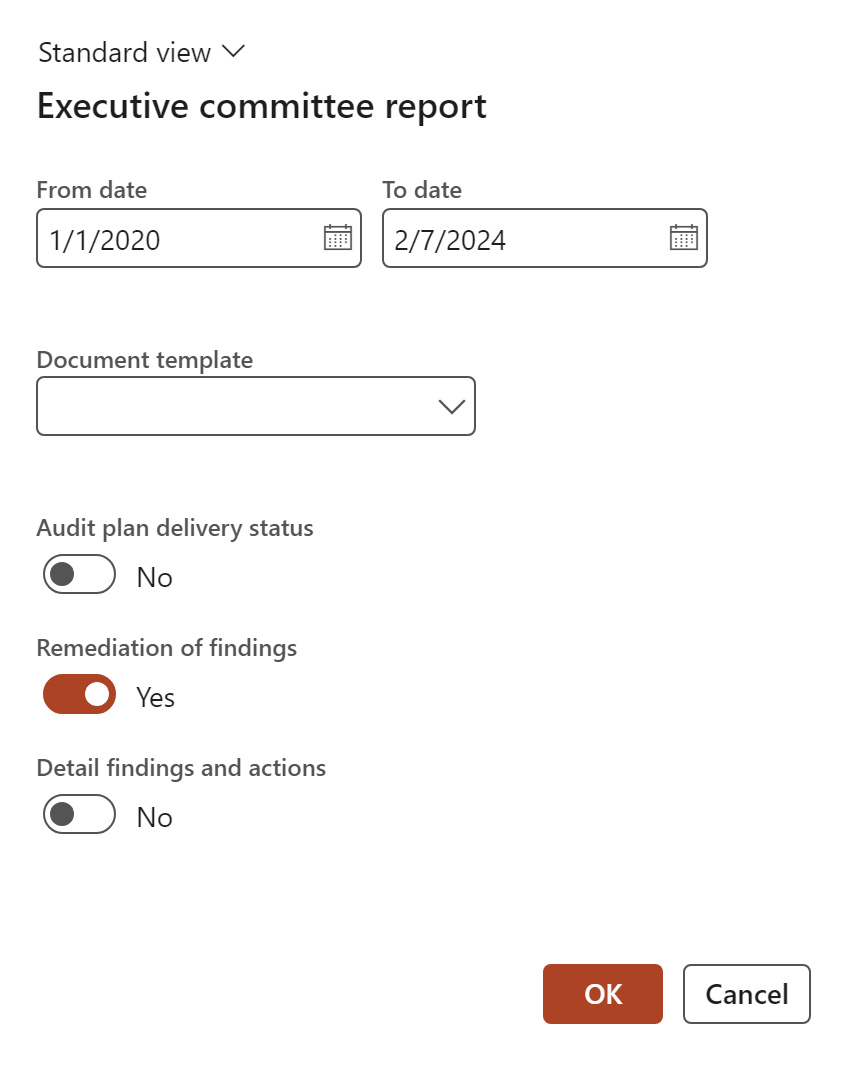
¶ 58. Executive committee report
GRC > Internal audit > Reports and Inquiries > Executive committee report
The Executive committee report dialog allows the user to print three reports (one at a time)
- Audit plan delivery status
- Remedies of findings (Findings age analysis)
- Detail findings and actions
Select the parameters and then click OK
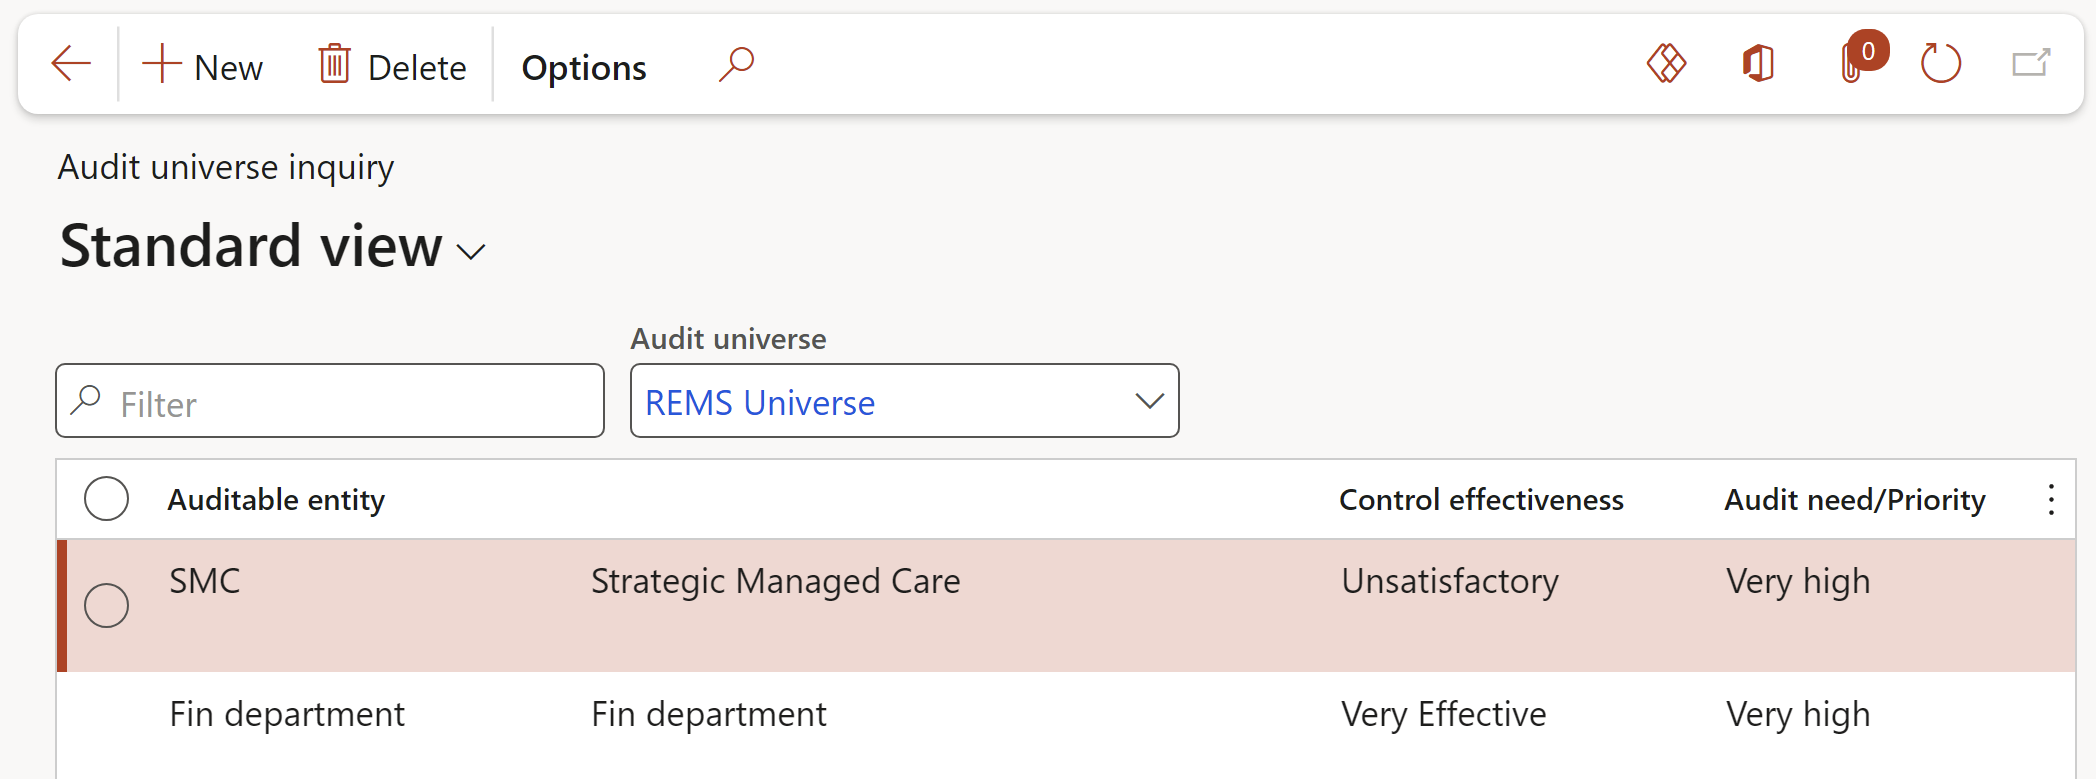
¶ 59. Audit universe inquiry
GRC > Internal audit > Reports and Inquiries > Audit universe inquiry
Select the relevant Audit universe from the dropdown list
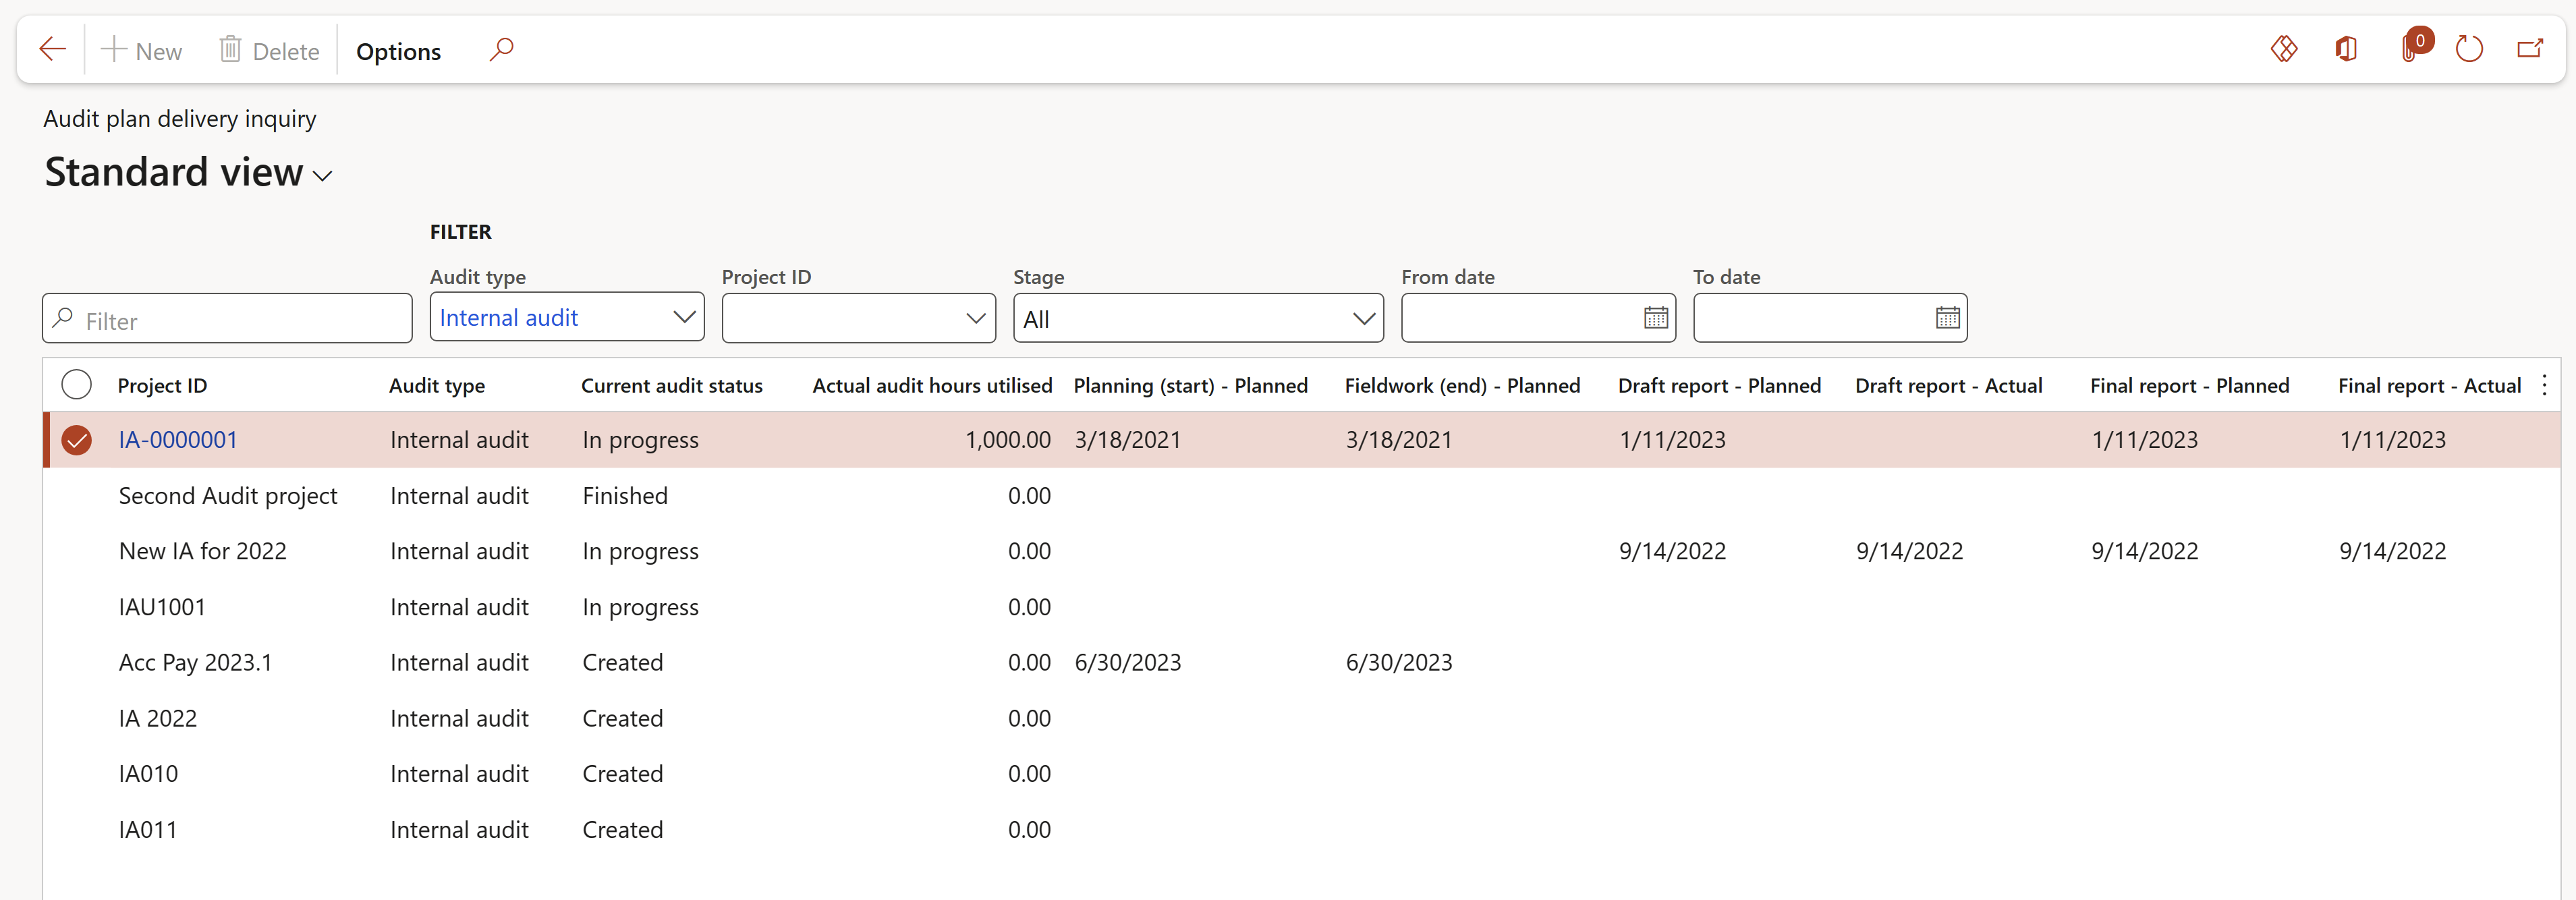
¶ 60. Audit plan delivery inquiry
GRC > Internal audit > Reports and Inquiries > Audit plan delivery inquiry
¶ 61. Internal audit findings
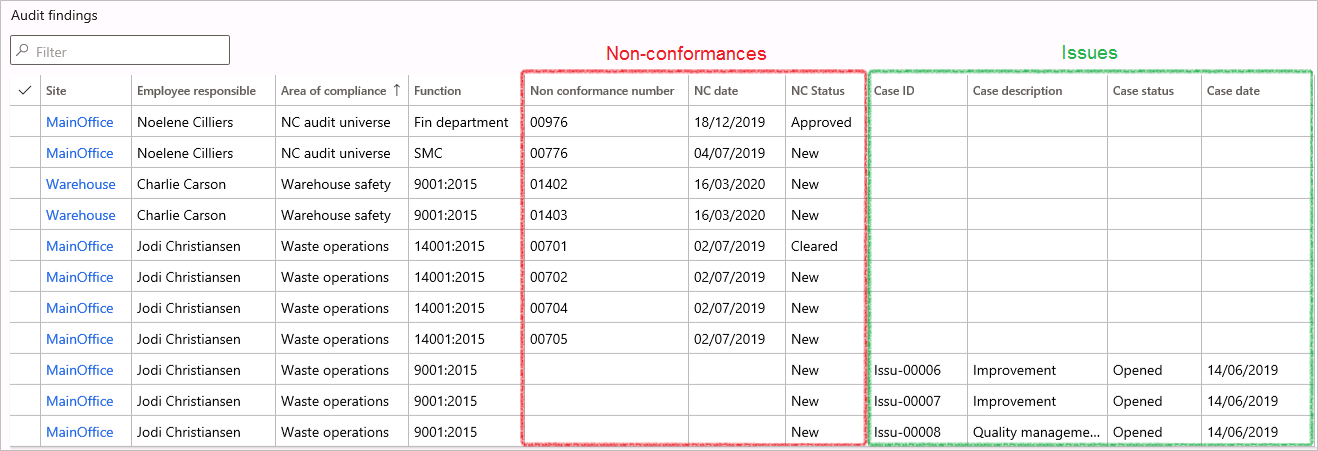
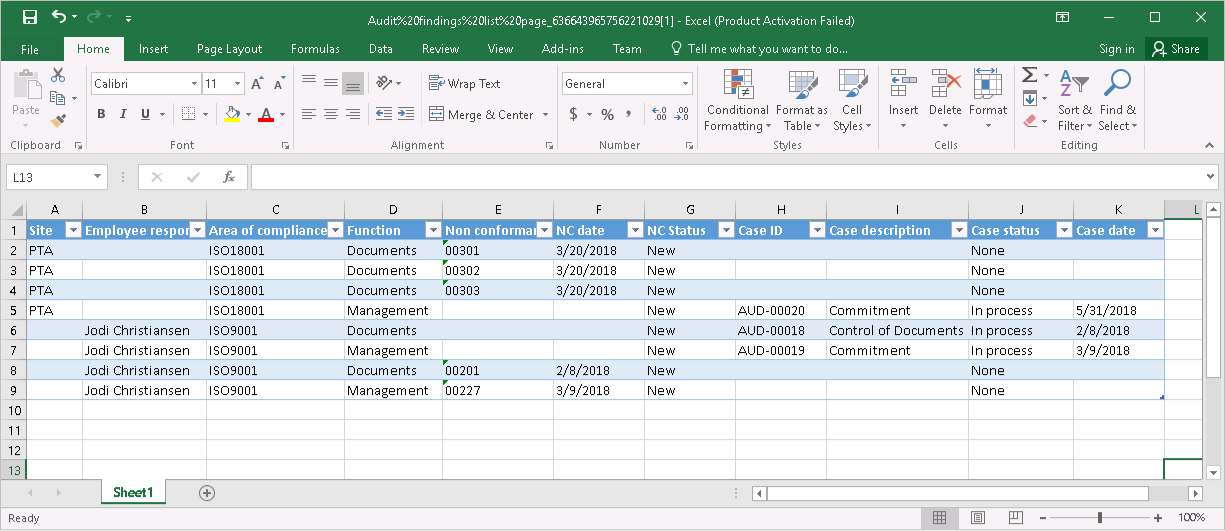
GRC > Internal audit > Reports and Inquiries > Internal audit findings
¶ 62. Findings age analysis (Remediation of findings)
.png)
¶ HSE Reports & Inquiries
¶ Environmental Reports & Inquiries
¶ 1. Environmental risk worksheet
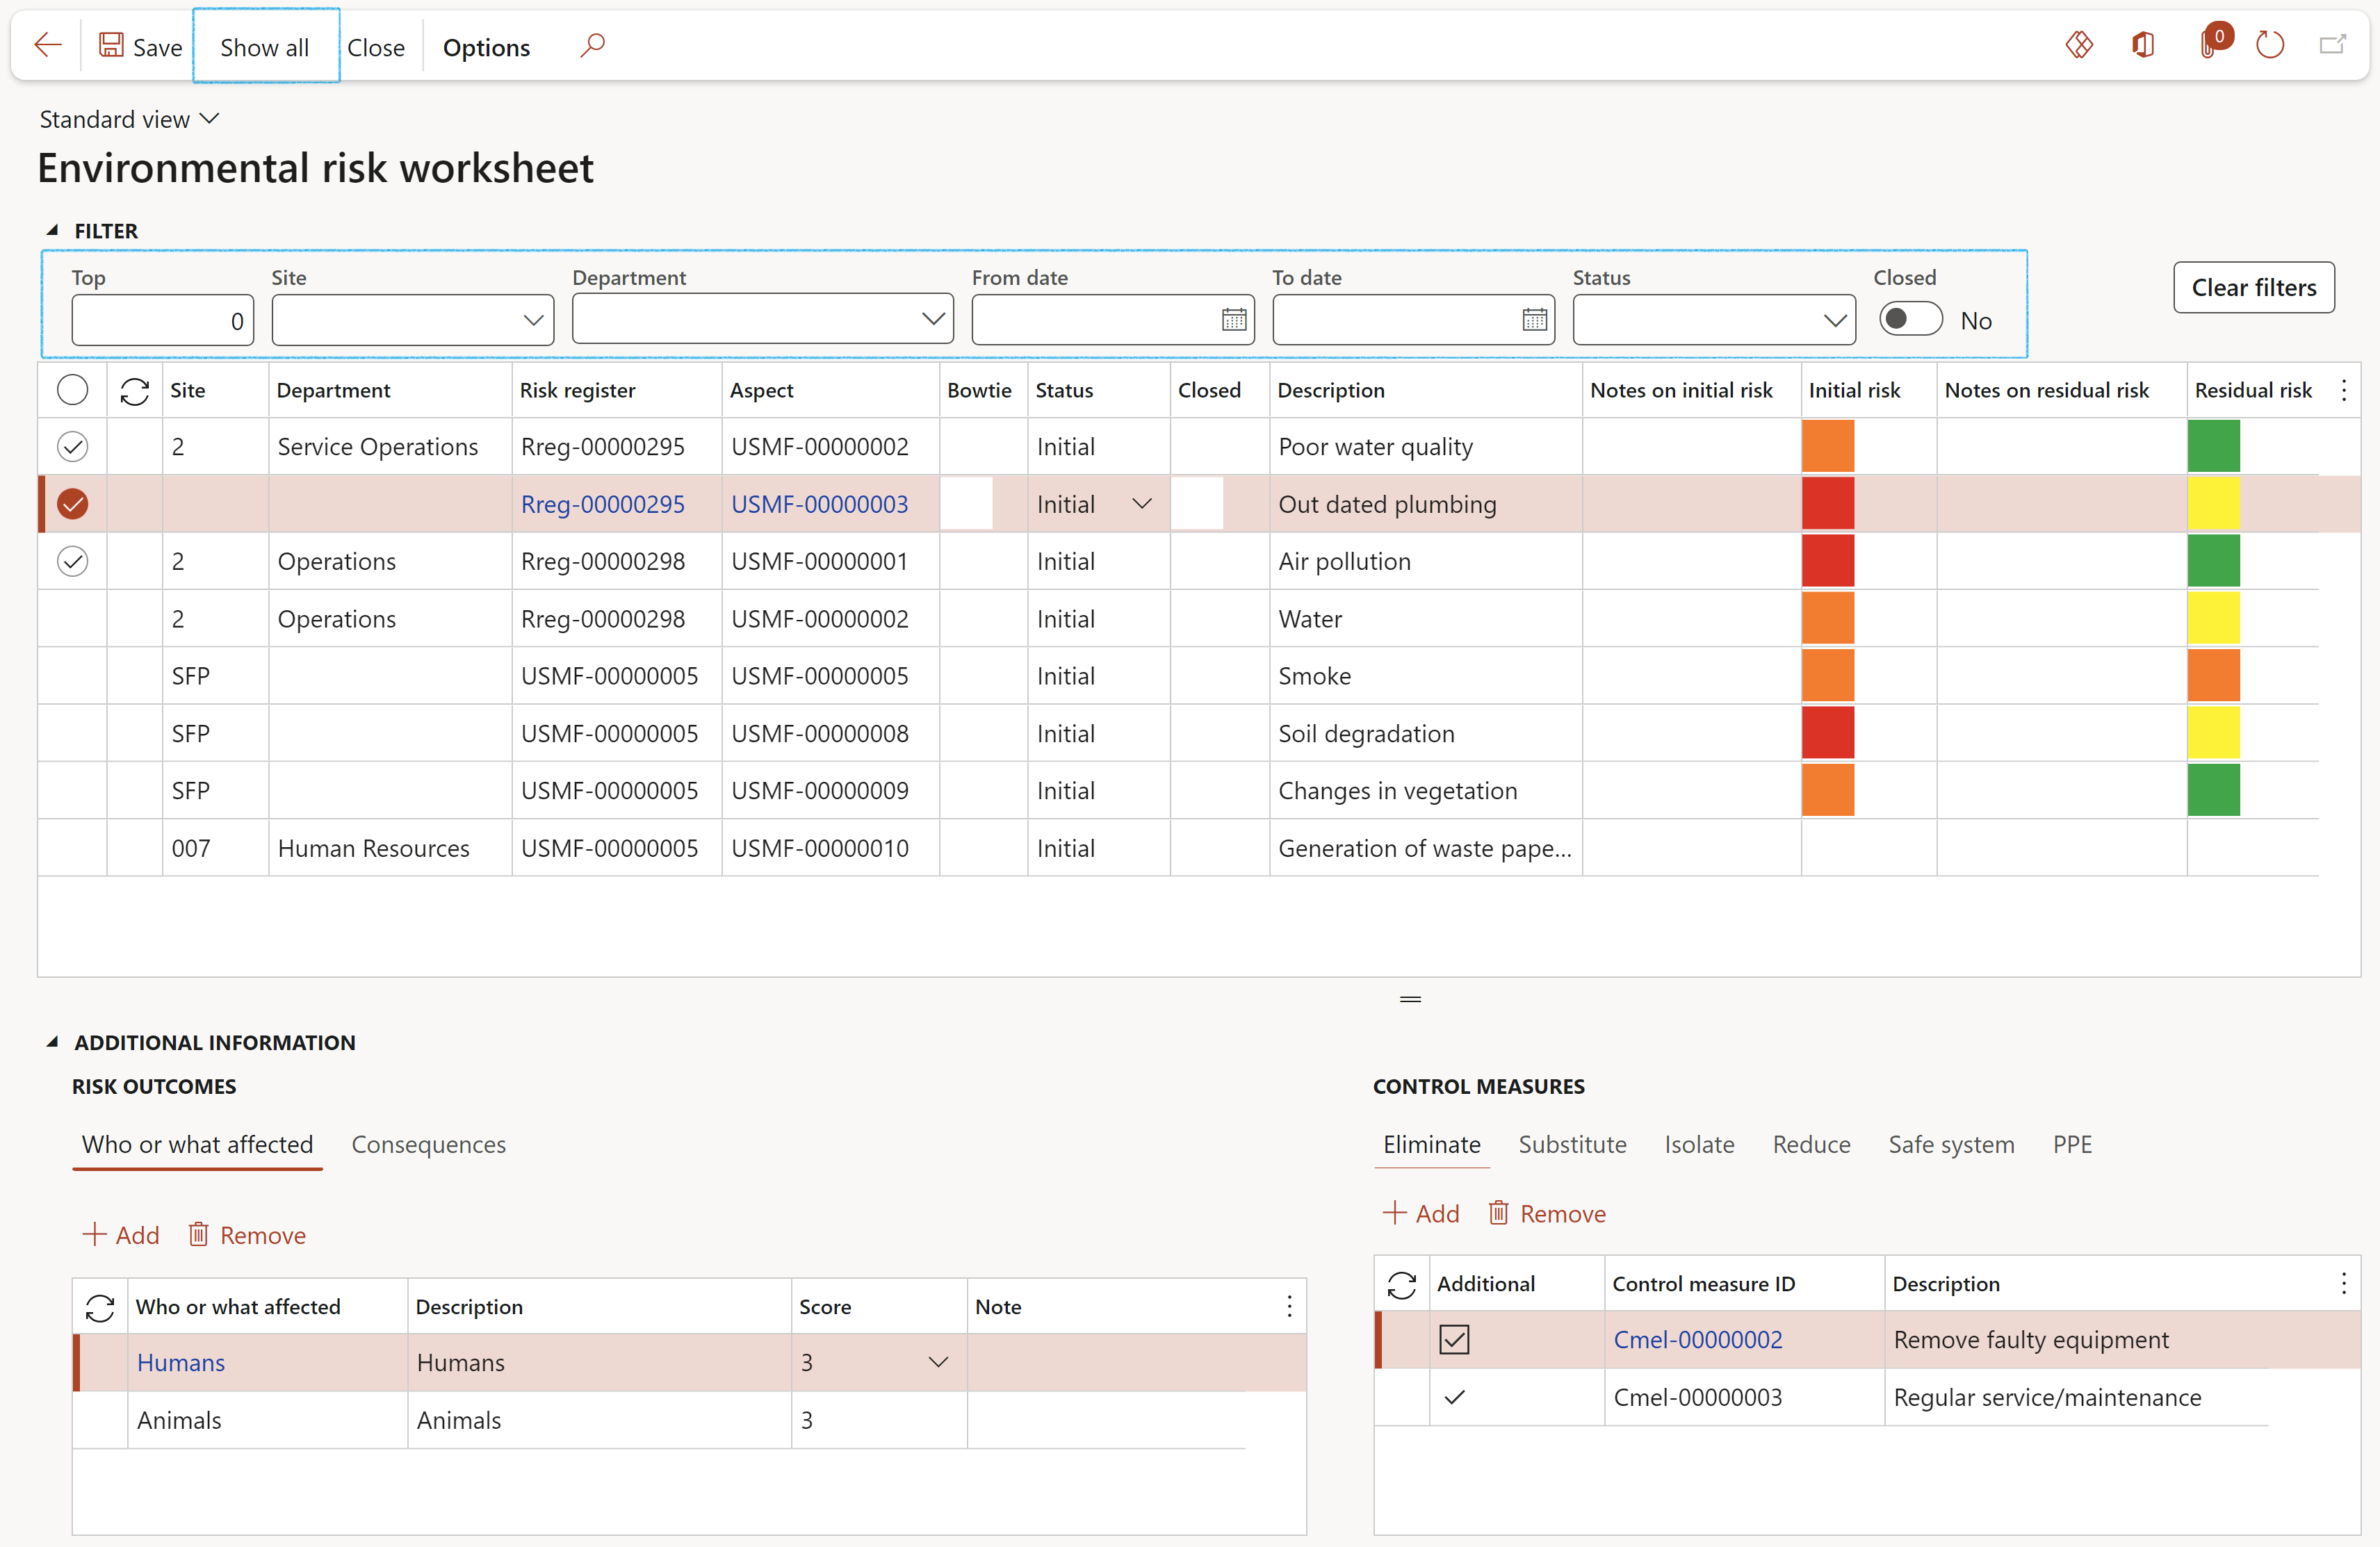
HSE > Environmental > Reports and inquiries > Environmental risk worksheet
The filters can be used to view specific records
The user can click on the Show all/Hide columns button, depending on the required view
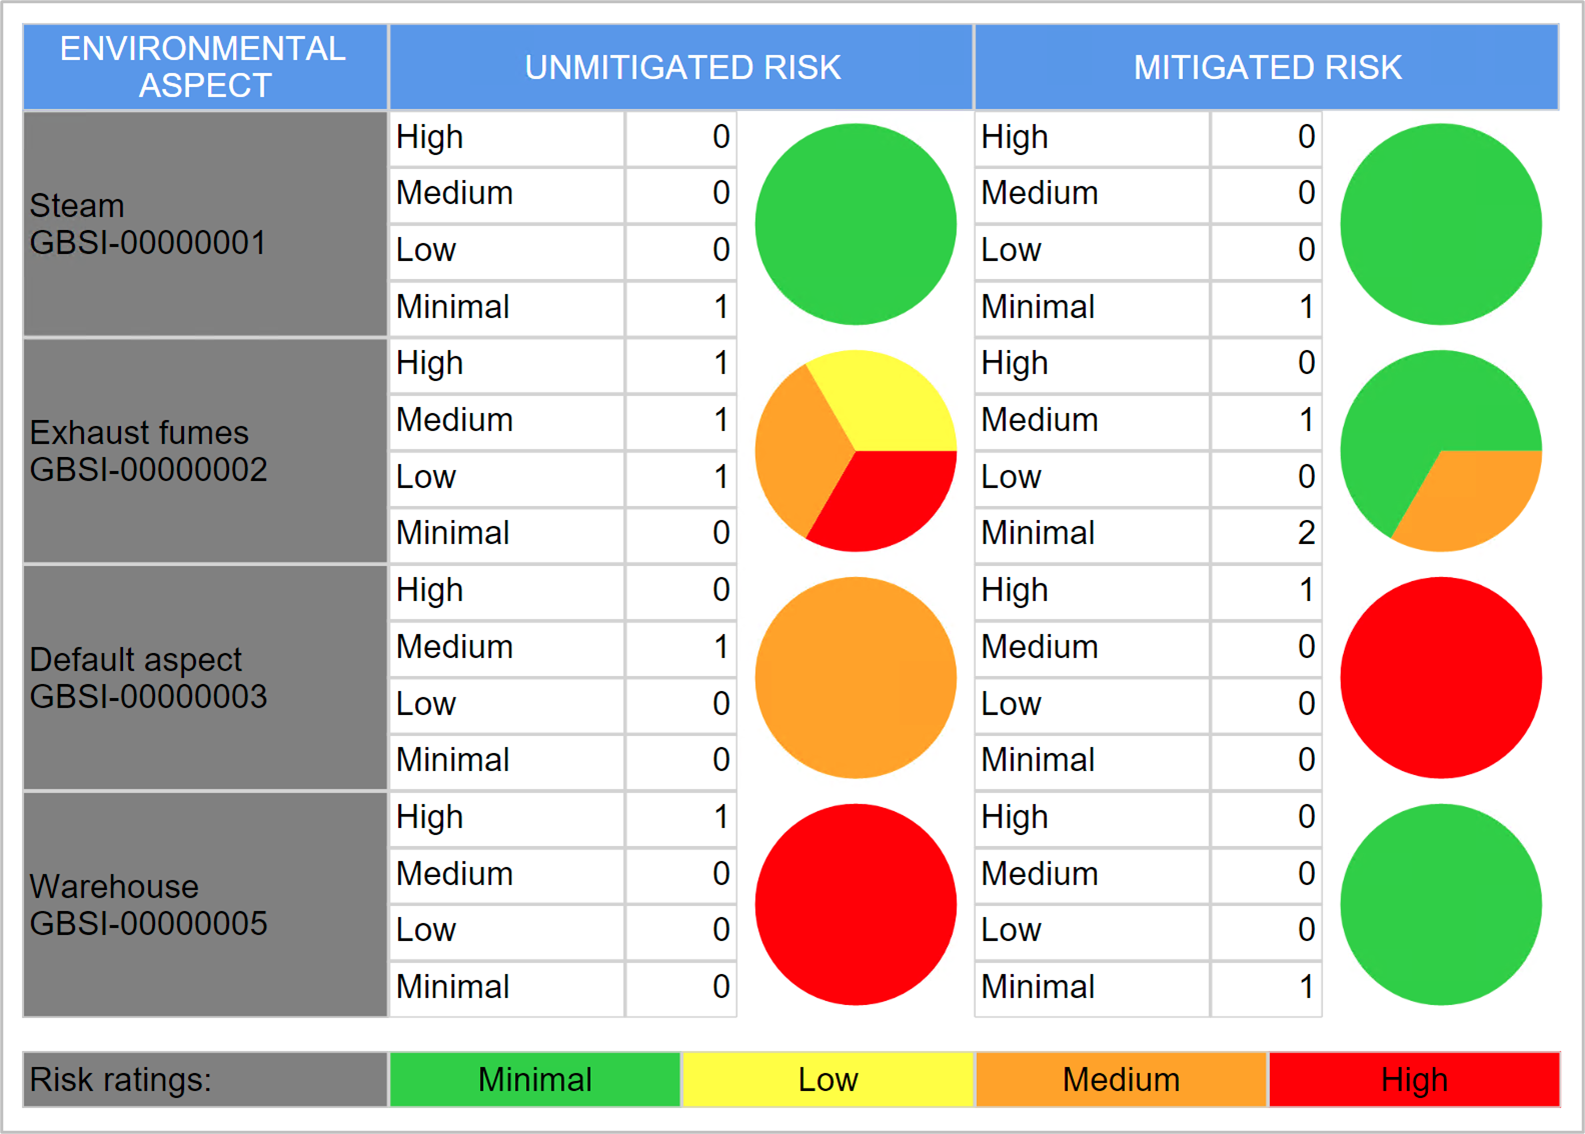
¶ 2. Environmental impact report
HSE > Environmental > Reports and inquiries > Environmental impact report
Select the parameters and then click OK
¶ 3. Waste register report
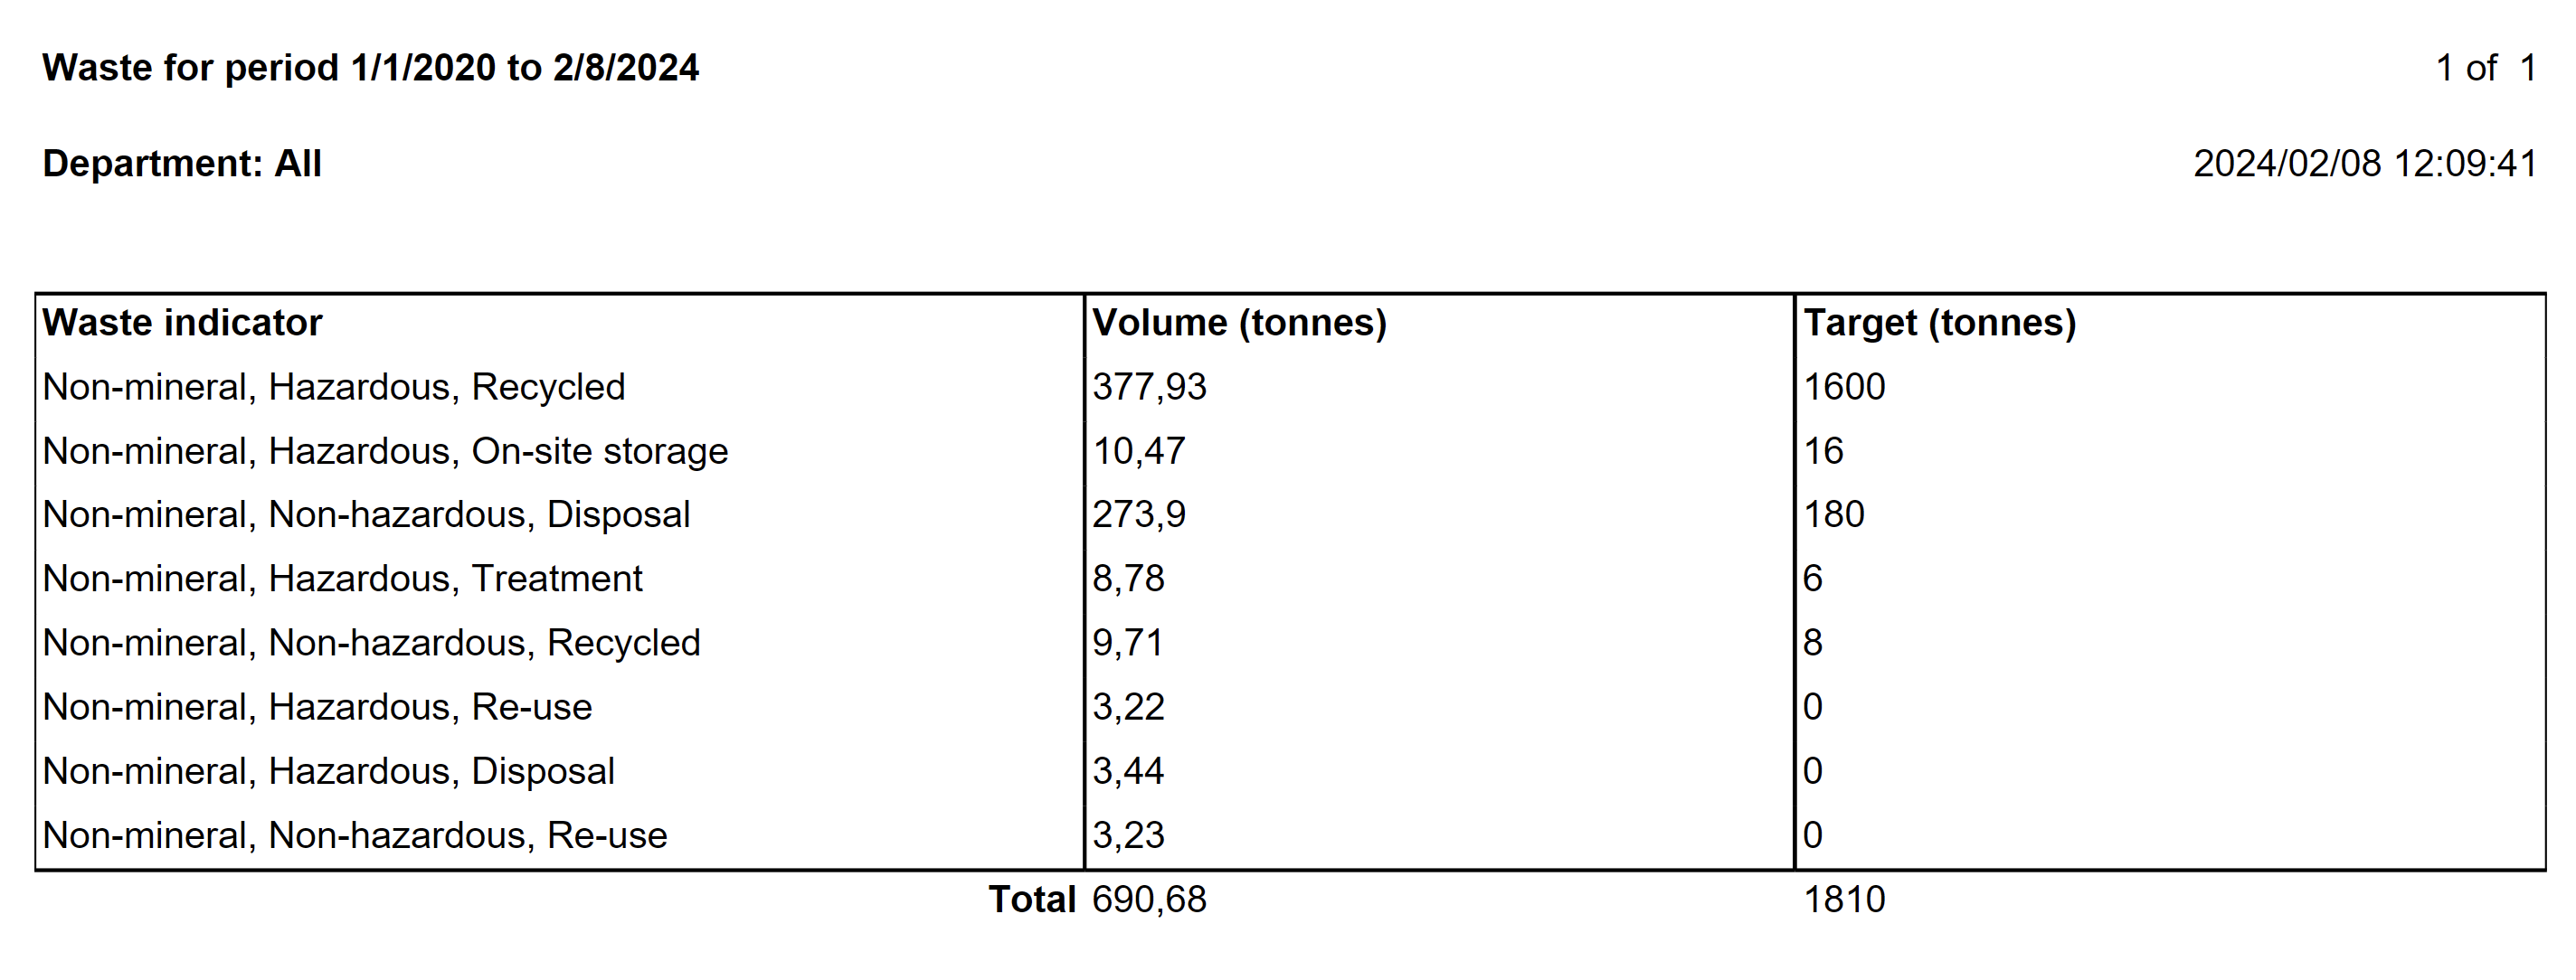
HSE > Environmental > Reports and inquiries > Waste register report
Select the parameters and then click OK
¶ Safety and security Reports & Inquiries
¶ 4. Hazards by classification
HSE > Hazards > Reports and inquiries > Hazards by classification report
Select the parameters and then click OK
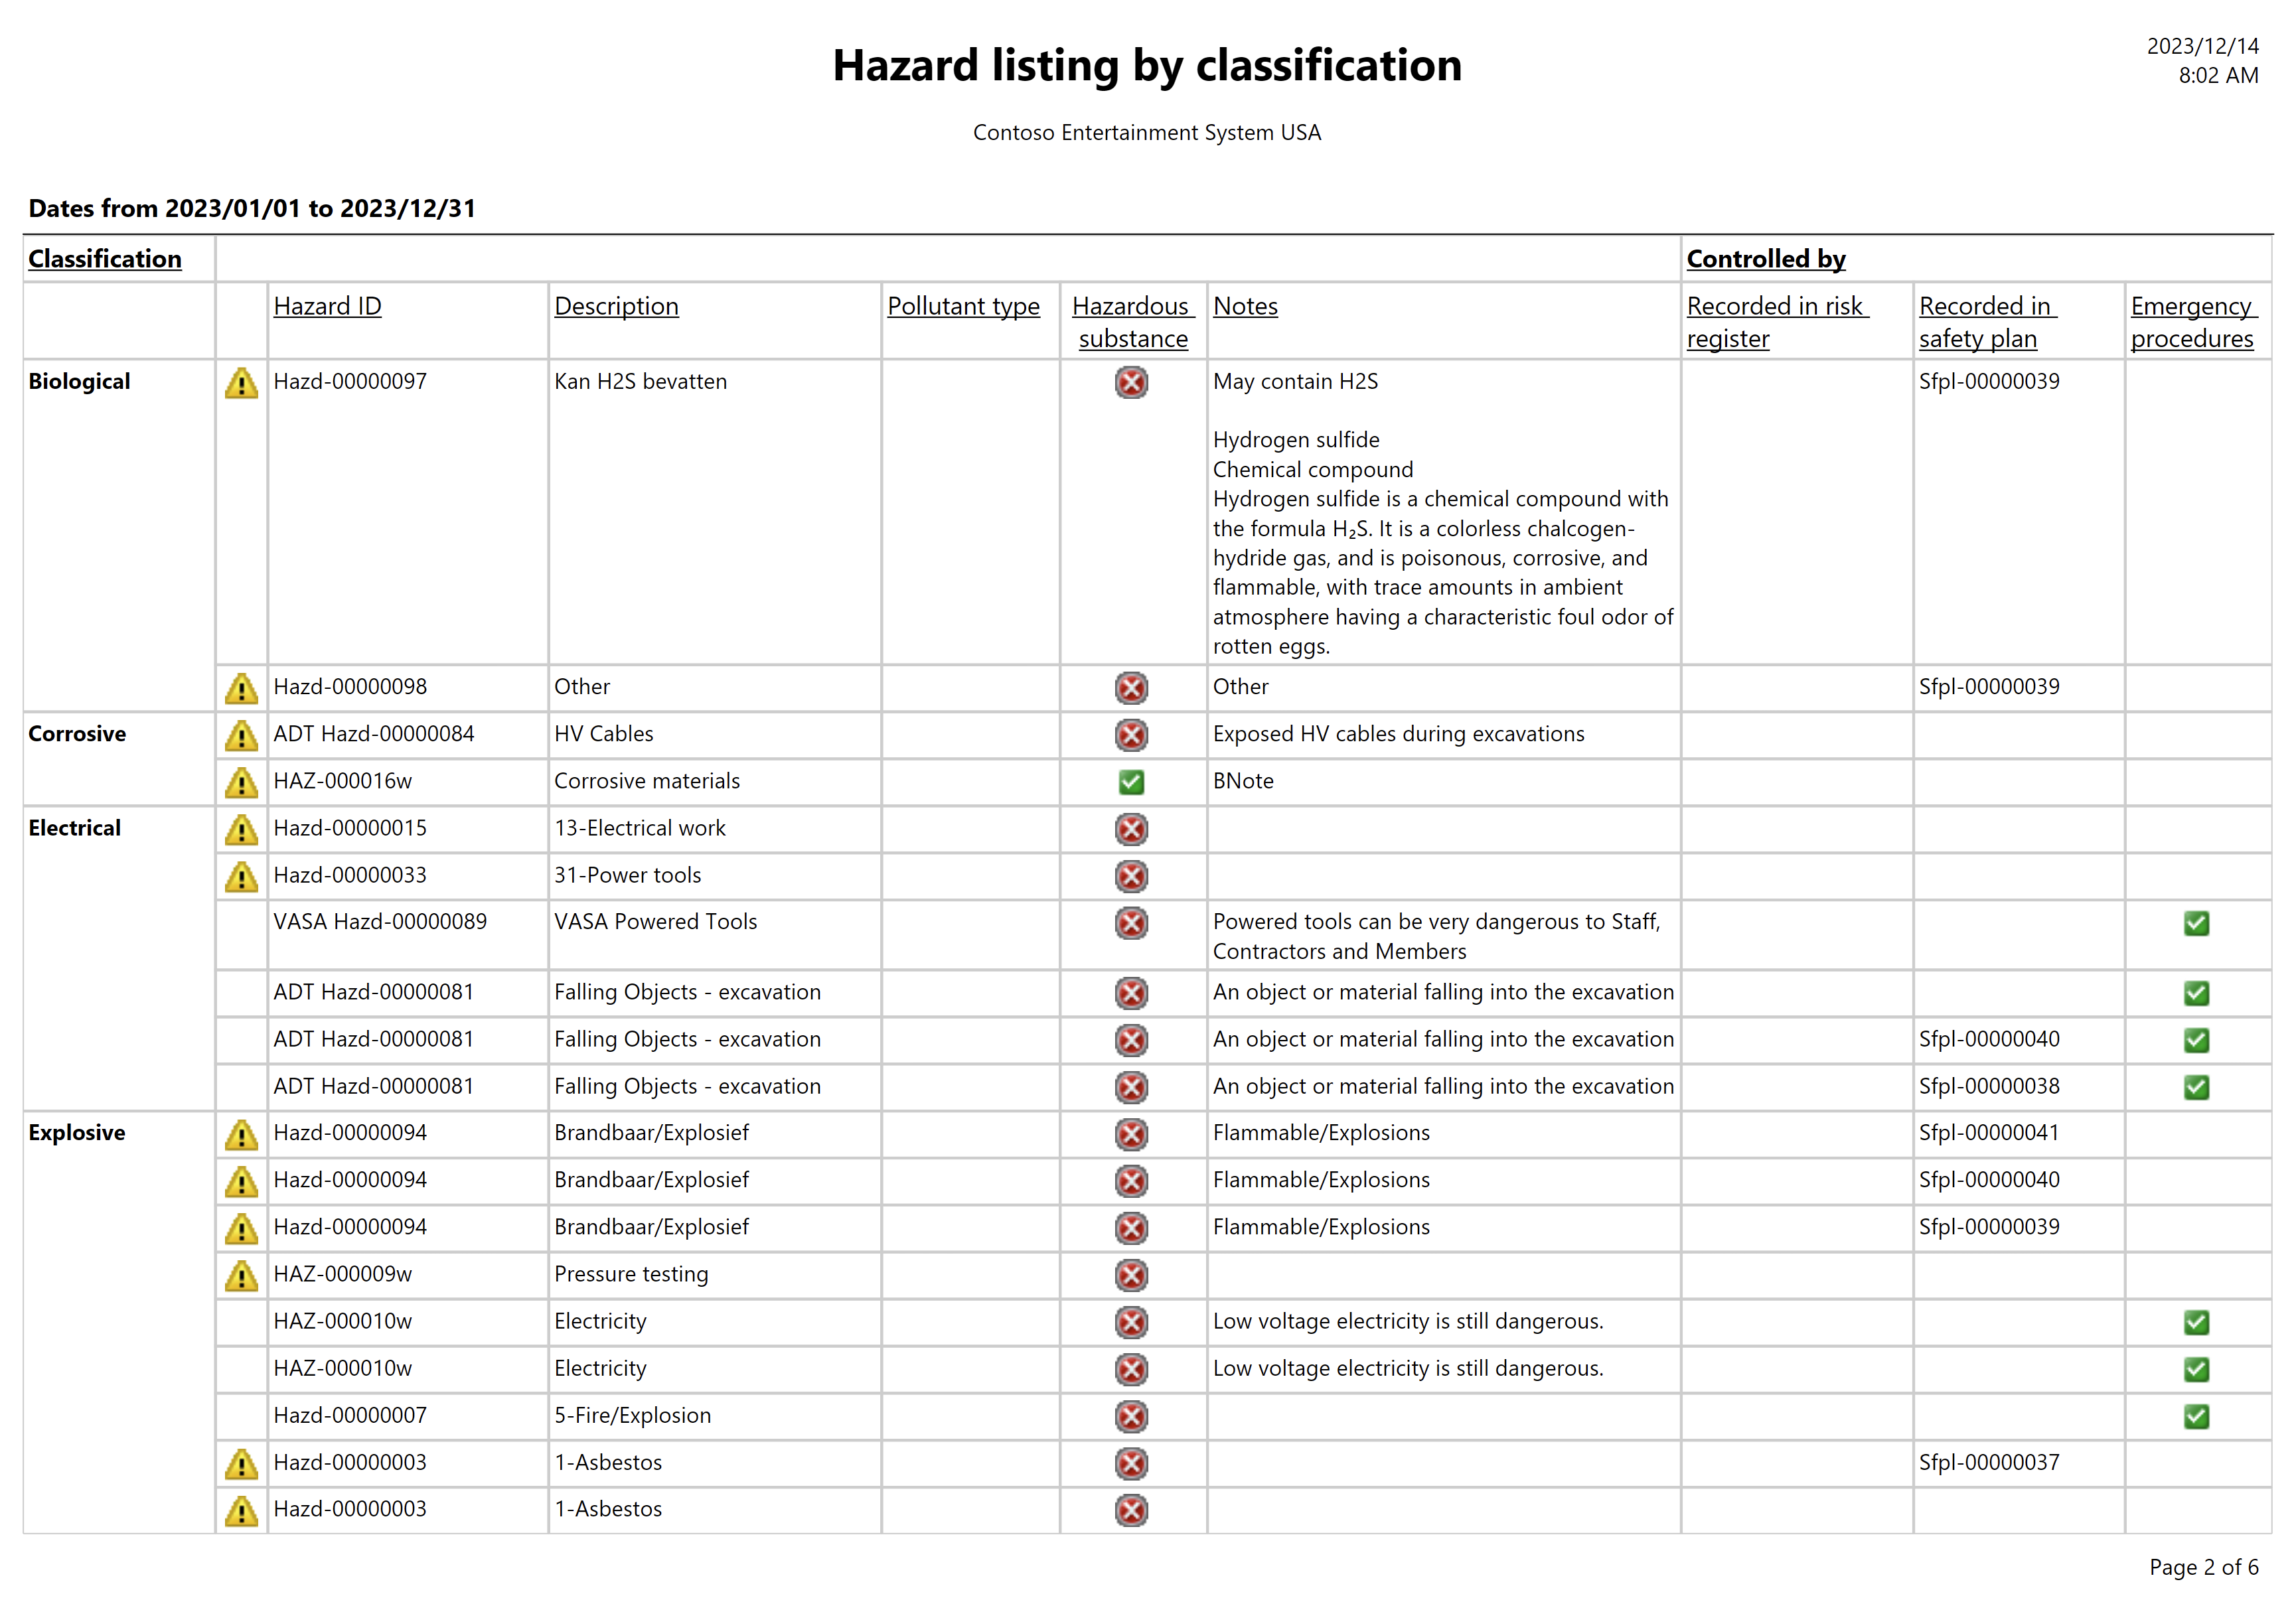
After Hazards have been identified and recorded, and controls have been put in place to mitigate the possible realization of a hazard, users can view the listed hazards per category. This report will also flag if less than two controls are in place.
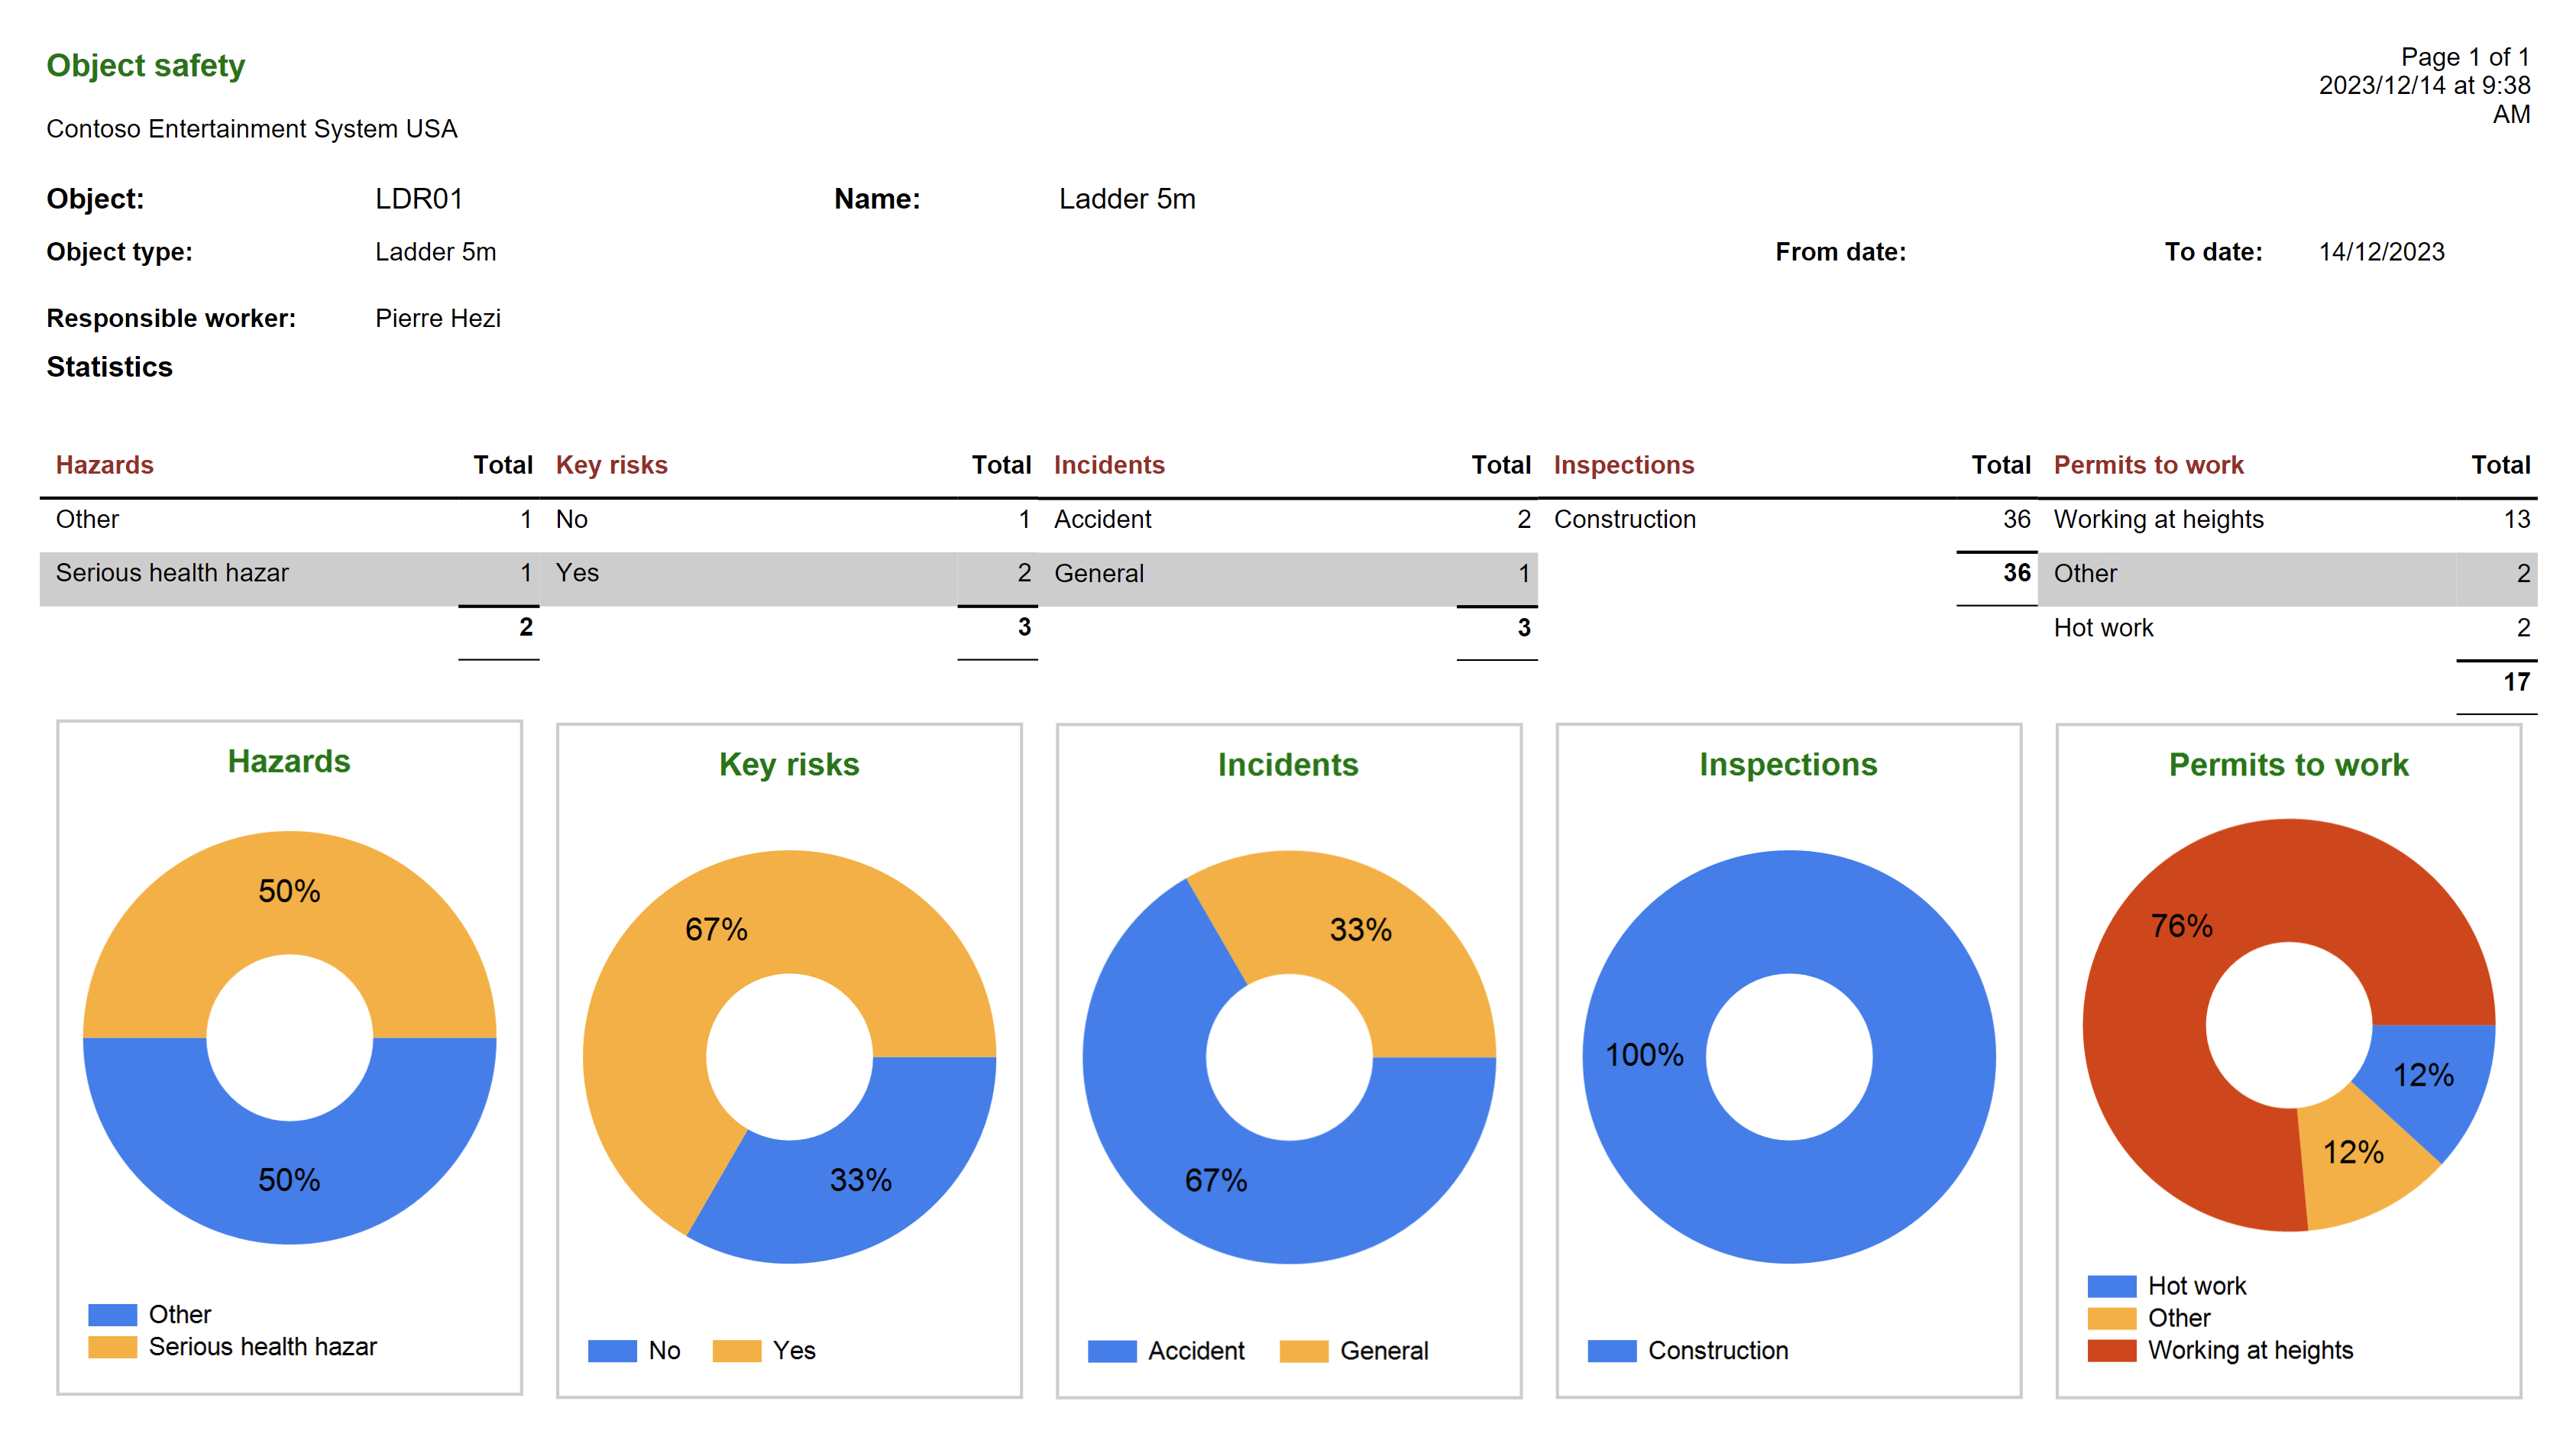
¶ 5. Object safety report
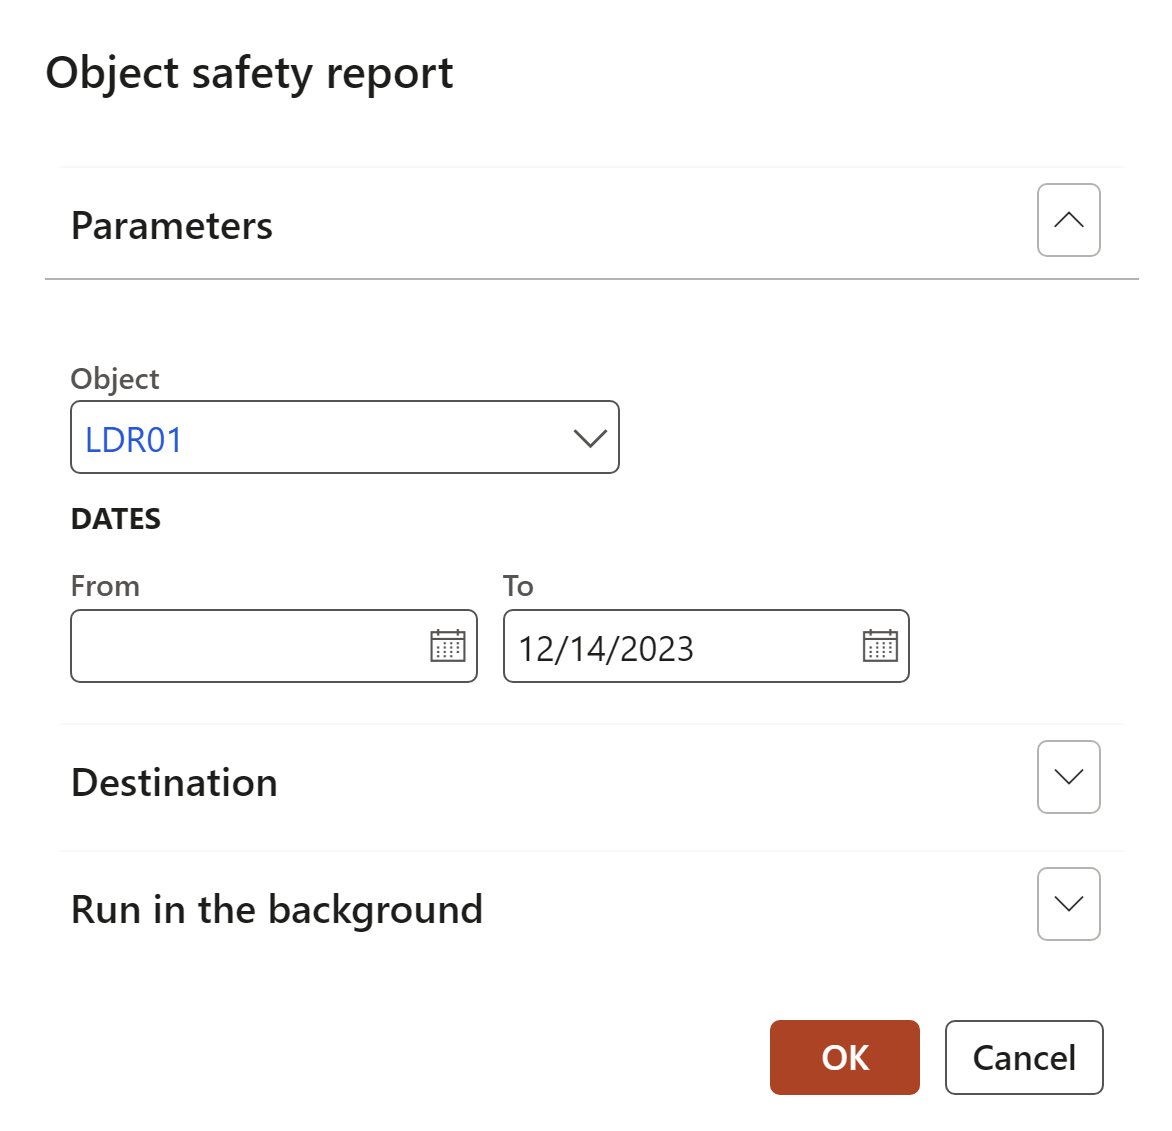
HSE > Safety and security > Reports and Inquiries > Object safety report
Select the parameters and then click OK
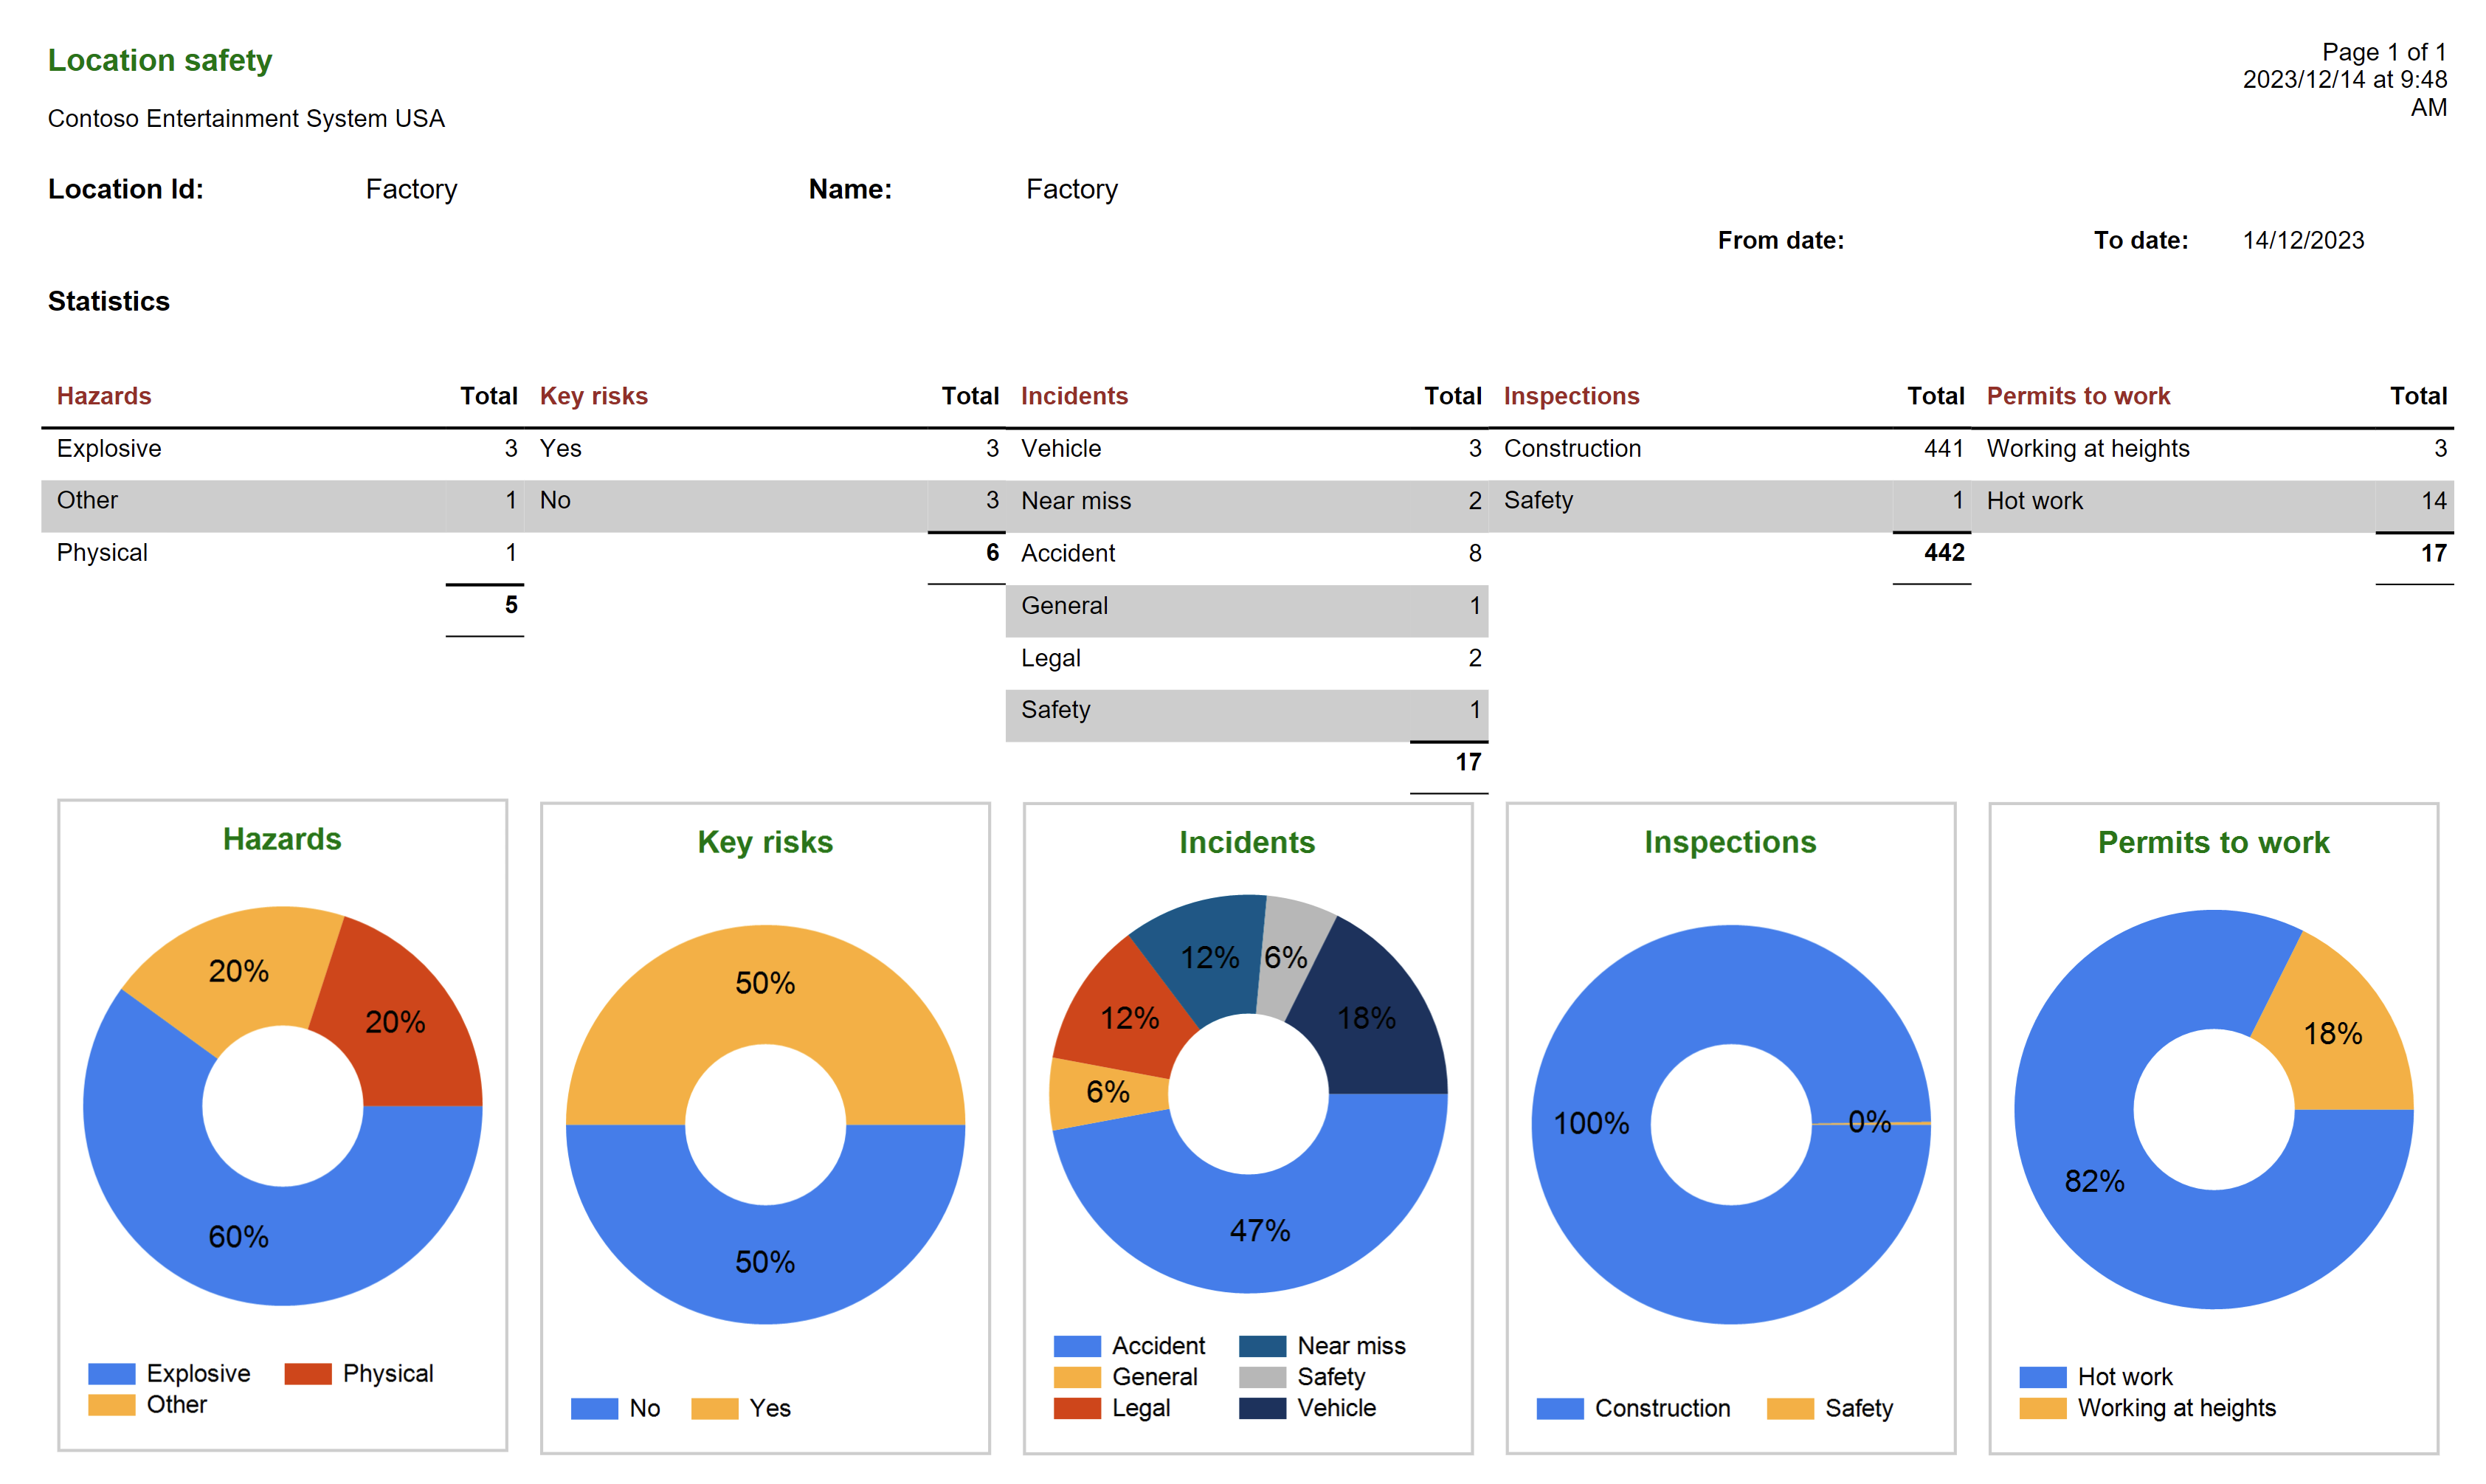
¶ 6. Location safety report
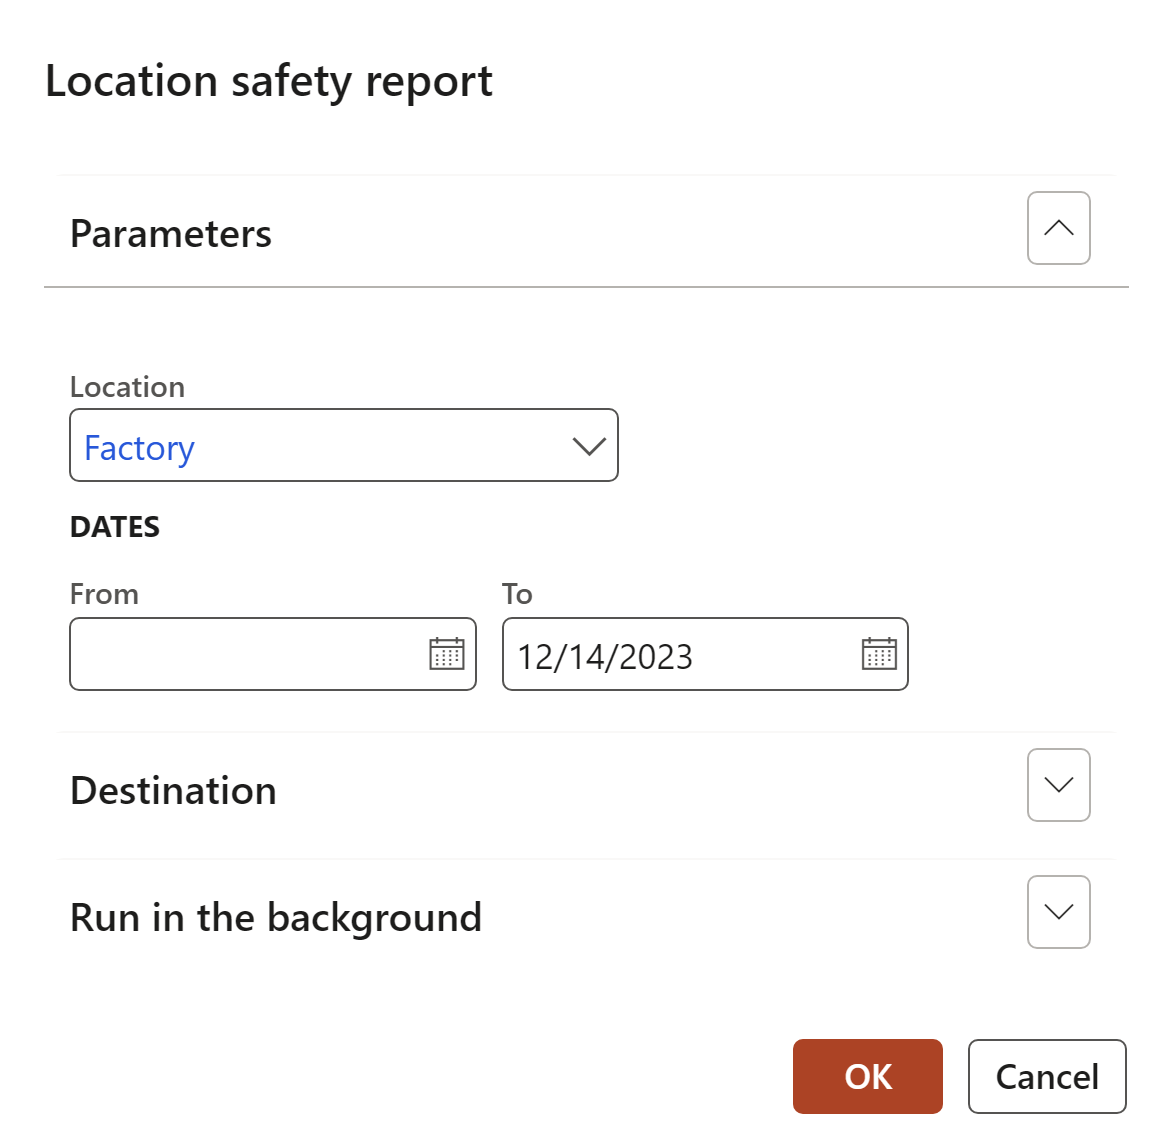
HSE > Safety and security > Reports and Inquiries > Location safety report
Select the parameters and then click OK
¶ 7. Safety meetings graph
HSE > Safety and security > Reports and inquiries > Safety meetings graph
Select the parameters and then click OK
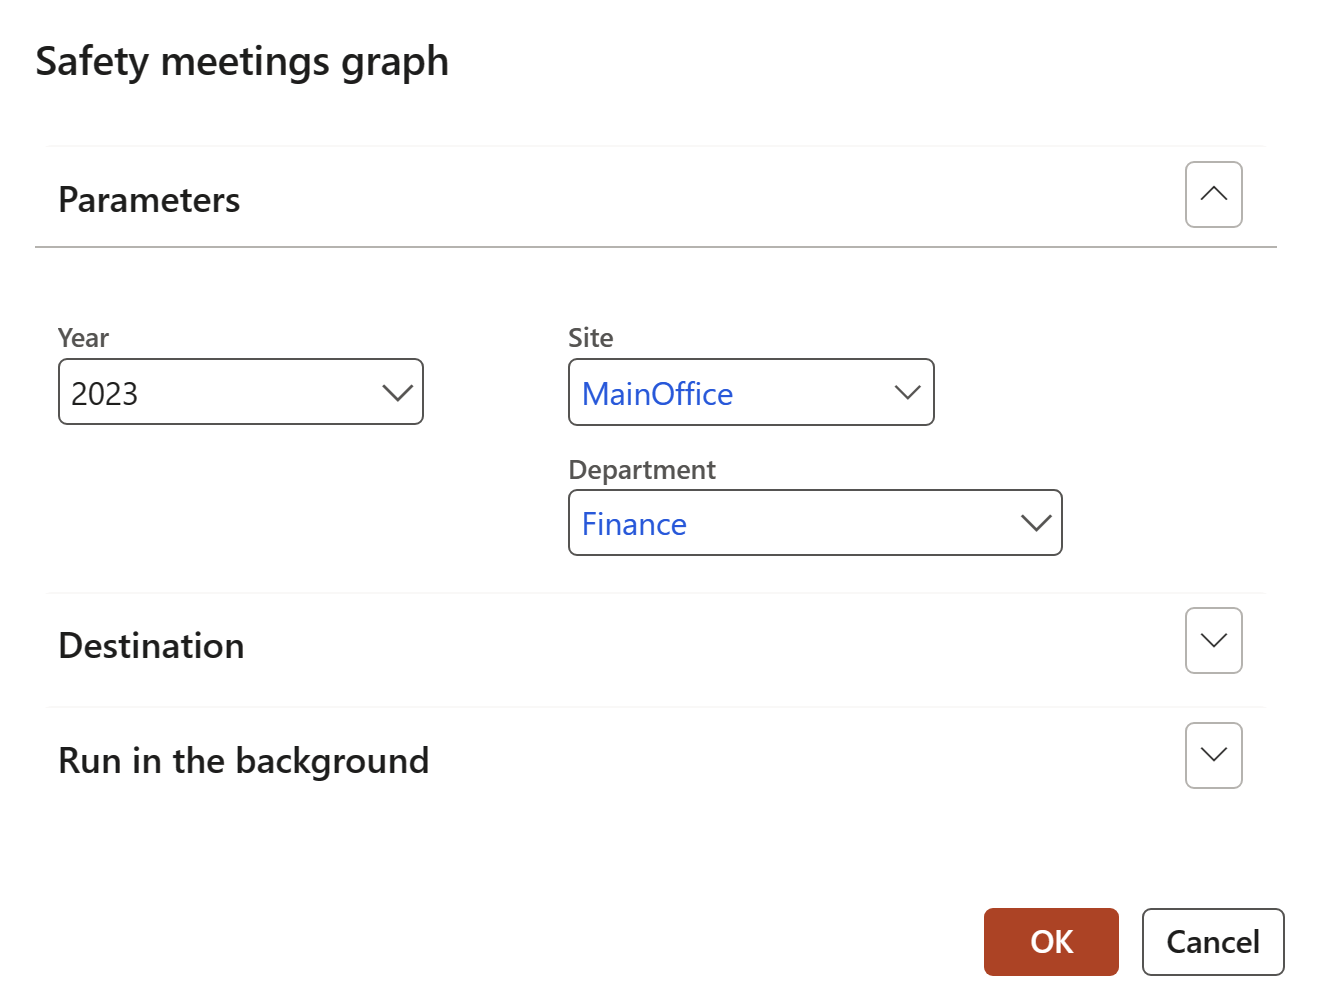
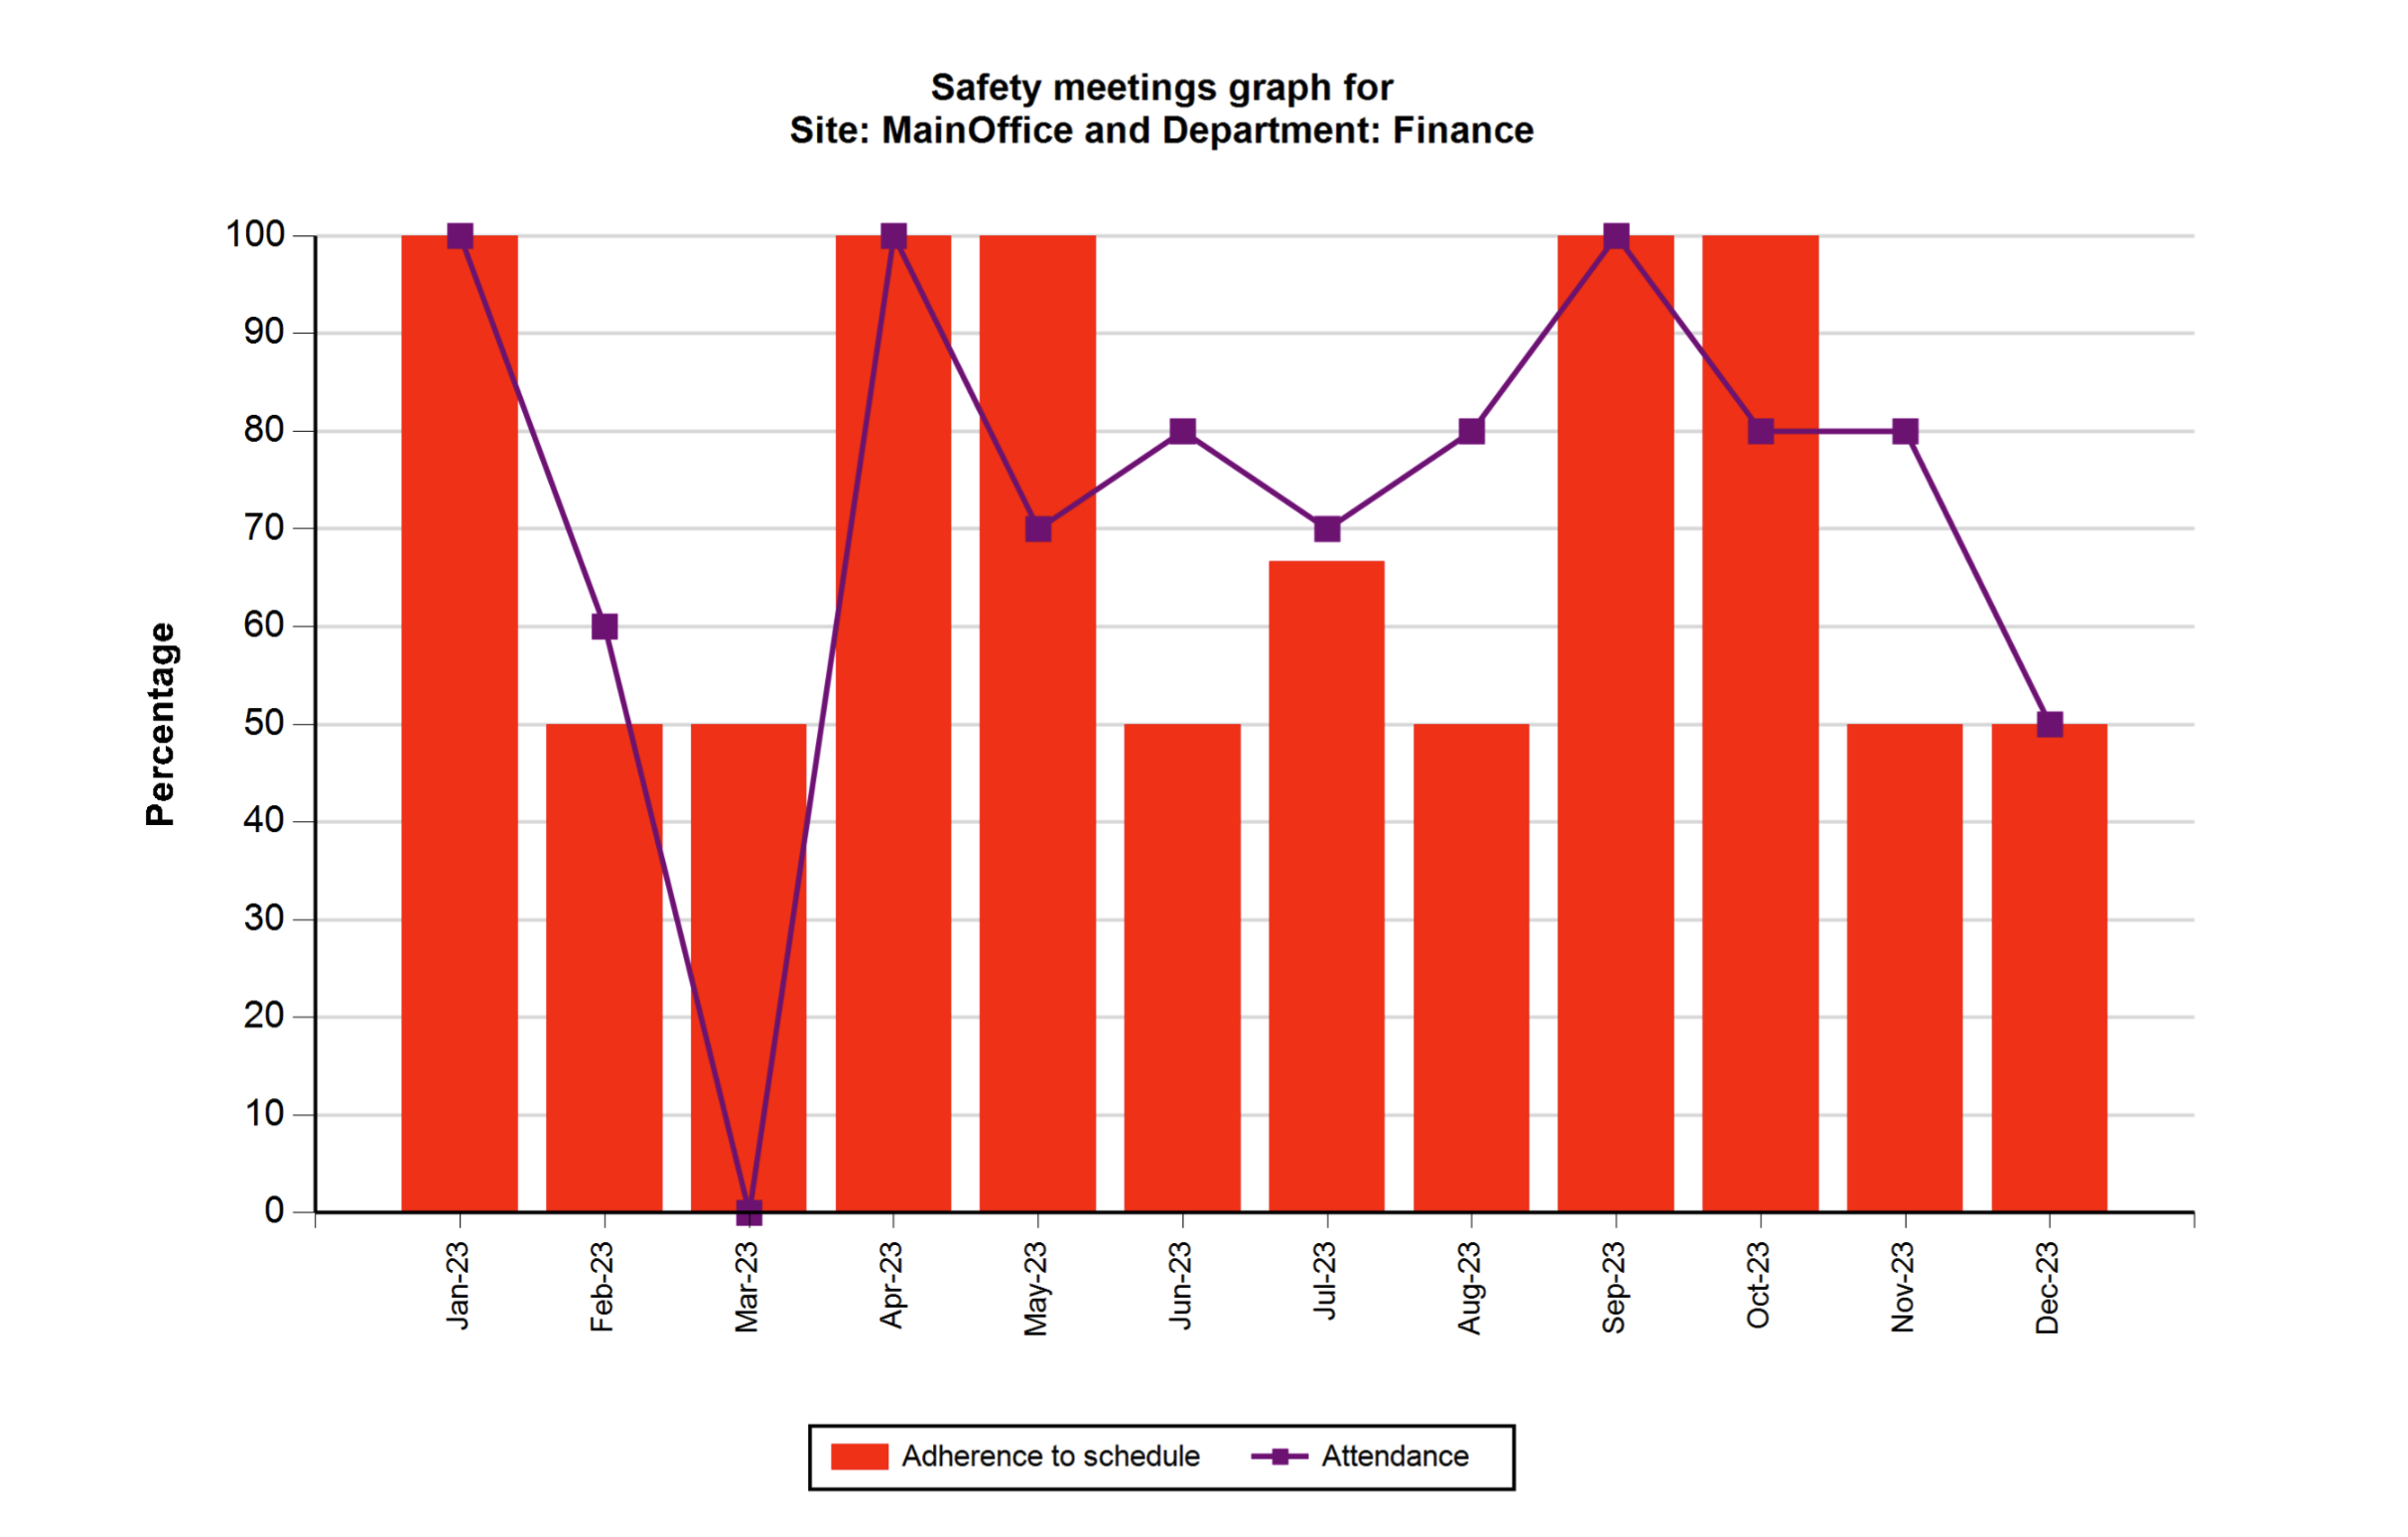
The above graph displays the adherence to scheduled meetings, as well as the attendance of the meetings. The data displayed can be filtered by year, site or department.
¶ 8. Hours worked graph
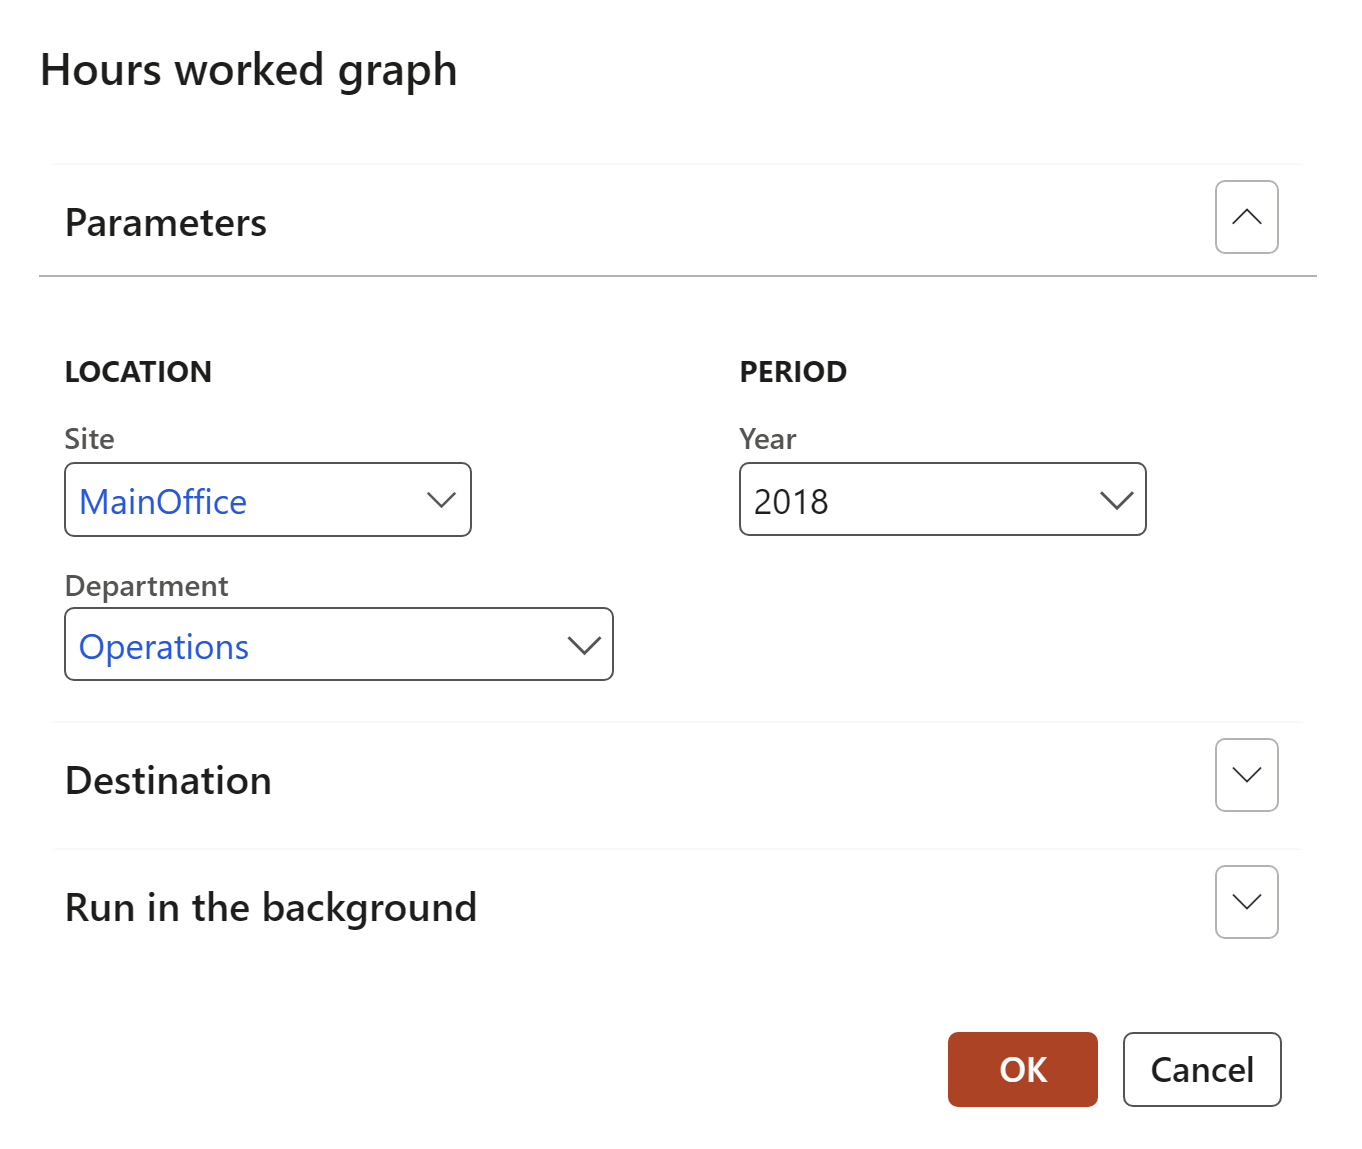
HSE > Safety and security > Reports and inquiries > Hours worked graph
Select the print destination and then click OK
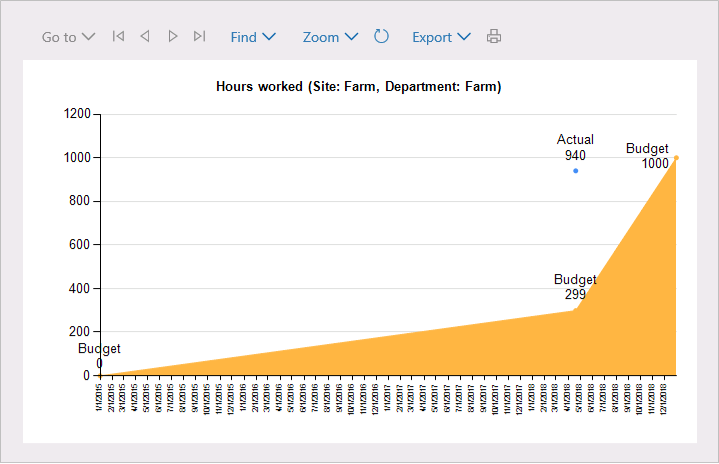
Users can view a progressive chart of hours worked
¶ 9. Safety objects report
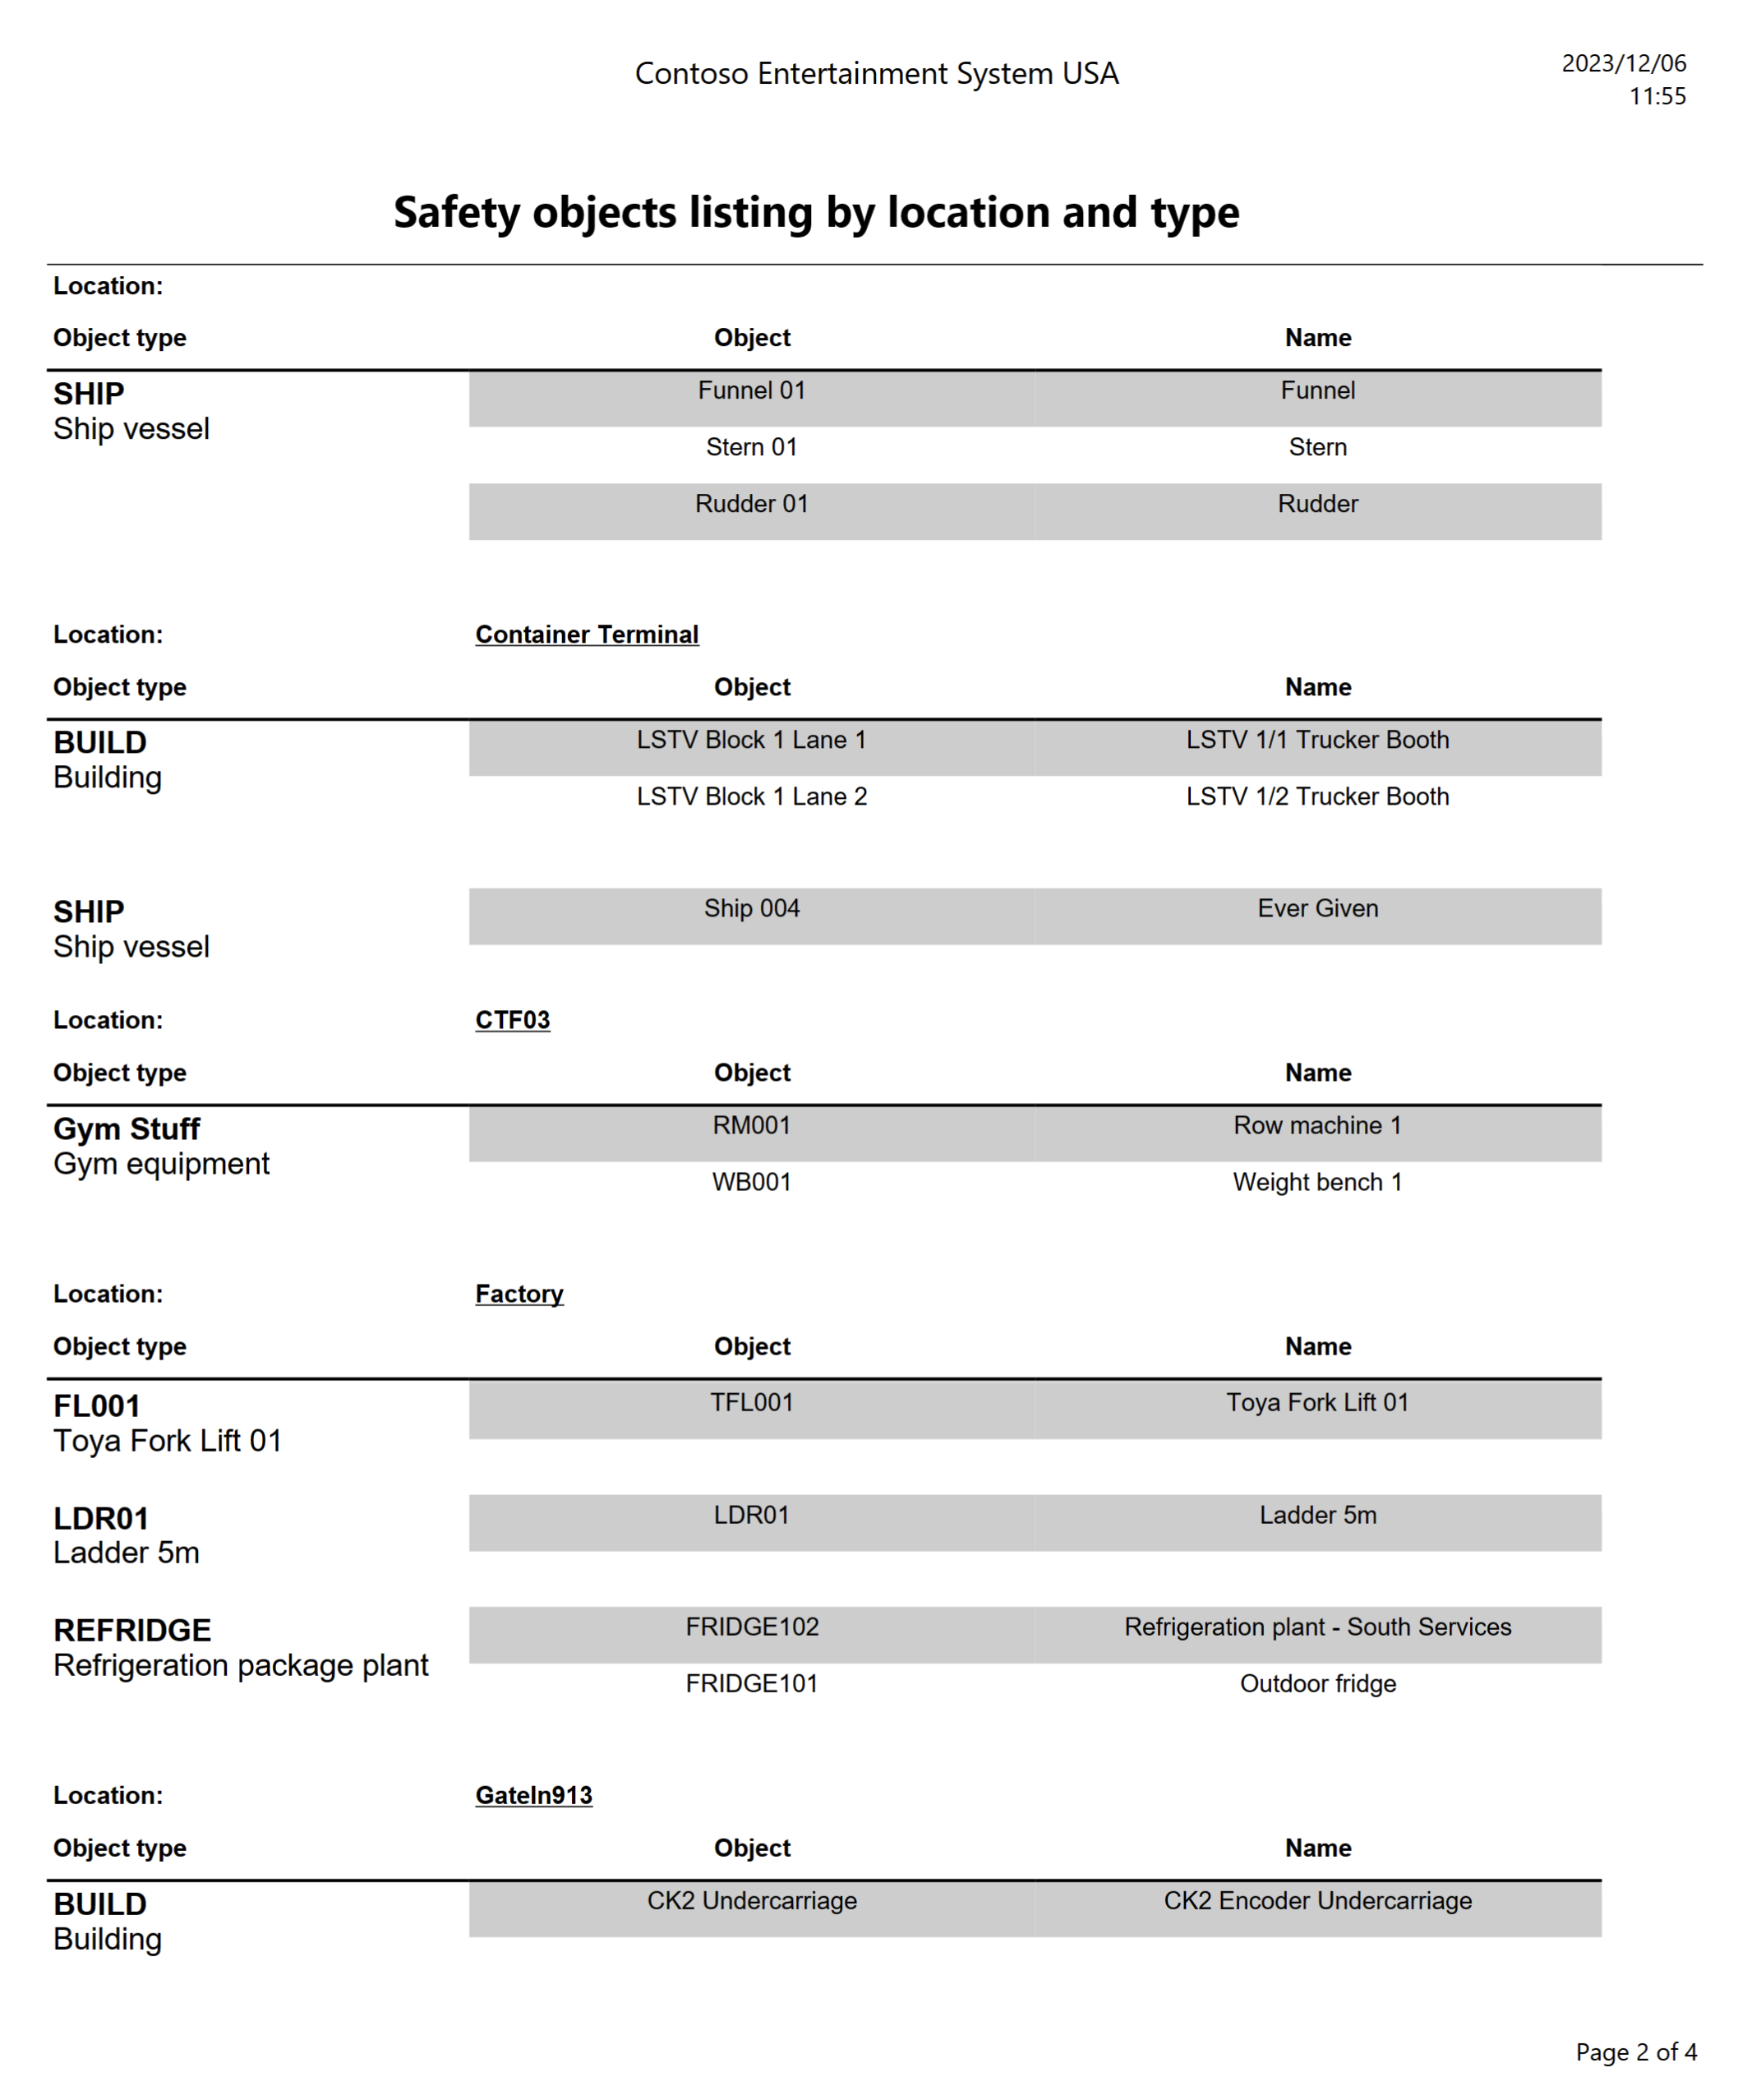
HSE > Safety and security > Reports and inquiries > Safety objects report
Select the parameters and then click OK
¶ 10. Safety plan repot
HSE > Safety > Reports and Inquiries > Safety plan report
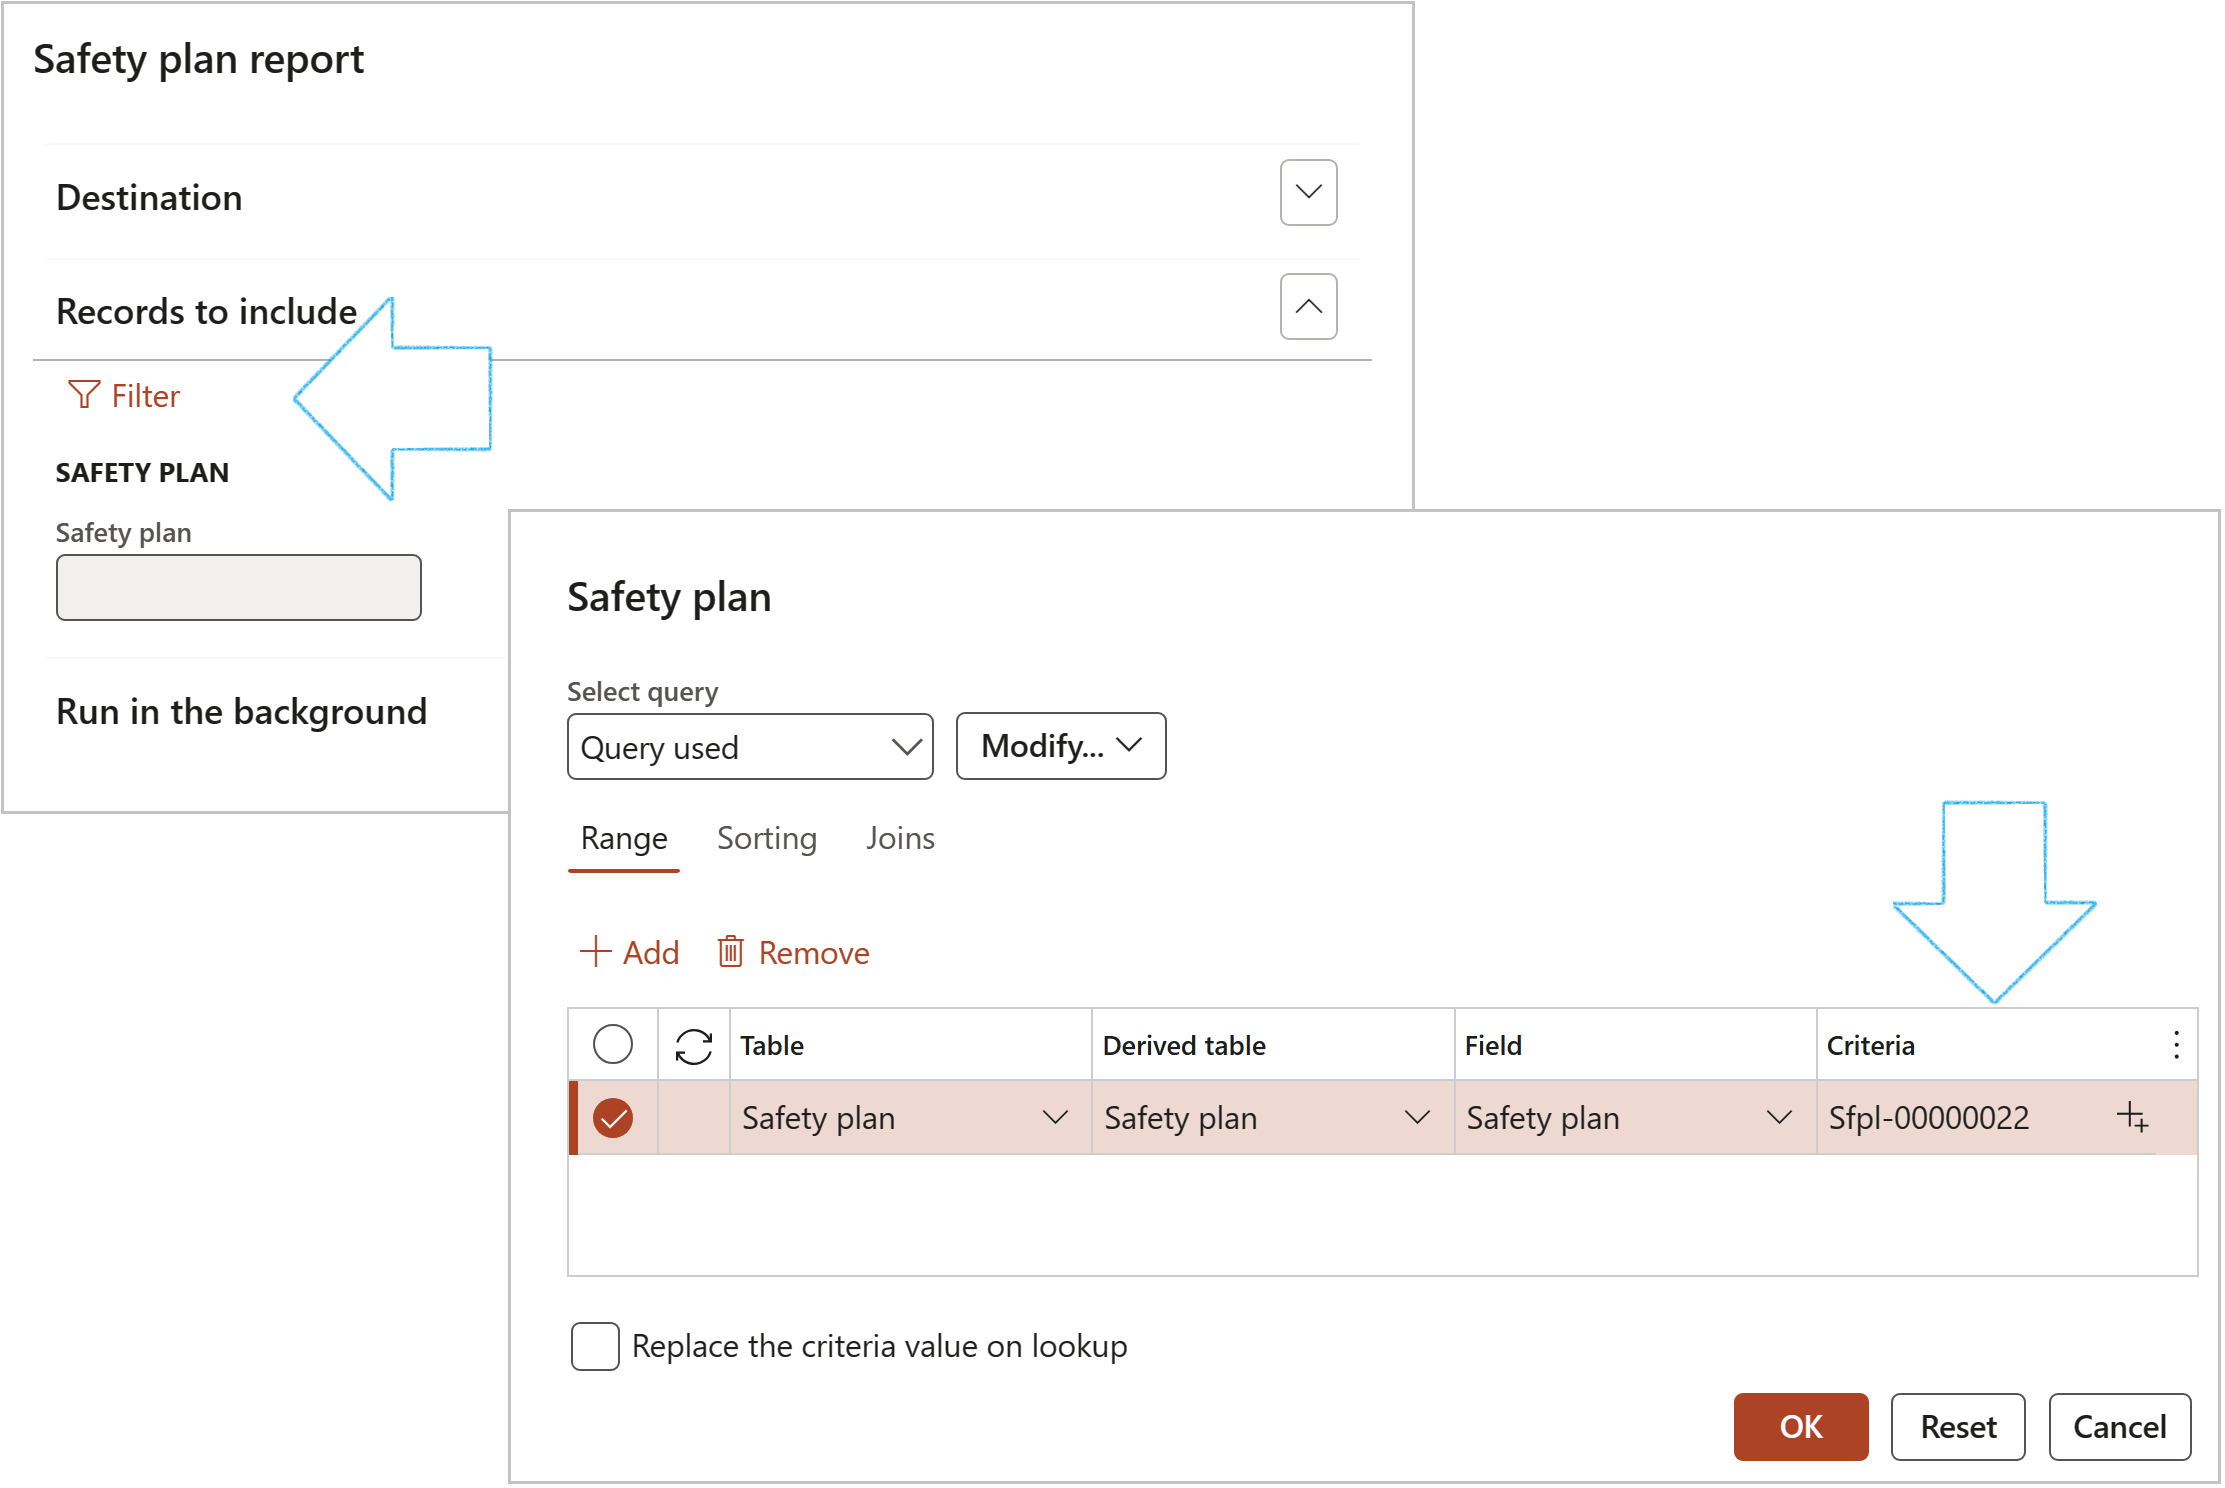
On the Safety plan dialog, click on the Filter button, then select the Records to include and click on OK
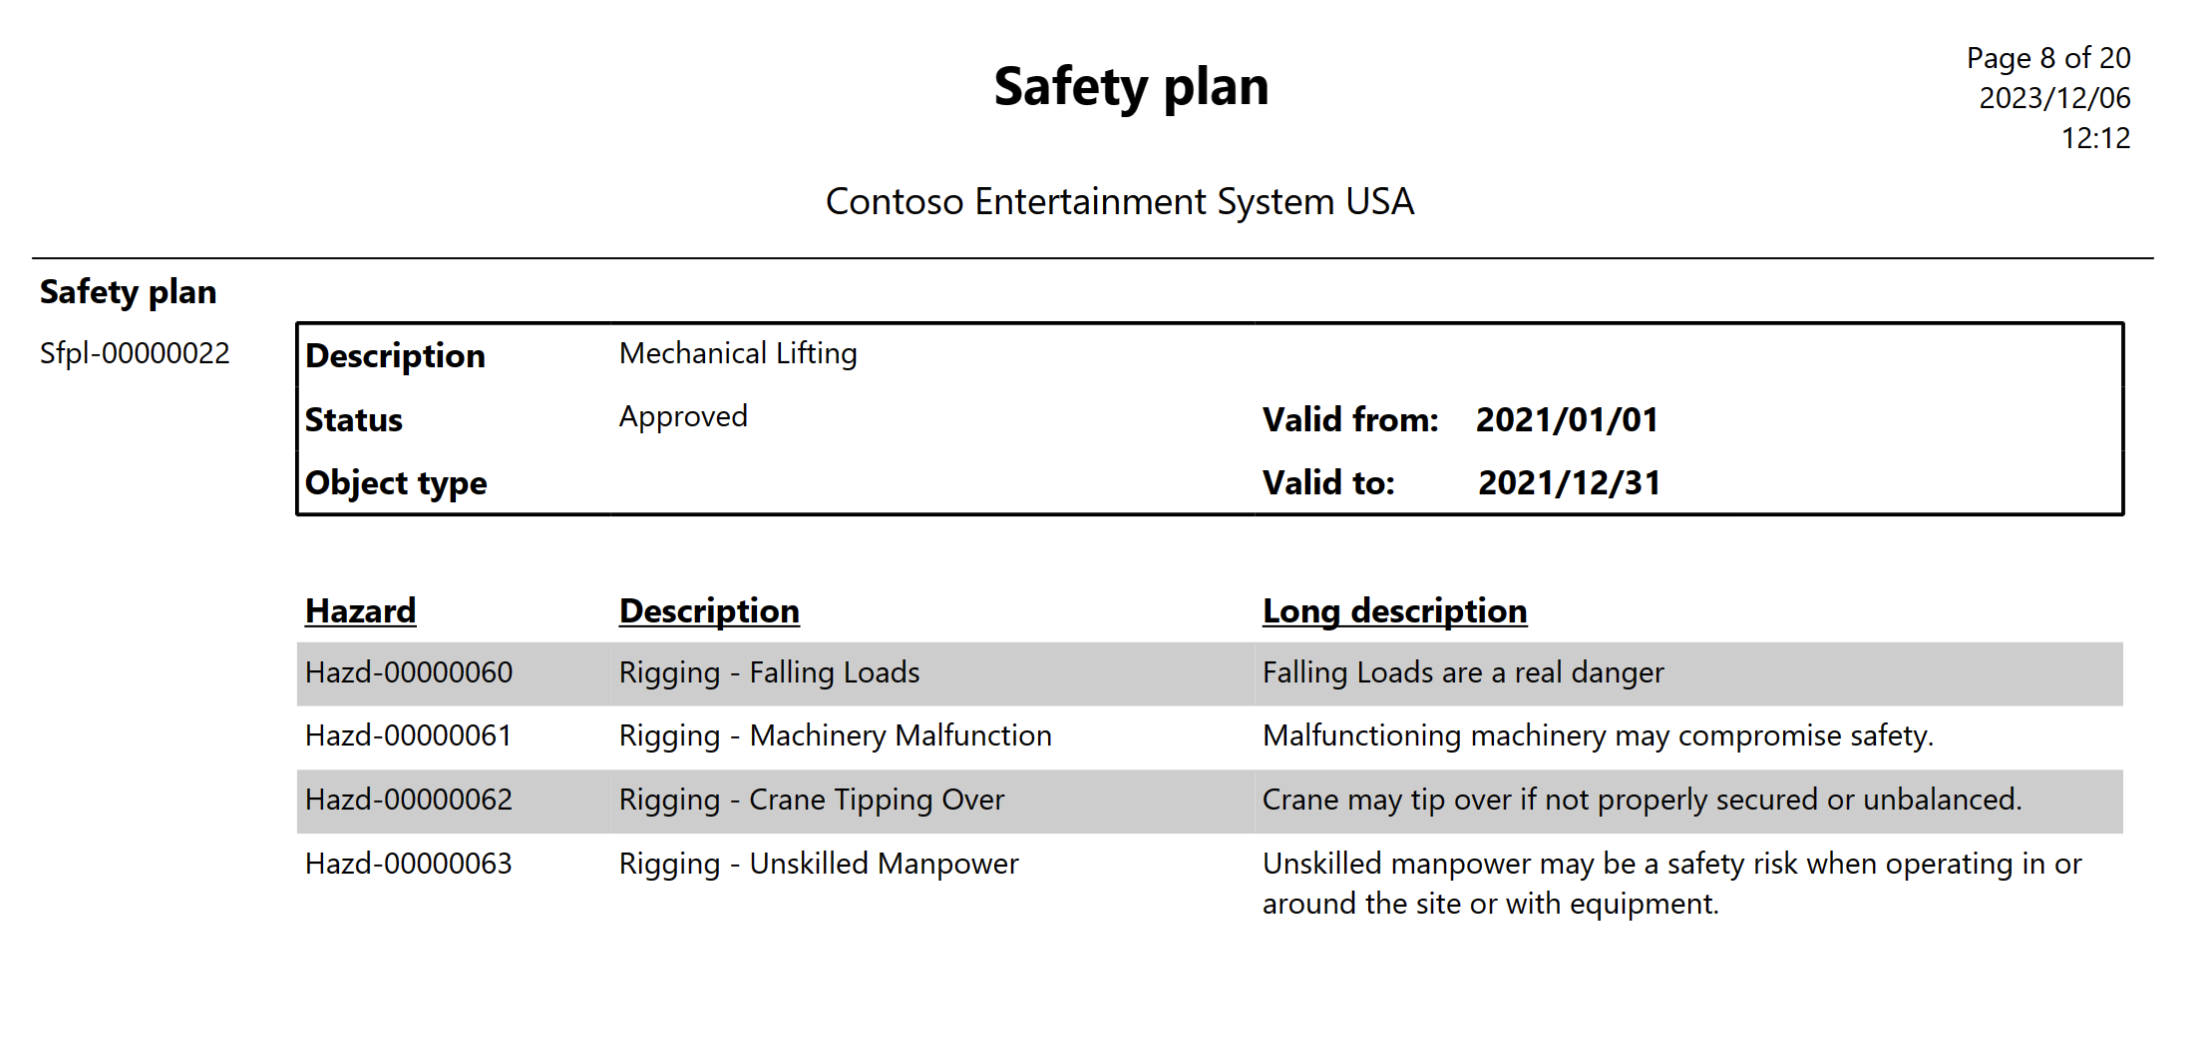
The Safety plan report gives a summary of the safety plan selected on the parameters dialog form.
¶ 11. Asbestos register
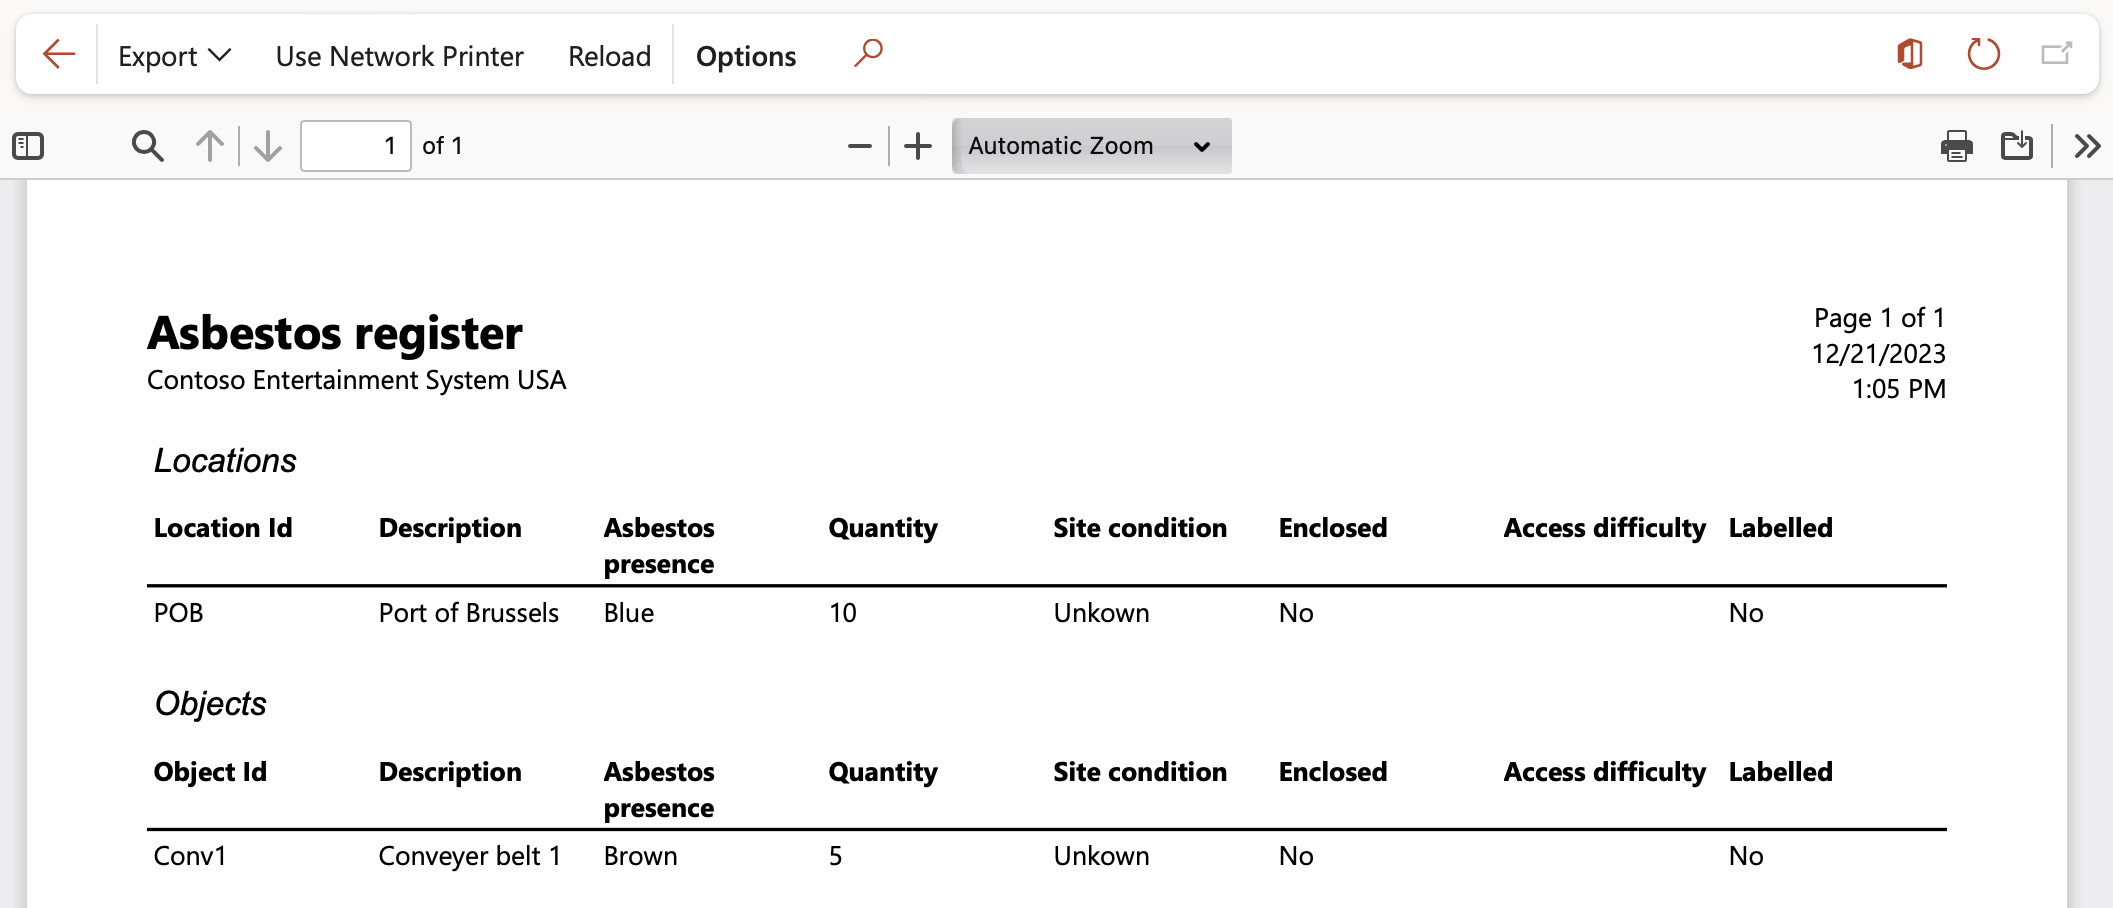
HSE > Safety and security > Reports and Inquiries > Asbestos register
¶ 12. Confined space register
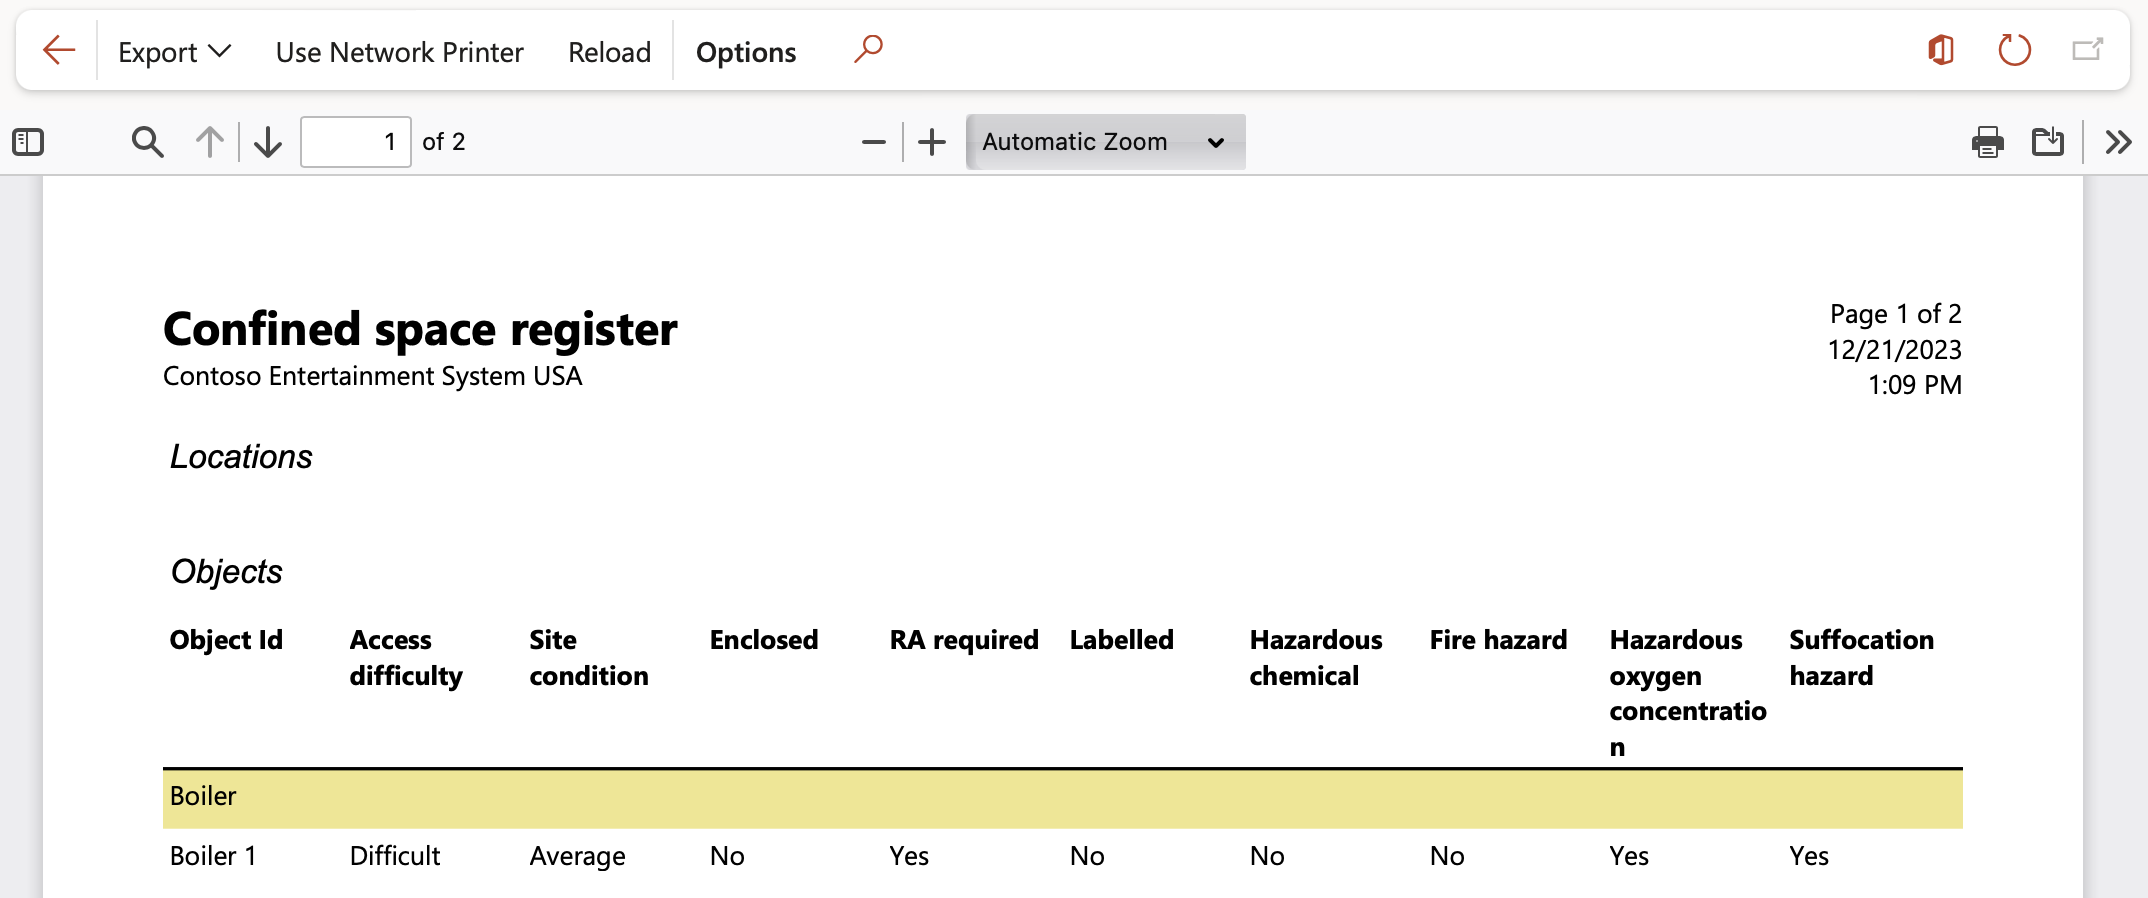
HSE > Safety and security > Reports and Inquiries > Confined space register
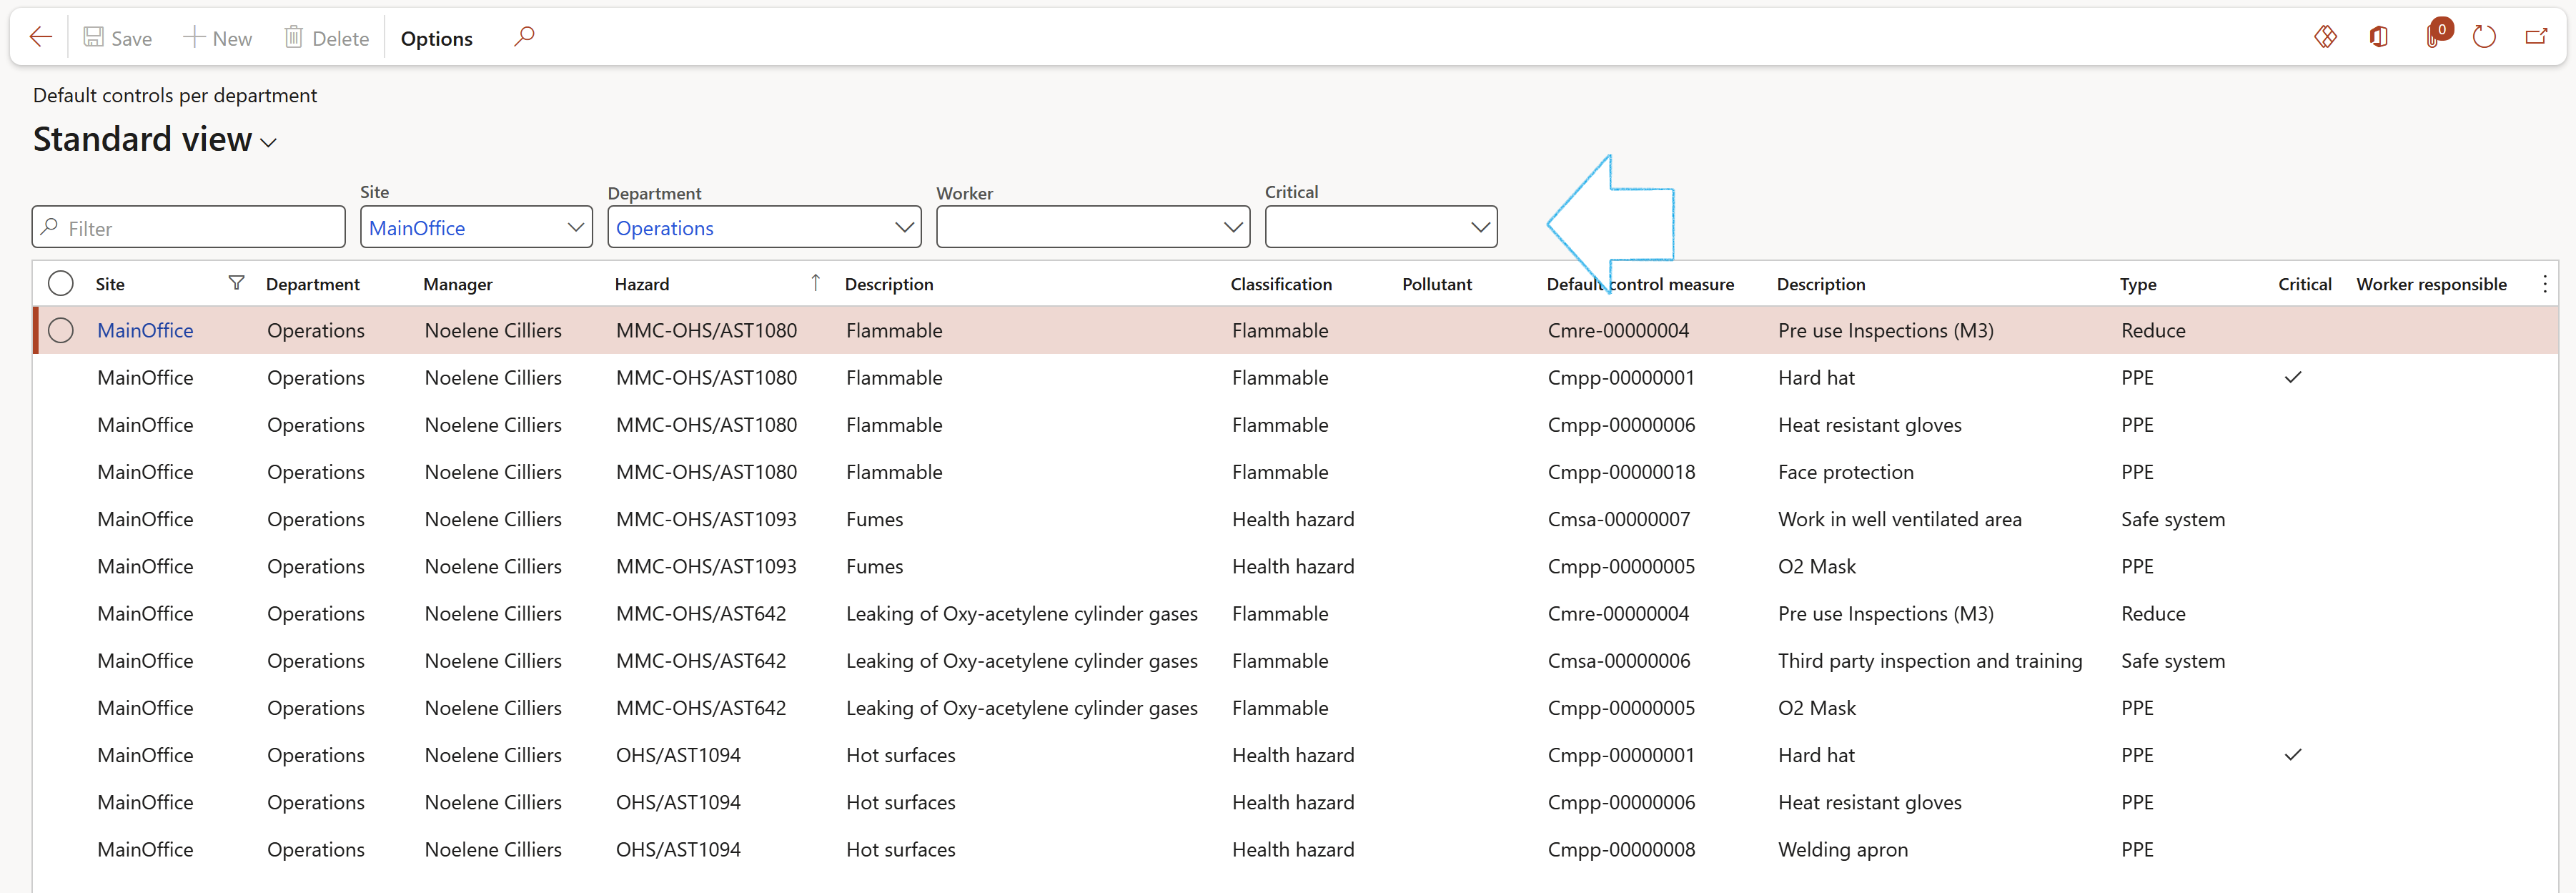
¶ 13. Default controls by department
HSE > Safety and security > Reports and Inquiries > Default controls by department
¶ Permits to work Reports & Inquiries
¶ 14. Permit to work
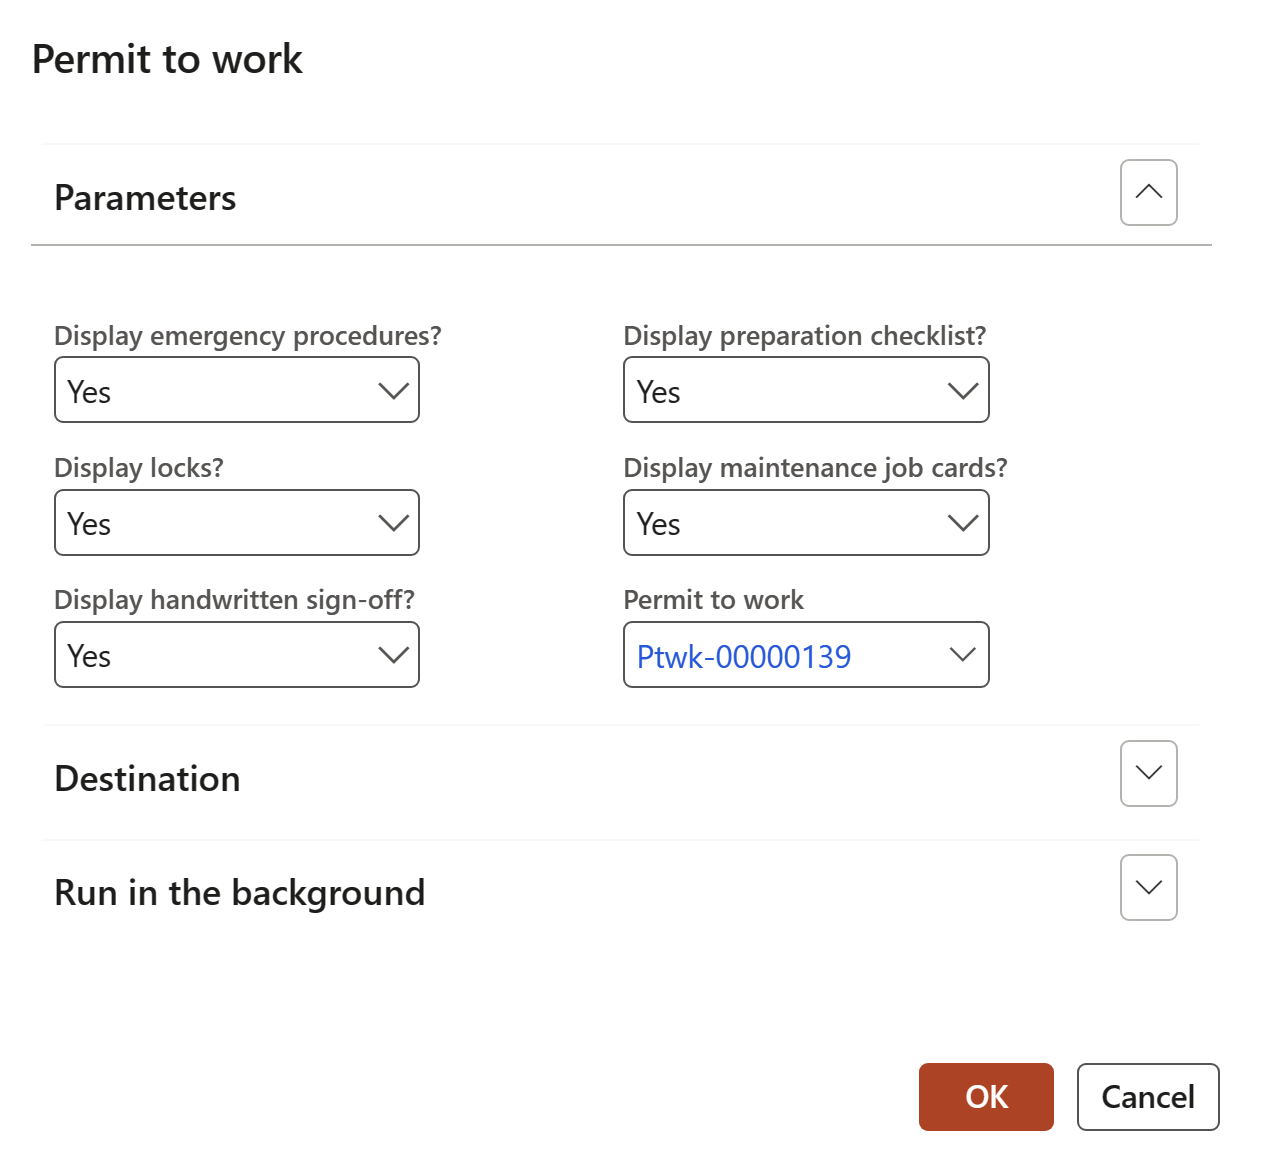
HSE > Permits to work > Reports and inquiries > Permit to work report
Select the parameters and then click OK
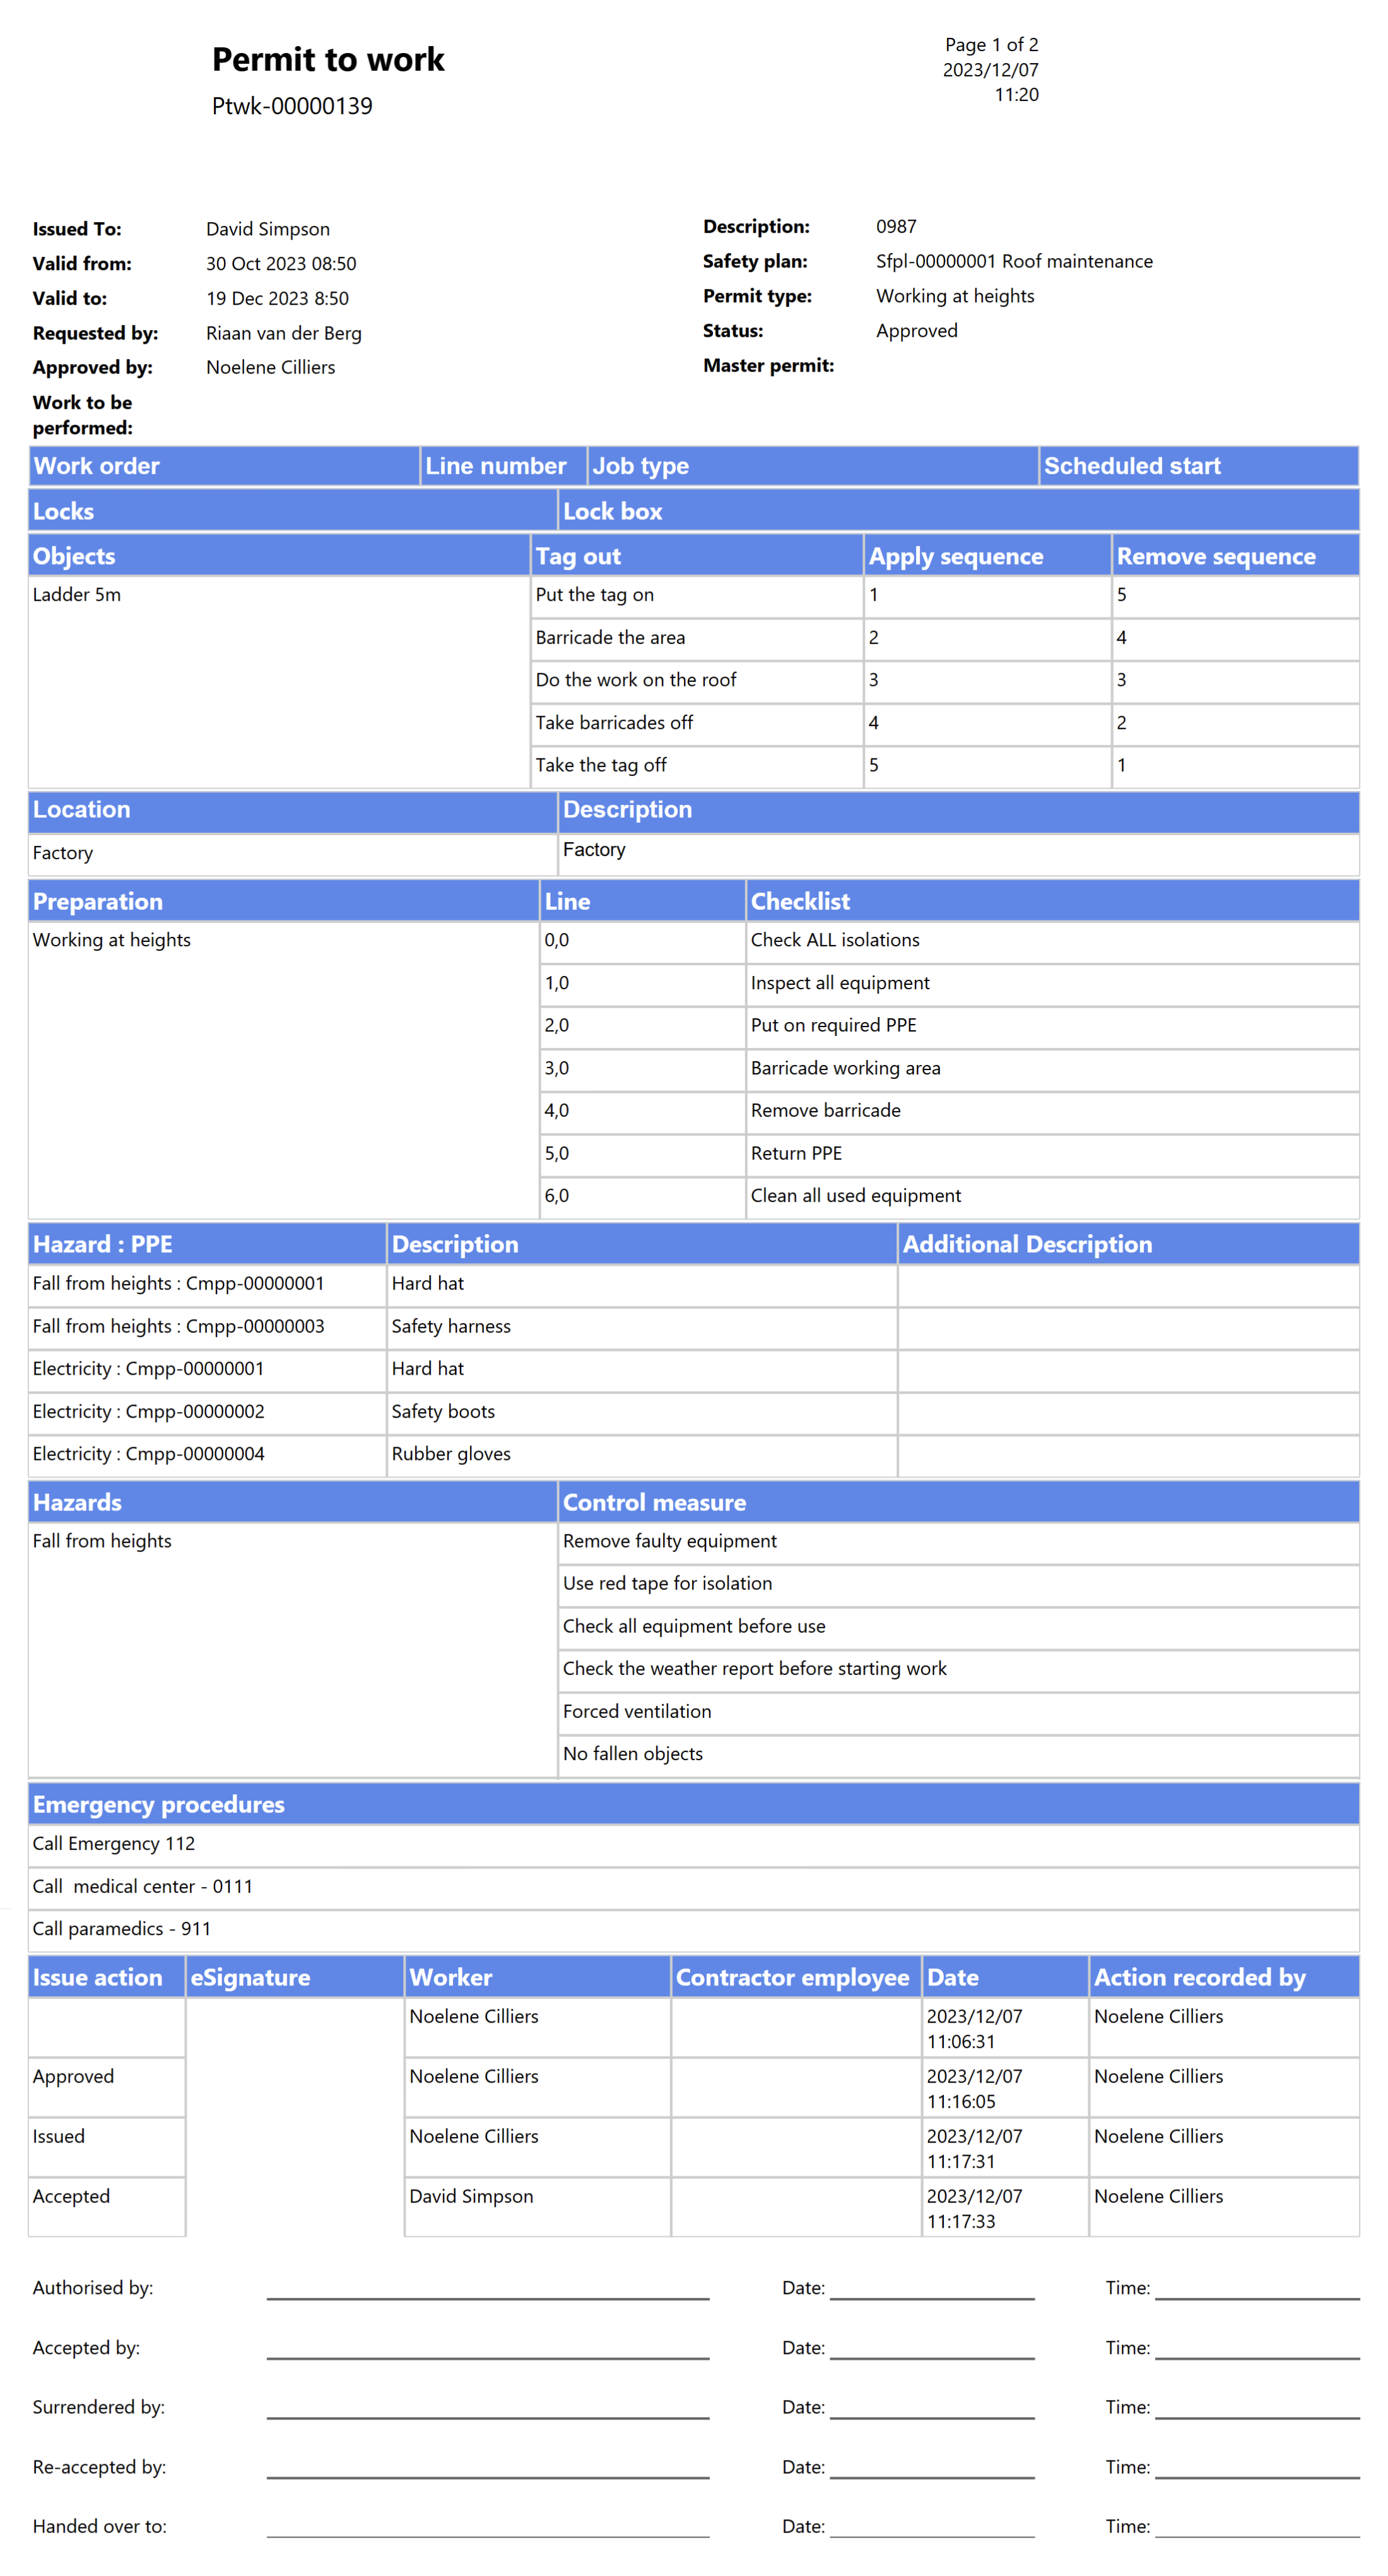
The Permit to work report displays relevant dates, isolations, objects, job plans and hazards.
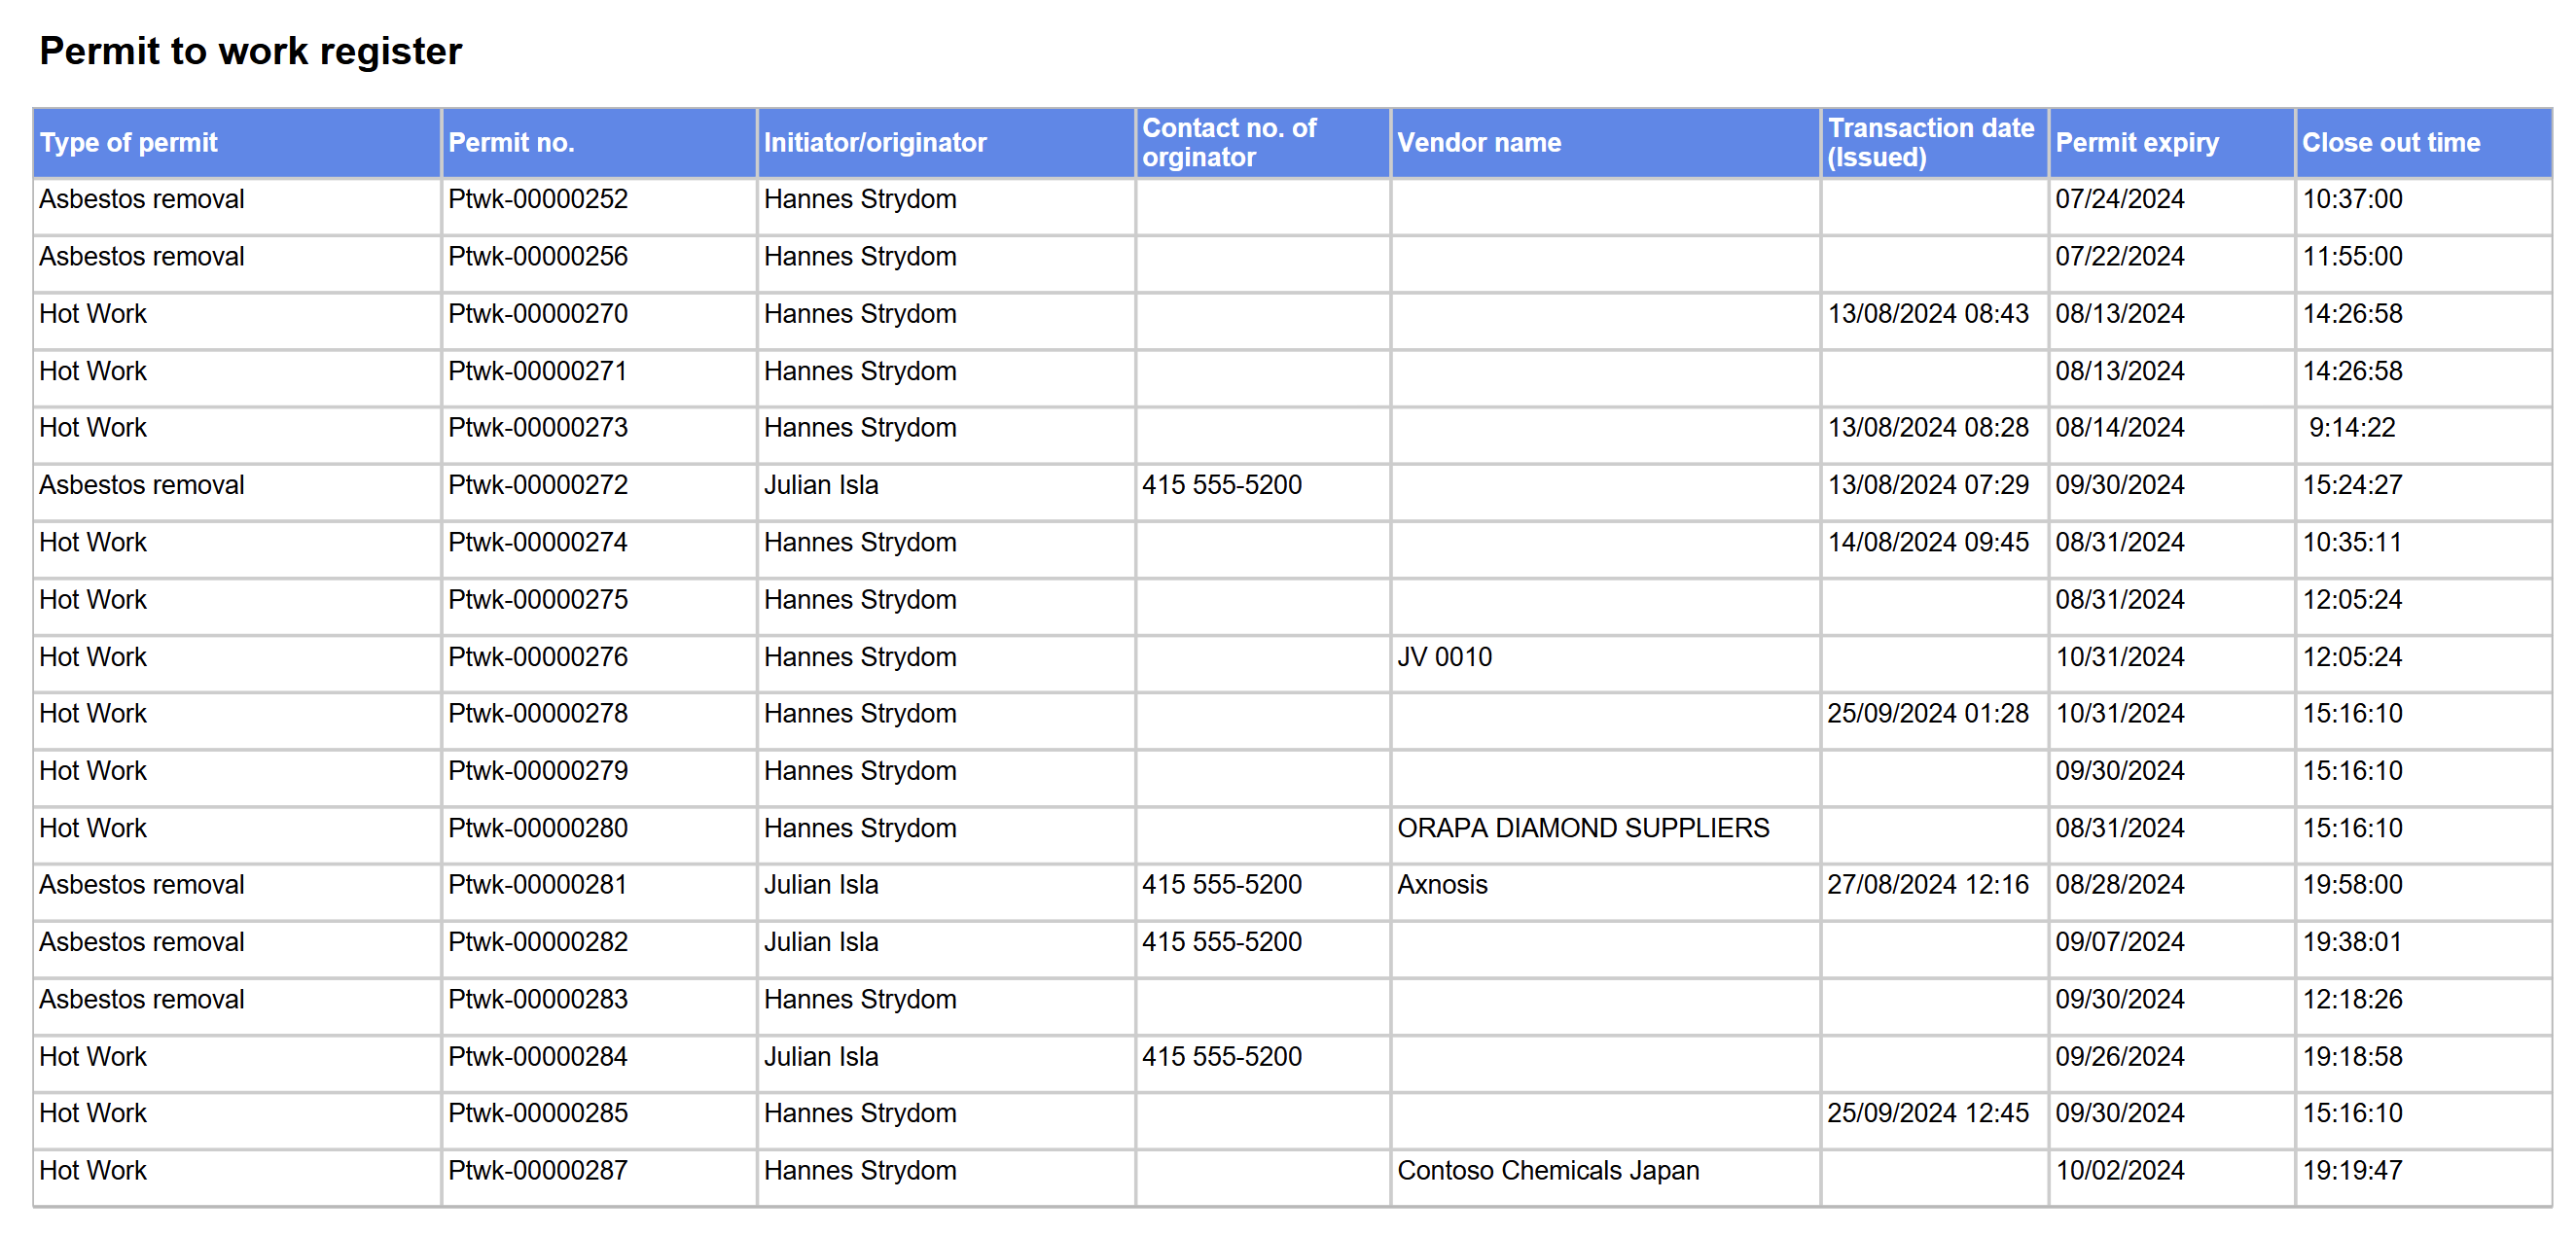
¶ 15. Permit to work register
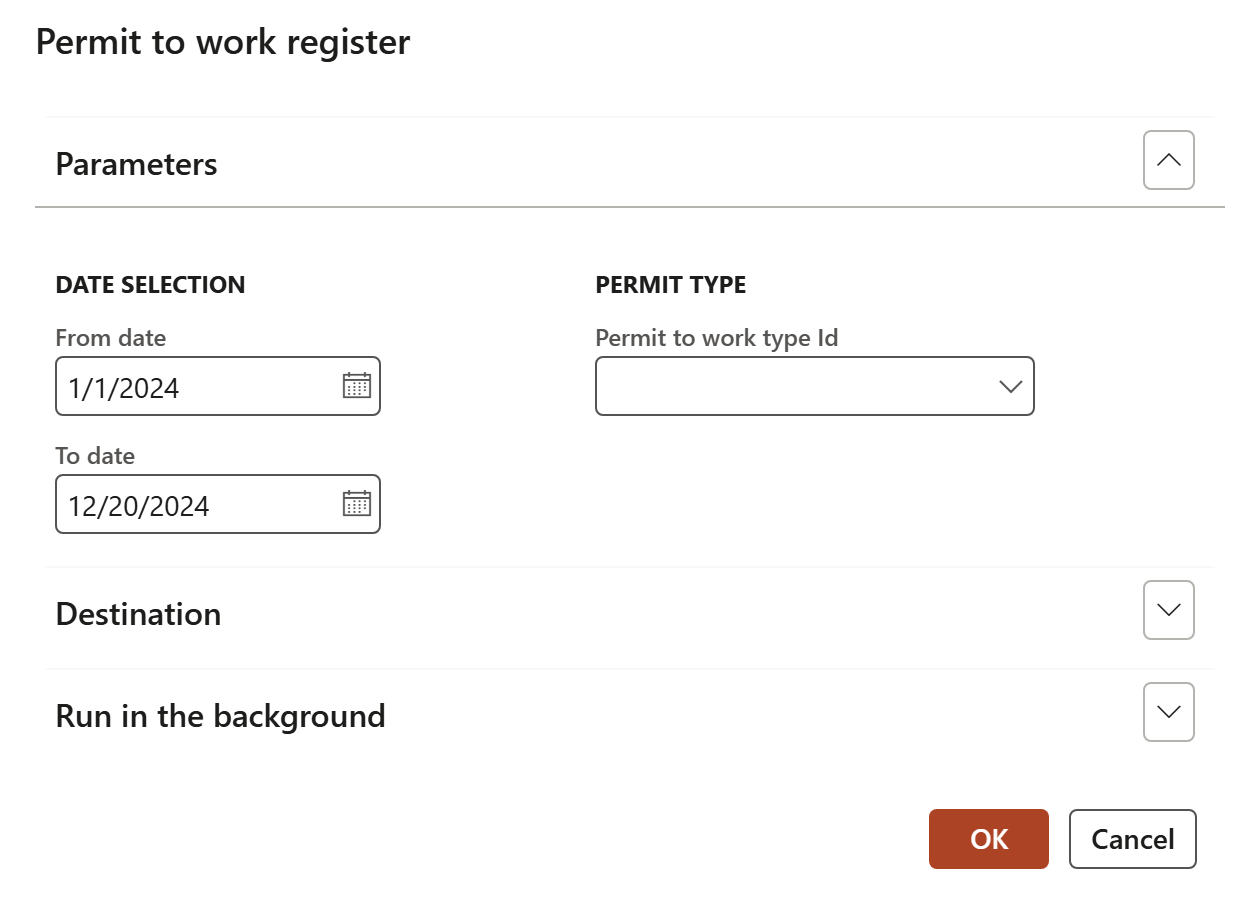
HSE > Permits to work > Reports and inquiries > Permit to work register
Select the parameters and then click OK
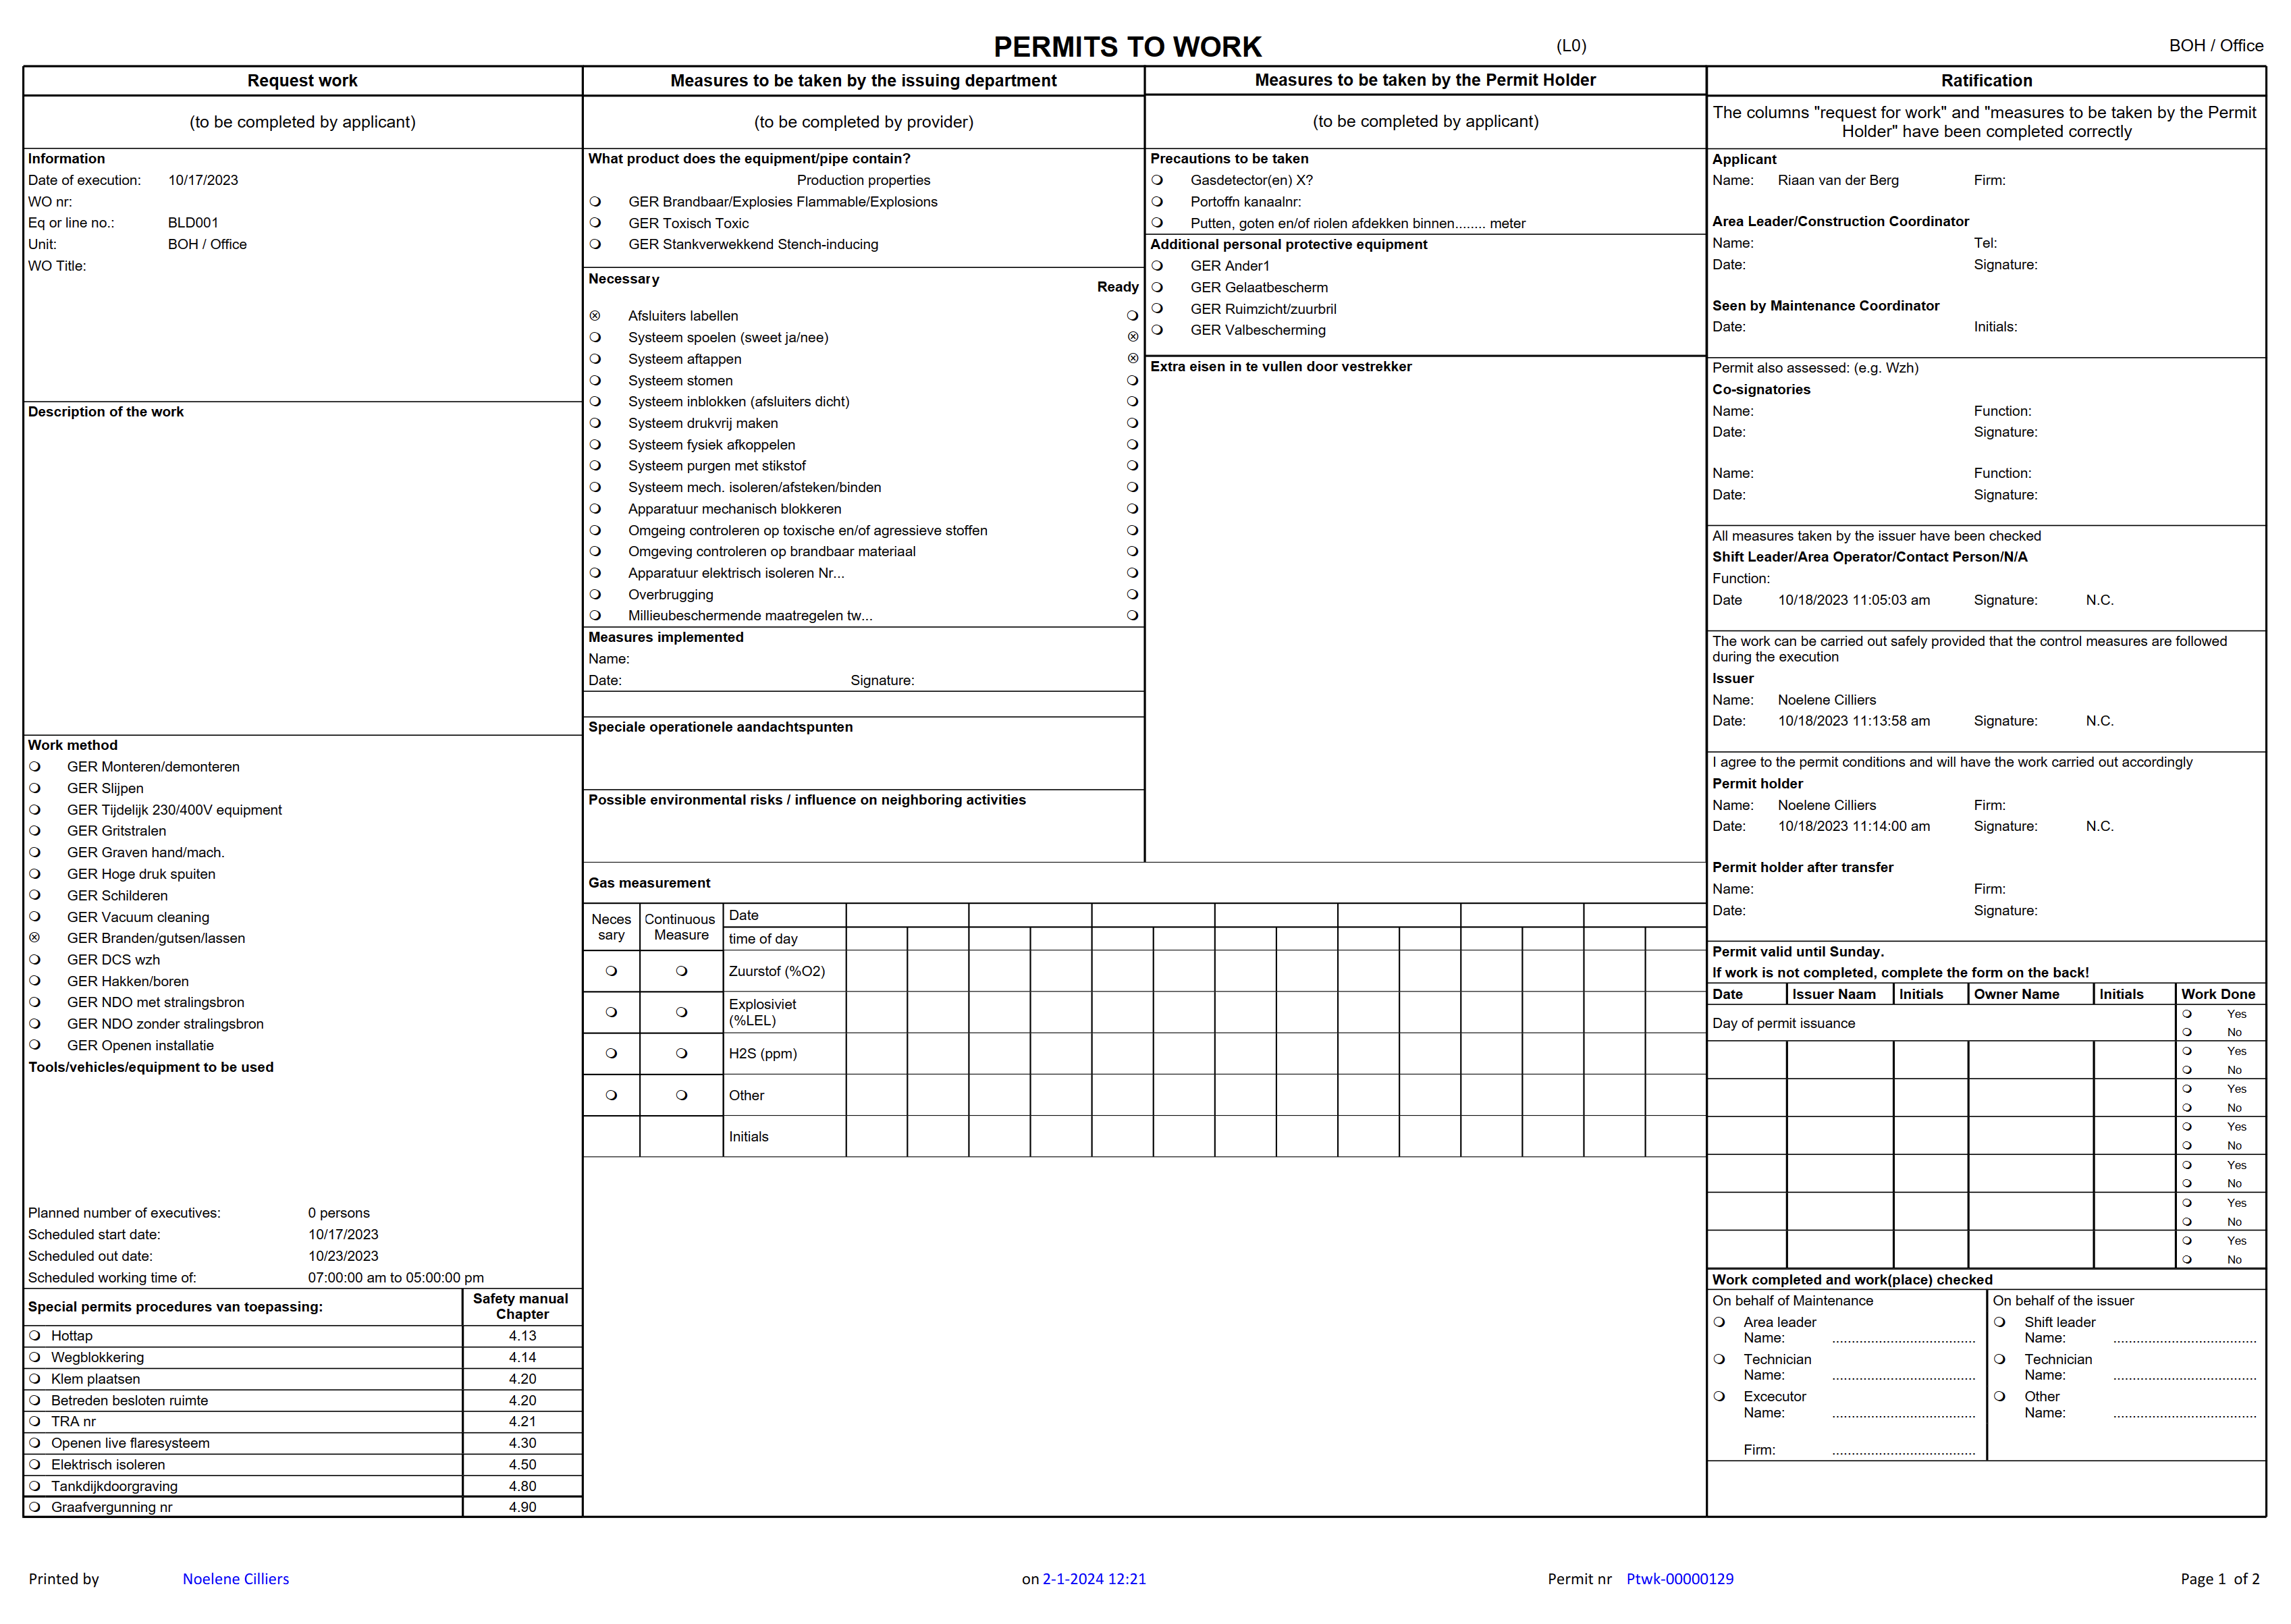
¶ 16. Permit to work in columns
HSE > Permits to work > Reports and inquiries > Permit to work in columns
OR go to: HSE > Permits to work > Permit to work list pages > All permits to work
- Select the Permit to work that you want to print the report for
- On the Action pane, in the References button group, click on the Print permit in columns button
- The Print permit in columns button generates a DRAFT watermarked report until the report’s Permit Status = Approved, and the Issued field = Yes
- Once the PTW becomes Permit Status = Approved and the Issued field = Yes, then an un-watermarked report is generated, but only for the first time after this print button is clicked! Every time it is printed again from this button, the report will print with a COPY watermark

¶ Inspections Reports & Inquiries
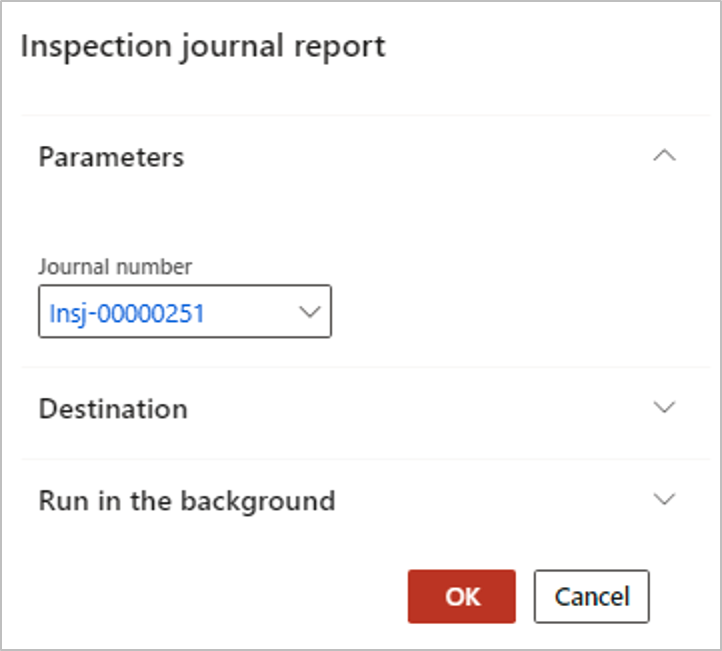
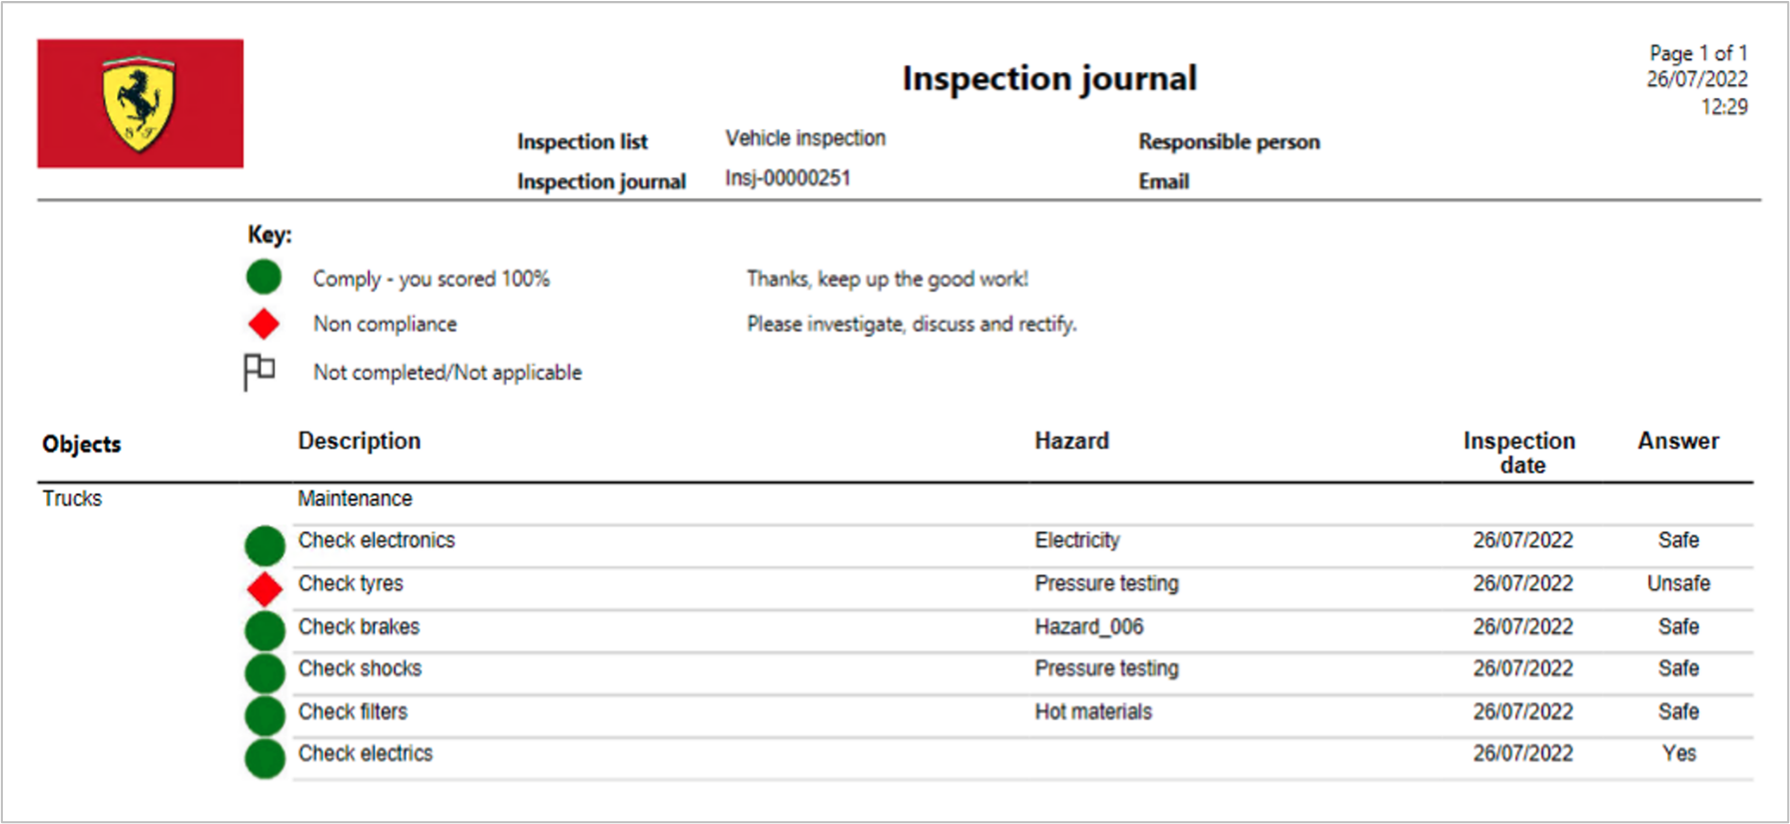
¶ 17. Inspection journal report
HSE > Inspections > Reports and Inquiries > Inspection journal report
Select the parameters and then click OK
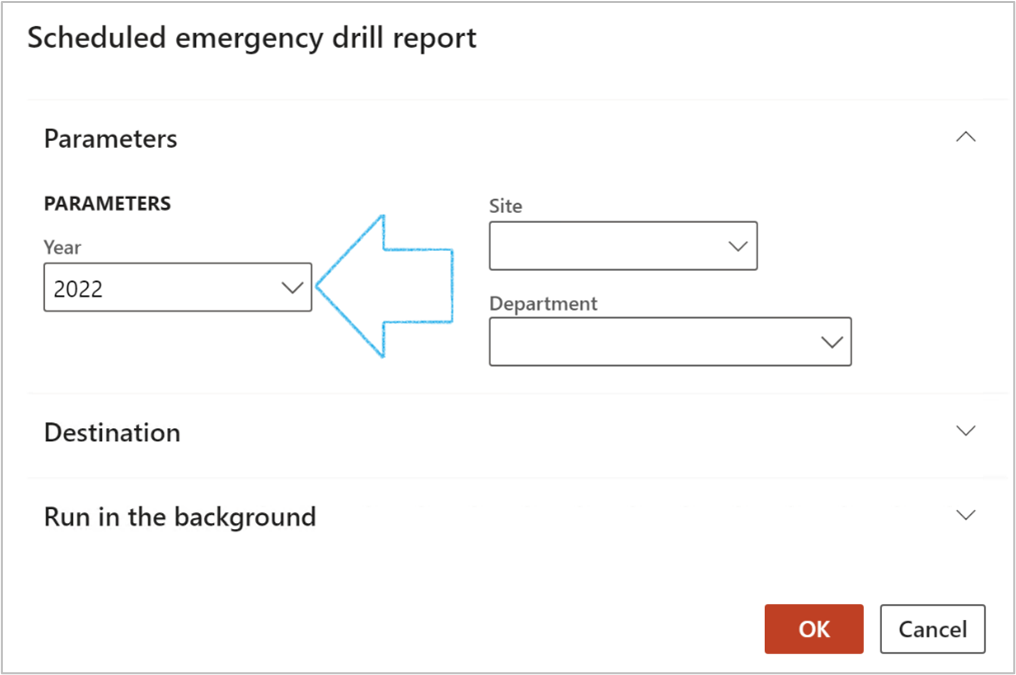
¶ 18. Scheduled emergency drill report
HSE > Inspections > Reports and inquiries > Scheduled emergency drill report
Select the parameters and then click OK

¶ 19. Posted inspections per line header inquiry
Go to: HSE > Inspections > Reports and Inquiries > Posted inspections per line header
- Use the filters to narrow down your search

¶ Incidents Reports & Inquiries
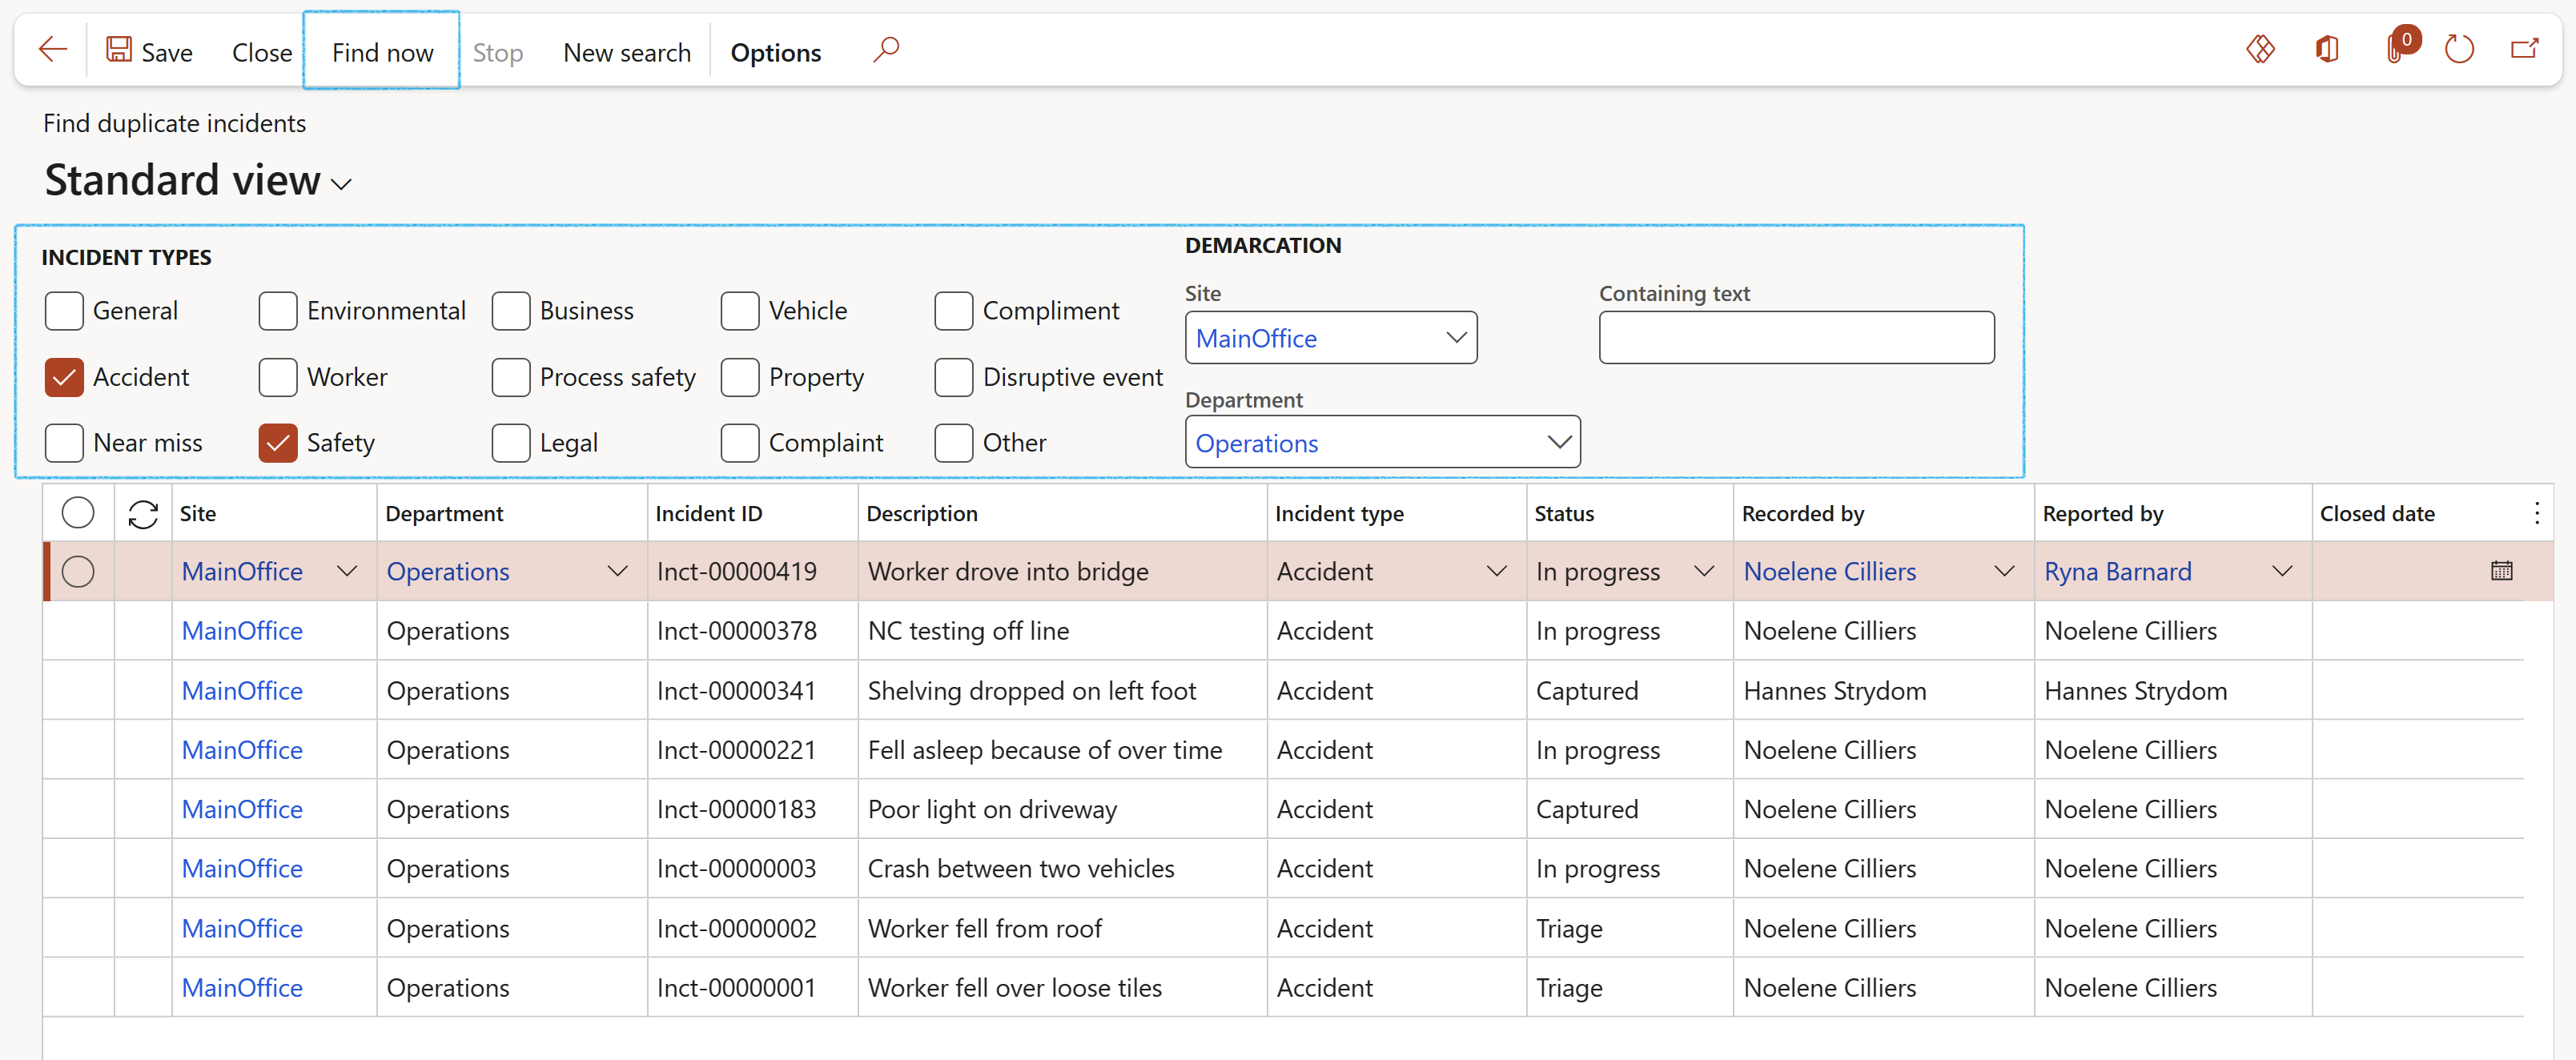
¶ 20. Find duplicate incidents
HSE > Incidents > Reports and Inquiries > Find duplicate incidents
Select the relevant filters and then click on the Find now button
¶ 21. Incident summary
HSE > Incidents > Reports and Inquiries > Incident summary report
Select the parameters and then click OK
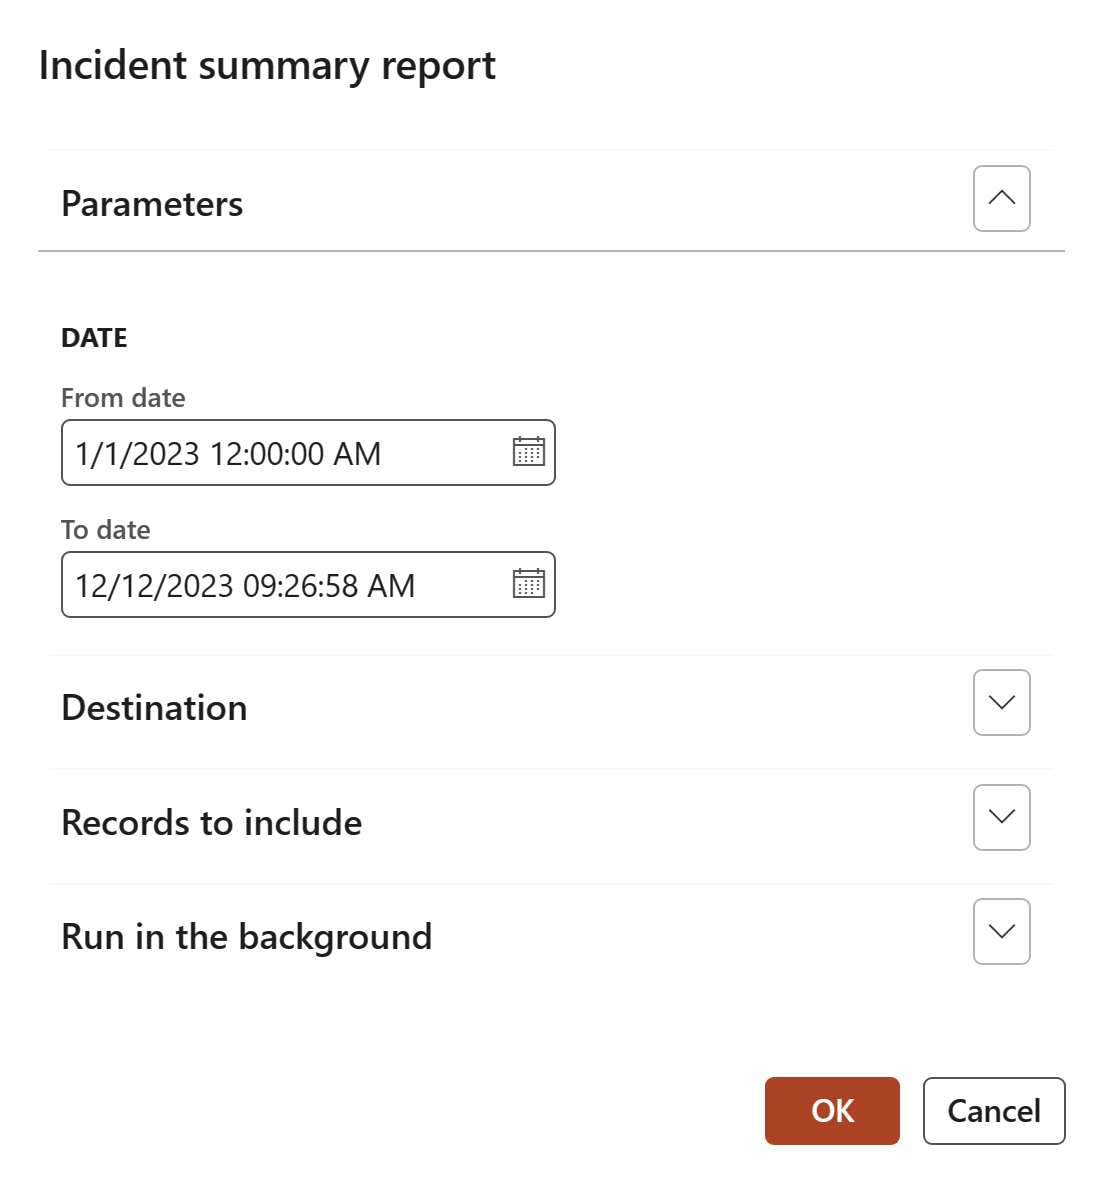

The purpose of the Incident summary report is to document the exact details of the occurrence.
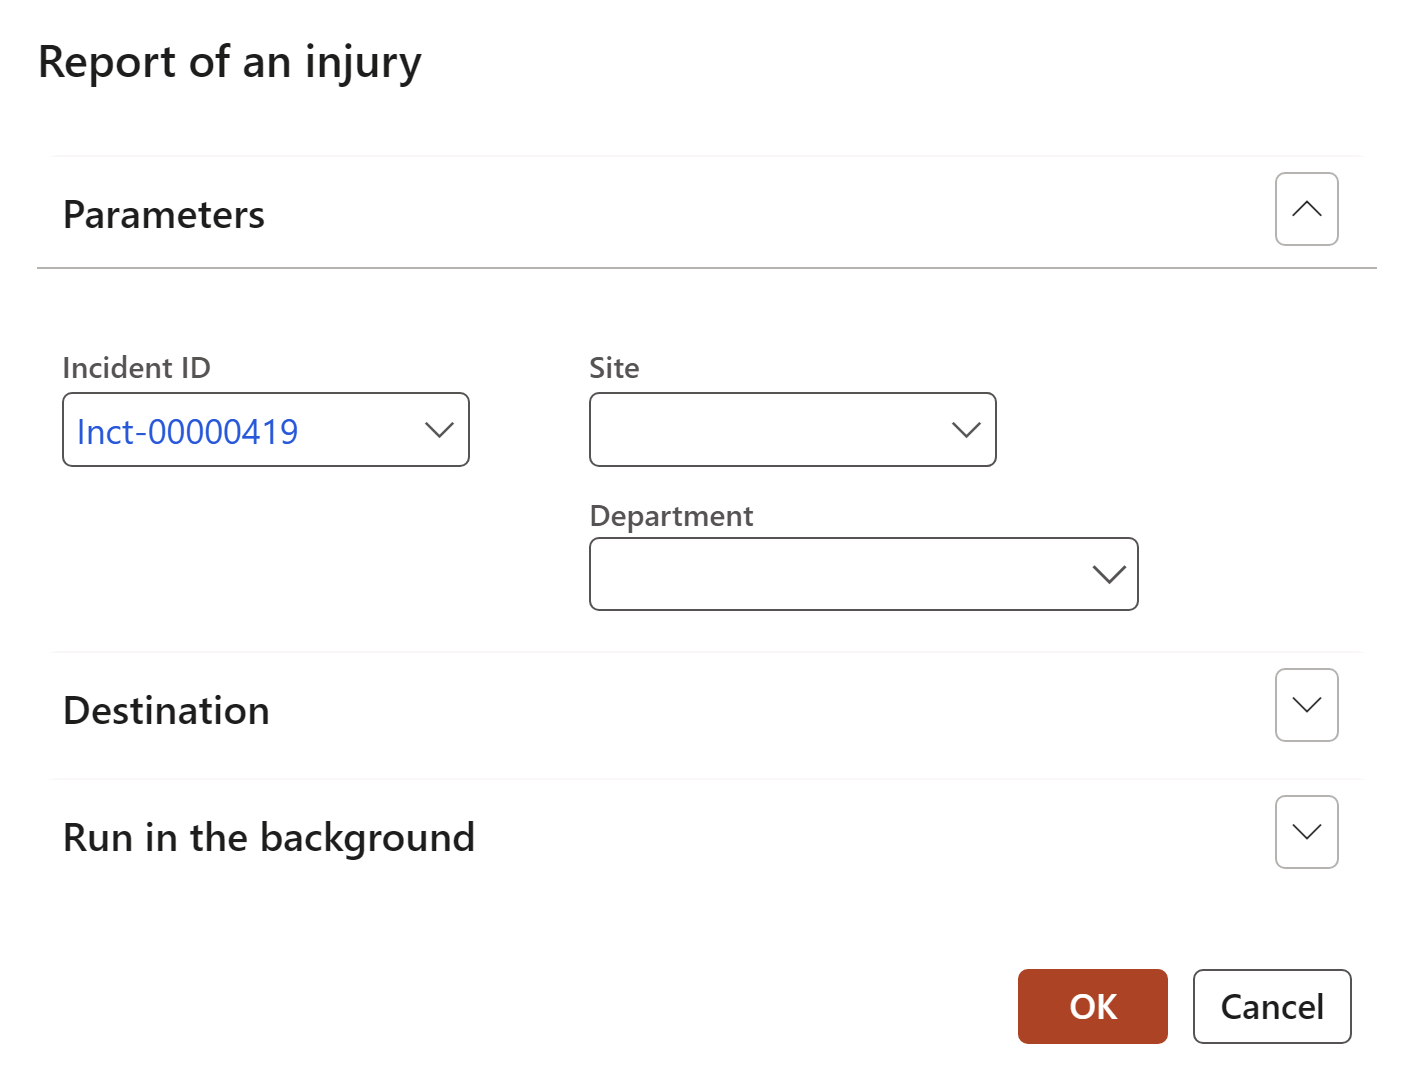
¶ 22. Report of an injury
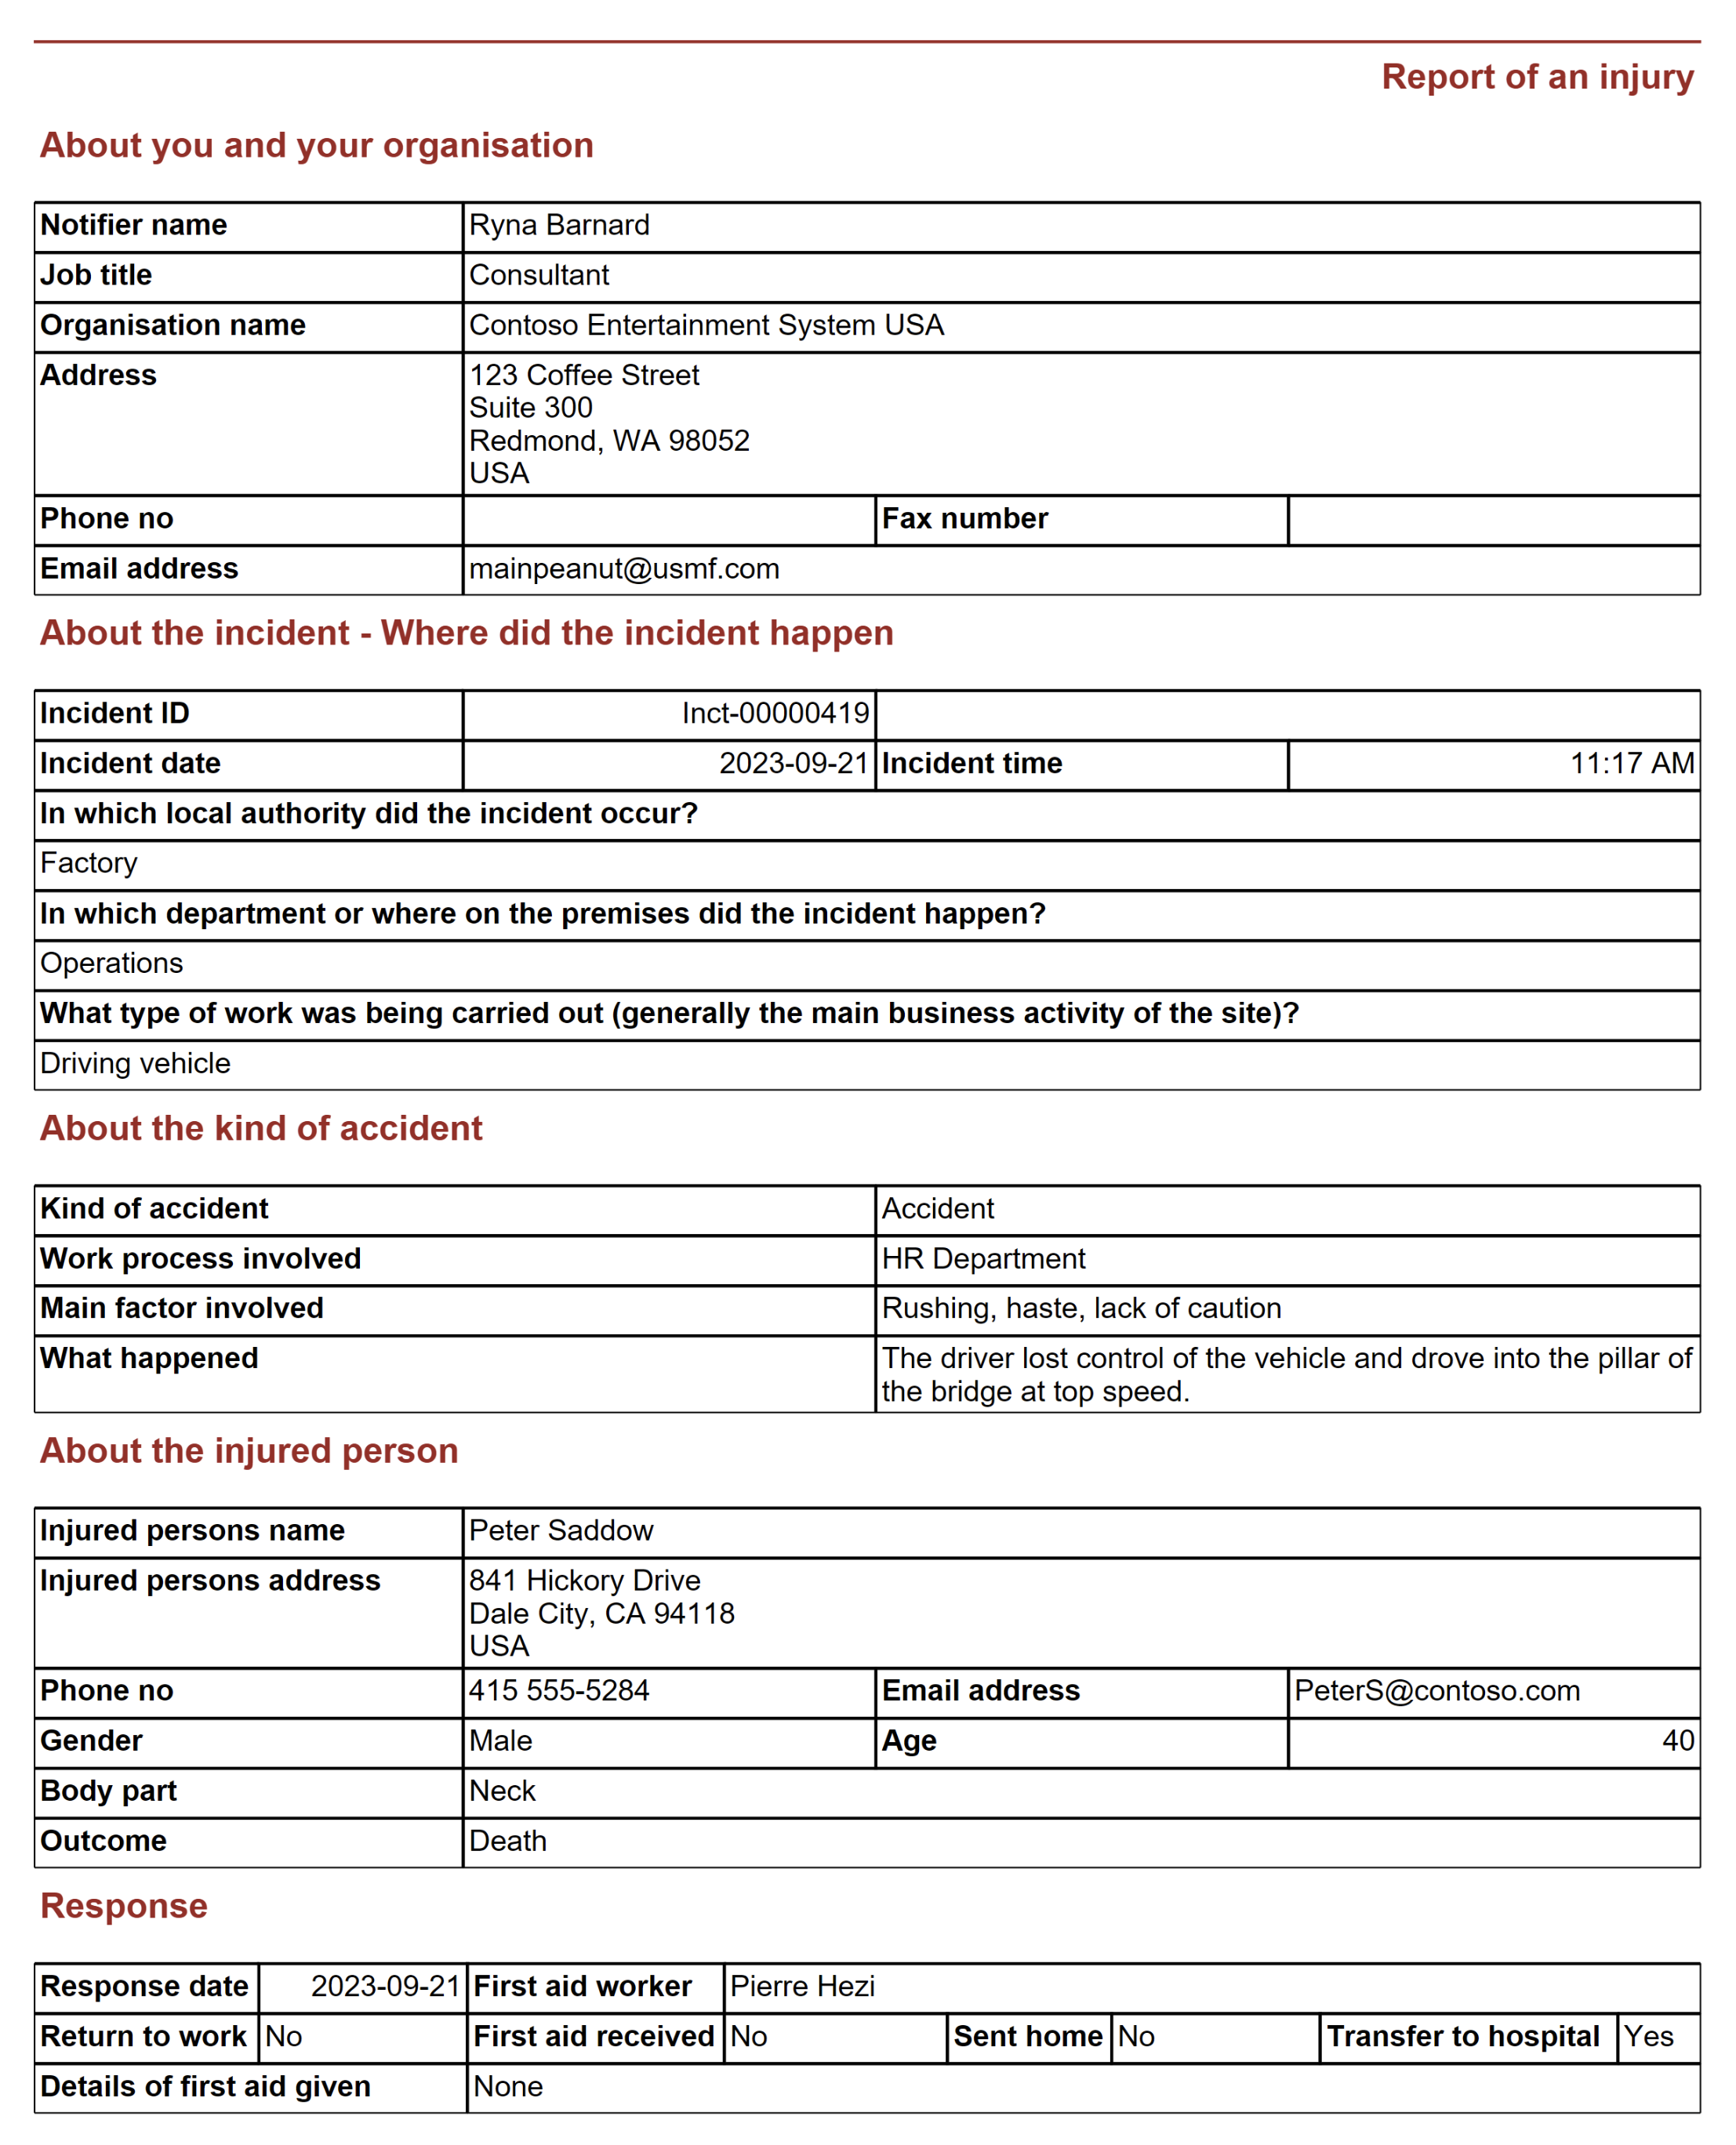
This report is a complete summary of the selected injury/incident
HSE > Incidents > Reports and inquiries > Report of an injury
- On the Report of an injury parameters form:
- Select the Incident ID of the injury that you want to see the report of, from the dropdown list
- Select the relevant Site from the dropdown list
- Select the relevant Department from the dropdown list
- Click OK
¶ 23. Global incident report
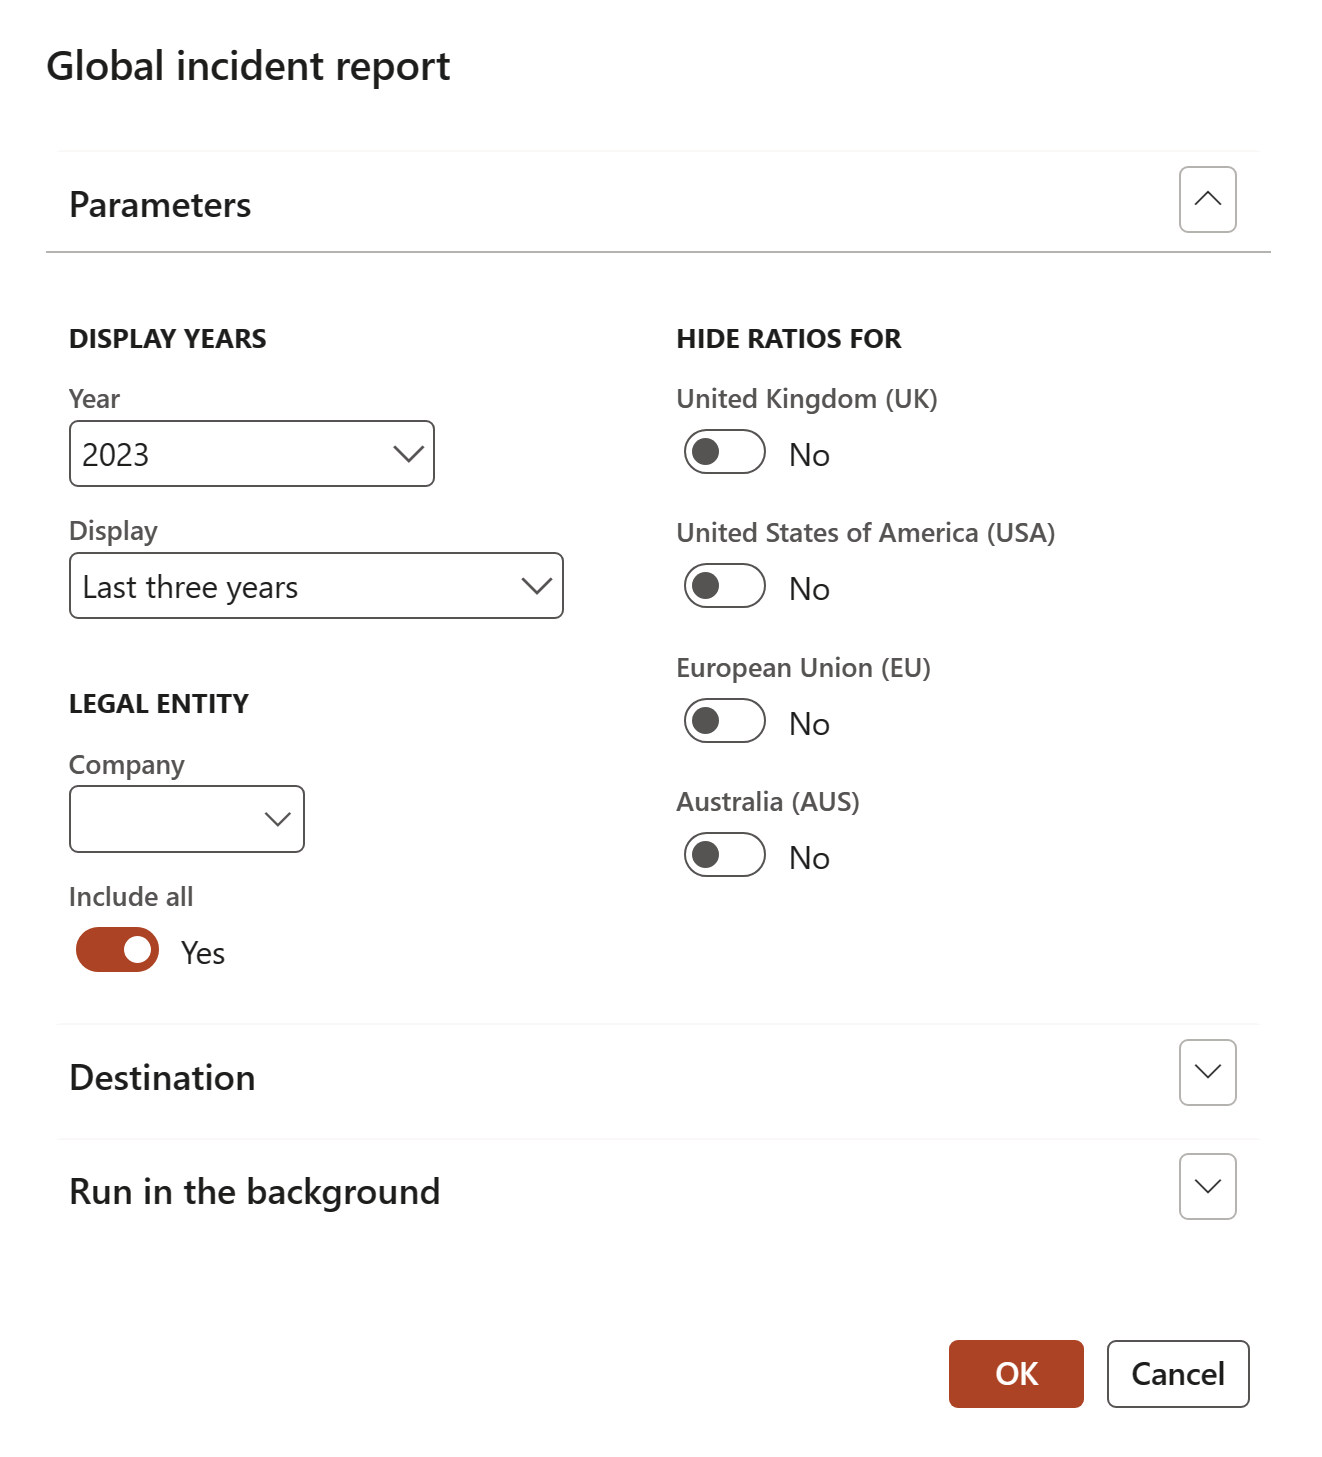
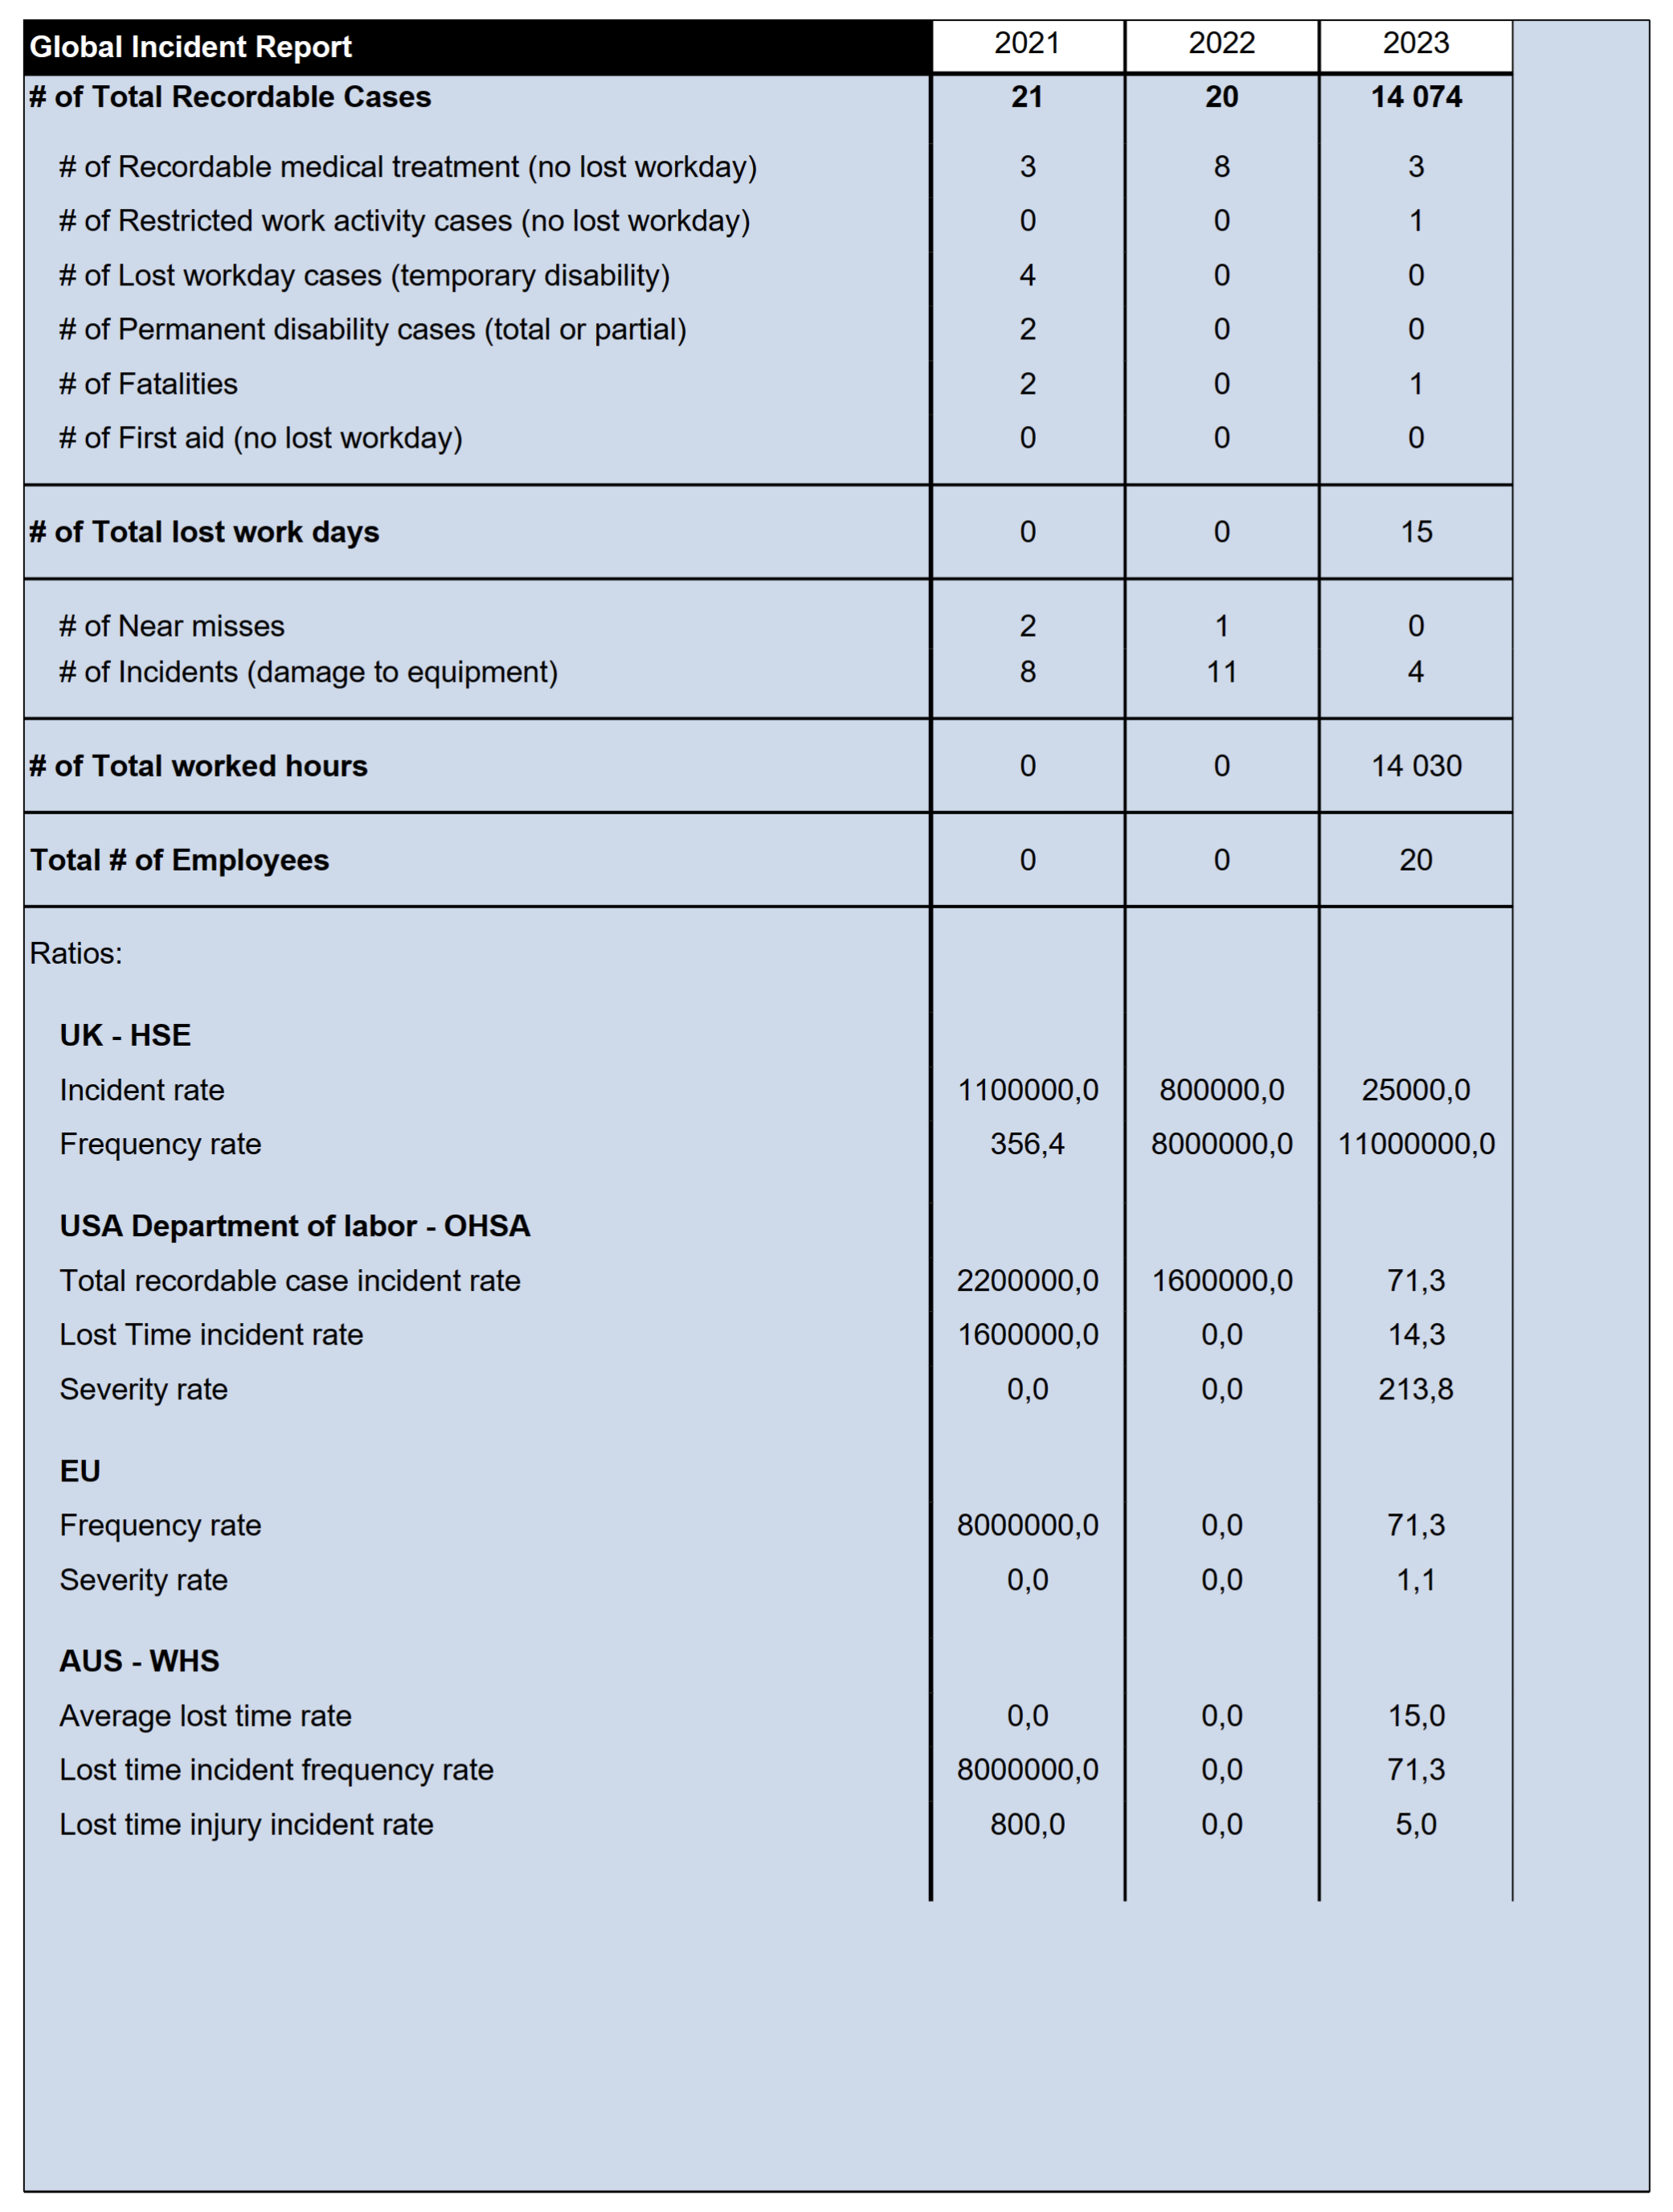
When an Occupational Health and Safety incident or near miss has occurred, it is important that it is reported and managed properly in order to remedy the damage and prevent recurrence.
HSE > Incidents > Reports and Inquiries > Global incident report
Select the parameters and then click OK
¶ 24. Tree year injury stats
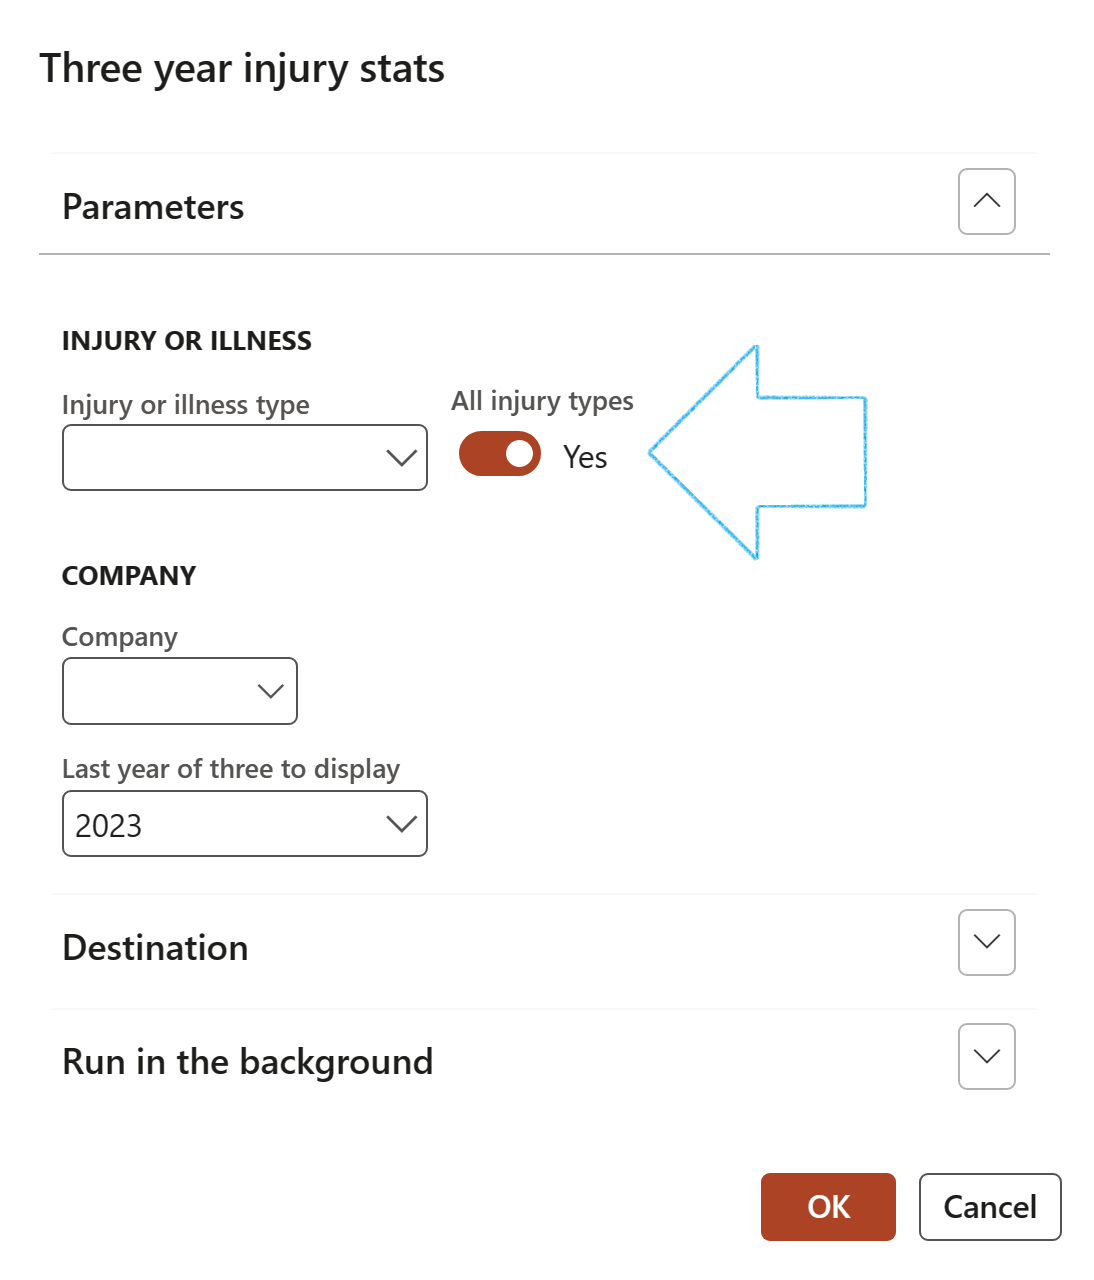
HSE > Incidents > Reports and Inquiries > Three year injury stats
Select the parameters and then click OK
¶ 25. Incidents by country and severity
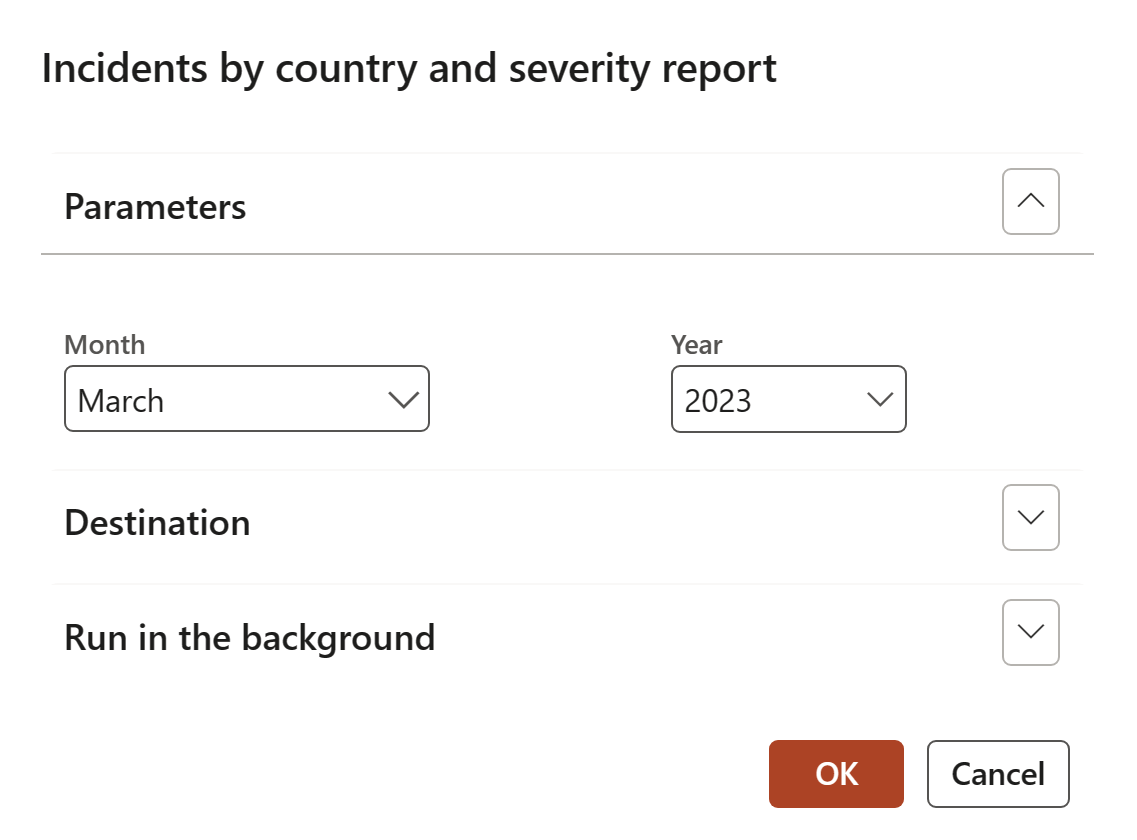
HSE > Incidents > Reports and Inquiries > Incidents by country and severity
Select the parameters and then click OK
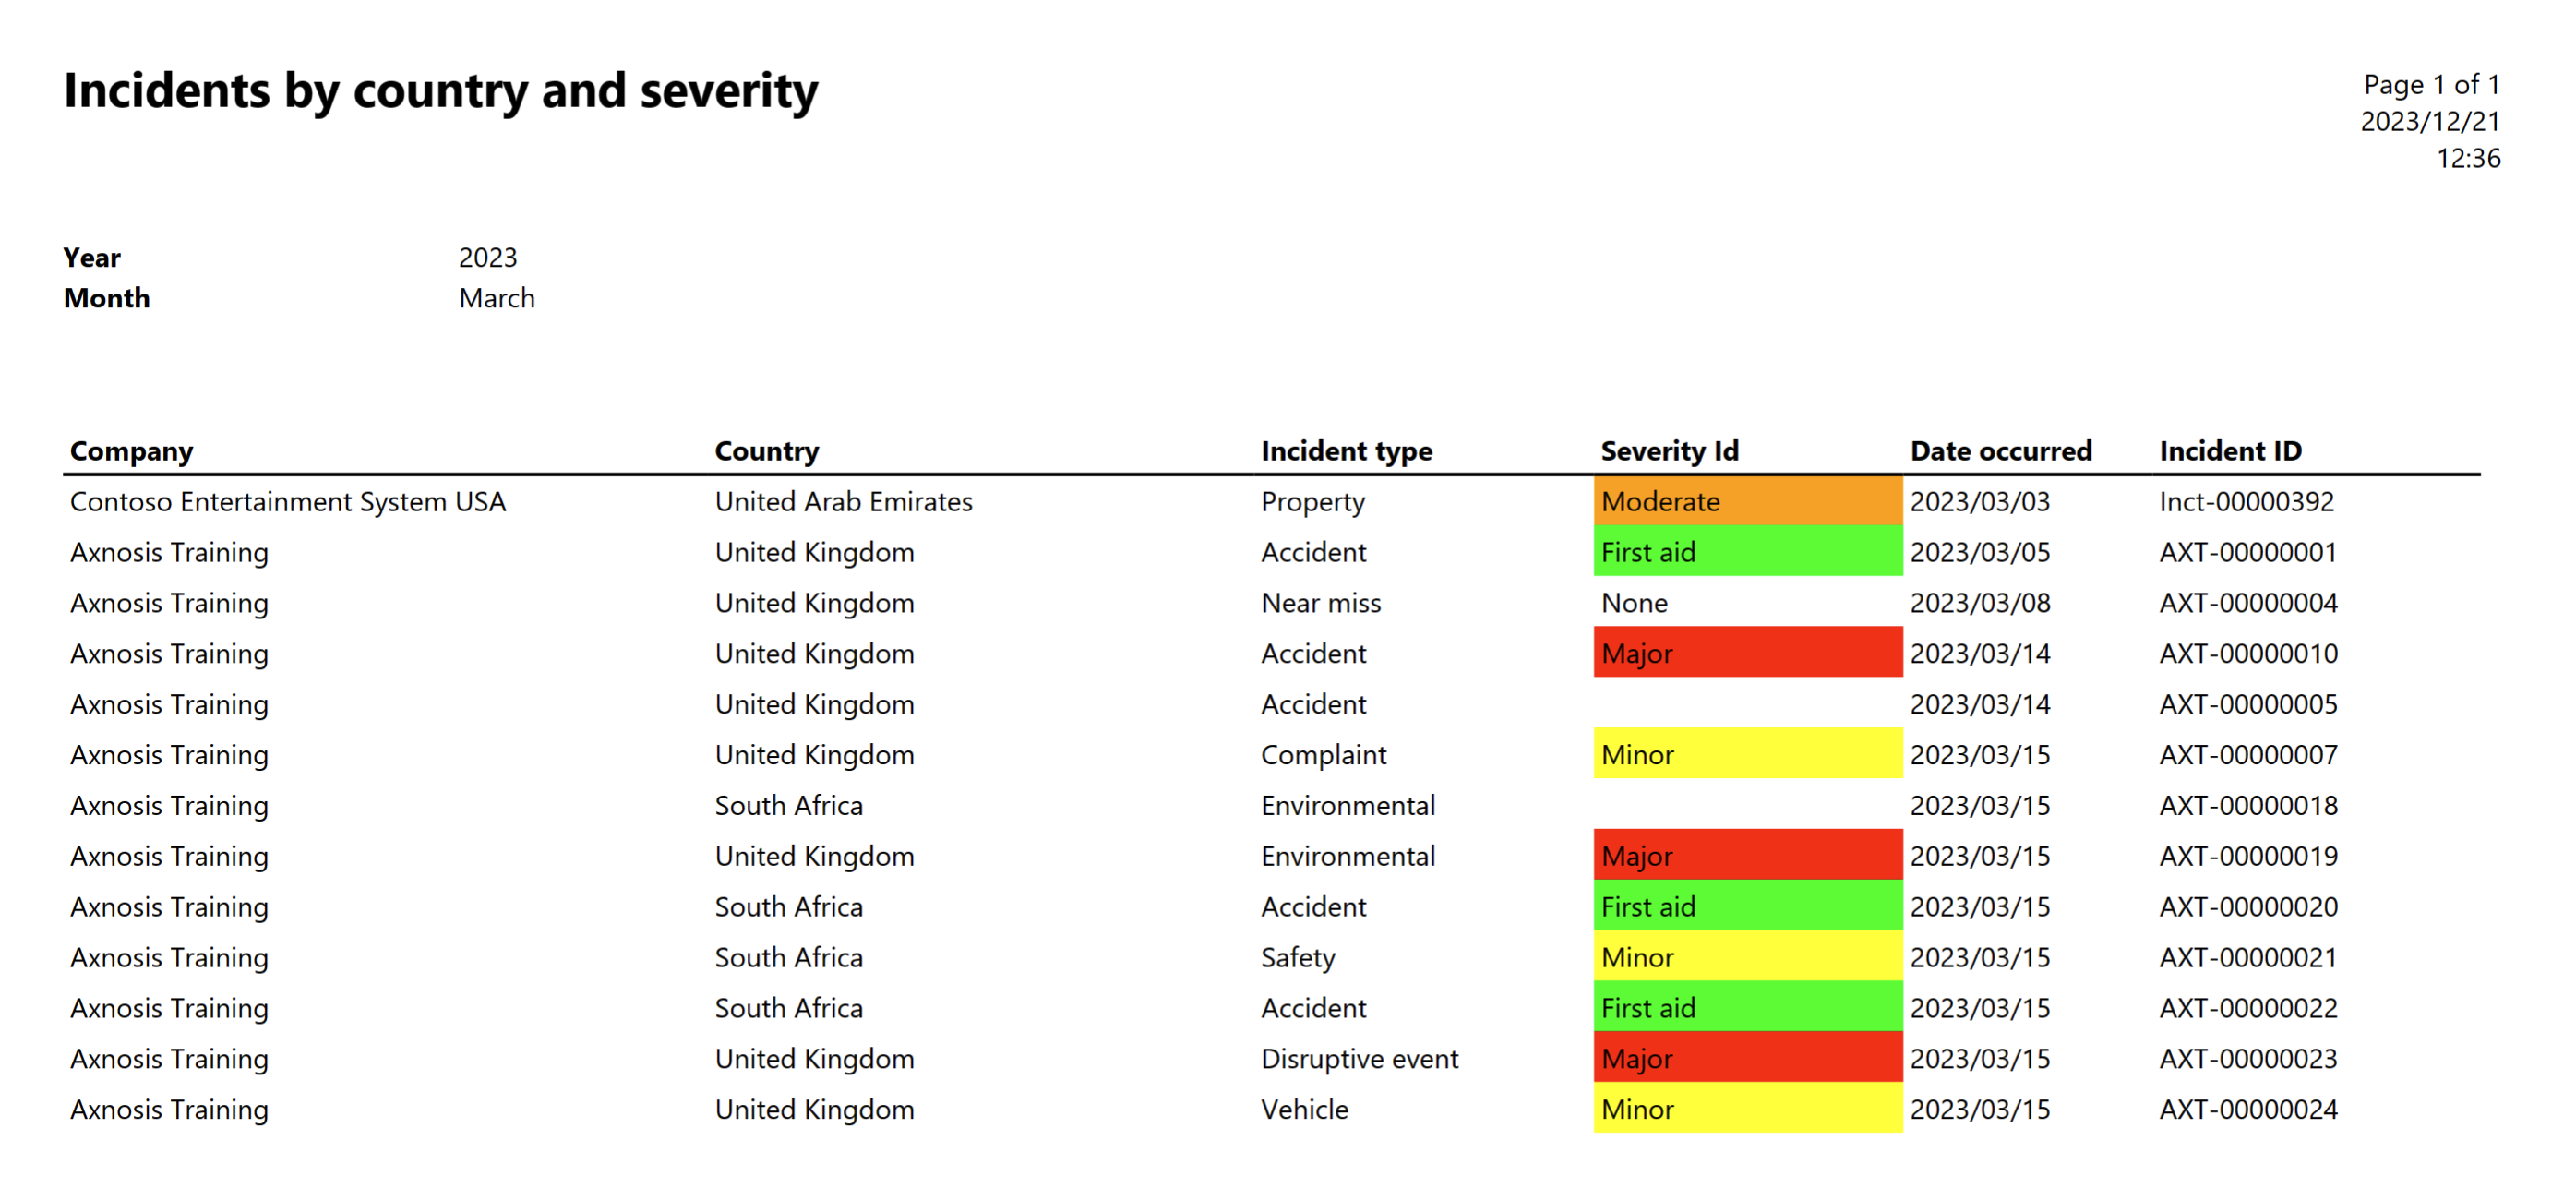
Each Company must have a language setting
Each Site must have a Primary address that has a country/region
¶ 26. Incidents graphs
HSE > Incidents > Reports and Inquiries > Incident graphs
Select the parameters and then click OK
¶ 27. Outstanding claims payments
HSE > Incidents > Reports and Inquiries > Outstanding claims payments
Use the filters to narrow down your search

¶ 28. Incident cost report
HR > Workers > Injury and illness > Incident costs report
Select the parameters and then click OK
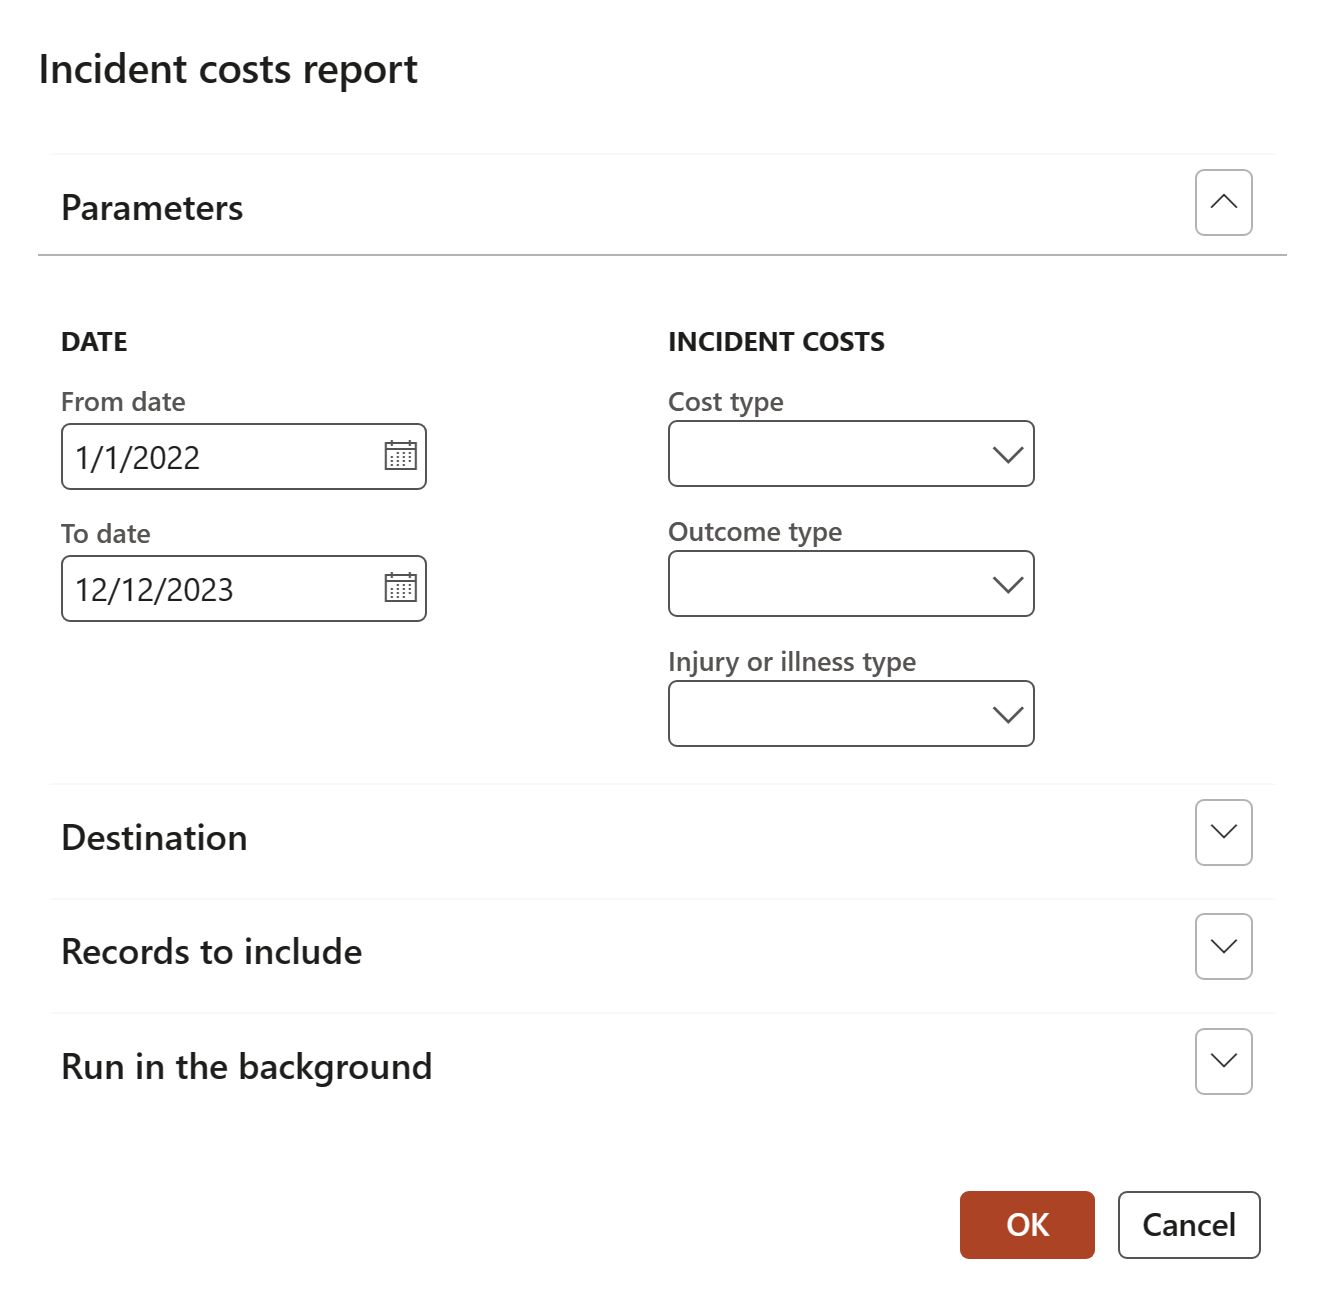
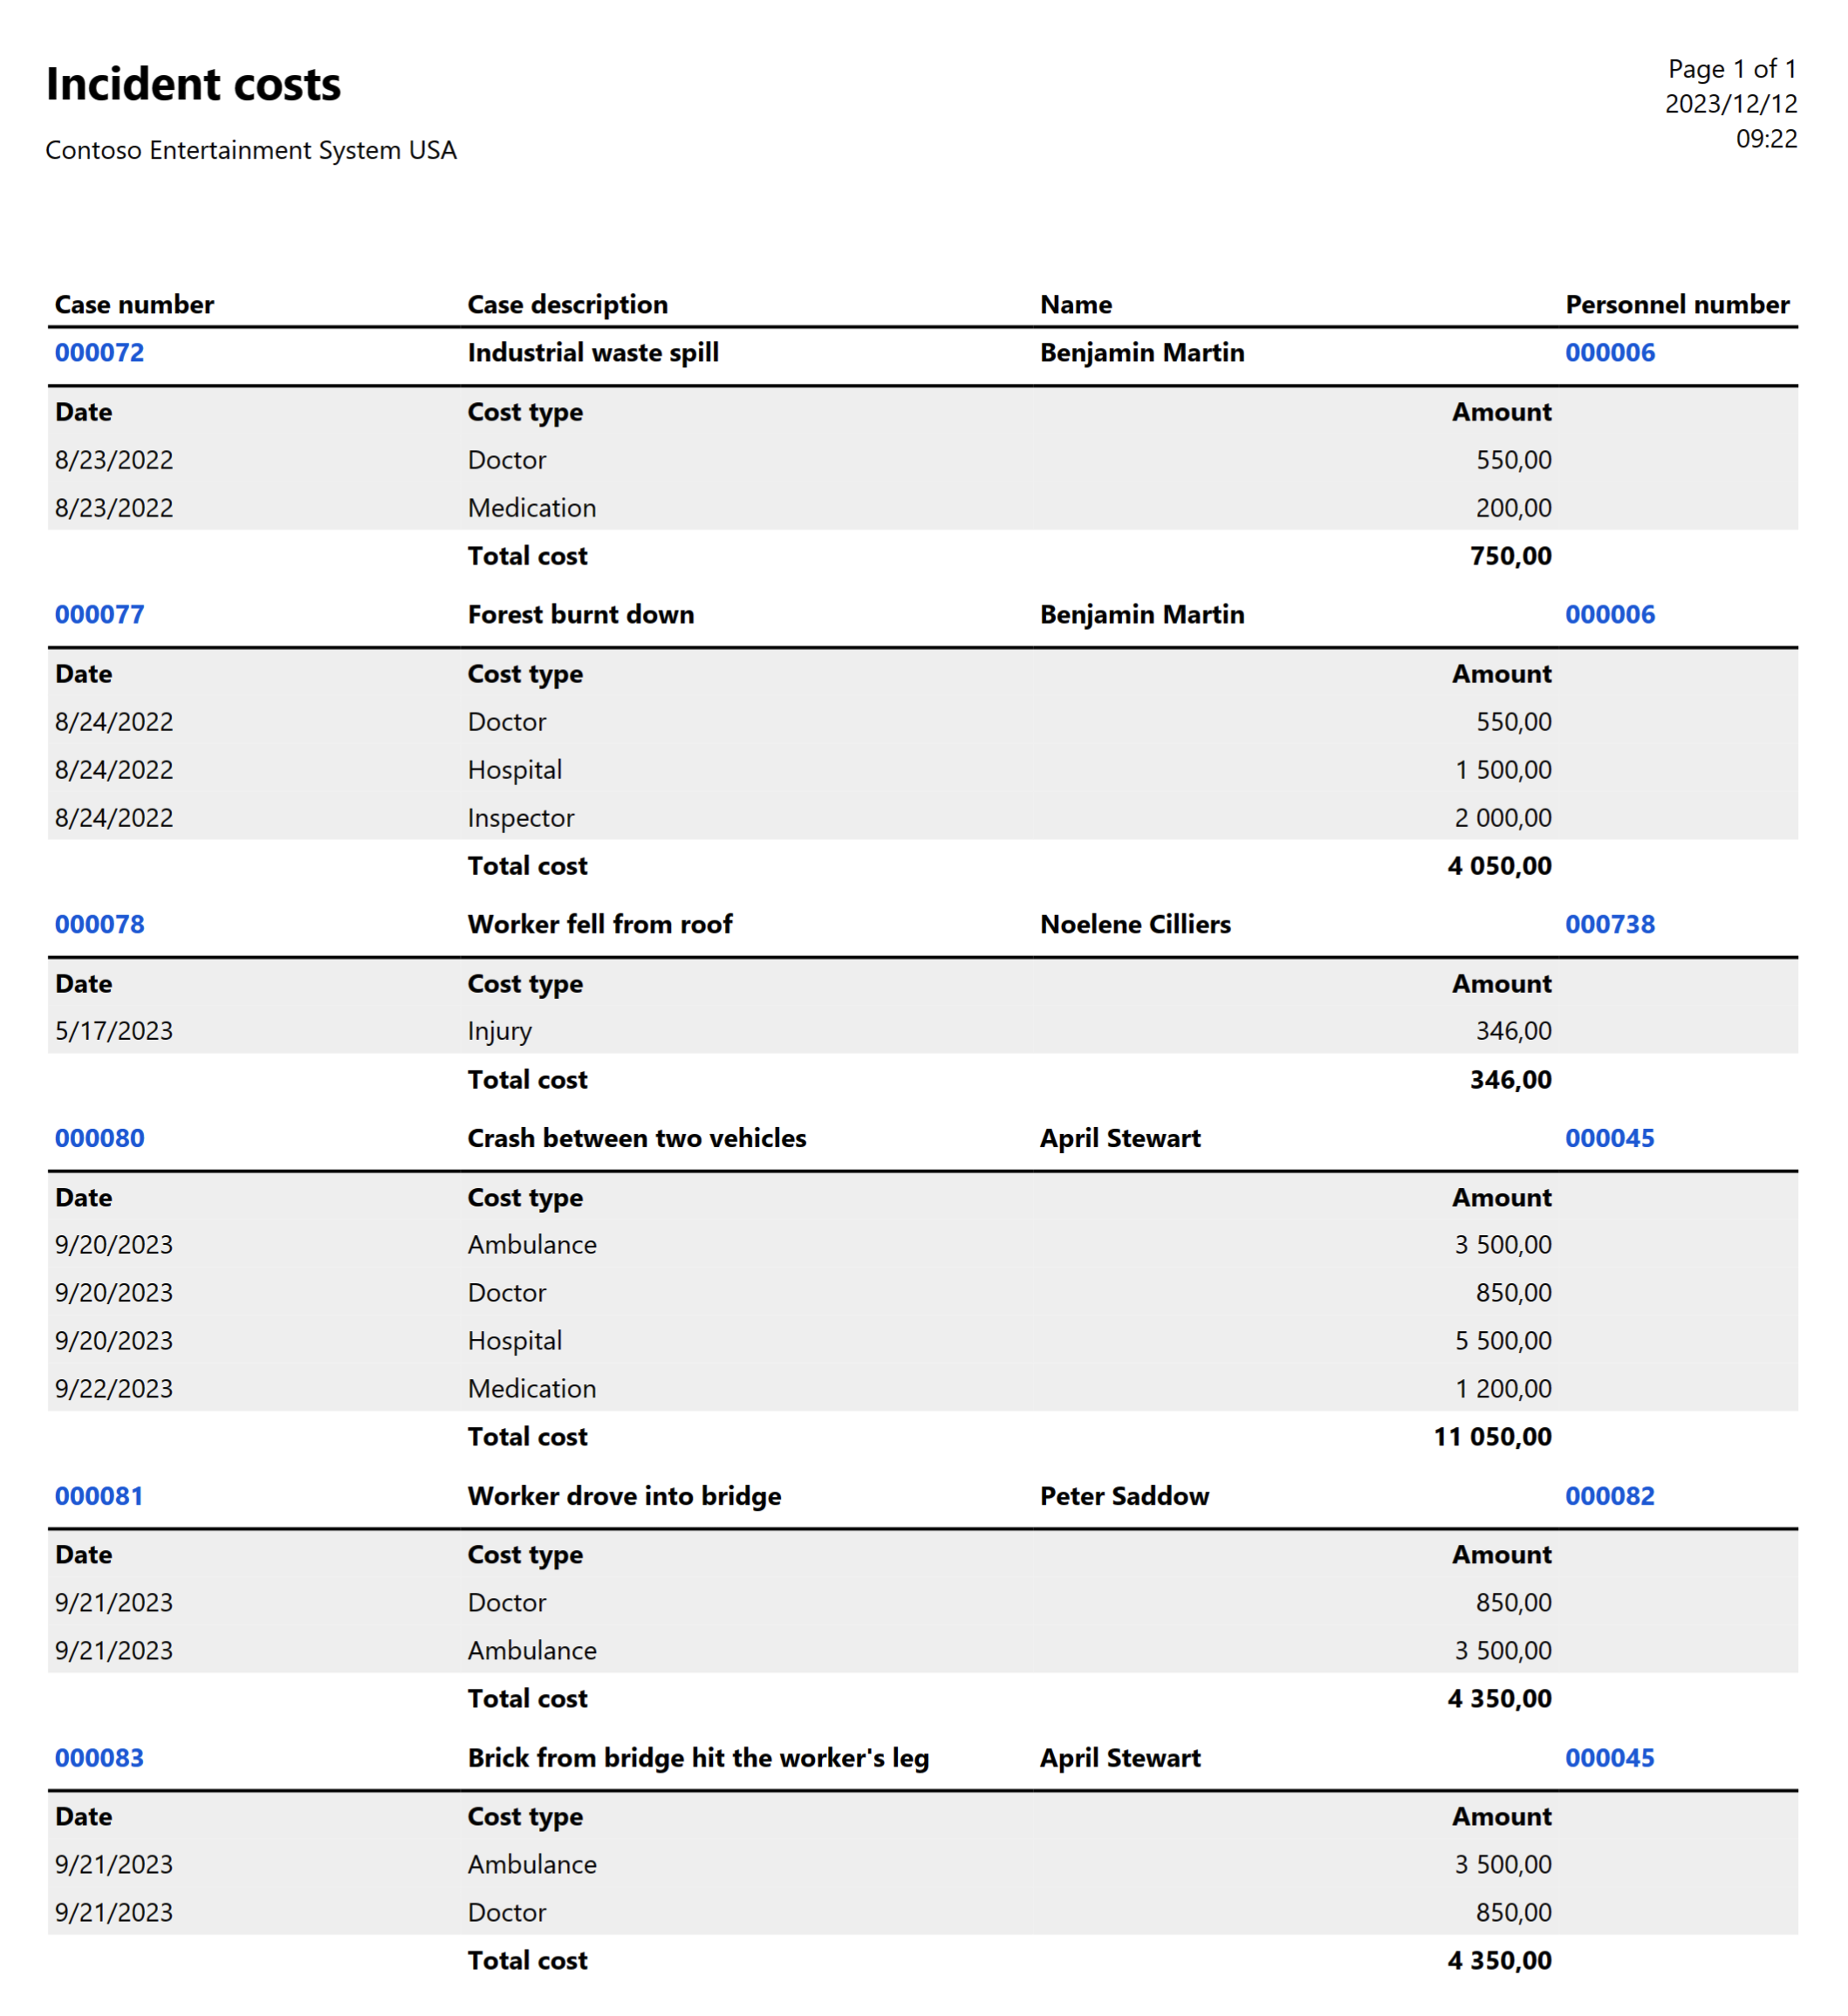
The Incident costs report summarizes the case with details of the case number, a short description of the incident and the amount that it cost the company.
¶ 29. Incident treatments
HR > Injury and illness > Incident treatment report
Select the parameters and then click OK
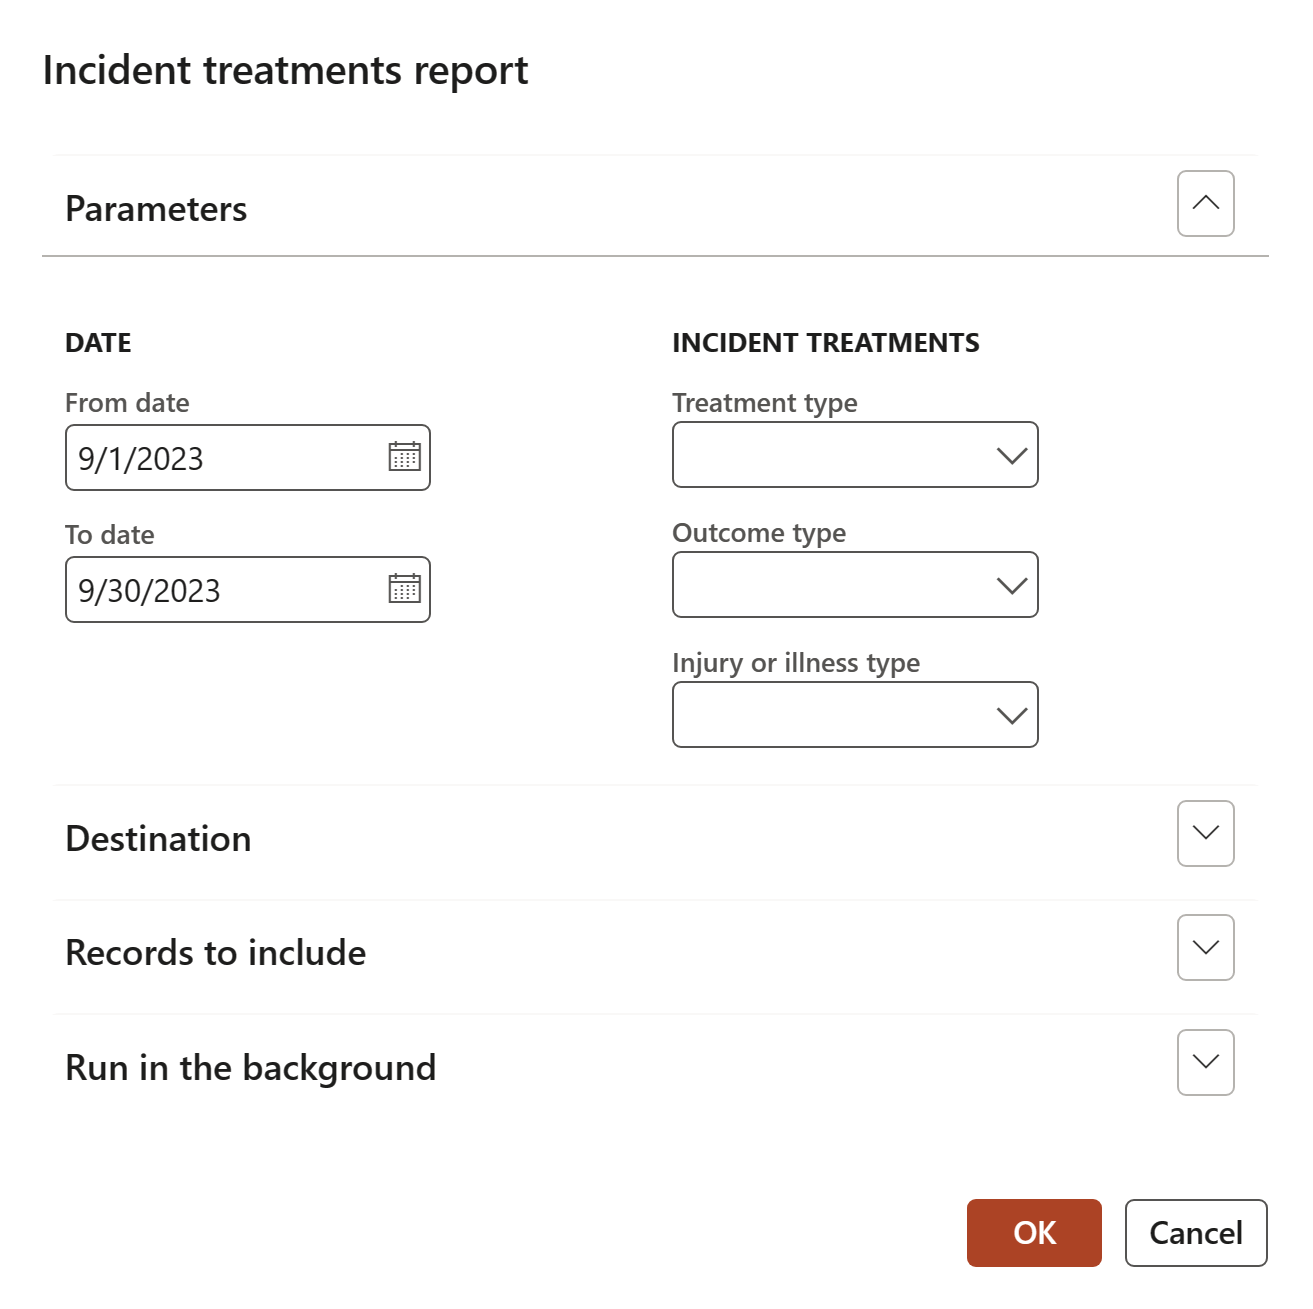
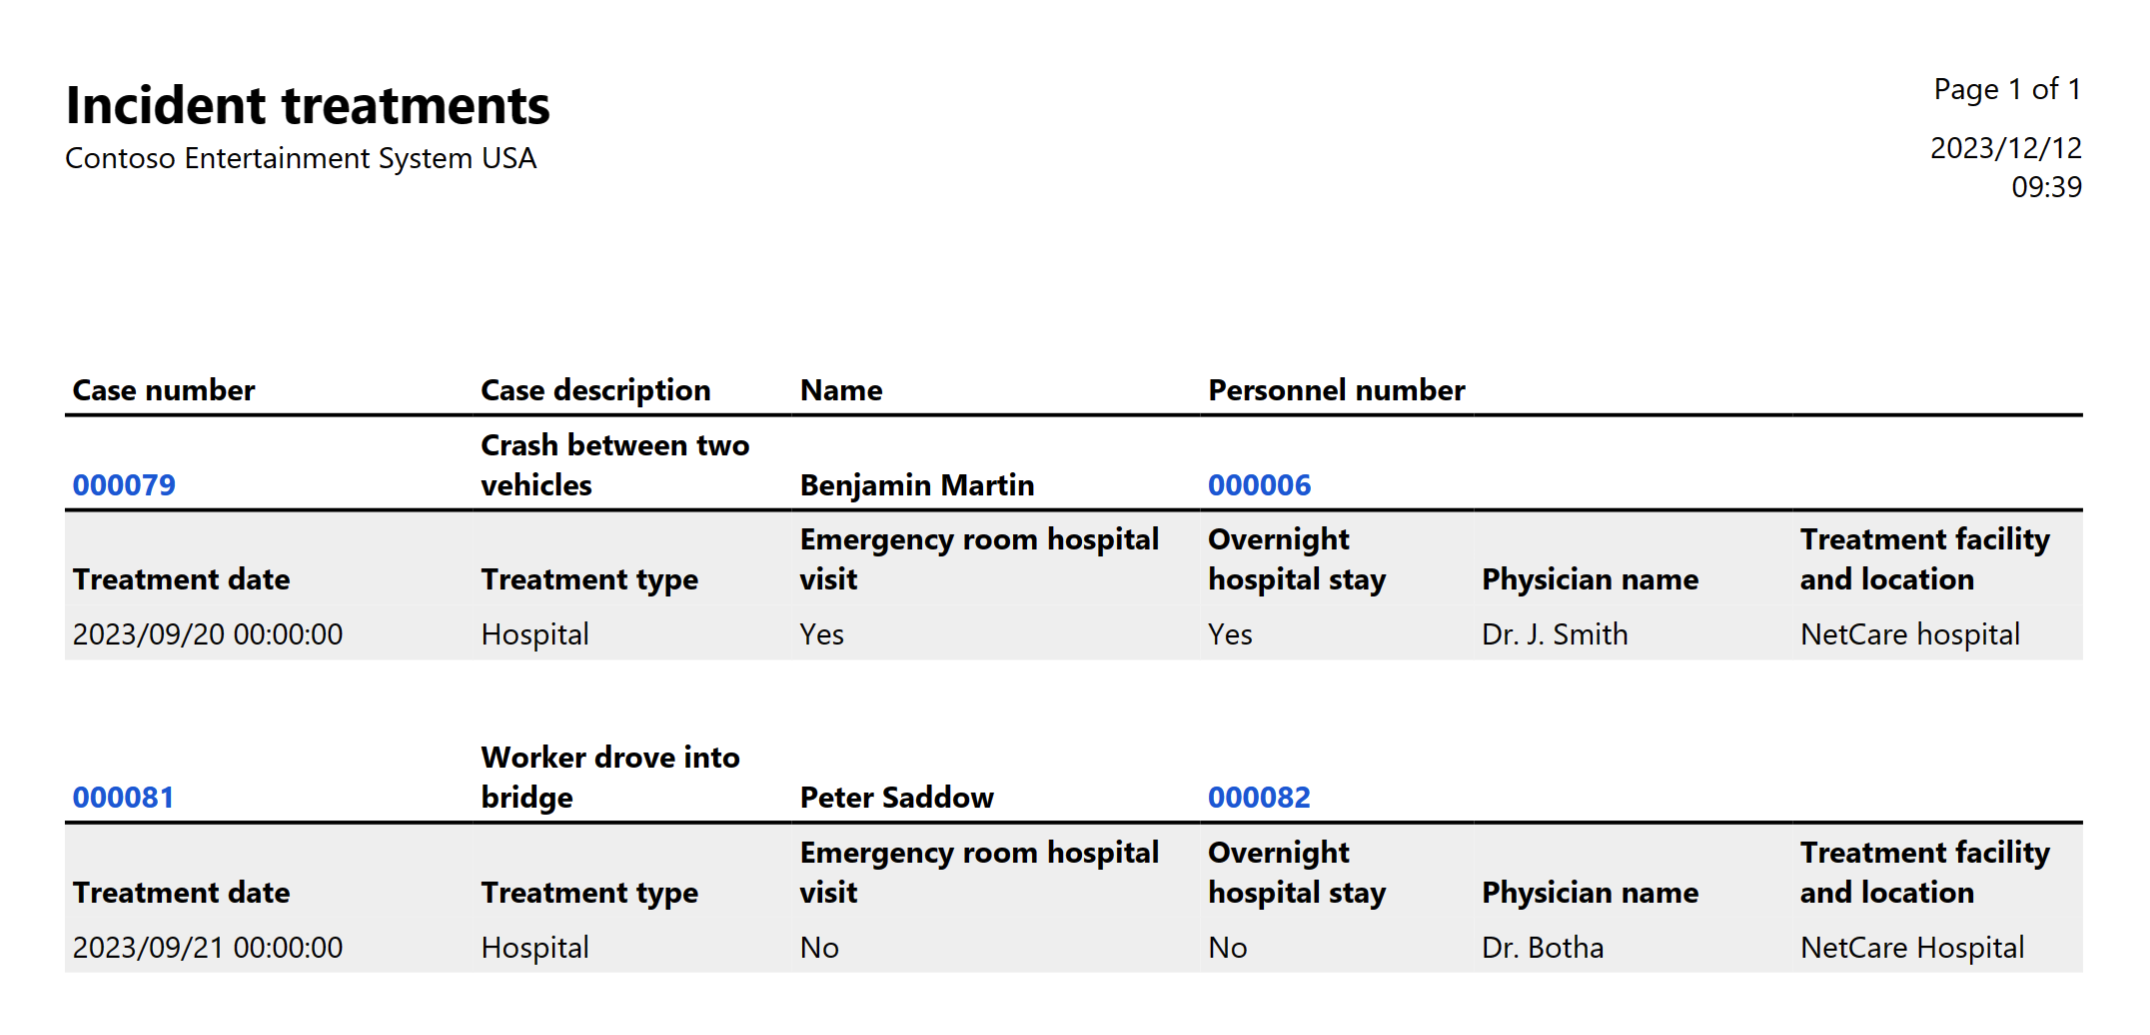
A short summary of the incident, as well as the treatment that was given to the worker are displayed on the Incident treatments report.
¶ Investigations Reports & Inquiries
¶ 30. Investigation report
HSE > Investigations > Reports and Inquiries > Investigation report
Select the parameters and then click OK
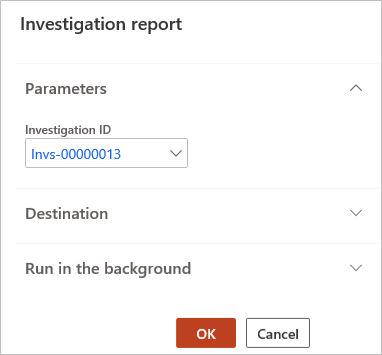
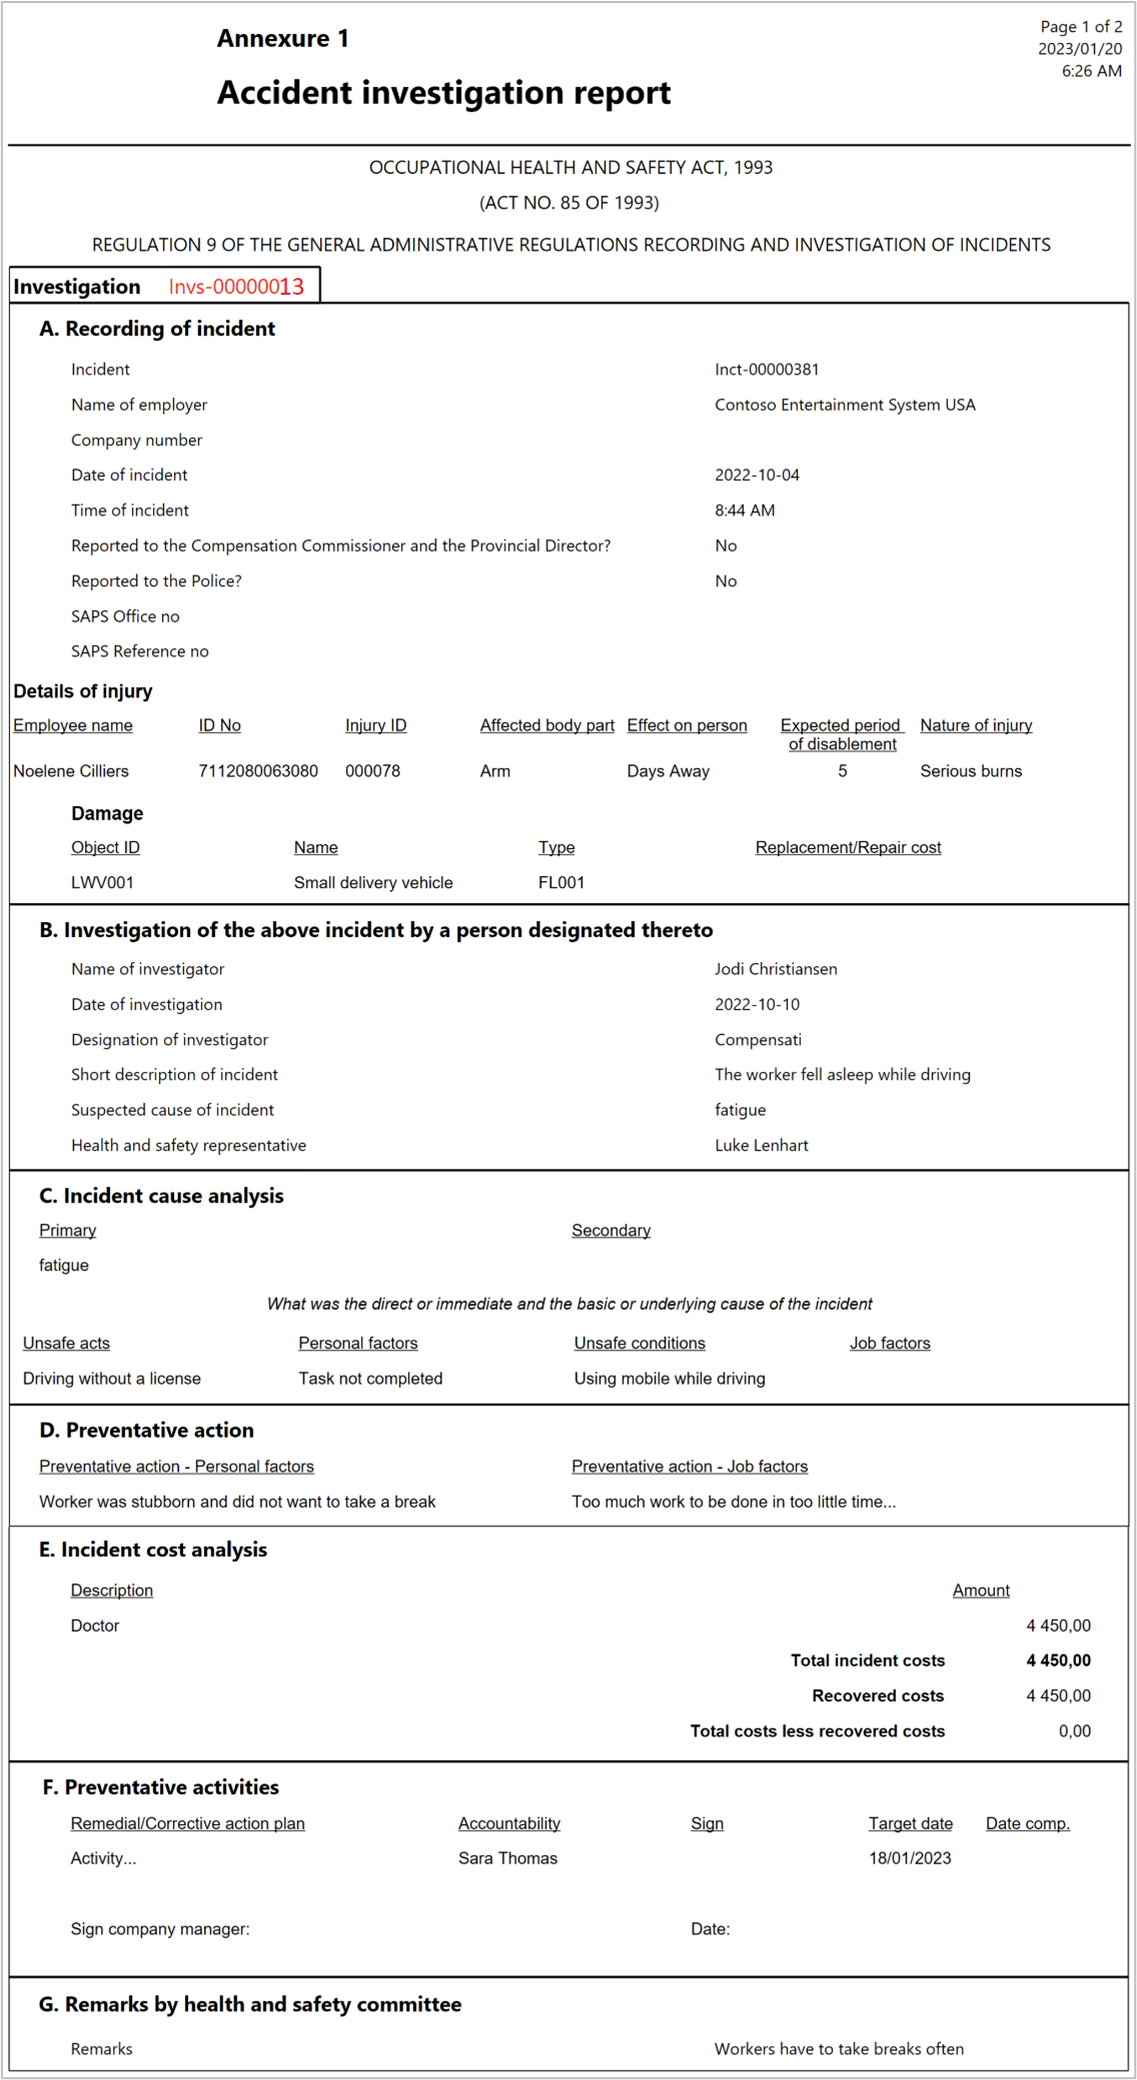
The Investigation report prints the different investigations and their relating details.
¶ 31. The Investigations graph
The Investigations graph is used to display the status of investigations. Refer to the color scheme key code below the Investigations graph:
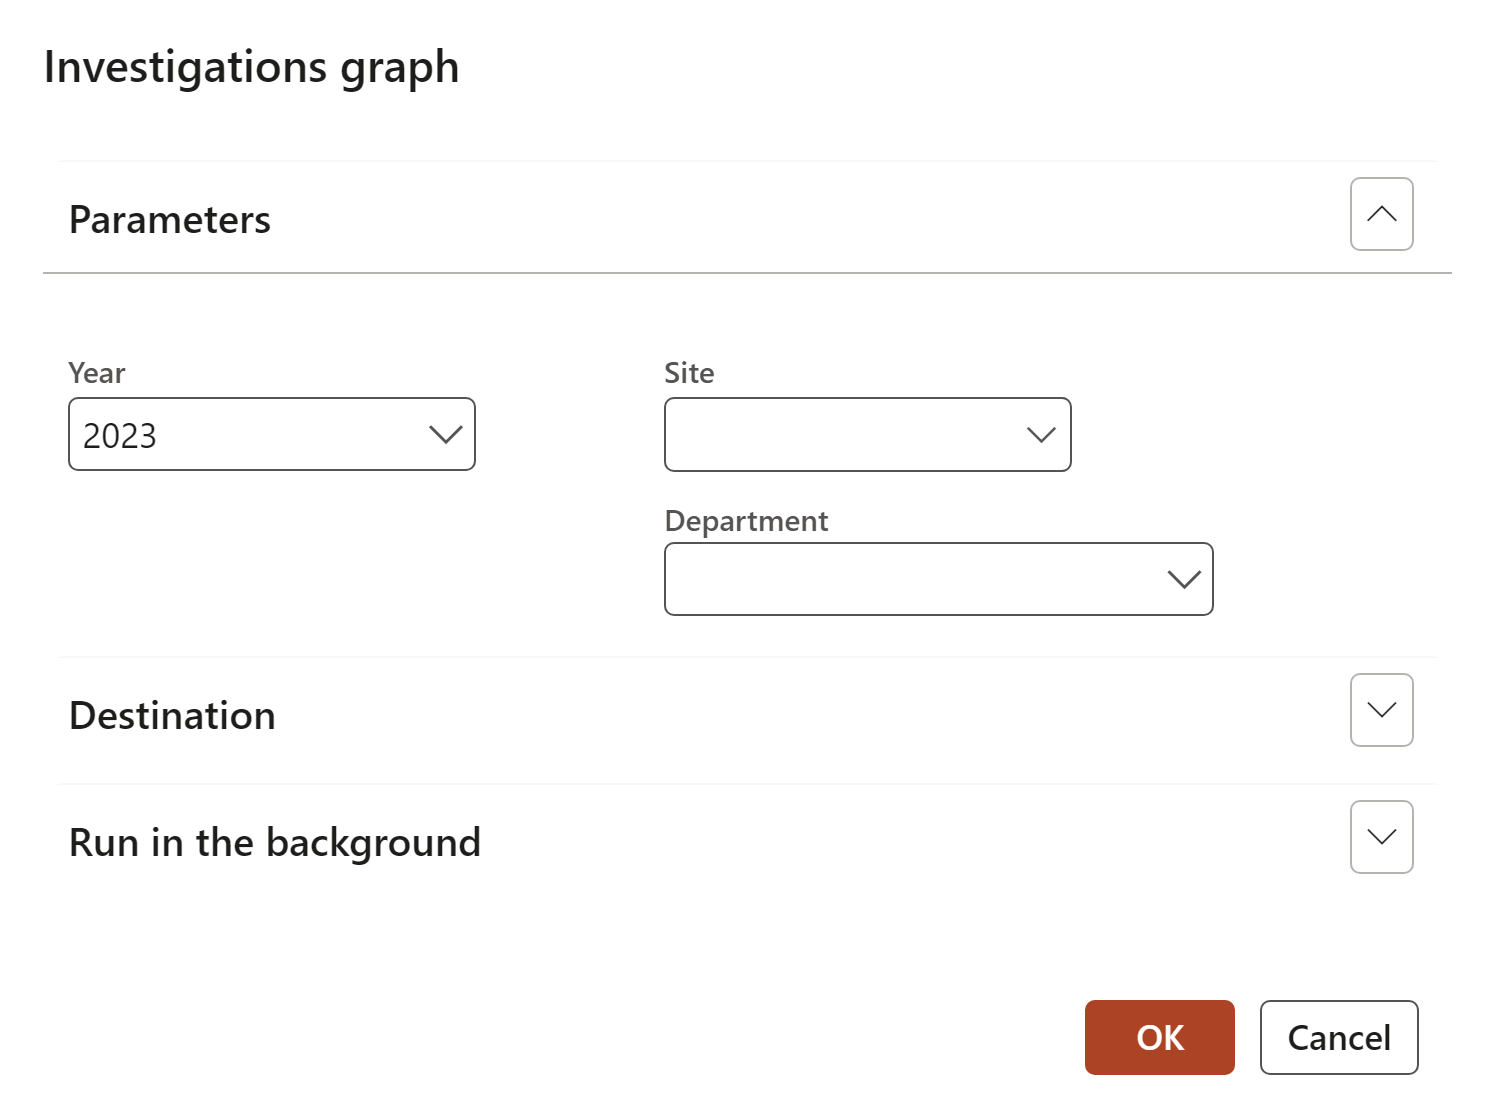
HSE > Investigations > Reports and inquiries > Investigations graph
- Complete the parameters
¶ Industrial hygiene Reports & Inquiries
¶ 32. All exposure results
HSE > Industrial hygiene > Reports and inquiries > All exposure results
Select the criteria to group results on

This inquiry allows the user to capture and inquire on all exposure sample test results.
The criteria for the inquiry can be grouped according to the following:
- All exposure test results
- Results of tests done on objects
- Manual HEG tests
- Scheduled HEG tests
- Ad-hoc worker
- Ad-hoc workplace
¶ Occupational health Reports & Inquiries
¶ 33. All medical results
HSE > Occupational health > Reports and inquiries > All medical results
Select the criteria to group results on
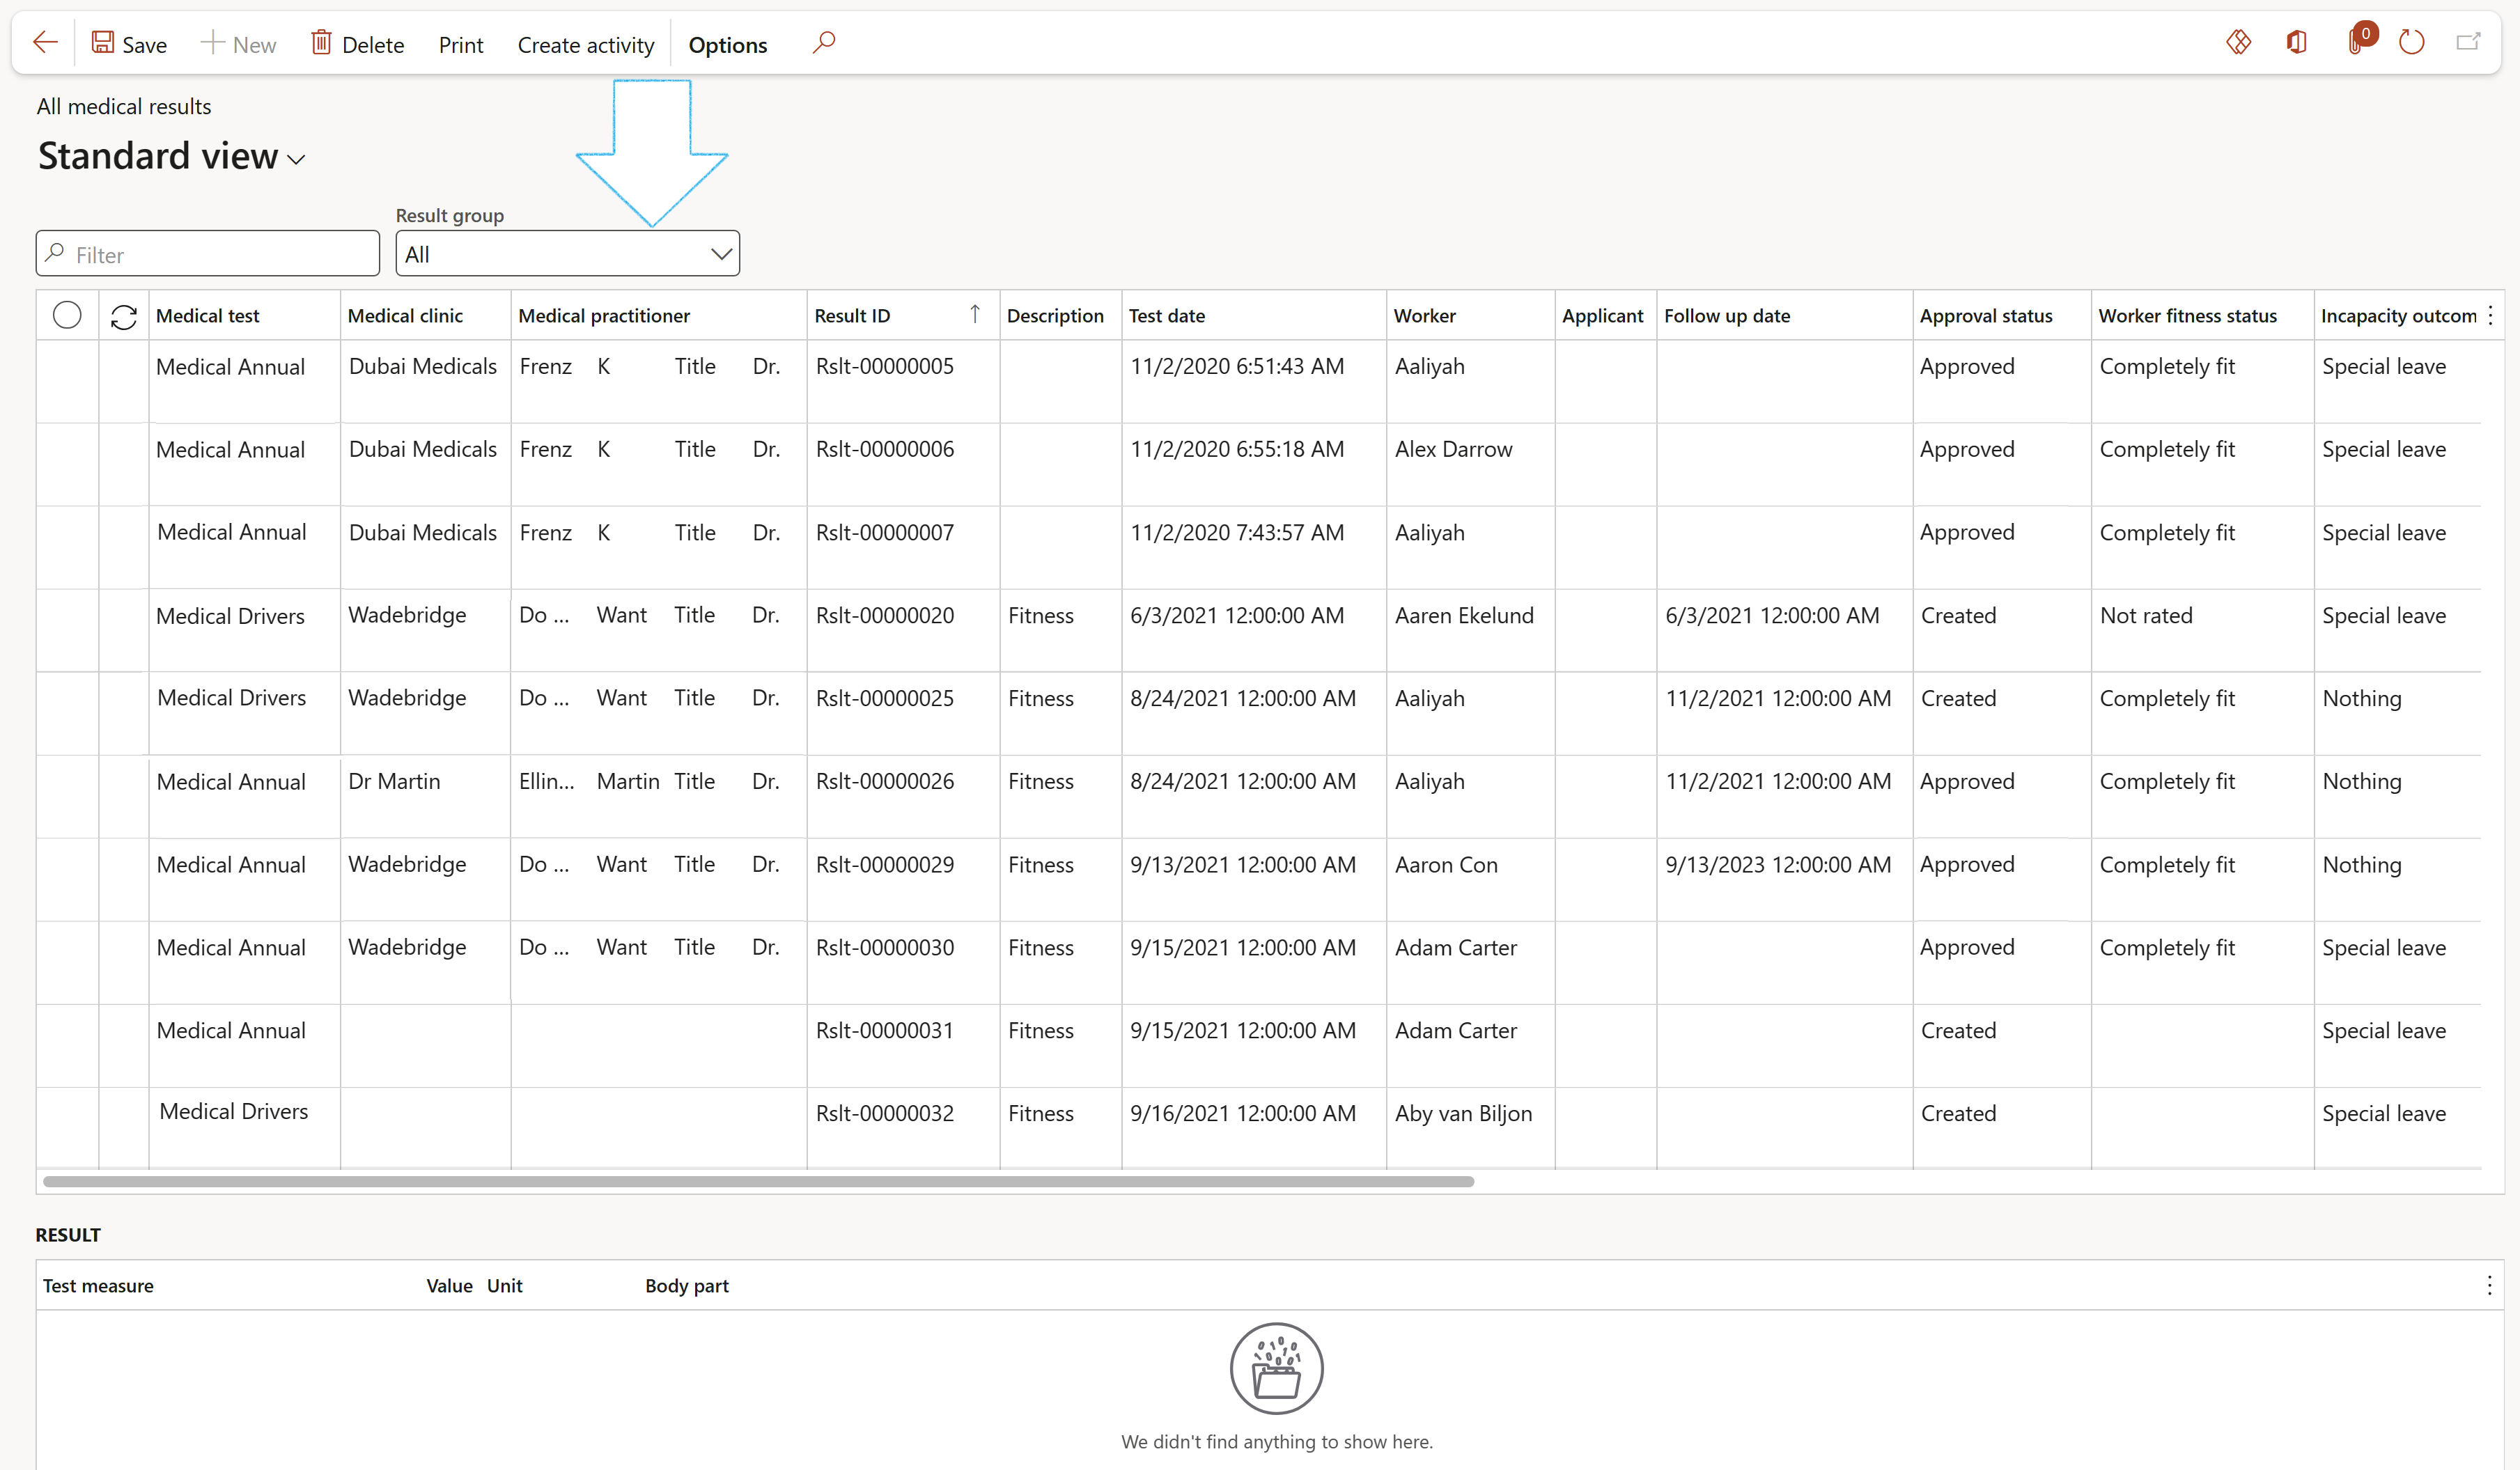
The All medical results inquiry allows the user to capture and inquire on medical test data.
The criteria for the inquiry can be grouped according to the following:
- All medical results
- Applicant medicals
- Worker medicals – Scheduled
- Worker medicals – Ad hoc
- Worker fitness
¶ 34. Current worker fitness
HSE > Occupational health > Reports and Inquiries > Current worker fitness

Additional columns displayed:
| Blood pressure | Respitory rate | Eye sight |
| Hearing | Weight | Hight |
| BMI | Urinary | Other |
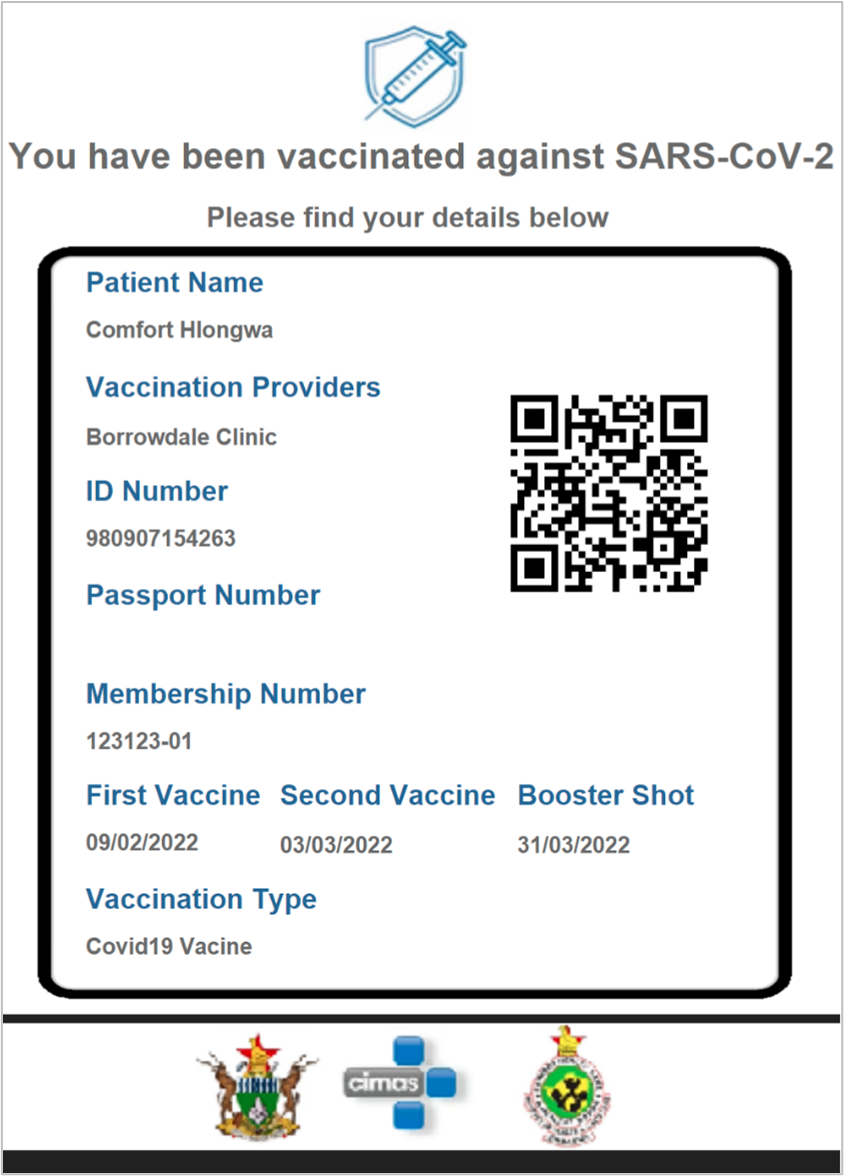
¶ 35. Vaccination certificates
HSE > Occupational health > Reports and inquiries > Vaccination certificates
- Select the Vaccination certificate that you want to view
- On the Action pane, click on the Print button
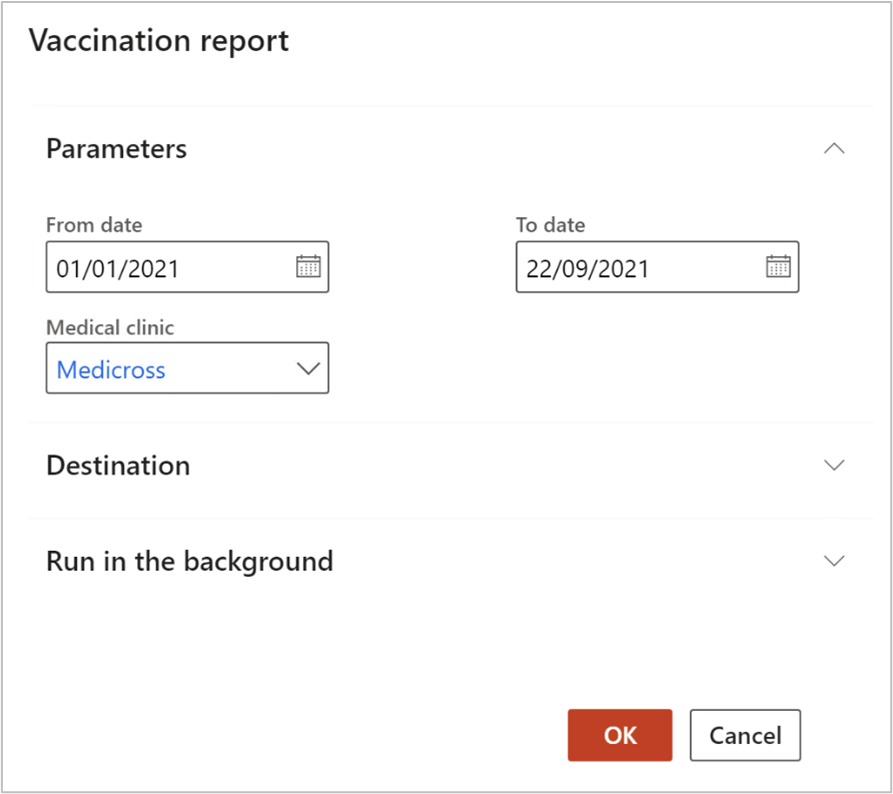
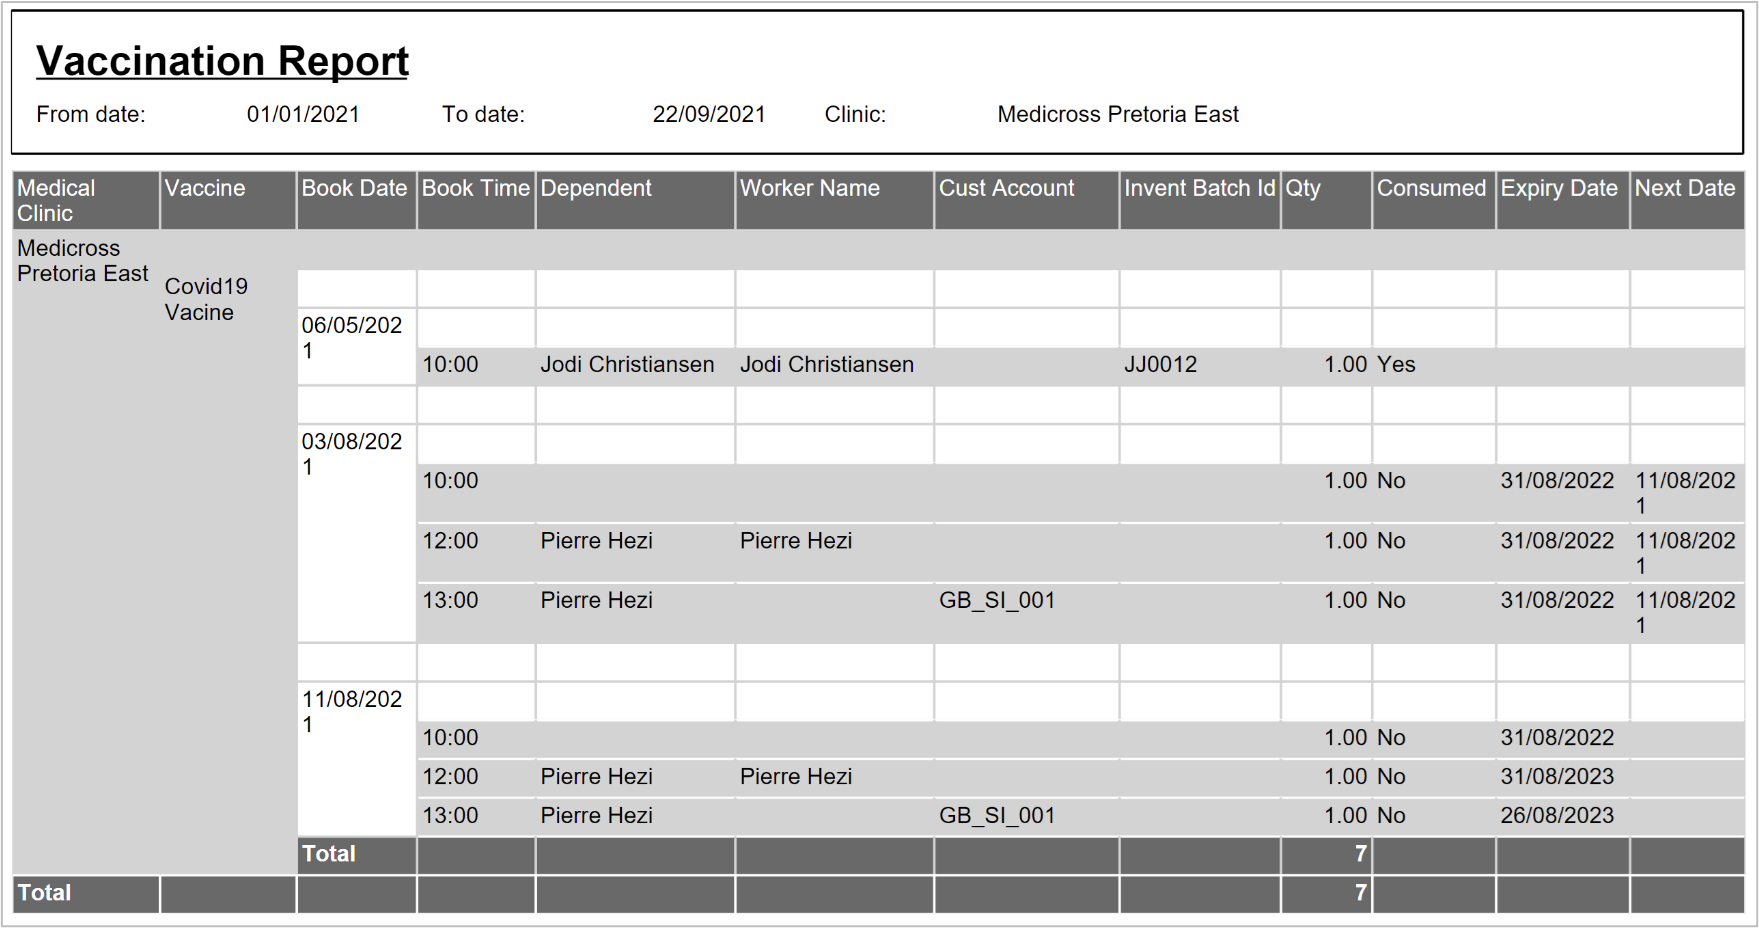
¶ 36. Vaccination report
HSE > Occupational health > Reports and inquiries > Vaccination report
- Enter the relevant parameters on the Vaccination report dialog
- Click OK
¶ 37. PPE stock movement
HSE > PPE > Reports and Inquiries > PPE stock movement
Select the parameters and then click OK
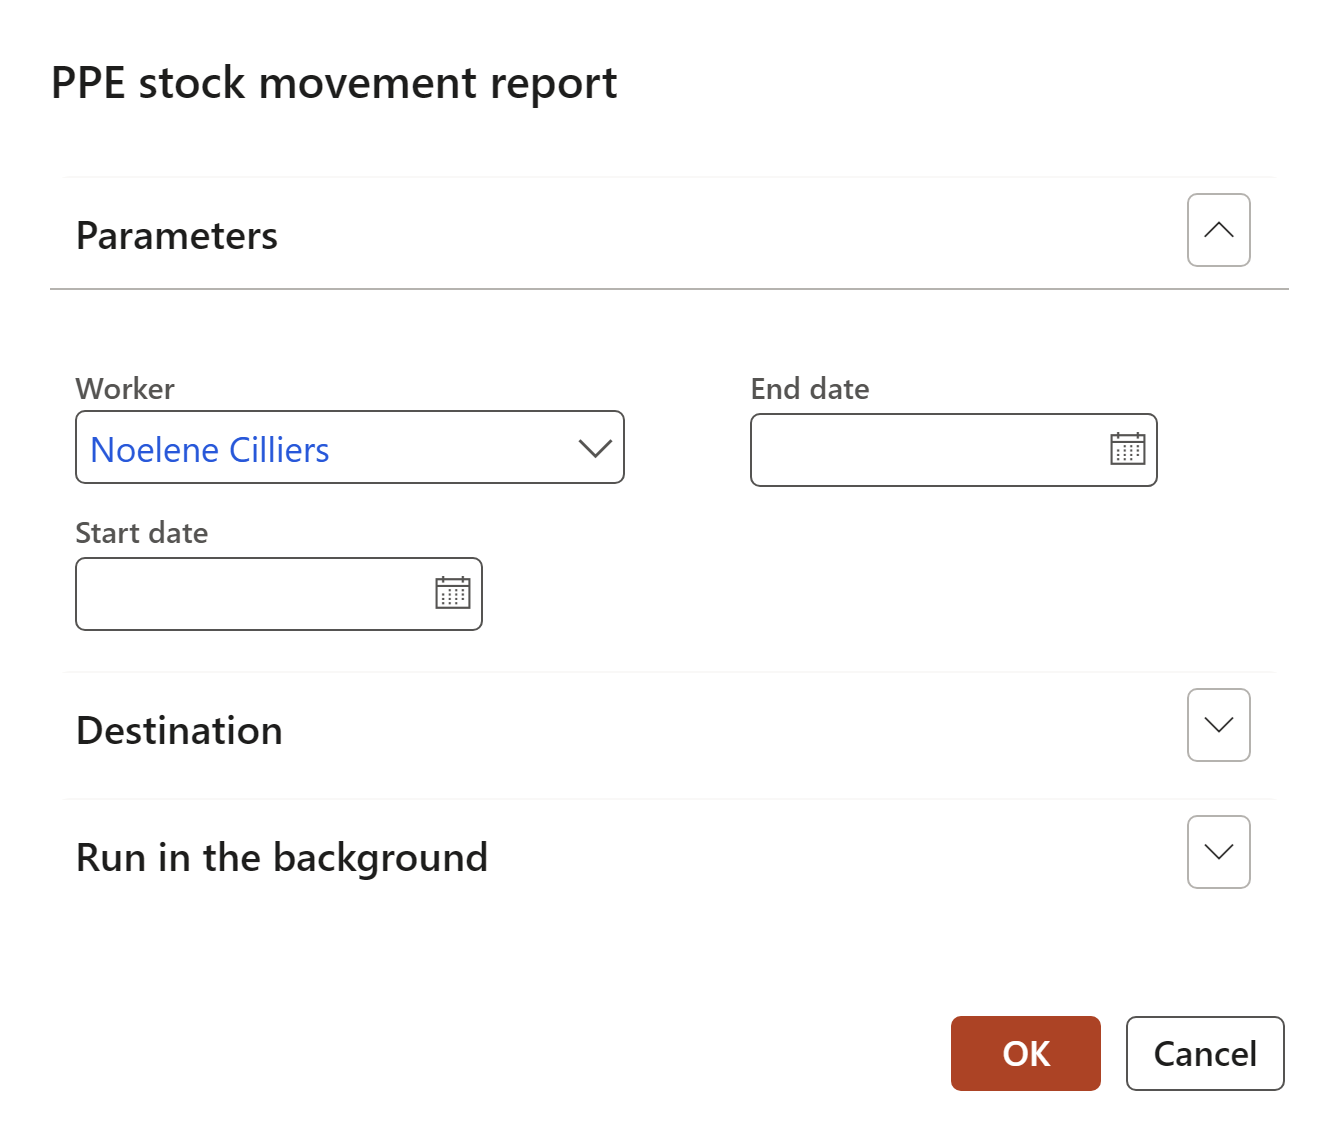

The above report provides the user with details concerning the distribution of PPE items to workers.
¶ 38. PPE allowance matrix export
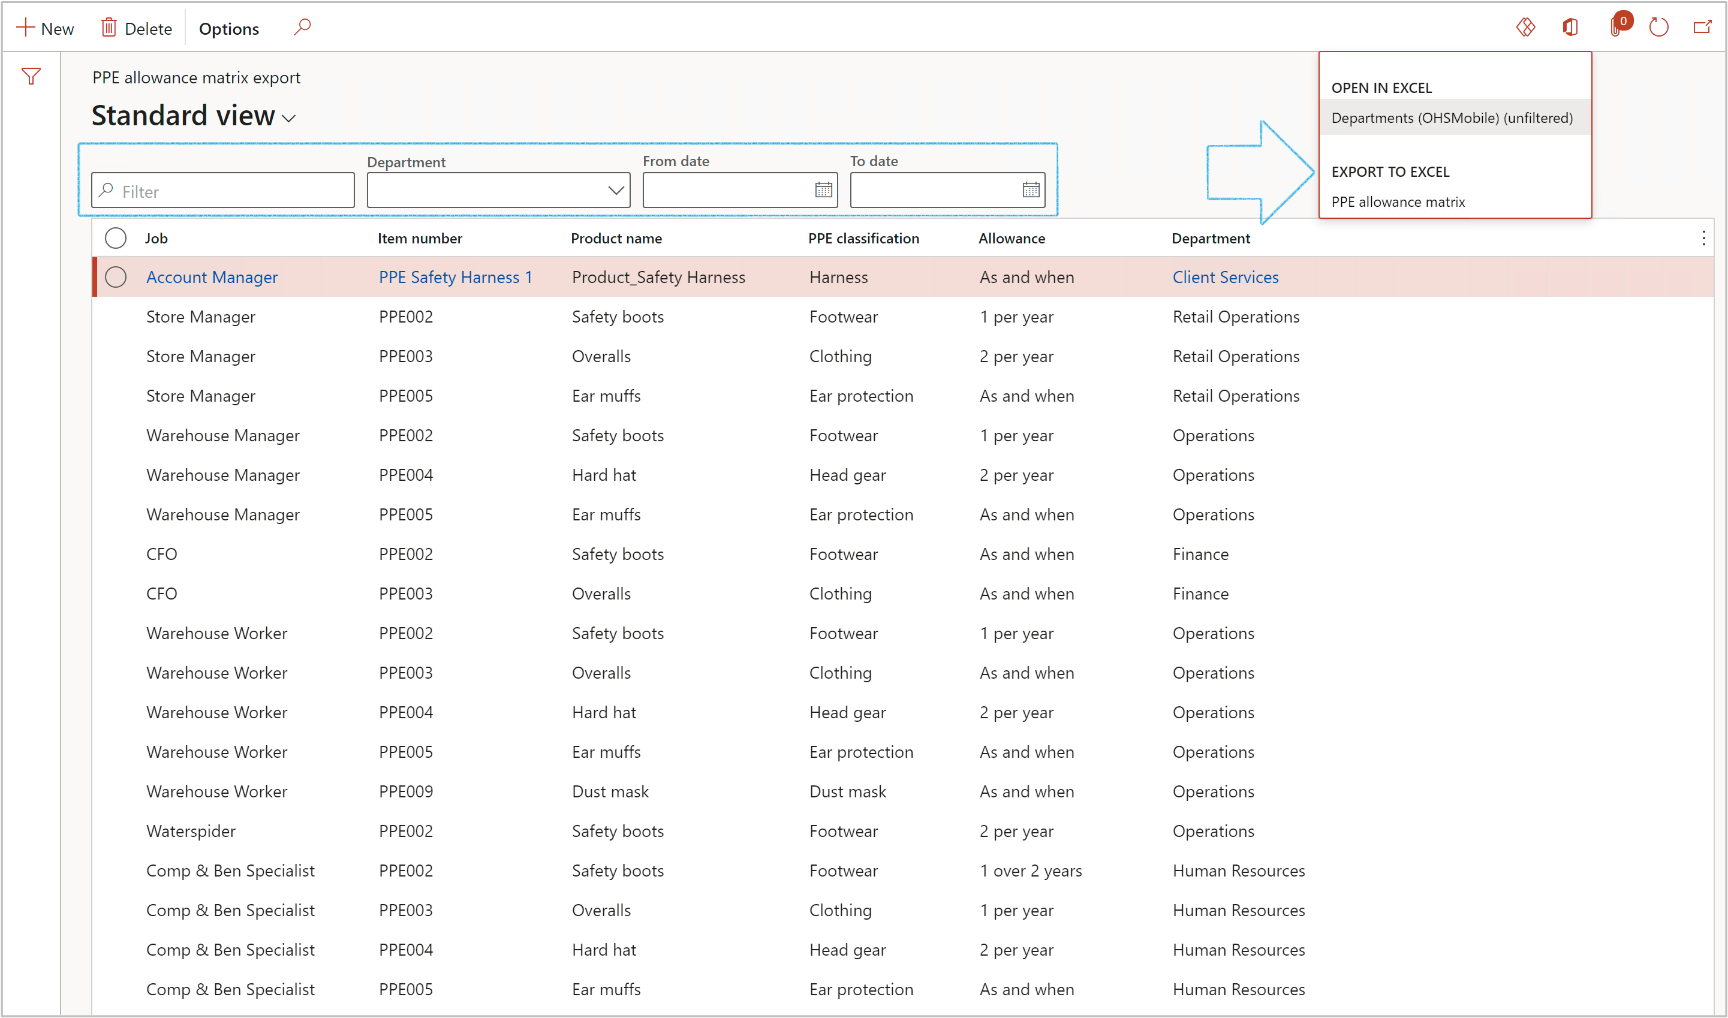
HSE > PPE > Reports and Inquiries > PPE allowance matrix export
- Use the filters to narrow down your search
- Click on the Open in Microsoft Office button and select Export to Excel
