¶ Introduction
This section will discuss functionality available as standard within the Microsoft Dynamics 365 Finance and Operation Vendor Collaboration Portal. Its aim is to discuss and illustrate the functionality using screenshots.
The Vendor Collaboration Portal enables organisations to collaborate with vendors in a timely manner without the need for additional administration to maintain vendor details. Vendors can be onboarded through the portal, vendors may maintain information such as bank details, contact information, purchase order confirmation and participation in bids.
Below is a diagram that illustrates the processes discussed in the section below:
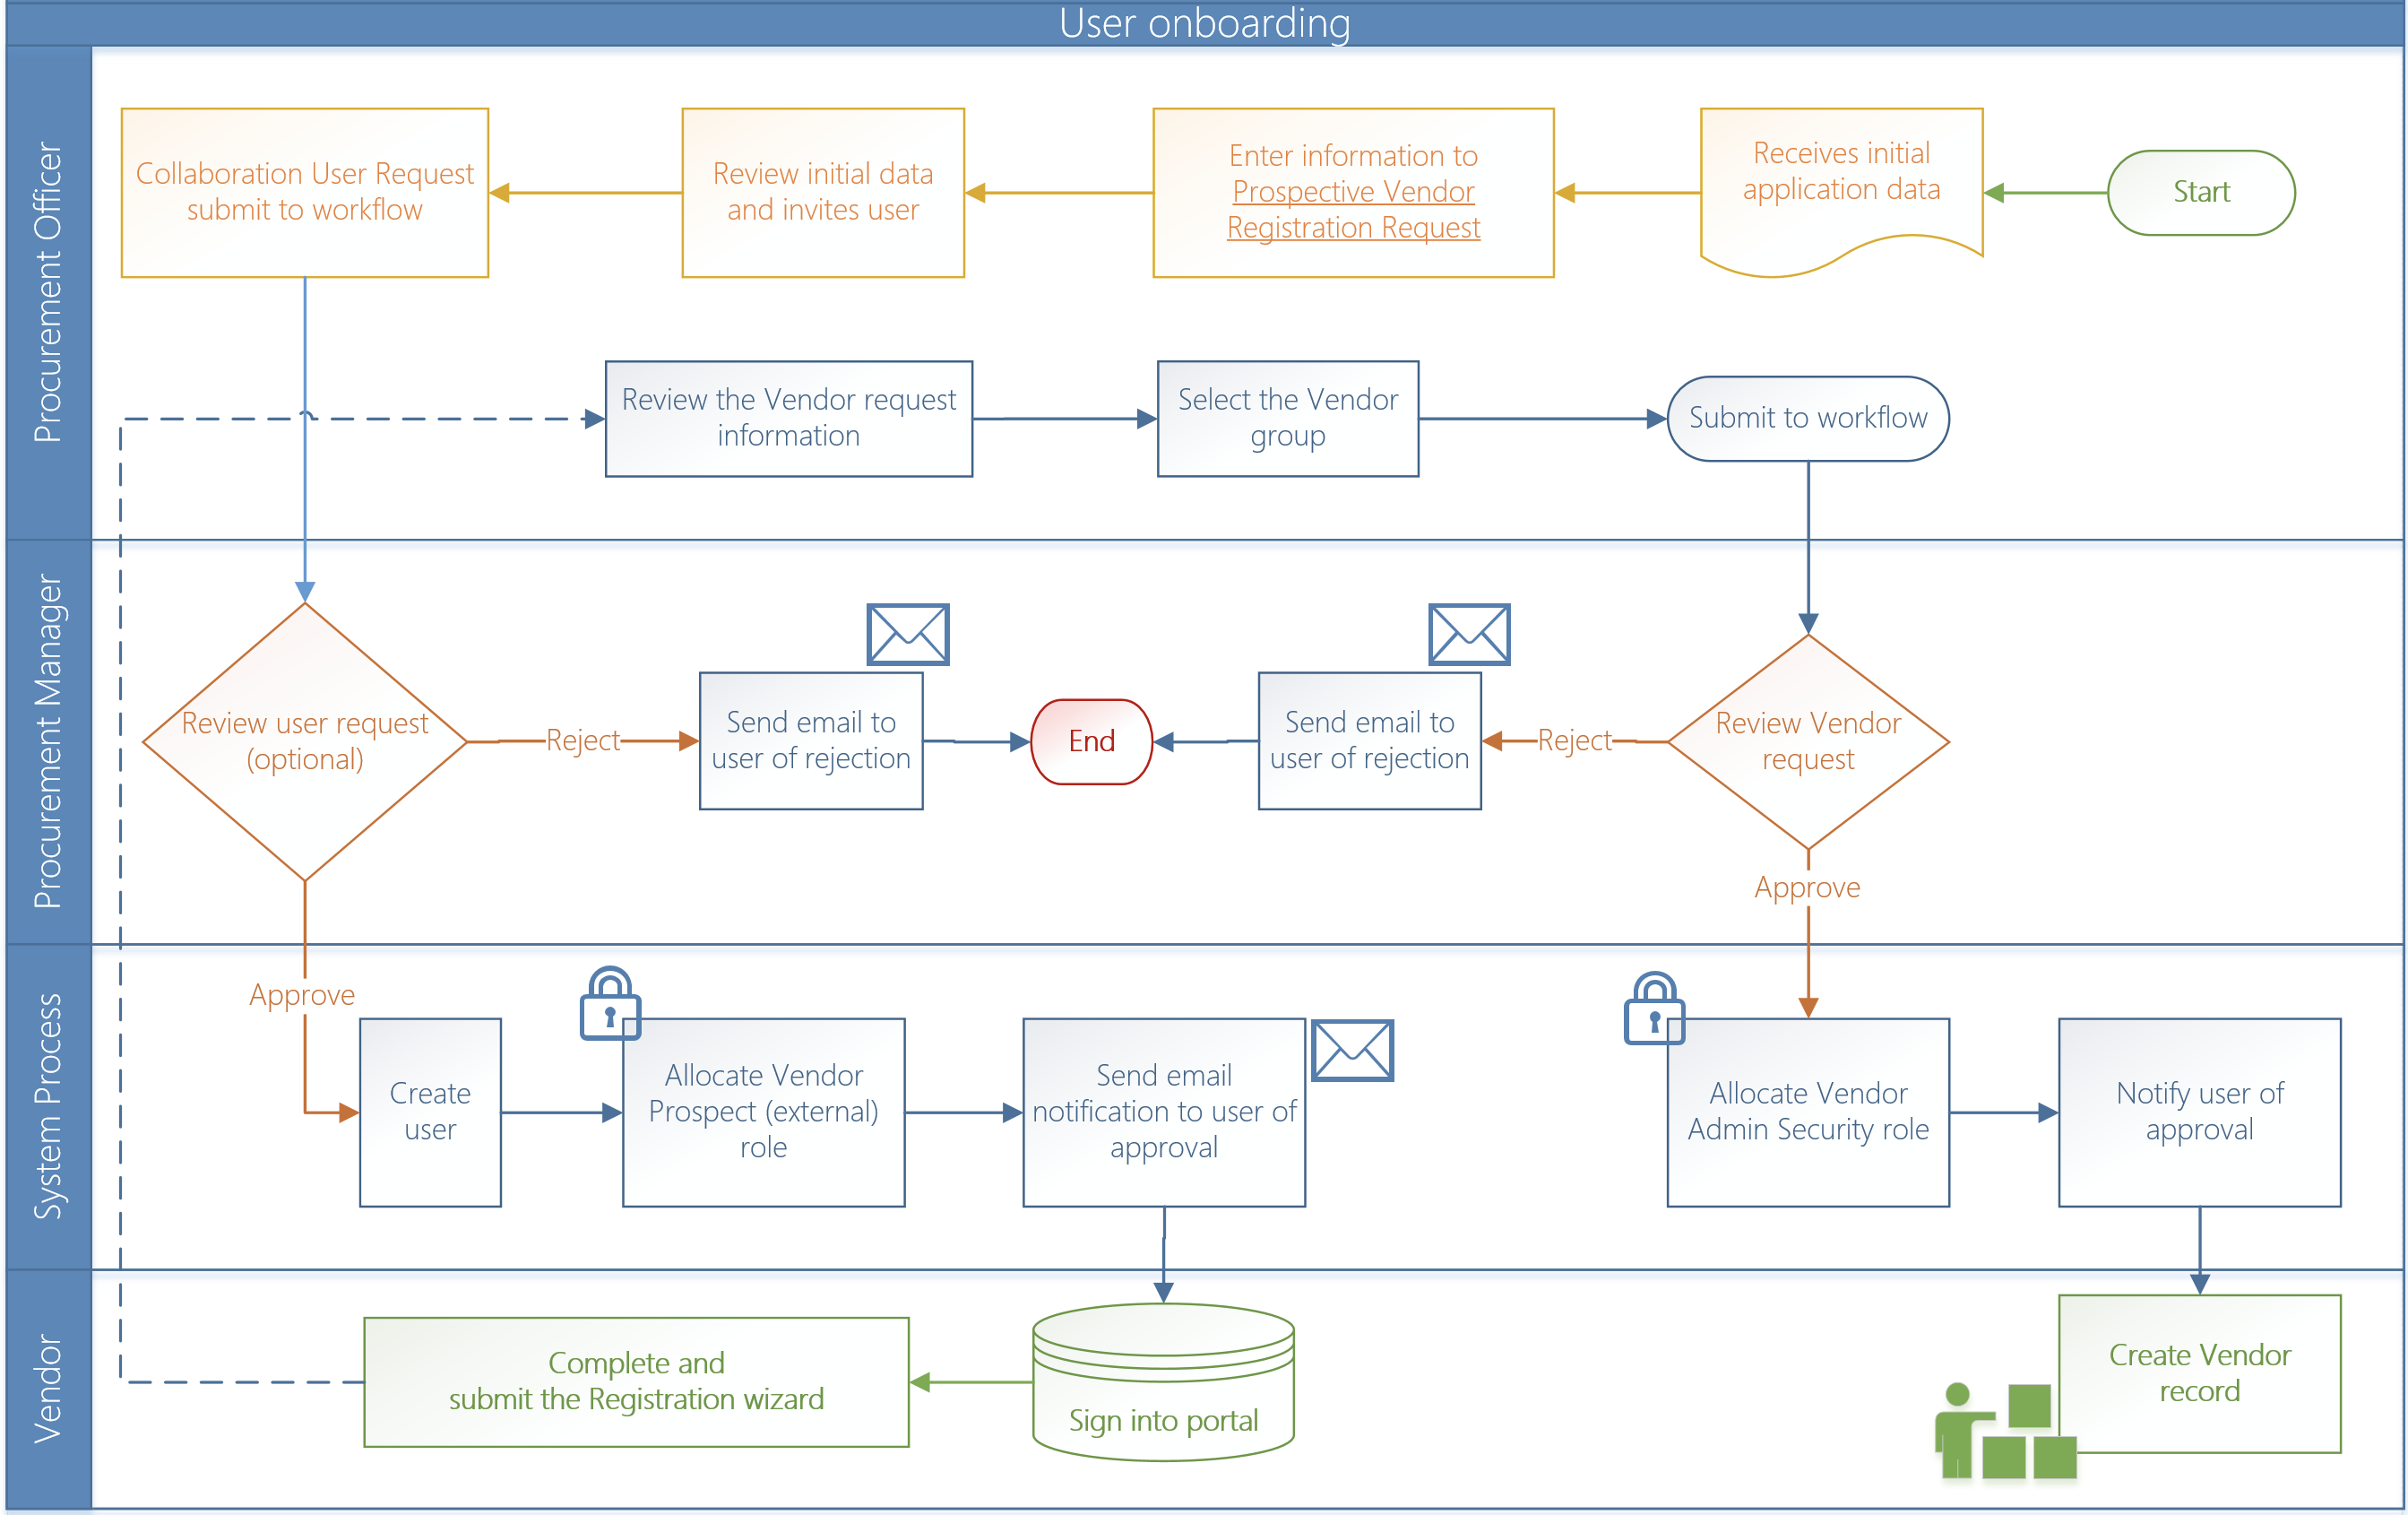
The Vendor collaboration module is targeted at vendors who don't have electronic data interchange (EDI) integration with Microsoft Dynamics 365 Supply Chain Management. It lets vendors work with purchase orders (POs), invoices, consignment inventory information, and requests for quotation (RFQs), and lets them access parts of their vendor master data. This document explains how you can collaborate with external vendors who use the vendor collaboration interface to work with POs and RFQs.
¶ Step 1: VSS mobile app
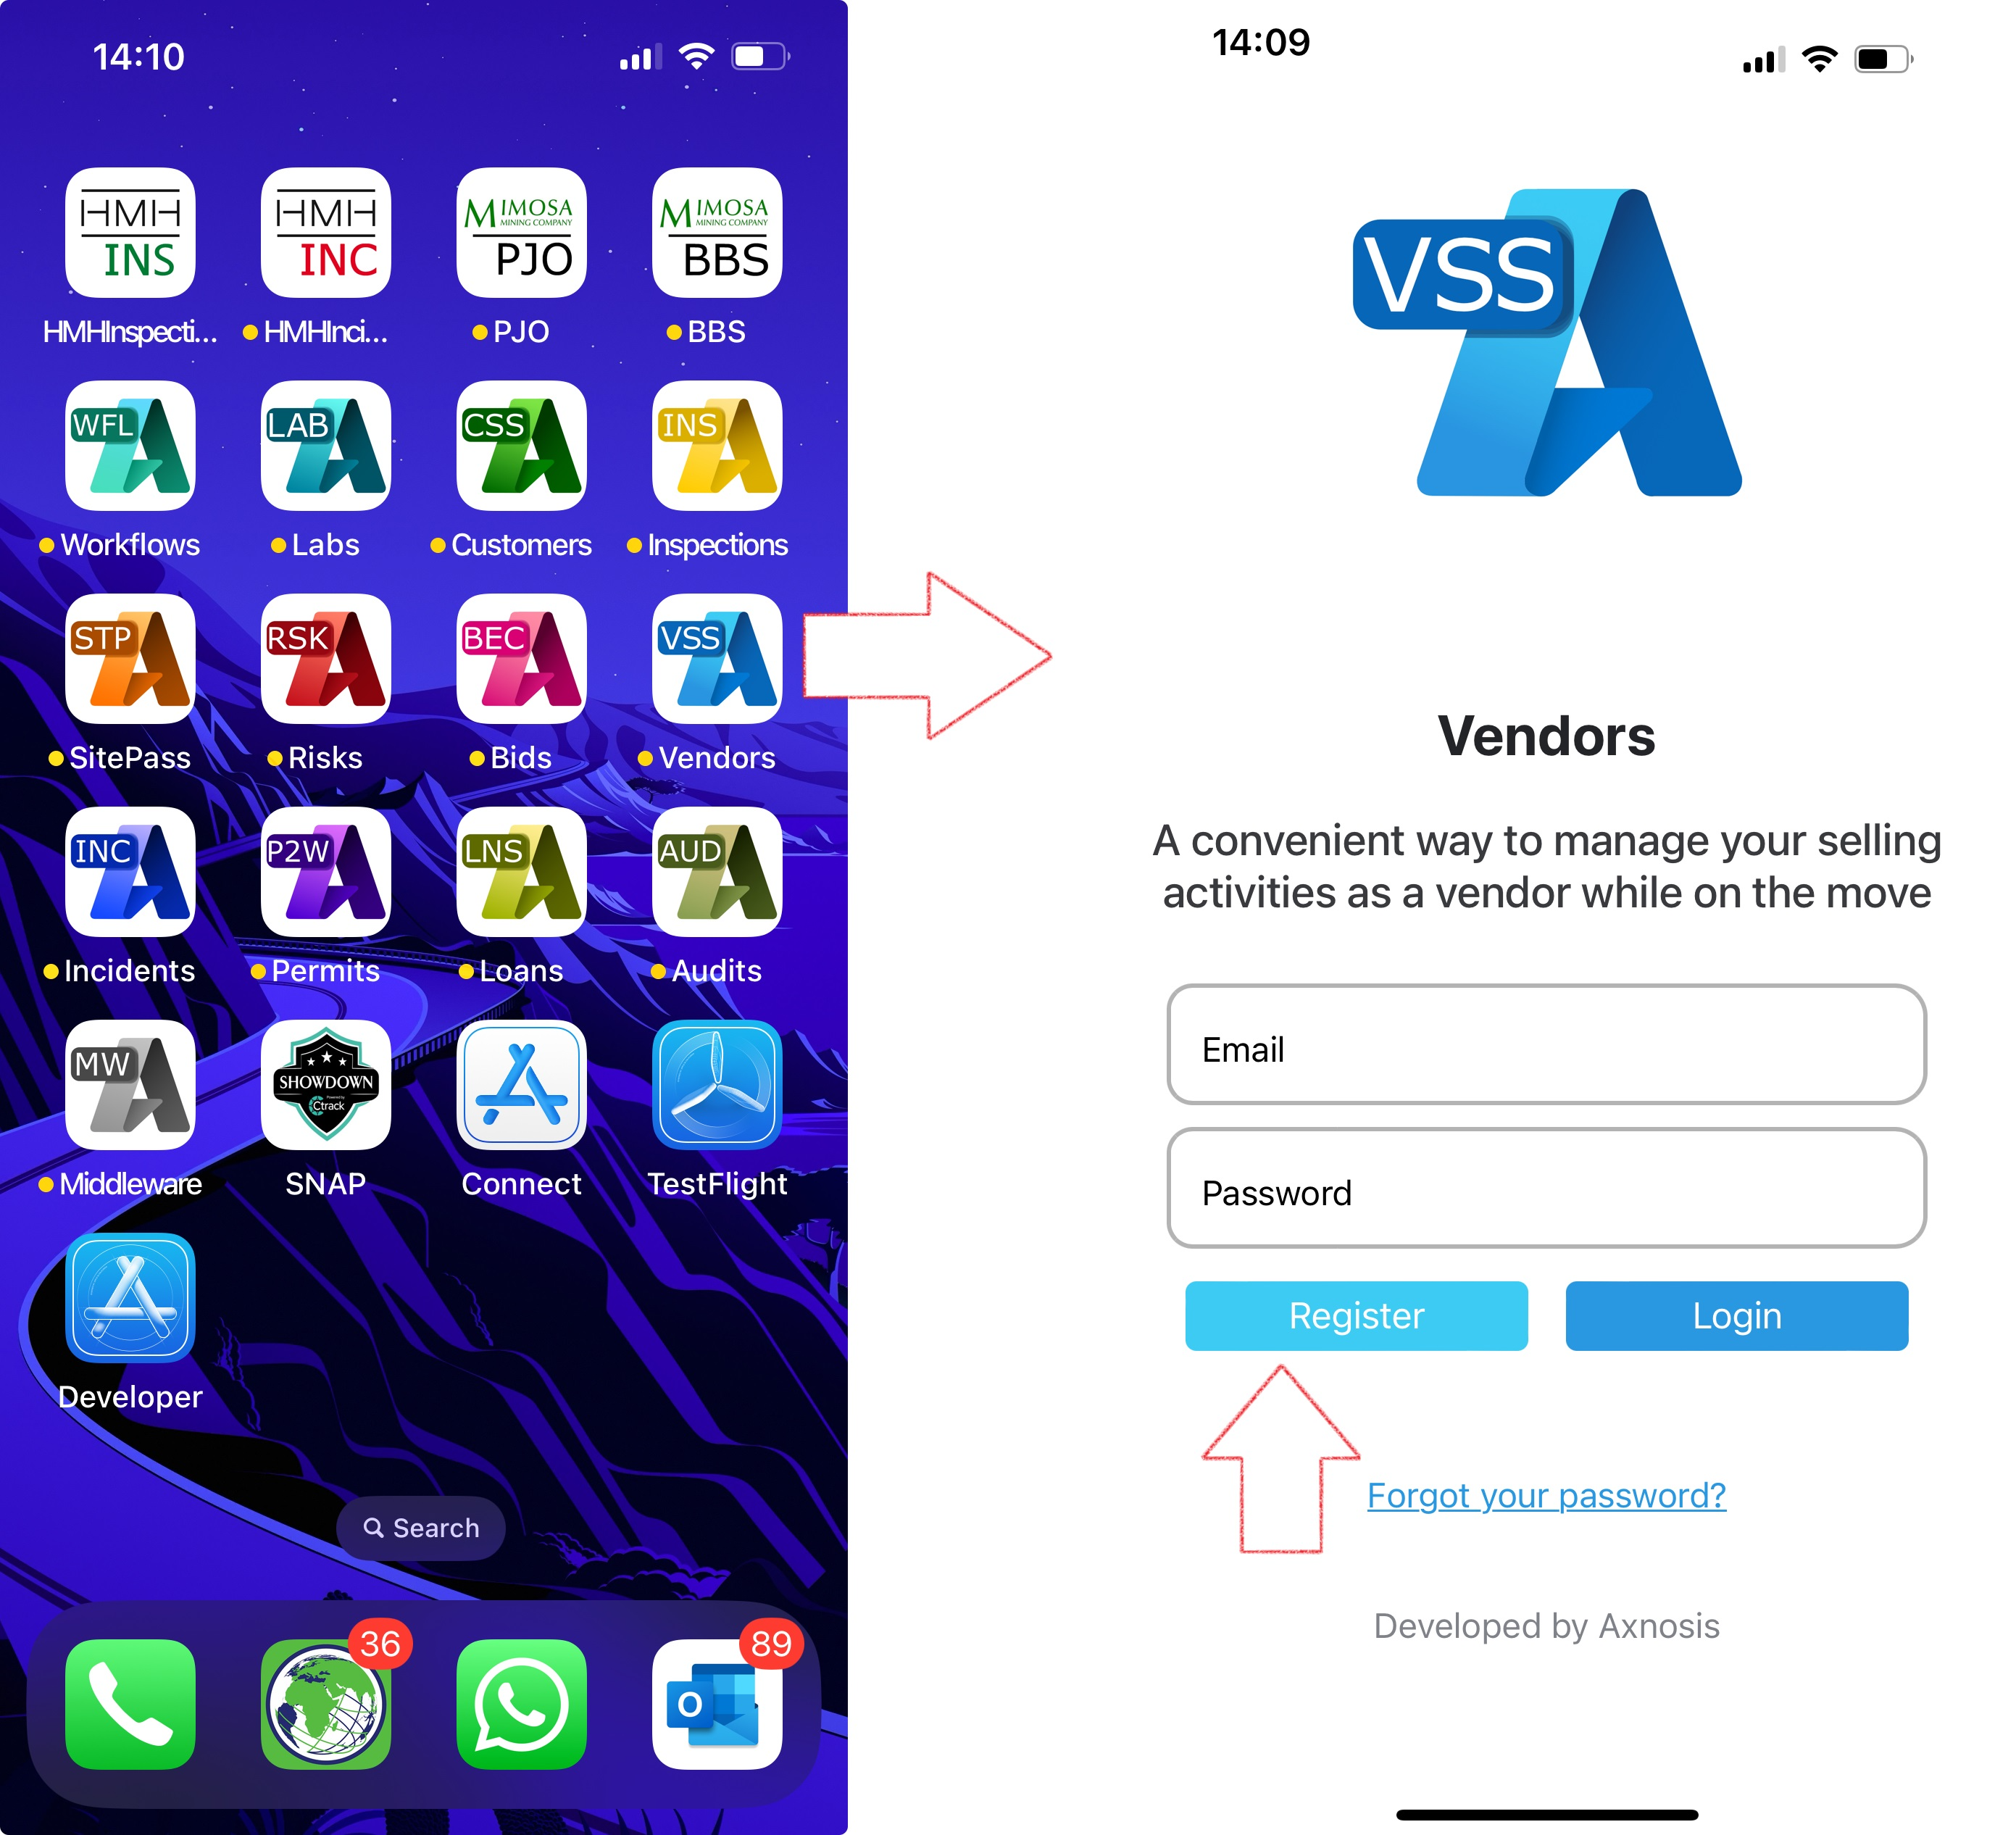
By using the Axnosis VSS mobile app, people can regsiter themselves as new prospective vendors.
¶ Navigation

¶ Setup
¶ Step 2: Vendor collaboration portal configuration
¶ Step 2.1: Technical configuration
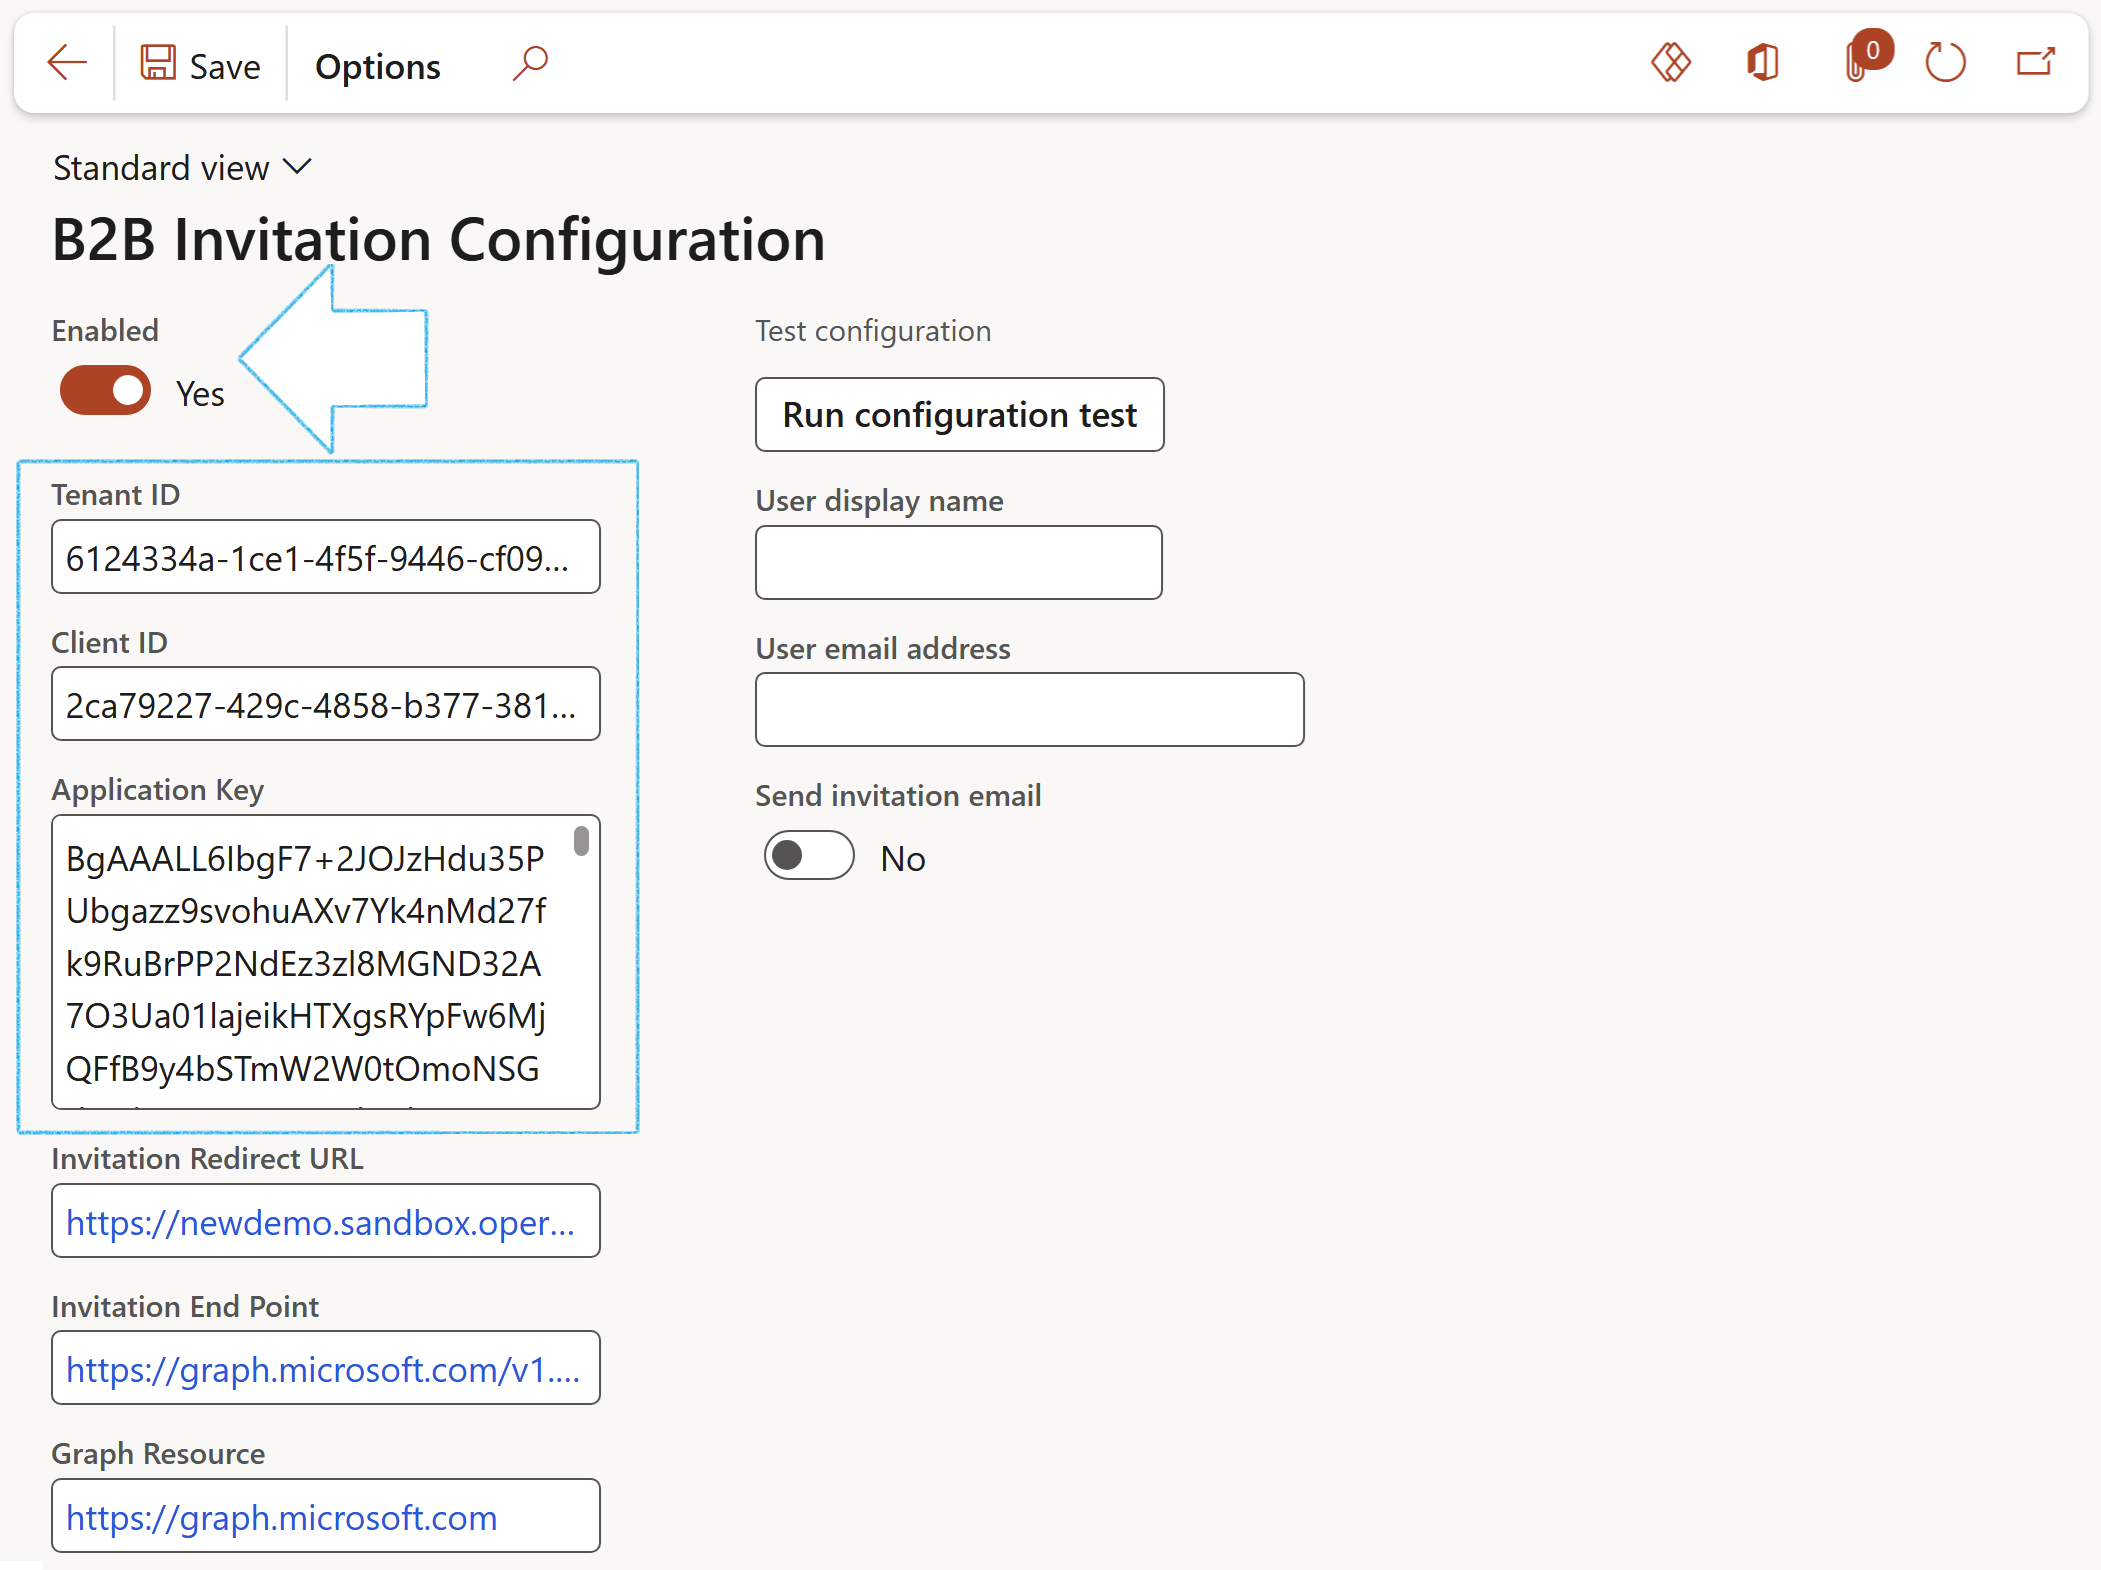
In order to ensure that external users can be created from the Vendor collaboration portal, it is required that the following technical configuration is done
Go to: System administration > Setup > B2B Invitation Configuration
- Ensure that B2B Invitation Configuration is Enabled
- A Tenant ID has to be entered
- The Client ID has to be entered
- An Application key has to be entered
¶ Step 2.2: Vendor collaboration parameters
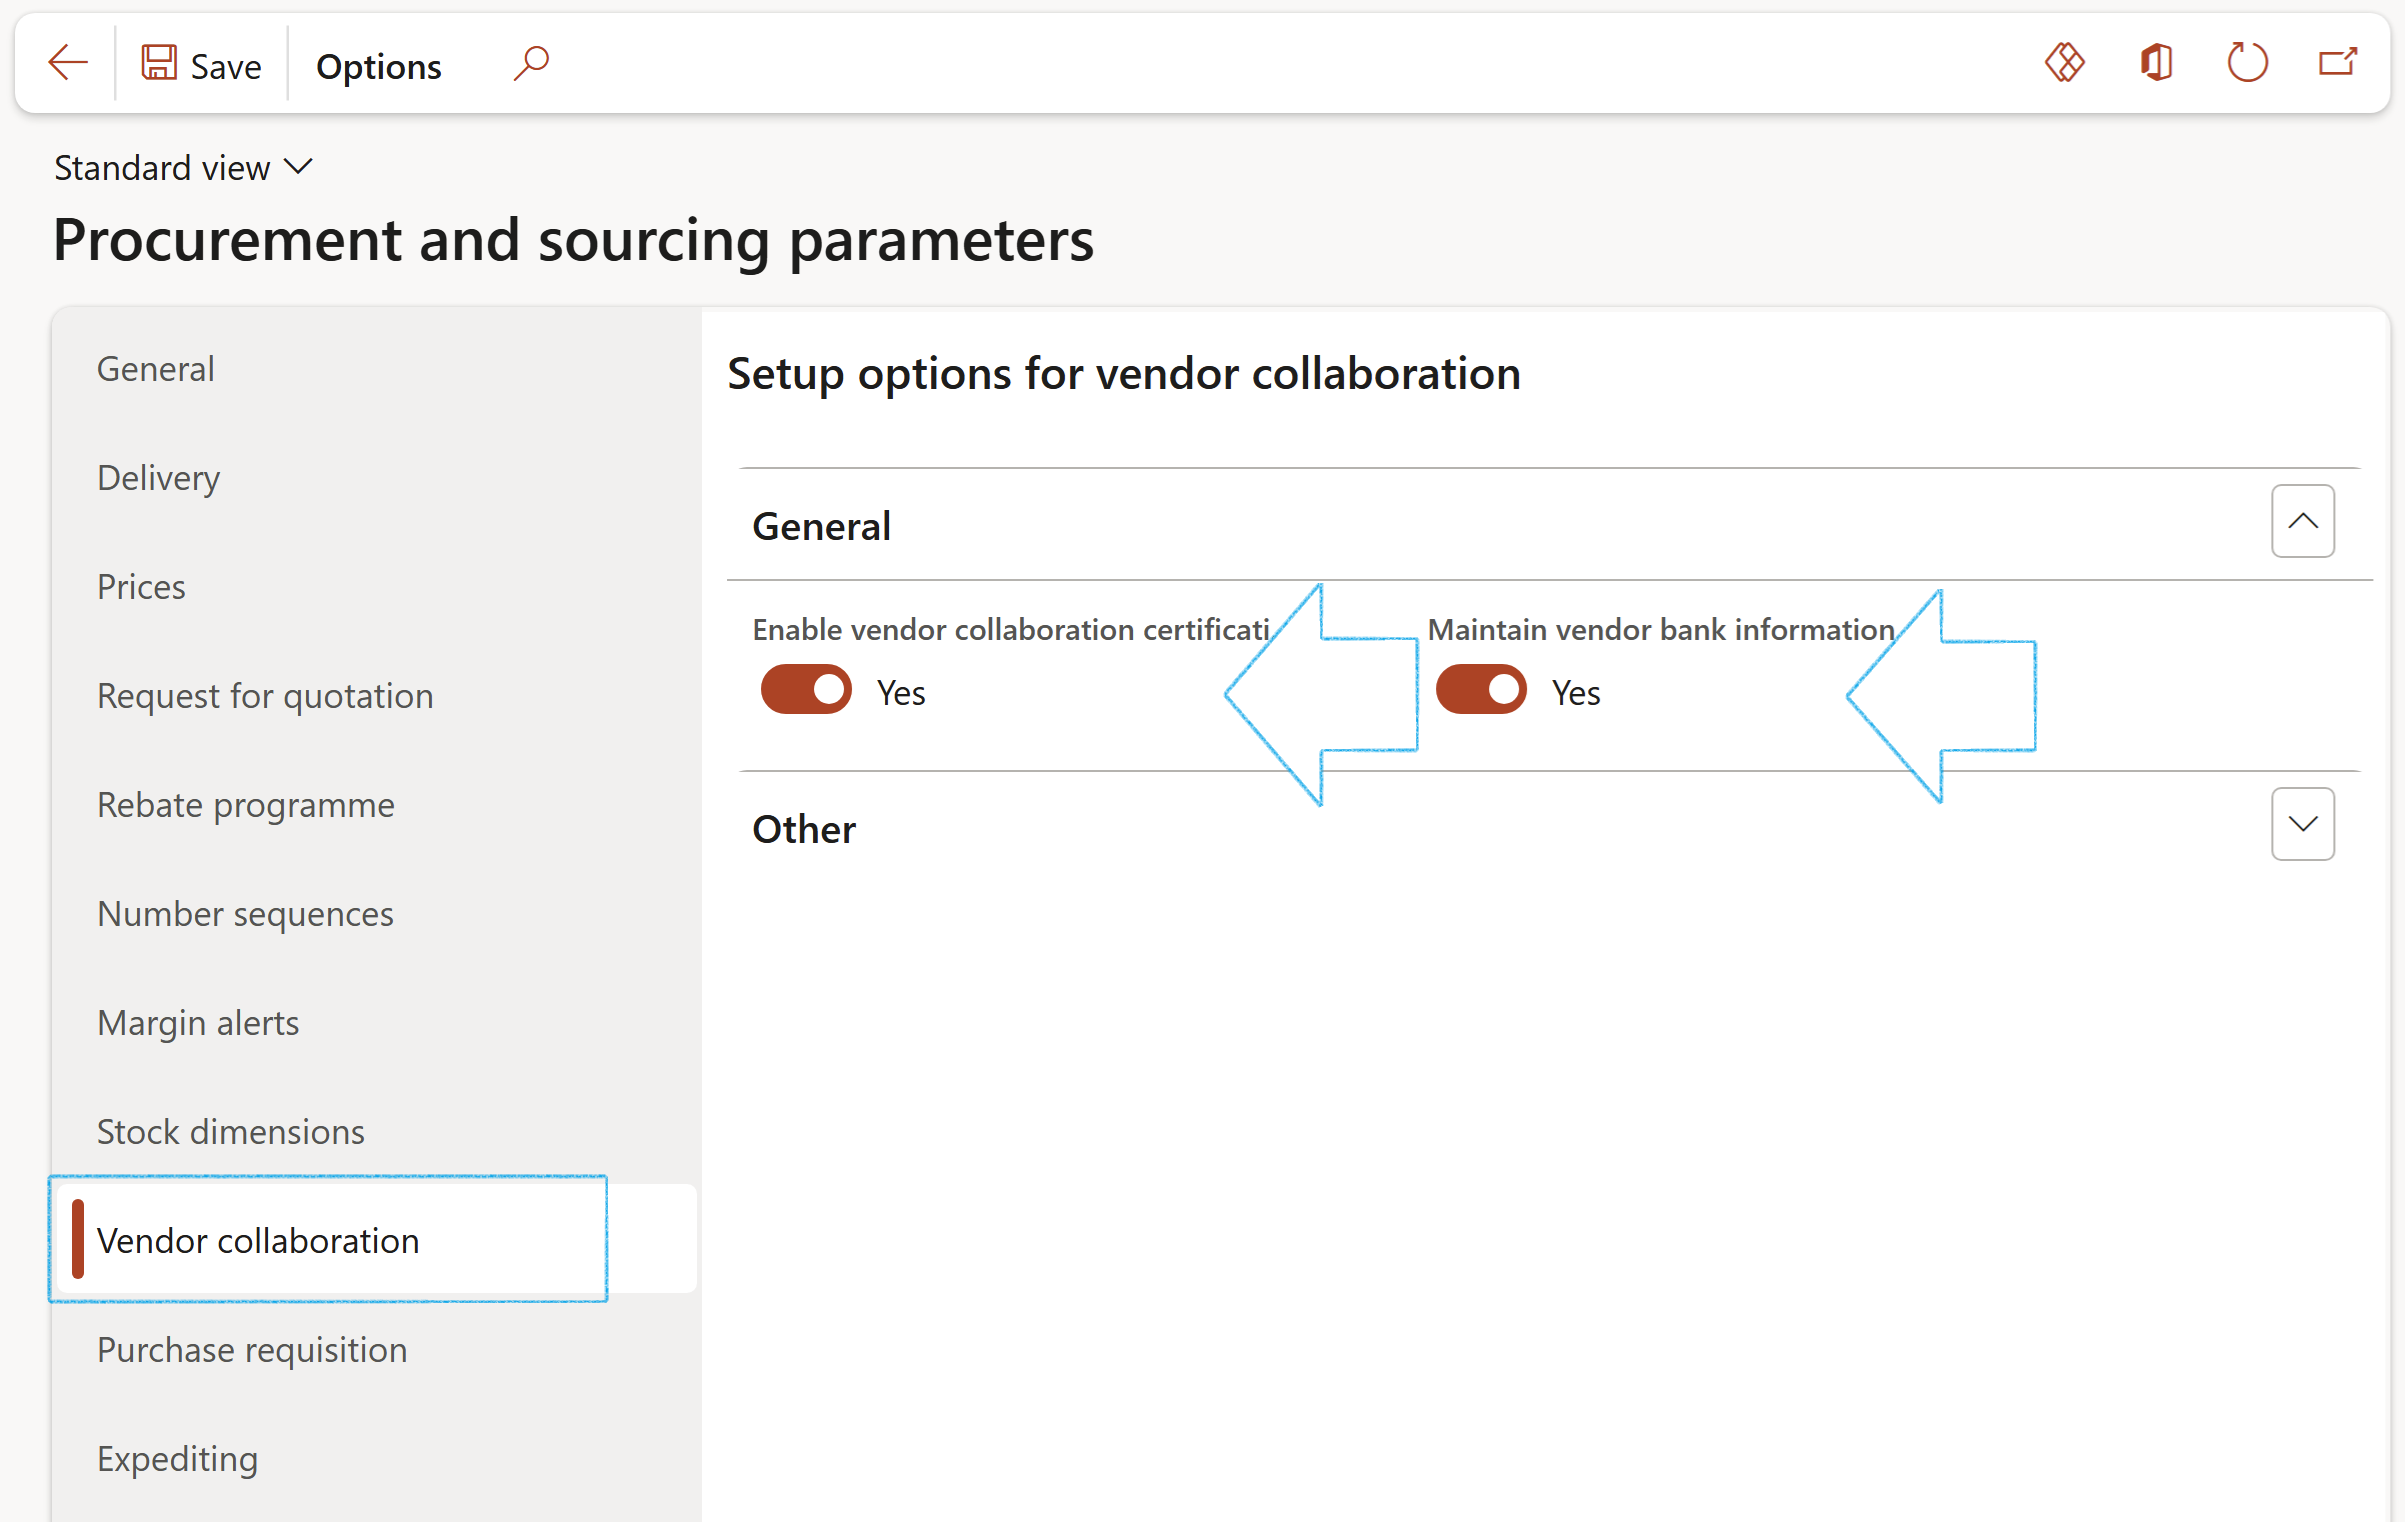
Go to: Procurement and Sourcing > Setup > Procurement and sourcing parameters
- Open the Vendor collaboration tab
- Expand the General Fast tab
- Move the Enable vendor collaboration certification management slider to Yes to allow Vendors to manage their own certifications via the portal
- Move the Maintain vendor bank information slider to Yes to allow Vendors to maintain their own bank information (when Vendors change bank information, it requires approval).
- Move the Duplication check on contact email address slider to Yes to enable checks on new prospective vendor registration requests for duplicate company name, organization number and where the email address is also found in vendor contacts.
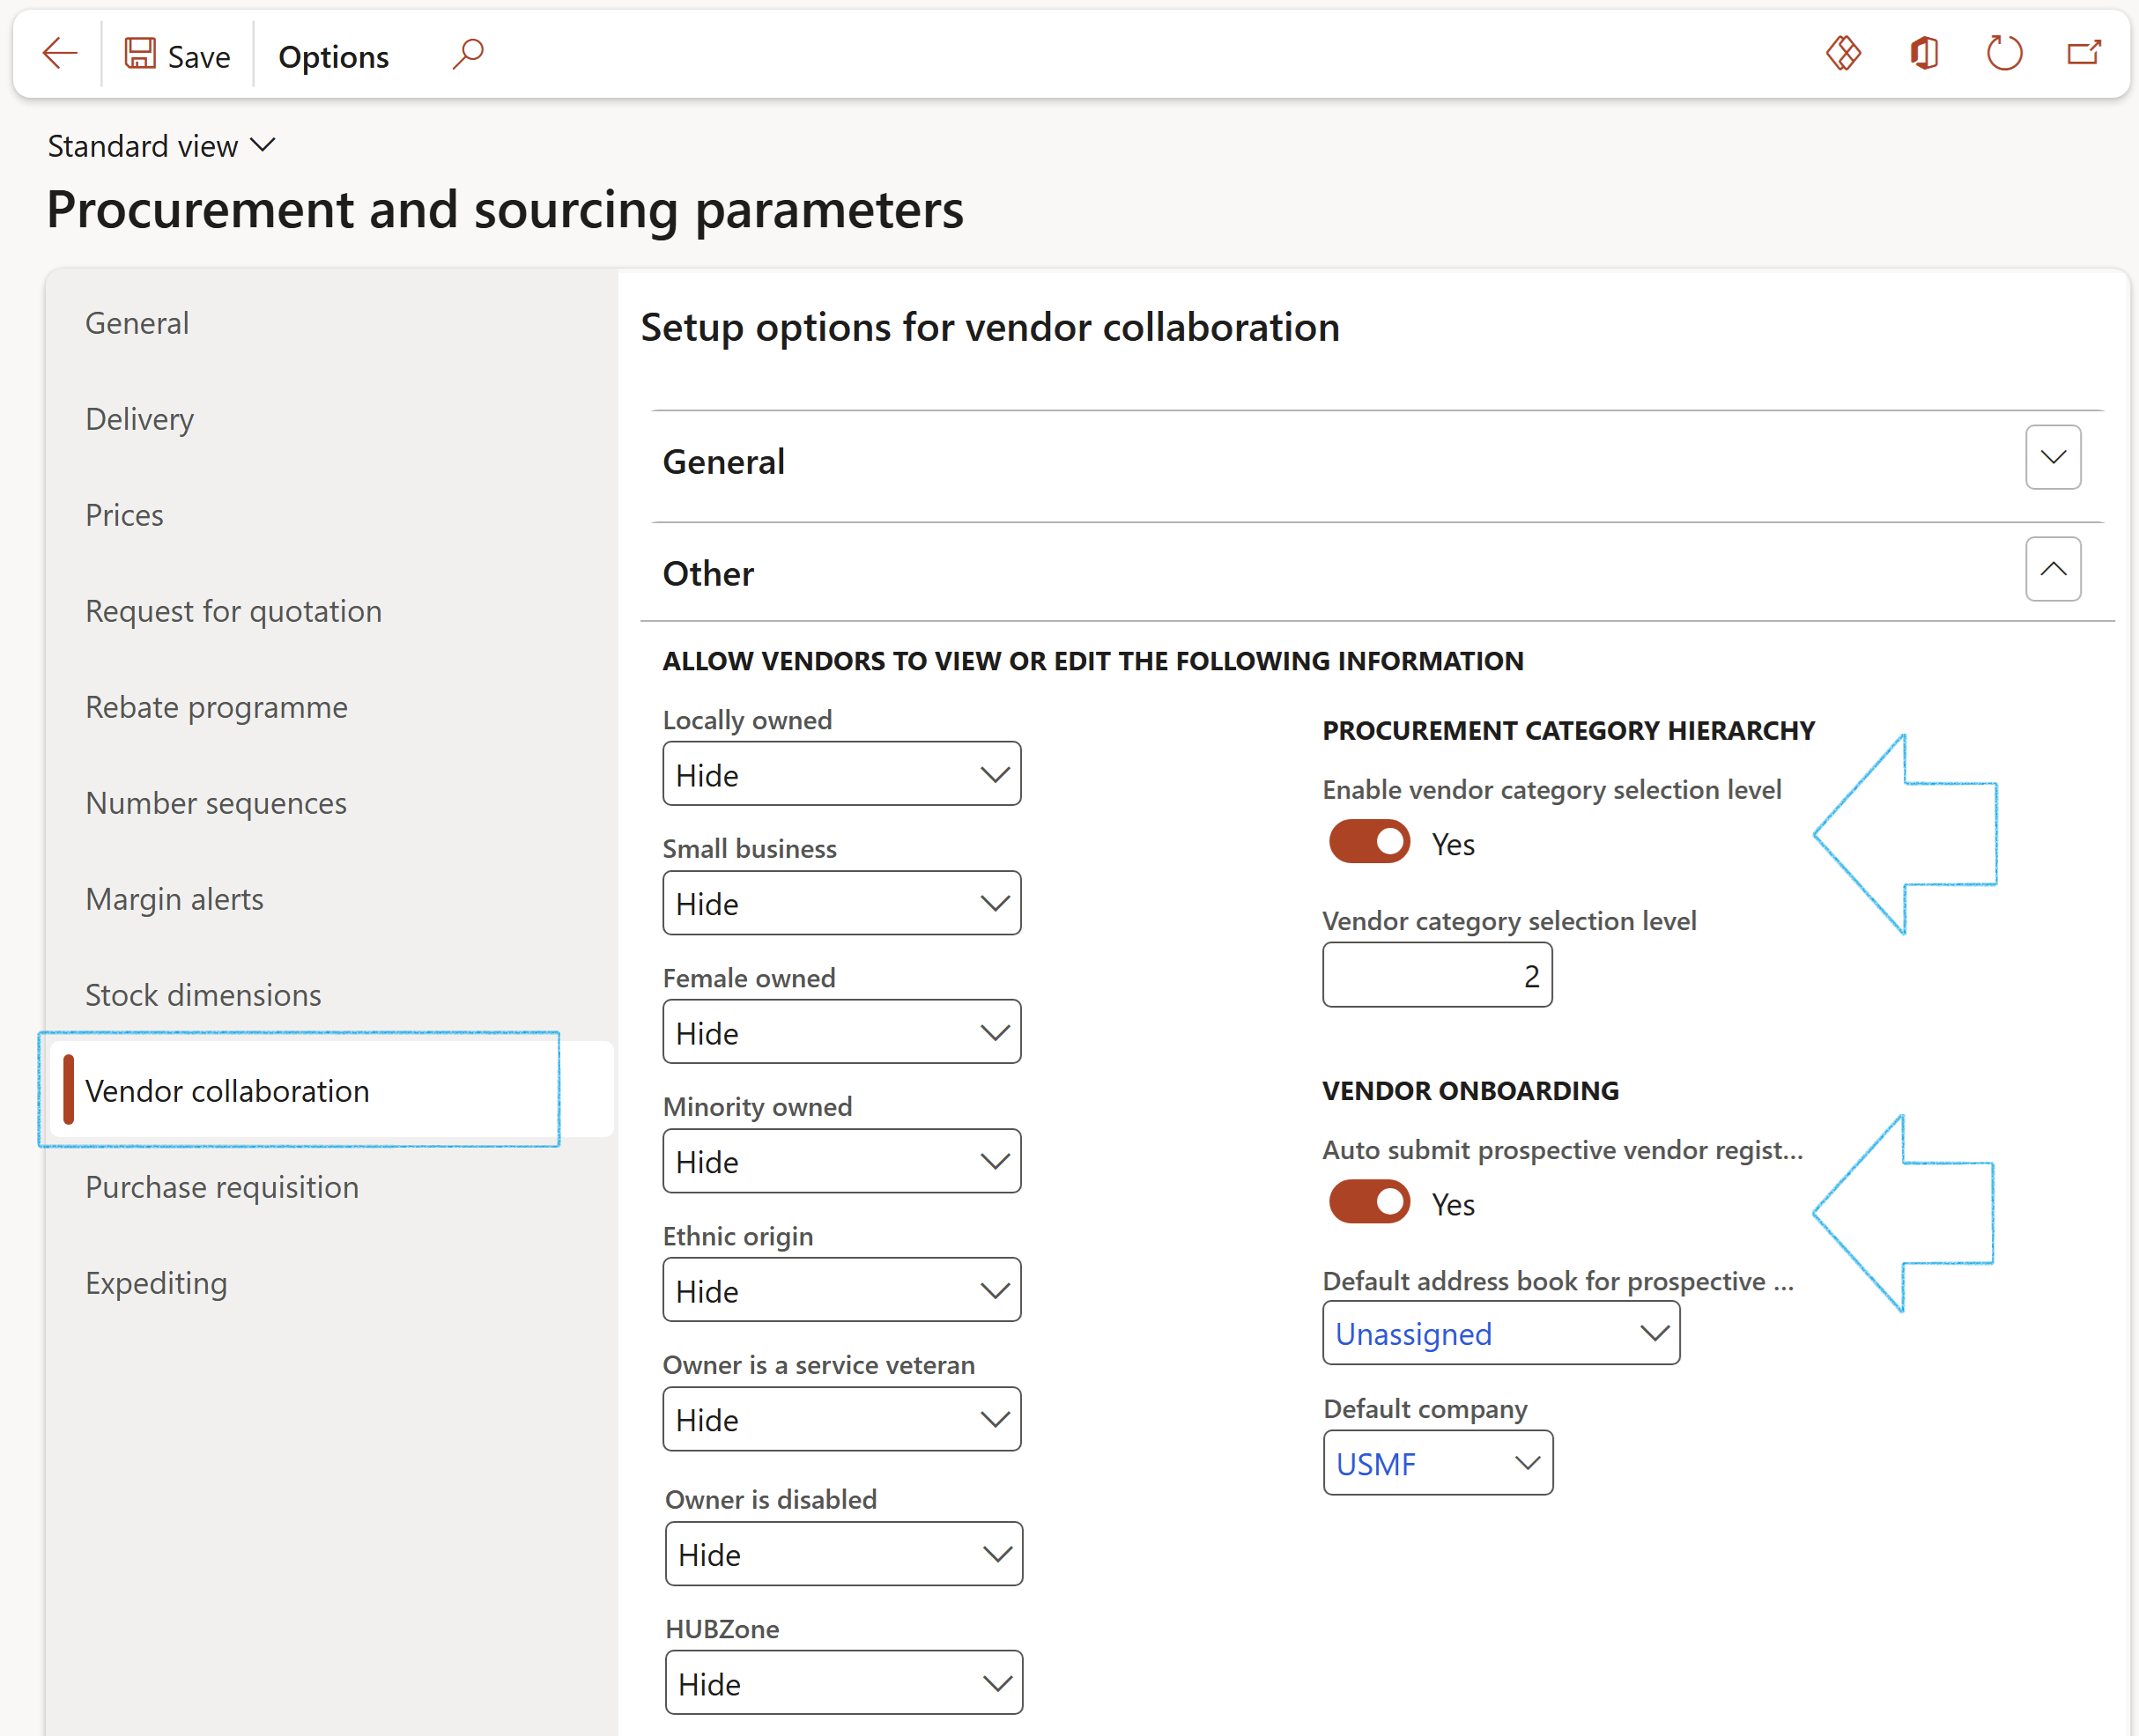
- Expand the Other Fast tab
- Move the Enable vendor category selection level slider to Yes to allow Vendors to select the Procurement category they will form part of during registration
- Enter the Vendor category level that the Vendors will be able to select under the Procurement category hierarchy
- Move the Auto submit prospective vendor request to workflow slider to Yes to allow the Vendor request to be submitted to workflow after the Registration Wizard is completed
- Select the relevant Default address book for Vendors to be used when analysing vendor requests to determine if the vendor is already a vendor for your organisation
- Select the Default company to be used when analysing vendor requests to determine if the vendor is already a vendor for your organisation
¶ Step 2.3: Vendor request configurations
The Vendor request configurations form is where the user defines what information should be required (mandatory), hidden or displayed (optional) as part of a Vendor's submission. This is defined by country/region. When a Vendor completes the Registration wizard, the first step is to select their country/region.
Go to: Procurement and sourcing > Setup > Vendors > Vendor request configurations
- Expand the Fields Fast tab
- Select the Field label and in the Visibility column, define whether it should be displayed, hidden or required for the selected country/region

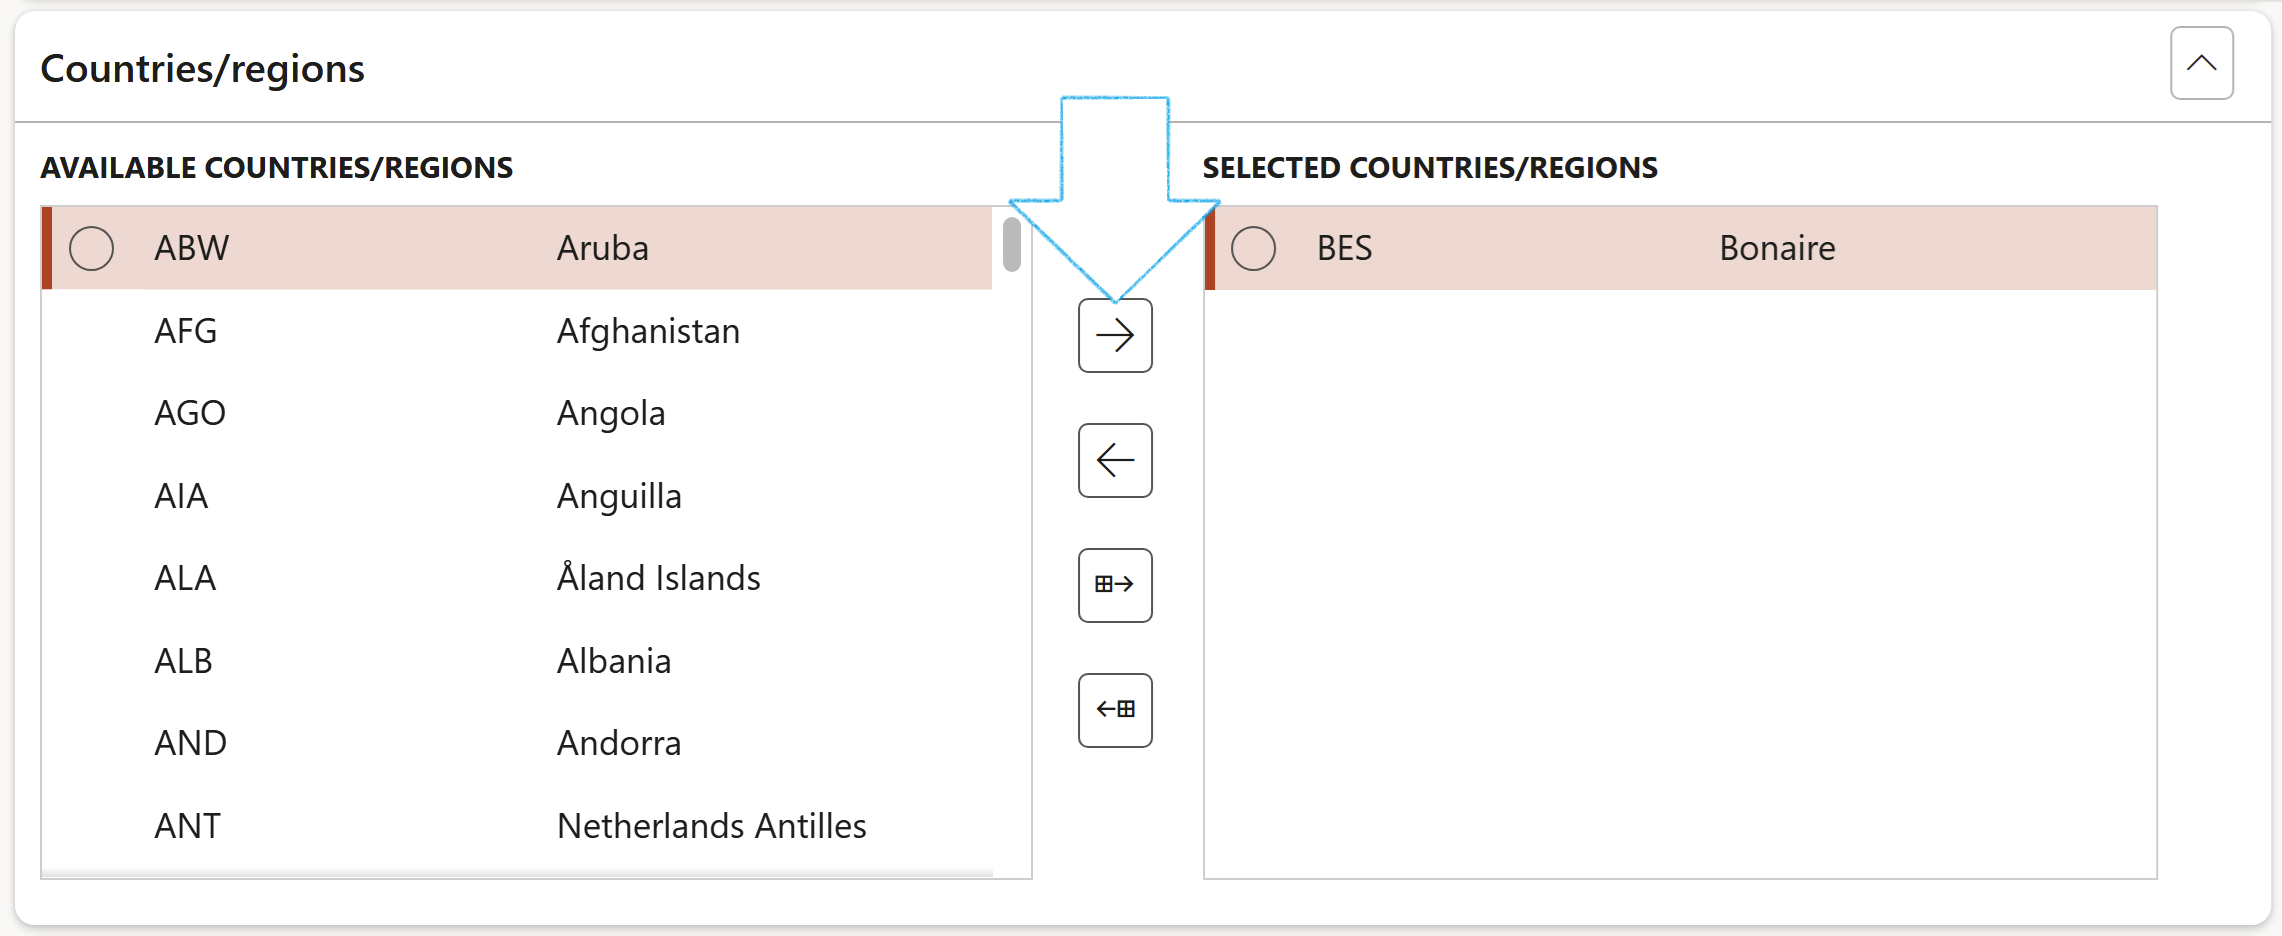
- Expand the Countries/regions Fast tab
- Select the countries/regions that the configuration is applicable for
- Expand the Content Fast tab
- Define a welcoming message in the General text box. This could include a link to the company's terms and conditions for vendors applying through the Vendor collaboration portal.
- Define that the Vendor must acknowledge that they have read the terms and conditions
- Enter a confirmation message for after the Registration wizard has been submitted
- Move the Enable attachments slider to Yes to enable vendors to attach applicable documents on the Registration wizard

- Expand the Questionnaires Fast tab
- In the Button strip, click on the Add button
- Select the Company/Legal entity that the questionnaire should apply to, from the dropdown list
- Select the Questionnaire that the vendors need to complete as part of their registration, from the dropdown list

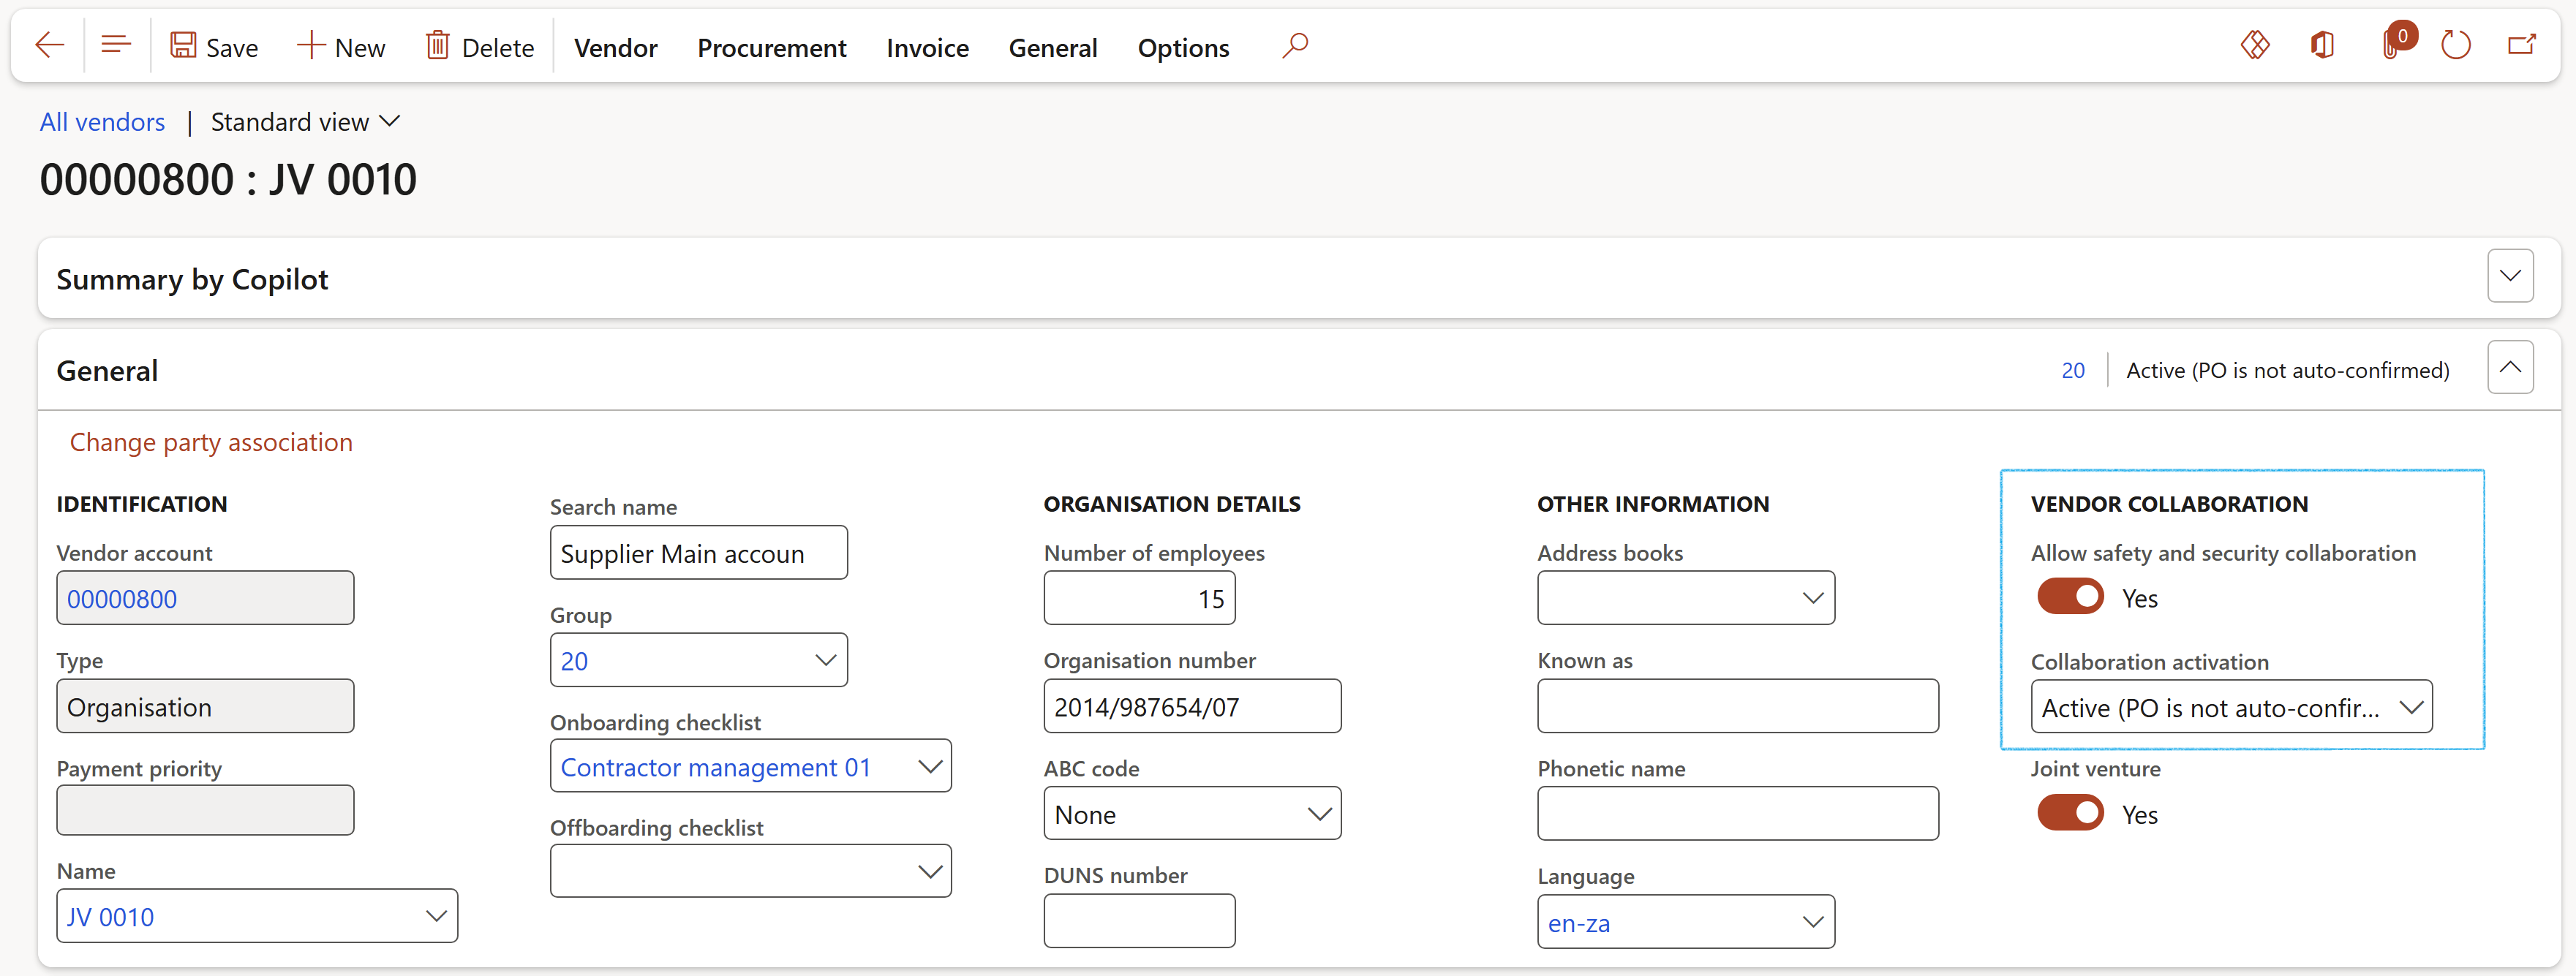
Before user accounts can be created for an external vendor, you must configure the vendor account so that vendor can use vendor collaboration. On the Vendors page, under the General Fast tab, set the Collaboration activation field. The following options are available:
- Active (PO is auto-confirmed) – POs are automatically confirmed if the vendor accepts them without changes. If you use this option, be sure to schedule the Confirm accepted purchase orders from vendor collaboration batch job, which is responsible for processing the confirmations. For instructions, see the next section.
- Active (PO is not auto-confirmed) – Your organization must manually confirm POs after the vendor has accepted them.
Axnosis has added a parameter to block Dynamics to delete vendor responses when amendments are done on the RFQ
Go to: GRC > Setup > GRC parameters. Under the Governance Tab, expand the Sourcing and tender governance Fast tab. Note the “Delete submission” slider (default setting is “No”)
¶ Step 3: Certification type
Go to: Procurement and sourcing > Setup > Vendors > Certification type
- In the Action pane, click on the New button
- Enter a Certification type identifier for the new type
- Enter a Description for the new Certification type
- Select the relevant Email template for the new Certification type
- Select the relevant Certifying organisation from the dropdown list
- Tick the Force attachment box if registration on the vendor portal should force users to attach documents
- If a certification is mandatory for a bid response, select either Technical or Commercial from the dropdown list

¶ Step 4: Warehouse
For Purchase order details to display in the Vendor collaboration portal, Purchase order confirmation page:
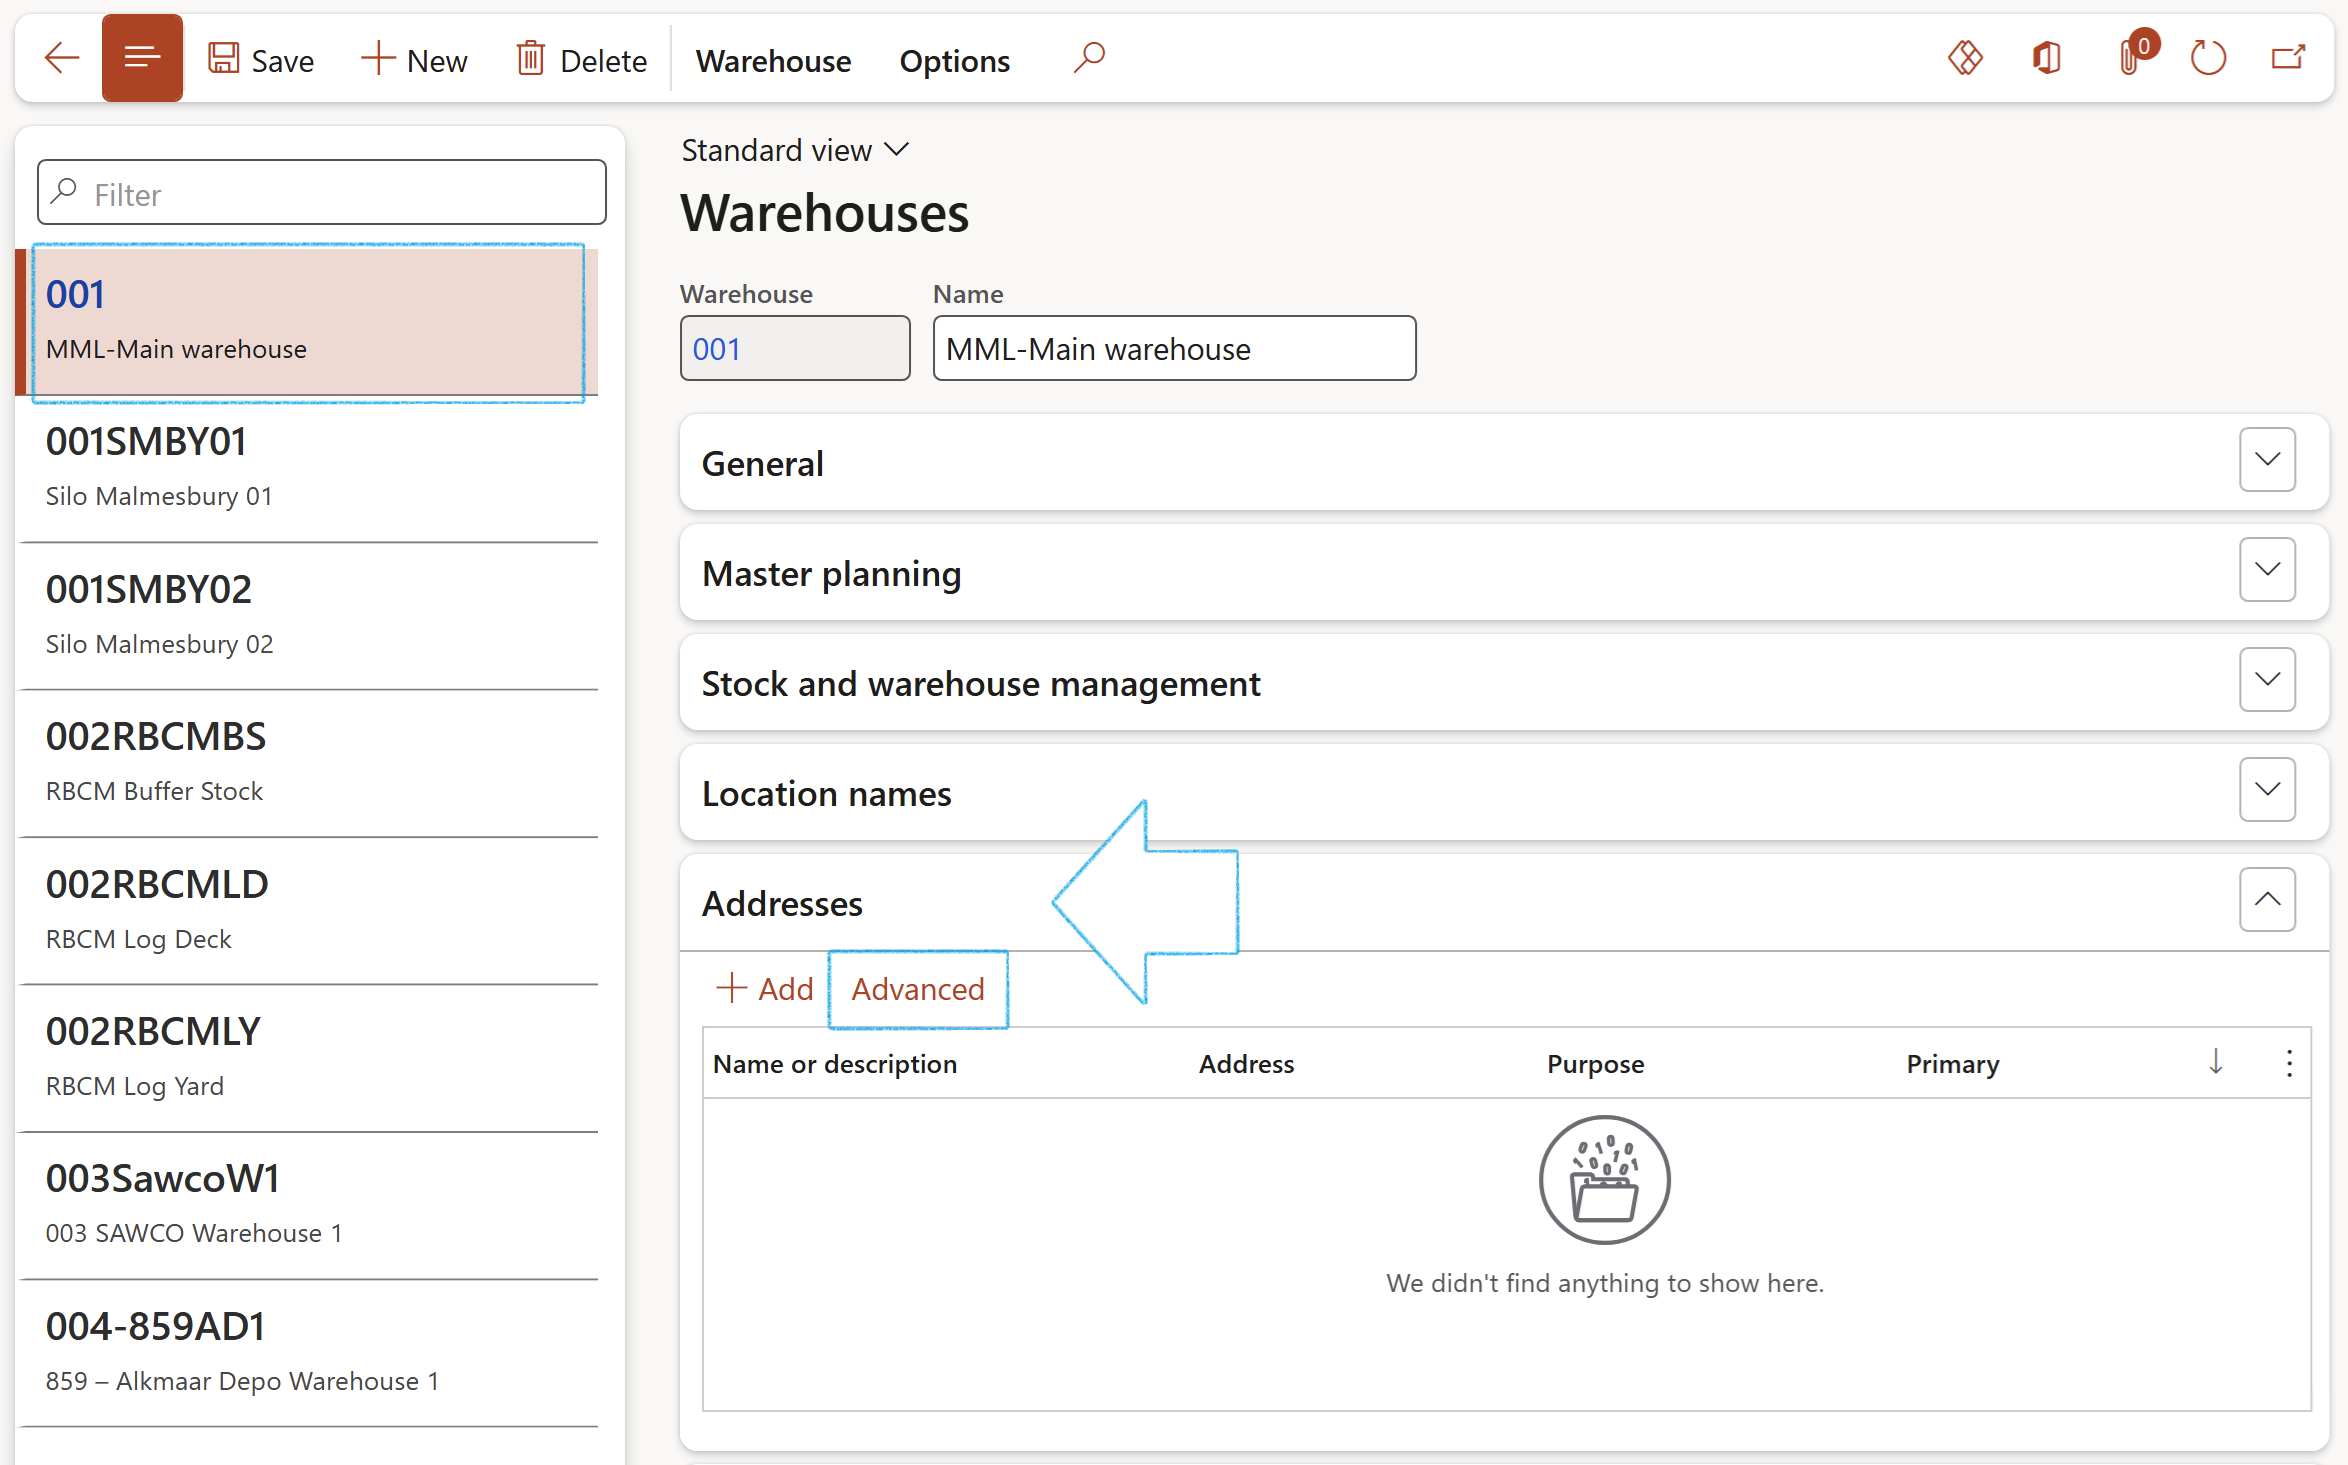
Go to: Warehouse management > Setup > Warehouse > Warehouses
- Select the relevant record
- Expand the Addresses Fast tab and click on the Advanced button
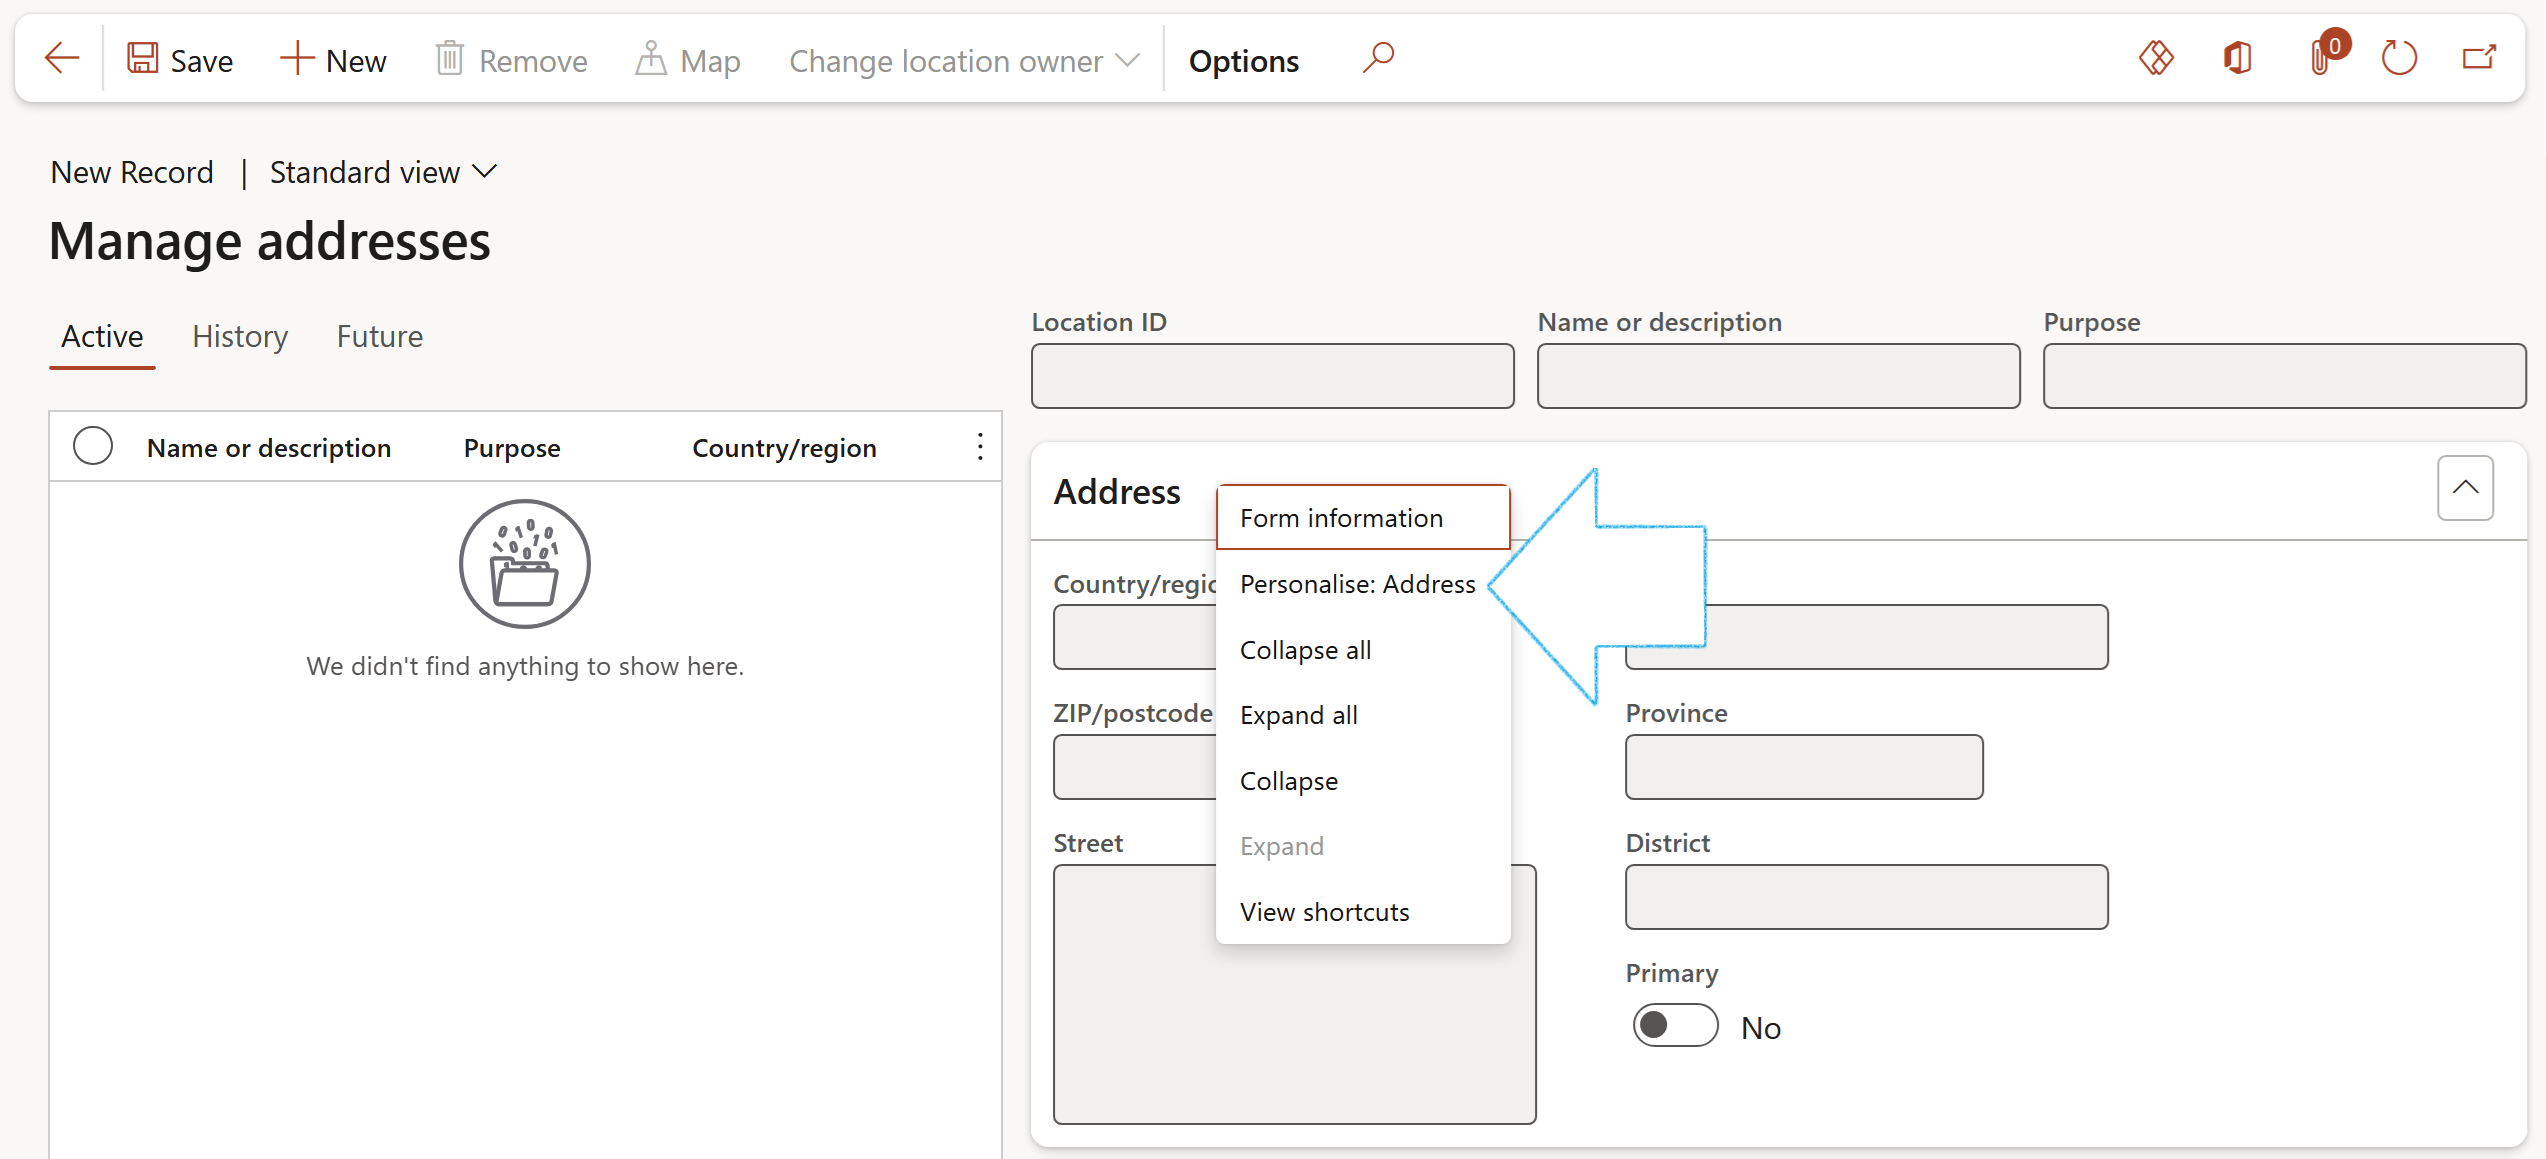
- On the Manage addressess form, expand the Address Fast tab
- Do a "right click" on the Address Fast tab, and select Personalise: Address from the dropdown list
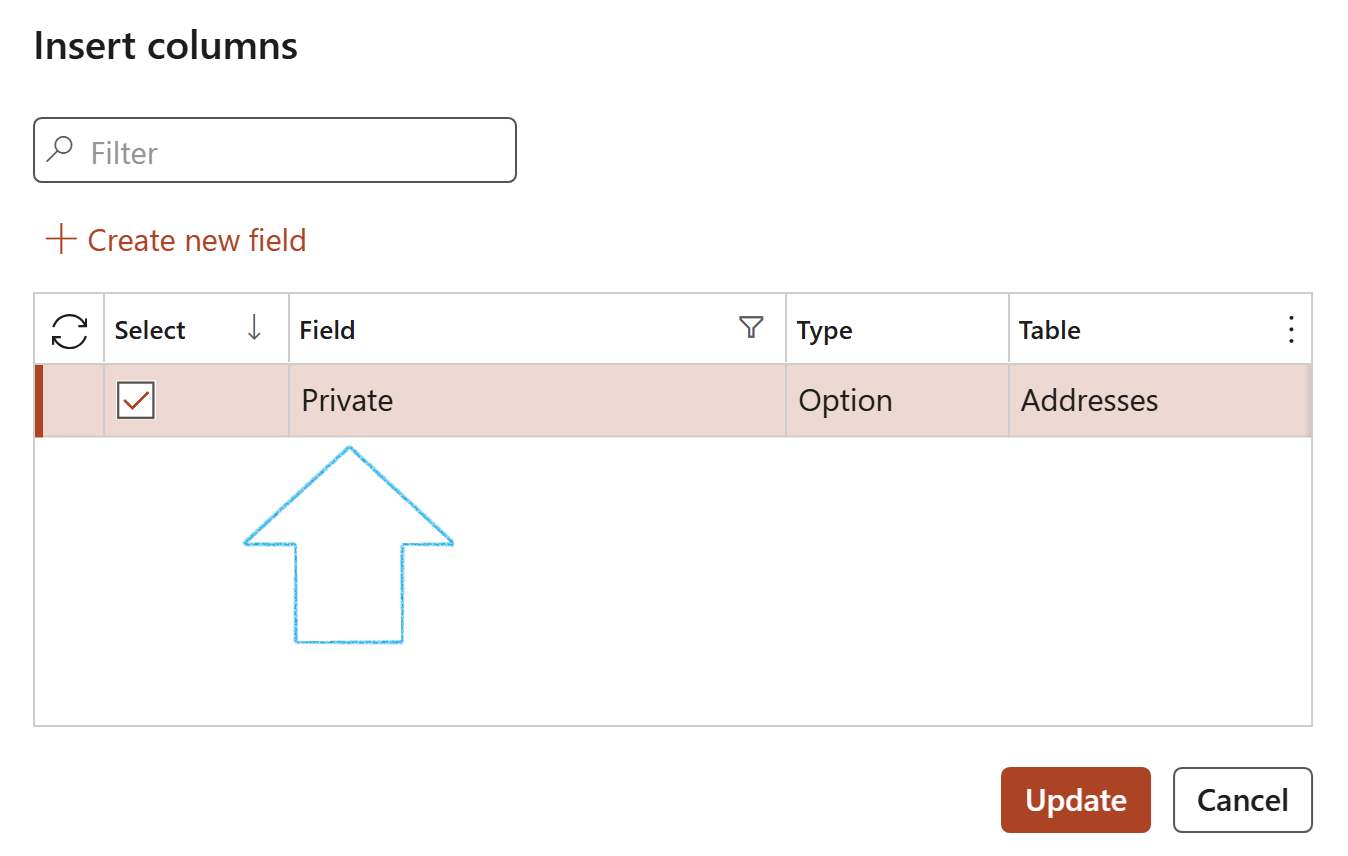
- On the Personalise form, select Add a field

- On the Insert columns dialog, search for and select Private
- Click on the Update button
Make sure that this new Private slider is set to No

¶ Step 5: Notifications RFQ Questions and answers
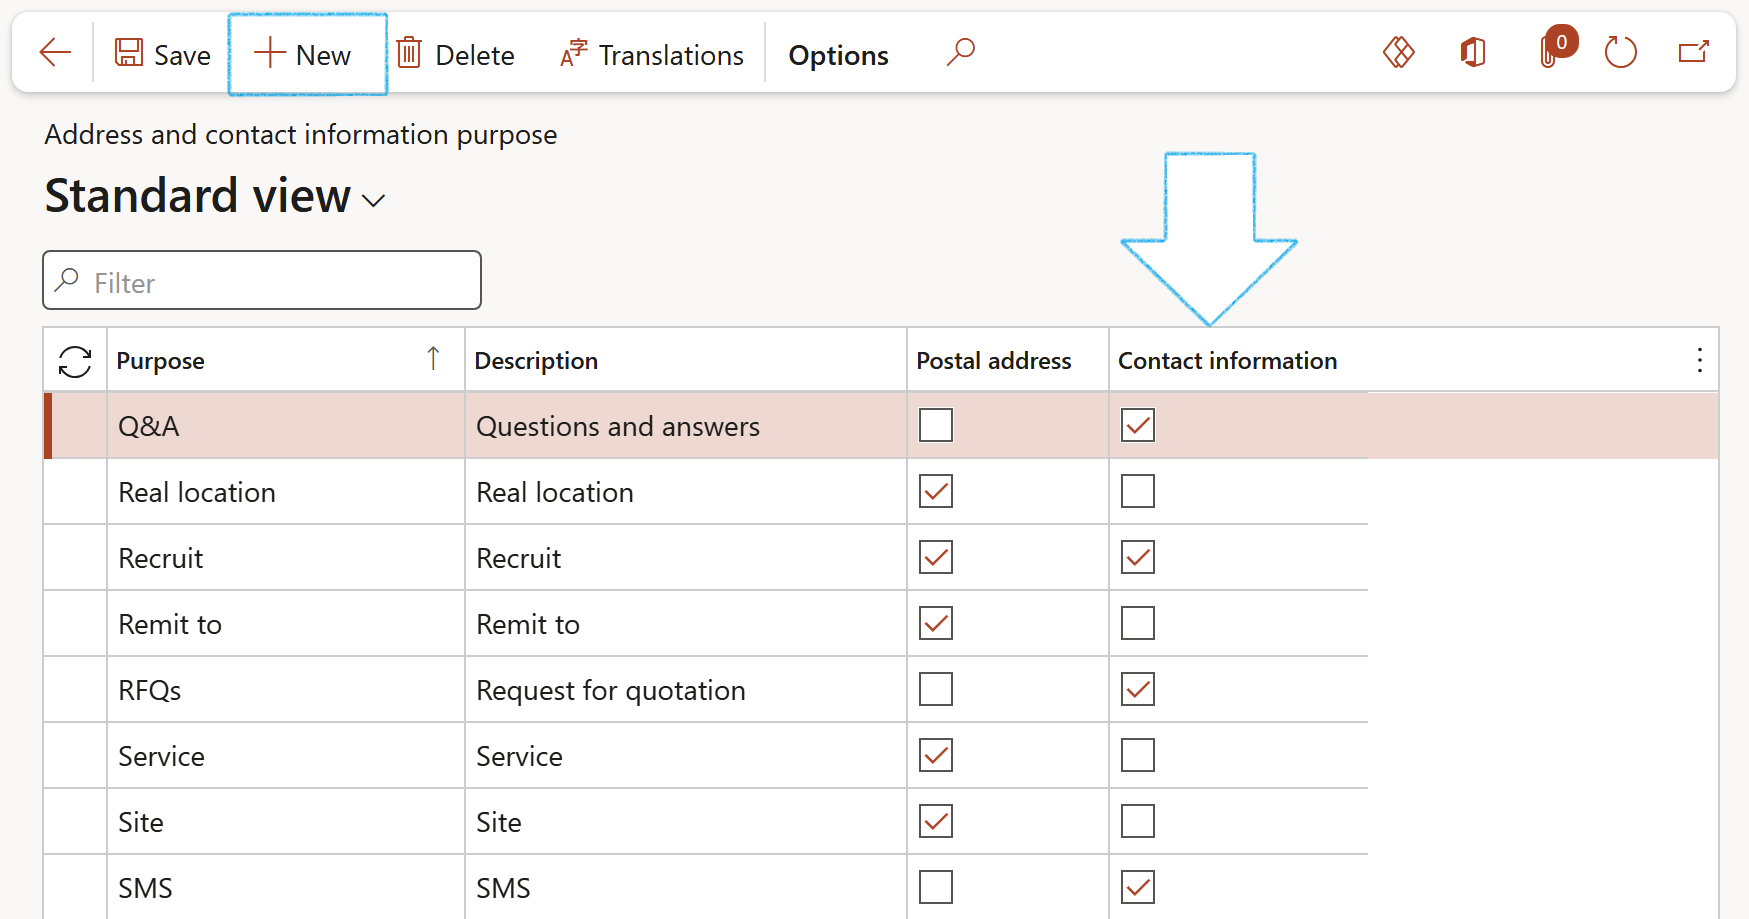
Go to: Go to: Organisation administration > Global address book > Address and contact information purpose
- In the Action pane, click on the New button
- Enter the Purpose and a brief Description
- Tick the Contact information tick box
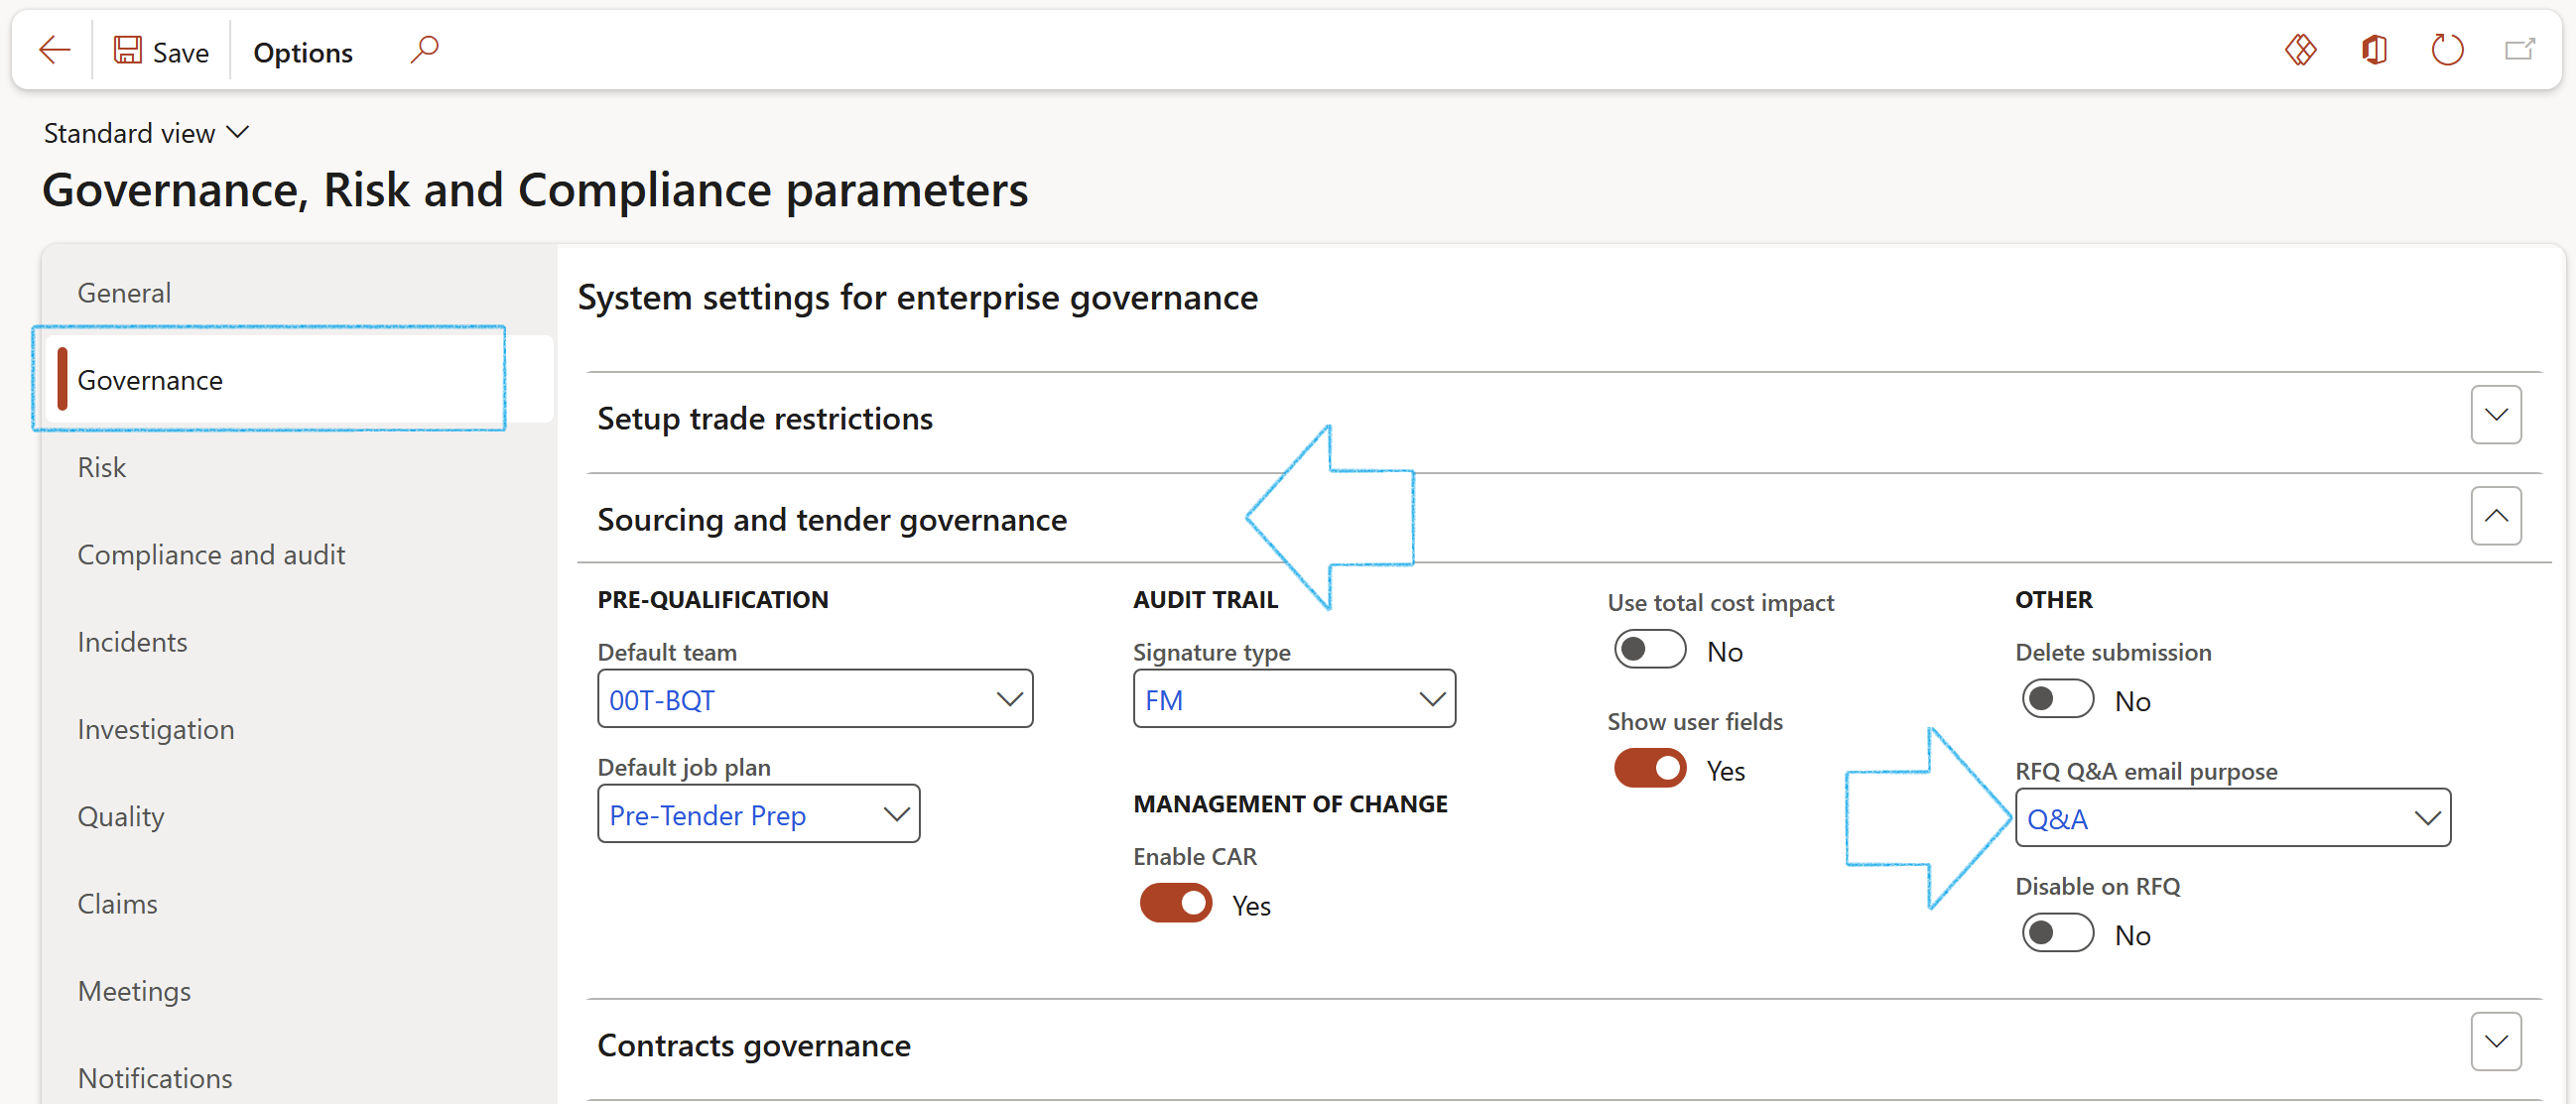
Go to: GRC > GRC parameters
- Open the Governance tab and expand the Sourcing and tender governance Fast tab
- In the RFQ Q&A email purpose field, select the relevant value (value created above)
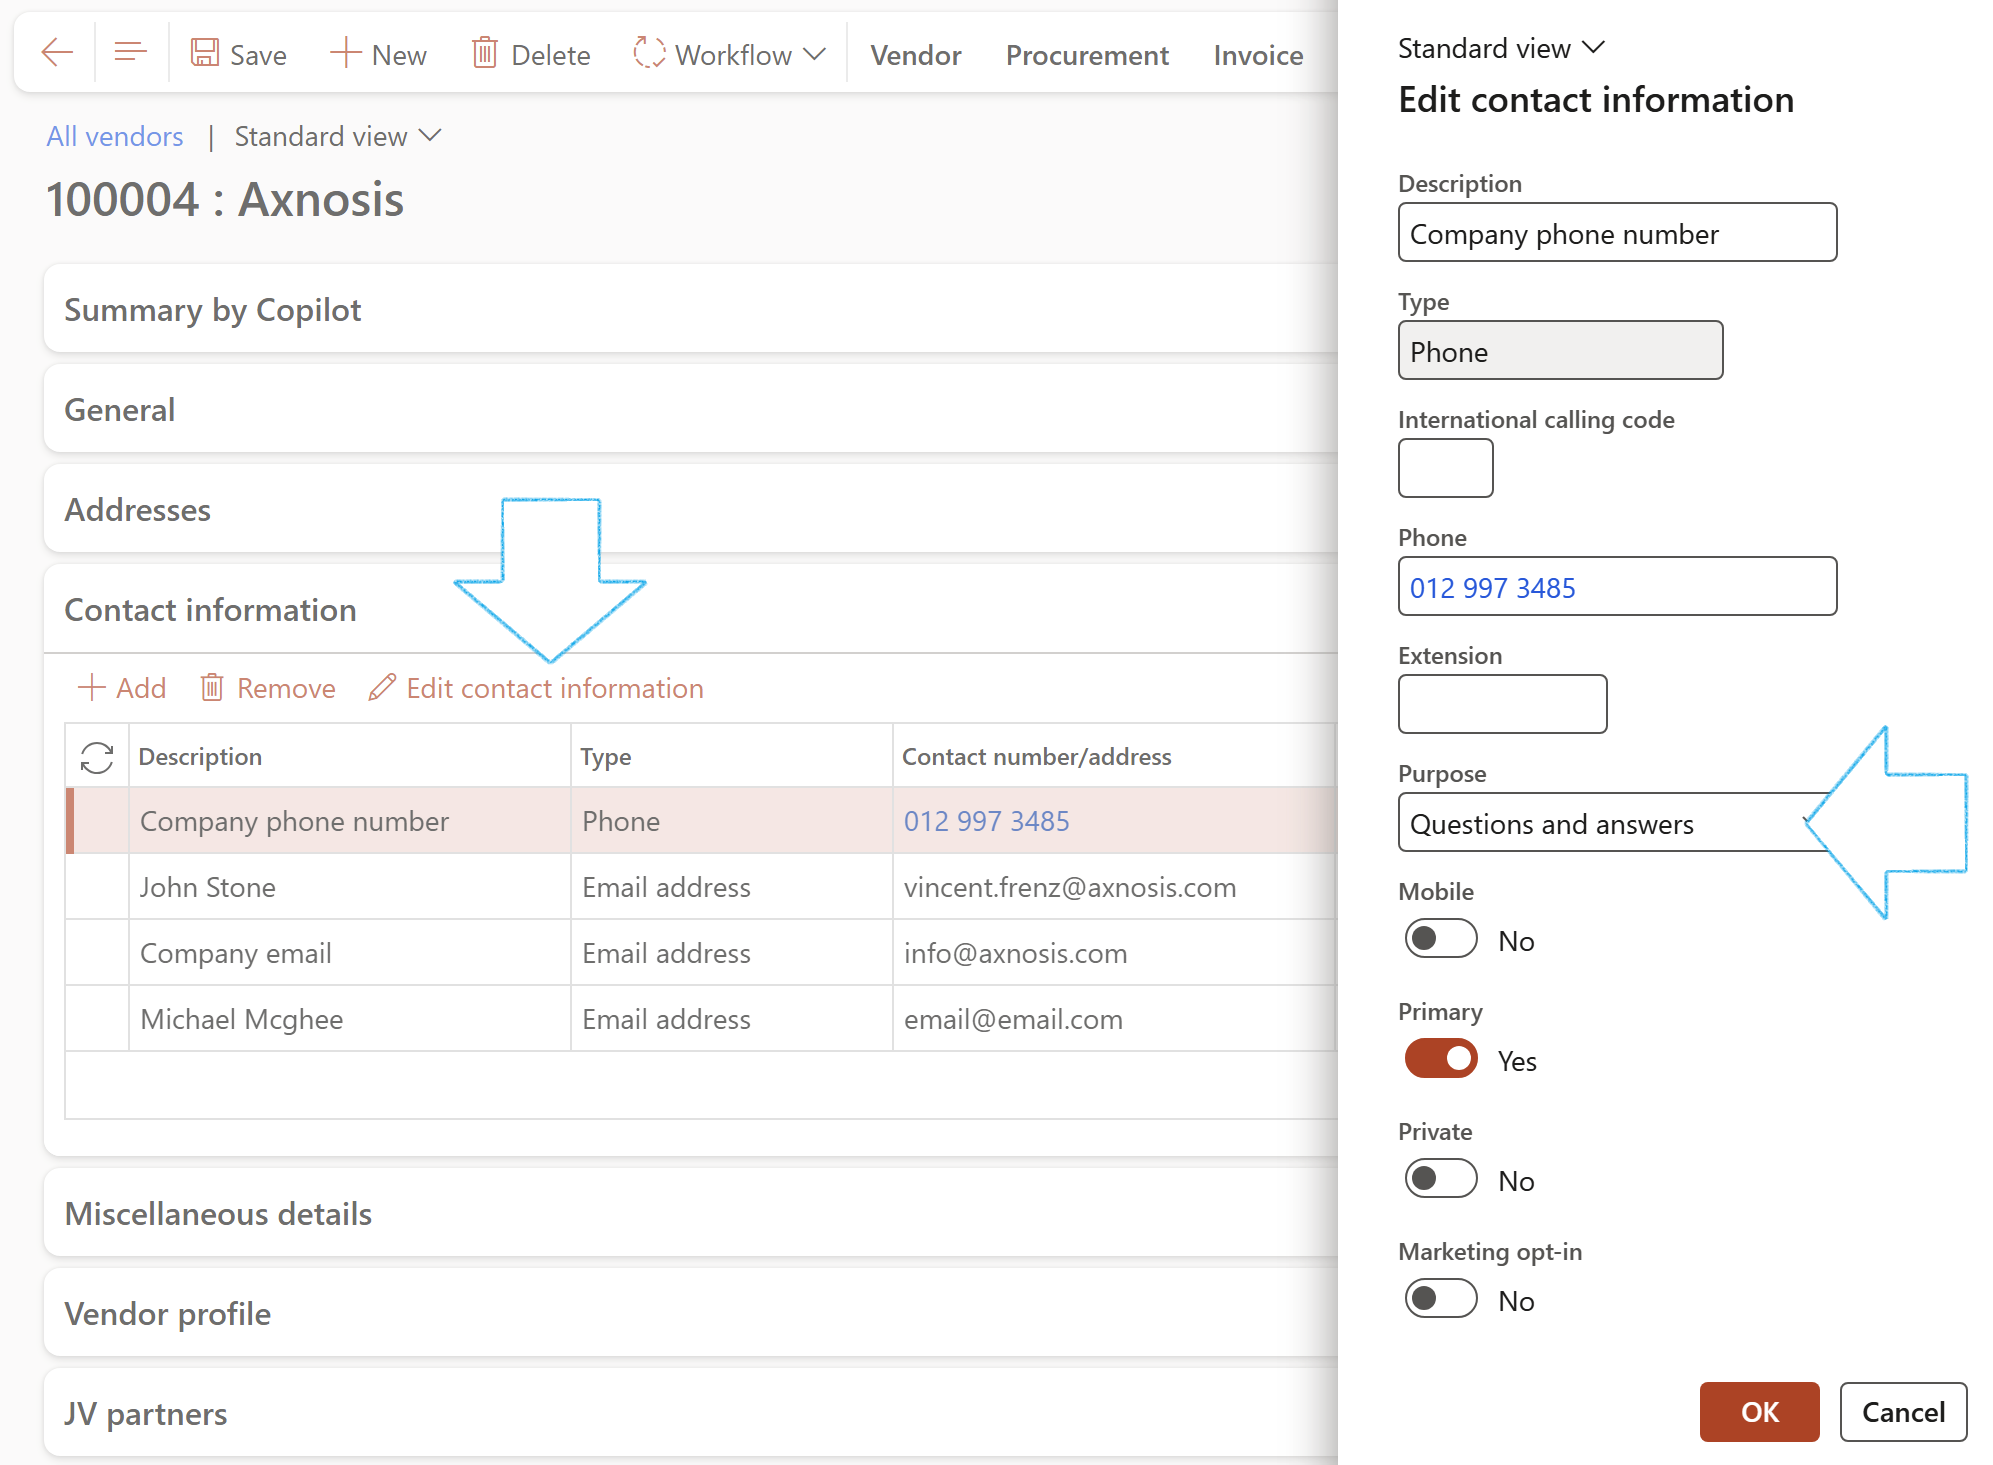
- On the Vendor, expand the Contact information Fast tab
- In the Button strip, click on the Edit contact information button
- On the Edit contact information dialog, in the Purpose field, select the relevant value (value created above)
For "Answer" email notifications to be sent, email templates must be set up and selected on the GRC parameters, Notifications tab, under the Email templates for batch use (and where due dates apply) Fast tab
¶ Daily use
¶ Step 6: Prospective vendor registration
The Prospective vendor registration request is the start of the Vendor onboarding process. Initial high-level information can be captured here to start the decision-making process to onboard a vendor.
The process to give access to a vendor's representative to the system also starts here. After reviewing the initial information, the decision can be made to “invite” the user, who will be given access to the vendor representative, creating a Vendor collaboration user request.
Go to: Procurement and sourcing > Vendors > Vendor collaboration requests > Prospective vendor registration requests
- Select the prospective vendor that you want to invite
- In the Action pane, click on the Invite user button
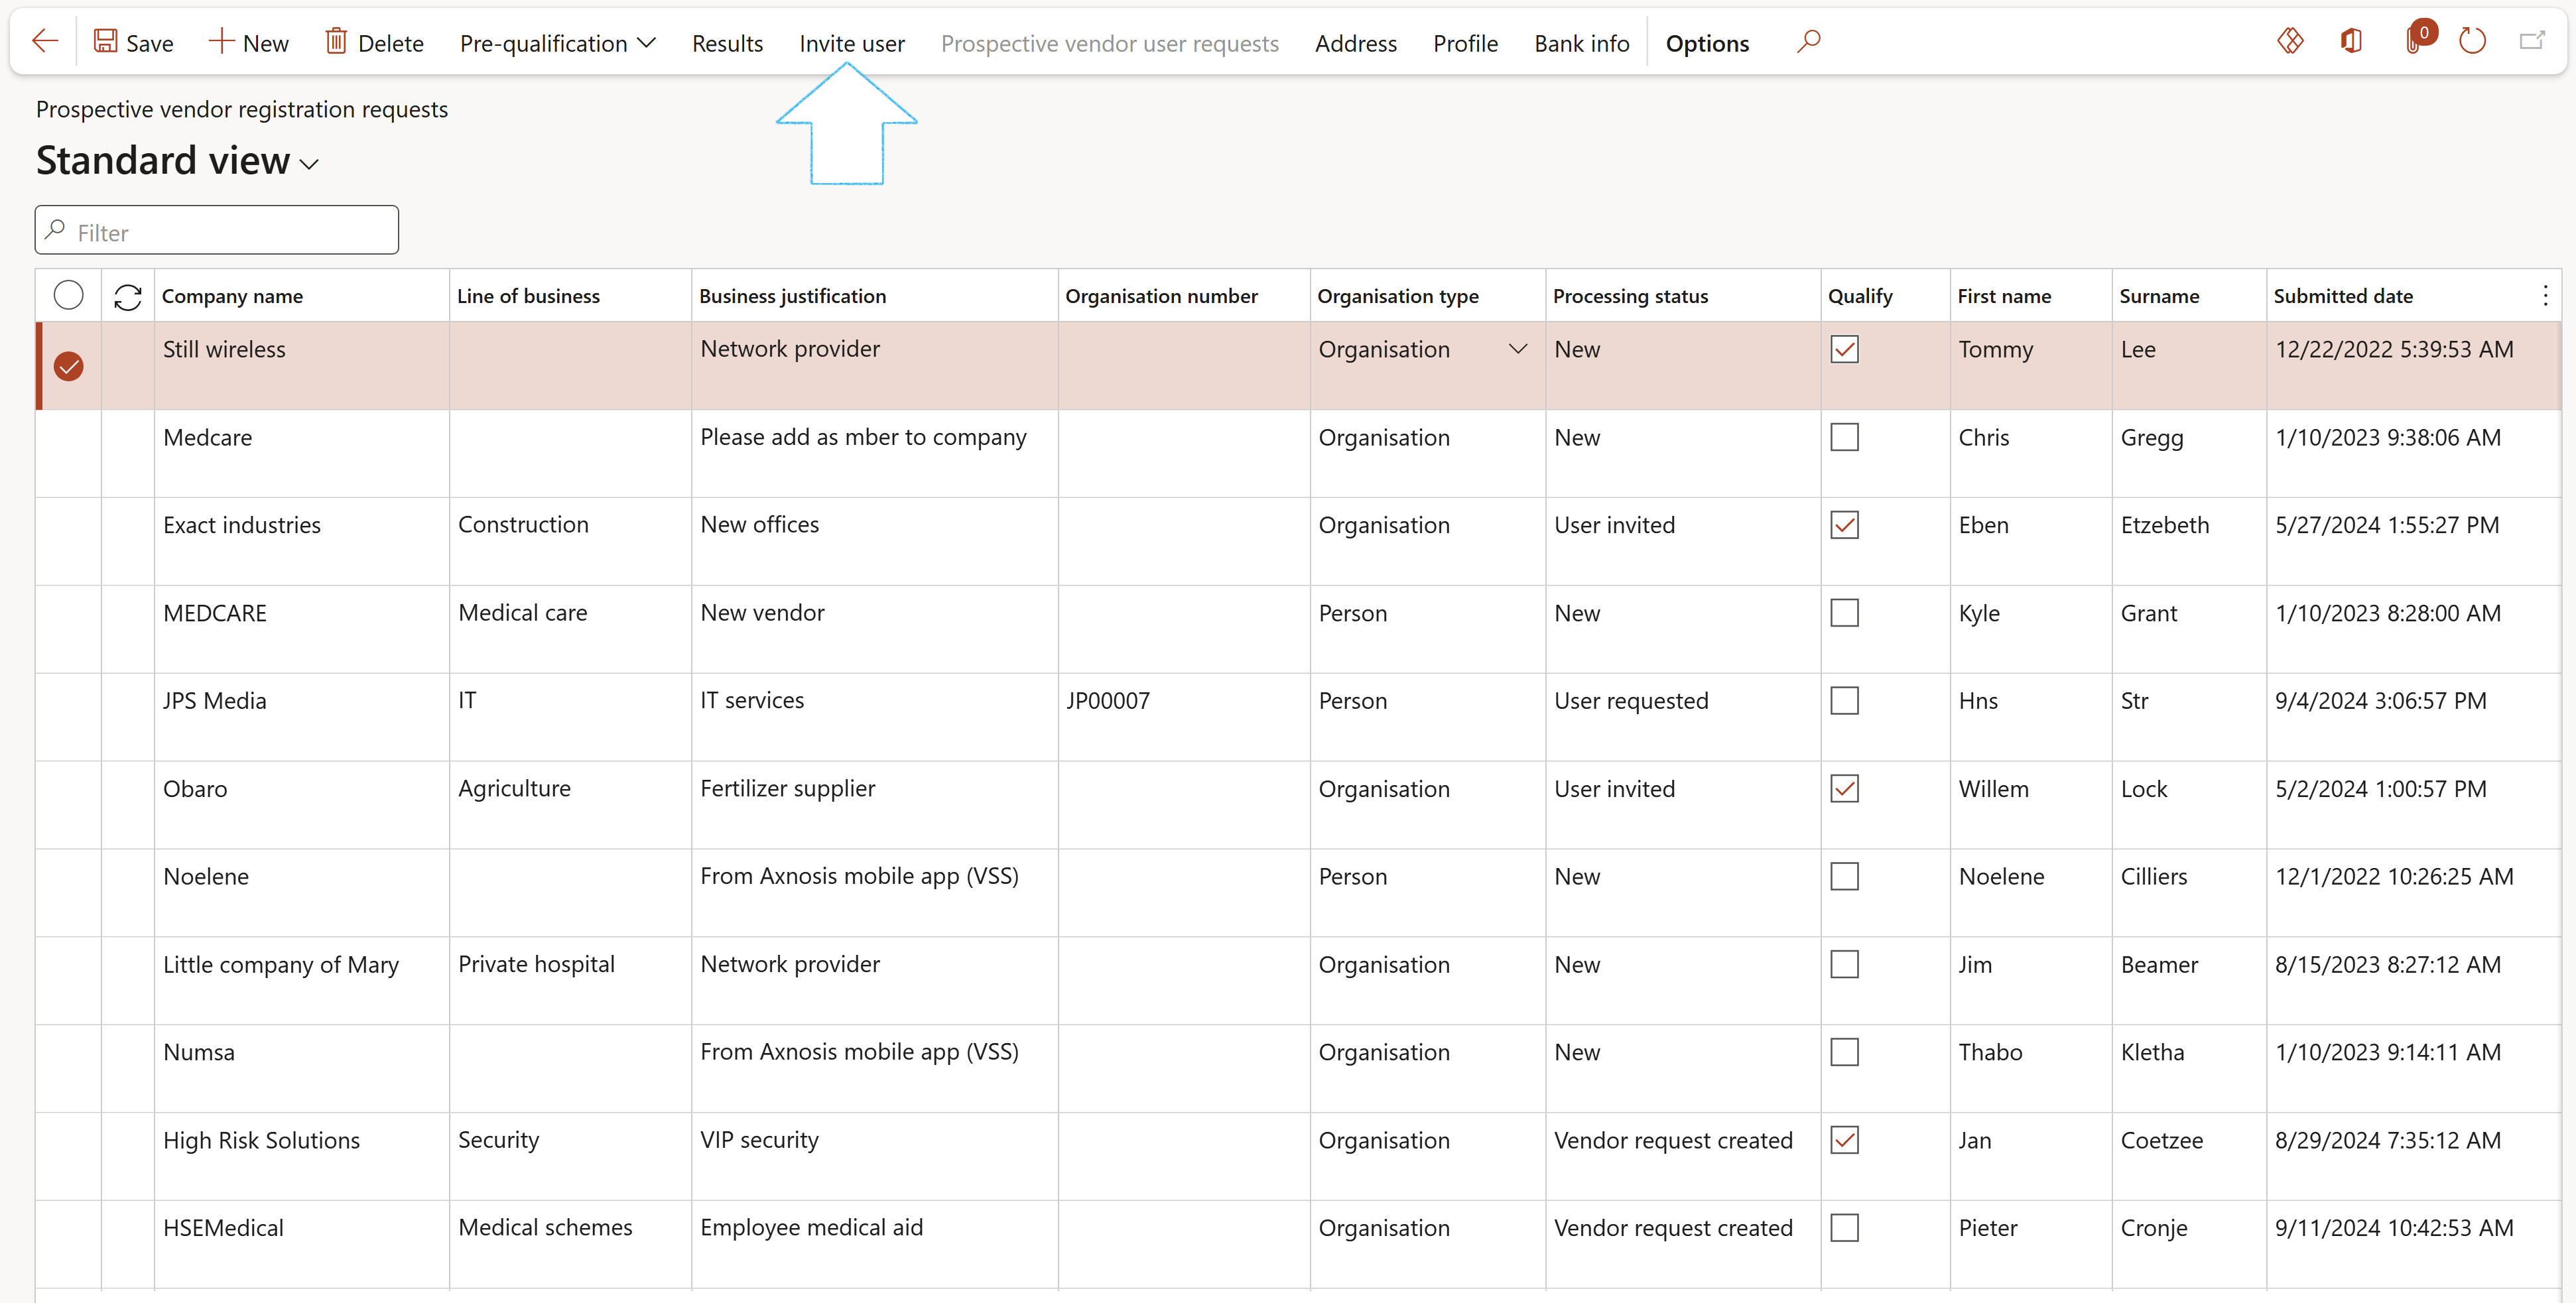
The following message will appear at the top of the screen:
The request to create a new user with prospective vendor privileges has been submitted. Once your request has been processed, the status of the vendor registration request will be set to User invited.
¶ Step 6.1: Vendor collaboration user requests
The review process to give access to the Vendor representative starts here.
A standard mandatory workflow is applied, automatically creating the user and assigning the Vendor prospect (External) security role upon arrival. The workflow can be set up to include approvers but can also be configured only to create the user and assign the security roles once submitted.
Once the workflow is completed, the vendor representative will receive a confirmation email with a link where they can access the Collaboration portal. This is also where user offboarding or changes to user information will be captured for review and approval.
Go to: Vendor collaboration > Contacts > Vendor collaboration user requests
- Click on the relevant Request ID to view the detail of the request
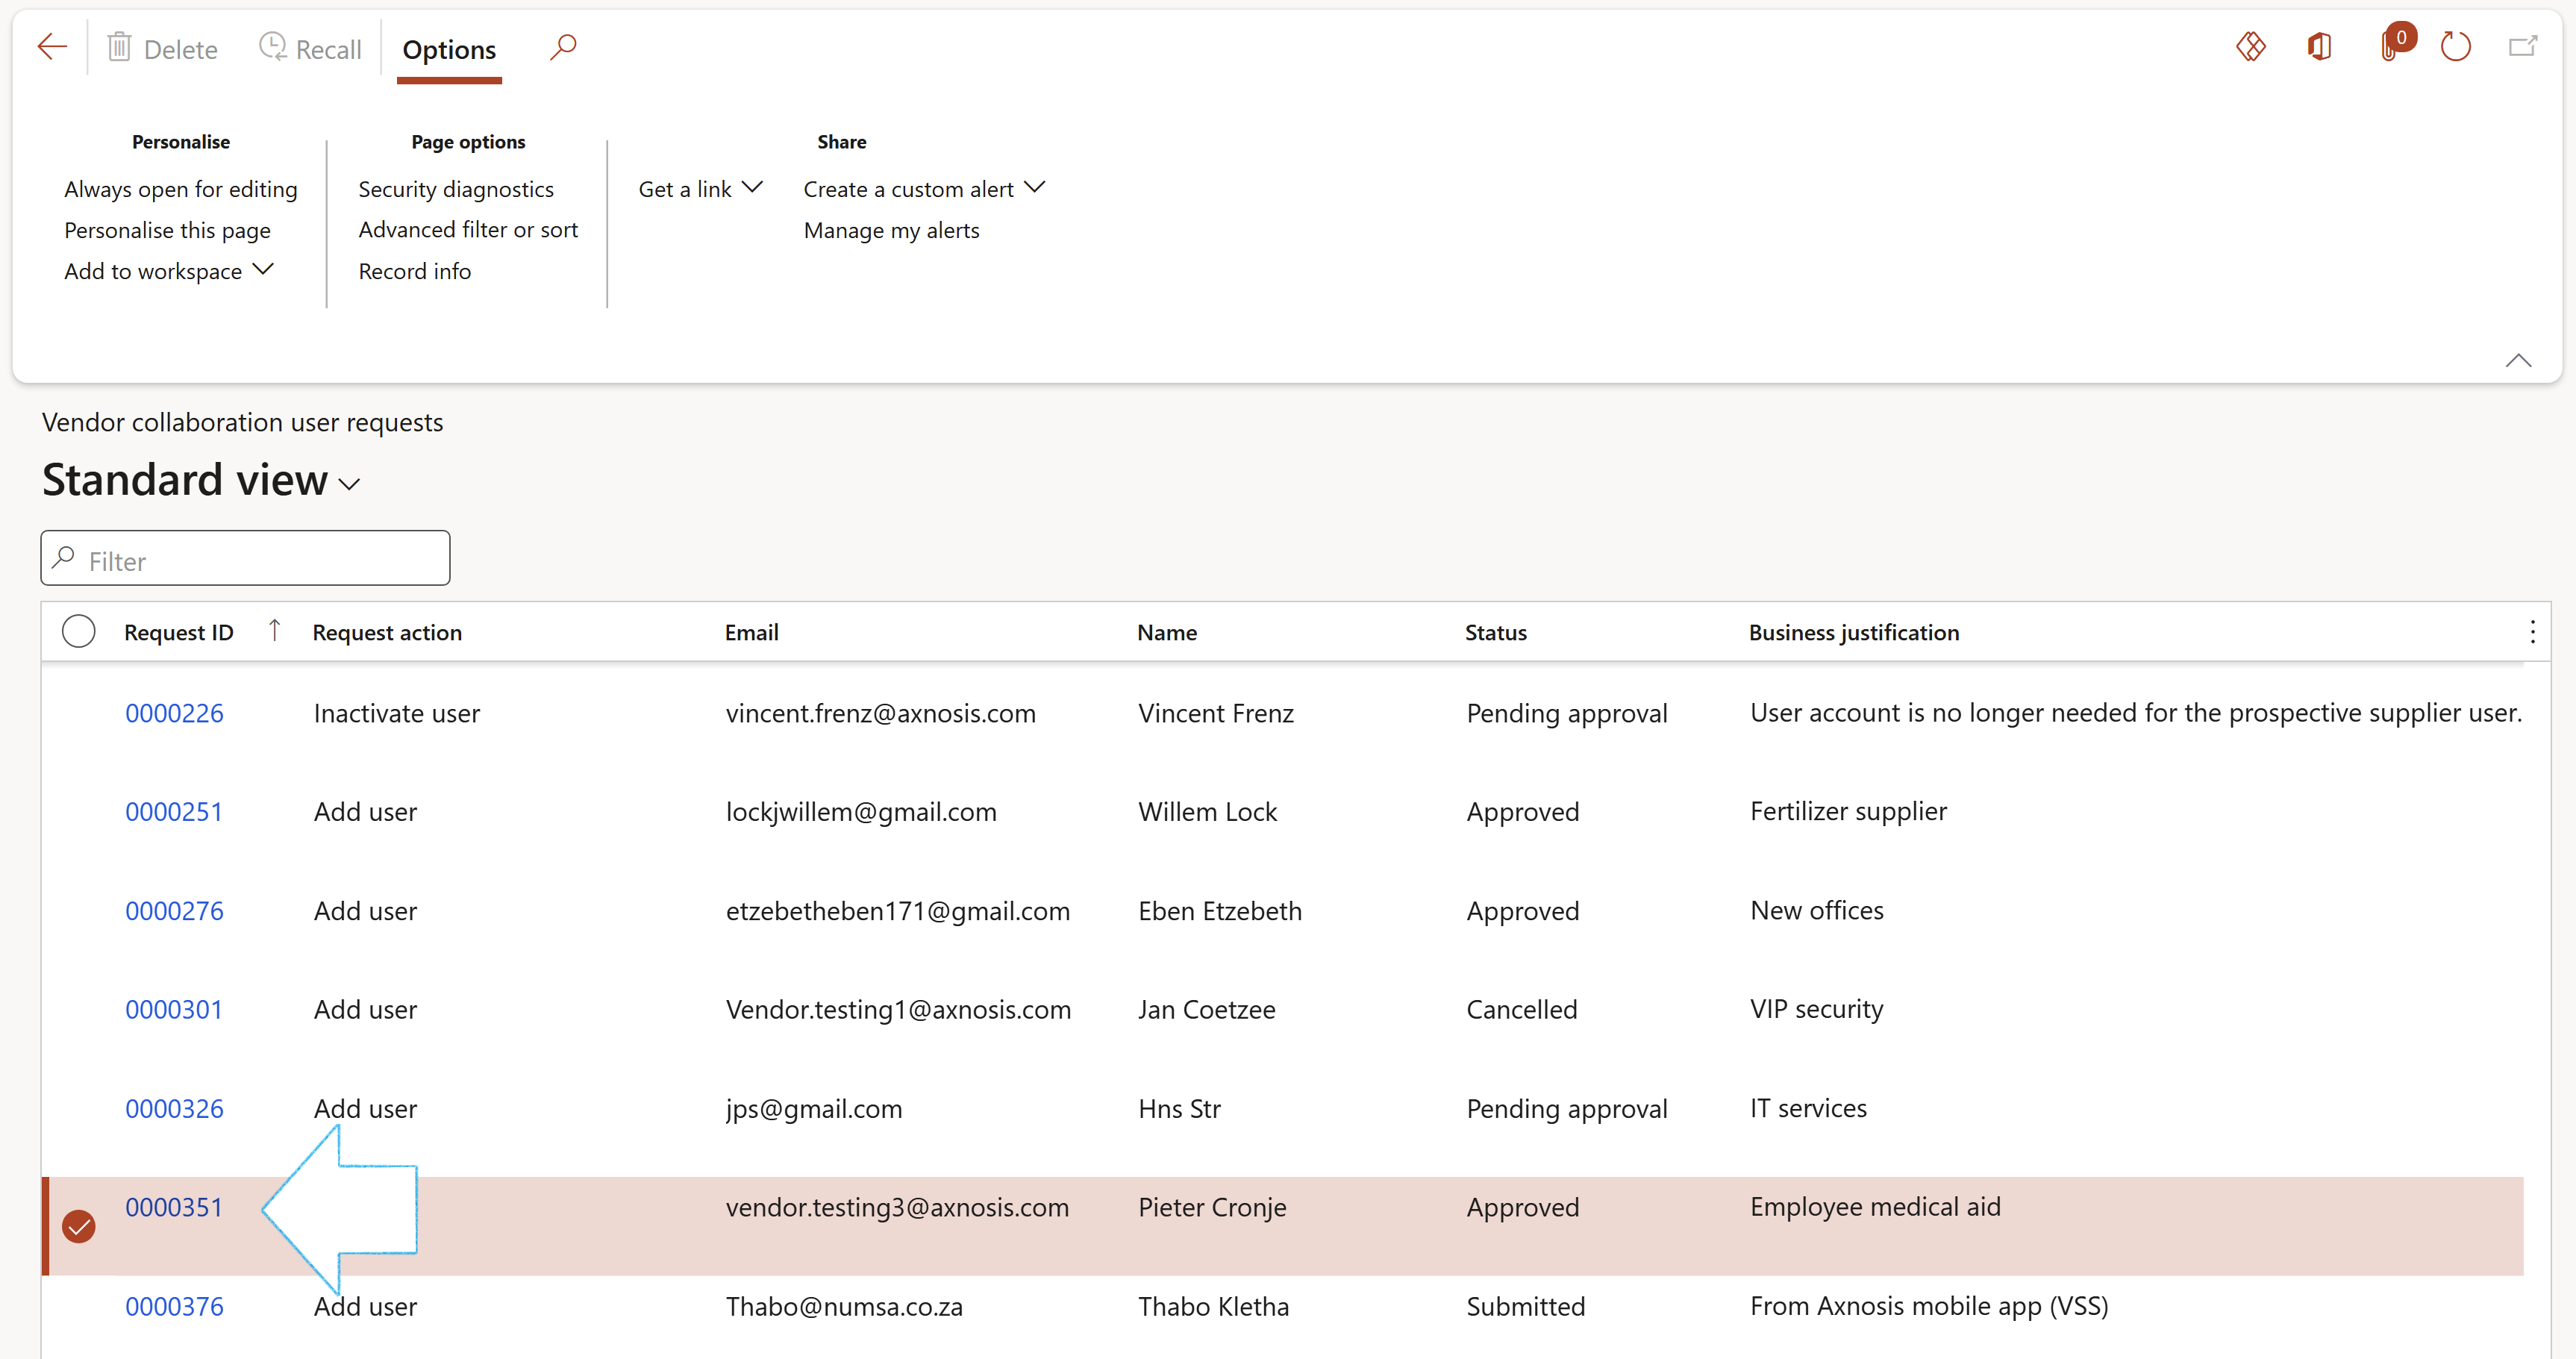
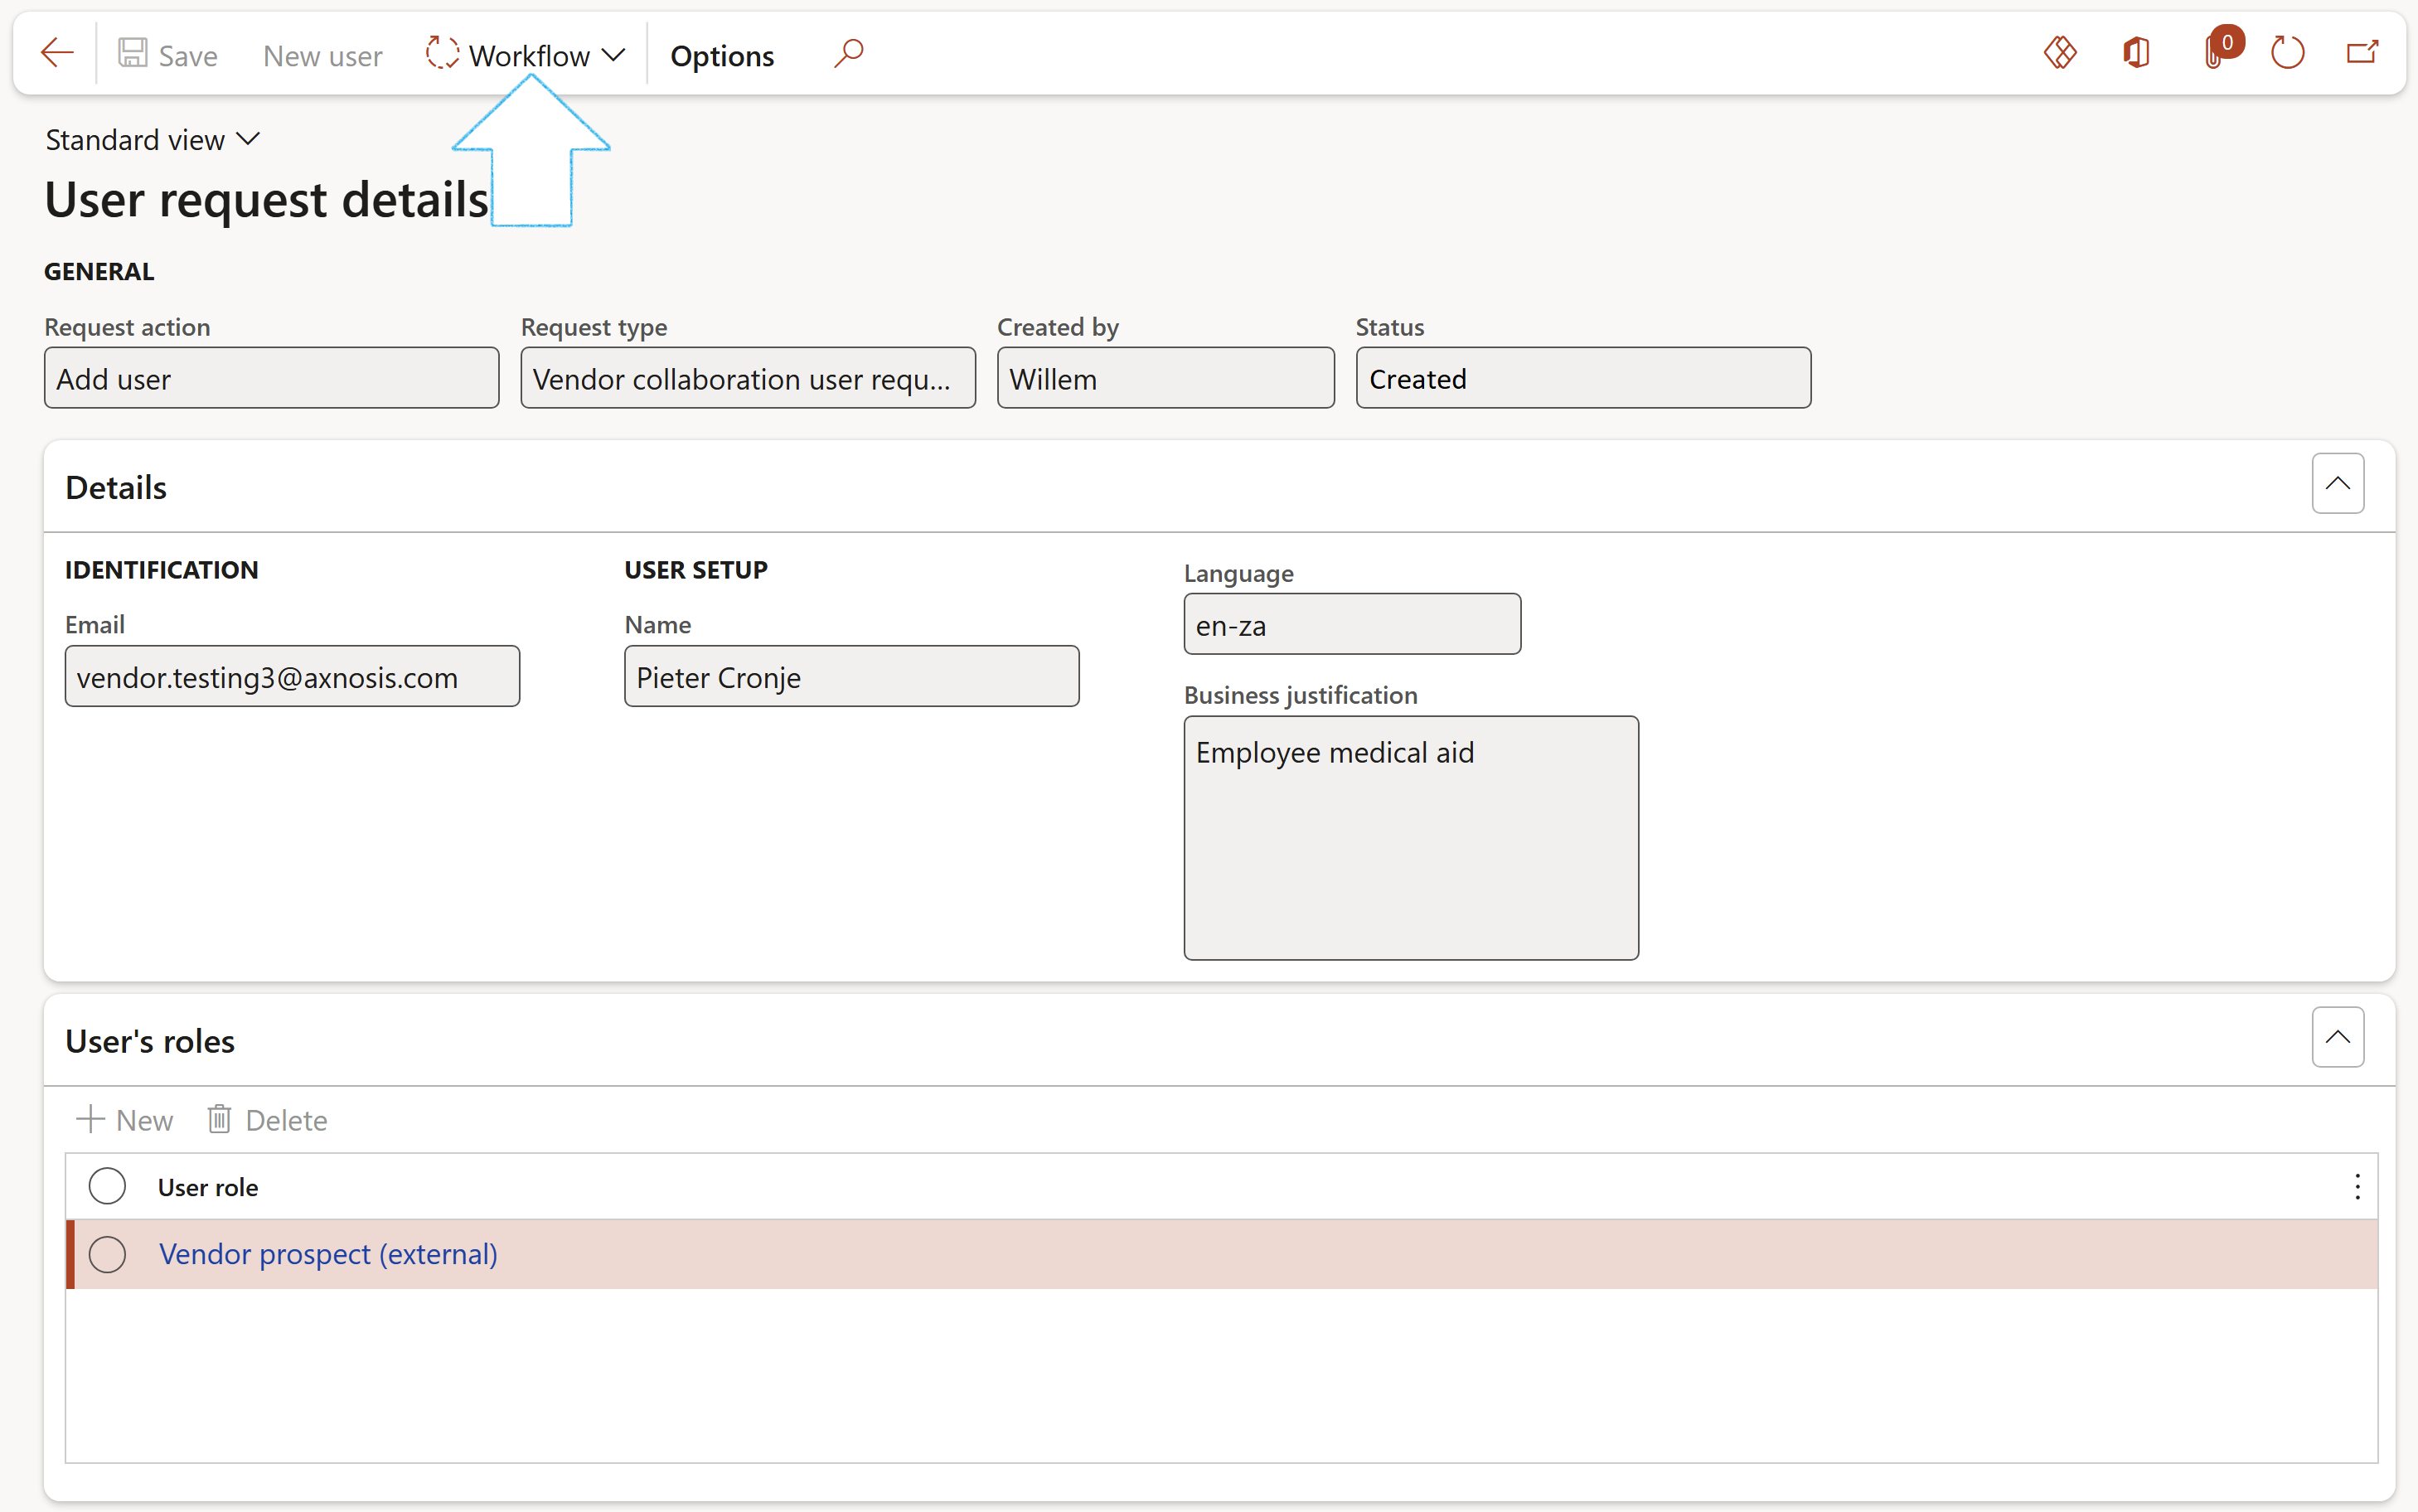
The Vendor collaboration user request contains data applicable to the prospective vendor user who has requested access to D365FO.
- The Request action field defines the request purpose
- The Created by field displays the business user who has invited the vendor
- Click on the Workflow button in the Action pane and submit the request into workflow
¶ Step 6.2: Vendor collaboration registration wizard
The first time a vendor representative signs in to the Vendor collaboration portal, they are met with the Registration wizard.
The Wizard guides the user through the onboarding process, more detailed information relating to the prospective vendor is entered here and submitted for review to complete the onboarding process by the vendor representative.
The wizard's configuration can be tailored to define which fields are mandatory, hidden, or displayed (optional). The configuration is configure by country and region.

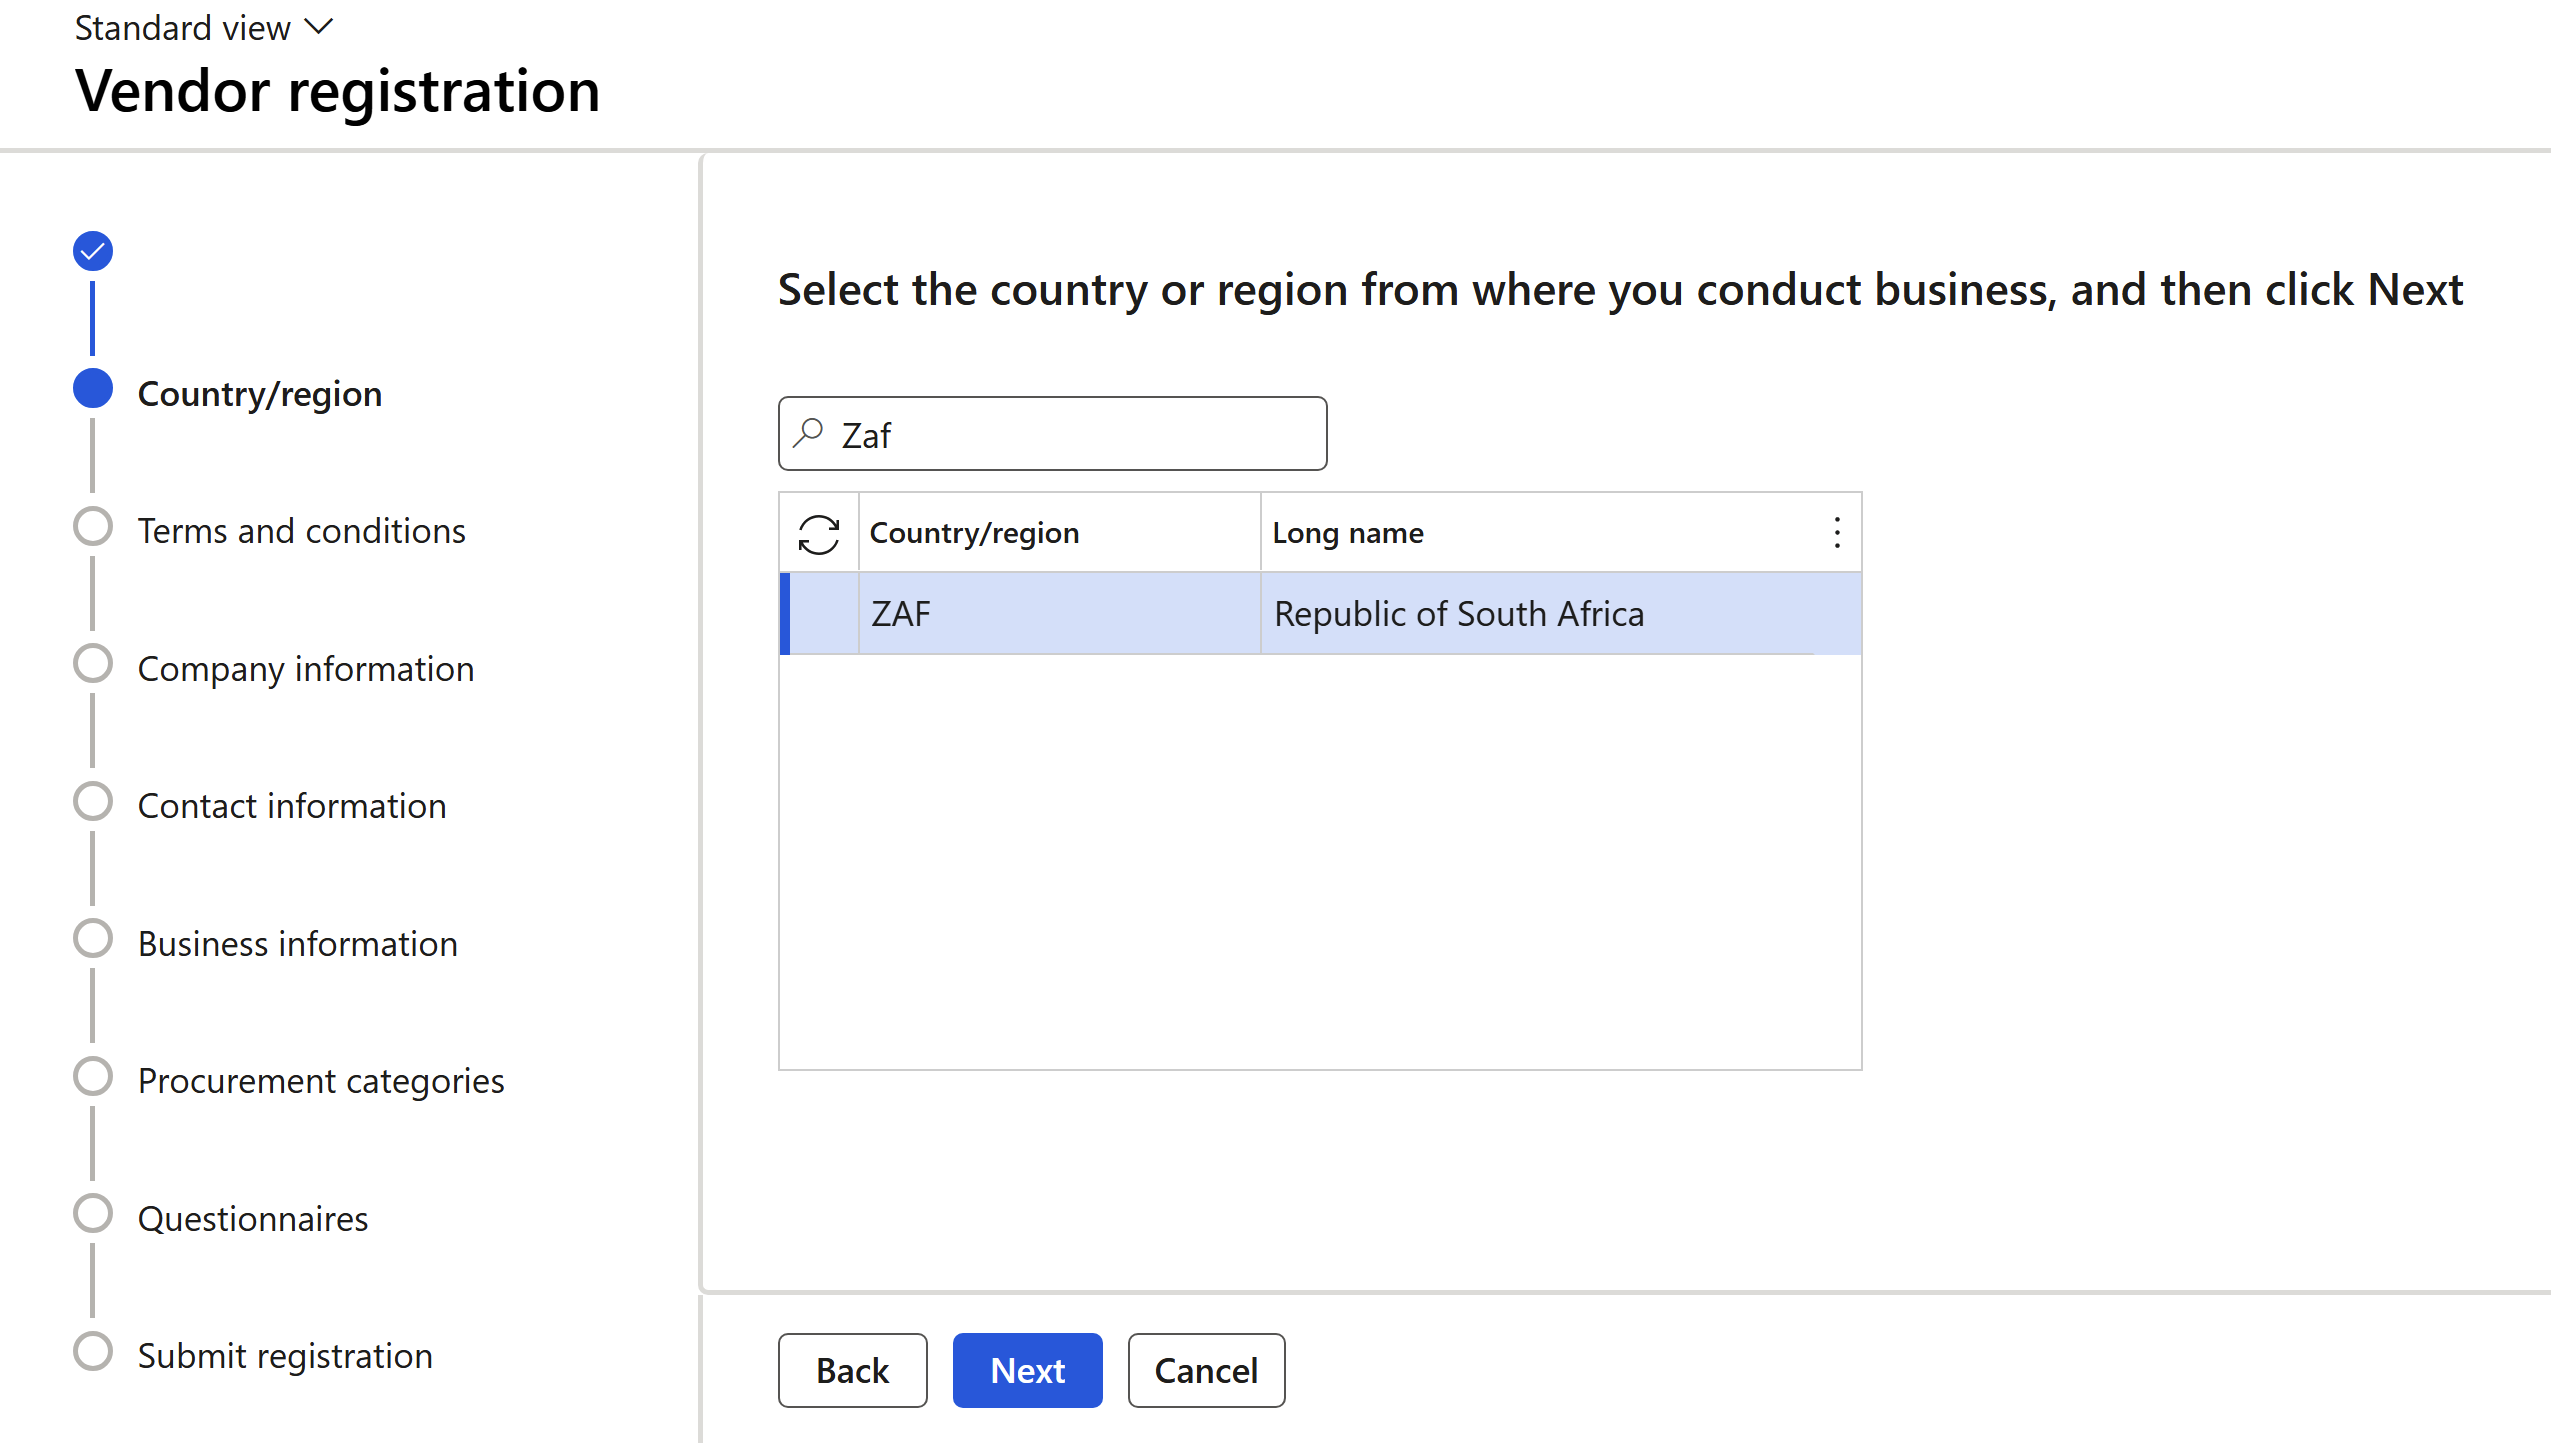
- Step 1 of the registration wizard is for the vendor to select their country or region, as per the configuration, this will also apply the rules of which fields throughout the wizard are mandatory, hidden, or displayed (optional).
- Step 2 of the registration wizard can include terms and conditions that can be configured to per country or region.
- The terms and conditions are read through by the prospective vendor before going to the next step.
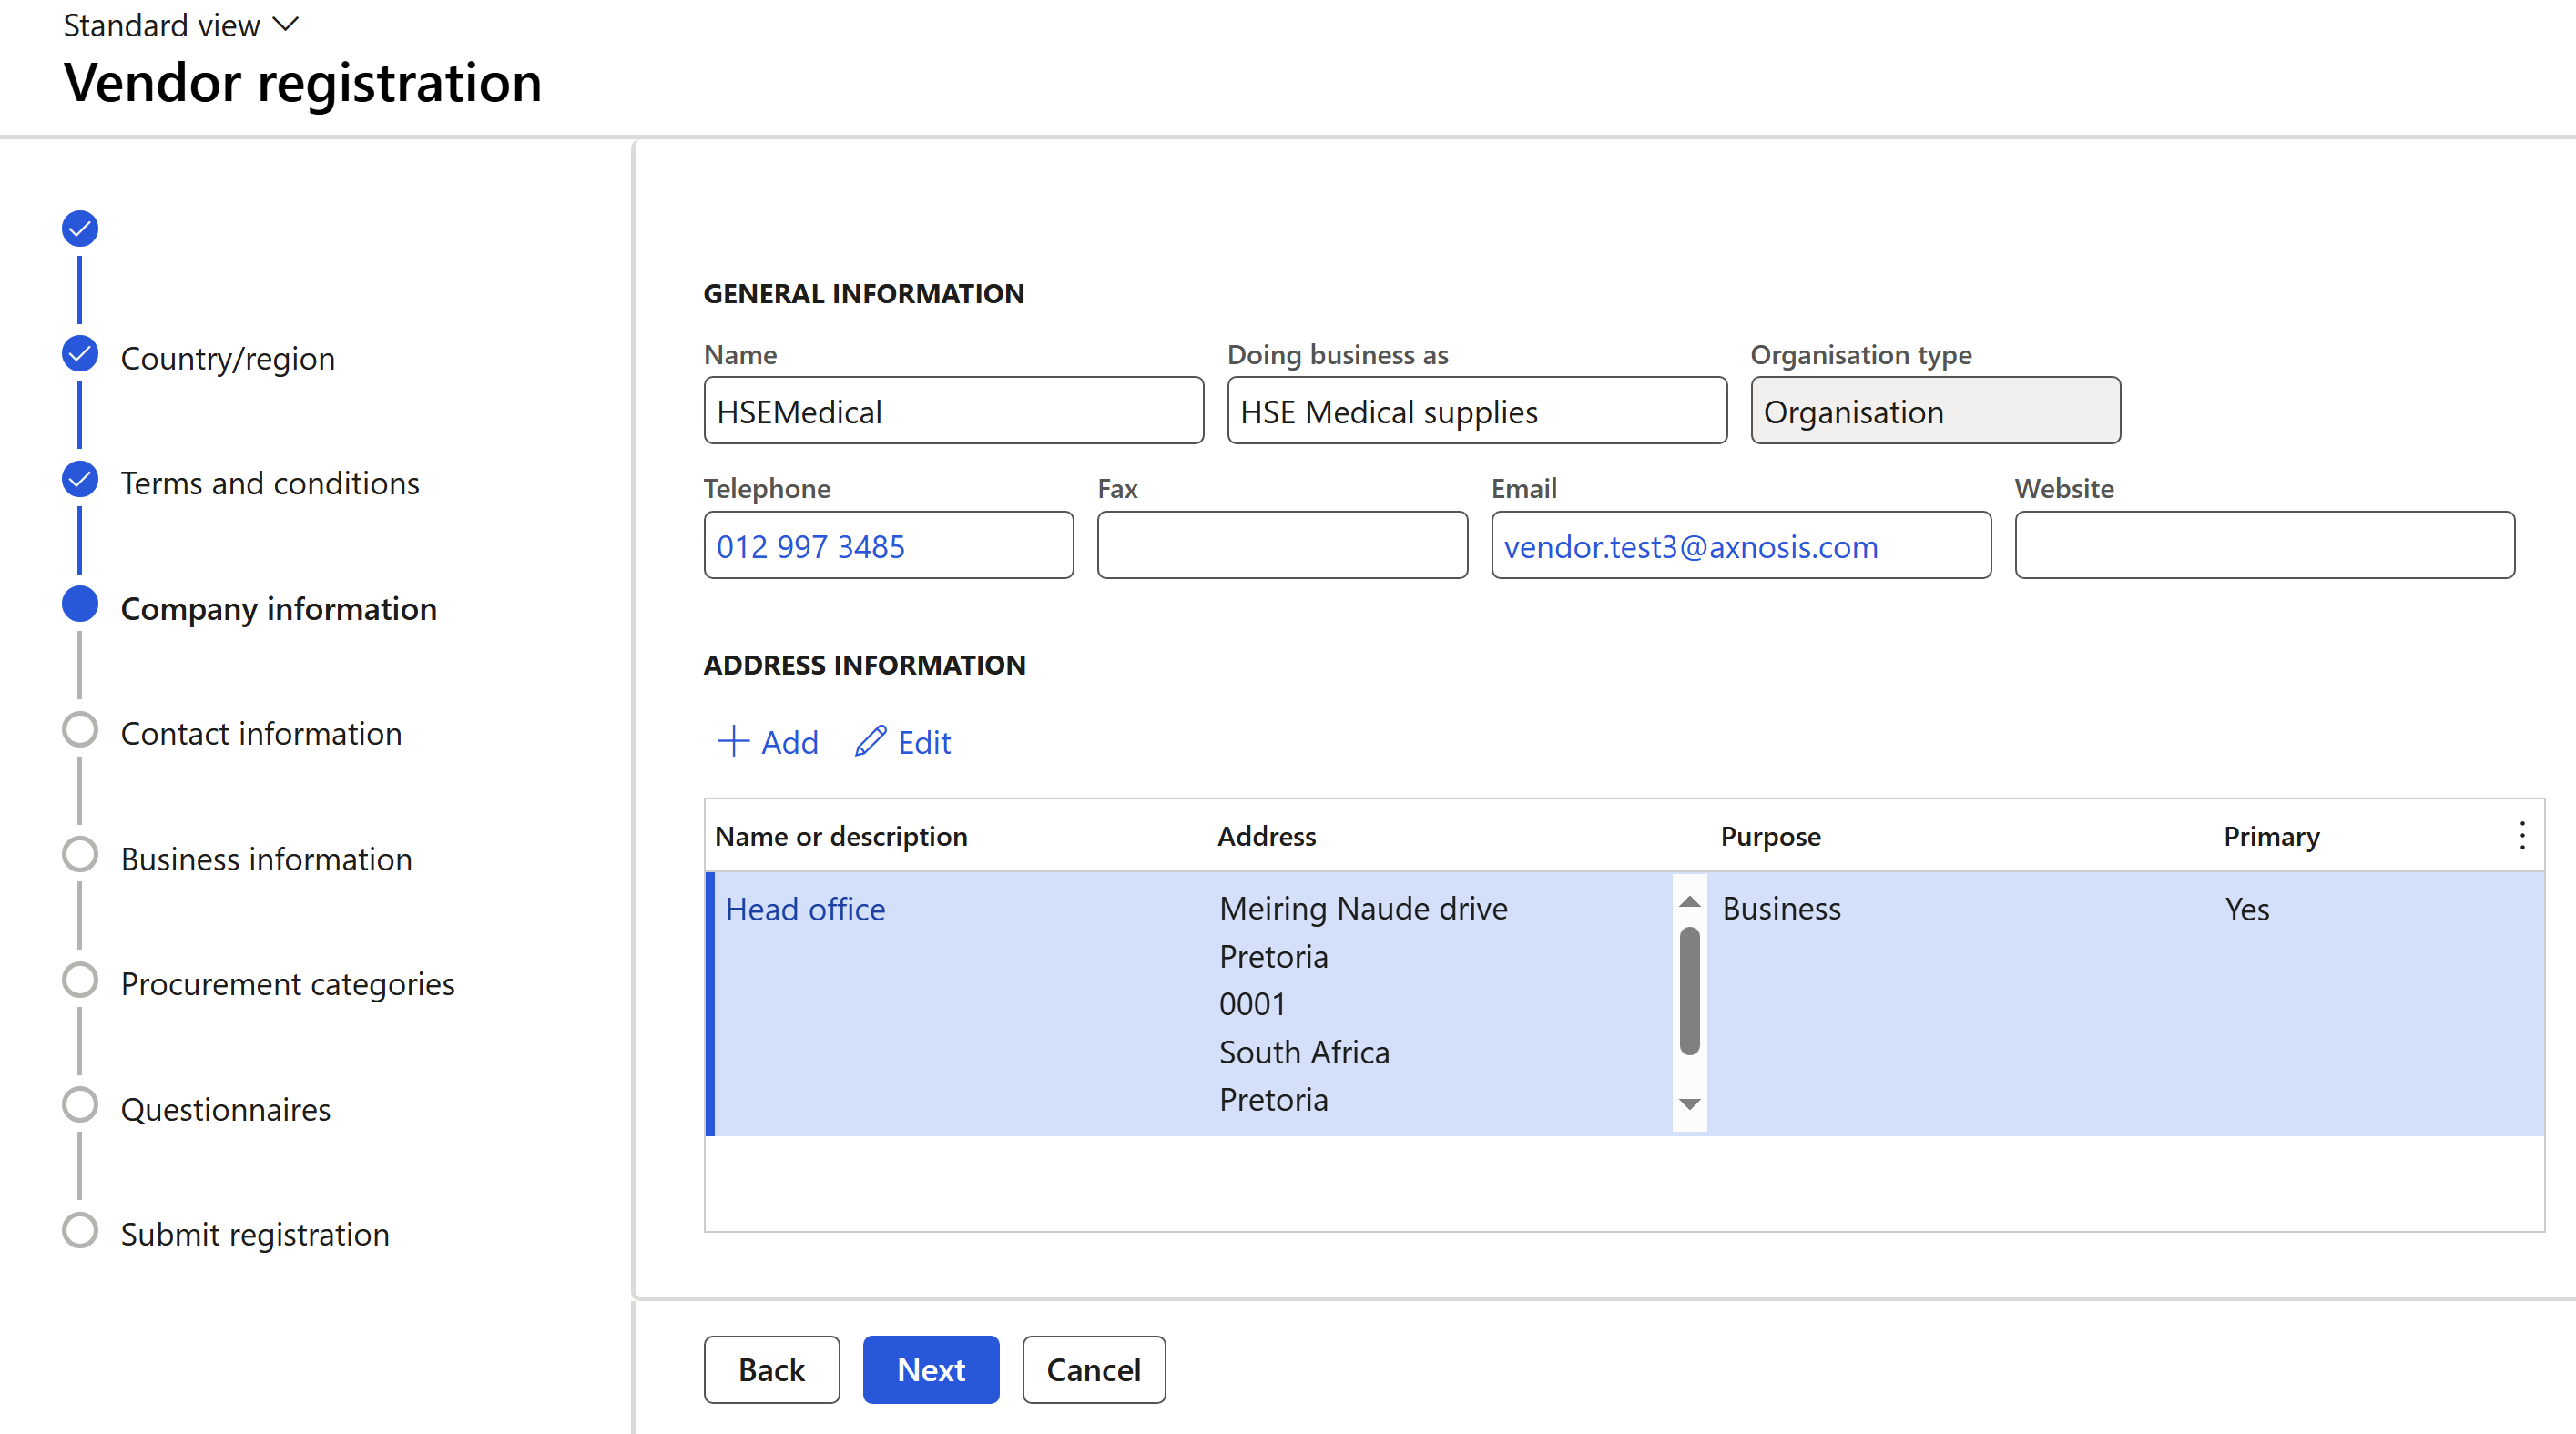
- Step 3 of the registration wizard is where the company information can be enterd by the vendor prospect.
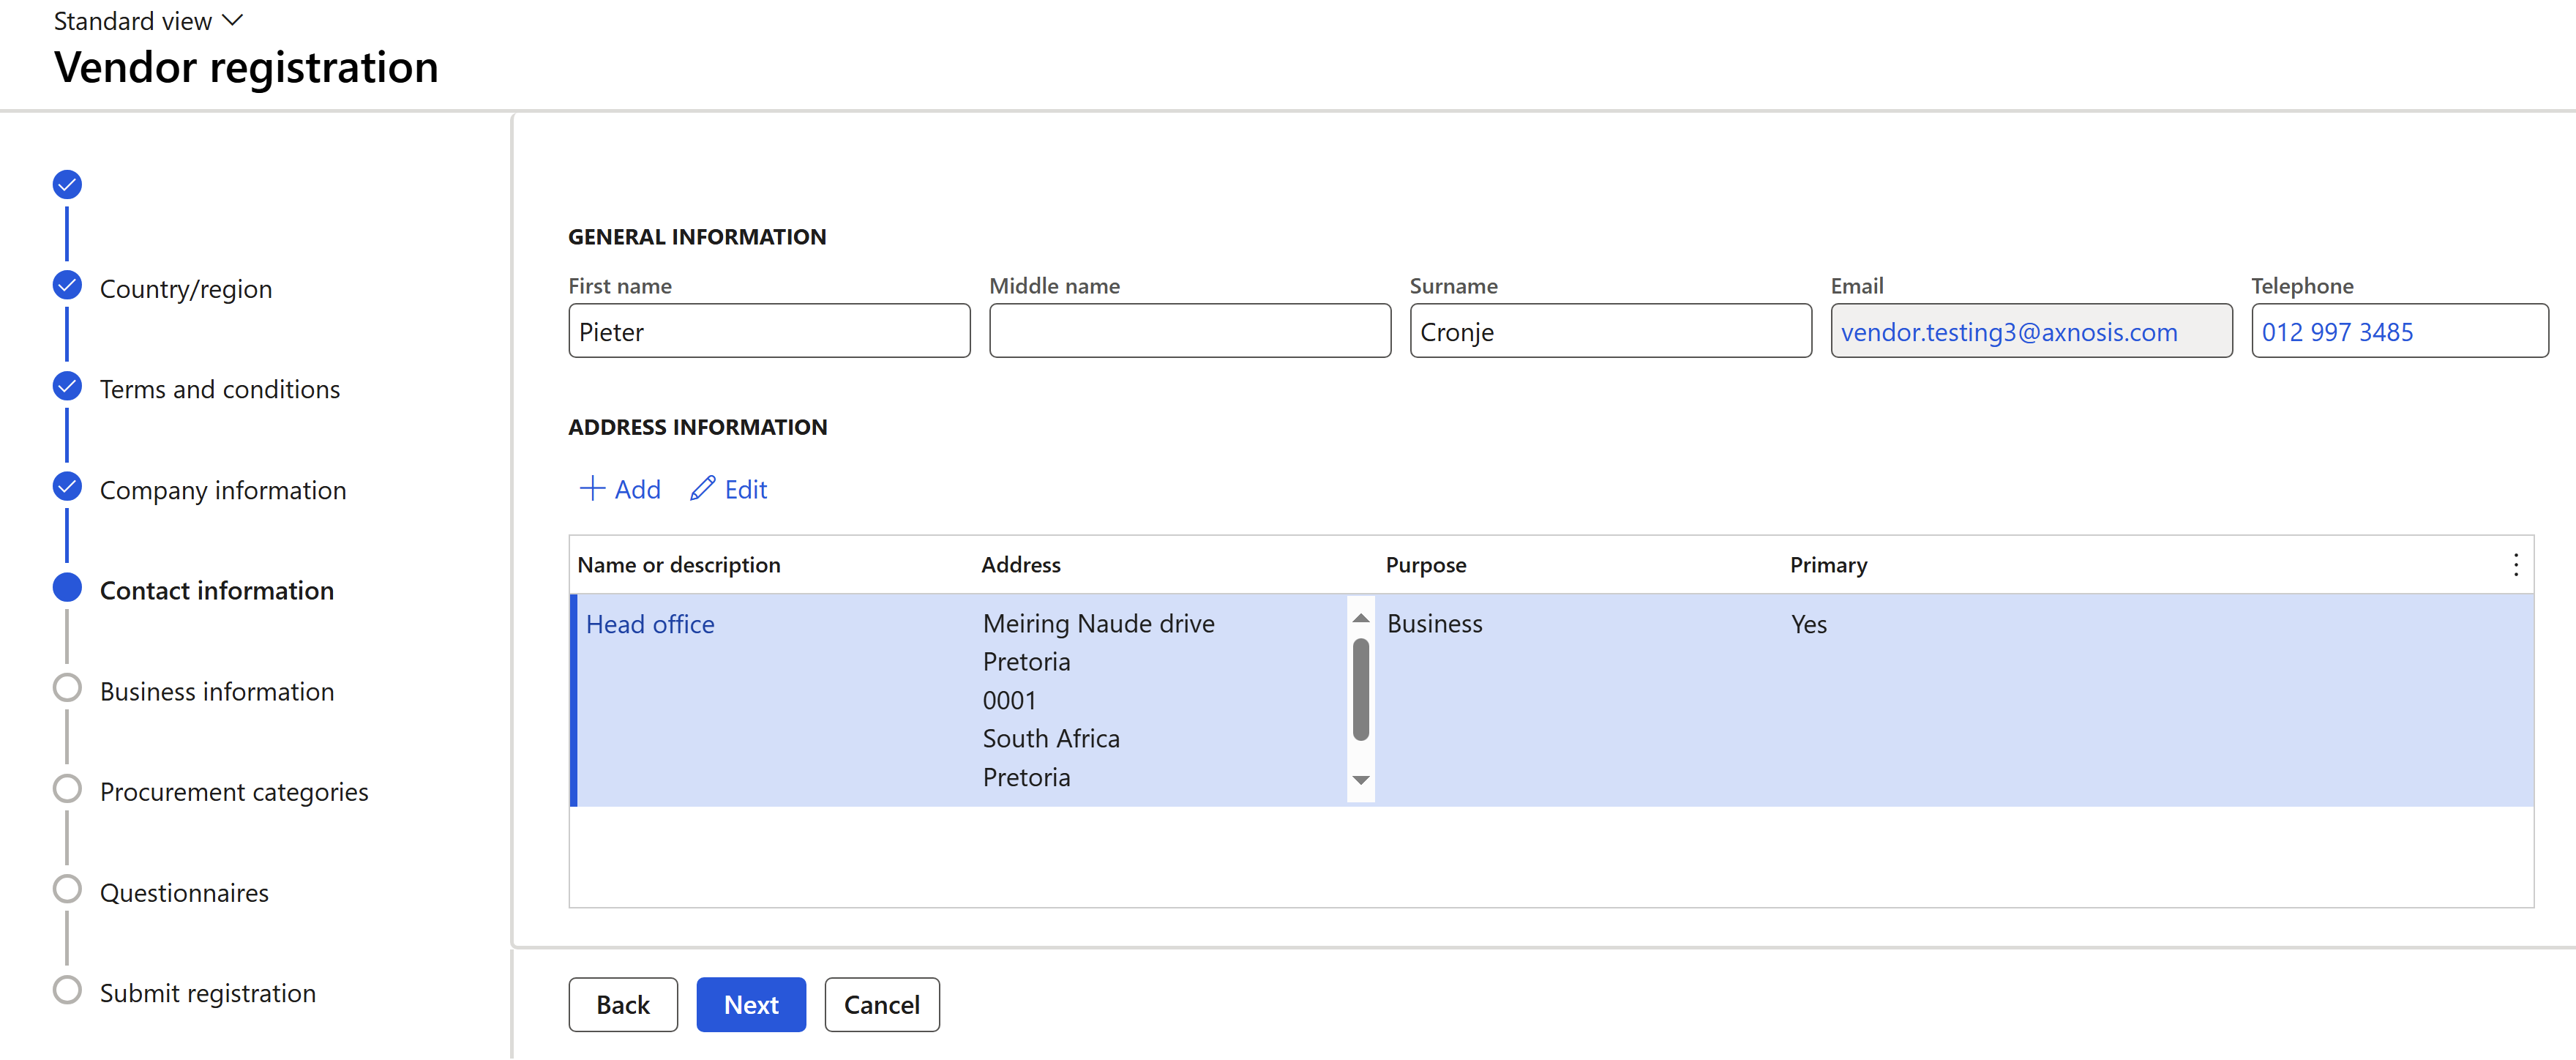
- Step 4 of the registration wizard requires the vendor prospect to enter their contact information into the system.
- Step 5 of the registration wizard is for the vendor prospect to enter more detailed business information.
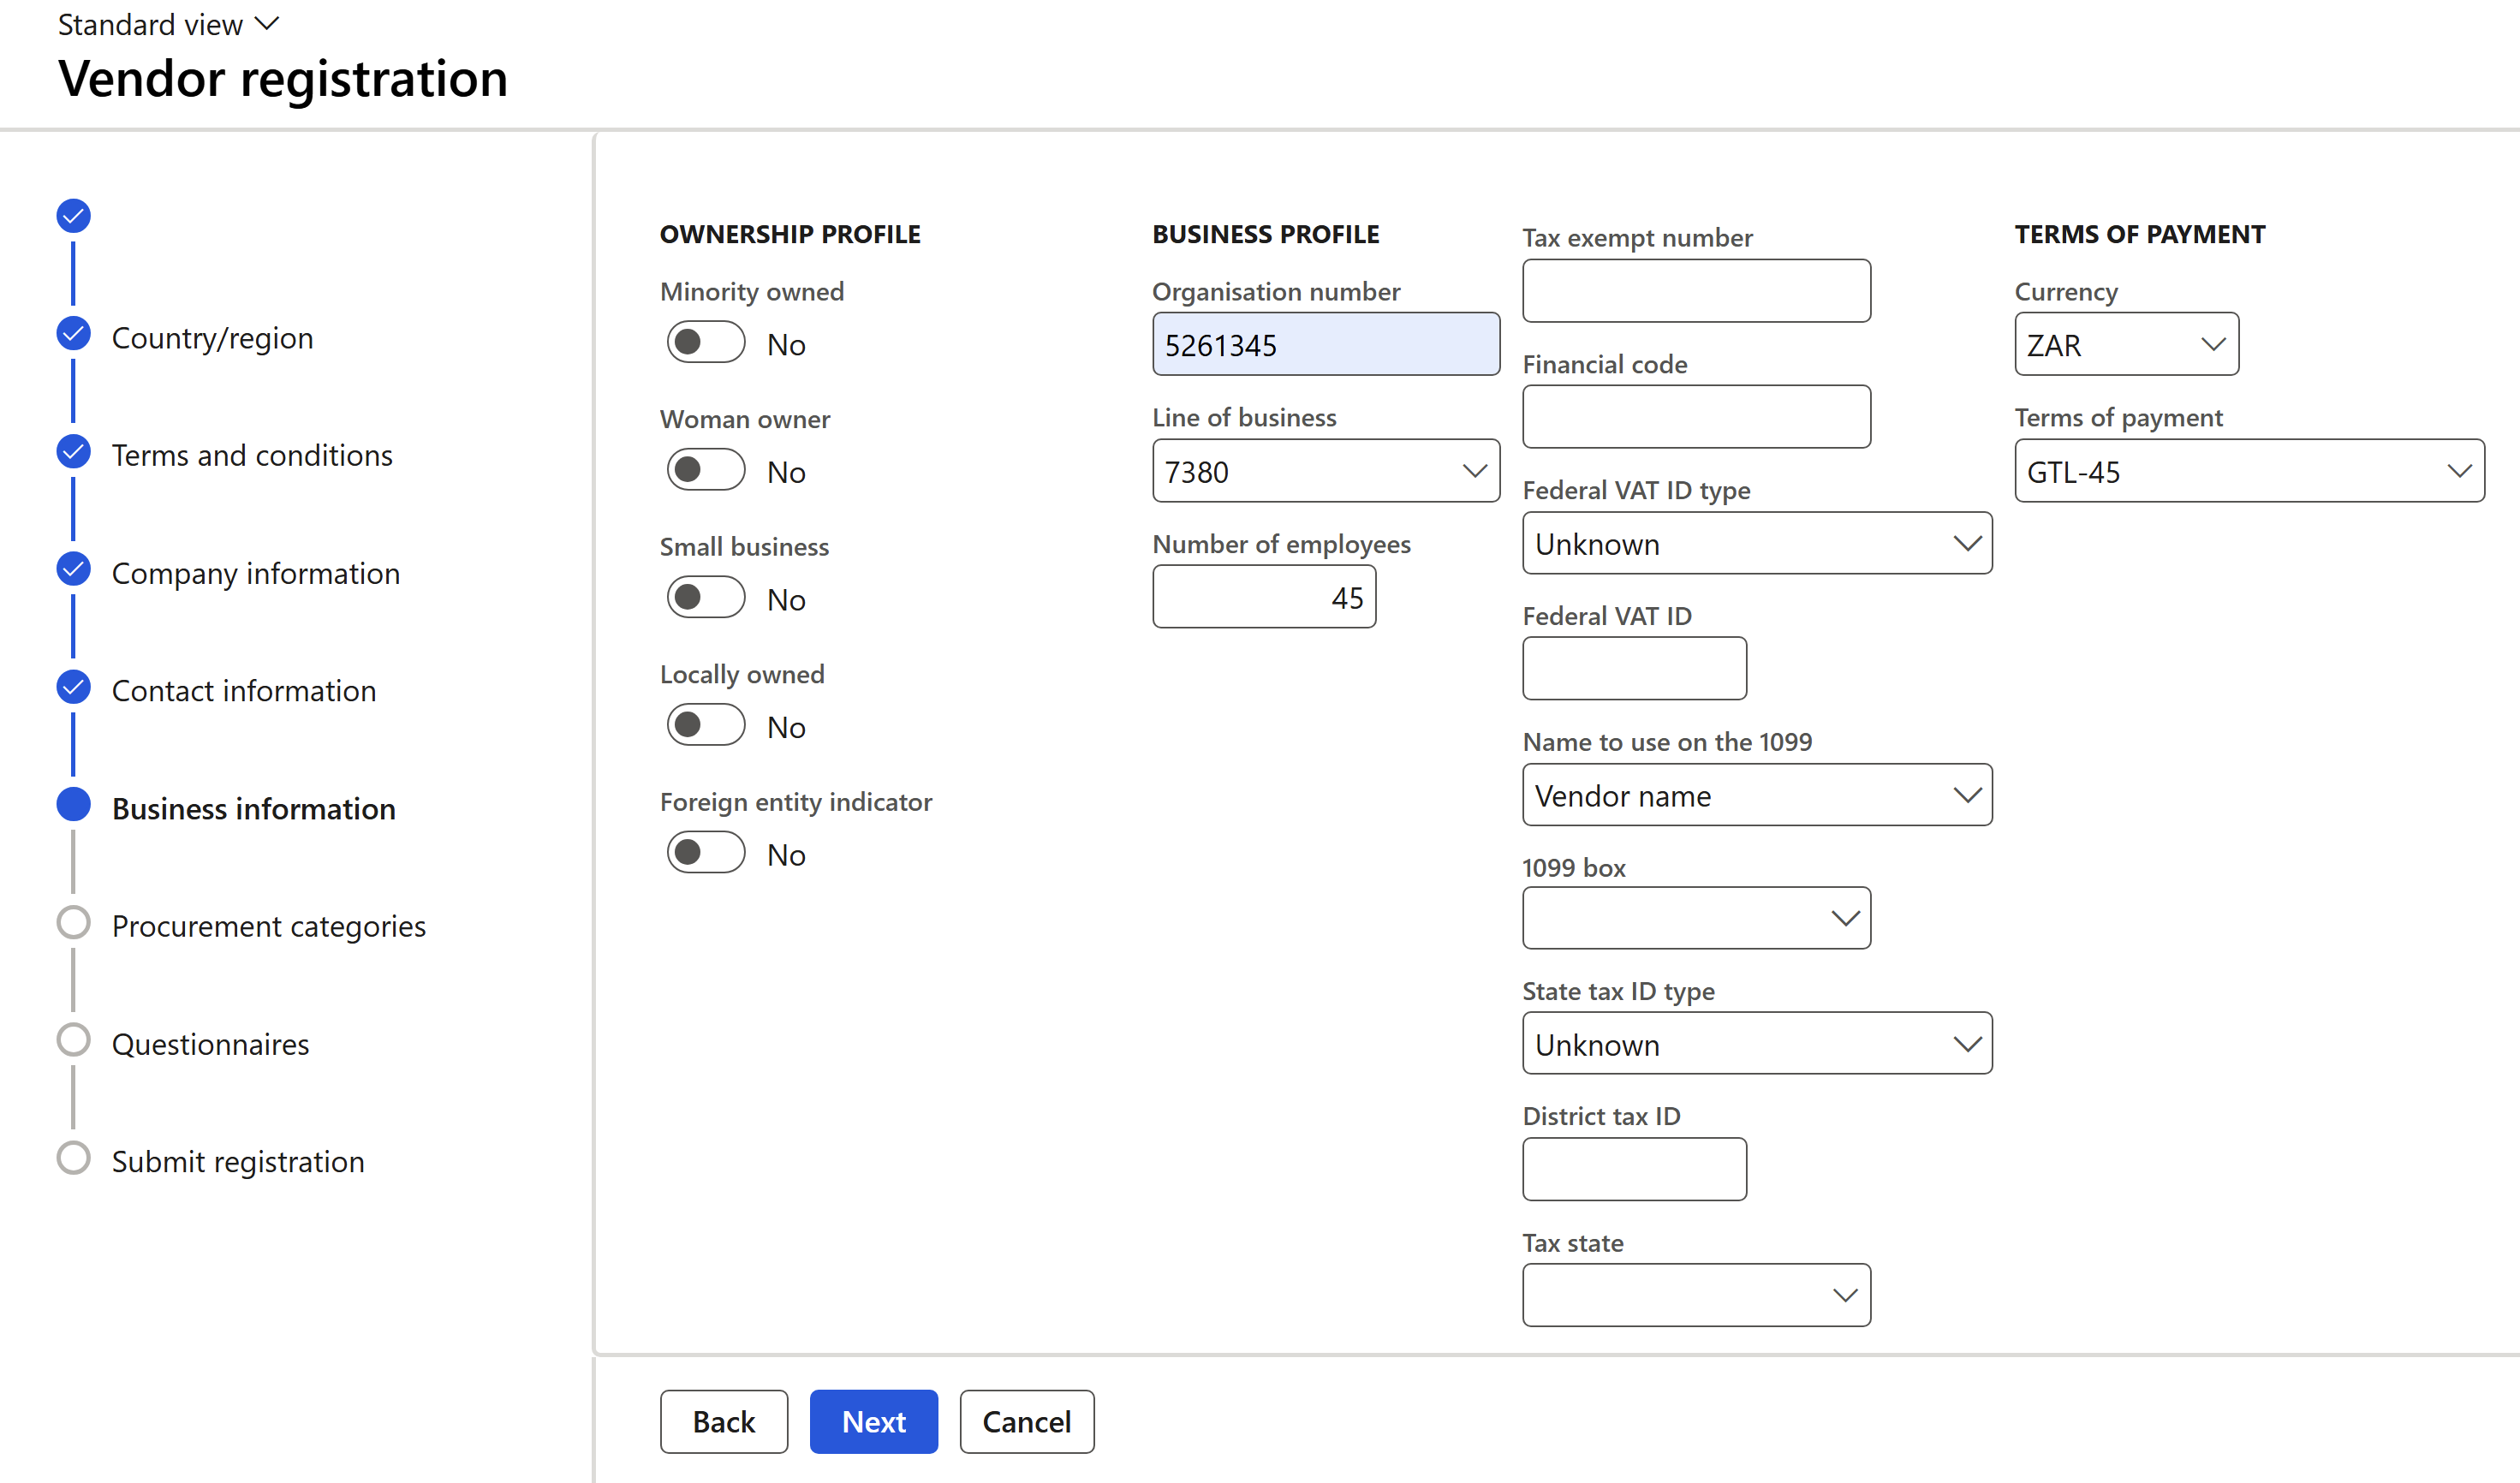
- Step 6 of the registration wizard requires the vendor prospect to select which procurement categories they are applying for. This step is not mandatory and can be configured to be skipped.
- Step 7 of the registration wizard is questionnaires.
- This step can be configured to inlude additional questions that might be posed to the vendor and are important for the registration process.
- Questionnaires are answered by the vendor and the answers can be reviewed before the vendor is approved.
- Step 8 of the registration wizard displays a list of documents that have to be attached by the vendor.
- Step 9 of the registration wizard is for the vendor prospect to submit their application for review.
¶ Step 6.3: Vendor request
After the vendor submits their application for review, the system creates a record in the Vendor request form.
- A business user reviews the information entered into the registration wizard.
- As a mandatory step, the Vendor group needs to be selected which the vendor will be a part of.
- After initial review from the business user, the vendor request can be submitted to workflow for further stakeholder approval before the vendor onboarding process is completed.
After the vendor request is approved, a vendor record is created in the system. Additionally, the vendor user is allocated the Vendor Admin (External) and Vendor contact (External) Security roles, which will grant them access to additional functionality within the system..
Go to: Procurement and sourcing > Vendors > Vendor requests
- Select the relevant Vendor request
- In the Action pane, click on the Edit button
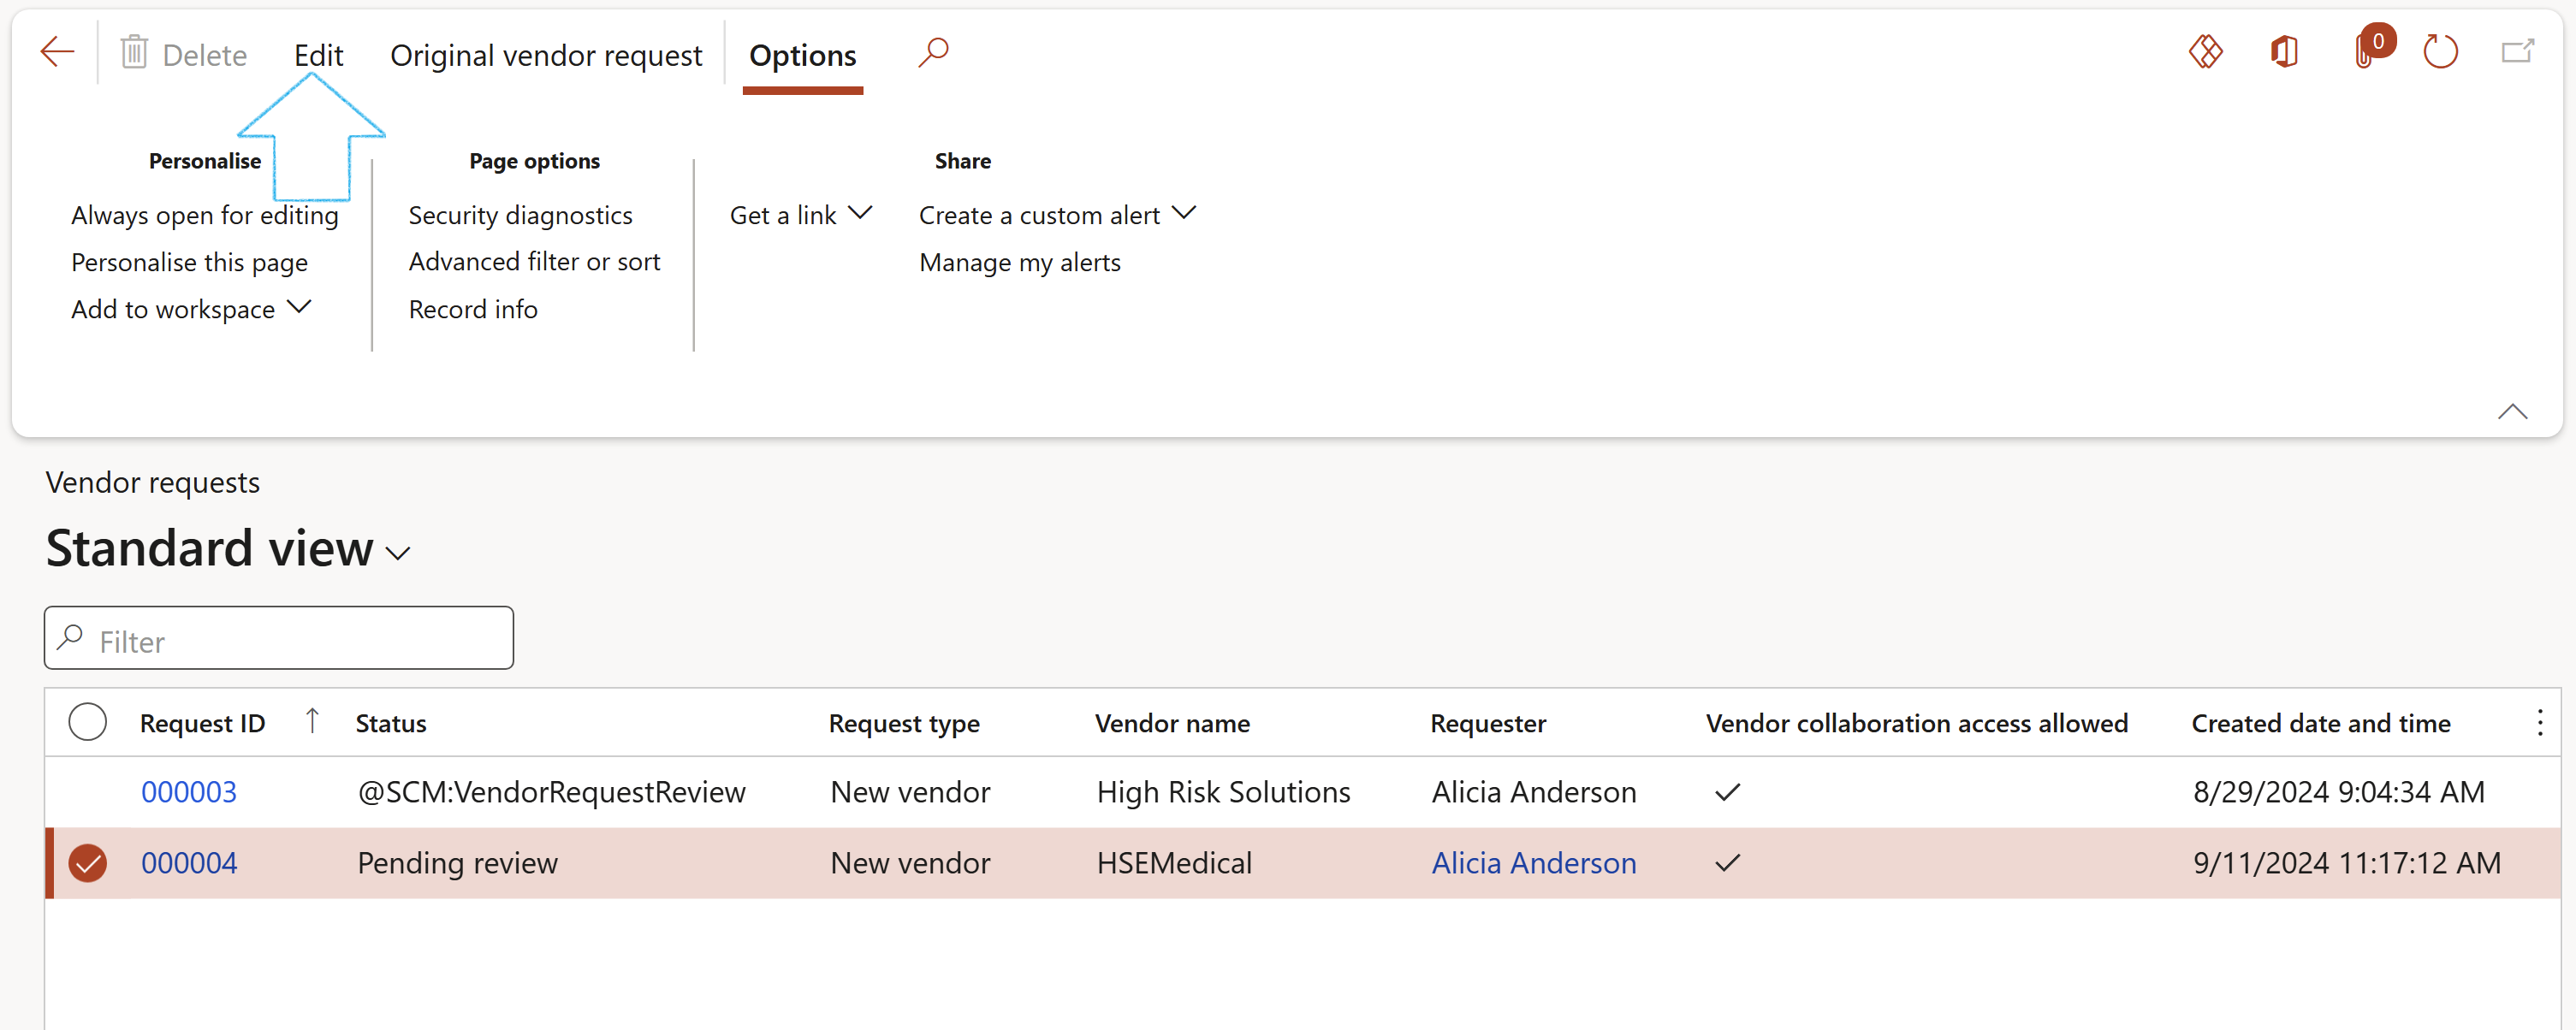
- Under the General Fast tab:
- Indicate whether this is a High risk vendor (the default is No)
- Select the relevant Vendor group from the dropdown list

¶ Step 6.4: Security roles
¶ Step 6.4.1: Vendor admin (External)
In Dynamics 365 Finance & Operations (D365 F&O), the Vendor Admin (External) security role provides ecternal vendors with specific administrative capabilities within the Vendor Collaboration portal. This role is designed to enable vendors to manage certain aspects of their profiles and interactions with your organisation without needing internal intervention. Here's a high-level overview of the functionality granted by this role:
- Profile management: Vendors can update their own contact information, banking details, and other critical profile information directly within the system.
- User management: Vendors can manage users by adding or removing users, assigning roles within their organisation, and resetting passwords. This allows the vendor organisation to control who within their team can access the Vendor Collaboration portal and what they can do.
- Access to procurement information: The role provides access to view and respond to purchase orders, requests for quotations (RFQs and bidding process), and other procurement documents. Vendors can acknowledge orders, provide feedback, or request changes directly in the portal.
- Invoice and payment management: Vendors can view the status of their invoices and payments. They can also submit invoices for payment and track the payment status.
- Collaboration with internal teams: The role allows vendors to communicate and collaborate with internal procurement and finance teams through the portal. This might include discussions about orders, deliveries, and other transactional information, such as bid submissions.
- Compliance and documentation: Vendors can submit required compliance and certifications to meet the legal and regulatory standards for doing business with your organisation.
- Reporting and analytics: The role may provide access to certain reports and analytics related to their transactions, allowing vendors to monitor their performance and activities within the portal.
The functionality mentioned above can be configured to include approval for changes to business information, such banking details, and when new users are added.
This role is essential for vendors who must actively manage their relationship with your organisation. It offers them a self-service capability that reduces the need for internal administrative support.
The security role can be customised to limit functionality or give more access than standard.
¶ Step 6.4.2: Vendor contact (External)
In Dynamics 365 Finance & Operarions (D365 F&O), the Vendor Contact (External) security role is designed to give external vendor users access to specific functionalities within the Vendor Collaboration portal. The main cpabilities provided by this role includes:
- Access to purchase orders: Vendor contacts can view and acknowledge purchase orders that are sent to them. They can also propose changes or accept the terms of the purchase order directly through the portal.
- Responding to request for quotations and bids: The role allows vendor contacts to repsond to RFQs and bids by submitting quotations and provided additional information as needed. This is crucial for participating in the bidding processes.
- Viewing invoices and payments:: Vendor contacts can monitor the status of invoices they have submitted, and track payments made by the organisation. This includes viewing payment terms and any discrepancies that may arise.
- Collaboration and communication: The role enables vendor contacts to communicate with internal procurement teams and engage in discussions related to specific purchase orders, deliveries, and other transactional details.
- Basic profile management: While this role does not provide full profile management capabilities like the Vendor Admin role, vendor contacts can typically update certain contact details and information relevant to their in teractions.
This role is used for vendor representatives responsible for managing orders, responding to RFQs, and handling daily communications with the purchasing organisation. It provides them the necessary tools to perfom these tasks efficiently within the D365 F&O environment.
The security role can also be customised to limit functionality or give more access than standard.
¶ Step 7: Vendor information
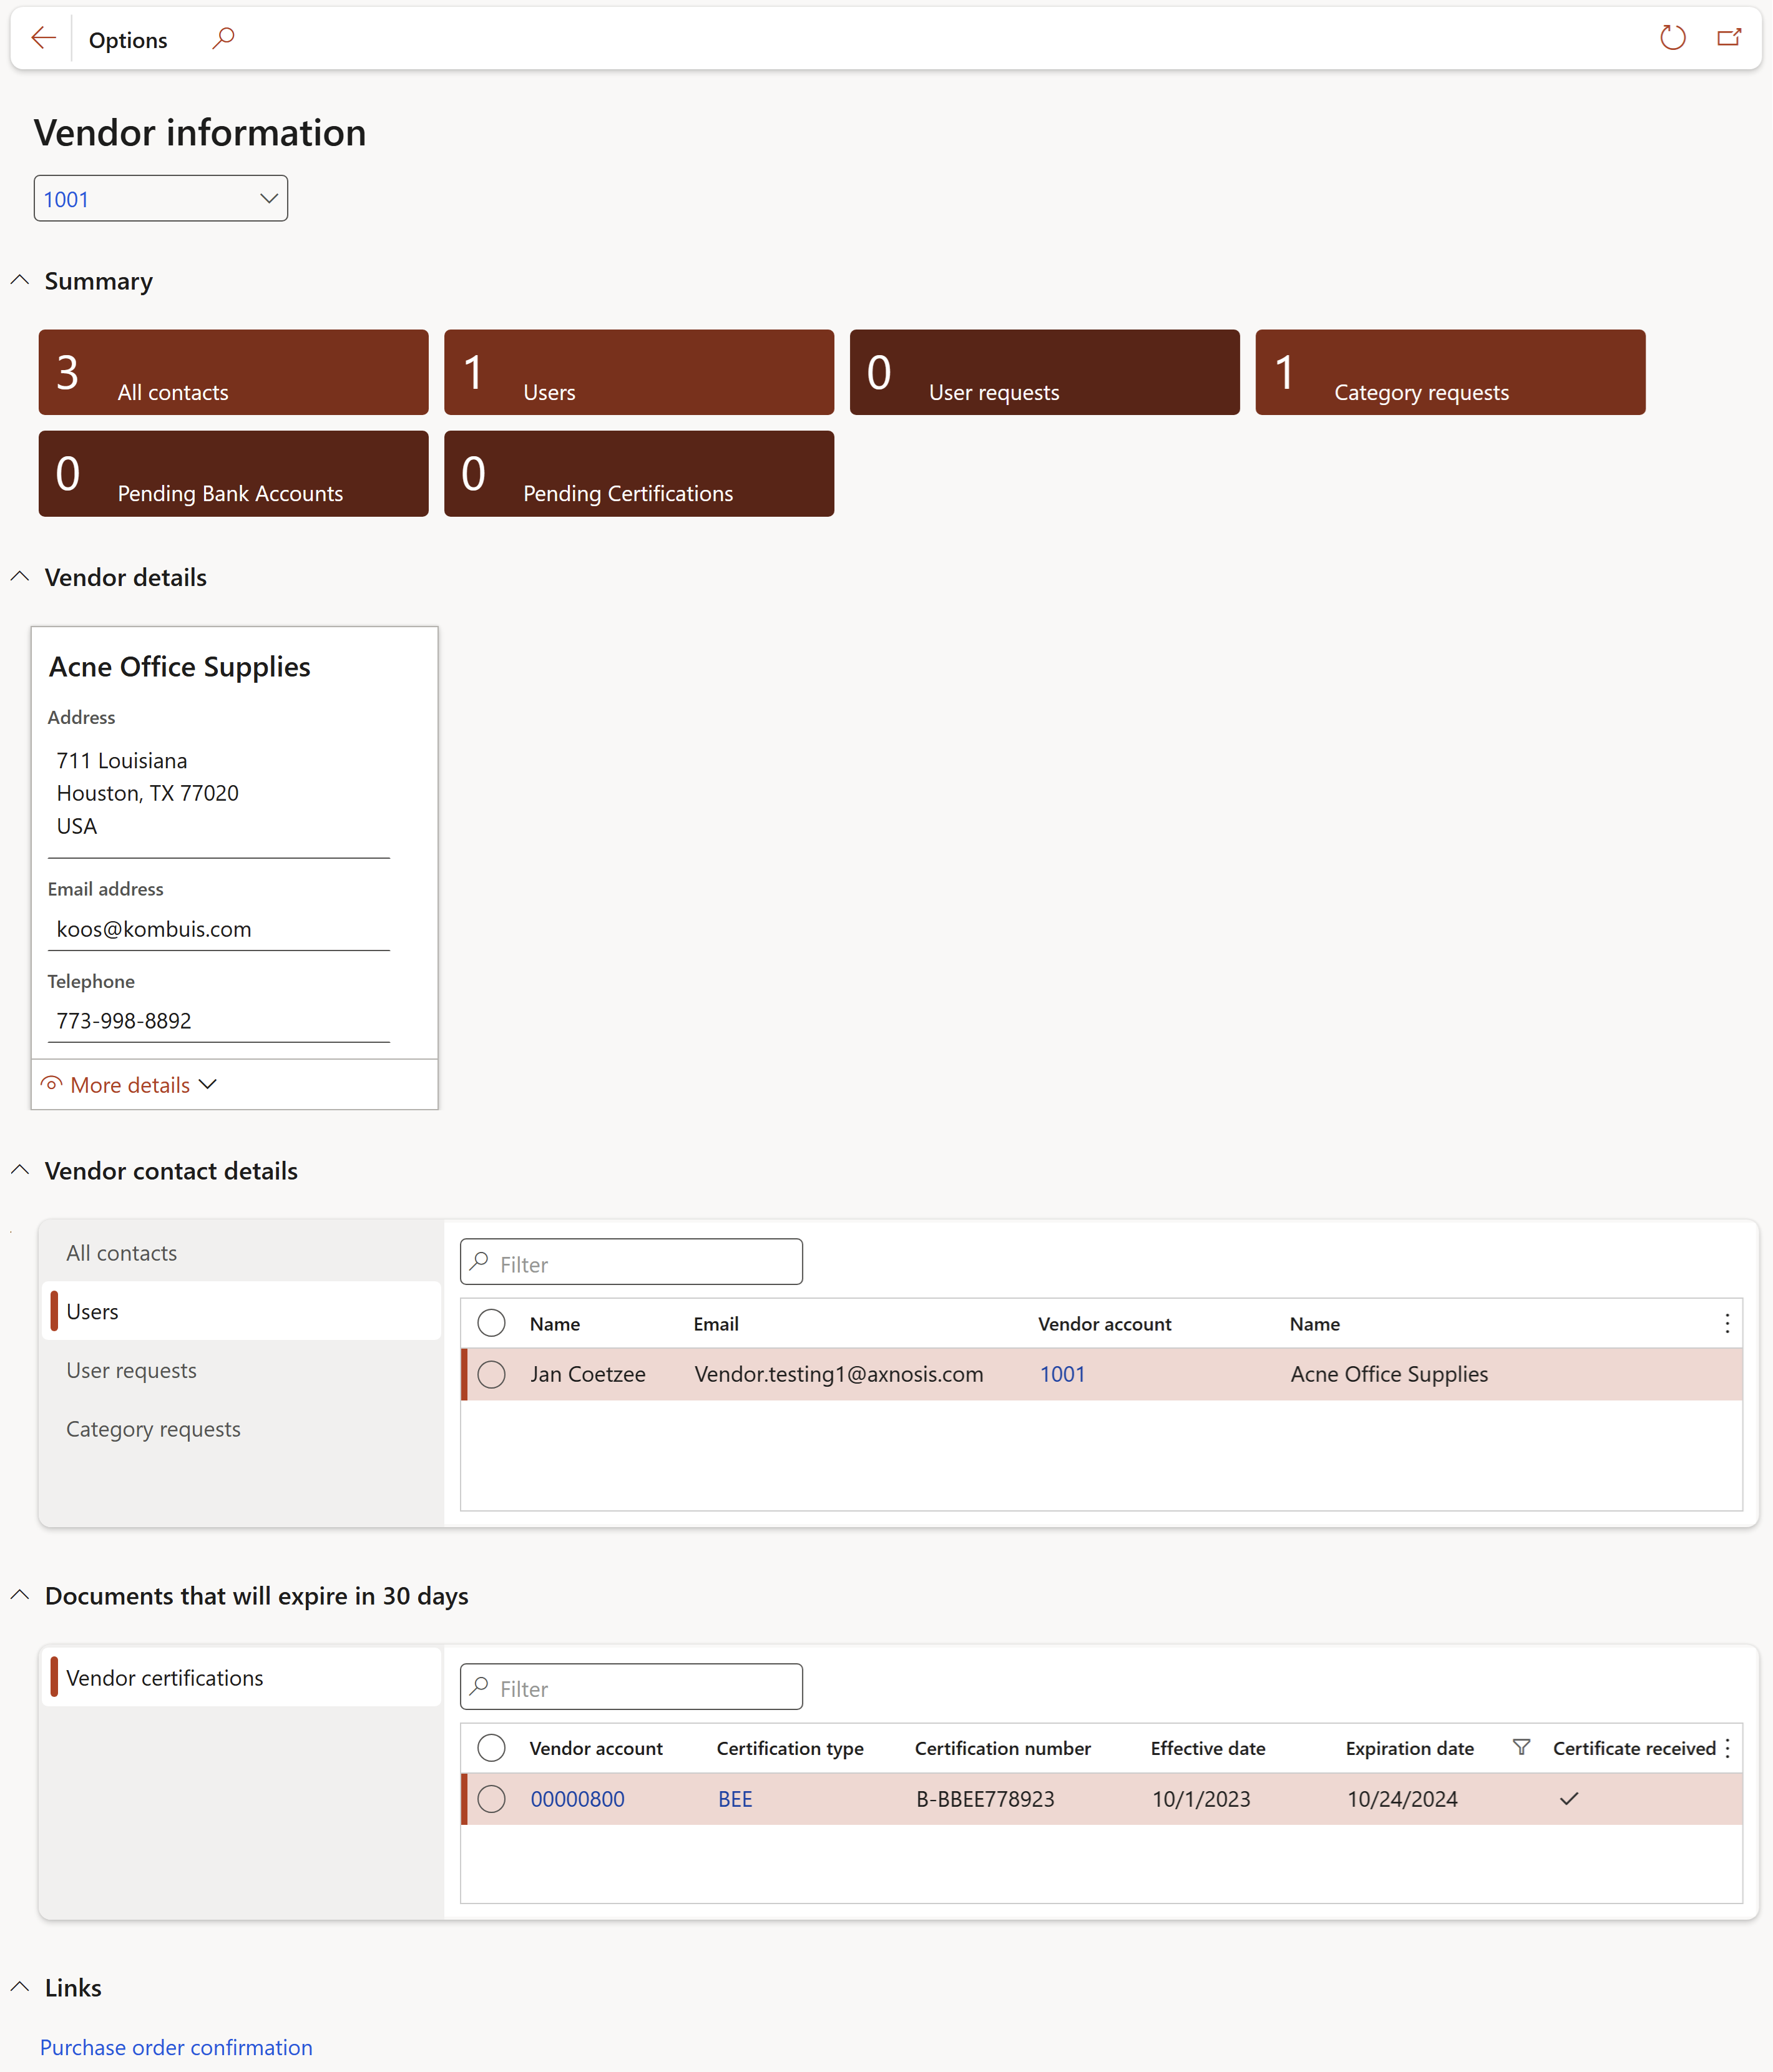
The diagram below illustrates the process of vendors requesting changes to their information or requesting access to a new contact:

- Vendors can maintain their information on the system
- Depending on the assigned security roles, vendor users will be limited in what they can change
- Changes made to vendor information can be submitted for your organisation's approval. The changes will create vendor requests to be reviewed.
- Changes to contact information or new user requests will create user request records for review
Go to: Vendor collaboration > Workspaces > Vendor information
¶ Step 8: Bid management
The diagram below illustrates the process of bid management between prospective vendors and the procurement team:
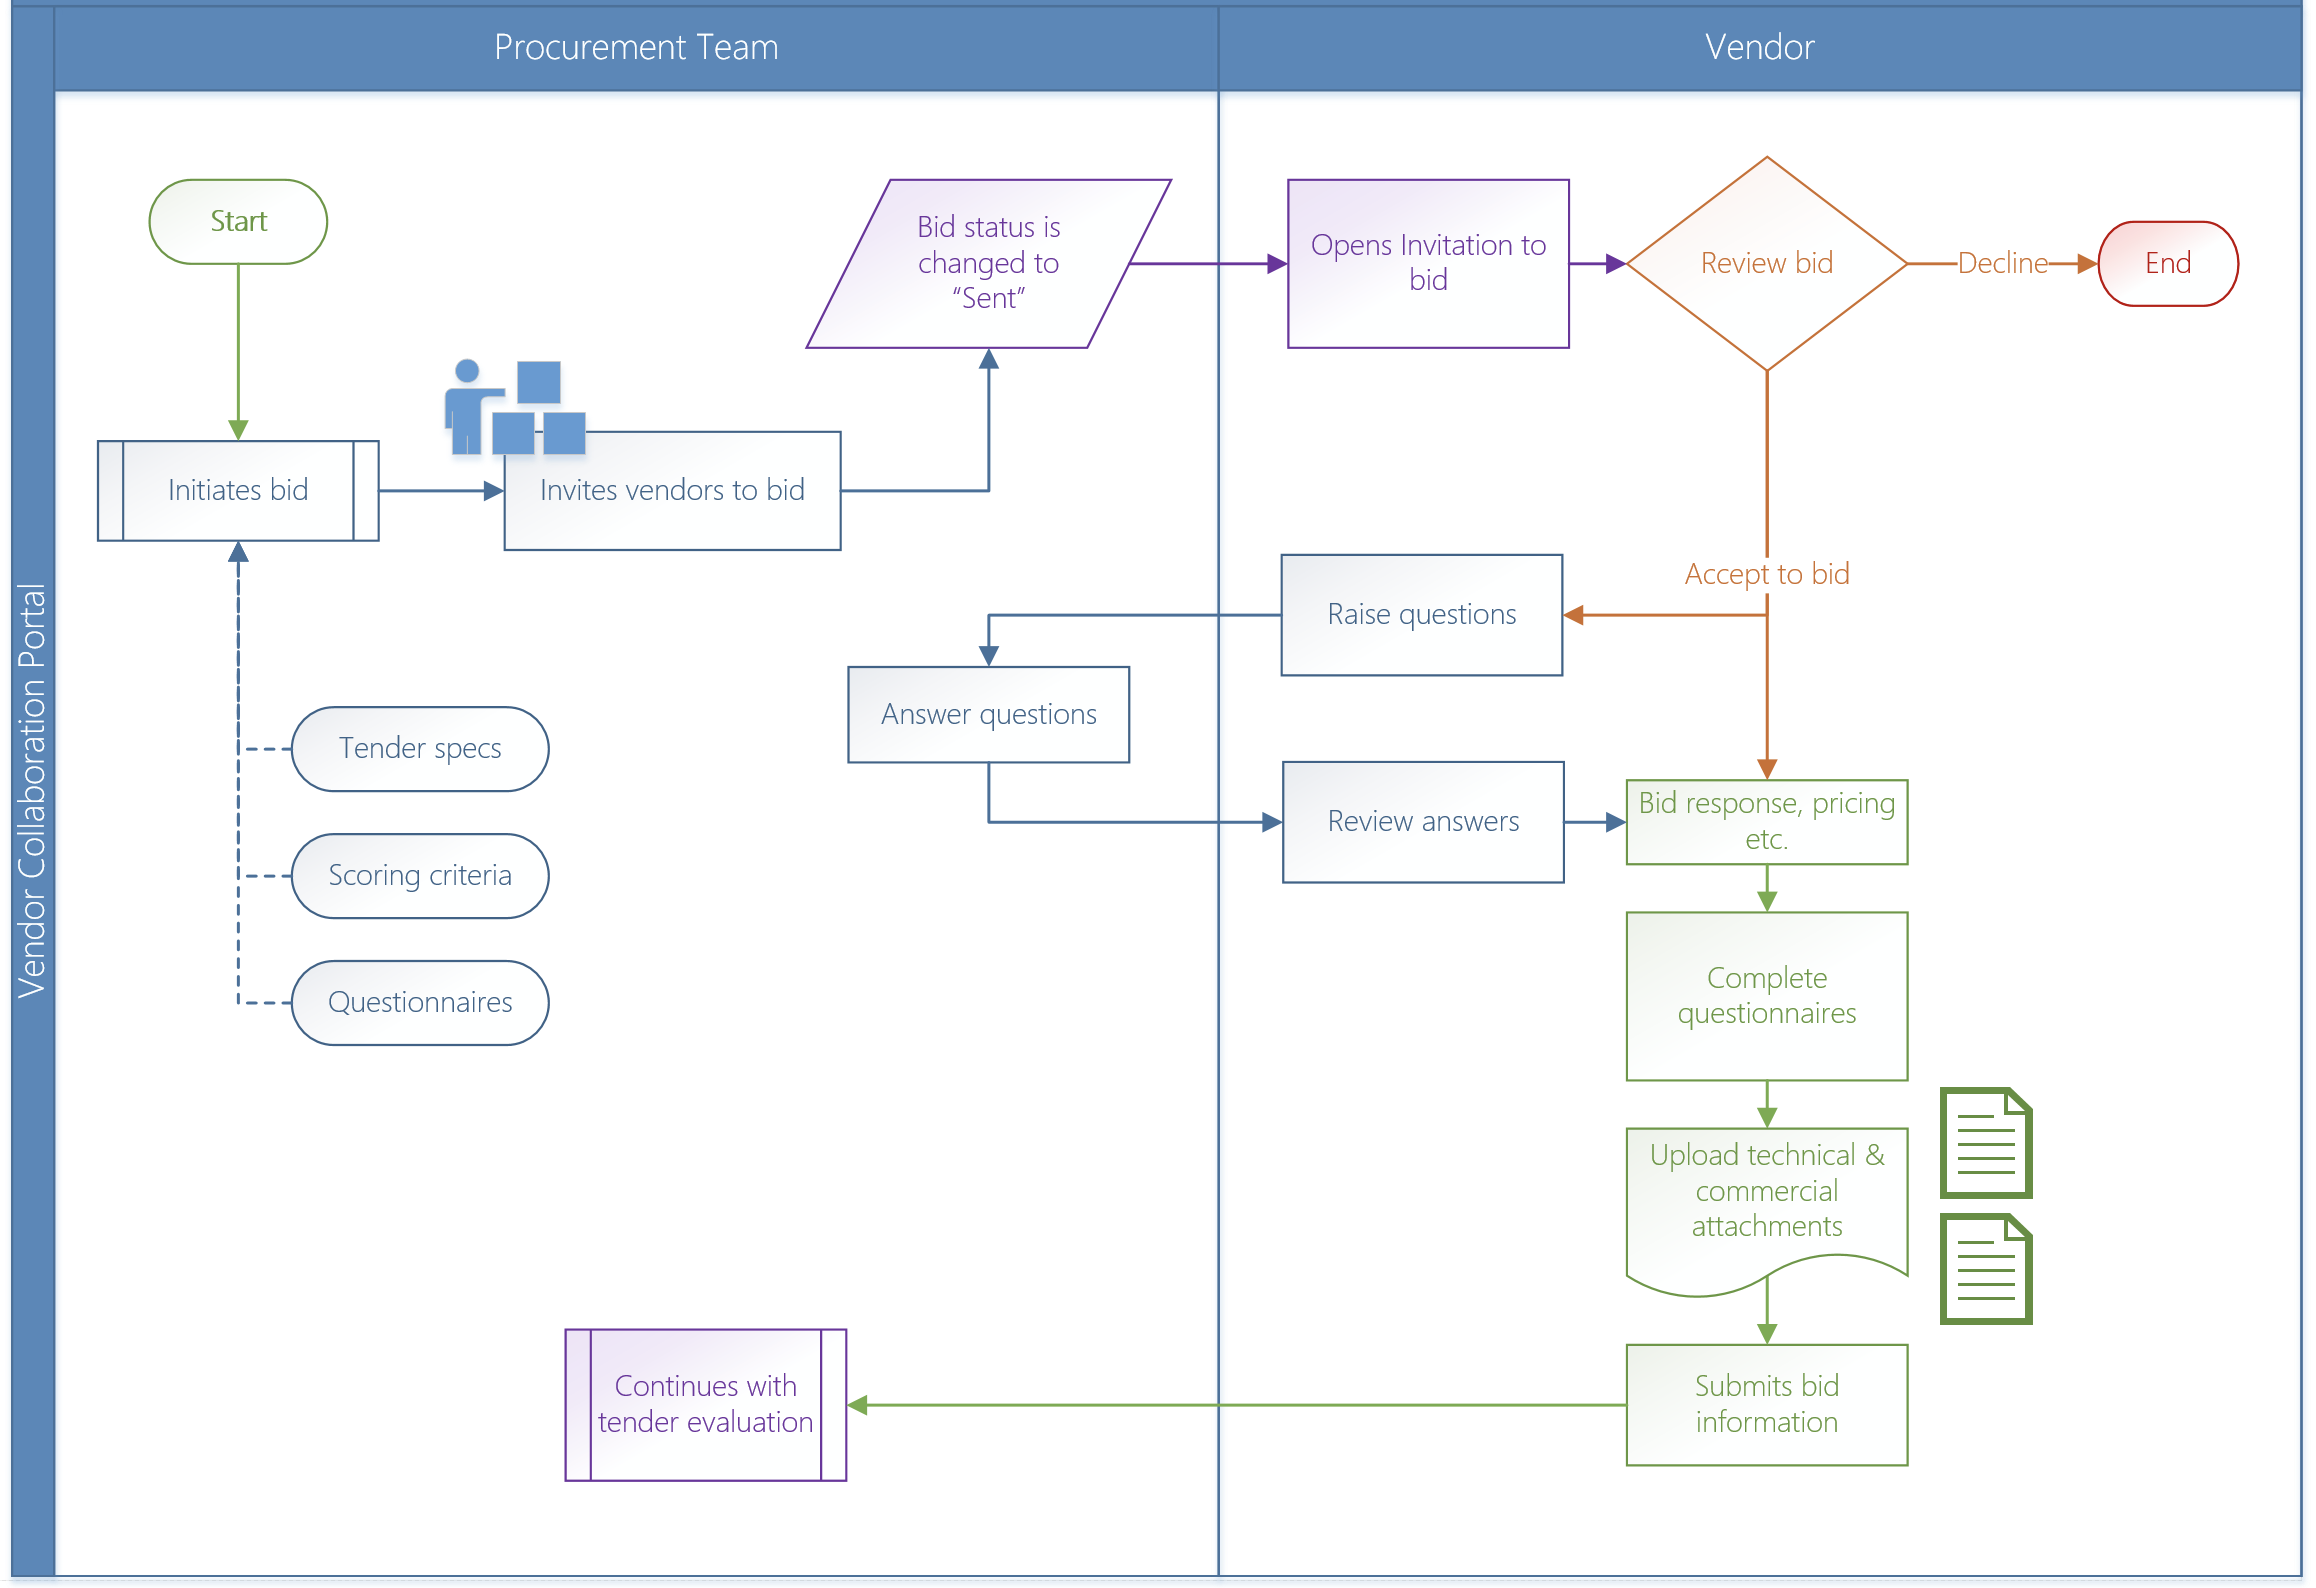
Vendors with access to the collaboration portal can view and respond to bids. They can submit their bid or choose to decline the invitation. Subsequently the vendors can view bid attachments and ask questions on the bid.
When a vendor replies to a bid, they can enter the following information:
- Terms of payment & Discount
- Requested receipt date
- Delivery terms, Mode of delivery
- Reply effectvie date & expiration date
- Vendor reference
- Purchase agreement effective date & expiration date
- Vendors item number & Lead time
- Quantity ordered, Unit price, Unit of measure
- Comments on items
- Complete questionnaires
- Add attachments to lines
¶ Step 8.1: Opt to participate in the bid
Go to: Vendor collaboration > Workspaces > Vendor bidding
- Click on the New bid invitations tile
RFQs that have a Bid closing date and time later than the System date, will not be visible on the Vendor collaboration portal
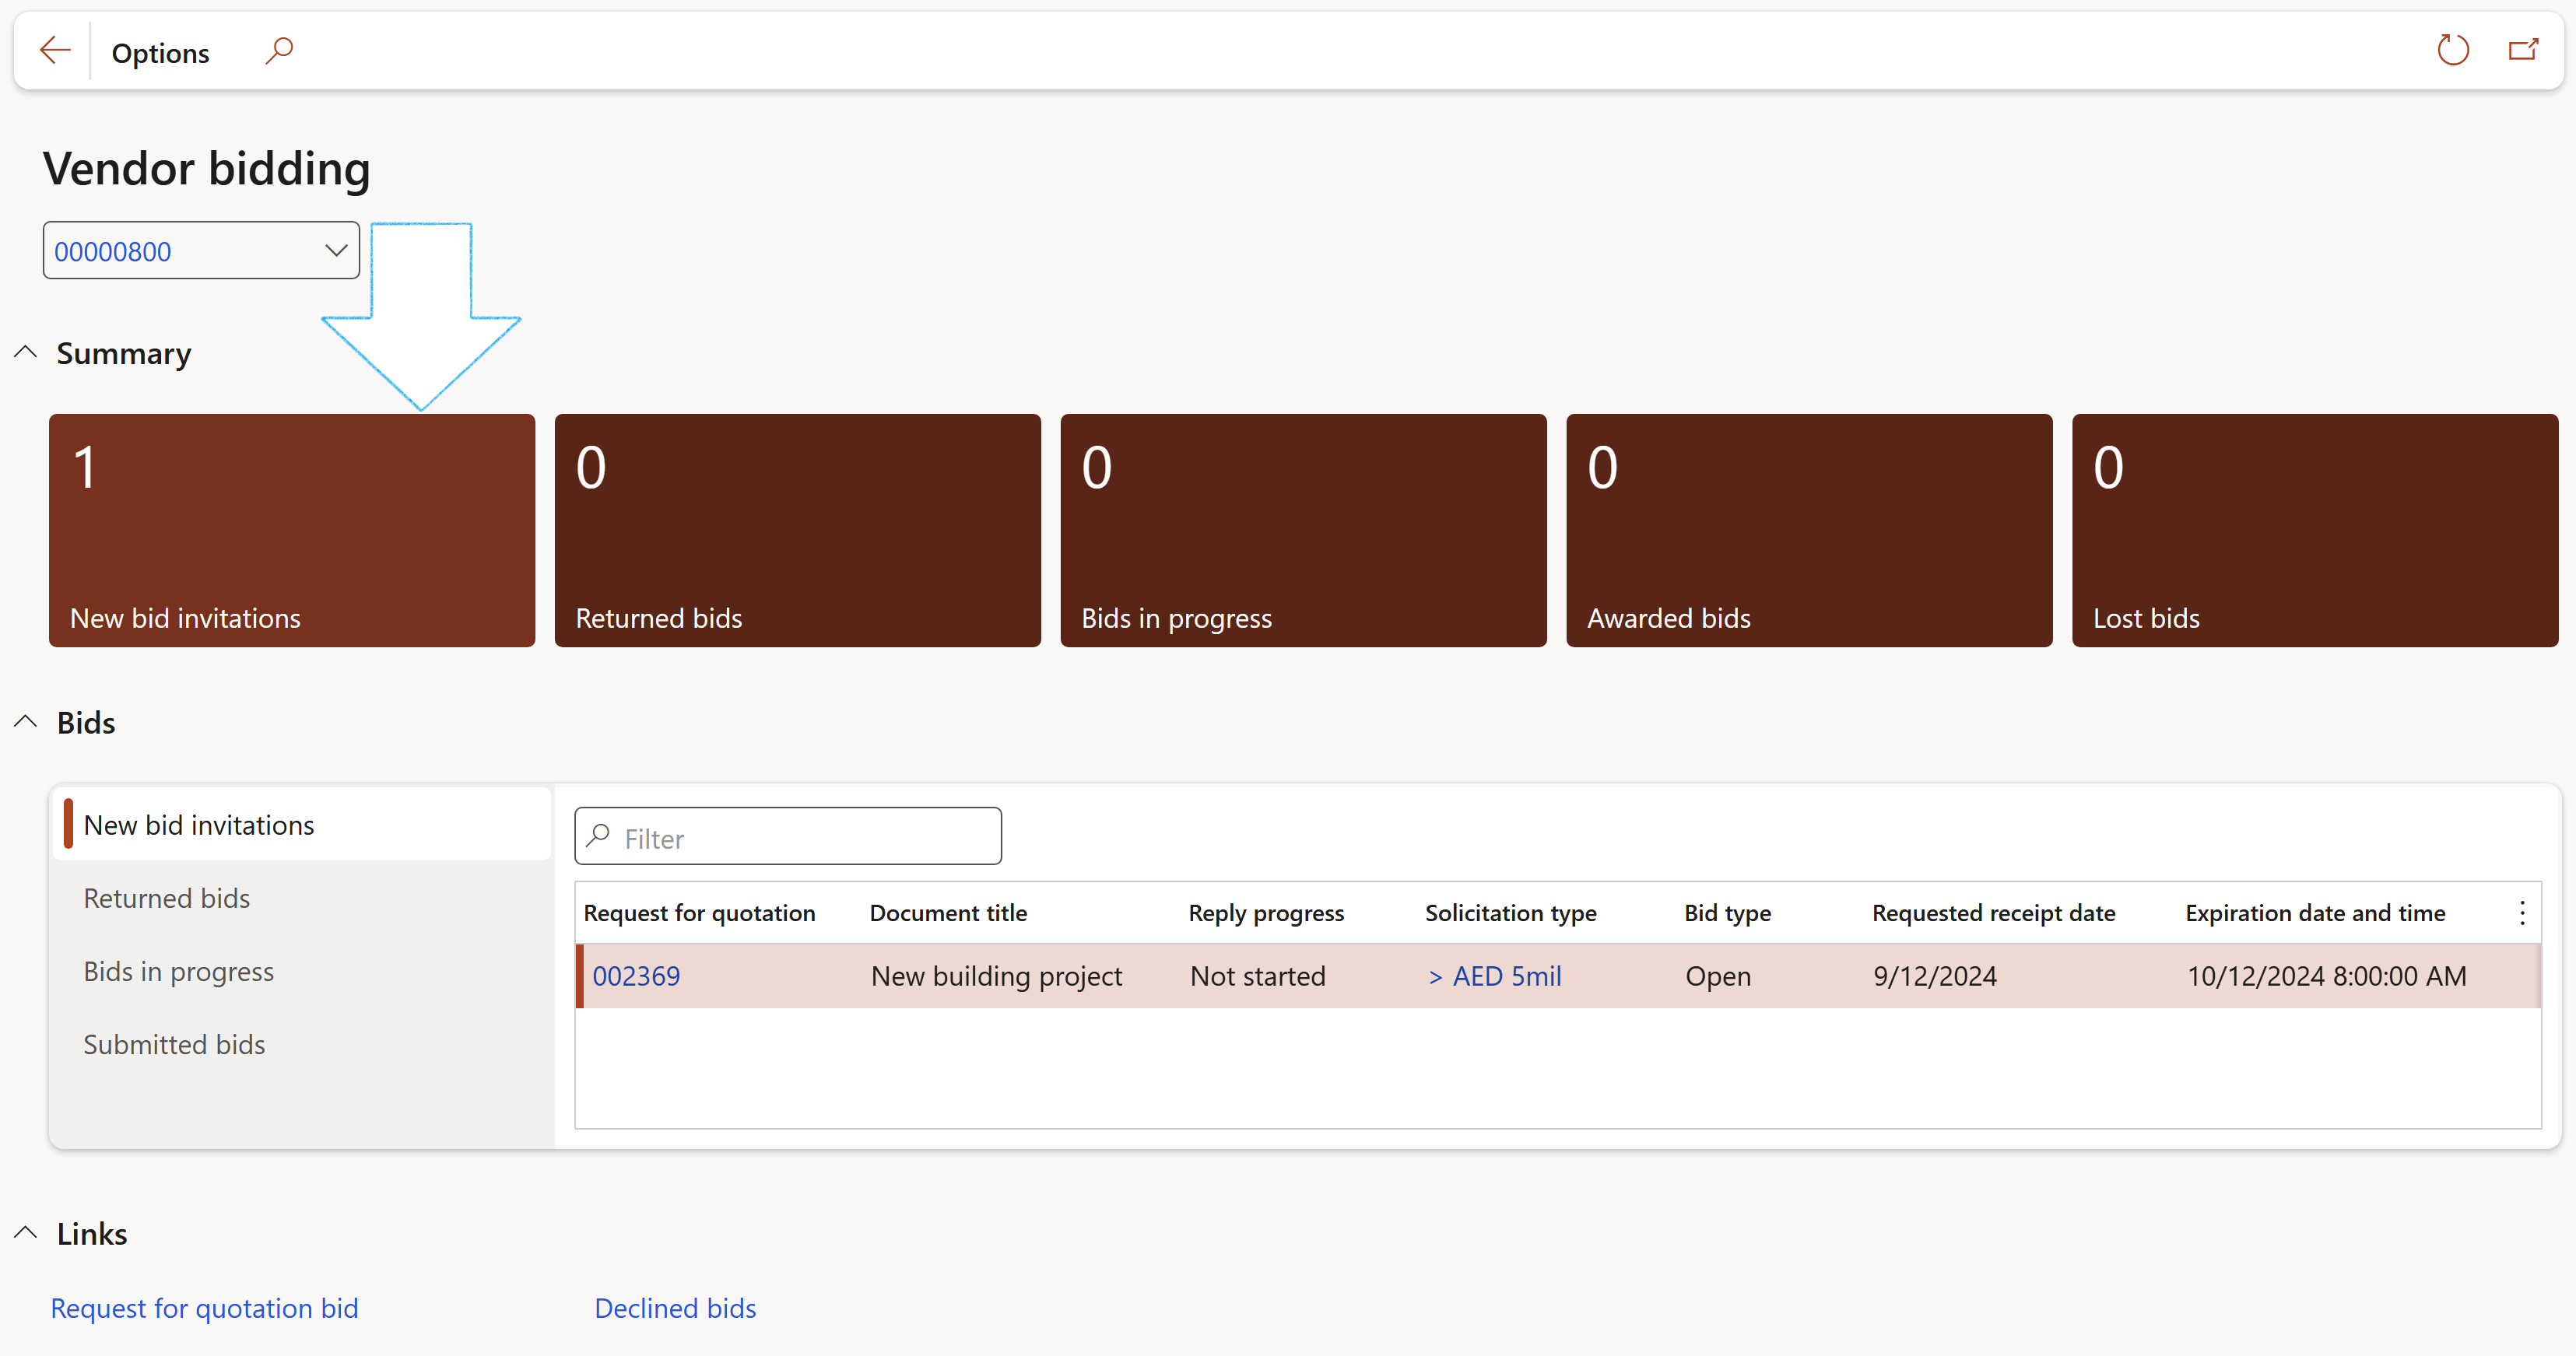
- On the New bid invitations form, in the Action pane, click on the Bid button

¶ Step 8.2: Questions and answers
¶ Step 8.2.1 Enable RFQ reply
Go to: Procurement and sourcing > Setup > Procurement and sourcing parameters
- Open the Request for quotation tab
- Under the RFQ reply field group, select Yes for Purchaser can edit vendors bid

Allow vendor questions: Enables or disables vendor questions for RFQ cases.
Default direct response: When you reply to a question, you can choose to reply to all vendors who received the RFQ or to reply only to the specific vendor who submitted the question. You may choose this option each time you reply, but this setting controls the default. If you usually reply to all vendors, set this to No. If you usually reply to individual vendors, set this to Yes.
The Allow vendor questions slider on the RFQ header has to be on Yes
¶ Step 8.2.2 Ask questions and review answers
- Click on the Bids in progress tile
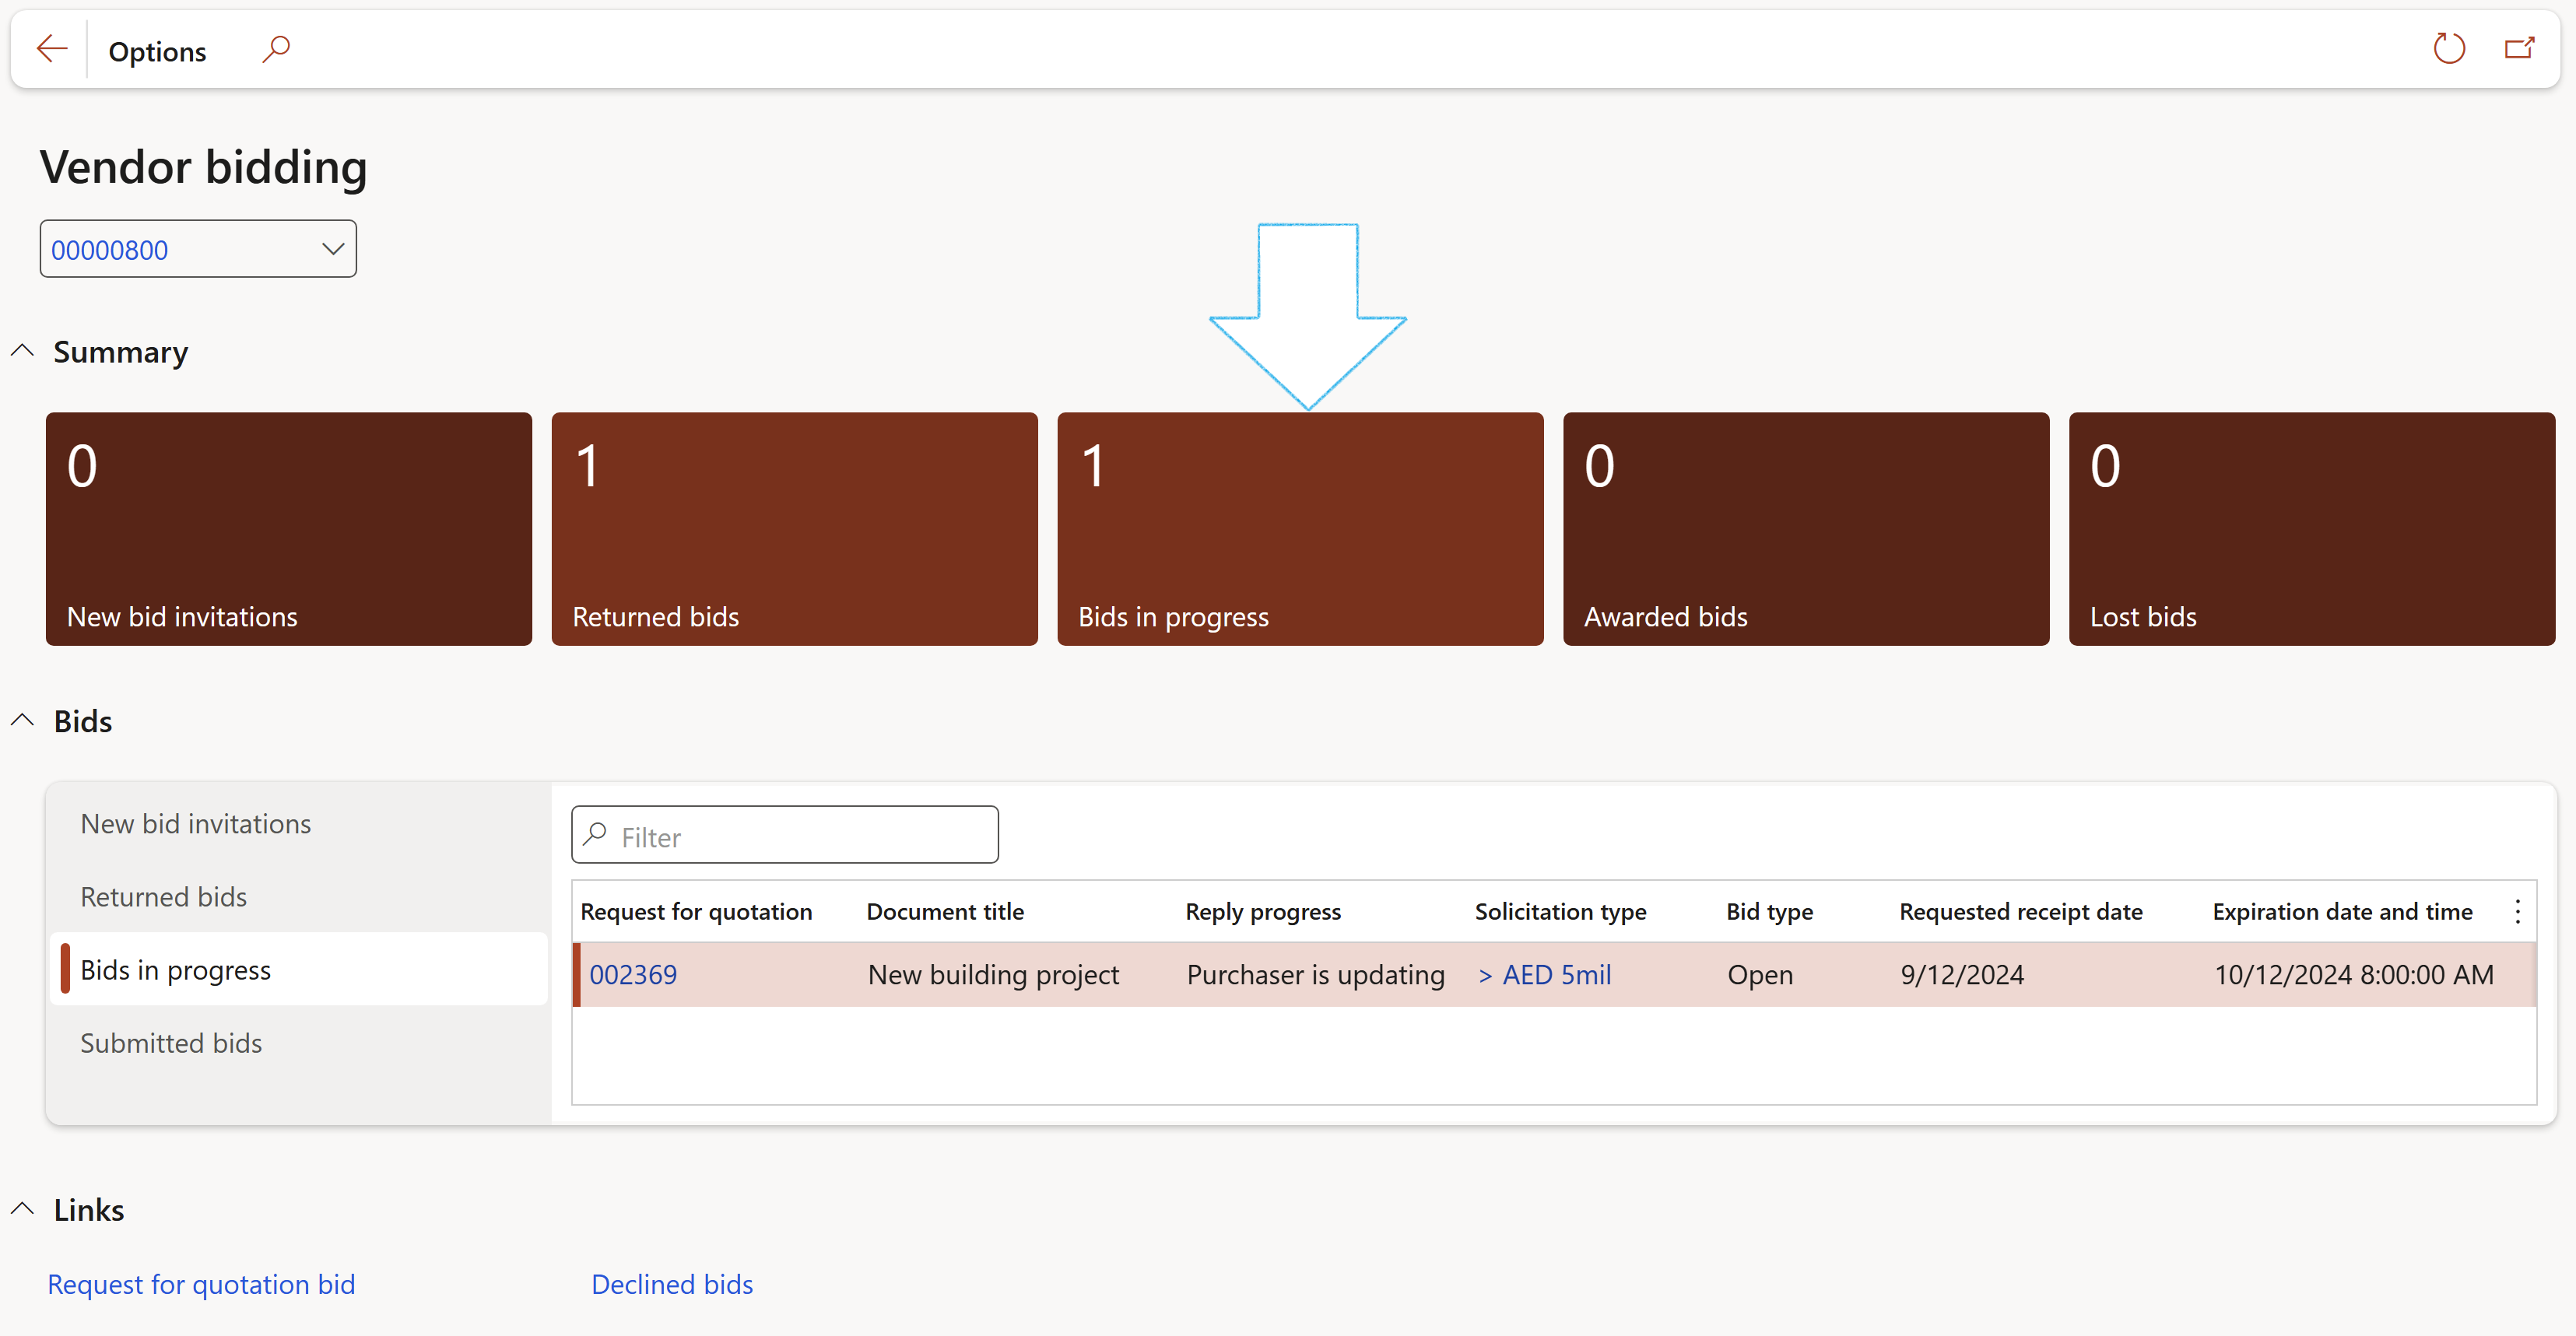
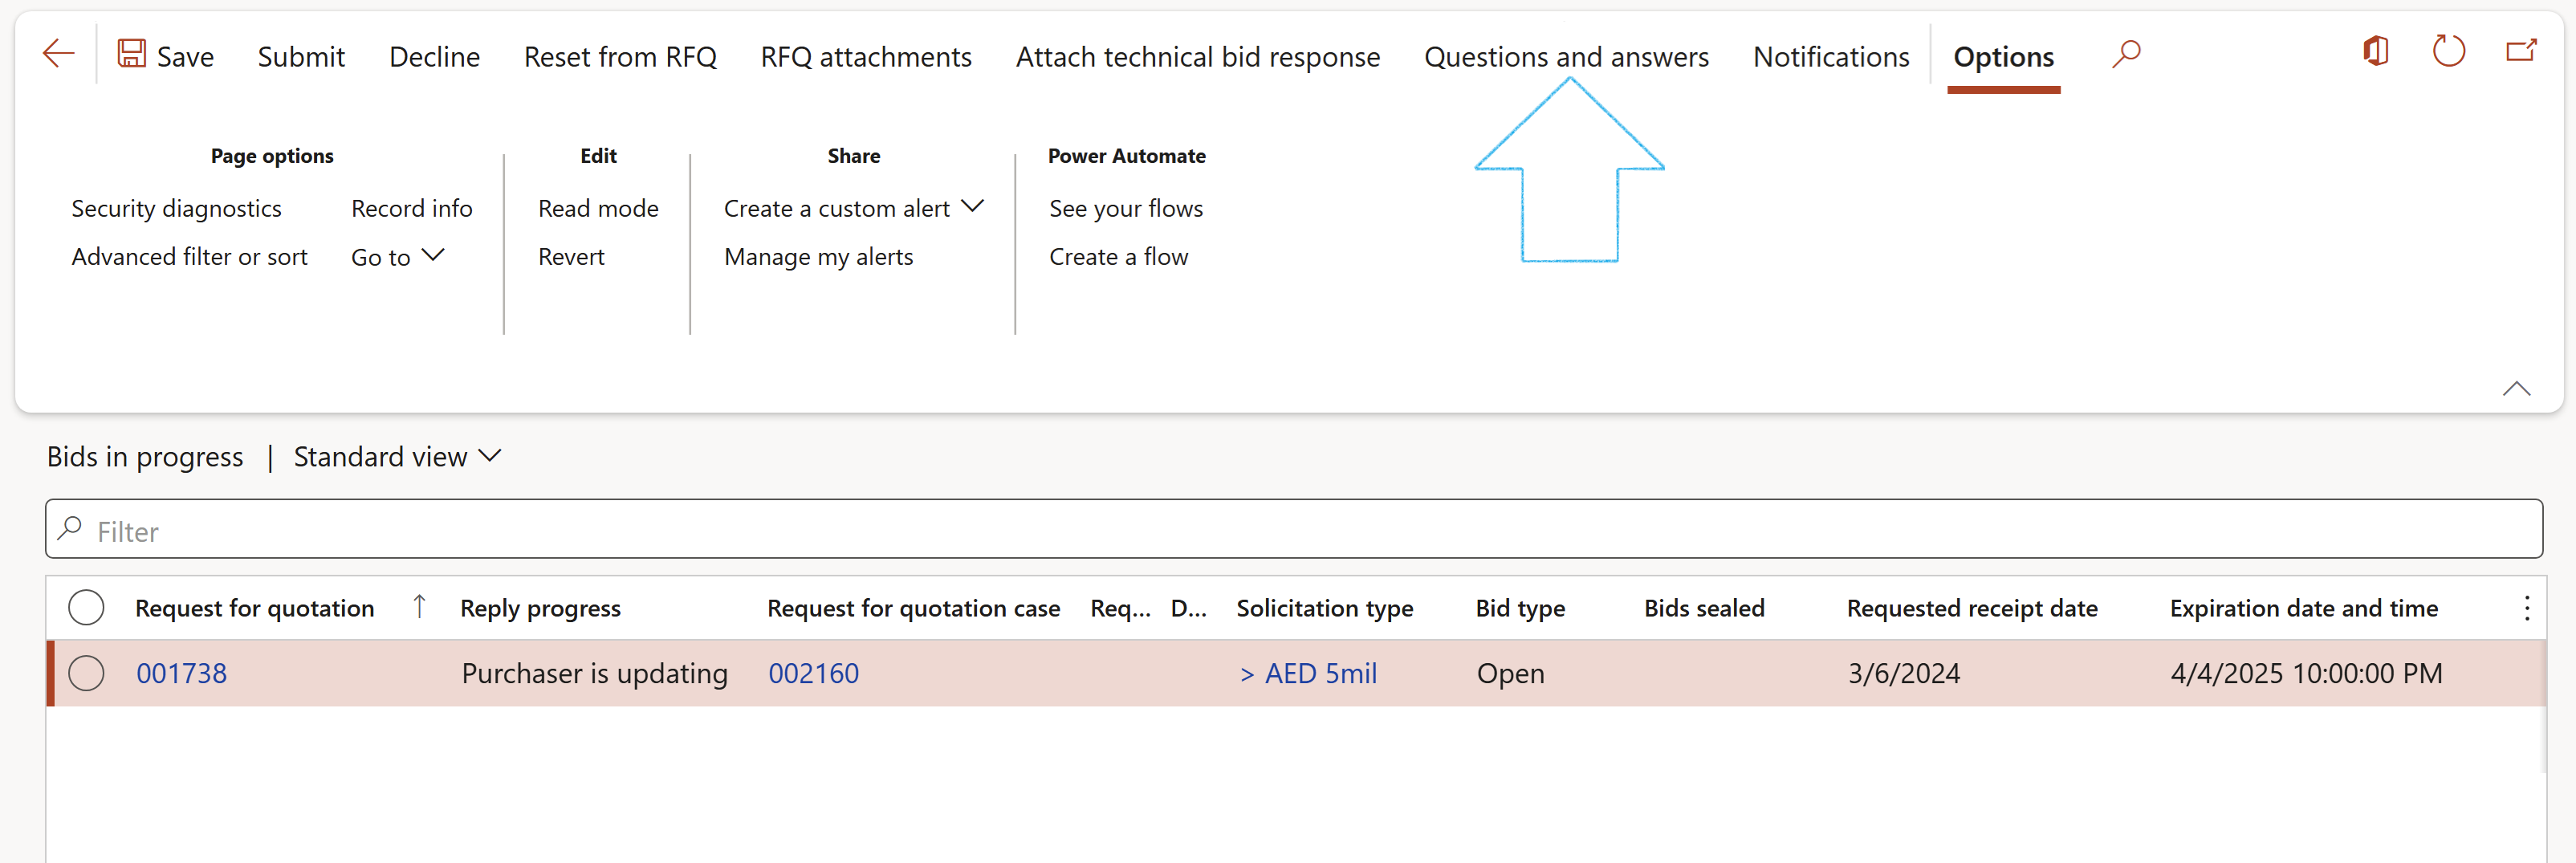
- On the Bids in progress list page, select the relevant record
- In the Action pane, click on the Questions and answers button
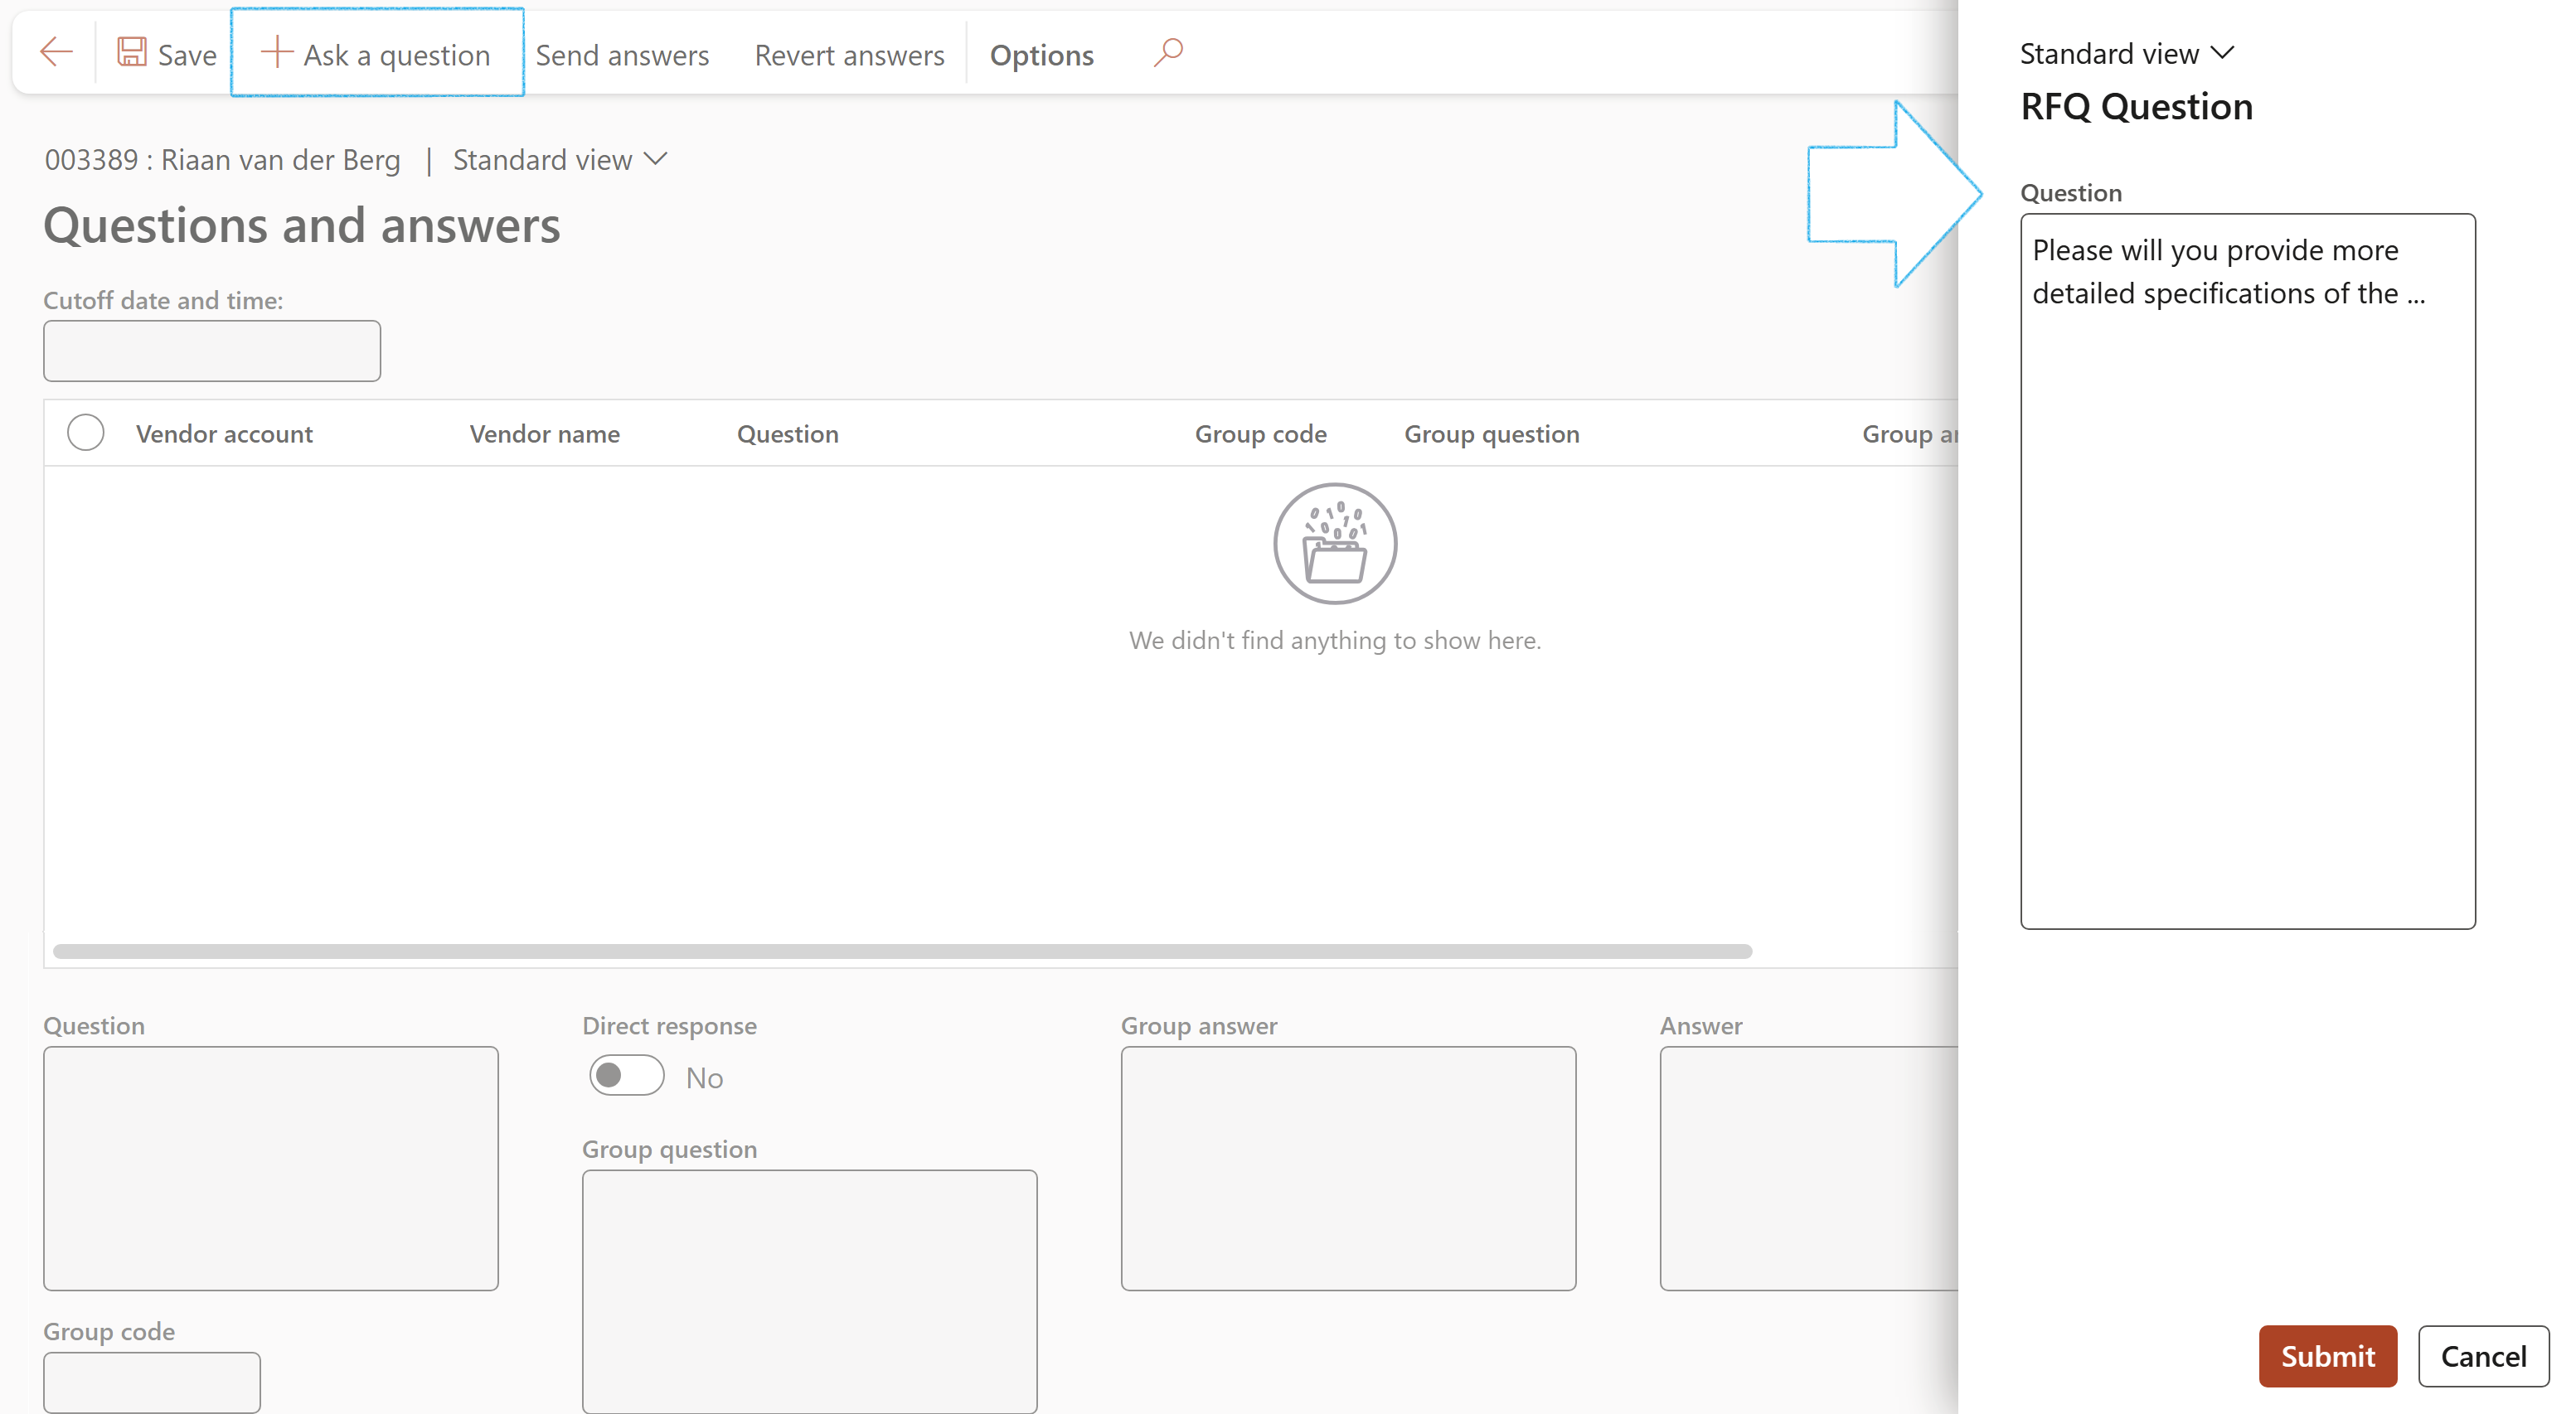
- On the Questions and answers form, click on the Ask a question button
- Type the question in the note box provided
- Click on the Submit button
The following placeholders exist for the email notifications that will be sent to the vendors:
| Placeholder mappings | Field on form |
|---|---|
|
%RFQCaseID% %Name% %VendQuestion% %VendorName% %CustomerAnswer% |
RFQ Case ID Document title Question Vendor name Answer |
Additionally, for the RFQ answer email template, a placeholder for the Answer = %CustomerAnswer%
Please refer to the Alerts wiki page for details on the setting up of email templates.
¶ Step 8.3: Notifications
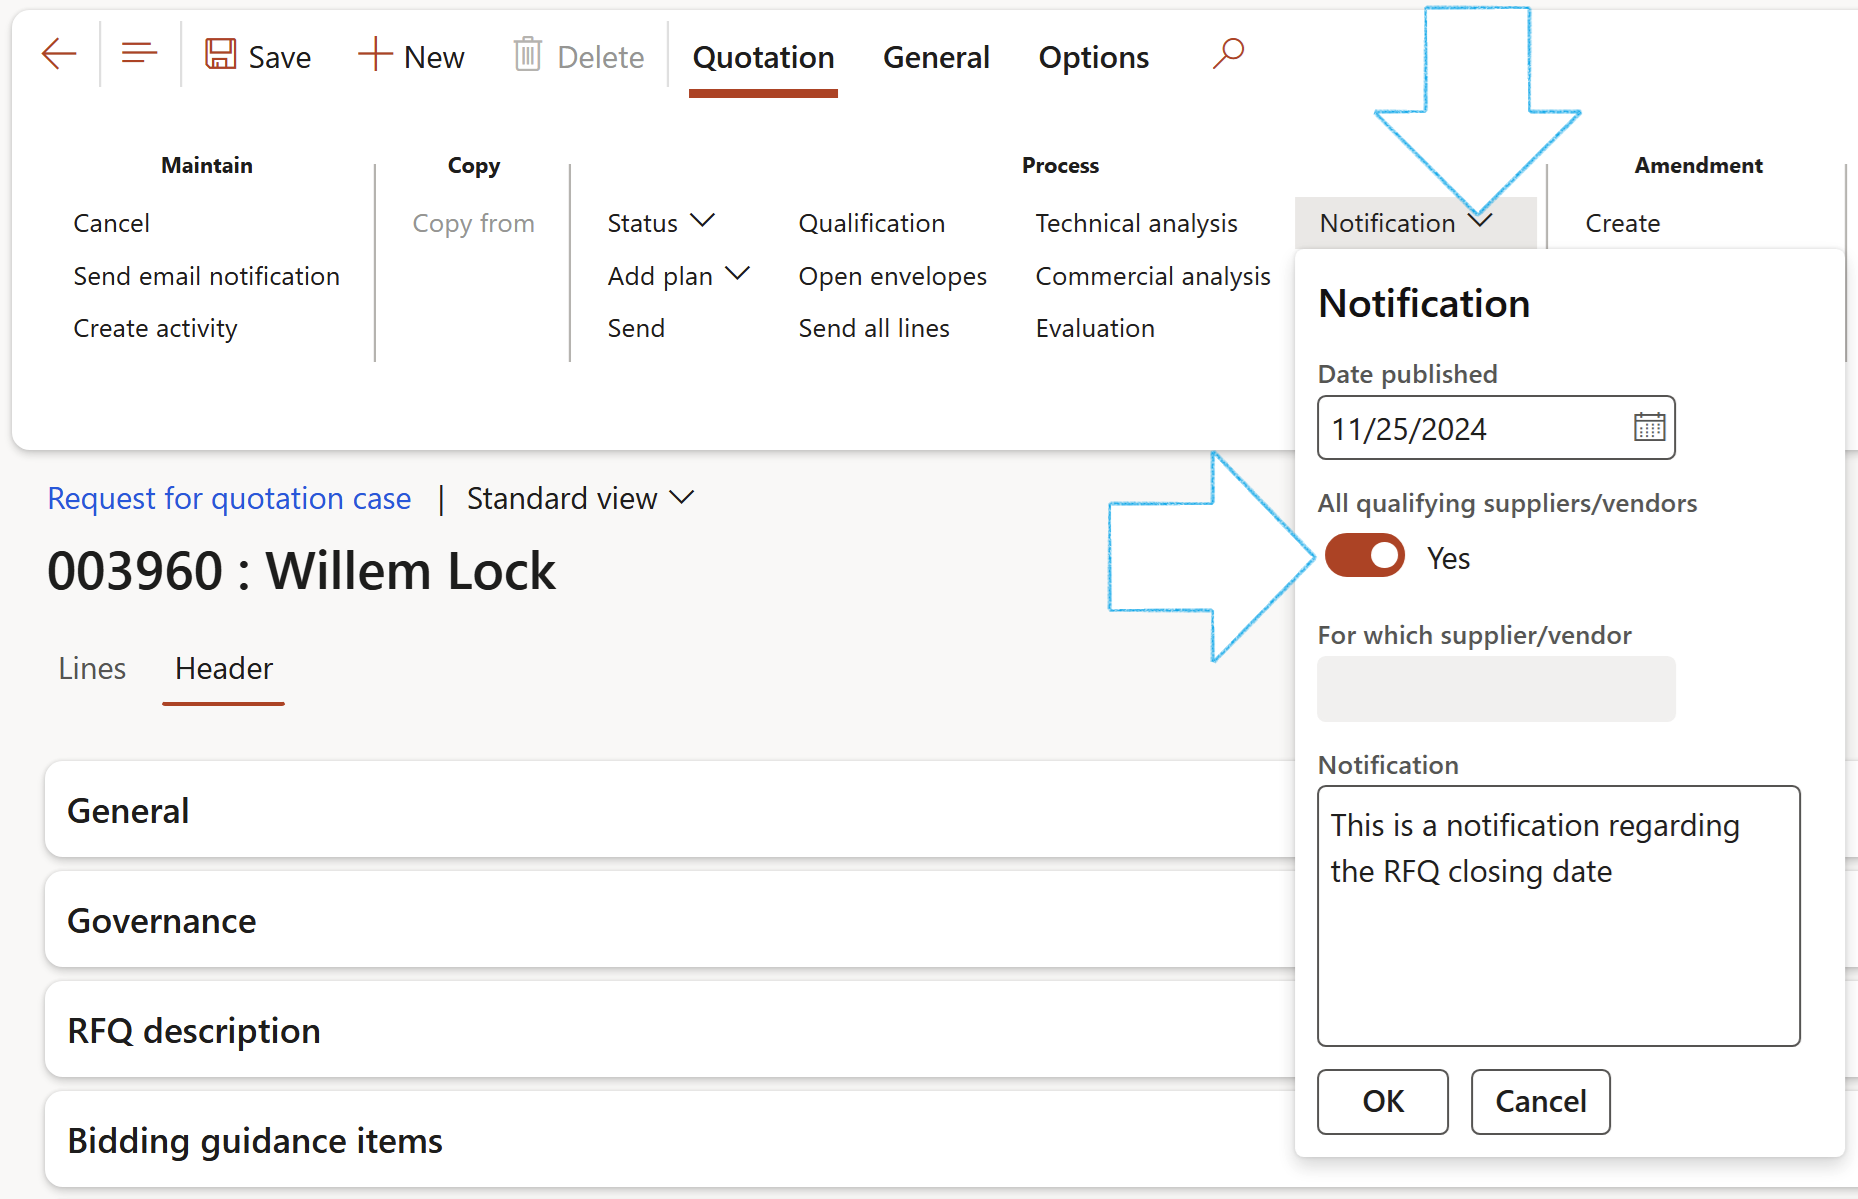
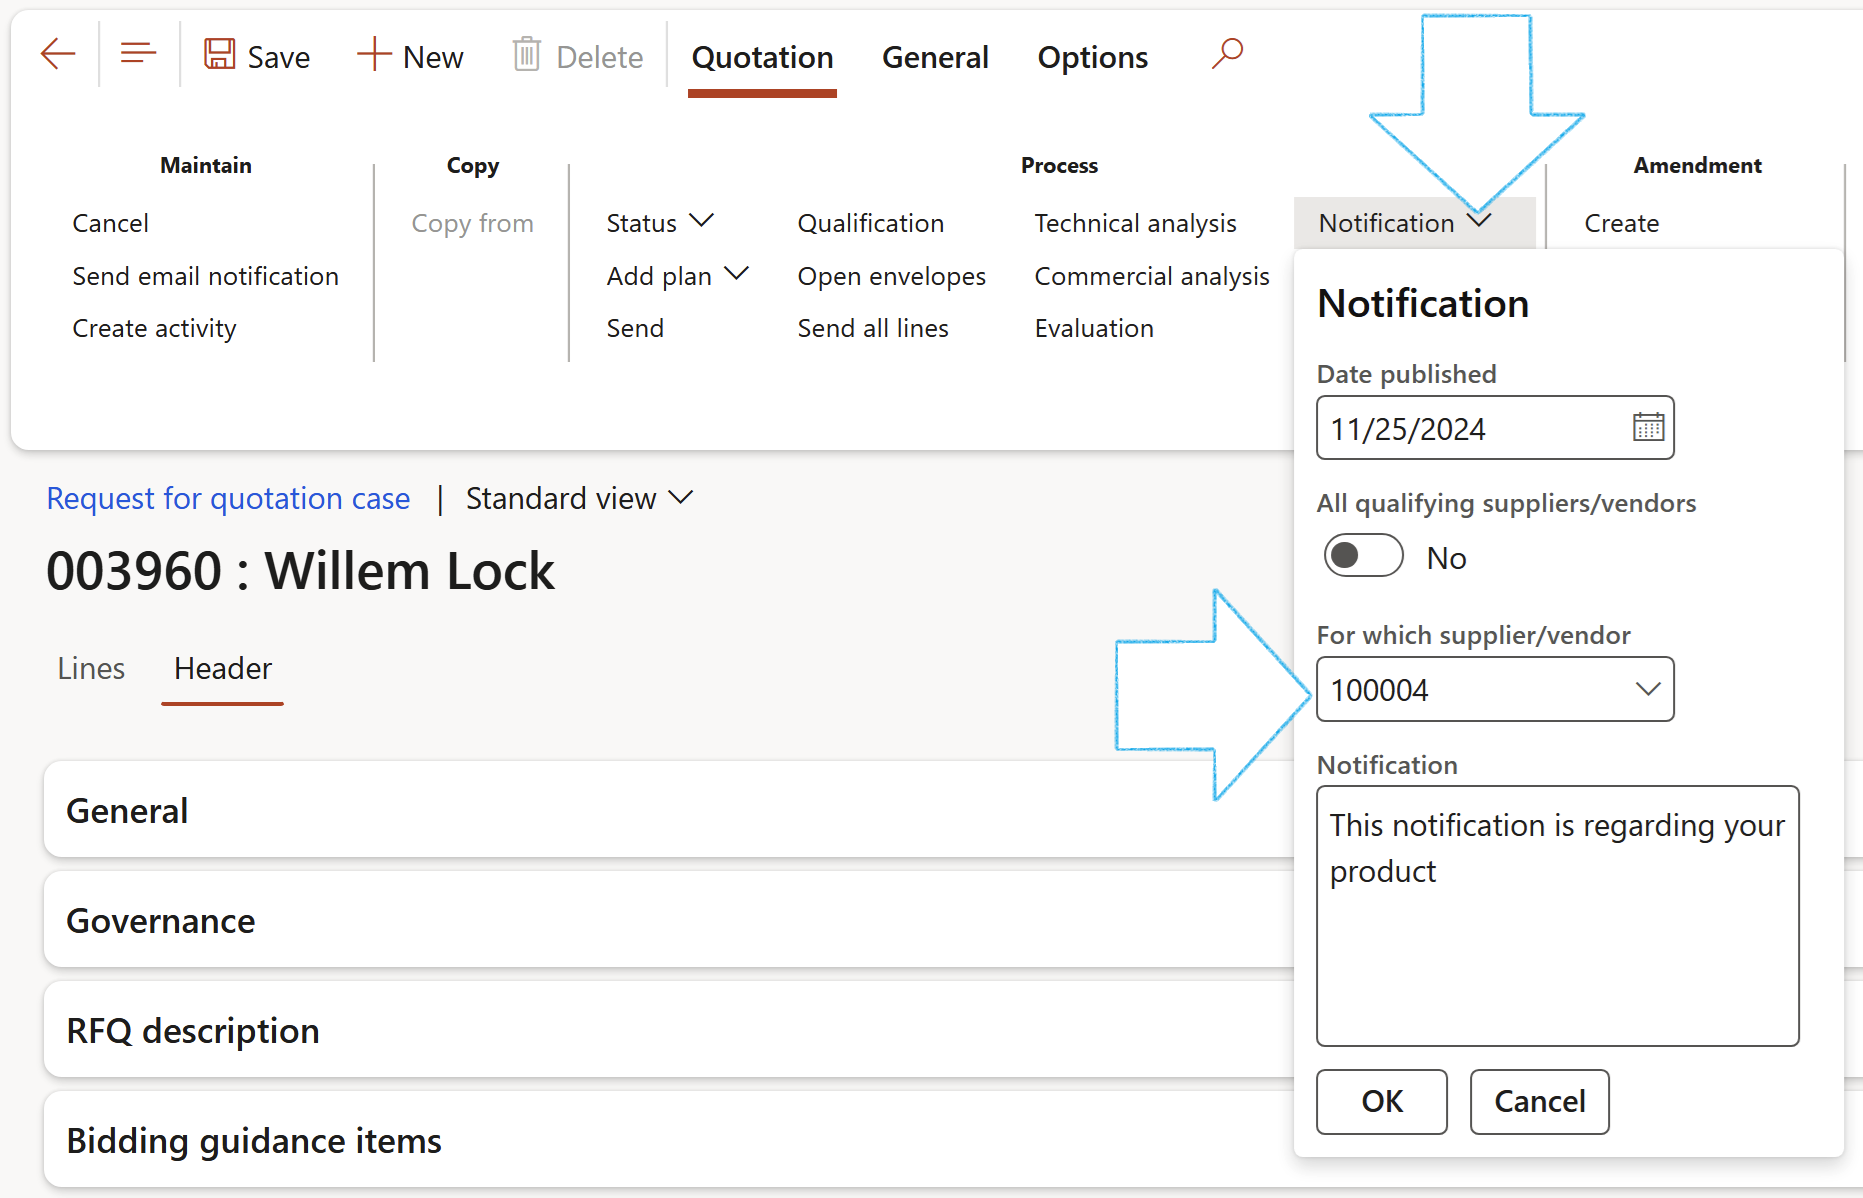
Notifications can be sent to a single vendor on an RFQ, or to all vendors on an RFQ
Go to: Governance, Risk and Compliance > Governance > Tender management > All requests for quotations
- Select the relevant record
- Open the Header view
- On the Action pane, in the Quotation group, click on the Notification button
- Move the All qualifying suppliers/vendors slider to Yes
- Type the message in the Notification field
OR
- In the For which supplier/vendor field, select the relevant vendor form the dropdown list
- Type the message in the Notification field
- Click OK
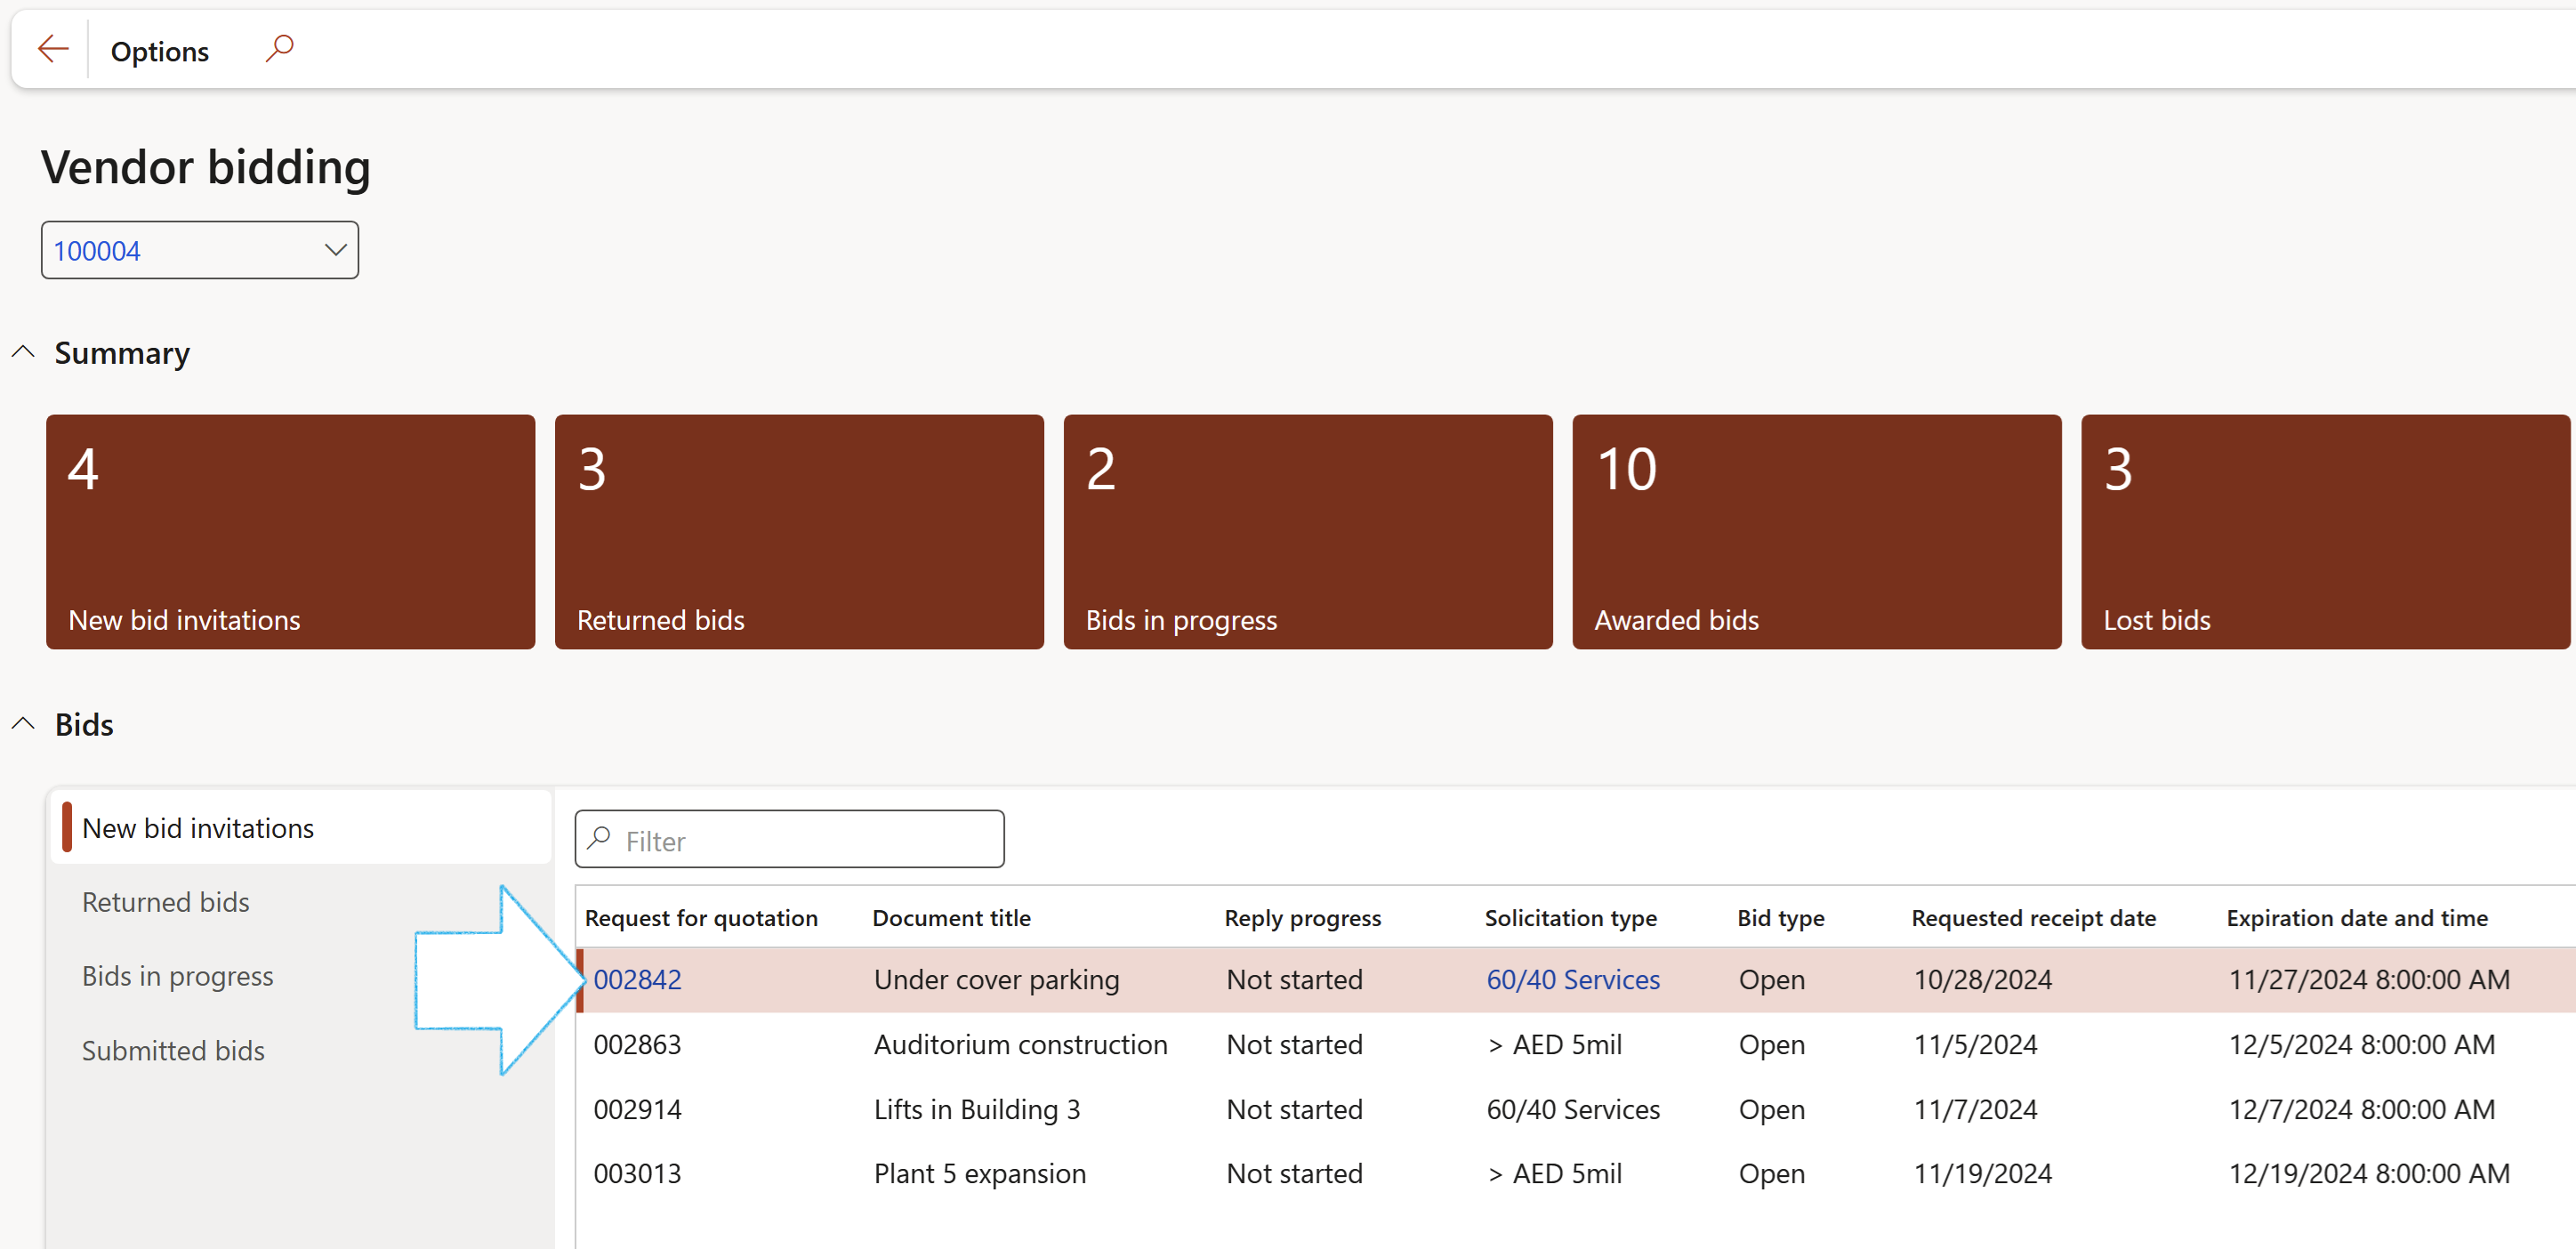
Go to: Vendor collaboration > Workspaces > Vendor bidding
- Open the New bid invitations tab / Bids in progress tab
- Find the relevant record
- Click on the link in the Request for quotation field
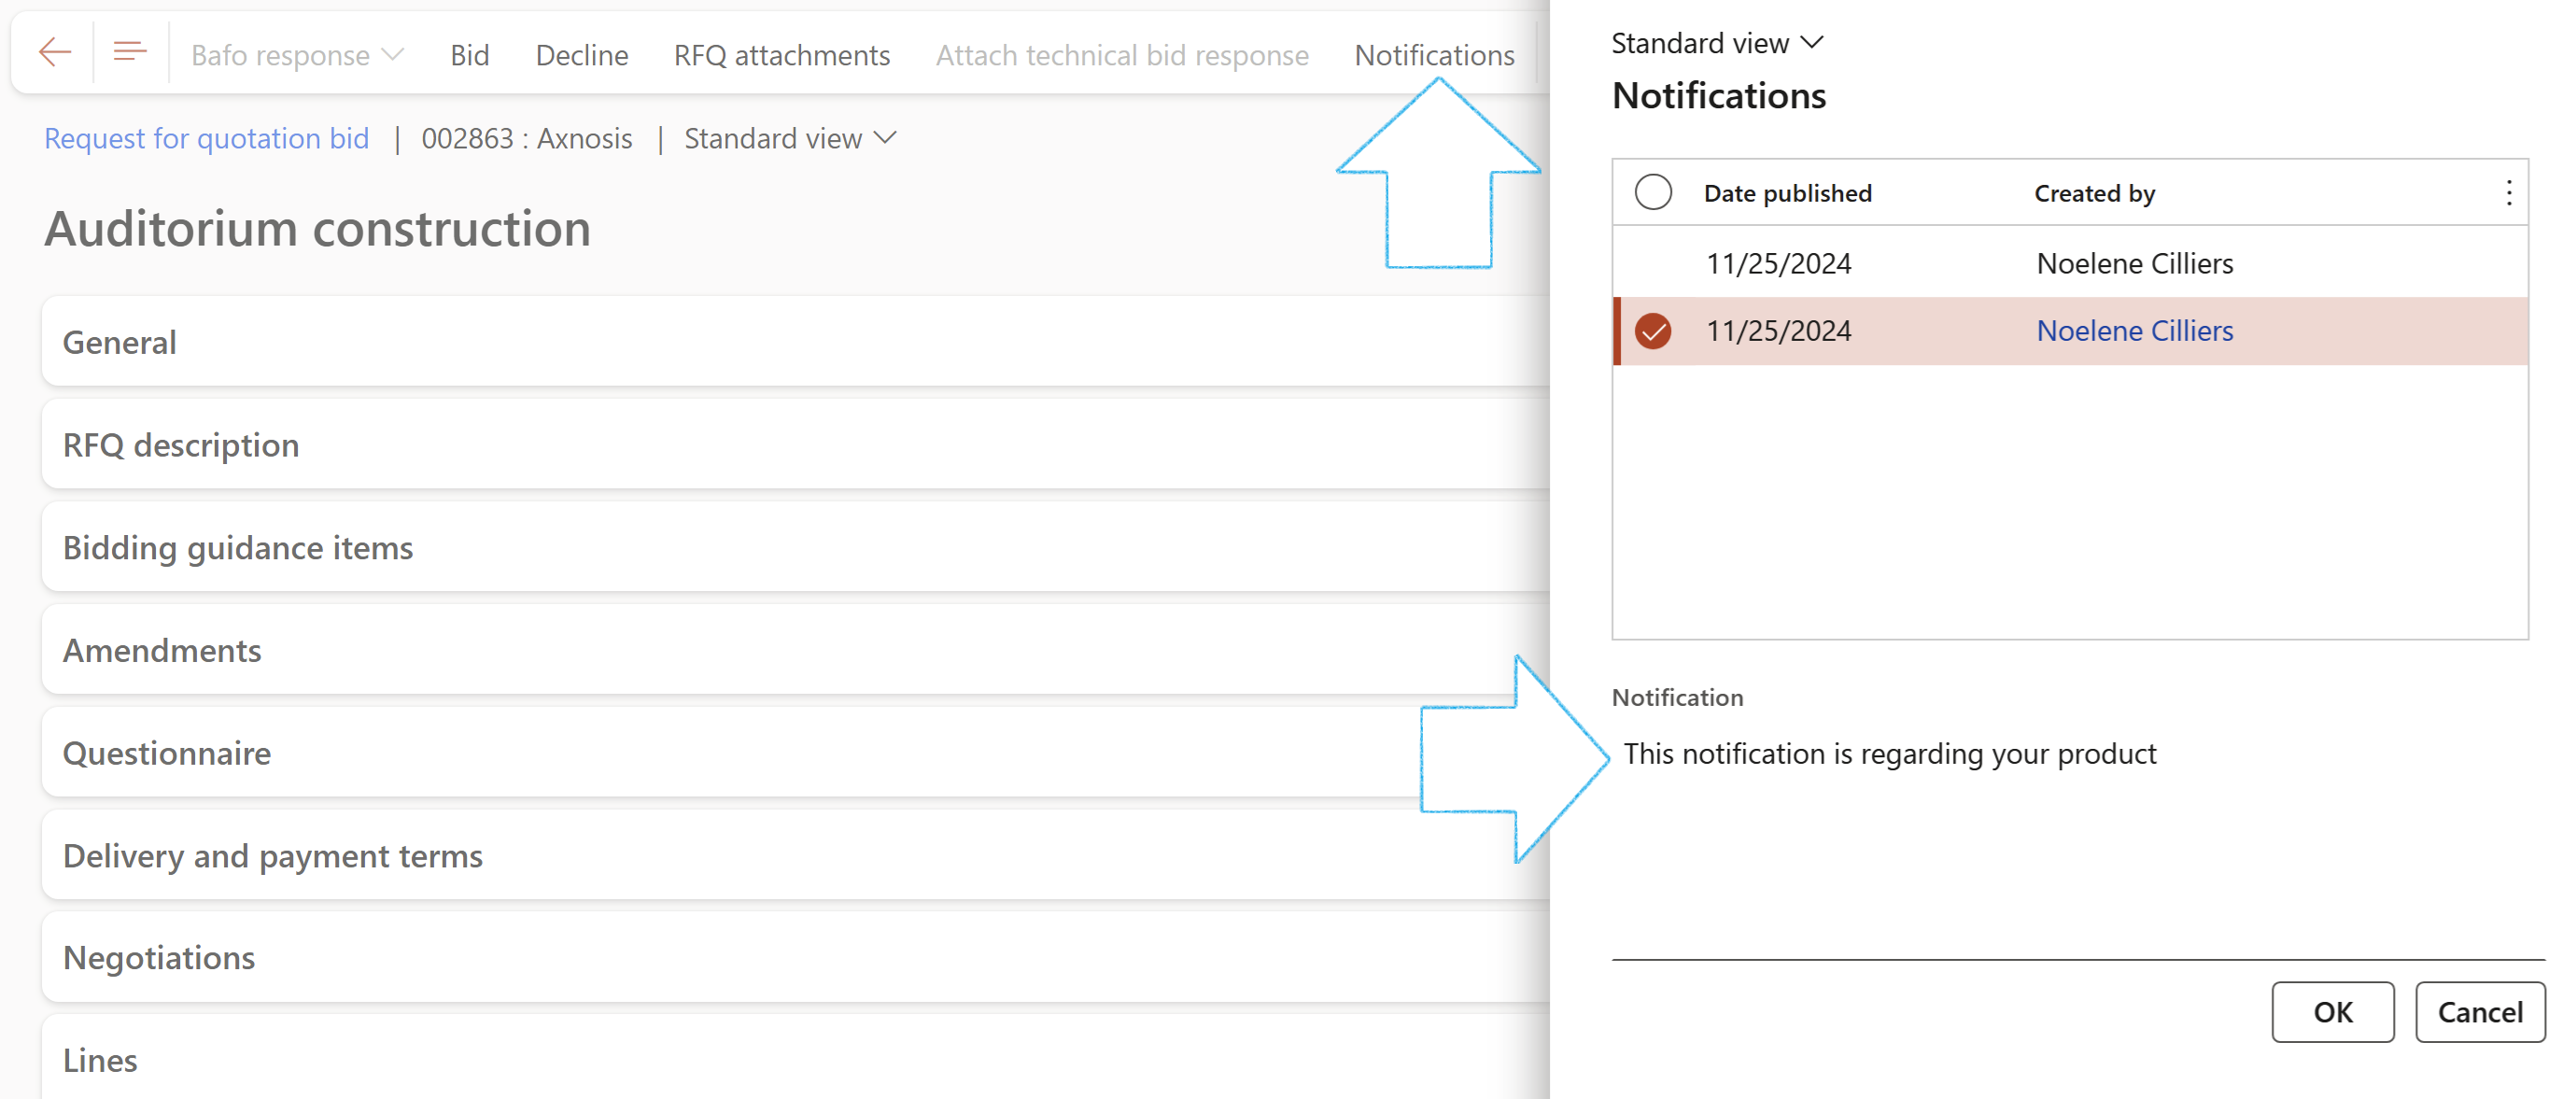
- In the Action pane, click on the Notifications button
- Click OK
¶ Step 8.4: Complete bid response
Go to: Vendor collaboration > Requests for quotations > Request for quotation bid
- Select the relevant RFQ from the list
- The vendor can upload documents by clicking on the Attach technical bid response button in the Action pane
- On the Attachments form, under the General Fast tab, select the relevant option from the Used for dropdown list. This will indicate whether the attachment is for the Technical bid response, or Commercial bid response. (The default is Technical bid response)
- Select the relevant Attachment certification type from the dropdown list
If a certificate type was indicated as mandatory on the Solicitation type, a yellow warning will pop up if all the required certificates have not been uploaded when the Save or back buttons are clicked

¶ Step 8.4.1: Complete Questionnaire
- Expand the Questionnaires Fast tab to complete the questionnaire (If applicable)
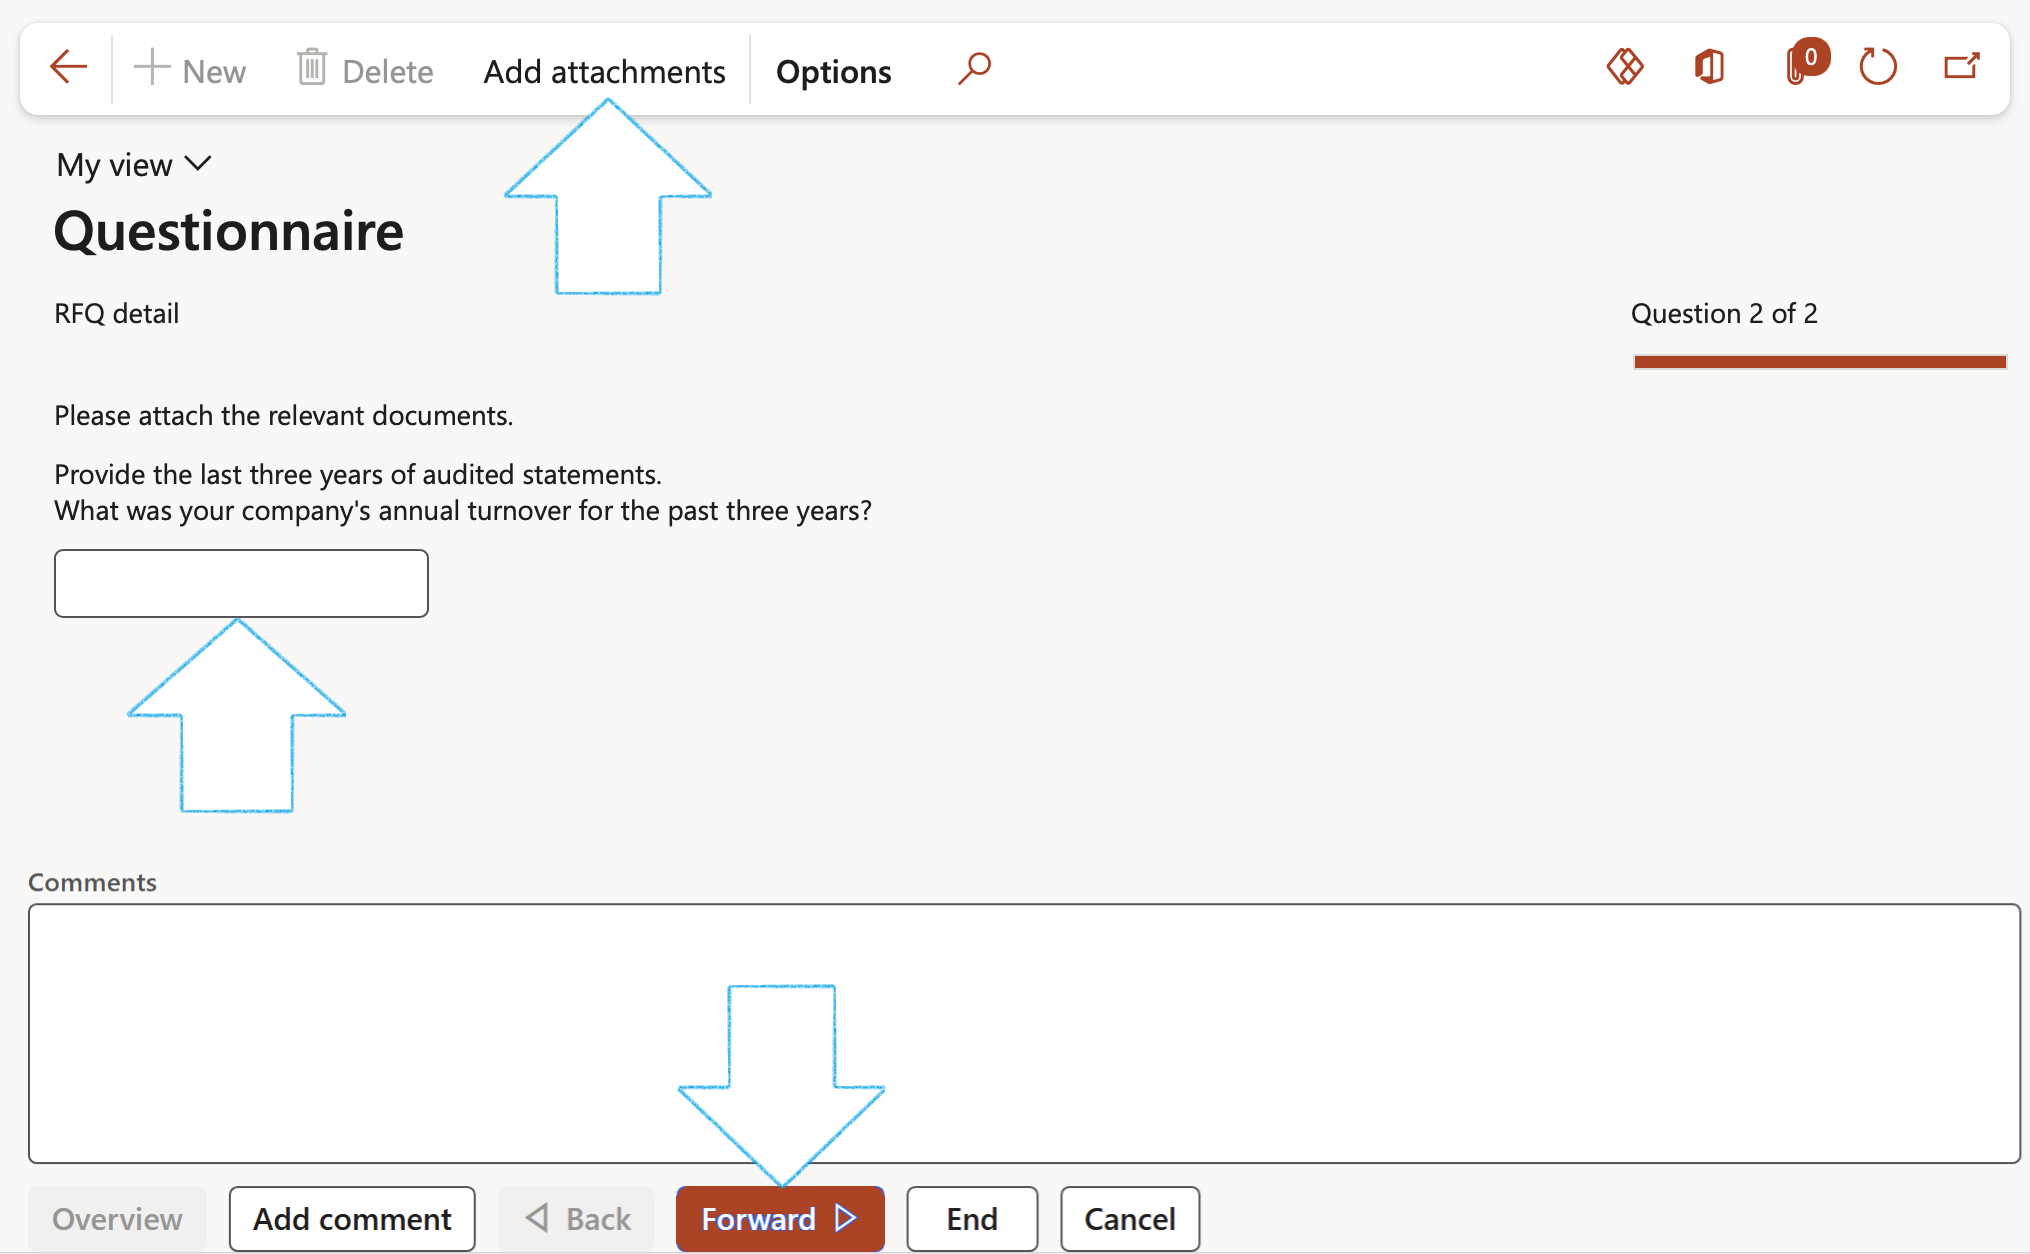
- Click on the Complete questionnaire button

- Answer the question and add a comment where relevant
- Click on the Add attachments button to attach the required documents
- Click on the Forward button and complete the questionnaire
- Click End
¶ Step 8.4.2: Enter line details
- Expand the Lines Fast tab to enter details, e.g Unit price
- In the Action pane, click on the Submit button
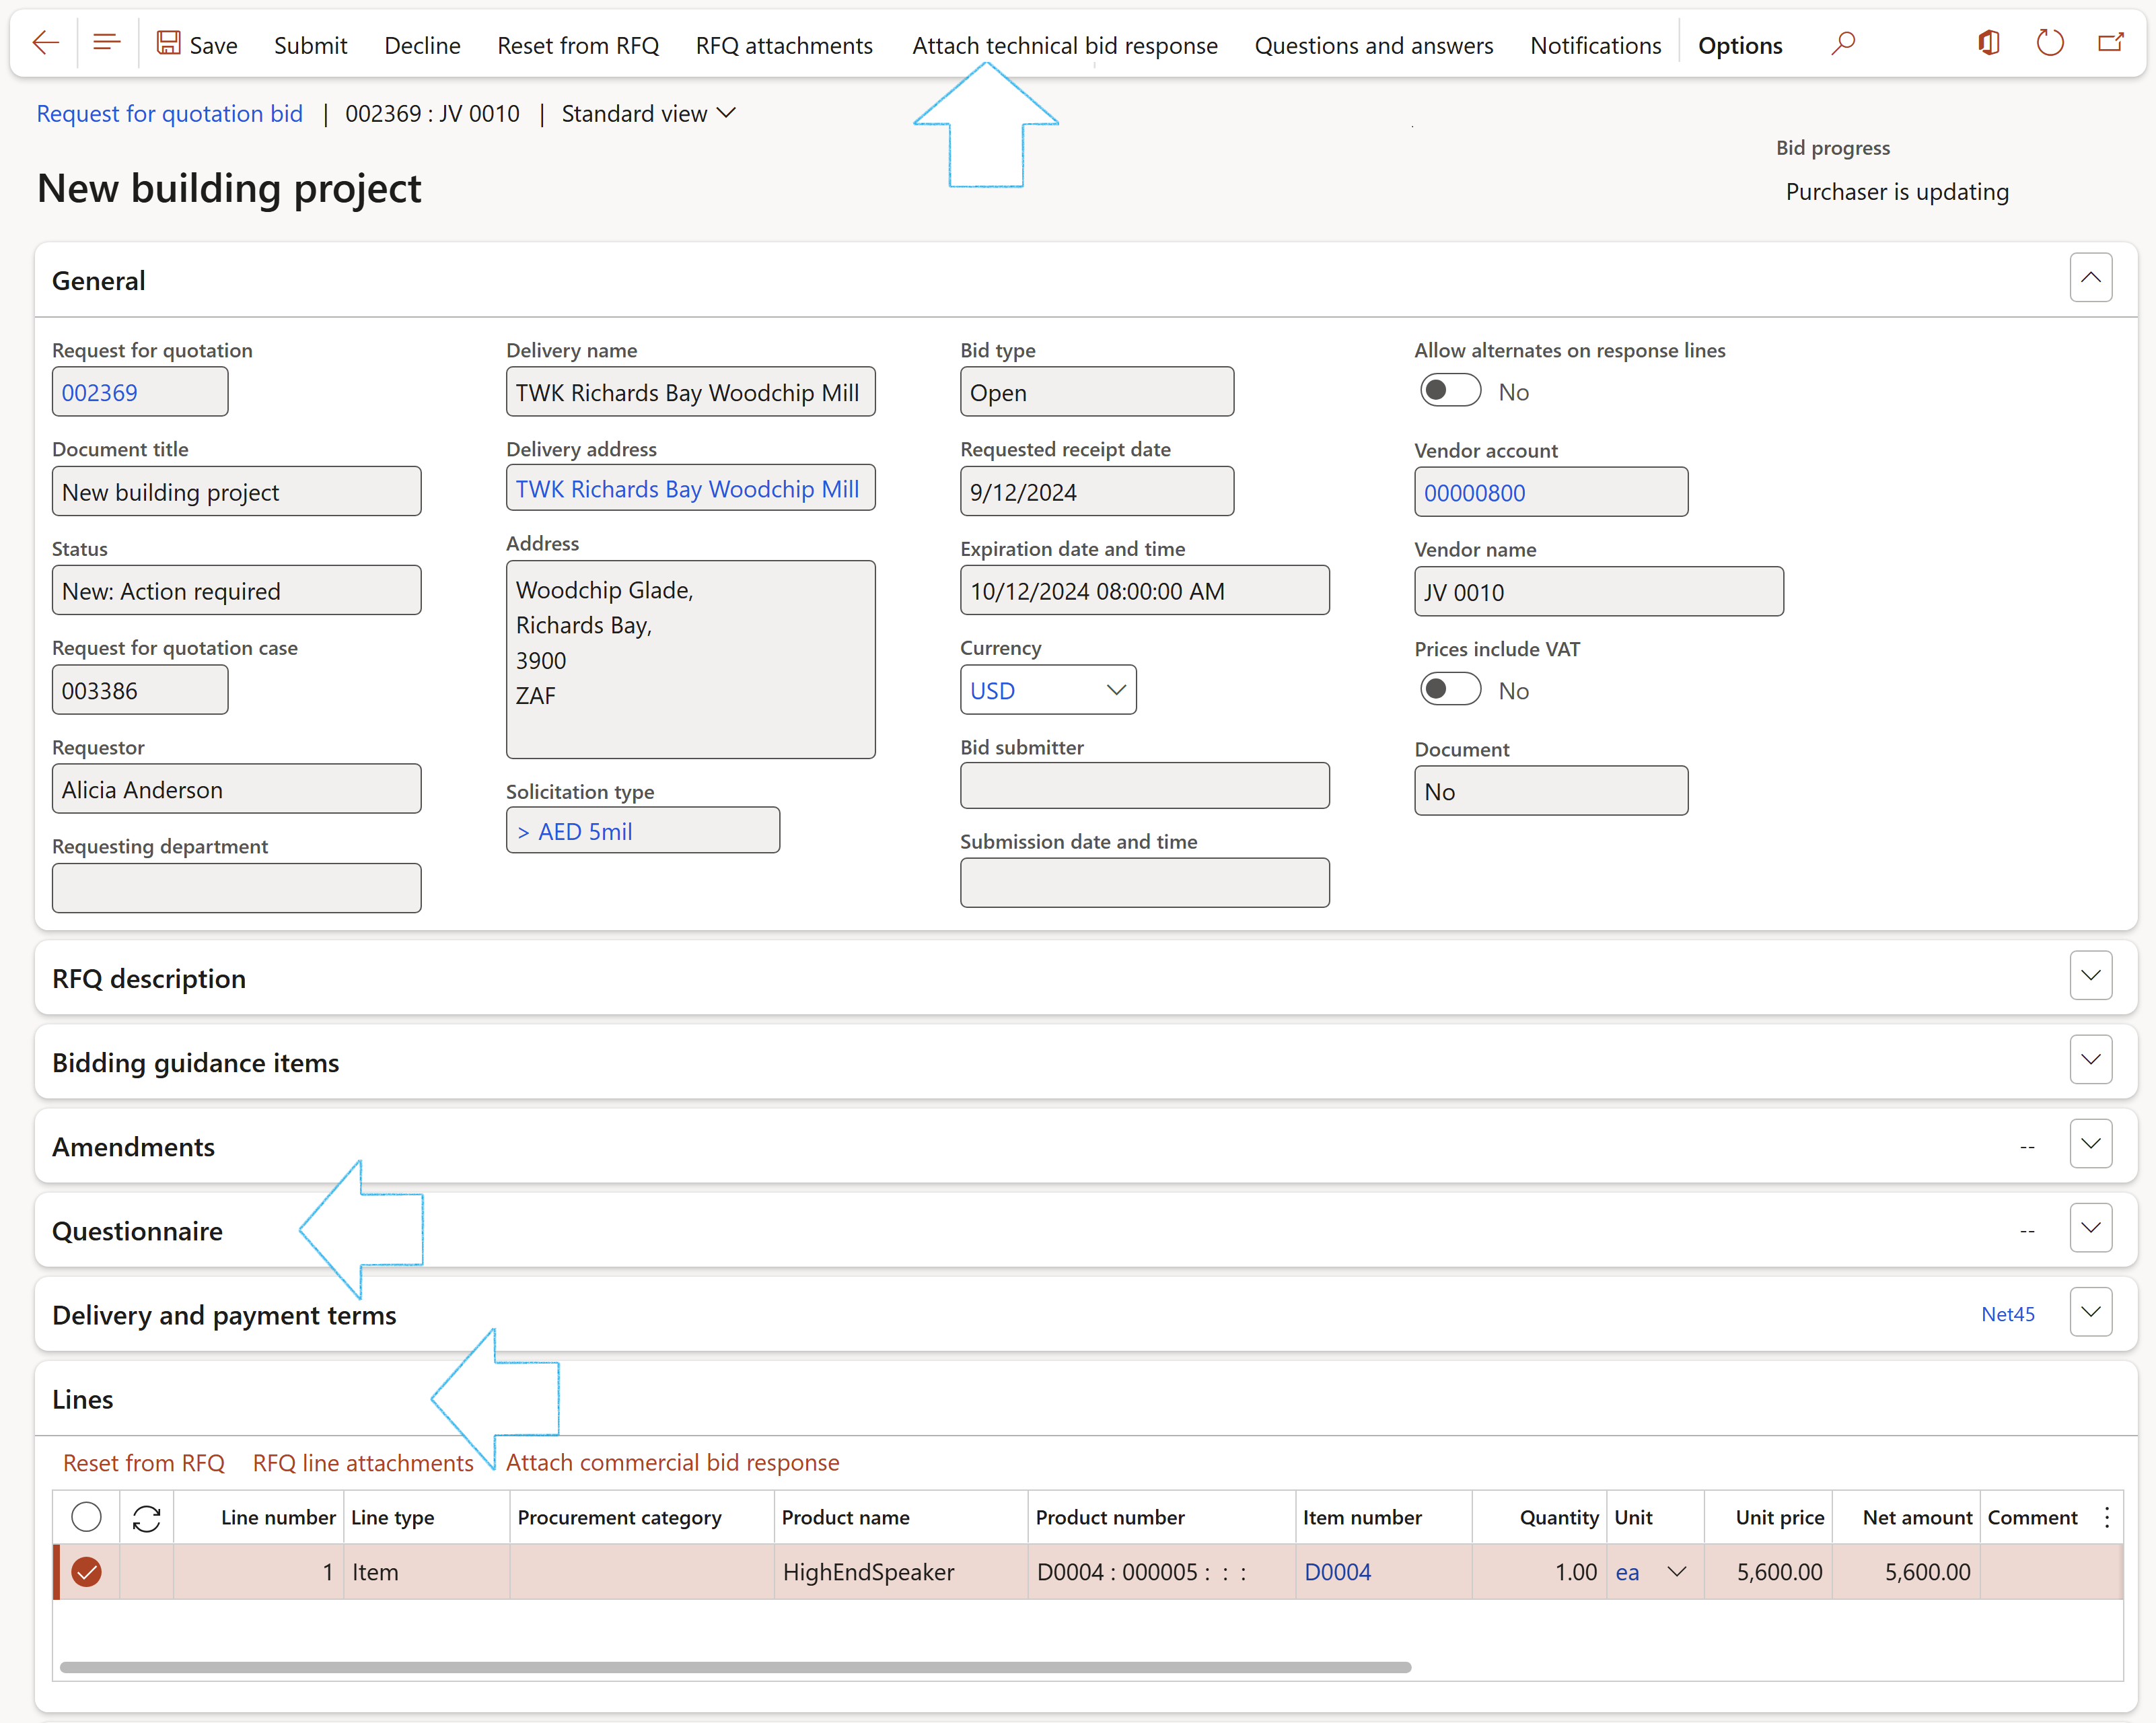
The vendor can view documents attached to the RFQ by clicking on the RFQ attachments button in the Action pane
¶ Step 8.5: Bafo response
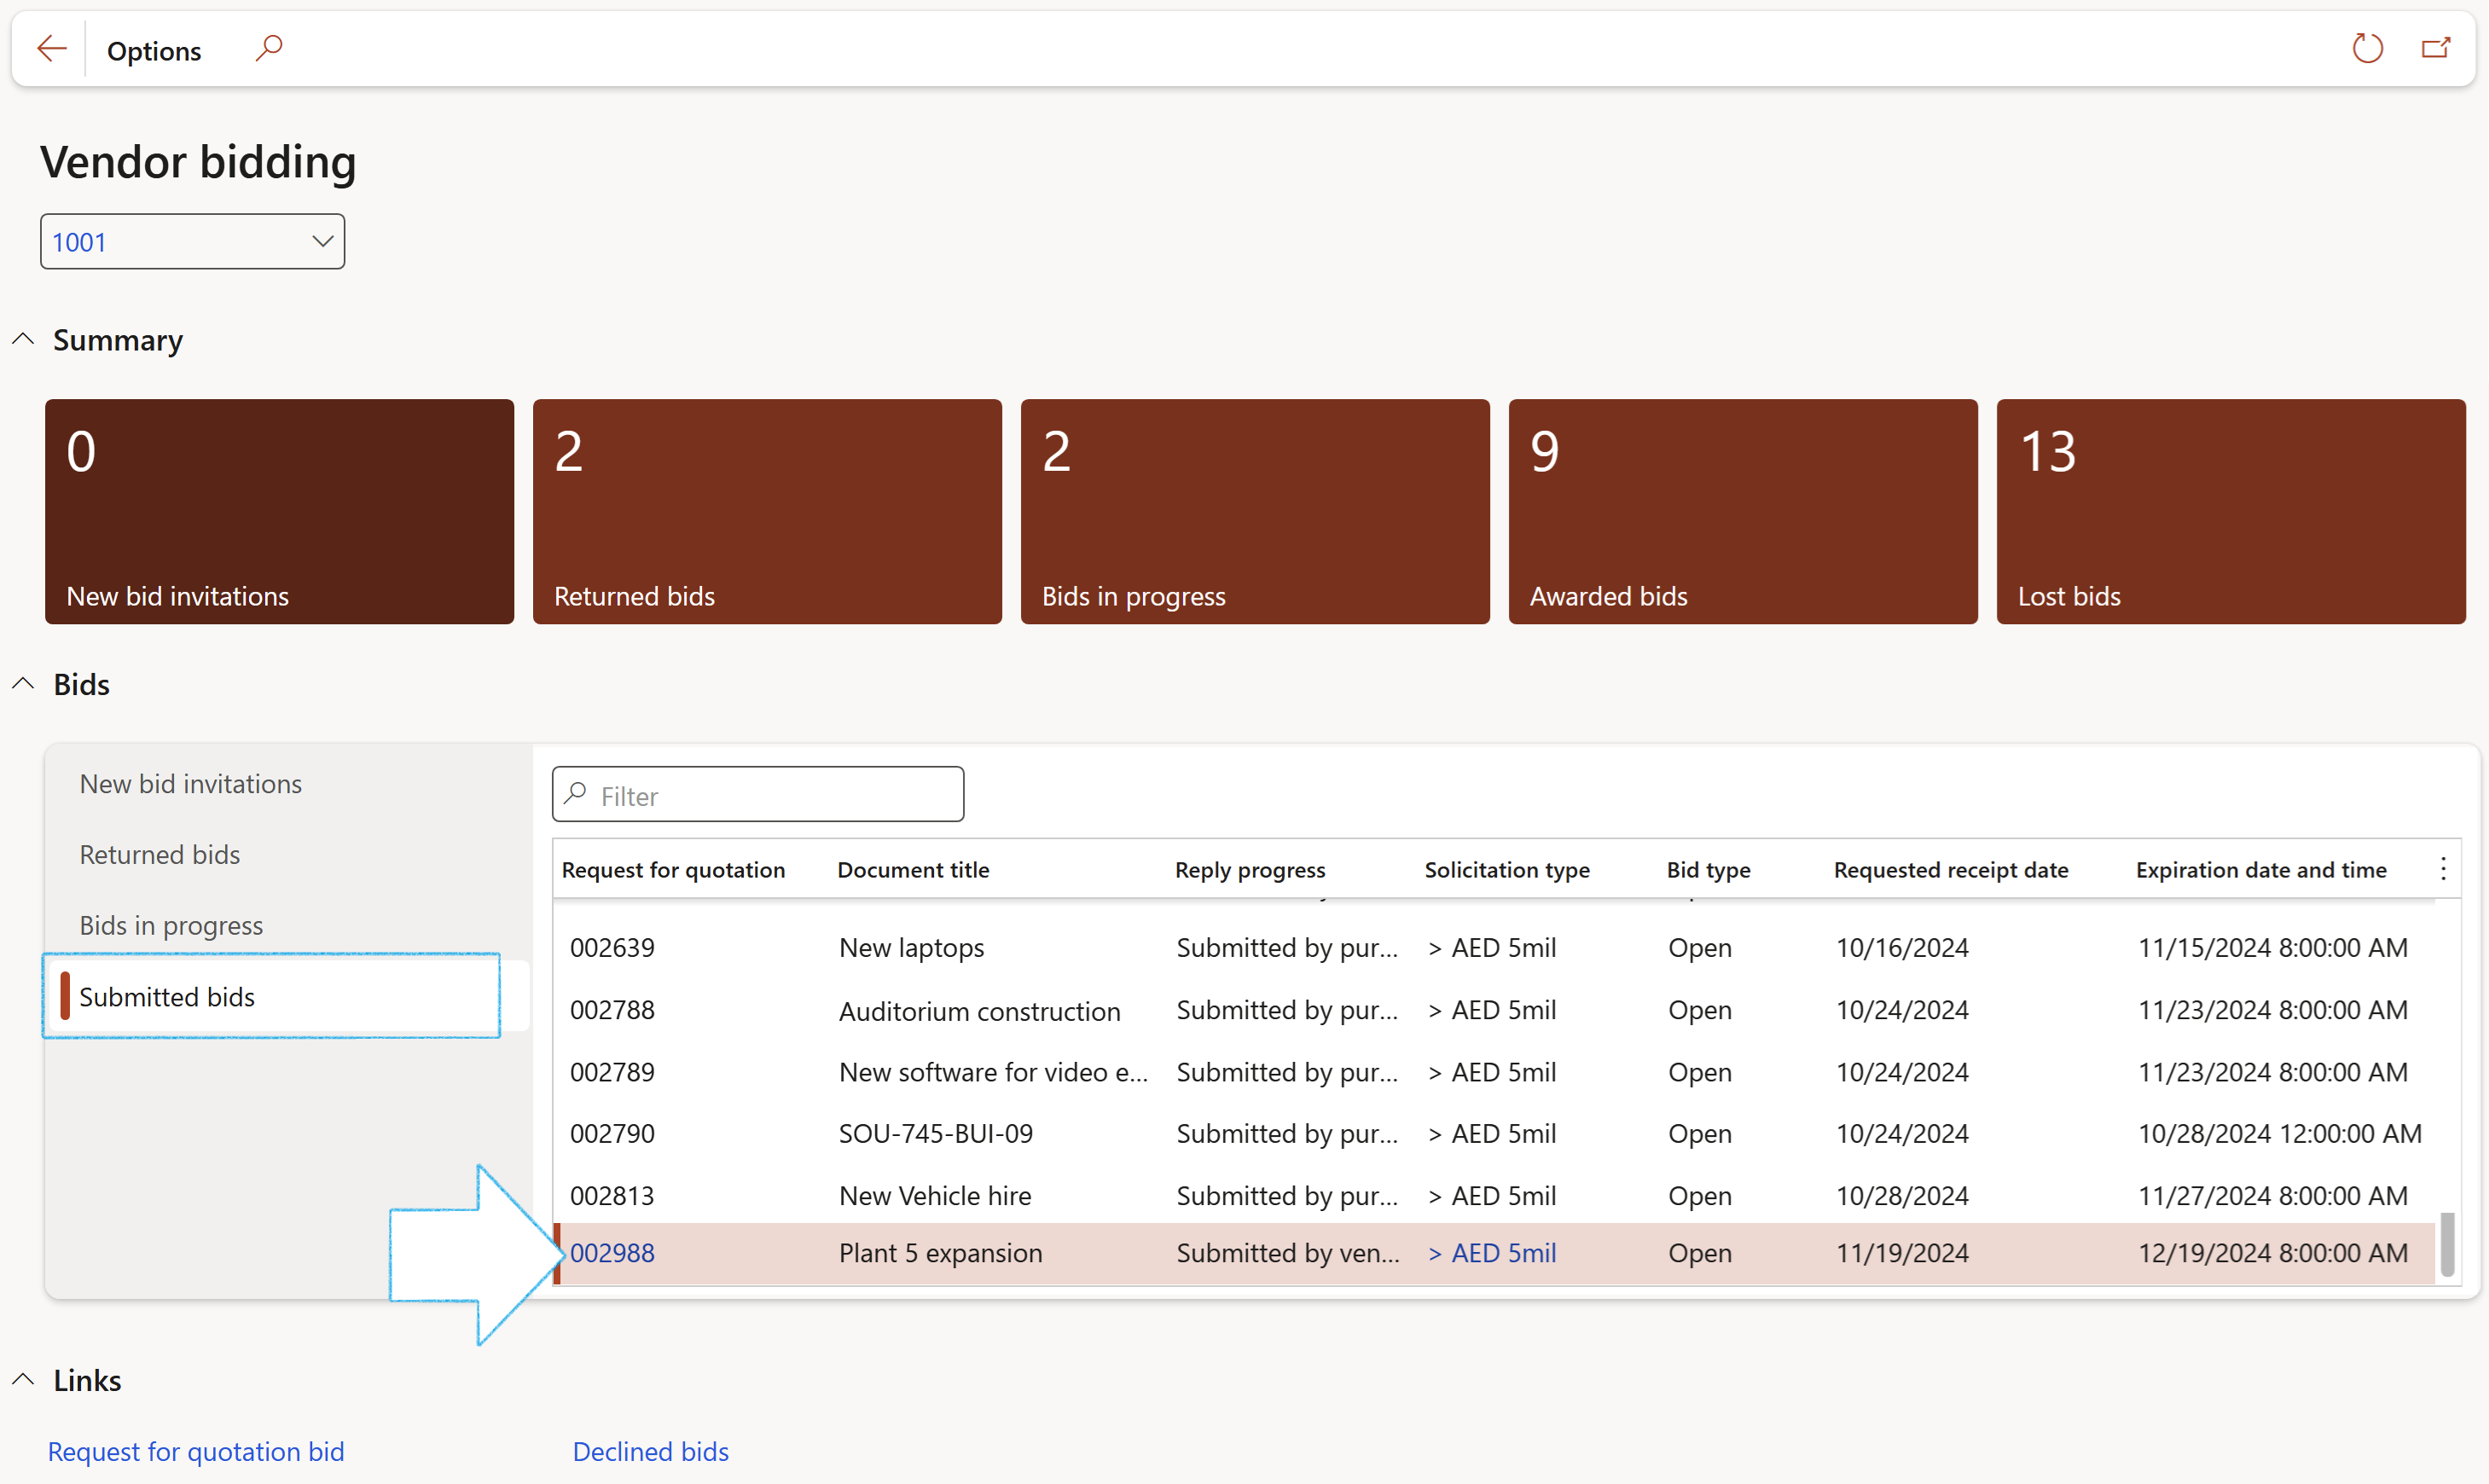
Go to: Vendor collaboration > Workspaces > Vendor bidding
- Open the Bids in progress tab, or the Submitted bids tab
- Select the relevant RFQ record
For header level bafo responses:
- In the Action pane, click on the Negotiation response (header level) button
- On the Negotiation response dialog, enter the Negotiation price
- Move the Technical unchanged slider to Yes (if applicable)
- Click on the OK button
The Negotiation response (header level) button will only be avialble for records where a Negotiation request was created for header level negotiation on the RFQ
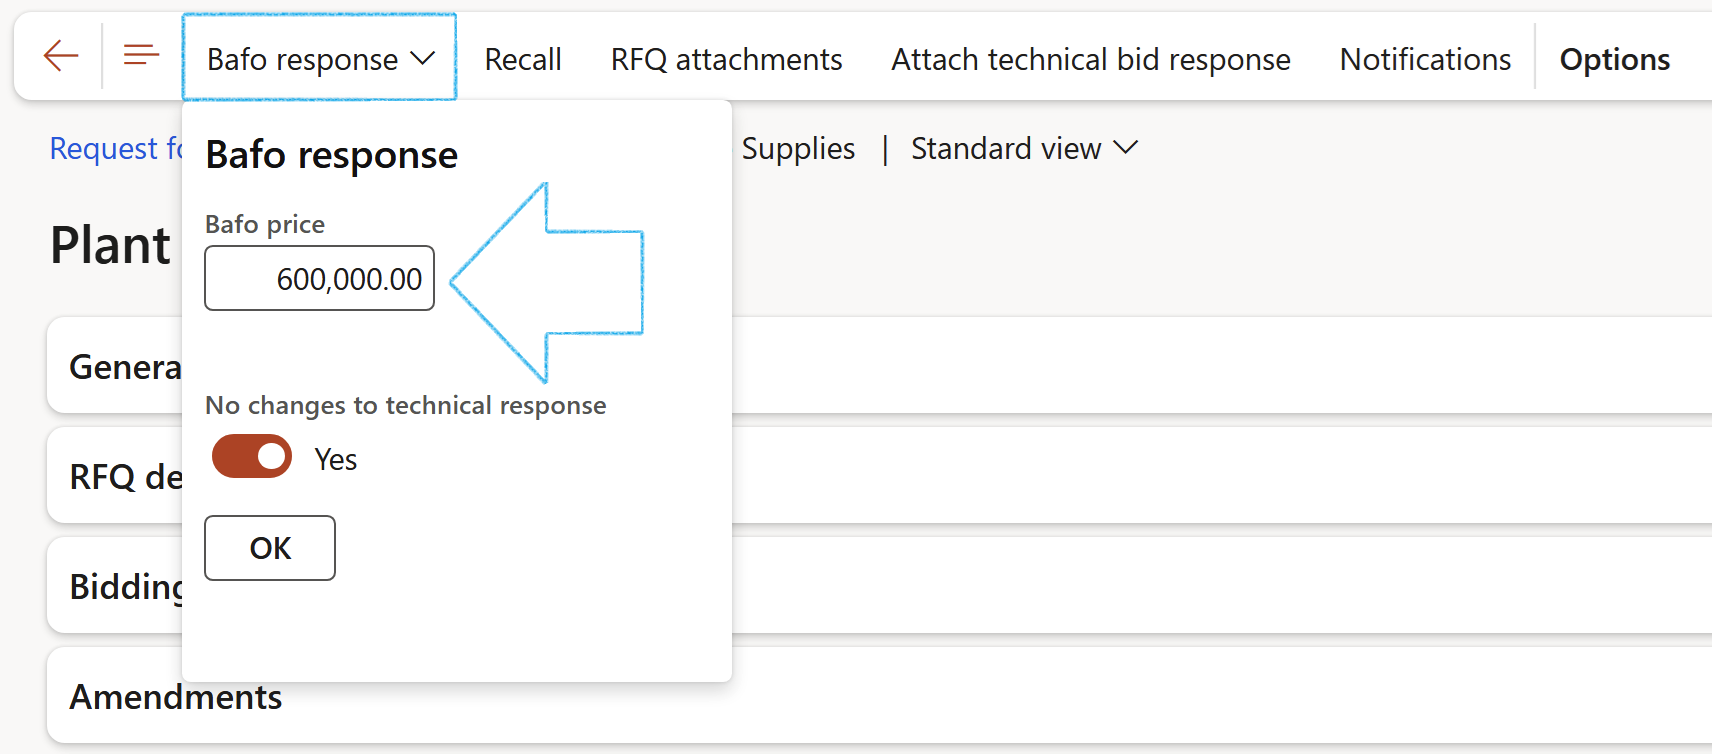
For line level bafo responses:
- Under the Lines Fast tab, click on the Bafo response button
- On the Bafo response dialog, enter the Bafo price
- Move the No changes to technical response slider to Yes (if applicable)
- Click on the OK button
The Bafo response button will only be avialble for records where a Bafo request was created from the RFQ

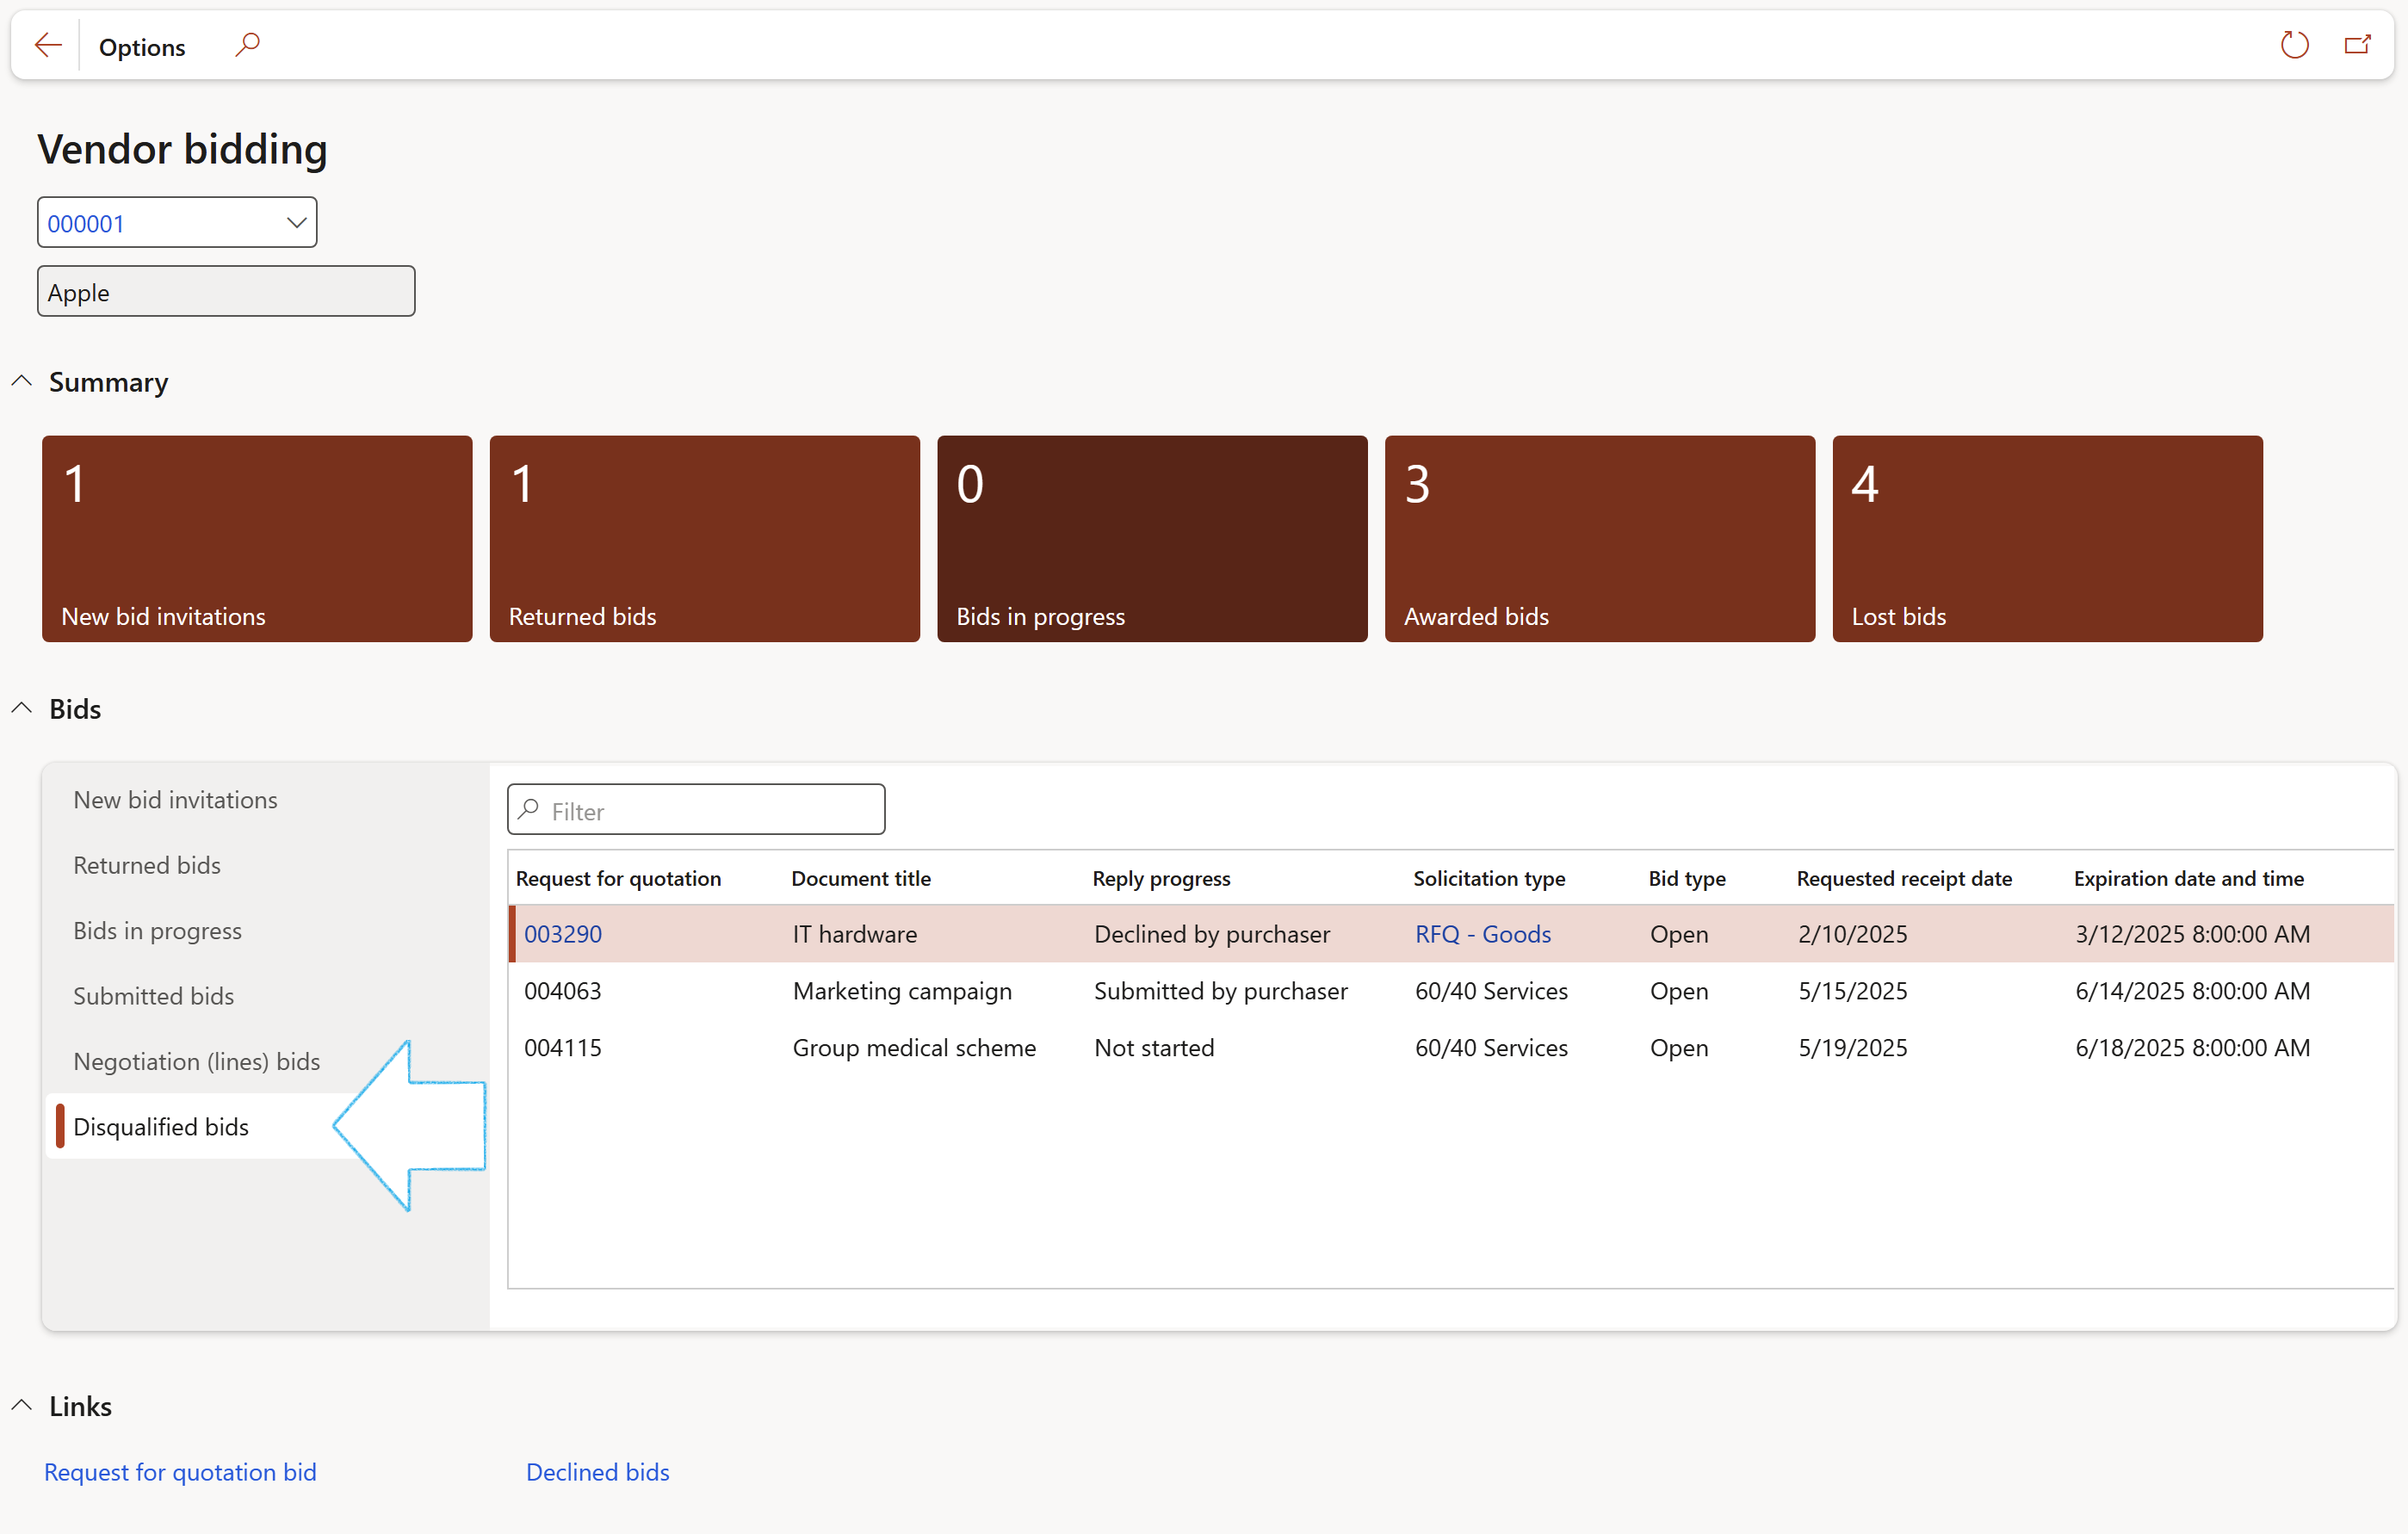
¶ Step 8.6: Disqualified bids
Disqualified bids can be viewed under the Disqualified bids tab. Vendors can open the bids but cannot edit
¶ Step 9: Purchase orders
The below diagram illustrates the process of purchase orders by utilising the collaboration portal specifically related to procurement:
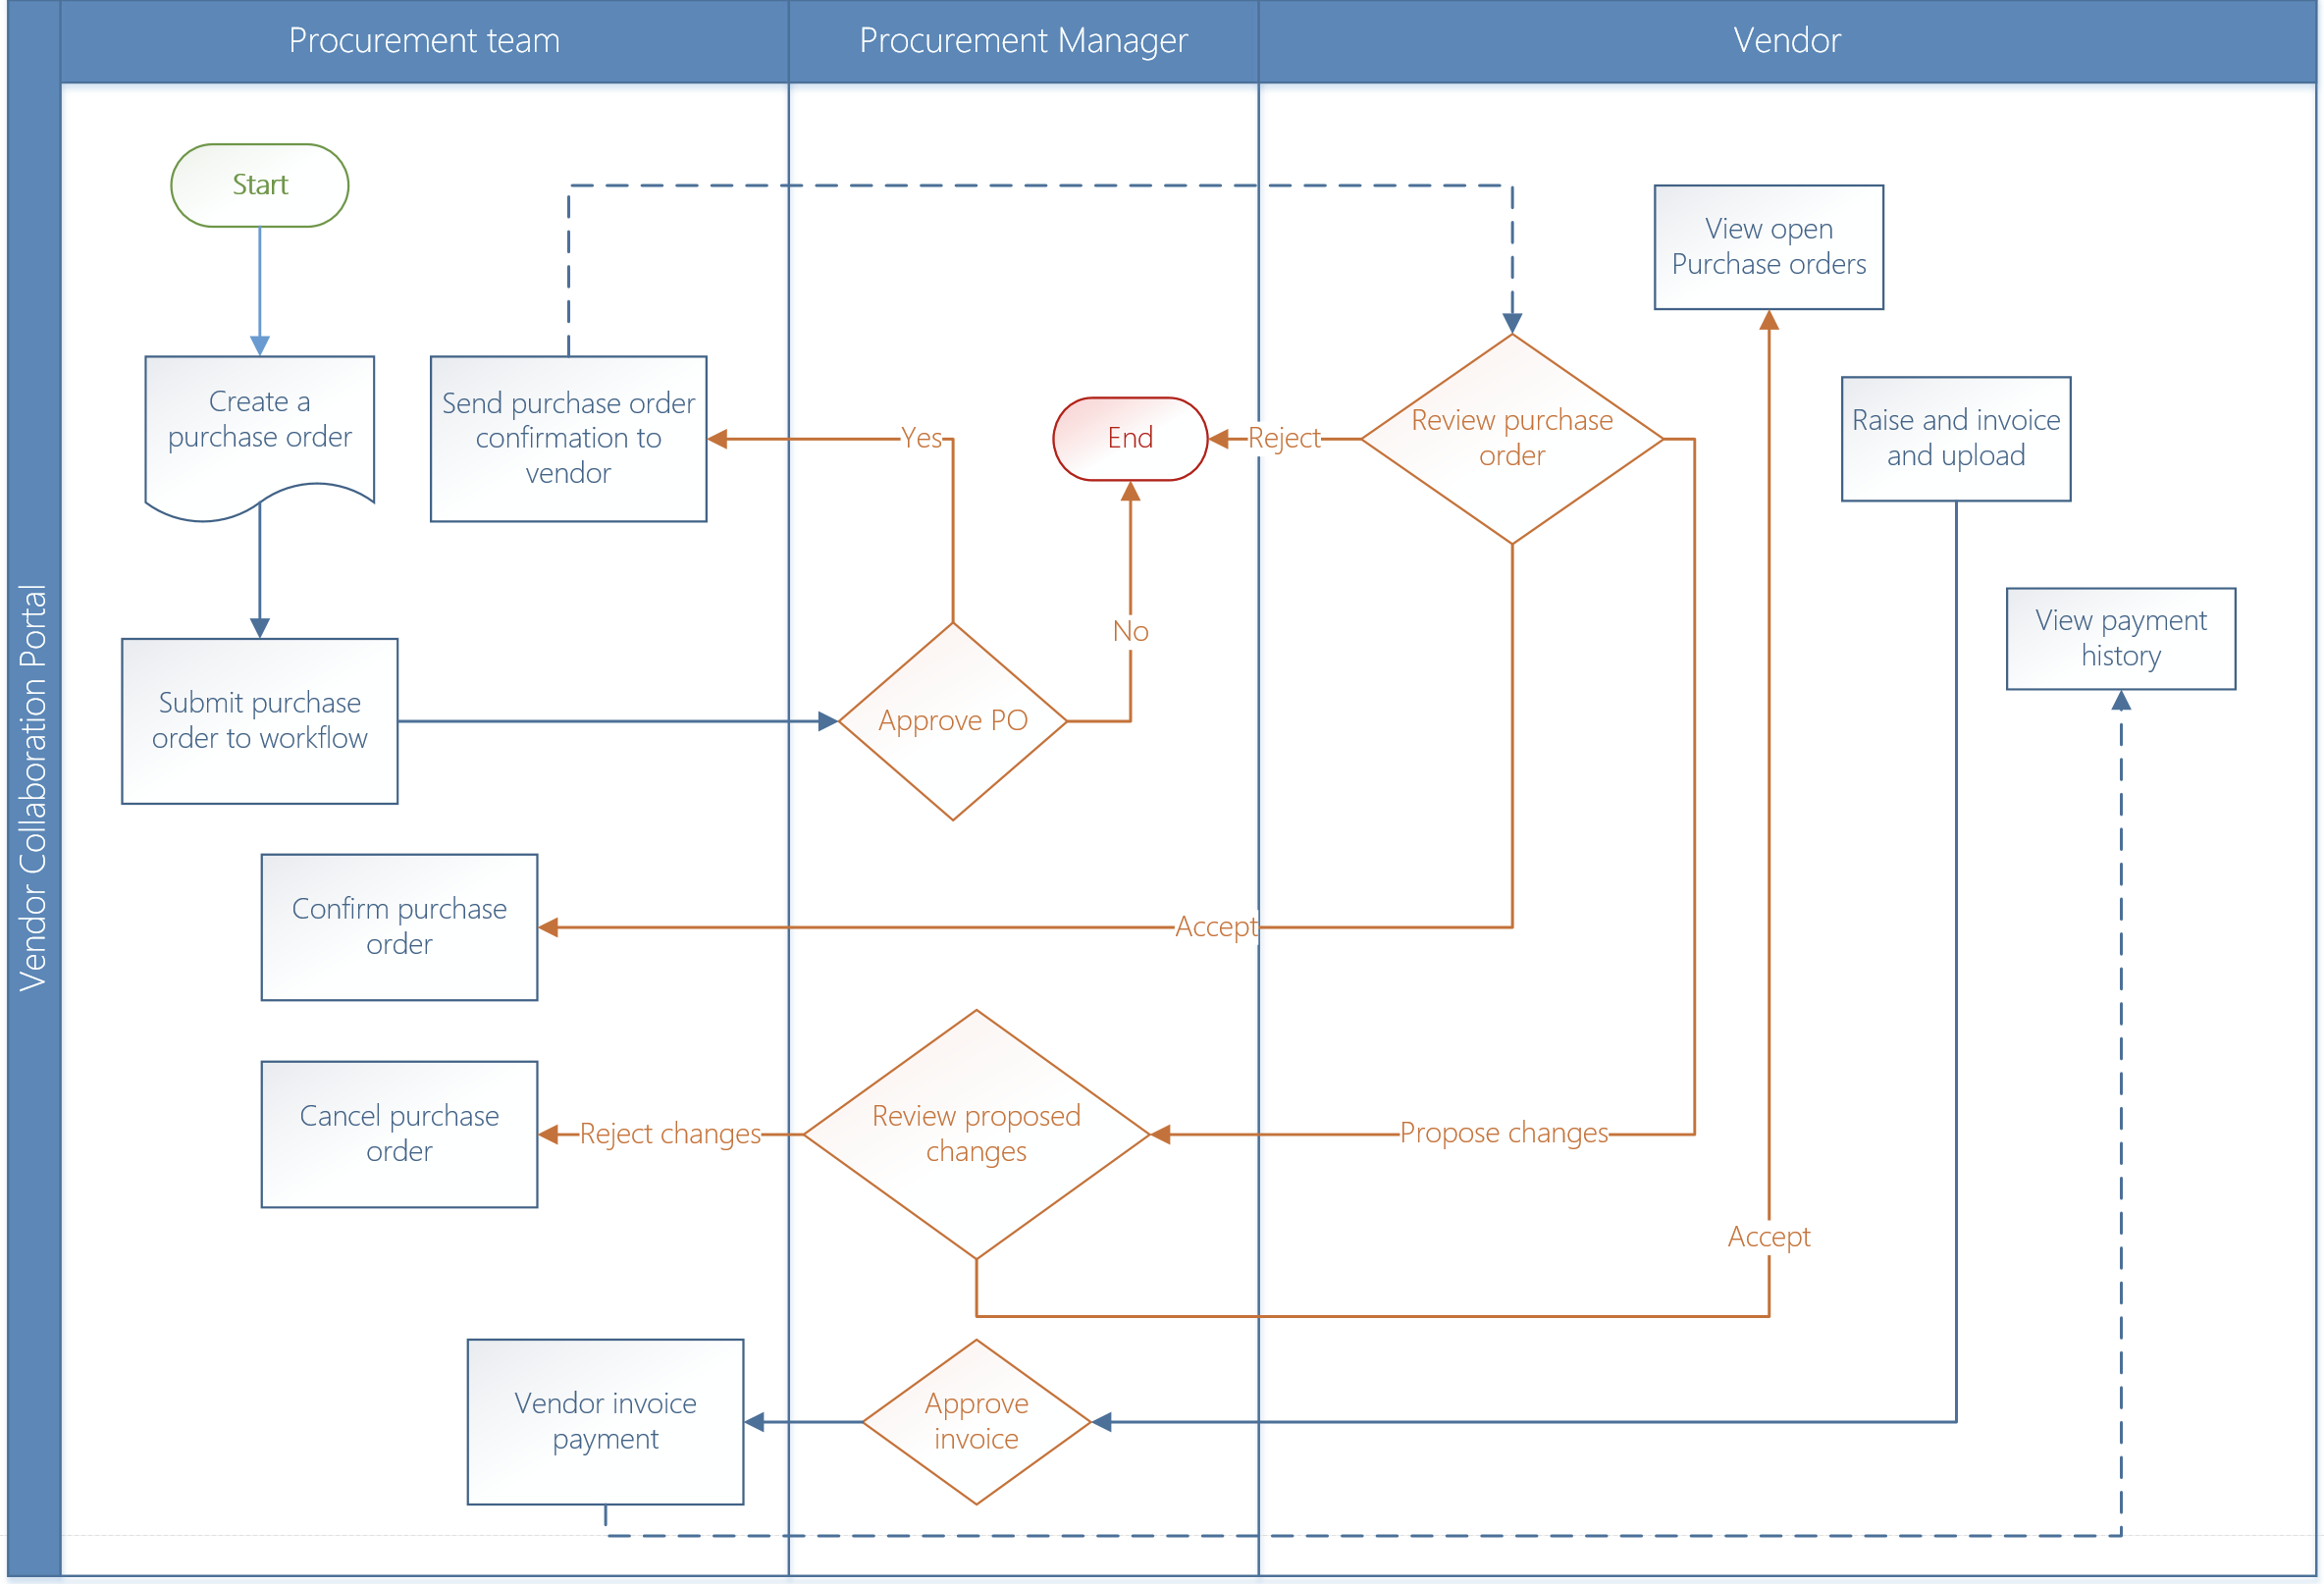
- Vendor users can have access to purchase orders to review them, accept them, reject them, propose changes, and view invoices.
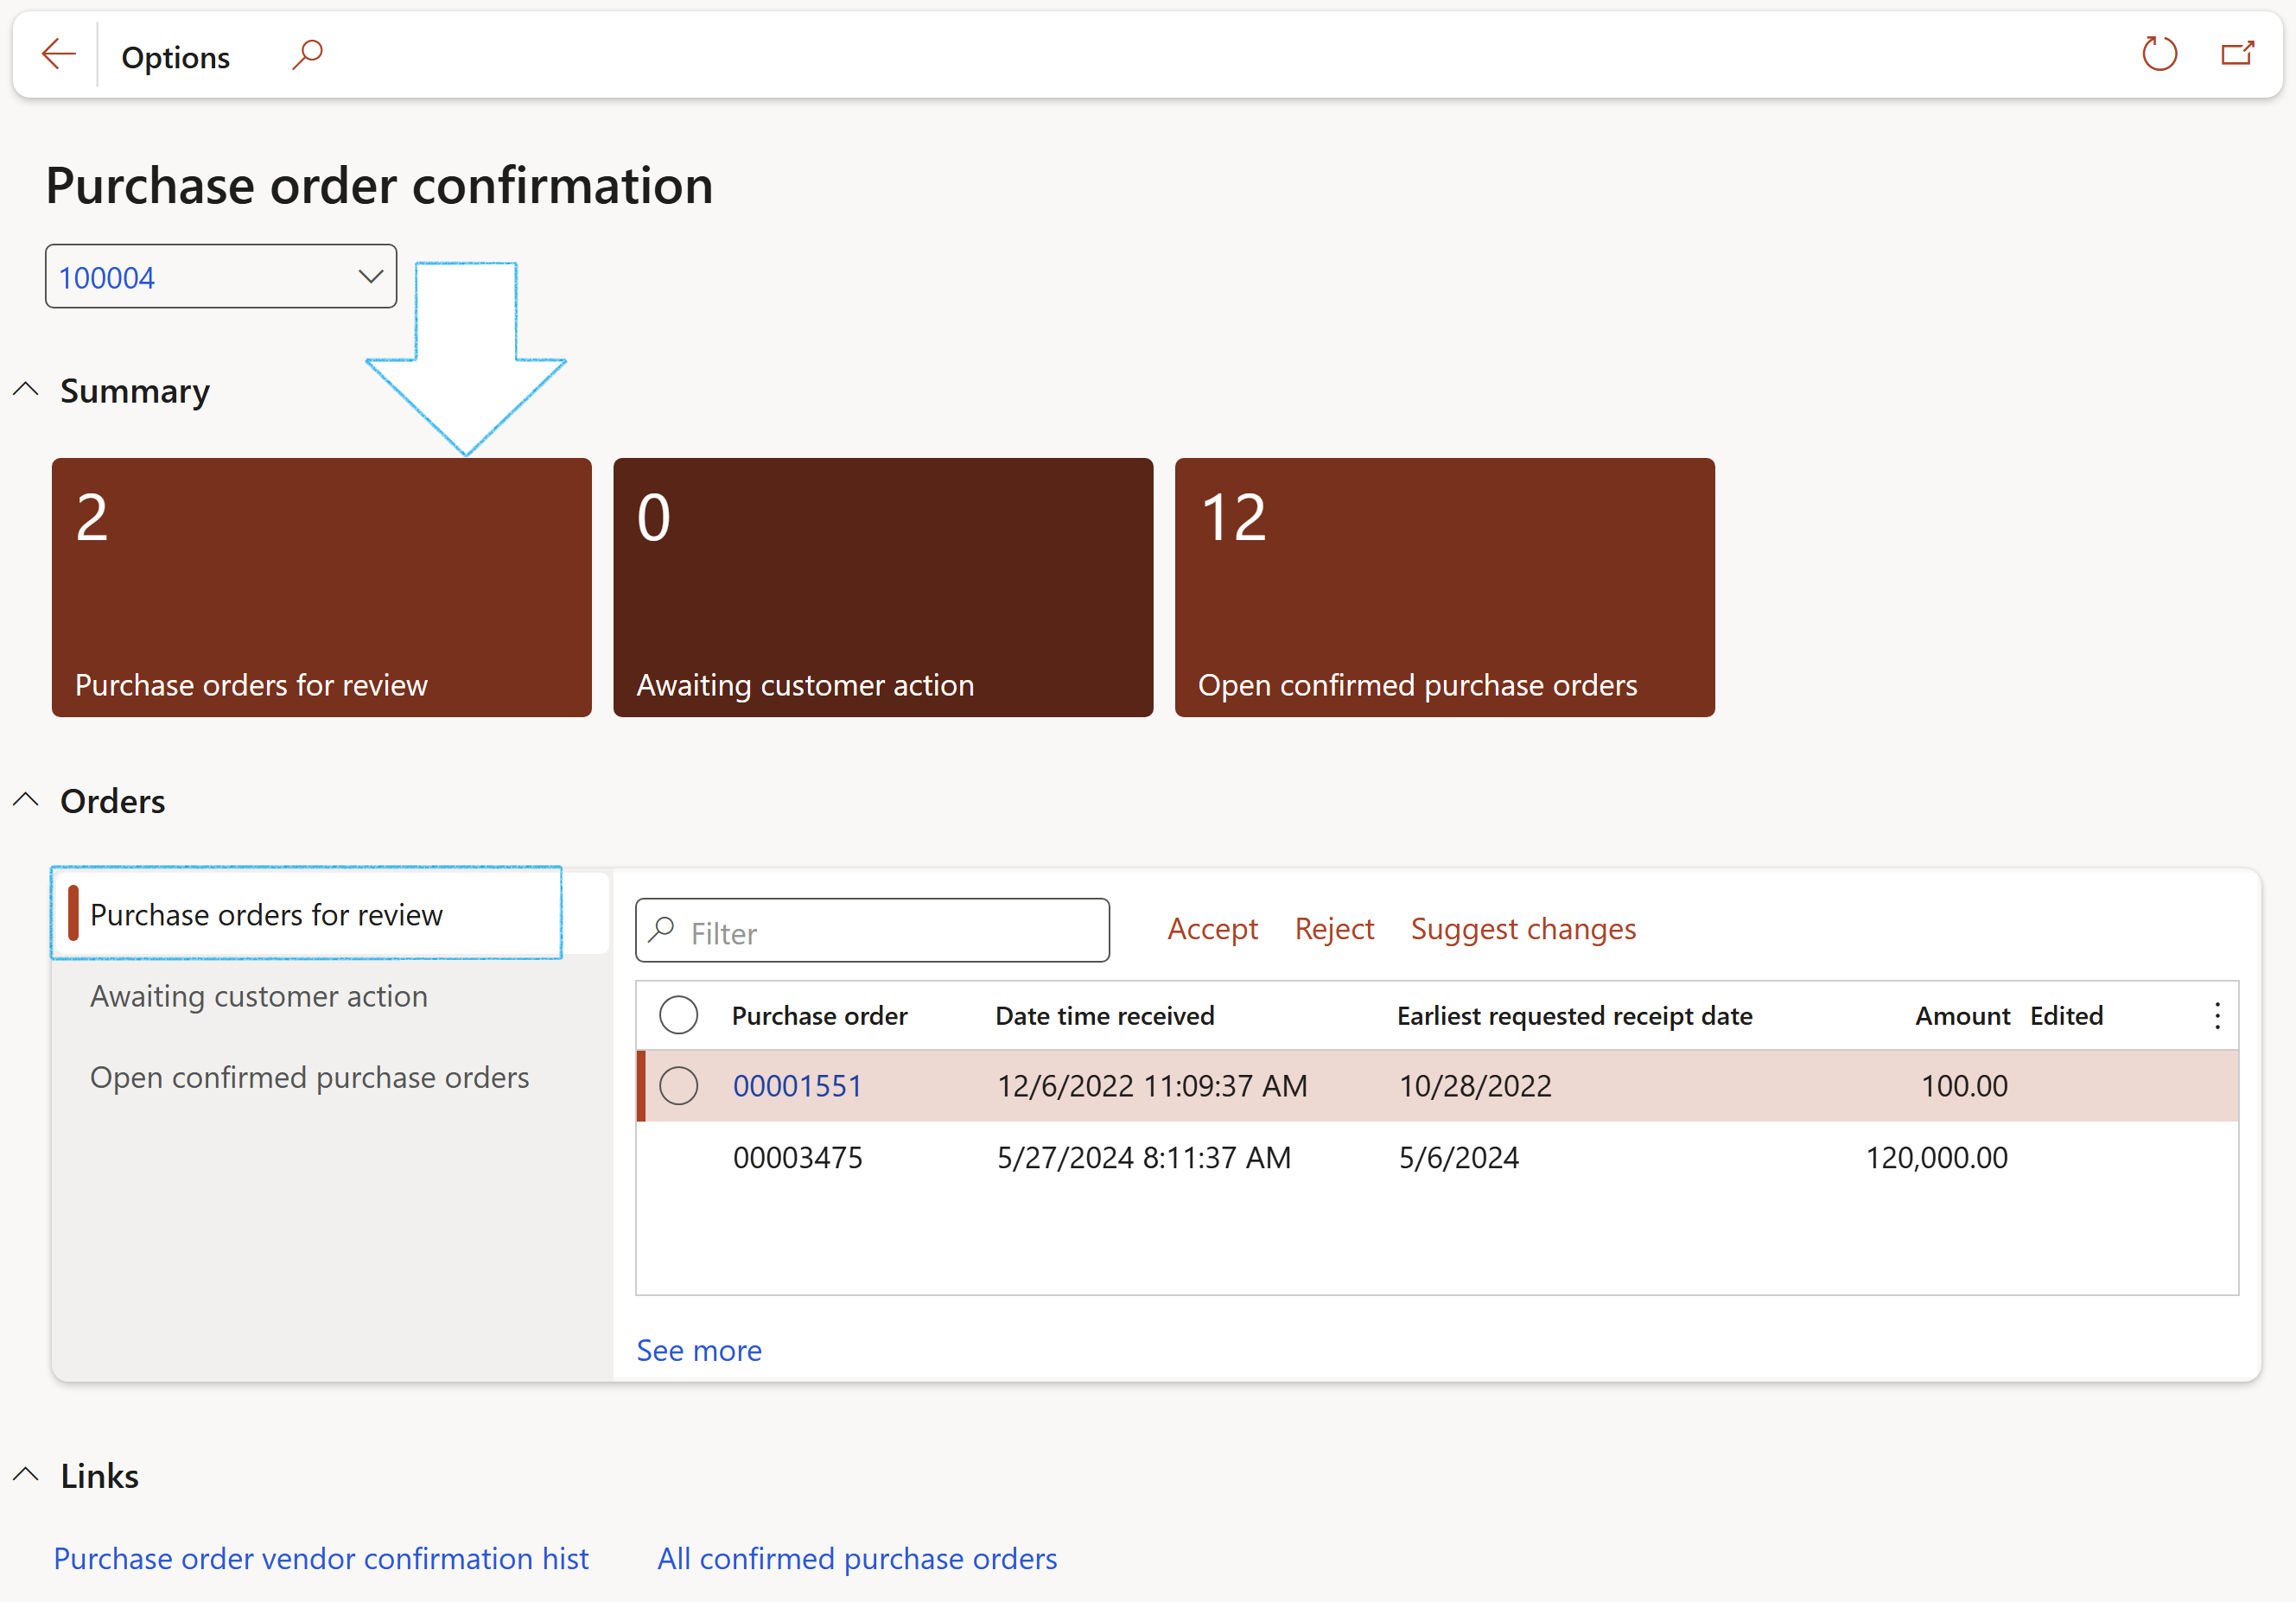
- The vendor can use a workspace for summary data on purchase orders.
- A purchase order is sent to the vendor for confimration. The vendor can review purchase orders sent for confirmation on the Received Purchase orders form.
- A purchase order sent for confimration to the vendor will have an In external review status.
Go to: Vendor collaboration > Workspaces > Purchase order confirmation
- Accepted purchase orders will need to be confimred after acceptance.
- Rejected purchase orders will have a status of rejected.
- Proposing changes allows the vendor to change details on the purchase order:
- Delivery date
- Price
- Quantity
- Discount
- Purchase orders with changes proposed by the vendor can be accepted by the business user or reverted to the vendor with more changes
- Vendors have the option to accept purchase orders with changes
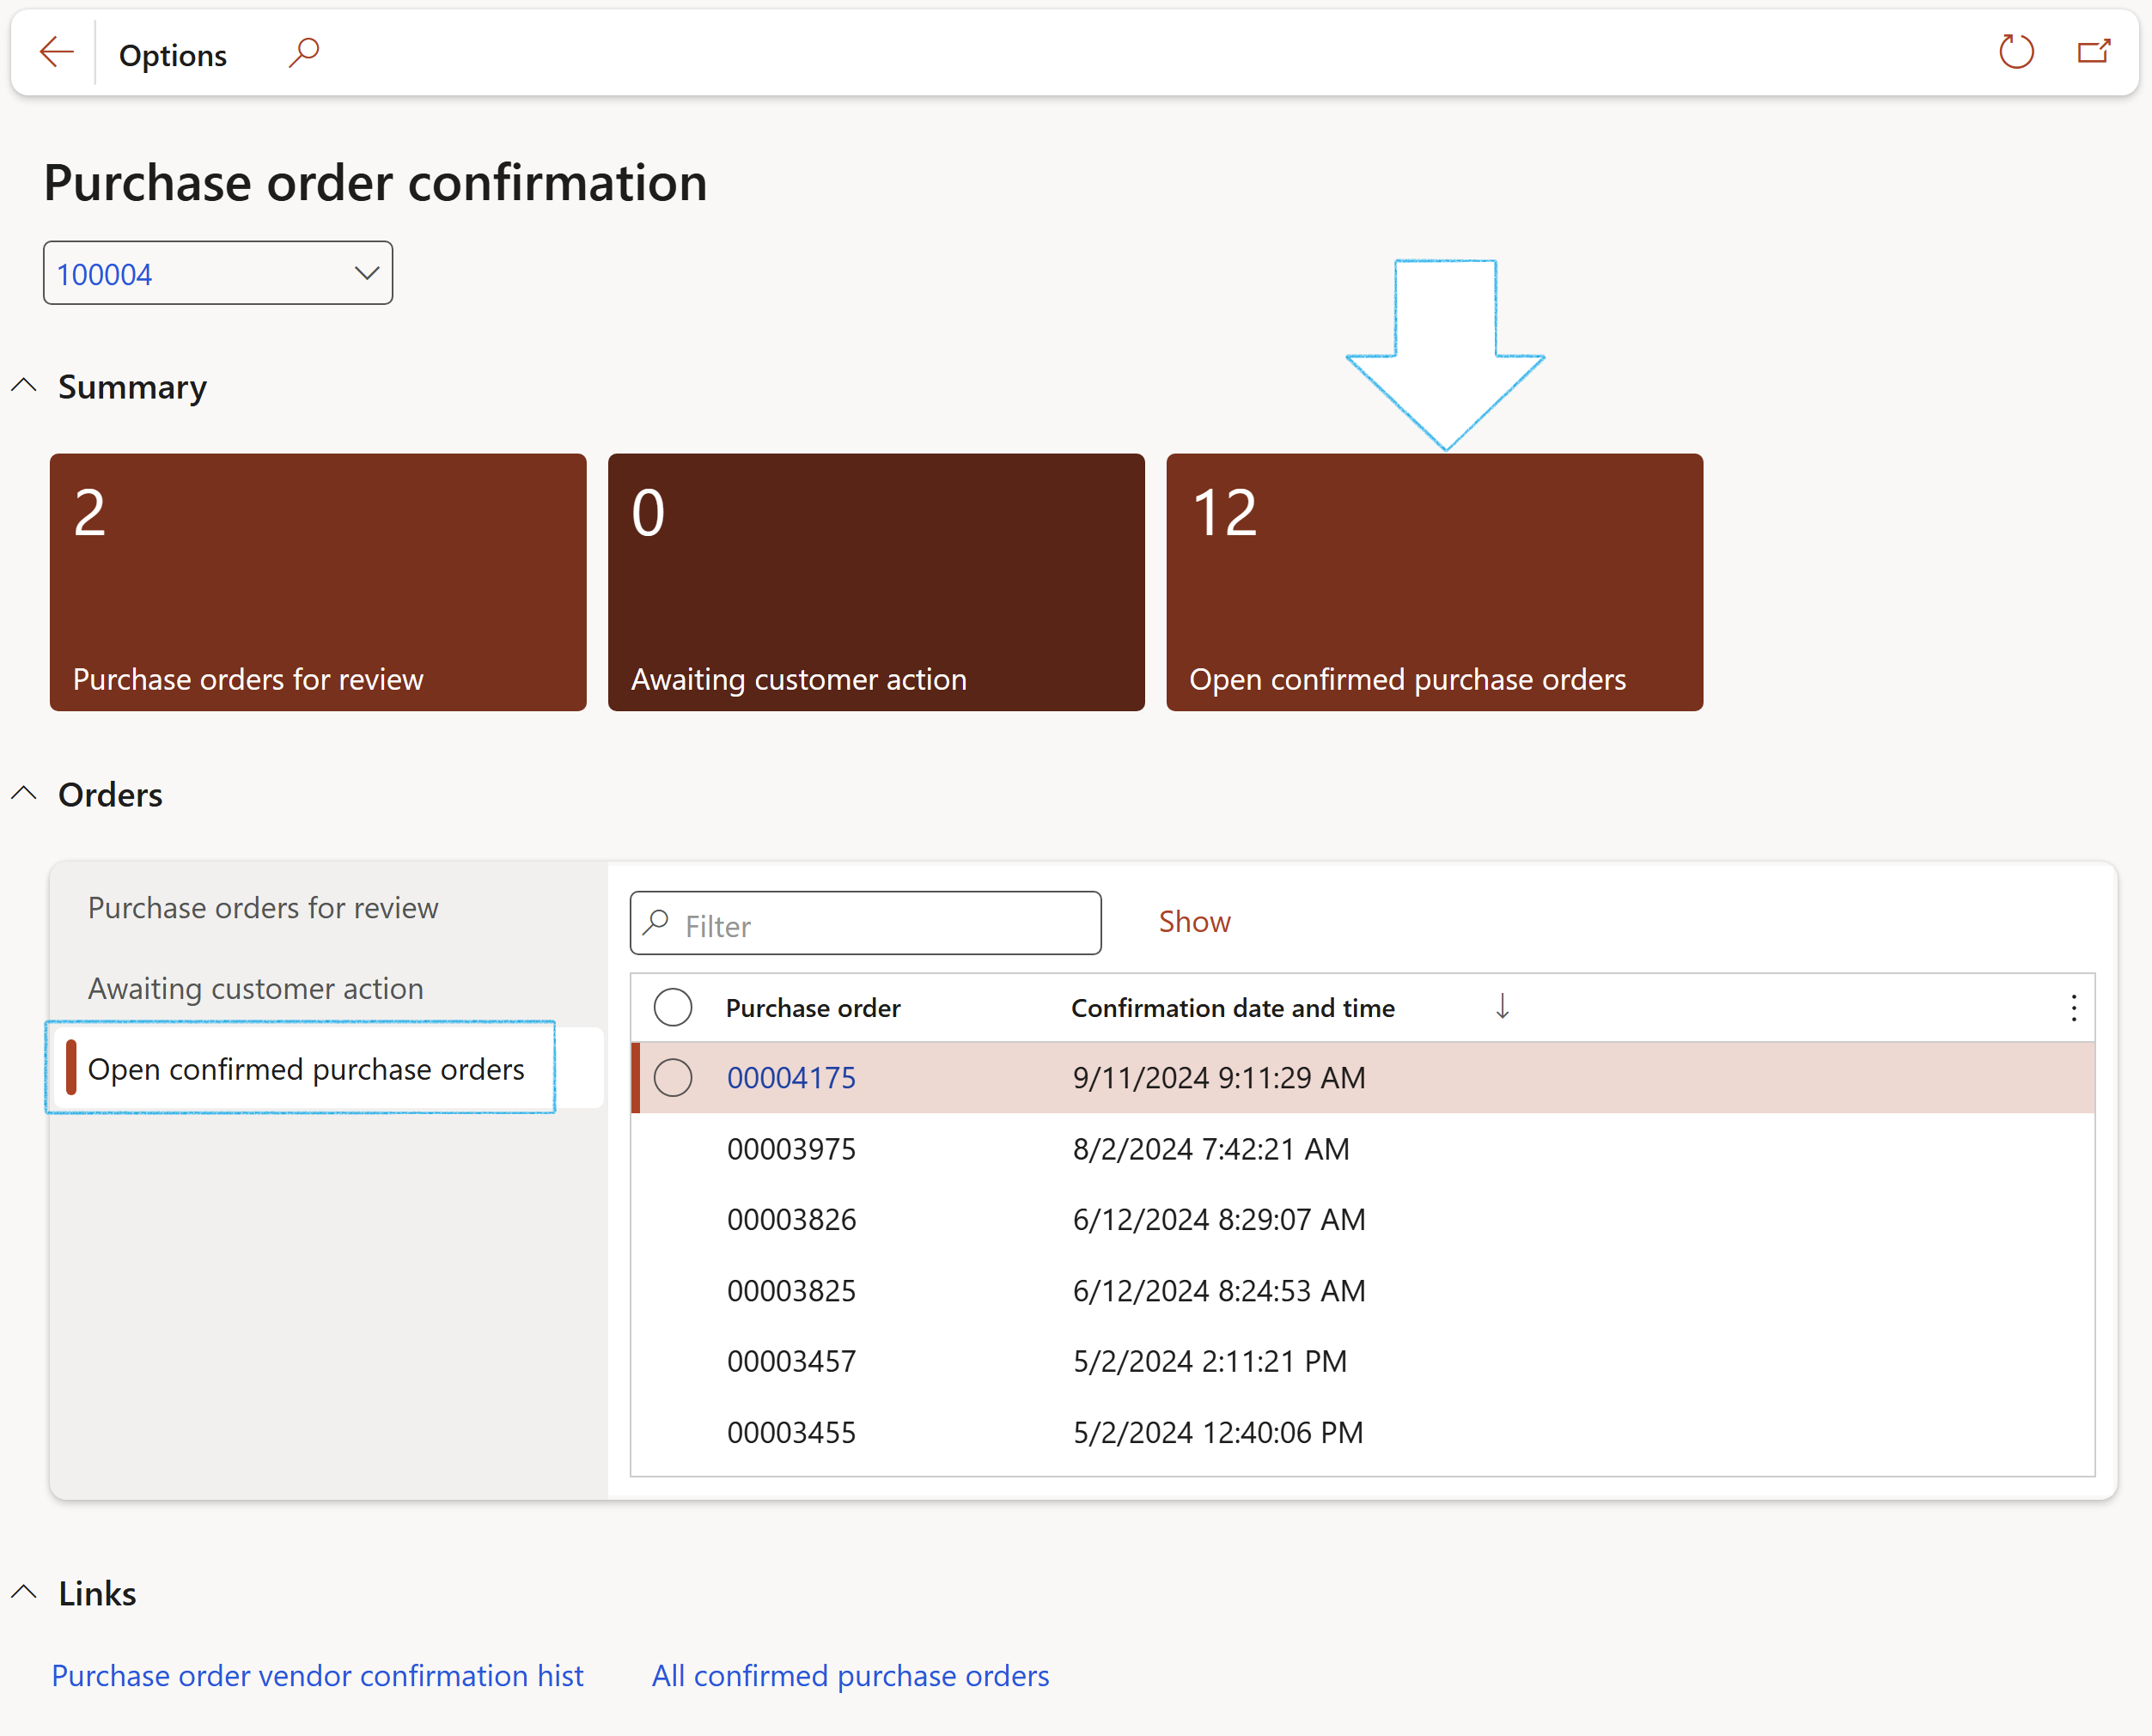
- Vendors can view confirmed purchase orders and start processing for delivery
¶ Step 10: Invoices
- Vendors can invoice against approved contracts in your organisation, from the collaboration portal.
- Invoices submitted by the vendor are sent for review by your organisation.
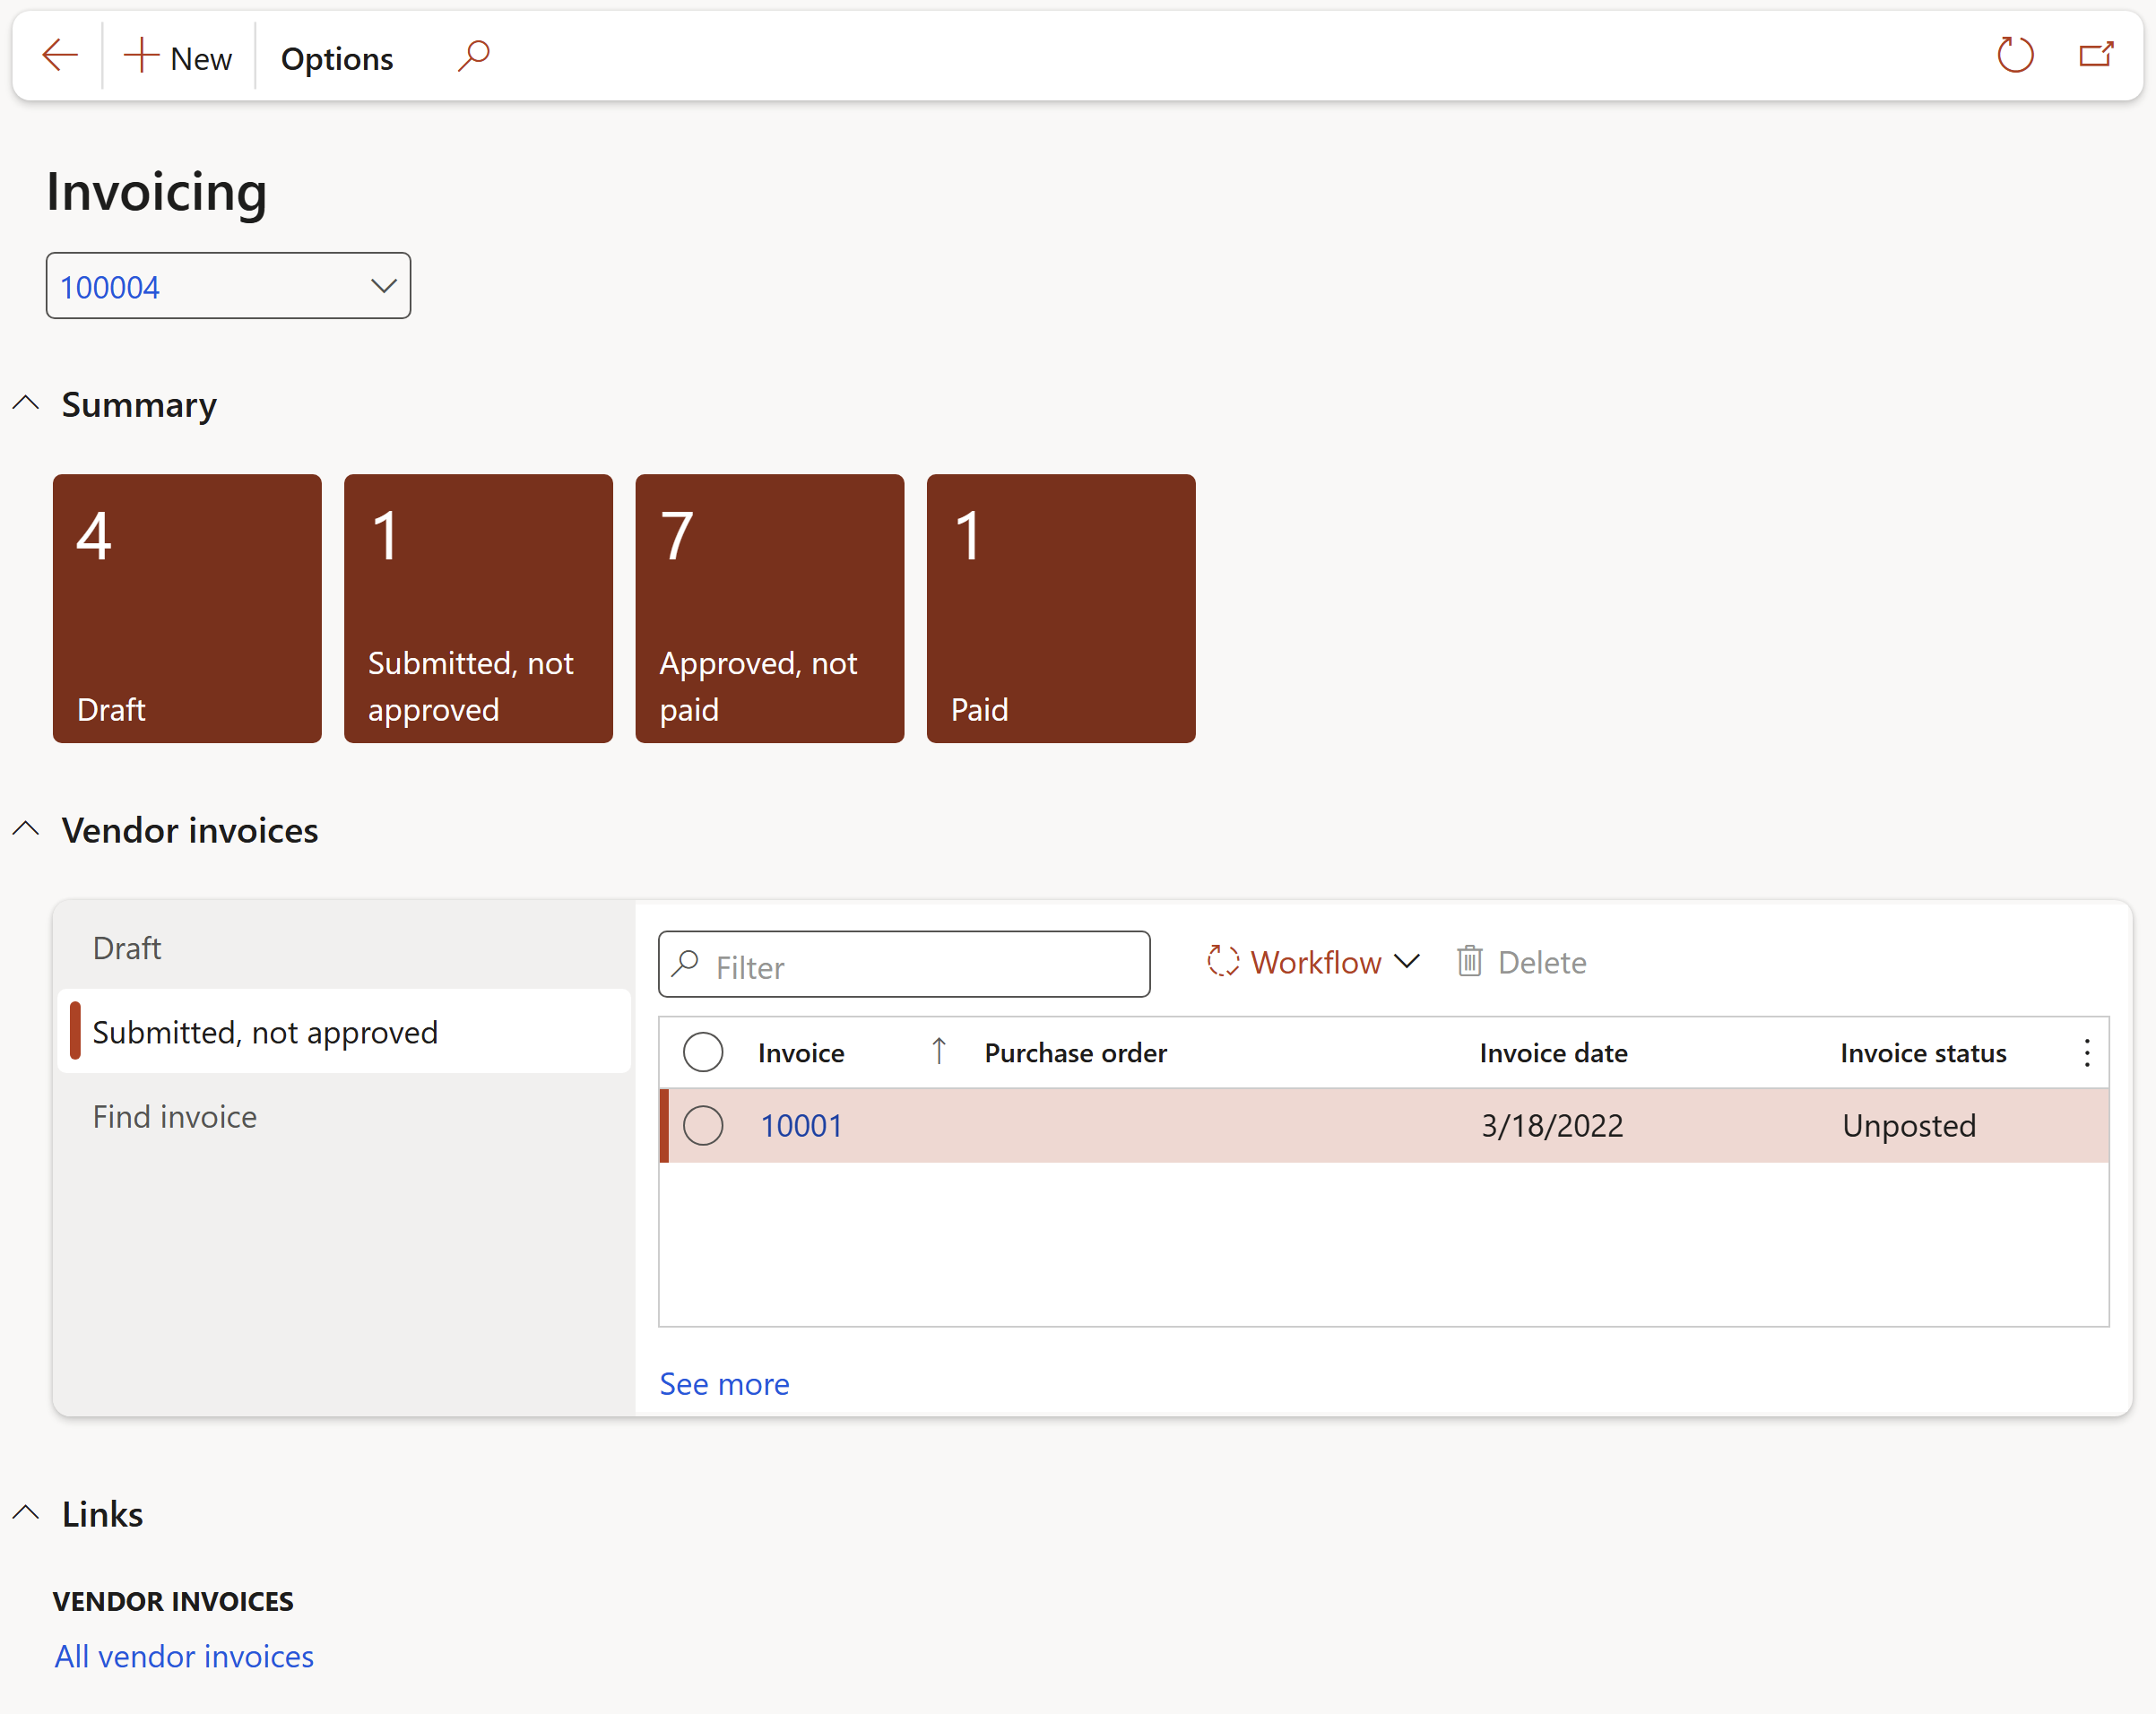
- Vendors can also view paid invoices from the Invoicing workspace.
Go to: Vendor collaboration > Workspaces > Invoicing
- In the Action pane, click on the New contract invoice button
- On the Create new invoice dialog, select the relevant Contract from the dropdown list
- Enter an Invoice number
- Enter the Invoice date
- Enter an Invoice description
- Click on the Create invoice button
Once the contract is selected all the relevant fields will be populated with the contract details
