¶ Background
A document management system (DMS) is usually a computerized system used to store, share, track and manage files or documents. Some systems include history tracking where a log of the various versions created and modified by different users is recorded. The term has some overlap with the concepts of content management systems. It is often viewed as a component of enterprise content management (ECM) systems and related to digital asset management, document imaging, workflow systems and records management systems. Users can use a DMS to for example manage policies...
¶ Navigation

¶ Specific setup
¶ Step 1: Case setups
¶ Step 1.1: Create case category
Go to: GRC > Governance > Setup for governance > Case categories
- On the Action pane, click on the New button
- Enter the Case category and a brief Description
- Select the relevant Category type from the dropdown list
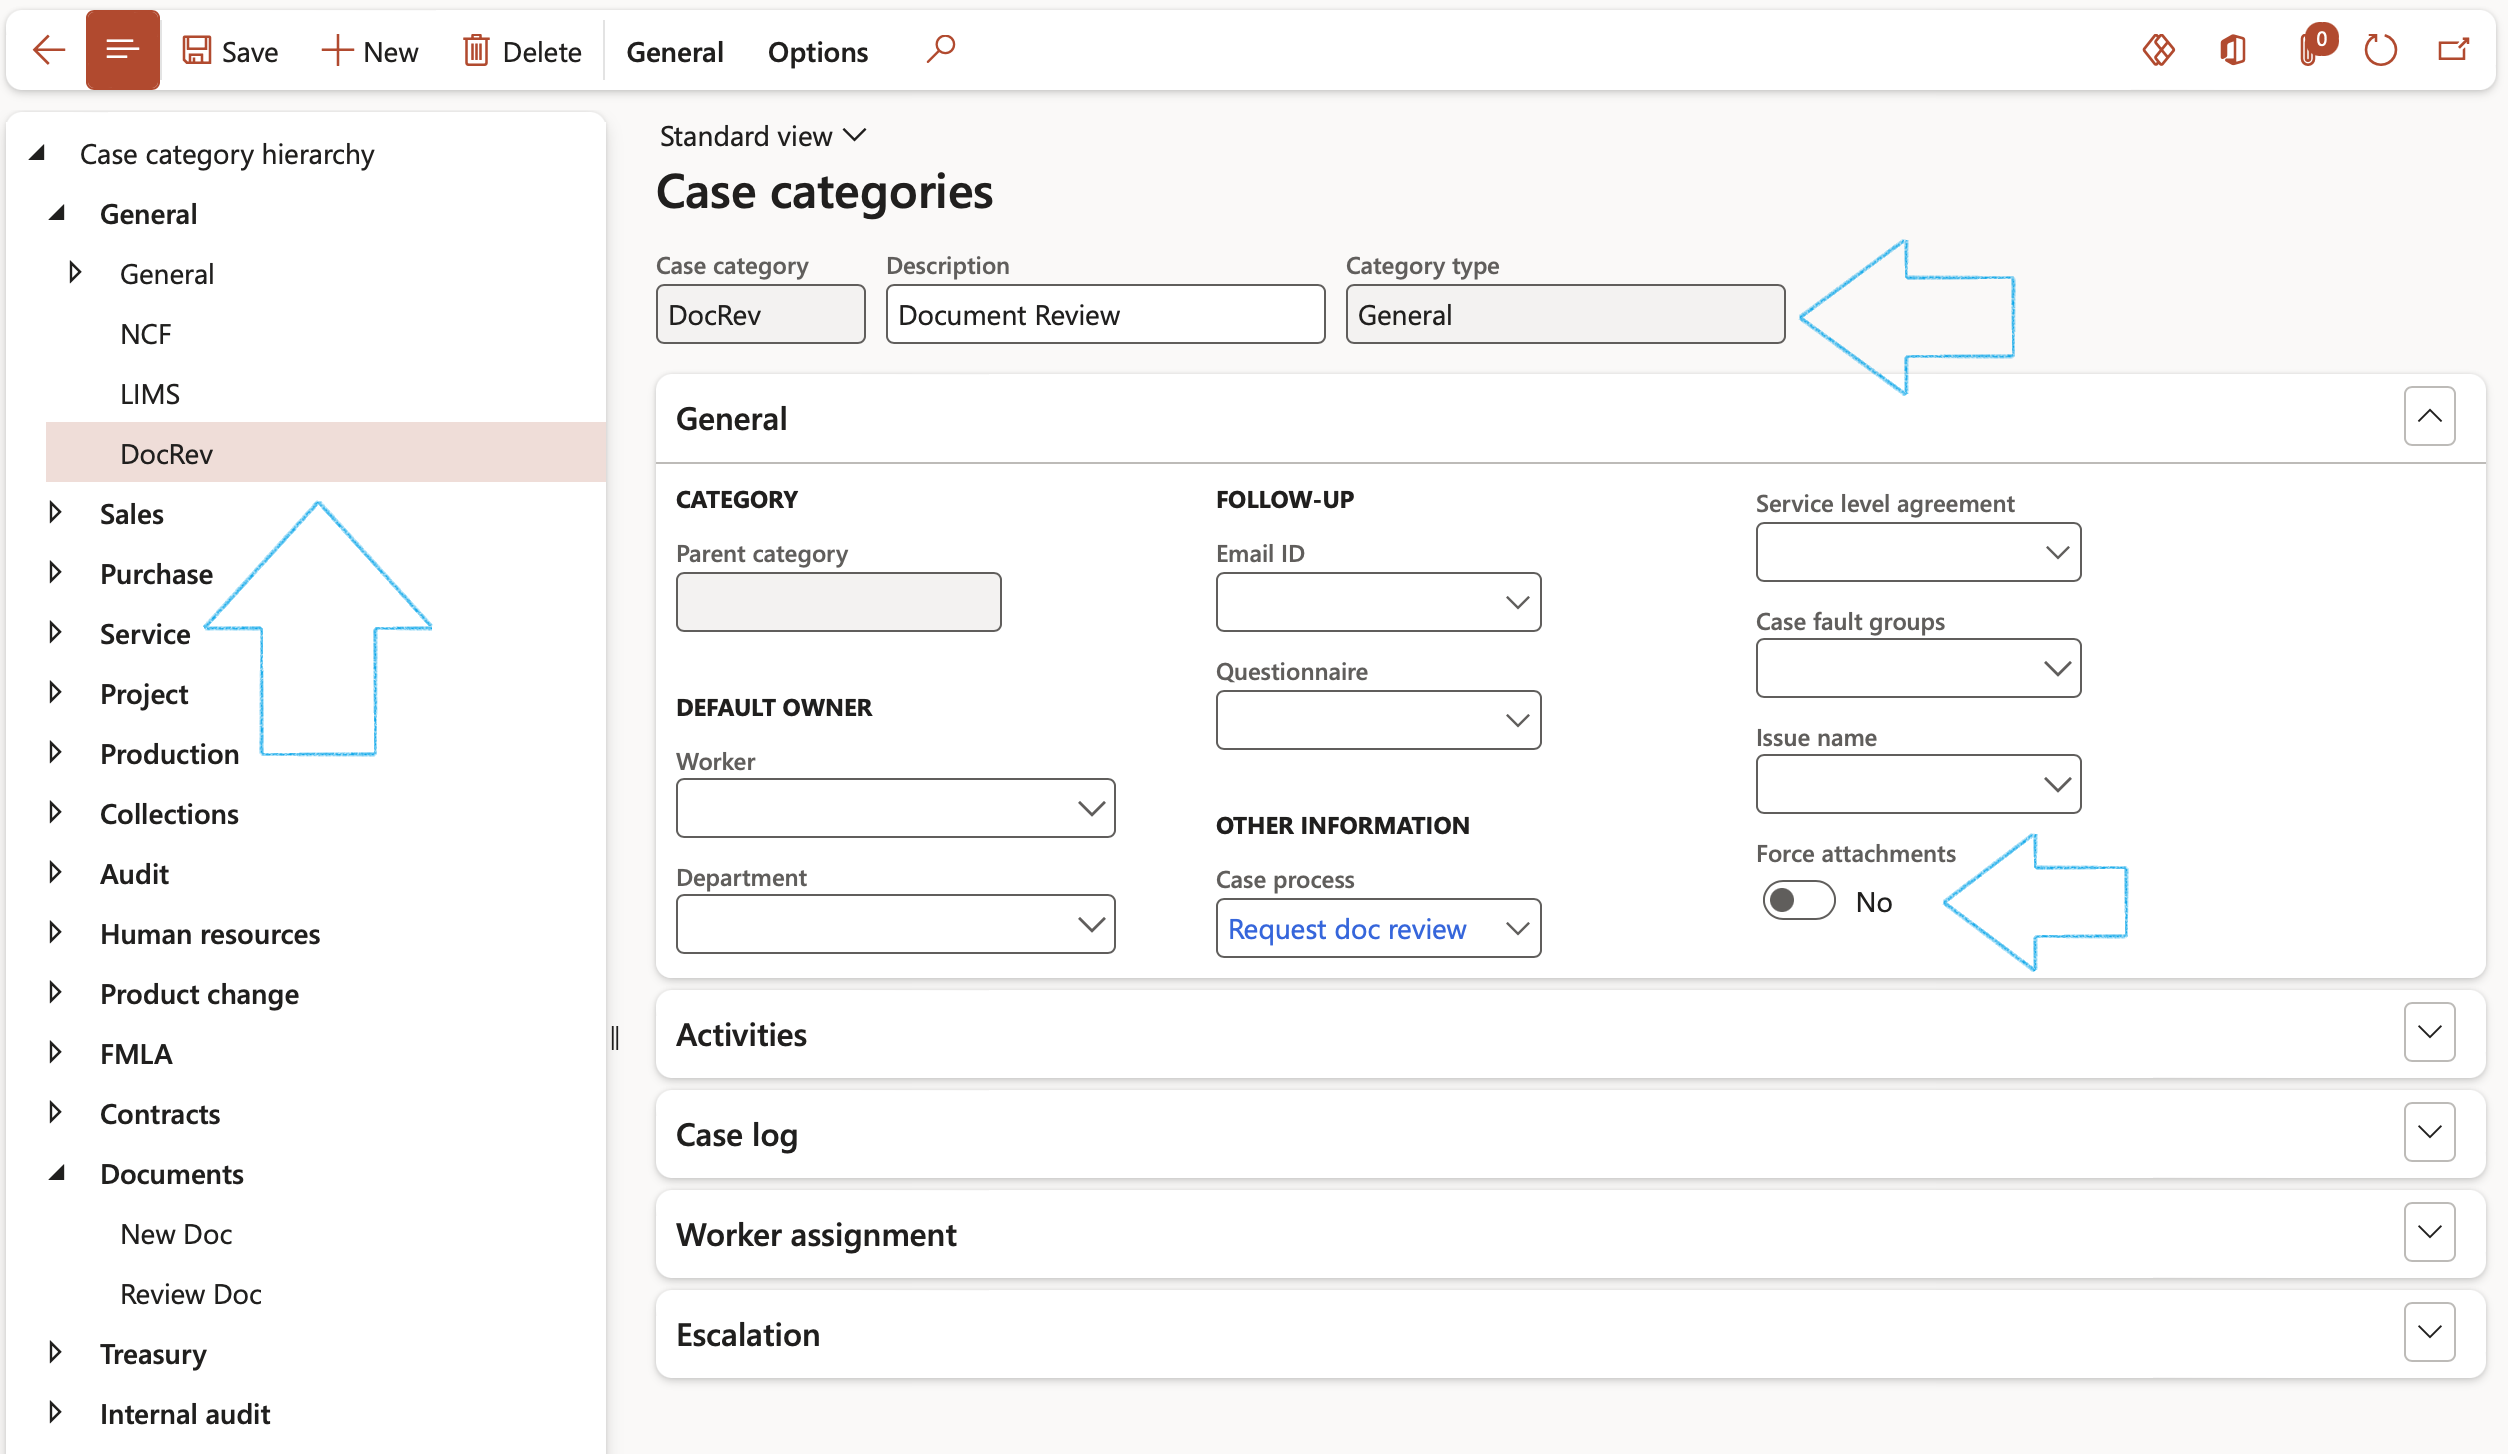
If it is required that documents have to be attached before submitting a request for a new document into workflow, select Yes under Force attachments.
A yellow warning line will appear at the top of the workflow submit dialog and the Attachments form will open
¶ Step 1.2: Setup Case category type security
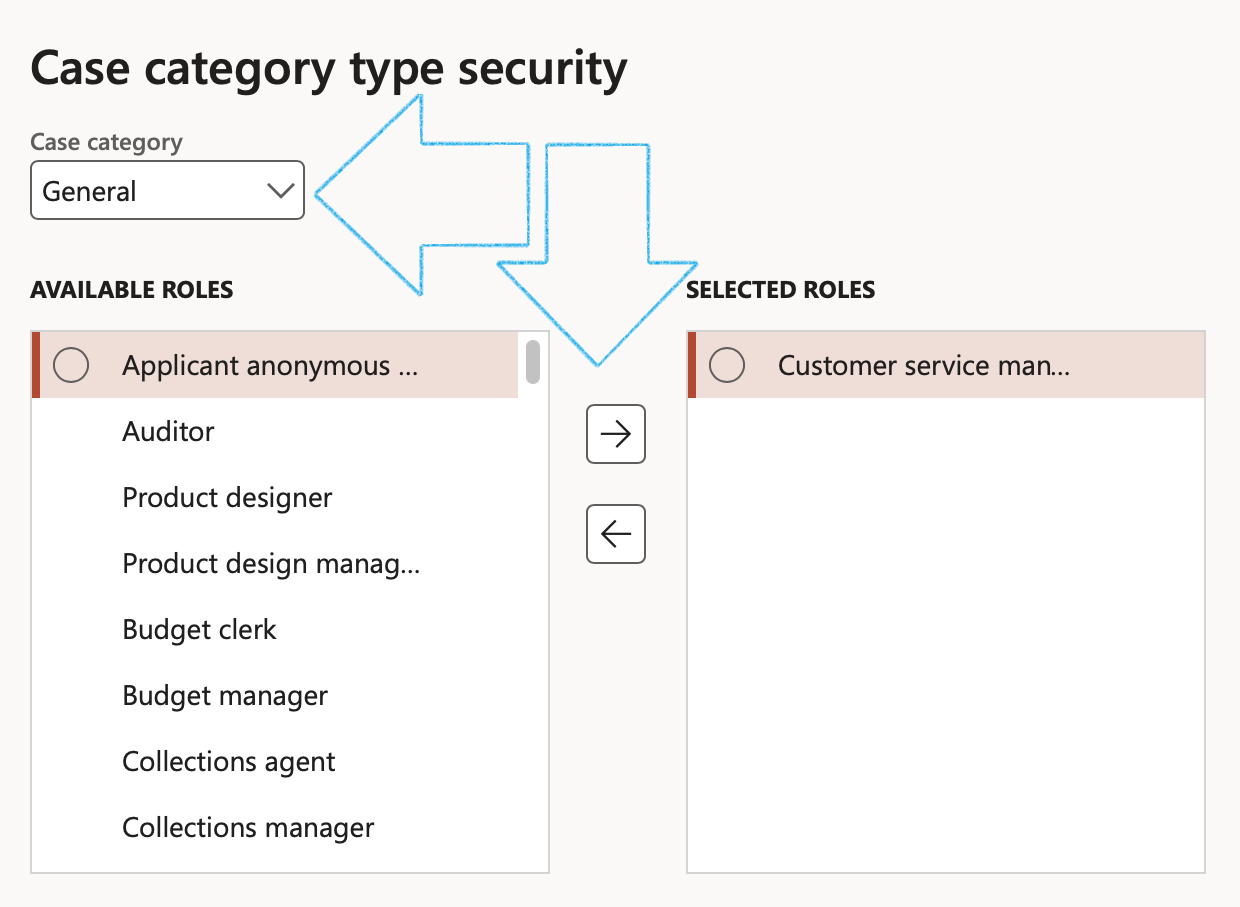
By selecting roles for the Case category type security, only users with these roles assigned to them, will have the privilege to create a New document request/Request for document review.
Go to: Organisation administration > Setup > Cases > Case category type security
- Select the required Case category from the dropdown list
- Select the required role/s from the Available roles list
- Click on the → button to move the selected role/s to the Selected roles list
¶ Step 1.3: Create Case priorities
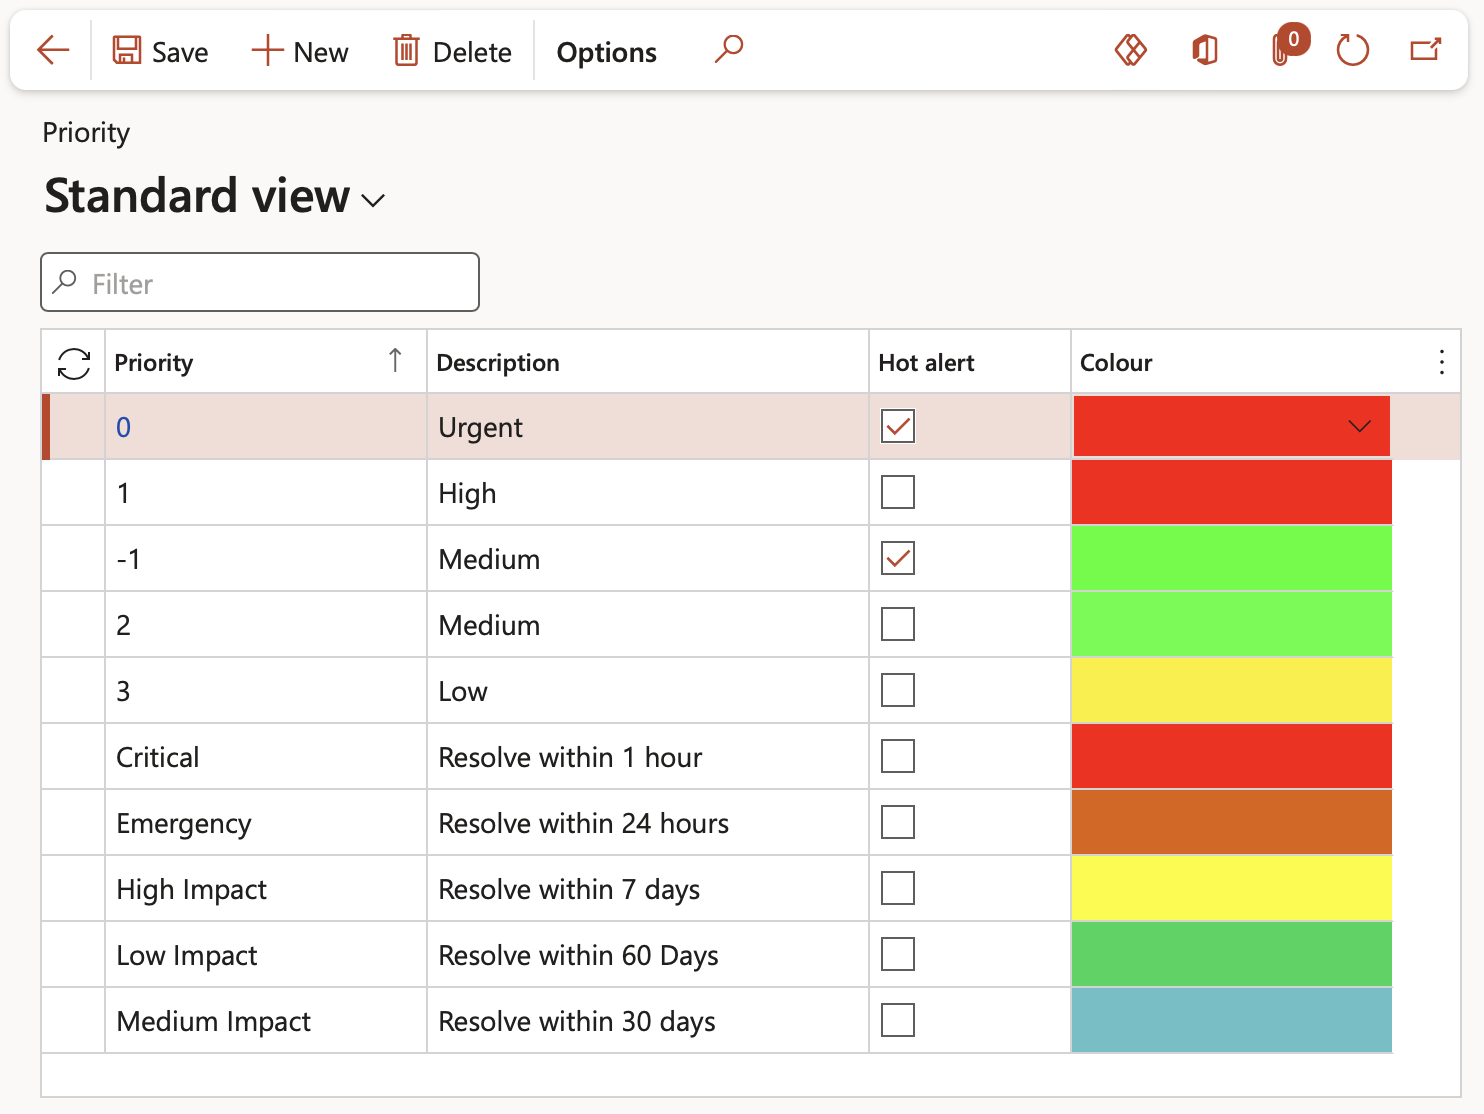
Go to: GRC > Governance > Setup for governance > Priority
- Enter a code or name for the Priority
- Enter a brief Description for the priority
- Indicate whether it is a Hot alert
- Select the relevant Colour
¶ Step 2: Setup Escalation types
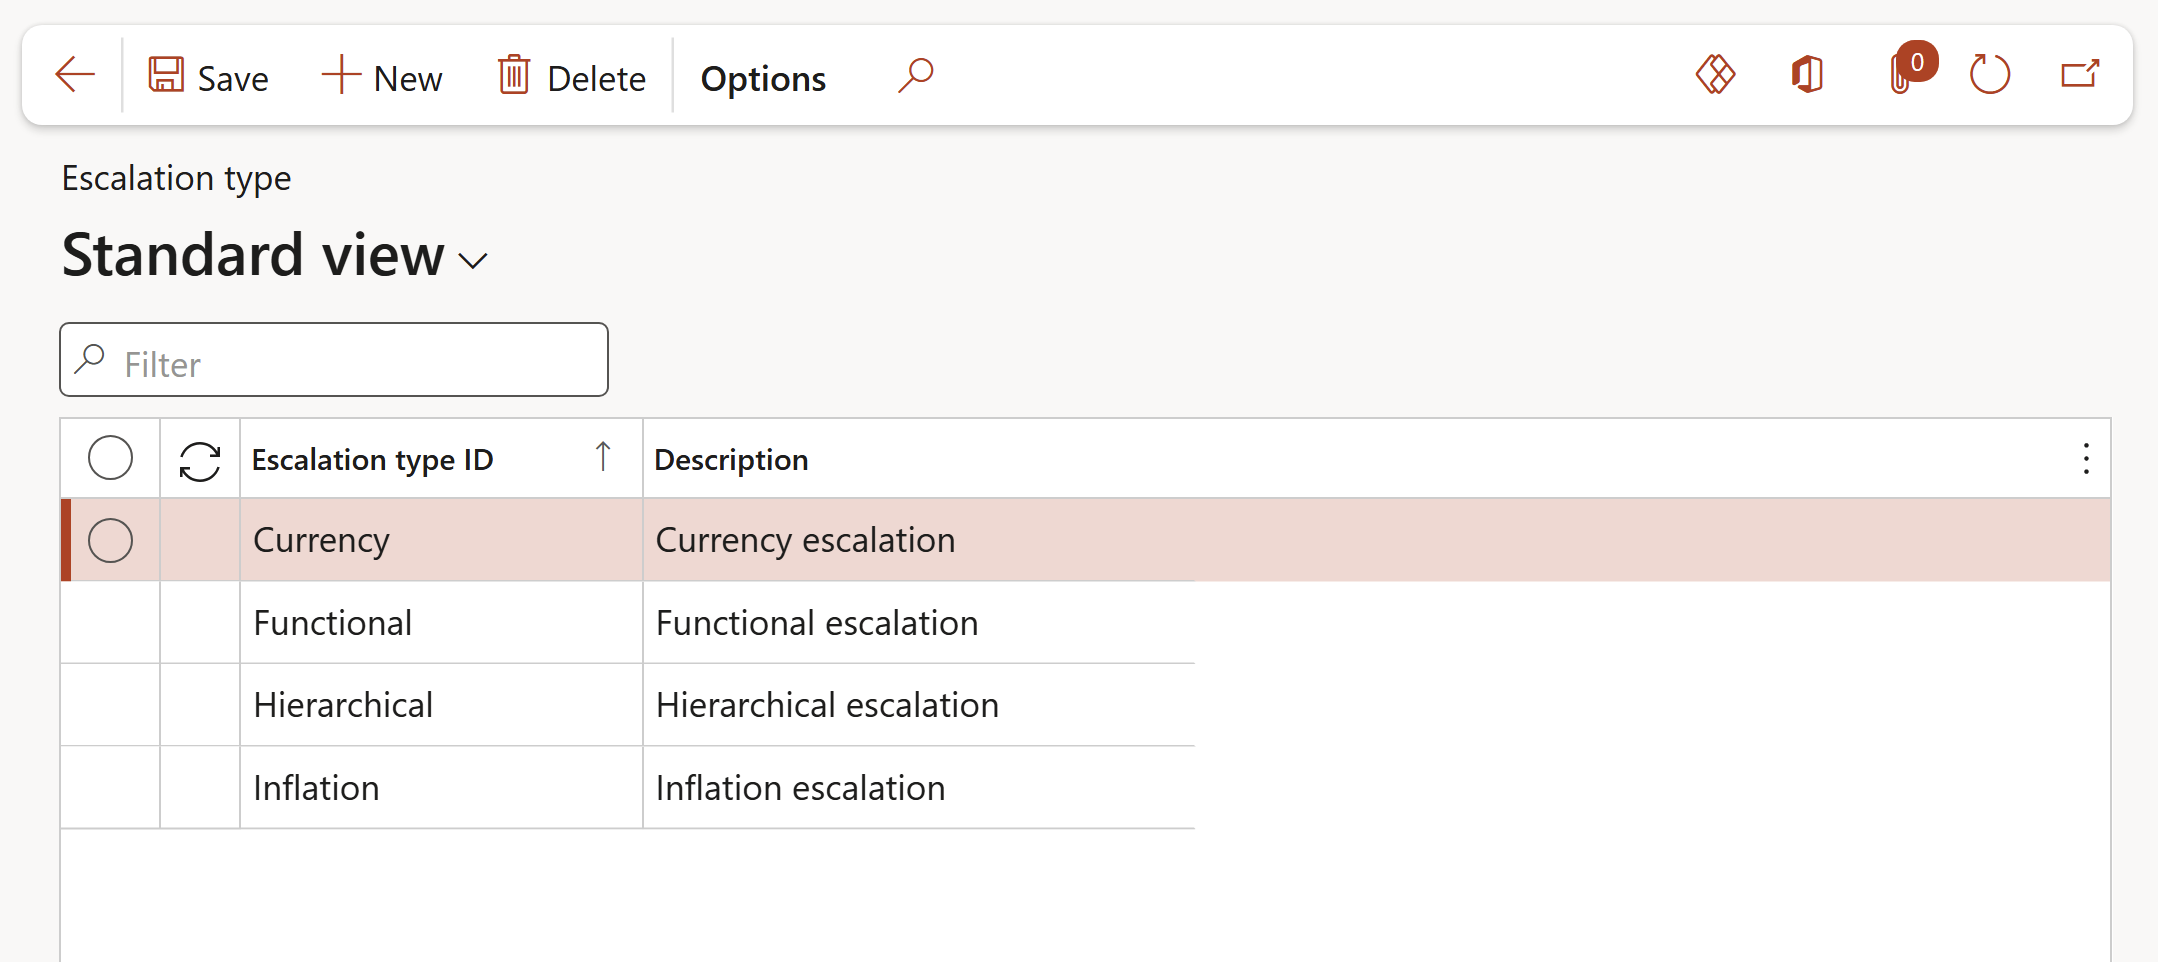
Go to: GRC > Governance > Setup for governance > Escalation type
- On the Action pane, click New button
- Enter an Escalation type ID
- Enter a brief Description of the escalation type
¶ Step 3: Setup Signature type
Signature types are used when people (workers and outside contractors) need to sign on Contracts and bids.
Go to: GRC > Governance > Setup for governance > Signature type
- On the Action pane, click on the New button
- Under the Signature type Index tab:
- Enter a unique Signature type ID
- Enter a brief Description for the signature type
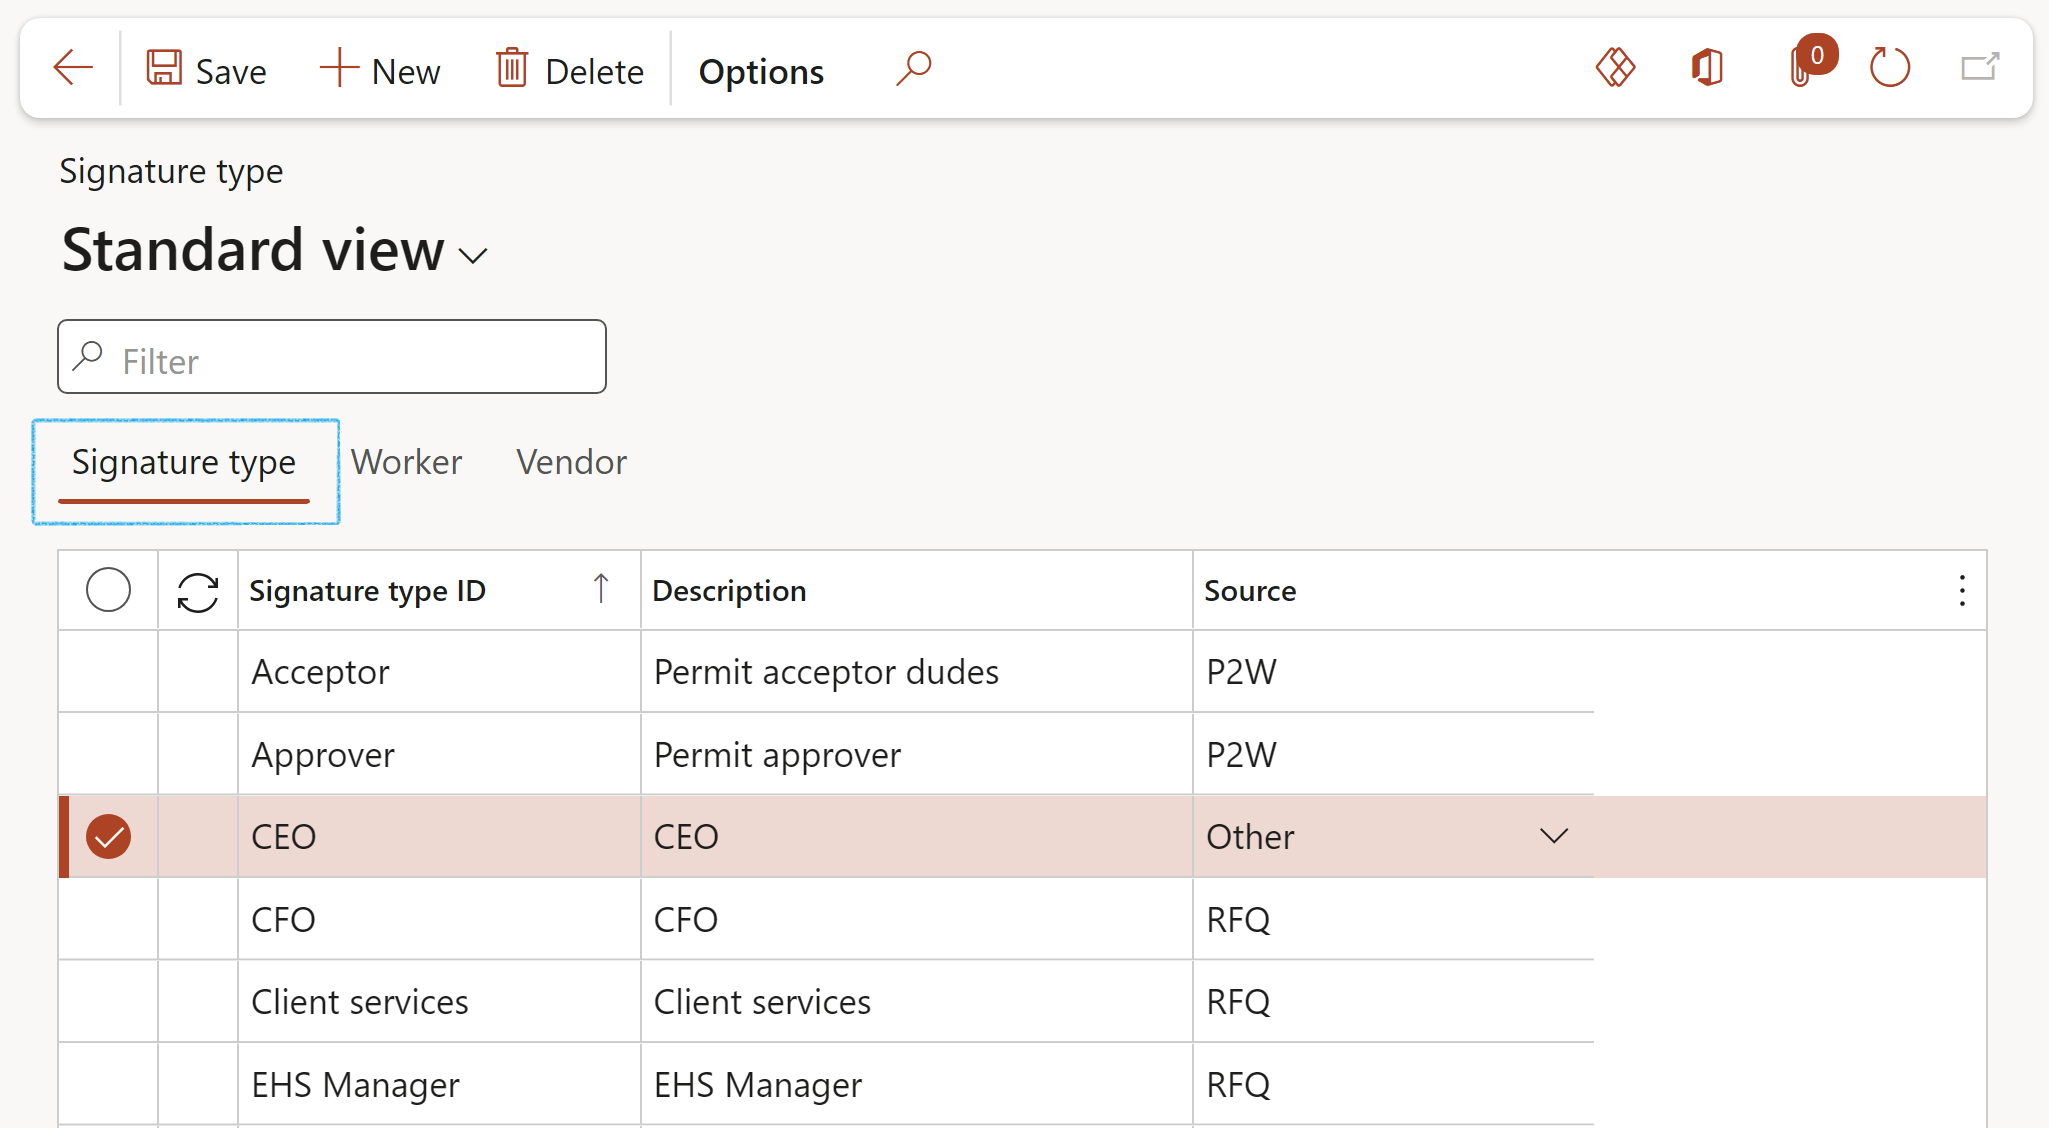
- Select the Signature type that you want to add workers to
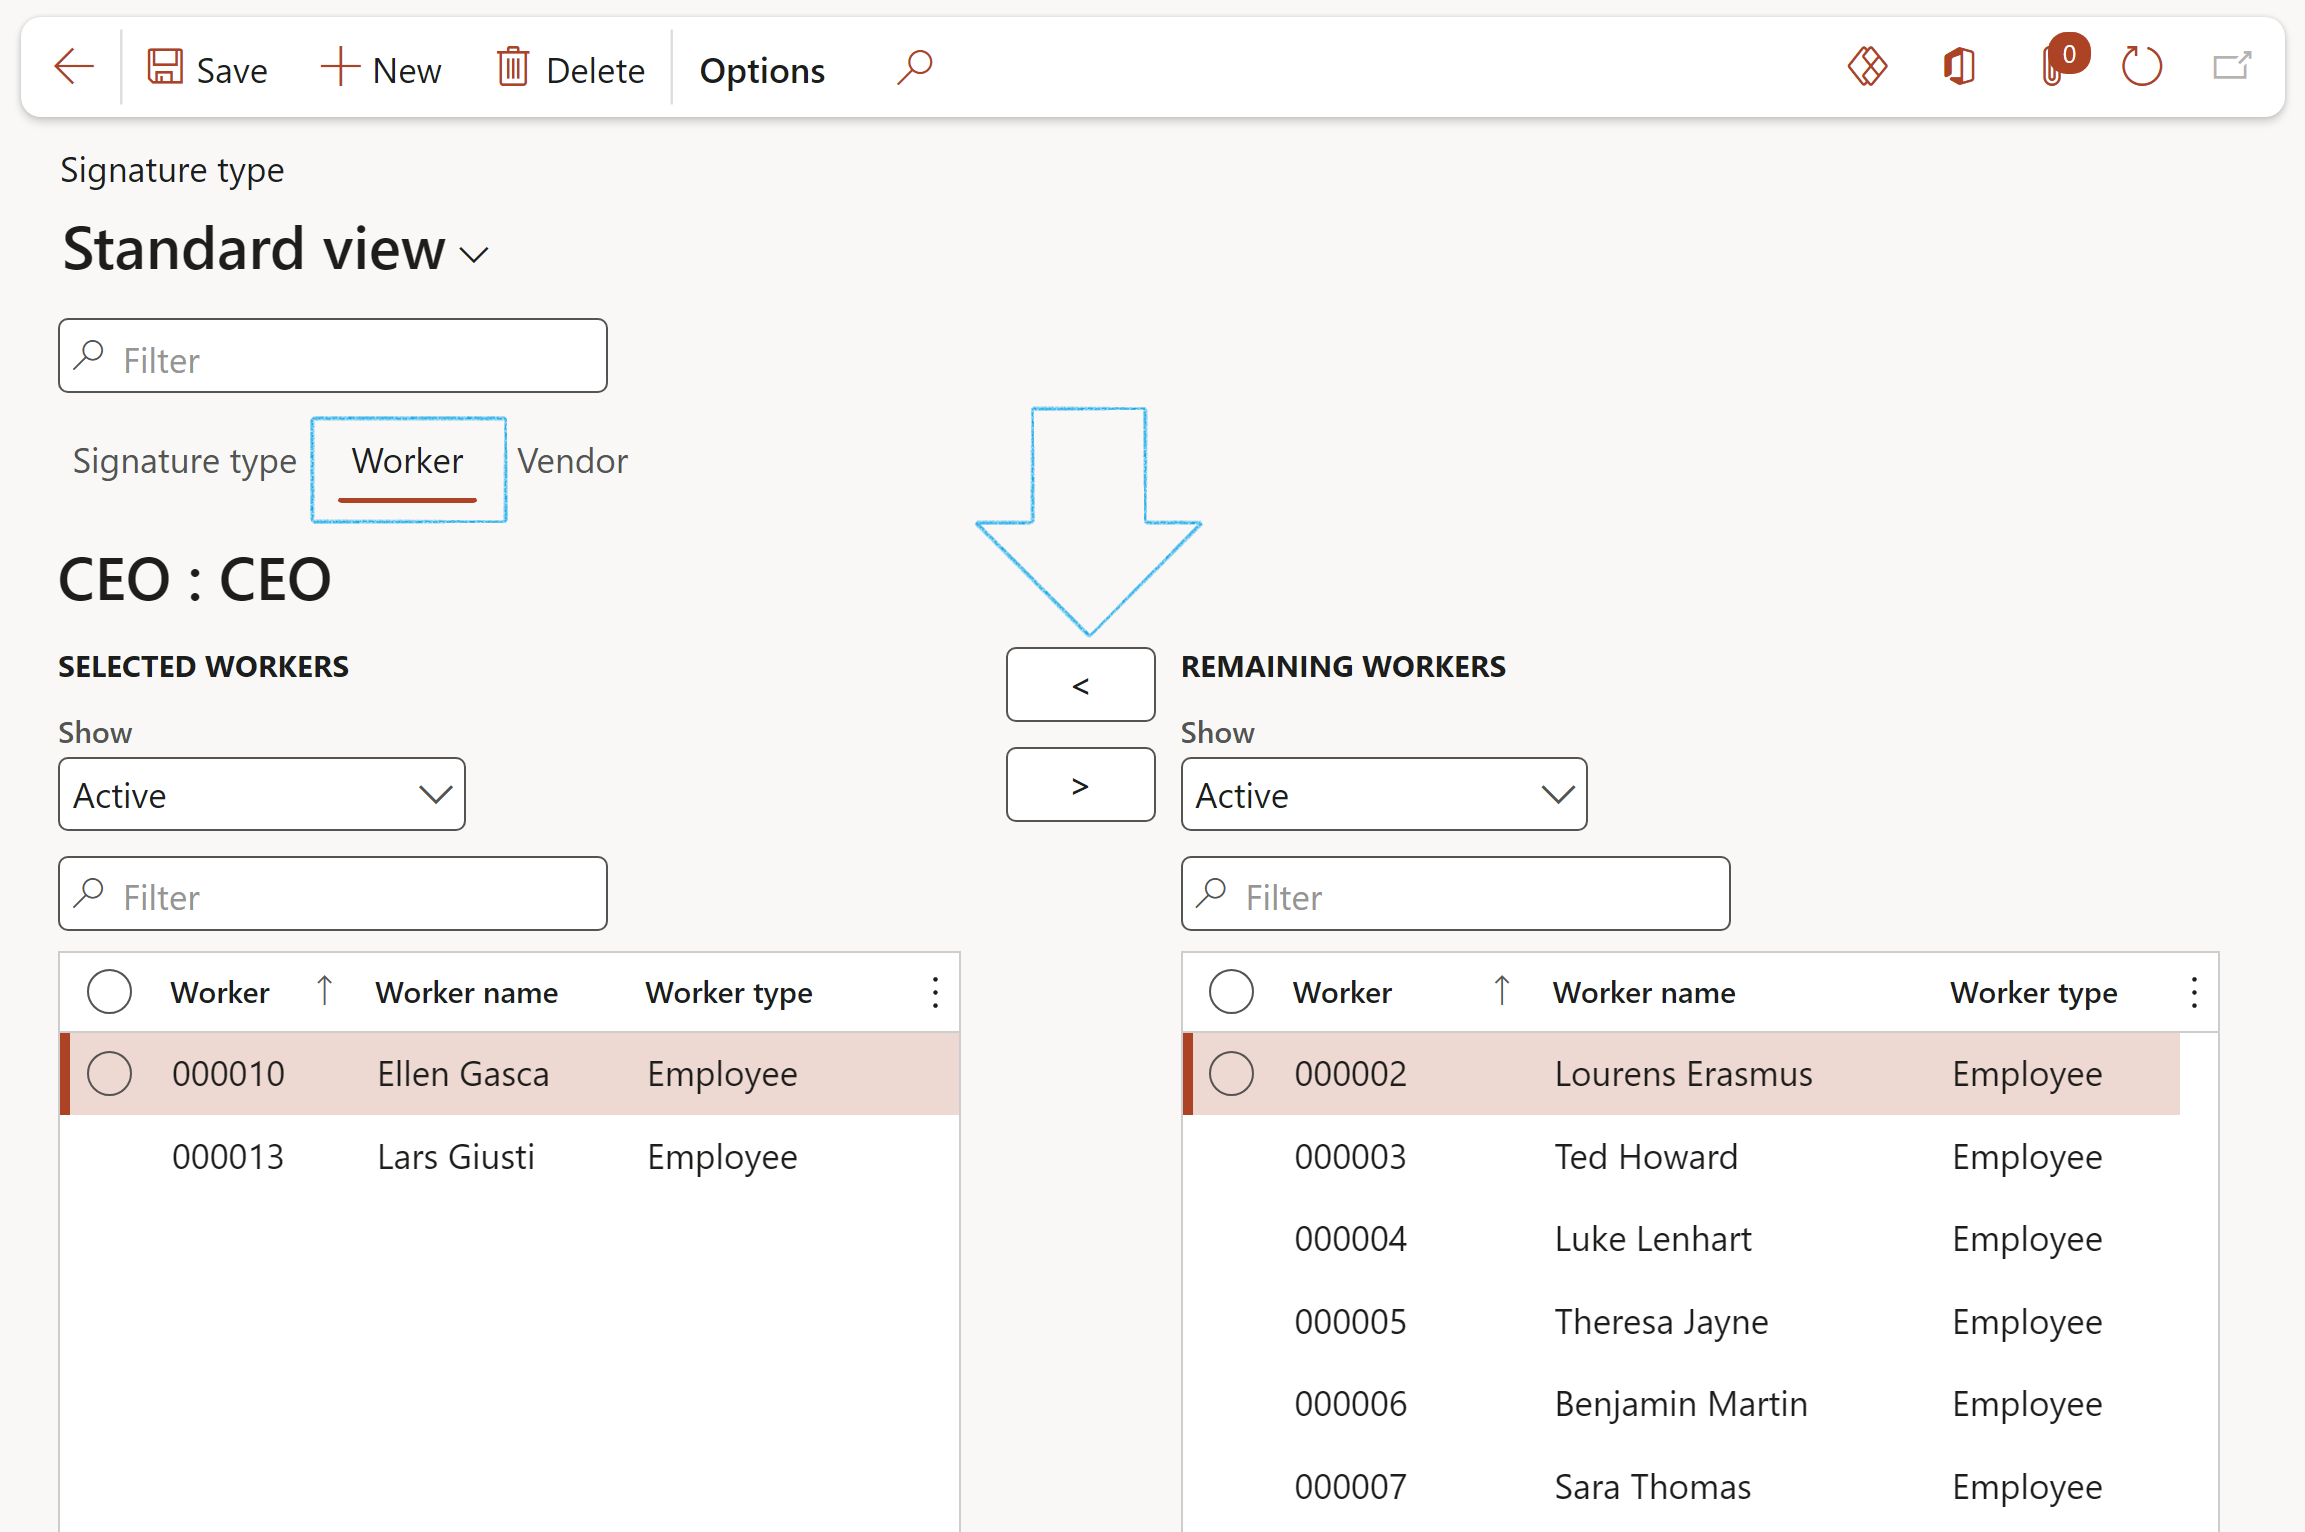
- Open the Worker Index tab:
- In the Remaining workers column, select the Worker that you want to link to the Signature type
- Click on the < button to move the Worker across to the Selected workers column
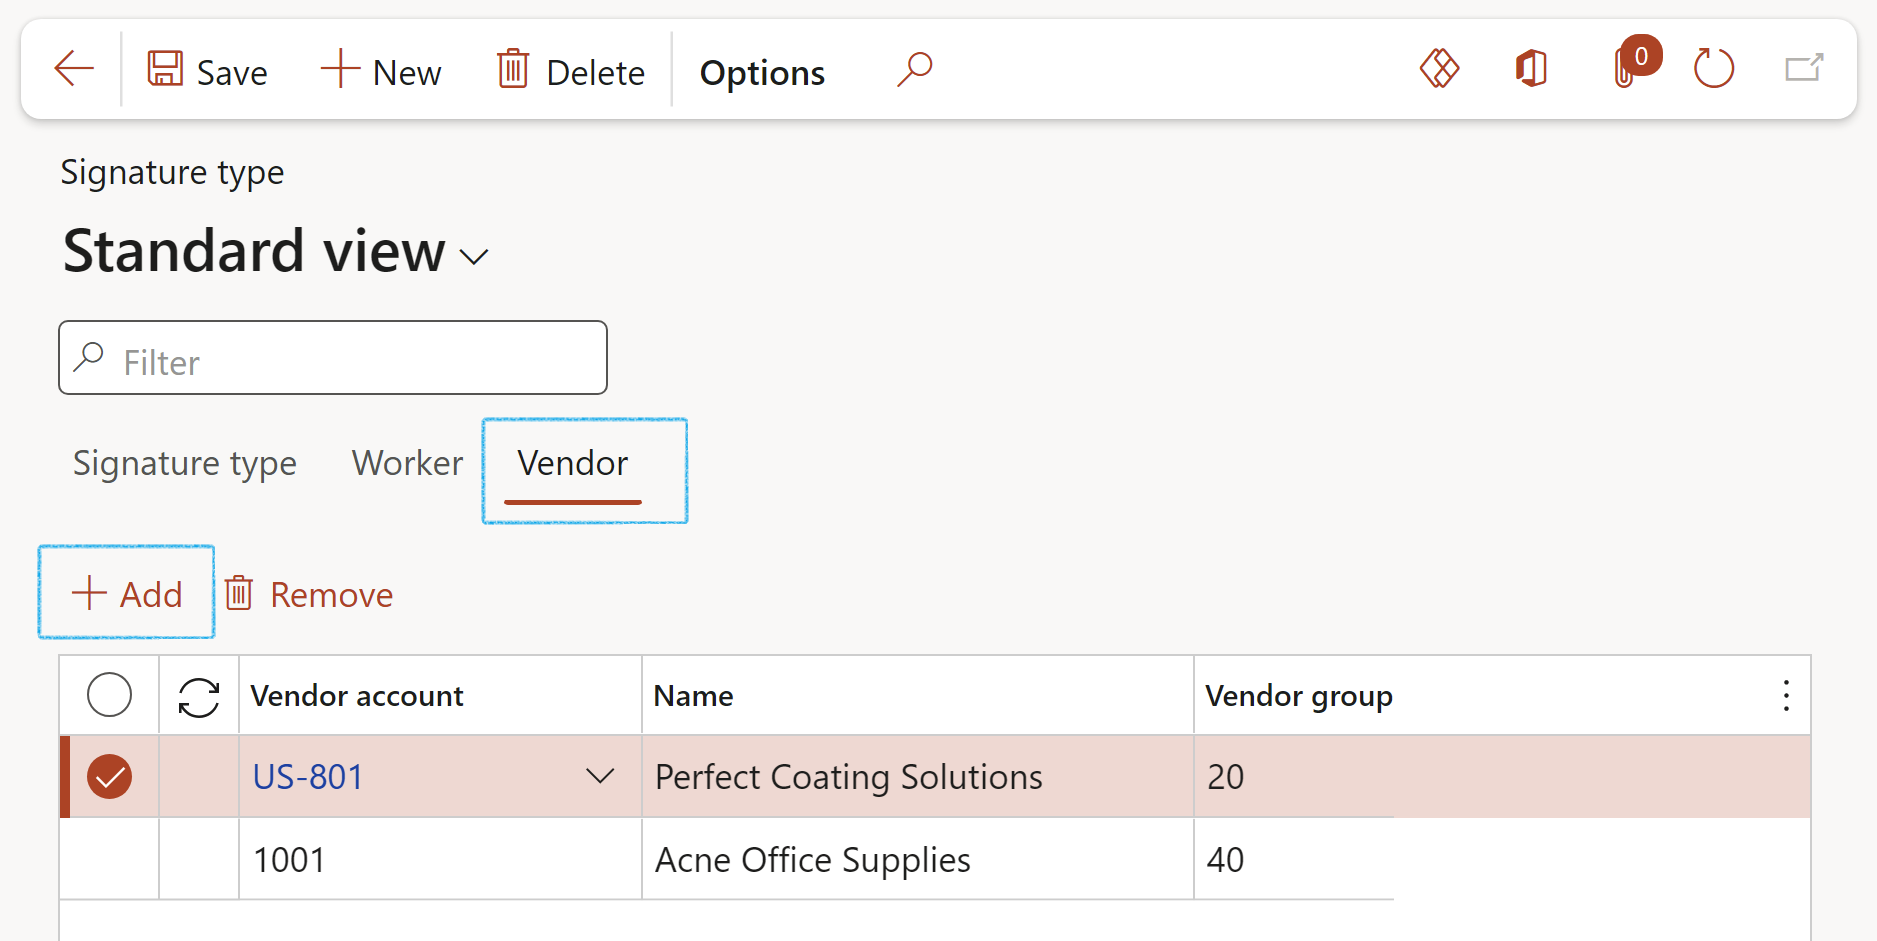
- Select the Signature type that you want to add vendors to
- Open the Vendor Index tab:
- In the Button strip, click on the Add button
- Select the relevant Vendor account from the dropdown list
Only workers/vendors that have been linked to a Signature type can be selected under the Sign off Fast tab on the Document
¶ Step 4: Setup Reporting agency
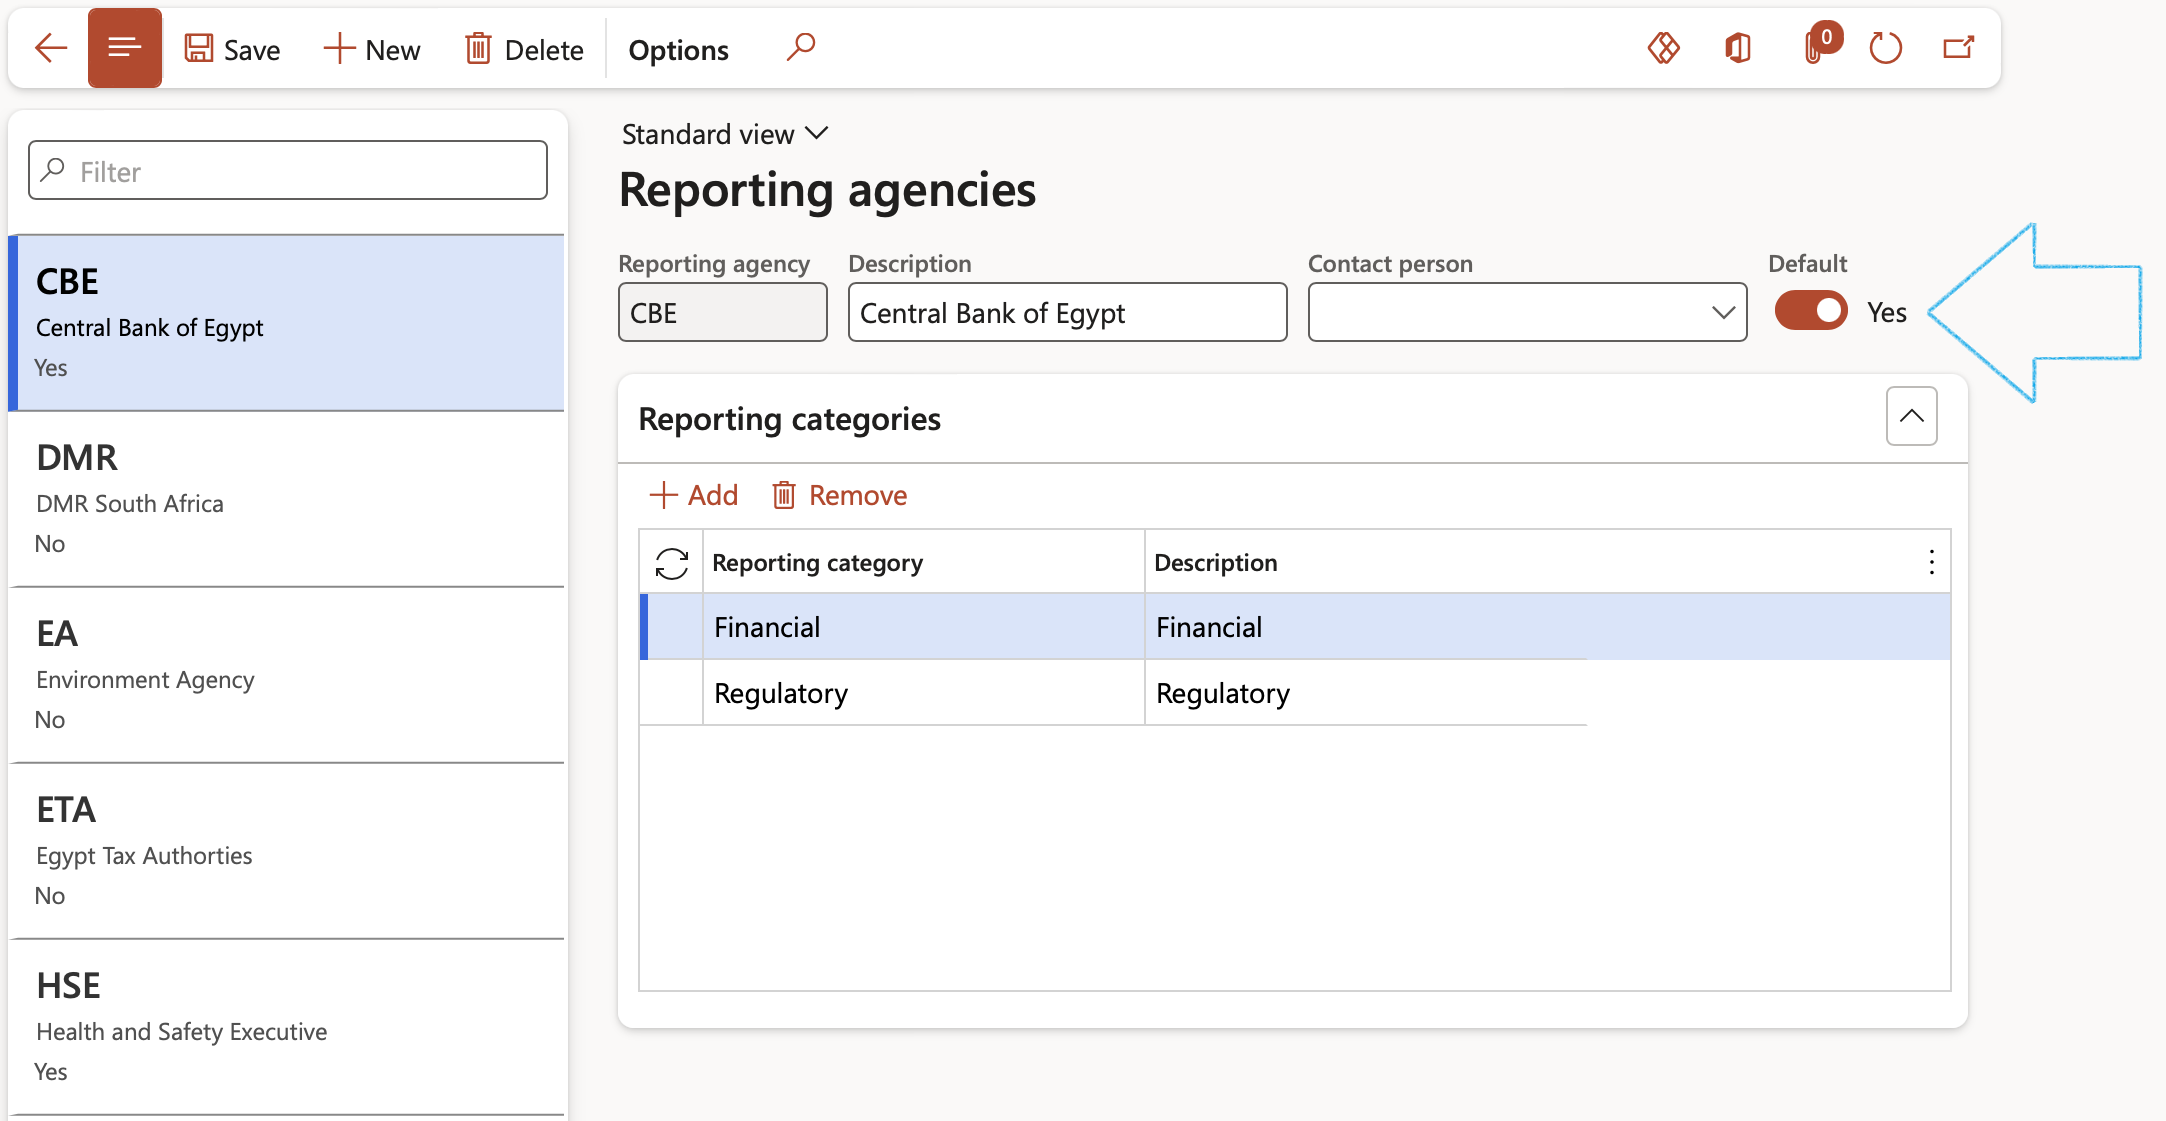
Go to: GRC > Governance > Setup for governance > Reporting agencies
- On the Action pane, click on the New button
- Enter a Reporting agency name
- Enter a brief Description
- Indicate whether this is a default Reporting agency
- Expand the Reporting categories Fast tab
- In the Button strip, click on the Add button
- Enter a Reporting category
- Enter a brief Description
¶ Step 5: PDF integration parameters
Go to: GRC > Setup > Governance, Risk and Compliance parameters
- Under the General tab, under the Integration Fast tab, click on the Interfaces button
- Under the PDF signatures Fast tab, click on the New button
- Enter a Name for the new set of parameters
- Enter an external integration Account ID. This will be provided on the PDF integration provider account details page.
- Select the Default box if the new set of parameters should be used for PDF integration services
- Enter an external integration Authorisation server. This will be provided on the PDF integration provider account details page.
- Enter an external integration Client ID (Integration key). This will be provided on the PDF integration provider account details page once a new integration has been created.
- Enter an external integration User ID. This will be provided on the PDF integration provider account details page.
- Enter an external integration Redirect URL. This will be provided on the PDF integration provider account details page.
- Enter an external integration Base path. This will be provided on the PDF integration provider account details page.
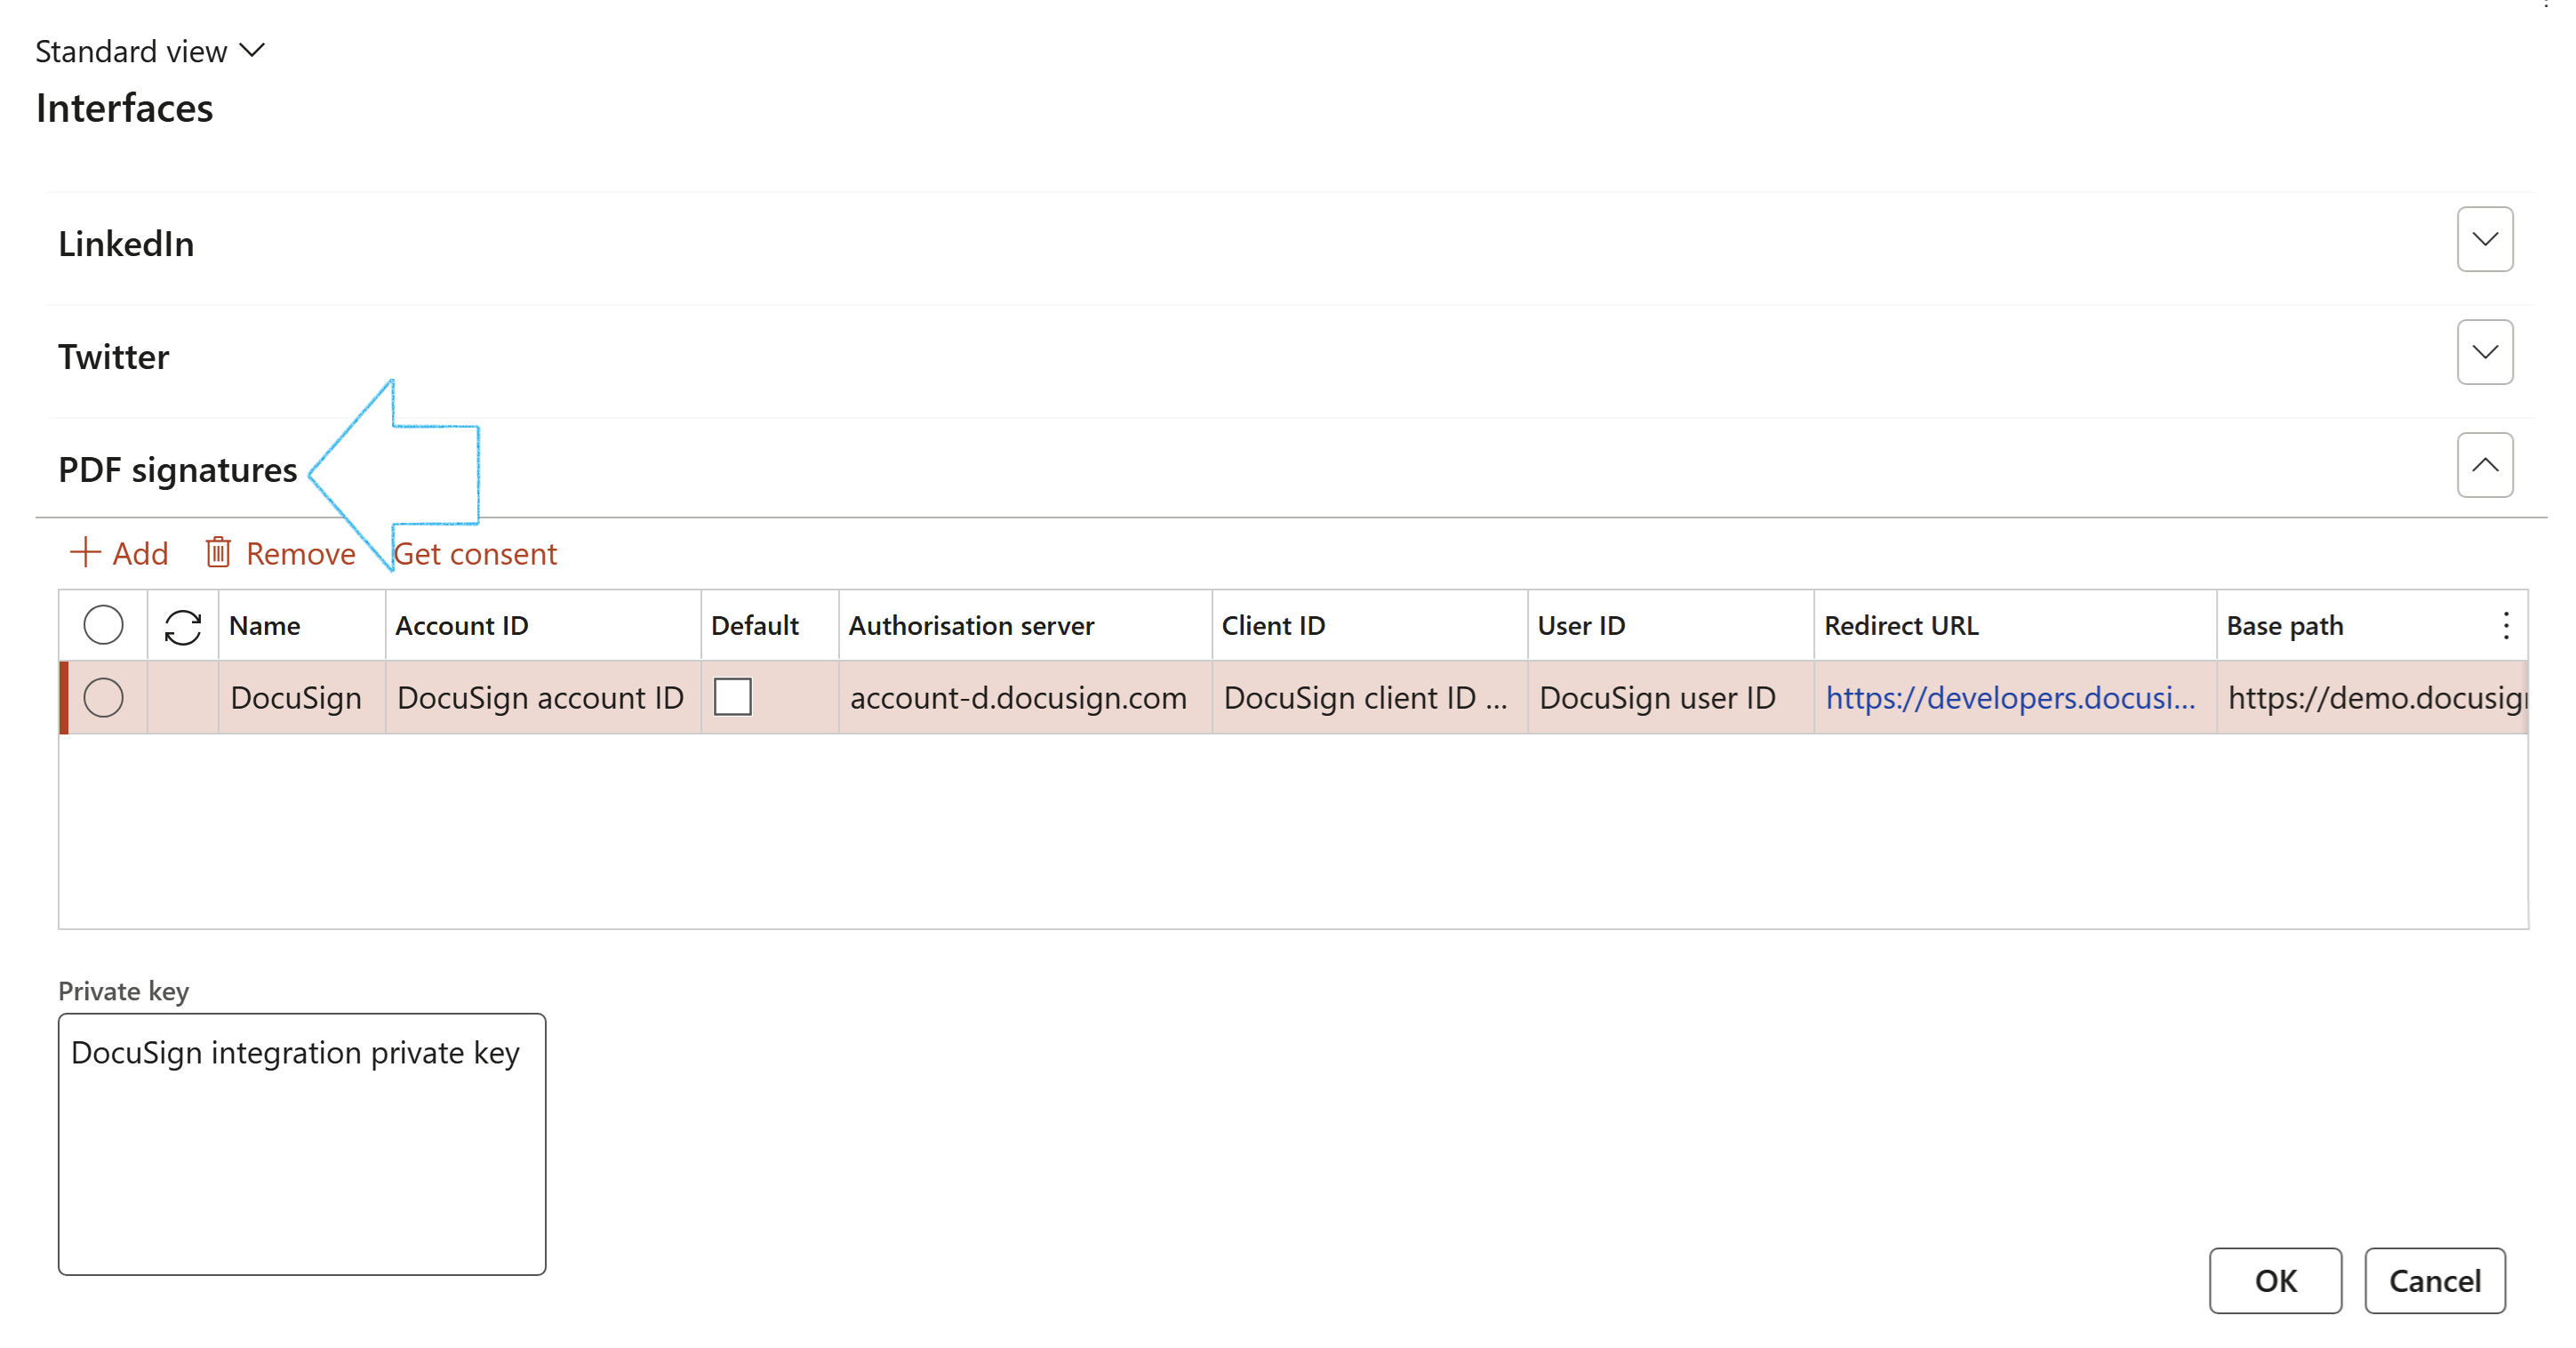
Please note that the person or document controller who will be facilitating the signing process within the PDF provider ecosystem, will have to create a developer account to allow access to the PDF provider API.
¶ Step 6: Integration template for PDF services
Go to: GRC > Governance > Setup for governance > Integration template for PDF services
- In the Action pane, click on the New button
- Enter a Template ID
- Enter a brief Description of the template
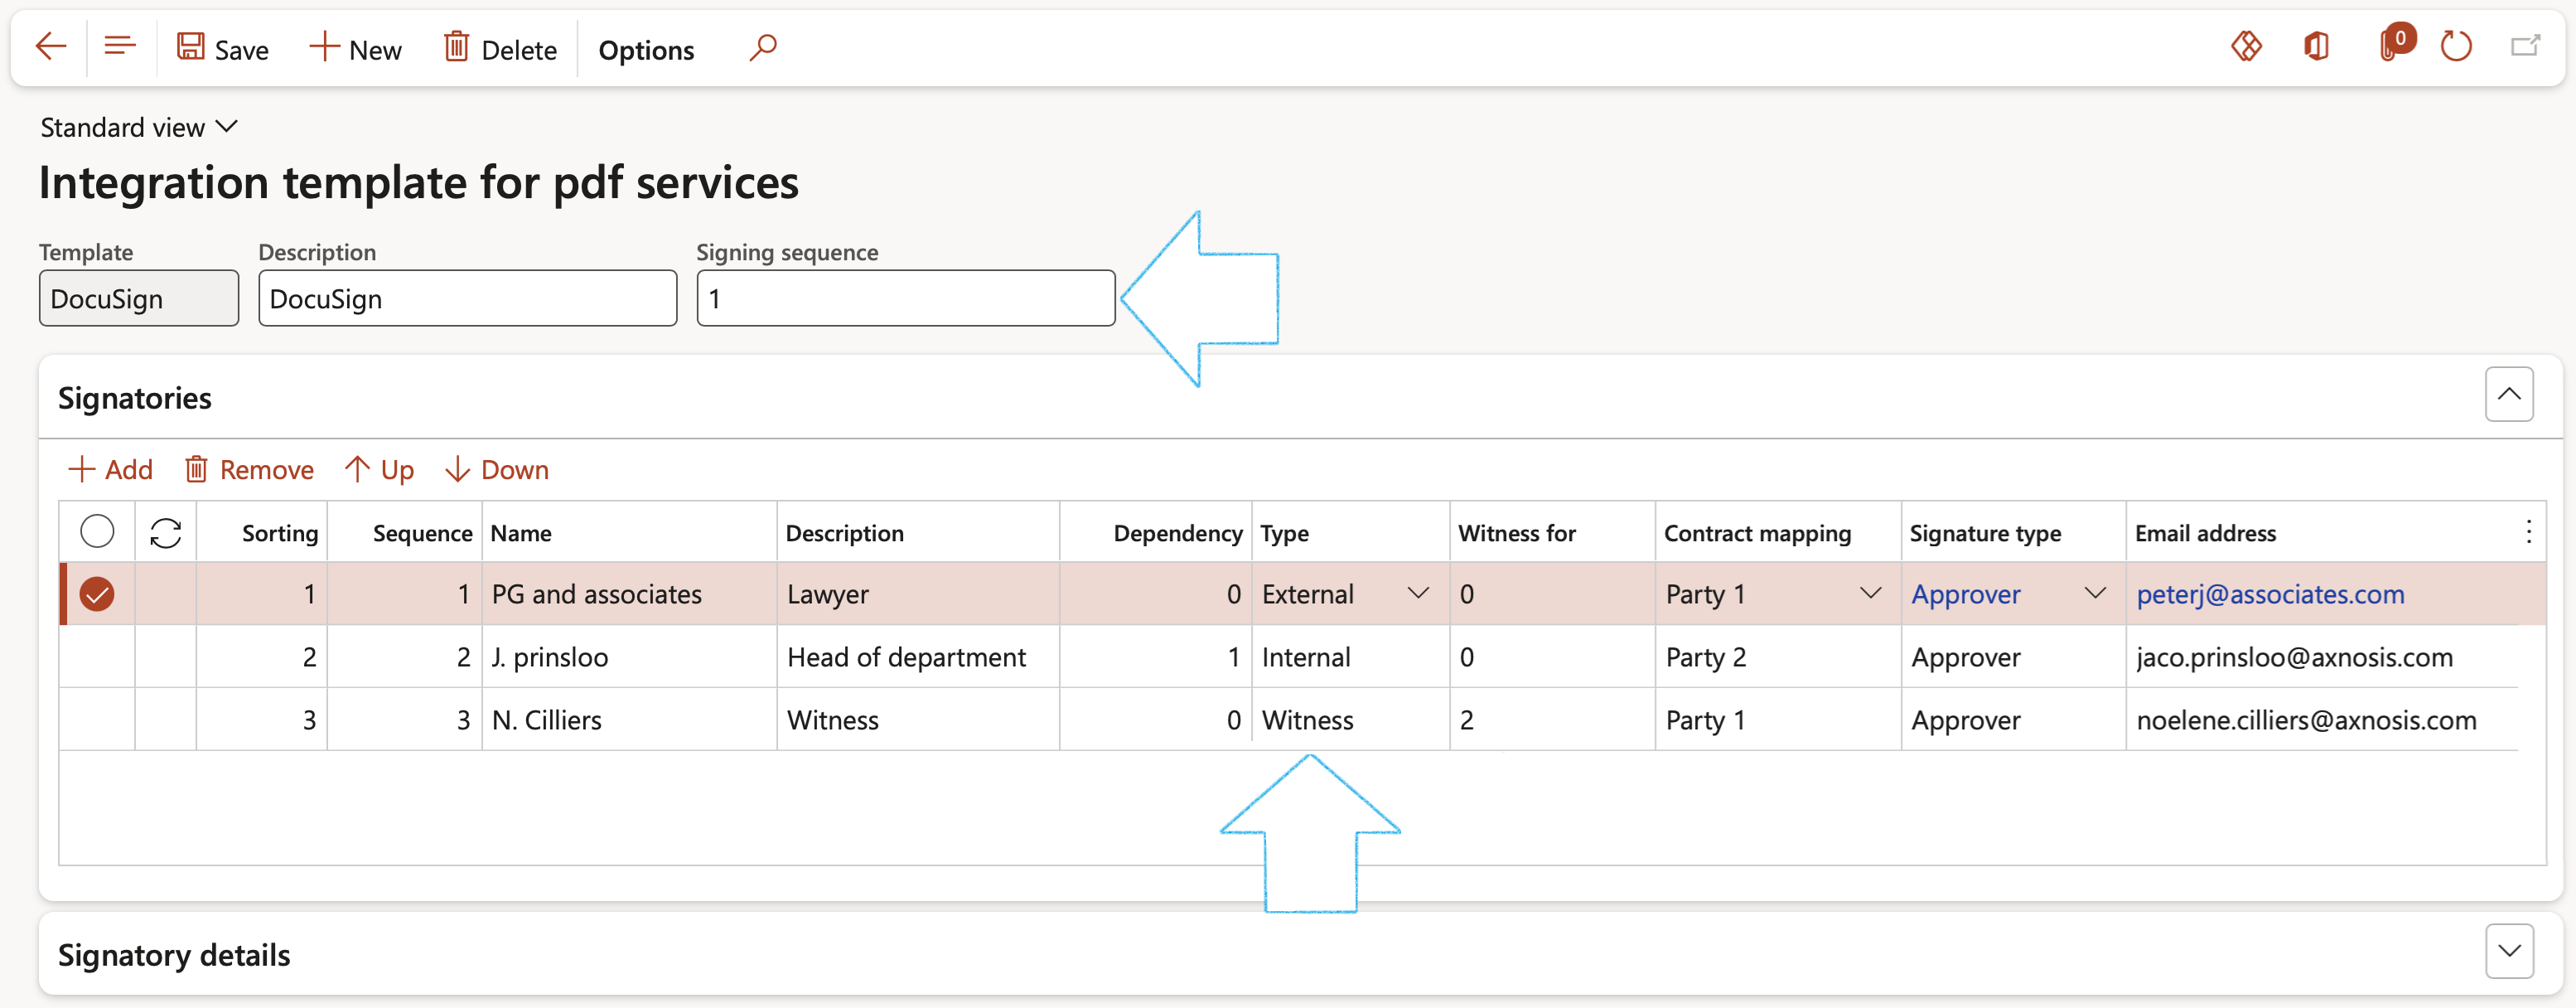
- Enter the Signing sequence
- Under the Signatories Fast tab:
- Click on the Add button
- The system will assign a unique identified in the Sorting column
- Enter a value (the routing order for the recipient signing sequence) in the Sequence column
- Enter the Name of the recipient
- Enter a brief Description of the Signatory (Role name of the recipient)
- Enter the value of the Dependency of the Signatory (Sorting number)
- Select the Type of Signatory from the dropdown list
- If Witness is selected in the Type column, enter the Sequence number of the signatory for whom the witness has to sign, in the Witness for column
- Select the relevant Contract mapping from the dropdown list (For GRC Contracts)
- Select the relevant Signature type from the dropdown list
- Enter the Email address where the document has to be sent to for signing
- Under the Signatory details Fast tab:
- Click on the Add button
- Enter an identifier for the Tag
- Select the Position on the page for the tag
- Enter the Anchor string for the tag
- Enter the X and Y axes for the tag
- Enter the Unit of measure to be used for the measurements for the placements of the tags
- In the Page column, indicate whether the tag should be on all, or only on a specific page number
- Enter the Page number for the tag
The Signatory details are entered for the selected record under the Signatories Fast tab

¶ Daily use
¶ Step 7: Creating documents
¶ Step 7.1: Document standard clauses
Standard clauses and standard terms and conditions are approved and then grouped. These groups of clauses and T&C's can then be used to create a document with only a few clicks.
Go to: GRC > Governance > Setup for governance > Standard clauses
- On the Action pane, click on the New button
- Enter a Standard clause ID
- Enter a brief Description
- Select the relevant Heading for the clause (Heading 1 for a primary heading, Heading 2 for a secondary heading)
- If this is a secondary clause, select the relevant Parent clause form the dropdown list
- Select the relevant Status from the dropdown list
- Under the Overview Fast tab, enter the clause details

If the Status of the clause is Approved, the record will be locked
Only Approved clauses can be selected on the Other documents
¶ Step 7.2: Record standard terms and conditions
Go to: GRC > Governance > Setup for governance > Standard terms and conditions
- On the Action pane, click on the New button
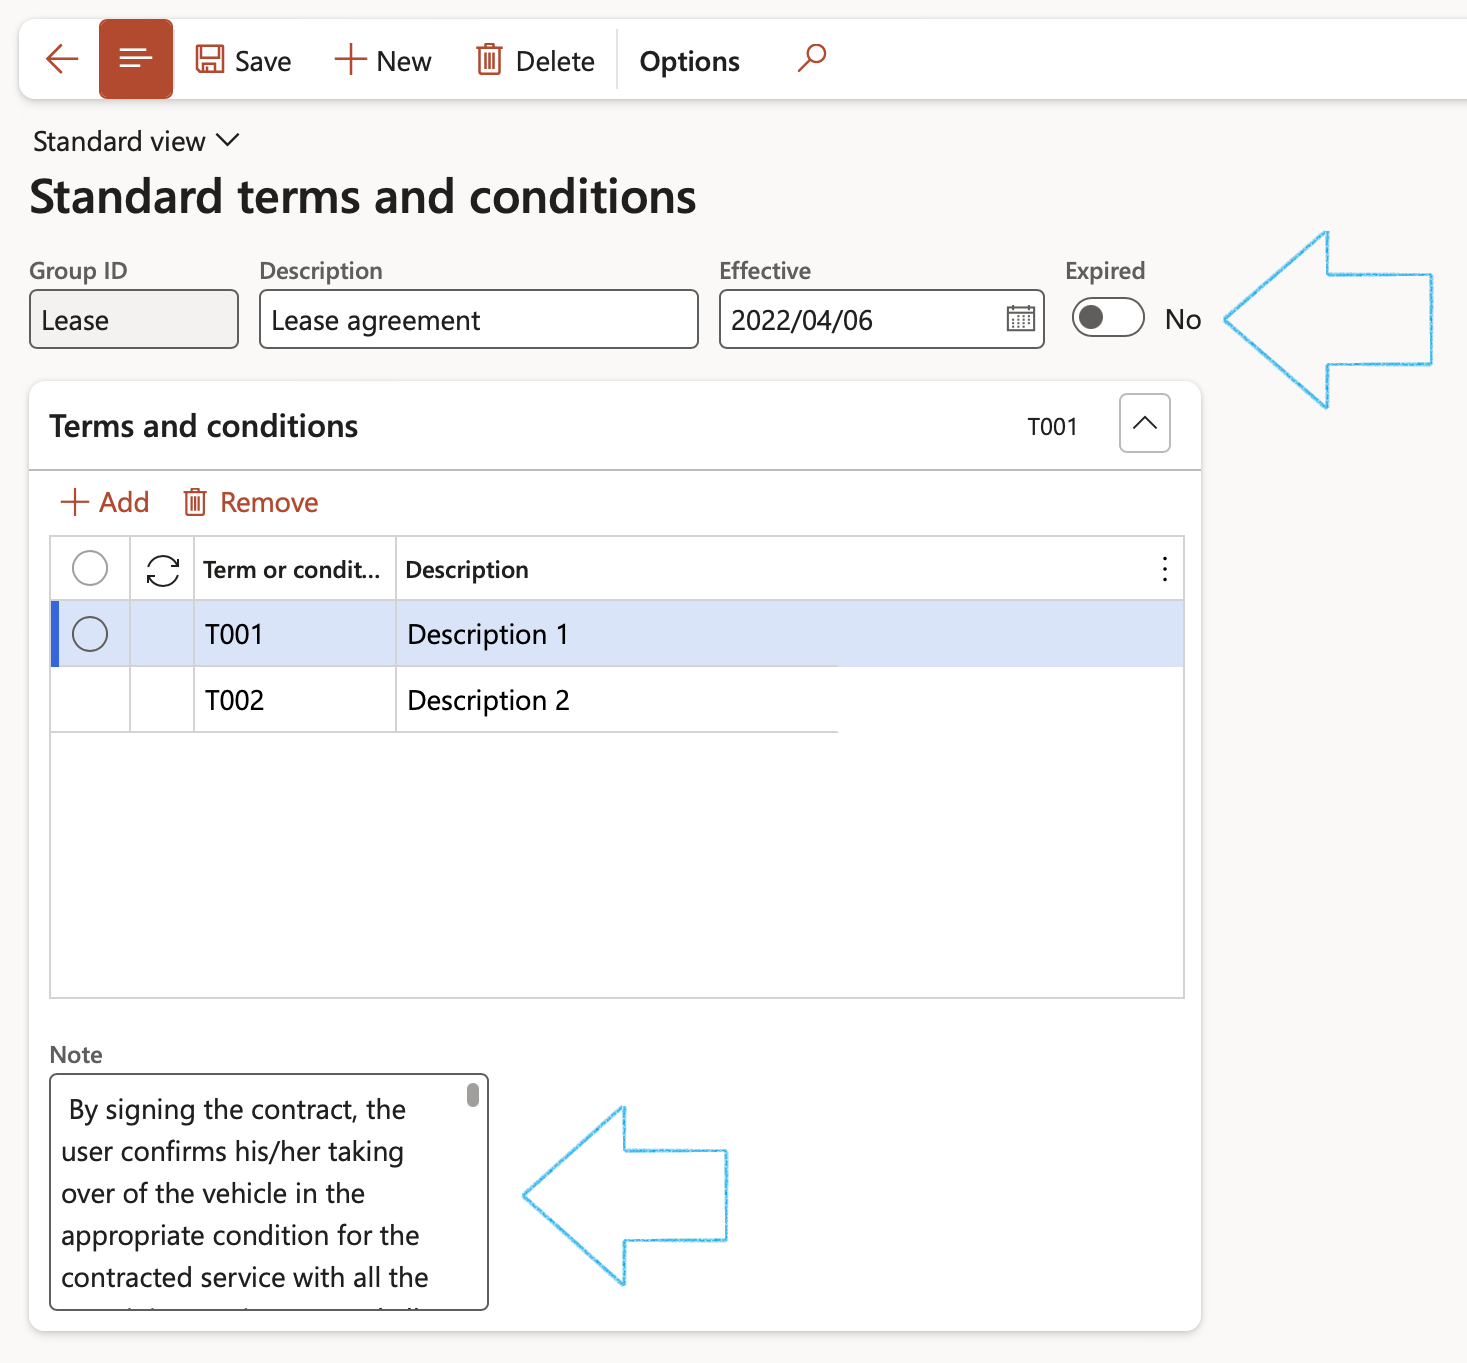
- Enter a Group ID for the standard terms and conditions
- Enter a brief Description
- Enter the Effective date of the standard terms and conditions
- Under the Terms and conditions Fast tab, click on the Add button
- Enter the Term or condition ID
- Enter a Description of the term or condition
- Enter additional Notes in the box provided
¶ Step 8: Grouping docs into a document pack
A Document pack is used to group multiple documents together. These documents normally support contracting activities. For example, when a set of templates are needed for a purchase, they can be referenced in the contract by using a Document pack. Additionally, a list of recipients can also be added to the pack. This is useful when a set of documents must be sent to a bid committee meeting.
Go to: GRC > Governance > Setup for governance > Document pack
- On the Action pane, click on the New button
- In the Document pack ID field, enter a name and enter a Description
- A SharePoint URL can be entered
- Indicate whether the record should be published to the portal
- Expand the Recipients Fast tab and click on the Add button
- Select the Workers that you want to send the Document pack to
- Expand the Related documents Fast tab to view the documents related to the selected Document pack
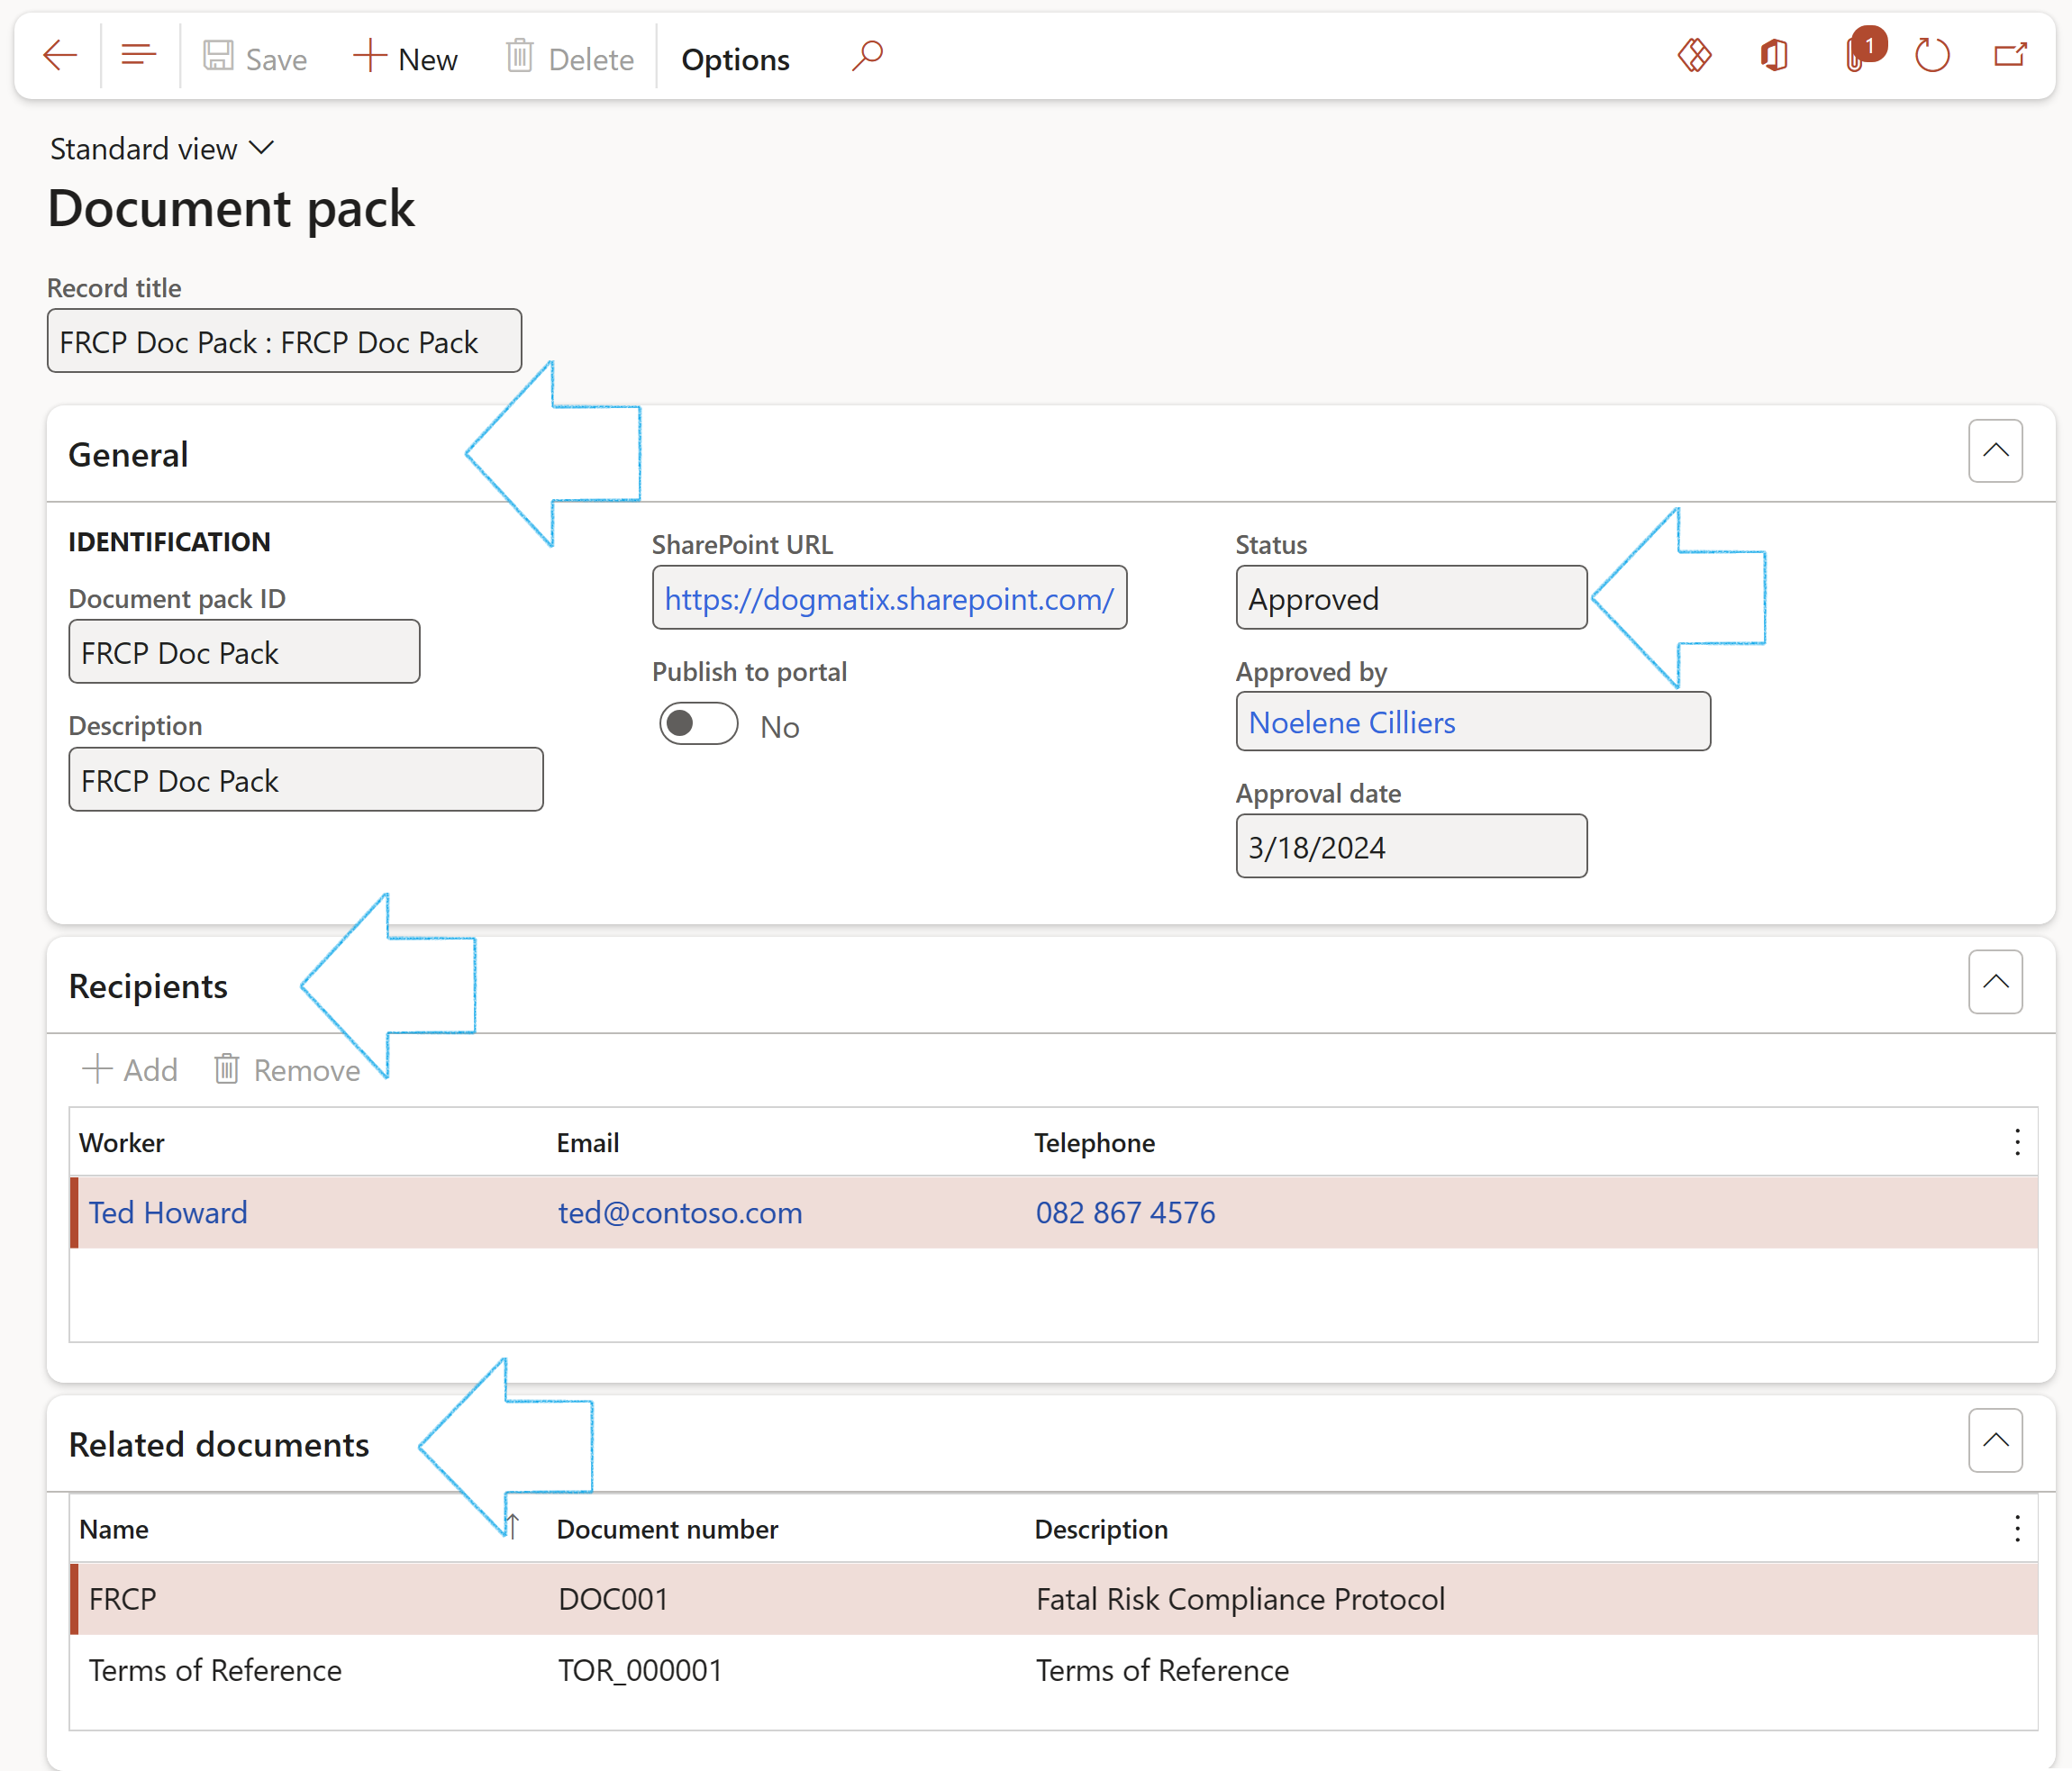
- In order to link documents to document packs, the relevant Document pack has to be selected from the dropdown list on the Other documents form
- After documents have been added to the document pack, they can be viewed under the Related documents Fast tab on the Document pack form
¶ Step 9: Create a document
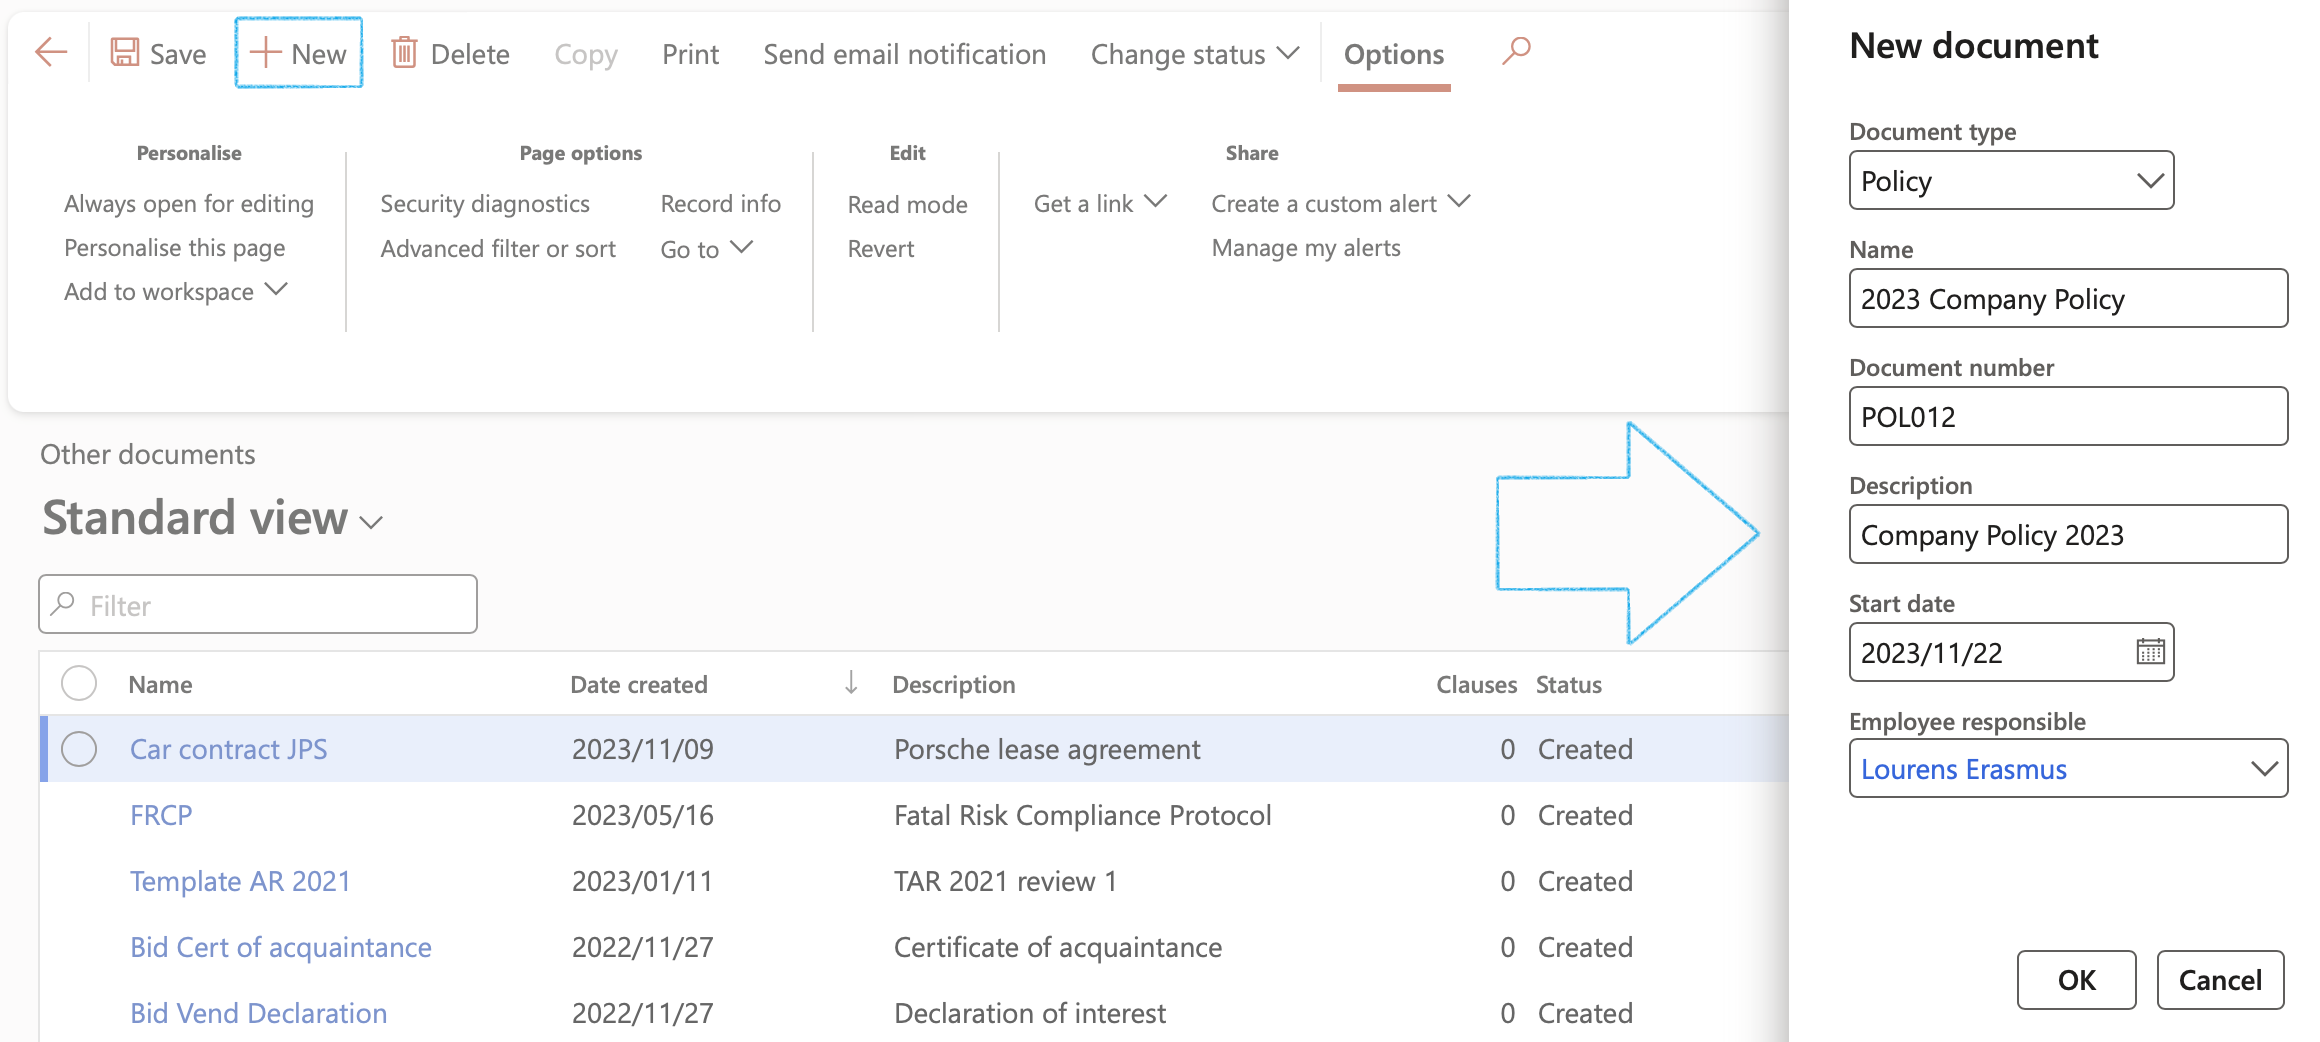
Go to: GRC > Governance > Documents > Other documents
- On the Action pane, click on the New button and select Document
- On the New document dialog, in the Document type field, the user has the option to select either Policy, Report or Other from the dropdown list
- Enter the relevant detail in the remaining fields
- Click on the OK button
¶ Document statuses
| Status | Rules |
|
Created:
Receive: |
|
| Draft: |
|
| Submit: |
|
| Approve: |
|
| Revise: |
|
| Reject: |
|
| Archive: |
|
¶ Step 9.1: Create the document Cover page
Go to a created document from the list page
- Expand the Content Fast tab
- Open the Cover page Index tab
- Select the relevant PDF integration template from the dropdown list (if applicable)
- Enter a SharePointURL
- Select the relevant Email template from the dropdown list
- Select the Approval team from the dropdown list
- Select the Department from the dropdown list
- Select the Date on which the document was created
- Select the relevant Document pack from the dropdown list (If required)
- Indicate whether this is document is a Baseline/template to be used for copy purposes

Only users who are members of the selected Approval team will be able to Approve the document. If the Approval team field is left blank, the user can change the status even if he is not a team member
For Baseline documents:
- Before moving the Baseline slider to Yes, enter the clauses. Once the slider is moved to Yes, the clauses are locked, and no more lines can be added/removed.
- Moving the Baseline slider to Yes will indicate that the document can be used as a template, and the Copy tick box will be available under the Clauses index tab.
- When the baseline is used as a template, the user can tick the Copy tick box for the clauses that need to be copied into the new document
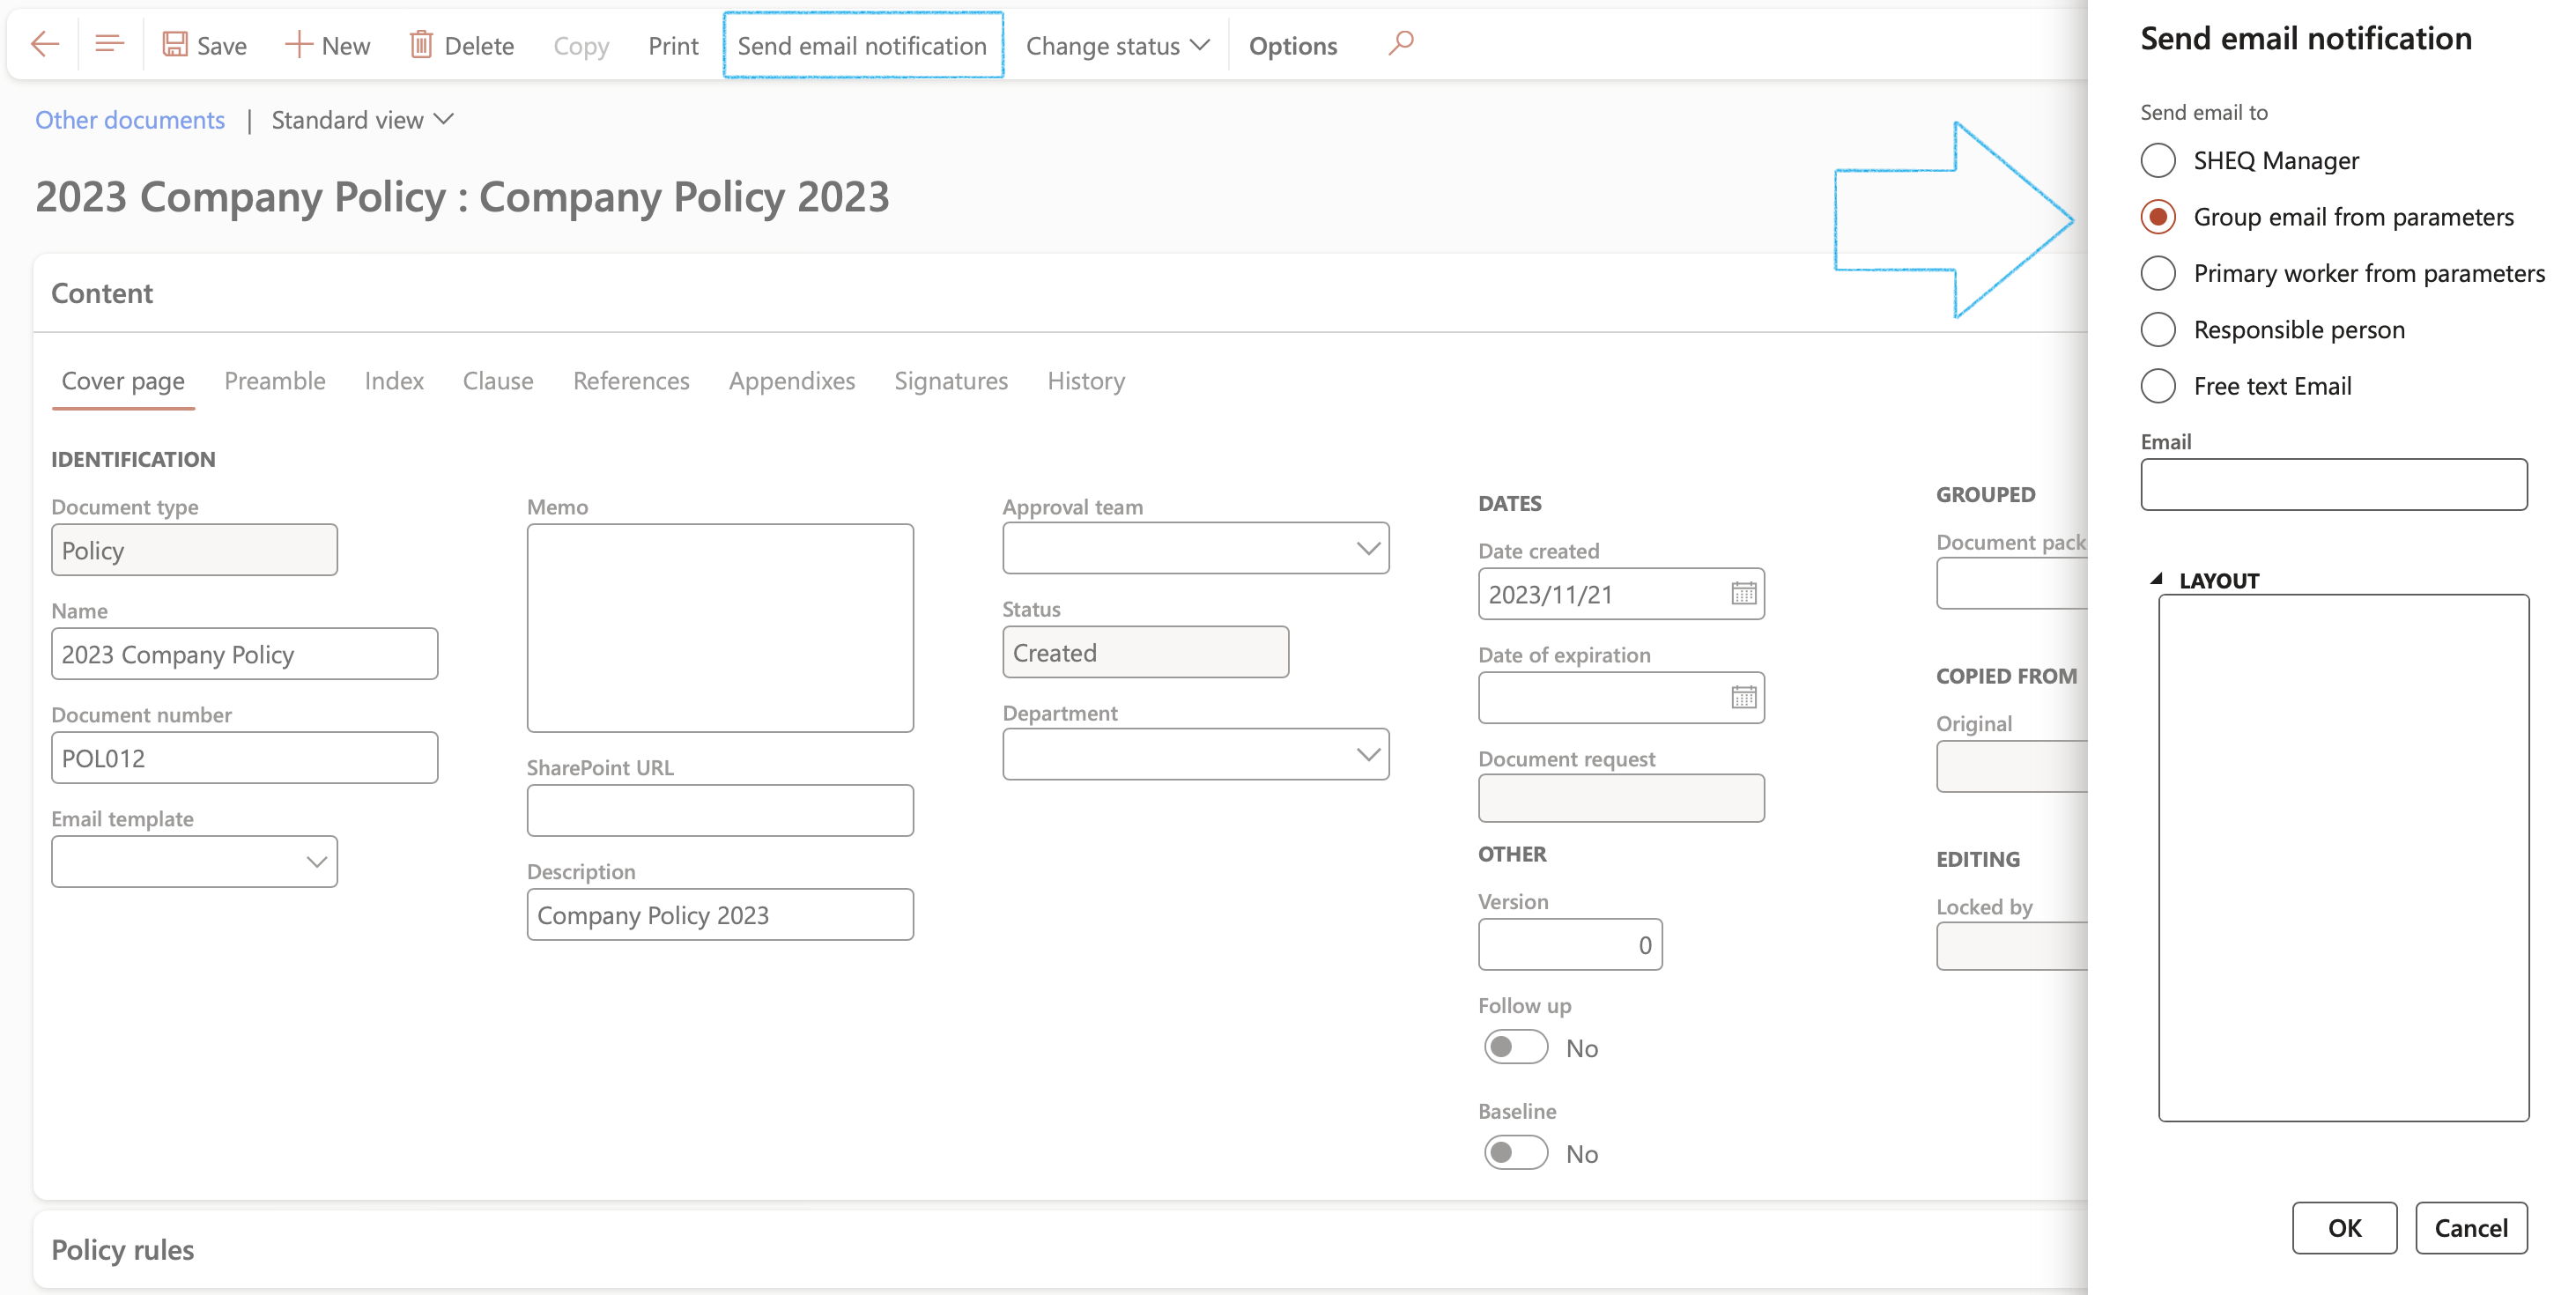
An email notification will be sent to the selected stakeholders using the values in the record for these placeholders.
| Placeholders | Field on form |
|---|---|
|
%ReferenceNumber % %DateCreated% %urlLink% |
Reference number Date created Hyperlink |
- A Parent can be selected for the contract by selecting the relevant contract from the Parent dropdown list
- Only Master documents with a status of Submitted can be selected as a Parent on another document
- A contract can be marked as a Master by moving the slider to Yes
- The Sub documents of a Master record can be viewed in the Related information pane

¶ Step 9.2: Create the Preamble
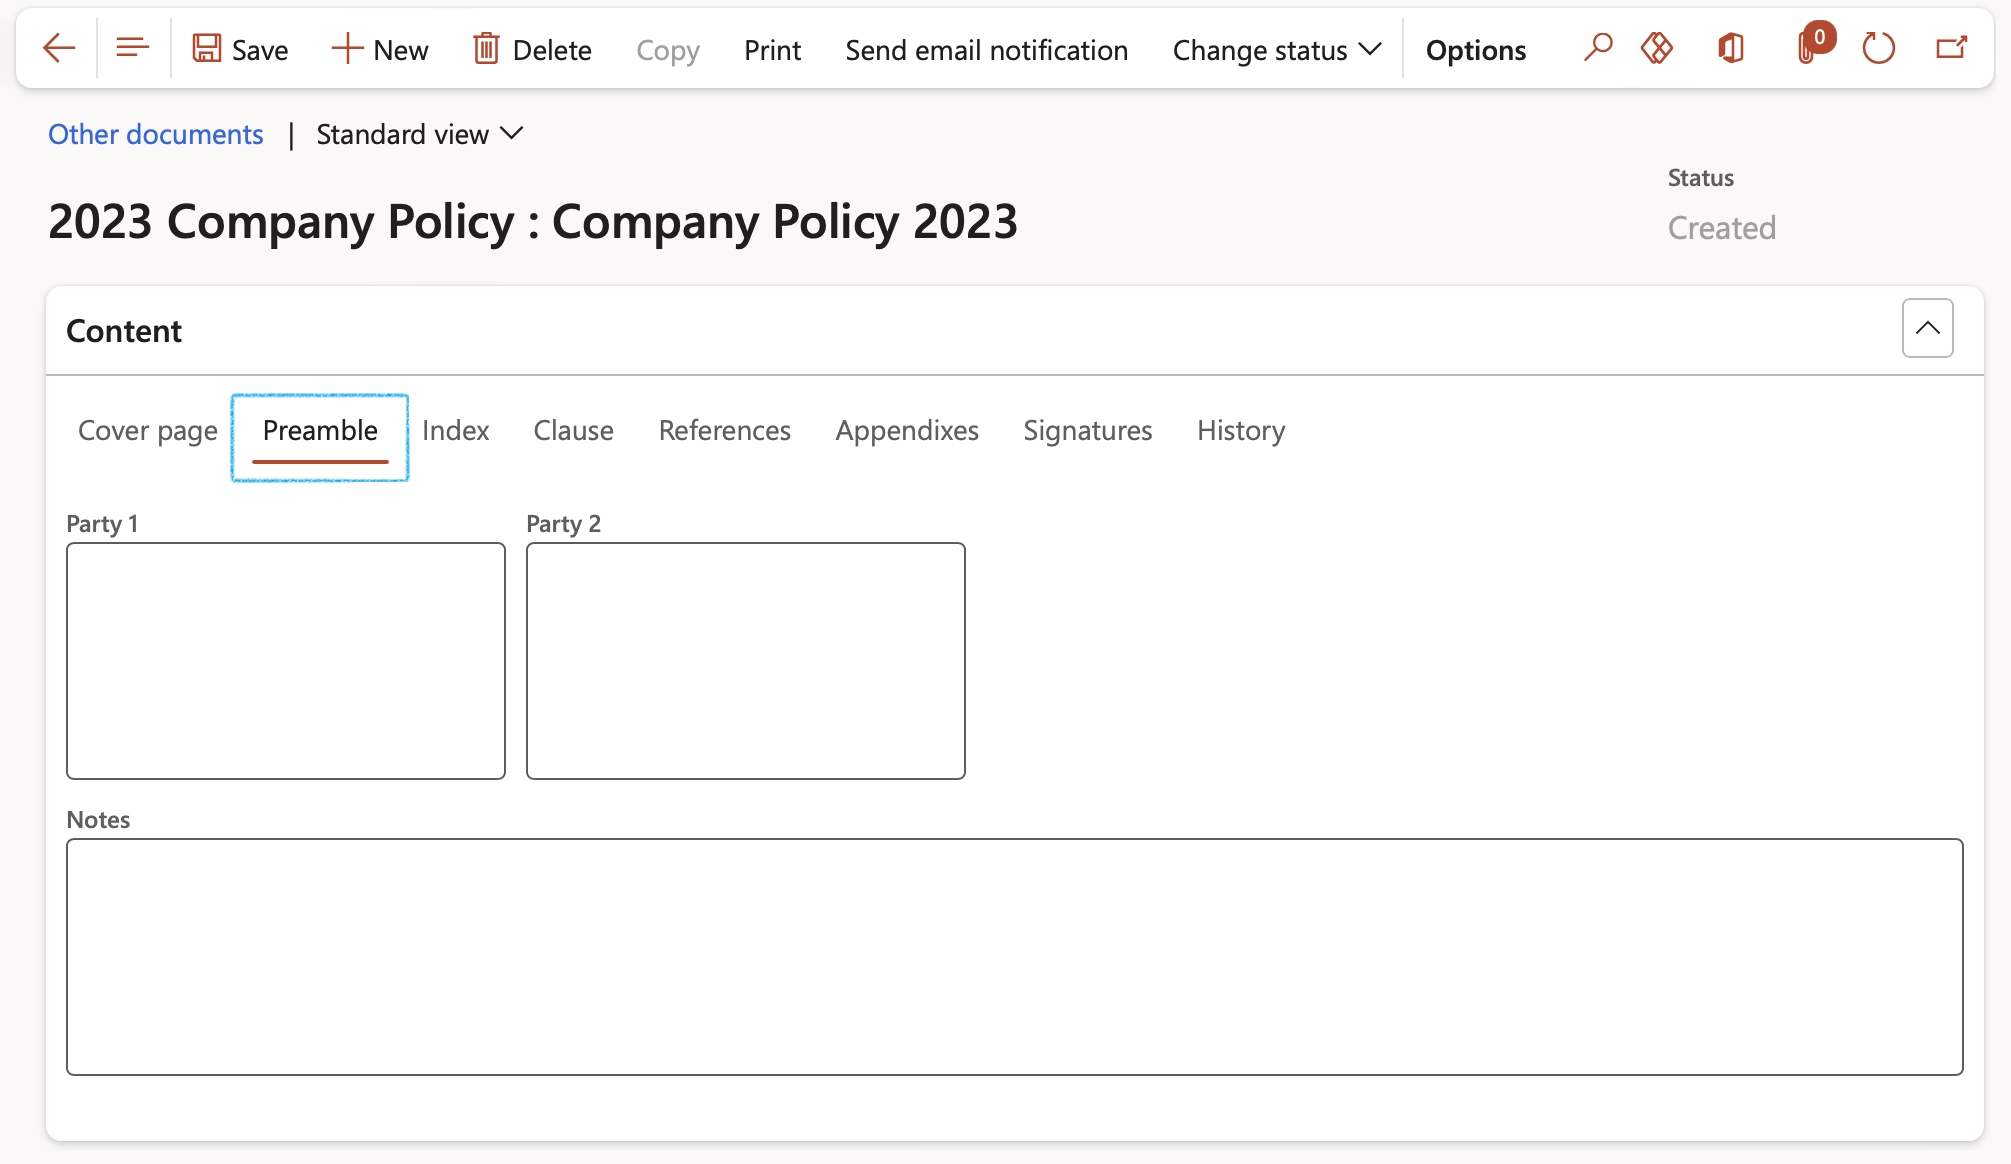
- Open the Preamble Index tab
- Enter the details of Party 1 in the box provided (If different to the current Legal entity)
- Enter the details of Party 2 in the box provided
- Select the Legal panel service provider from the dropdown list. (Only legal panels with a status of Accepted will be on this dropdown list)
- Enter the Preamble text in the Notes box provided
¶ Step 9.3: Create the document Clauses
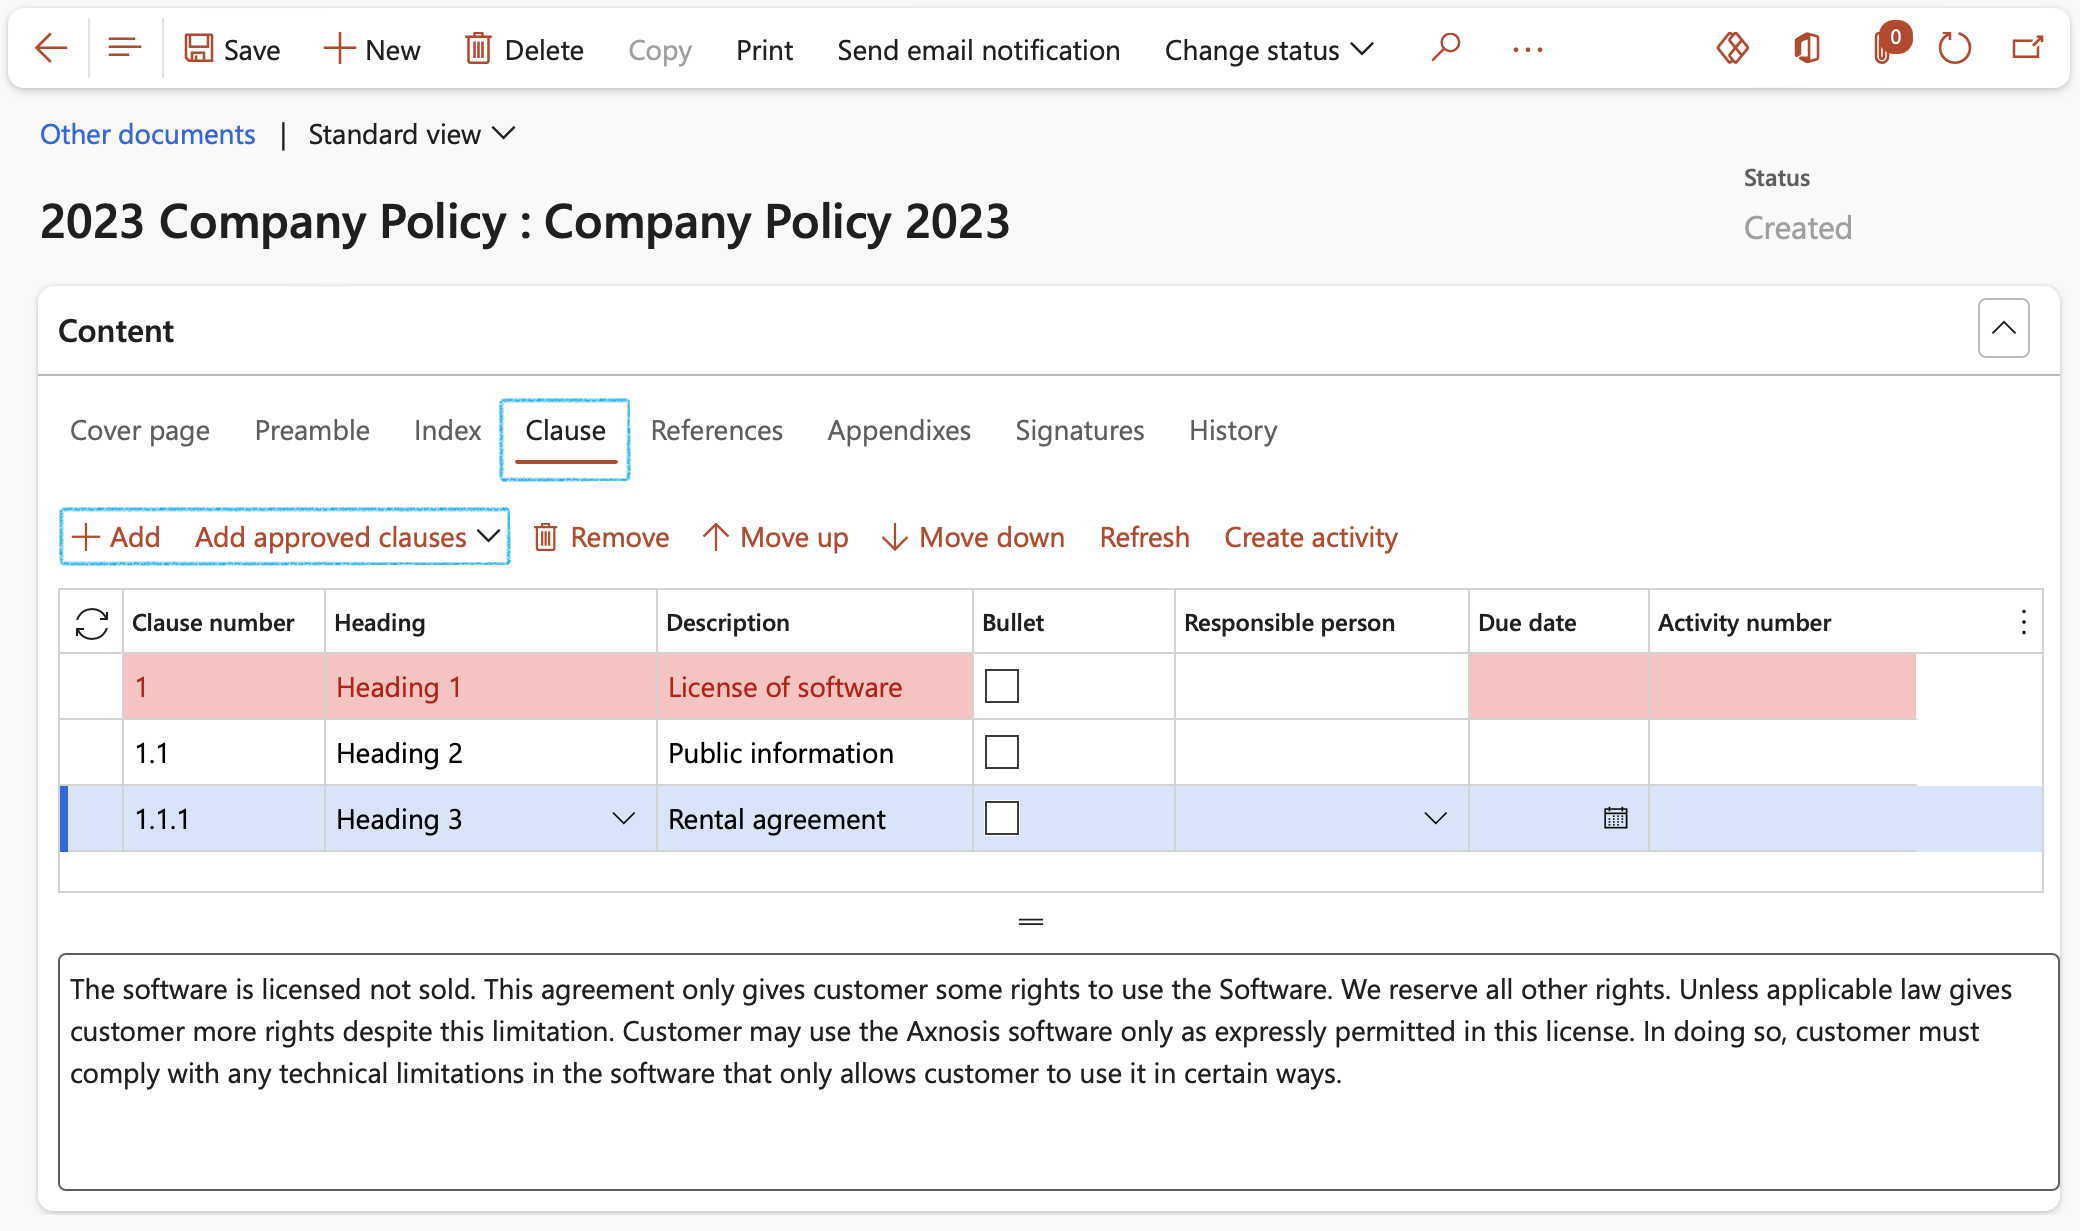
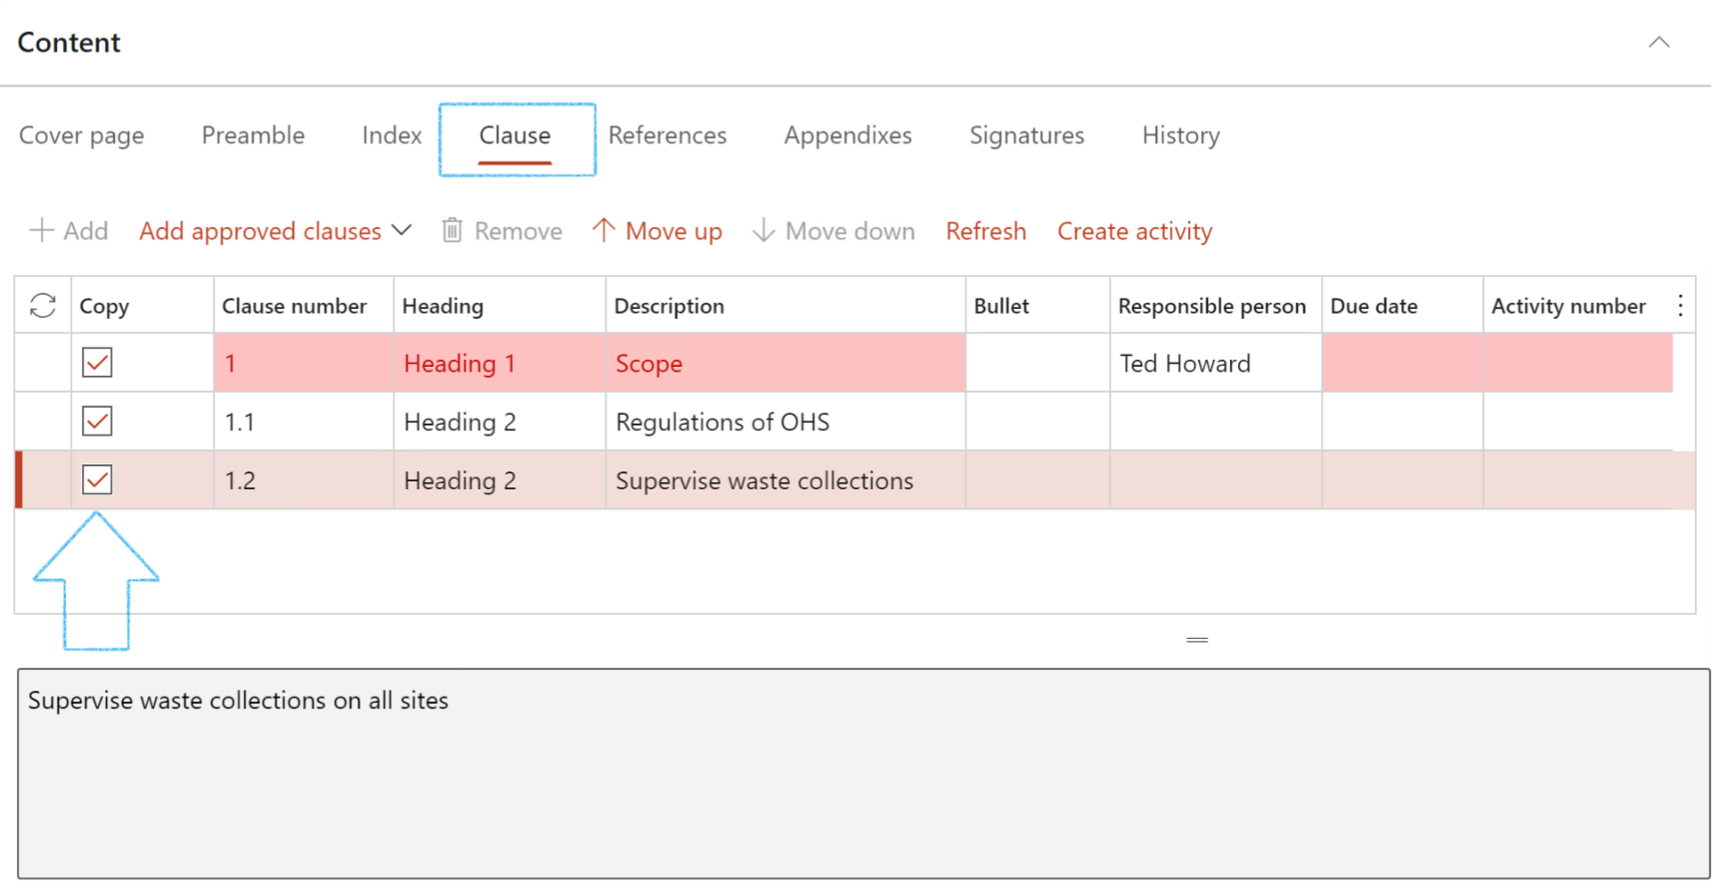
- Open the Clause Index tab
- In the Button strip, click on the Add button
- The Clause number will be generated by the system
- Select the Heading (Heading 1 for a primary heading, Heading 2 for a secondary heading)
- Enter a Description
- If required, select the worker responsible for doing the Action
- Select the date on which the action should take place
- Use the box provided to type the Clause definition
Or
- Click on the Add approved clauses button and select the relevant approved clause form the dropdown list
- If there is a sub clause, tick the check box in the Bullet column
The Copy checkbox is only available if this is a Baseline document. Check the box to copy the detail of the selected line
¶ Step 9.4: Add Signatures
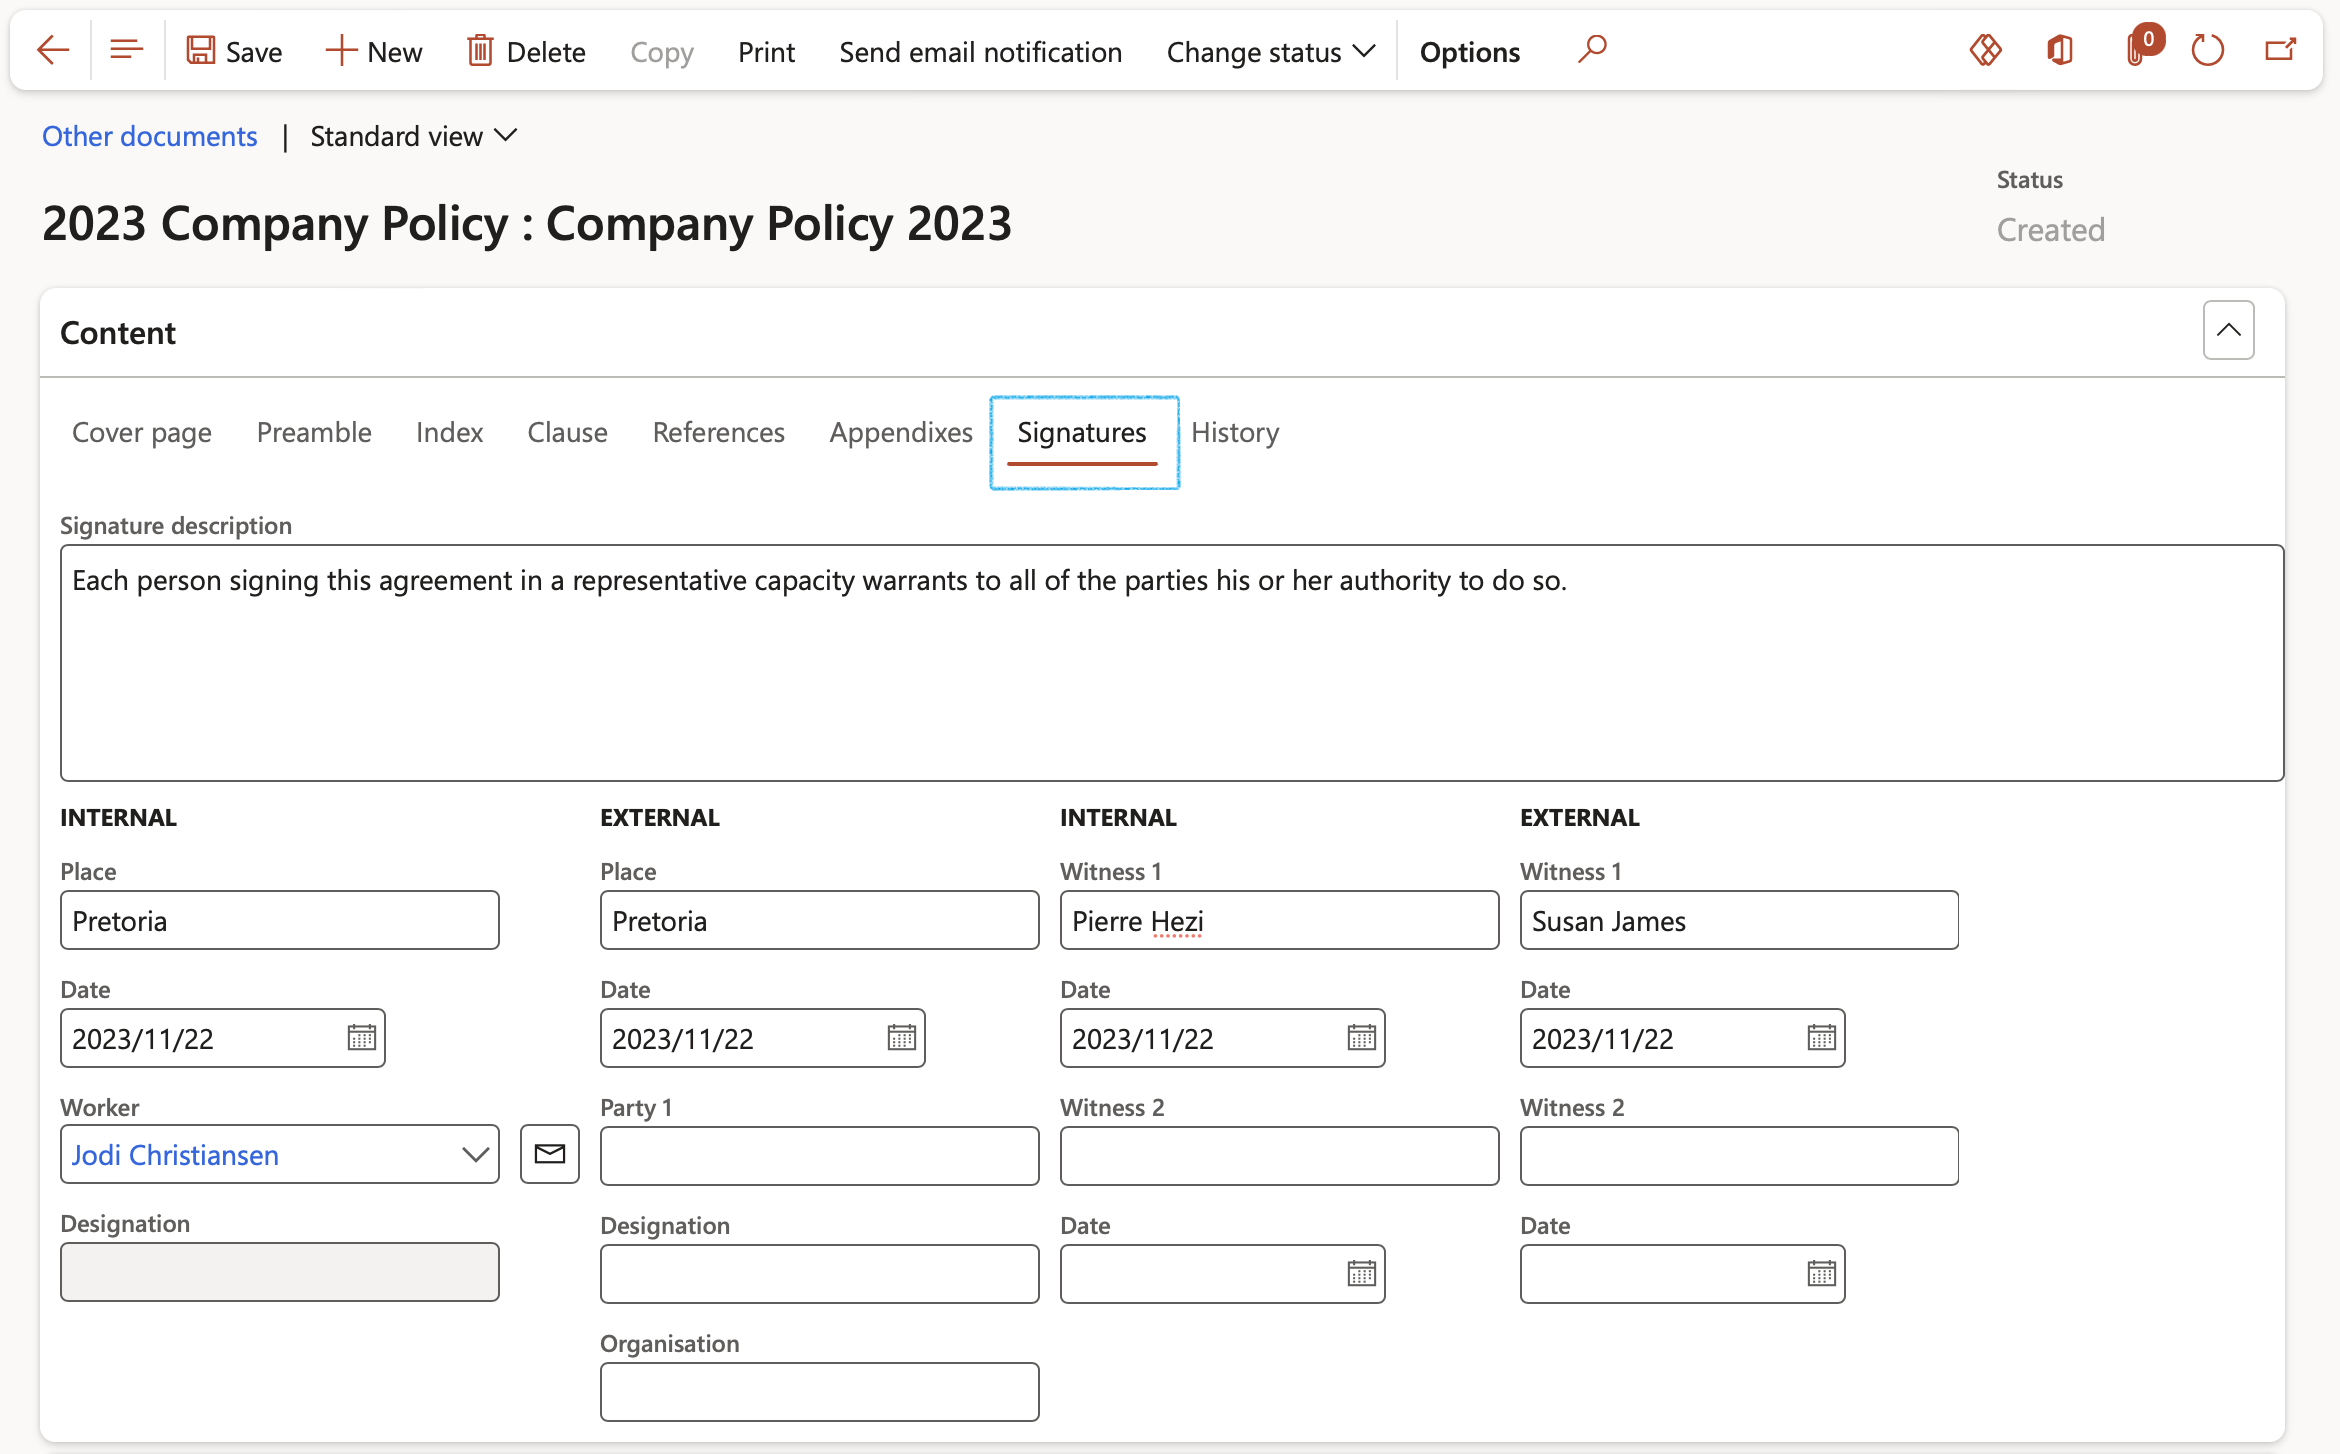
- Open the Signatures index tab
- Enter a Signature description in the box provided
- Under the Internal field groups:
- Enter the Place where the document will be signed
- Select the Date on which the document will be signed
- Select the Worker whose signature is required for approval of this document, from the dropdown list
- Enter the names of the internal Witnesses that will be signing the document
- Under the External field groups:
- Enter the Place where the document will be signed
- Select the Date on which the document will be signed
- Enter the name of the person who will be signing on behalf of the External Party (Party 1)
- Enter the person’s Designation
- Enter the name of the Organization
- Enter the names of the external Witnesses that will be signing the document
¶ Step 9.5: View the History
Dynamics 365 GRC will keep a full audit trial of changes made by users. This is visible under the History Index tab

The Policy rules Fast tab is only visible when the Document type = Policy
To learn more about the standard Microsoft Purchasing policies, click on the link below:
Microsoft Purchasing policies overview
¶ Step 9.6: Choose financial dimensions
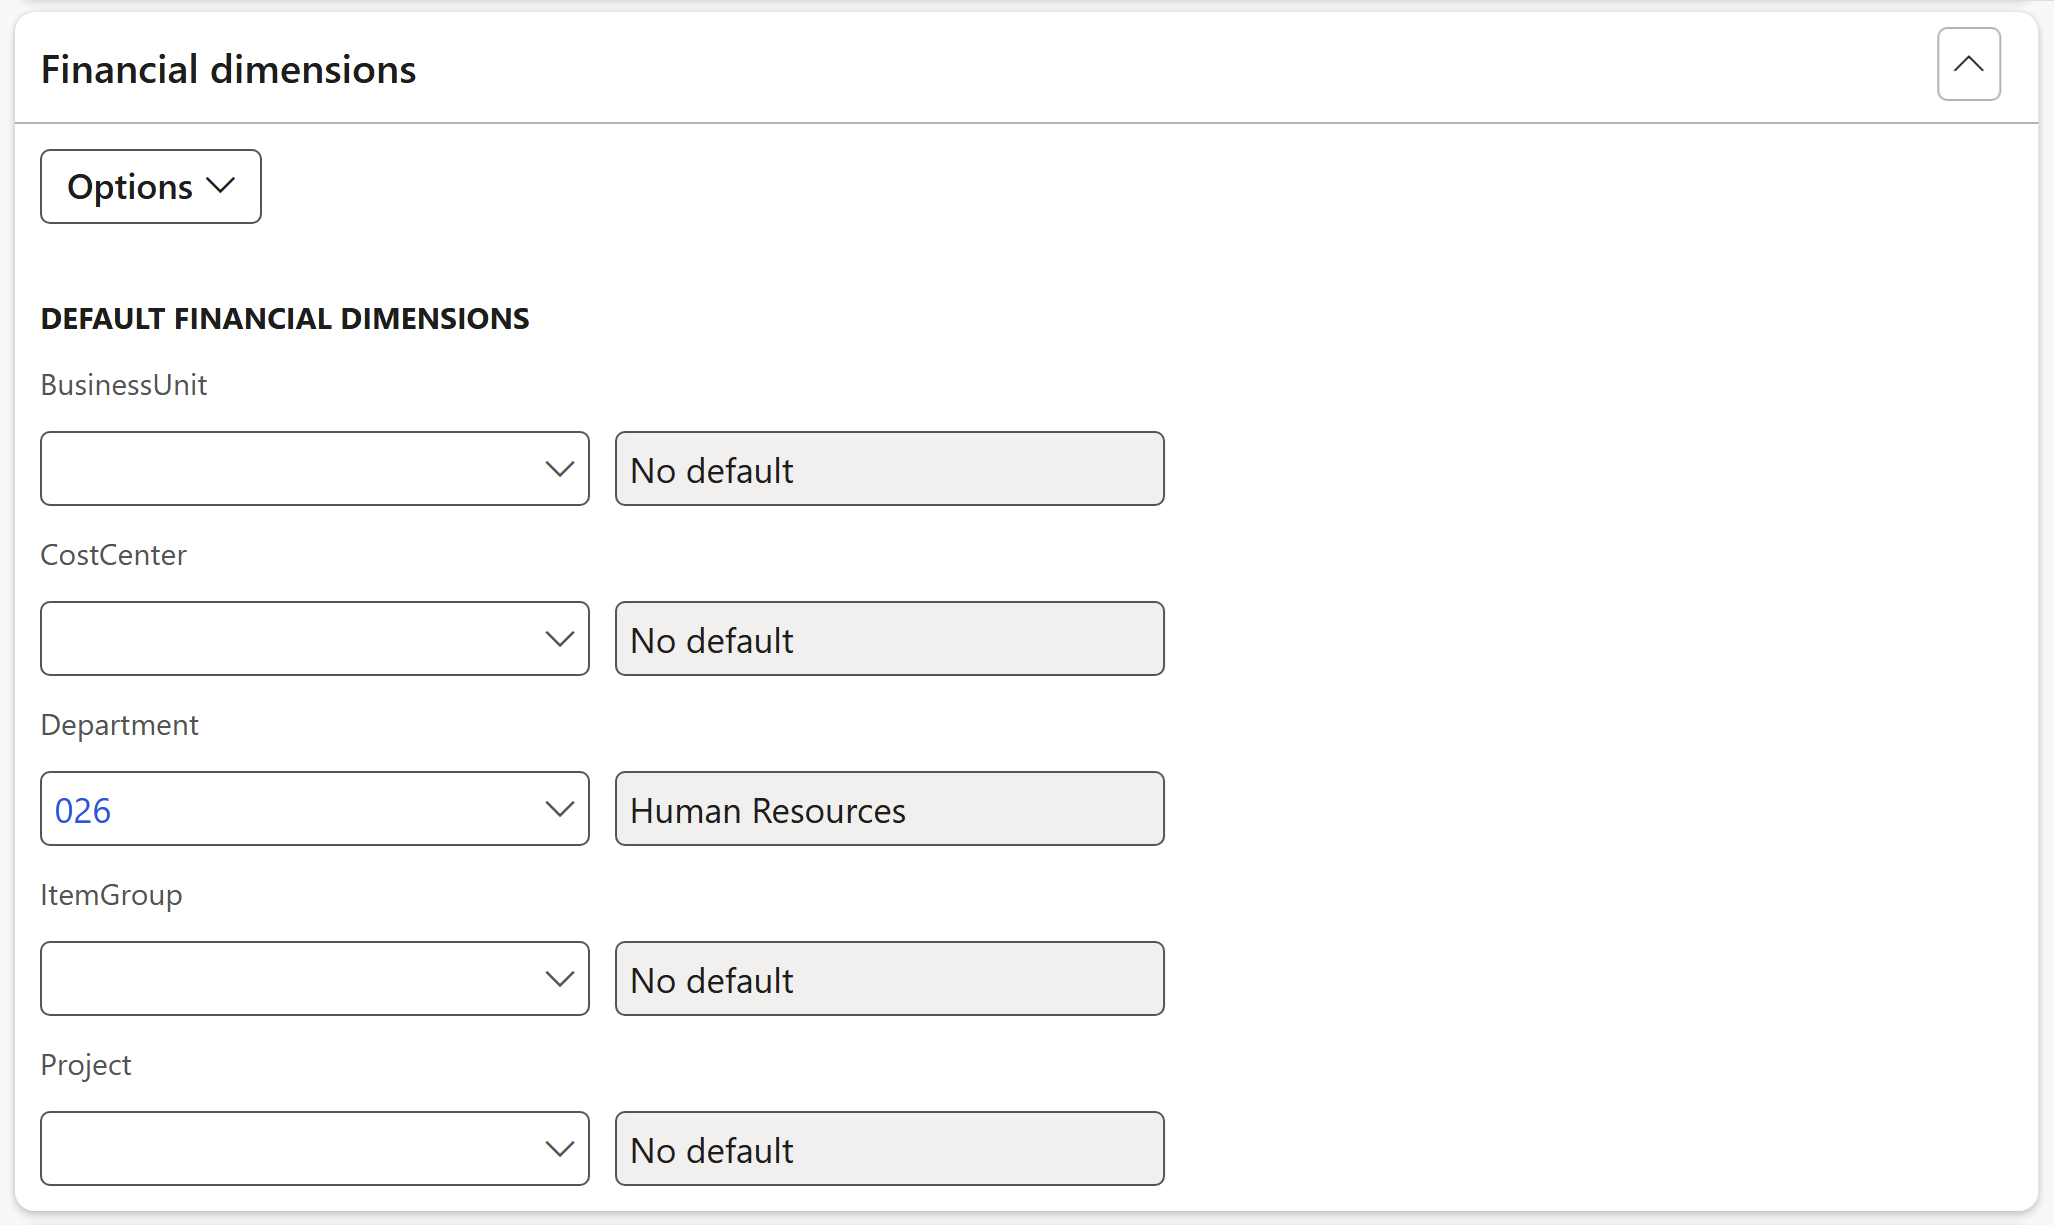
Expand the Financial dimensions Fast tab
- Select the relevant default Financial dimensions for the following:
- BusinessUnit
- CostCenter
- Department
- ItemGroup
- Project
¶ Step 9.7: Document RACI
- Select the Employee responsible from the dropdown list
- Select the Employee accountable from the dropdown list
- Select the Employee consulted from the dropdown list
- Select the Employee informed from the dropdown list
- Additional contacts can be added by clicking on the Add button and selecting the relevant Worker from the dropdown list
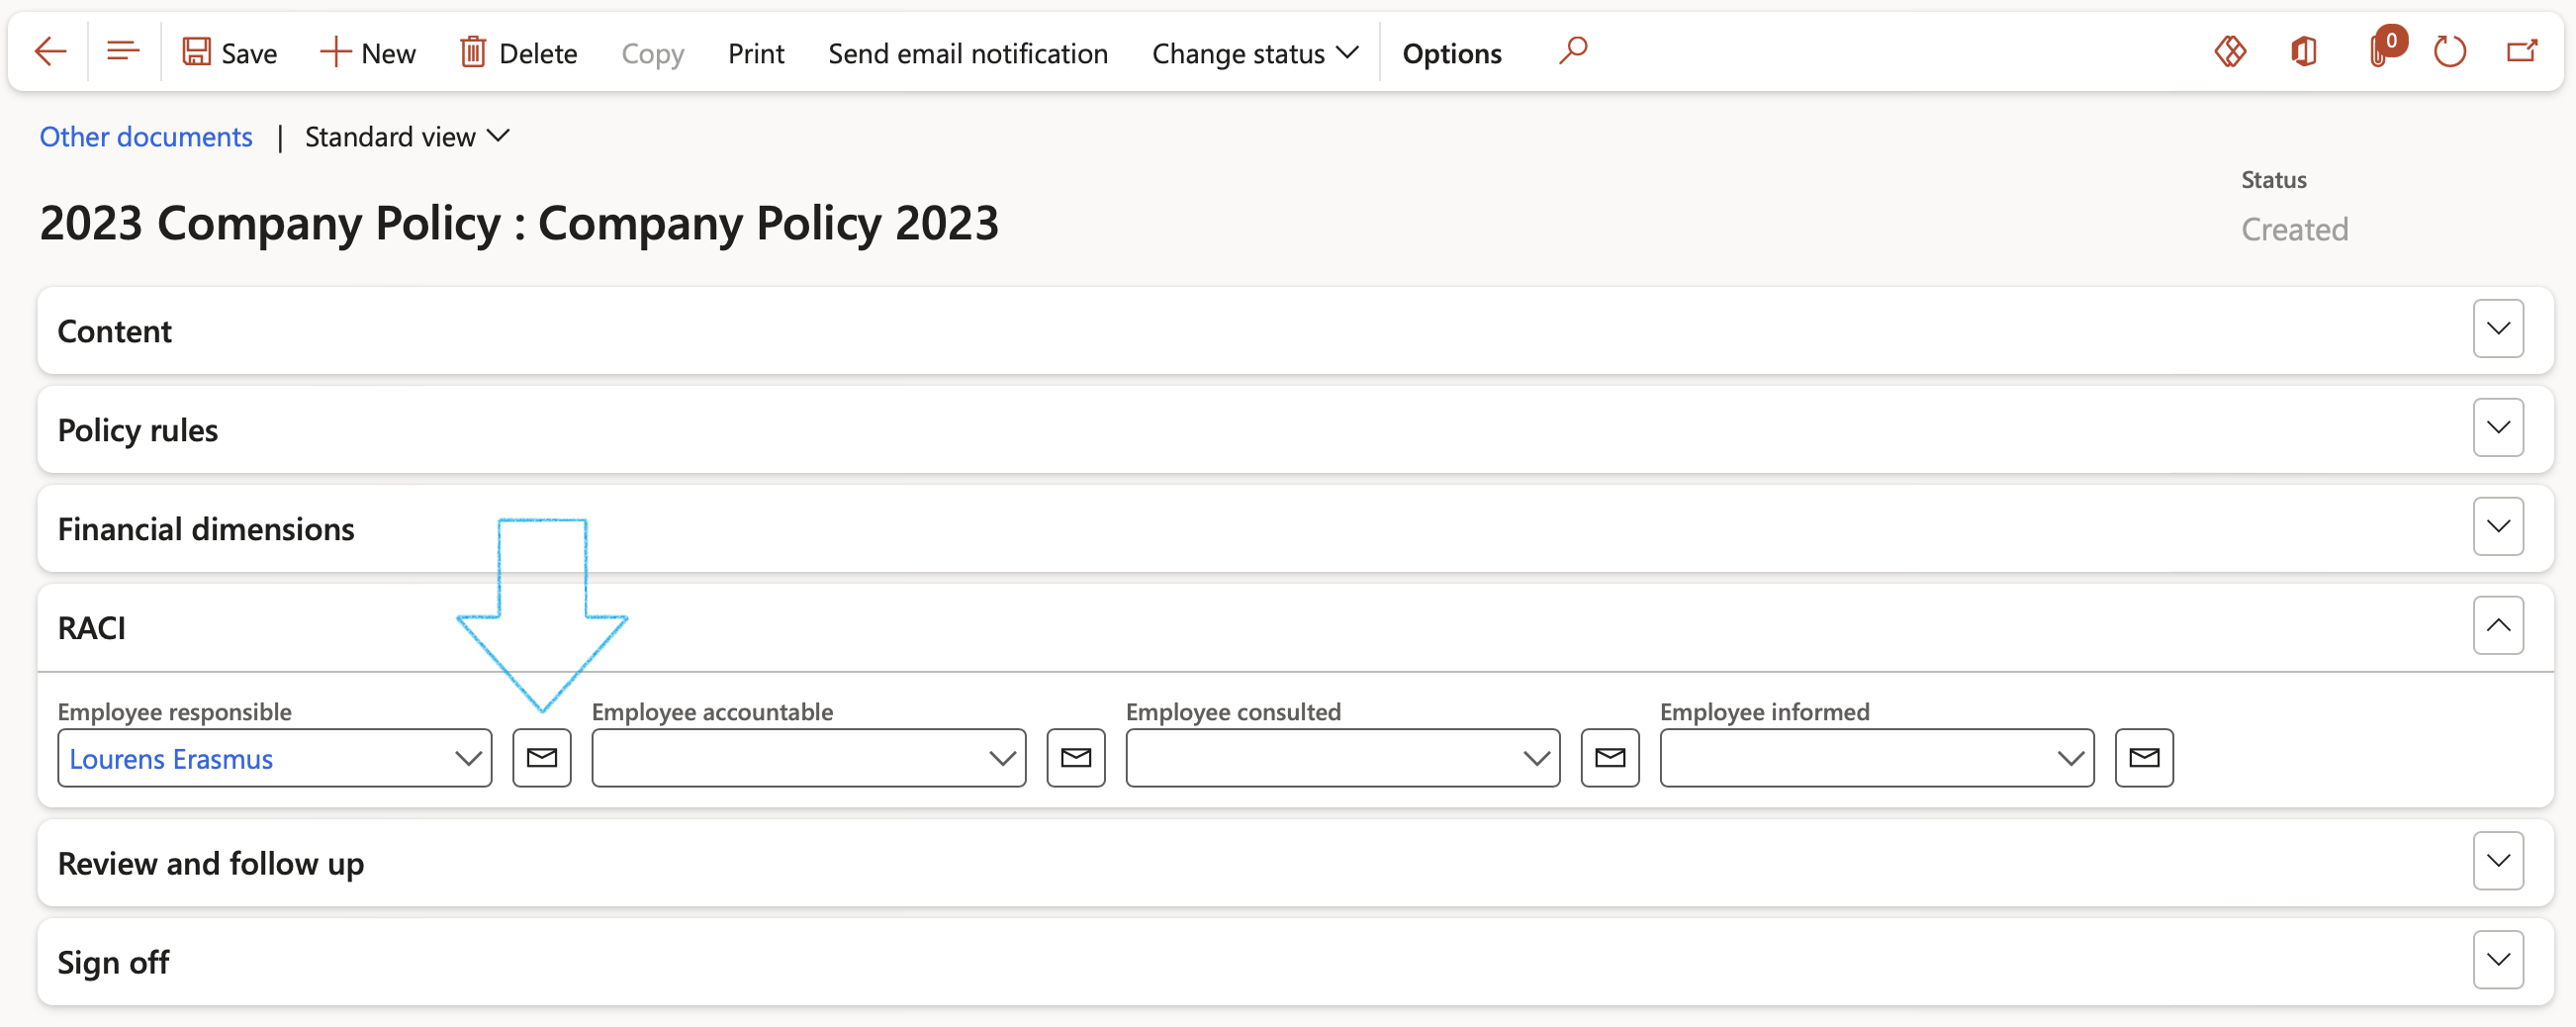
An email can only be sent to the selected worker if they have a Primary email address (selected on the Worker record)
¶ Step 10: Review and follow up
- Under the Content Fast tab, move the Follow up slider to Yes
- Expand the Review and follow up Fast tab
- Enter the Follow up notes in the box provided
- Select the worker’s name who did the review, from the dropdown list
- The Last review date field will be populated with today’s date (Can be edited)
- The Next review date field will be populated with the date calculated by the system (Calculated by using Last review date and Review frequency)
- A Planned action will be created by the system (See the blue notification at the top of the screen)
Once the Planned action has been closed, the user can come back to the record and move the Follow up slider bac to No:
- Under the Content Fast tab, move the Follow up slider to No
- The notes entered in the Follow up note box will be moved to the Last review notes box, and the Last review date field will be populated
- Another follow up can be done now

¶ Step 11: Requests for new documents
The objective of formal document management is to centrally store and manage content that could benefit the whole enterprise if done properly. To achieve this enterprises normally have a formal process of requesting creation of new documents or requesting to review existing documents for accuracy and relevance.
Go to: GRC > Governance > Documents > All document requests
- On the Action pane, click on the New button
- Select Case from the dropdown list

- On the New case dialog, open the General Index tab
- Select the Source Name from the dropdown list
- In the Case category field, select DocNew from the list (mandatory)
- Enter a brief Description for the new case
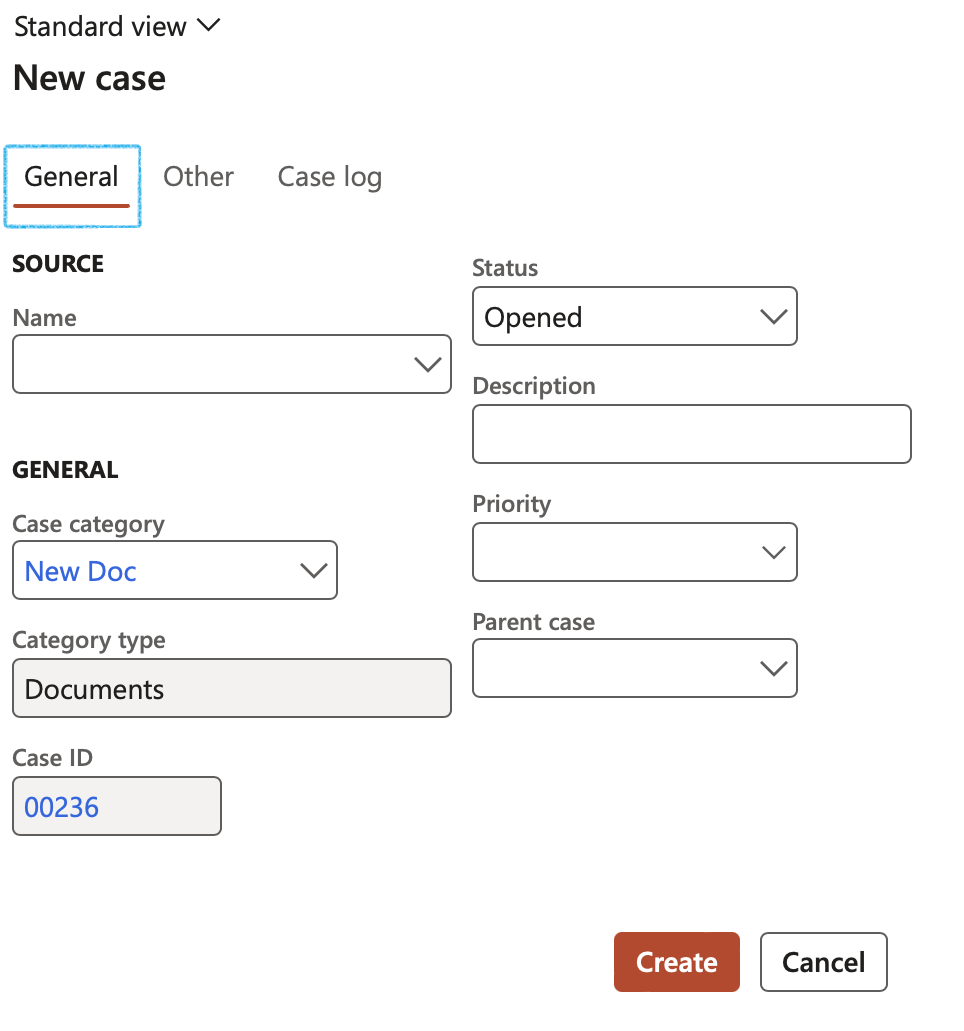
If Force attachments was selected on the selected Case category, the Attachments form will open, reminding the user to attach a document to the case.
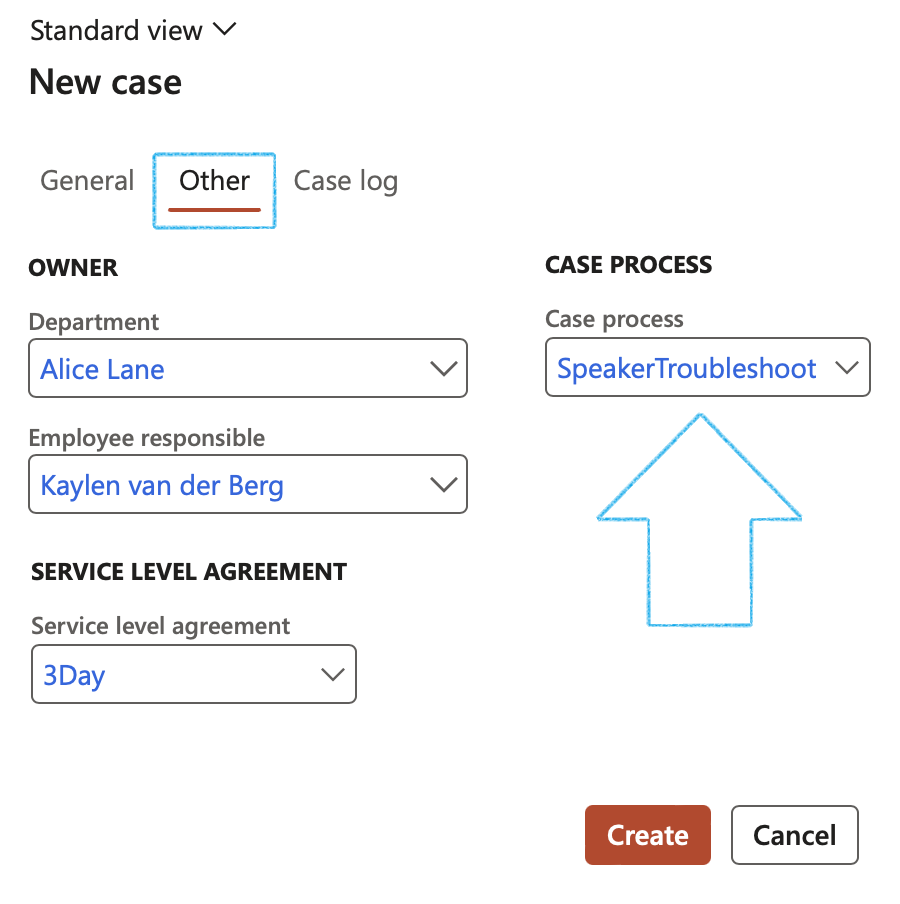
- Open the Other Index tab
- Select the relevant Department from the dropdown list
- Select the Employee responsible from the dropdown list (mandatory)
- In the Case process field, select Request new doc from the dropdown list
- Click on the Create button
¶ Step 11.1: Document request detail form
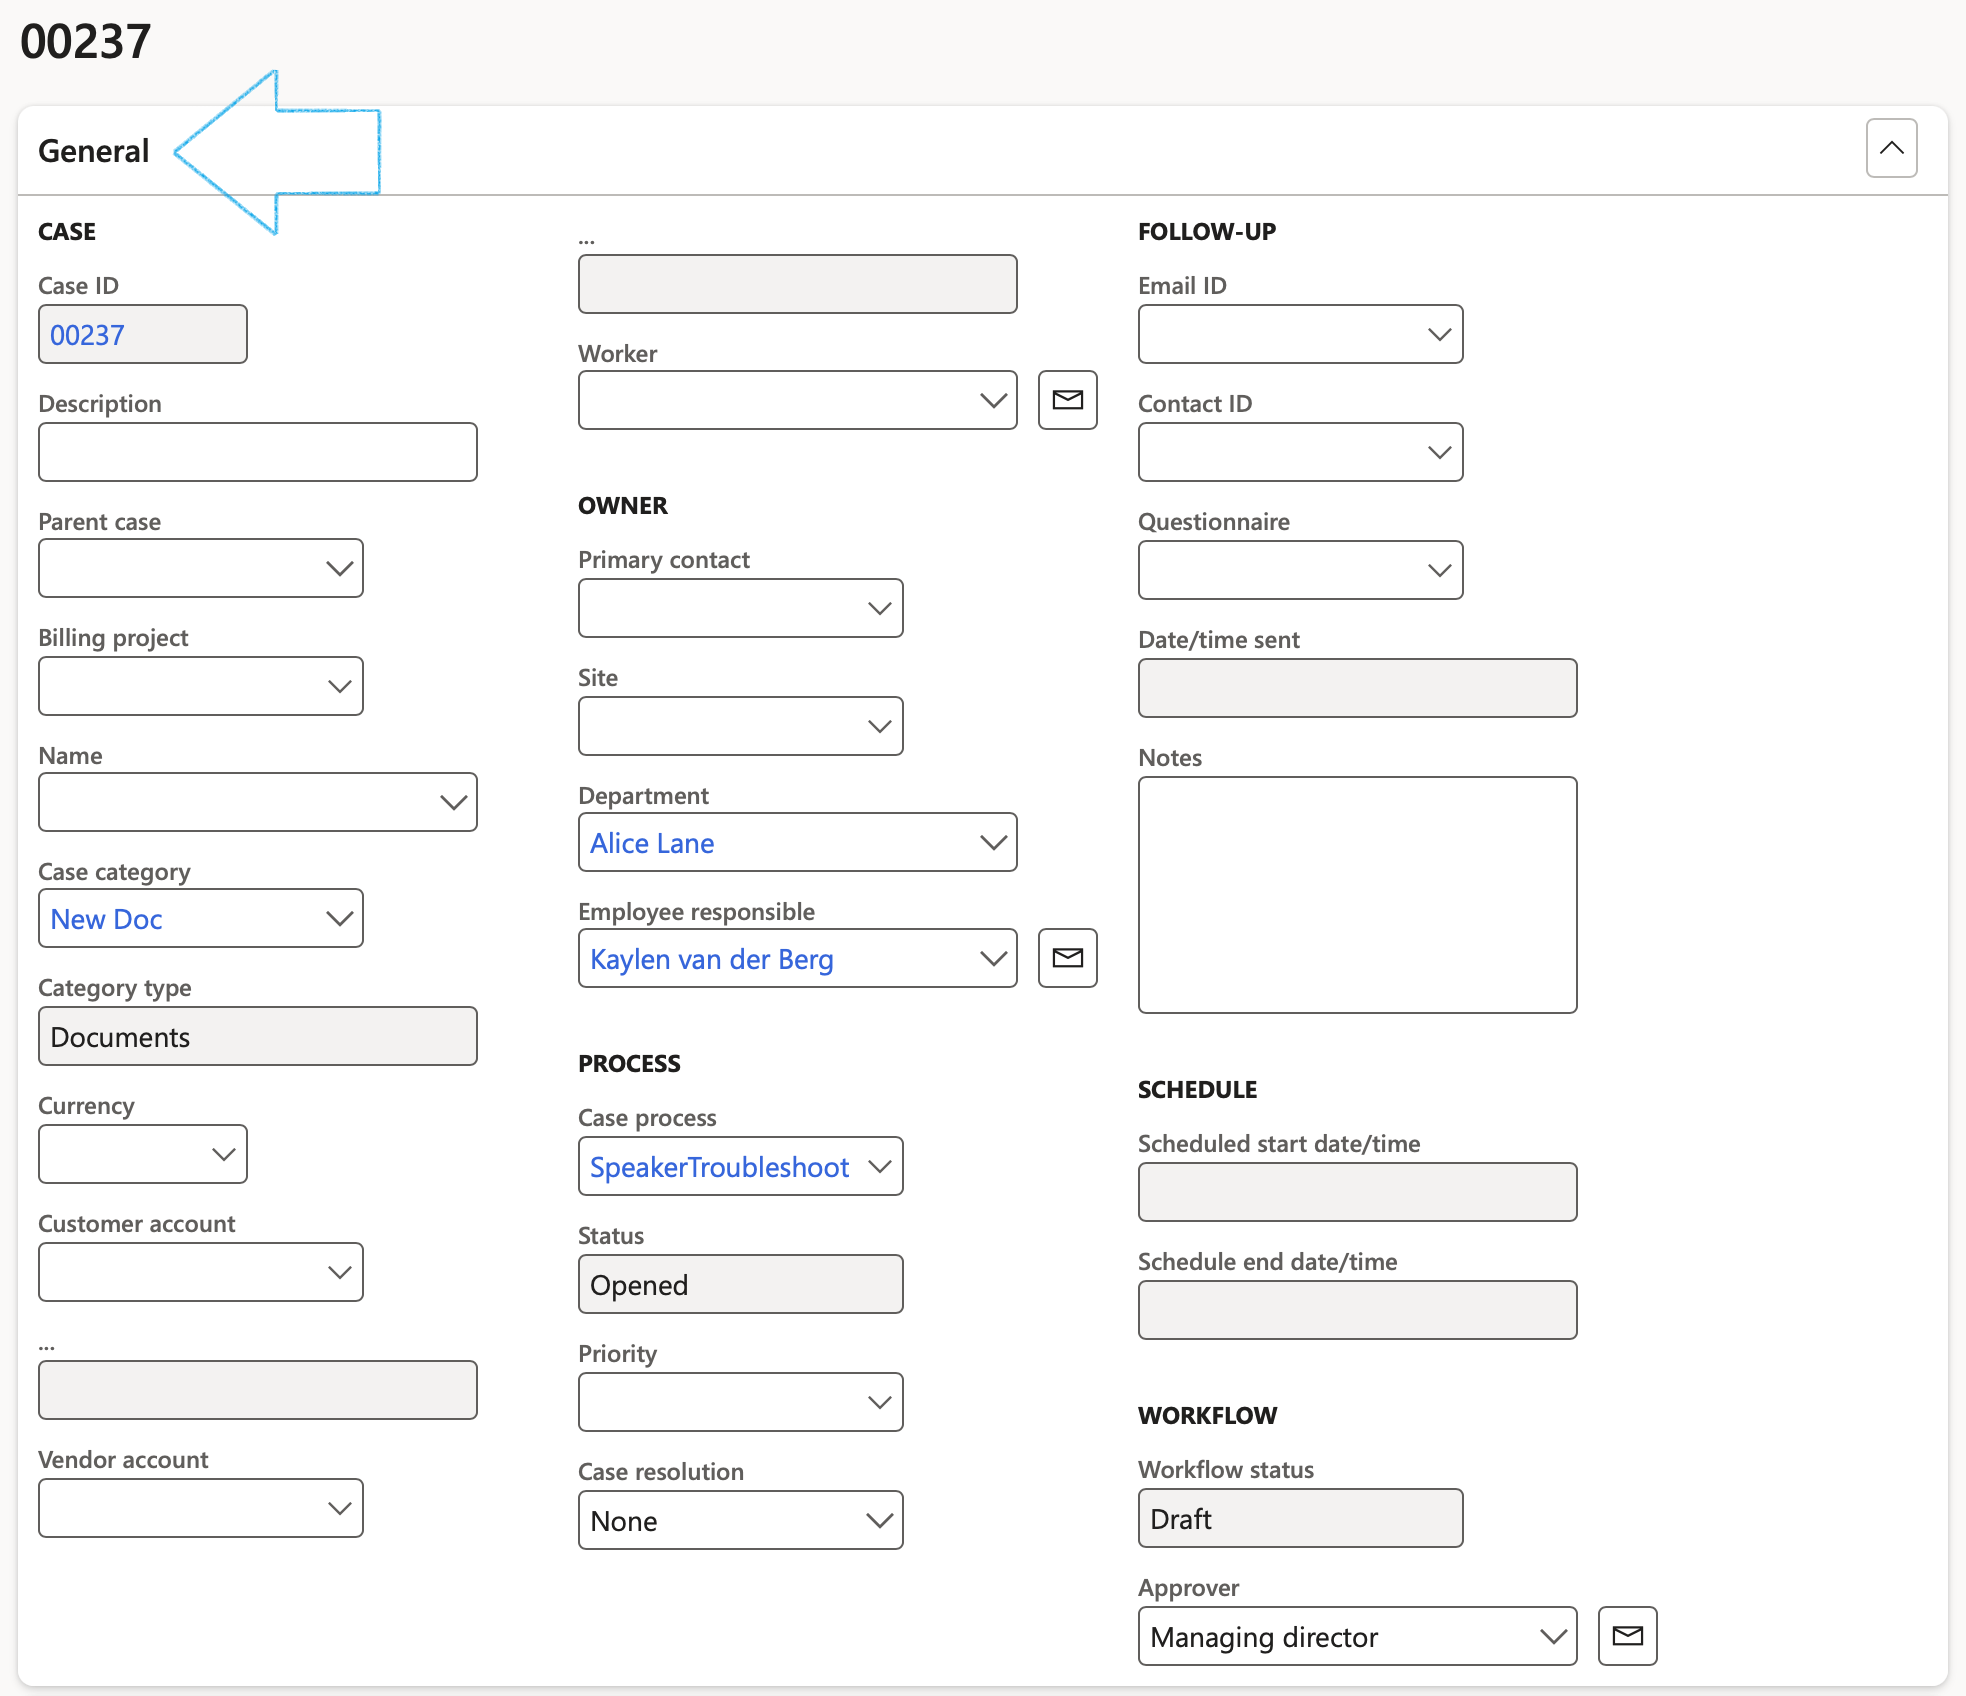
The information entered on the New case dialog will populate the relevant fields on the detail form.
Go to: GRC > Governance > Documents > All document requests
- On the All document request list page, select the relevant document request
- Enter the relevant information under the General Fast tab
¶ Step 11.2: Document management Fast tab
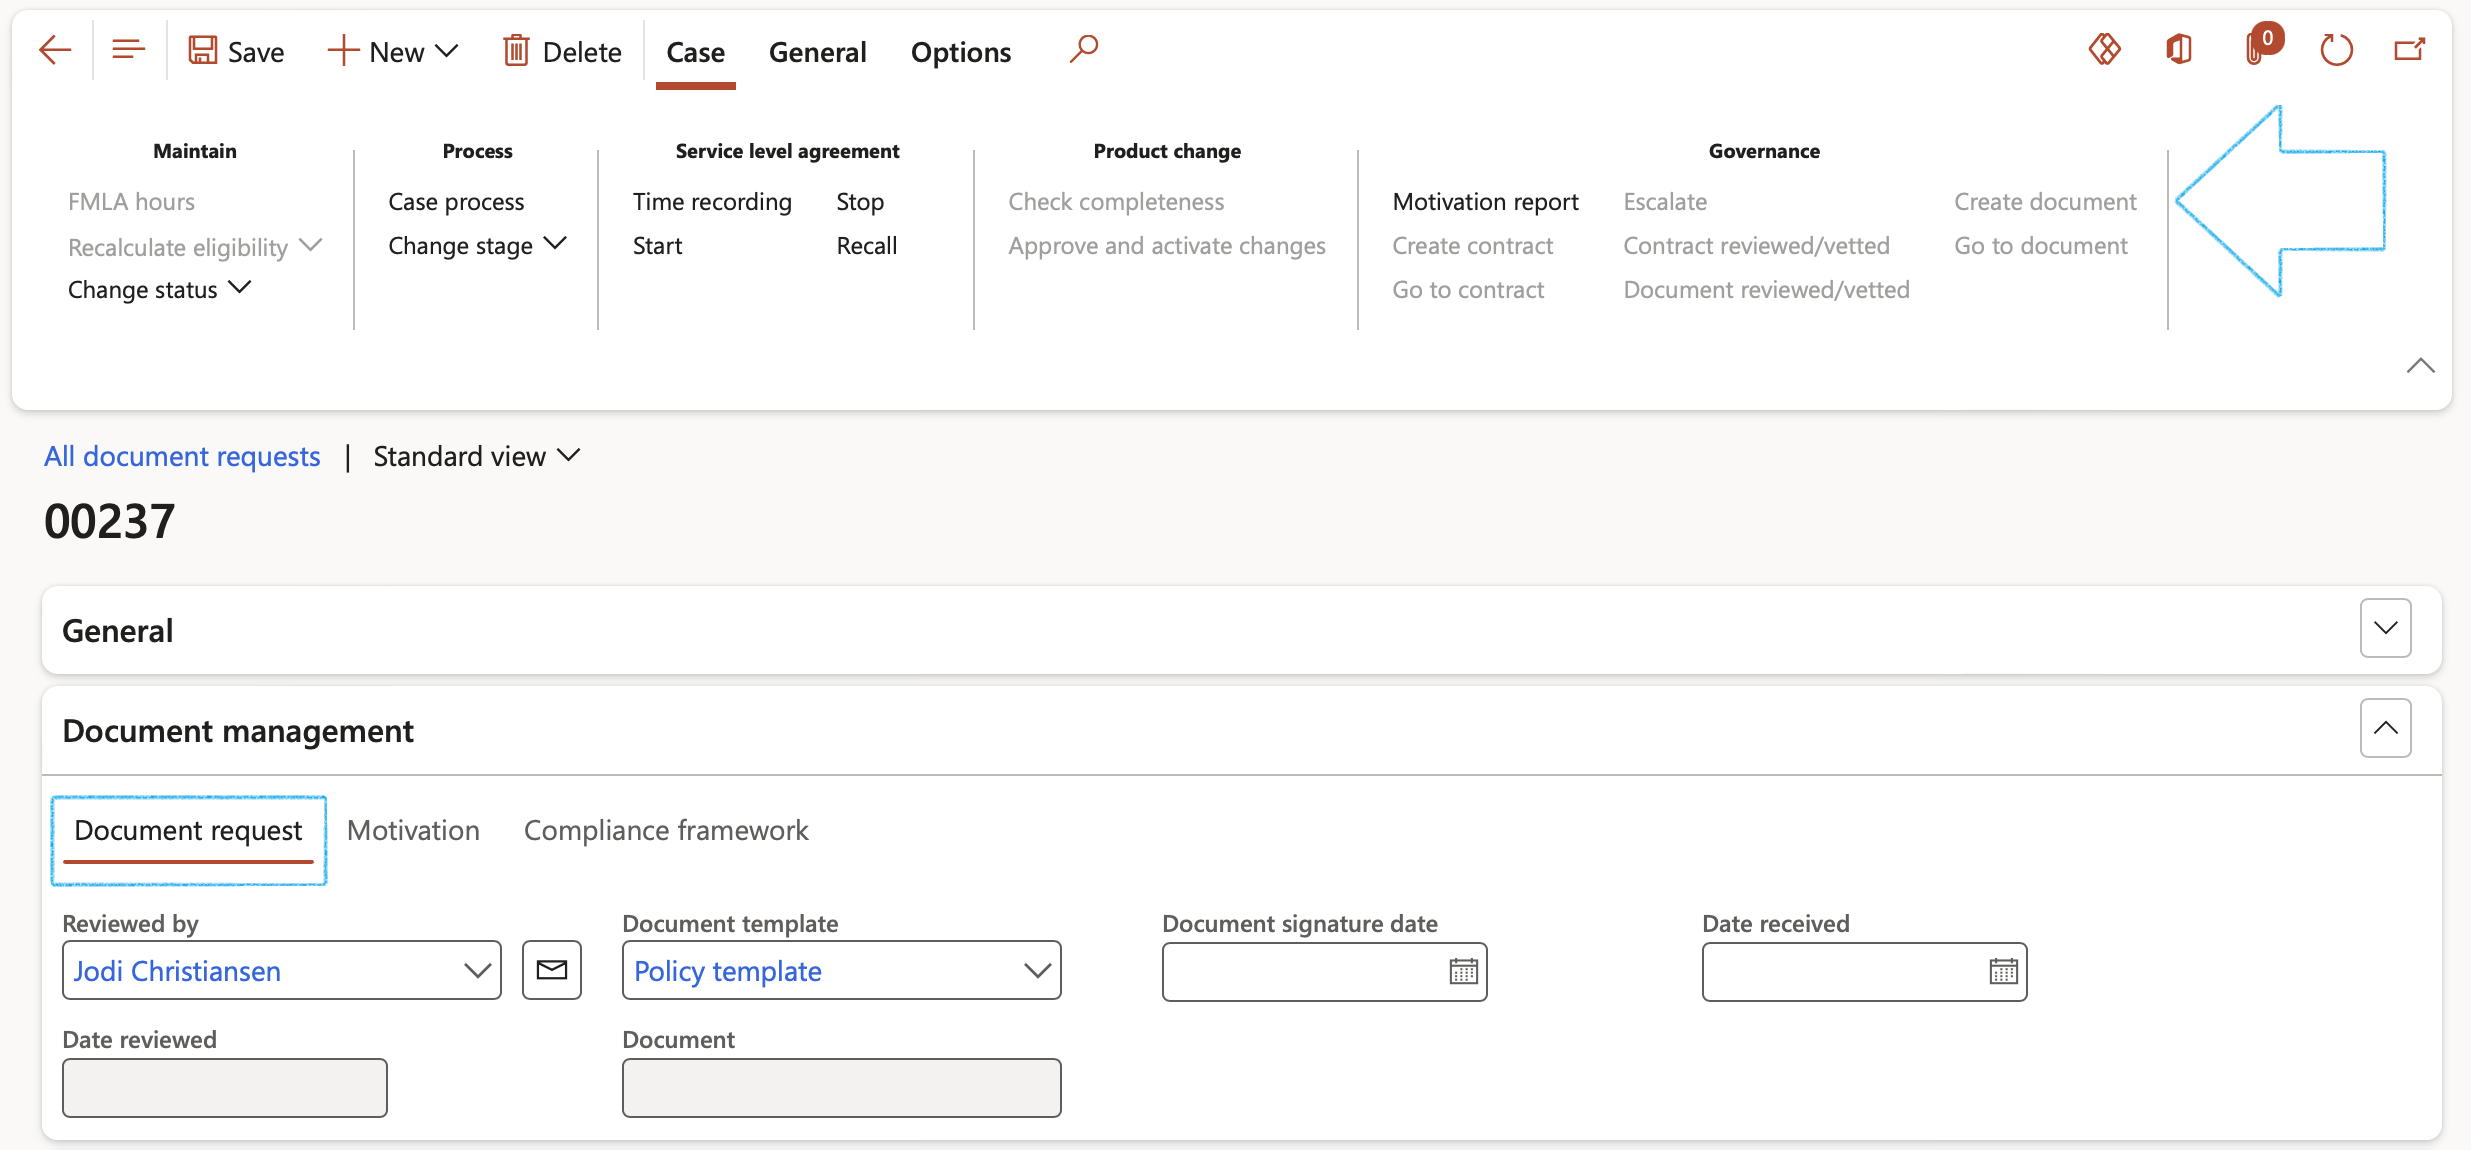
- Expand the Document management Fast tab
- Open the Document request Index tab
- In the Reviewed by field, select the relevant person from the dropdown list
- Once the document has been reviewed, the Date reviewed field will be populated by the system
- Select the relevant Document template from the dropdown list
- Once the Create document button in the Action pane has been clicked, the Document field will be populated with the new document’s name
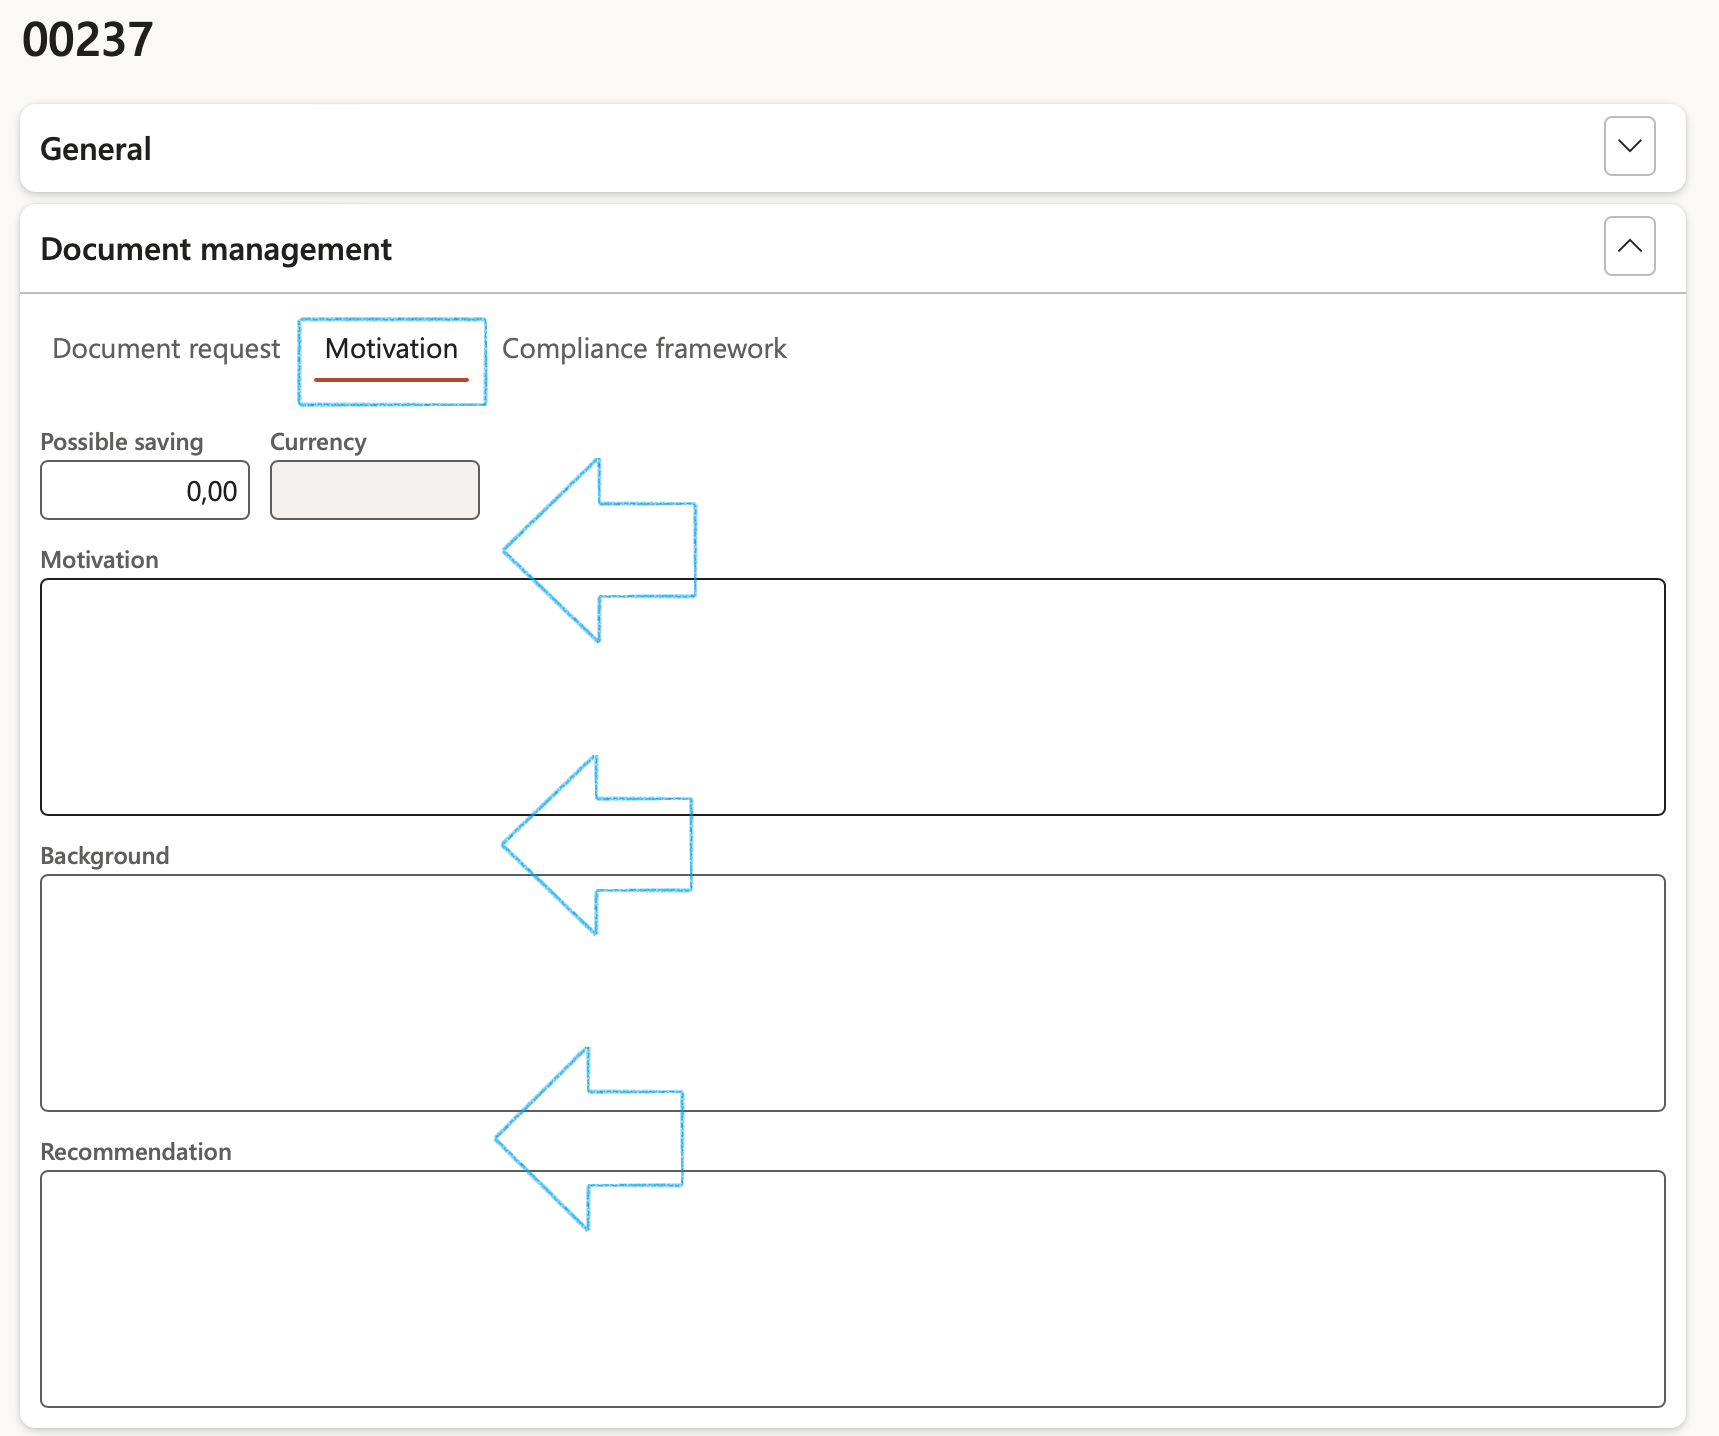
- Open the Motivation Index tab
- Enter the Motivation for requesting the new document
- Enter Background information supporting the request
- Enter relevant Recommendation in the box provided
¶ Step 11.3: Approve the document request
Go to: GRC > Governance > Documents > Release new document requests
- Select the relevant document request
- On the Action pane, in the Maintain group, click on the Change status button and select In progress from the list
- On the Action pane, under the Case tab, in the Governance group, click on the Create document button

A blue line will appear confirming that the document has been created and the request will now be closed
¶ Step 11.4: The new created document
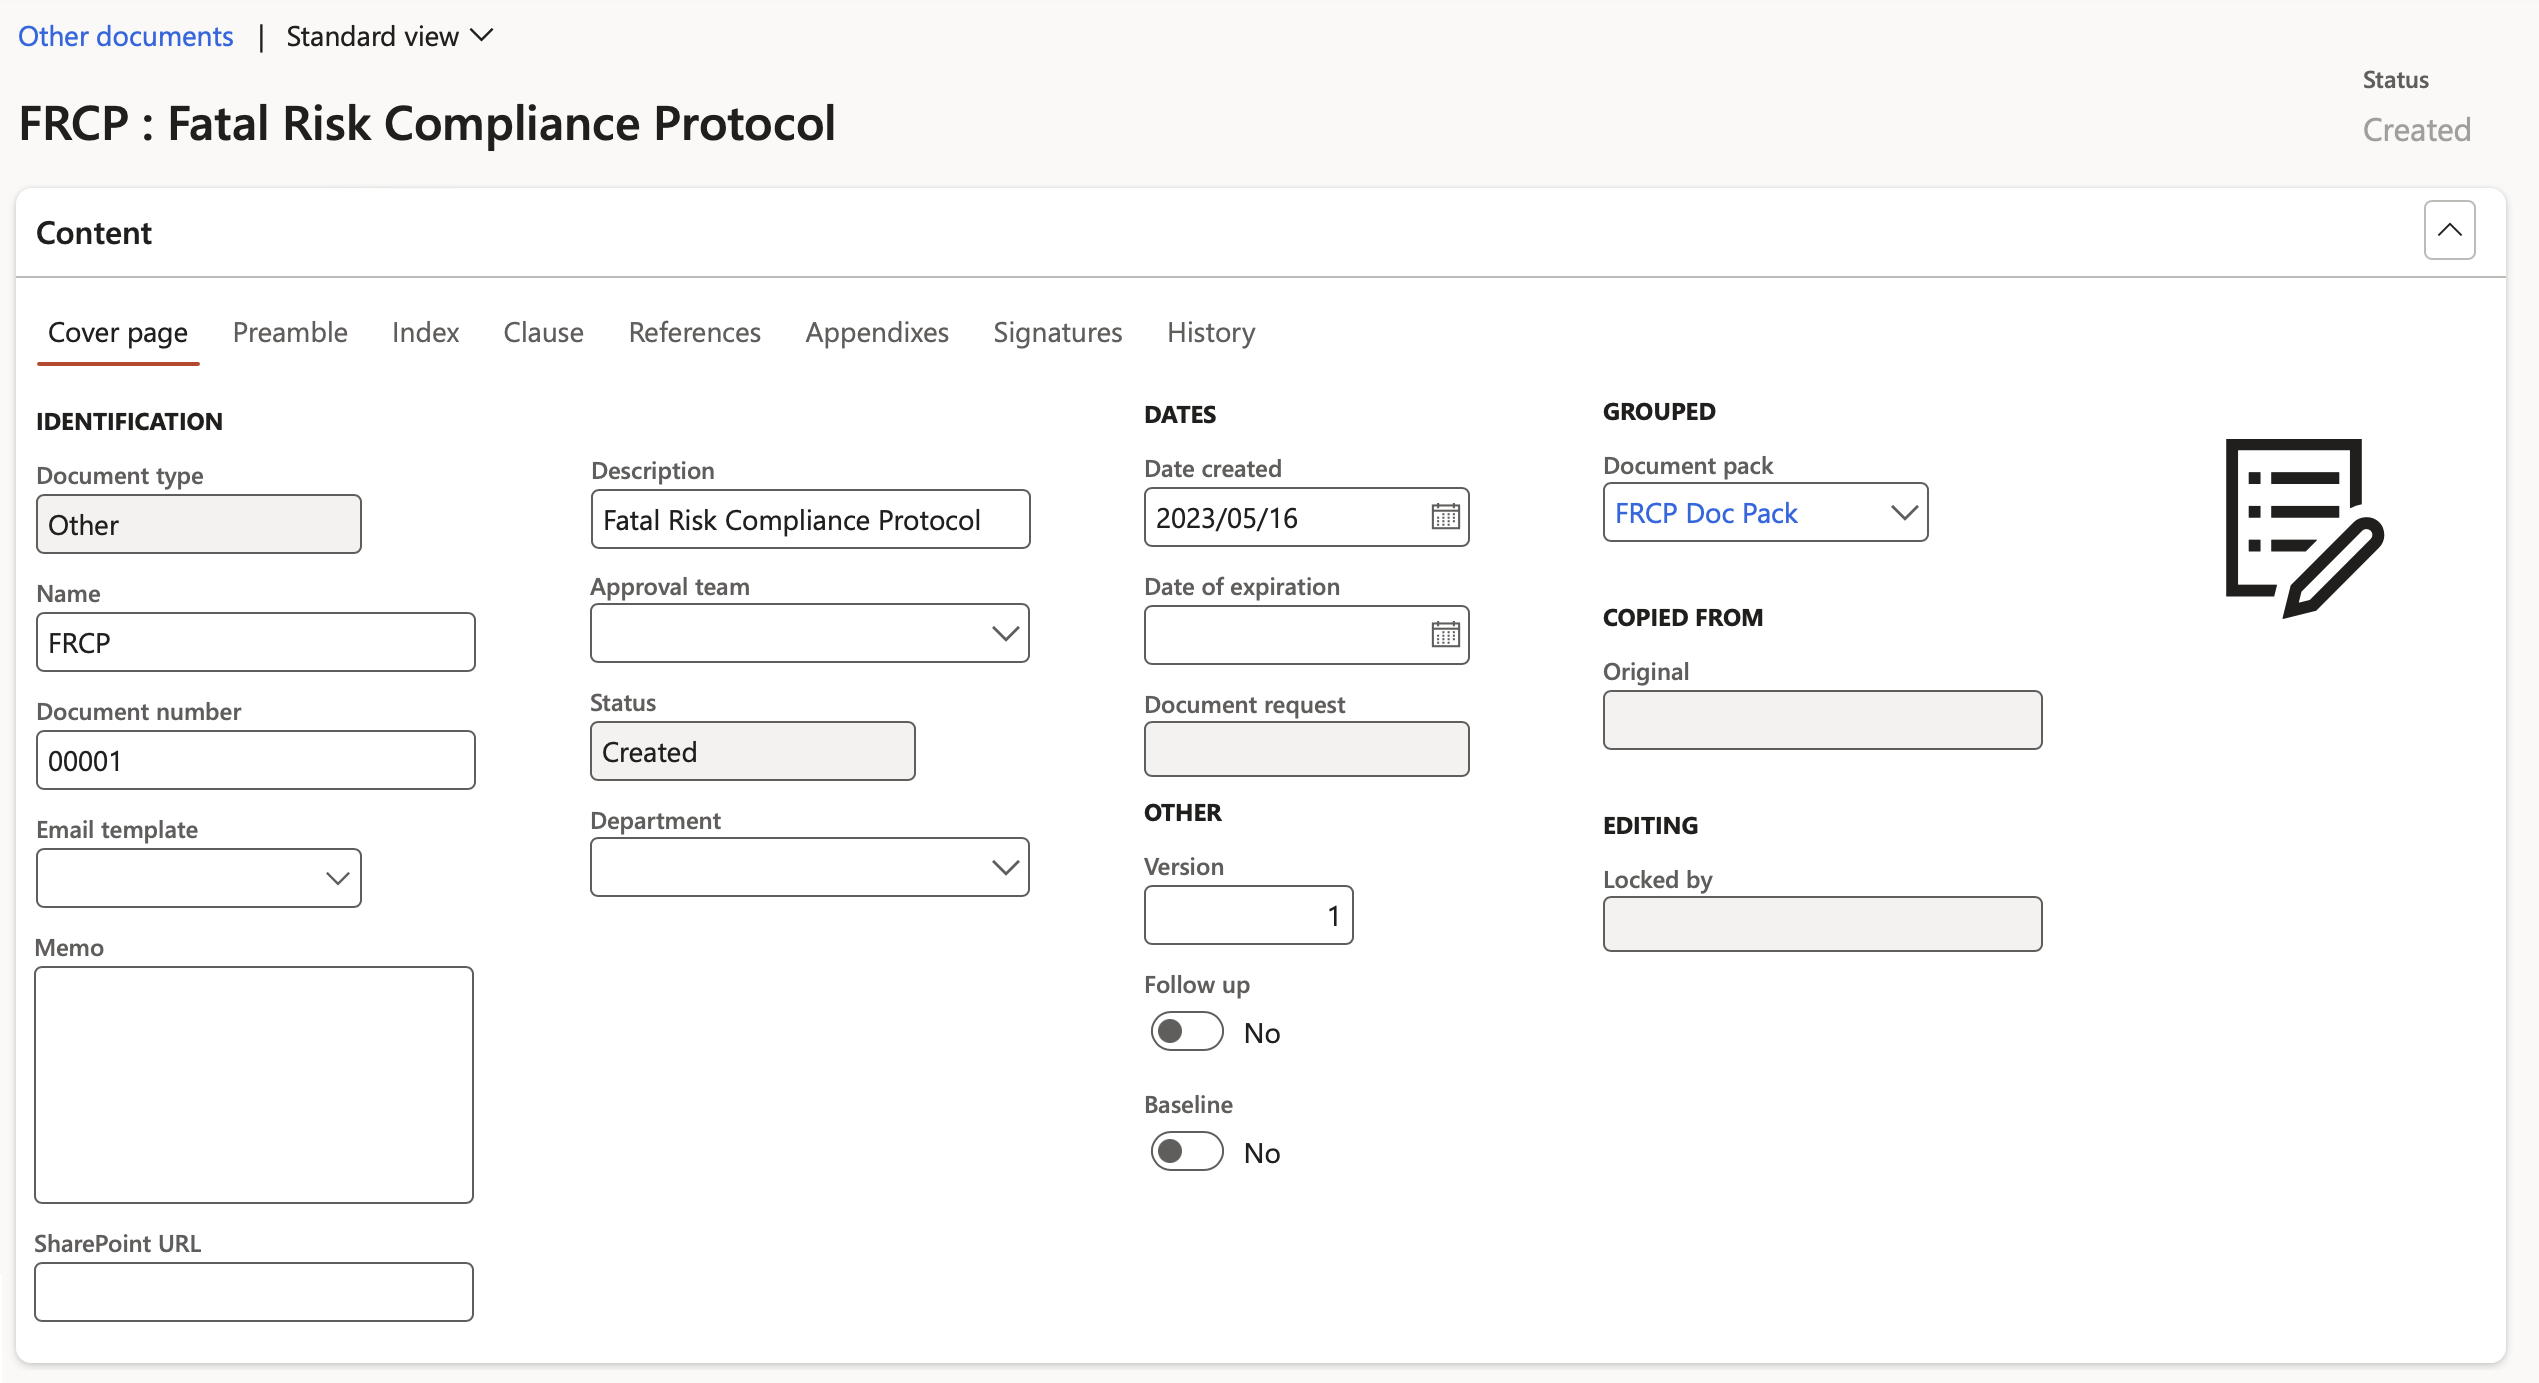
Go to: GRC > Governance > Documents > Other documents
- On the Other documents list page, select the relevant document
¶ Step 12: Requests for Document reviews/vetting
Document review is a “thinking process” - a rational analysis. This process includes clarifying of document related facts, measuring of the feasibility of documents, and forecasting of document risks. To get this started users can request other users to review
Vetting of documents means carefully checking the documents for the errors they might or might not have.
Go to: GRC > Governance > Documents > Review documents
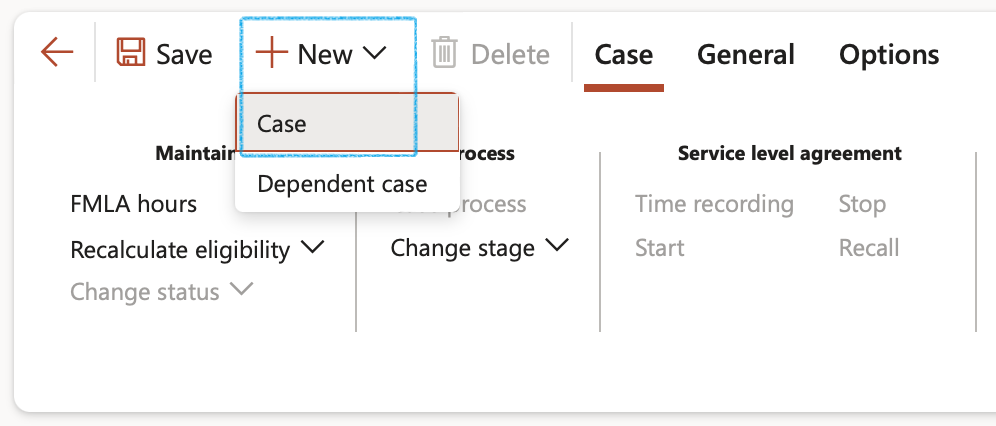
- On the Review documents list page, in the Action pane, click on the New button
- Select Case from the dropdown list
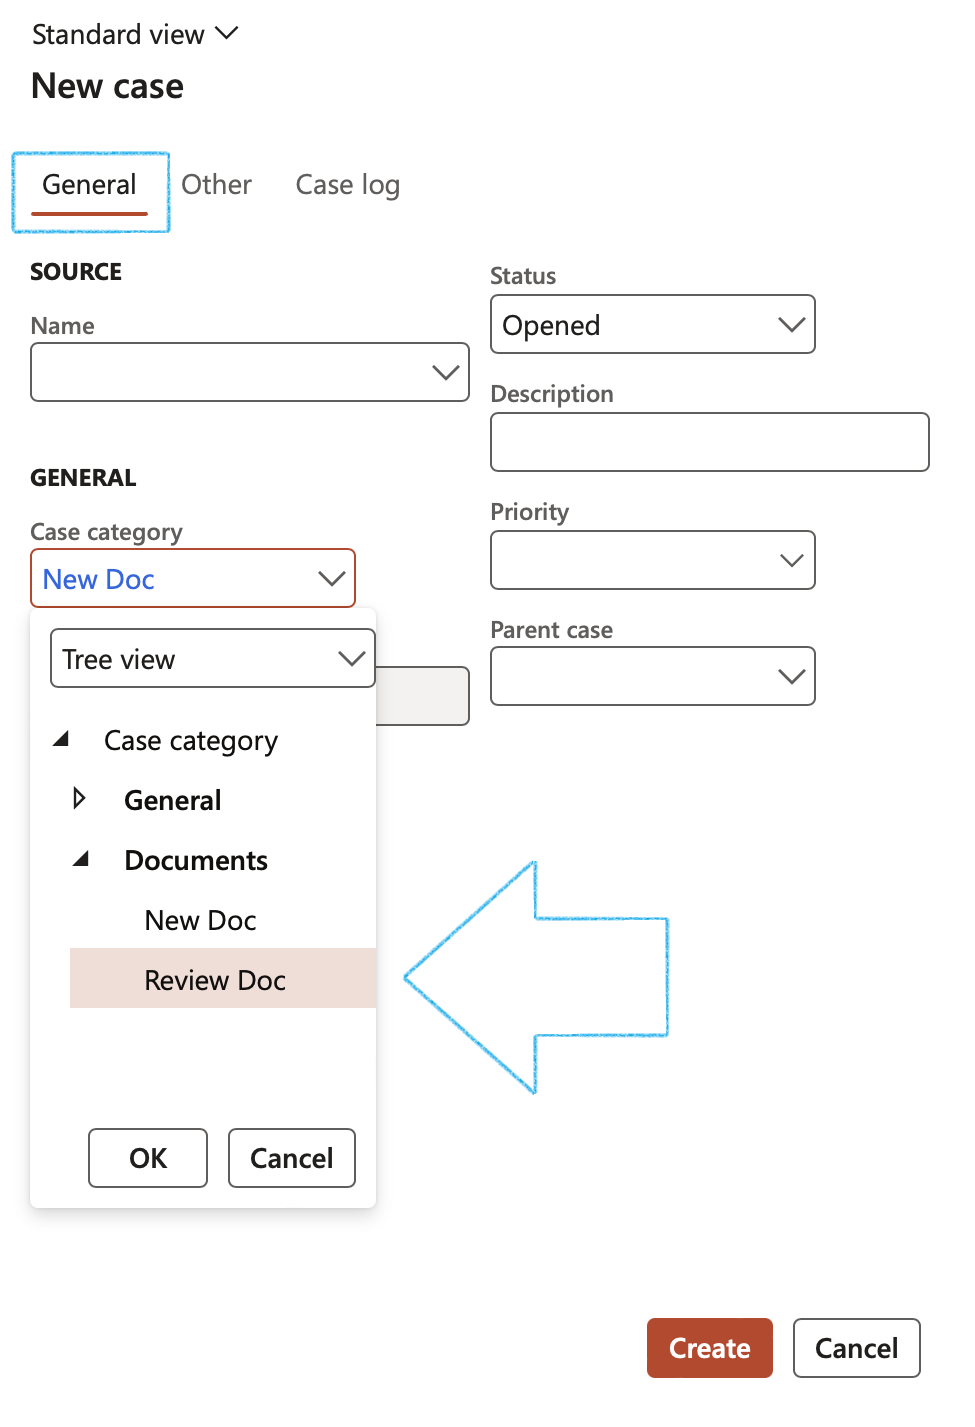
- On the New case dialog, open the General Index tab
- Select the Source Name from the dropdown list
- In the Case category field, select Documents, then select the DocRev (Document review) option from the list
- Enter a brief Description for the new case
- Open the Other Index tab
- Select the relevant Department from the dropdown list
- Select the Employee responsible from the dropdown list
- Click on the Create button
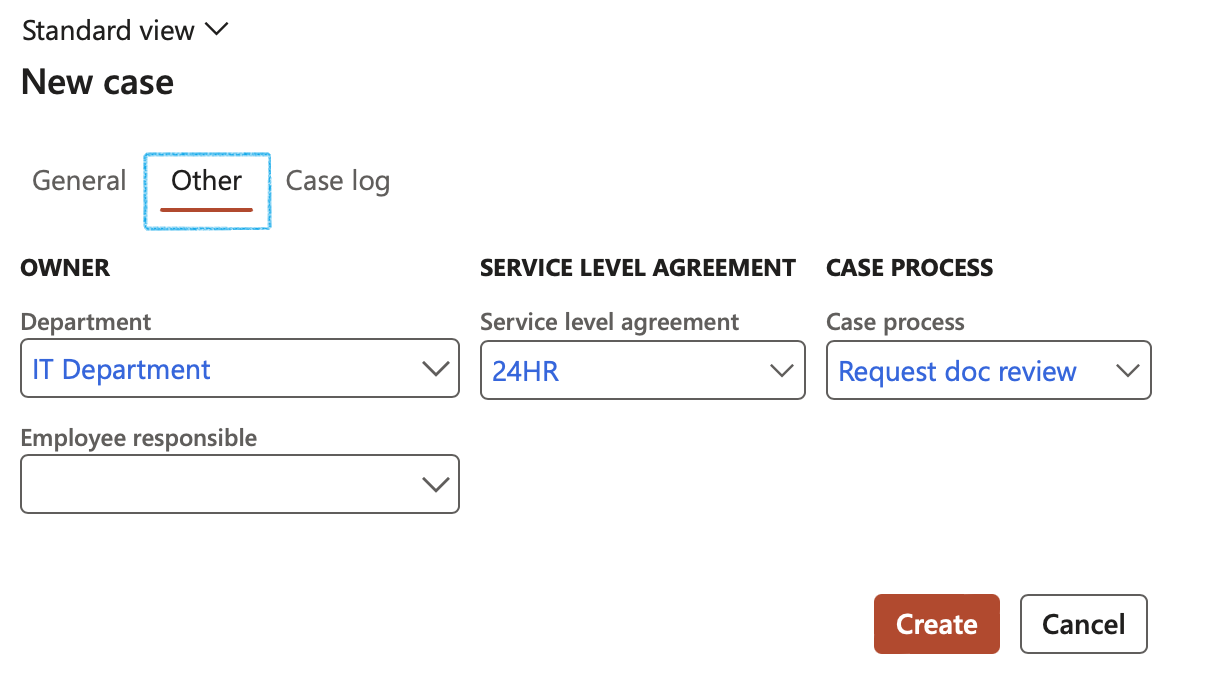
The information entered on the New case dialog will populate the relevant fields on the detail form
¶ Step 12.1: Document to be reviewed/vetted detail form
Go to: GRC > Documents > All document requests
- On the All document requests list page, select the relevant document request
- Enter additional information under the General Fast tab
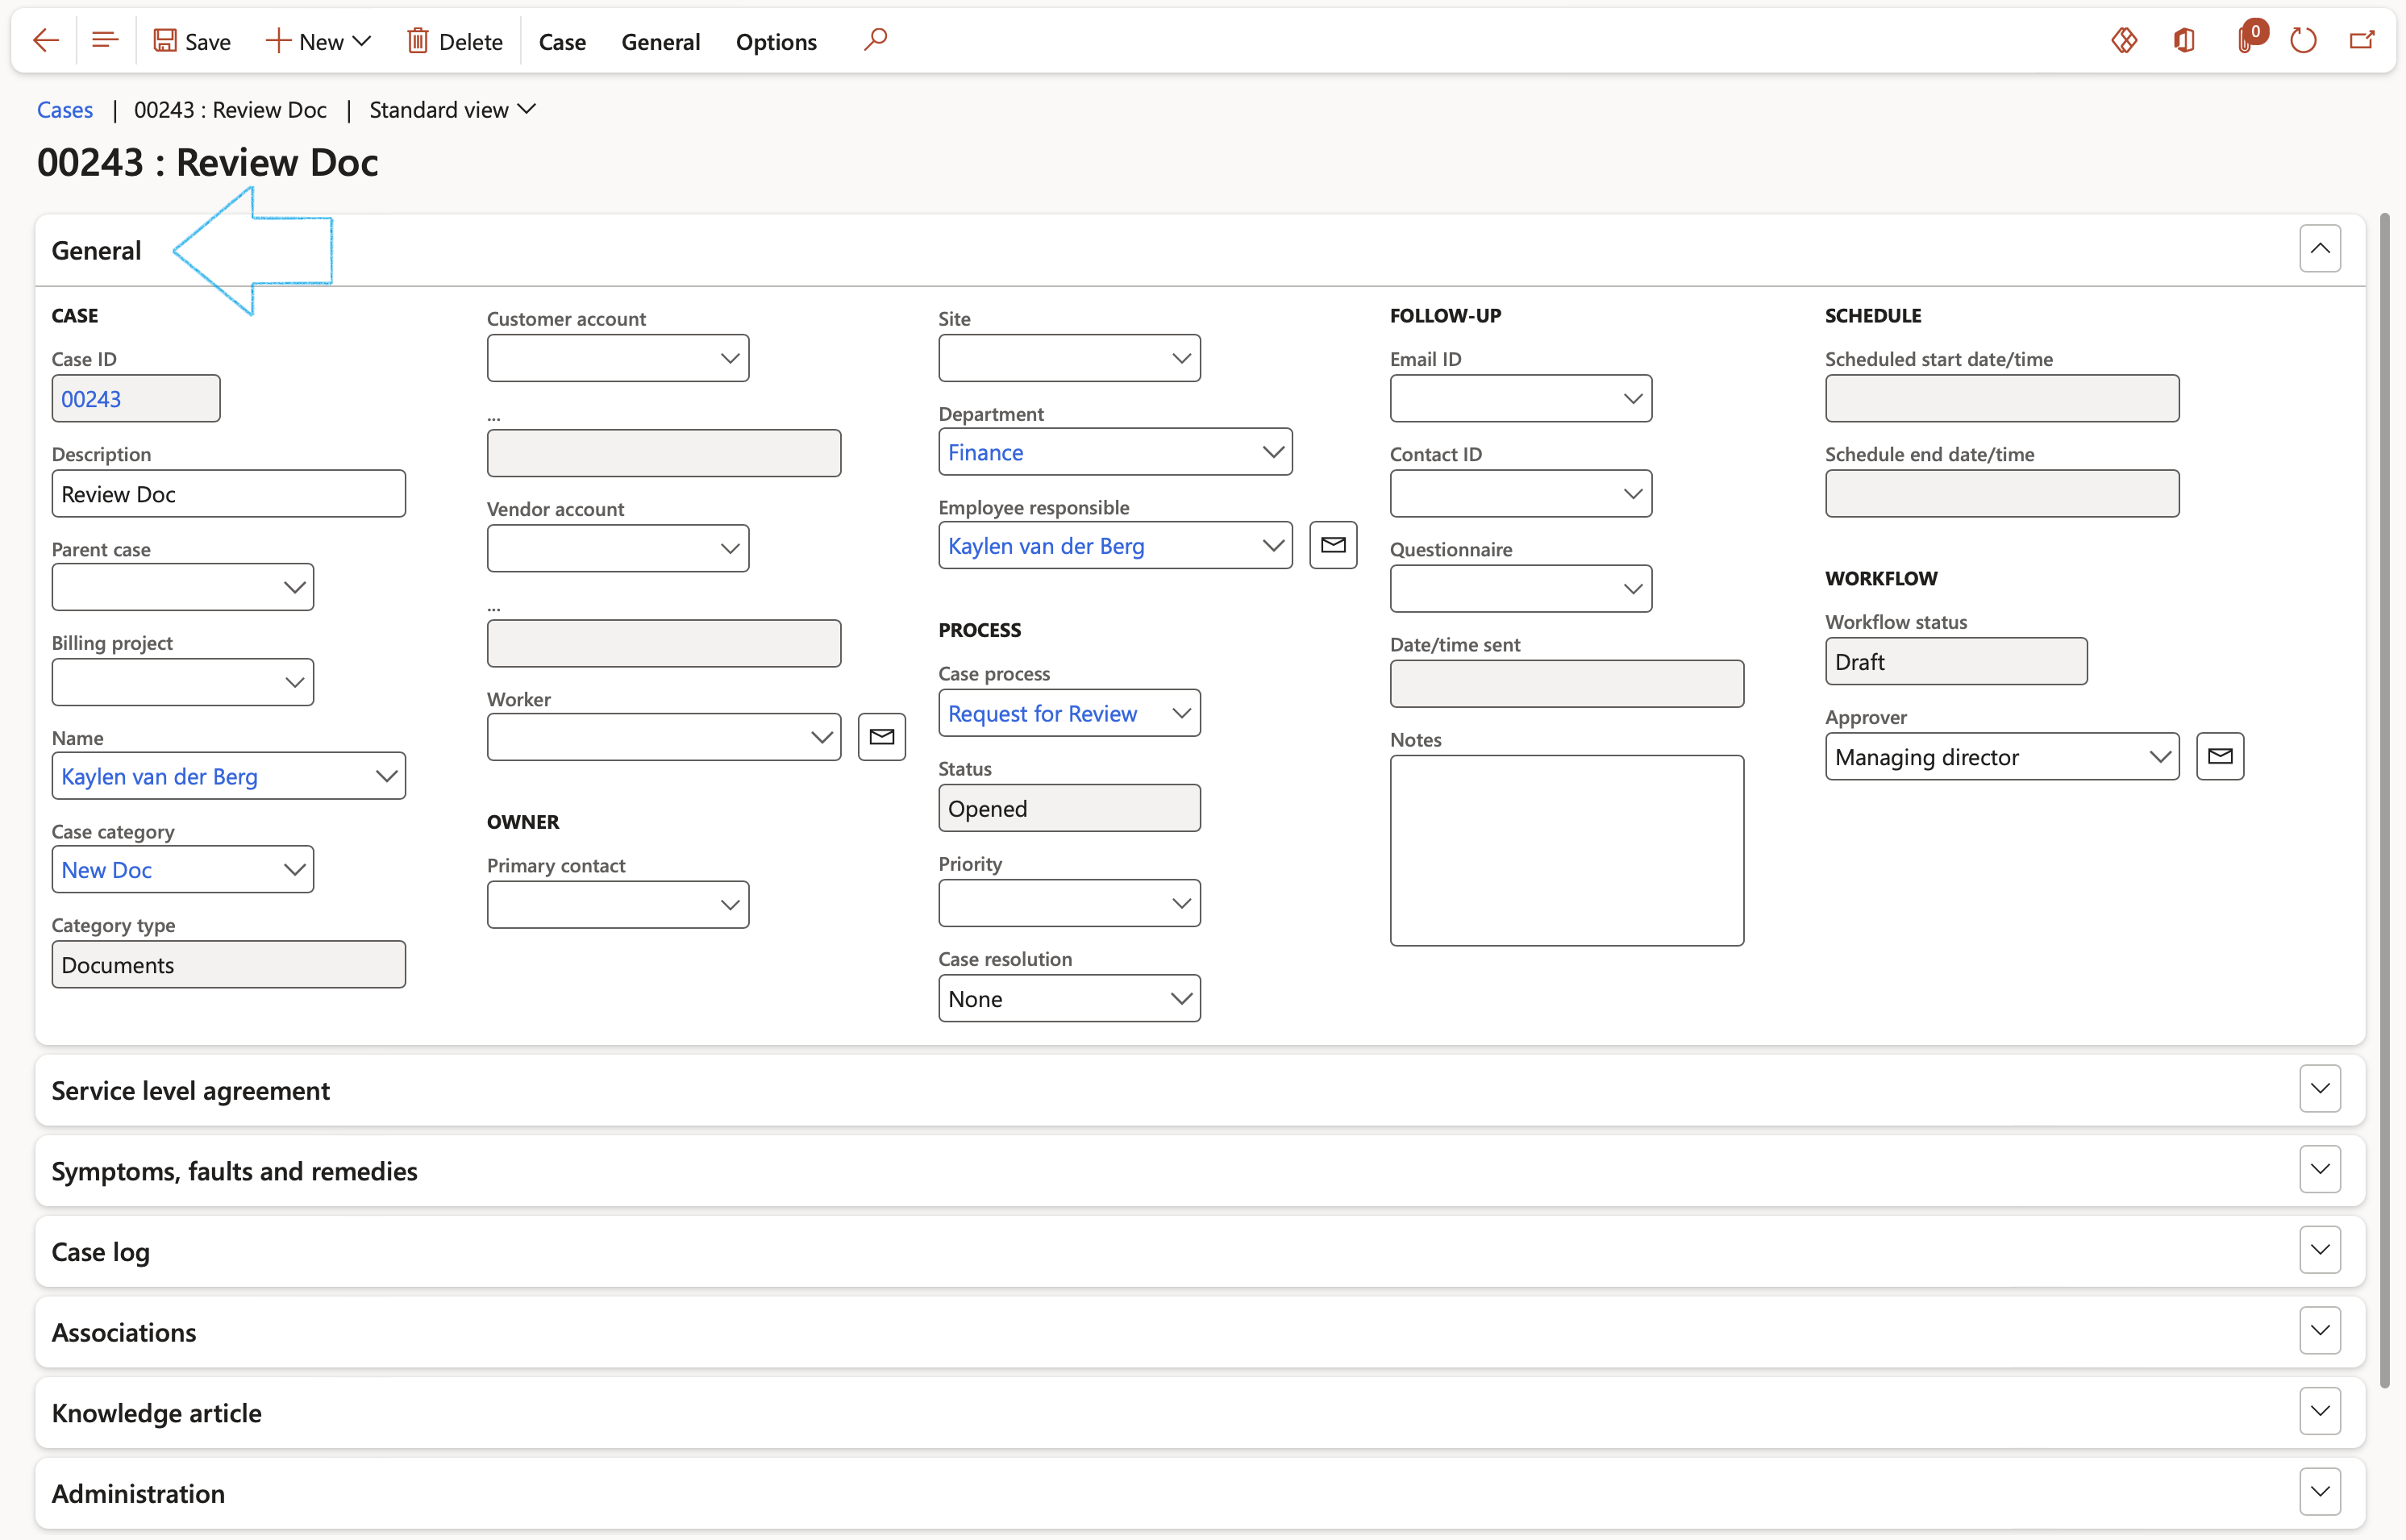
- Expand the Document management Fast tab
- Open the Document request Index tab
- Select the name of the person who is going to review the document, from the dropdown list

¶ Step 13: PDF repository
Go to: GRC > Documents > PDF repository
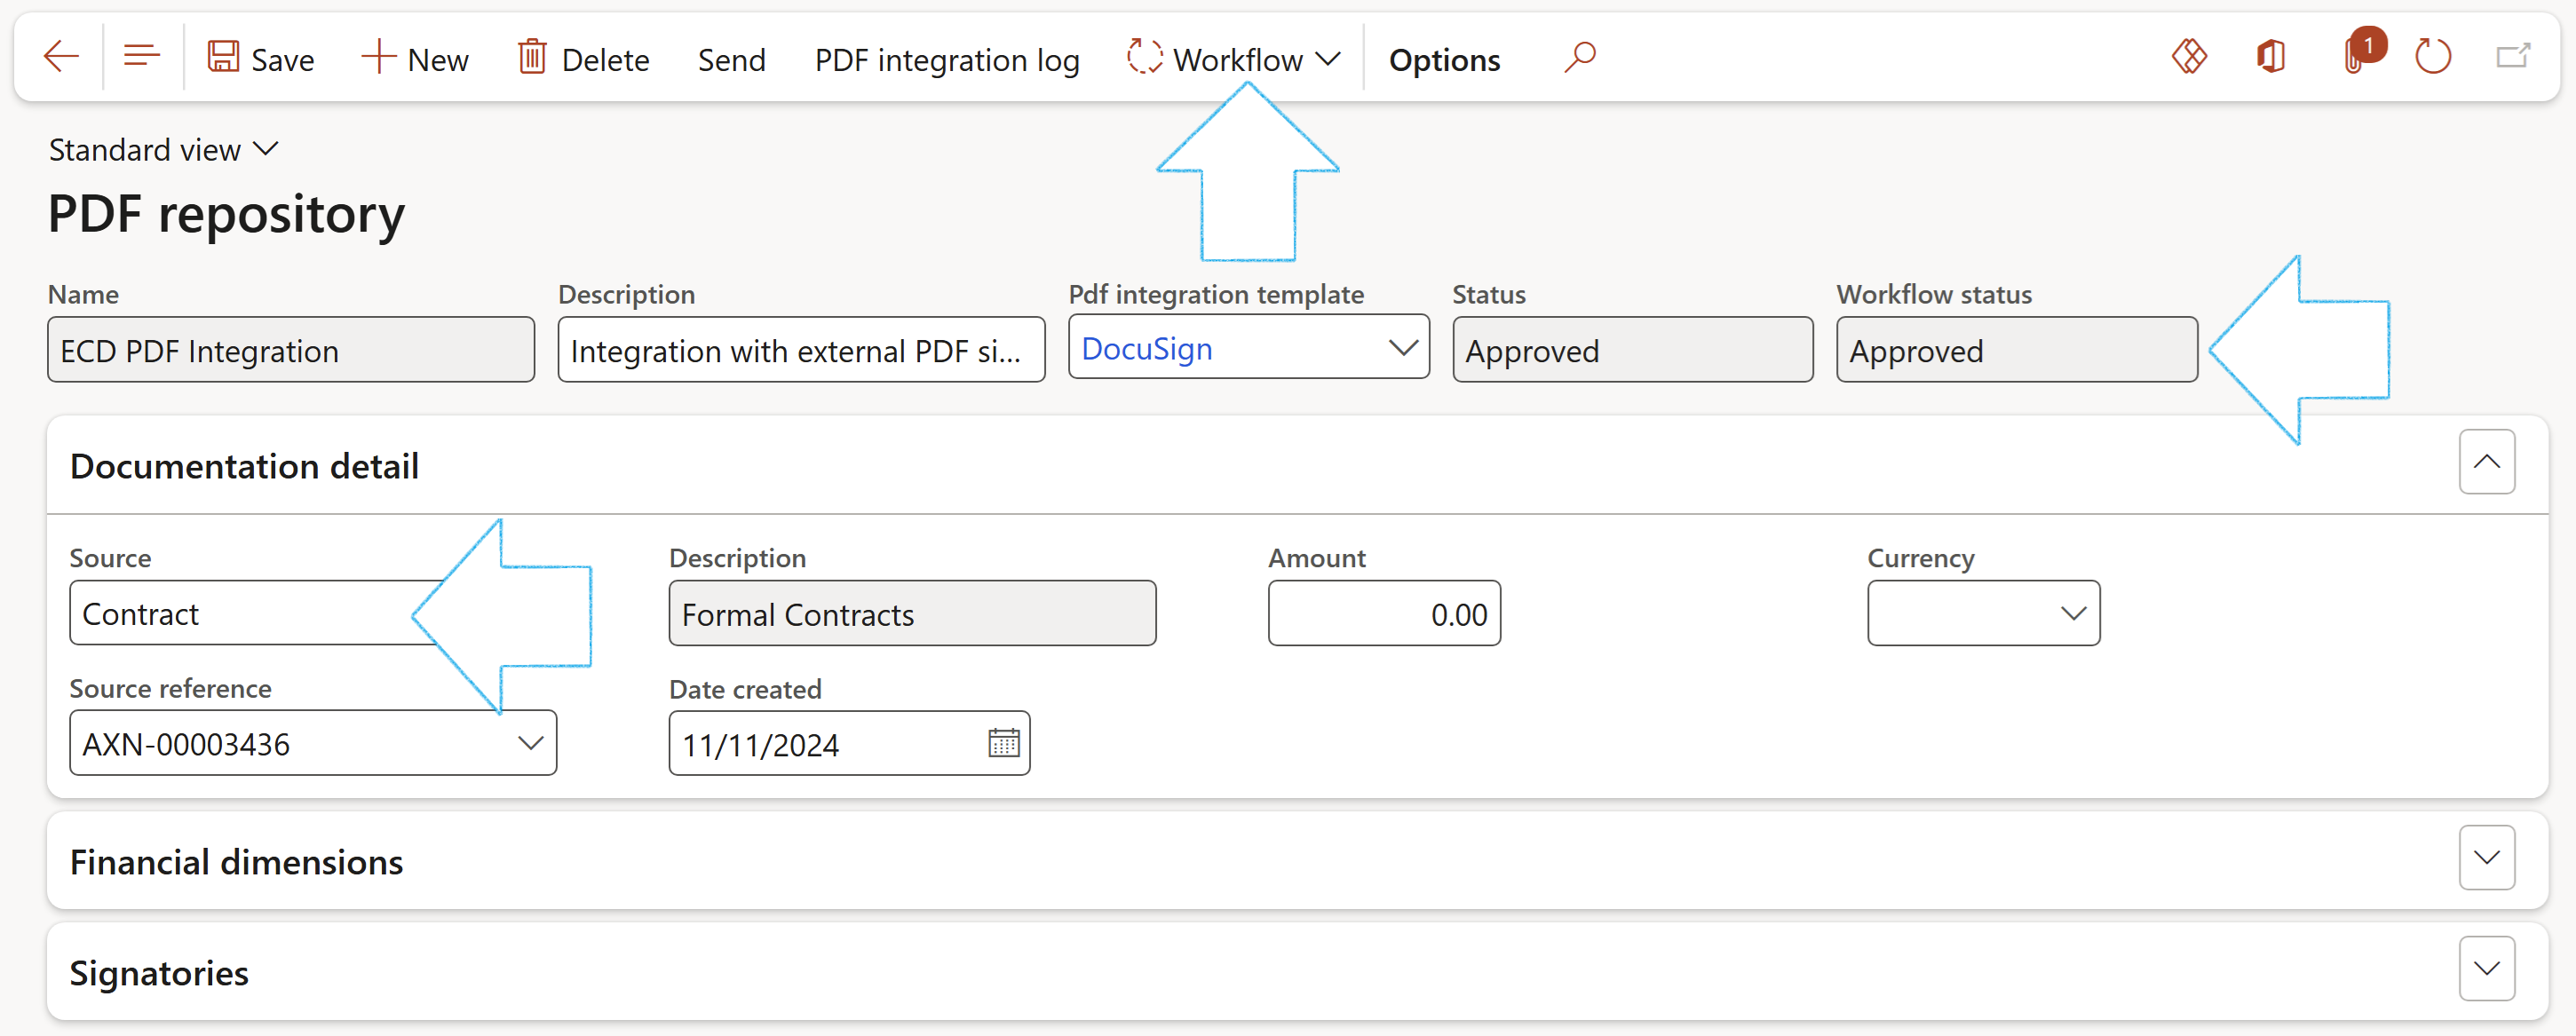
- In the Action pane, click on the New button
- Enter a Name for the PDF repository
- Enter a brief Description for the PDF repository
- Select the relevant PDF integration template from the dropdown list
- Expand the Documentation detail Fast tab
- Select the relevant Source for the PDF repository, from the dropdown list
- Select the relevant Source reference for the PDF repository, from the dropdown list
The Status and Workflow status will be Draft. Once you click on the Save button, the Workflow button becomes availible. Submit the record into workflow for approval.
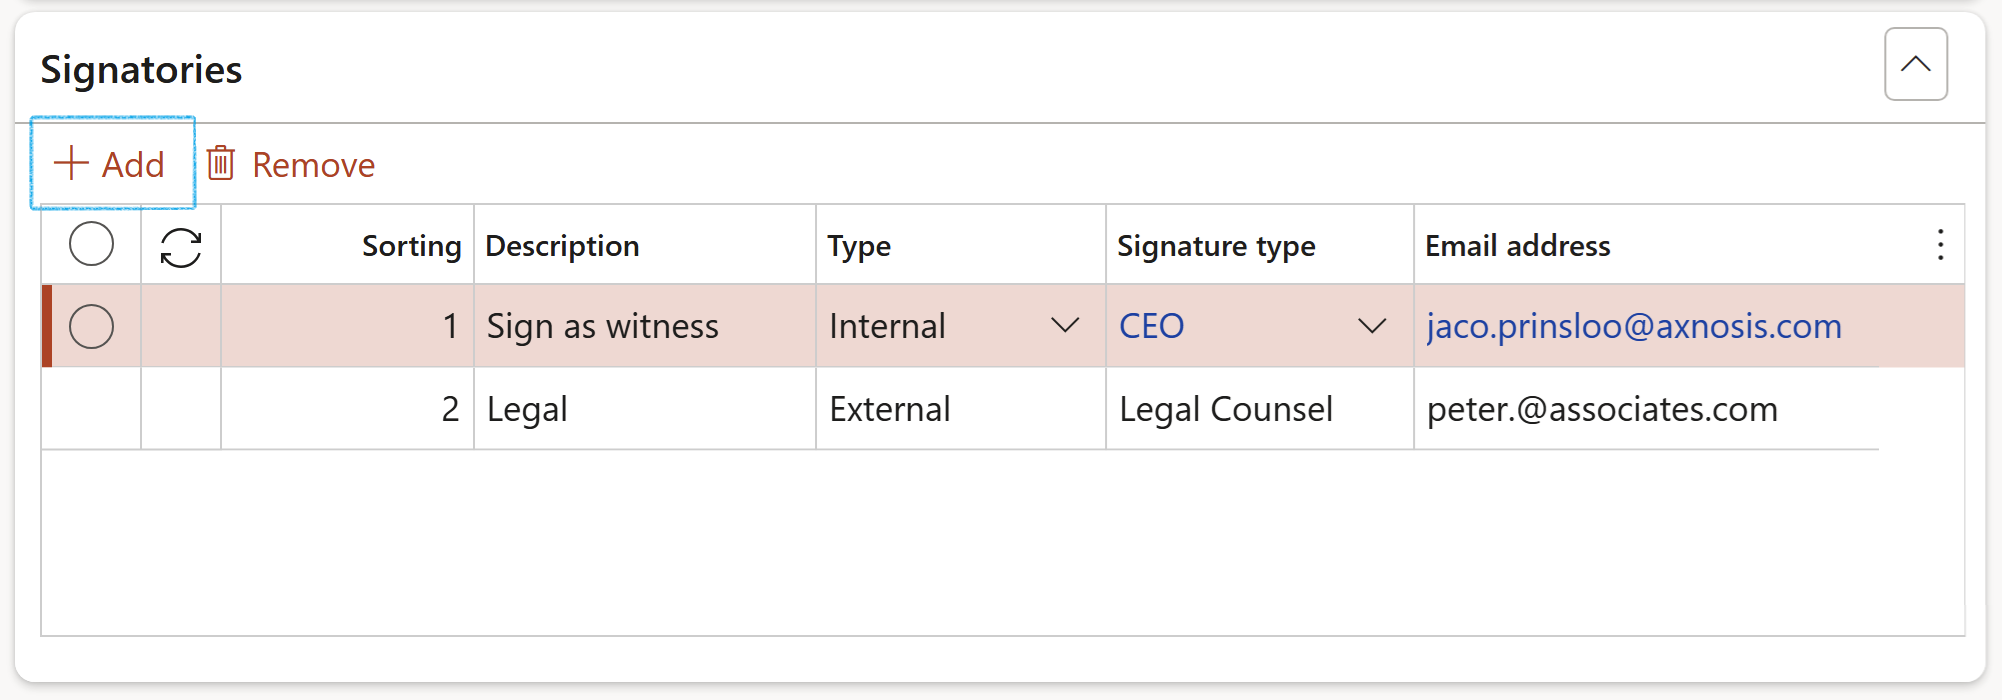
- Expand the Signatories Fast tab
- The system will assign a value in the Sorting column
- Enter a brief Description of the Signatory
- Select the Type of Signatory from the dropdown list
- Select the relevant Signature type from the dropdown list
- Enter the Email address where the document has to be sent to for signing
The Send button will only be availible:
- If there is a document attached to the record
- The record is approved
- There is at least one record under the Signatories Fast tab
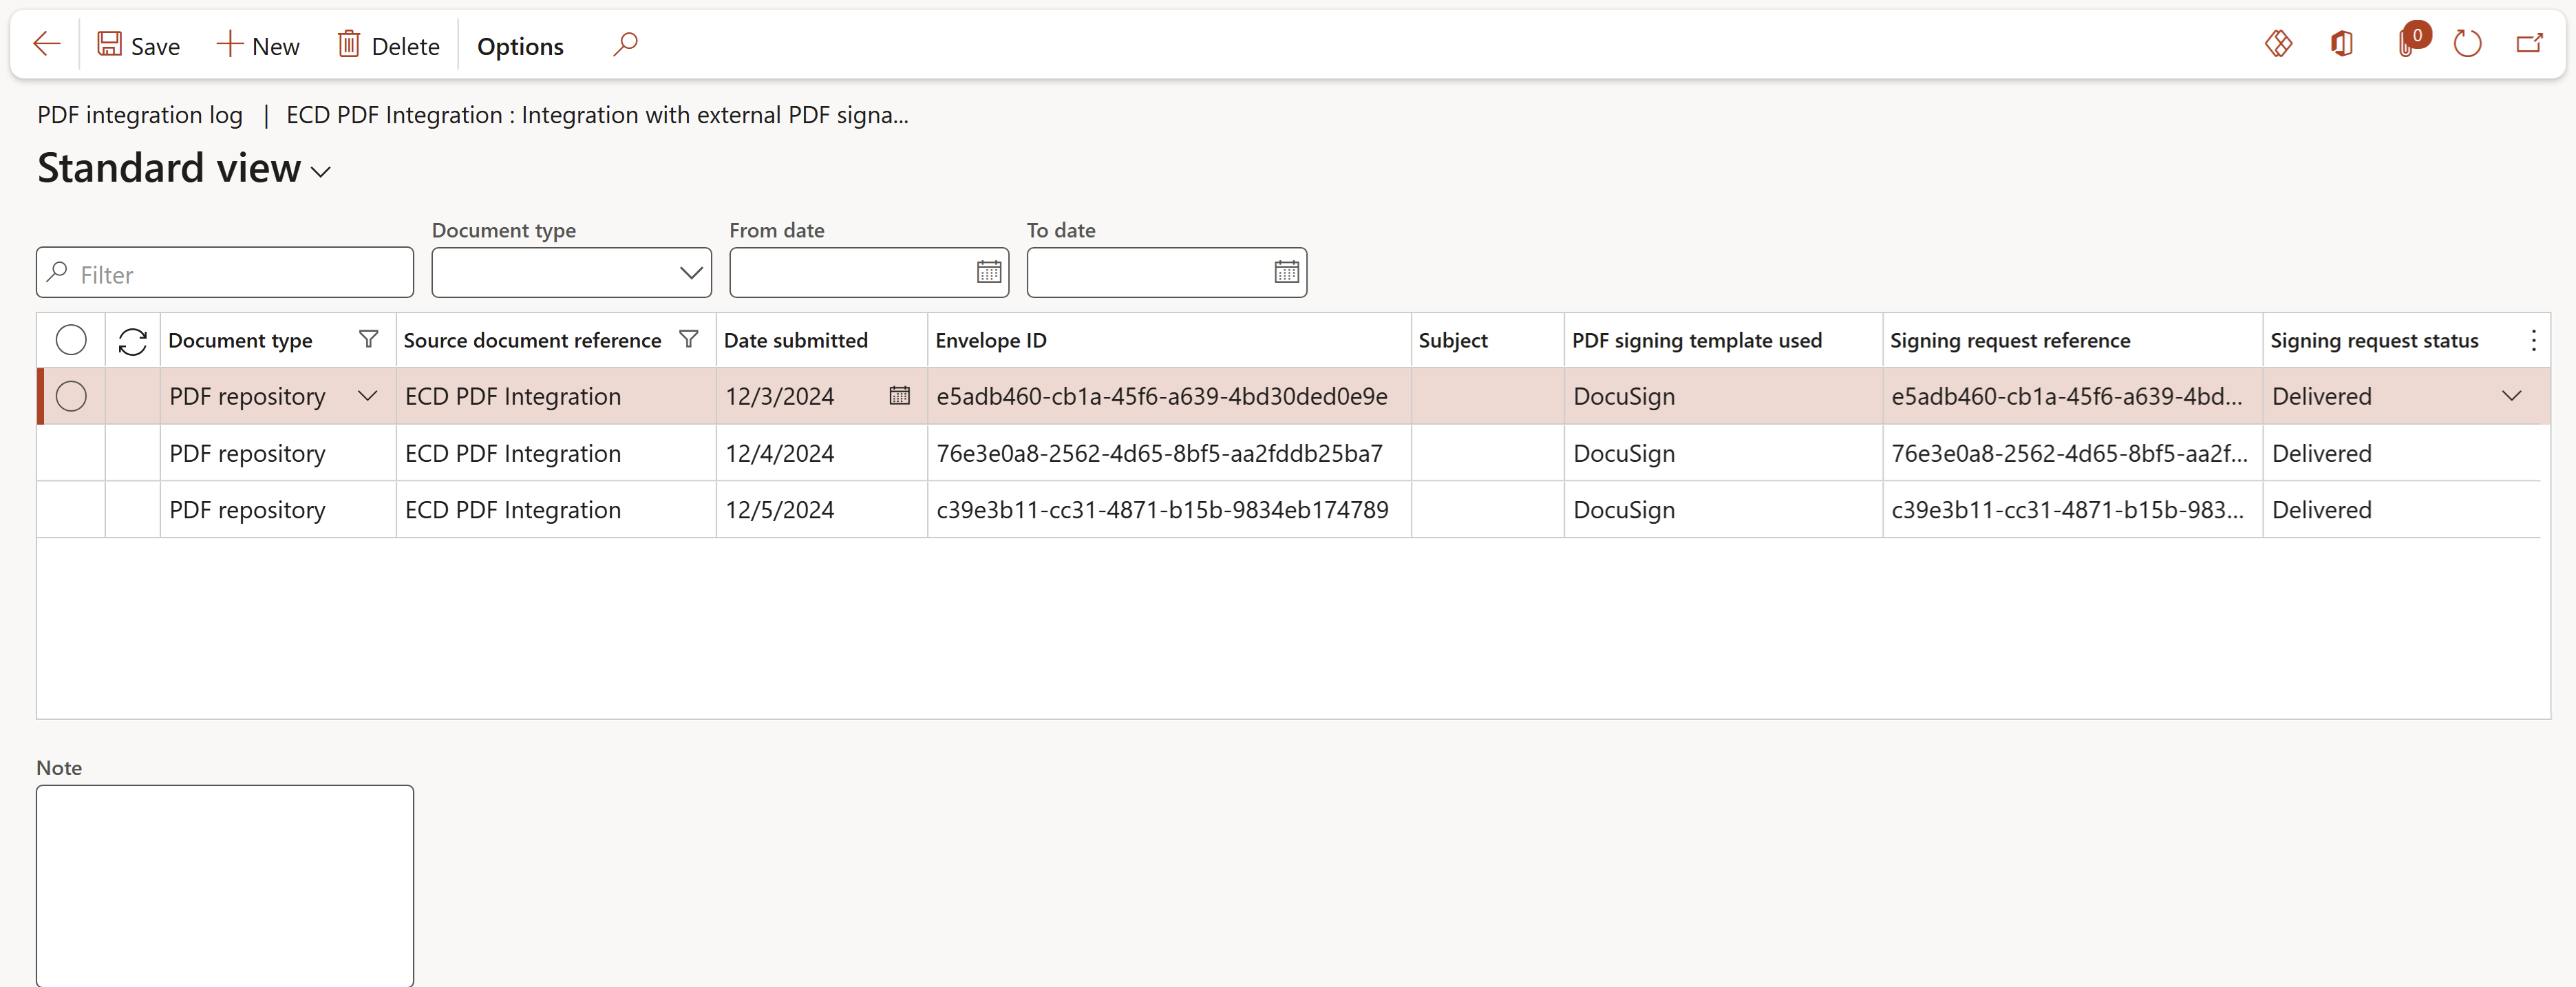
In the Action pane, click on the PDF integration log button
¶ Reporting
¶ Step 14: Print the actual document
Select the record that you want to print the document for
- On the Action pane, click on the Print button
- On the dialog, select whether you want to print the cover page or not
