¶ Introduction
A checklist is a job aid used to reduce the risk of failure by compensating for potential limits of human memory and attention. It helps to ensure consistency and completeness in carrying out a job/task.
Areas of application could include:
- Pre-startup safety review (PSSR)
- Pre-flight checklists aid in aviation safety to ensure that critical items are not forgotten
- Used in medical practice to ensure that clinical practice guidelines are followed. An example is the Surgical Safety Checklist developed for the World Health Organization
- Used in quality assurance, to check process compliance, code standardization and error prevention.
- Often used in industry in operations procedures.
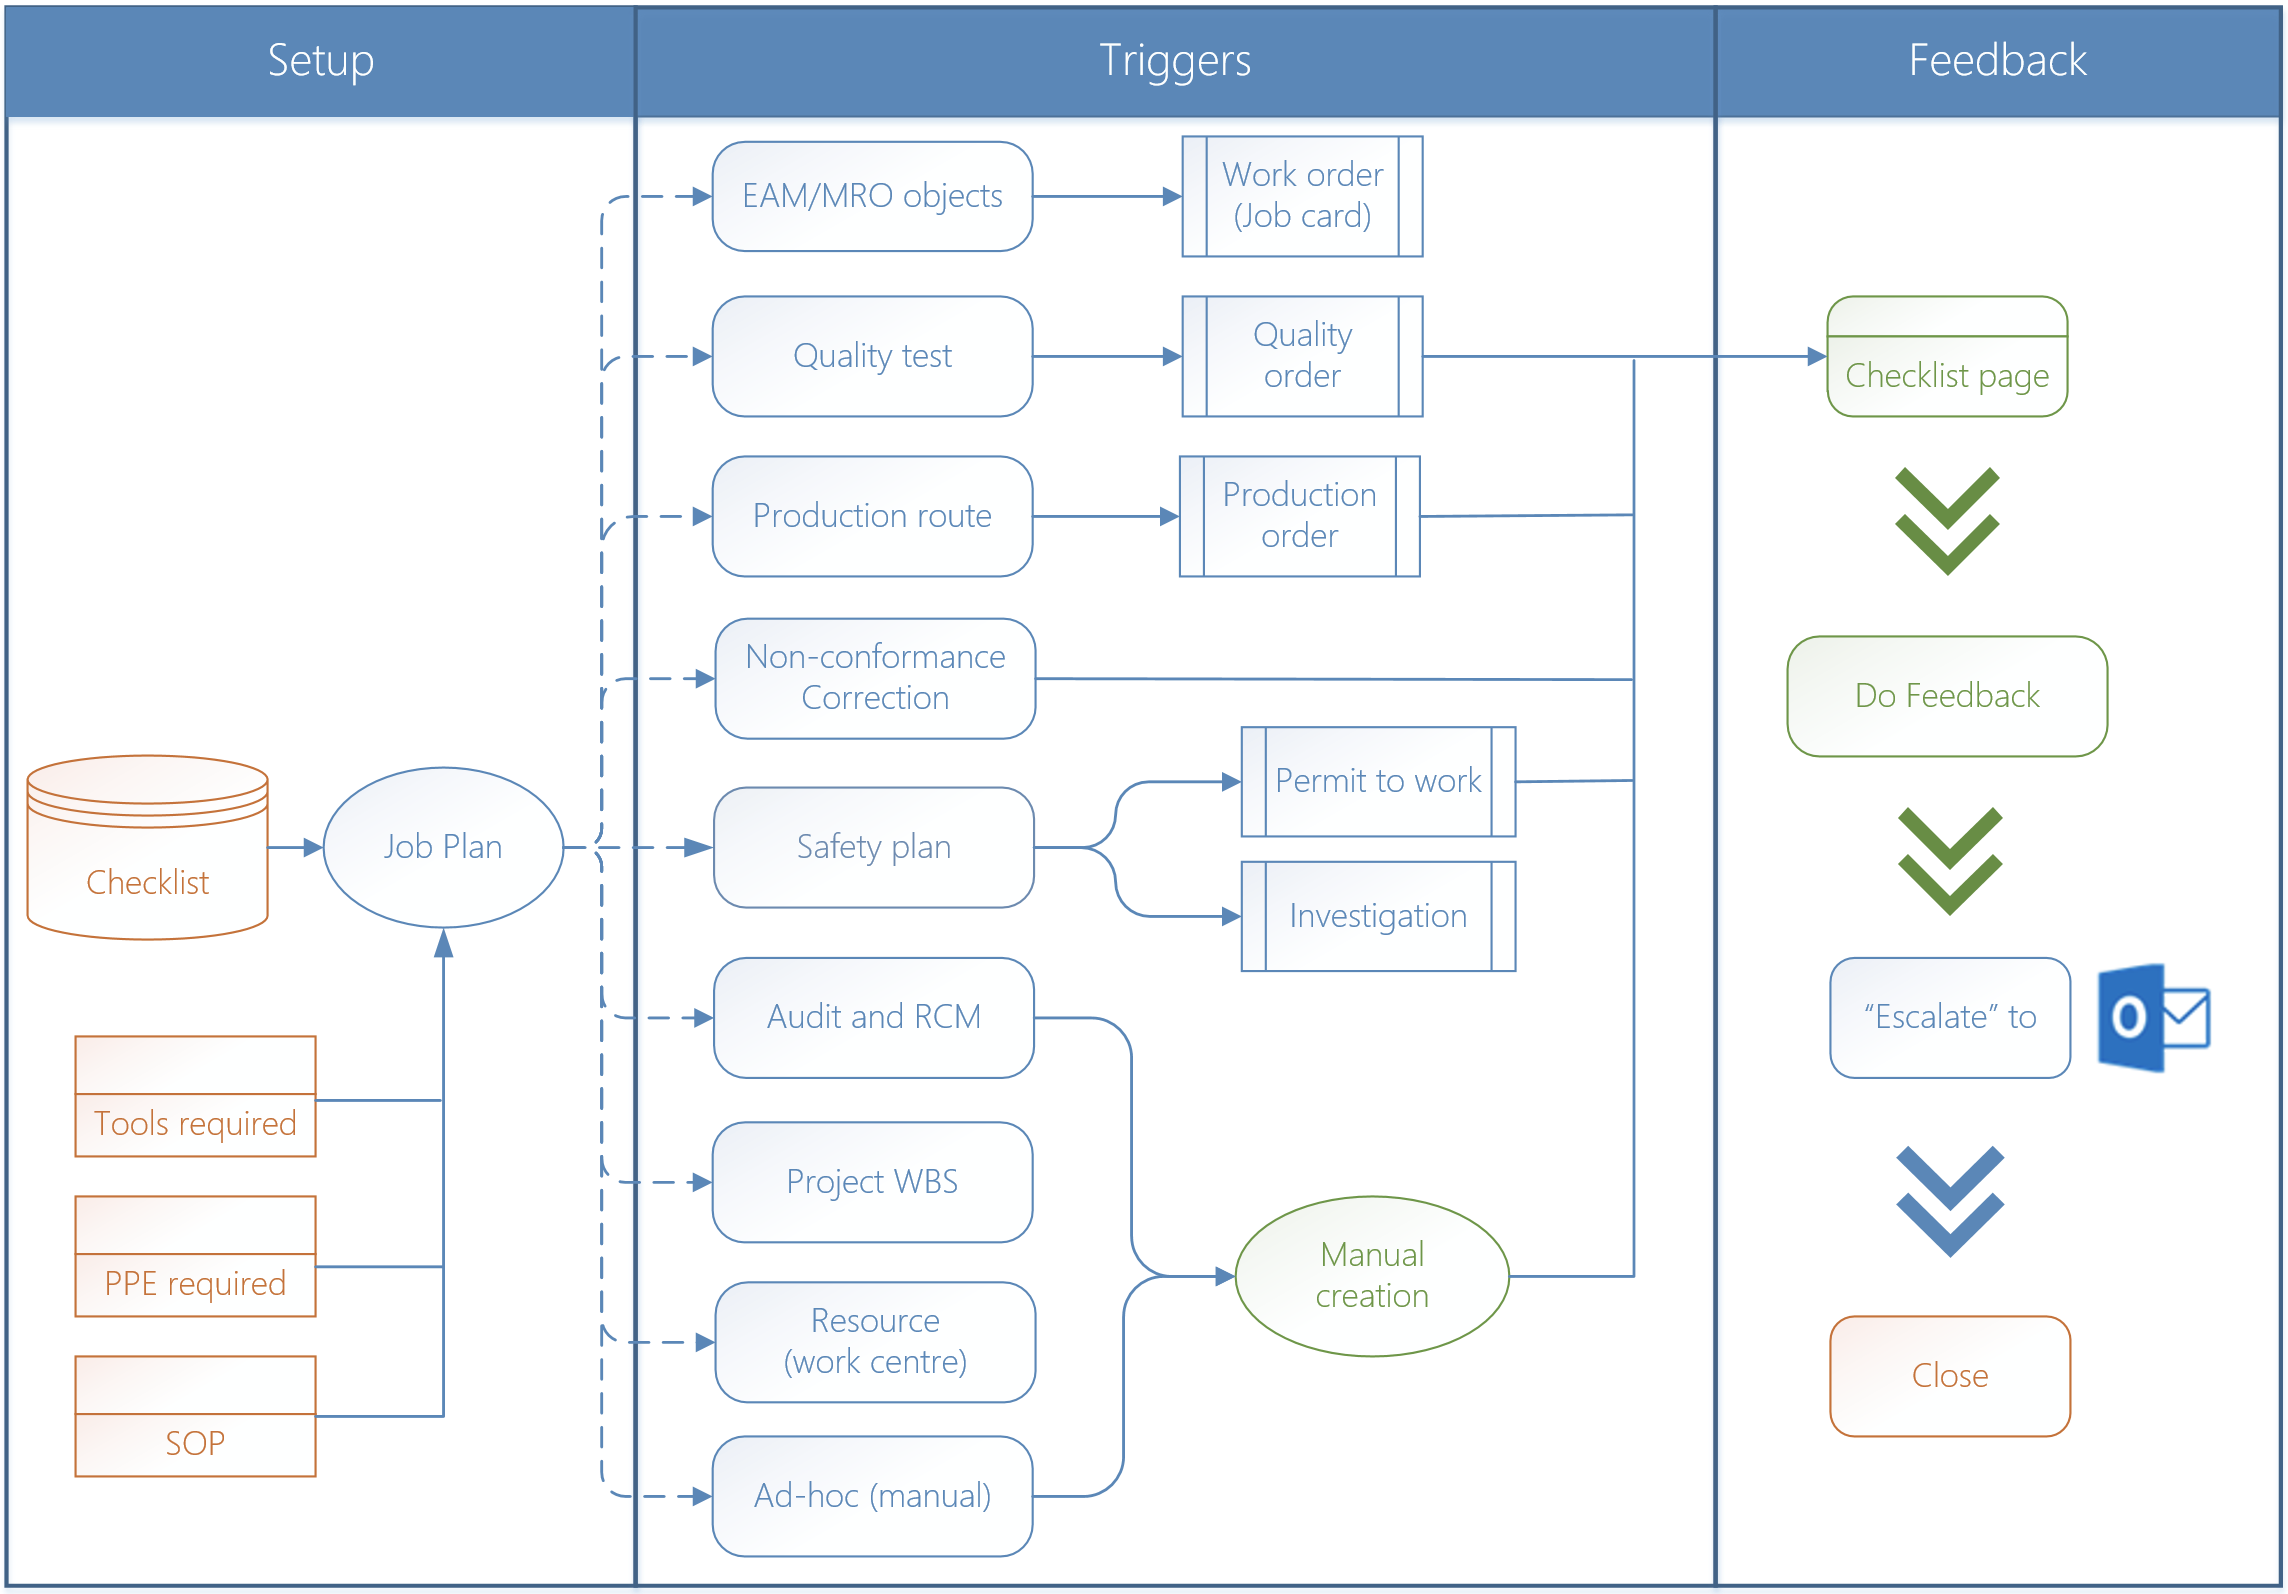
Inside GRC the checklist definition (setup) is found on the Job plan as indicated in the diagram above and then used elsewhere in Dynamics.
¶ Checklist supported sources
GRC supports checklists on the following:
- Assets/objects used from a maintenance point of view. Please note the checklist feedback is done on the work order/job card of the maintenance module not inside GRC
- Quality management as specified on the Tests
- A permit to work and investigation as referenced via safety plans
- Organizational resources/work center of type Location
- Corrections on a Non conformance
- Audit and related RCM (Risk & Control Matrix)
- Project work breakdown (WBS) activities
- Production related routes
- Generic non linked checklists
A formal Checklist transaction list is maintained. These entries can be created manually by the user for last four mentioned above. The other checklists are created automatically from the mentioned sources above.
Users can do feedback on the checklist for all sources above by completing the date and specifying the worker that followed the checklist steps and, where applicable, users can enter measuring points per checklist.
¶ Checklist vs. Inspection
There is a difference between a checklist and an inspection. In a pure day to day context these two could be seen as the same, but it is wise to treat both as separate concepts.
A checklist could be seen as something to aid a worker in doing his job. A plan to guide the worker on steps to follow.
An inspection could be defined as the manager, supervisor or foreman of a worker, doing a follow up to see if work was actually performed. This is after work has been performed; after a worker has followed a checklist.
¶ Navigation
¶ Specific setups
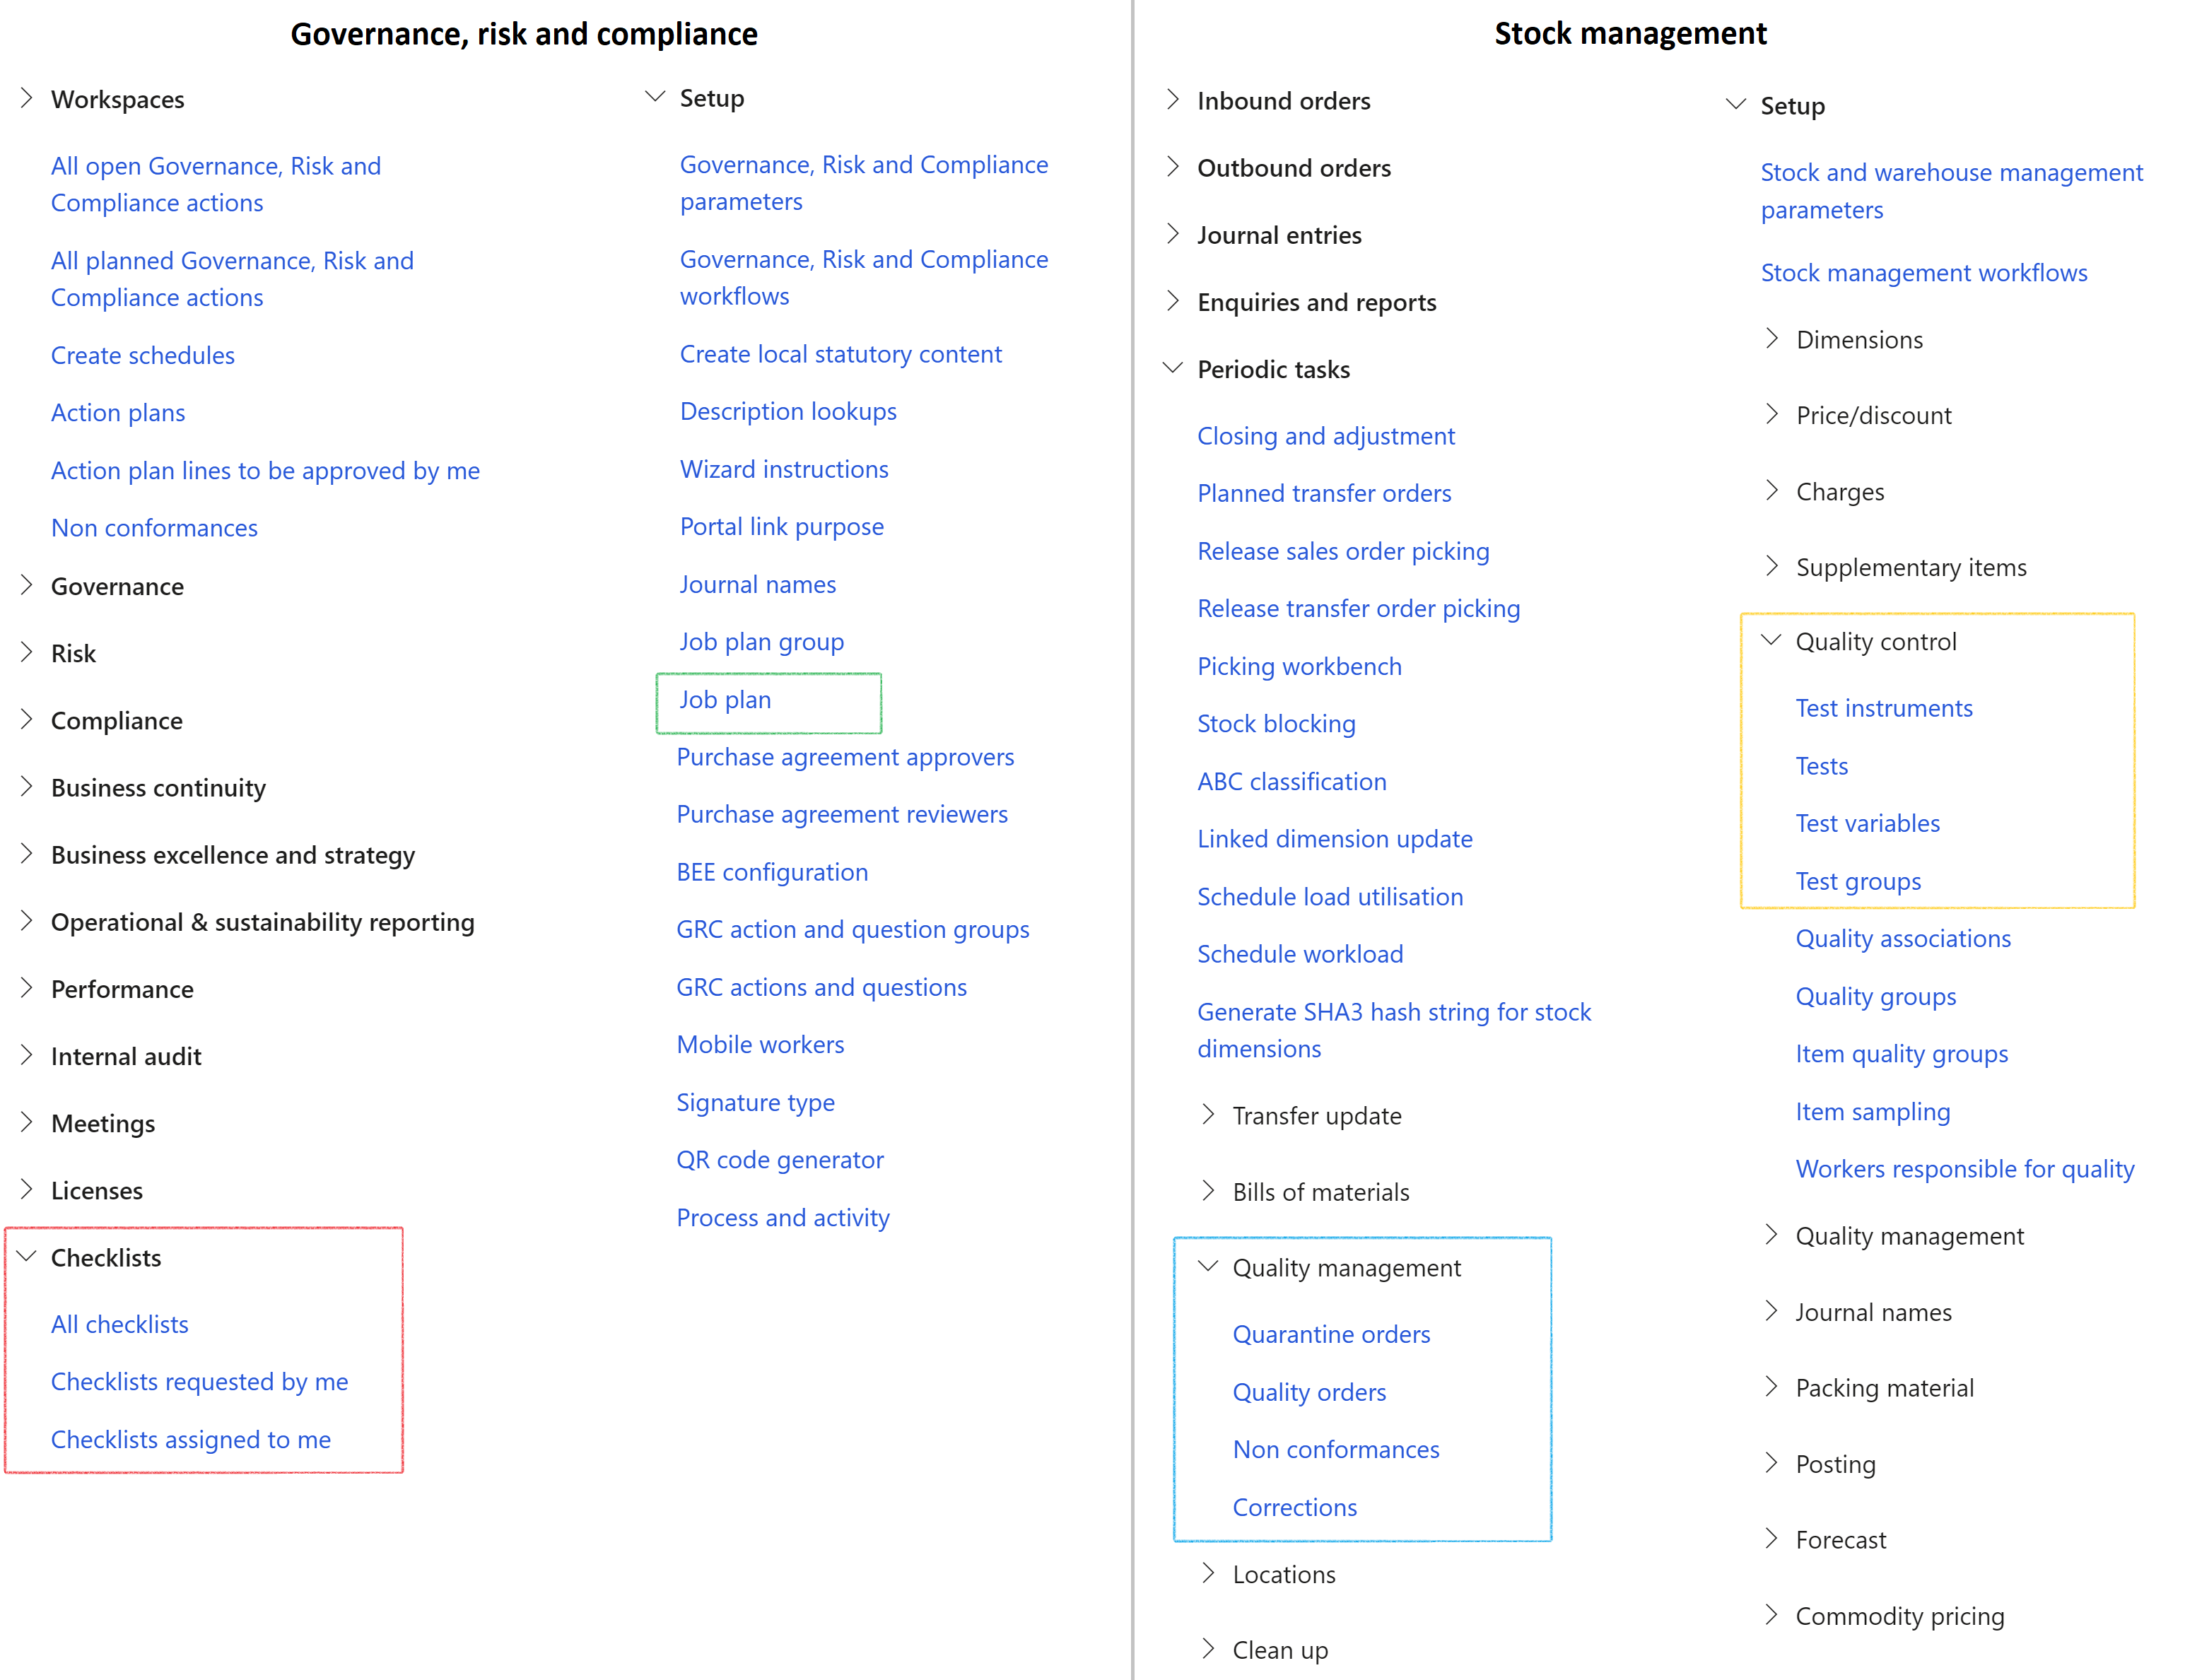
- Job plan - This is the fundamental building block and a logical grouping of job aids. In the context of checklists, the job plan is where the “step-by-step” checks and balances are created and maintained
- Checklist - A list to aid a worker in doing his job. A plan to guide the worker on steps to follow
- Measuring points - Measuring points are used to record discontinuous quantities/values, for example: The condition of silica gel of transformer. Measuring points describe a condition, for example: Temperature and pressure on a Boiler. To enable you to differentiate more easily between the individual measuring points and to provide them with a unit, measuring points are assigned to a job plan
- Test group - This is used to set up, edit, and view test groups and the individual tests that are assigned to a test group. The test group that is assigned to a quality order provides the initial basis for the tests that have to be performed on the specified item. Tests can be added, deleted or changed on the quality order. Test results are reported for each test on a quality order
- Tests – Are used to define and view the individual tests that determine whether your products meet quality specifications. You can assign one or more individual tests to a test group. When doing this, you also specify test-specific information such as the acceptable measurement values. Measurement values are used for quantitative tests and test variables are used for qualitative tests
- A quantitative test has a test type of integer or fraction and a designated unit of measure. Quality specifications and test results are expressed as numbers.
- A qualitative test has a test type of option. It requires additional information about the test variable that is being measured and its enumerated options. Quality specifications and test results are expressed according to an outcome.
- Test instruments – Are used to define and view the equipment that is used in performing quality tests. A unit of measure must be assigned to a test instrument that reflects the associated measurement and its decimal precision. An example of such units of measure are centimeters and a decimal precision of four. You can also assign a test instrument to a test area.
- Test variables - This is used to define and view the variables that are associated with a qualitative test, where each variable will have enumerated outcomes that represent the possible options. You can define variables and their outcomes for qualitative tests. Tests are defined on the Tests form with a test of the type Option. Use the Test groups form to assign a test variable to an individual test.
¶ Step 1: Create Job plan and add checklist records
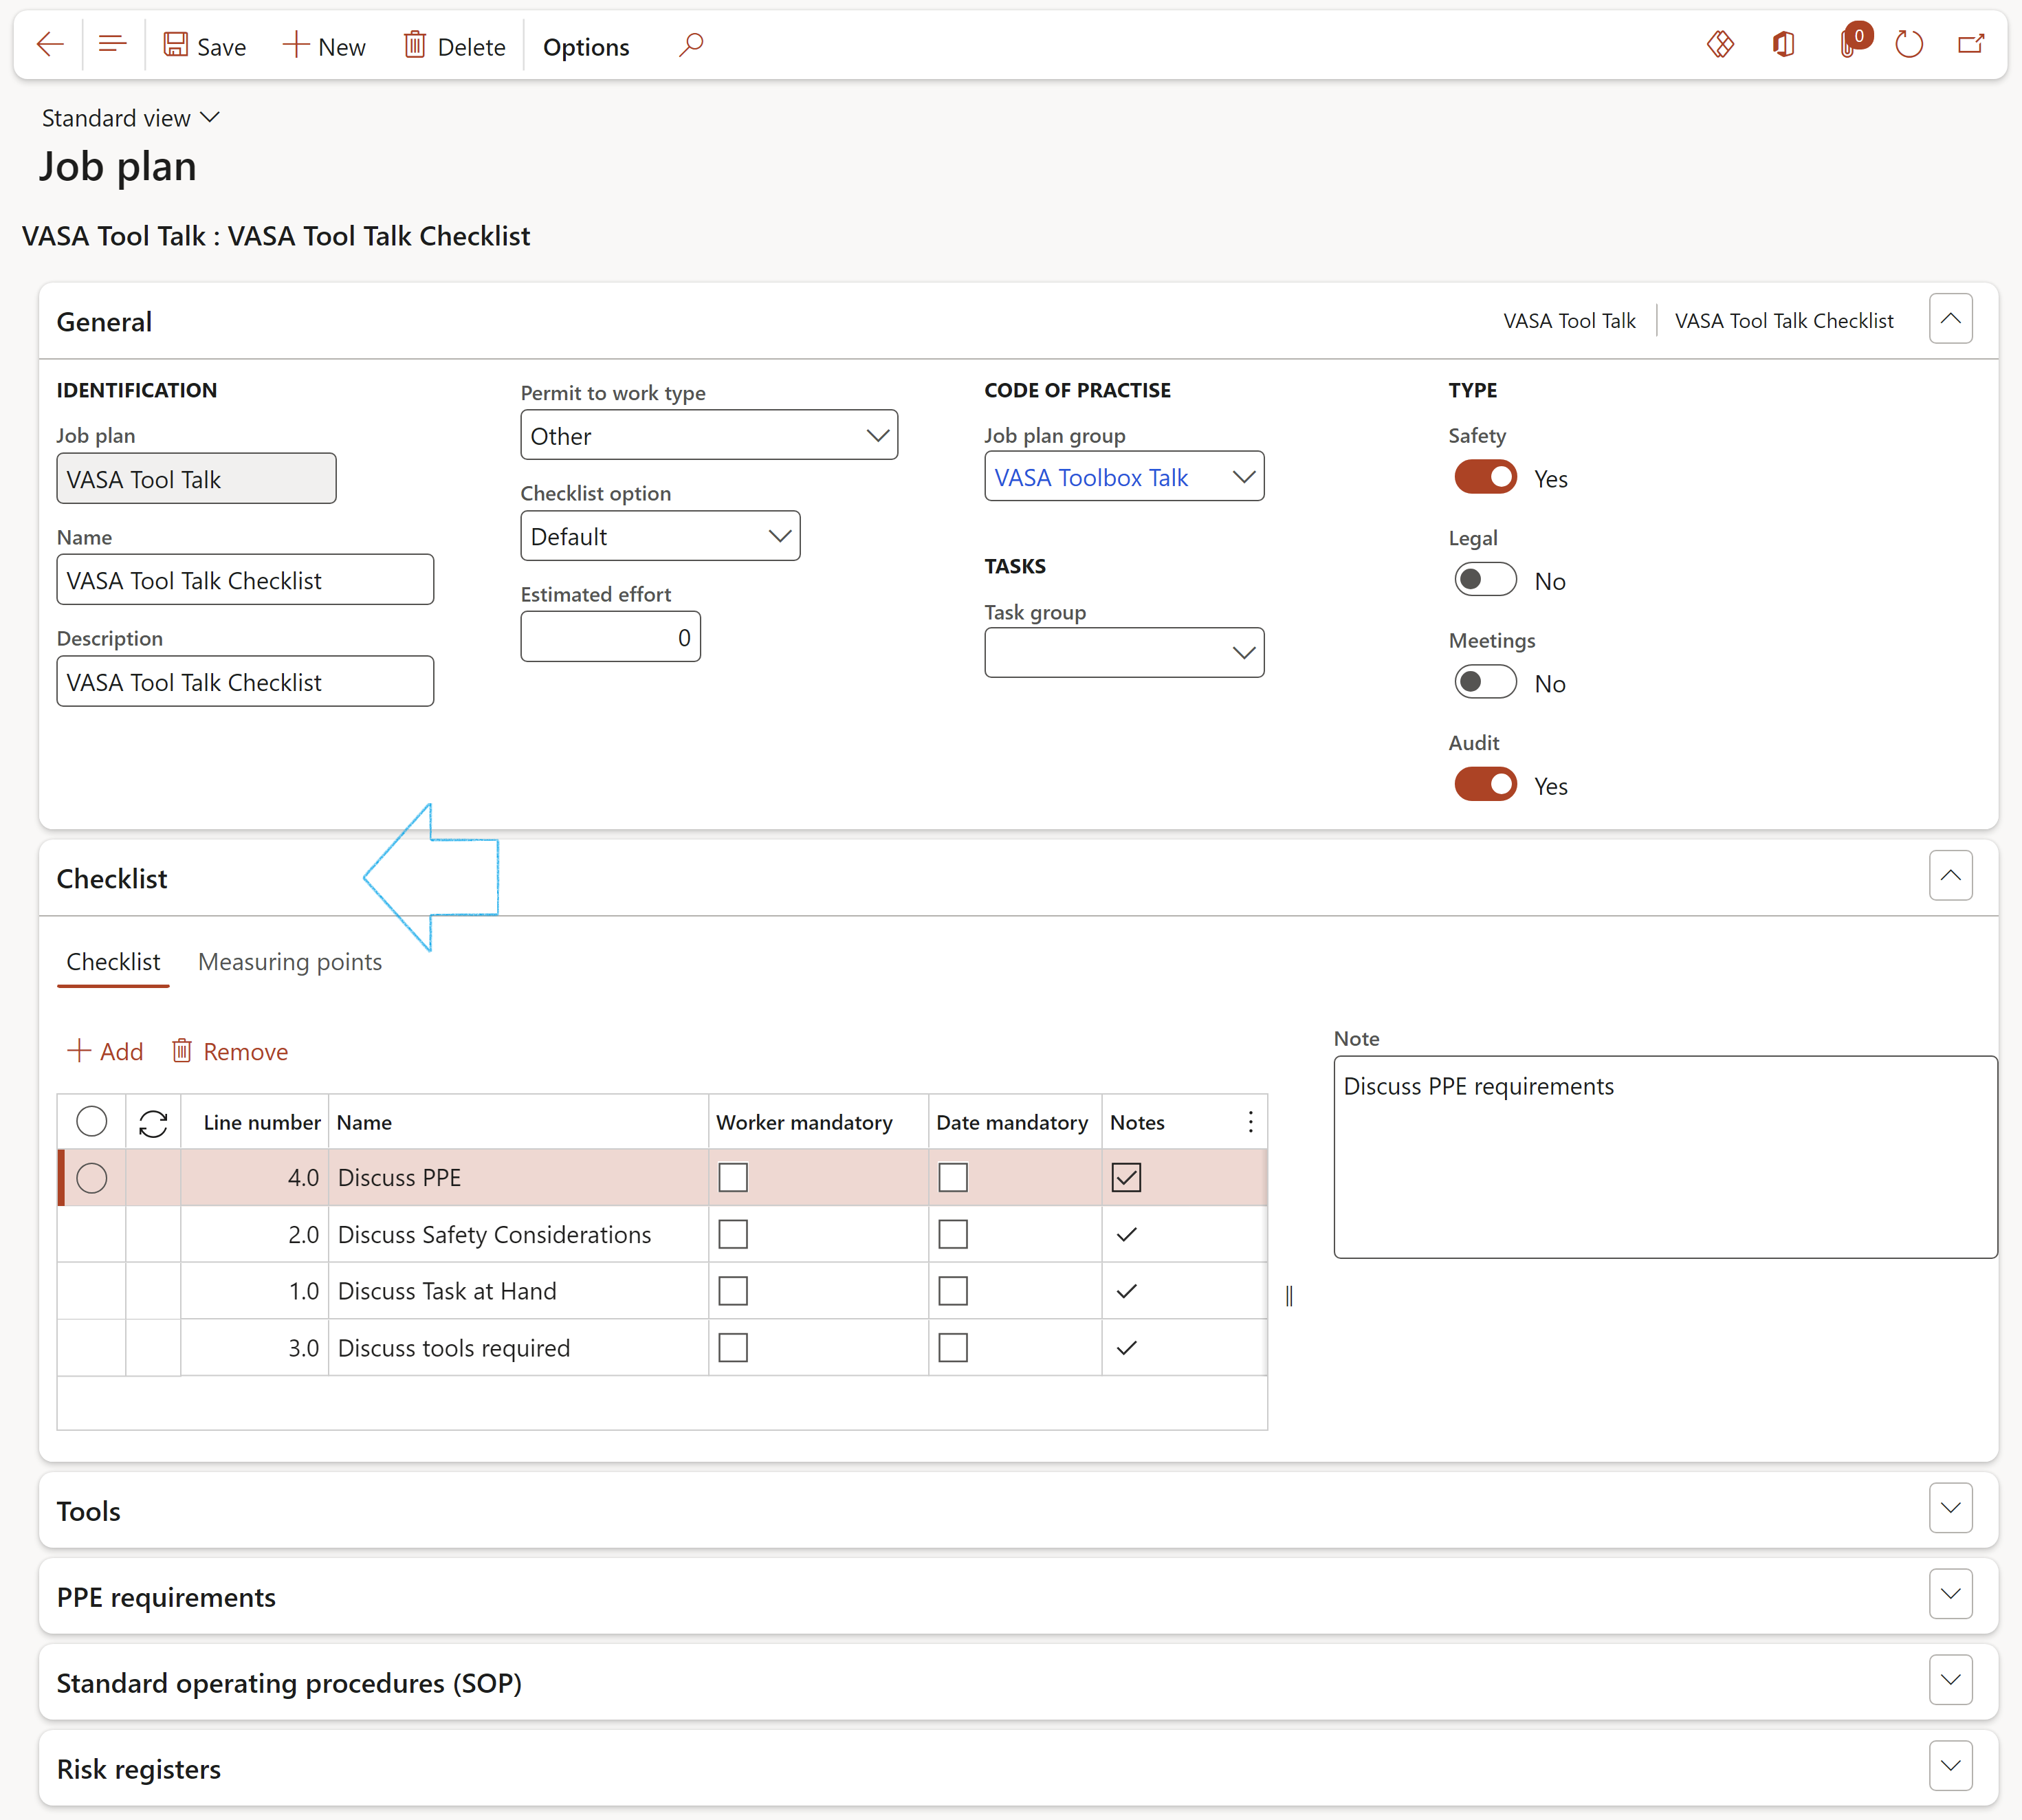
Go to: GRC > Setup > Job plan
- On the Action pane, click New
- Complete the fields under the General Fast tab
Note that there are the following Checklist options to choose from:
(The Checklist option selected will have an effect on the Feedback form. See Step 10 below)
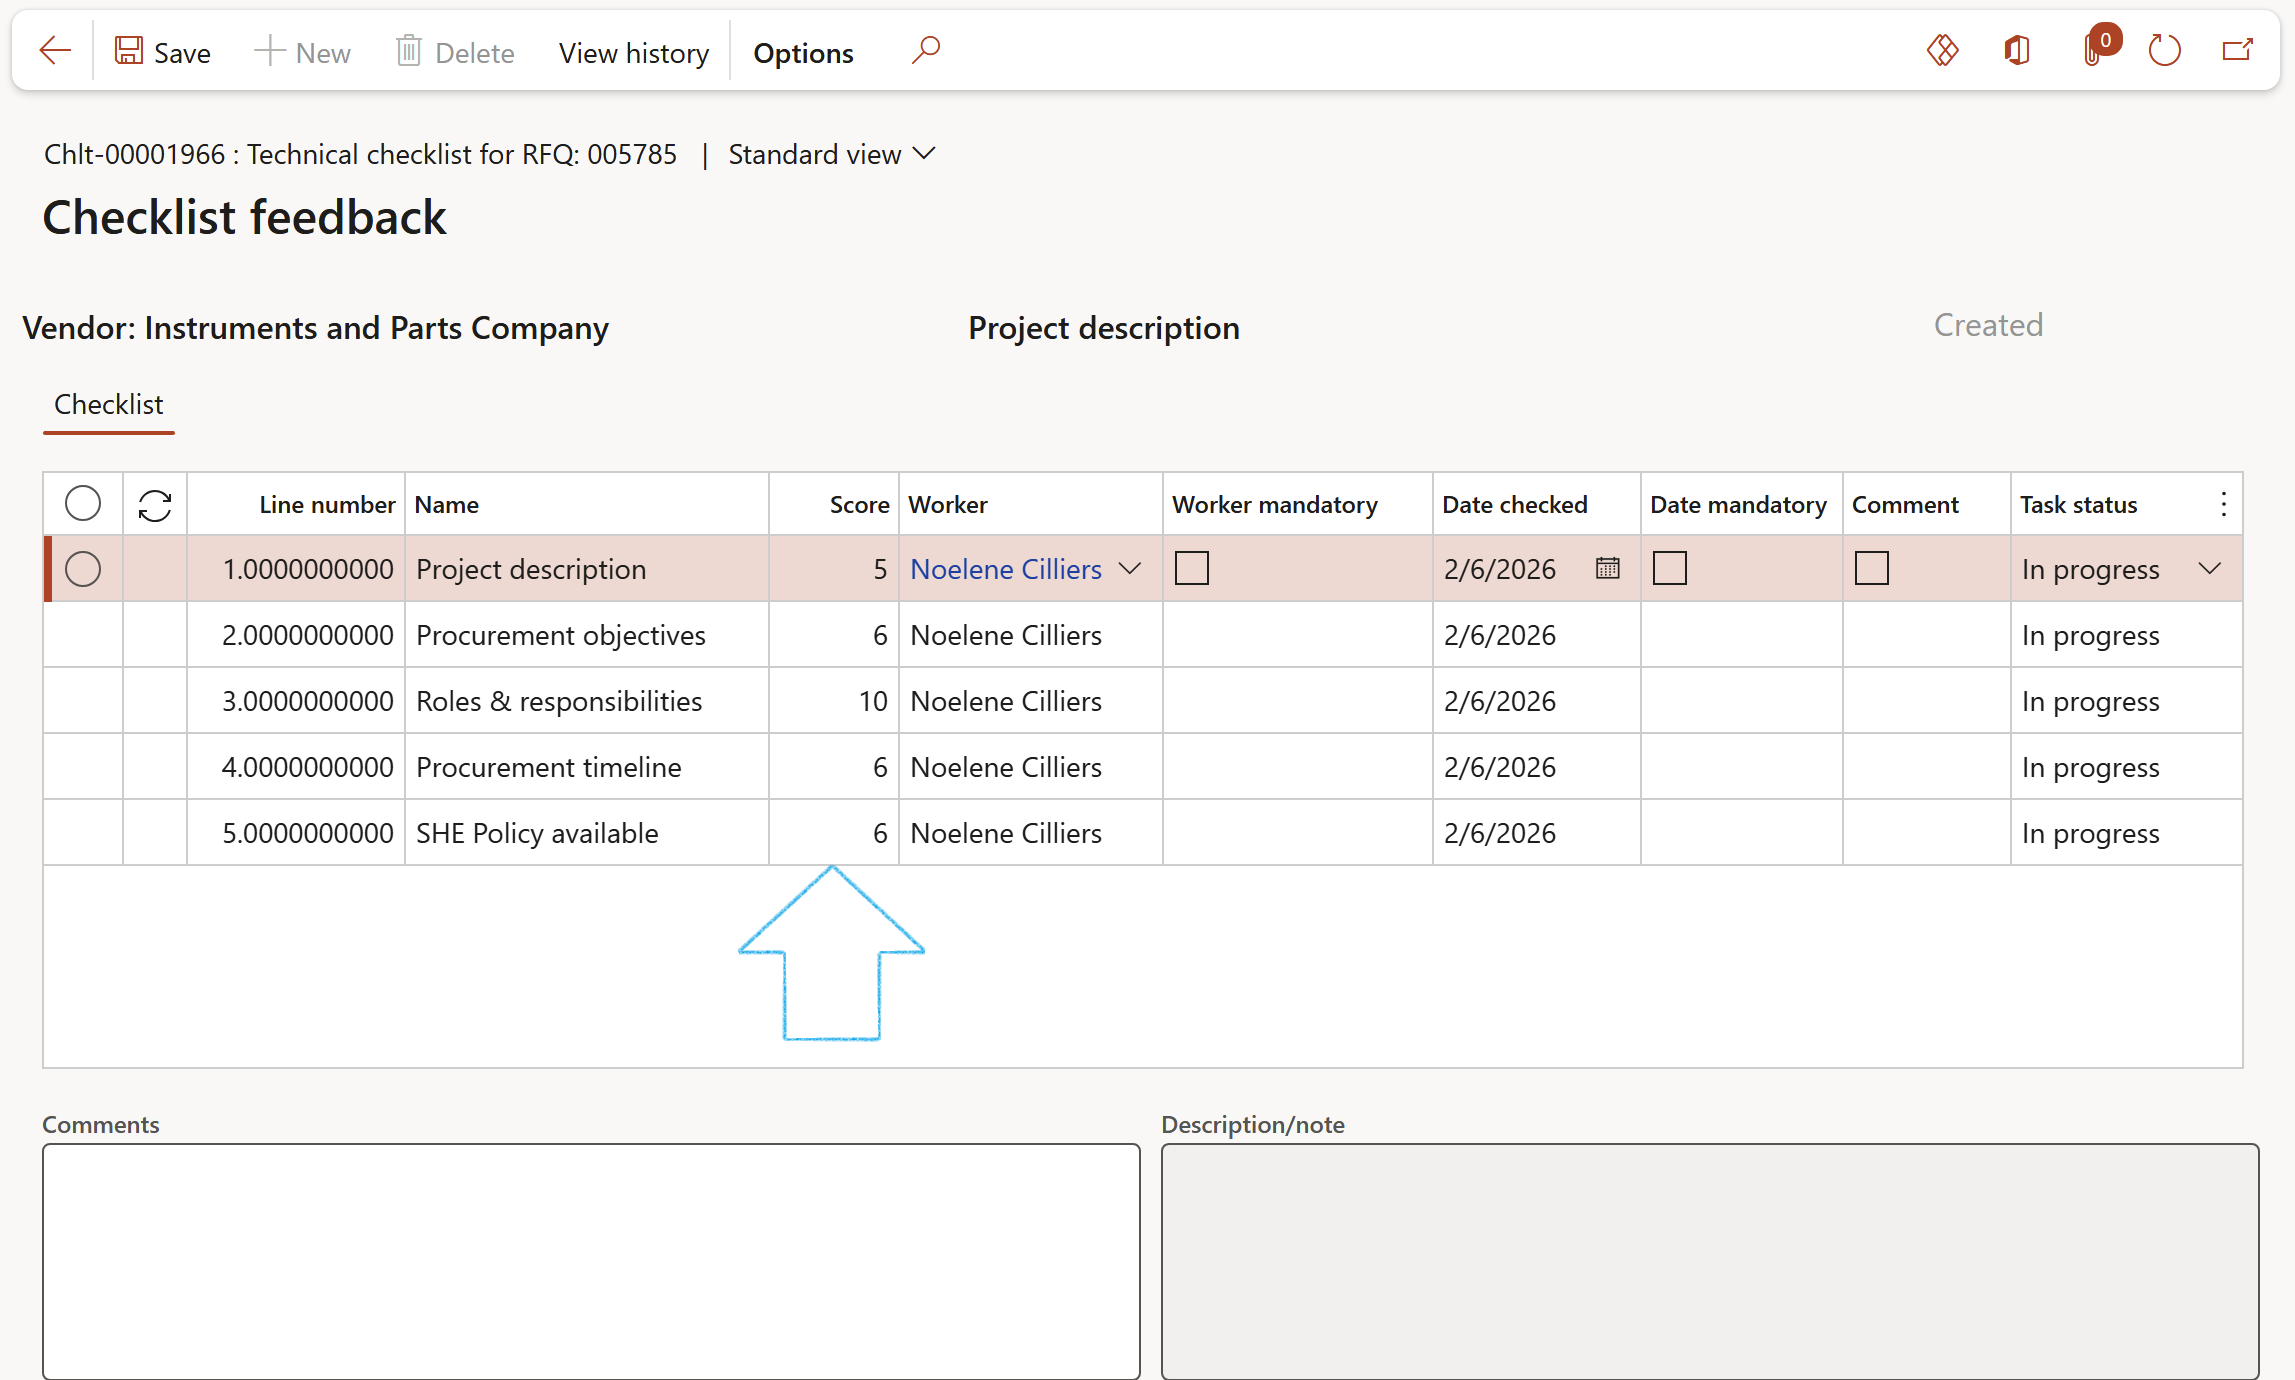
- Default = Score 1 to 3
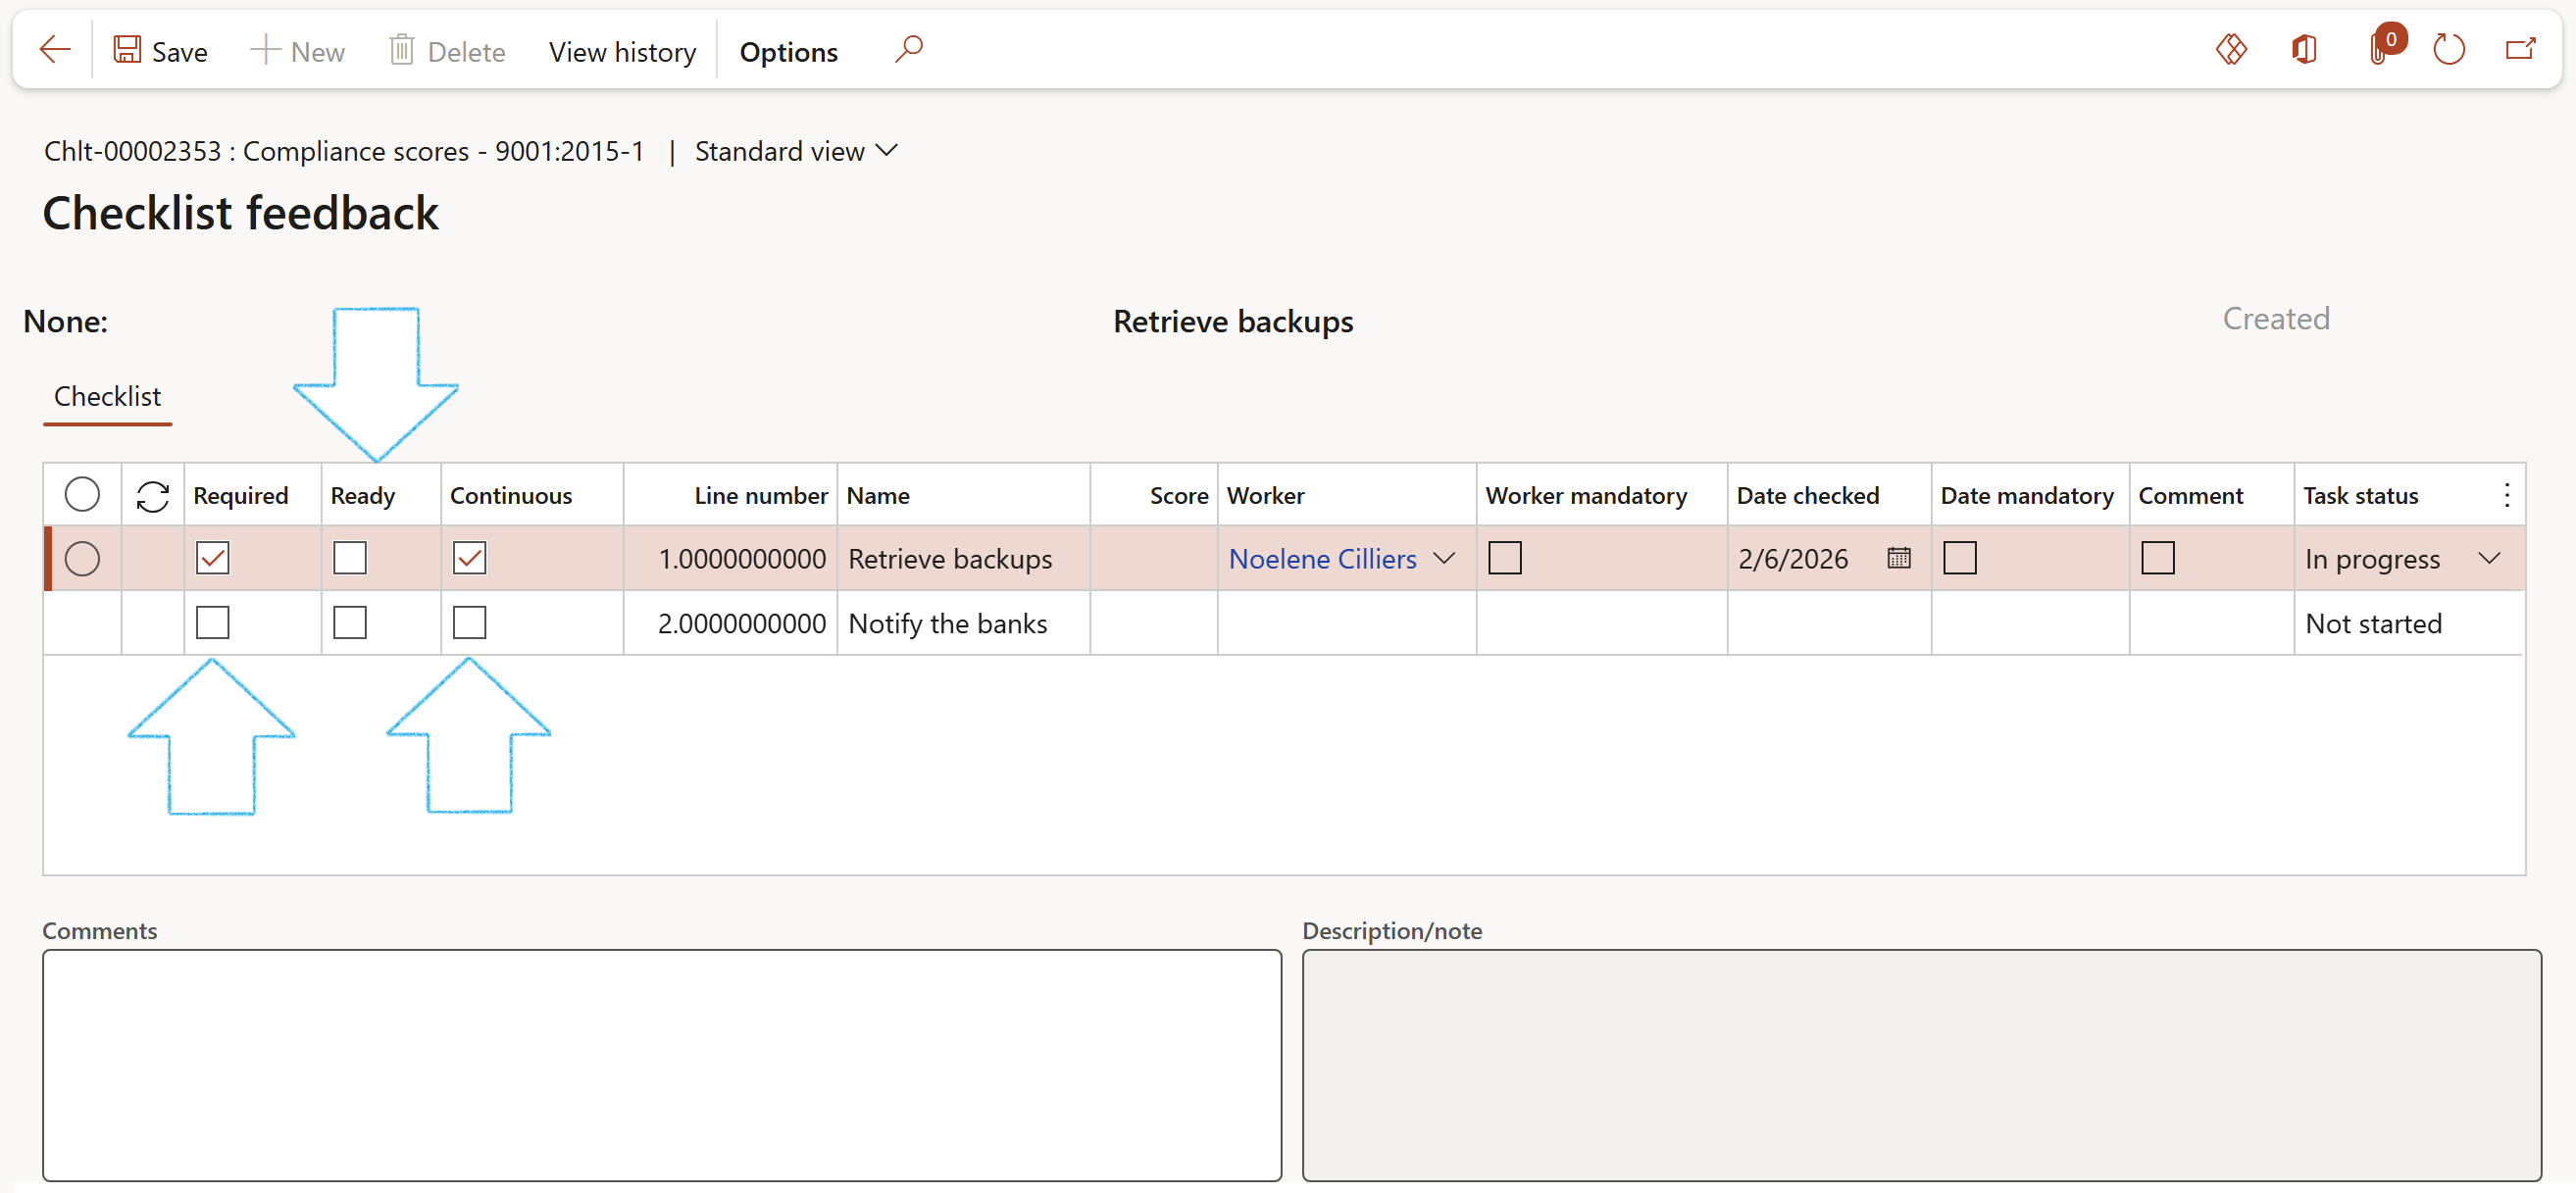
- Tick box = Score 1 to 5
- Percentage %
- Expand the Checklist Fast tab
- Click on the Add button
- Enter the lines for the checklist making sure that the relevant check boxes are ticked:
- Worker mandatory – It is mandatory that the worker does the specific task
- Date mandatory – It is mandatory that the worker does the specific task on the specified date
- Notes – If notes have been added, tick the Notes check box
- Enter notes to provide more details on the specific line
It is mandatory to select a Worker and a Date if feedback needs to be done on a checklist
¶ Daily use
GRC checklists help workers to better execute their work. This is done by extending the functionality of other modules for example: Project WBS, Production routes and Quality orders. These all now have check list capabilities.
(Where these other modules are referred to, their specific menu steps will be explained)
After the setup of checklists on the Job plan, the user can on a daily basis create checklists on a test form via the quality order.
¶ Step 2: Add a Job plan to QA tests
Go to: Stock management > Periodic tasks > Quality management > Quality orders
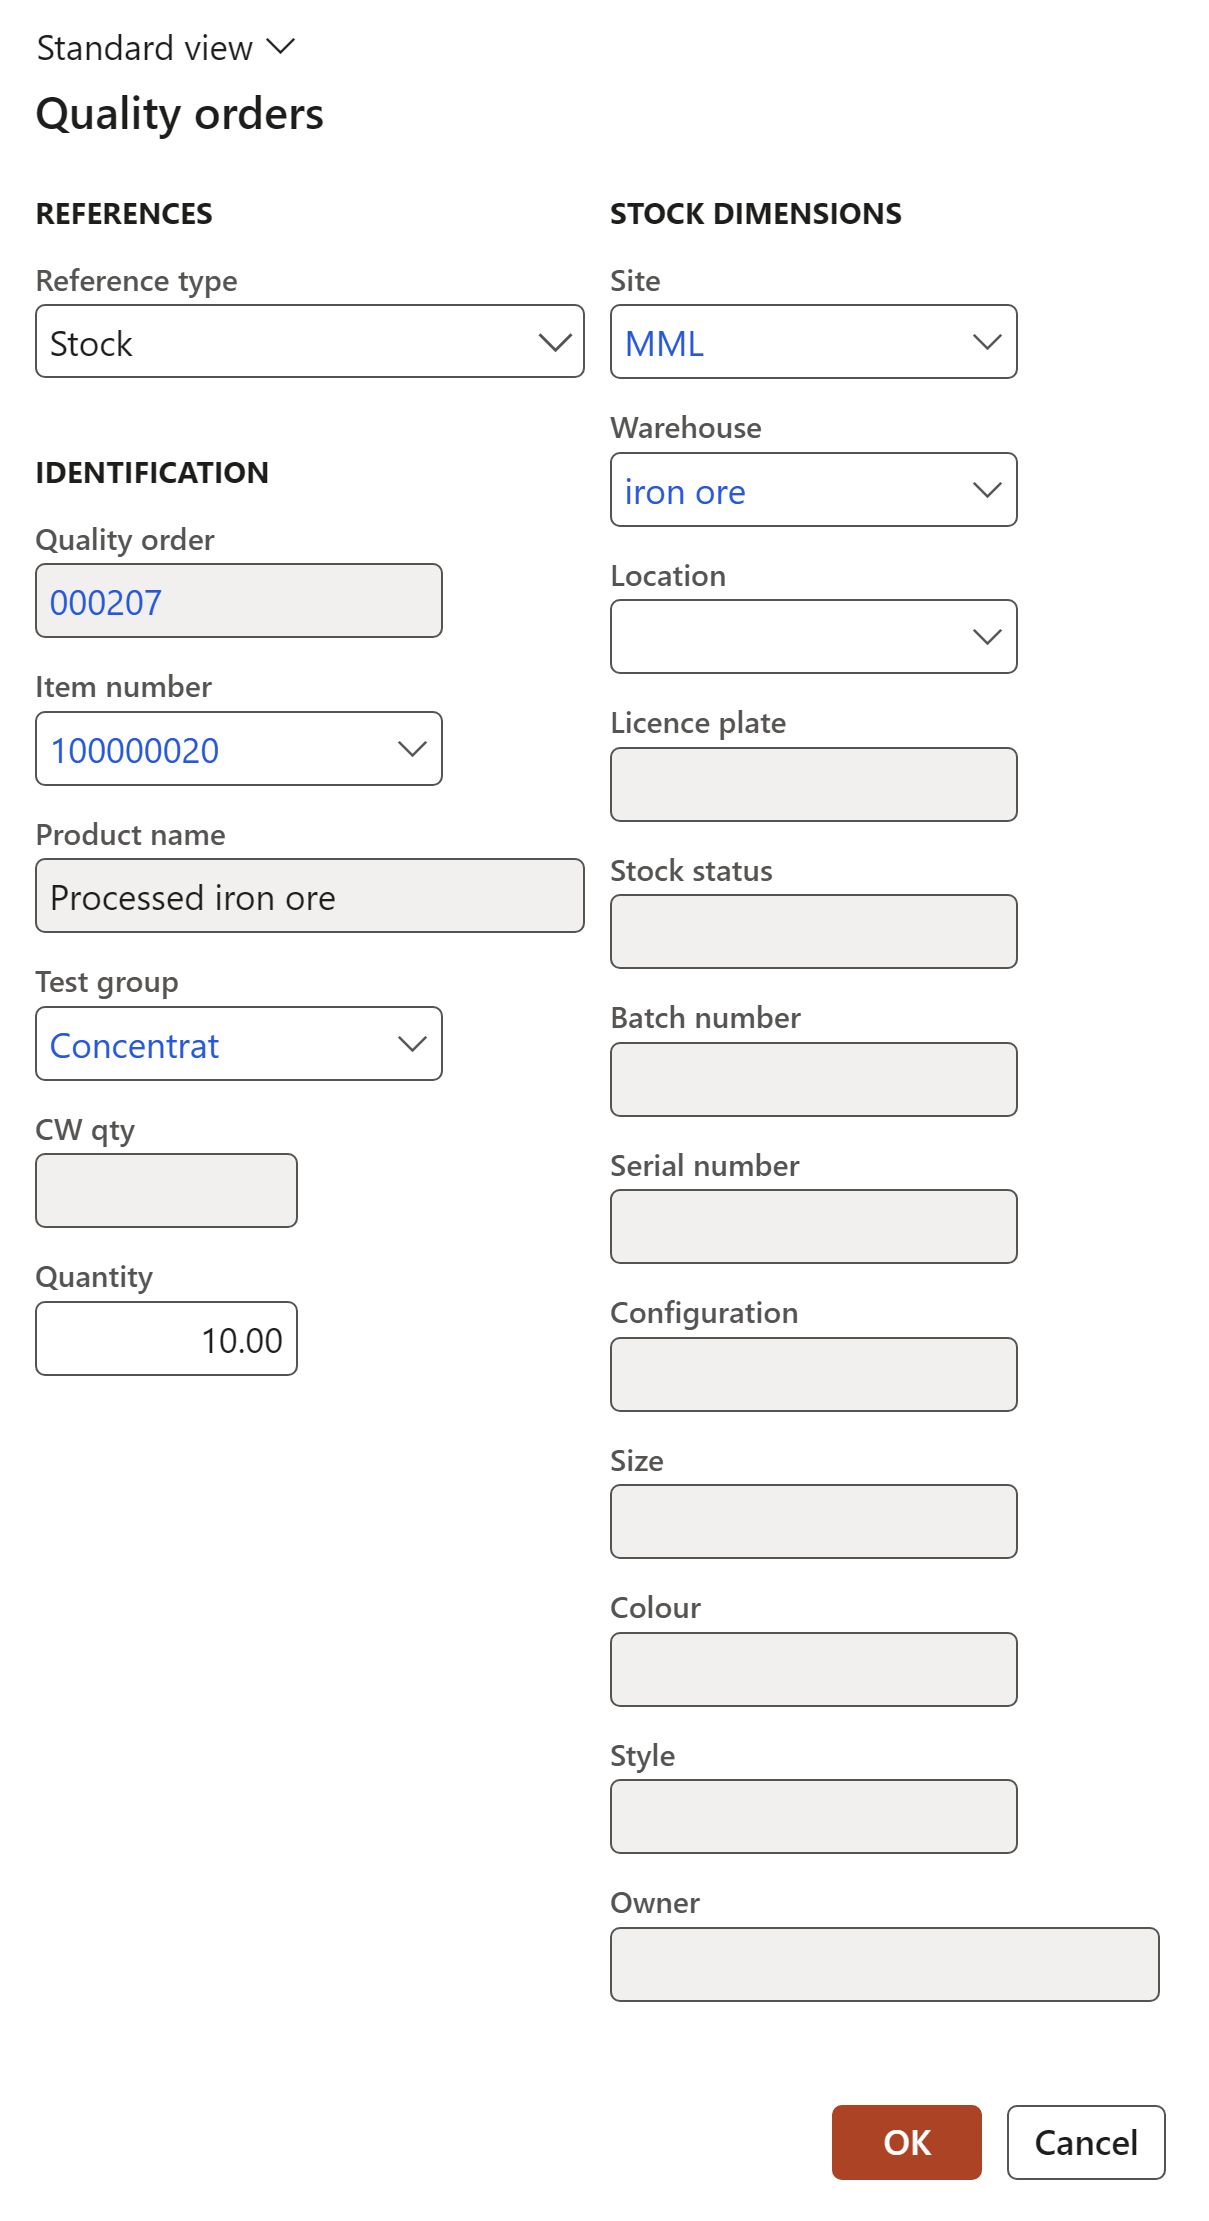
- Click New and enter information on the Quality order dialogue
- Click on the OK button
- On the Quality order lines form, in the bottom grid, click Add and enter a Sequence number
- In the Test field, select a Test from the dropdown list
- Open the Test tab and enter the test variables
- If a Job plan (with the associated Checklist) was specified on the Test form, the Checklist button will be active
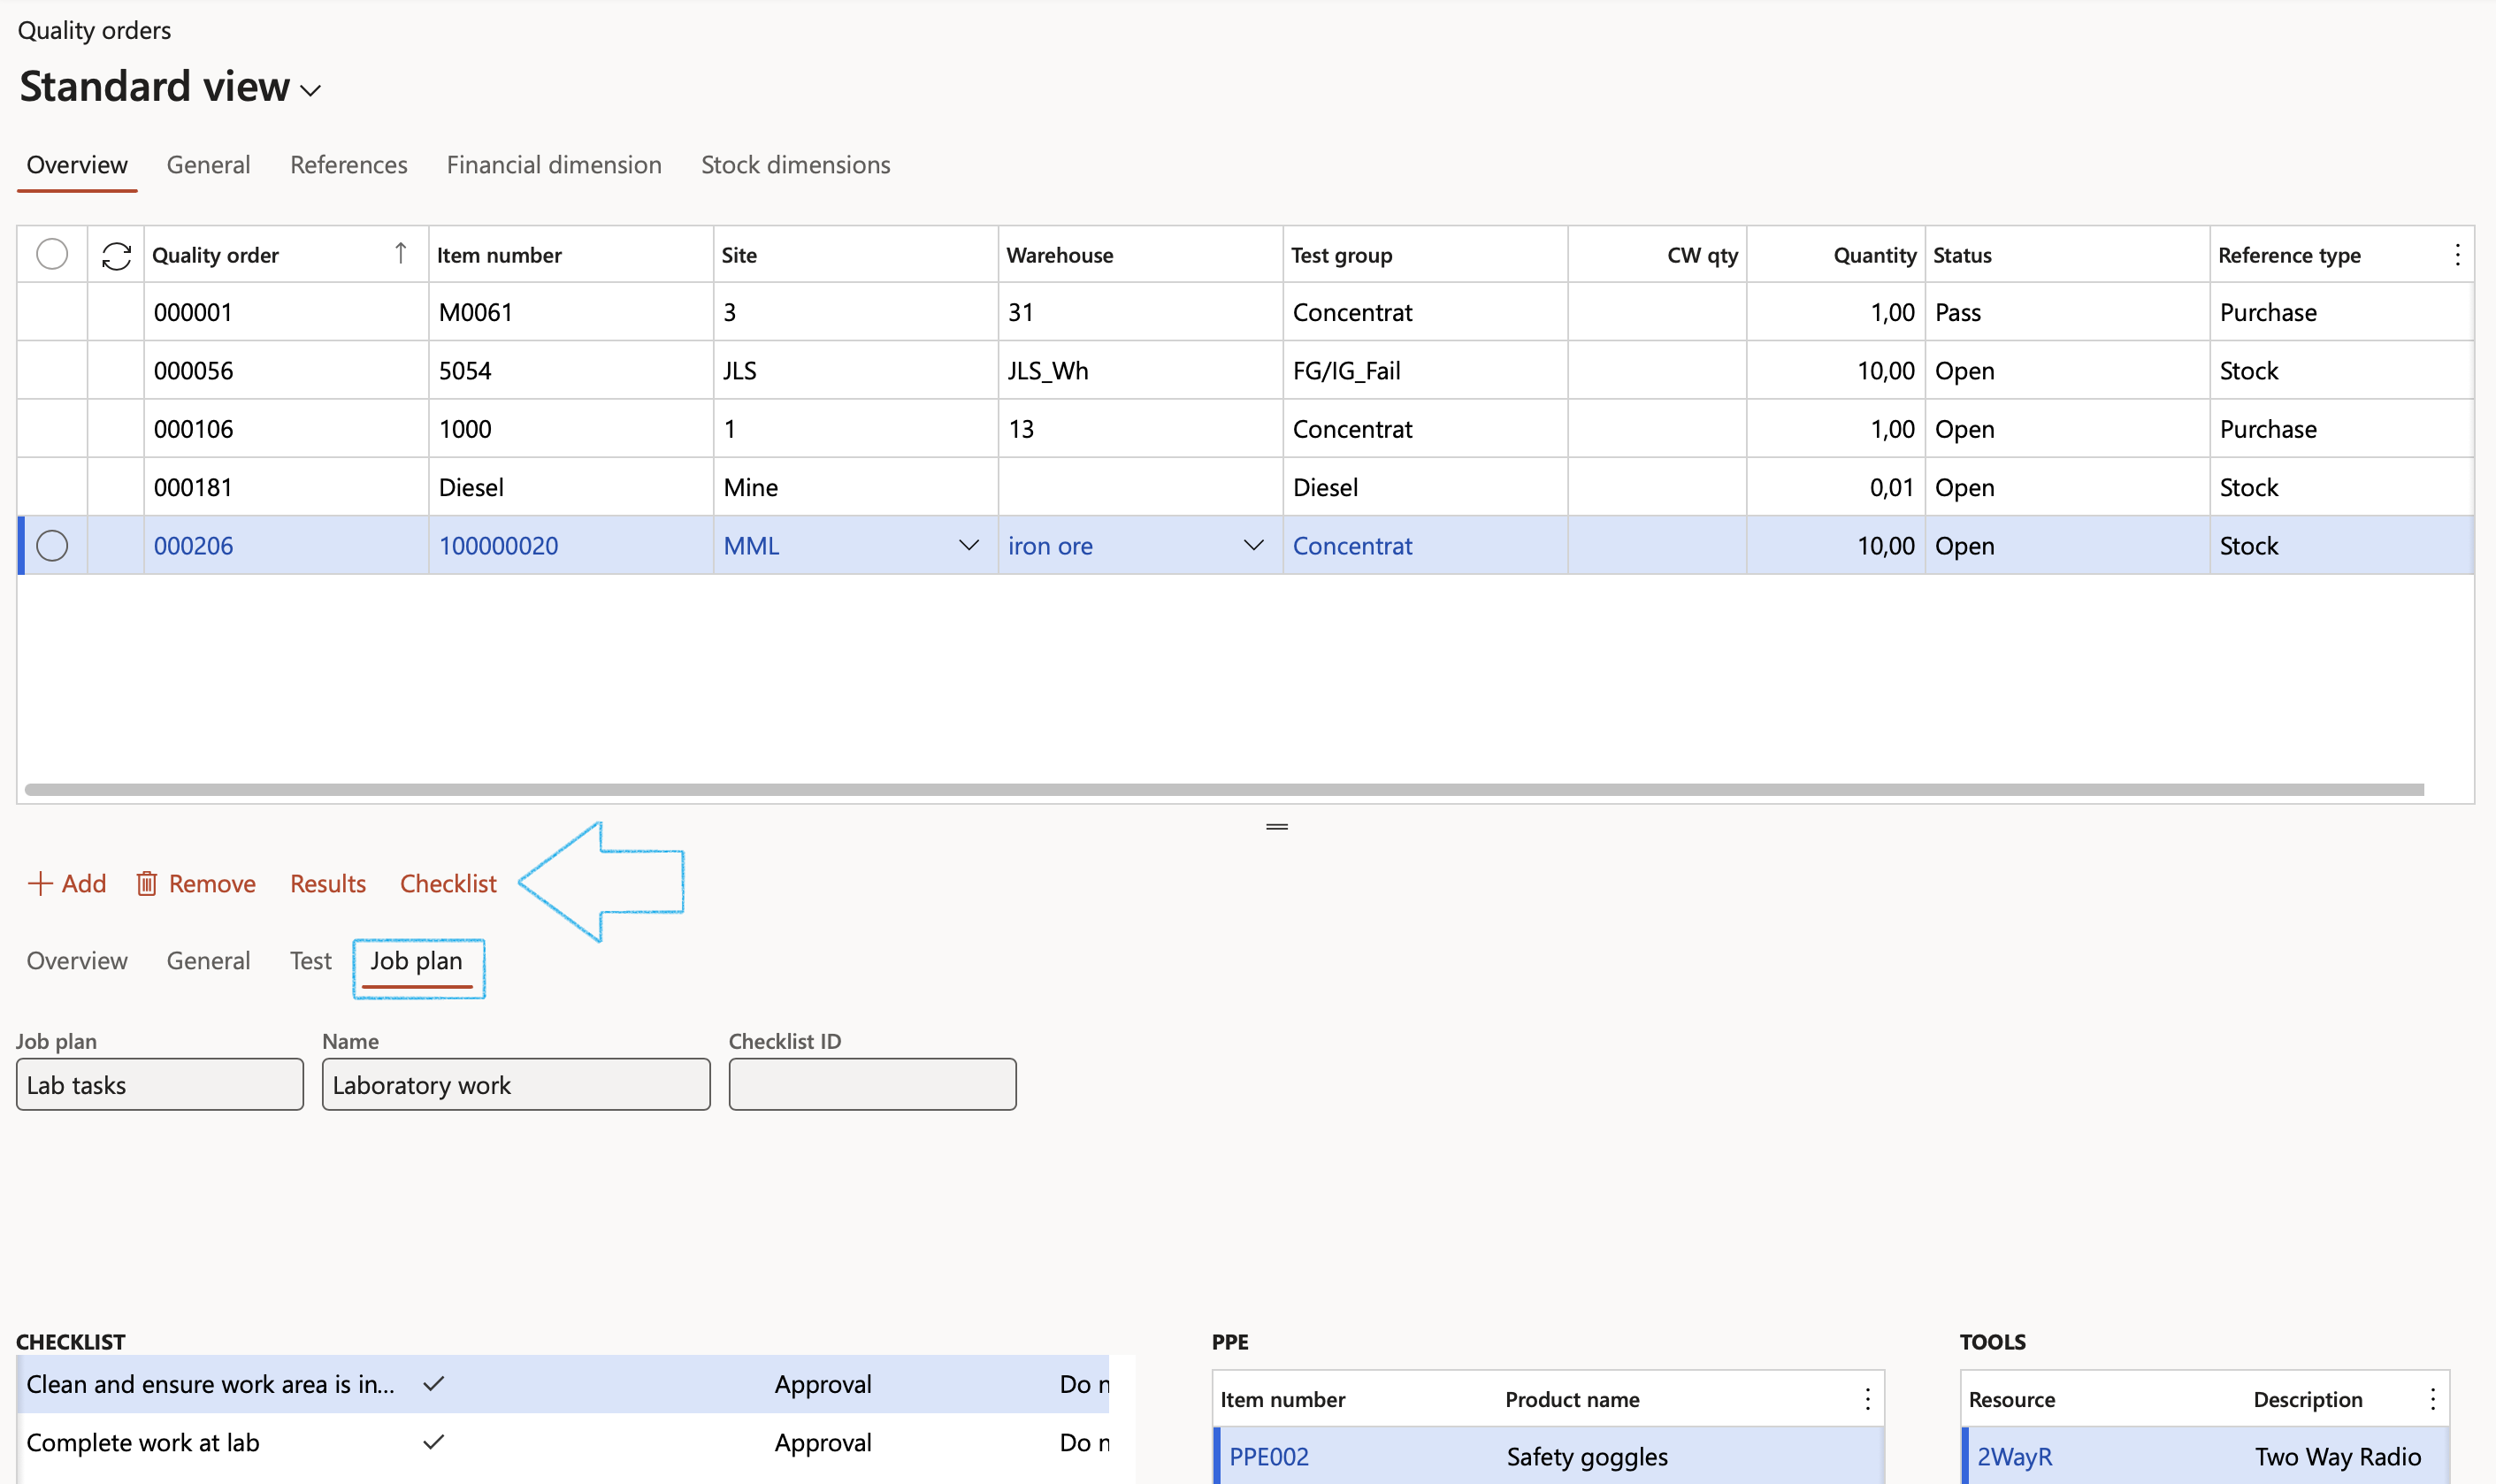
A checklist transaction will be created automatically if and when the above Job plan (with previously defined checklist) is used with a test on the Quality order
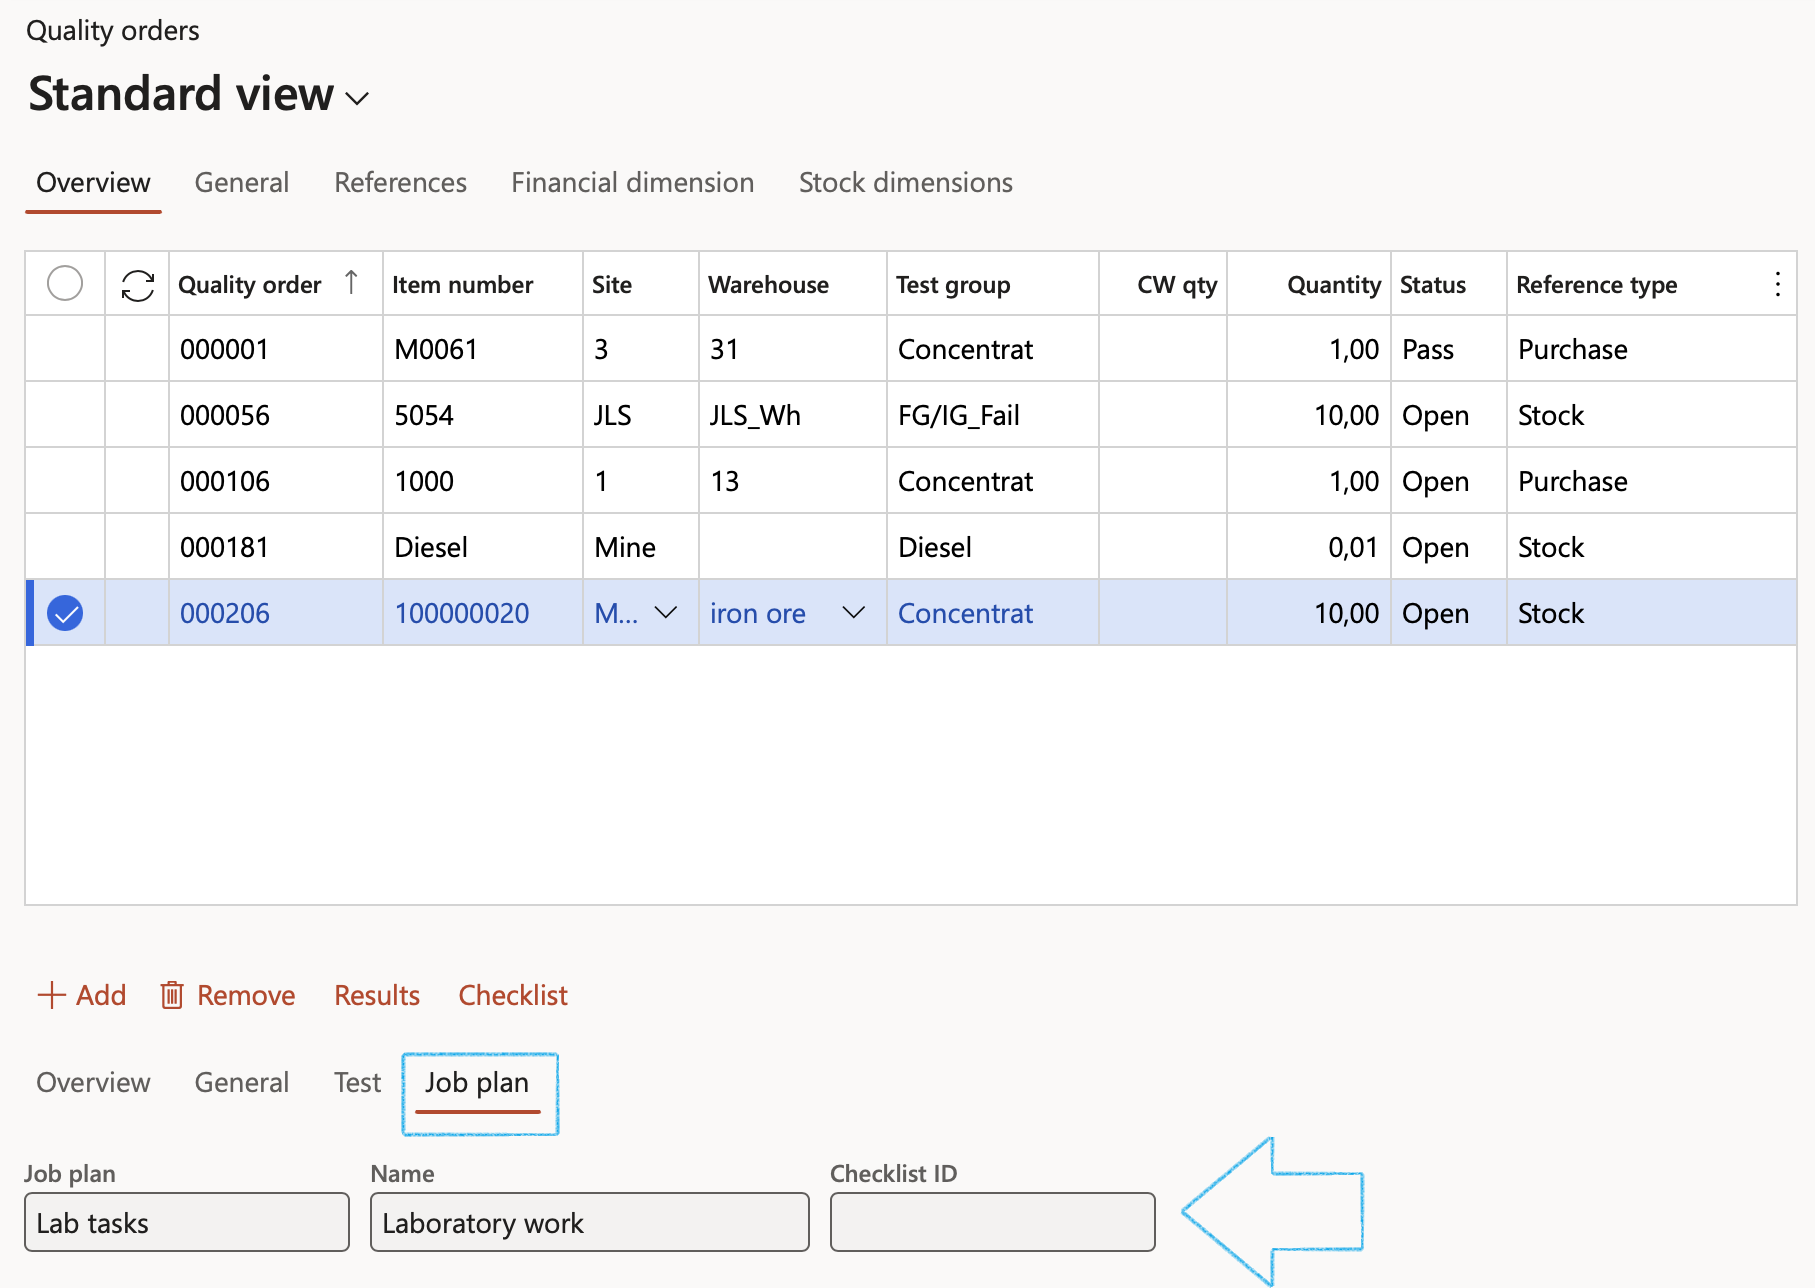
- Open the Job plan tab
- Click on Save
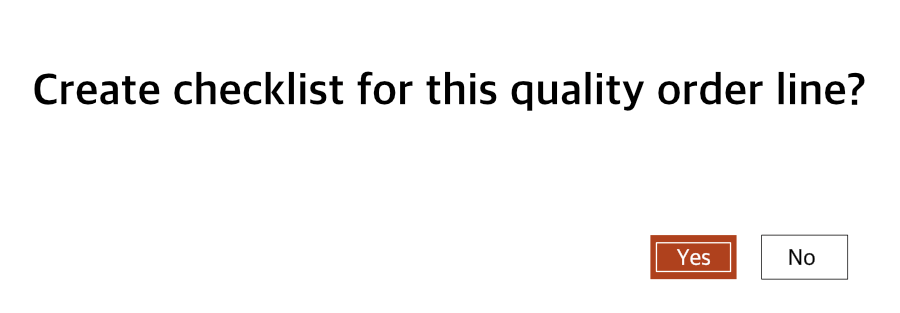
- A dialog will pop up asking the user if a Checklist needs to be created for the quality order line
- Click Yes button
- Open the Job plan Index tab to view the Checklist ID
¶ Step 3: Create a production work order with related Job plan on Route
A checklist is automatically created when a new Production or Batch order is created using the route (on which a Job plan with checklist was linked)
Thus, when users click Create, a checklist transaction will automatically be created
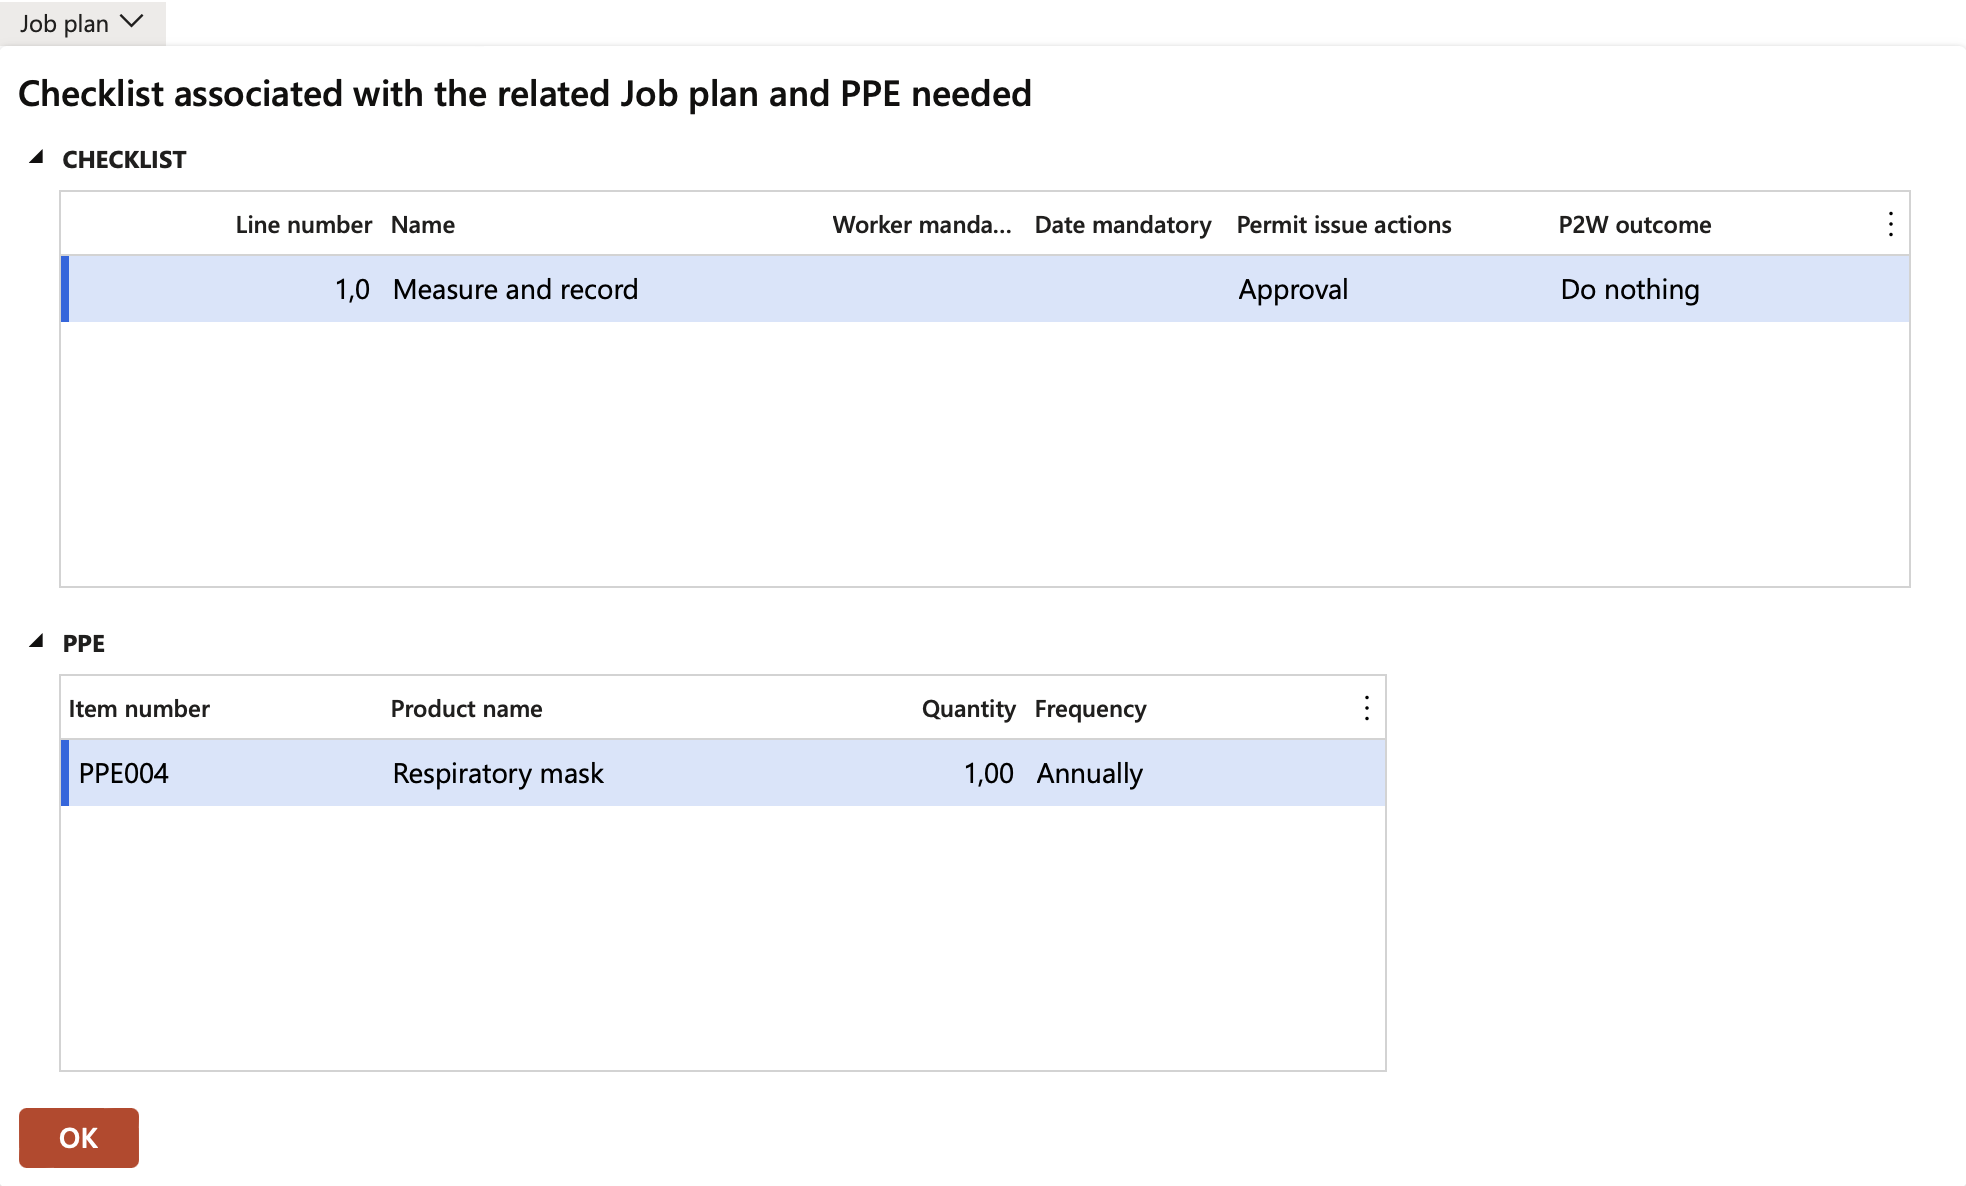
The Job plan button will display the checklist and PPE required for the operation
¶ Step 3.1: Create a Route
Go to: Production control > All routes
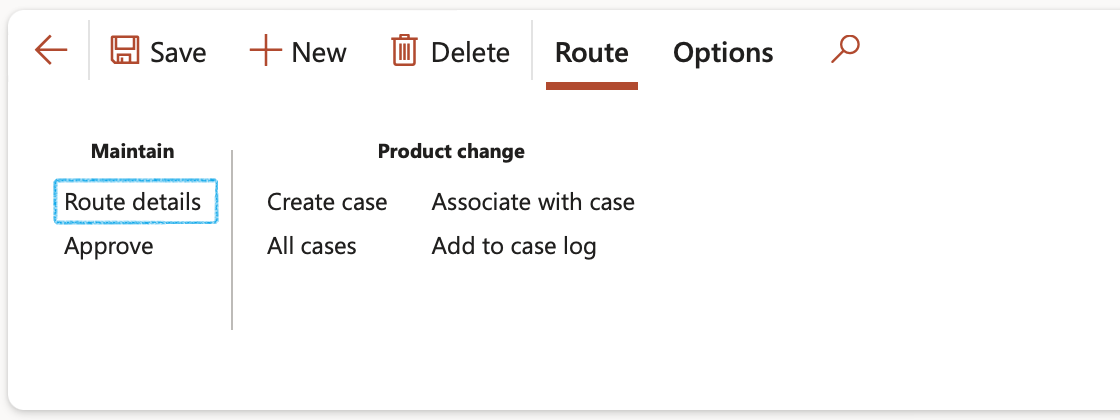
- On the Action pane, under the Route tab, in the Maintain group, click on the Route details button
- On the Route details form, in the Action pane, click the New button
- Create a record
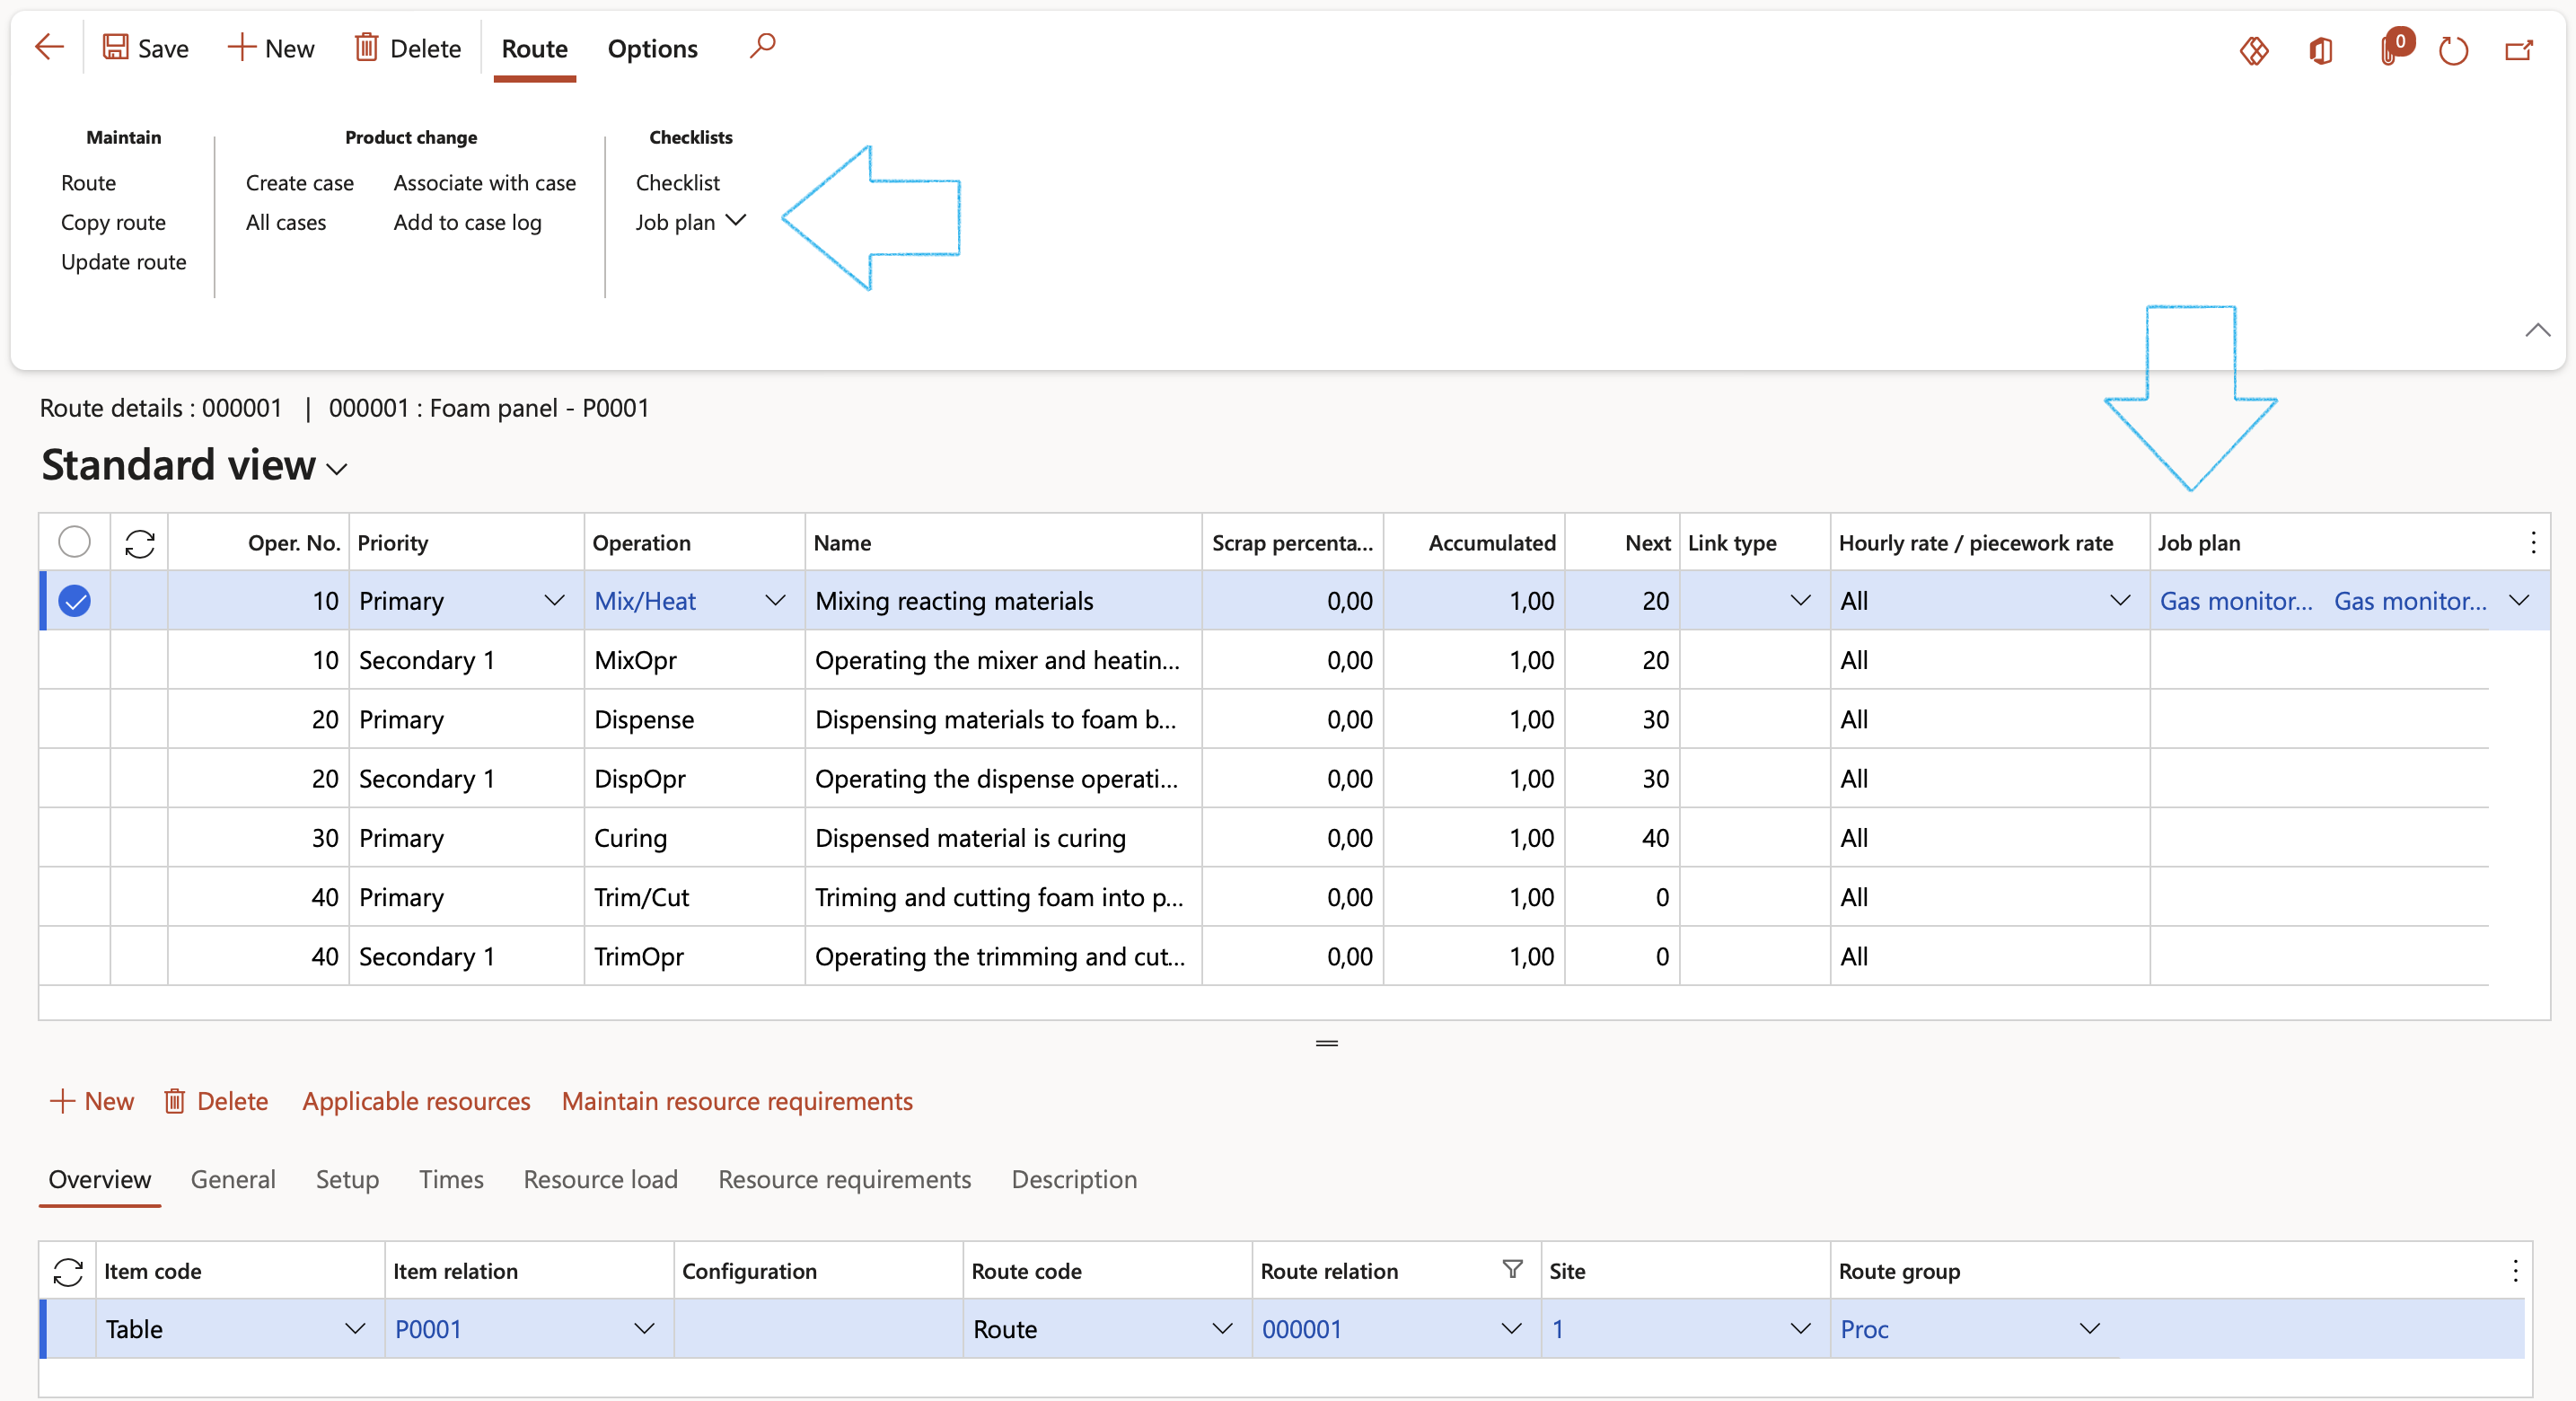
- Select the relevant Jop plan from the dropdown list
- To view the details of the job plan: On the Action pane, in the Checklist group, click on the Job plan button
A screen displaying the checklist associated with the related Job plan and required PPE will appear. Click OK.
¶ Step 3.2: Create a production work order
Go to: Production control > Production orders > All production orders
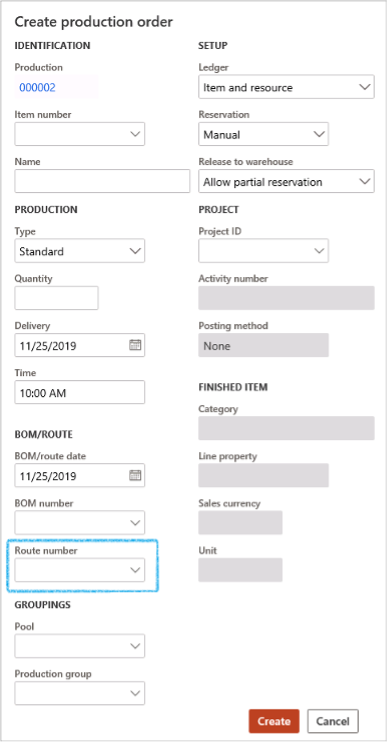
- On the Action pane, click on the New production order button
- Select the Route in the Route number field
- Click on the Create button
¶ Step 4: Create Non conformance
A checklist is automatically created when a new Non conformance is raised within HSE as an outcome from either an Investigation, Inspection or doing a Compliance score. Thus, when users click Raise a Non conformance, a checklist transaction will automatically be created.
Go to: GRC > Compliance > Findings > Non conformances
- Select the relevant record
- On the Action pane, click on the Functions button and select Approve non-conformance from the dropdown list
- On the Action pane, click on the Corrections button. (The Corrections button is only available for non conformances that have been Approved)
- Click on the New button to add a record
- Select the Worker responsible for the correction from the dropdown list
- Open the SHREQ Index tab
- Select a Job plan from the dropdown list

A confirmation dialog will pop up, click on the Yes button. A checklist will be created.
¶ Step 5: Select an Improvement plan and create a checklist
An Improvement plan is a set of activities in the form of a checklist designed to bring improvement to a process or flaw. This is done by creating a formal checklist from the Improvement plan that is selected on the investigation.
Go to: HSE > Investigations > Investigations
- Select the Investigation that you want to choose the improvement plan for
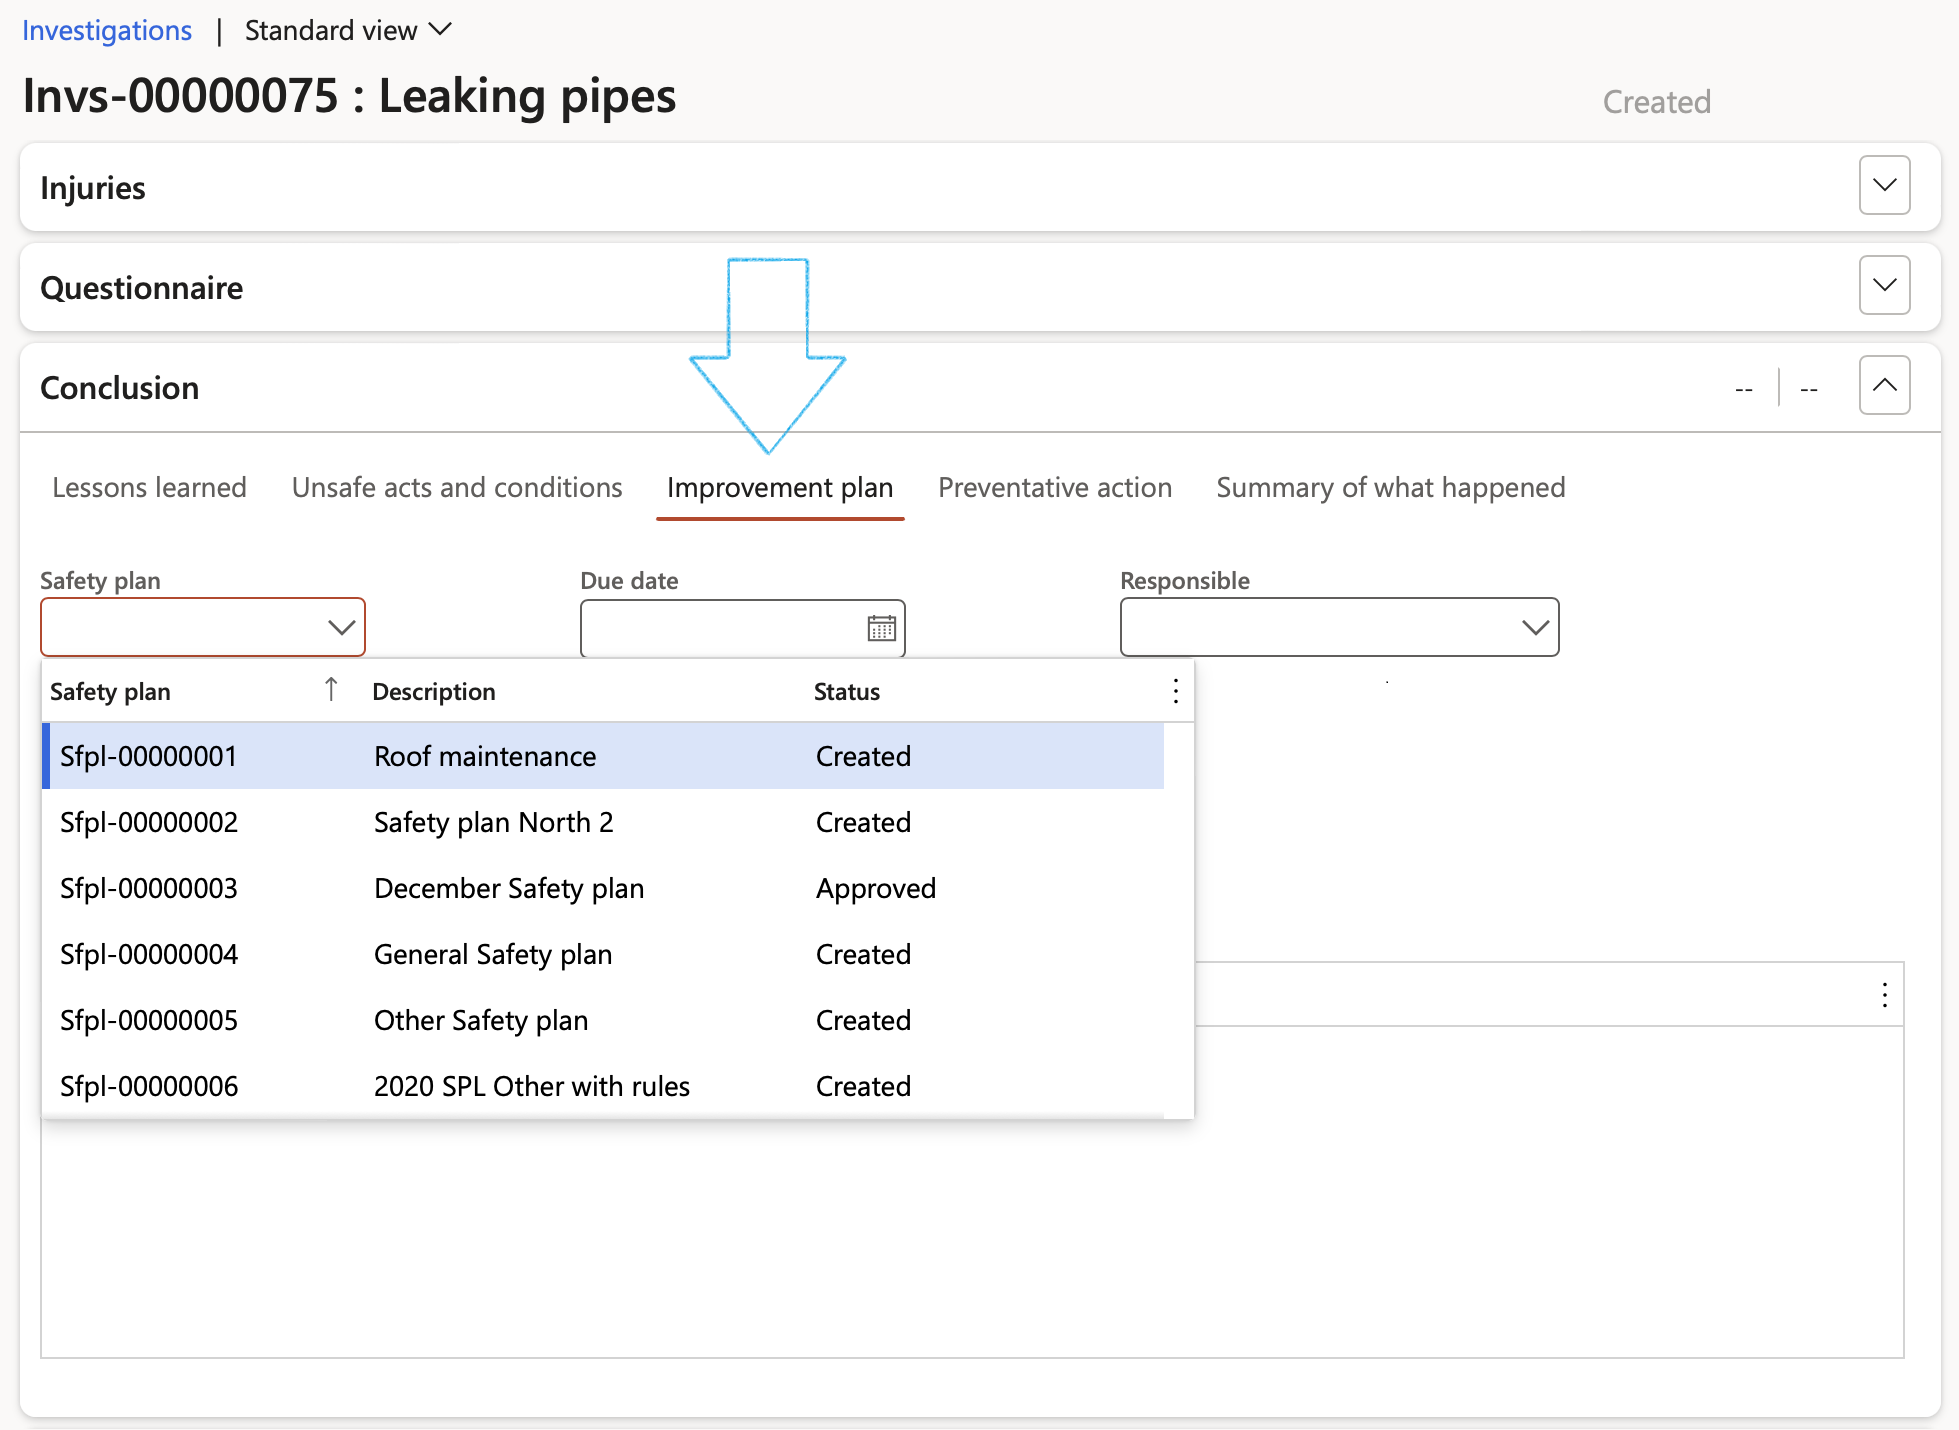
- Expand the Conclusion Fast tab
- Open the Improvement plan Index tab
- In the Safety plan field, select the Safety plan that you want to use for the Improvement plan
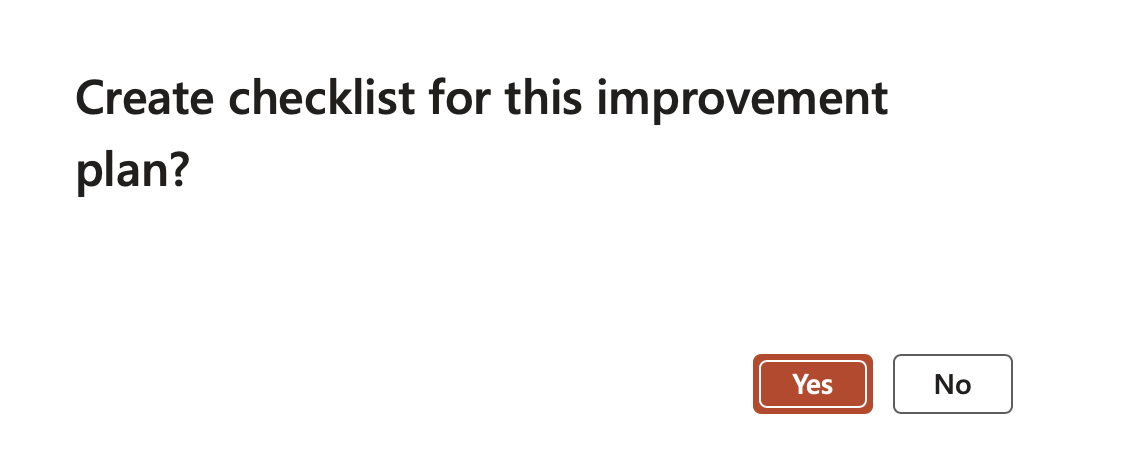
- A confirmation dialog will pop up, click on the Yes button
- Click in the Job plan field to auto populate the lines of the Improvement plan
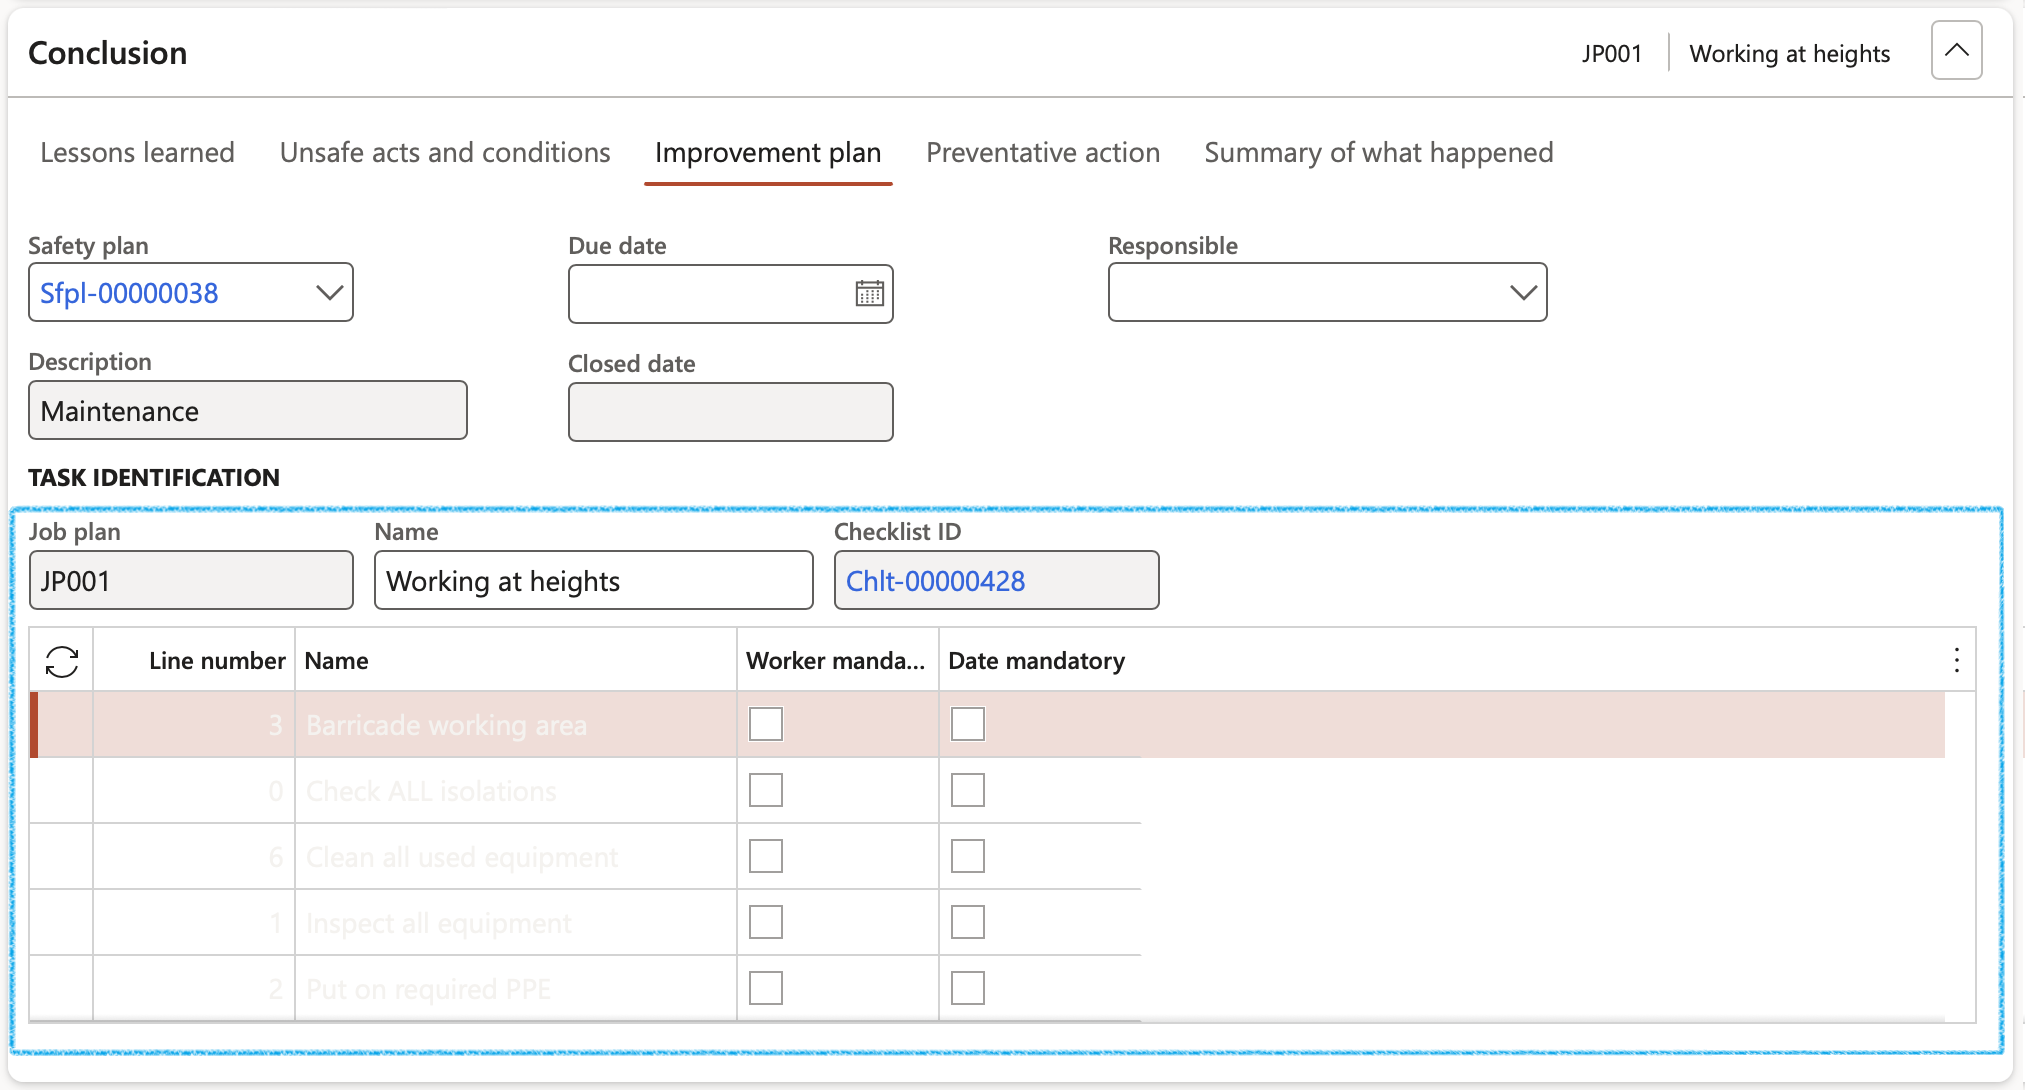
To view the Improvement plan on the All checklists list page
Go to: GRC > Checklists > All checklists

¶ Step 6: Link a job plan to a location resource
Checklists can be created manually form organisational resources/work centres of type Location, Machine and Tool
Go to: HSE > Setup > Work location > Resources
- Select the resource that you want to link the job plan to
- In the Action pane, open the Health and safety tab
- On the Action pane, in the New group, click on the Job plan button
- Select the relevant job plan from the dropdown list
- Click on the OK button

To create a checklist for the job plan, now linked to the resource:
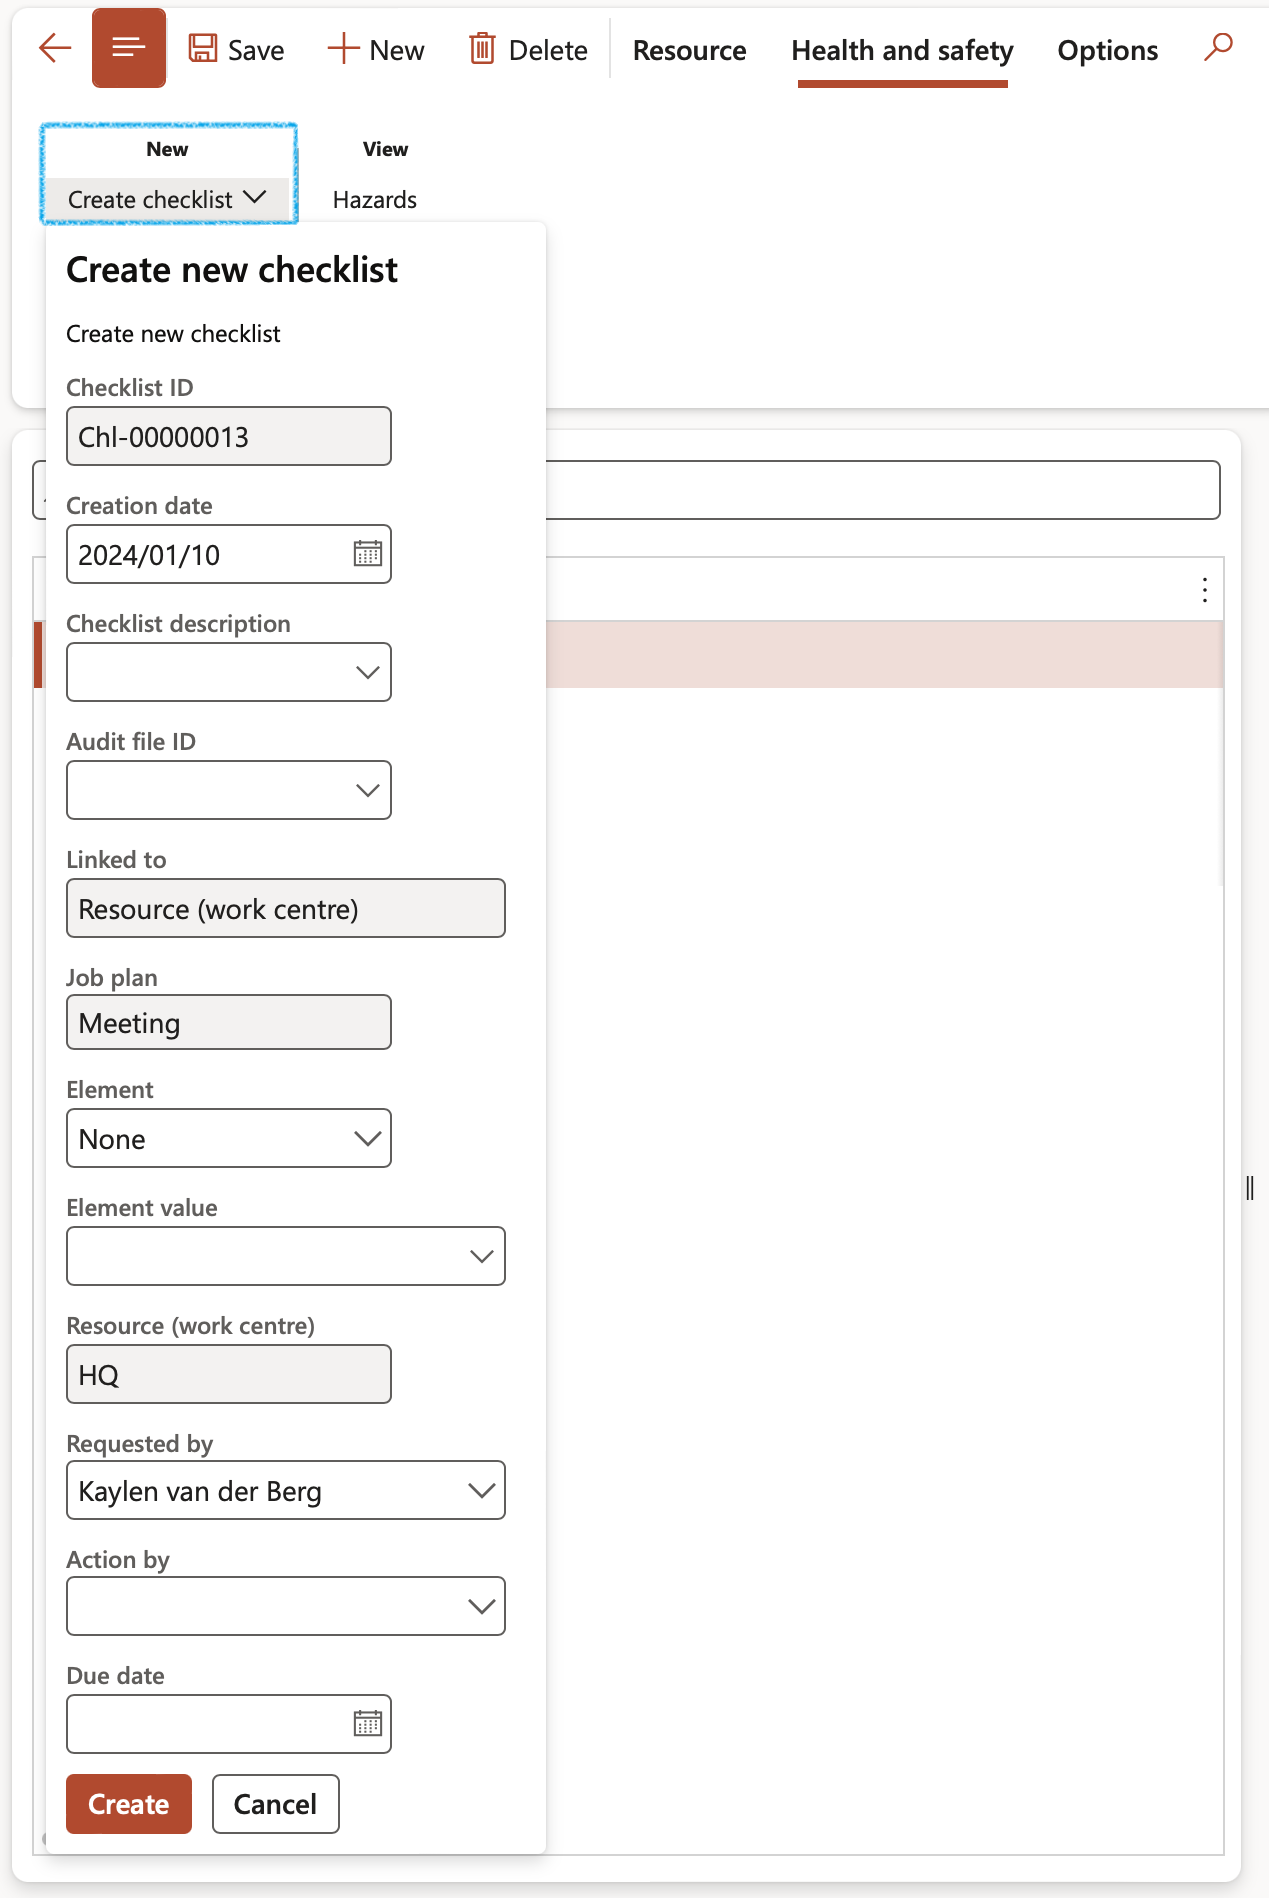
- On the Action pane, in the New group, click on the Create checklist button
- Enter the relevant details
- Click on the Create button
¶ Step 7: Link a job plan to the line detail of a project WBS
Go to: Project management and accounting > Projects > All projects
- Select the project that you want to link the job plan to and create the checklist for
- On the Action pane, open the Plan tab
- On the Action pane, in the Activities group, click on the Work breakdown structure button

The WBS for the project will open
- In the Button strip, click on the New button
- For the required task (WBS Id) select the relevant row
- In the Button strip, click on the Details button

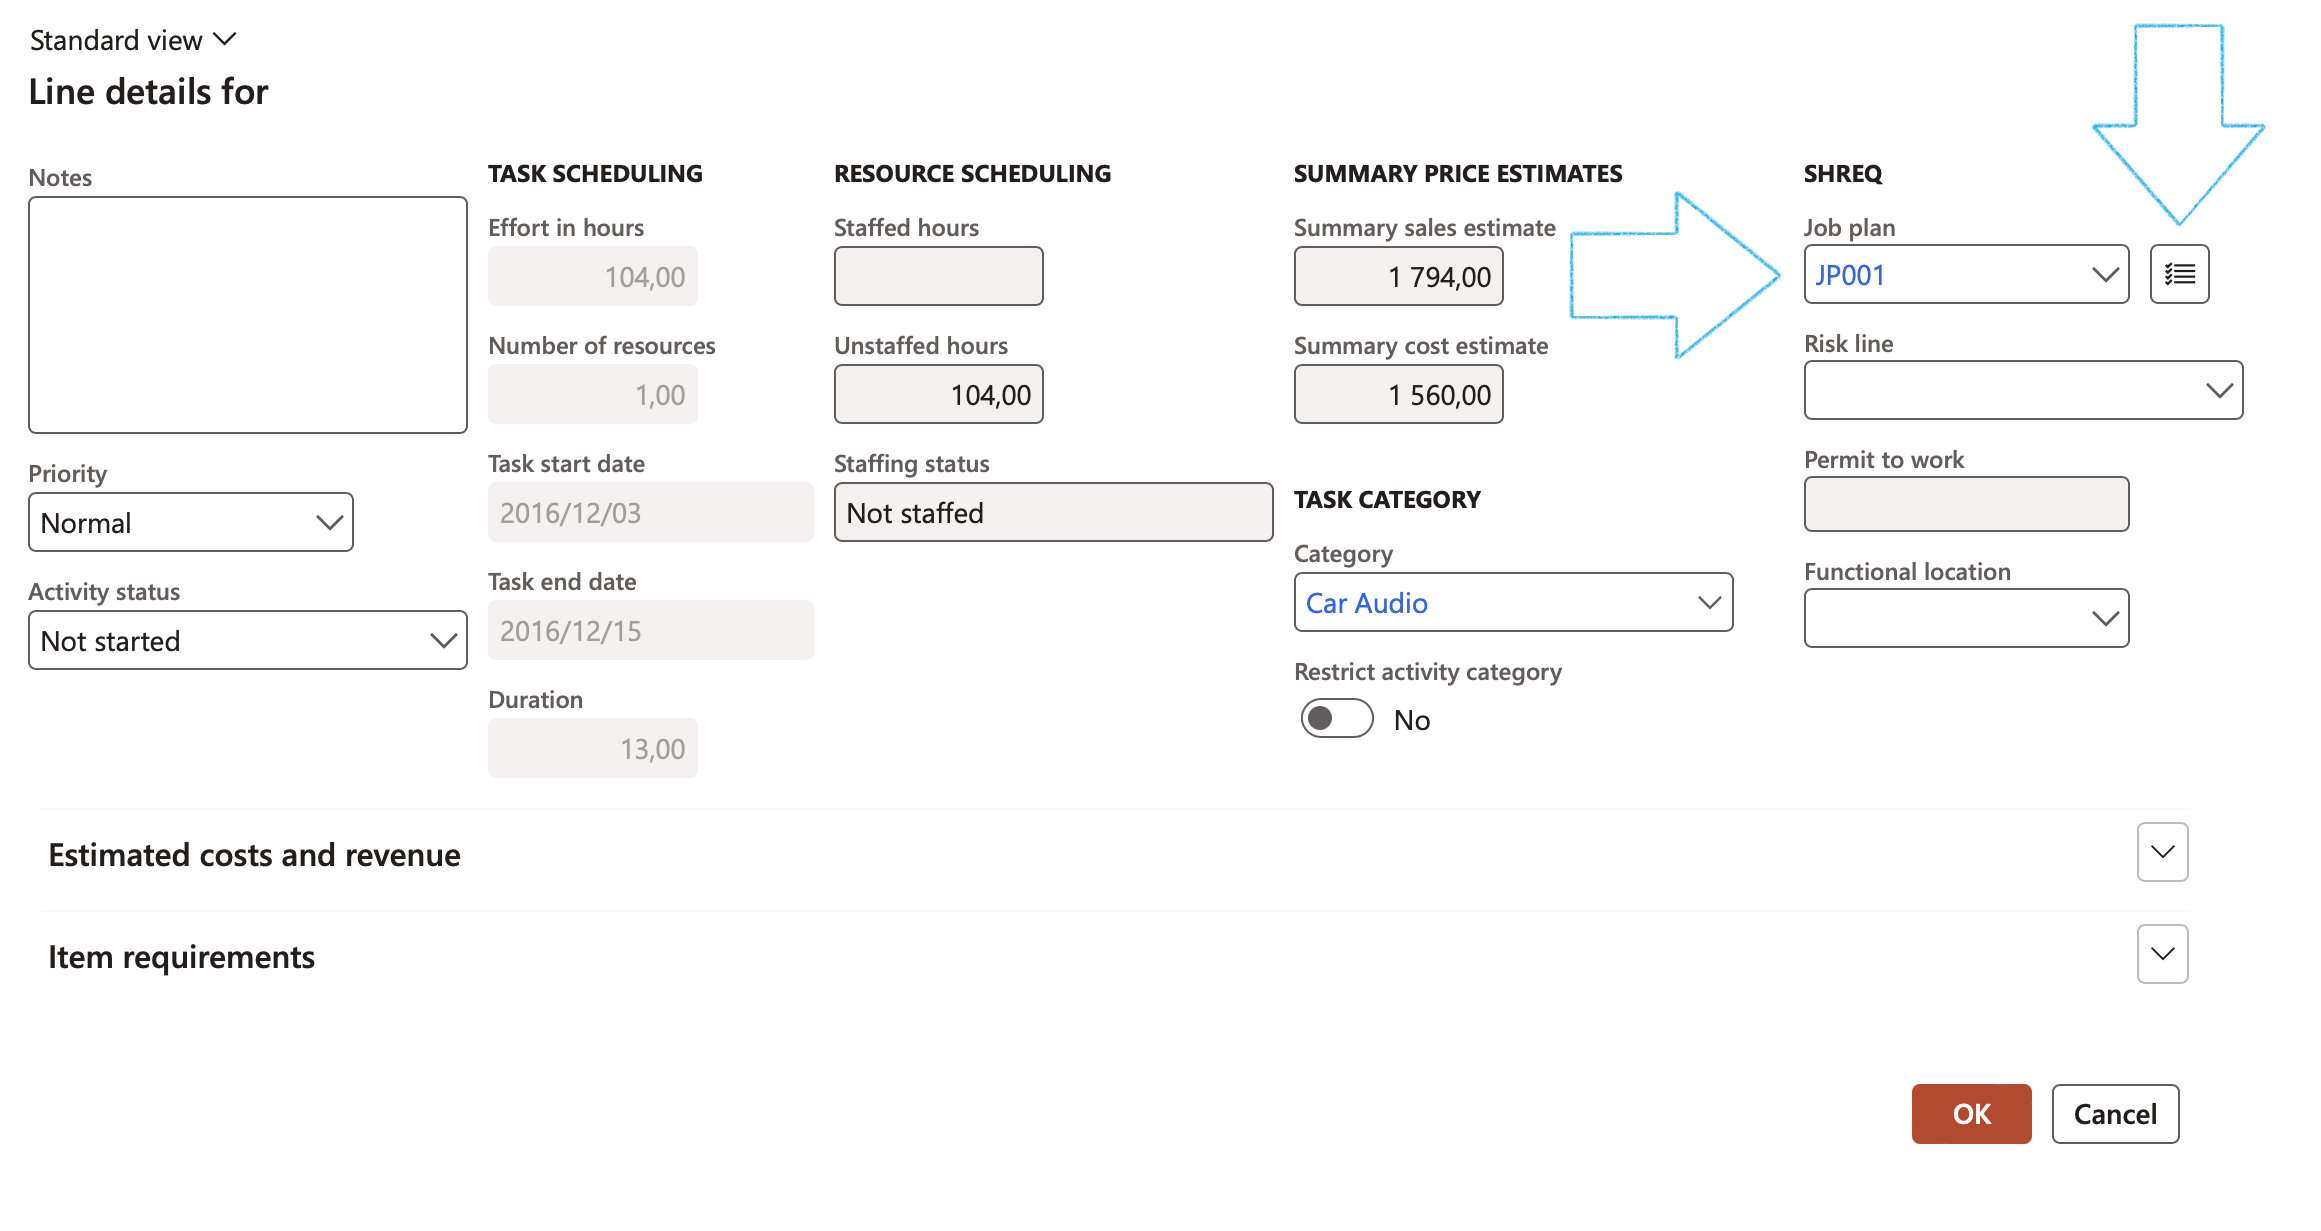
On the Line details dialogue, in the SHREQ group, Select a Job plan from the dropdown and click on the Create checklist button to the right of the job plan field
- Enter Checklist description, Action by and Due date fields
- Change Creation date and Requested by if needed
- Click on the Create button
¶ Step 8: Create a checklist for a change request
Go to: Engineering change management > Common > Engineering change management > Engineering change requests
- Select the relevant change request
- Expand the Change planning Fast tab
- Select the relevant Job plan from the dropdown list
- On the Action pane, in the Functions group, click on the Create checklist button
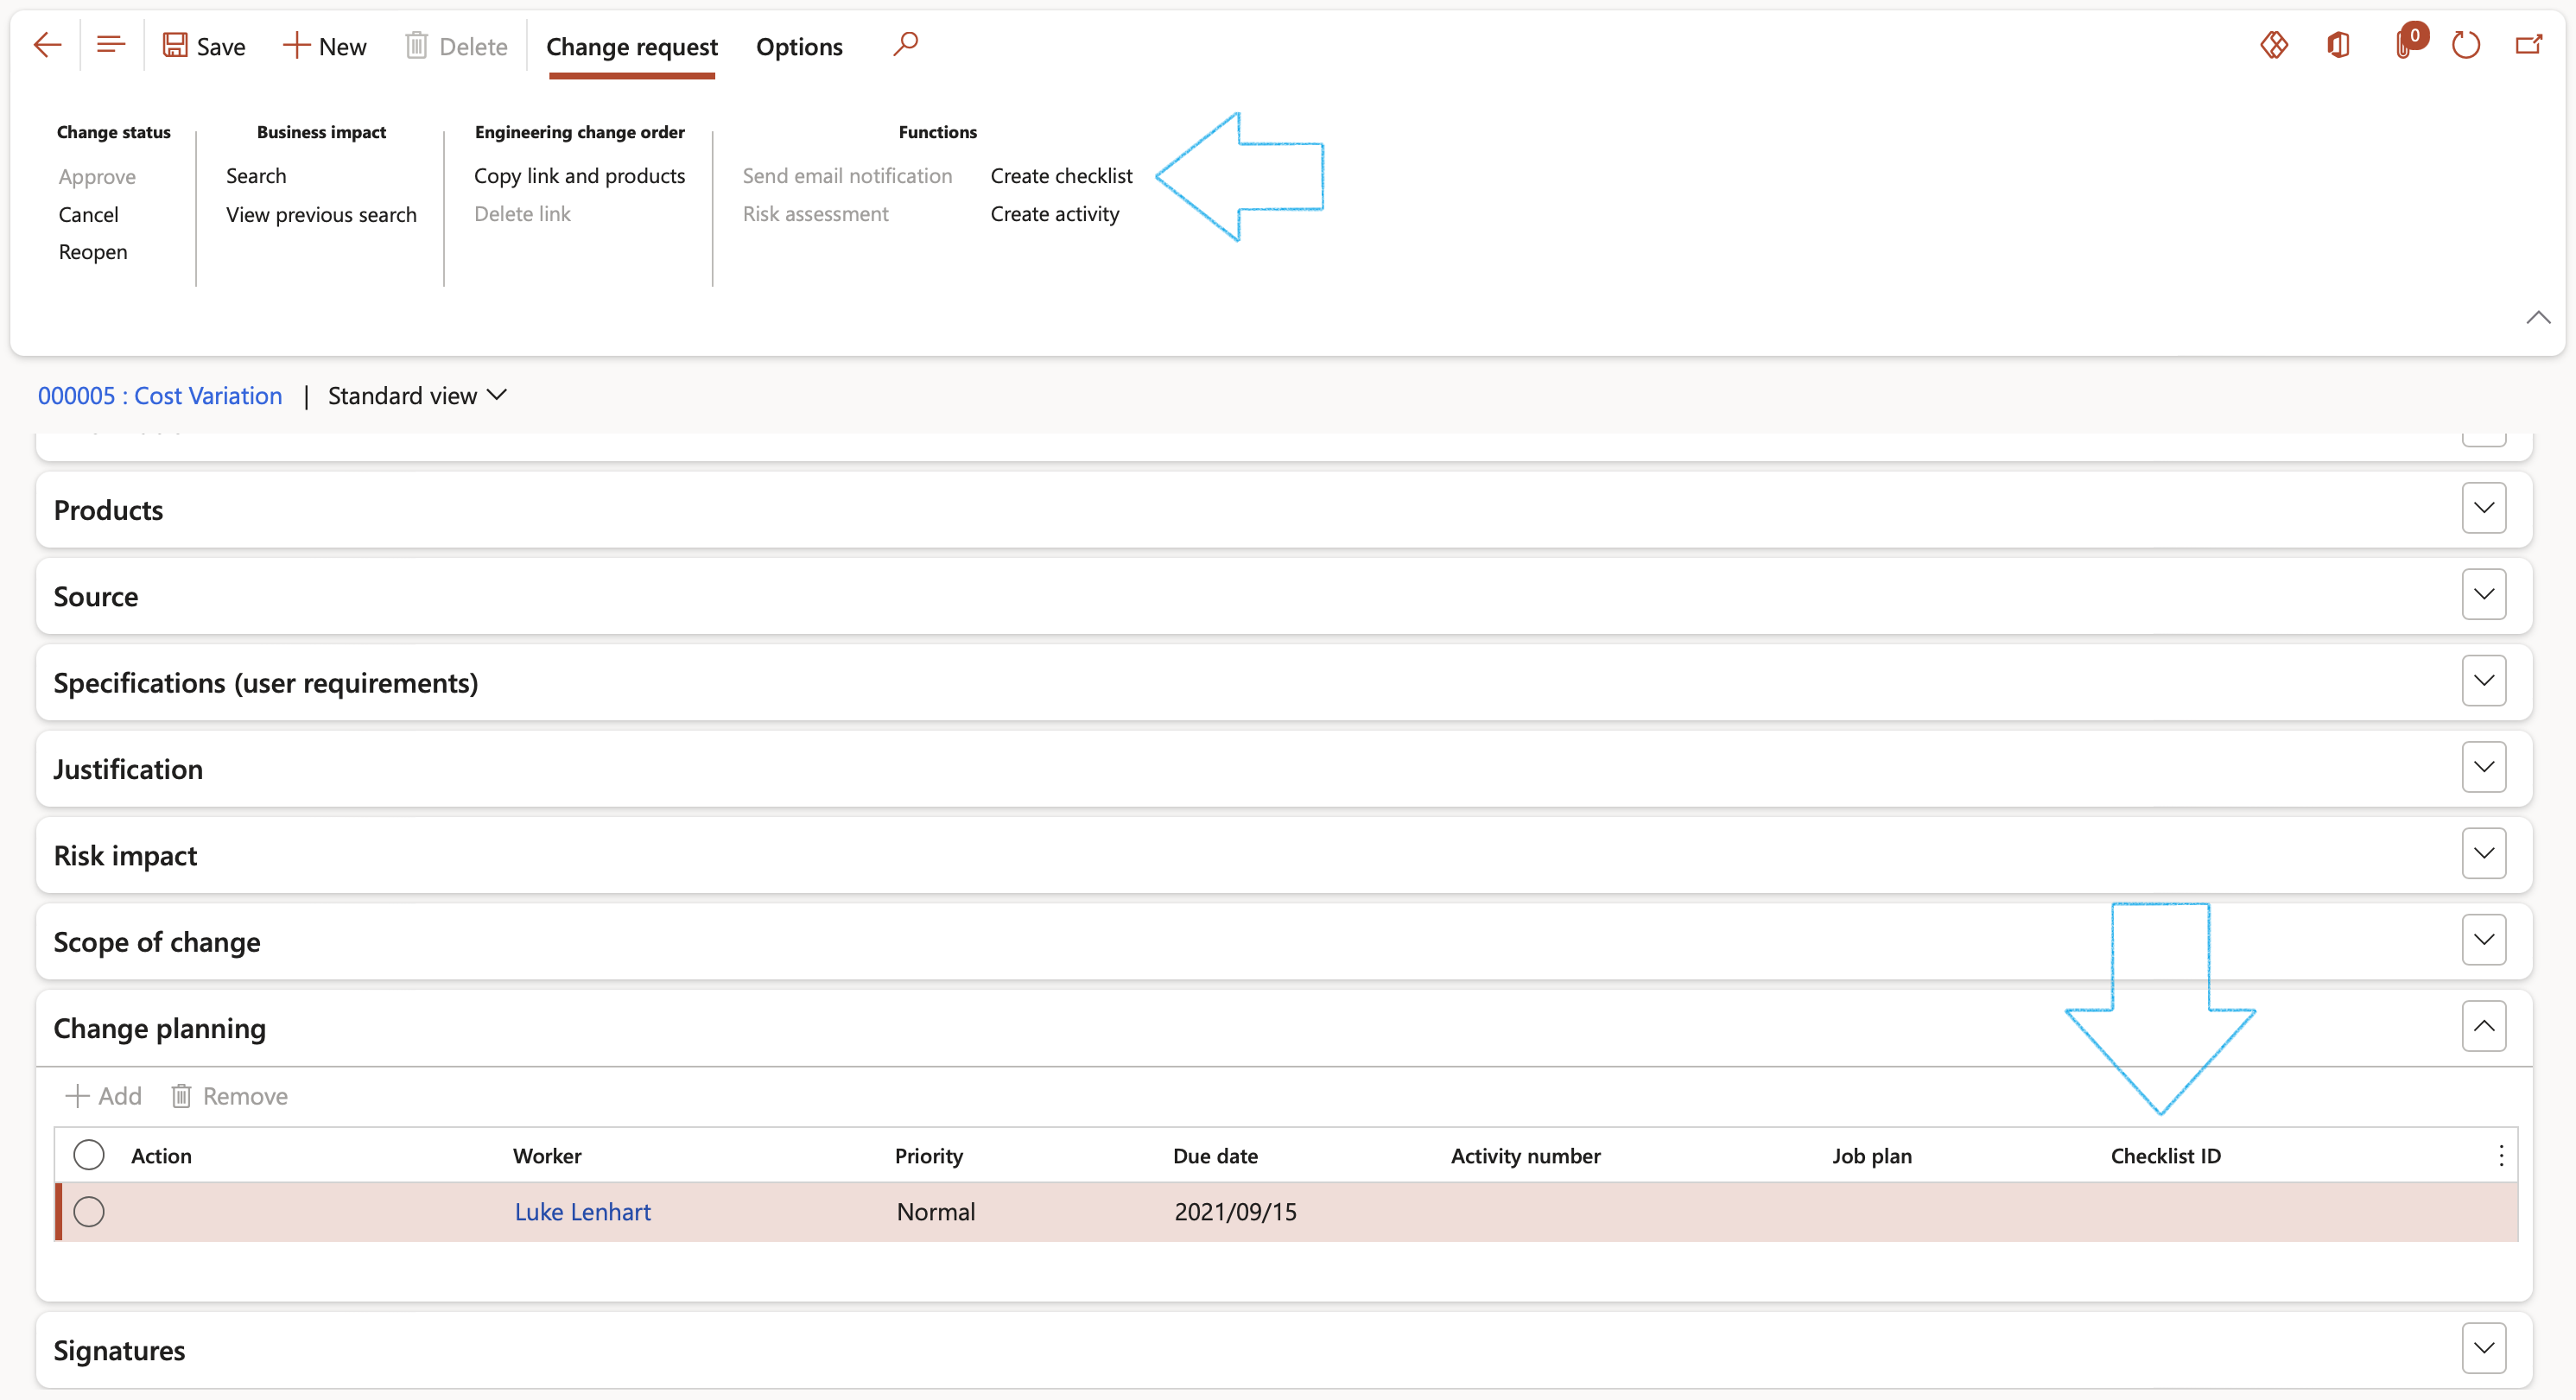
The Checklist ID will be visible under the Change planning Fast tab
Please note that only one checklist can be created per Change planning line
¶ Step 9: Create a general (non-linked) checklist
Manual checklists are not always linked to any specific objects as the ones above. This is normally used for ad-hoc checklists. Formal feedback can still be done.
Go to: GRC > Checklists > All checklists
- On the Action pane, click on the New button
- Complete the Create new checklist dialog
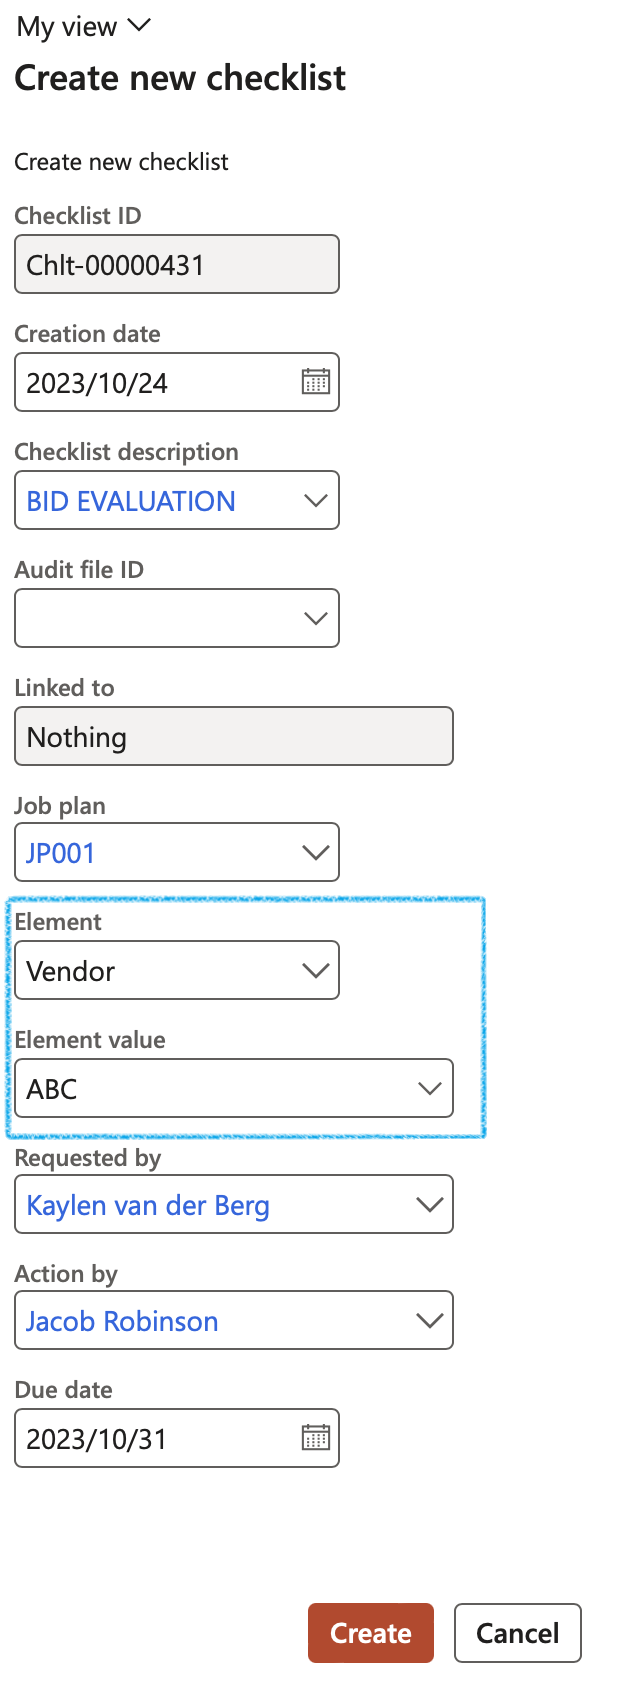
The Element and Element value fields are used for example, when multiple vendors have to be evaluated when they are bidding on a RFQ
¶ Step 10: Collaboration
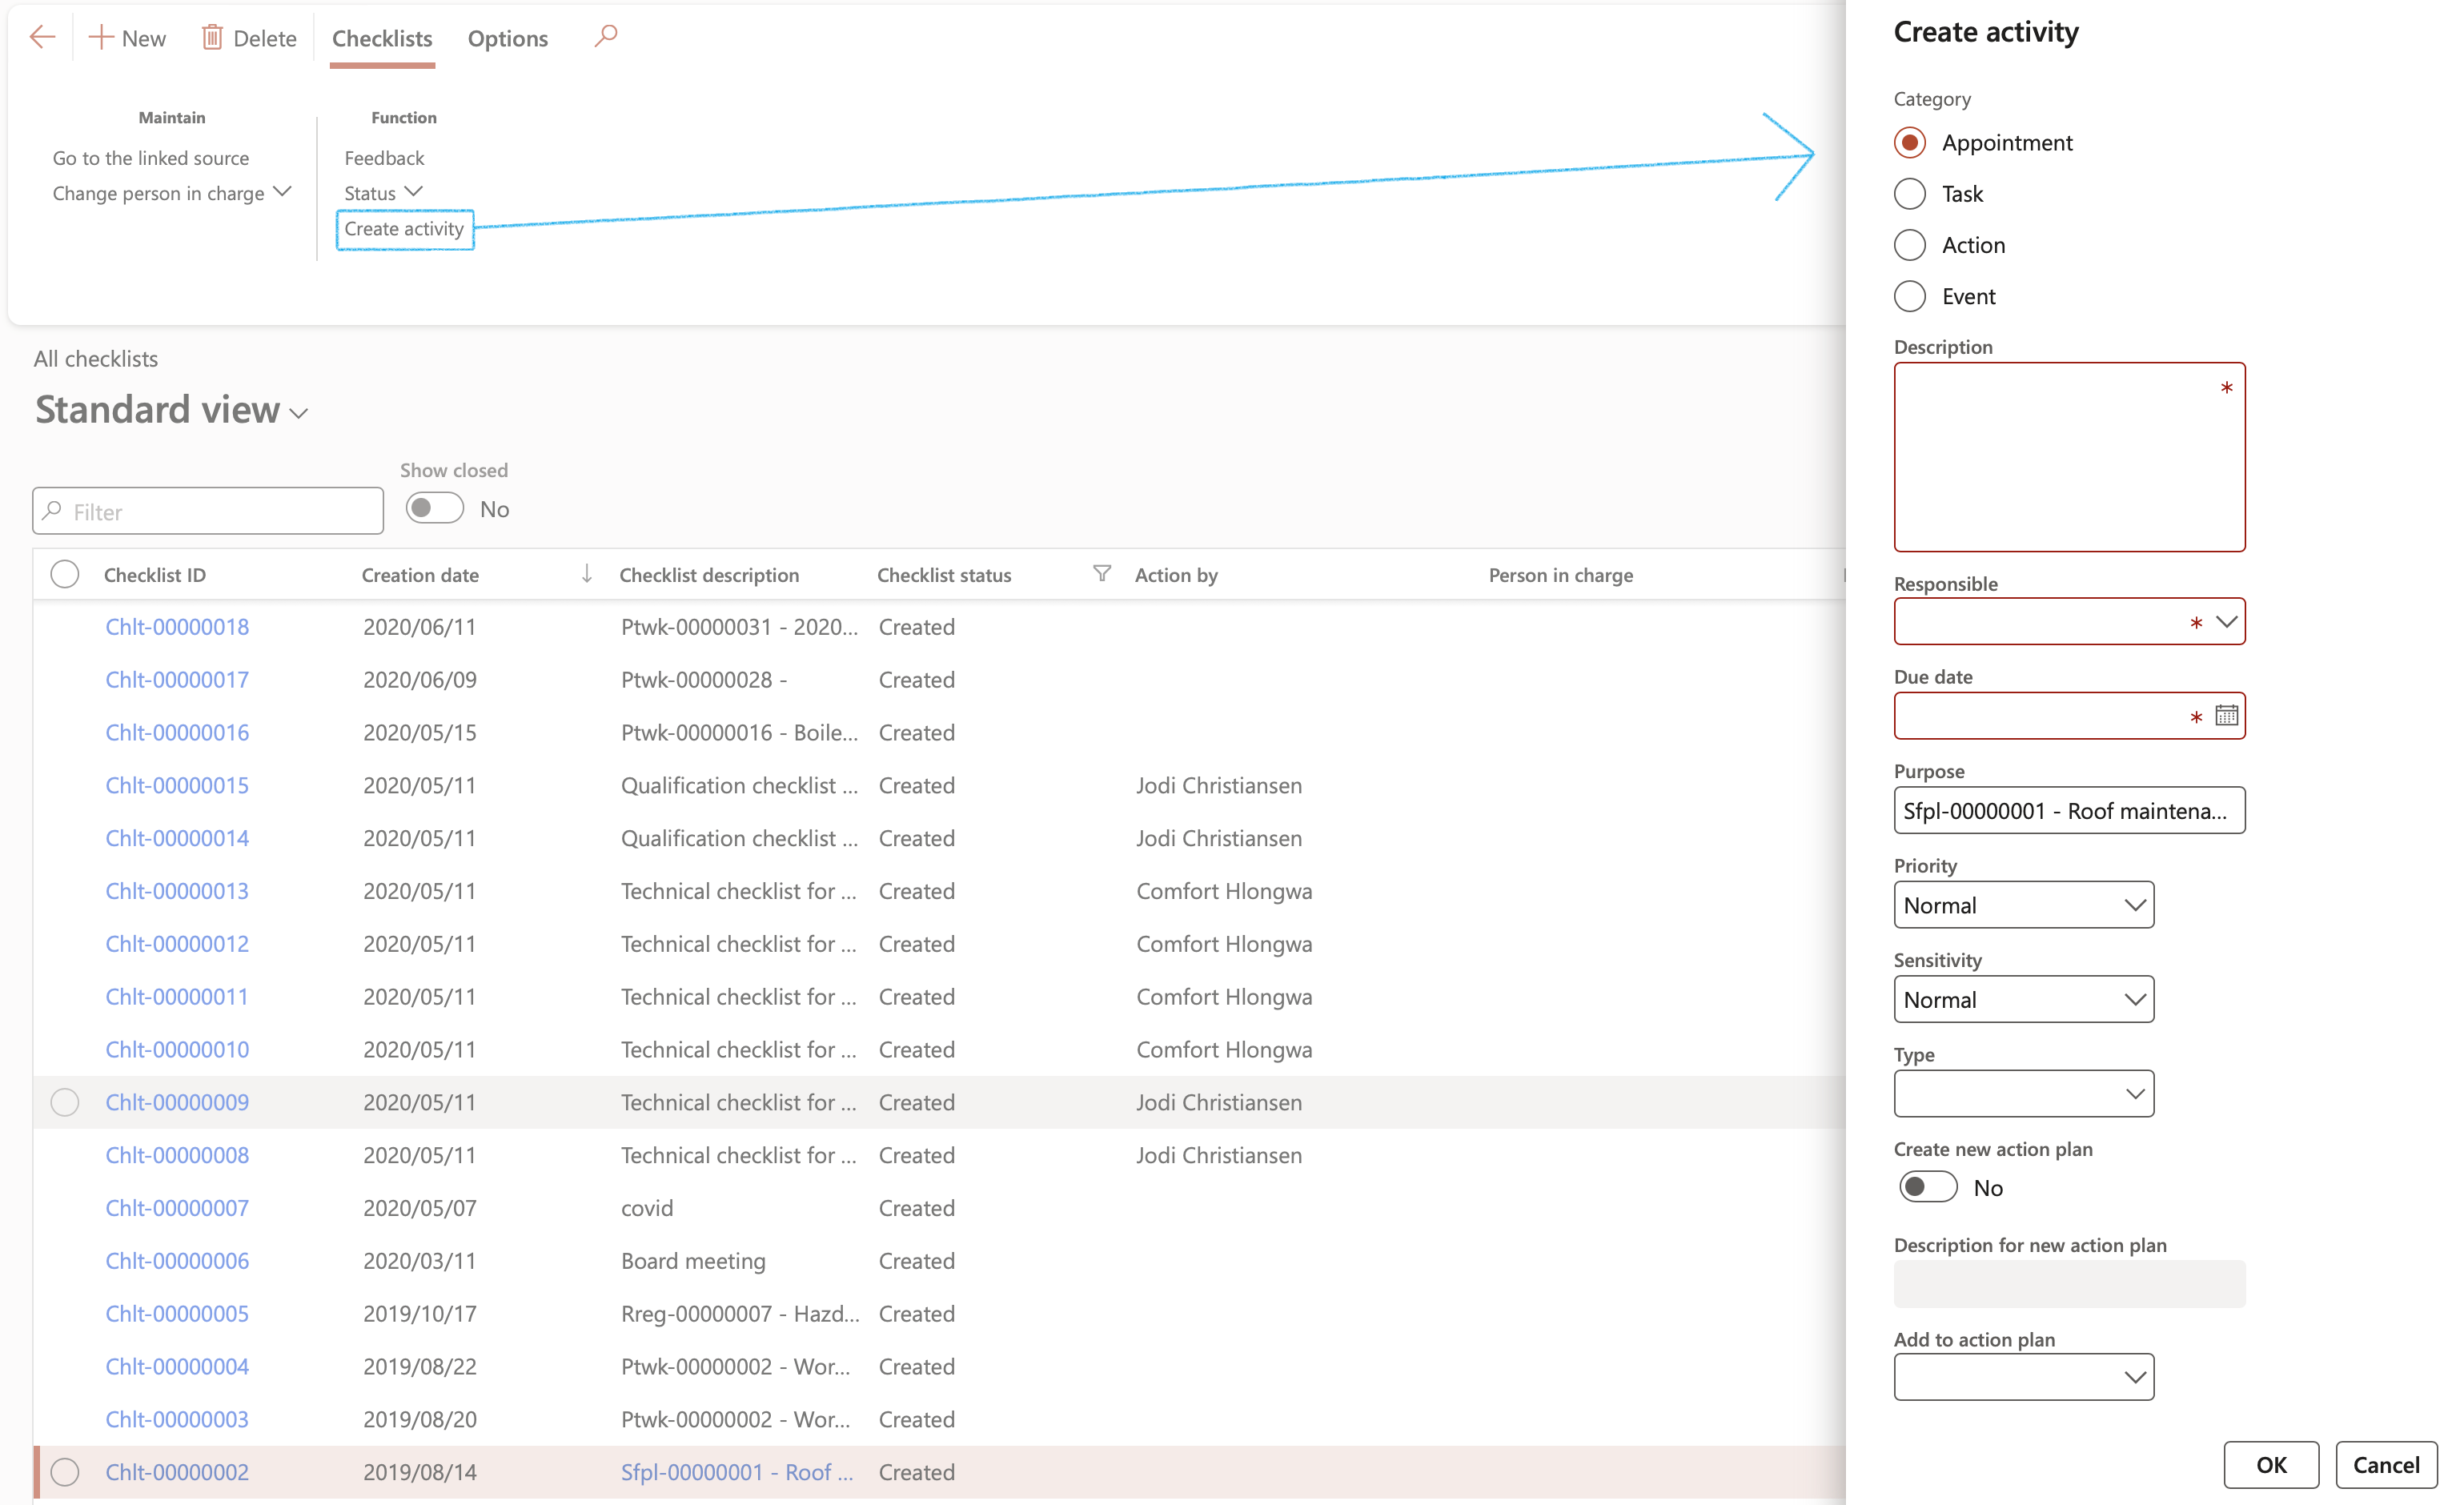
Finally (like all HSE/GRC activities) the Checklist activities can be sent to the standard list page that allows for integration with MS Outlook
Go to: GRC > Checklists > All checklists
¶ Step 11: Do feedback on a checklist
Users can do feedback on checklists by completing the date and specifying the worker that followed the checklist steps, and where applicable, entering measuring points
Go to: GRC > Checklists > All checklists
- Select the checklist that you want to do feedback on
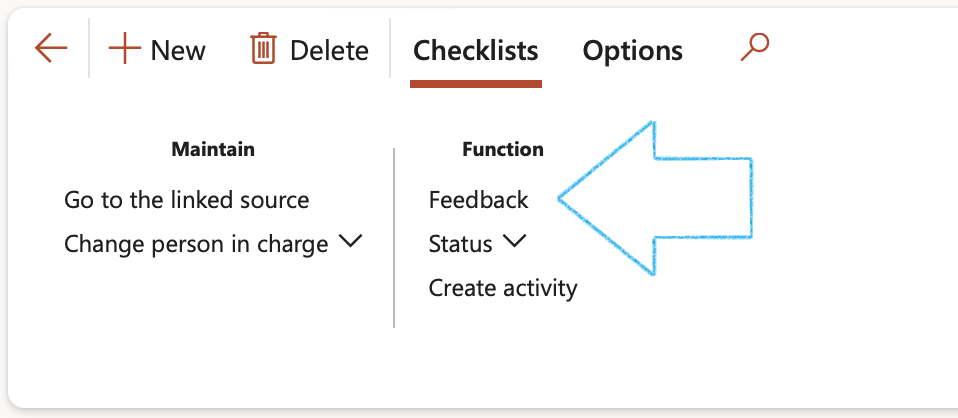
- On the Action pane, in the Function group, click on the Feedback button
Checklist option = Scoring:
Checklist option = Tick box:
¶ Reporting
¶ Step 12: The All checklists list page
This is where the check list “transactions” live. Some of these records were created automatically while others were created manually.
Go to: GRC > Checklists > All checklists
- To change the Person in charge, click on the Change person in charge button in the Action pane and select the relevant person from the dropdown list

¶ Step 13: Inquire checklist source document
Go to: GRC > Checklists > All checklists
- Select the checklist that you want to view the linked source document of
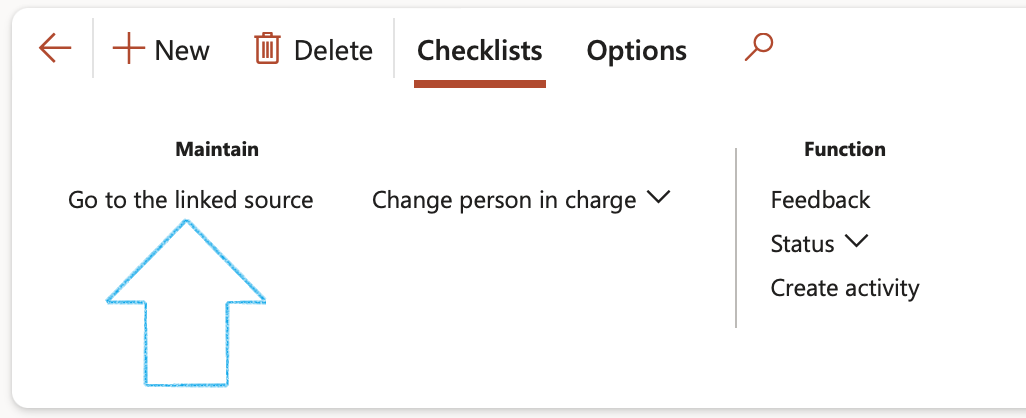
- On the Action pane, in the Maintain group, click on the Go to the linked source button
¶ Step 14: View open actions
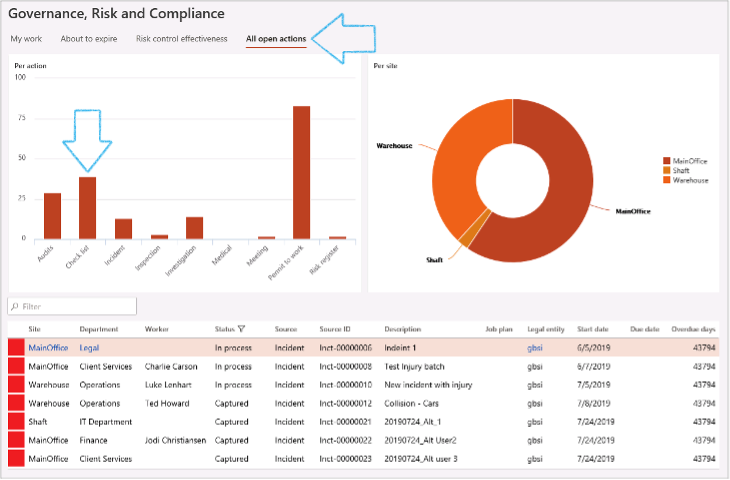
All OPEN/un-resolved HSE activities and actions are displayed in the All open HSE activities list page under Common. This is a “Real time” list page, meaning that all open/un-closed HSE checklists will appear here automatically, with the overdue days as well as the responsible worker.
The definition of open = action by date is passed current system date.
Thus, all checklists that have not been closed will be visible on this page
Go to: GRC workspace > Activity manager
- Open the All open Actions Index tab
