
¶ Introduction
ISO 31000 (2009) / ISO Guide 73:2002 definition of risk is the 'effect of uncertainty on objectives'. Therefore, risk has the potential of gaining or losing something of value. There is normally an initial risk (inherent) before controls are applied. After application, risk should reduce or remain to an acceptable risk (residual) value.
Risk can also be defined as the intentional interaction with uncertainty. Uncertainty is a potential, unpredictable, and uncontrollable outcome; risk is a consequence of action taken in spite of uncertainty.
In proper risk management, a prioritization process is followed whereby the risks with the greatest possible loss (or impact) and the greatest probability of occurring are handled first, and risks with lower probability and loss are dealt with later. In practice the process of assessing risk can be difficult as well as balancing of resources to mitigate between risks with a high probability of occurrence but lower loss versus a risk with high loss but lower probability of occurrence.
Risk management also faces difficulties in allocating resources. This is the idea of opportunity cost. Resources spent on risk management could have been spent on more profitable activities. Again, ideal risk management minimizes spending (or manpower or other resources) and also minimizes the negative effects of risks.
Intangible risk management identifies a new type of a risk that has a 100% probability of occurring but is ignored by the organization due to a lack of identification ability. For example, when deficient knowledge is applied to a situation, a knowledge risk materializes. Relationship risk appears when ineffective collaboration occurs; hence the approach to manage risk inside Dynamics 365 ERP.
Operational risk is defined as an uncertainty or hazard associated with the delivery of specific project, program, job or operational objectives, and includes risks inherent to the day to day operation of an enterprise. It can include internal risk method statement and external events such as an incident.
¶ Navigation

¶ Specific setups
¶ Step 1: GRC Parameters
The settings for the heat map on the Risk page will display in the Risk register form and on all relevant forms where “risk assessments” are done from:
Go to: GRC > Setup > Governance, Risk and Compliance parameters and open the Risk tab
¶ Step 1.1: Scale setup Fast tab
The scale of risk is proposed to categorize risks along a multidimensional ranking, based on a comparative evaluation of the consequences, probability, and source of a given risk. A risk is ranked higher on the scale the larger the consequences, the greater the probability, and the more morally culpable the source.
- In the Maximum value field, enter the maximum value on the scale (Total = Severity X Frequency X Exposure)
- By moving the slider for a risks class to Yes, risk assessments for that class will be done using a scale as opposed to the risk matrix as setup under the Matrix setup Fast tab

Below is an example of what the scale will look like:
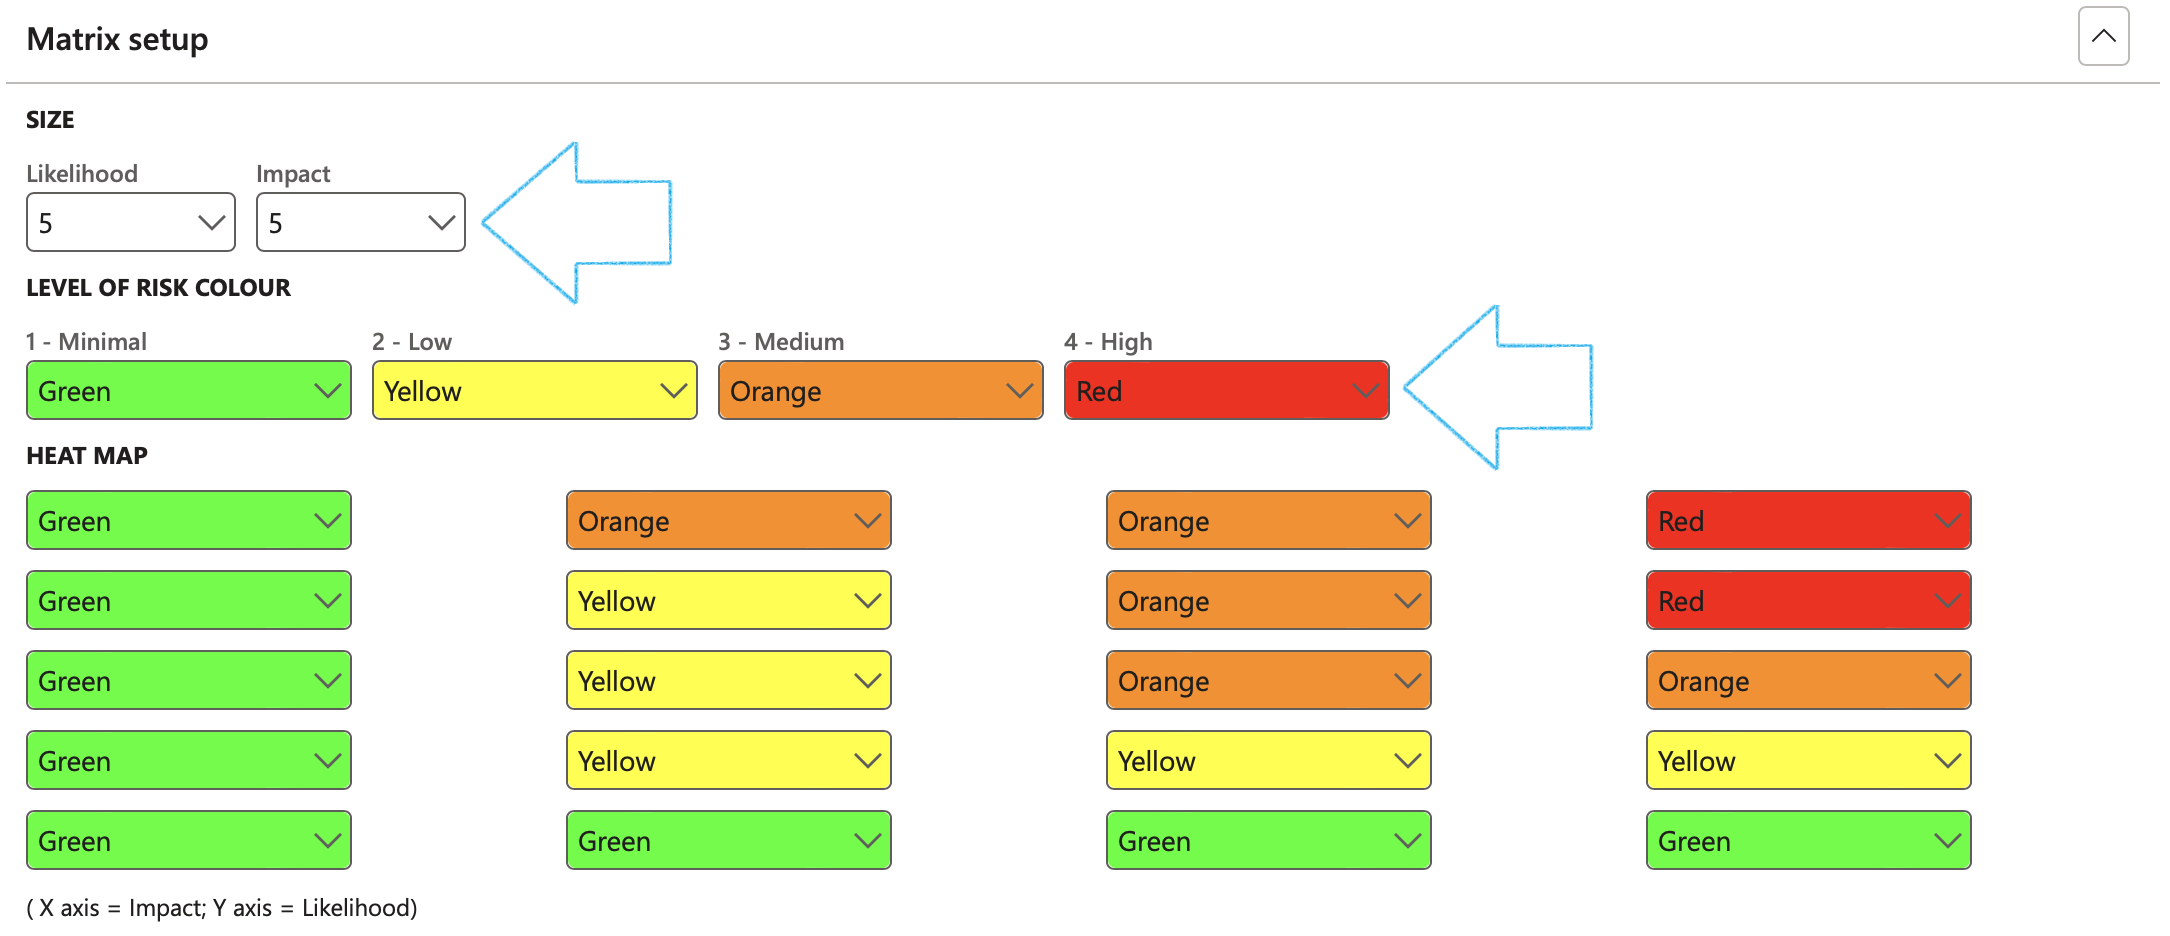
¶ Step 1.2: Matrix setup Fast tab
A risk matrix is a tool that is normally used to assess the level of risk and assist the decision-making process. It takes into consideration the category of probability, or likelihood, against the category of consequence severity.
- Under the SIZE Field group:
- Select the size of the matrix by selecting the relevant values in the Likelihood and Impact fields
- Under the LEVEL OF COLOUR Field group:
- Select the relevant colour for each level
- Under the HEAT MAP Field group:
- Assigned colours to the matrix, considering the Likelihood and Impact values selected under SIZE Field group

It is imperative that a default hazard, as well as an aspect value is selected under the Risk lines Fast tab
To view the result of the Risk matrix setup:
Go to: GRC > Risk > Operational risk assessments
Users can also set up a 2nd risk matrix for Level of investigation under the Investigation tab on the Parameters.
¶ Step 1.3: Risk lines Fast tab
Users have the option to change the labels of the two Note fields under the Other Fast tab on the Risk register lines view.
- Under the Field label for note 1 and note 2 field groups:
- Enter the labels of the two note boxes for the relevant risk classification
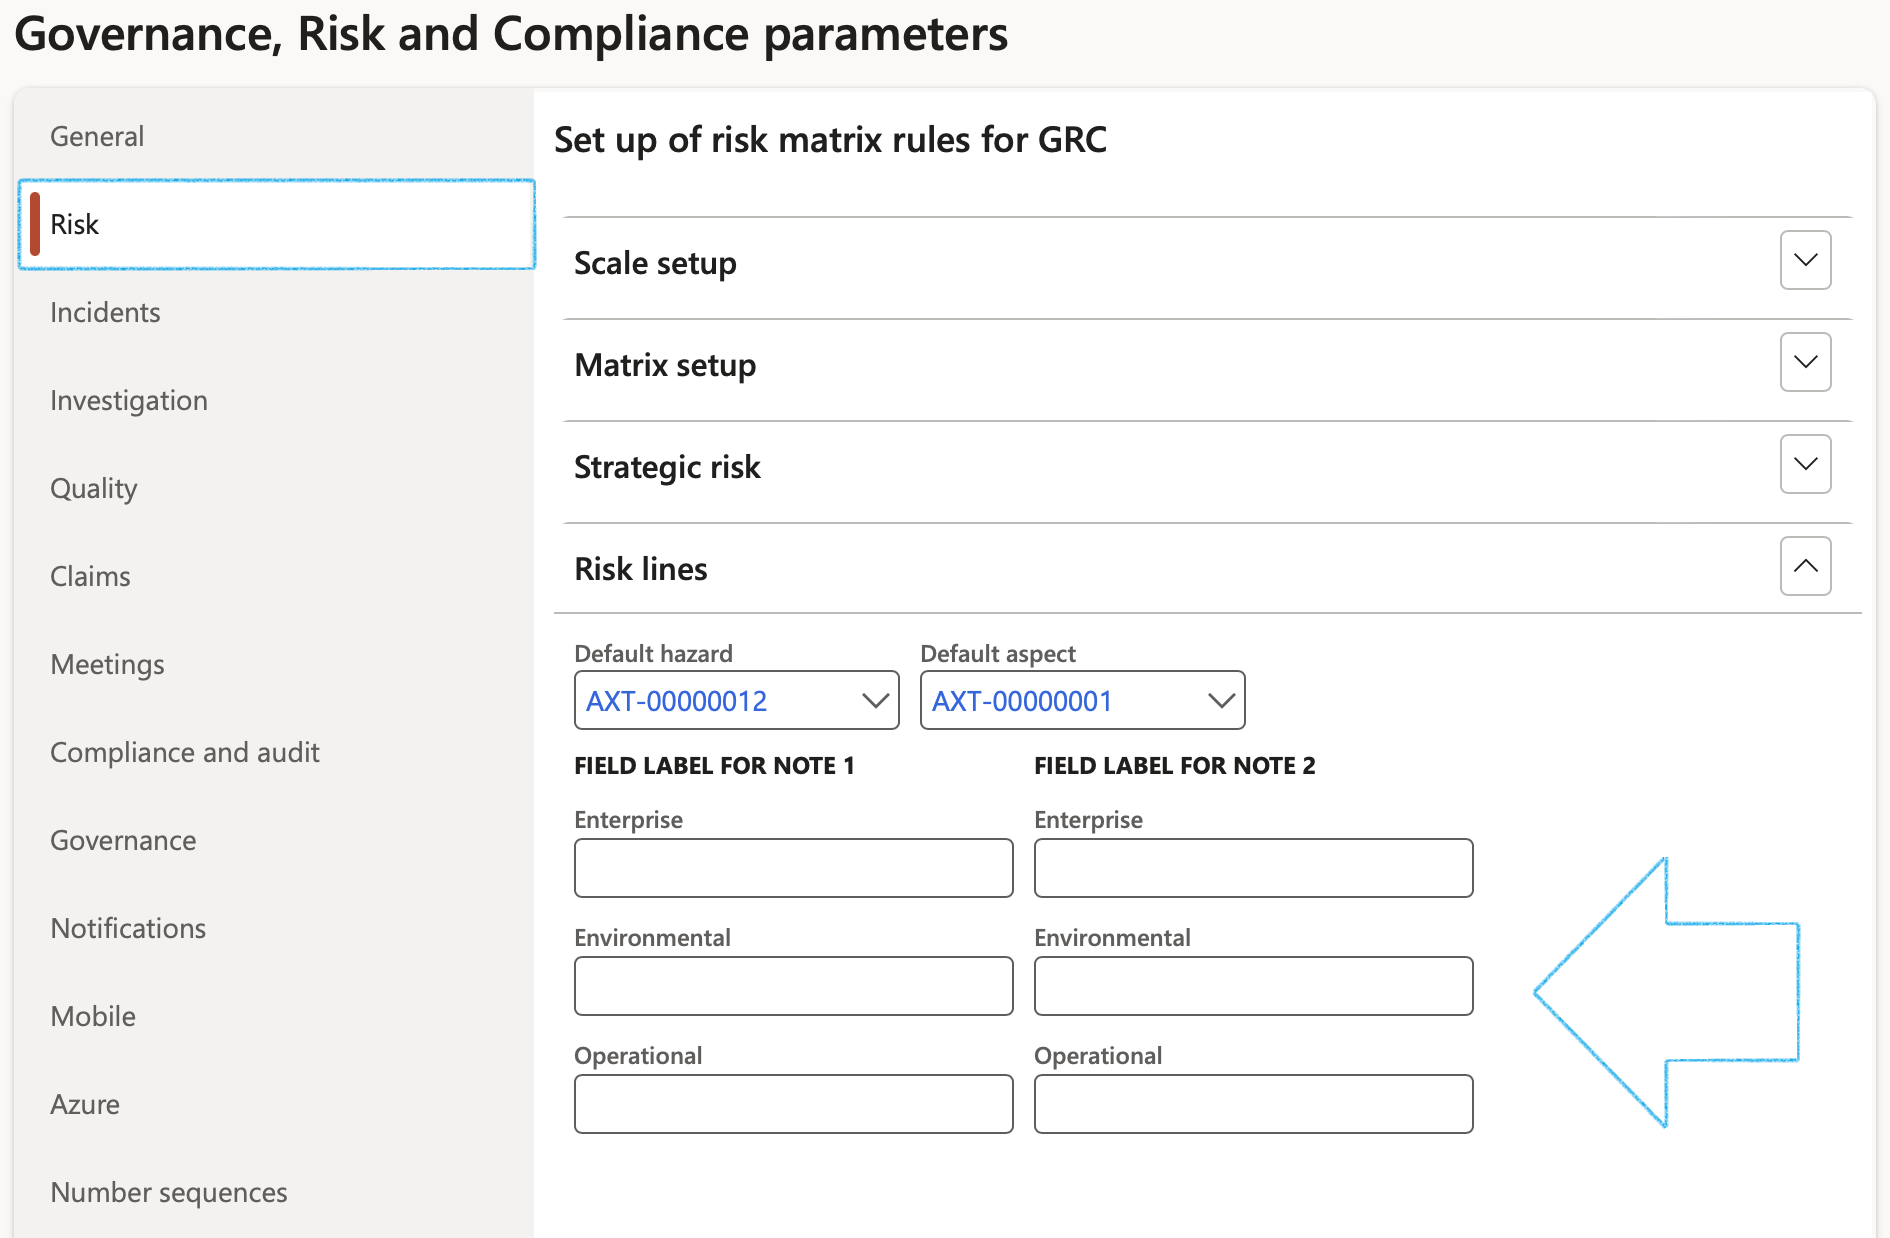
It is imperative that a default hazard, as well as a default aspect value is selected under the Risk lines Fast tab
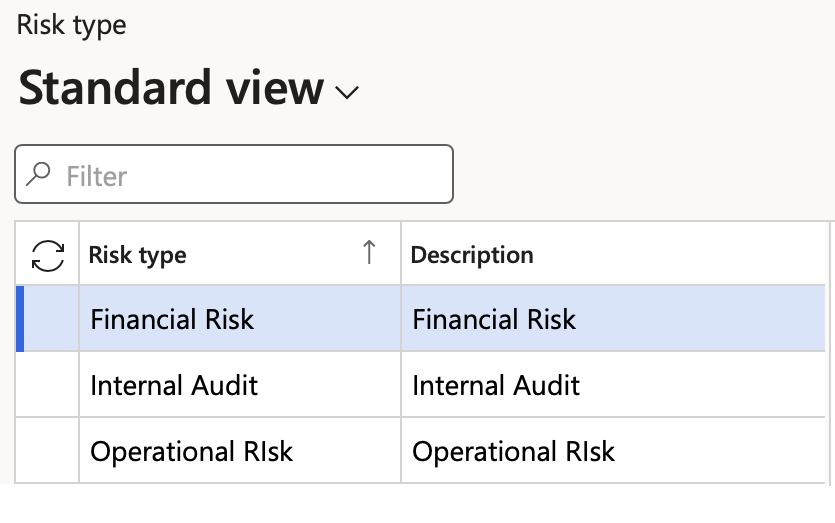
¶ Step 2: Risk type
There are different types of risks which have different impacts.
Go to: GRC > Risk > Setup for risks > Risk type
- On the Action pane, click New
- Enter a unique Risk type ID as well as a brief Description
- Click Save
¶ Step 3: Risk configuration
Go to: GRC > Risk > Setup for risk > Risk configuration
¶ Step 3.1: Likelihood
Likelihood is the chance that something might happen. Likelihood can be defined, determined, or measured objectively or subjectively and can be expressed either qualitatively or quantitatively (using mathematics).
- Click on the Likelihood tab
- Click New
- Select the Score from the dropdown list and enter a brief Description
- Enter the lower percentage value of the score range
- Enter the upper percentage value of the score range
- Enter the Guide percentage value
- Click Save

¶ Step 3.2: Mitigation effectiveness
Mitigation is the action and effort entered into, with the objective to reduce loss of life and property by lessening the impact of risk. These actions and efforts must be assessed for effectiveness. At this point users must define effectiveness factors with a percentage rating. These setups are used by the Control measures, having available the Effectiveness factors and Rating % as per setup done here.
- Click on the Mitigation effectiveness tab
- Click New
- Select the Effectiveness factor from the dropdown list
- Enter a brief description of the Qualification criteria
- Enter the Rating percentage
- Select the relevant Color rating for the effectiveness factor
- Click Save and refresh the screen to apply the selected colours

The above setup is used on the Risk register, Mitigation Fast tab

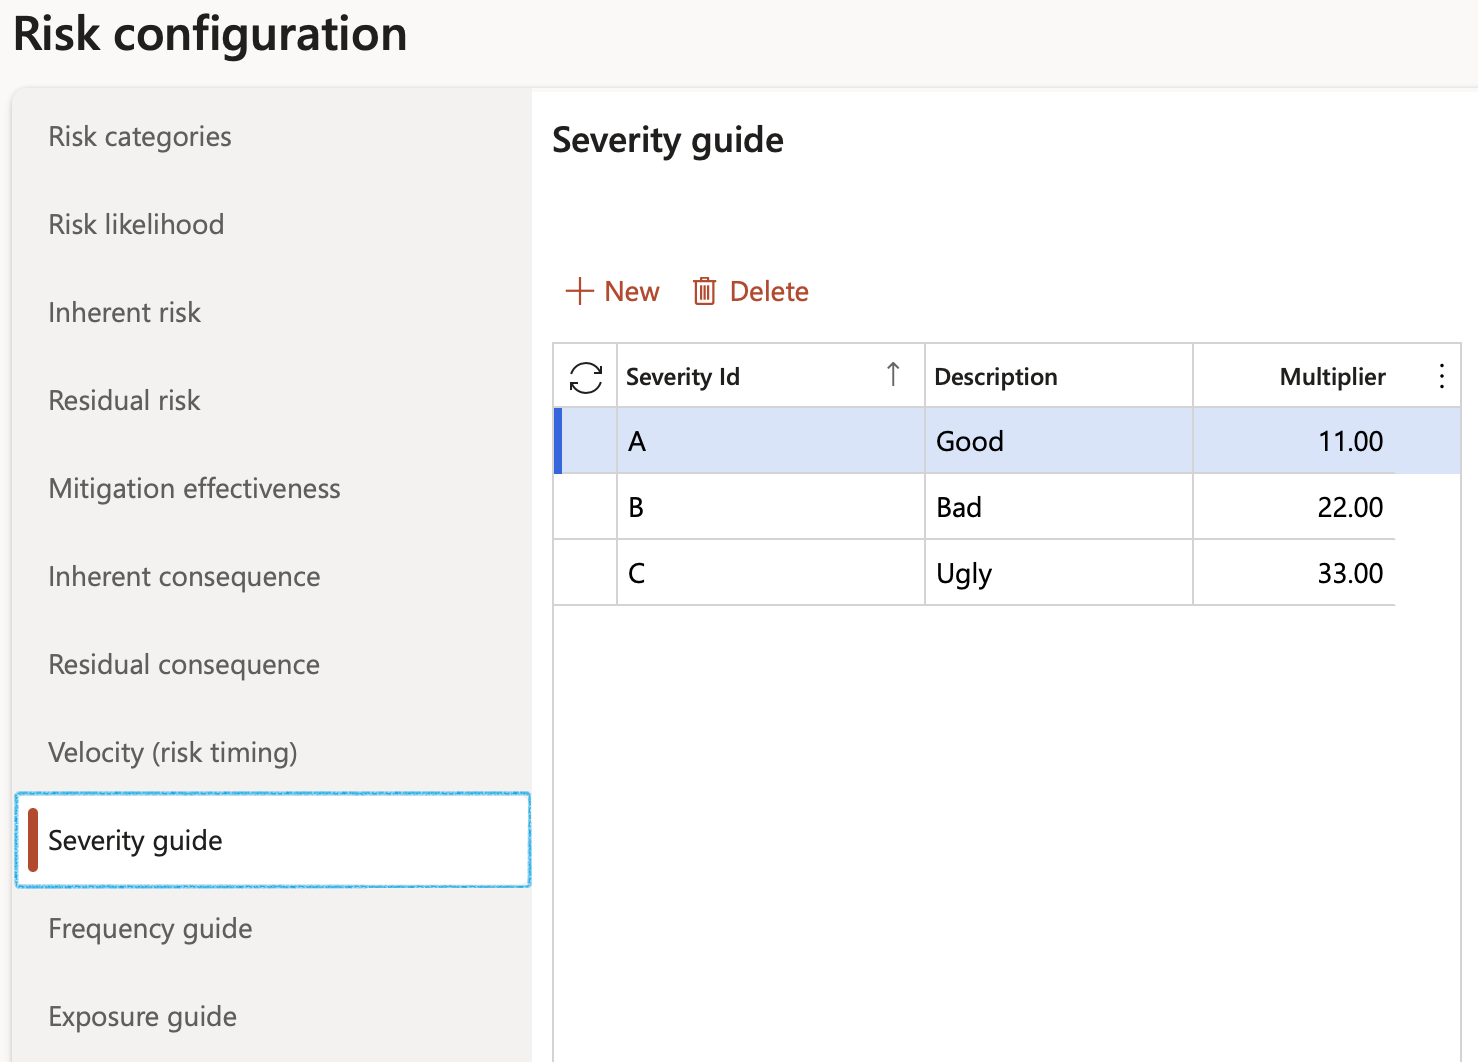
¶ Step 3.3: Severity
Risk severity is the extent of the damage to the institution, its people, and its goals and objectives resulting from a risk event occurring.
- Click on the Severity tab
- Click New
- Enter the Severity ID
- Enter a brief Description for the severity
- In the Multiplier field, enter the relevant severity value
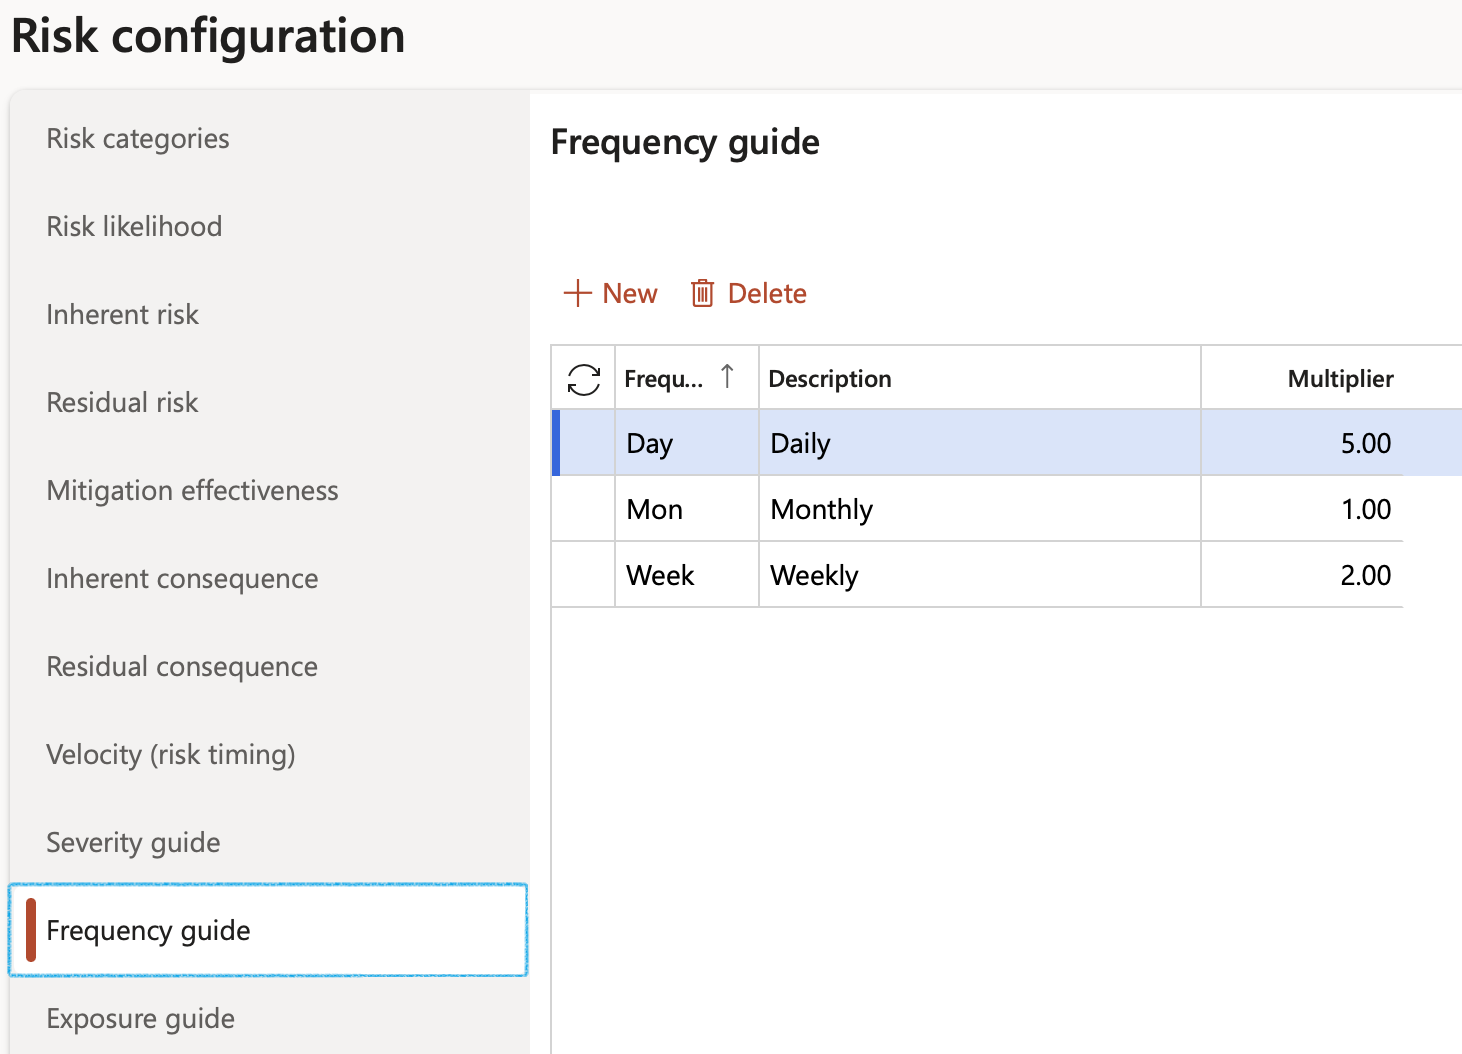
¶ Step 3.4: Frequency
Frequency is a measure of how often an event occurs on average during a unit of time. It ranges from 0 to infinite.
- Click on the Frequency tab
- Click New
- Enter the Frequency ID
- Enter a brief Description for the frequency
- In the Multiplier field, enter the relevant frequency value
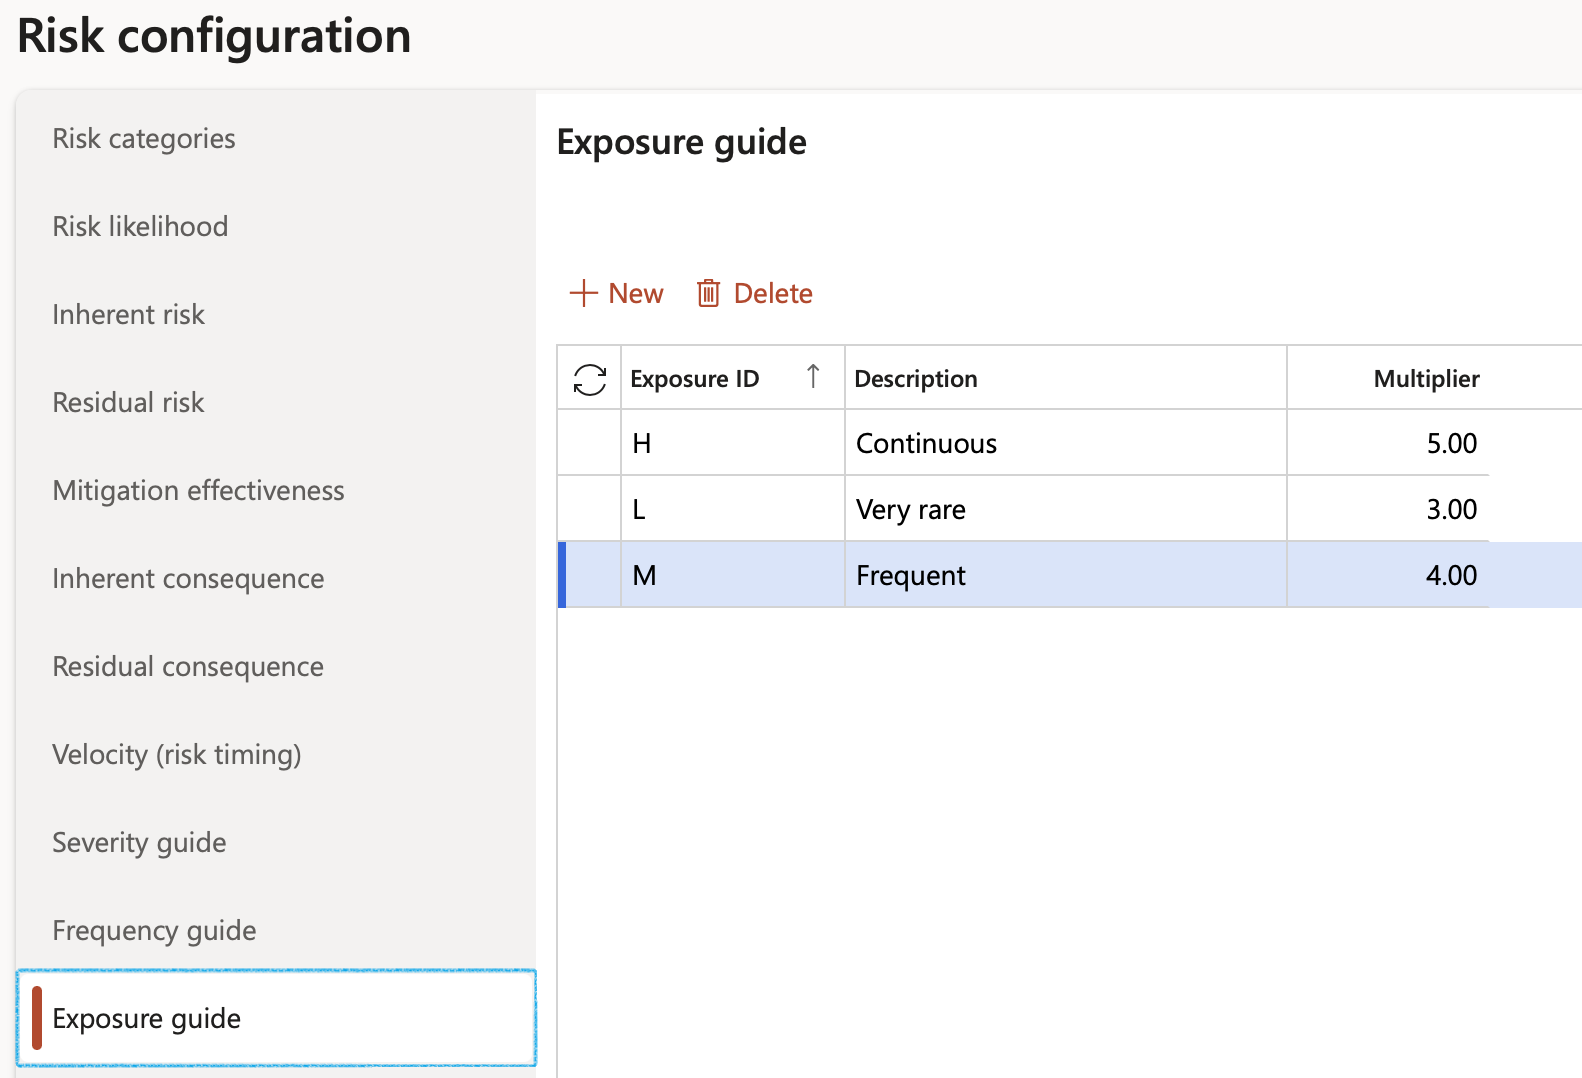
¶ Step 3.5: Exposure
Risk exposure is the quantified potential loss from business activities currently underway or planned. The level of exposure is usually calculated by multiplying the probability of a risk incident occurring by the amount of its potential losses.
- Click on the Exposure tab
- Click New
- Enter the Exposure ID
- Enter a brief Description for the exposure
- In the Multiplier field, enter the relevant frequency value
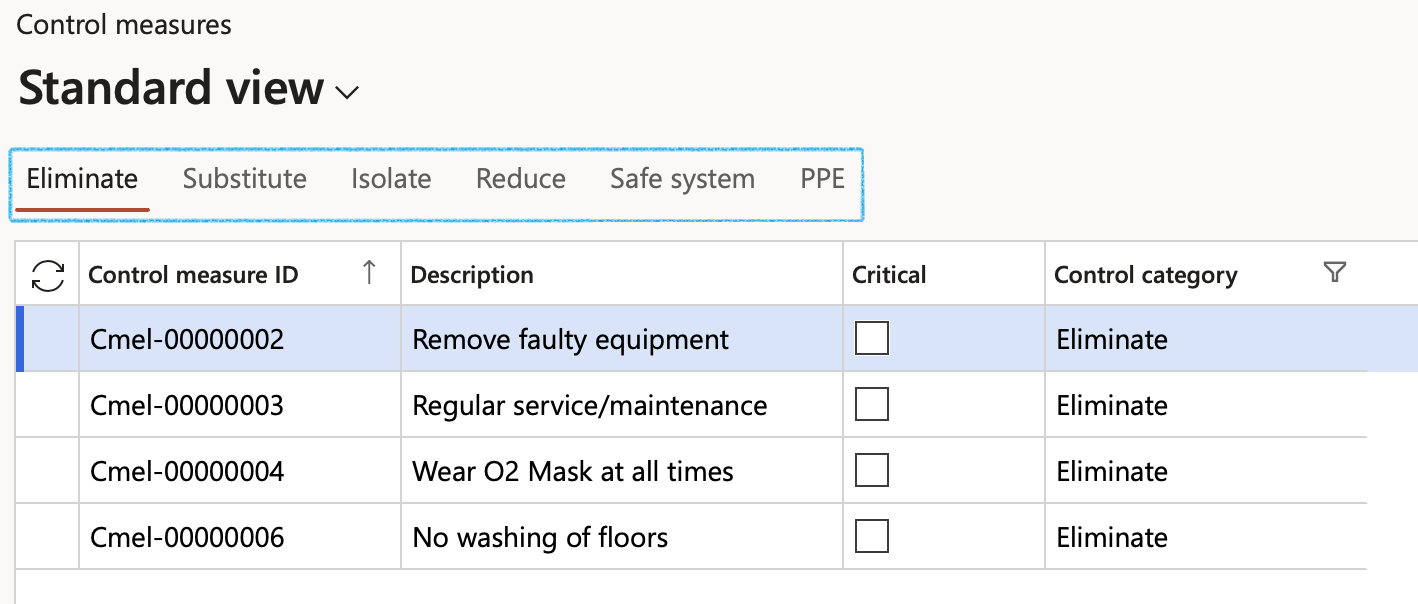
¶ Step 4: Setup Control measures
Go to: GRC > Risk > Setup for risk > Control measures
- Open the Index tab for which you want to add the control measures
- In the Action pane, click on the New button
- Enter a Description for the control measure
- Indicate whether this is a Critical control measure
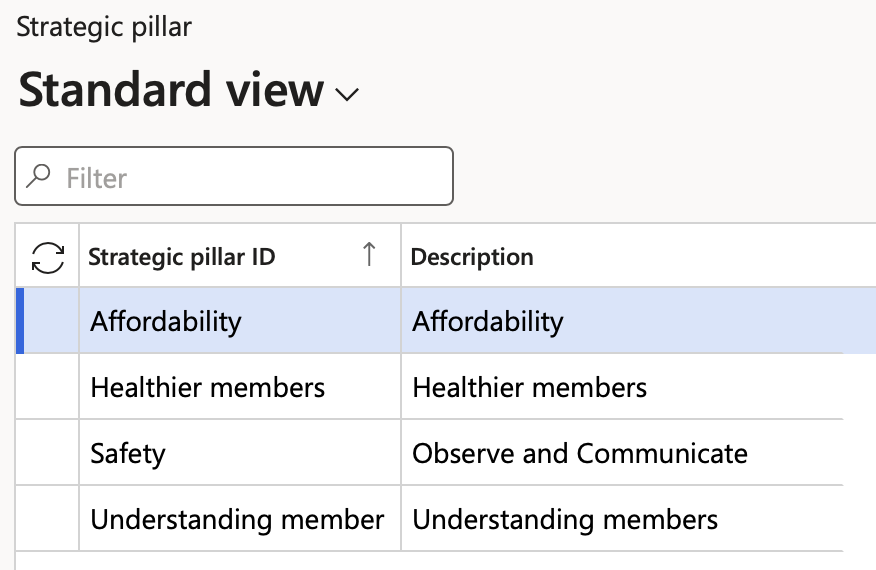
¶ Step 5: Setup Strategic pillar
Go to: GRC > Risk > Setup for risk > Strategic pillar
- In the Action pane, click on the New button
- Enter the Strategic pillar ID
- Enter a brief Description
¶ Daily use
¶ Create a Risk register
A Risk register is a collection of risks. Each Risk register consists of a header and lines. The headers (registers) are listed in a list page with Risk register numbers. The lines are the multiple risks (Hazard records) listed under each Risk register header. To create, view or edit the lines, users have to work on the risk detail form.
¶ Step 6: Open the Risk register
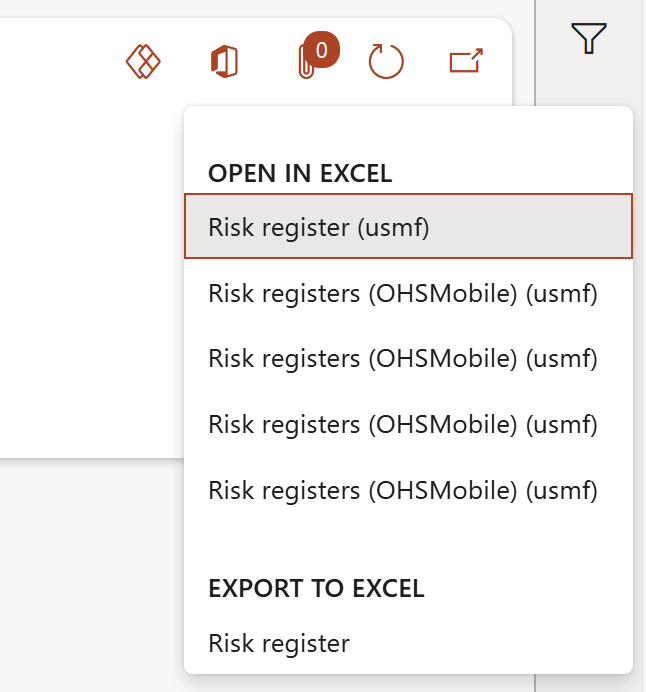
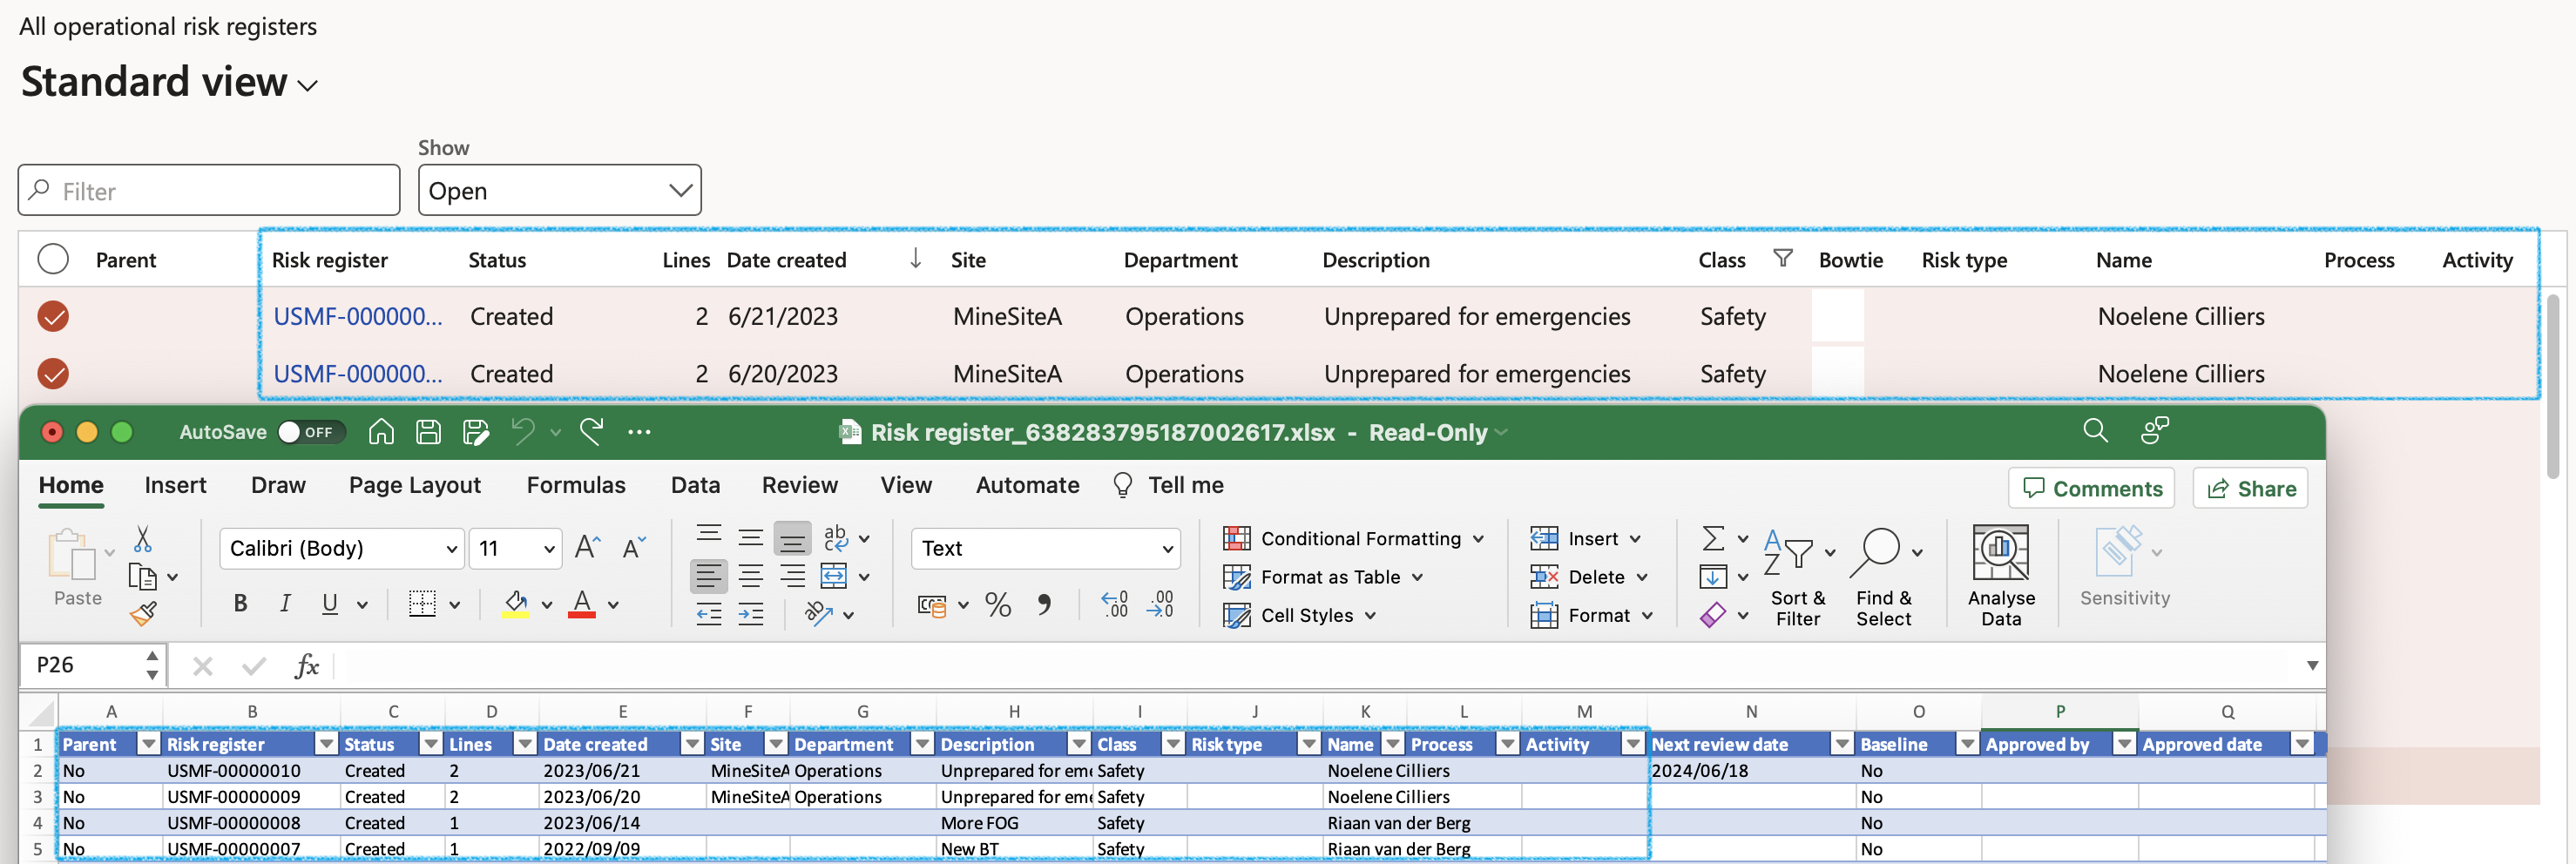
Go to: GRC > Risk > Registers > All operational risk registers
- Click on the Edit button, or on the Risk register ID

It is noteworthy that the risk register and individual risk lines (hazard lines), both have life cycles
The Reset line statuses button gives the user the option to reset the line statuses of all associated risk lines in this risk register, in mass, back to Draft
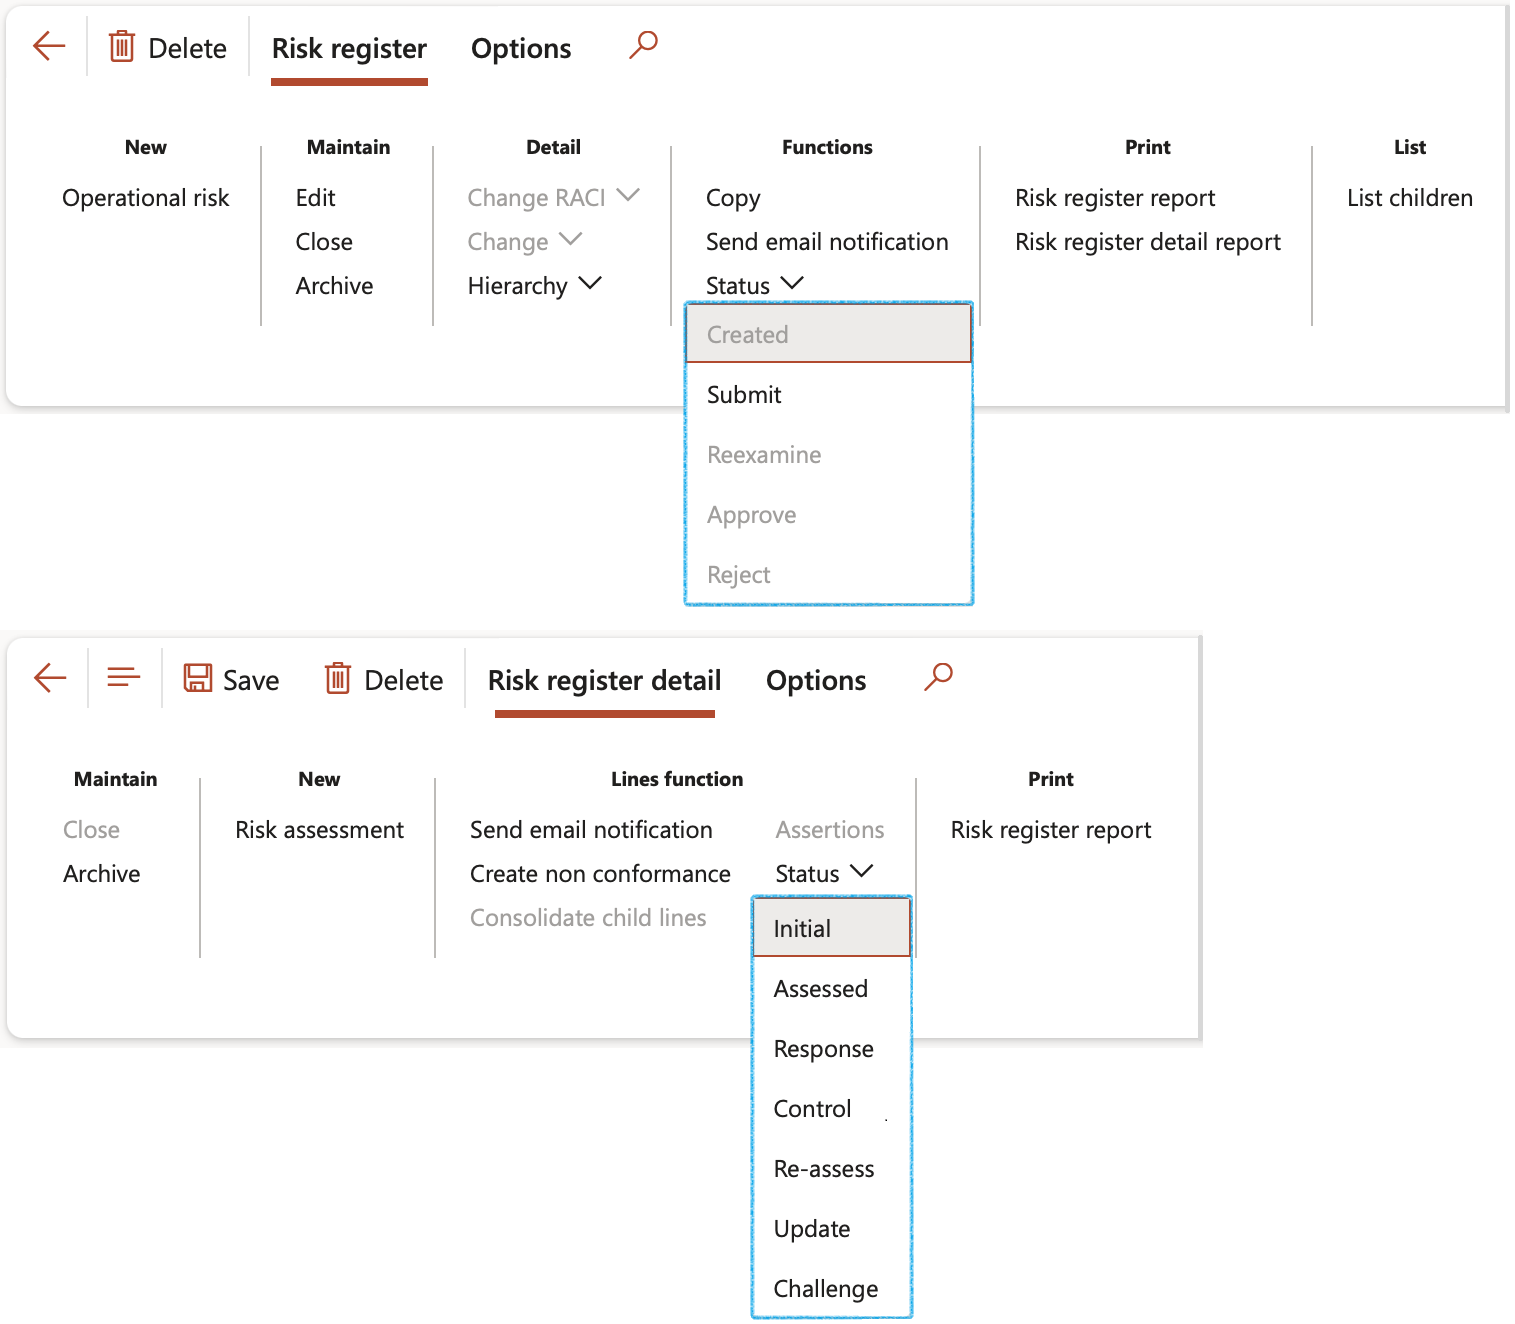
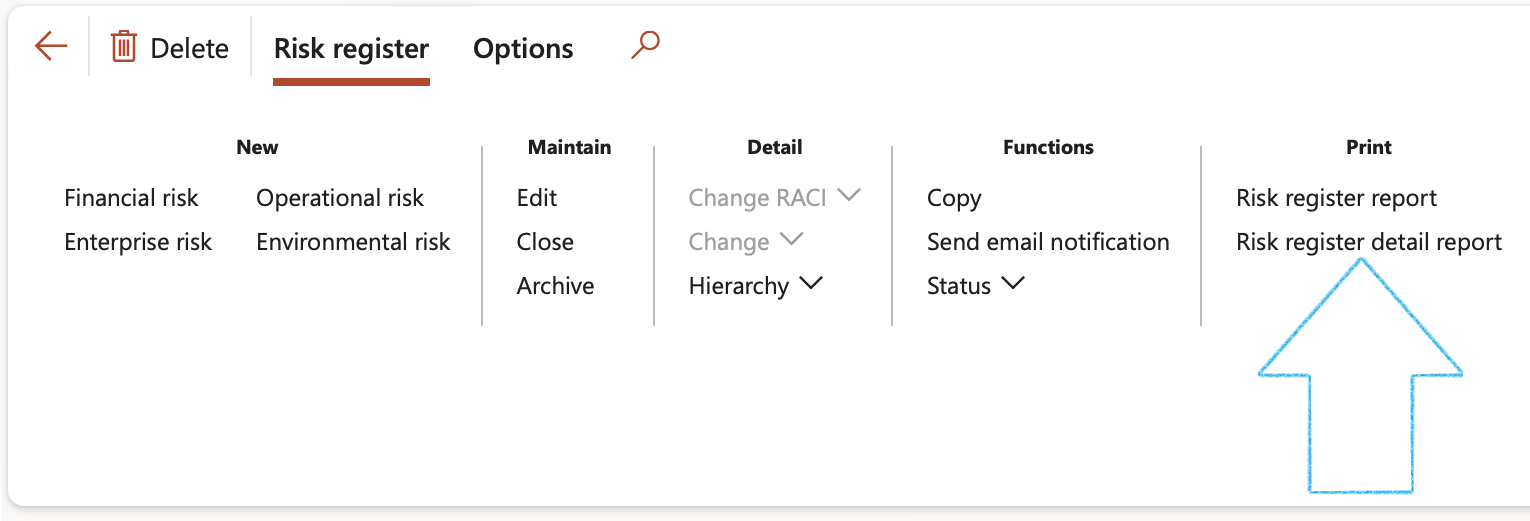
¶ Step 6.1: Buttons on the Risk register list page:
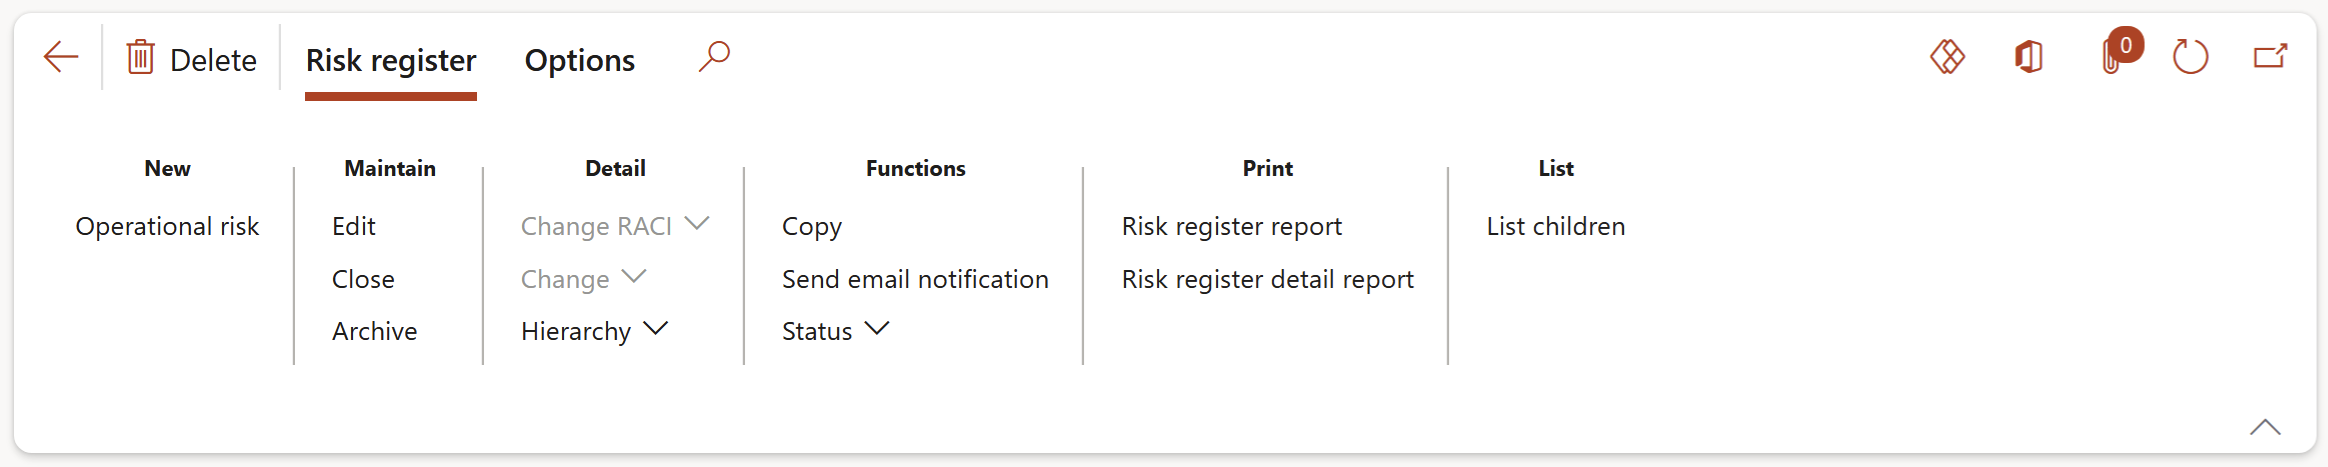
- An existing risk register can be Deleted (Risk registers cannot be deleted if risk/hazard lines exist) – this is not advisable since the Risk register number sequence will be interrupted, containing missing records.
- A new Oprational risk register can be created by doing a risk assessment (Refer to step 9, illustrating the risk assessment functionality)
- An existing risk register can be Edited
- One can close a Risk register. Use the Close button to mark a register as completed. All lines will be closed.
- Archive:A risk register can be archived and locked. The user has the option to keep an active copy of the archived risk register. All archived risk registers can be viewed on the All archived registers list page.
- Change RACI: The Responsibility matrix can be setup by selecting responsible employees’ data from HR setup data.

Please note that if no values are filled in, the record will be updated with blank values. If Cancel is clicked, no changes will be made to the existing records.
- Change: Details of the selected risk register can be changed under this option. When the (details of a risk register) have been changed, the status of the risk register will be set to Changed. This Changed status can be used for filtering purposes and can be changed back to a “normal” Risk status.

Please note that if no values are filled in, the record will be updated with blank values. If Cancel is clicked, no changes will be made to the existing records.
It is possible to create a complete hierarchy by marking a specific Risk register as the parent of another Risk register. To add this parent to another parent (thus creating multiple levels), select the parent the “child” belongs to from the Parent dropdown list on the Hierarchy setup form.

- Hierarchy: The Risk register hierarchy setup form
- The Parent field indicates a header record (Parent) to the current Risk register line (The Parent field contains a list of header (Parent) type risk registers)
- Select the relevant “Parent” to assign to the current “Child” Risk register
- Enter a description in the Hierarchy description field

- Copy: Make a copy of the selected Risk register and attached risks. All attachments will also be copied to the copied Risk register
- Send email notification: Email the highlighted risk notification to all stakeholders

The Send email notification button is on the Risk register list page as well as the Risk register detail form. The first three email options are defined on the parameters form.
- Status – Update the status of the risk register by selecting the relevant status from the drop down list when clicking on the Status button

| Status: | |
|
Created |
The user can submit the risk register |
|
Submitted |
The user can Reexamine, Approve or Reject the risk register |
|
Re-examine |
The user can Approve or Reject the risk register |
|
Approved |
No changes can be made to the status |
|
Rejected |
No changes can be made to the status |
|
Changed |
The user can Reexamine, Approve or Reject the risk register |
- Print the Risk register report
- Print the Risk register detail report
- Create risk report: Using the selected baseline/template this will create a risk management report with applicable clauses
- List children: Shows the records (risks/hazards) that belong to the current/selected header record family
- Refresh: to update the form and display any latest changes/updates made in previous steps
- Export to Microsoft Excel:

- Attachments (document handling): this functionality displays and carries relevant documents, notes and files which can be attached to the selected Risk register
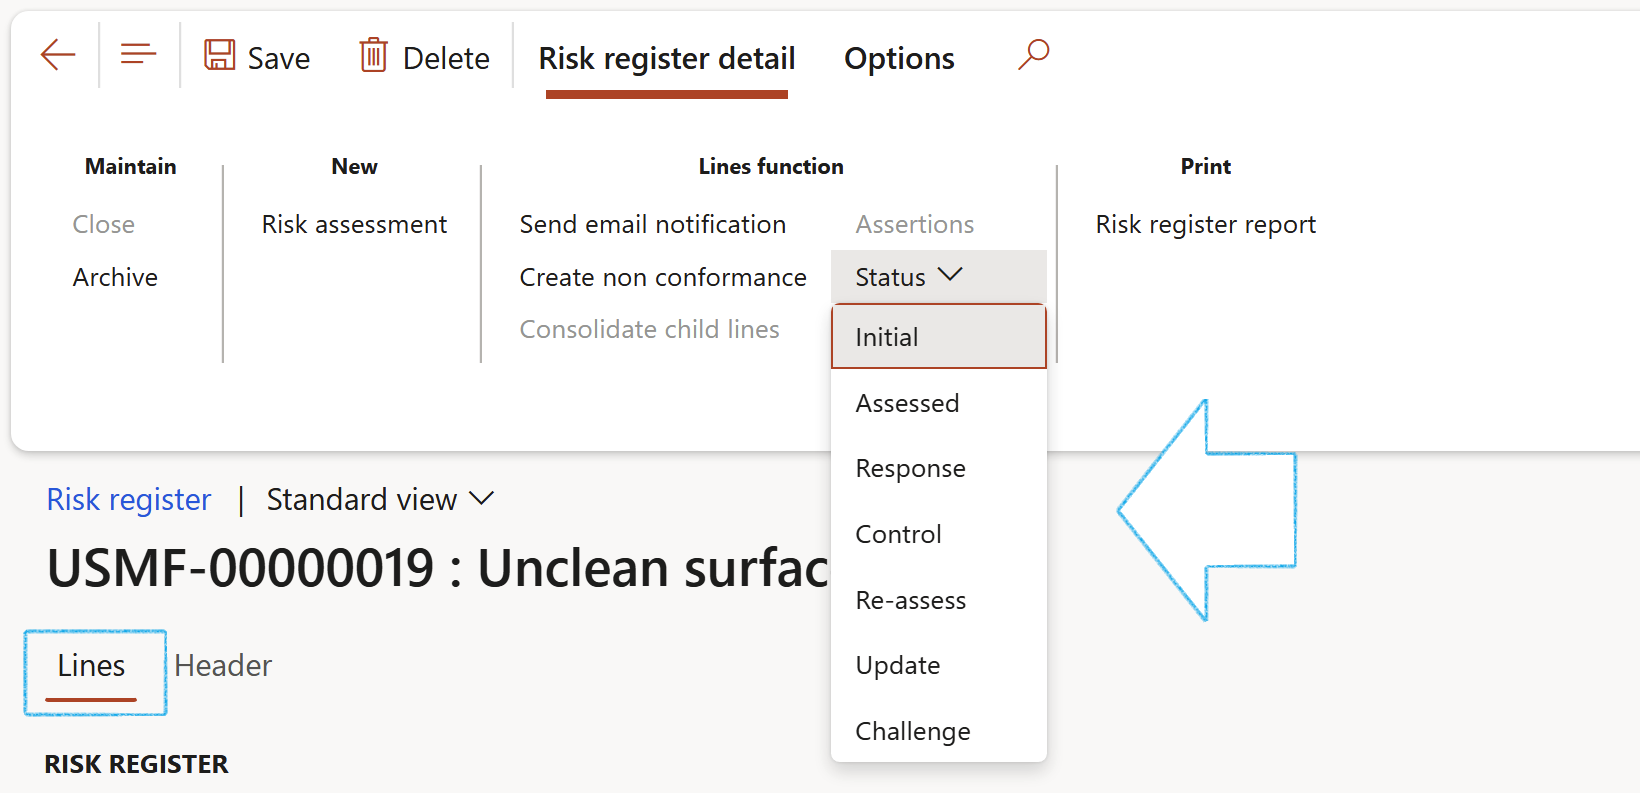
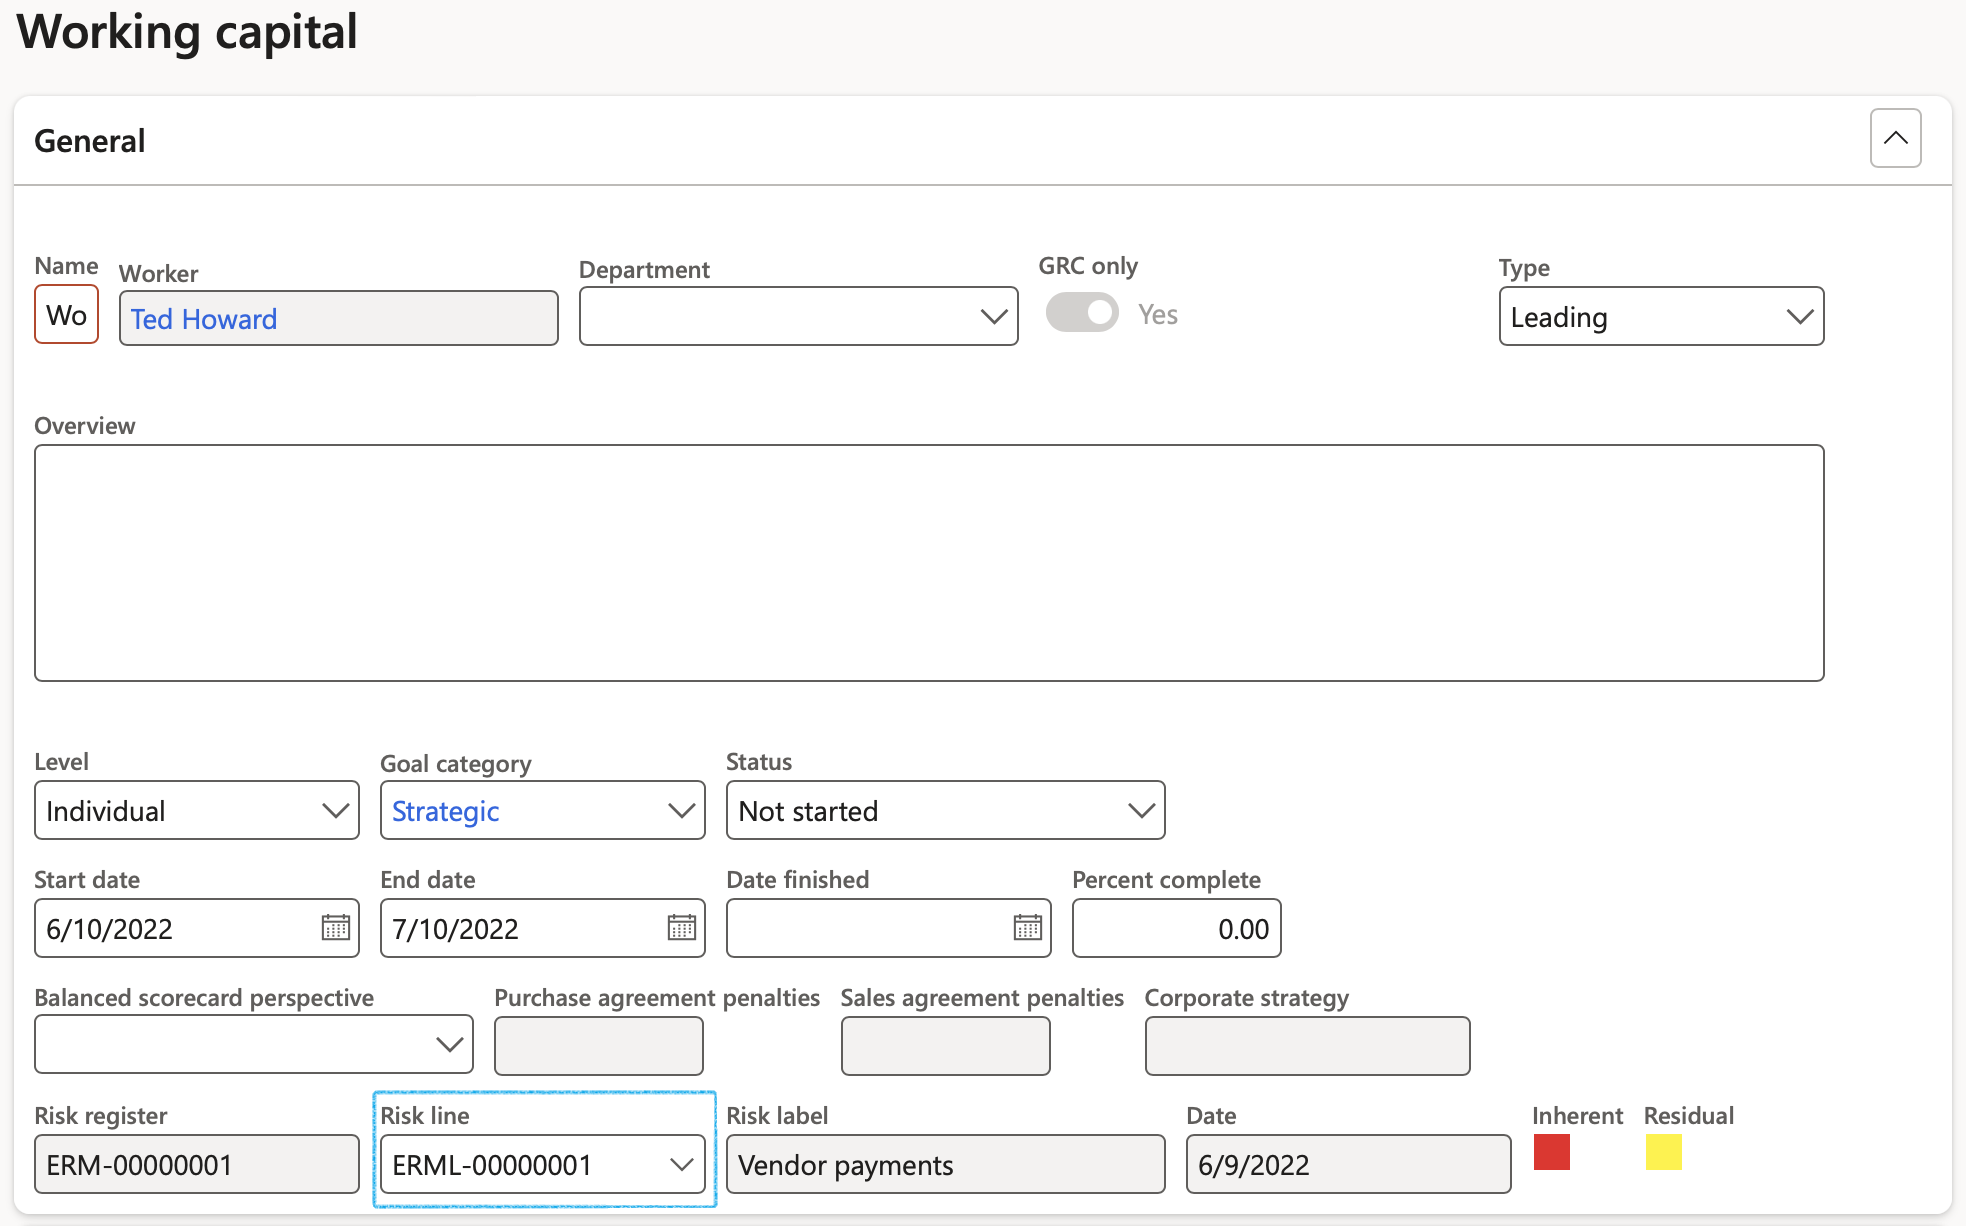
¶ Step 7: Risk register (Header view)
Buttons on the Risk register detail form
.png)
- Archive: An existing risk register can be archived
- Risk assessment: Create a new risk assessment
- Send email notification: Send an email notification to the selected worker on the parameters
- Create a non-conformance: Create a non-conformance on the selected risk line. A record will be created under the Associations Fast tab
- Status: Change the status of the selected risk line
- Print the Risk register detail report
To edit a risk register, or to add lines (risks/hazards) to a risk register, select the relevant register and click the Edit button on the Action pane. Open the Header view.
- The General Fast tab:
- The Baseline slider indicates whether this Risk register is a baseline type Risk register. If this slider is moved to Yes, this risk register can be used as a template for creating other risk registers.
- Risk register ID – a unique number assigned to the Risk register
- Description displays a brief description of the Risk register
- Select the relevant Site from the dropdown list
- Select the relevant Department from the dropdown list
- In the Class field, select the risk classification from the dropdown list
- Select the relevant Risk type from the dropdown list
- Select the relevant Project from the dropdown list (If required)
- In the Recorded by field, select the worker who created the Risk register
- Select the date on which the risk register was Created
- When the Created date is changed, a message will pop up asking the user if the lines need to be updated with the same date or not
- The default Created date is the system date when the Risk register is created
- The next Review date for the Risk register can be selected – this is beneficial for reporting purposes
- The Status field indicates the Risk register status – all the risk lines need to conform to this status in order to contribute to the status on the Header
- The Closed slider indicates whether the Risk register is closed. The user can also close the Risk register from here.
- The Closed date indicates the date on which the risk register was closed
When a Parent risk register is closed, all its Child risk registers will be closed as well

- The Jobs and work Fast tab:
- Select the Job plan group from the dropdown list
- Select the Permit to work type group from the dropdown list
- Select the Process from the dropdown list
- Select the Activity from the dropdown list
- The COSHH selection slider indicates whether the risk register is COSHH compliant

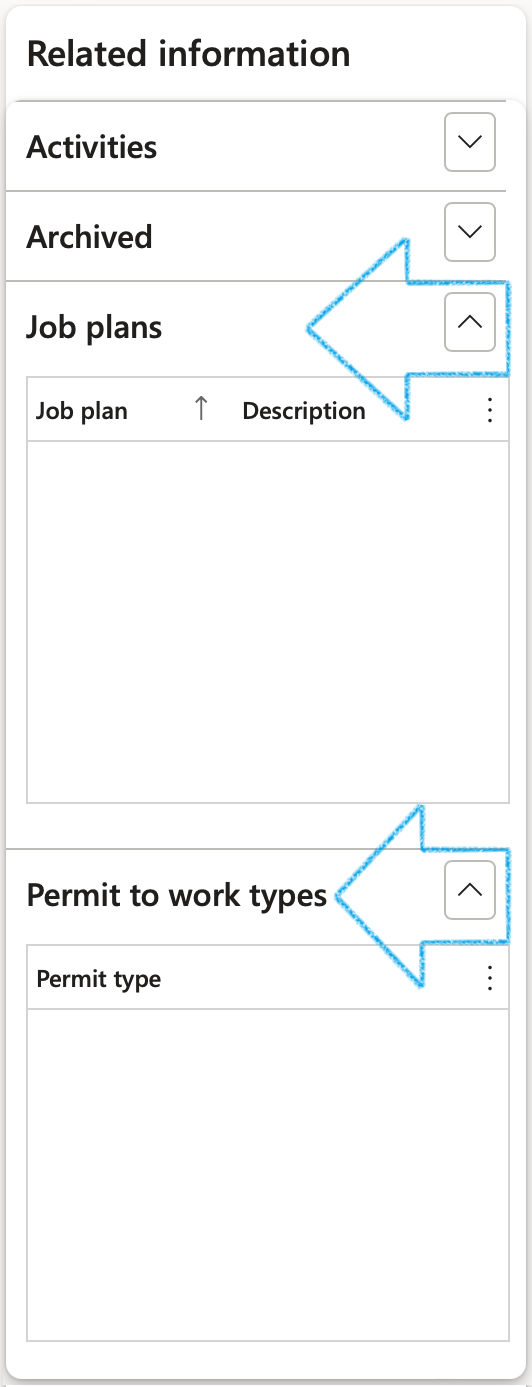
The list of Job plans that are linked to the selected Job plan group will be displayed in the related information pane.
The list of Permit to work types that are linked to the selected Permit to work type group will be displayed in the Related information pane.
- The Applicable areas Fast tab:
- Select the Object relevant to the risk register, from the dropdown list
- Select the Location relevant to the risk register, from the dropdown list
- Select the Job plan relevant to the risk register, from the dropdown list

- The RACI Fast tab:
- Select the Employee responsible from the dropdown list
- Select the Employee accountable from the dropdown list
- Select the Employee consulted from the dropdown list
- Select the Employee informed from the dropdown list
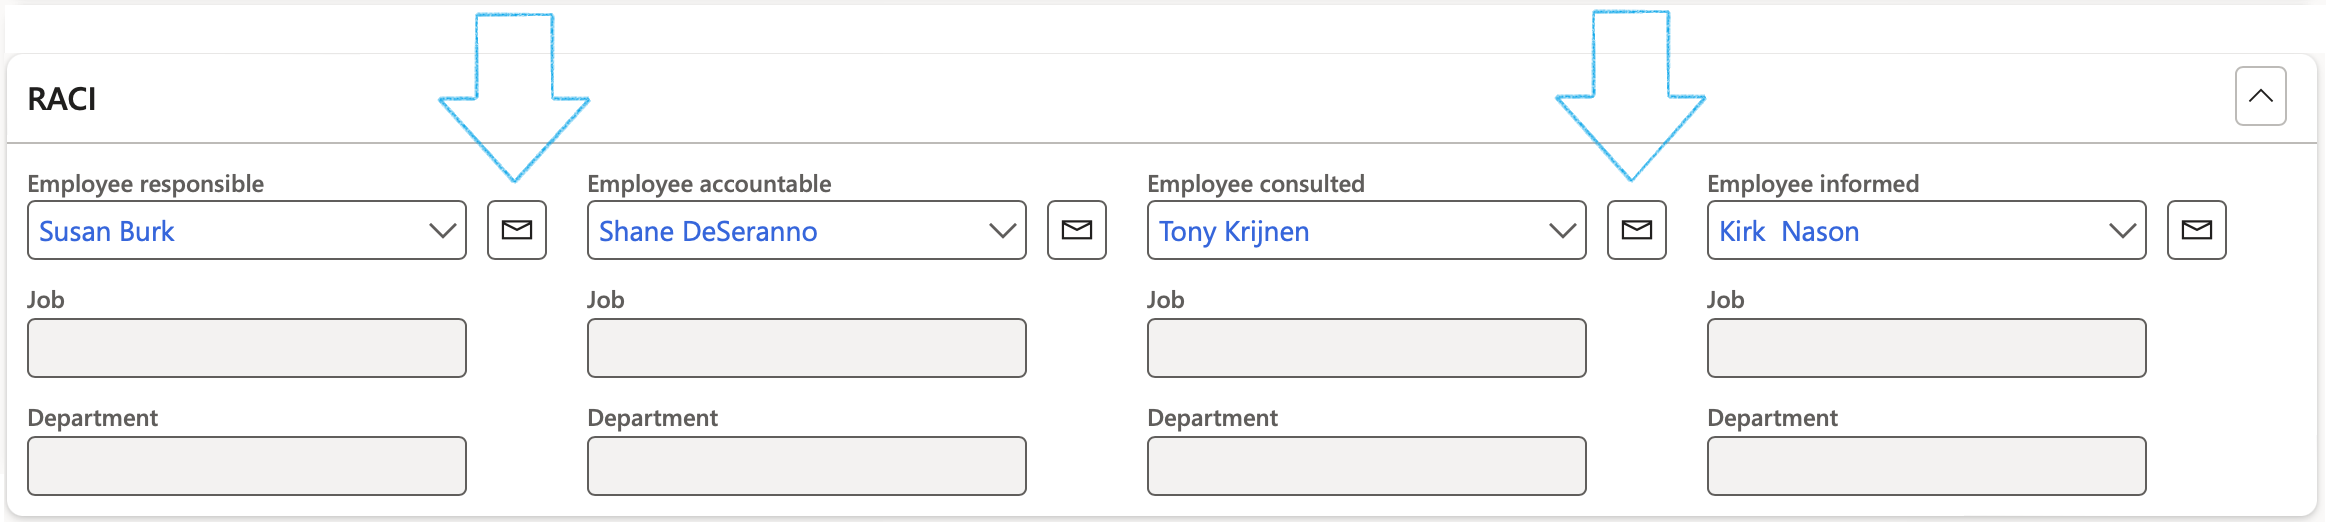
- When using the Send email notification button on the Action pane, the Employee accountable will receive an email notification
- Emails can be sent to the selected workers by clicking on the email icon next to the relevant name
- The selected worker must have a primary email address
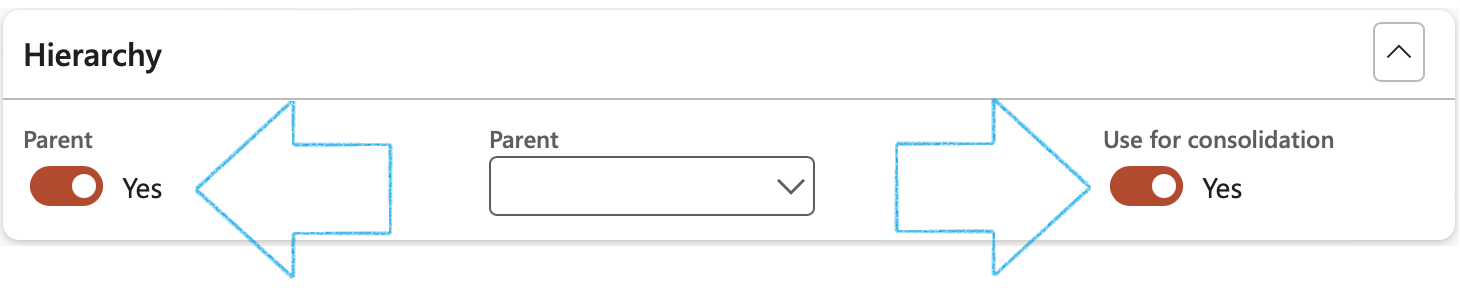
- The Hierarchy Fast tab:
- Move the Parent slider to Yes if this is a parent risk register
- If this register has a Parent risk register, select the relevant Parent from the dropdown list
- Move the Use for consolidation slider to Yes if you want to use the Risk register for consolidation
- Enter Consolidation notes in the note box provided
- If this risk register was created from a baseline register, the risk register ID will be displayed in the Baseline used field
When Use for consolidation = Yes:
- The Parent slider will be moved to Yes
- On the Risk register lines, the following buttons will be disabled:
- Add
- Remove
- Bowtie focus
- On the Risk register Action pane, the Consolidate child lines button will be enabled
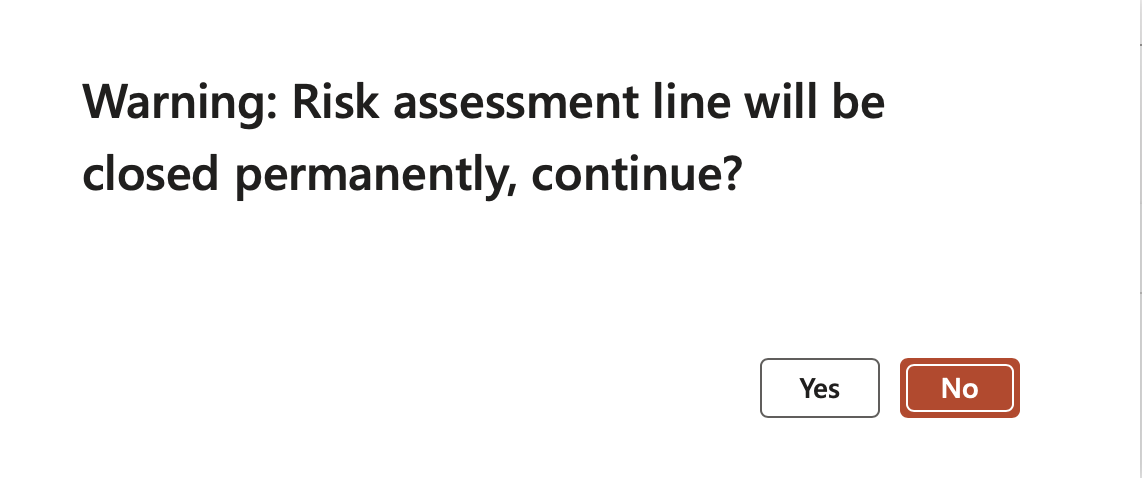
- The Review and follow up Fast tab:
- Move the Enable for review slider to Yes
- Select the relevant Review frequency from the dropdown list
- Enter additional notes in the Review instruction note box provided
- In the Due days field, enter the number of days before the review action is due to be completed
- In the To be reviewed by field, select the name of the person who is going to review the Risk line
- Click on the Yes button on the pop-up to create a Planned GRC action
A blue line will appear confirming that a Planned action has been created for the follow up.
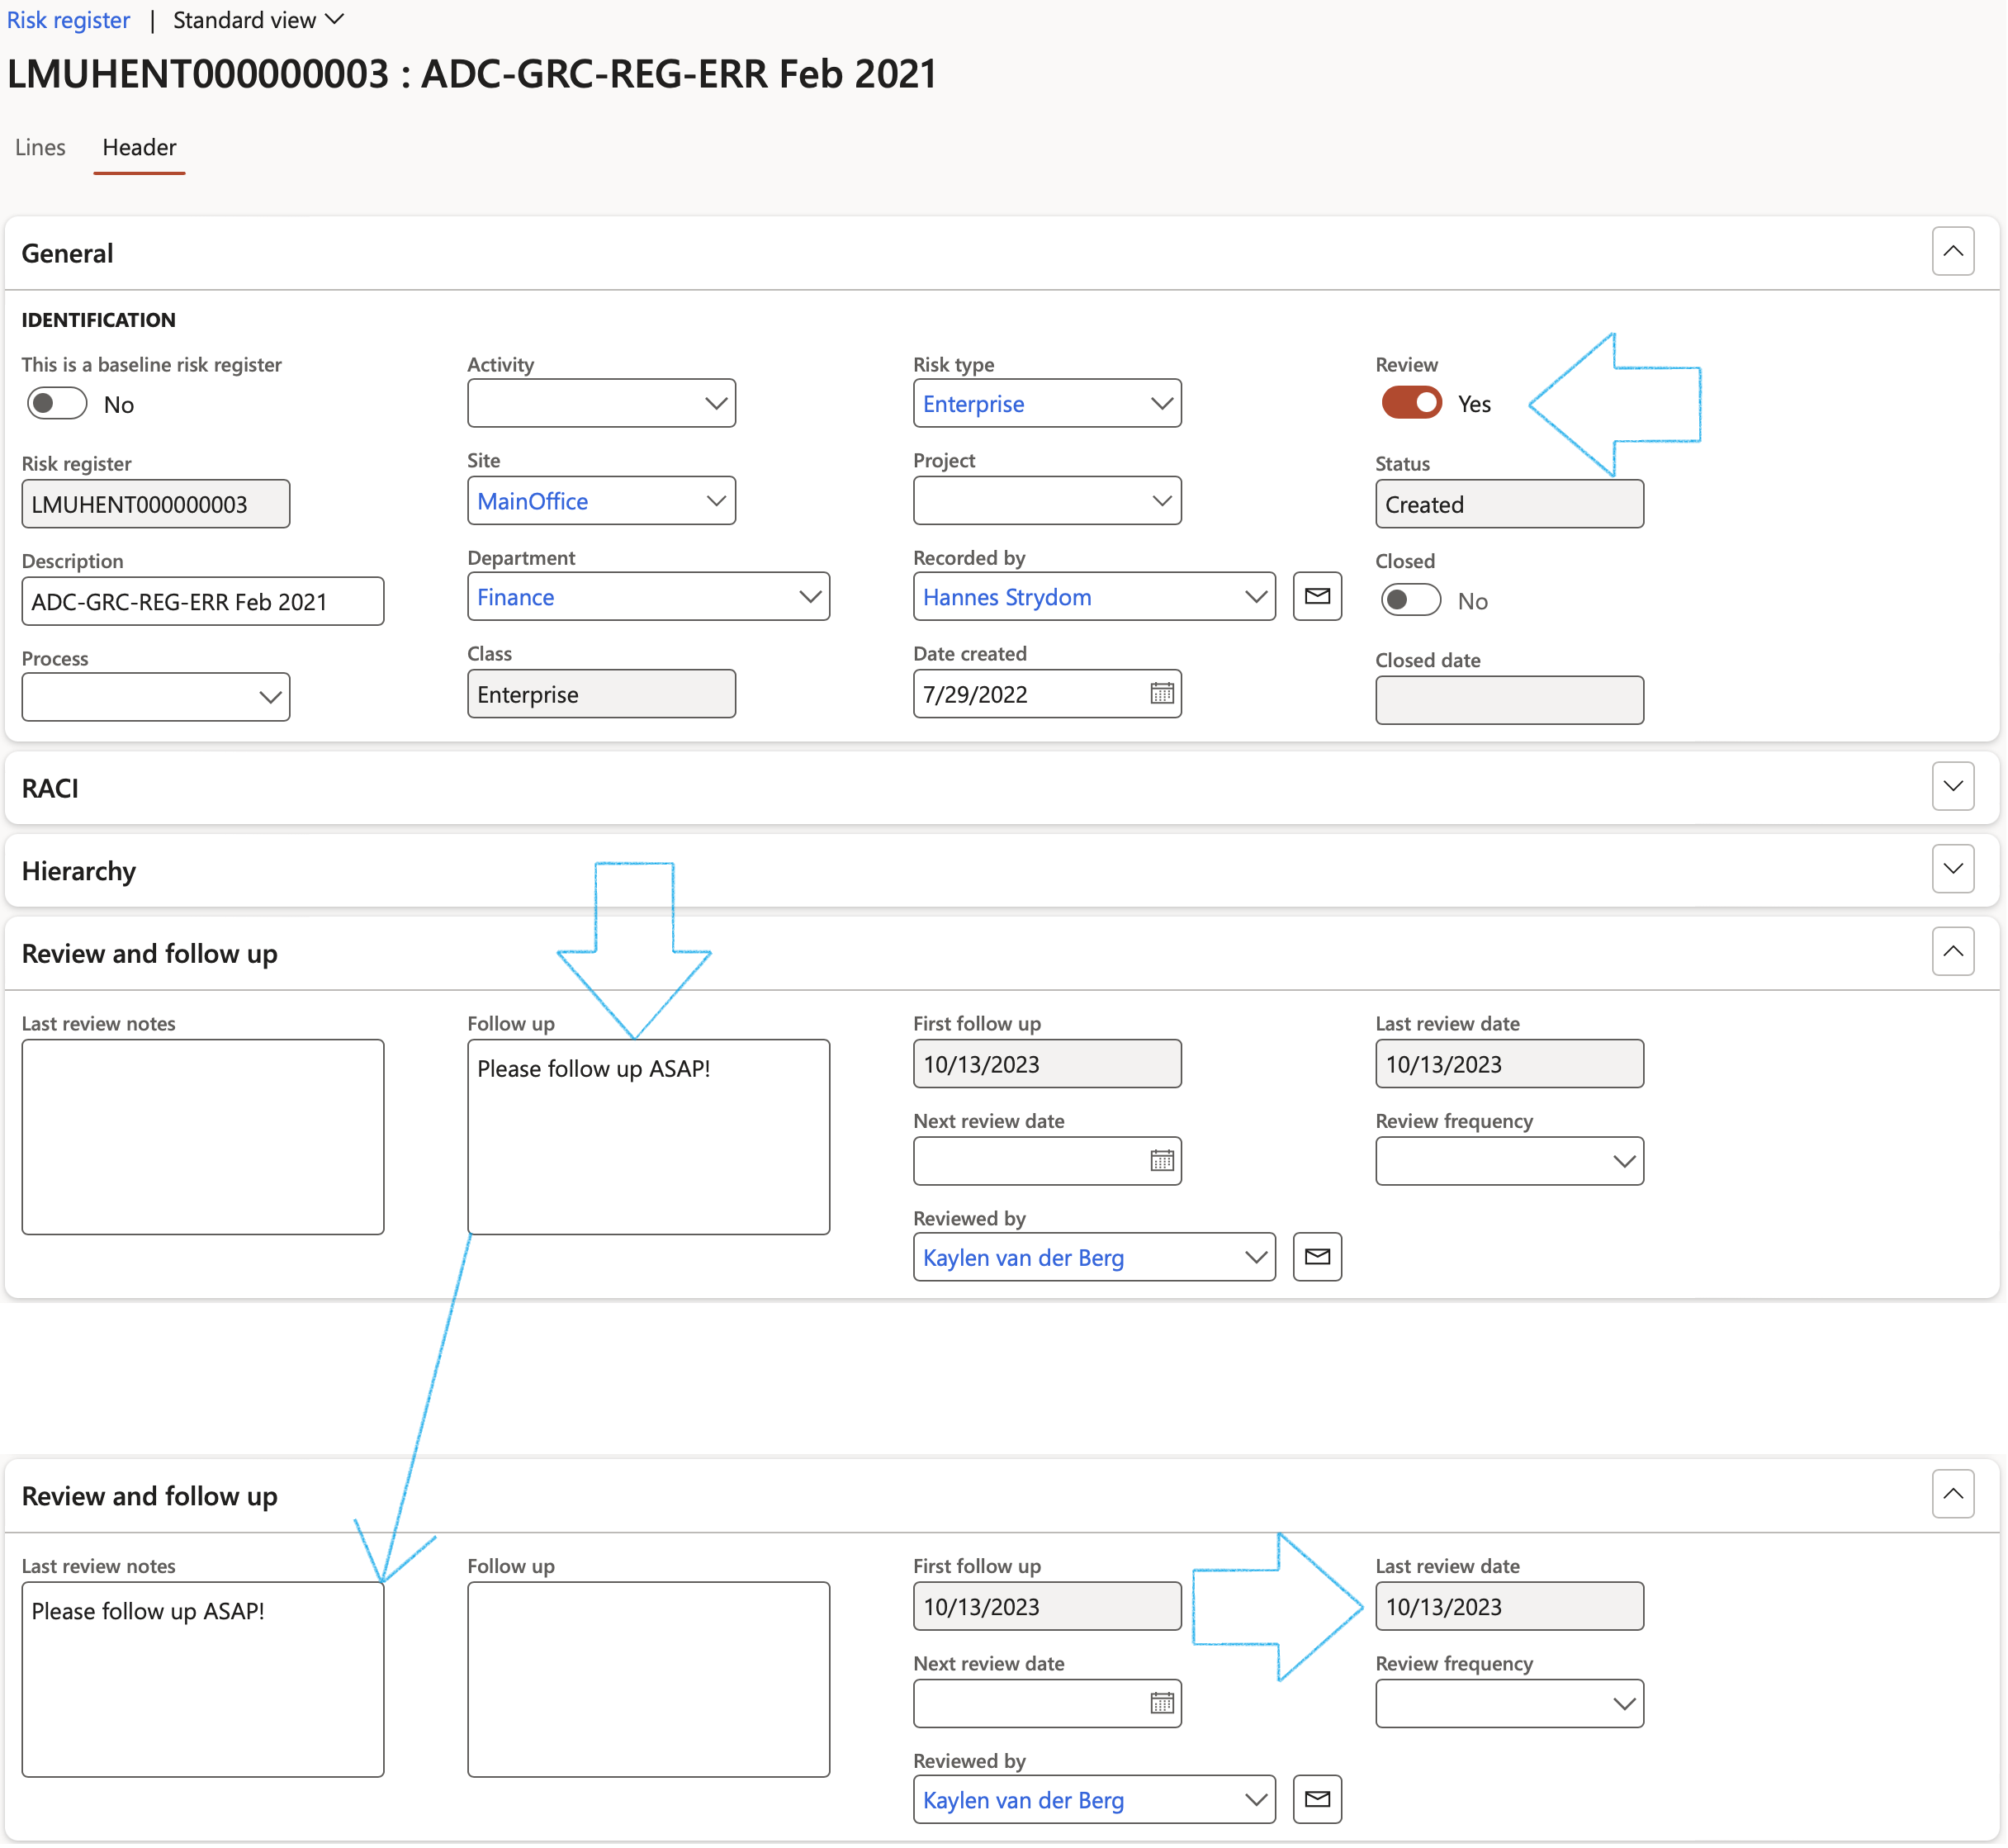
From here users can click on Reviews button in the Action pane to see all open reviews. Alternatively users can close a review directly from the Risk register by using the Close review button.
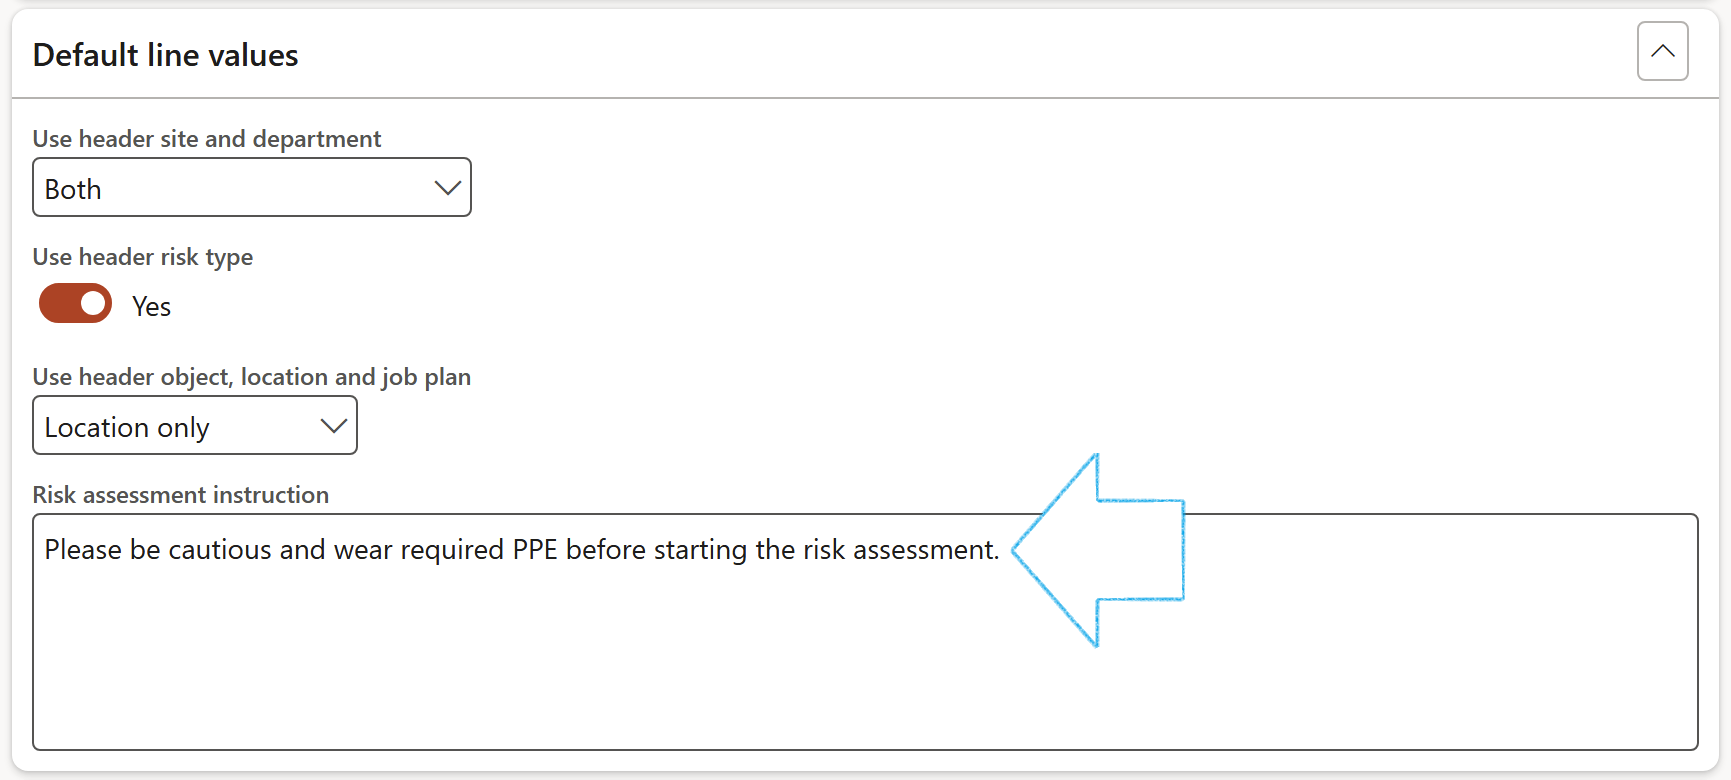
- The Default line values Fast tab:
- Select whether the Site and/or Department from the Header should be used on the Lines
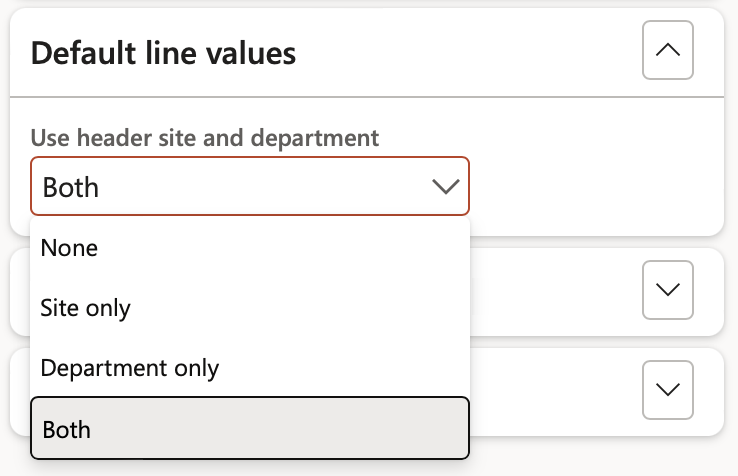
Use header site and department dropdown selection:
- None – When neither site nor department from the header should be used on the lines
- Site only – Only the site from the header should be used on the lines
- Department only - Only the department from the header should be used on the lines
- Both – Both site and department from the header should be used on the lines
- The user also has the option to use the Risk type selected on the Header under the General Fast tab, as the default for Risk lines (assessments)
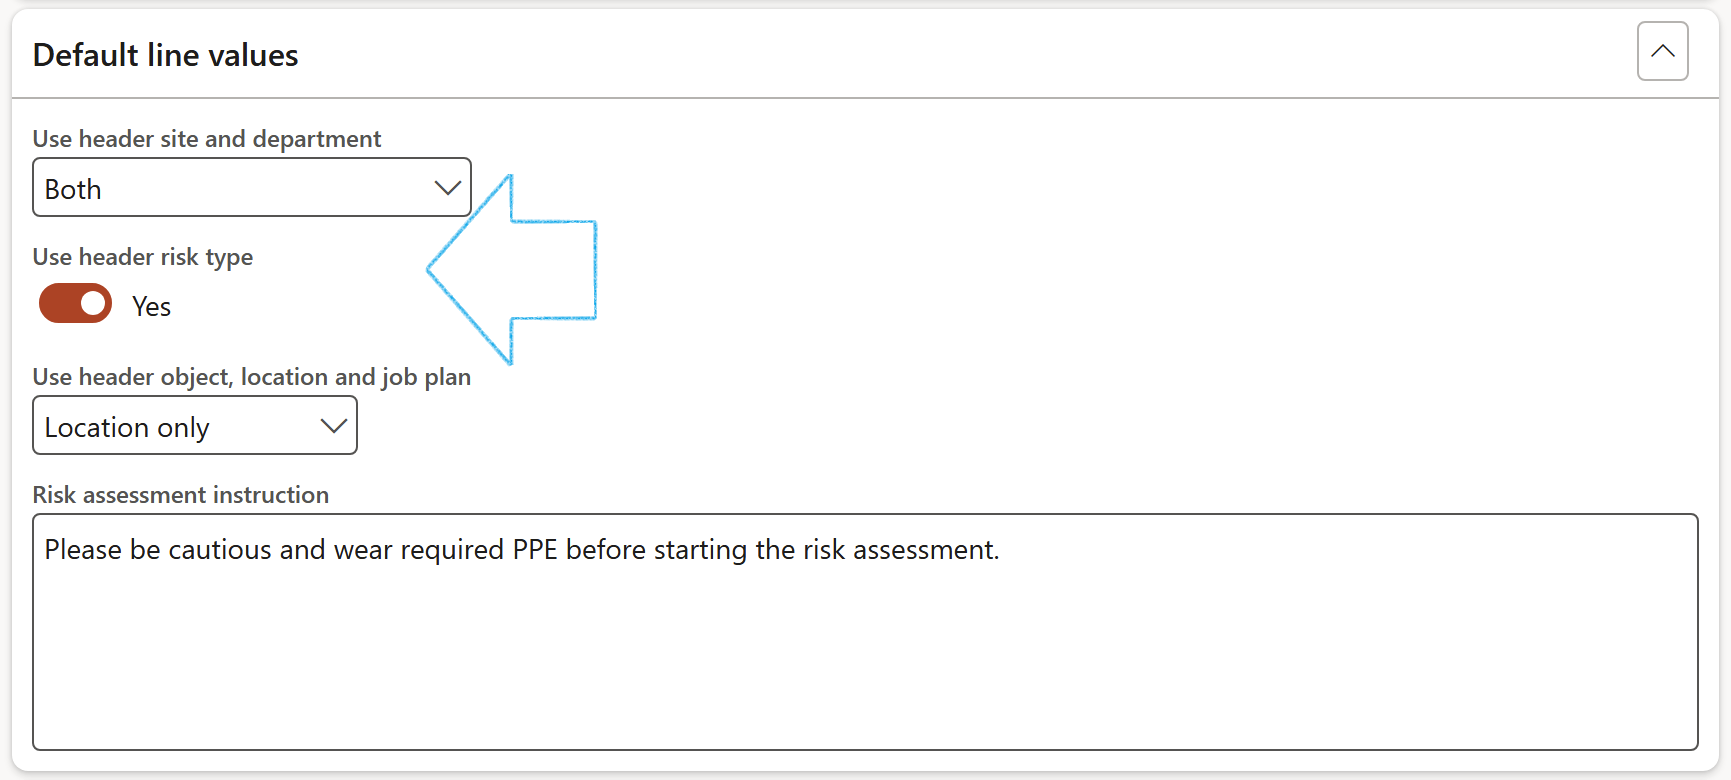
- Select whether the Object or Location or Job plan or All threefrom the Header should be used on the Lines
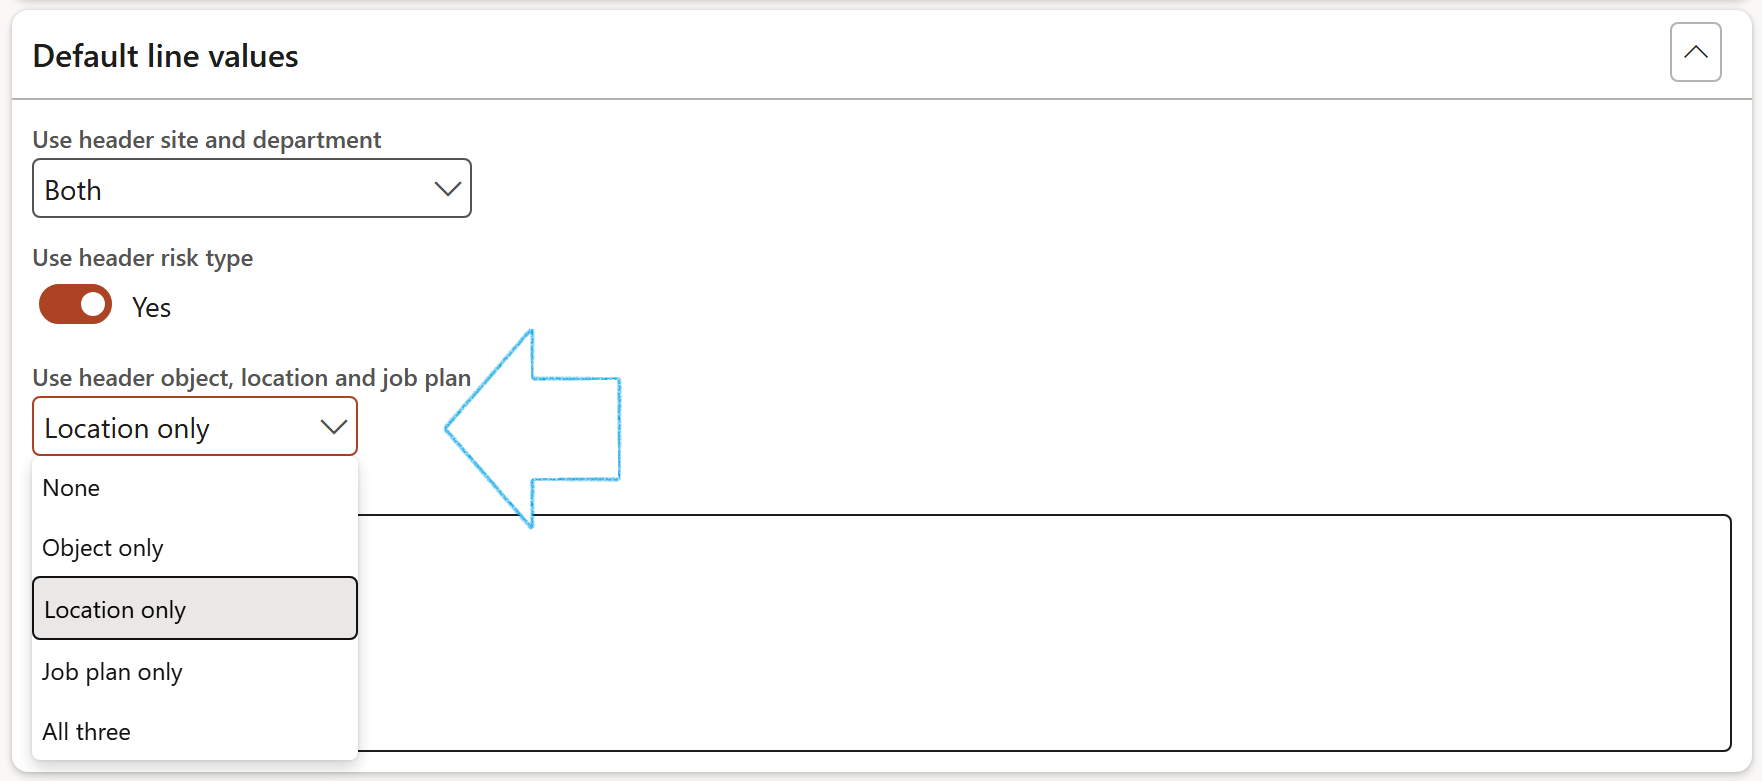
- Enter a Risk assessment instruction in the note box provided
- The Continuity and disaster recovery Fast tab:
- In the Button strip, click on the Add button
- Select the relevant Date
- Select the relevant BC/DR ID (Continuity and disaster recovery plan ID) from the dropdown list

The values for the other fields are populated with the values entered on the selected Continuity and disaster recovery plan
For details on the setup for Disaster recovery, please refer to the GRC page on Business Continuity Management
- The Approval history Fast tab:
The Approval history of the risk register can be viewed. The following is displayed:
- User ID – Name of the user who changed the status of the risk register
- Date time stamp – When the Status was changed
- Reason code – The user can enter the reason for changing the status of the risk register
- Status– The updated/new status of the risk register

¶ Step 8: Risk register lines
Filters:
Tick the box next to the risk colour that you want to filter on
OR
In the Top field, enter the number of top risks that you want to see (Filtered on the Risk score level)
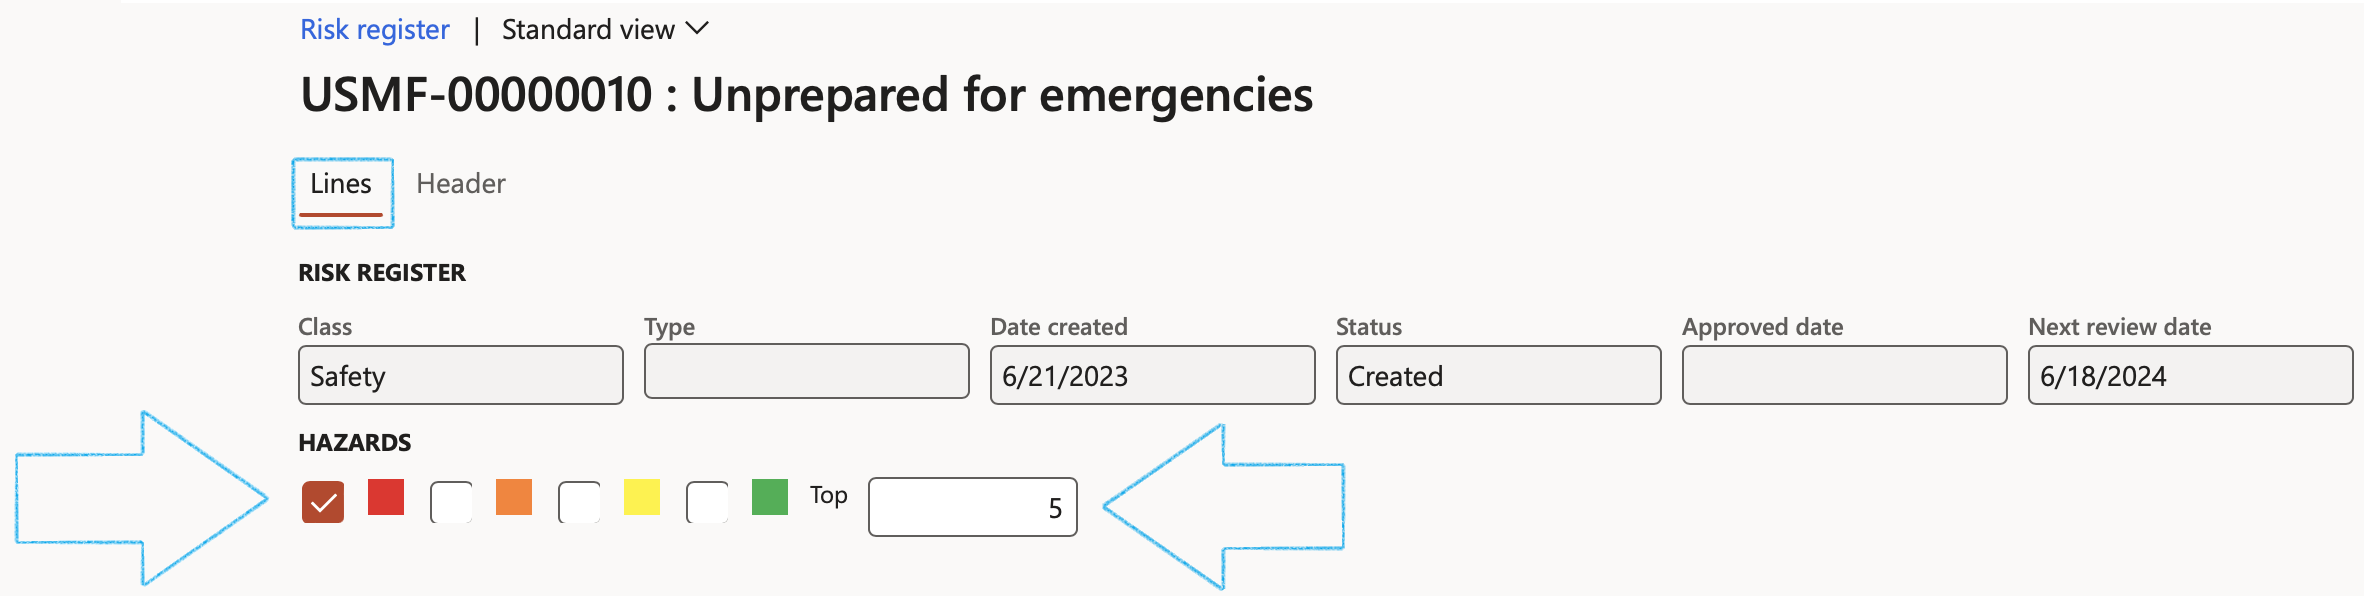
The data displayed when the form is opened in Lines view, is the data captured when the risk assessment was done
- The following summary information of the header can be viewed:
- Risk register ID - unique assigned number
- Description of the risk register
- The Class of the risk register
- The Type of the risk register
- The Date on which the risk register was created
- The Status of the Risk register
- The Date on which the Risk register was approved
- The Review date of the Risk register
- Baseline selection slider
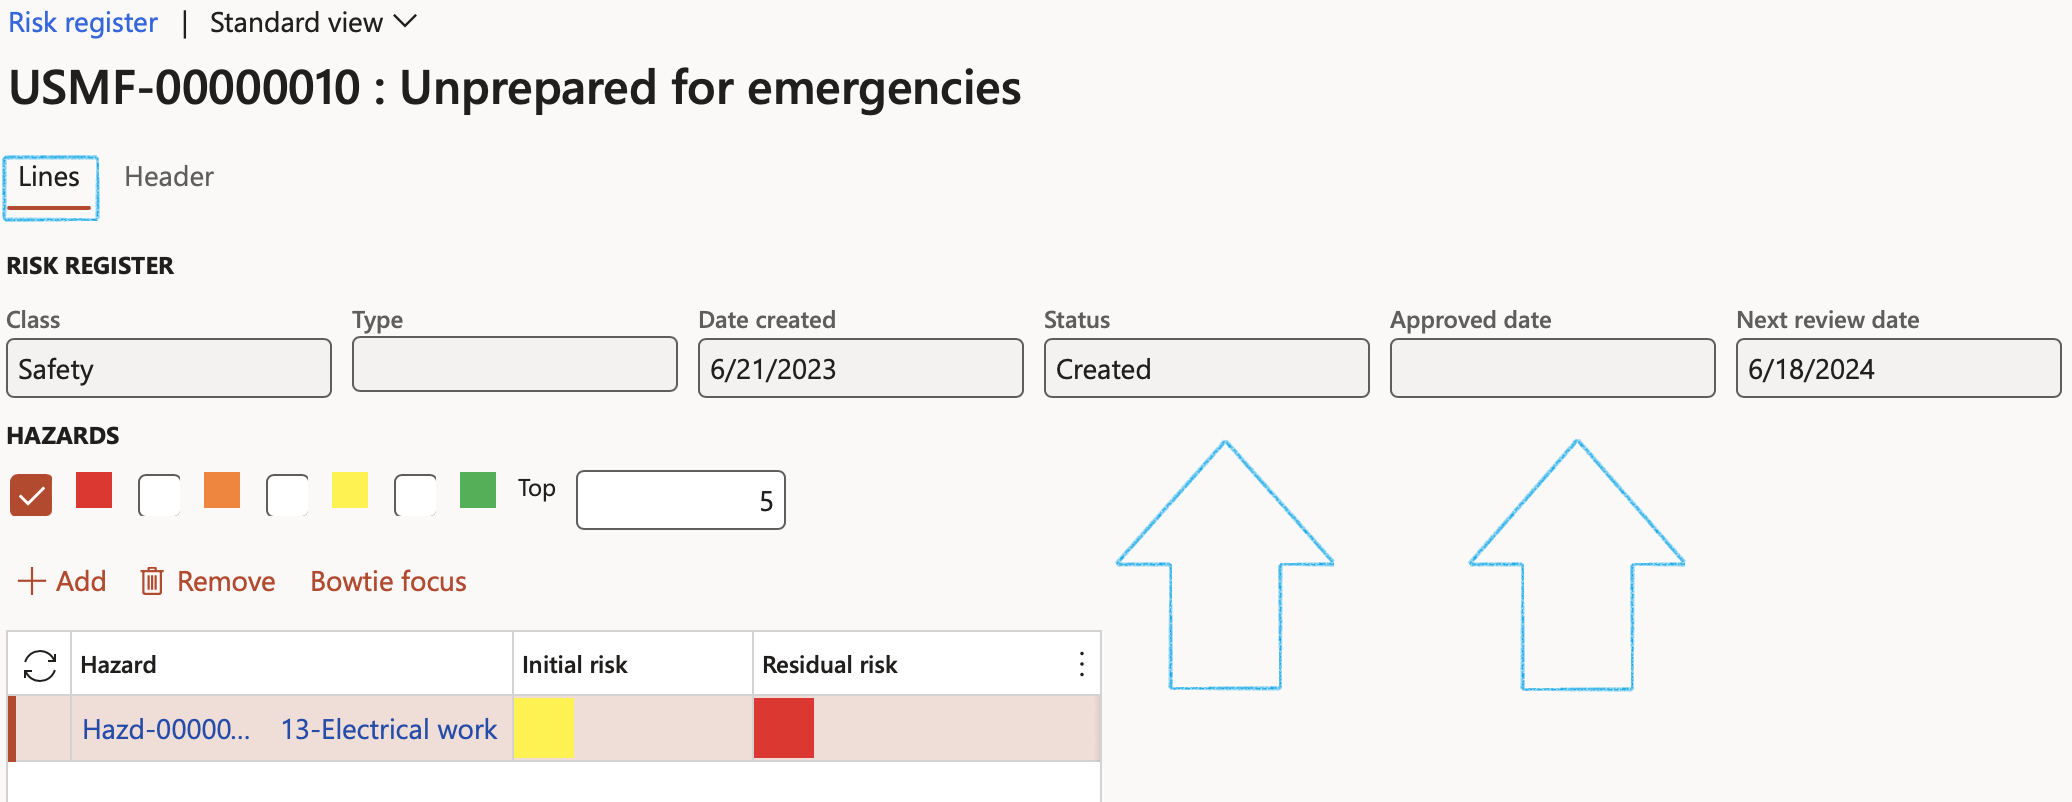
To the left, a grid of lines (Hazards) is visible.
To the right, in the Fast tabs, detail is displayed for each line.
For Environmental risk registers, Aspects will be used instead of Hazards
To create an Environmental risk register:
Go to:
GRC > Risk > All environmental risk registers
OR
HSE > Environmental > All environmental risk registers
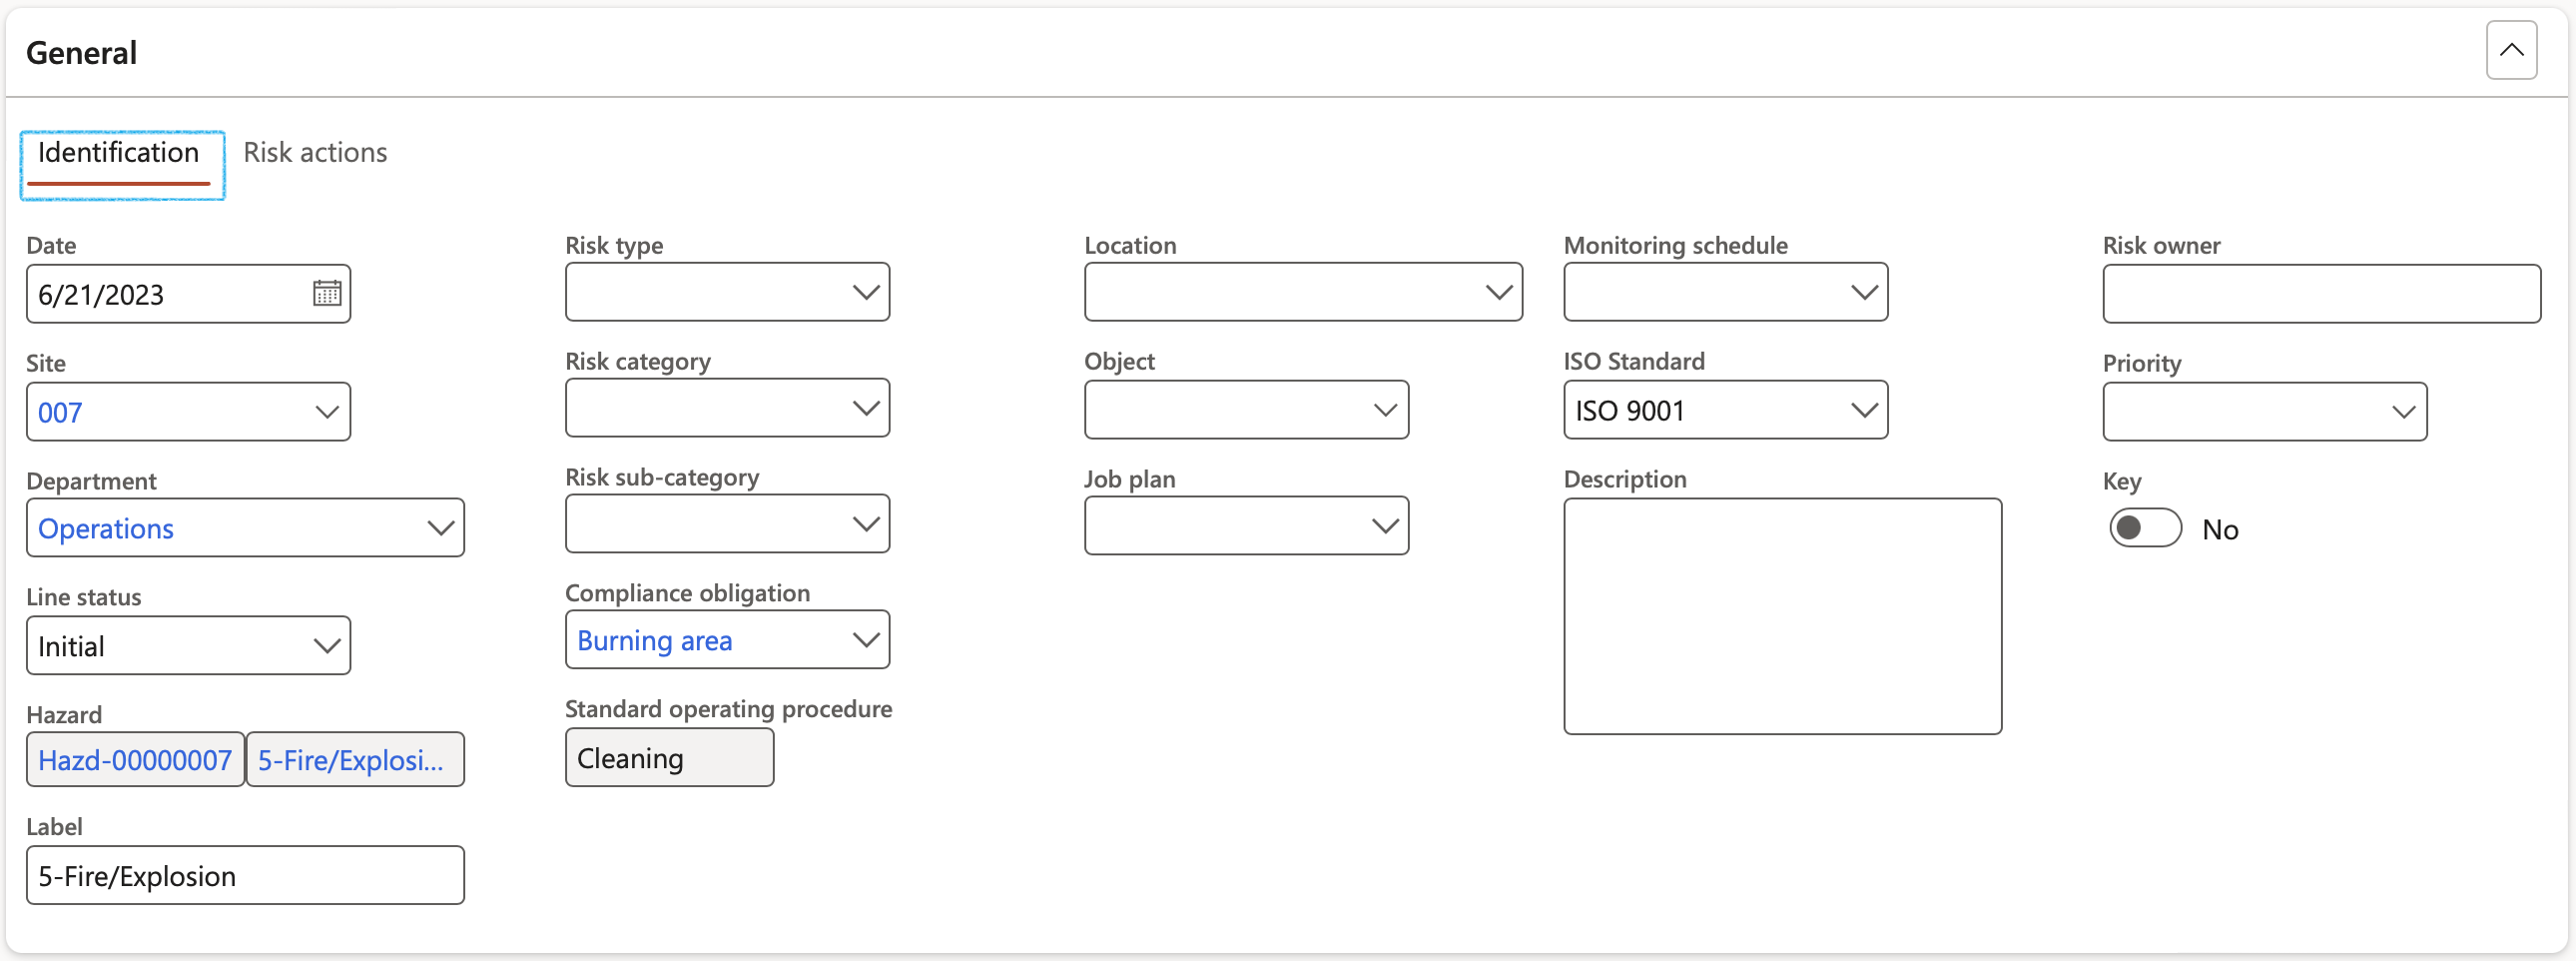
¶ Step 8.1: General Fast tab
¶ Step 8.1.1: Identification Index tab
- Date – Select the date that the risk was reported on
- Risk type – Select the relevant risk type
- Site - Select the site where the risk is
- Select the Organisation hierarchy from the dropdown list (if applicable)
- Department - Select the relevant department
- Line status - Indicates the status of the line (risk/hazard)
- Hazard - Shows the hazard that was identified on the left-hand side of the form
- Select the relevant Risk category from the dropdown list
- Select the relevant Risk sub-category from the dropdown list
- Compliance obligation - Select the relevant Compliance obligation placed on the enterprise, based on the Legal register (GRC > Governance > Legal > Legal register > Organisation applications Fast tab)
- Location - Shows the OHS location of the risk
- Object - Indicates the object linked to the risk (from OHS objects)
- Label – Description of the risk (This will be used in reports)
- Job plan - Indicates the job plan linked to the risk
- Monitoring schedule – Select the relevant Monitoring schedule from the dropdown list
- Select the relevant ISO standard from the dropdown list (if applicable)
- Risk owner – Enter the employee/department that is the owner of the risk
- Priority - Select the risk Priority from the dropdown list
- Select the relevant Strategic pillar from the dropdown list
- Description - Enter a detailed description of the risk
- Quantifiable - Indicates whether this is a “quantifiable” risk
- Top - Indicates whether this is a “top” risk
¶ Step 8.1.2: Risk actions Index tab
Under the Approval Field group:
- Once the Approved slider is moved to Yes, the Approval date will be populated with today’s date
The user has the option to approve the Header as well by clicking Yes on the pop-up
- Enter the Due date for the approval and closing of the risk line
- When the Closed slider is moved to Yes, the selected risk line is closed and marked as Completed
- Closed date is the date when the risk was closed
Under the Review and follow up Field group:
- Move the Enable for review slider to Yes
- Select the relevant Review frequency from the dropdown list
- Enter additional notes in the Review instruction note box provided
- In the Due days field, enter the number of days before the review action is due to be completed
- In the To be reviewed by field, select the name of the person who is going to review the Risk line
- Click on the Yes button on the pop-up to create a Planned GRC action
A blue line will appear confirming that a Planned action has been created for the follow up.
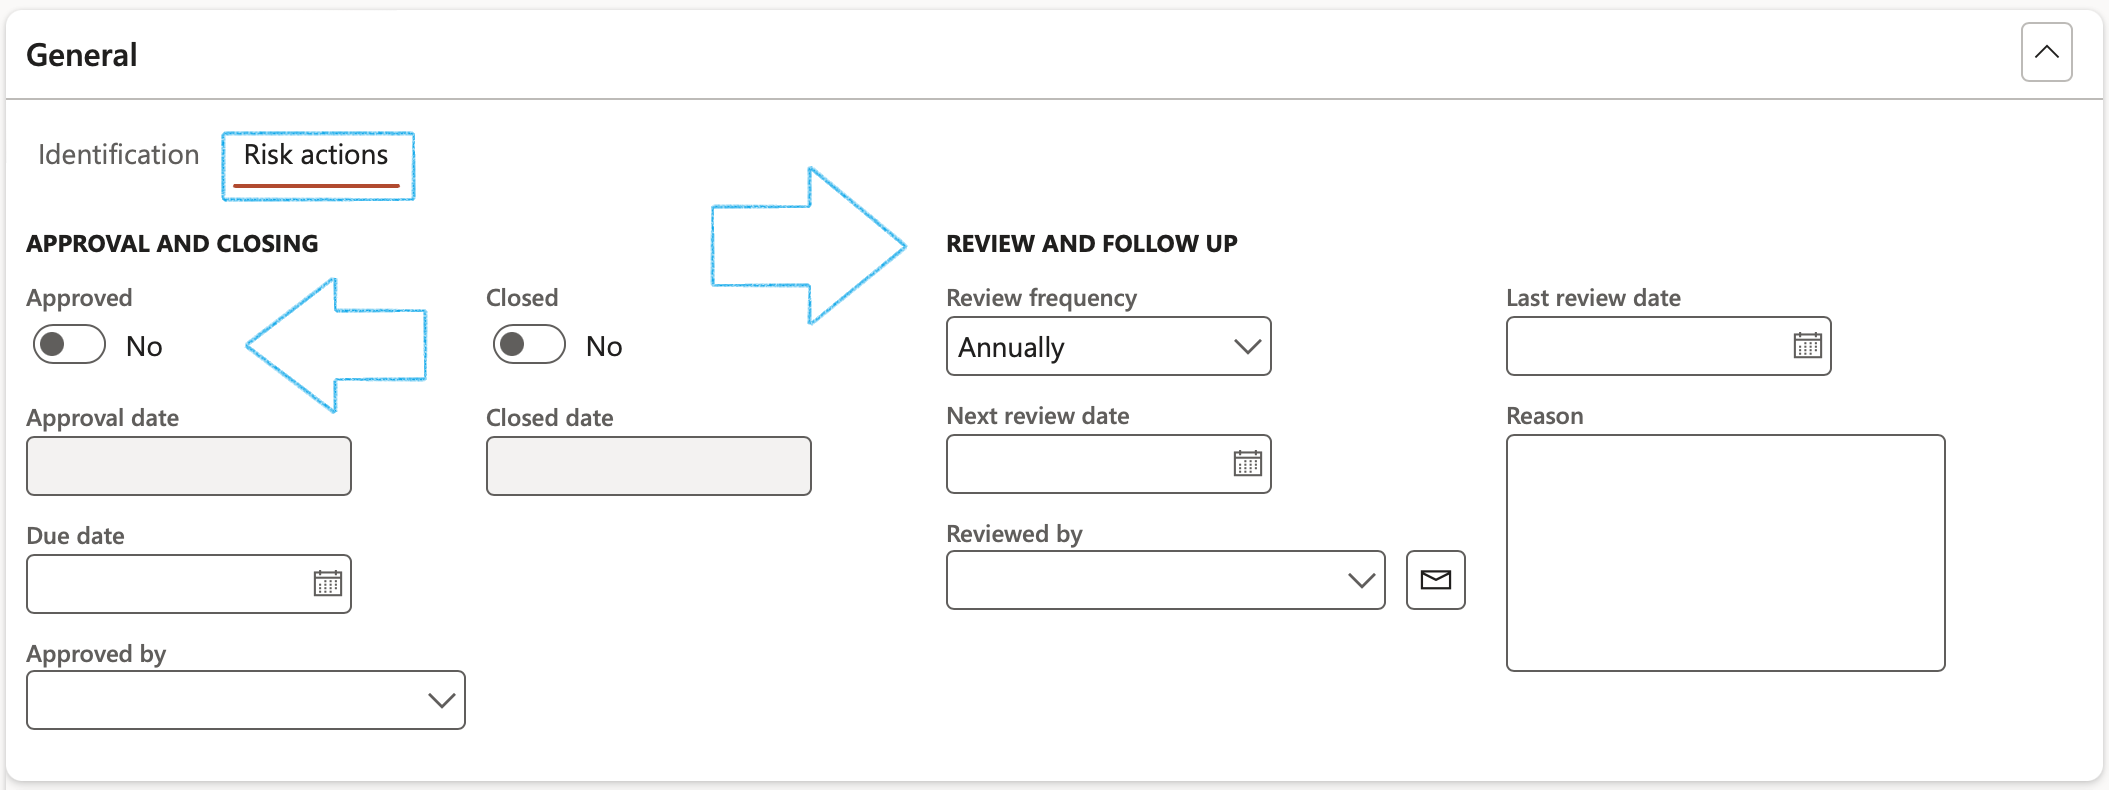
Under the Closing Field group:
- Once the Closed slider is moved to Yes, the Closed date will be populated with today’s date
- The Closed by field will be populated with the name of the logged-in user that moved the Closed slider to Yes
- When the Closed slider is moved to Yes, the selected risk line is closed and marked as Completed
Review actions can also be created for approved risk lines
¶ Step 8.1.3a: Planned actions
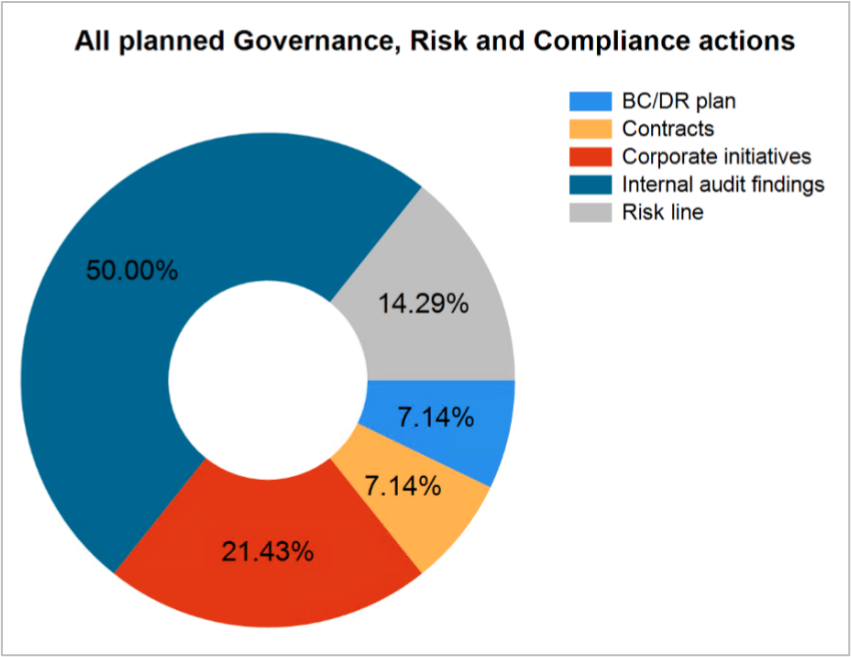
Go to: GRC > All planned Governance, Risk and Compliance actions
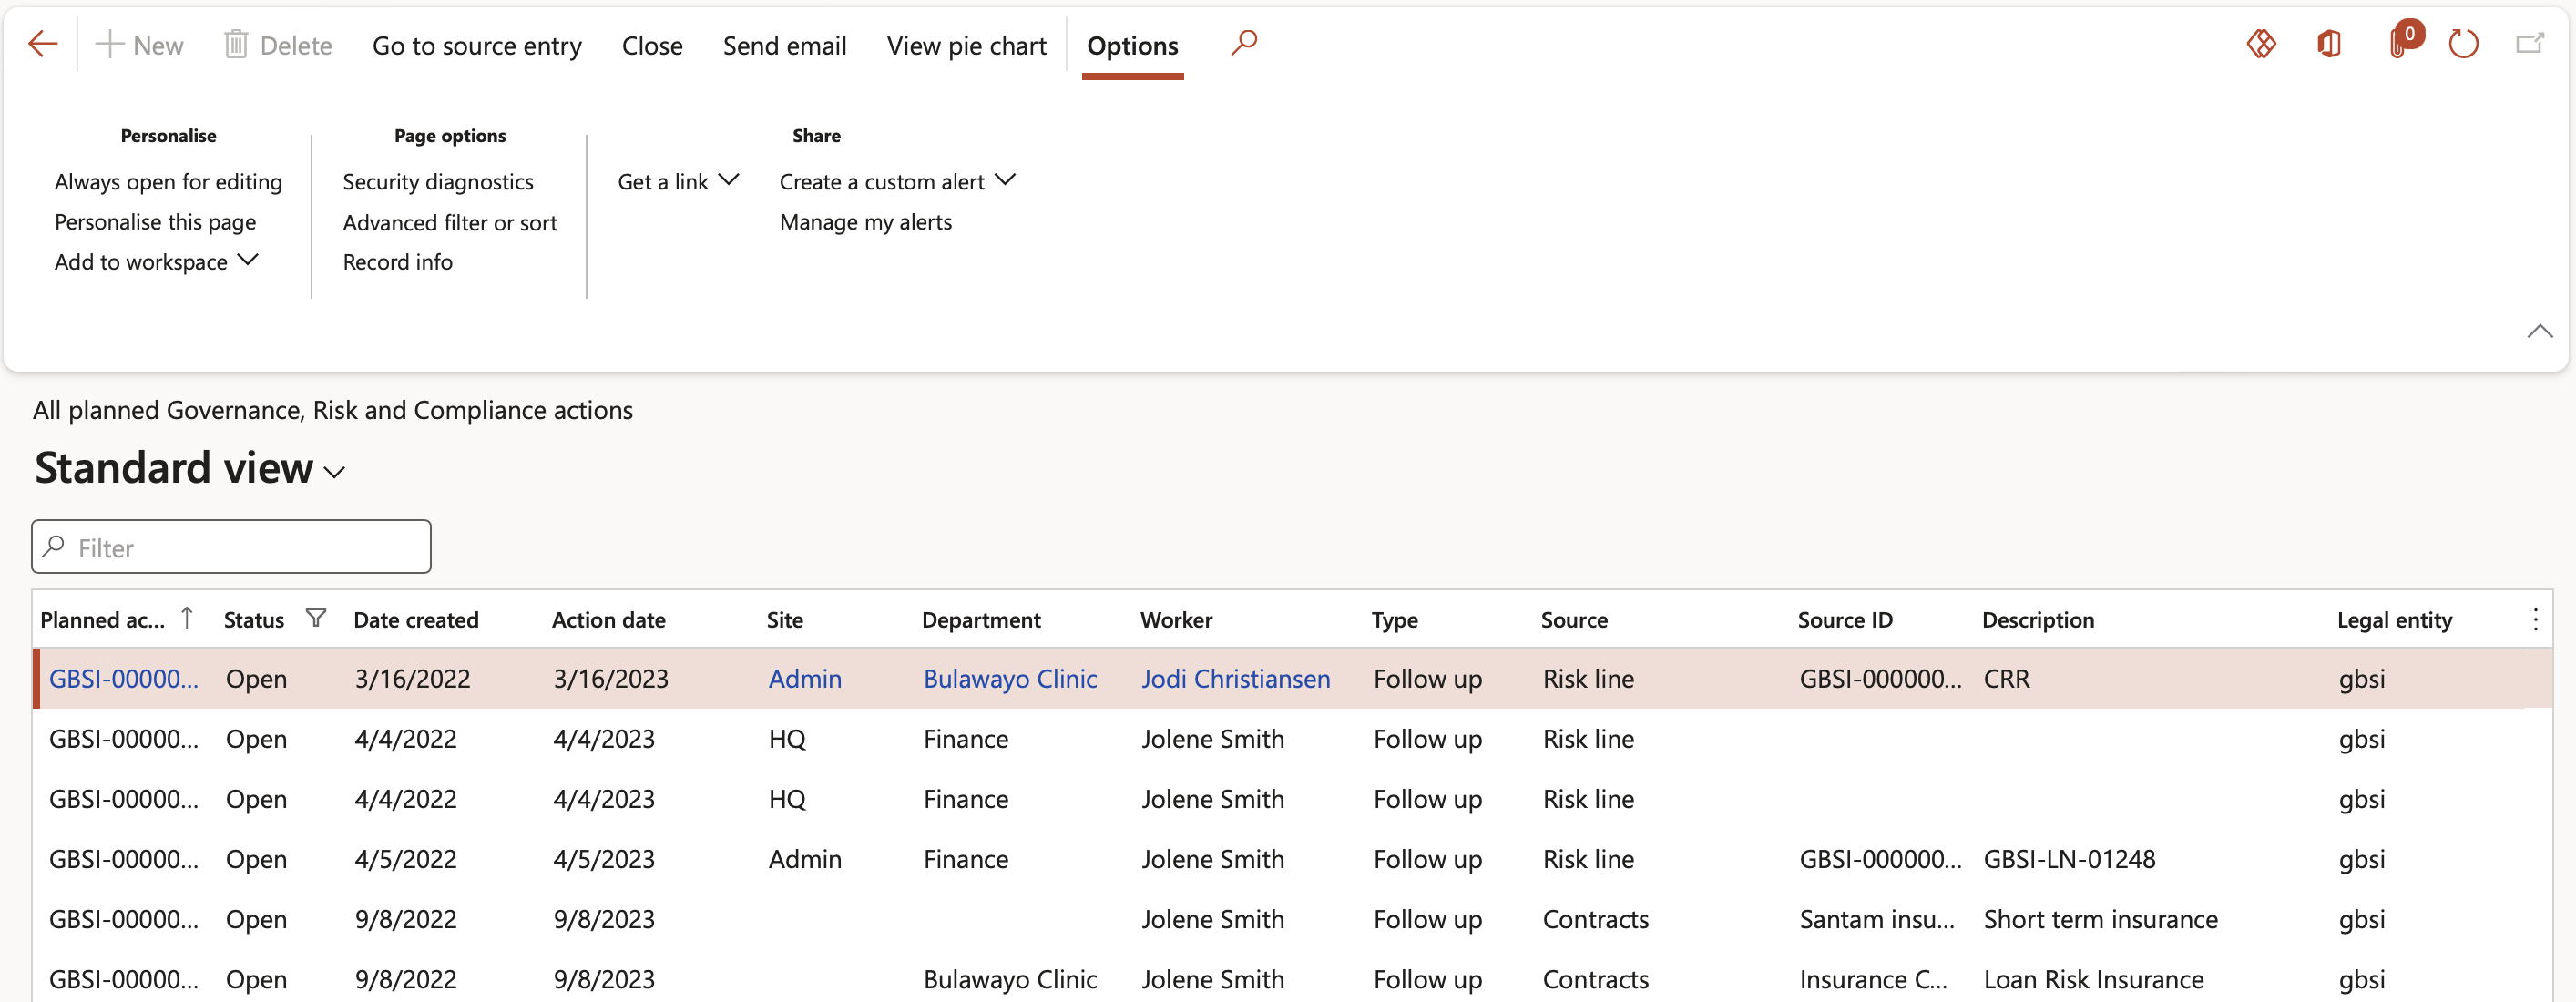
- Buttons on the All planned GRC actions list page:
- Go to source entry – Opens the form from which the follow up action was created
- Close – Closes the action and removes the record from the list
- Send email notification – Sends an email notification to the selected worker in the Reviewed by field
- View pie chart – Displays a pie chart of all the planned GRC actions
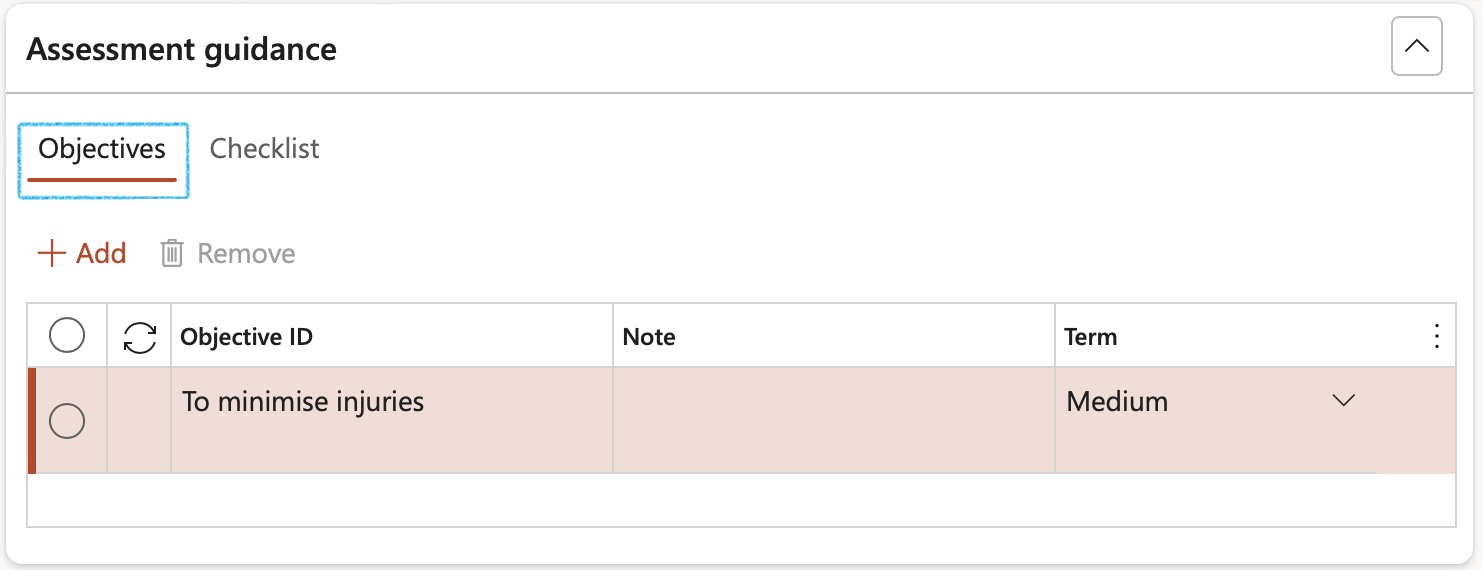
¶ Step 8.2: Assessment guidance Fast tab
- Open the Assessment guidance Fast tab
- Open the Objectives Index tab
- In the Button strip, click on the Add button
- Enter the Objective ID
- Enter additional Notes
- Select the relevant Term from the dropdown list
- Open the Checklist Index tab
- Select the relevant Job plan from the dropdown list. Click Save
- Click on the Create checklist button (a checklist will be created from the safety plan)

The Checklist ID will be populated and the Go to checklist button will become available
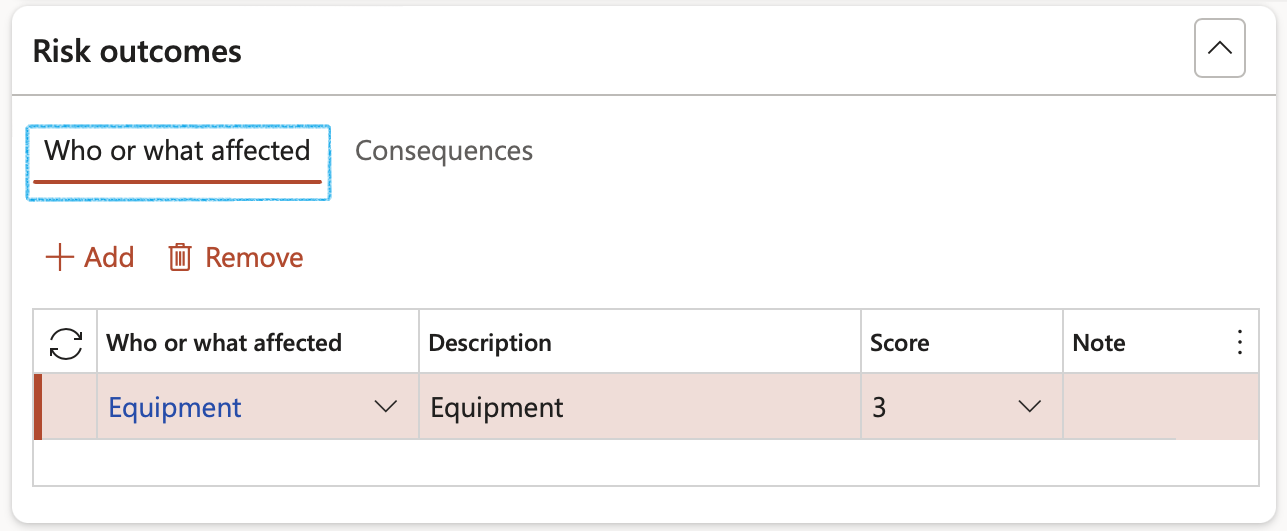
¶ Step 8.3: Risk outcomes Fast tab
- Open the Who or what affected Index tab
- In the Button strip, click on the Add button
- Select the affected party from the dropdown list
- Enter a Description
- Select the Risk score level from the dropdown list
- Enter additional Notes
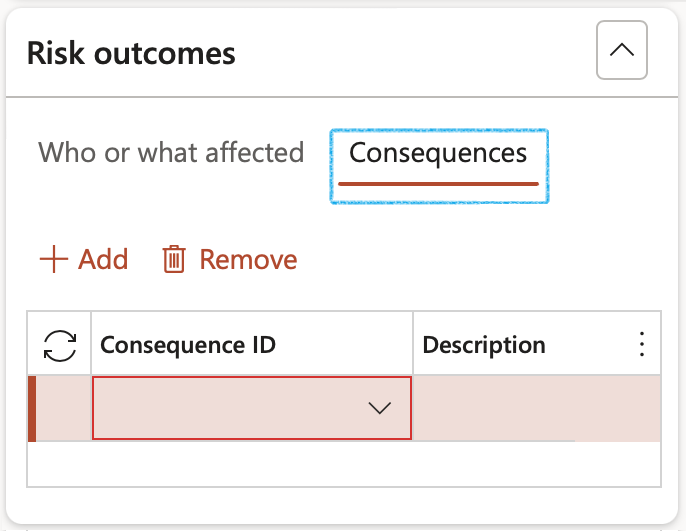
- Open the Consequences Index tab
- In the Button strip, click on the Add button
- Select the relevant Consequence ID from the dropdown list
- Enter a Description
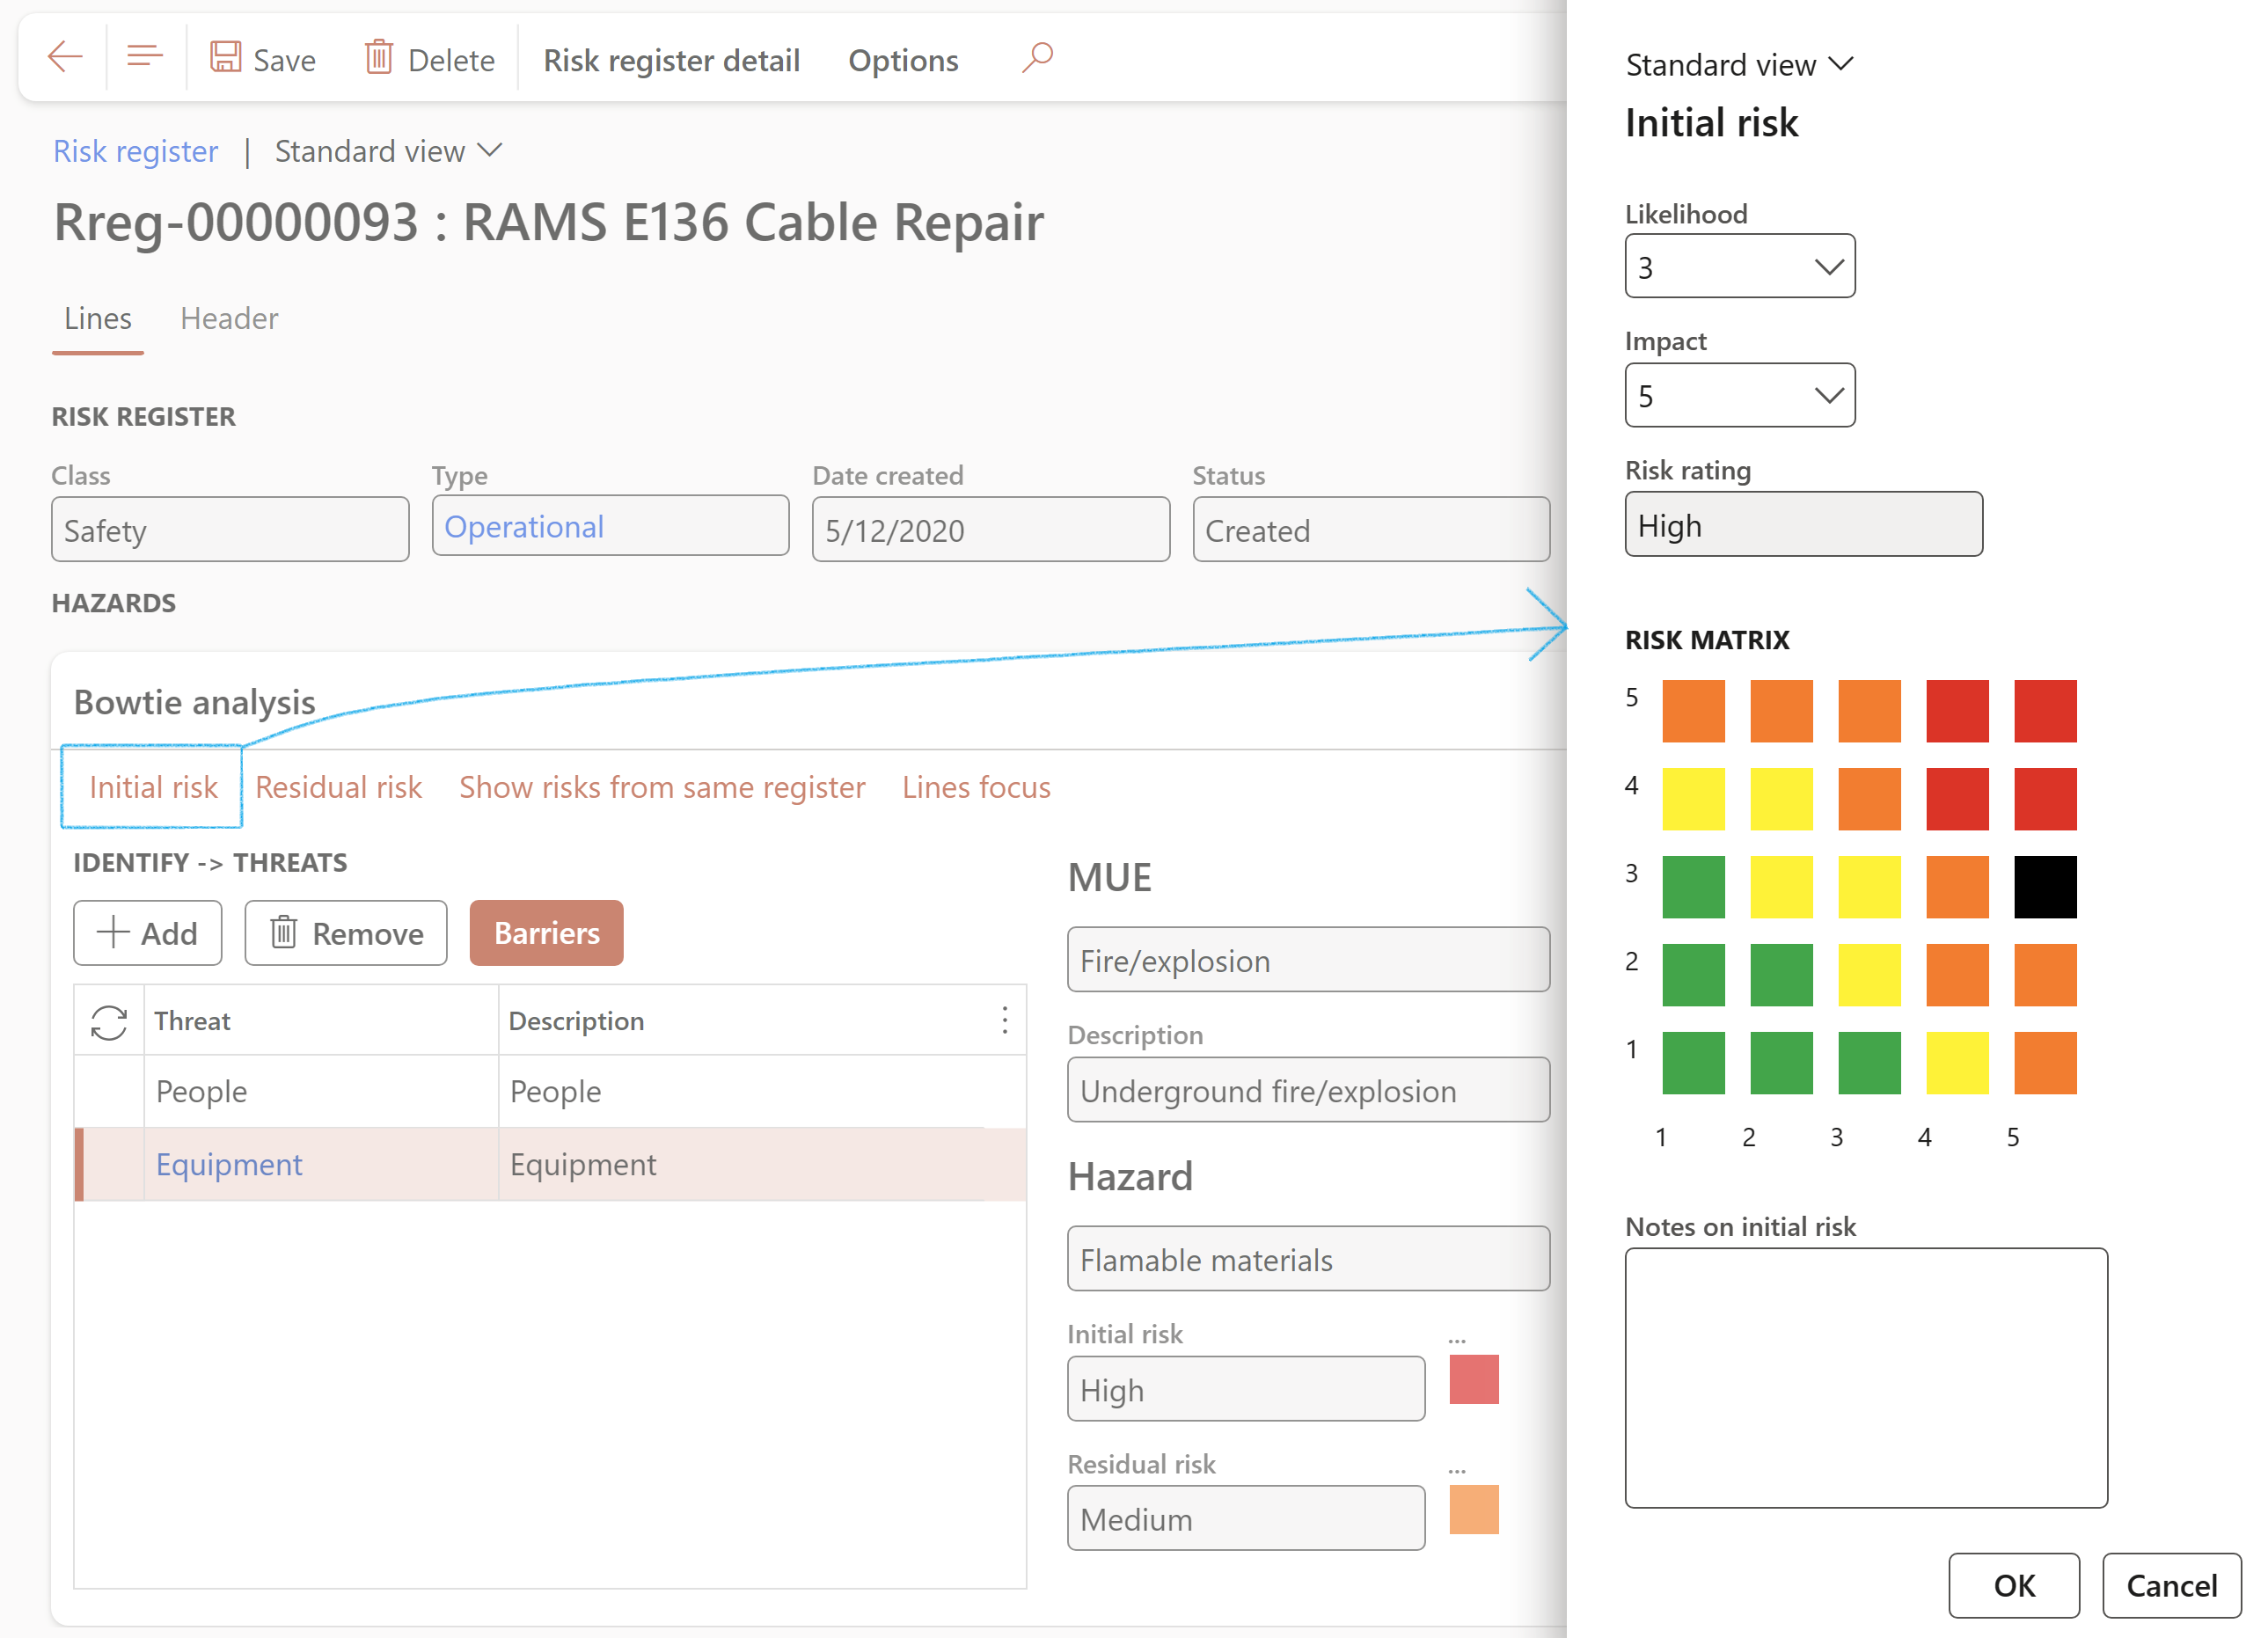
¶ Step 8.4: Initial risk Fast tab
Users can view a plotting of the inherent risk on the Risk matrix by means of a black block indicating the Likelihood x Impact Risk rating
- Likelihood - Select the value of the Likelihood of the recurrence from the dropdown list
- Impact - Select the consequence/Impact rating from the dropdown list
- Enter additional Notes on the initial risk
- Risk rating - Displays the risk rating
- Risk matrix - The X by Y matrix displays the matrix as it is setup on the parameters form
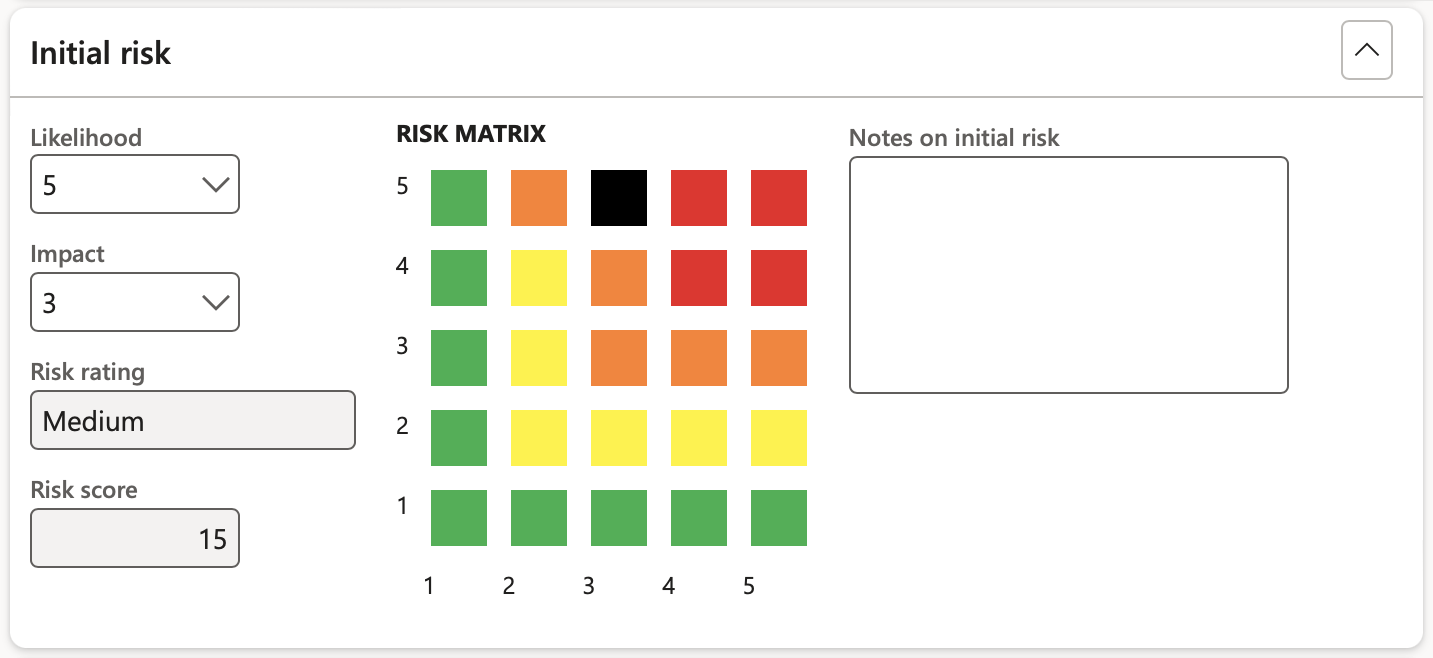
- Inherent risk (also known as initial risk) is current risk levels given the existing set of controls (or in the absence of any controls)
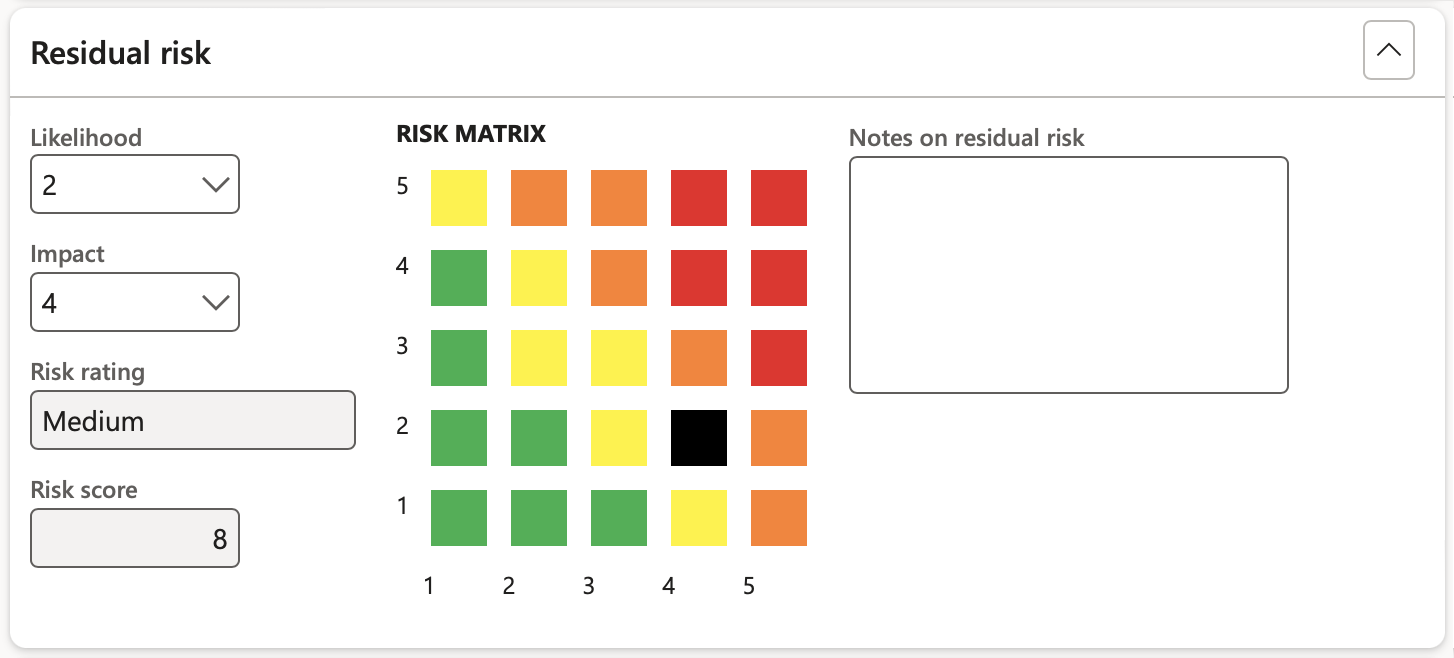
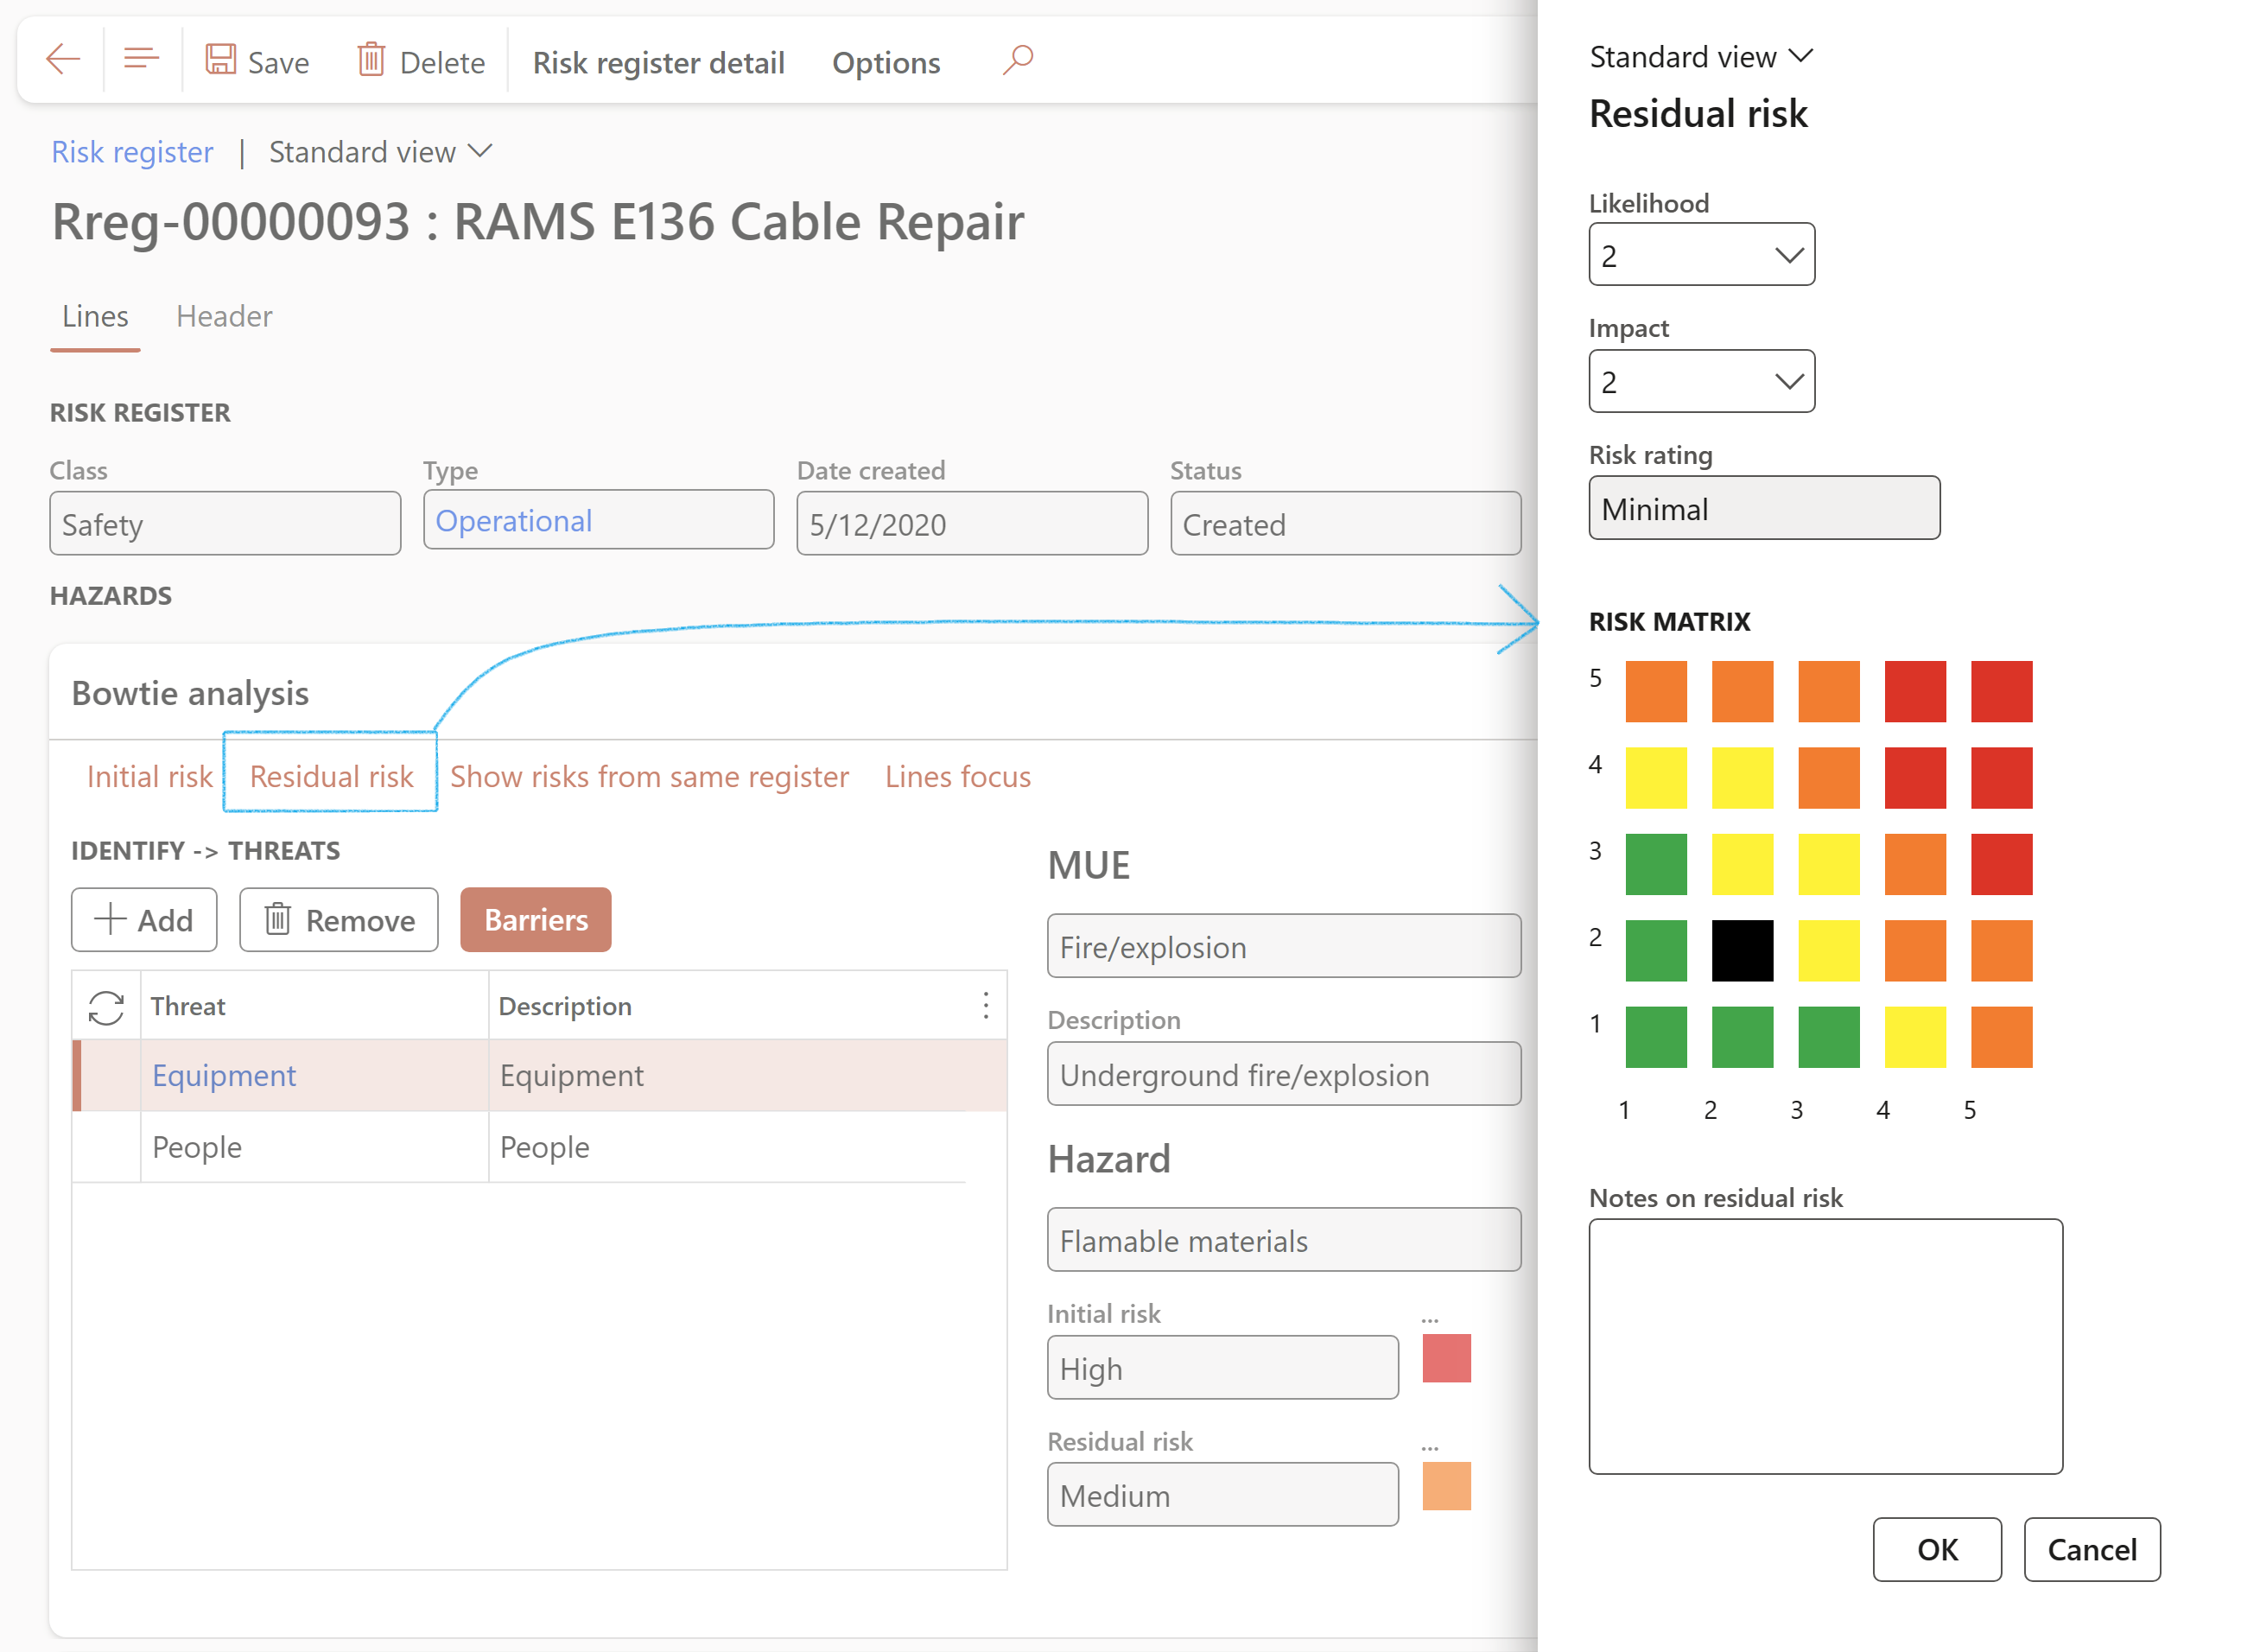
- Residual risk would then be whatever risk level remains after additional (or new) controls are applied.
- Thus, residual risk is the amount of risk or danger associated with an action or event remaining after inherent risks have been reduced by mitigating controls.
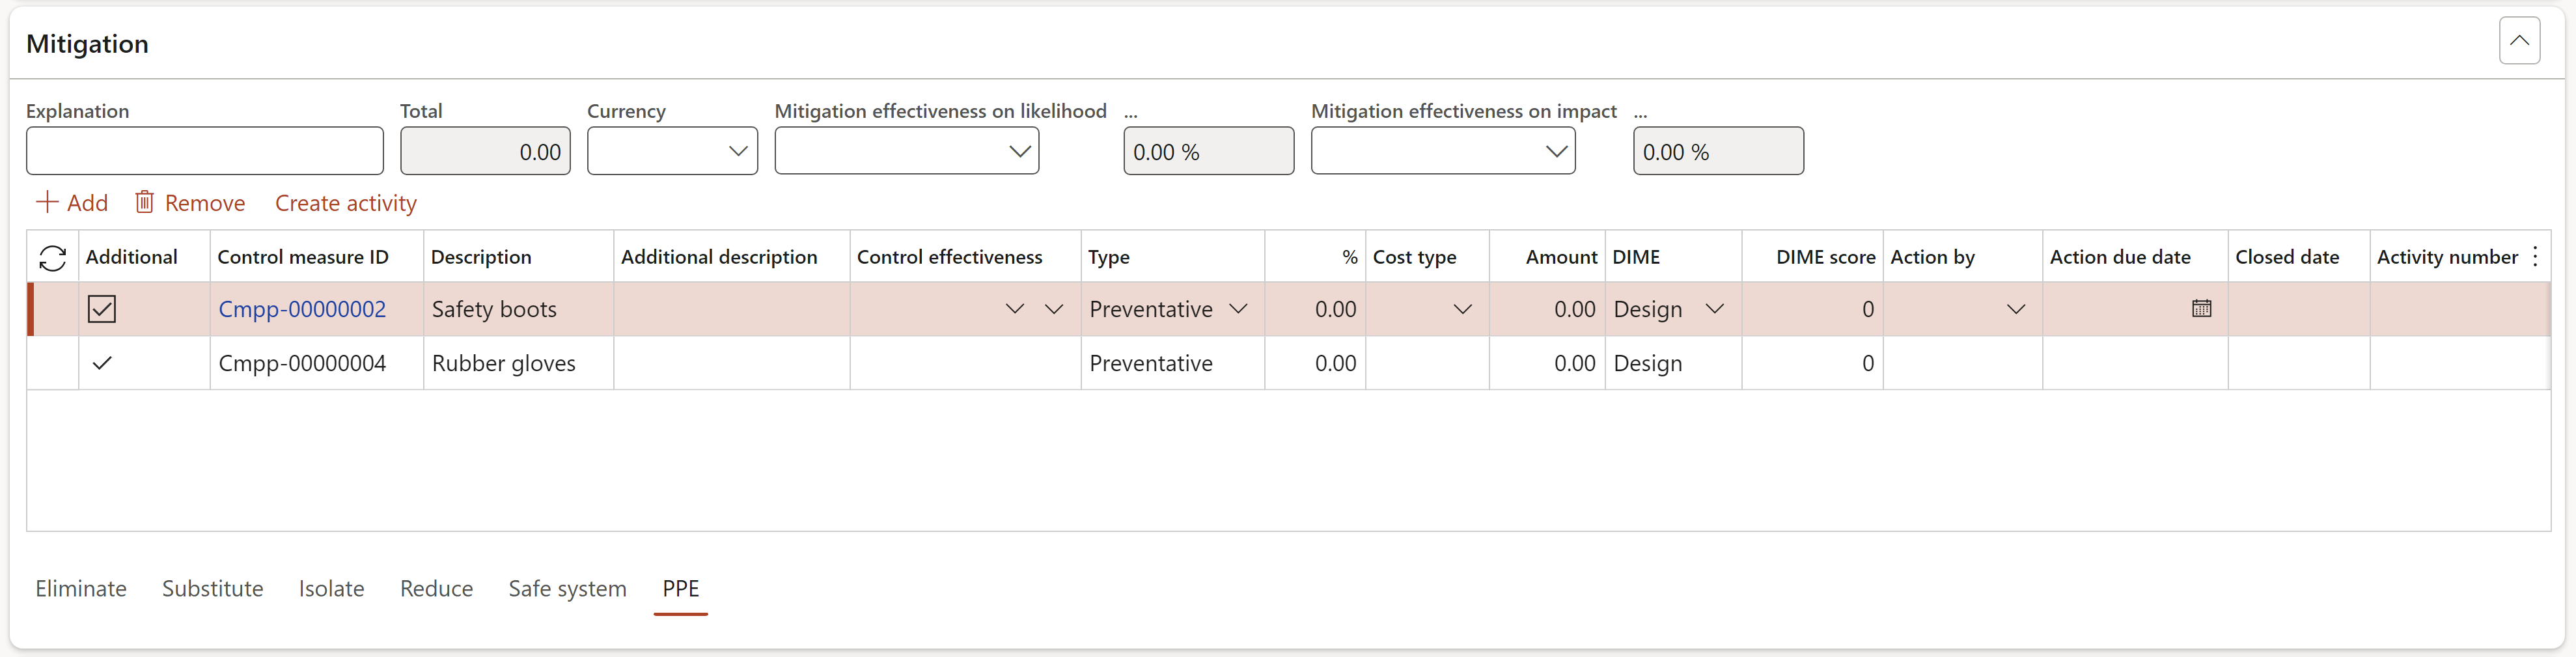
¶ Step 8.5: Mitigation
Users can apply Mitigation effectiveness percentages on likelihood and impact.
- Enter a detailed description in the Explanation field
- Select the relevant Currency from the dropdown list
- Select the Mitigation effectiveness on likelihood from the dropdown list
- Select the Mitigation effectiveness on impact from the dropdown list
- Open the Eliminate, Substitute, Isolate, Reduce, Safe system and PPE Index tabs and enter the following:
- Tick the Additional tick box to create a new control measure ID
If the box is not ticked, the user can look up a default control measure
- The unique Control measure ID is system populated
- Enter an Additional description (Optional)
- Select the relevant Control effectiveness level from the dropdown list
- Select the relevant control Type from the dropdown list
- Select the Cost type from the dropdown list
- Enter the relevant Amount (cost of the incident)
To create Activities for the mitigation lines, under the grid:
- Select the relevant Responsible person (Action by) from the dropdown list
- Select the Action due date

The Action due date = Planned end date
The Closed date = The closed date on the Activity
When the Show all button in the Button strip is clicked, the following columns will be added to the grid:
- DIME: The user can select one of the following values, Design, Implement, Monitor or Evaluate
- DIME score: The user can enter a numeric value of 1 to 4
¶ Step 8.6: Residual risk Fast tab
Residual risk displays the Likelihood and Impact values after controls have been applied. The mitigation effectiveness percentages on likelihood and impact applied in the above tab drive the Likelihood and Impact scores displayed under this tab.
The user can overwrite the Likelihood and Impact scores if the Mitigation effectiveness percentages are to be side-lined.
The Residual Likelihood x Residual Impact risk rating is displayed on the Risk matrix:
- Likelihood - Select a value to for the Likelihood of recurrence from the dropdown list
- Impact - Select a value for consequence/Impact from the dropdown list
- Enter additional - Notes on the residual risk
- Risk rating - This field displays the rating
- Risk matrix - The X by Y matrix displays the matrix as it is setup on the parameters form
¶ Step 8.7: Strategy and response Fast tab
Risk response is the process of developing strategic options and determining actions to enhance opportunities and reduce threats to the organization’s objectives. An enterprise team member is assigned to take responsibility for each risk response.
- Expand the Strategy and response Fast tab
- Select the relevant Strategic pillar from the dropdown list
- Enter the Control strategy
- Enter the Responsibility
- Select the relevant Risk response from the dropdown list
- Select the Employee responsible for the response
- Select the Due date for the response
- Enter any Further action

¶ Step 8.7.1: Creating Activities
- On the button strip, click on the Create activity button
- Complete the Create activity dialog
- Click OK
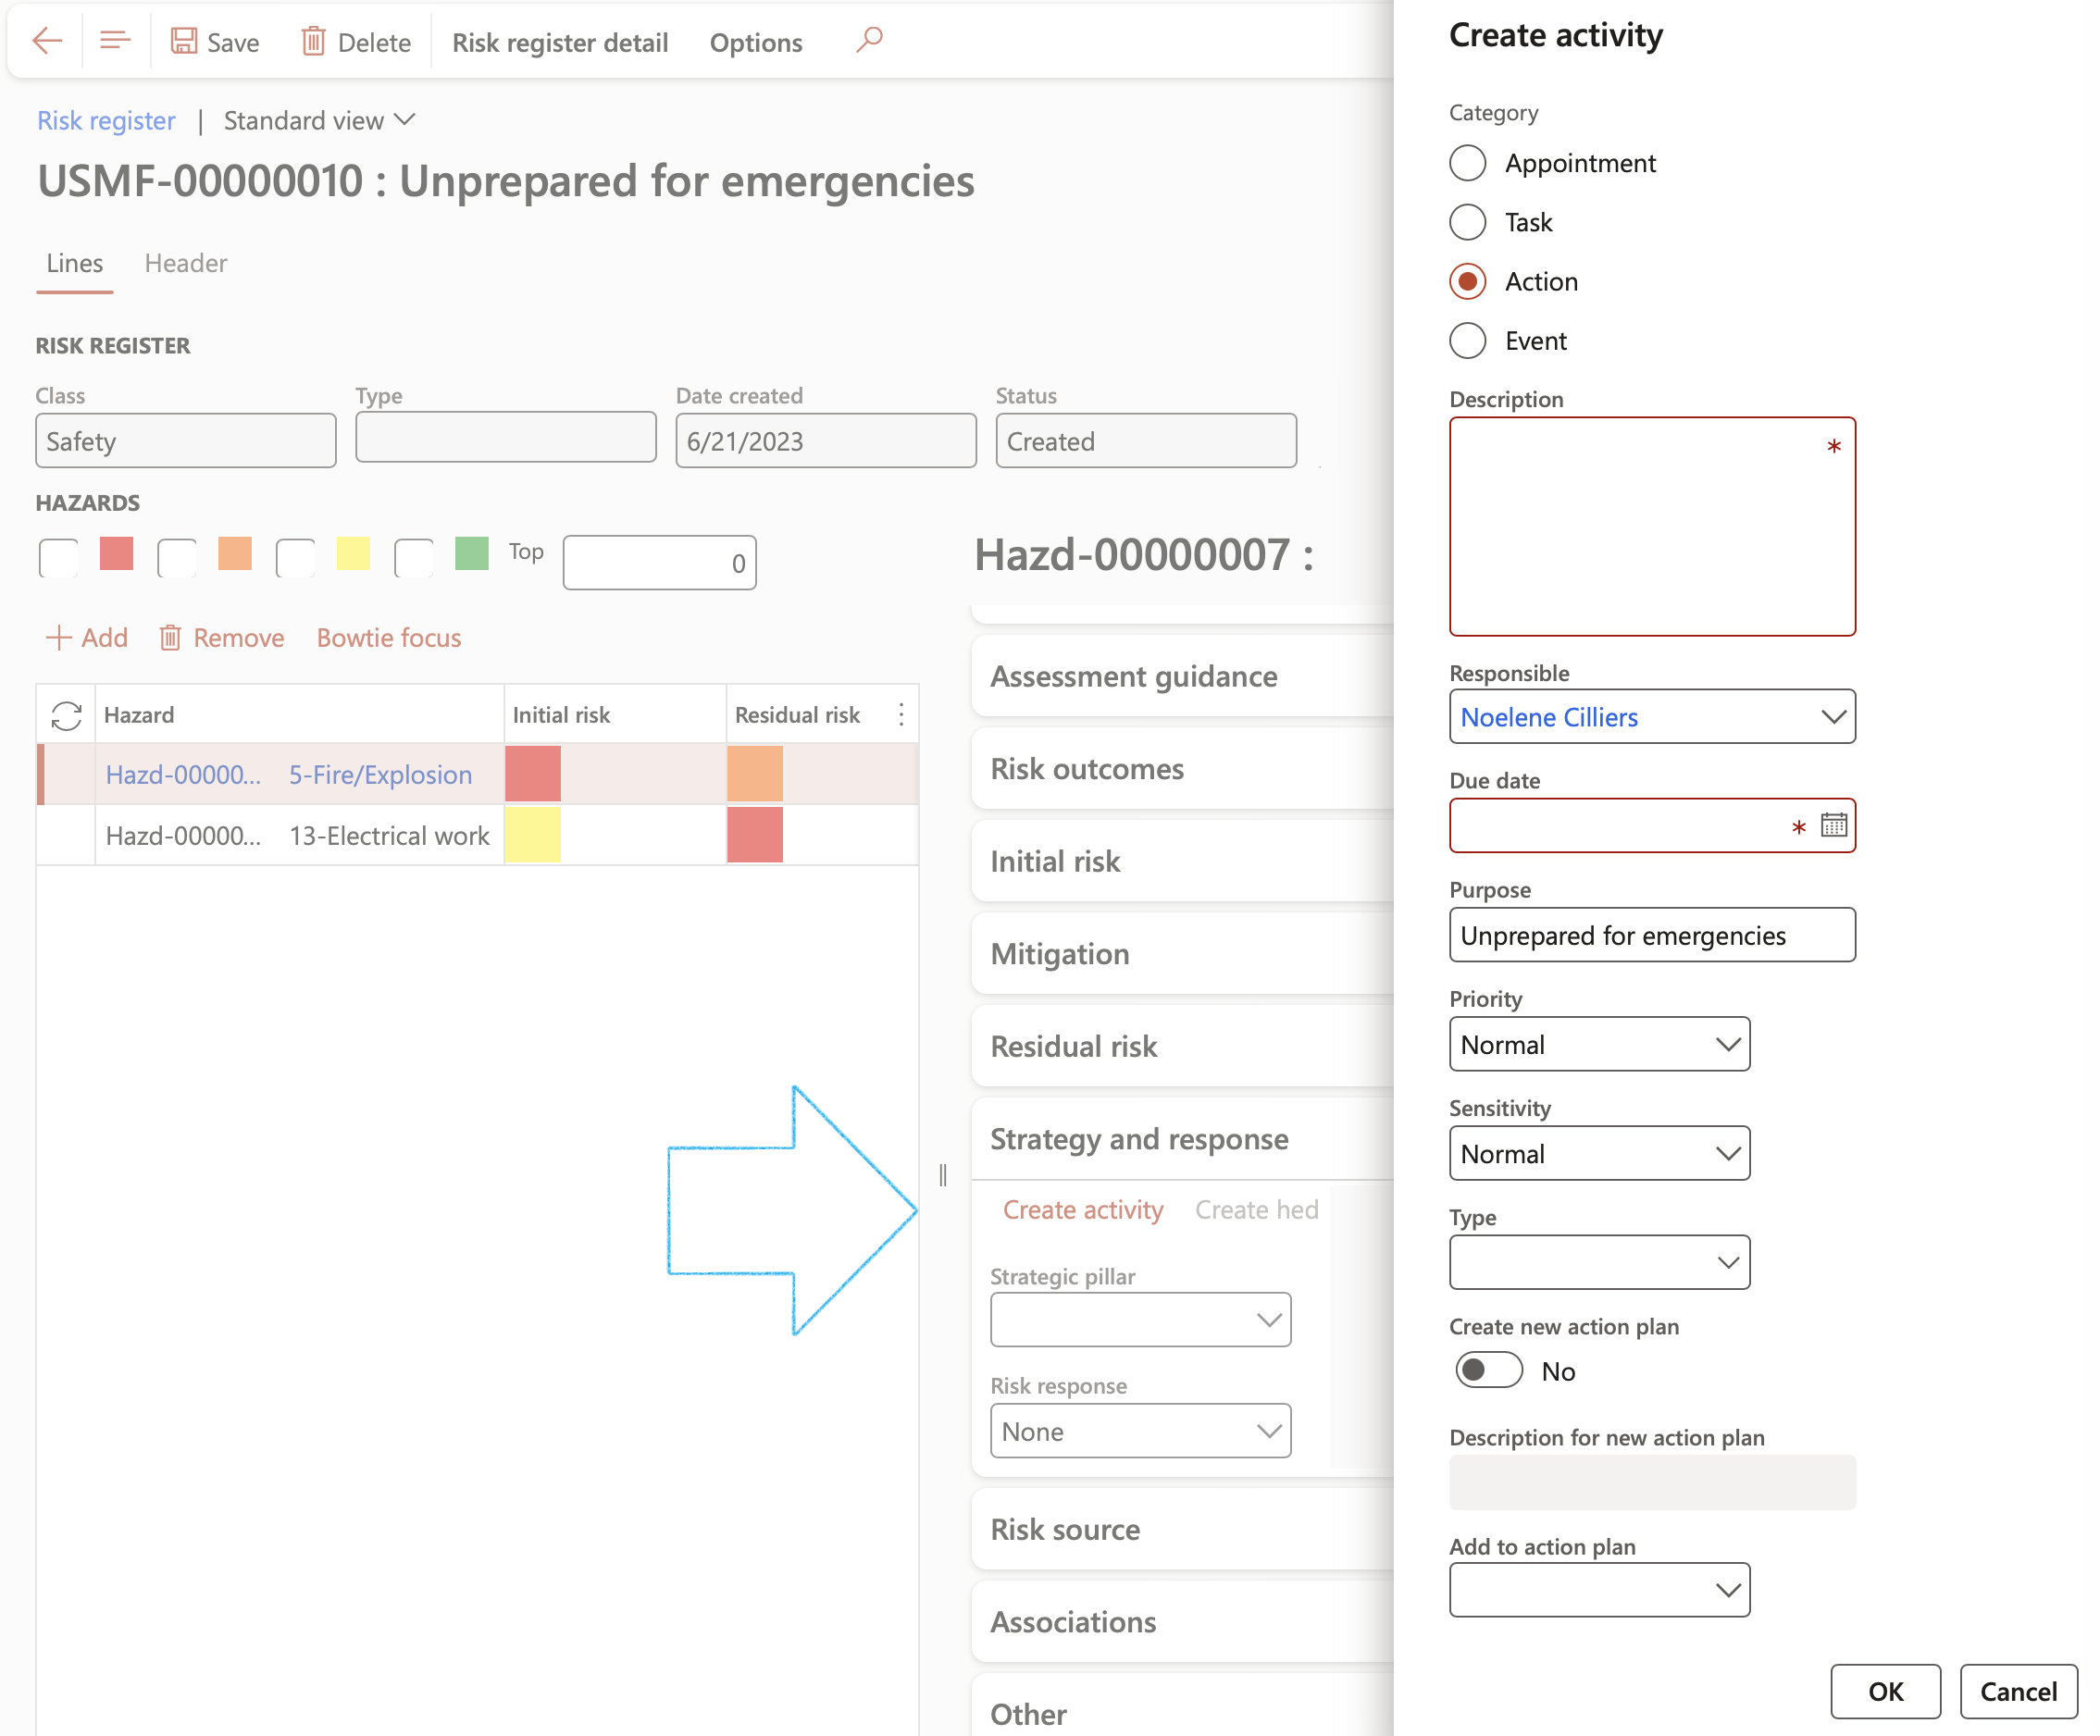
The Due date = Planned end date
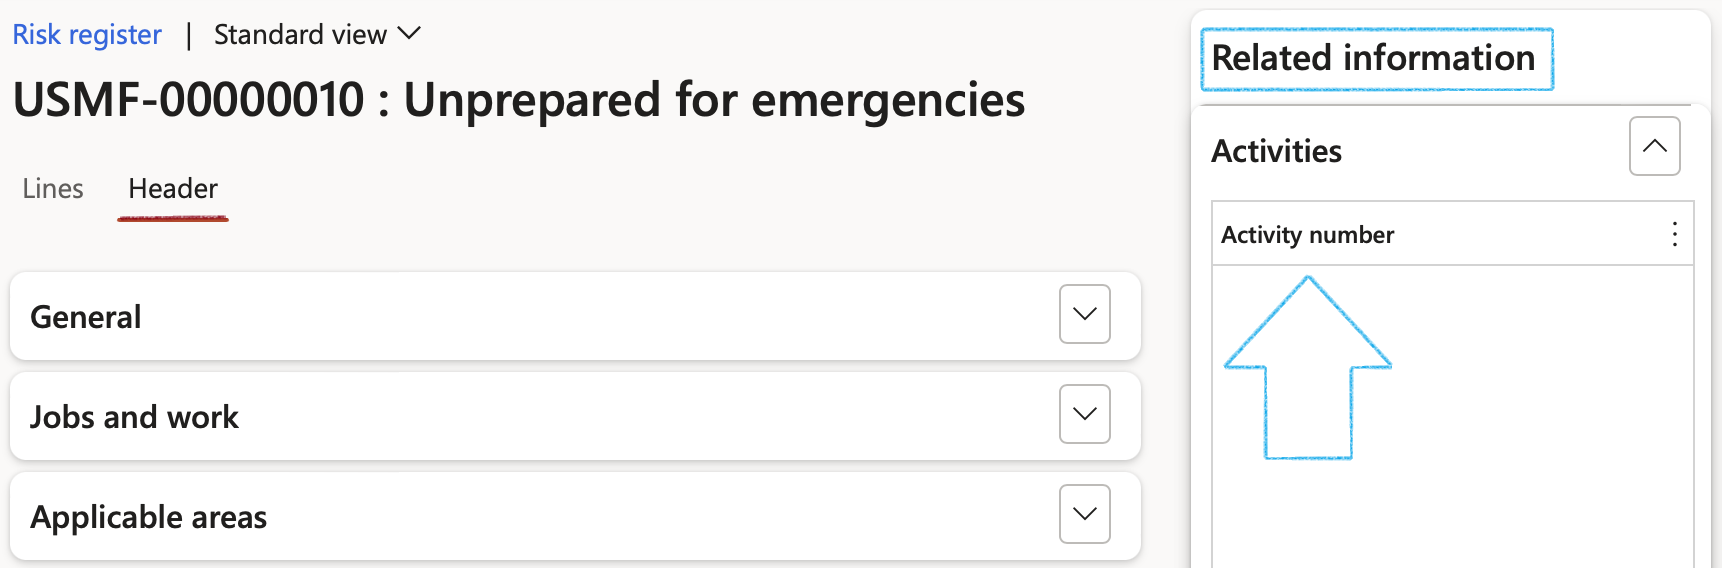
To see the activities that have been created for the risk register, expand the Related information tab
¶ Step 8.8: Risk source Fast tab
This gives users a view of where inside Dynamics 365, Risk assessments were done from.
Risks can be created from the following sources inside D365 modules:
- Incidents
- Investigations
- Inspections
- Permits to work
- Projects
- Activities
These sources are displayed with the linked record number.
Multiple sources can be linked to one Risk register.

A future release will add maintenance jobs Risk assessments as an additional source.
¶ Step 8.9: Associations Fast tab
Additional information such as an item, order, product, etc. can be selected under the Associations Fast tab in order to link it to the selected risk
- In the button strip, click on the Add button
- A selected Primary check box indicates that this is the primary association for the risk
- Select the relevant Entity type from the dropdown list
- Select the unique identification of the entity
- The name of the selected entity is displayed in the Name field
To reveal details of the selected association, click the Details button on the button strip
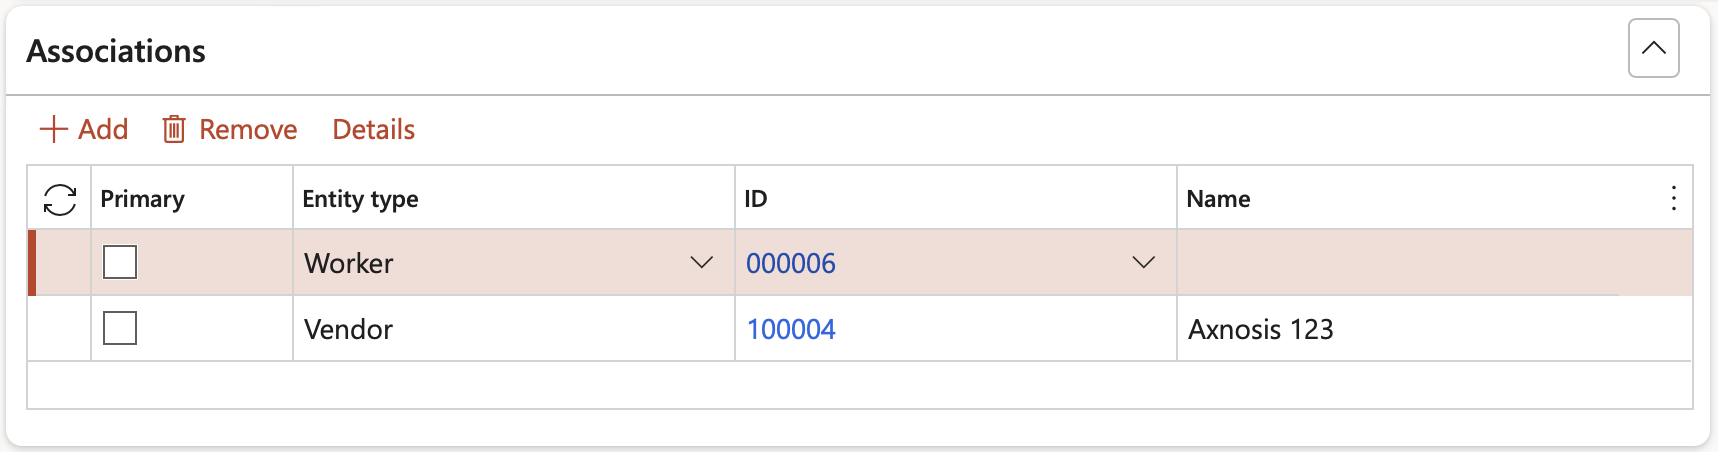
List of Entity types:
|
|
|
¶ Step 8.10: Other details
Additional information can be entered under the Other Fast tab
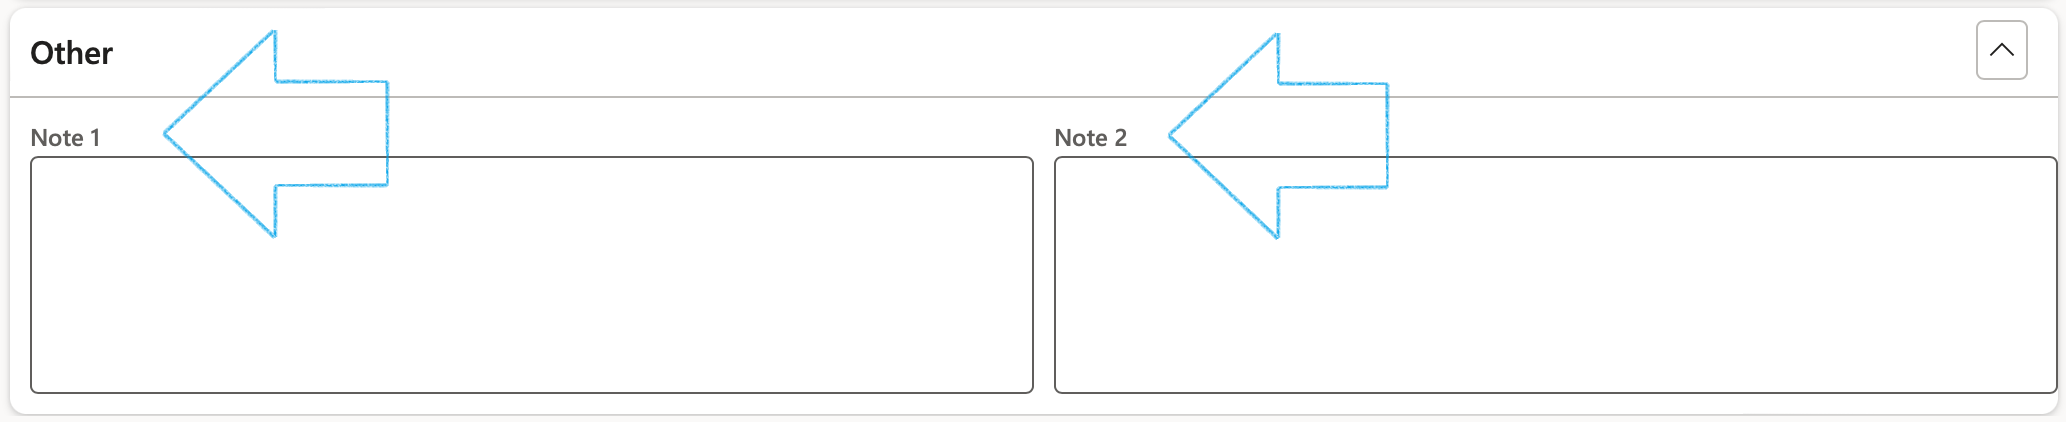
The labels of the two note boxes can be changed on the GRC parameters
¶ Step 9: Switching to Bowtie focus
Sometimes an organization wants to zoom in and focus on one risk. They then manage that risk with what is referred to as a "Bowtie" methodology.
This can be done in D365 by following the steps below:
Go to: GRC > Risk > Registers > All operational risk registers
- Select the relevant risk register
- On the Lines view, select the relevant risk line
- Click on the Bowtie focus button

The Bowtie risk register will open displaying the details of the selected risk line
- Bowtie risks can be changed to Operational risks by clicking on the Line focus button
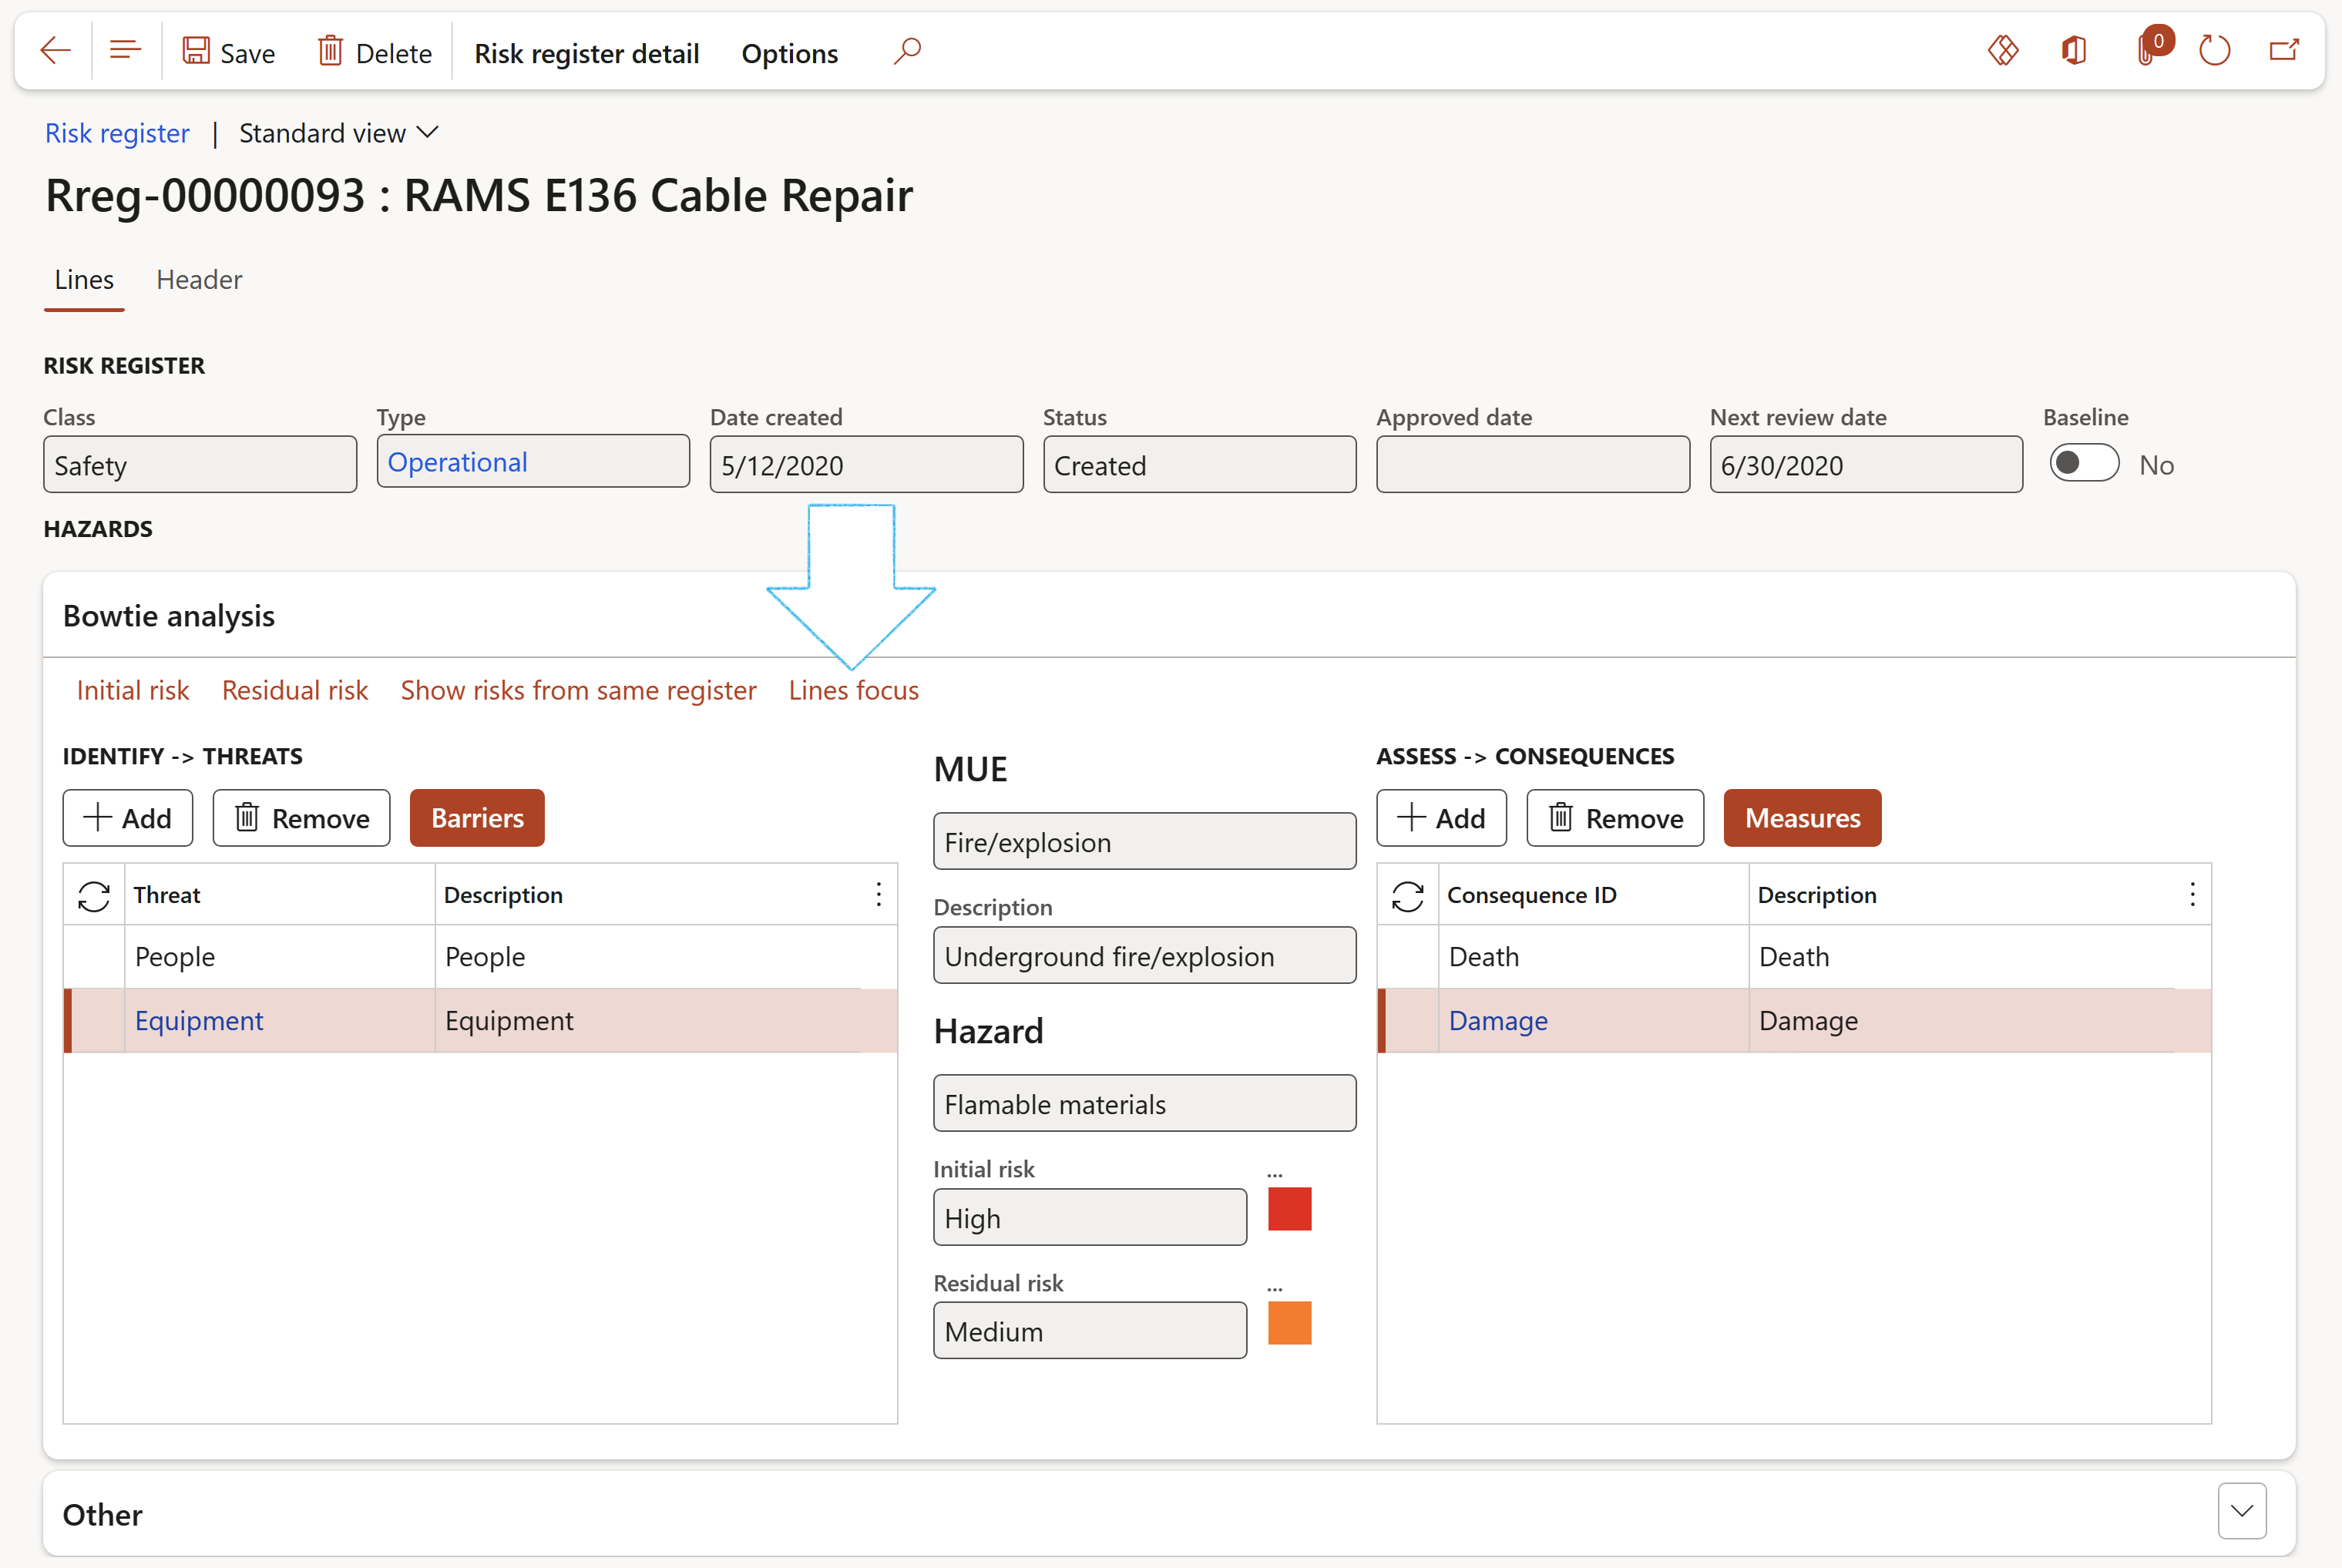
- The risk lines that were not converted to Bowtie, can be viewed by clicking on the Show risk lines from same register button
- To change the Initial risk values, click on the Initial risk button
- To change the Residual risk values, click on the Residual risk button
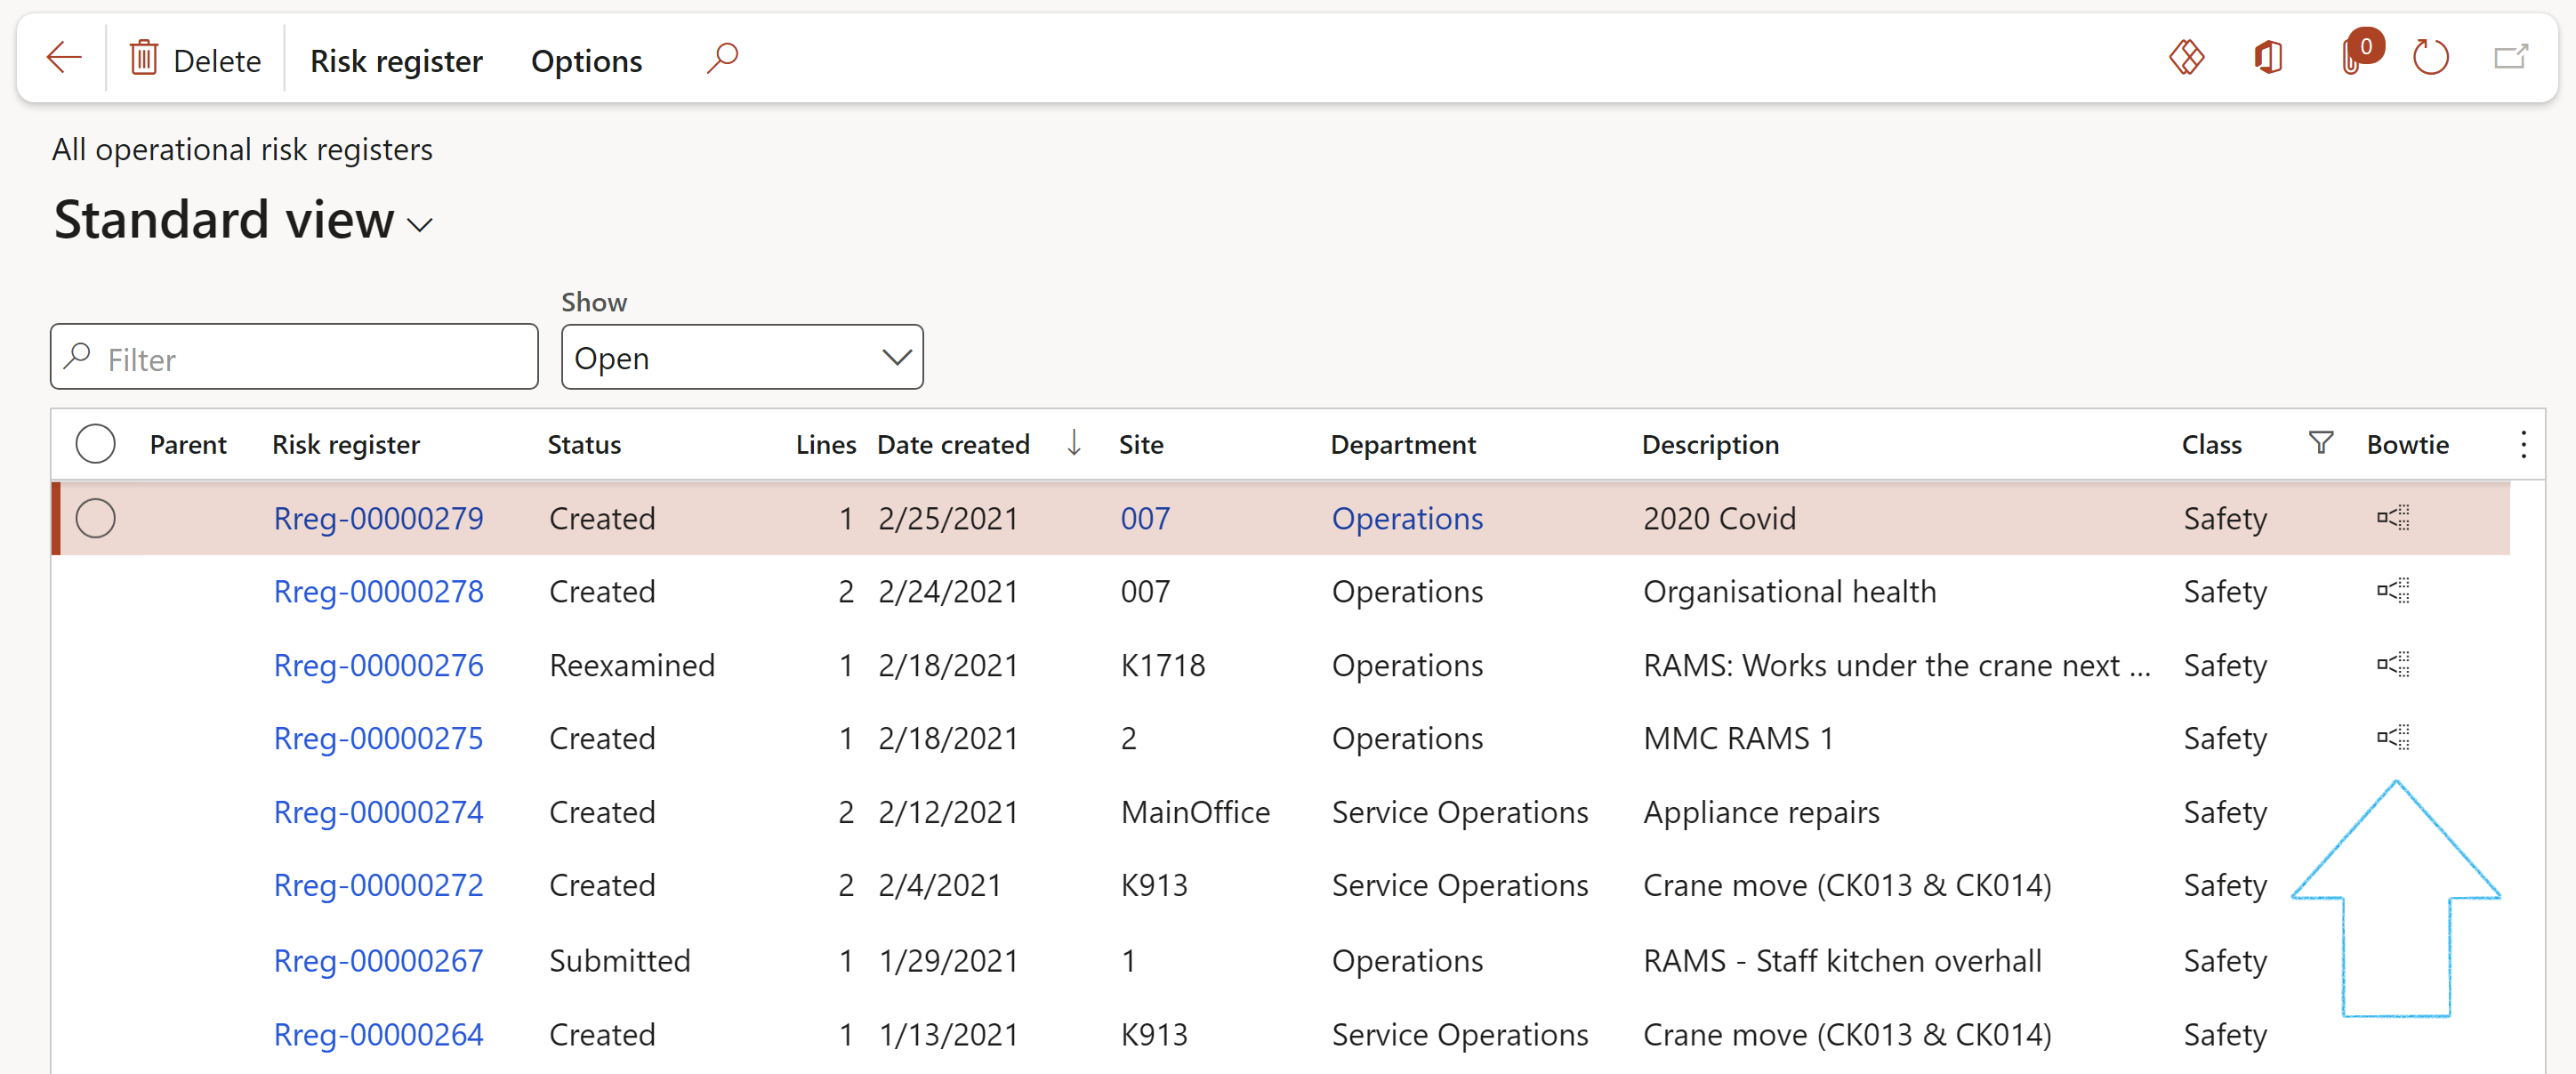
Risk registers that have a risk line that has been converted to Bowtie, are indicated on the list page
¶ Step 10: Doing a Risk assessment
It is important for risk assessments to be carried out regularly so that employers can identify any substance or thing that may pose a danger to health and safety and ensure that the necessary preventative control measures are implemented. The risk assessment should include information on all present hazards in the organization, their necessary control measures, all the safe systems of work and monitoring procedures in place.
There are three ways of doing a risk assessment:
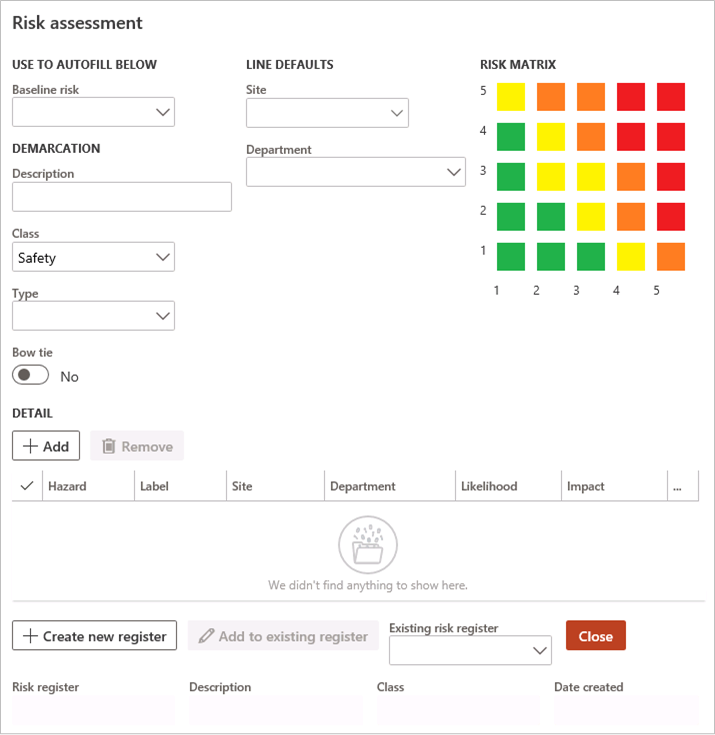
¶ Step 10.1: Risk assessment dialog
Go to: GRC > Risk > Operational risk assessment
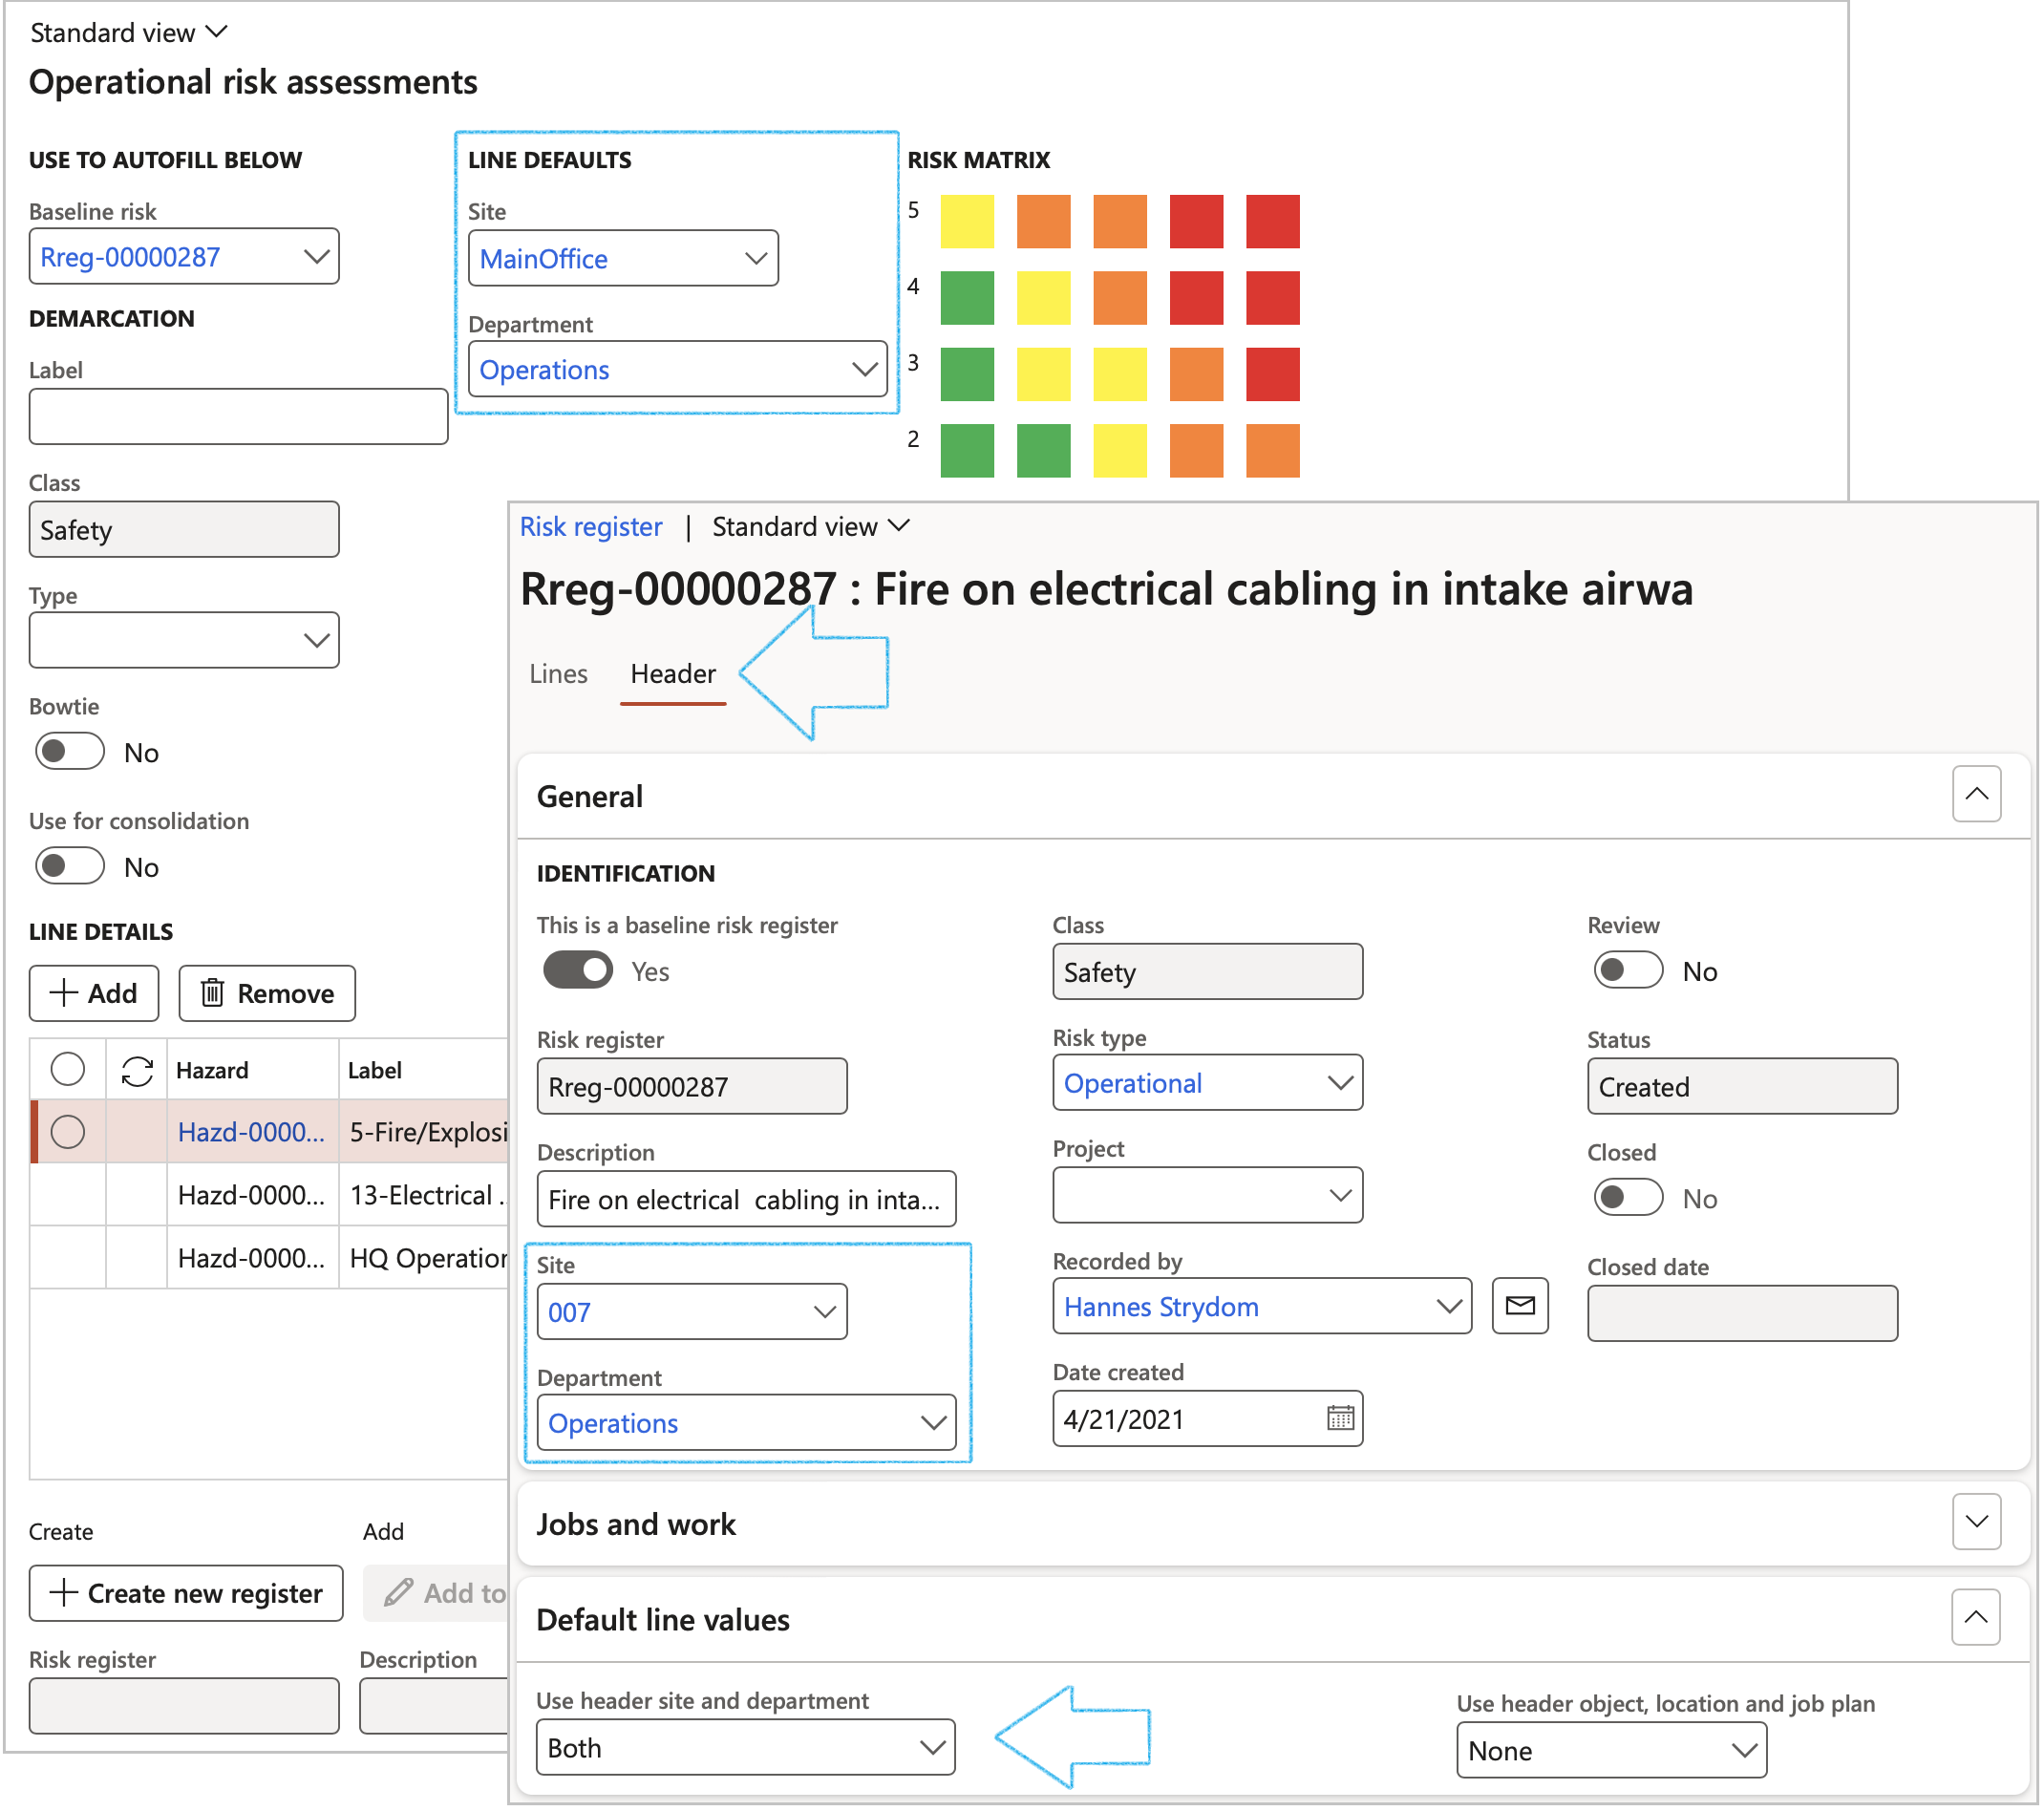
- If required, select a Baseline risk from the dropdown list. This functionality will display and bring forward all the risk/hazard data captured on the baseline entity, into the new risk assessment form.
- Users can override the default values from the baseline risk
- Additional hazard details can be entered
- Update the new information to an existing risk register
OR
- Click on the Create new register button to create a new Risk register
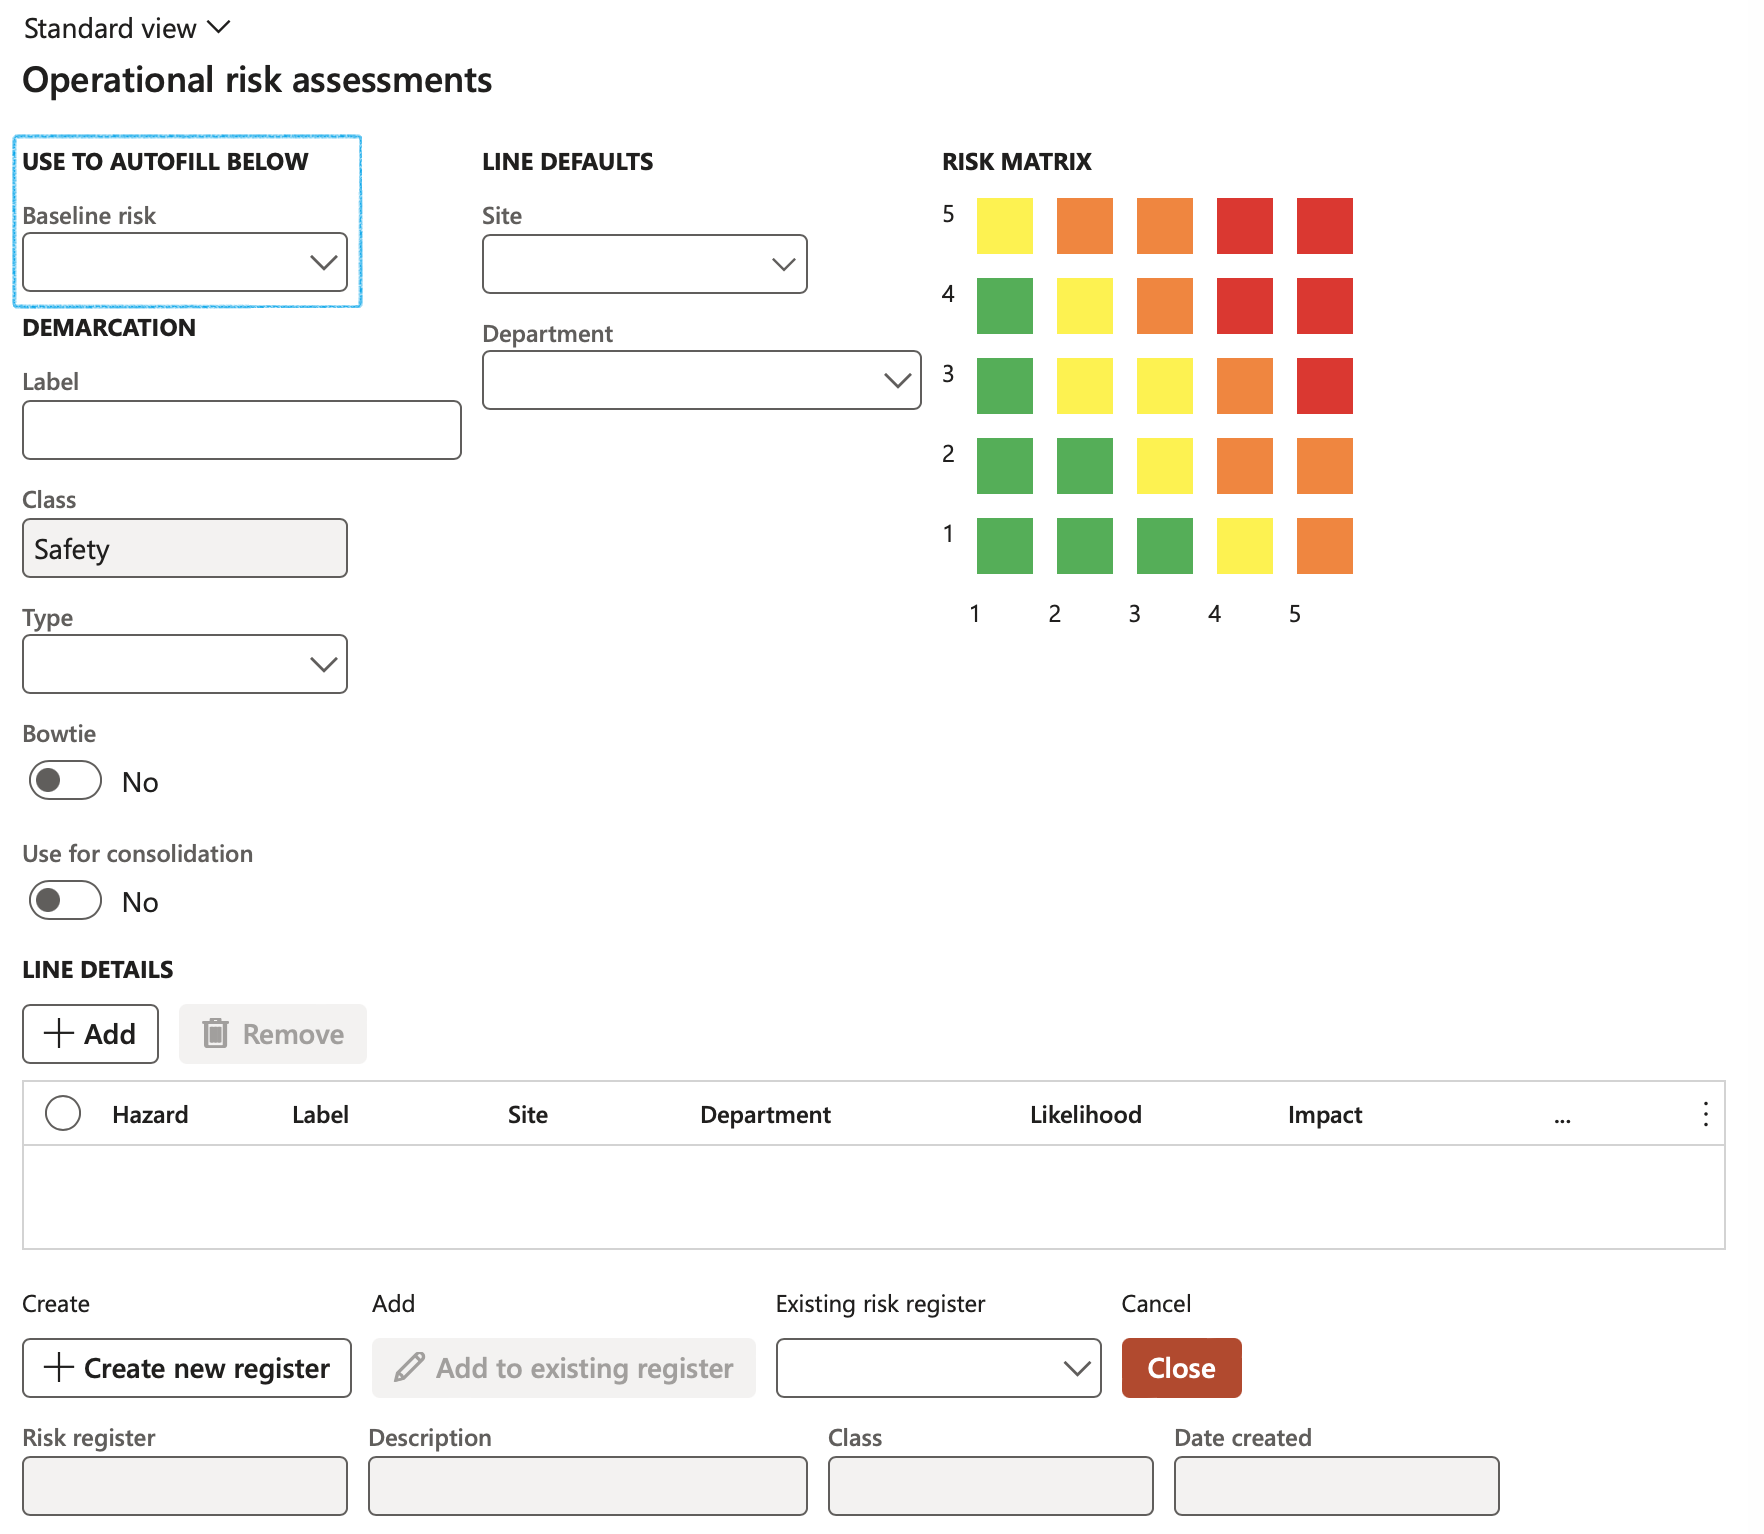
To ensure that only operational related Risk assessments can be done from the following forms, the Class field on the Risk assessment dialog is un-editable and the value defaults to Safety which includes Permit to work, Incidents and Investigations
When a risk assessment is done:
- The values that are entered in the Site and Department fields will populate the Site and Department fields on the new Risk register header under the General Fast tab
- Under the Default line values Fast tab of the detail Risk register form, the Use header site and department field will automatically be selected as Both.This will now default through to the Risk lines
¶ Step 10.2: Manually create a Risk register
- On the All operational risk registers list page, on the action pane, in the New group, click on the Operational risk button
- Manually enter the following details:
- Update the Description of the risk register
- Select the relevant Class from the dropdown list
- Select the risk Type from the dropdown list
- Add more Hazards if required
- If the new details that were entered are not related to an existing register, click on the Create new register button
OR
- Select an Existing risk register which currently exists in D365
- Click on the Add to existing register button
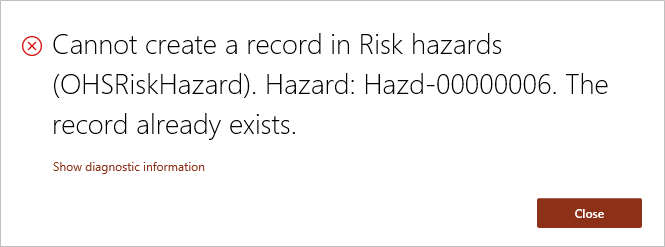
If an “Add to existing register” transaction has to be done, Dynamics 365 will check if a similar hazard already exists. The criteria for the duplicate check is:
- Existing hazard record under the existing Risk register
A message will appear to warn the user that a similar risk already exists
¶ Step 10.3: Using the Risk assessment wizard
Go to: GRC > Risk > Risk assessment wizard
Step 1: Classification
- Select the relevant Risk classification
- Click on the Next button
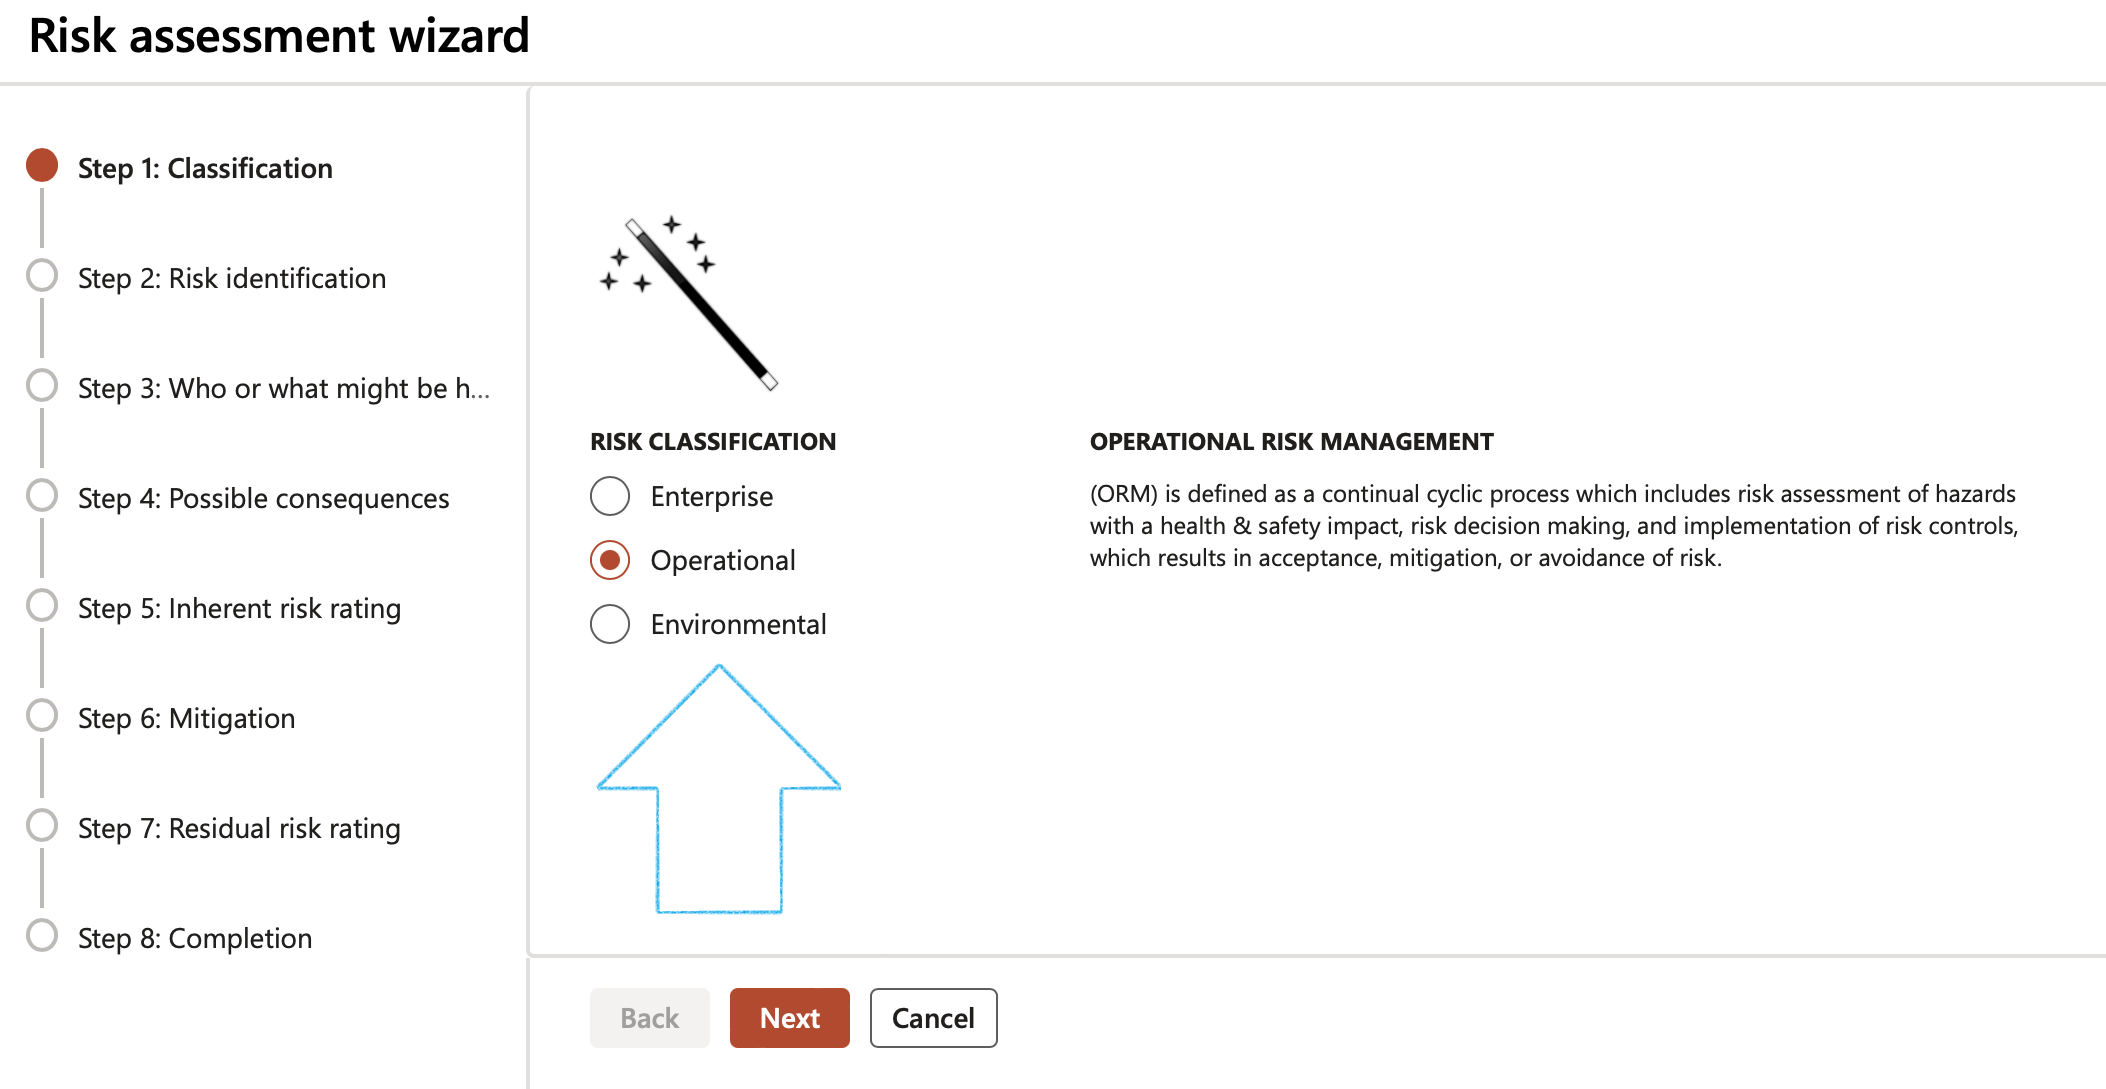
Risk classification definitions:
- Operational risk management (ORM) is defined as a continual cyclic process which includes risk assessment of hazards with a health safety impact, risk decision making, and implementation of risk controls, which results in acceptance, mitigation, or avoidance of risk.
- Financial risk management (FRM) is the practice of mitigating loss to economic value in a firm by using financial instruments to manage exposures, such as credit risk ;and market risk, foreign exchange risk, volatility risk, liquidity risk, inflation risk and commodity risk. (Reserved for future version)
- Enterprise risk management (ERM) is a plan-based business strategy that identifies, assesses, and prepares for any potential non health & safety related risks that may interfere with an organization's operations and objectives.
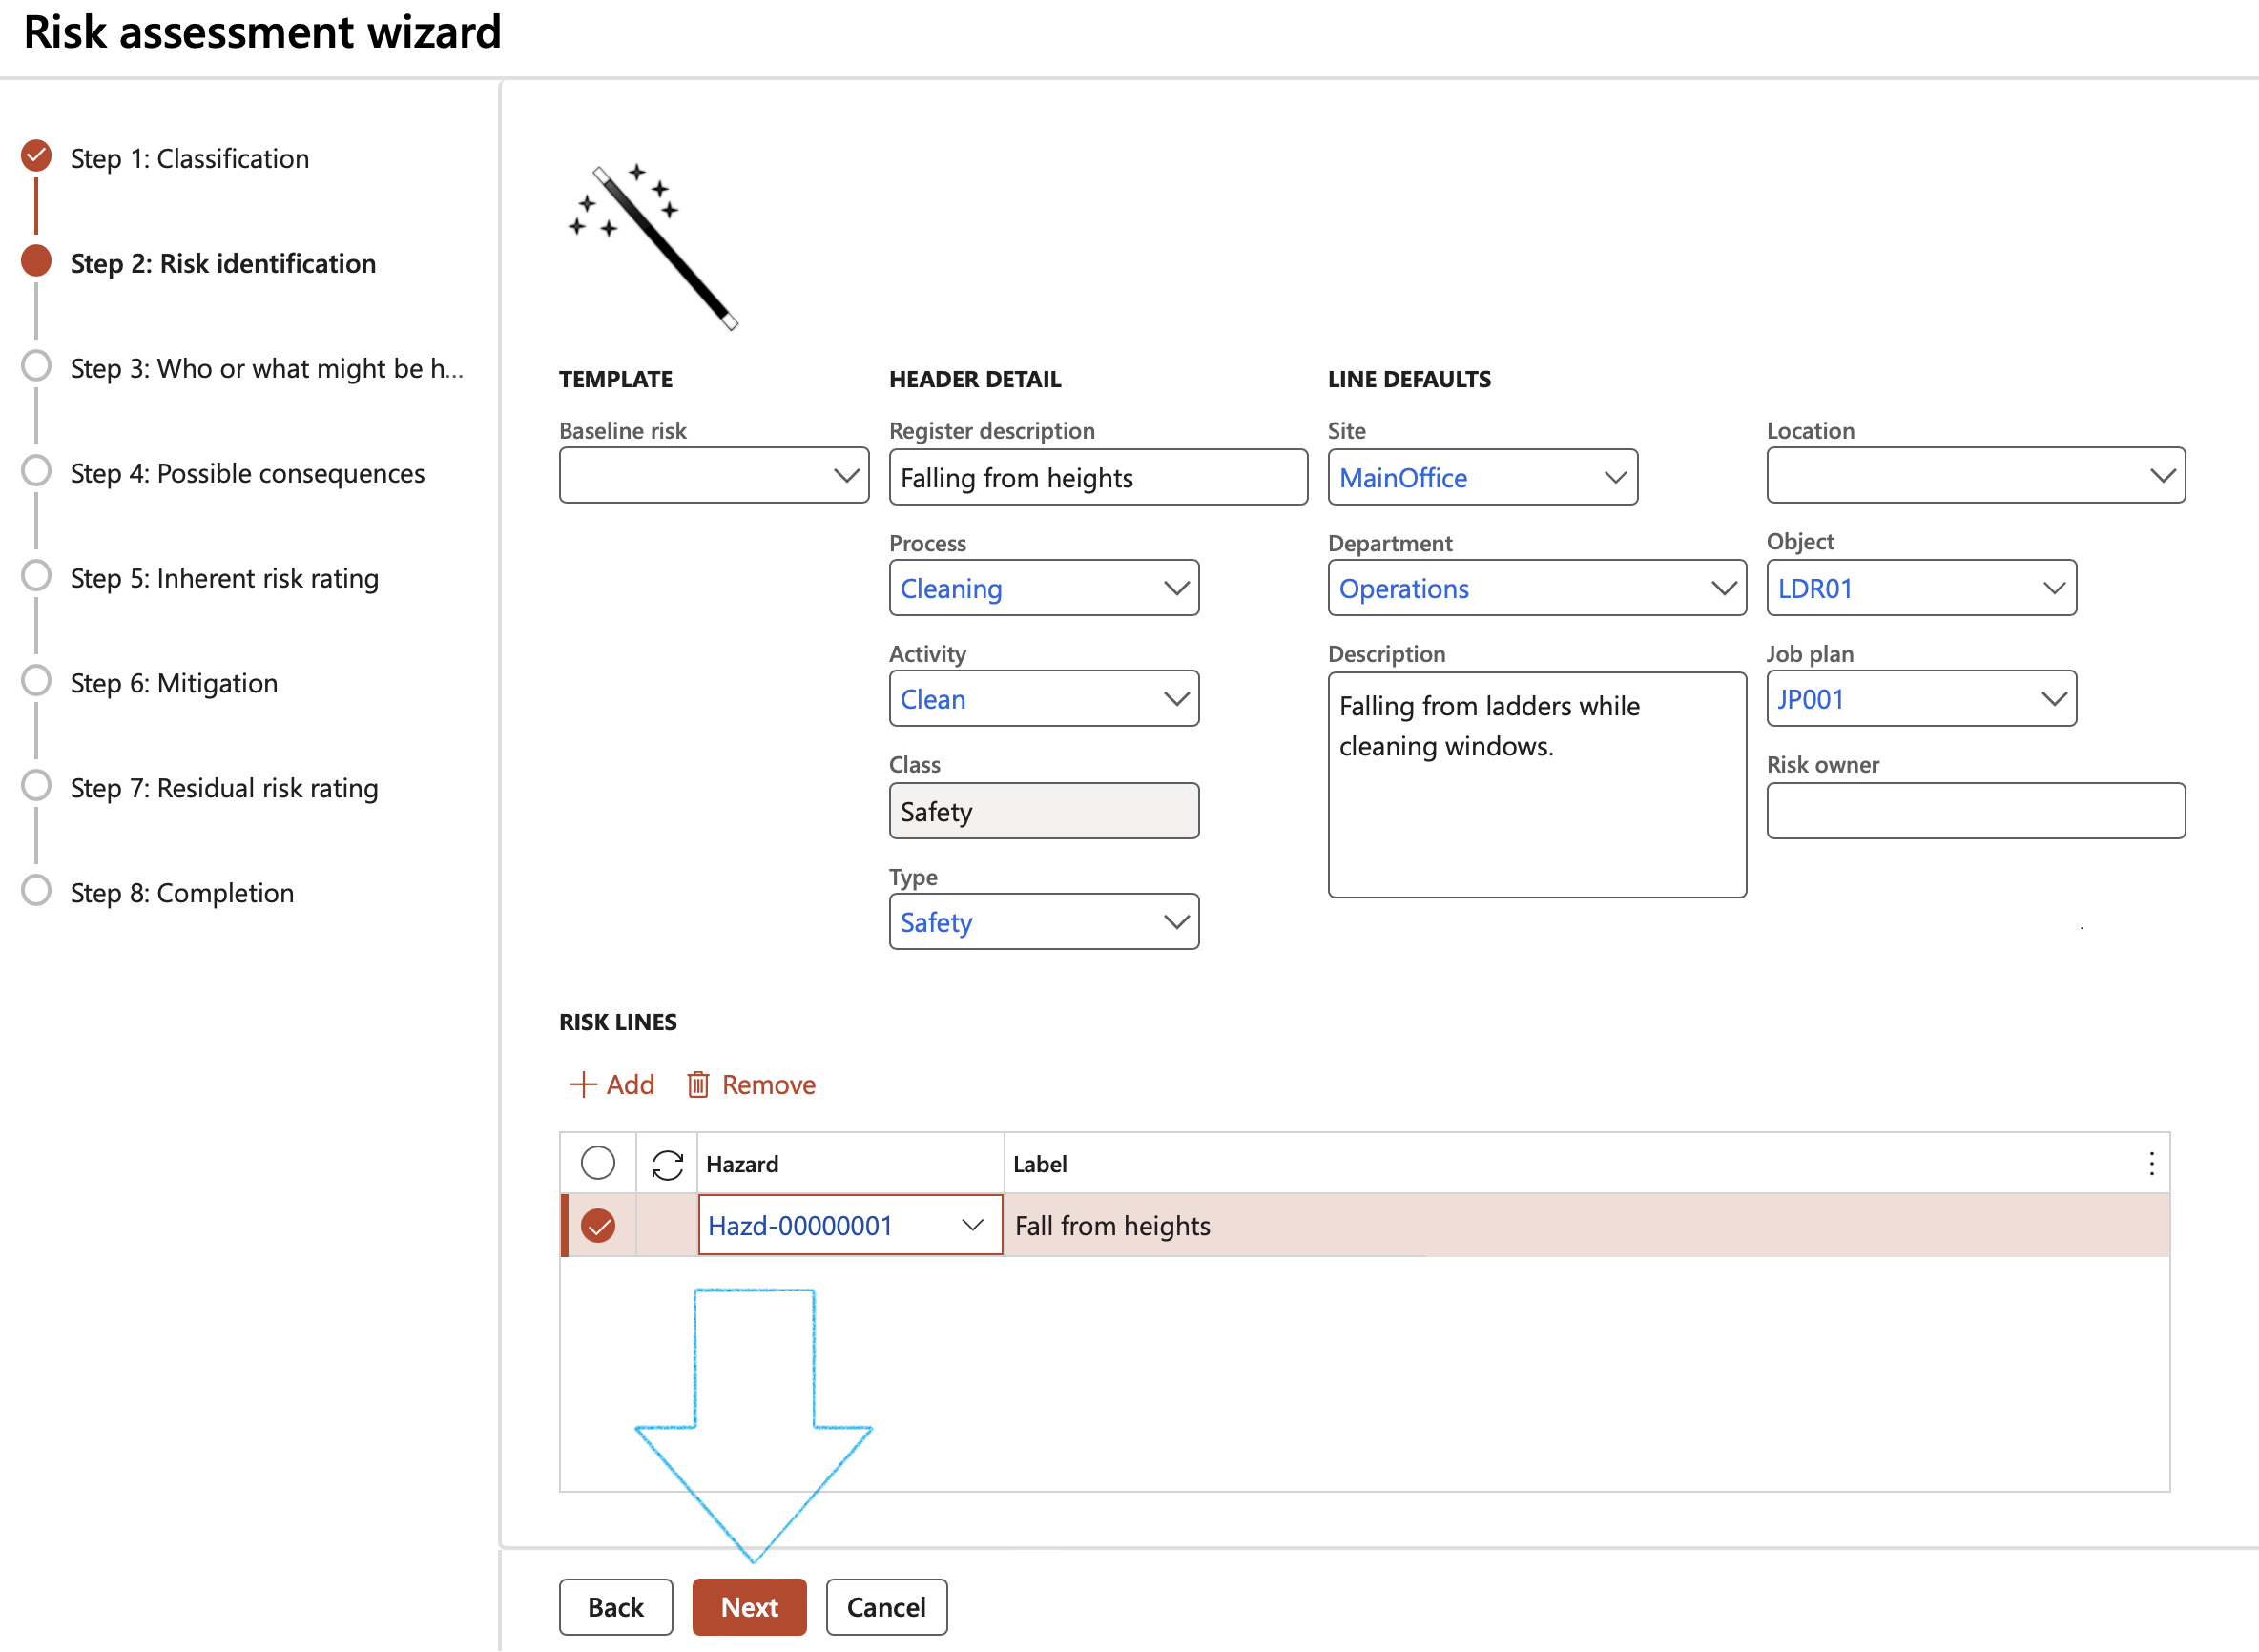
Step 2: Baseline and Hazards
- Under the Template Field group, the user has the option to select a Baseline risk
- Under the Header detail Field group:
- Enter a description for the Register
- Select the unique Process ID from the dropdown list
- Select the unique Activity ID from the dropdown list
- The Class field will by default be Safety
- In the Type field, select the Risk type from the dropdown list
- Under the Line defaults Field group:
- Select the relevant Site from the dropdown list
- Select the relevant Department from the dropdown list
- Enter a detailed Description of the risk
- Select the relevant Location from the dropdown list
- Select the relevant Object from the dropdown list
- Select the relevant Job plan from the dropdown list
- In the Risk owner field, indicate the owner of the risk (Employee/Department)
- Under the Risk lines Field group:
- Click on the Add button
- Select the relevant Hazard from the dropdown list
- Click on the Next button
In order to ensure that the information entered from Step 3 to Step 7 is applied to each hazard (line) selected on Step 1, click on the Apply these values to every risk line from step 2 button
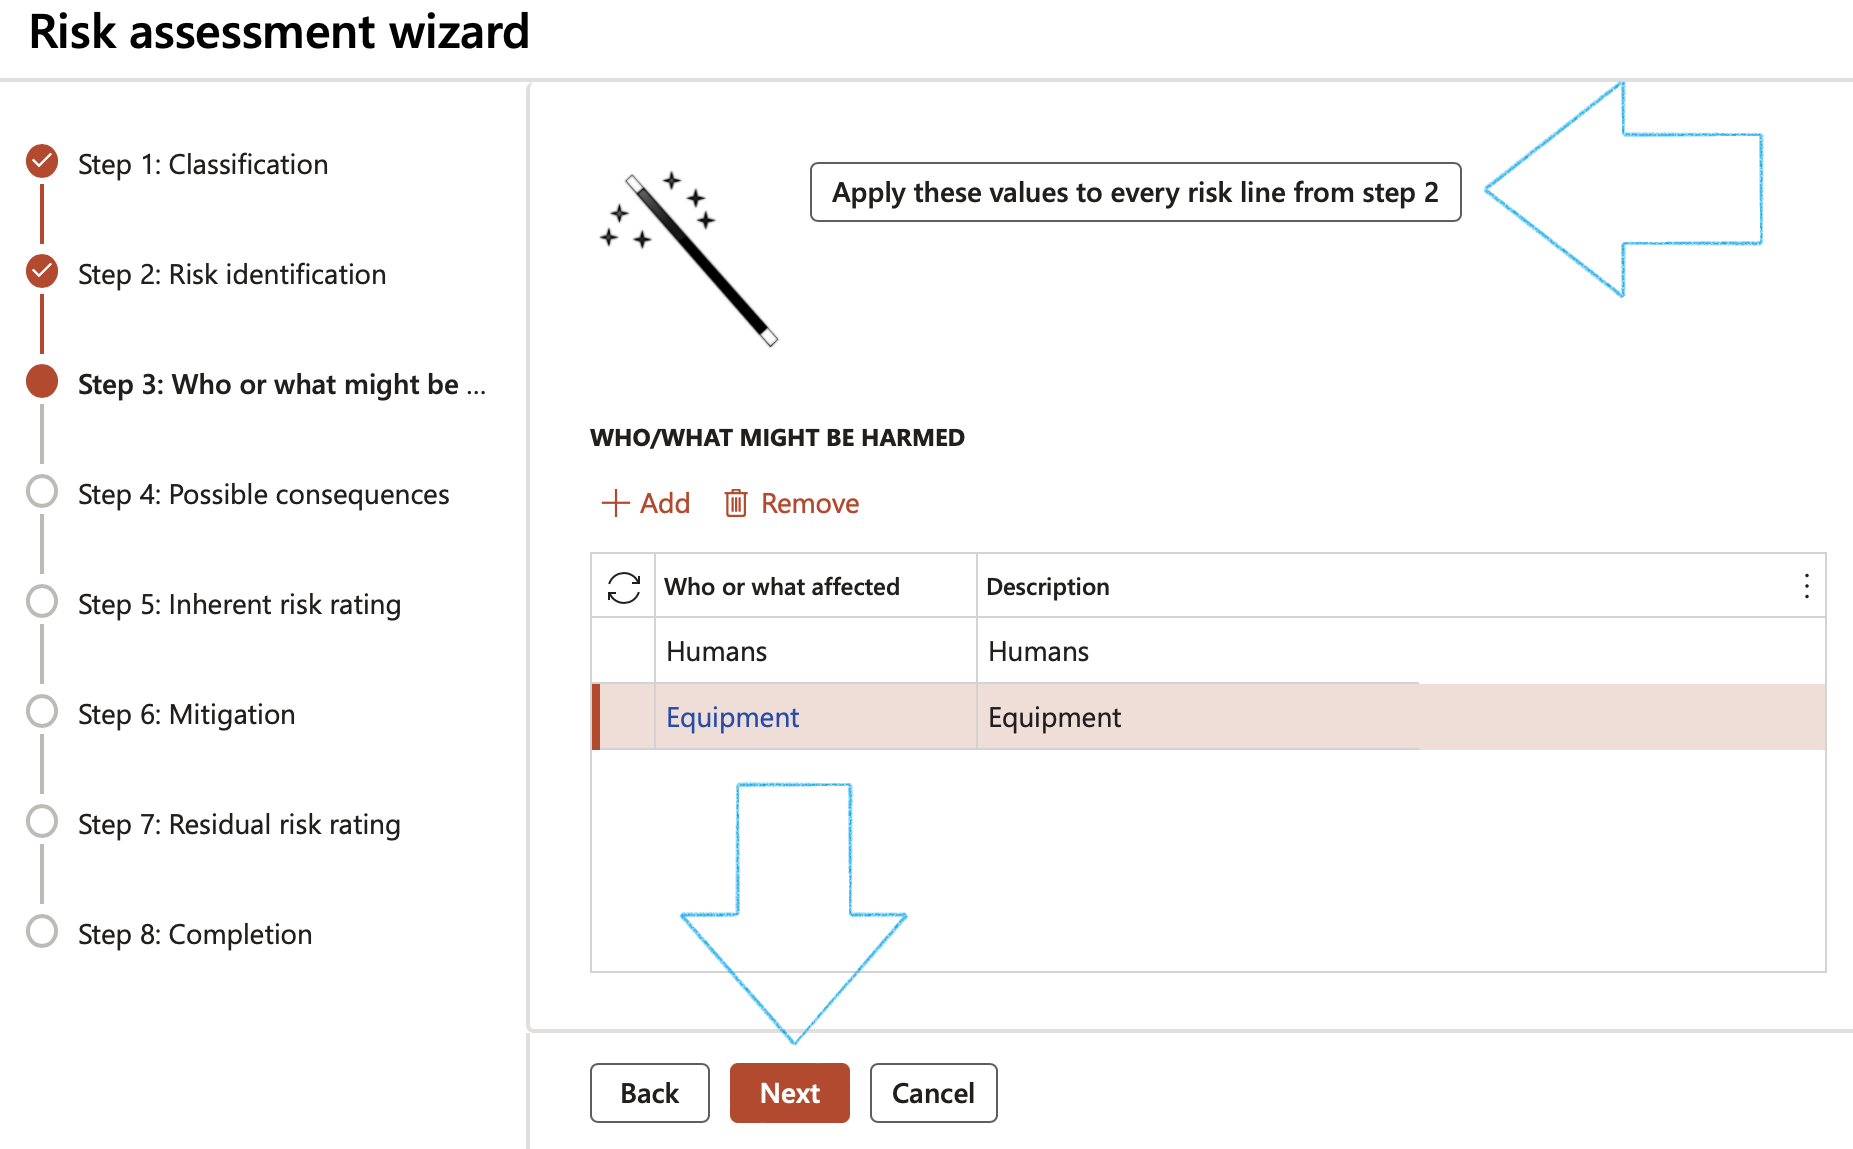
Step 3: Who or what might be harmed
- Click on the Add button
- Select Who or what affected from the dropdown list
- Click Next
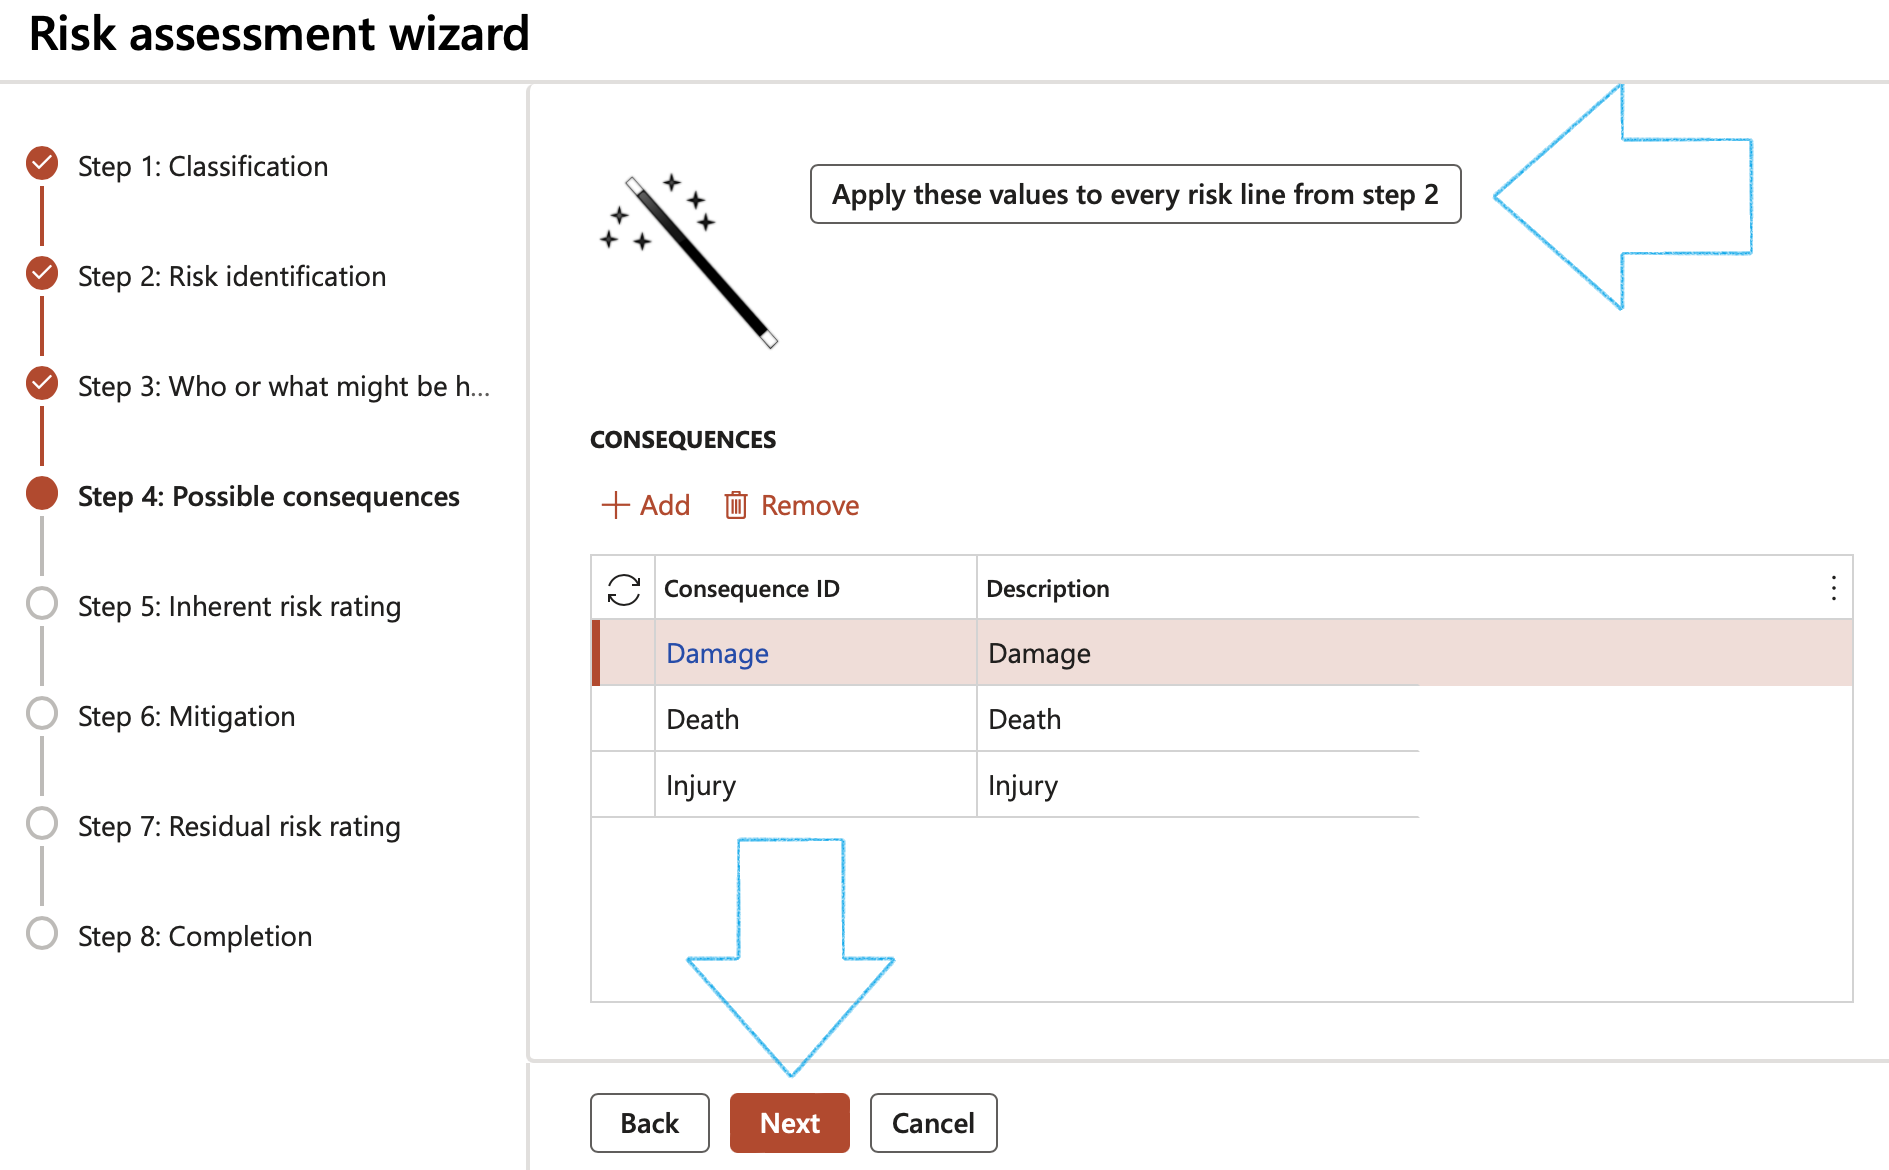
Step 4: Possible consequences
- Click in the Add button
- Select the relevant Consequences from the dropdown list
- Click Next
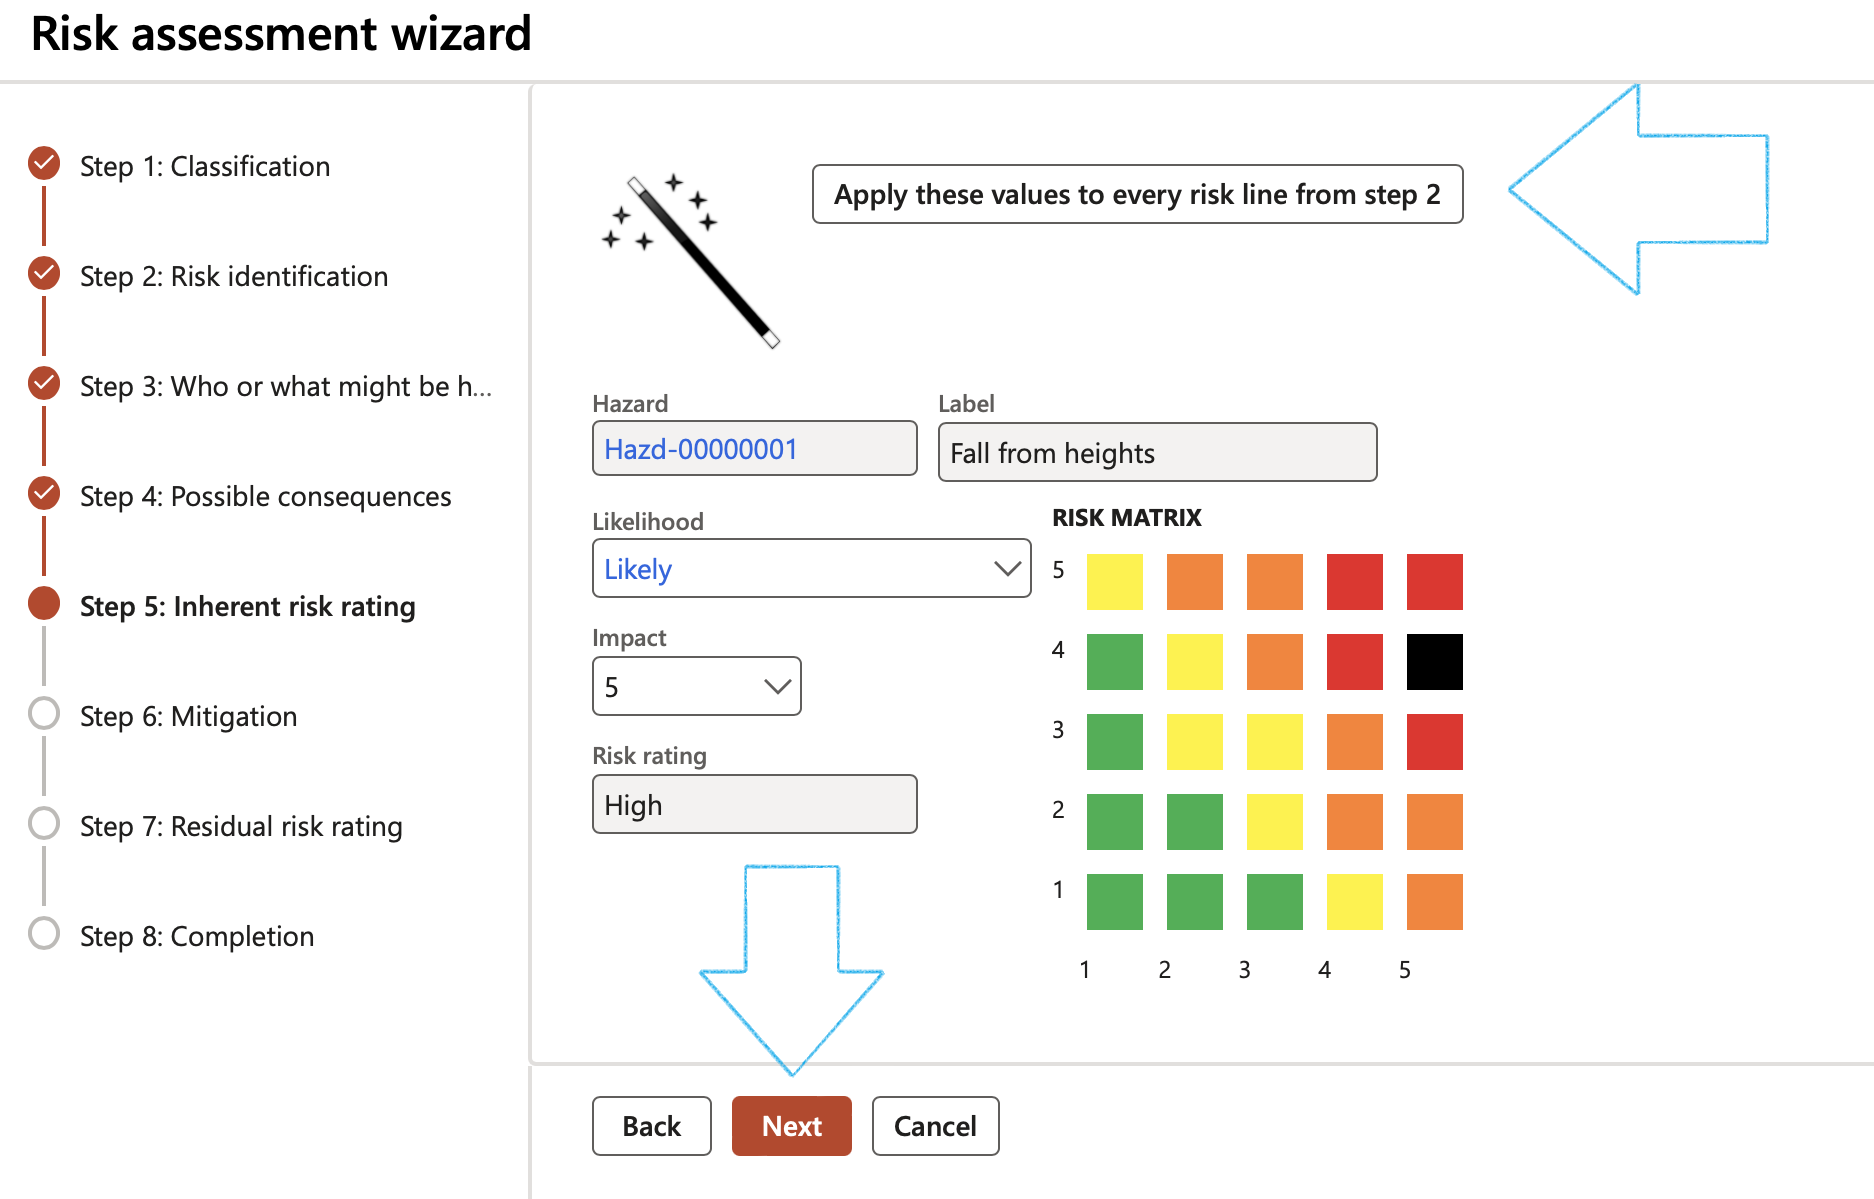
Step 5: Inherent risk rating
- Select the Likelihood and Impact ratings
- Click Next
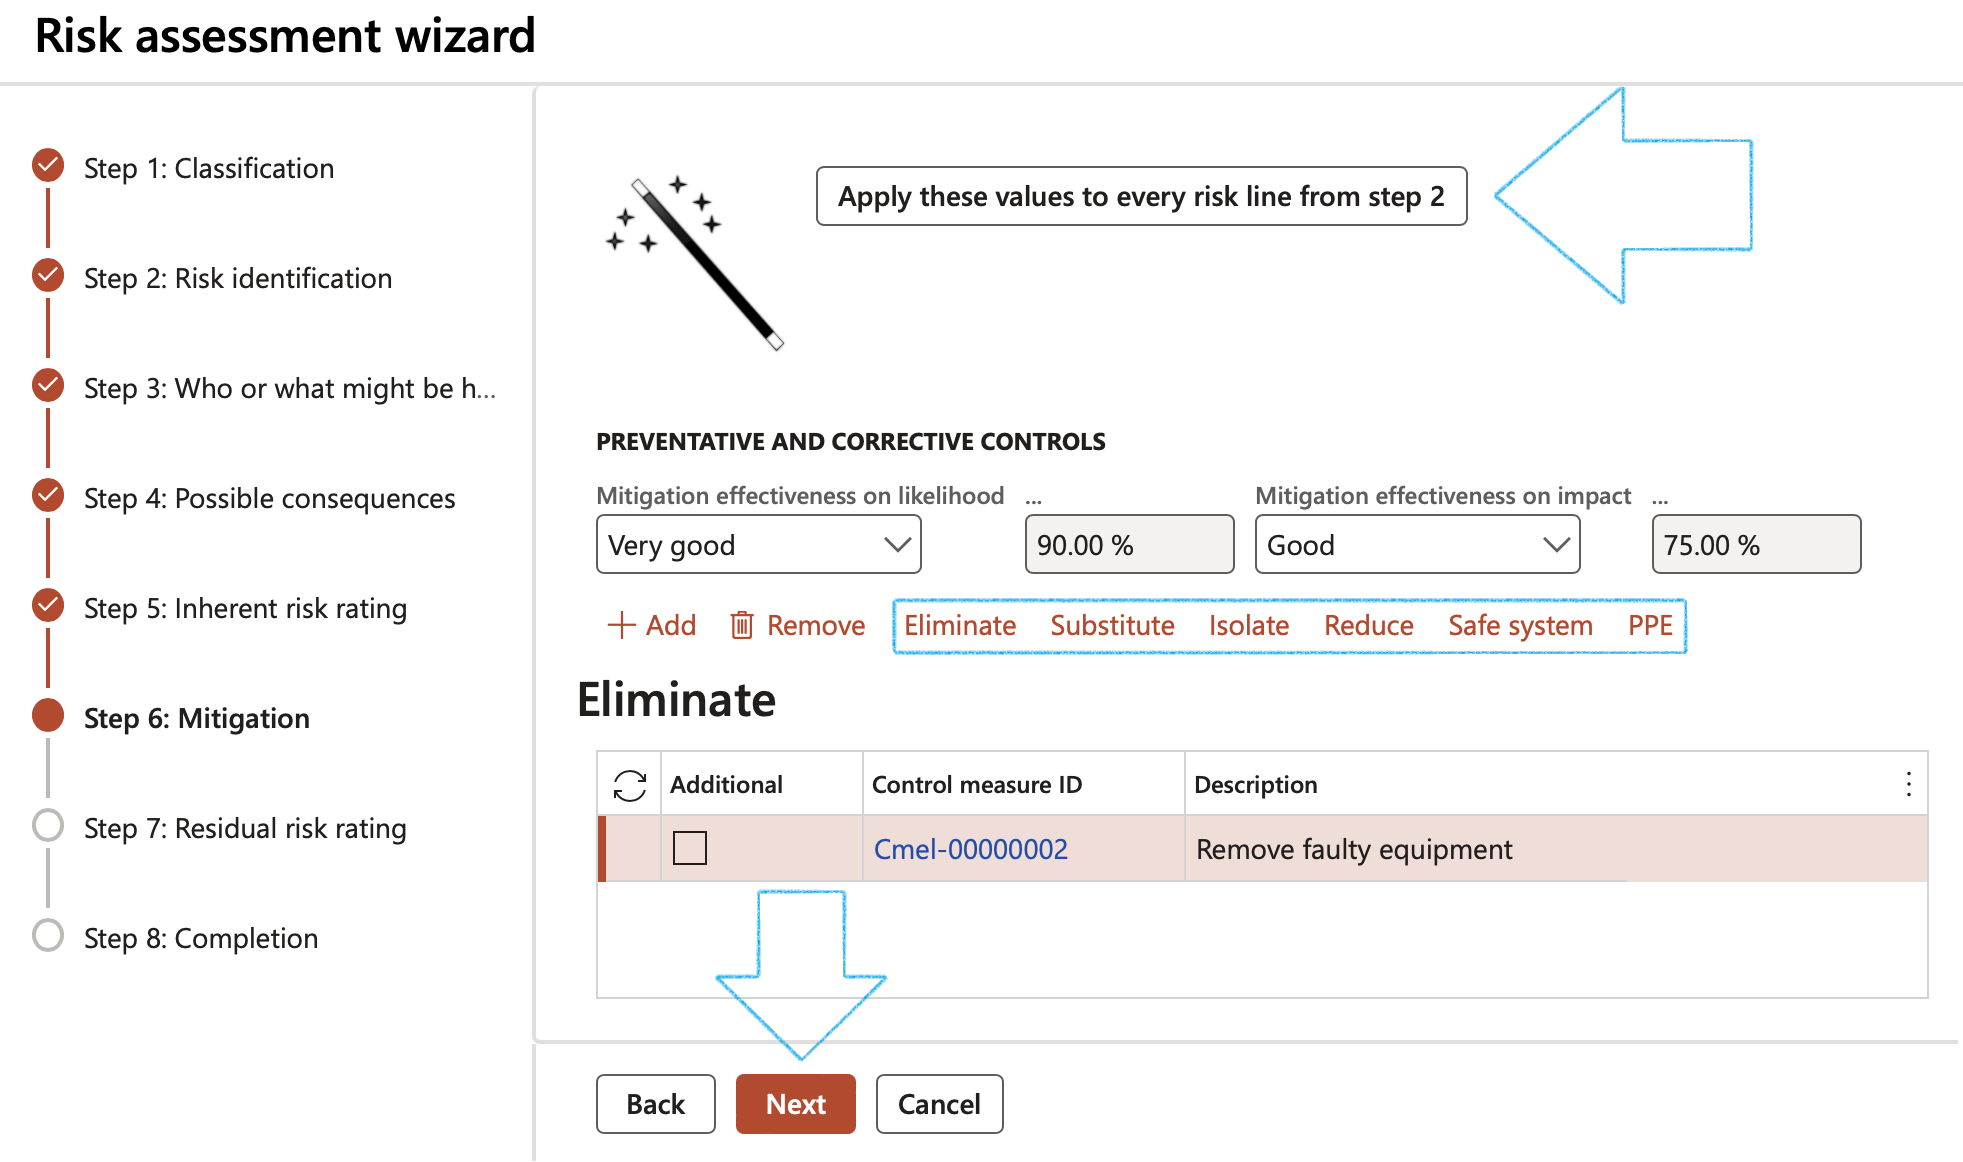
Step 6: Mitigation
- Select the relevant Mitigation effectiveness on likelihood
- Select the relevant Mitigation effectiveness on impact
- Click on the Add button and select the relevant Preventative and corrective controls
- Click Next
Step 7: Residual risk rating
- Select the Likelihood and Impact ratings
- Click Next

Step 8: Completion
- On the Completion form, click on the Finish button
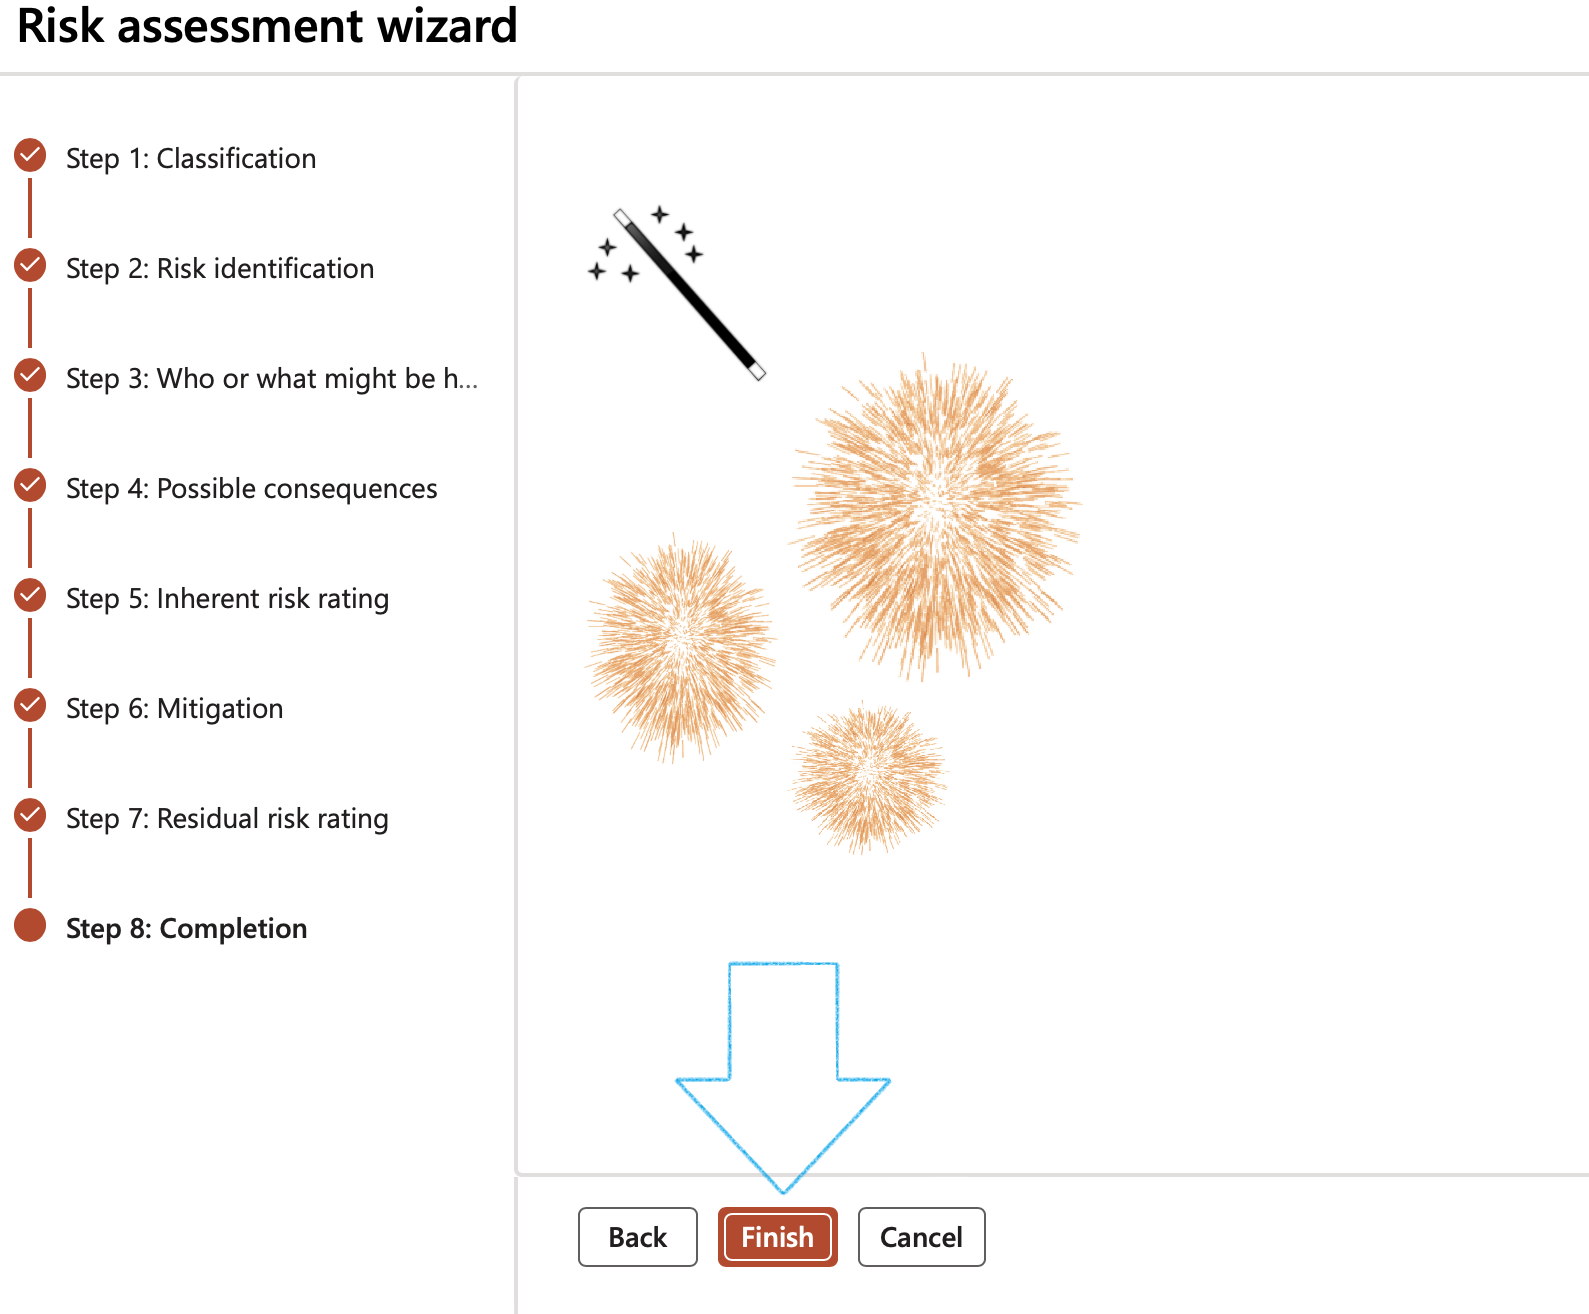
In order to go to the previous screen, the user can choose to click on the Back button at any stage.
When the Cancel button is clicked a warning will pop up to warn the user that all data that has been entered, will be lost.
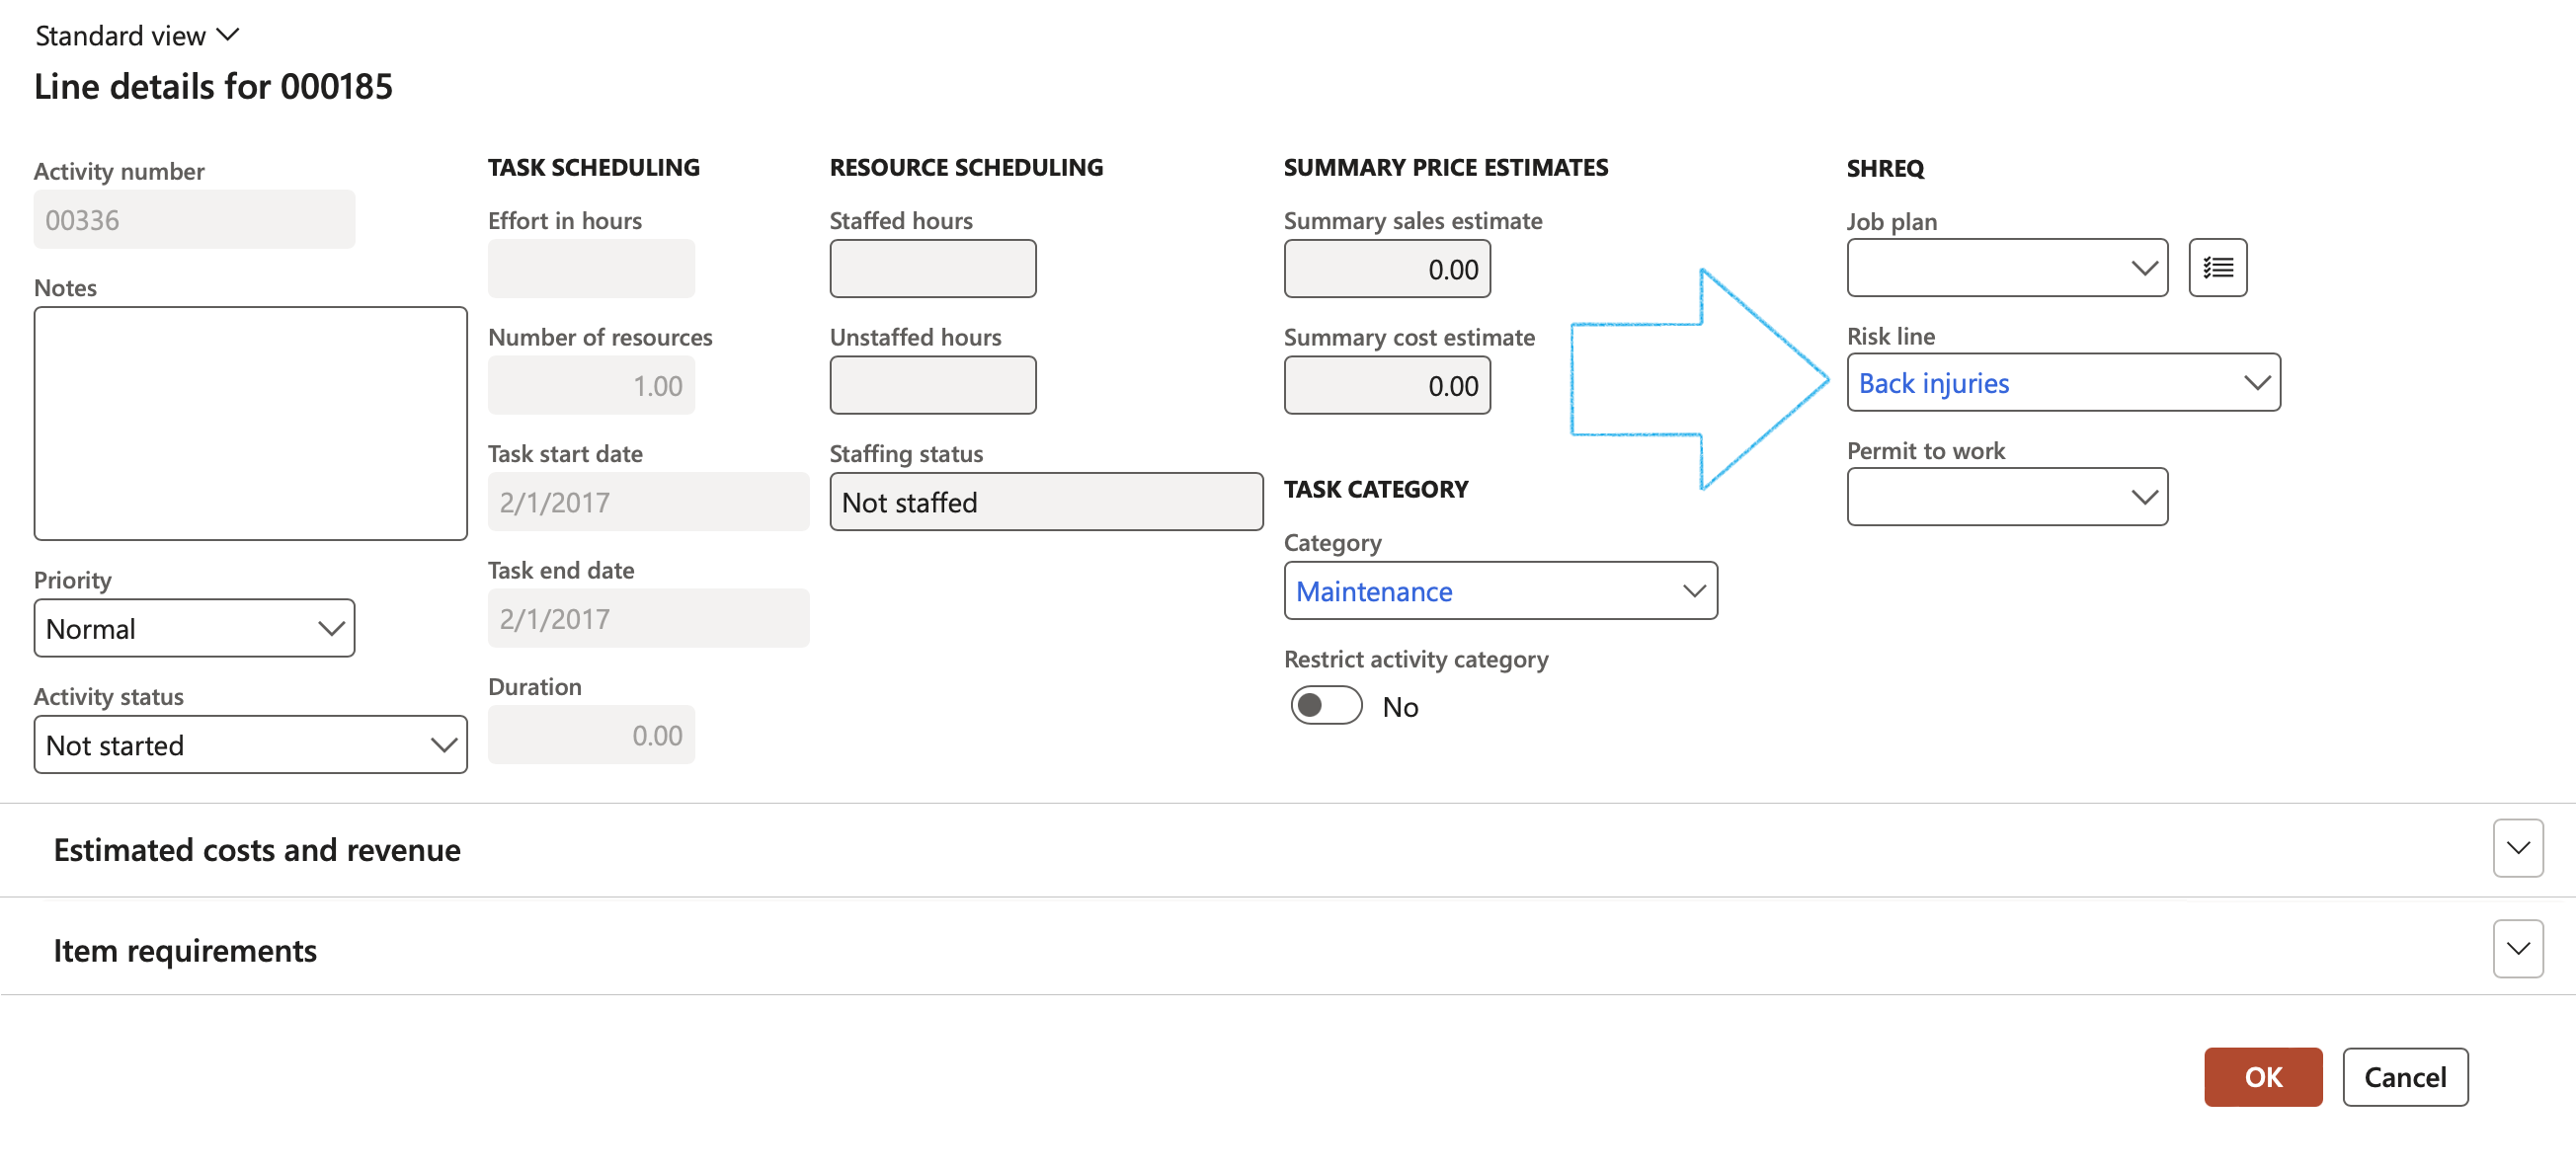
¶ Step 11: Using Risk assessments with Project WBS
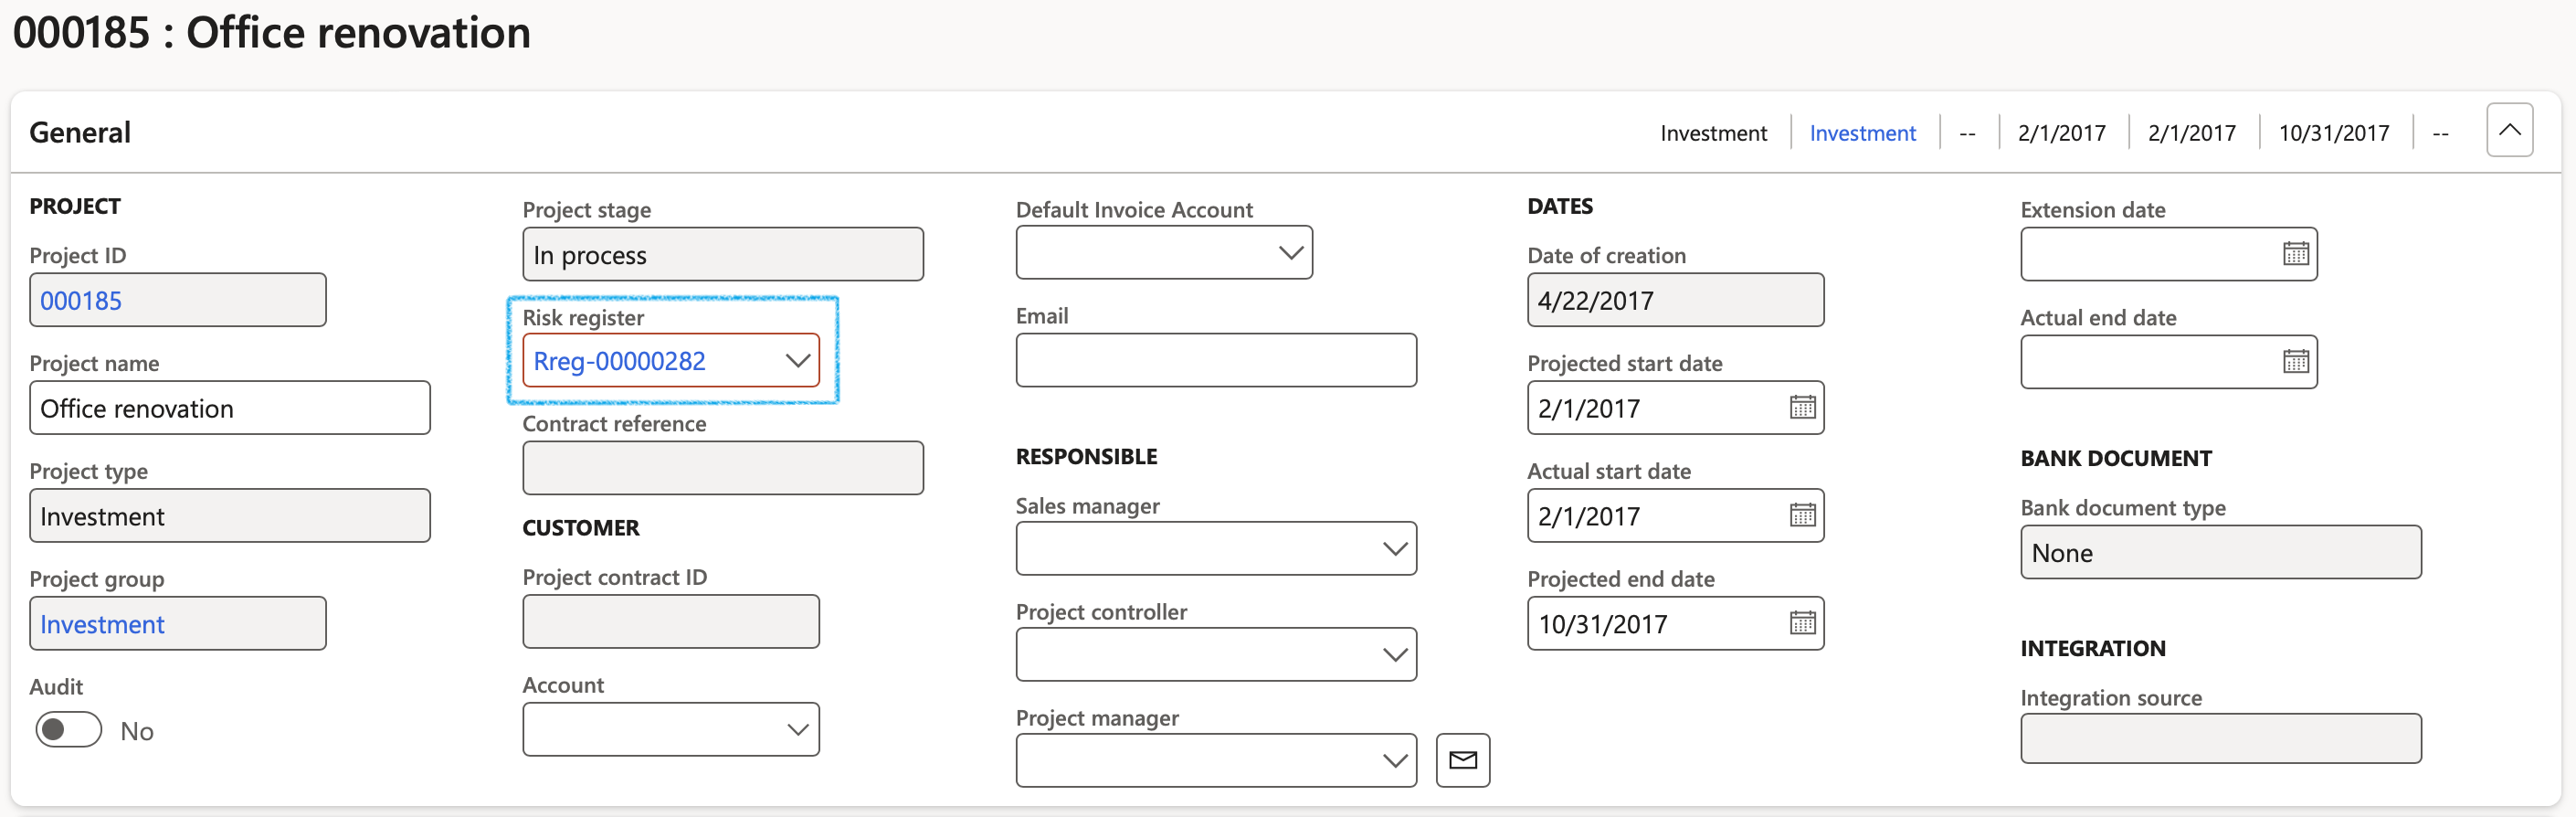
Go to: Project management and accounting > Projects > All projects
- Select the relevant project
- Under the General Fast tab, in the Risk register field, select the relevant Risk register from the dropdown list
- On the Action pane, click on the Plan tab
- On the Action pane, in the Activities group, click on the Work breakdown structure button

- On the Work breakdown structure, select the relevant WBS ID
- Click on the Details button
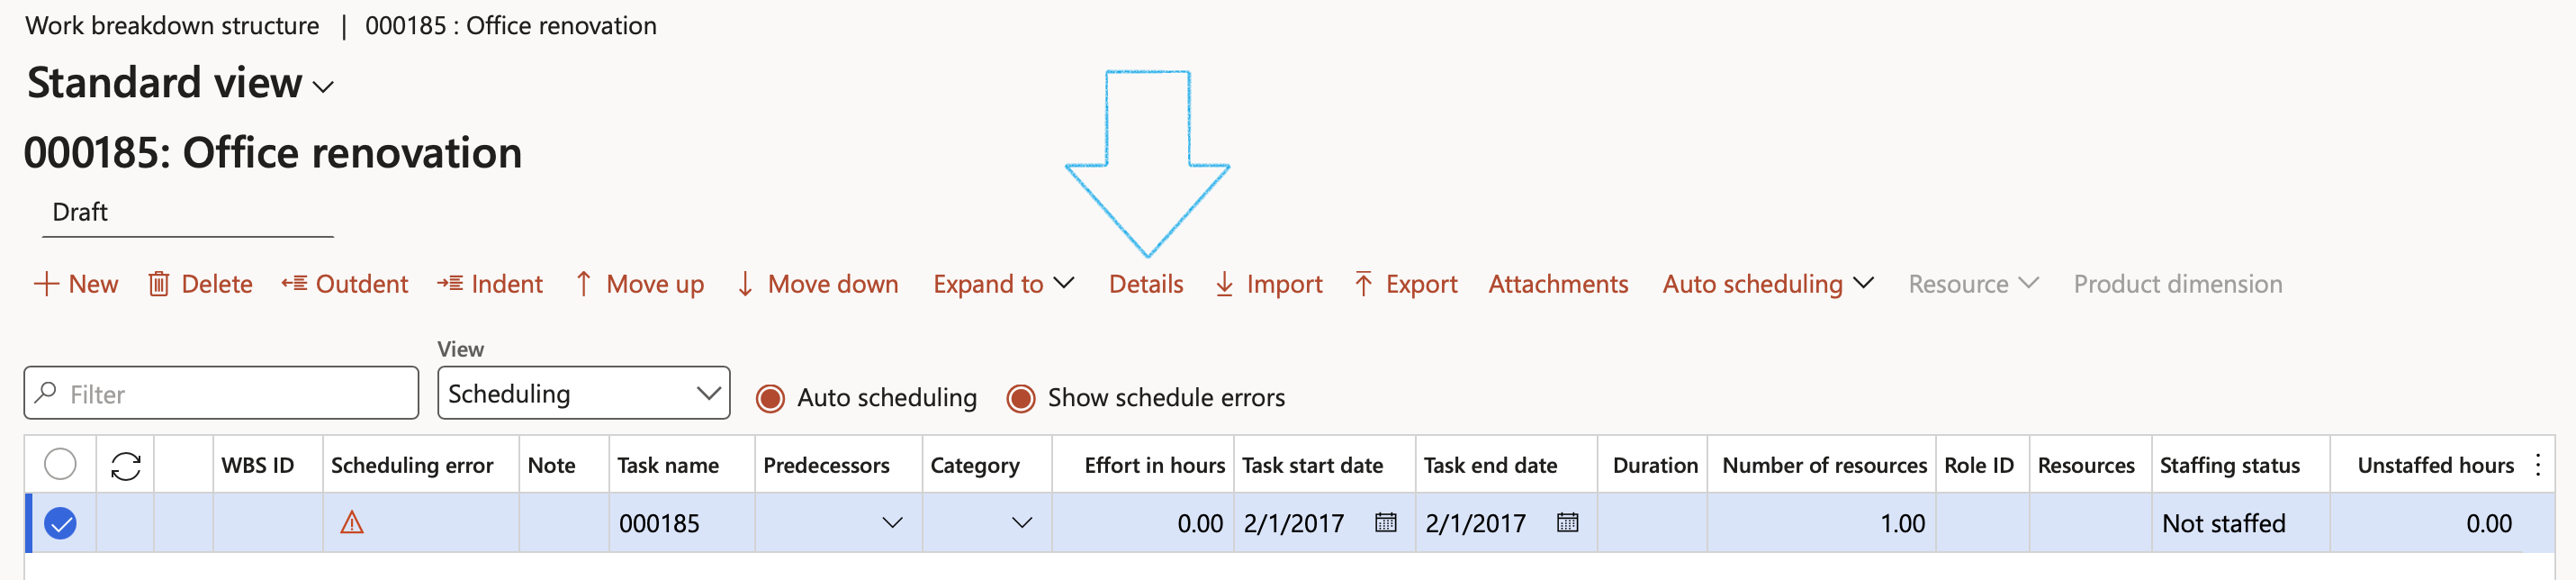
- On the Line details for 000185, in the Risk line field, select the relevant Risk line from the dropdown list
- Click on the OK button
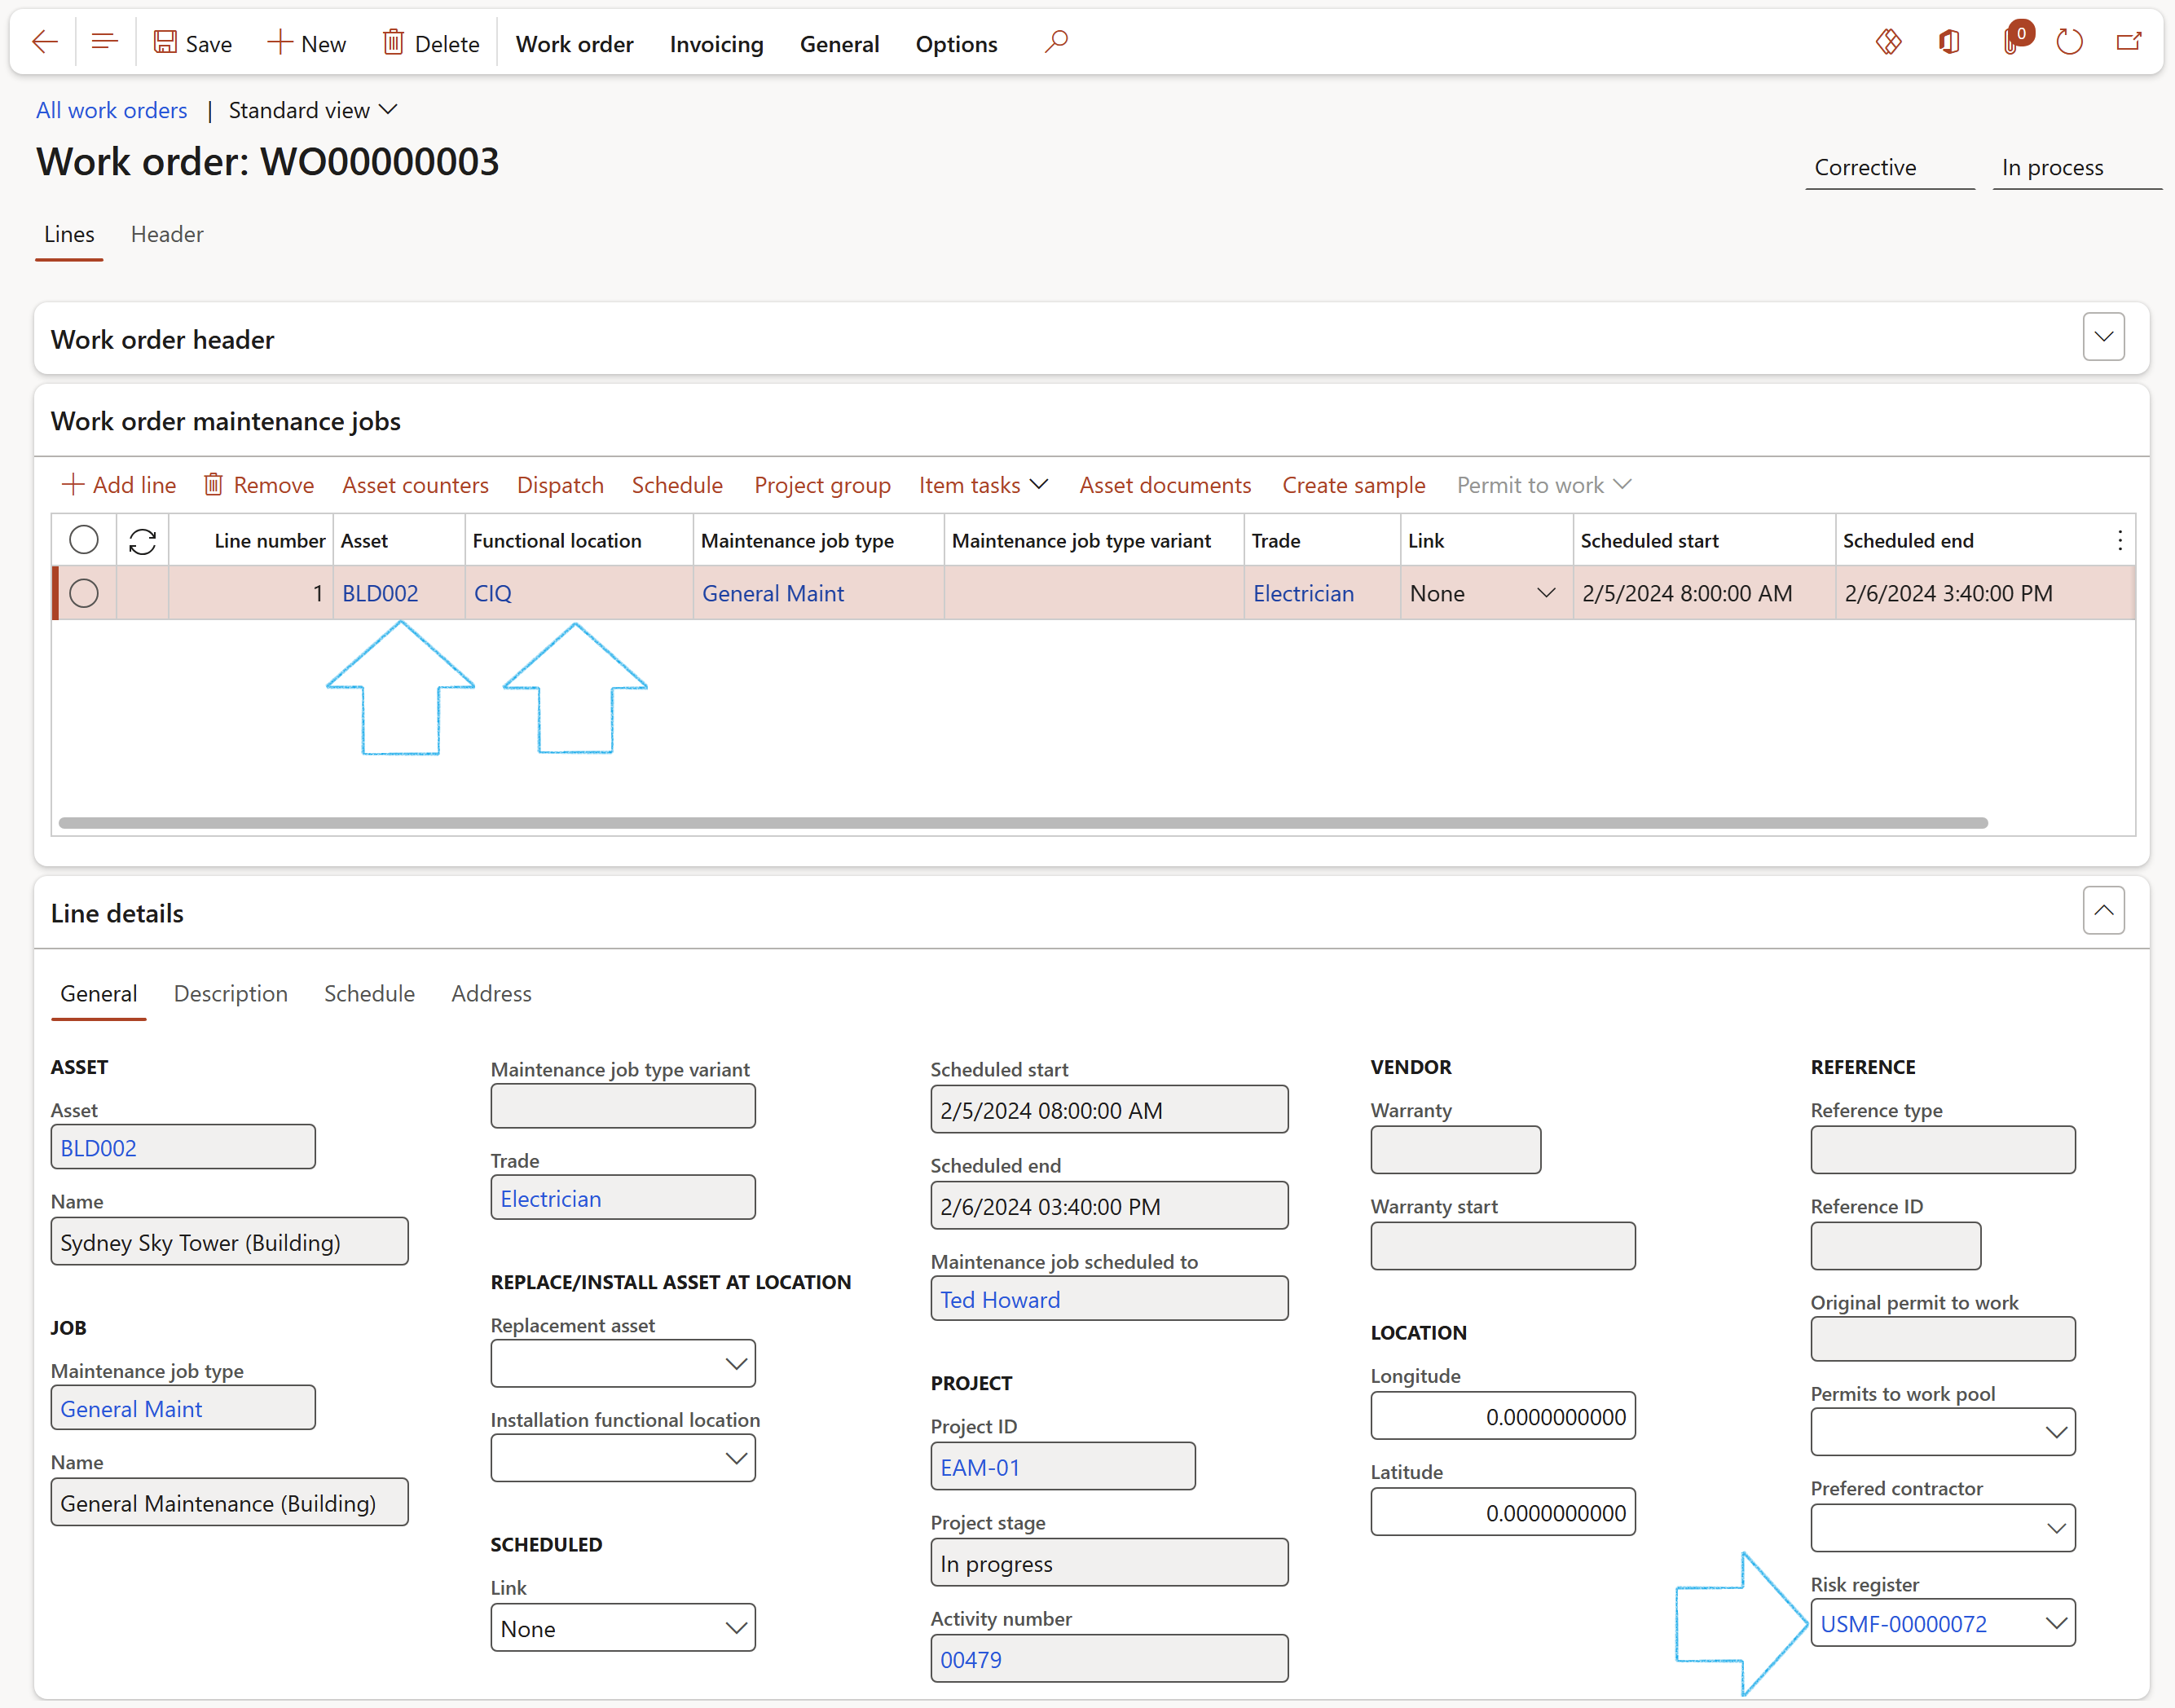
¶ Step 12: Using Risk assessments with Maintenance
Go to: Asset management > Work orders > All work orders
- Select the relevant Work order
- Open the Lines view
- Under the Line details Fast tab, select the relevant Risk register from the dropdown list
Filters on the Risk register field include:
- The Risk register must be approved
- The asset (selected on the Work order line) and it's functional location, must be the same as the object and location selected on the Risk register header. OR
- Risk registers with no functional location and no object selected on the header. OR
- Risk registers with no functional location but the same object selected on the header. OR
- Risk registers with no object but the same functional location selected on the header.
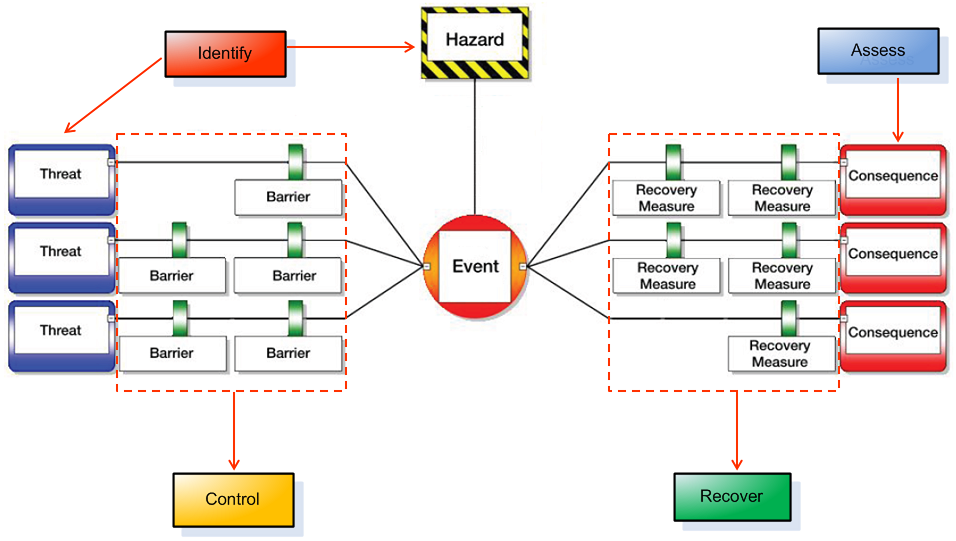
¶ Step 13: Bowtie risk assessment
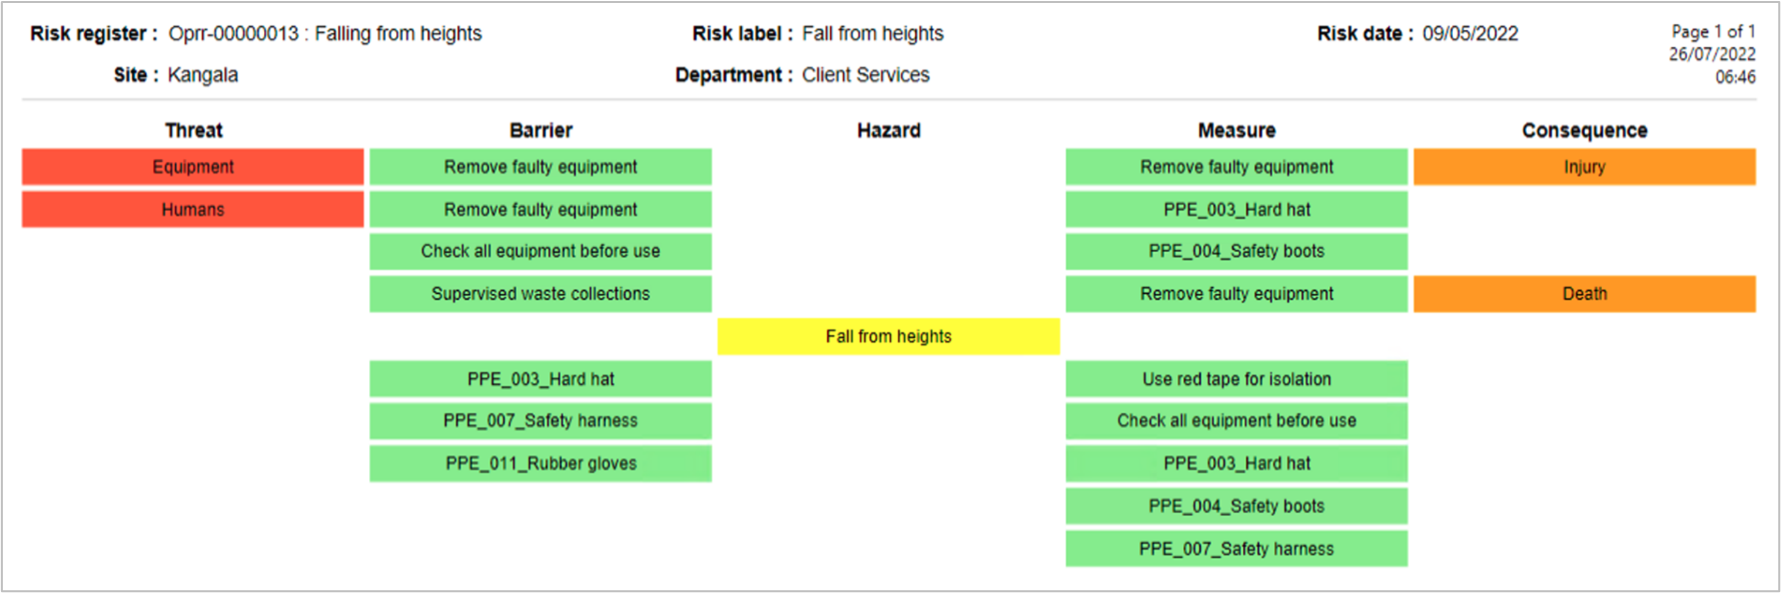
The Bowtie method is a risk evaluation method that can be used to analyze and demonstrate causal relationships in high-risk scenarios. The method takes its name from the shape of the diagram that you create, which looks like a men’s bowtie. A Bowtie diagram does two things. First of all, a Bowtie gives a visual summary of all plausible accident scenarios that could exist around a certain Hazard. Second, by identifying control measures the Bowtie displays what a company does to control those scenarios.
The Bowtie method includes at least four major steps: Identify, Assess, Control and Recover and start with a hazard.
Go to: GRC > Risk > Operational risk assessment
- If required, select a Baseline risk from the dropdown list. This functionality will display and bring forward all the risk/hazard data captured on the baseline entity, into the new risk assessment form.
- To indicate that you are doing a Bowtie risk assessment, move the Bowtie slider to Yes
- Users can override the default values from the baseline risk
- Additional hazard details can be entered
- Update the new information to an existing risk register
OR
- Click on the Create new register button to create a new Risk register

Only the FIRST Hazard in the grid will be recorded for the Bowtie risk
- The relevant Risk register will open in the Lines view
- Under the Bowtie analysis Fast tab, in the IDENTIFY -> THREATS field group, click on the Add button and add the relevant Threats
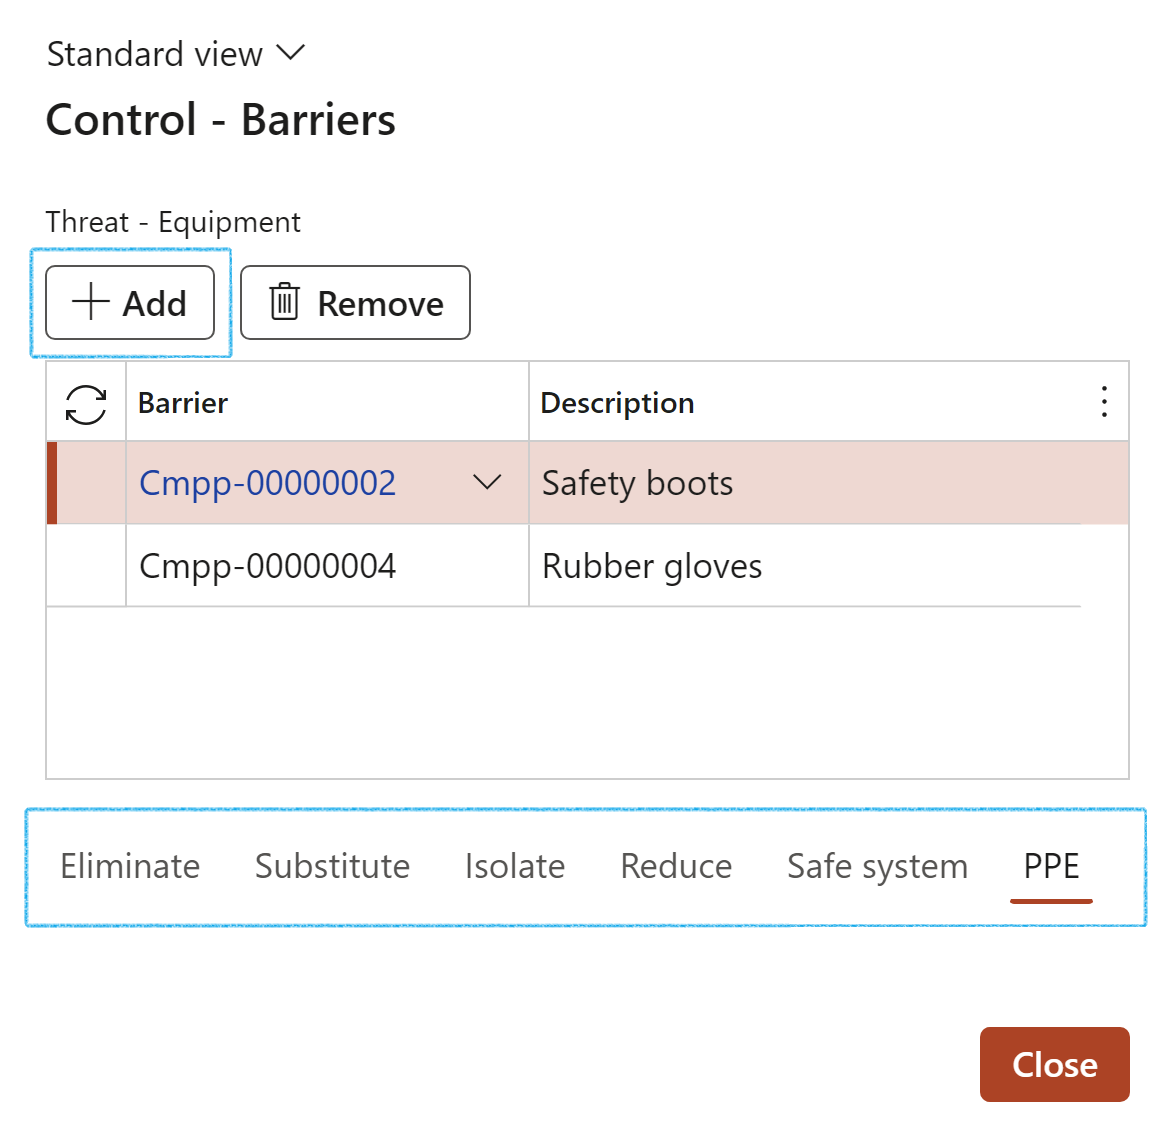
- Select the Threat that you want to add the Barrier to, then click on the Barriers button
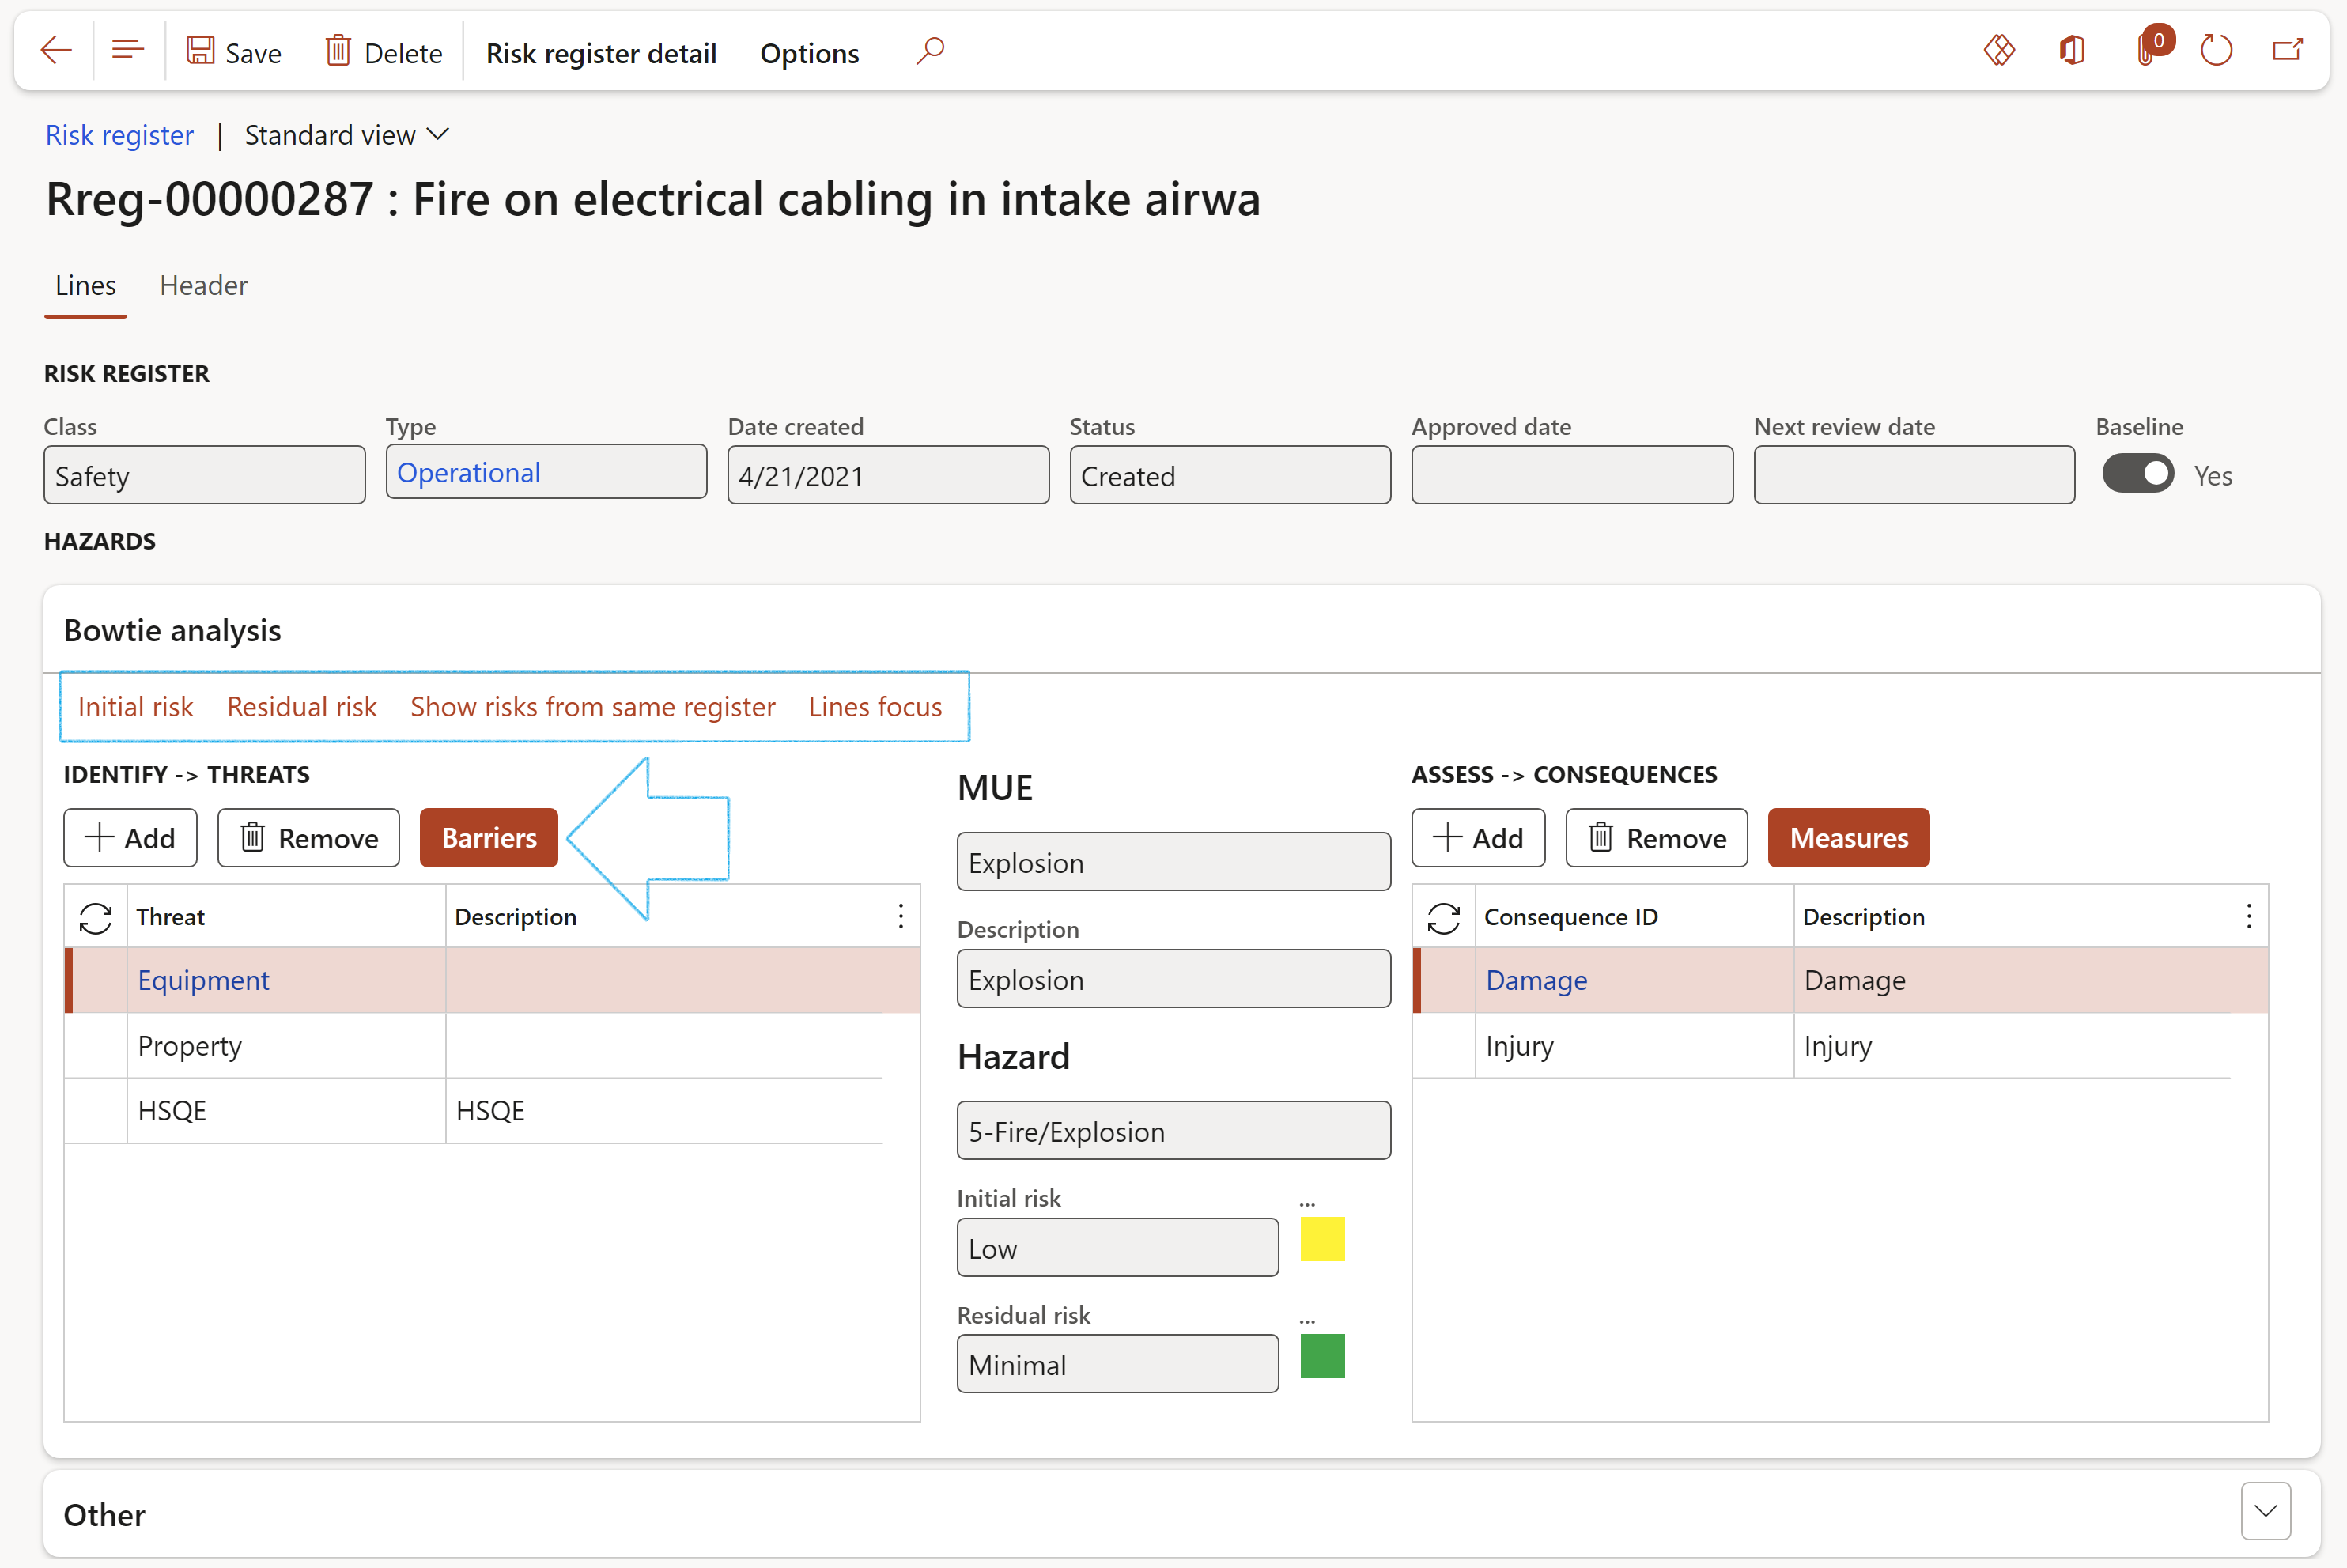
- On the Control – Barriers dialog, click on the relevant Control measure Index tab
- Click on the Add button and select the relevant Barriers from the dropdown lists
- Under the Bowtie analysis Fast tab, in the ASSESS -> CONSEQUENCES field group, click on the Add button and add the relevant Consequences
- Select the Consequence that you want to add the Measure to, then click on the Measures button

- On the Recovery – Measures dialog, click on the relevant Control measure Index tab
- Click on the Add button and select the relevant Measurements from the dropdown lists

- Expand the Mitigation Fast tab (Not Bowtie view)
- The Action due date = Planned end date
- Only the selected Threat or Consequence lines will be displayed under the Mitigation Fast tab
- Complete the Risk register Header view as described in Step 5 above
To view the list page displaying all Bowtie registers:
Go to: GRC > Risk > Registers > All bowtie registers

Where risk assessments can be done from:
| Incidents | Normally back-office staff will Interpret “all reported incidents” - On the Incident tab on the Action pane |
| Inspections | On the Inspection journal, on the header |
| Permit to work | On the header on the Action pane |
| Area of Compliance | On the Risk source Fast tab of the Risk register lines, users can select the compliance standard |
| Projects | On the Manage tab on the Action pane |
| Investigations | On the Investigation tab on the Action pane |
| Activities | On the Activity tab on the Action pane (useful for COSHH) |
| Internal Audit RCM | Auditors can do a risk assessment on the Risk Control Matrix |
| Manually | Using the menu step as per this Wiki page |
|
Using the menu step under Risk |
|
In the Action pane |
¶ Step 14: Risk worksheet
Go to: GRC > Risk > Worksheets > Operational risk worksheet
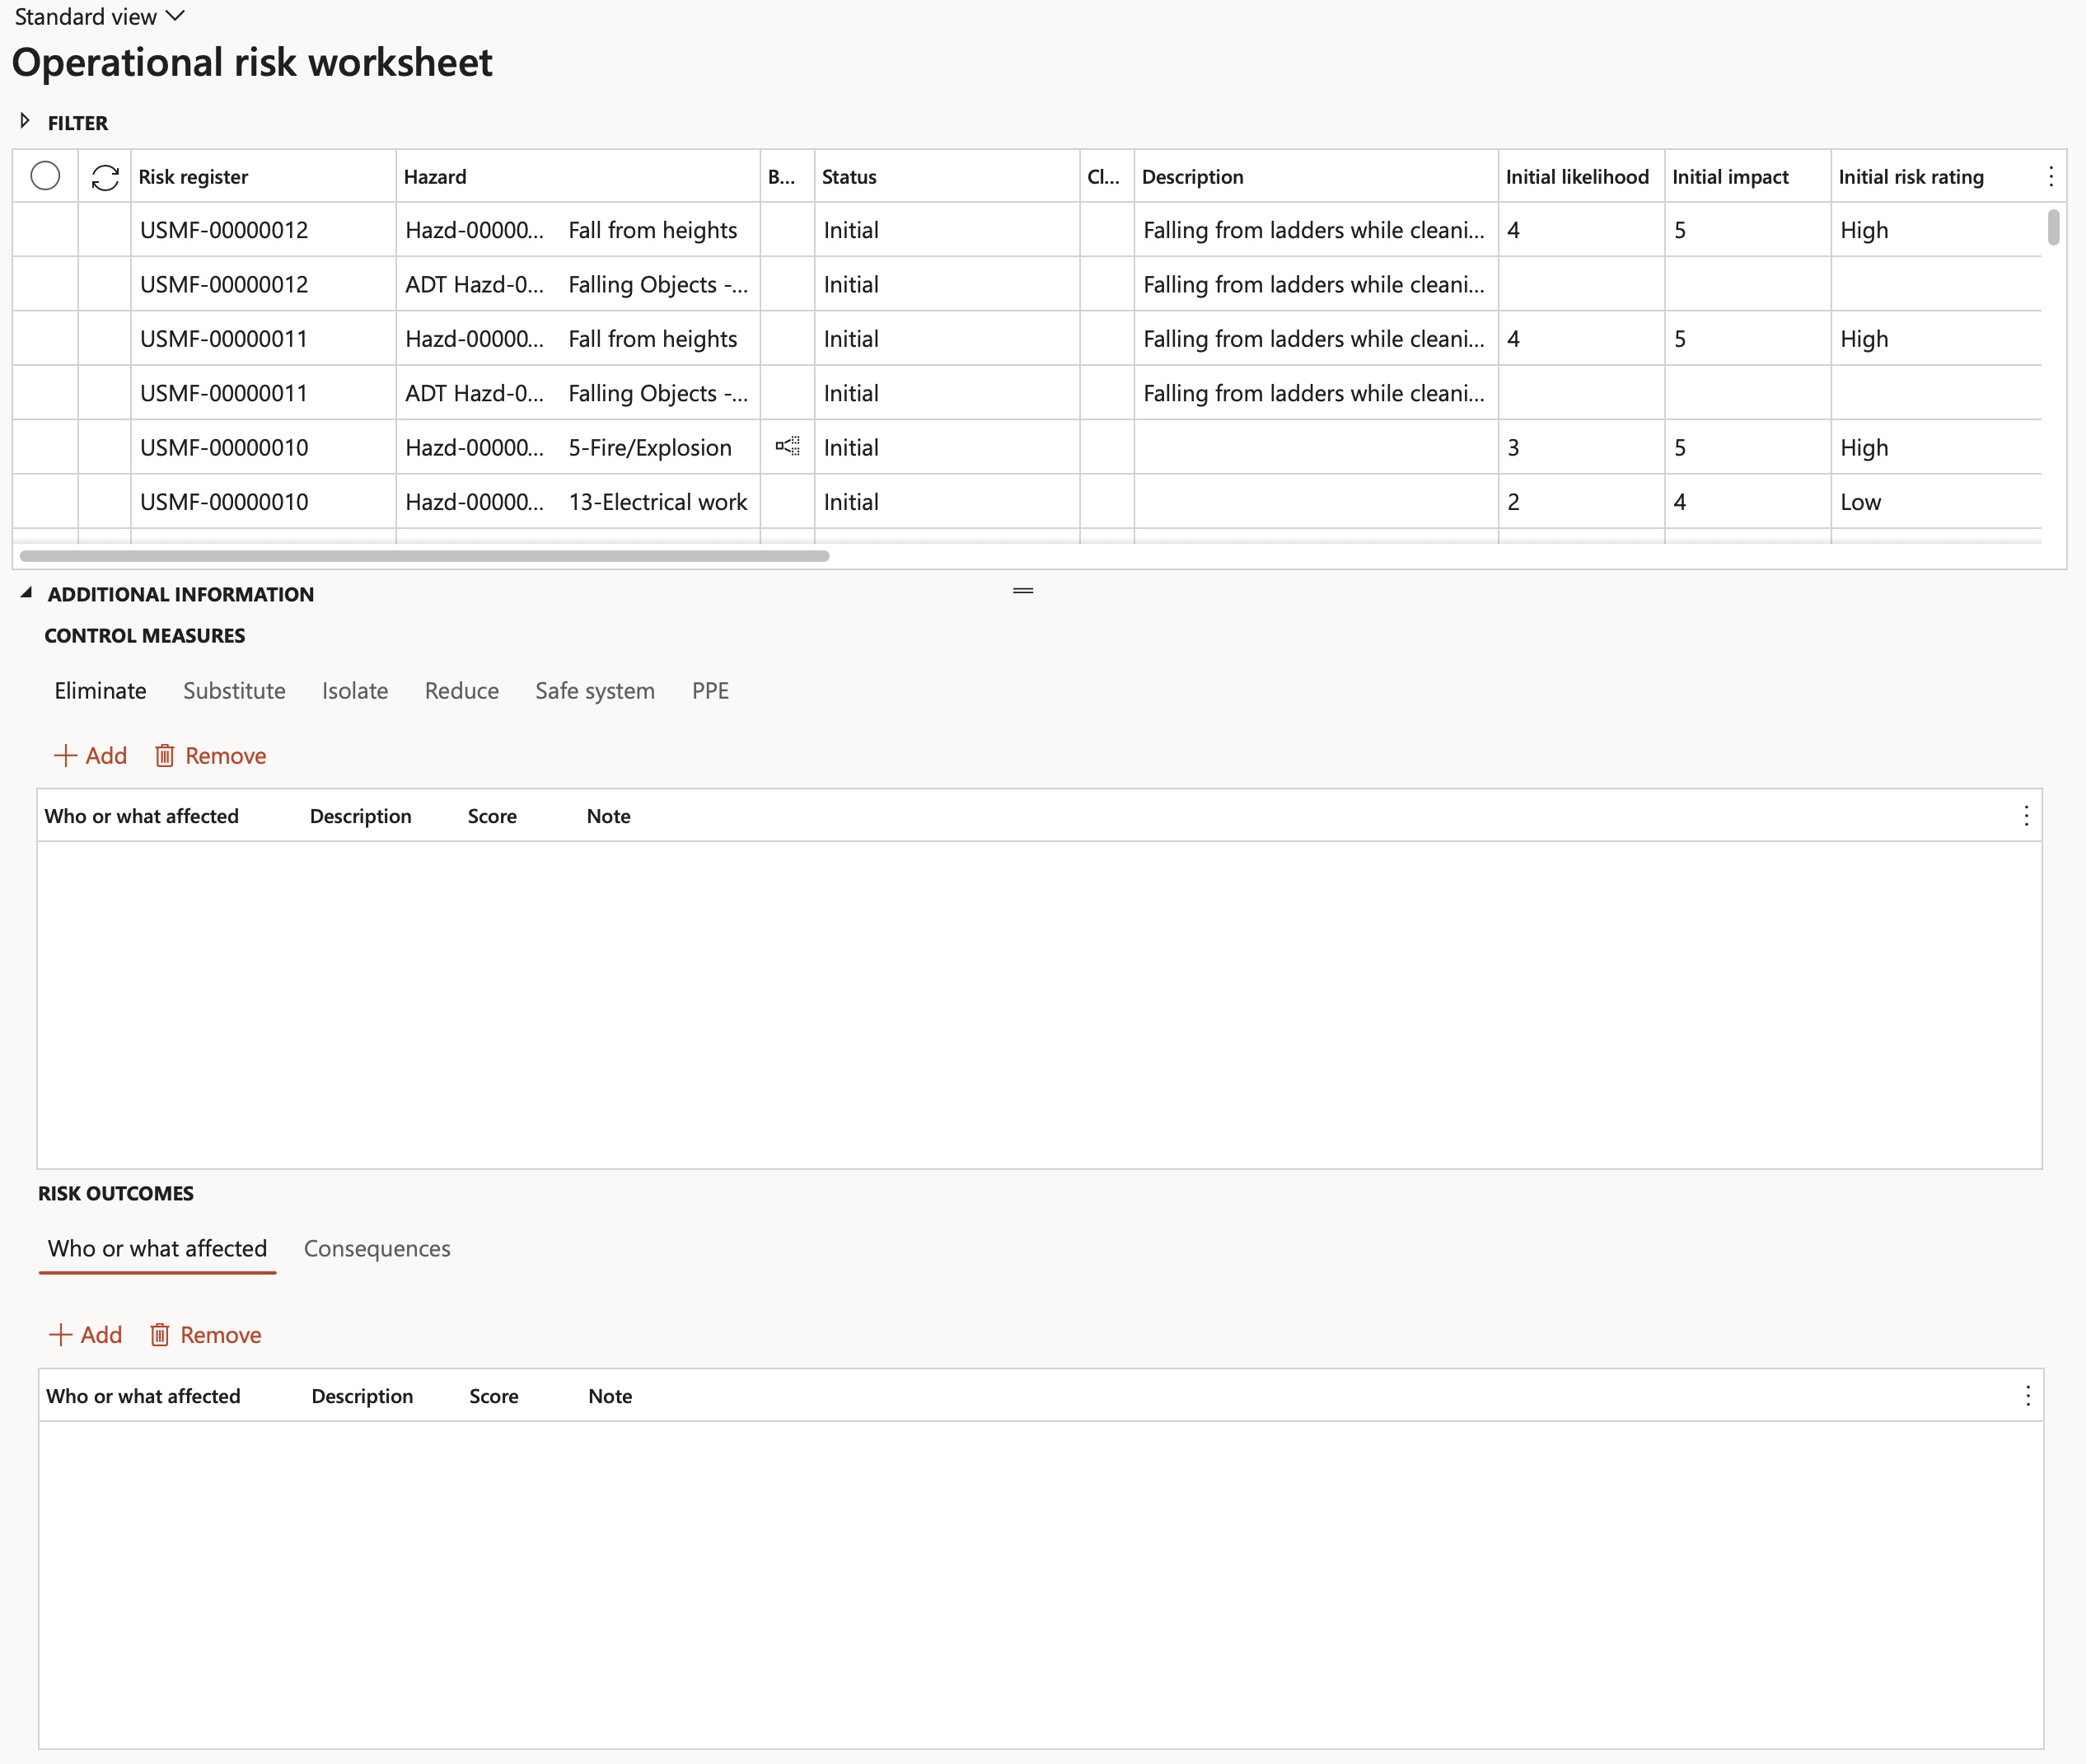
The same information as per Risk register can be worked on via the Risk worksheet. The objective of the risk worksheet is to have all risks/hazards displayed in a flat list (regardless of which Risk register they belong to) and to manage these risks via controls.
Refer to the GRC page on Risk worksheet for a step-by-step guide.
All risks of class Finance and Enterprise are excluded from the above and from the Risk analysis
¶ Step 15: Risk management report
The risk management report is an important document in the risk management file and acts as a check or quality control which provides an assurance that the risk management plan has been implemented correctly, the overall residual risk is acceptable, and that mechanisms are in place for the compilation of production and post-production information.
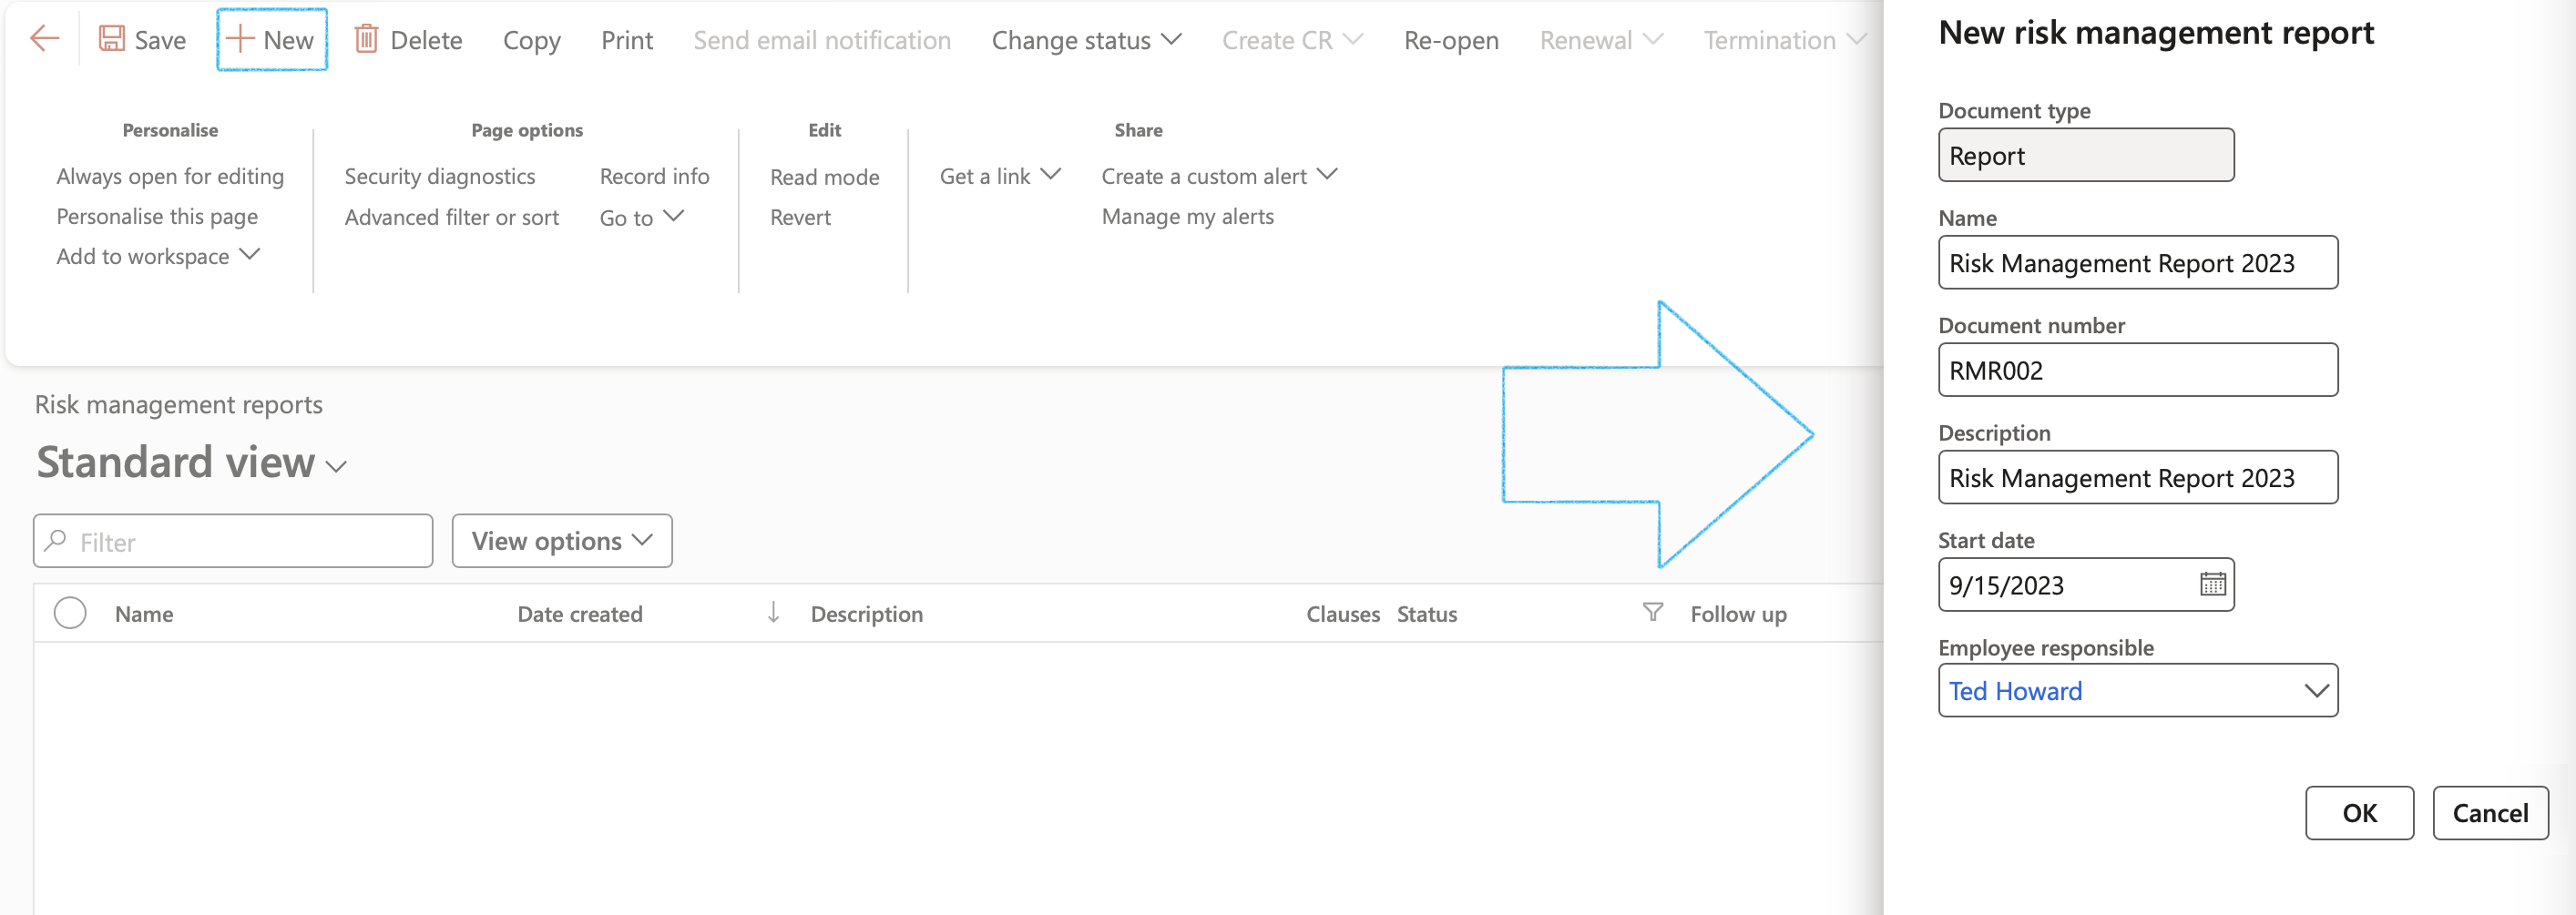
Go to: GRC > Risk > Risk management reports
- On the Action pane, click on the New button
- On the New risk management report dialog:
- Enter the Name of the report
- Enter the Document number
- Enter a brief Description for the report
- Select the Employee responsible for the report, from the dropdown list
- Click on OK
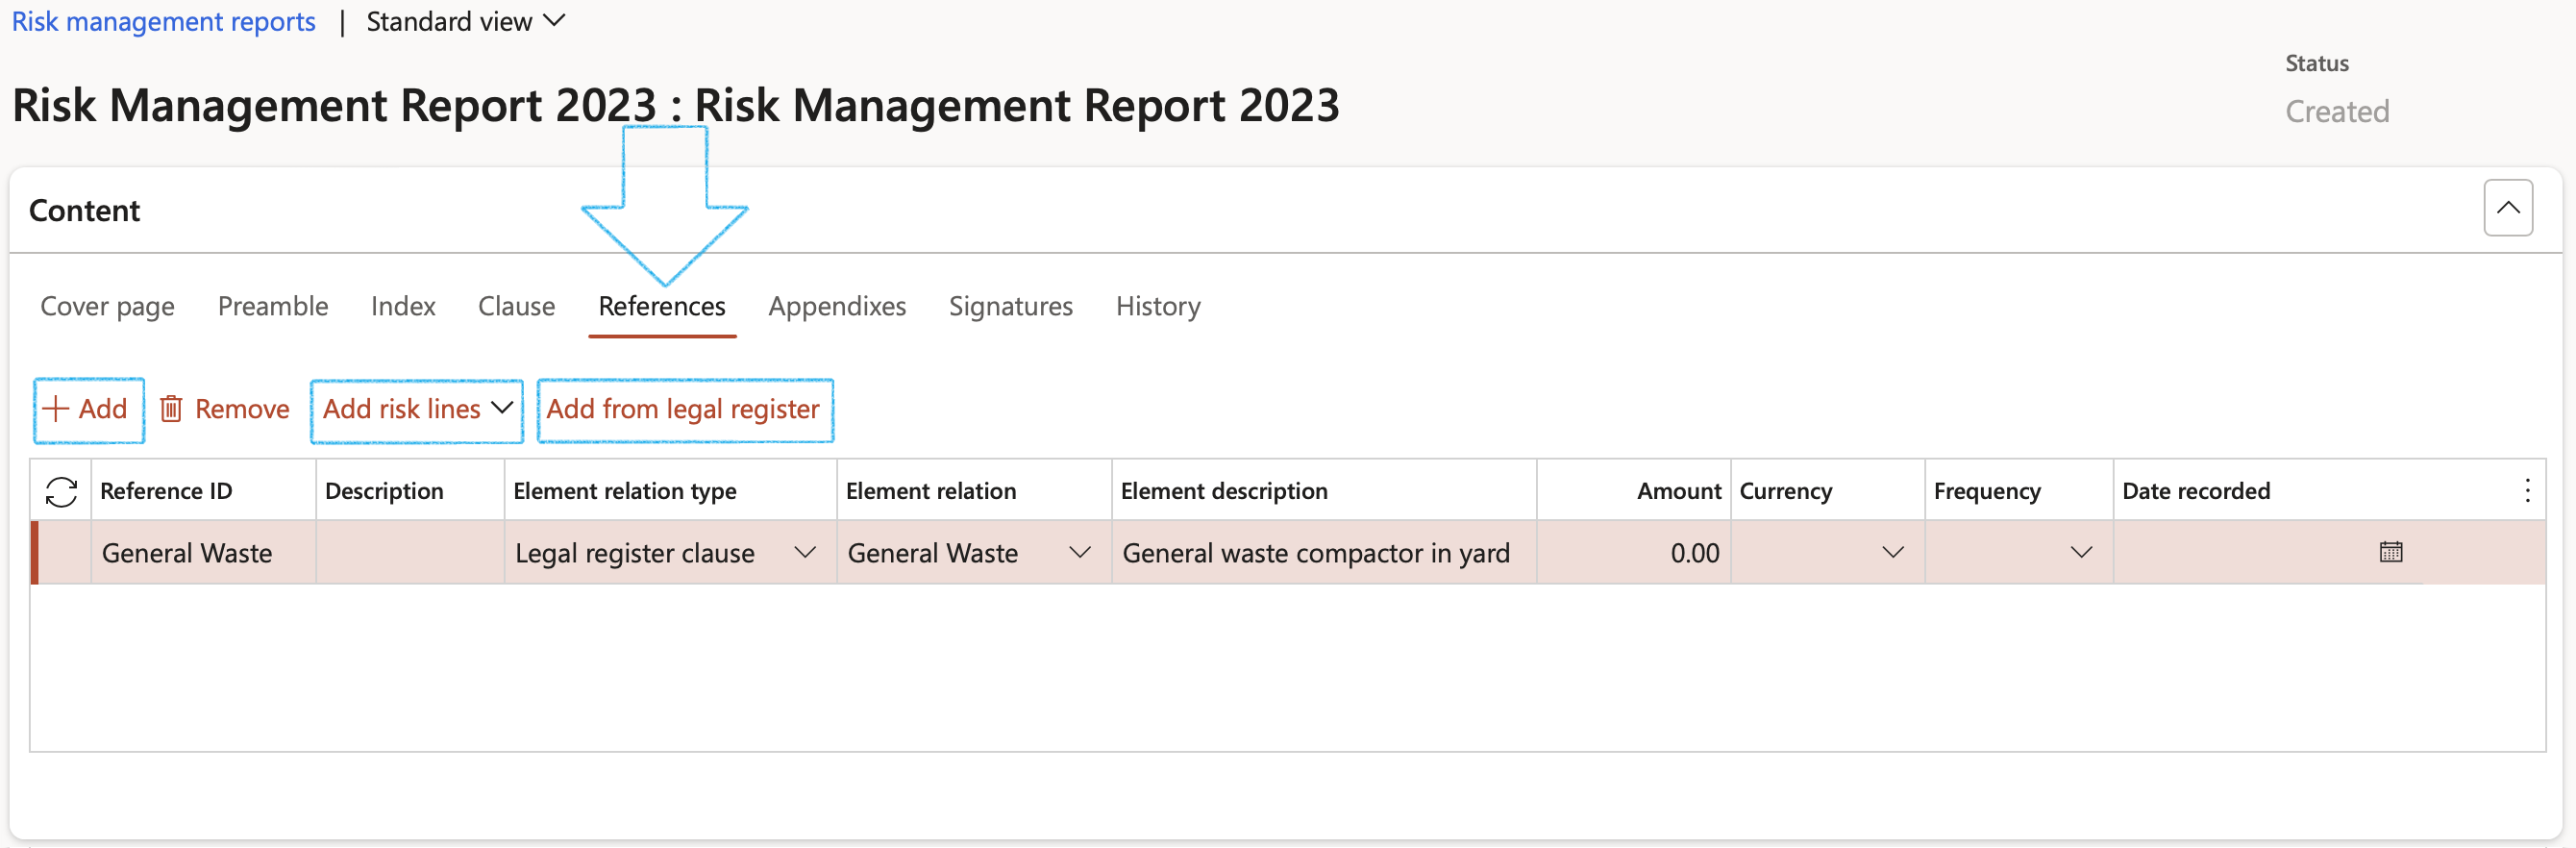
- On the Risk management report form, under the Content Fast tab, open the References Index tab
- The user can add lines one by one manually by clicking on the Add button in the button strip
- Enter a Reference ID
- Enter a brief Description for the reference
- In the Element relation type field, select the relevant type from the dropdown list
- Select the relevant Element relation from the dropdown list
OR
- Add Risk lines from the risk register linked to the Department selected under the Cover page Index tab
OR
- Add clauses from the Legal register linked to the Department selected under the Cover page Index tab
¶ Reports and Inquiries
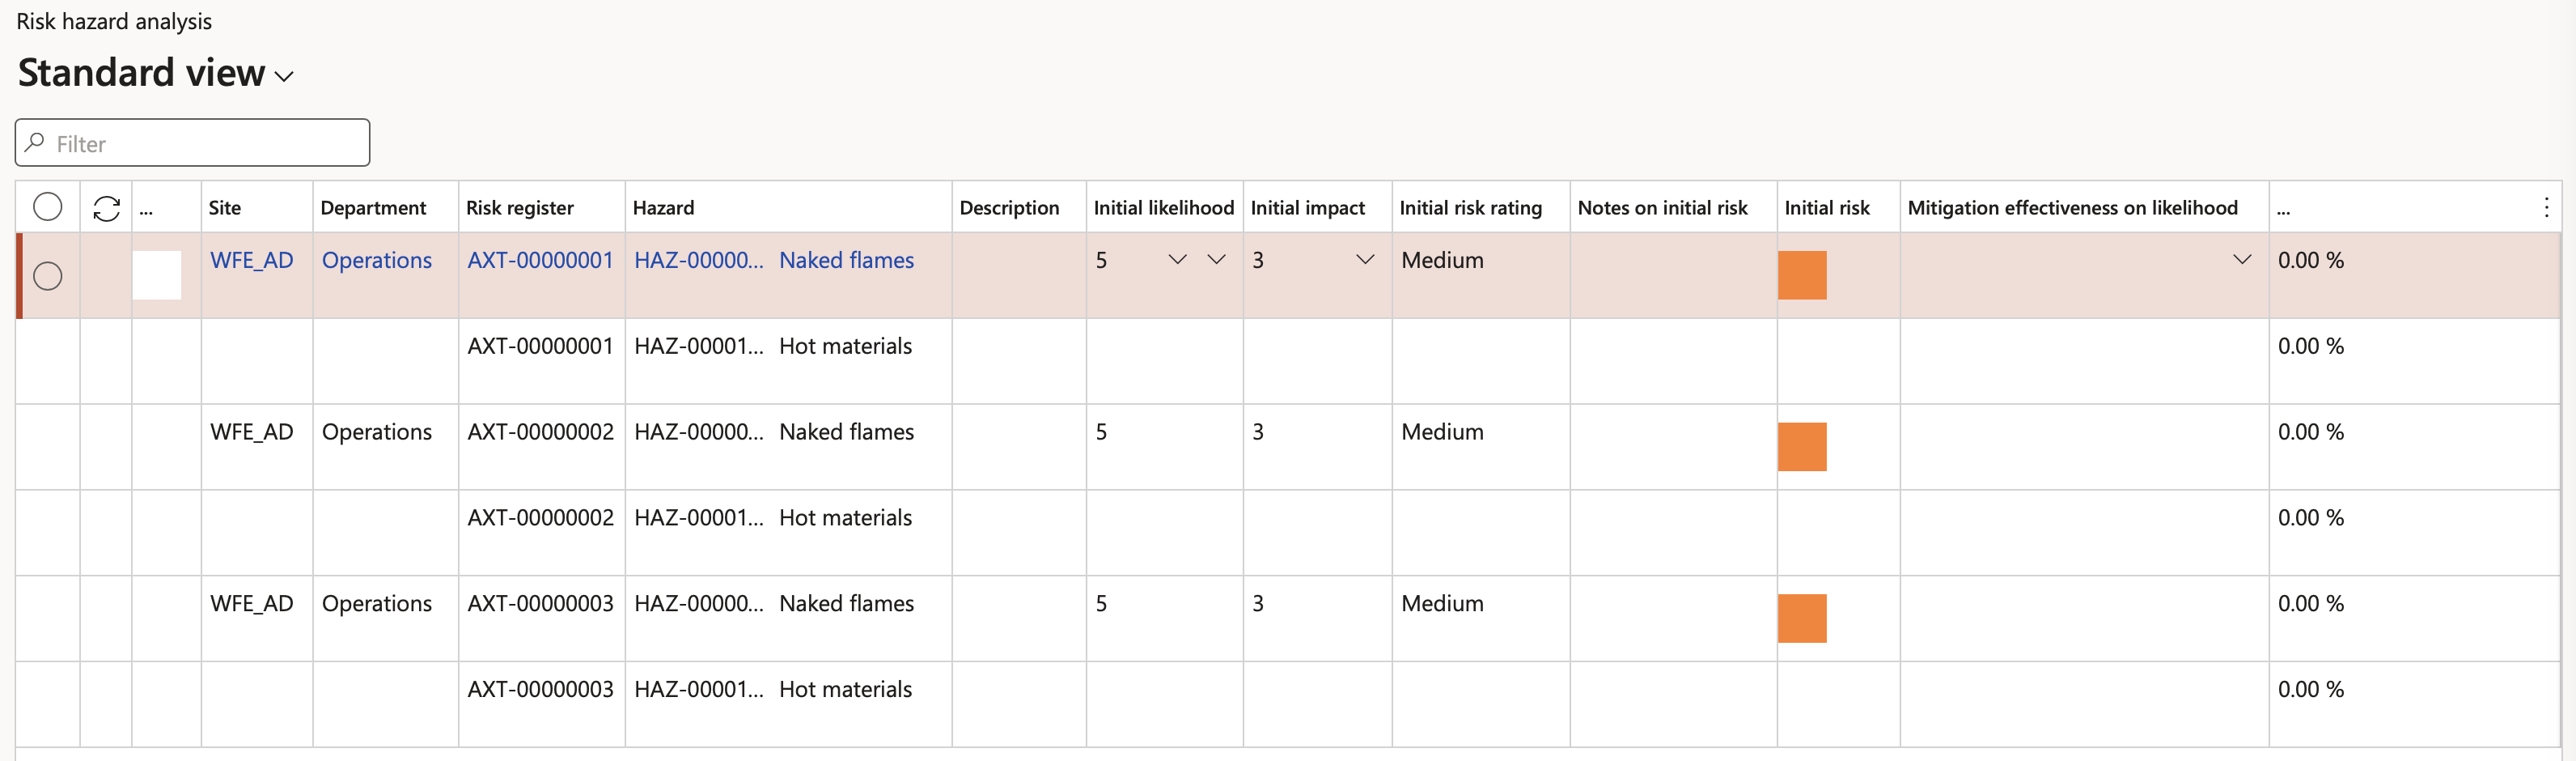
¶ Step 16: Risk hazard analysis
Go to: GRC > Risk > Reports and Inquiries > Risk hazard analysis
- View the Risk hazard analysis grid with details
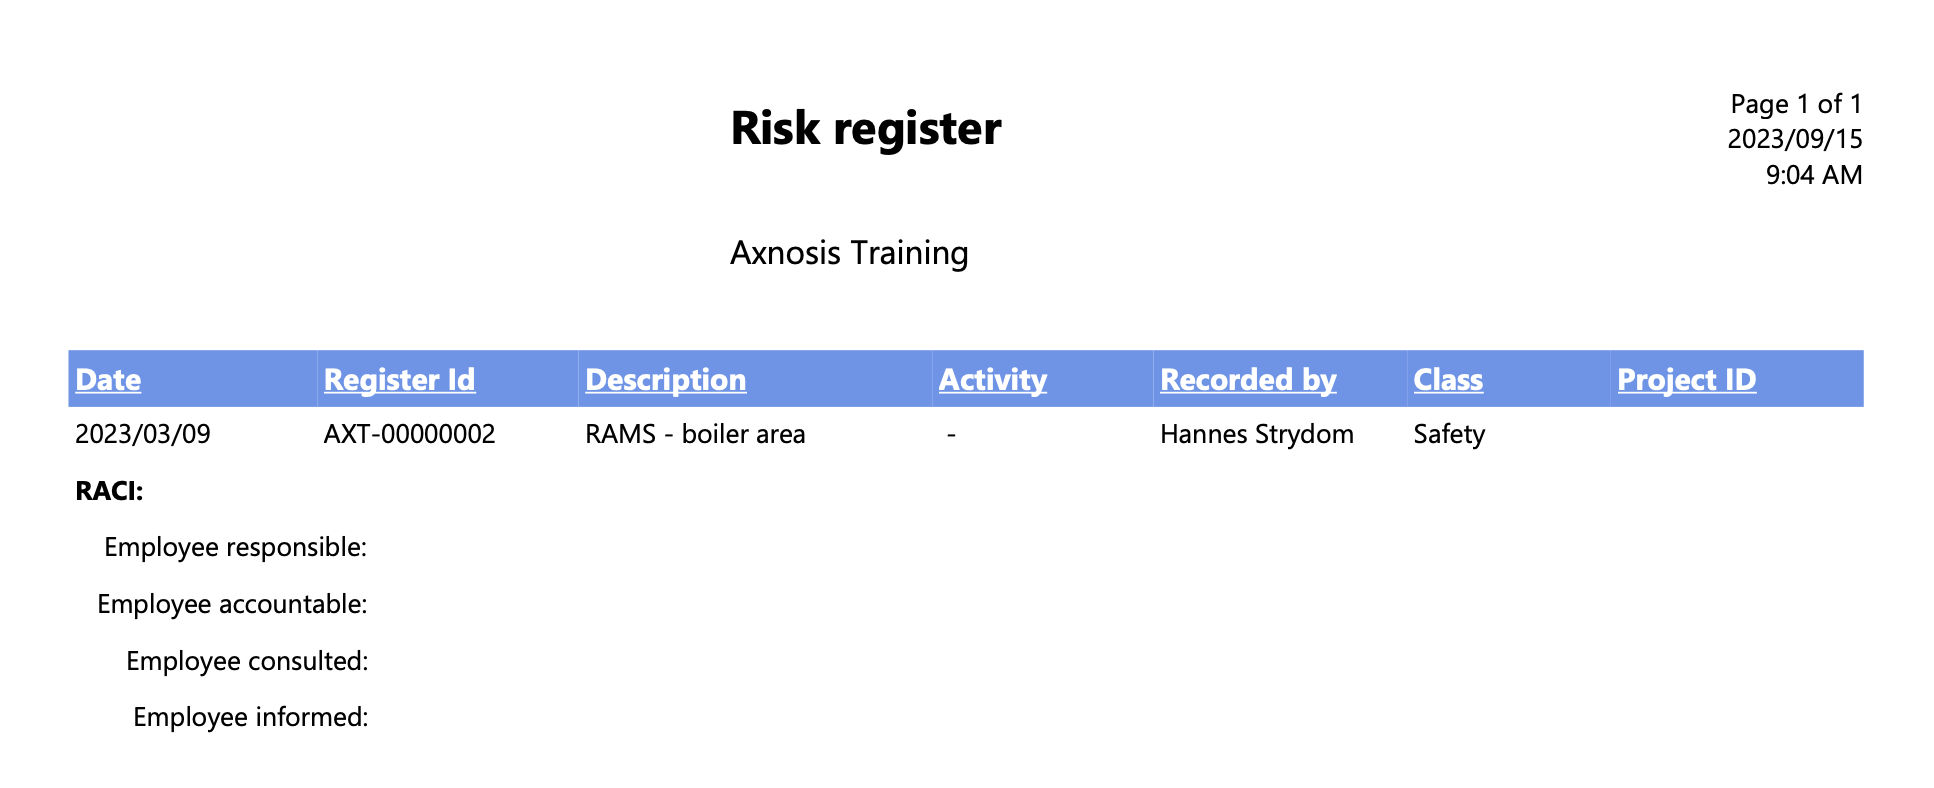
¶ Step 17: Risk register report
Go to: GRC > Risk > Reports and Inquiries > Risk register report
- On the Risk register dialog form, select the Risk register from the dropdown list
- Click OK
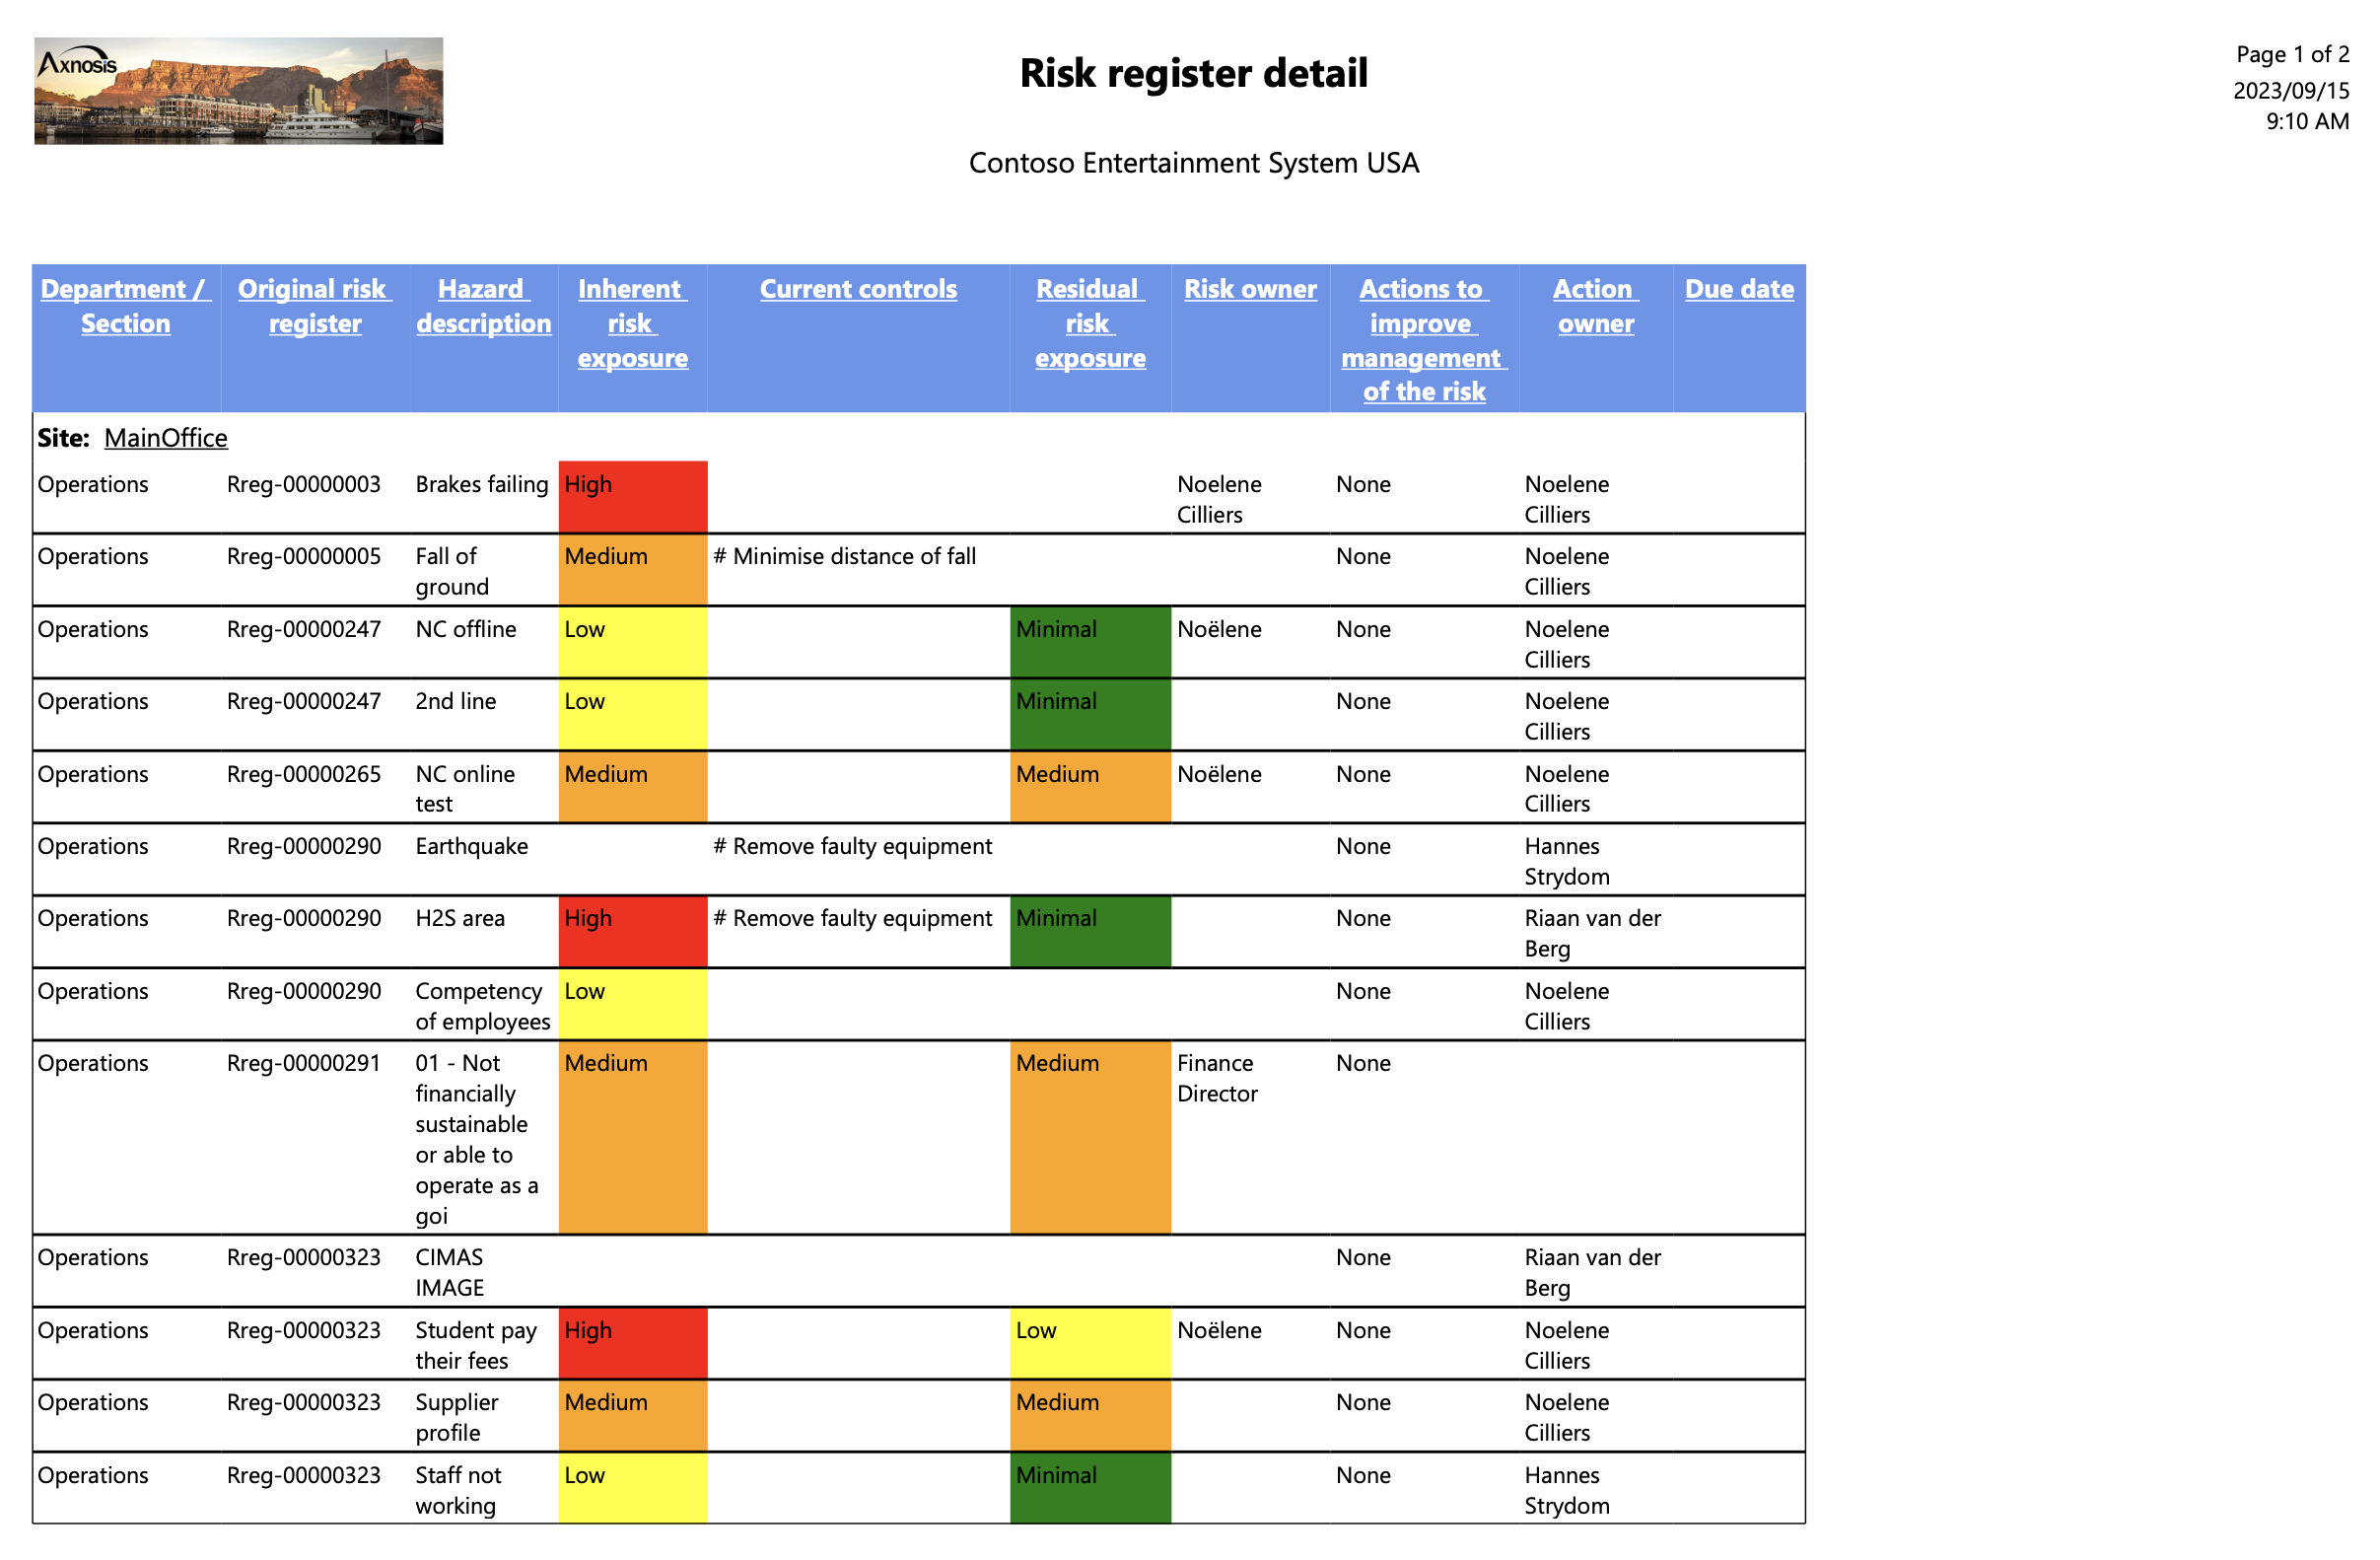
¶ Step 18: Risk register detail report
Go to: GRC > Risk > Reports and Inquiries > Risk register detail report
- On the Risk register detail dialog form, select the Parameters
- Click OK
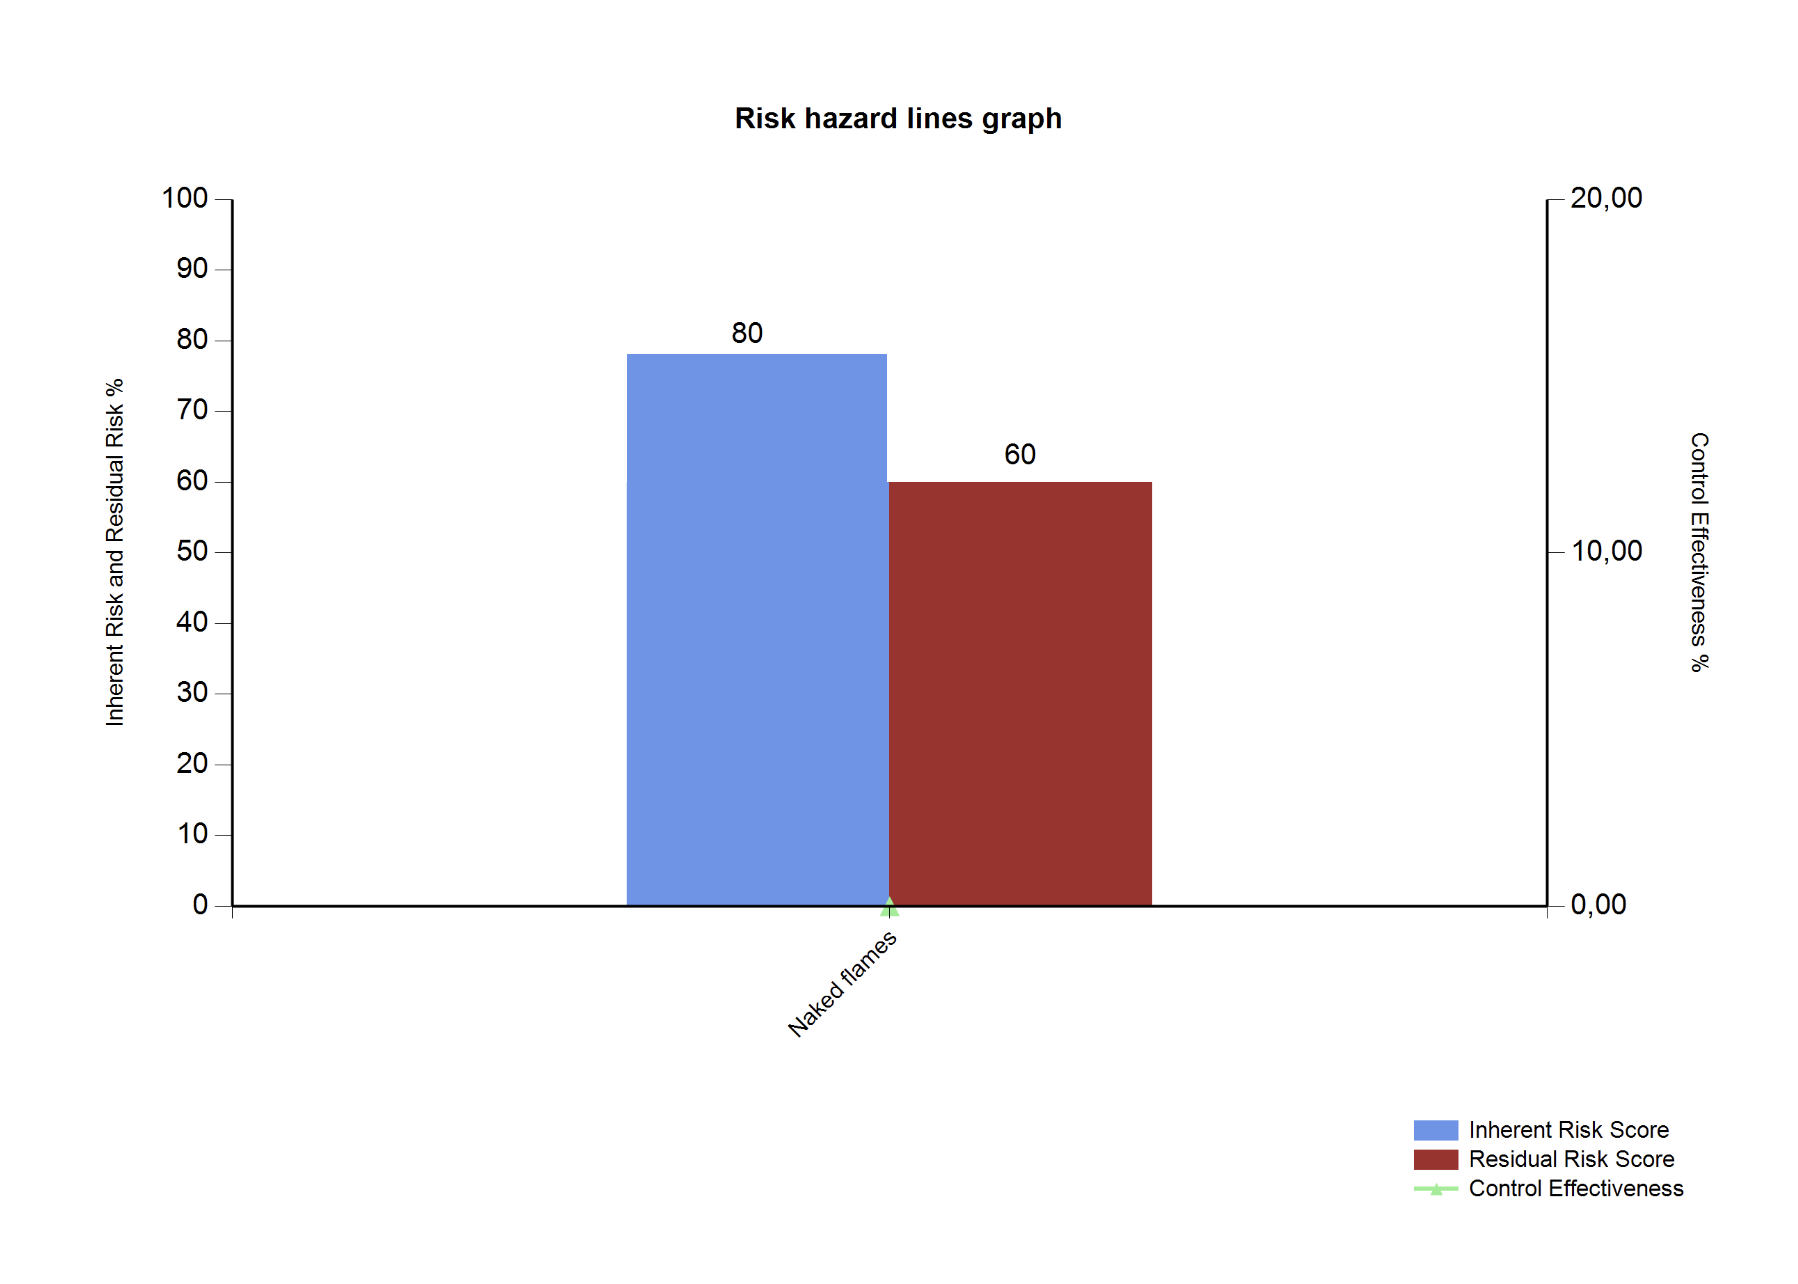
¶ Step 19: Risk hazard lines graph
Go to: GRC > Risk > Reports and Inquiries > Risk hazard lines graph
- On the Risk hazard lines graph dialog form, select the Parameters
- Click OK
¶ Step 20: Risk hazard assessment report
Go to: GRC > Risk > Reports and Inquiries > Risk hazard assessment report
- On the Risk assessment dialog form, select the Parameters
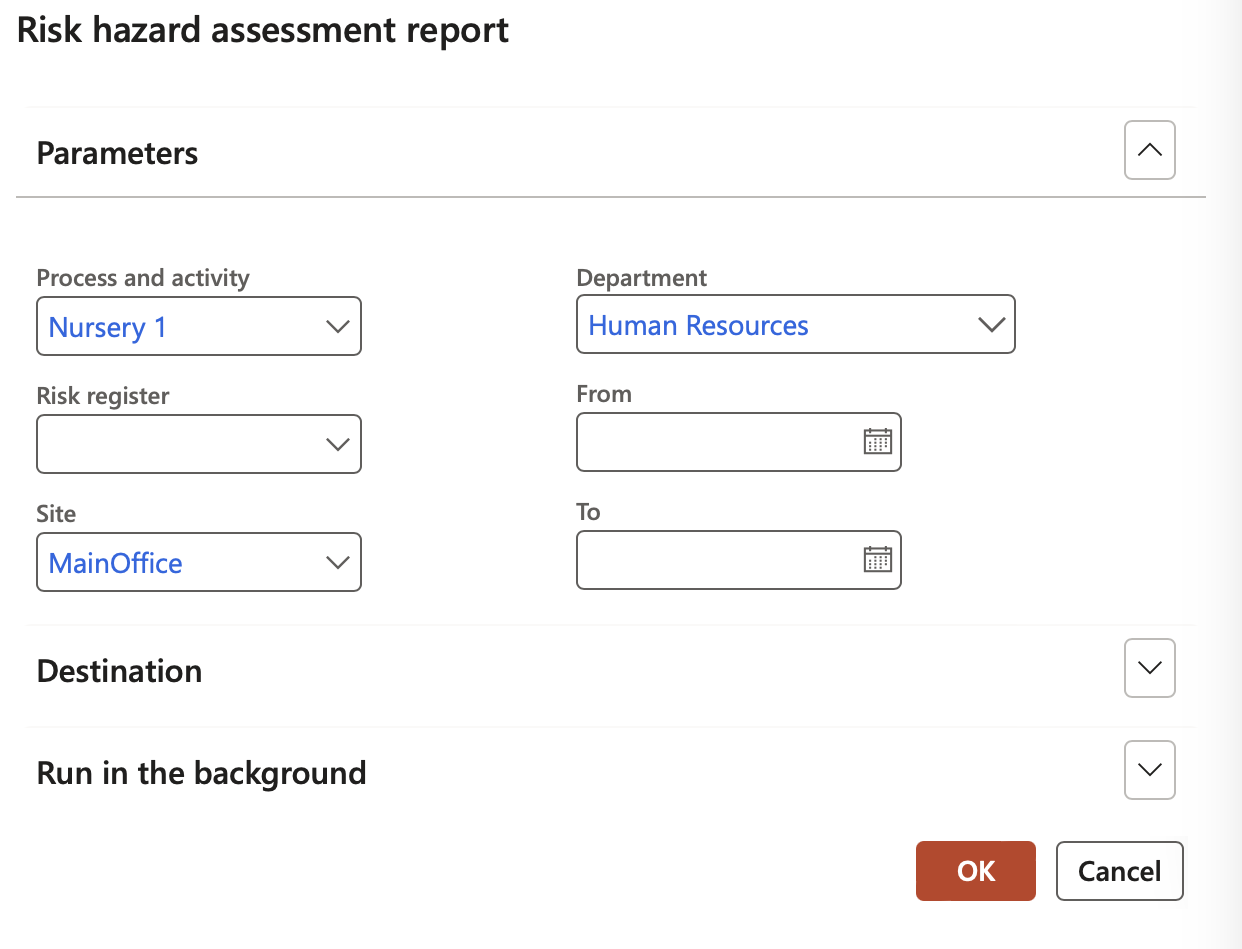
- Click on the Export button and select to PDF

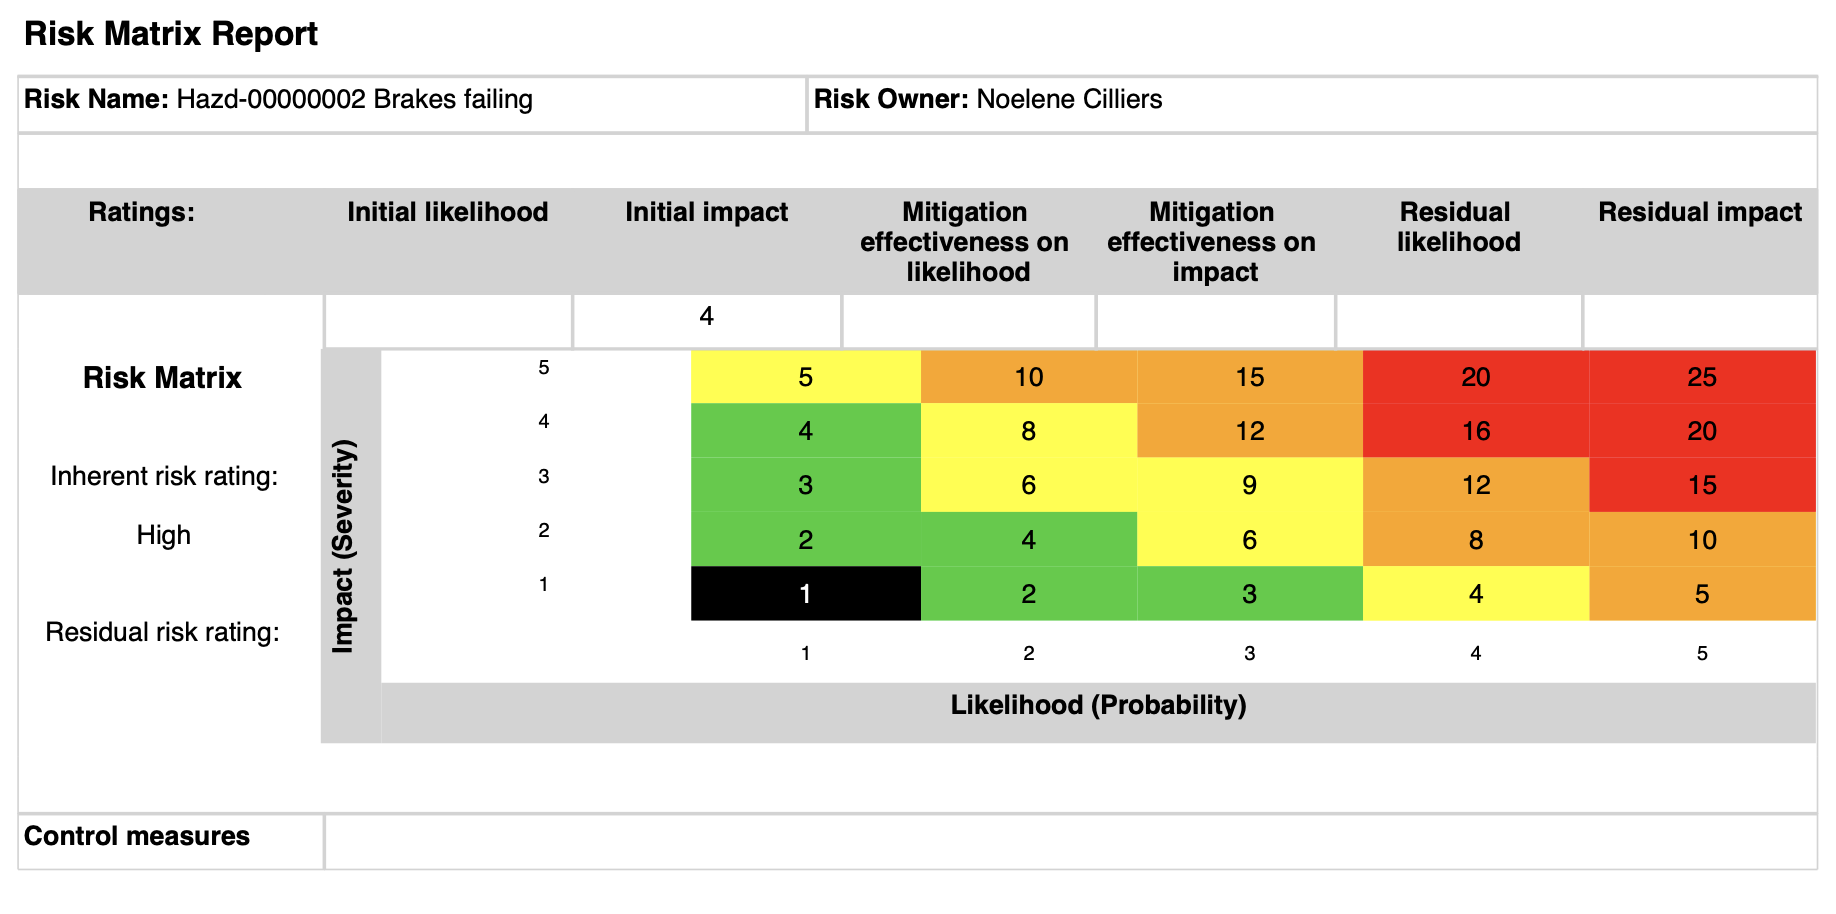
¶ Step 21: Risk matrix report
Go to: GRC > Risk > Reports and Inquiries > Risk hazard matrix report
- On the Risk matrix dialog form, select the Parameters
- Click OK

¶ Step 22: KRI’s and goals
A risk line can be selected on the KRI and goals form
Go to: GRC > Performance > KRI & goals
- Select the relevant record
- Under the General Fast tab, select the relevant Risk line from the dropdown list
¶ Step 23: Bowtie report
The Bowtie report gives users the ability to evaluate the probability and severity of risks, document risk causes, quantify potential risk impacts, assign, and monitor risk controls, and systematically evaluate the full spectrum of factors that contribute to the organization’s overall risk exposure.
Go to: GRC > Risk > Registers > All bowtie registers
- In the Action pane, in the Print group, click on the Bowtie report button
¶ Reference Table
More definitions
| Incident: | An unplanned event resulting in, or having potential for injury, ill health, damage or other loss. Incidents may involve actual or potential injury/illness, property/environment damage, motor vehicle accidents or near misses. |
|
Hazard: |
Any source or situation with a potential for harm in terms of injury/illness, damage to property/plant/equipment, or damage to the environment. |
| Risk: | A risk is the likelihood that exposure to a hazard will result in injury or disease. |
| Risk Assessment: |
The process of analyzing all of the risks associated with hazards and evaluating them to determine steps for risk control and priorities. Risk Assessment considers two (2) main factors: -
|
|
Risk Score: |
The risk score is the number allocated following risk assessment, which describes the level of risk, ranging from H (very high risk) to L (very low risk). The risk score is also used to identify the priority and timeframe of response to the identified hazard. |
|
Risk Control: |
Risk Control is a method of managing the risk, which involves taking actions to eliminate &/or reduce the likelihood that exposure to a hazard will result in injury/disease. There is a hierarchy of control measures to be followed with the primary emphasis on controlling the hazards at source. Methods of Risk control in preferred priority order are:
|
| COSHH: | Control of Substances Hazardous to Health Regulations. These Regulations require employers to control exposure to hazardous substances to prevent ill health. |