
¶ Introduction
ISO 31000 (2009) / ISO Guide 73:2002 definition of risk is the 'effect of uncertainty on objectives'. Therefore, risk has the potential of gaining or losing something of value. There is normally an initial risk (inherent) before controls are applied. After application, risk should reduce or remain to an acceptable risk (residual) value.
Risk can also be defined as the intentional interaction with uncertainty. Uncertainty is a potential, unpredictable, and uncontrollable outcome, risk is a consequence of action taken in spite of uncertainty.
In proper risk management, a prioritization process is followed whereby the risks with the greatest possible loss (or impact) and the greatest probability of occurring, are handled first, and risks with lower probability and loss are dealt with later. In practice the process of assessing risk can be difficult as well as balancing of resources to mitigate between risks with a high probability of occurrence but lower loss versus a risk with high loss but lower probability of occurrence.
Risk management also faces difficulties in allocating resources. This is the idea of opportunity cost. Resources spent on risk management could have been spent on more profitable activities. Again, ideal risk management minimizes spending (or manpower or other resources) and also minimizes the negative effects of risks.
Enterprise Risk Management is defined as an organization’s ability to understand, control, and articulate the nature and level of risks taken in pursuit of business strategies, coupled with accountability for risks taken and activities engaged in. One of the main benefits of ERM is an enhanced perspective and focus on risk management across the enterprise.
¶ Navigation

¶ Specific setups
¶ Step 1: GRC Parameters
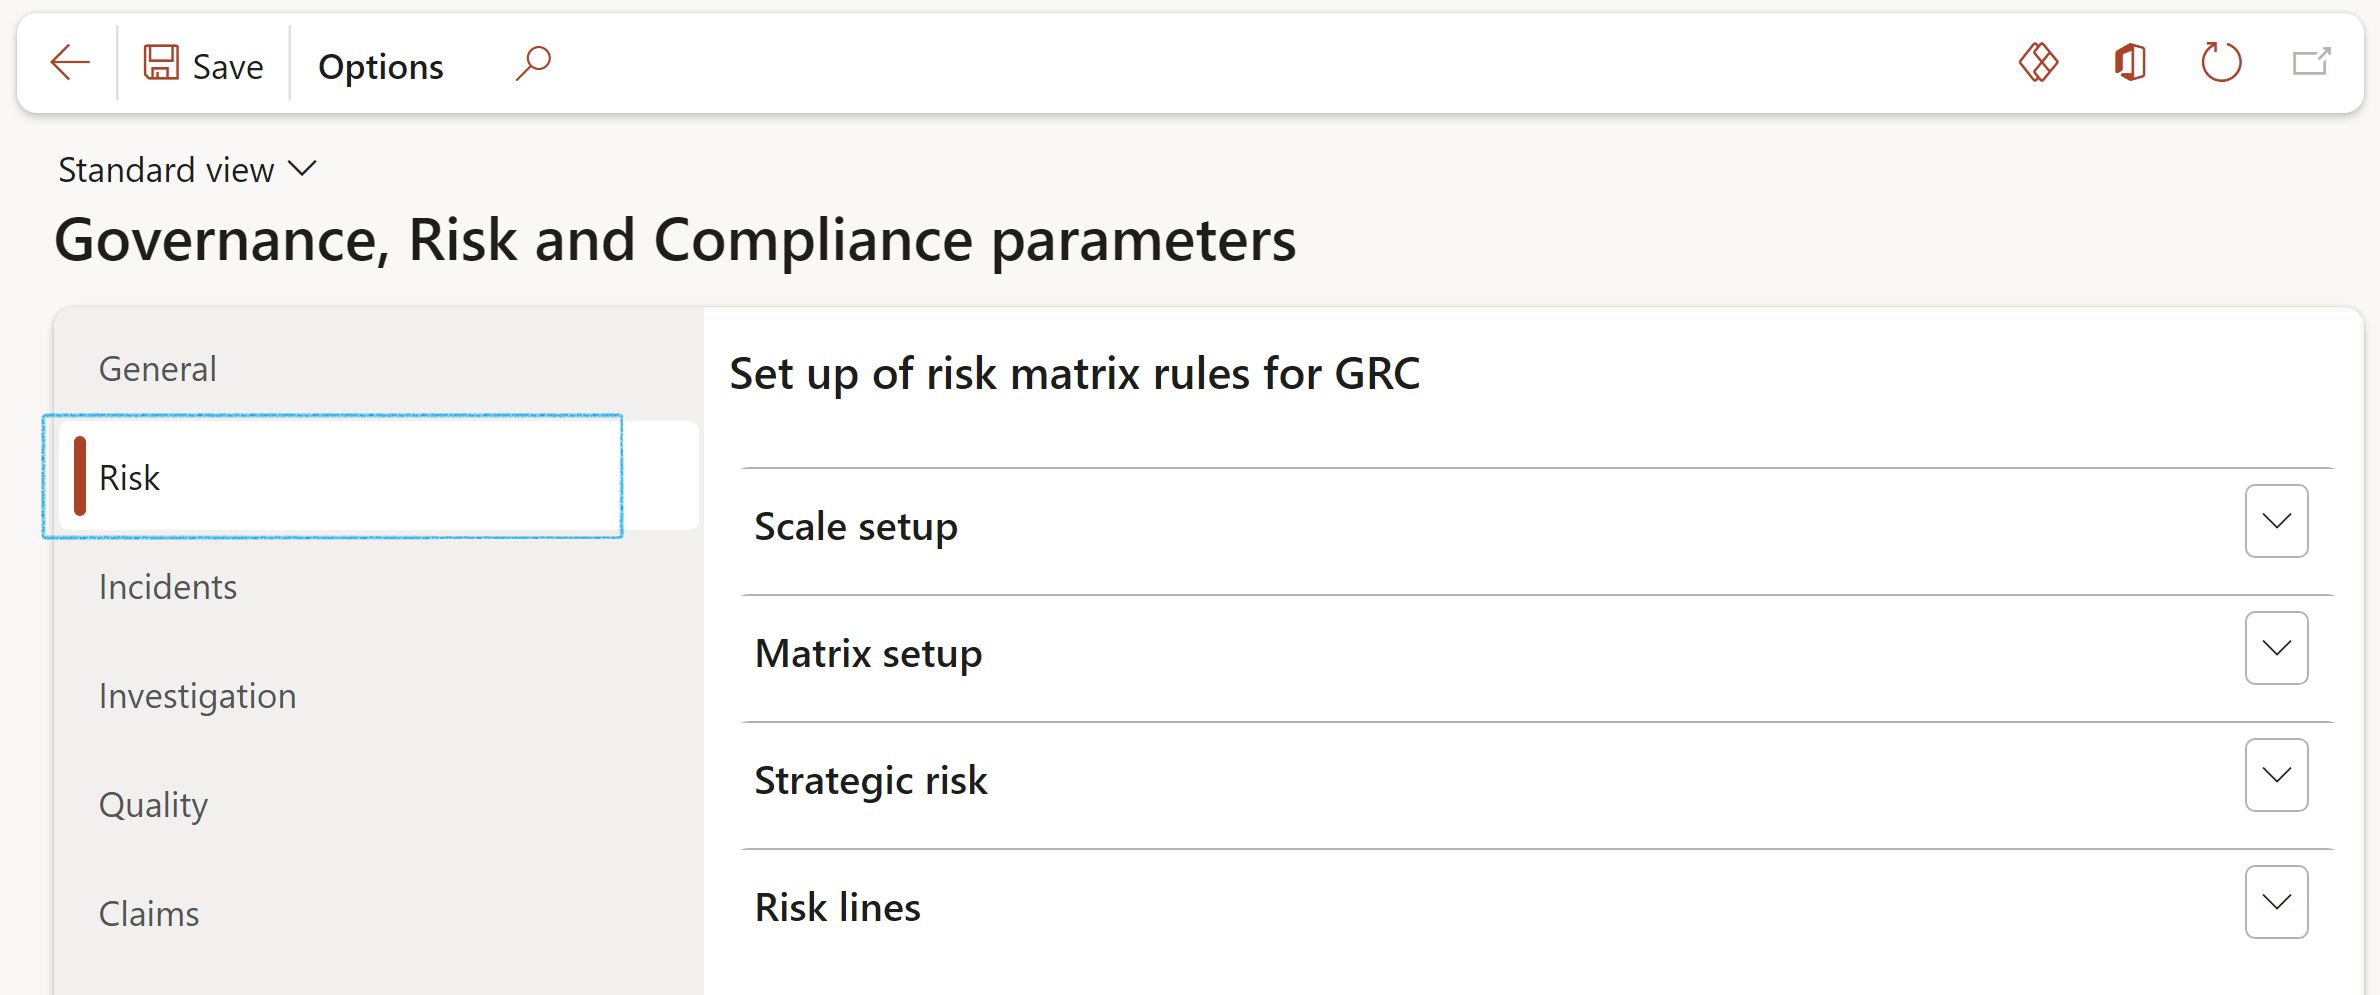
The settings for the heat map on the Risk page will display in the Risk register form and on all relevant forms where “risk assessments” are done from.
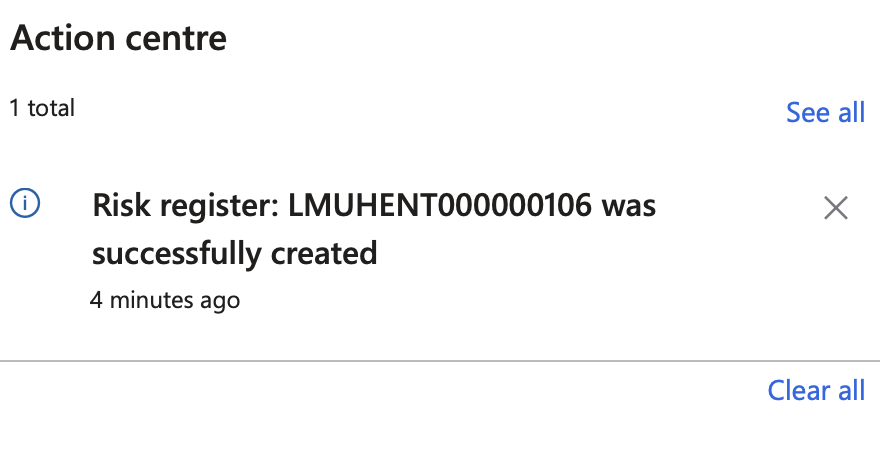
Go to: GRC > Setup > Governance, risk and compliance parameters
- Click on the Risk tab
¶ Step 1.1: Matrix setup Fast tab
A risk matrix is a tool that is normally used to assess the level of risk and assist the decision-making process. It takes into consideration the category of probability, or likelihood, against the category of consequence severity.
- Under the SIZE Field group:
- Select the size of the matrix by selecting the relevant values in the Likelihood and Impact fields
- Under the LEVEL OF RISK COLOUR Field group:
- Select the relevant color for each level
- Under the HEAT MAP Field group:
- Assign colours to the matrix, considering the Likelihood and Impact values selected under SIZE Field group
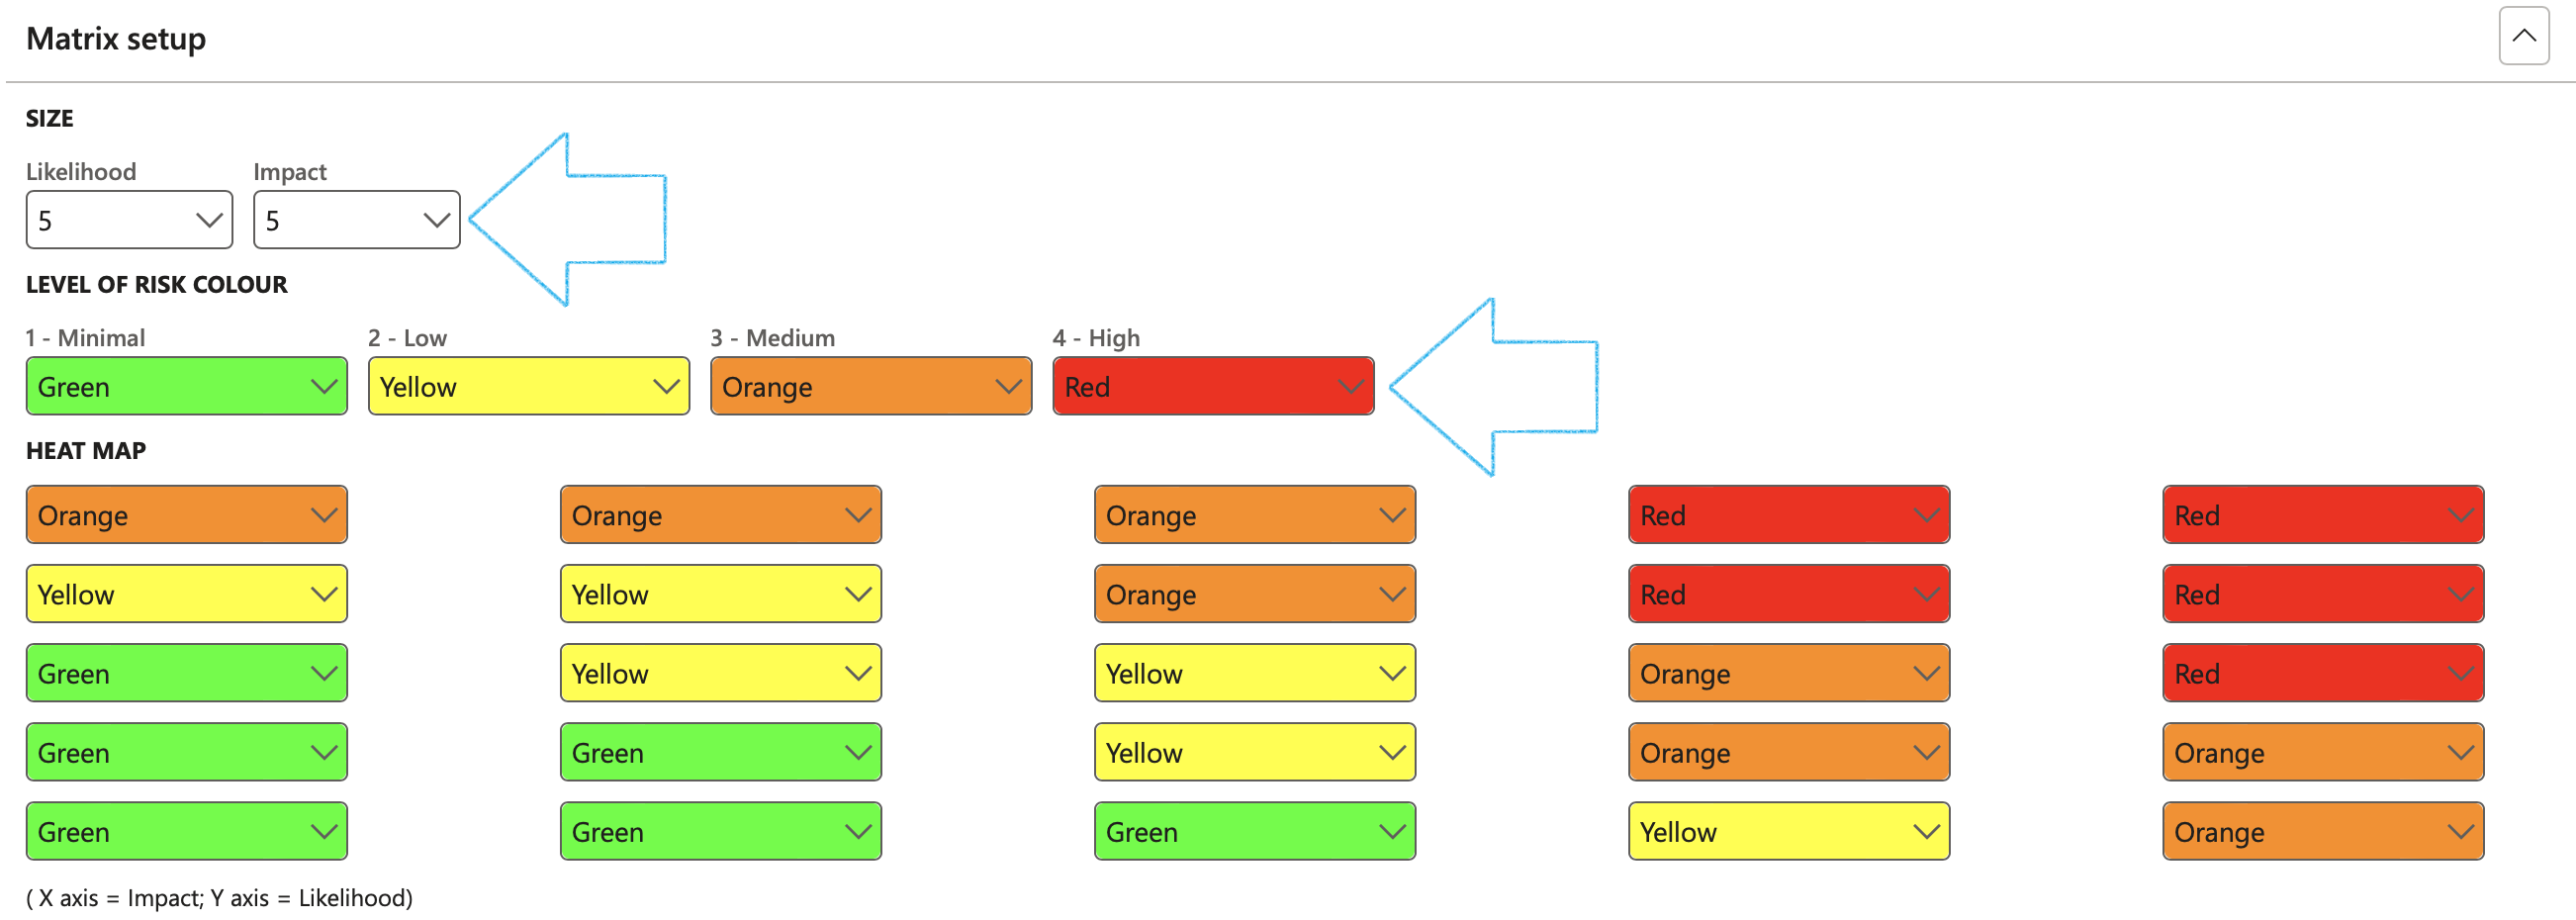
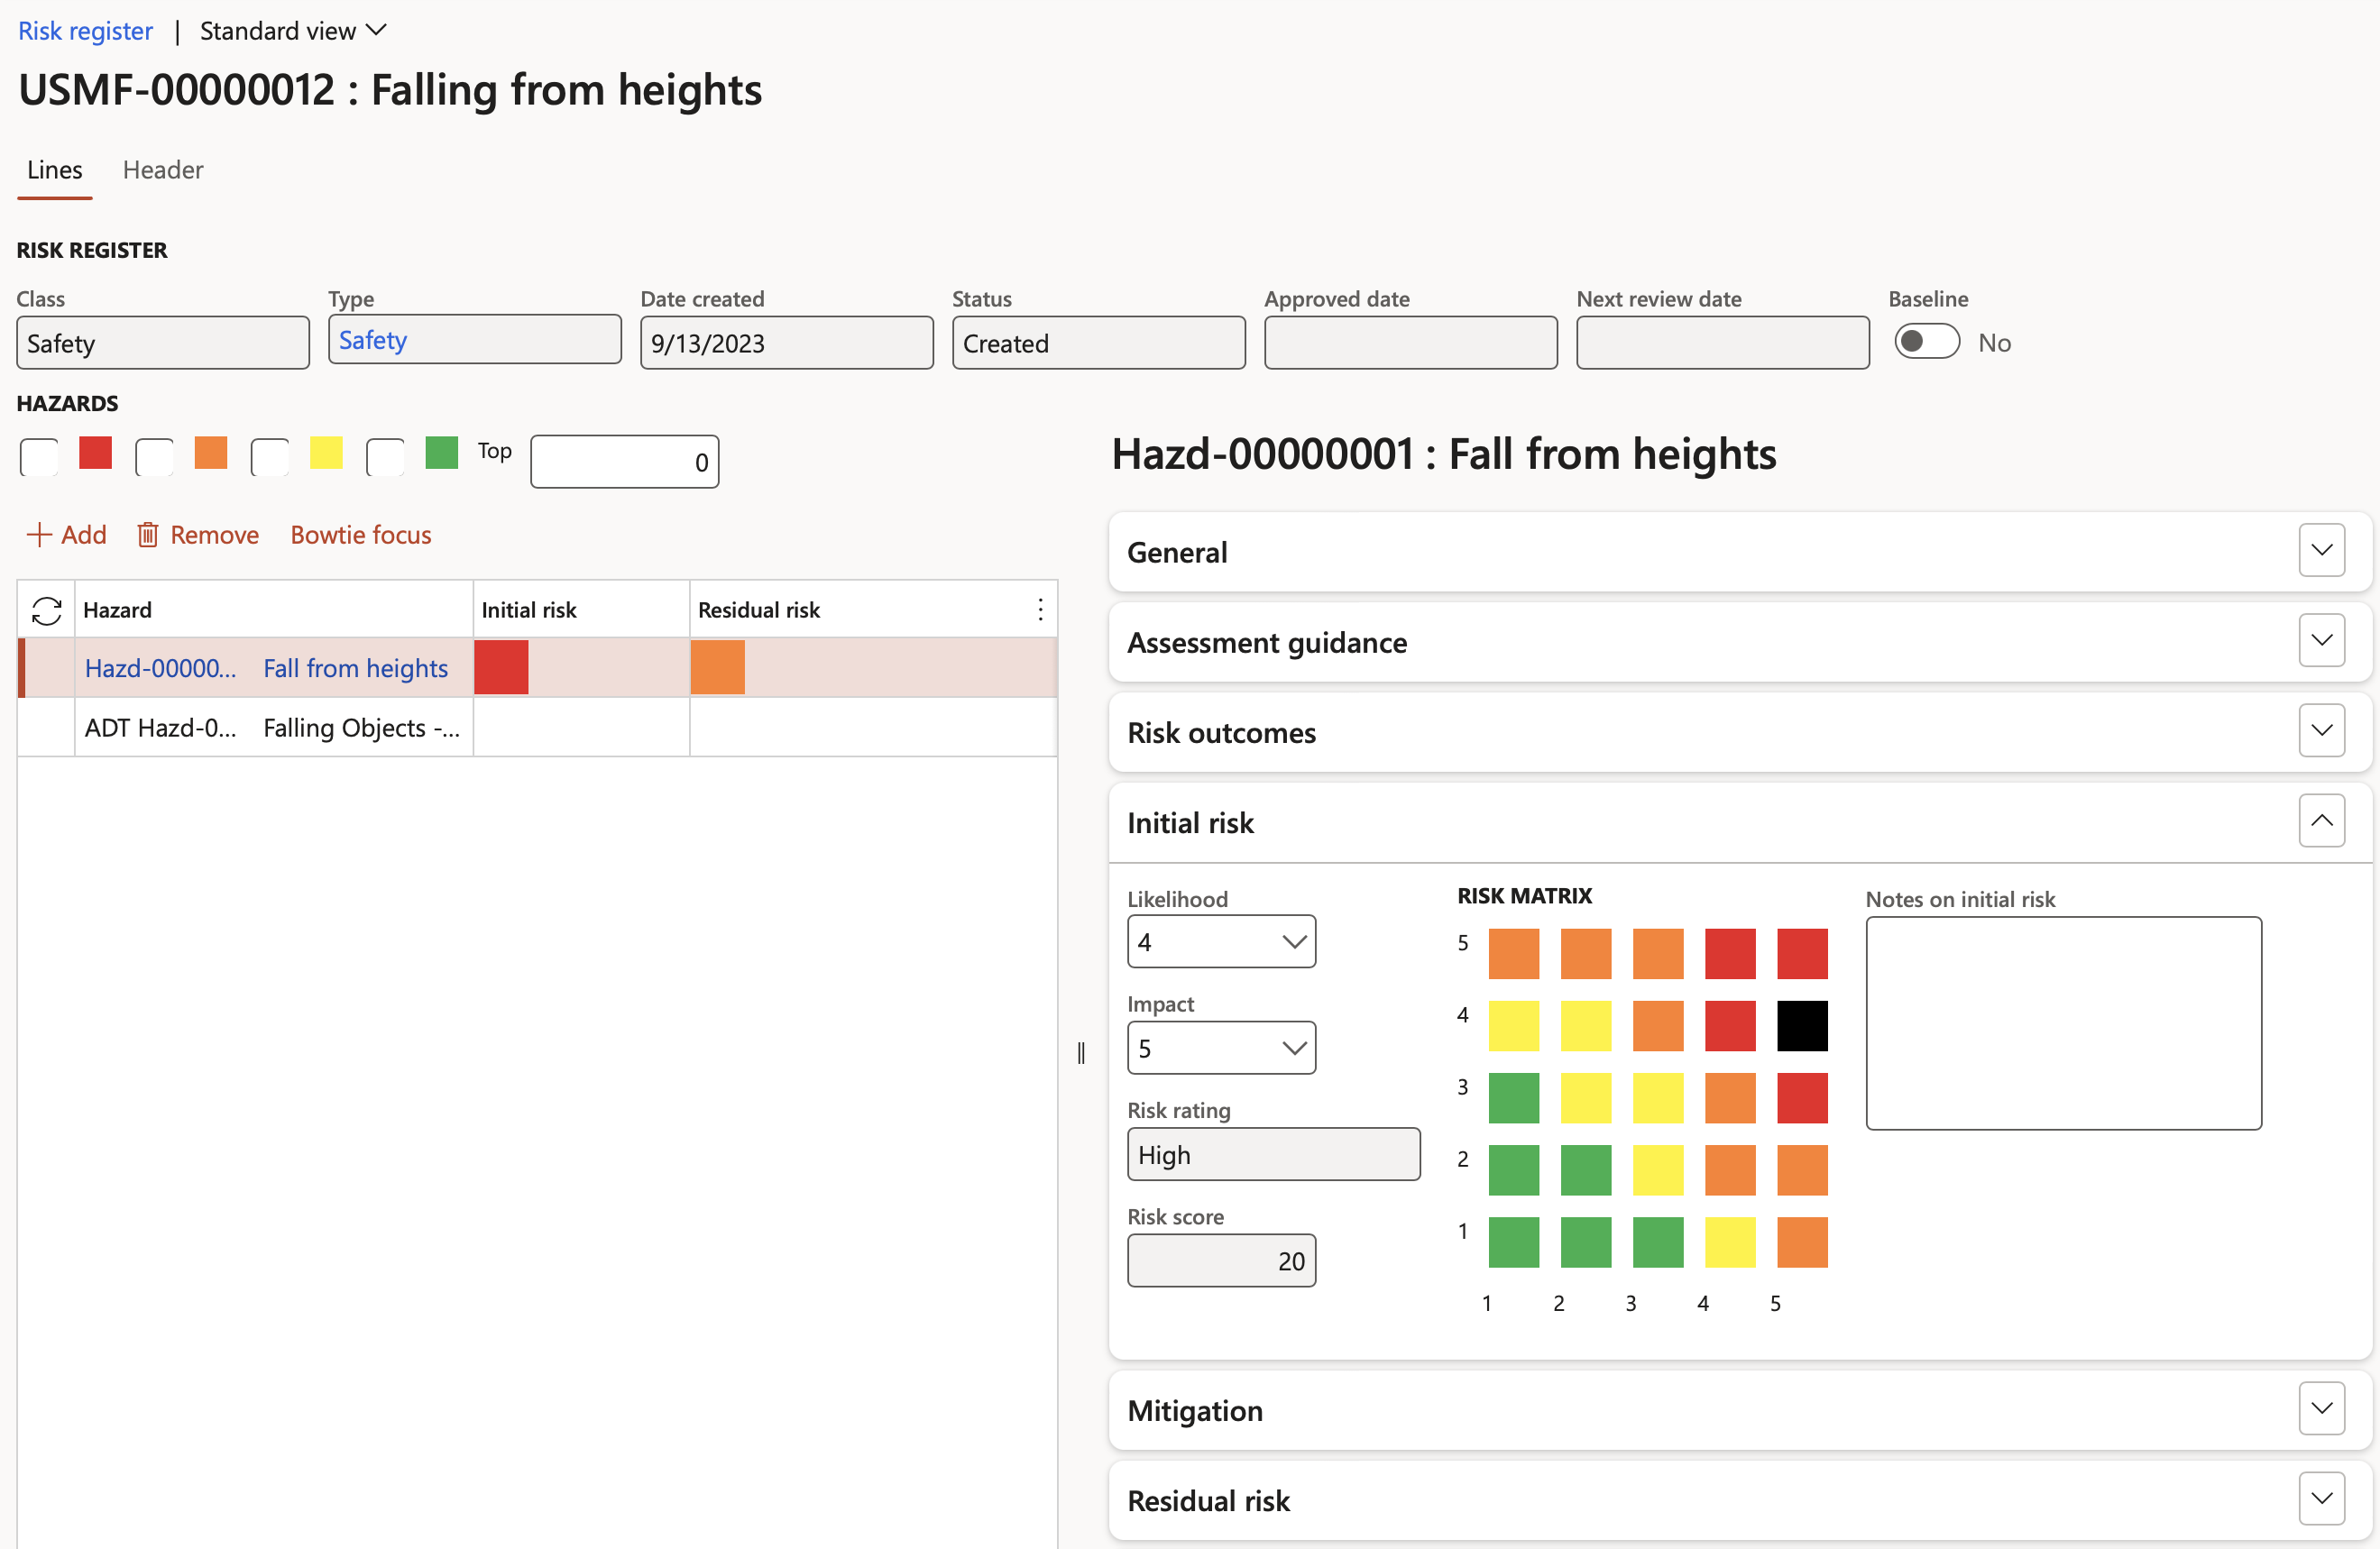
The result of the Risk matrix setup:
¶ Step 1.2: Risk lines Fast tab
Users have the option to change the labels of the two Note fields under the Other Fast tab on the Risk register lines view.
- Under the FIELD LABEL FOR NOTE 1 and 2 Field groups:
- Enter the labels of the two note boxes for the relevant risk classification
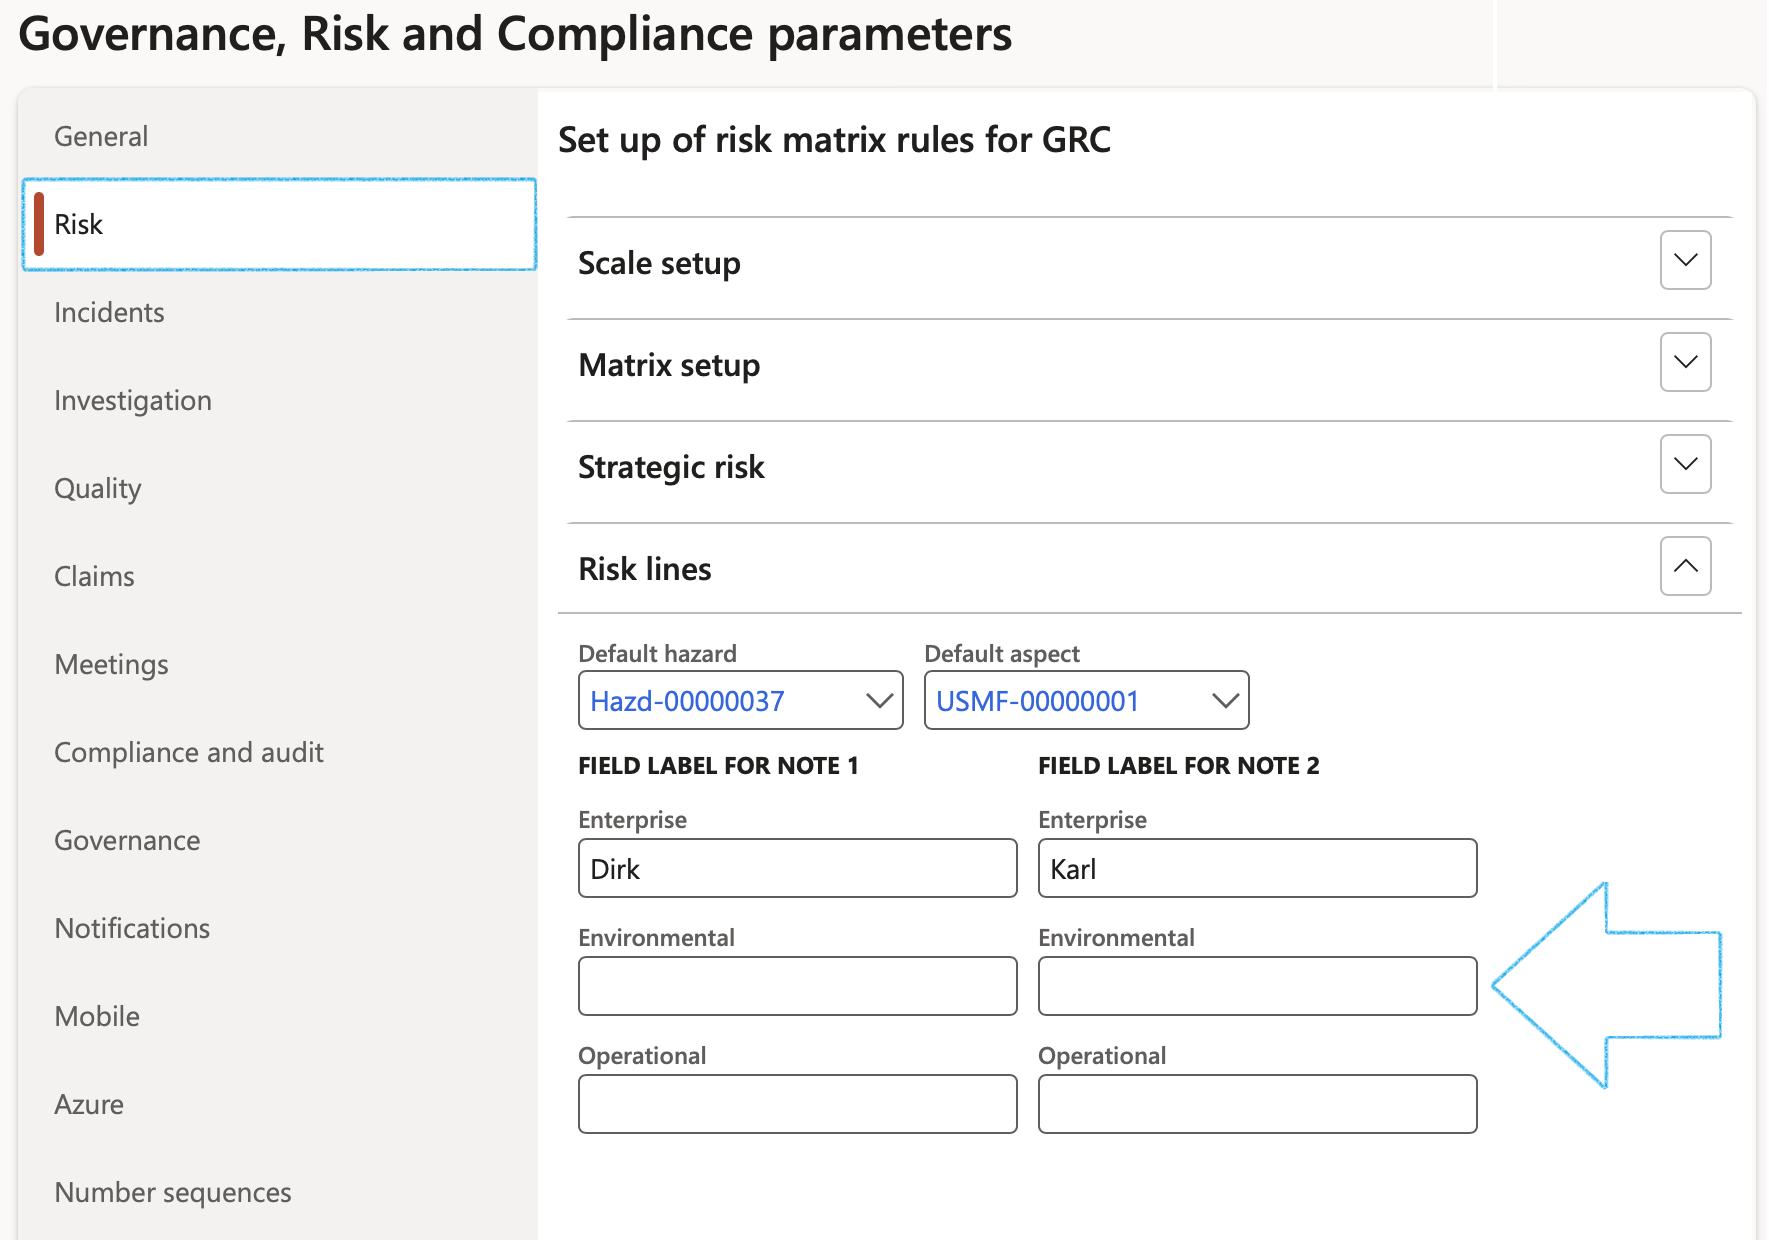
It is imperative that a Default hazard, as well as a Default aspect value is selected under the Risk lines Fast tab
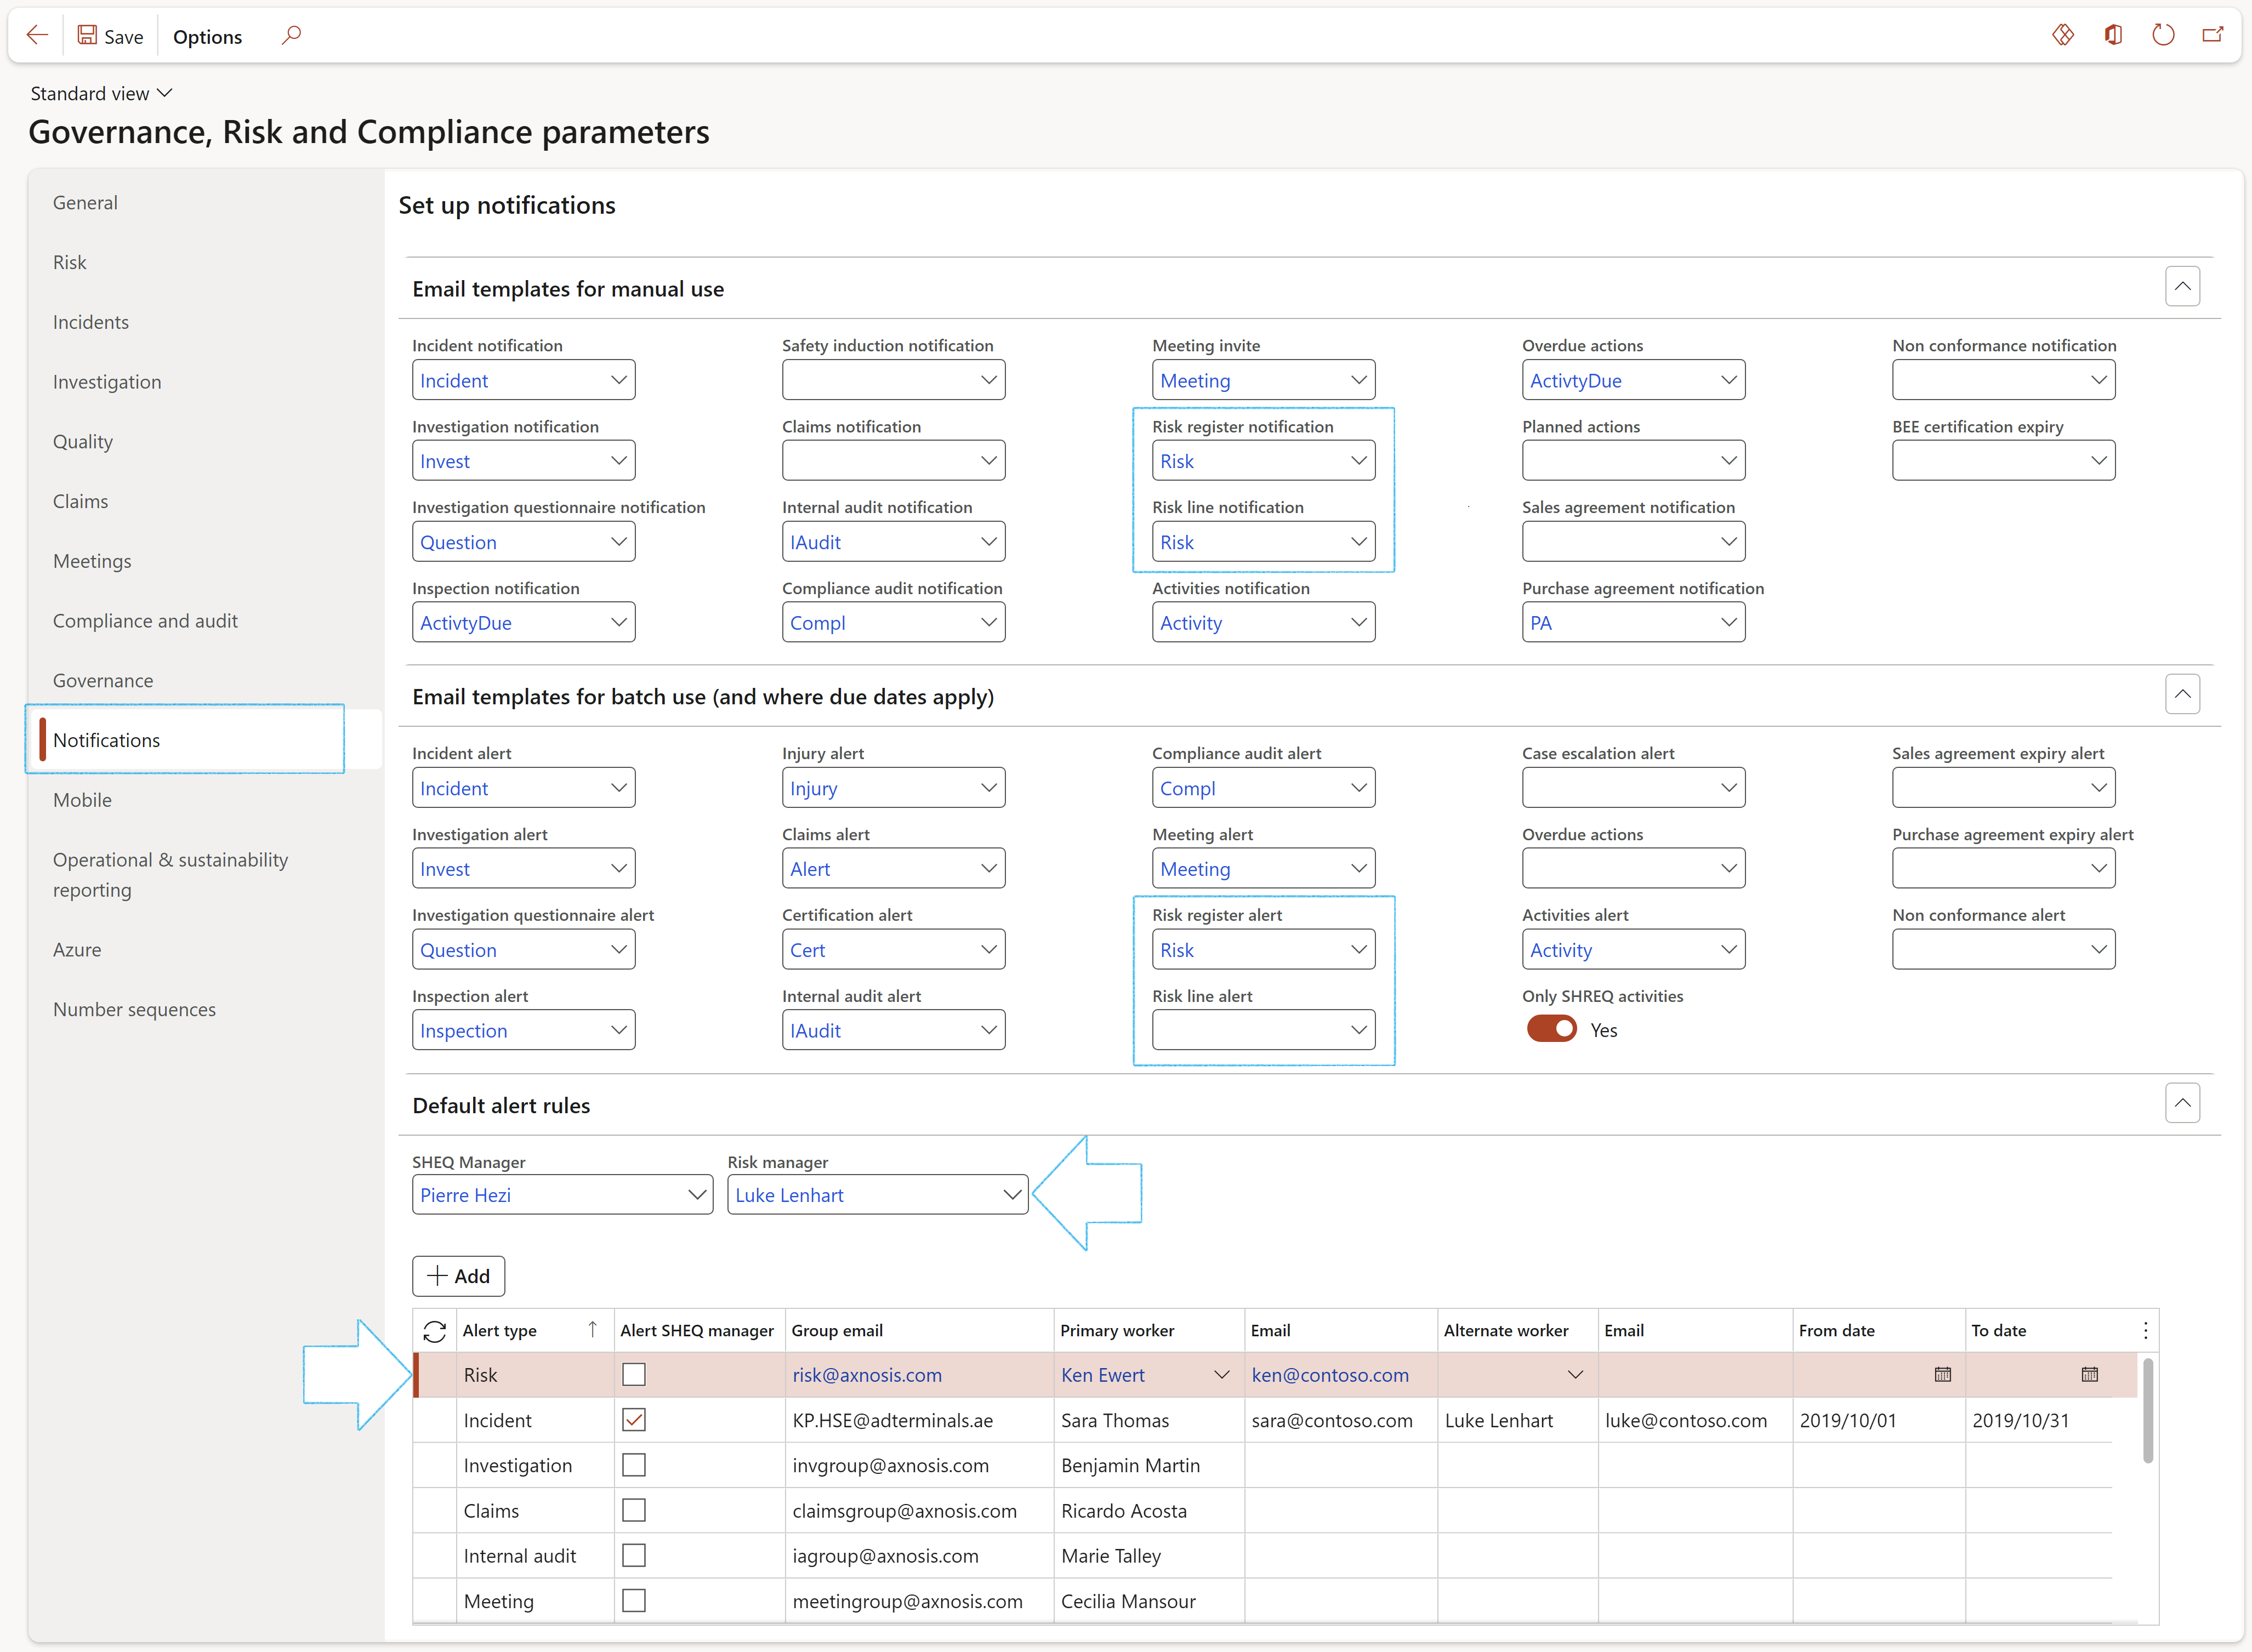
¶ Step 1.3: Notifications
Users will create and link an email template here for risk register, or risk line notifications, for example a notification email to be sent to a department to notify them of an upcoming risk assessment.
Please refer to the Alerts Wiki page for details on how to create email templates
¶ Step 2: Risk type
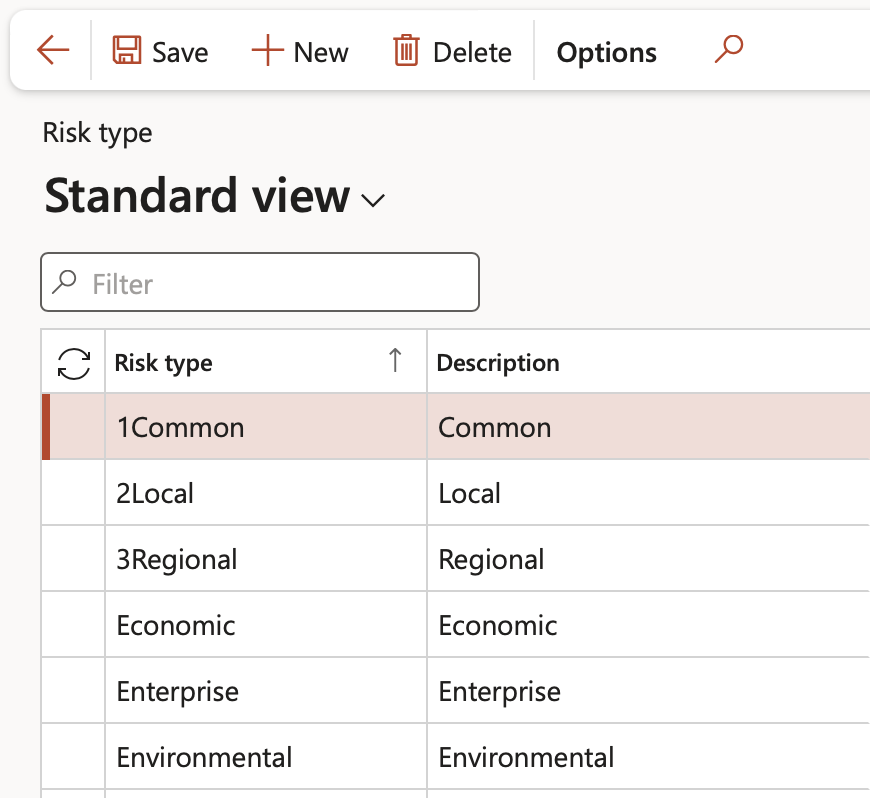
There are different types of risks that have different impacts. Useful rules exists here. Users can choose to hide certain Fast tabs on the Risk register and default values are specified on the risk types, these values will then default in onto the risk assessment if selected.
Go to: GRC > Risk > Setup for risks > Risk type
- On the Action pane, click New
- Enter a unique Risk type ID as well as a brief Description
- Tick the boxes of the Fast tabs to be hidden on the Risk register (optional)
- Select the relevant value in the Assessment roll forward column
- Select the relevant day and month in the Start of 1st quarter column
Under the DEFAULT VALUES Field group:
- If the risk type can be measured or expressed as a number, move the Quantifiable slider to Yes
- Select the relevant ISO standard from the dropdown list
- Select the relevant Risk category from the dropdown list
- Select the relevant Review frequency from the dropdown list
- Click Save
¶ Step 3: Risk appetite
Risk appetite is a core consideration in an enterprise’s approach to risk management. Risk appetite can be defined as “The amount and type of risk that an enterprise is willing to tolerate in order to meet their objectives”
Go to: GRC > Risk > Setup for risks > Risk appetite
- On The Action pane, click on the New button
- In the Threshold minimum % field, enter the minimum risk percentage for the level of risk
- In the Threshold maximum % field, enter the maximum risk percentage for the level of risk
- Select the Level of risk when defining risk appetite, from the dropdown list
- Select the Level of risk tolerance from the dropdown list
- Select the Action to be taken regarding the risk level, from the dropdown list
When the risk assessment residual risk % falls within the minimum and maximum values as per the risk appetite, the action selected in the Action column, will be taken.

When users assess risks (inside the risk register), a warning will pop up and the relevant dialog will open when the Residual risk exceeds the risk appetite maximum threshold - ‘Residual Risk exceeds the risk appetite maximum threshold’
¶ Step 4: Risk configuration
Most of the configuration and setups that are required to use risk assessment inside Dynamics 365 FO is done here on the Risk configuration setup form.
Go to: GRC > Risk > Setup for risks > Risk configuration
¶ Step 4.1: Risk categories
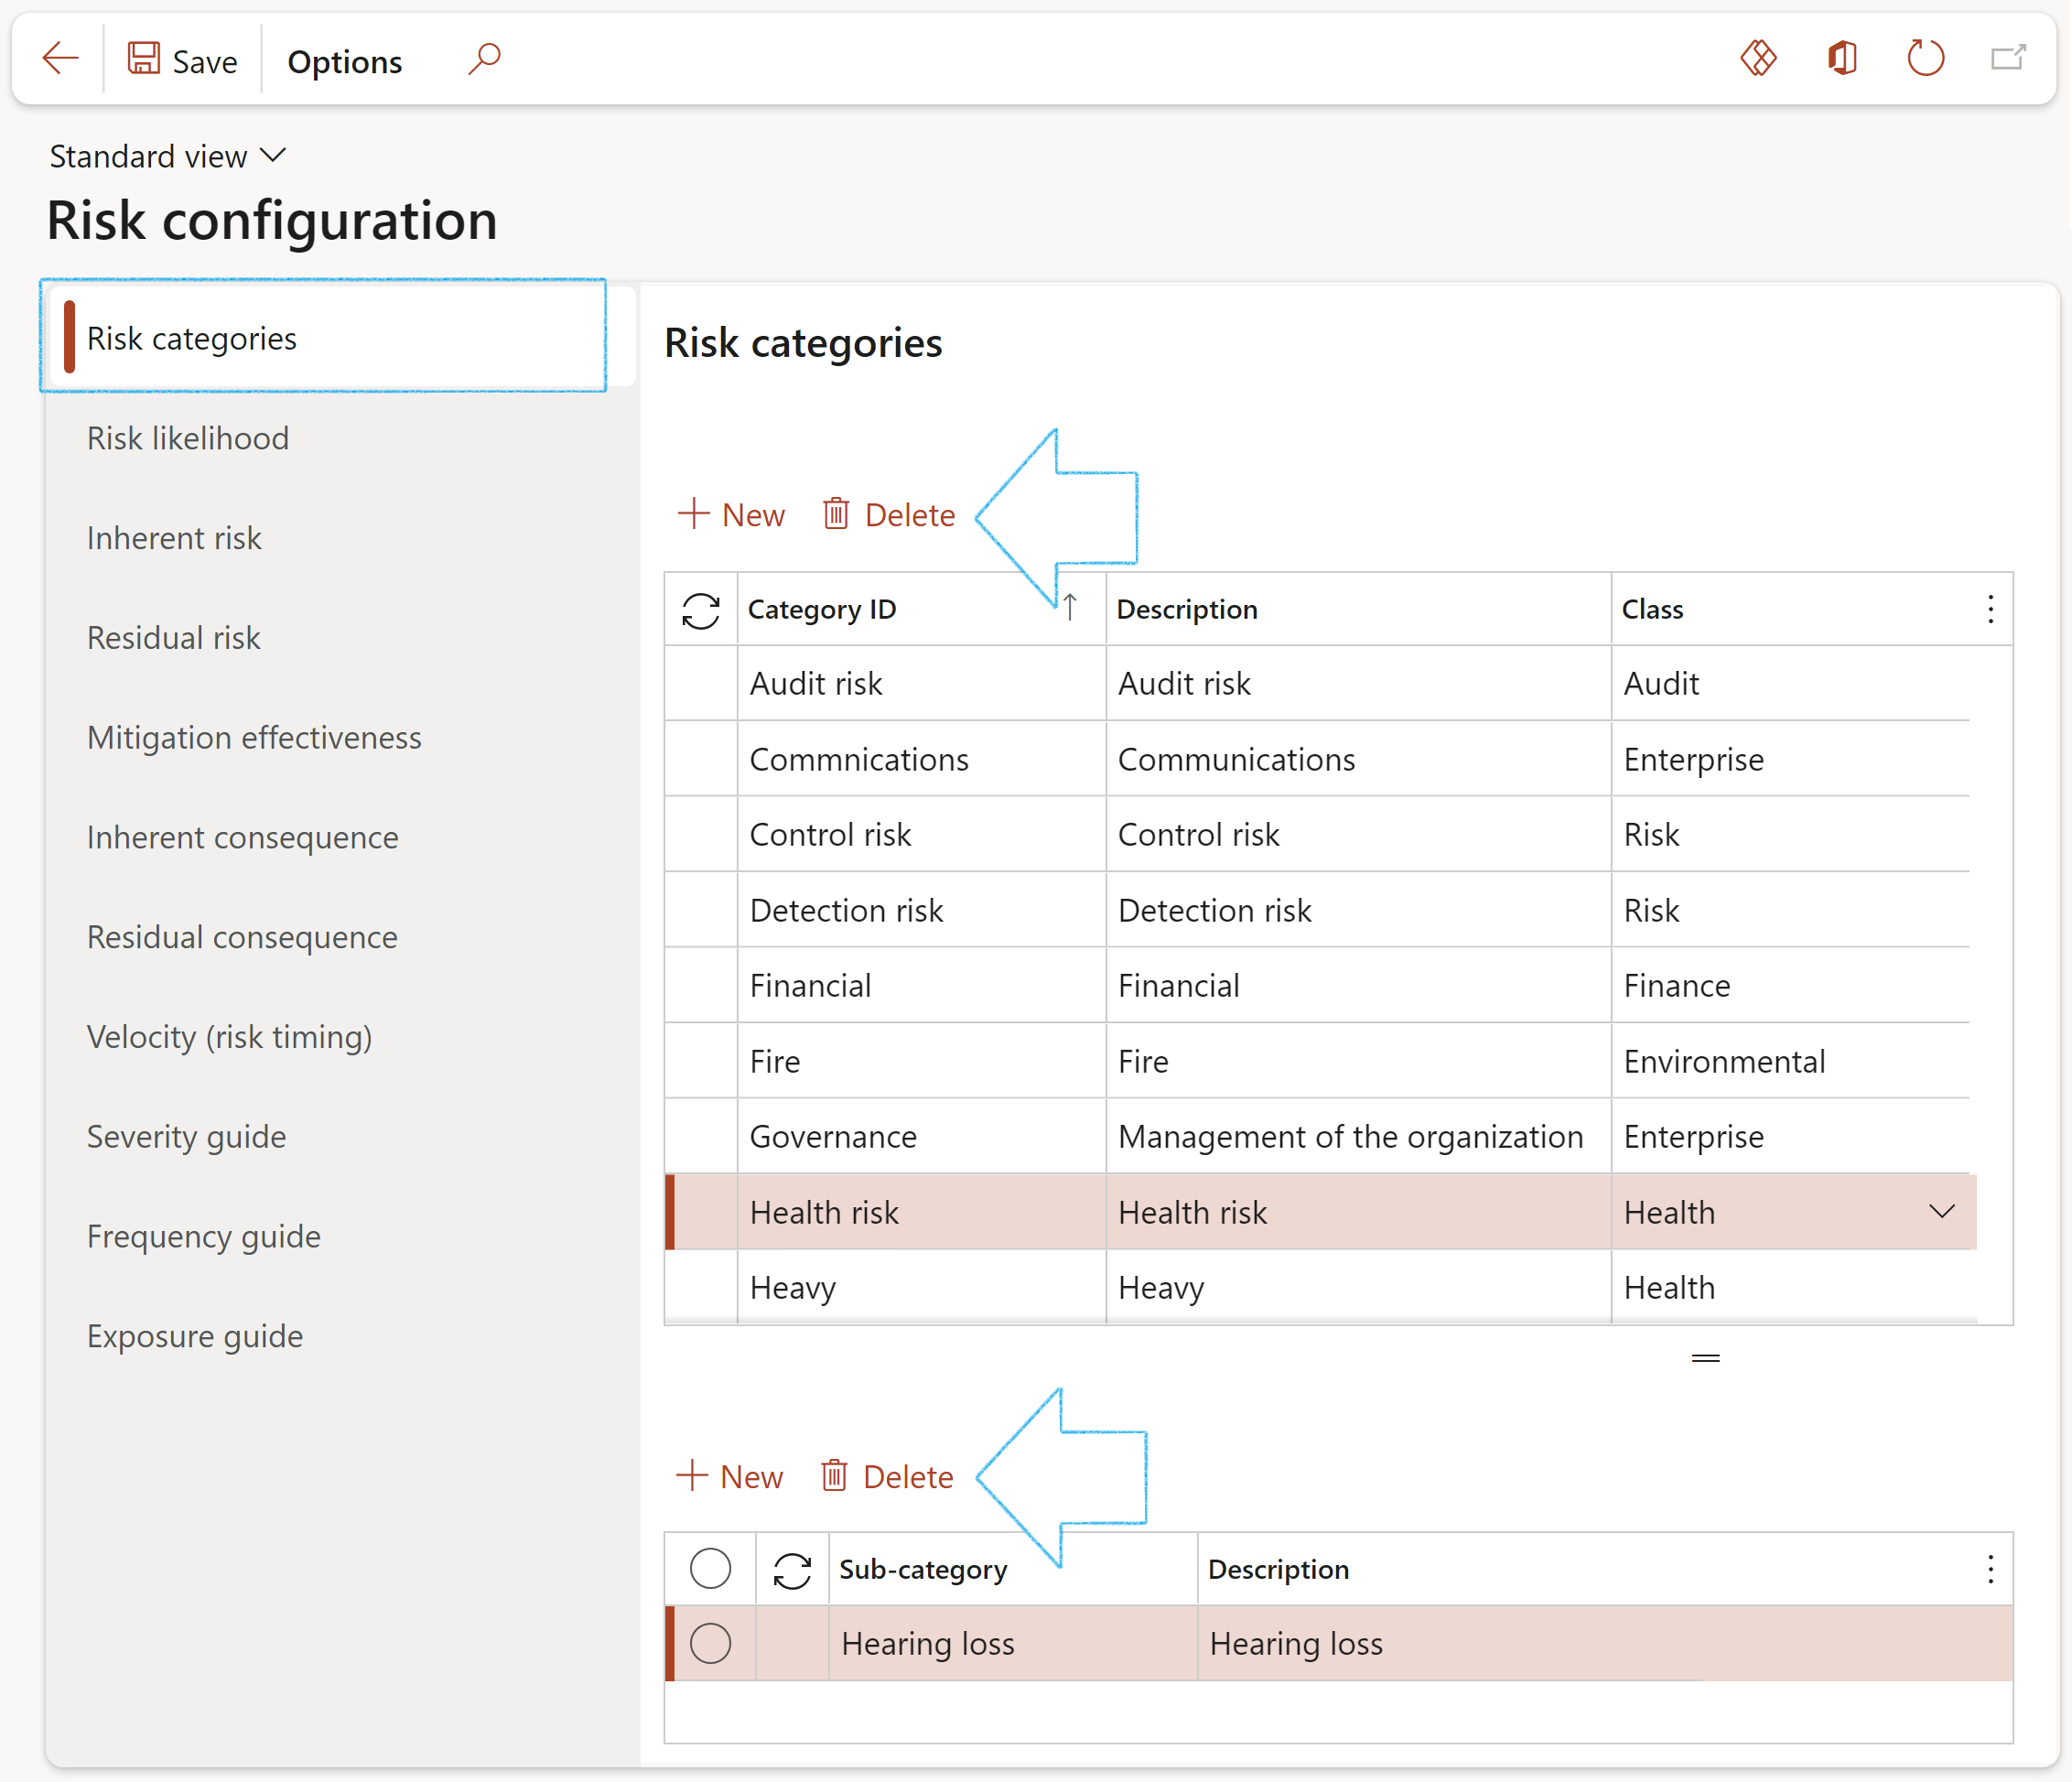
Risk Category is a way to group individual project risks to highlight a potential source of threats. A project manager uses risk categories to identify common project risks.
- Click on the Risk categories tab
- Click New
- Enter a unique risk Category ID
- Enter a brief Description
- Select the relevant risk Classification from the dropdown list
- To add Sub-categories, click on the New button in the bottom half of the form
- Enter the name of the Sub-category
- Enter a brief Description
¶ Step 4.2: Risk likelihood
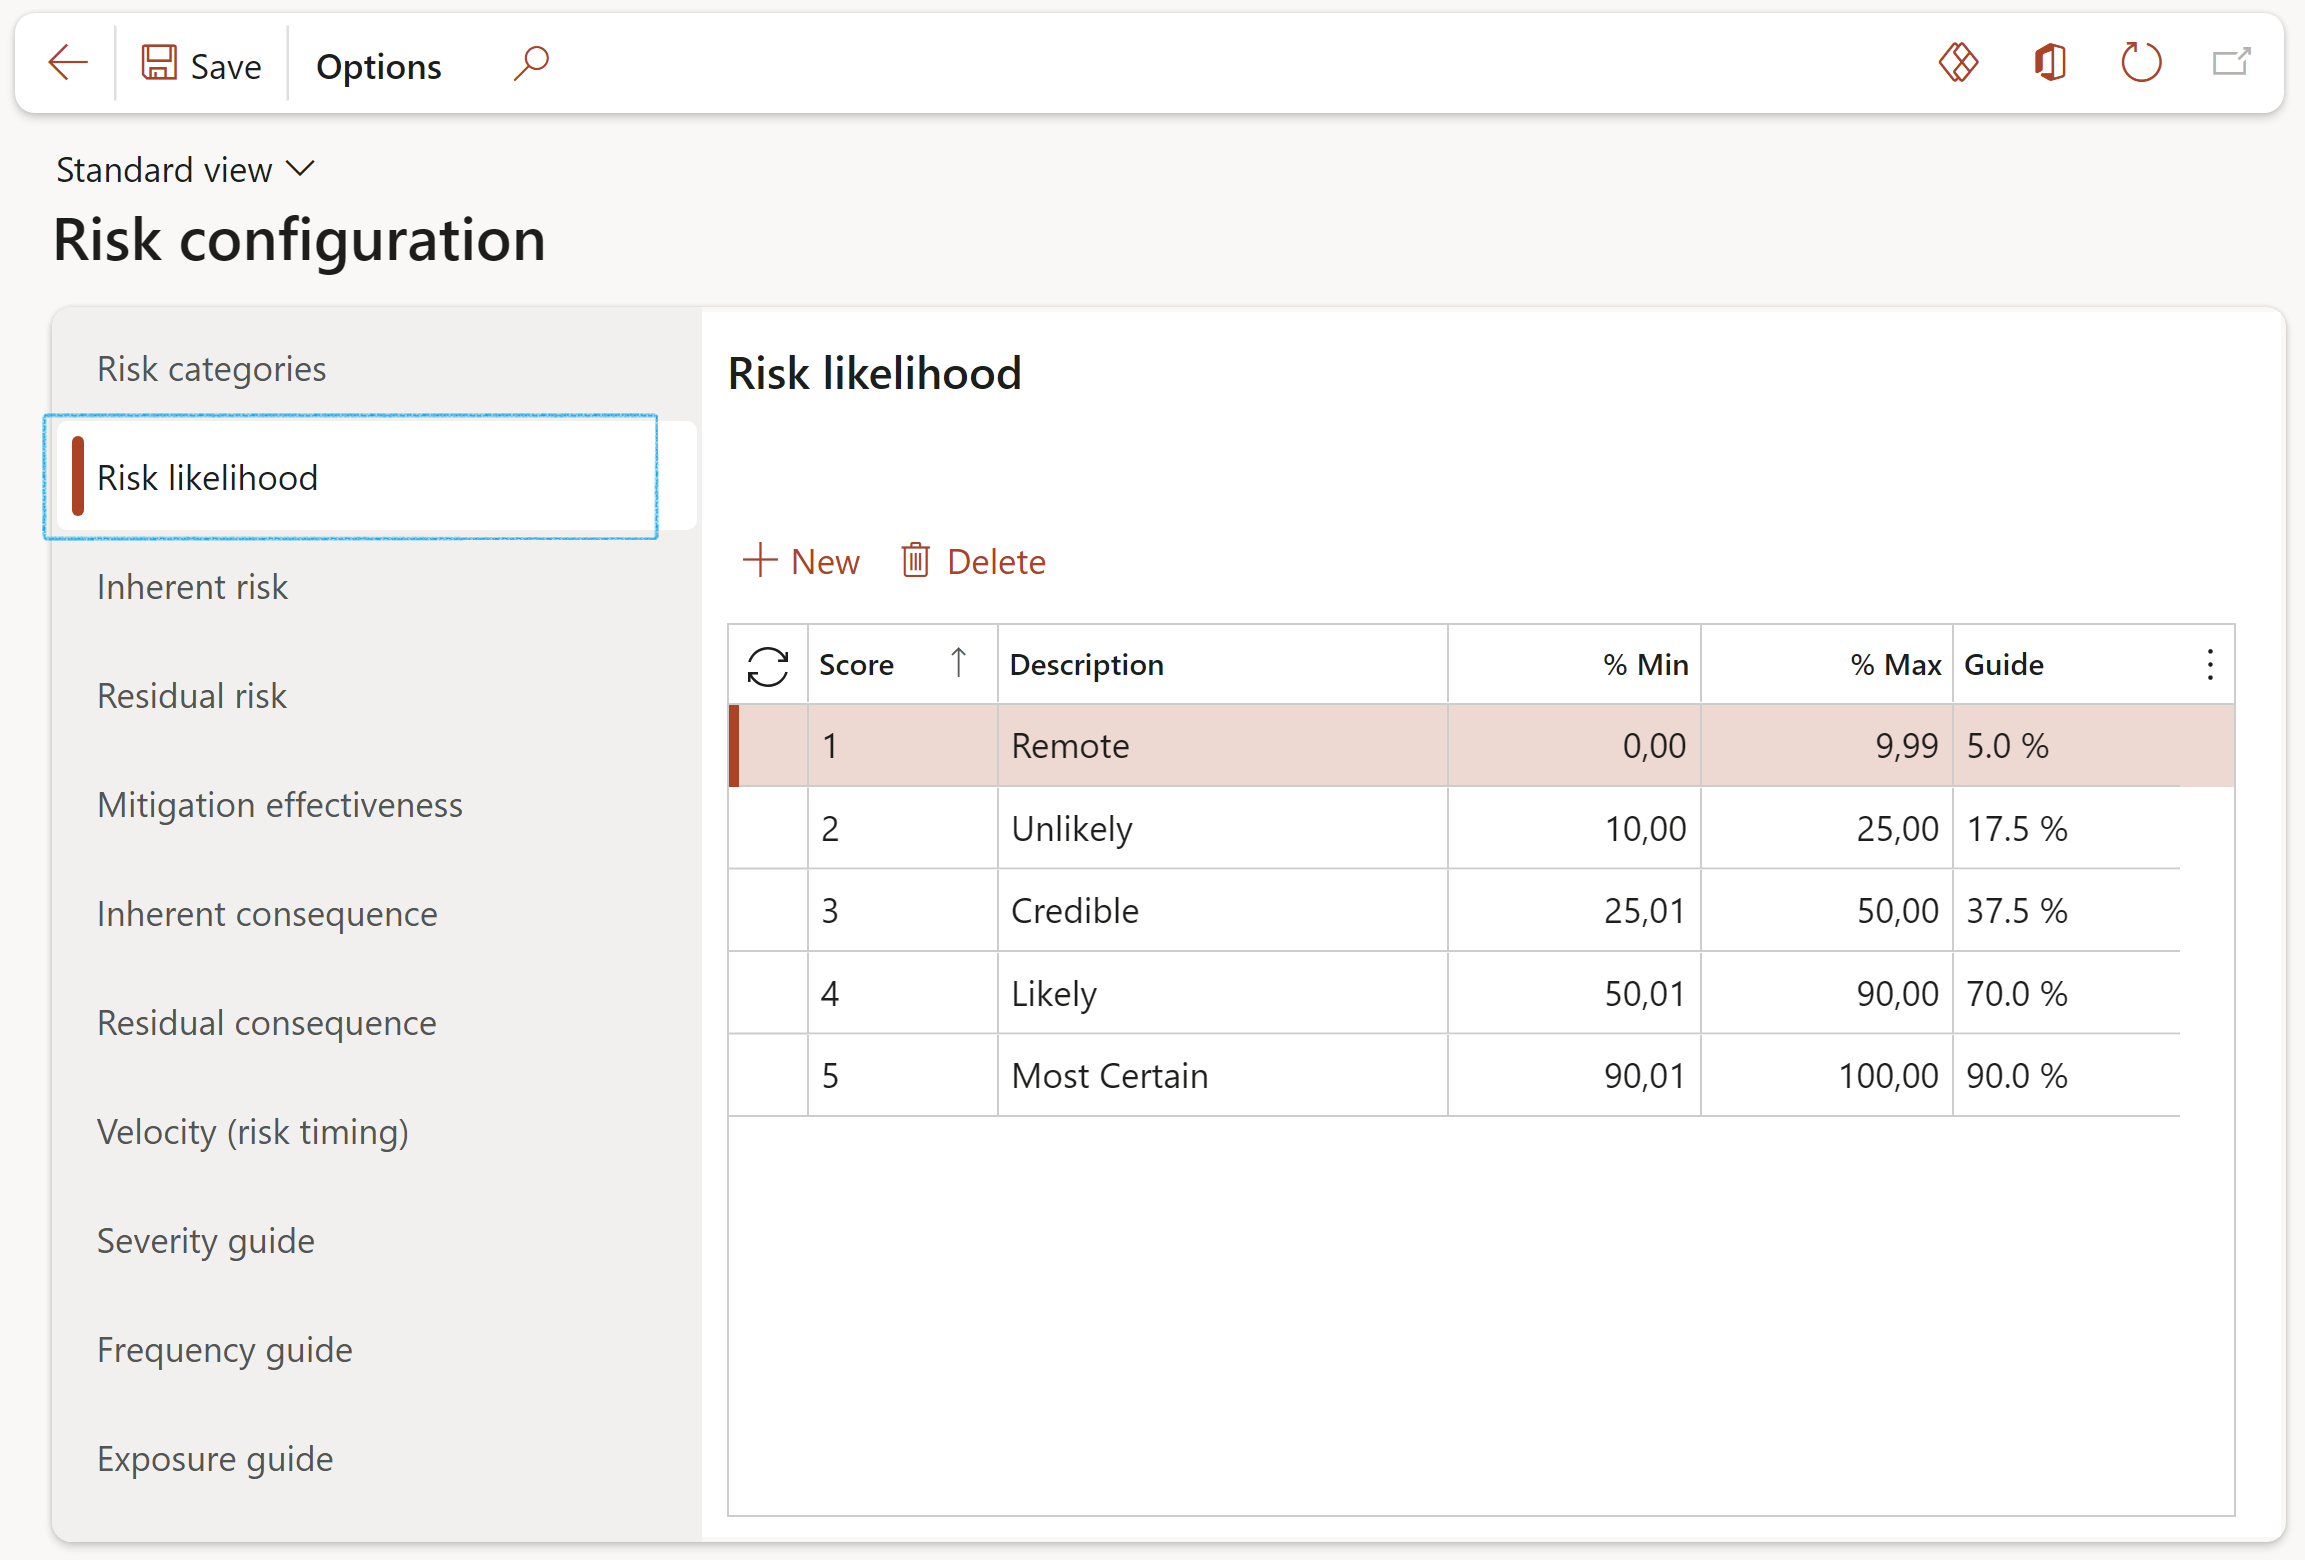
Likelihood is the chance that something might happen. Likelihood can be defined, determined, or measured objectively or subjectively and can be expressed either qualitatively or quantitatively (using mathematics).
- Click on the Likelihood tab
- Click New
- Select the Score from the dropdown list and enter a brief Description
- Enter the lower percentage value of the score range
- Enter the upper percentage value of the score range
- Enter the Guide percentage value
- Click Save
¶ Step 4.3: Inherent risk
Inherent Risk: The risk that an activity would pose if no controls or other mitigating actions and factors were in place (the gross risk or risk before controls)
- Click on the Inherent risk tab
- Click New
- Select the Inherent risk from the dropdown list and enter a brief Description
- Enter the Rating as well as the Rating percentage
- Click Save
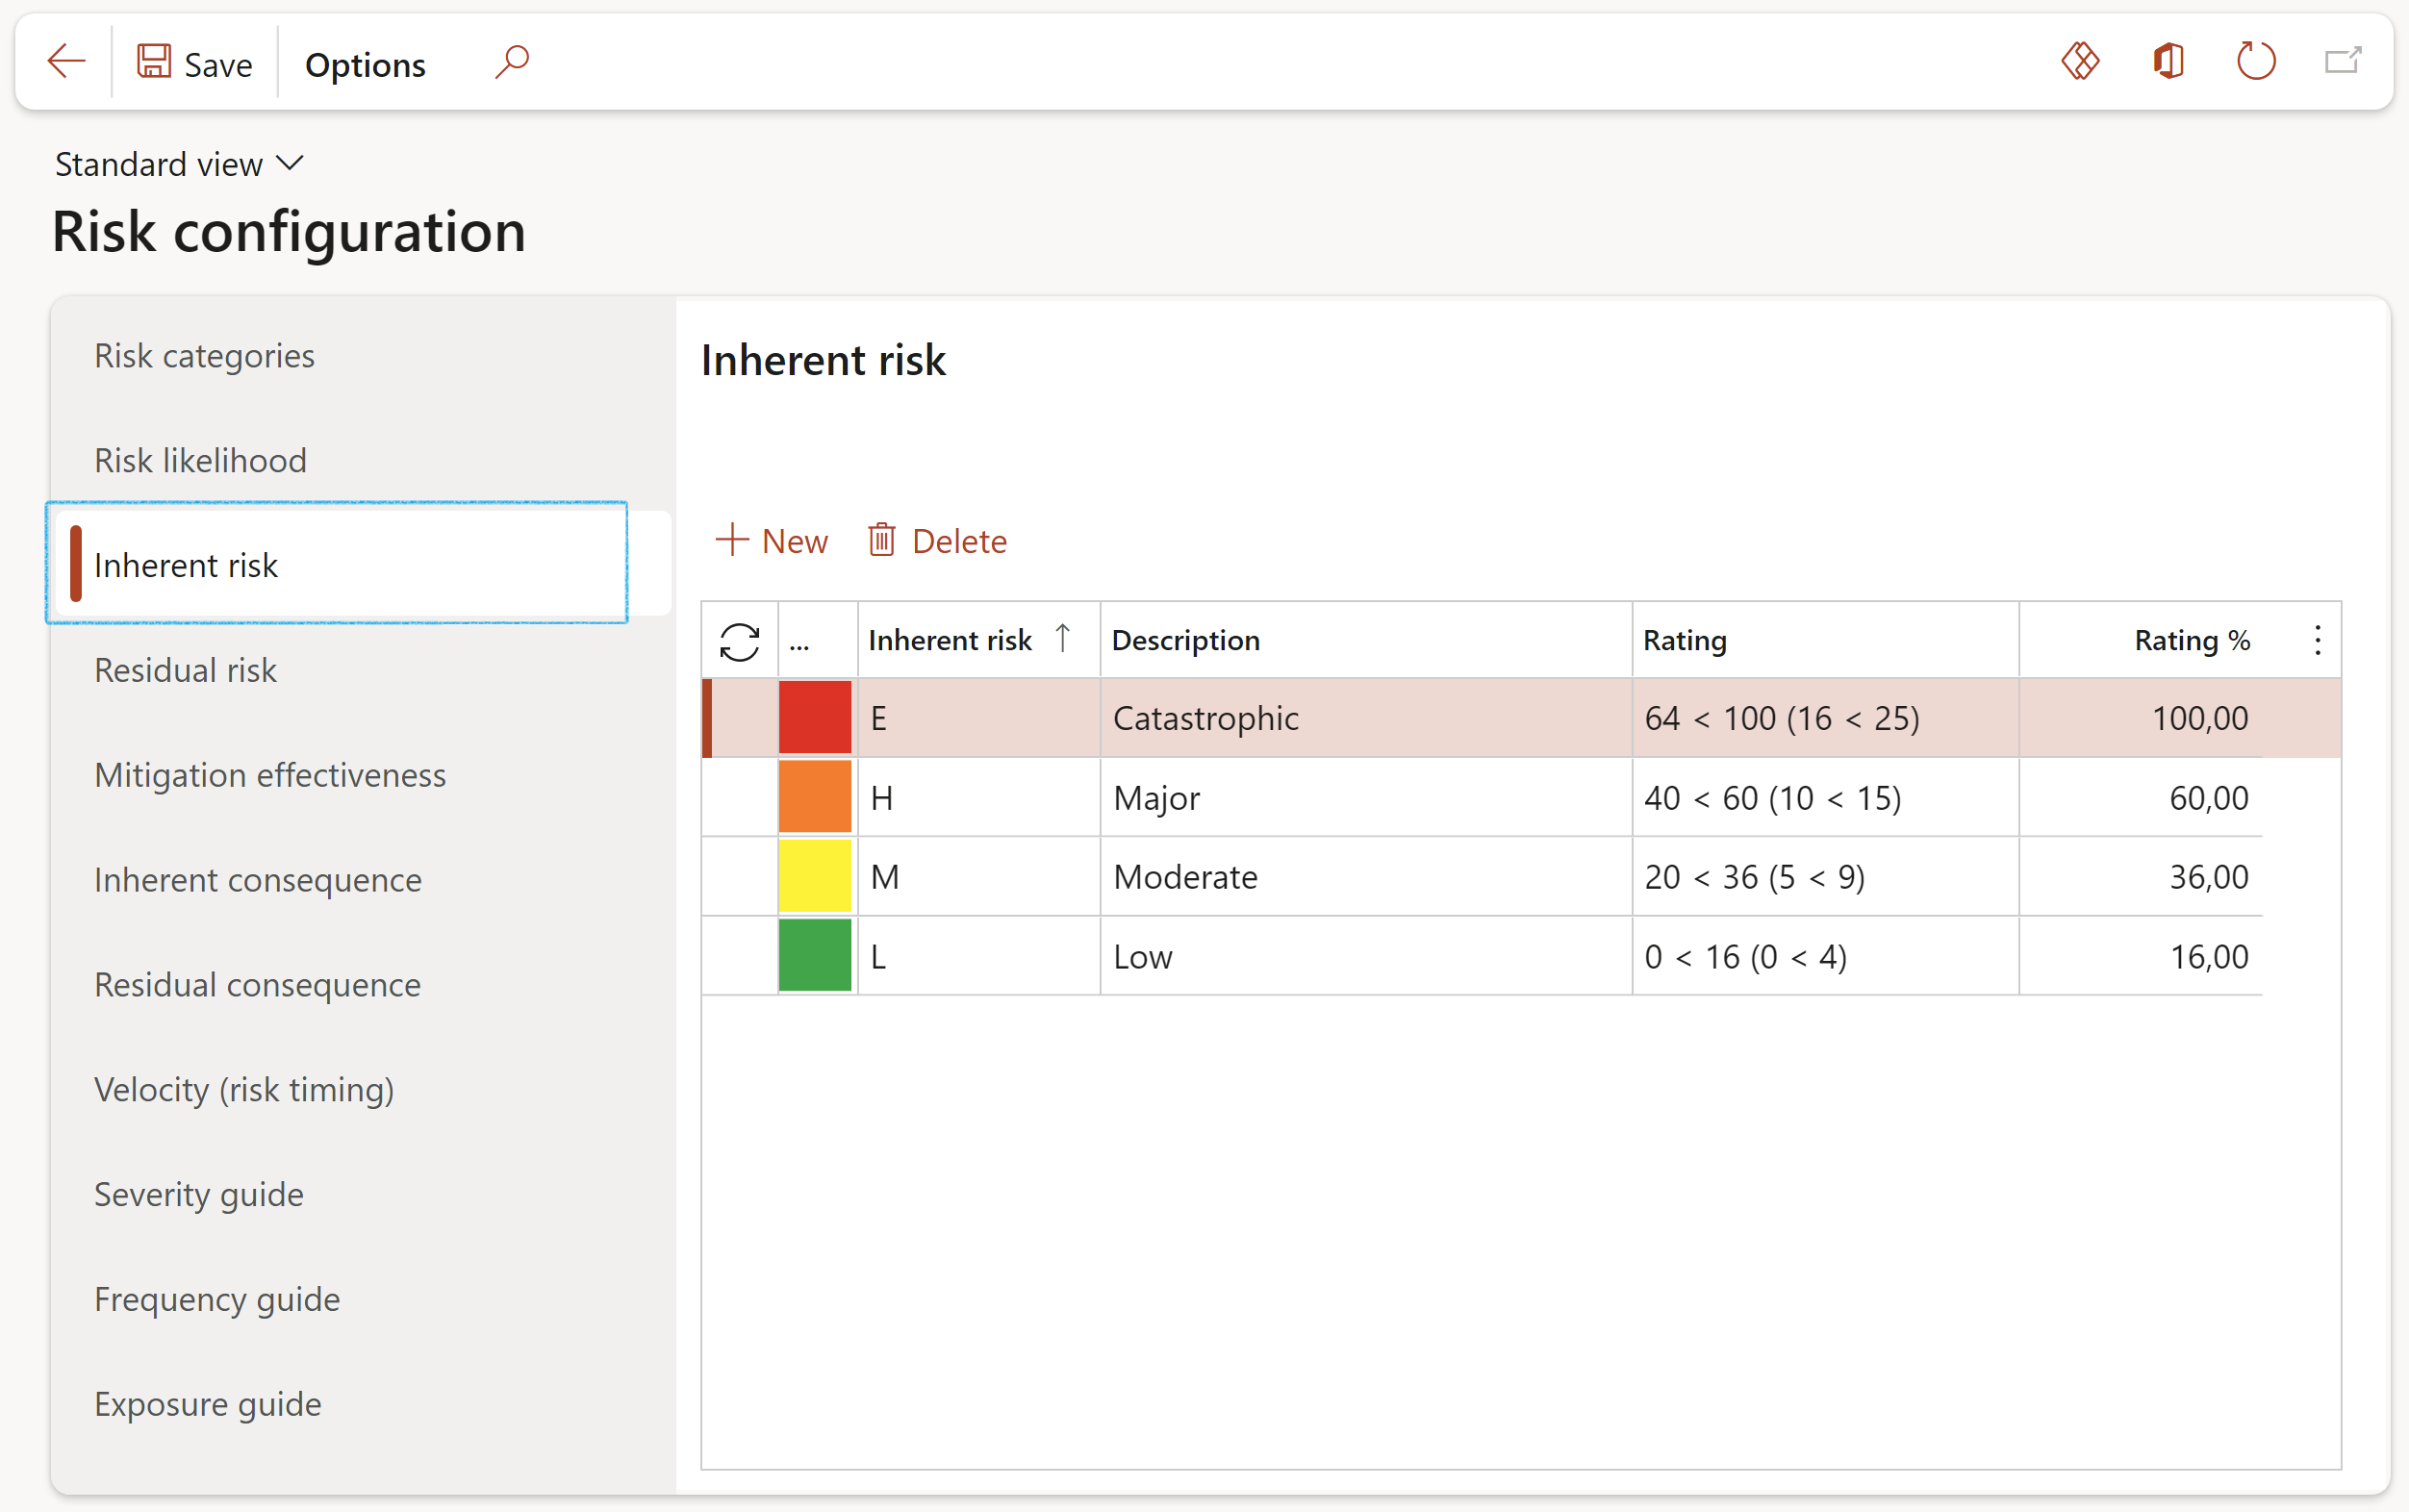
Please note that each Inherent risk line’s ‘Rating %’ setup value should represent the maximum % value of the highest combination of Likelihood x Impact for the specific color (Inherent risk element E, H, M, etc.), i.e. 5x5 = 100%. The Rating column is only for guidance and these figures will not be used by D365’s calculations engine.
¶ Step 4.4: Residual risk
Residual Risk: The risk that remains after controls have been taken into account (the net risk or risk after controls)
- Click on the Residual risk tab
- Follow the same instructions as for Inherent risk
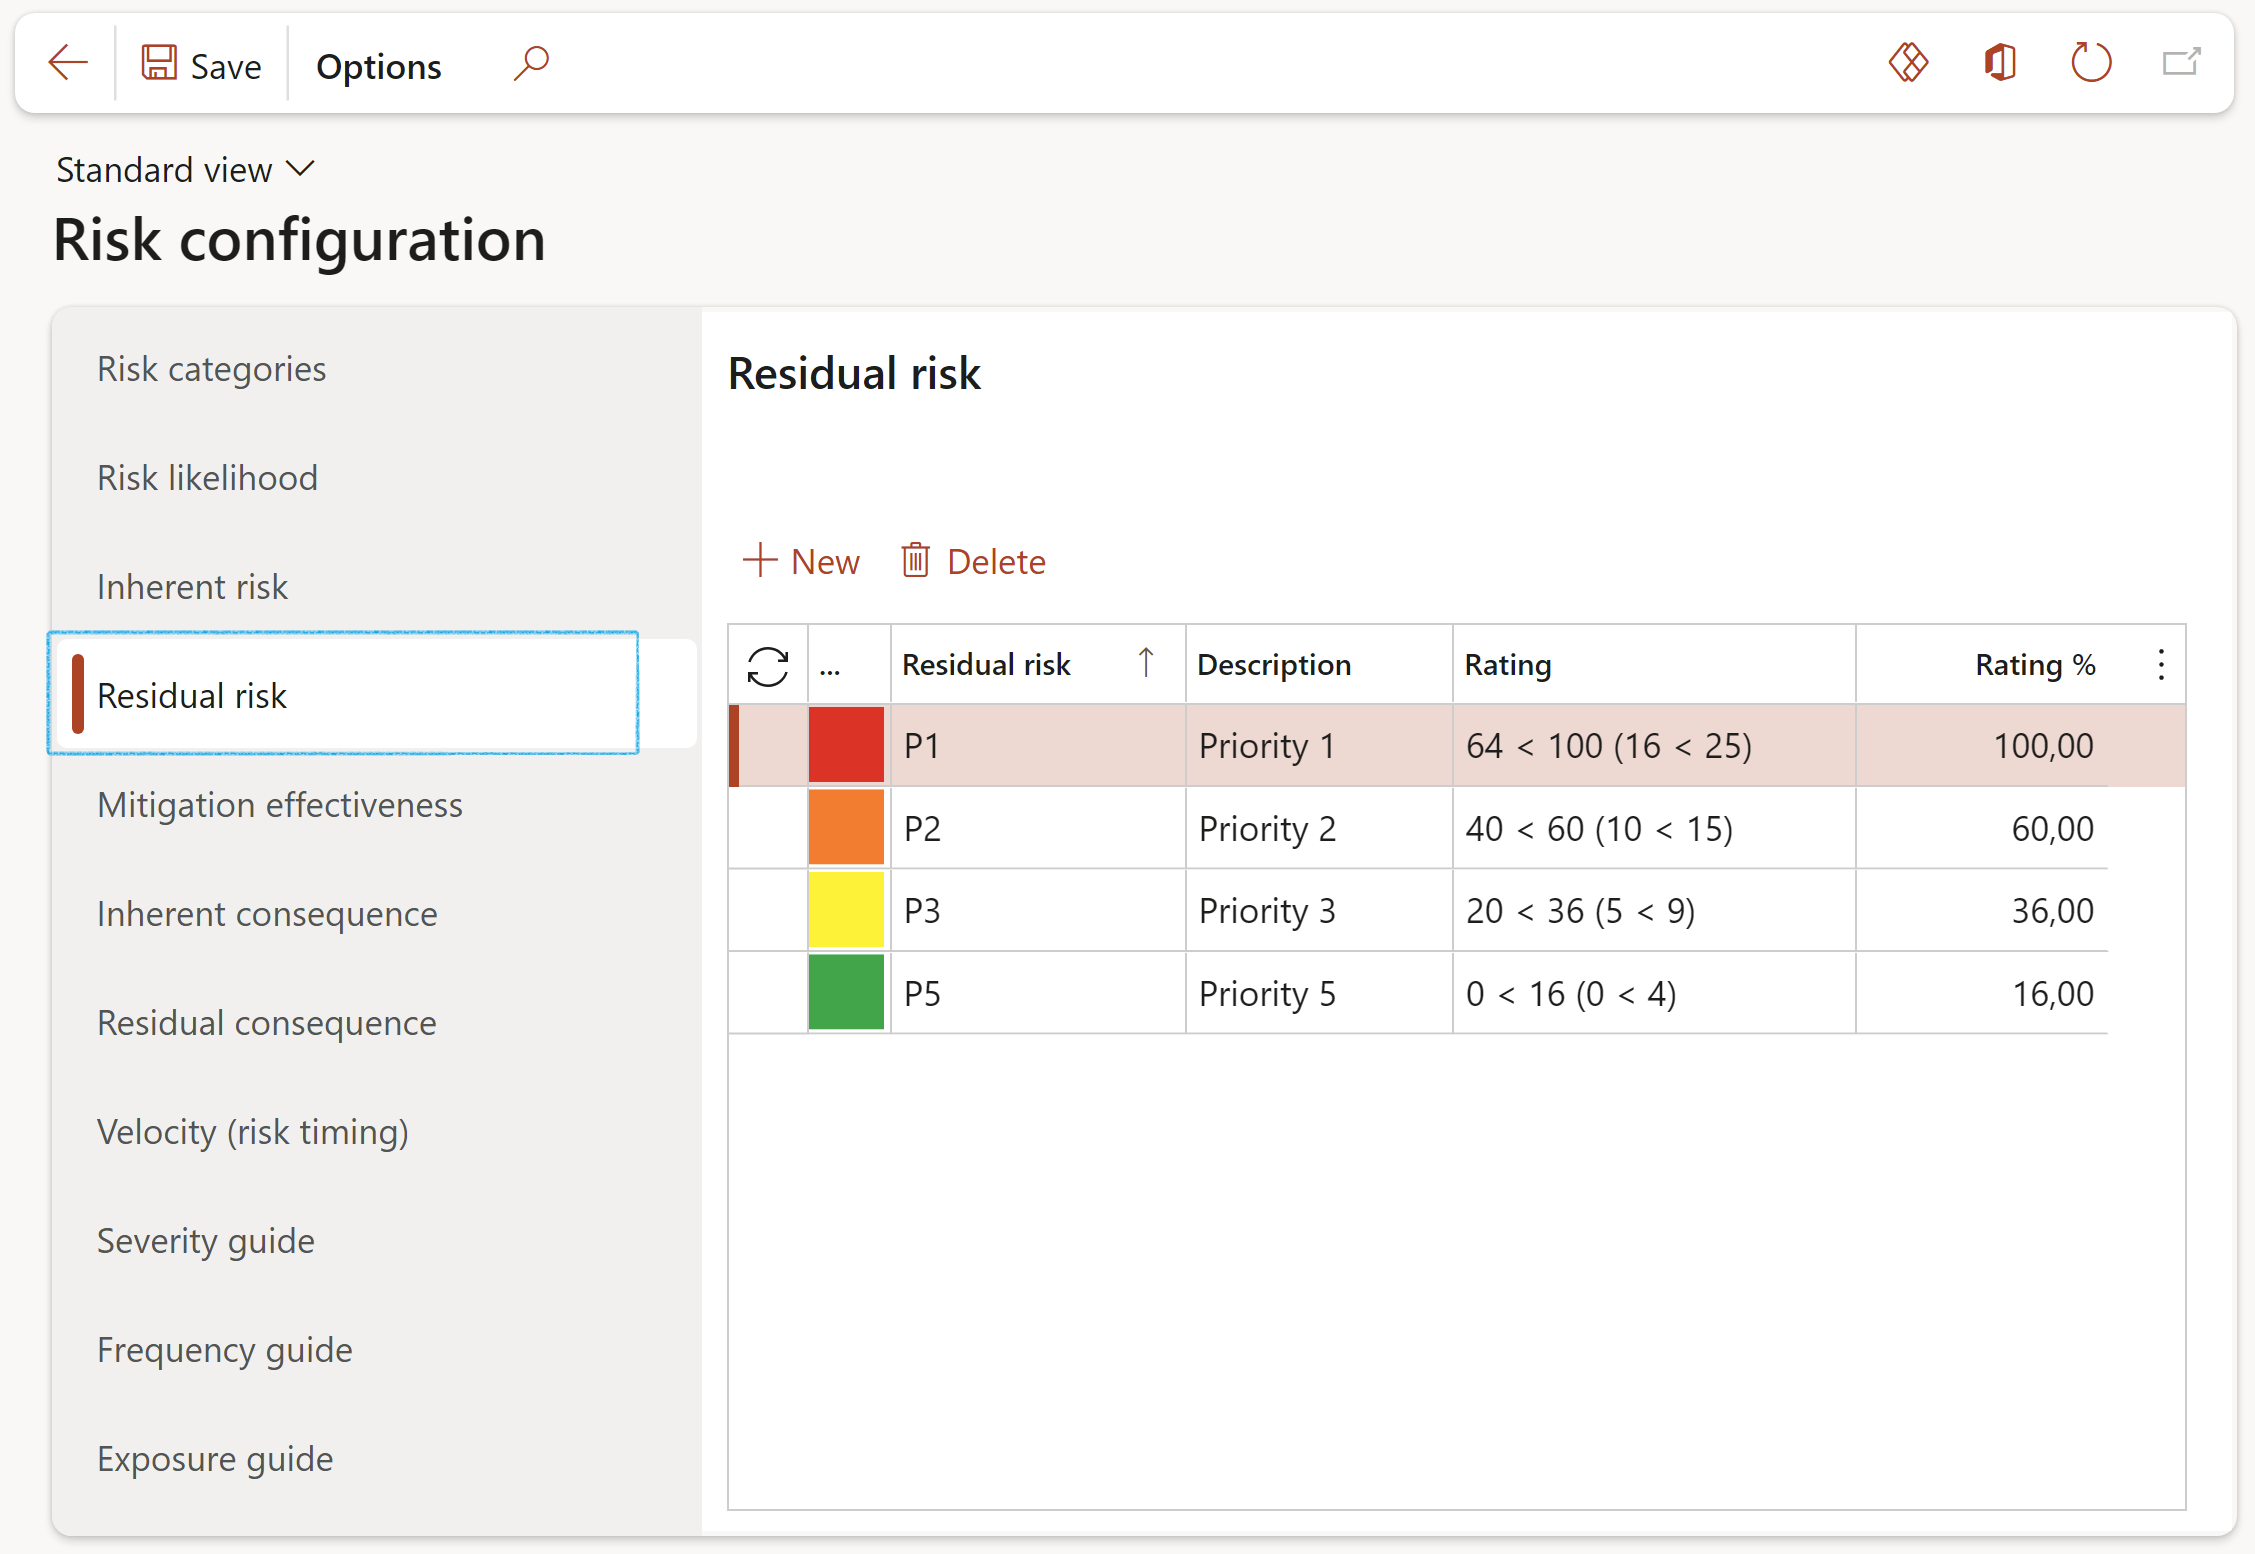
Please note that each Residual risk line’s ‘Rating %’ setup value should represent the maximum % value of the highest combination of Likelihood x Impact for the specific color (Residual risk element P1, P2, P3, etc.), i.e. 5x5 = 100%. The Rating column is only for guidance and these figures will not be used by D365’s calculations engine.
¶ Step 4.5: Mitigation effectiveness
Mitigation is the action and effort entered into, with the objective to reduce loss of life and property by lessening the impact of risk. These actions and efforts must be assessed for effectiveness. At this point users must define effectiveness factors with a percentage rating. These setups are used by the Control measures, having available the Effectiveness factors and Rating % as per setup done here.
- Click on the Mitigation effectiveness tab
- Click New
- In the Effectiveness column, enter a description for the mitigation effectiveness
- Enter a brief description of the Qualification criteria
- Enter the Rating percentage
- Select the relevant Colour rating for the effectiveness factor
- Select the Effectiveness factor from the dropdown list
- Click Save and refresh the screen to apply the selected colours
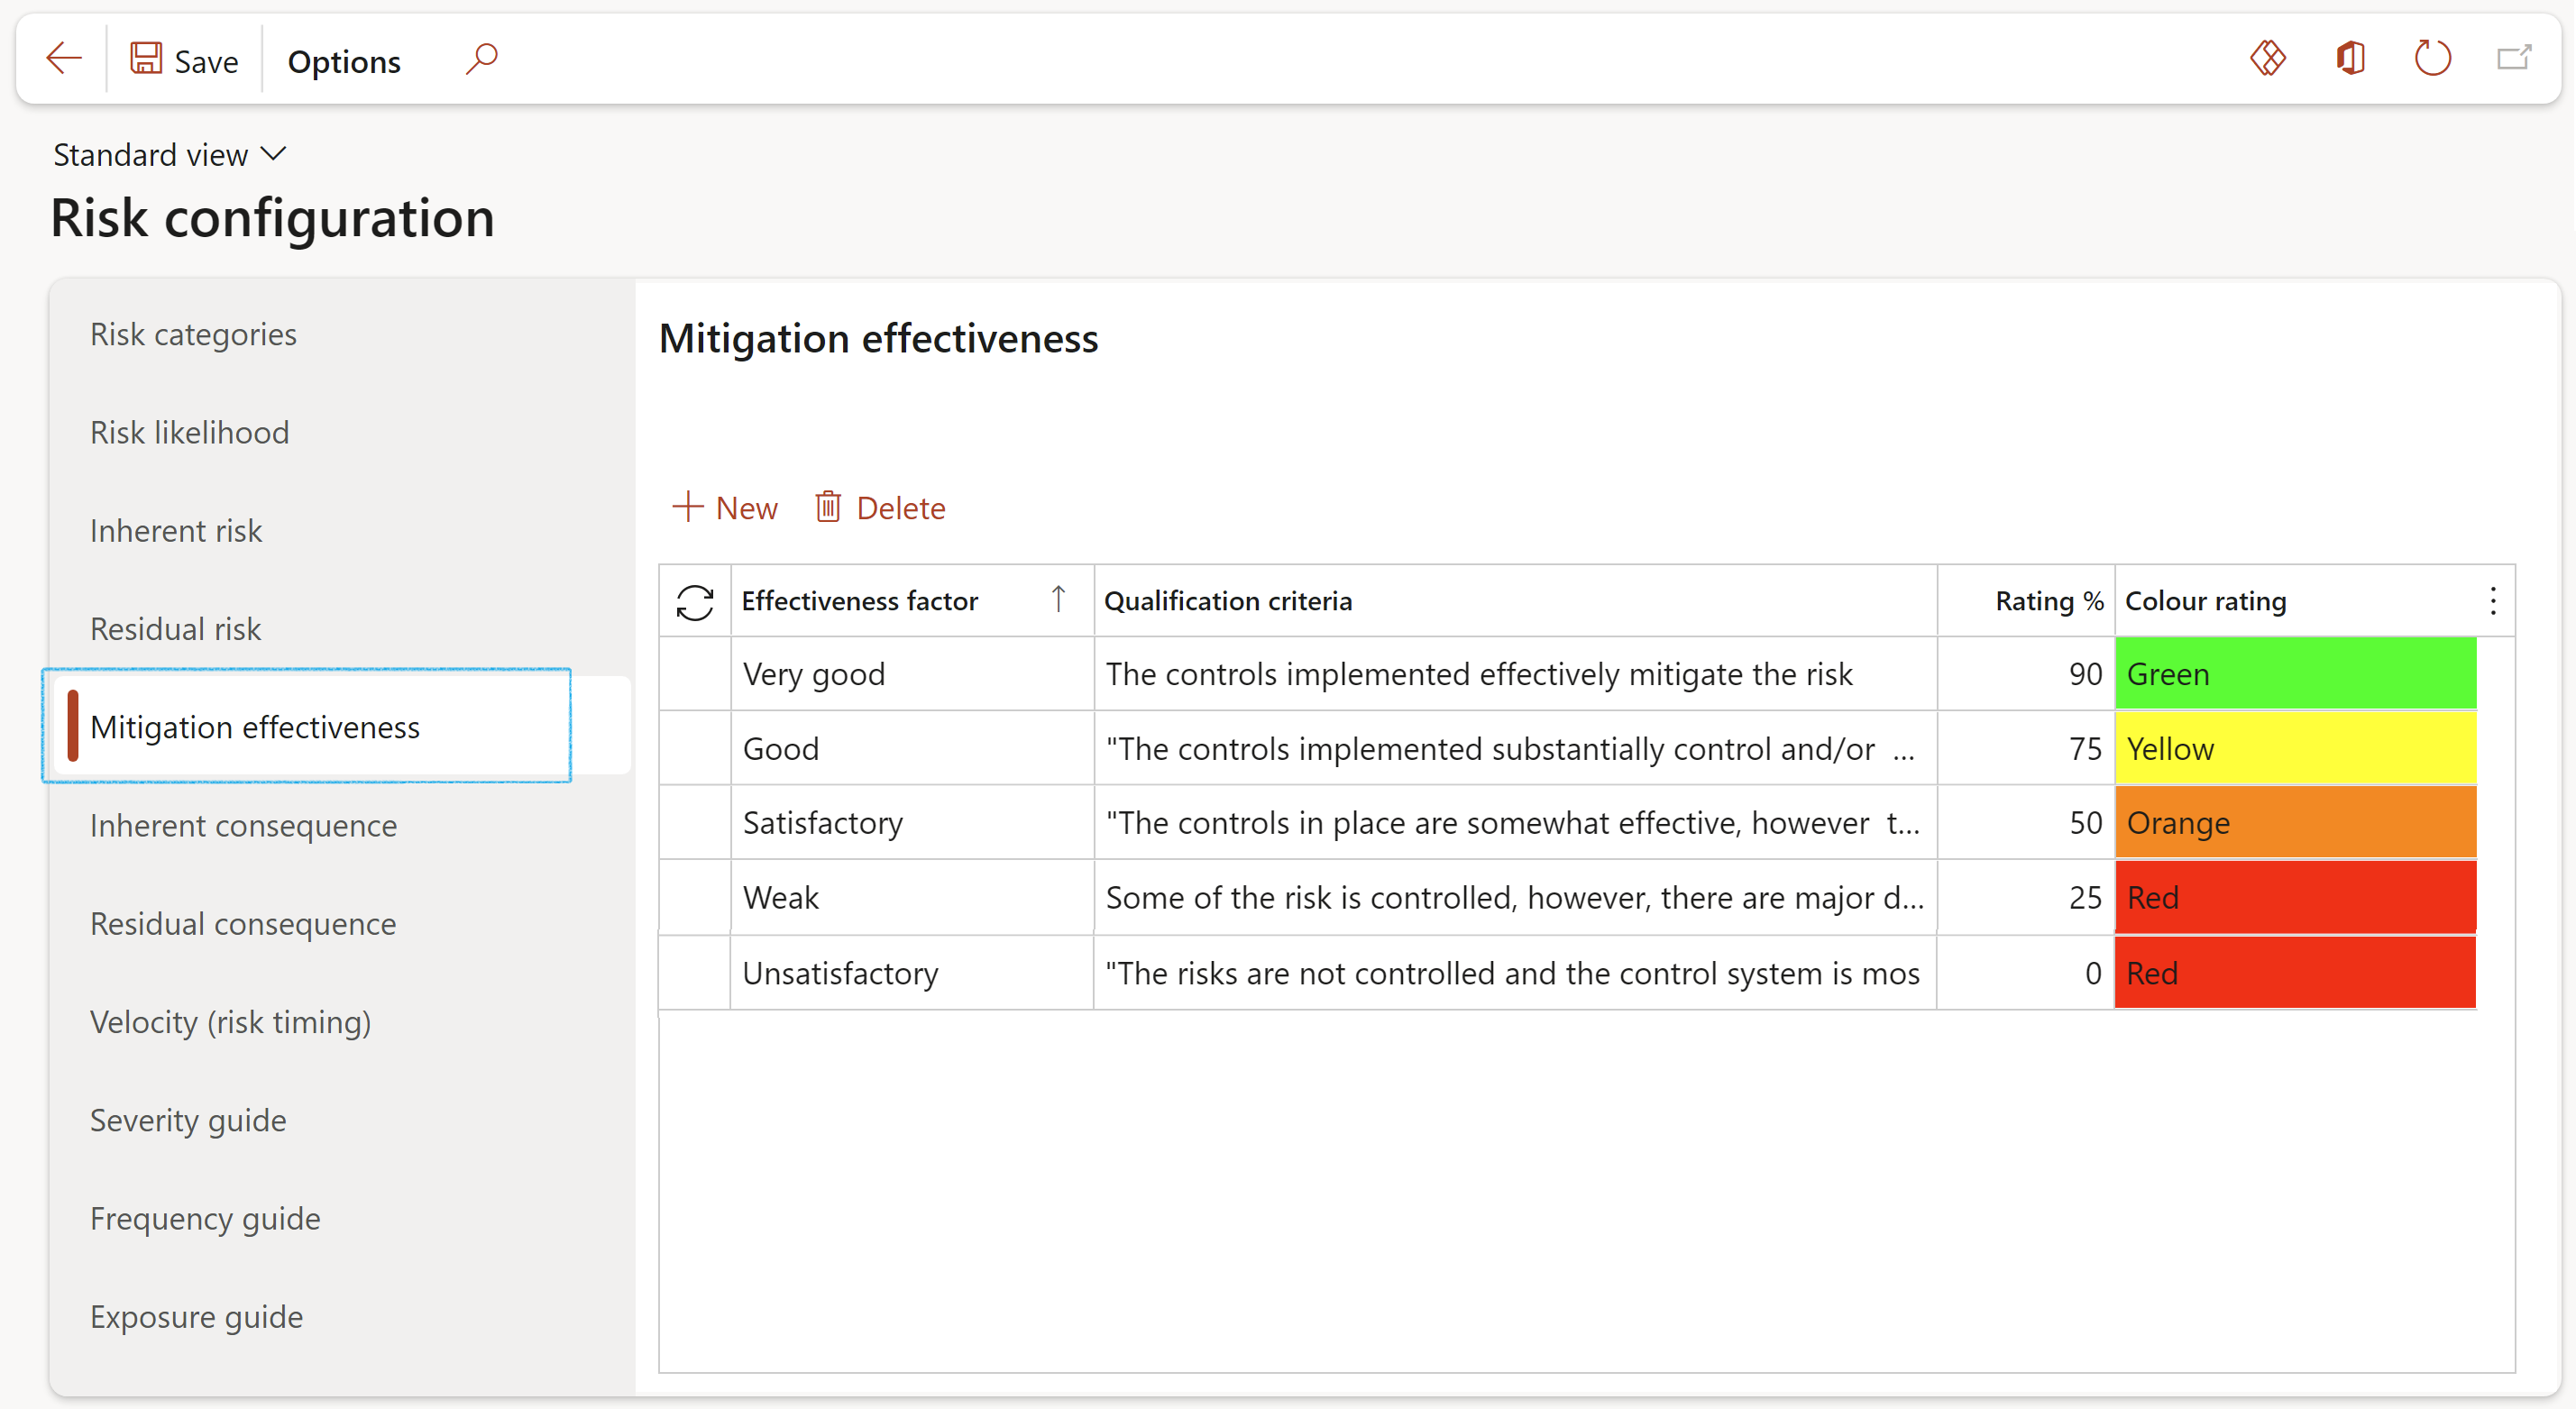
Please note that all five Mitigation effectiveness factors have to be setup in order for the relevant one to be displayed and used for calculations on the applicable risk line(s)
¶ Step 4.6: Inherent and Residual consequence (impact)
Inherent consequence: What is the extent of the most probable impact of the risk event occurring if no controls are in place. In other words, how severely will the consequences impact a business in the absence of any actions and effort to reduce or stop the risk?
The “Consequences” are indicated by a “Currency value” amount. I.e. if the risk occurs and the consequences arise, what do we estimate the damage or cost impact to be.
- Click on the Inherent consequence tab
- Click New
- Select the Score from the dropdown list and enter a brief Description
- Select the Consequence from the standard Dynamics 365 values dropdown list
- Enter the Range percentage
- Enter the Value minimum as well as the Value maximum (MFL)
- Enter an Annual value
- The Currency will default to the company’s currency
If the currency is changed on one line, all the other lines’ currencies will change to the new currency
- For Inherent consequence, for each line, enter the Financial, Reputational and Compliance details in the blocks provided under the grid
- Click Save
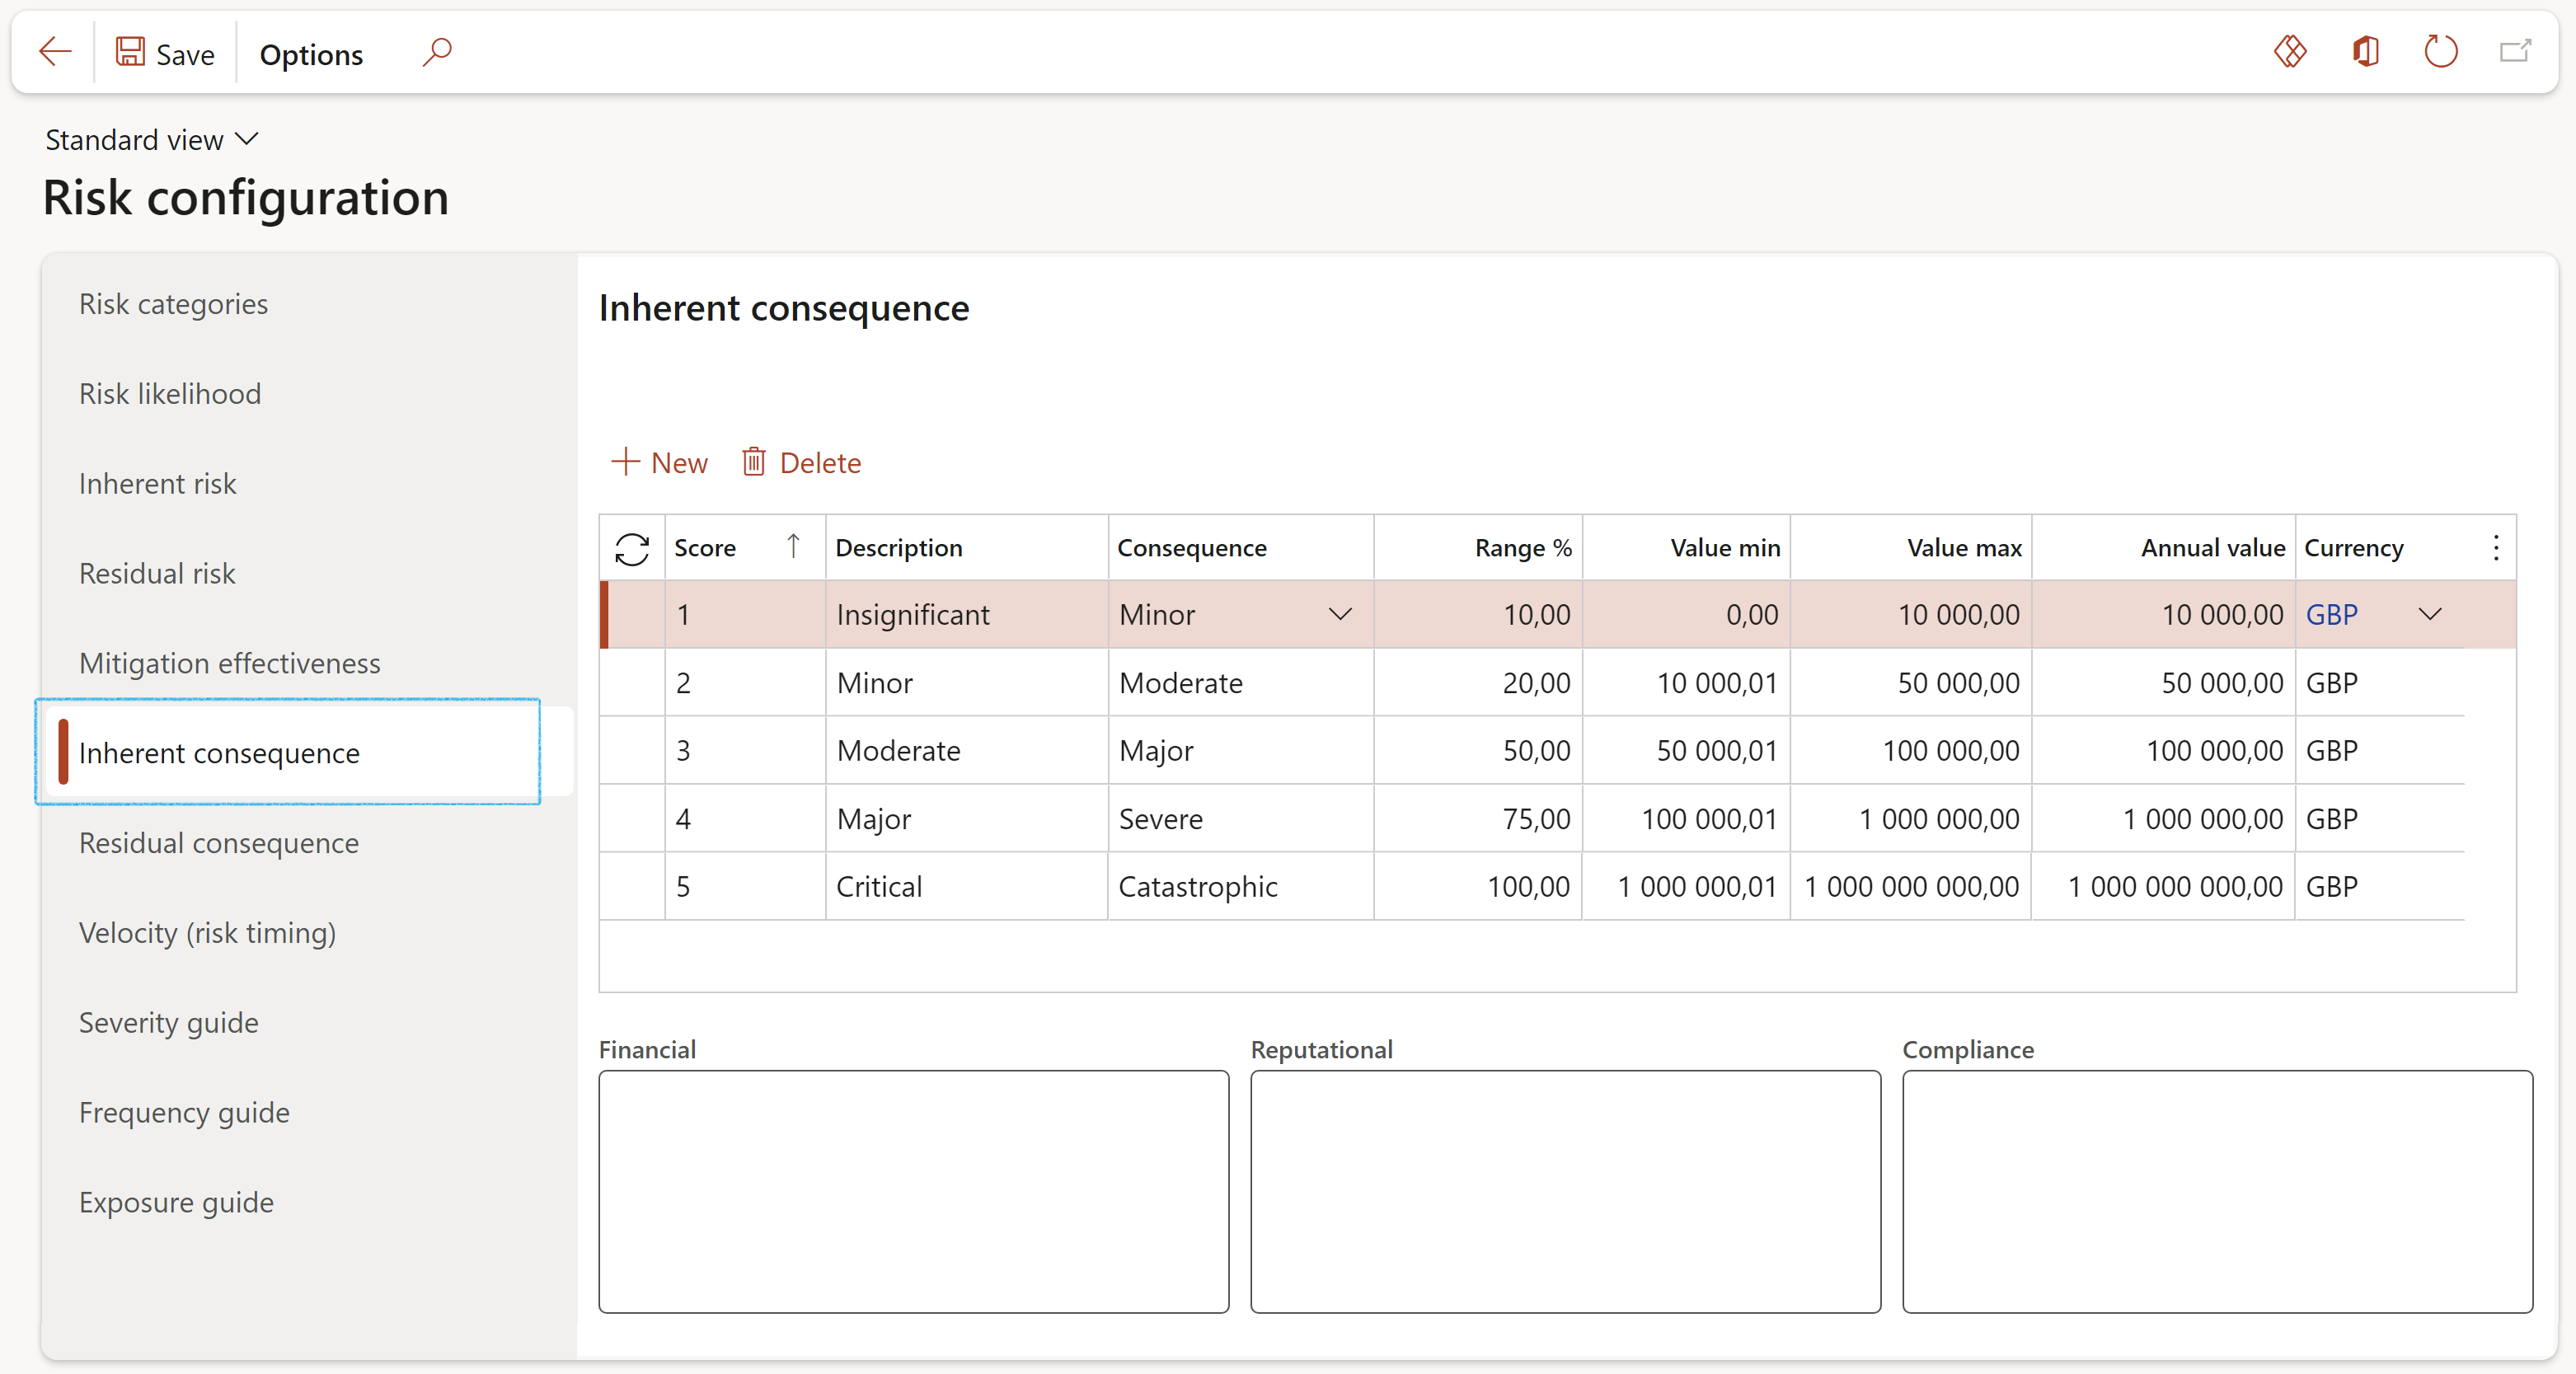
If the currency is changed under the Inherent consequence tab, the currency under the Residual consequence tab will also be changed to the new currency.
If the currency is changed under the Residual consequence tab, the currency under the Inherent consequence tab will also be changed to the new currency.
Residual consequence: The Inherent consequence is reduced by the percentage of Corrective Control. The Residual consequence is the "Currency value" left after control reduction of these two multiplied, is calculated.
The Residual consequence setup form displays the band values per score to determine the ranges of classifying the calculated Residual consequence.
- Click on the Residual consequence tab
- Follow the same instructions as for Inherent consequence
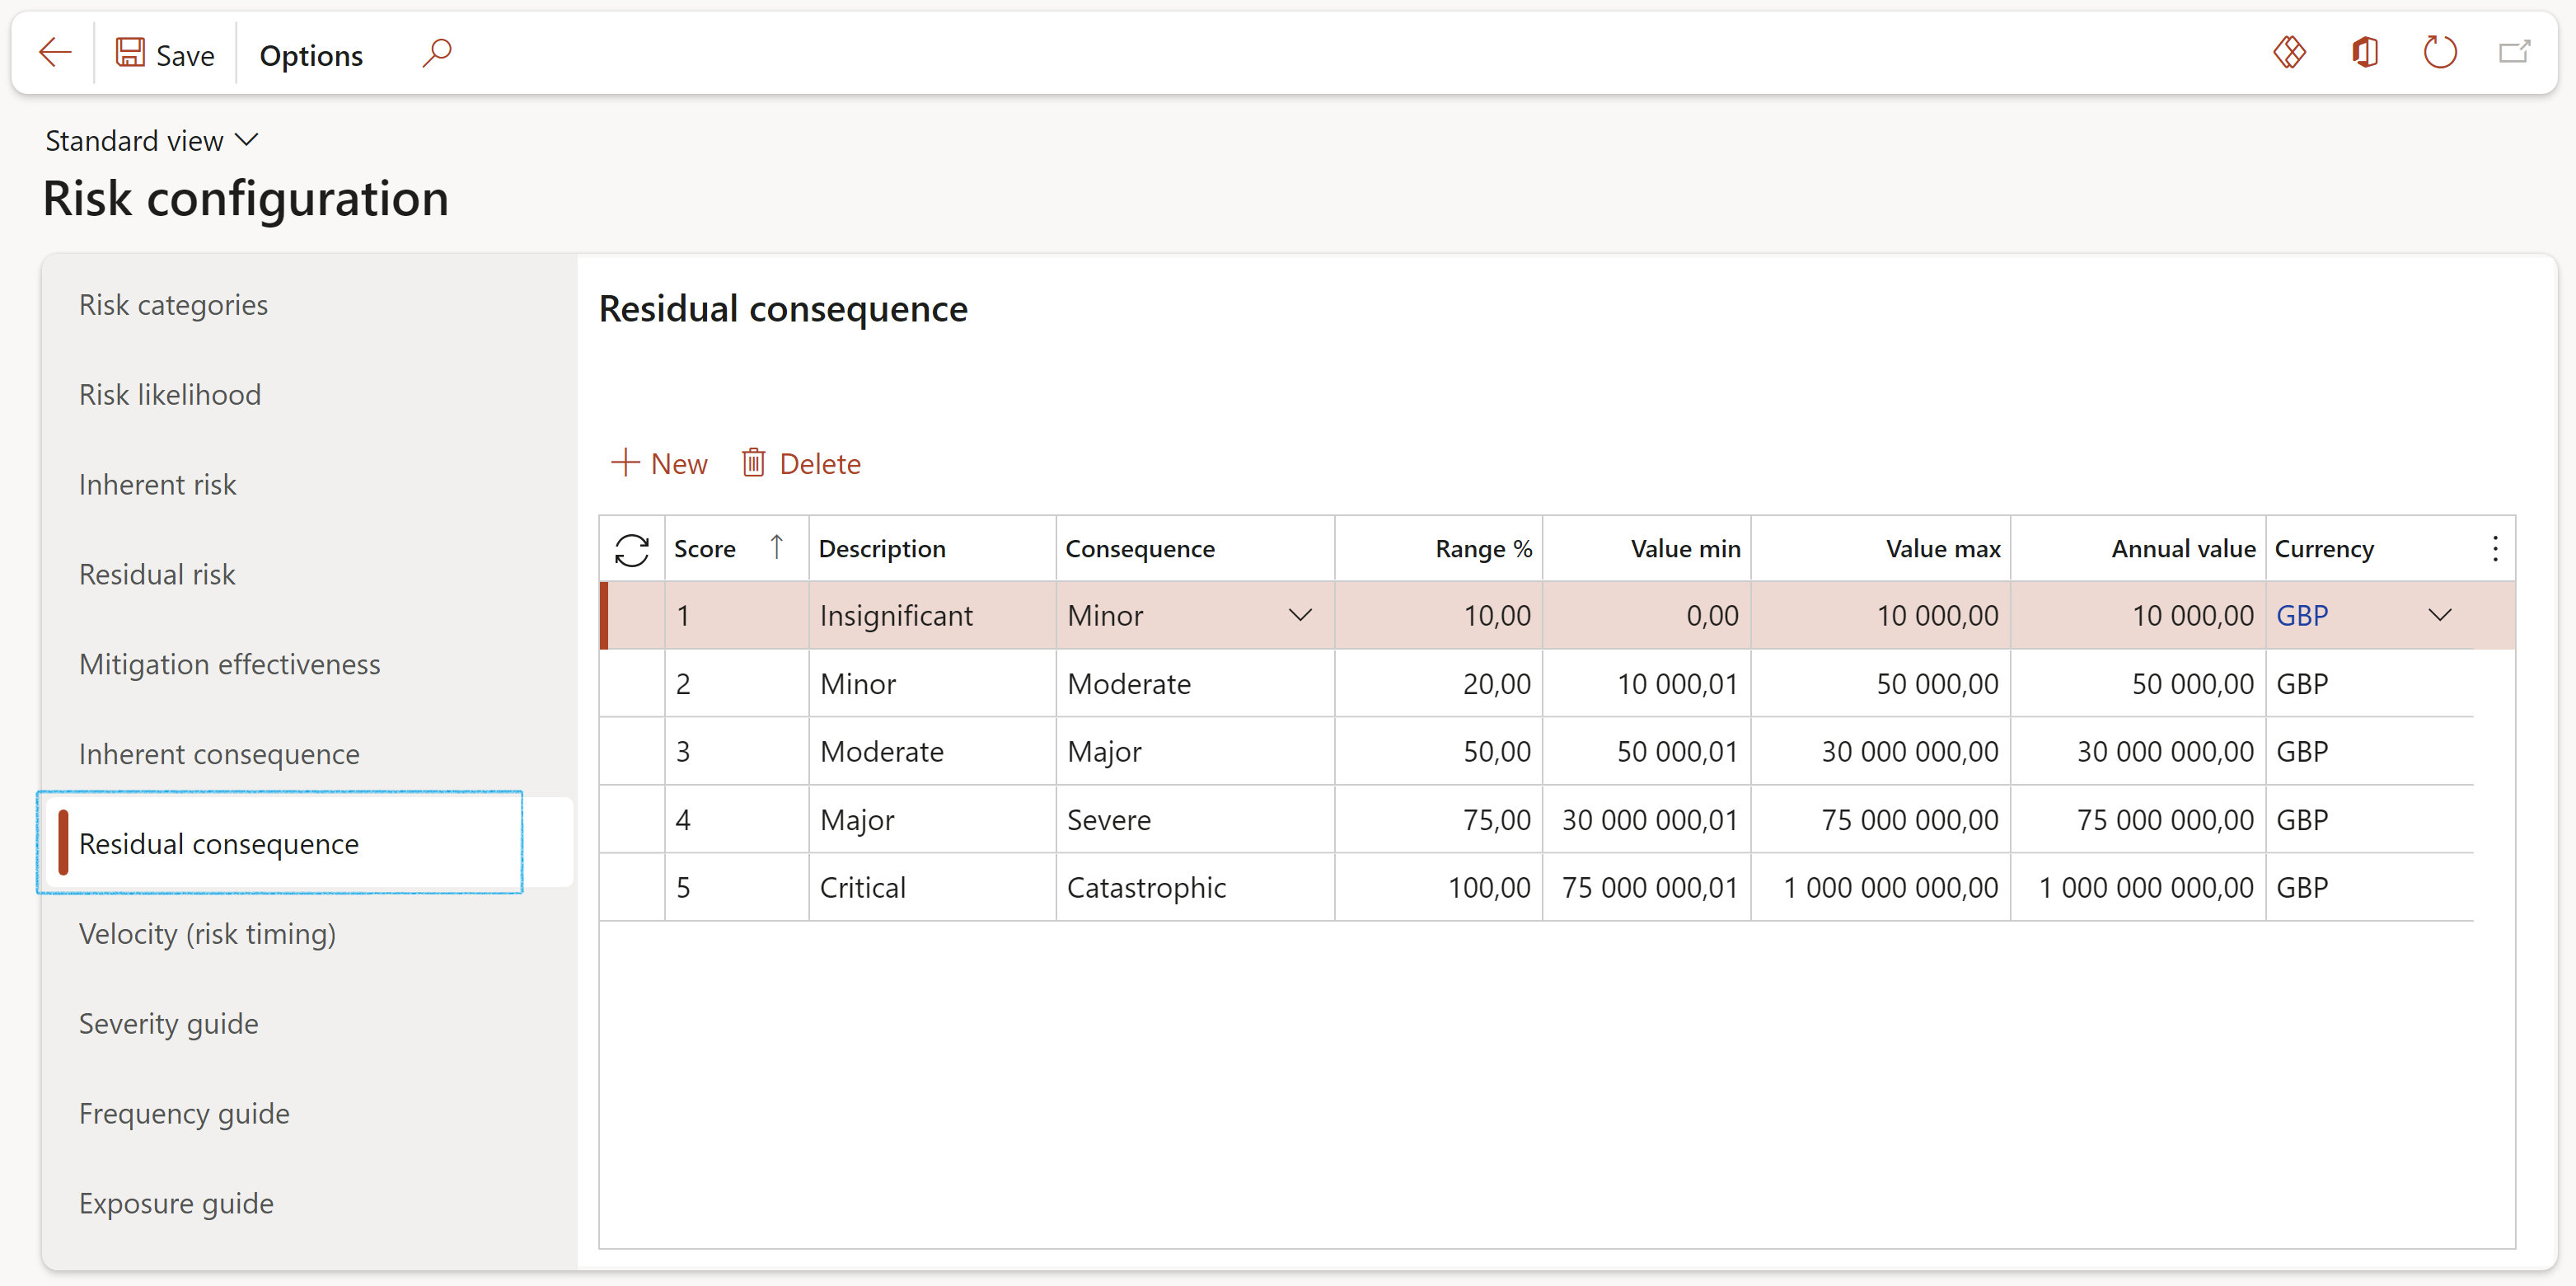
The Max value in the Consolidation Legal entity’s setup must be high enough so that the consolidated amount from various legal entities is not higher than this setup. If this Max value setup is not high enough, the consolidated inherent or residual score will not pull through to the Risk assessment.
¶ Step 4.7: Velocity (Risk timing)
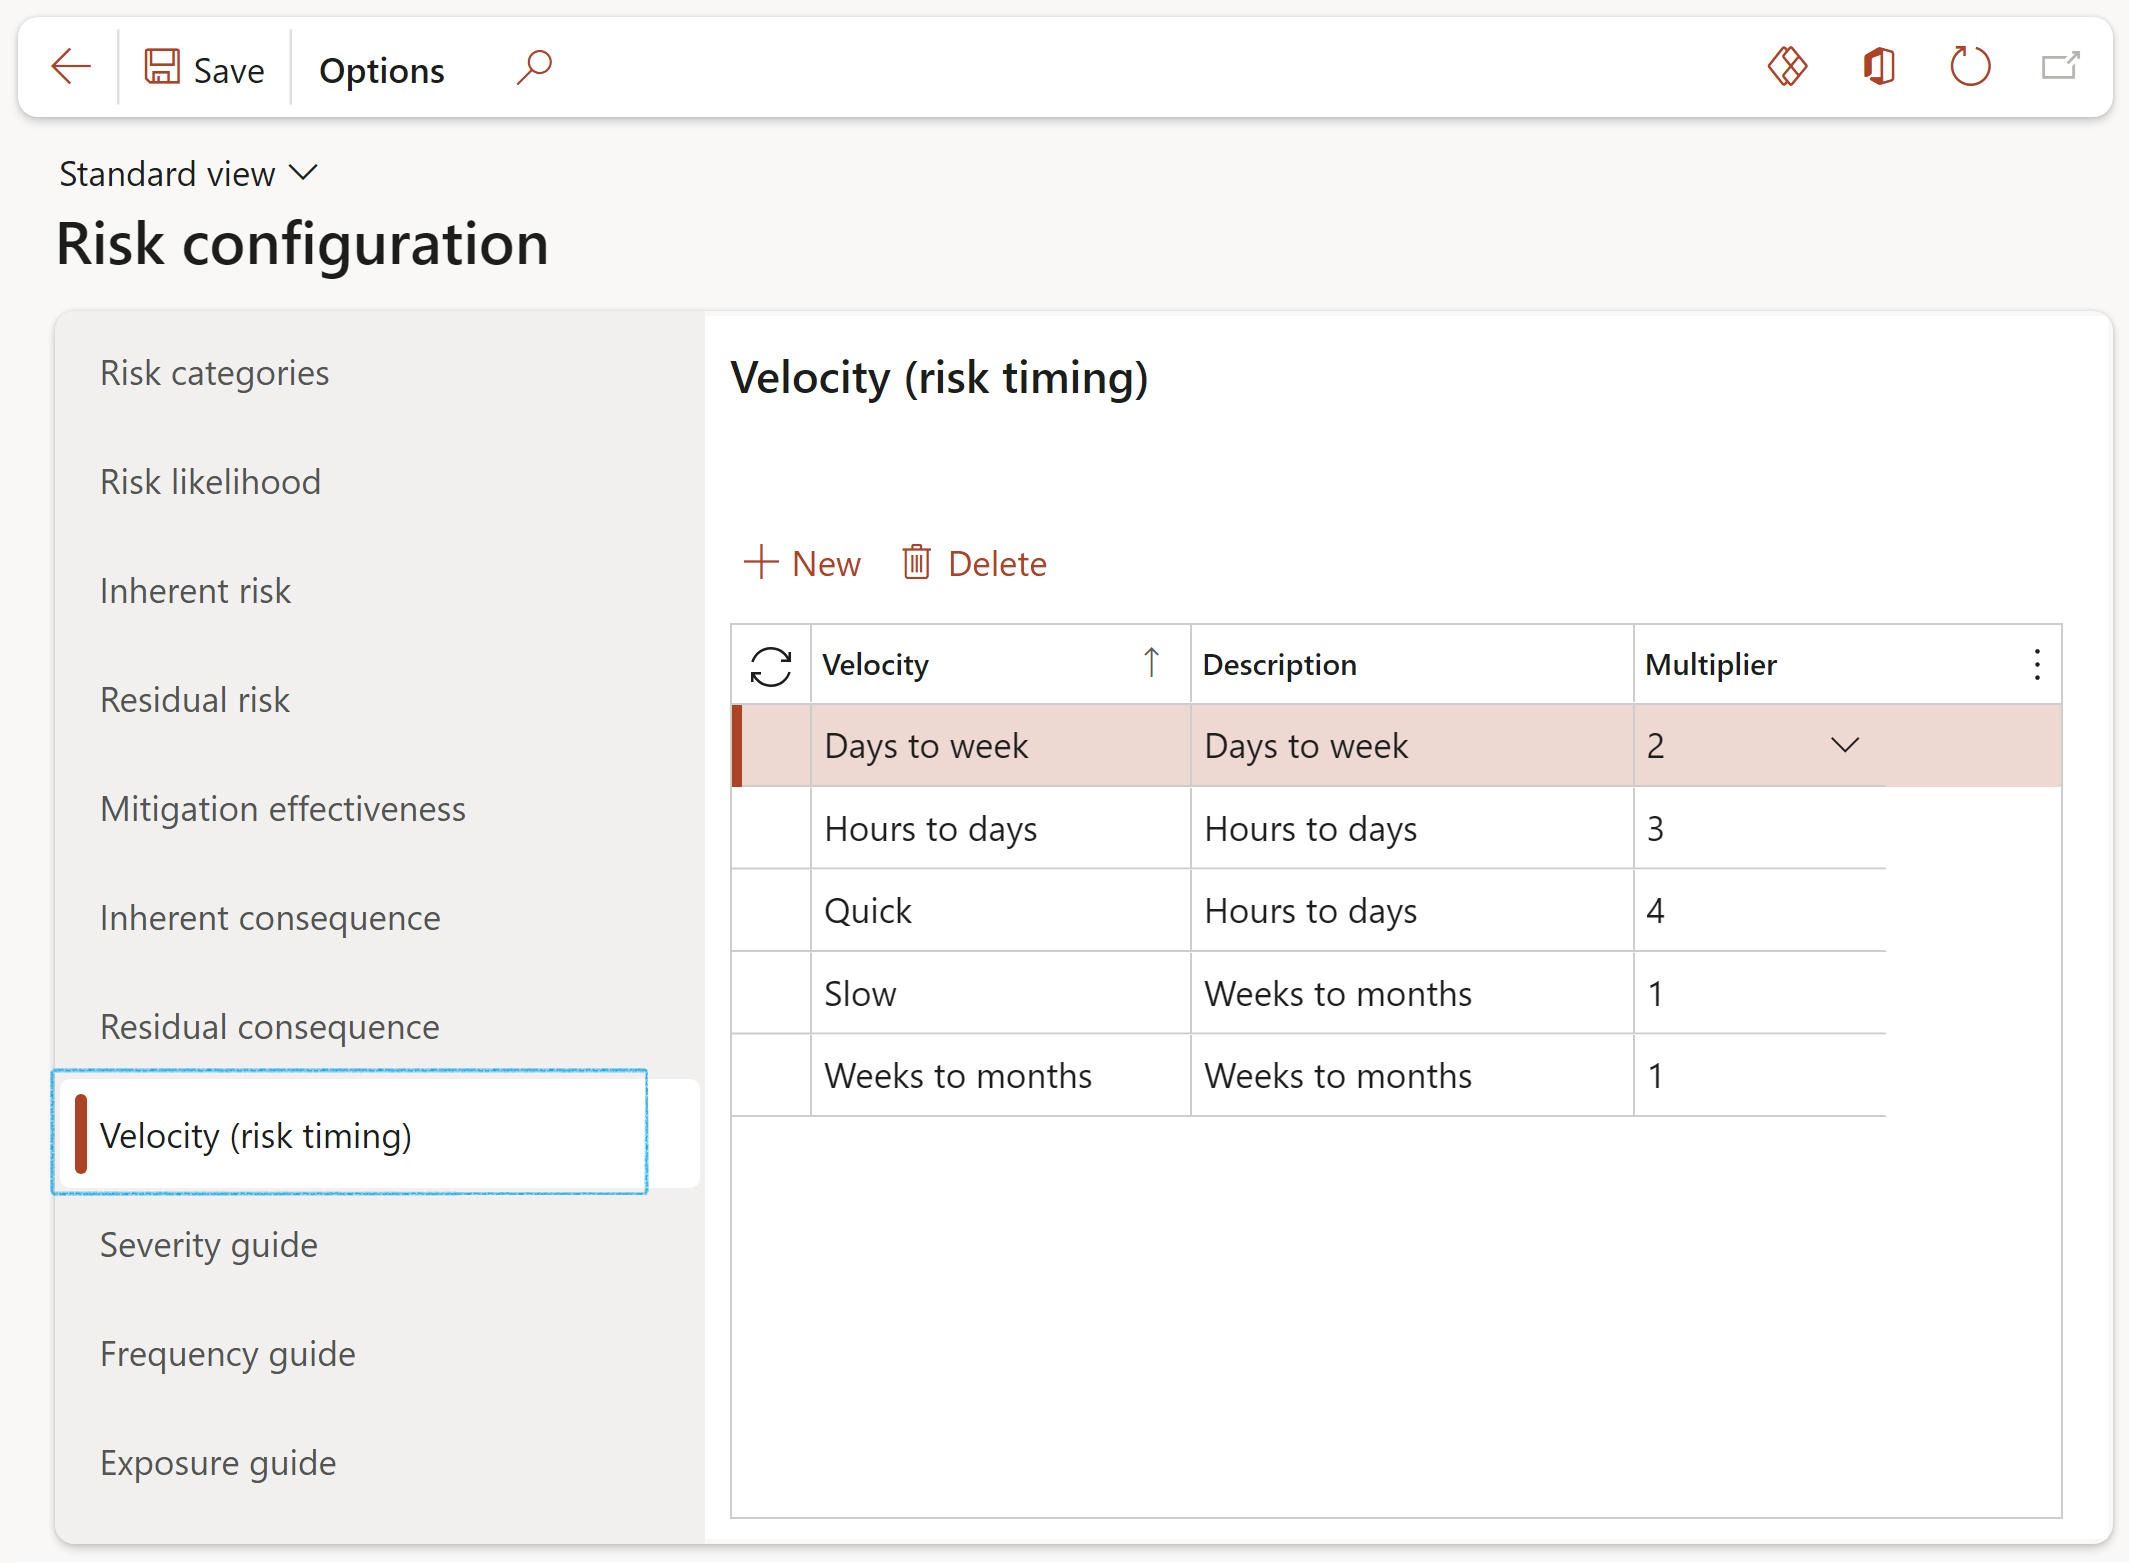
The idea behind velocity is to capture a time element in the risk measurement. Typically, this is seen as either Time to Cause or Time to Impact.
- Click on the Velocity (risk timing) tab
- Click New
- Enter the risk velocity formulation in the Velocity field
- Enter a brief Description for the velocity
- In the Multiplier field, select the relevant risk velocity multiplication factor from the dropdown list
¶ Step 4.8: Severity
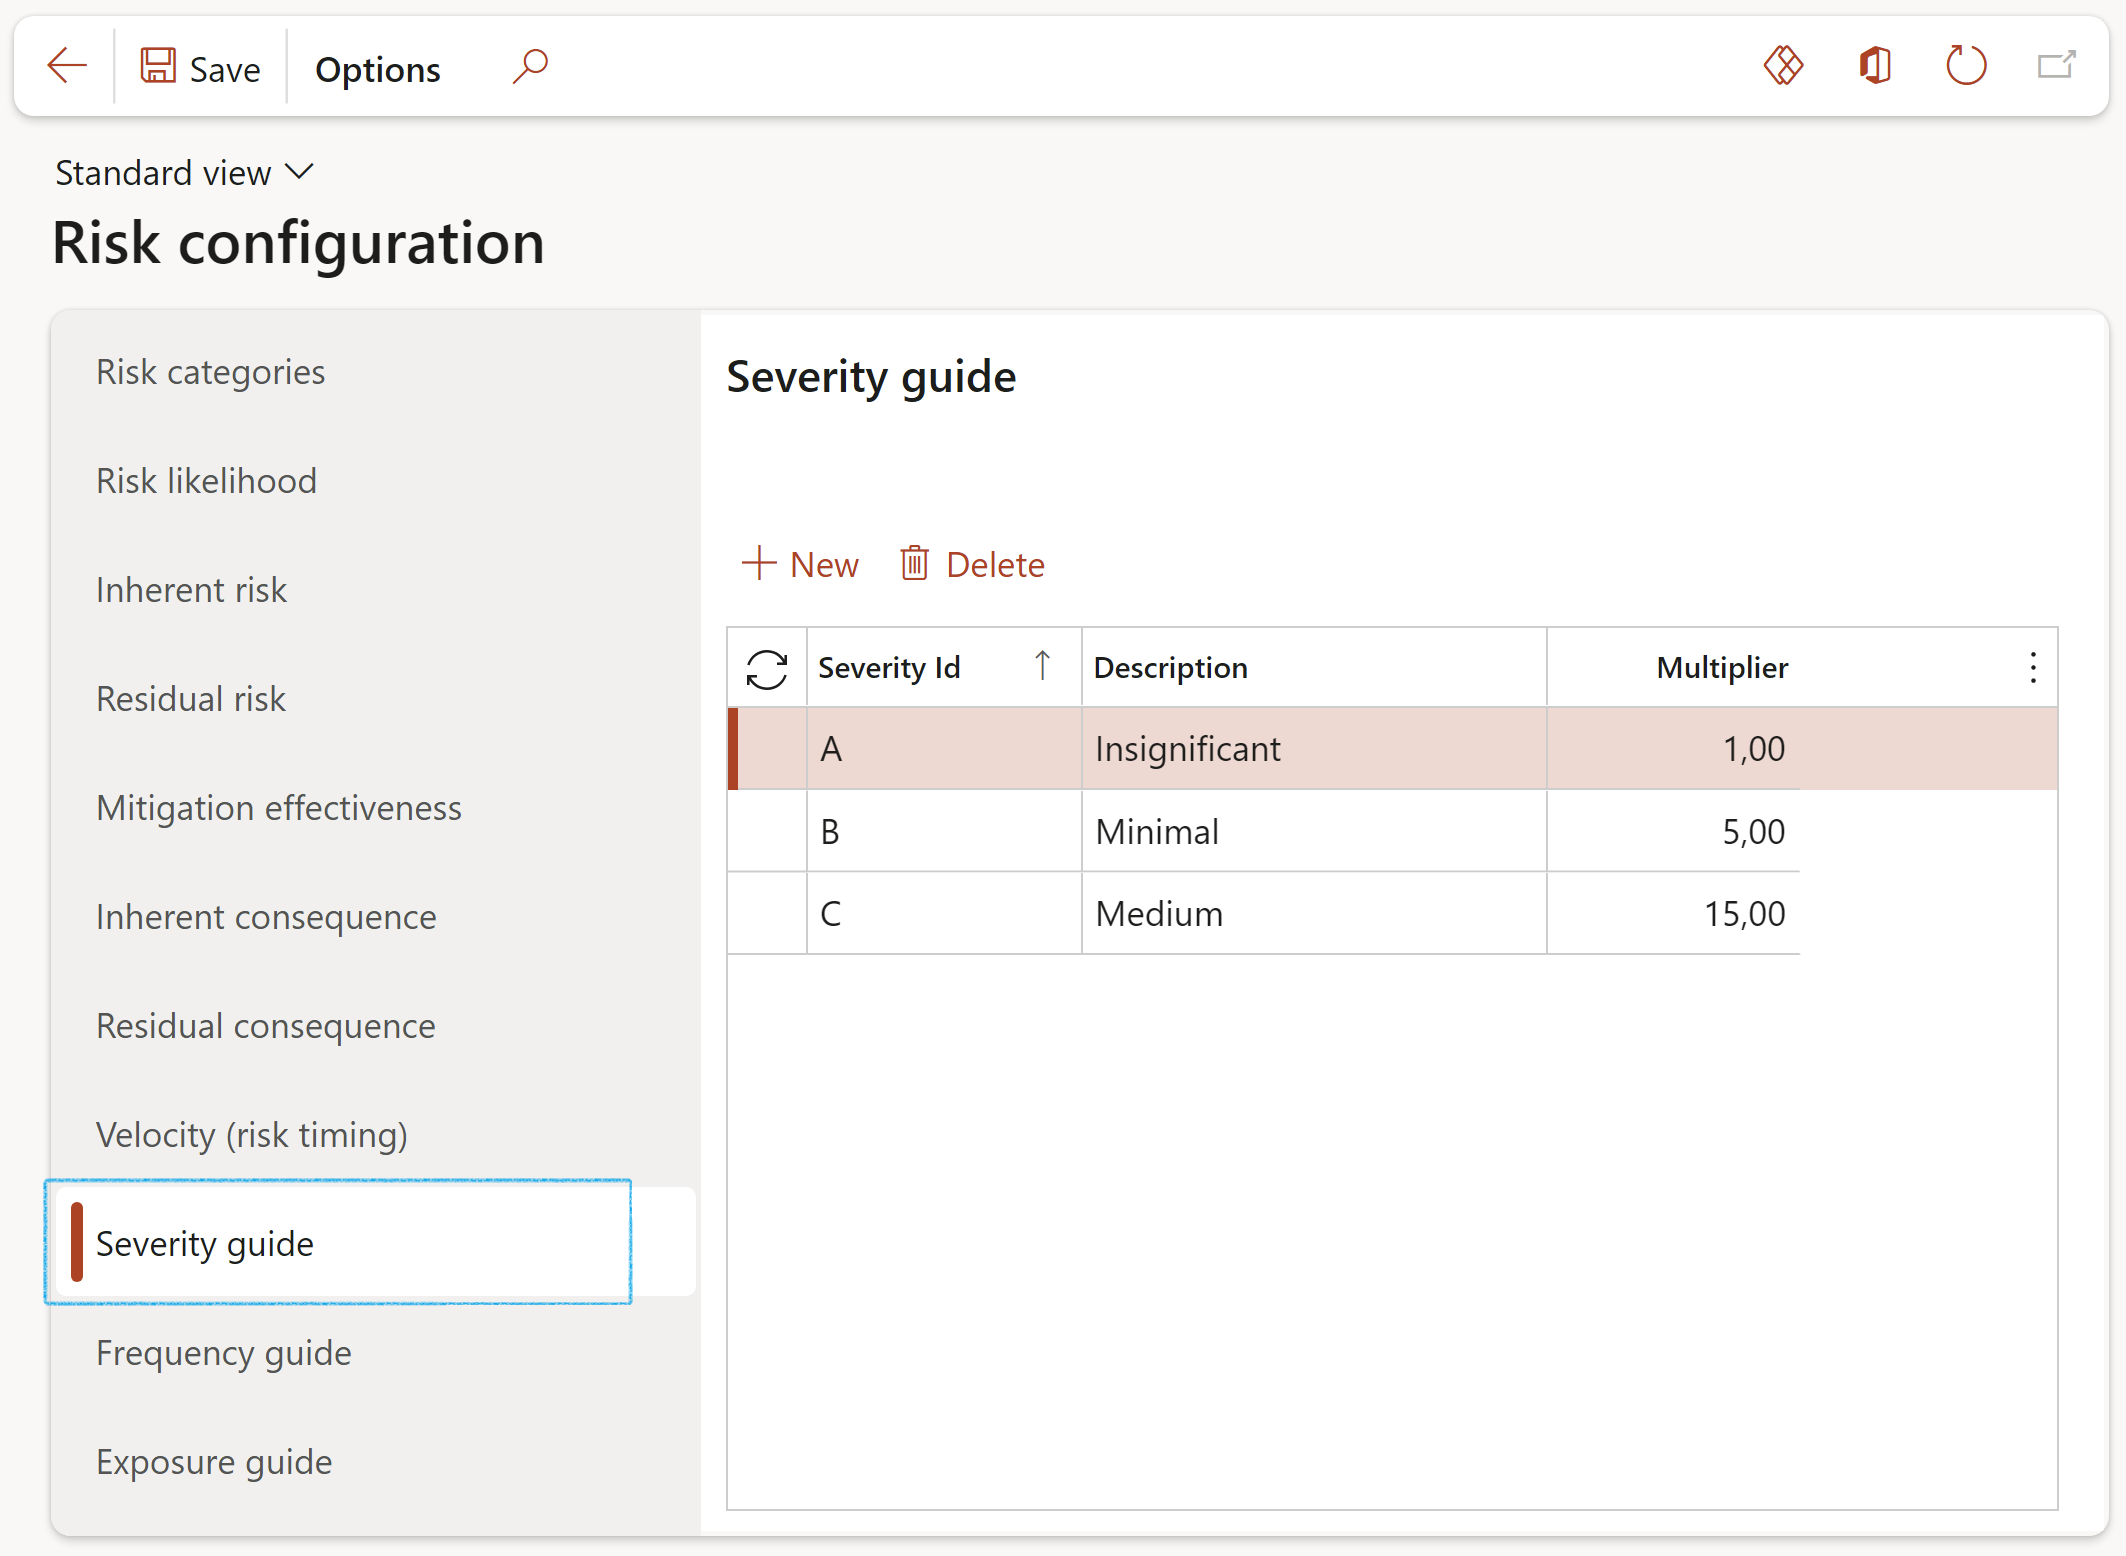
Risk severity is the extent of the damage to the institution, its people, and its goals and objectives resulting from a risk event occurring.
- Click on the Severity tab
- Click New
- Enter the Severity ID
- Enter a brief Description for the severity
- In the Multiplier field, enter the relevant severity value
¶ Step 4.9: Frequency
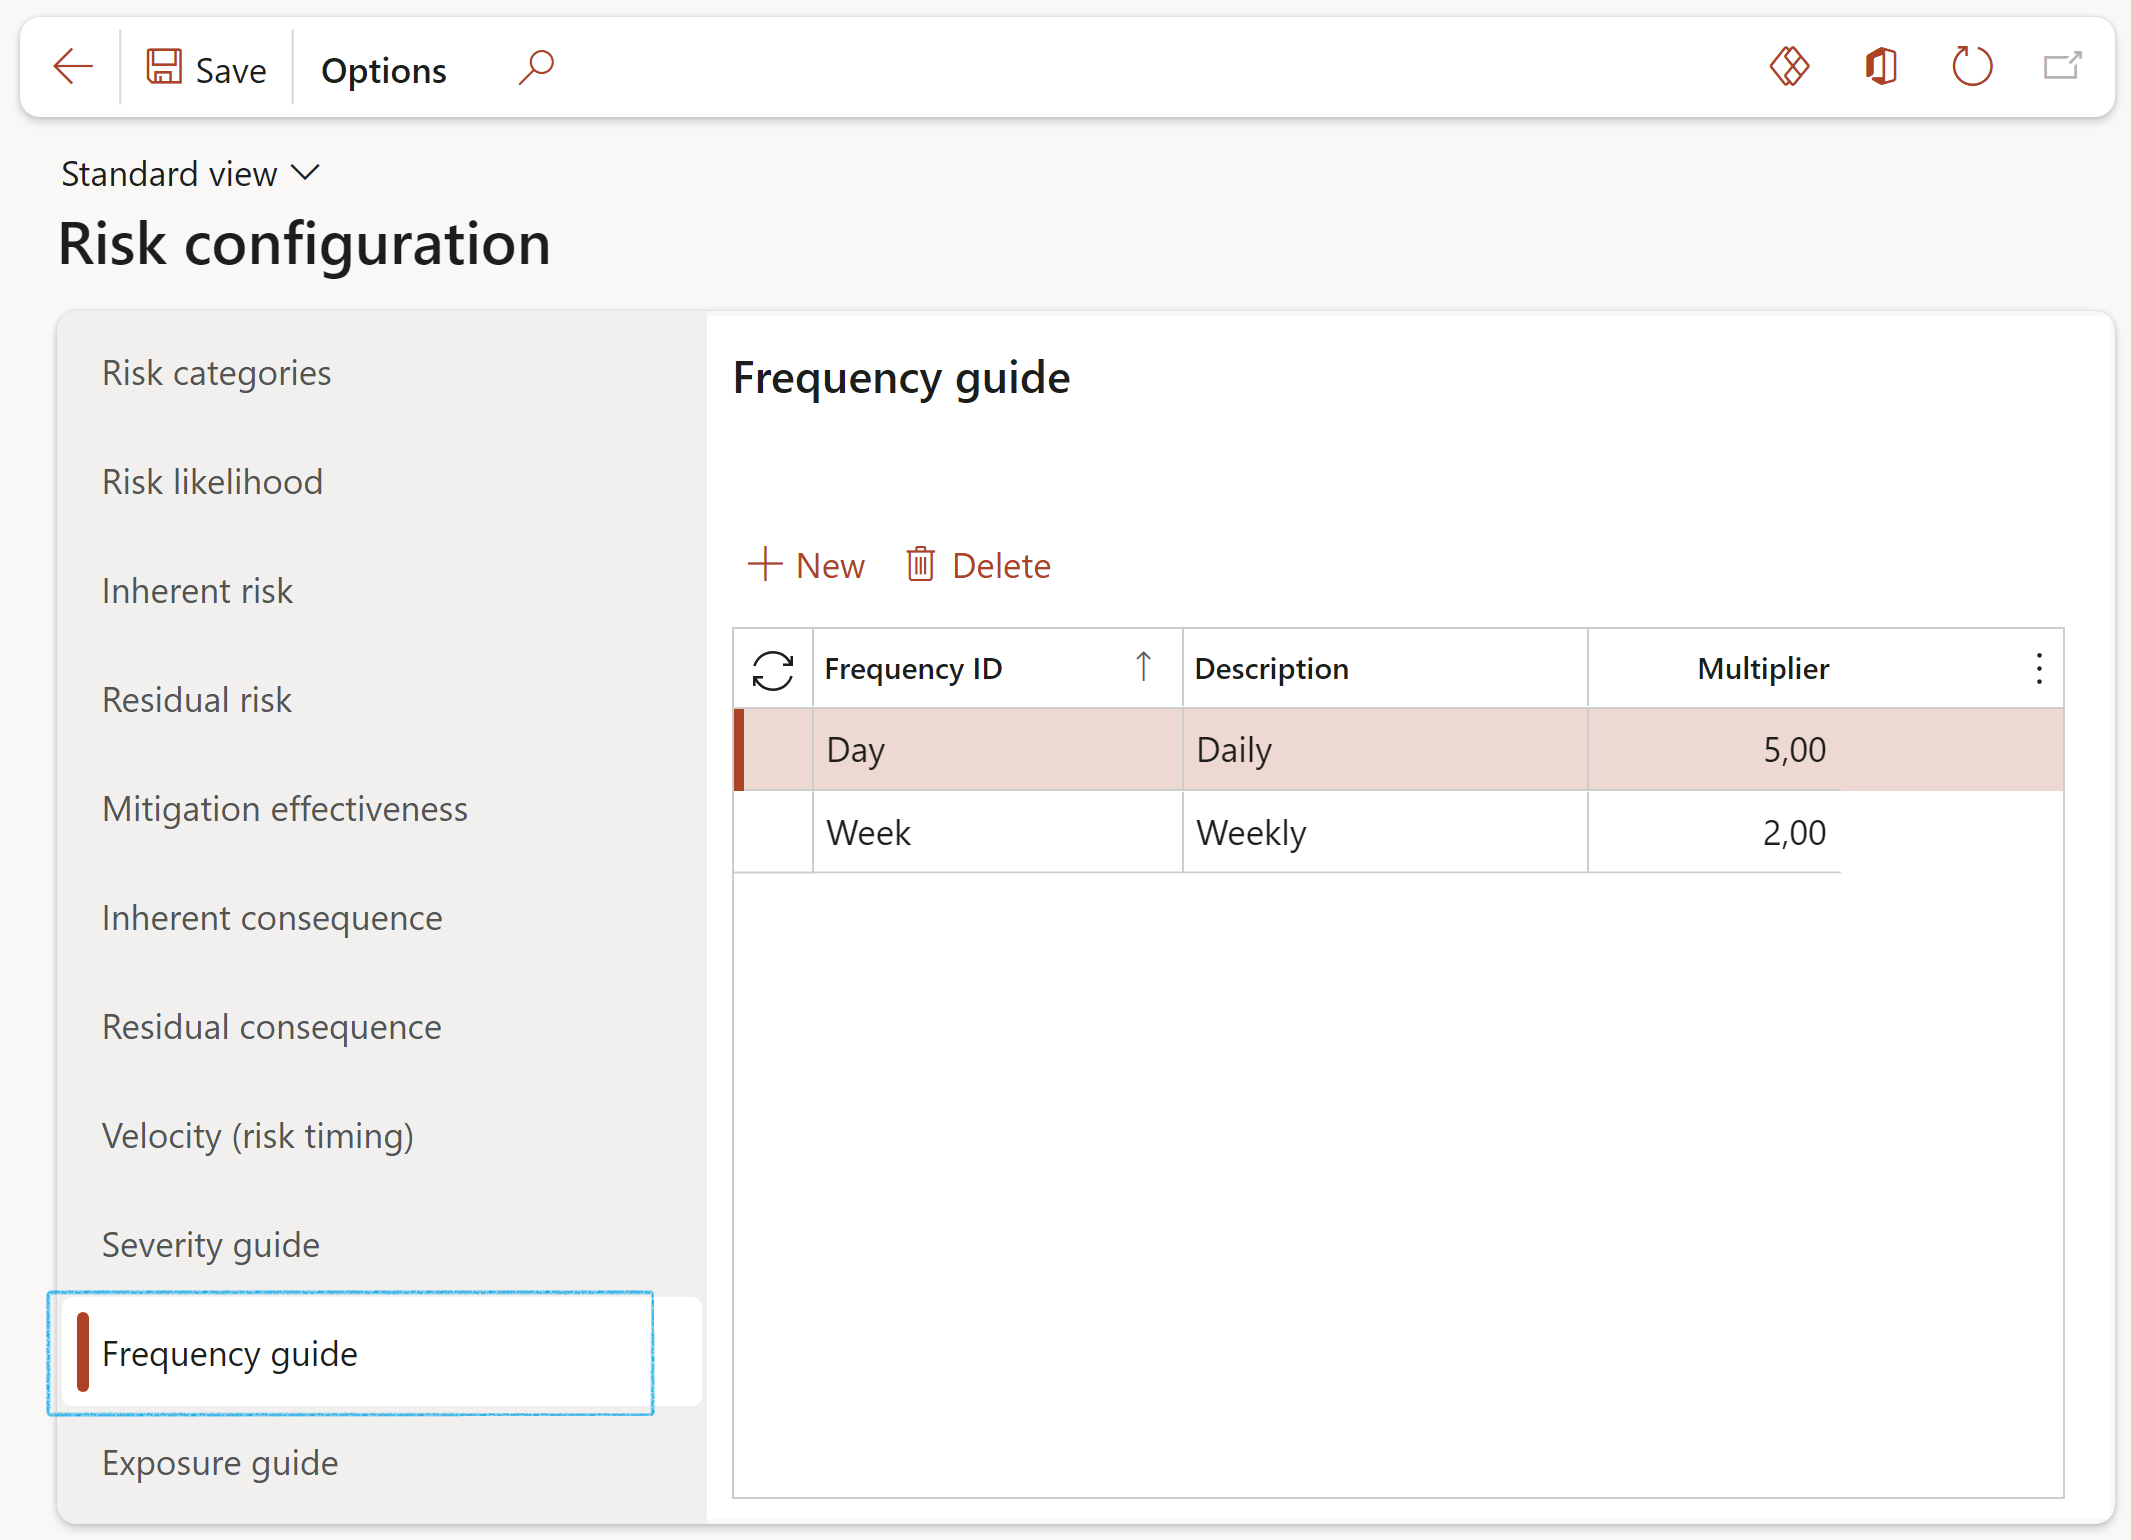
Frequency is a measure of how often an event occurs on average during a unit of time. It ranges from 0 to infinite.
- Click on the Frequency tab
- Click New
- Enter the Frequency ID
- Enter a brief Description for the frequency
- In the Multiplier field, enter the relevant frequency value
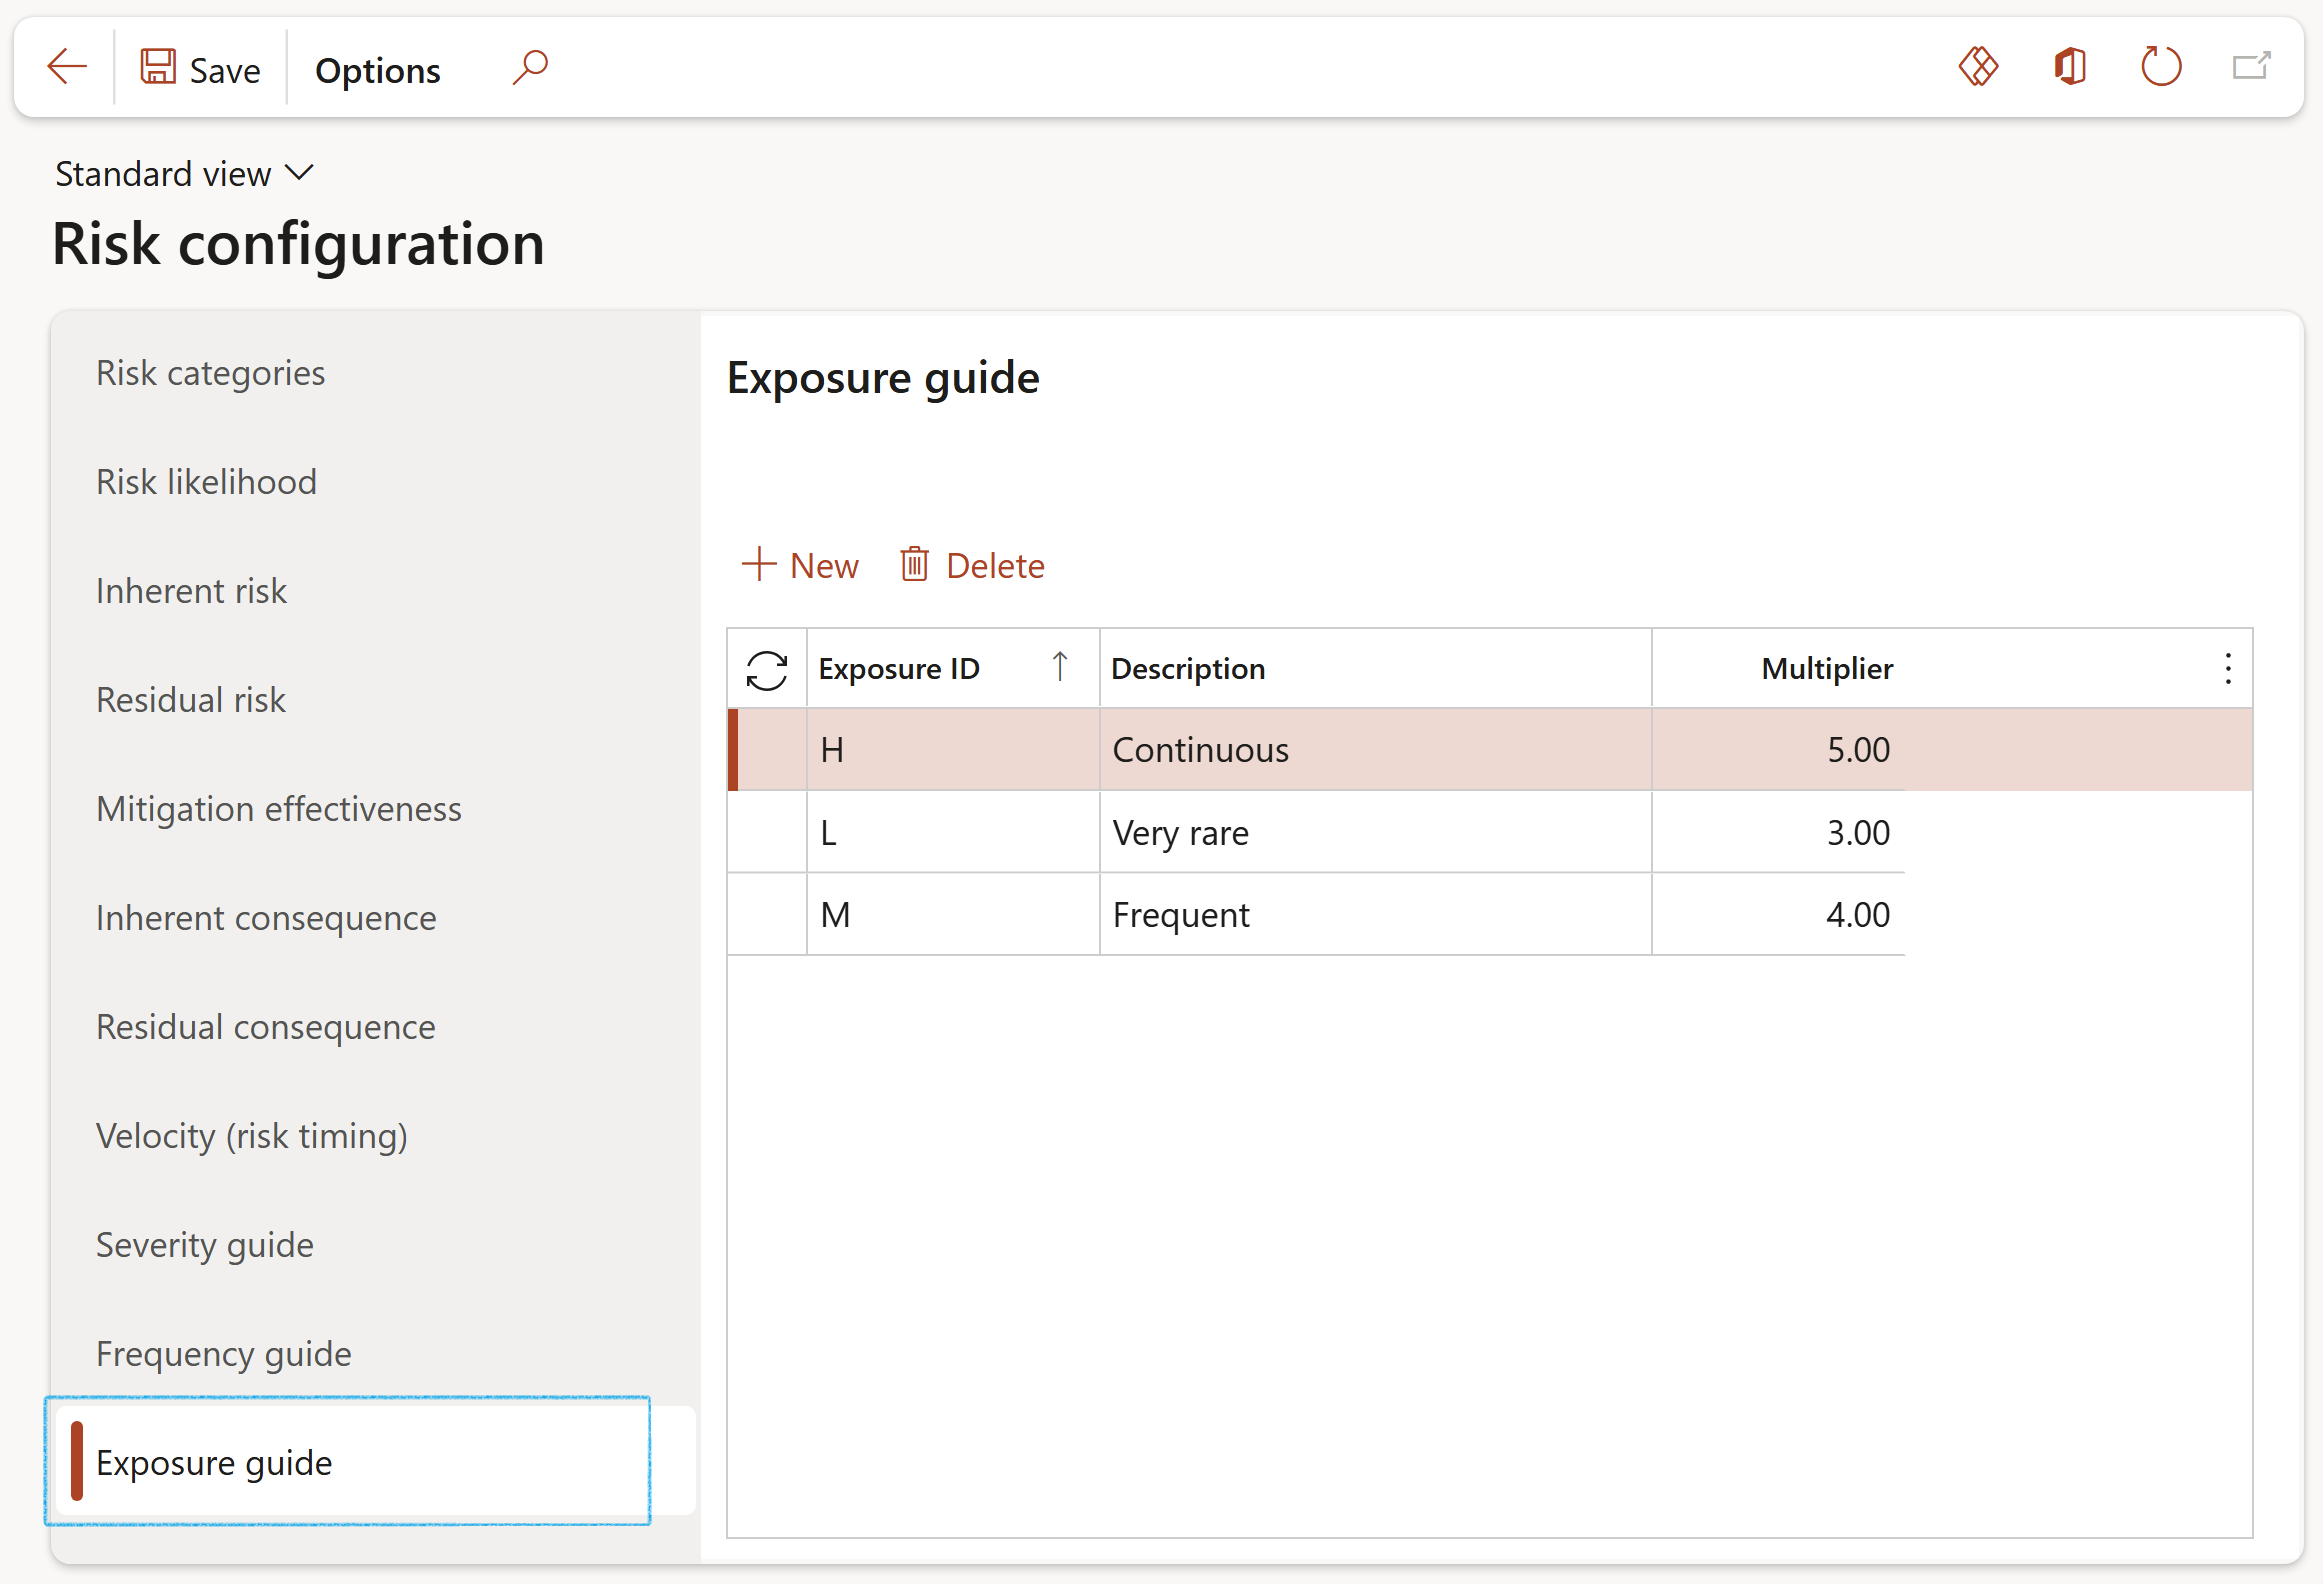
¶ Step 4.10: Exposure
Risk exposure is the quantified potential loss from business activities currently underway or planned. The level of exposure is usually calculated by multiplying the probability of a risk incident occurring by the amount of its potential losses.
- Click on the Exposure tab
- Click New
- Enter the Exposure ID
- Enter a brief Description for the exposure
- In the Multiplier field, enter the relevant frequency value
¶ Step 5: Response status
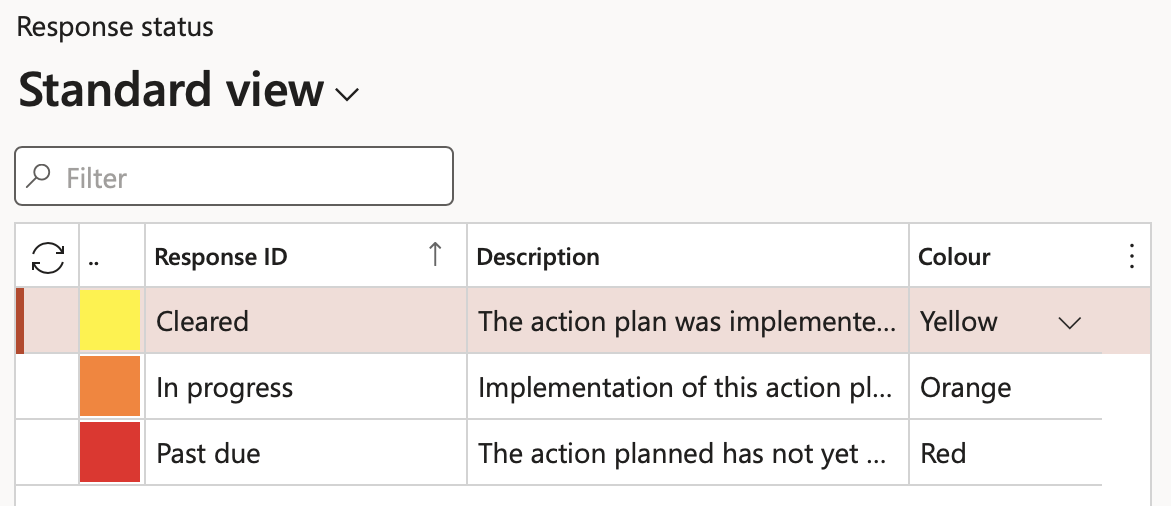
Go to: GRC > Risk > Setup for risks > Response status
- Click New
- Enter a unique risk response status ID
- Enter a brief Description of the response status
- Associate a colour to the response
- Click Save
¶ Step 6: Control status and effectiveness
Controls are defined as measures designed to modify risks. Controls include any process, policy, device, practice or actions that can alter the state and attributes of risks.
These can be manual, or system driven activities, or a combination of both. Each risk might require one or more controls to effectively reduce risk/threat to an acceptable level for stakeholders.
Controls should be preventative but can also be corrective.
¶ Step 6.1: Control status
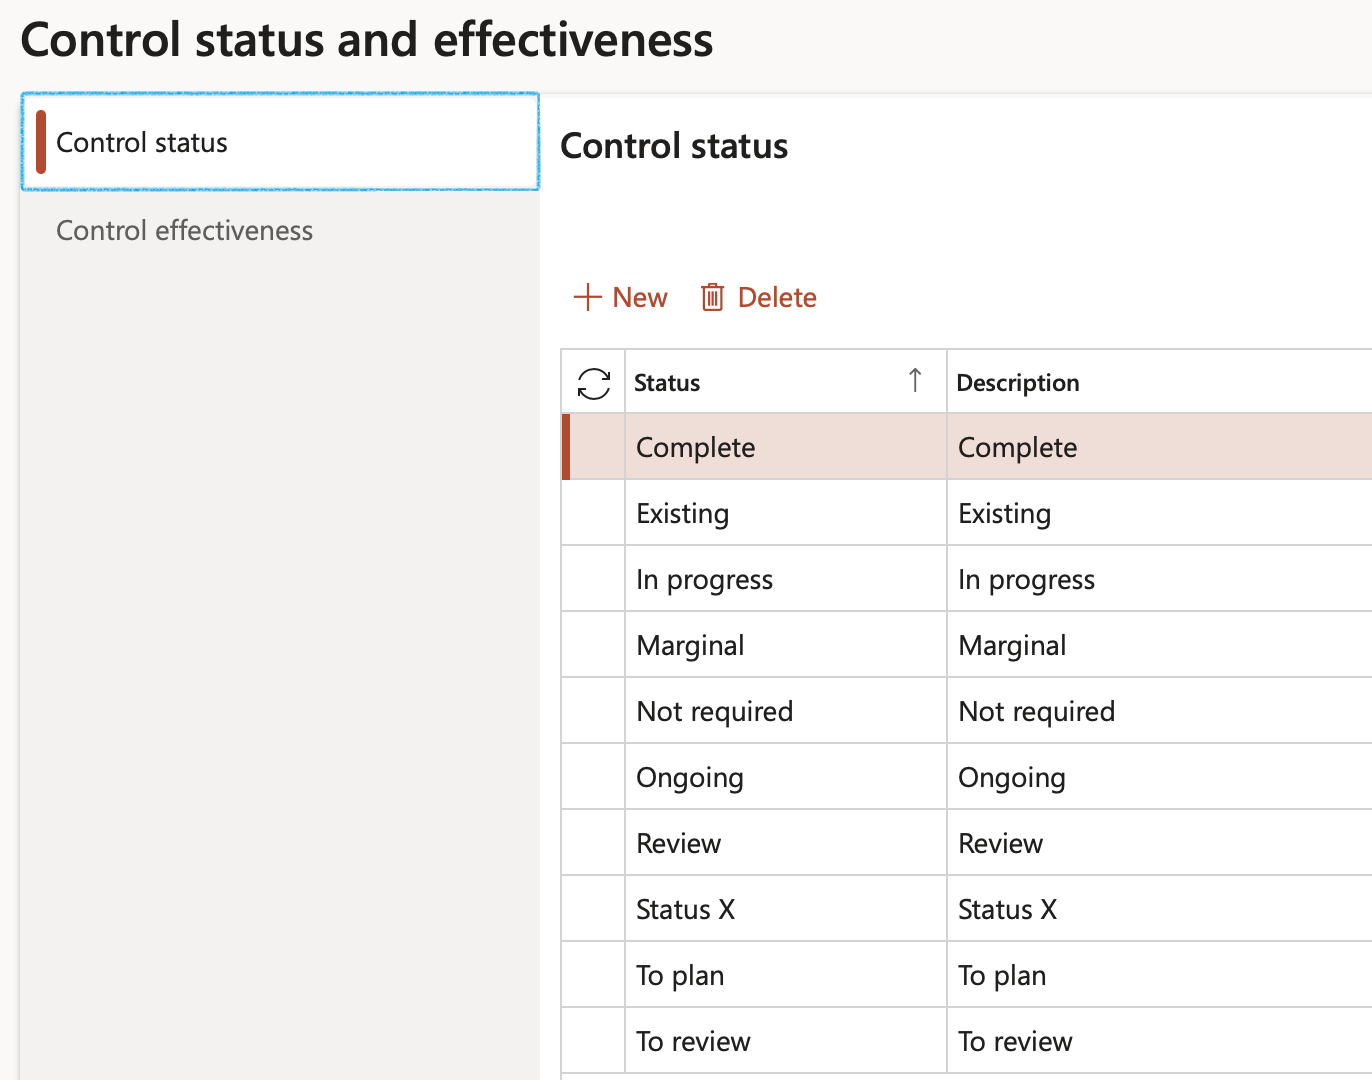
Go to: GRC > Risk > Setup for risks > Control status and effectiveness
- Click on the Control status tab
- Click New
- Enter the Risk measure or control status, as well as a brief description
- Because Control statuses are user defined, the user has to tick the box next to the relevant status to indicate the Default status to be used when a risk closes
- Tick the Validate attachment box for the relevant statuses
- Click Save
¶ Step 6.2: Control effectiveness
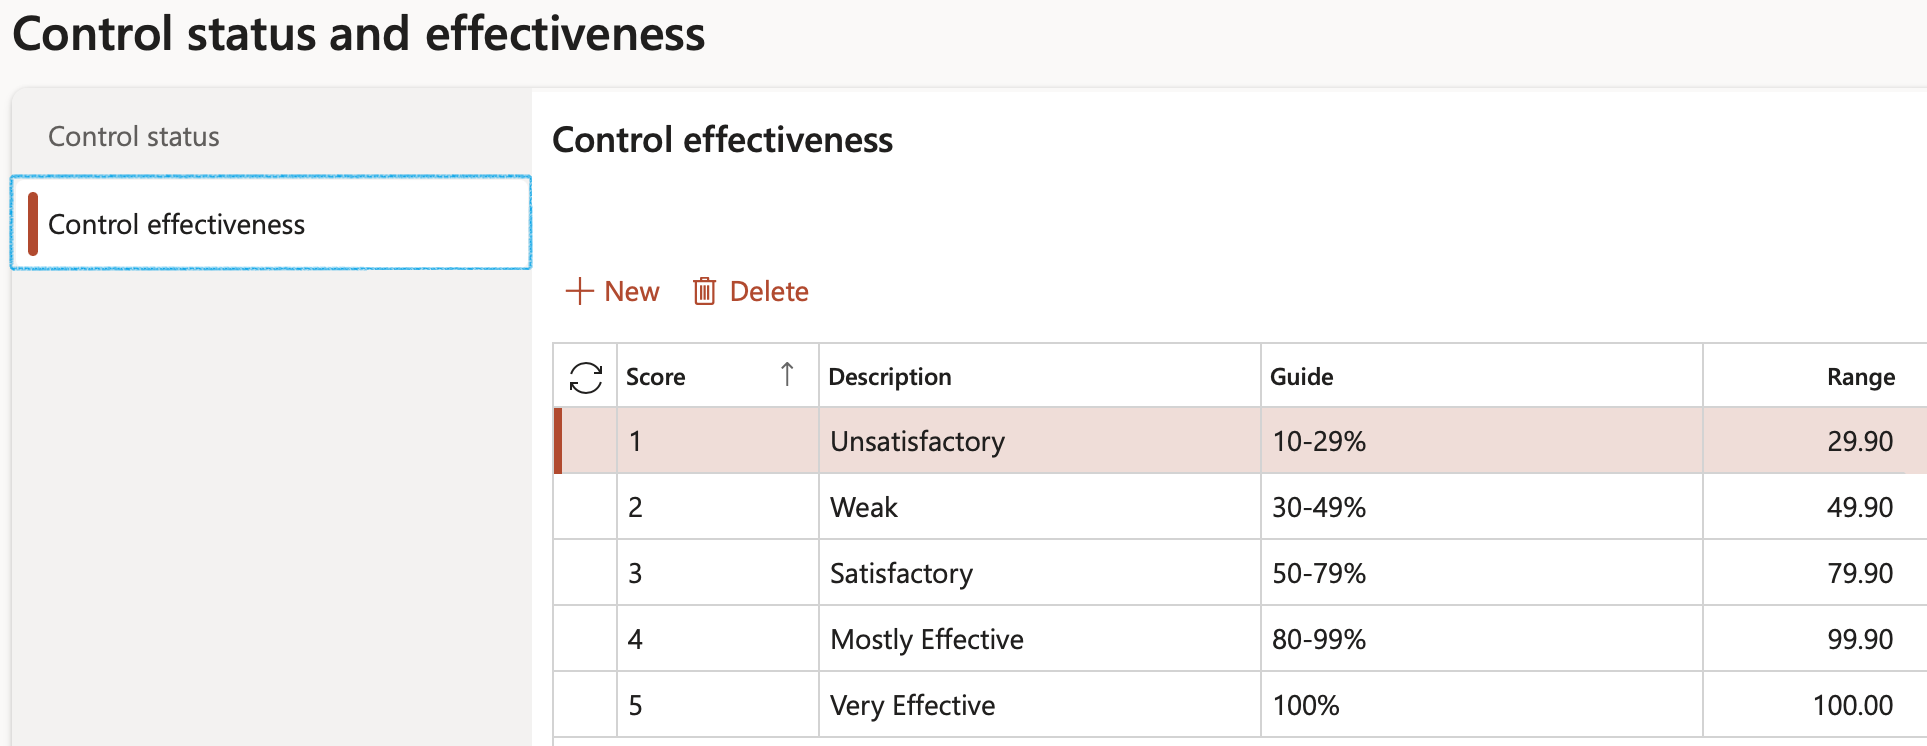
- Click on the Control effectiveness tab
- Click New
- Select the Risk score level from the dropdown list and enter a brief Description
- In the Guide field, enter description details
- Enter the upper percentage value of the score range
- Click Save
¶ Step 7: IT controls
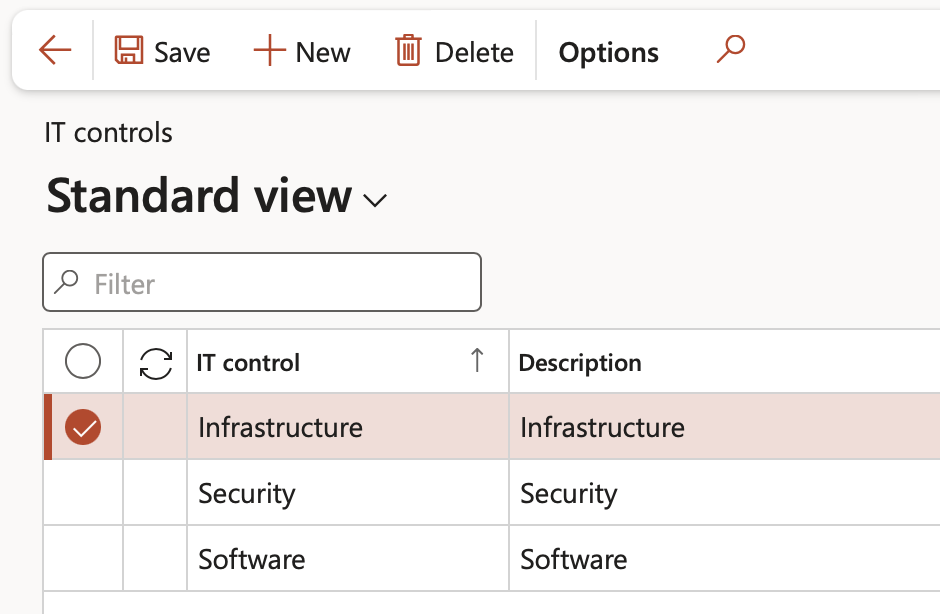
Go to: GRC > Risk > Setup for risks > IT controls
- On the Action pane, click on the New button
- Enter the IT control ID
- Enter a Description for the IT control
¶ Step 8: Process groups
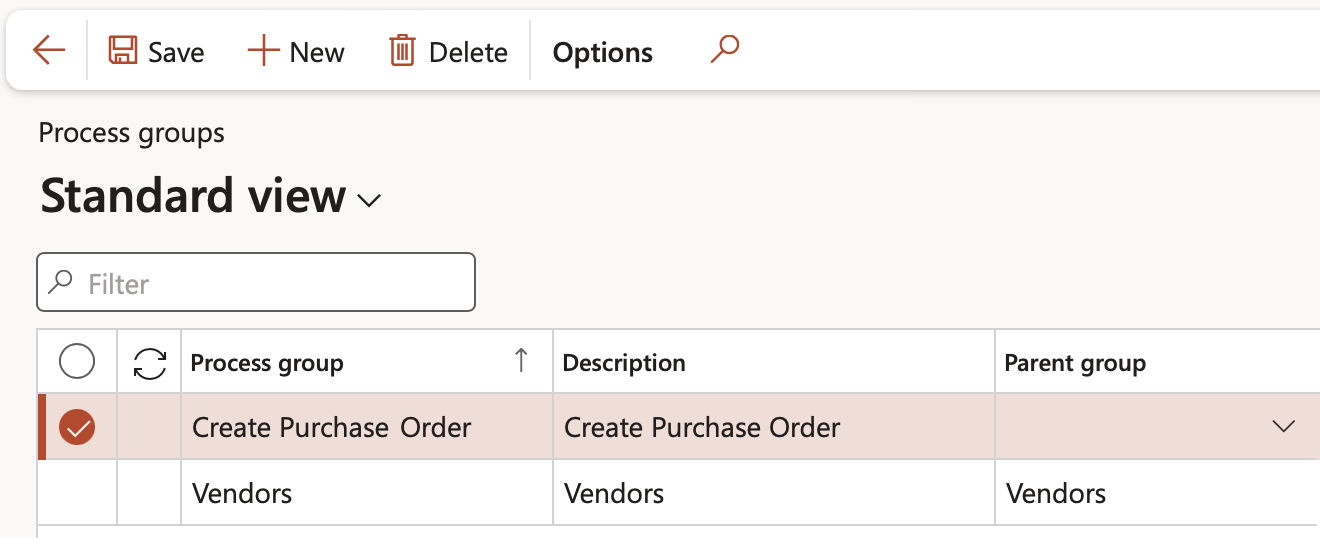
Go to: GRC > Risk > Setup for risks > Process groups
- On the Action pane, click on the New button
- Enter a name for the Process group
- Enter a Description for the process group
- Select the relevant Parent group from the dropdown list (if applicable)
¶ Step 9: Control category
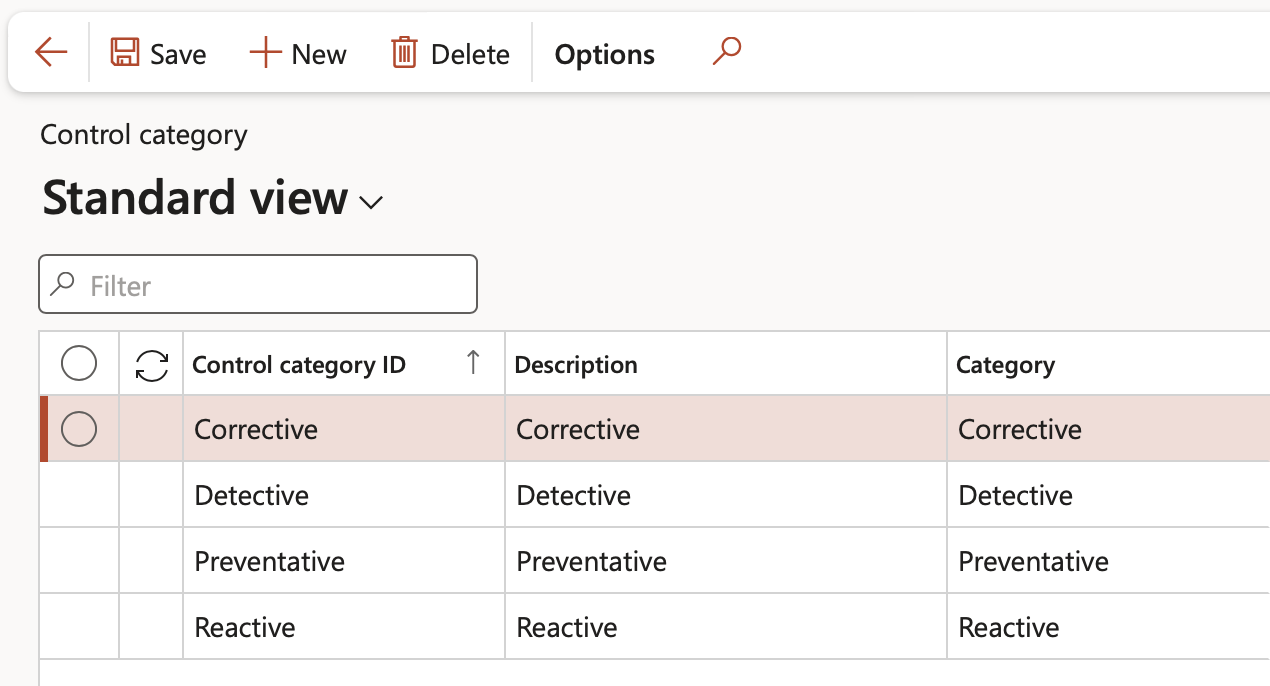
Go to: GRC > Risk > Setup for risks > Control category
- On the Action pane, click on the New button
- Enter the Control category ID
- Enter a Description for the control category
- Select the relevant Category from the dropdown list
¶ Step 10: Control galaxy
Go to: GRC > Risk > Control galaxy
- On the Action pane, click on the New button
- Select the relevant Accounting area from the dropdown list
- Select the relevant Process group from the dropdown list
- Enter the Process name
- Enter a Control ID for the control
- Select the relevant IT control from the dropdown list (if applicable)
- Select the relevant Control type from the dropdown list
- Enter a Control description
- Indicate whether this is a Critical control
- Enter the name of the Software application
- In the bottom half of the form, enter additional information for the selected line

¶ Step 11: Setup Strategic pillar
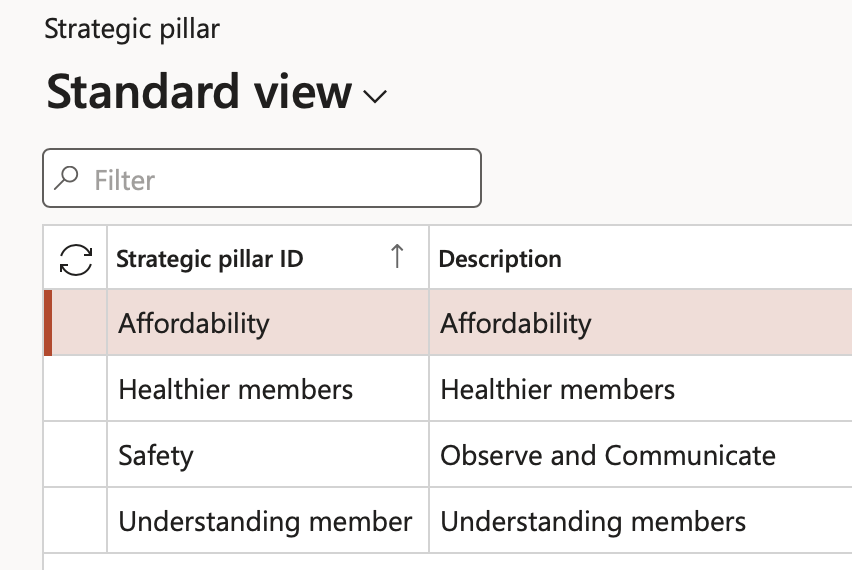
Go to: GRC > Risk > Setup for risk > Strategic pillar
- In the Action pane, click on the New button
- Enter the Strategic pillar ID
- Enter a brief Description
¶ Step 12: Setup Group of companies
Group of companies is used for consolidation
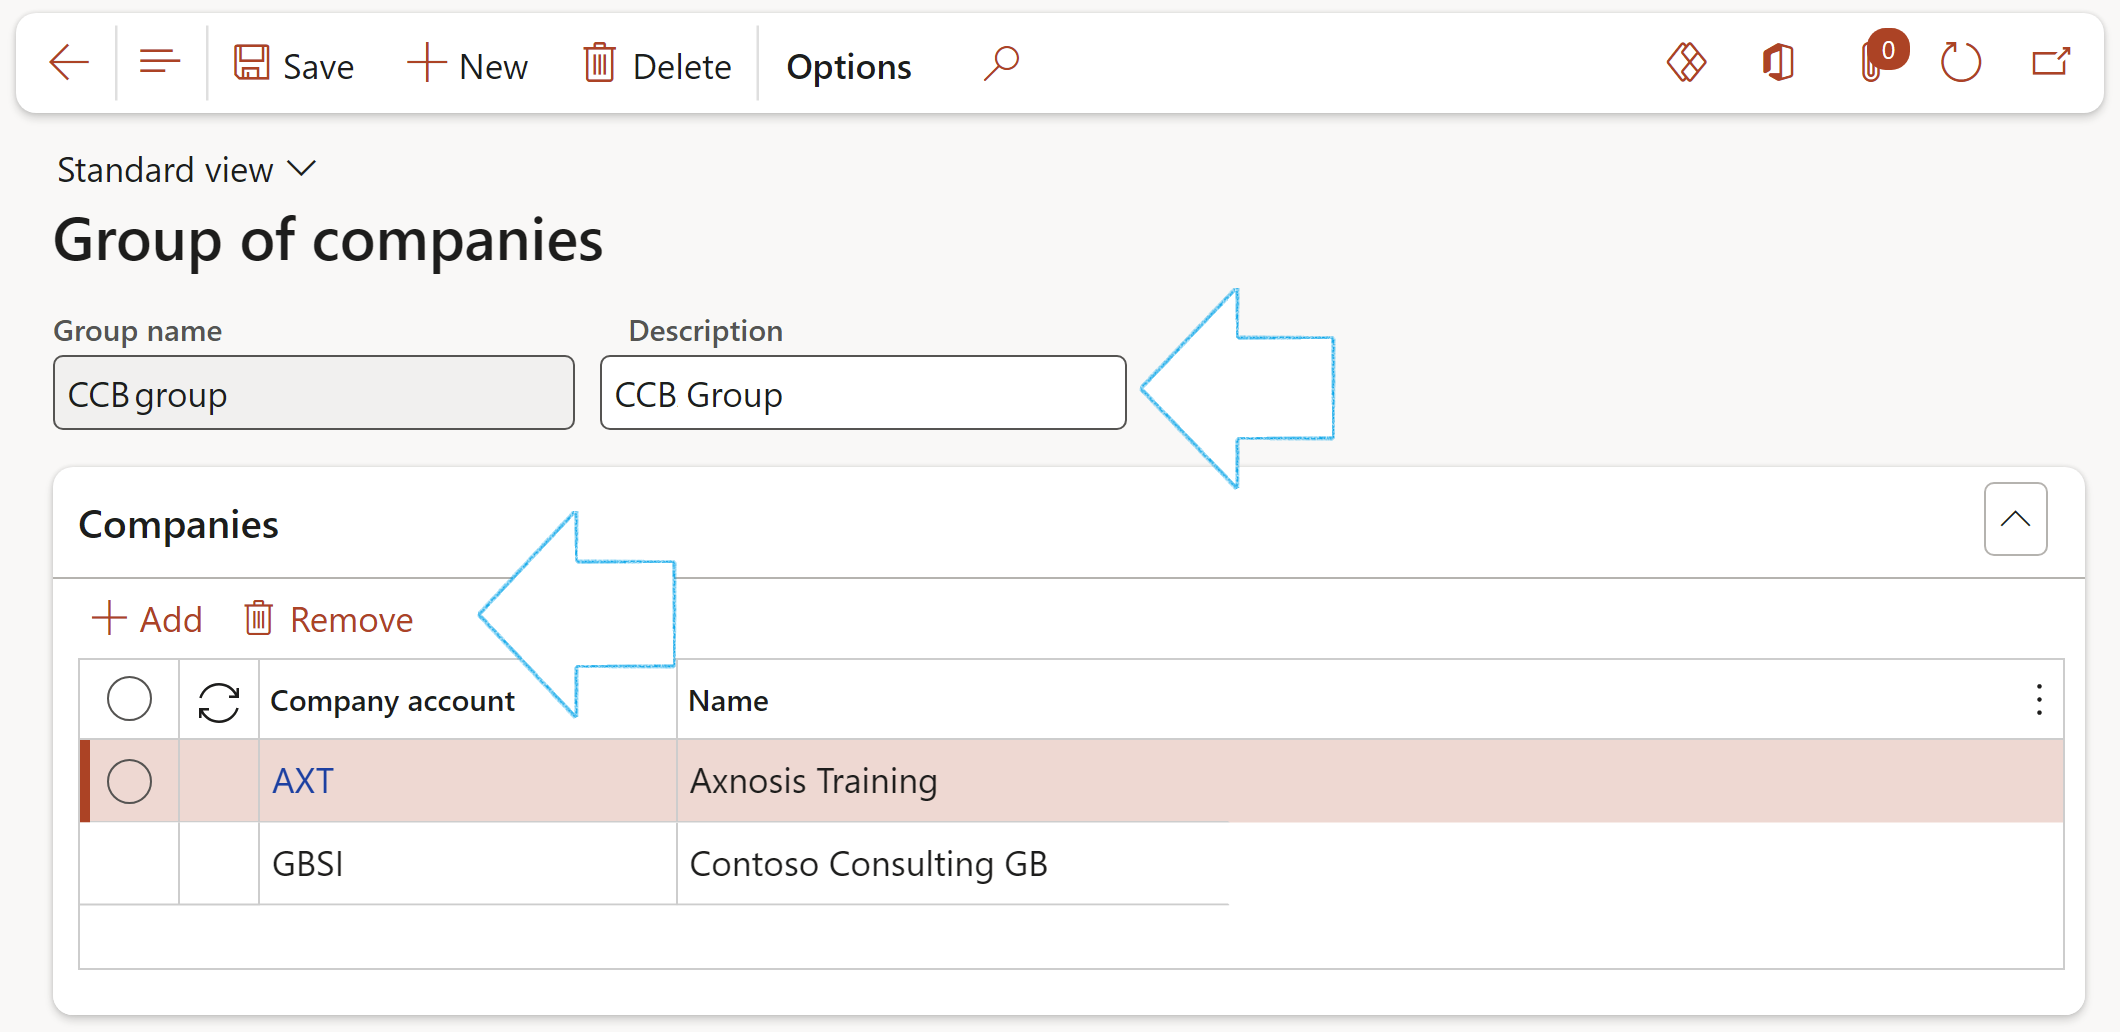
Go to: GRC > Setup > Group of companies
- In the Action pane, click on the New button
- Enter the Group name
- Enter a Description for the group
- Expand the Companies Fast tab
- In Button strip, click on the Add button
- Select the Company account that you want to add to the group, from the dropdown list
¶ Step 13: Create Baseline for Risk management report
Go to: GRC > Risk > Risk management reports
- On the Action pane, click on the New button and click on Document
- On the New risk management report dialog:
- Enter a Name for the template
- Enter a brief Description for the template
- Enter the Start date
- Select the Employee responsible for the report from the dropdown list. (This name will be printed as the Author on the report.
- Click on OK

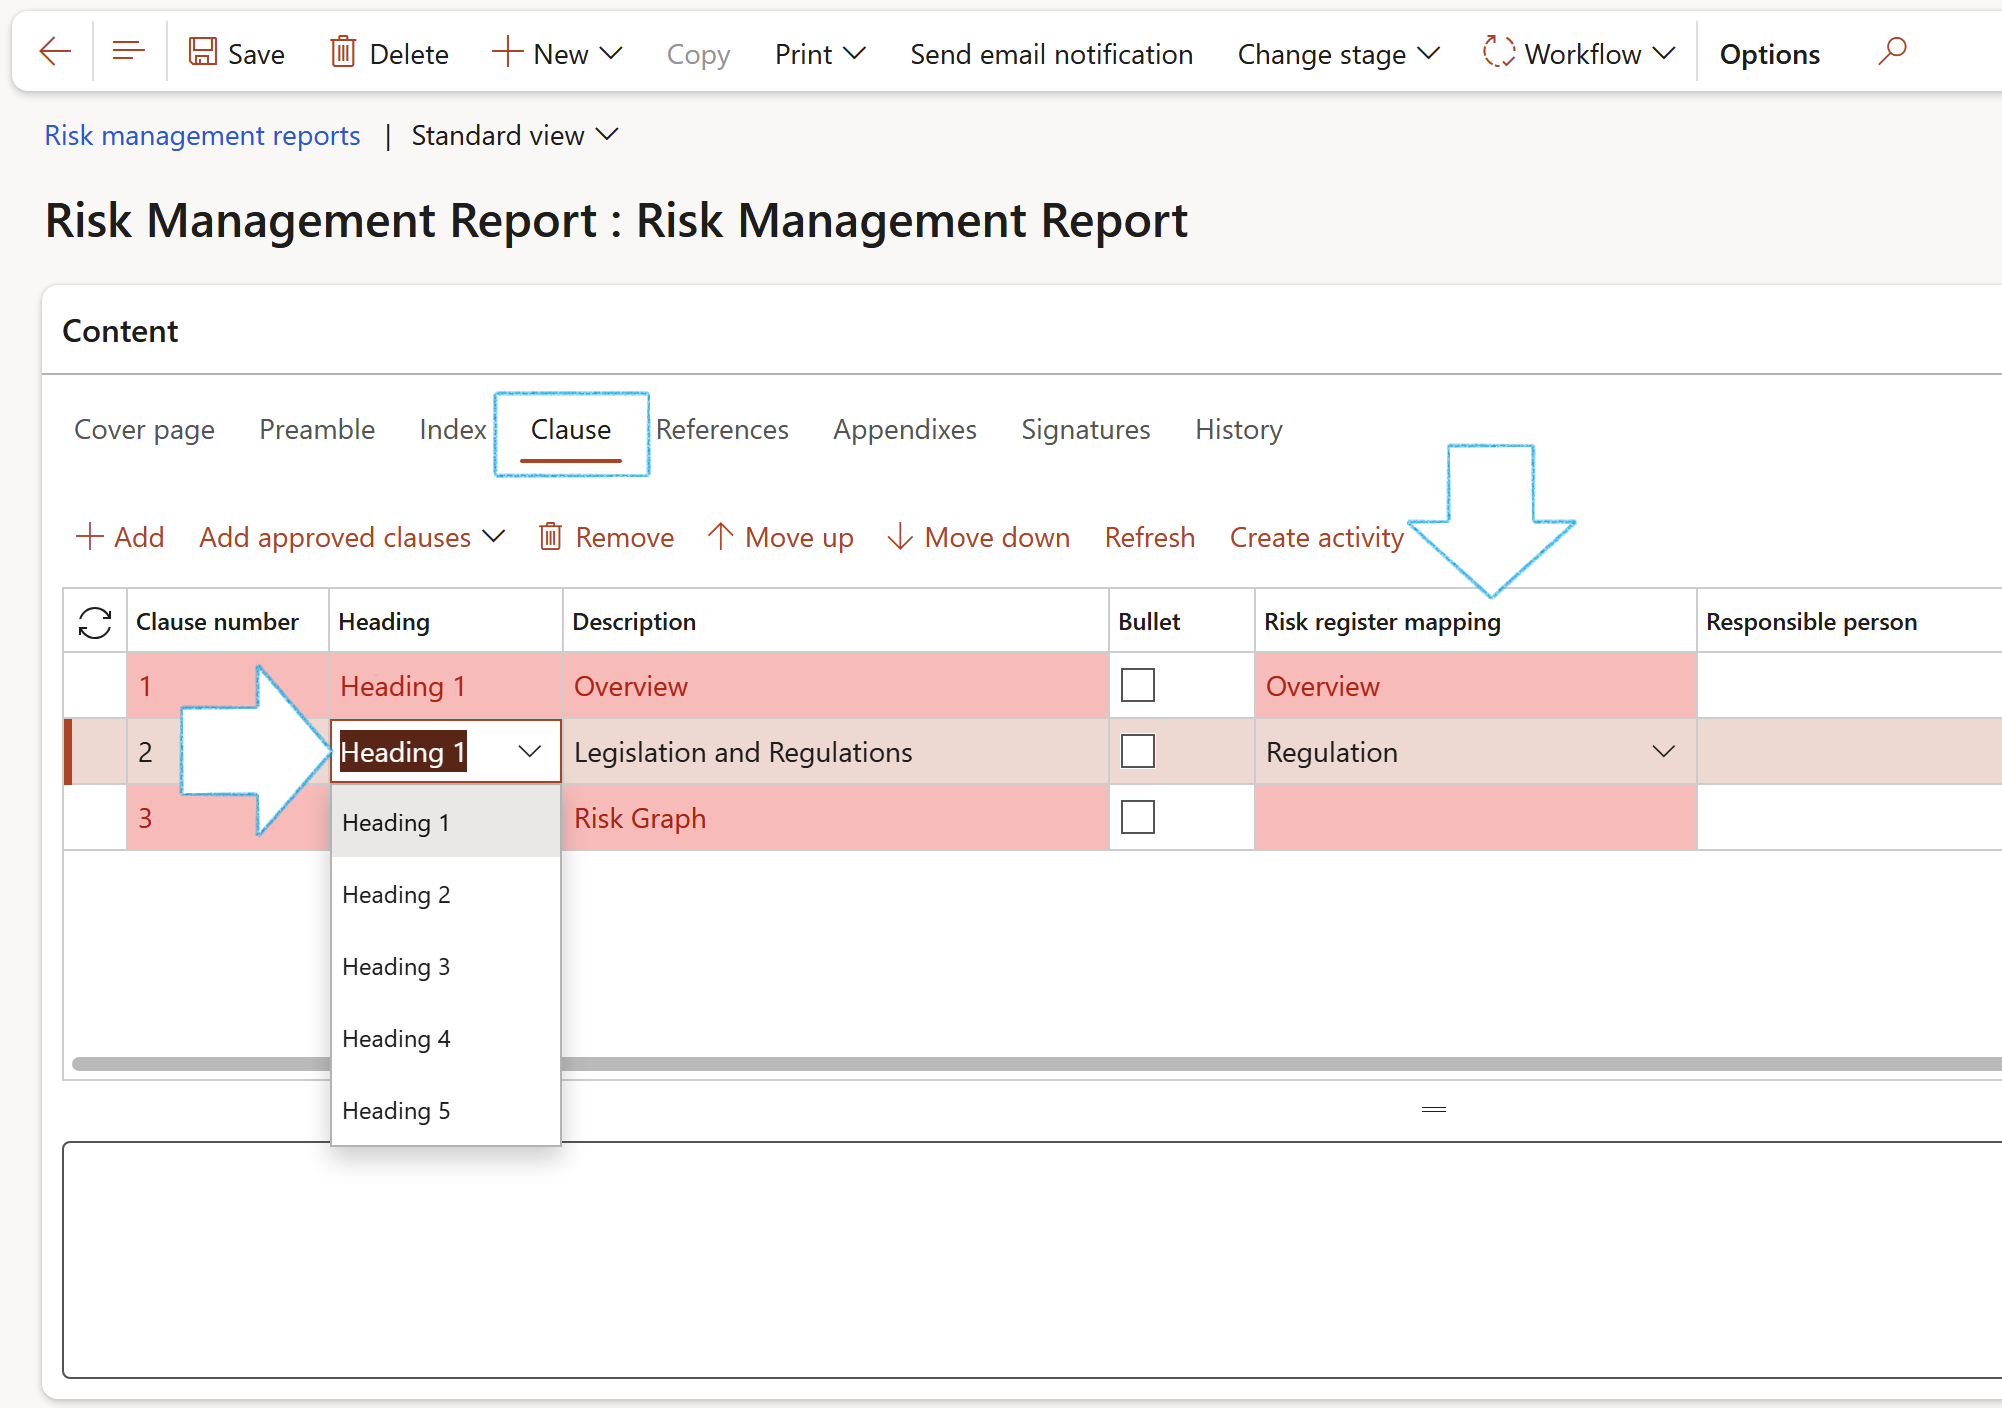
- On the detail form, under the Content Fast tab, open the Clause Index tab
- In the Button strip, click on the Add button
- The Clause number will be generated by the system
- Select the relevant Heading from the dropdown list. (Heading 1 for a primary heading, Heading 2 for a secondary heading)
- Enter a brief Description
- There is a list of field names that are on the Risk register header form on the dropdown list in the Risk register mapping field. Select the field which values should be printed under the selected heading and description.
- If no values from fields from the Risk register form should be printed on the report, and you want to enter your own text, for example under an Introduction heading, enter the text in the memo box provided under the grid
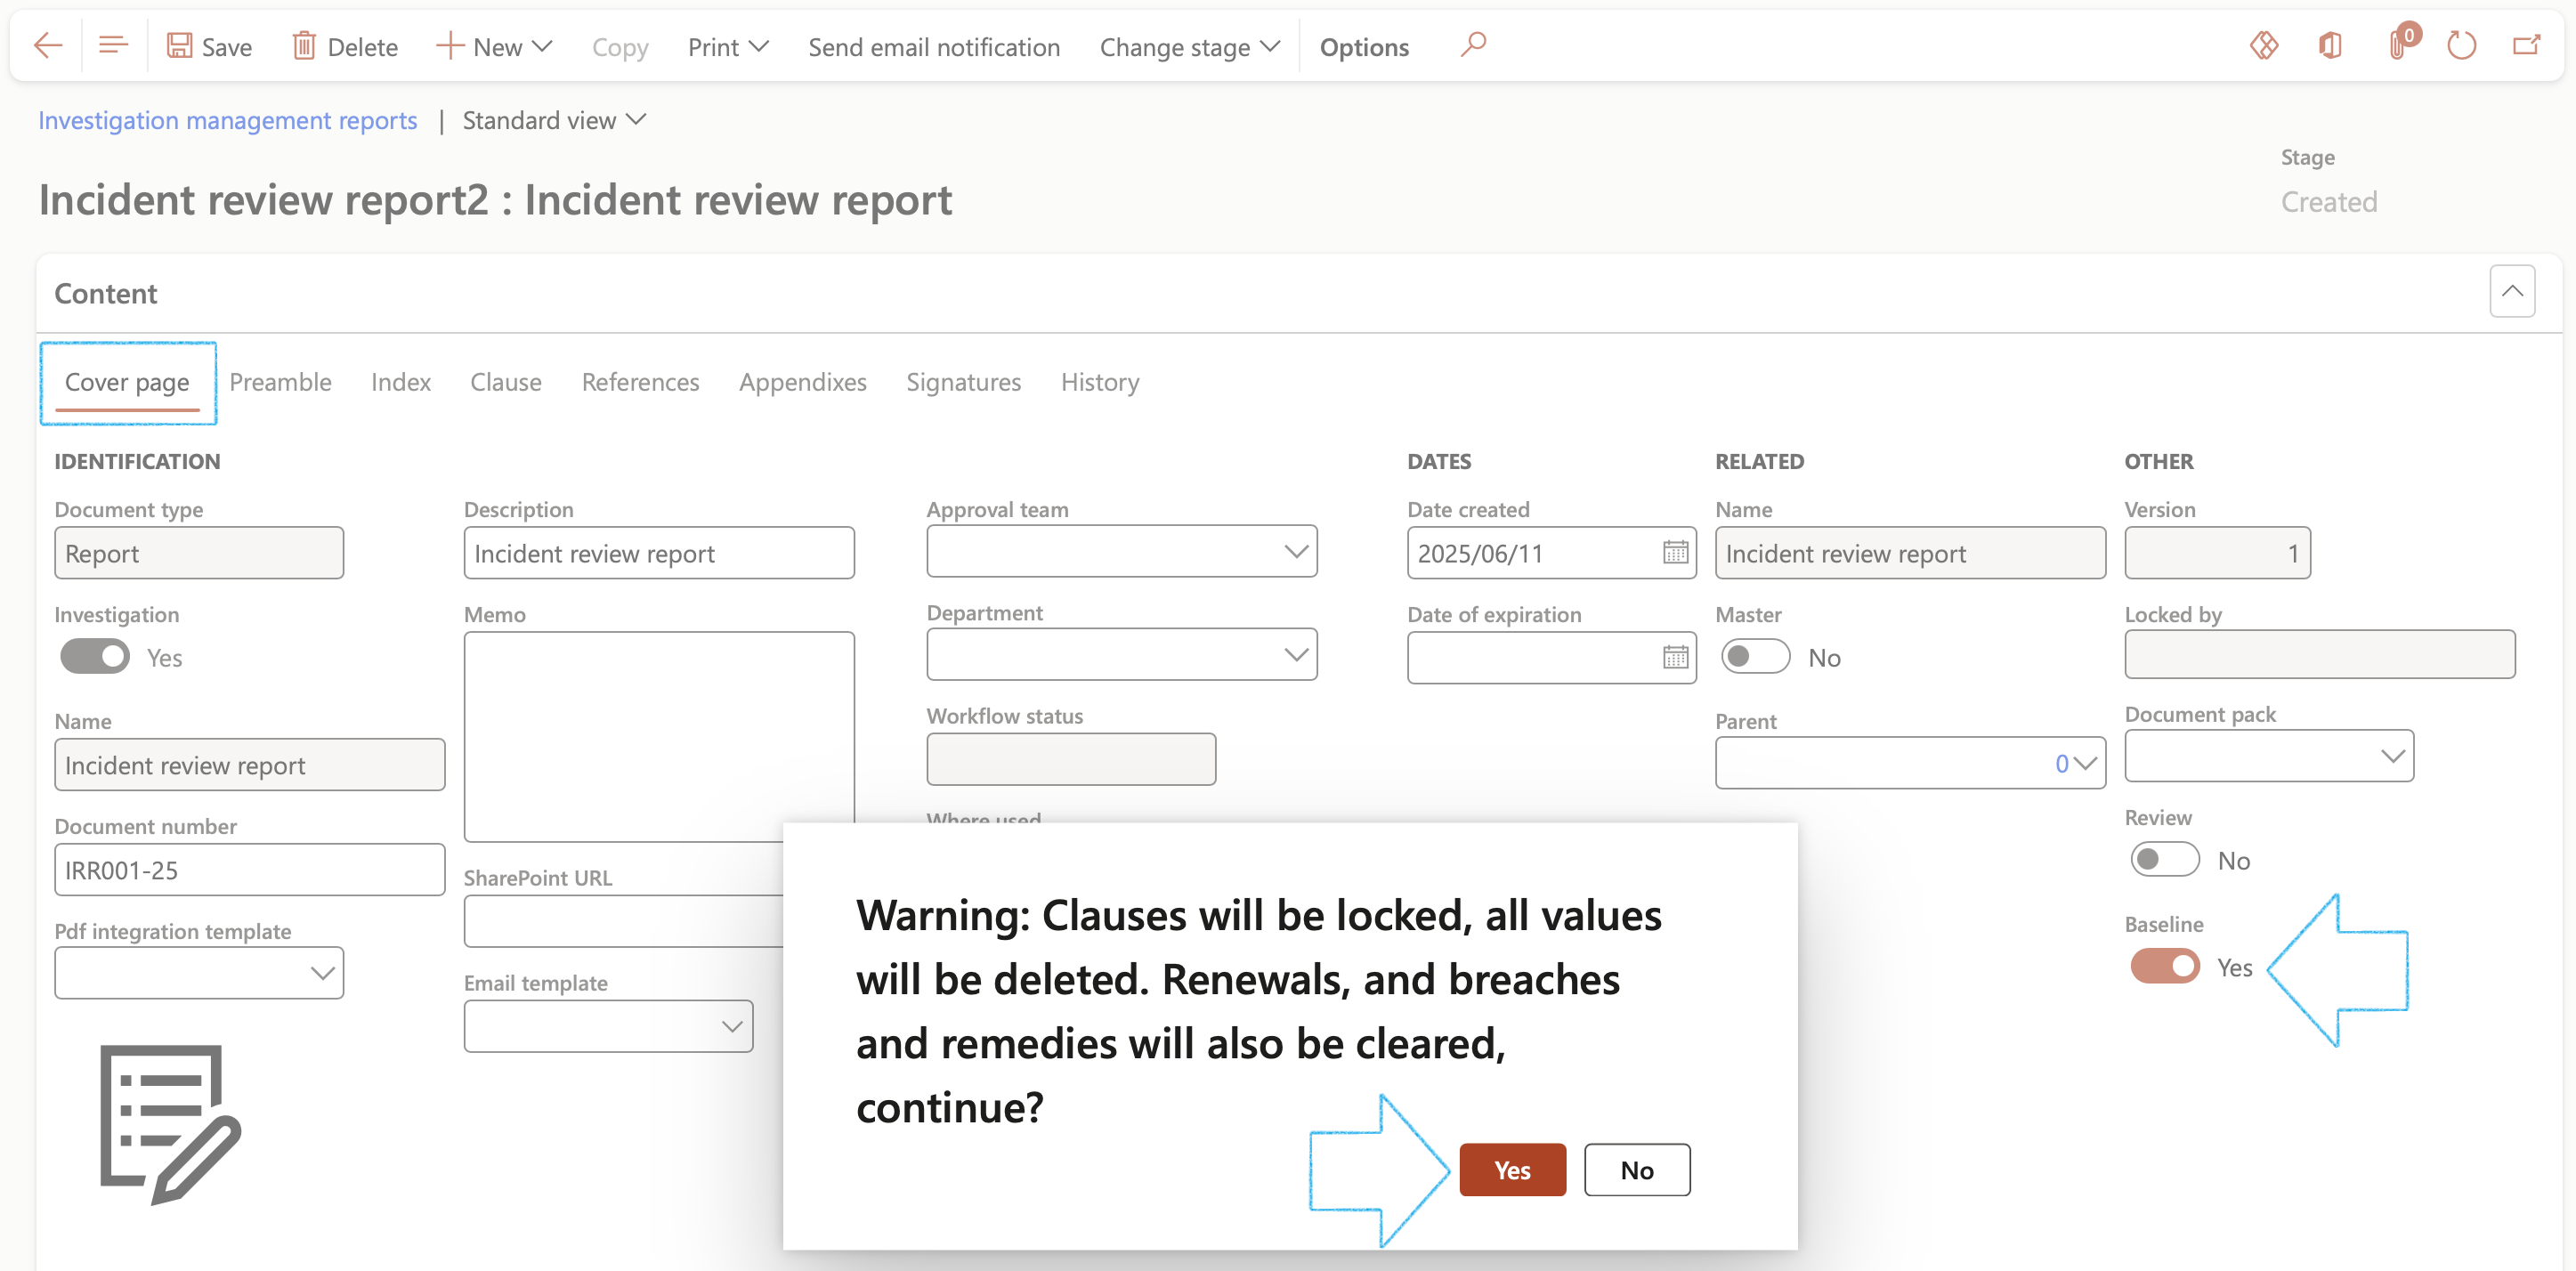
- Open the Cover page Index tab
- Move the Baseline slider to Yes and click Yes on the pop-up
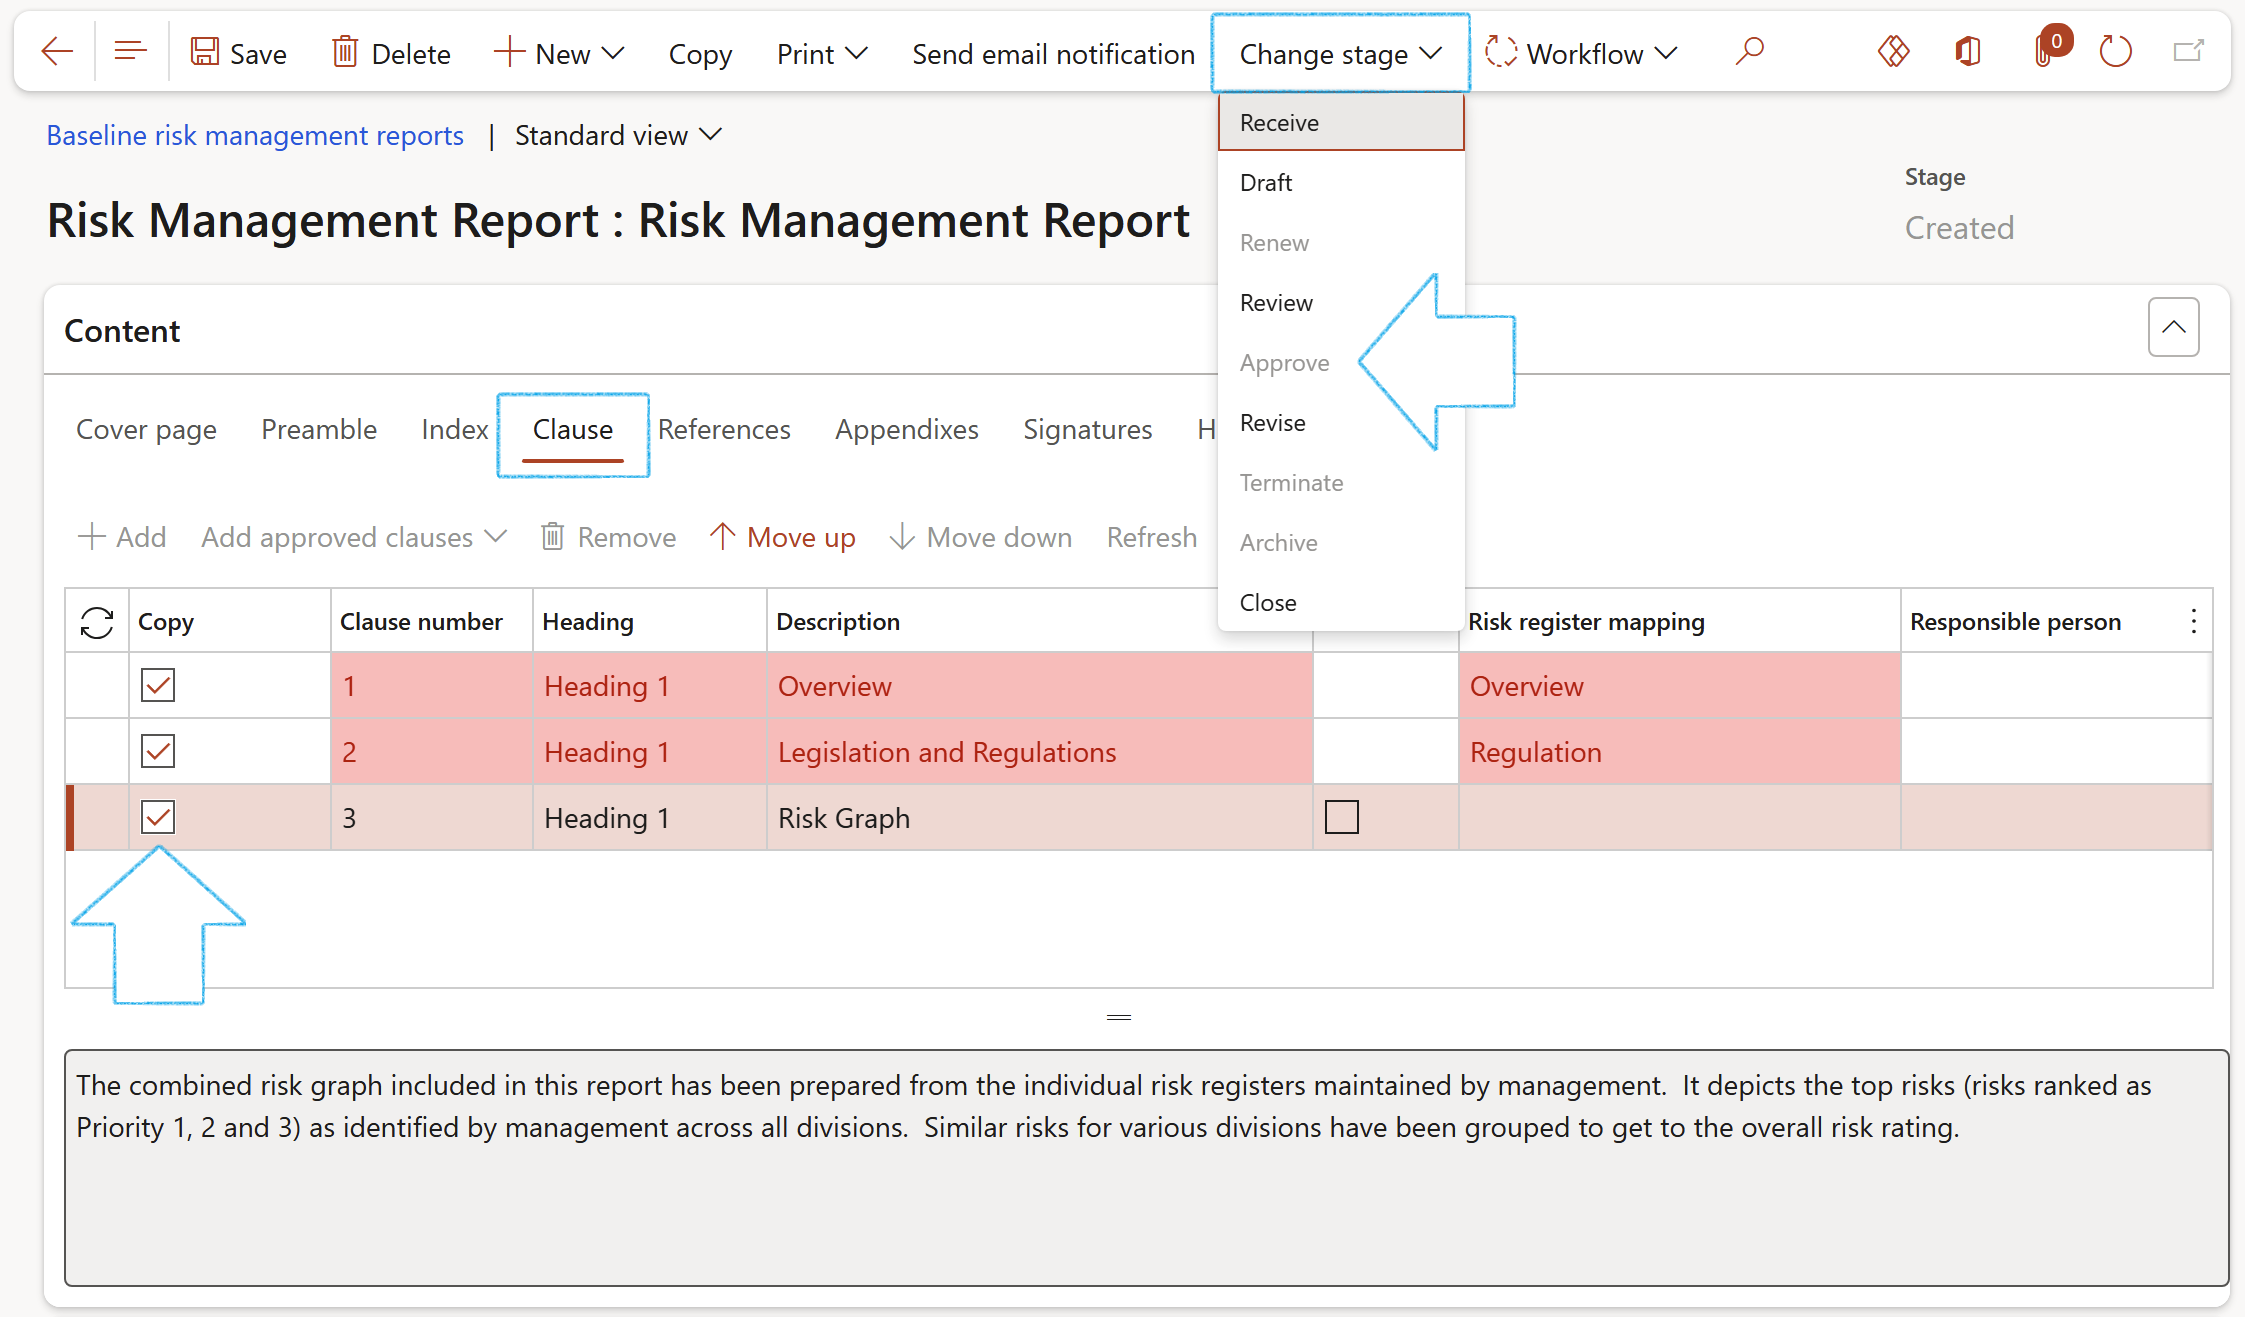
Go to: GRC > Risk > Baseline risk management reports
- Select the relevant record
- Open the Clause Index tab
- In the Copy column, tick the boxes of the lines that must be printed on the report when the Baseline is selected on an Risk register
- In the Action pane, click on the Change stage button and click on Approve
¶ Step 14: Define Approval authority
Only the risk register lines workflow has been integrated with the GRC approval authority
It is possible to define specific approvers for multiple risk lines by making use of the GRC approval authority. This integration enables the approval of individual risk lines where the risk owner is unique for each risk line
New records can be added on the approval authority grid. The column values can be specified as follows:
Go to: GRC > Governance > Setup for governance > Approval authority
- Provide a Year in the Year column
- Provide a Level in the Level column
- Specify an Authority in the Authority column
- Select Risk line in the Target column
- Provide a description in the Description column
- Specify a Worker in the End user 1 column. Please note that the selected worker must match with the specified worker in the Risk owner field for the risk line under the General Fast tab
- Select Risk manager in the Role column
- The name of the Risk manager defined on the GRC parameters will populate the Request approver column

¶ Daily use
A Risk register is a collection of risks. Each Risk register consists of a header and lines sections. The headers (registers) are listed in a list page with a preview of the risks (lines). The lines are the multiple risks listed under each header. To create, view or edit the lines, users have to work on the risk detail form.
¶ Step 15: "Master" risks
In the context of a group of companies or a large enterprise with many divisions or departments it would be wise to create a list of approved risks (masters) to be used when doing a risk assessment. Thus giving all subsidiaries or departments the same risk "label" to use in the risk register. These can be flagged as "master" thus allowing them to be used cross legal entities. Deafult risk values such as risk type can be attached. Thus when users do an assessment these default values will be populated for the users.
¶ Step 15.1: Creating an Approved group risk
Go to: GRC > Risk > All master risks
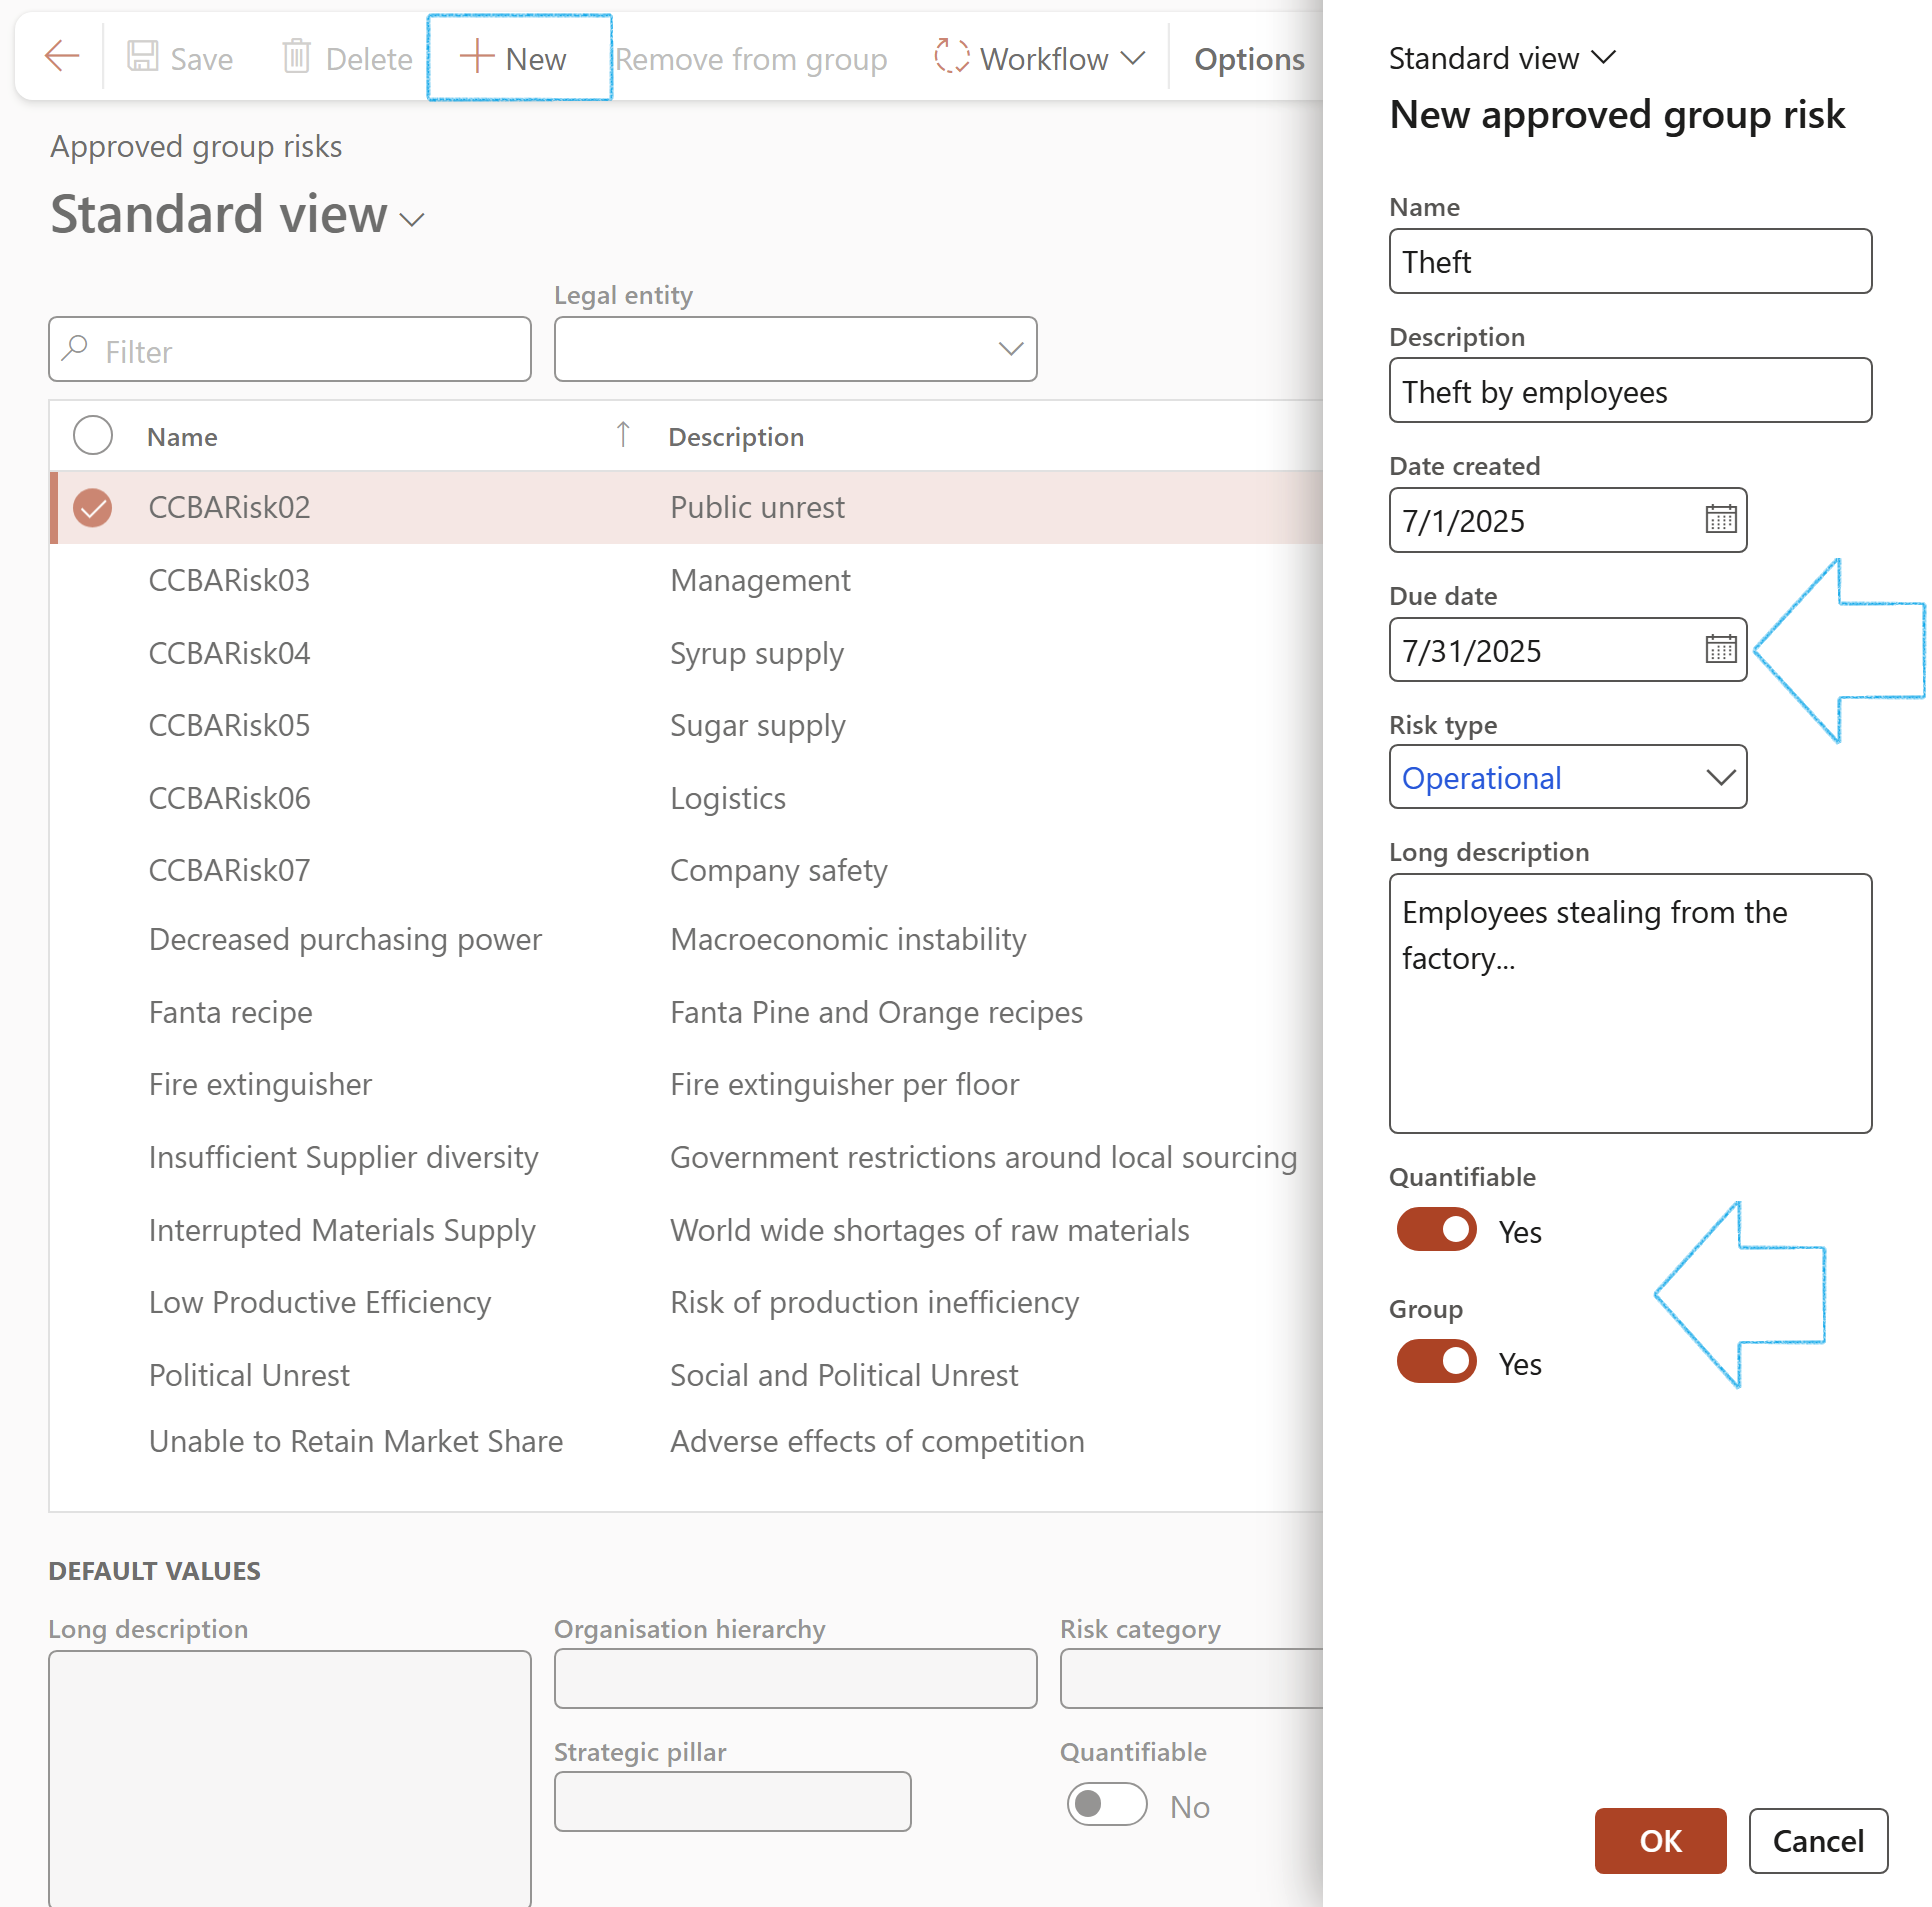
- In the Action Pane, click on the New button
- On the New master risk dialog:
- Enter a Name for the master risk
- Enter a Description of the master risk
- Enter the Date created
- Enter the Due date. (Date on which this master risk will expire. Users should review before this date)
- Enter a Long description of the master risk
- Indicate whether this is a Quantifiable master risk
- The Group slider will by default be on Yes
- Click on the OK button
- The following Default values can be selected under the grid for each record before it is approved:
- Long description
- Organisation hierarchy
- Department
- Strategic pillar
- Risk category
- Quantifiable
If the Group tick is on, the Default values will be copied to the risk register where the Master risk is selected
- To submit the record for approval, click on the Workflow button in the Action pane
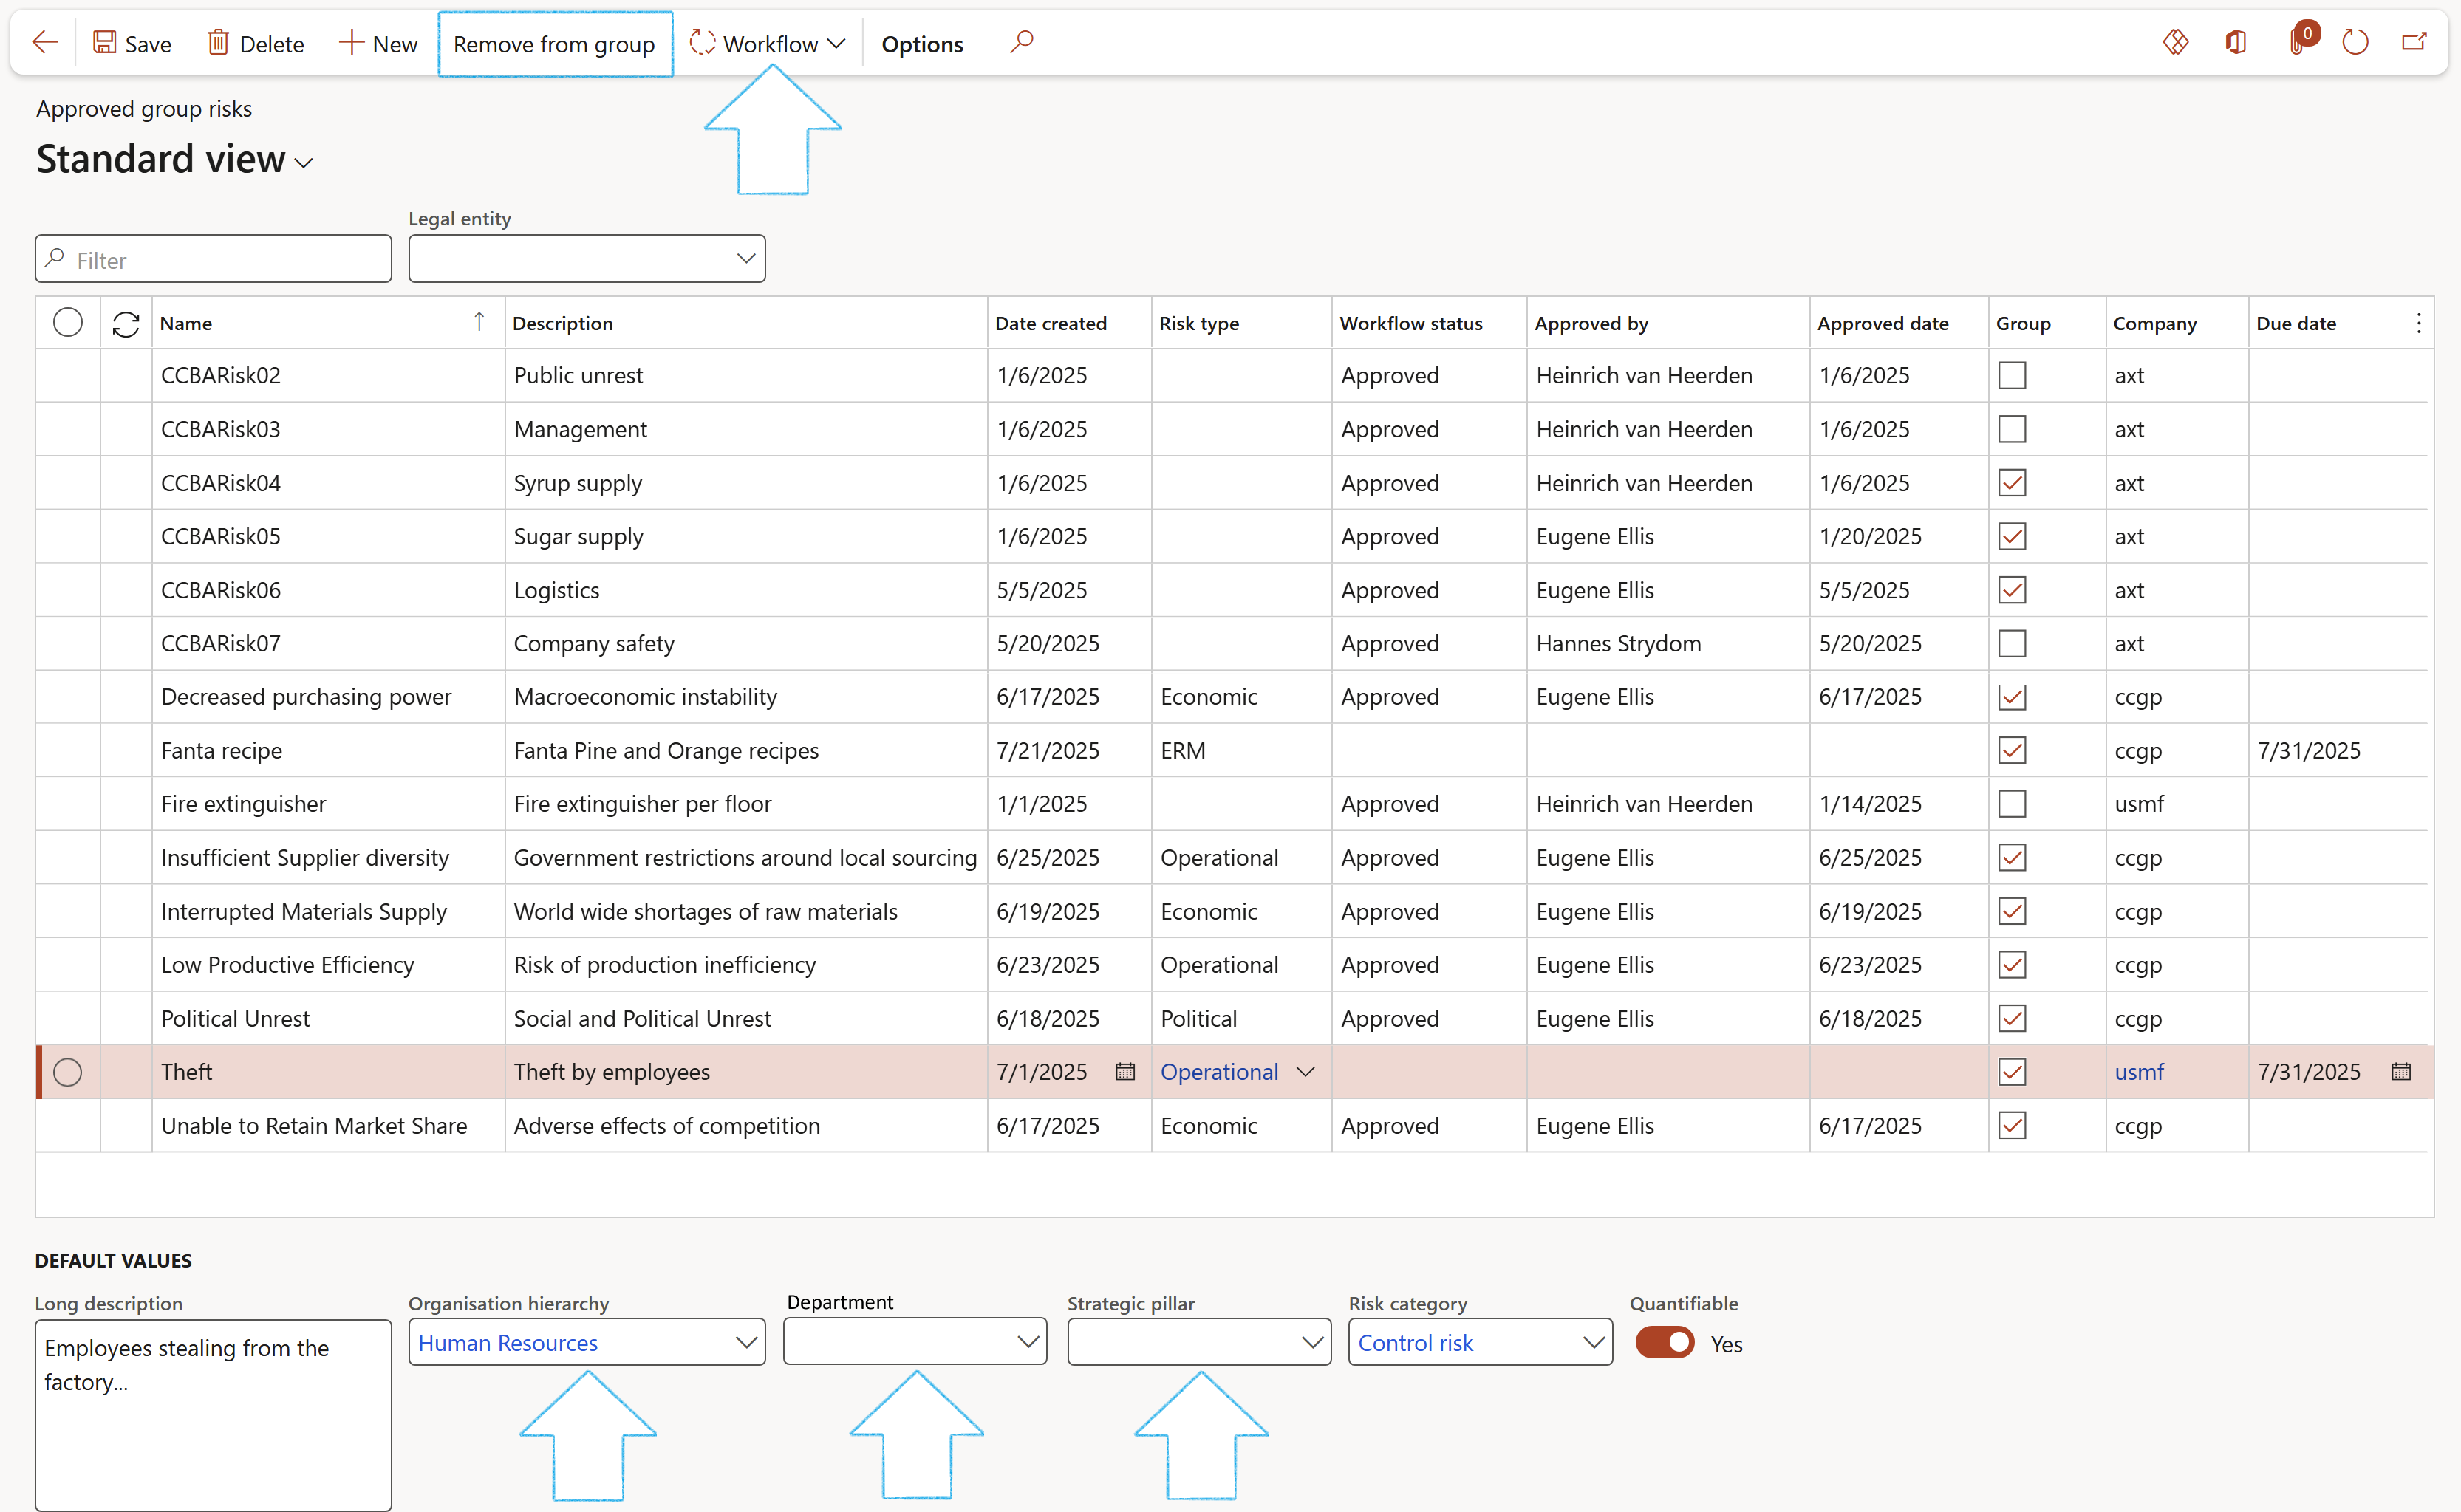
To remove a record from the group, click on the Remove from group button in the Action pane
Approved records cannot be edited
The Reinstate as group button will only be availible when the selected record has a Workflow status of Approved, and if the Group tick is off
To see a list of all the Approved master risks, go to: GRC > Risk > Approved master risks
¶ Step 16: Baseline risk register
A risk template (baseline risk register) is used to streamline the risk assessment process and reduce manual effort during risk identification. A risk template has no analysis and no responses linked to it, and serves as a model for actual risk creation. It is useful if you have several similar risks to create.
¶ Step 16.1: Create a Baseline risk register
Go to: GRC > Risk > Registers > All enterprise risk registers
- Select the risk register that you want to use as a baseline or create a new one
- Under the Lines view, add the risks that are typically associated with the with the risk register
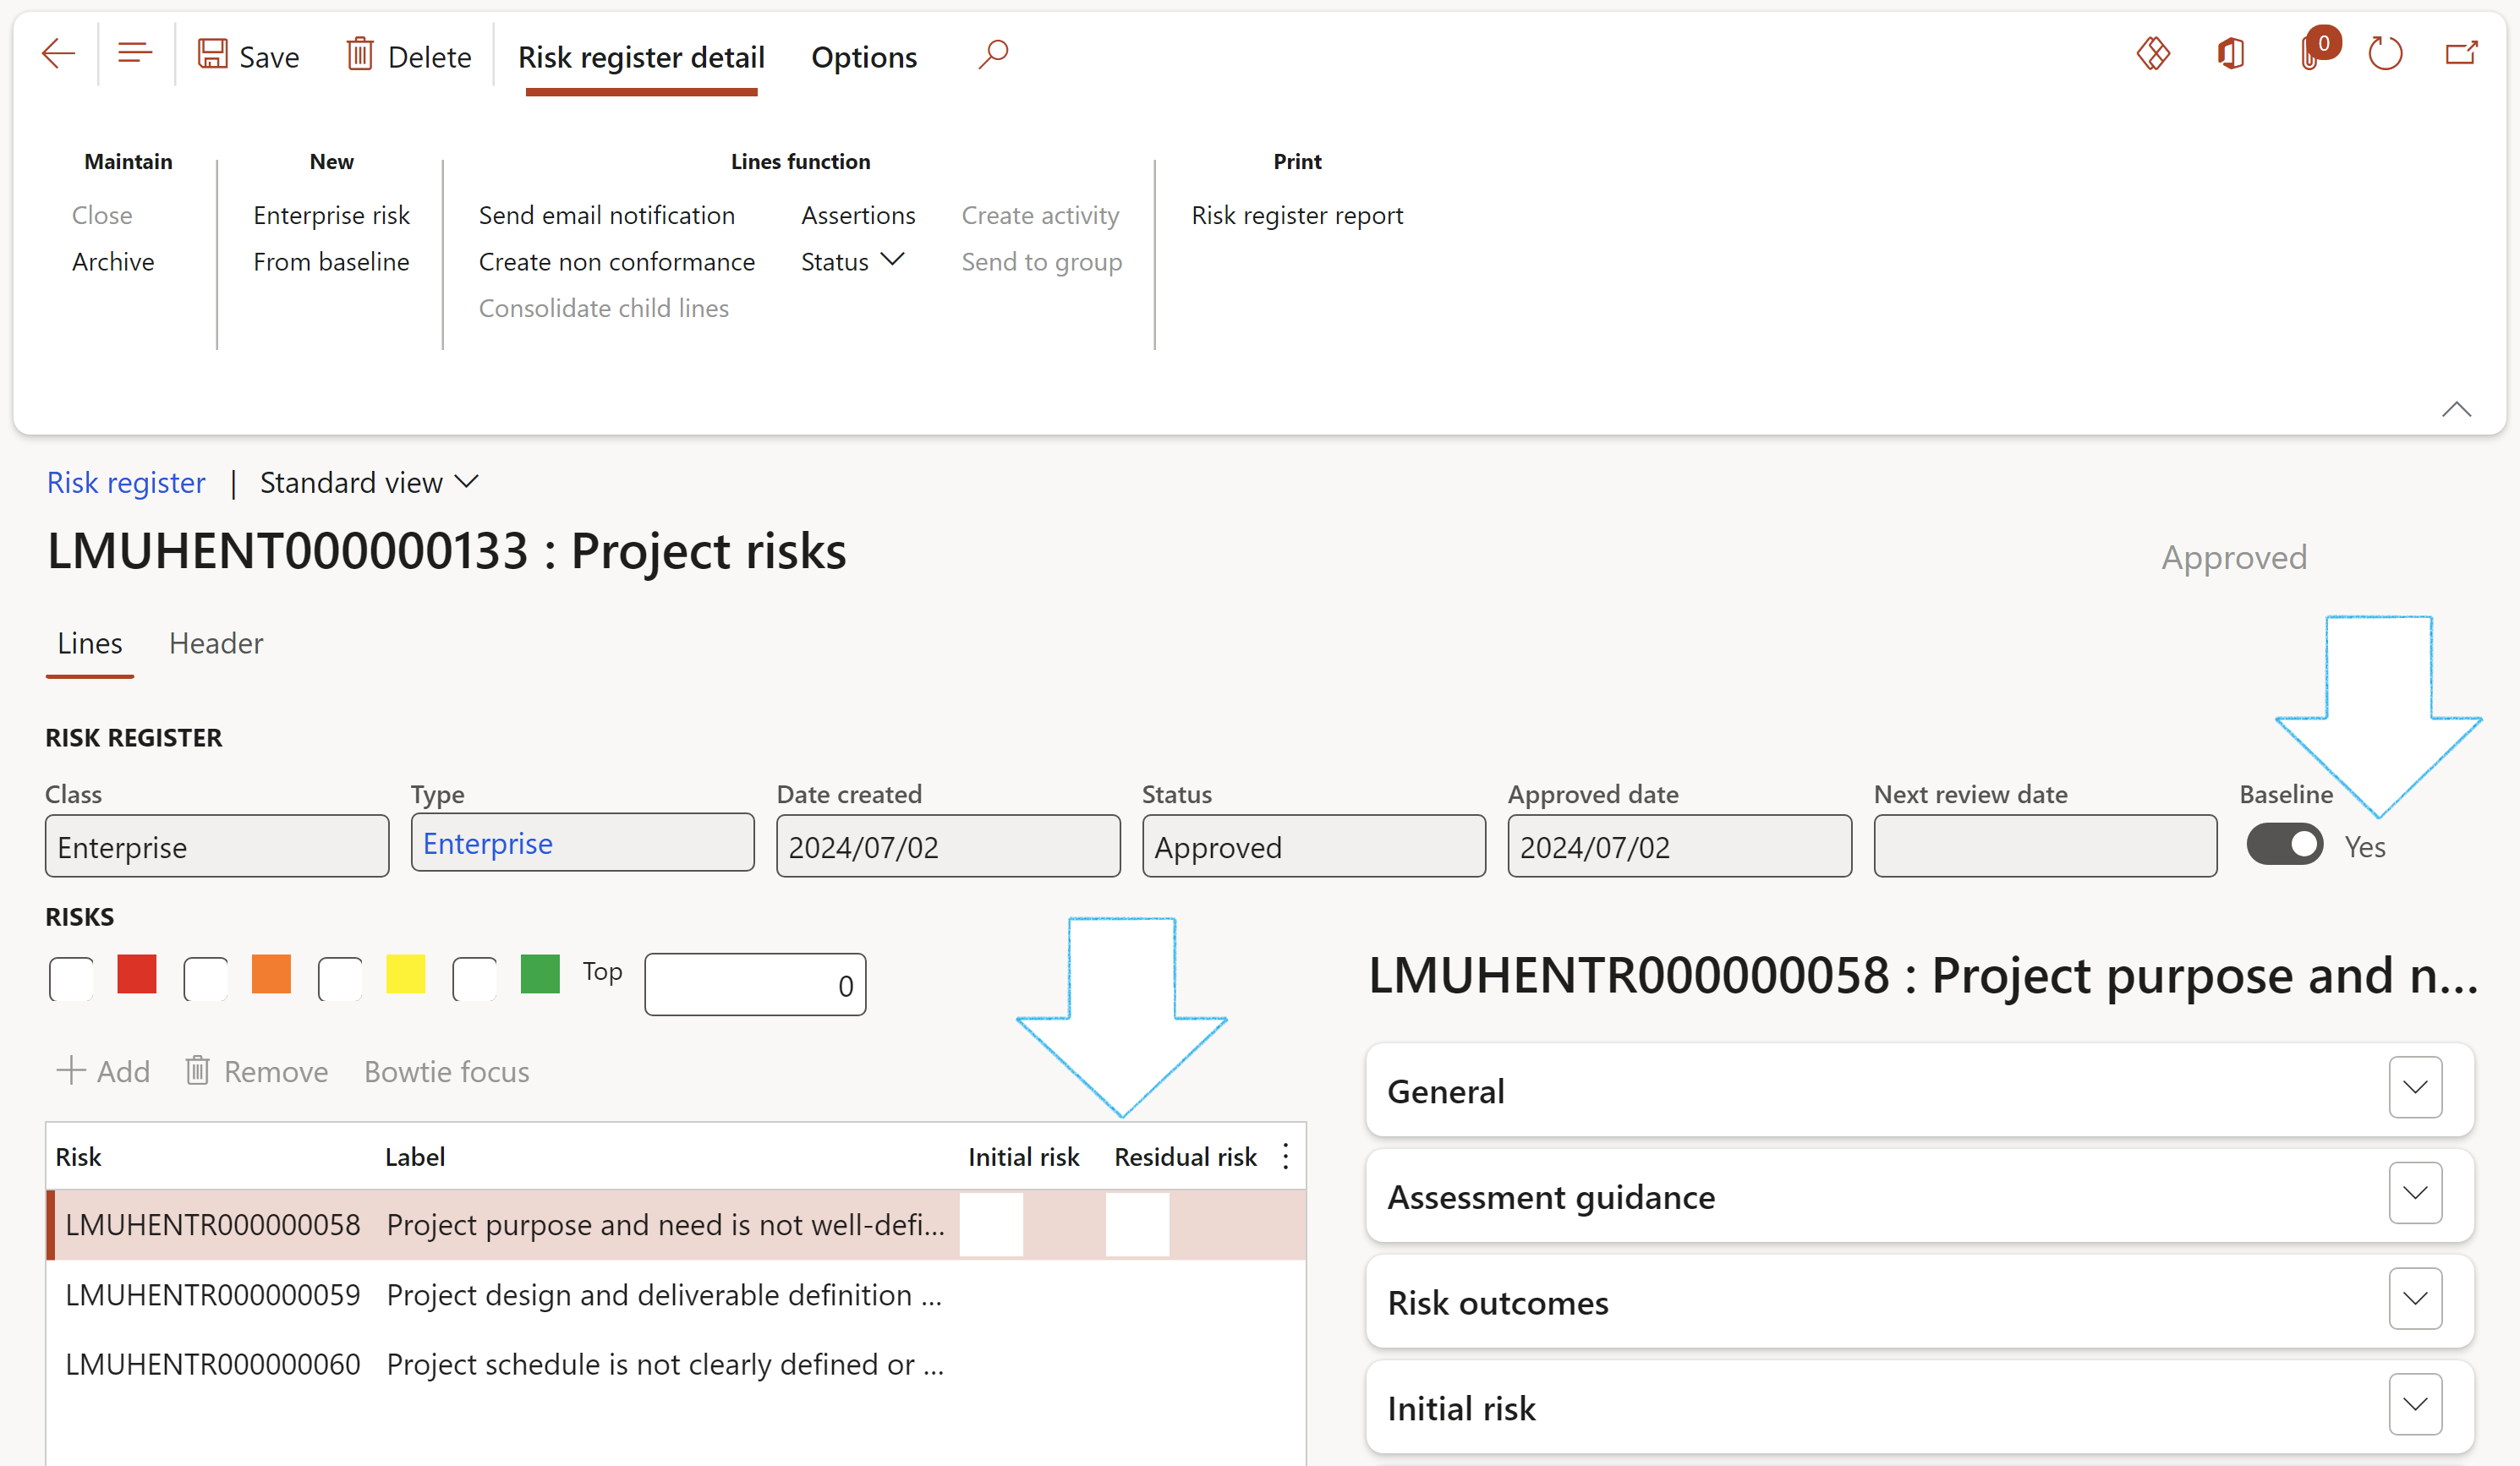
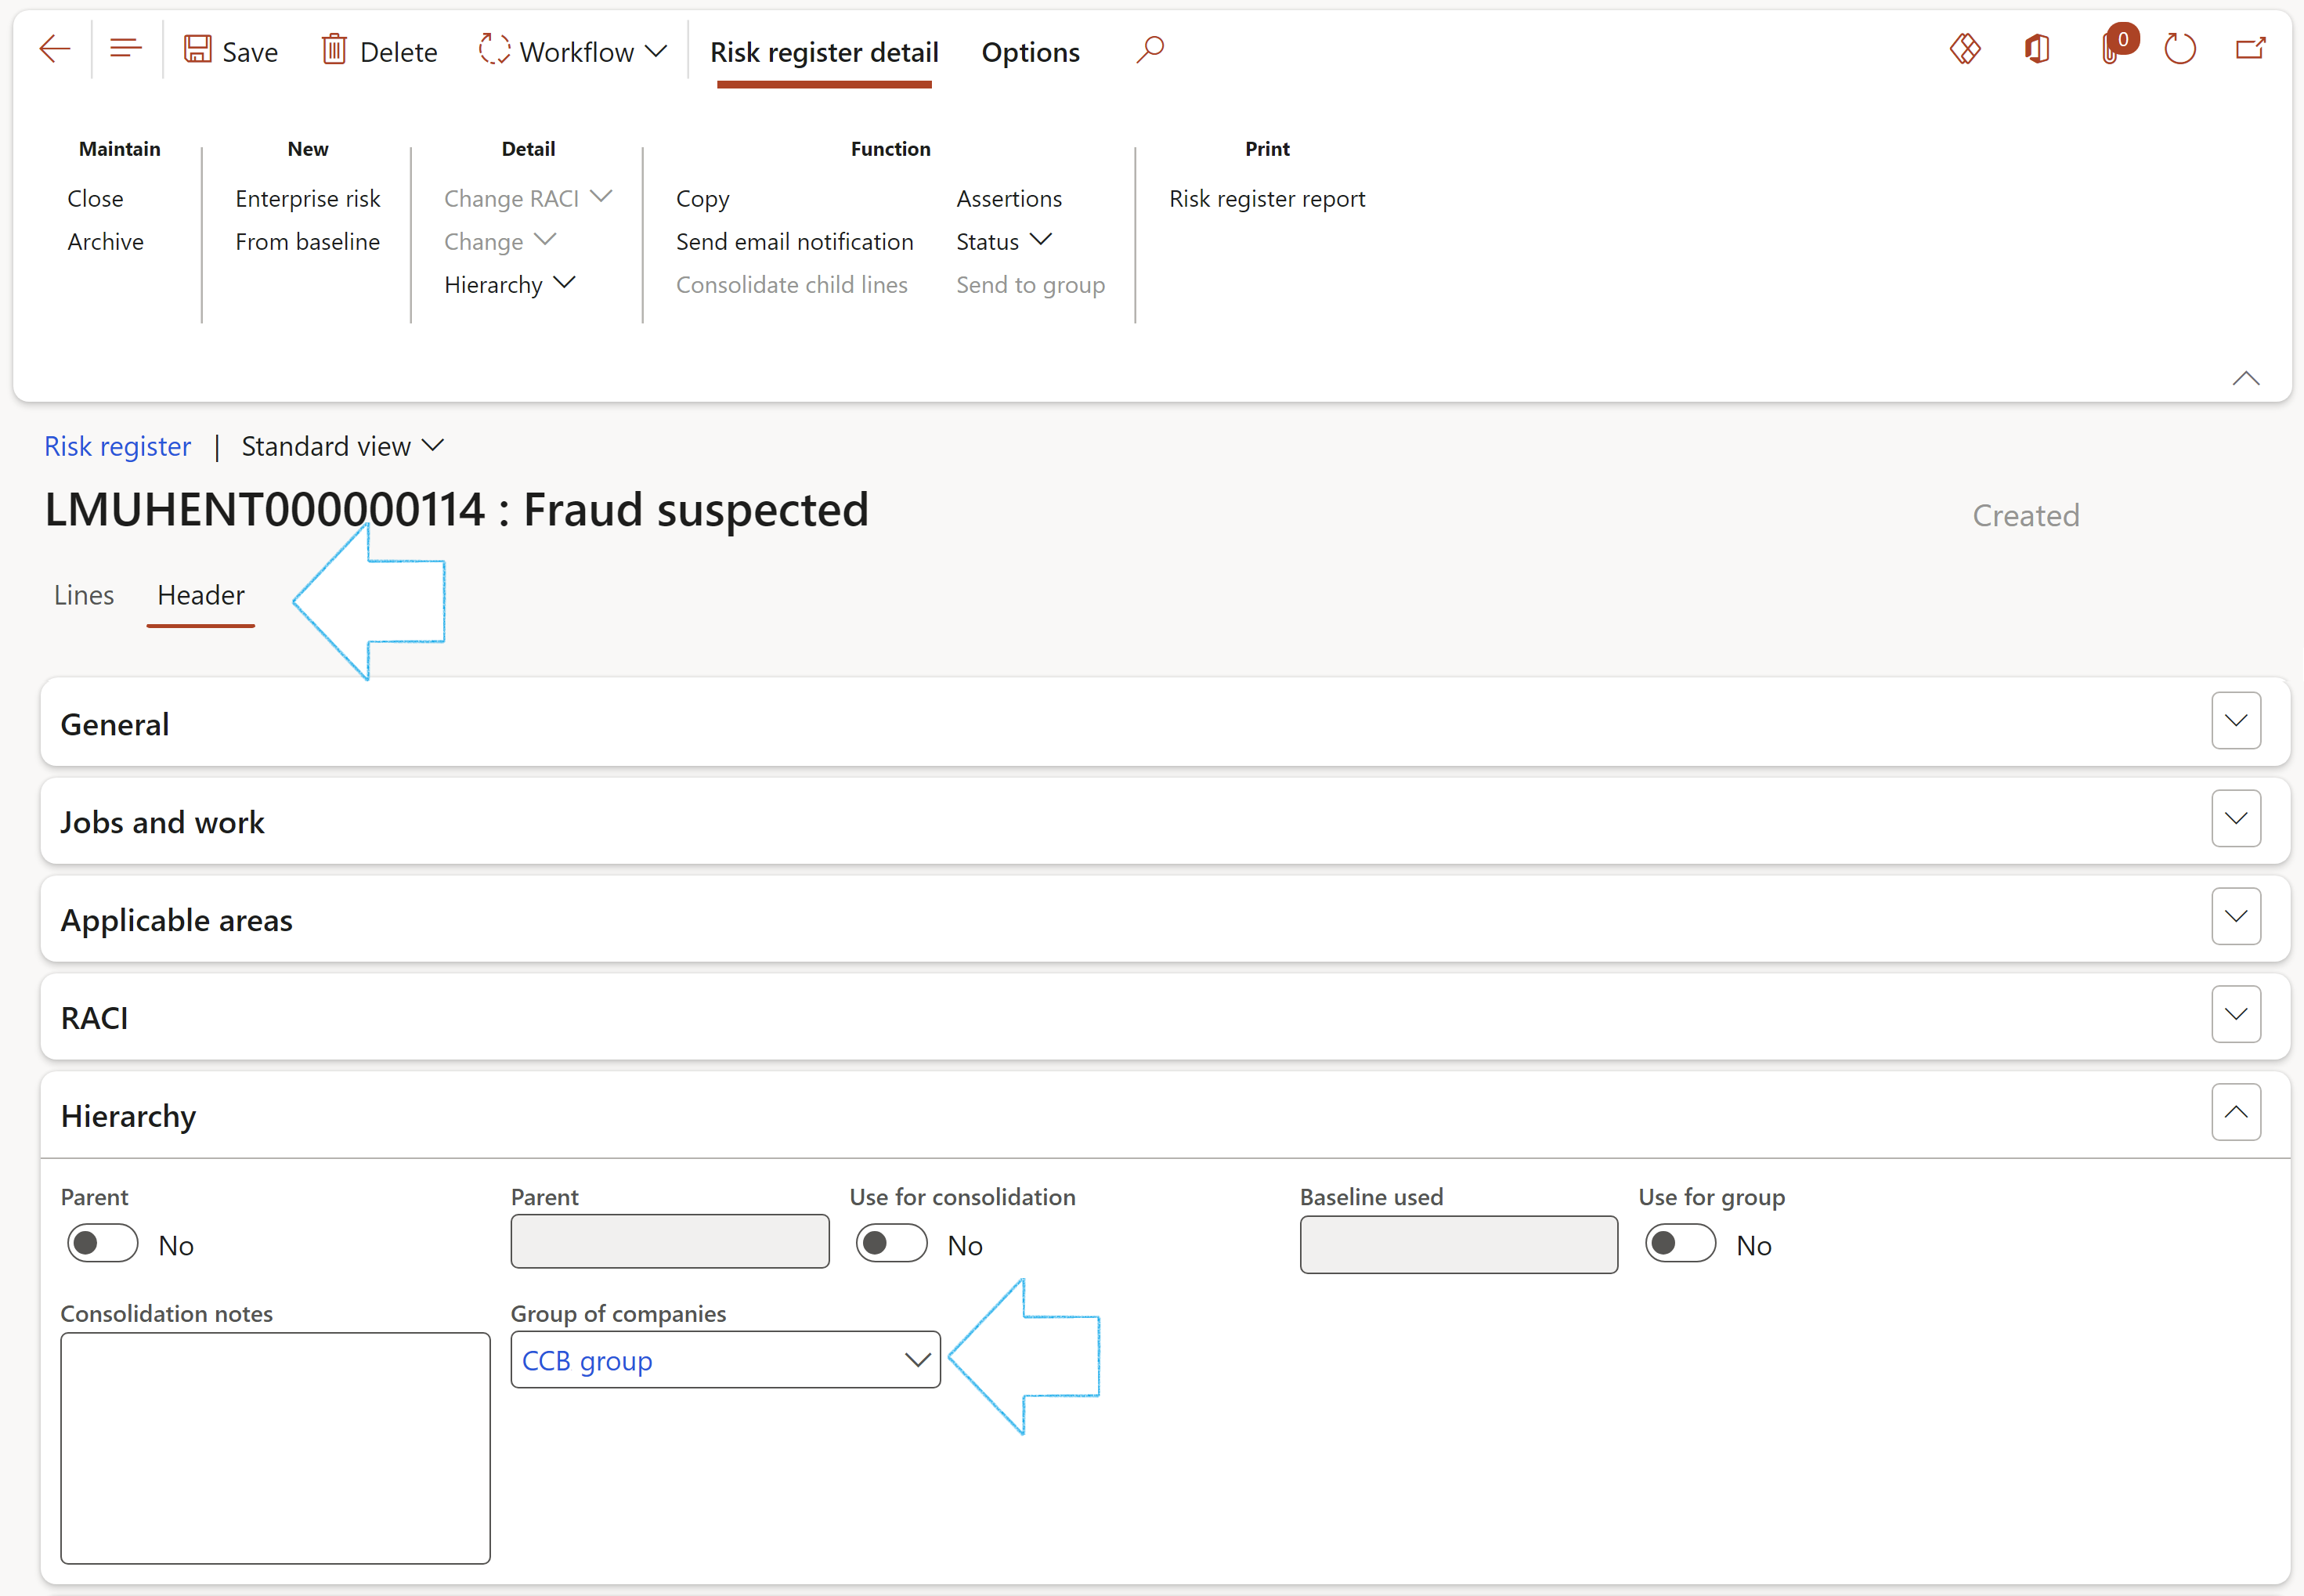
- Go to the Header view
- Expand the Hierachy Fast tab and select a Group of companies as per setup above
All Baseline risk registers can be found under the All baseline registers menu item
Refer to the Consolidation step below to see how the risk assessments (lines) are consolidated to the group or division level within the organization
¶ Step 16.2: Update Baseline risk register
- After the baseline risk register's status is updated to Submitted, the Change button in the Action pane becomes available. This update could be manual (use the Status button) or by using Dynamics 365 F&O workflow.
- When the Baseline slider is on Yes, the user can select one of the following options in the Consolidation field:
- Blank
- Use for group
- Use for group and create parent register
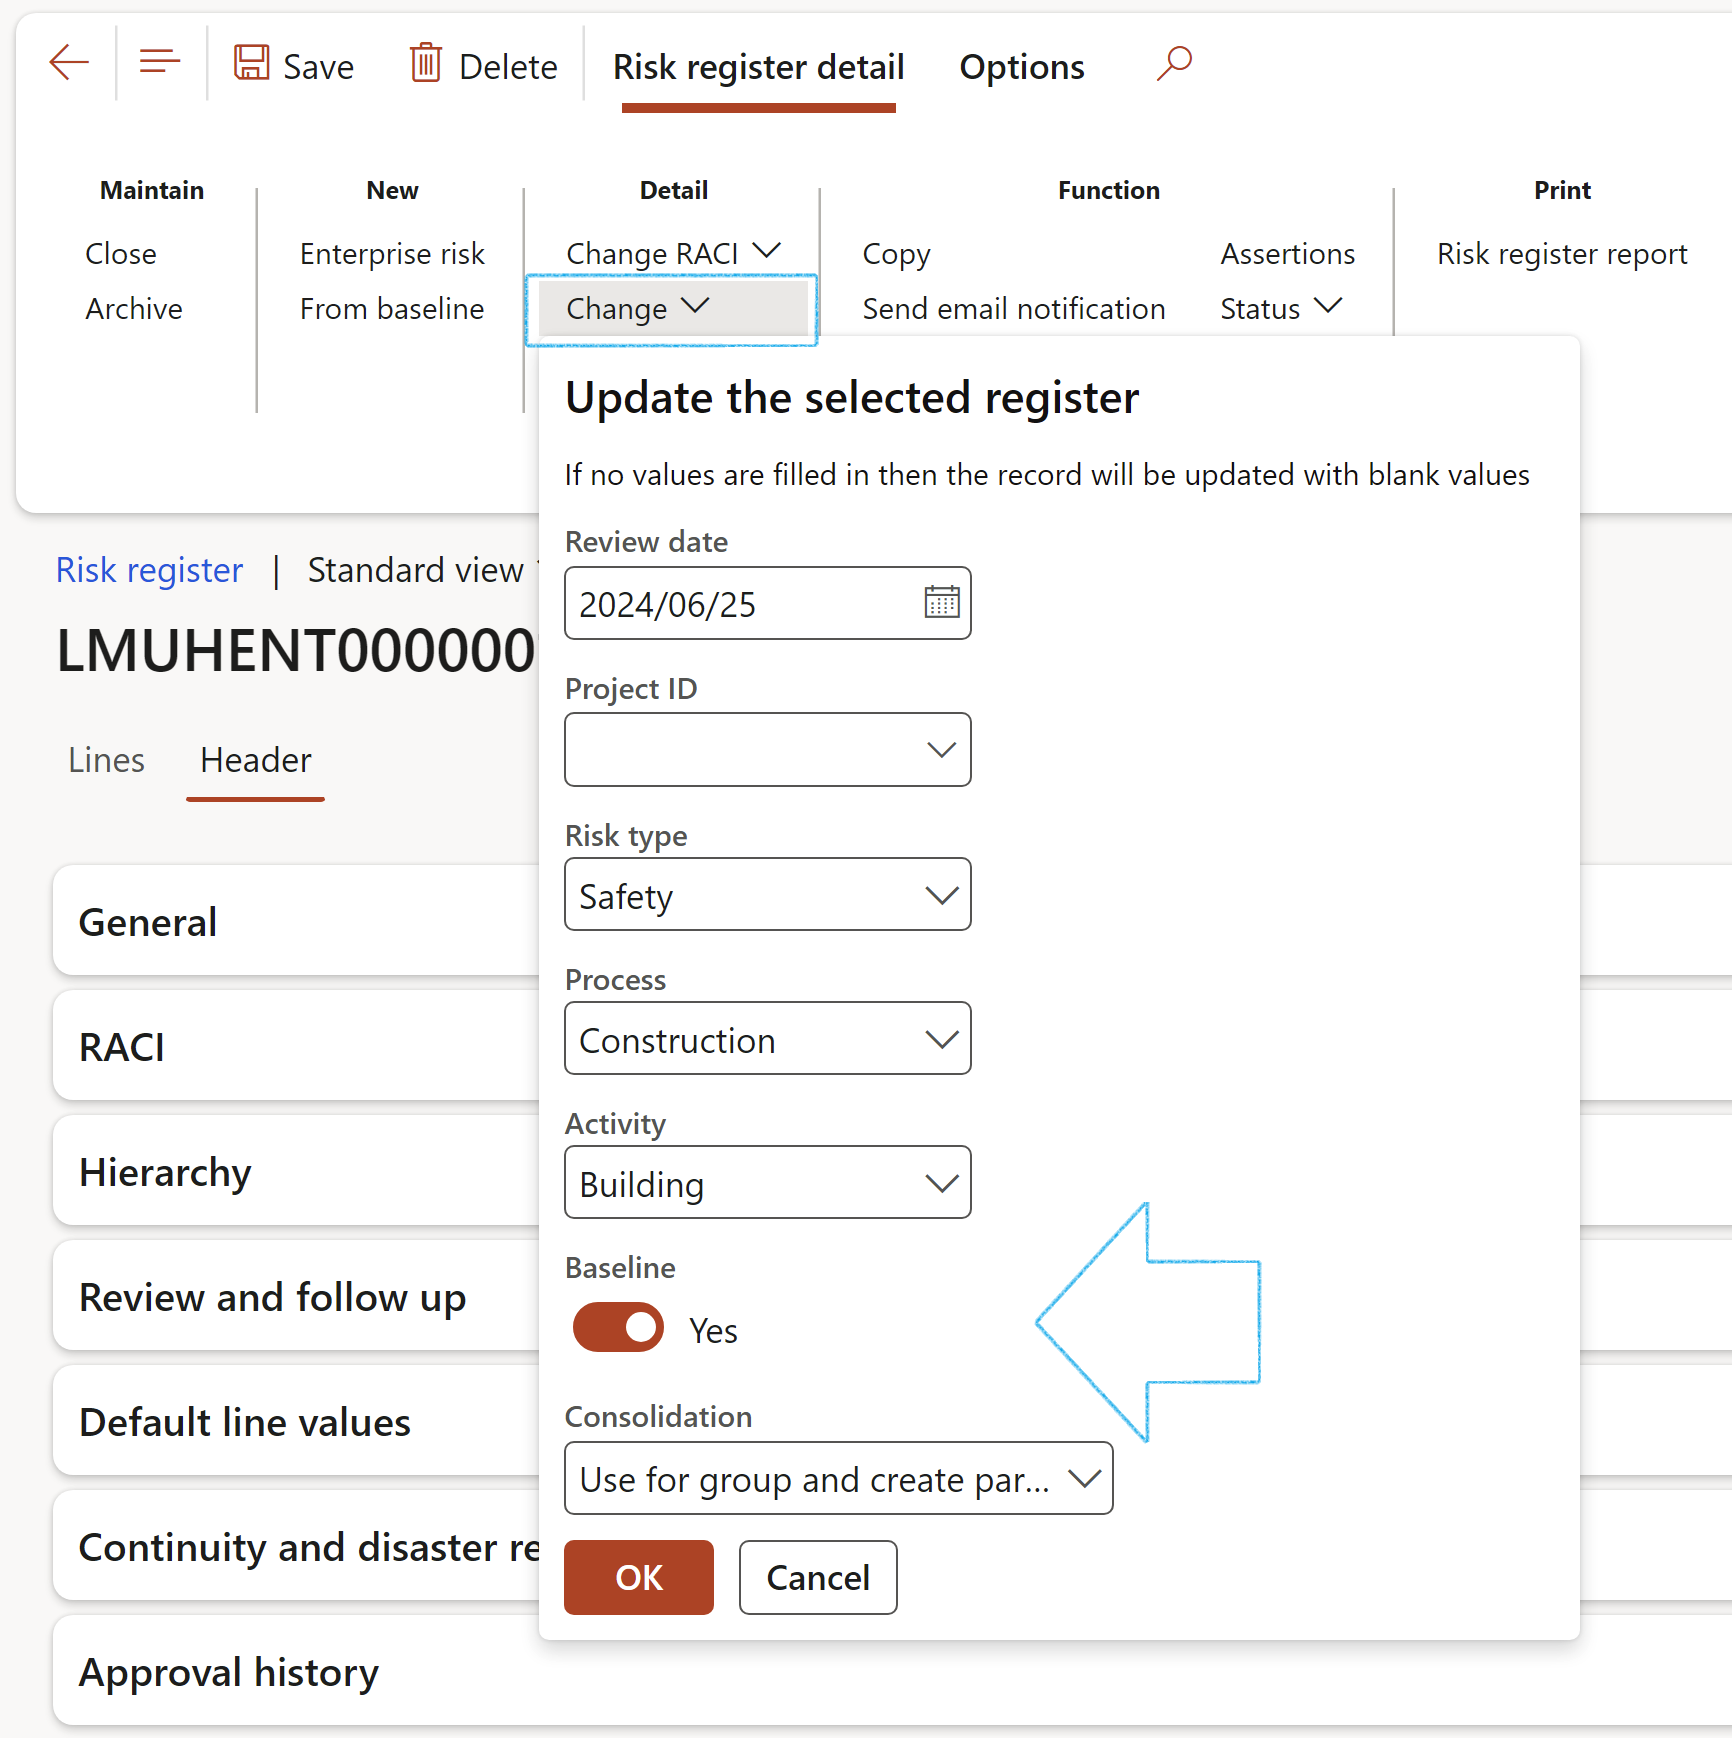
The last two options will enable this baseline register to be used across legal entities. If Create parent register is selected, an empty Parent risk register will be created.
Please note that if no values are entered, the record will be updated with blank values.
If Cancel is clicked, no changes will be made to the existing register.
¶ Step 17: Create an Enterprise risk register
Go to: GRC > Risk > Registers > All enterprise risk registers
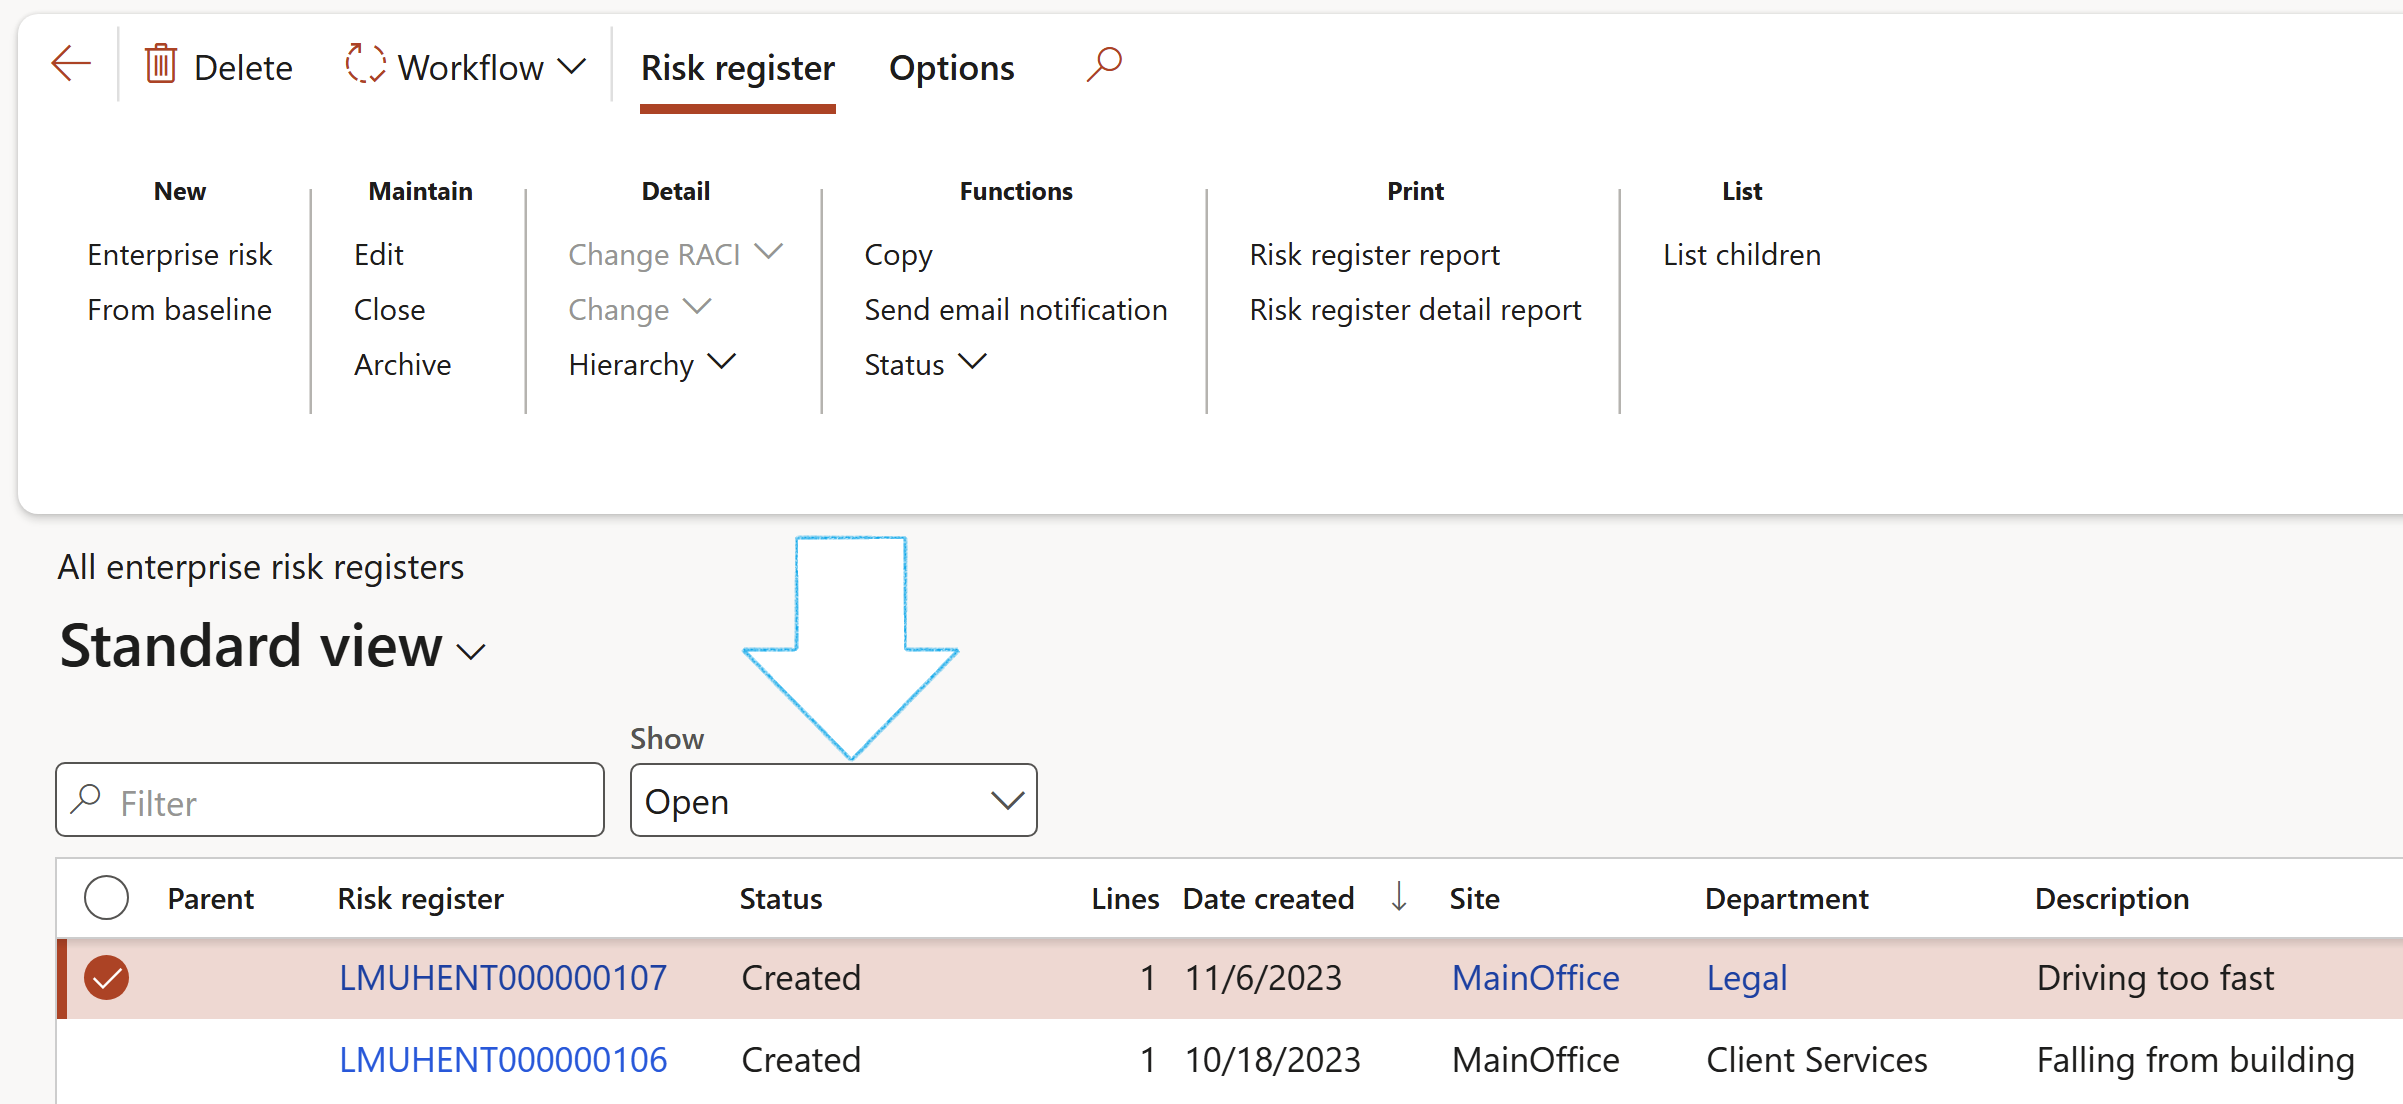
The Show filter can be used to narrow down your search by filtering on the following:
- All Enterprise risk registers
- All open Enterprise risk registers
- All closed Enterprise risk registers
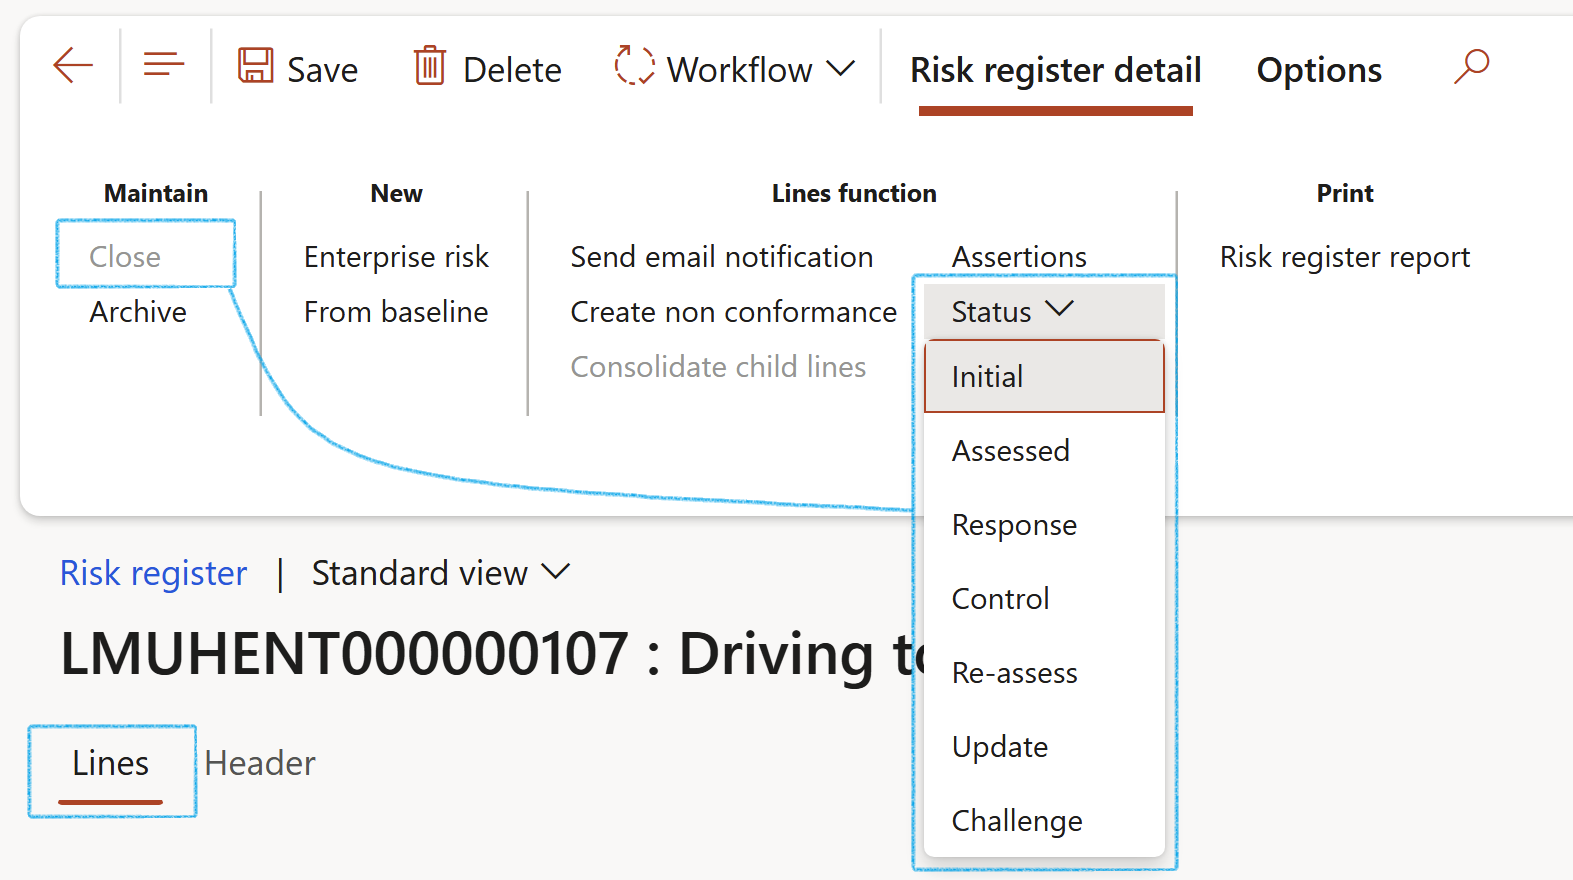
It is noteworthy that the risk register and individual risk lines both have life cycles.
¶ Step 17.1: Buttons on the Risk register list page

- An existing risk register can be Deleted (Risk registers cannot be deleted if risk lines exist) – this is not advisable since the Risk register number sequence will be interrupted, containing missing records.
- A New risk register can be created by doing a risk assessment
- On the Action pane, in the New group, click on the Enterprise risk button
- Enter the relevant detail on the Enterprise risk create dialog
- Click on the Create button
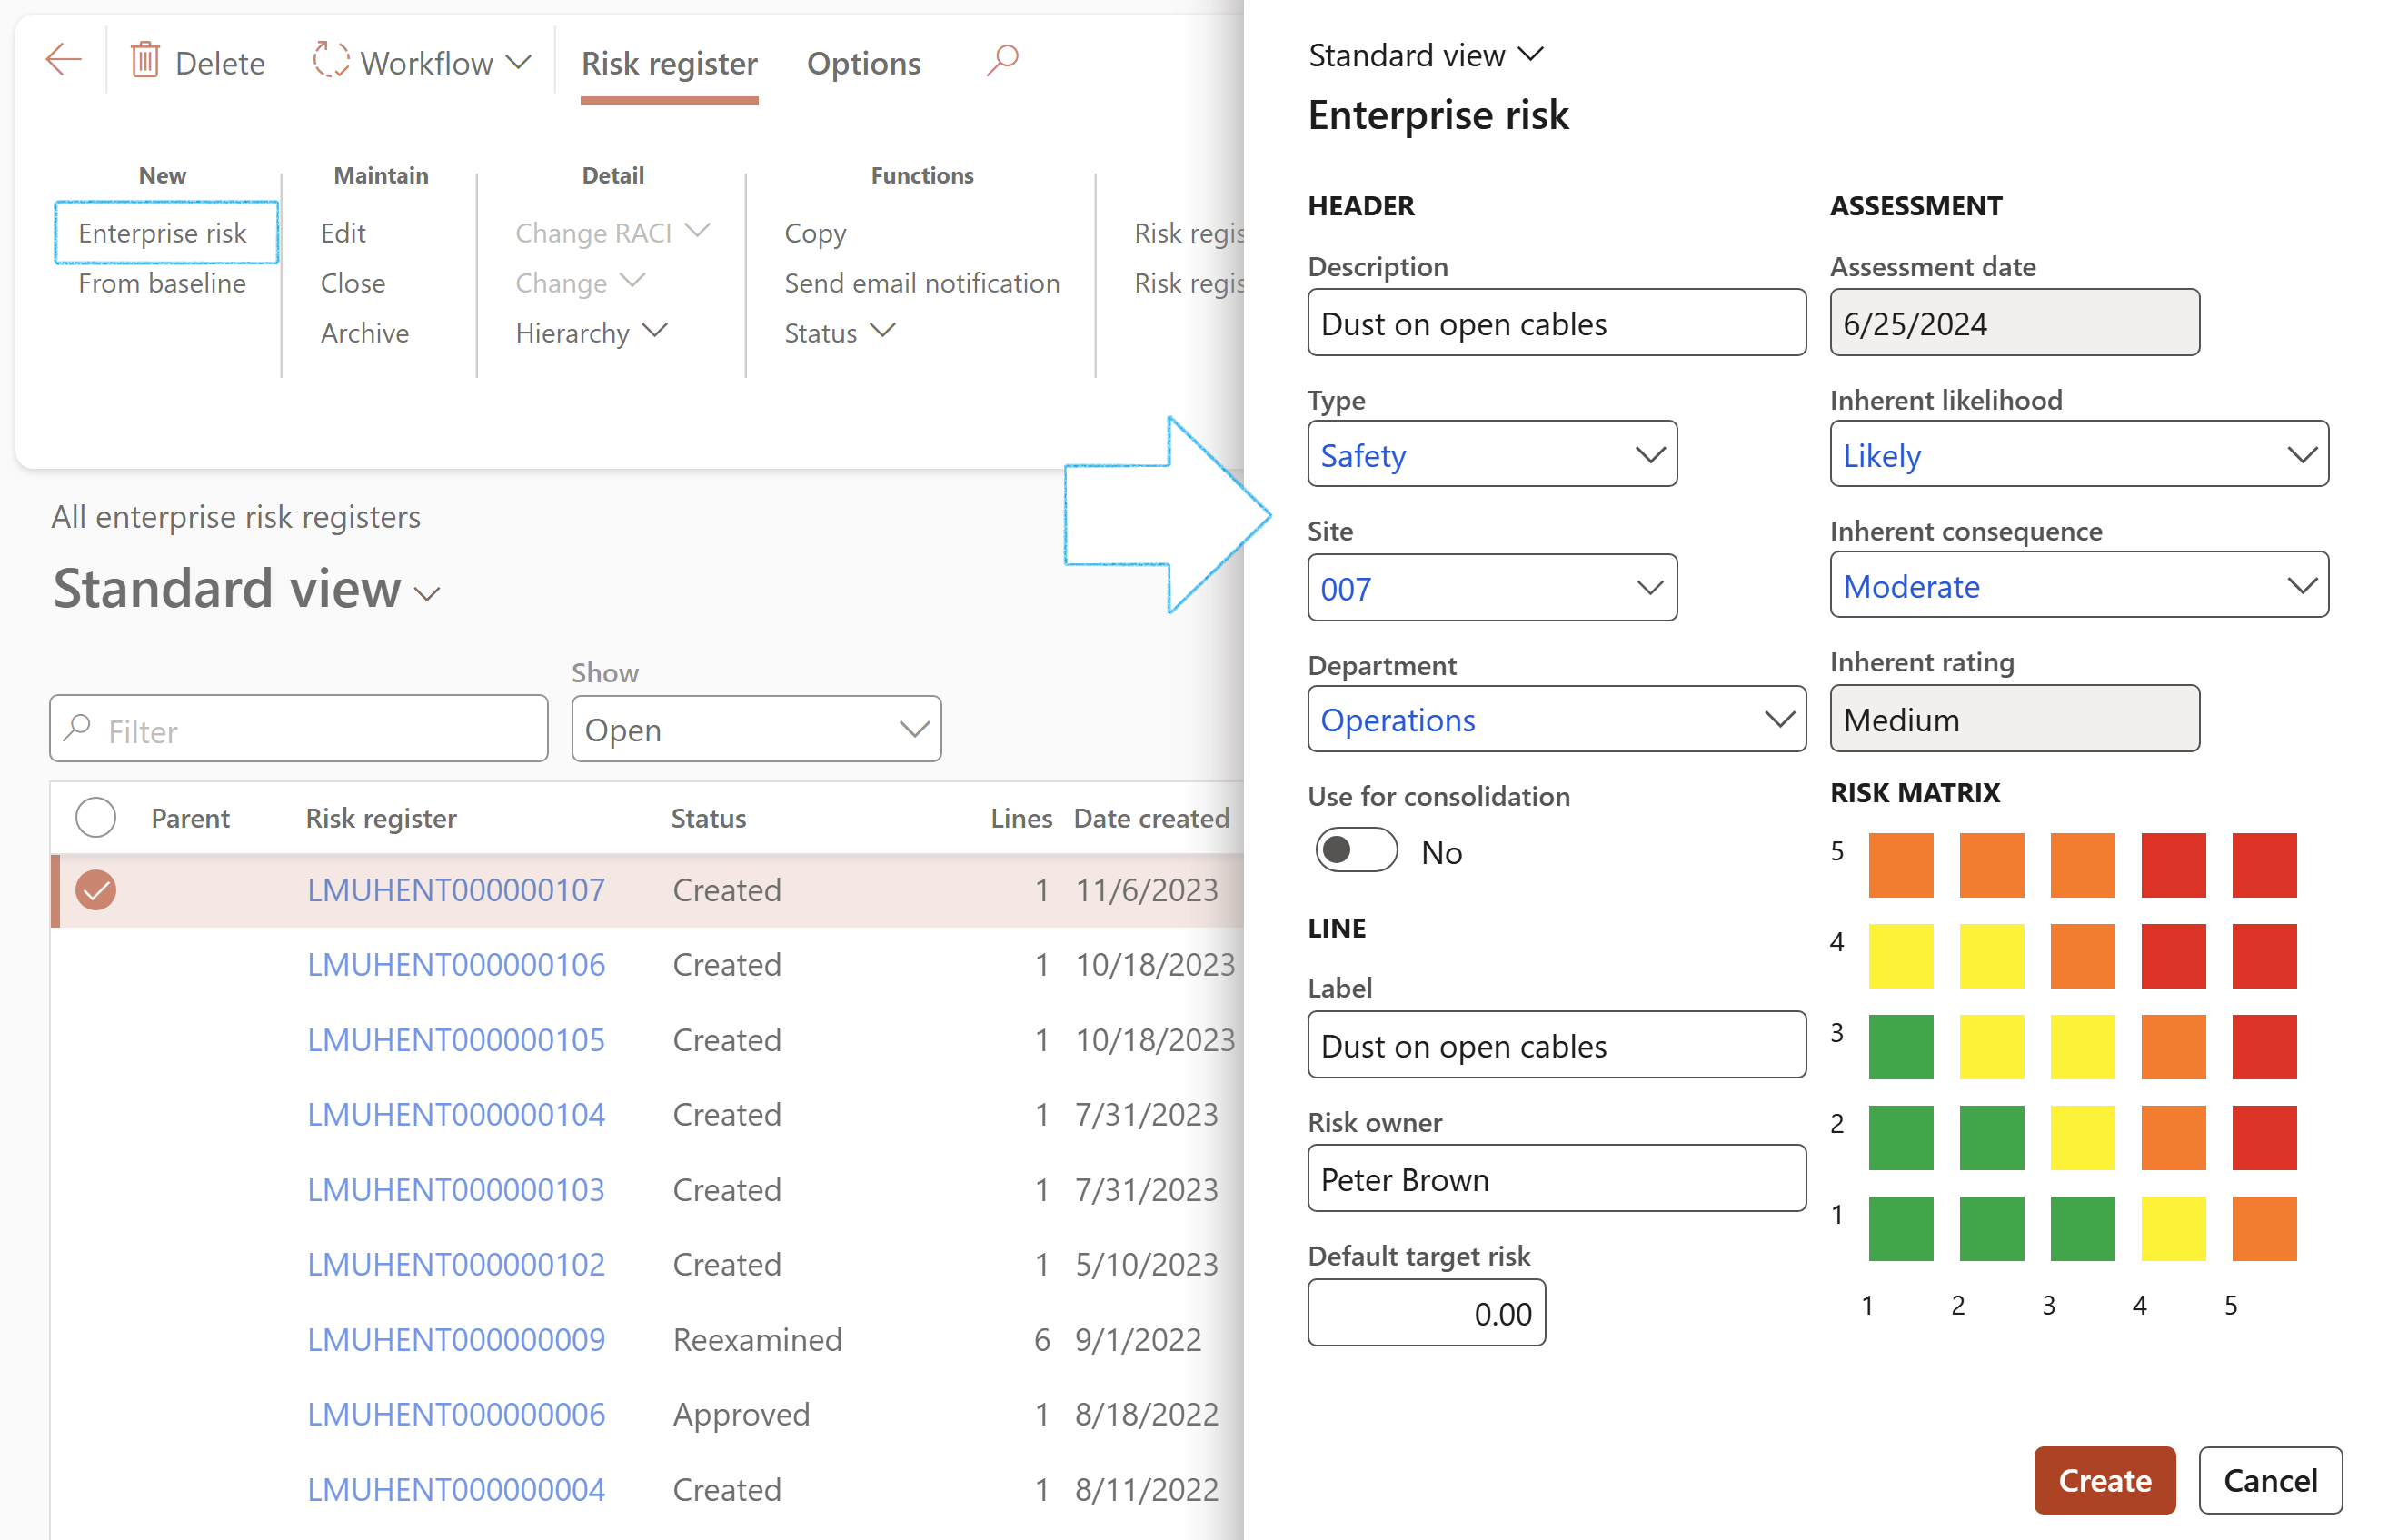
- OR, click on the From baseline button to do a risk assessment by using a baseline risk register
- Enter the relevant detail on the Enterprise risk assessment dialog
- Click on the Create new register button

- An existing risk register can be Edited
- One can close a Risk register. Click on the Close button to mark a register as complete.
- Archive: A risk register can be archived and locked (closed). The user has the option to keep an active copy of the archived risk register. All archived risk registers can be viewed on the All archived registers list page.
- Change RACI: The Responsibility matrix can be setup by selecting responsible employees’ data from setup HR data

The Status of the Risk register must be Submitted
Please note that if no values are entered, the record will be updated with blank values
If Cancel is clicked, no changes will be made to the existing records
- Change: Details of the selected risk register can be changed under this option
- When the details of a risk register have been changed, the status of the risk register will be set to Changed. This Changed status can be used for filtering purposes and can be changed back to a “normal” Risk status
It is possible to create a complete hierarchy by marking a specific Risk register as the parent of another register. To add this parent to another parent (thus creating multiple levels) select the parent that this “child” belongs to from the Parent dropdown list on the Hierarchy setup form.
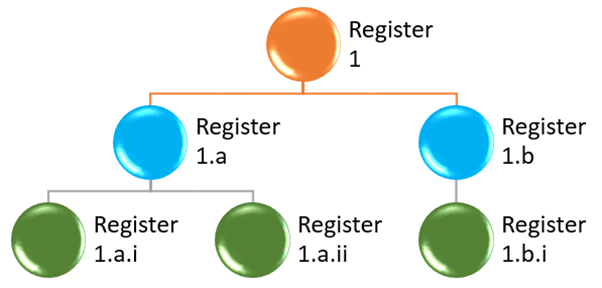
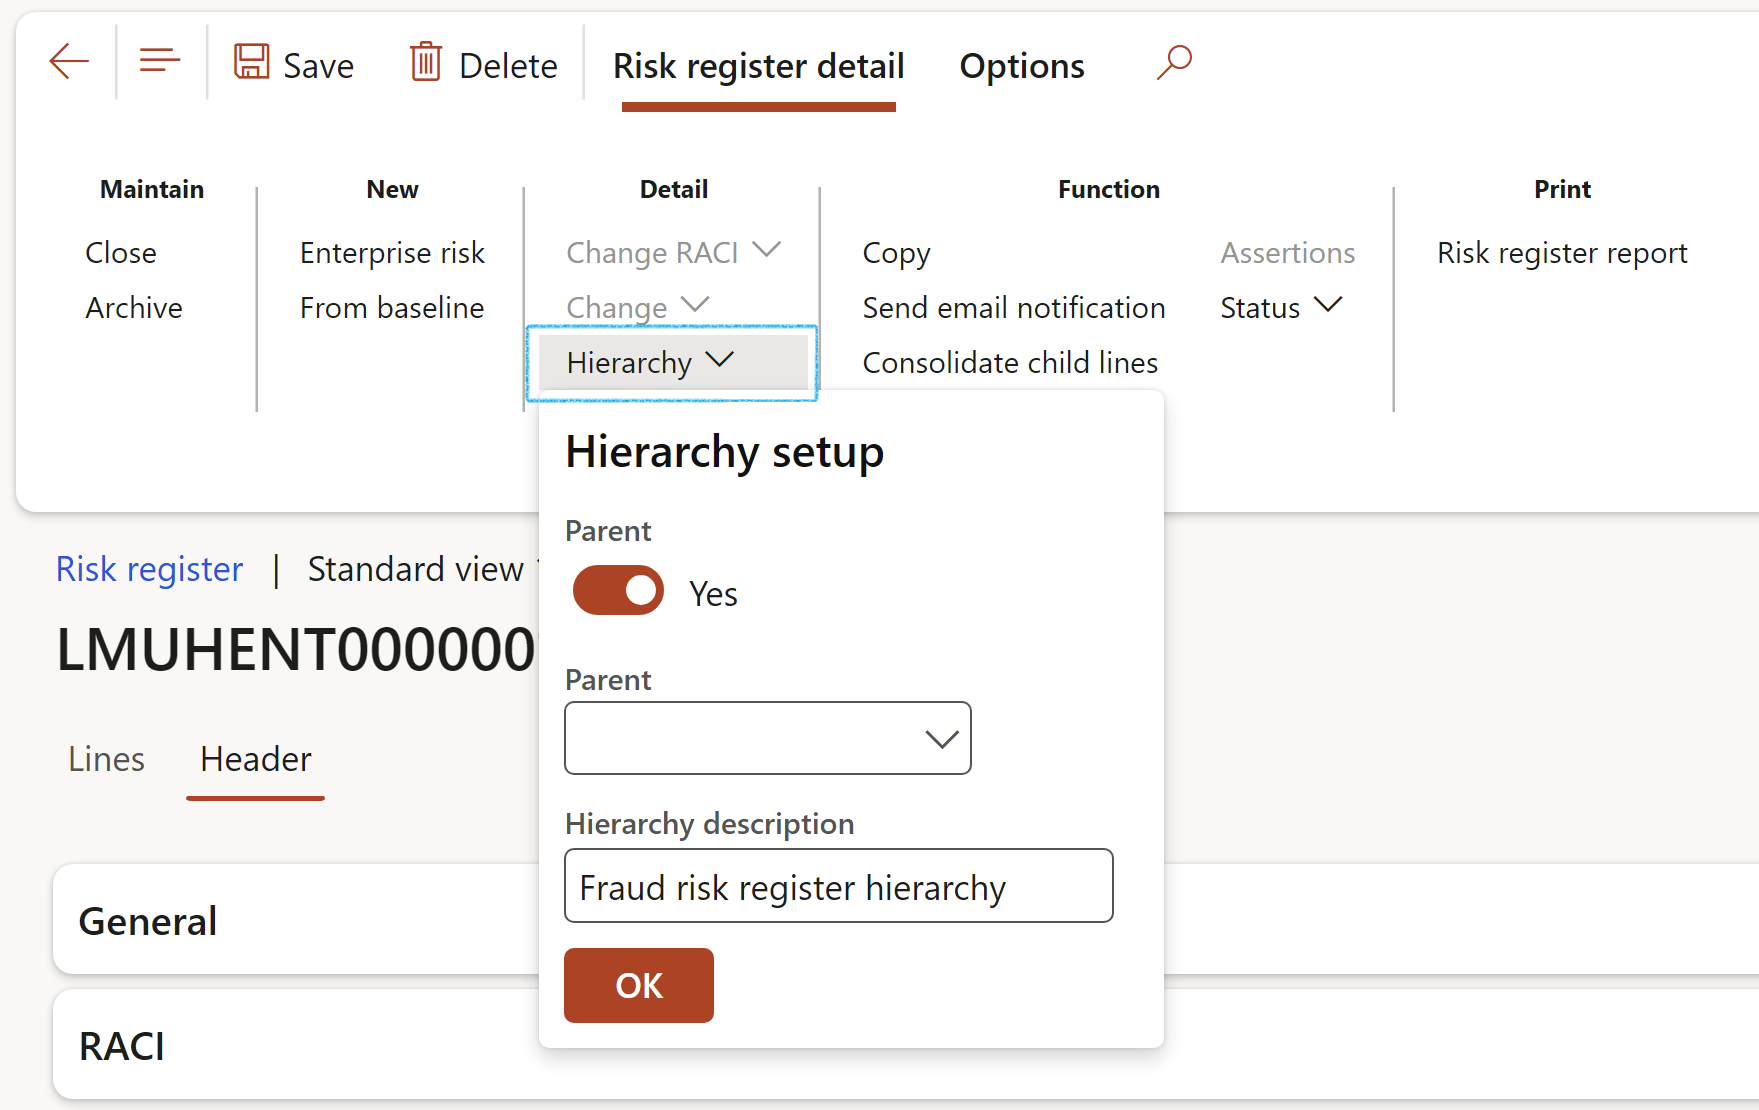
- Hierarchy: The Risk register hierarchy setup form
- The Parent field indicates a header record (Parent) to the current Risk register line
- The Parent field contains a list of header (Parent) type risk registers
- Select the relevant Parent to assign to the current Child Risk register
- Enter a description in the Hierarchy description field
- Click on OK
The details can be viewed under the Hierarchy Fast tab on the Risk register header
- Copy: Make a copy of the selected Risk register and attached risks (including the details)
- Send email notification: Email a risk notification to all stakeholders
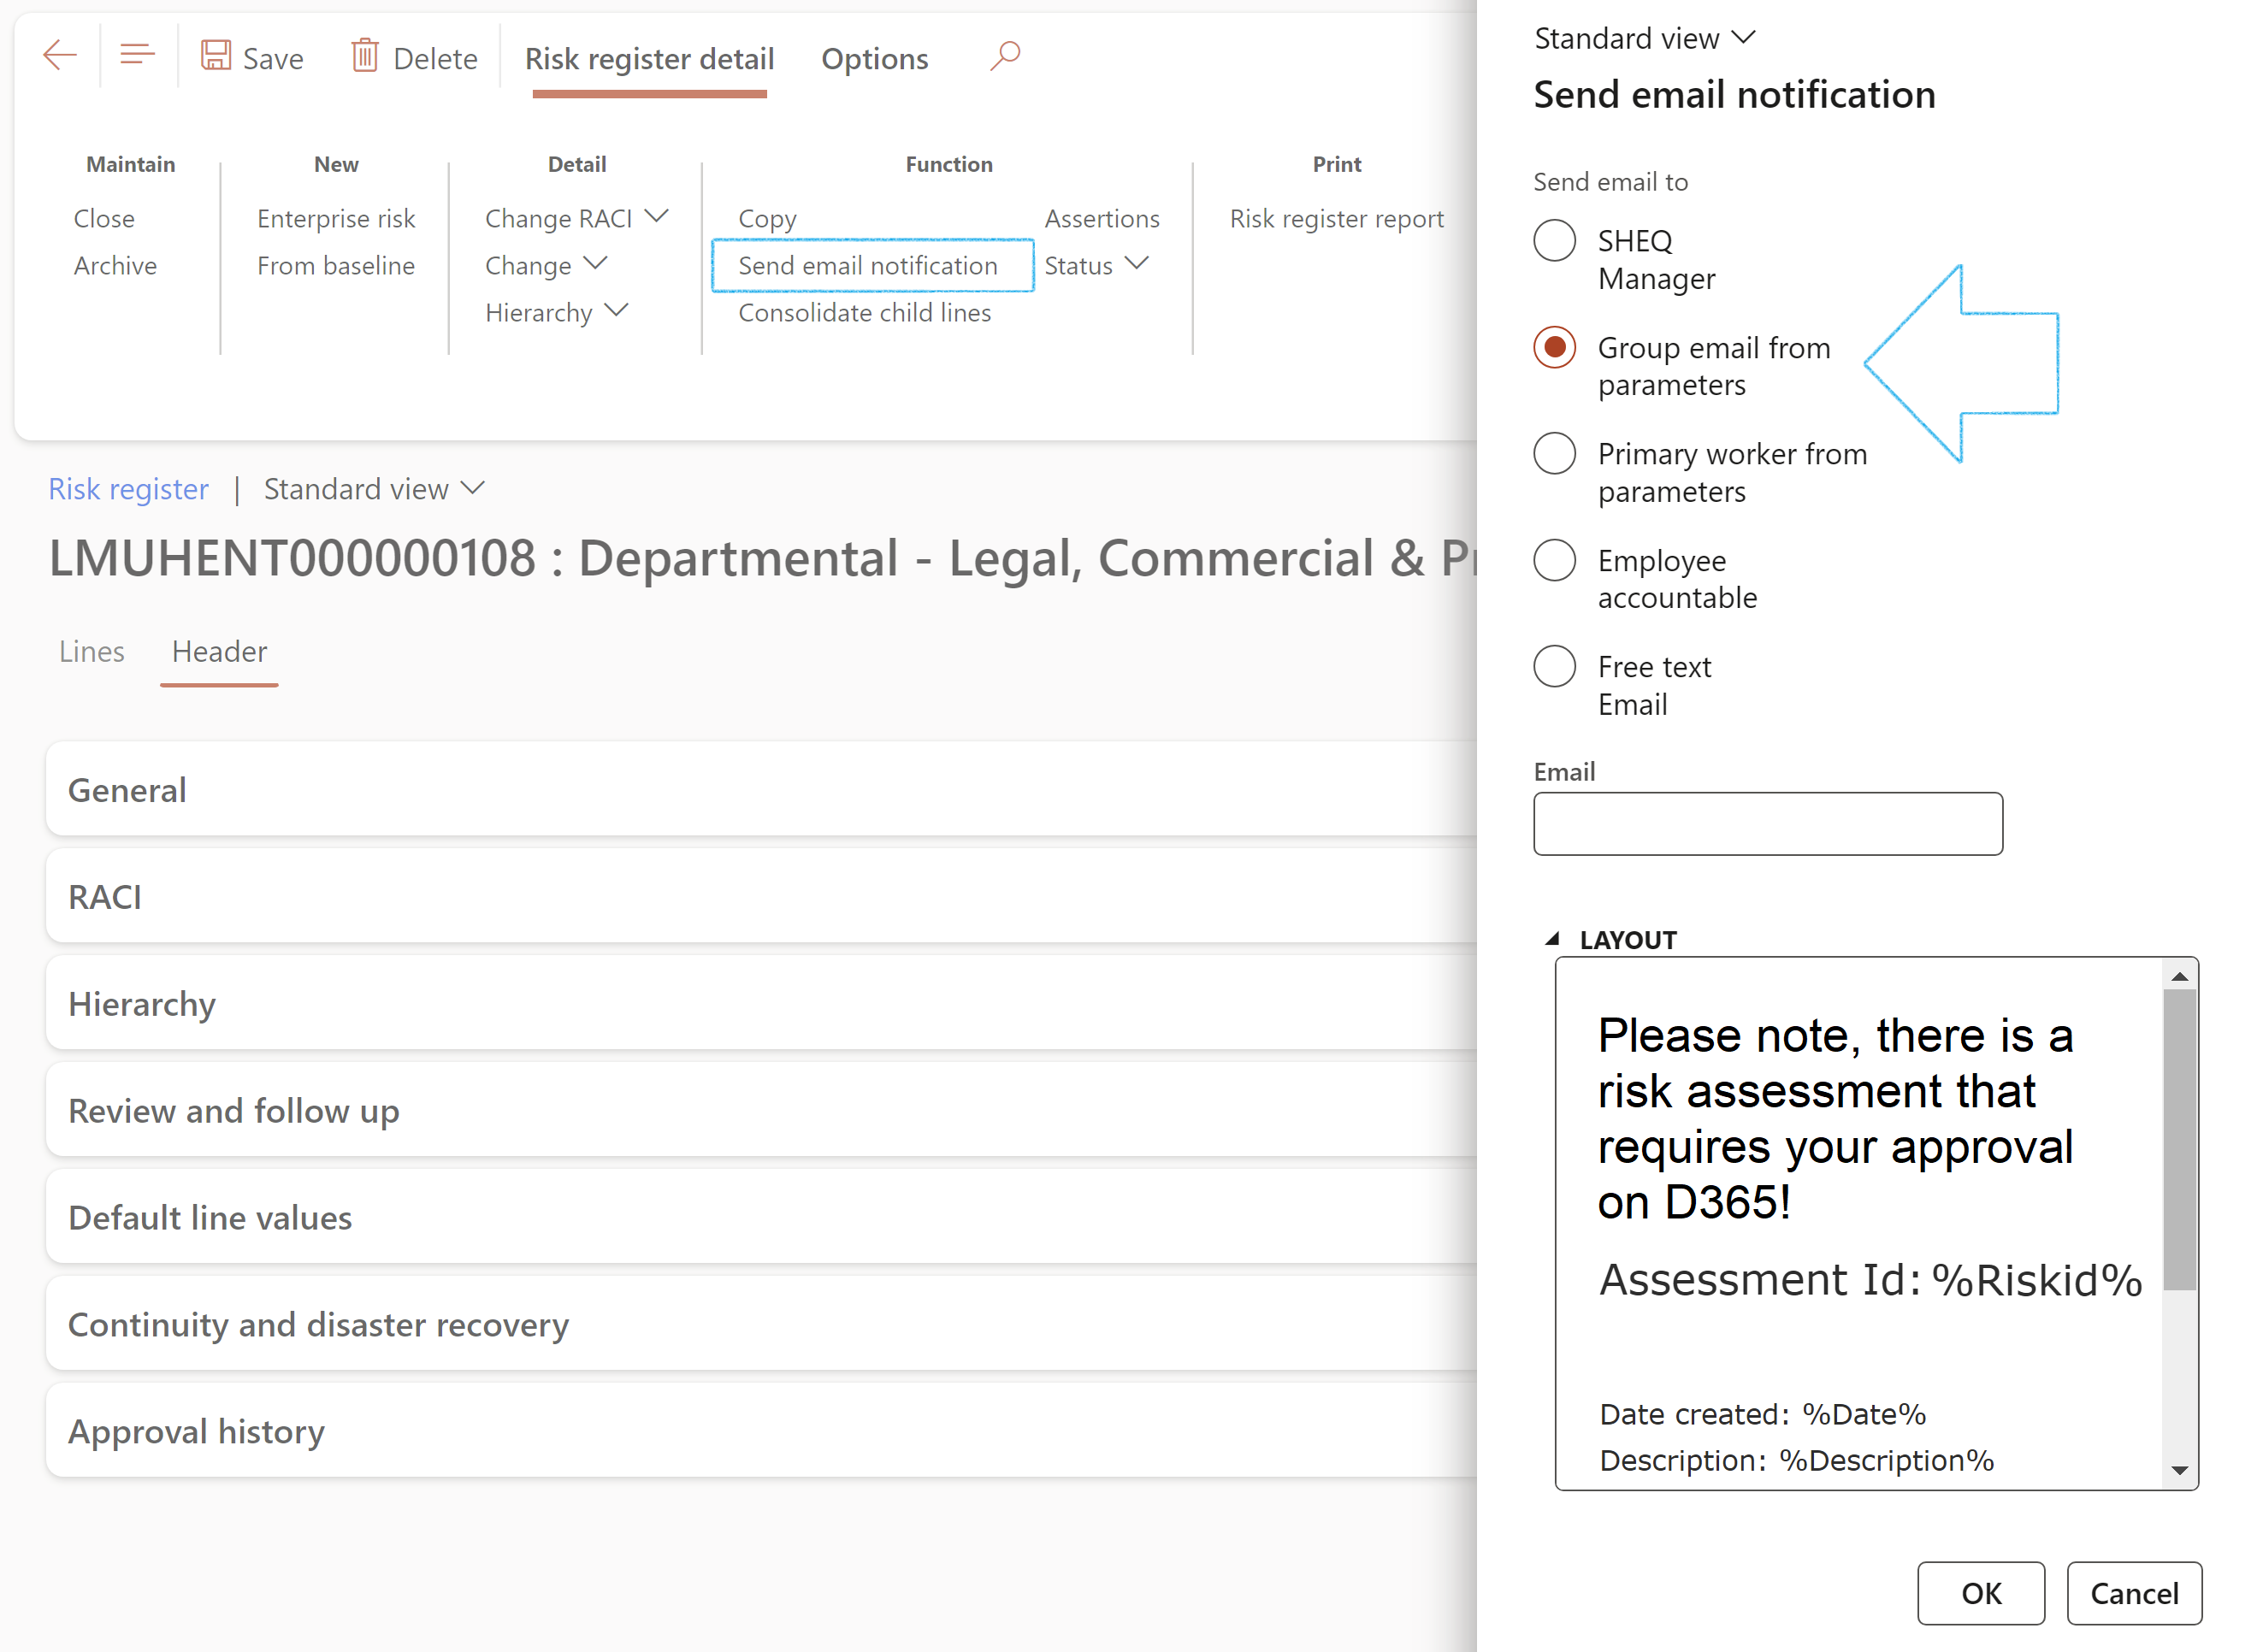
The Send email notification button is on the Risk register list page as well as the Risk register detail form
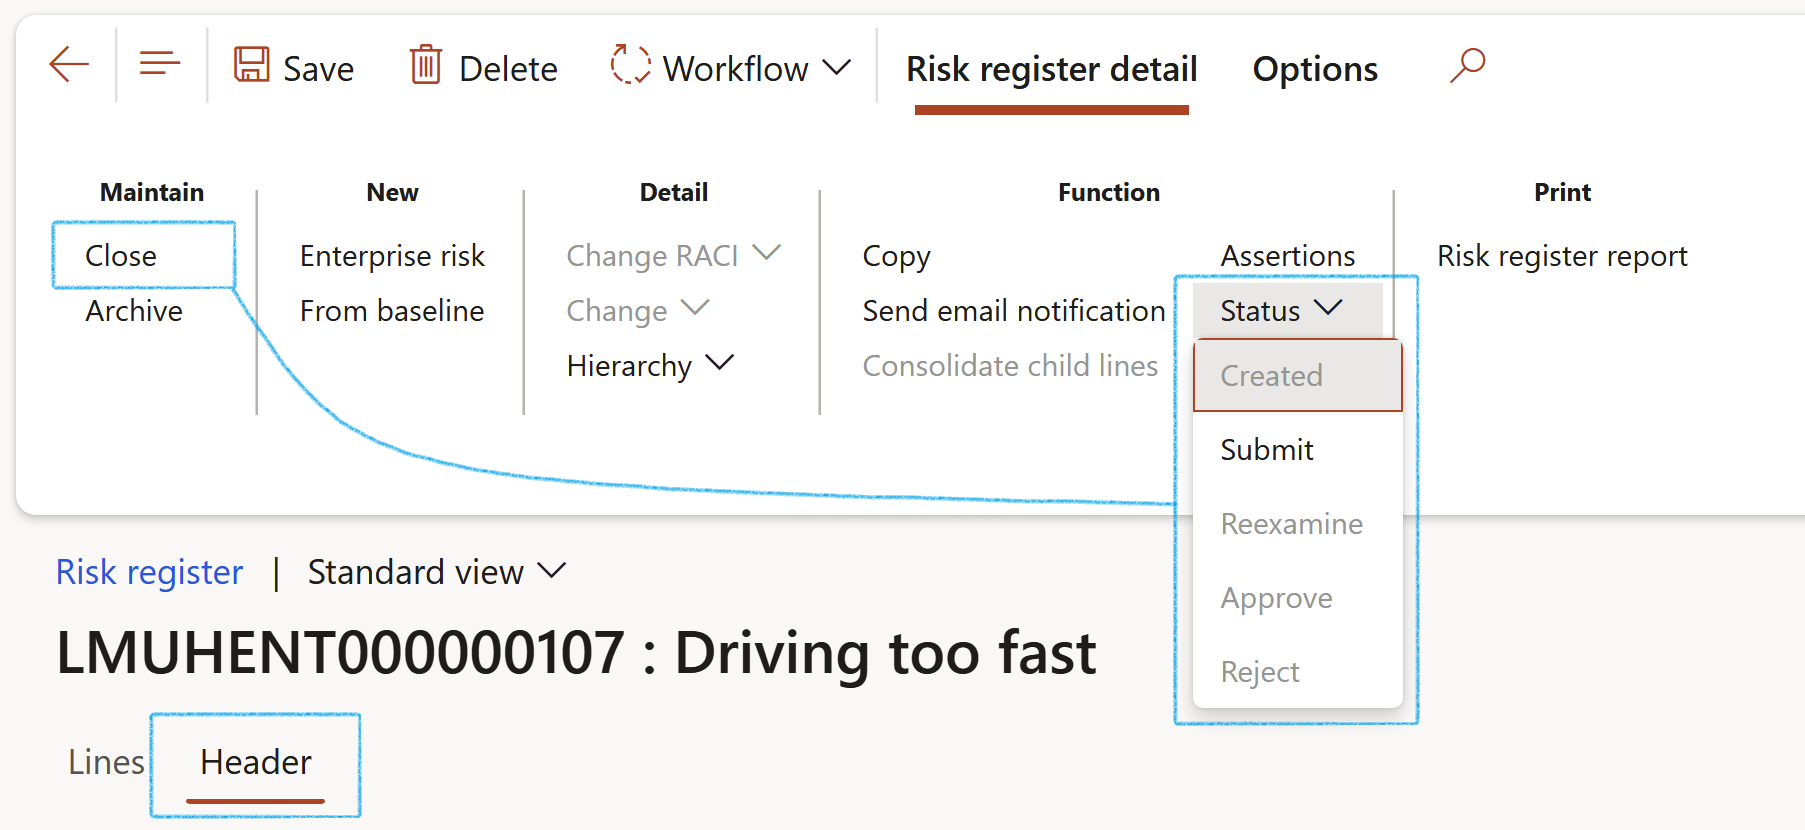
- Status – Update the status of the risk register by selecting the relevant status from the dropdown list when clicking on the Status button
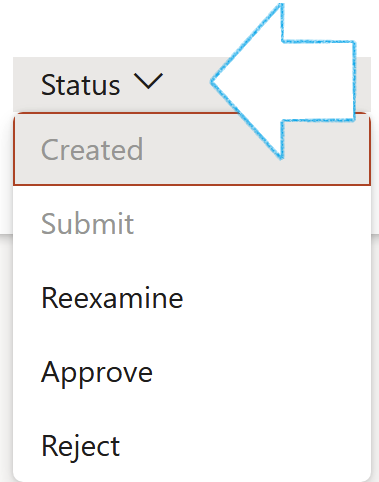
Status:
- Created - The user can submit the risk register
- Submitted - The user can Reexamine, Approve or Reject the risk register
- Re-examine - The user can Approve or Reject the risk register
- Approved - No changes can be made to the status
- Rejected - No changes can be made to the status
- Changed - The user can Reexamine, Approve or Reject the risk register
- Print the Risk register report
- Print the Risk register detail report
- List children: Shows the records (risks) that belong to the current/selected header record family
- Refresh: To update the form and display any latest changes/updates made in previous steps
- Export to Microsoft Excel:
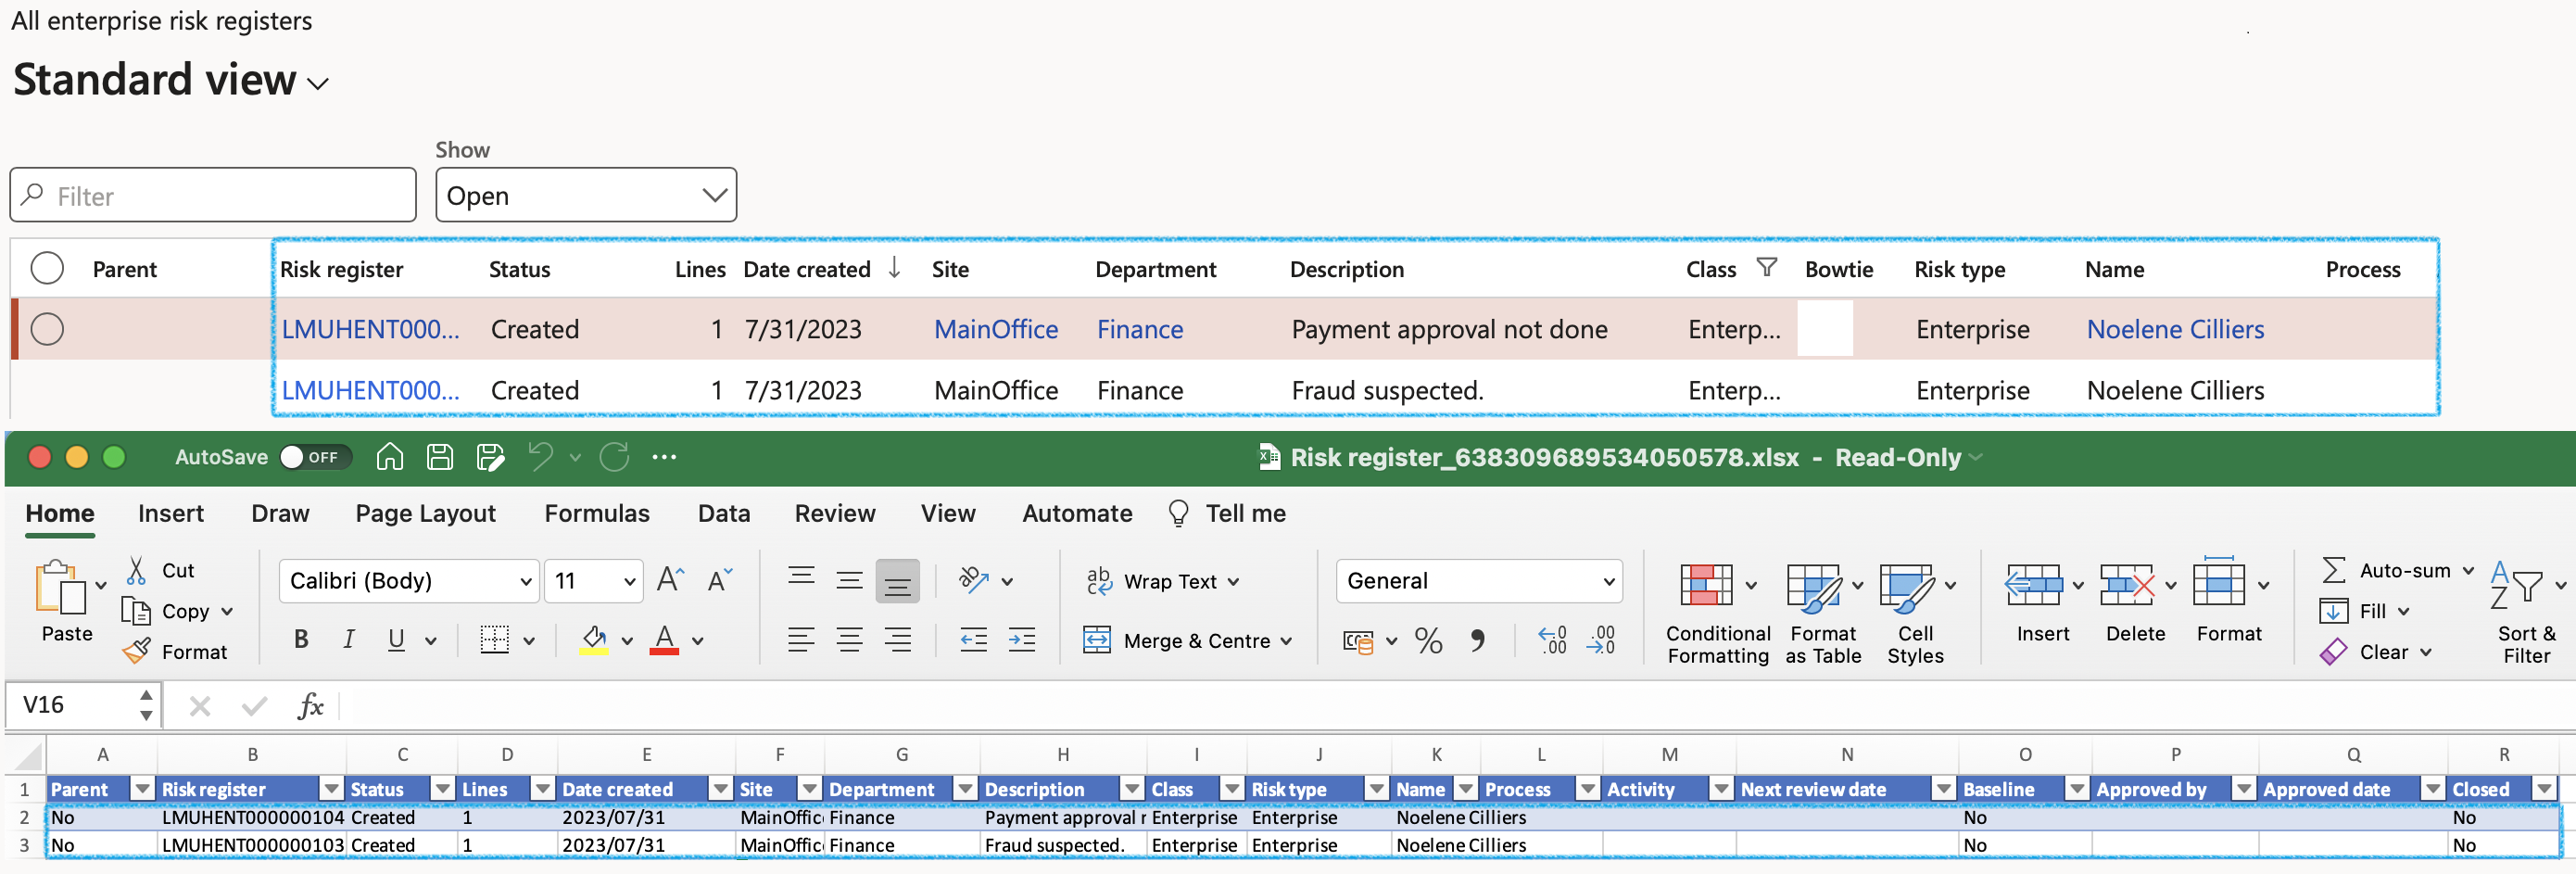
- Attachments (document handling): this functionality displays and carries relevant documents, notes and files which can be attached to the selected Risk register
¶ Step 18: Risk register (Header view)
¶ Step 18.1: Buttons on the Risk register detail form

When a Parent risk register is closed, all its Child risk registers will be closed as well
- Close: Closes the risk register
- Archive: An existing risk register can be archived
- Enterprise risk: Perform a risk assessment
- From baseline: Create a new risk assessment by using a baseline risk register
- Change RACI: Brings up a dialog where the user can define/change the Responsibility matrix
- Change: Brings up a dialog where the user can update the selected risk register
- Hierarchy: Brings up a dialog where the user can do the Hierarchy setup
- Copy: Make a copy of the selected risk register and attached risks (incl. detail)
- Send email notification: Send an email notification to the selected worker on the parameters
- Consolidate child lines: Opens a dialog where the user can specify the Parameters for the consolidation
- Assertions: Opens a dialog where the user can indicate the relevant Financial statement assertions
- Financial statement assertions are claims made by an organization’s management regarding its financial statements. The assertions form a theoretical basis from which external auditors develop a set of audit procedures.
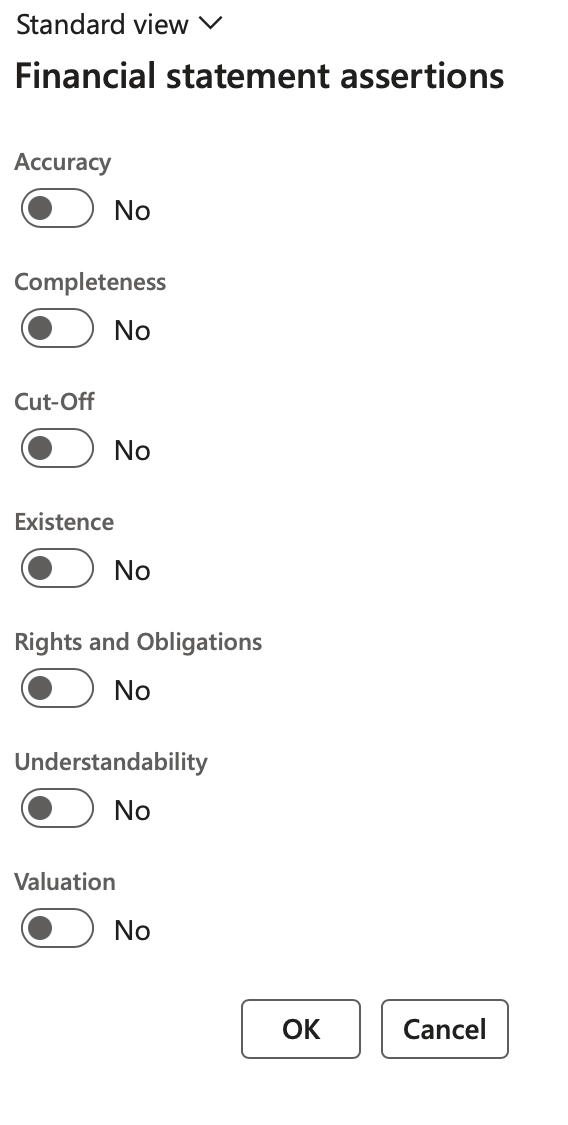
- Status: Change the status of the risk register Header
- Reset line statuses: Reset the line statuses of all associated risk lines in this risk register, in mass, back to Draft
- Approve all lines: Approve all lines that are in Draft status
- Reviews: List of all planned Governance, Risk and Compliance related actions
- Close review: Opens a dialog where the user can enter review notes
- Print the Risk register detail report
- Create risk report: Using the selected baseline/template this will create a risk management report with applicable clauses
Open the Header view
- The General Fast tab:
- The Baseline selection slider indicates whether this Risk register is a baseline type Risk register
- Risk register ID – a unique number assigned to the Risk register
- Description displays a brief description of the Risk register
- Select the relevant Process from the dropdown list
- Select the relevant Activity from the dropdown list
- Select the relevant Site from the dropdown list
- Select the relevant Department from the dropdown list
- In the Class field, select the risk classification from the dropdown list
- Select the relevant Risk type from the dropdown list
- Select the relevant Project from the dropdown list (If required)
- In the Recorded by field, select the worker who created the Risk register
- Select the date on which the risk register was Created
When the Date created is changed, a message will pop up asking the user if the lines need to be updated with the same date or not
The default Date created is the system date when the Risk register is created
- Move the Review slider to Yes to flag end enable review and follow up
- The Status field indicates the Risk register status – all the risk lines need to conform to this status in order to contribute to the status on the Header
- The Closed selection slider indicates whether the Risk register is closed. The user can also close the Risk register from here.
- The Closed date displays the date on which the risk register was closed

- The Responsibility matrix Fast tab:
- Select the Employee responsible from the dropdown list
- Select the Employee accountable from the dropdown list
- Select the Employee consulted from the dropdown list
- Select the Employee informed from the dropdown list

The Job and Department are those of the selected worker
- The Hierarchy Fast tab:
- Move the Parent slider to Yes if this is a parent risk register
- If this register has a Parent risk register, select the relevant Parent from the dropdown list
- Move the Use for consolidation slider to Yes if you want to use the Risk register for consolidation
- Enter Consolidation notes in the note box provided
- If this risk register was created from a baseline register, the risk register ID will be displayed in the Baseline used field

When Use for consolidation = Yes:
- The Parent slider will be moved to Yes
- On the Risk register lines, the following buttons will be disabled:
- Add
- Remove
- Bowtie focus
- On the Risk register Action pane, the Consolidate child lines button will be enabled
- The Review and follow up Fast tab:
- Move the Enable for review slider to Yes
- Select the relevant Review frequency from the dropdown list
- Enter additional notes in the Review instruction note box provided
- In the Due days field, enter the number of days before the review action is due to be completed
- In the To be reviewed by field, select the name of the person who is going to review the Risk line
- Click on the Yes button on the pop-up to create a Planned GRC action
A blue line will appear confirming that a Planned action has been created for the follow up.
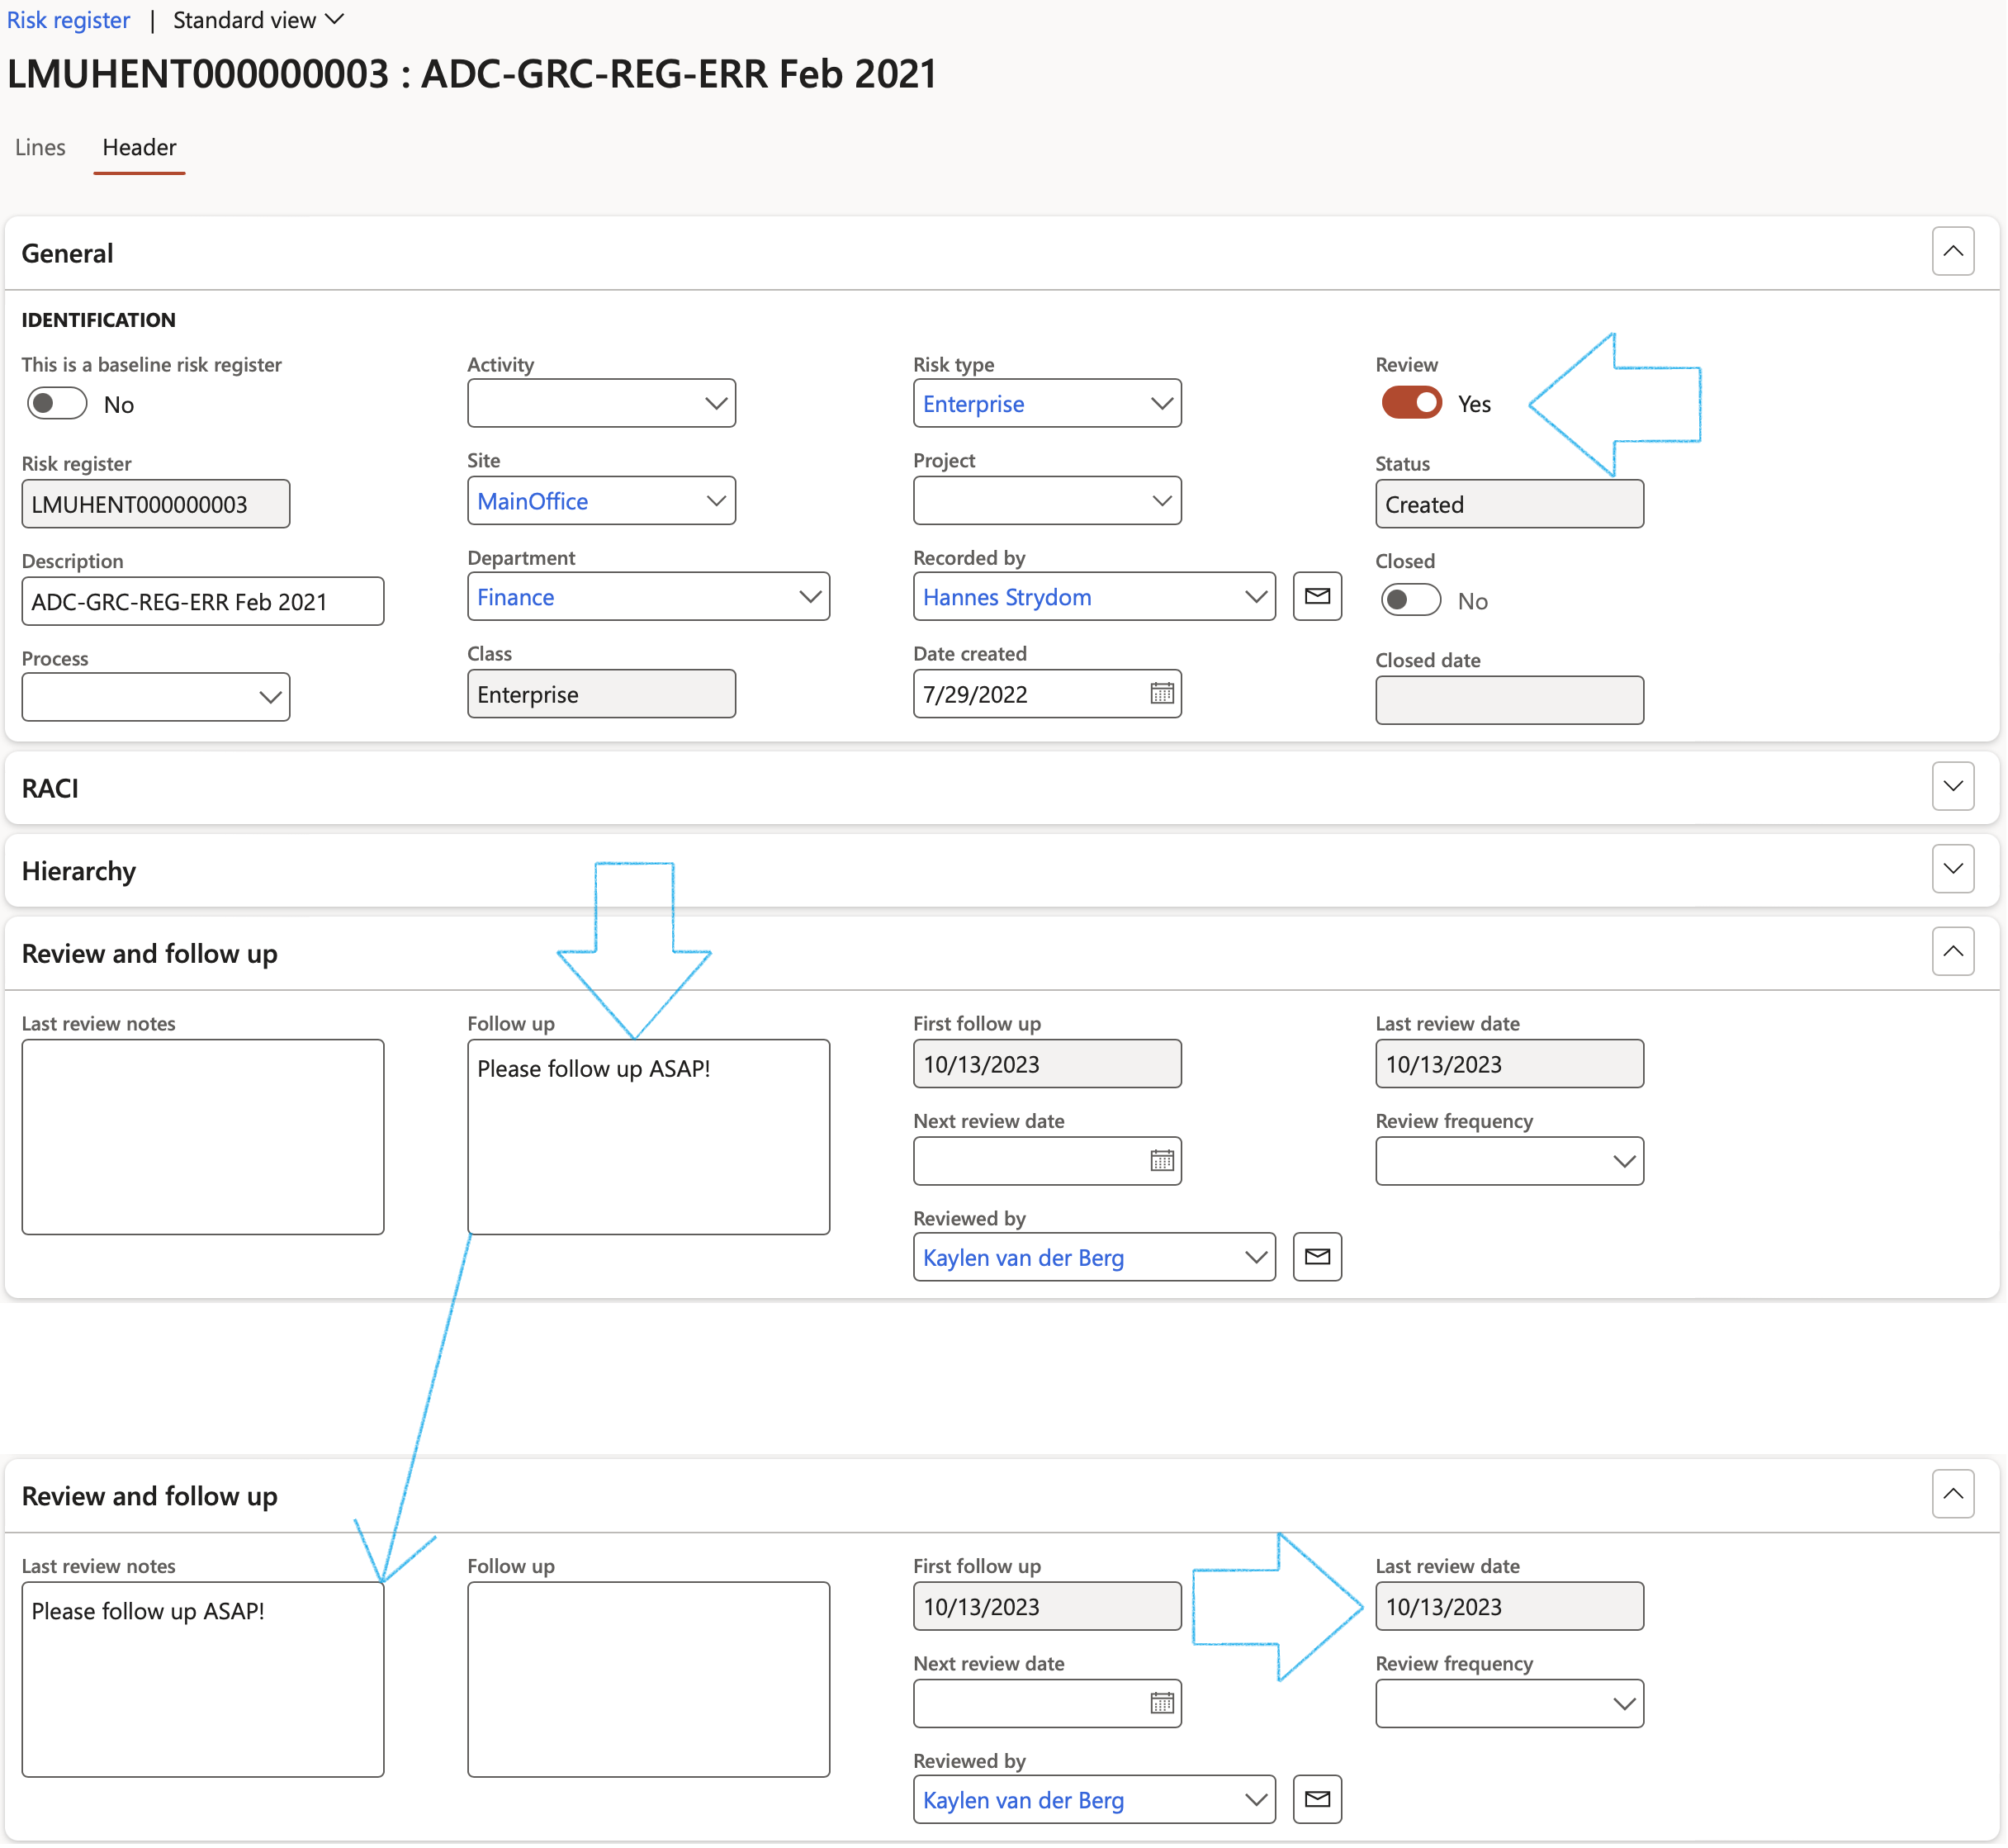
From here users can click on the Reviews button in the Action pane to see all open reviews. Alternatively users can close a review directly from the Risk register by clicking on the Close review button.
- The Default line values Fast tab:
- Select whether the Site and/or Department from the Header should be used on the Lines
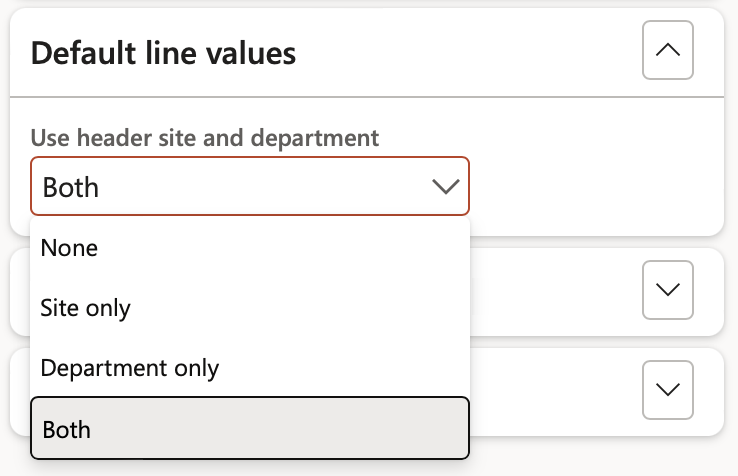
Use header site and department dropdown selection:
- None – When neither site nor department from the header should be used on the lines
- Site only – Only the site from the header should be used on the lines
- Department only - Only the department from the header should be used on the lines
- Both – Both site and department from the header should be used on the lines
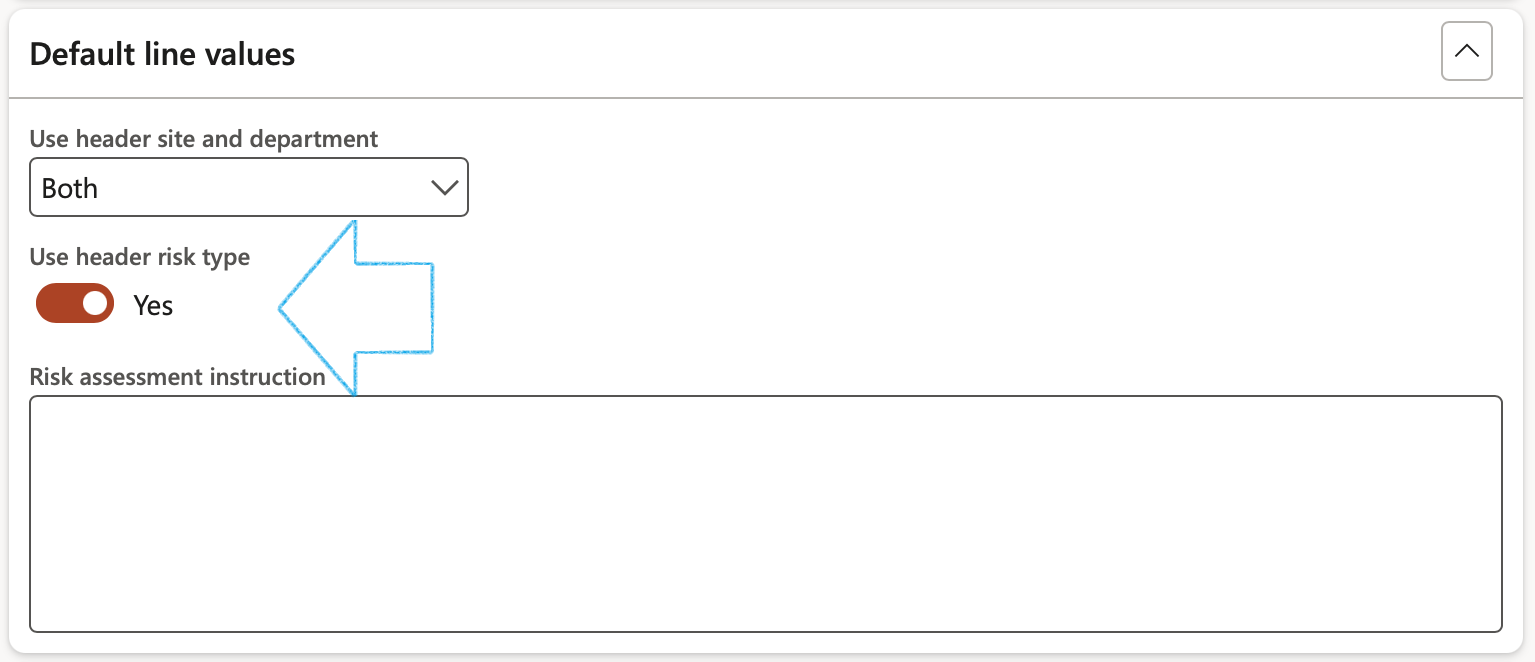
- The user also has the option to use the Risk type selected on the Header under the General Fast tab, as the default for Risk lines (assessments)
- Enter a Risk assessment instruction in the note box provided
- The Continuity and disaster recovery Fast tab:
- In the Button strip, click on the Add button
- Select the relevant Date
- Select the relevant BC/DR ID (Continuity and disaster recovery plan ID) from the dropdown list

The values for the other fields are populated with the values entered on the selected Continuity and disaster recovery plan
For details on the setup for Disaster recovery, please refer to the Wiki page on Business Continuity Management
- The Approval history Fast tab:
- User ID – Name of the user who changed the status of the risk register
- Date time stamp – When the Status was changed
- Reason code – The user can enter the reason for changing the status of the risk register
- Status – The updated/new status of the risk register

¶ Step 19: Lines view (General Fast tab)
Filters:
- Tick the box next to the risk color that you want to filter on
OR
- In the Top field, enter the number of top risks that you want to see (Filtered on the Residual risk %)

¶ Step 19.1: General Fast tab
¶ Step 19.1.1: Identification Index tab
- Creation date: Date that risk was reported on (the default is the system date on which the risk line was added)
- Risk type: Select the Risk type from the dropdown list
- Site: Select the site where the risk is
- Organisation hierarchy: Select the relevant hierarhy from the dropdown list
- Department: Select the relevant department (Only the departments in the selected Organisation hierarchy will be on the dropdown list)
- Default target risk: The target risk percentage
- Line status: Identifier of the risk life cycle
- Select the relevant Risk category from the dropdown list
- Select the relevant Risk sub-category from the dropdown list
- Compliance obligation: Select the relevant Compliance obligation placed on the enterprise, based on the Legal register
- Select the relevant Monitoring schedule from the dropdown list (if applicable)
- Select the relevant ISO standard from the dropdown list (if applicable)
- Description: Enter a detailed description of the risk
- Risk owner: Indicate the owner of the risk (Employee/department)
- Priority: Select the risk Priority from the dropdown list
- Top: Refers to the most significant threats to an organisation’s objectives
- Quantifiable: Risk where there is a measurable impact, often in terms of financial loss or other tangible outcomes
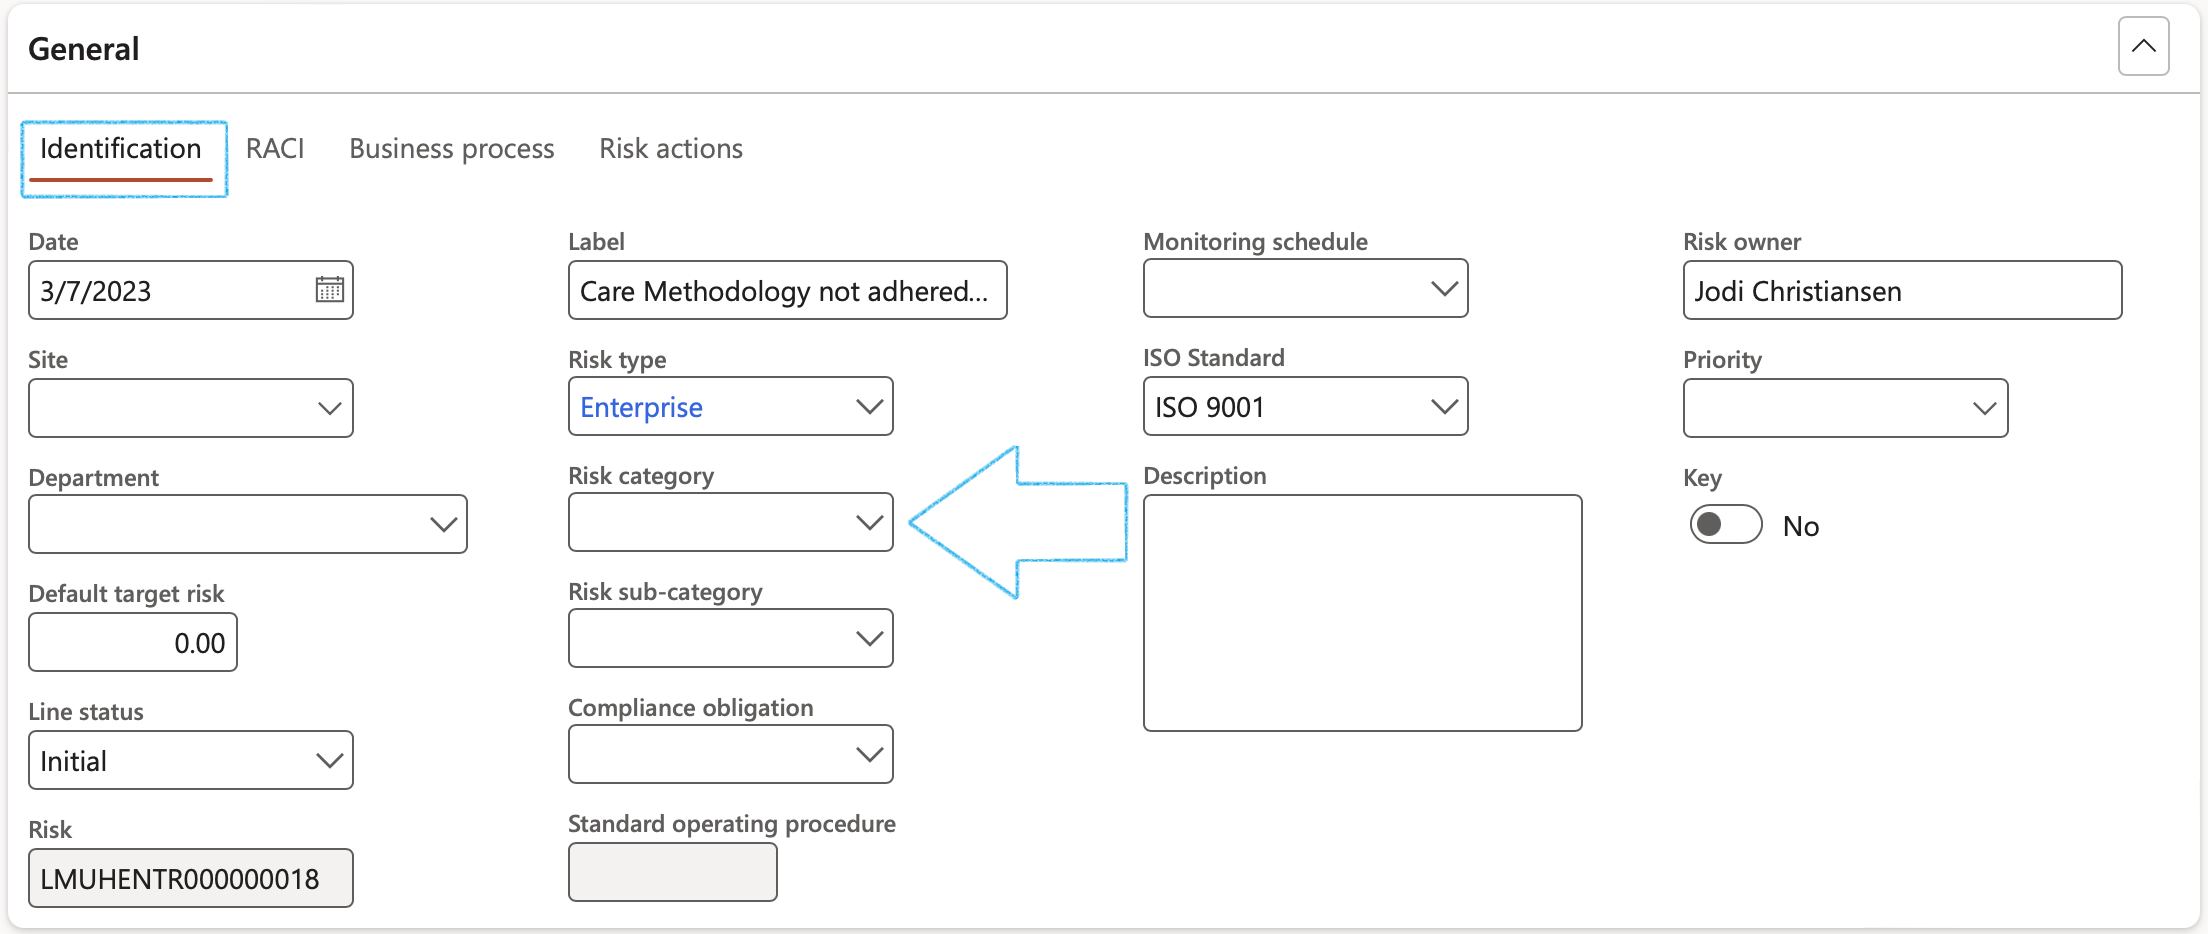
If a "Master" risk (Step 14 above) is selected in the left-hand side, the default values will be populated under the General Fast tab under the Identification Index tab
The Organisation hierarchy can be viewed by clicking on the View organisation hierarchy button in the button strip
¶ Step 19.1.2: RACI Index tab
Enter the RACI for each Risk line
- Select the Employee responsible from the dropdown list
- Select the Employee accountable from the dropdown list
- Select the Employee consulted from the dropdown list
- Select the Employee informed from the dropdown list

The Job and Department are those of the selected worker
- To send an email to the selected worker, click on the email icon next to the relevant workers’ name
- On the Send email dialog, enter a Subject and the Body of the email and click on the Send button
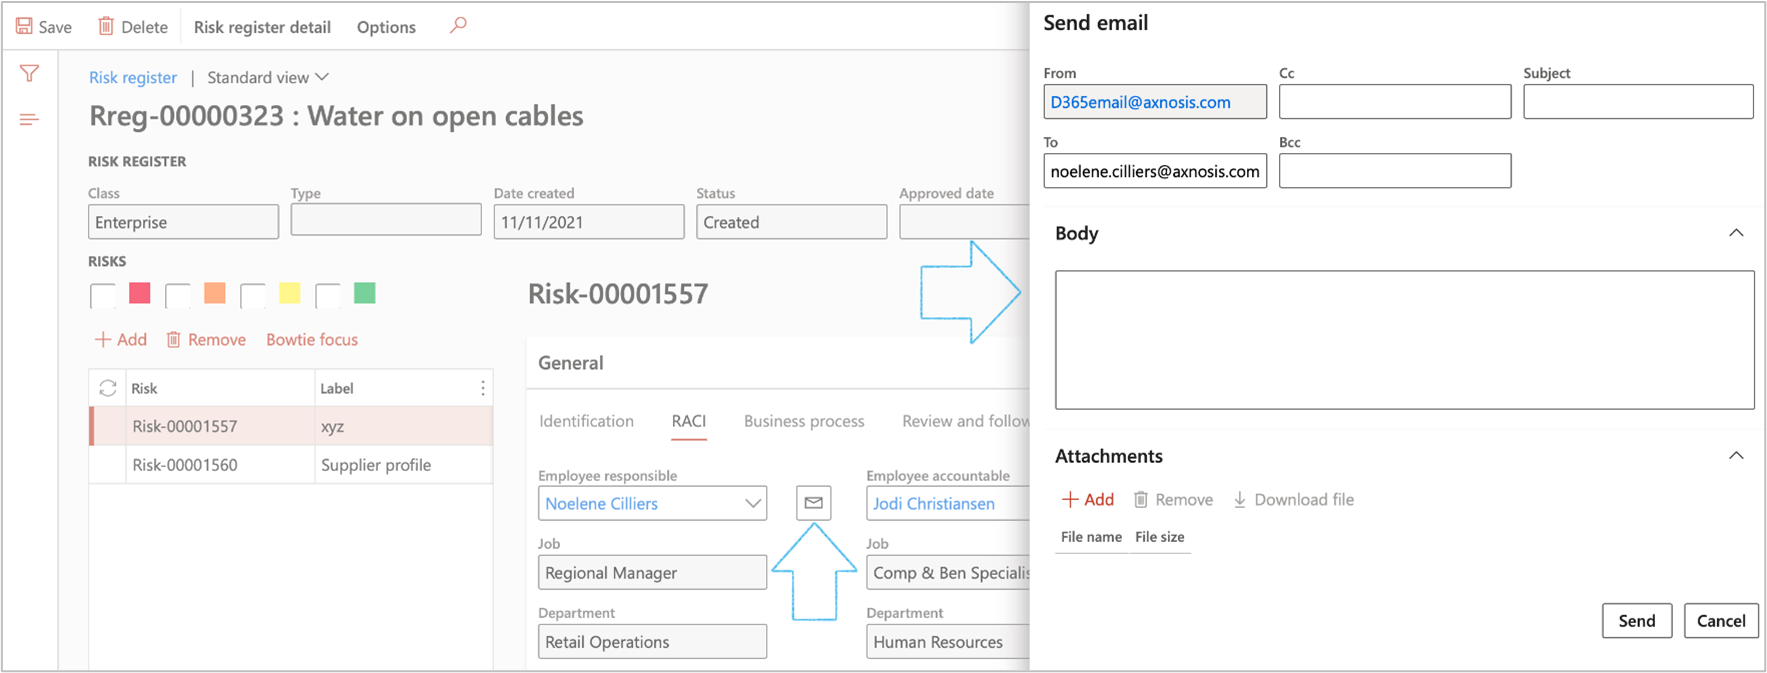
An email can only be sent to the selected worker if they have a Primary email address (selected on the Worker record)
¶ Step 19.1.3: Business process Index tab
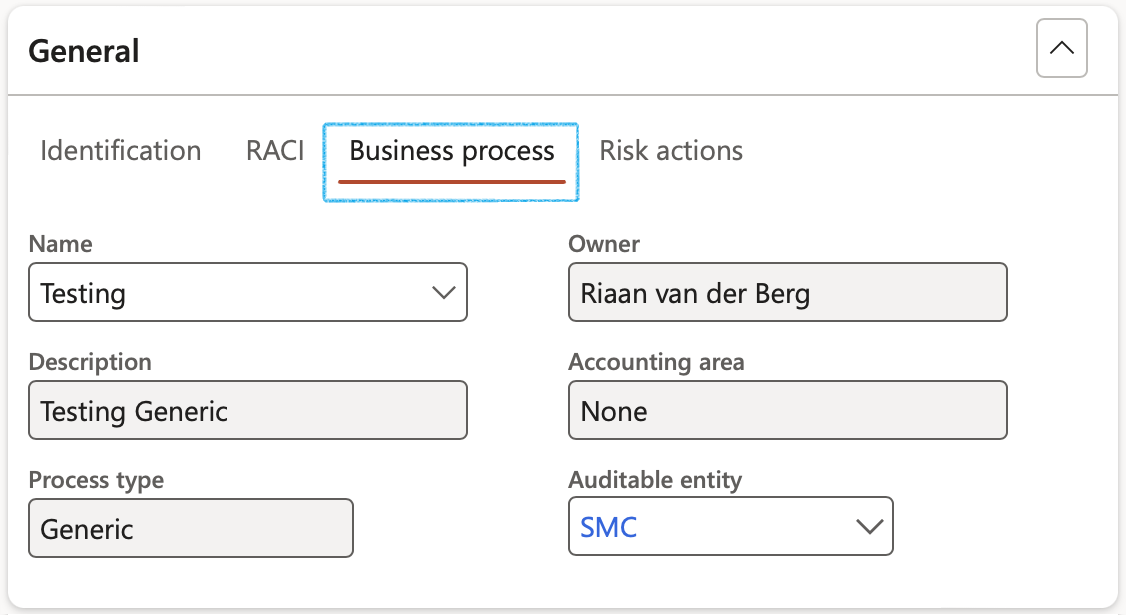
Enter the Business process for each Risk line
- Select the relevant Business process Name from the dropdown list
- Select the relevant Auditable entity from the dropdown list
¶ Step 19.1.4: Risk actions Index tab
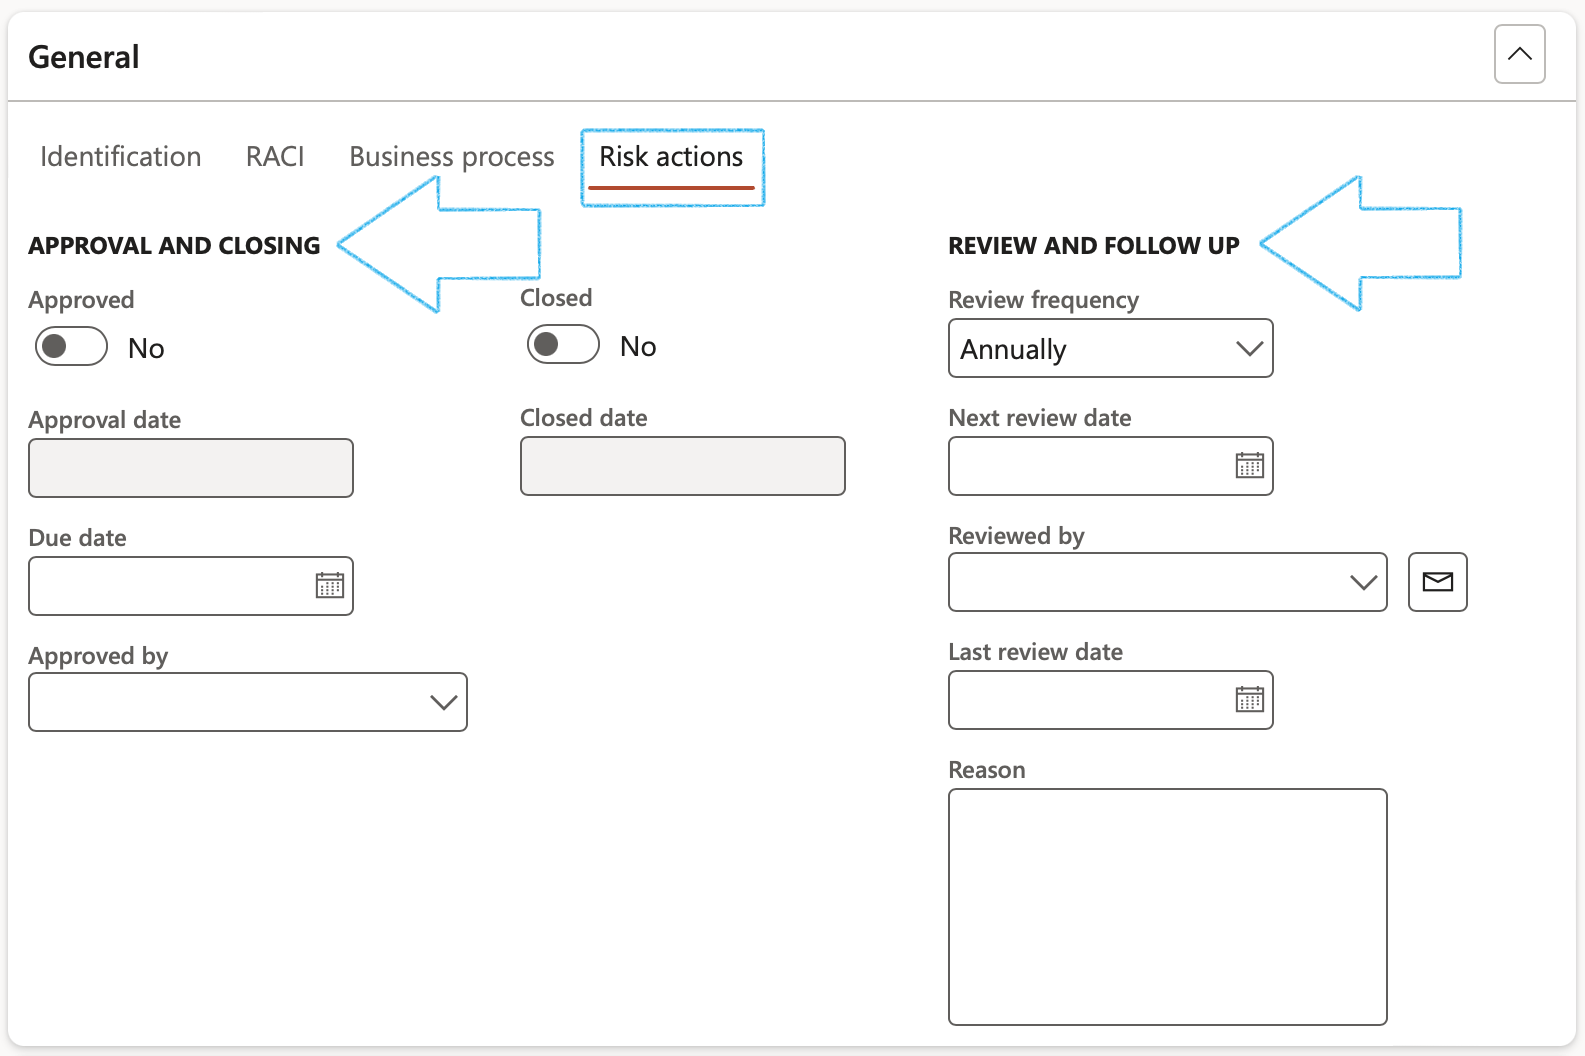
Under the APPROVAL Field group:
- Once the Approved slider is moved to Yes, the Approval date will be populated with today’s date
The user has the option to approve the Header as well by clicking Yes on the pop-up
- Enter the Due date for the approval and closing of the risk line
- When the Closed slider is moved to Yes, the selected risk line is closed and marked as Completed
- Closed date is the date when the risk was closed
Under the REVIEW AND FOLLOW UP Field group:
- Move the Enable for review slider to Yes
- Select the relevant Review frequency from the dropdown list
- Enter additional notes in the Review instruction note box provided
- In the Due days field, enter the number of days before the review action is due to be completed
- In the To be reviewed by field, select the name of the person who is going to review the Risk line
- Click on the Yes button on the pop-up to create a Planned GRC action
A blue line will appear confirming that a Planned action has been created for the follow up.
Under the CLOSING Field group:
- Once the Closed slider is moved to Yes, the Closed date will be populated with today’s date
- The Closed by field will be populated with the name of the logged-in user that moved the Closed slider to Yes
- When the Closed slider is moved to Yes, the selected risk line is closed and marked as Completed
Review actions can only be created for approved risk lines
¶ Step 19.1.4a: Planned actions
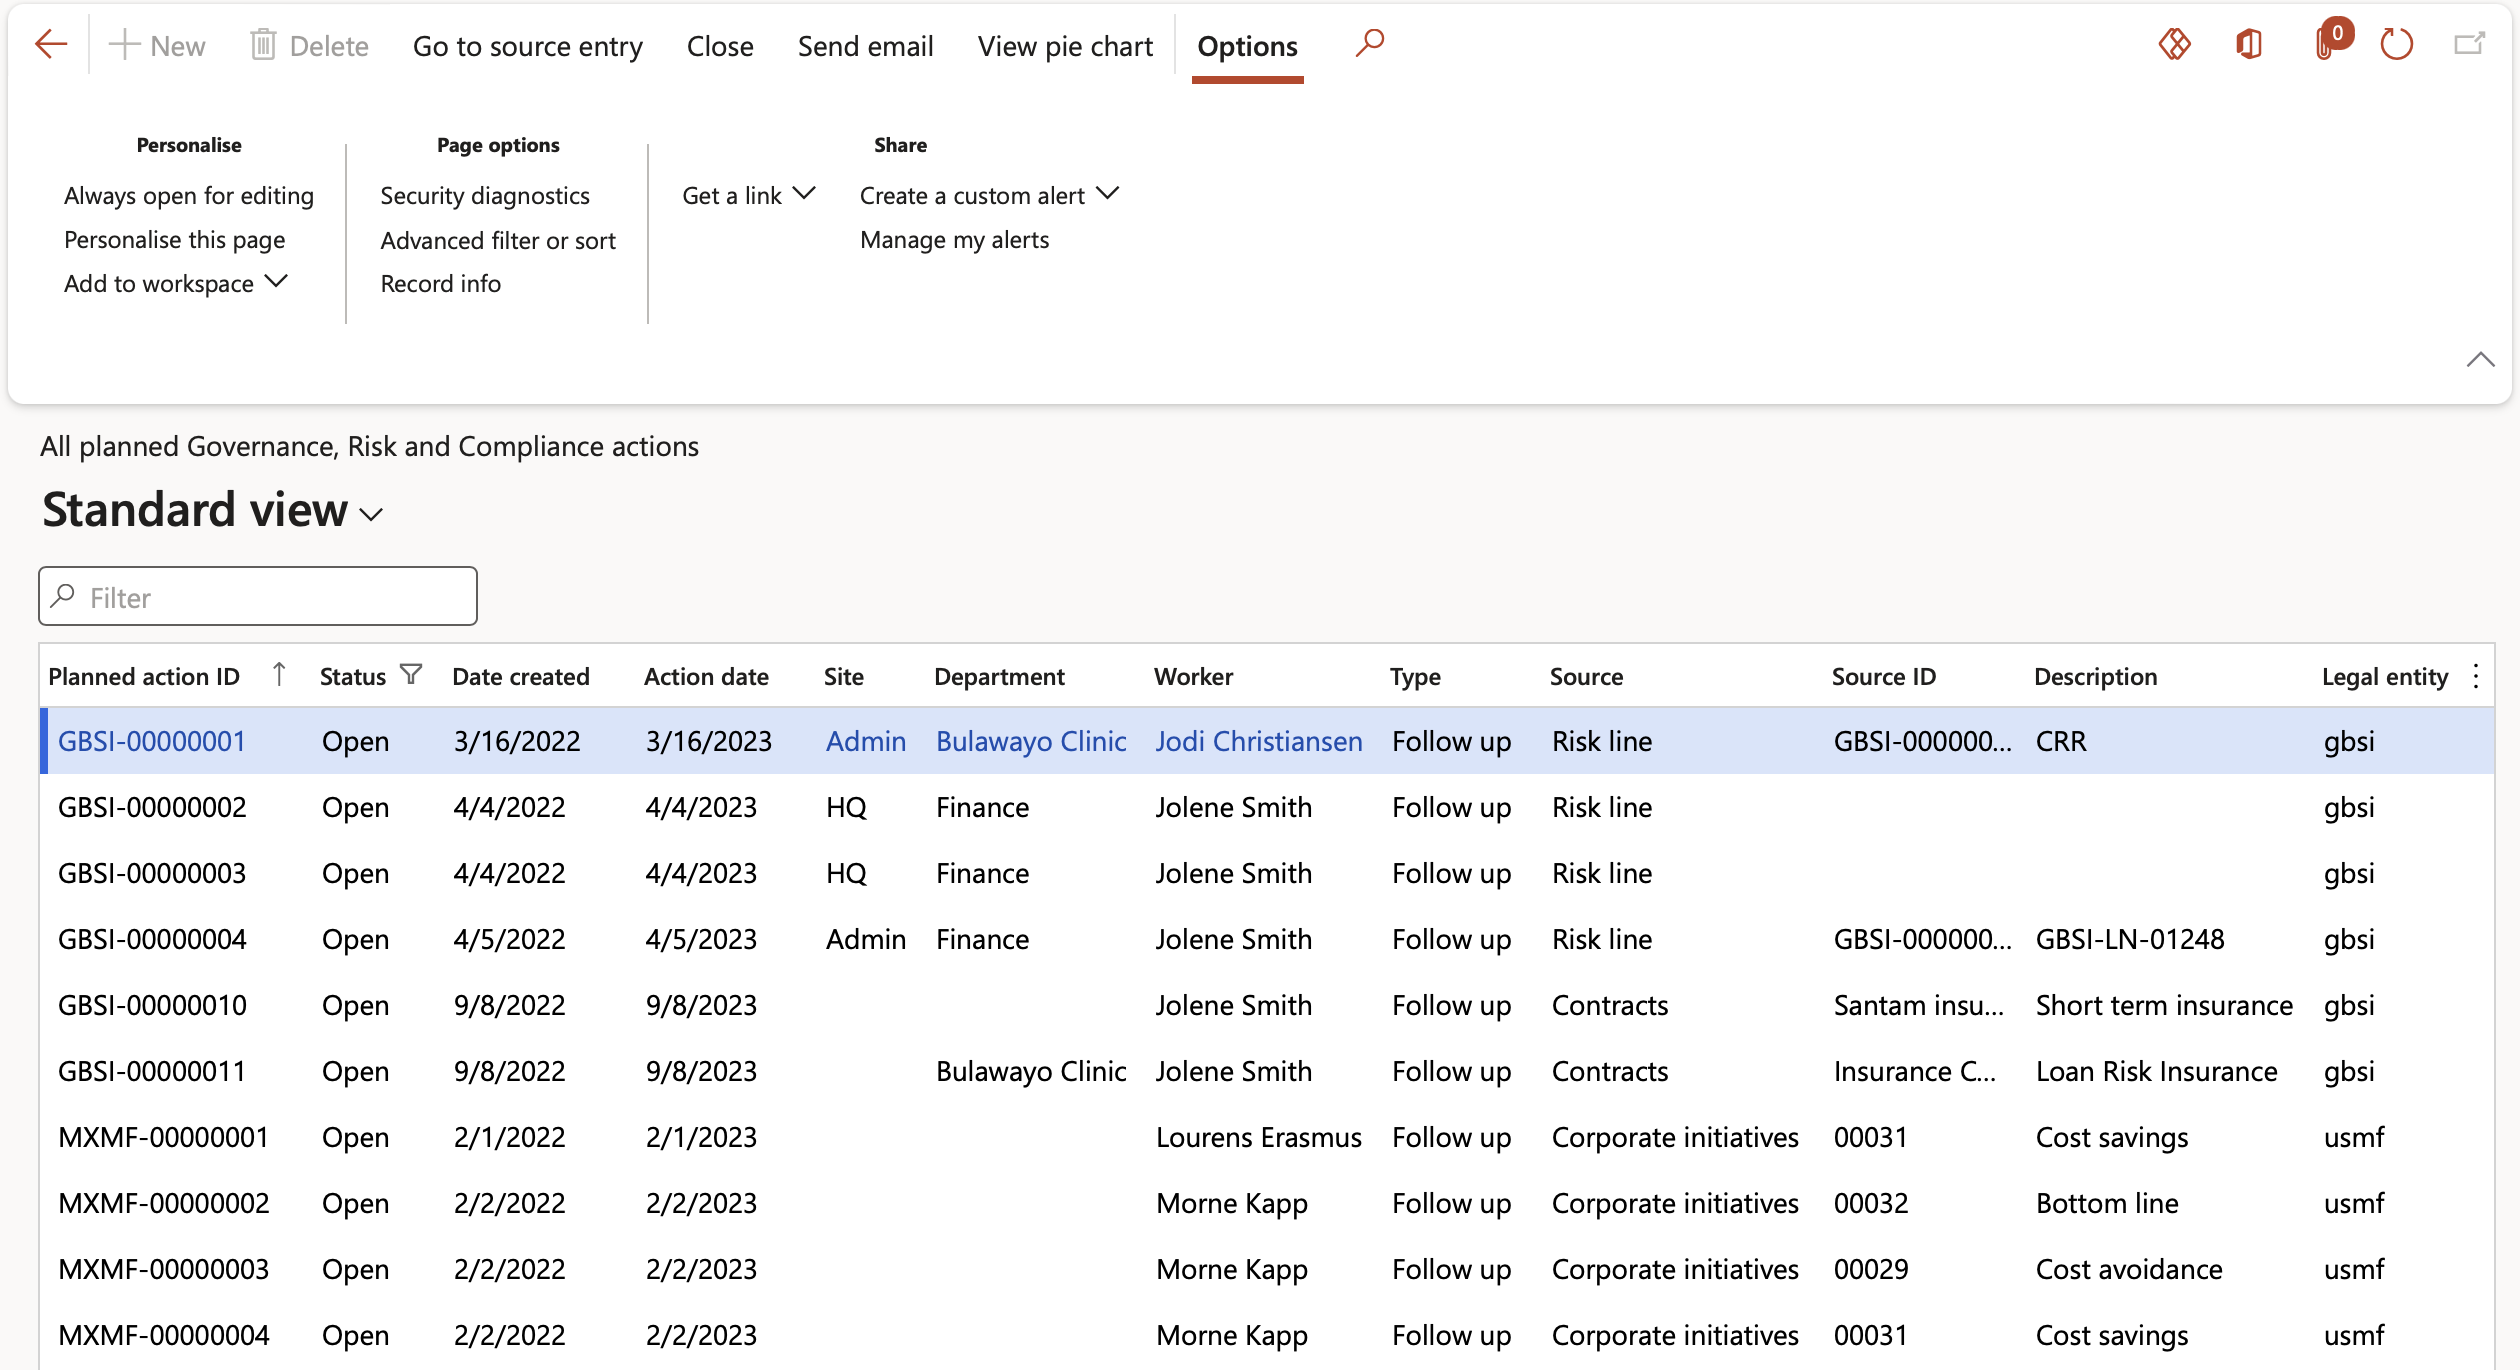
Go to: GRC > All planned Governance, Risk and Compliance actions
- Buttons on the All planned GRC actions list page:
- Go to source entry – Opens the form from which the follow up action was created
- Close – Closes the action and removes the record from the list
- Send email notification – Sends an email notification to the selected worker in the Reviewed by field
- View pie chart – Displays a pie chart of all the planned GRC actions

¶ Step 19.1.5: Do a risk assessment from the lines view
- On the left-hand side of the form, click on the Add button
- Enter a Label for the new risk
- Under the General Fast tab, click on the Do risk assessment button
- On the Initial risk assessment dialog:
- Select the relevant Inherent likelihood from the dropdown list
- Select the relevant Inherent rating from the dropdown list
- Click on the Create button
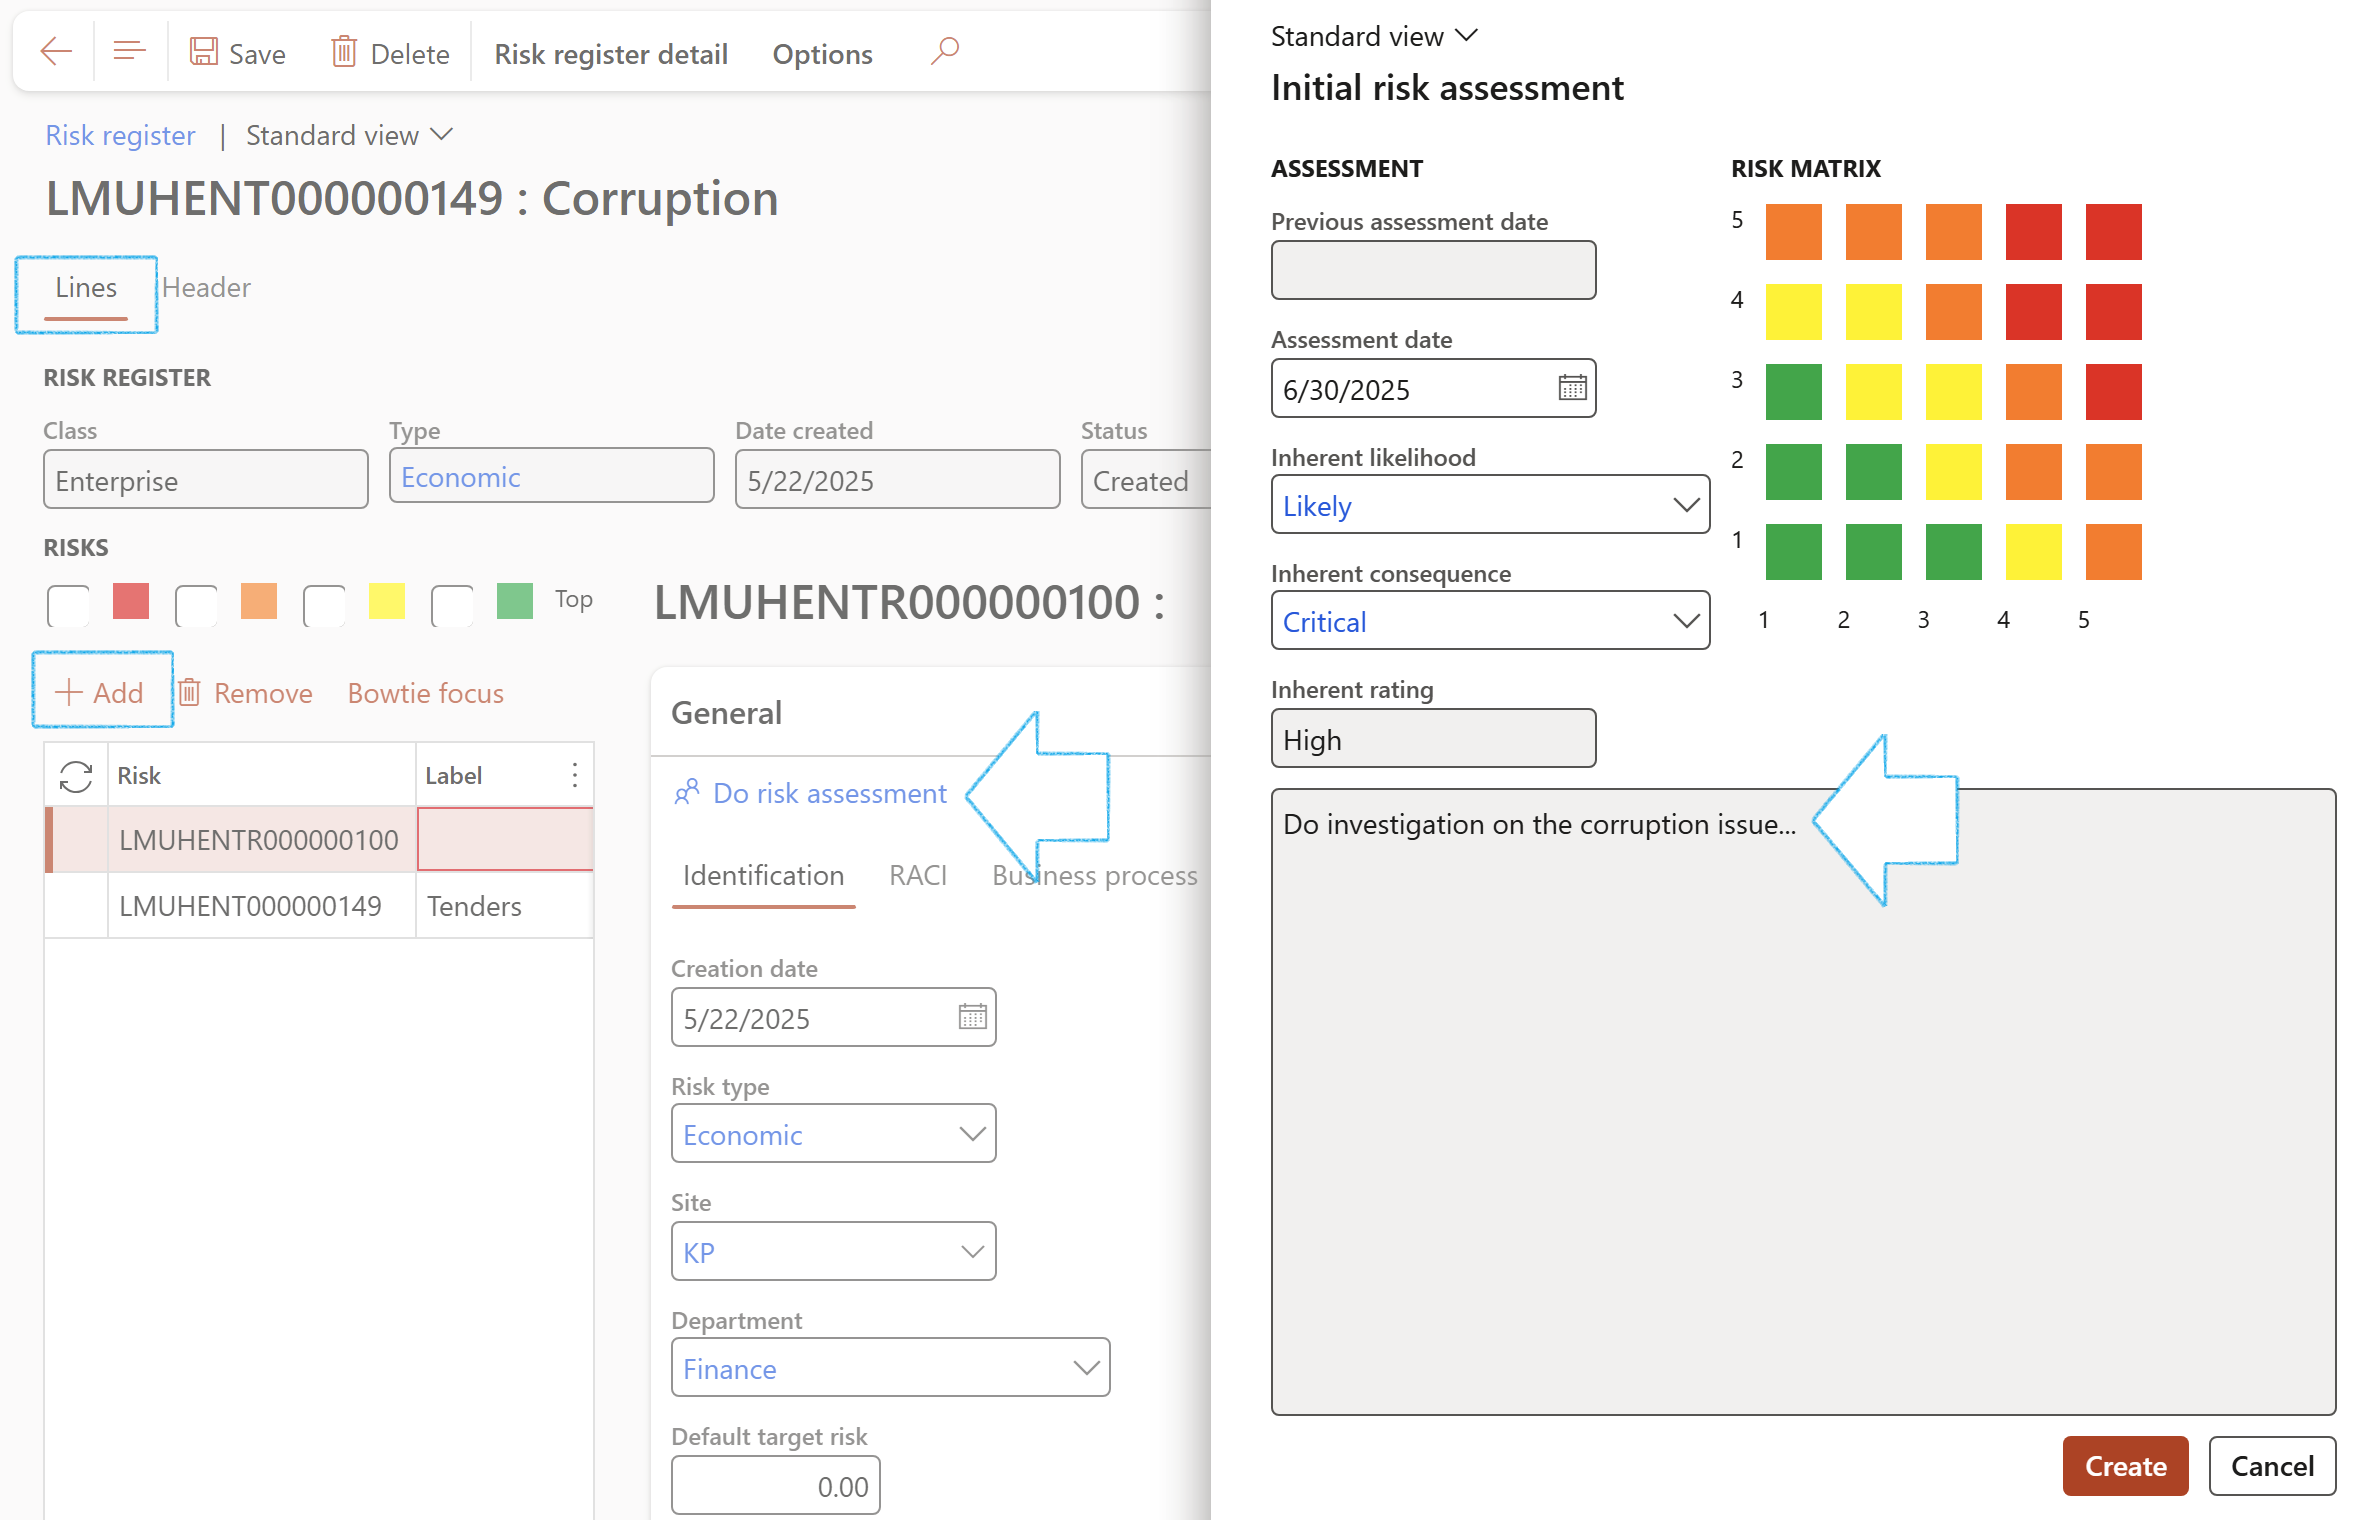
The text in the note box (Risk assessment instruction) is entered on the Risk register header under the Default line values Fast tab
¶ Step 19.1.6: Add a mitigating control
A mitigating control can be added to the risk assessment, form the General Fast tab
- Under the General Fast tab, click on the Add mitigation control button
- On the Add mitigating control dialog:
- Select the relevant risk assessment line in the RISK ASSESSMENT SUMMARY grid (if there is more than one)
- Select the relevant values under the CONTROLS FOR THE SELECTED LINE ABOVE Field group
- Click on the OK button
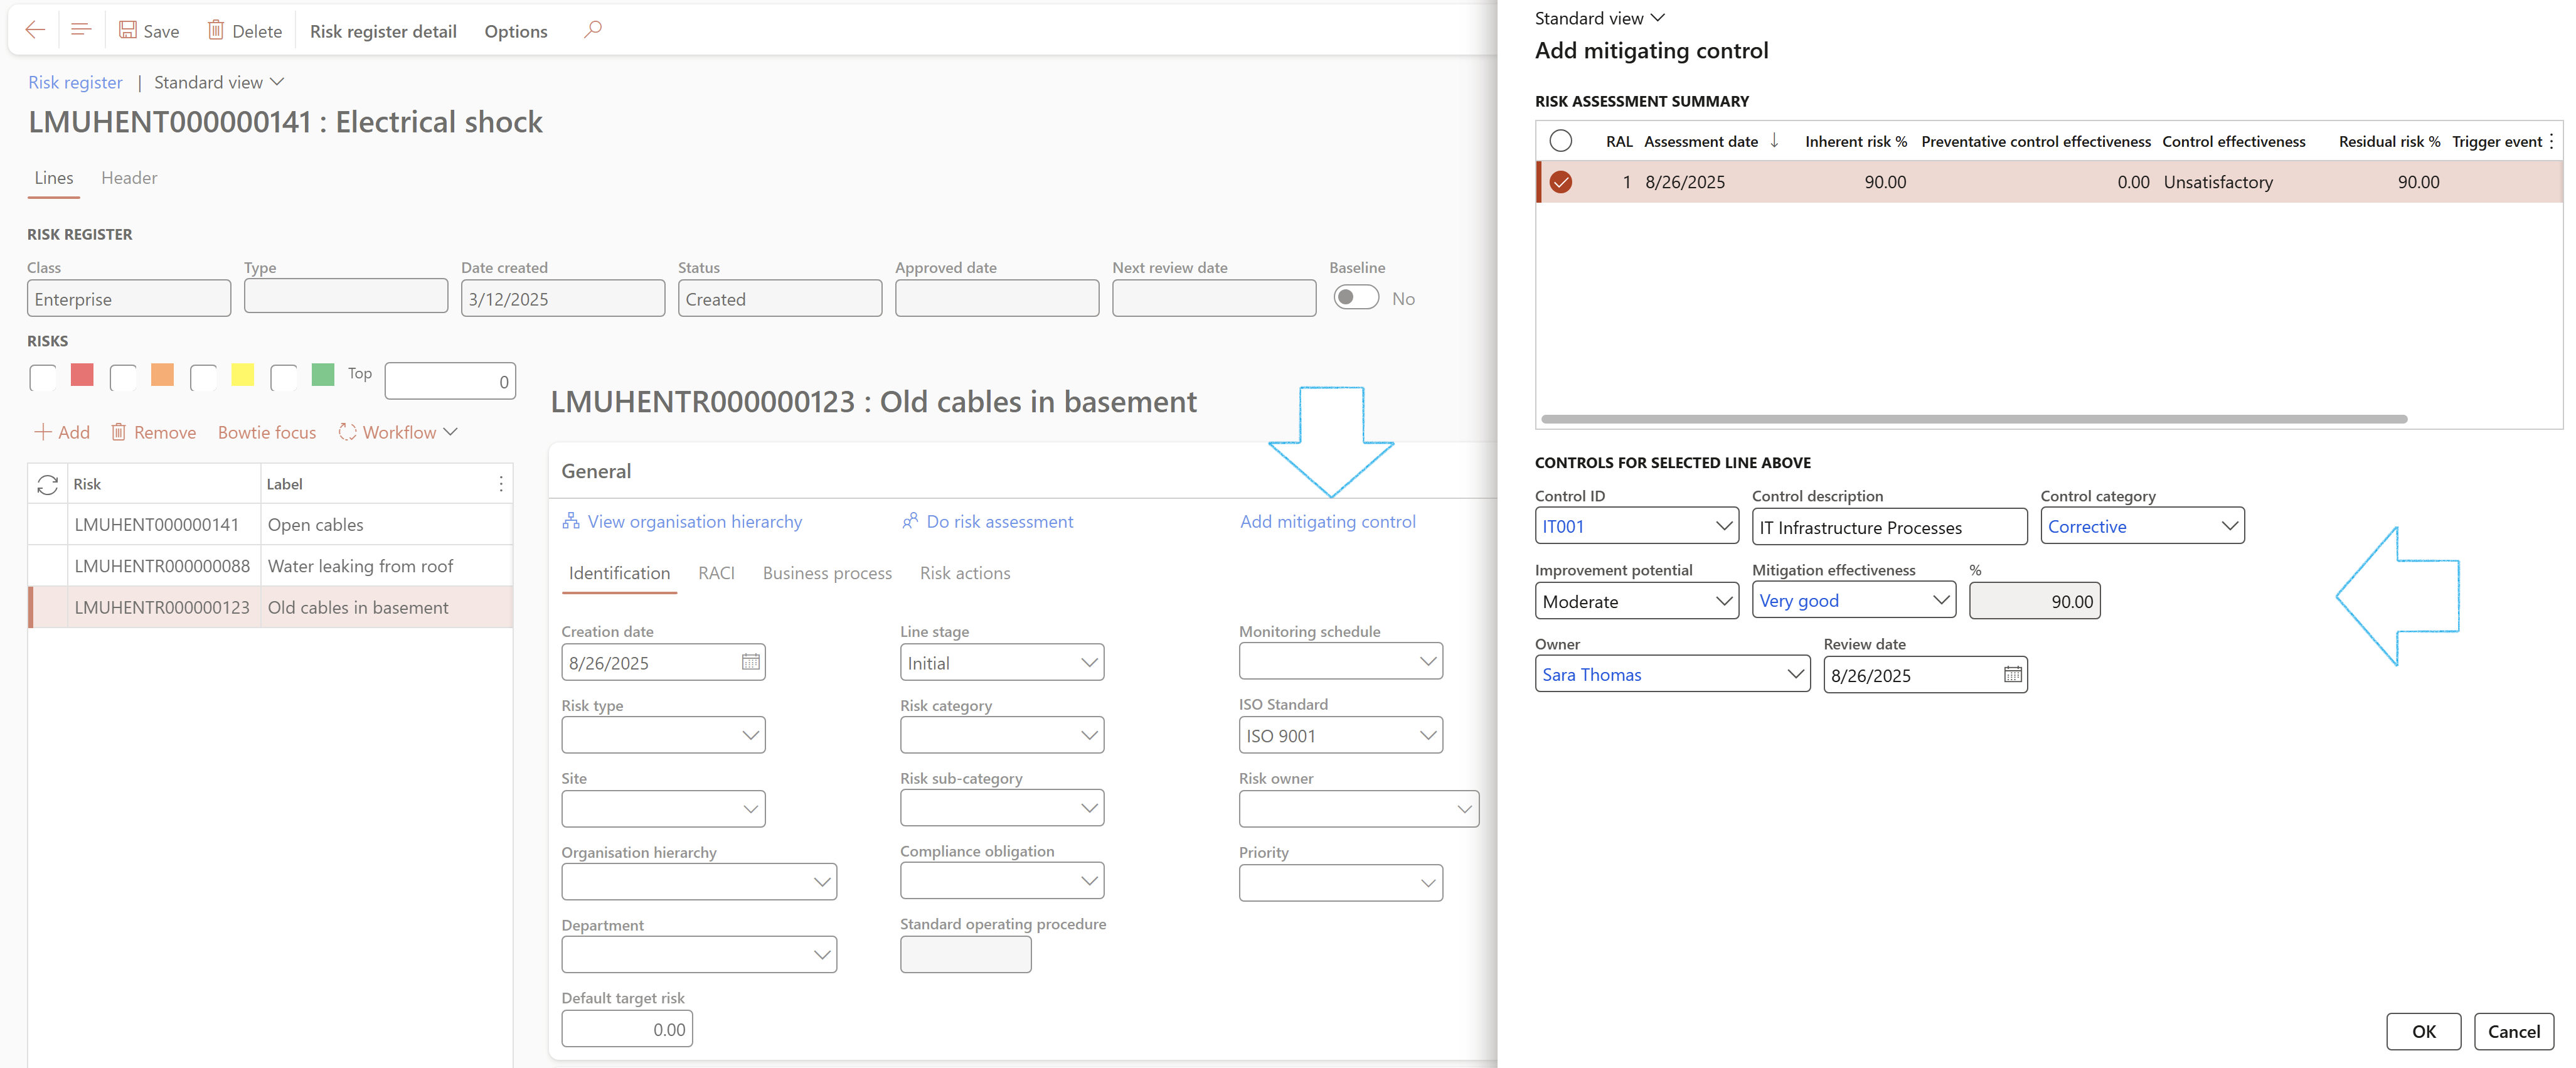
A line will be added under the Assessment calculations and controls Fast tab, Controls Index tab
¶ Step 19.2: Assessment guidance
Go to: GRC > Risk > Registers > All enterprise risk registers
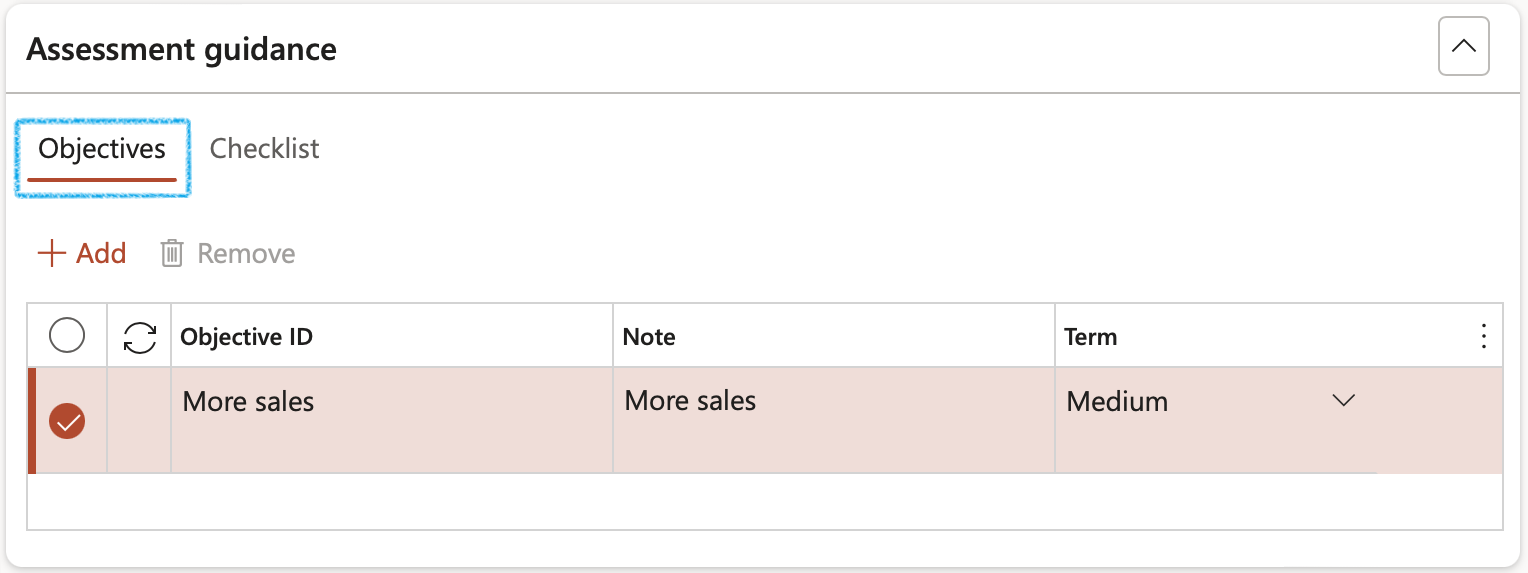
Enter the Risk objectives for each Risk line
- Open the Objectives Index tab
- Enter a unique risk Objective ID
- Enter a Note for the objective
- Select the relevant Term from the dropdown list
- Open the Checklist Index tab
- Select the relevant Job plan from the dropdown list
- On the Action pane, click Save
- Under the Checklist Index tab, click on the Create checklist button
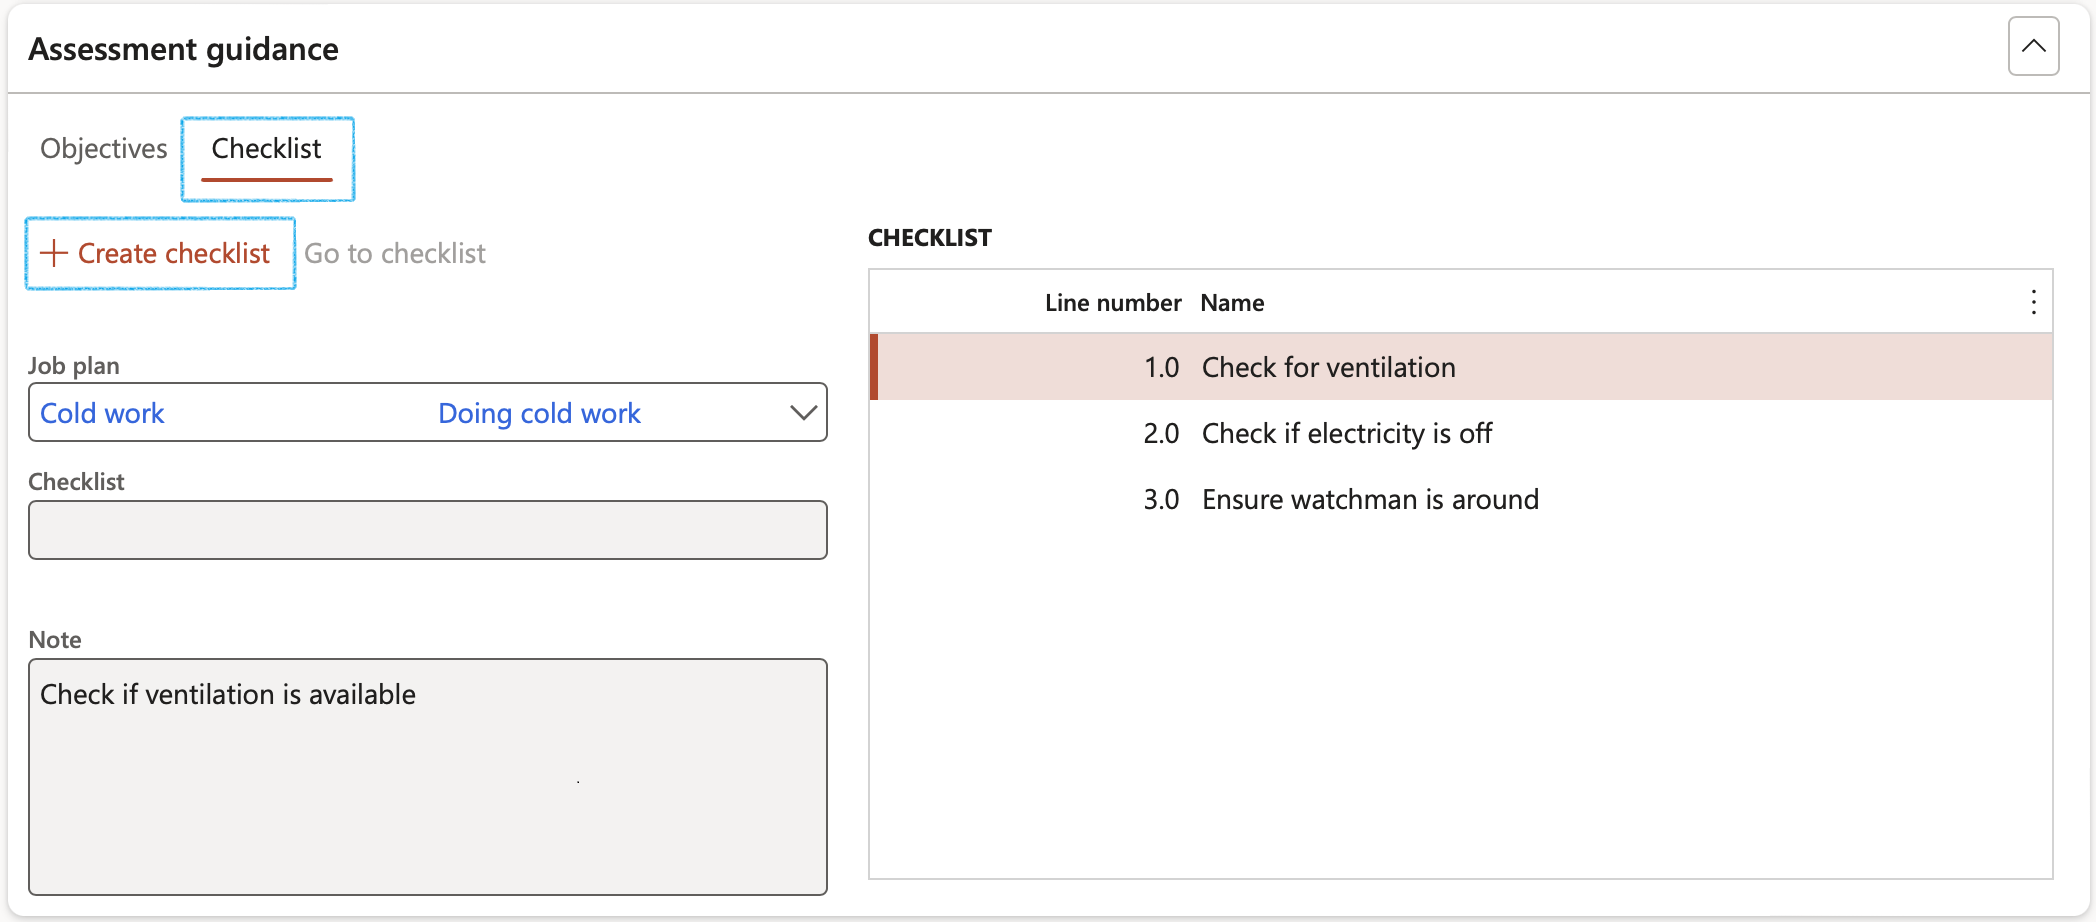
The Checklist ID will be populated and the Go to checklist button will become available
¶ Step 19.3: Risk outcome
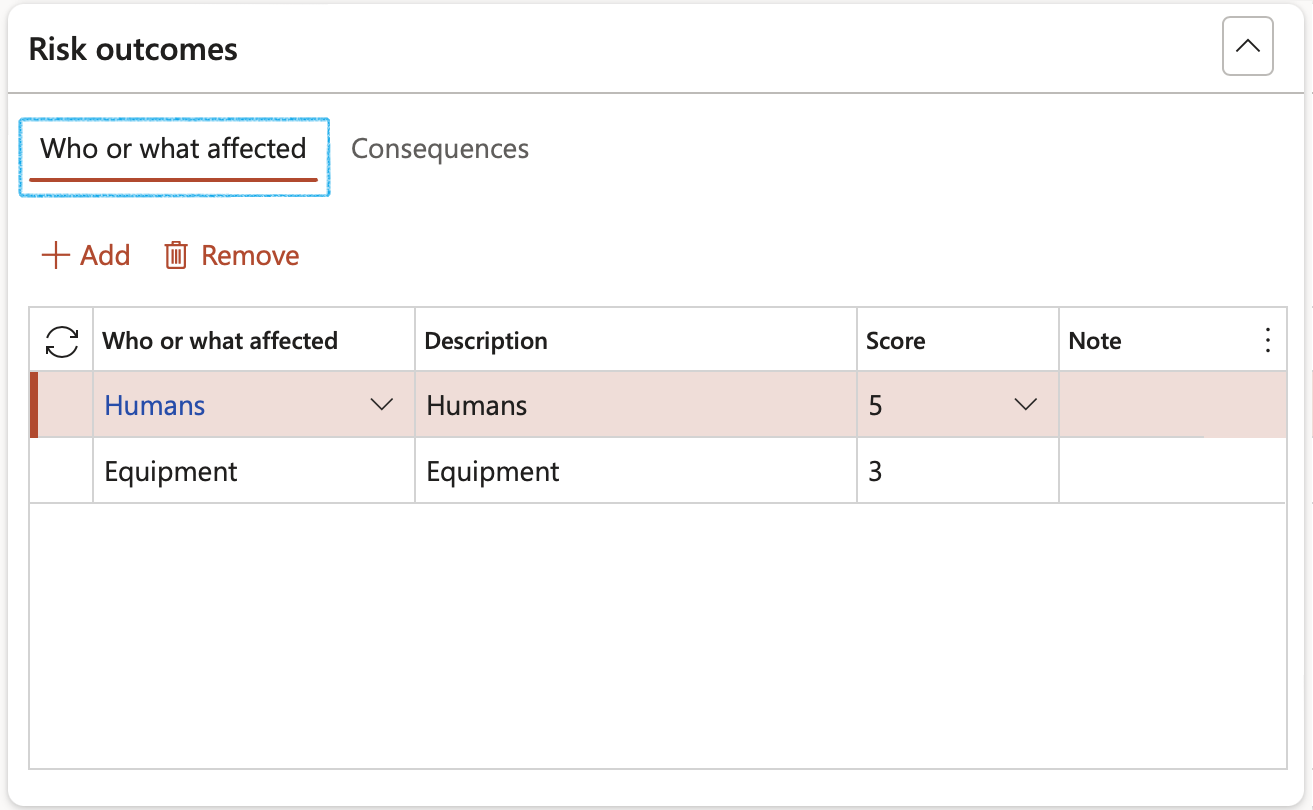
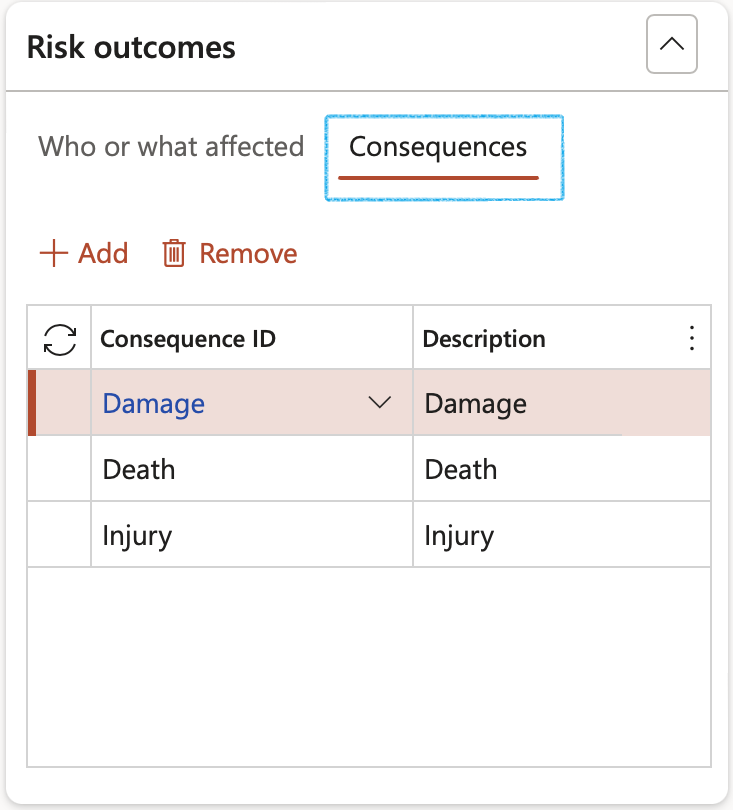
Enter the Who or what effected and Consequences of the risk occurring
- Expand the Risk outcomes Fast tab
- Under the Who or what effected Index tab, click on the Add button
- Select the relevant detail from the dropdown list
- Enter a Description
- Select the relevant risk Score level from the dropdown list
- Enter a Note if required
- Under the Consequences Index tab, click on the Add button
- Select the relevant Consequence ID from the dropdown list
- Enter a Description
¶ Step 19.4: Initial risk
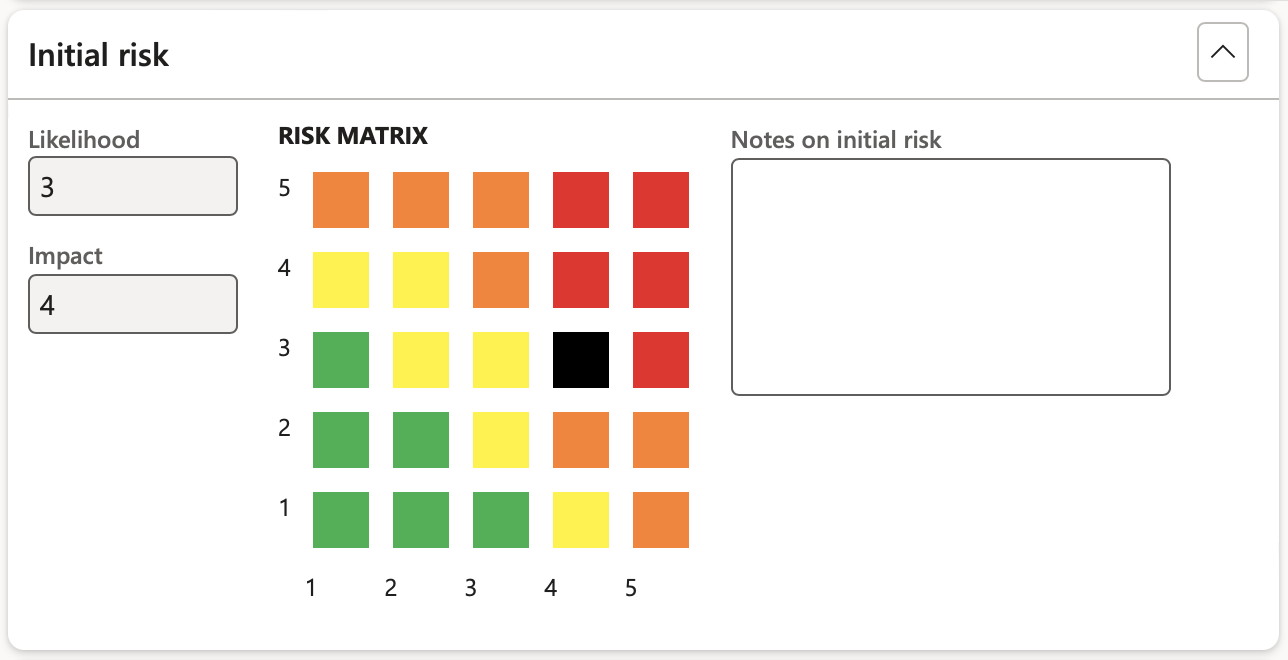
The values displayed under the Initial risk Fast tab, are the values that were entered when the risk assessment was done
These values can be updated under the Assessment calculations and controls Fast tab
- Enter additional Notes on the initial risk
¶ Step 19.5: Assessment calculations and controls
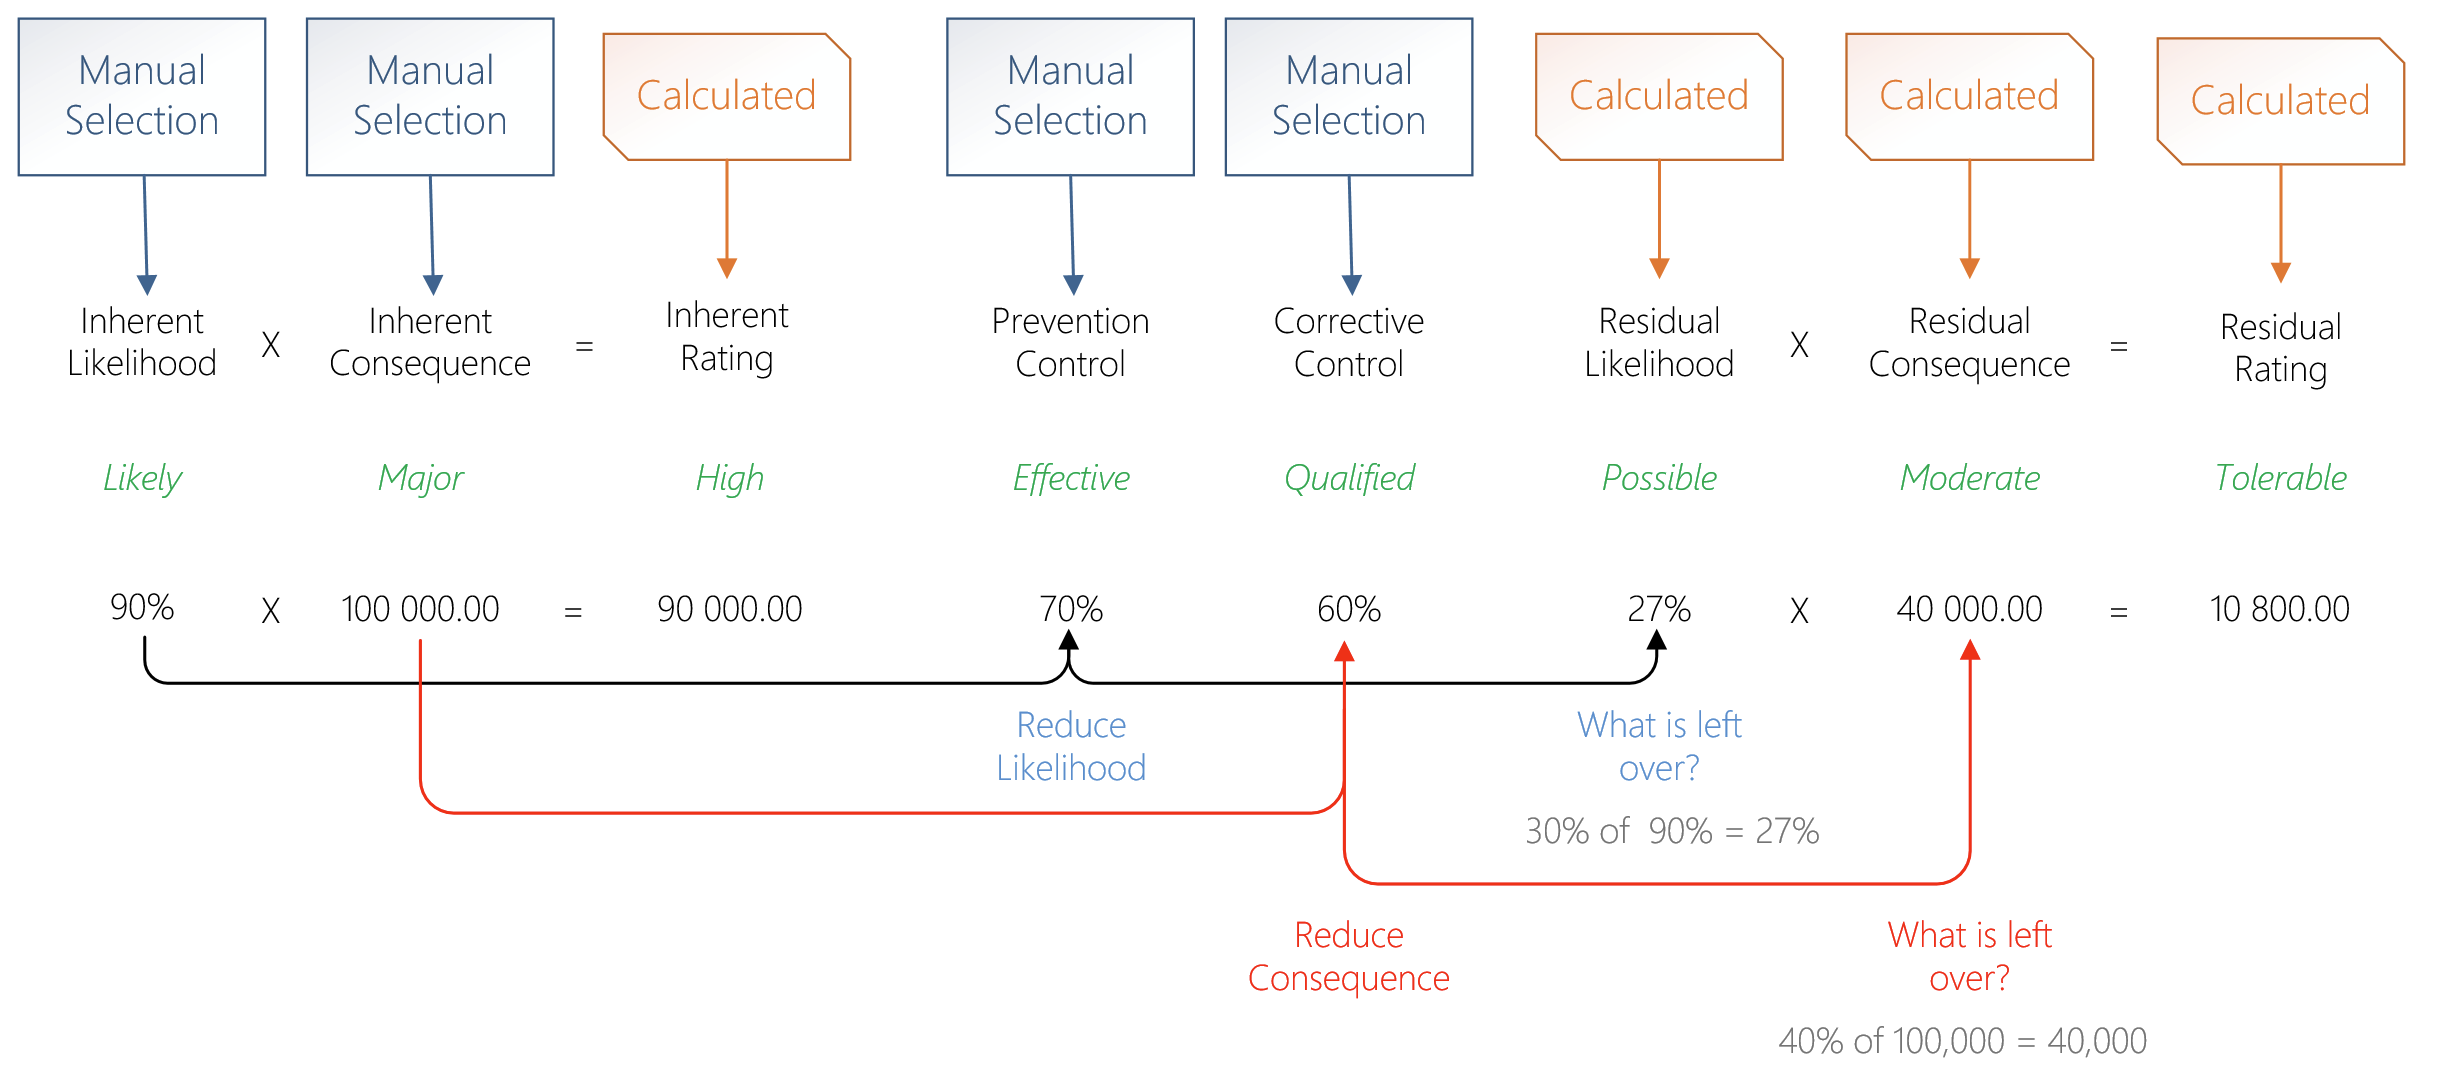
This section explains how to calculate inherent and residual risk ratings using likelihood, consequence, and the effectiveness of applied controls.
Step 1: Inherent Risk Calculation (Before controls)
- Inherent Likelihood = 90% (Likely)
- Inherent Consequence = 100,000 (Major)
- Inherent Rating = 90% × 100,000 = 90,000 (High)
Step 2: Apply Controls
- Prevention Control = 70% effective
- Reduces likelihood by 70%
- Remaining likelihood = 30% of 90% = 27%
- Corrective Control = 60% effective
- Reduces consequence by 60%
- Remaining consequence = 40% of 100,000 = 40,000
Step 3: Residual Risk Calculation (After controls)
- Residual Likelihood = 27% (Possible)
- Residual Consequence = 40,000 (Moderate)
- Residual Rating = 27% × 40,000 = 10,800 (Tolerable)
GRC 365 allows users to do many and different calculations per one defined risk
The Summary Index tab:
- In the Button strip, click on the Add button
- The RAL (Risk assessment line number) will be updated by the system. The earliest date will always be number 1.
- Enter the Assessment date
- In the Inherent risk % and Preventative control effectiveness fields, users can type in a value. This initial value can be refined by going to the Details Index tab
- In the Trigger event field, enter the possible occurrence that will trigger the risk
- The Target residual risk (it will default in from the risk line, general fast tab)
- The Created by will be auto filled based on the logged in user (linked to worker)

The theory of ERM:
- Users will subjectively/initially start with an assessment, additional information (such as Likelihood and Consequence) can be added later that will fine tune the initial assessment that will result in more relevant data. GRC will do some of the calculations automatically based on the setups above.
- The objective is to have GRC display the calculated Control effectiveness percentages based on the mitigation setups used (if the line-by-line controls are created), as well as the Residual risk values. Only Preventative type control values influence the Preventative % and Preventative control effectiveness.
If no specific Preventative controls were entered and the Recalculate button is clicked, the initial manual value stays the same
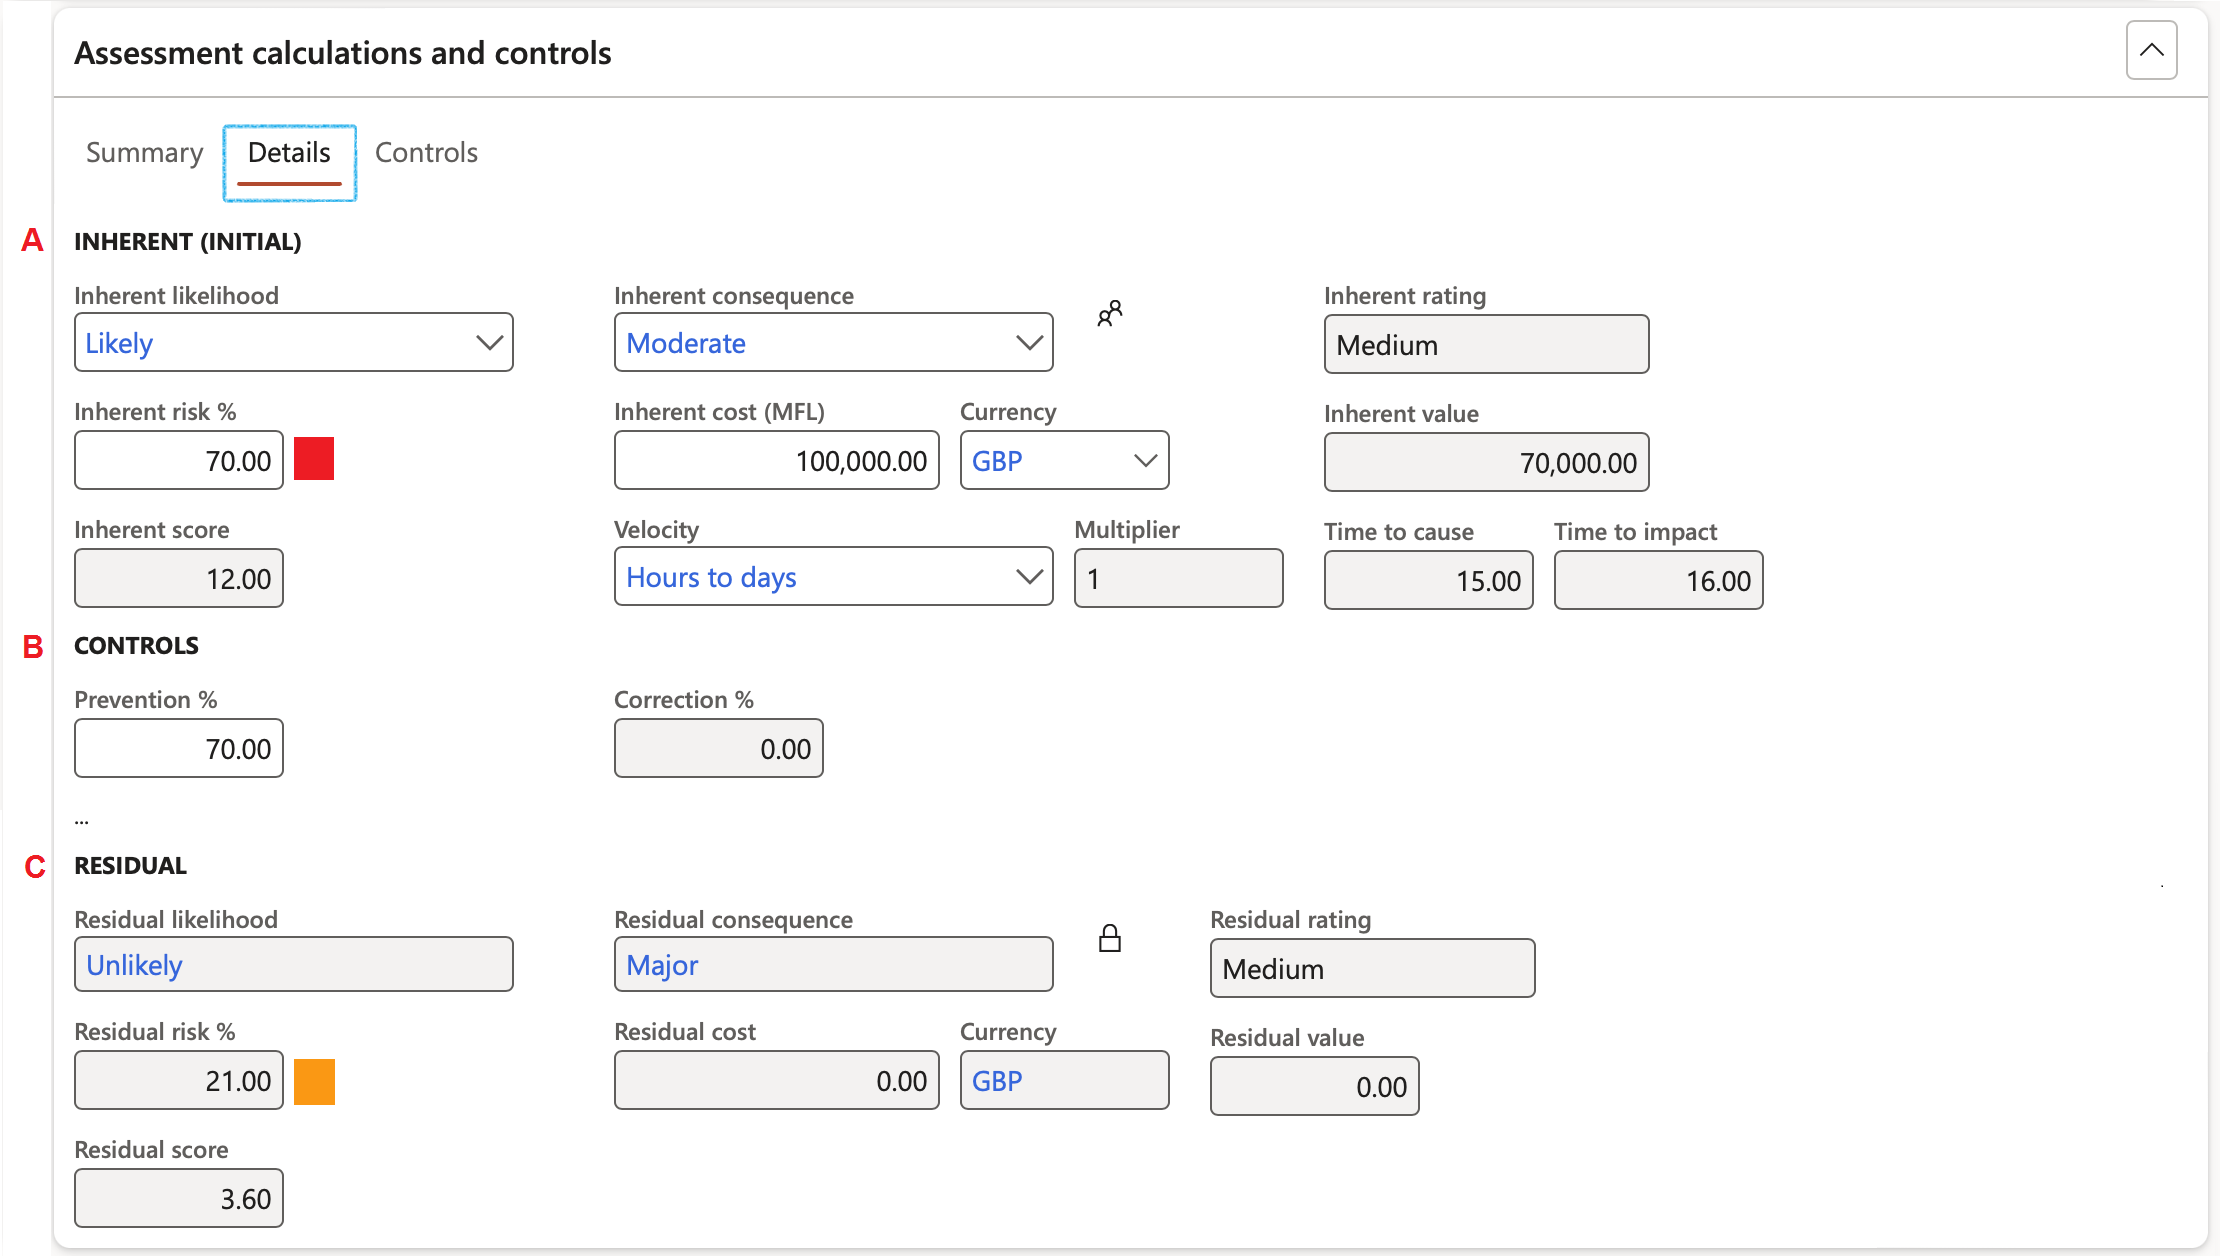
The Details Index tab:
- (A) INHERENT (INITIAL) Field group:
- Inherent likelihood: Select the relevant inherent likelihood from the dropdown list. This value can be updated under the Summary Index tab
- Inherent consequence: Select the relevant inherent consequence from the dropdown list This value can be updated under the Summary Index tab
- Inherent rating: This value = Inherent likelihood X Inherent consequence
- Inherent risk %: The percentage score for the inherent risk is updated based on the Inherent likelihood and Inherent consequence
- Inherent cost: Enter the estimate cost amount for the probable loss
- Currency: Select the relevant currency from the dropdown list
- Inherent value: This value = Inherent cost X Inherent risk %
- Inherent score: This value = Likelihood x Consequence
- Velocity: Select the relevant velocity value form the dropdown list. This value is also updated when a Velocity assessment is done
- Multiplier: This value will be populated according to the setup done on the Risk configuration setup form, Velocity (risk timing) Tab
- Time to cause is calculated as below:
- (Likelihood + Velocity multiplier) x Impact/consequence
- When and how fast can this happen to us?
- Time to impact is calculated as below:
- (Impact/consequence + Velocity multiplier) x Likelihood
- To indicate “At what point will we feel what happened?”
- (B) CONTROLS Field group:
- Prevention percentage: Inverse of preventative control percentage. Measures to mitigate potential risks, safeguarding assets and minimising losses before they occur
- By adding control lines, this value will be updated
- Correction percentage: A calculated field displaying the average effectiveness percentage for all corrective controls linked to the assessment calculation. Methods, procedures, and policies developed to reduce the impact of adverse events
- (C) RESIDUAL Field group: (Displays only)
- Residual likelihood: The likelihood of the event occurring in the current control environment. (This includes Insurance, preventive and detective controls and other risk treatments). This should be determined after a review of the effectiveness of the control.
- Residual risk: The percentage score for the residual risk
- Residual consequence: What is the most probable impact of the risk event if it were to occur within the current control environment? Assume that the controls are operating at their assessed strength, rather than the maximum consequence if the controls were to fail.
- Residual cost: The probable cost amount associated with the residual risk
- Residual rating: This is a system calculated residual risk rating
- Residual value: The value associated with the residual risk
¶ Step 19.5.1: Risk categories assessments
- GRC 365 allows many users to do Risk categories assessments on a risk line using multiple sub categories. These values will default in from the applicable risk category on the risk type.
- Risk categories assessments can be done from the Summary Index tab or the Details Index tab.
- If no line has been added under the Summary Index tab, these two buttons will not be active.
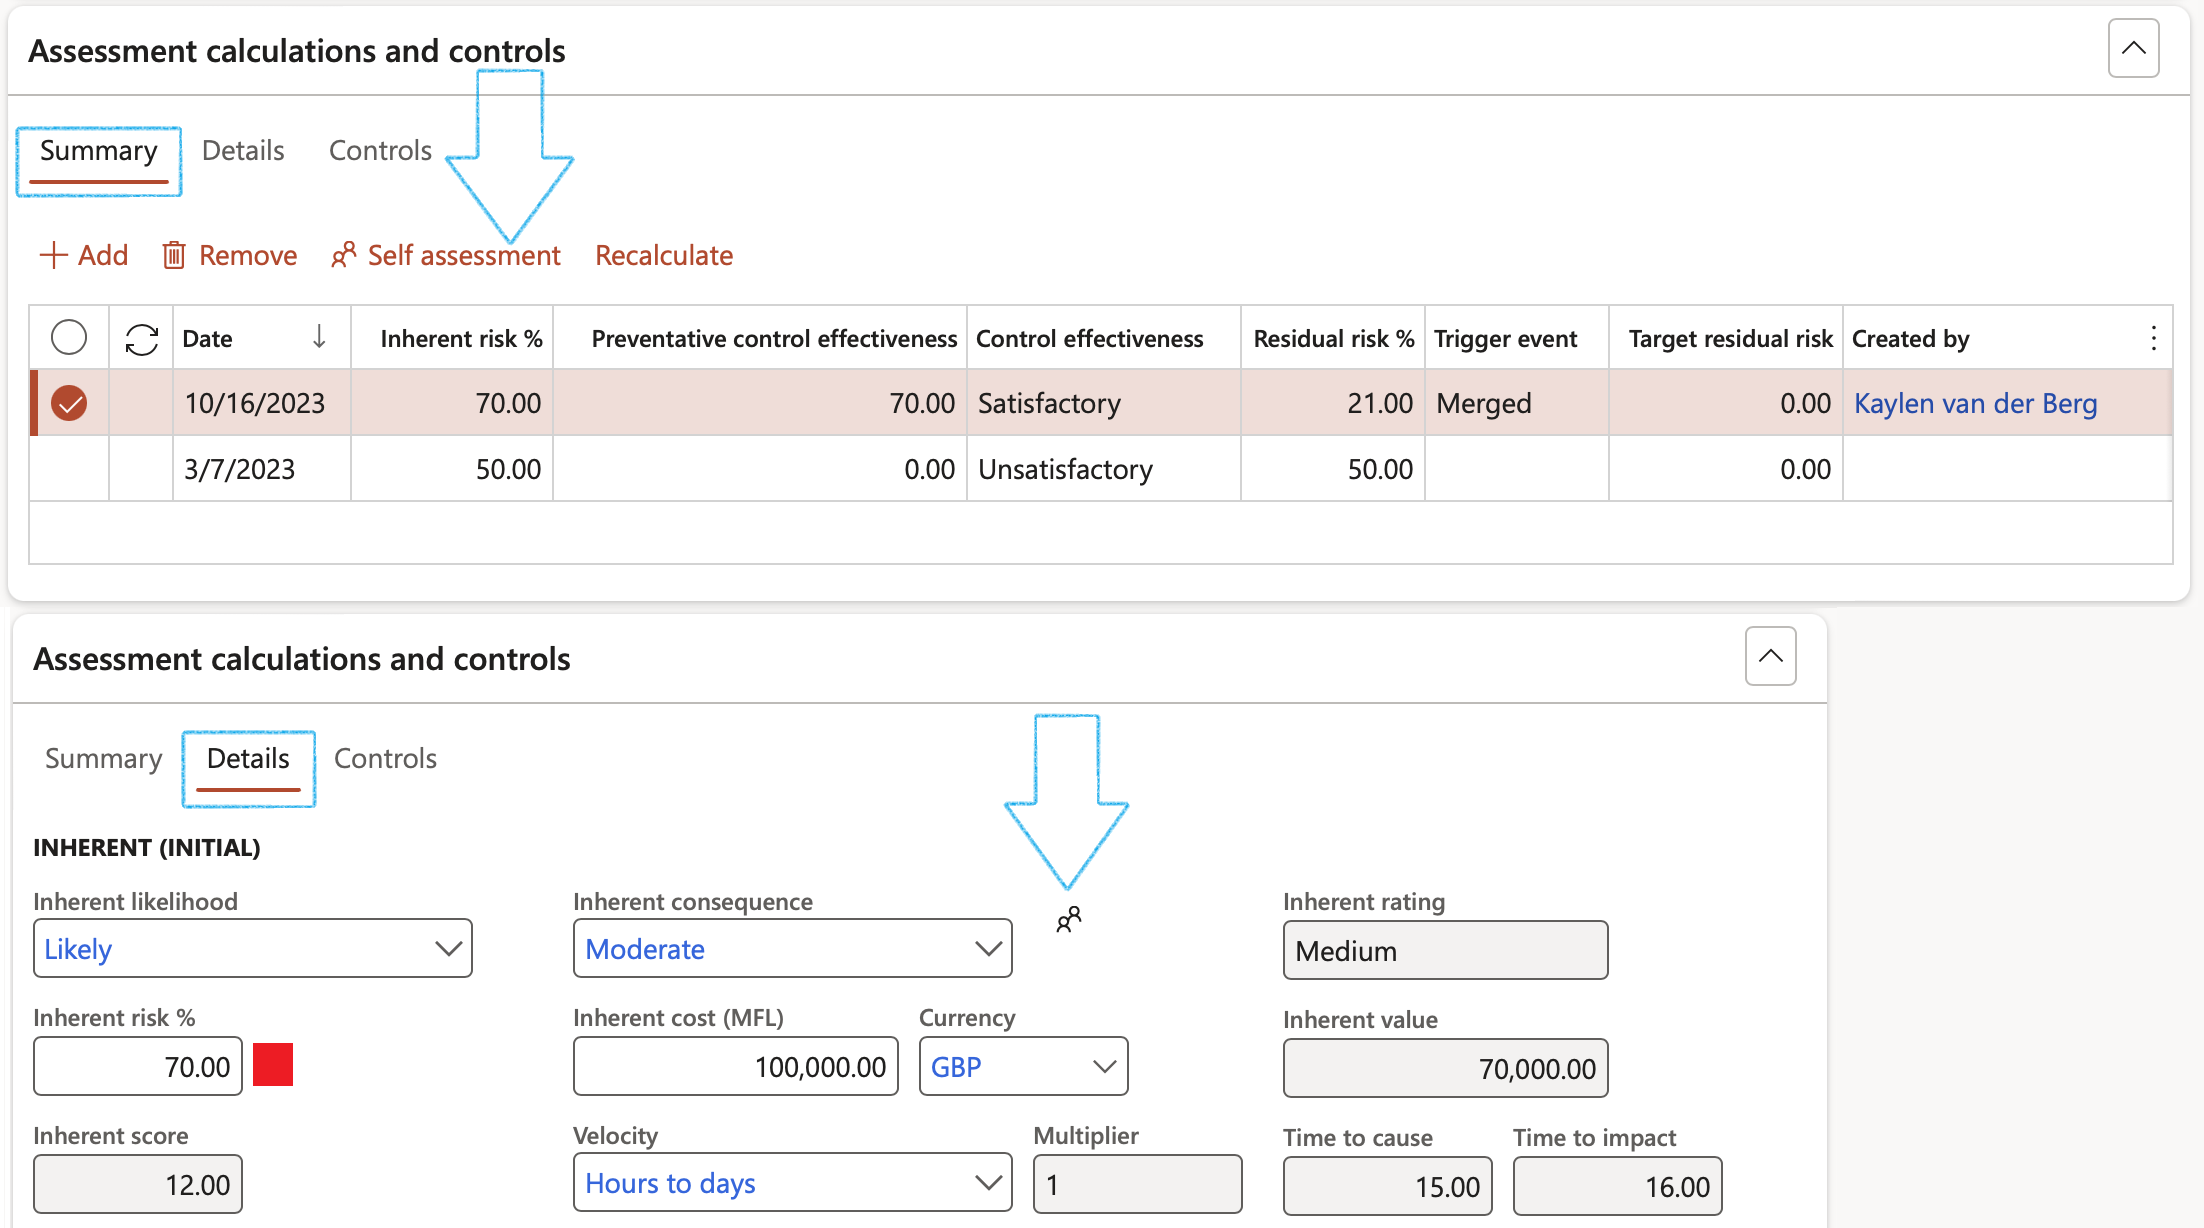
Under the Details Index tab:
- Click on the Risk categories assessment button (1 in the screenshot below)
- The Risk categories assessment form will open
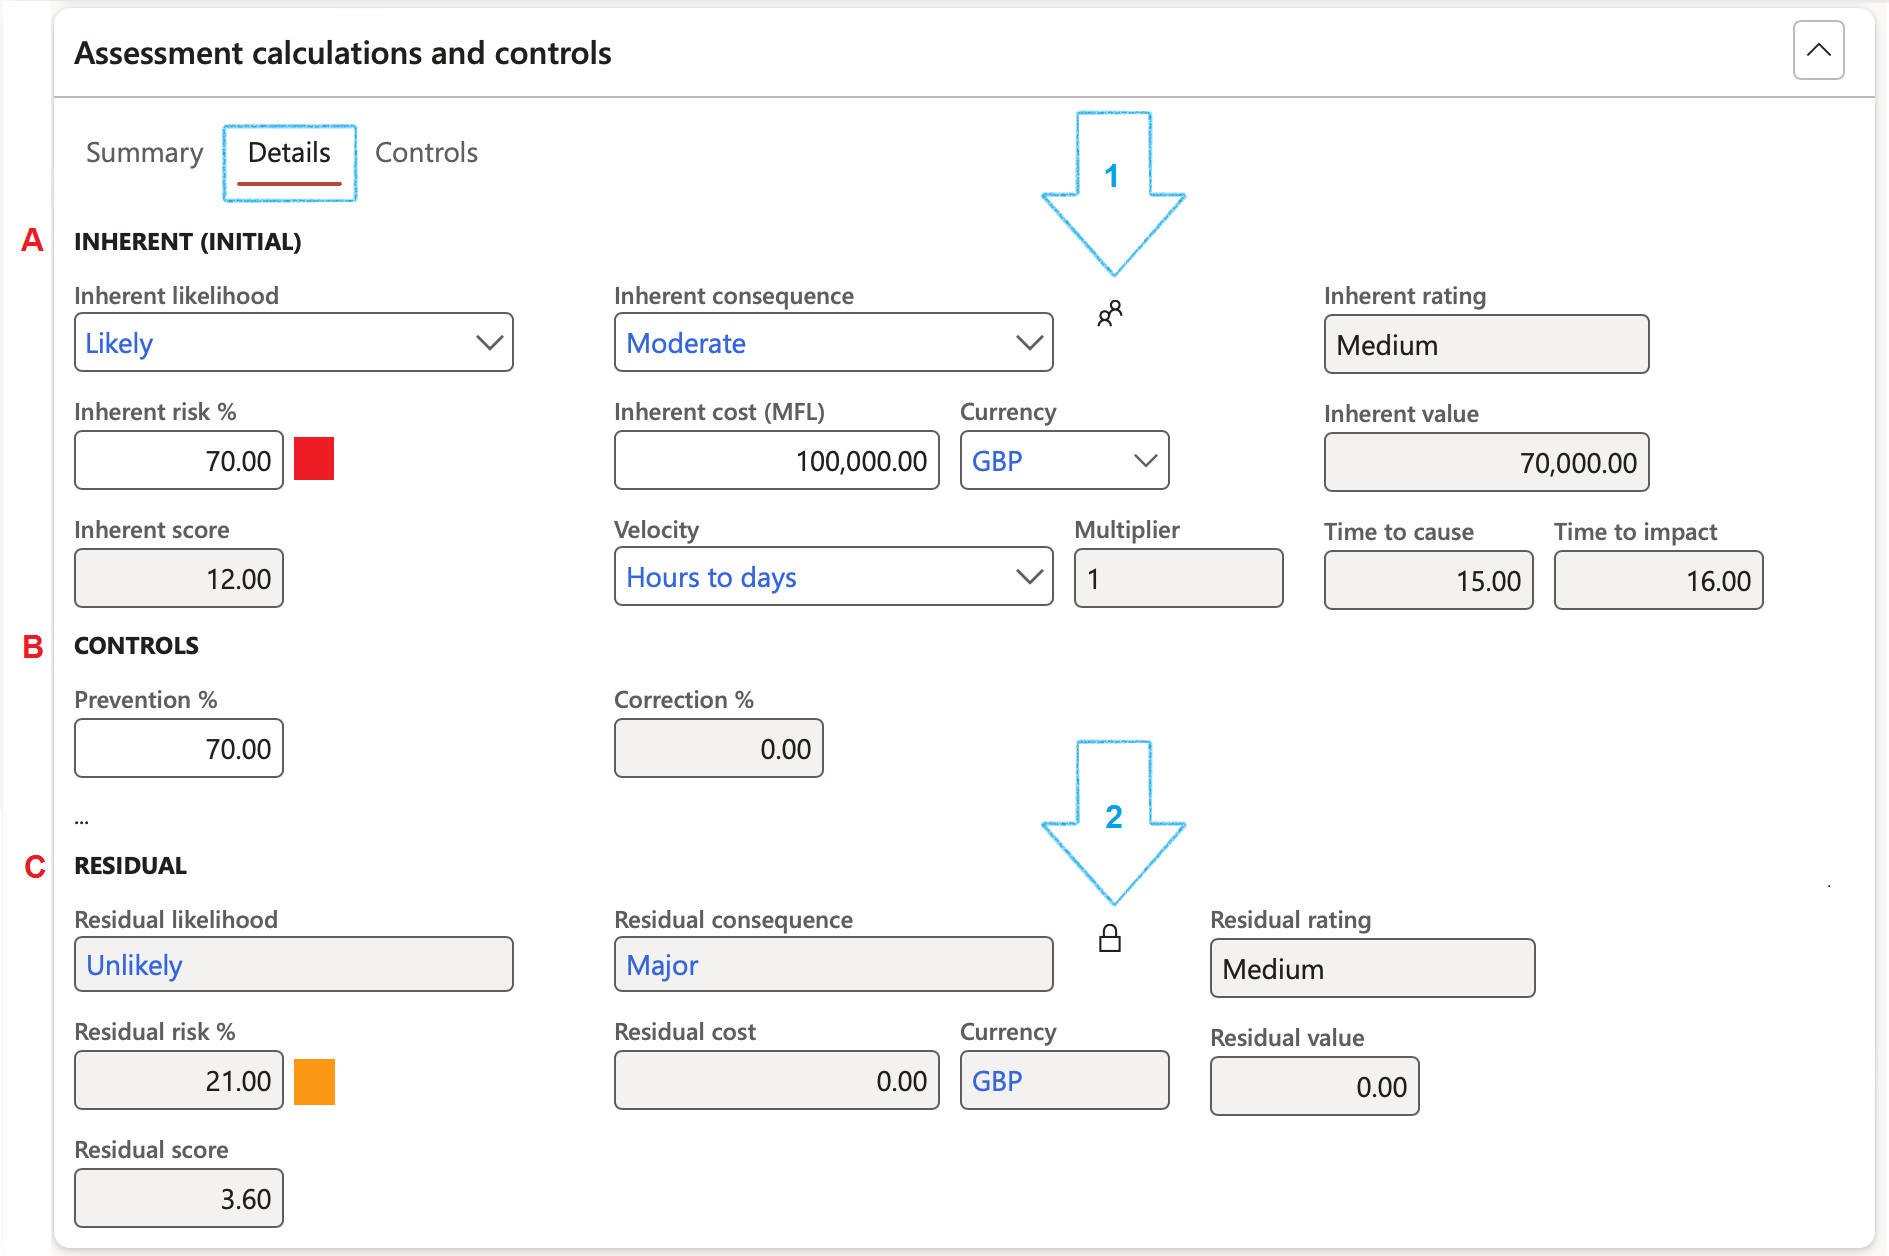
If you require the Residual consequence to be locked to the same value as the Inherent consequence, then click on the Lock icon/button (2 in the screenshot above)
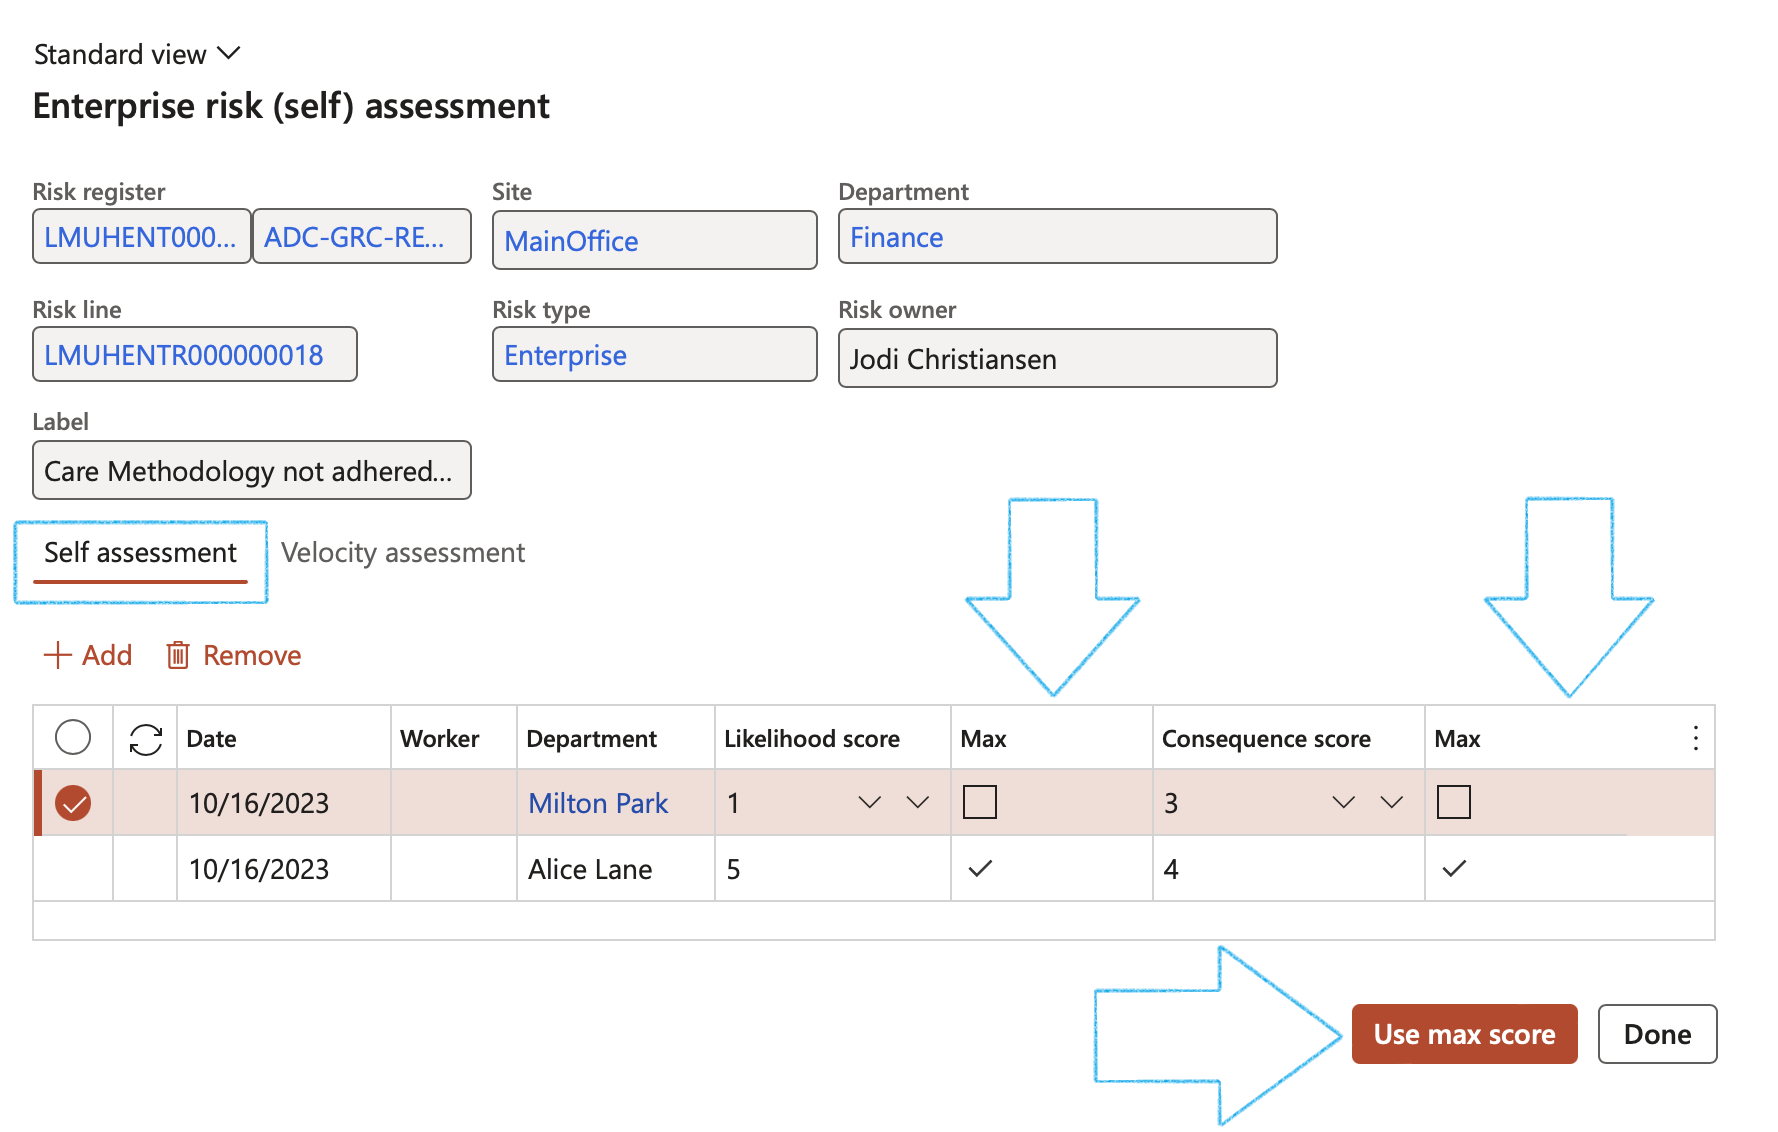
On the Risk categories assessment:
- In the Button strip, click on the Add button
- Enter the Date of the assessment
- Select the relevant Sub-category from the dropdown list
- Select the relevant Likelihood score from the dropdown list
- Select the relevant Consequence score from the dropdown list
- Click on the Use average button
OR
- Click on the Use max score button
The Controls Index tab:
If no line has been added under the Summary Index tab, the Button strip will not be active
Users can add many controls of different types to mitigate risk
- In the Button strip, click on the Add button
- Select the relevant Control ID from the dropdown list
- Enter a Control description
- Select the relevant Control category from the dropdown list
- Select the relevant Improvement potential value from the dropdown list
- Select the relevant Effectiveness factor from the dropdown list
- Select the Control Owner from the dropdown list
- Select the Frequency from the dropdown list
Activities can be created per control line. A record for each created activity will be added under the Associations Fast tab.
Attachments can be added per control line
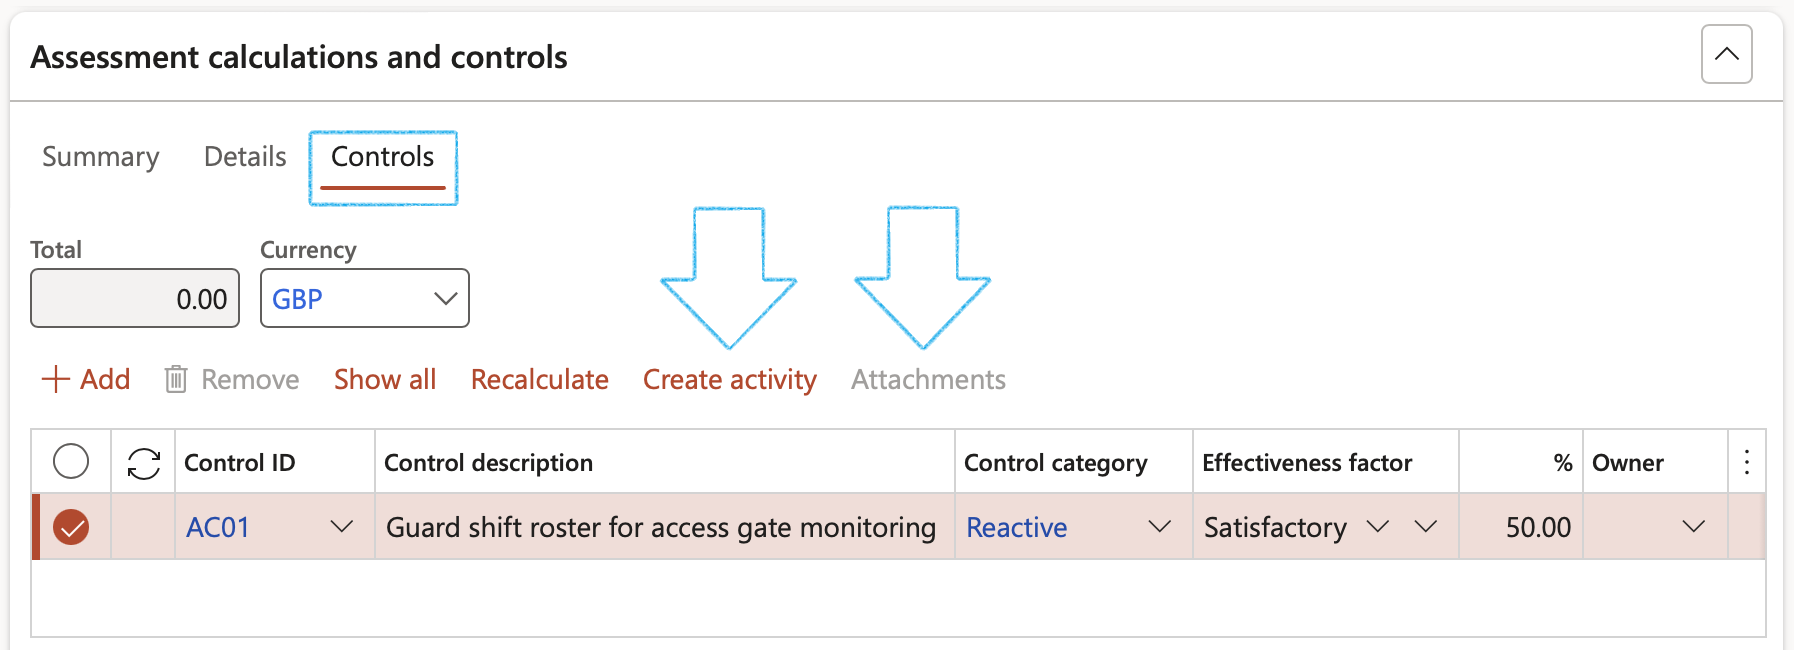
Only controls that are marked as Active, will be in the Control ID dropdown list
The Action due date = Planned end date
The Closed date = The closed date on the Activity
The Effectiveness factor and % values are calculated as per setup done in Step 6.2
¶ Step 19.6: Residual risk Fast tab
Residual risk displays the Likelihood and Impact values after controls have been applied. The mitigation effectiveness percentages on likelihood and impact applied in the above tab drive the Likelihood and Impact scores displayed under this tab.
The user can overwrite the Likelihood and Impact scores if the Mitigation effectiveness percentages are to be side-lined.
The Residual Likelihood X Residual Impact risk rating is displayed on the Risk matrix.
- Enter additional Notes on the residual risk

Risk matrix - The X by Y matrix displays the matrix as it is setup on the parameters form
¶ Step 19.7: Strategy and response
Risk response is the process of developing strategic options and determining actions to enhance opportunities and reduce threats to the organization’s objectives. An enterprise team member is assigned to take responsibility for each risk response.
- Expand the Strategy and response Fast tab
- Select the relevant Strategic pillar from the dropdown list
- Enter the Control strategy
- Enter the Responsibility
- Select the relevant Risk response from the dropdown list
- Select the Employee responsible for the response
- Select the Due date for the response
- Enter any Further action

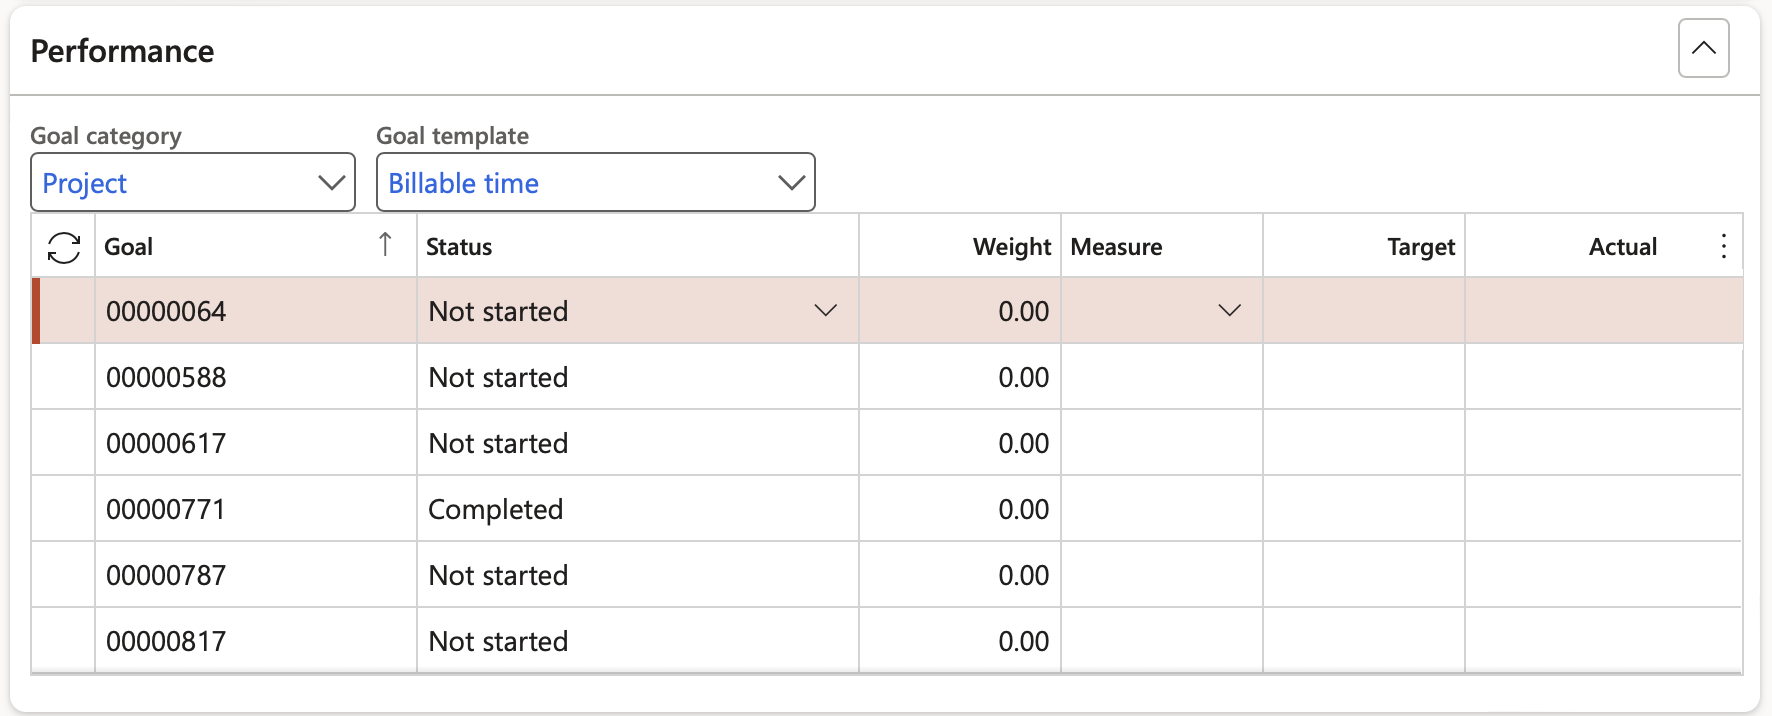
¶ Step 19.8: Performance management
Traditionally risk was only seen as negative “things” to be managed. But doing business “as usual” is a riskier proposition. Siloed approaches to risk management create dangerous blind spots for business. Closer alignment of risk and performance management has become a business imperative. An integrated approach to risk and performance management leads to smarter risk taking.
To this effect choose Goal categories and templates.
Enter against the targeted performance and measure the actuals.
¶ Step 19.9: Associations to a risk
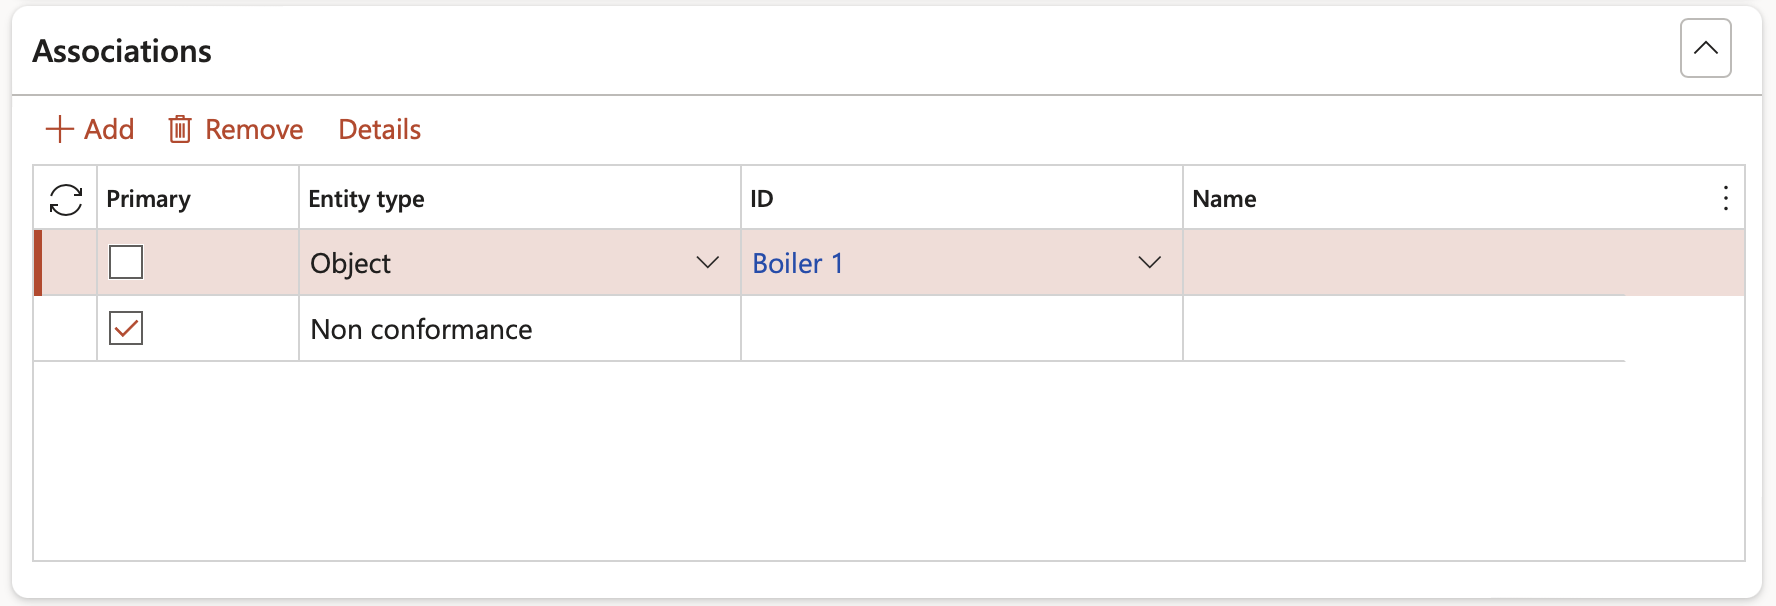
Additional information such as an item, order, product, etc. can be selected under the Associations Fast tab in order to link it to the selected risk
In the button strip, click the Add button
- A selected Primary check box indicates that this is the primary association for the risk
- Select the relevant Entity type from the dropdown list
- Select the unique identification of the entity
- The name of the selected entity is displayed in the Name field
To reveal details of the selected association, click on the Details button on the Button strip
List of Entity types:
• Case • Worker • Lead
• Opportunity • Customer • Vendor
• Prospect • Project • Sales order
• Purchase order • Service order • Item
• Customer transaction • Expense report line • Expense report
• Vendor invoice • Vendor invoice line • Purchase order line
• Returned order • BOM/Formula • Route
• Production order • Quality order • Product
• Customer invoice • Customer invoice line • Analysis journal • Incident
• Risk • Hazard • Object
• Courses • Course types • Compliance audit
• Investigation • Internal audit • Claims • Contract
• Policy • Report • Disciplinary • Inspection
• Waste register • Medical fitness • Medical consultation • Non conformance
• Compliance function • Activity • Loans • Investment: non cash • Investment: cash
• Questionnaire
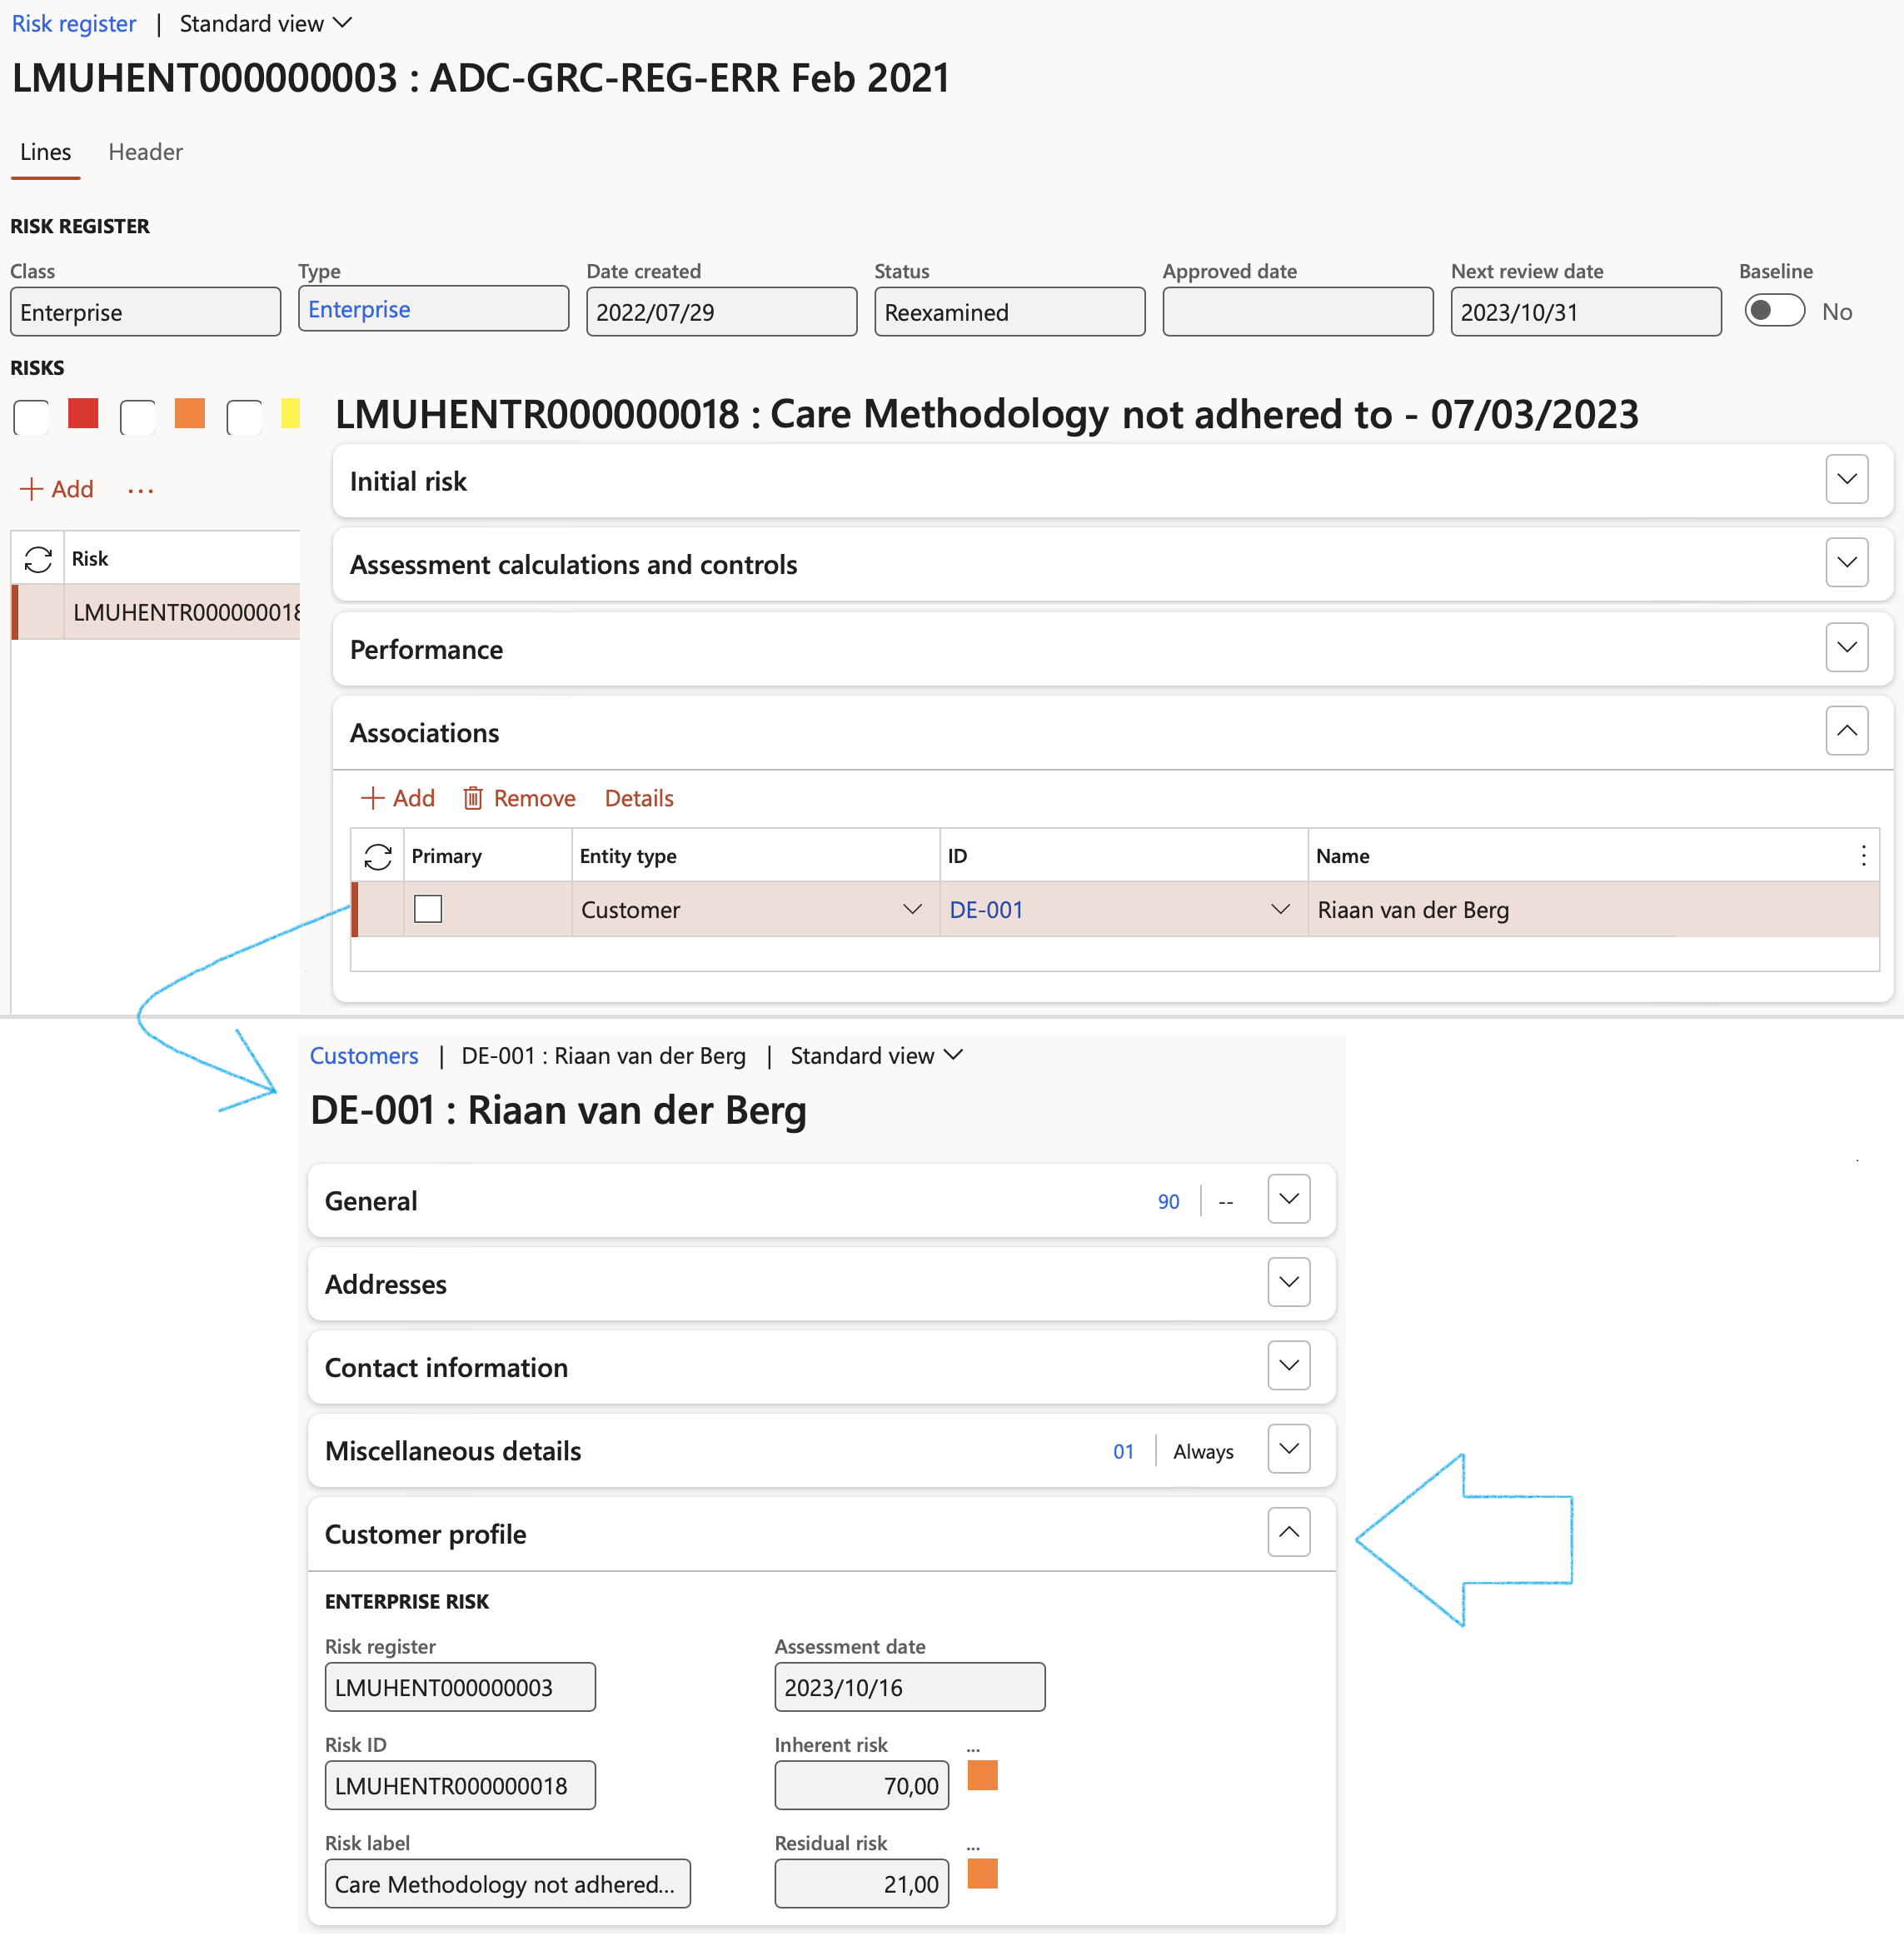
When a Vendor/Customer is associated with an Enterprise risk, information from the Enterprise risk register will be displayed on the Vendor/Customer profile.
If changes are made on the Enterprise risk register, these changes will be updated automatically on the Vendor profile.
A risk can be transferred from a Non-conformance to the Associations Fast tab
¶ Step 19.10: Other details
Additional information can be entered under the Other Fast tab

The labels of the two note boxes can be changed on the GRC parameters
¶ Step 20: Related information pane
The following is displayed in the Related information pane:
- Activities created under the Assessment calculations and controls Fast tab, Controls Index tab, or by clicking on the Create activiy button in the Action pane
- Record of when the Risk register was Archived
- Linked Key risk indicators on Goals

¶ Step 21: Switching to Bow tie focus
Sometimes an organization wants to zoom in and focus on one risk. They then manage that risk with what is referred to as a "Bow tie" methodology.
This can be done in D365 by following the steps below:
Go to: GRC > Risk > Registers > All enterprise risk registers
- Select the relevant risk register
- On the Lines view, select the relevant risk line
- Click on the Bow tie focus button
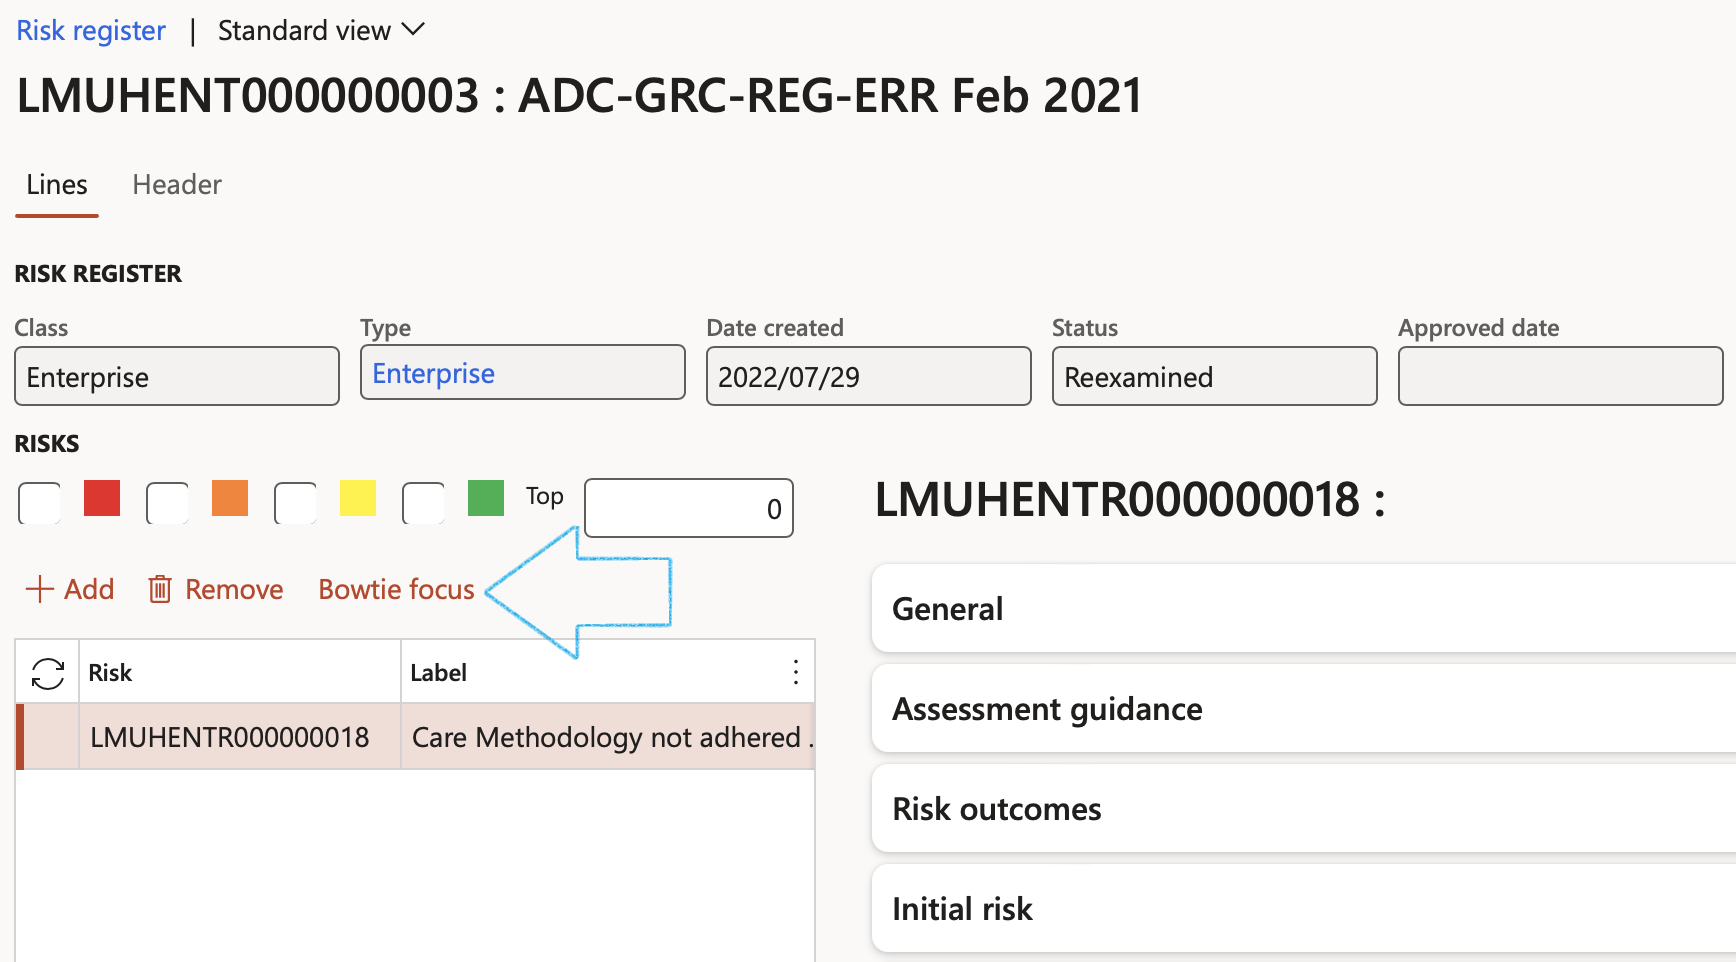
The Bow tie risk register will open displaying the details of the selected risk line
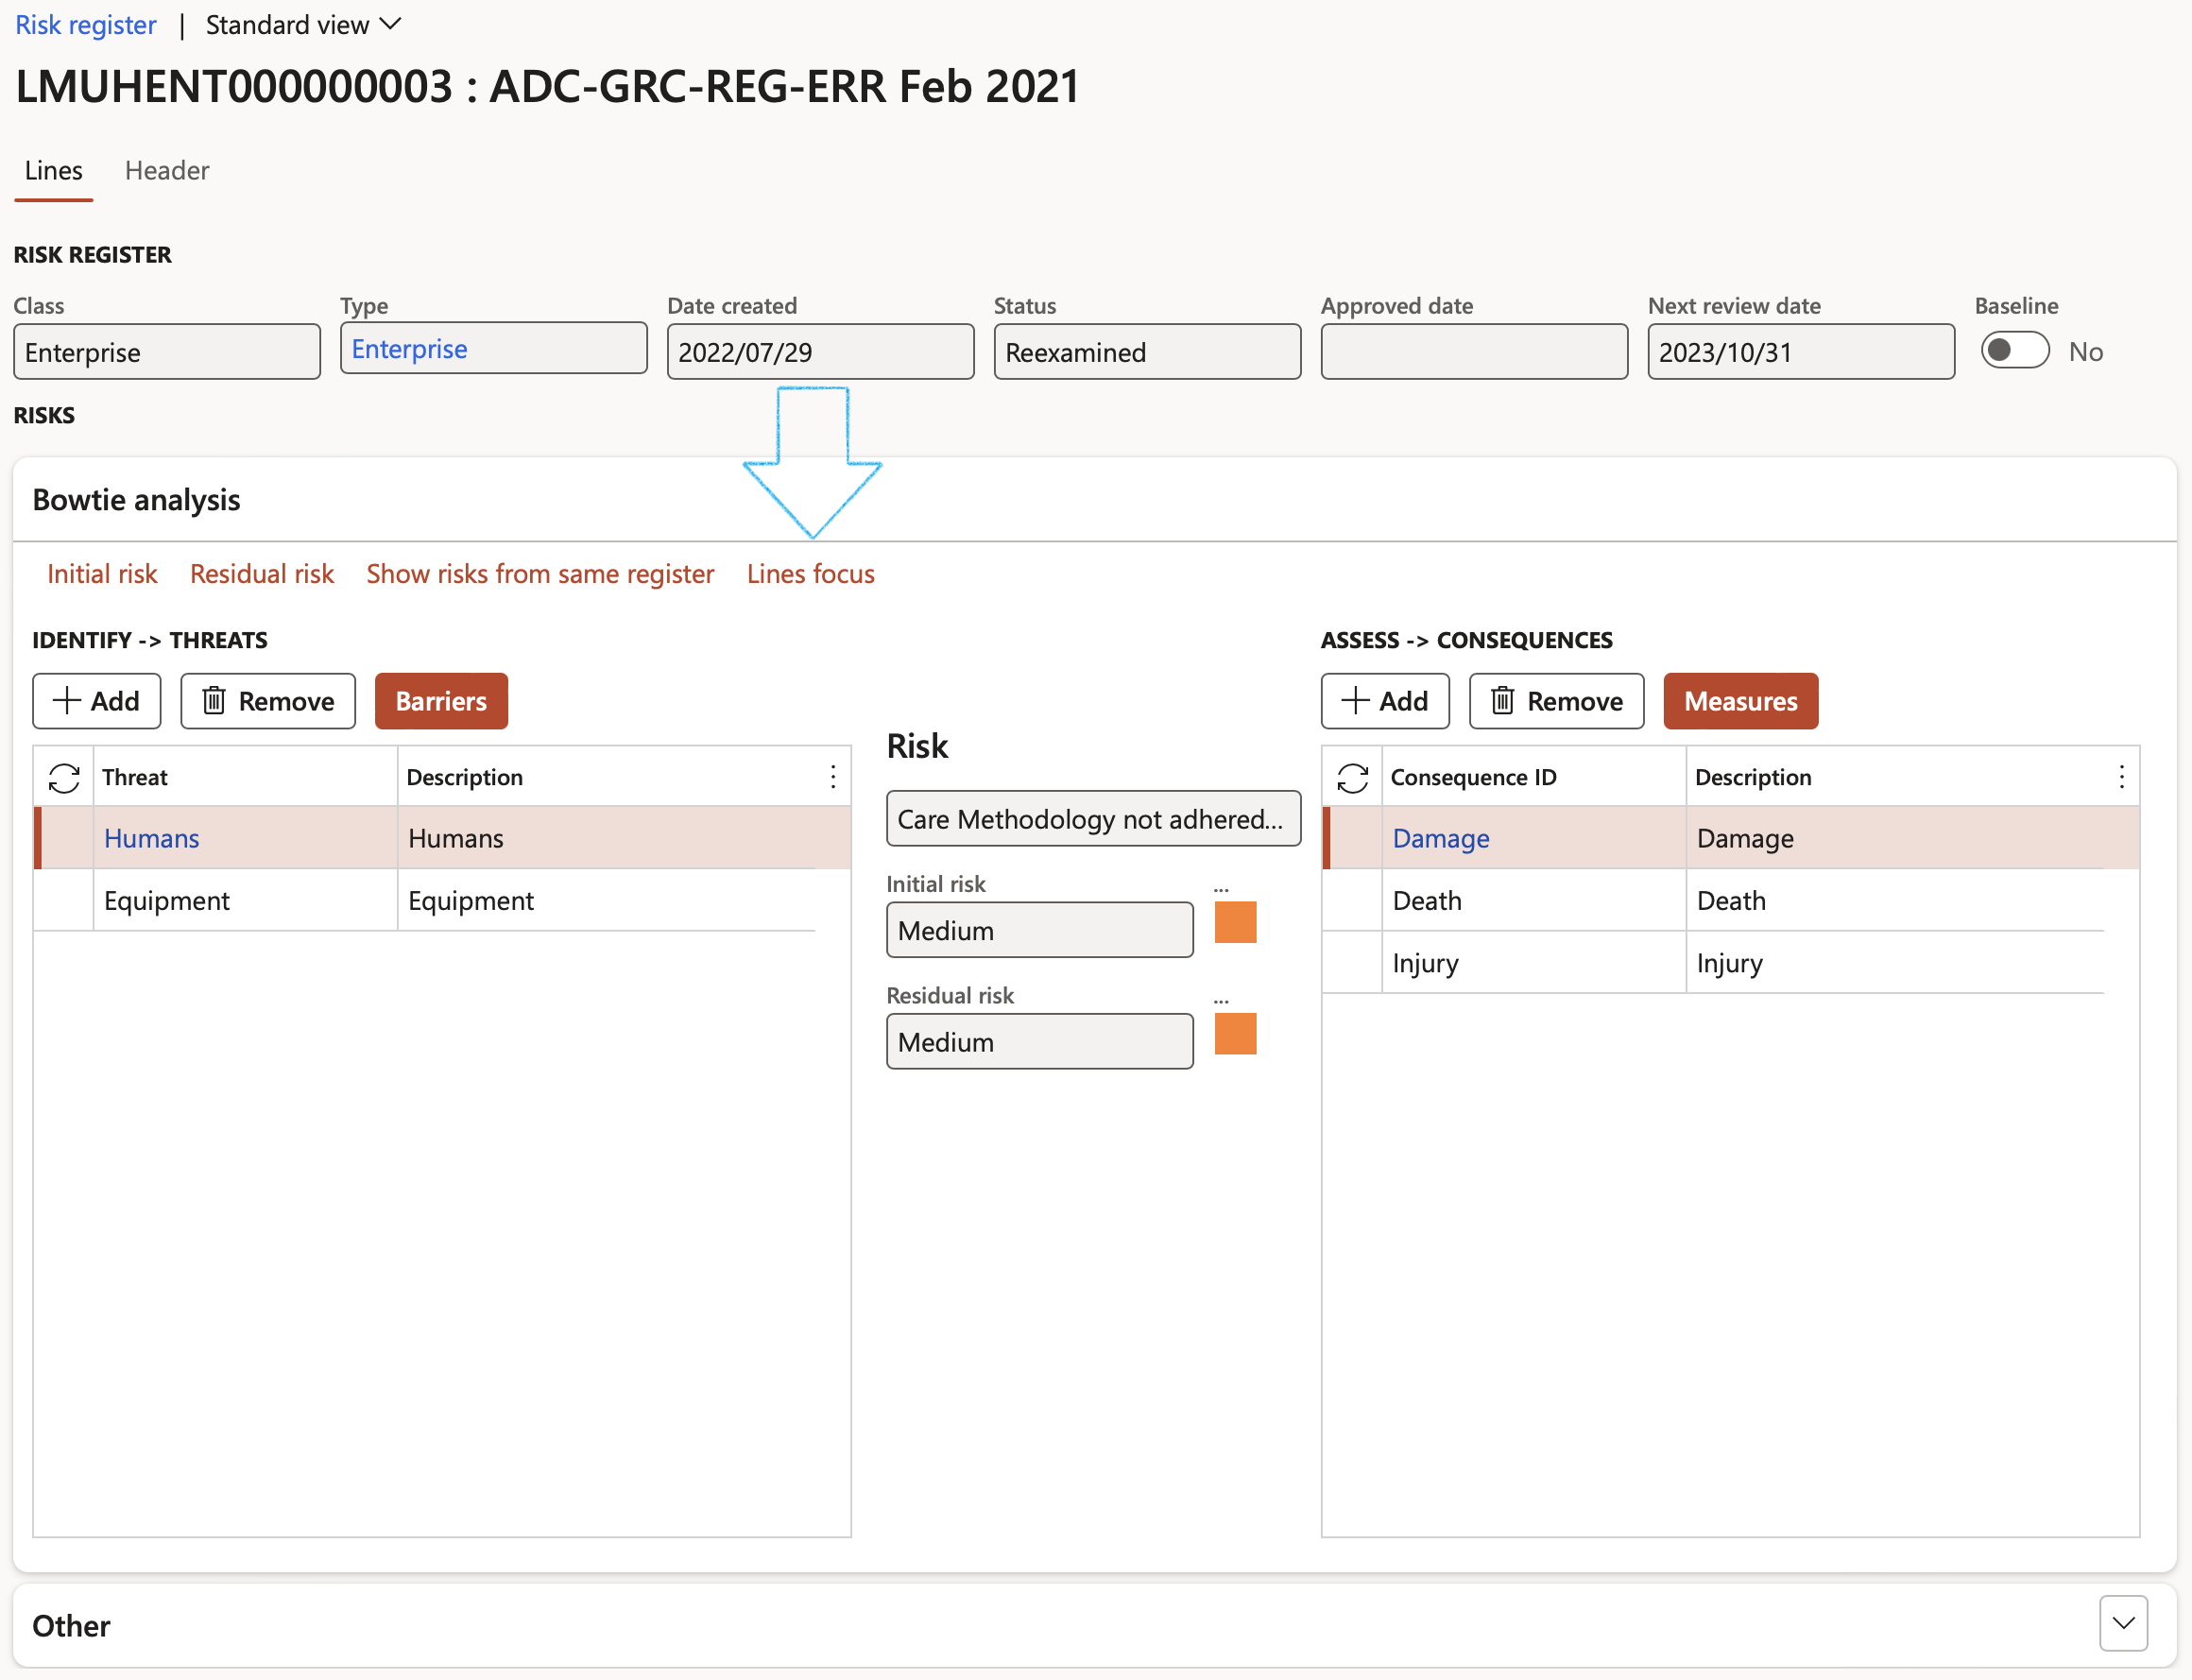
- Bow tie risks can be changed to Enterprise risks by clicking on the Line focus button
- The risk lines that were not converted to Bow tie, can be viewed by clicking on the Show risk lines from same register button
Risk registers that have a risk line that has been converted to Bow tie, are indicated on the list page

Refer to GRC001 Test script Operational risk Management for details on maintaining bow tie risk registers
¶ Step 22: Doing a risk assessment
It is important for risk assessments to be carried out regularly so that employers can identify any substance or thing that may pose a danger to health and safety and ensure that the necessary preventative control measures are implemented. The risk assessment should include information on all present risks in the organization, their necessary control measures, all the safe systems of work and monitoring procedures in place.
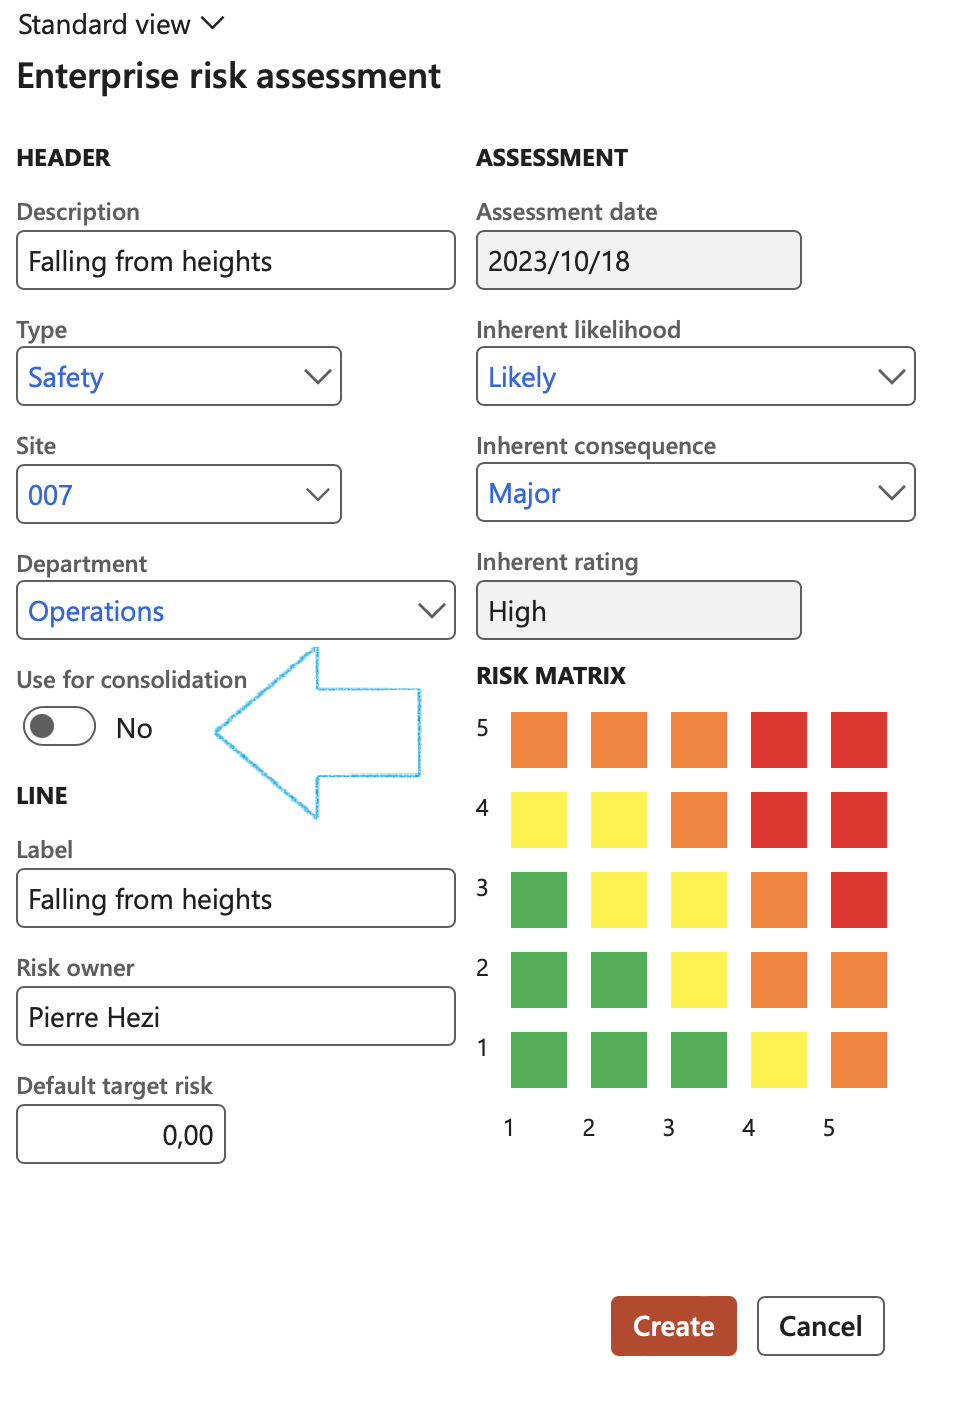
Go to: GRC > Risk > Enterprise risk assessment
- Enter a Description for the Risk register
- Select the relevant Risk type from the dropdown list
- Select the relevant Site from the dropdown list
- Select the relevant Department from the dropdown list
- Move the Use for consolidation slider to Yes if you want to use the Risk register for consolidation
- Enter a line Label
- Enter the name of the Risk owner
- Enter the Default target risk
- Select the relevant Inherent likelihood from the dropdown list
- Select the relevant Inherent consequence from the dropdown list
- Click Create
¶ Step 22.1: Using the Risk assessment wizard
Go to: GRC > Risk > Risk assessment wizard
¶ Wizard Step 1: Classification
- Select the relevant Risk classification
- Click on the Next button
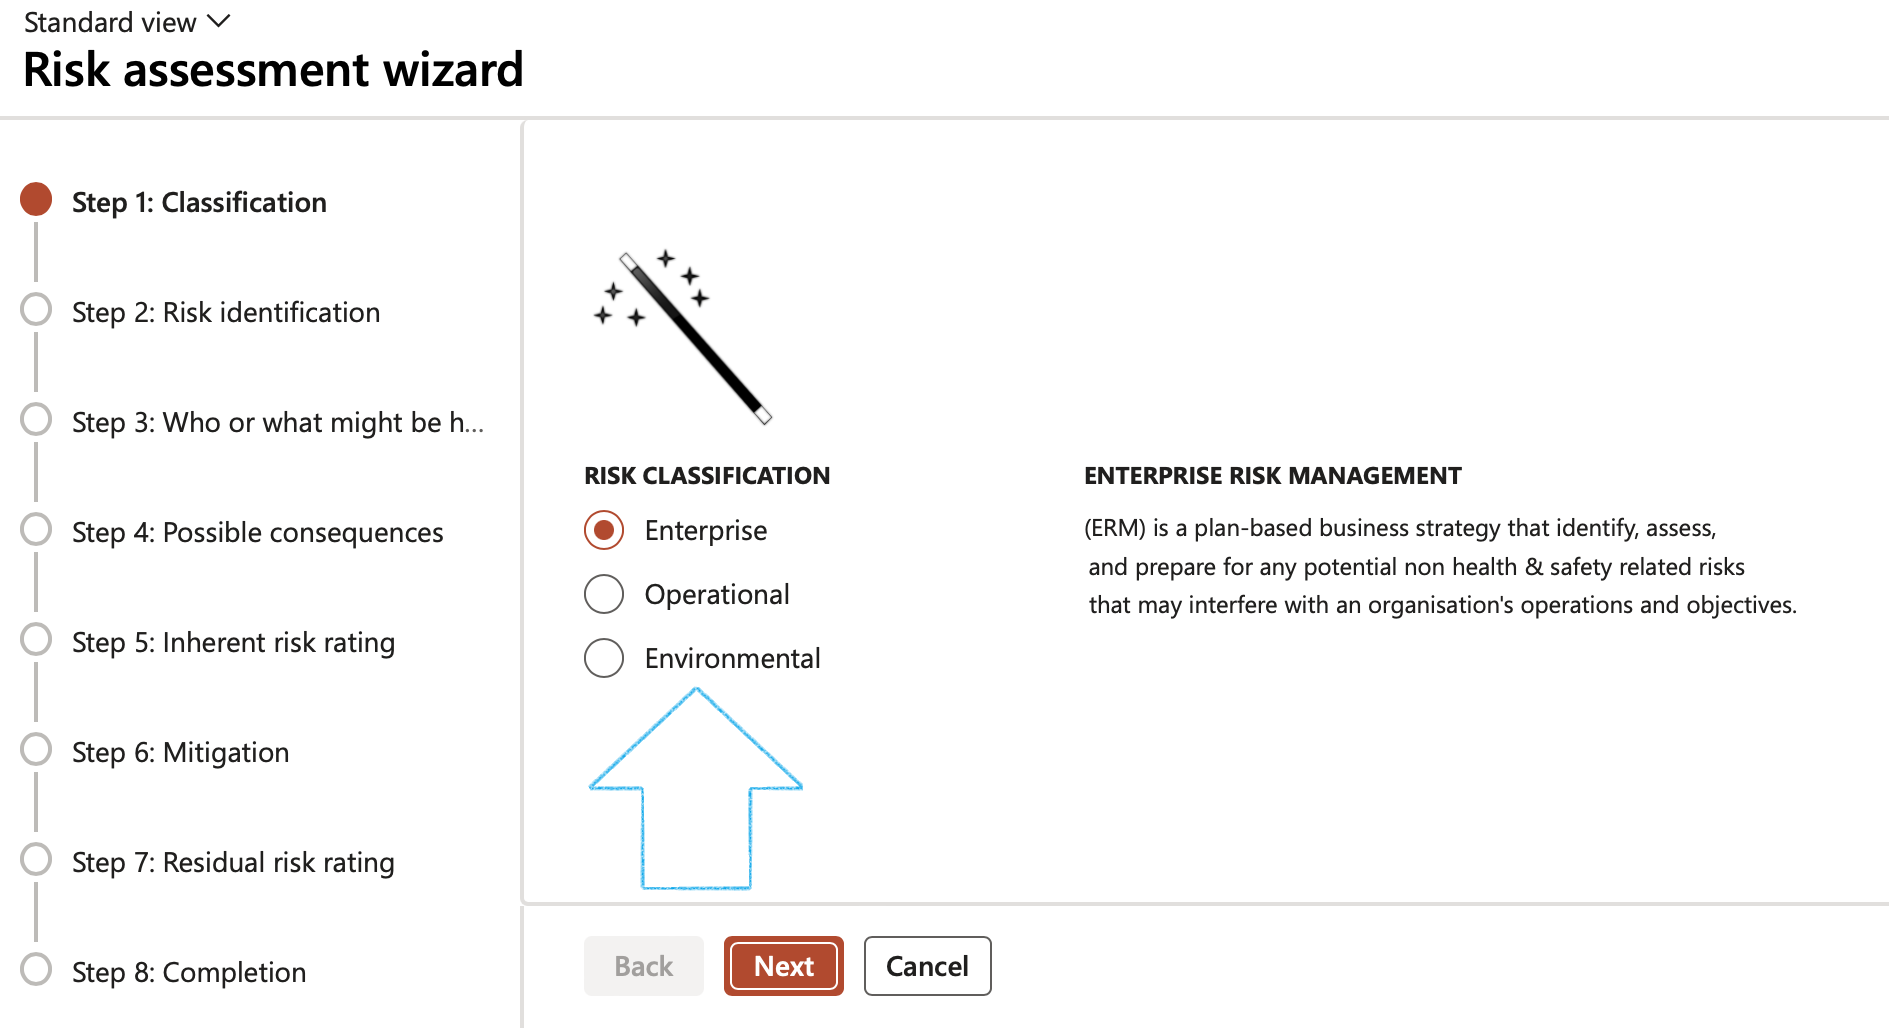
Risk classification definitions:
- Enterprise risk management (ERM) is a plan-based business strategy that identifies, assesses, and prepares for any potential non health & safety related risks that may interfere with an organization's operations and objectives.
- Operational risk management (ORM) is defined as a continual cyclic process which includes risk assessment of hazards with a health & safety impact, risk decision making, and implementation of risk controls, which results in acceptance, mitigation, or avoidance of risk.
- Financial risk management (FRM) is the practice of mitigating loss to economic value in a firm by using financial instruments to manage exposures, such as credit risk and market risk, foreign exchange risk, volatility risk, liquidity risk, inflation risk and commodity risk. (Reserved for future version)
¶ Wizard Step 2: Risk identification
- Under the TEMPLATE Field group, the user has the option to select a Baseline risk
- Under the HEADER DETAIL Field group:
- Enter a description for the Register
- Select the unique Process ID from the dropdown list
- Select the unique Activity ID from the dropdown list
- The Class field will by default be Enterprise
- In the Type field, select the Risk type from the dropdown list
- Under the LINE DEFAULTS Field group:
- Select the relevant Site from the dropdown list
- Select the relevant Department from the dropdown list
- Enter a detailed Description of the risk
- Select the relevant Location from the dropdown list
- Select the relevant Object from the dropdown list
- Select the relevant Job plan from the dropdown list
- In the Risk owner field, indicate the owner of the risk (Employee/Department)
- Under the RISK LINES Field group:
- Click on the Add button
- Enter the risk Label
- Click on the Next button
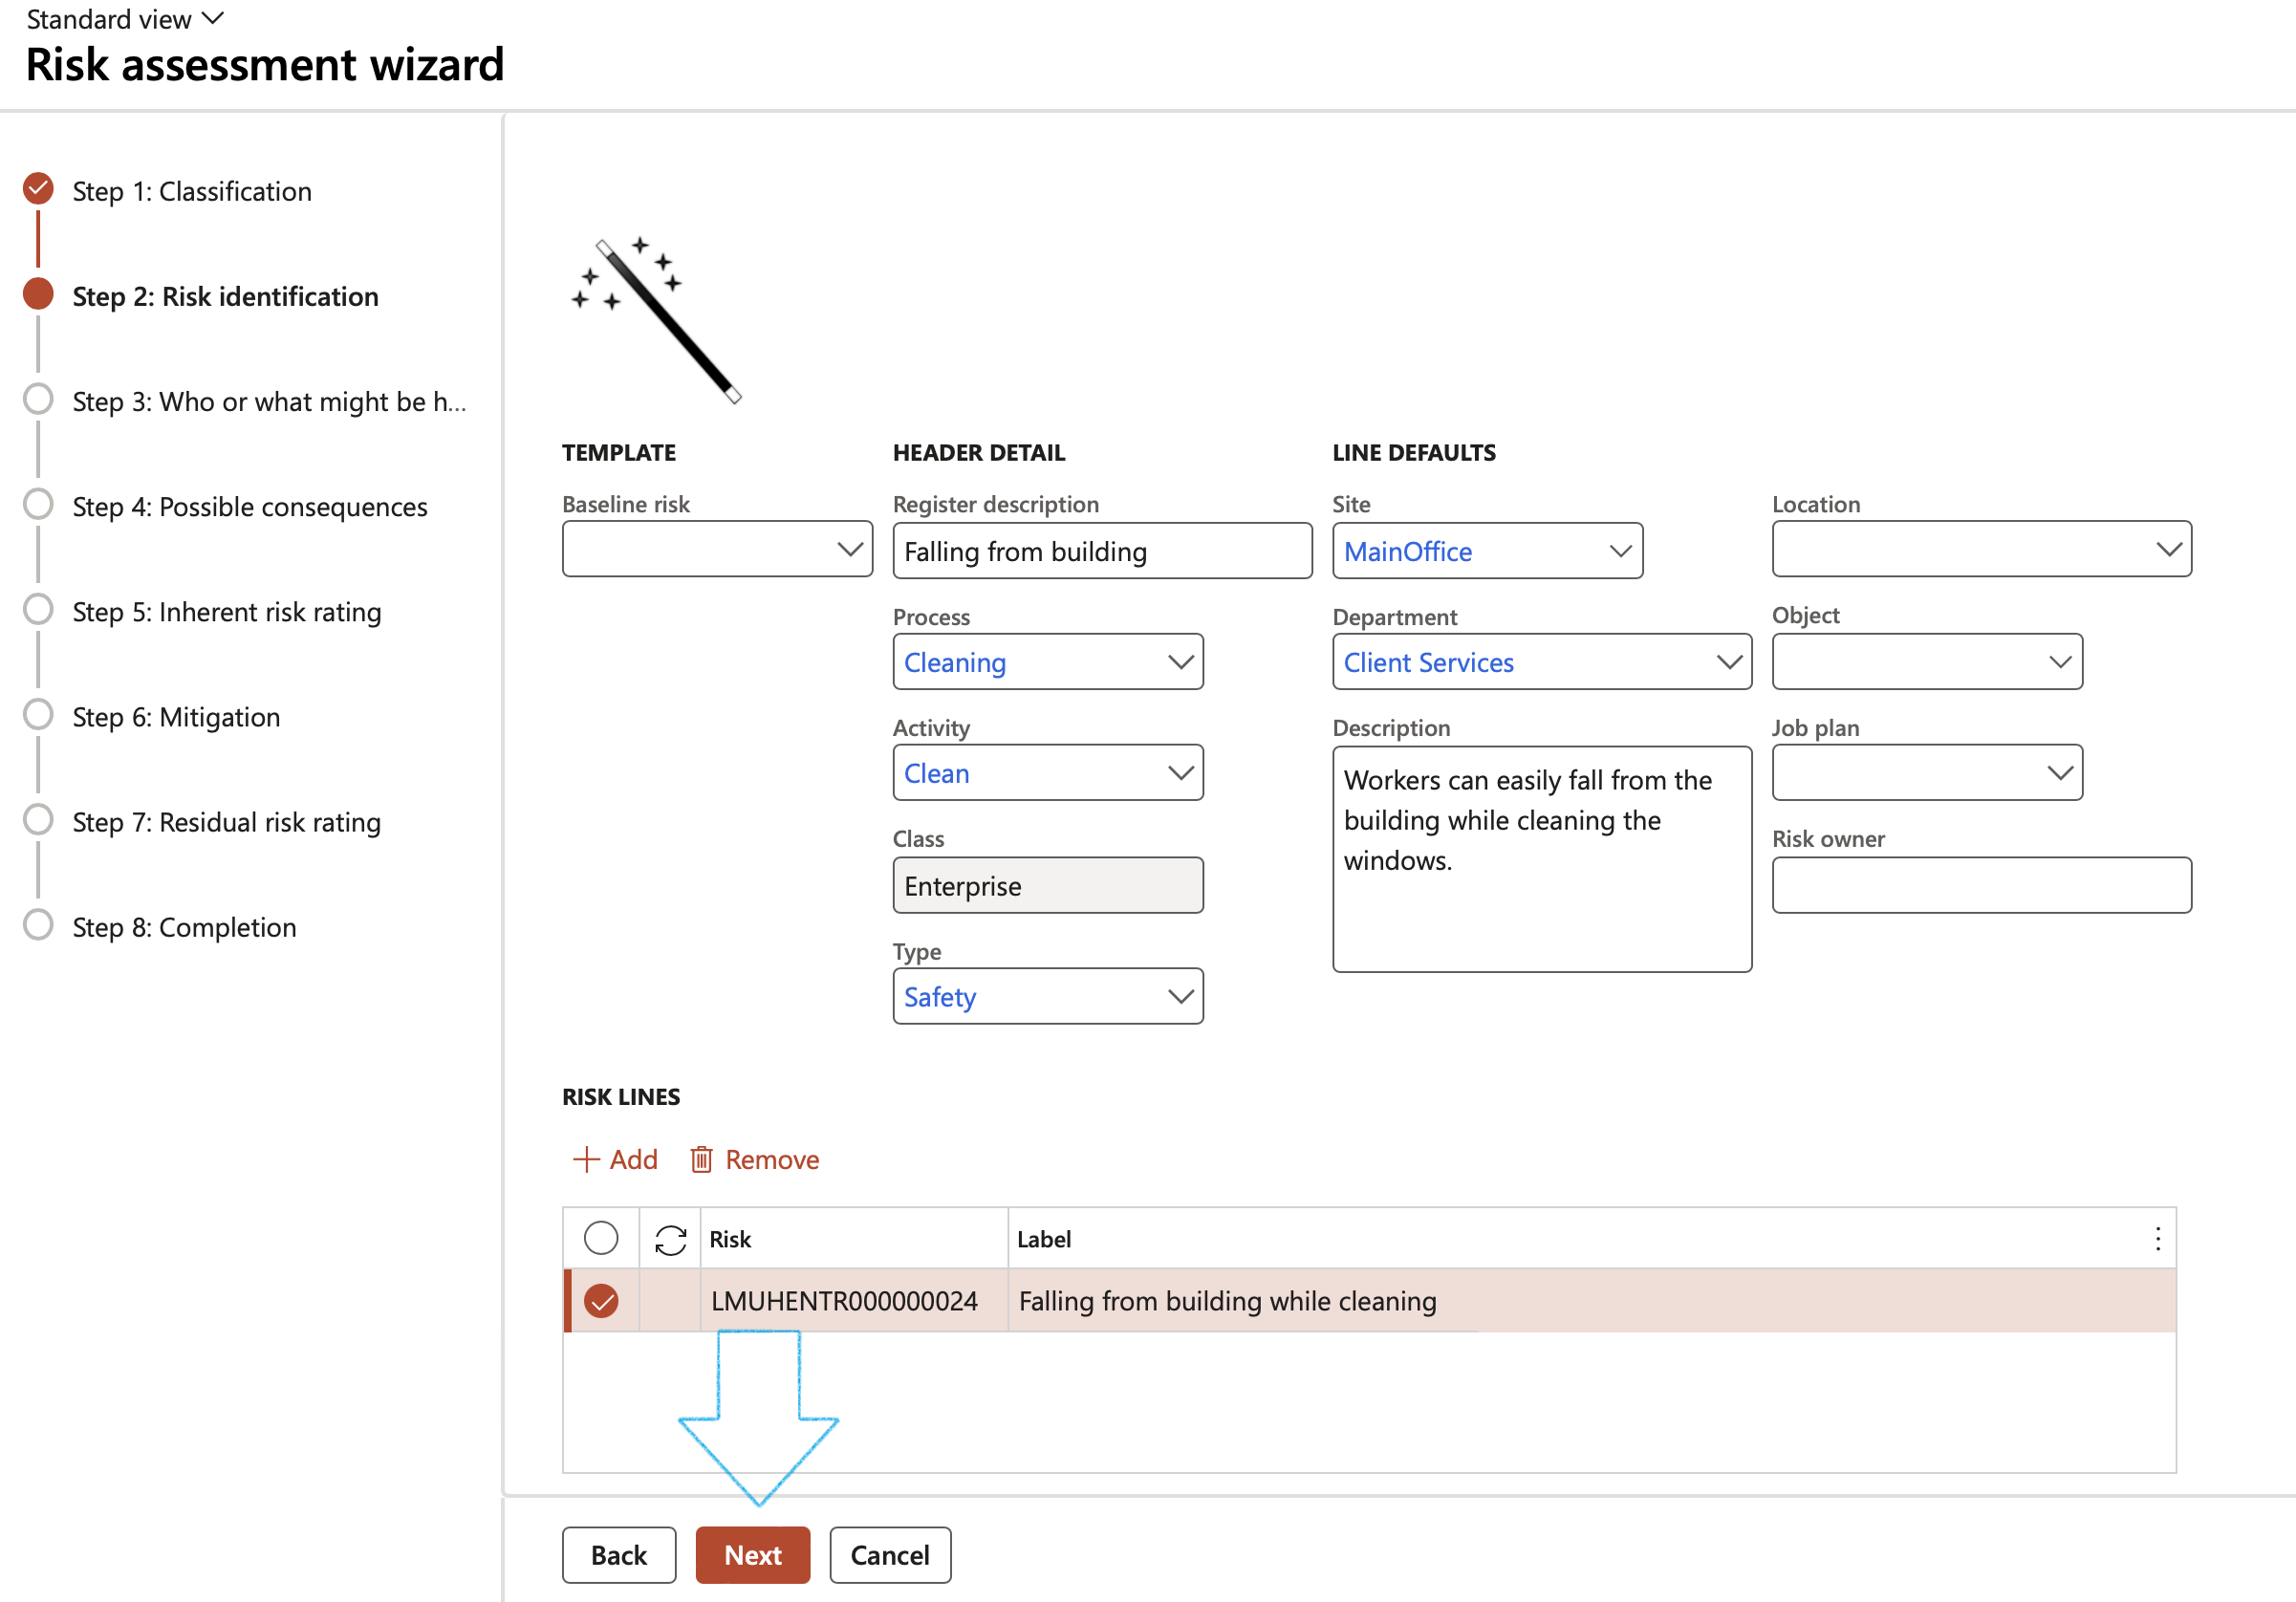
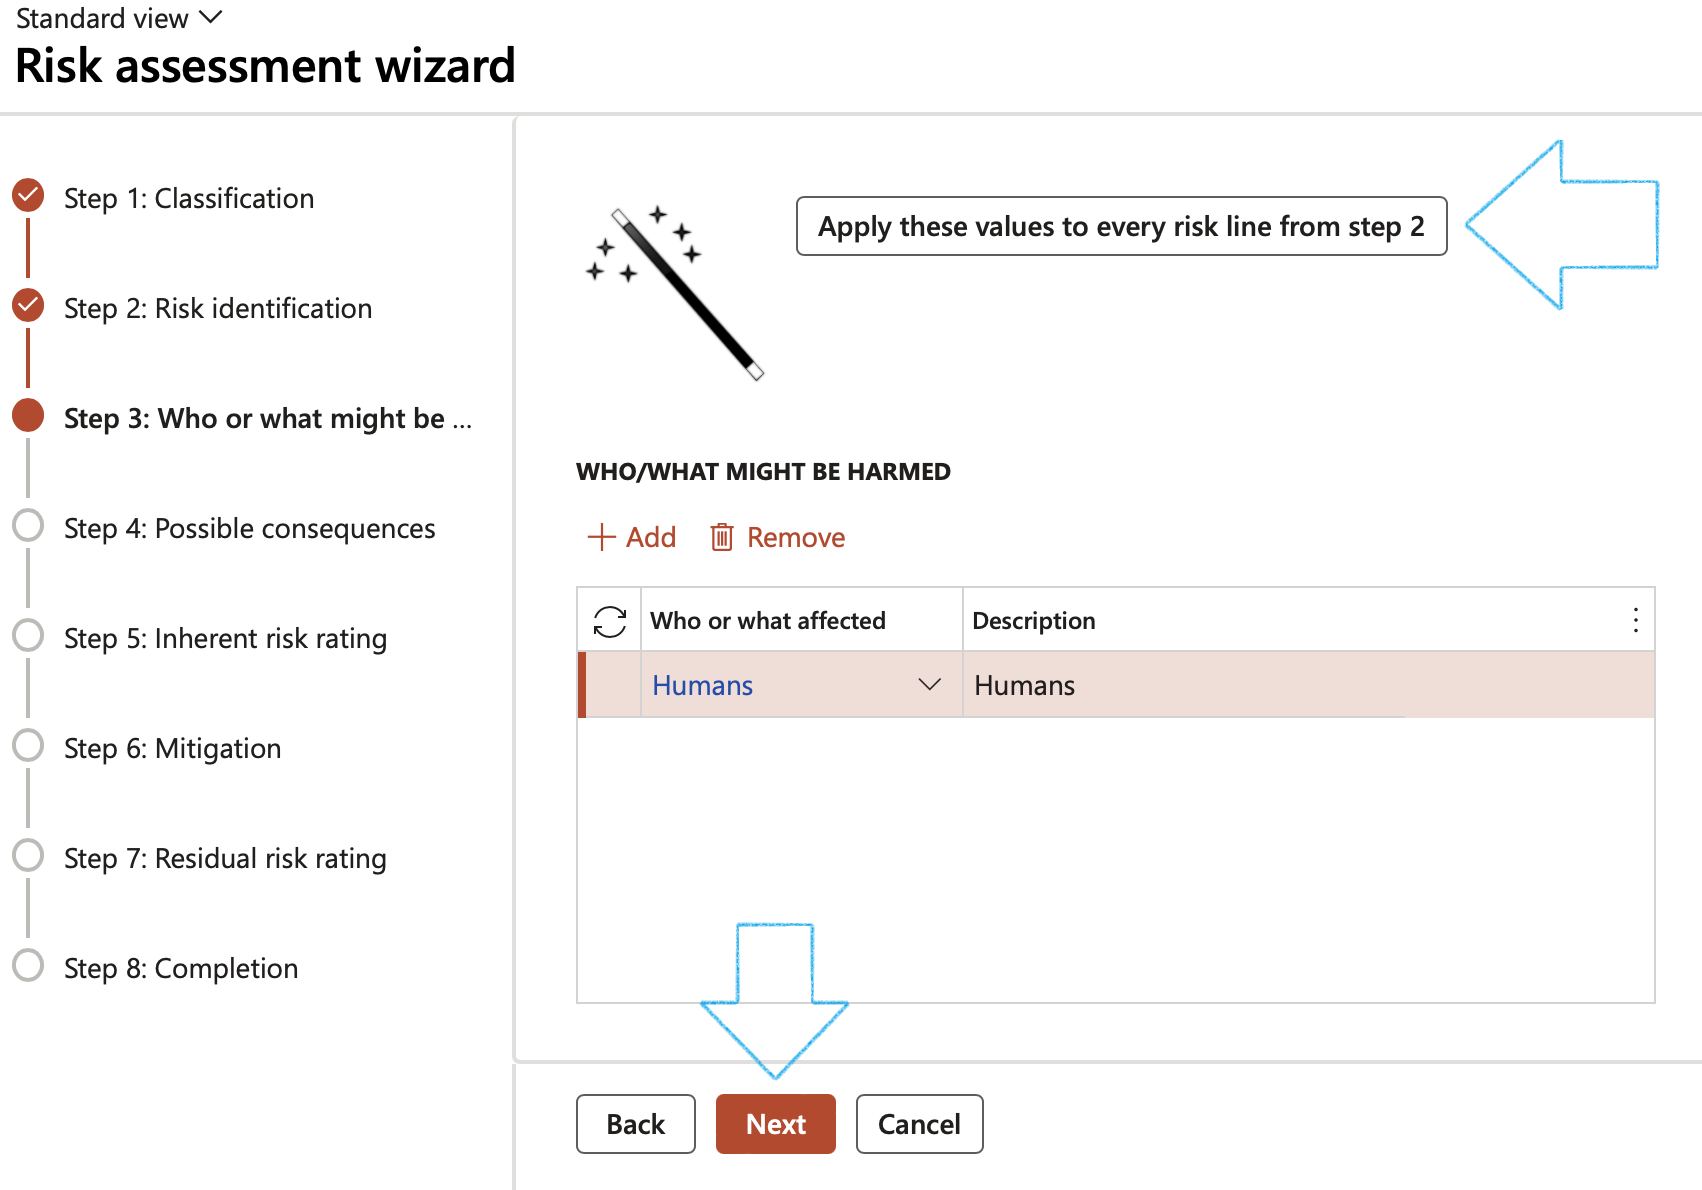
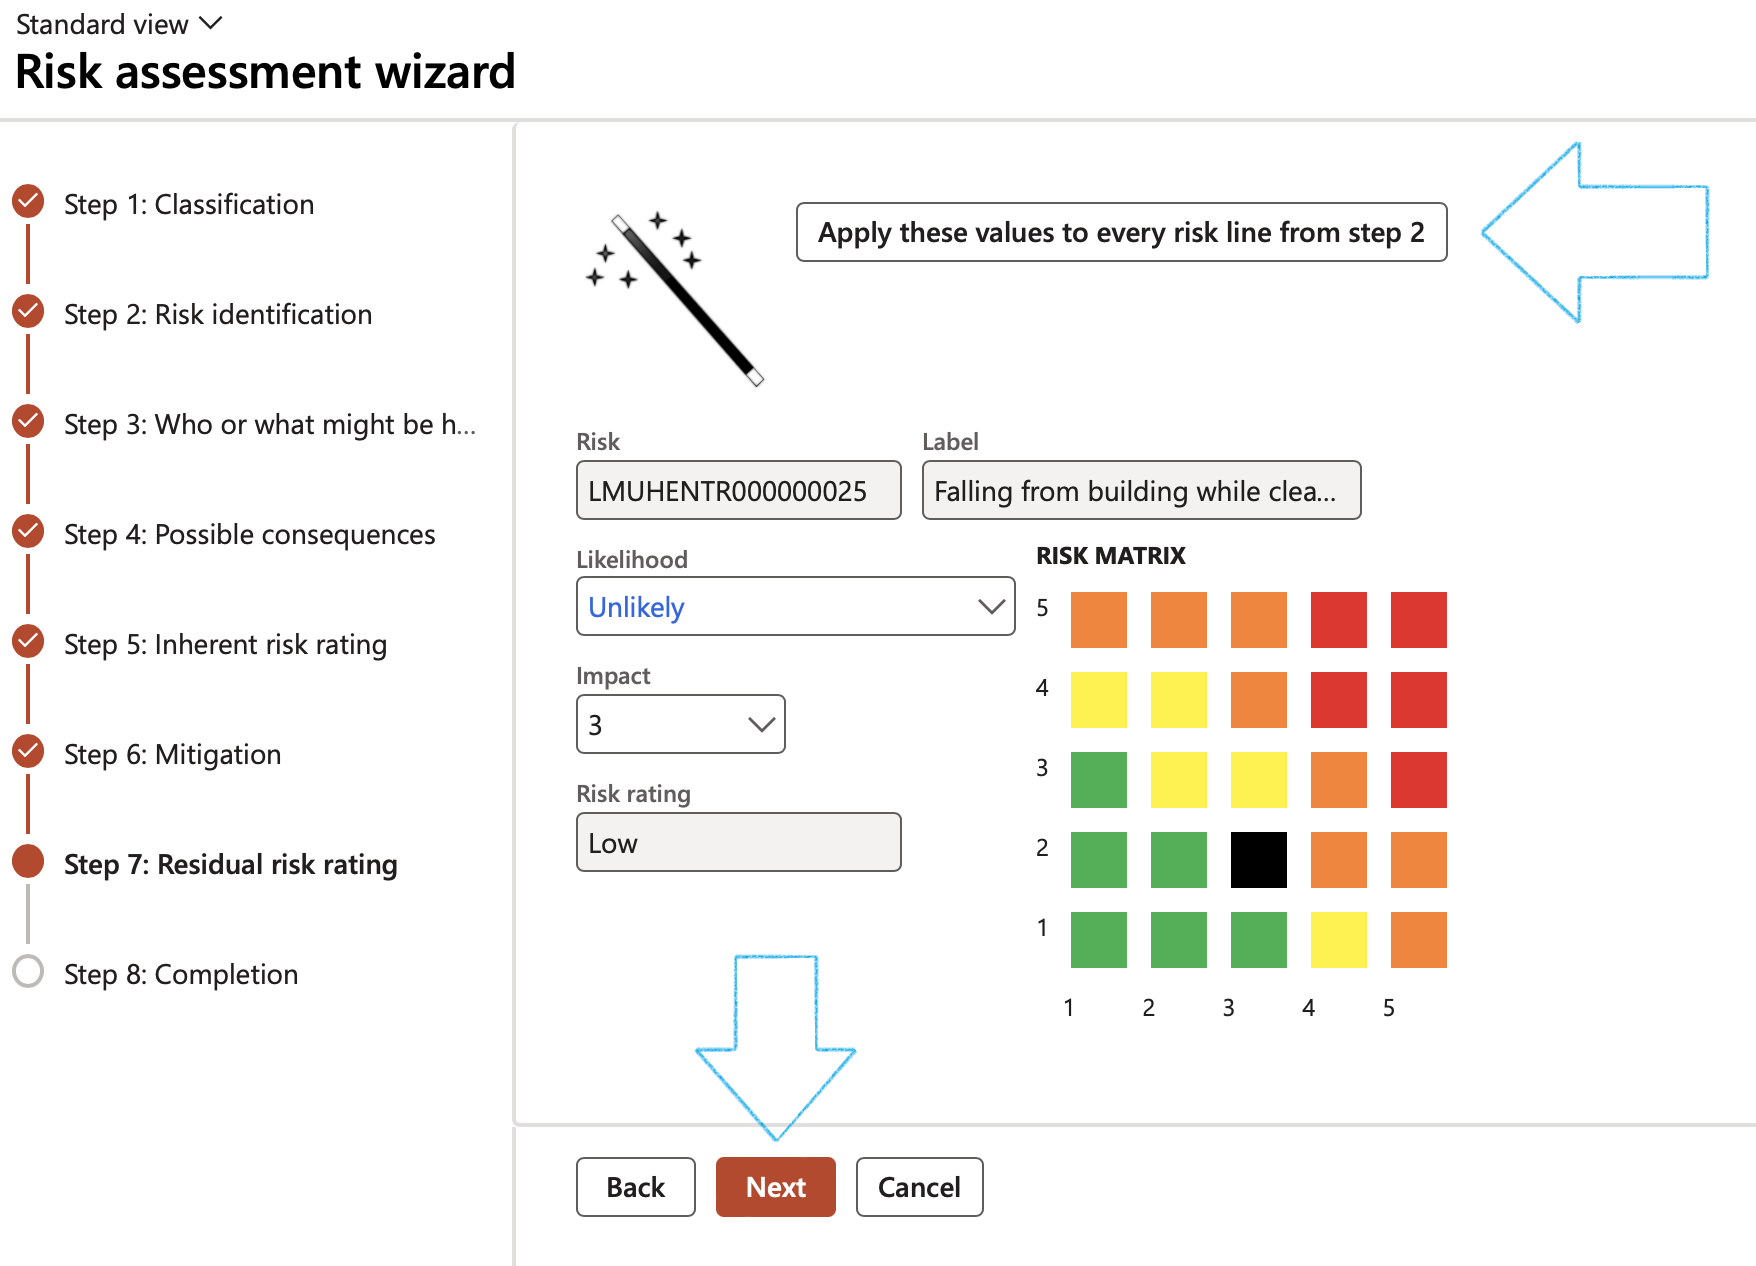
In order to ensure that the information entered from Step 3 to Step 7 is applied to each risk line selected on Step 2, click on the Apply these values to every risk line from step 2 button
¶ Wizard Step 3: Who or what might be harmed
- Click on the Add button
- Select Who or what affected from the dropdown list
- Click Next
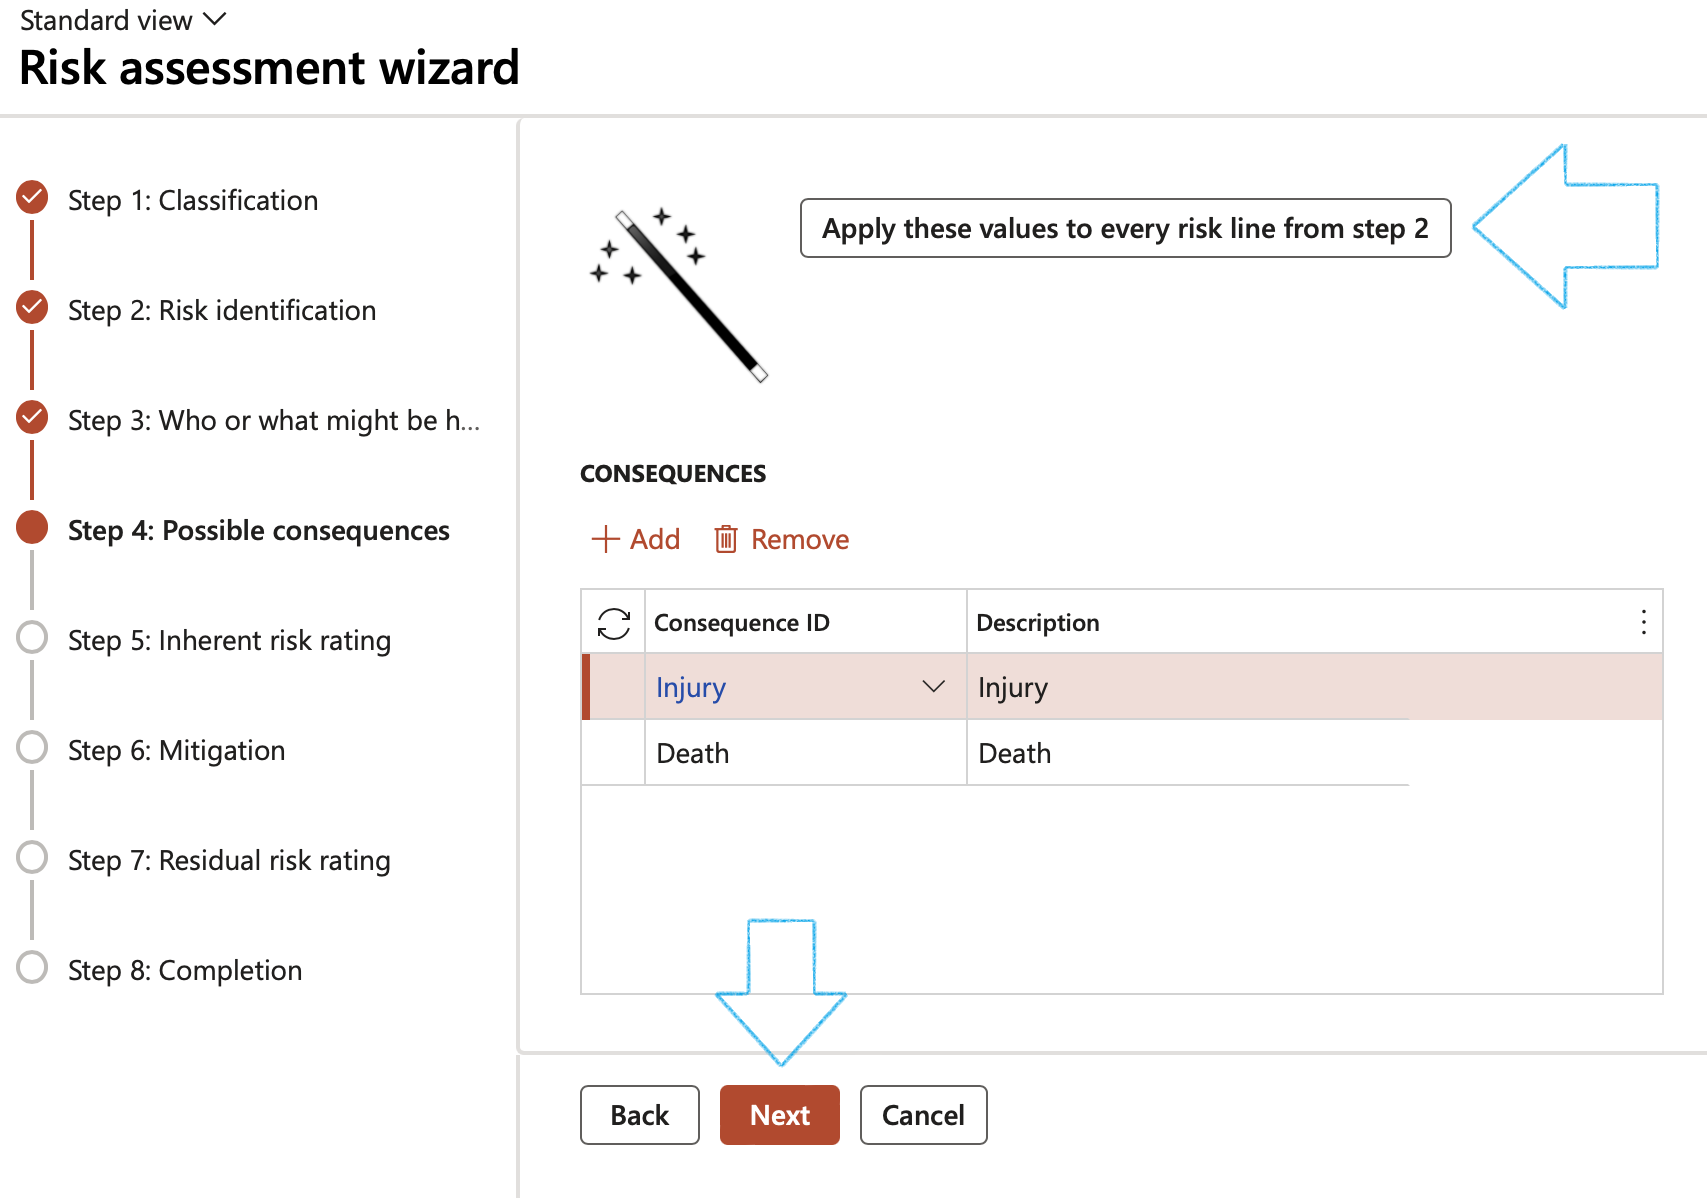
¶ Wizard Step 4: Possible consequences
- Click on the Add button
- Select the relevant Consequences from the dropdown list
- Click on Next
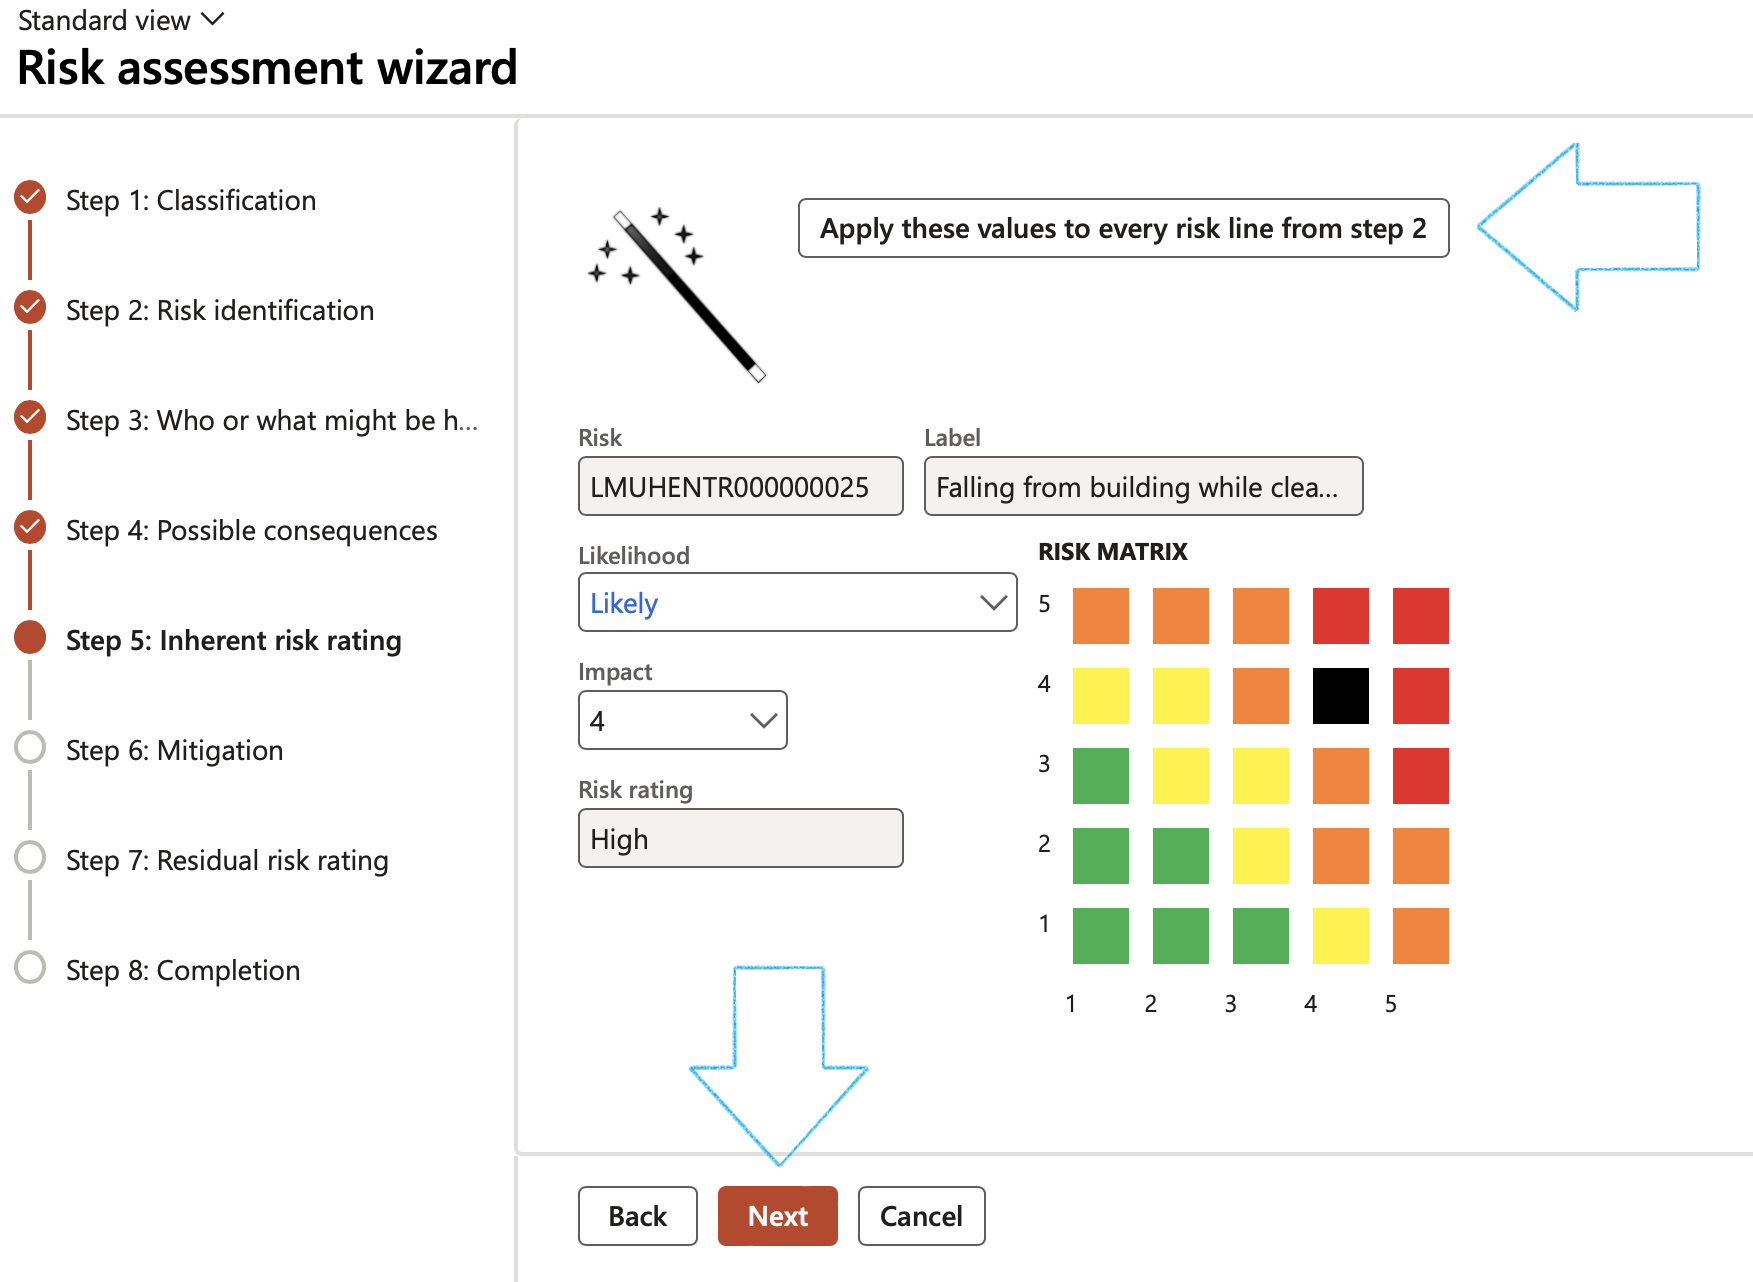
¶ Wizard Step 5: Inherent risk rating
- Select the Likelihood and Impact ratings
- Click Next
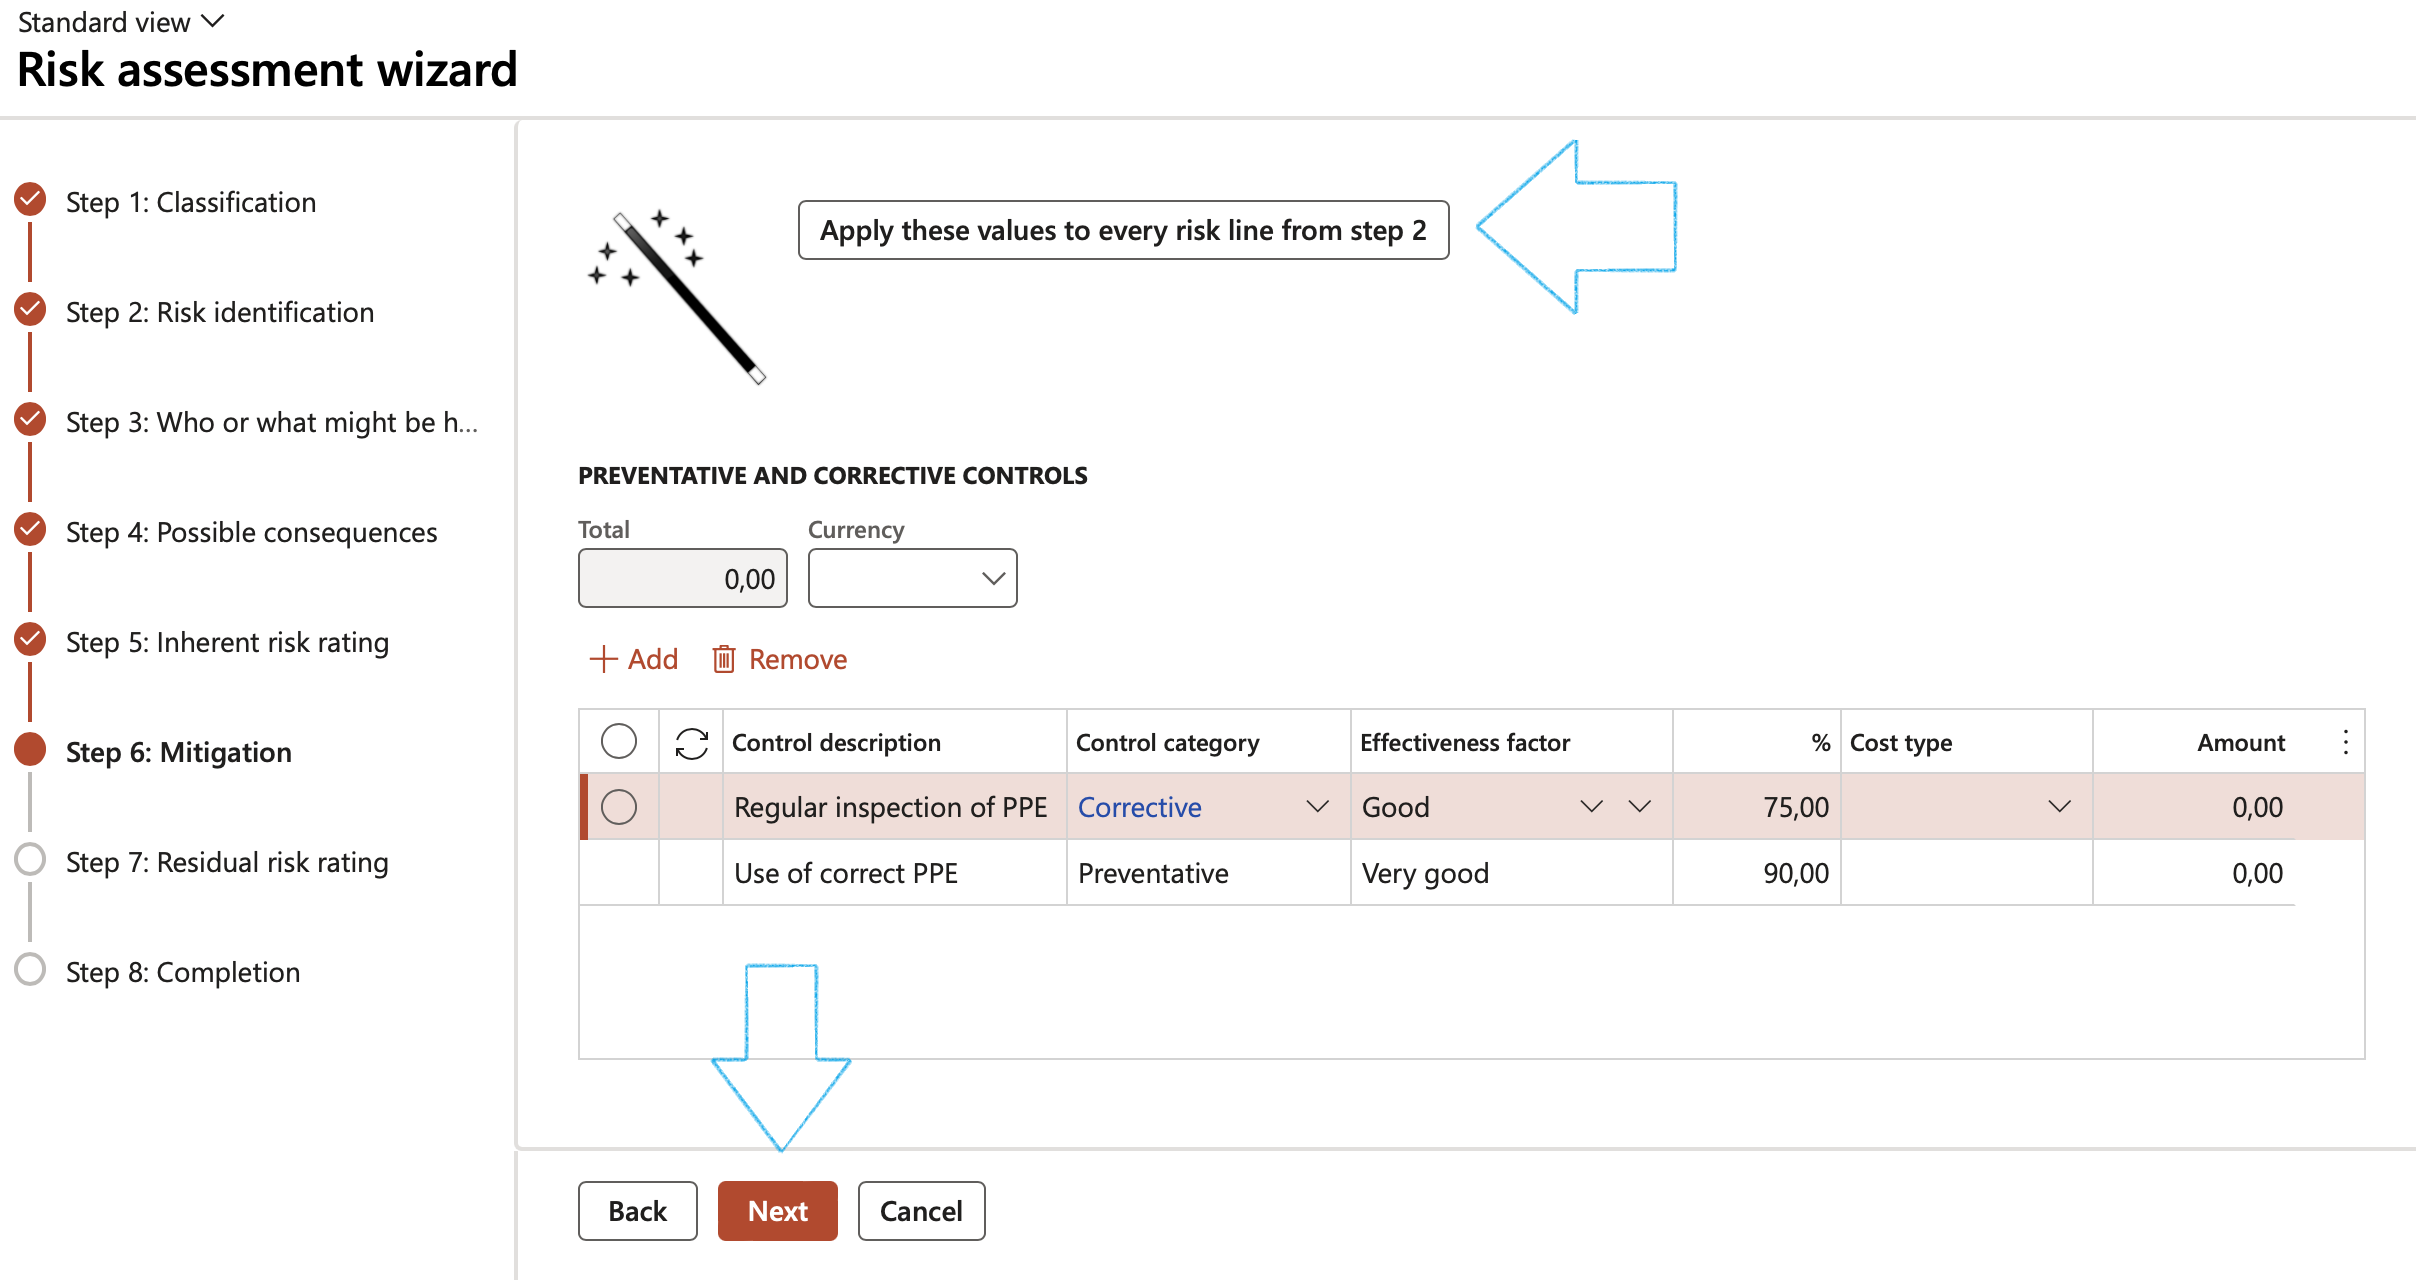
¶ Wizard Step 6: Mitigation
- Click on the Add button
- Enter the Control description
- Select the relevant Control type from the dropdown list
- Select the relevant Effectiveness factor from the dropdown list
- Select the relevant Cost type from the dropdown list
- Enter the Amount
- Click Next
¶ Wizard Step 7: Residual risk rating
- Select the Likelihood and Impact ratings
- Click Next
¶ Wizard Step 8: Completion
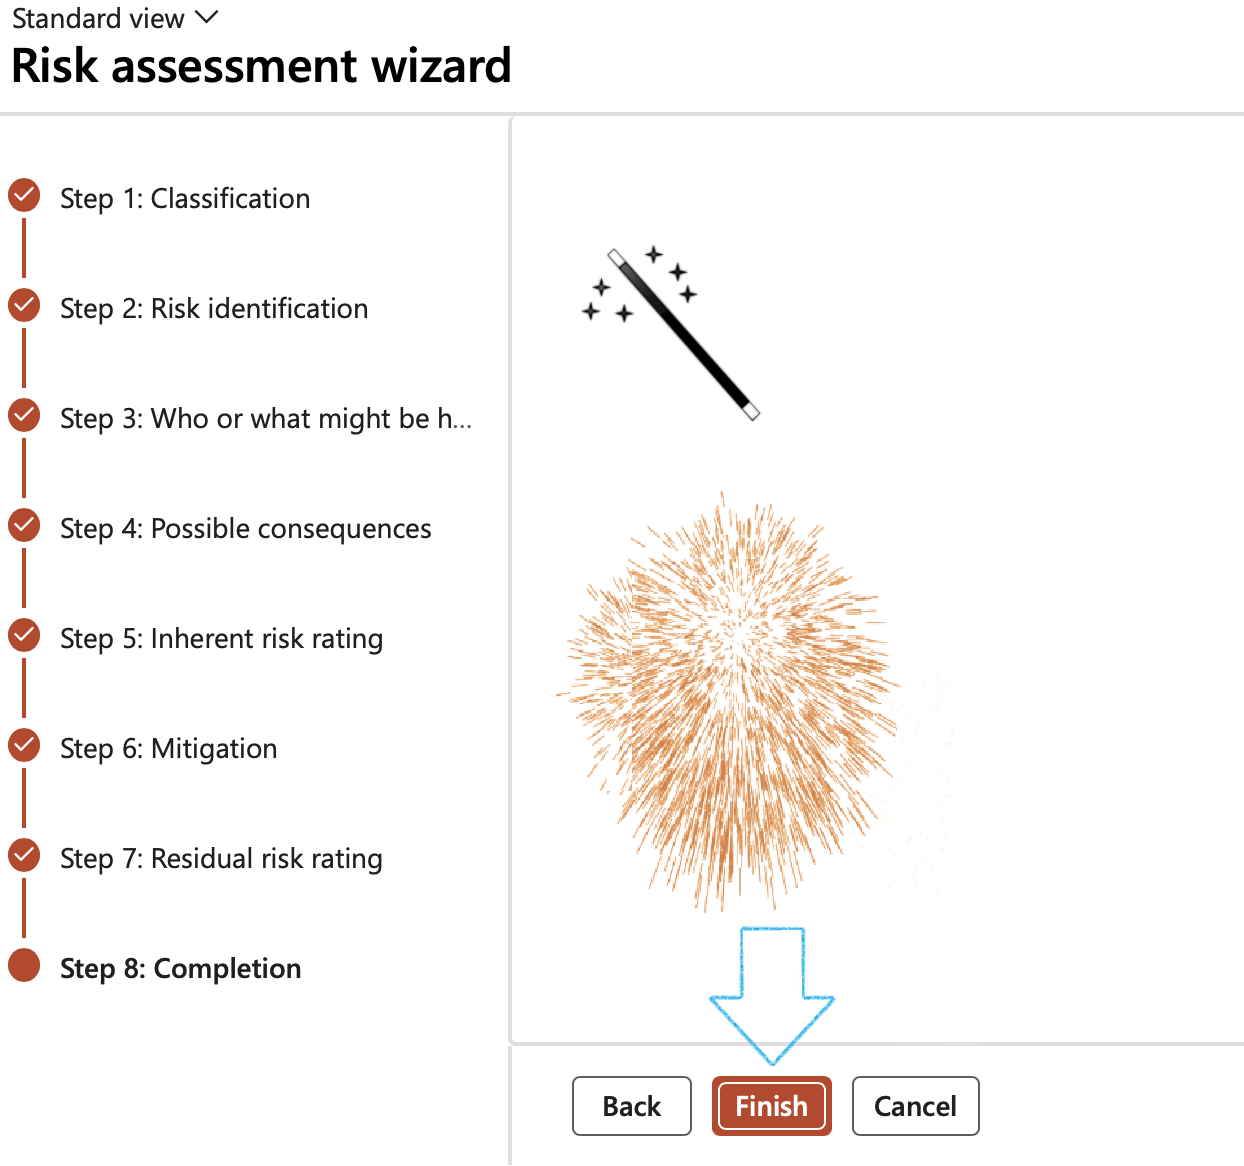
- On the Completion form, click on the Finish button
In order to go to the previous screen, the user can choose to click on the Back button at any stage.
When the Cancel button is clicked a warning will pop up to warn the user that all data that has been entered, will be lost.
¶ Step 23: Critical control questionnaire
A set of questions are setup under the Questionnaire module. When these questions are answered, and the final answer triggers an update to the controls as being "Critical" or not.
A process for selecting critical controls
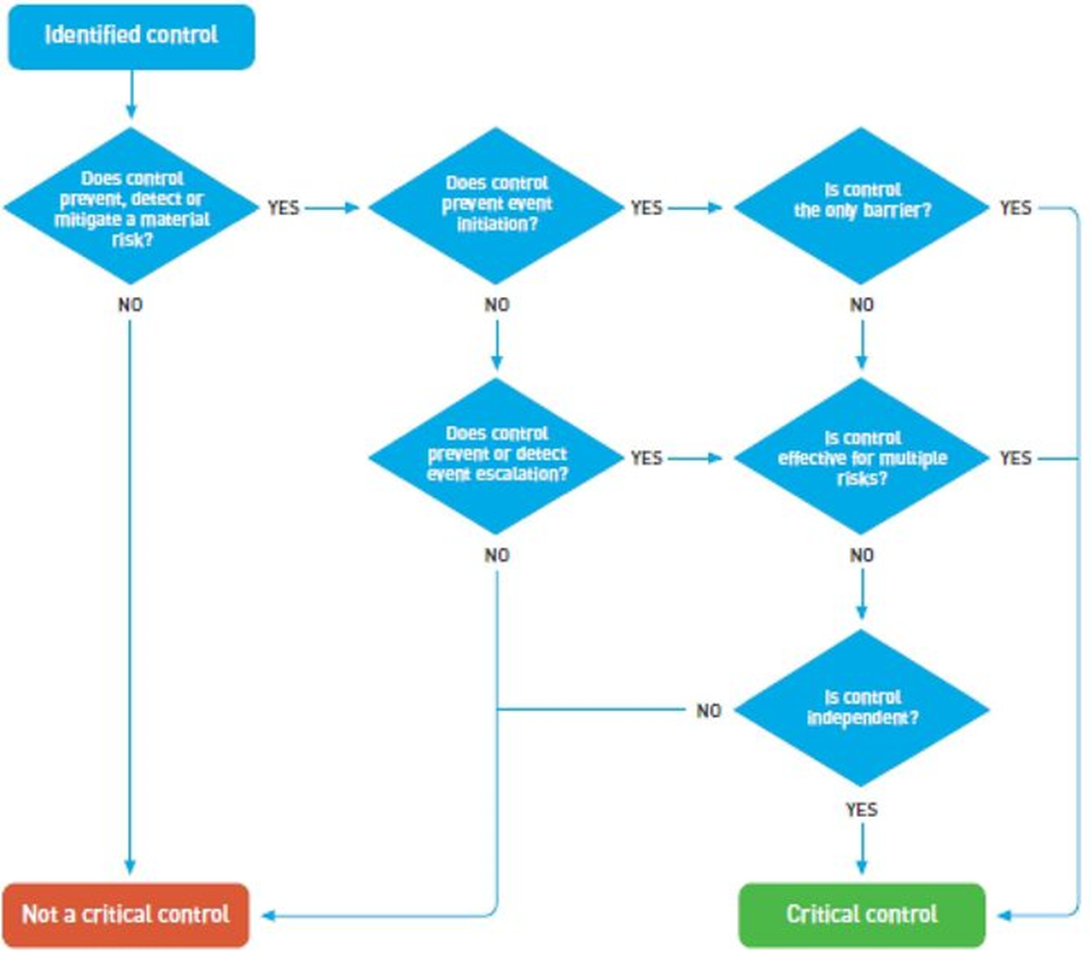
For the system to be able to update the control on the Control galaxy according to the outcome of the questionnaire, the last question in the questionnaire has to prompt the user to select YES. This last question has to be set up with the “If ‘yes’ update control” slider set to Yes.

Go to: GRC > Risk > Critical control questionnaire
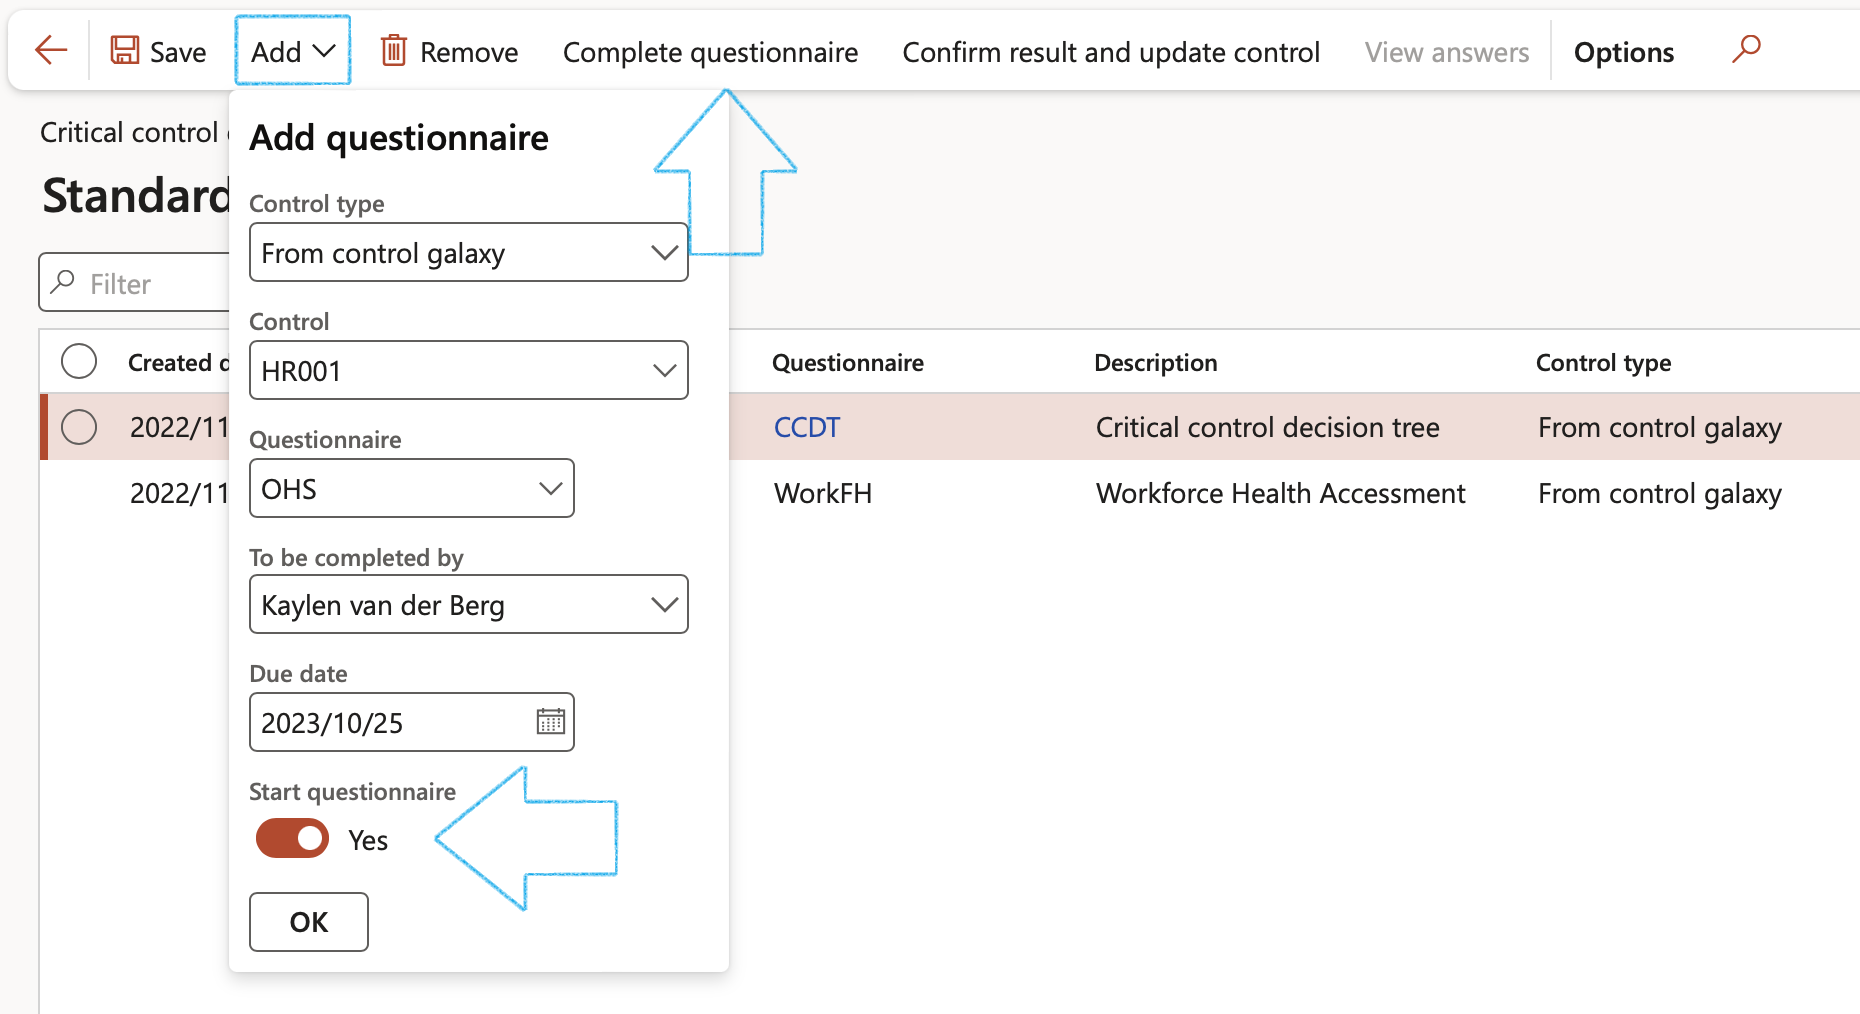
- In the Action pane click on the Add button
- On the Add questionnaire dialog:
- Select the relevant Control type from the dropdown list
- Select the relevant Control from the dropdown list
- Select the relevant Questionnaire from the dropdown list
- Select the name of the person who has to complete the questionnaire from the dropdown list
- Enter the Due date
- If you want to start the questionnaire when OK is clicked, move the Start questionnaire slider to Yes. The Questionnaire can also be started by clicking on the Complete questionnaire button in the Action pane.
On the Questionnaire, under the Compliance Fast tab, Risk assessment must be selected in the Used for field
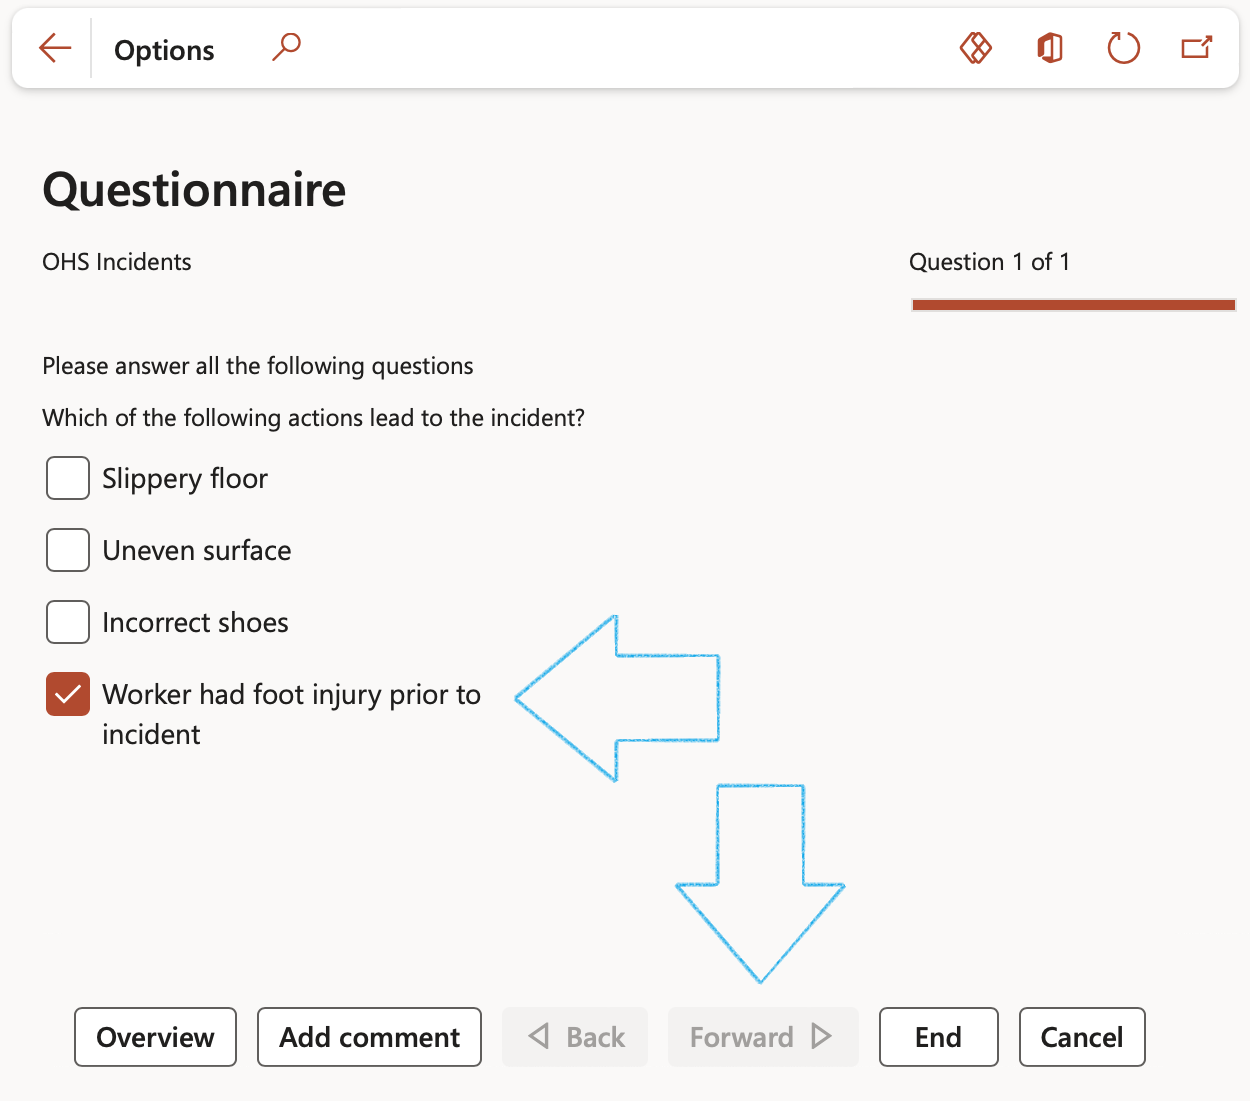
- Complete the questionnaire by answering all the questions and clicking on the Forward button at the bottom of the screen
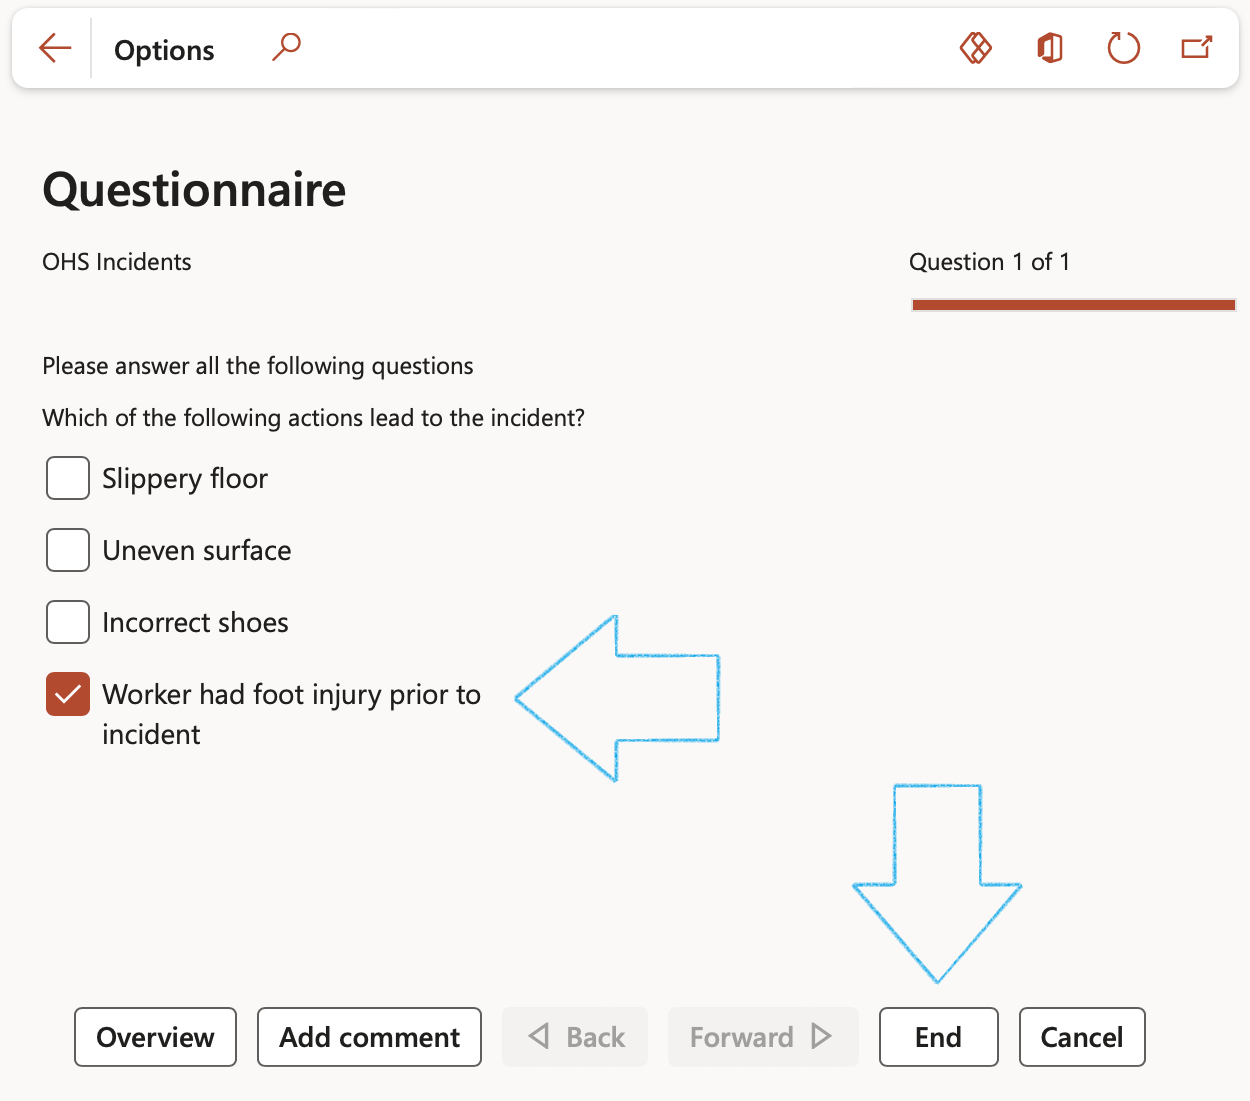
- If this is a critical control, the user will be asked to select Yes as confirmation
- Click on the End button at the bottom of the screen
- On Action pane of the Critical control questionnaire, click on the Confirm result and update control button

- If the last question was answered with Yes, and the “If ‘yes’ update control” slider on this question is set to Yes, the control will be flagged as Critical on the Control galaxy

¶ Step 24: Risk management report
The risk management report is an important document in the risk management file and acts as a check or quality control which provides an assurance that the risk management plan has been implemented correctly, the overall residual risk is acceptable, and that mechanisms are in place for the compilation of production and post-production information.
Detailed Risk management reports can be created by selecting a baseline (template) on the Risk register header under the General Fast tab
Go to: GRC > Risk > Risk registers > Enterprise risk registers
- Open the relevant Risk register
- Open the Header view
- Under the General Fast tab, select the relevant Baseline (template) for printing the Risk management report
- In the Action pane, in the Print group, click on the Create risk report button
A blue line will confirm that the report has been created, and the report will be referenced in the Actual report field
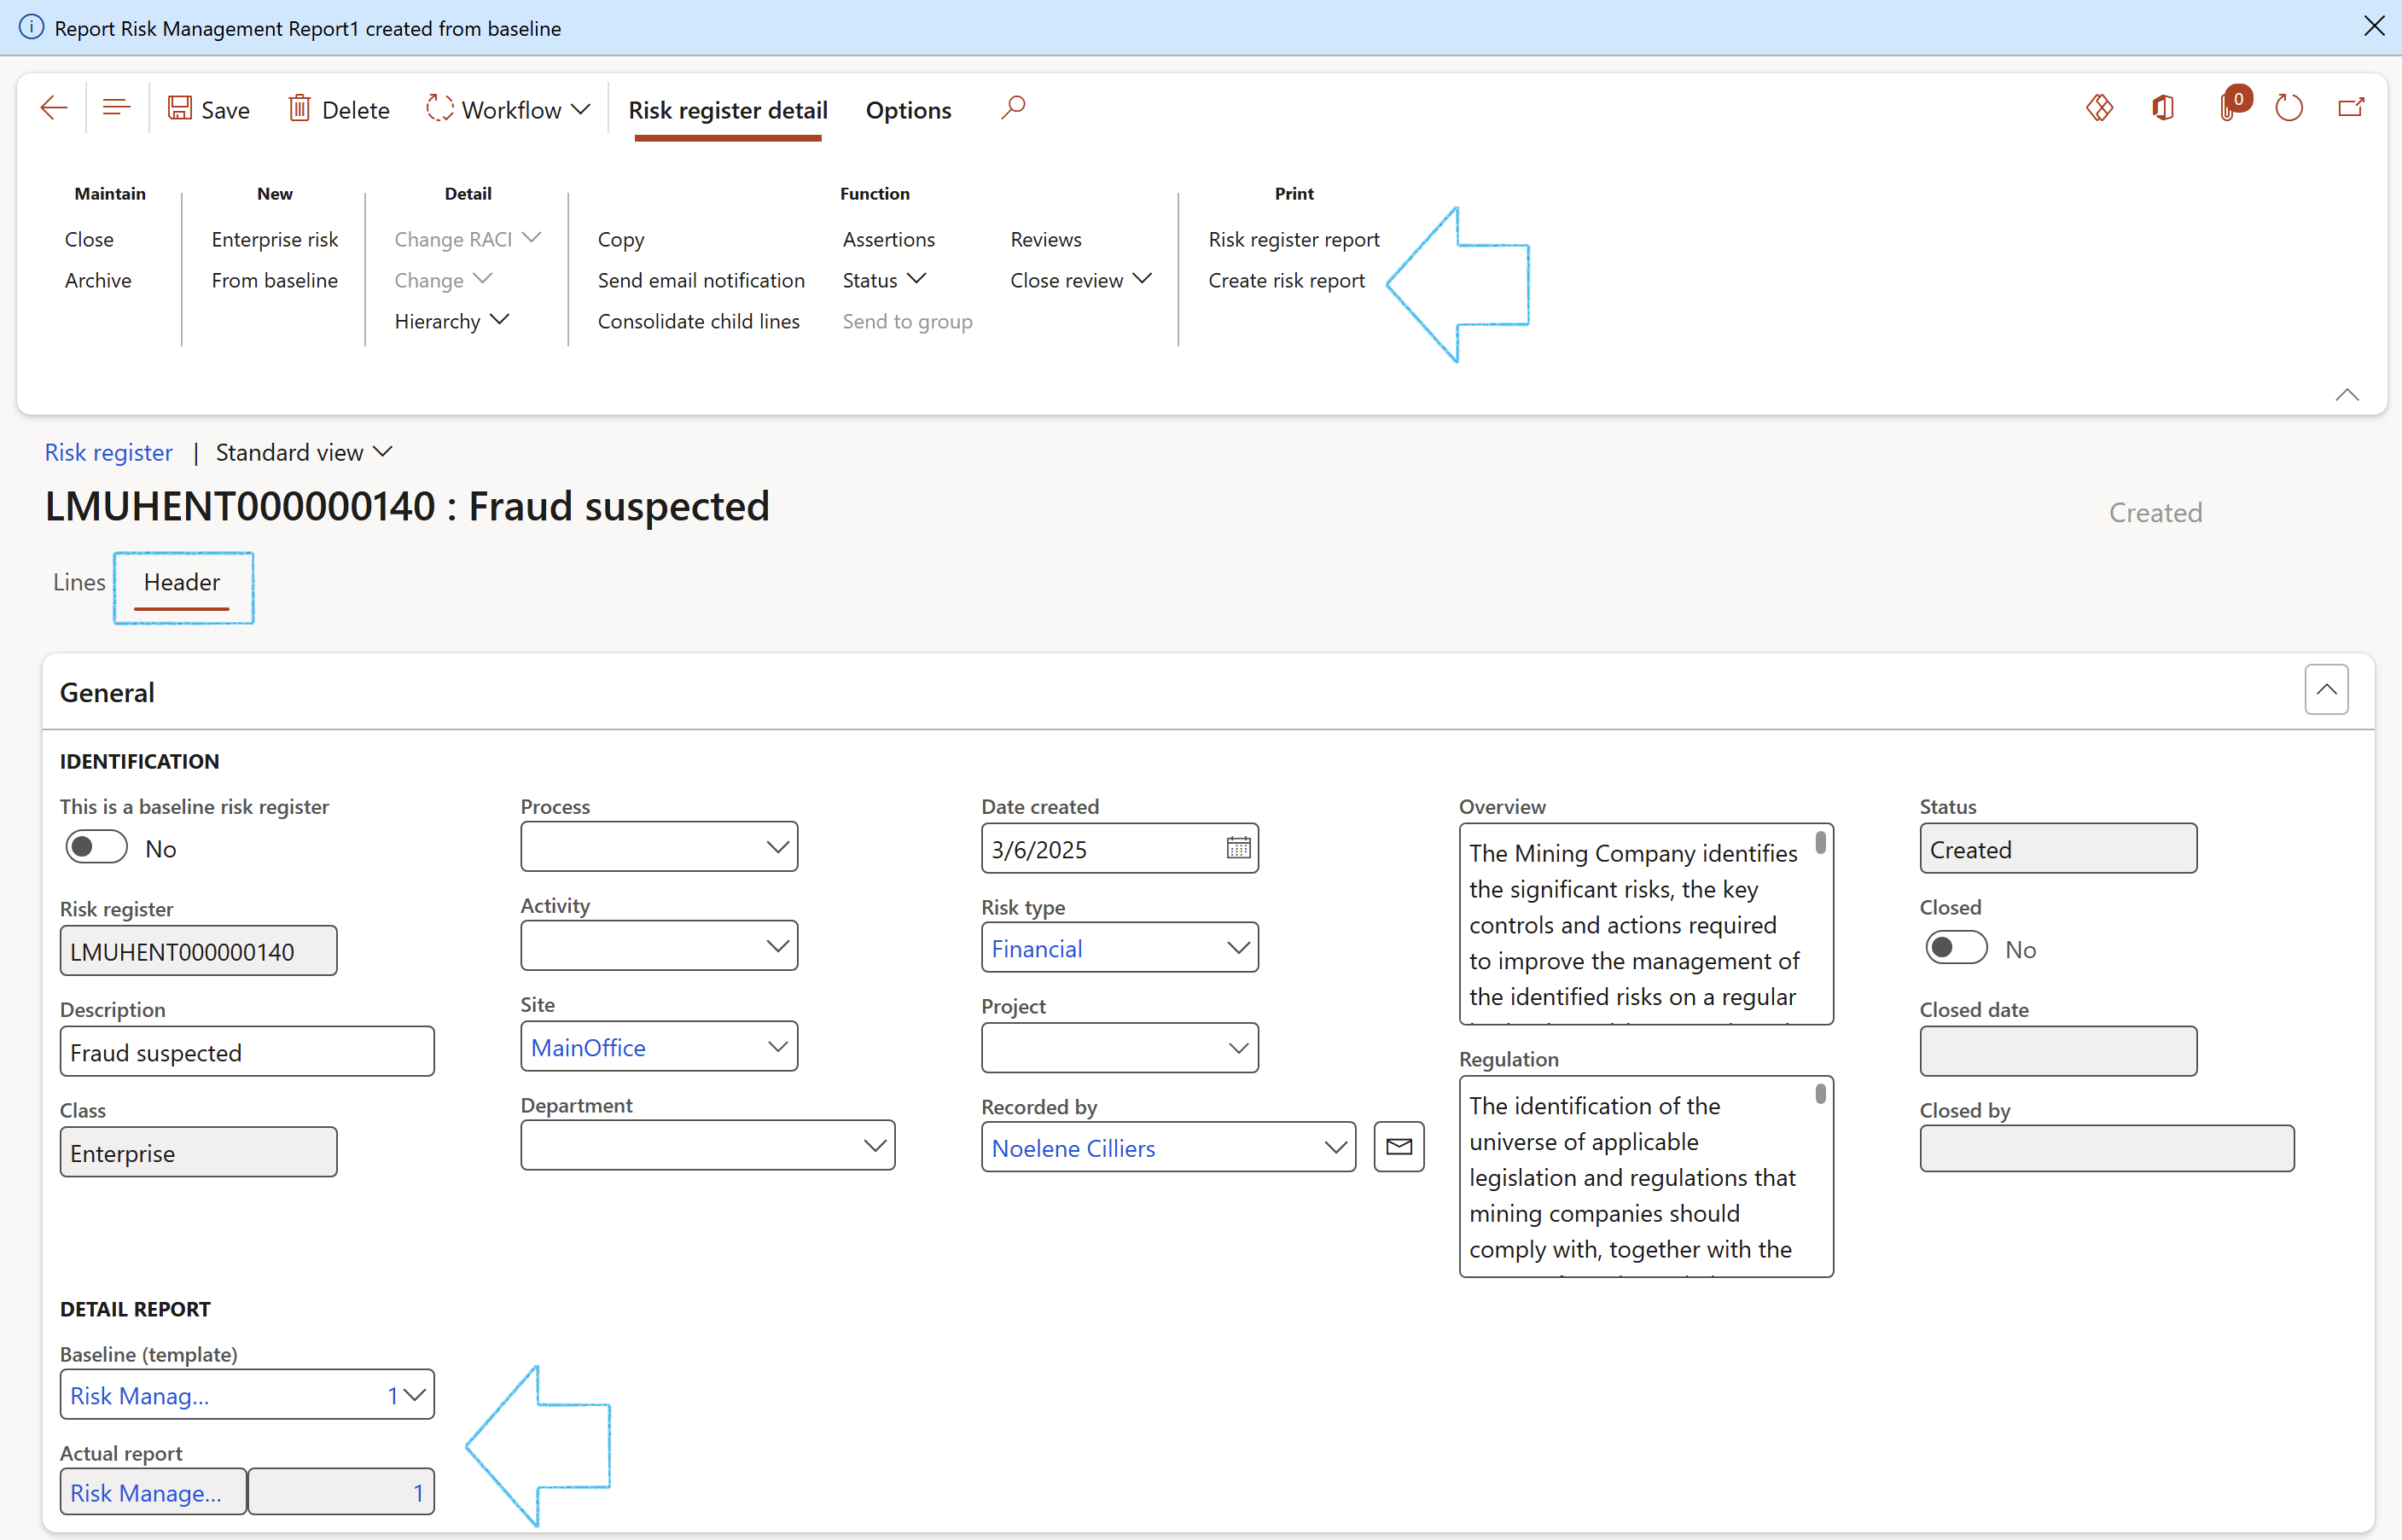
The report can be printed by clicking on the Print icon next to the Actual report field
Go to: GRC > Risk > Risk management reports
- Open the newly created record
- On the Action pane, click on the Print button and click on Print document
- On the Print dialog you have the option to choose to print the Cover page of the report
- Click on OK
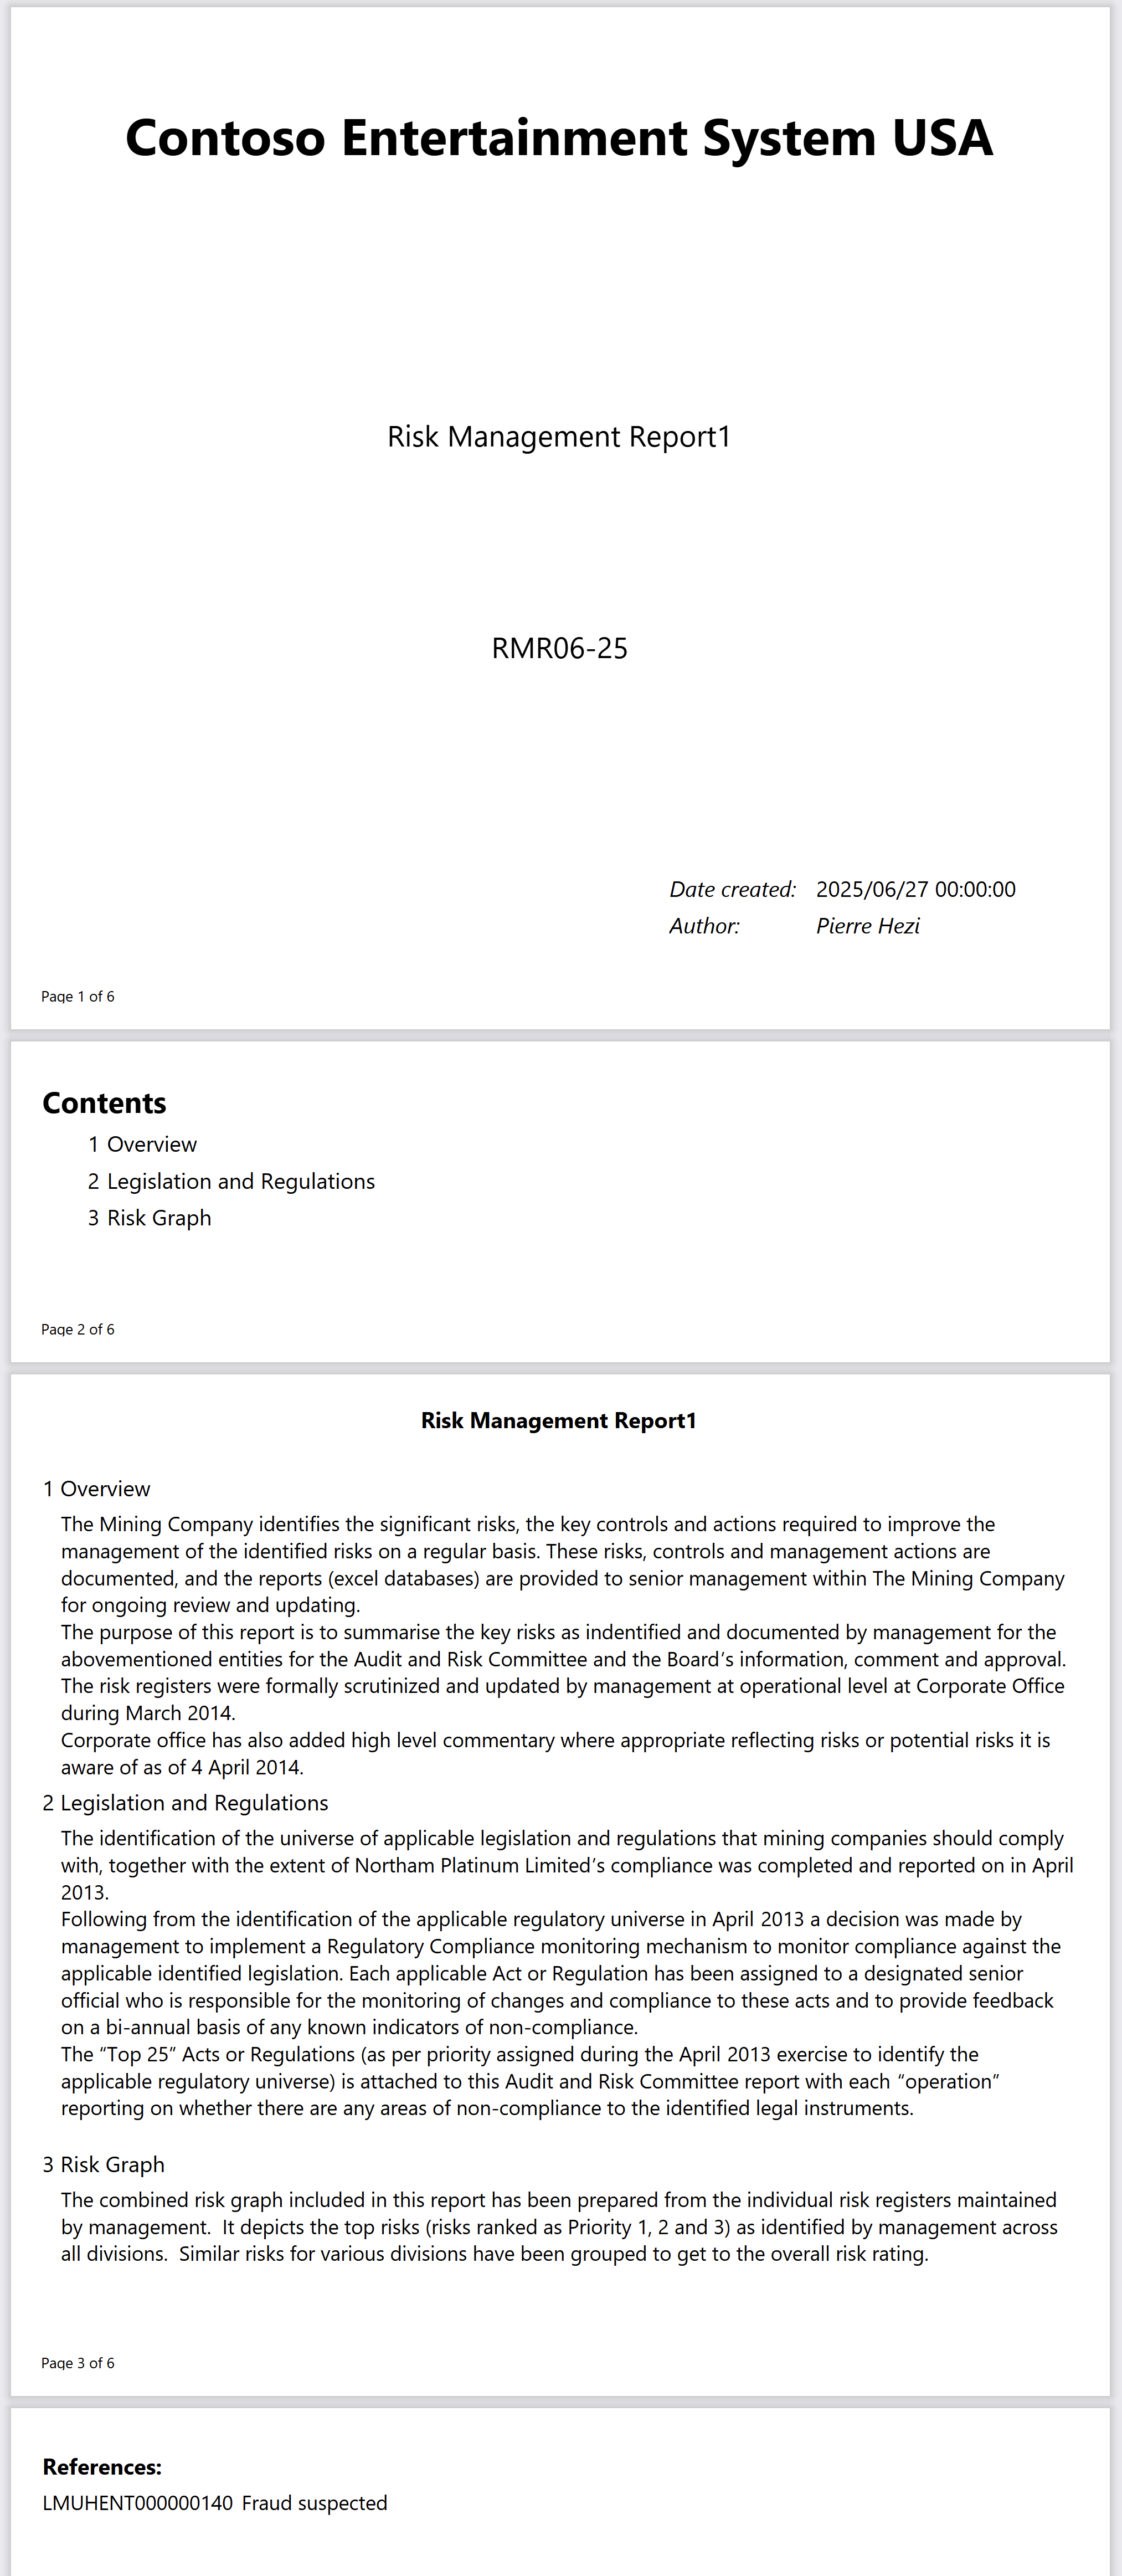
The Risk register will be referenced under References on the report
¶ Step 25: Consolidation
Risk consolidation allows users to evaluate the risks of different departments or divisions inside one legal entity as well as different subsidiaries across a group of companies from the bottom up, and consolidate them at group level. Users can choose the risks to be consolidated from a lower level organization unit, and submit them to the upper level organization unit, until all risks reach the group level.
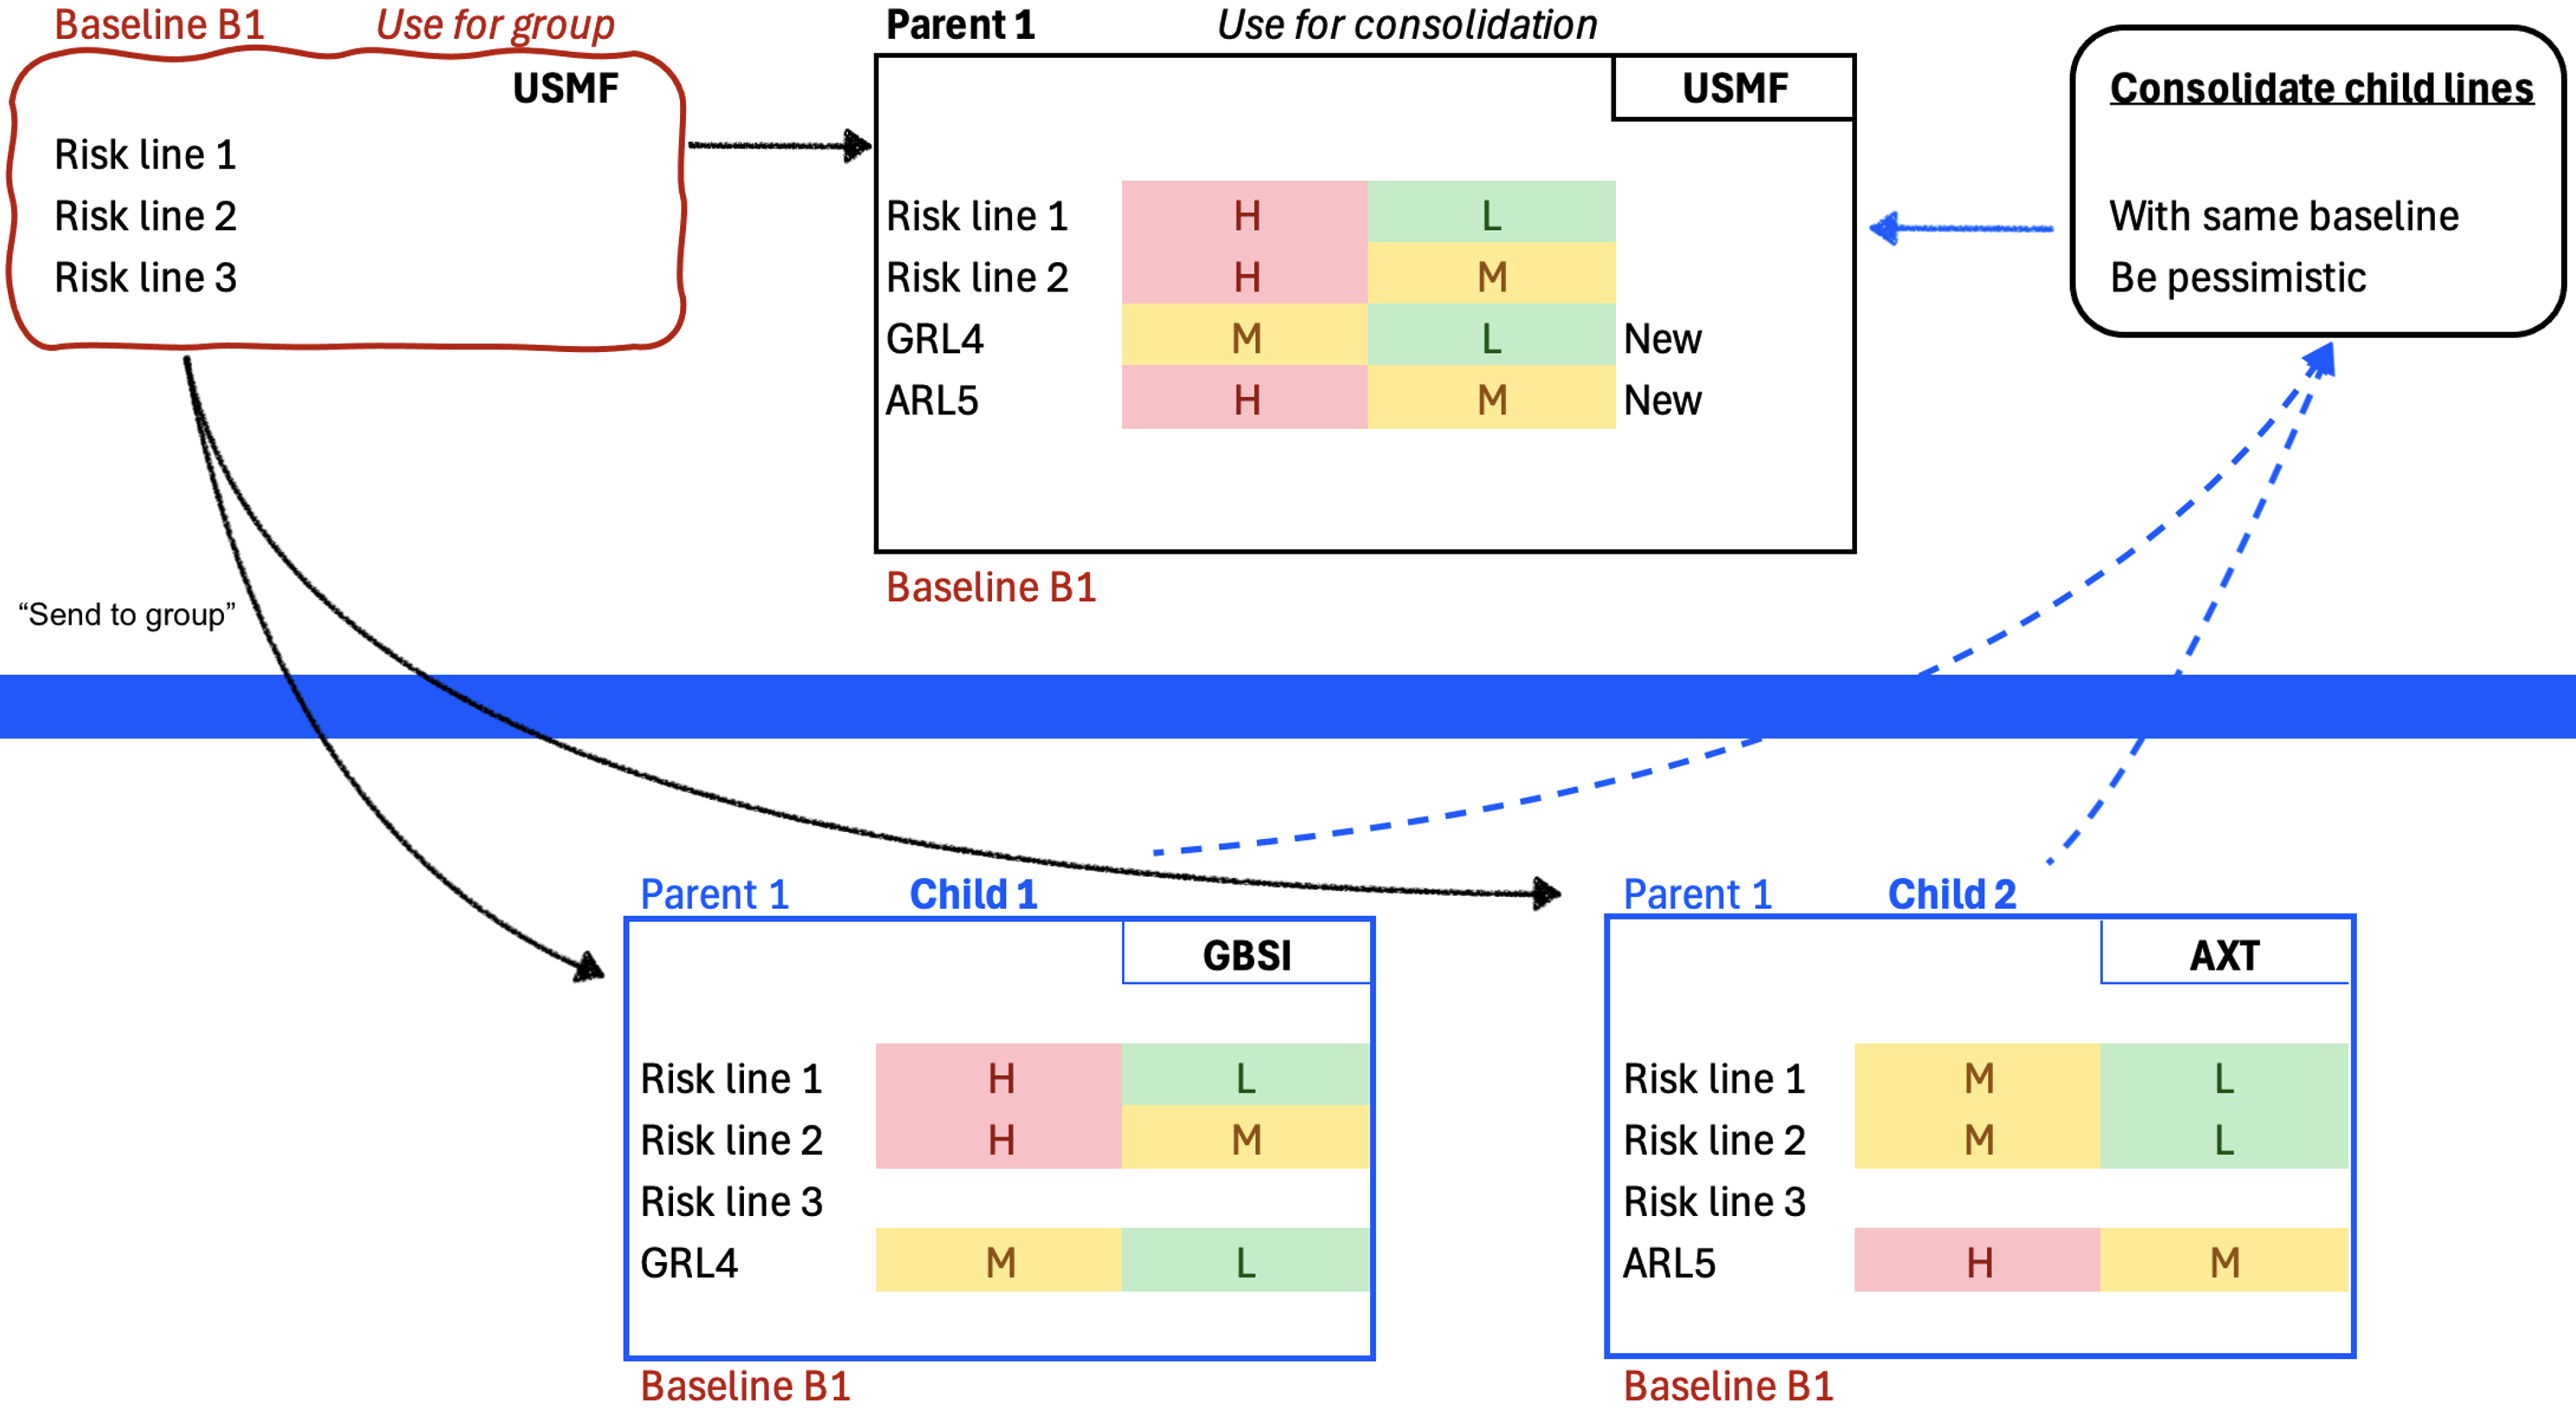
GRC supports top down as well as bottom up consolidations. The latter is where users in subsidiaries create their own registers based on group baseline registers. We will explain the top down below.
¶ Step 25.1: Using a Baseline risk register
Go to: GRC > Risk > Registers > All baseline risk registers
- Find the baseline enterprise register that was created by head office and open it
- Change the status of the risk register to Approved
- On the Action pane in the Function group, click on the Send to group button
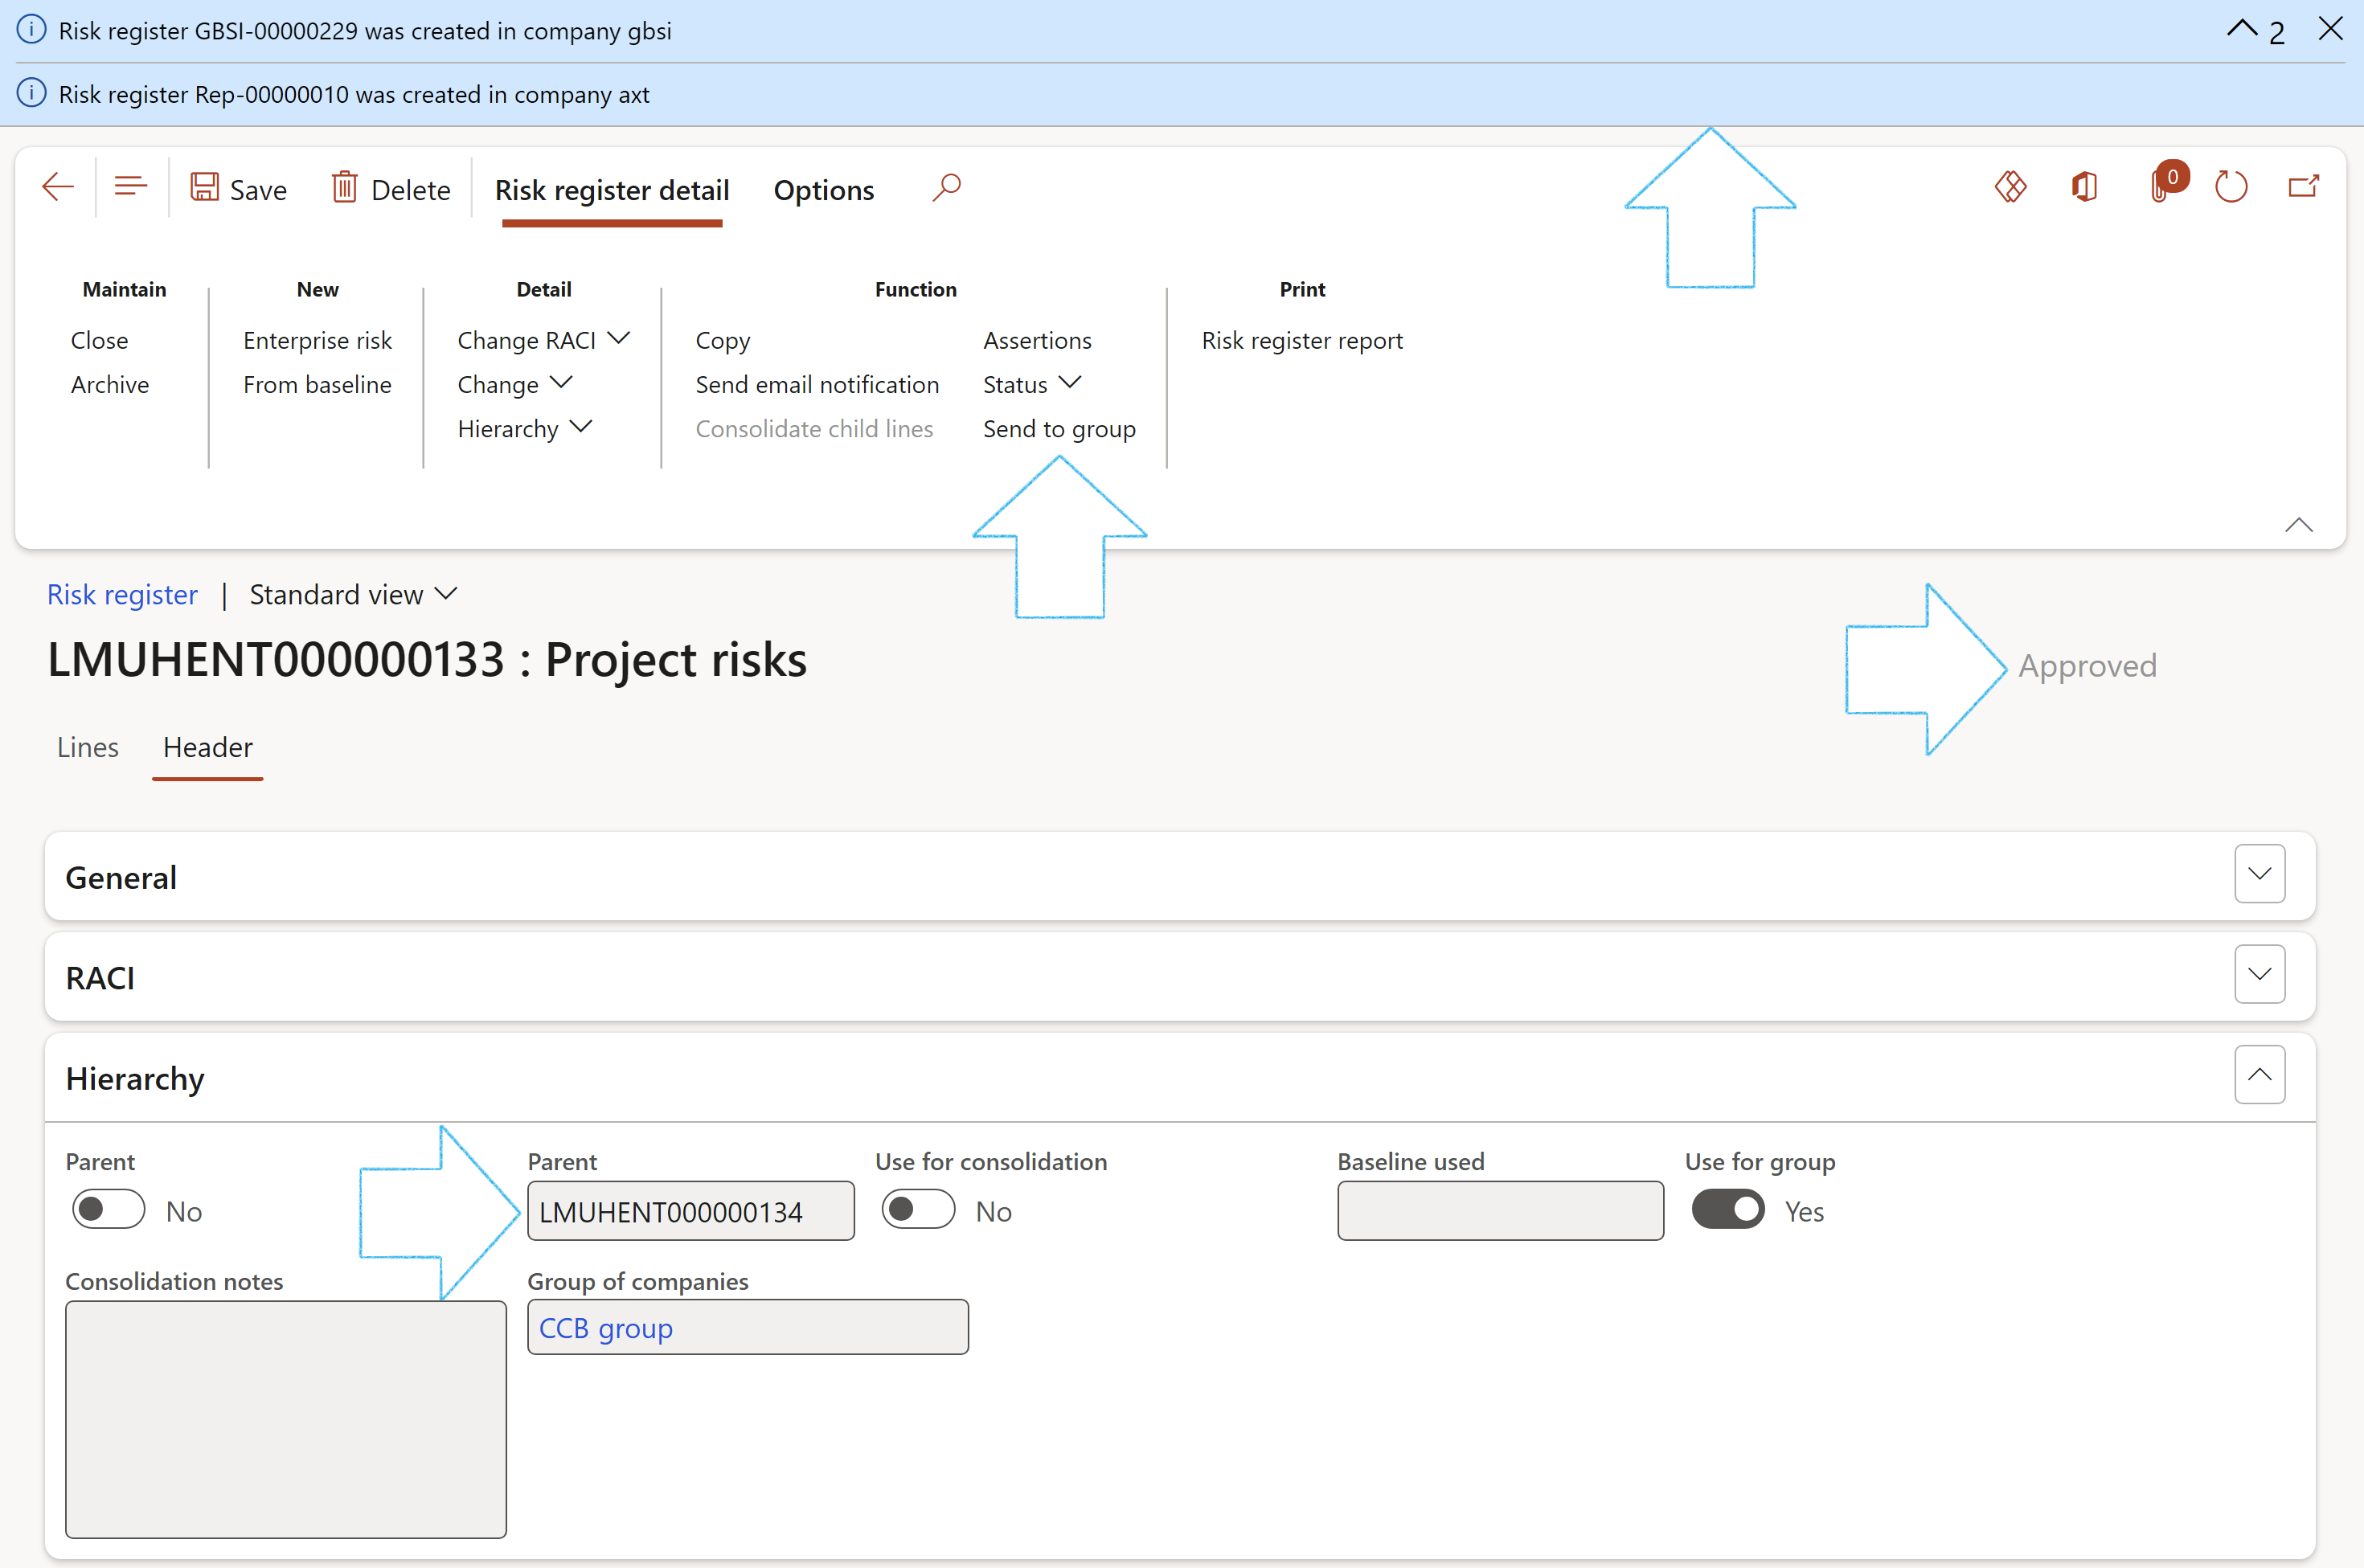
The Risk register ID's that were created for the subsidiaries in the group, will be displayed in the blue notification lines at the top of the screen
¶ Step 25.2: Individual subsidiary risk registers
Assuming users (in the holding company) created a baseline register and flagged it for group use as well as that a parent consolidation register was created from this baseline.
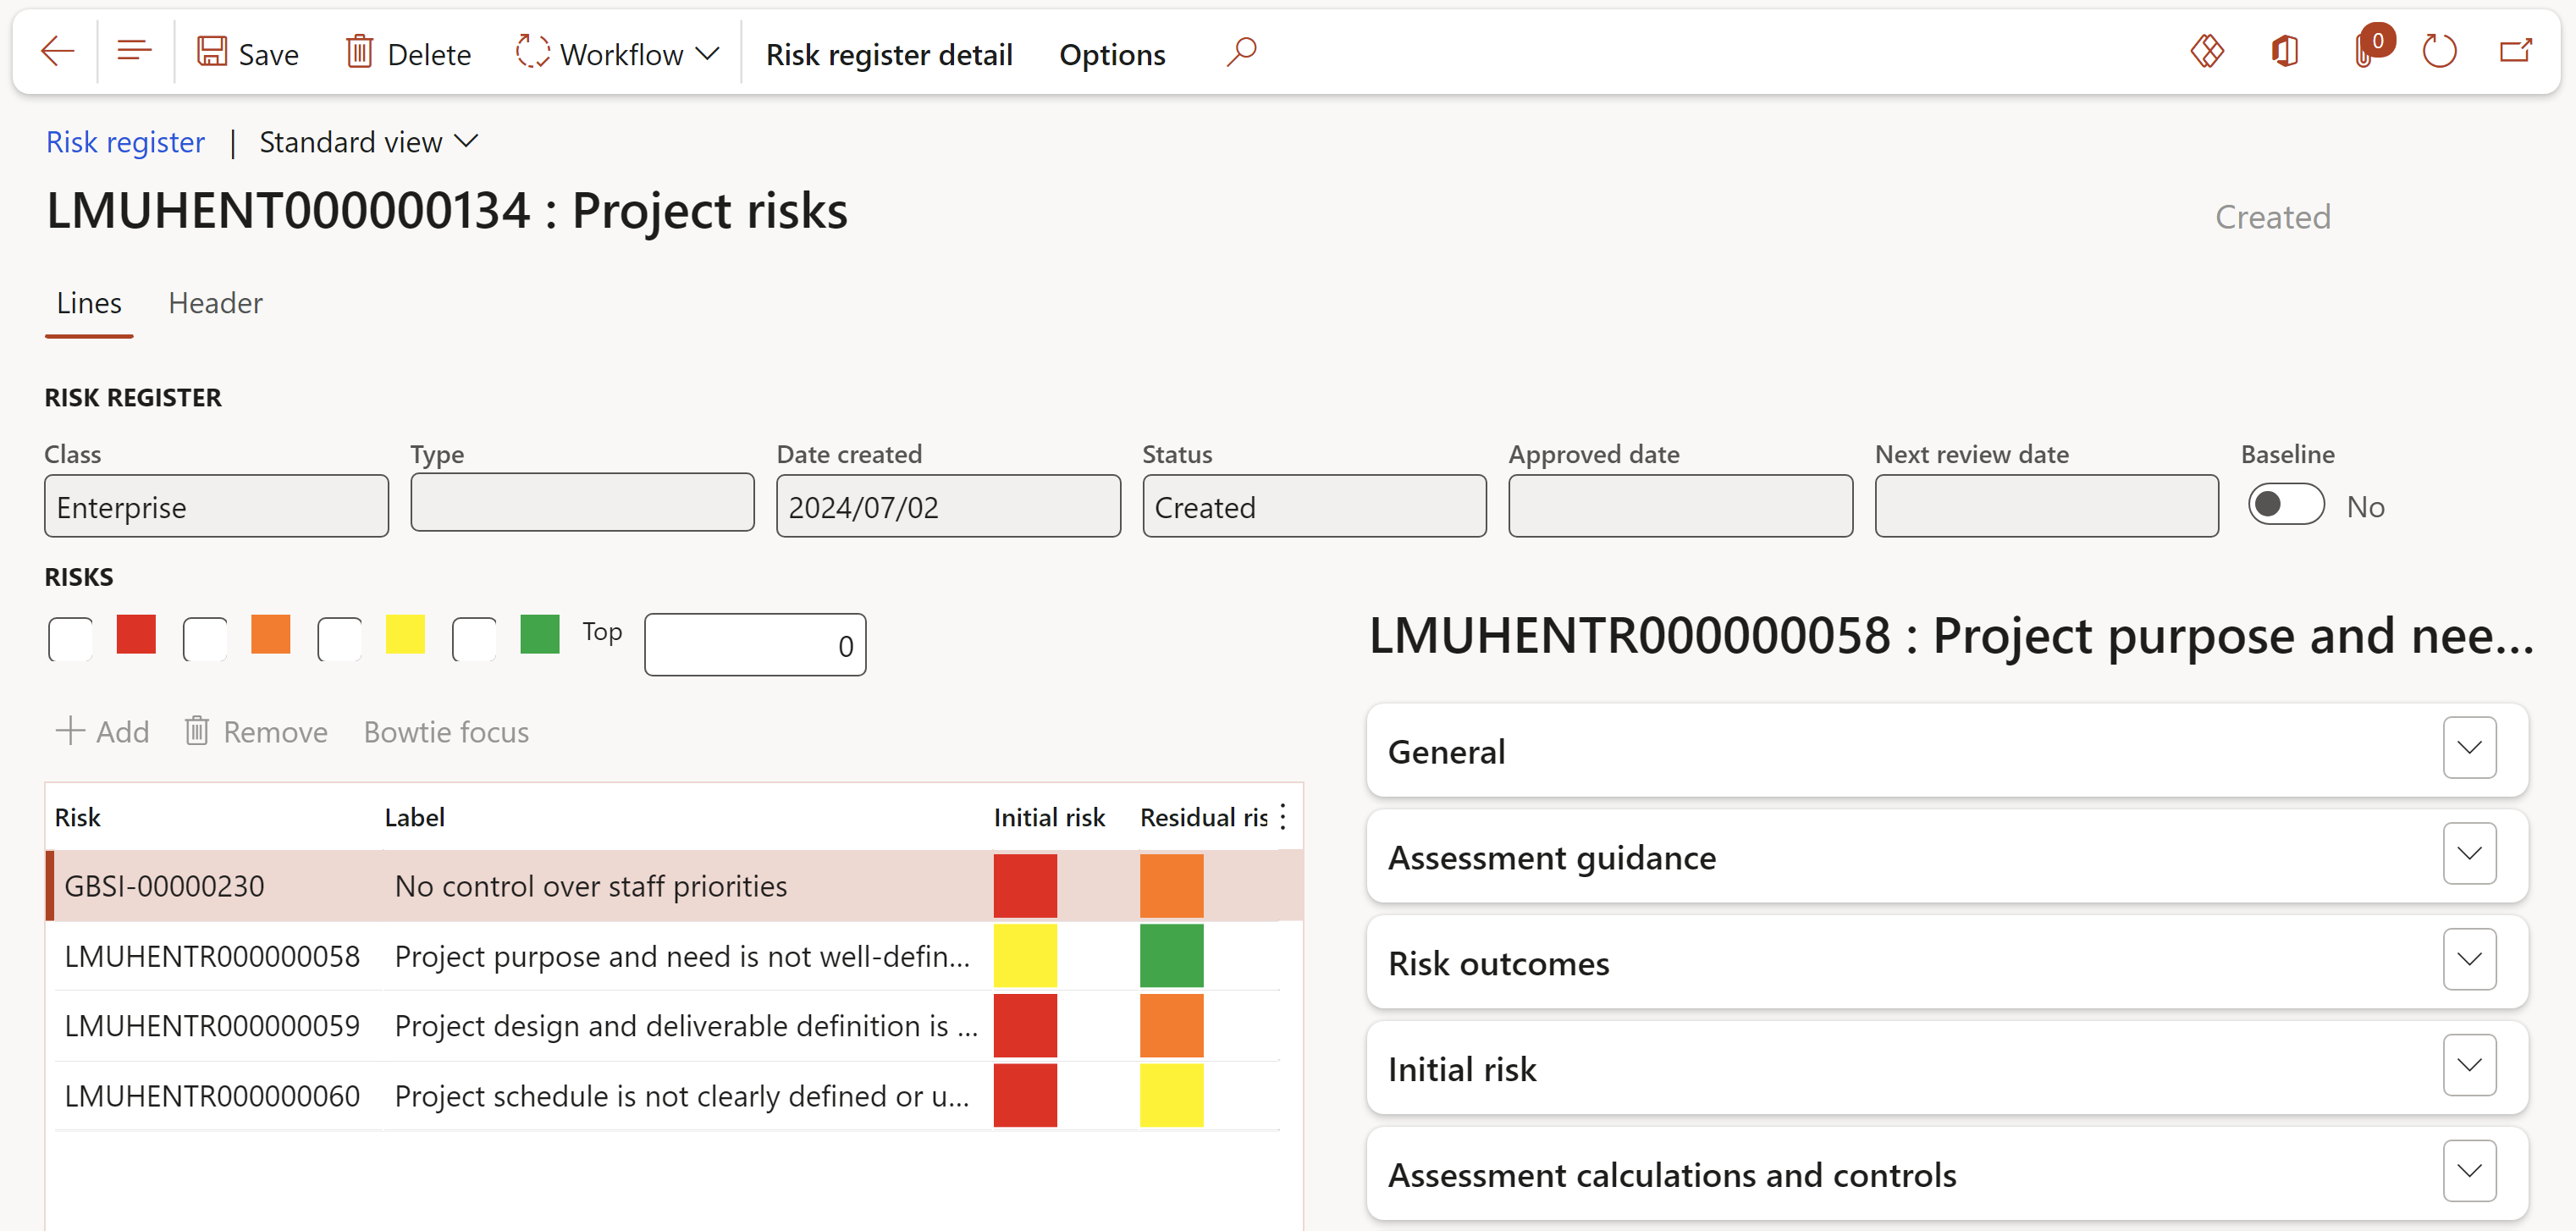
For every subsidiary (as specified in the Group of companies setup) users in those "child" legal entities will see that a Risk register is created with the proposed risk lines (assessments) to be completed by them.
Open the Header view and expand the Hierarchy Fast tab to view the Parent register ID
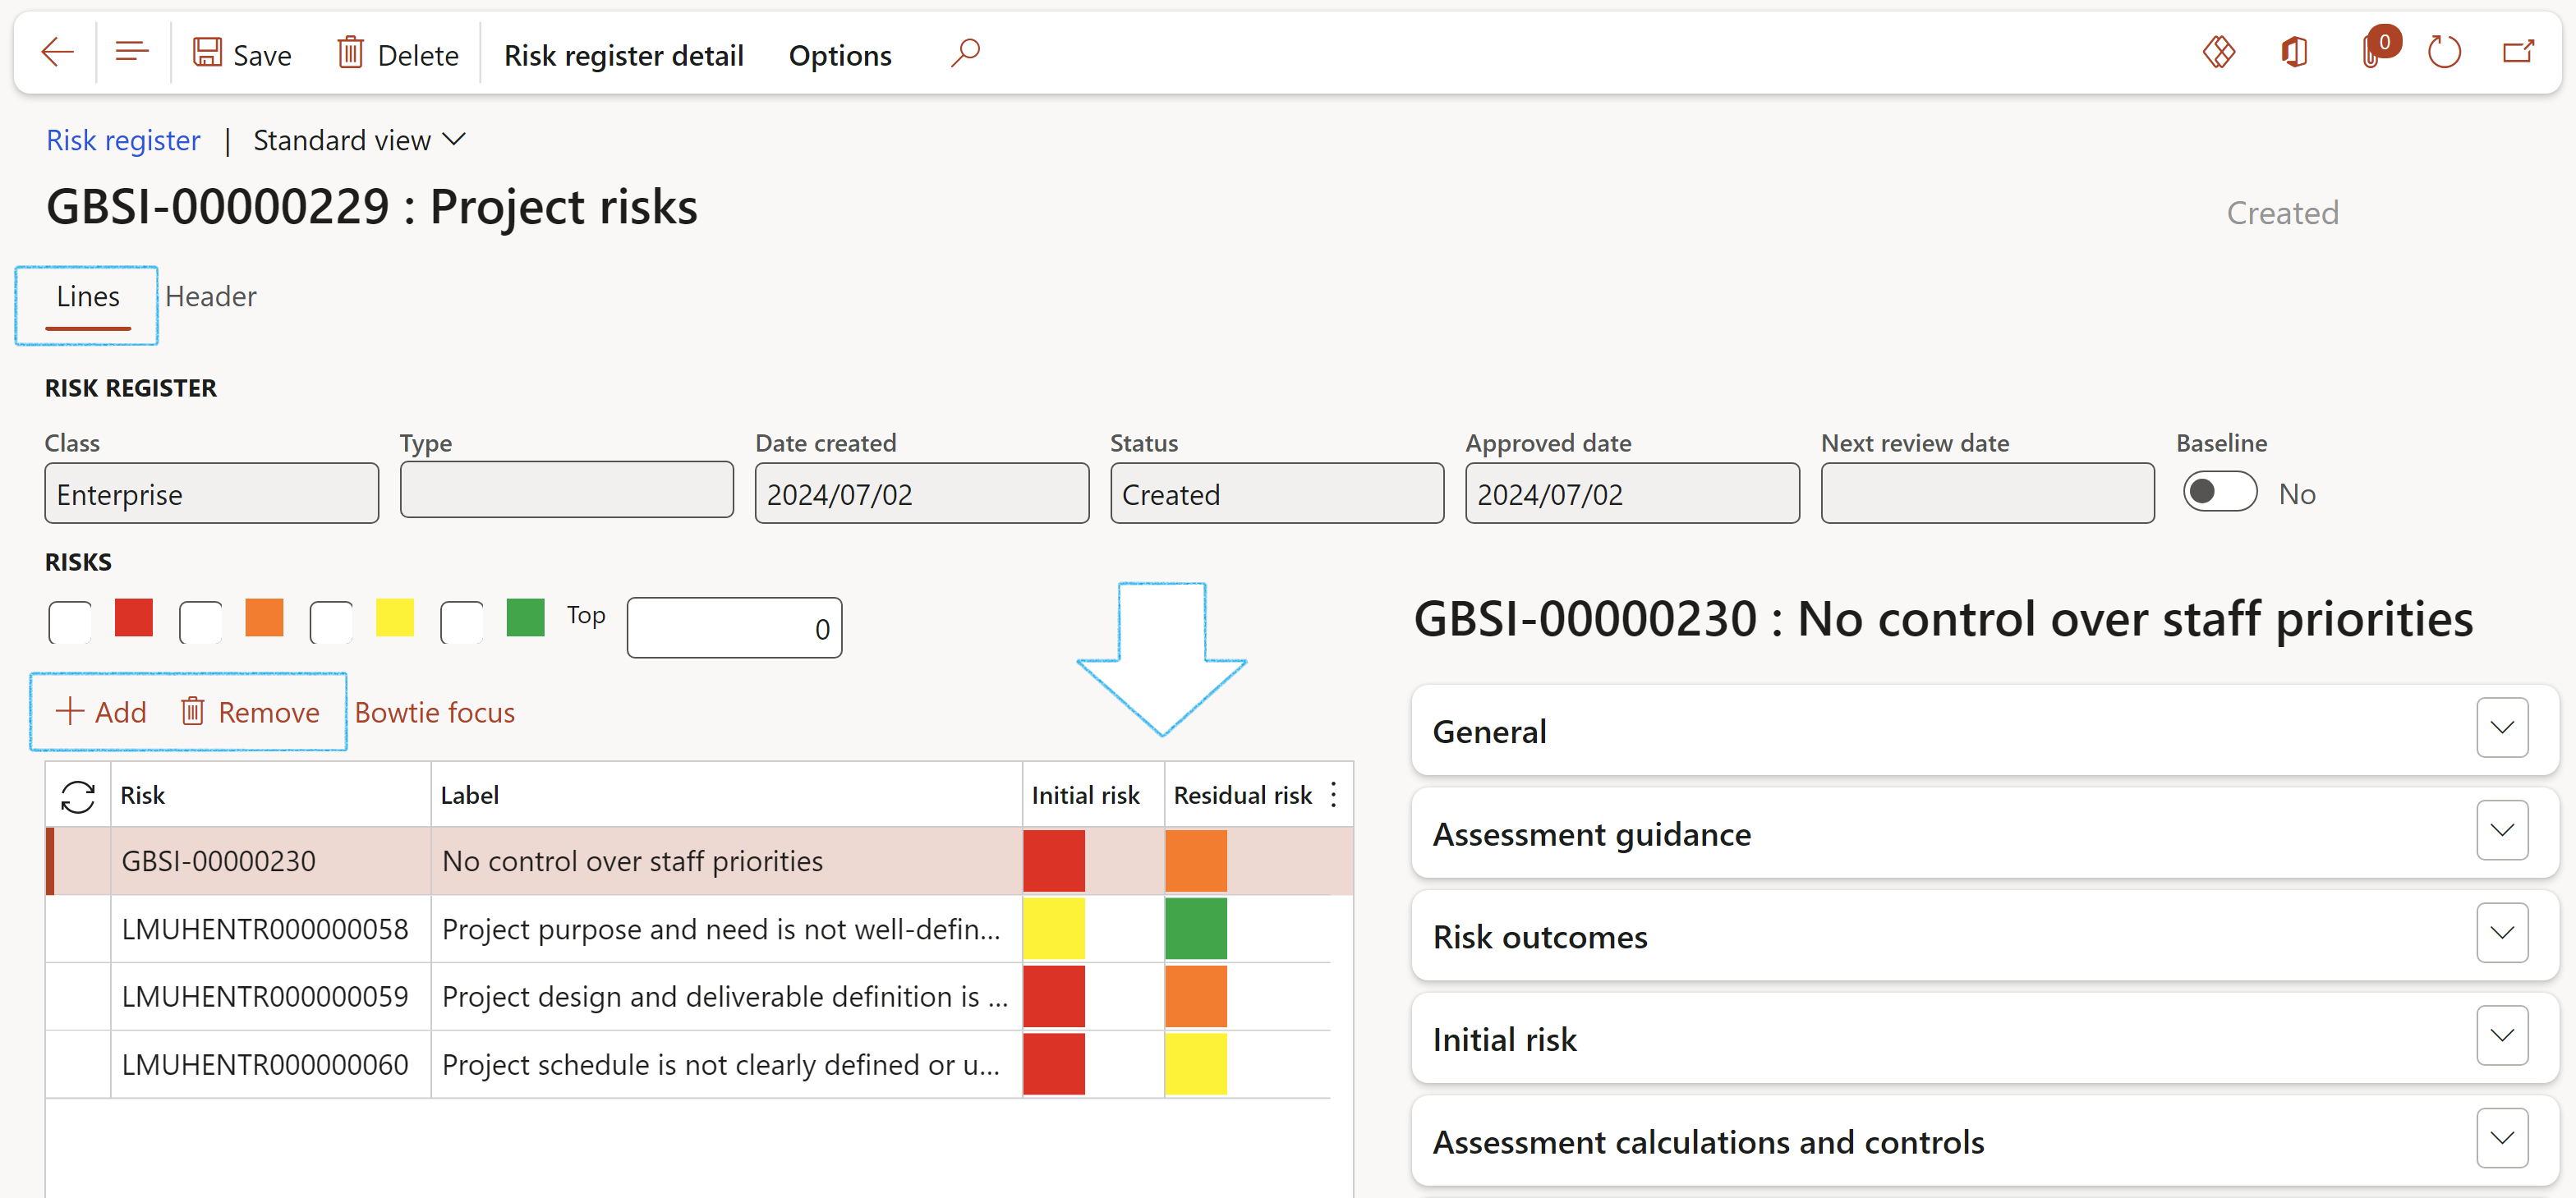
- Go to the "child" risk register
- Under the Lines view, add/remove risk lines as required
- Enter the assessment calculations and controls for each risk line
¶ Step 25.3: Consolidate risks from subsidiary/children
- Go to the Parent risk register
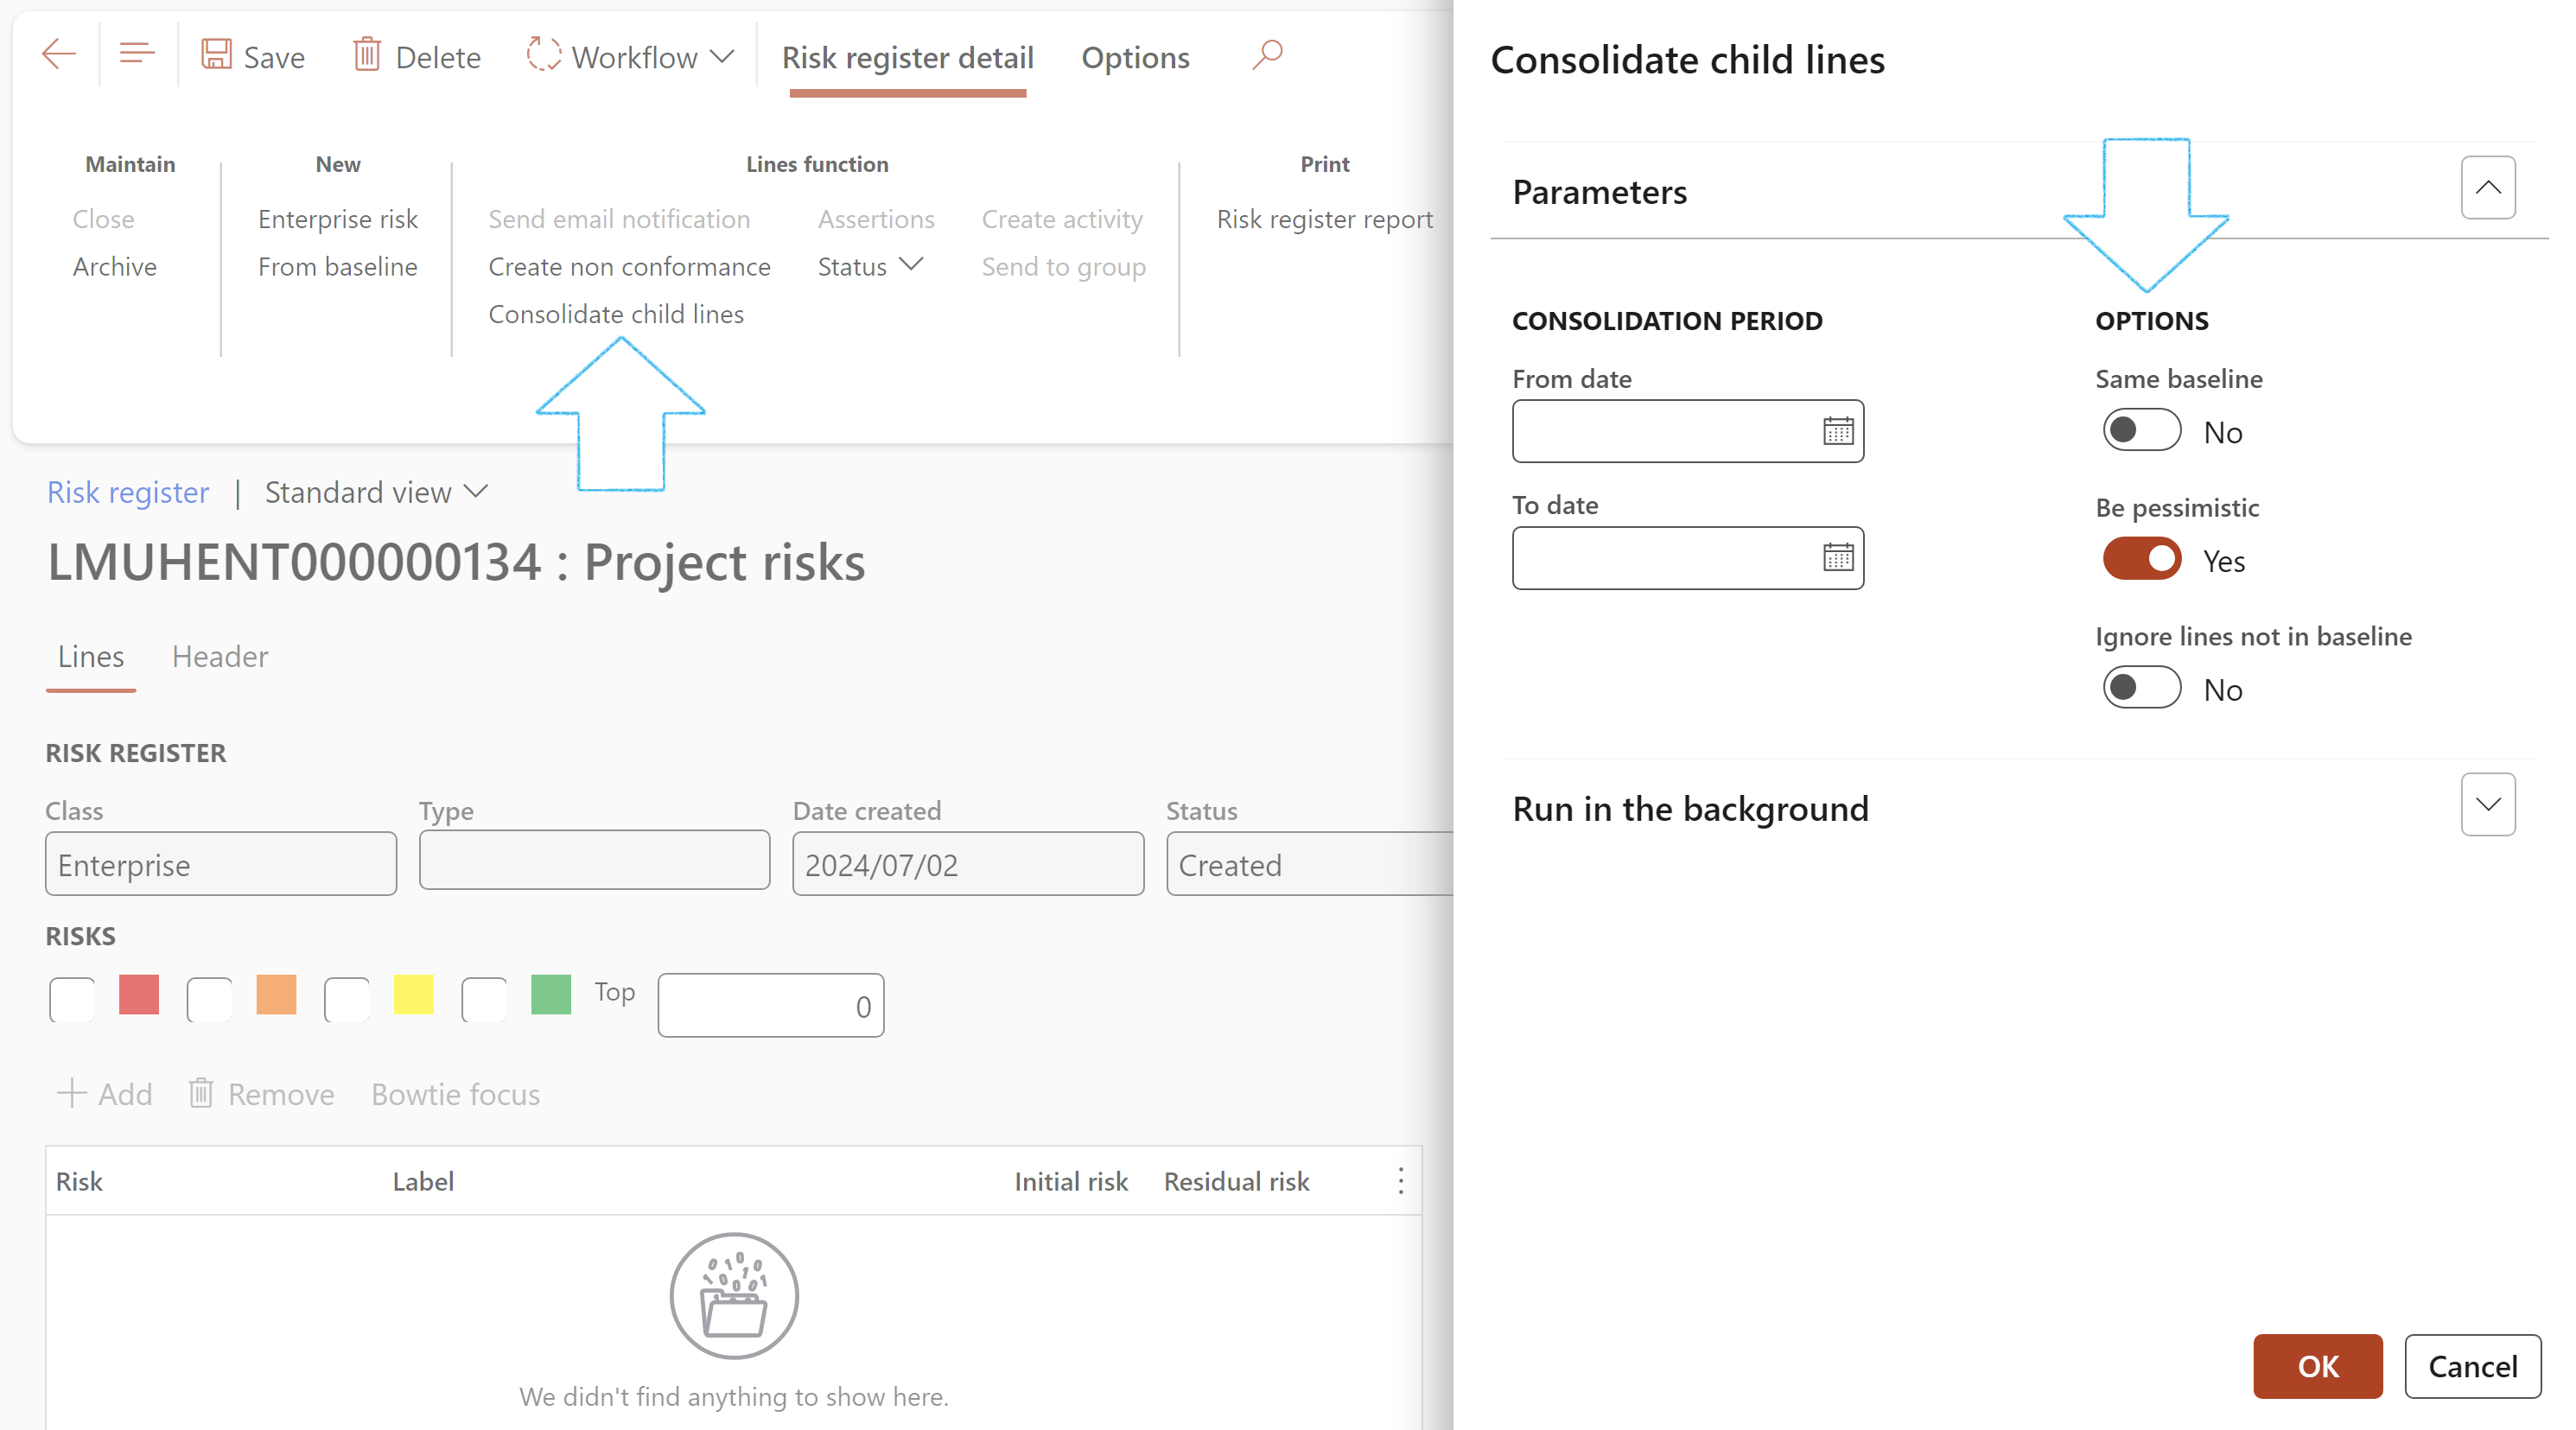
- On the Action pane, in the Lines function group, click on the Consolidate child lines button
- Select the relevant parameters on the Consolidate child lines dialog:
- Select the dates for the consolidation period
- Move the Same baseline slider to Yes if only risk registers with the same Baseline risk register should be consolidated
- Move the Be pessimistic slider to Yes if only risk registers with the highest risk rating should be consolidated
- Move the Ignore lines not in baseline slider to Yes to exclude all risk lines that are not in the baseline register
- The value selected in the Sum these fields:
- 1. Blank (default)
- 2. Maximum foreseeable loss (MFL)
- 3. Residual cost
- 4. Both MFL and residual cost
- Click on OK
If Both MFL and residual cost is selected, then SUM the values from the child risk register lines fields: Inherent cost (MFL) and Residual cost into the above created risk lines
If 2 or 3 is selected, then sum the respective values from the risk lines
¶ Reports and Inquiries
¶ Step 26: Enterprise risks (Inquiry)
Go to: GRC > Risk > Reports and Inquiries > Enterprise risks

This enquiry can be exported to Excel by using the Office icon (Export to Excel option), in the top right-hand corner
¶ Step 27: Risk register report
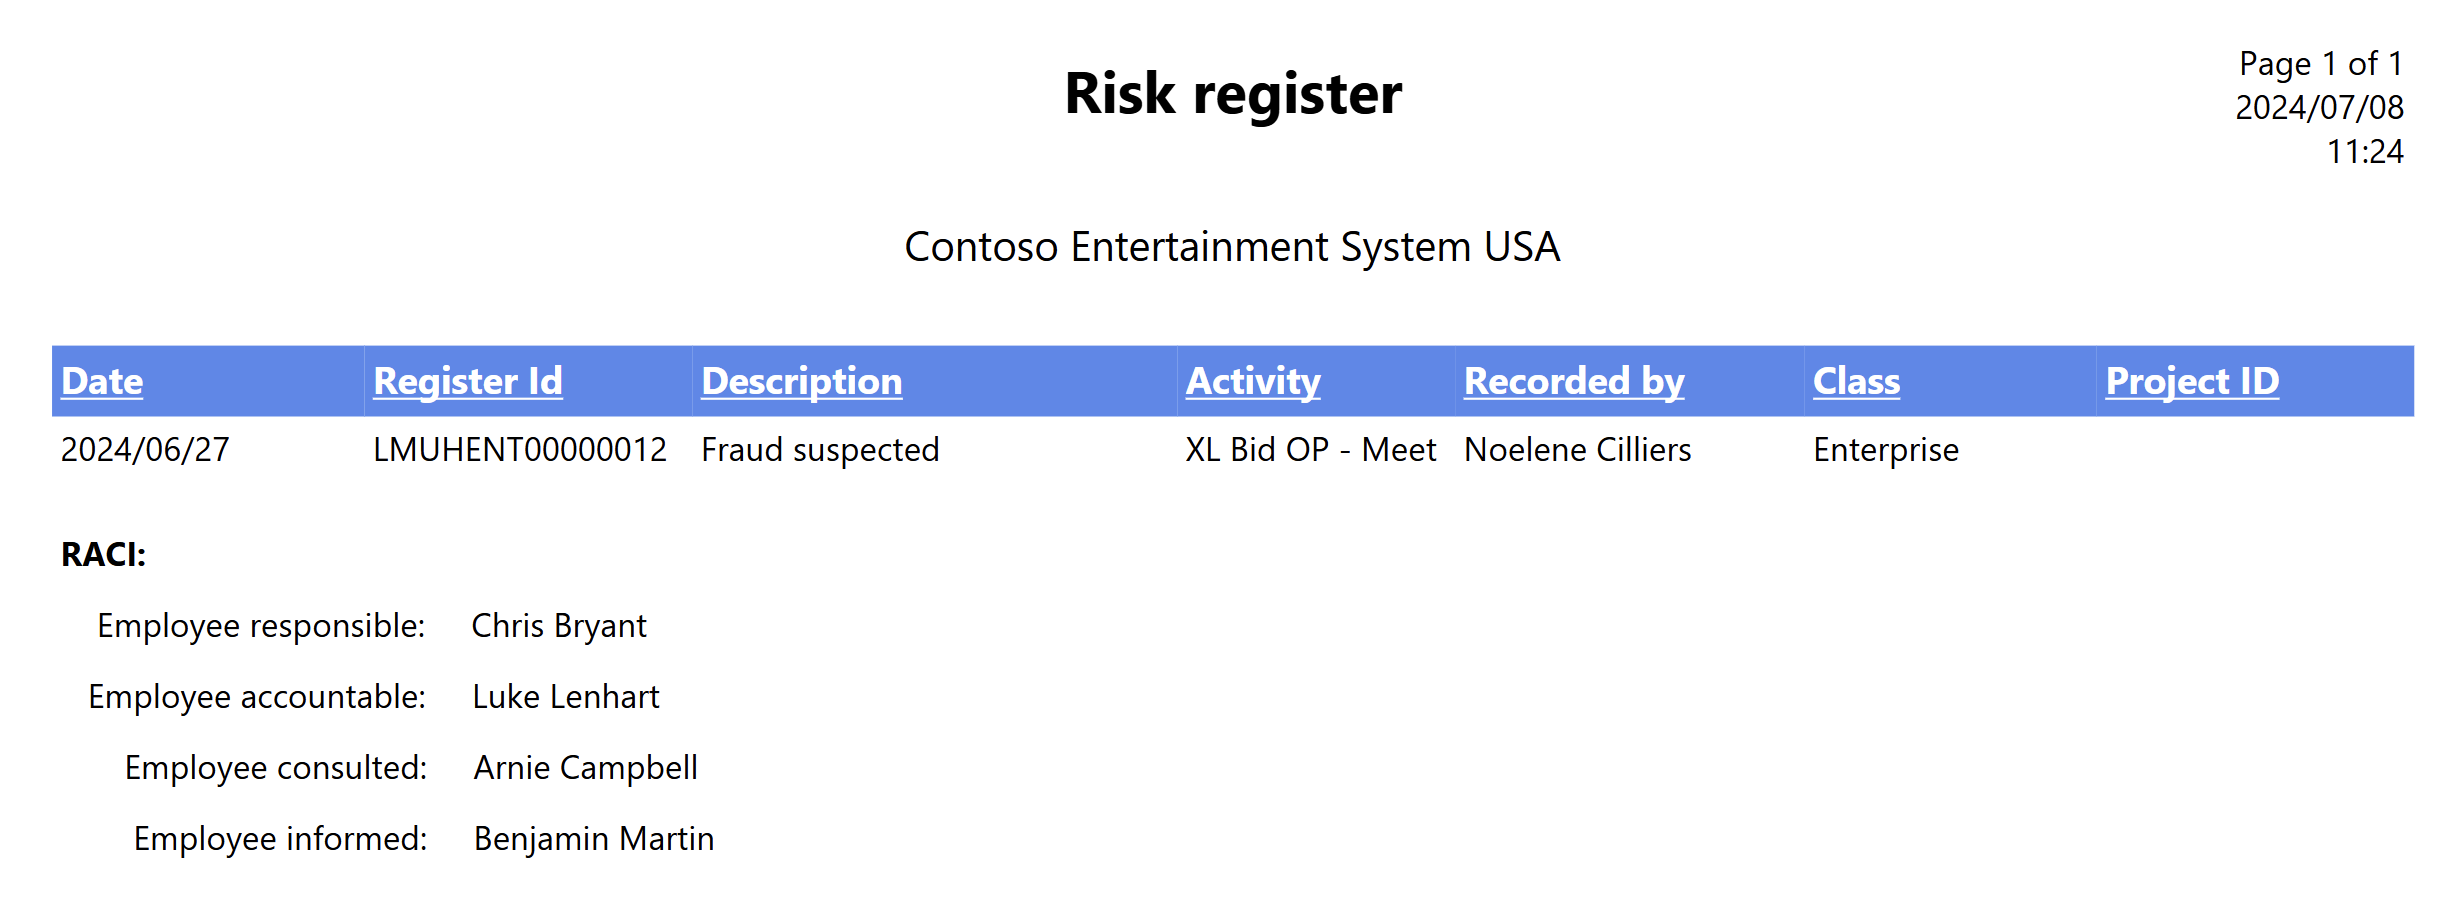
Go to: GRC > Risk > Reports and Inquiries > Risk register report
- On the Risk register dialog form, select the Risk register from the dropdown list
- Click OK
¶ Step 28: Enterprise risk profile and controls report
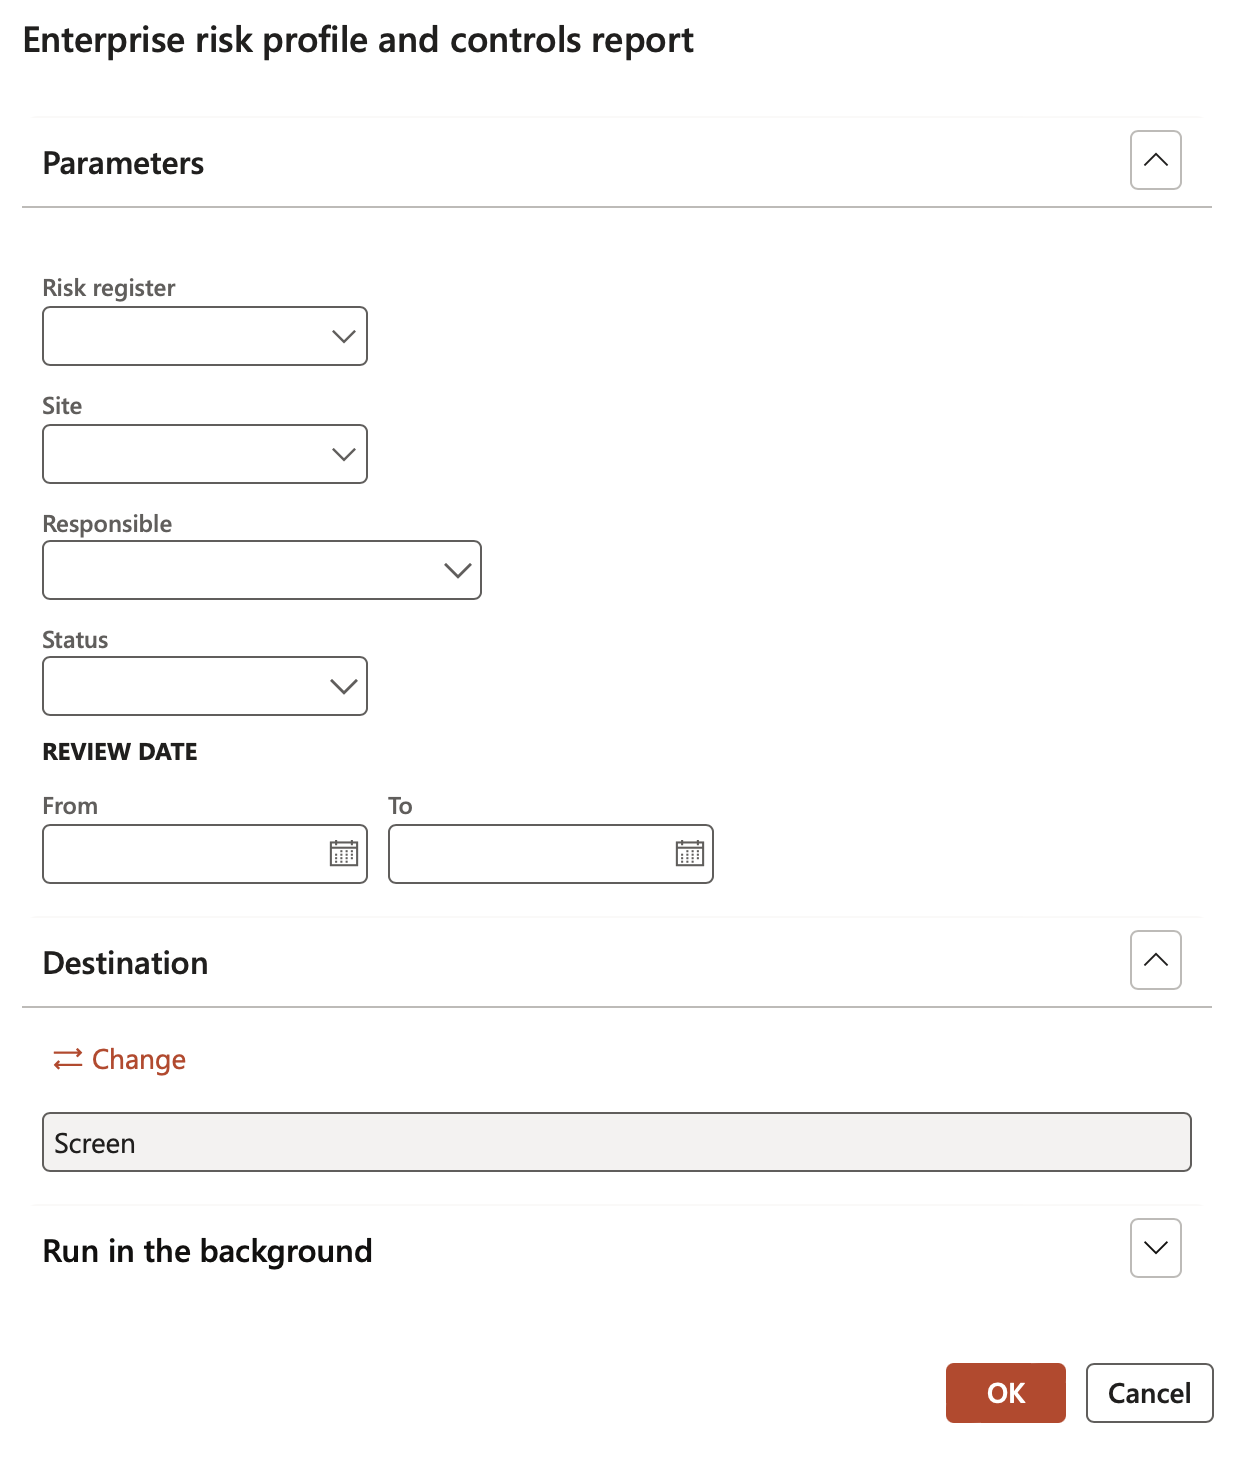
Go to: GRC > Risk > Reports and Inquiries > Enterprise risk profile and controls report
- On the Profile risk register dialog form, select the Parameters
- Click OK

¶ Step 29: Enterprise risk movement analysis report
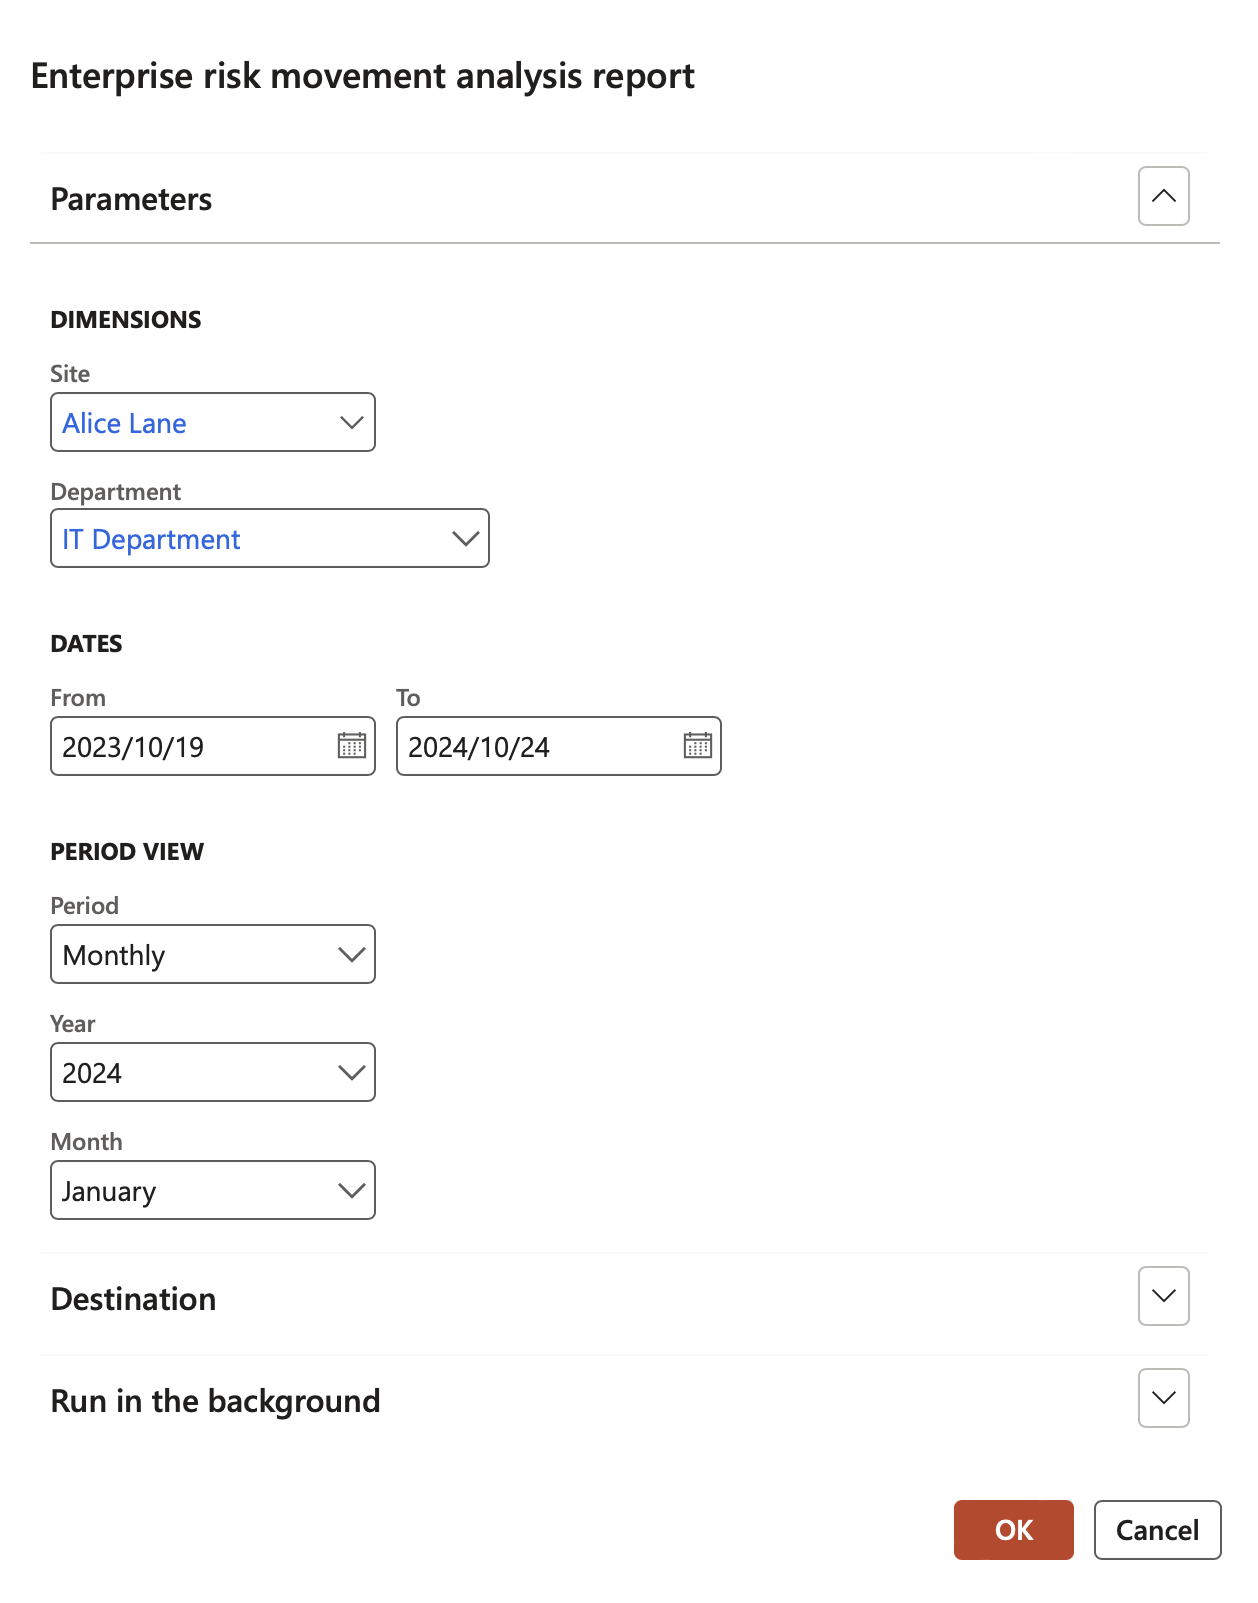
Go to: GRC > Risk > Reports and Inquiries > Enterprise risk movement analysis report
- On the Enterprise risk movement analysis dialog form, select the Parameters
- Click OK
These 3 scenarios will give the user an error if not adhered to:
- The user must fill in the From and To date
- The From date must be before the To date
- The year/month combination must be within the from/to date period

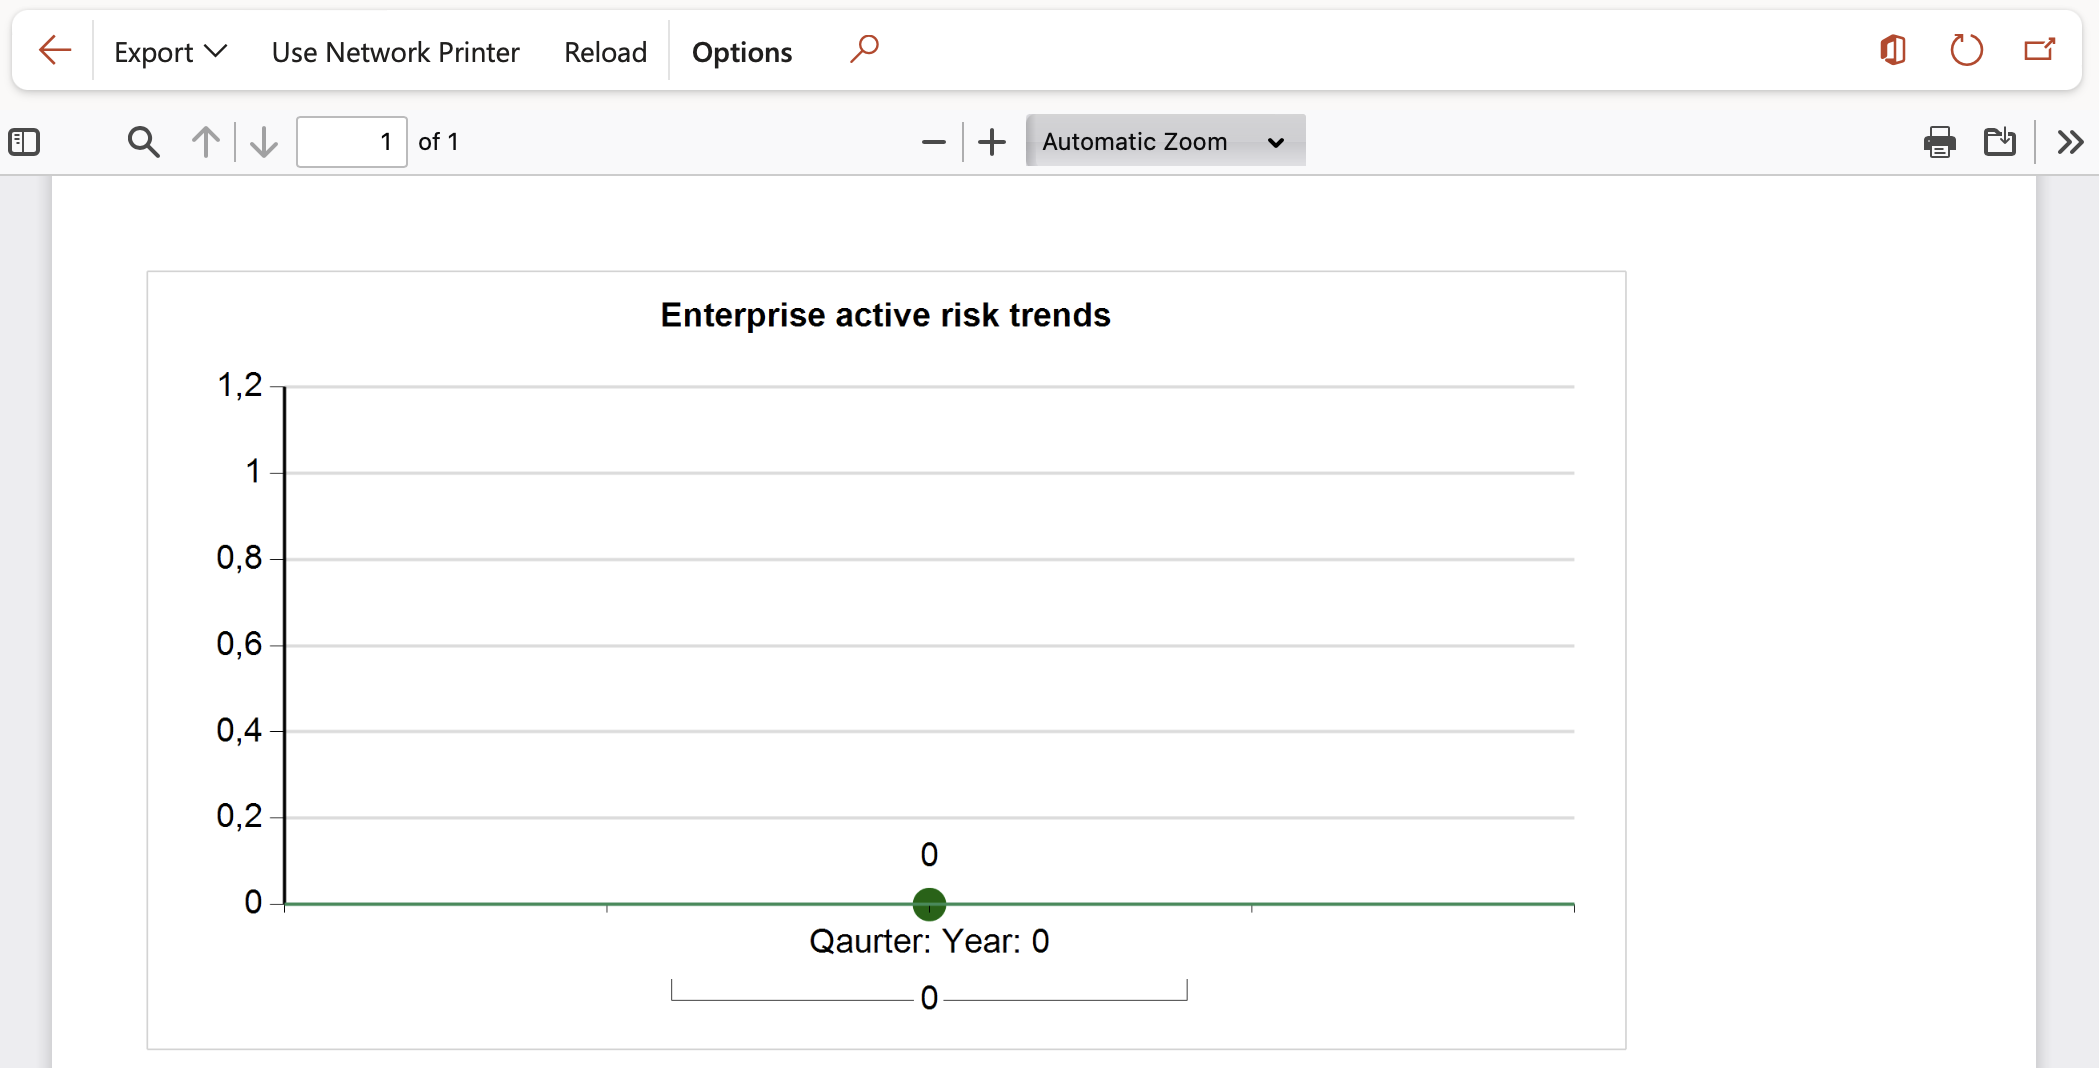
¶ Step 30: Enterprise active risk trends
This graph displays the count of open risk lines per quarter for the selected site
Go to: GRC > Risk > Reports and Inquiries > Enterprise active risk trends graph
- On the Parameters dialog, select the required Site and Year
- Click OK
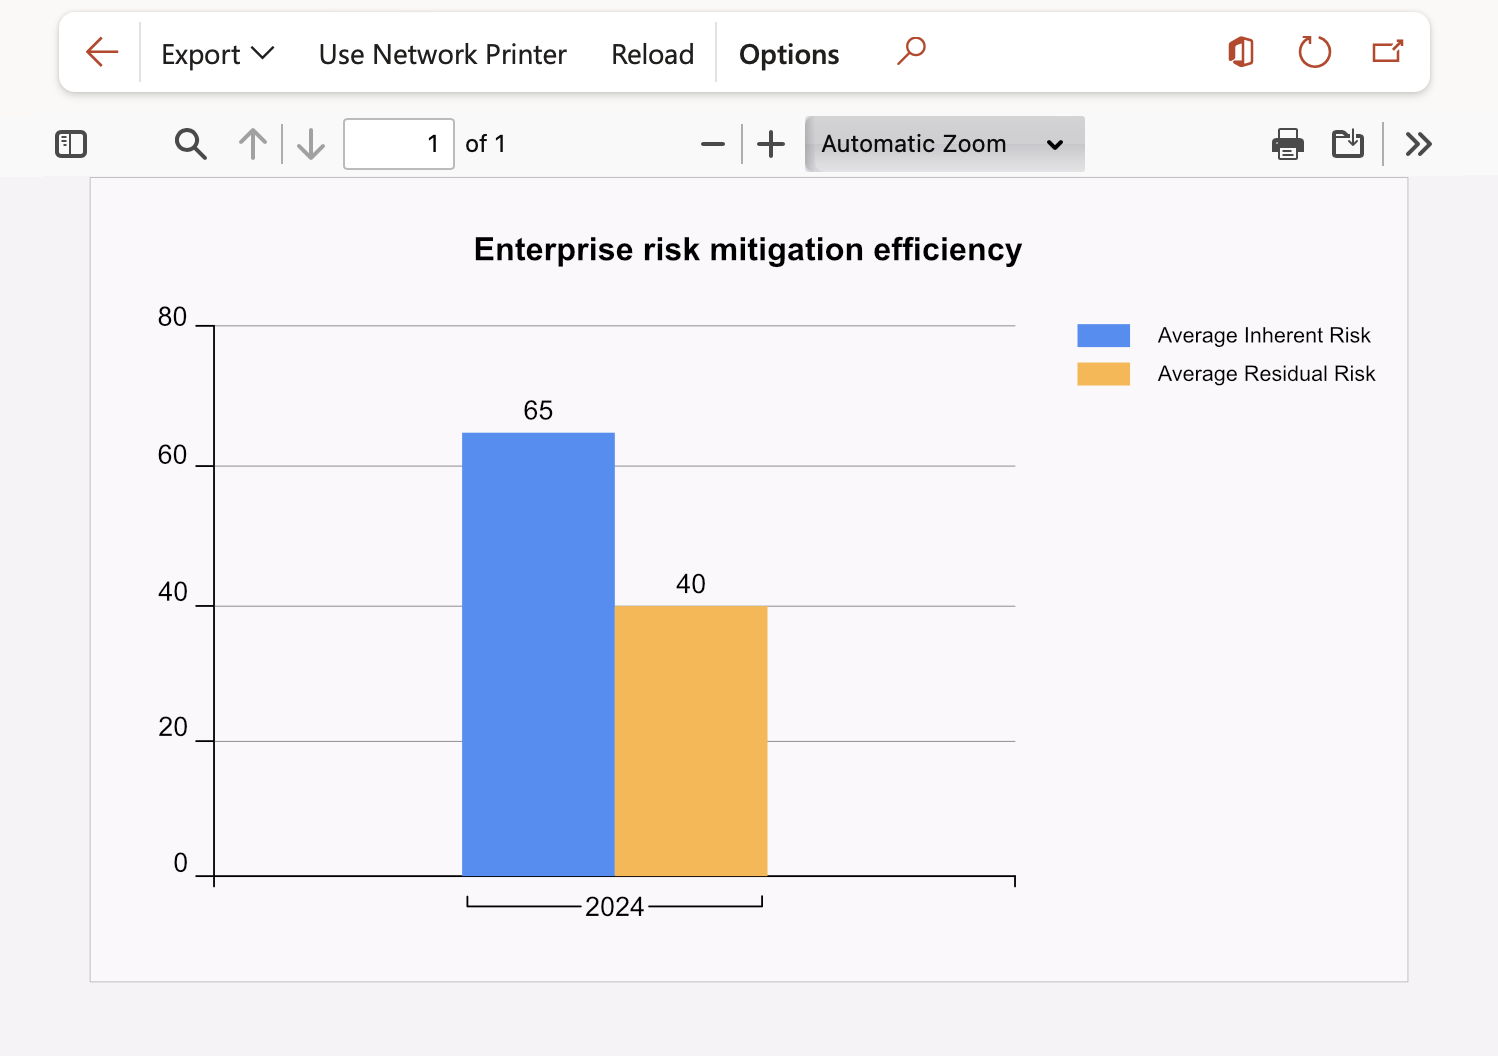
¶ Step 31: Enterprise risk mitigation efficiency
This graph displays the average mitigation efficiency of the risk lines per quarter for the selected site
Go to: GRC > Risk > Reports and Inquiries > Enterprise risk mitigation efficiency graph
- On the Parameters dialog, select the required Site and Year
- Click OK
¶ Step 32: KRI’s and goals
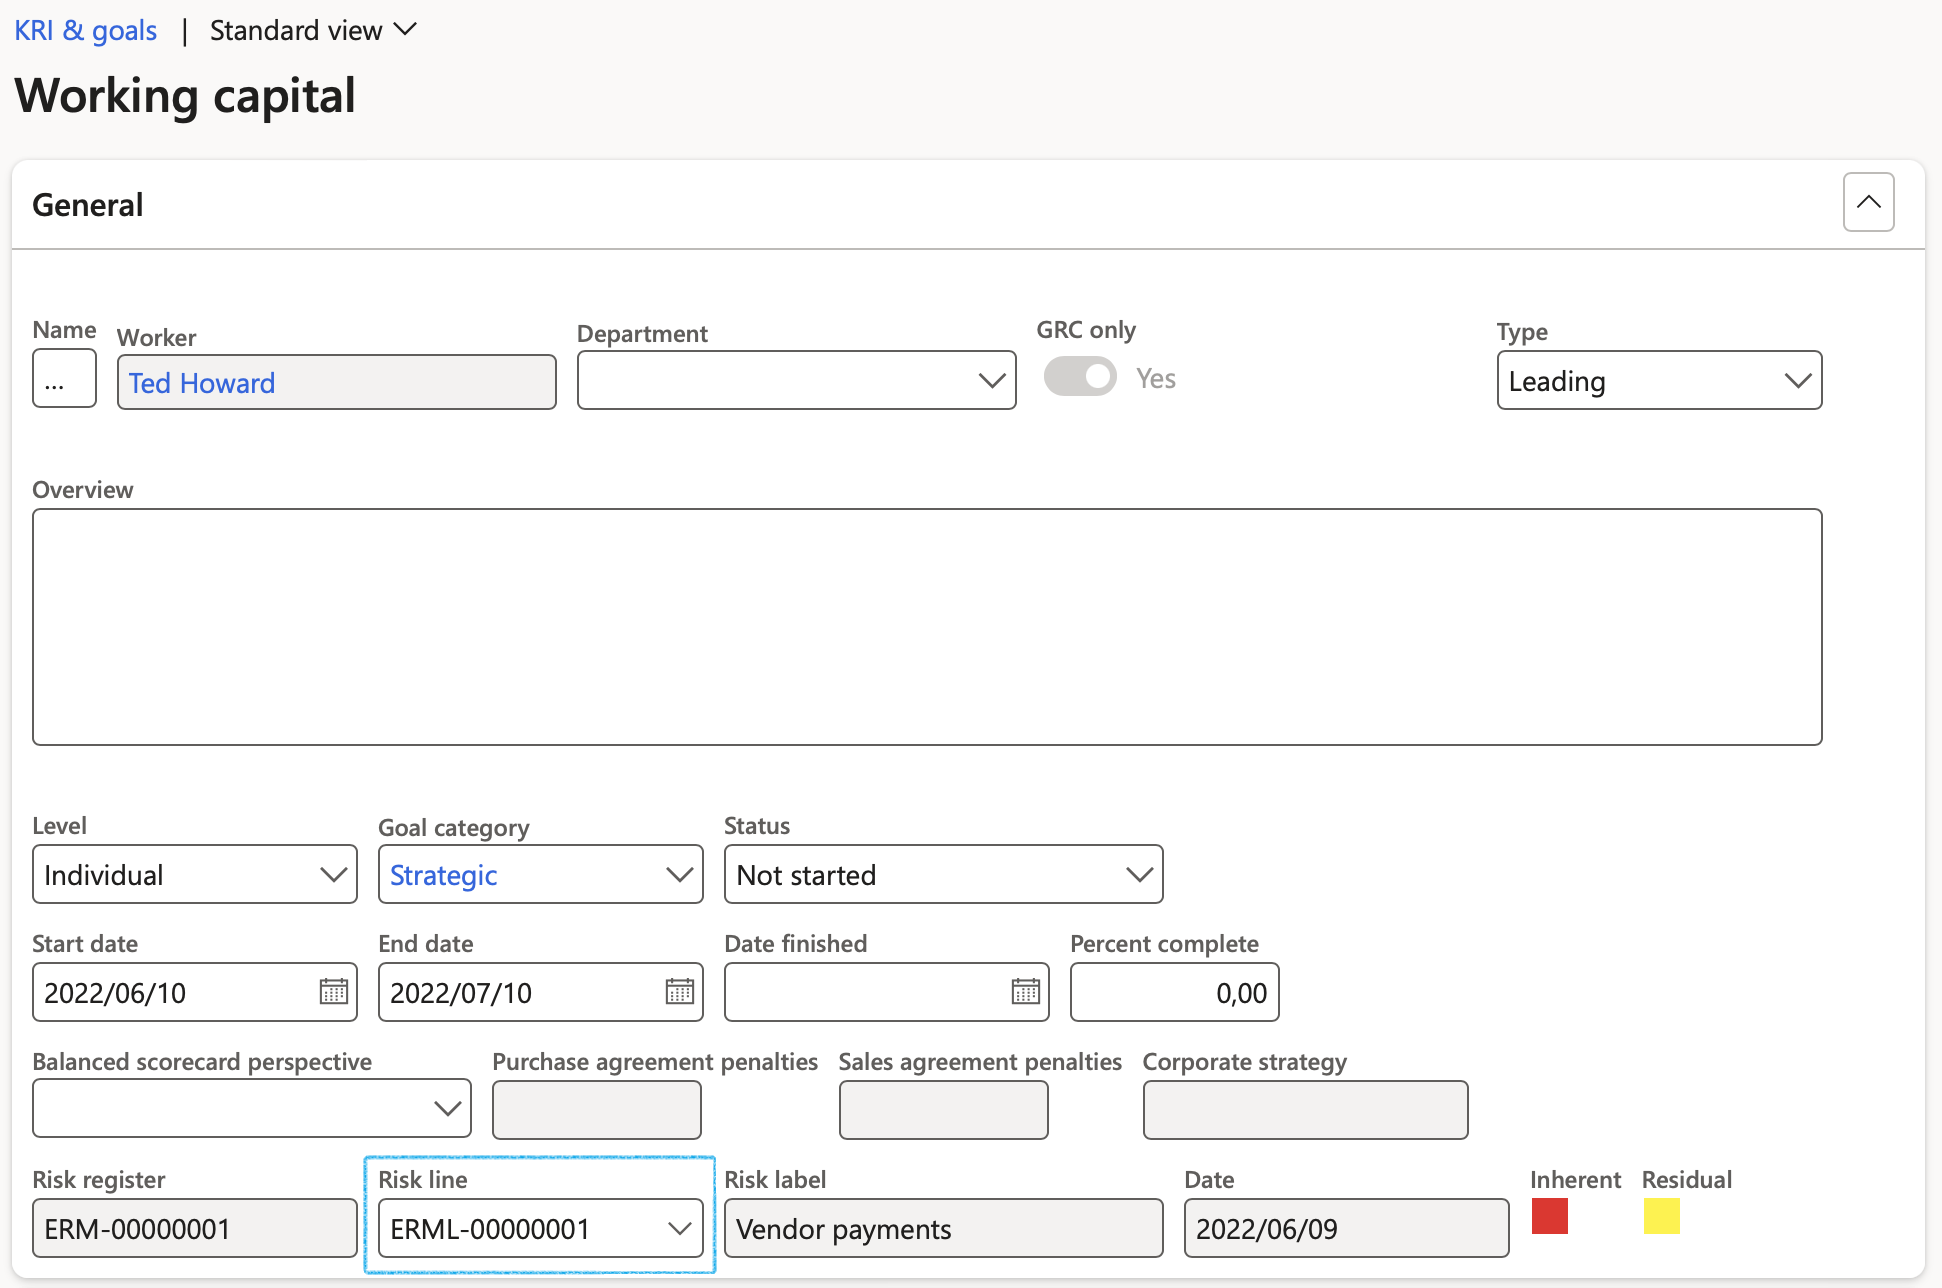
A risk line can be selected on the KRI and goals form
Go to: GRC > Performance > KRI & goals
- Select the relevant record
- Under the General Fast tab, select the relevant Risk line from the dropdown list
¶ Step 33: Workflow on Risk registers
The Workflow editor can only be opened in Microsoft Edge
¶ Step 33.1: Risk register header workflow
To create workflow for Risk register headers, go to:
GRC > Setup > Governance, Risk and Compliance workflows
Below is a screenshot of the Risk register header approval workflow
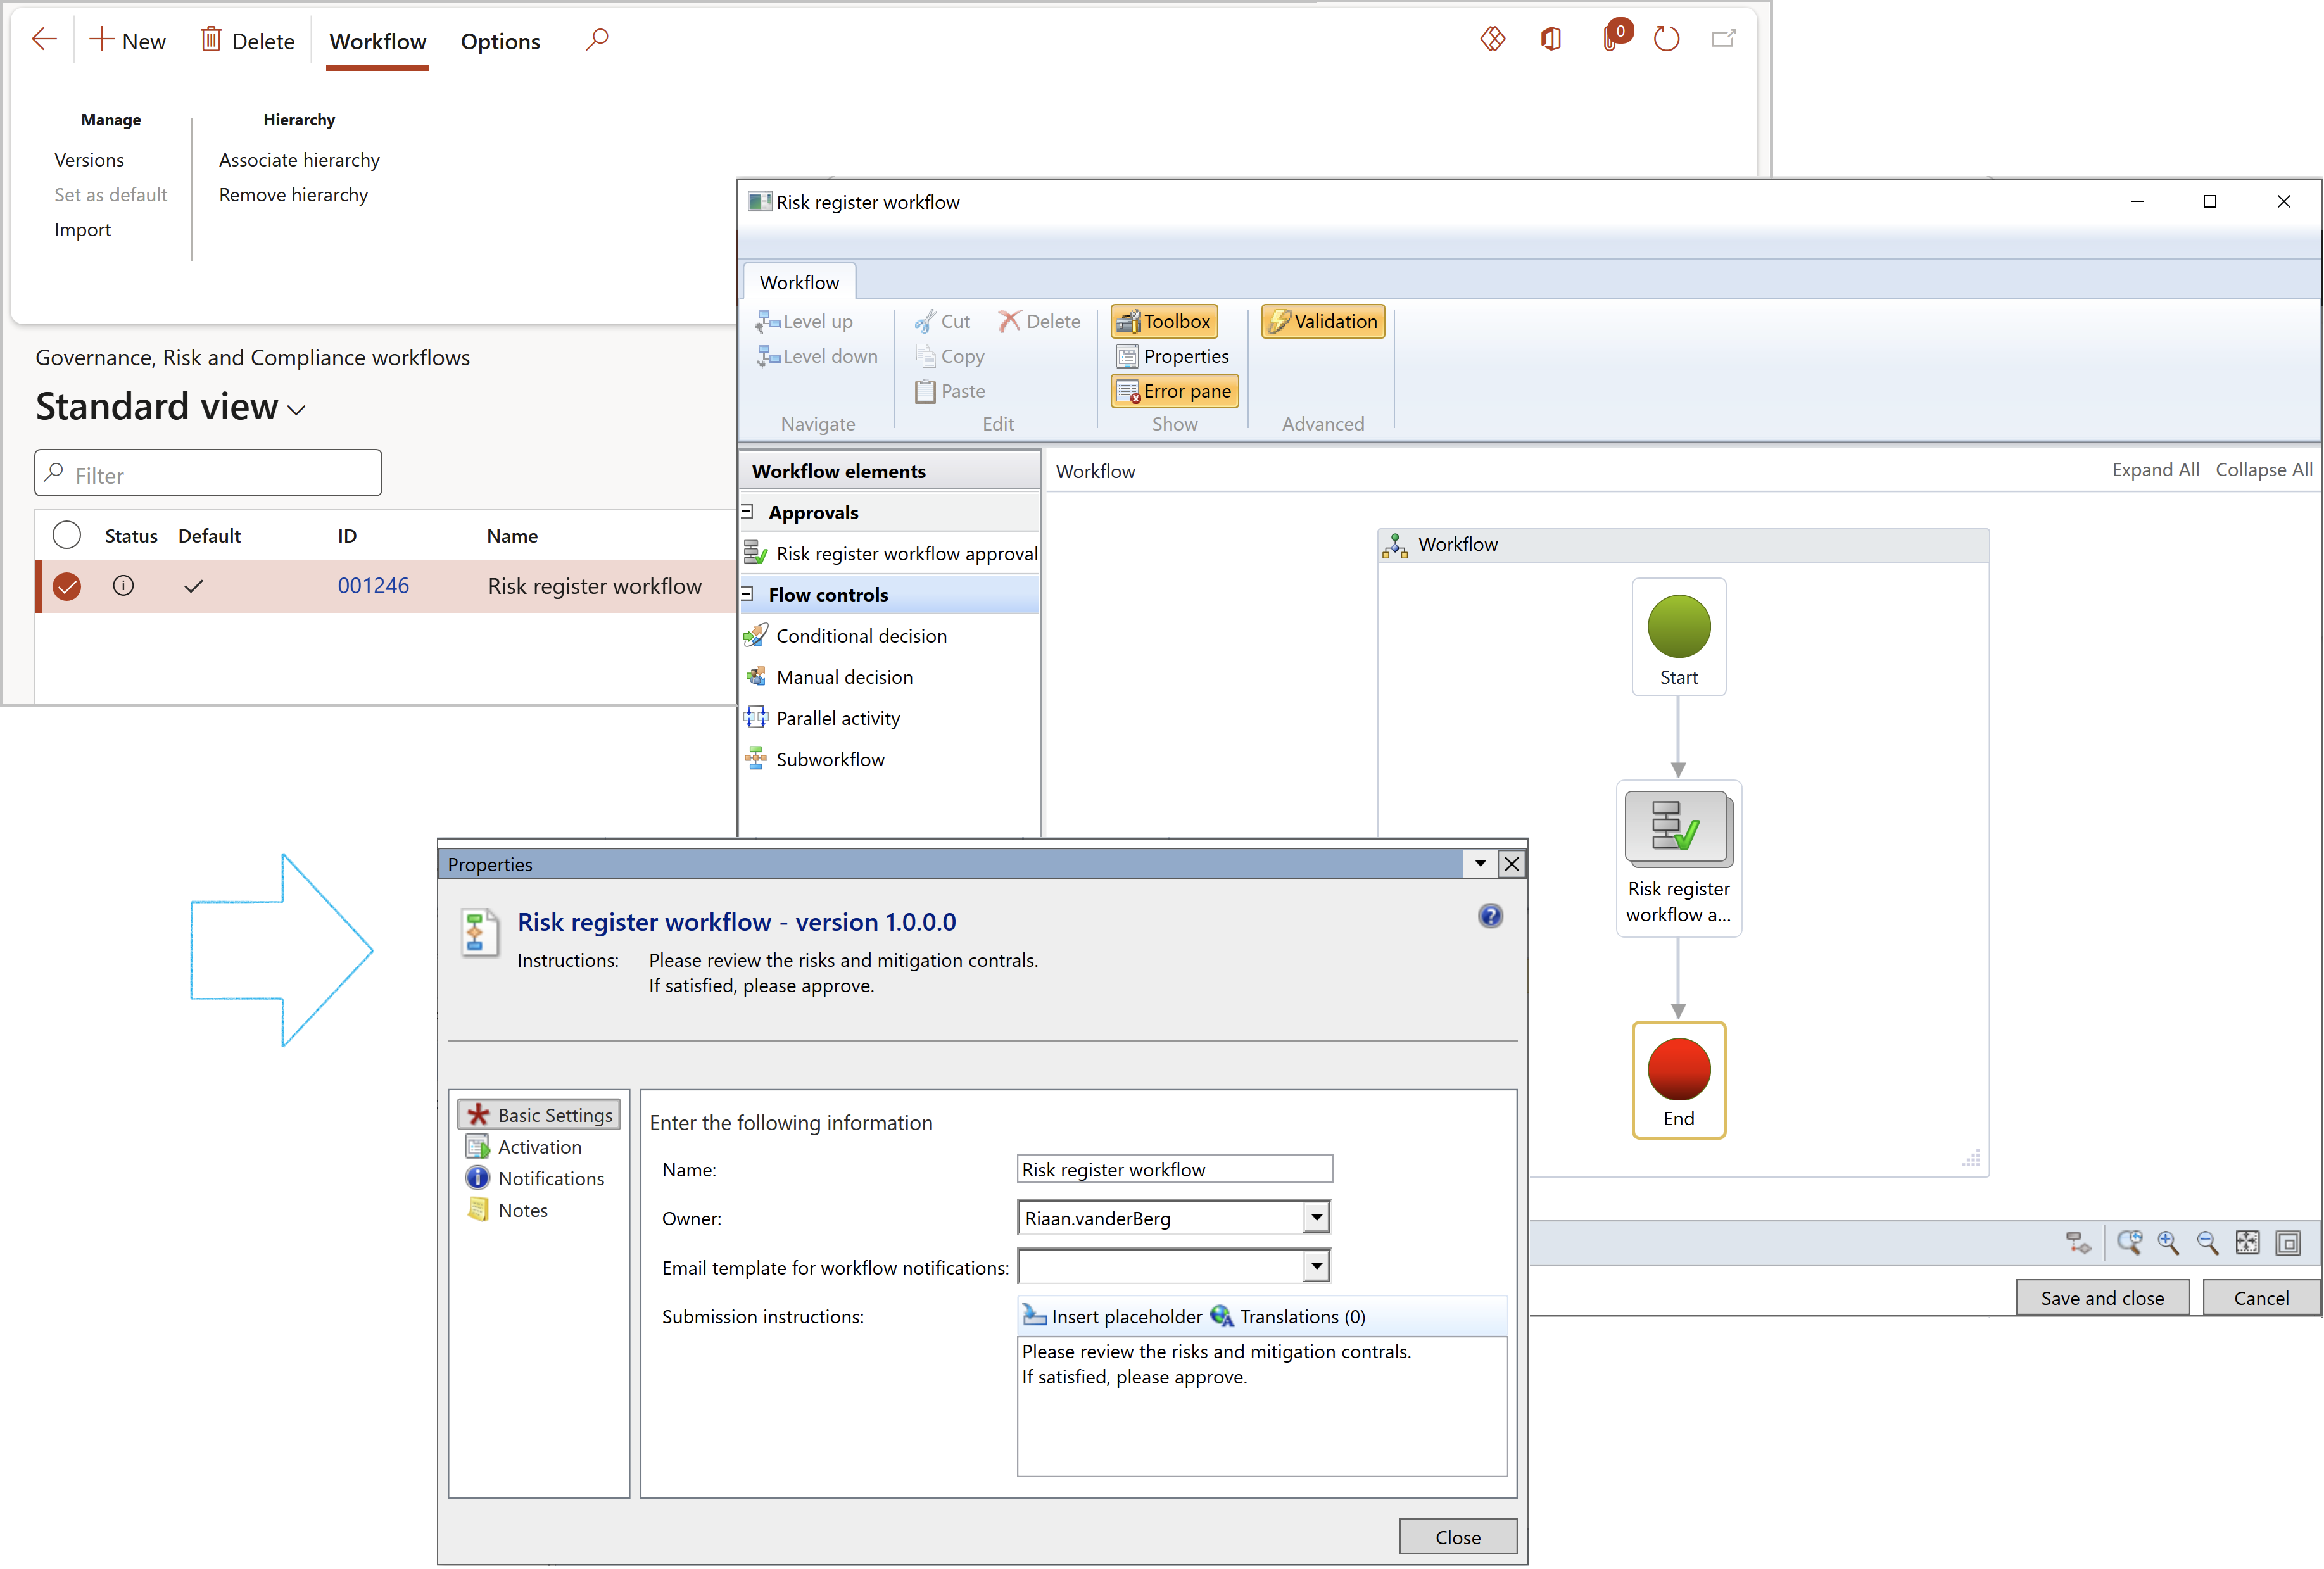
When risk register header workflow is enabled:
- The Stage button will be hidden when the Header stage = Created, but the record can be submitted into workflow
- Once the record is submitted to workflow, the Header stage will change to Submitted
- If the Header stage of the record = Submitted, the only option available on the Stage button dropdown list, will be Reexamine
- When Reexamine is selected from the Stage button dropdown list, the Header stage will become Reexamined and the record will treated the same as if it had a stage = Created
- The Stage button will not be available when the Header stage = Reexamined
- A record with stage = Reexamined can be submitted into workflow
- Once the Workflow has been Approved, the Header stage will be Approved
- The Stage button options will be hidden when the Header stage = Approved or Rejected
- When the Header stage of a record = Changed, the Workflow button will be available and the record will treated the same as if it had a stage = Created
- When the Header stage of a record = Changed, the only option available on the Workflow button dropdown will be Submit
¶ Step 34: Workflow on Risk assessments
Workflow is the series of activities that are necessary to complete a task. Each step in a workflow has a specific step before it and a specific step after it.
¶ Step 34.1: Risk register line workflow
To create workflow for Risk register lines, go to:
GRC > Setup > Governance, Risk and Compliance workflows
Below is a screenshot of the Risk register line approval workflow
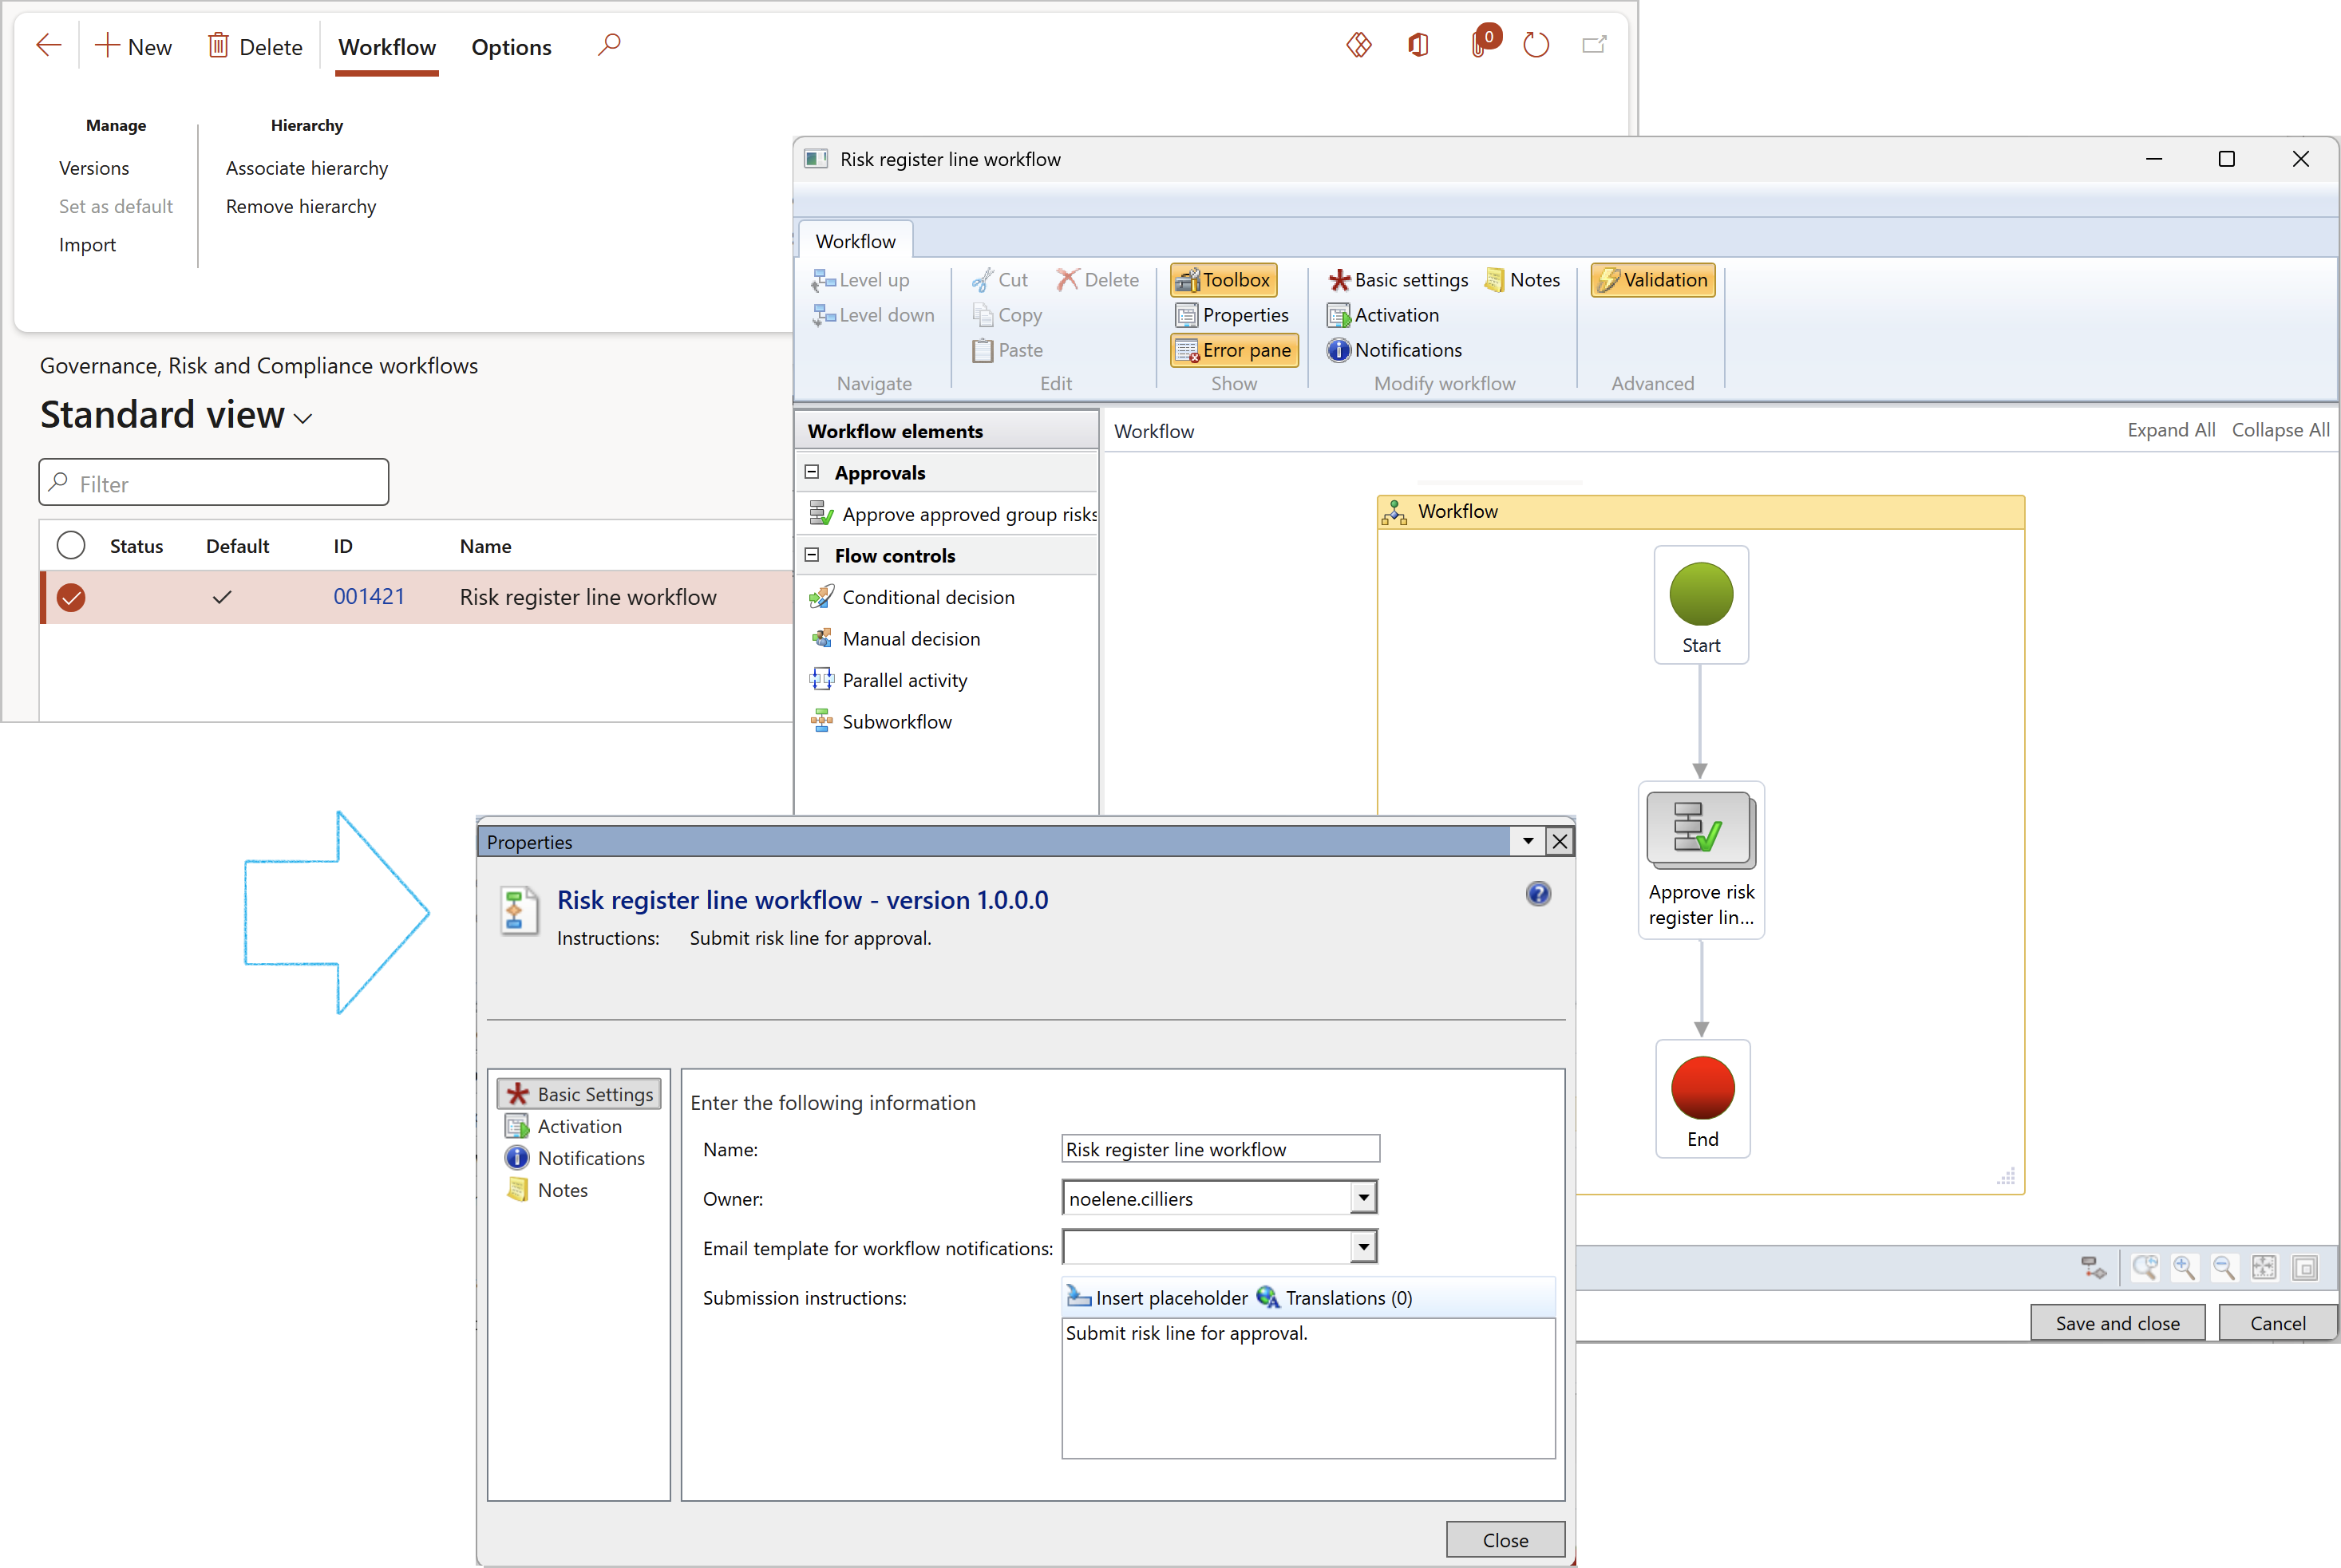
When risk line workflow is enabled:
- The Workflow button will be visible on the risk line action pane, next to the Bowtie focus button
- The risk line status can be viewed next to the risk line title. The status value will change from Draft to In review to Approved or Rejected as the line progresses through the workflow process
- Multiple lines can be submitted into workflow, however, submission can only be done sequentially
- Once a line has been submitted into workflow, the risk line fast tab details will be disabled to prevent changing of details during the approval process
- Once a risk line has been approved, the following fields will be updated in the Approval field group, under the Risk actions Index tab
- The Approved slider will be set to Yes
- The Approval date will be set to the date and time of approval
- The Approved by field will be populated with the name of the workflow approver
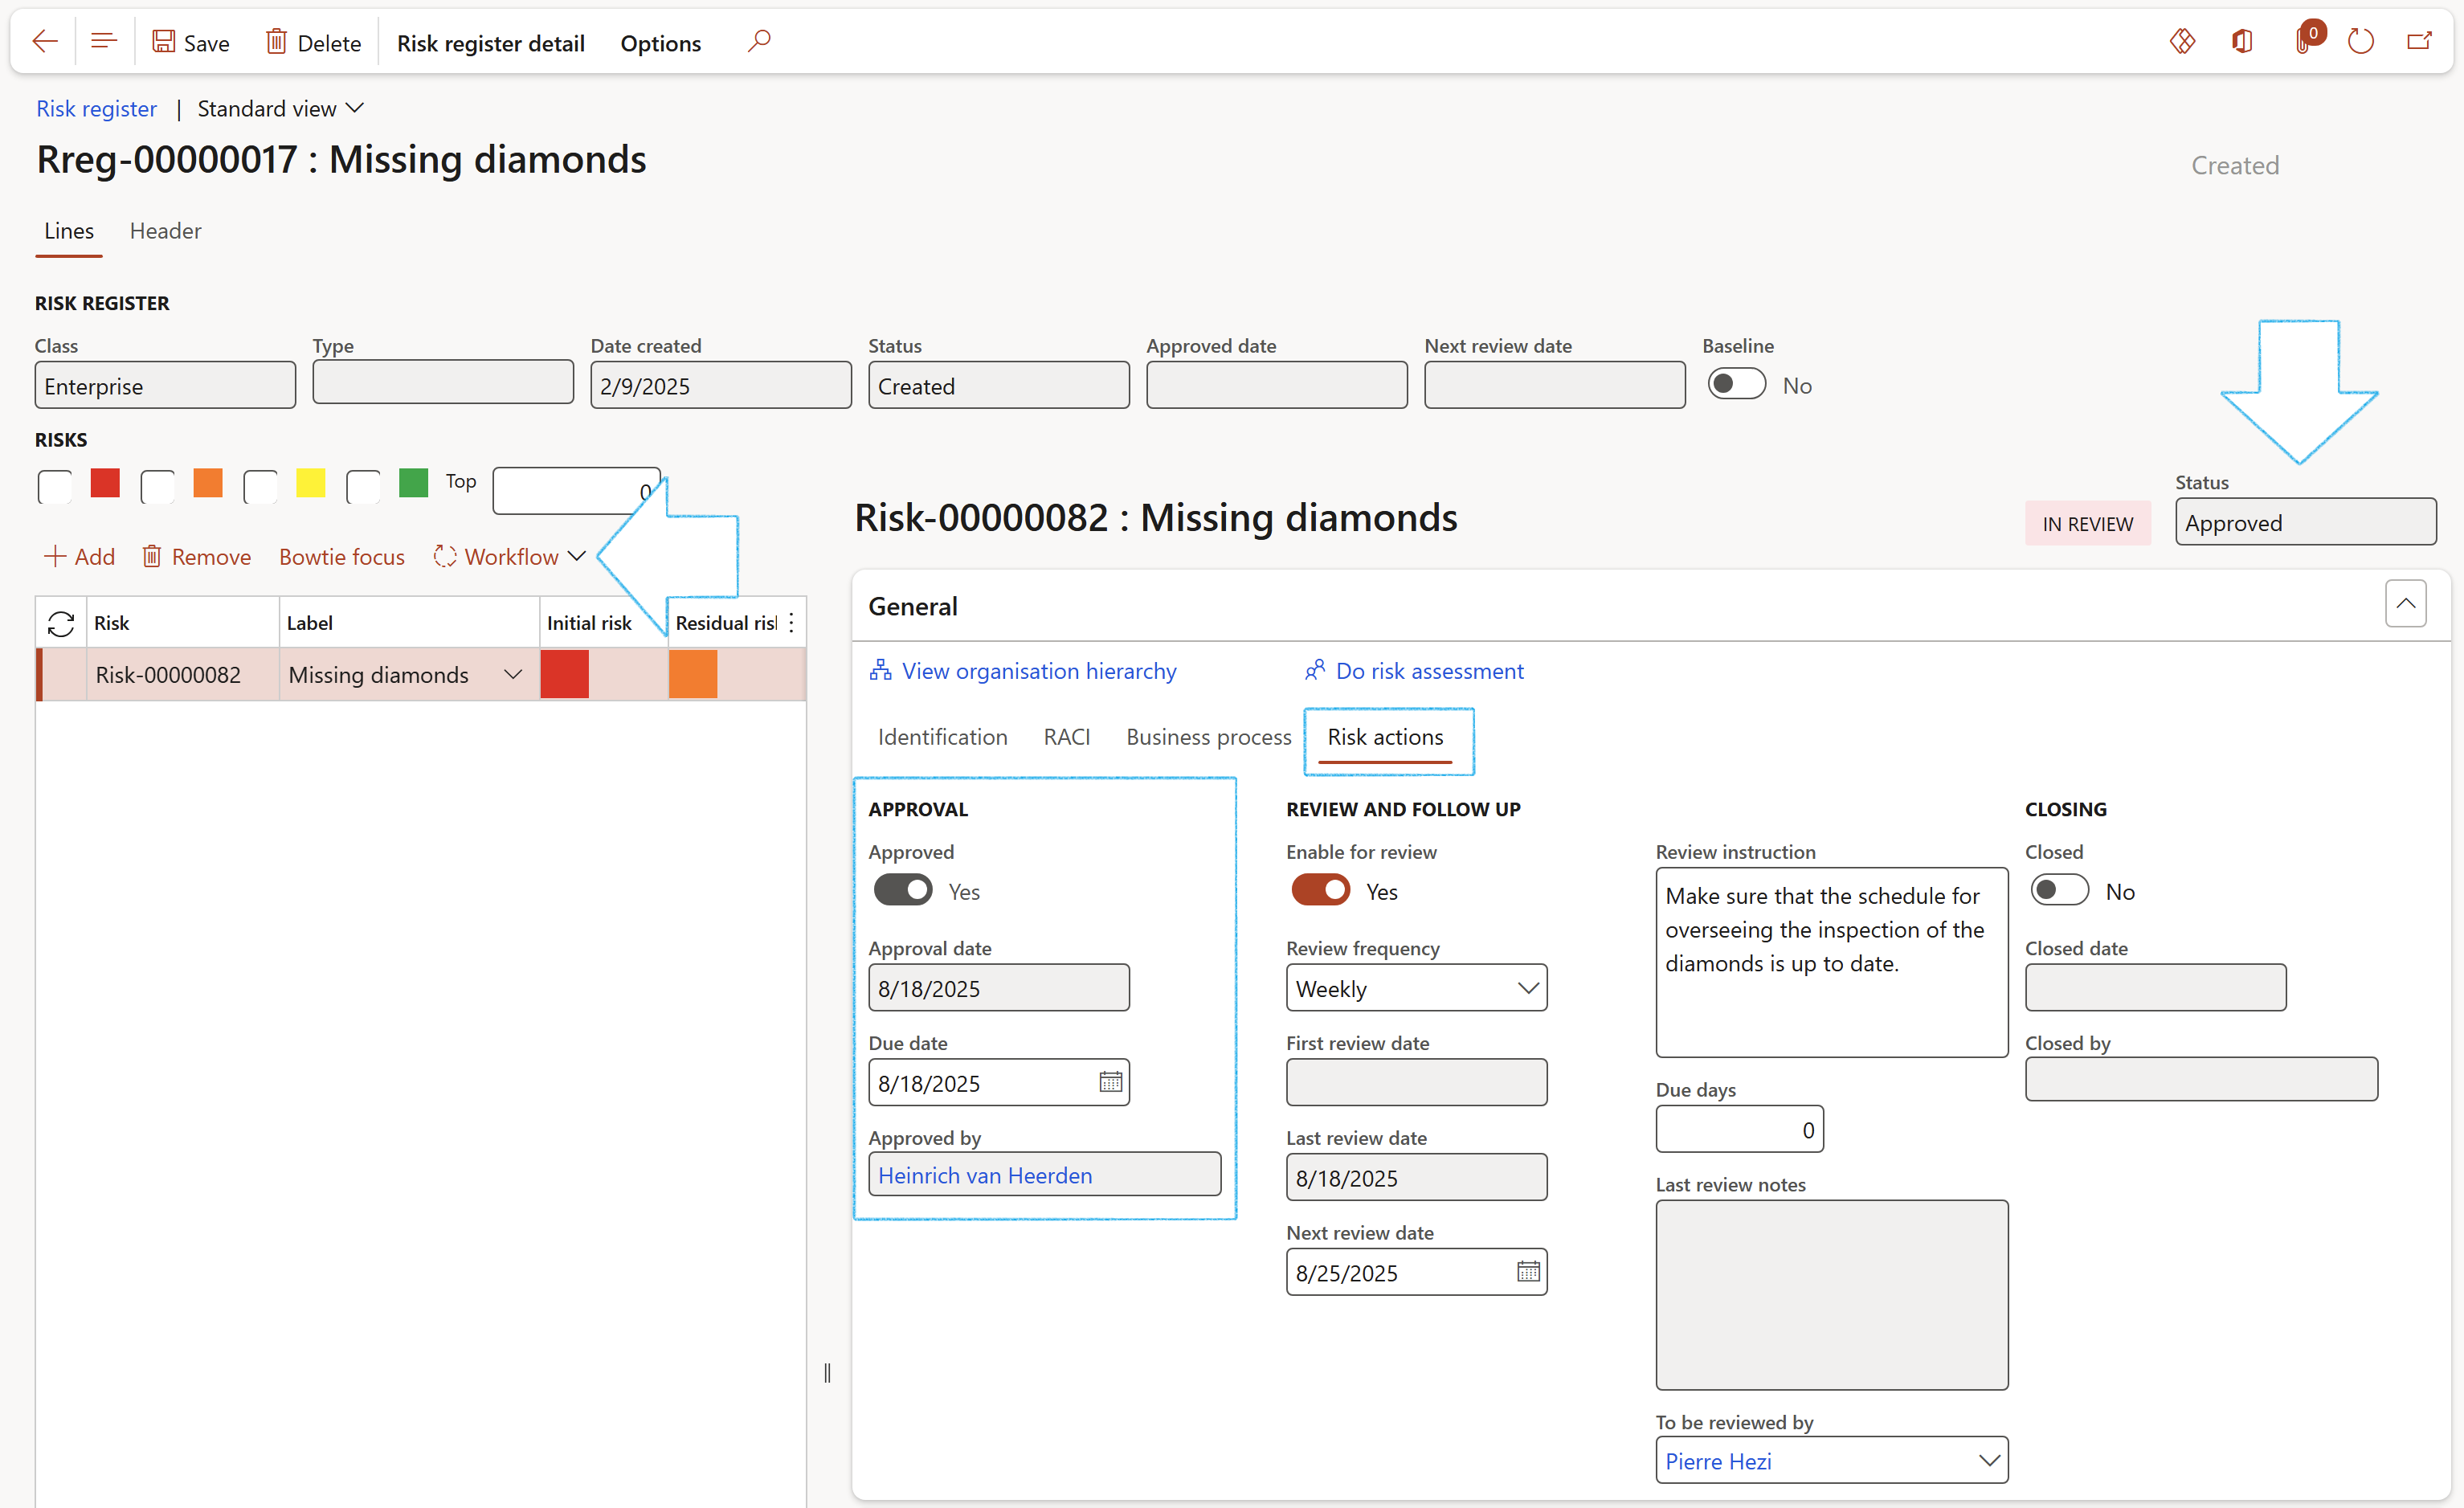
The risk register header and line workflow cannot be used together. It is always important to make sure that only one of the two workflows are active
¶ Enterprise risk worksheet
¶ Step 35: Using the Risk worksheet (Header)
Various Risks are created and identified in the Risk register. These risks need to be maintained, mitigated, and eventually closed. The Enterprise risk worksheet is used for “quick” maintenance on and viewing of Risks, and places focus on the responses to risks. Risk outcomes and Control measures are defined and maintained on this form.
The Risk worksheet displays the various open Risks per Risk register in the top grid, with the related Additional information (Risk outcomes and Control measures) in the bottom grid. Additional Risk outcomes and Control measures can be added for each Risk line by using the bottom grid.
Go to: GRC > Risk > Worksheets > Enterprise risk worksheet
.png)
Please note the one-to-many link allowing one Risk to be mitigated via many Controls (Control measures)
¶ Step 35.1: Buttons on the Risk worksheet

- New - Opens the Risk assessment dialog for doing a new Enterprise risk assessment
- Edit - The Self-assessment dialog opens and the selected risk line can be edited
- Hide columns - Is a toggle to control focussed form layout (Site and Department are hidden or displayed)
- Close - Marks the Risk line (as well as all Controls measures) as closed. Risks which have been completed in full can be marked as closed.
After a risk has been closed, the line will not be displayed by default anymore on the Enterprise risk worksheet.
To view closed risks, select the Yes option under Closed in the filter area (see Step 27.2 below)
- Print - Print one of the following reports:
- Risk register
- Risk register detail
- Export to Excel - The user can choose to export on of the following for the selected Risk register:
- Export all the Risk controls
- All the Risks
- Who or what affected

¶ Step 35.2: Filters on the Risk worksheet

- Top - List the top X (1 to 10) lines of highest risk score. Zero/empty value will list all lines
- Site - Filter for risks as captured per Site
- Department - Filter for risks as captured per Department
- From date (date created) and To date - Search for risks in selected date period
- Closed - The default view displays only the open risk entries. To view the closed entries, select the Yes option under Closed in the filter area
- Status - Filter risk lines by status
- Clear filters - Removes all filters in on order to display only open risk entries
¶ Step 35.3: Display risk records
Risk information and values from the Enterprise risk register are displayed in the top grid of the Enterprise risk worksheet
- Risk register - Indicates the Risk register that groups together multiple risks
- Label - Brief description of the risk
- Description - Detailed description of the risk (as per risk lines, General Fast tab)
- Initial likelihood, Initial impact and Initial risk rating - Act as guides and display the colour under Initial risk column (as per the register’s risk lines, populated under the risk lines, Initial risk Fast tab)
- Preventative control effectiveness and Control effectiveness - Indicate the values selected on the register’s risk lines, populated under the risk lines Assessment calculations and controls Fast tab
- Residual likelihood, Residual impact and Residual risk rating - Act as guides and display the colour under Residual risk column, (as per the register’s risk lines, populated under the risk lines, Residual risk Fast tab)

¶ Step 36: Using the Risk worksheet (Lines)
The lower section of the Enterprise risk worksheet, Additional information:
- Risk outcomes:
- There are two index tabs Who or what affected and Consequences
- Lines can be added and removed under each index tab
- Control measures:
- Lines can be added and removed
¶ Step 36.1: The Risk outcomes fields
¶ Step 36.1.1: Who or what affected
- In the Who or what affected field, select the type of entity which is affected
- Select the relevant risk Score level from the dropdown list
- Enter a detailed description in the Note field
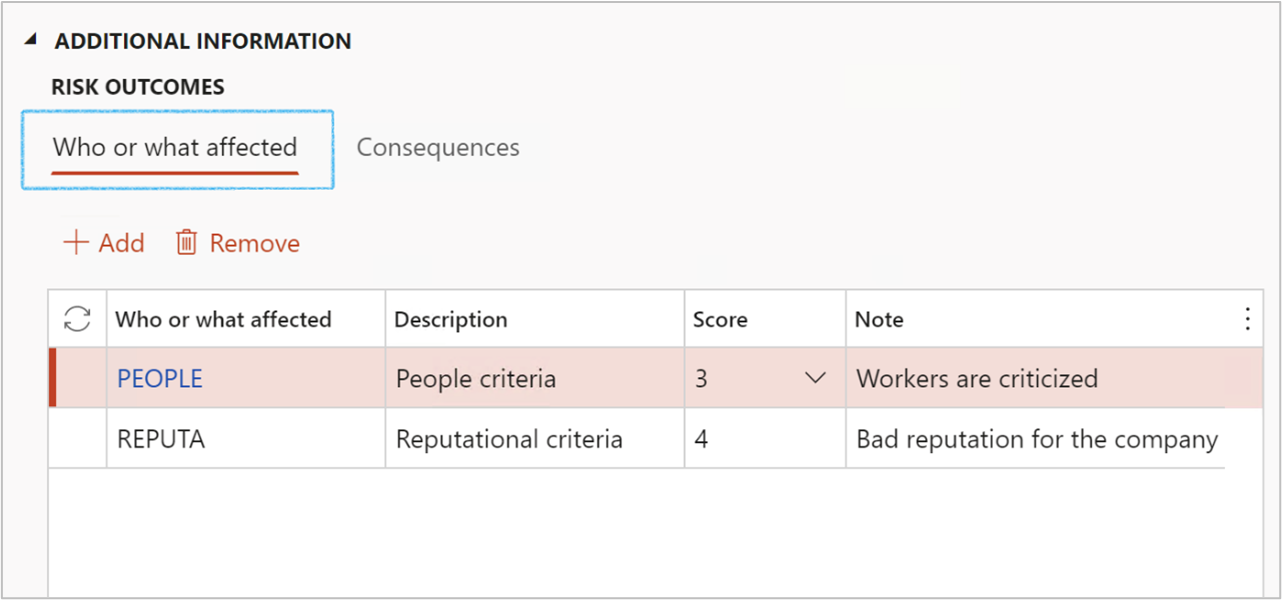
These details are from the risk lines inside the Enterprise risk register
¶ Step 36.1.2: Who or what affected
- The Consequence ID field is a dropdown, selecting the type of consequence which is affected
- Specify the Description of the consequence selected in the previous point
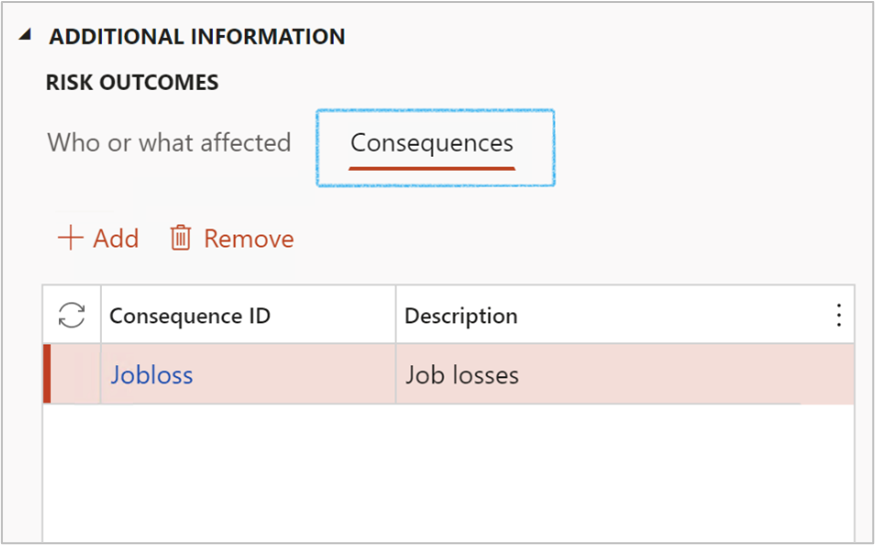
These details are from the risk lines inside the Enterprise risk register
¶ Step 36.2: The Control measures
Users can add many controls of different types to mitigate risk
- Enter a Control description
- Select the relevant control Type from the dropdown list
- Select the relevant Effectiveness factor (Control effectiveness level) from the dropdown list

- If no specific Preventative controls were entered and the Recalculate button is clicked, the initial manual value stays the same
- These details are from the risk lines inside the Enterprise risk register
- Activities can be created per line by clicking on the Create activity button
- The Action due date = Planned end date
- The Closed date = The closed date on the Activity
¶ Reference table
Definitions
| Risk Assessment: |
The process of analyzing all of the risks associated with hazards and evaluating them to determine steps for risk control and priorities. Risk Assessment considers two (2) main factors:
|
|
Risk Score: |
The risk score is the number allocated following risk assessment, which describes the level of risk, ranging from H (very high risk) to L (very low risk). The risk score is also used to identify the priority and timeframe of response to the identified hazard. |
|
Risk Control: |
Risk Control is a method of managing the risk. |