
¶ Introduction
Contract management, also known as Contract lifecycle management (CLM) is the management of contracts made with customers, vendors, partners, or employees. The staff involved in Contract Administration required to negotiate, support and manage effective contracts are expensive to train and retain. Contract management includes negotiating the terms and conditions in contracts and ensuring compliance with the terms and conditions, as well as documenting and agreeing on any changes or amendments that may arise during its implementation or execution. It can be summarized as the process of systematically and efficiently managing contract creation, execution, and analysis for the purpose of maximizing financial and operational performance and minimizing risk.
CLM is the methodical management of a contract from initiation through award, compliance and renewal. Implementing CLM can lead to significant improvements in cost savings and efficiency and can limit liability and increase compliance with legal requirements.
Some key steps in the CLM process are:
- Capture: Step one for most people is to get all their existing paper contracts in a central visible place. If you have no clear idea what contracts you have, then you have no idea what your potential risk exposure is.
- Track: Once you know where all your contracts are, the next step is to track important data, so you don’t miss any milestones. This affects both existing and newly signed contracts.
- Create: Contract creation has two tracks. First, empowering business users with self-service, wizard-based creation using intelligent templates pre-approved by legal. Second, making life easier for legal when drafting complex deals on your own paper, or reviewing and “patching” contracts negotiated on other people’s paper.
- Approve: Companies need an approval workflow process to ensure that risky contracts are reviewed and approved by the right person. Some risks need to be approved by legal, some by management, some by special departments like credit, etc. Ideally, safe deals are pre-approved.
- Negotiate: The needs of the typical negotiator include: a checklist of issues for each type of deal, a way of marking up the paper to highlight how it’s different from the original or the last draft, and a way of capturing and flagging those differences (if possible).
¶ Navigation
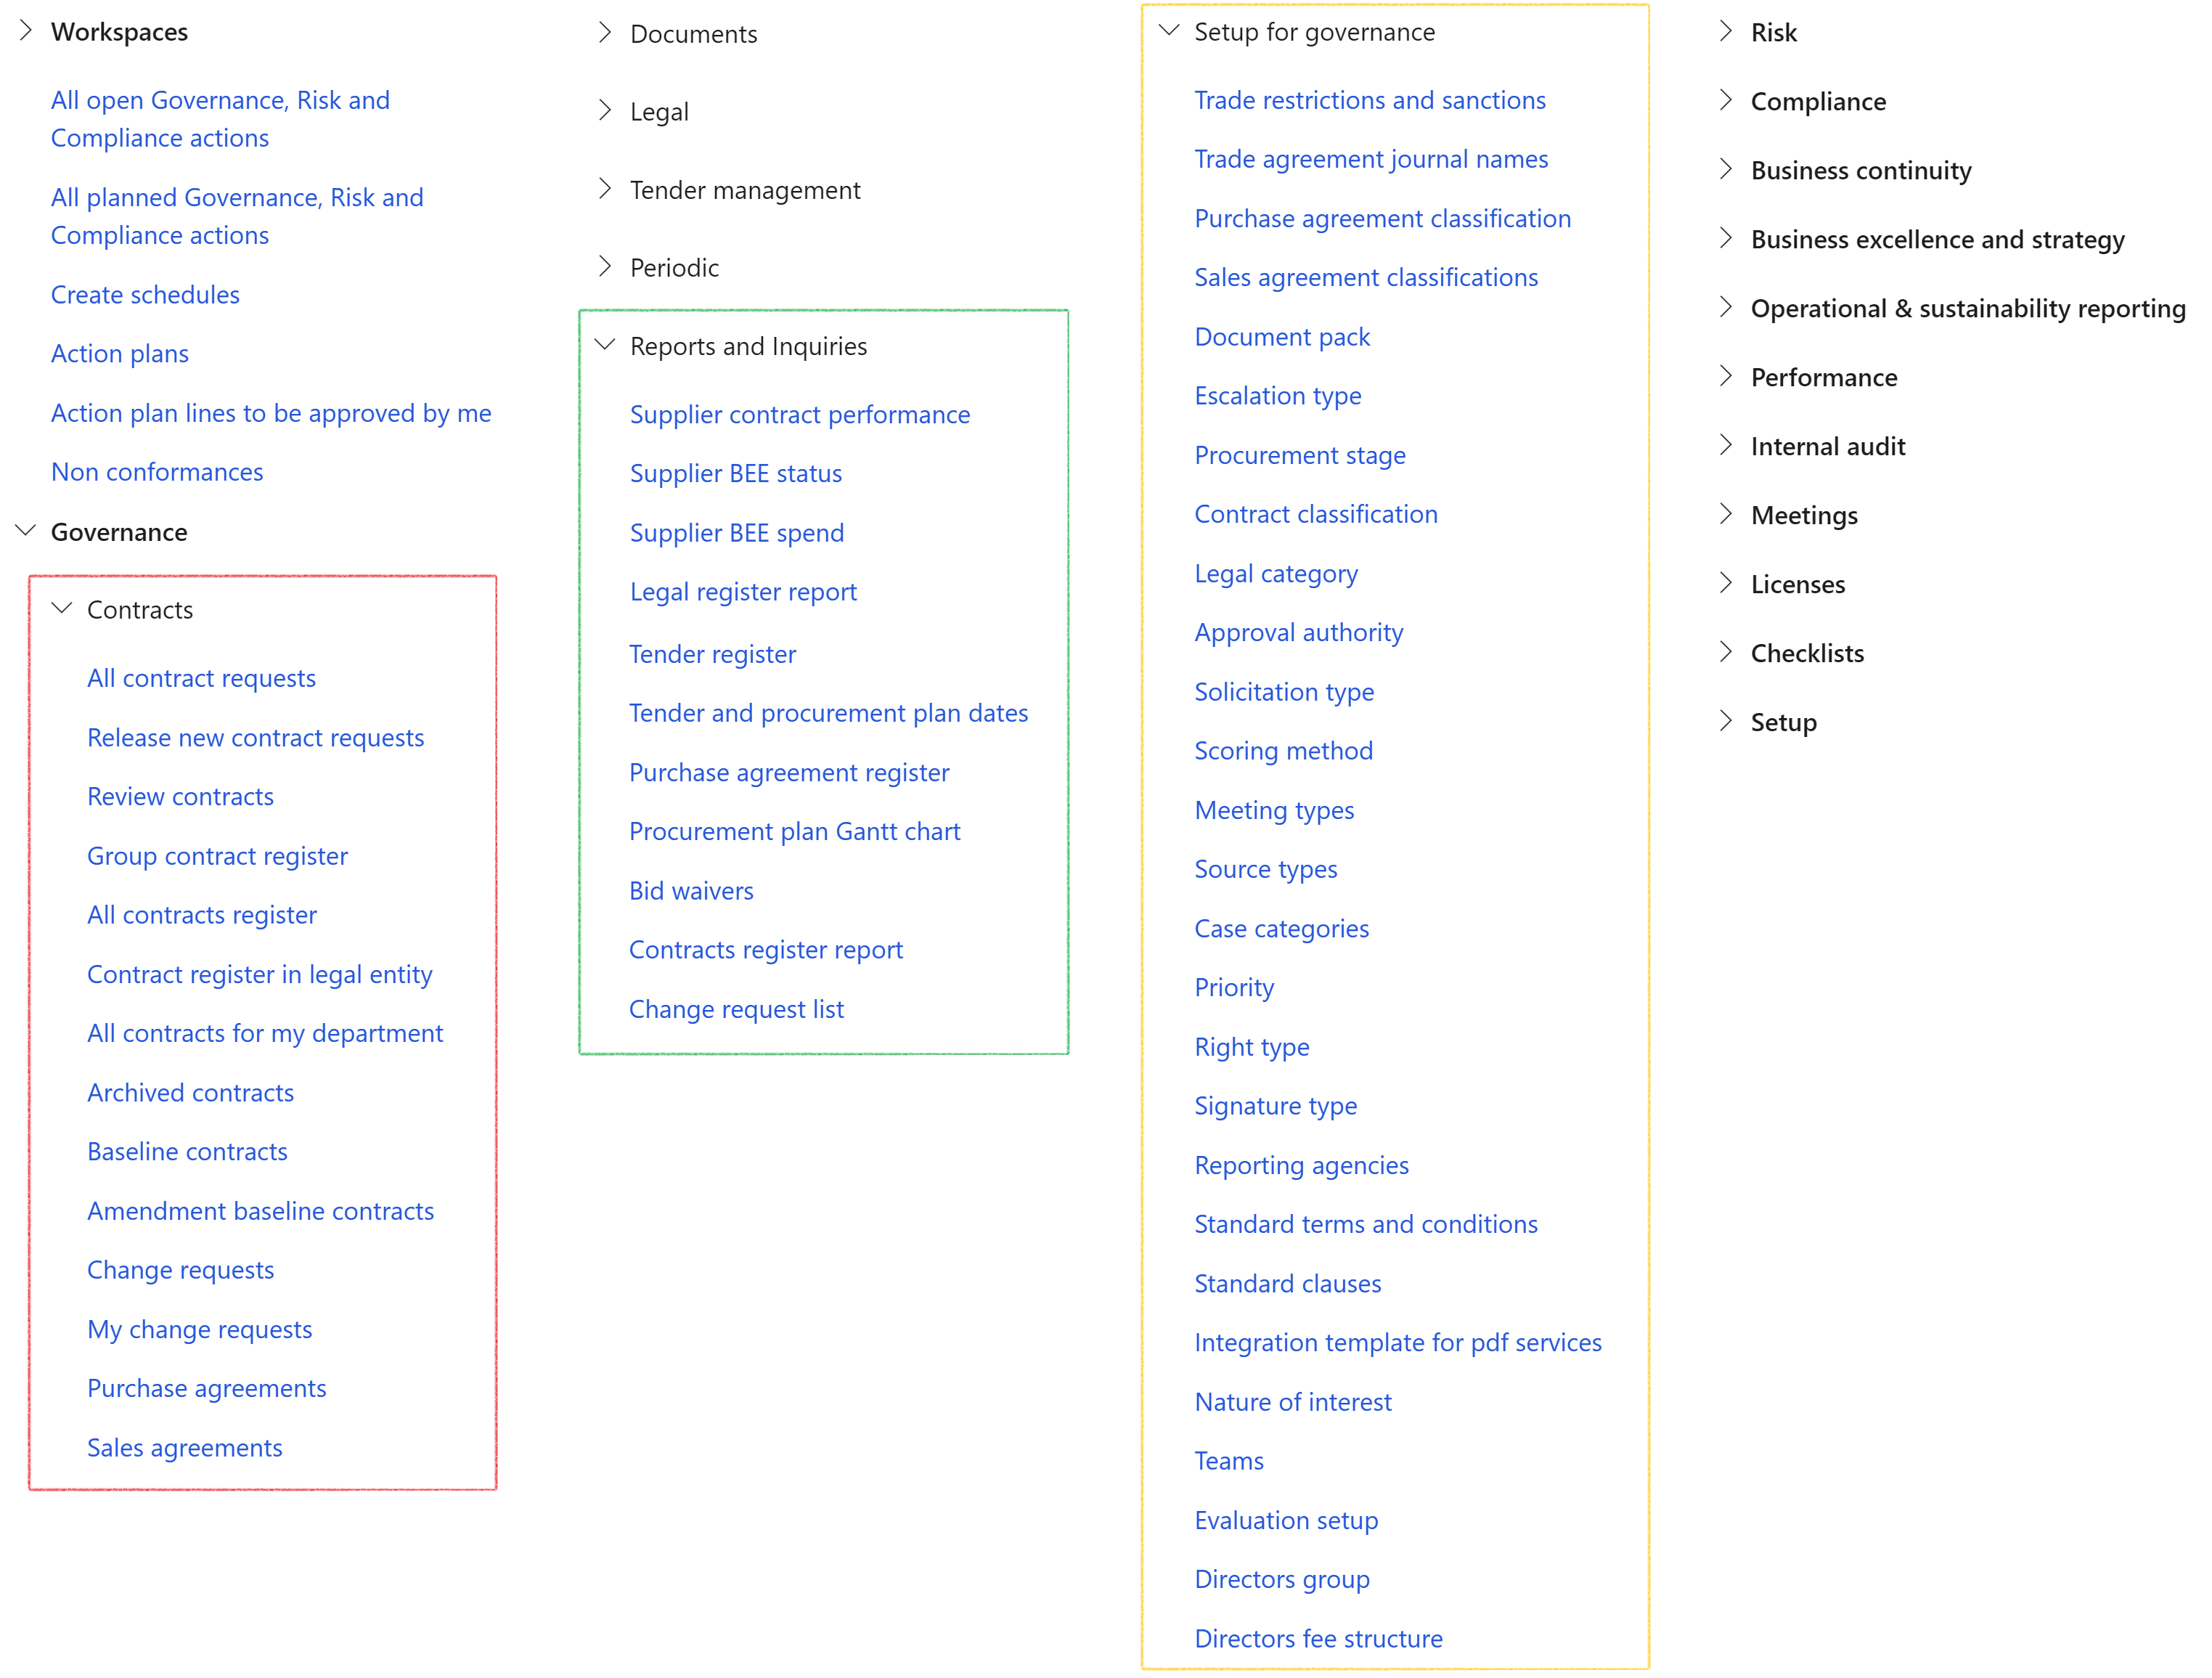
¶ Specific setups
The following will be covered below:
- Parameters; contracts governance
- Document pack
- Meeting types
- Performance goals
- Risk configuration
- Journal names
- Purchase agreement classification
- Escalation types
GRC365 supports trade and non-trade contracts.
Sales and purchase agreements can be classified as Trade contracts. These are characterized by the selling and buying of items, or by executing or receiving a “Statement of work”.
Non-trade contracts are those contracts which are by definition not trade contracts and are usually found in your normal business and day-to-day life, e.g., lease agreement, employment contract etc.
If Workflow is used, Case category type security needs to be setup
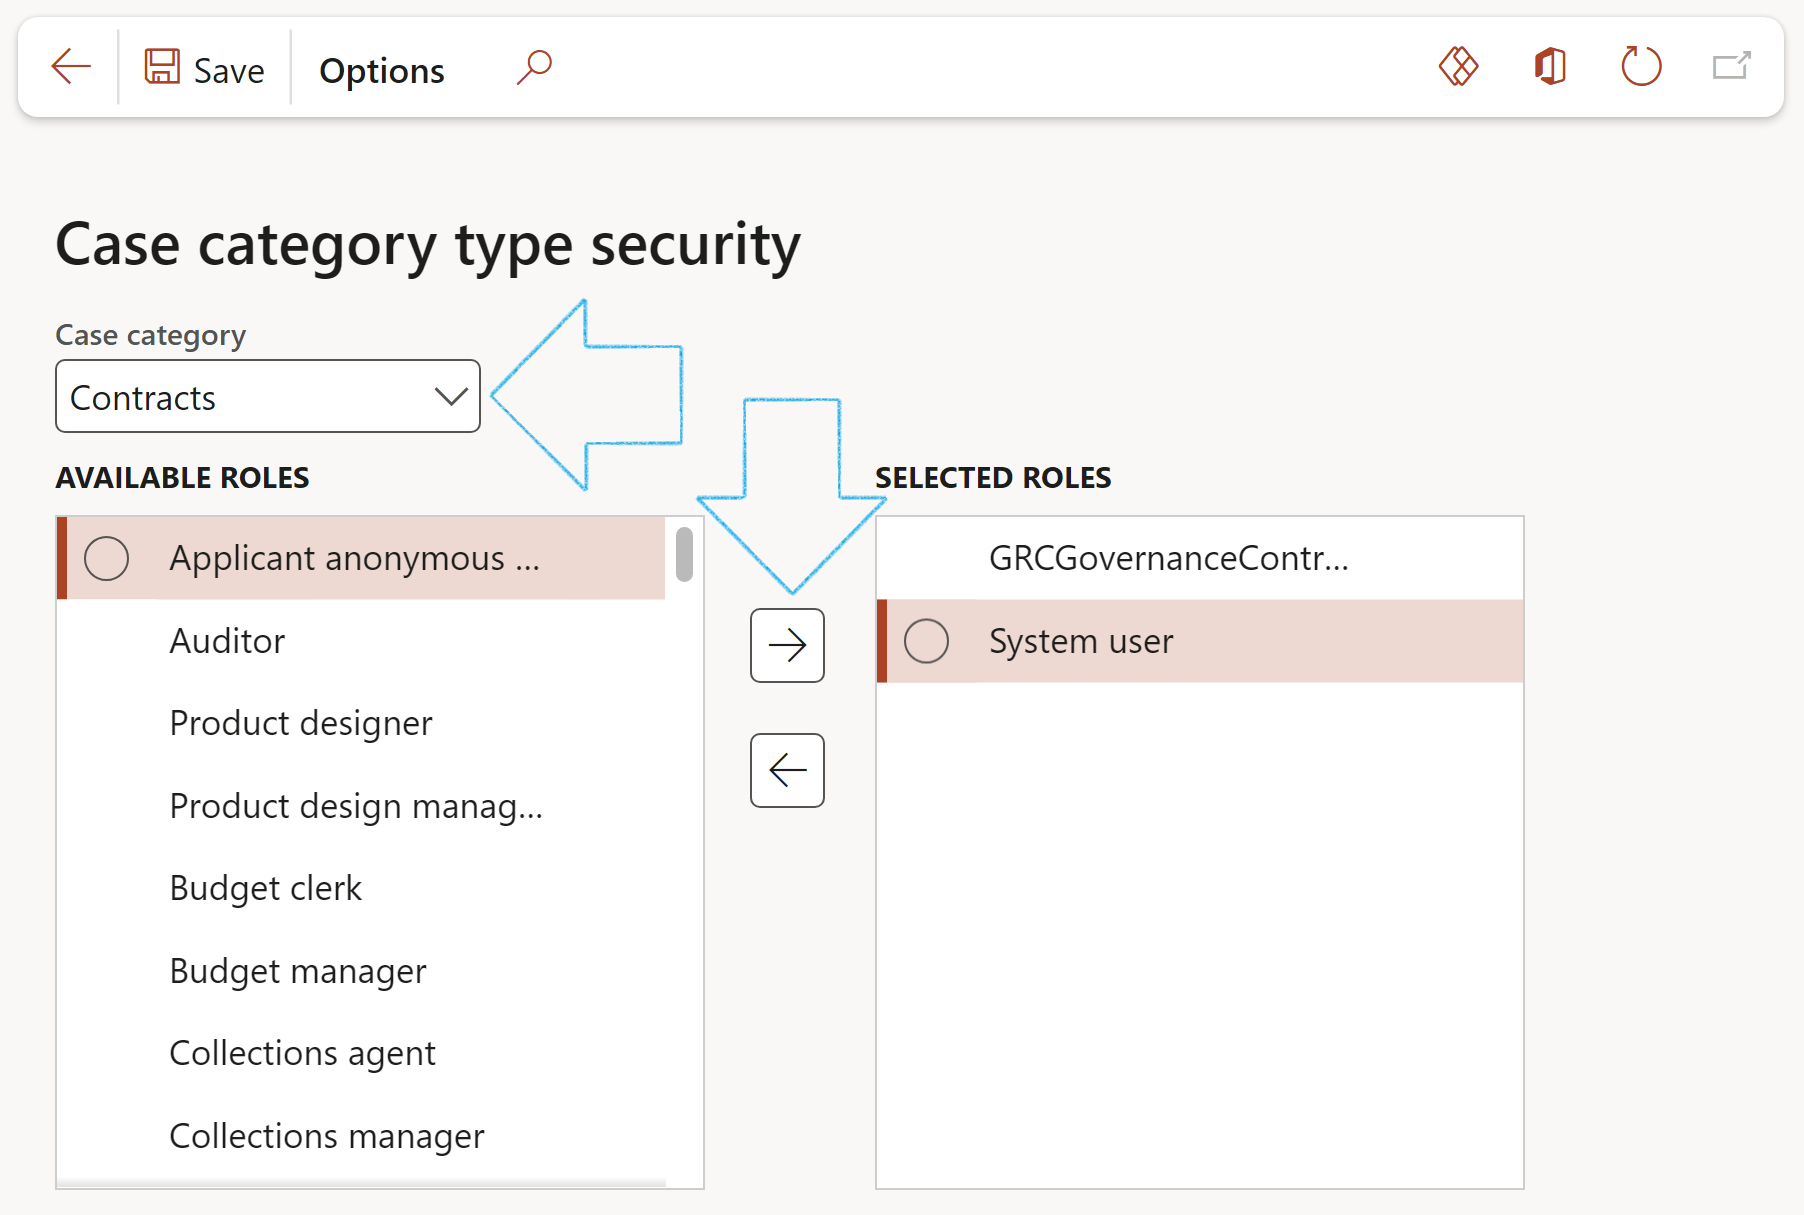
- Go to: Organization administration > Setup > Cases > Case category type security
- In the Case category field, select Contract from the dropdown list
- Select the relevant Roles from the Available roles column and move them to the Selected roles column
¶ Step 1: Governance, risk and compliance parameter setups
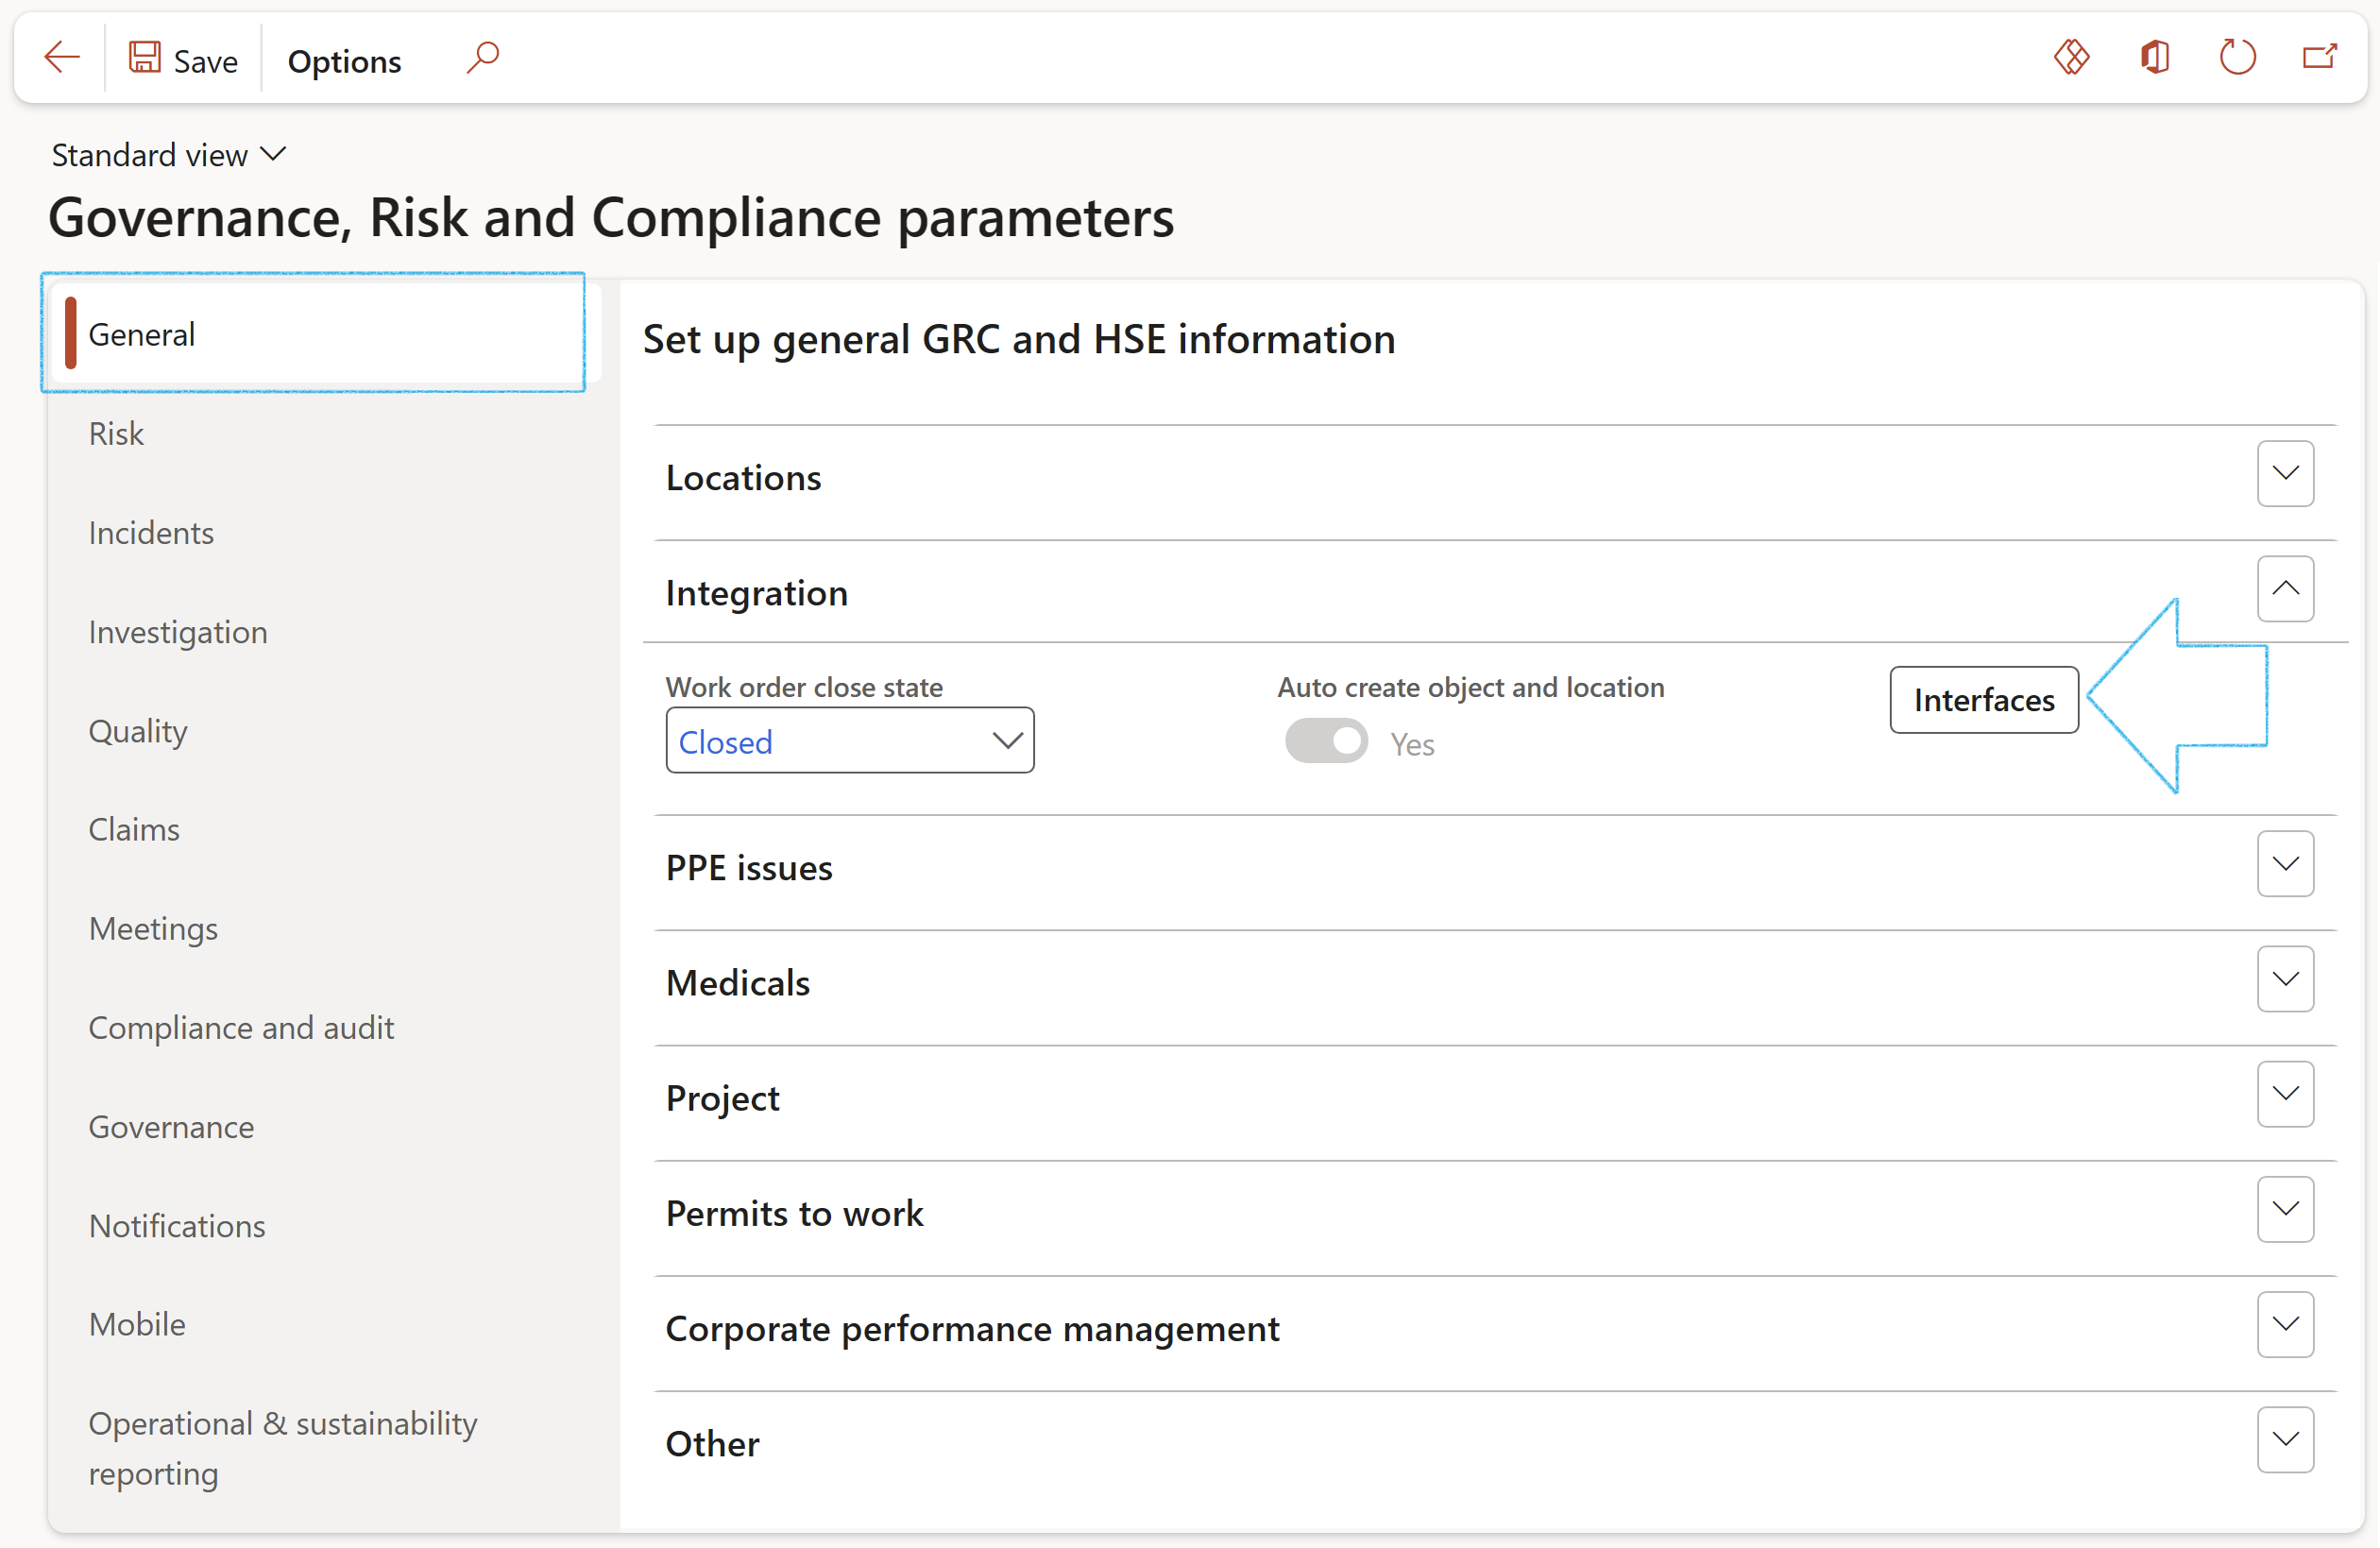
¶ Step 1.1: Interfaces
Go to: GRC > Setup > GRC parameters
- Open the General tab
- Expand the Integration Fast tab
- Click on the Interfaces button
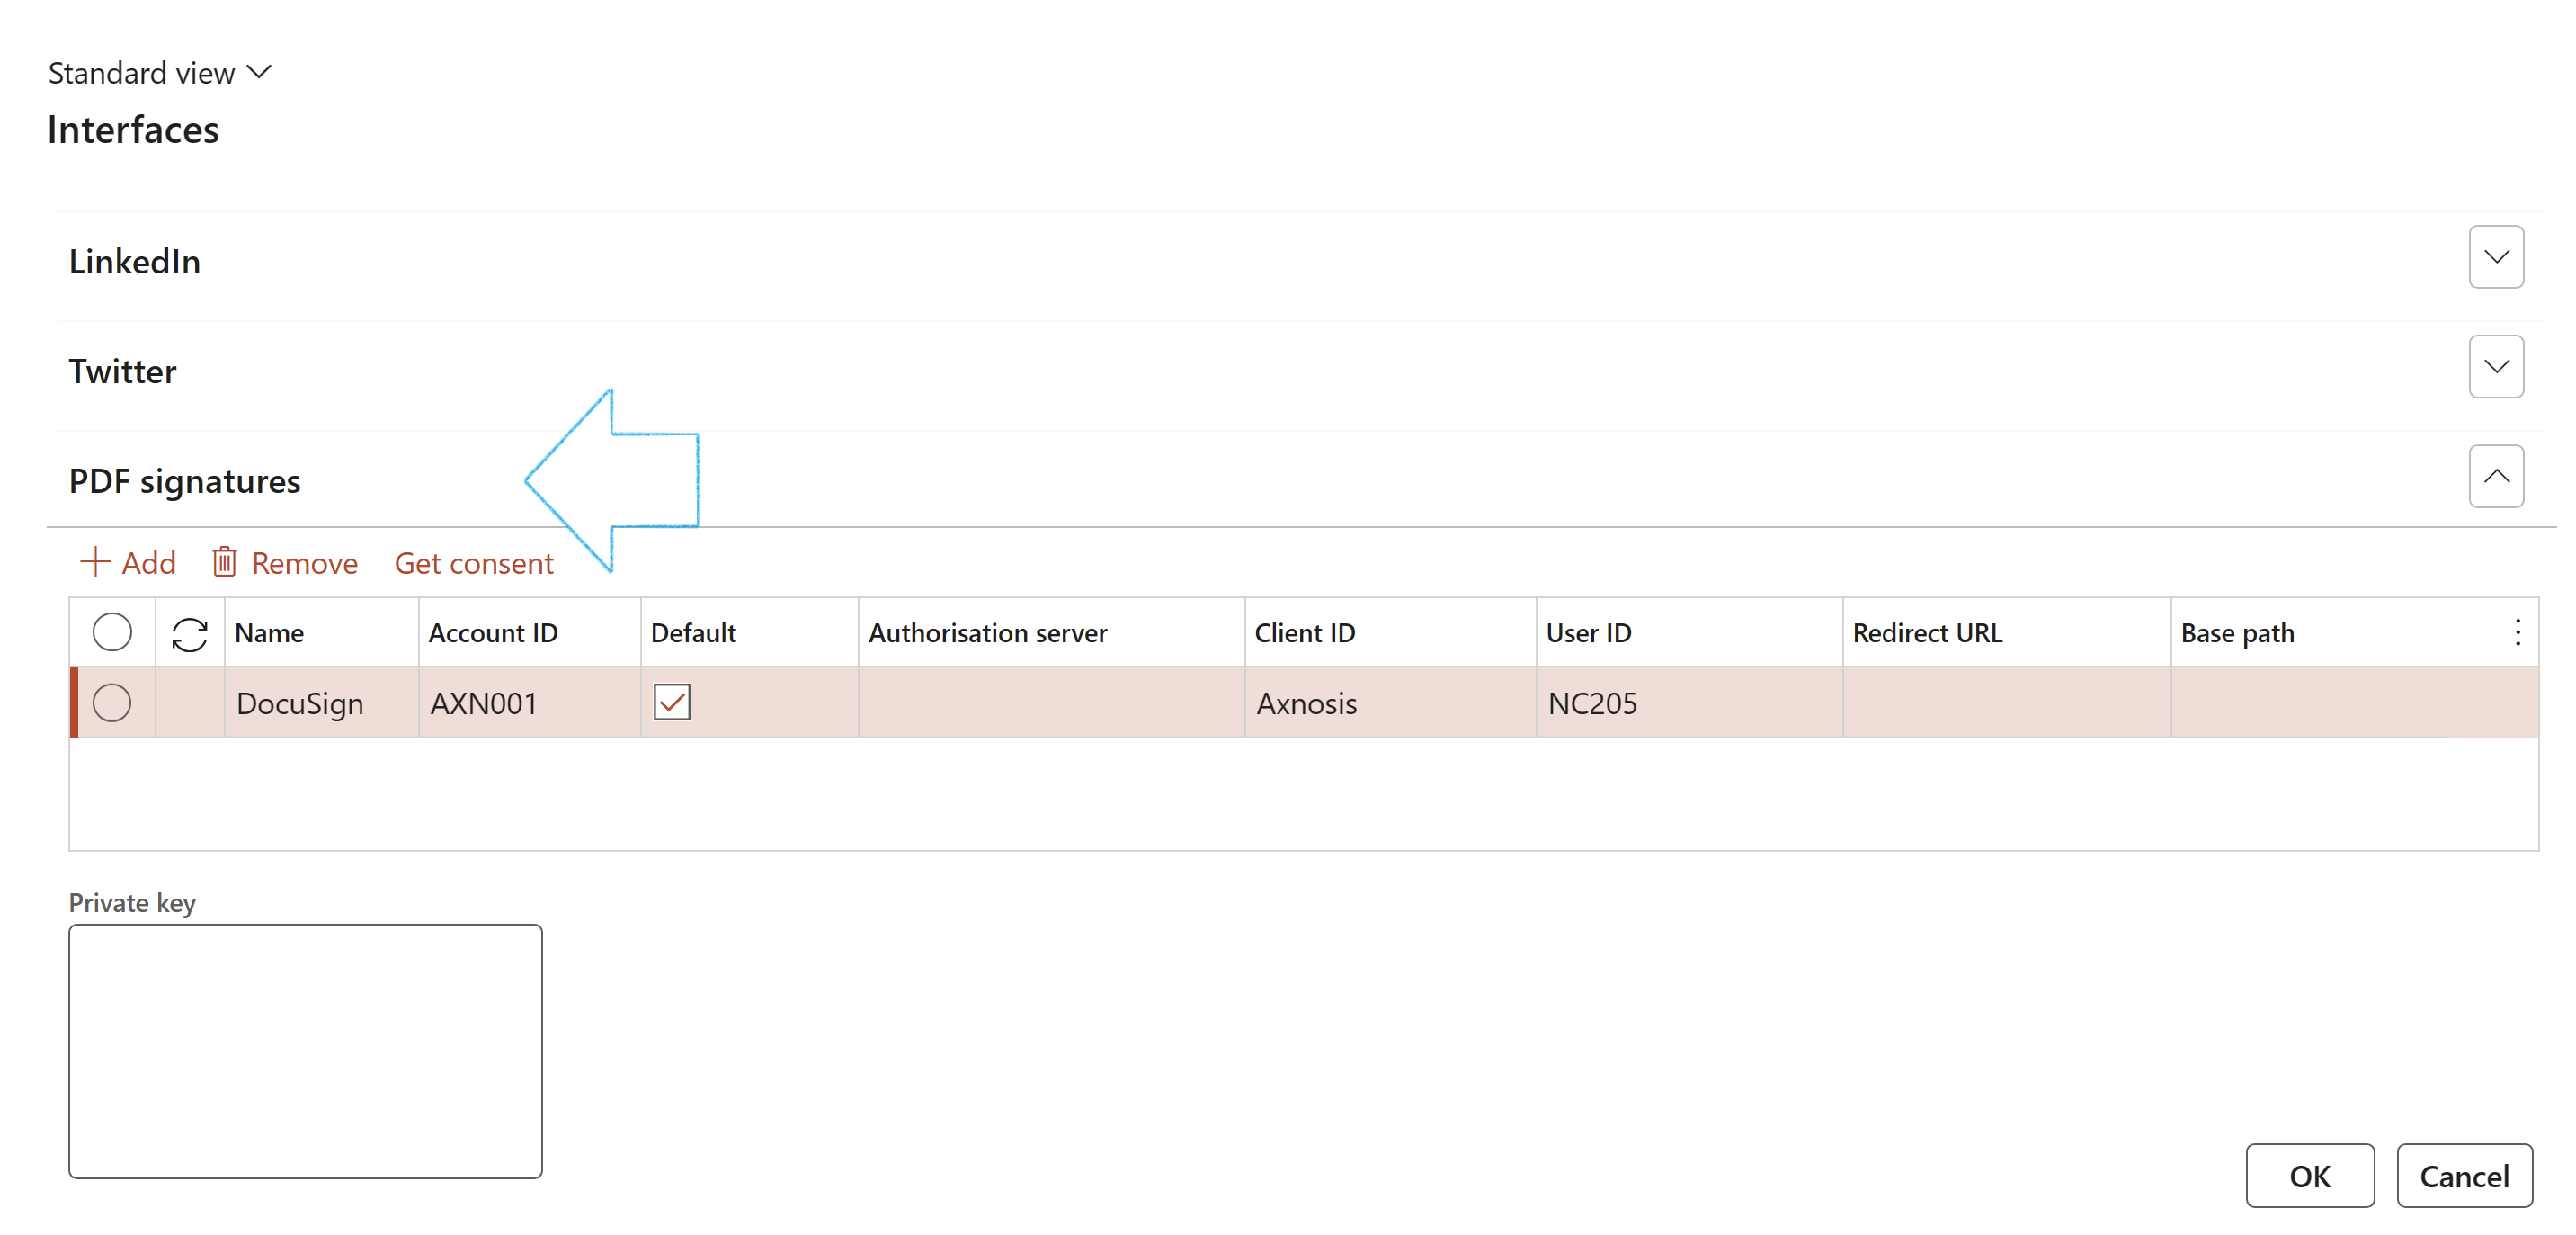
¶ Step 1.1.1: PDF signatures
- Expand the PDF signatures Fast tab
- Click on the Add button
- In the Name field, select the e-signature tool that you will be using, from the dropdown list
- Enter an Account ID. A unique identifier for your account specifies the account being accessed when making API calls. This ensures the integration targets the correct account for operations like sending or signing documents.
- Indicate whether this will be the Default e-signature tool used
- Enter the details of the Authorisation server
- Enter the Client ID. Also known as the Integration Key, it is a unique identifier for your integration application. It is essential for the authentication process and enables secure access to your account.
- Enter the User ID. Represents a specific user in your account. It ensures that API calls are correctly attributed and authorised on behalf of this user.
- Enter the Redirect URL
- Enter the Base path. The URL endpoint for API calls. It may vary depending on the environment (e.g., production or sandbox) being accessed, serving as the base URL for all API requests.
- Enter the Private key in the box provided. A secret key is used in the authentication process to securely validate API requests without exposing sensitive login credentials.
- Click on the OK button
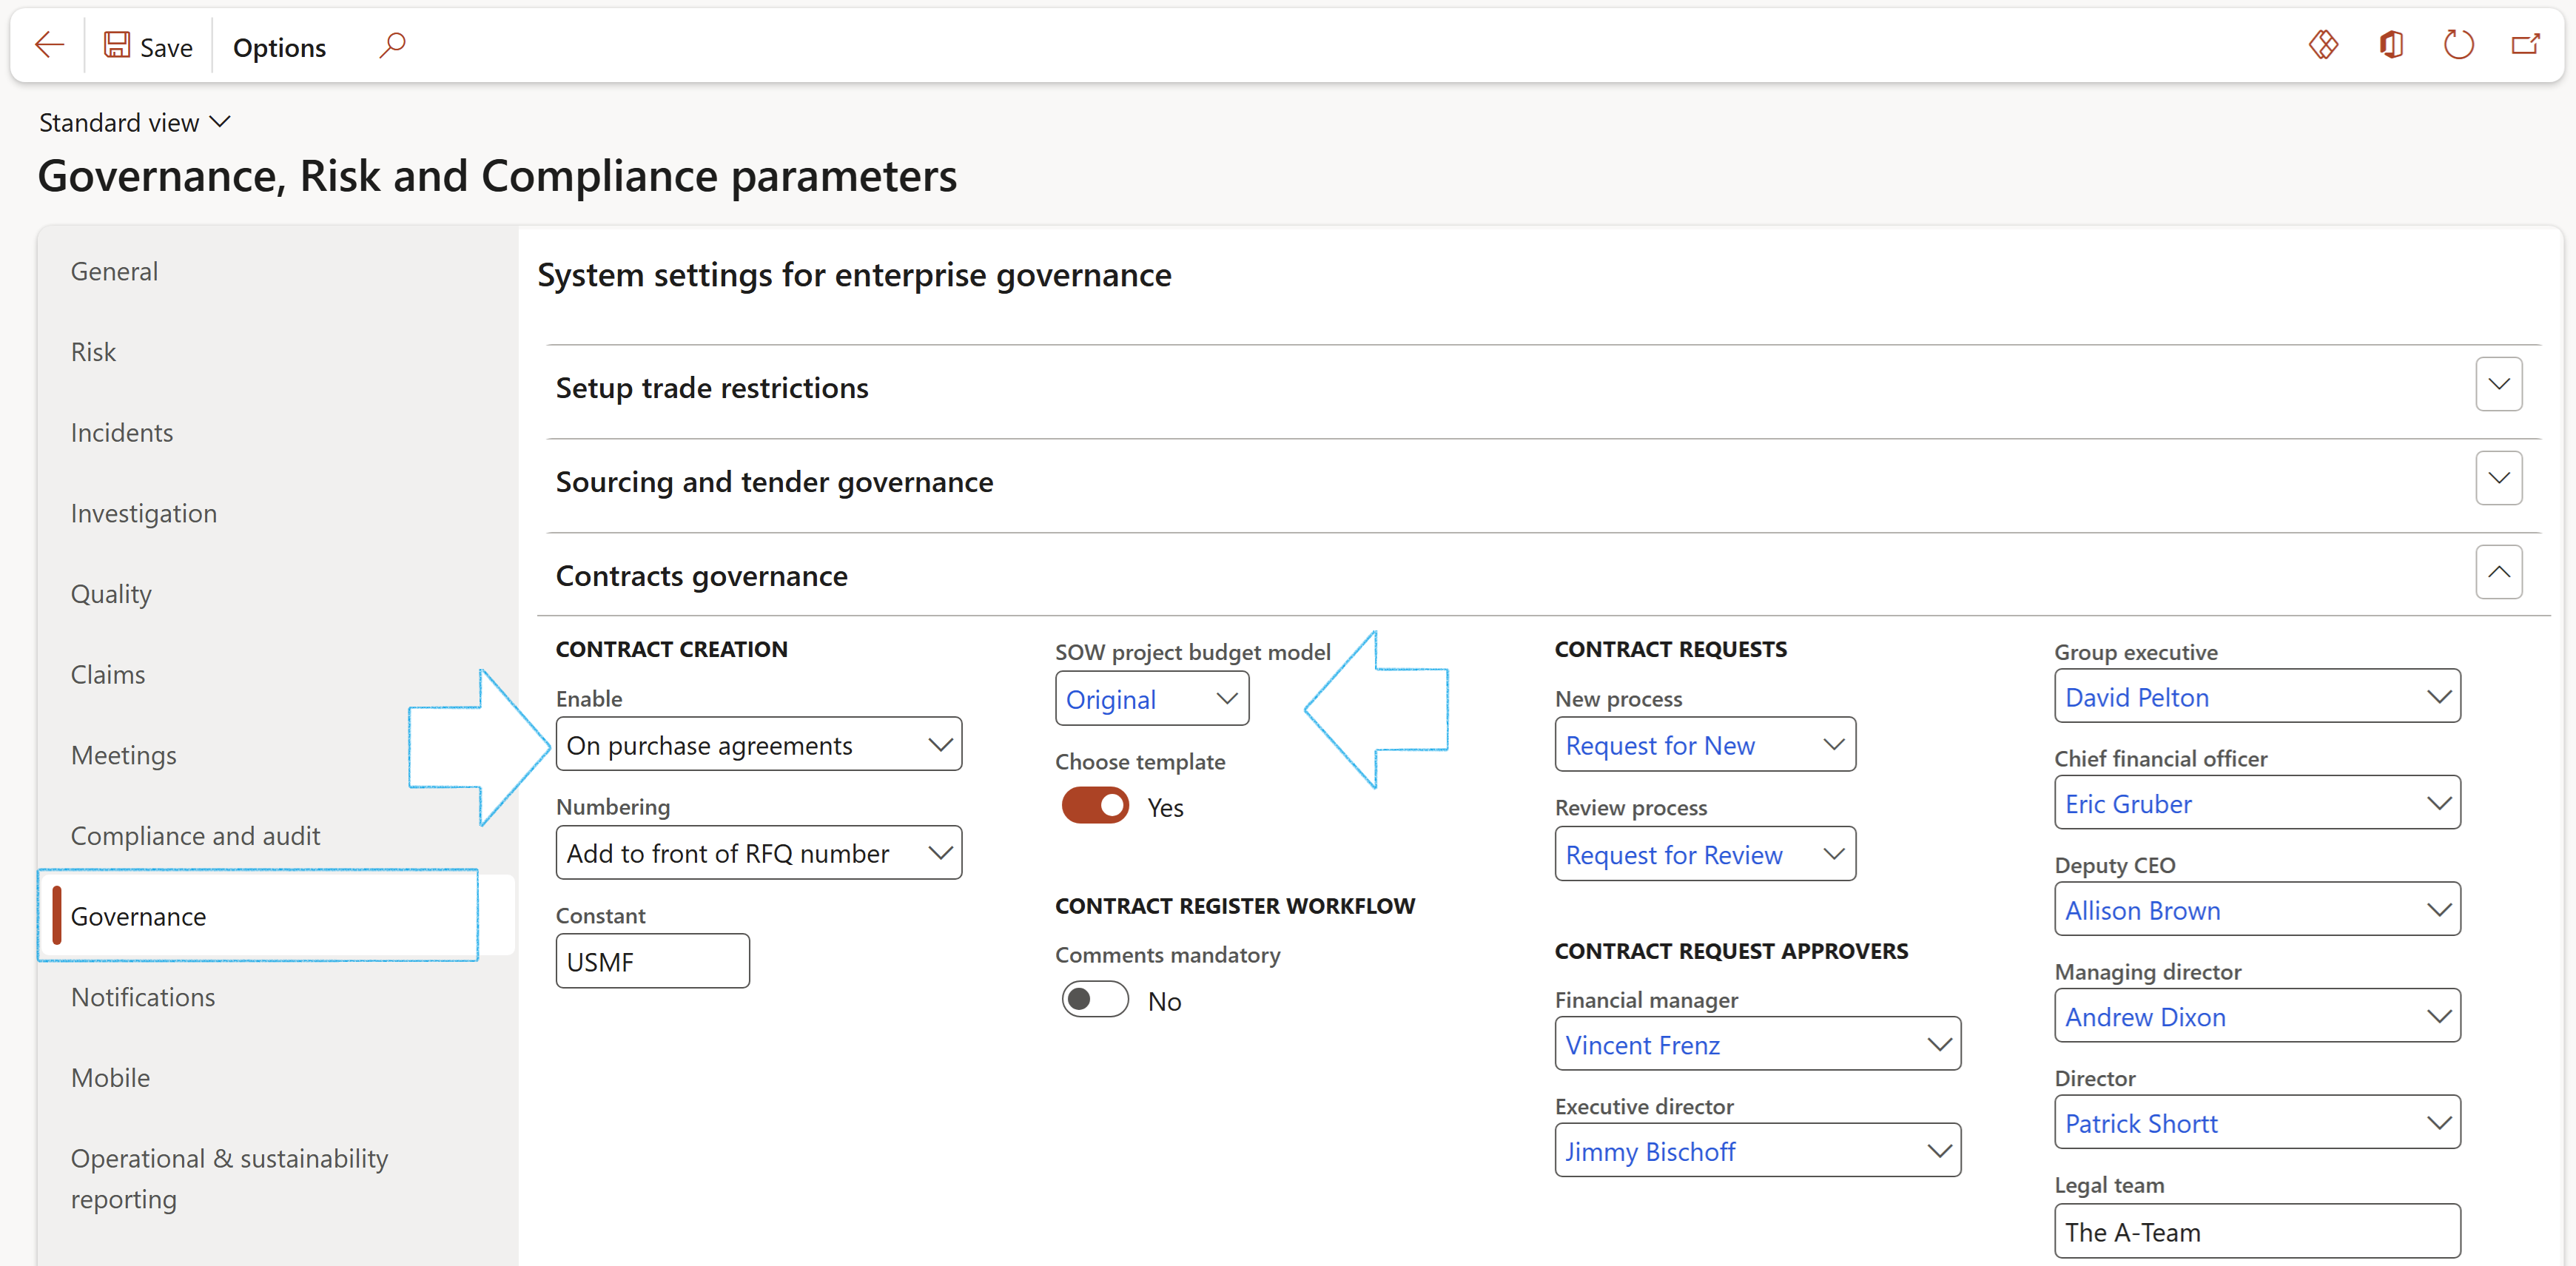
¶ Step 1.2: Enable contract governance for SCM contracts (purchase/sales agreements)
Go to: GRC > Setup > GRC parameters
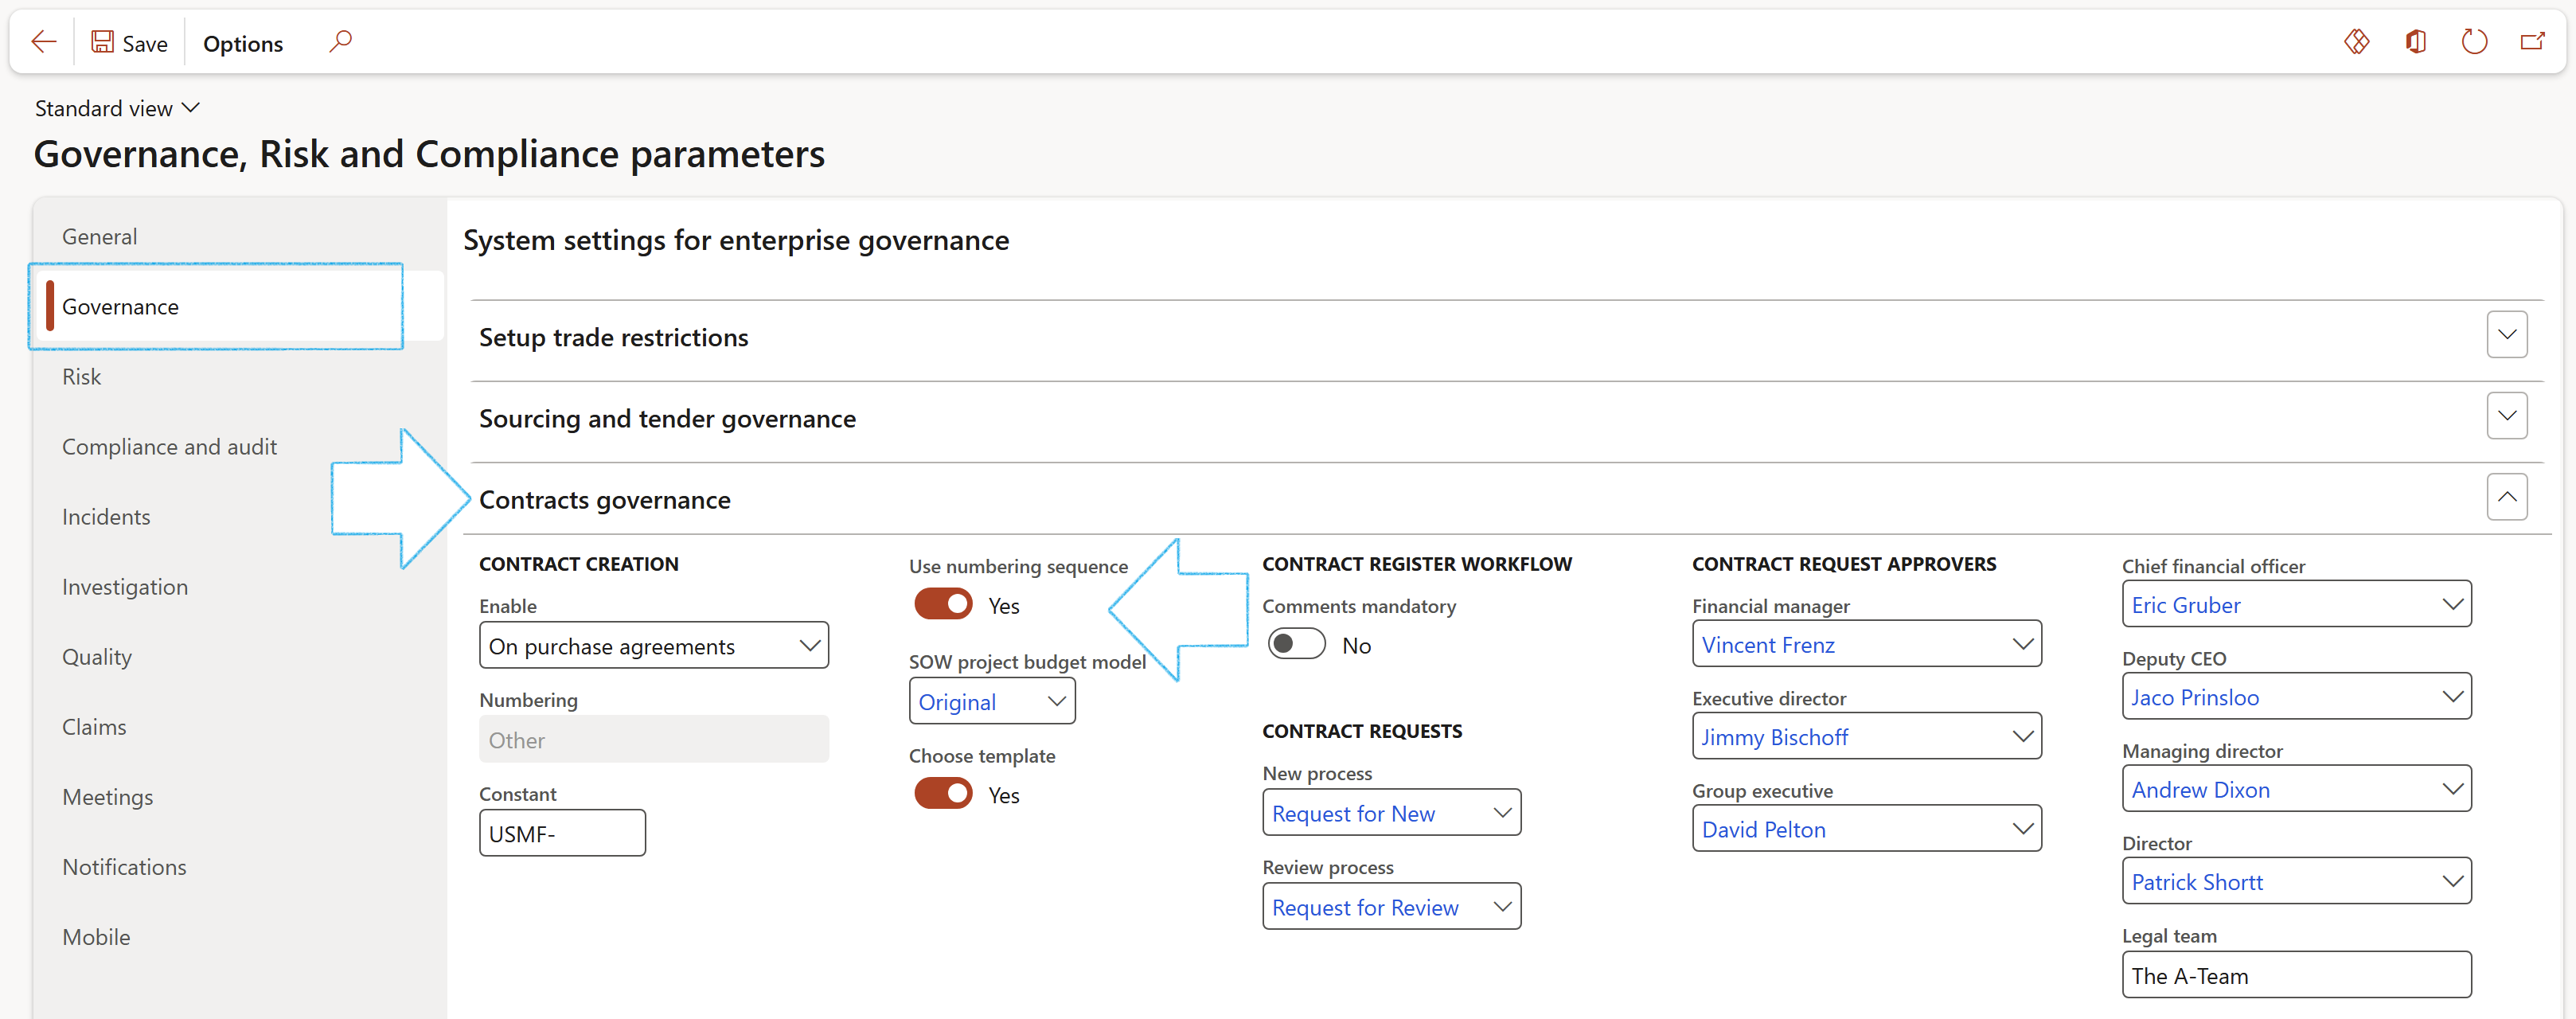
- Open the Governance tab
- Expand the Contracts governance Fast tab
- Enable contract governance for a specific area by selecting the relevant value in the Enable field
- Select the relevant SOW project budget model from the dropdown list
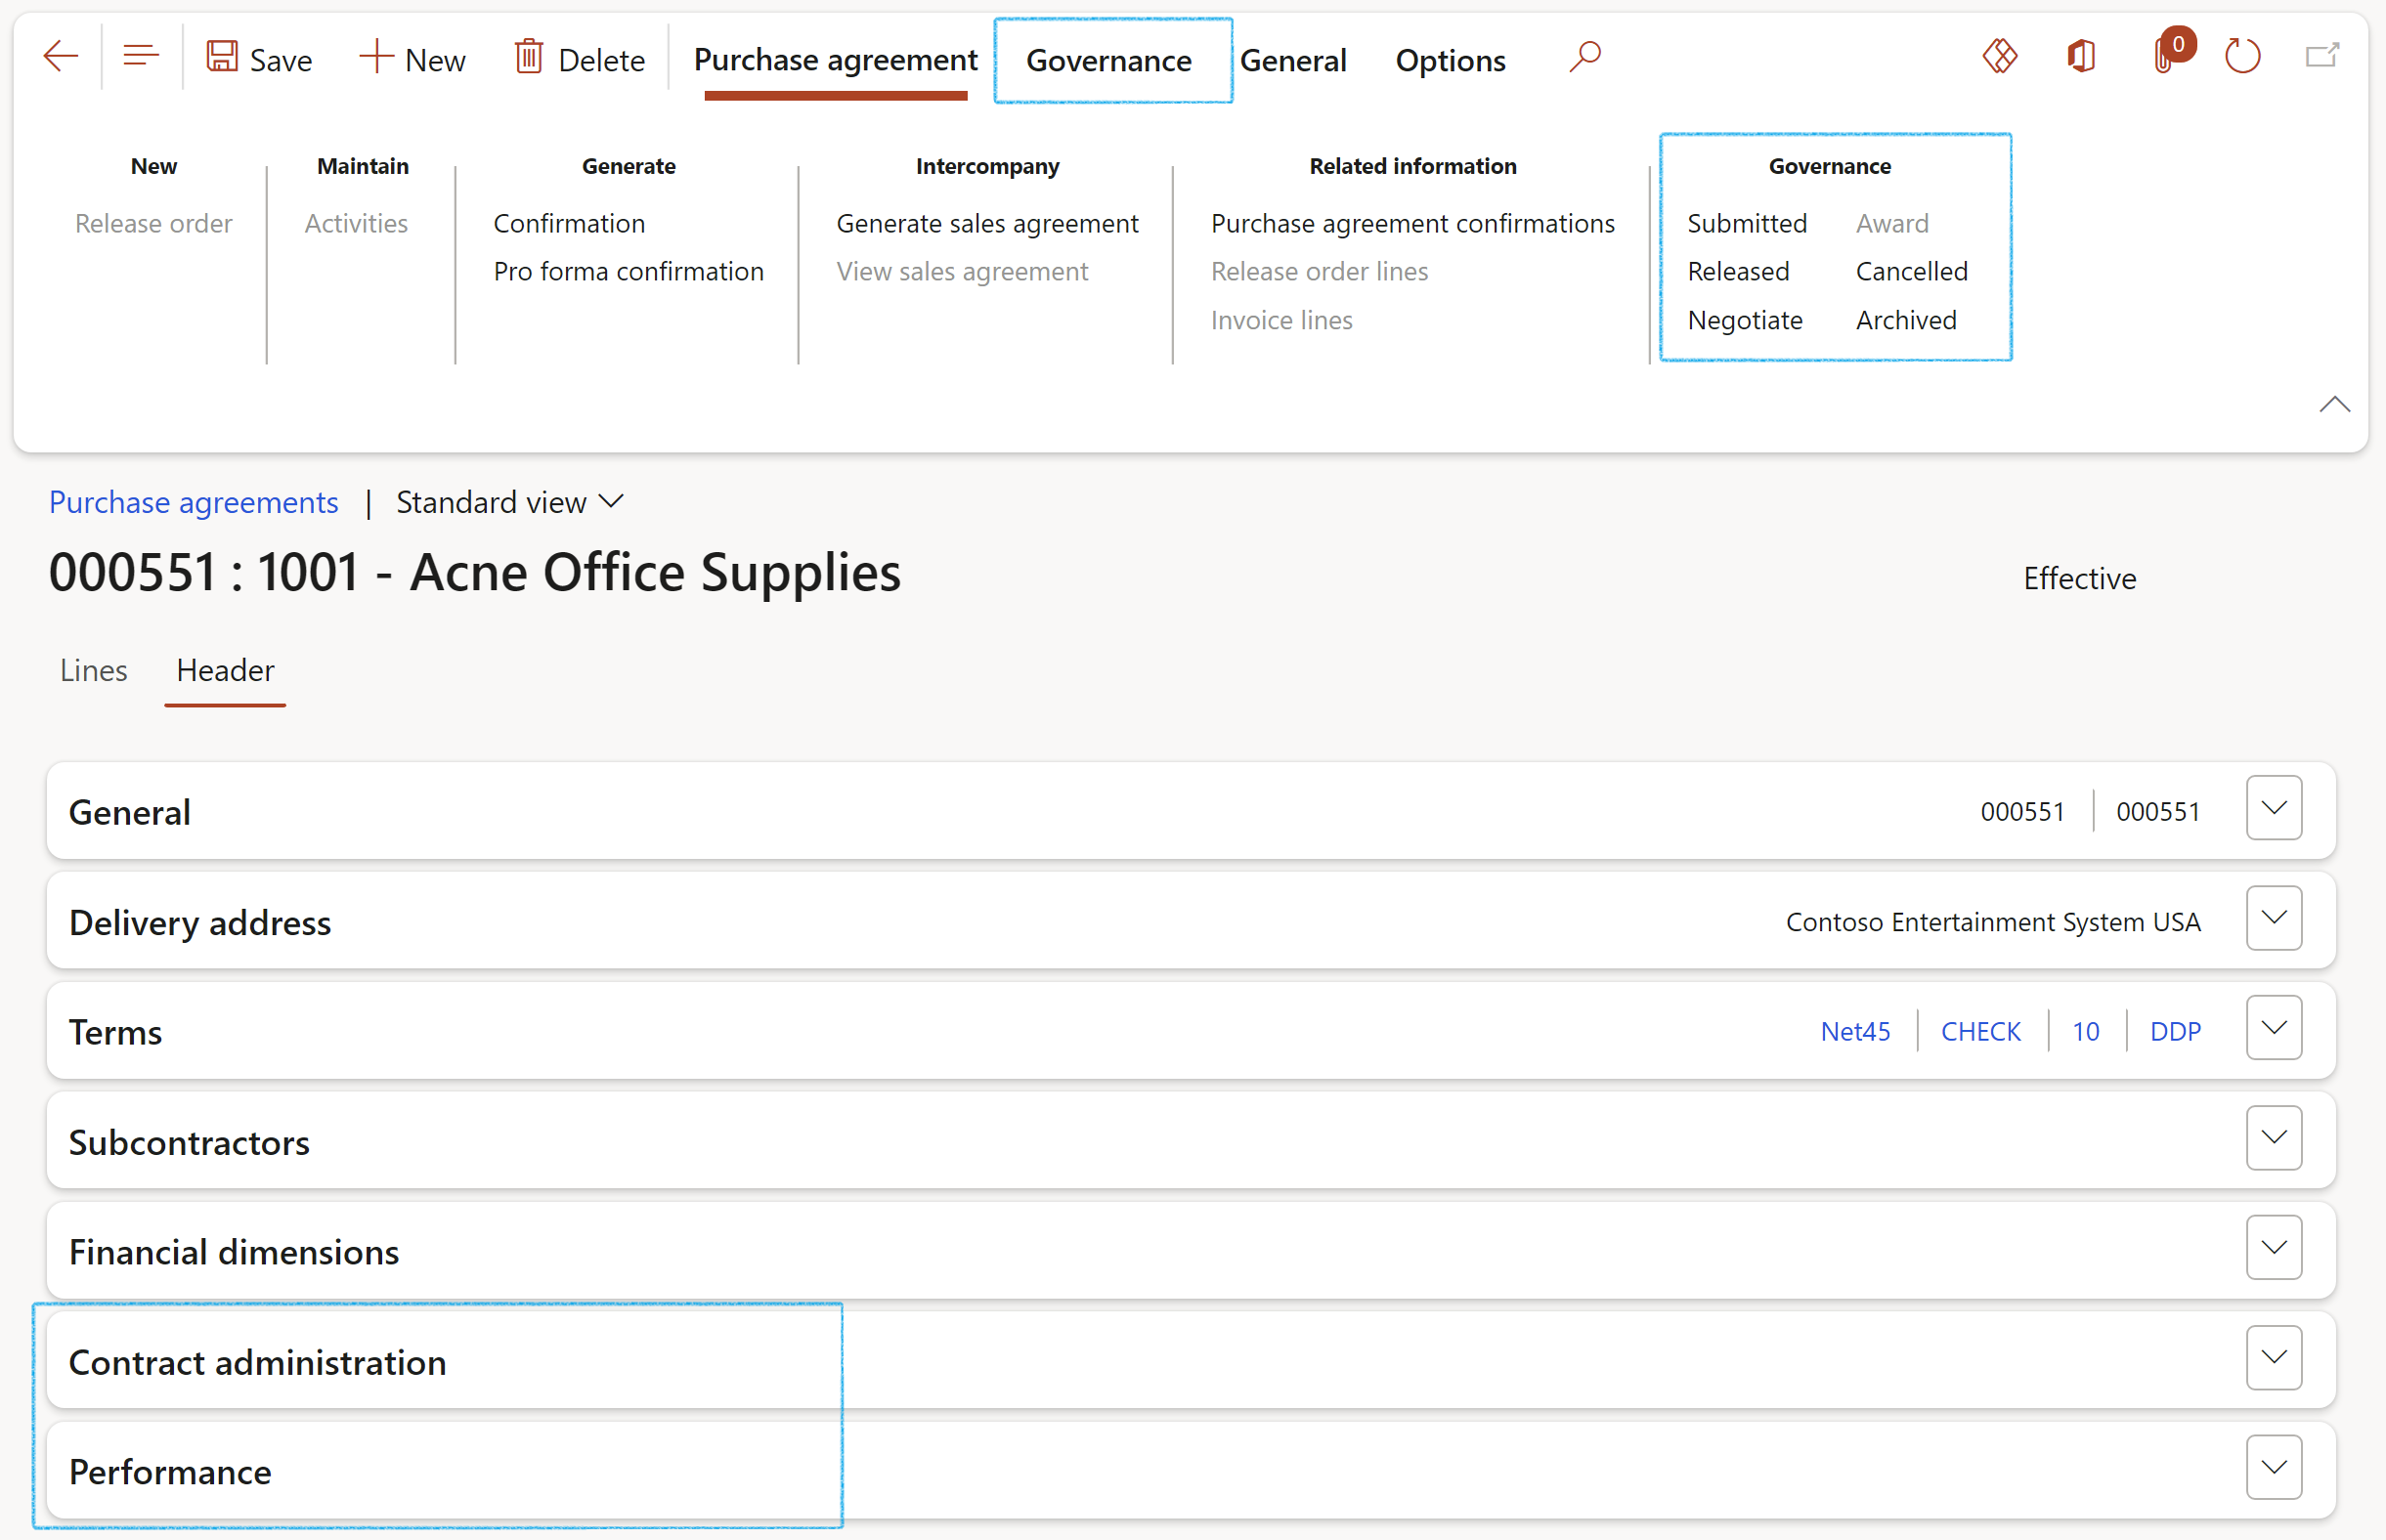
If Contracts governance has not been enabled for purchase/sales agreements, the items marked below will not be visible on the purchase/sales agreements
¶ Step 1.3: Setup contract governance for contract requests
Contract Requests are the triggers to initiate your company’s formal contract process, specifically to request the creation of a Contract in GRC 365. This is an internal process and at the begining excludes 3rd party involvement. Later down stream in the prosess external legal counsel can be called upon. A request must be approved in order for the contract to be created. For this process to be enabled users must fill in some default values and subsequently do some case setups.
Specify the default case process values for new contract requests and for contracts to be reviewed/vetted.
Go to: GRC > Setup > GRC parameters
- Open the Governance tab
- Expand the Contracts governance Fast tab
- In the New process field, select Request for new from the dropdown list
- In the Review process field, select Request for review from the dropdown list

¶ Step 1.4: Setup Contracts number sequence
The standard GRC Contracts functionality is for contracts to be numbered manually. For organizations that prefer to use a number sequence for numbering contracts, the below steps can be followed.
Go to: GRC > Setup > GRC parameters
- Open the Governance tab
- Expand the Contracts governance Fast tab
- Move the Use numbering sequence slider to Yes
- Indicate where the numbering sequence should apply by selecting the relevant value in the Contract creation source field
- Enter the Constant for the numbering sequence
¶ Step 2: Case configuration
As explained above, cases are used for contract requests. GRC 365 supports requests of type "new contracts" as well as request of type "reviewing of existing contracts".
¶ Step 2.1: Create Case category
Go to: GRC > Governance > Setup for governance > Case categories
- On the Action pane, click on the New button
- Enter the Case category and a brief Description
- Select the relevant Category type from the dropdown list

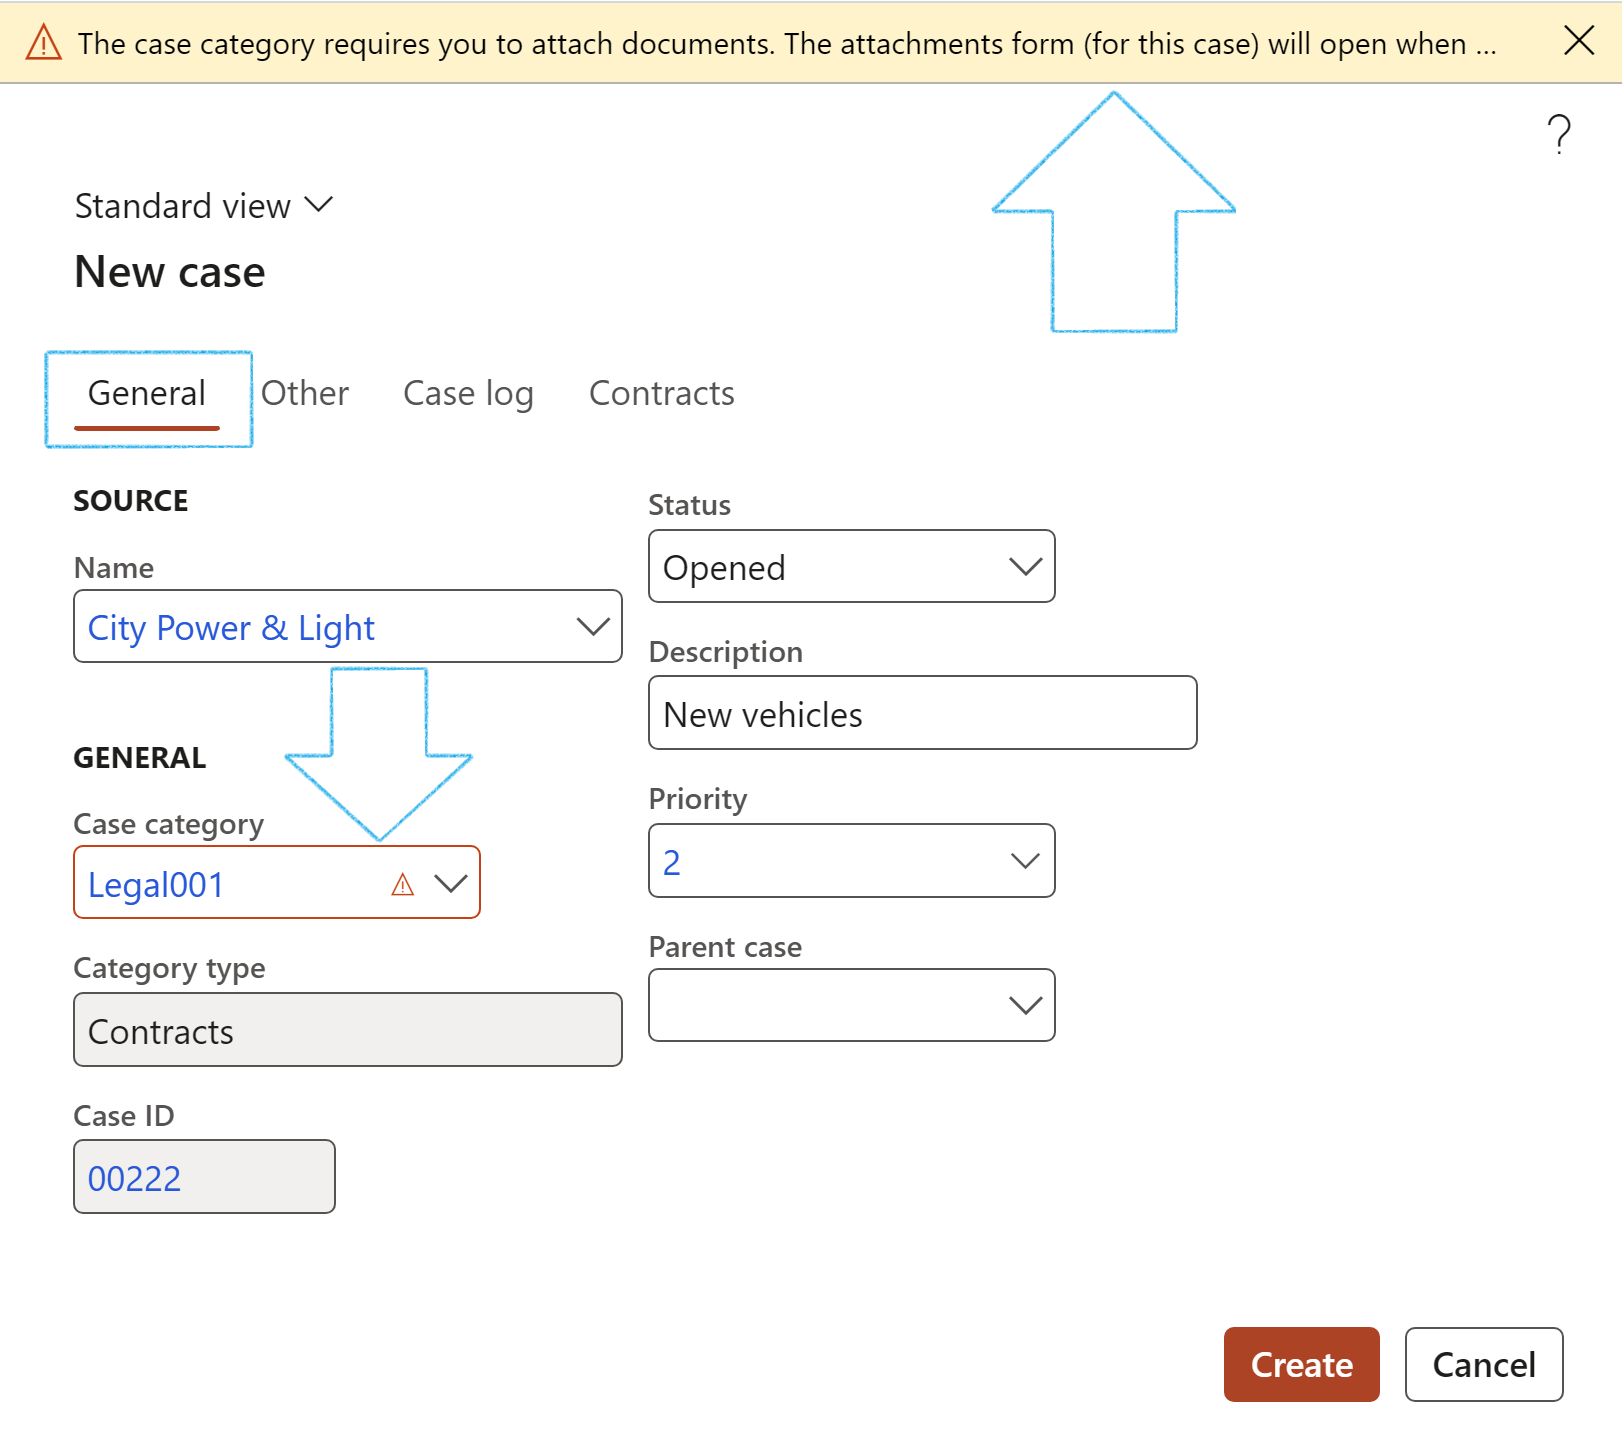
If it is required that documents must be attached before submitting a request for a new contract into workflow, select Yes under Force attachments.
A yellow warning line will appear at the top of the workflow submit dialog and the Attachments form will open.
¶ Step 2.2: Setup Case category type security
By selecting roles for the Case category type security, only users with these roles assigned to them, will have the privilege to create a New contract request or a request for contract review.
Go to: Organization administration > Setup > Cases > Case category type security
- Select the required Case category from the dropdown list
- Select the required role/s from the Available roles list
- Click on the right pointing arrow button to move the selected role/s to the Selected roles list
¶ Step 2.3: Create Case priorities
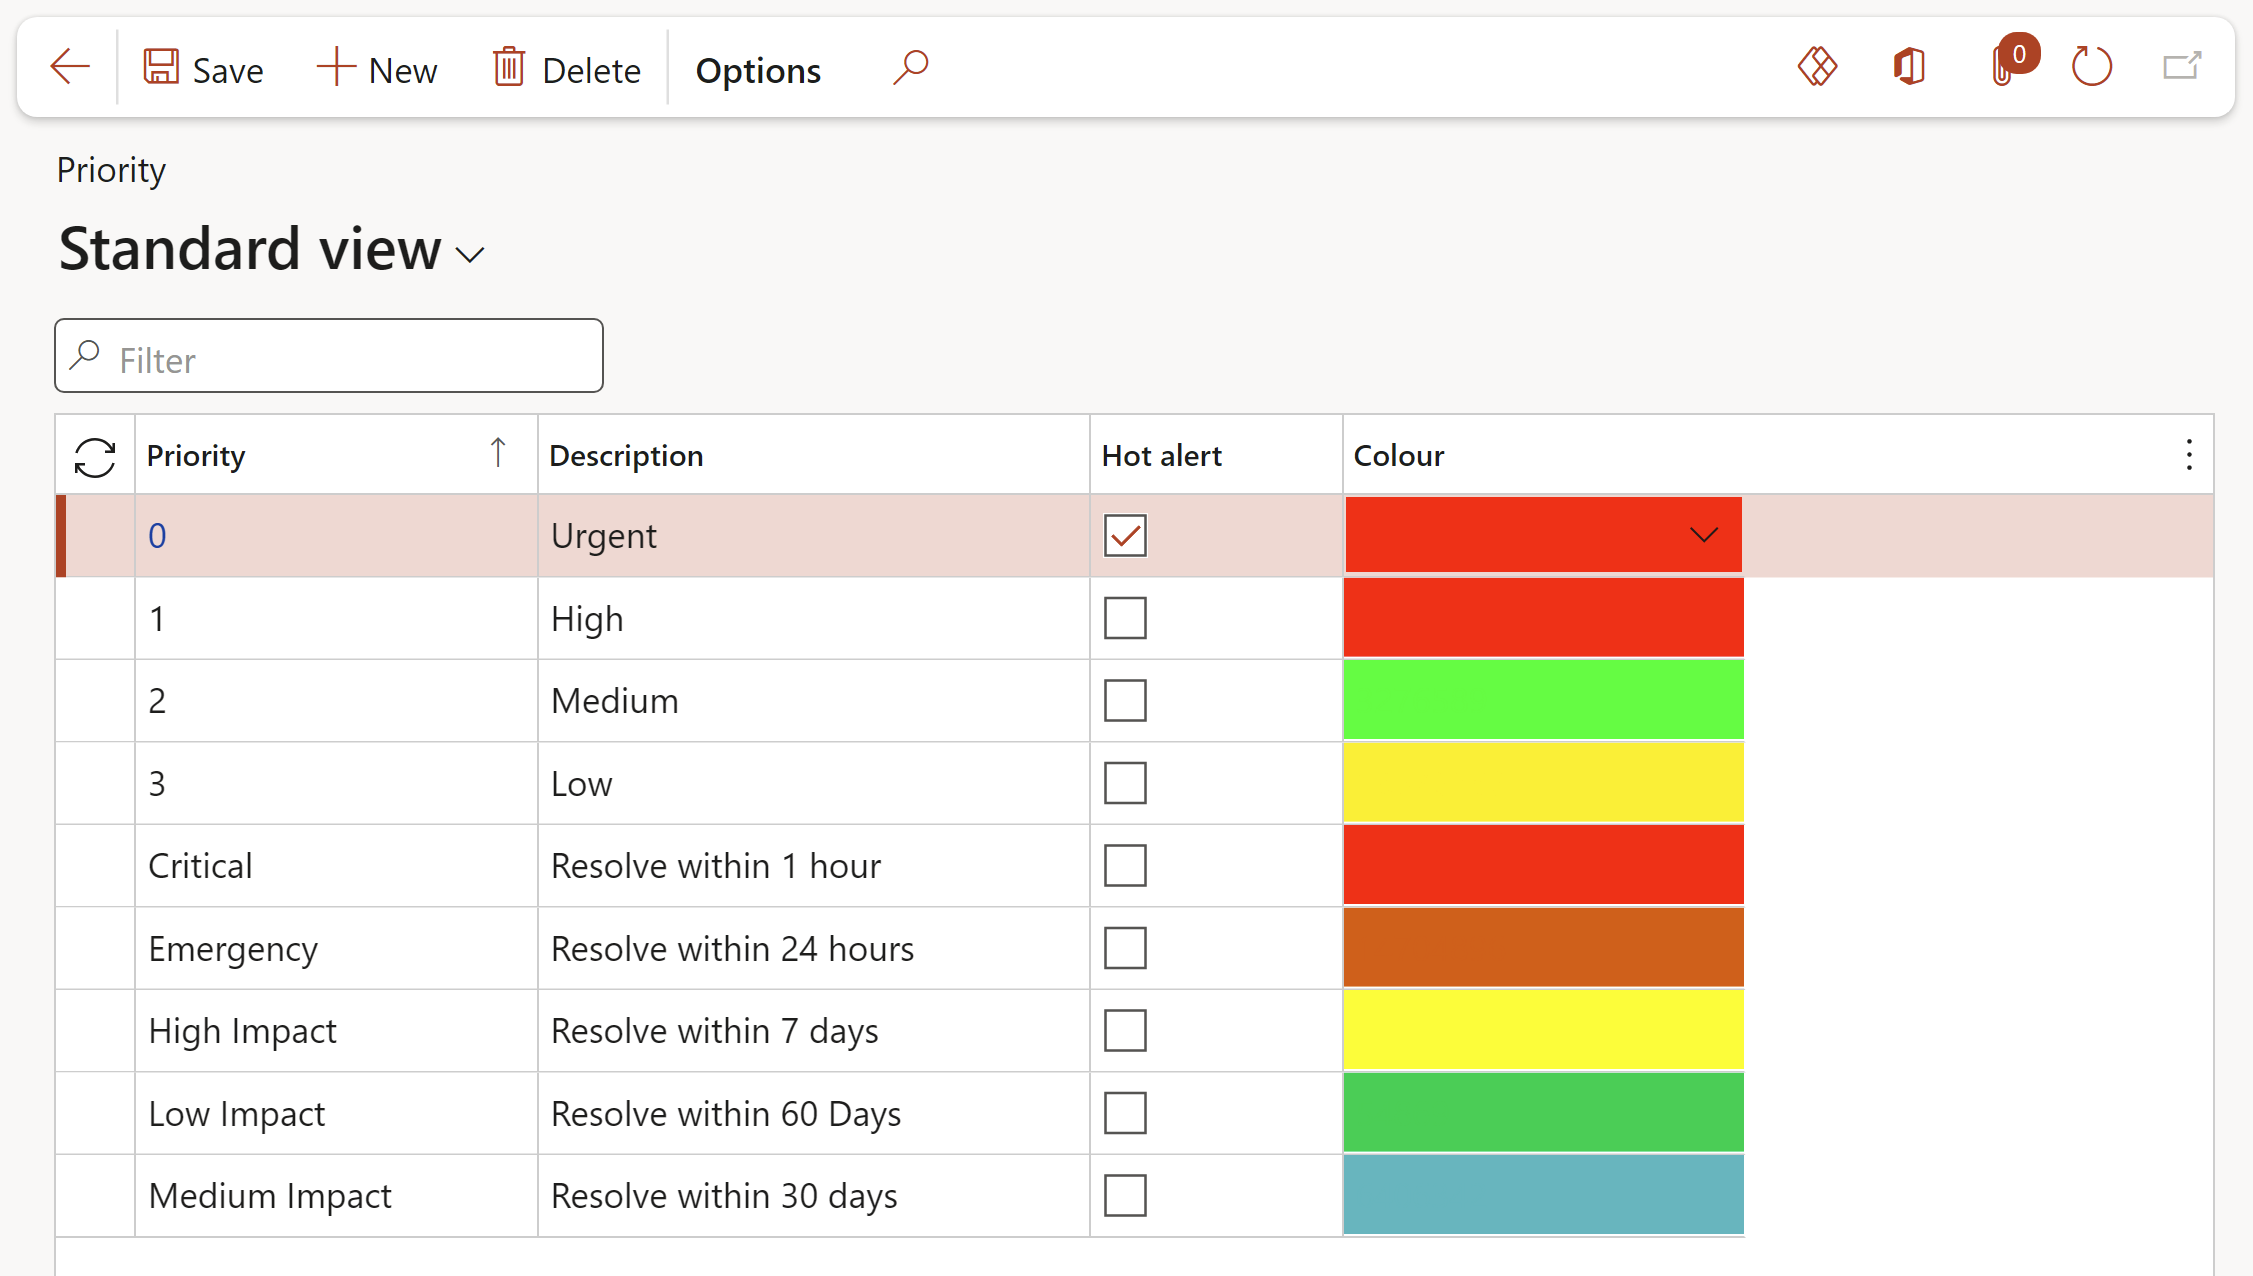
Go to: GRC > Governance > Setup for governance > Priority
- Enter a code or name for the Priority
- Enter a brief Description for the priority
- Indicate whether it is a Hot alert
- Select the relevant Colour
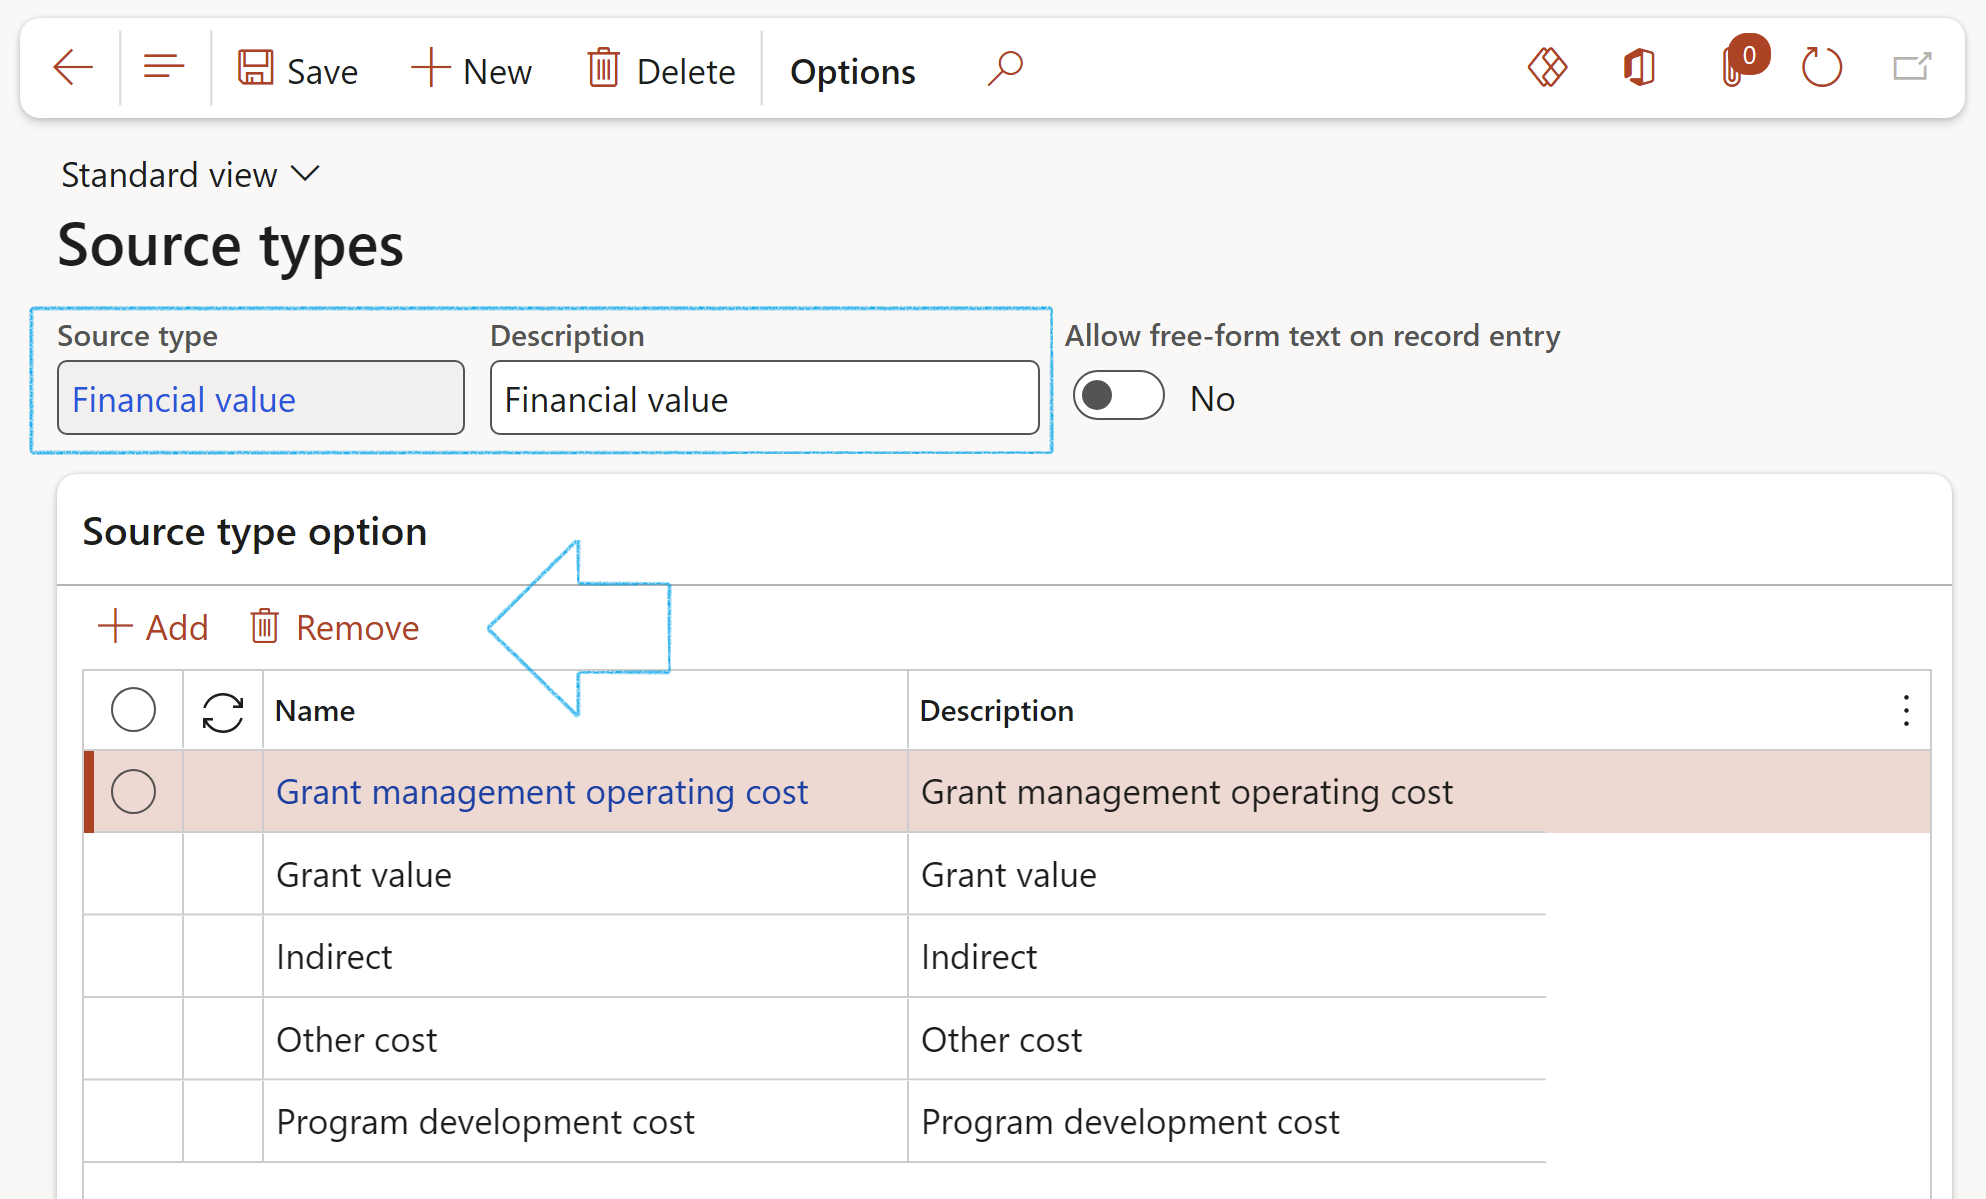
¶ Step 3: Setup Source type and Source ID
As part of the contract request approval process, users can and should print out a Motivation report. The Source type and Source ID are used when compiling the Motivation report. This information is selected under the Case log fast tab on the Case.
Go to: GRC > Governance > Setup for governance > Source types
- On the Action pane, click on the New button
- In the Source type field, enter the type of source (E.g. Financial value, Cost center)
- Enter a brief Description for the source
- Under Source type option, in the button strip, click on the Add button
- Enter a Name and brief Description for the source type option (These are the column names on the report)
¶ Step 4: Record legal panel vendors
A list of suppliers/vendors of legal services should be created and maintained inside GRC 365. These legal panel members are used when drafting contracts as well as giving advice when contract breaches and remedies are considered.
Go to: GRC > Governance > Legal > Legal panel
- In the Action pane, click on the New button
- Select a Legal category from the dropdown list
- Enter a brief Description
- Select the relevant supplier/vendor from the dropdown list in the Panel member field
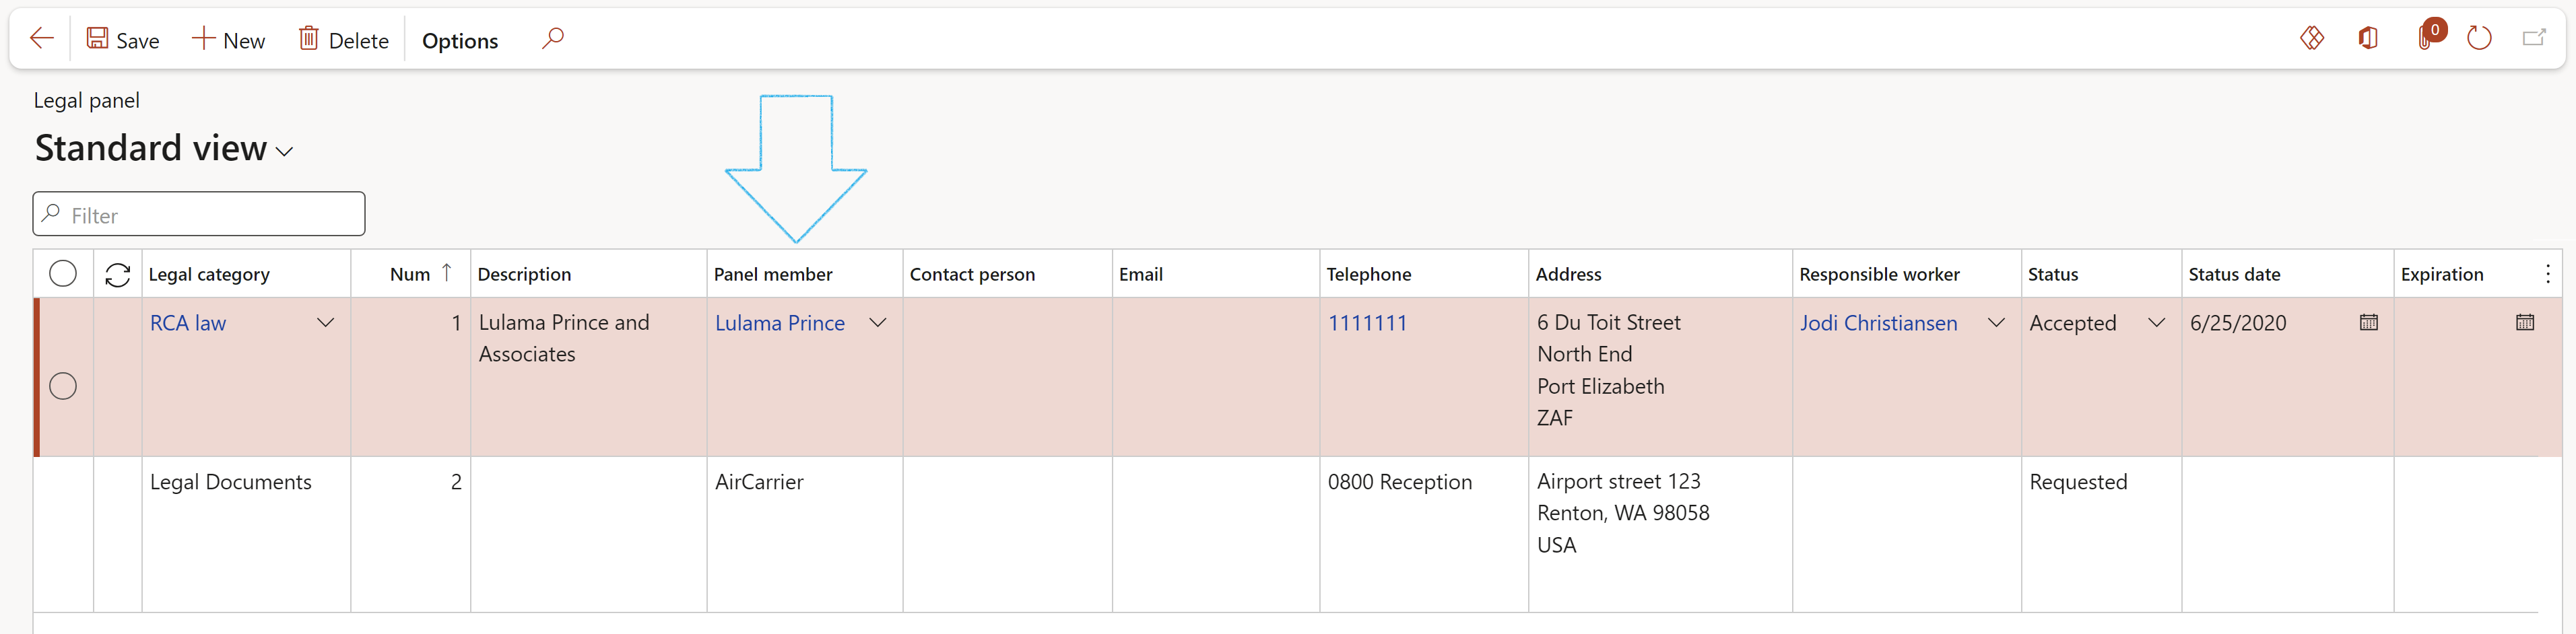
Legal panel members are also used when creating a contract request and on the contract (Preamble index tab).
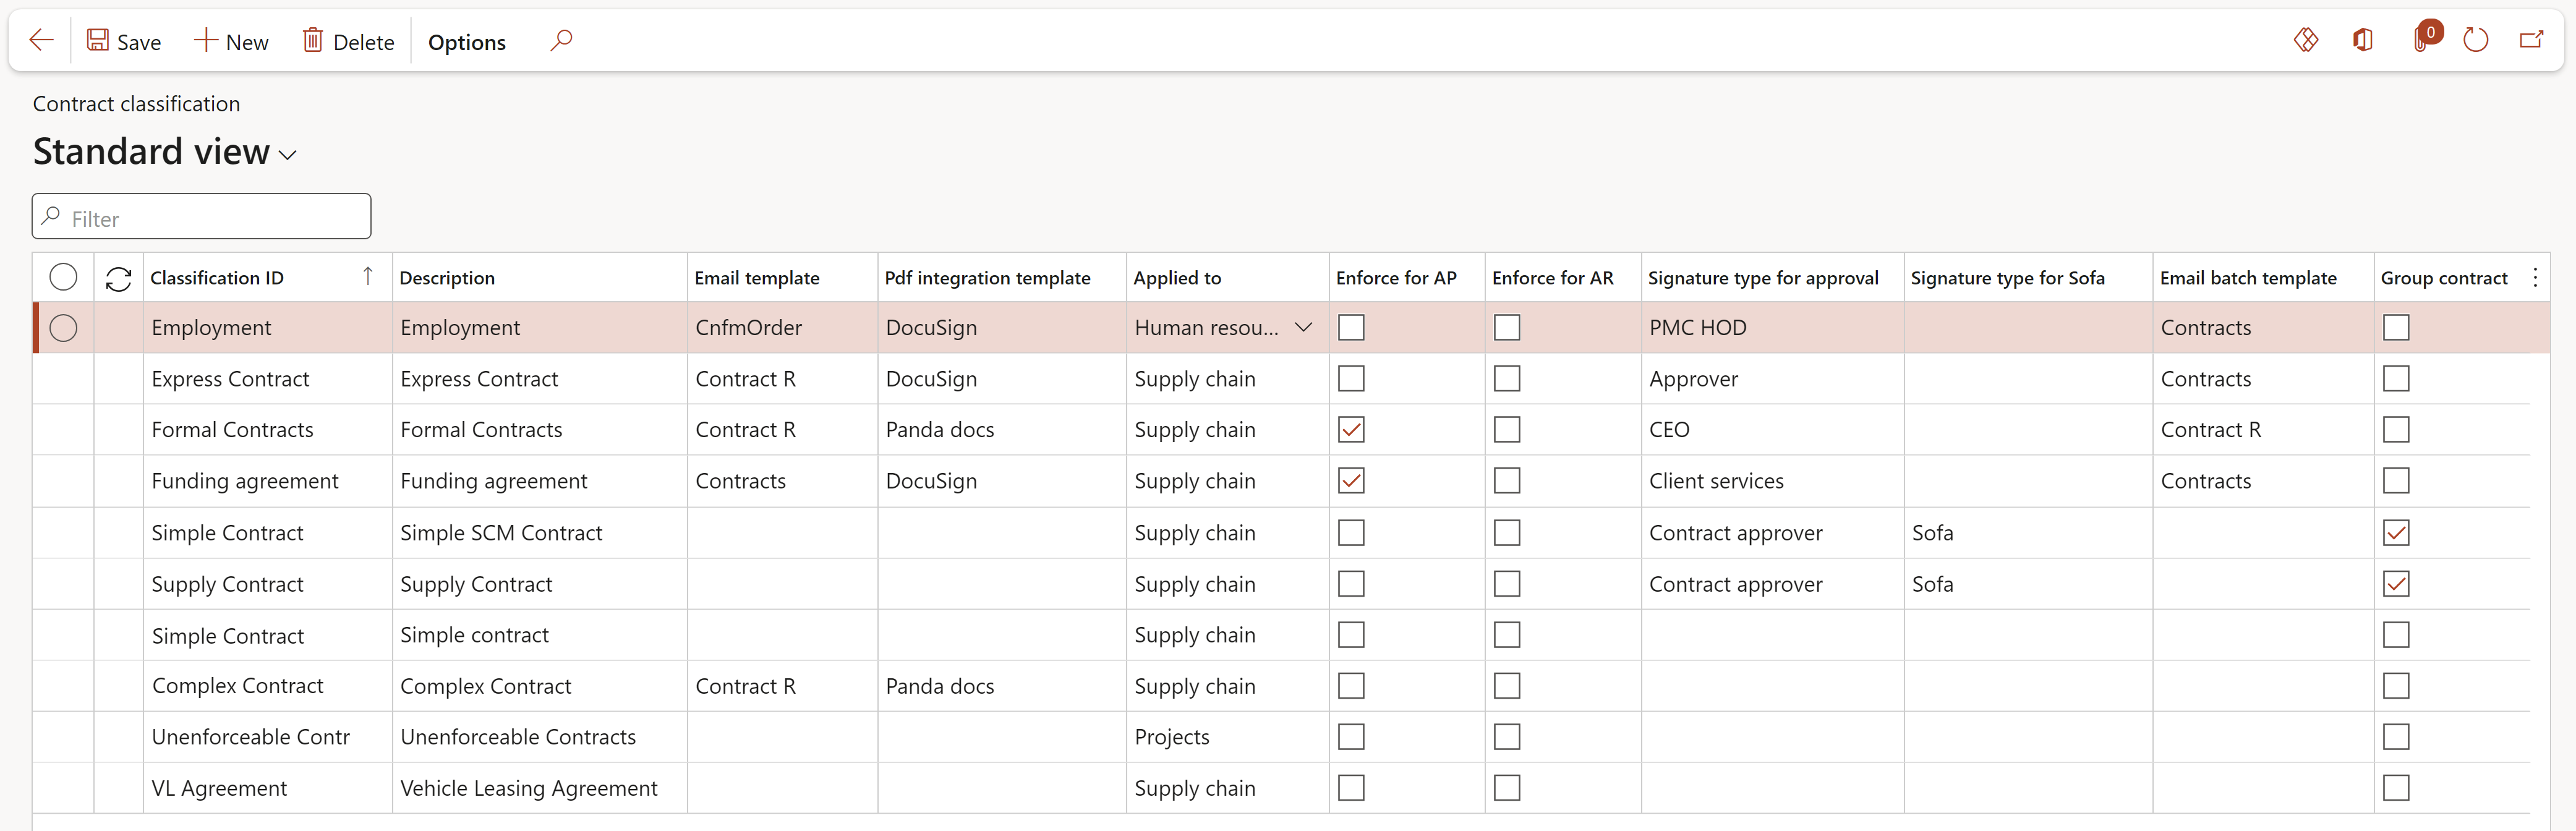
¶ Step 5: Setup Contract classification
Contracts may be classified on the basis of their validity, formation or formance (that which is performed or accomplished; a thing done or carried through).
The Applied to dropdown list gives the user option to create the following types of contracts:
- Human resources
- Supply chain
- Projects
- Treasury
- Insurance
- Other
Go to: GRC > Governance > Setup for governance > Contract classification
- Enter a unique ID for the classification in the Classification ID field
- Enter a brief Description for the classification ID
- Select the relevant PDF integration template from the dropdown list
- Select where this email template is Applied to, from the dropdown list (the field will be locked after creation of the record)
- In the Enforce for AP and Enforce for AR fields, tick the box to enforce the total contract value, and limit users to spend beyond the contract value (the fields will be locked after creation of the record)
- Select the relevant AP journal name from the dropdown list (Only journal names of type Vendor invoice recording, can be selected)
- Select the Signature type for approval required for contract approval, from the dropdown list
- Select the Signature type required for printing the Sofa report, from the dropdown list
- In the Performance bond batch template field, choose the template to use for automated batch alerts, from the dropdown list
The email notification will be sent to the Employee responsibe selected under the RACI Fast tab on the Contract, when running the Performance bond batch alert periodic task
- In the User group field, choose the user group to use for automated batch alerts from the dropdown list
- Indicate whether this Contract classification will be used for Investments (Yes or No)
- Tick the Group contract box to enable the use of the Contract, via purchase agreements, in multiple legal entities
- Select the Goal group to be used for performance management, from the dropdown list
- In the User group batch template field, choose the template to use for automated batch alerts from the dropdown list
The following email templates for each record can be selected under the grid:
- In the Email template field: Select the template to use when sending an email directly from a contract record
- In the Email batch template field: Select the template to use when sending batch emails for contract expiration notifications
The email notification will be sent to the Employee responsible selected under the RACI Fast tab on the Contract
- In the Notification batch template field: Select the template to use when sending batch emails when a contract’s consumption threshold is reached
- In the Notification % field: Specify the percentage at which an email notification will be sent when contract consumption reaches this threshold
- In the Vendor termination batch template field: Select the template to use when sending batch emails to primary vendors when a contract is terminated
The email notification will be sent to the Primary Vendor email address, when running the Primary Vendor contract expiration batch alert periodic task
- In the User group batch template field: Select the template to use when sending batch emails to a user group based on contract classification
- In the Performance bond batch template field: Select the template to use when sending batch emails to a user group based on contract classification
- In the LMP type field: Select the relevant value from the dropdown list, based on contract classification
- On the Contract detail form, Content Fast tab, Cover page Index tab, the Worker field will only be editable where Human resources is selected in the Applied to field on the Contract classification setup form
- On the Contract detail form, Content Fast tab, Cover page Index tab, the Vessel field will only be editable where Supply chain is selected in the Applied to field on the Contract classification setup form
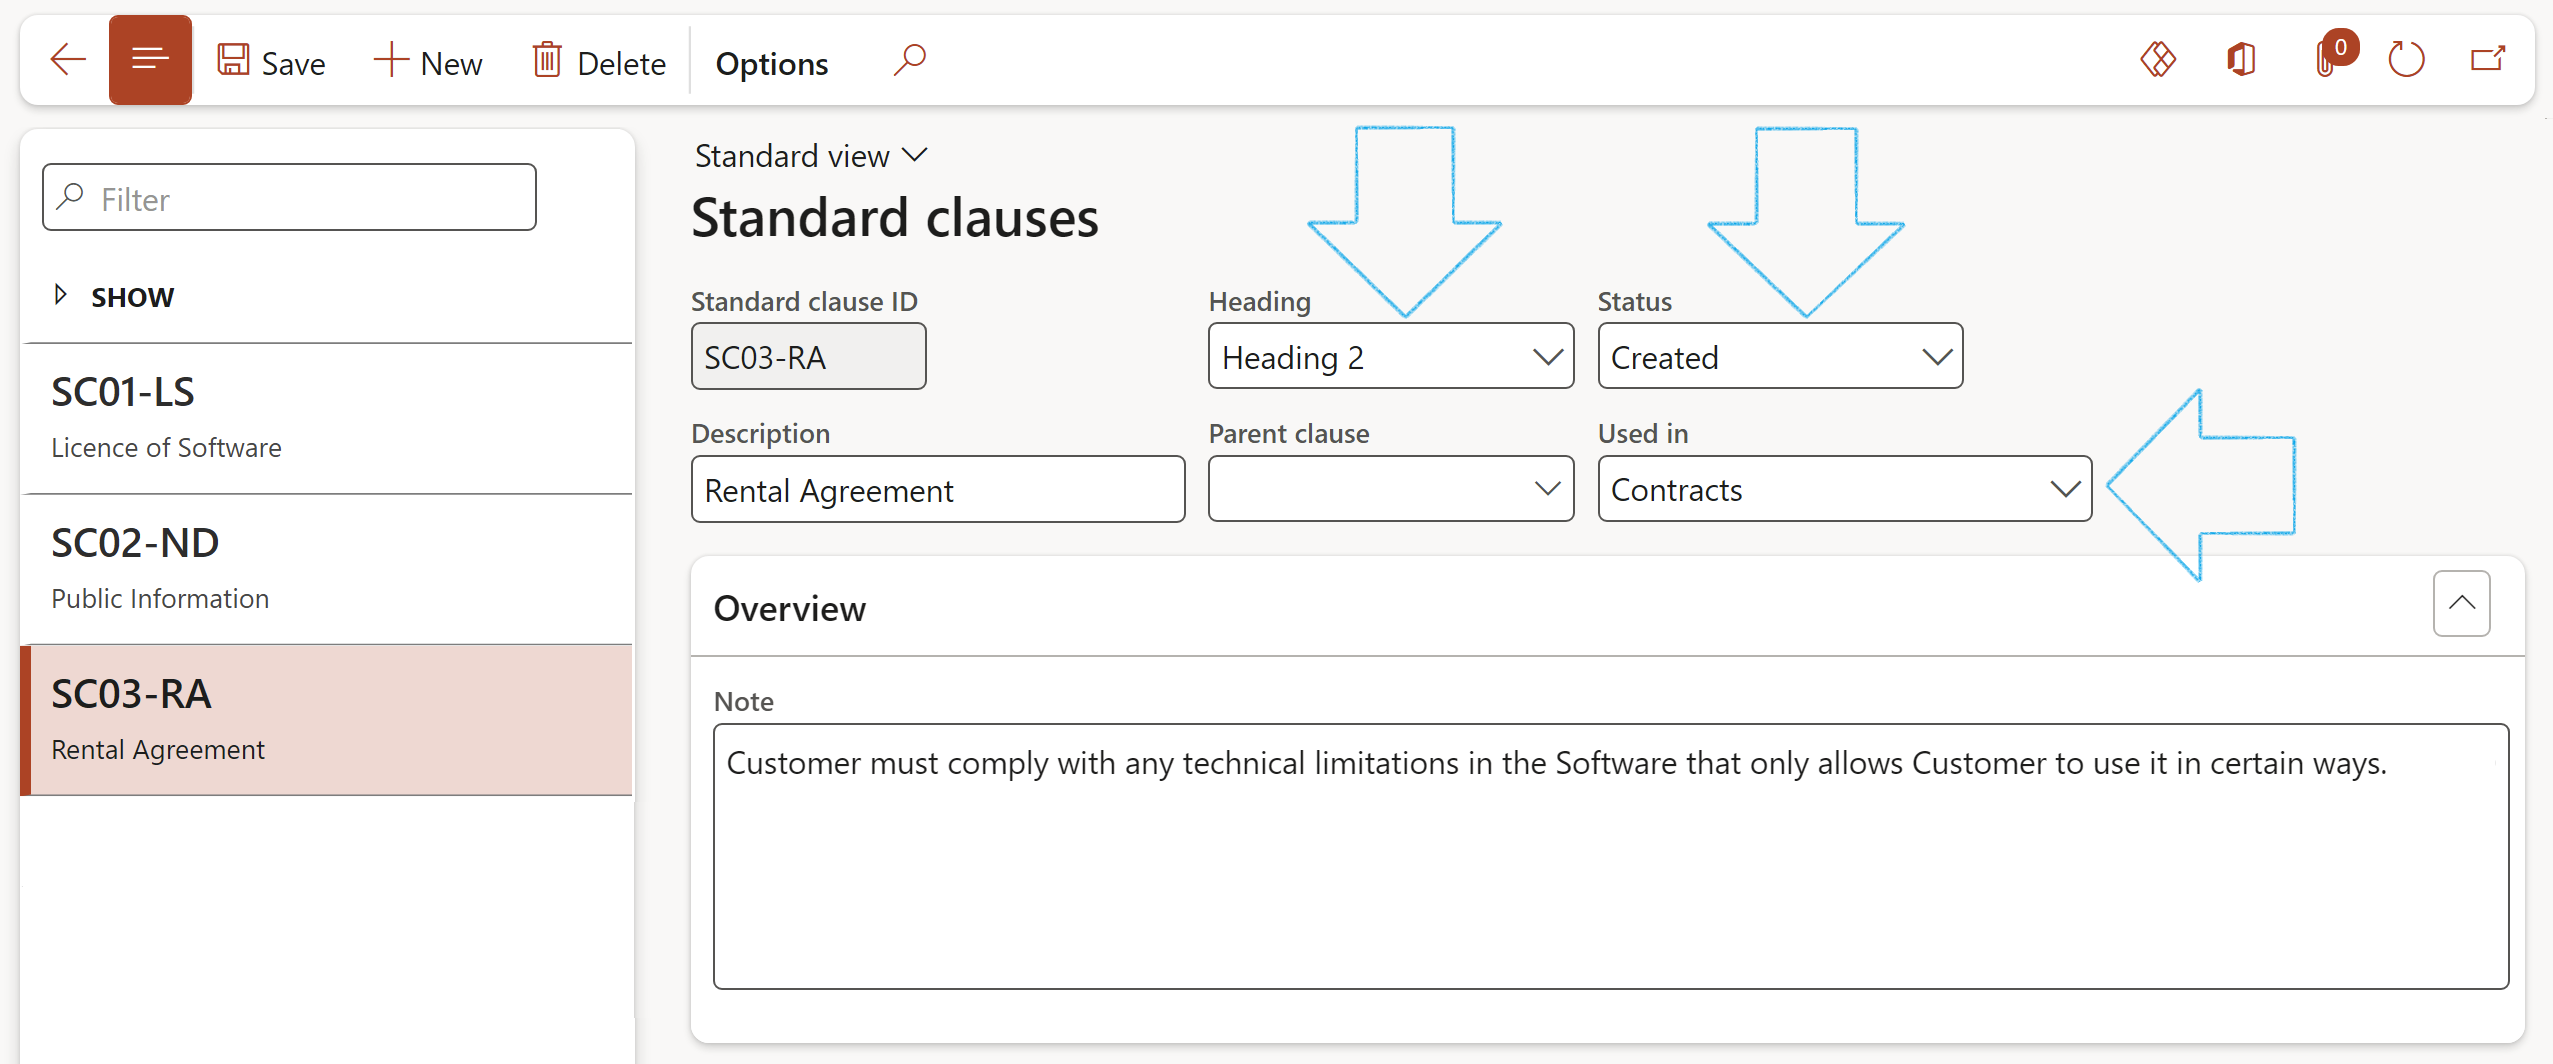
¶ Step 6: Setup Standard clauses
The easiest way to think about a contract clause is to first understand that it's a written portion that exists to do a legal-specific job. In other words, a clause in a contract is a unique section that addresses a specific need, privilege, right, deadline, or duty.
Users can create a list of frequently used and generaly accepted clauses for approval.
Users must also flag these clauses in the Used in field to group clauses together for specific use in contract drafting or other type of document drafting.
Go to: GRC > Governance > Setup for governance > Standard clauses
- On the Action pane, click on the New button
- Enter a Standard clause ID
- Enter a brief Description
- Select the relevant Heading for the clause
(Heading 1 for a primary heading, Heading 2 for a secondary heading)
- If this is a secondary clause, select the relevant Parent clause form the dropdown list
- Select the relevant Status from the dropdown list
- Select the area that the clause will be Used in from the dropdown list. (E.g. Contracts)
- Under the Overview Fast tab, enter the clause details
If the Status of the clause is Approved, the record will be locked
Only Approved clauses can be selected on the Contract
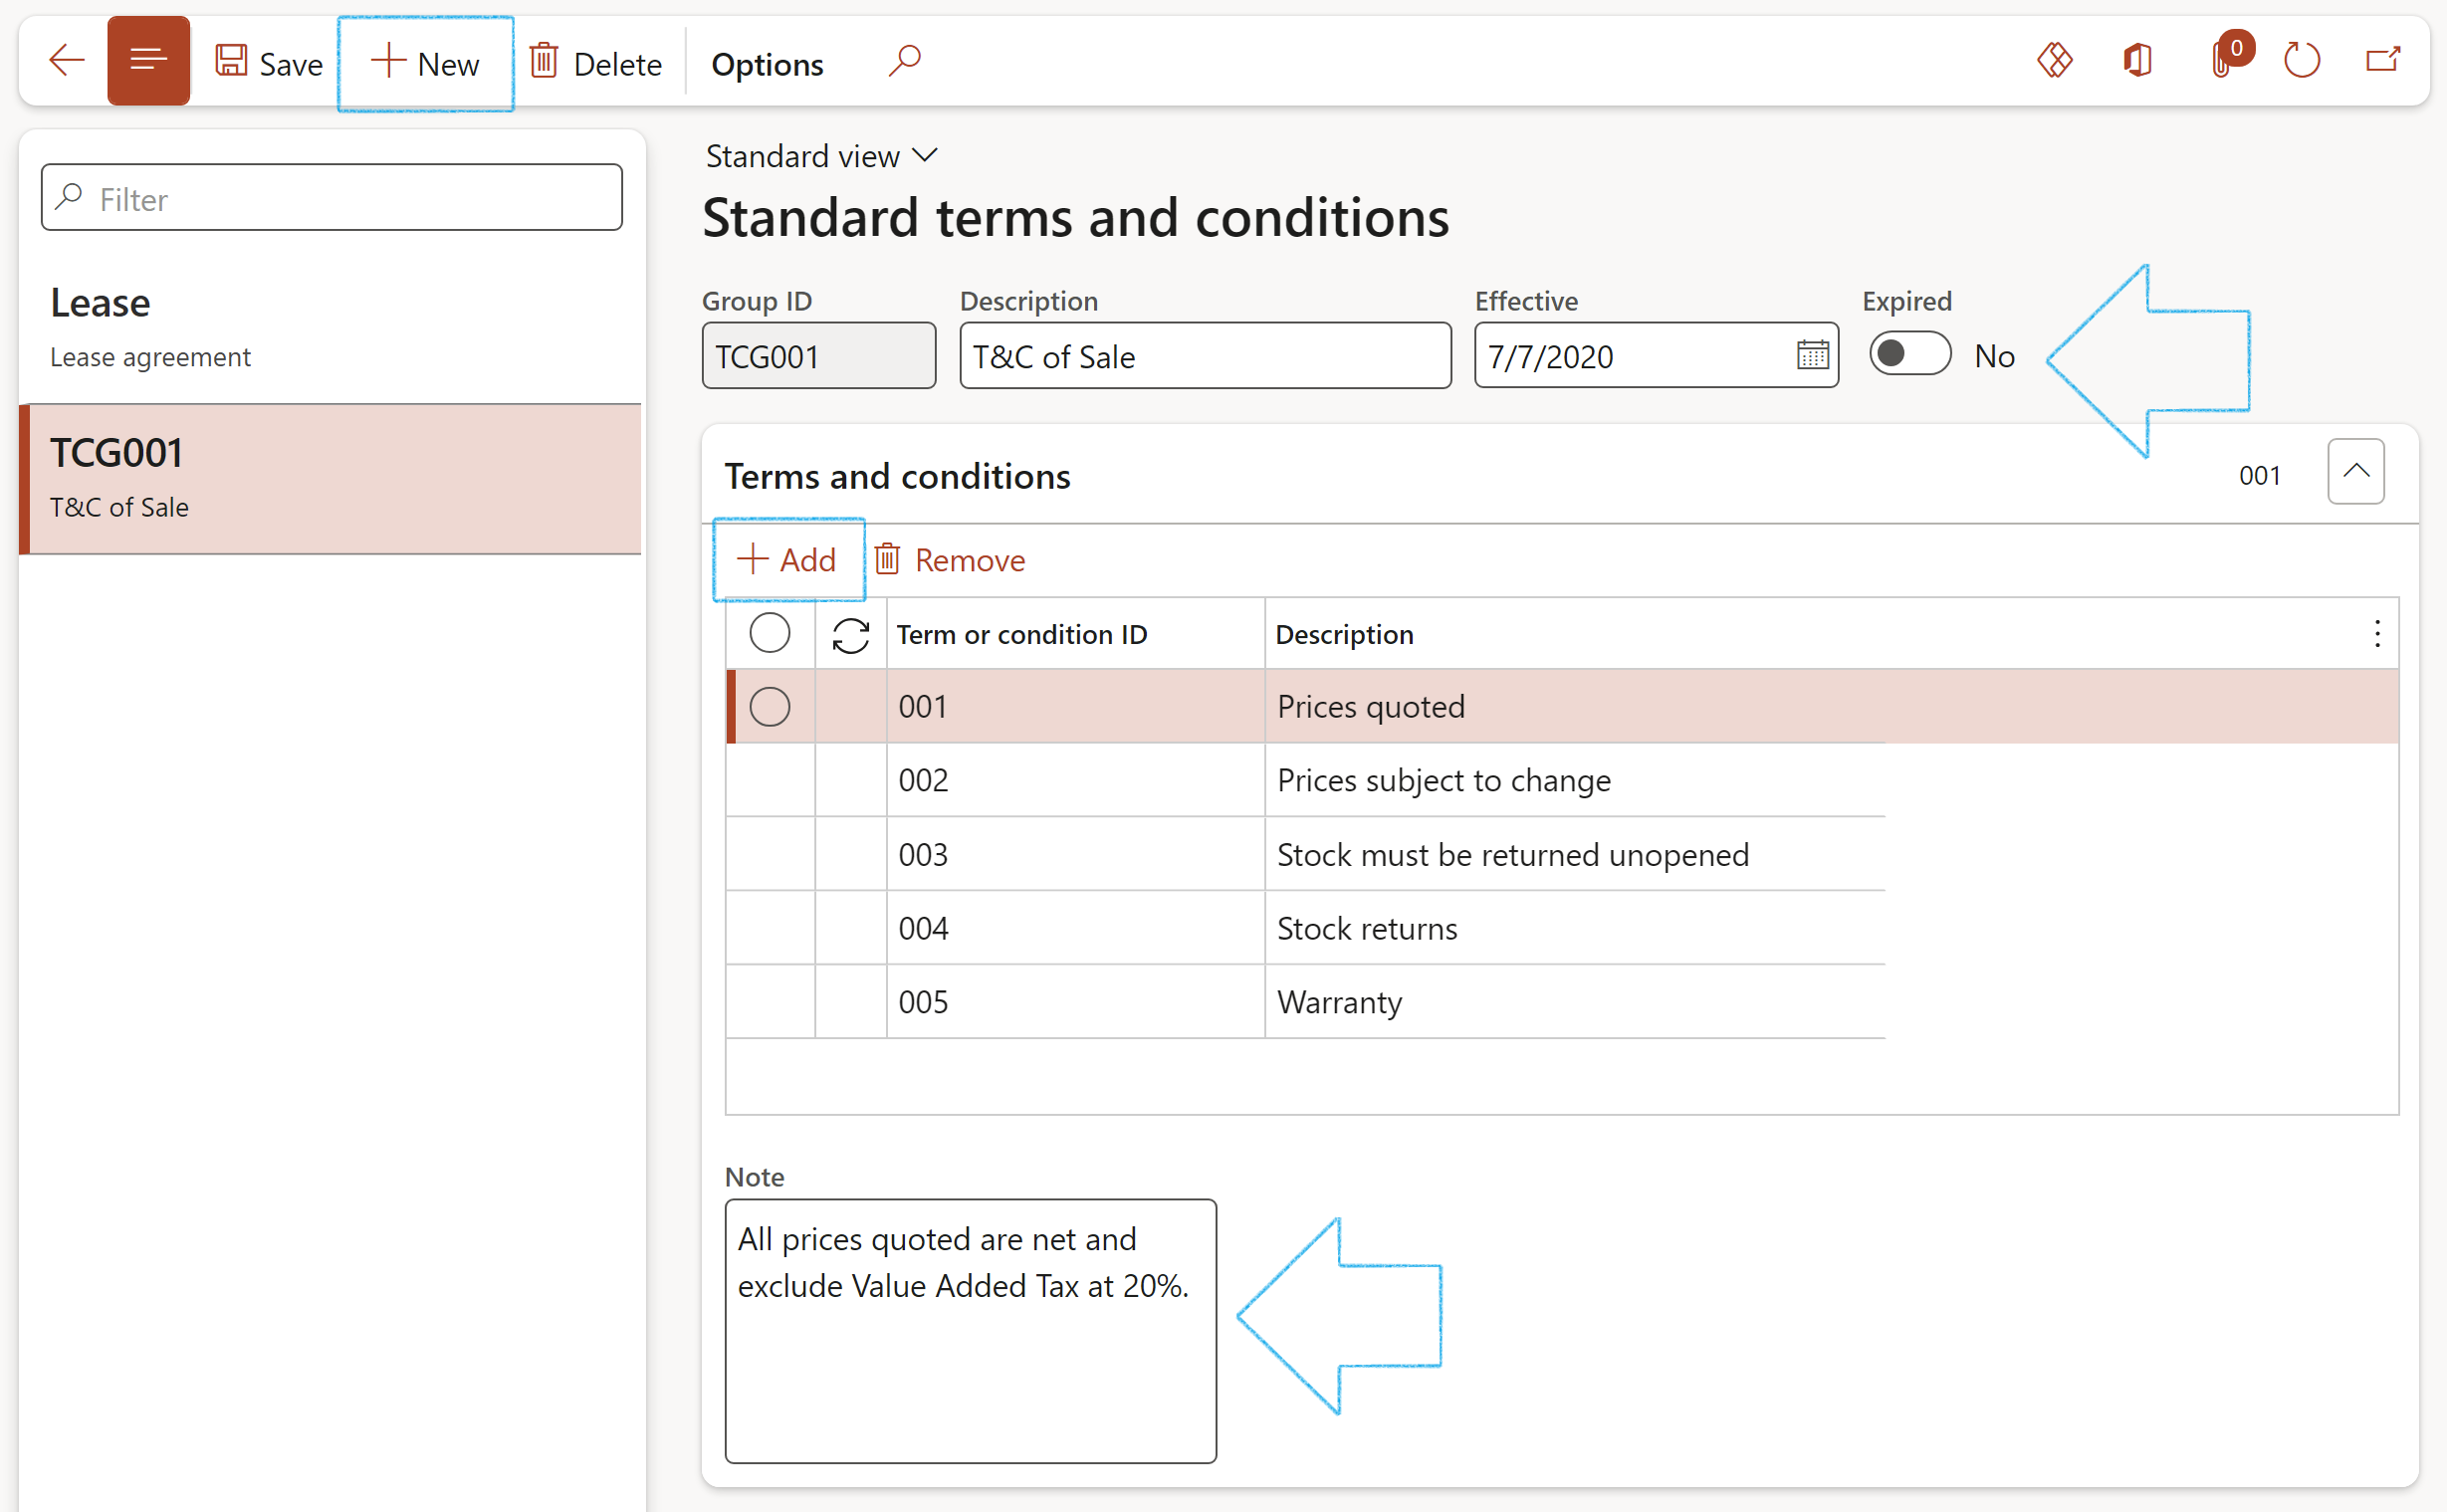
¶ Step 7: Setup Standard terms and conditions
Terms and conditions refer to the contractual rights and obligations of a party to any contract. They refer to the broader more generic guidelines (opposed to specific clauses) that parties must follow in an agreement.
Go to: GRC > Governance > Setup for governance > Standard terms and conditions
- On the Action pane, click on the New button
- Enter a Group ID for the standard terms and conditions
- Enter a brief Description
- In the Effective date field, enter the date from which the record is valid
- When the record has expired, move the Expired slider to Yes
- Under the Terms and conditions Fast tab, click on the Add button
- Enter the Term or condition ID
- Enter a Description of the term or condition
- Enter additional Notes in the box provided
¶ Step 8: Setup Signature type
Signature types are used when people (workers and outside contractors) need to sign on Contracts and bids.
Go to: GRC > Governance > Setup for governance > Signature type
- On the Action pane, click on the New button
- Under the Signature type Index tab:
- Enter a unique Signature type ID
- Enter a brief Description for the signature type
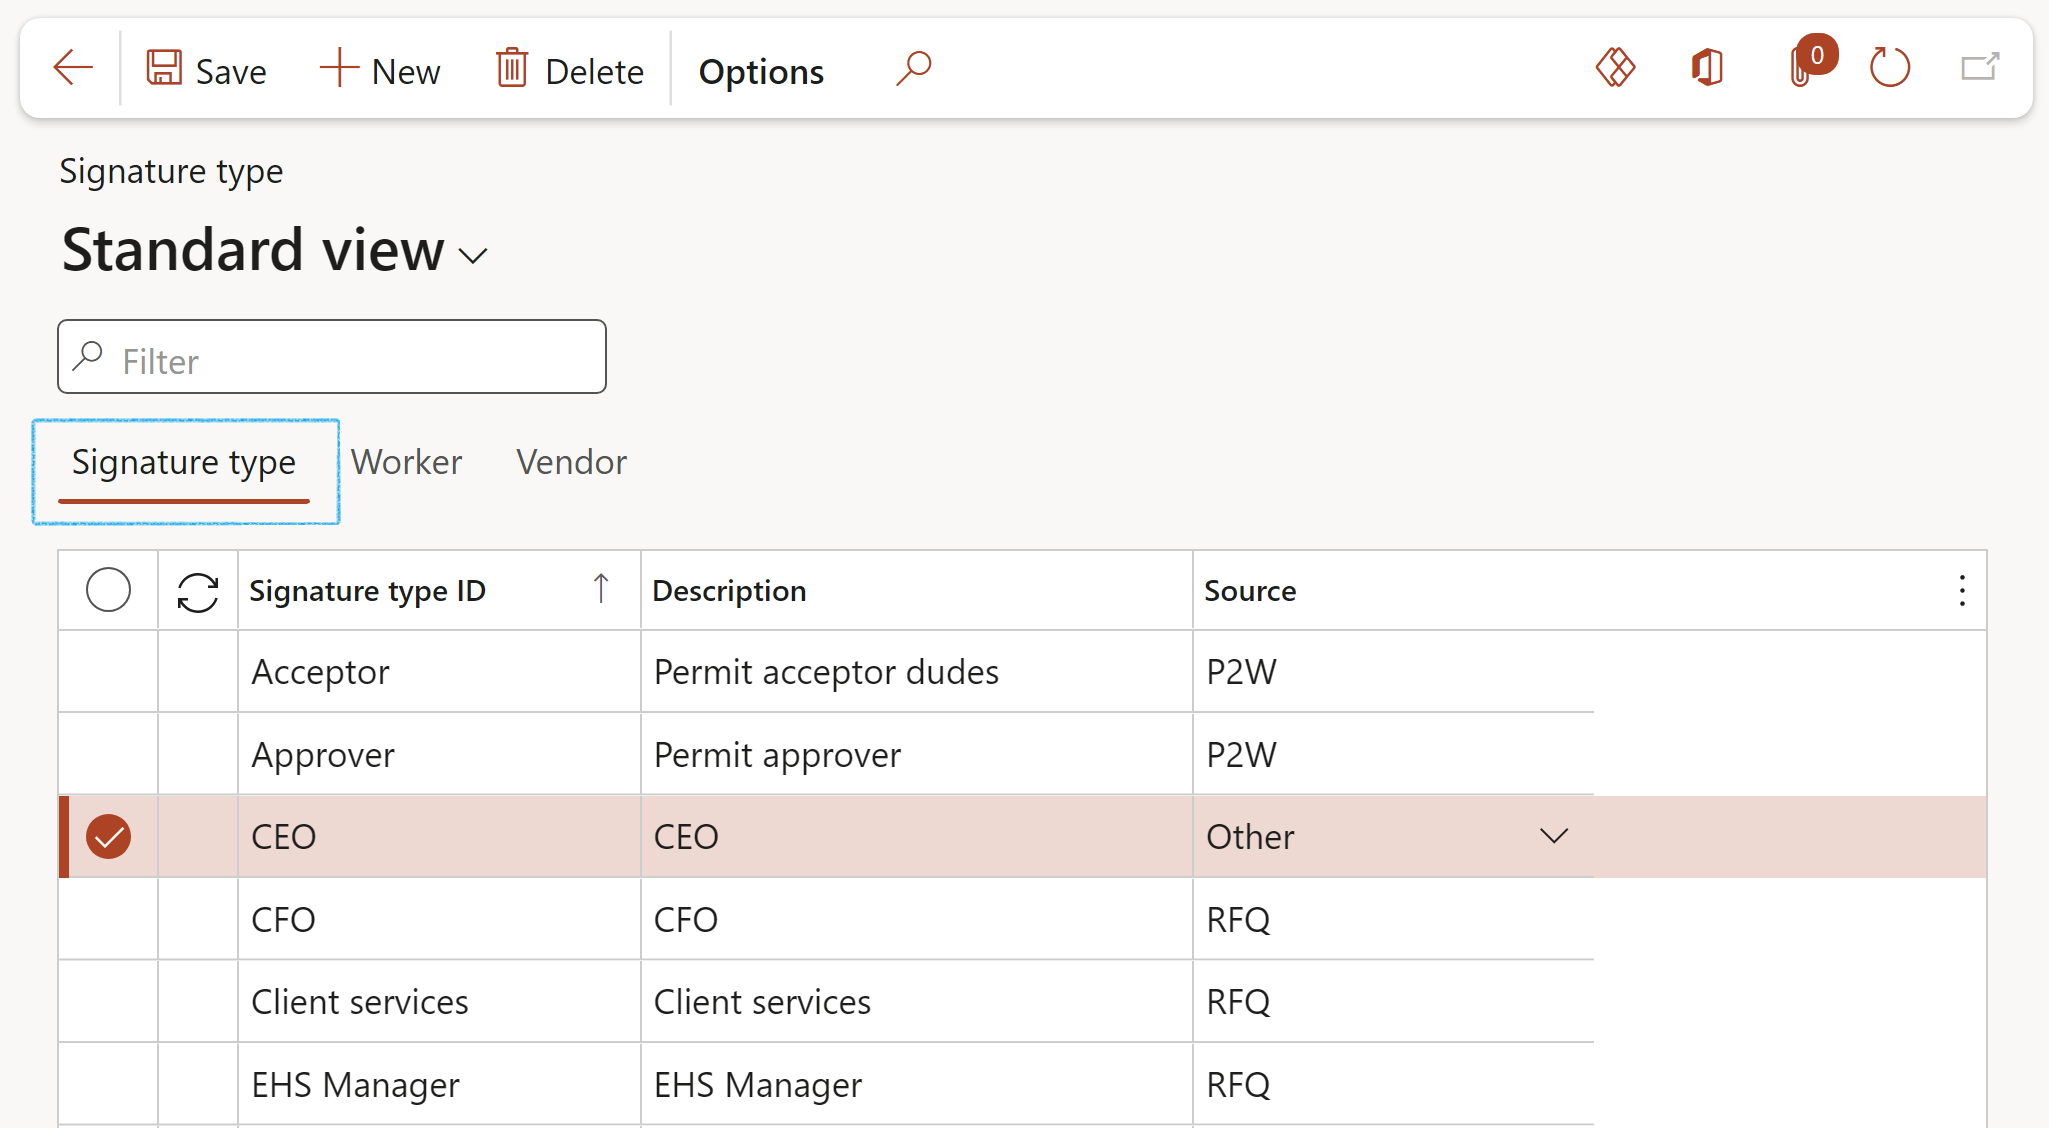
- Select the Signature type that you want to add workers to
- Open the Worker Index tab:
- In the Remaining workers column, select the Worker that you want to link to the Signature type
- Click on the < button to move the Worker across to the Selected workers column
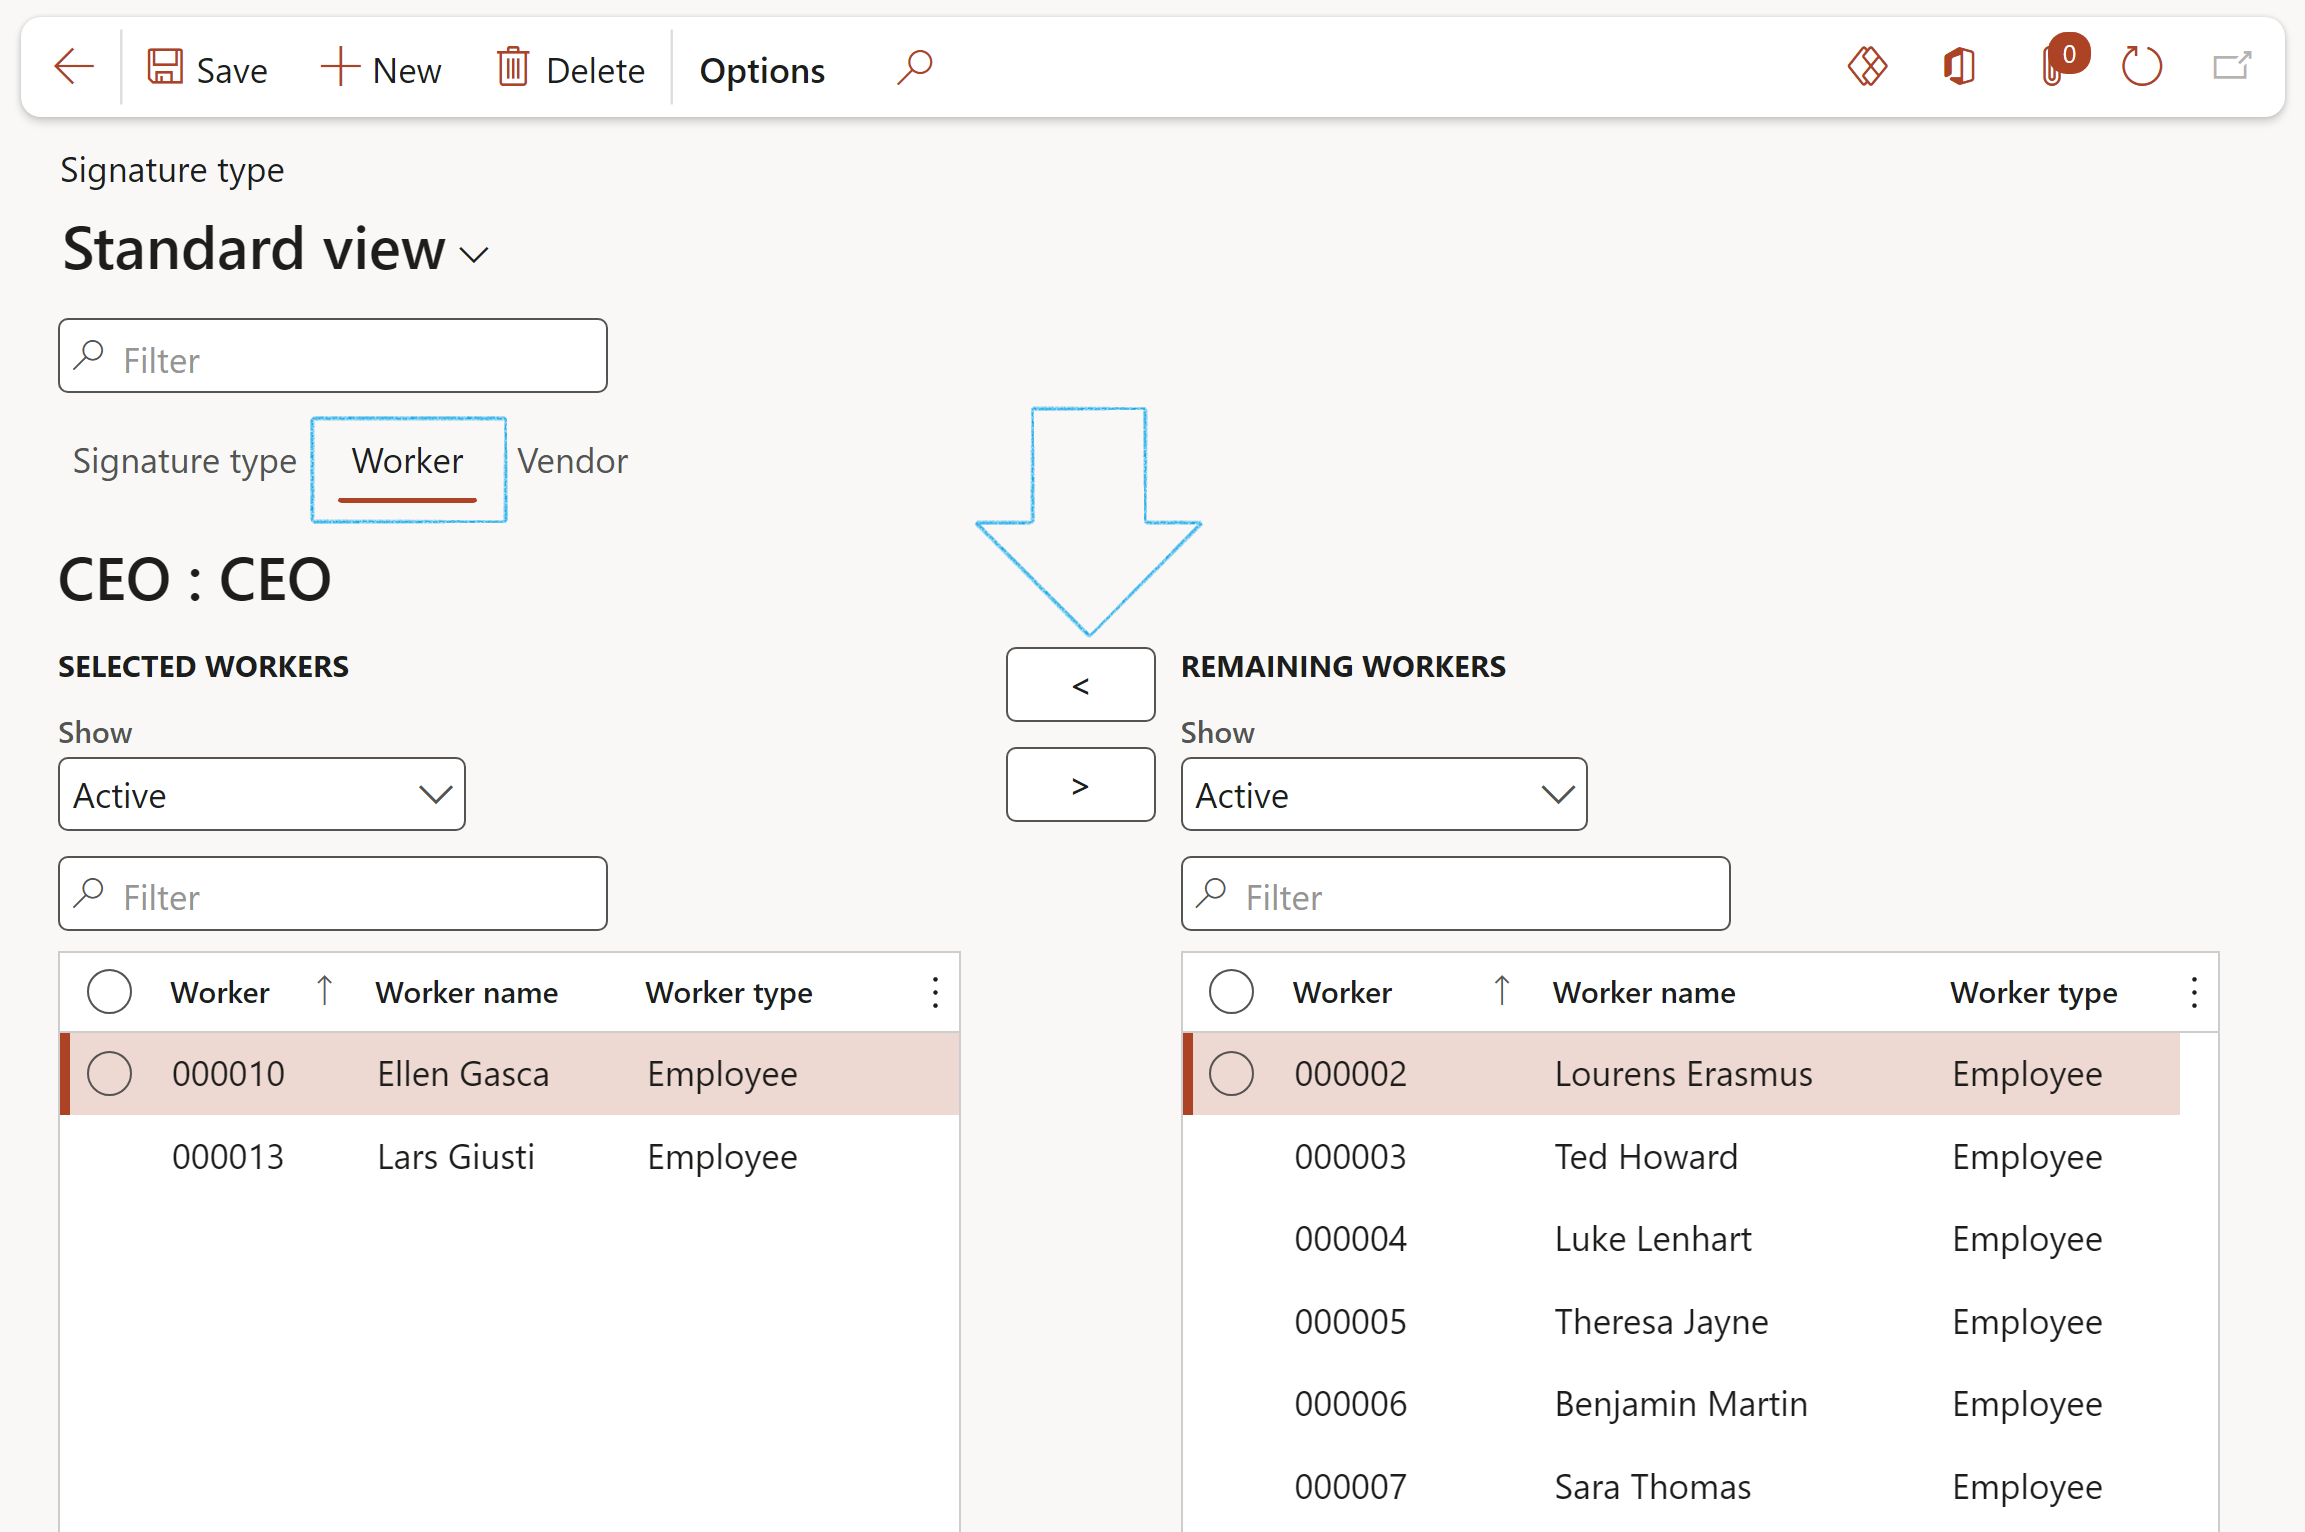
- Select the Signature type that you want to add vendors to
- Open the Vendor Index tab:
- In the Button strip, click on the Add button
- Select the relevant Vendor account from the dropdown list
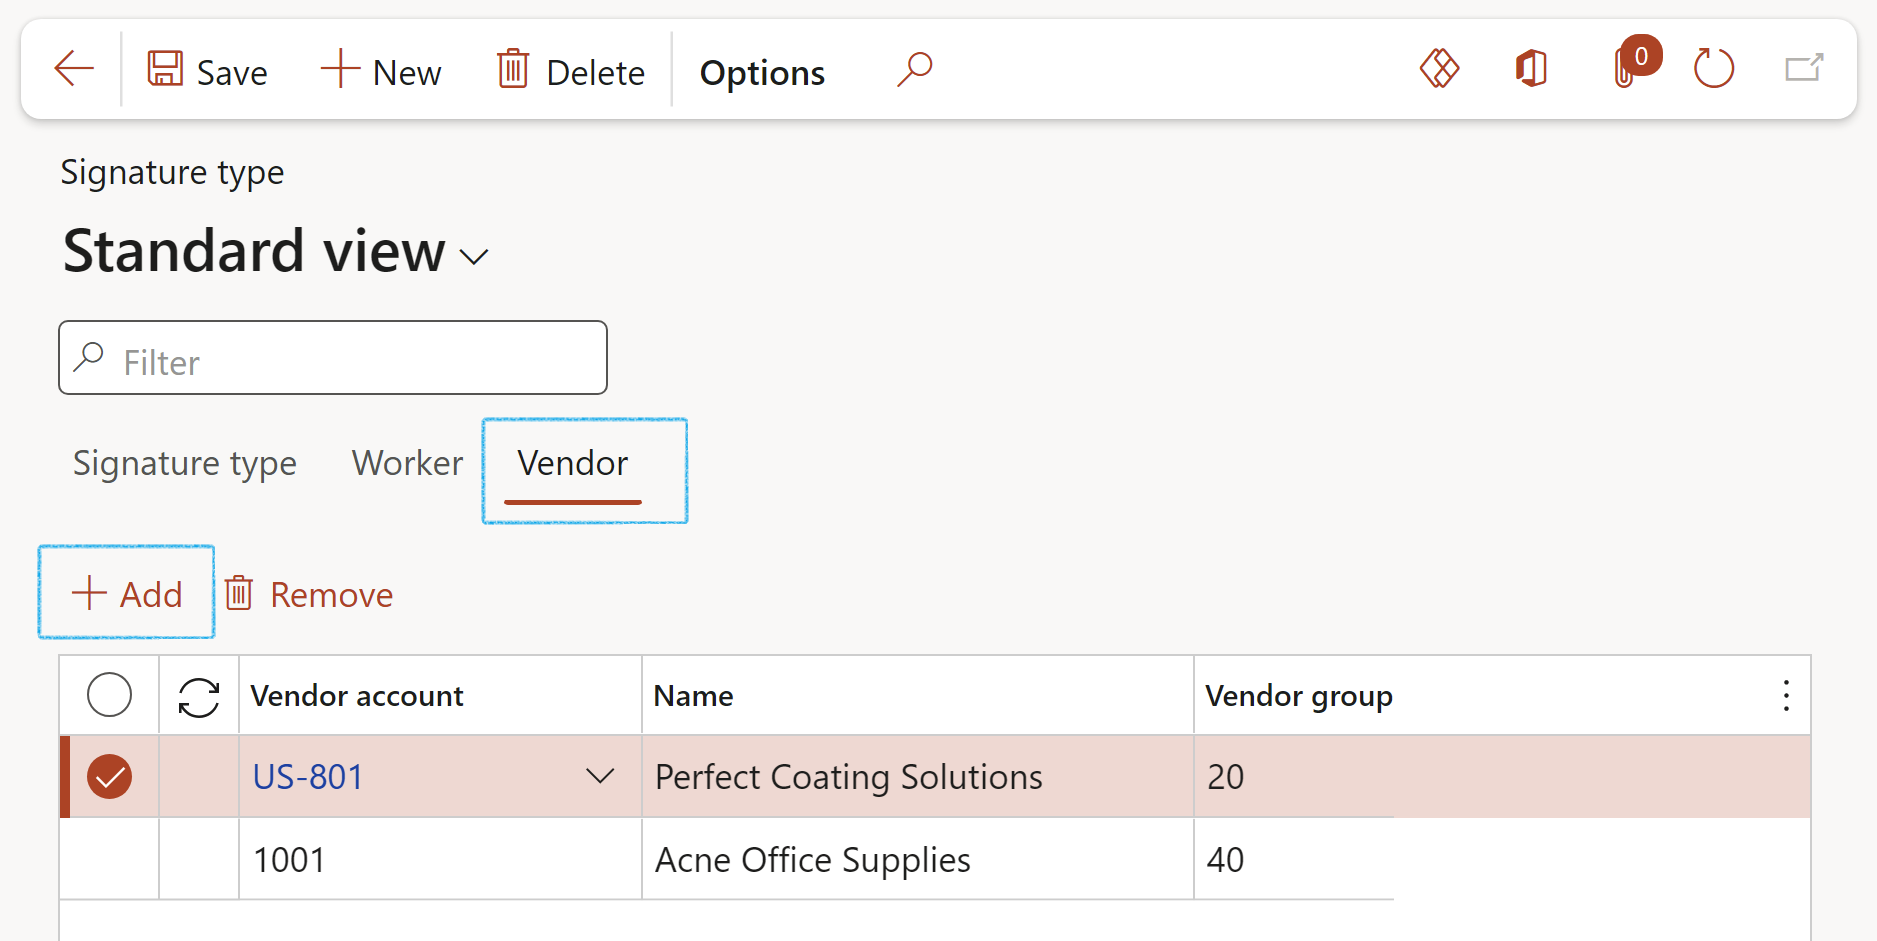
Only workers/vendors that have been linked to a Signature type can be selected under the Sign off Fast tab on the Contract
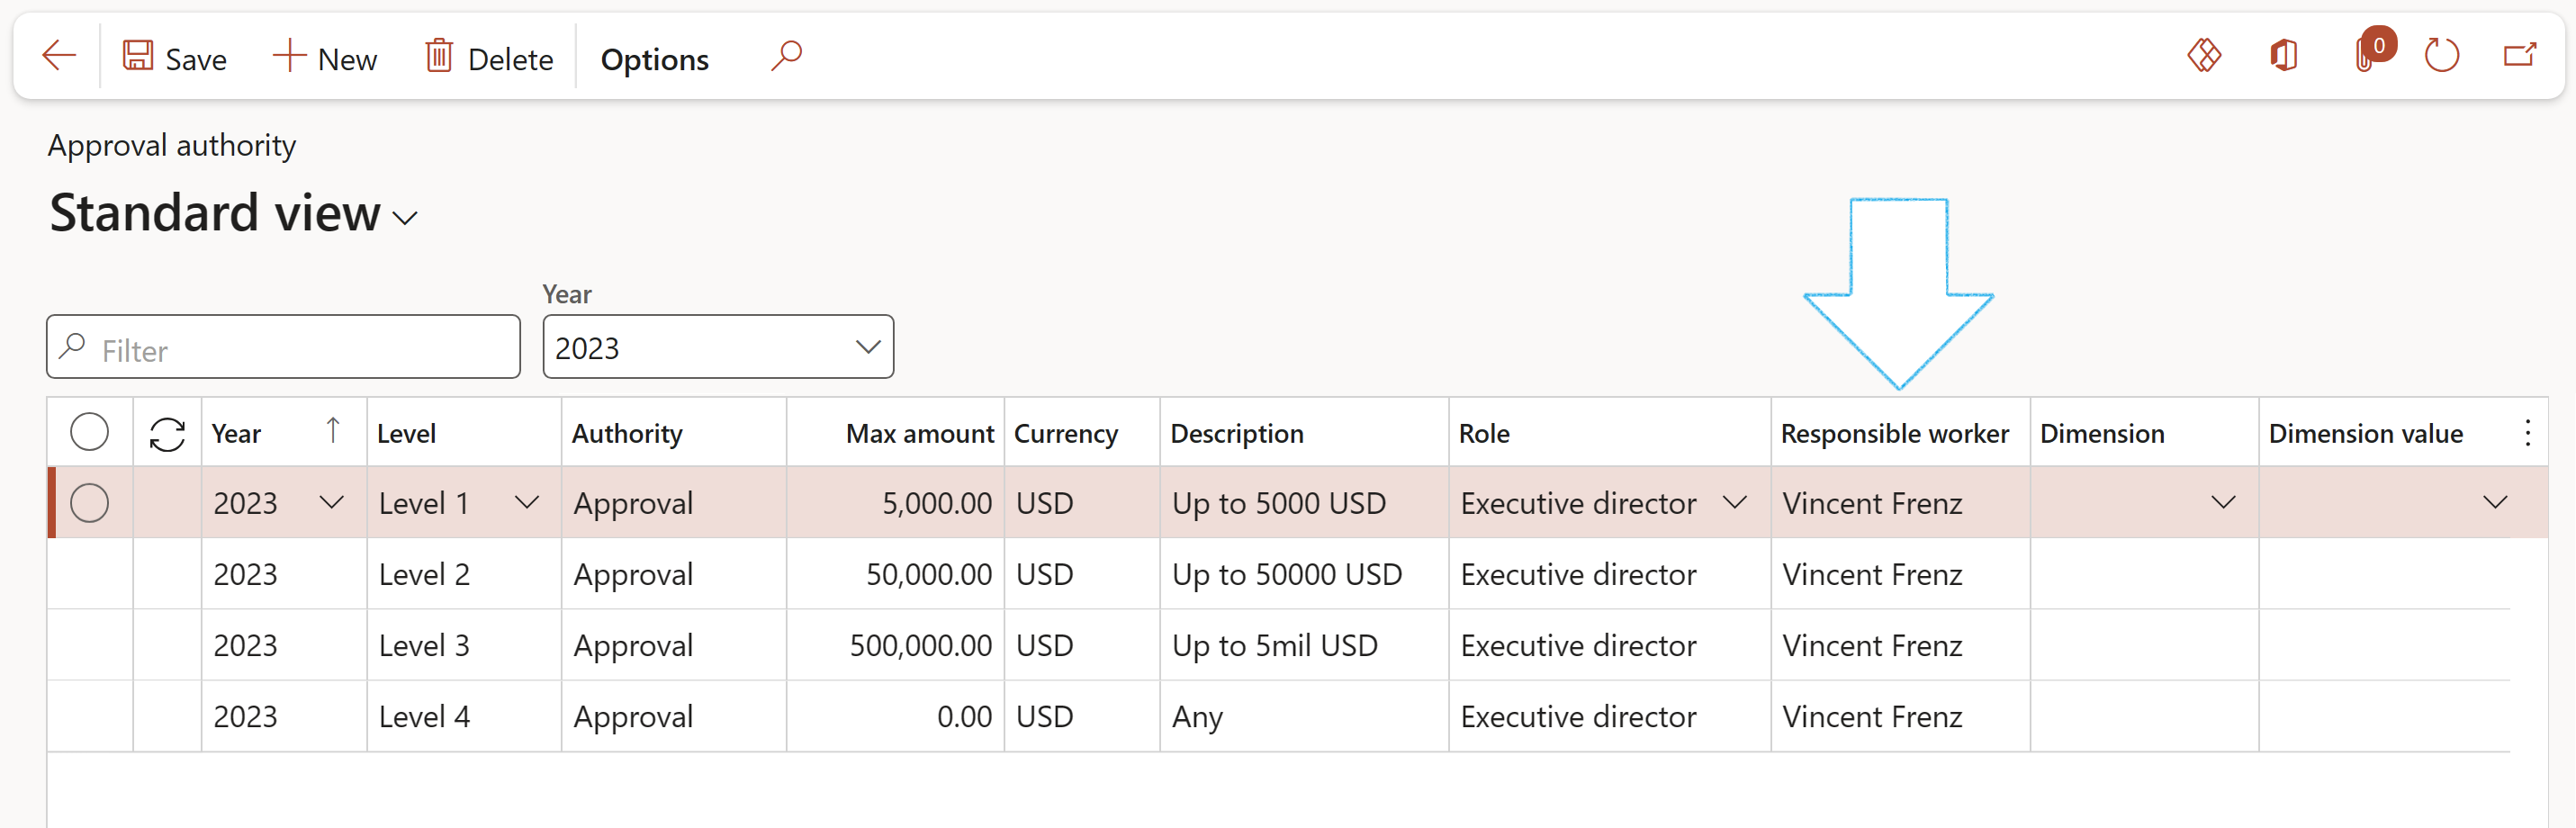
¶ Step 9: Define Approval authority
It is possible to define specific approvers for multiple contracts by making use of the GRC approval authority.
Go to: GRC > Governance > Setup for governance > Approval authority
- On the Action pane, click on the New button
- Enter the applicable Year
- Select the relevant approval Level from the dropdown list
- Enter the name of the Authority
- Select the relevant Target from the dropdown list
- Enter the Maximum amount
- Select the relevant Currency from the dropdown list
- Tick the Unlimited checkbox for all values greater than the Maximum amount
- Enter a brief Description
- Select the relevant Approver from the dropdown list
- Select the relevant Approval group from the dropdown list
- Select the relevant Approval authority Role from the dropdown list
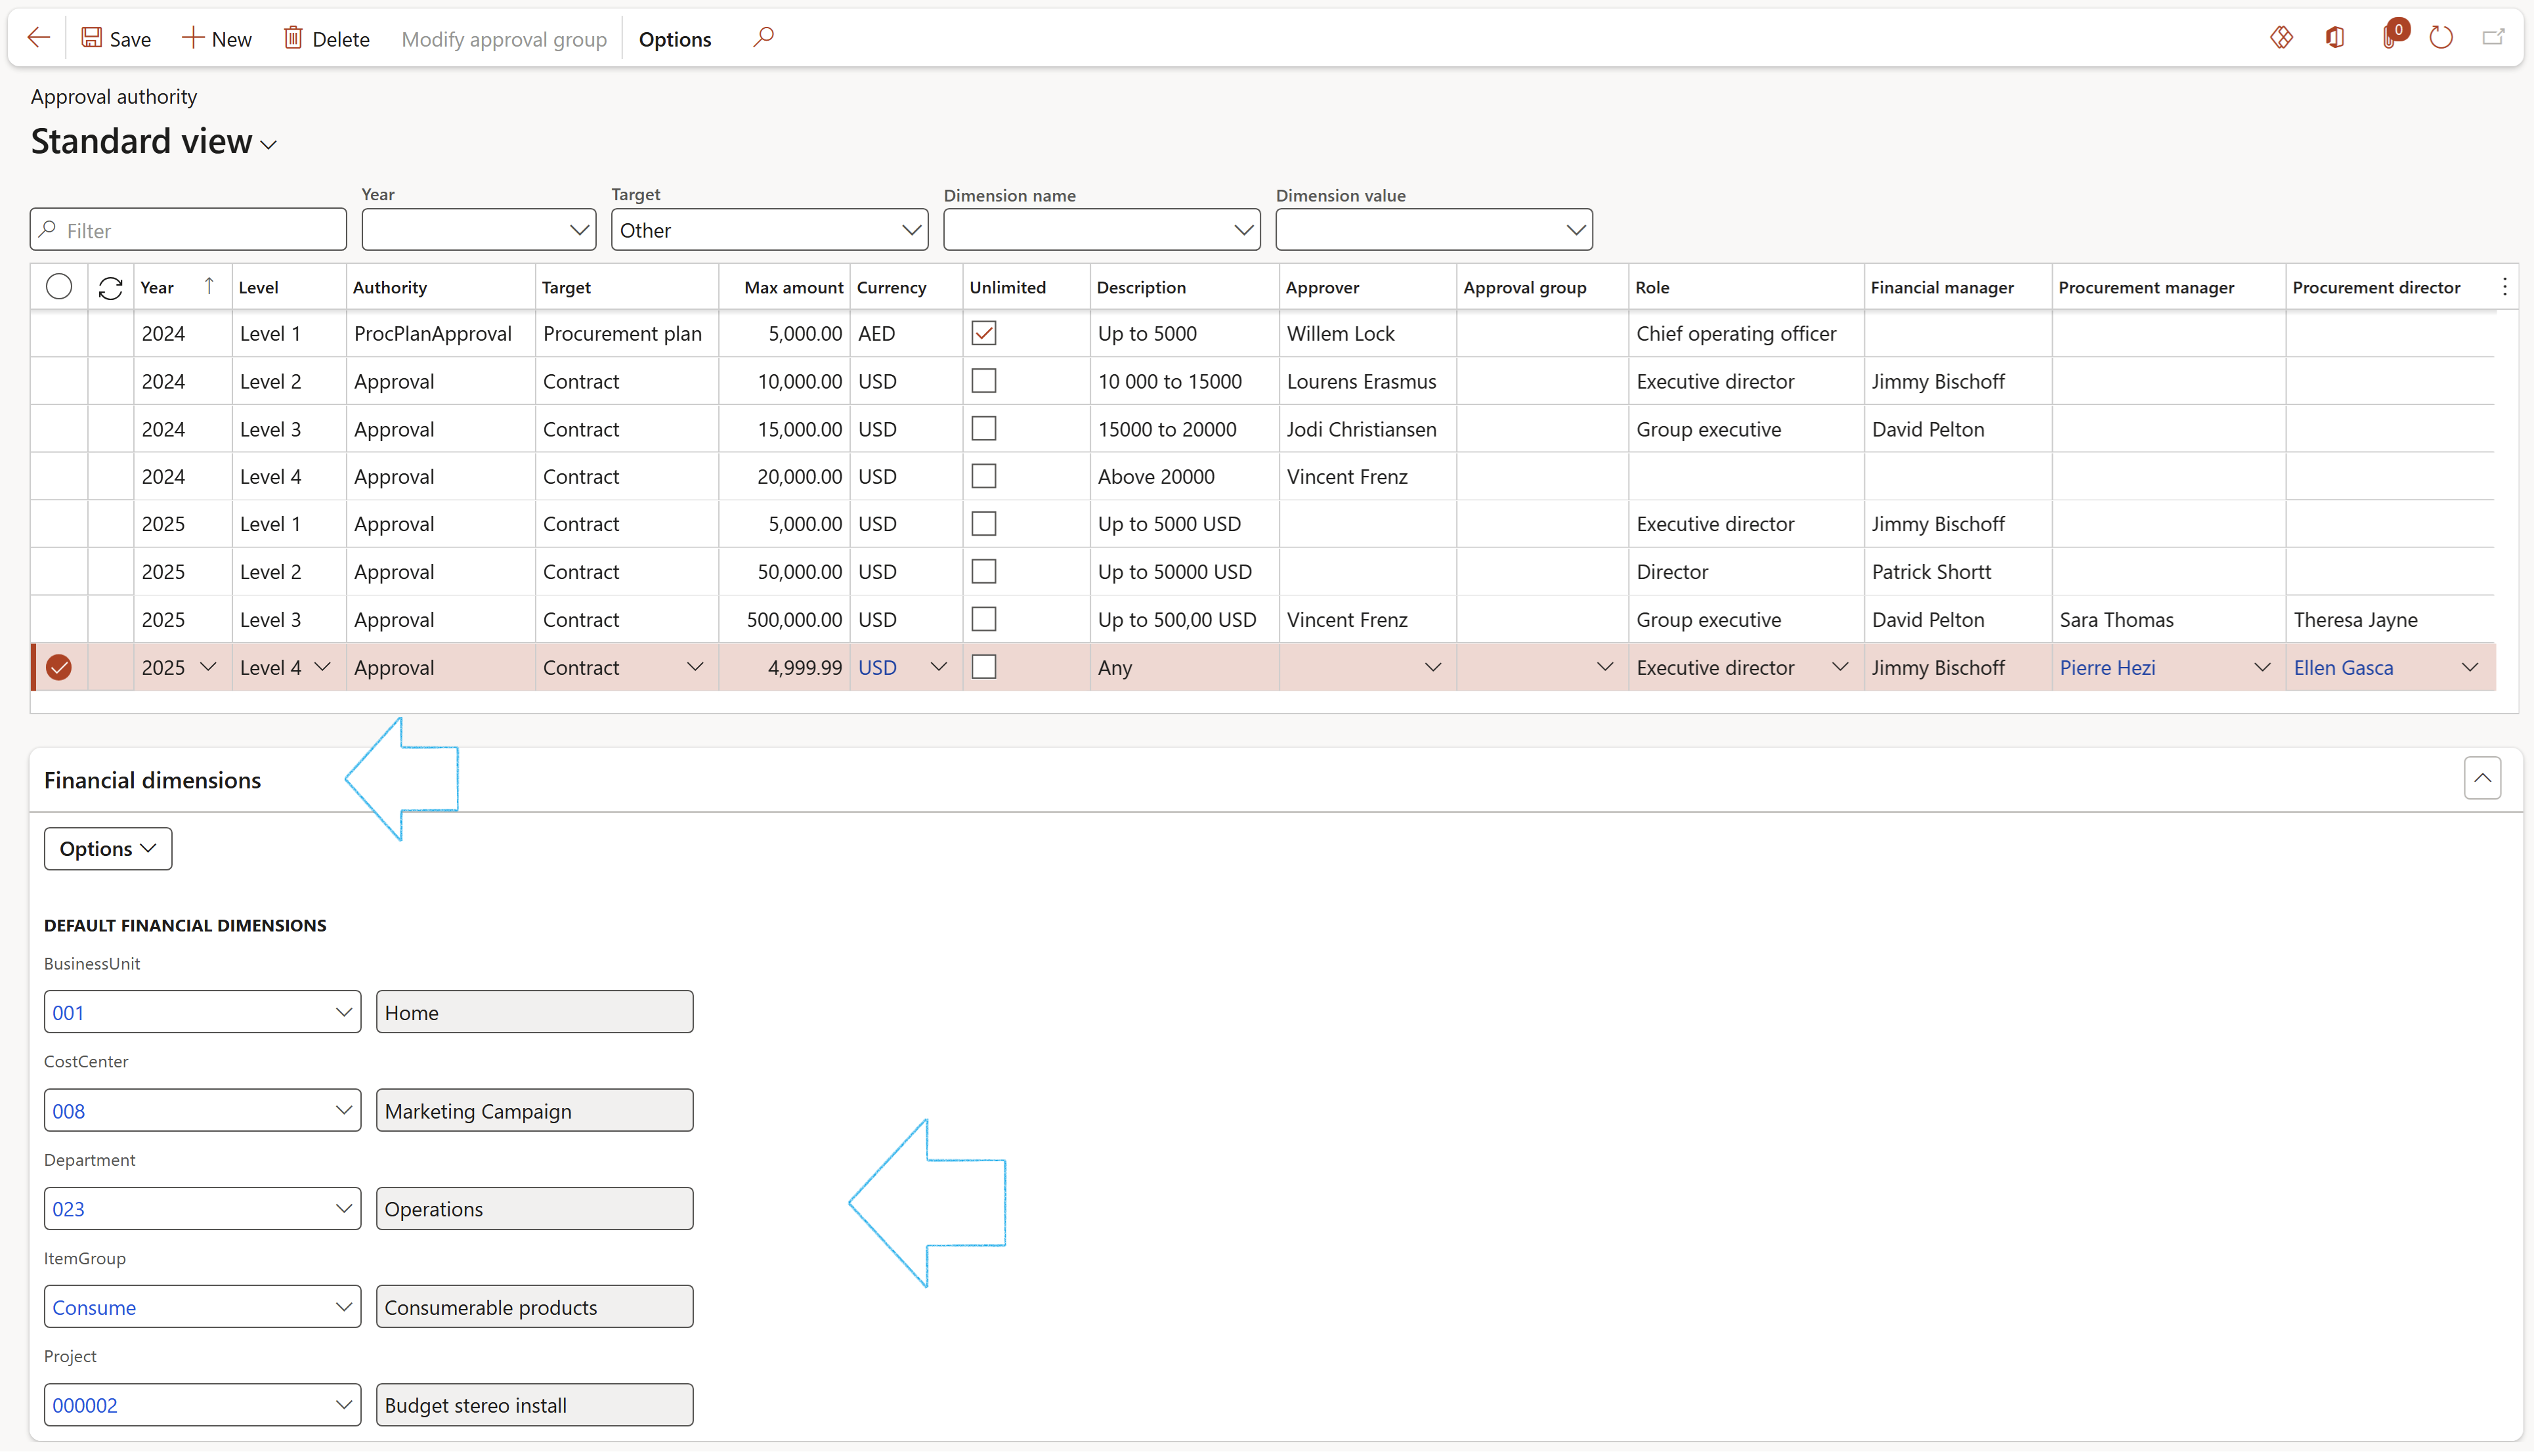
- Select the relevant Contract request approver from the dropdown list
- Select the relevant Finance manager from the dropdown list
- Select the relevant Procurement manager from the dropdown list
- Select the relevant Procurement director from the dropdown list
The filters above the grid can be used to find specific records
¶ Step 9.1: Default financial dimensions
- Expand the Financial dimensions Fast tab
- Select the relevant Default financial dimensions for the selected record in the grid
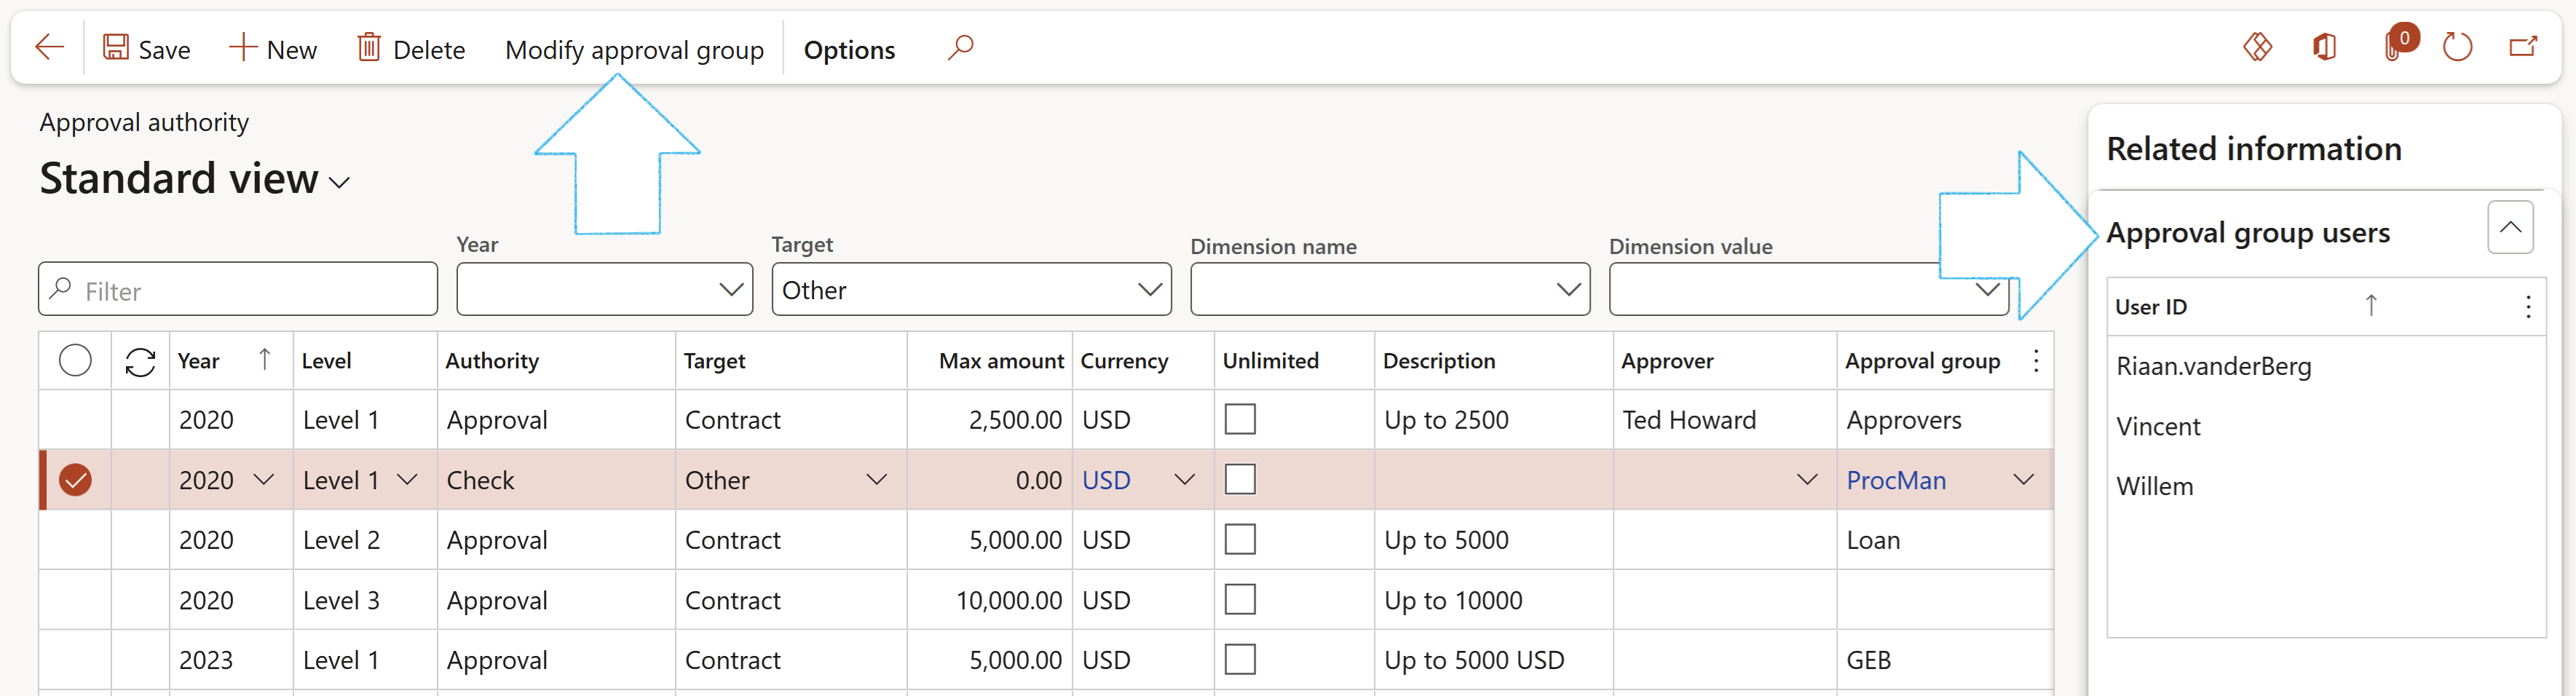
¶ Step 9.2: Change Approval group user
- Expand the Related information pane to view the users in the selected Approver group
- In the Action pane, click on the Modify approval group button
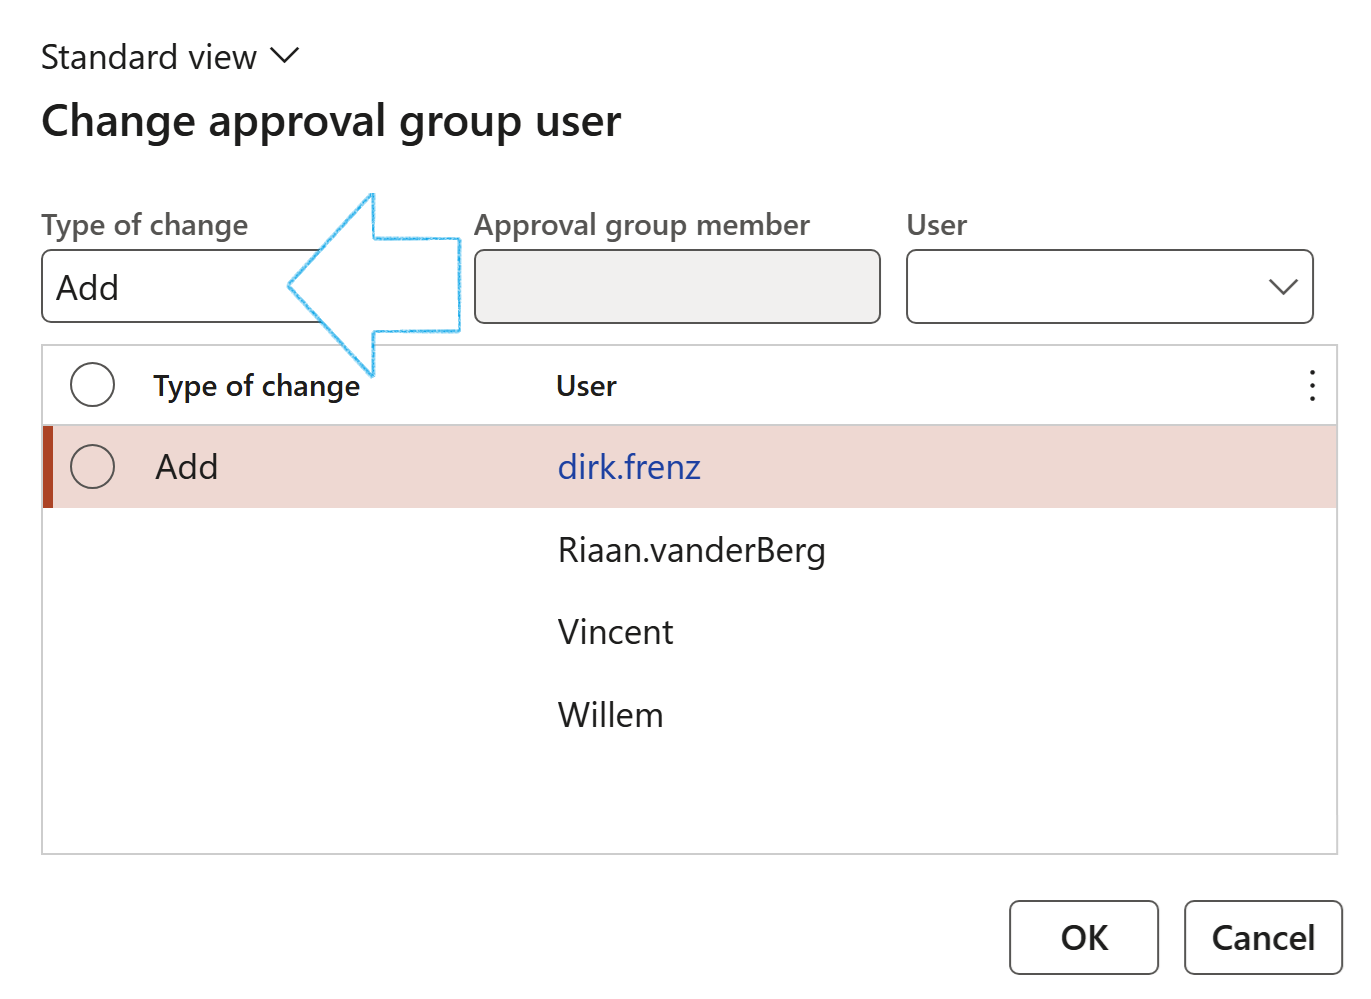
- On the Change approval group user dialog:
- Select the relevant Type of change from the dropdown list:
- Add
- Remove
- Replace
- Select the user that should be added to the group, from the User dropdown list
- Select the user that should be removed from the group, from the Approval group member dropdown list
- Click on the OK button
This is useful for Workflow as well reporting inside the tender evaluation report (TER). The approval authority is also used in the gift register. Users define thresholds (per department/cost centre etc.) for gifts received and subsequent approval based on said threshold value.
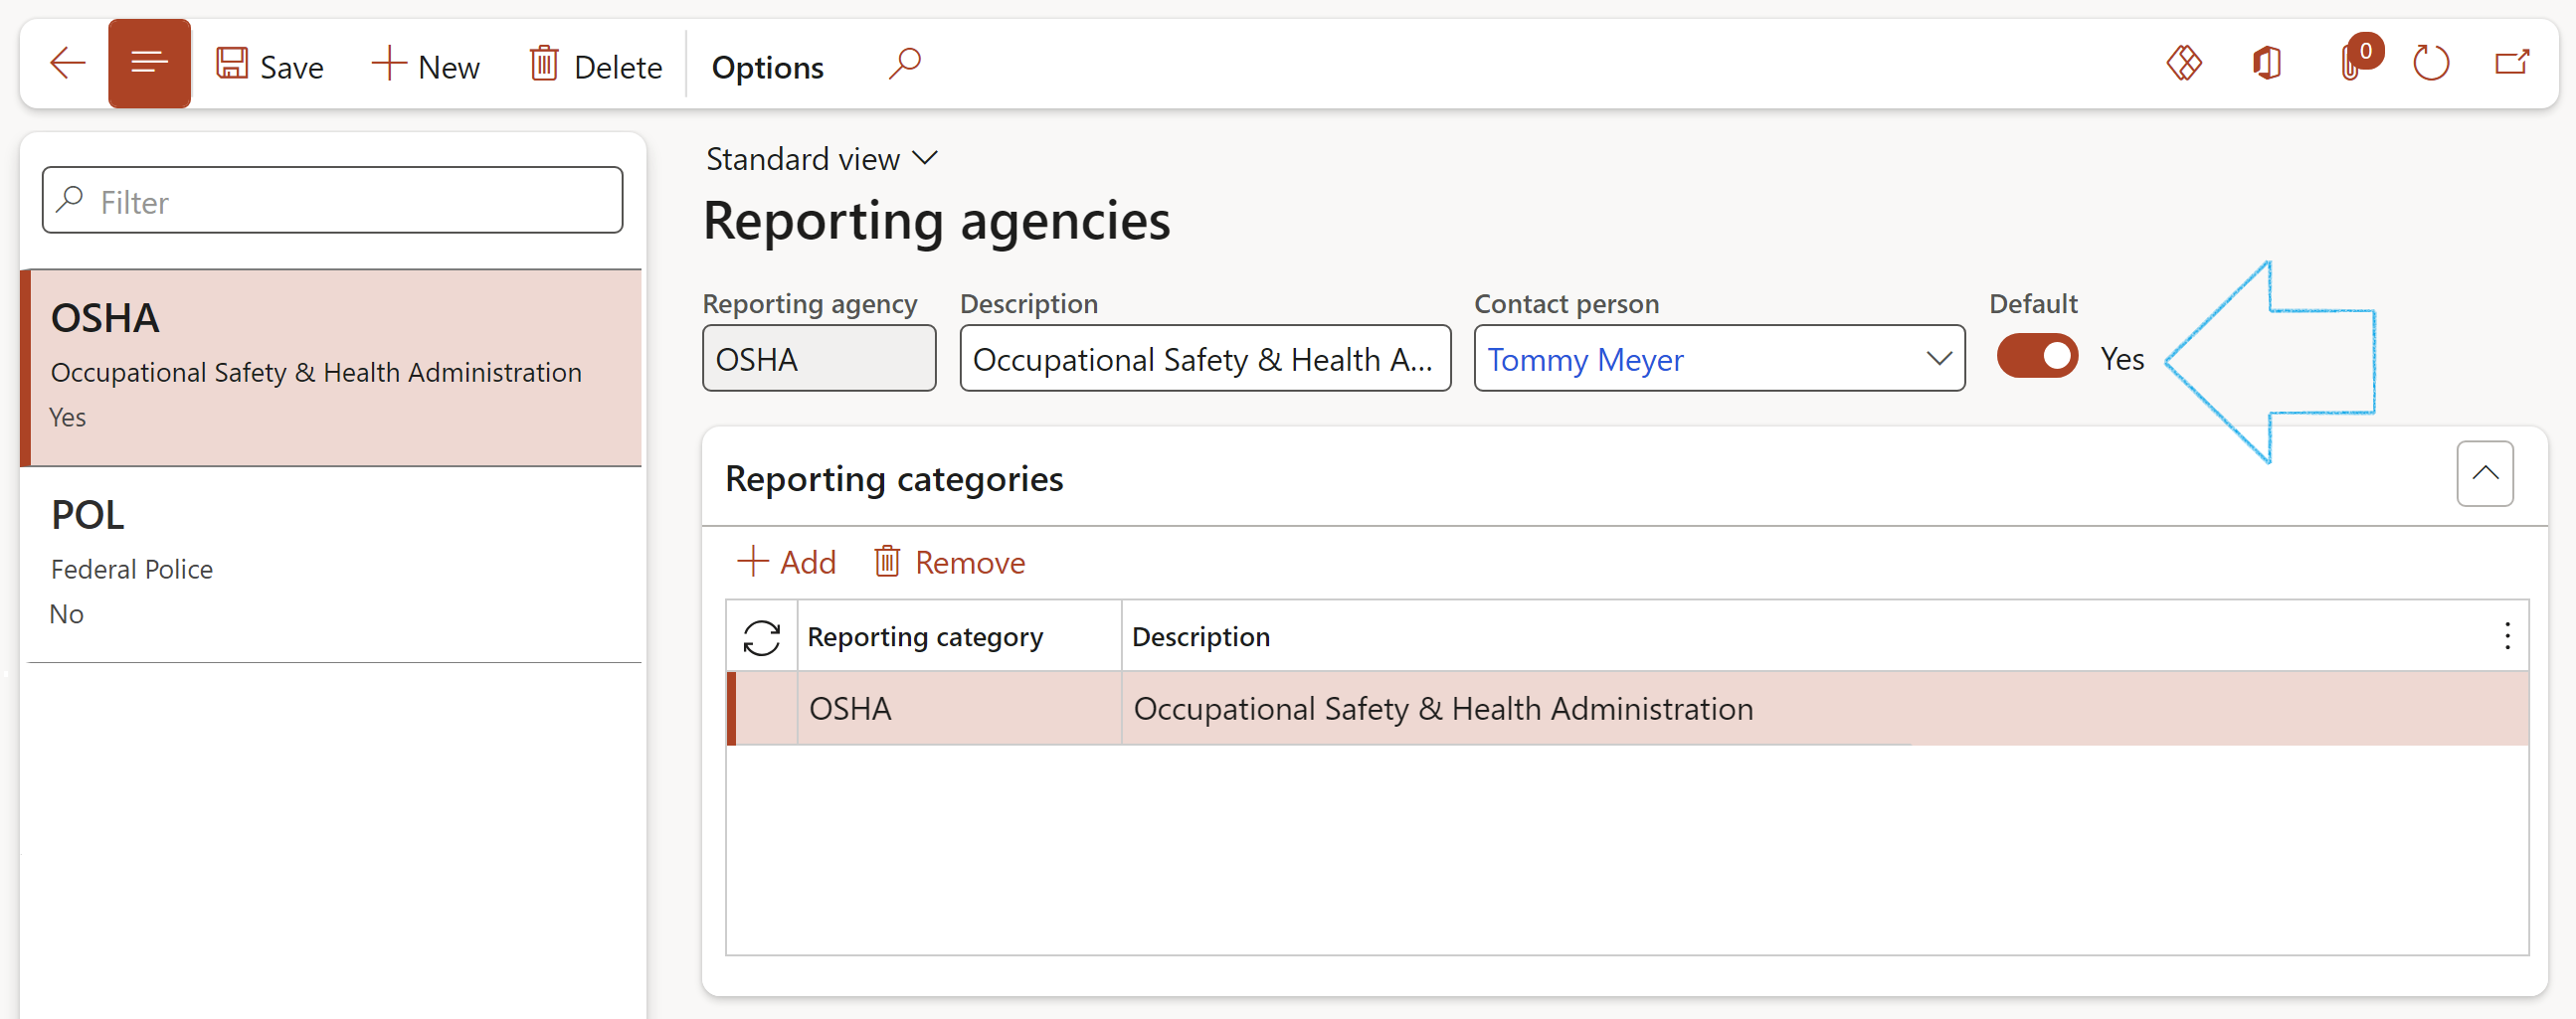
¶ Step 10: Setup Reporting agency
In some geographies it is a legal requirement to "report" contracts to government agencies. GRC 365 supports this but require a list of these agencies to be created.
Go to: GRC > Governance > Setup for governance > Reporting agency
- On the Action pane, click on the New button
- Enter a Reporting agency name
- Enter a brief Description
- Select the Contact person for the Reporting agency
- Indicate whether this is a default Reporting agency
- Expand the Reporting categories Fast tab
- In the Button strip, click on the Add button
- Enter a Reporting category
- Enter a brief Description
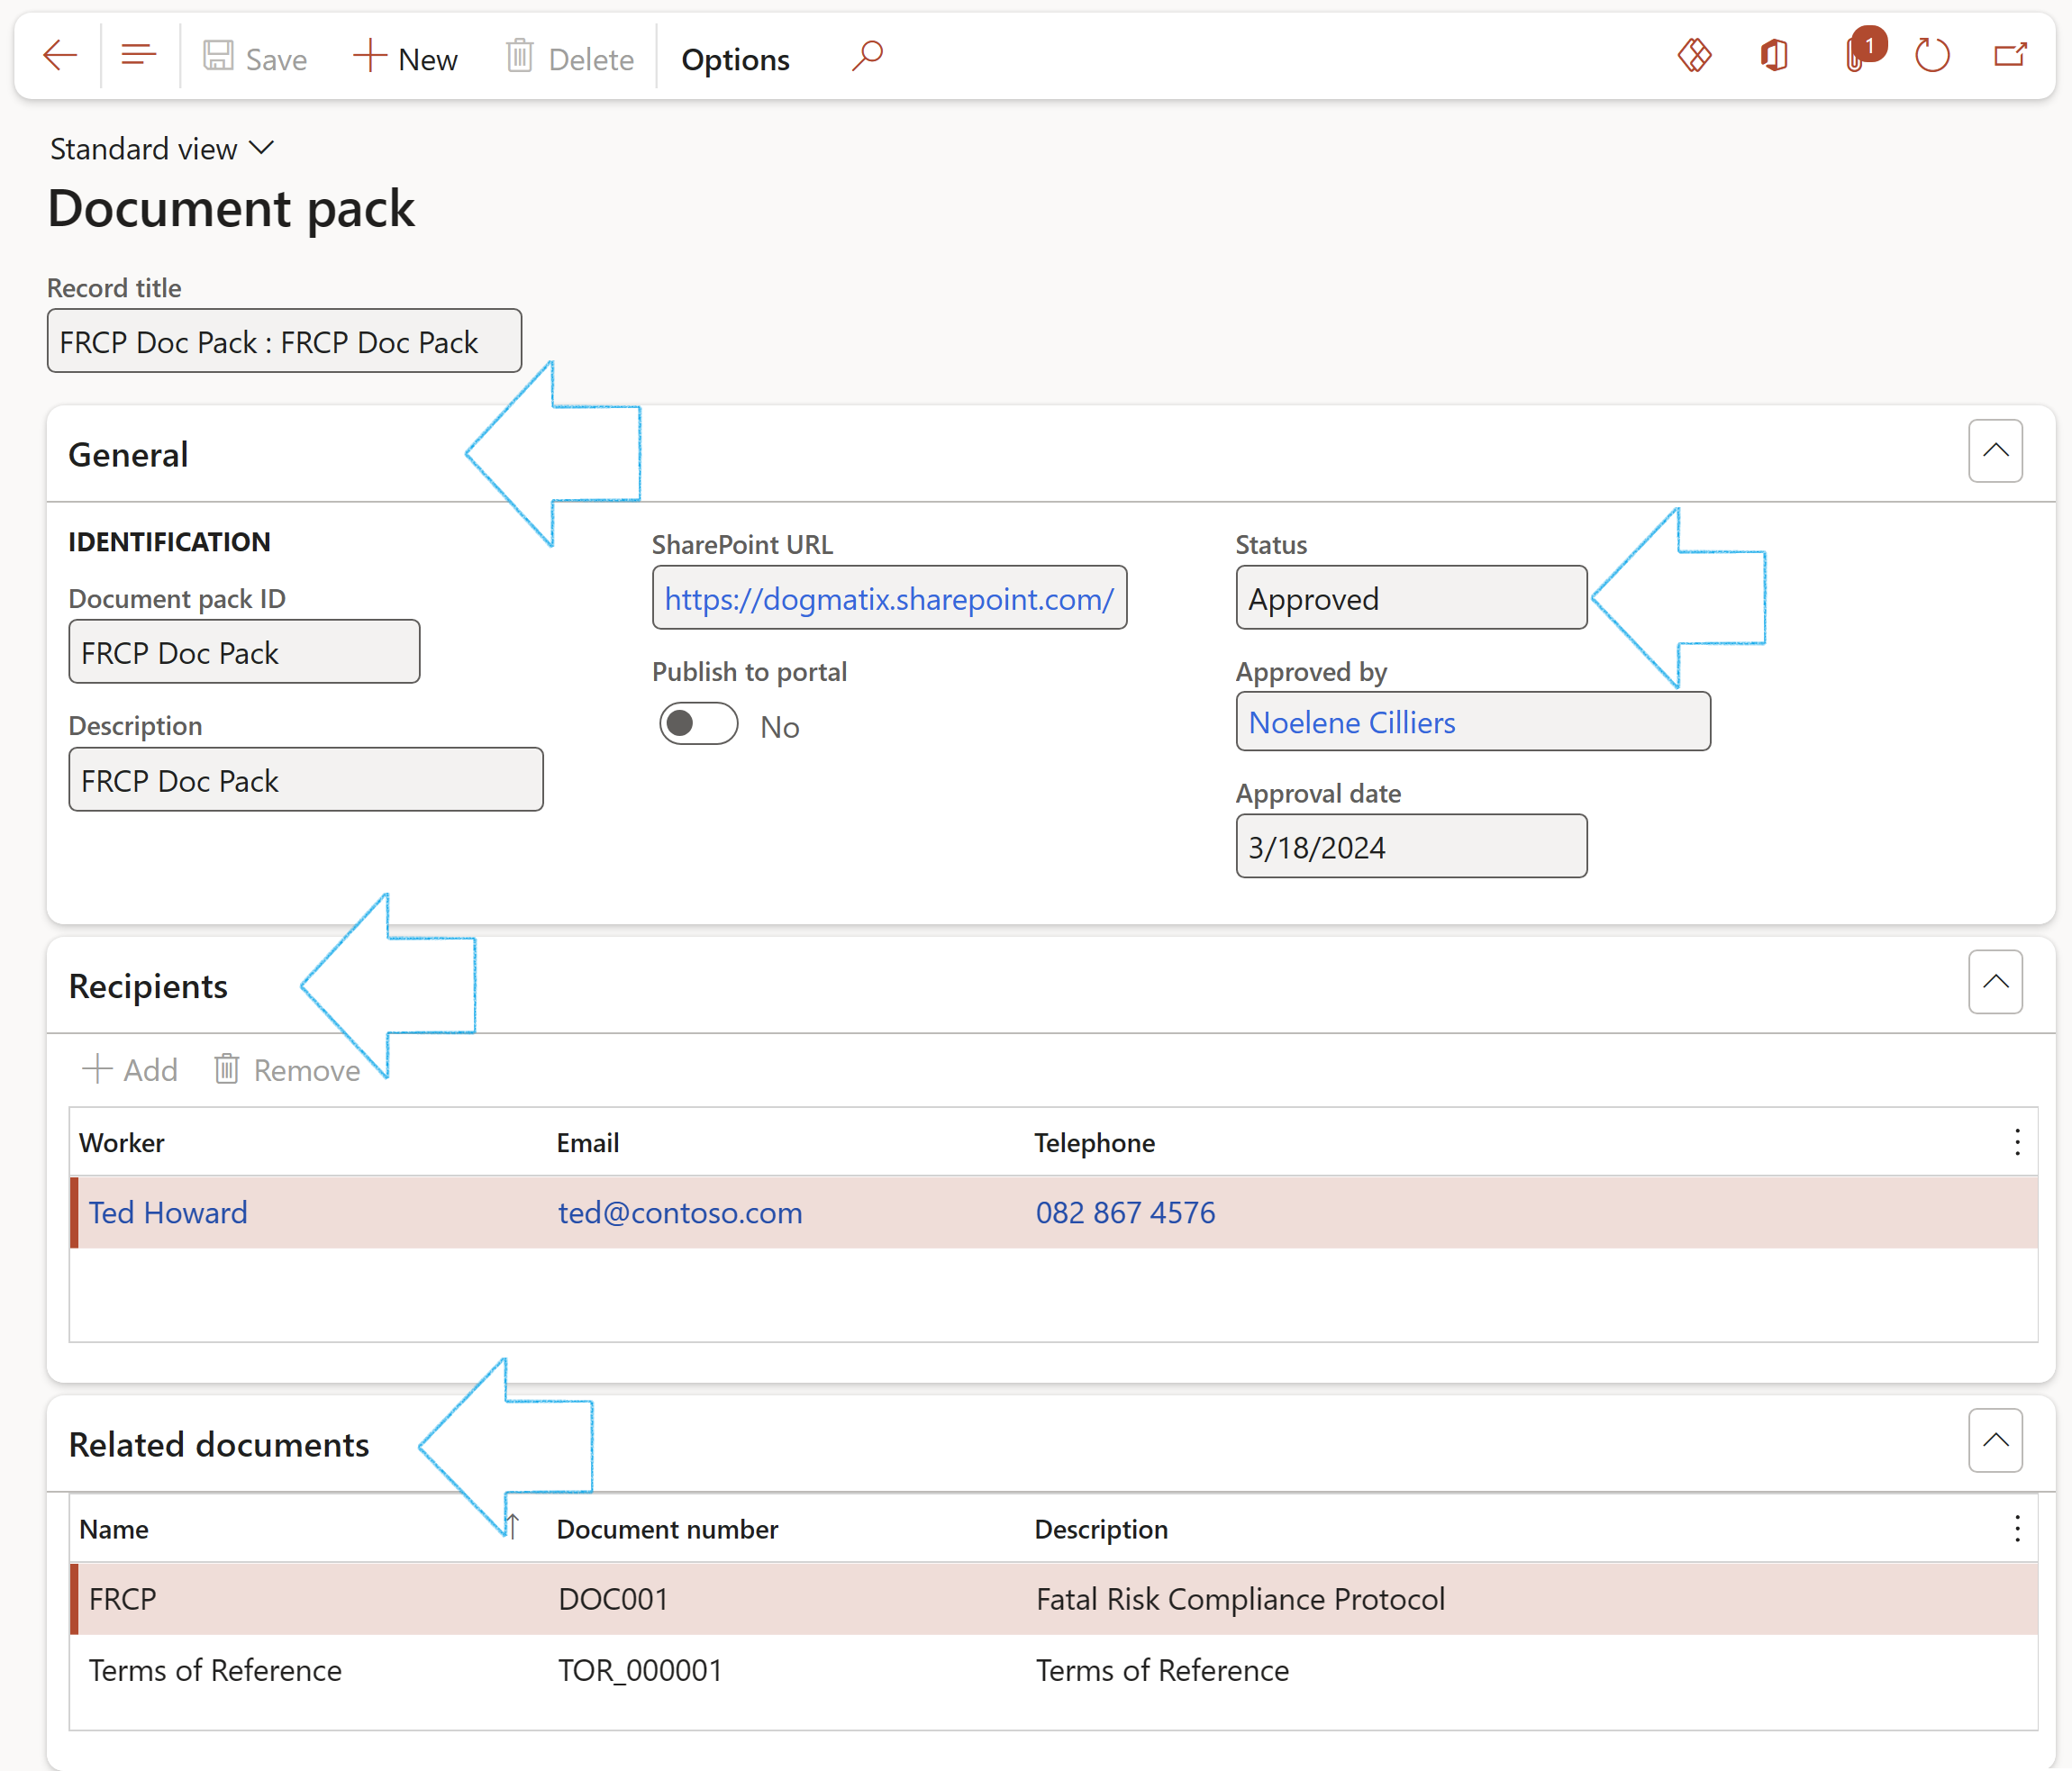
¶ Step 11: Create Document pack
A Document pack is used to group multiple documents together. These documents normally support contracting activities. For example, when a set of templates are needed for a purchase, they can be referenced in the contract by using a Document pack. Additionally, a list of recipients can also be added to the pack. This is useful when a set of documents must be sent to a bid committee meeting.
Go to: GRC > Governance > Setup for governance > Document pack
- On the Action pane, click on the New button
- In the Document pack ID field, enter a name and enter a Description
- A SharePoint URL can be entered
- Indicate whether the record should be published to the portal
- Expand the Recipients Fast tab and click on the Add button
- Select the Workers that you want to send the Document pack to
- Expand the Related documents Fast tab to view the documents related to the selected Document pack
- Only Approved document packs can be selected on the Solicitation type and on the RFQ
- The link between the Document pack and the Related documents is created on the Contract detail form under the Content Fast tab
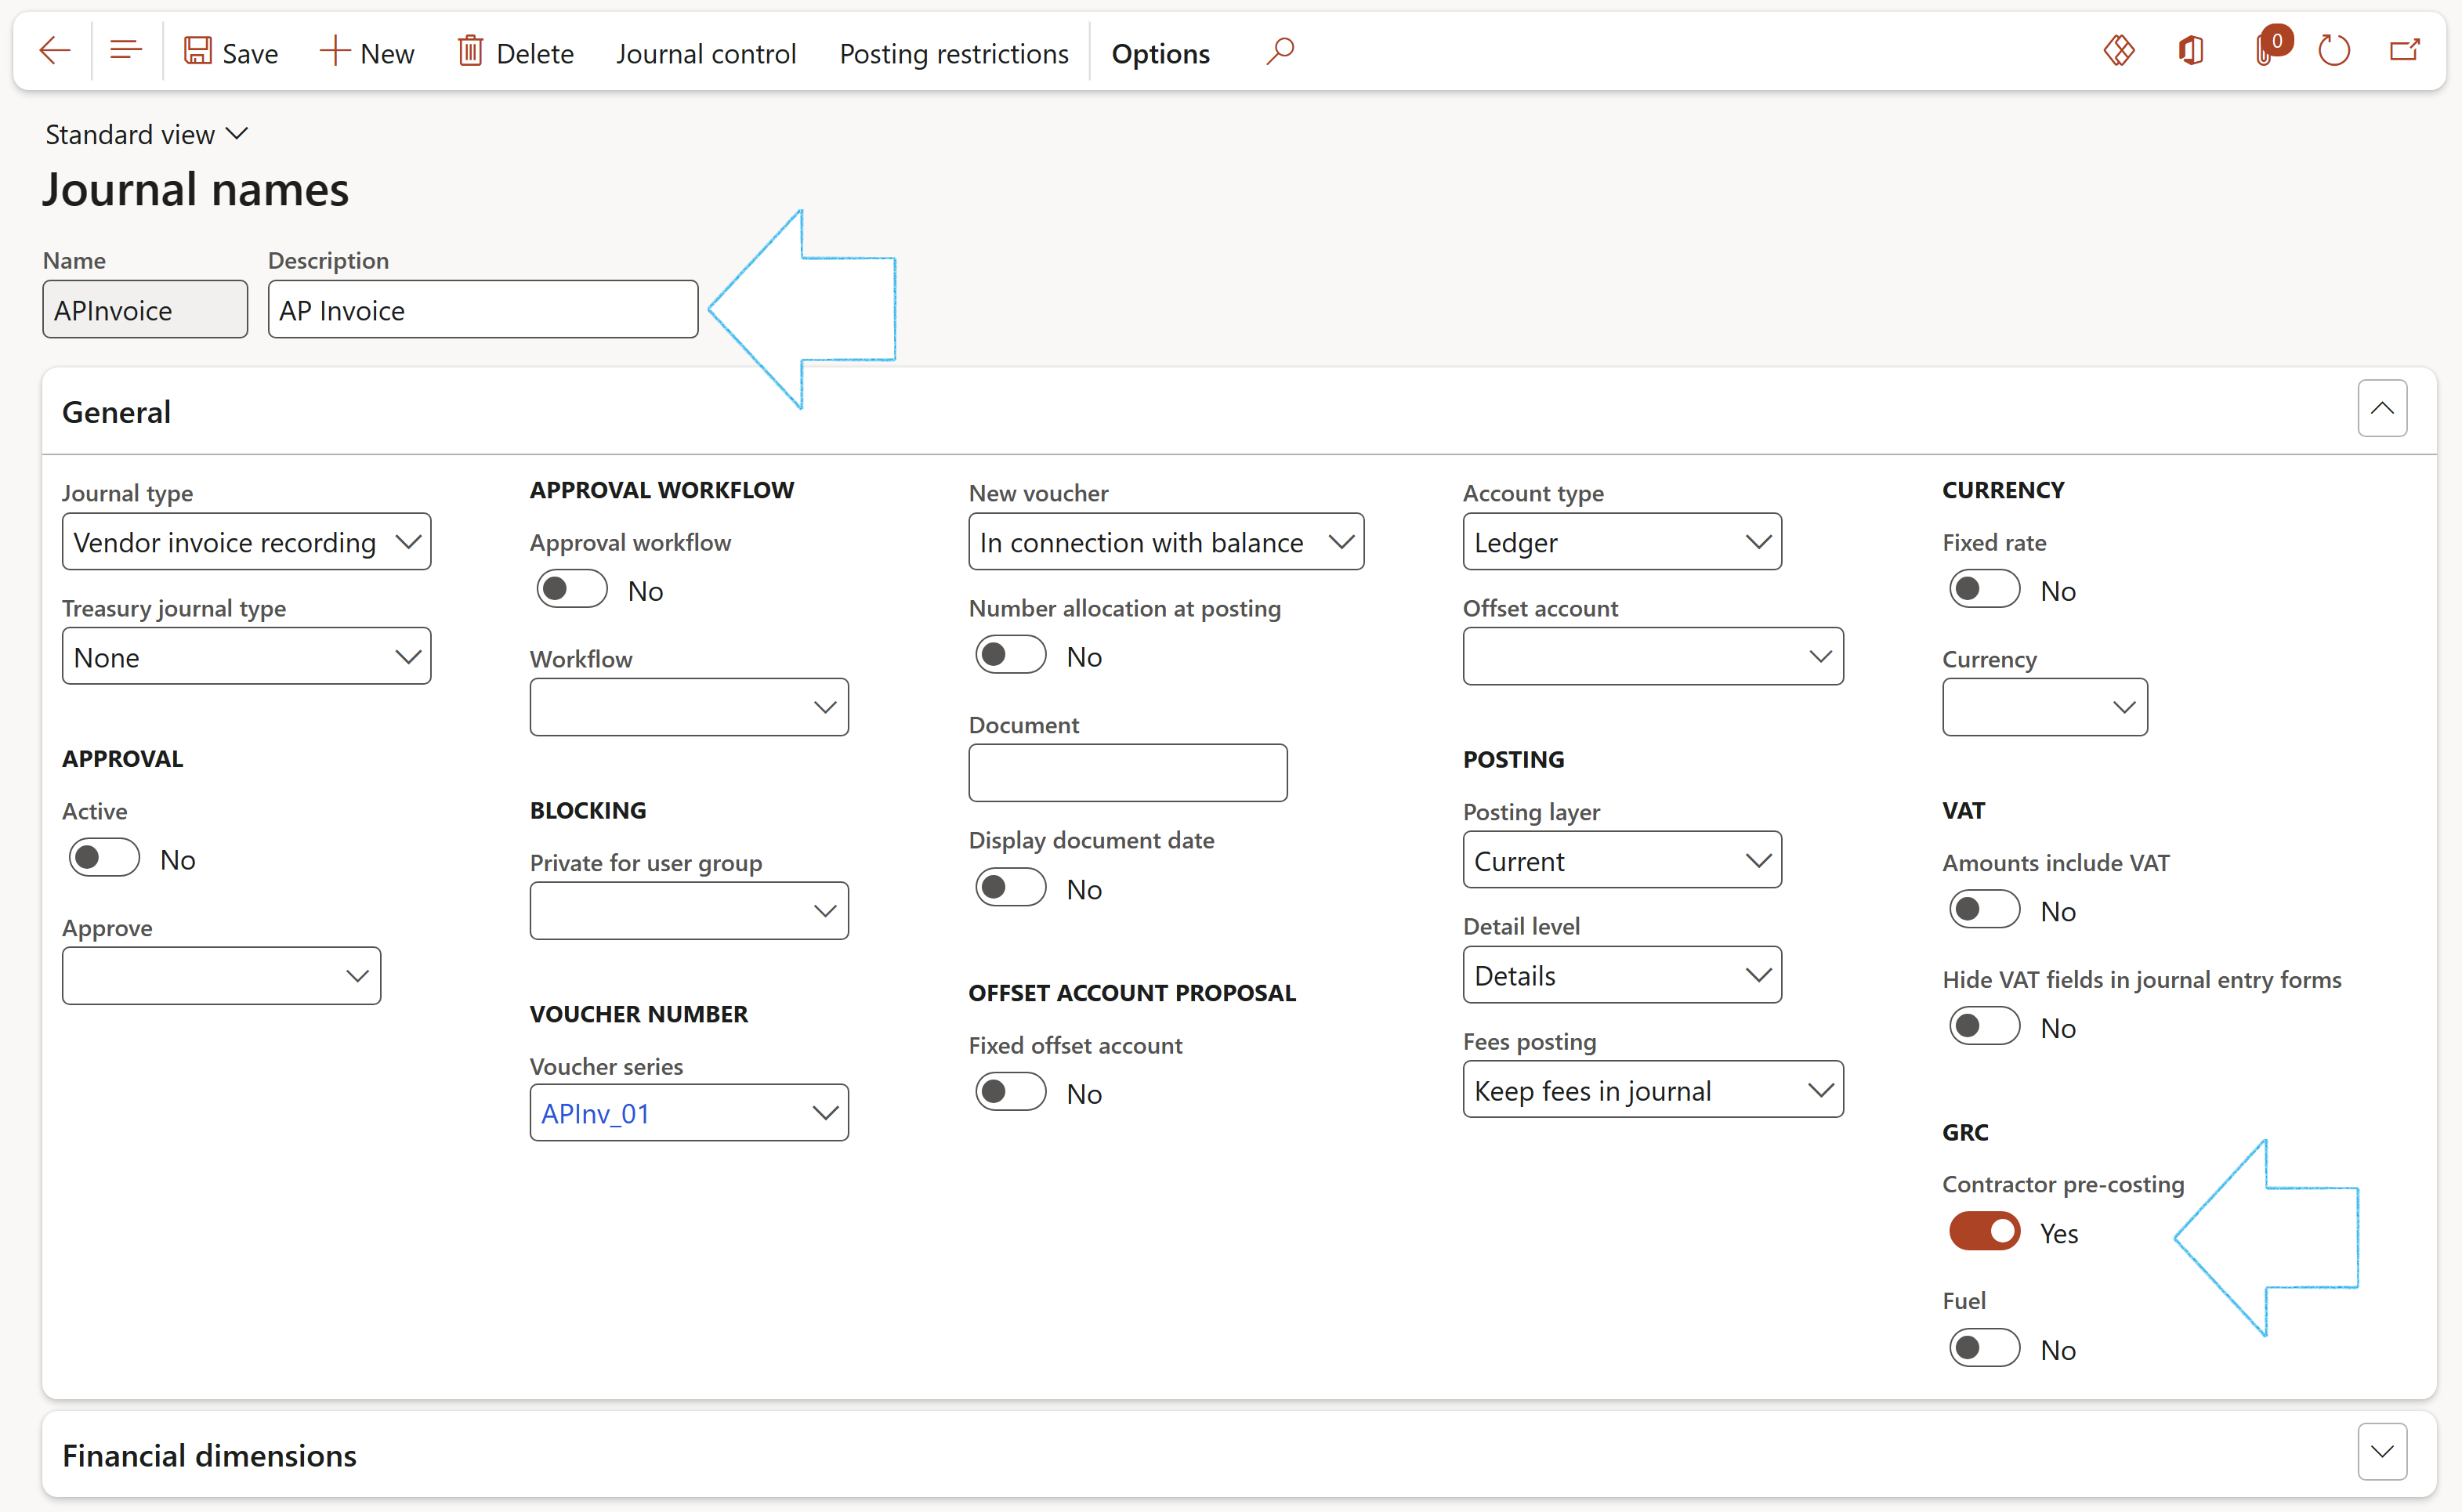
¶ Step 12: Setup Journal names
Go to: GRC > Setup > Journal names
- On the Action pane, click on the New button
- Enter a Journal name
- Enter a Description for the Journal name
- Expand the General Fast tab
- Under the GRC Field group, move the Contractor pre-costing slider to Yes. (This indicates that the journal will be for contractor invoicing)
¶ Step 12.1: For use in AP accruals
Go to: Accounts payble/Purchase ledger > Invoices > Invoice journal
(Follow steps below from **)
OR
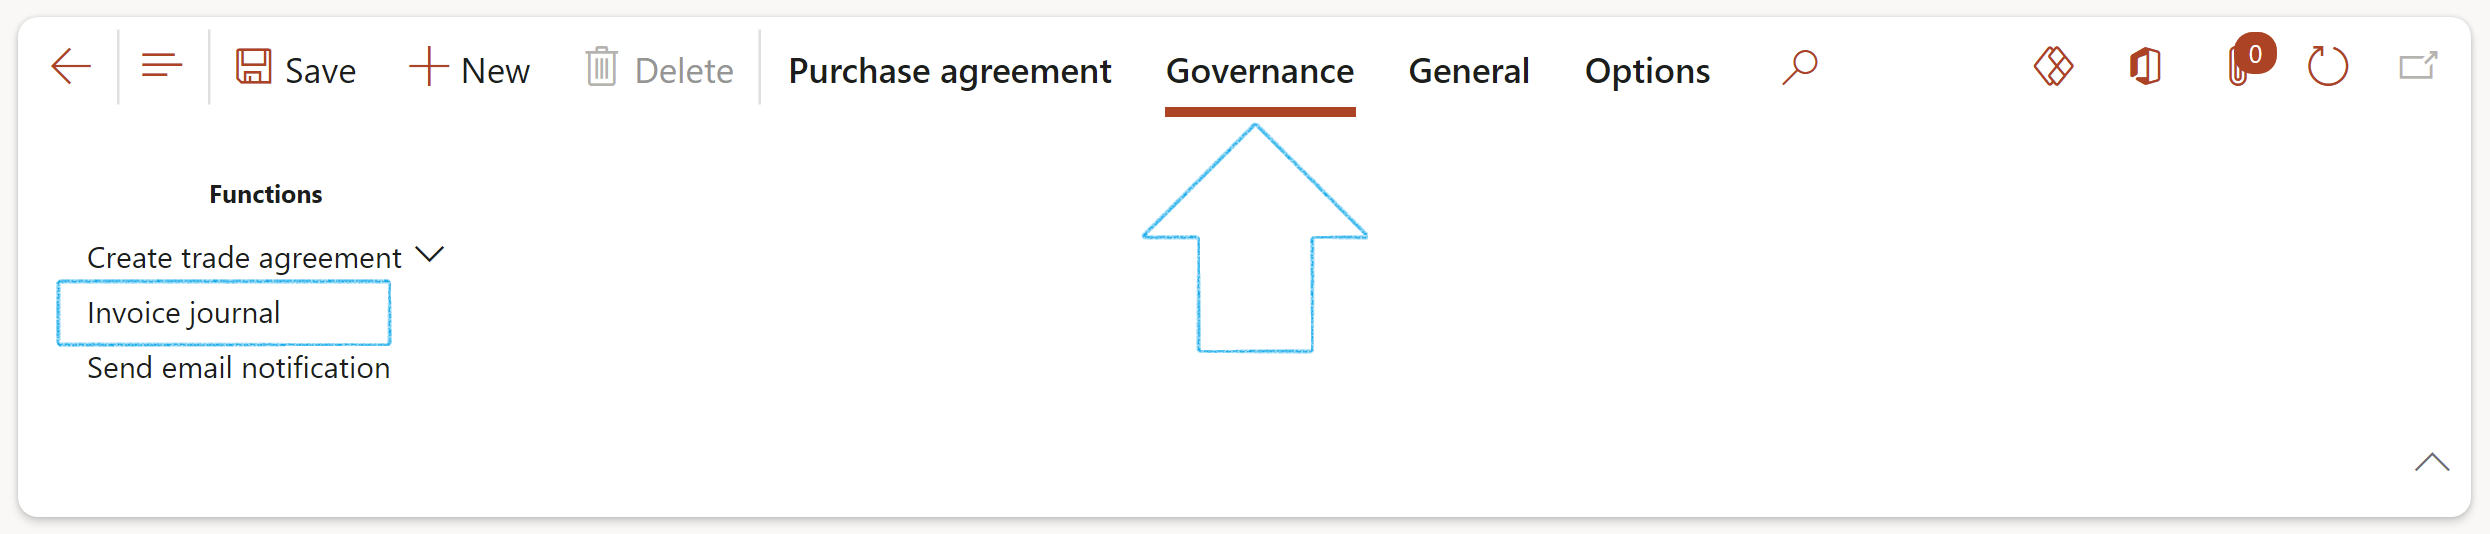
Go to: GRC > Governance > Contracts > Purchase agreements
- On the Action pane, under the Governance group, click on the Invoice journal button
- **Select the relevant journal (batch of journal entry line items)
- On the Button strip, under the Contracts group, click on the Accrue button
- Complete the Accrue dialog
- Click OK
¶ Step 12.2: For use with Trade agreement
There are two “agreements” in Dynamics that on the surface appear to be similar: The purchase agreement and the trade agreement.
In Dynamics, a Trade agreement can be thought of as an “if this, then that” mechanism for applying discounts. Essentially, you can create a rule for pricing and apply it to a particular product, group of products, client, or group of clients. You can apply all kinds of limitations and exceptions to these rules, such as date ranges. For example, trade agreements in Dynamics 365 allow you to realize the following scenarios:
“If client X purchases more than 100 widgets, they will receive a 12% discount” or “If any client purchases 10 widgets or more between 20 December and 24 December, they will receive $5000 off their order”
A purchase agreement is a contract that commits an organization to buy a specified quantity or amount by using multiple purchase orders over time. In exchange for this commitment, the buyer receives special prices and discounts.
Purchase agreements override trade agreements. They represent a commitment by a certain organization to purchase a certain amount. While it is possible to apply a trade agreement to a single client, trade agreements do not represent a commitment. You would want to implement a purchase agreement following a price negotiation, for example.
These two are the same in nature as they allow you to create price discounts based on purchase behavior, but there are two key differences between purchase agreements and trade agreements. Trade agreements are more flexible when applying discounts to a wide range of purchase situations, while a purchase agreement is specific to a vendor and is representative of a commitment to buy.
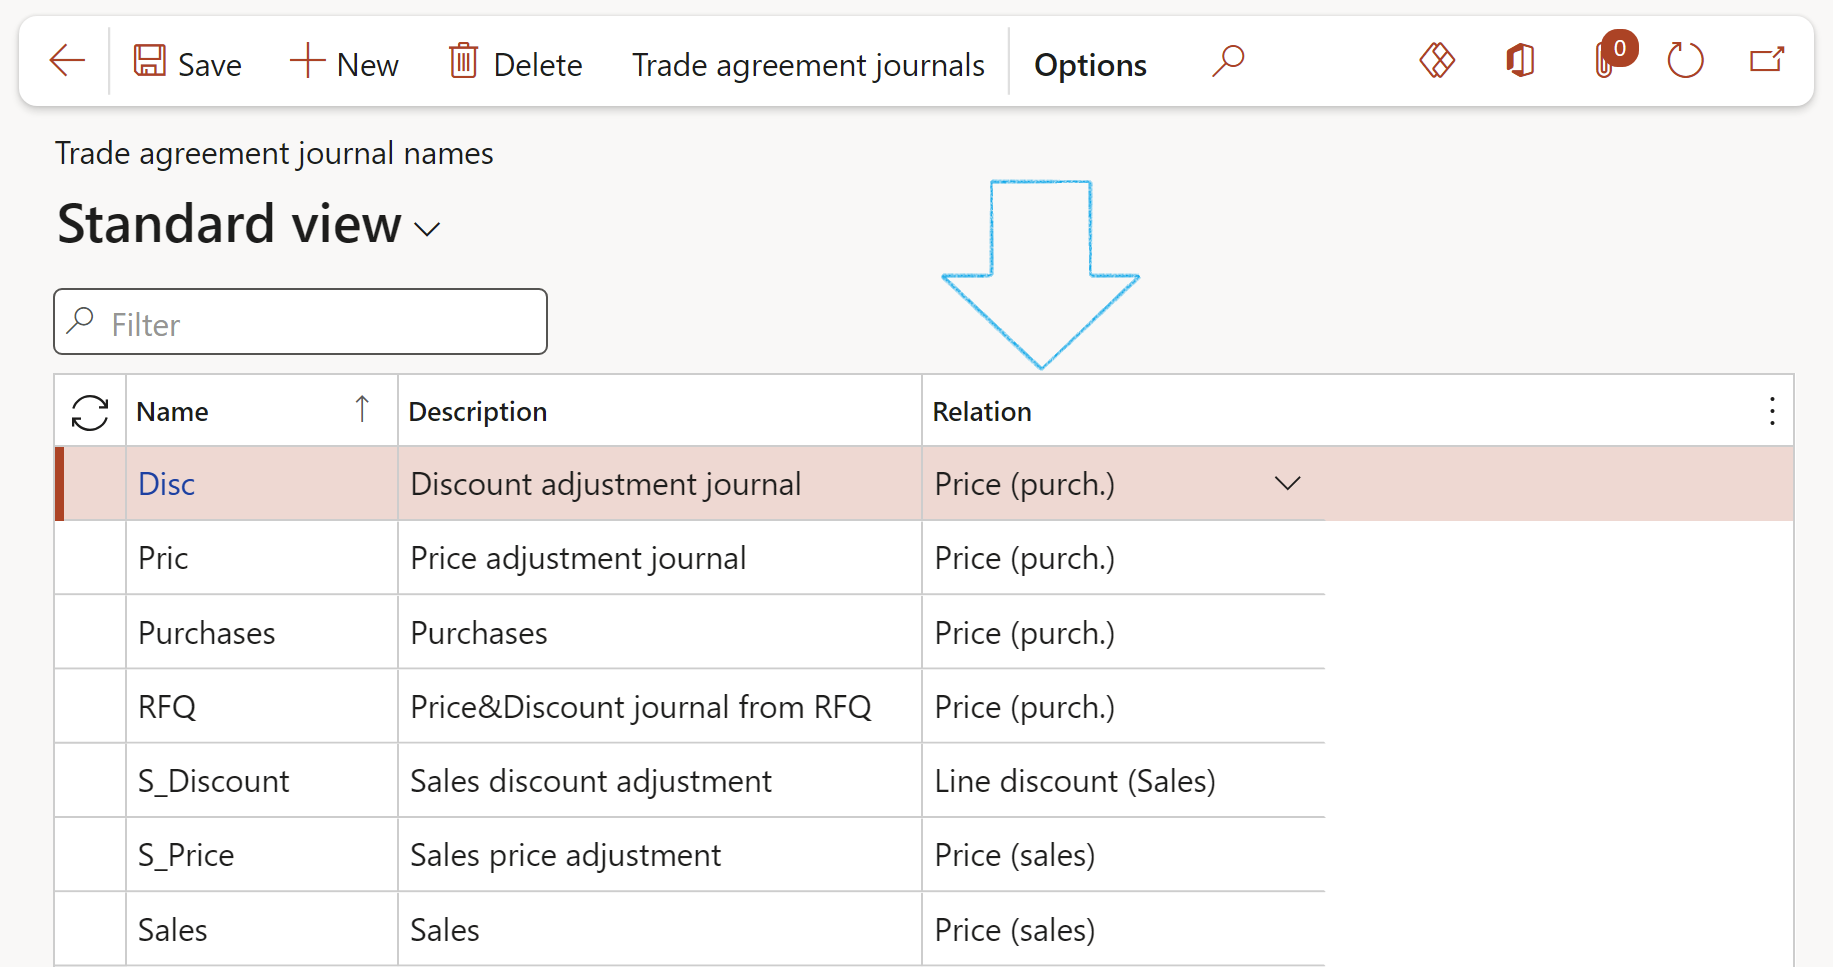
Go to: GRC > Governance > Setup for governance > Trade agreement journal names
- On the Action pane, click on the New button
- Enter a Journal name
- Enter a brief Description for the new journal name
- Select the relevant Relation from the dropdown list
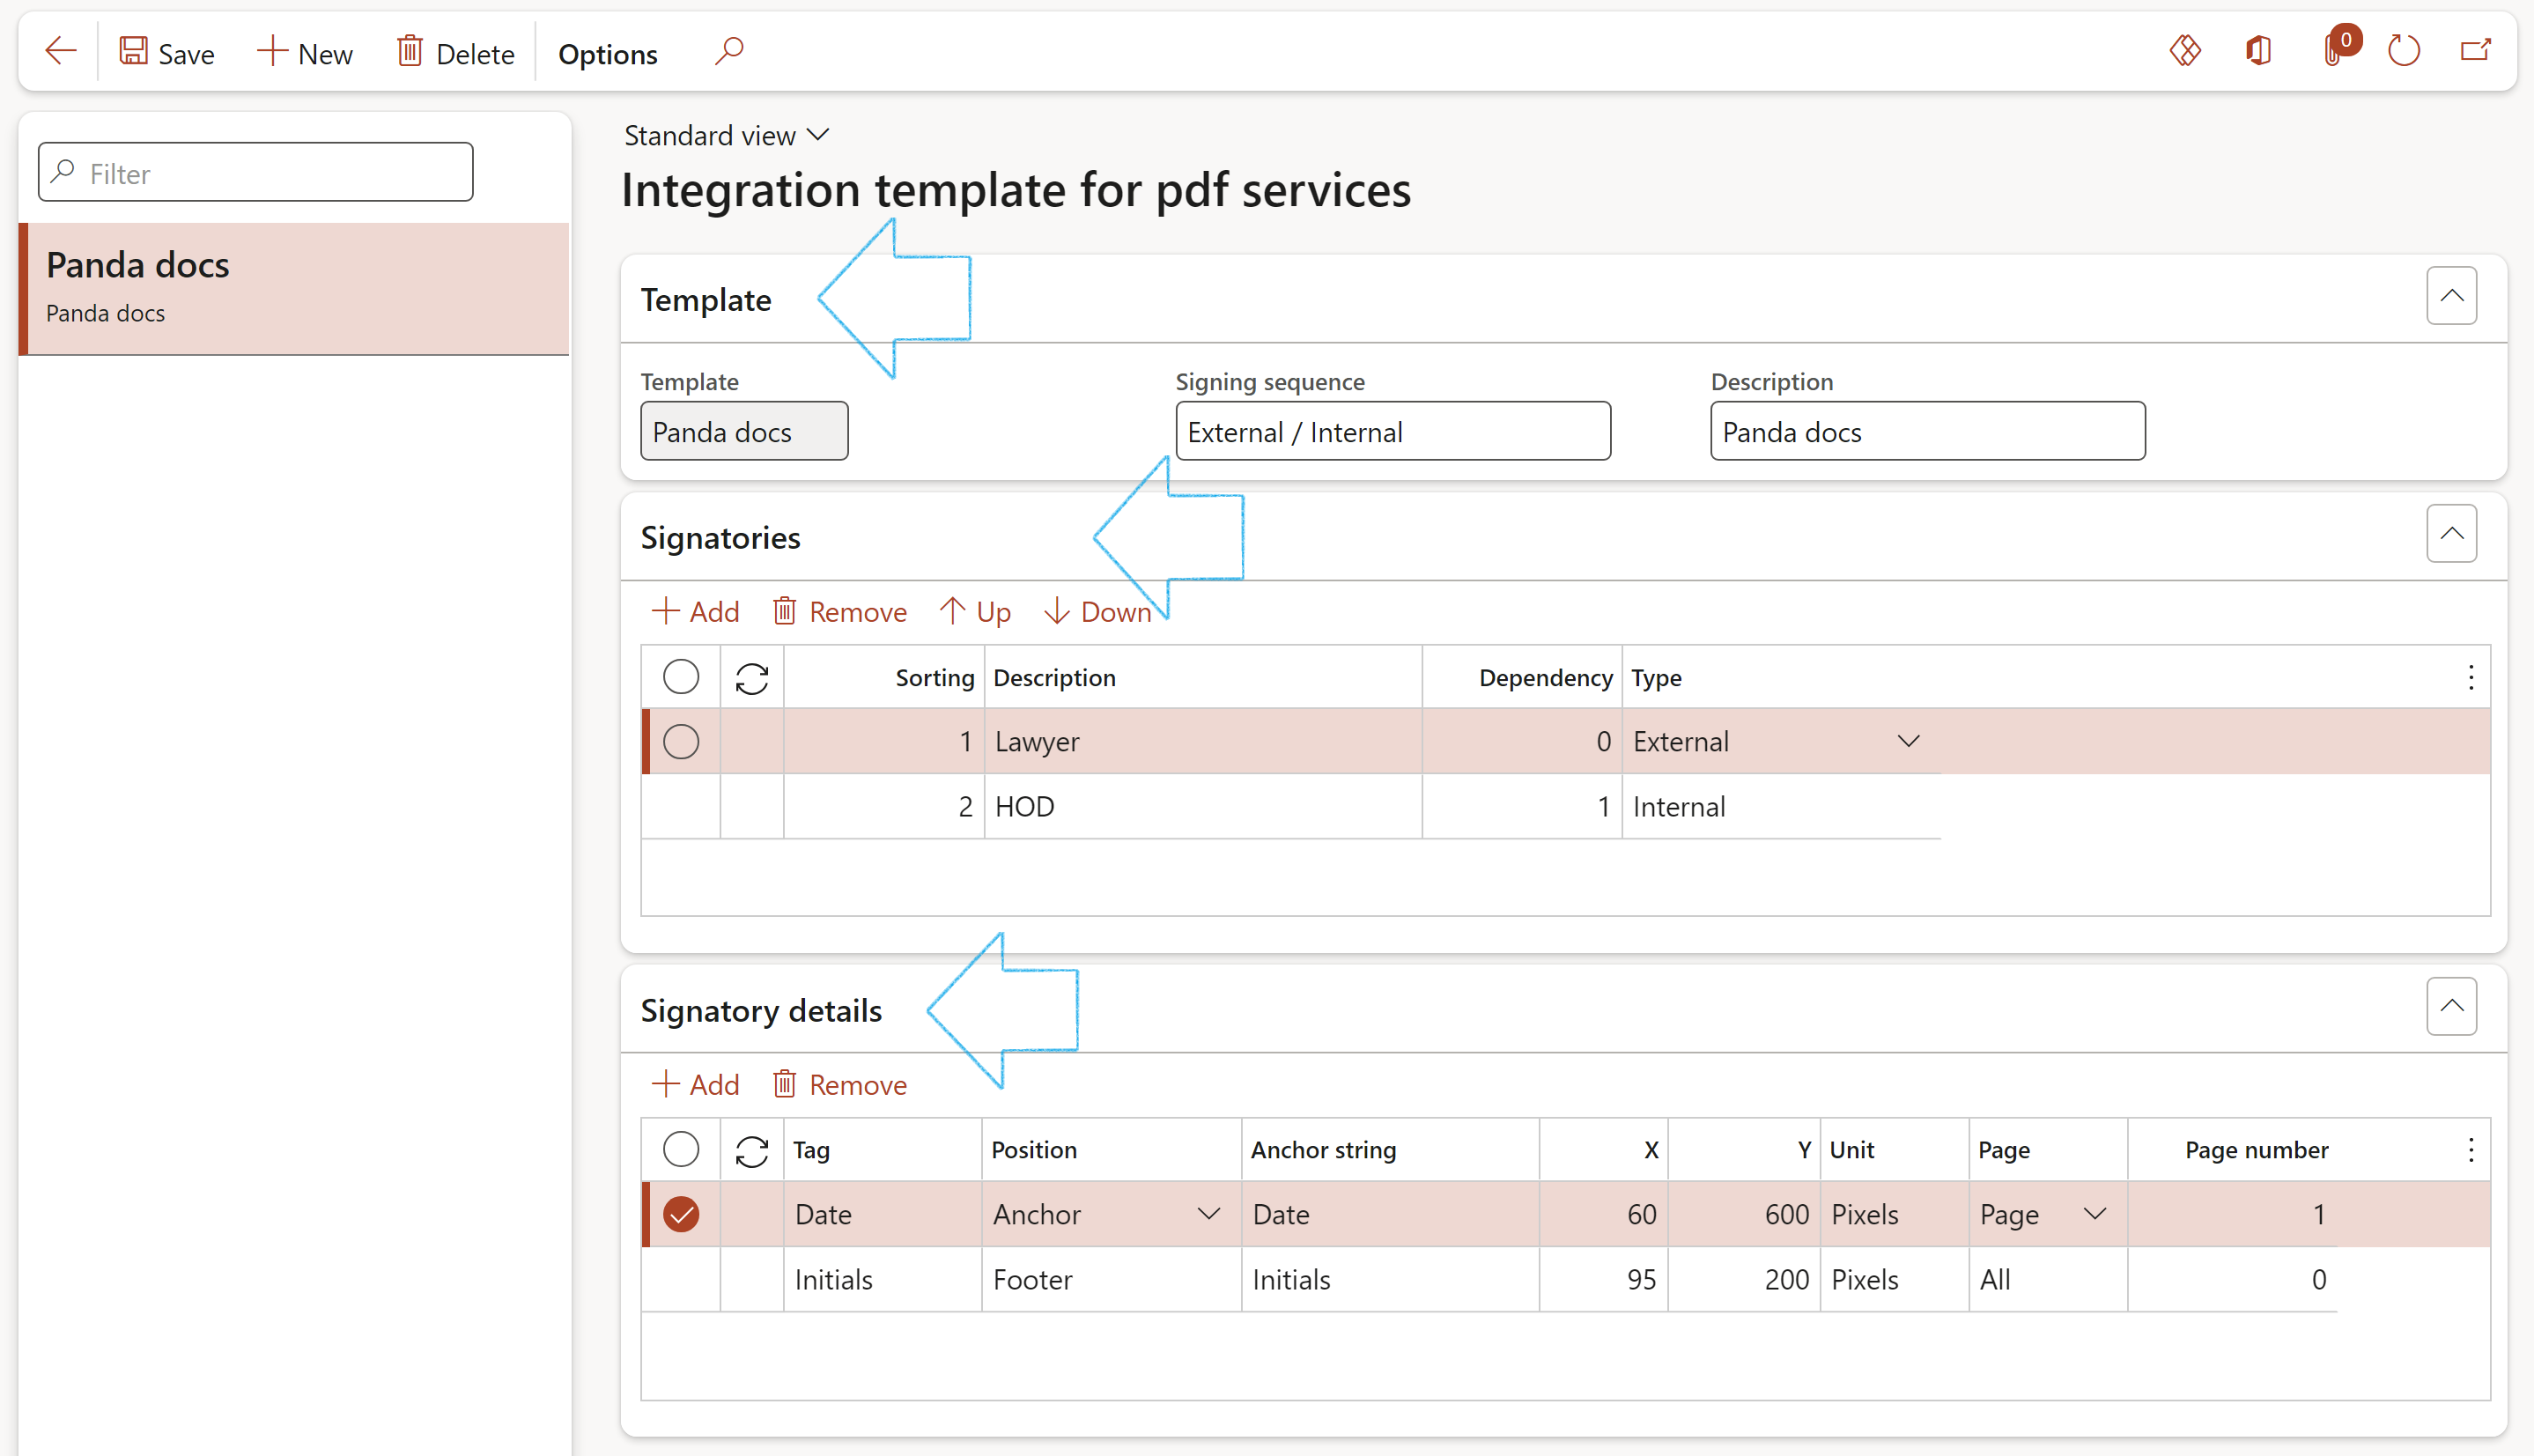
- In the Action pane, click on the New button
- Under the Template section:
- Enter a Template ID
- Enter a brief Description of the template
- Enter the Signing sequence
- Under the Signatories Fast tab:
- Click on the Add button
- The system will assign a value in the Sorting column
- Enter a brief Description of the Signatory
- Enter the value of the Dependency of the Signatory (Sorting number)
- Select the Type of Signatory from the dropdown list
- Under the Signatories Details Fast tab:
- Click on the Add button
- Enter a brief Tag of the Signatory details
- Select the Position of the Signatory details from the dropdown list
- Enter a brief Anchor string of the Signatory details
- Enter the value of the X positioning of the Signatory detail
- Enter the value of the Y positioning of the Signatory detail
- Enter a brief Unit of the Signatory details
- Select the Page of Signatory details from the dropdown list
- If the Page option is selected, enter the value of the Page number of the Signatory detail
- On the Action pane, click New
- Enter a Name that describes the purchase agreement classification. The classification will be available on the Purchase agreement page when you create new purchase agreements
- Enter a brief Description for the Purchase agreement classification
- Under the General Fast tab:
- Indicate whether Subcontractors may be used for this classification
- Under Certifications, select Yes to enable the entry of insurance policies and bonds on purchase agreements that use this classification
- Indicate whether this classification will Require direct invoicing
- Under Activities, select Yes to enable the entry of milestones and tasks on purchase agreements that use this classification
- Under Workflow, select Yes to indicate that the HSE (Health, Safety and Environmental) workflow is enabled for this classification
- Under the Governance Fast tab:
- Select the relevant Performance goal category from the dropdown list
- Indicate whether the maximum value is to be enforced or not
- Indicate whether the contract value from the contract register should be locked or not
- Open the Risk categories tab
- On the Action pane, click New
- Enter the unique risk Category ID
- Enter a brief Description of the risk category
- In the Class field, select the relevant risk classification from the dropdown list
- Click Save
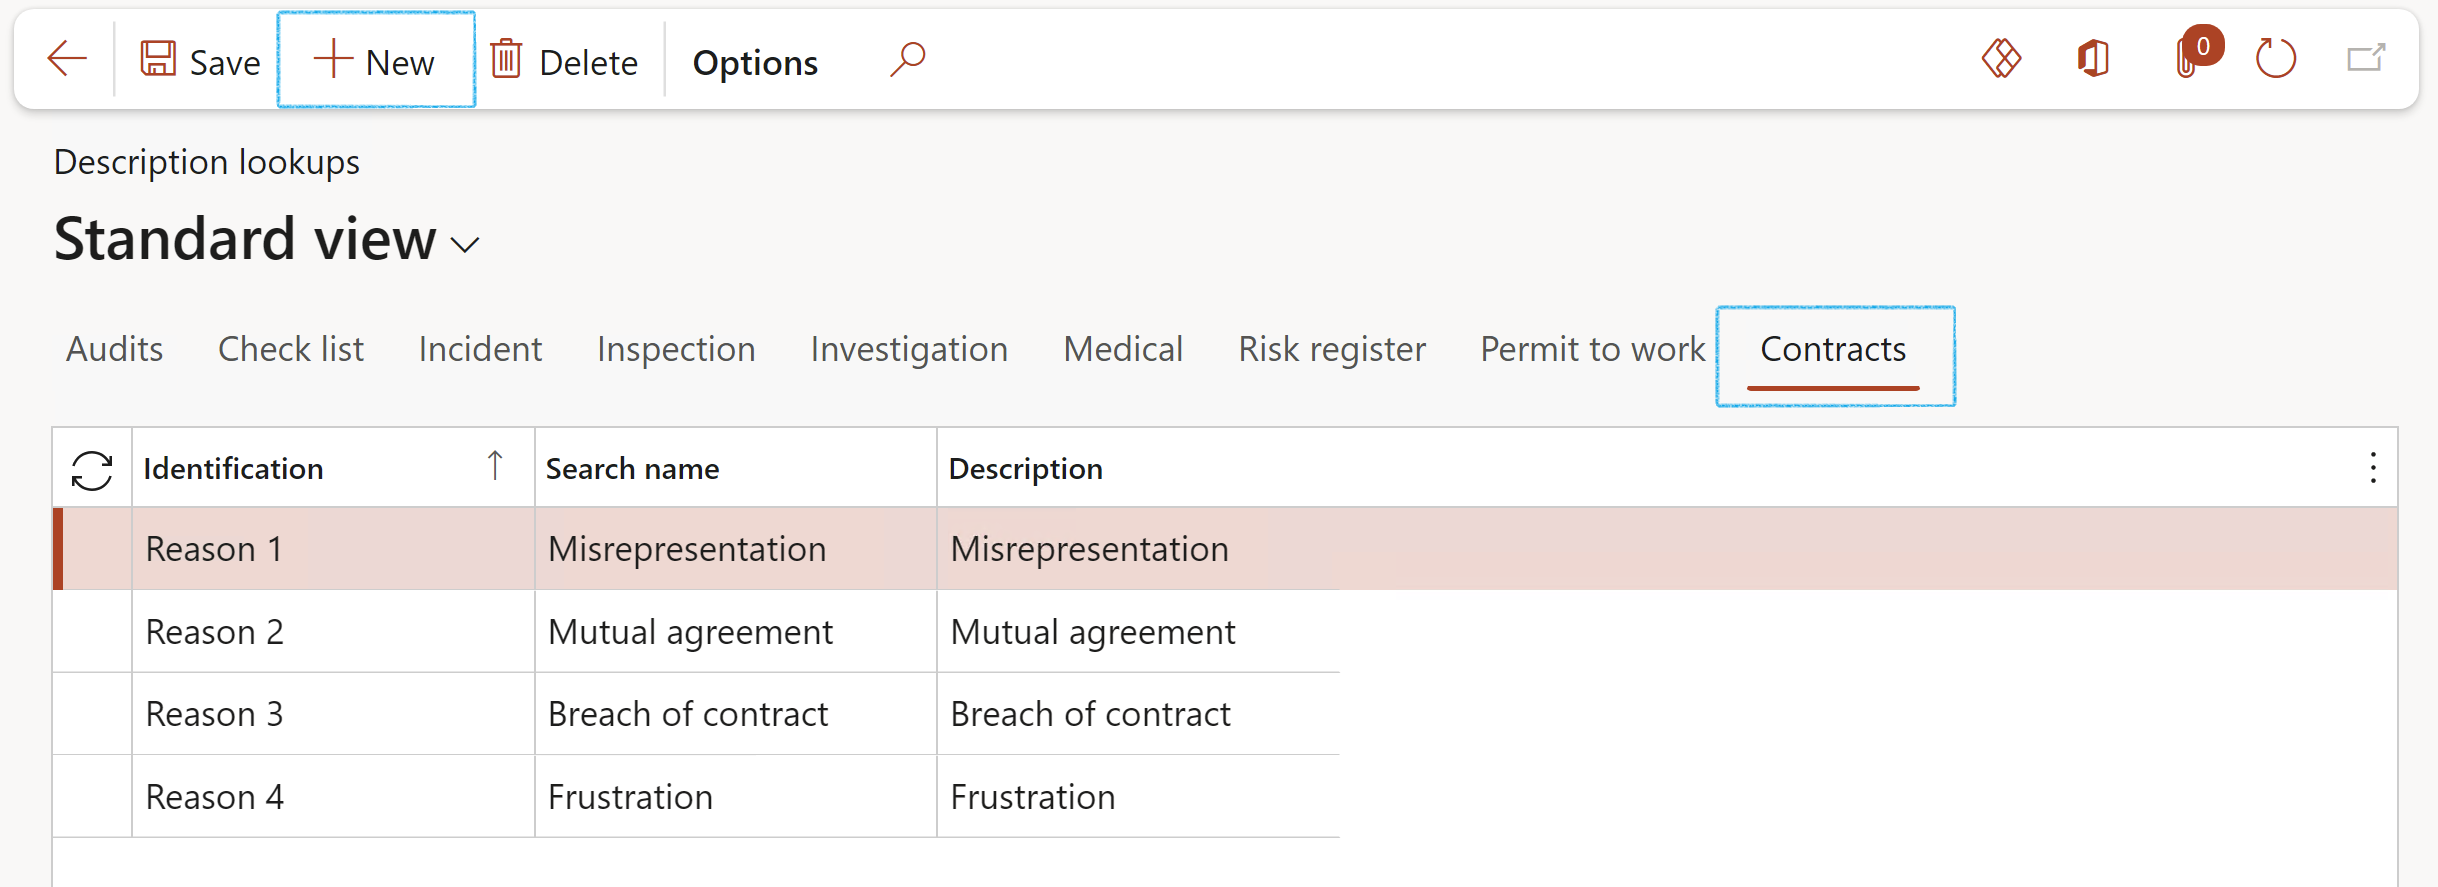
- Open the Contracts Index tab
- On the Action pane, click on the New button
- Enter an Identification for the description lookup/Reason code
- Enter a Search name for the description lookup/Reason code
- Enter a Description for the description lookup/Reason code
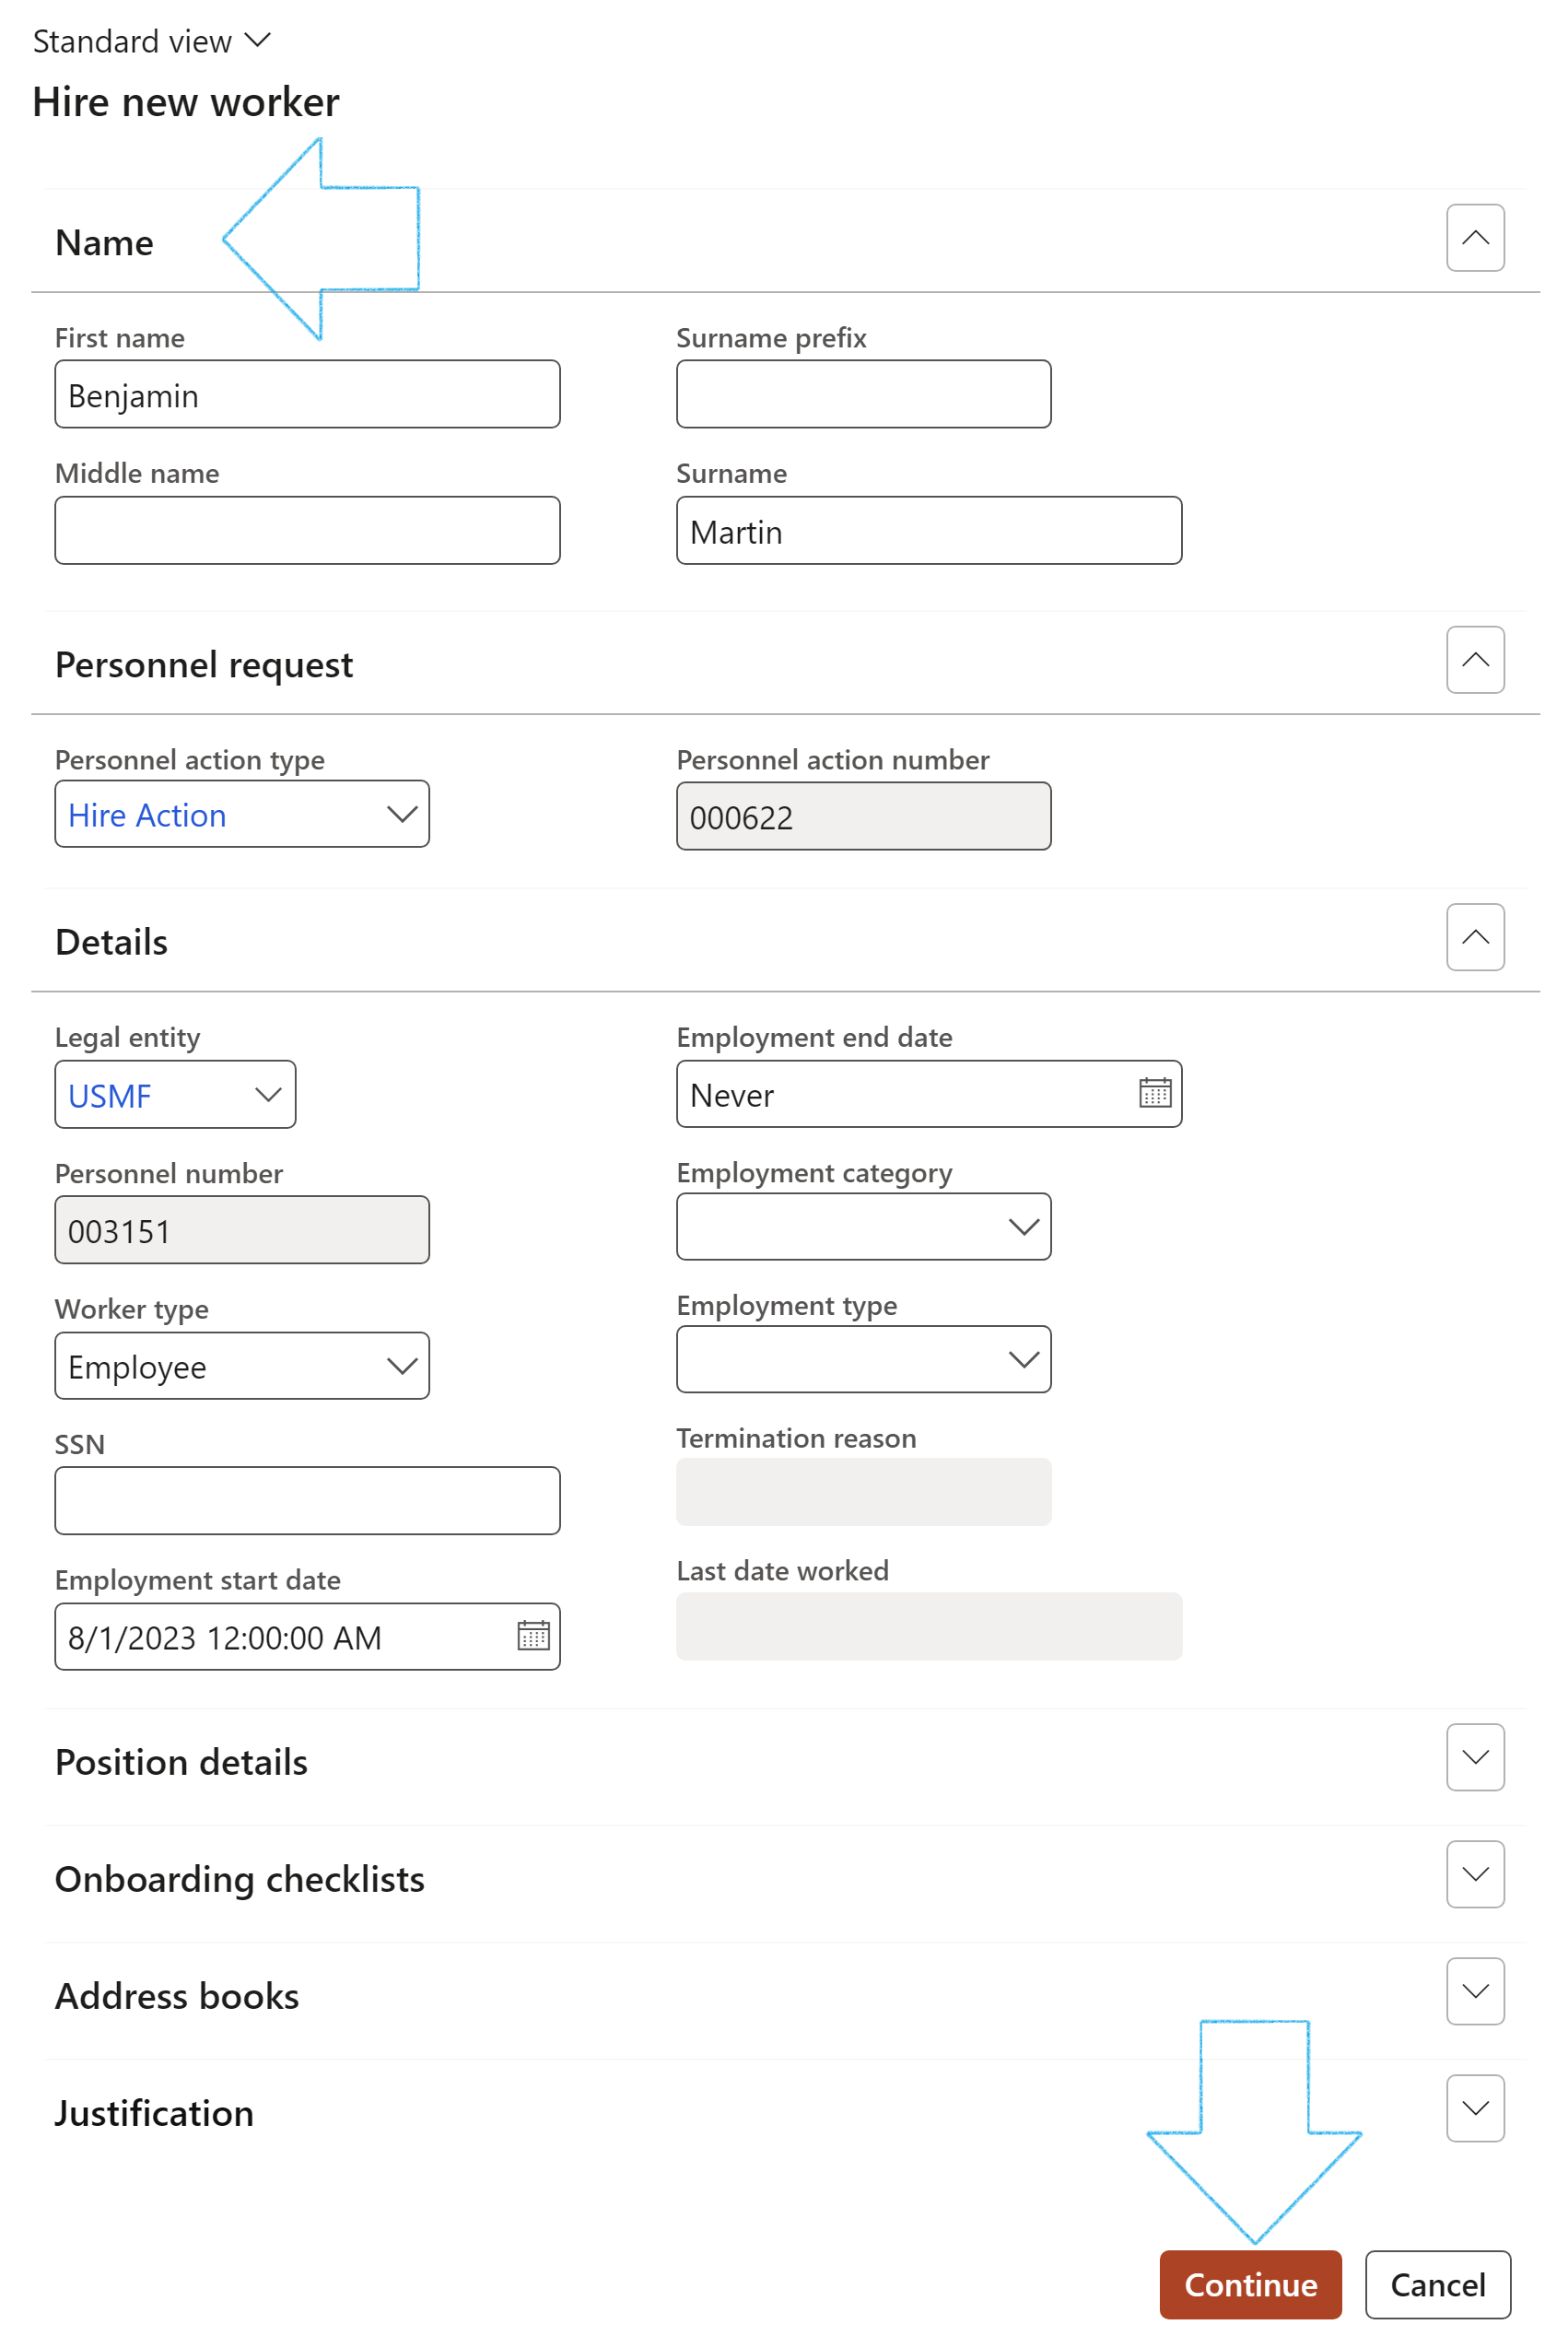
- On the Action pane, click New
- Complete the Hire new worker dialog with the relevant details
- Click on the Continue button
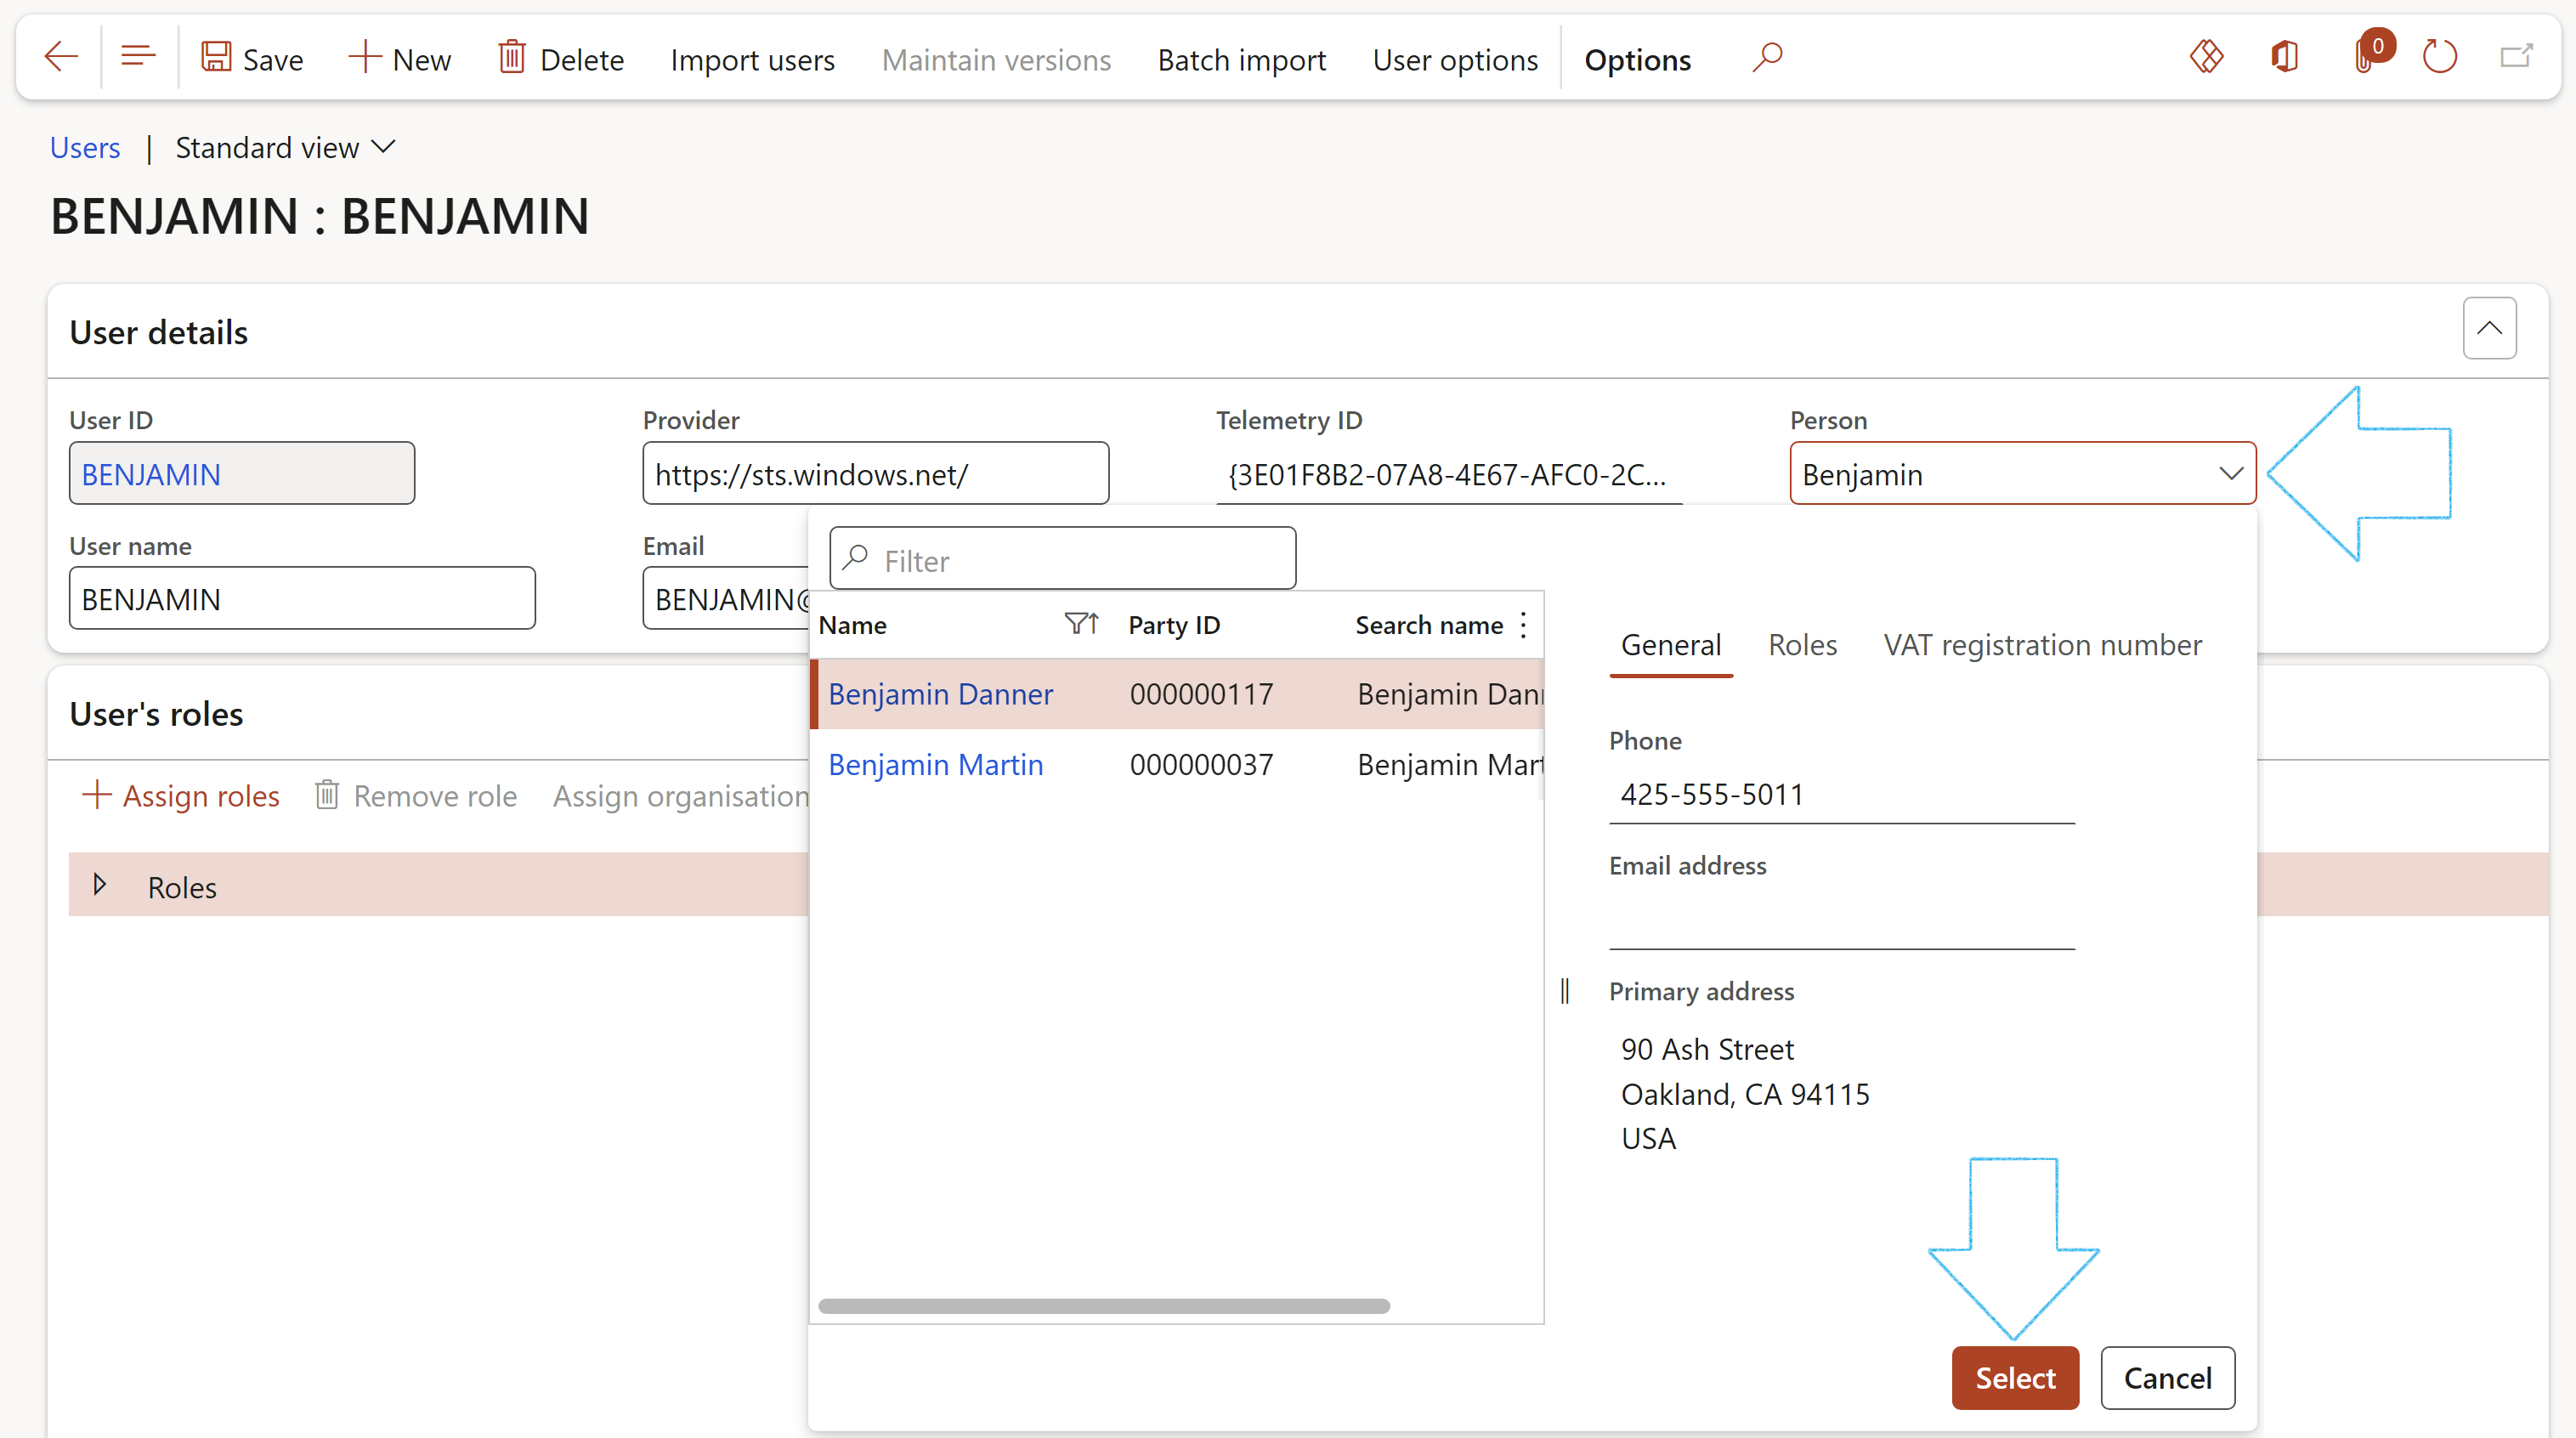
- Search for the user that you want to link to the newly created worker
- Click on the User ID to view the details of the user
- On the User details form, search for the worker in the Person field
- Click on the Select button
- Make sure that the user is Enabled
- Click Save
- On the Auto expiry of contract & other documents dialog, click on the OK button
- Request for a new contract
- Request to review an existing contract
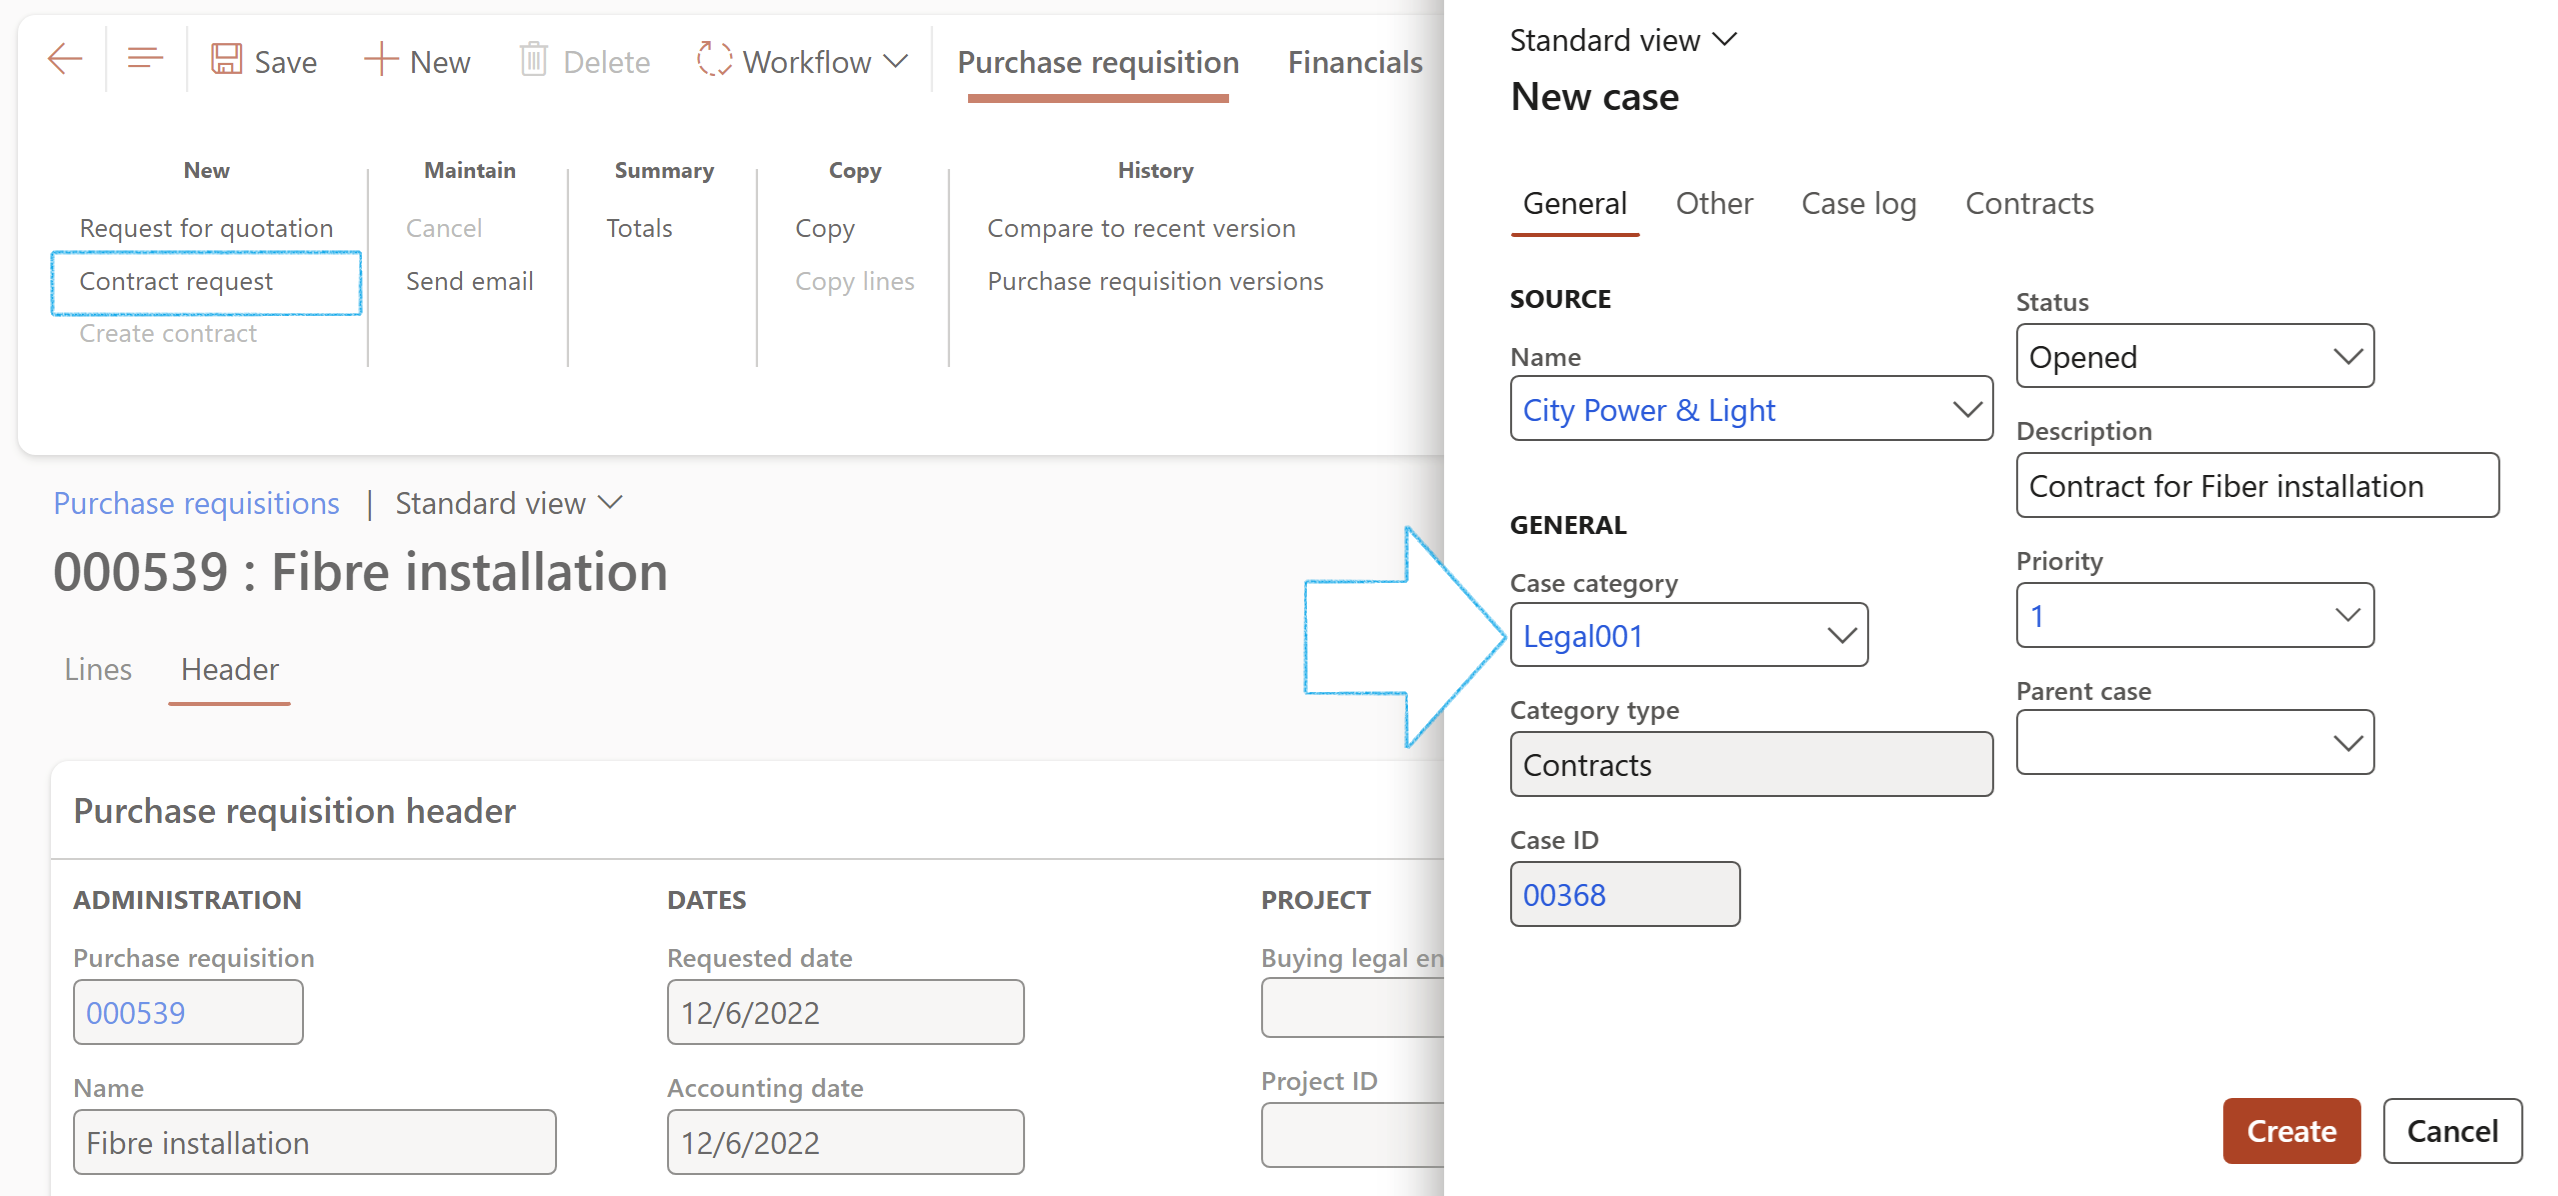
- On the Action pane, click on the New button
- Select Case from the dropdown list
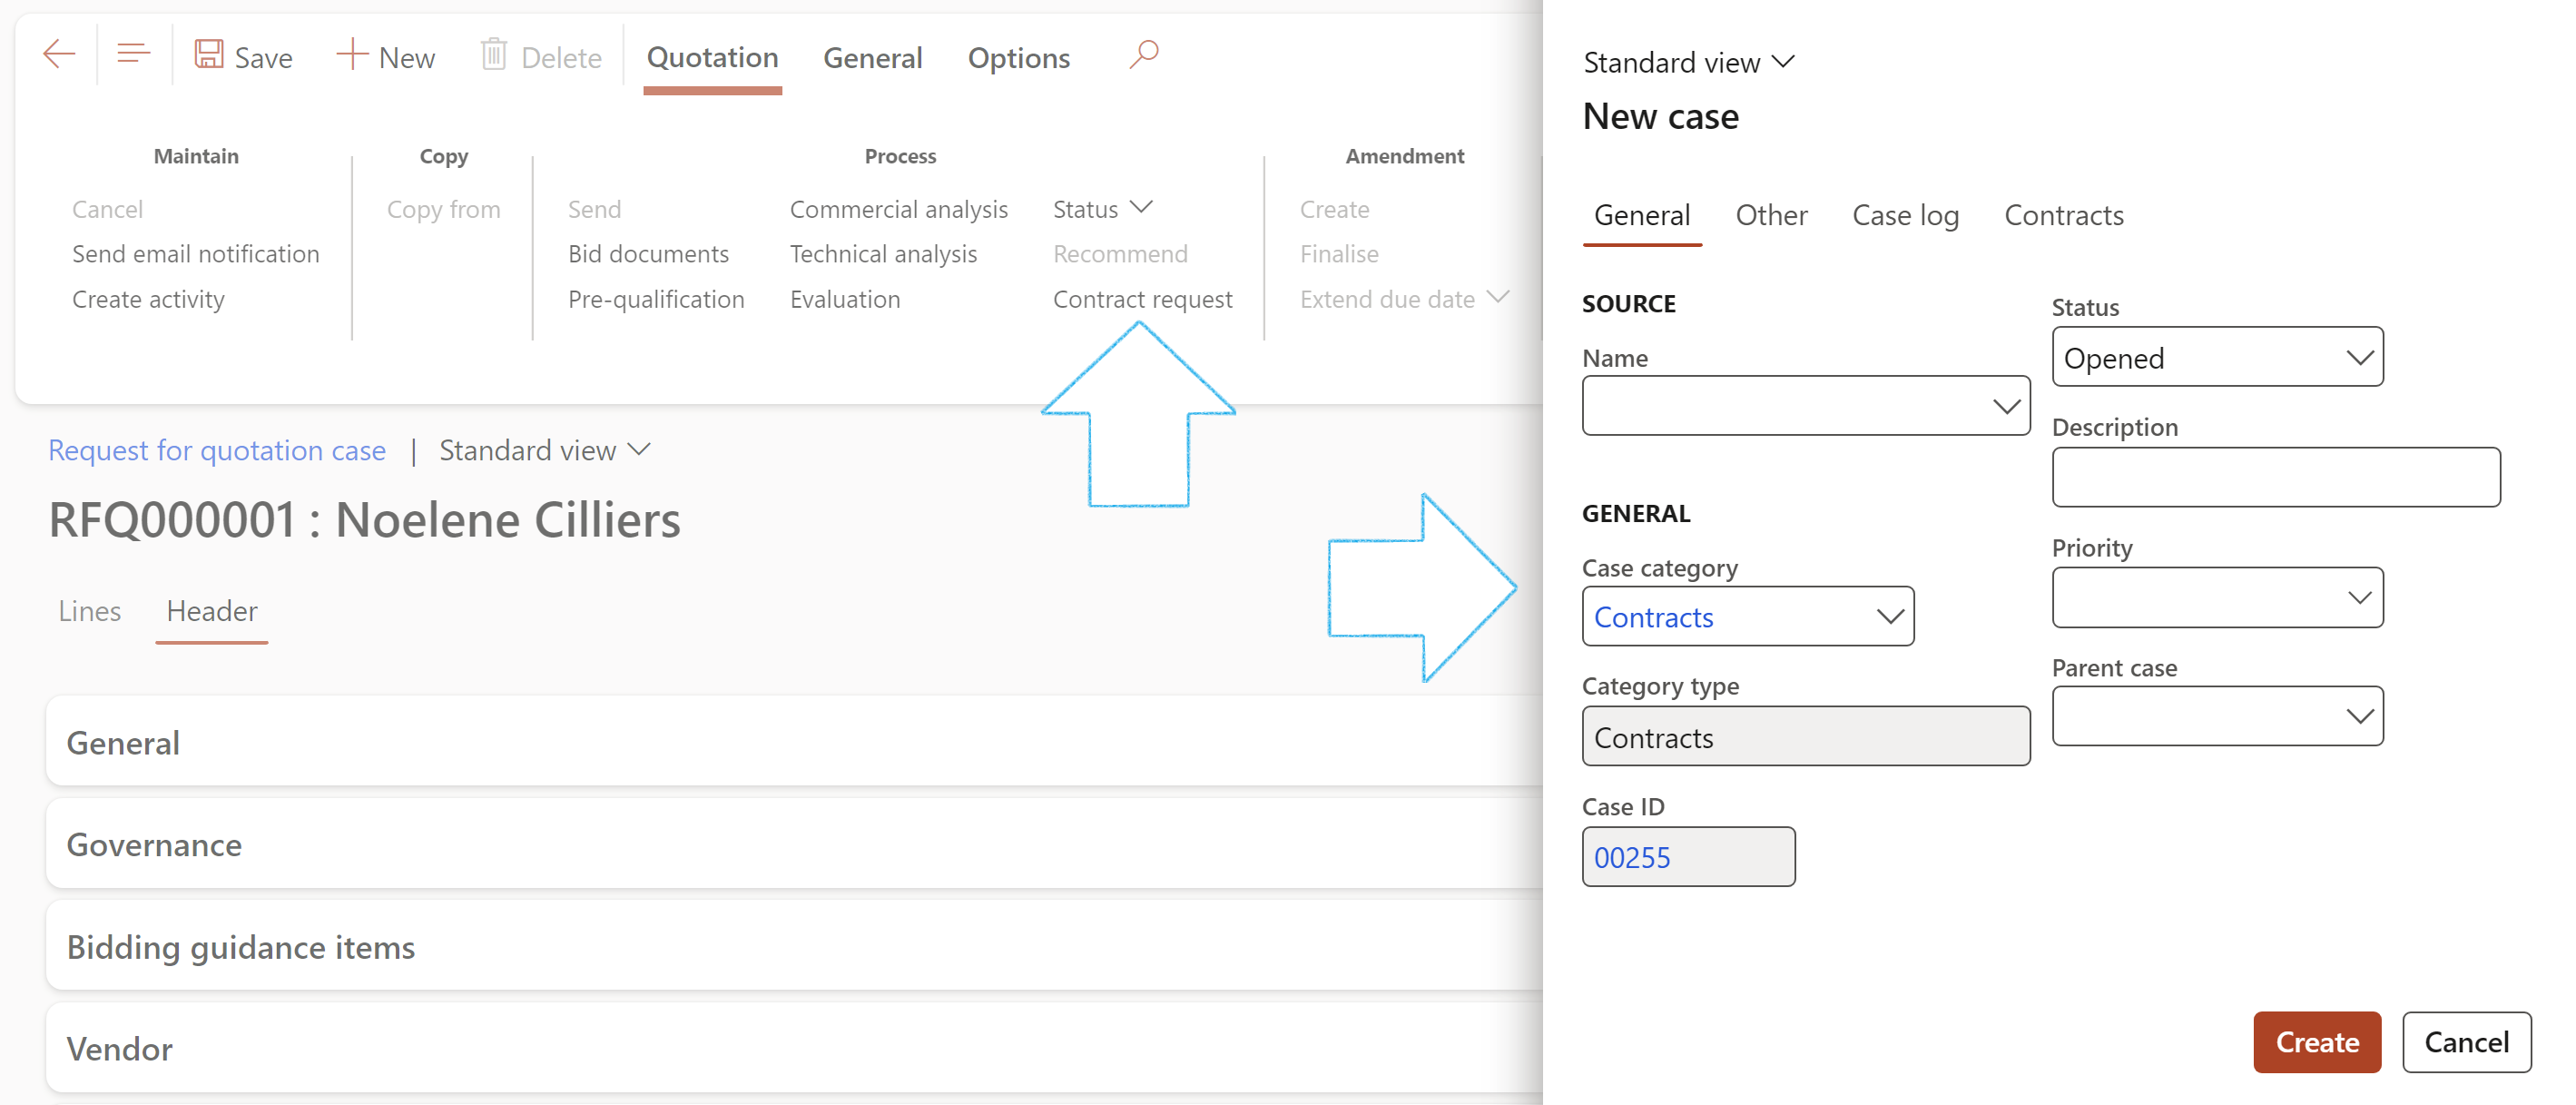
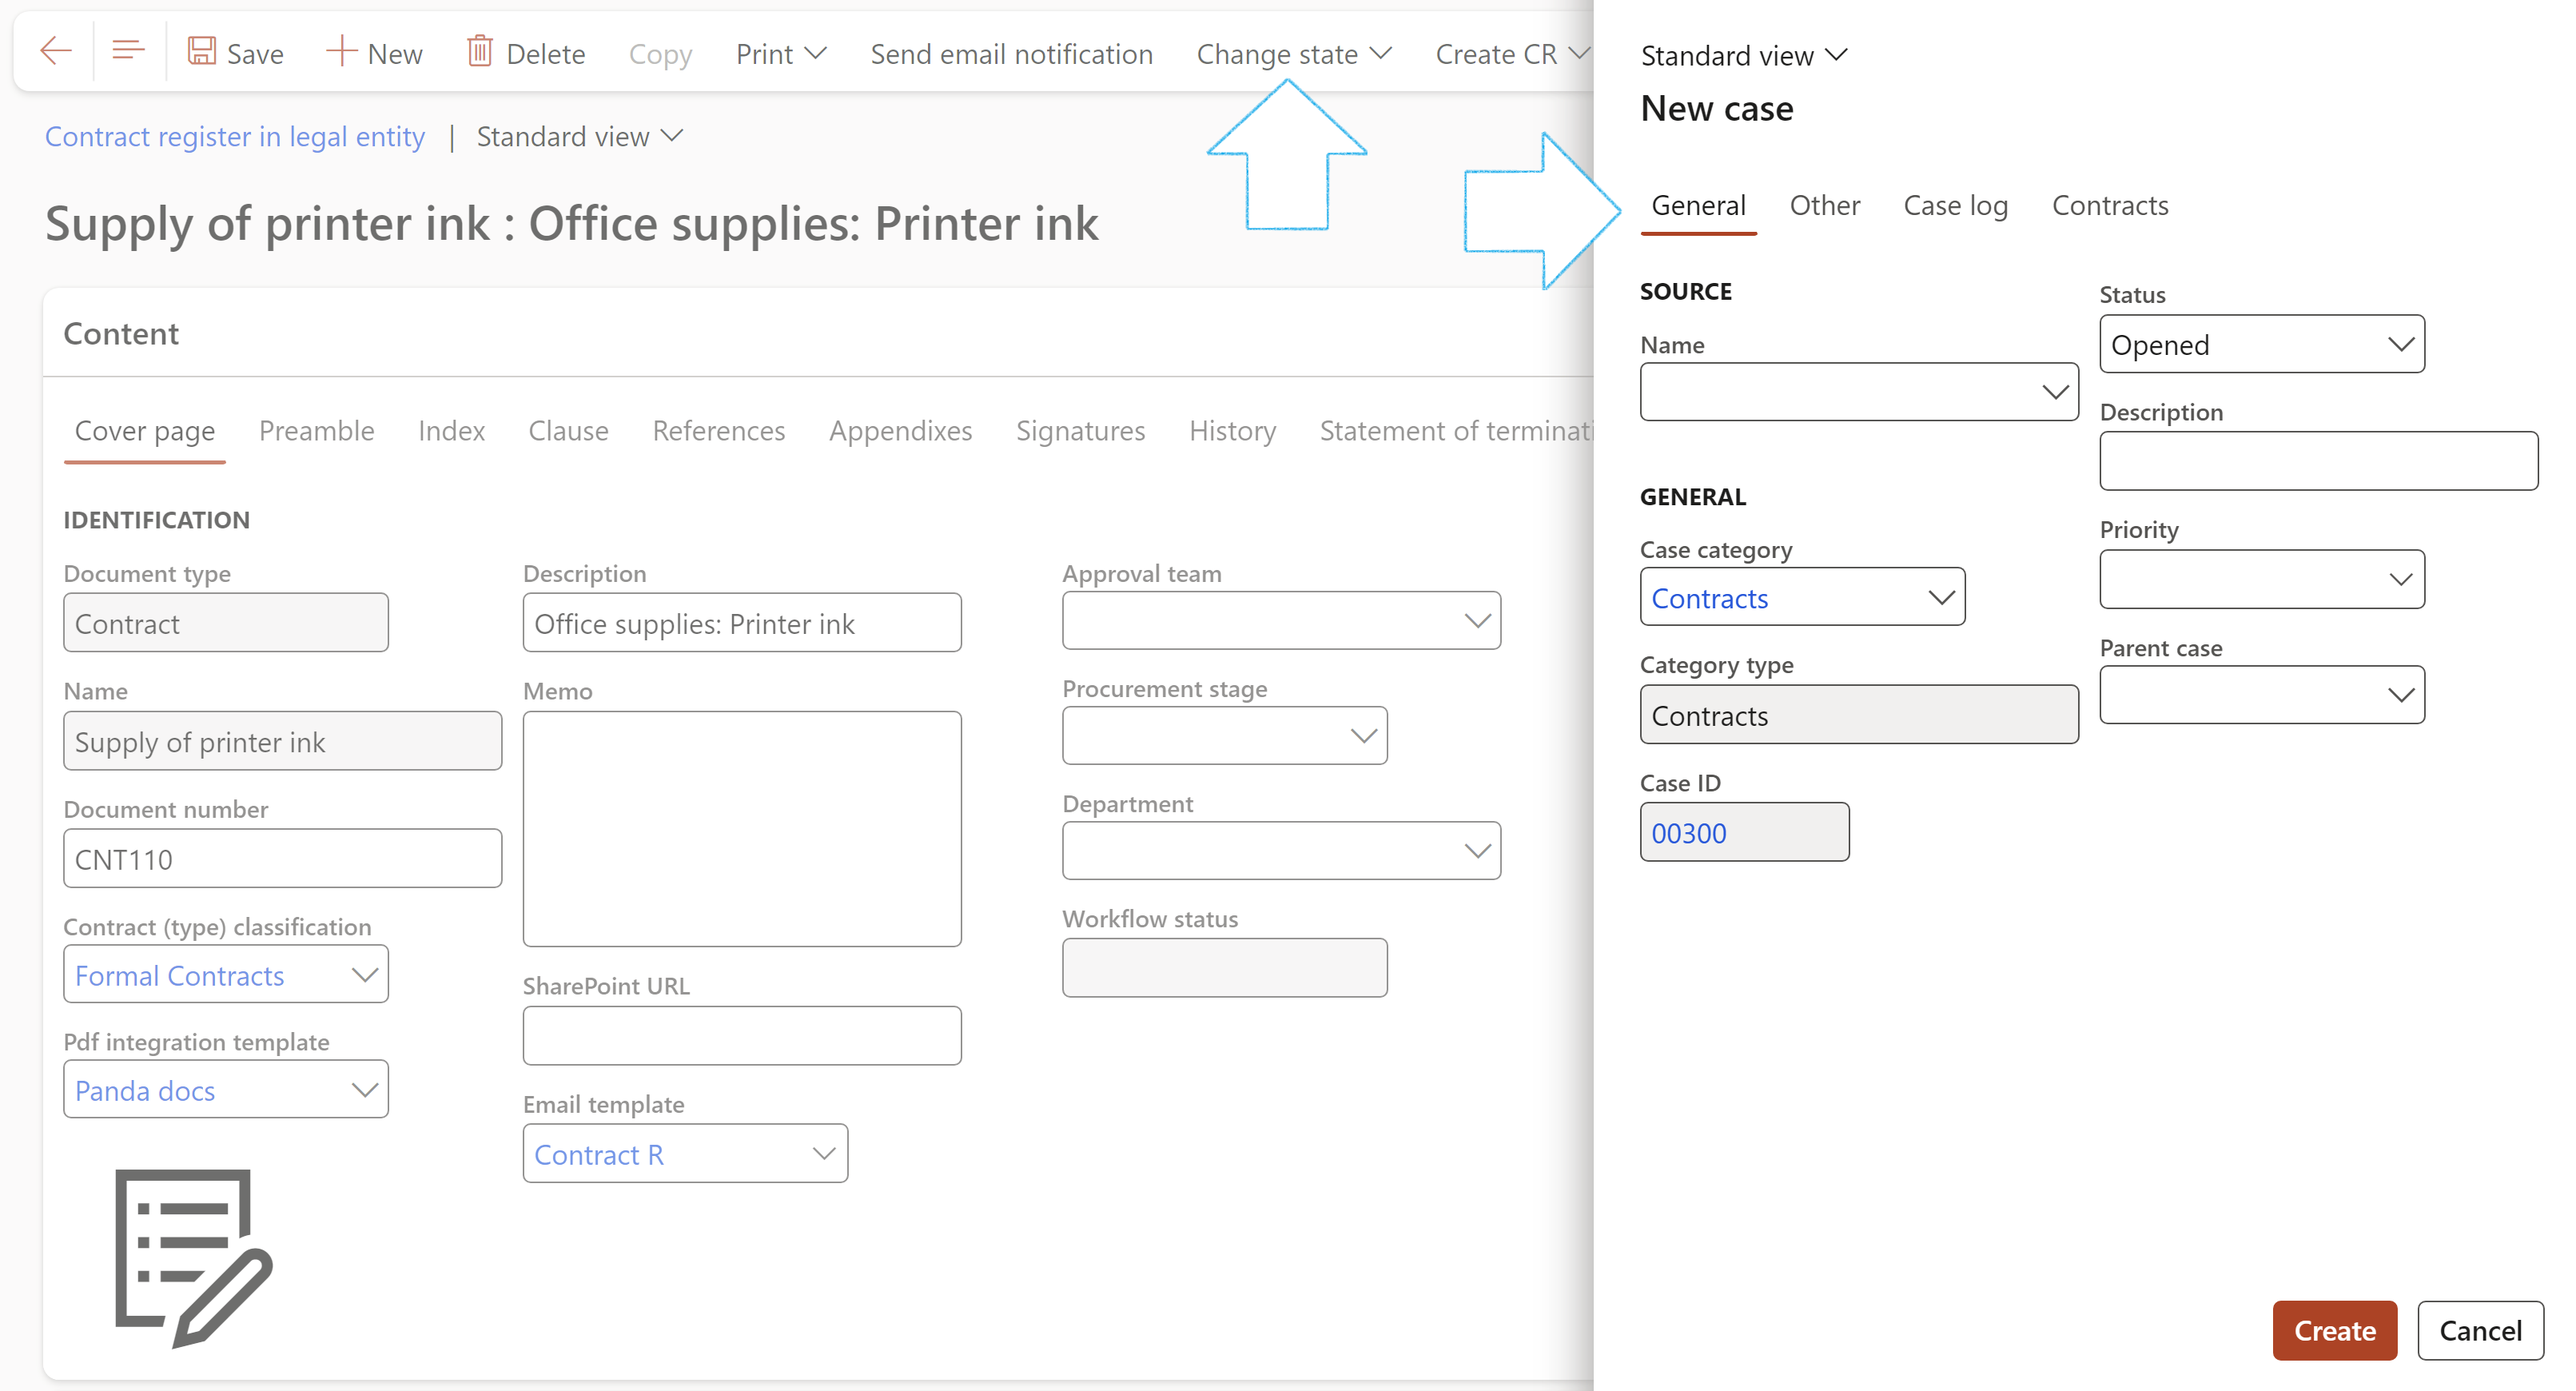
- On the New case dialog, click on the General Index tab
- Select the Source Name from the dropdown list
- In the Case category field, select New contract from the list (mandatory)
- Enter a brief Description for the new case
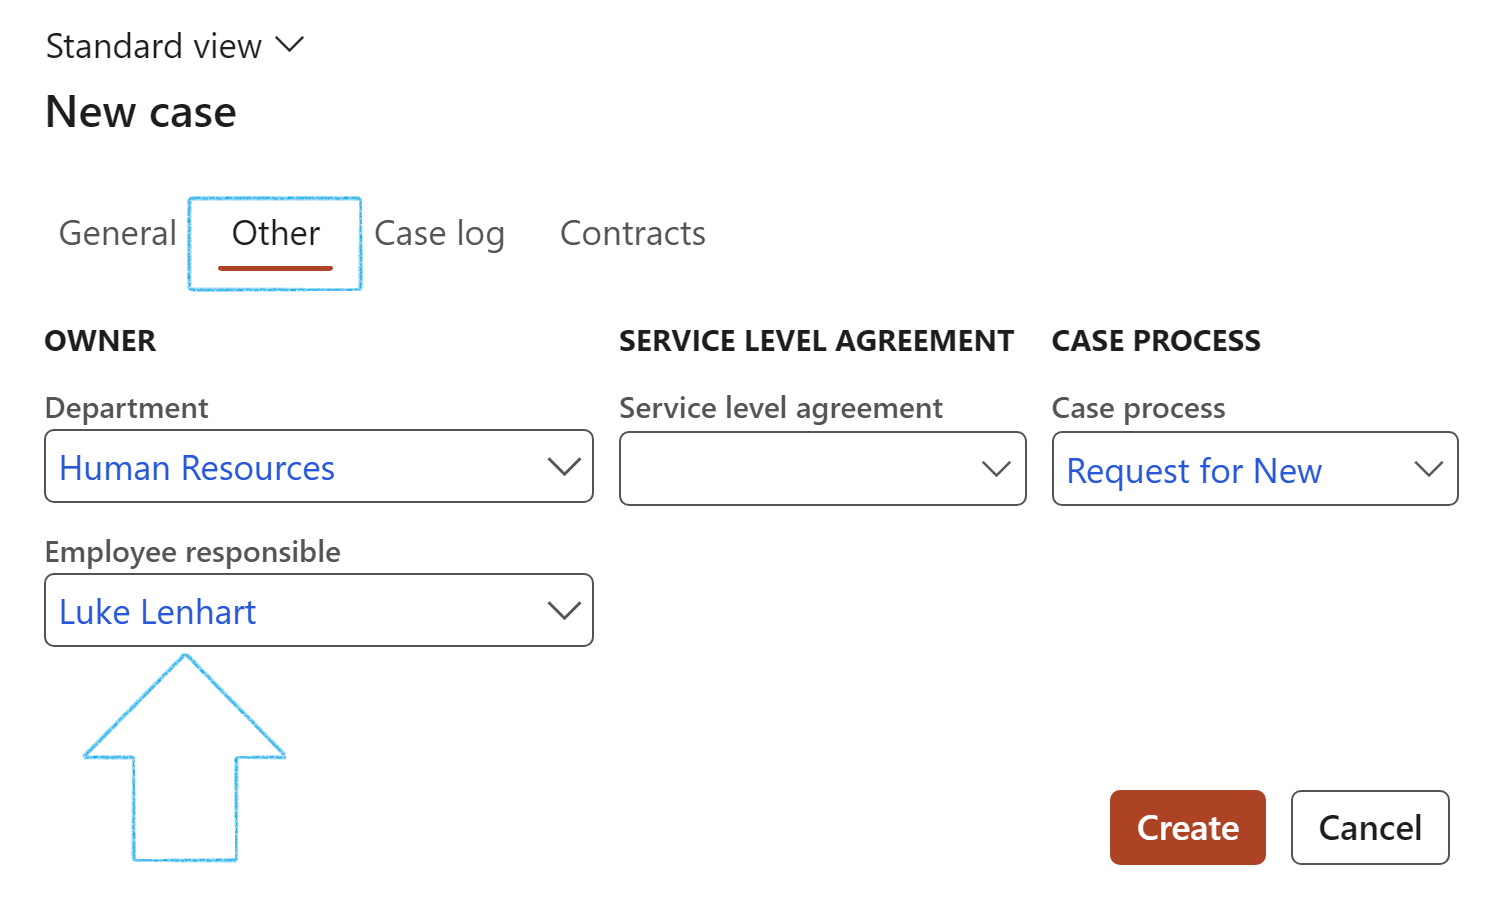
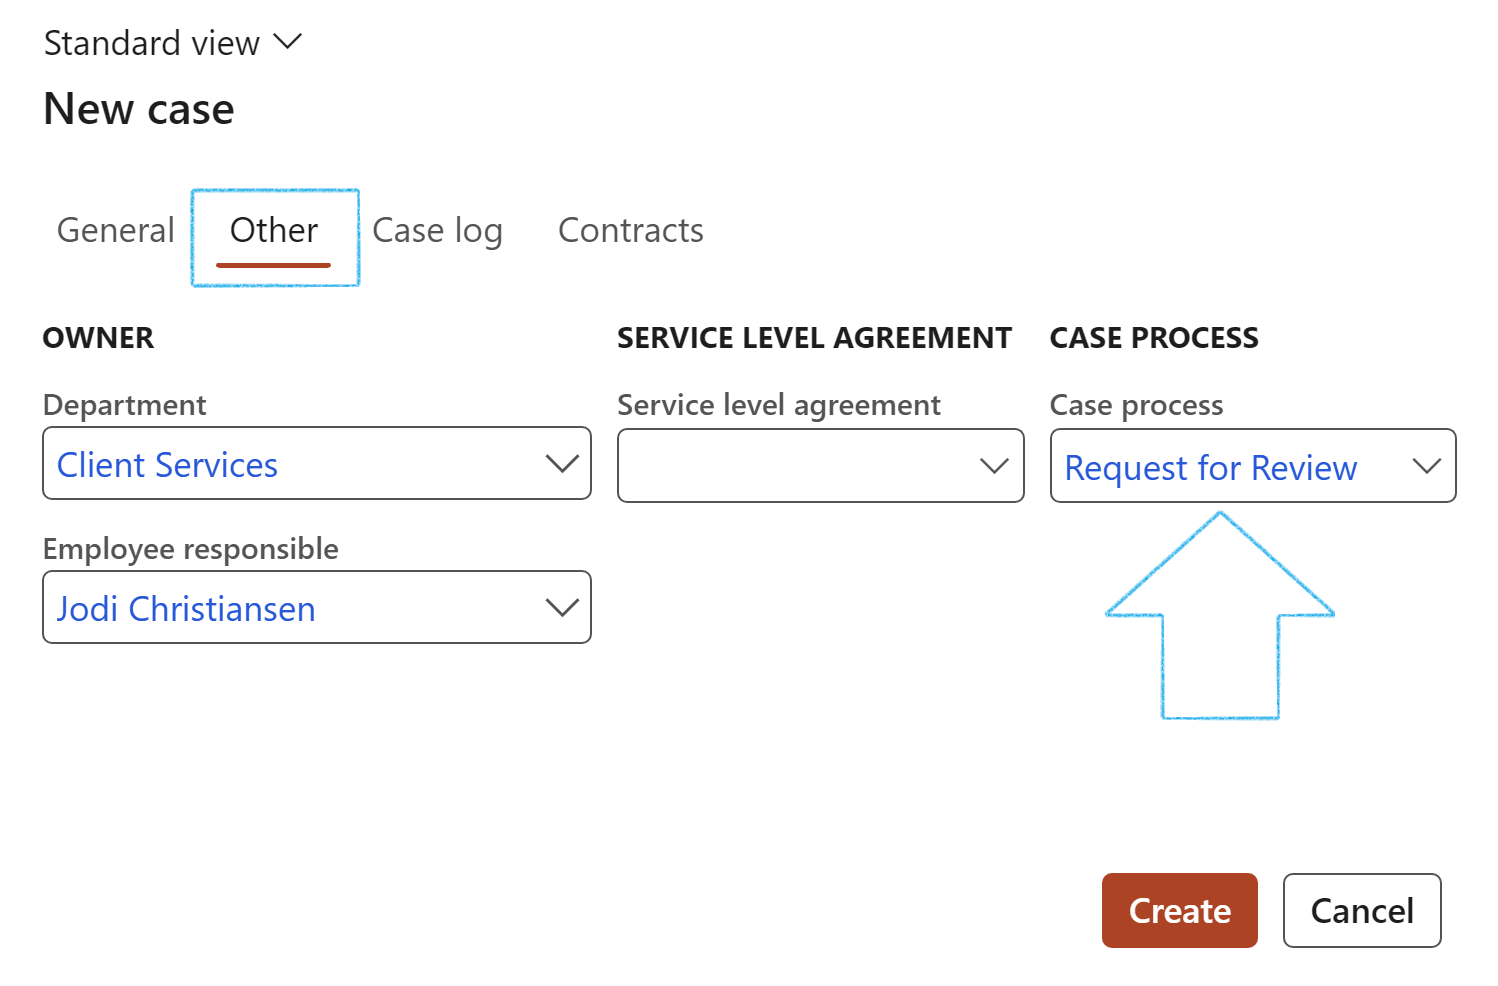
- Click on the Other Index tab
- Select the relevant Department from the dropdown list
- Select the Employee responsible from the dropdown list
- In the Case process field, select Request for new from the dropdown list
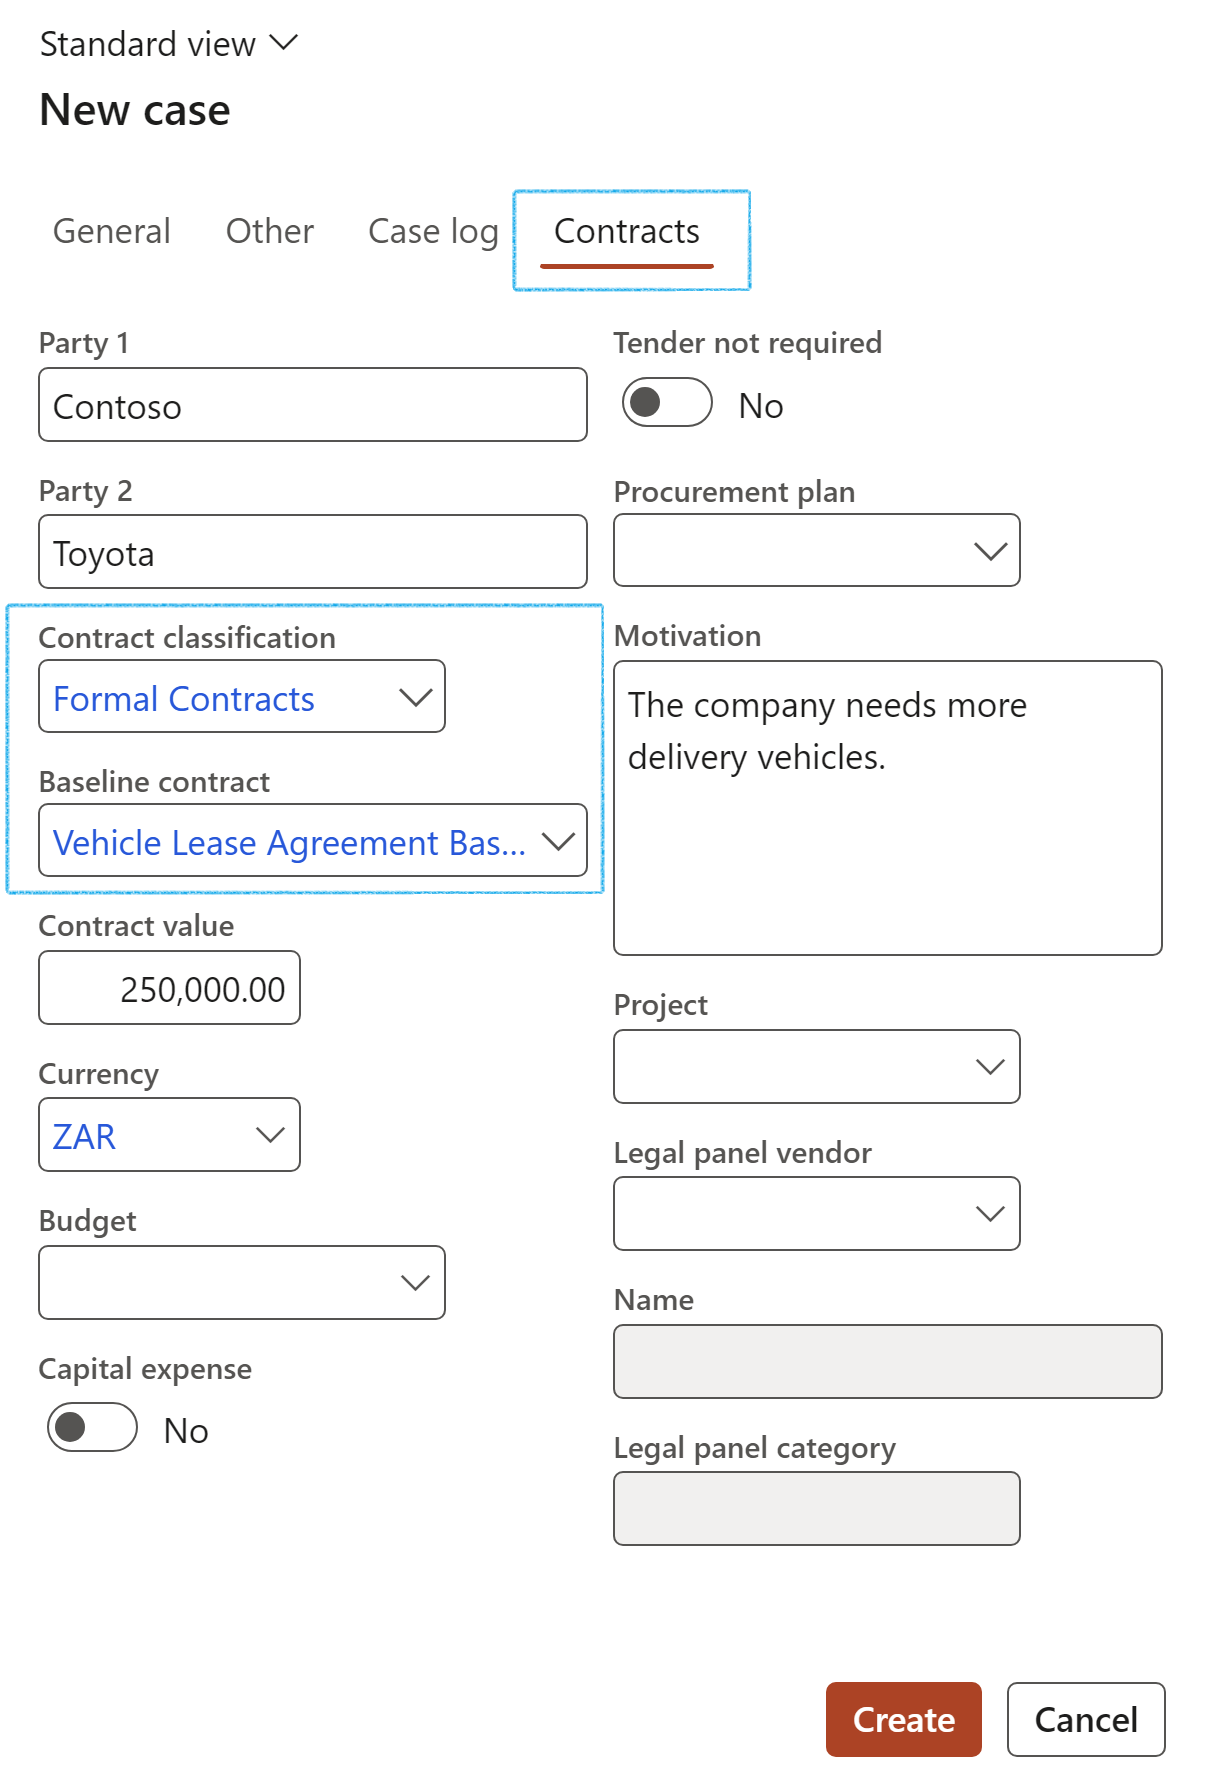
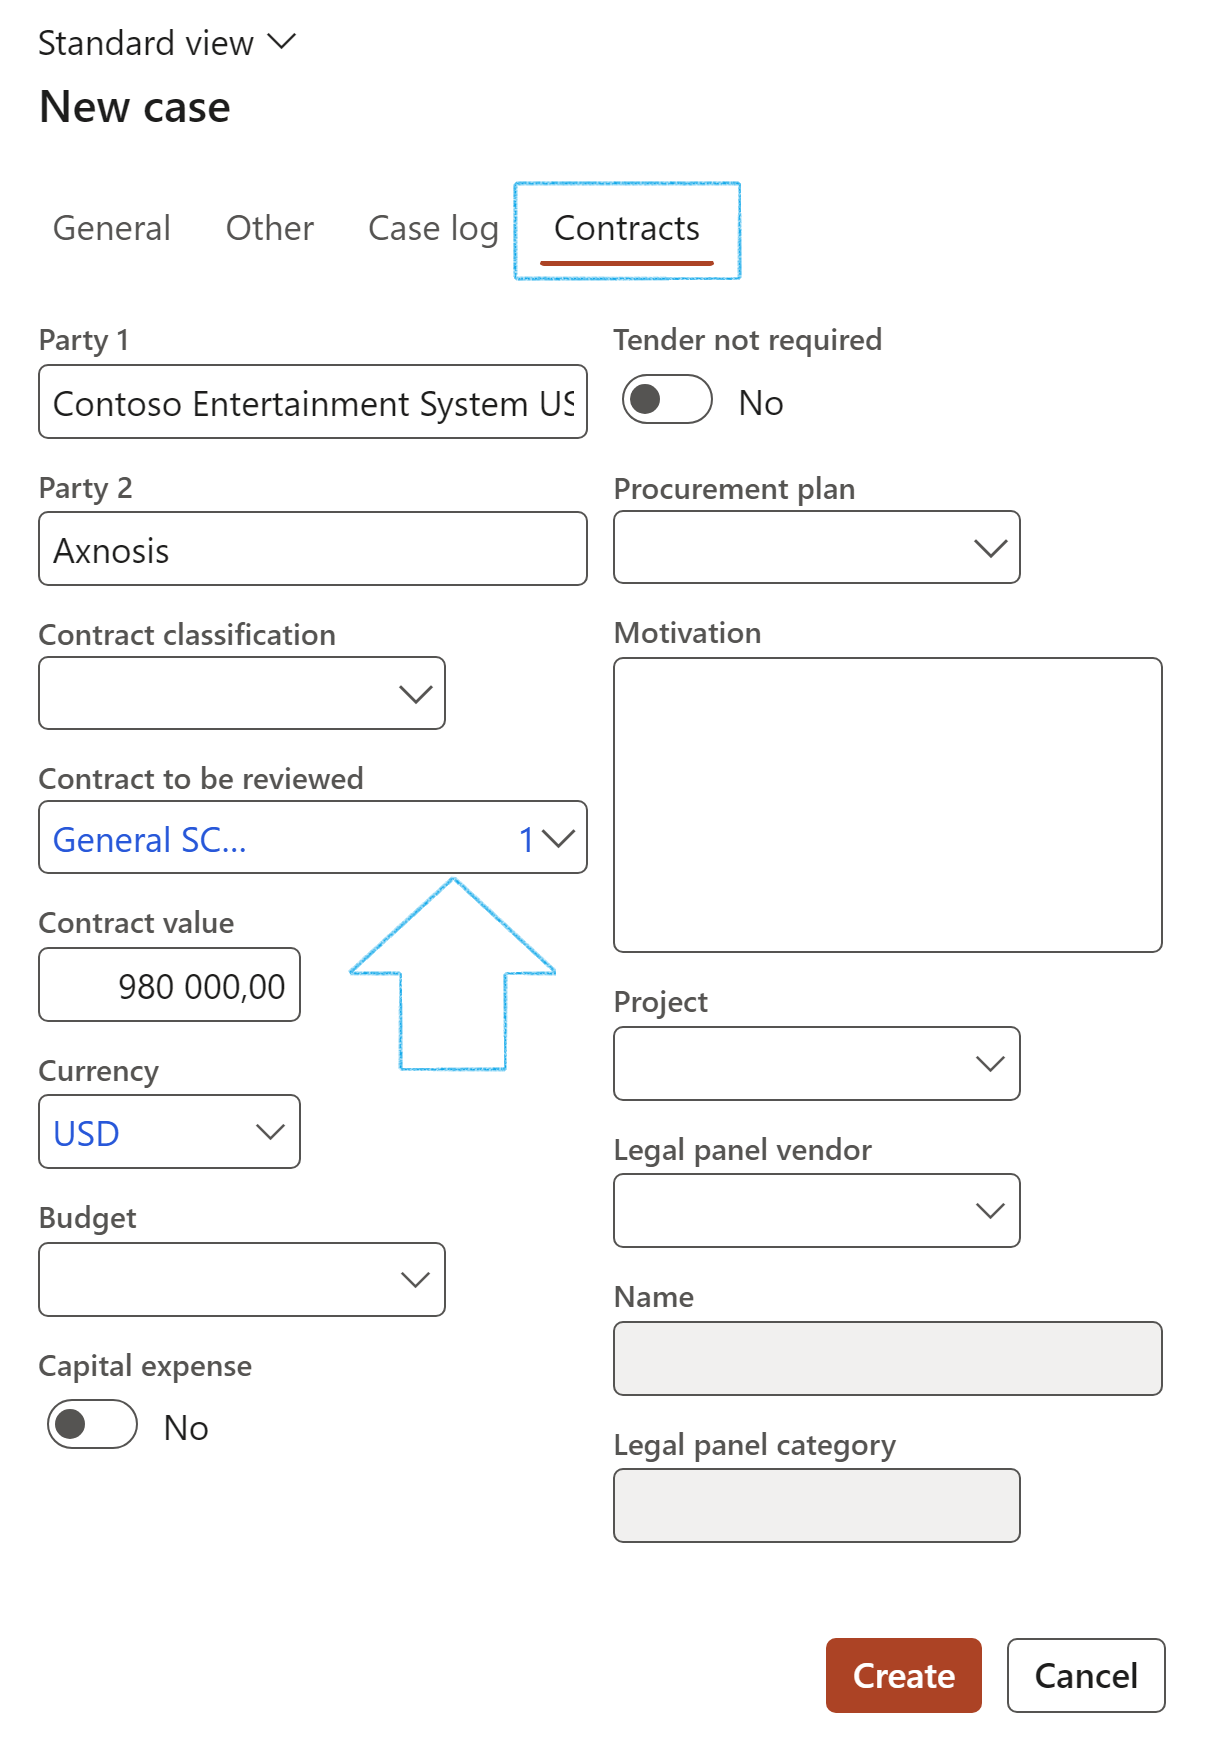
- Click on the Contracts Index tab
- The Party 1 field will be populated with the company details of the loggedin user. (This can be edited)
- In the Party 2 field, enter the name of the second party involved in the contract request
- Select the relevant Contract classification from the dropdown list
- Select the Baseline contract from the dropdown list
- Select the Procurement plan from the dropdown list (if applicable)
- Enter the Motivation for the new contract request
- Click on the Create button
- On the All purchase requisitions list page, select the relevant record
- On the Action pane, in the New group, click on the Contract request button
- On the All Request for quotations list page, select the relevant record
- On the Action pane, in the Process group, click on the Contract request button
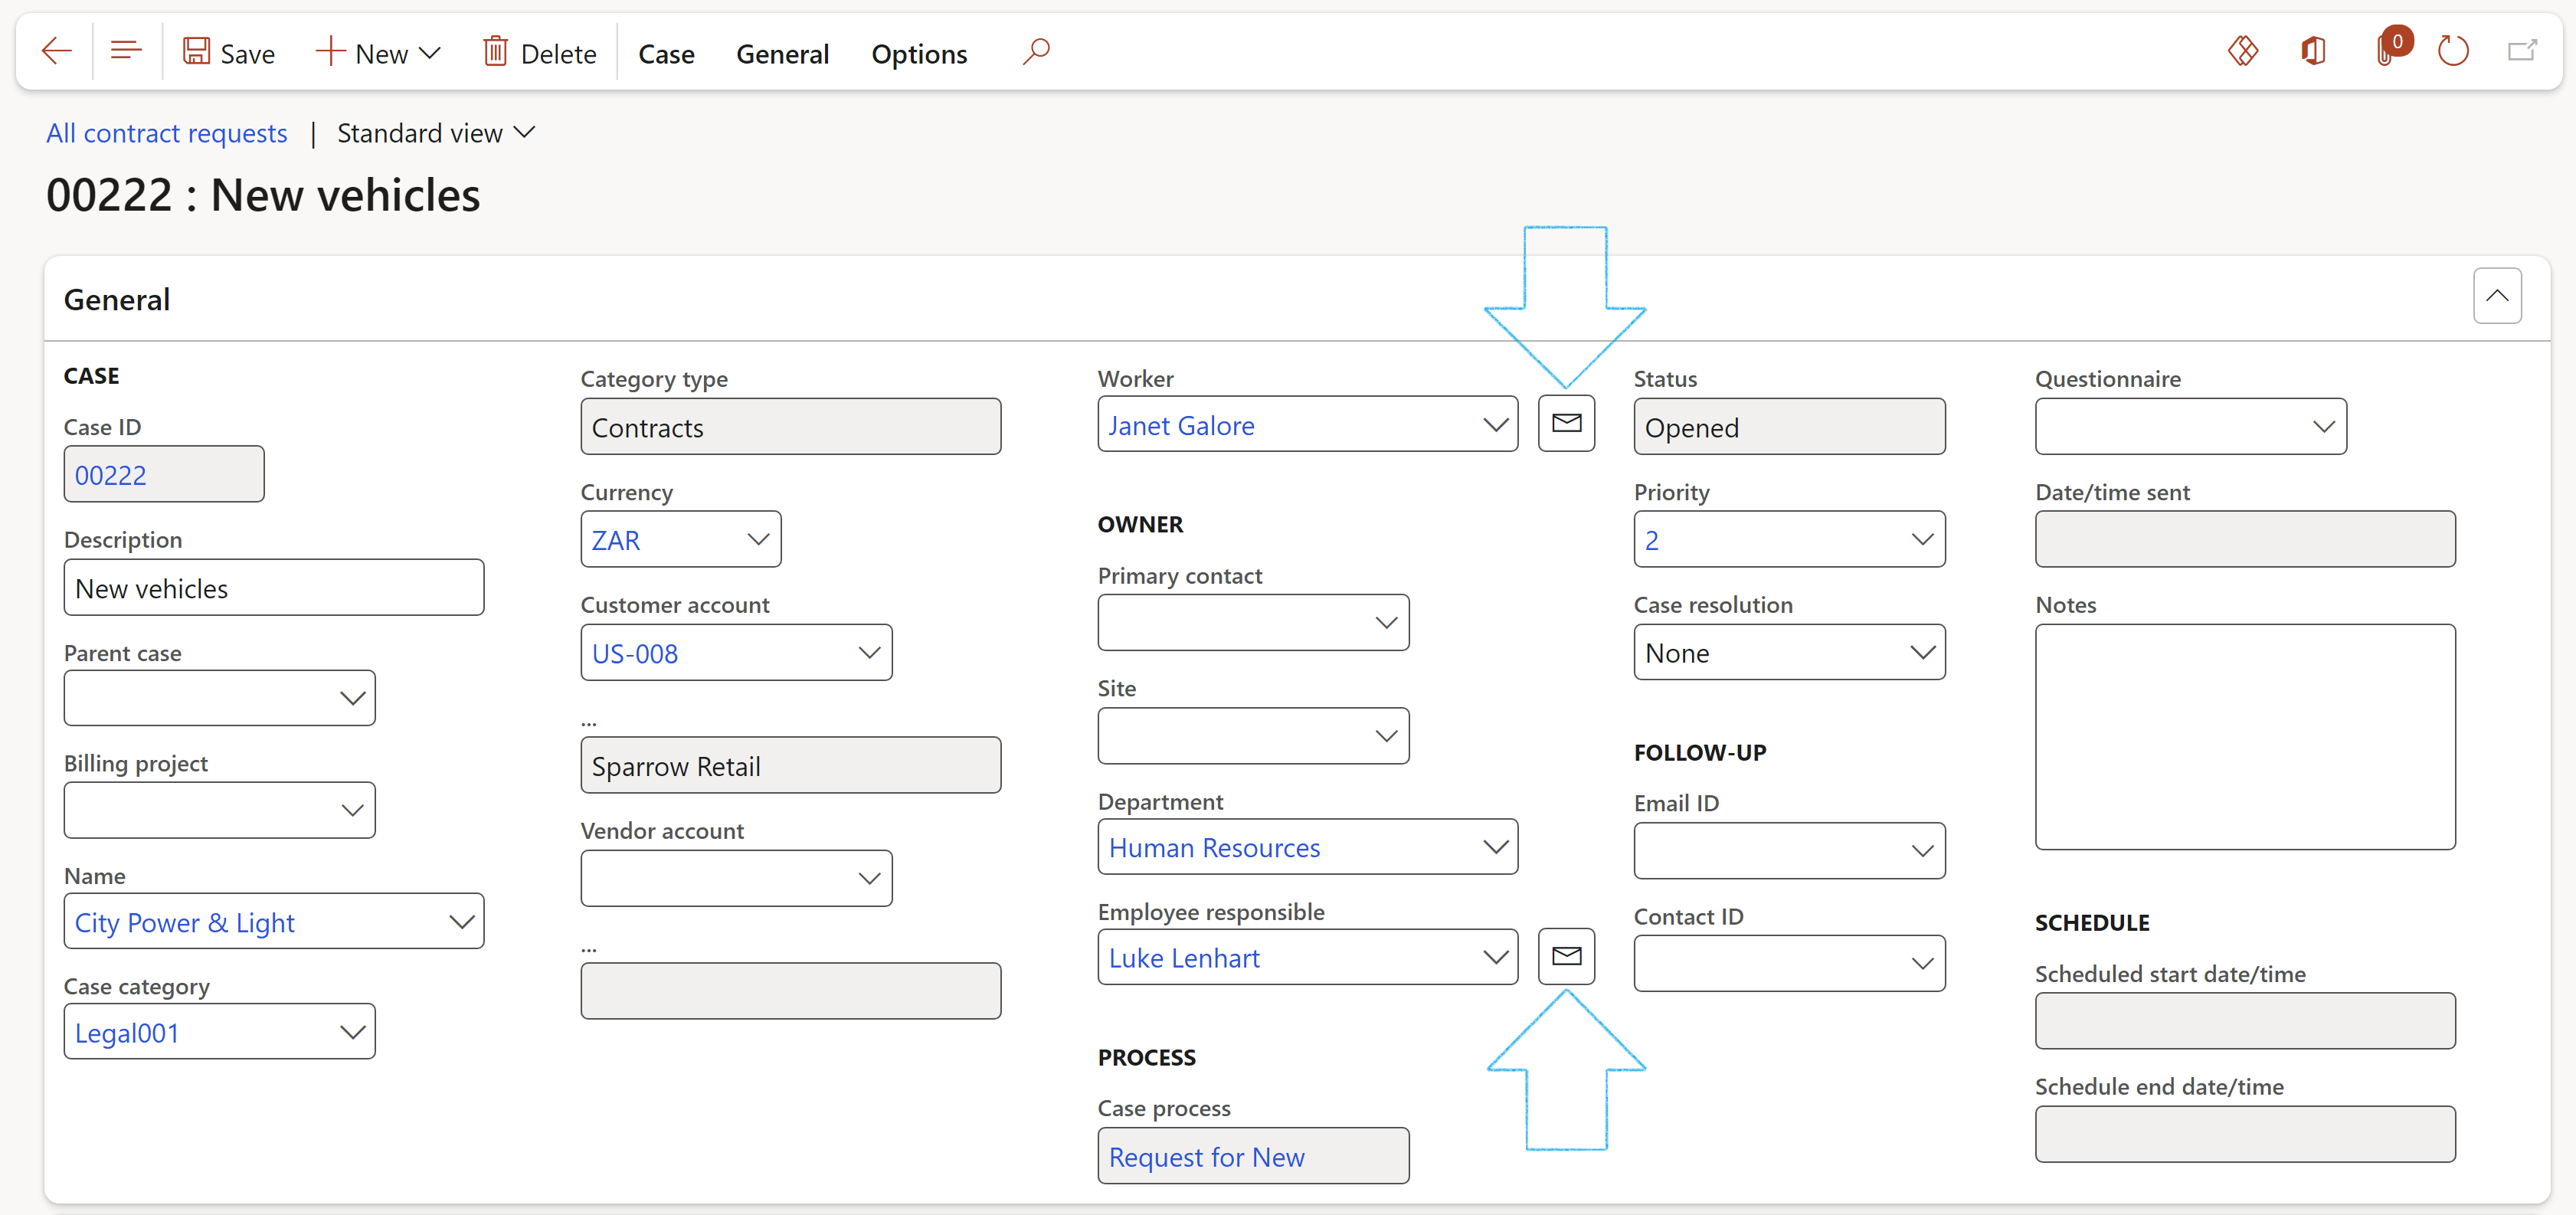
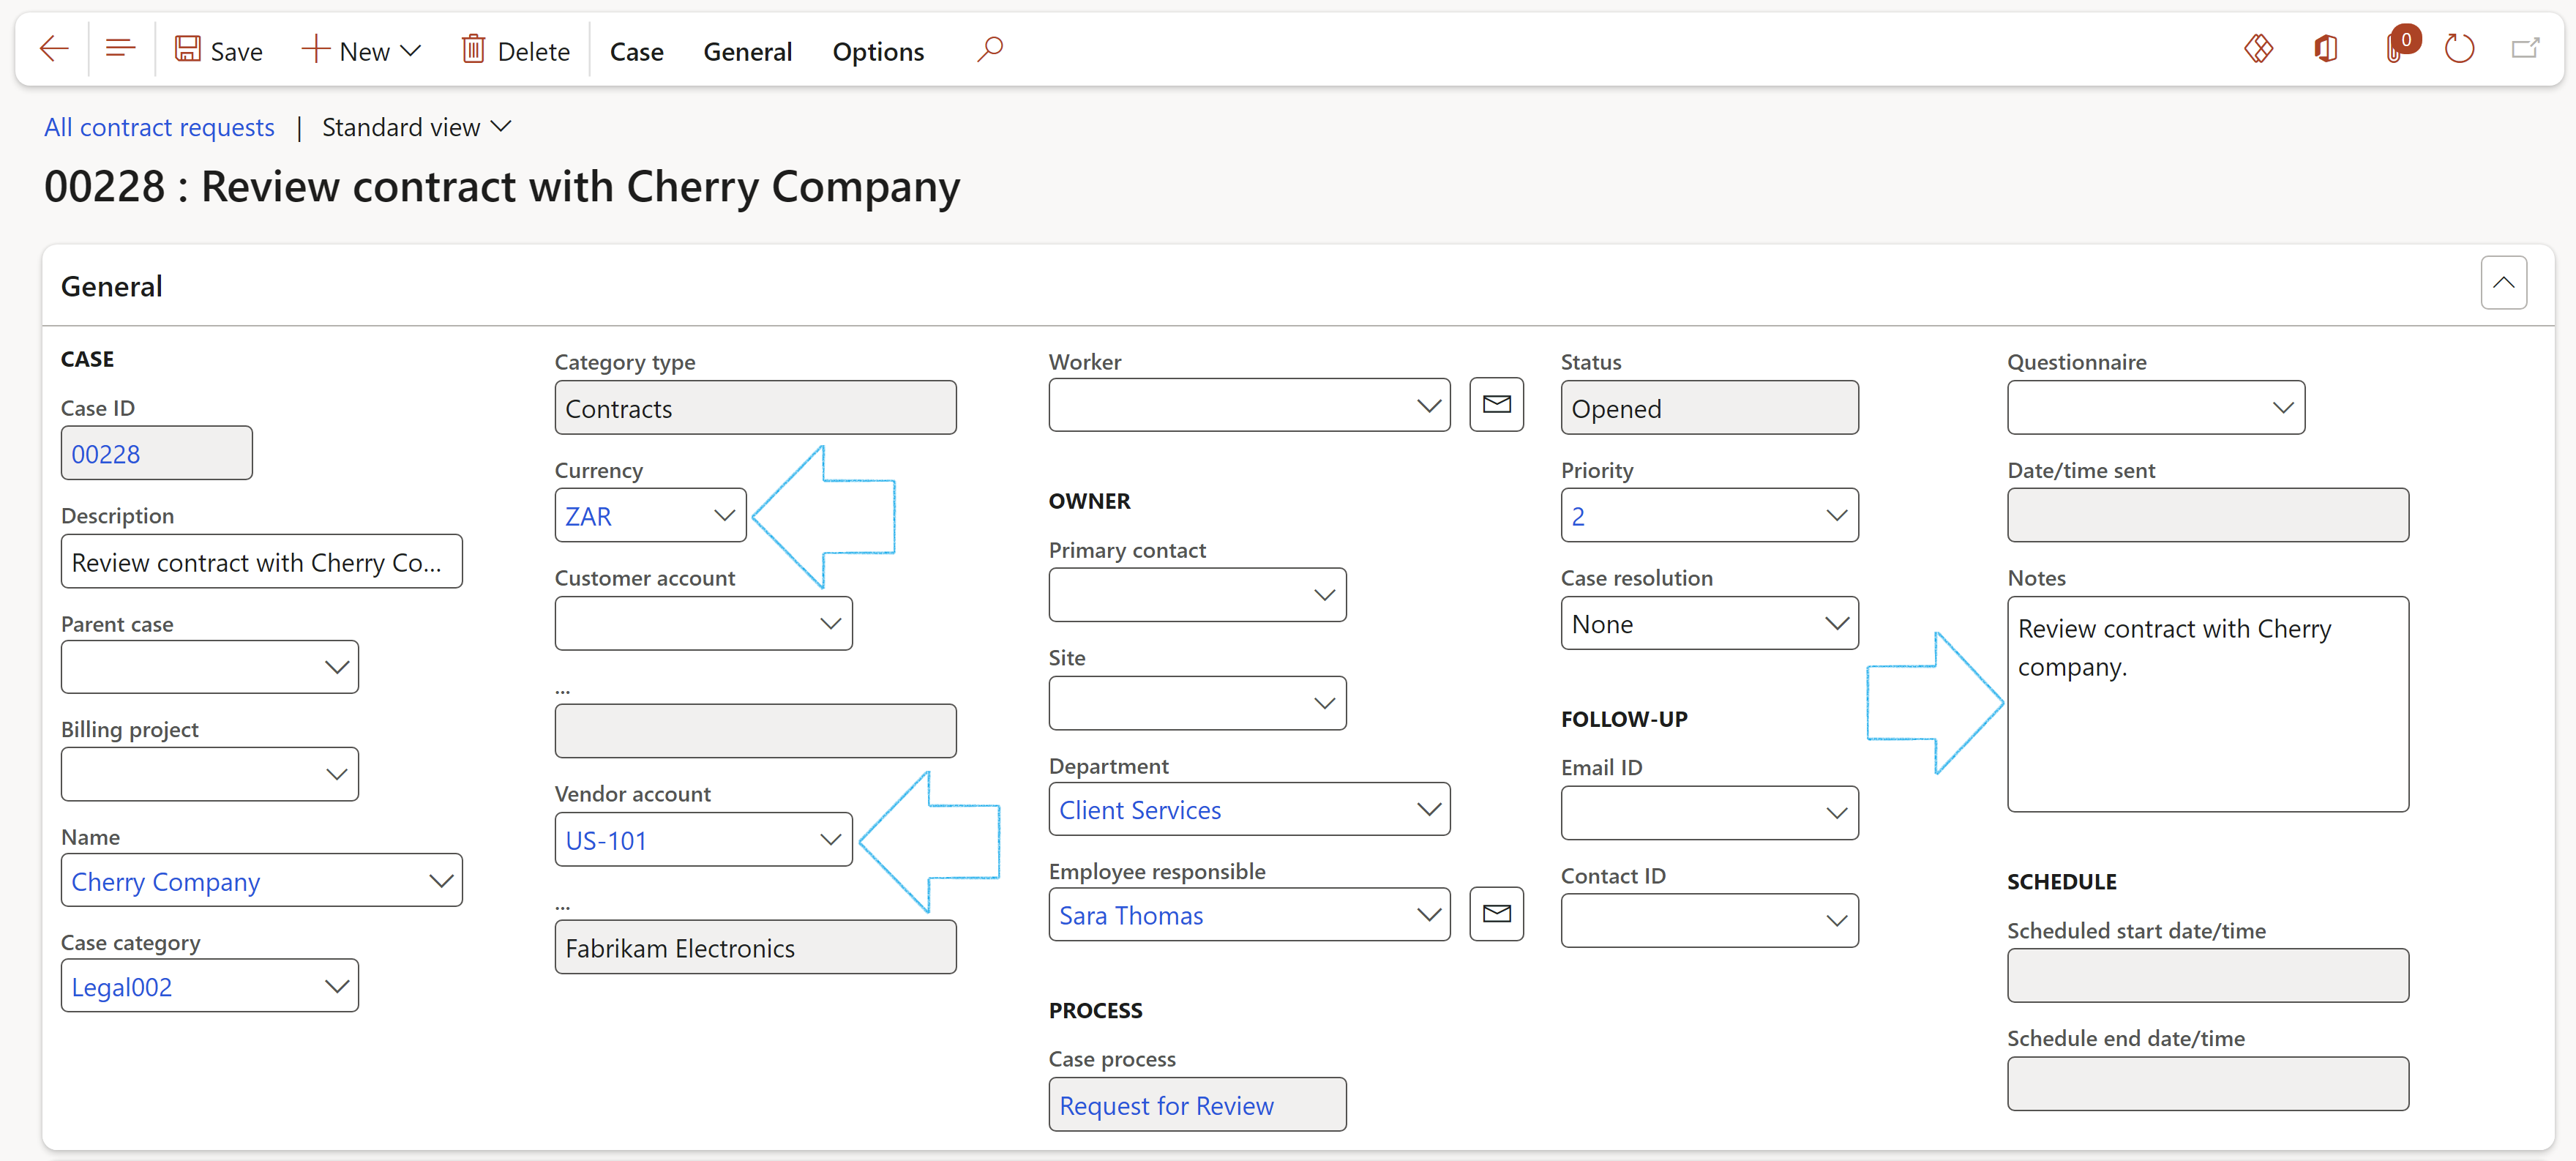
- On the All contract requests list page, select the relevant contract request
- Expand the General Fast tab
- Select the relevant Currency from the dropdown list
- Select the relevant Customer/Vendor account from the dropdown list
- Emails can be sent to the selected workers by clicking on the email icon next to the relevant name
- The selected worker must have a primary email address
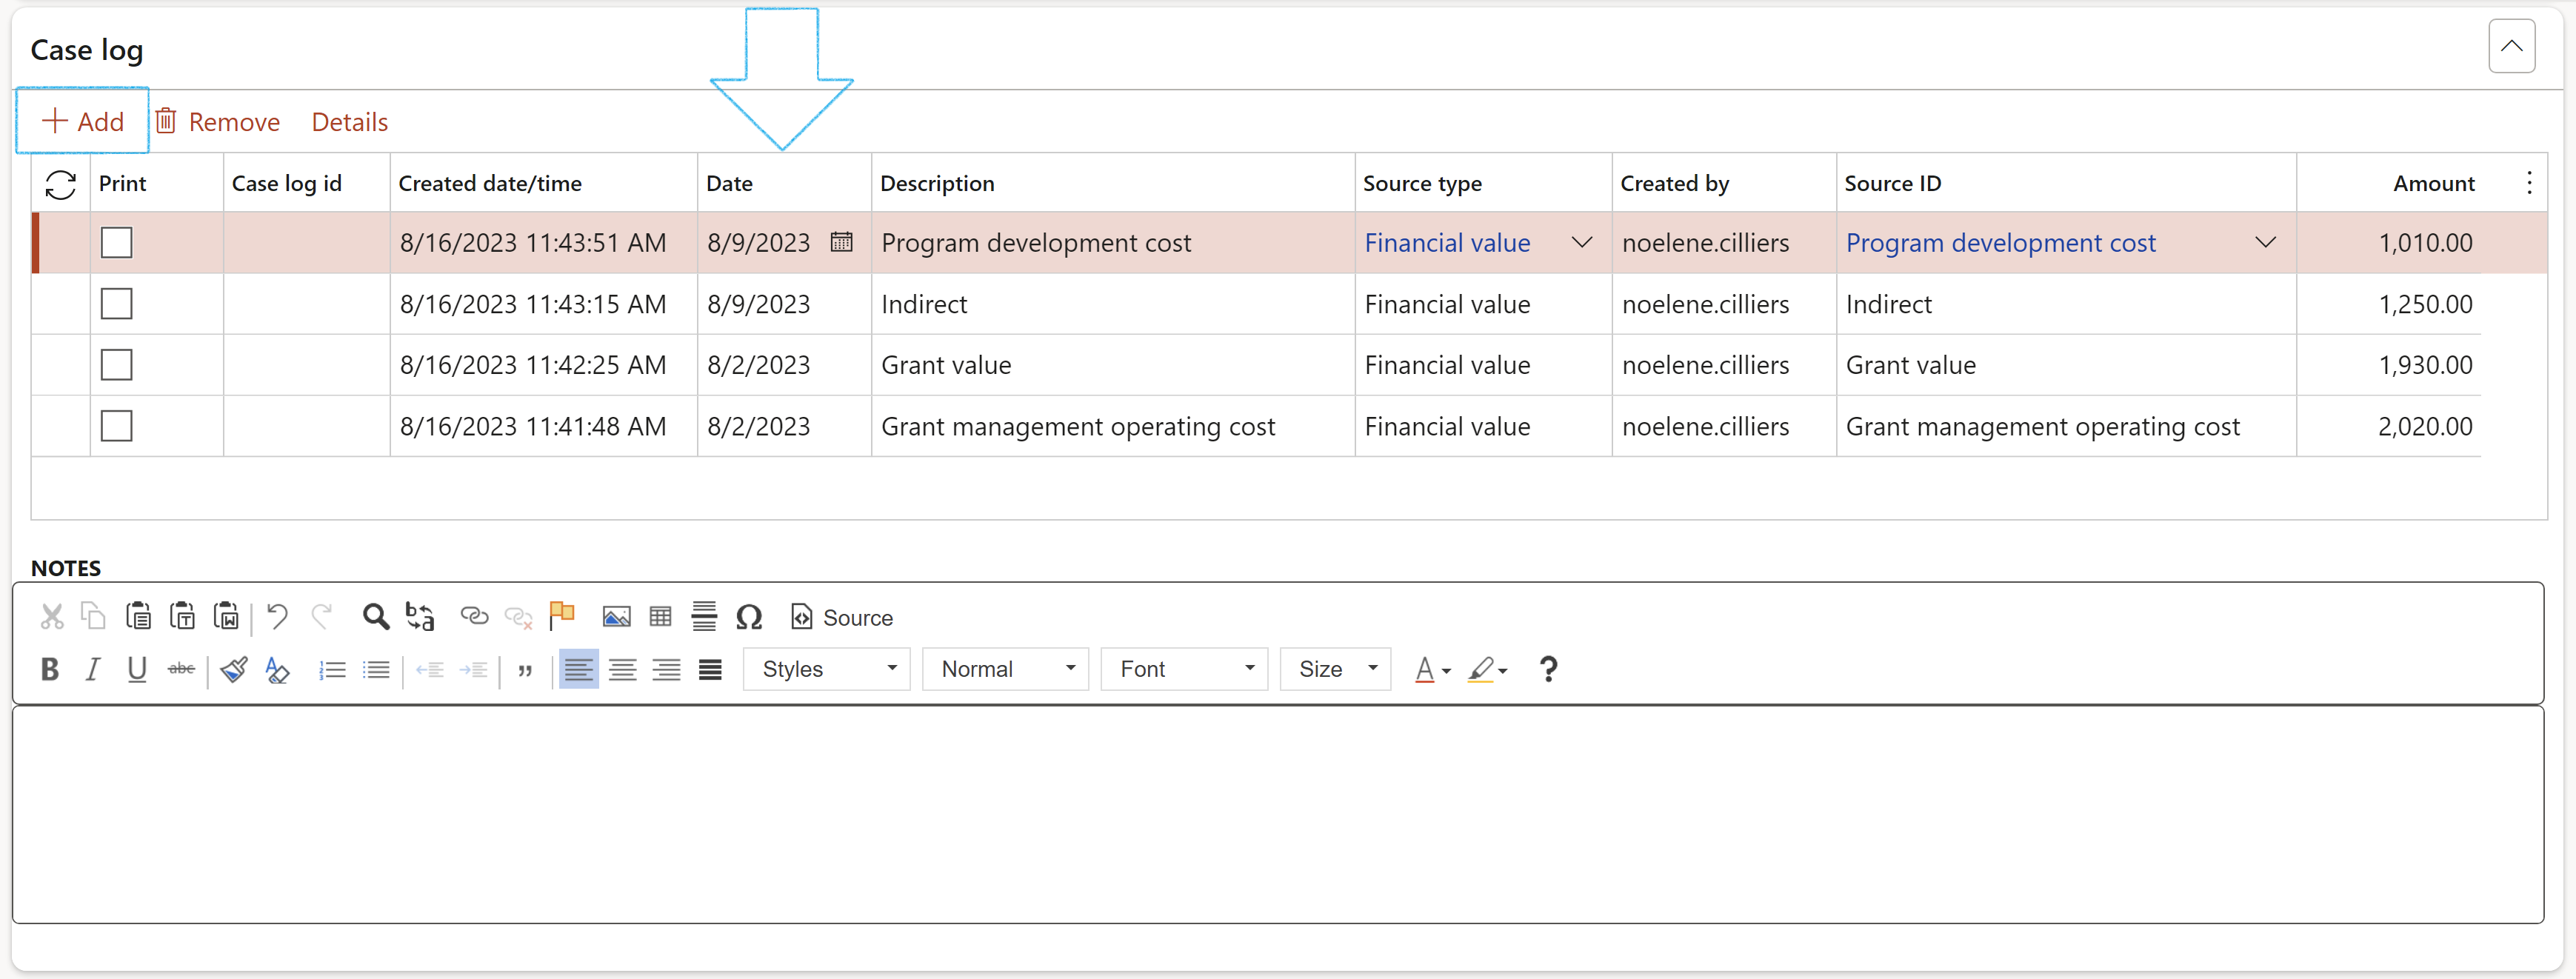
- Expand the Case log Fast tab
- Click on the Add button
- Select the relevant date in the Date field (If a date is not selected, TODAY’s date will be used)
- Enter a Description for the Source type
- Select the relevant Source type from the dropdown list
- Select the relevant Source ID from the dropdown list
- Enter an Amount
- Enter additional Notes in the note box provided
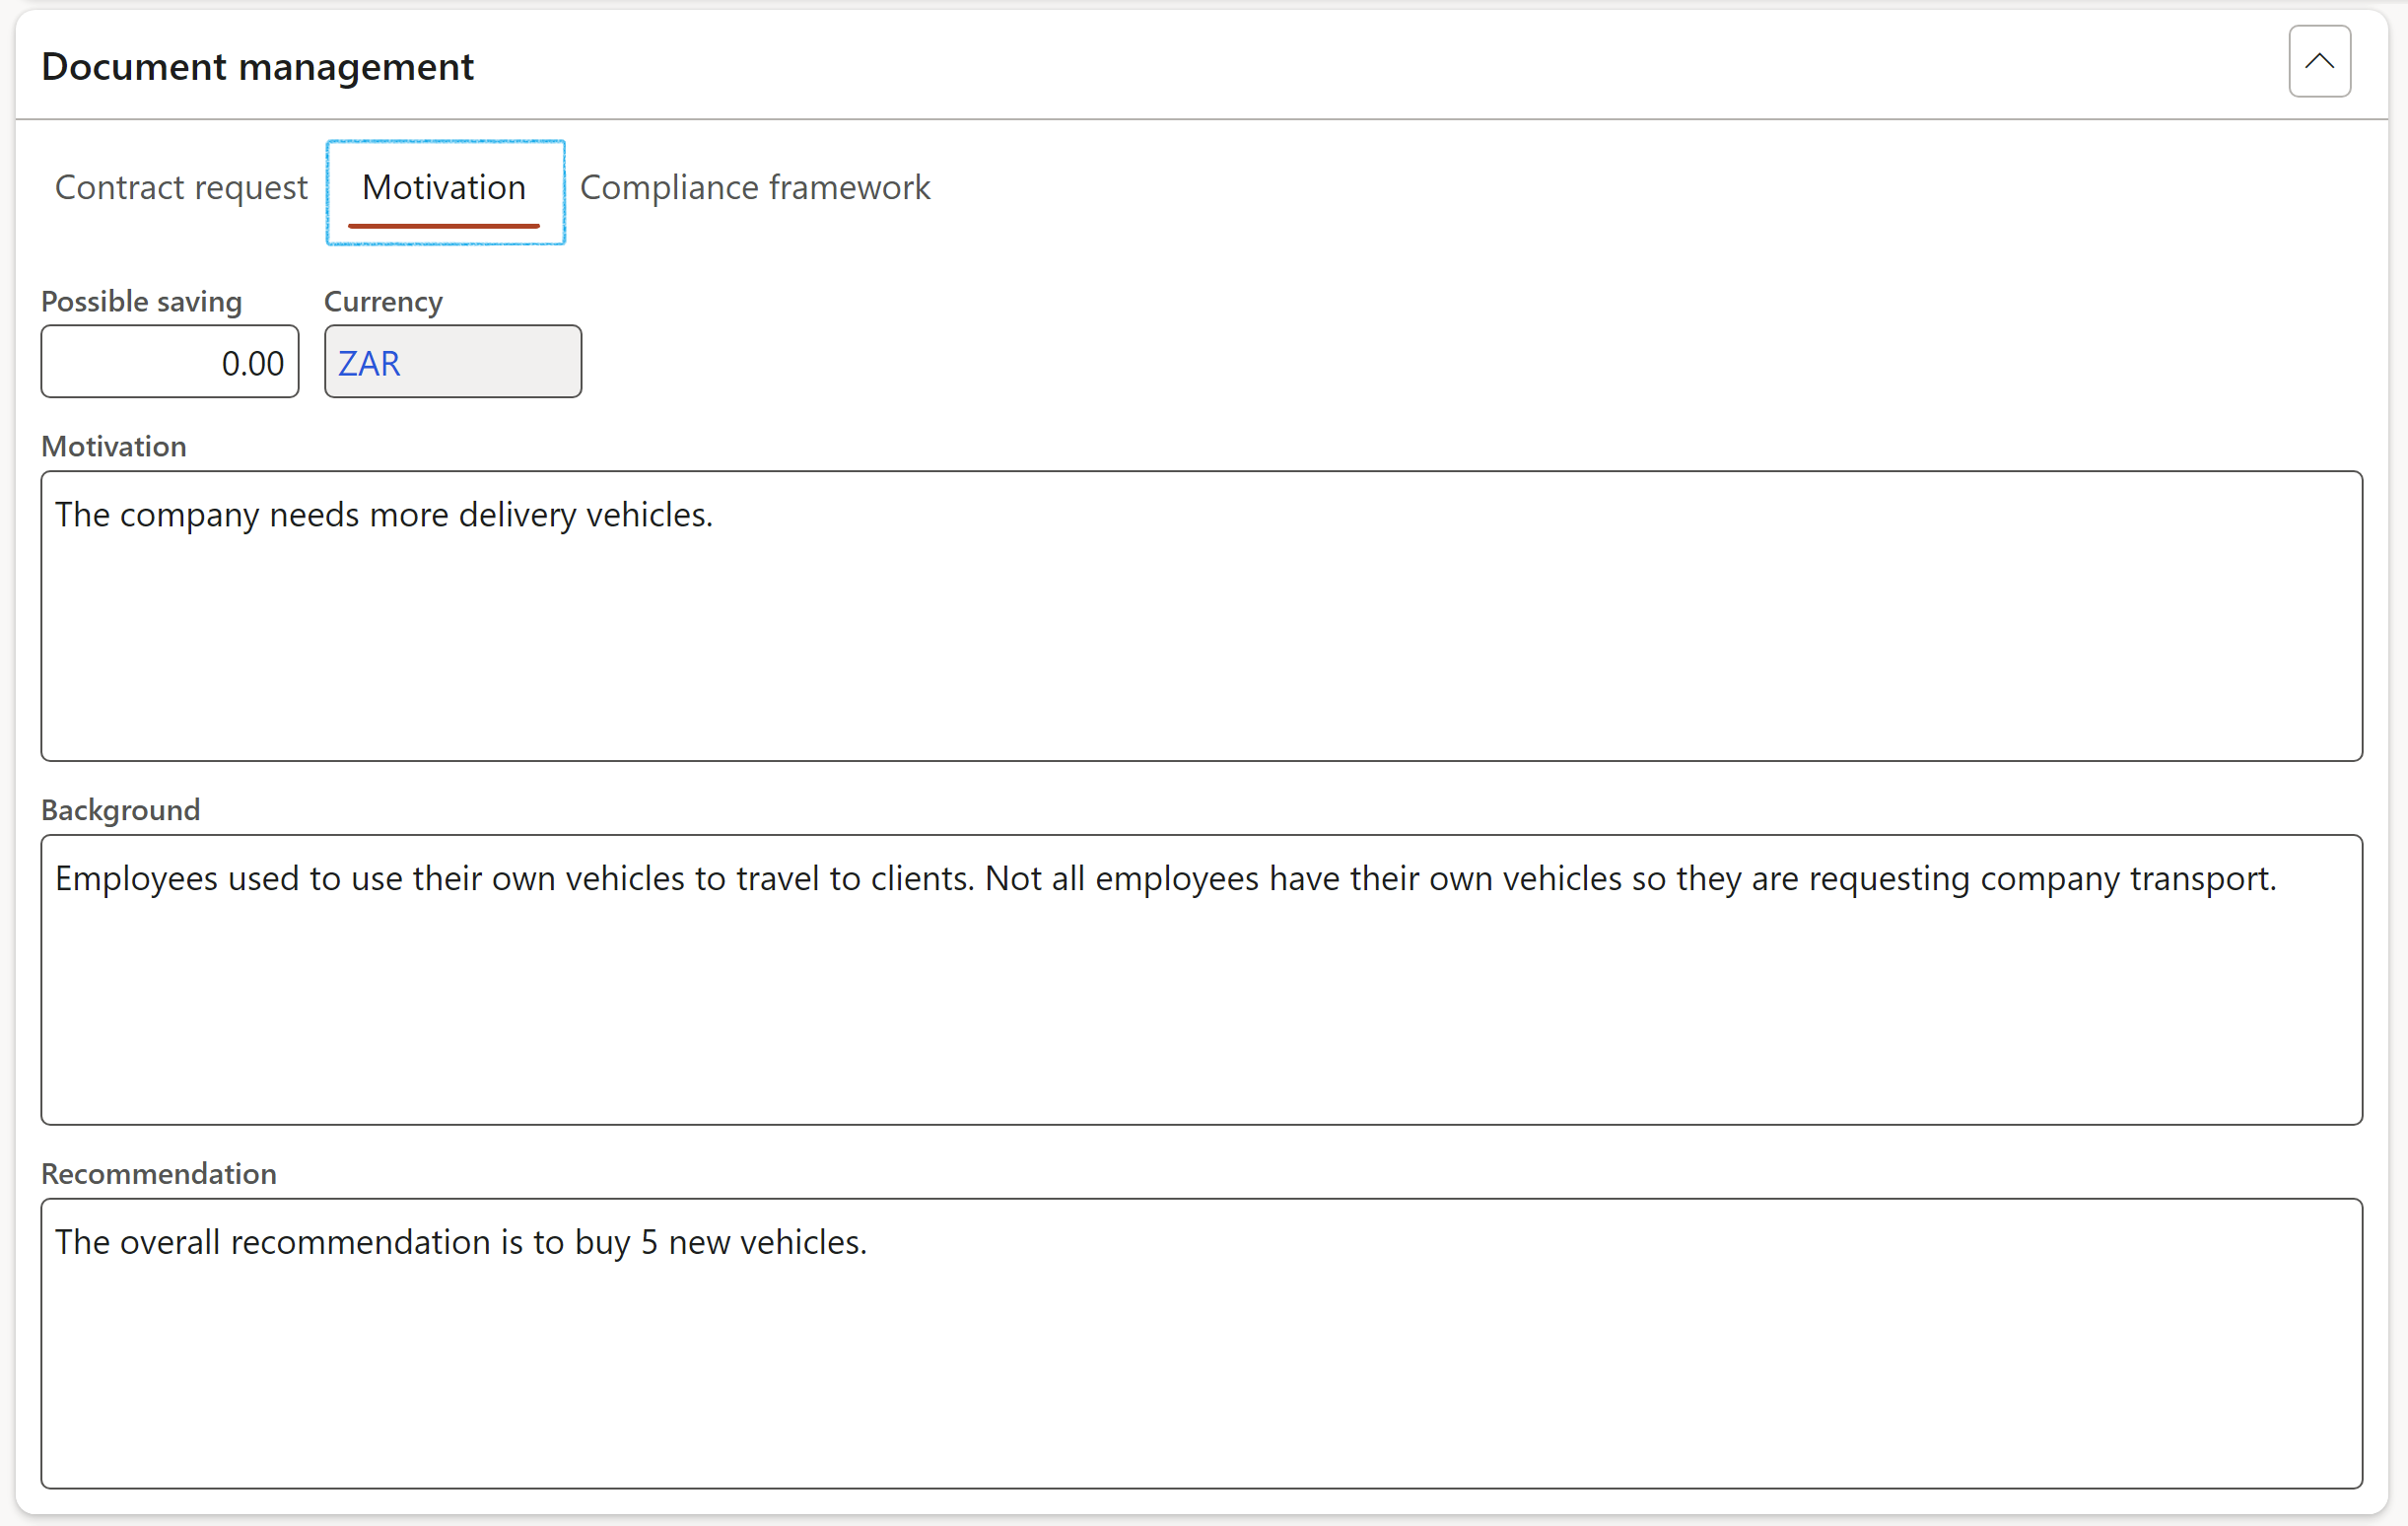
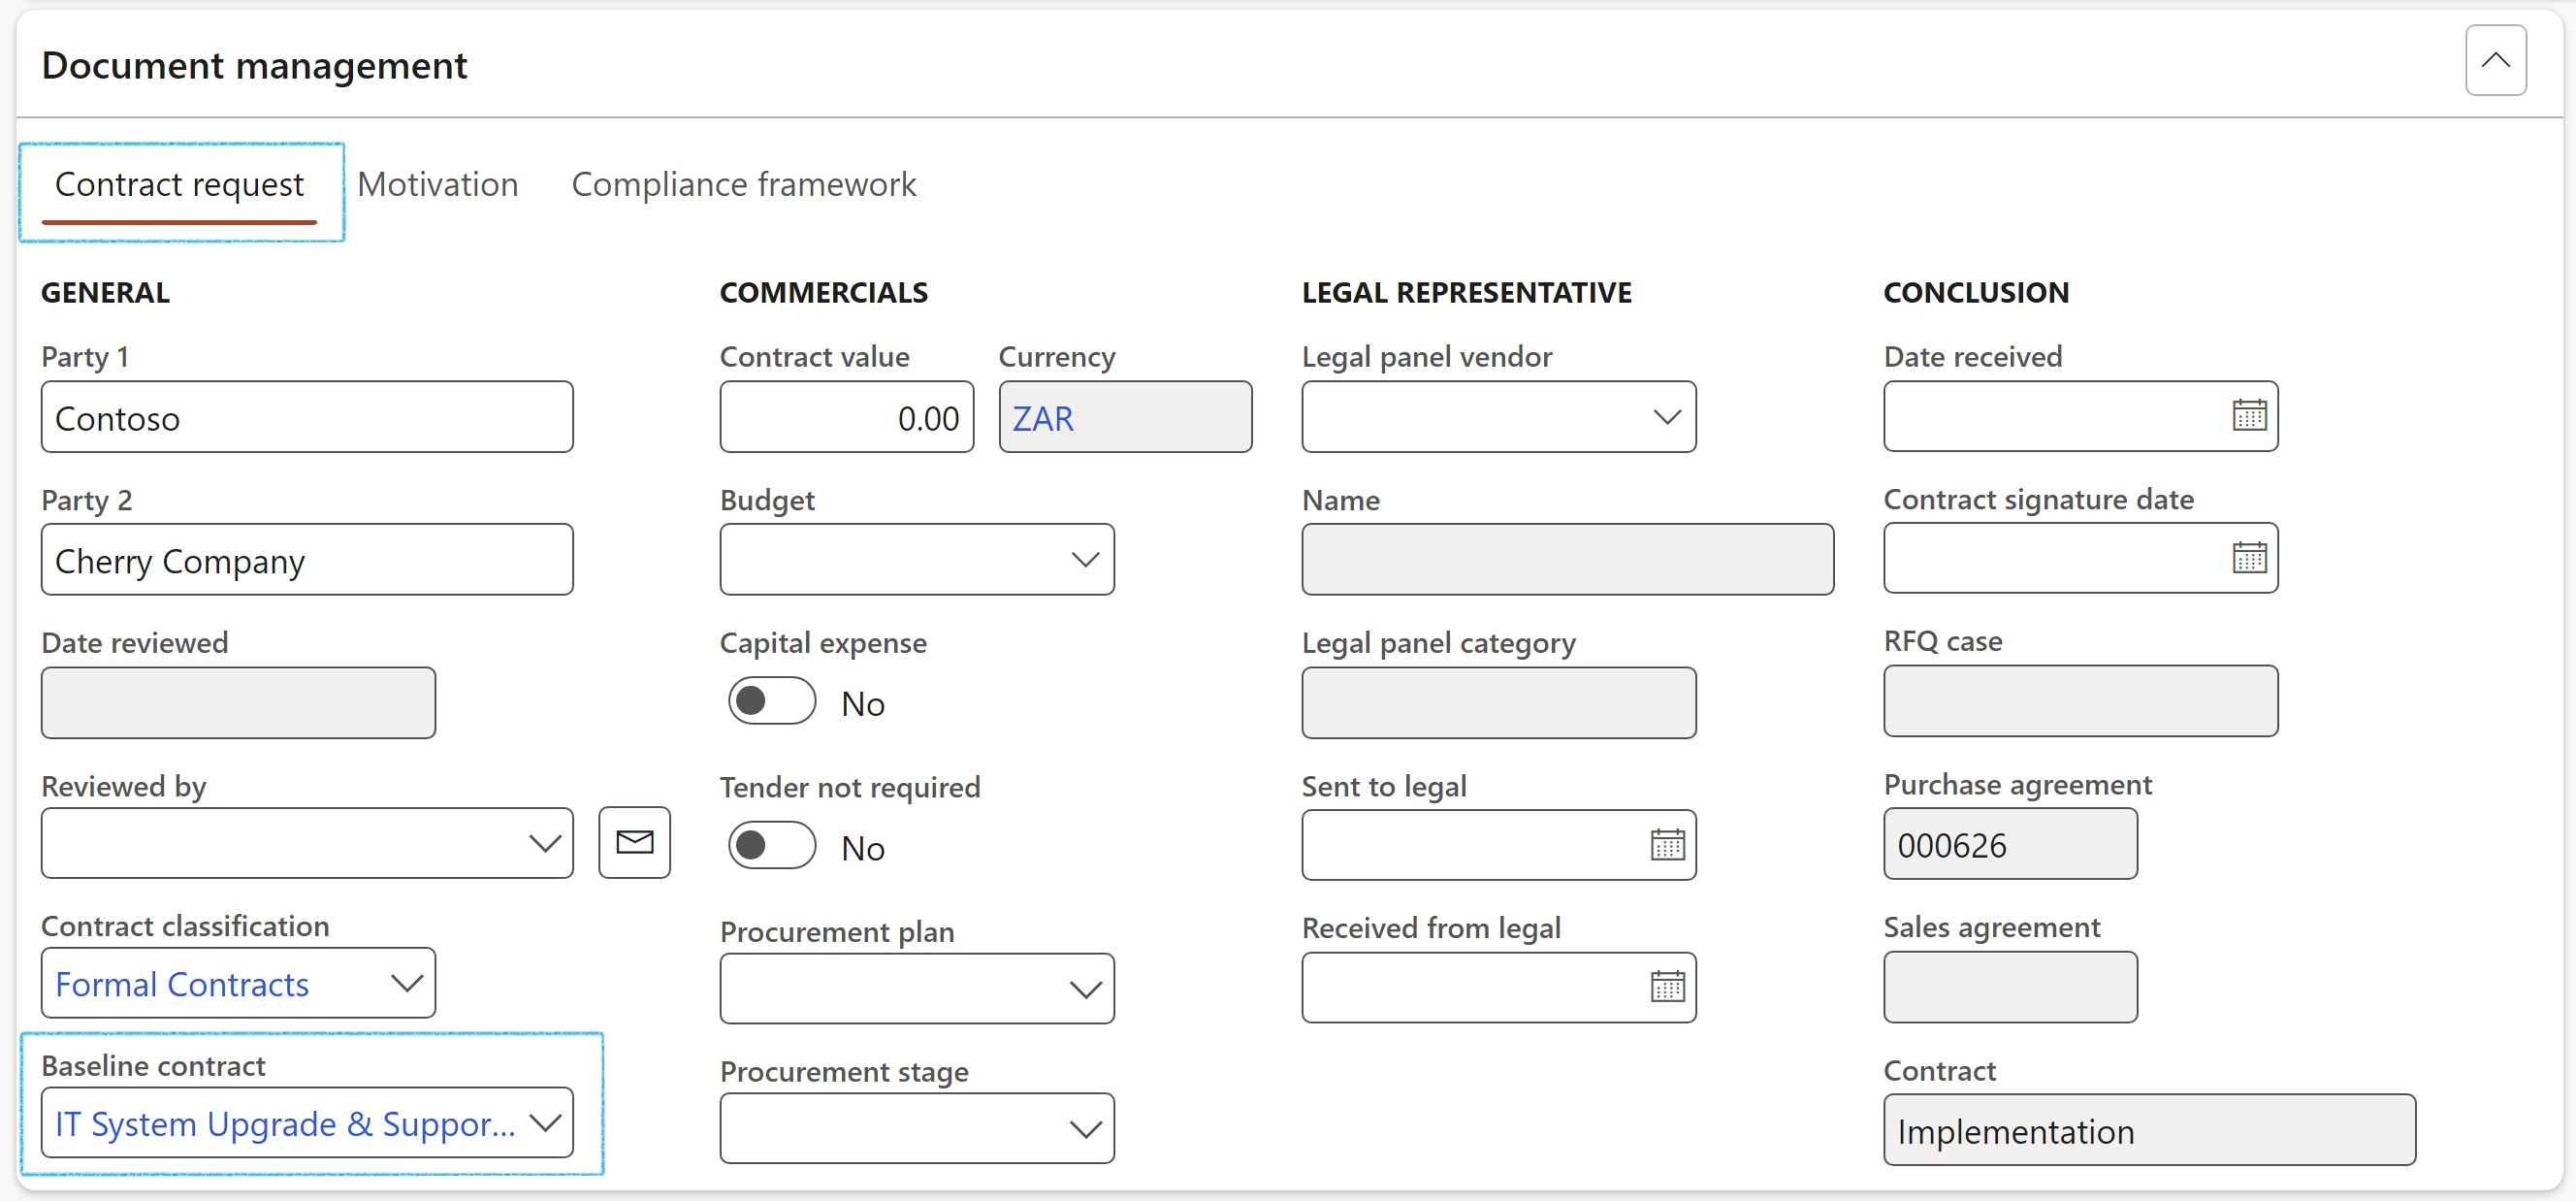
- Expand the Document management Fast tab
- Under the Contract request Index tab:
- Parties involved in the contract request
- A Baseline contract can be selected
- Linked Purchase/Sales agreement will be displayed (If there is one)
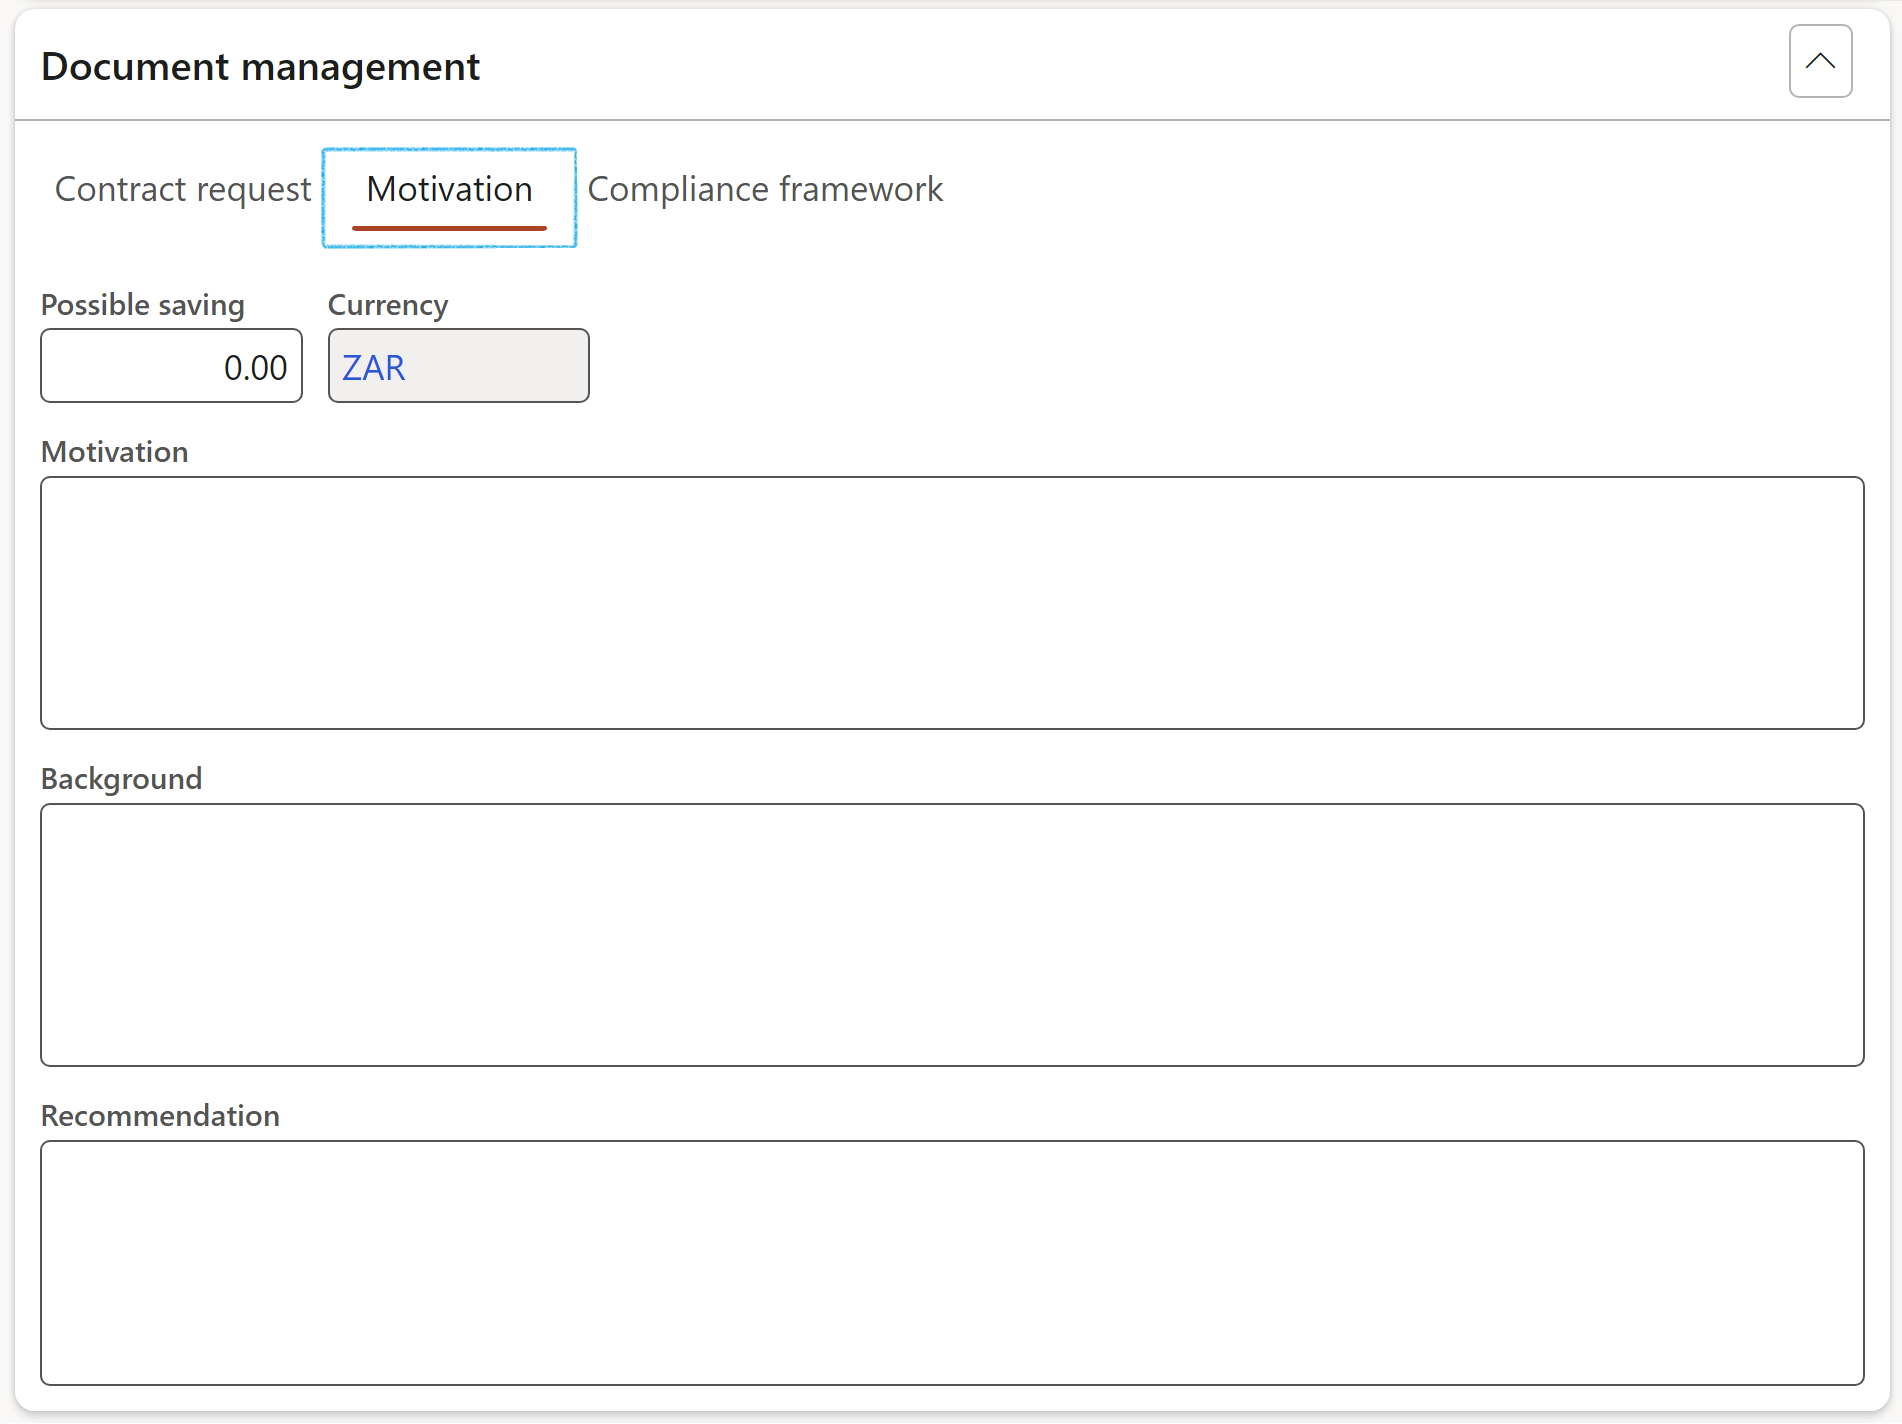
- Under the Motivation Index tab:
- Enter the Motivation for the contract request (if it was not entered when the request was created)
- Enter the Background of the contract request
- Enter the Recommendation for the contract request
- Expand the RACI Fast tab
- Select the Employee responsible
- Select the Employee accountable
- Select the Employee consulted
- Select the Employee informed
- Emails can be sent to the selected workers by clicking on the email icon next to the relevant name
- The selected worker must have a primary email address
- Select the relevant contract request
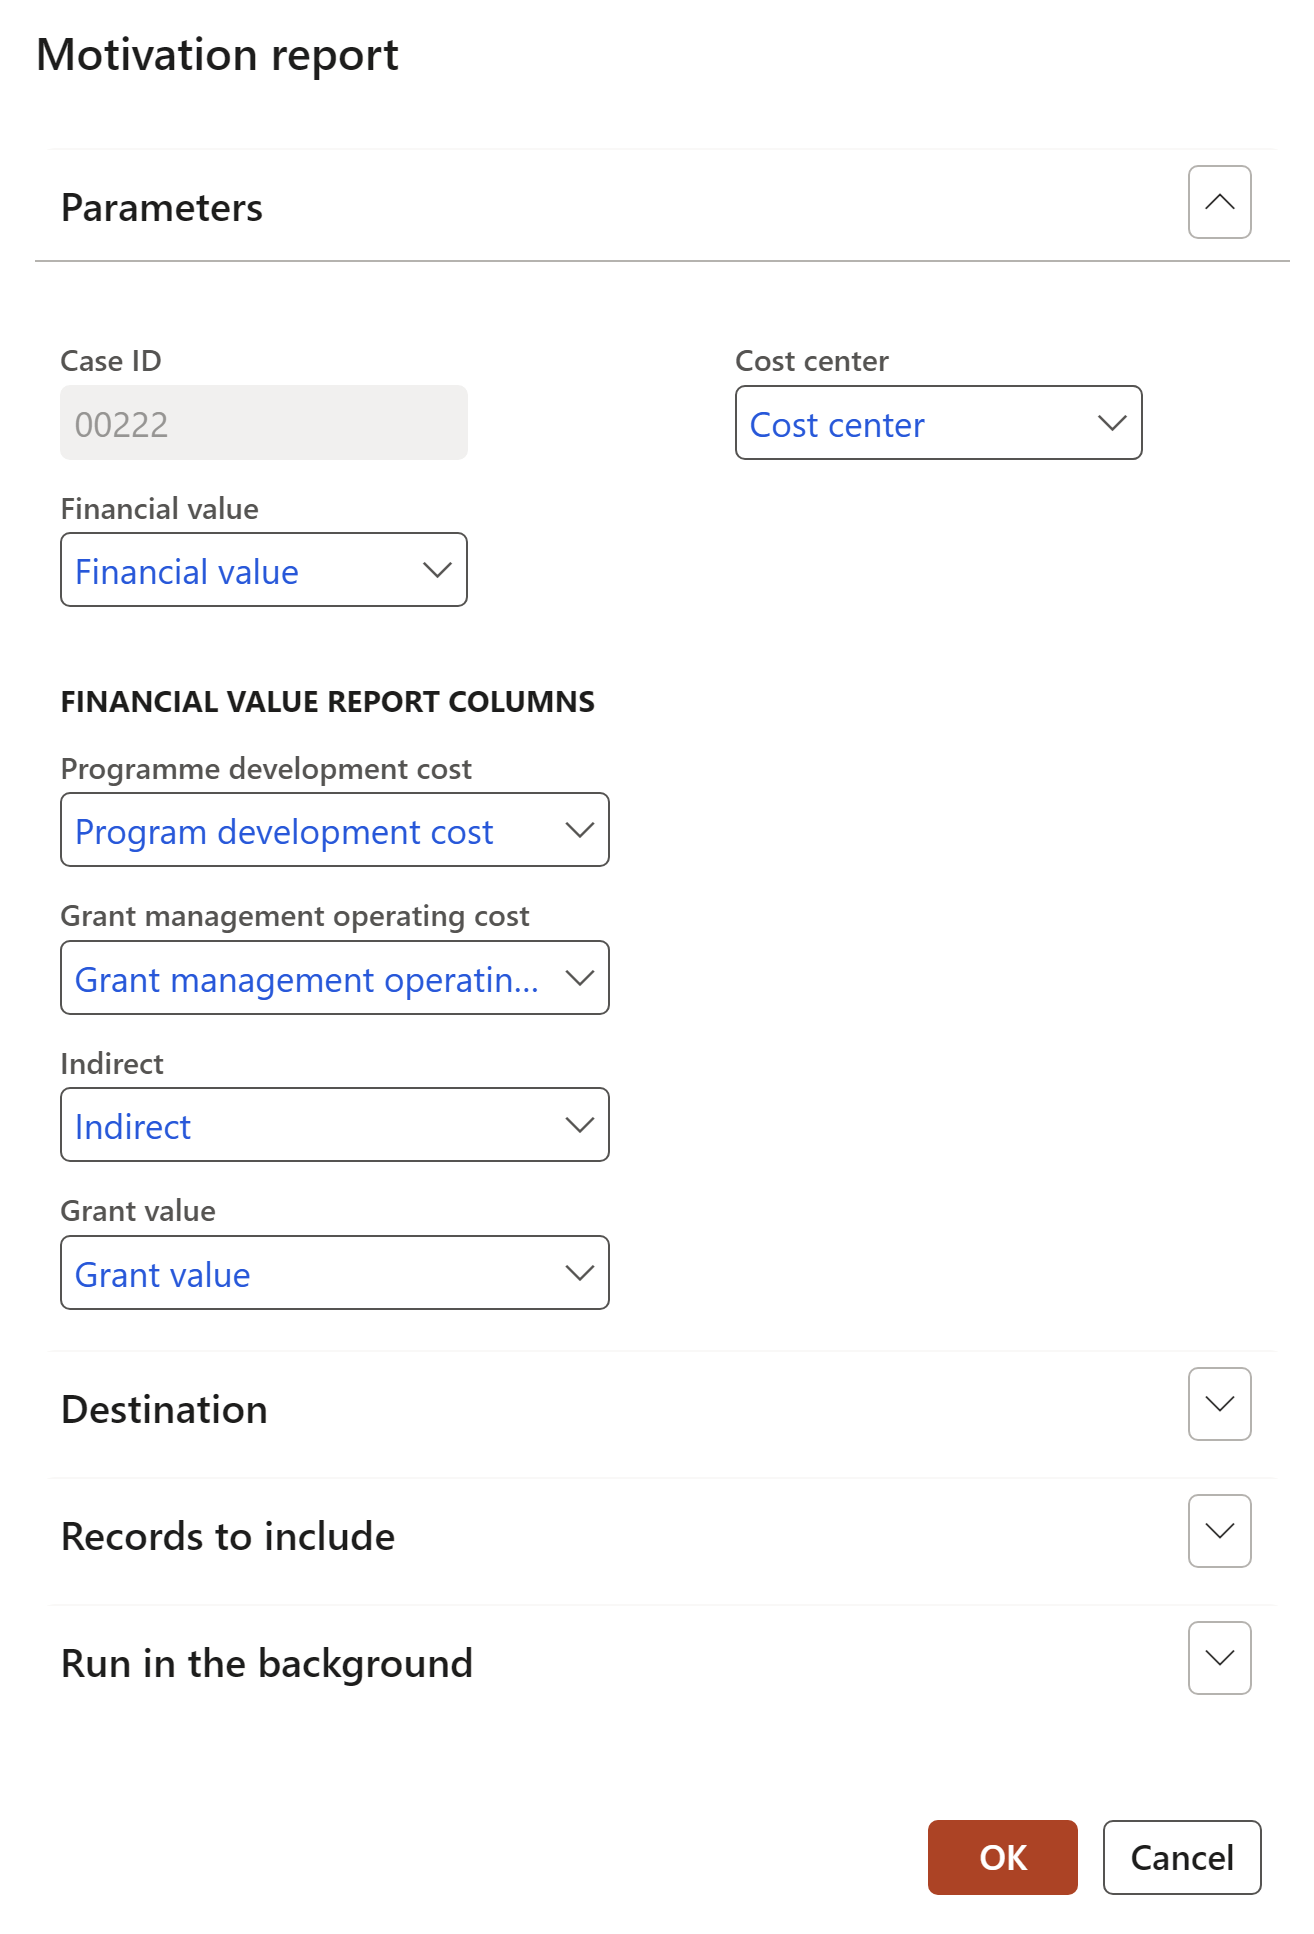
- On the Action pane, under the Case tab, in the Governance group, click on the Motivation report button
- Select the Financial value from the dropdown list
- Select the relevant Financial value report columns from the dropdown lists
- Select the Cost centre from the dropdown list
- Select the relevant contract request
- On the Action pane, under the Case tab, in the Governance group, click on the Create contract button. The status of the contract request will now be Closed
- On the Contract register in legal entity list page, select the relevant contract
- The Contract classification field and the Contract request field, will only be available if the Document type = Contract
- The Worker field will only be editable where Human resources is selected in the Applied to field on the Contract classification setup form
- On the Contract register in legal entity list page, select the relevant contract
- In the Action pane, click on the Change stage button and select Review from the dropdown list
- Enter the details on the New case dialog as described below
- On the Review contracts list page, in the Action pane, click on the New button
- Select Case from the dropdown list
- On the New case dialog, open the General Index tab
- Select the Source Name from the dropdown list
- In the Case category field, select Contracts, then select the Review (Legal 2) option from the list
- Enter a brief Description for the new case
- Click on the Other Index tab
- Select the relevant Department from the dropdown list
- Select the Employee responsible from the dropdown list
- In the Case process field, select Request for review from the dropdown list
- Click on the Contracts Index tab
- Select the relevant Contract to be reviewed from the dropdown list
- Enter a motivation in the Motivation text box (mandatory)
- Click on the Create button
- The contract must exist in the Contract register
- The state of the contract must be Approved
- There can be no existing Contract request (case) against the contract
- On the All contract requests list page, select the relevant contract request
- Under the General Fast tab:
- Currency
- Customer/Vendor account
- Expand the Case log Fast tab
- Click on the Add button
- Select the relevant date in the Date field (If a date is not selected, TODAY’s date will be used)
- Enter a Description for the Source type
- Select the relevant Source type from the dropdown list
- Select the relevant Source ID from the dropdown list
- Enter an Amount
- Expand the Document management Fast tab
- Under the Contract request Index tab:
- Parties involved in the contract request
- Select a Baseline contract
- Linked Purchase/Sales agreement will be displayed
- Under the Motivation Index tab:
- Enter the Motivation for the contract request
- Enter the Background of the contract request
- Enter the Recommendation for the contract request
- Expand the RACI Fast tab
- Select the Employee responsible
- Select the Employee accountable
- Select the Employee consulted
- Select the Employee informed
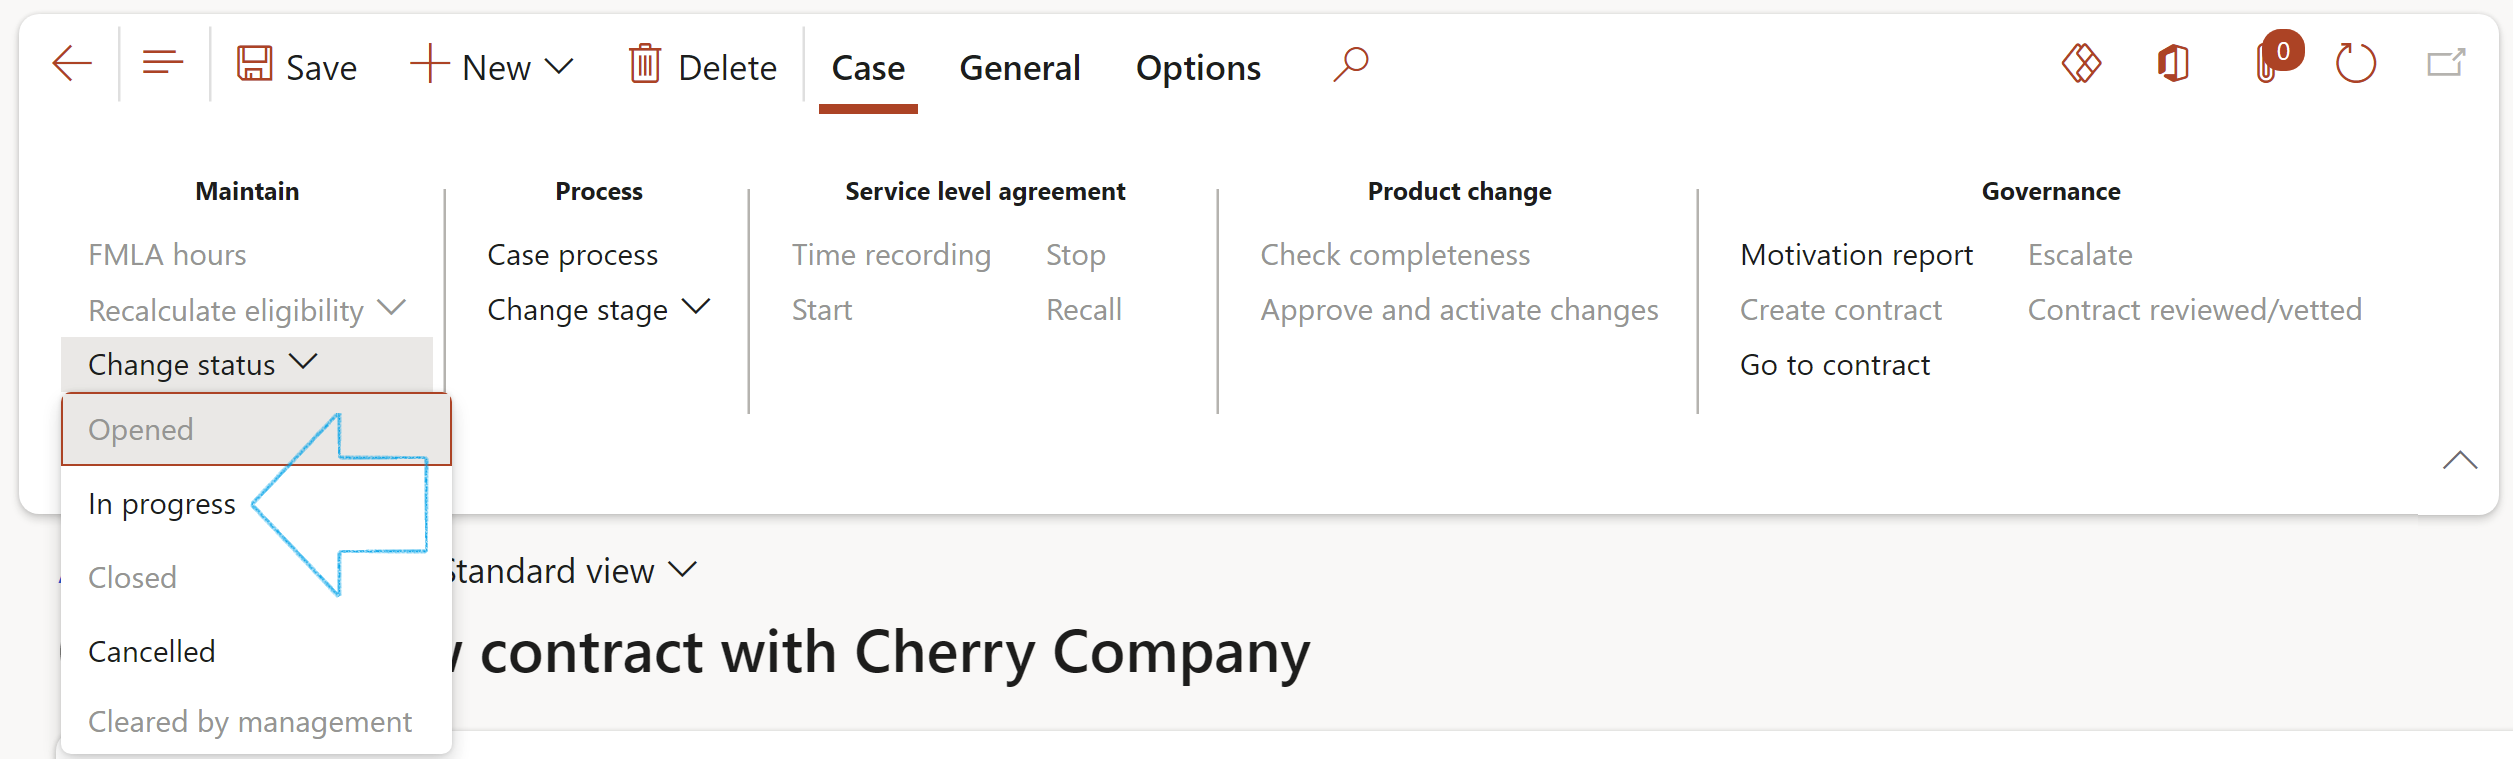
- Select the relevant contract request to be reviewed
- On the Action pane, in the maintain group, click on the Change status button
- Select In progress from the dropdown list
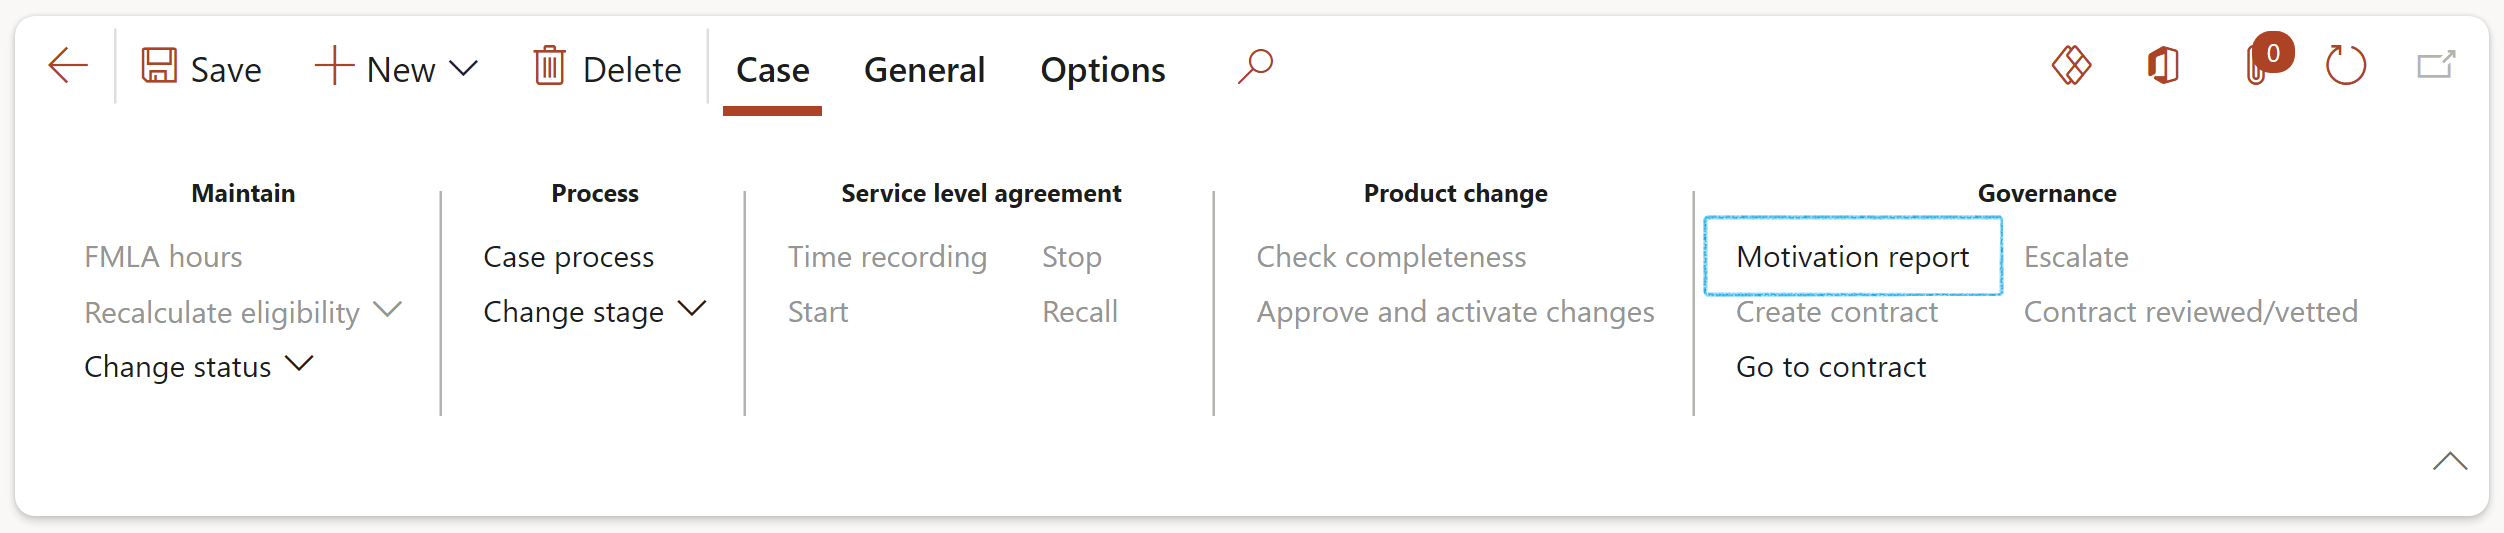
- Select the relevant contract request
- On the Action pane, under the Case tab, in the Governance group, click on the Motivation report button
- Select the Financial value from the dropdown list
- Select the relevant Financial value report columns from the dropdown lists
- Select the Cost centre from the dropdown list
- Select the relevant record
- On the Action pane, under the Case tab, in the Governance group, click on the Contract reviewed/vetted button
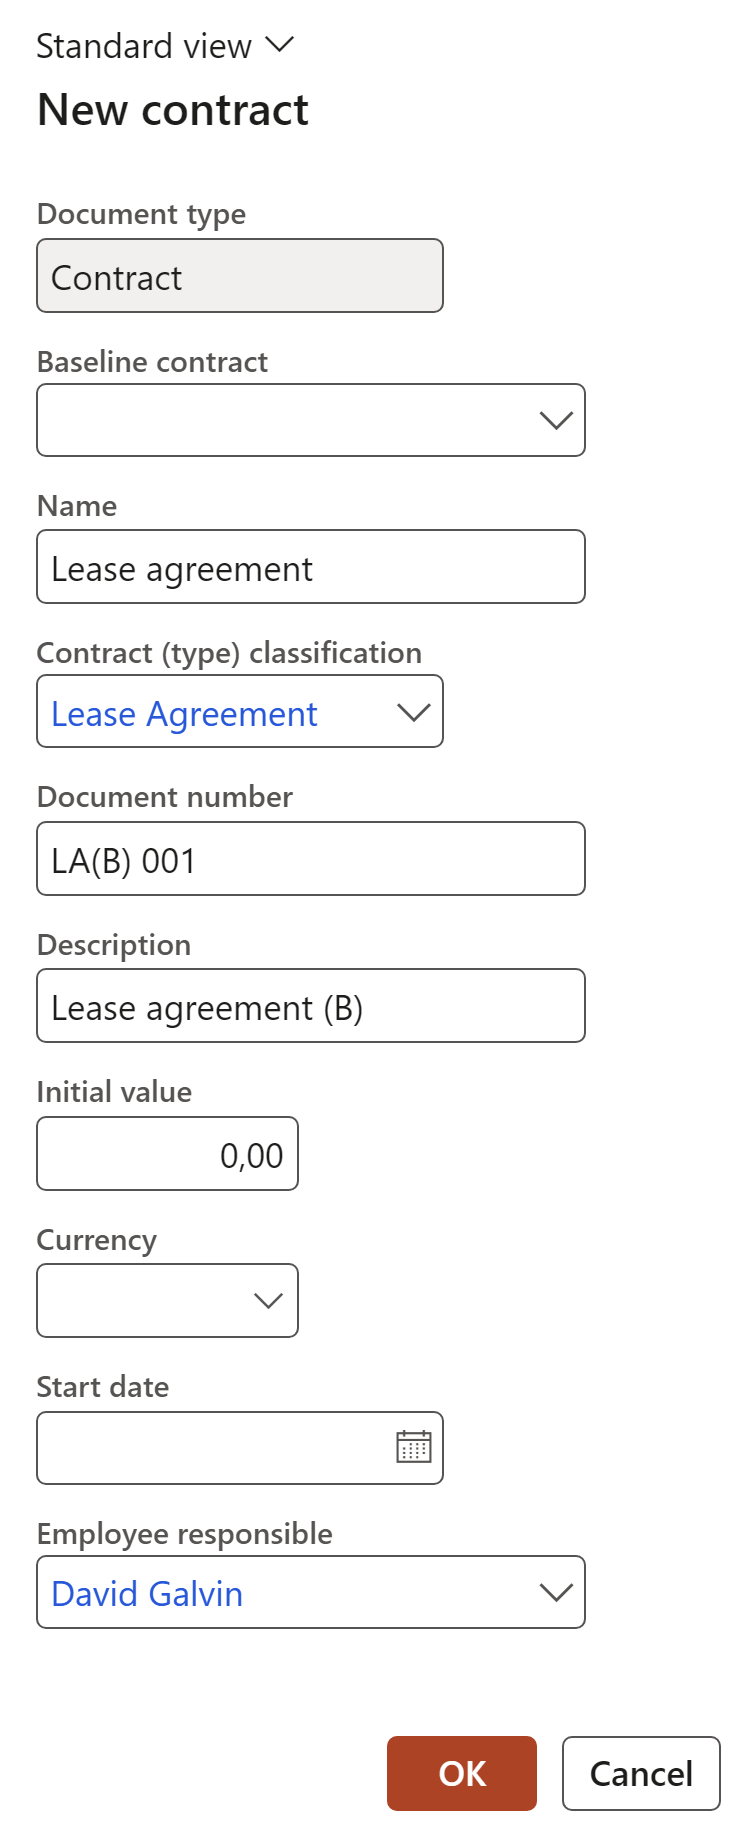
- On the Action pane, click on the New button, and click on Document
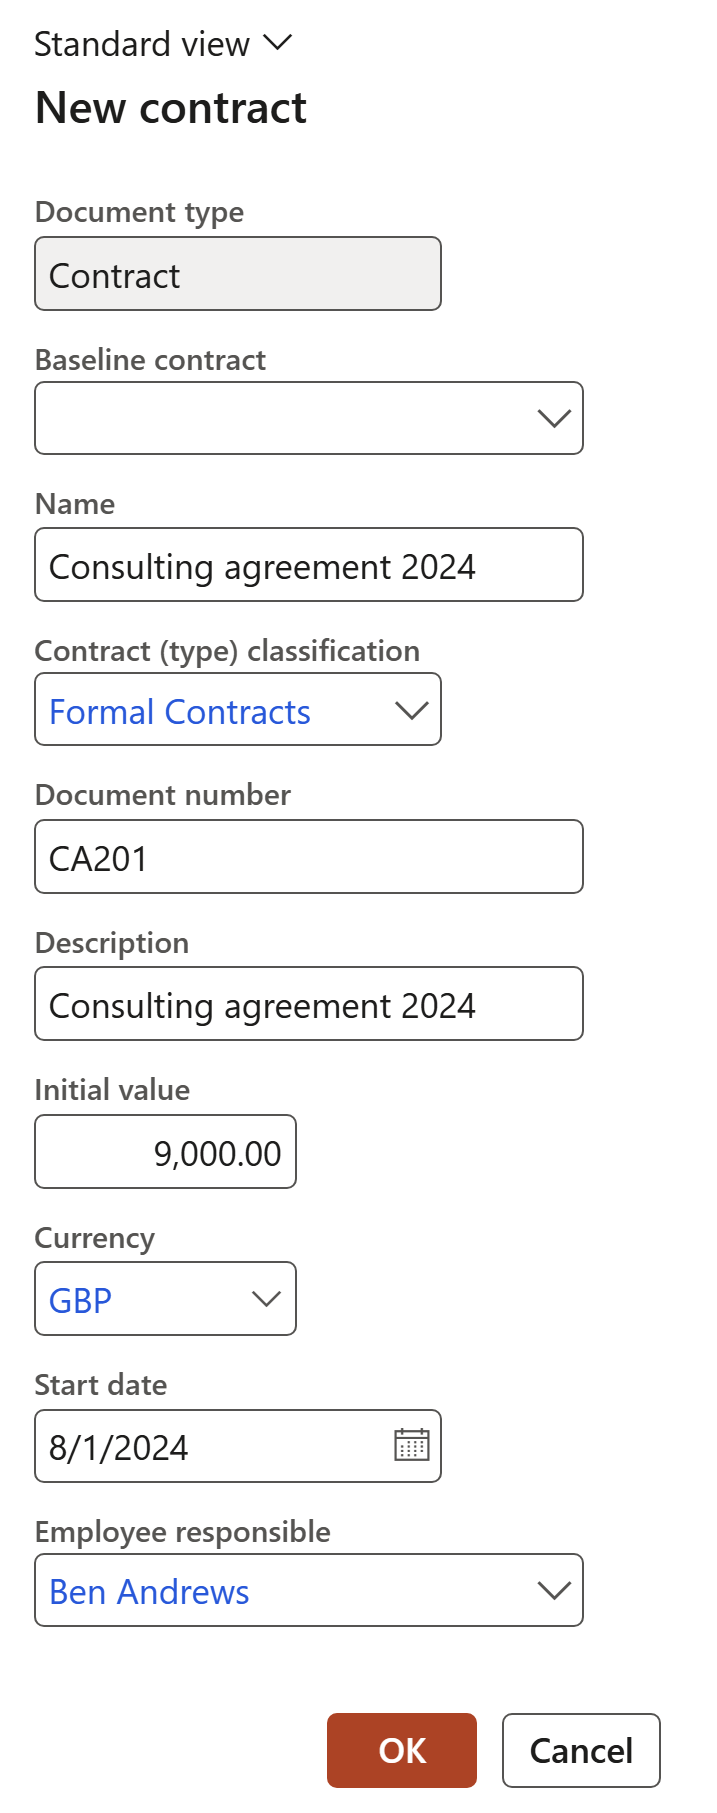
- On the New contract dialog:
- Enter a Name for the contract
- Select the relevant Contract (type) classification from the dropdown list
- Enter a Document number
- Select the relevant Currency from the dropdown list
- Enter the Start date for the contract
- Enter the Date of expiration for the contract
- Select the Employee responsible for the contract, from the dropdown list. This worker's name will populate the Employee responsible field under the RACI and other contacts Fast tab on the Contract.
- Click on the OK button
- On the Contract, under the Content Fast tab, add the relevant Preamble details, as well as the required Clauses (Step 20 below)
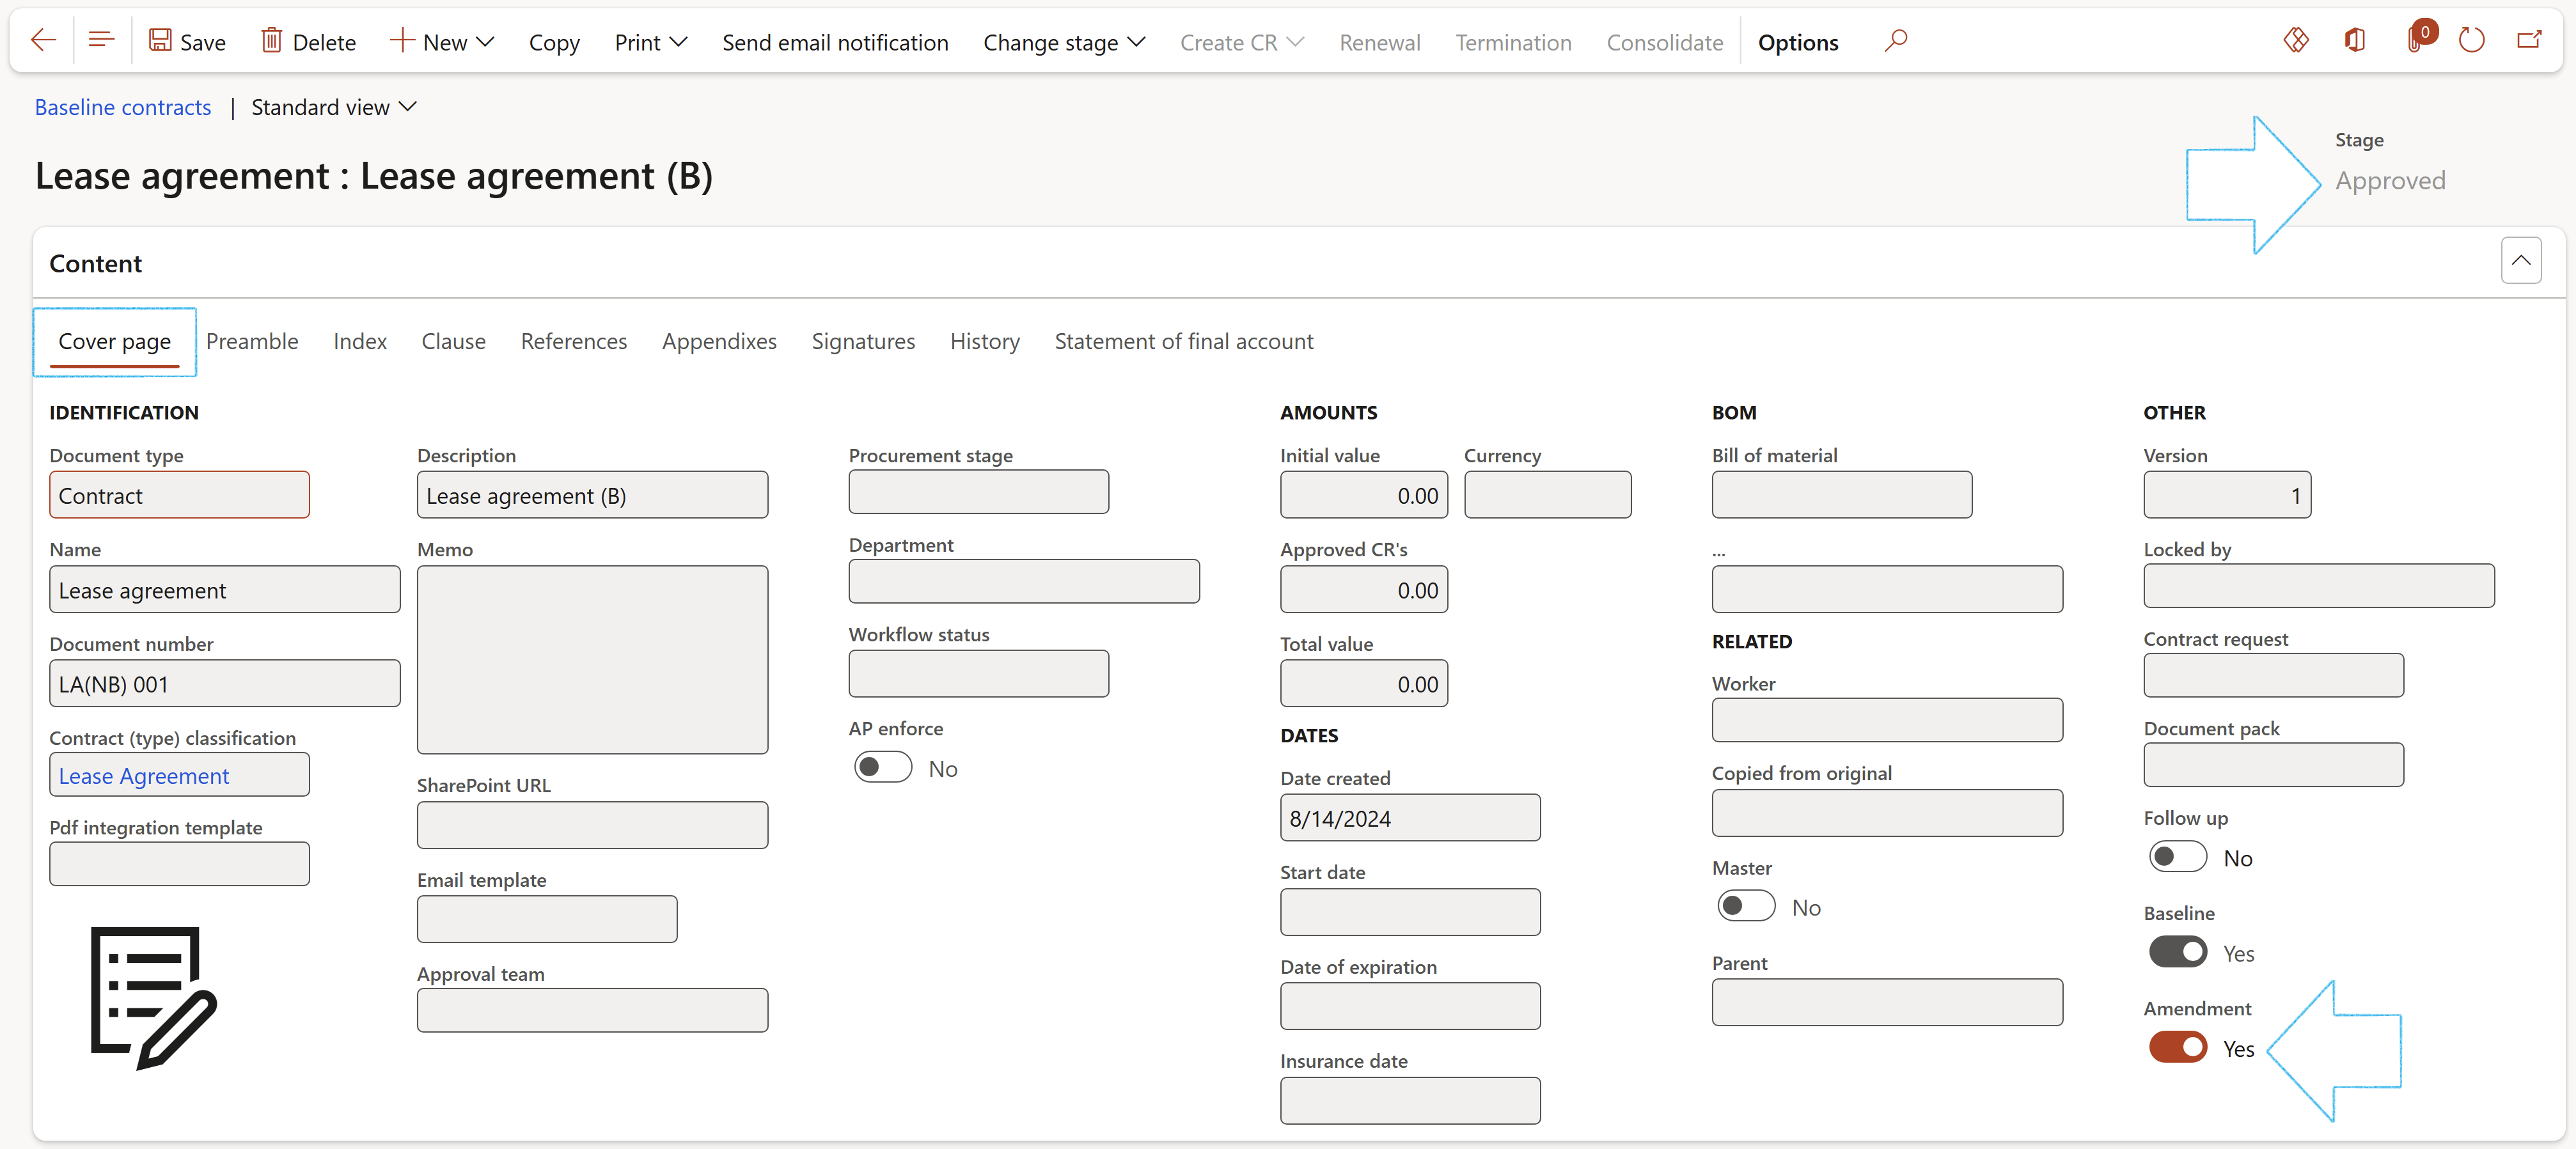
- Under the Content Fast tab, Cover page Index tab, move the Baseline slider to Yes
- A message will pop up to warn the user that the record will be locked and certain records will be cleared
- Select the baseline contract that you want to use for amendments
- Under the Content Fast tab, move the Amendment slider to Yes
- Submit the baseline contract into workflow. Once fully approved, the Stage of the Amendment baseline contract to Approved
- On the Action pane, click on the New button, and click on Document
- On the New contract dialog:
- Enter a Name for the contract
- Select the relevant Baseline contract from the dropdown list (Optional)
- Select the relevant Contract (type) classification from the dropdown list
- Enter a Document number
- Enter the contract Value
- Select the relevant Currency from the dropdown list
- Enter the Start date for the contract
- Enter the Date of expiration for the contract
- Select the Employee responsible for the contract, from the dropdown list
- Click on the OK button
- The Contract (type) classification field will be populated with the Contract (type) classification selected on the Baseline contract
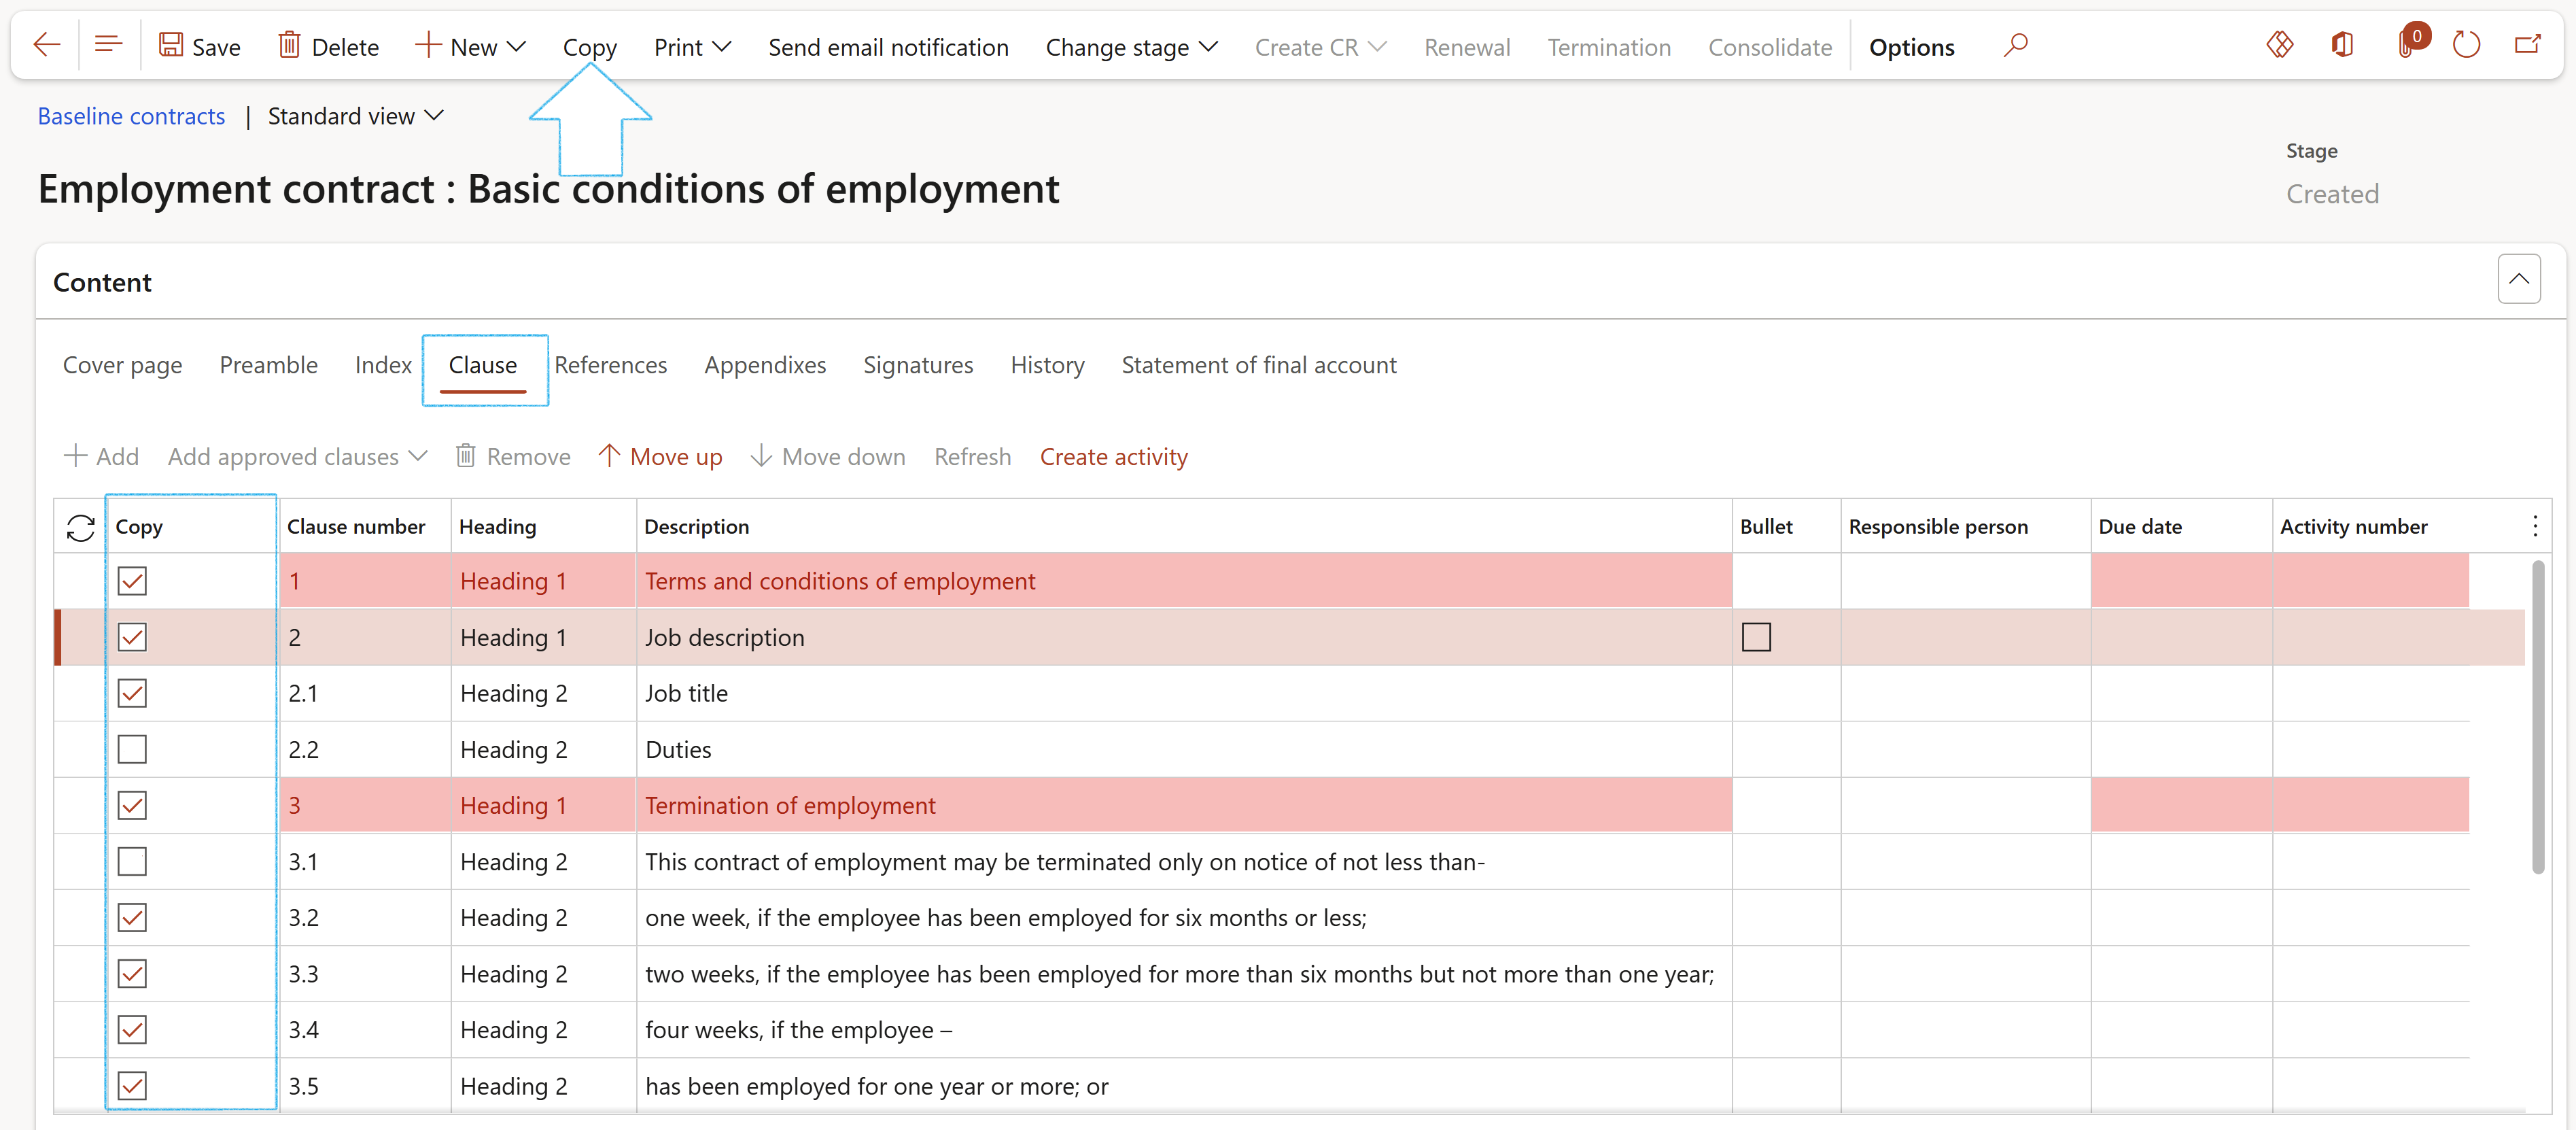
- The clauses that you want to copy from the Baseline contract to the new contract, must have the Copy box ticked
- If a BOM exists on the baseline, the BOM lines will copied to the new contract
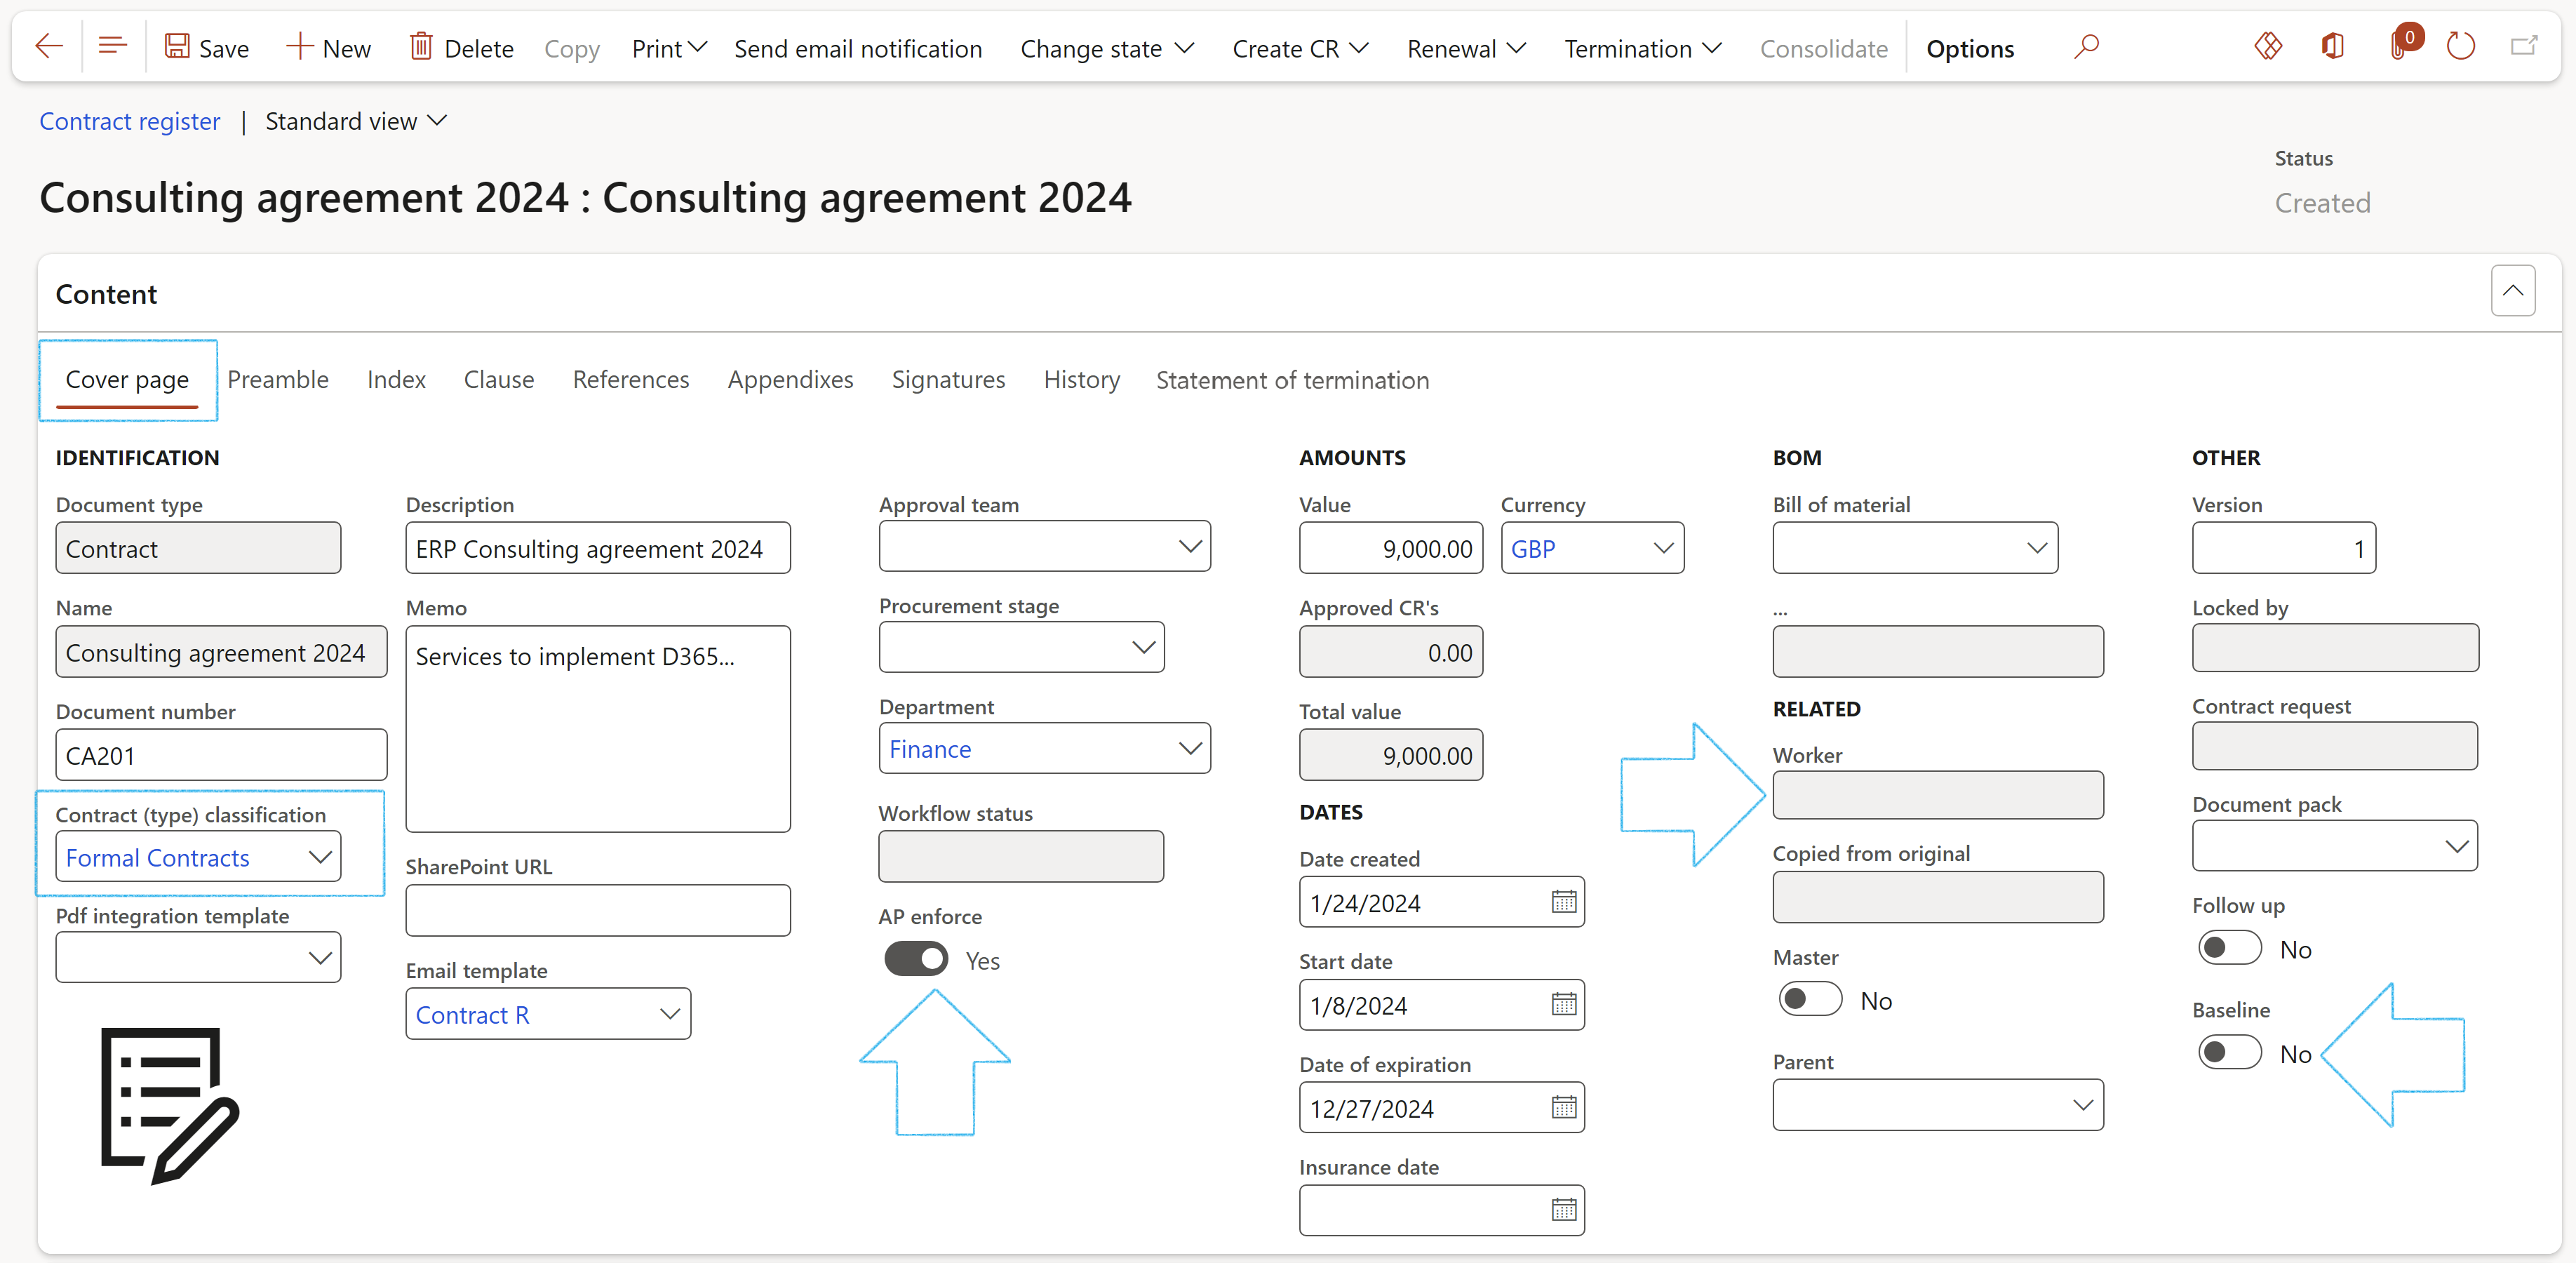
- Under the Content Fast tab:
- Open the Cover page Index tab
- Enter a link in the SharePoint URL field
- Enter a brief Description of the document
- If this contract has to be approved by a team, select the relevant Approval team from the dropdown list
- Select the department that the contract belongs to in the Department field
- Navigate to GRC > Governance > Contracts > Department contracts to see a list of contracts linked to the Worker's department
- The user has one of 3 options to create the Package ID. In the Package ID field:
- Enter the required ID
- Select the relevant value from the dropdown list
- Click on the gear icon. The system will then generate the package ID
- The AP enforce slider is a display of what was specified on the Contract classification that was selected
- The State of the document can be changed by clicking on the Change state button on the Action pane
- **If this is an employment contract, select the employee’s name from the Worker dropdown list
- Select the relevant Dates
- If this contract was requested, the Contract request ID will be displayed
- Indicate whether a Review has to be done
- Select the relevant Document pack (if applicable)
- If there are no Item lines selected against the contract, a warning message will be displayed.
- If there are no Financial dimensions selected against the contract, a warning message will be displayed.
- On a Baseline contract, under the Content Fast tab, open die Clause Index tab
- Tick the Copy tick box of all the clauses that you want to copy to the new contract
- In the Action pane, click on the Copy button
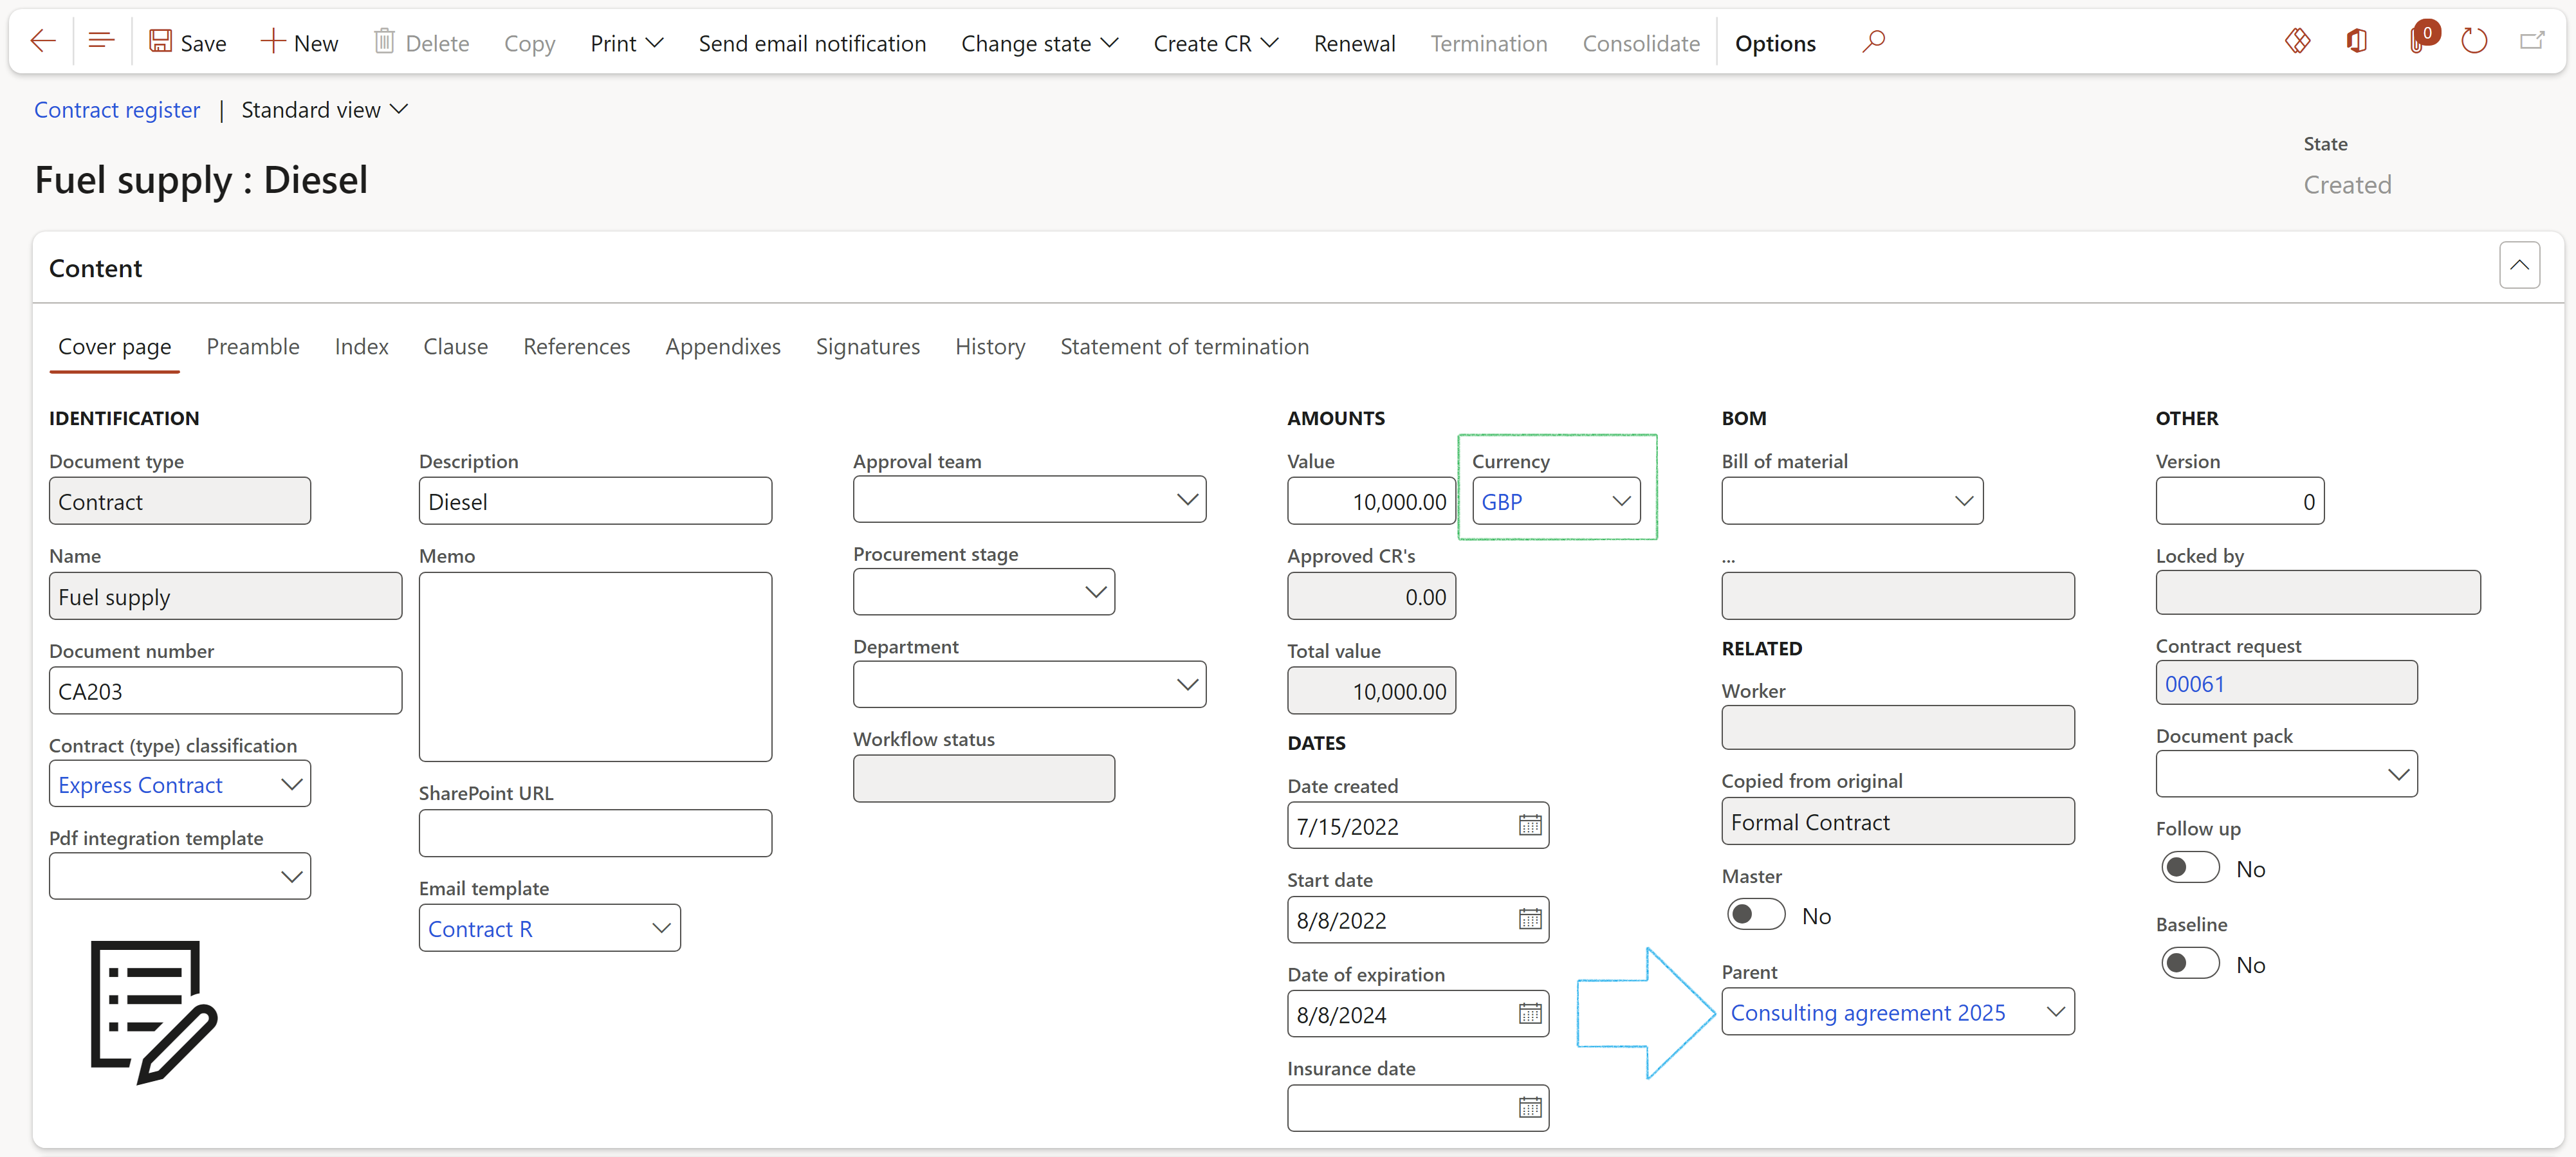
- A Parent can be selected for the contract by selecting the relevant contract from the Parent dropdown list
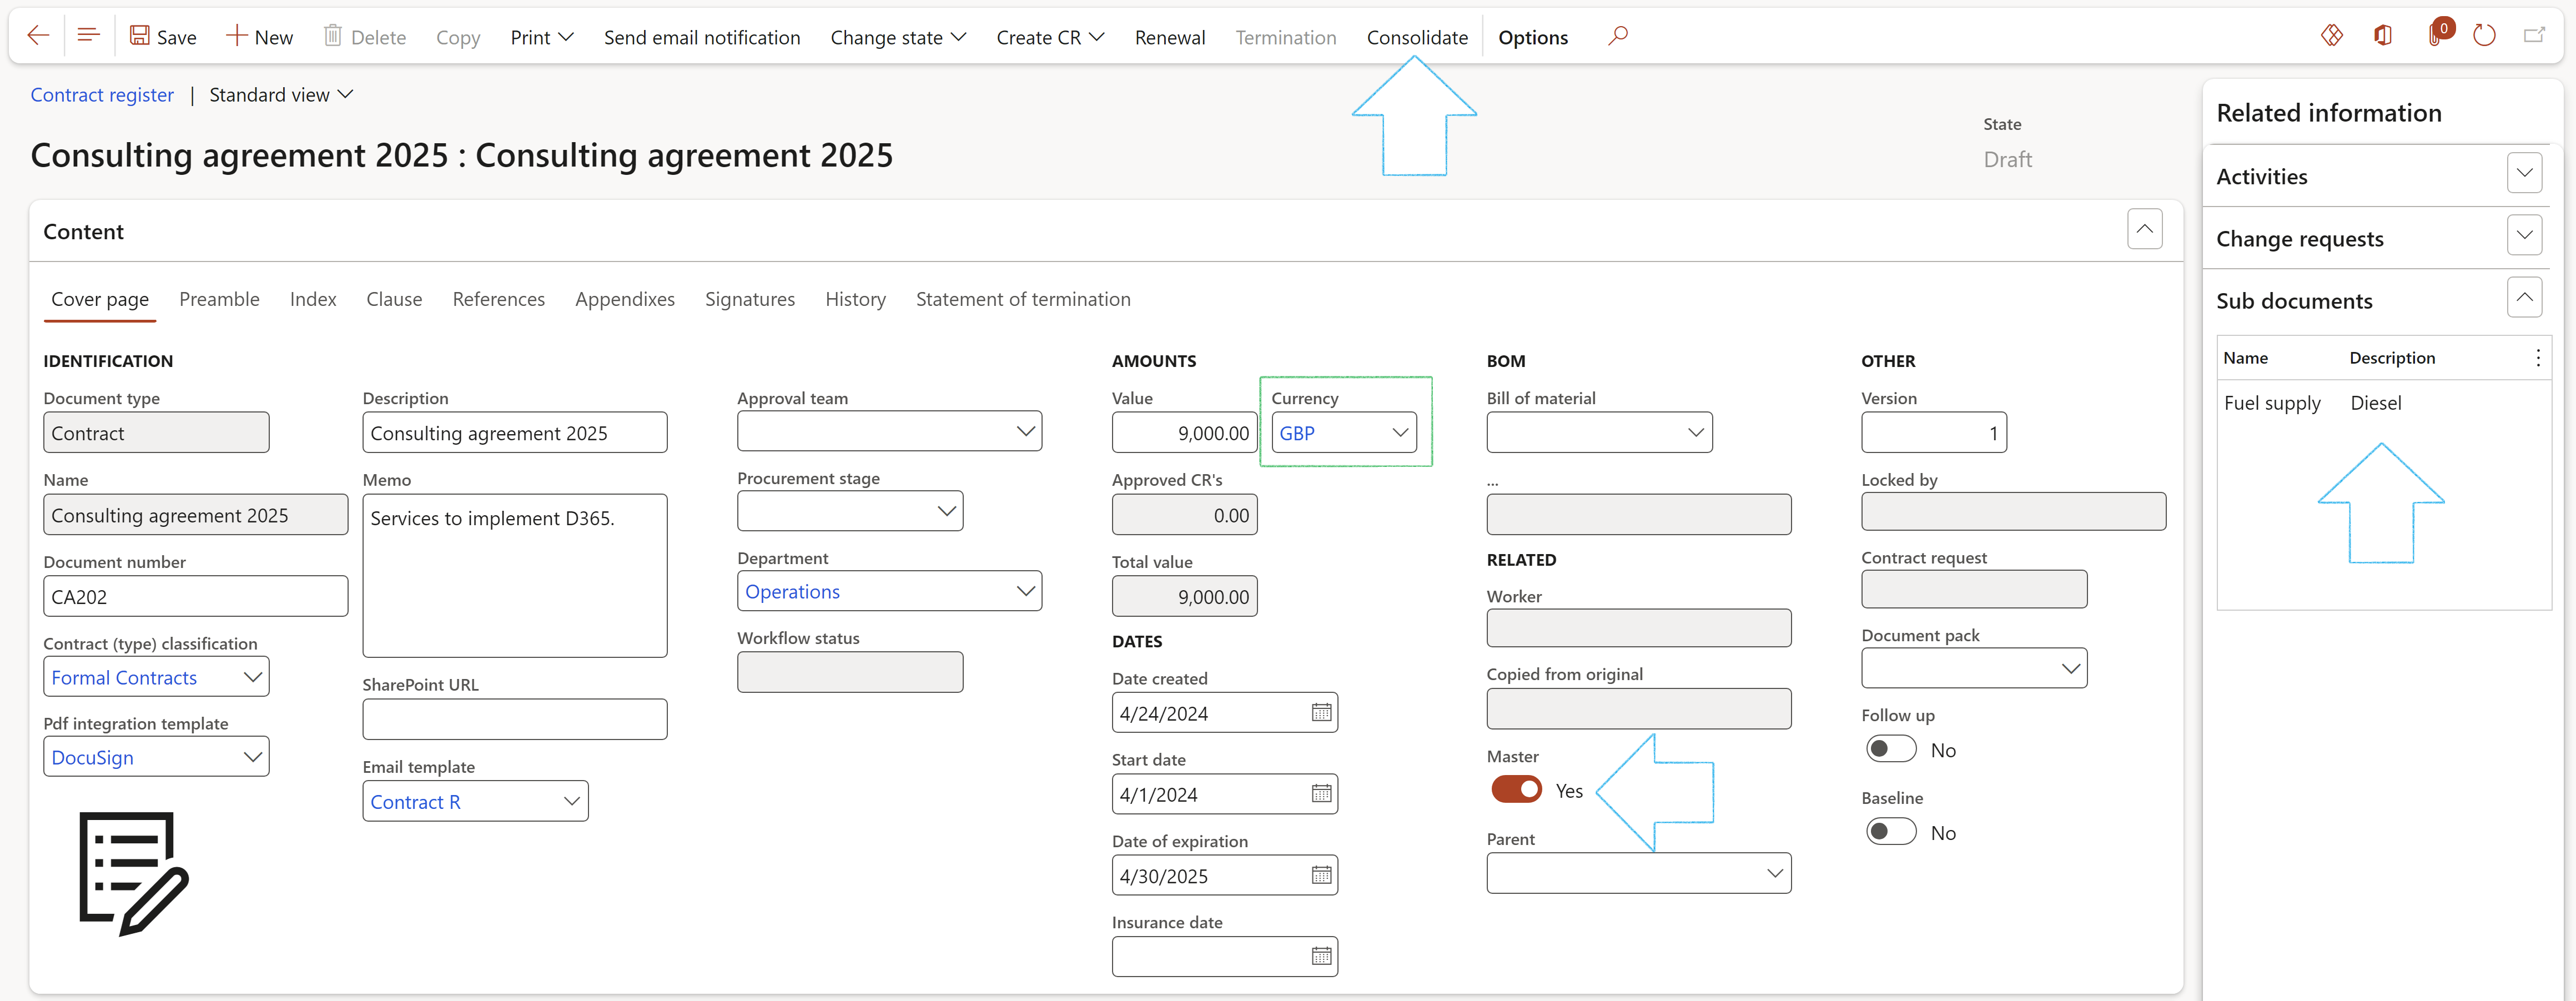
- Only Master contracts with a state of Draft can be selected as a Parent on another contract
- A contract can be marked as a Master by moving the slider to Yes
- The Sub documents of a Master record can be viewed in the Related information pane
- The Consolidate button in the Action pane, is only available for Master contracts
- When this button is clicked, the values from the “children” contracts are added and displayed in the Value field under the Content Fast tab on the Master contract
- Only Master contracts with a state of Draft can be selected as a Parent on another contract
- The Currency on the Master must be the same on the “Child”
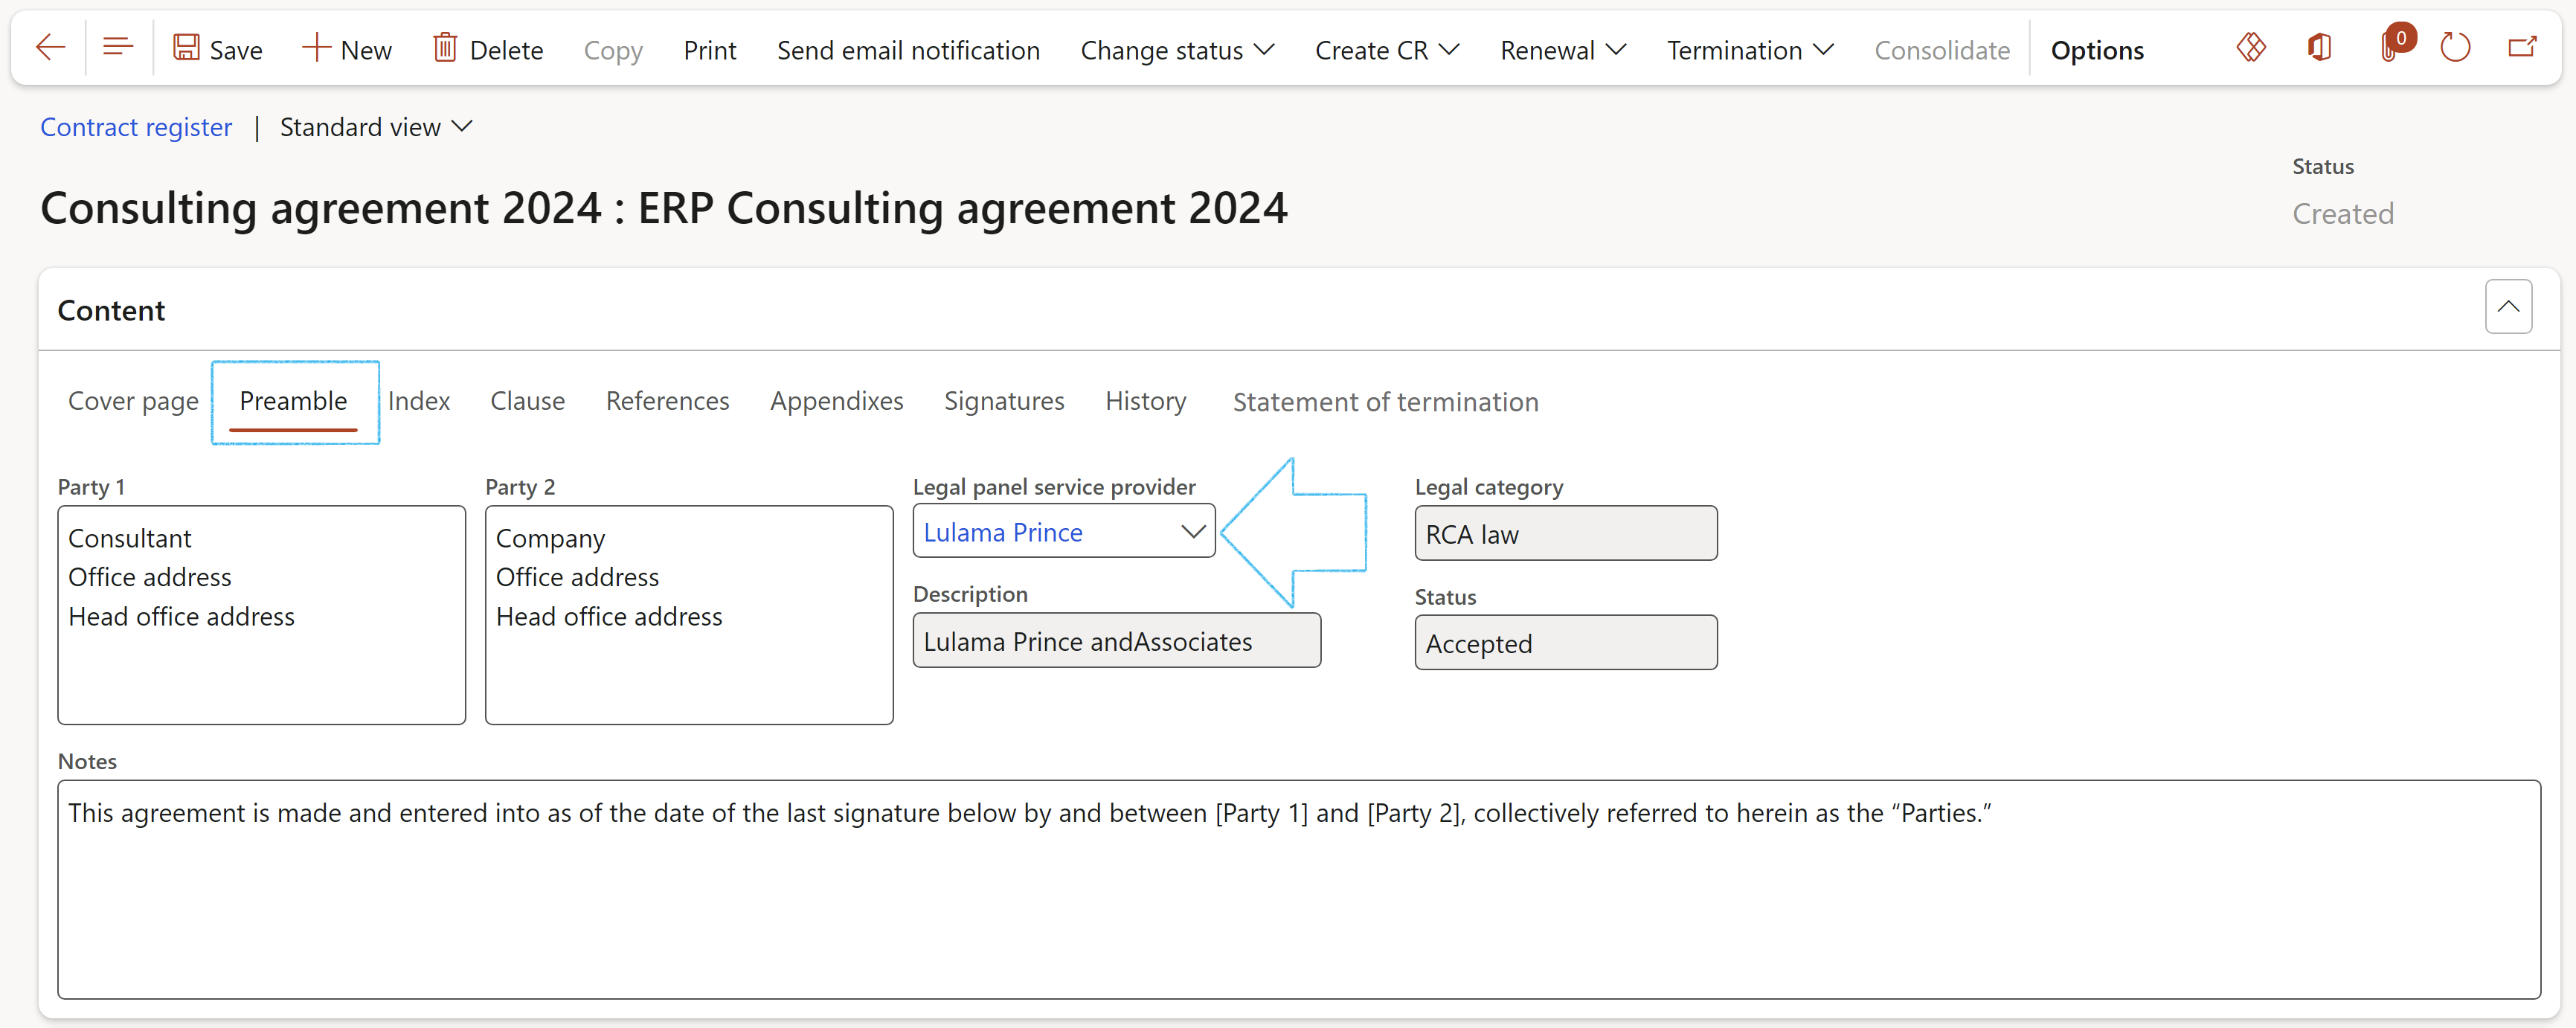
- Open the Preamble tab
- Enter the details of Party 1 and Party 2 in the note boxes provided
- Select the Legal panel service provider from the dropdown list. (Only legal panels with a status of Accepted will be on this dropdown list)
- The text entered in te Notes box, will be printed as the preamble on the contract
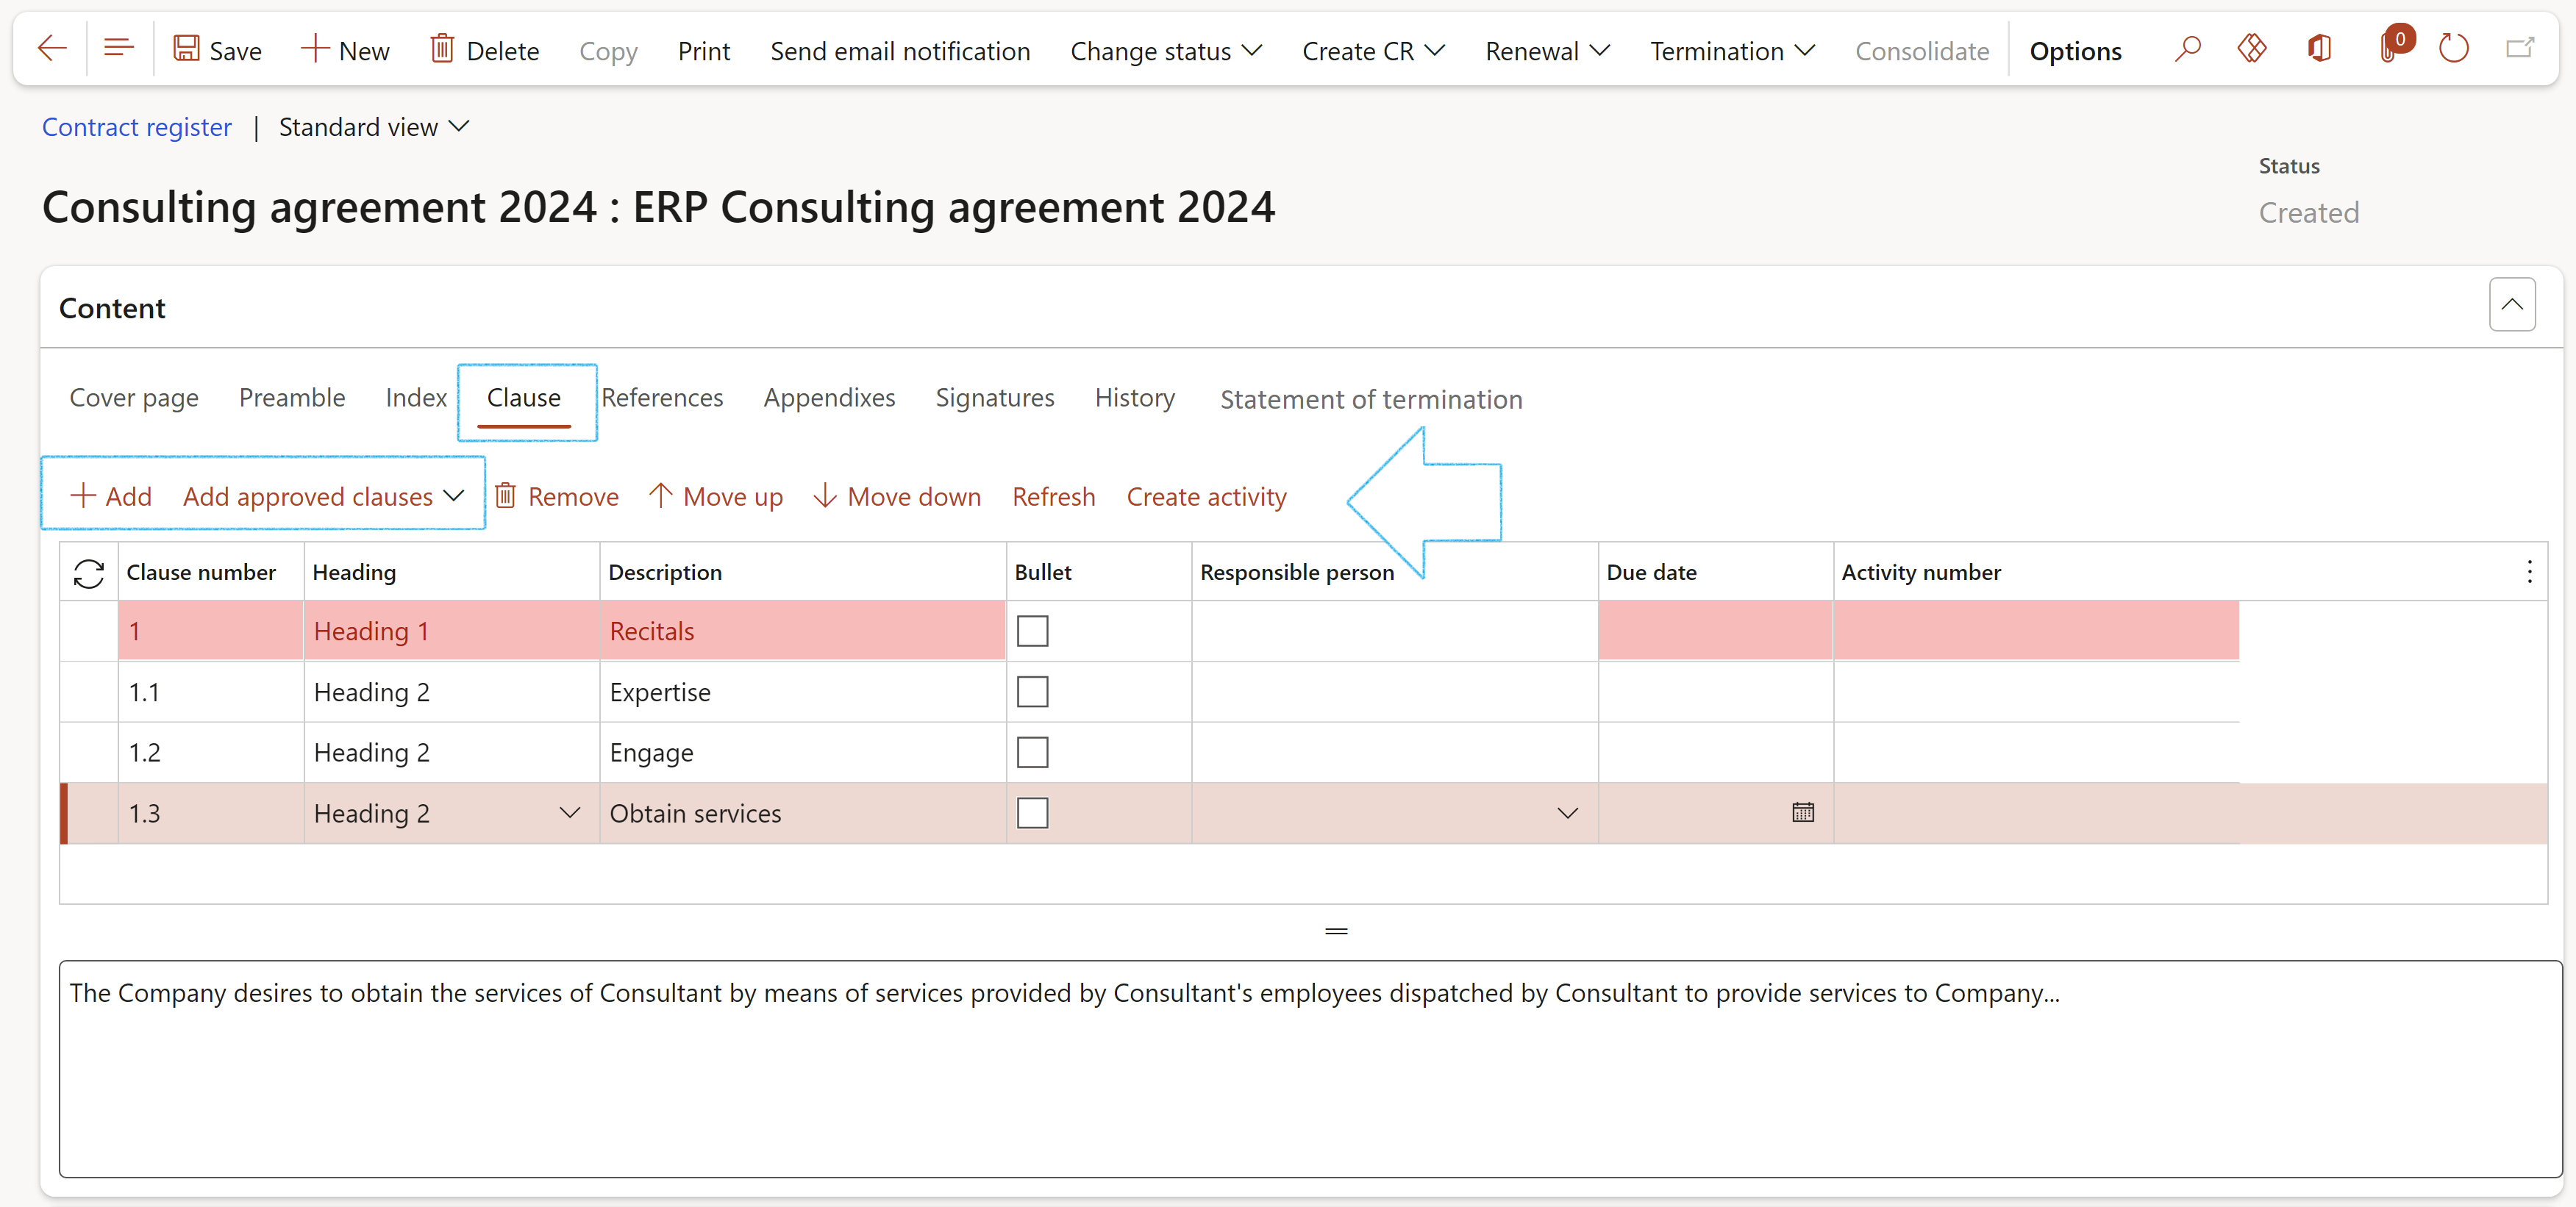
- Open the Clause tab
- In the Button strip, click on the Add button
- The Clause number will be generated by the system
- Select the Heading (Heading 1 for a primary heading, Heading 2 for a secondary heading)
- Enter a Description
- If required, select the worker responsible for doing the Action
- Select the date by which the action should take place
- Use the box provided to type the Clause definition
- Click on the Add approved clauses button and select the relevant approved clause form the dropdown list
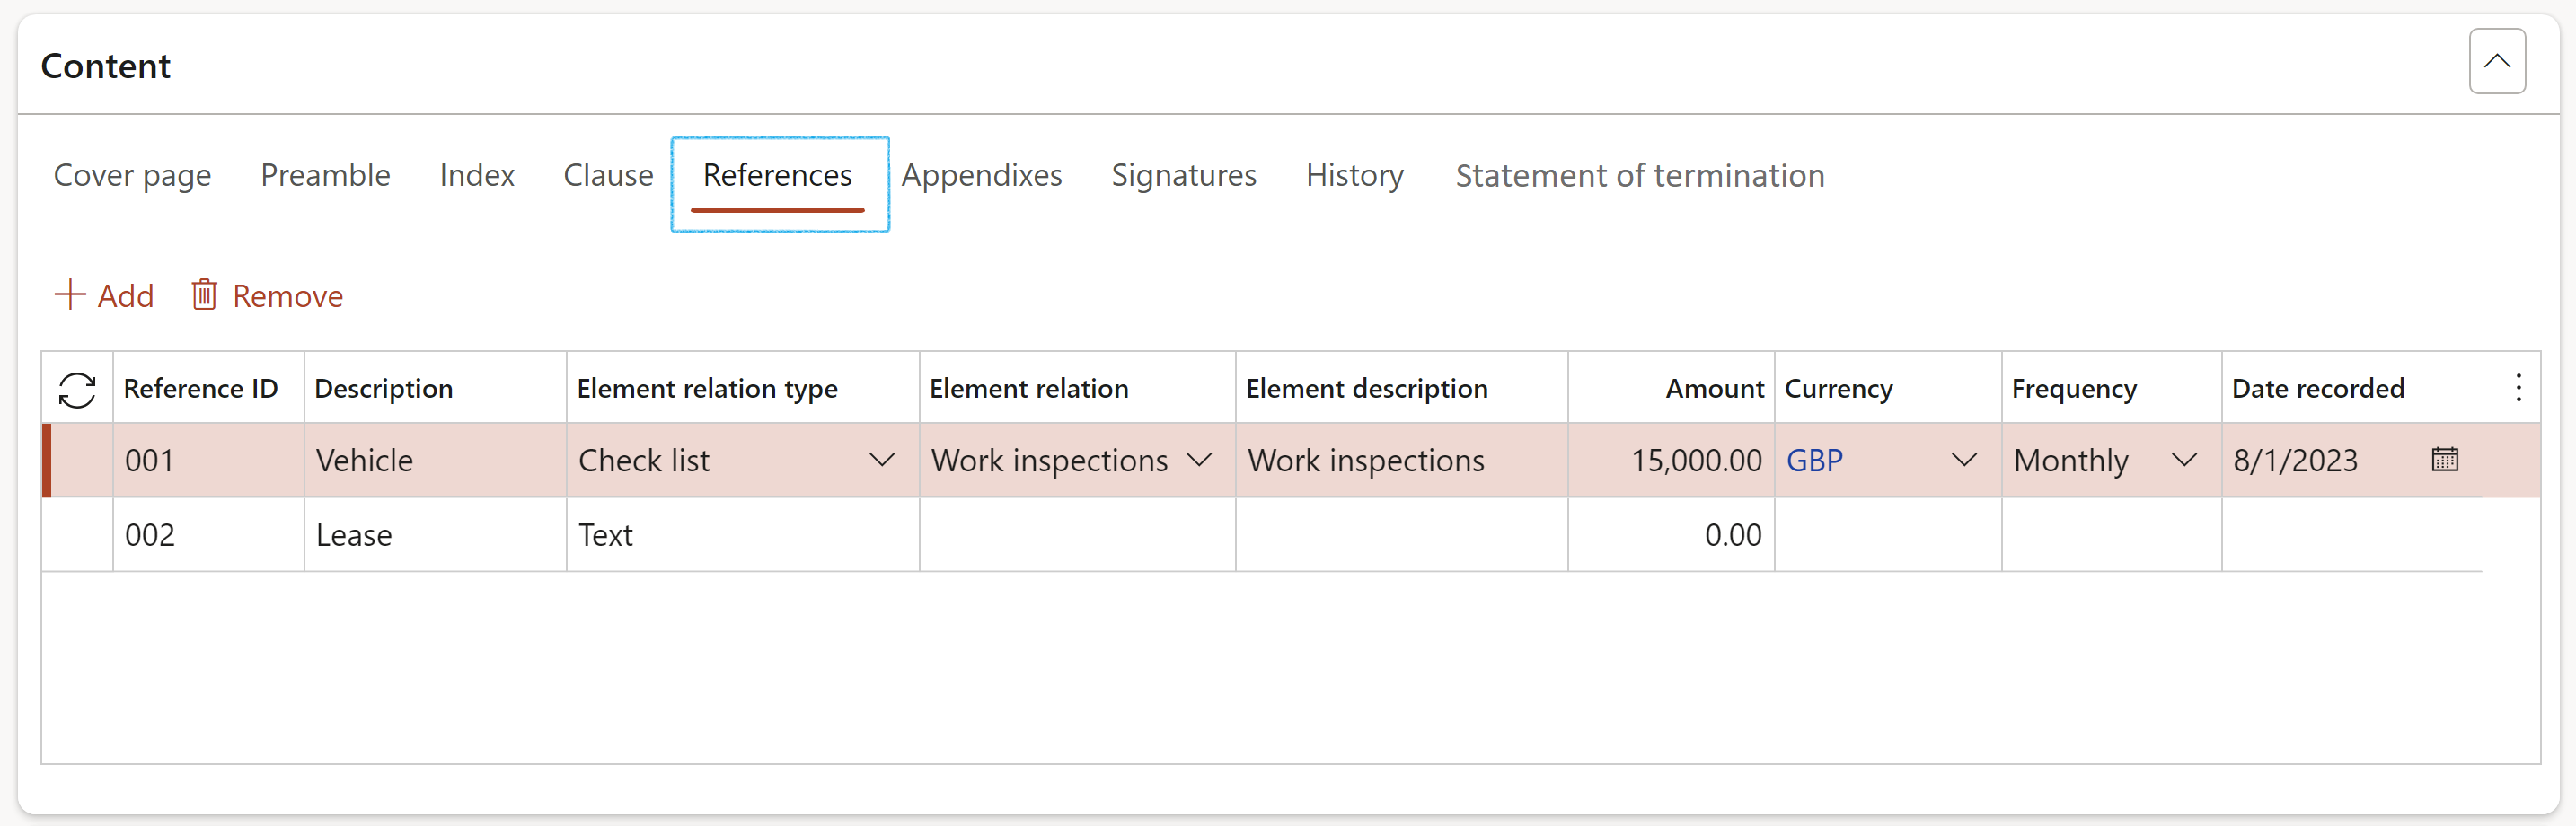
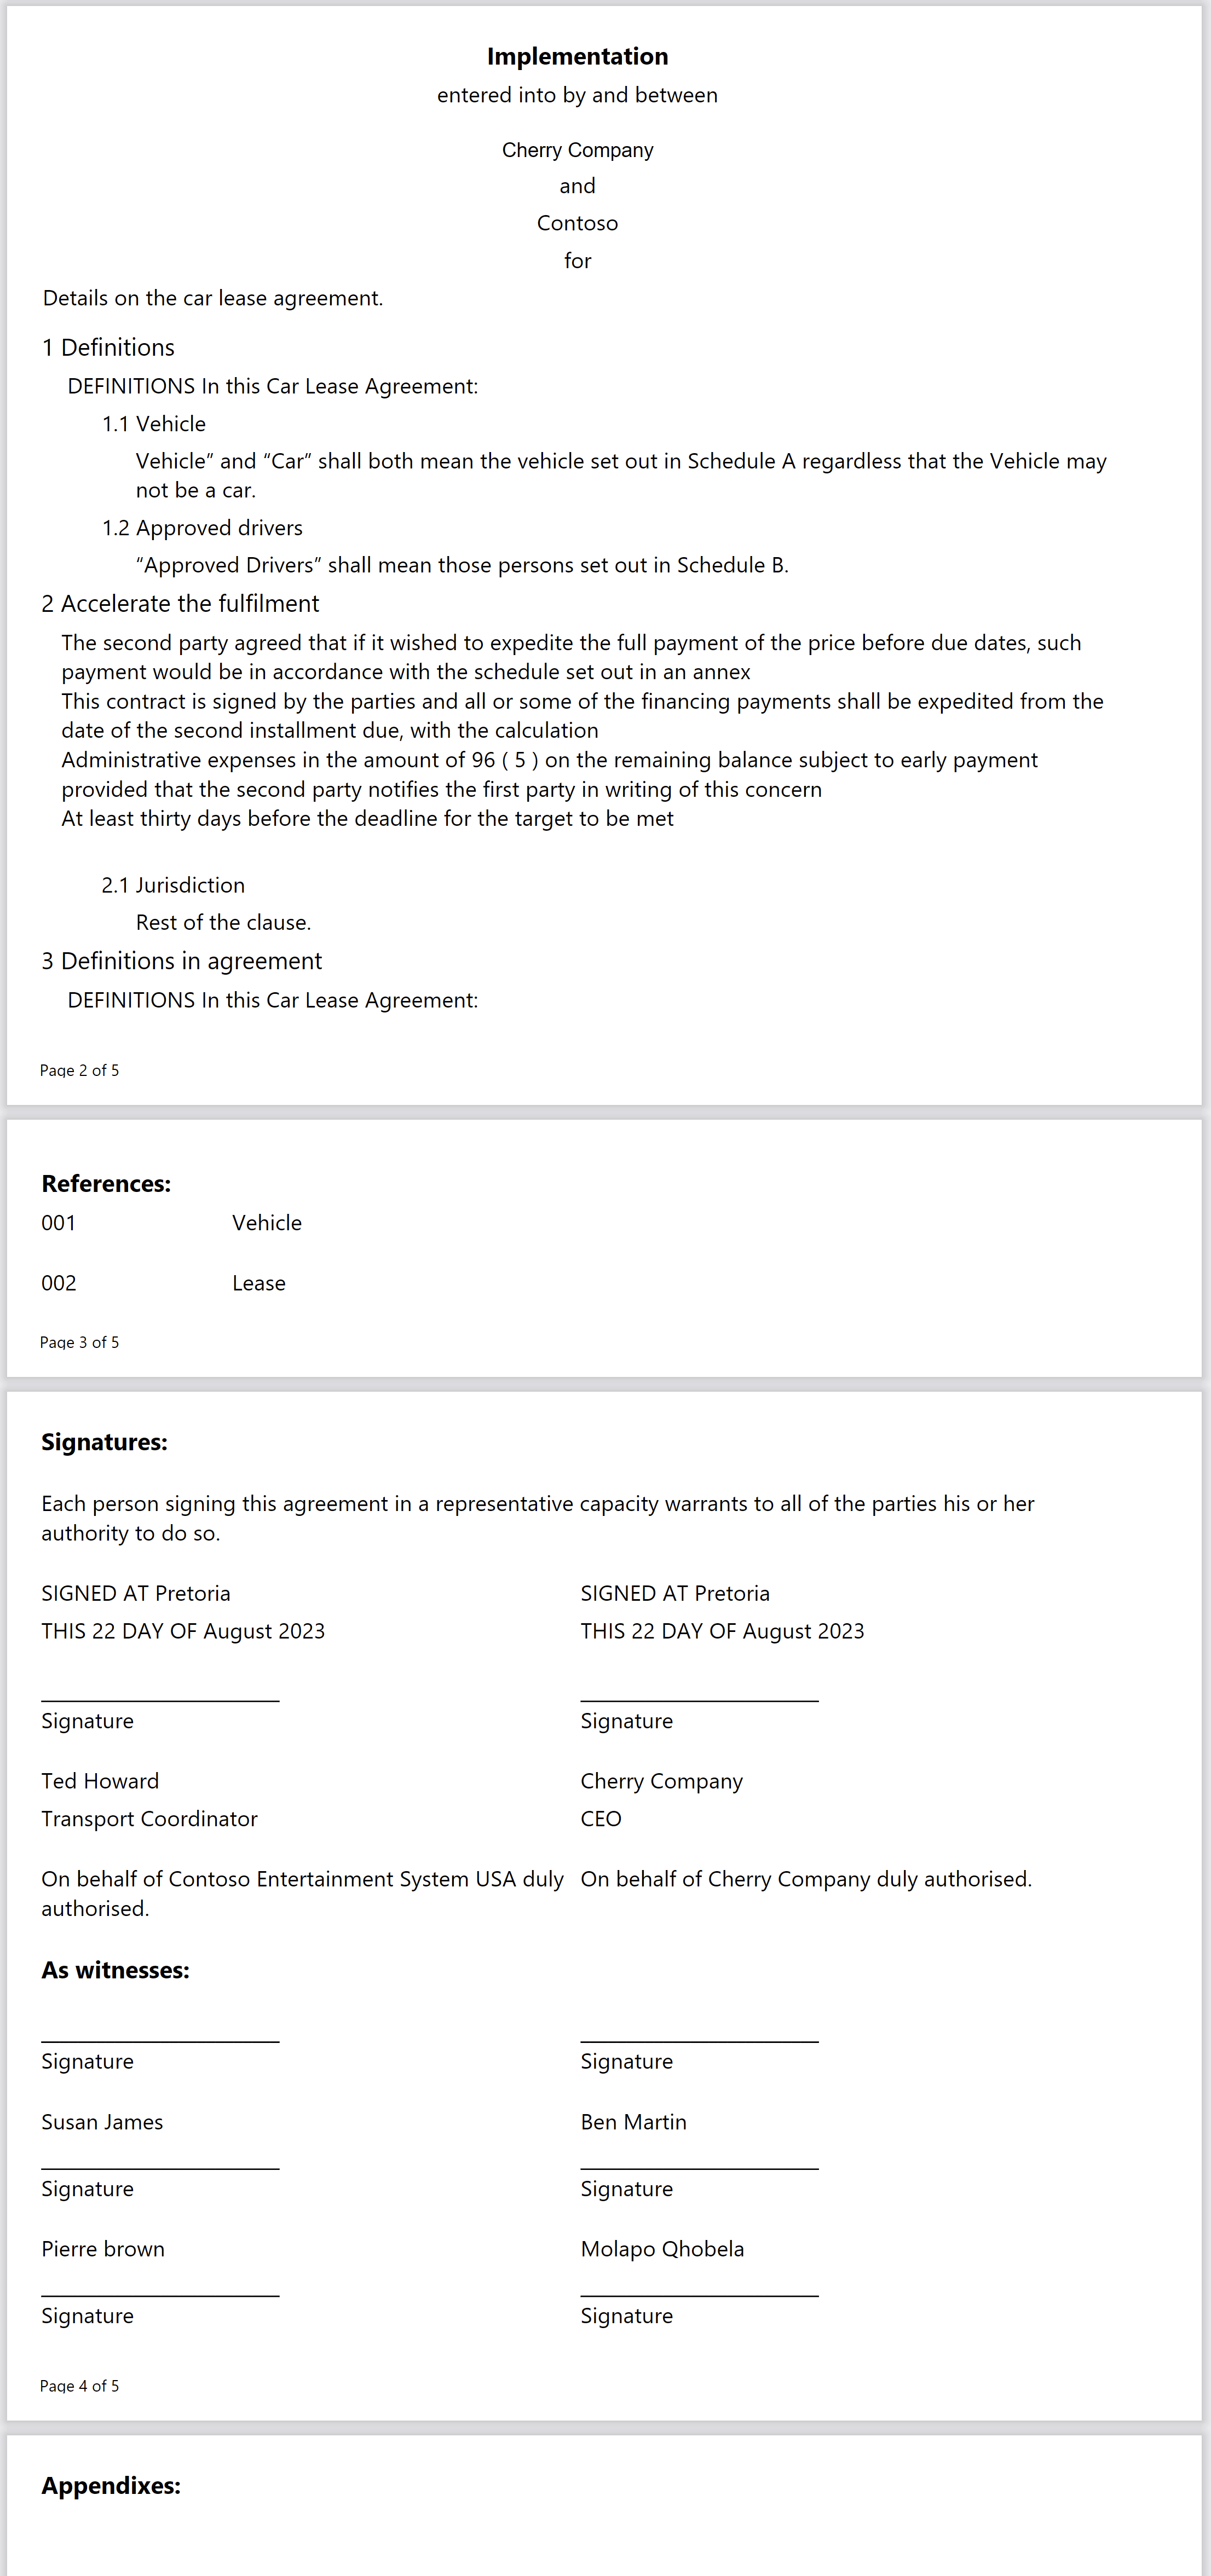
- Open the References tab
- In the Button strip, click on the Add button
- Enter a Reference ID
- Enter a brief Description
- Select the relevant Element relation type from the dropdown list
- Select the relevant Element relation from the dropdown list
- Enter the Element description
- Enter the Amount
- Select the relevant Currency from the dropdown list
- Select the relevant Frequency from the dropdown list
- Enter the Date recorded
- For contracts, users will be able to reference physical agreements (on the “Purchase and Sales agreement” forms) under the Trading partner Fast tab against vendors and customers. See the screenshot below.
- The Total value field, under the Content Fast tab, displays the sum of the Value field and the Approved CR’s field (Remaining contract value). This value can be given to one or more suppliers/vendors by selecting them under the Trading partners Fast tab.
- The Worker field will only be editable where Human resources is selected in the Applied to field on the Contract classification setup form
- The Approved CR’s field displays the sum of all linked CR’s with status = Approved
- The Total value field displays the sum of the Value field and the Approved CR’s field (Remaining contract value). This value can be given to one or more suppliers/vendors by selecting them under the Trading partners Fast tab.
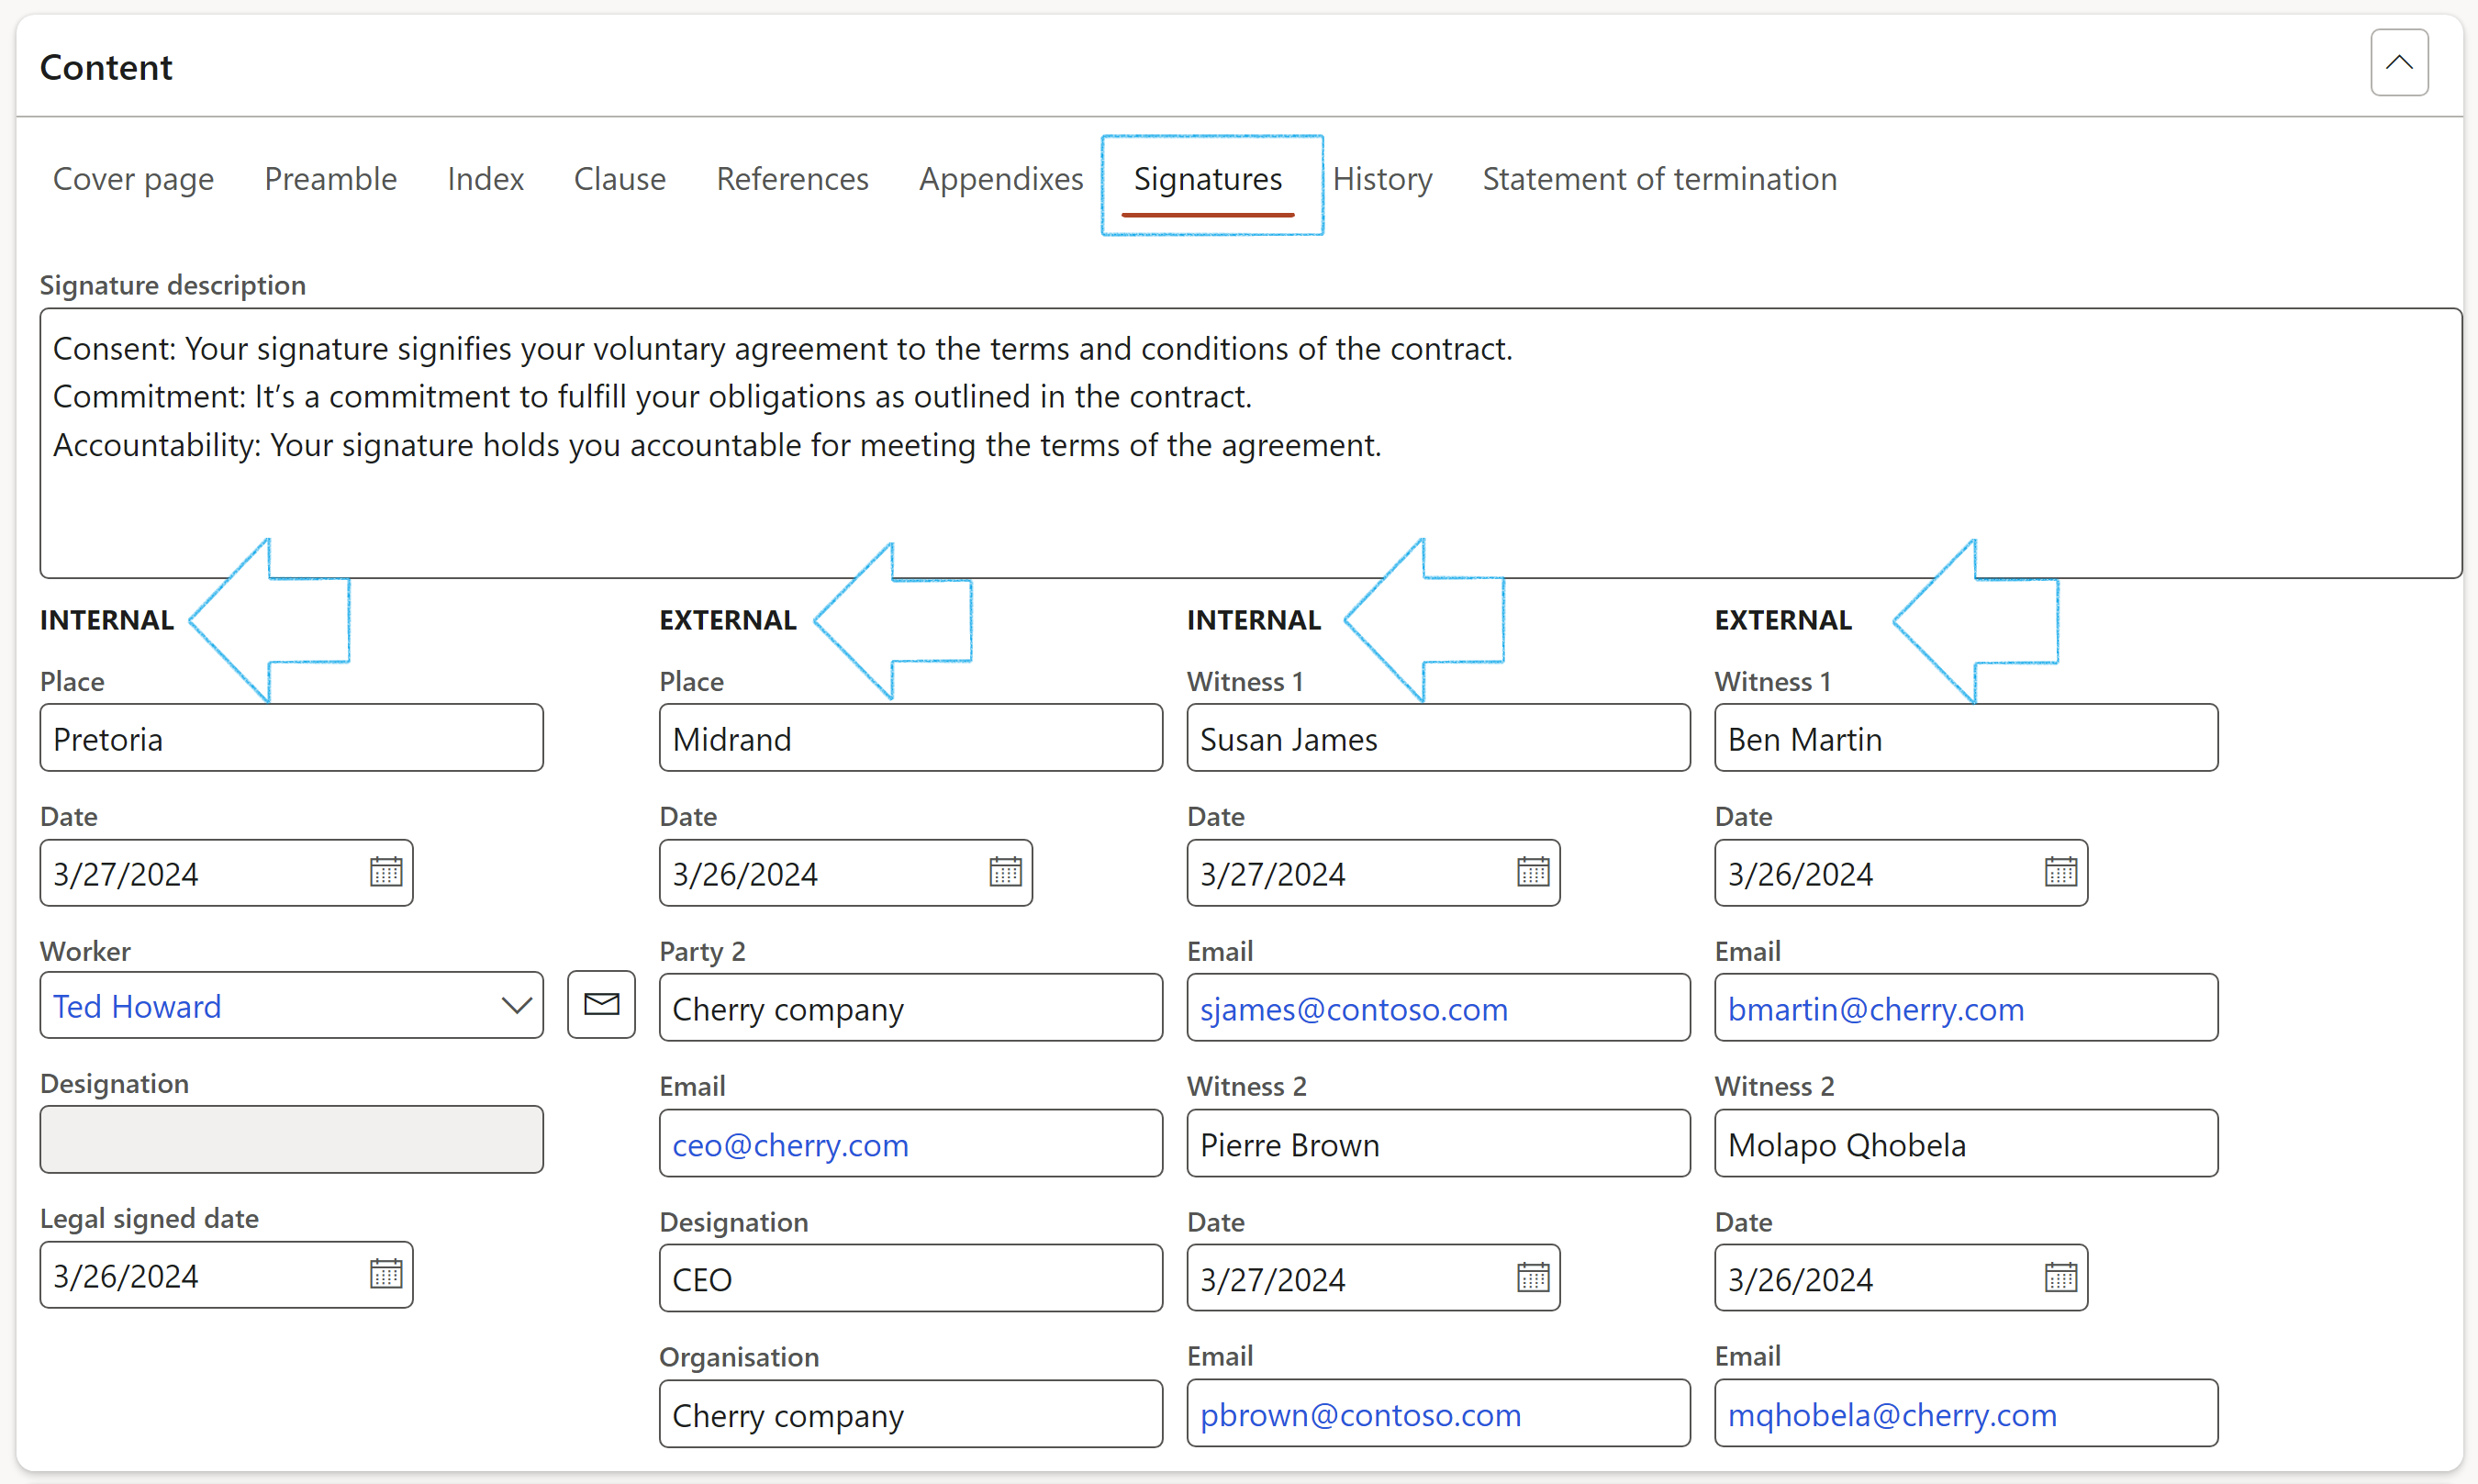
- Open the Signatures tab
- In the Signature description note box, enter a detailed description of the signatures required
- Enter the relevant details under the INTERNAL field groups
- Enter the relevant details under the EXTERNAL field groups
- Default state when a contract is created
- The record can be deleted only if the Contract request field is empty
- The record cannot be Renewed, Terminated or Archived
- Indicates that a contract has been received from a trading partner (vendor/customer)
- The record cannot be deleted
- The record cannot be terminated/archived
- The record can be deleted
- The record cannot be terminated
- Will be greyed out when any other status is selected
- Can be submitted to workflow
- The contract can only be renewed if the stage = Approved
- The stage of the contract will be changed to Draft
- The record cannot be deleted
- The record cannot be copied
- User is allowed to create a review case
- All states are disabled, but can be terminated
- The record cannot be deleted
- If workflow status = Approved, the contract stage will be changed to Approved
- State can only be changed to: Renew/Review/Approve
- The record cannot be deleted
- Contract stage cannot be changed to Expired when the current stage = Terminated
- The record can only be terminated when the current stage = Approved
- The record is locked
- The record cannot be deleted
- The record cannot be copied
- Can be archived if a new version of the contract is created
- The stage of the record will be Terminated
- All states are disabled
- The record is locked
- The record is now on the Archived contracts list page
- Submitted
- Returned
- Escalated
- Rejected
- Approved
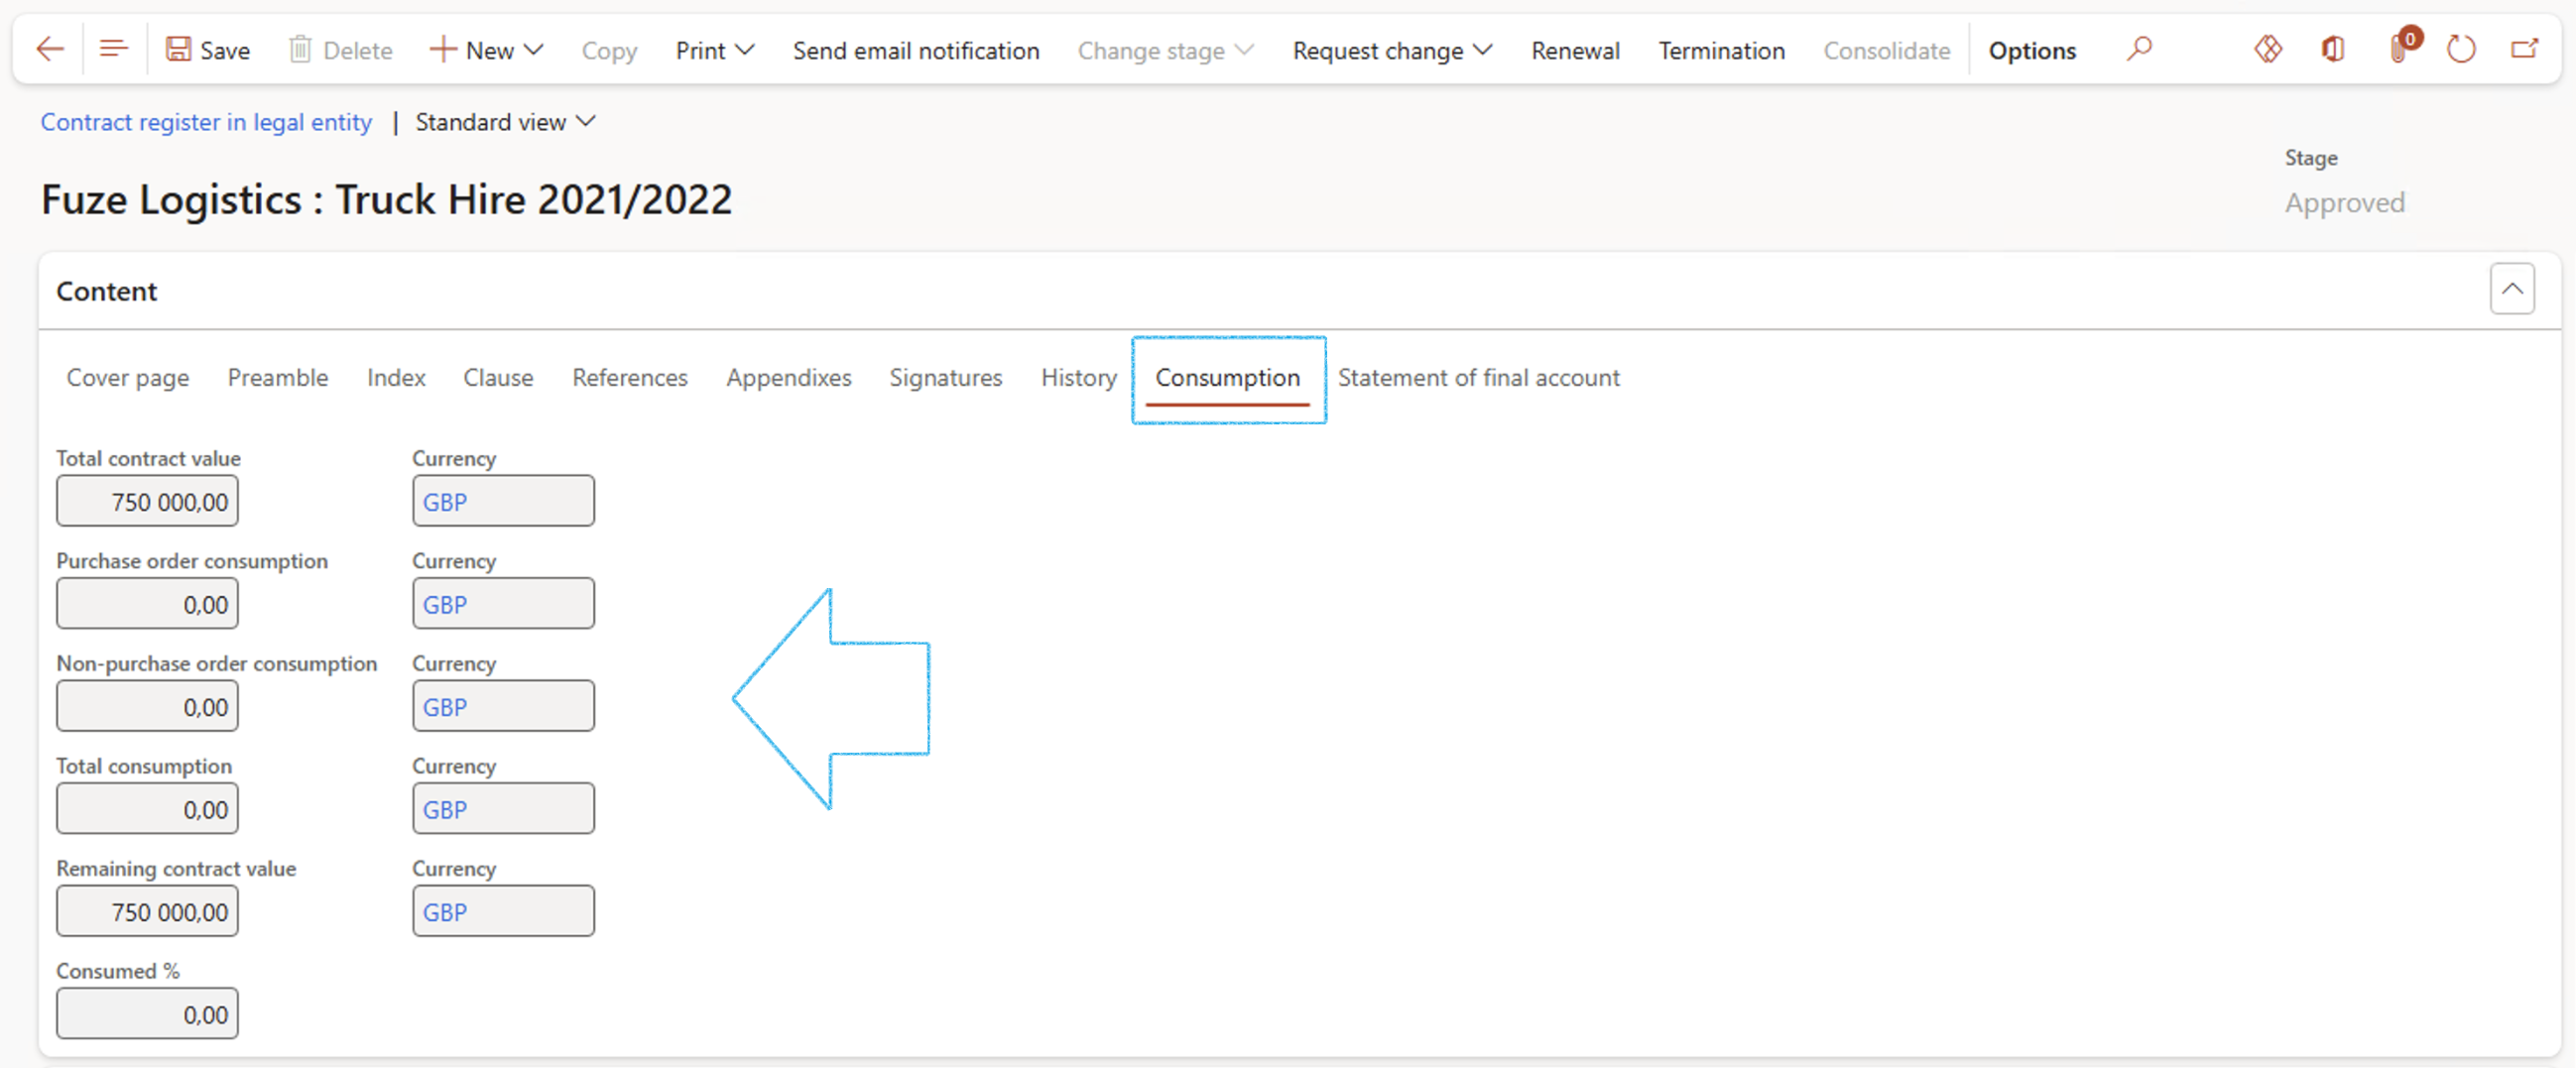
- Total contract value: The total approved monetary value of the contract
- Purchase order consumption: Displays the value consumed through linked purchase orders
- Non-Purchase order consumption: Displays the value consumed through direct linked invoices
- Total consumption: Displays the sum of purchase order and non-purchase order consumption
- Remaining contract value: The unutilized portion of the contract value. Calculated as the Total contract value minus the Total consumption
- Consumed %: The percentage of the contract value that has been consumed
- Select the record that you want to print the report/contract for
- On the Action pane, click on the Print button and select Print document
- On the dialog, select whether you want to print the cover page or not
- The document will also be sent to the PDF repository
- Enter the details of Payment account 1 in the note box provided
- Enter the details of Payment account 2 in the note box provided
- Select the relevant Terms of payment from the dropdown list
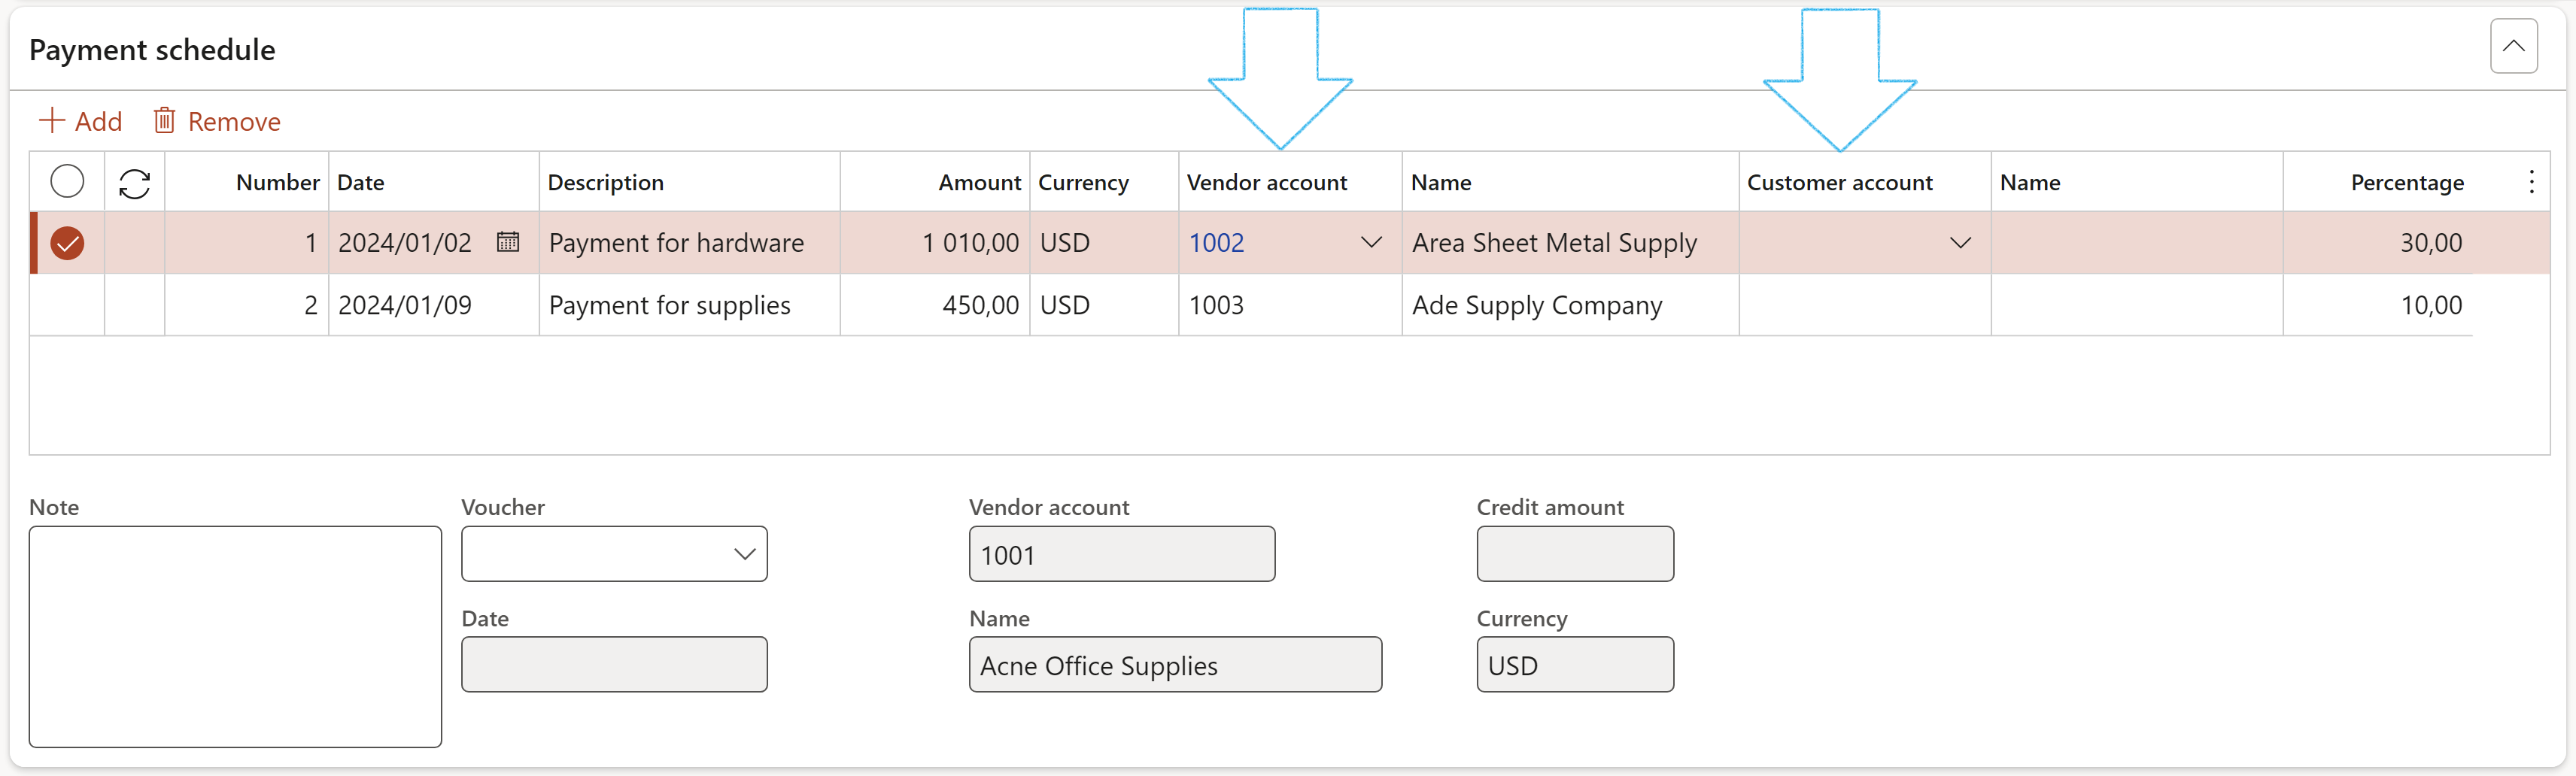
- Click on the Add button
- Enter the Date on which the payment is scheduled
- Enter a Description for the scheduled payment
- Enter the Amount that is scheduled to be paid
- Enter the relevant Vendor/Customer ID
- Enter additional Notes
- Select the Voucher that the scheduled payment is for
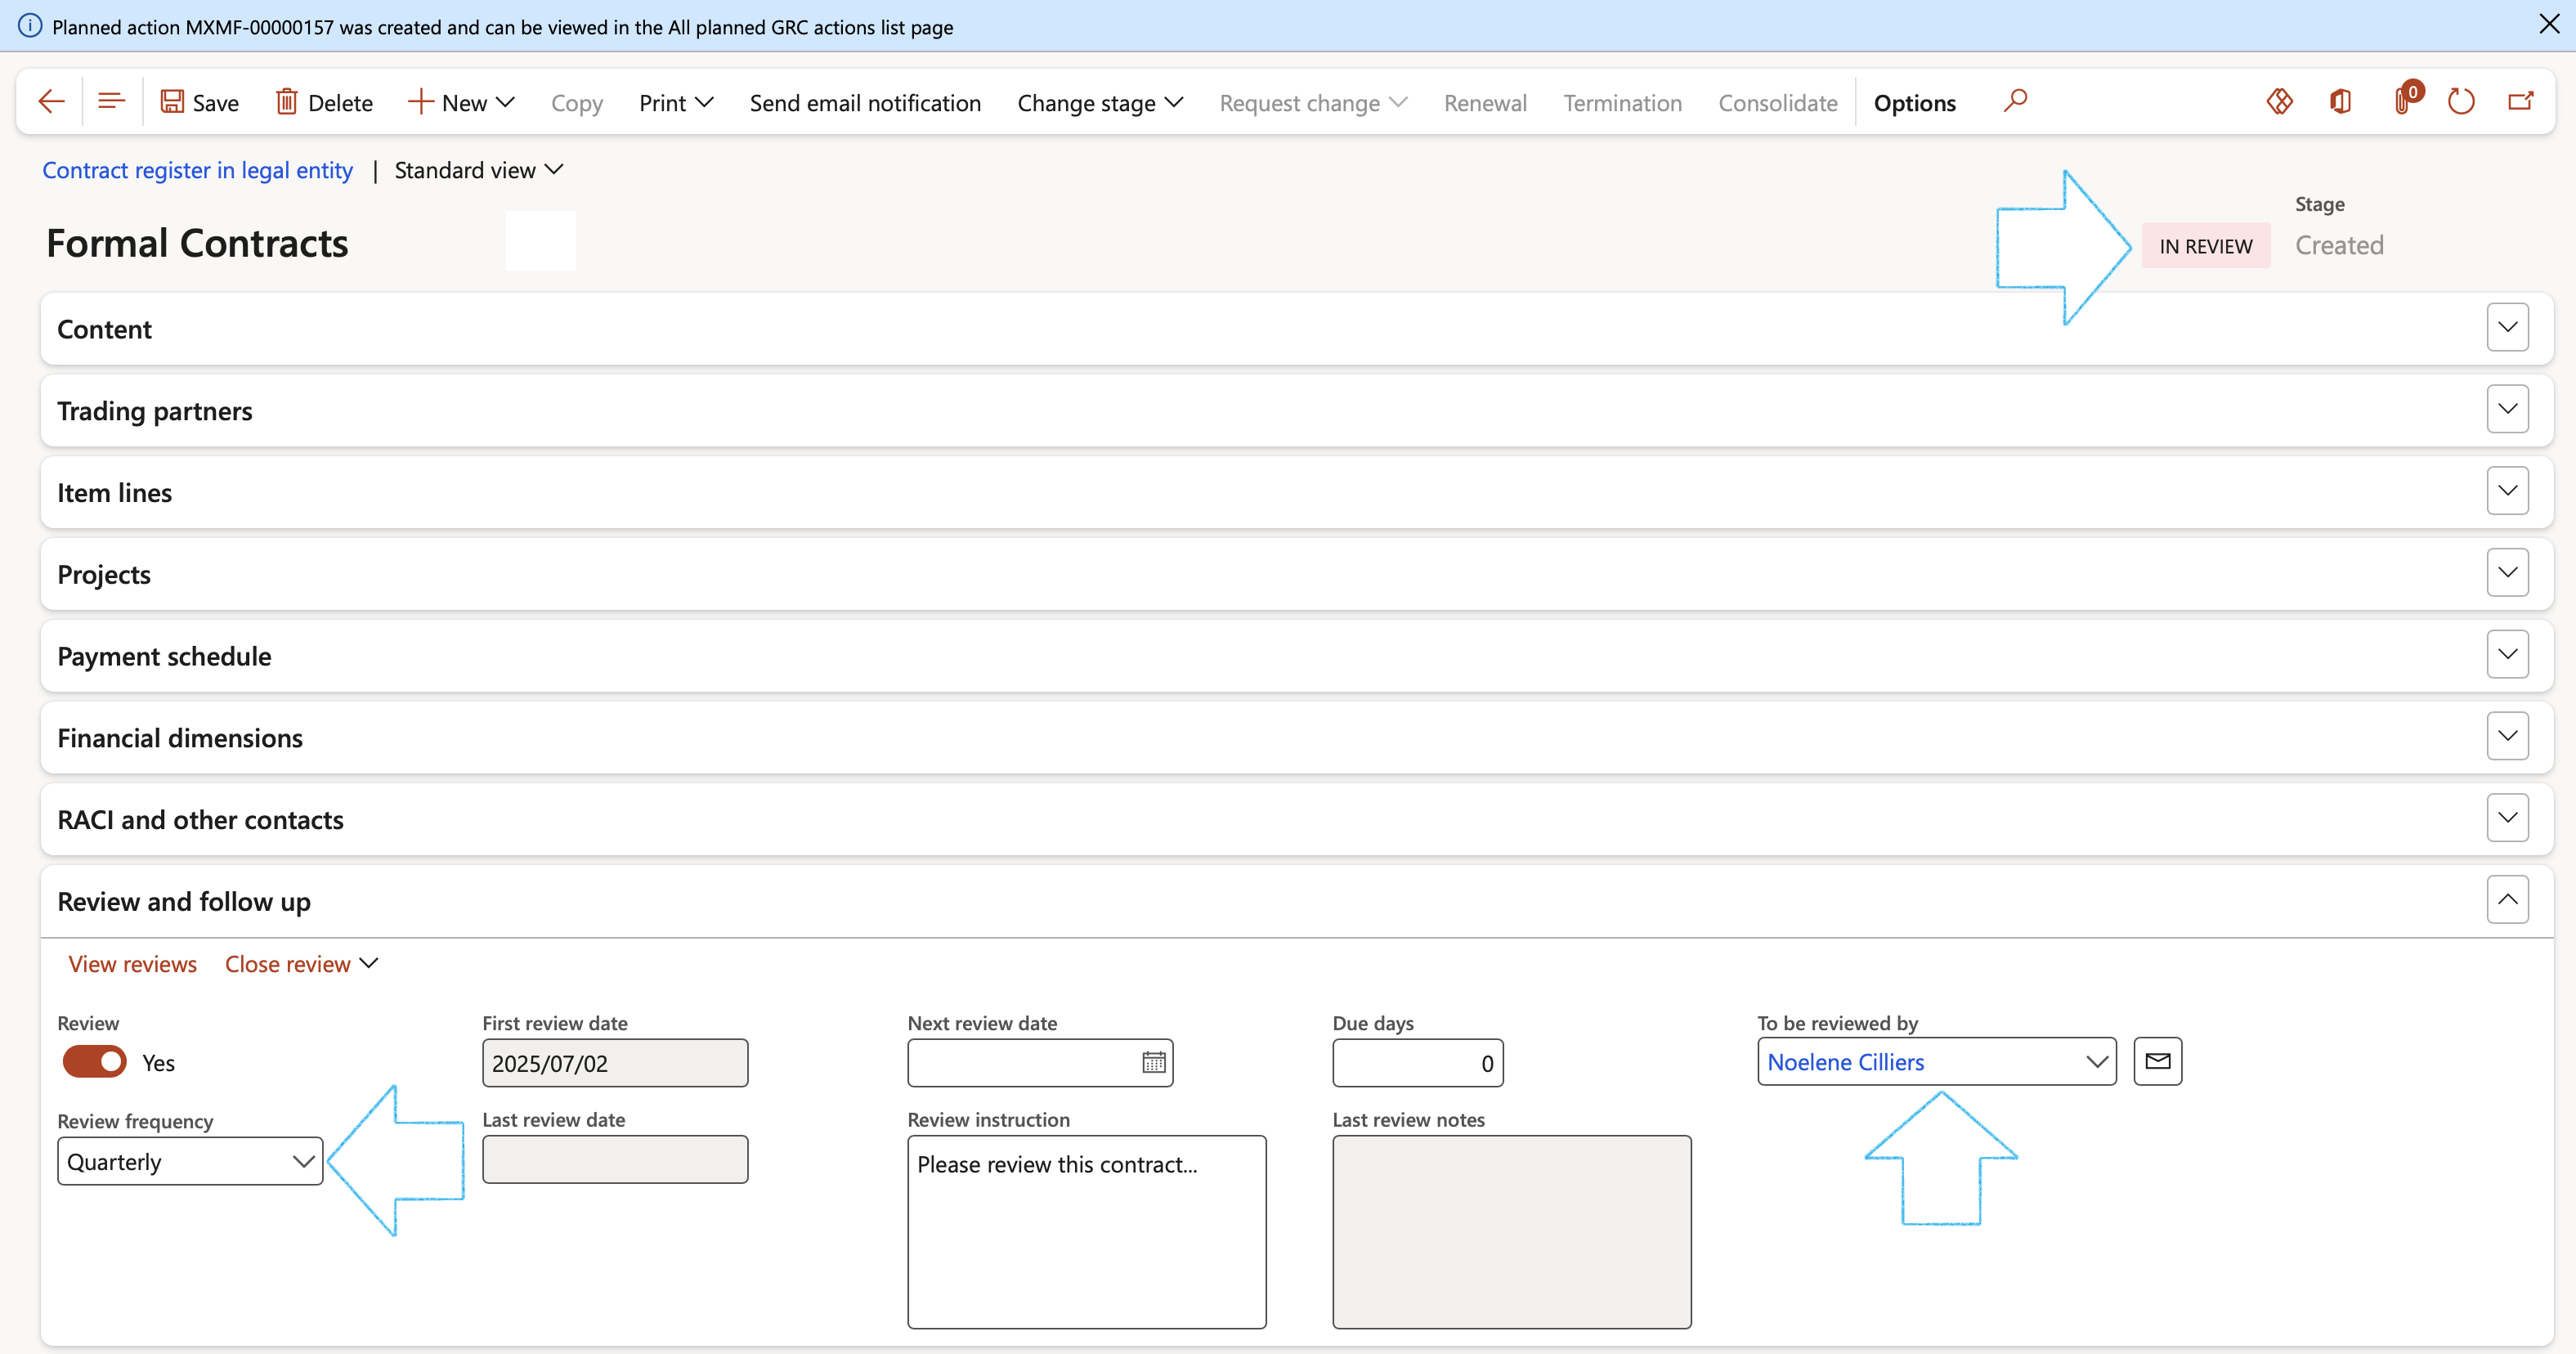
- Select the relevant contract
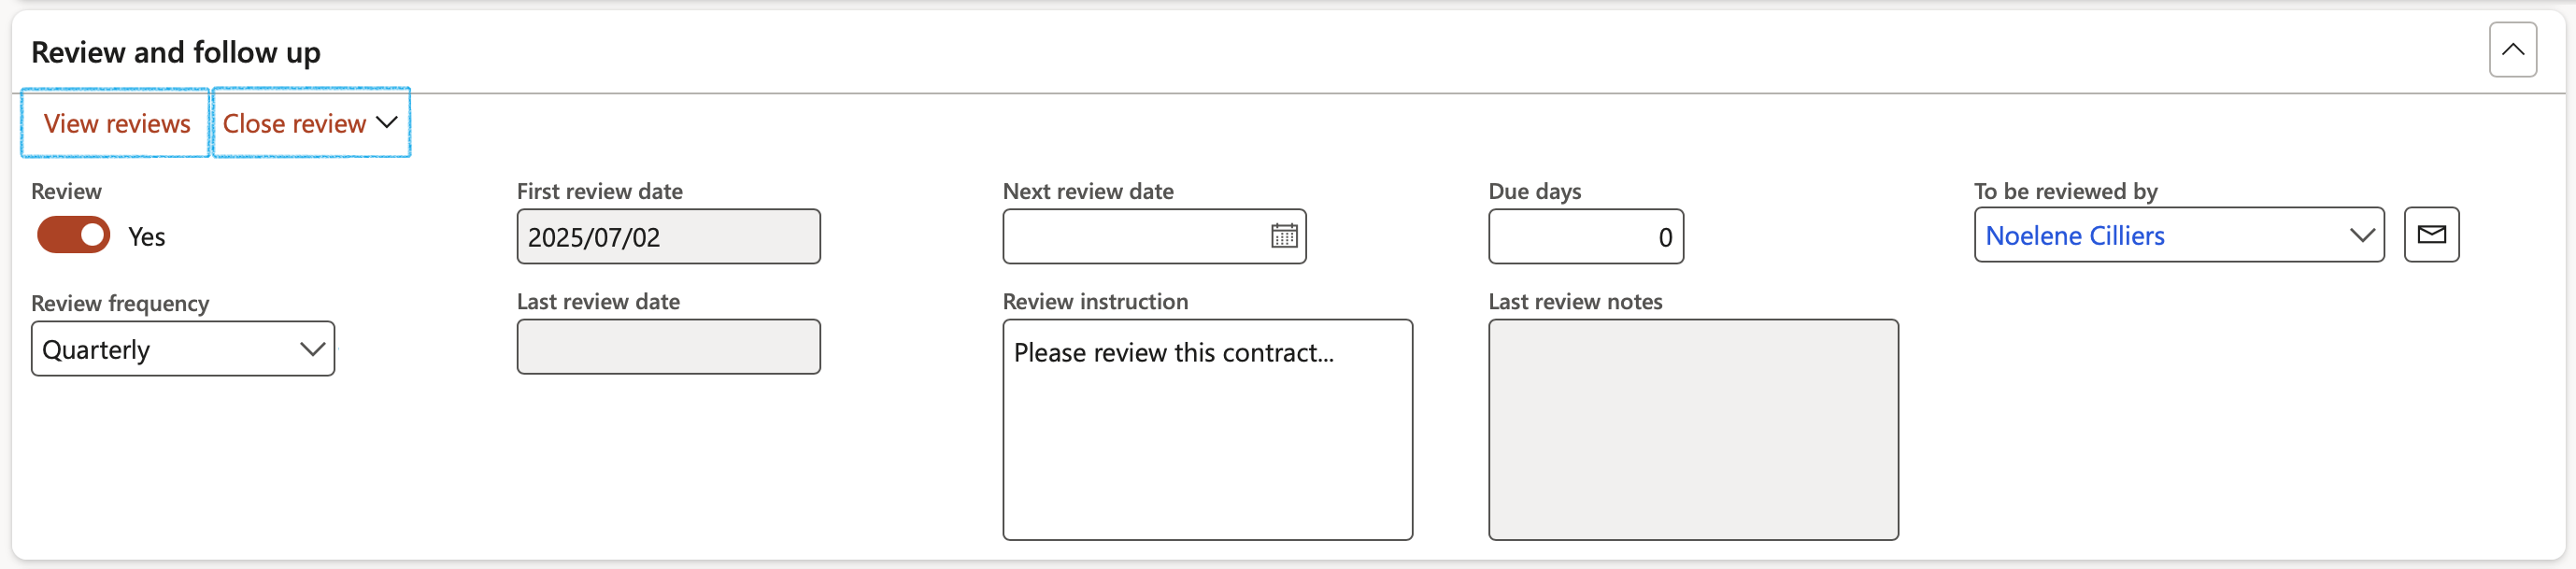
- Expand the Review and follow up Fast tab
- Move the Review slider to Yes to indicate that the contract is being reviewed
- Select the relevant Review frequency from the dropdown list
- Enter additional notes in the Review instruction note box provided
- In the Due days field, enter the number of days before the review action is due to be completed
- In the To be reviewed by field, select the name of the person who is going to review the Contract
- Closing an action:
- Select the action that you want to close
- Click on the Close button in the Action pane
- Enter Review notes in the note box provided
- Click on the OK button
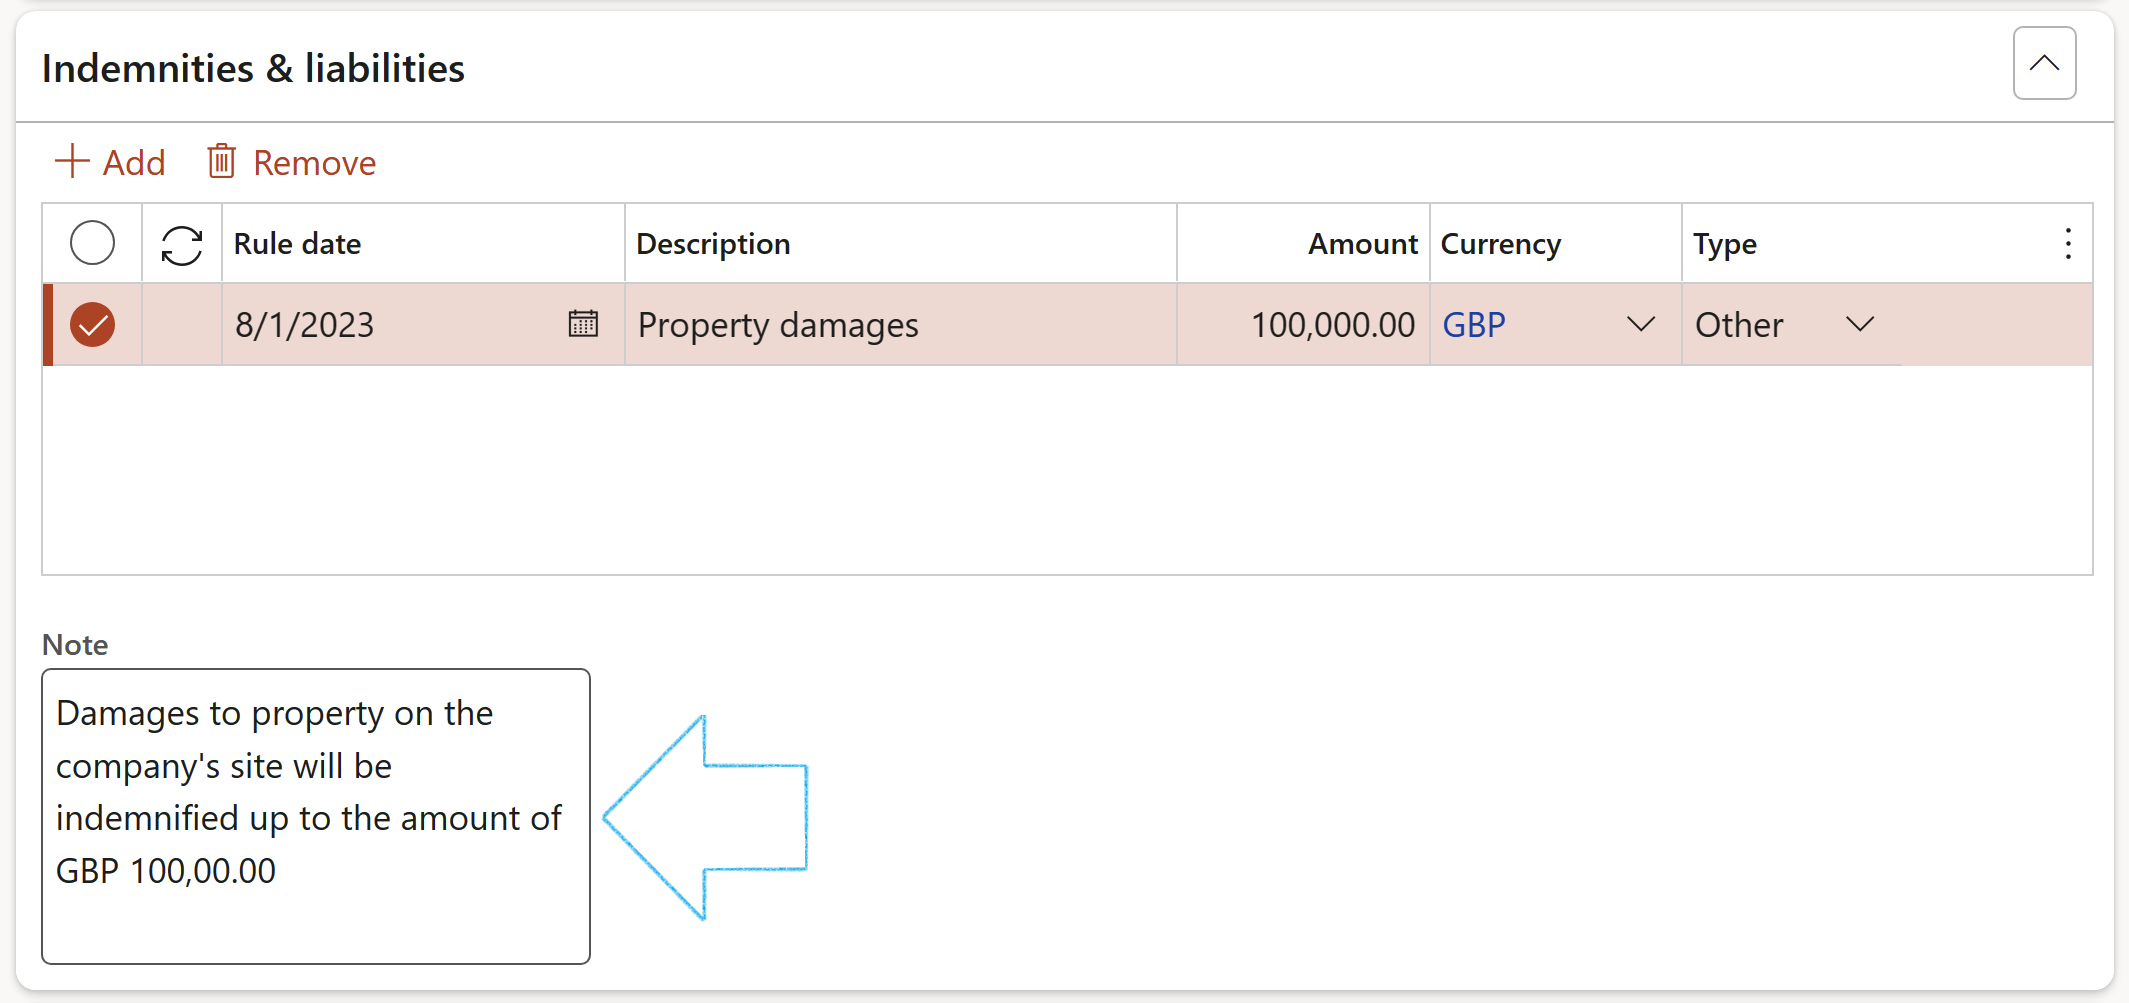
- Select the relevant contract
- Expand the Indemnities and liabilities Fast tab
- In the button strip, click on the Add button
- Enter the Rule date
- Enter a brief Description
- Enter the Amount
- Select the relevant Currency from the dropdown list
- Select the relevant Type from the dropdown list
- Enter additional details in the Note box provided
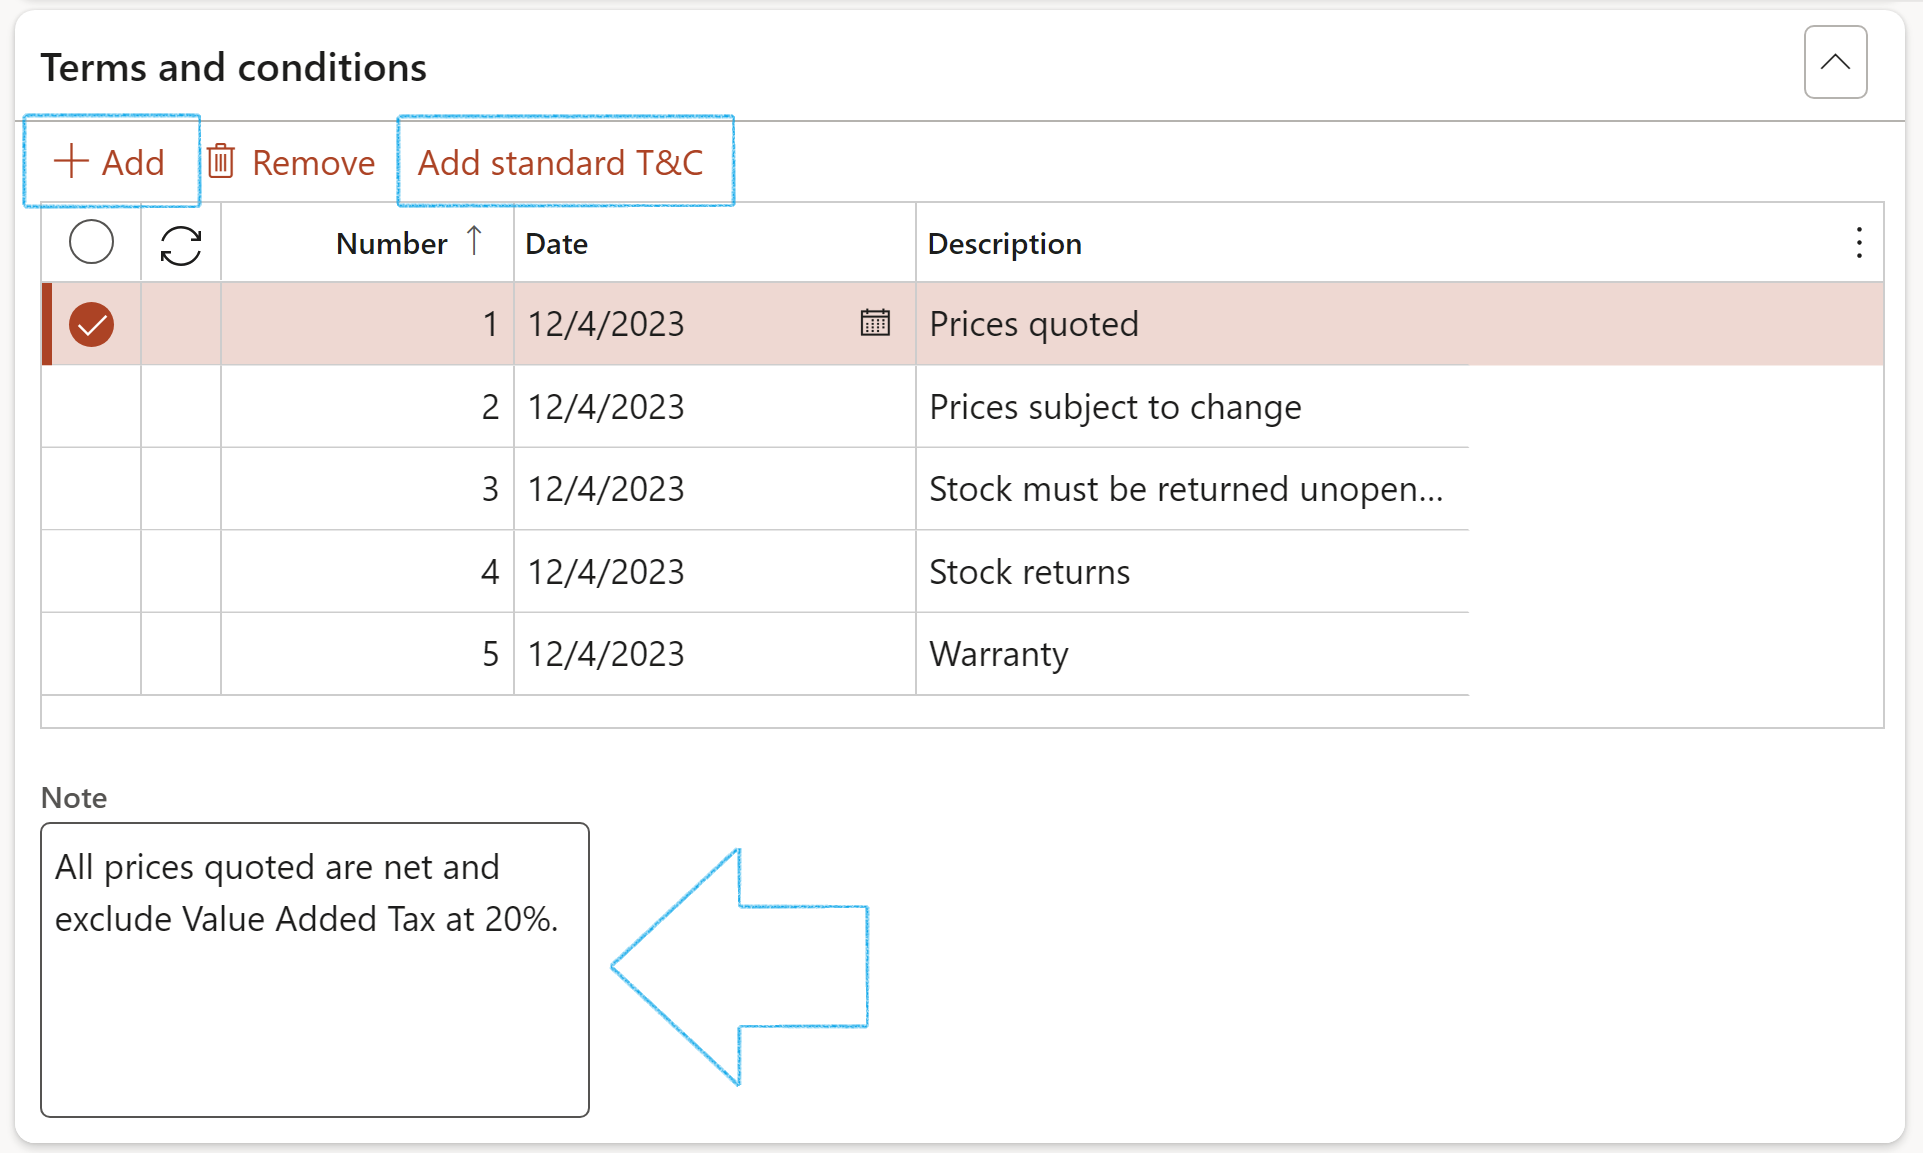
- Select the relevant contract
- Expand the Terms and conditions Fast tab
- In the Button strip, click on the Add button
- Enter the Number of the term/condition
- Enter the Date on which the term/condition was added
- Enter a brief Description
- Enter additional information in the Note box provided
- Click on the Add standard T&C button
- In the dialogue box, select the relevant Standard terms and conditions from the dropdown list
- Click on the OK button
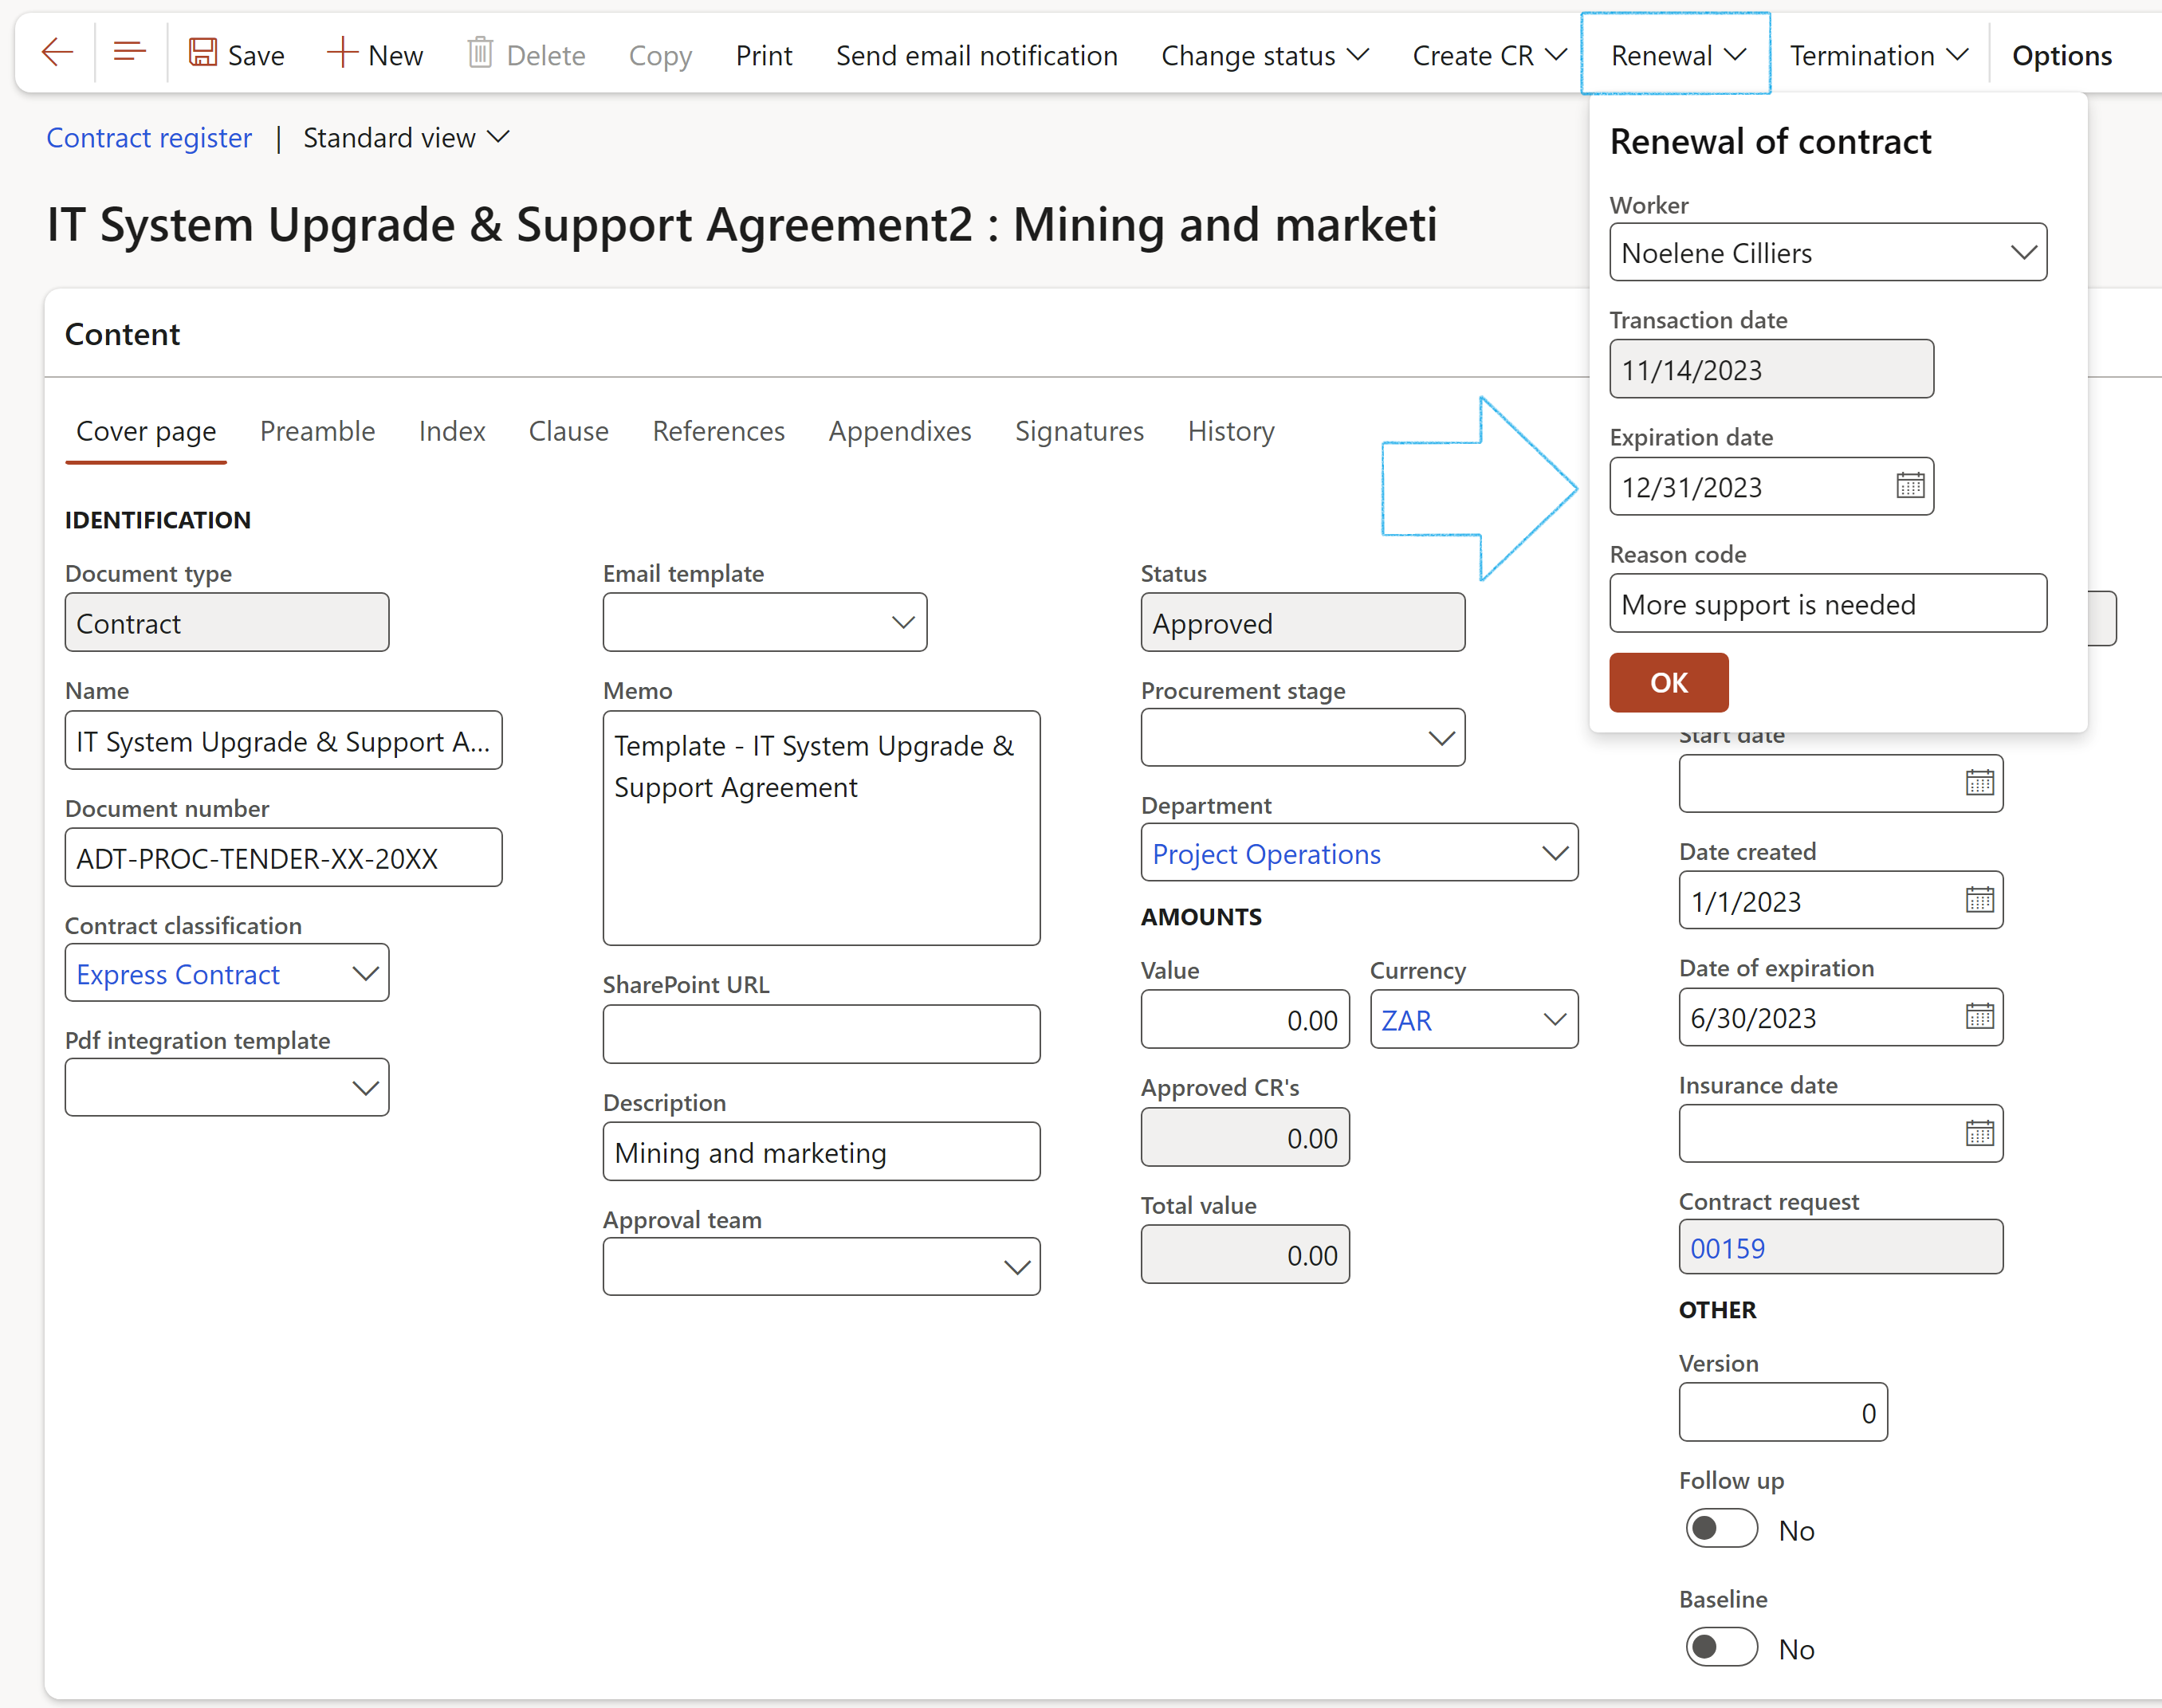
- On the drop-dialog, select the new Expiration date for the contract
- Select a Reason code for renewing the contract
- Click on the OK button
- Move the Create change request slider to Yes
- Enter a Title for the change request
- Select the relevant Priority level from the dropdown list
- Select the relevant Category from the dropdown list
- Select the relevant Severity level from the dropdown list
- Select the relevant Change type from the dropdown list. For a renewal, a date change must be selected as a Type
- Click on the OK button
- Expand the Renewal and termination Fast tab to view the record of the contract renawal
- The change request reference can be viewed in the Change request column on the newly added line under the Renewals and terminations fast tab
- The status of the change request can be viewed in the Status column under the Renewals and terminations fast tab
- Once the change request is approved, the new date will be visible in the Expiration date column
- The previous expiration date before the approval of the change request will be visible in the Prior expiry date column
- If a cost impact is also applicable on the approved change request, the previous contract total value before the approval of the change will be visible in the Prior total value column
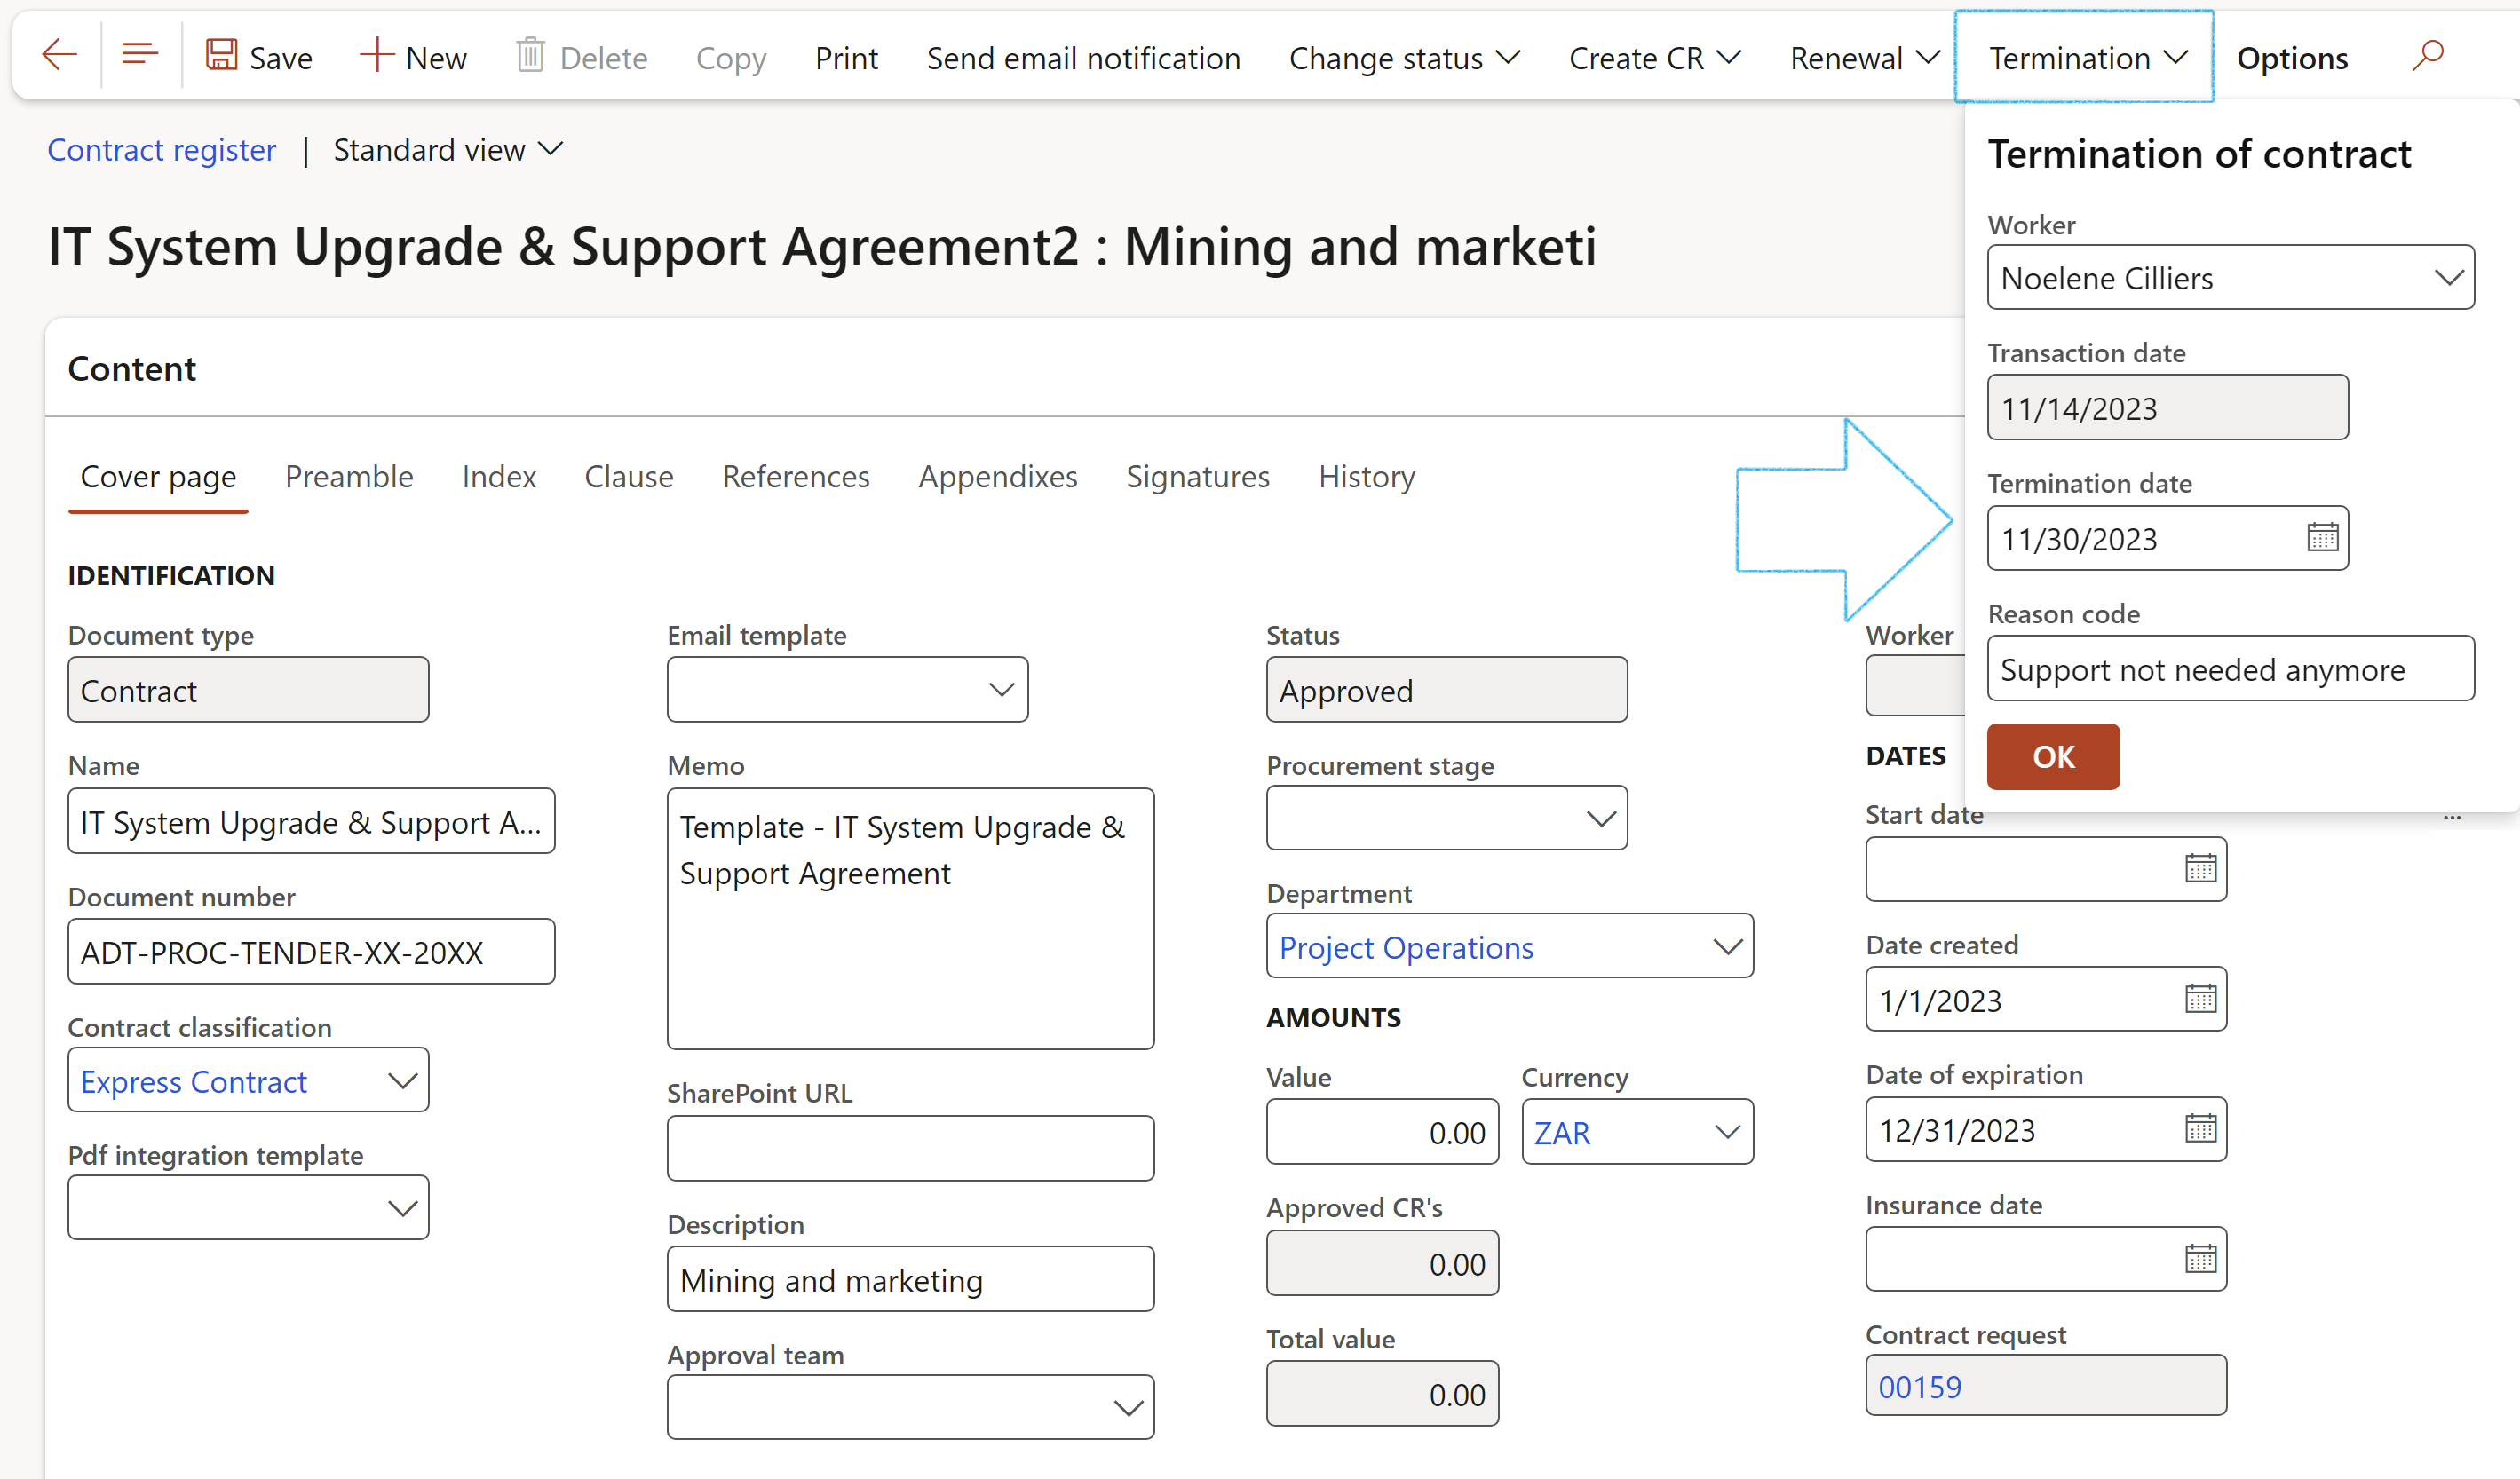
- In the Action pane, click on the Termination button
- On the drop-dialog, select the Termination date for the contract
- Enter a Reason code for terminating the contract
- Click on the OK button
- Expand the Renewals and termination Fast tab to view the record of the contract termination
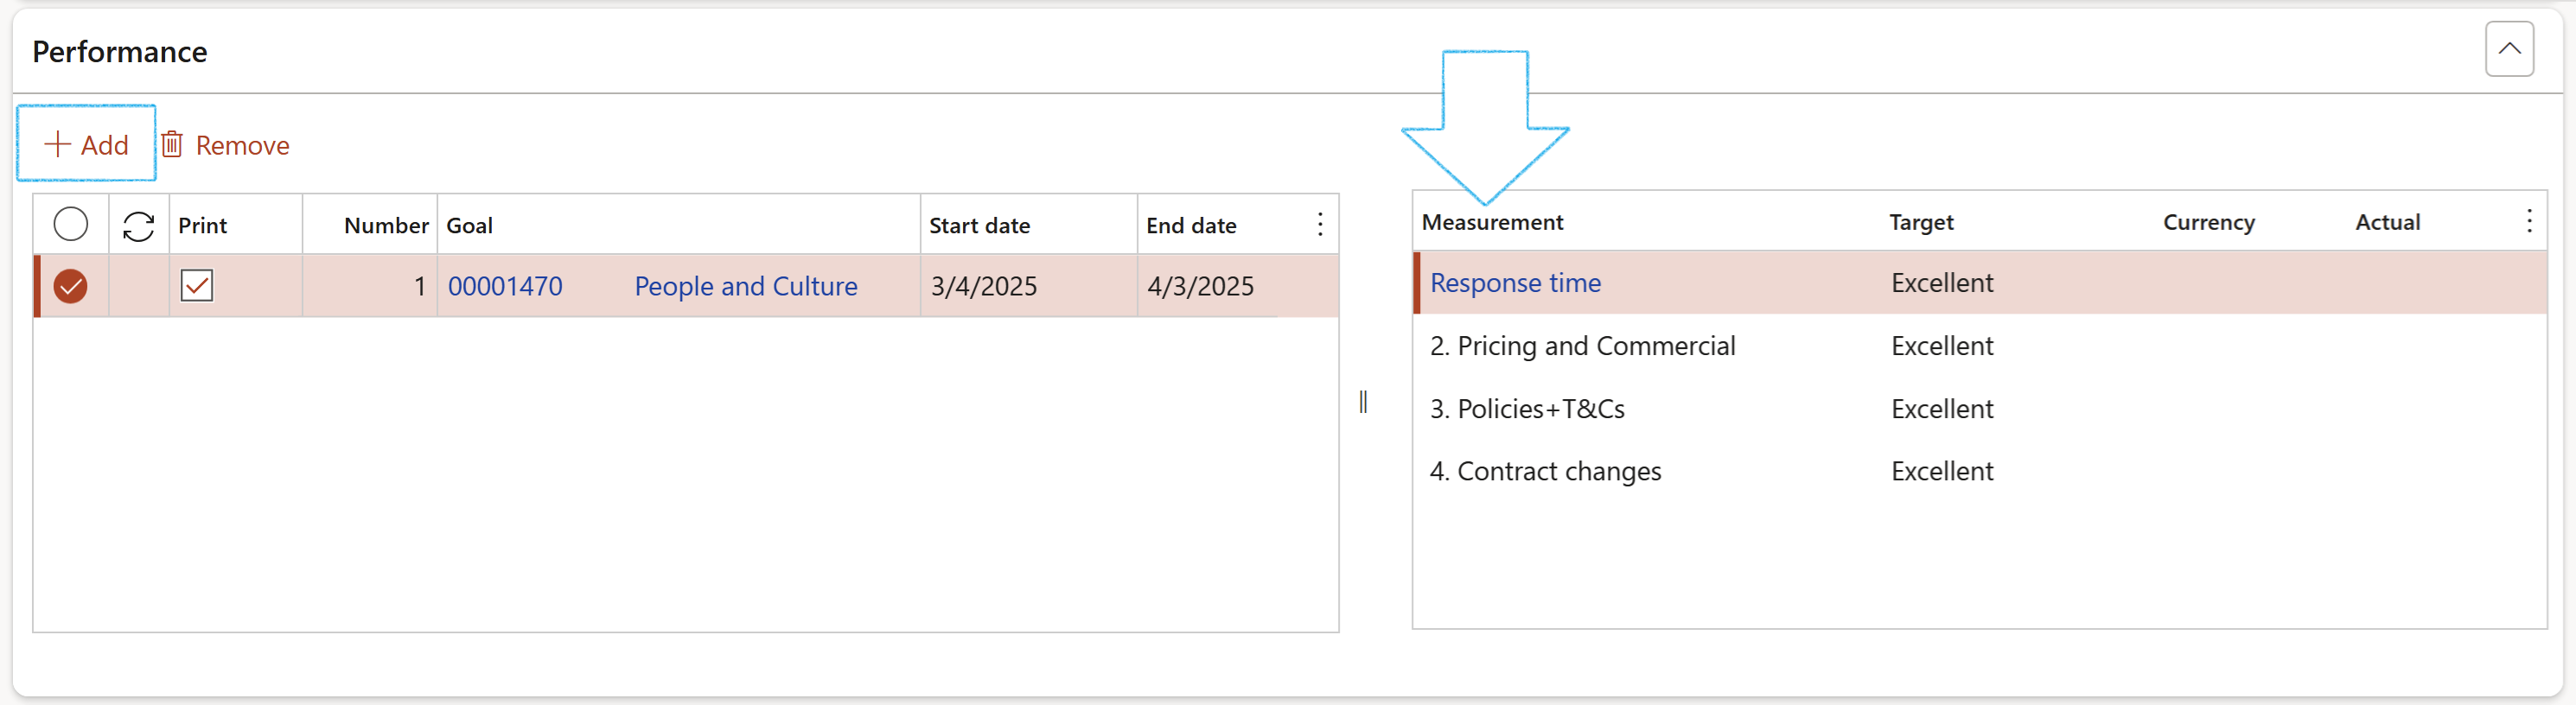
- Under the Performance Fast tab:
- Click on the Add button
- Tick the Print box if the goal must be printed
- Enter a Number in the Number field
- Select the relevant Goal from the dropdown list
- The Start date and End date will be populated by the system according to the selected goal
- The Measurements will be displayed according to the selected goal
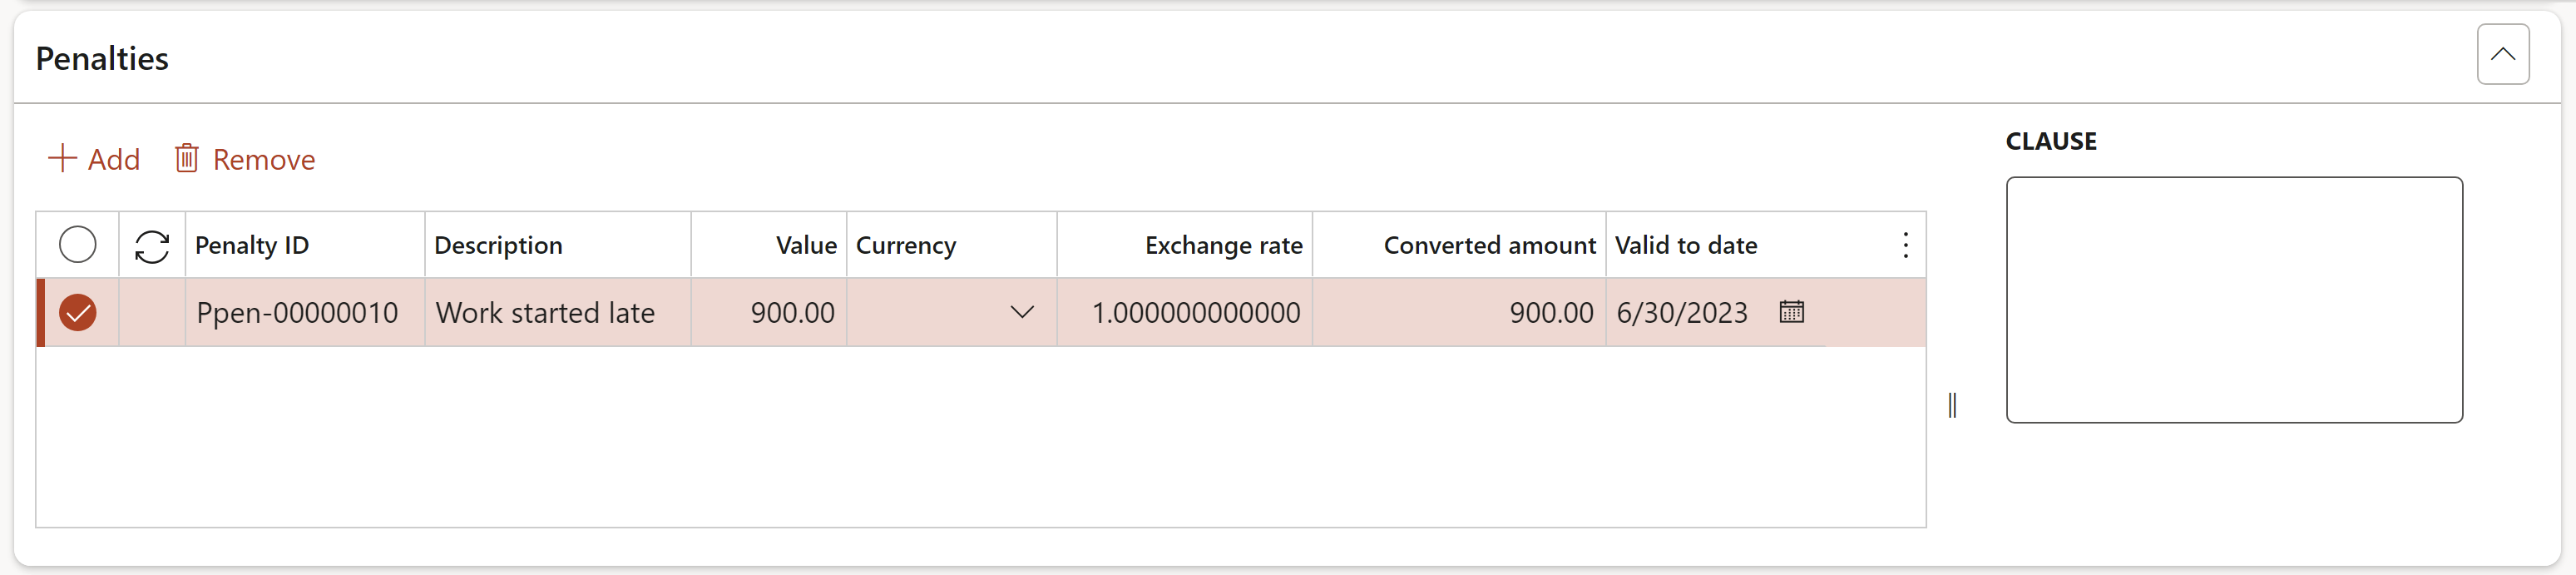
- Under the Penalties Fast tab:
- Click on the Add button
- Enter a Description for the penalty
- Enter the penalty Value
- Enter the Date until when the penalty is valid
- Enter any additional Clauses in the box provided
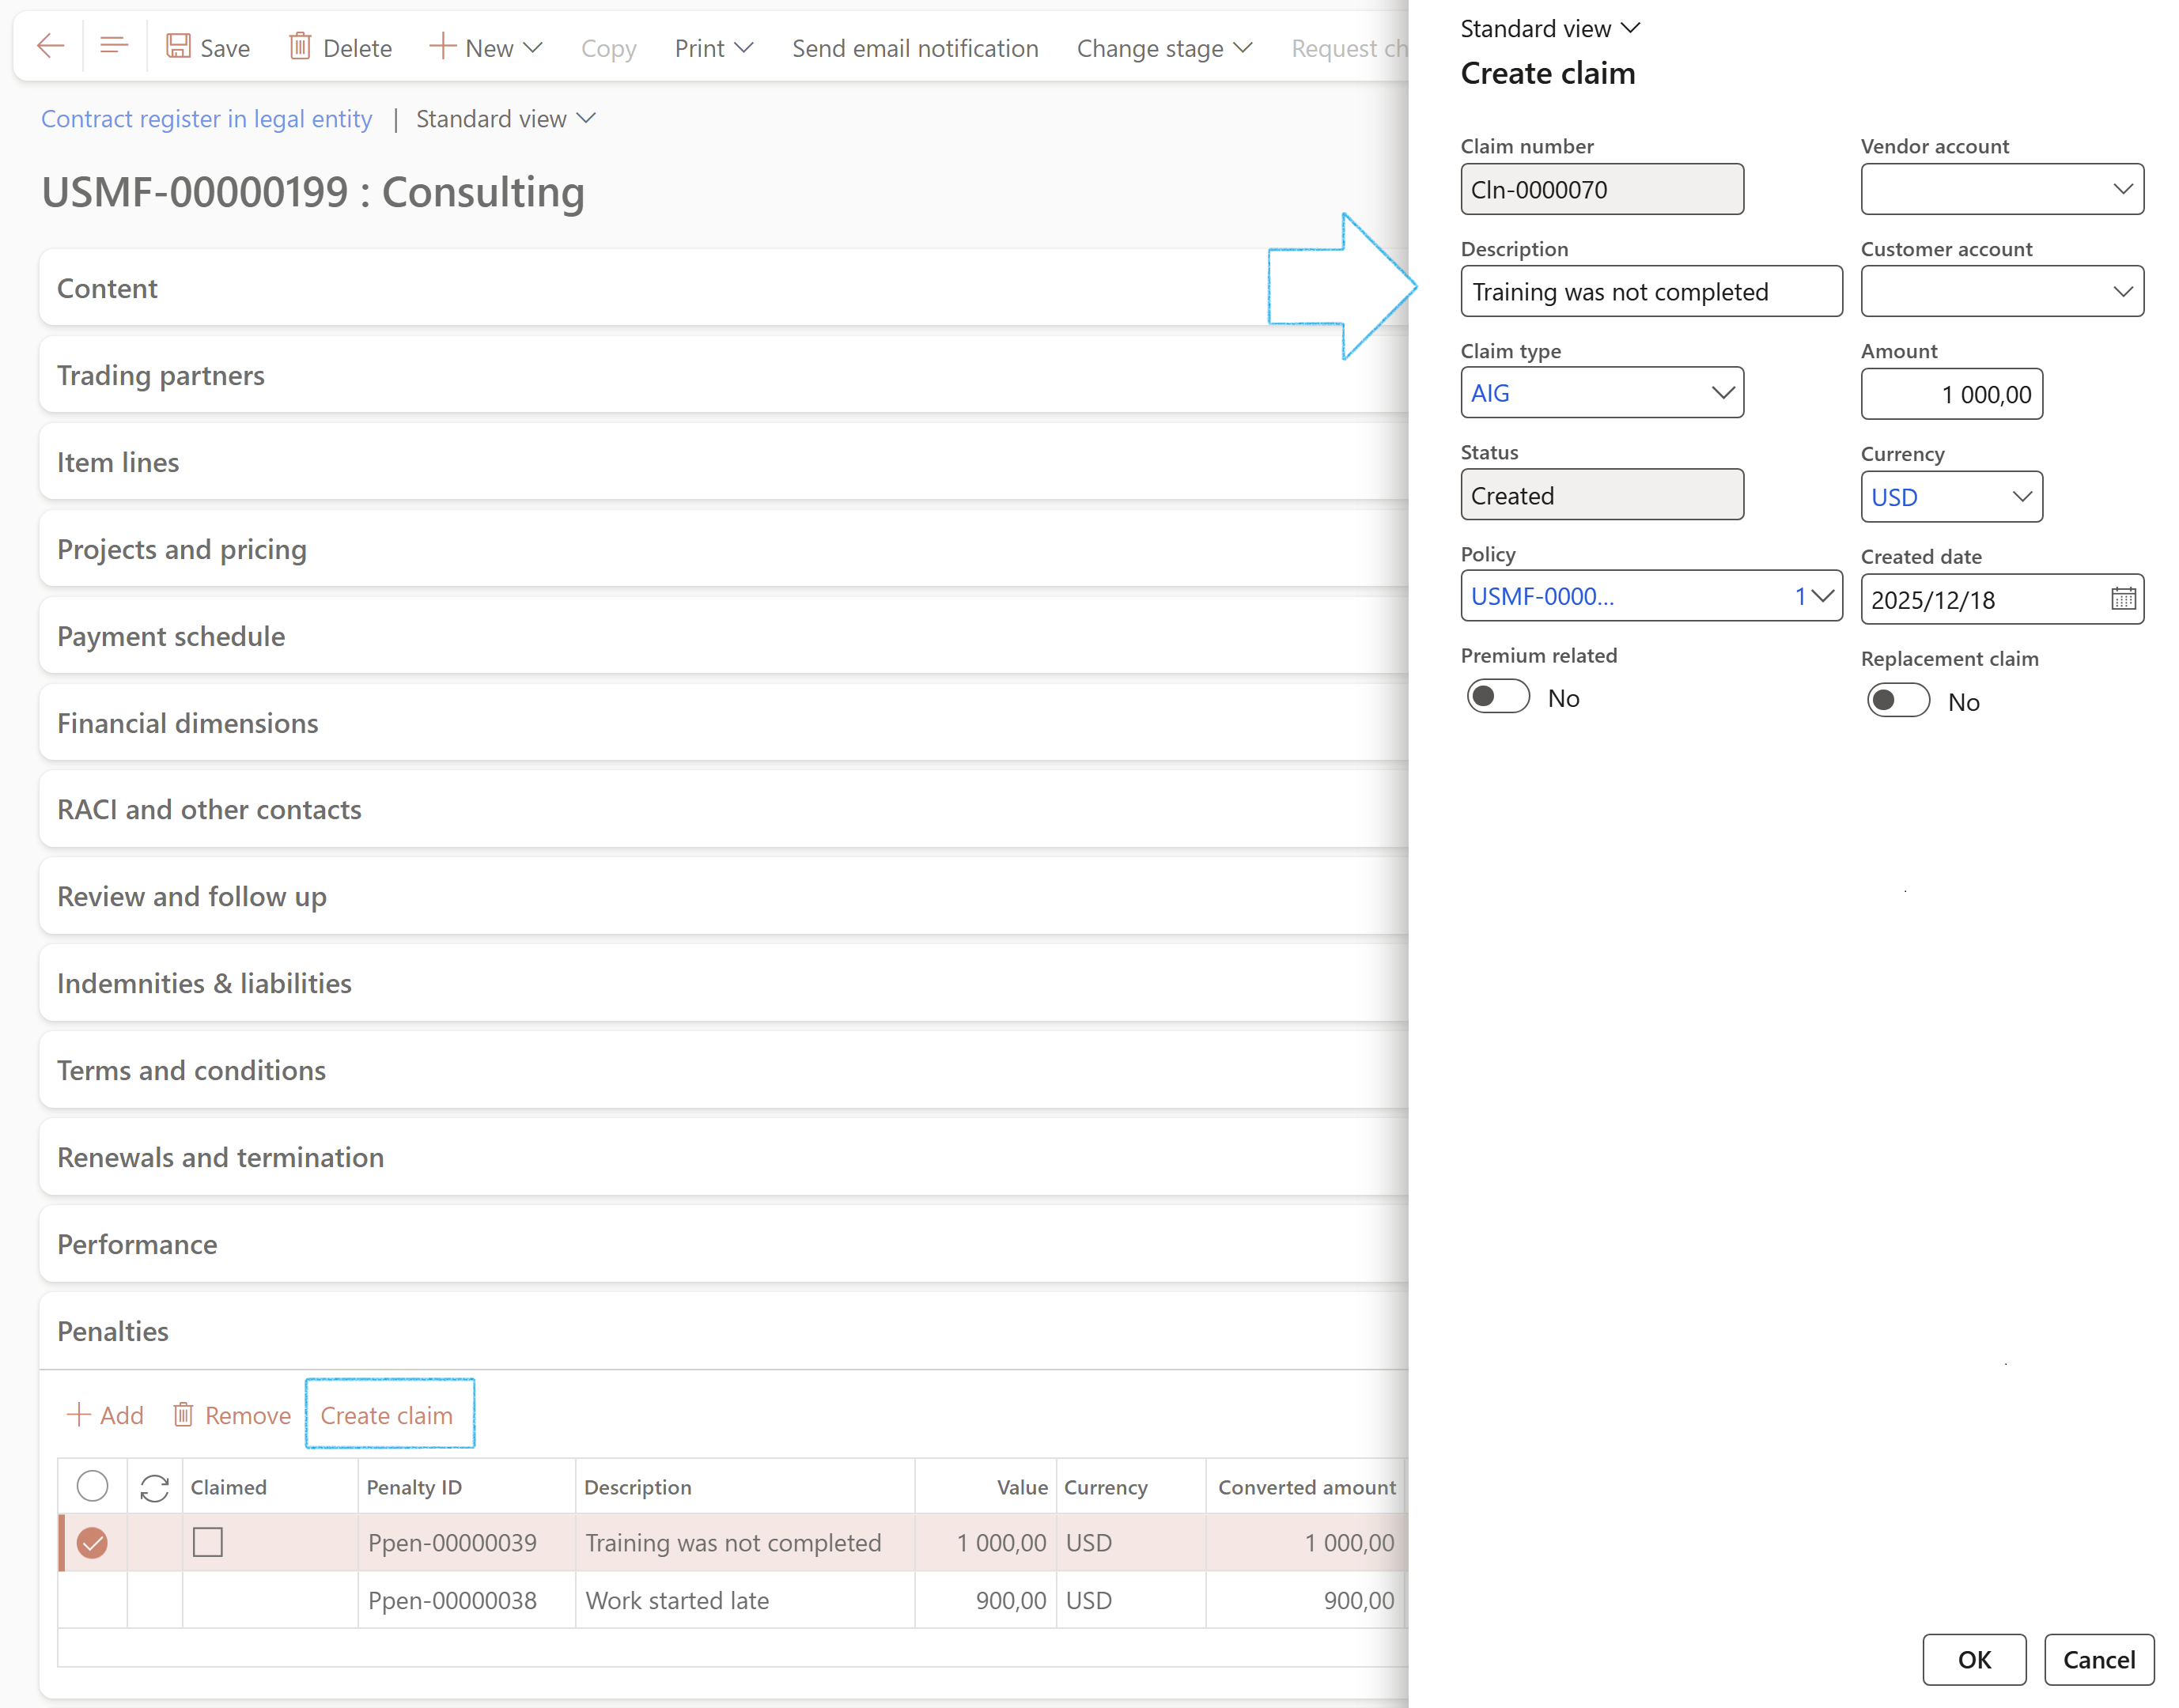
- Create a record under the Penalties Fast tab as described above
- In the Button strip, click on the Create calim button
- On the Create claim dialog:
- Select the relevant Calim type from the dropdown list
- Select the relvant Vendor account/Customer account from the dropdown list
- Indicate whether this is a Replacement claim
- Click on the OK button
- Under the Breach and remedies Fast tab:
- Click on the Add button
- Enter the Breach date
- Select the Breach type from the dropdown list
- Tick the Service level agreement box if the SLA was breached
- Select the Remedy type from the dropdown list
- Enter the Expected damage
- Enter the Consequencial damage
- Enter additional notes in the Breach and Remedies note boxes
- Select the relevant contract
- Expand the Profile Fast tab
- If you want to see the detail on the risk register, click on the Go to risk register button
- Select the relevant Purchasing policy from the dropdown list
- Select the relevant contract
- Expand the Sign off Fast tab
- In the button strip, click on the Add button
- Select the relevant Signature type from the dropdown list
- Select either a Worker or Vendor, or enter a Contractor employee
- Enter the Date signed
- Indicate which actions have been done by the Worker/Contractor employee
- Notified
- Legal counselled
- Risk assessed
- Approved
- Activities completed
- Worker submitted
- Worker approved
- Select the relevant contract
- Expand the Reportable Fast tab
- Enter the Date reported
- Add a Note
- In the button strip, click on the Add button
- Select the relevant Reporting agency from the dropdown list
- Indicate whether this is the Primary reporting agency by ticking the box
- To select the Reporting category, click on the Add button above the right hand side grid
- Select the relevant Reporting category from the dropdown list
- Select the relevant record (has to be an approved Purchase Requisition)
- In the Action pane, click on the Create contract button
- Complete the New contract dialog
- The new contract will be referenced in the Contract field
- A primary trading partner has to be selected for the contract
- All item lines and statement of work lines have to add up to the total contract value
- A Purchase agreement has to exist against the contract (Step 27 below)
- The Request change button is only available when the contract is approved
- The Request change button will not be available when there is a CR with status In progress linked to the contract
- Select the relevant contract
- In the Action pane, click on the Request change button
- On the Create change request dialog:
- The system will create a Change request number
- Enter a Title for the change request
- Select the relevant Priority of the change request from the dropdown list
- Select the relevant Category of the change request from the dropdown list
- Select the relevant Severity level of the change request from the dropdown list
- Enter a Summary of change in the note box provided
- Move the Auto create note slider to Yes. Adding a note under the Information Fast tab on the CR, is required. Moving this slider to Yes saves the user time on the Change request form
- Click on the OK button
- On the Action pane, under the Maintain group, click on the New change request button
- On the Create change request dialog:
- Enter a Title for the change request
- Select the Priority of the change request
- Select the relevant Contract of the change request from the dropdown list
- Enter a Summary of change in the note box provided
- Move the Auto create note slider to Yes. Adding a note under the Information Fast tab on the CR, is required. Moving this slider to Yes saves the user time on the Change request form
- Under the General Fast tab:
- Select the Amendment template to be used for the clause change requests, from the dropdown list. (The clauses that you want to copy from the Amendment template must be ticked in the Copy column on the template)
- Under the Changes to Fast tab:
- The Contract register reference that the change request is for, can be seen under this Fast tab
- Under the Assumptions Fast tab:
- Enter Inclusions in the note box provided
- Enter Exclusions in the note box provided
- Expand the Scope of change (lines) Fast tab
- In the Button strip, click on the Add button
- In the Change type field, select Scope from the dropdown list
- In the State field, select Final from the dropdown list
- In the Element type field, select Clause from the dropdown list
- In the Element field, select the clause that is to be replaced, from the dropdown list
- In the Button strip, click on the Add button
- In the Change type field, select Scope from the dropdown list
- In the State field, select New from the dropdown list
- In the Element type field, select Clause from the dropdown list
- Enter the text for the new clause in the Long description note box provided
- In the Button strip, click on the Approve the change button
- On the Action pane, in the Change status group, click on the Approve button
- Please note that a document has to be attached under the Information Fast tab before it can be approved
- Once a change request has been approved, the record will be locked
- On the Action pane, in the Functions group, click on the Create amendment button
- Enter a Name for the amendment that you are creating
- Click on OK
- Select the contract that the change request was created from
- Expand the Related information pane
- Expand the Sub documents Fast tab
- On the Action pane, click on the Send email notification button
- Click OK
- Select the relevant contract
- Expand the RACI and other contacts Fast tab
- Click on the Email icon next to the worker that you want to send the email to
- Complete the Send email dialog
- Click on the Send button
- Click on the Add button
- Select the Worker name from the dropdown list
- The Phone number value will be derived from the primary Phone number listed against the Worker
- The Email address value will be derived from the primary Email address listed against the Worker
- To include the additional worker to the contract alert, tick one or more of the following boxes:
- Expiration notification
- Consumption threshold notifications
- Performance bond expiration notifications
- Go to: GRC > Governance > Contracts > Contract register in legal entity
- Go to: GRC > Governance > Contracts > Group contract register (A list of contracts accessible across all legal entities)
- Click on the View options button
- Select the filters of the relevant Contract stage that you want to view
- Select the filters under the Type of contract that you want to view
- Click on the Apply button
- Select the relevant contract
- Select the relevant vendor
- On the Action pane, in the Related information group, click on the Contracts button
- Select the relevant worker
- In the Action pane, Work tab, in the Work details Button group, click on the Contracts button
- The Contract register list page will open, listing ONLY the selected worker’s employment contract
- Select the contract/record that you want to link to a project
- Expand the Projects Fast tab
- Under the Statement of work Index tab:
- Click on the Add button to add lines
- On the lines, select the Header as Parent for the line
- Select the relevant Frequency from the dropdown list
- Enter a Description
- Indicate that the lines are part of the Budget for the Project that is to be created
- Click on the Create a project with WBS button, and the normal Project create dialog will appear
- The new project's number will be displayed in the Project field at the end of the grid
- There has to be a Header for each project that you want to create
- The combination in the Cost/Revenue field and the Project category field, has to be different for every line
- If the values in the Amount column have changed, click on the Update contract value button to update the amount in the Value field under the Content Fast tab
- Click on the Add button
- Enter a Name for the milestone
- Enter a Description of the milestone
- Select the relevant Project ID from the dropdown list
- Enter the Due date for the milestone
- Select the relevant value in the Internal decision field
- The date on which the line is Approved will populate the Decision date field
- Select the name of the worker who made the decision in the Decision by field
- A Decision note can be entered in the note box provided
- Under the Cost price (hour) Index tab, click on the Add button
- Enter the Effective date for the Rate card
- Select the relevant Resource from the dropdown list
- Indicate wheather this is an Effective labour rate
- Select the relevant Category from the dropdown list
- Select the relevant Project ID from the dropdown list
- Select the relevant Price group from the dropdown list
- Enter the Cost price
- Under the Sales price (hour) Index tab, click on the Add button
- Enter the Effective date for the Rate card
- Select the relevant Category from the dropdown list
- Select the relevant Resource from the dropdown list
- Select the relevant Project ID from the dropdown list
- Select the relevant Price group from the dropdown list
- Select the relevant Sales currency from the dropdown list
- Select the relevant Sales price model from the dropdown list
- Enter the Pricing
- Under the Insurance Index tab:
- Click on the Add button
- Enter the Start date for the Insurance policy
- Select the relevant Policy from the dropdown list
- Select the relevant Vendor from the dropdown list
- Enter the insurance Amount
- Select the insurance Currency from the dropdown list
- Under the Project changes Index tab:
- Click on the Add button
- Select the relevant Change request from the dropdown list
- Enter the Date on which the request was added
- Enter a Description for the change request
- Select the worker who Requested the change
- Select the worker who has to Approve the change request
- Enter the Amount
- Select the change request Currency from the dropdown list
- Click on the Import change requests button
- Select the relevant contract
- Expand the Trading partners Fast tab
- Click on the Add button and select a Vendor account
- Tick the Prime tick box
- Expand the Projects and pricing Fast tab
- Click on the Add button and create one or more Statement of work lines
- The status of the contract must be Approved
- The Prime box must be ticket for a trading partner
- Under the Projects and pricing Fast tab, the Frequency must be set to Monthly
- Select the relevant journal (batch of journal entry line items)
- On the Action pane, click on the Lines button
- Click on the New button and create a record
- On the Vendor invoice journal, in the button strip, click on the Accrue button
- Complete the Accrue dialog
- Click OK
- Select the relevant contract
- Expand the Content Fast tab
- Open the Statement of final account Index tab
- In the Action pane, click on the Termination button
- On the Termination/Sofa of contract dialog:
- Select the relevant Worker from the dropdown list
- Enter the Termination/Sofa date
- Select the relevant Reason code for the termination, from the dropdown list
- Enter the Agreed final account
- Click on the OK button
- Under the Content Fast tab, open the Statement of final account Index tab
- Select the relevant Sofa status from the dropdown list
- Enter details/reasons for the termination in the note box provided
- Click on the Print the statement of final account button
- Only contracts with the SOFA status as In progress or Closed will be displayed
- Under the Content Fast tab, open the Statement of final account Index tab
- Enter the relevant text in the Contract conclusion note box
- Click on the Print contract conclusion button
- In the Action pane, click on the New button
- Enter a Name for the reviewer group
- In the Target field, select the relevant workflow from the dropdown list. This is the workflow for which the dimensions are looked for in the Approval authority.
- In the Button strip, click on the Add button
- Select the relevant Vendor/Supplier account from the dropdown list
- Select the relevant Purchase agreement from the dropdown list
- Enter the Purchase agreement amount
- Click on Save
- The user now has the option to create/update the contract value (or the portion allocated) as a line in the Statement of work on the Purchase agreement (by navigating to: Accounts Payable > Purchase Orders > Purchase agreements)
- Open the RACI Index tab
- Select the Employee responsible from the dropdown list
- Select the Employee accountable from the dropdown list
- Select the Employee consulted from the dropdown list
- Select the Employee informed from the dropdown list
- In the Action Pane, click on the Change RACI button
- Select the Employee responsible from the dropdown list
- Select the Employee accountable from the dropdown list
- Select the Employee consulted from the dropdown list
- Select the Employee informed from the dropdown list
- Click the OK button
- The Employee accountable field is used when sending out manual notifications when clicking on the Send email notification in the Action pane
- To send an email to Line management, click on the email icon next to the relevant name
- The selected worker must have a primary email address
- Select the relevant contract
- Expand the Item lines Fast tab
- Click on the Distribute all line amounts button
- On the Distribute all line amounts form:
- Click on the New button
- The default Status under the General Fast tab, will be Draft
- Expand the Item lines Fast tab and select the relevant record
- Expand the Line distribution Fast tab and click on the Add button
- Select the relevant Ledger financial dimension combination
- Select the Date from value
- Enter the Distributed amount or Distributed percentage value
- Select the relevant contract
- Expand the Item lines Fast tab
- Click on the Create invoice journal button
- On the Create invoice journal dialog:
- Enter the Invoice date
- Enter the Invoice number
- Click on the OK button
- In the Invoice journal, open the General Index tab to see the referenced contract
- In the Action pane, click on the Lines button
- Firstly, open the line detail view of the relevant invoice
- Remove the Ledger transaction type voucher of the invoice and adjust the Credit amount value of the Vendor transaction type voucher of the invoice accordingly
- In the button strip, click on the Function button and click on Breakdown of voucher
- In the Overview section, click on the Add contract line distributions button
- On the Add contract line distributions form:
- Select the relevant ledger dimension combination line
- Enter the Amount to invoice amount
- Tick the Mark tick box
- Click on the OK button
- Amount to invoice cannot exceed amount available
- On the Breakdown of Voucher form:
- In the Action Pane, click on the Update button
- The Ledger transaction type voucher of the invoice will be updated
¶ Step 13: Setup Integration template for PDF services
**Future release will support PDF integration.
Go to: GRC > Governance > Setup for governance > Integration template for PDF services
¶ Step 14: Setup Purchase agreement classification
The purchase agreement classification allows you to control the administrative information that is available on purchase agreements.
Go to: GRC > Governance > Setup for governance > Purchase agreement classification
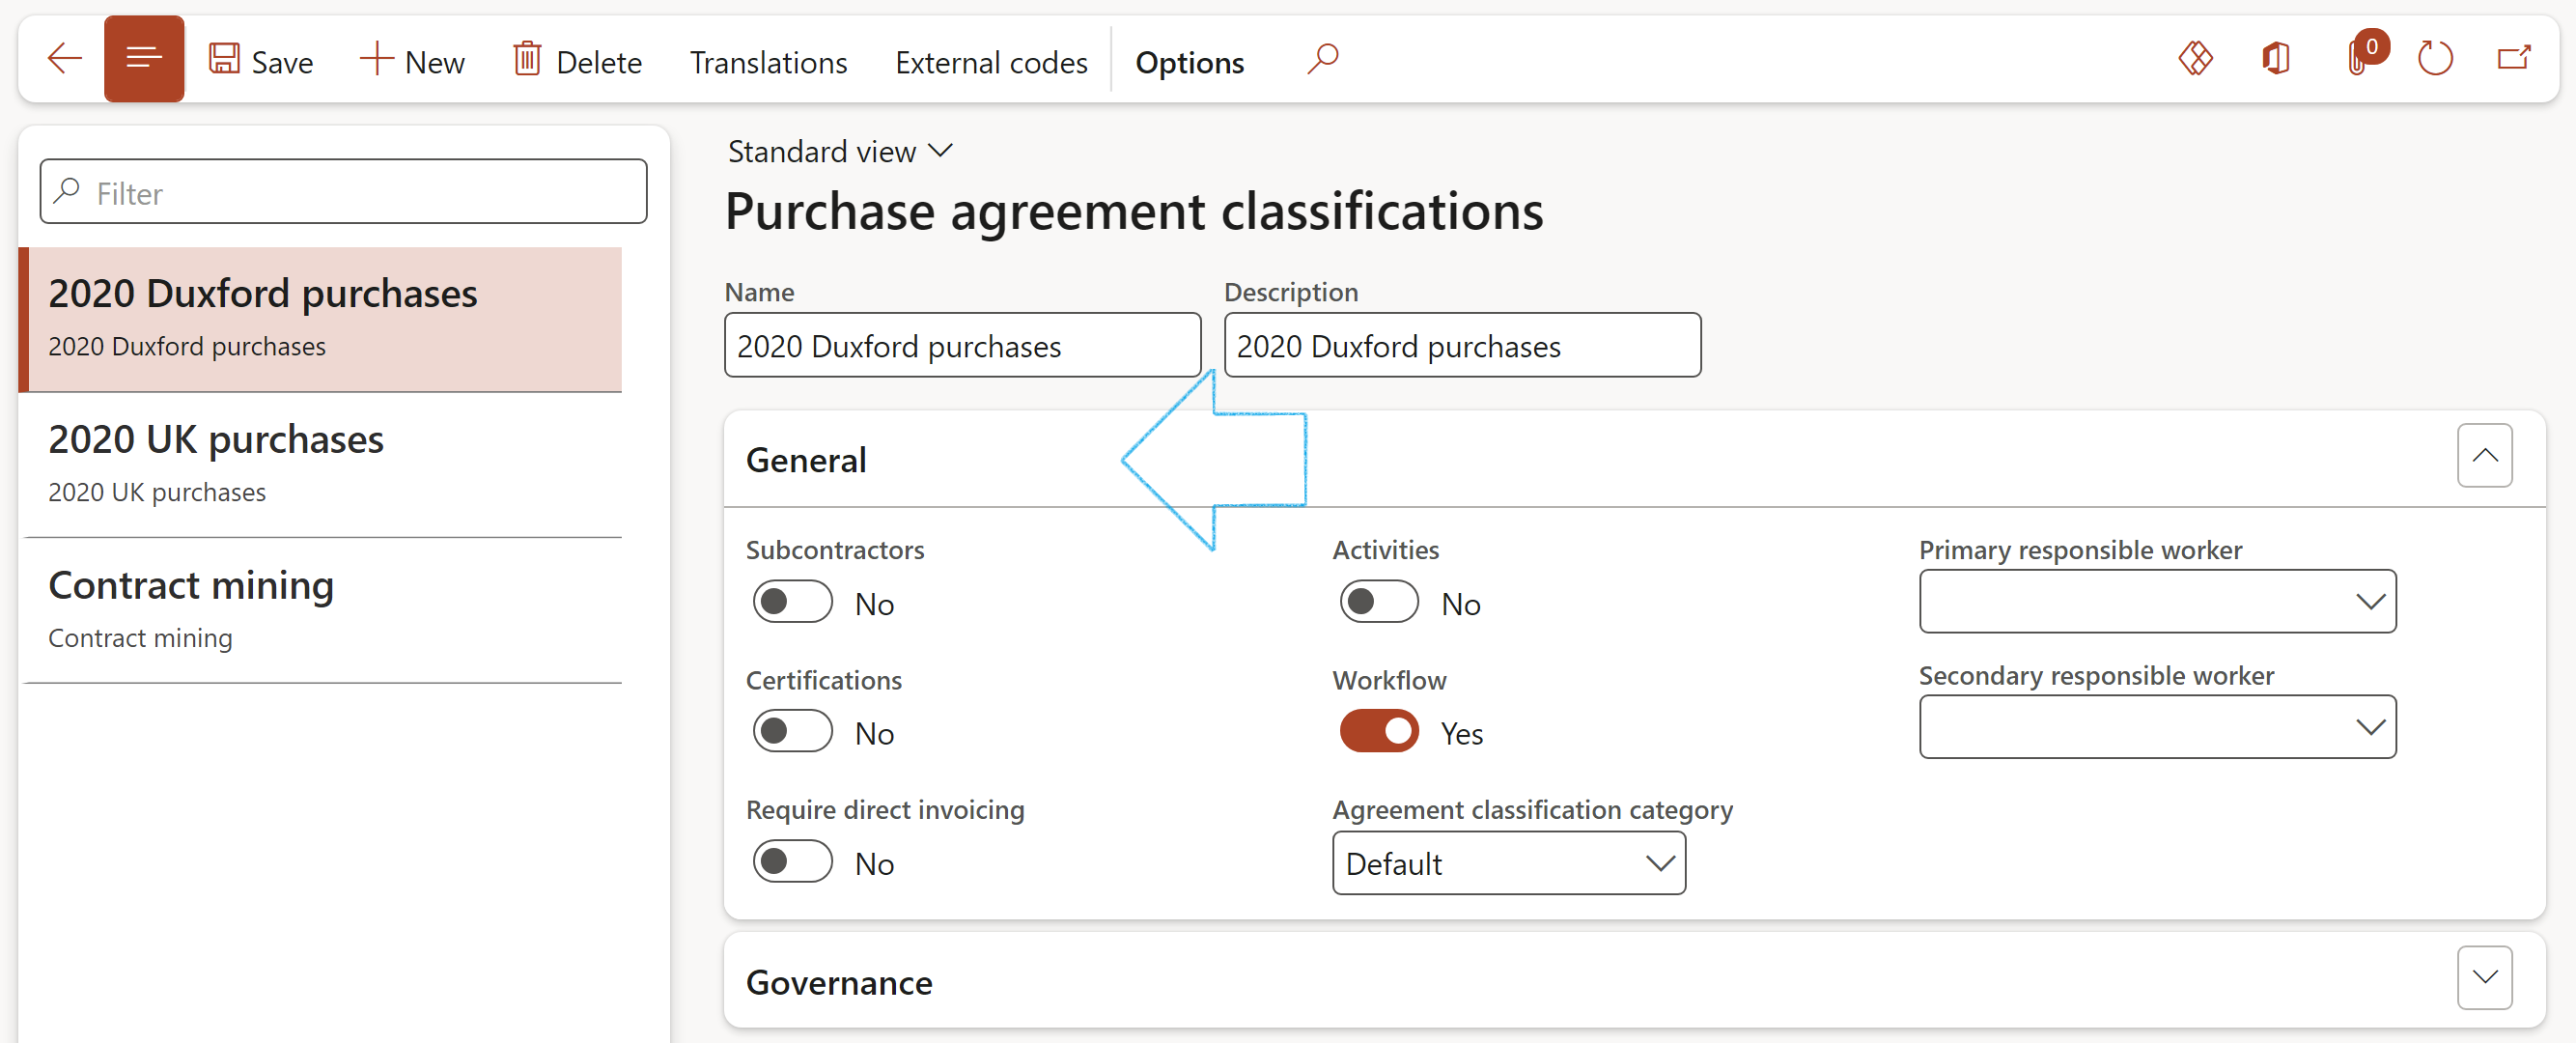
An organization negotiates and concludes a contract. The detail of this contract includes that users can and should release PO’s (most likely without approval since there is an approved contract) against this contract. But the rules of the organization states that the total of all PO’s being released cannot go beyond the negotiated contract value. Under the Governance Fast tab, super users can choose to enforce the above rule.

¶ Step 15: Risk configuration
It is prudent to assess the risks associated with Trading partners and related contracts. To support this, users can do a risk assessment via the Profile Fast tab on the Contracts detail form/page. Risk categories are needed for this.
Go to: GRC > Risk > Setup for risks > Risk configuration
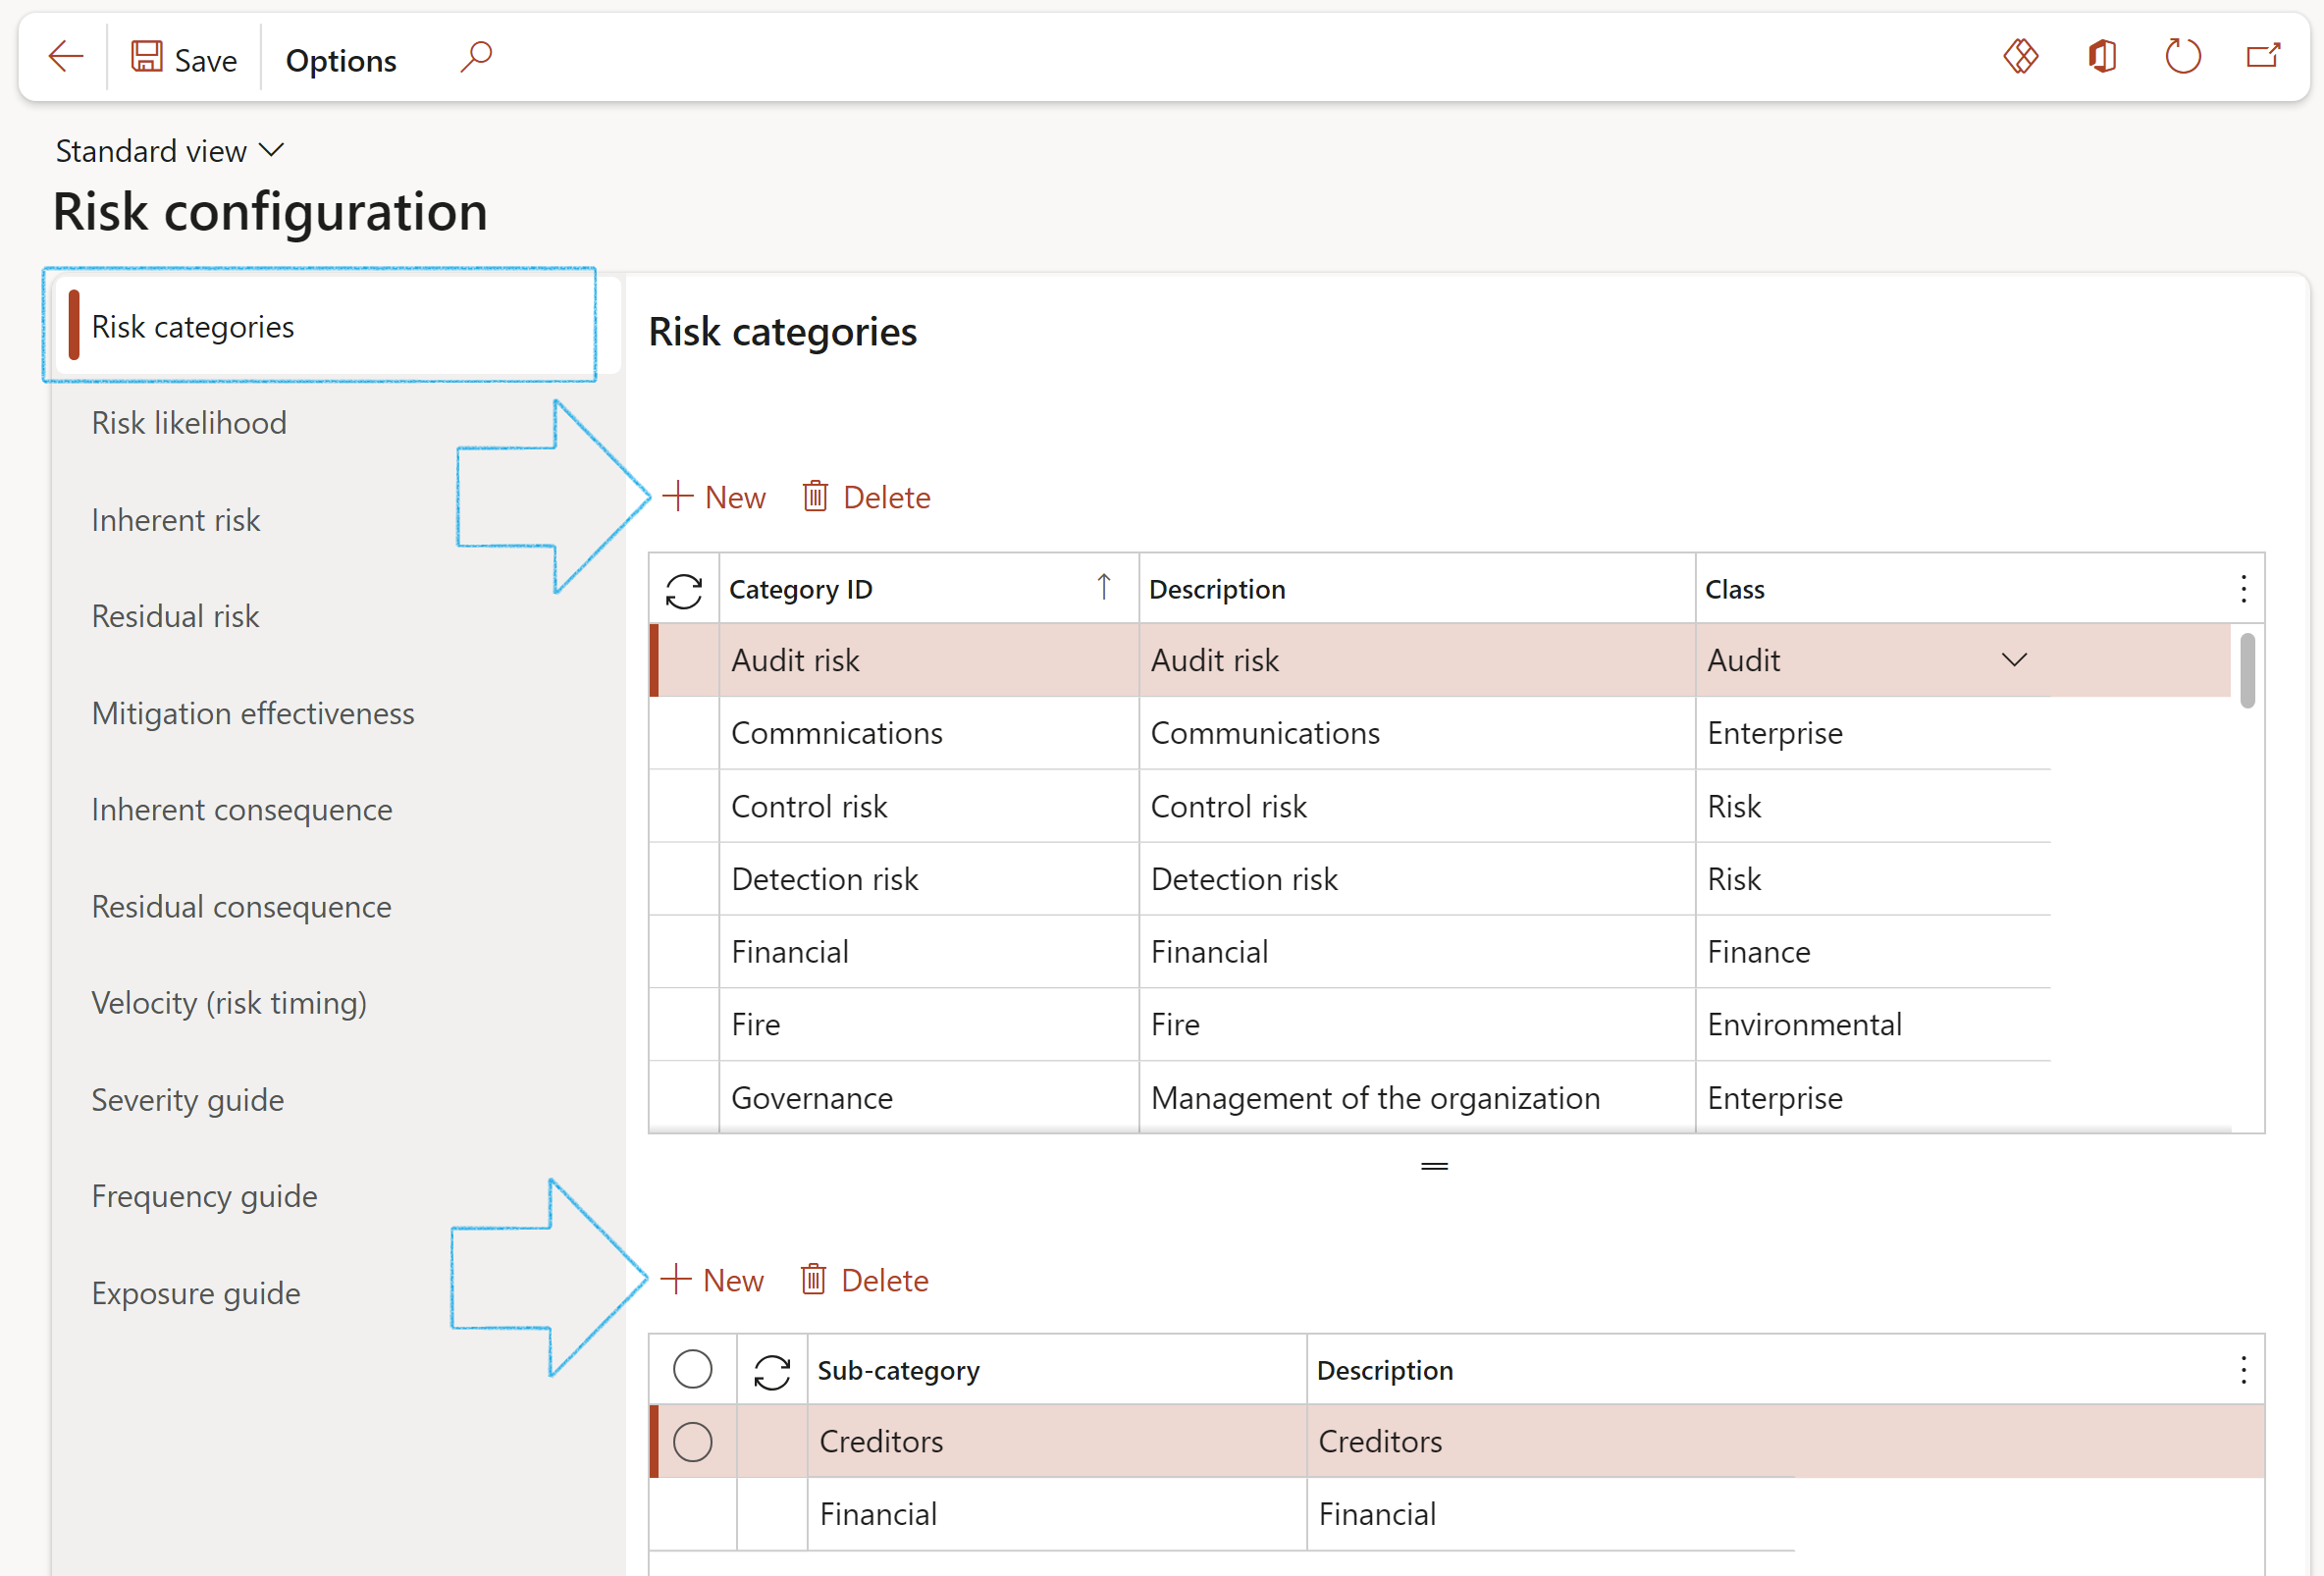
Sub-categories can be setup for each Risk category
¶ Step 16: Setup Description lookups
A reason must be provided when a contract is renewed or terminated. These reasons can be setup as described below.
Go to: GRC > Setup > Description lookups
¶ Step 17: Setup Performance KPIs, goals and users
To measure supplier performance; users can link Key performance indicators (KPIs) and performance goals to a contract. The KPIs are linked directly against a supplier/vendor and customer on the Trading partner Fast tab.
¶ Step 17.1: Setup workers and users
In order to use the Performance management functionality, the user must be setup as follows:
Go to: Human resources > Workers > Workers
Go to: System administration > Users > Users

¶ Step 17.2: Create KPIs
Go to: GRC > Performance > Setup for performance > Key performance indicators list
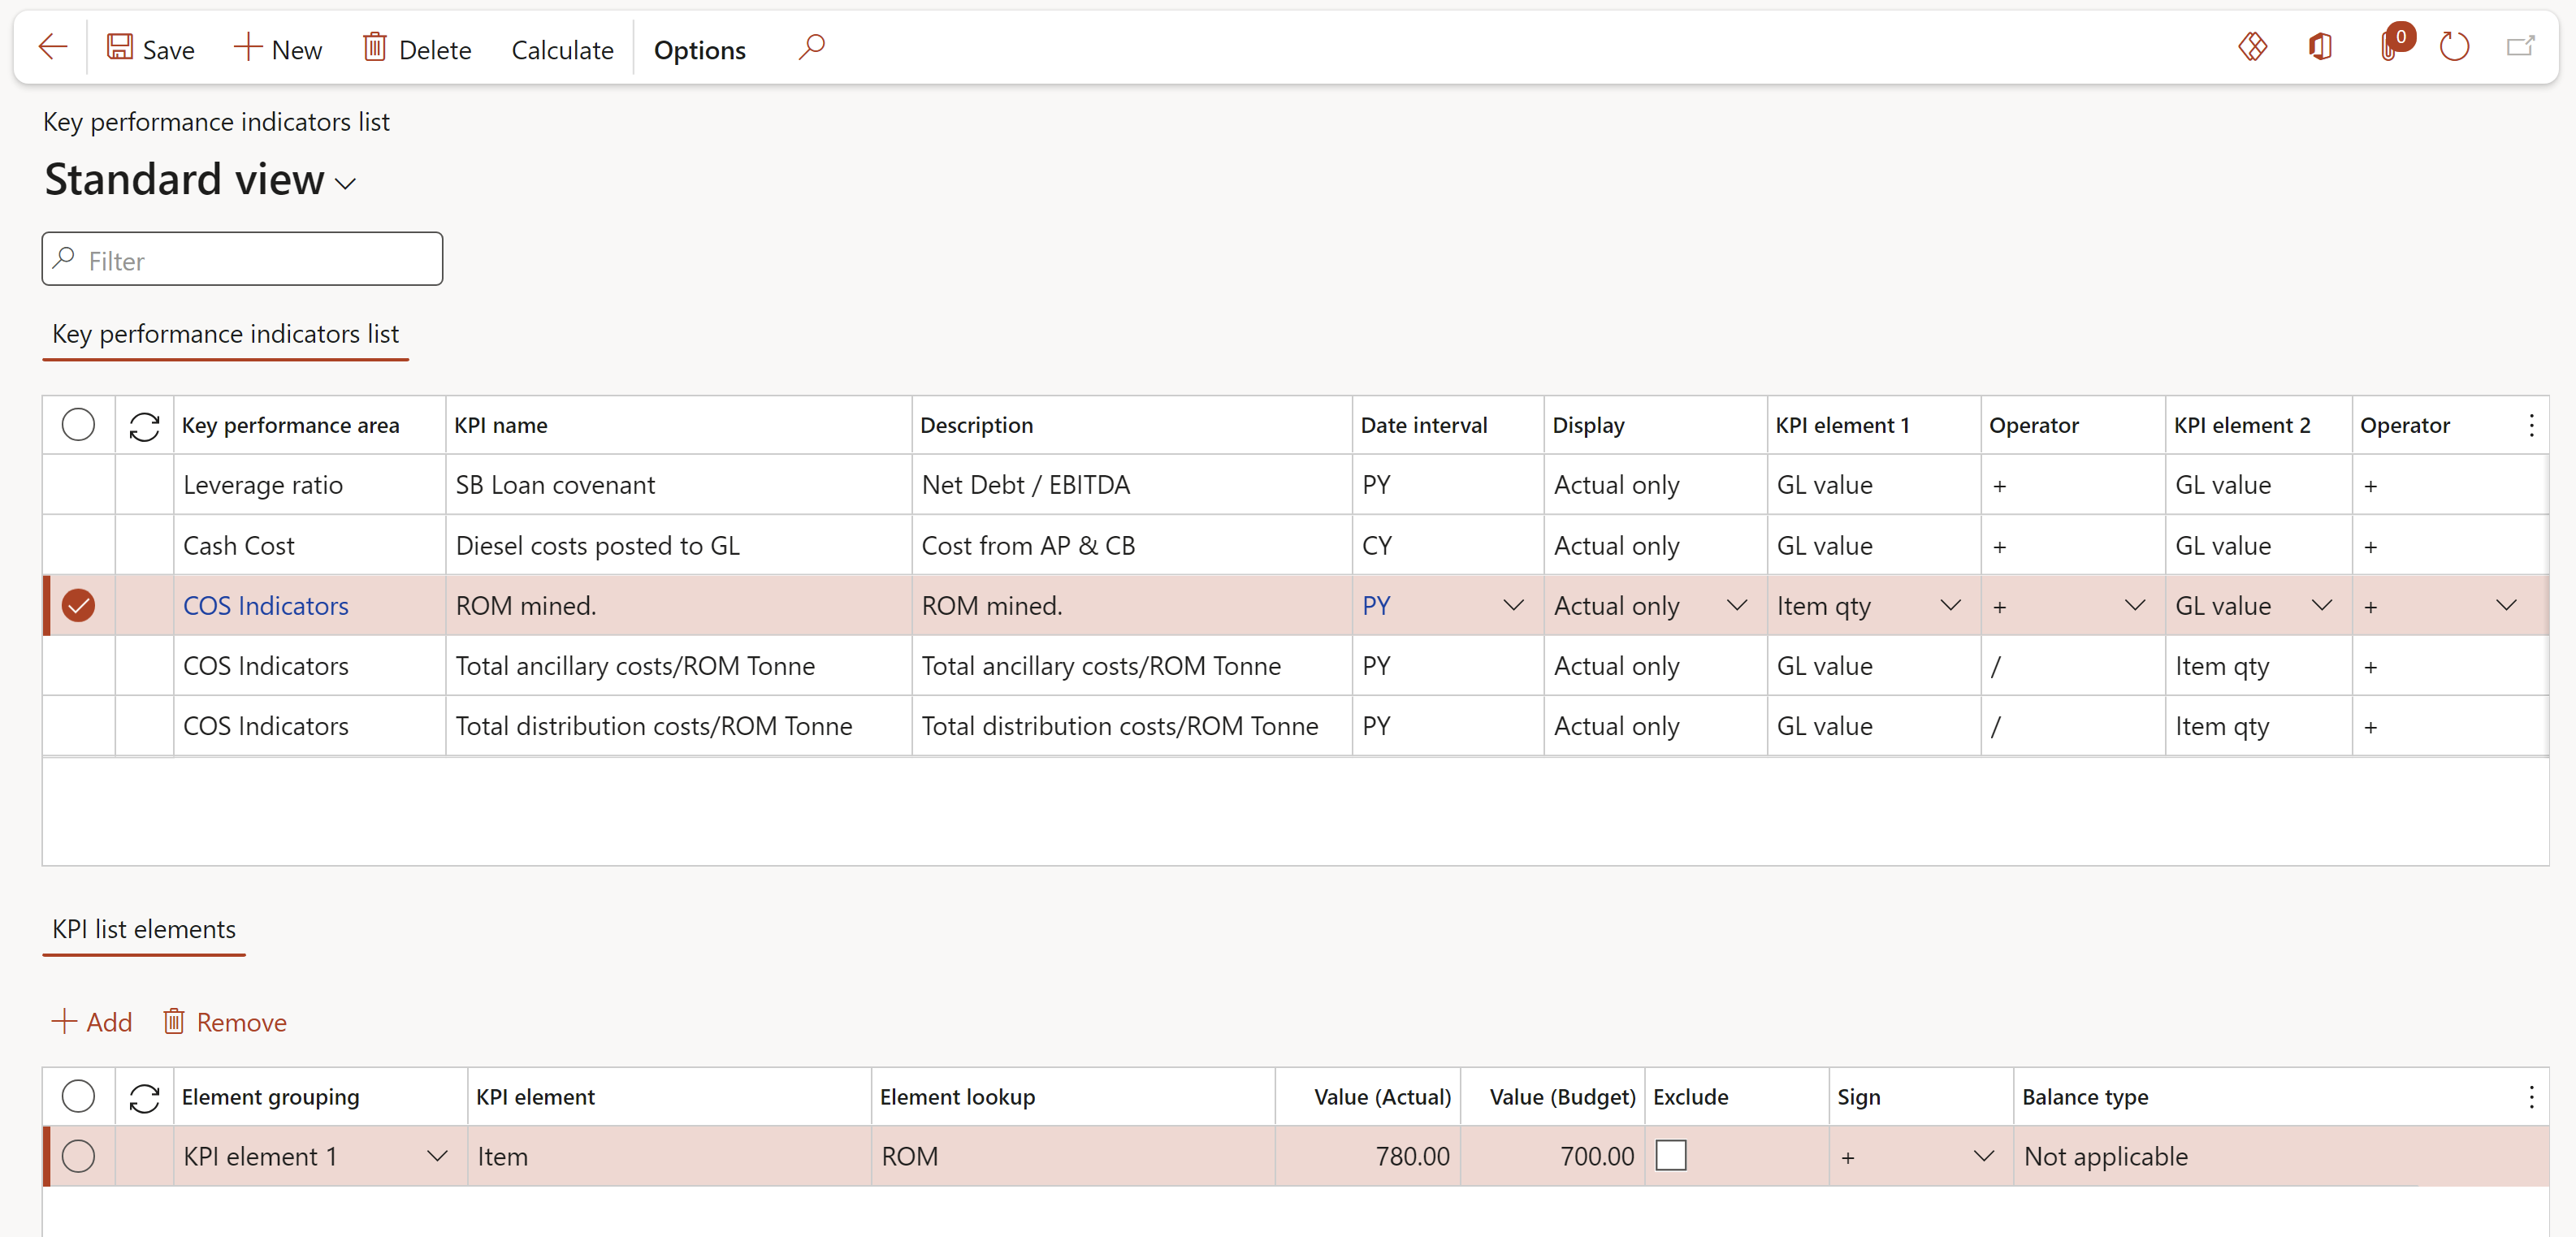
Refer to the GRC Corporate performance management Wiki page for more detail
¶ Step 18: Setup auto expiry of contract & other documents
Go to: GRC > Governance > Periodic > Auto expiry of contract & other documents
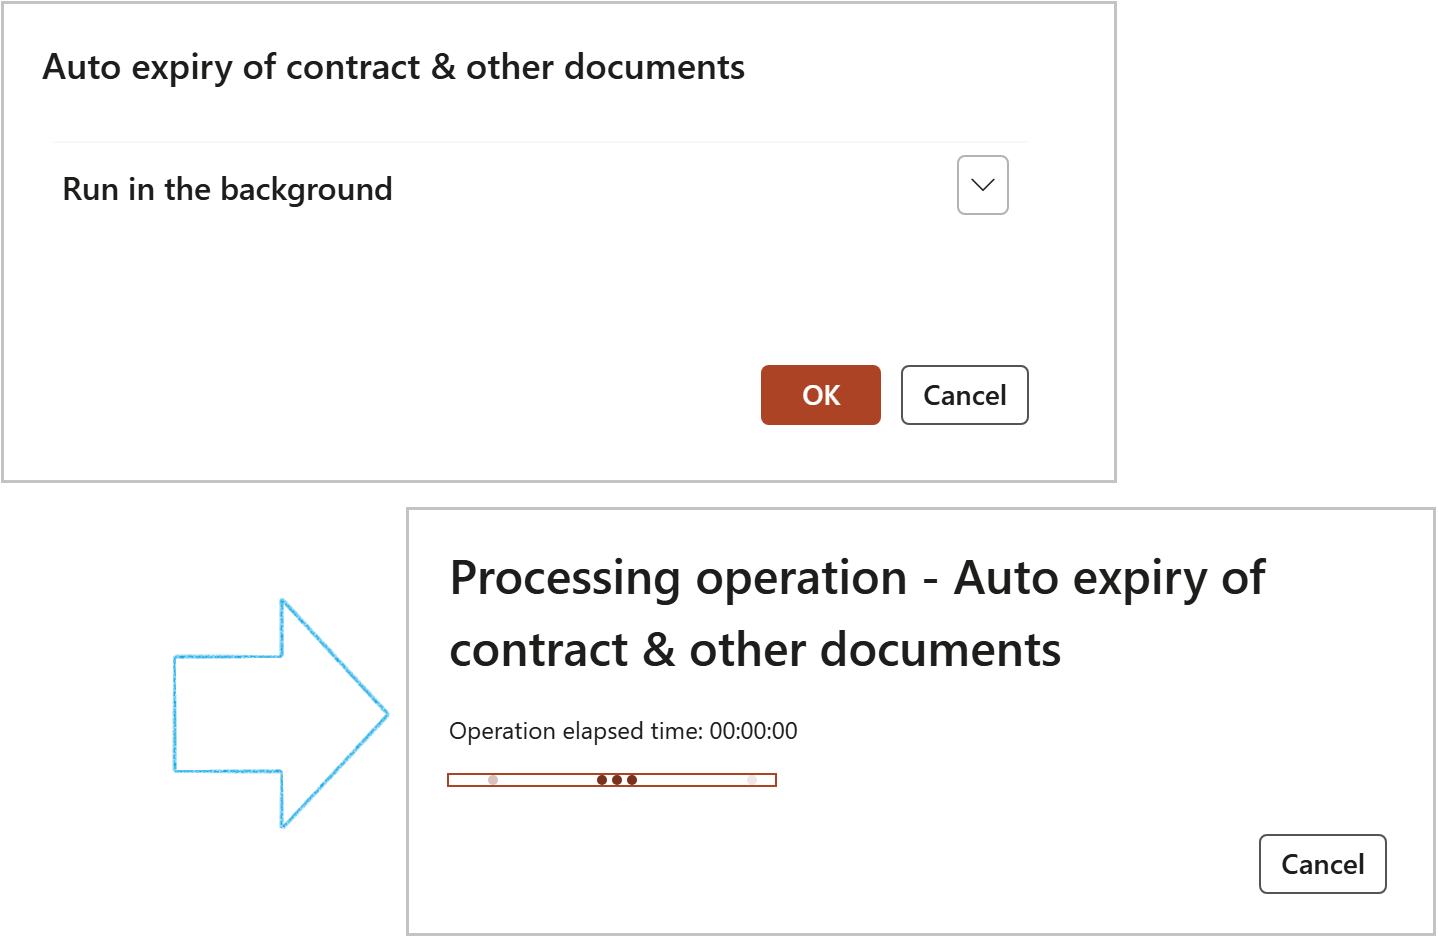
The status of all contracts and other documents where System date is past the Due date, will be changed to Expired
¶ Daily use: Contract requests
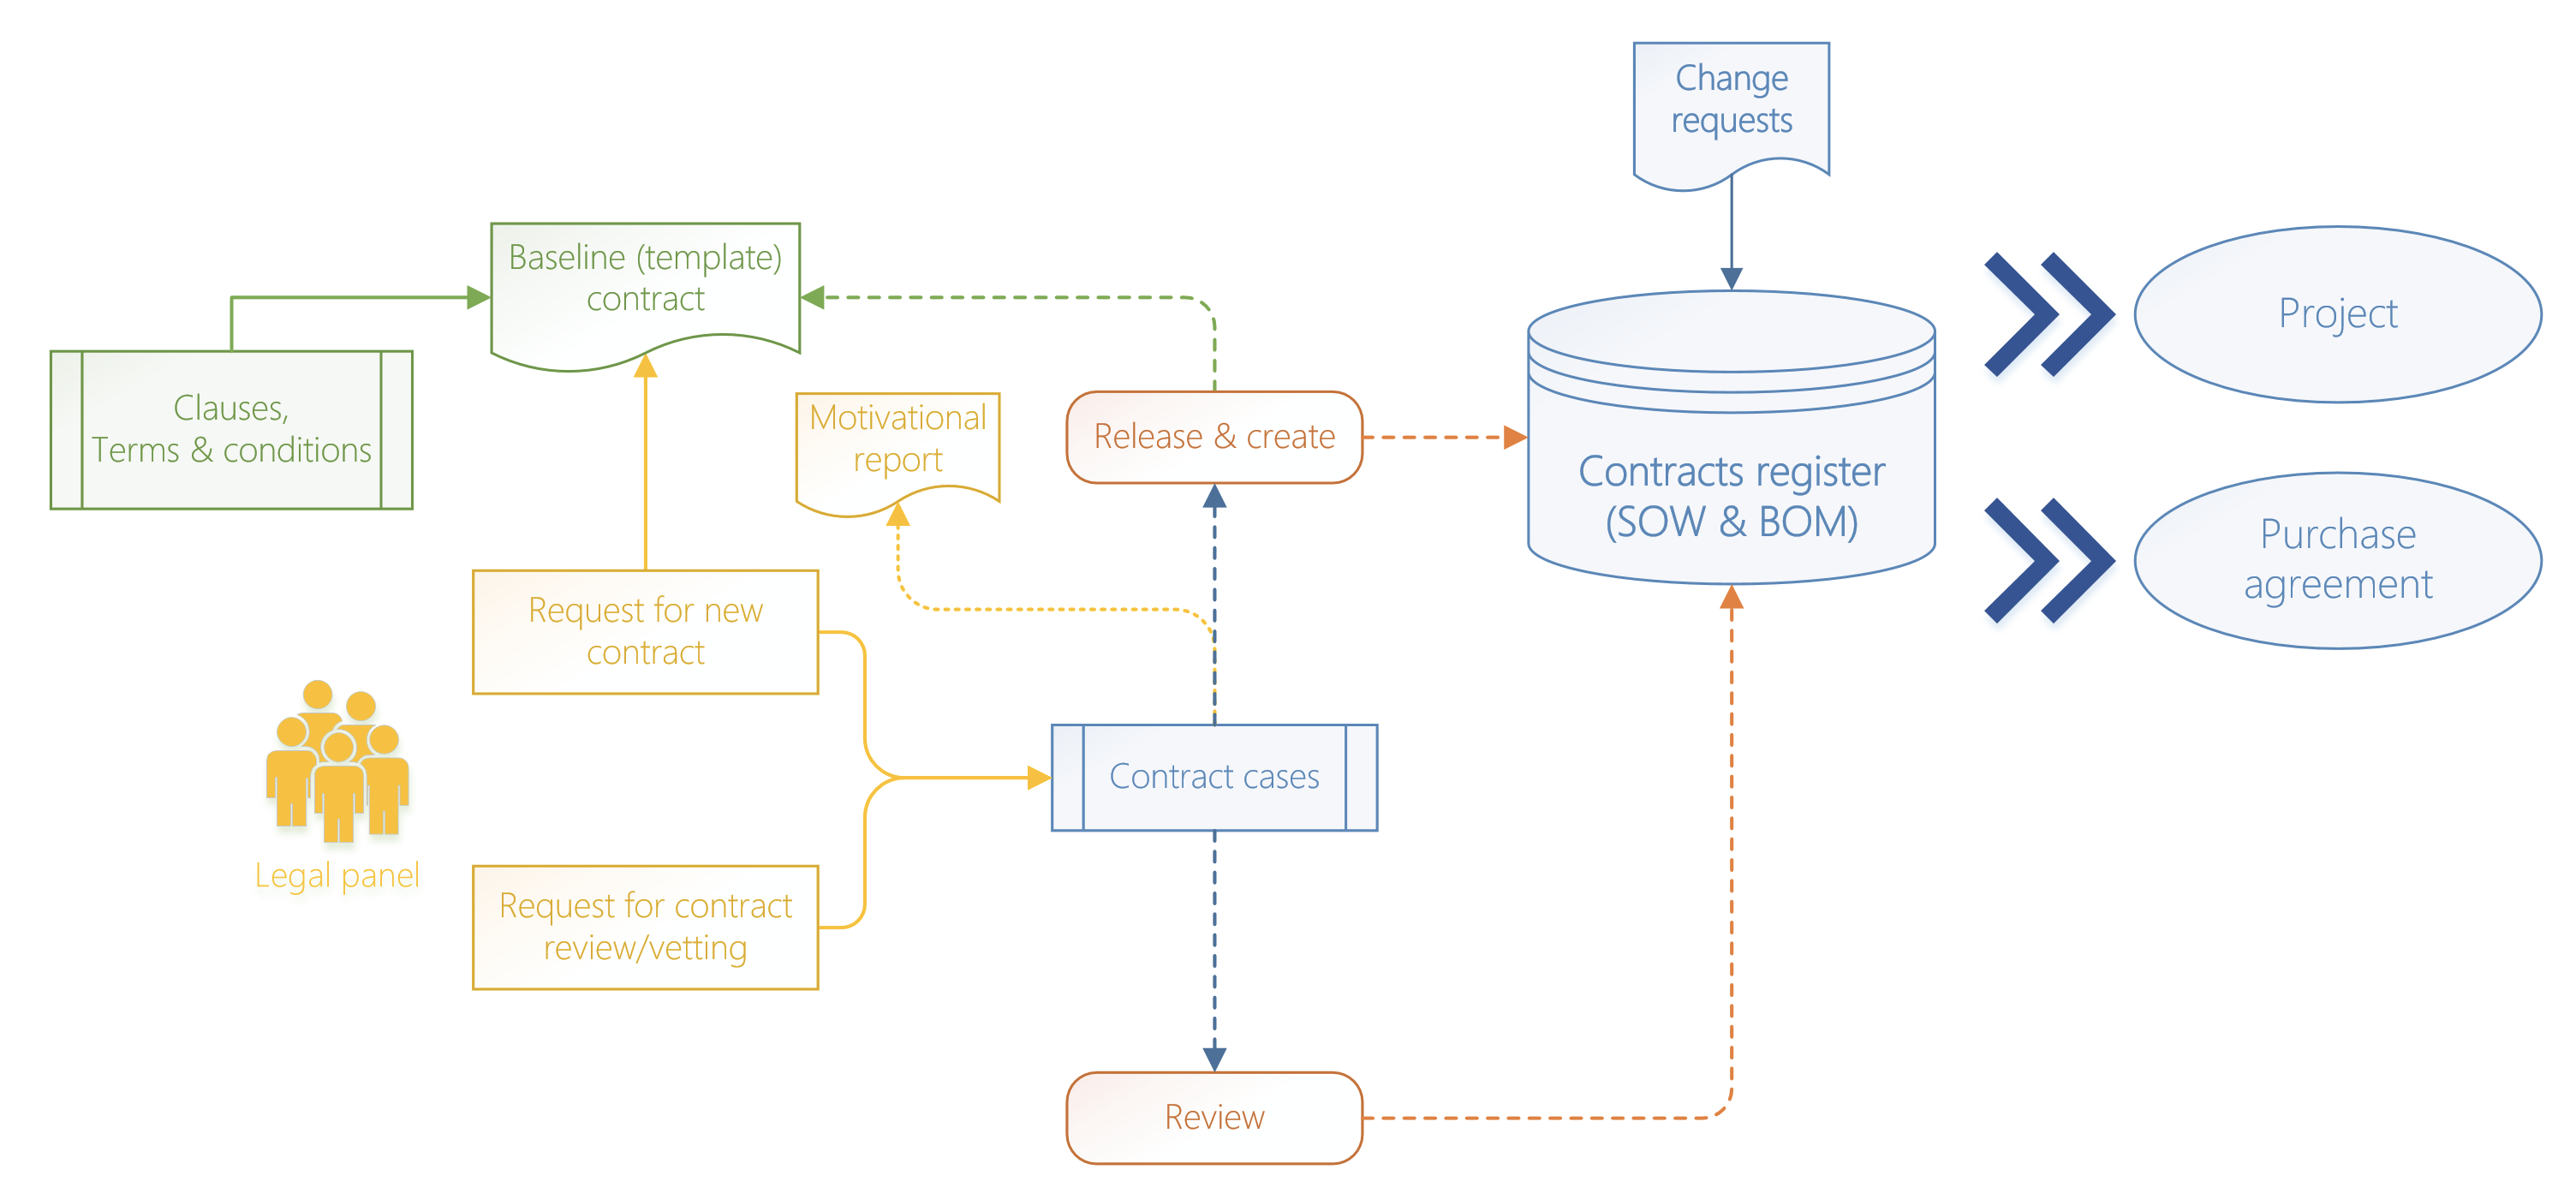
¶ Step 19: Contract requests
Contract request is the start of the entire contract lifecycle and defines the type of contract to be created and the related details. Contract request involves all the activities necessary to initiate a new contract in Dynamics 365 F&O. The process can be ad hoc, where users manually write down what type of contract they want and what should be inside it, or automated, where users choose from a contract baseline (template) and using workflows to route to the proper approval users. GRC 365 supports two types of contract request cases:
¶ Step 19.1: Create a request for new Contract
Go to: GRC > Governance > Contracts > All contract requests

If Force attachments was selected on the selected Case category, the Attachments form will open, reminding the user to attach a document to the case
¶ Step 19.1.1: Request a new contract from a Purchase requisition
Go to: GRC > Governance > Tender management > All purchase requisitions
¶ Step 19.1.2: Request a new contract from RFQ
Go to: GRC > Governance > Tender management > All requests for quotations
¶ Step 19.1.3: Contract request detail form
The information entered on the New case dialog will populate the relevant fields on the detail form.
Go to: GRC > Governance > Contracts > All contract requests


¶ Step 19.1.4: Print the Motivation report
The user who must approve the contract request has the ability to do the following:
Go to: GRC > Governance > Contracts > Release new contract requests

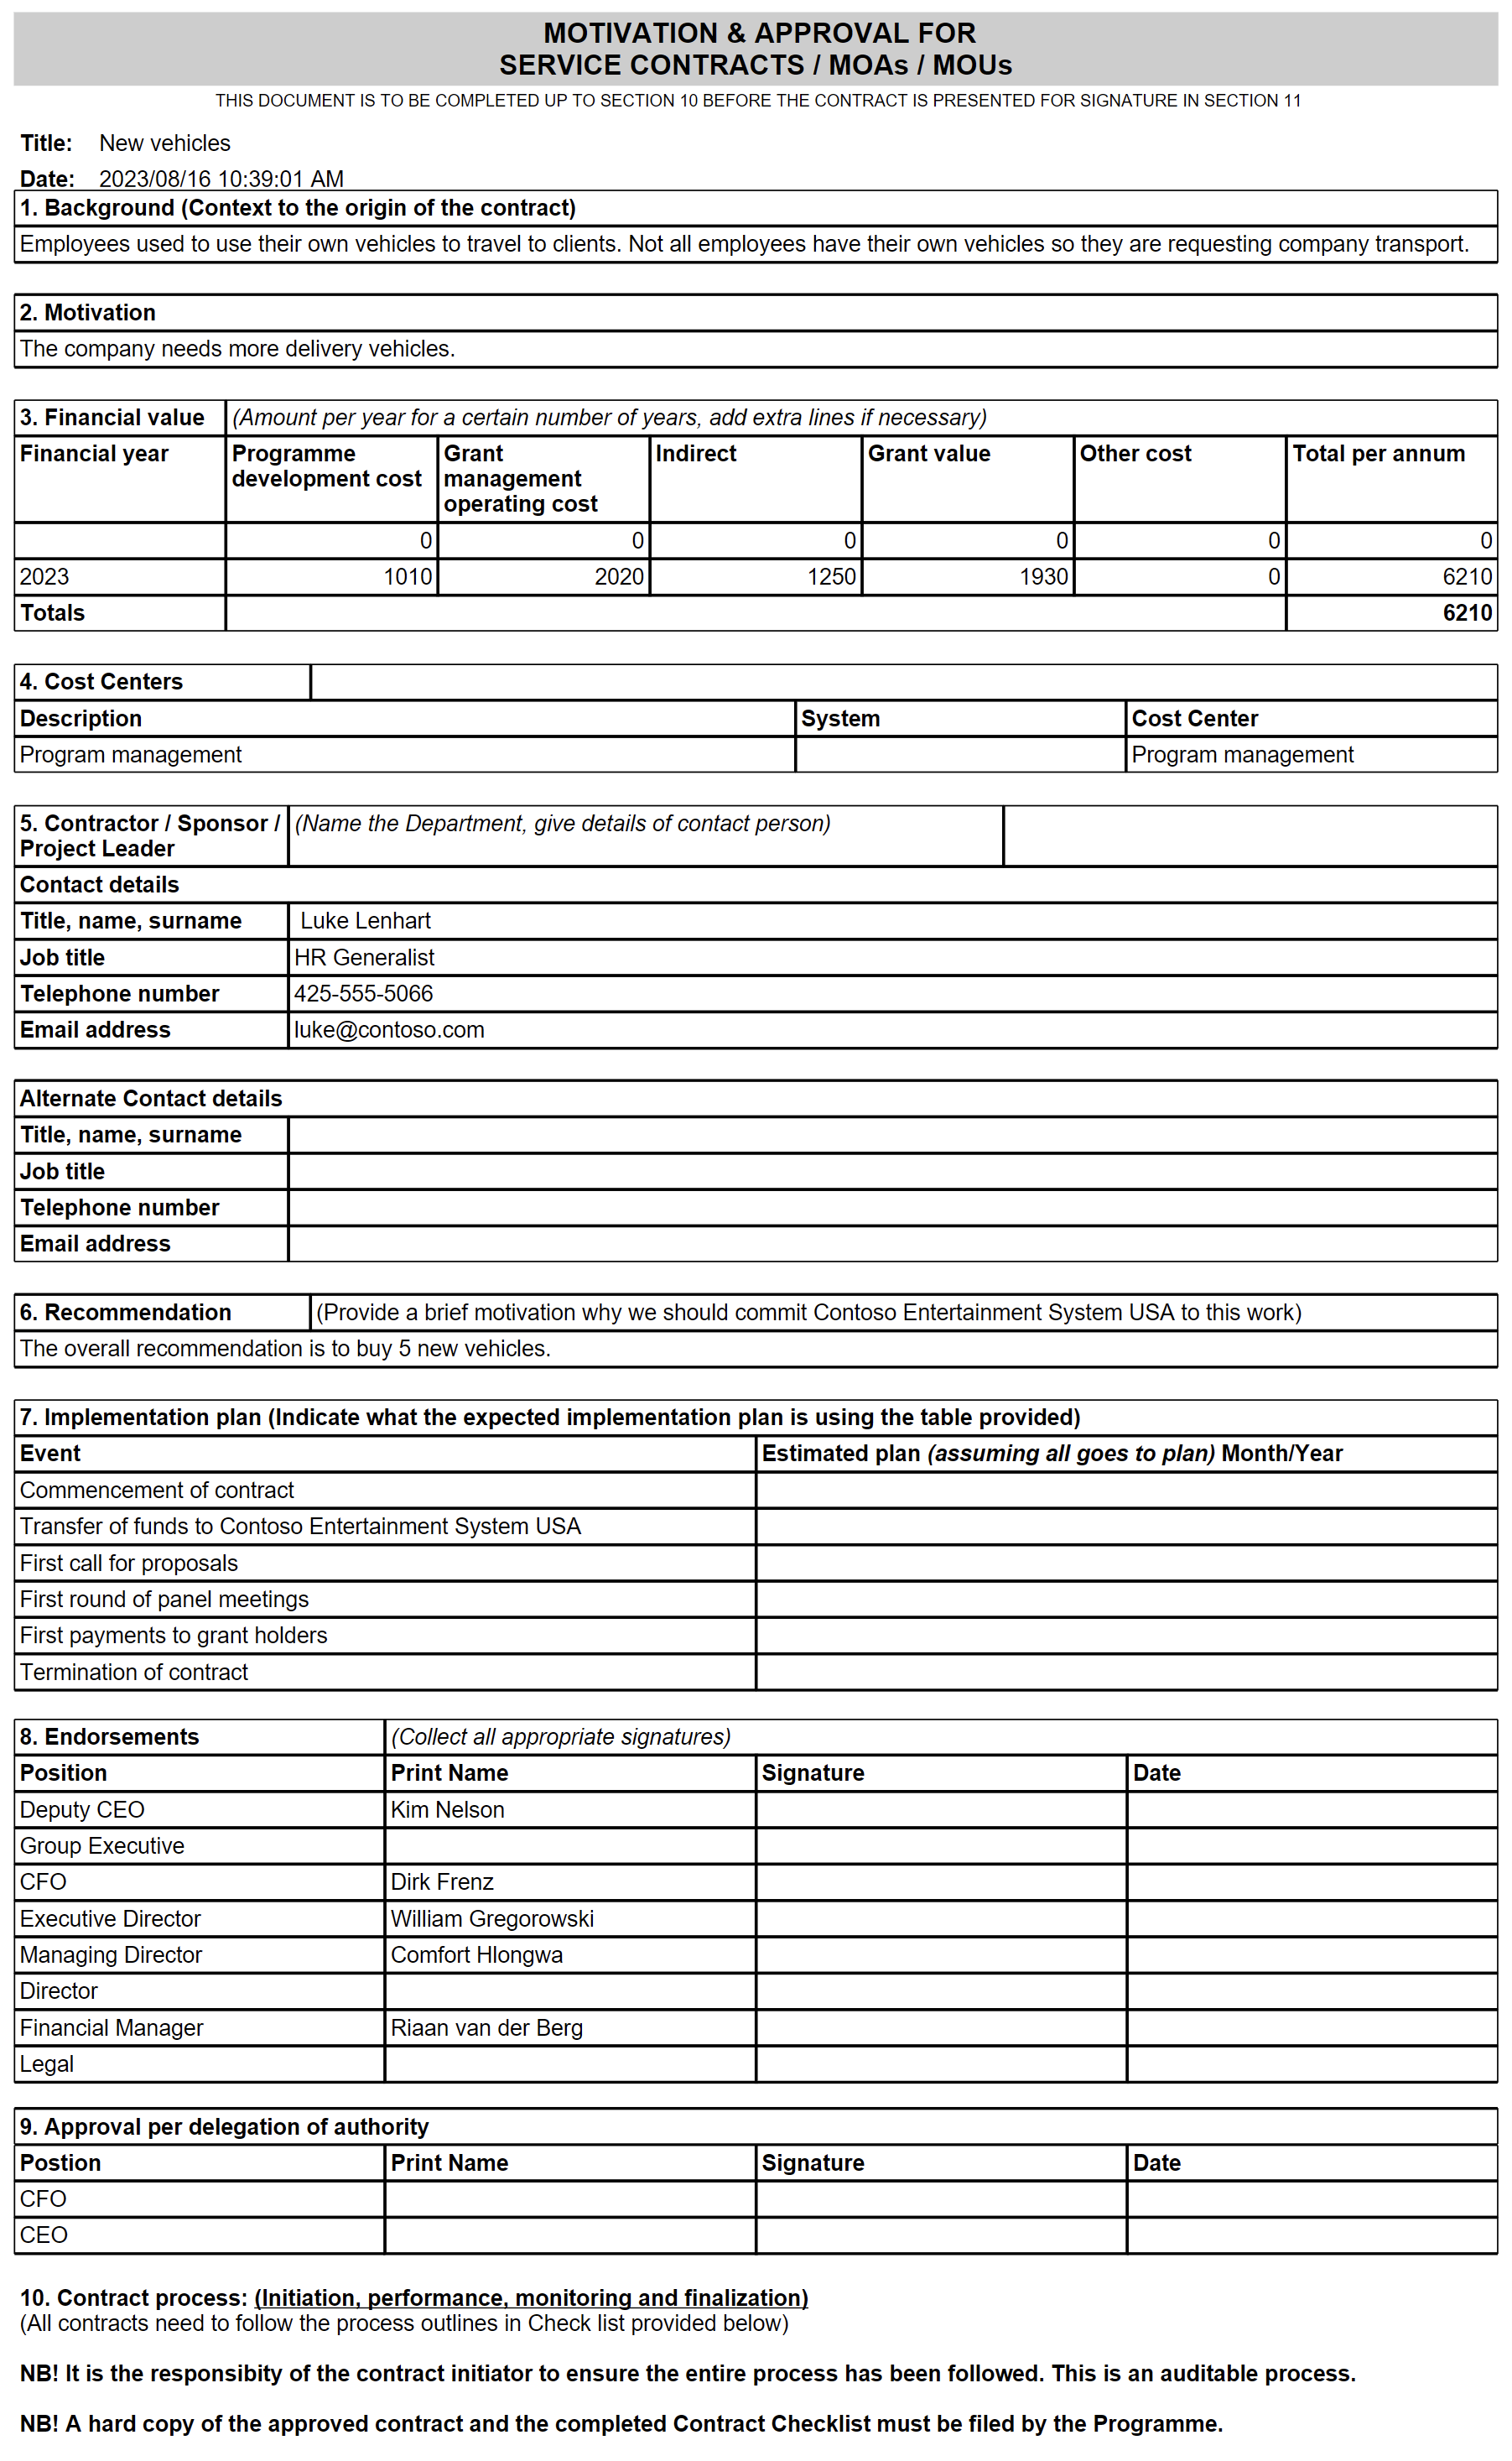
On the Motivation report print dialog:
It is important to complete this form EXACTLY as in the example provided!
¶ Step 19.1.5: Approve the contract request
Workflow will make the Create contract button available
If workflow is not enabled, change the state of the Contract request to In progress
Go to: GRC > Governance > Contracts > Release new contract requests
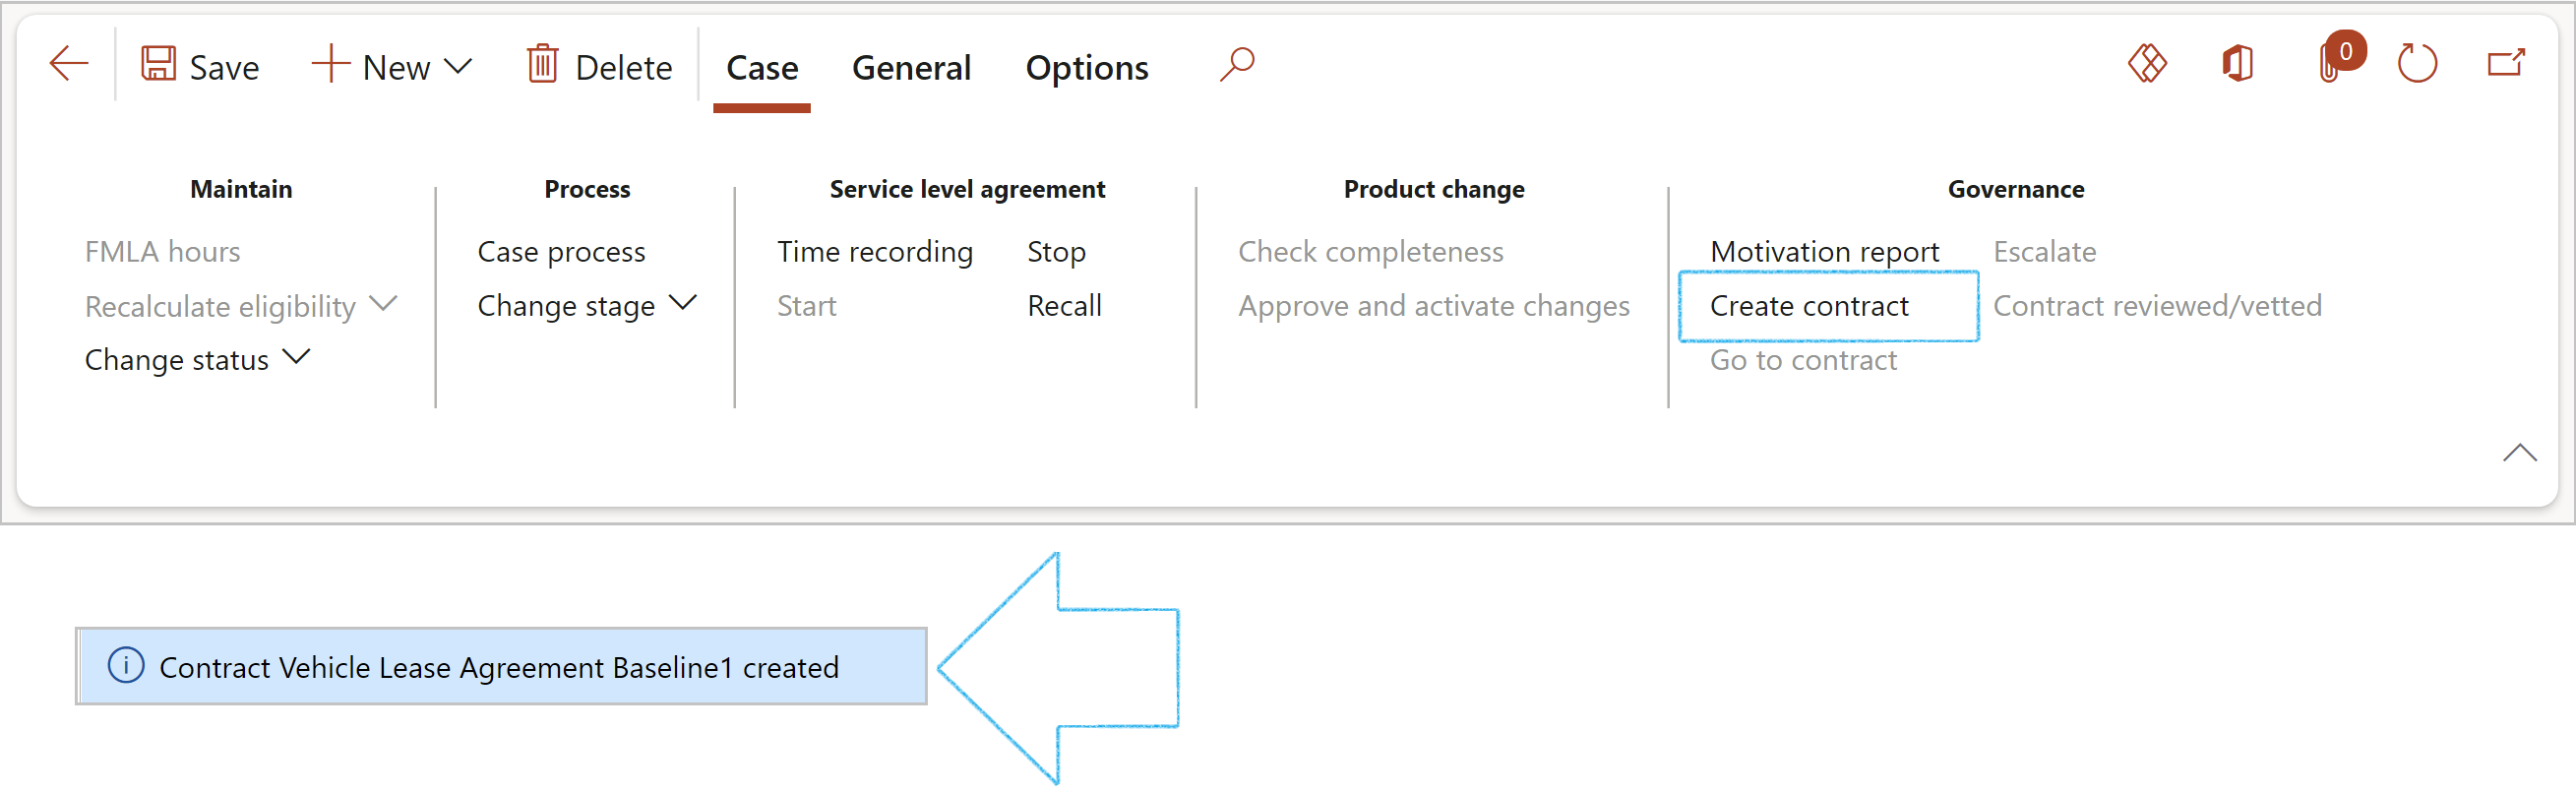
A blue line will appear confirming that the contract has been created
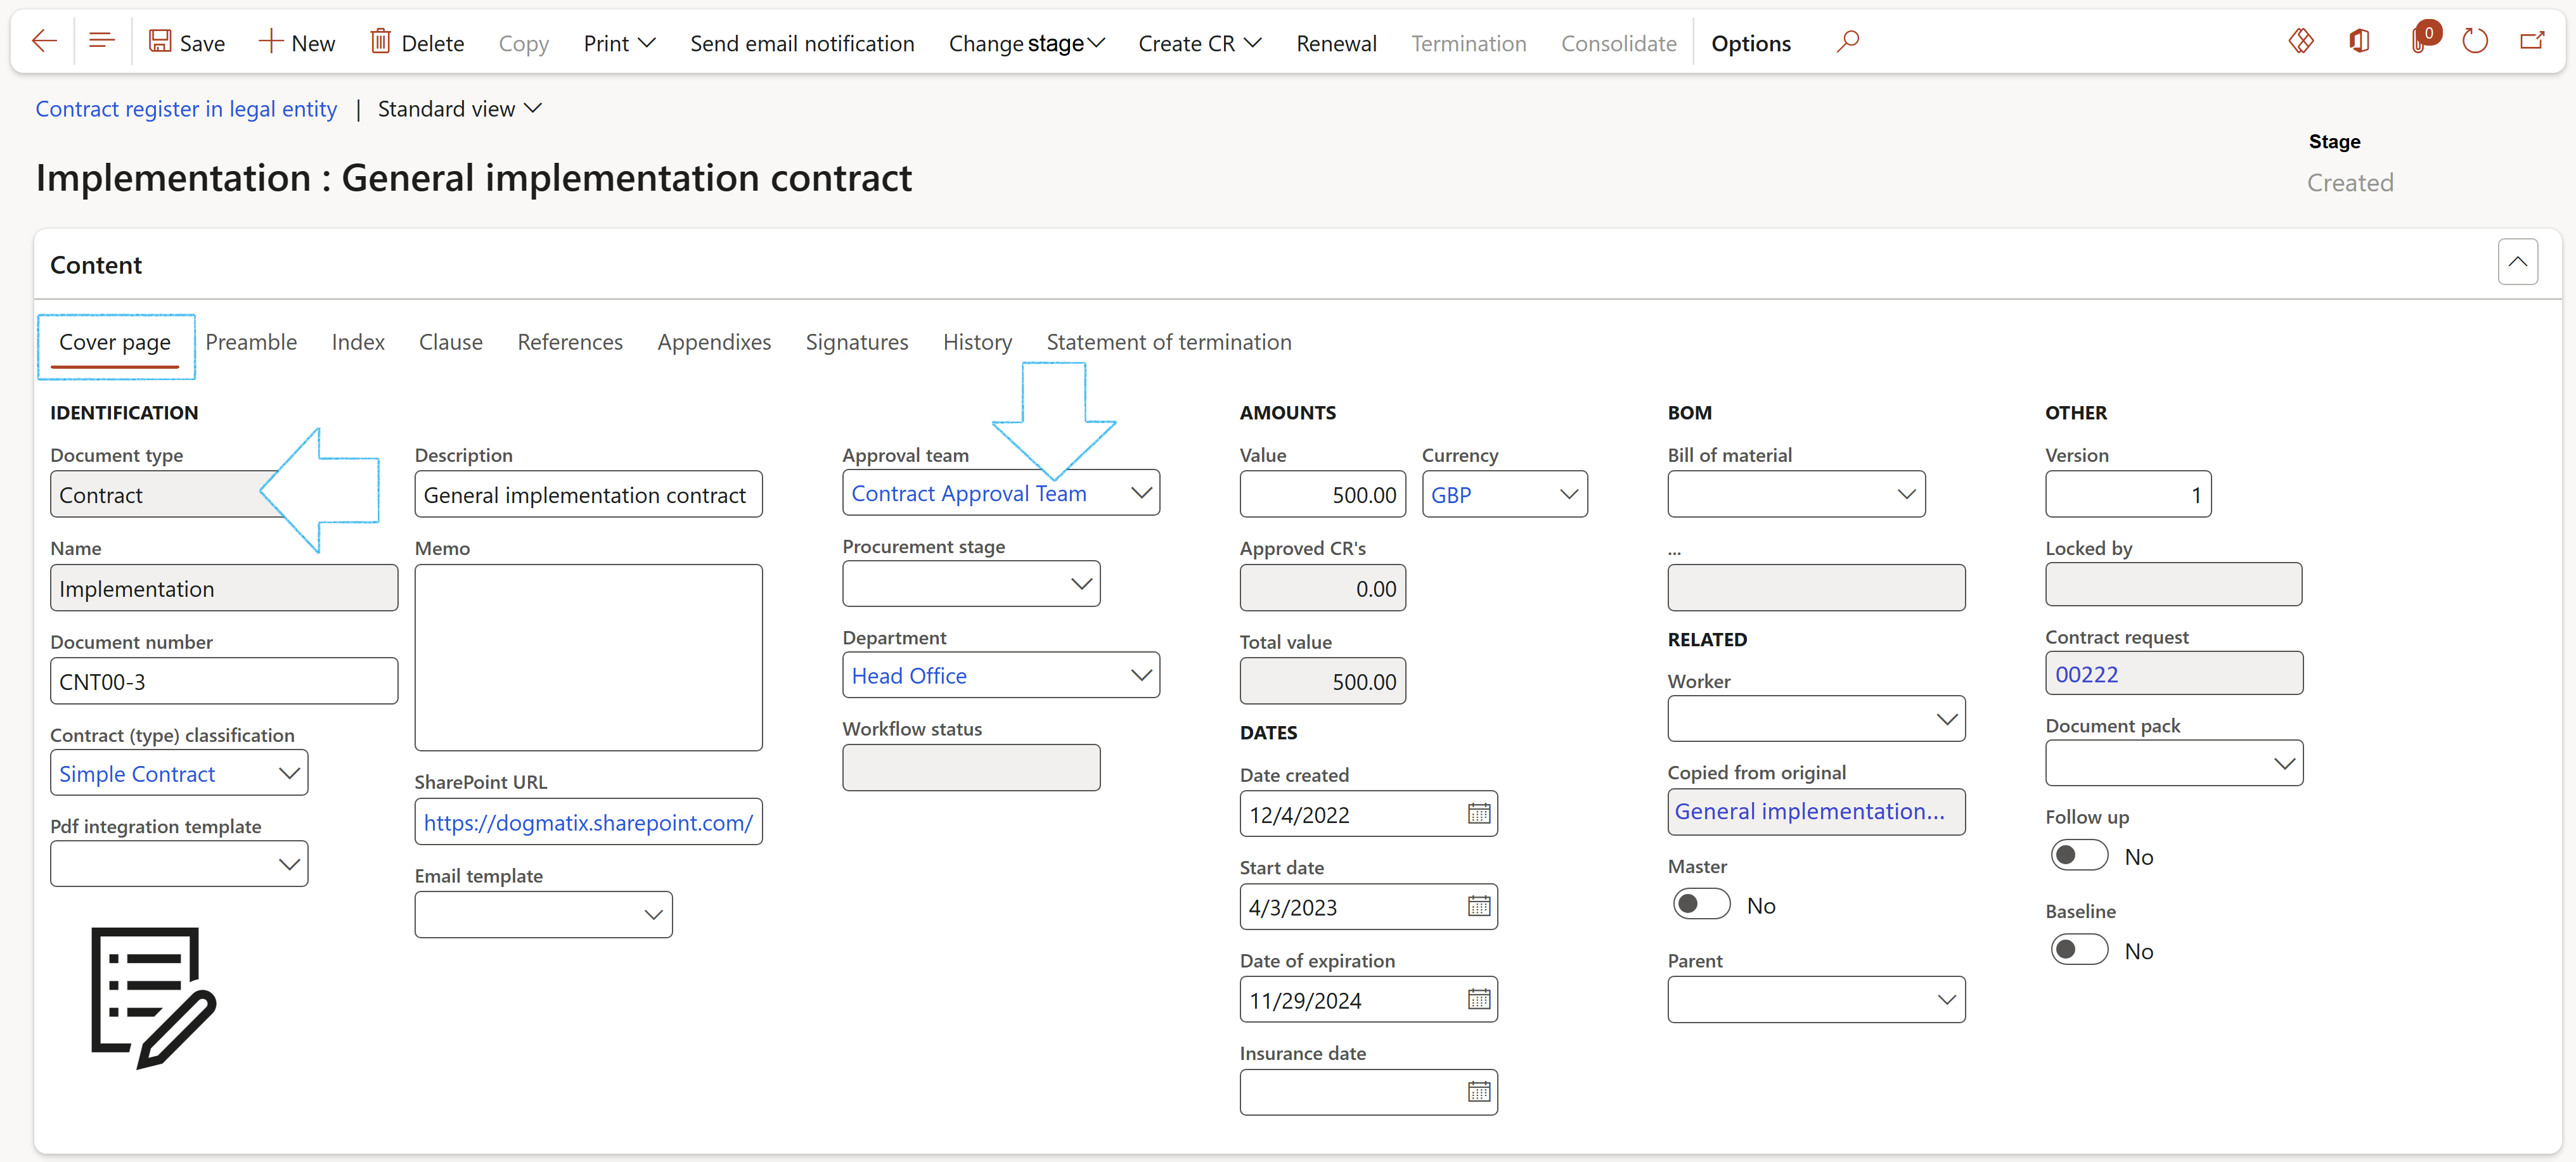
¶ Step 19.1.6: The new created contract
Go to: GRC > Governance > Contracts > Contract register in legal entity
¶ Step 19.2: Reviewing/Vetting a contract
Contract review is a thinking process - a rational analysis. This process includes clarifying of contract related facts, measuring of the feasibility of contract, and forecasting of contract risks.
Contract vetting is to critically examine the details of a contract.
There are two ways of creating a review case for a contract.
Go to: GRC > Governance > Contracts > Contract register in legal entity
OR
Go to: GRC > Governance > Contracts > Review contracts


For the Contract to be reviewed to appear on the dropdown list:
¶ Step 19.2.2: Contract to be reviewed detail form
If workflow is enabled, the request for the contract to be reviewed will be on the Review contracts list page
Go to: GRC > Governance > Contracts > Review contracts
The information entered on the New case dialog will populate the relevant fields on the detail form.
Go to: GRC > Governance > Contracts > All contract requests
Additional information can be entered under the Fast tabs:


Go to: GRC > Governance > Contracts > All contract requests
¶ Step 19.2.3: Print the Motivation report
The user who has reviewed/vetted the contract will do the following:
Go to: GRC > Governance > Contracts > Requests for contract reviewed
On the Motivation report print dialog:
It is important to complete this form EXACTLY as in the example provided!

¶ Step 19.2.4: Approve the reviewed/vetted contract
Go to: GRC > Governance > Contracts > Review contracts
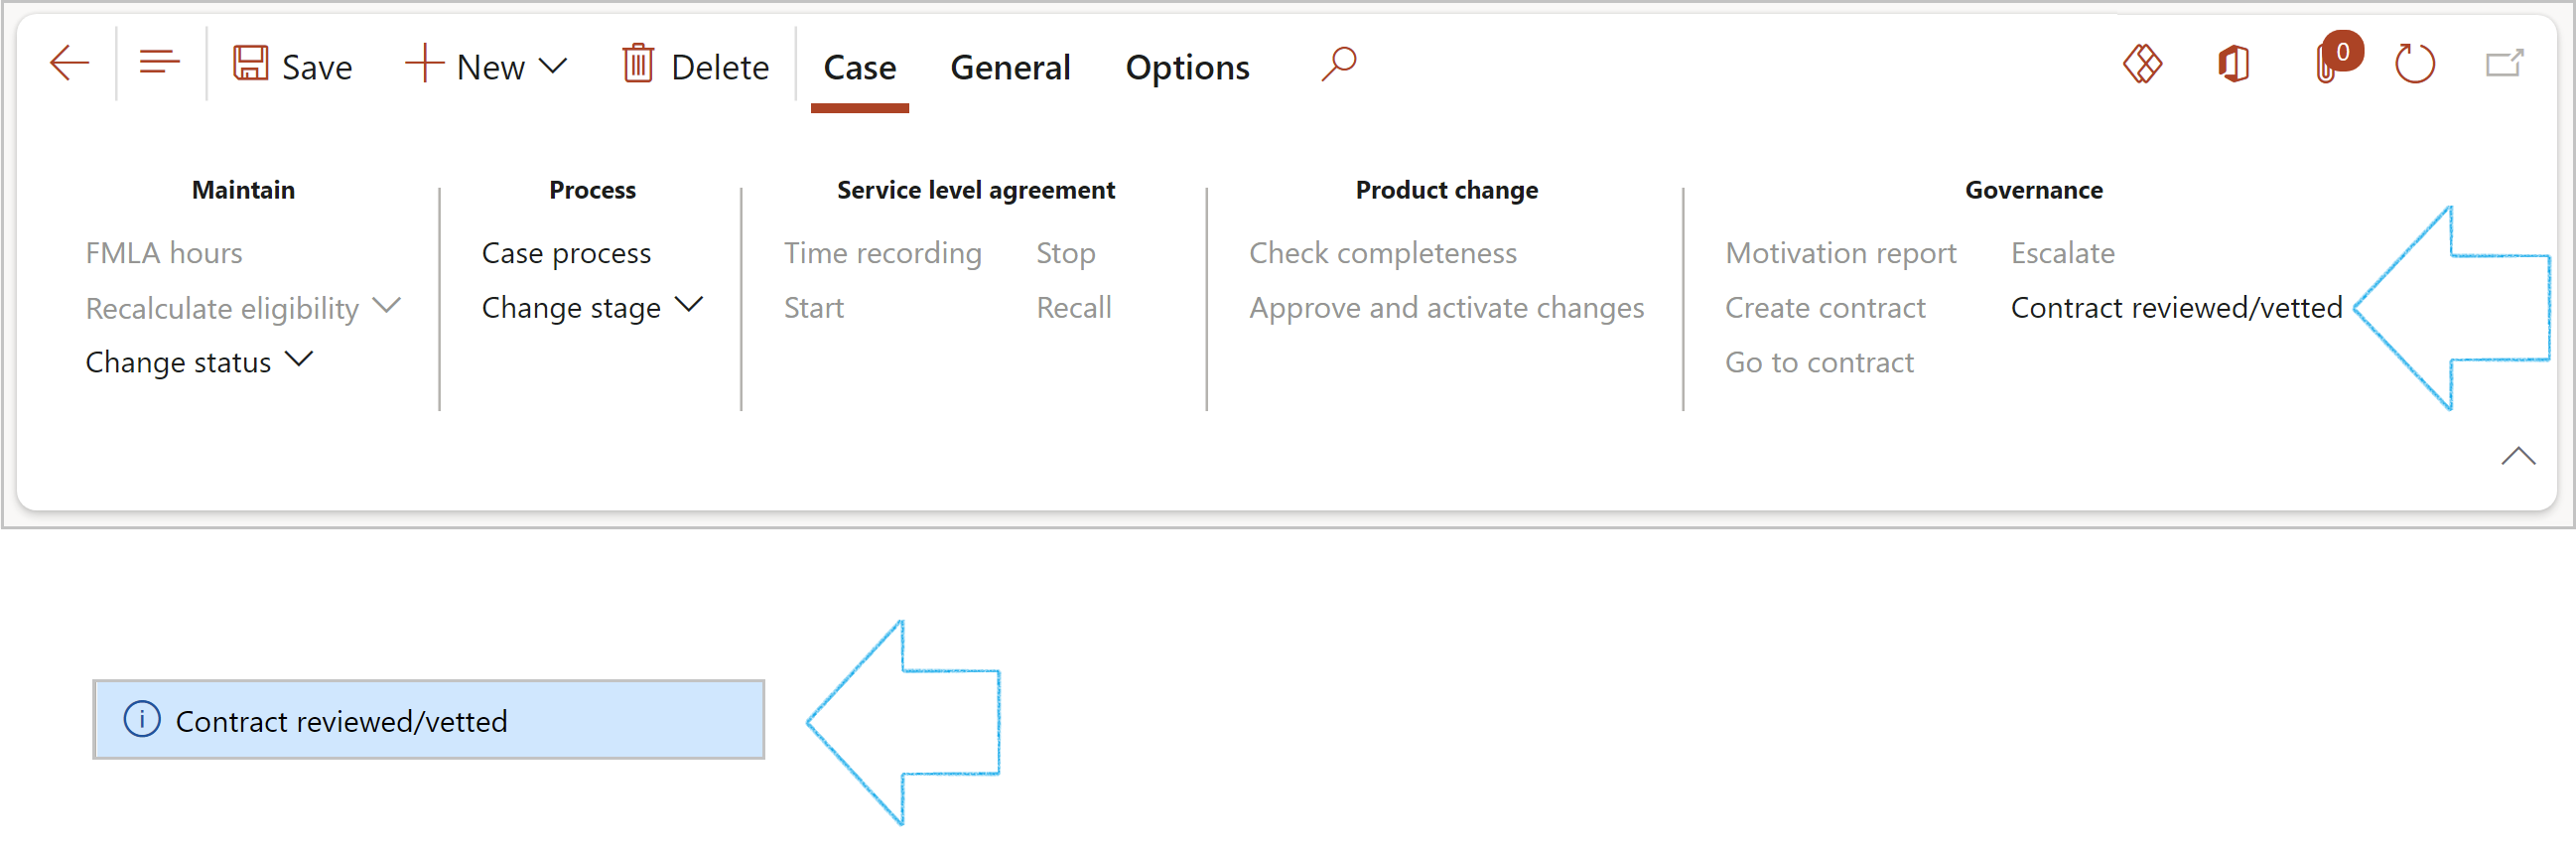
A blue line will appear at the top of the screen confirming that the contract has been reviewed/vetted
Contracts that have been reviewed/vetted will dissappear from the Review contracts list page
¶ Daily use: Trade & Non-trade contracts
¶ Step 20: Baseline (template) contracts
GRC365 has a register for Baseline contracts (also known as templates). These are defined as a template with an outline of a contract and can be used for certain types of contracts, or for a combination of contracts. A baseline contract contains approved clauses, terms and conditions, milestones and more. The intent is to use a baseline contract to quickly and easily create new contracts.
¶ Step 20.1: Create a Baseline contract
Go to: GRC > Governance > Contracts > Contract register in legal entity

The record will now be under GRC > Governance > Contracts > Baseline contracts
¶ Step 20.2: Create an Amendment baseline contract
Go to: GRC > Governance > Contracts > Baseline contracts
The record will now be under GRC > Governance > Contracts > Amendment baseline contracts
¶ Step 21: Create contract
If a contract is not created via a request (as explained above), users can manually create a contract in the contracts sub module. The content (clauses and paragraphs) of contracts can be added, created, managed and stored under GRC, using the contracts register.
¶ Step 21.1: Cover page, clauses and references
Go to: GRC > Governance > Contracts > Contract register in legal entity
If a Baseline contract is selected:
If the worker linked to the user has a specific Department selected against the Worker record:
To create a new version of the contract, click on the New button in the Action pane, and click on Version
All references to Purchase agreements on the original Contract will be deleted on the new version
Users can create a “Baseline” or “Template” and then use this Baseline contract's approved clauses to copy clauses into a new contract. This contract can then be linked to a Vendor or Customer account via the Trading partners Fast tab. Alternatively a Worker can be linked to the contract for HRM employment purposes.
If the Contract classification that has been selected for the contract, is Applied to Supply chain on clicking the Save button, the following validations are run:
To get to the new (copied) contract, go to: GRC > Governance > Contracts > Contract register in legal entity
Certain enterprises need to consolidate contracts. GRC allows users to link different contracts to a “Master” (parent) contract and calculate the consolidated contract value from the "child" contracts.
The Consolidate button:
Contract clauses are added under the Clause tab. This is useful so that users can see for example, which performance clauses, penalty clauses or breach clauses are applicable.
Or
Activities can be created per clause
¶ Step 21.2: Contract stages and workflow statuses
The following contract stages are supported to guide users through the contract lifecycle:
| Stage | Rules |
|
Created: |
|
|
Receive: |
|
|
Draft: |
|
|
Renew: |
|
|
Review: |
|
|
Approve: |
|
|
Revise: |
|
|
Expire: |
|
|
Terminate: |
|
|
Archive: |
|
When a user changes the state to Review, the record will be locked and the user's name displayed in the Locked by field. This user is now the only one who can edit the record.
A record of the stage change will be added under the History tab
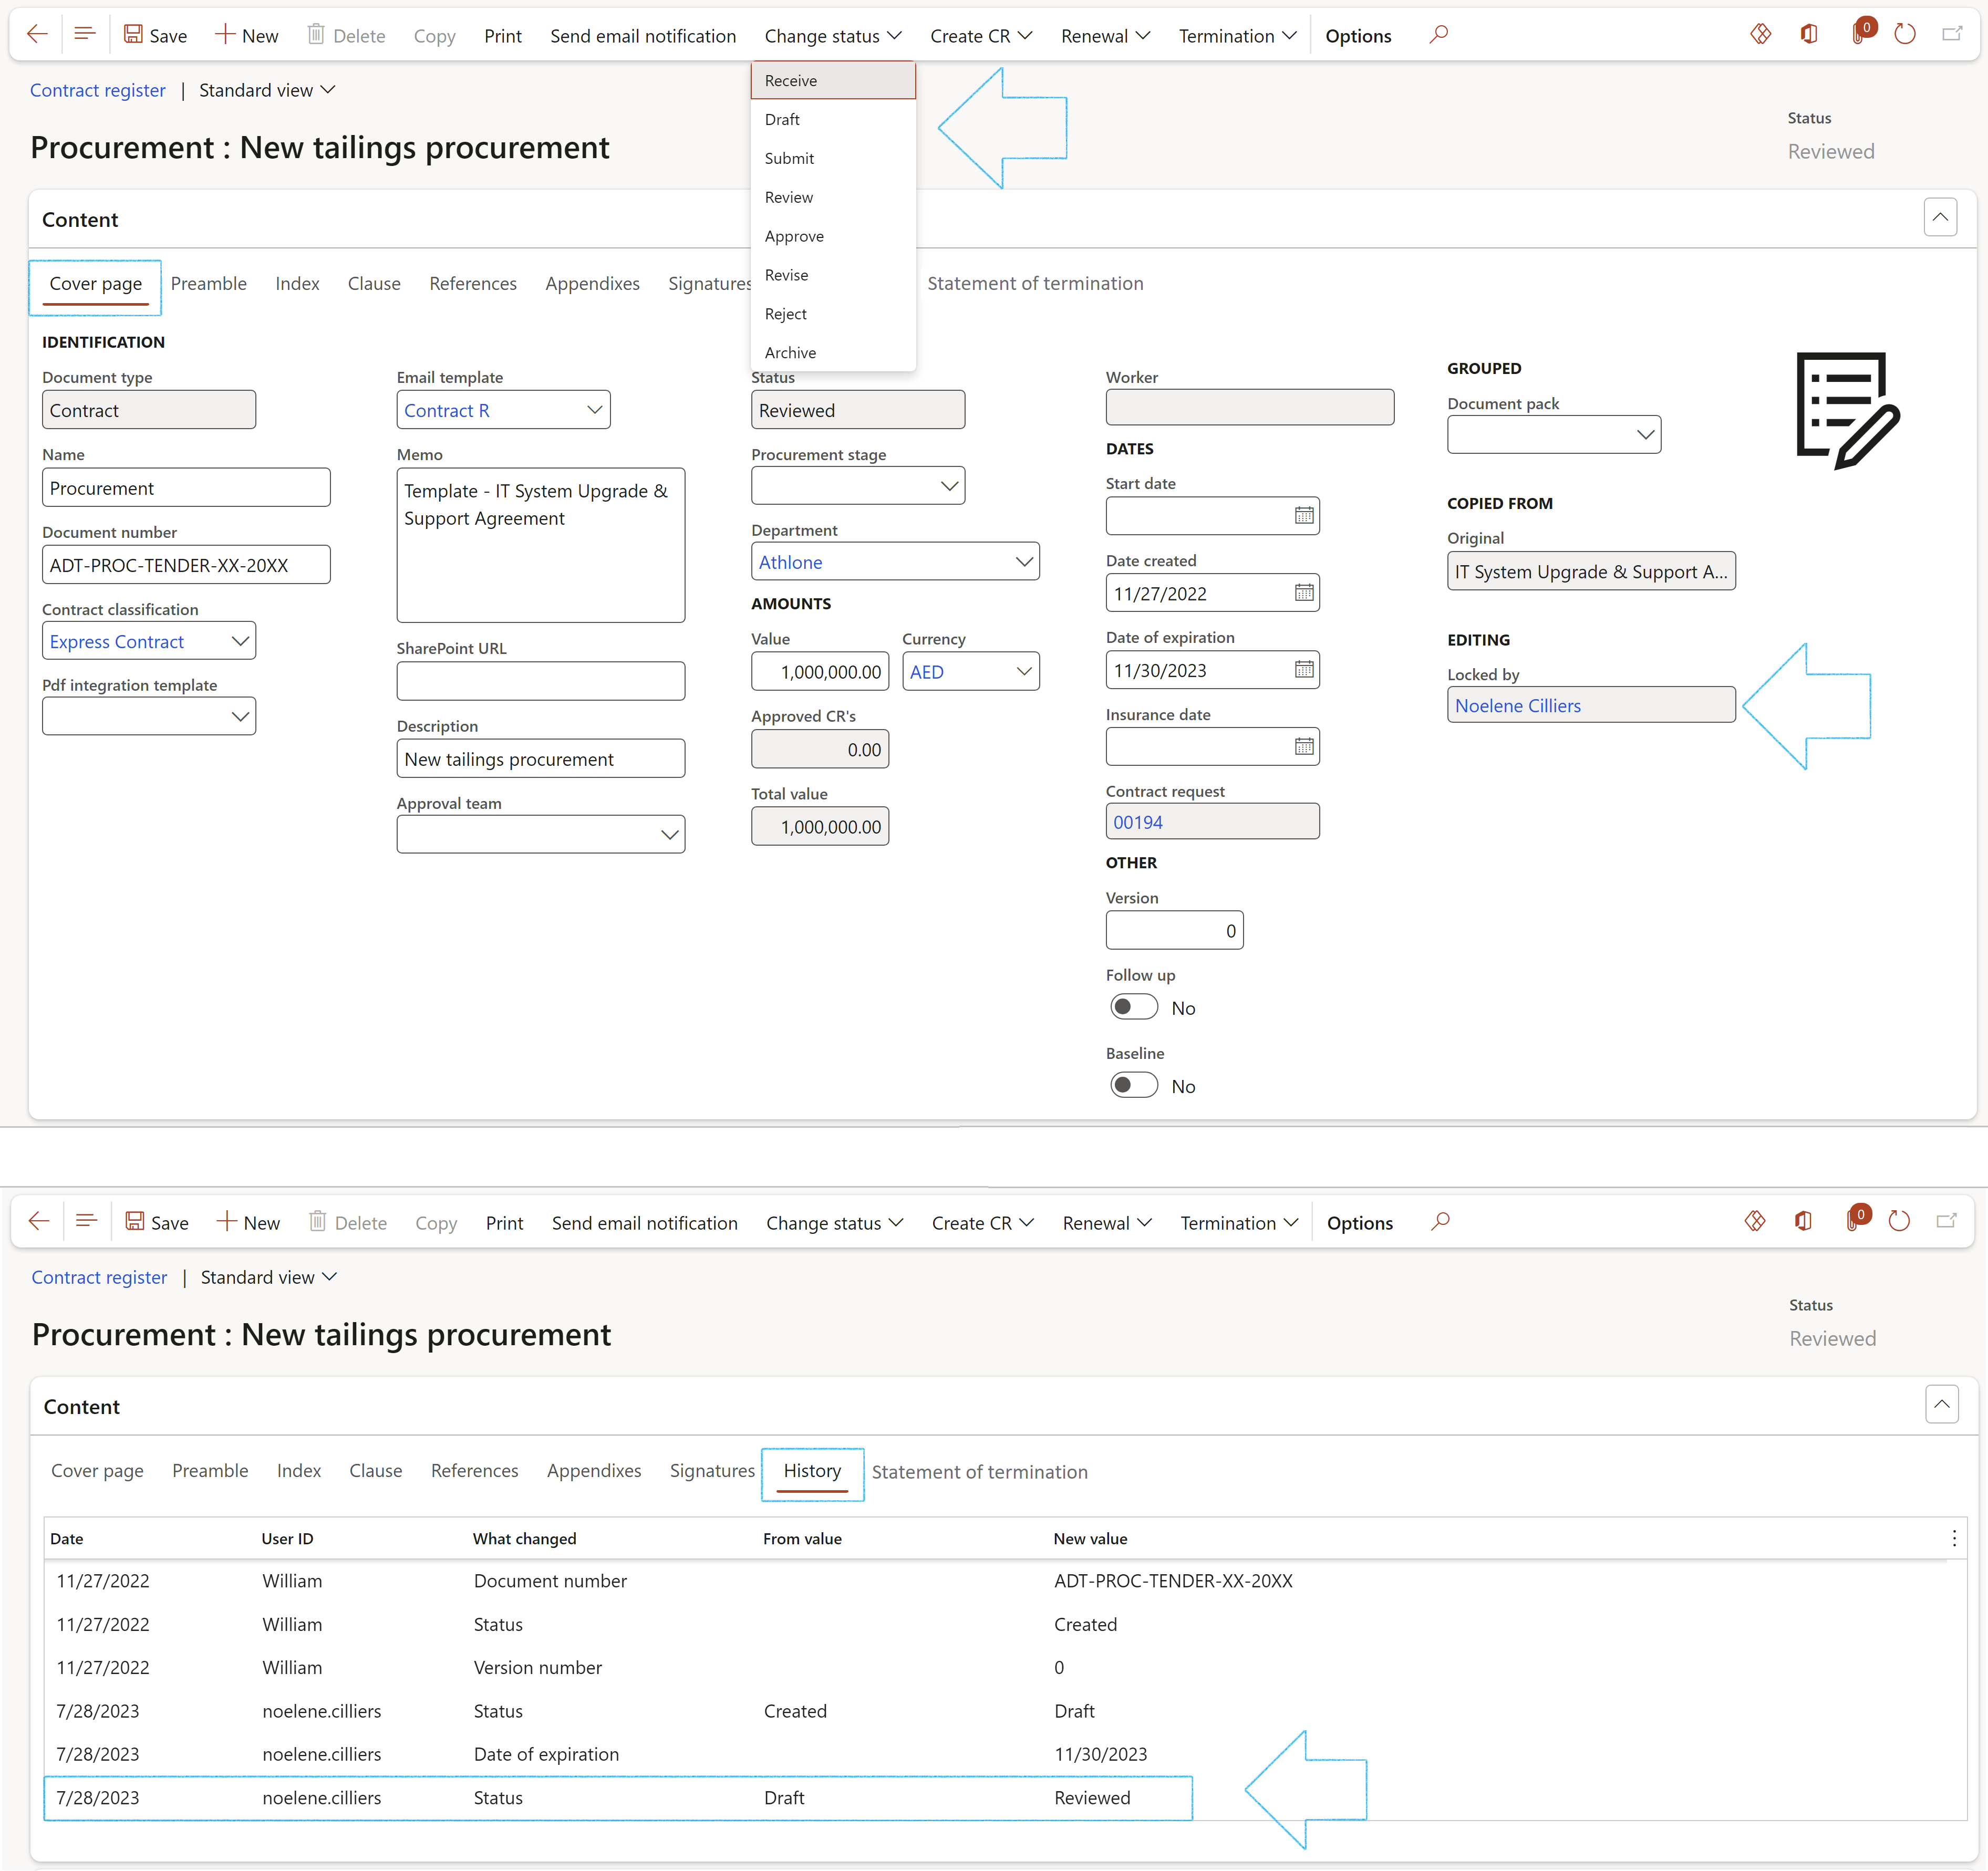
In addition to the Contract stage, GRC also supports a workflow status. These are:
¶ Step 21.3: Consumption
The Consumption tab provides an overview of contract utilization, showing total consumption with a breakdown of purchase order and non-purchase order spend.
¶ Step 21.4: Printing contract content
Go to: GRC > Governance > Contracts > Contract register in legal entity
If a document needs to be sent to Docusign the relevant template can be selected in the PDF integration template field:
¶ Step 21.5: Additional information
¶ Step 21.5.1: The payment schedule Fast tab
¶ Step 21.5.2: The Review and follow up Fast tab
Go to: GRC > Governance > Contracts > Contract register in legal entity
A blue line will appear confirming that a Planned action has been created for the follow up
Once the user closes the Planned action on the All planned GRC actions list page, a record will be added under the Sign off Fast tab, indicating that the Contract has been reviewed
View and close planned actions
1. View reviews: On the Contract, under the Review and follow up Fast tab, the user can click on the View reviews button to view a list of review ations created from the contract
2. Close review: On the Contract, under the Review and follow up Fast tab, the user can click on the Close review button and enter the relevant detail on the drop-dialog as described below
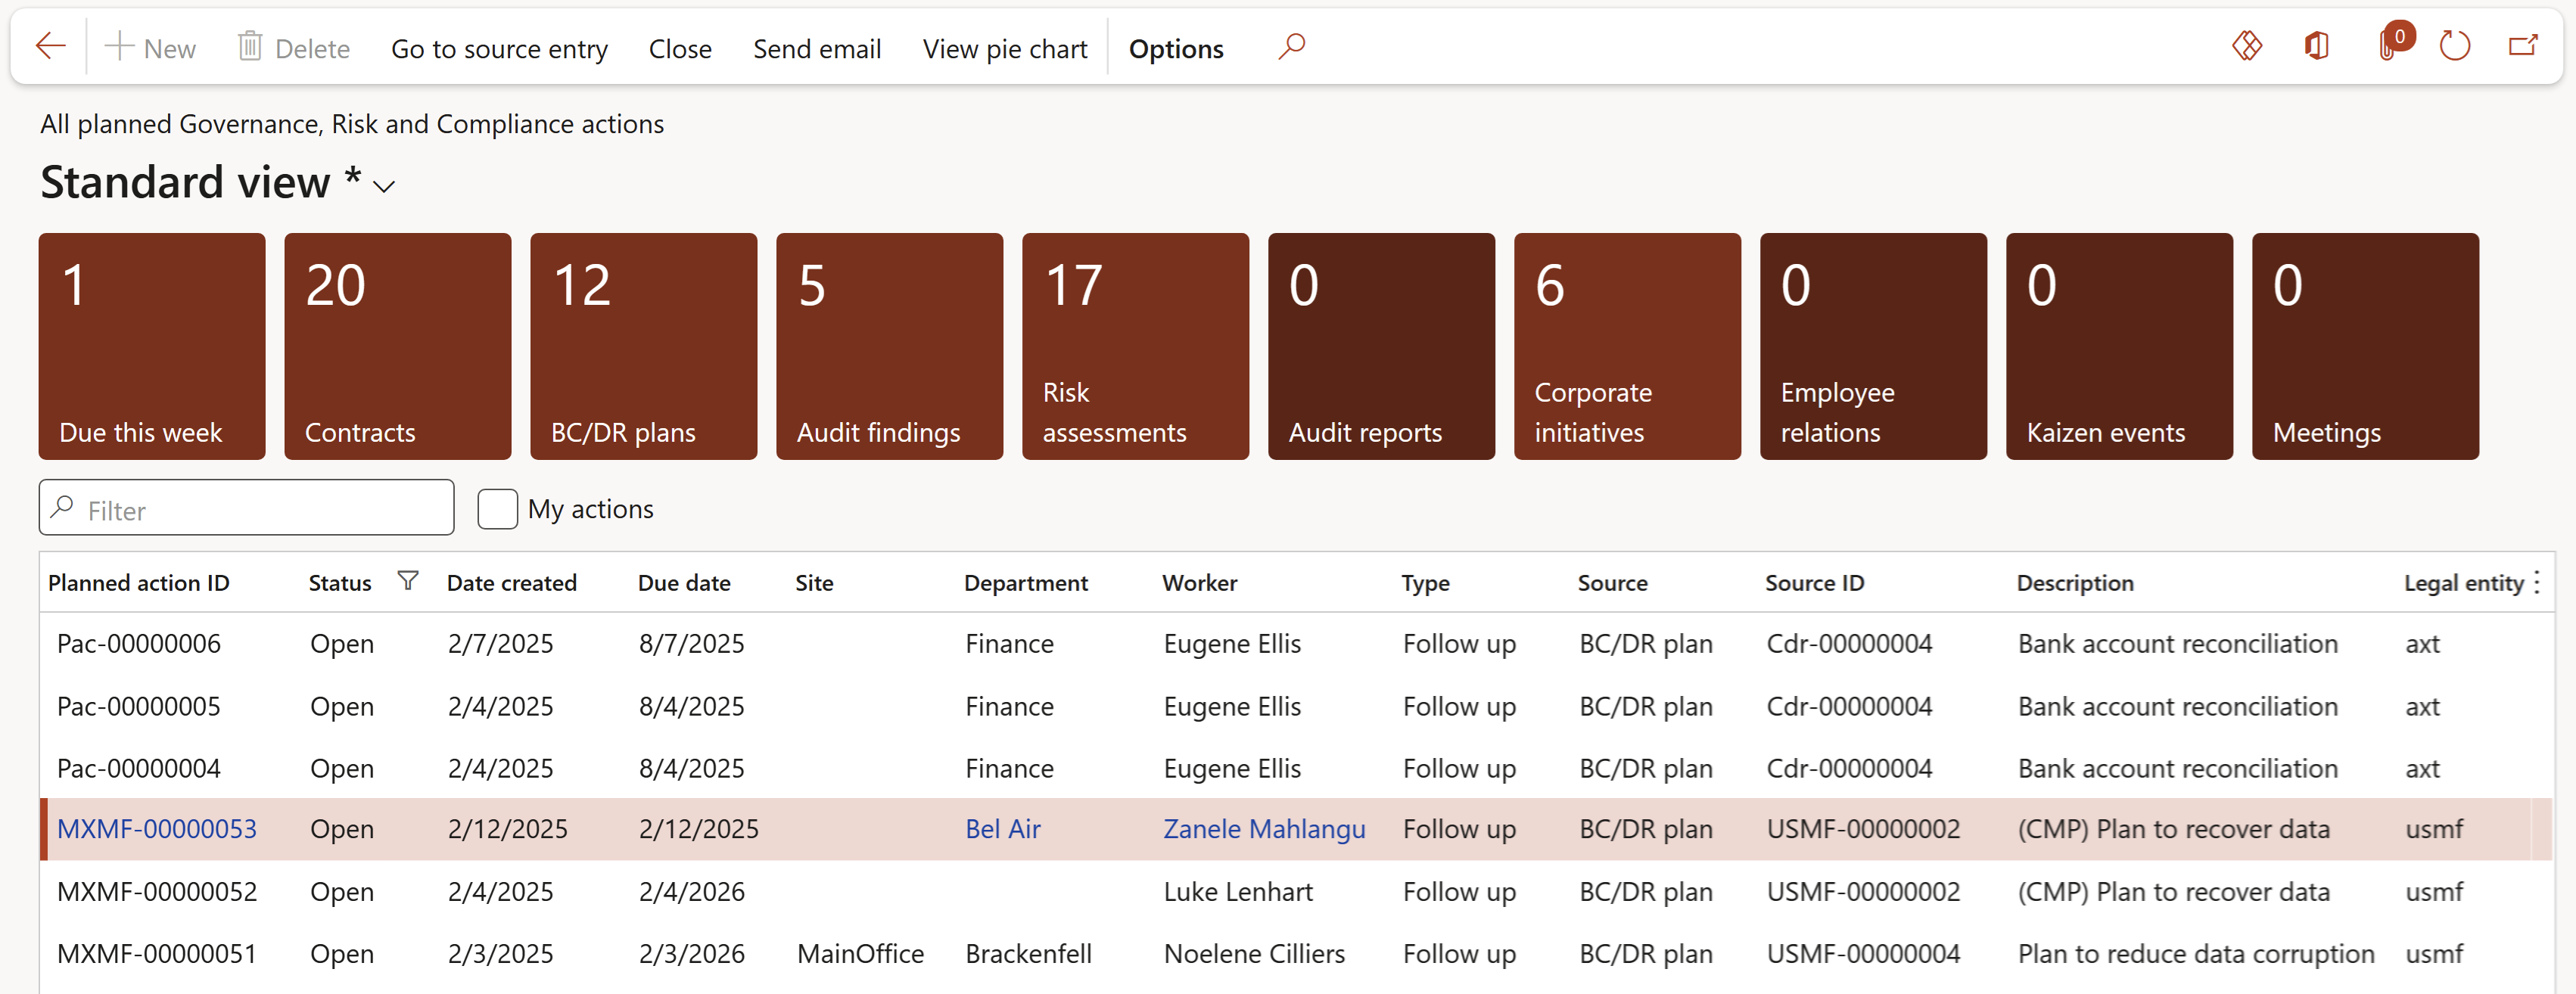
Go to: GRC > All planned Governance, Risk and Compliance actions
The user can use the filters to view only actions assigned to him/her, and also all or only open actions
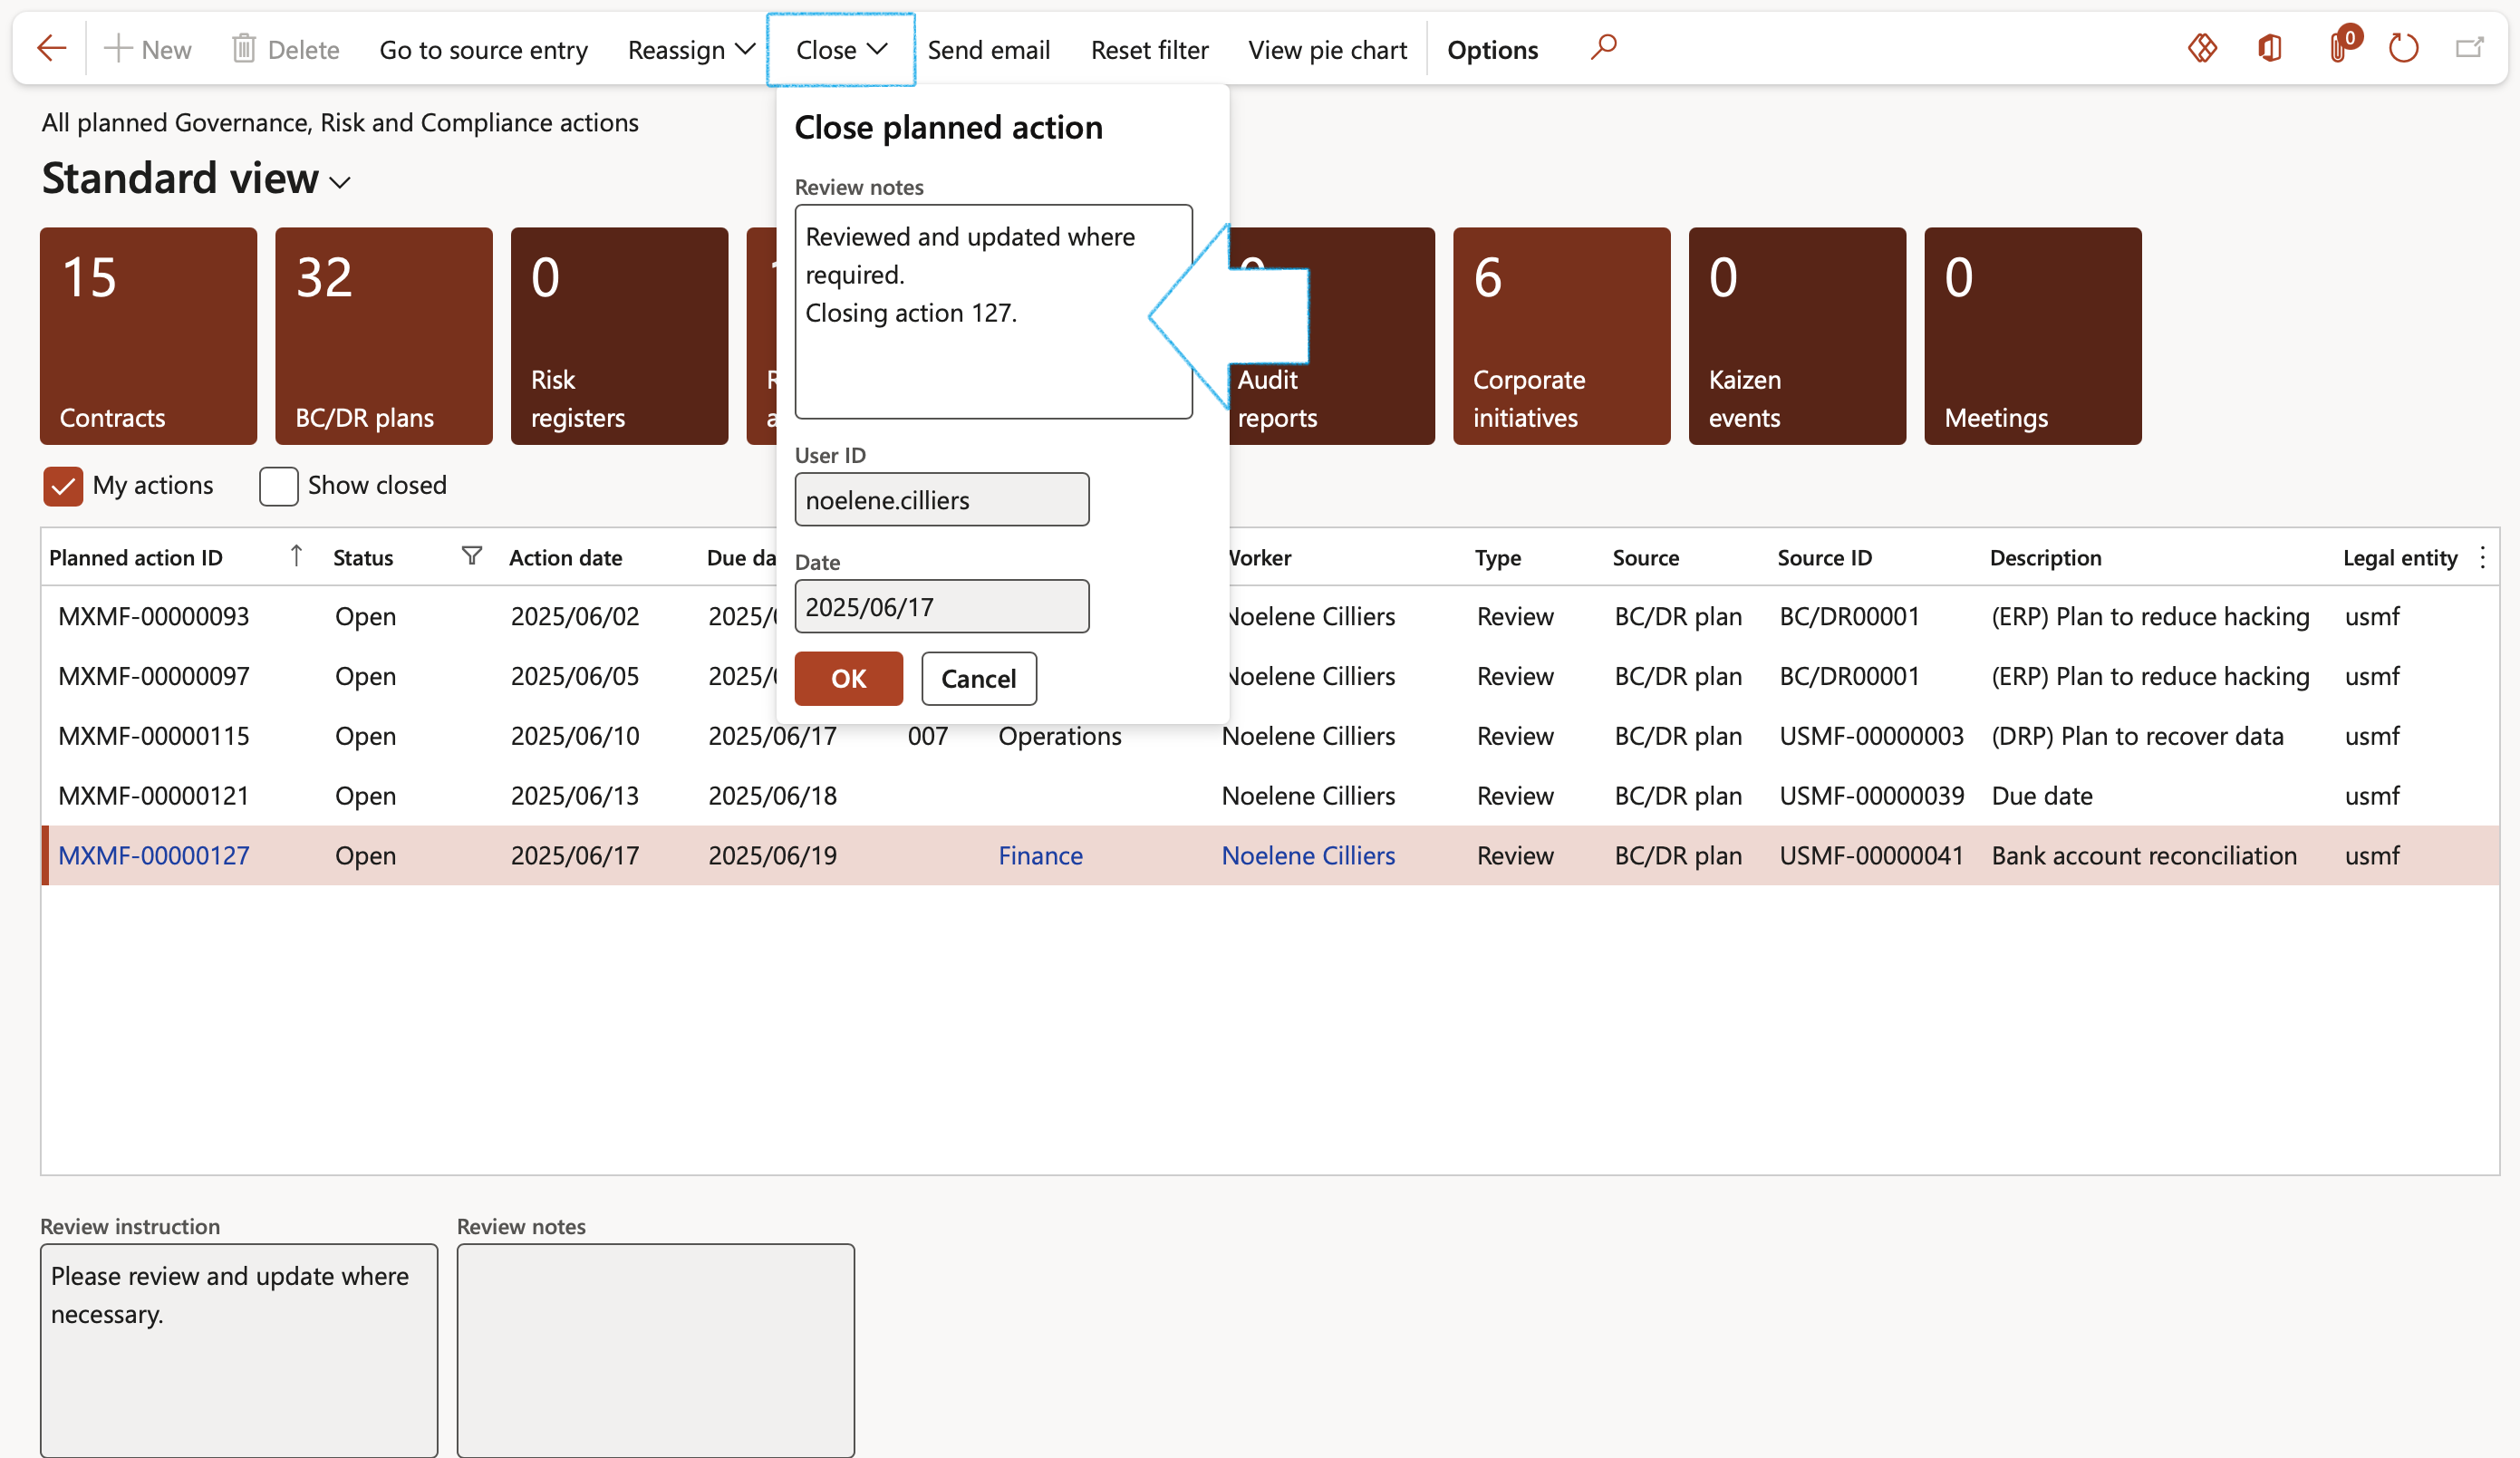
The Go to source button in the Action pane will take you directly to the source of the action
¶ Step 21.5.3: The Indemnities and liabilities Fast tab
Go to: GRC > Governance > Contracts > Contract register in legal entity
¶ Step 21.5.4: Terms and conditions
Go to: GRC > Governance > Contracts > Contract register in legal entity
OR
¶ Step 21.5.5: Renewal of a contract
In the Action pane, click on the Renewal button
OR, if it is required that the renewal of the contract has to be done via a change request:


When a change request is created during the renewal action, please take note of the following:
¶ Step 21.5.6: Termination of a contract

¶ Step 21.5.7: Performance
¶ Step 21.5.8: Penalties
Penalties can only be added if the Contract status = Approved
¶ Step 21.5.8.1: Claims from contracts
Claims can only be created if the Contract status = Approved
The Claim type dropdown list is filtered to only show Claim types where the Type = Contracts
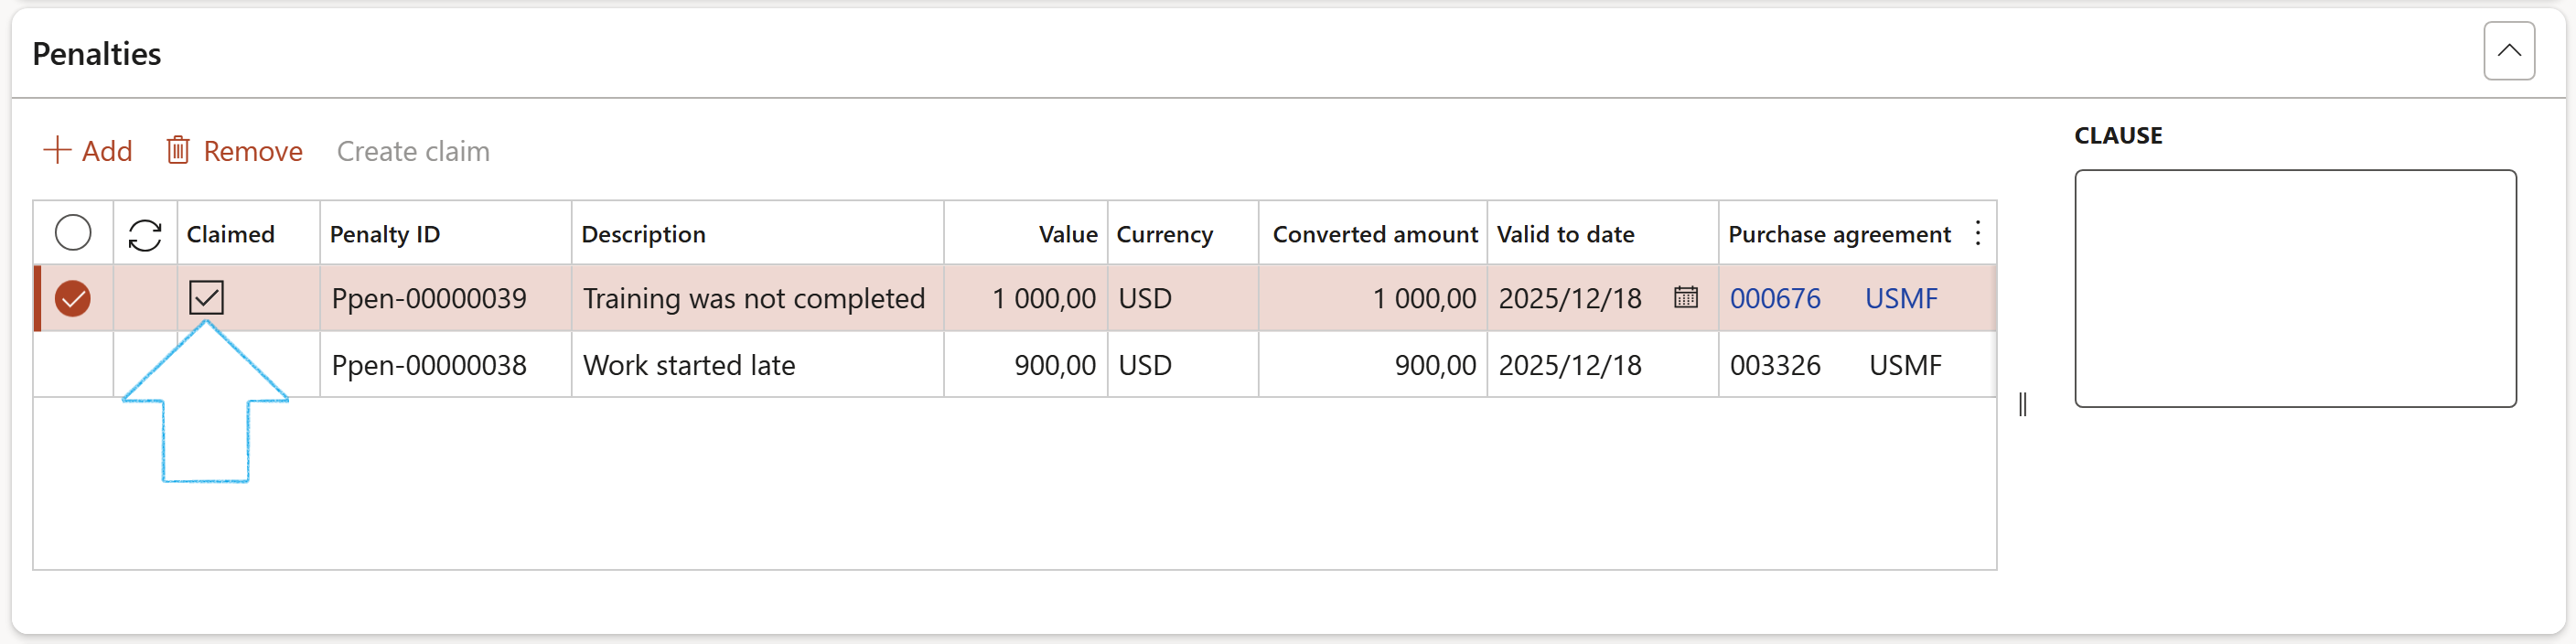
Under the Penalties Fast tab, the Claimed box will be ticked for the relevant line
Under the Content Fast tab, References Index tab, a record will be added with the details of the new Claim
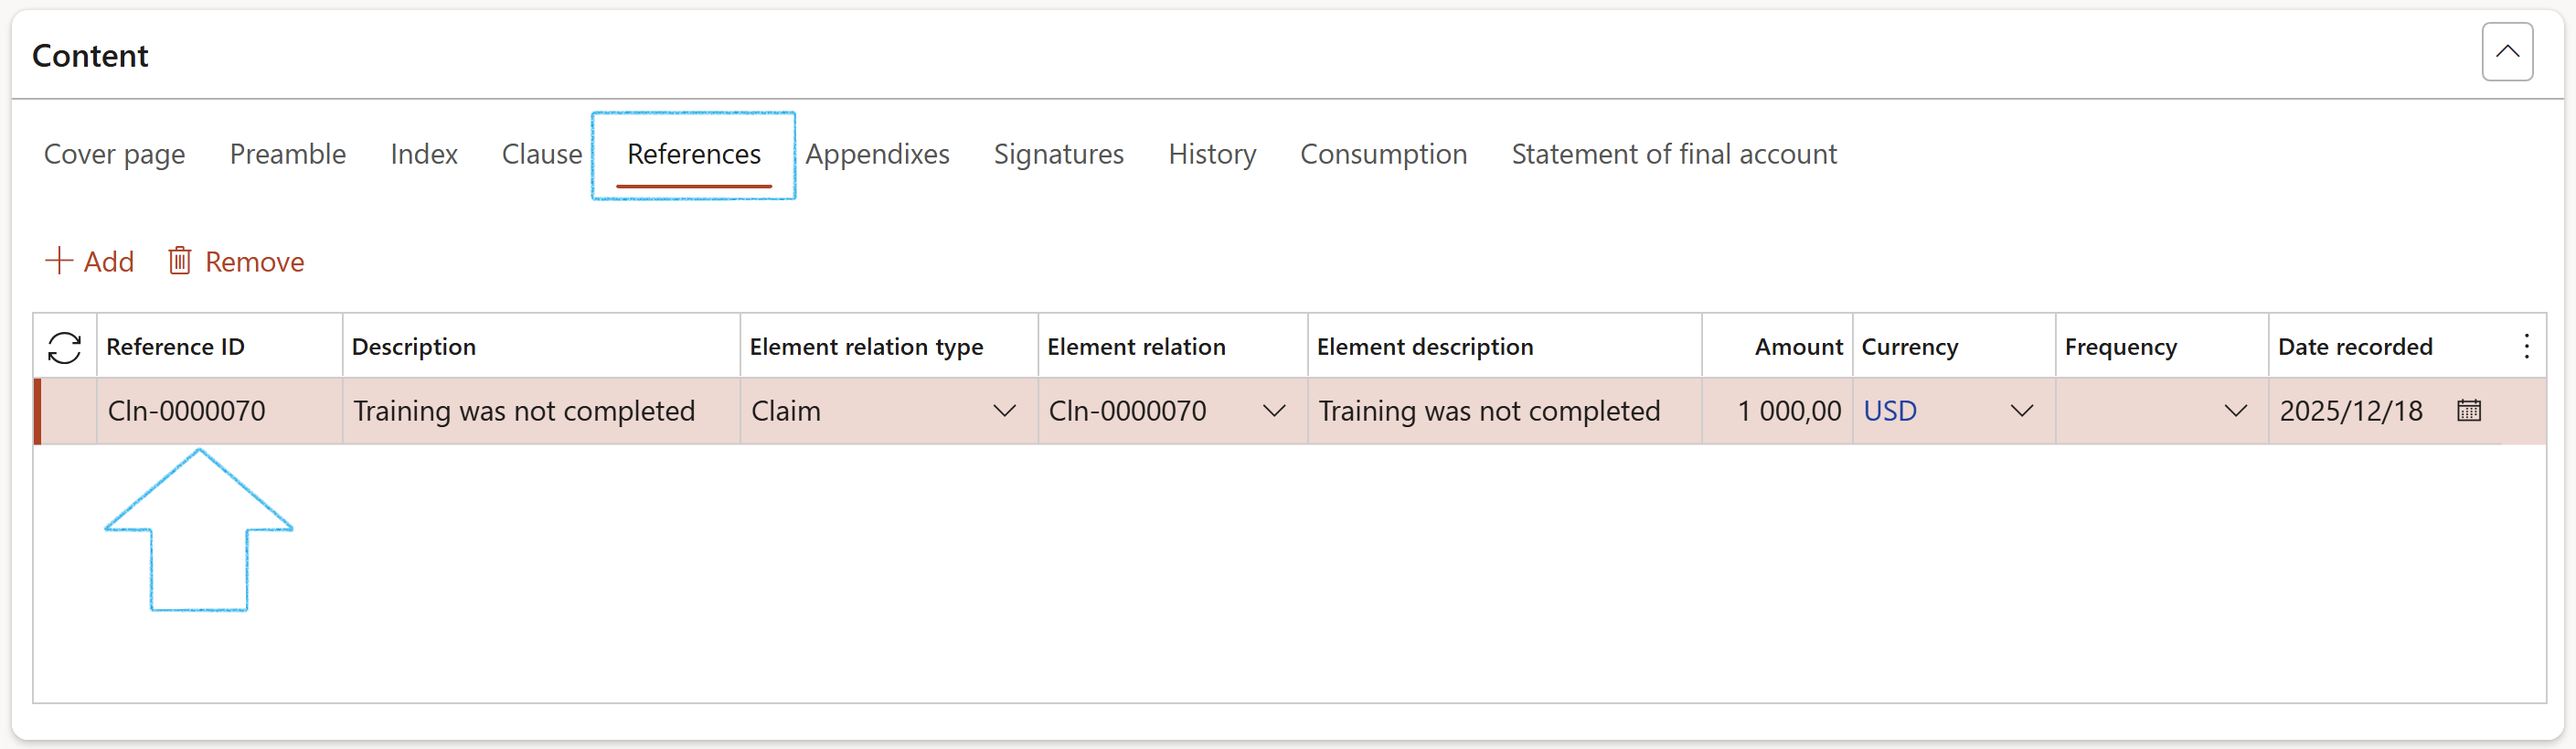
¶ Step 21.5.9: Breach and remedies
A breach of contract is a violation of any of the agreed-upon terms and conditions of a binding contract. The breach could be anything from a late payment to a more serious violation, such as the failure to deliver a promised asset.
There are several remedies for breach of contract, such as award of damages, specific performance, cancellation, restoration.
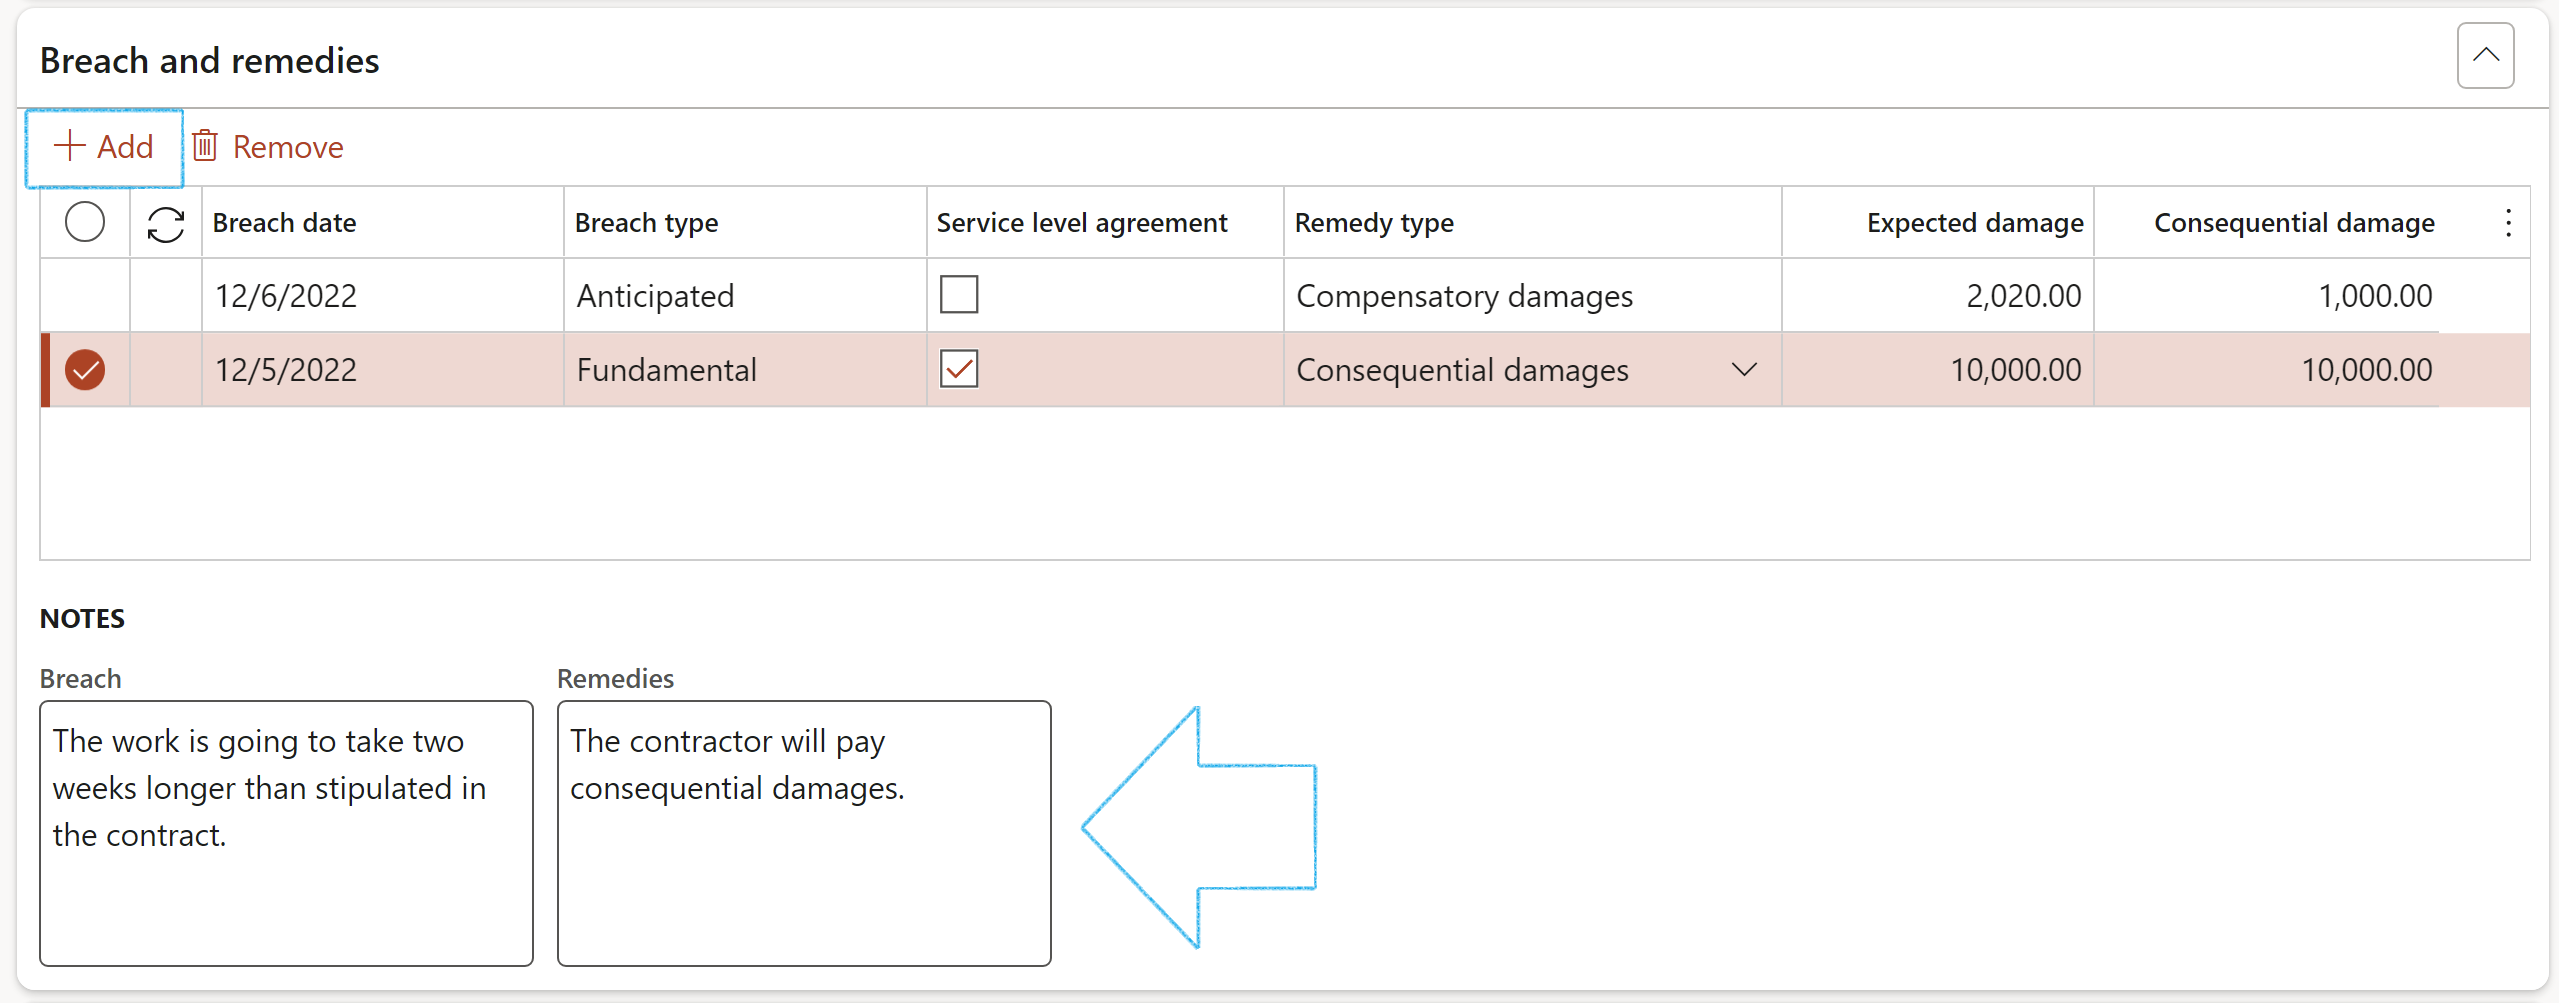
¶ Step 21.5.10: Profile
If a Risk assessment was done on the contract, the details will be displayed here
Go to: GRC > Governance > Contracts > Contract register in legal entity
OR

¶ Step 21.5.11: Sign off
Go to: GRC > Governance > Contracts > Contract register in legal entity
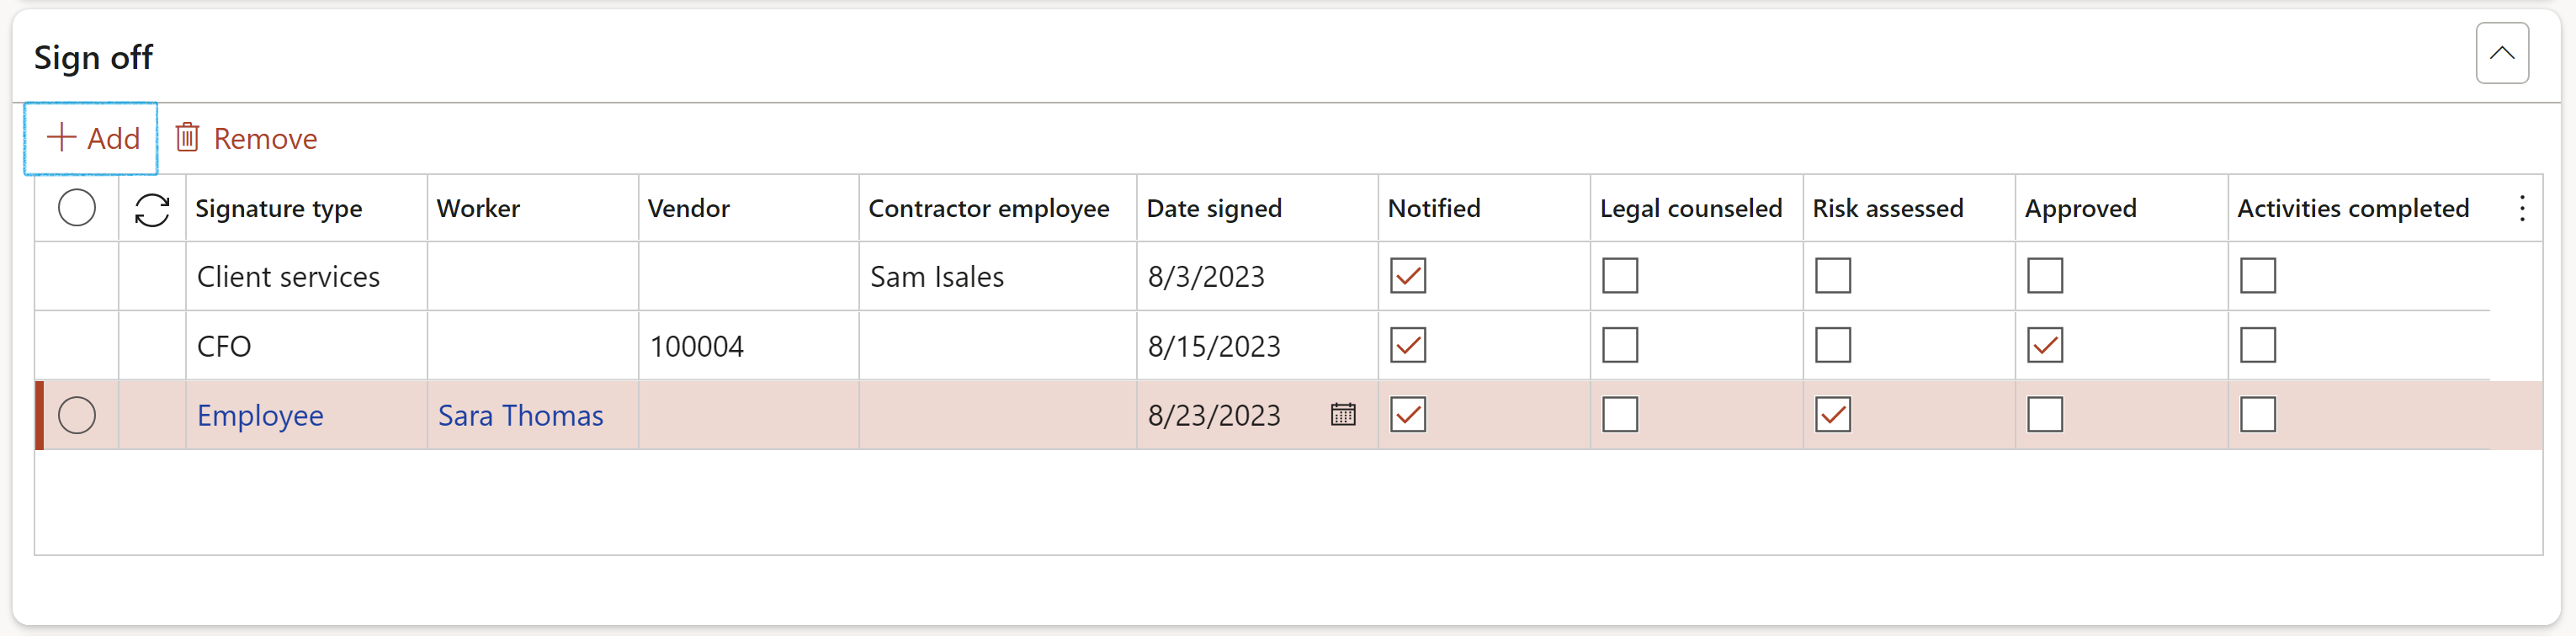
Two additional sign-off records are created when a contract is submitted into workflow:
¶ Step 21.5.12: Reportable
Go to: GRC > Governance > Contracts > Contract register in legal entity
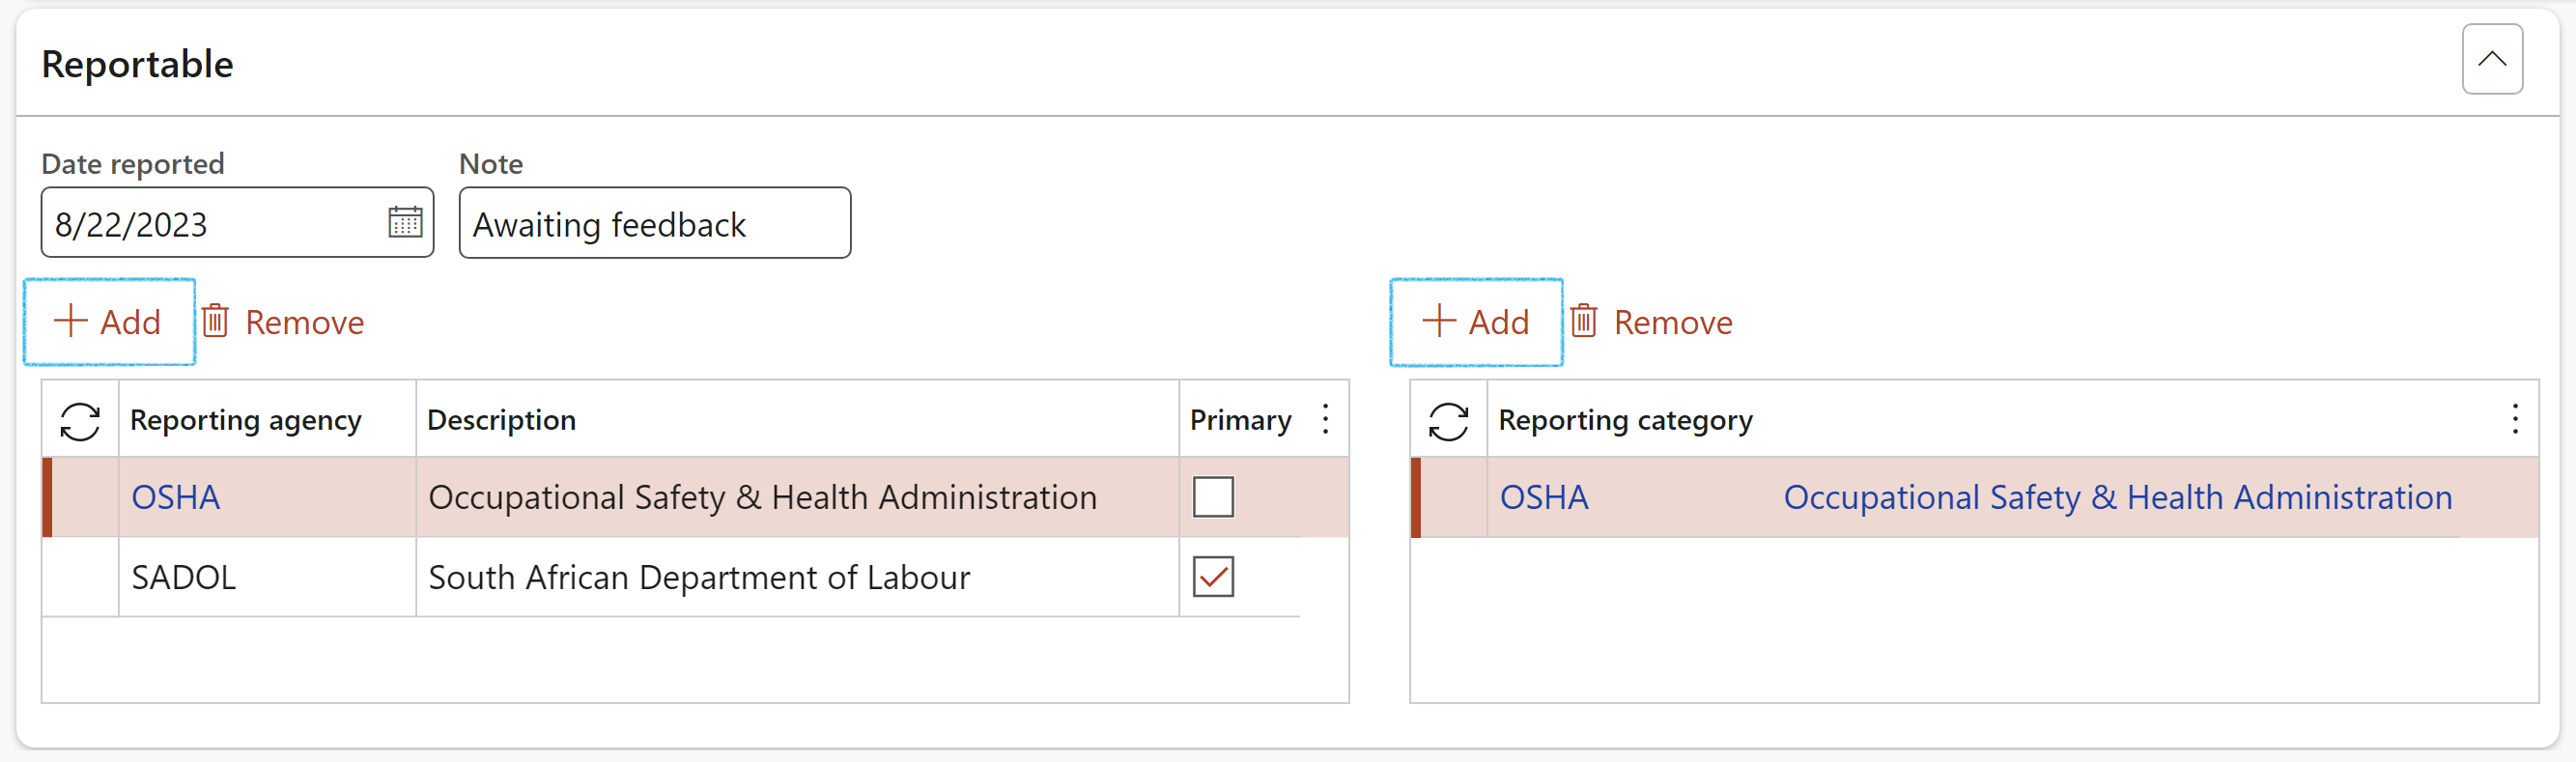
This section is completed if a contract has to be reported to Government or Local authorities
¶ Step 22: Create a contract from an RFQ
On "Acceptance" of a vendors bid response (on the RFQ); Dynamics normaly automatically creates a purchase agreement. In addition, a contract can be created from an RFQ (Purchase type = Purchase agreement) if the solicitation type includes a baseline contract, and the relevant clauses on the baseline contract are marked to be copied.
When the baseline contract is not specified on the solicitation type, D365 will warn the users when the manage replies button is clicked.
The trigger for the contract creation is on acceptance of a vendor from the RFQ form.
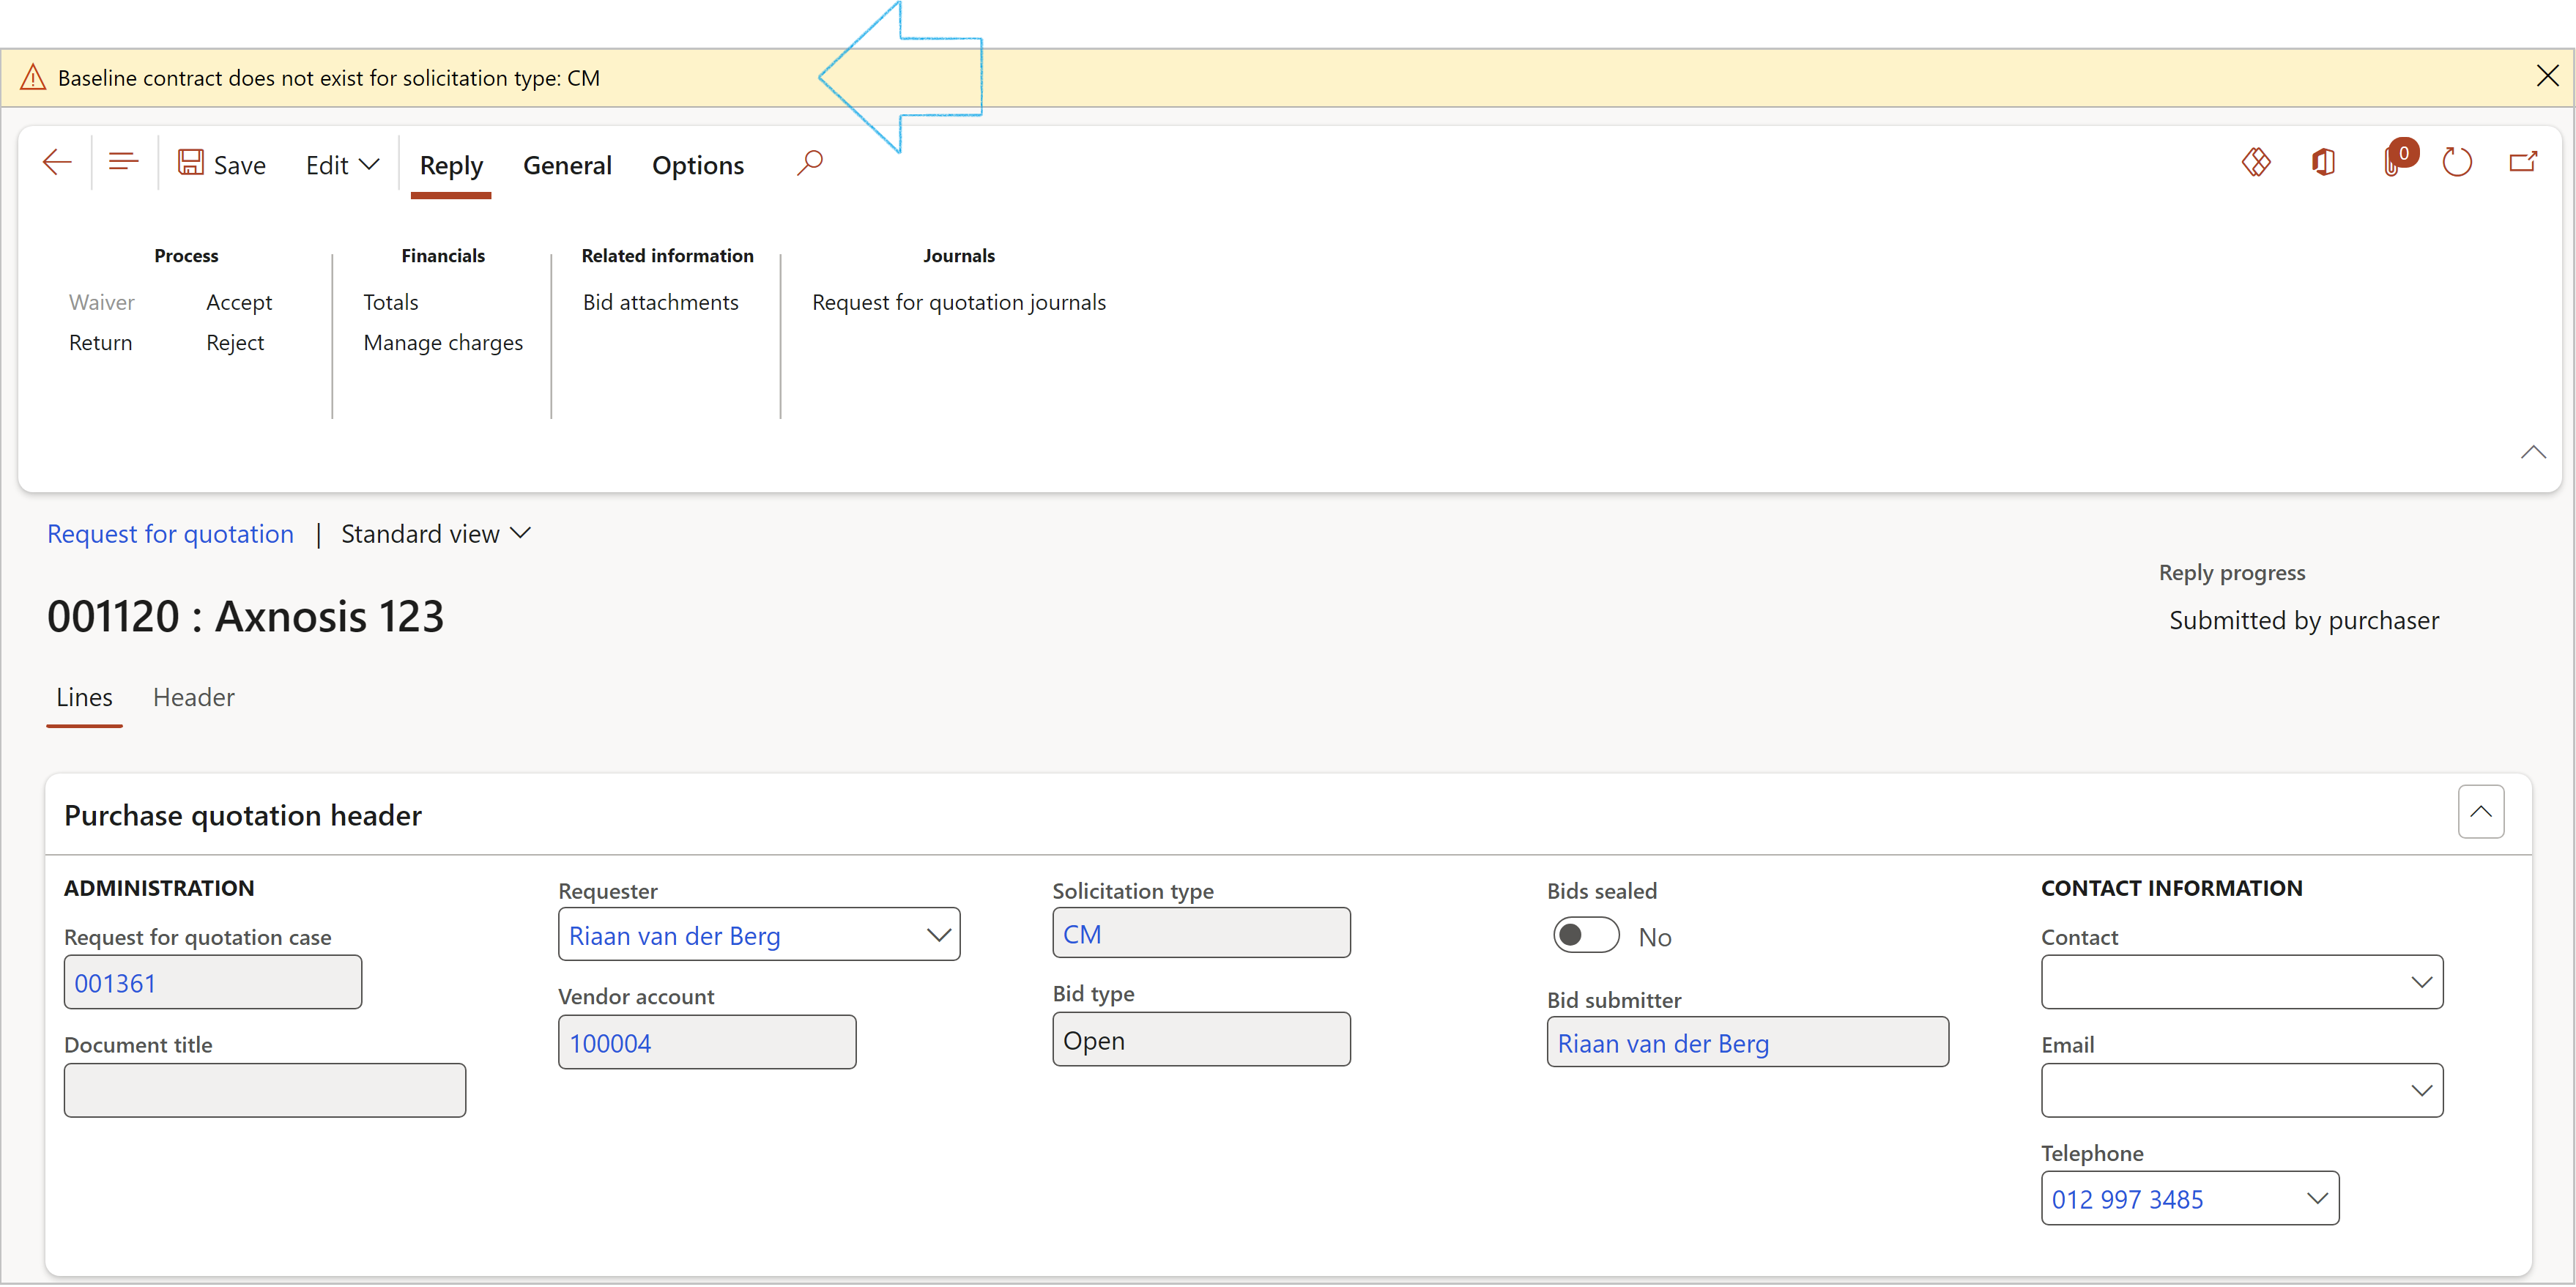
¶ Step 23: Create a contract from a Purchase requisition
Go to: Procurement and sourcing > Purchase requisitions > All purchase requisitions
The Stage of the contract will be Draft
All Vendor accounts listed on the Purchase requsition lines will be transferred to the Trading partners Fast tab of the newly created contract
If a Vendor account has been selected as a Primary vendor on the Purchase requisition, this Vendor will also be selected as the Primary vendor for the contract
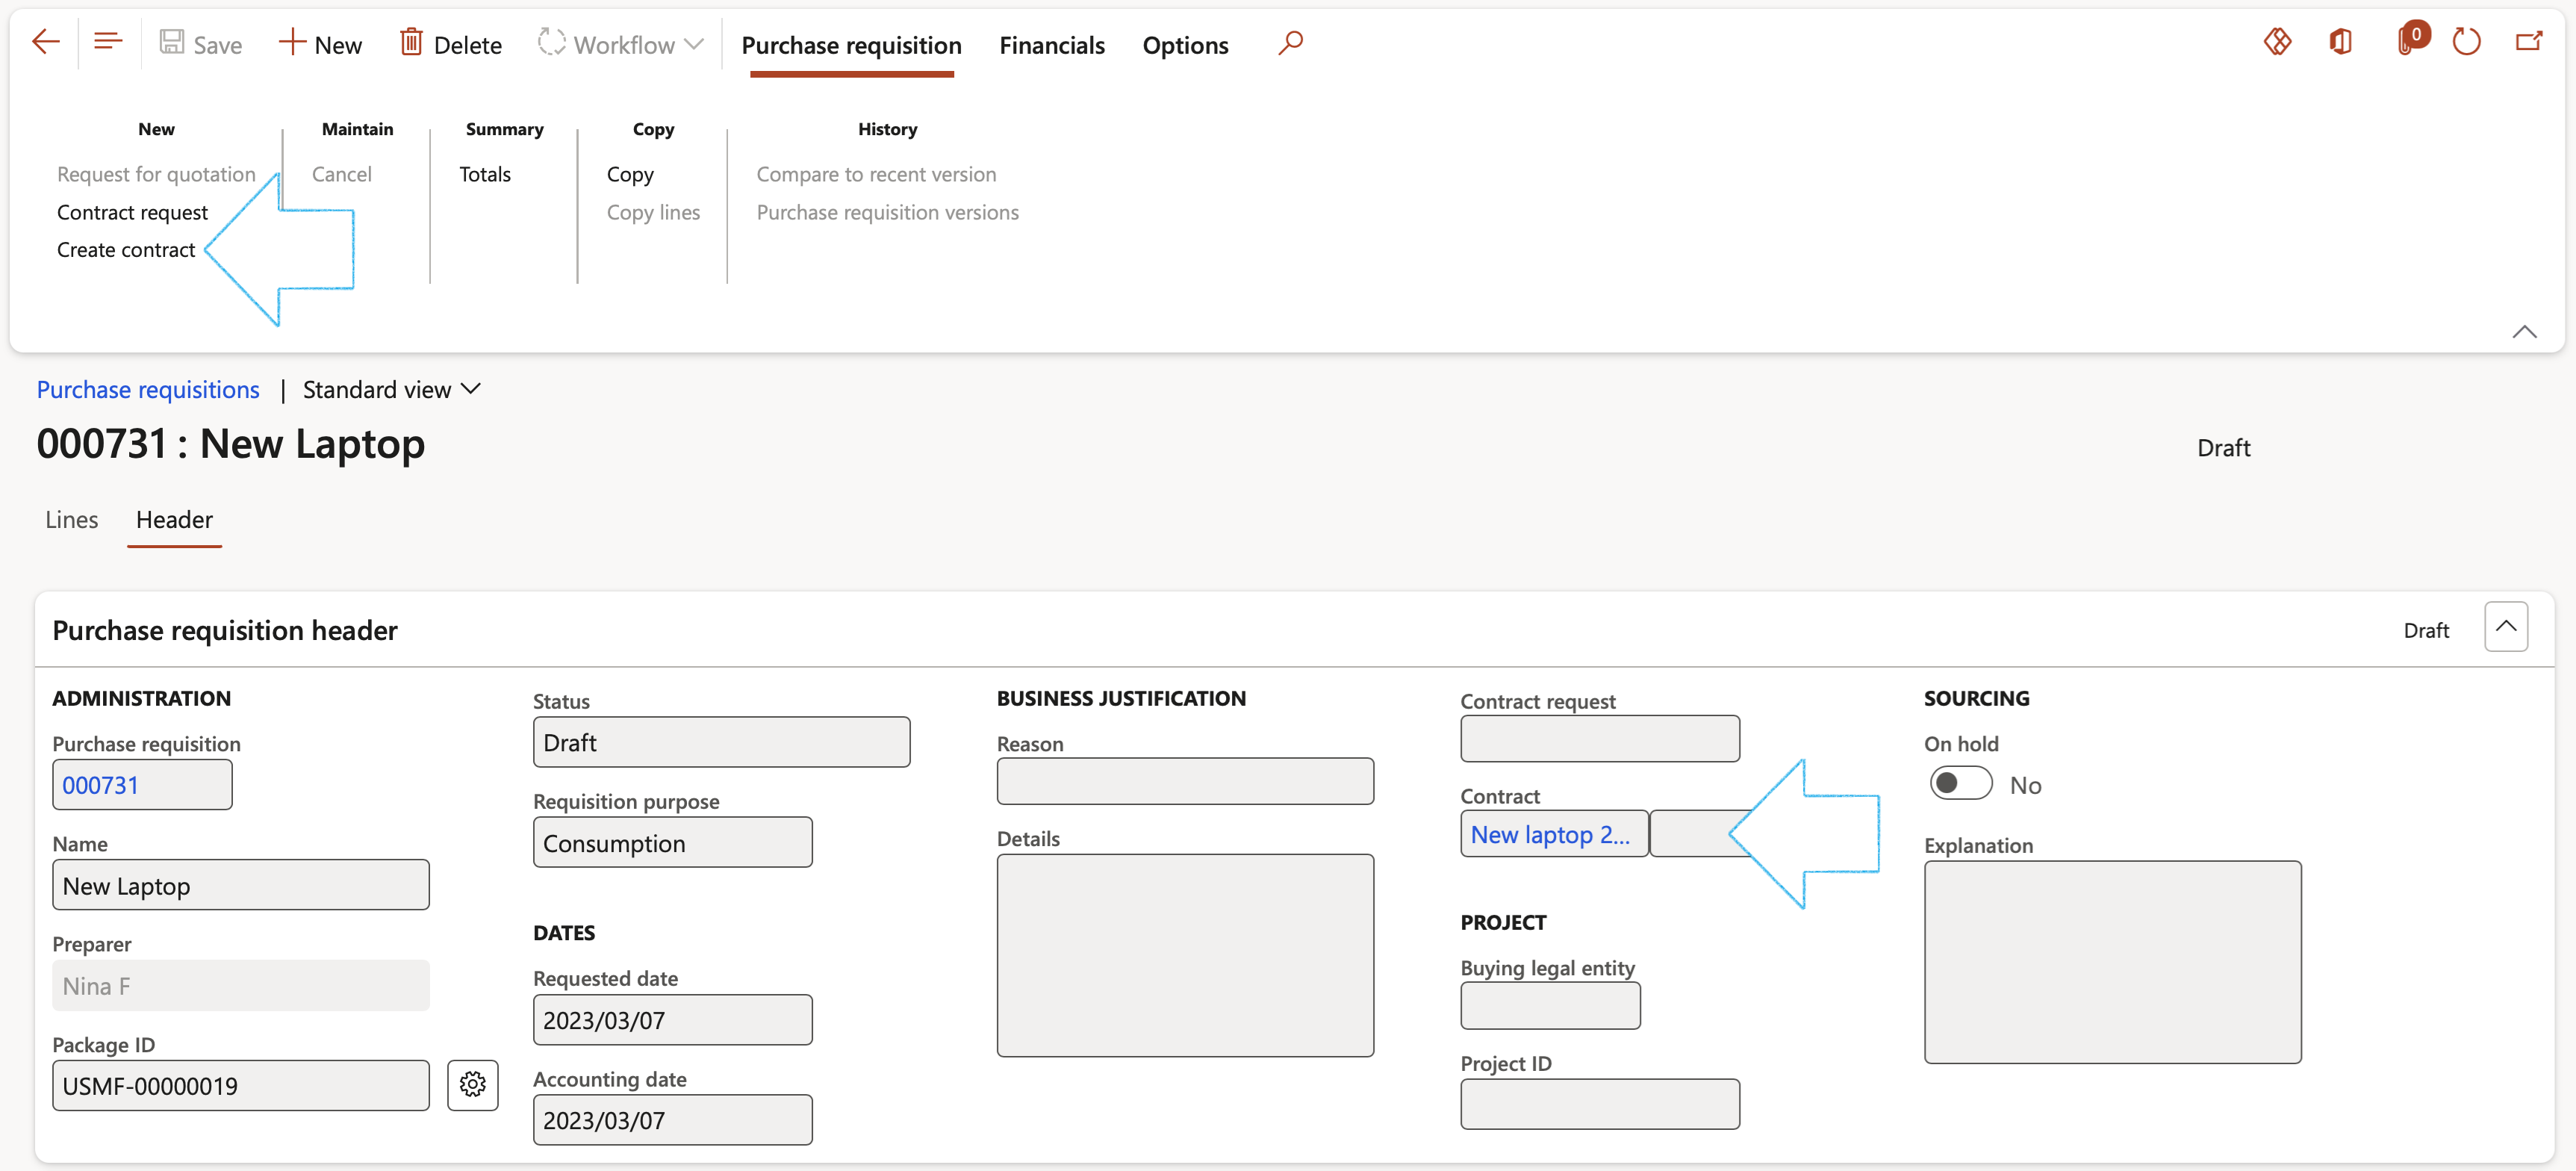
¶ Step 24: Change requests on contracts
Go to: GRC > Governance > Contracts > Contract register in legal entity
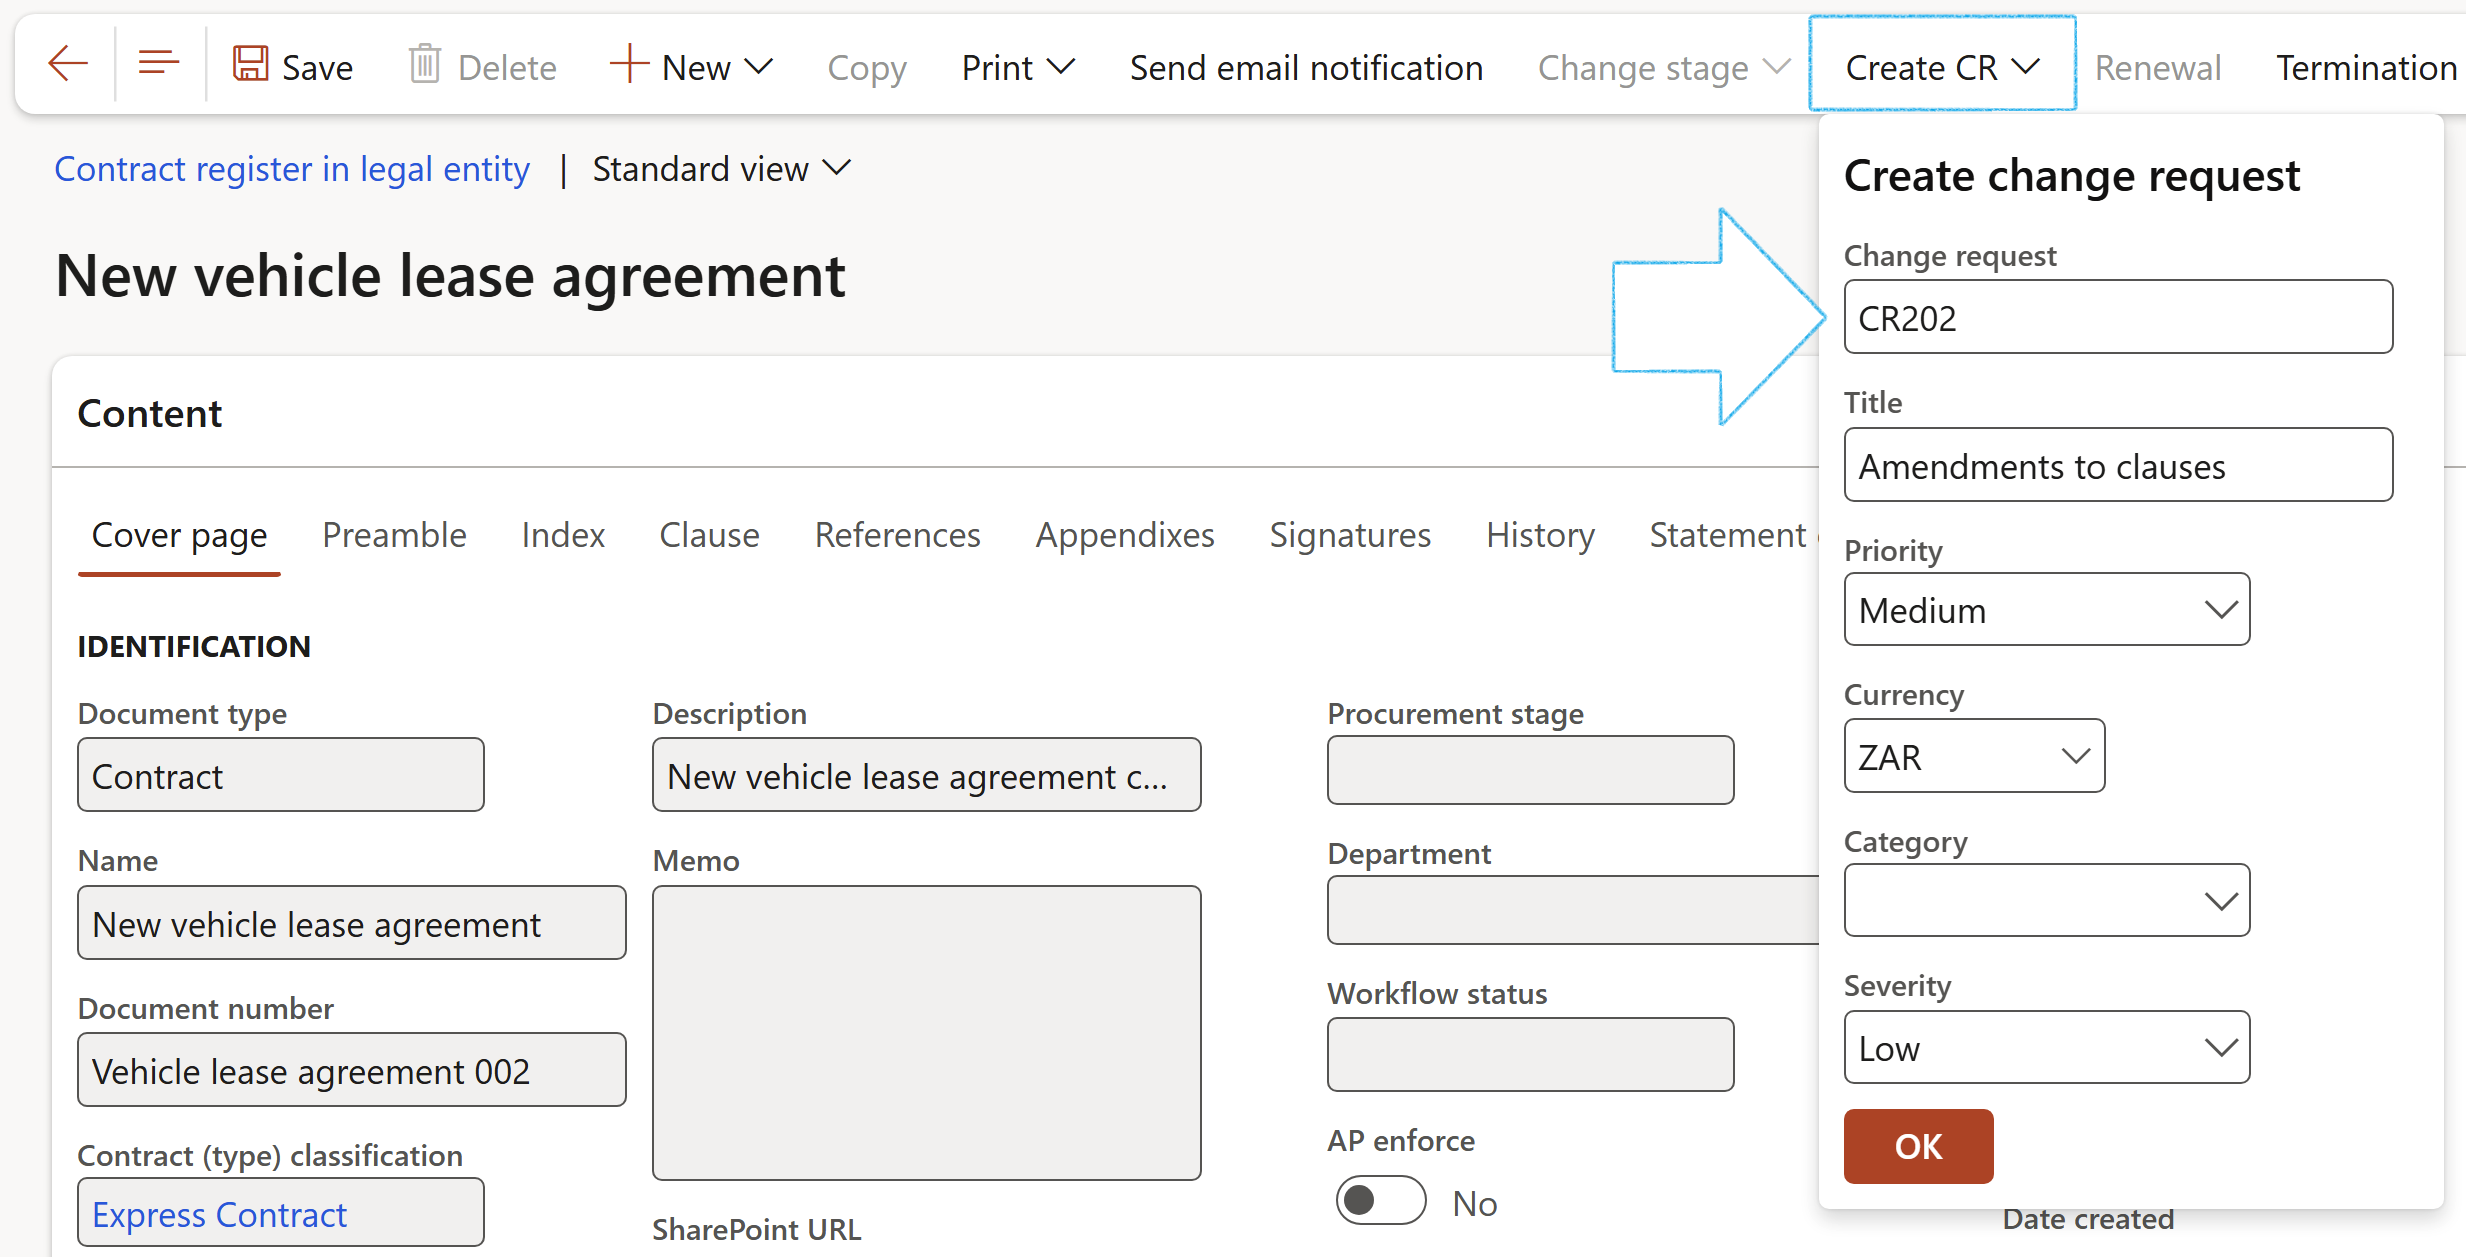
OR
Go to: GRC > Governance > Contracts > Change requests
To specify the existing clause that has to be changed:
To enter the new/replacement clause:
To approve the new/replacement clause:

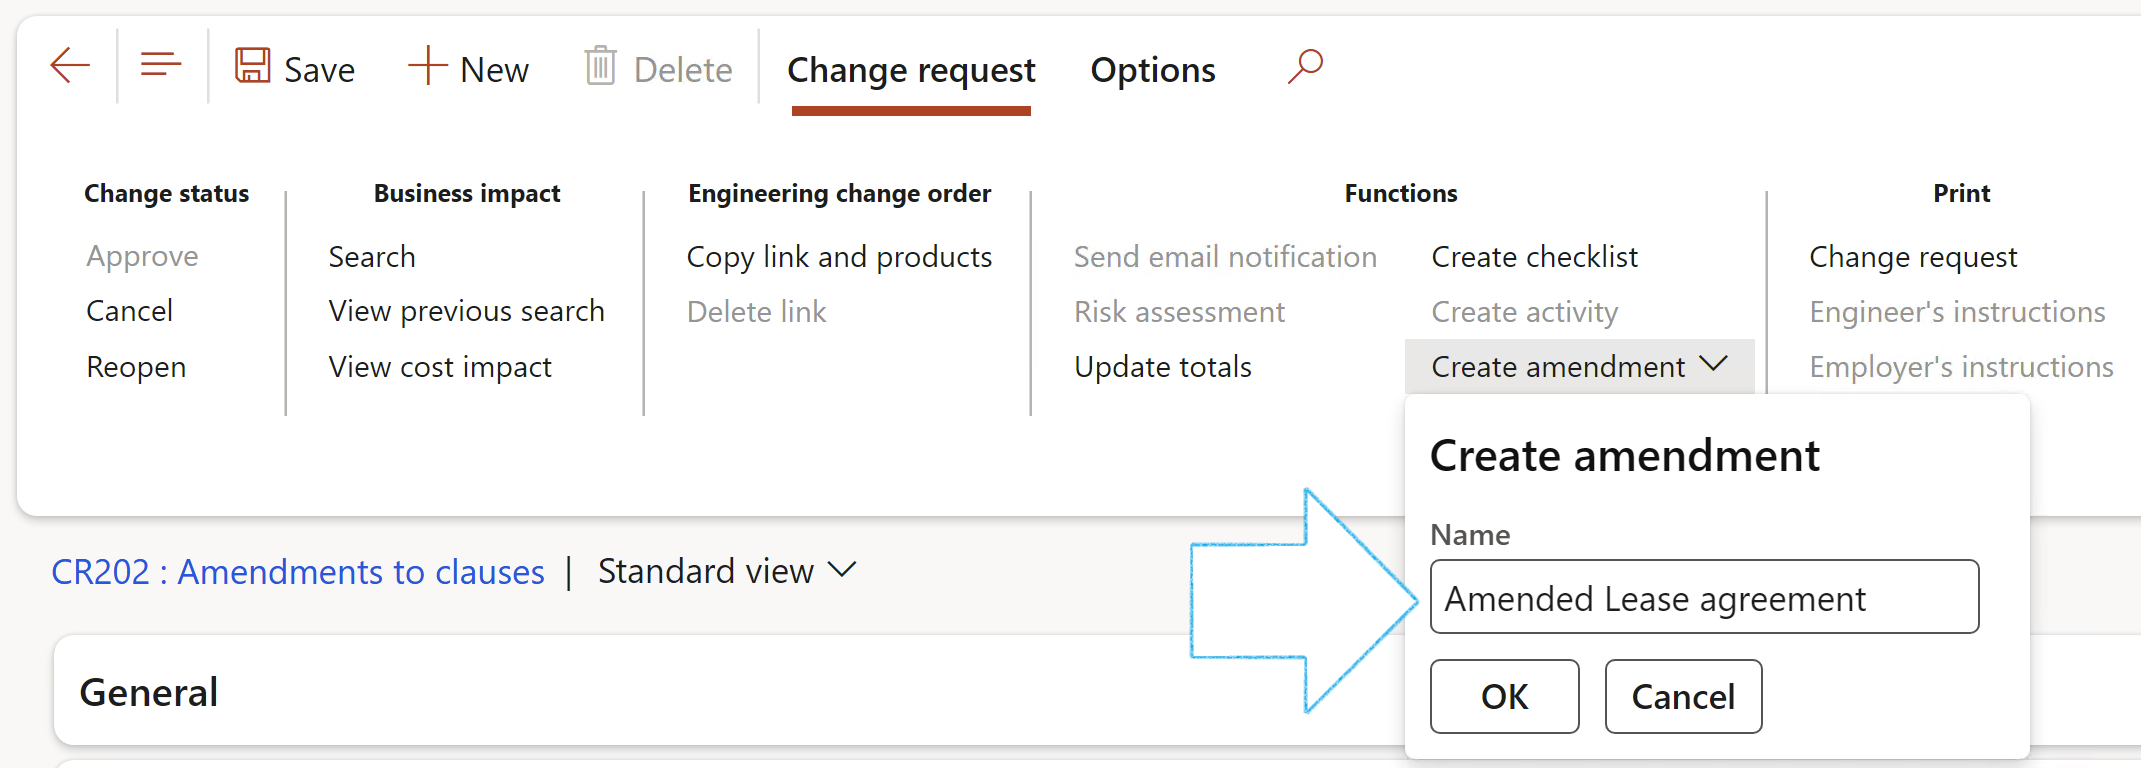
A record will be created under the Change planning Fast tab
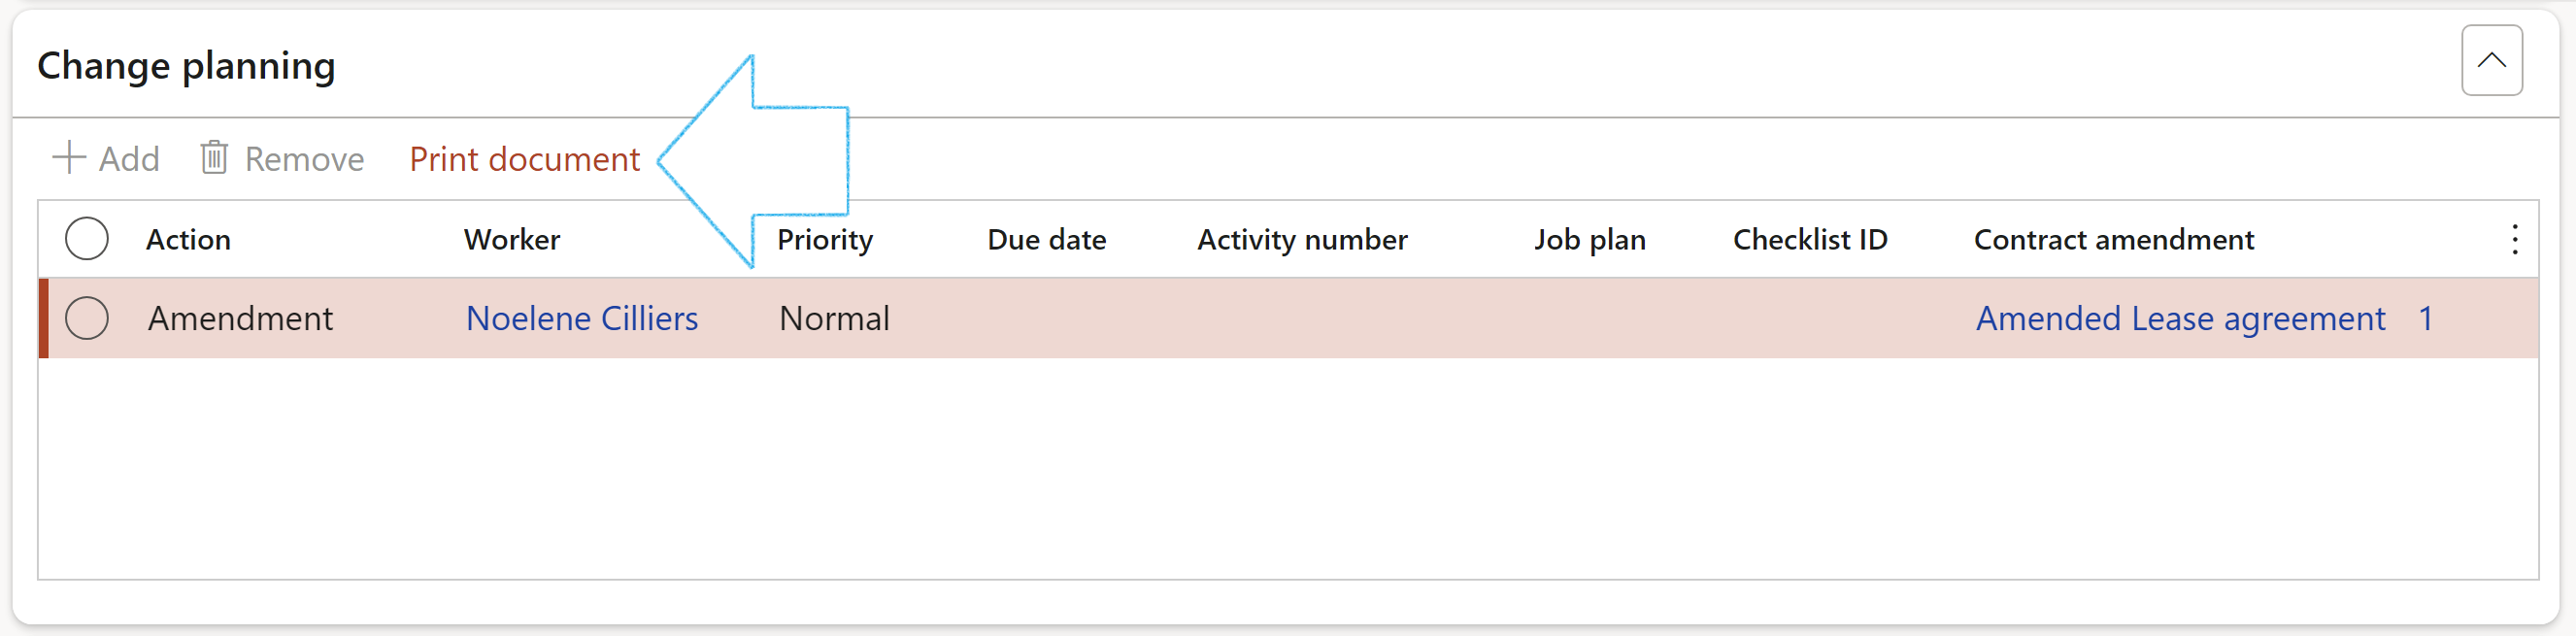
The document with listed Amendments can be printed by clicking on the Print document button. Scroll to the last page to see the amendments.

View the Sub document created by the Change request:
Go to: GRC > Governance > Contracts > Contract register in legal entity
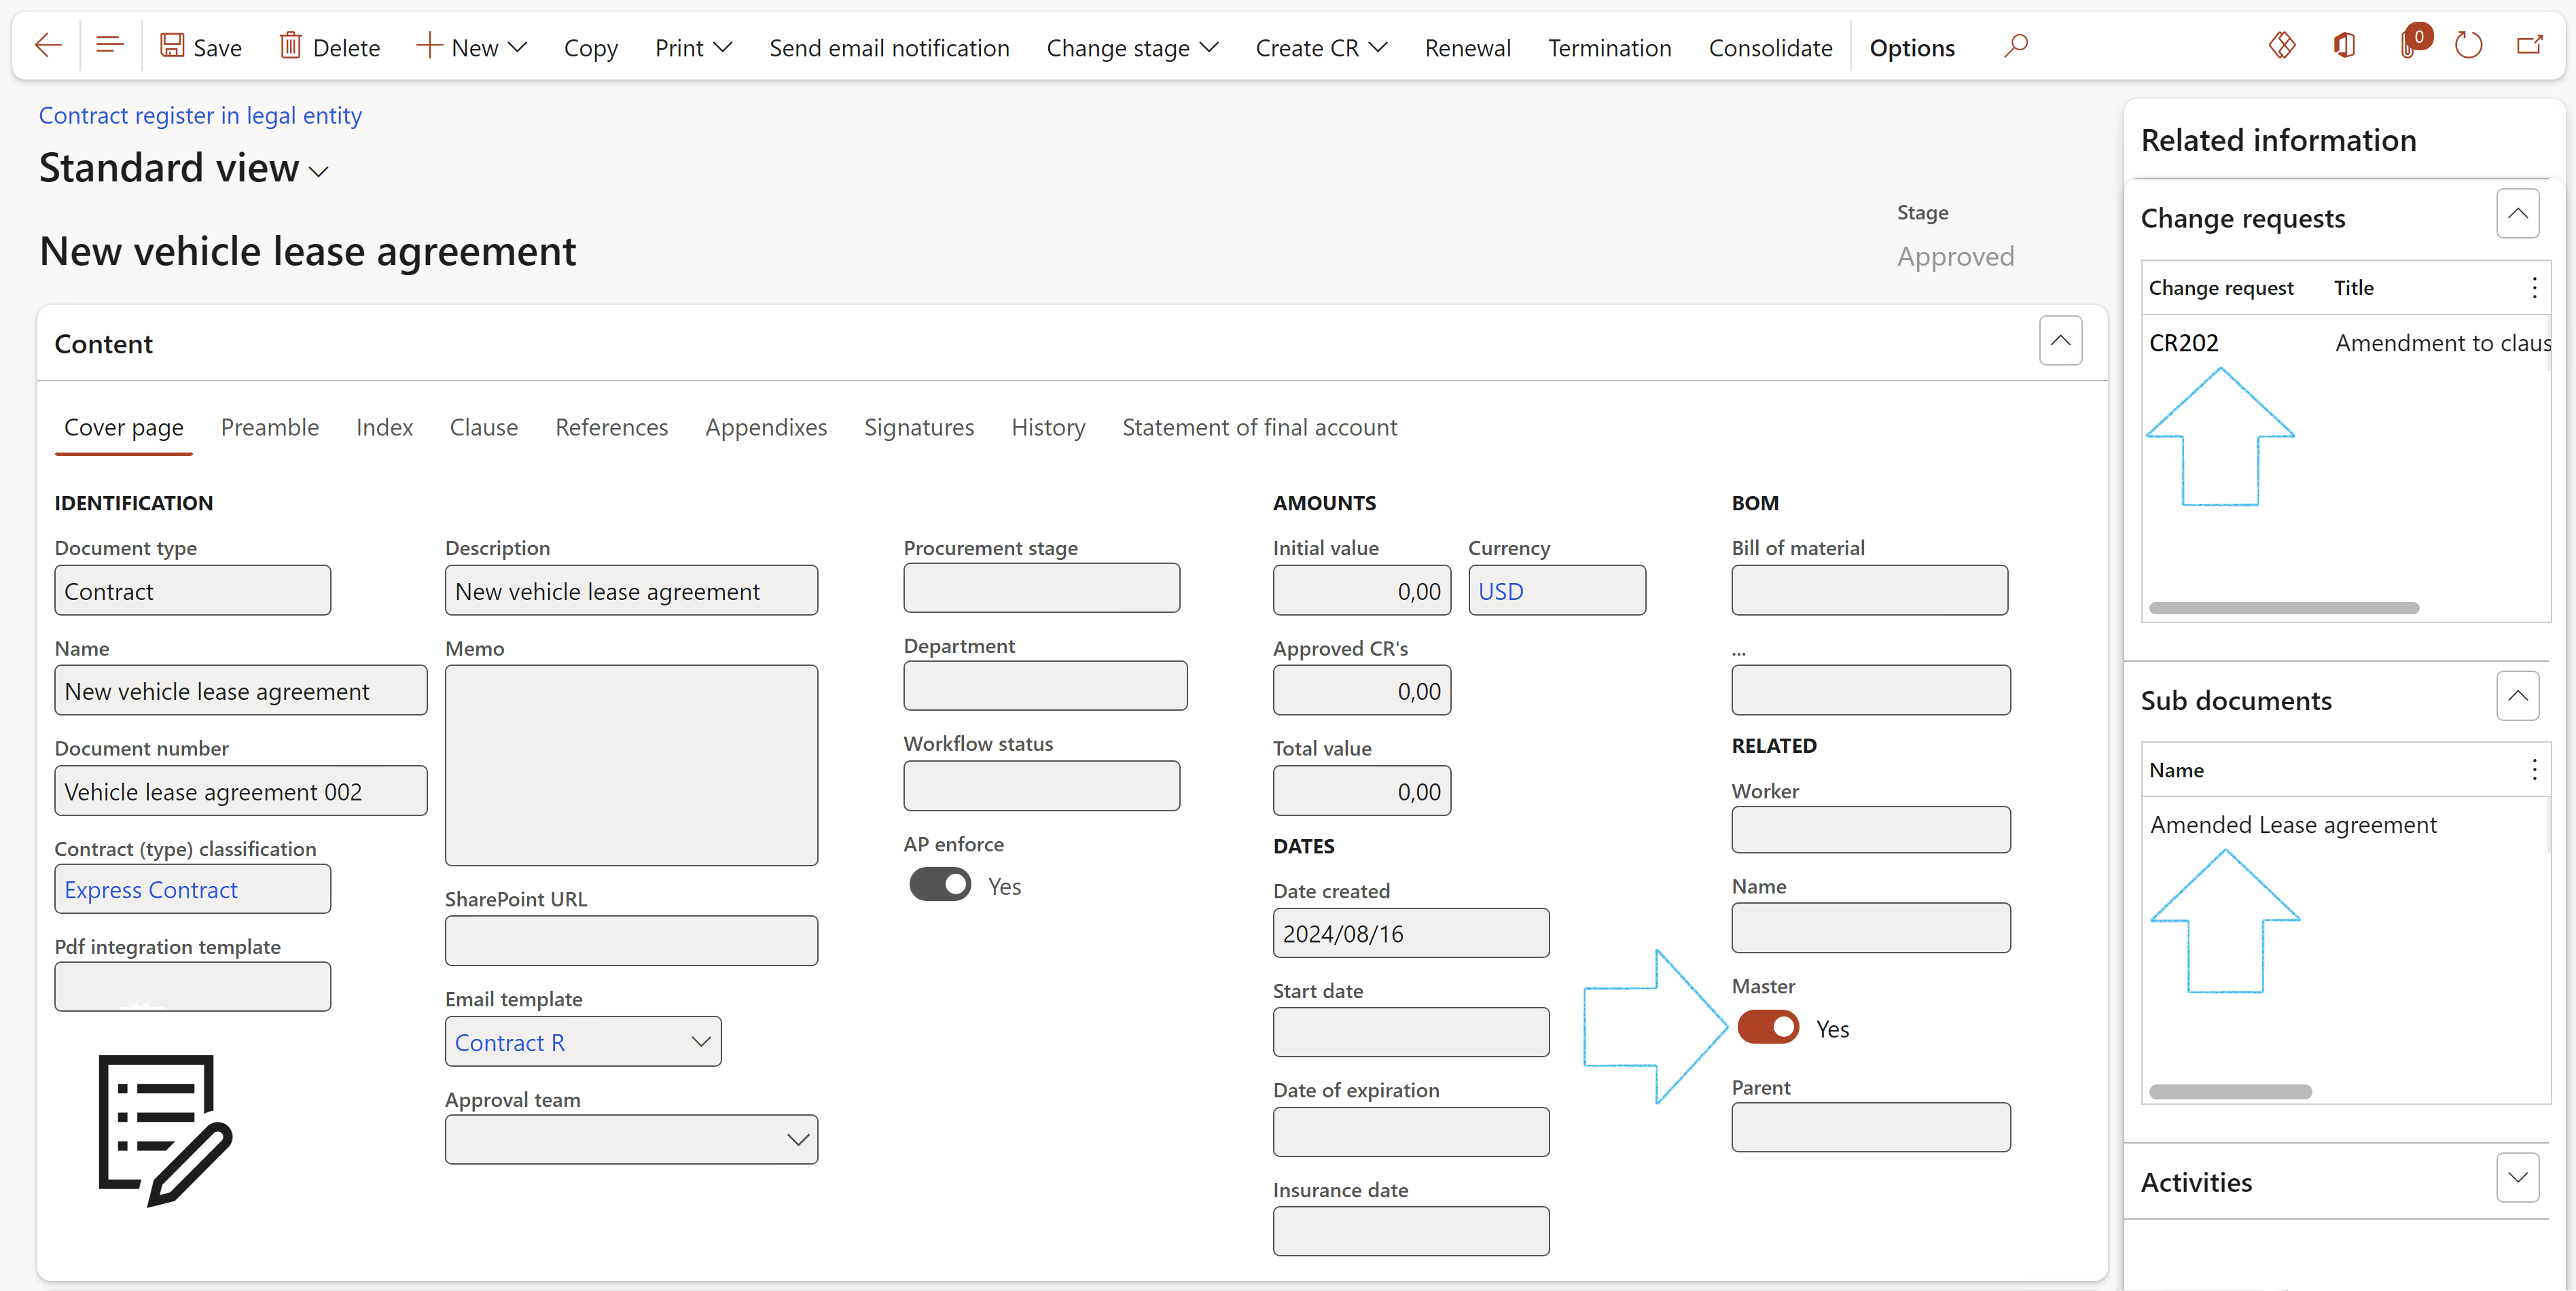
The Master slider will now be on Yes, indicating that this is the original contract
The document with listed Amendments can also be printed from the new Contract that was created, by clicking on the Print button in the Action pane and selecting Print document. Scroll to the last page to see the amendments.
¶ Step 25: Sending Emails
¶ Step 25.1: From header
Send email notification:
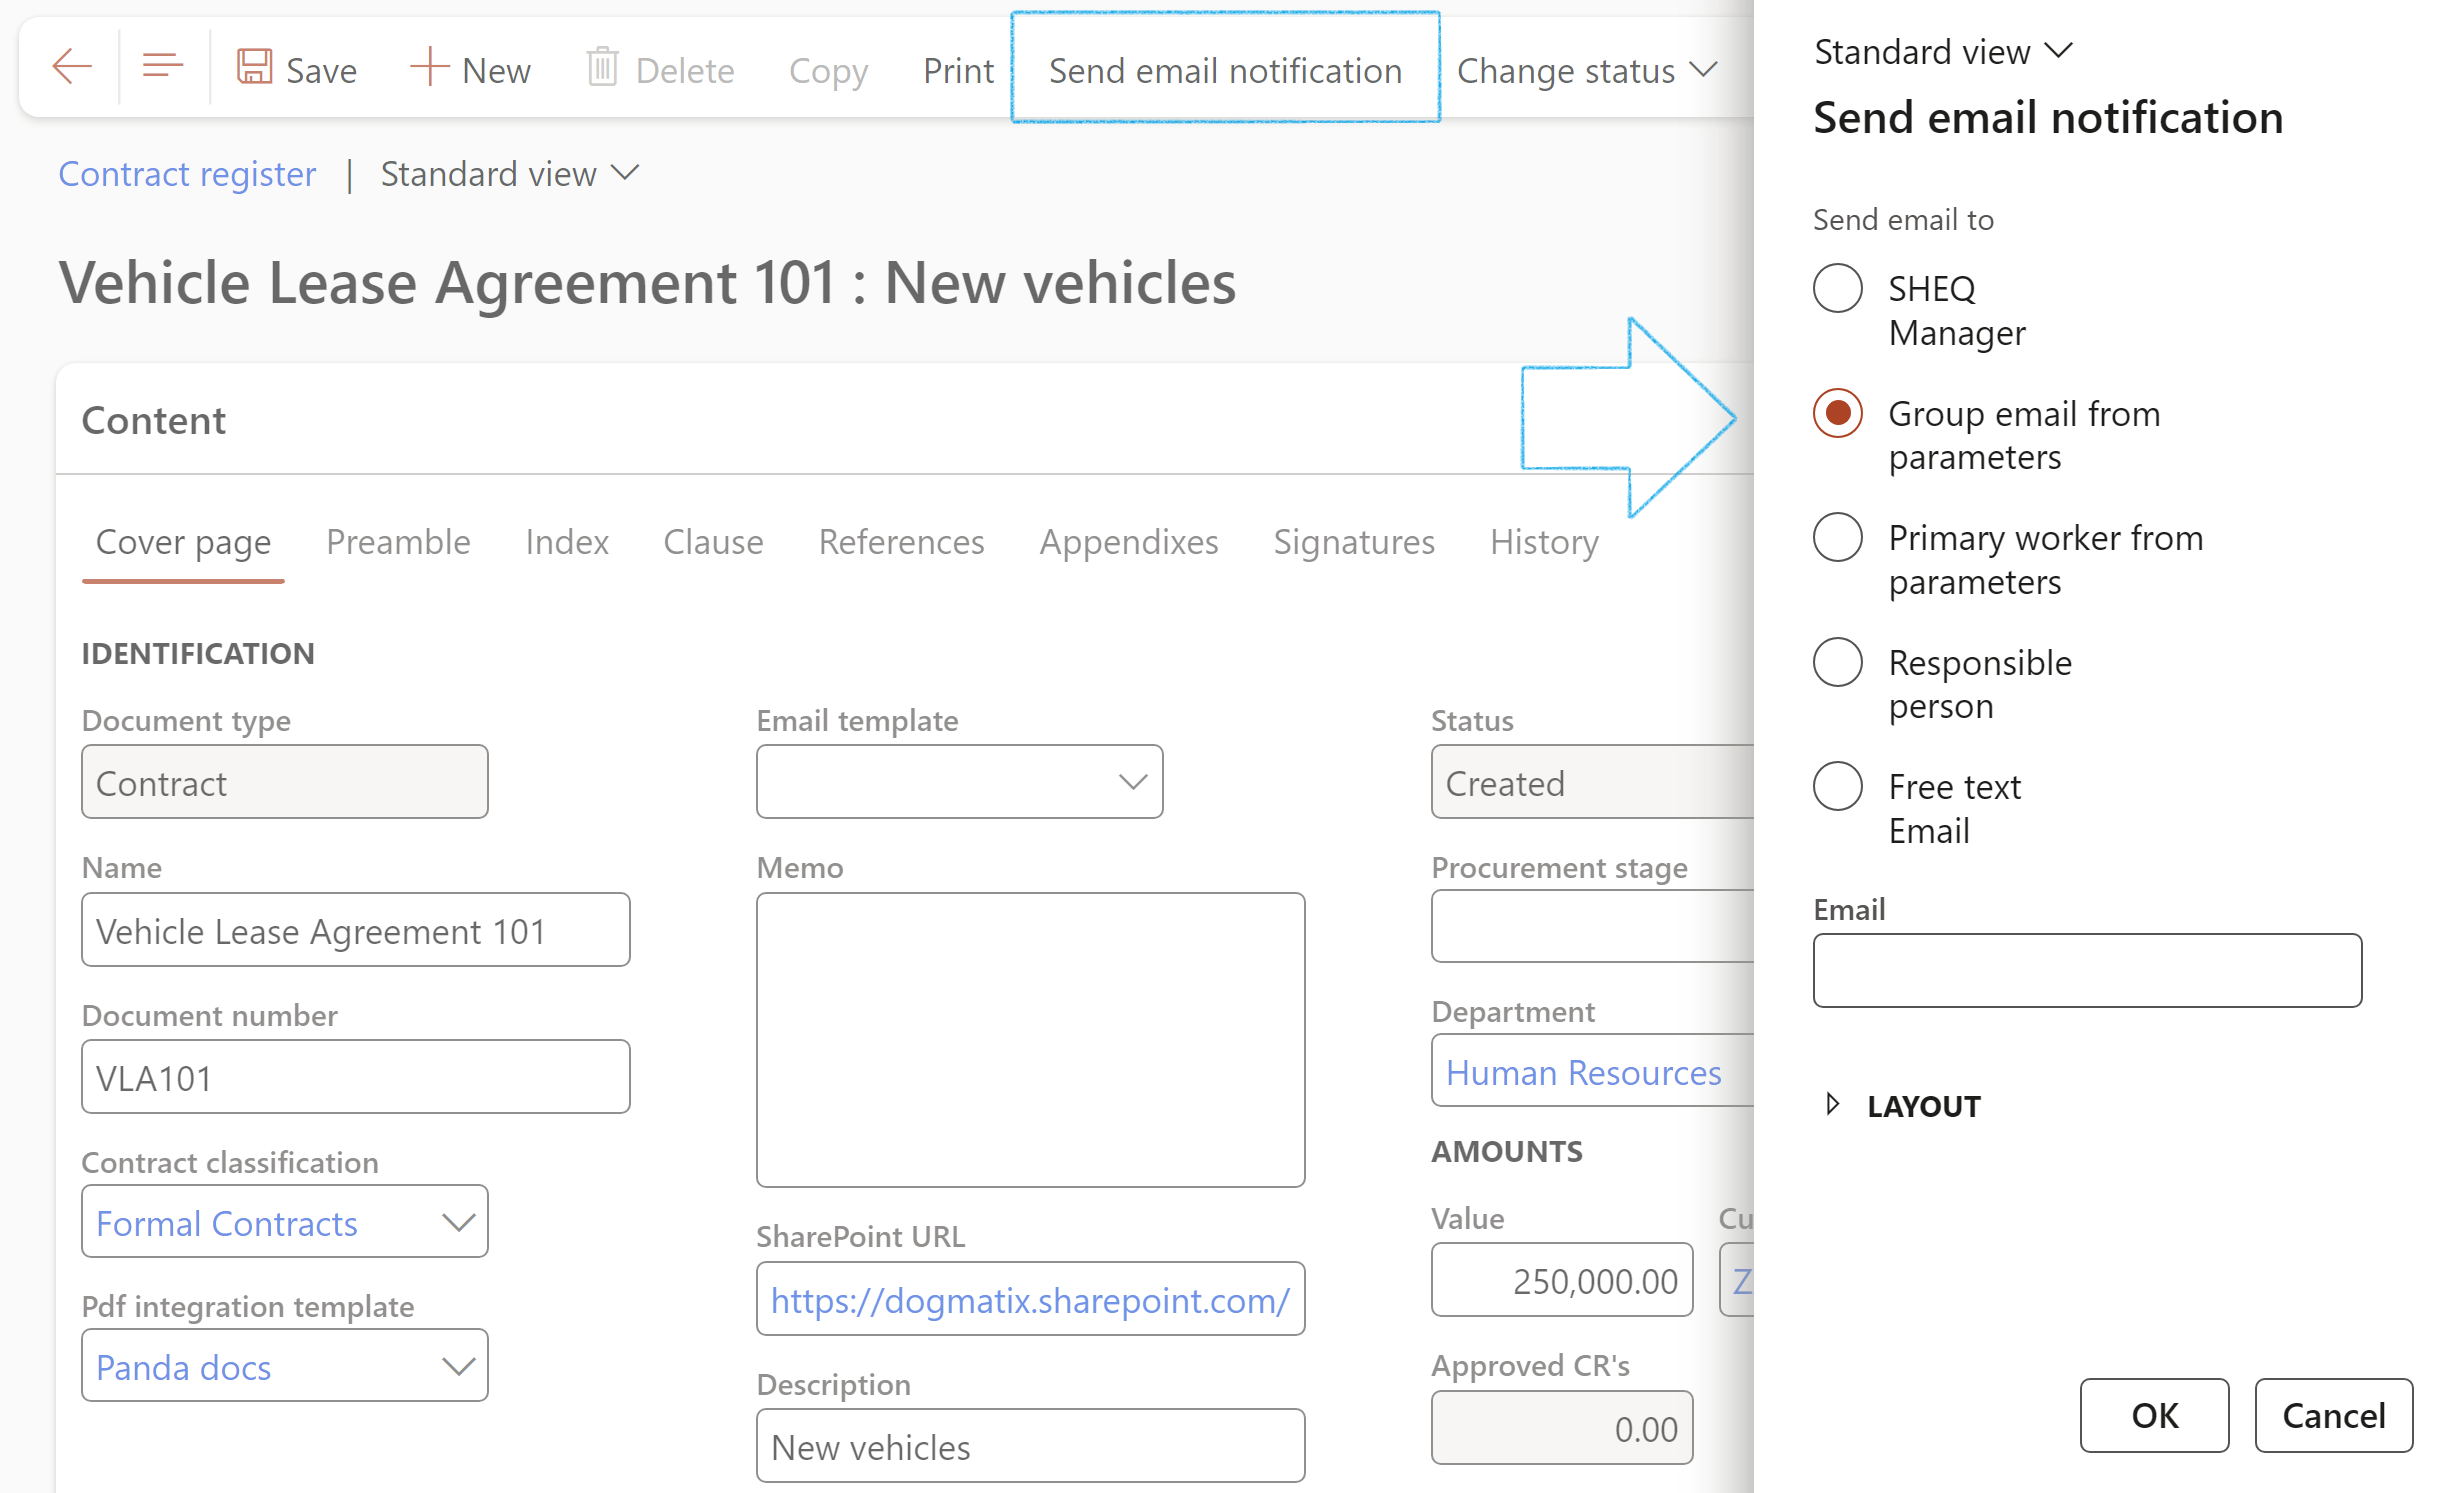
An email notification will be sent to the selected stakeholders
| Placeholder mappings | Field on form |
|---|---|
|
%ContractName% %ContractNumber% %Contract Status% %ExpiryDate% %Value% %Currency% %ApprovedCrsValue% %Currency% %TotalContractValue% %Currency% %VendorName% |
Contract name Document number Status Expiration date Initial value and Currency Approved change requests Total value and Currency Vendor name |
¶ Step 25.2: Using RACI workers
Emails can be sent to selected workers under the Responsibility matrix Fast tab. These workers must have a Primary email address
Go to: GRC > Governance > Contracts > Contract register in legal entity

The selected worker must have a primary email address
Please to refer to the Alerts Wiki page for sending Contract batch email alerts
To change the employees in the RACI fields when a contract is approved, click on the Change RACI button in the Action pane and select the workers to replace the current RACI members
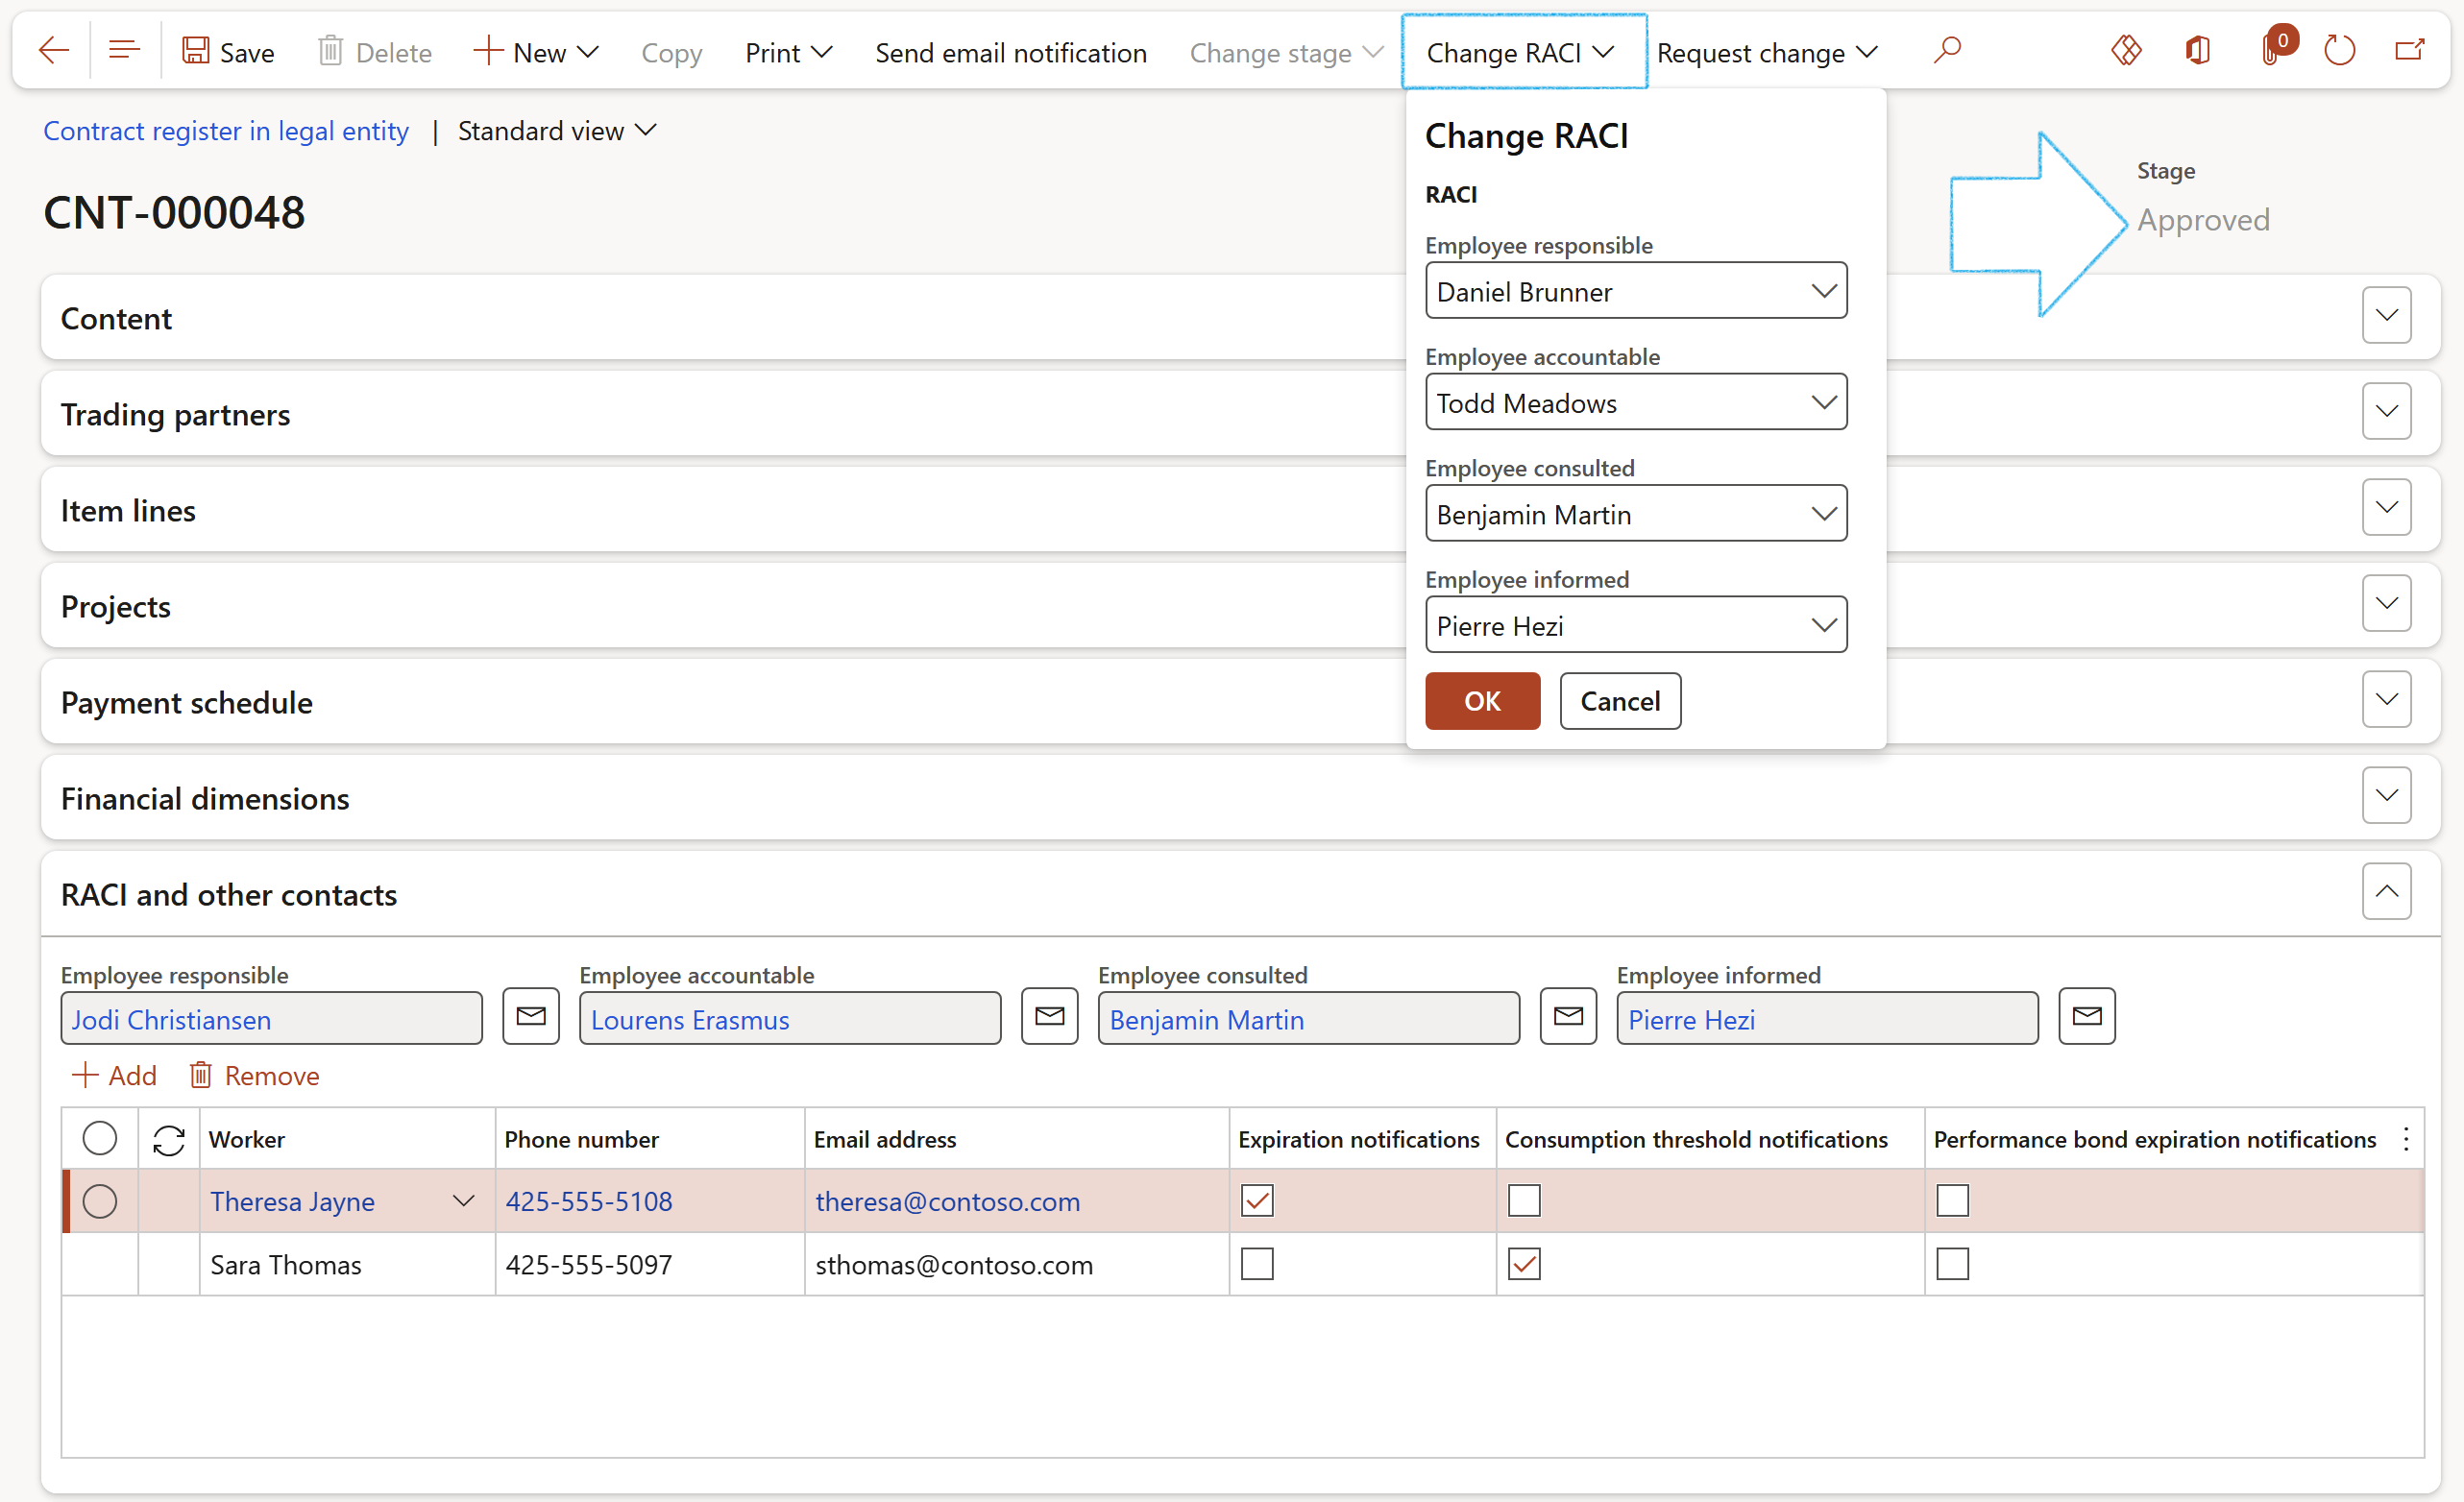
Additional worker information can be loaded under the RACI and other contacts Fast tab:
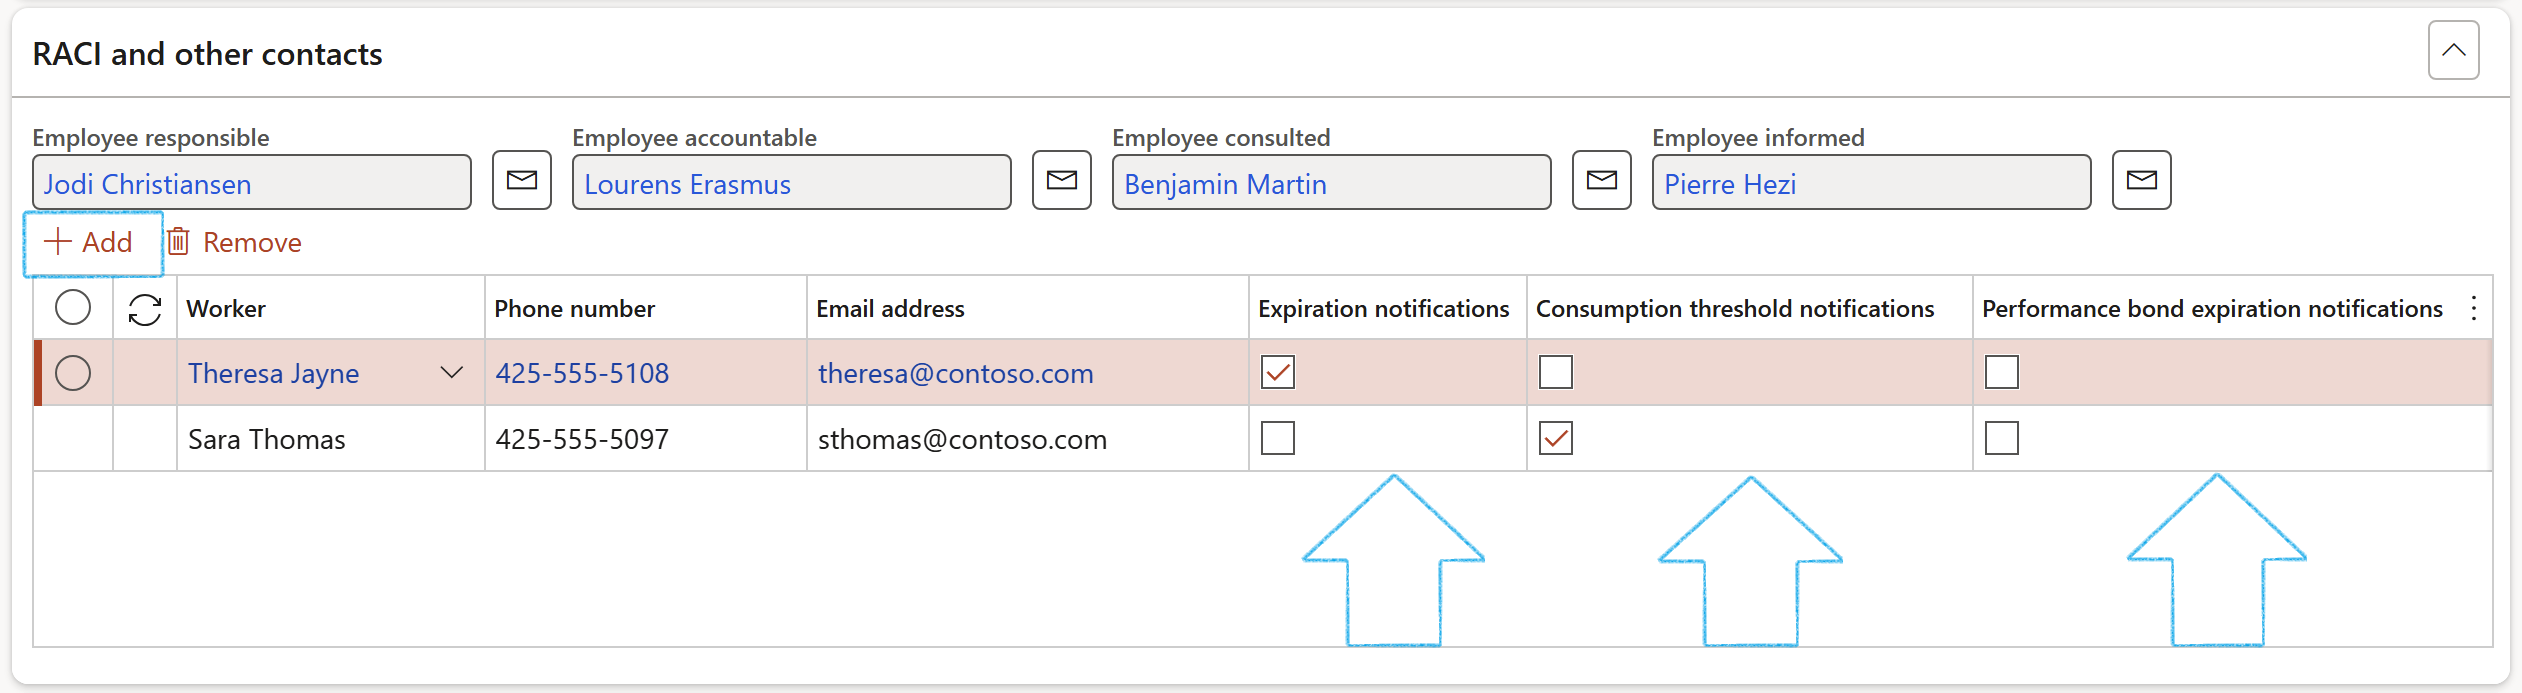
¶ Step 26: View existing contracts
Contracts can be viewed from the following two menu items:
Go to: GRC > Governance > Contracts > Contract register in legal entity
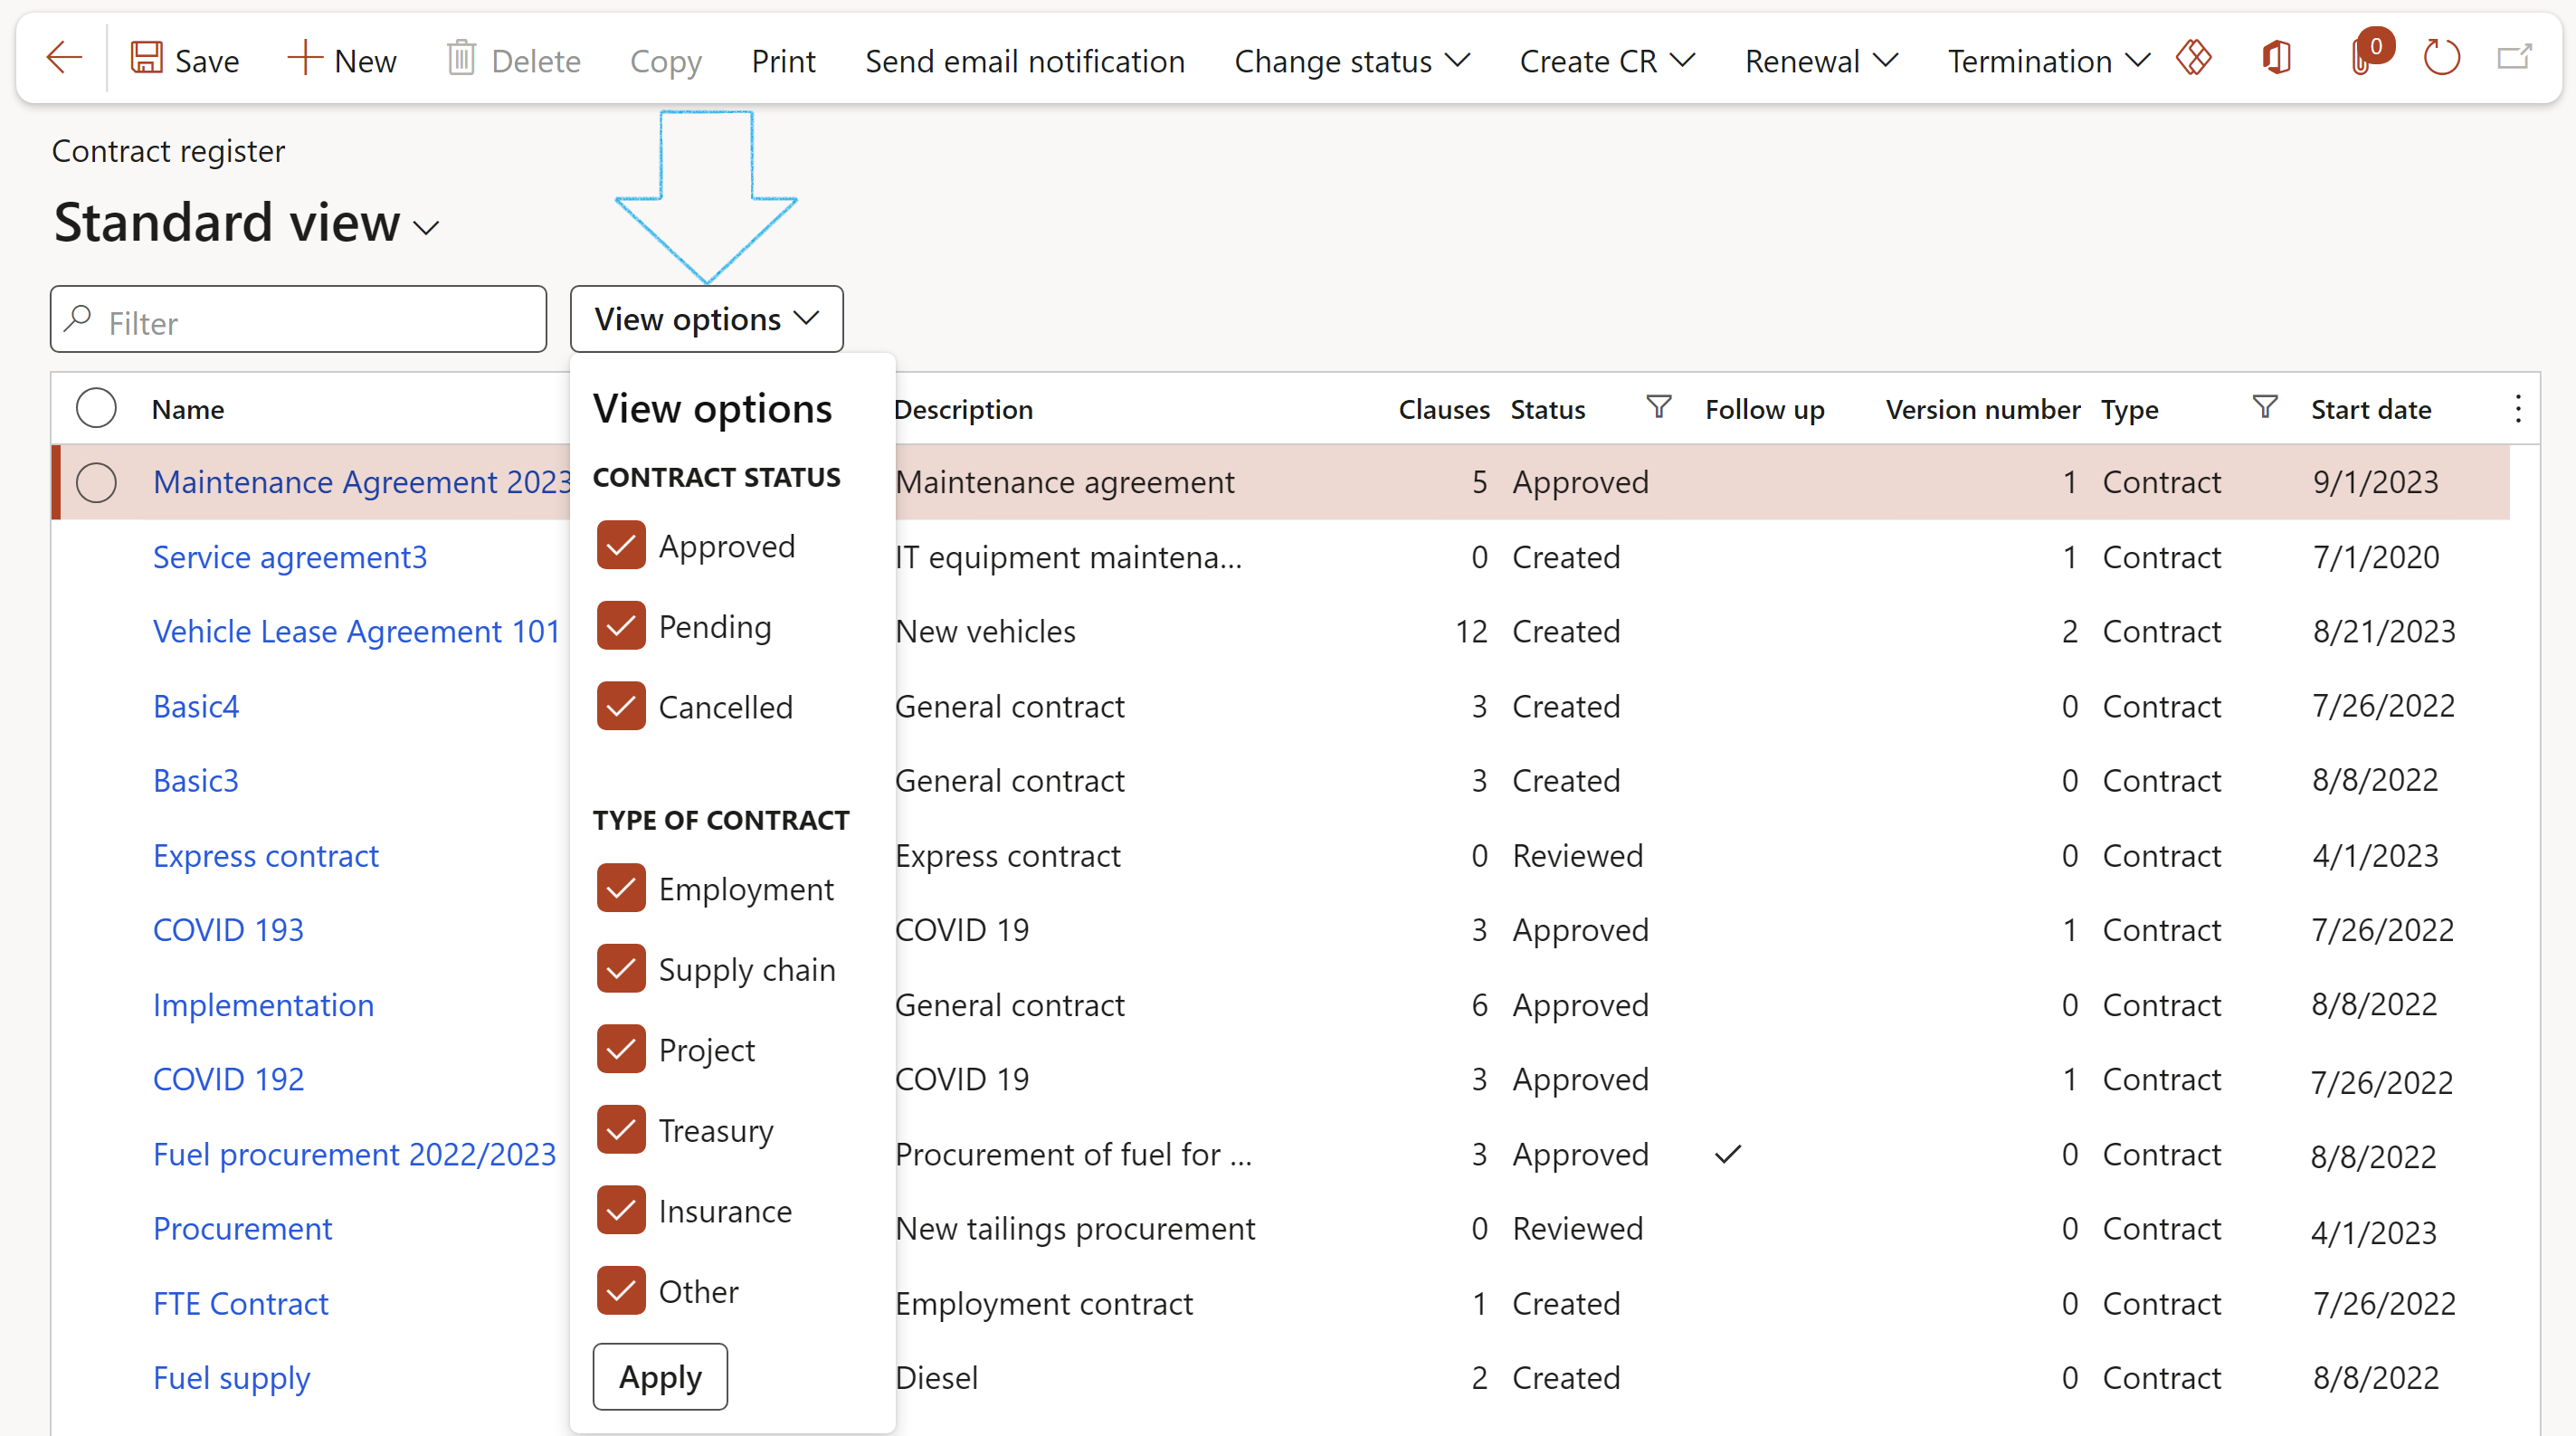
This will filter the contracts register list page accordingly.
OR
Go to: GRC > Governance > Tender management > All vendors

A list page displaying all the existing, open contracts for the vendor will appear
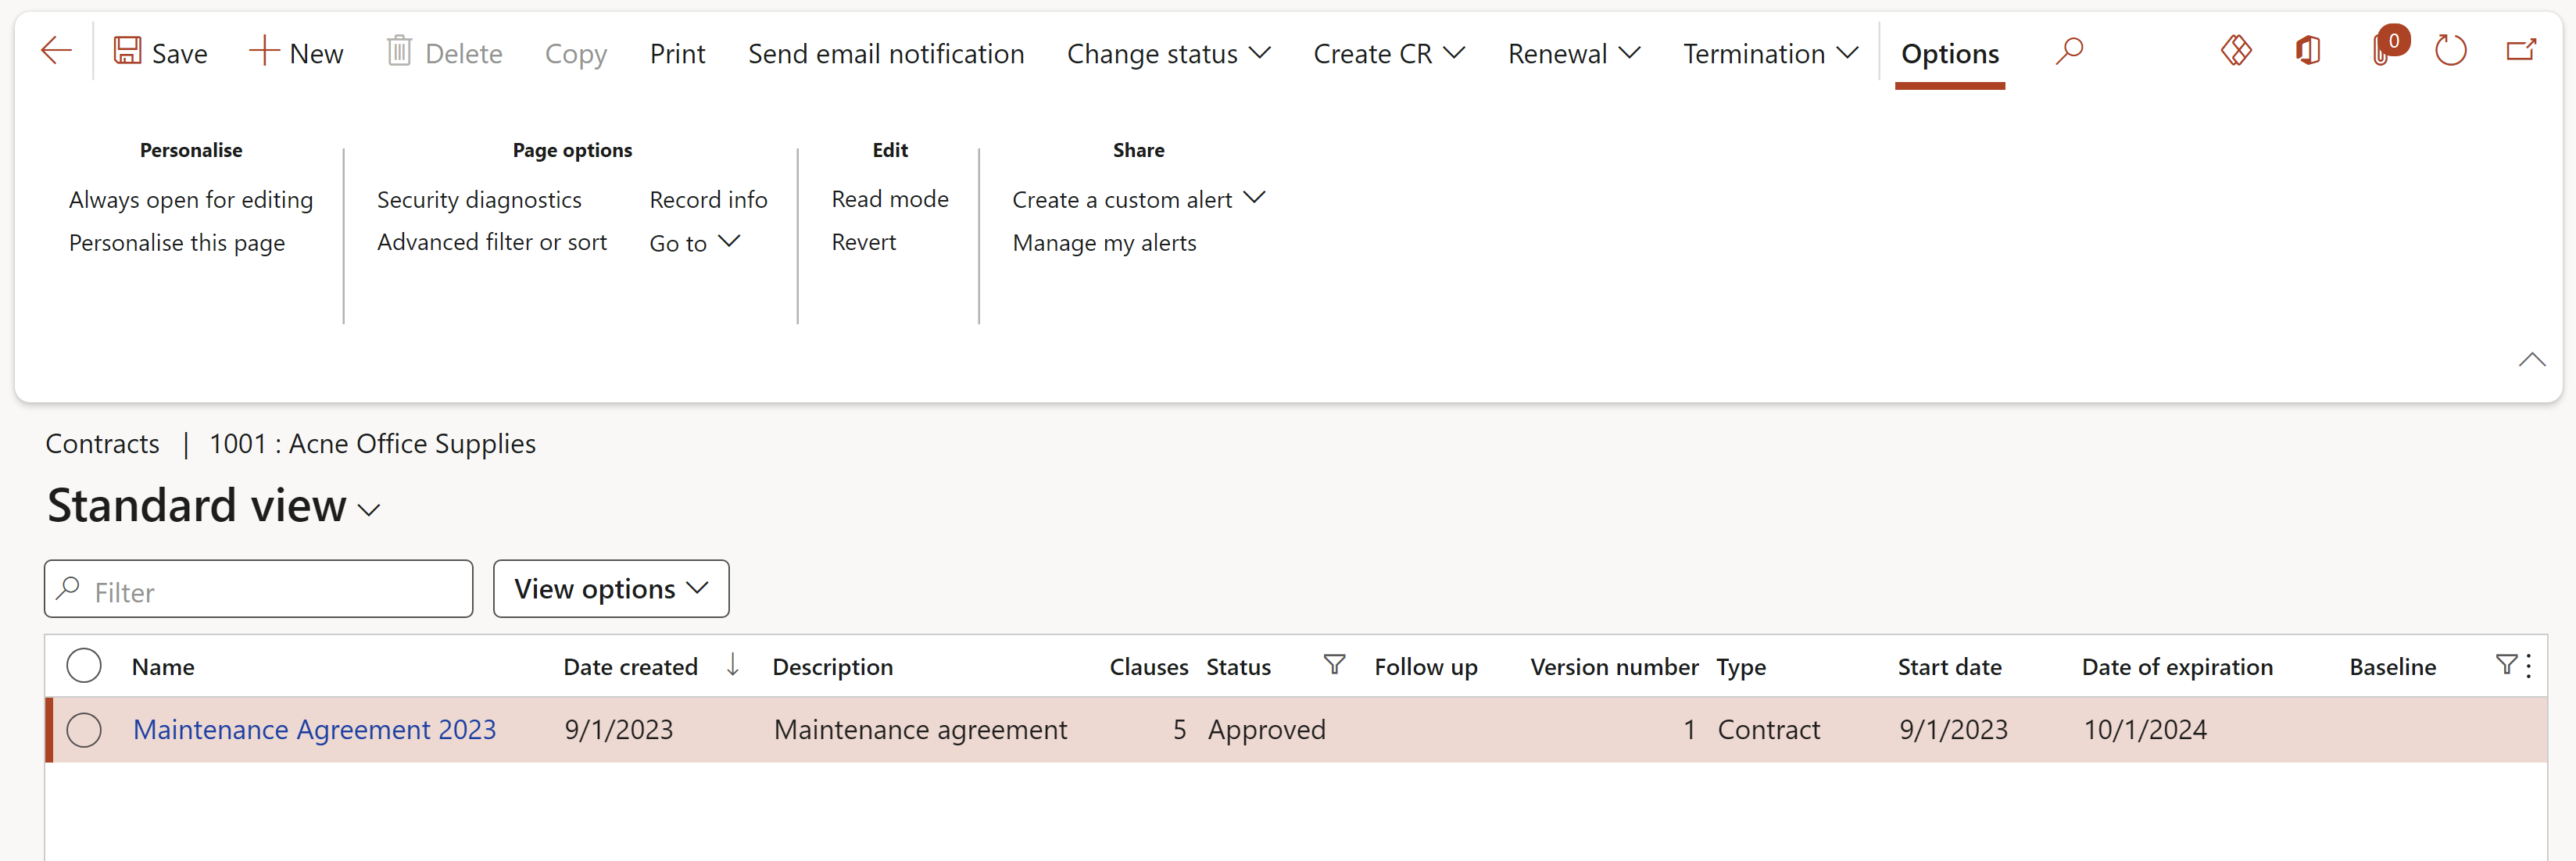
OR
**For Employment contracts:
If this is an employment contract, and a Worker is selected in the Worker dropdown list, the contract can be viewed from the Worker record.
Go to: HR > Workers > Workers

¶ Step 27: Projects from a contract
¶ Step 27.1: The Projects and pricing Fast tab
Go to: GRC > Governance > Contracts > Contract register in legal entity
The Create a project with WBS button: For SOW record where Header is selected a single project will be created and work breakdown structure lines for this project based on the SOW ID lines linked to the WBS parent
The Create a group of projects button: All SOW records in grid without a project link (at the end of the grid) will be created into a project Hierarchy. The statement of work ID flagged as "main" will be the top project
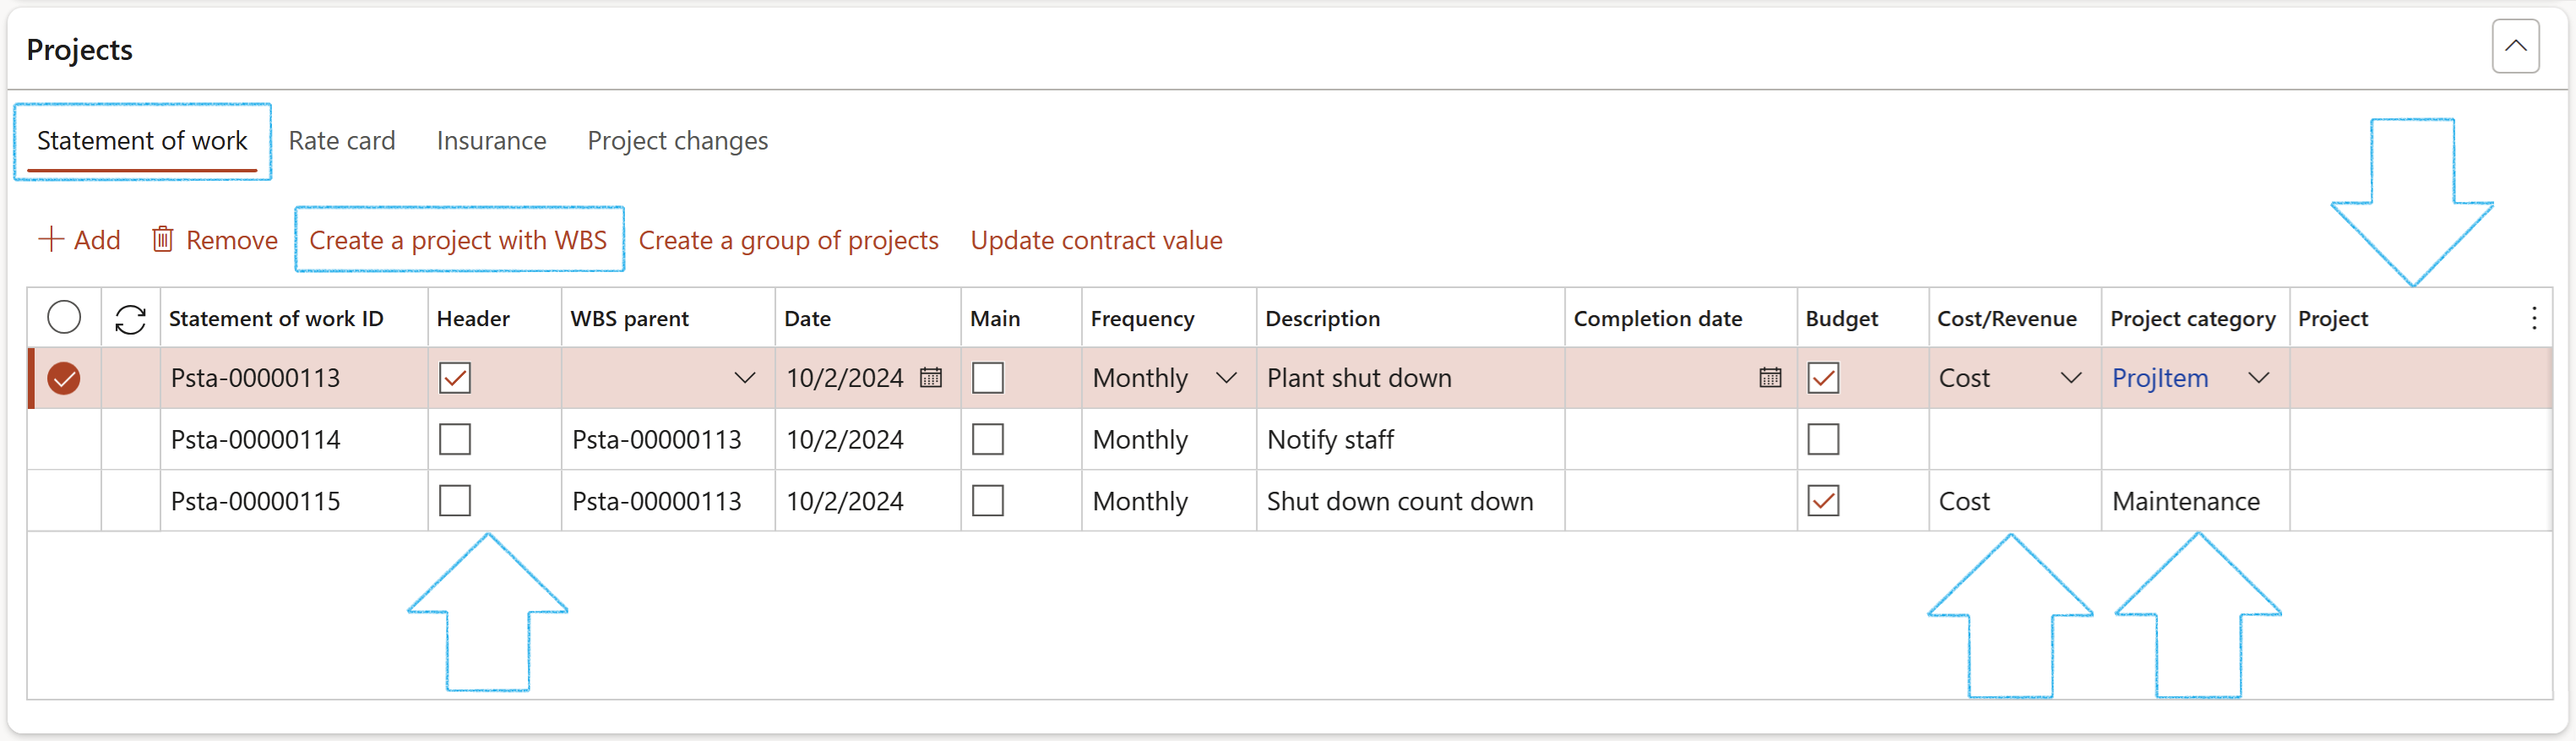
¶ Step 27.2: Project Milestones on a contract
Contract milestones mark progress in the contract lifecycle management process. They are often linked to deliverables or payment stages. These milestones serve as checkpoints, helping organizations ensure contracts remain on schedule and that work meets specific standards before moving forward.
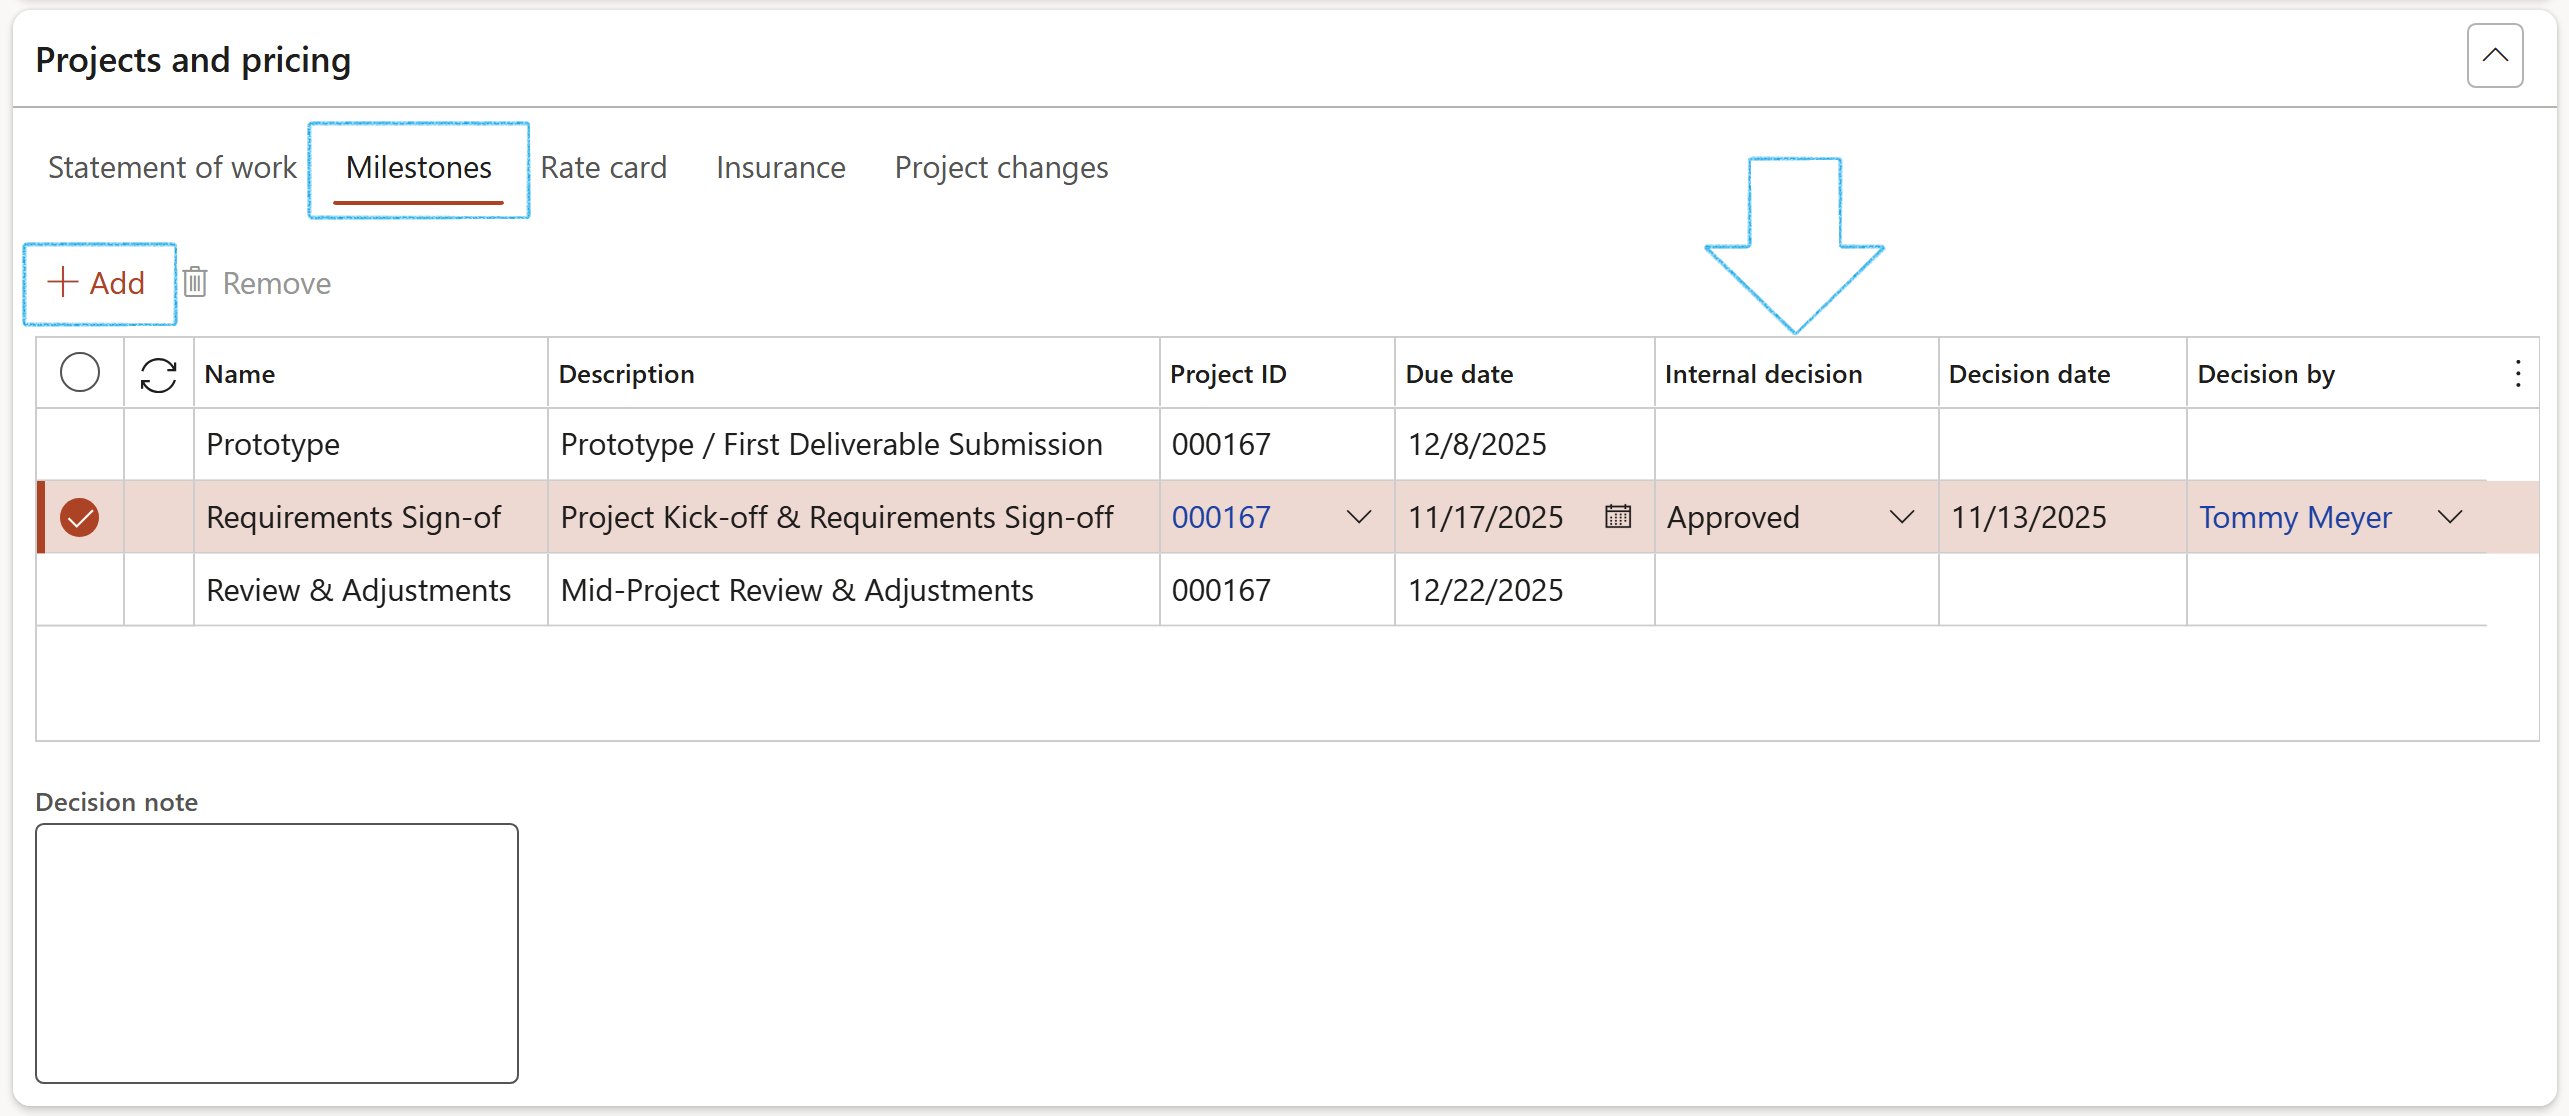
¶ Step 27.3: Project Rate card on a contract
A Rate card is a “tool” used to establish project billing rates by either resource type (e.g., labor) or role (e.g., project manager)
¶ Step 27.3.1: Cost price (hour)
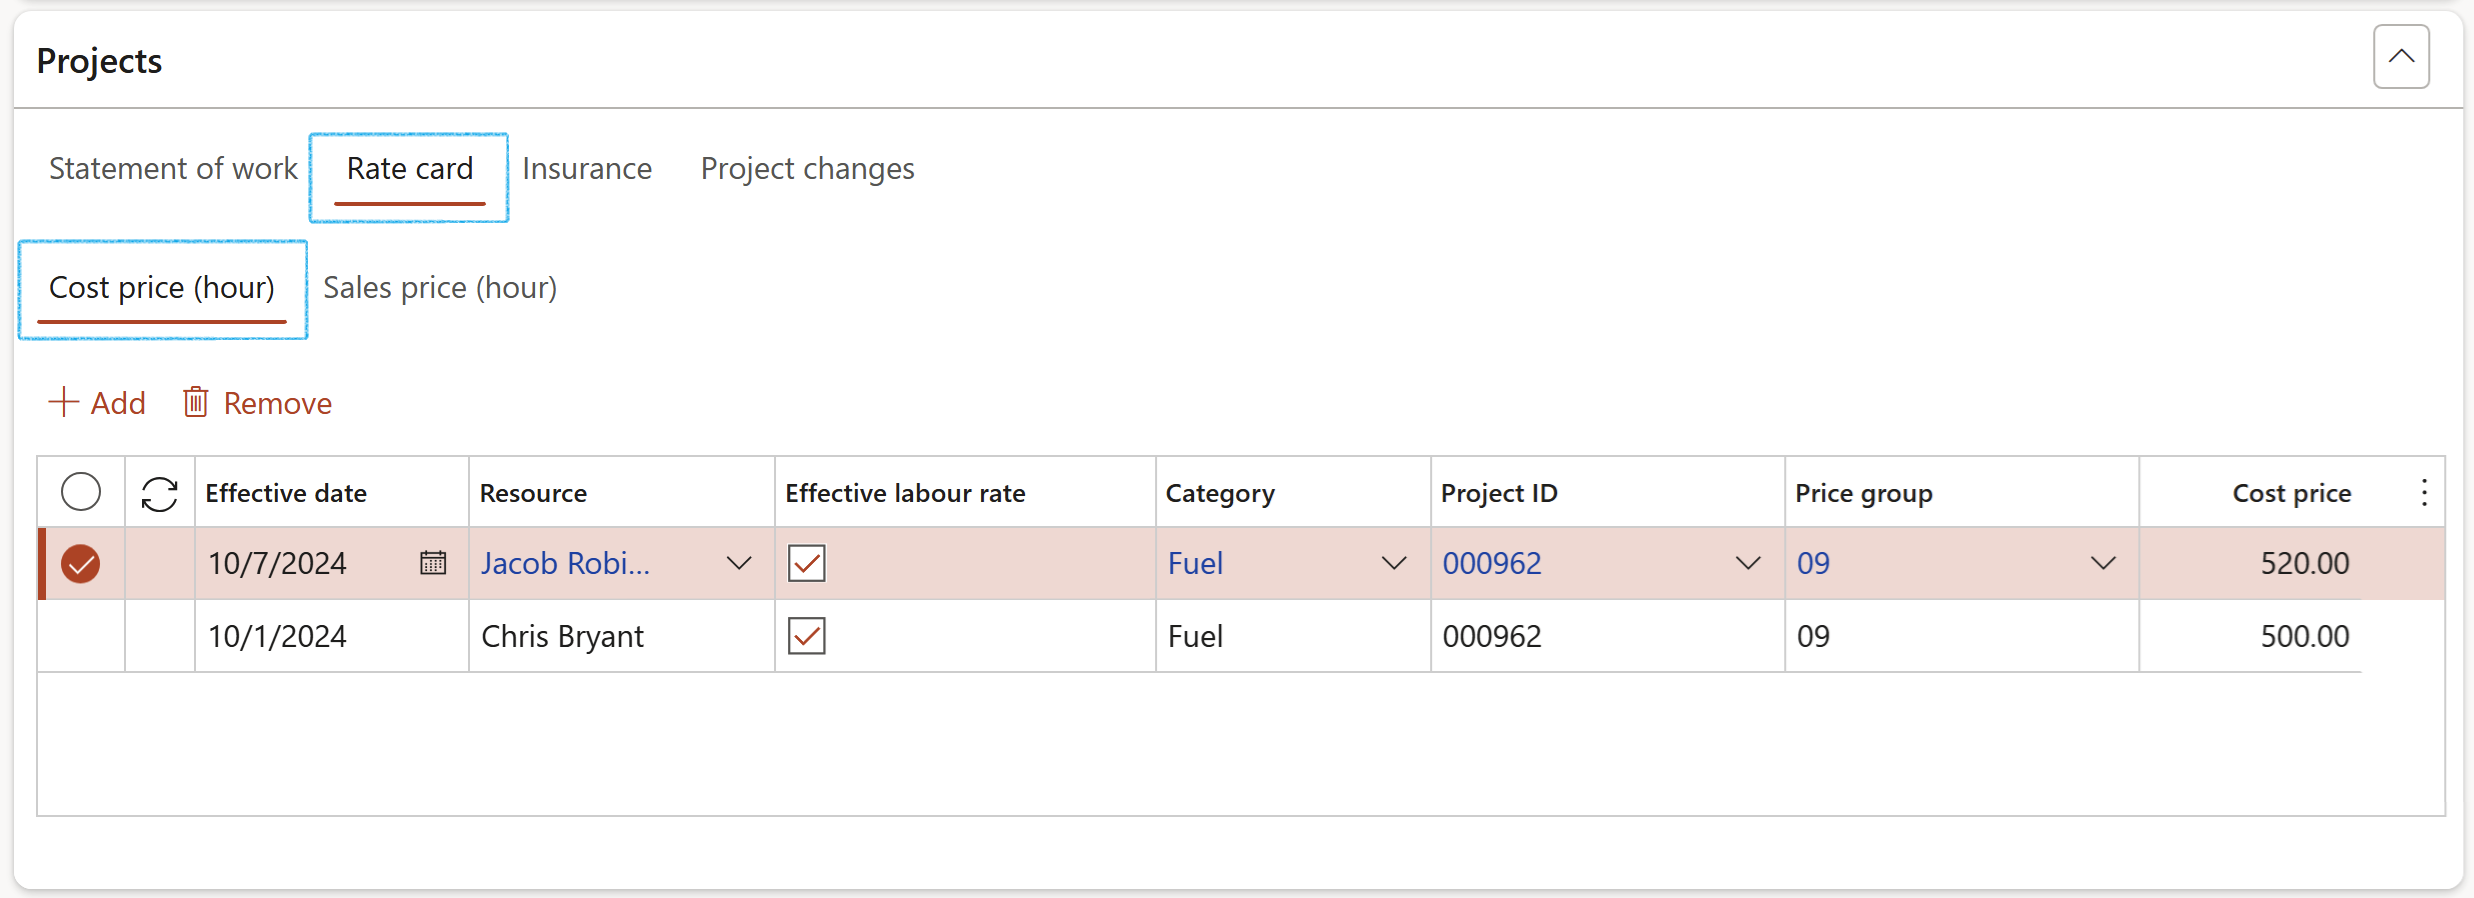
¶ Step 27.3.2: Sales price (hour)
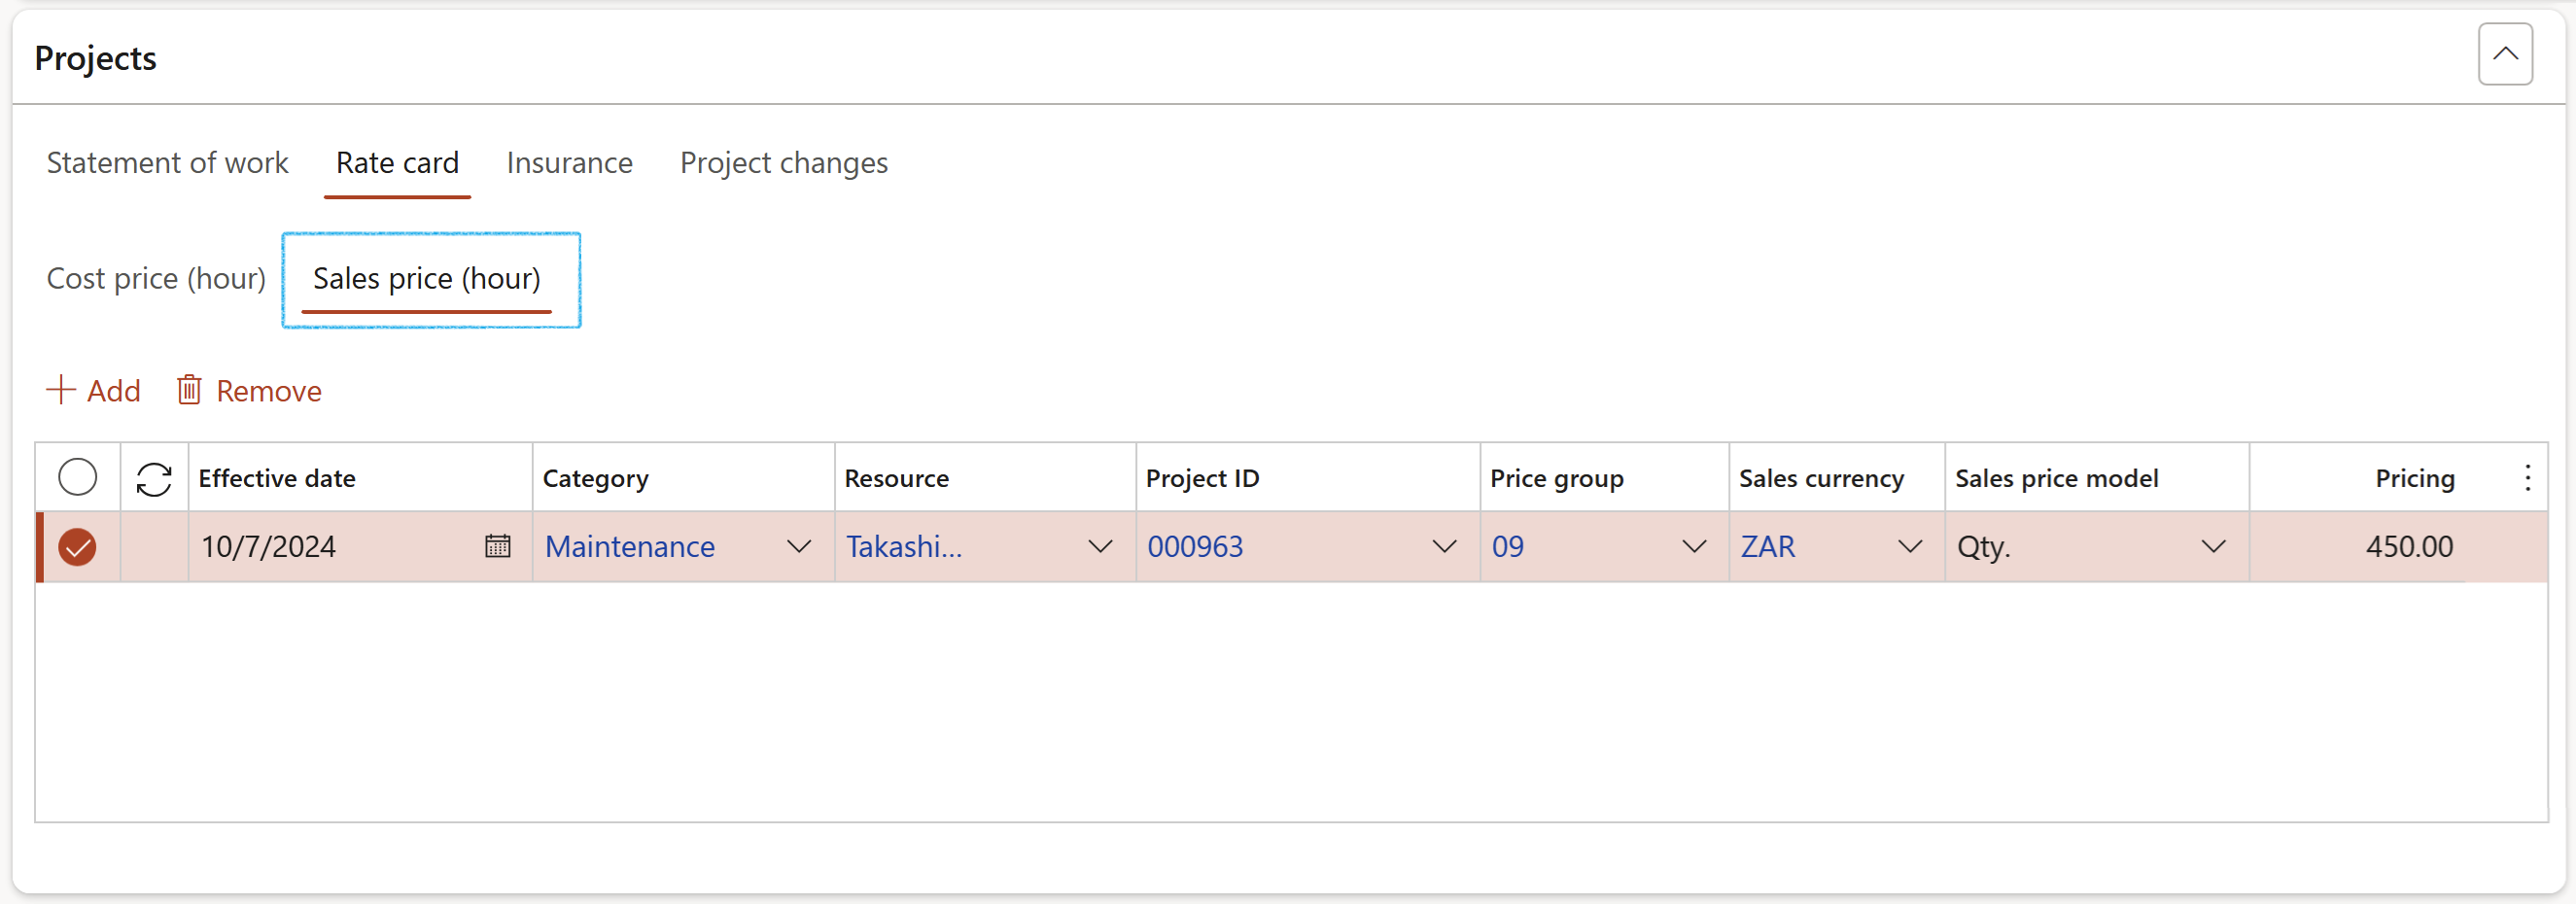
¶ Step 27.3: Insurance for a contract
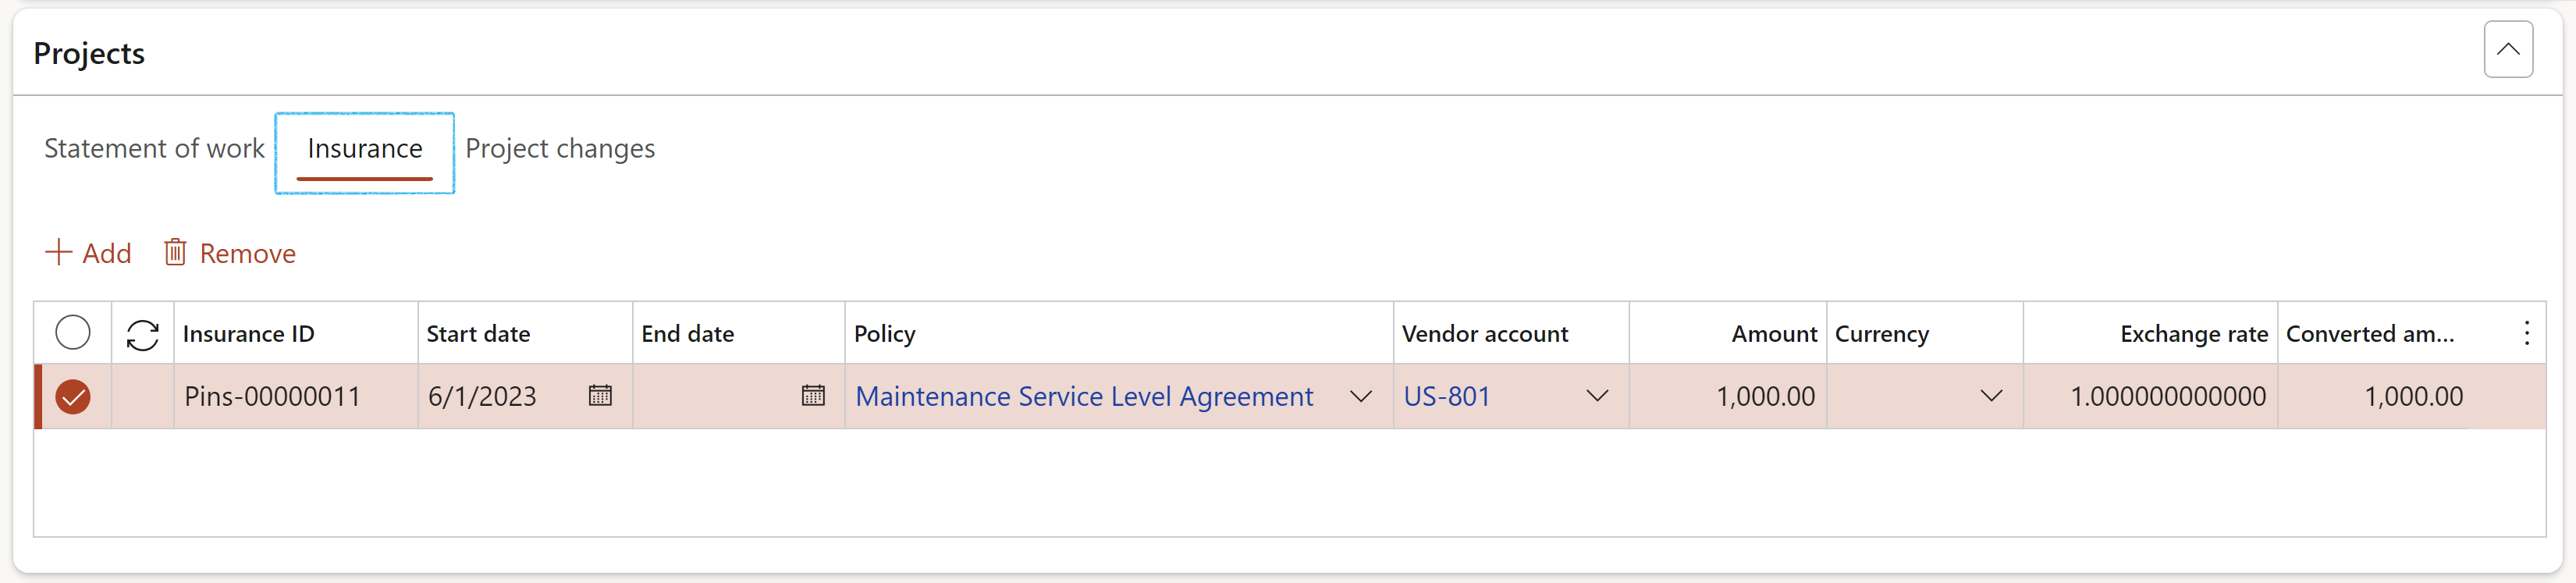
¶ Step 27.4: Change requests on a contract
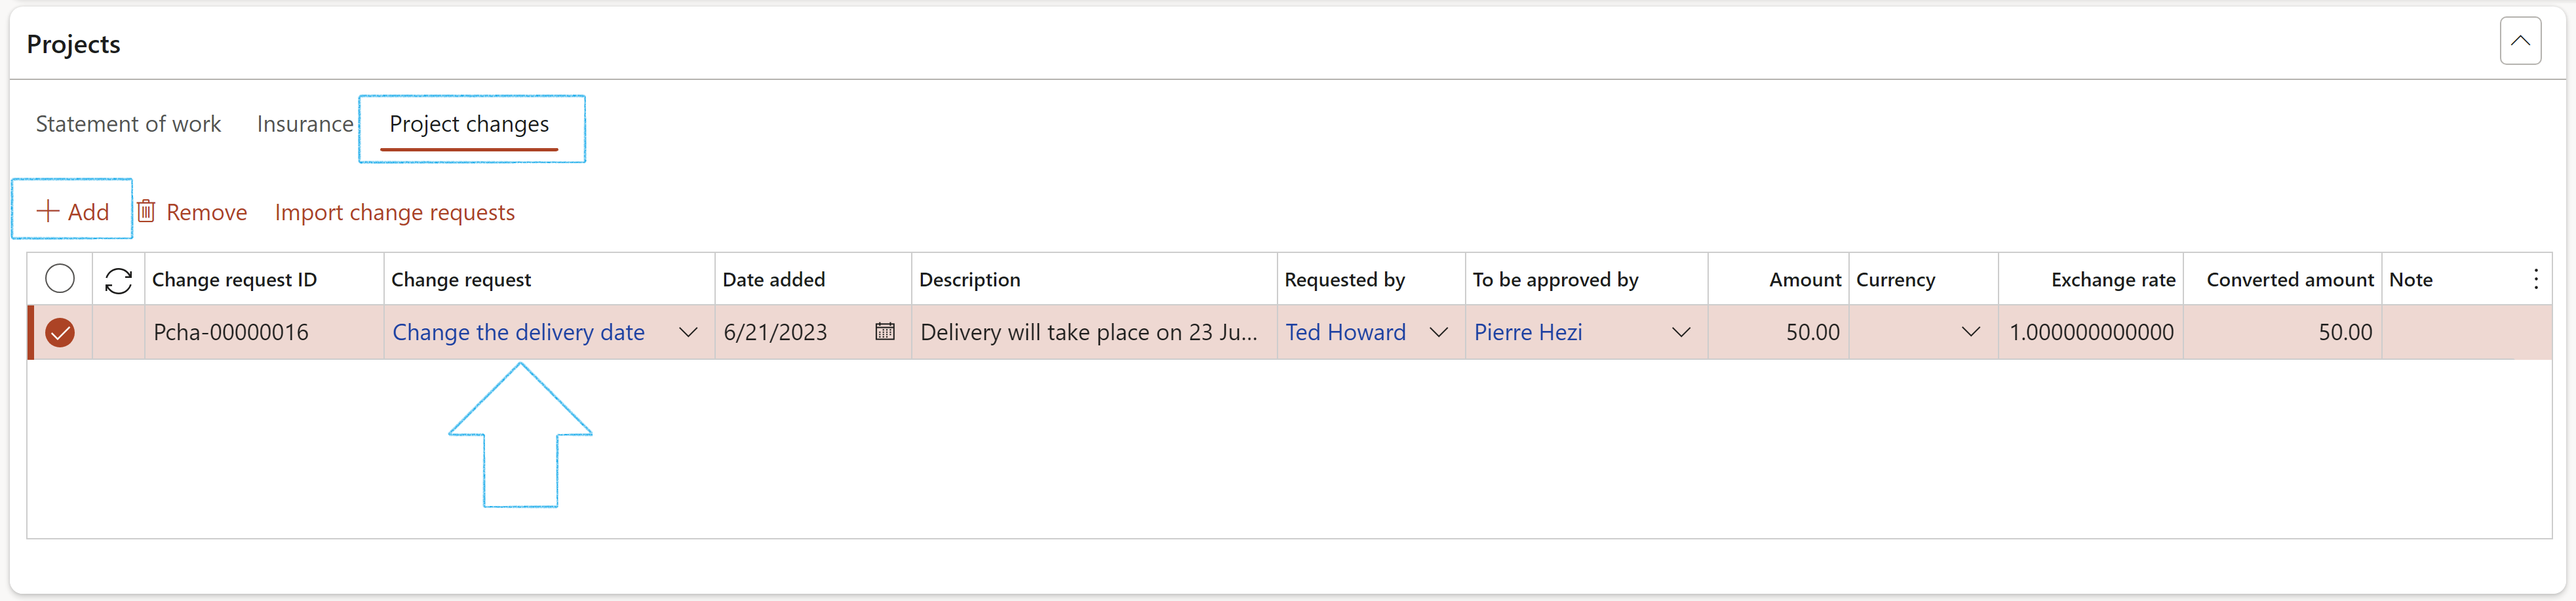
OR
If a Change request exists on the Contract, the Project lines from the Change request will populate the grid
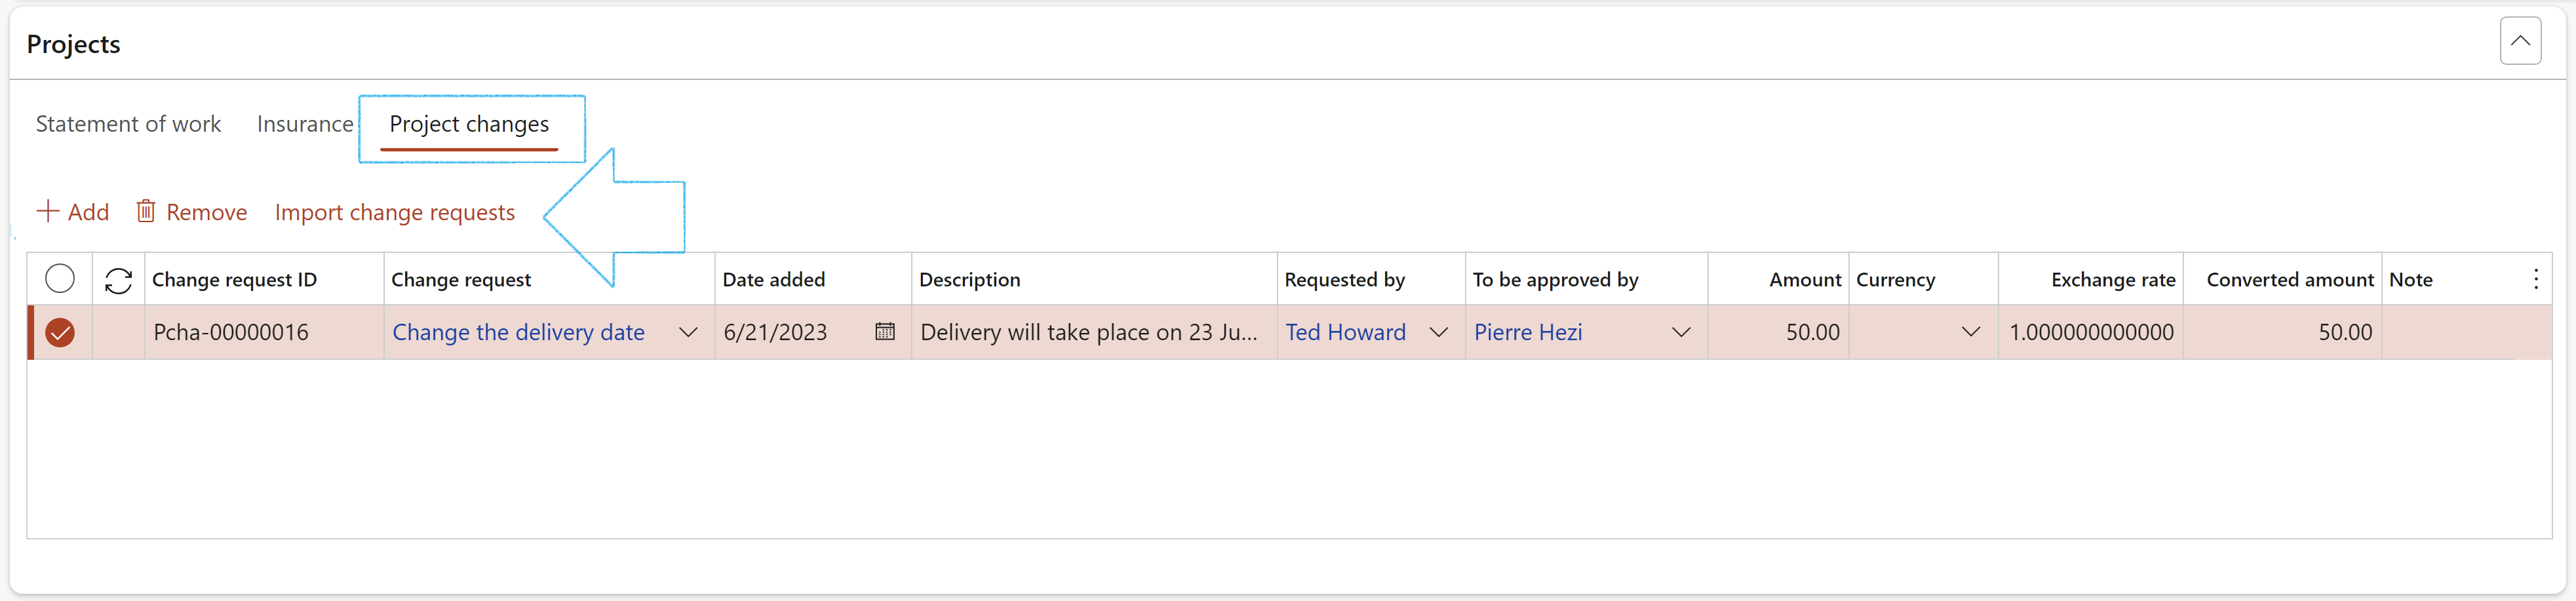
¶ Step 28: Accruals from a contract
Organizations must account for any expenses incurred in the past (and know about them) as these are costs that become due in the future. To wait or rely on suppliers/vendors to submit proof timeously is not prudent. Assuming a contract exists between an organisation and its suppliers/vendors that governs the relationship, this contract can allow users to accrue (also known as "pre-cost") the expenses/services into an Invoice journal.
¶ Step 28.1: Contract with statement of work
Go to: GRC > Governance > Contracts > Contract register in legal entity
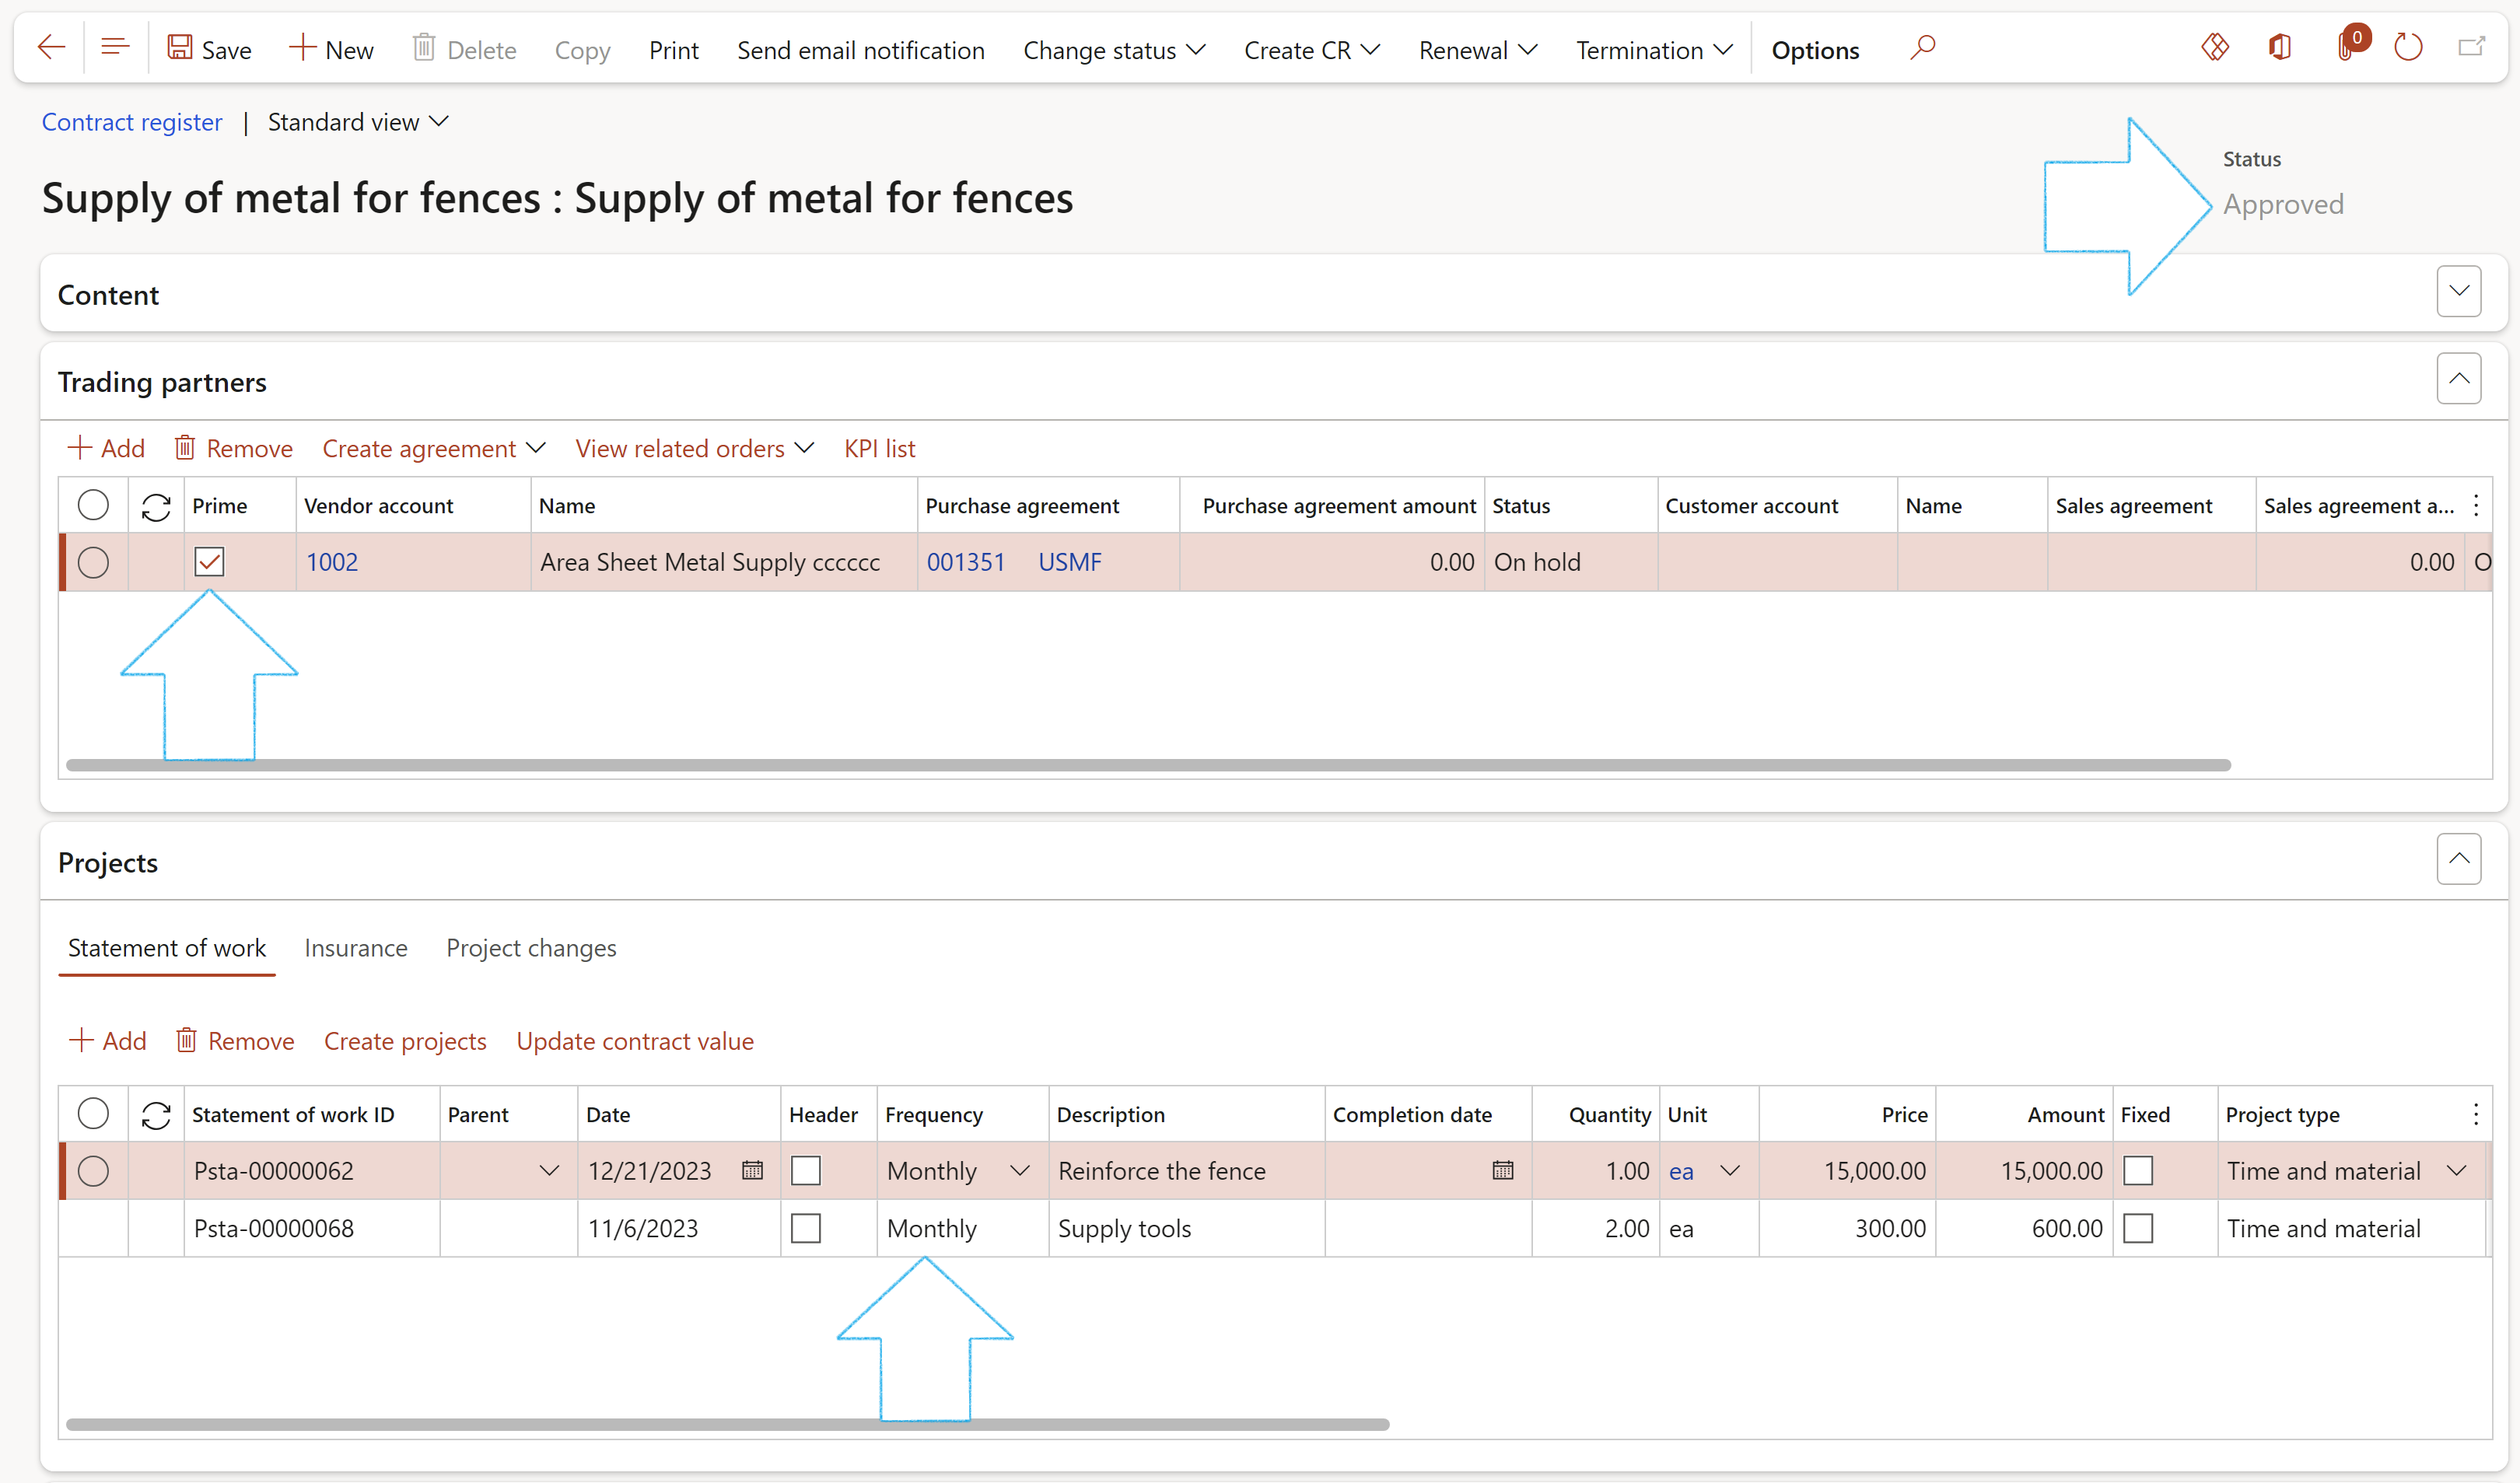
¶ Step 28.2: Invoice journal inside Accounts payable
Go to: Accounts payble/Purchase ledger > Invoices > Invoice journal
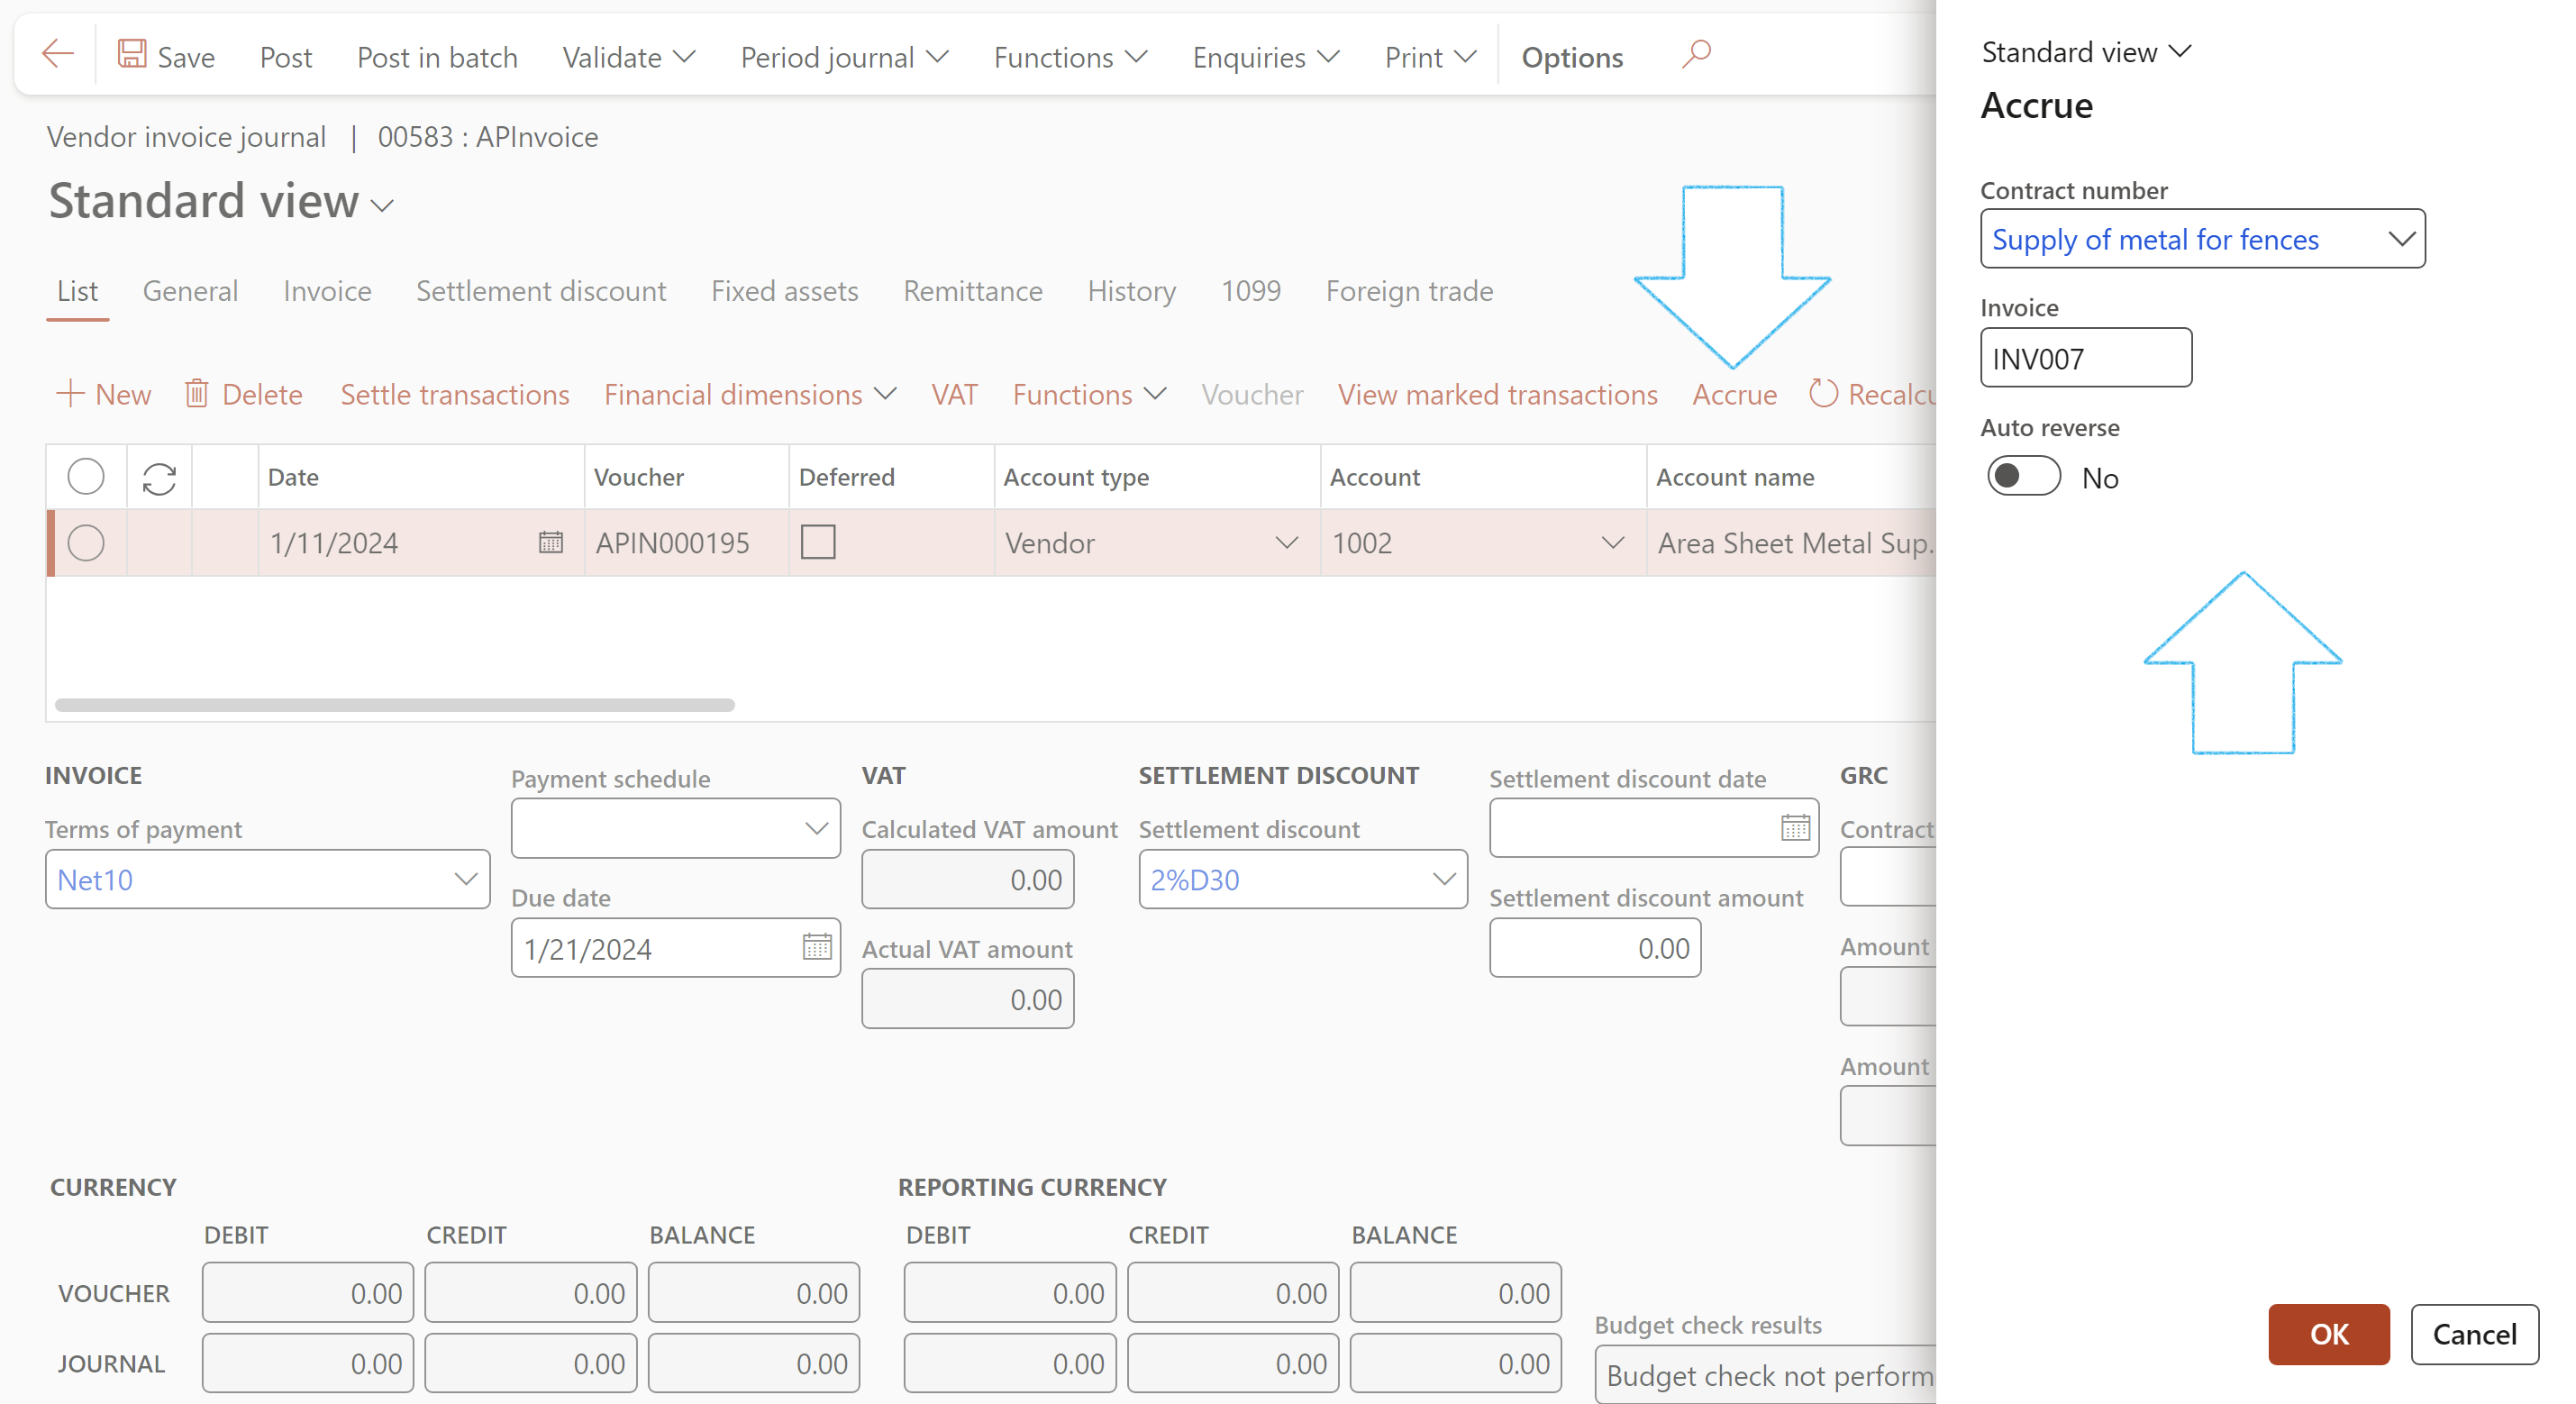
Select the Journal name that was created under Step 12 above
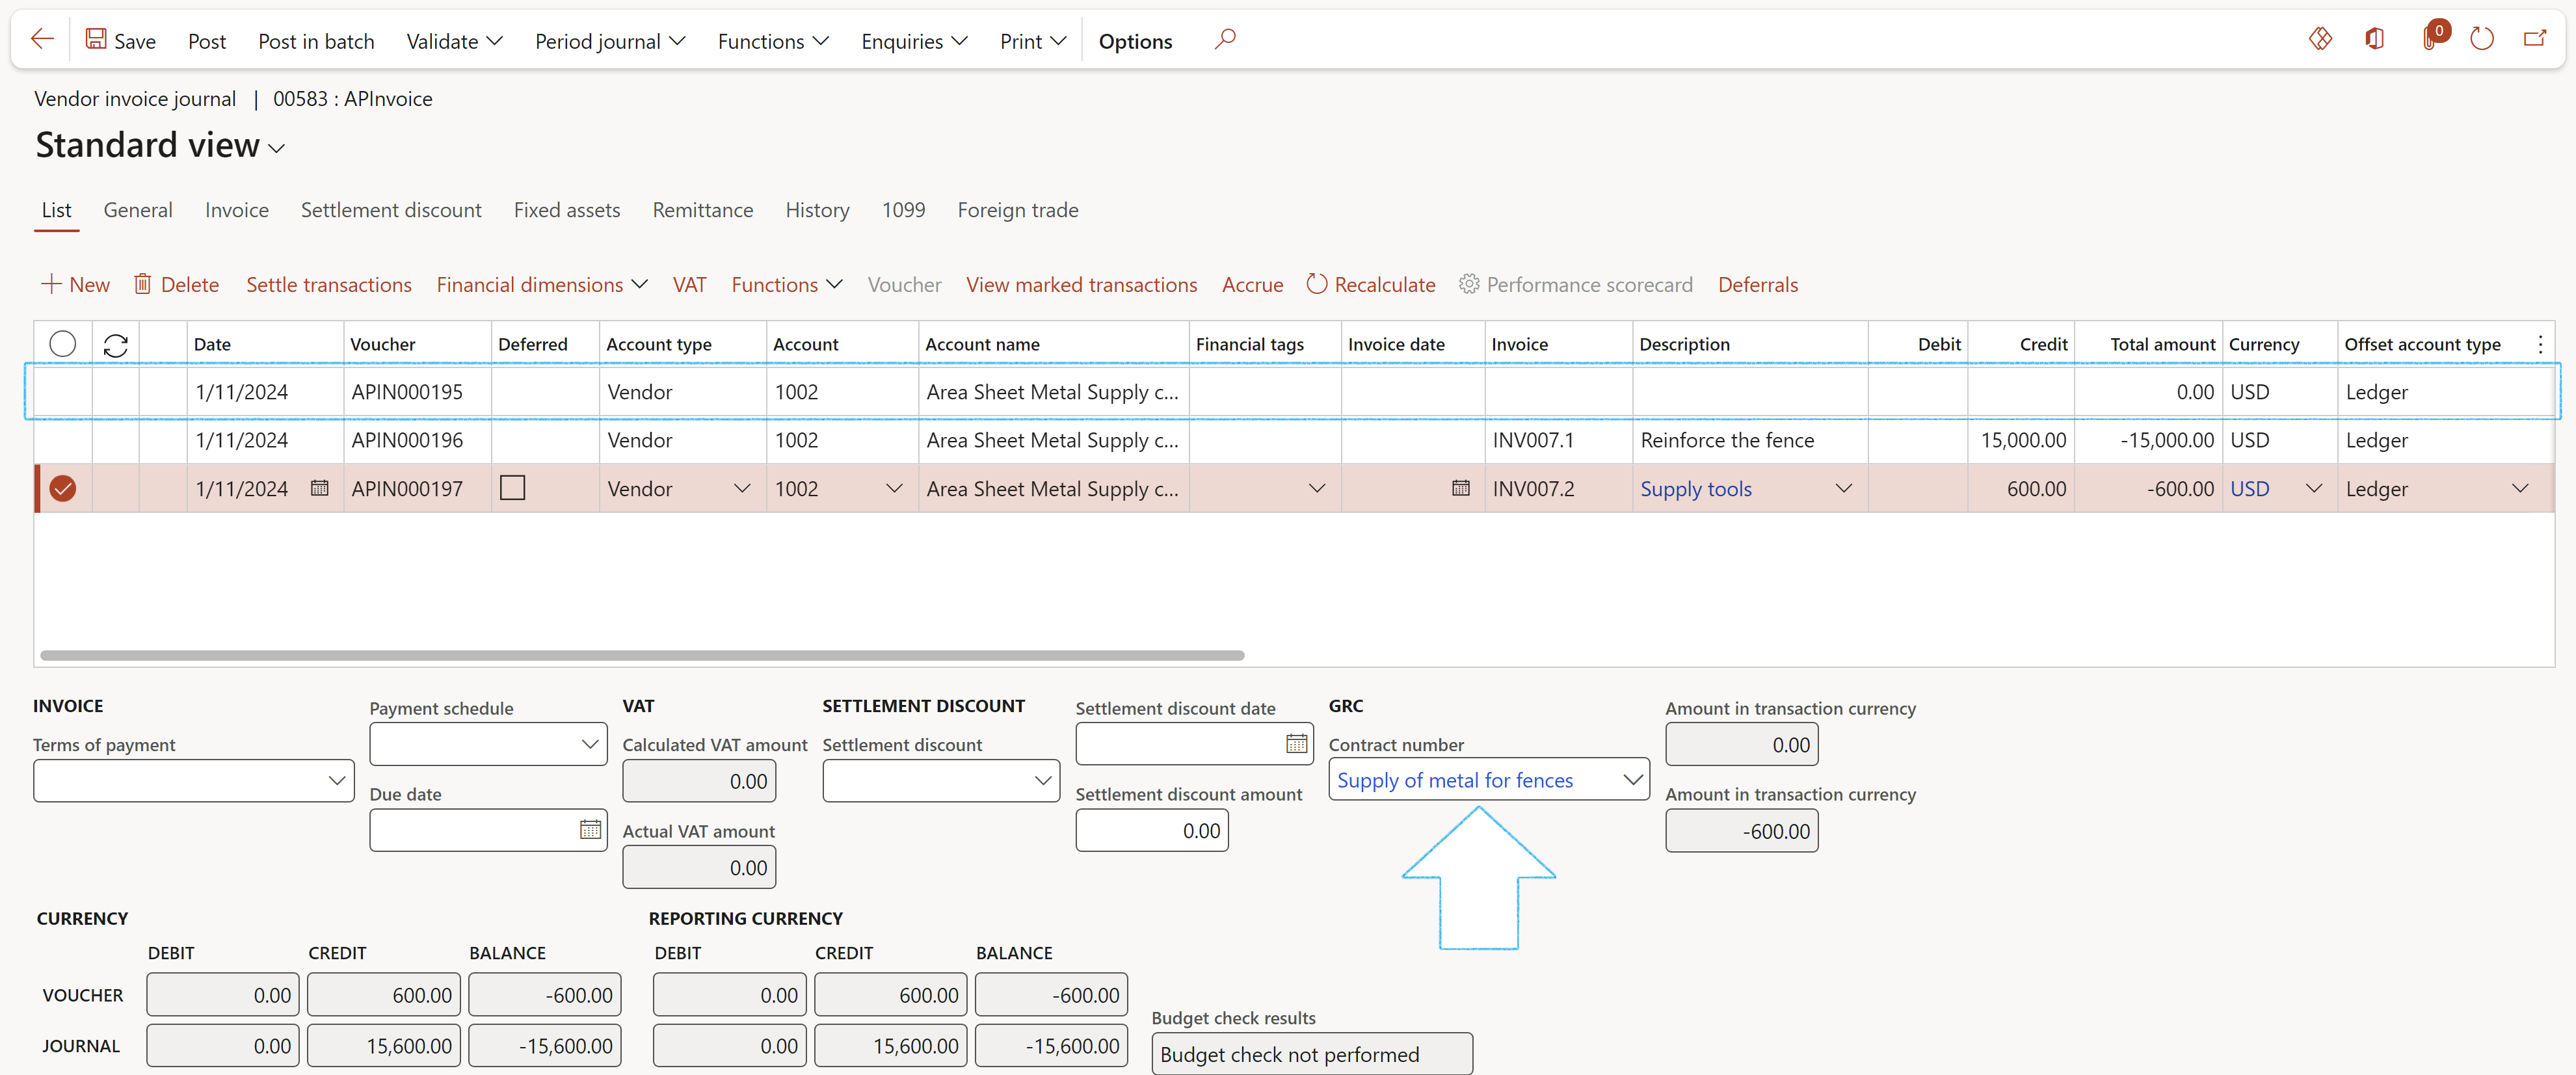
It is important to delete the record that does not have an Invoice number
¶ Step 29: Statement of final account
The final account is the conclusion of the contract sum (including all necessary approved change requests) and signifies the agreed amount that the party will pay to the contractor. It includes any work that is paid to the contractor through the main contract.
The steps below should be done before a contract is terminated
Go to: GRC > Governance > Contracts > Contract register in legal entity
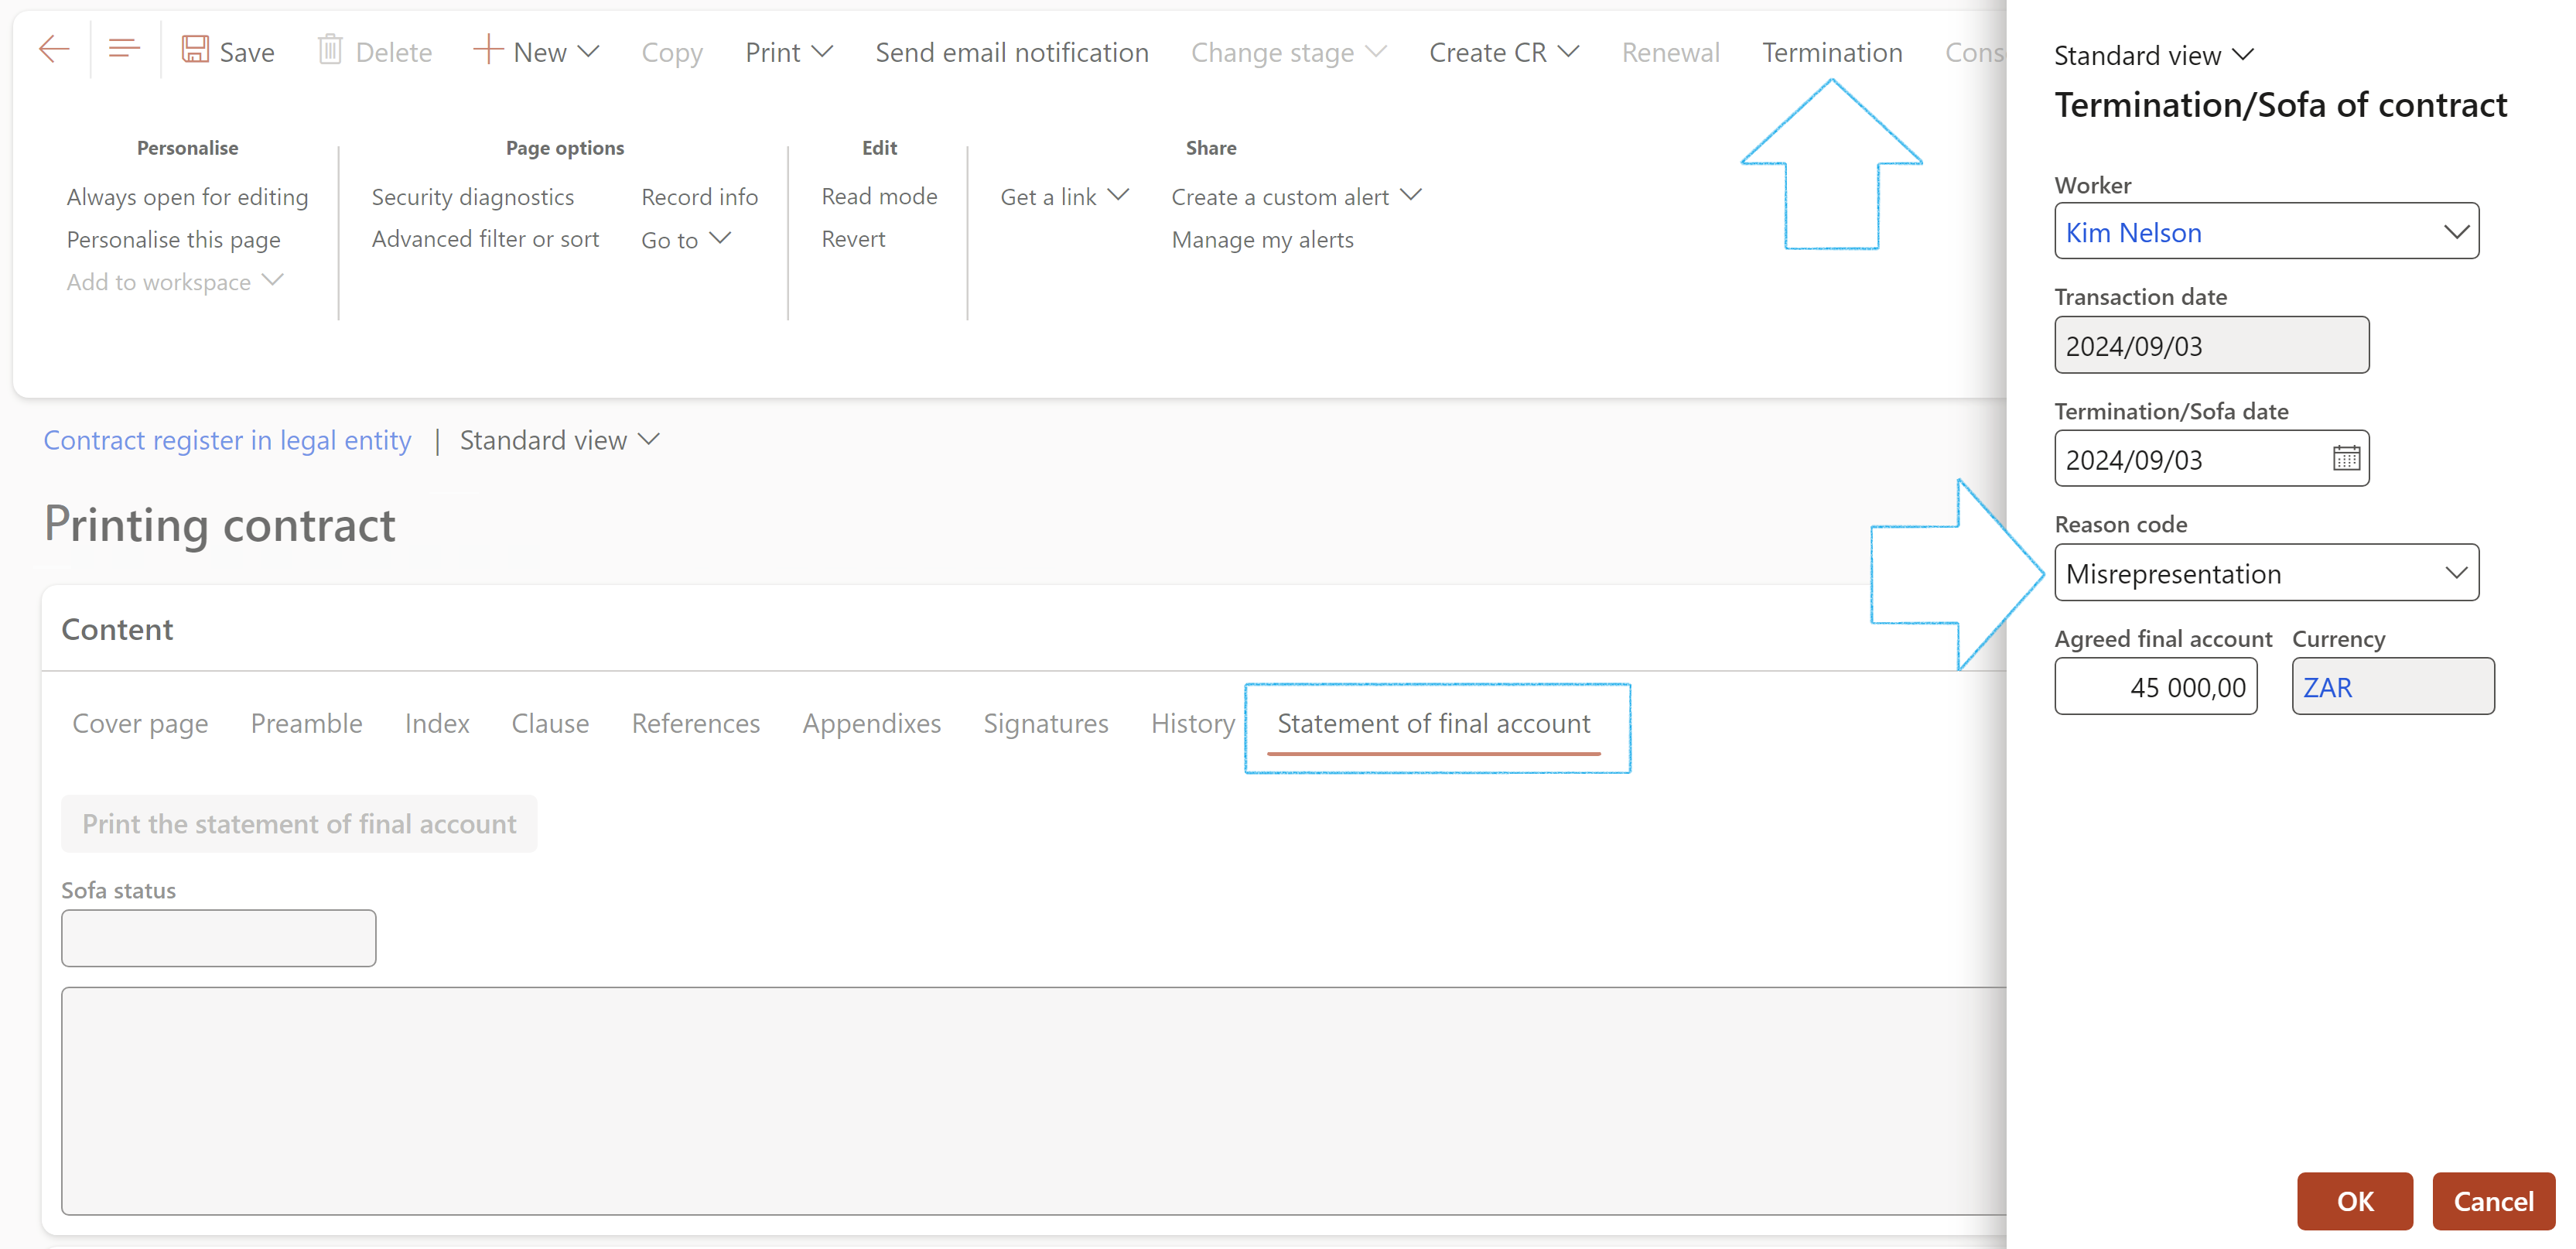
A record will be added under the Renewals and termination Fast tab
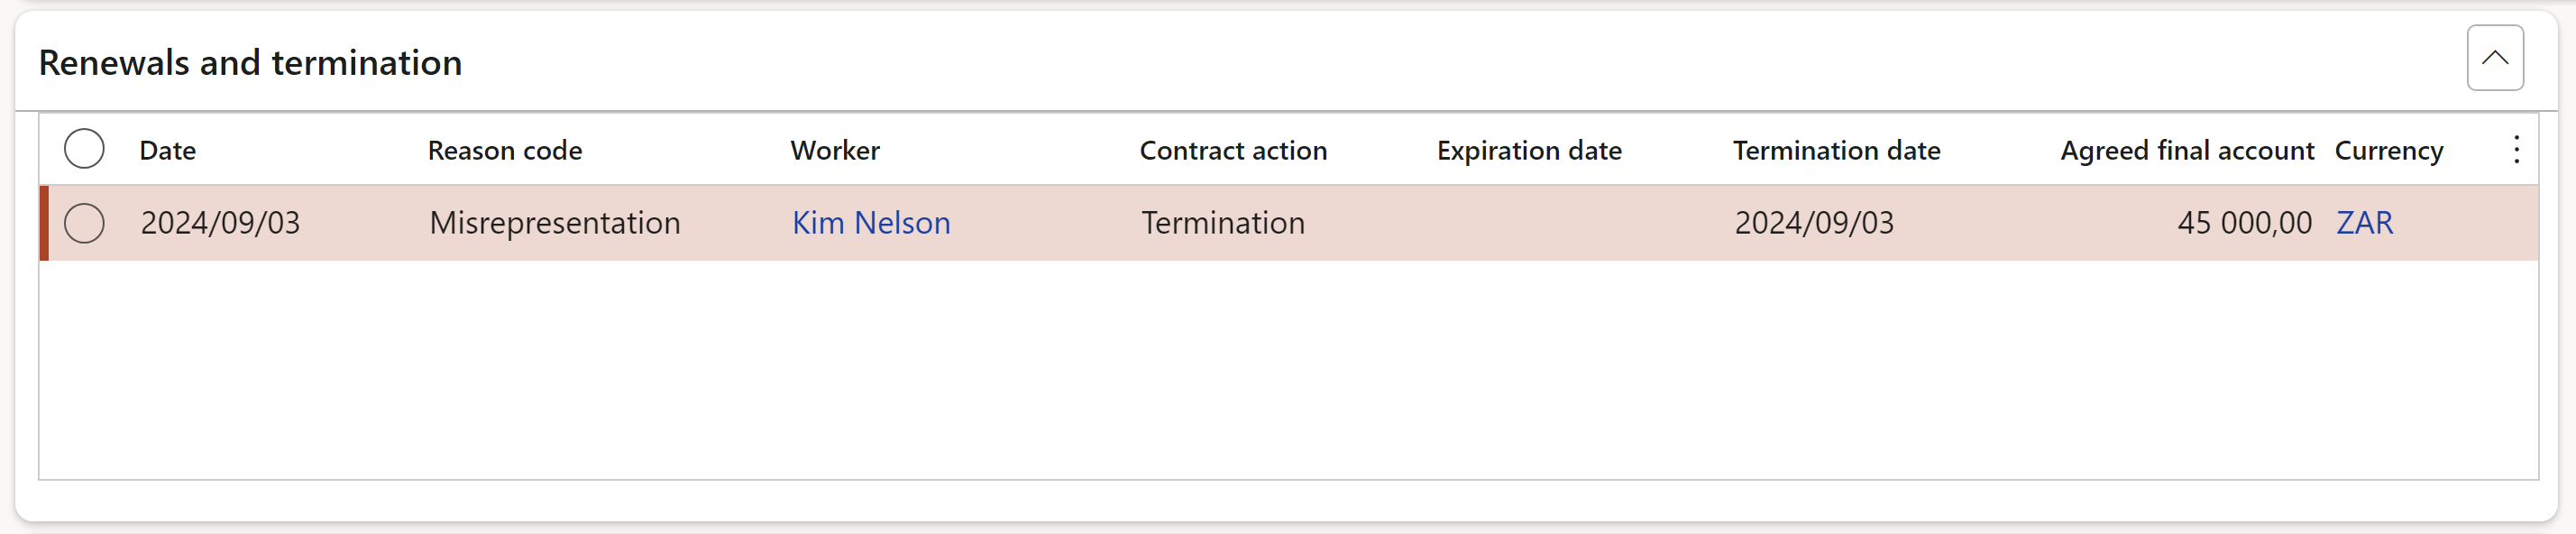
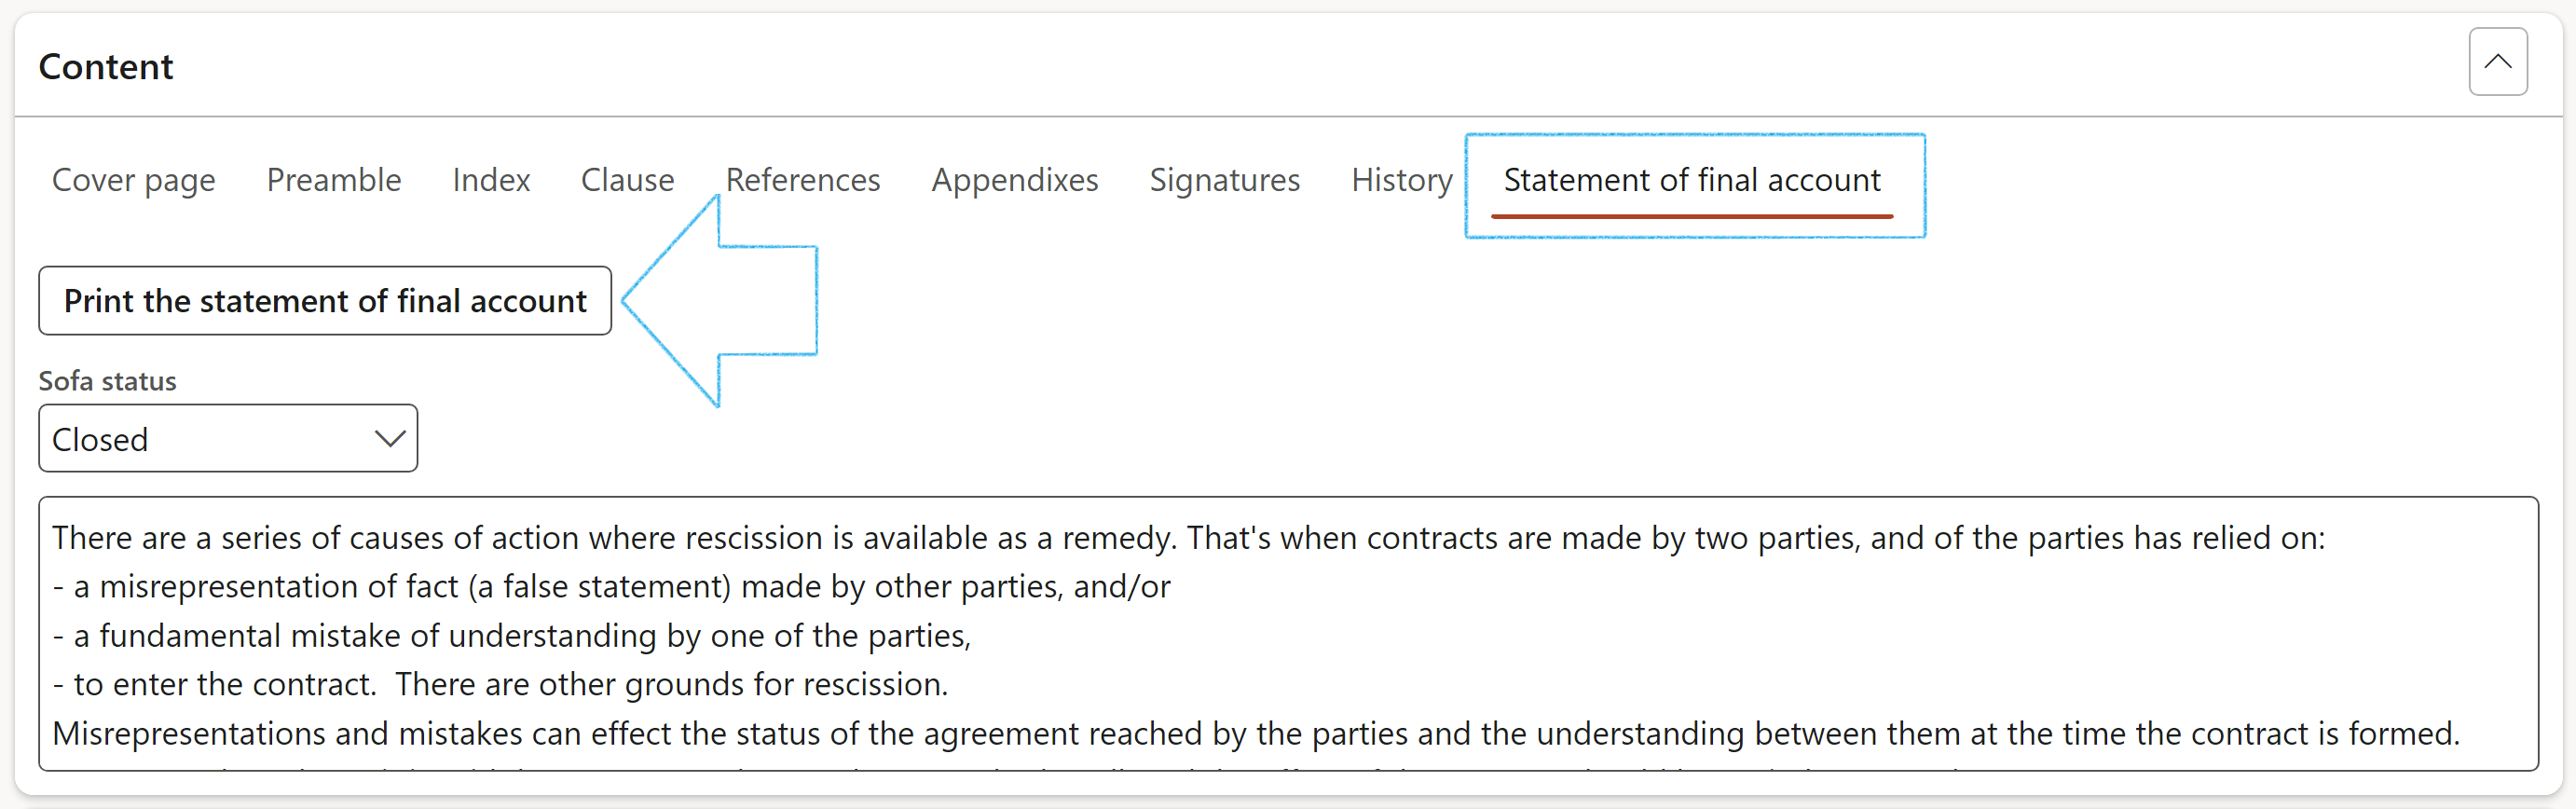
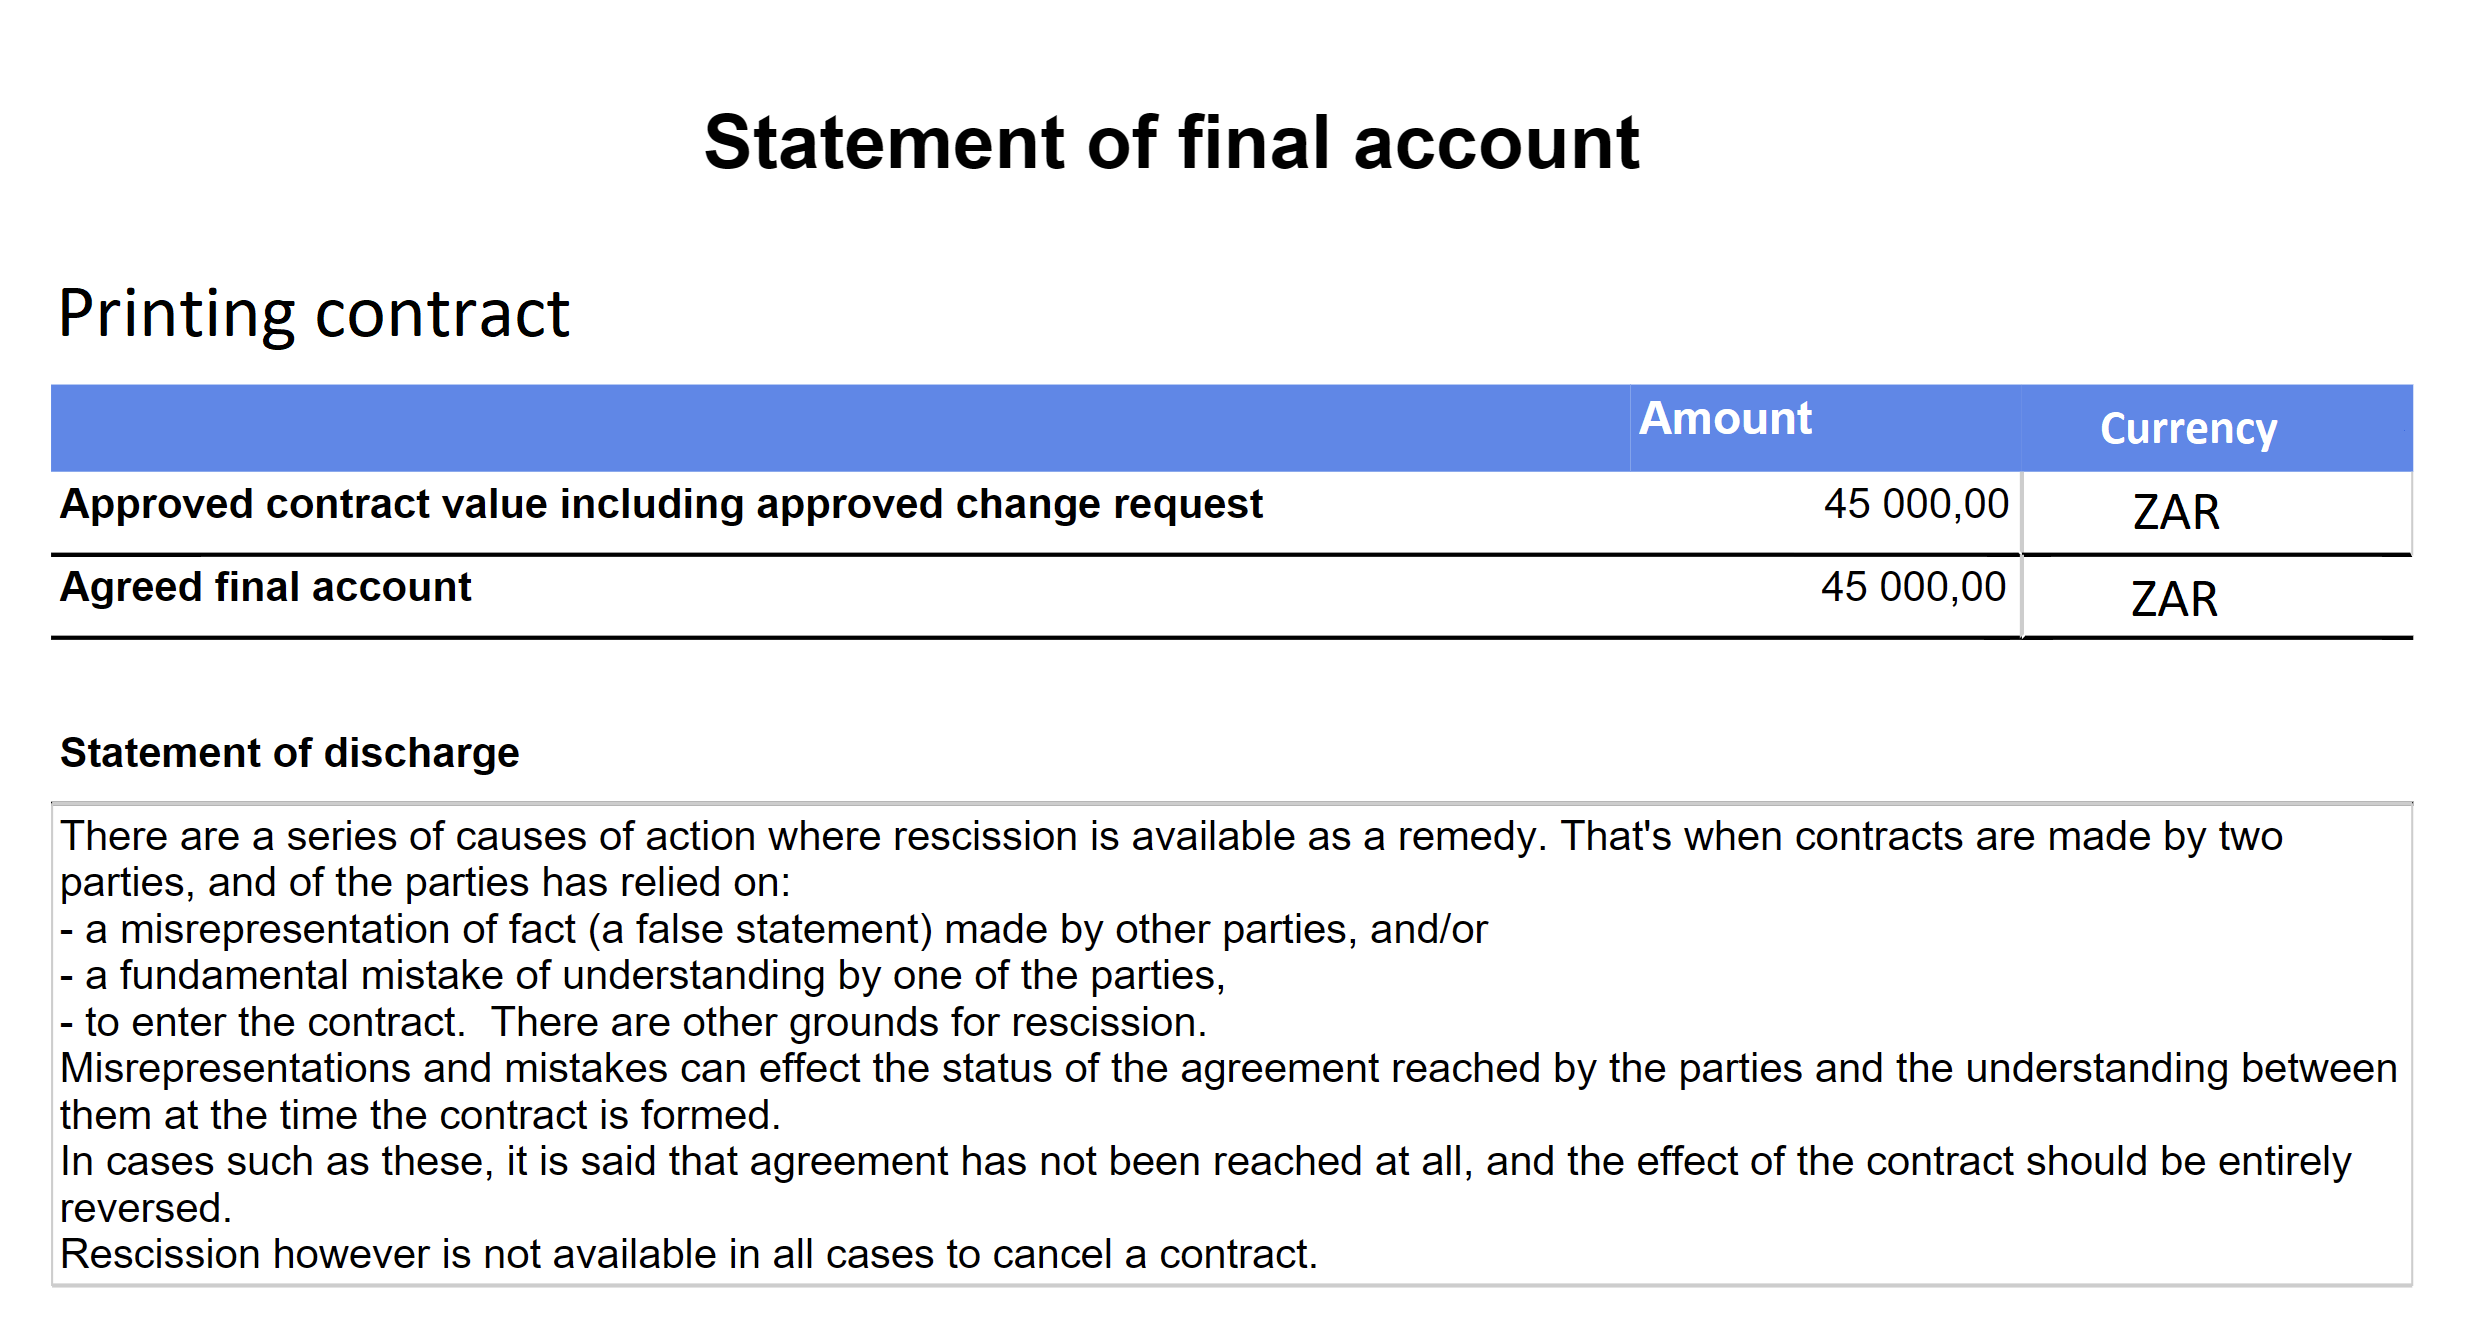
A record will be added under the Sign off Fast tab with the Sofa box ticked.

The SOFA status can be changed to In progress when the contract stage is Approved. A record will be added under the Sign off Fast tab with the Sofa box ticked.
To see a list of contracts filtered for active and completed Statement of final account, navigate to GRC > Governance > Contracts > Final account contracts
¶ Step 30: Contract conclusion
When a client does not renew their contract, a Contract conclusion letter can be printed
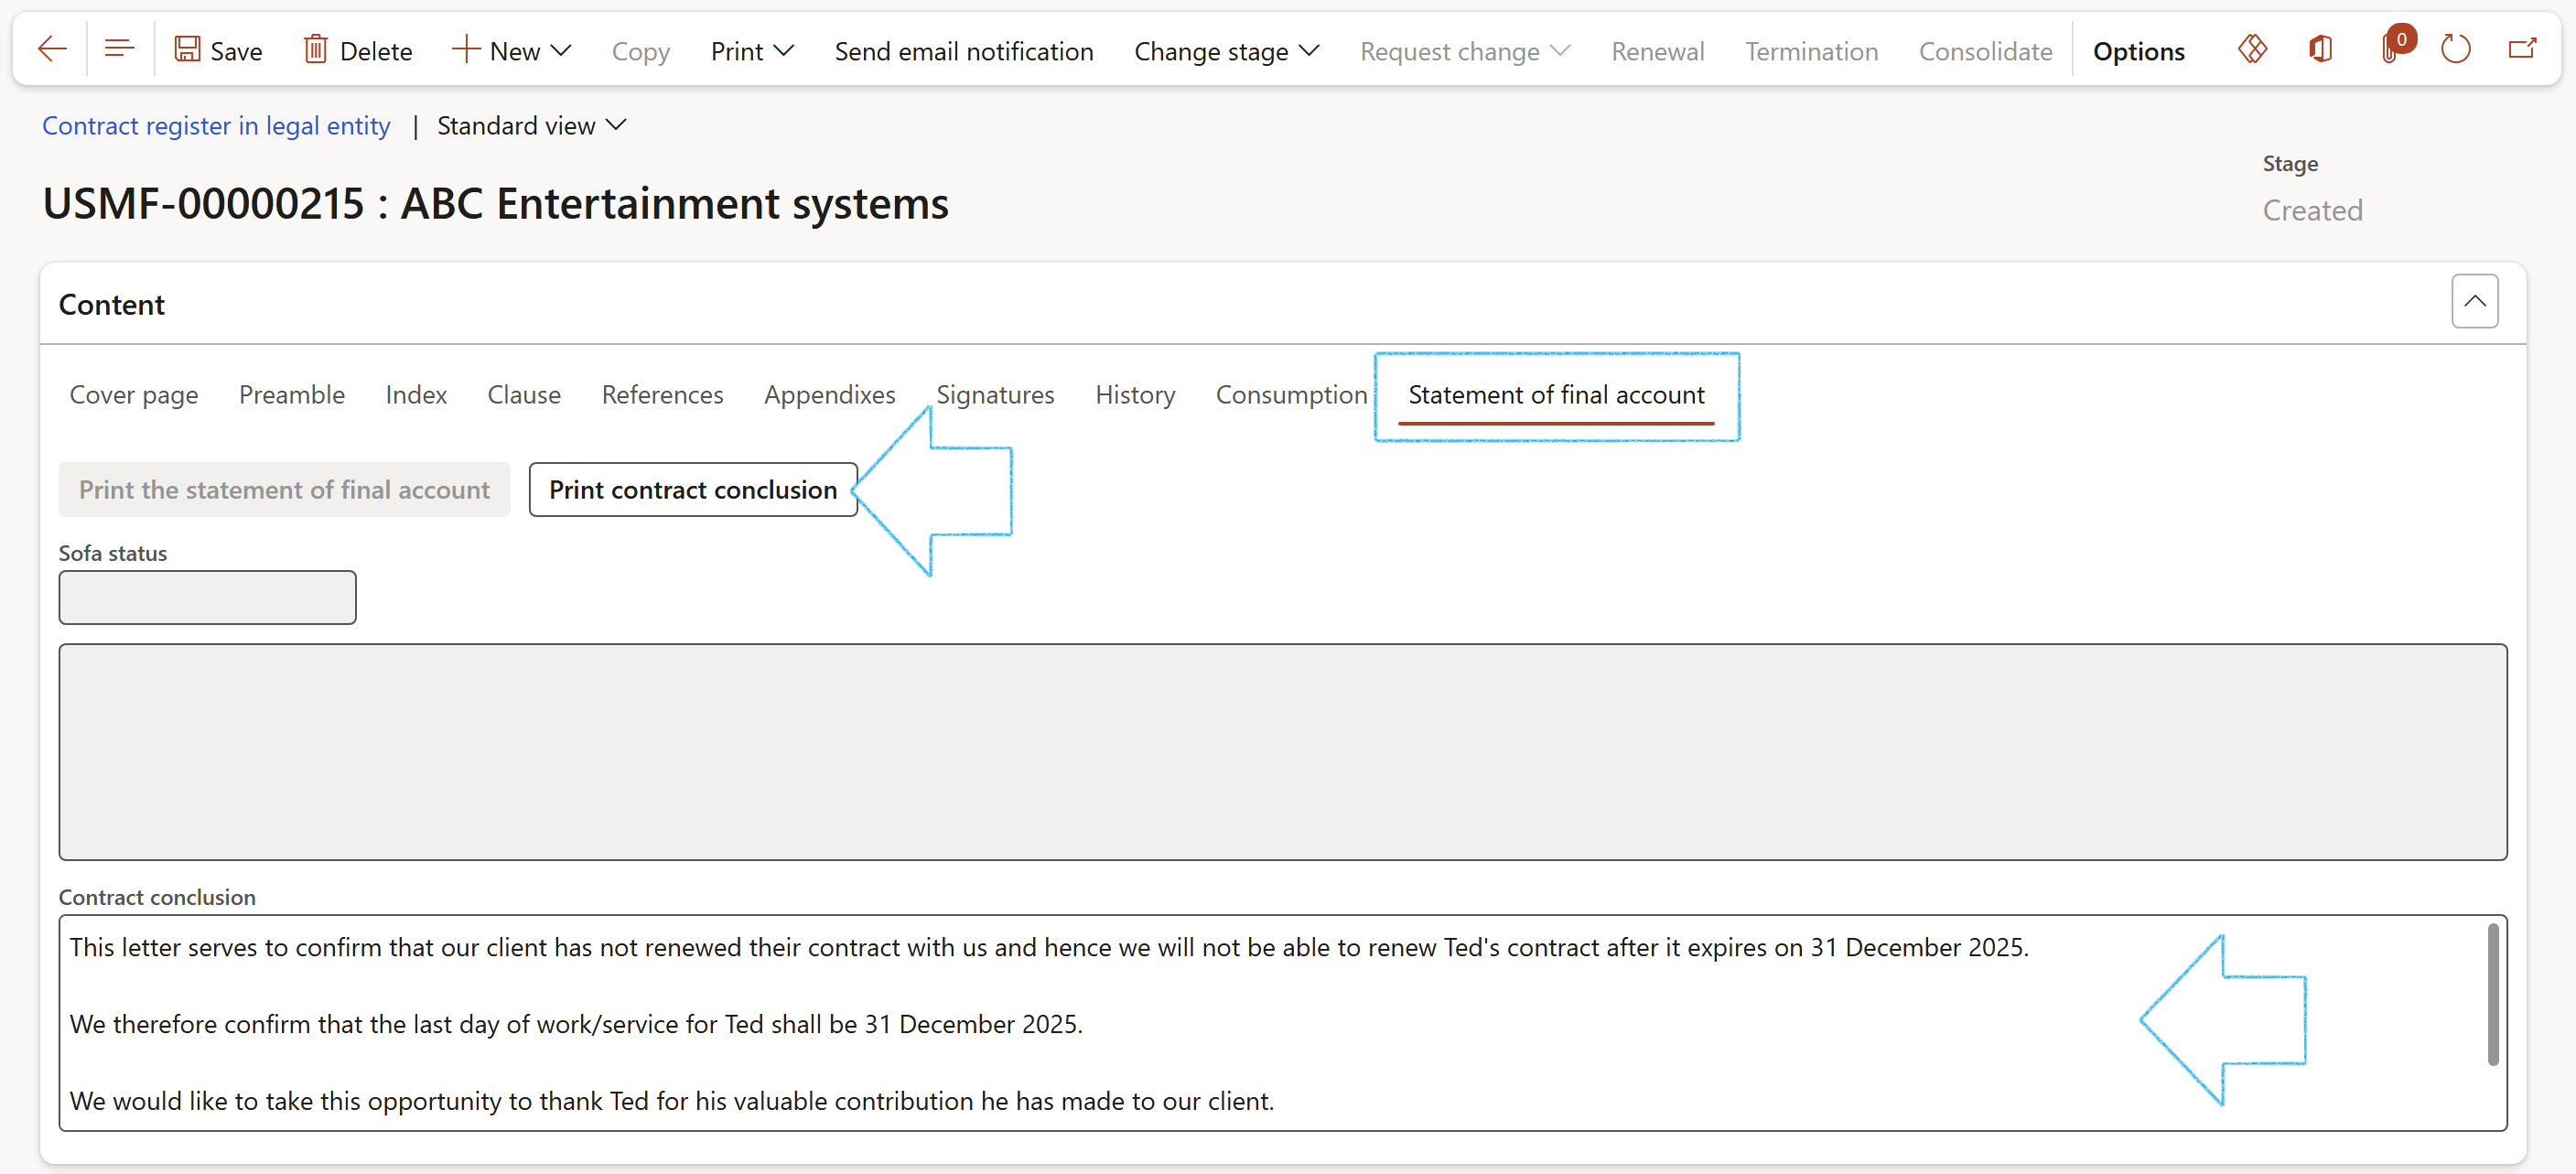
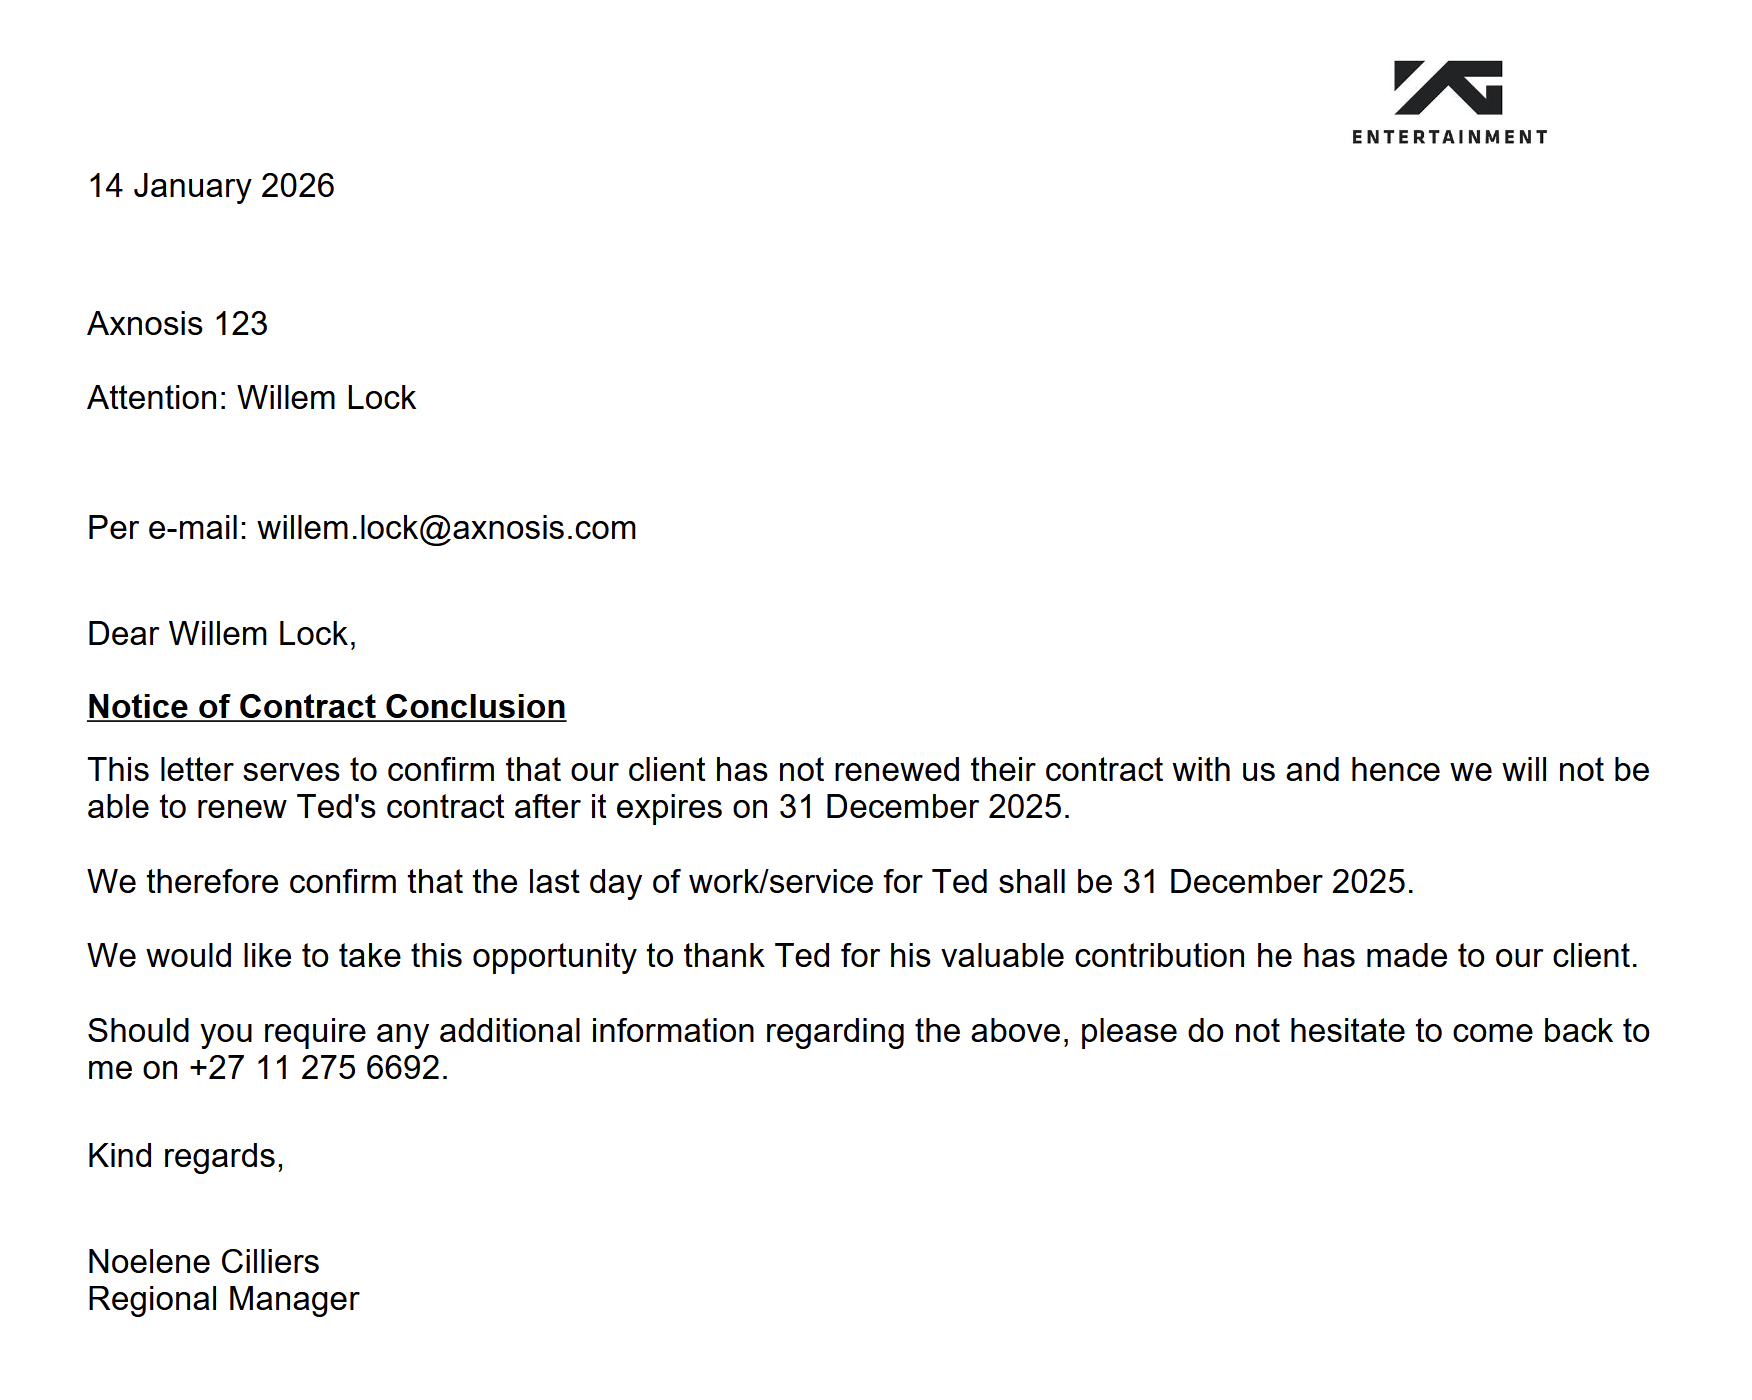
¶ Step 31: Contracts workflow
Contracts and tender management reviewers is a setup form used in the Contracts workflow when a lookup is used to the Approval authority form. The Financial dimensions that should be used by the Approval authority, are specified on this form. If financial dimensions are not defined here, the system will attempt to retrieve all dimensions from the Approval authority. This can result in an error if any required financial dimensions are missing from the Approval Authority.
Go to: GRC > Governance > Setup for governance > Contracts and tender management reviewers
In the screenshot below we have an example of how the setup under the General Fast tab will be done for the Contracts workflow, where only dimension owners of the Department must be able to approve the workflow
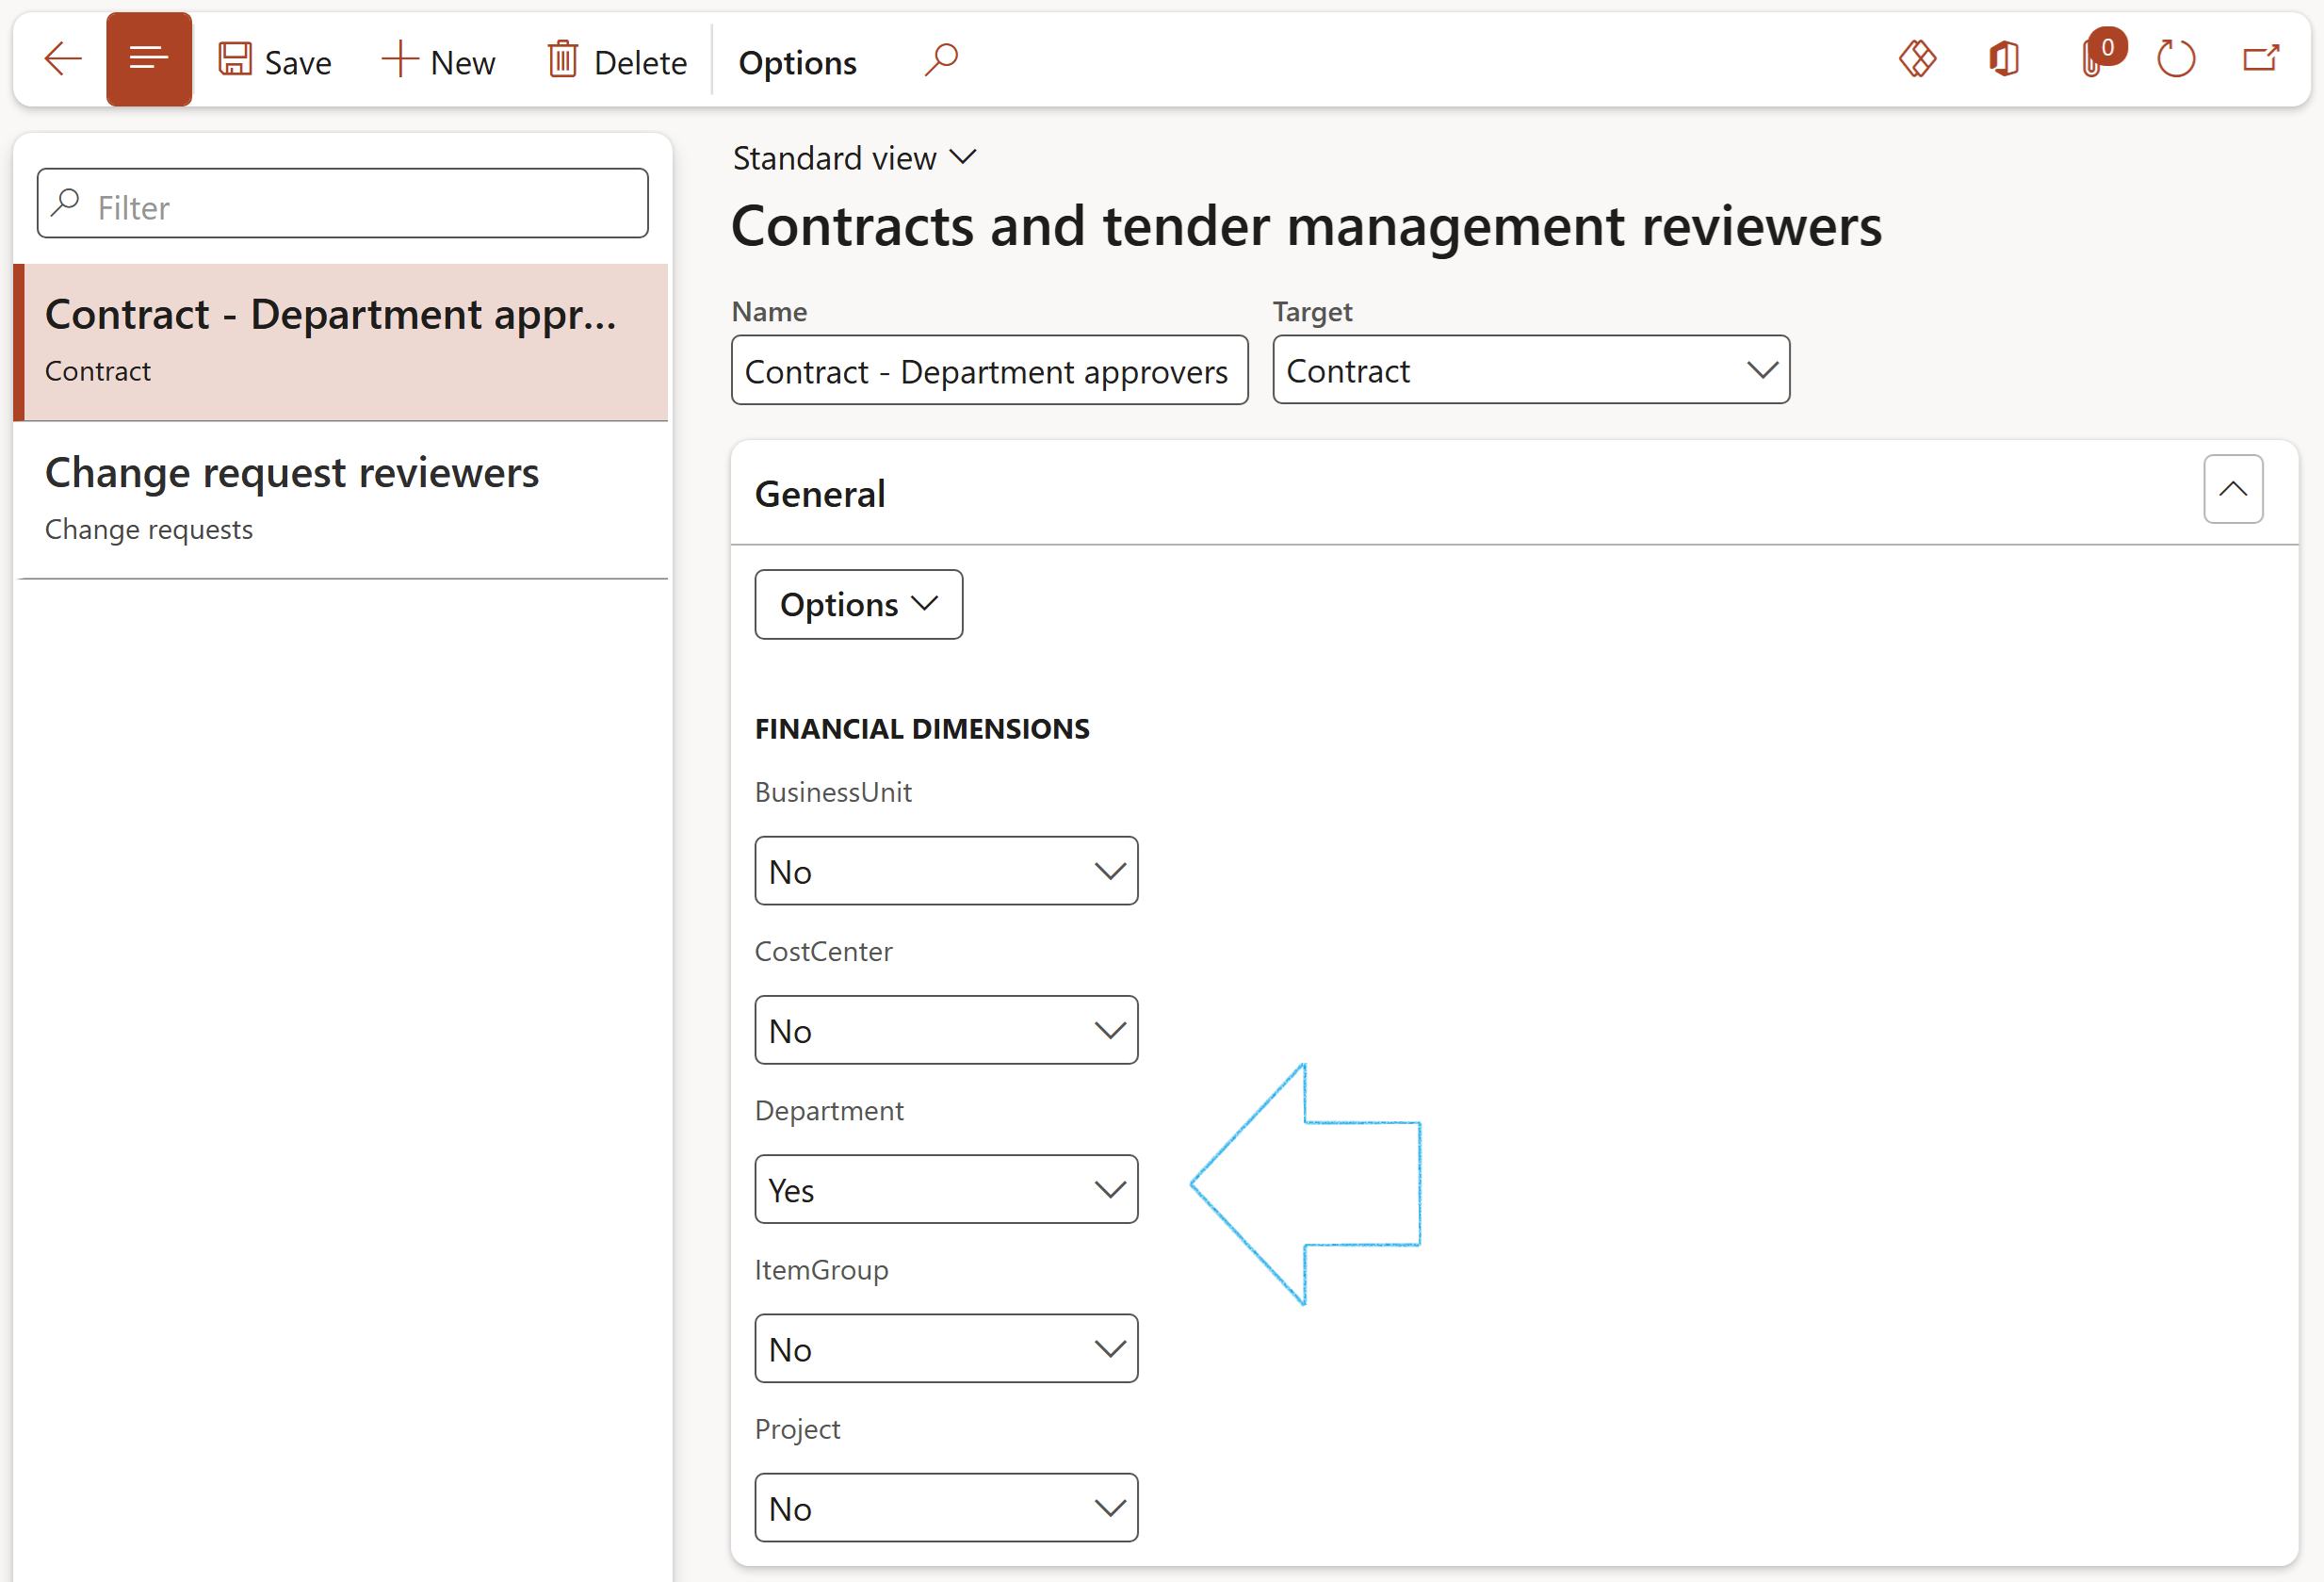
¶ Daily use: Trade contracts
¶ Step 32: Contract items
When a Bill of Material (BOM) is selected on the contract under the Content Fast tab, Cover page Index tab, the user is given the option to create item lines for the BOM
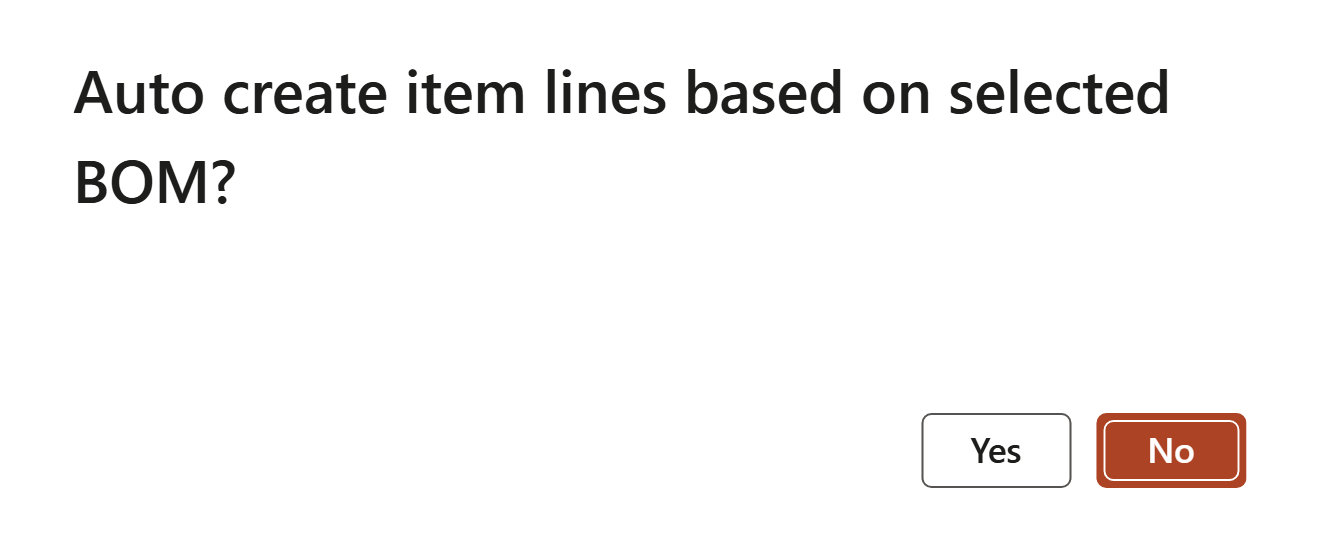
Item lines can also be added manually under the Item lines Fast tab by clicking on the Add button
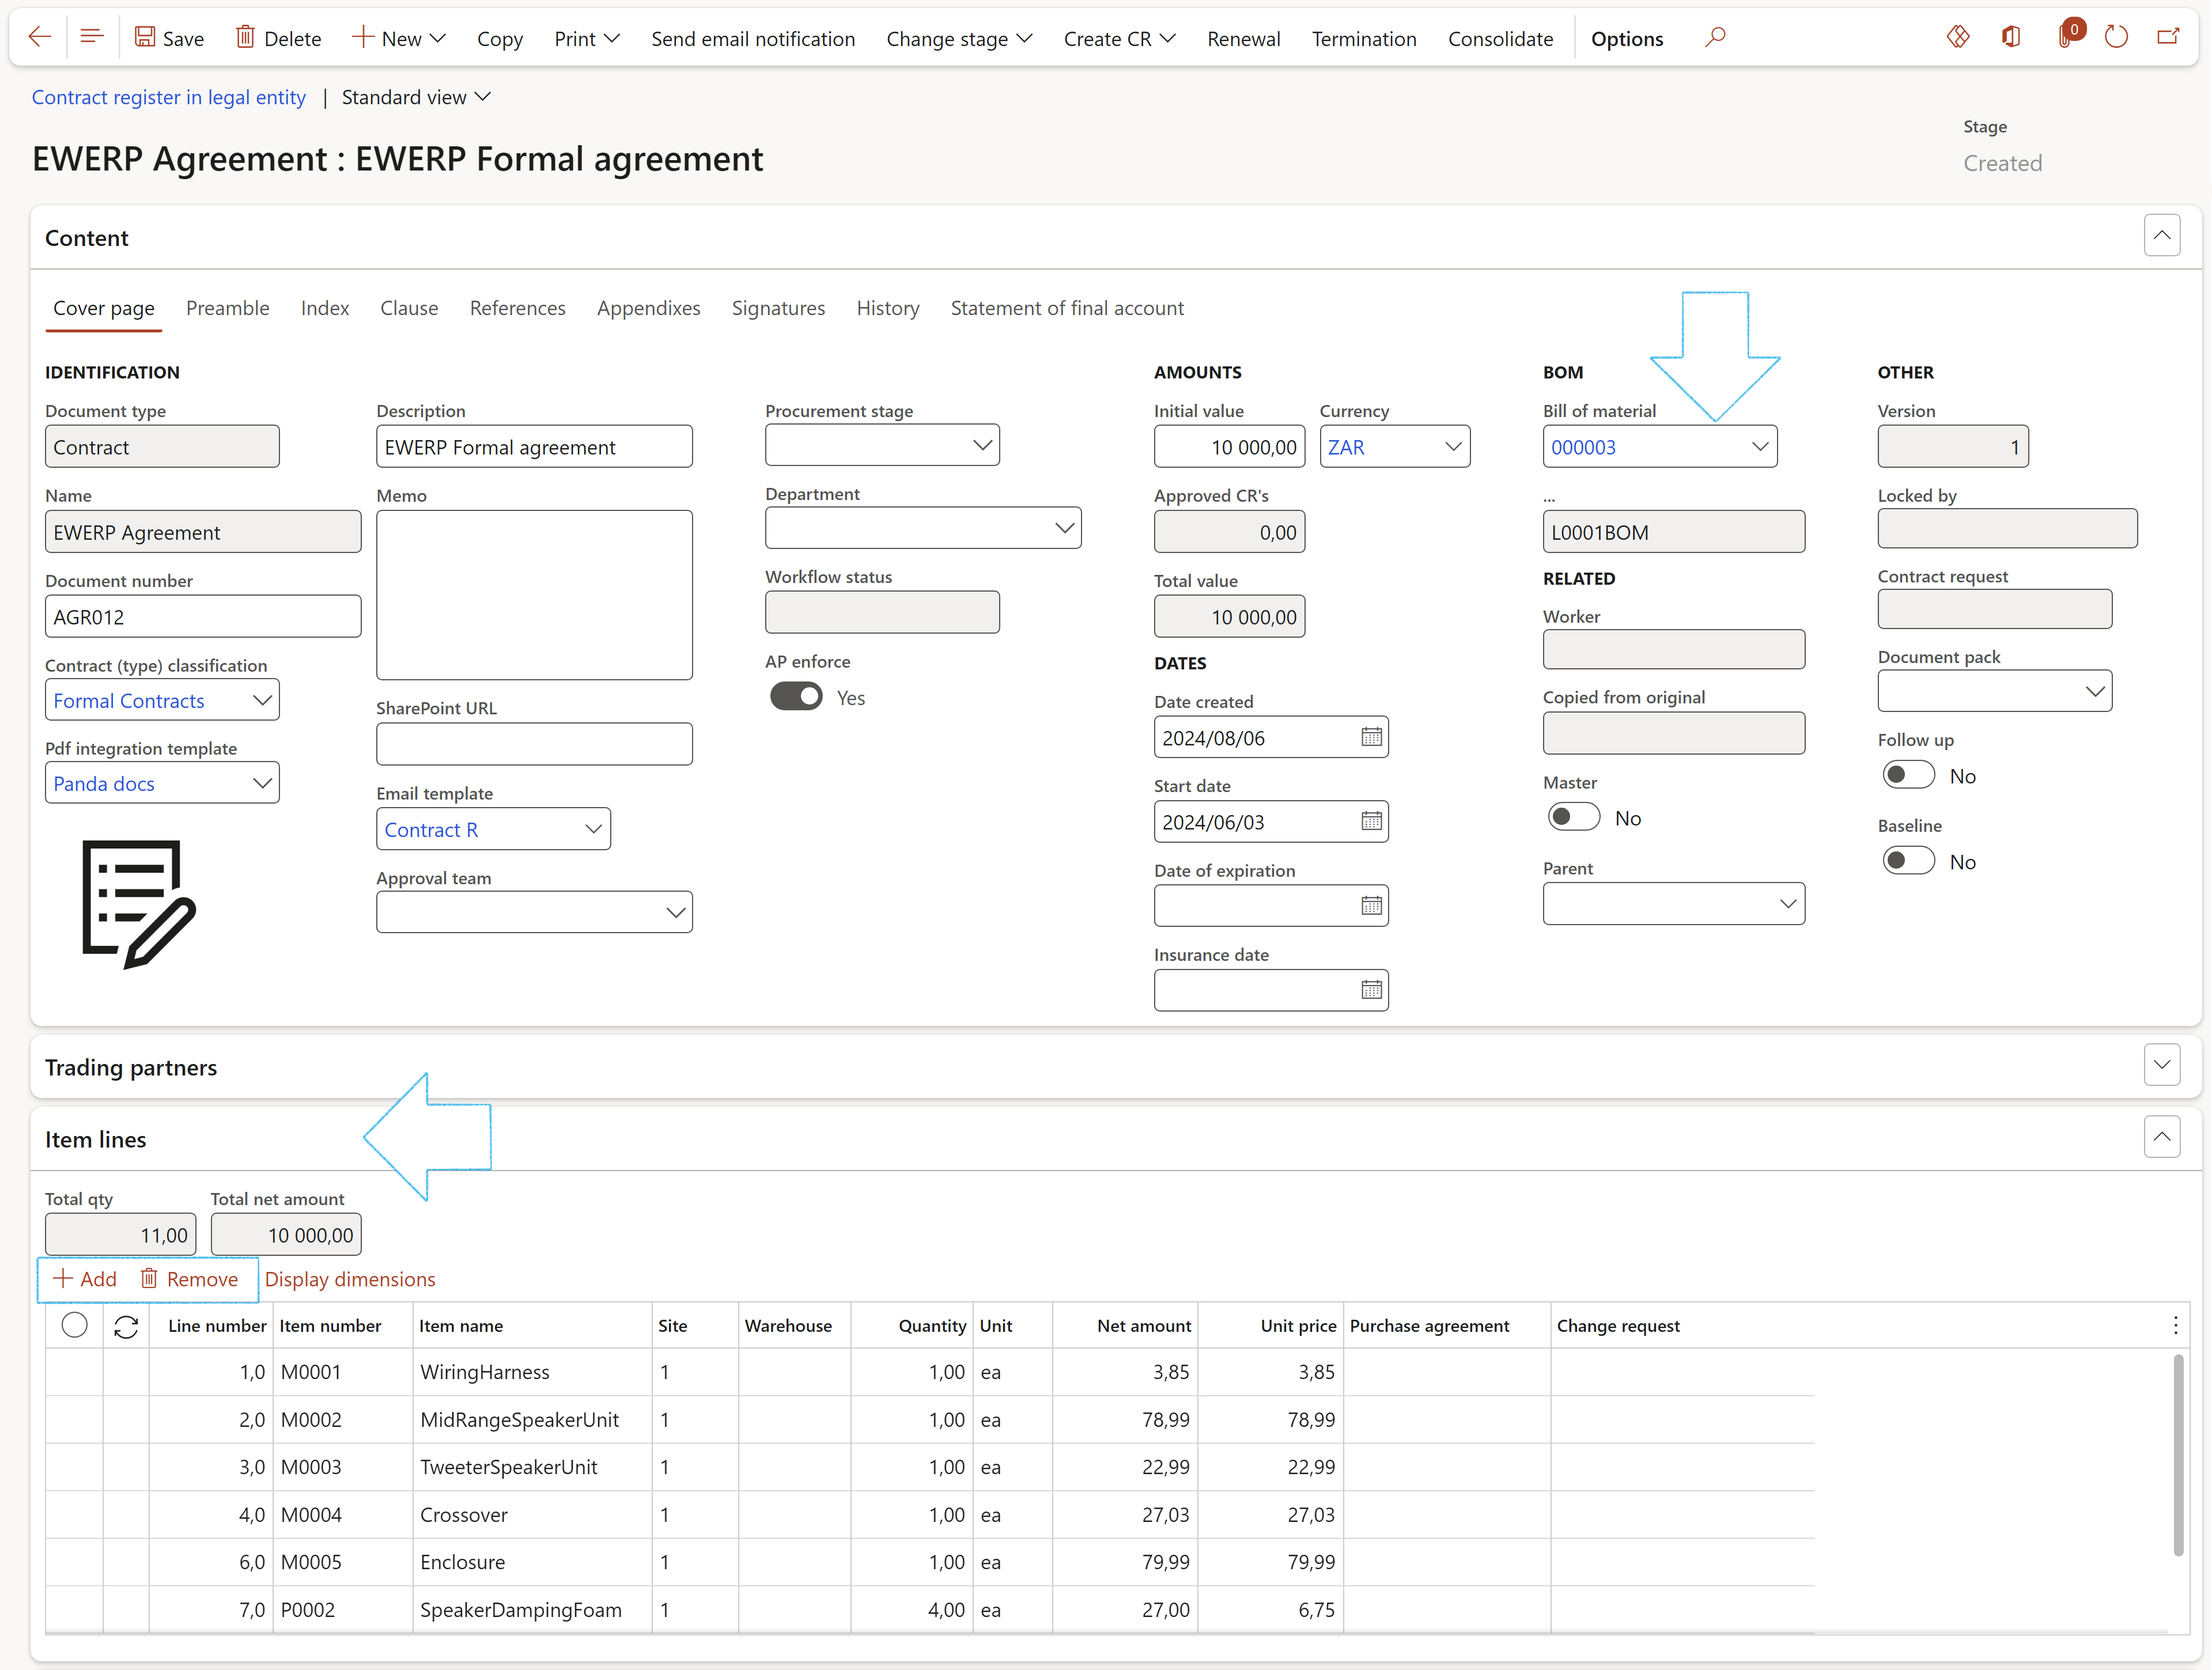
¶ Step 33: Add Trading partners to the contract
On the creation of a contract, the Value of the contract is entered under the Content Fast tab, Cover page Index tab.
It is common for enterprises to award a contract to one primary vendor with more than one secondary vendor (trading partner). The Trading partners (and the related Purchase agreements) are selected under the Trading partners Fast tab:
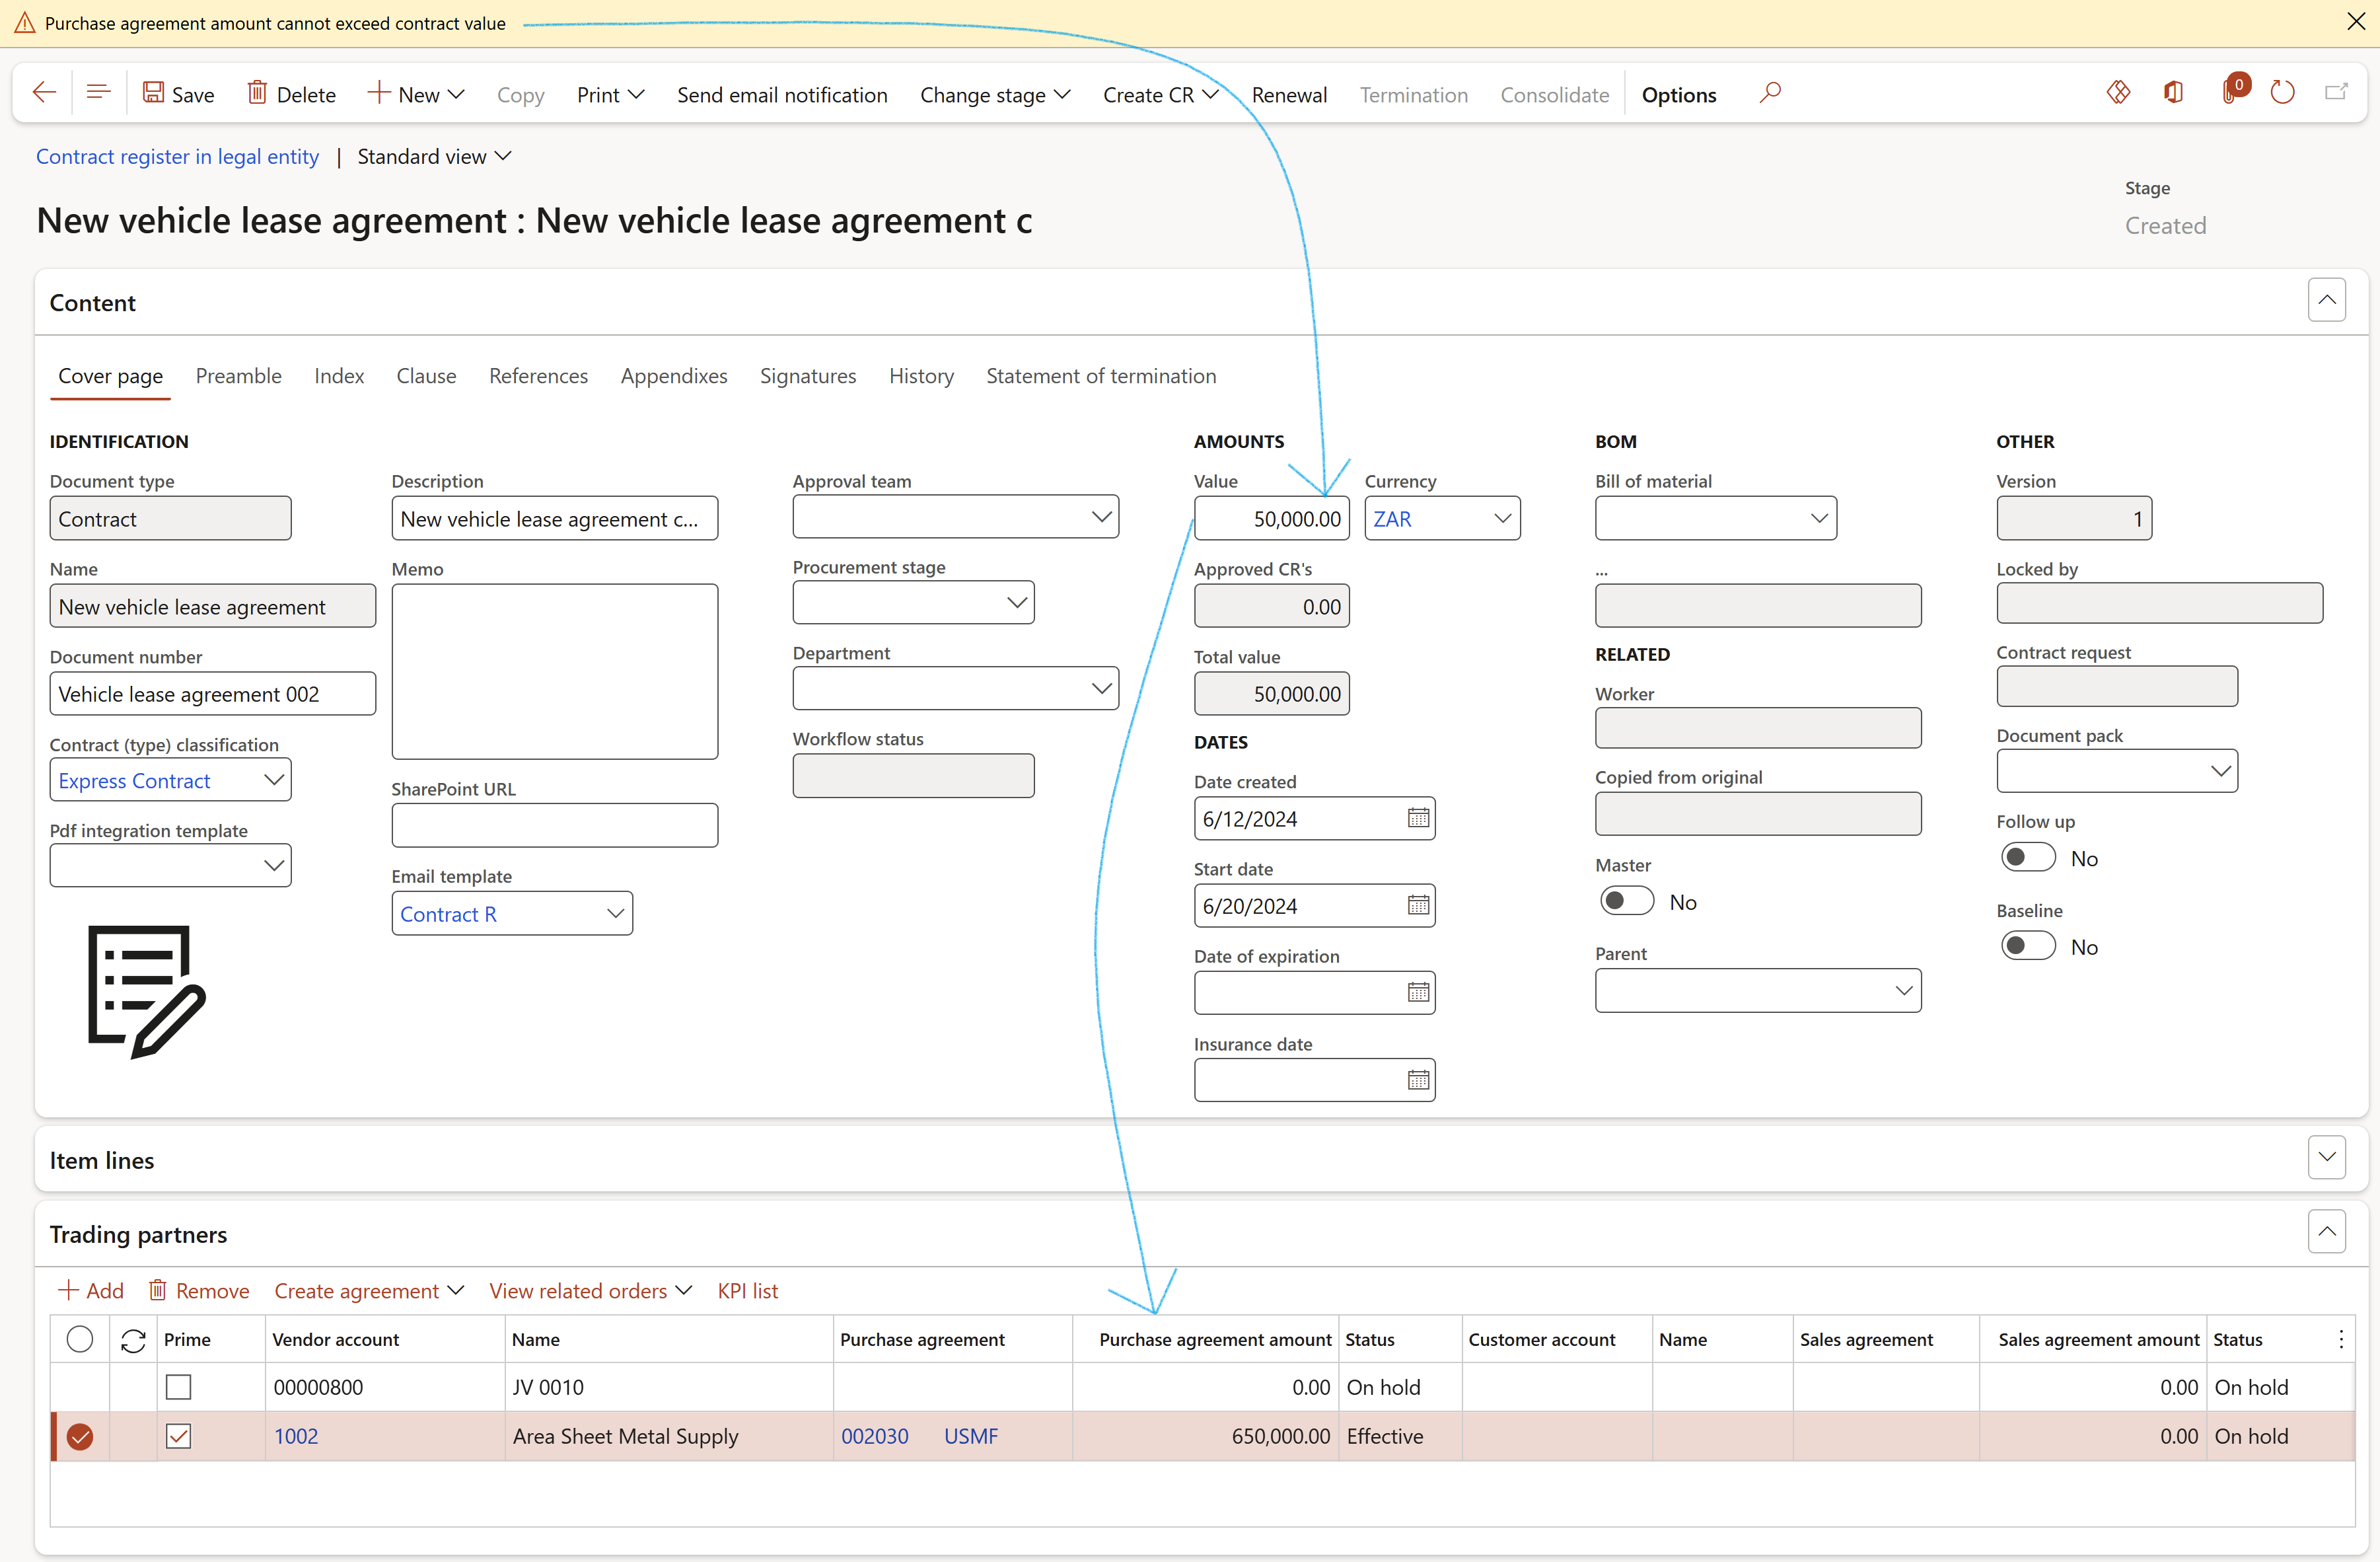
A validation is done to make sure that the sum of the Purchase agreement amounts does not exceed the contract value
The primary vendor/customer can be indicated by ticking the Prime box
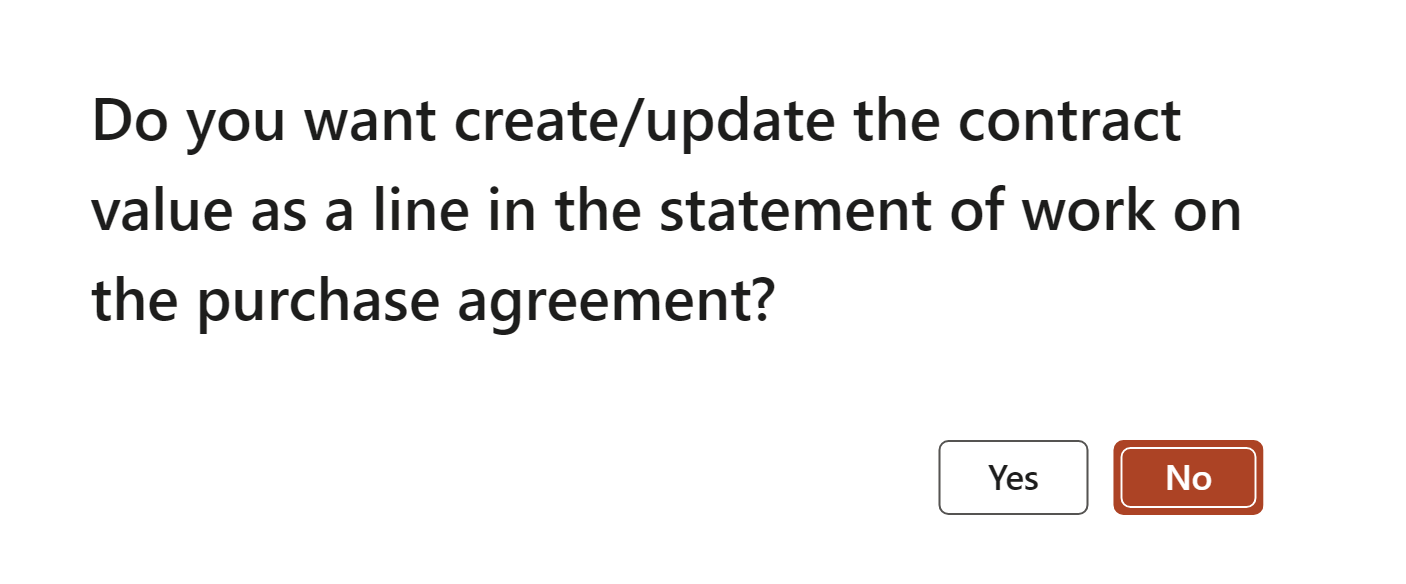
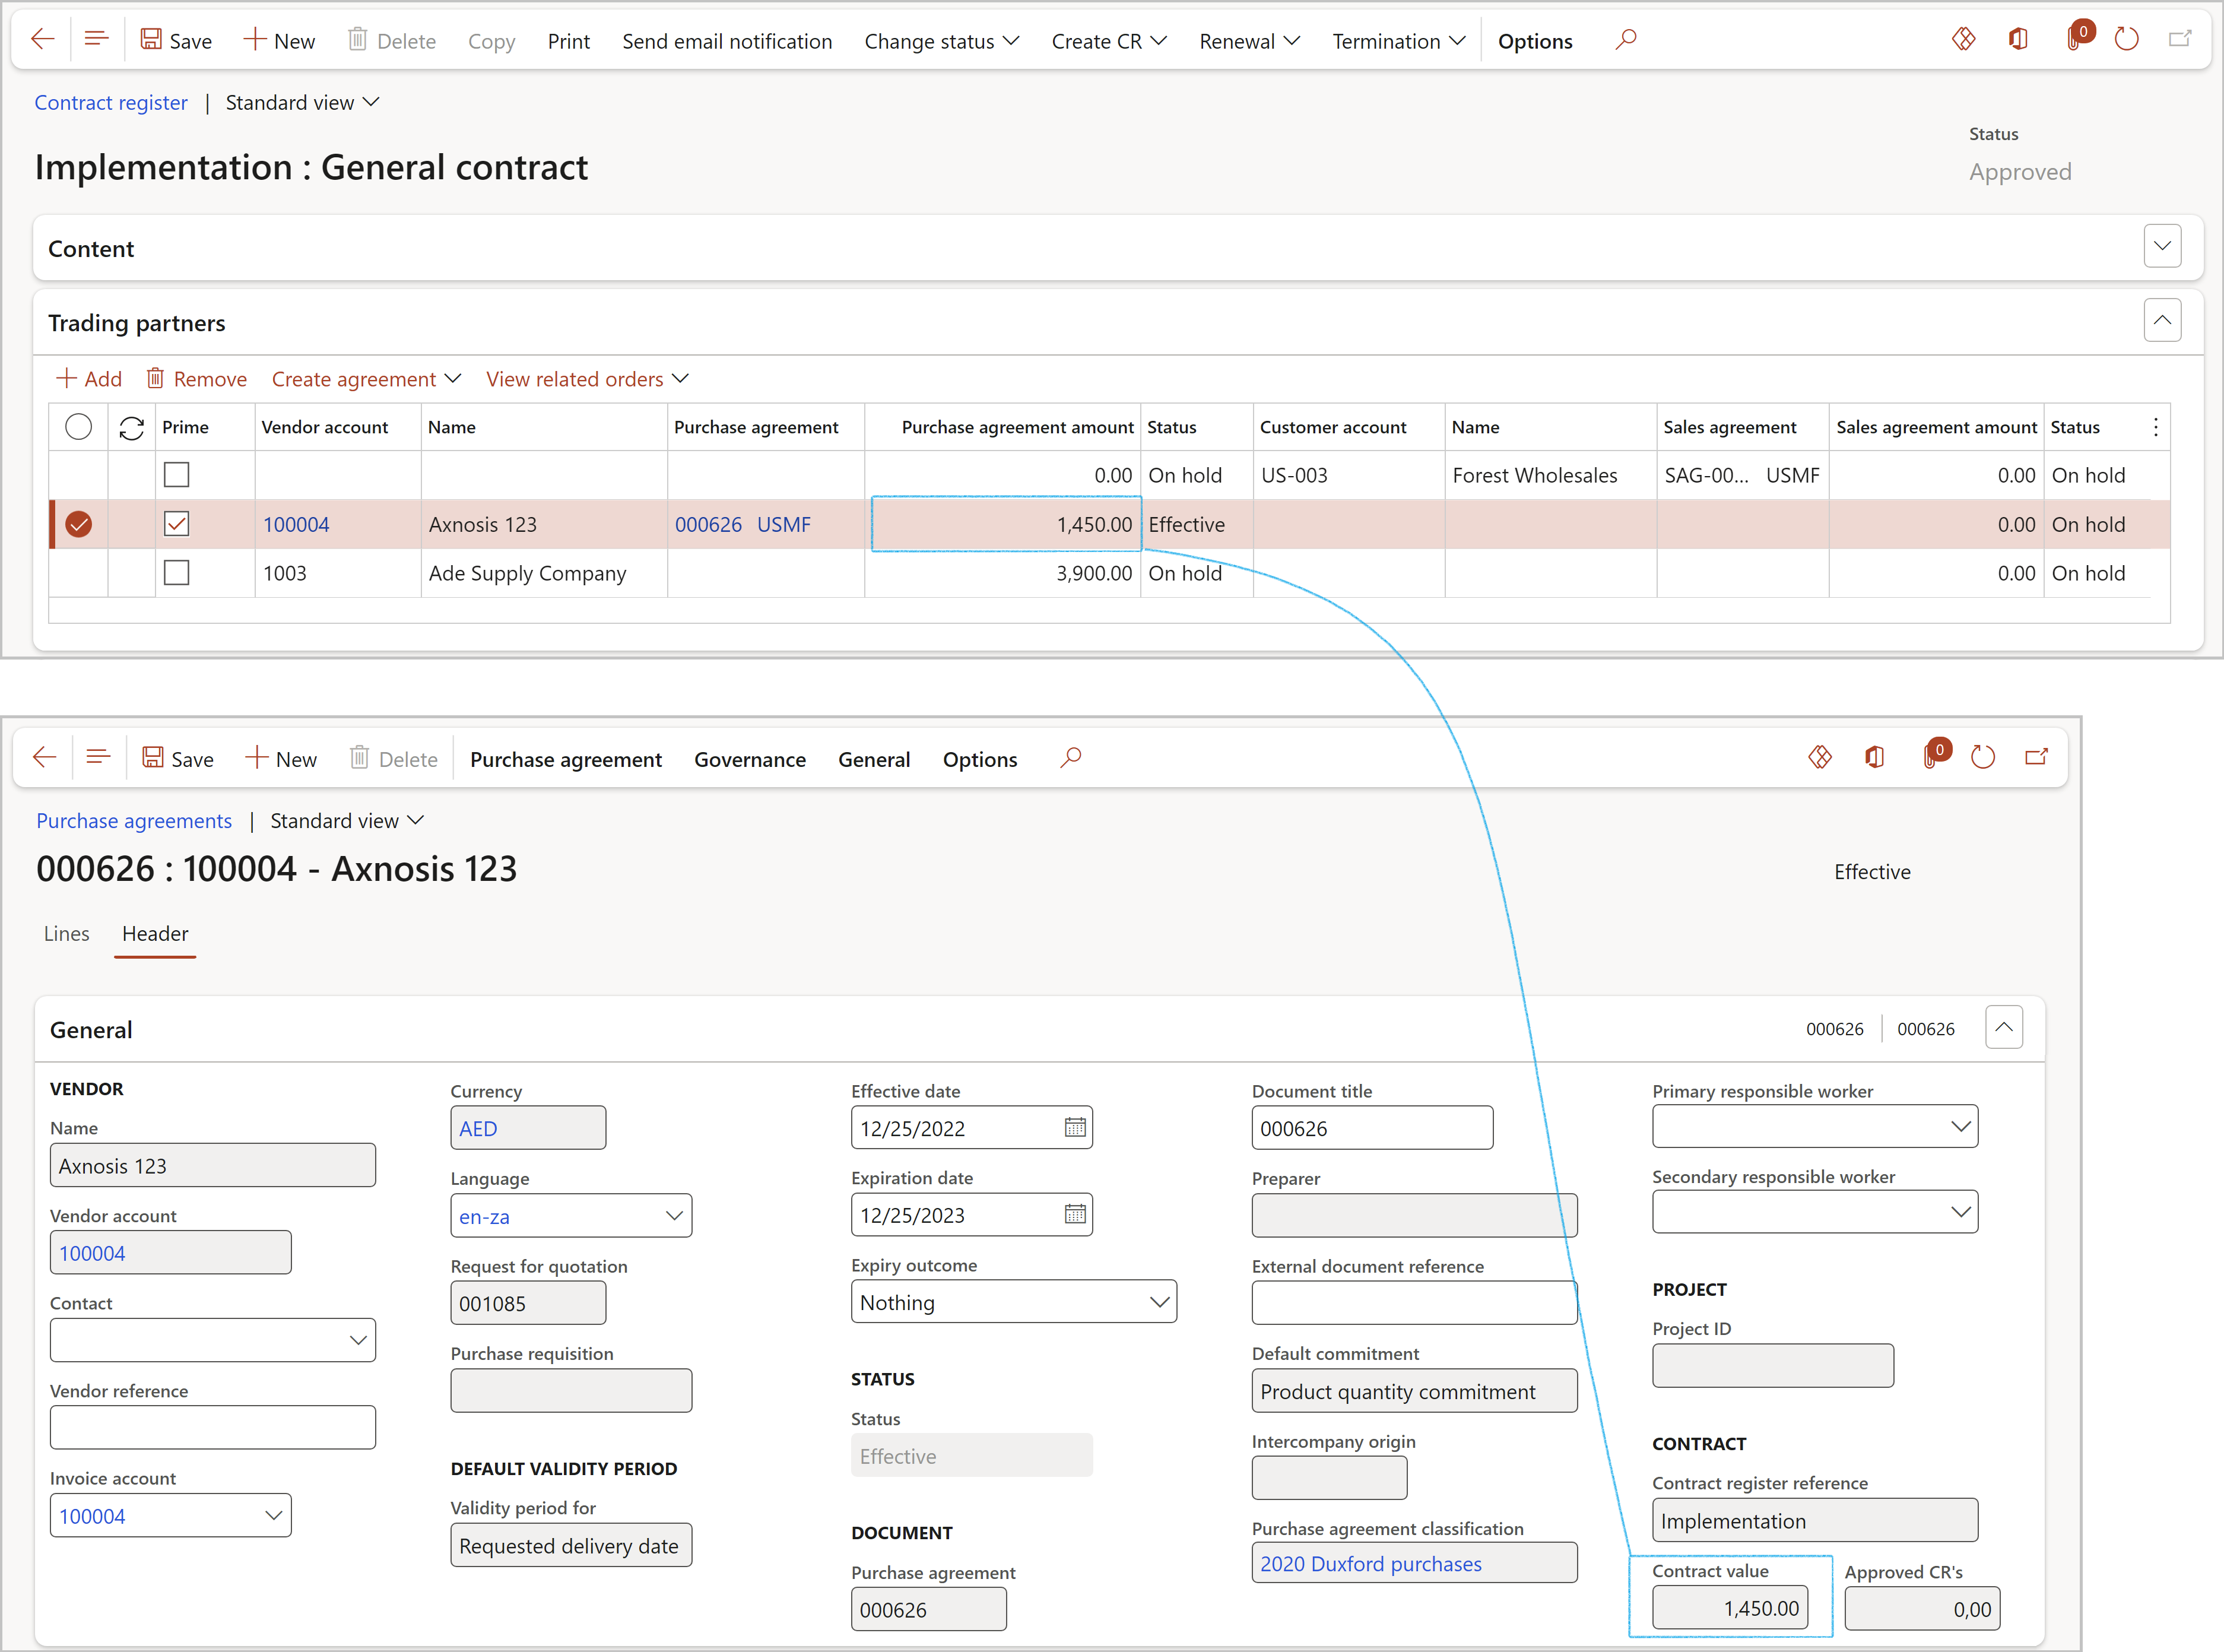
If contract value is enforced on the selected Purchase agreement classification, the Contract value enforced Field group becomes visible under the Contract administration Fast tab.
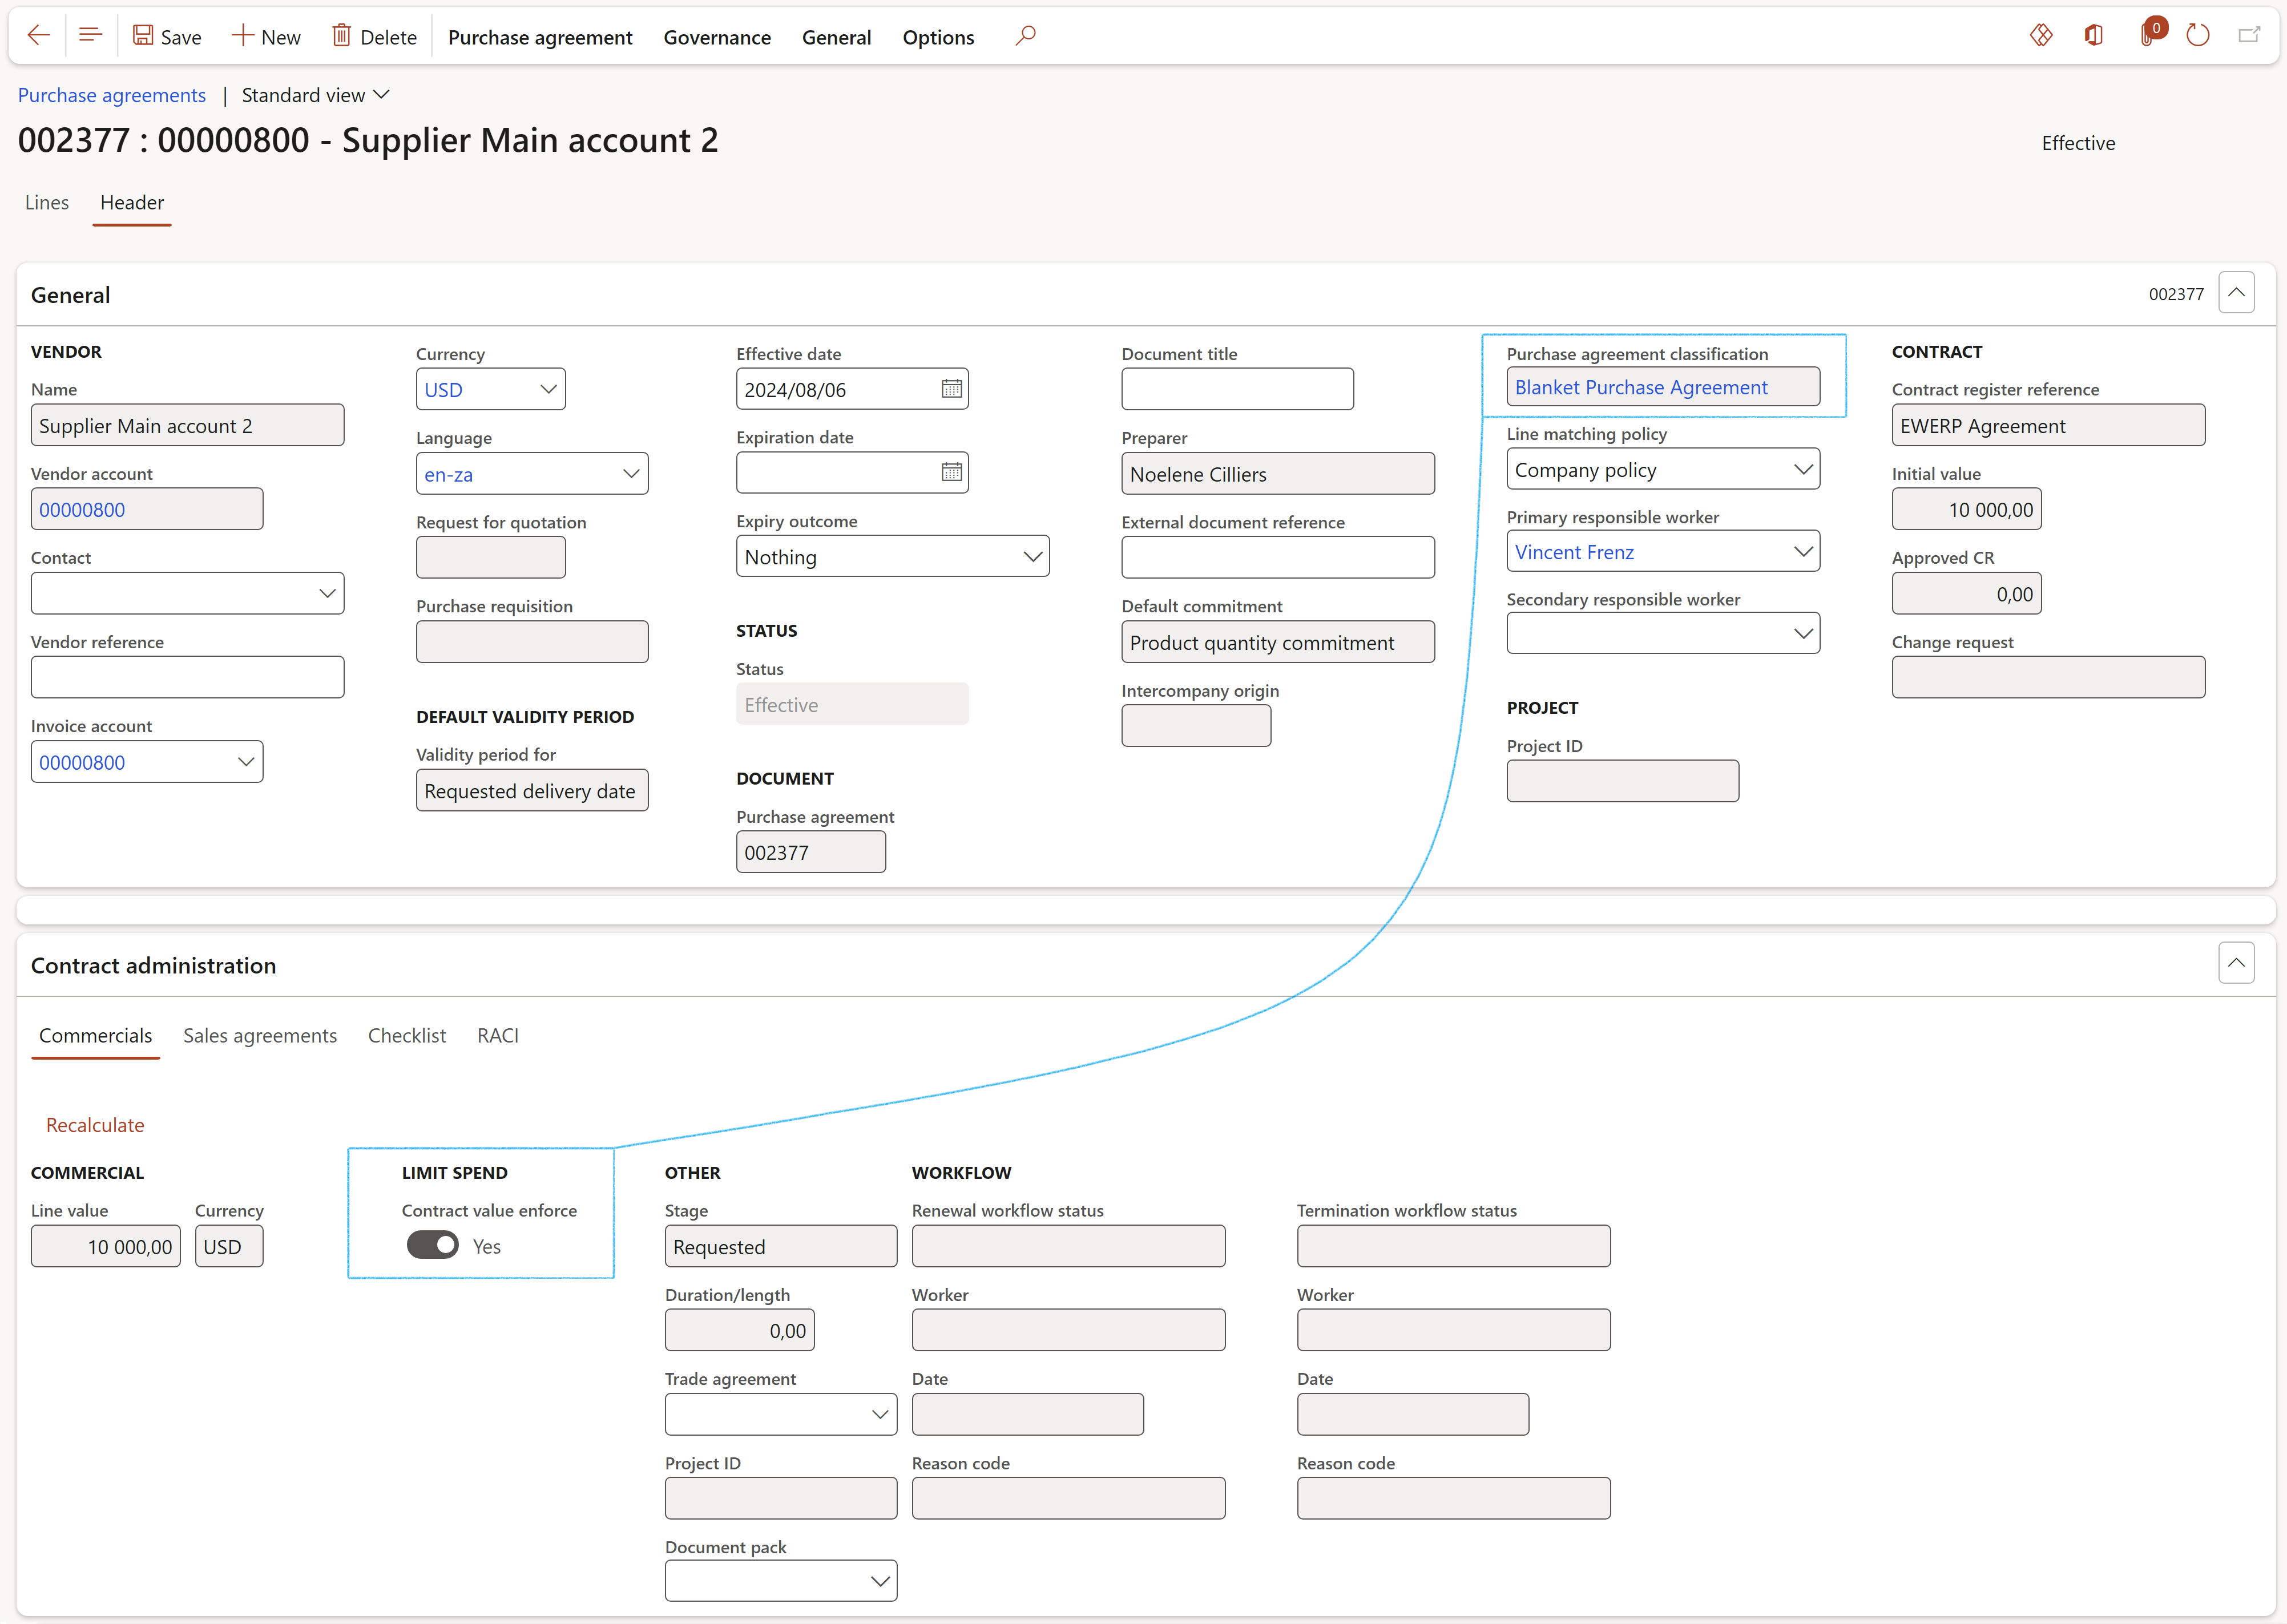
RACI
Once the contract is in an Approved stage, the RACI fields are locked from editing. To edit these fields:

¶ Step 34: Vendor invoices from the contract
¶ Step 34.1: Create a contract item line distribution:
Go to: GRC > Governance > Contracts > Contract register in legal entity
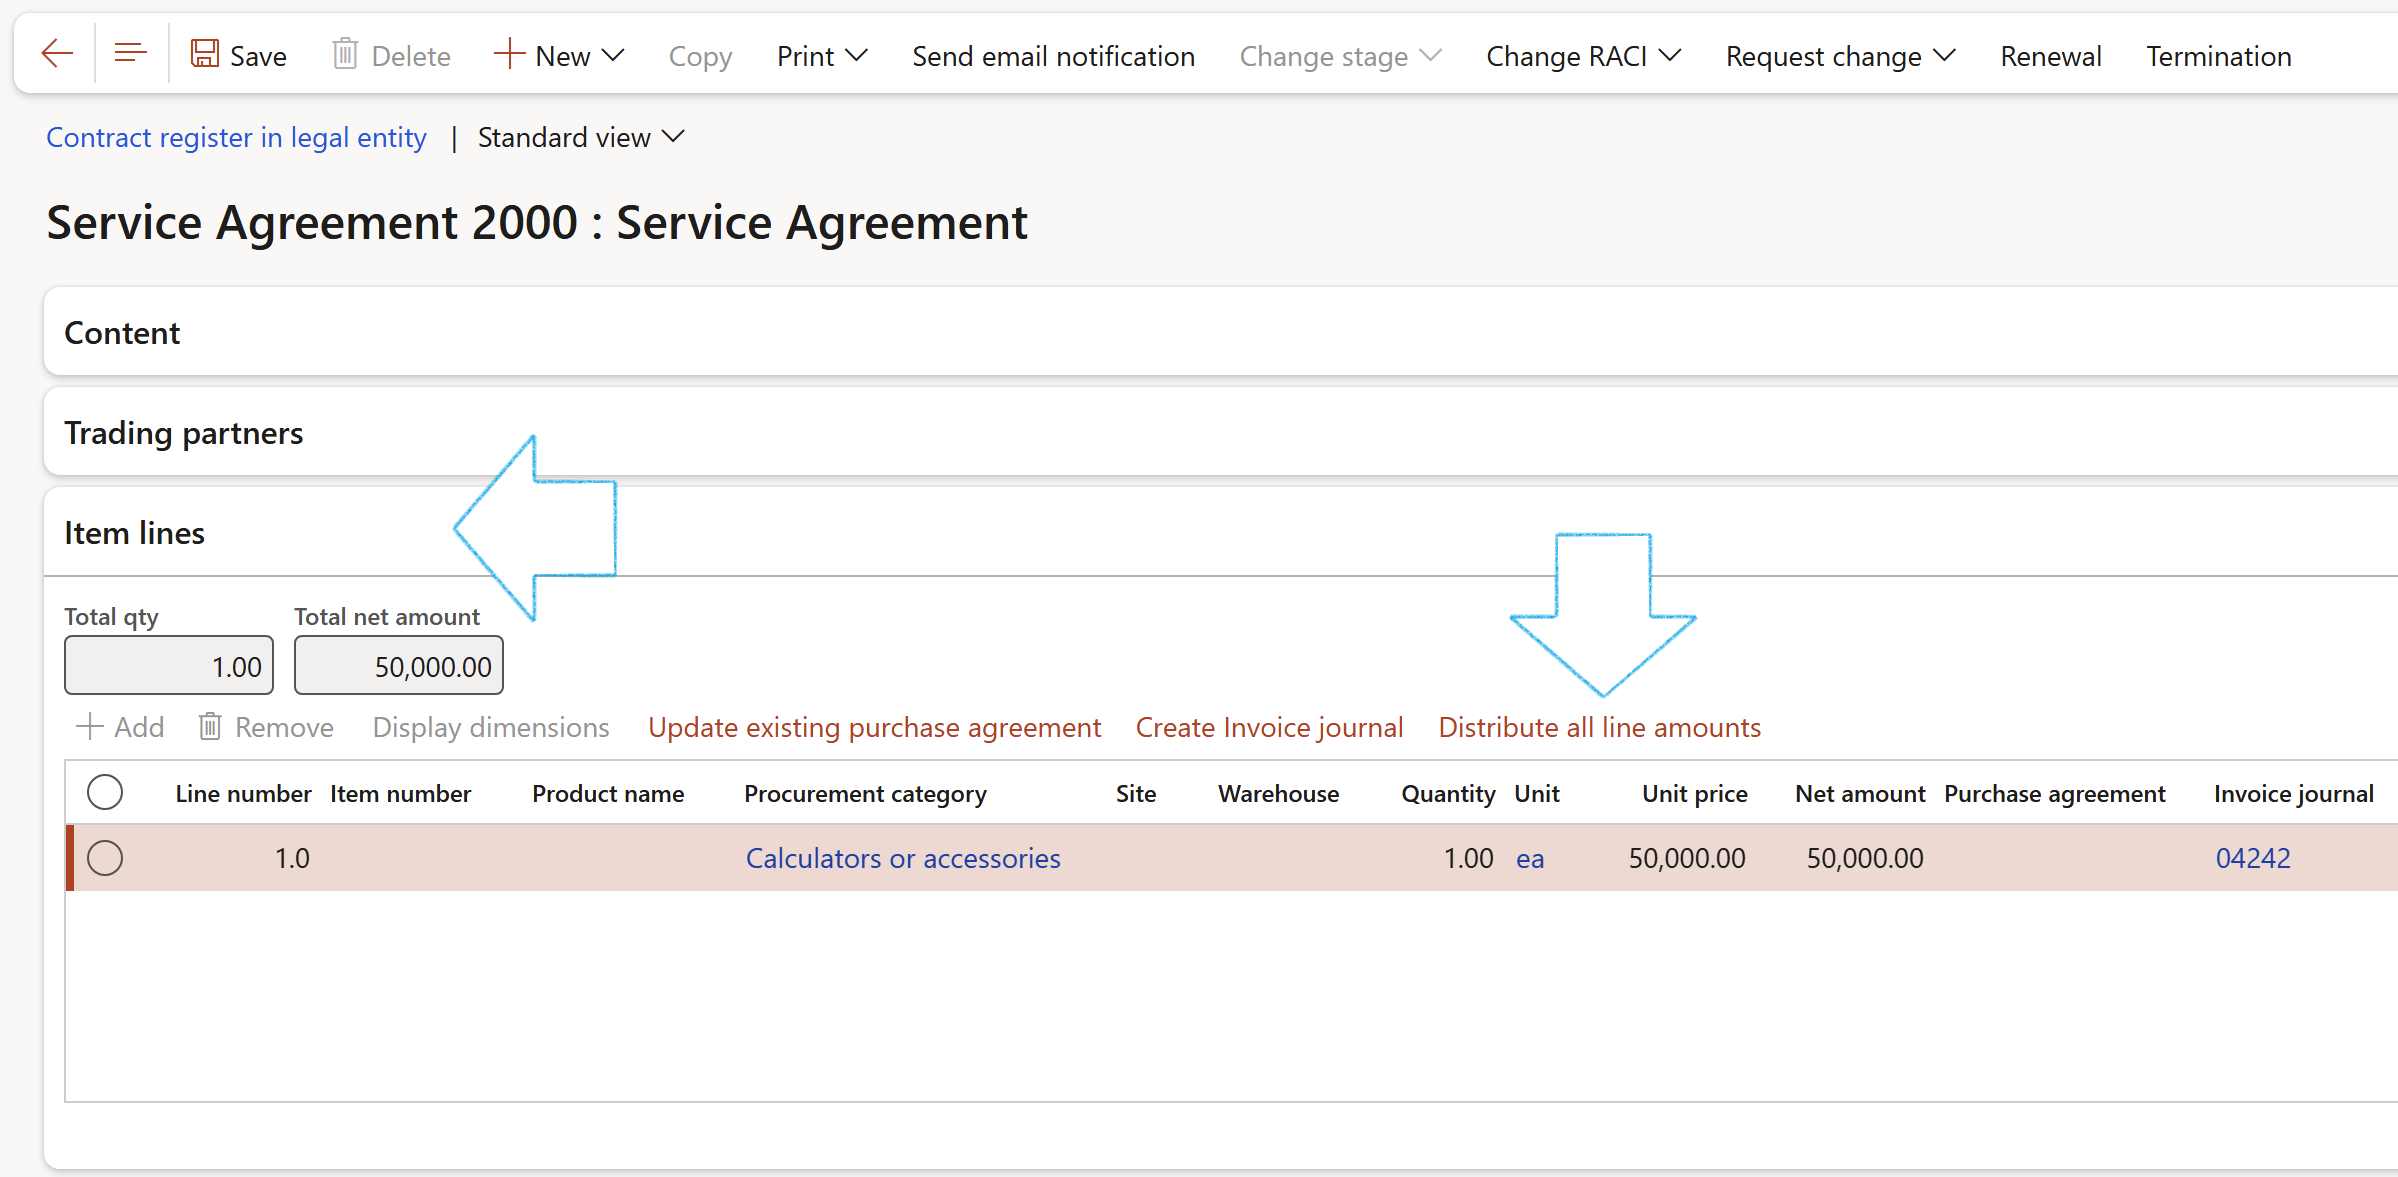
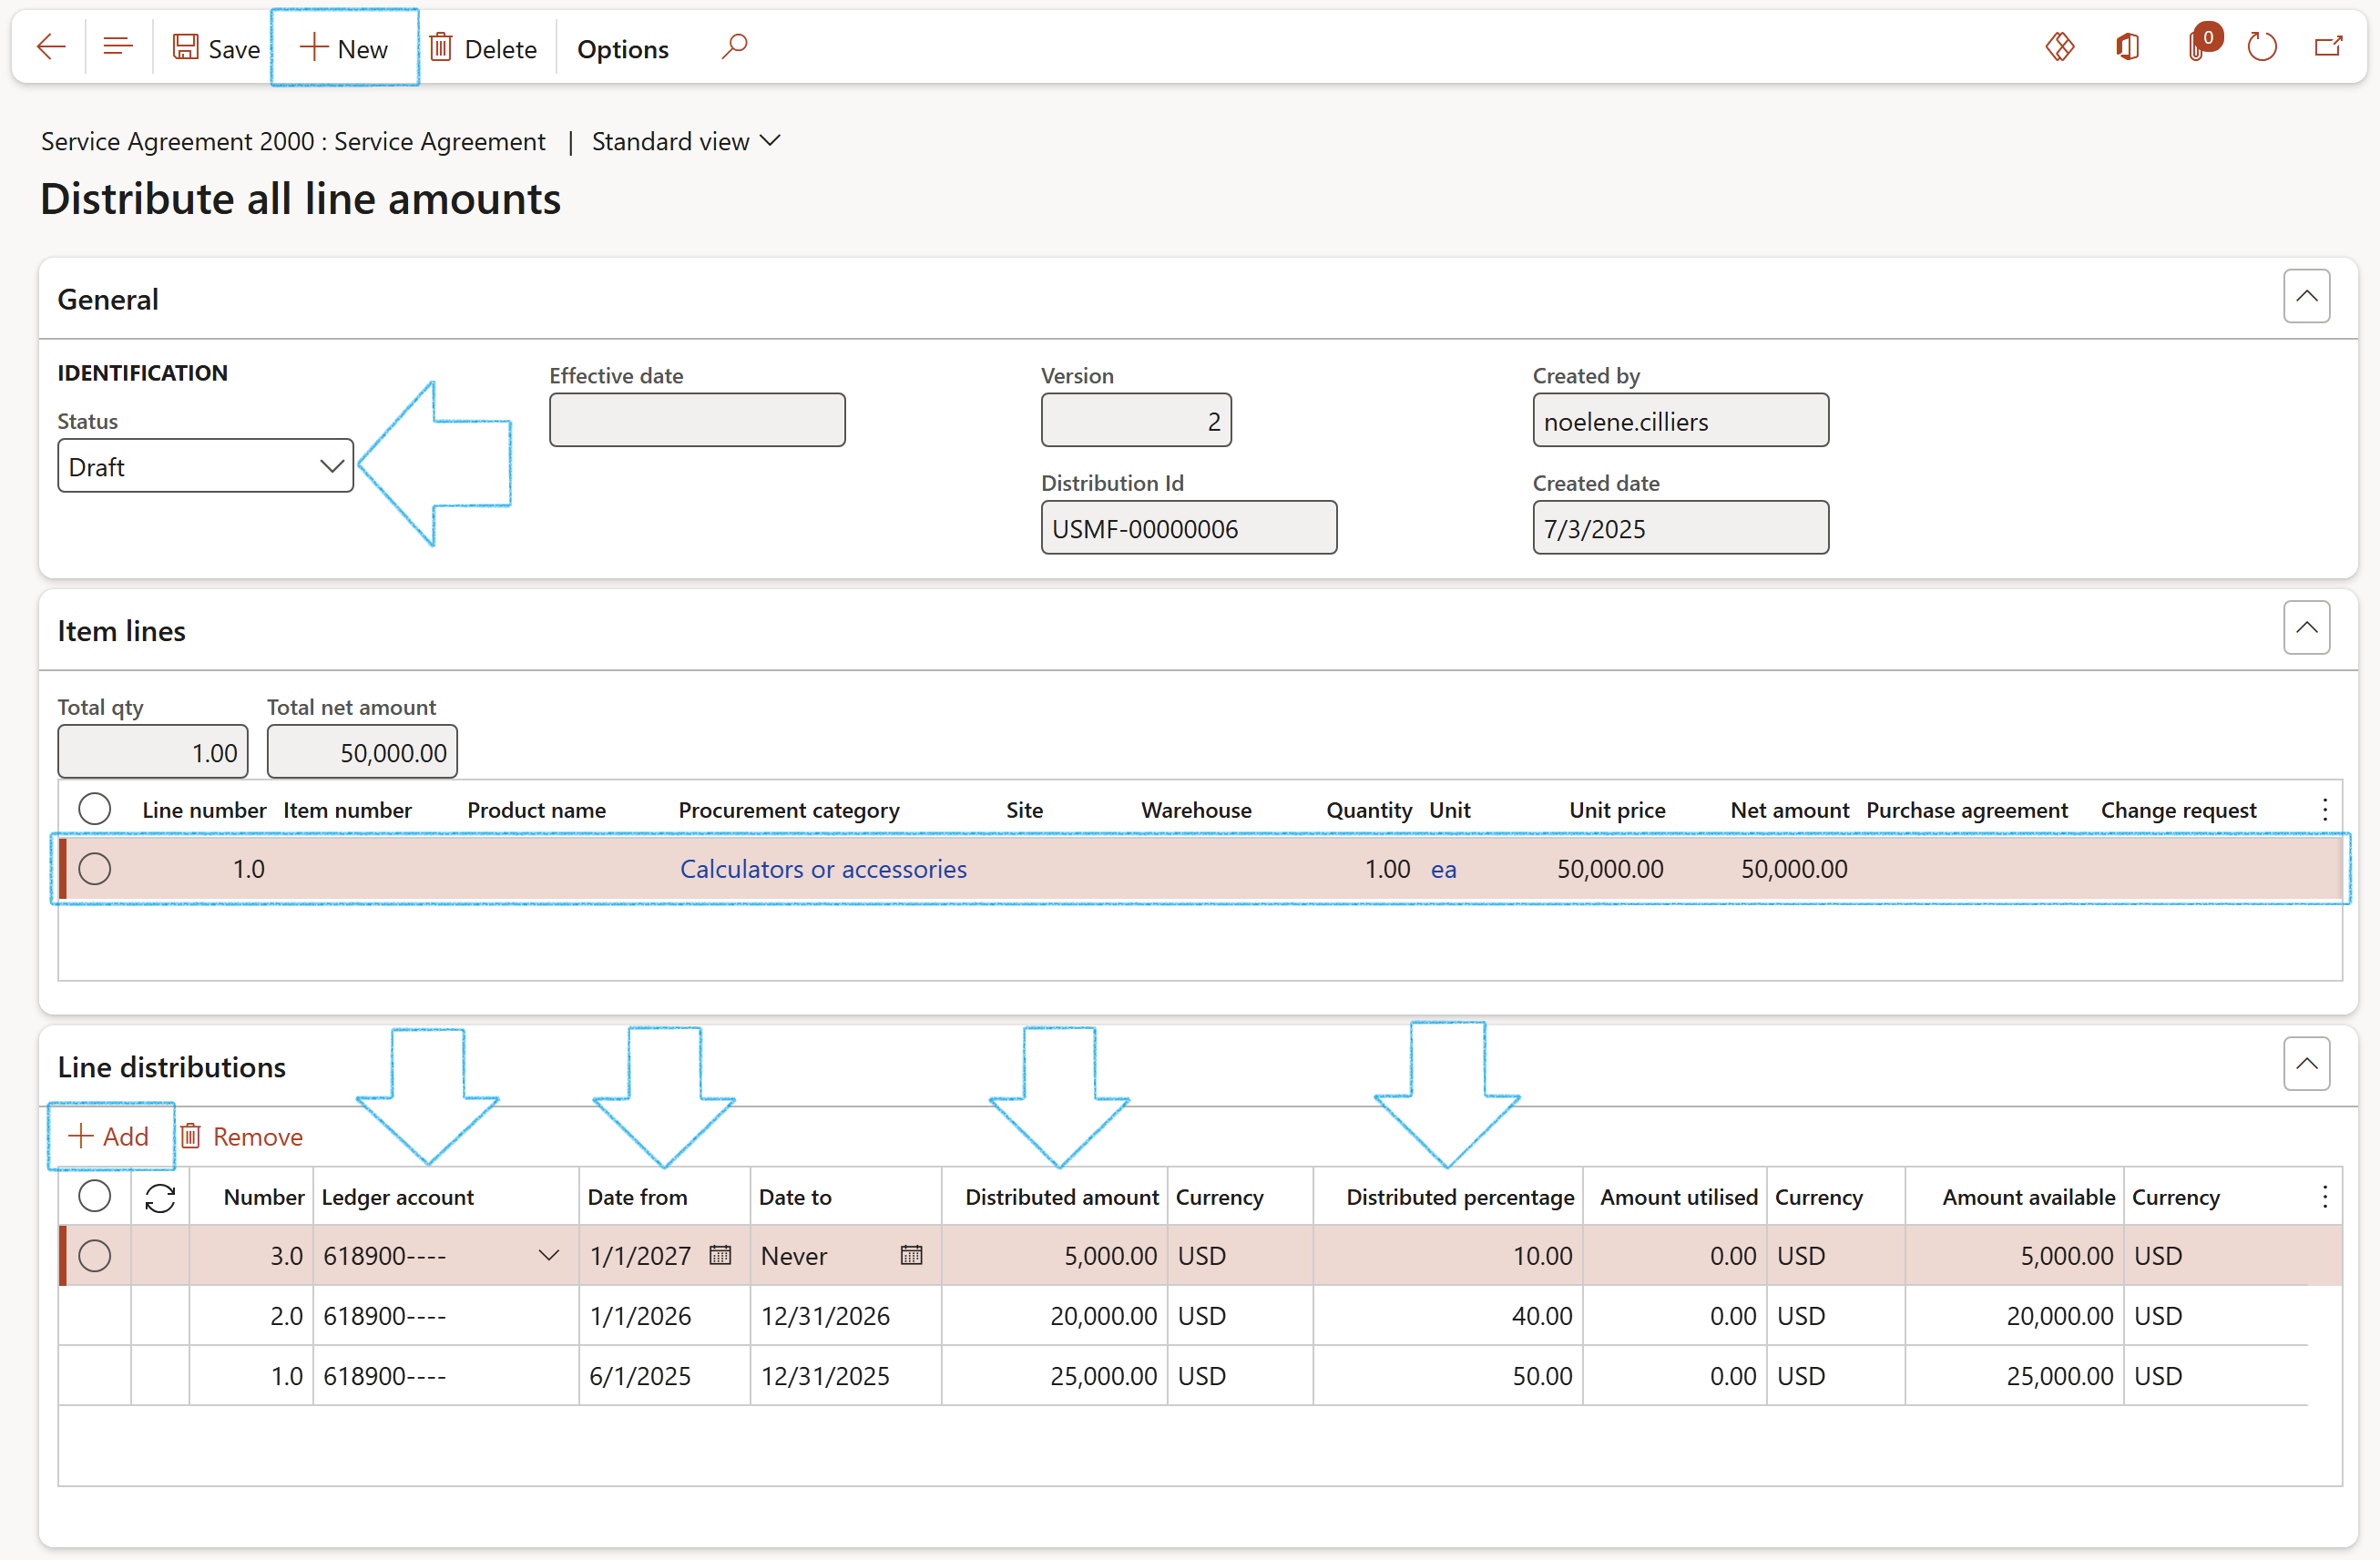
When creating a new line distribution and saving the changes made, a Dialogue box will pop-up to indicate updates can be made to the previous records automatically.
Clicking on Yes will update the previous records Date from record
Clicking on No will change no values
¶ Step 34.2: Create an invoice from the contract:
The contract has to be Approved, and there should be no Purchase agreement linked under the Item lines Fast tab
Go to: GRC > Governance > Contracts > Contract register in legal entity
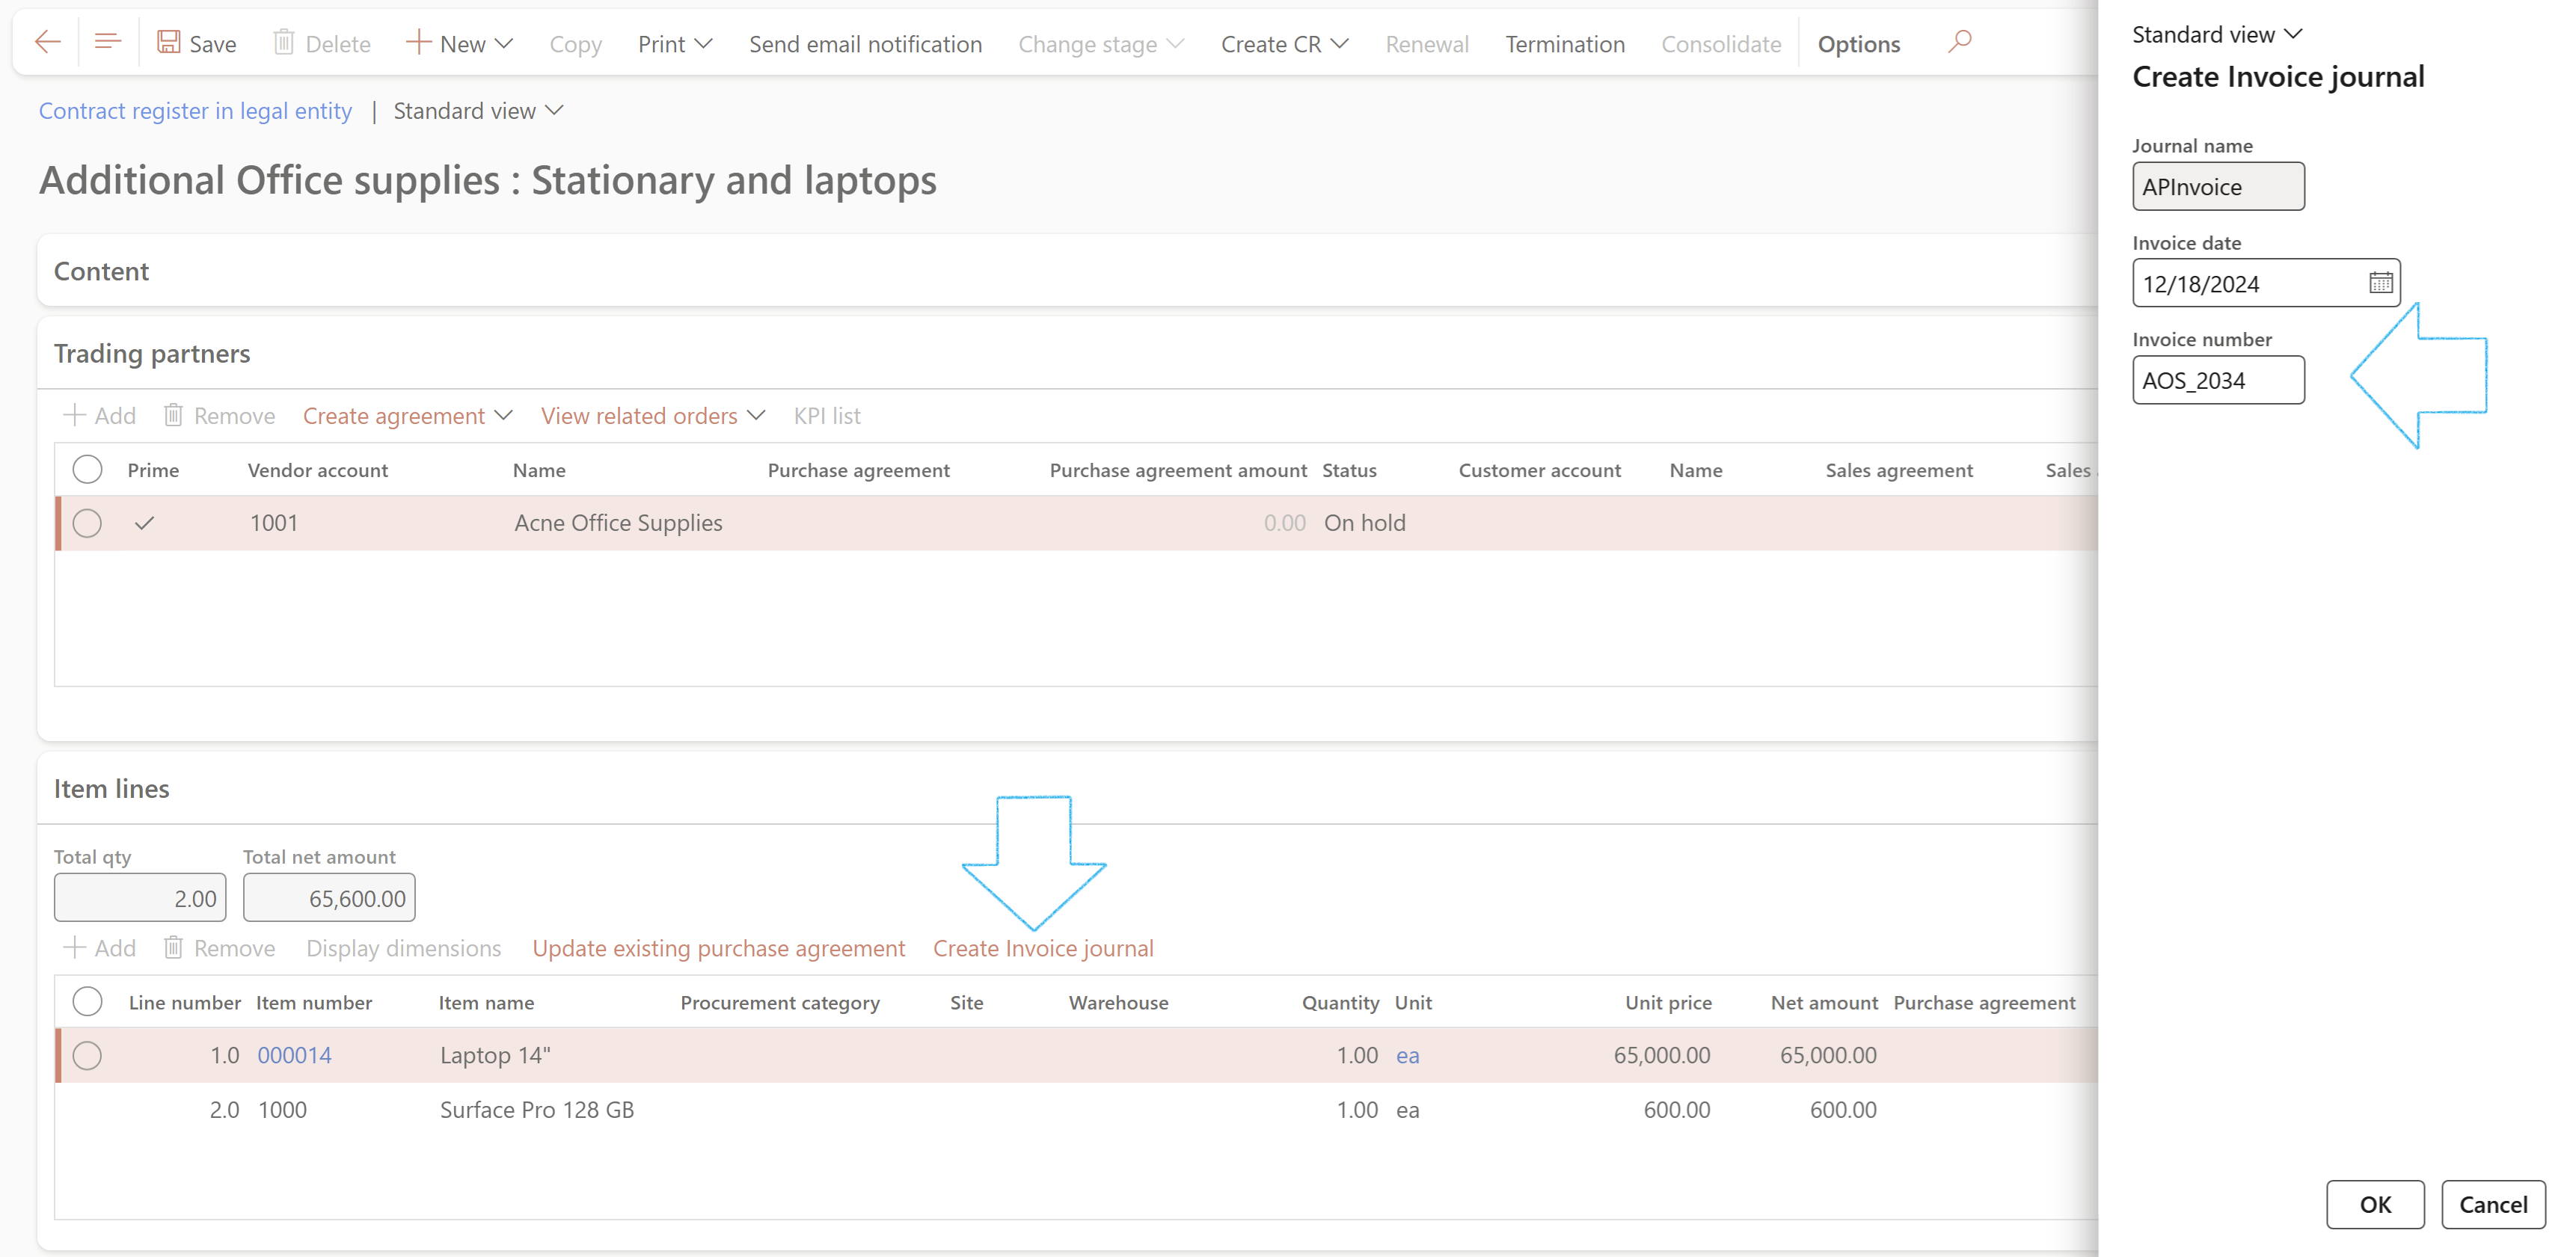
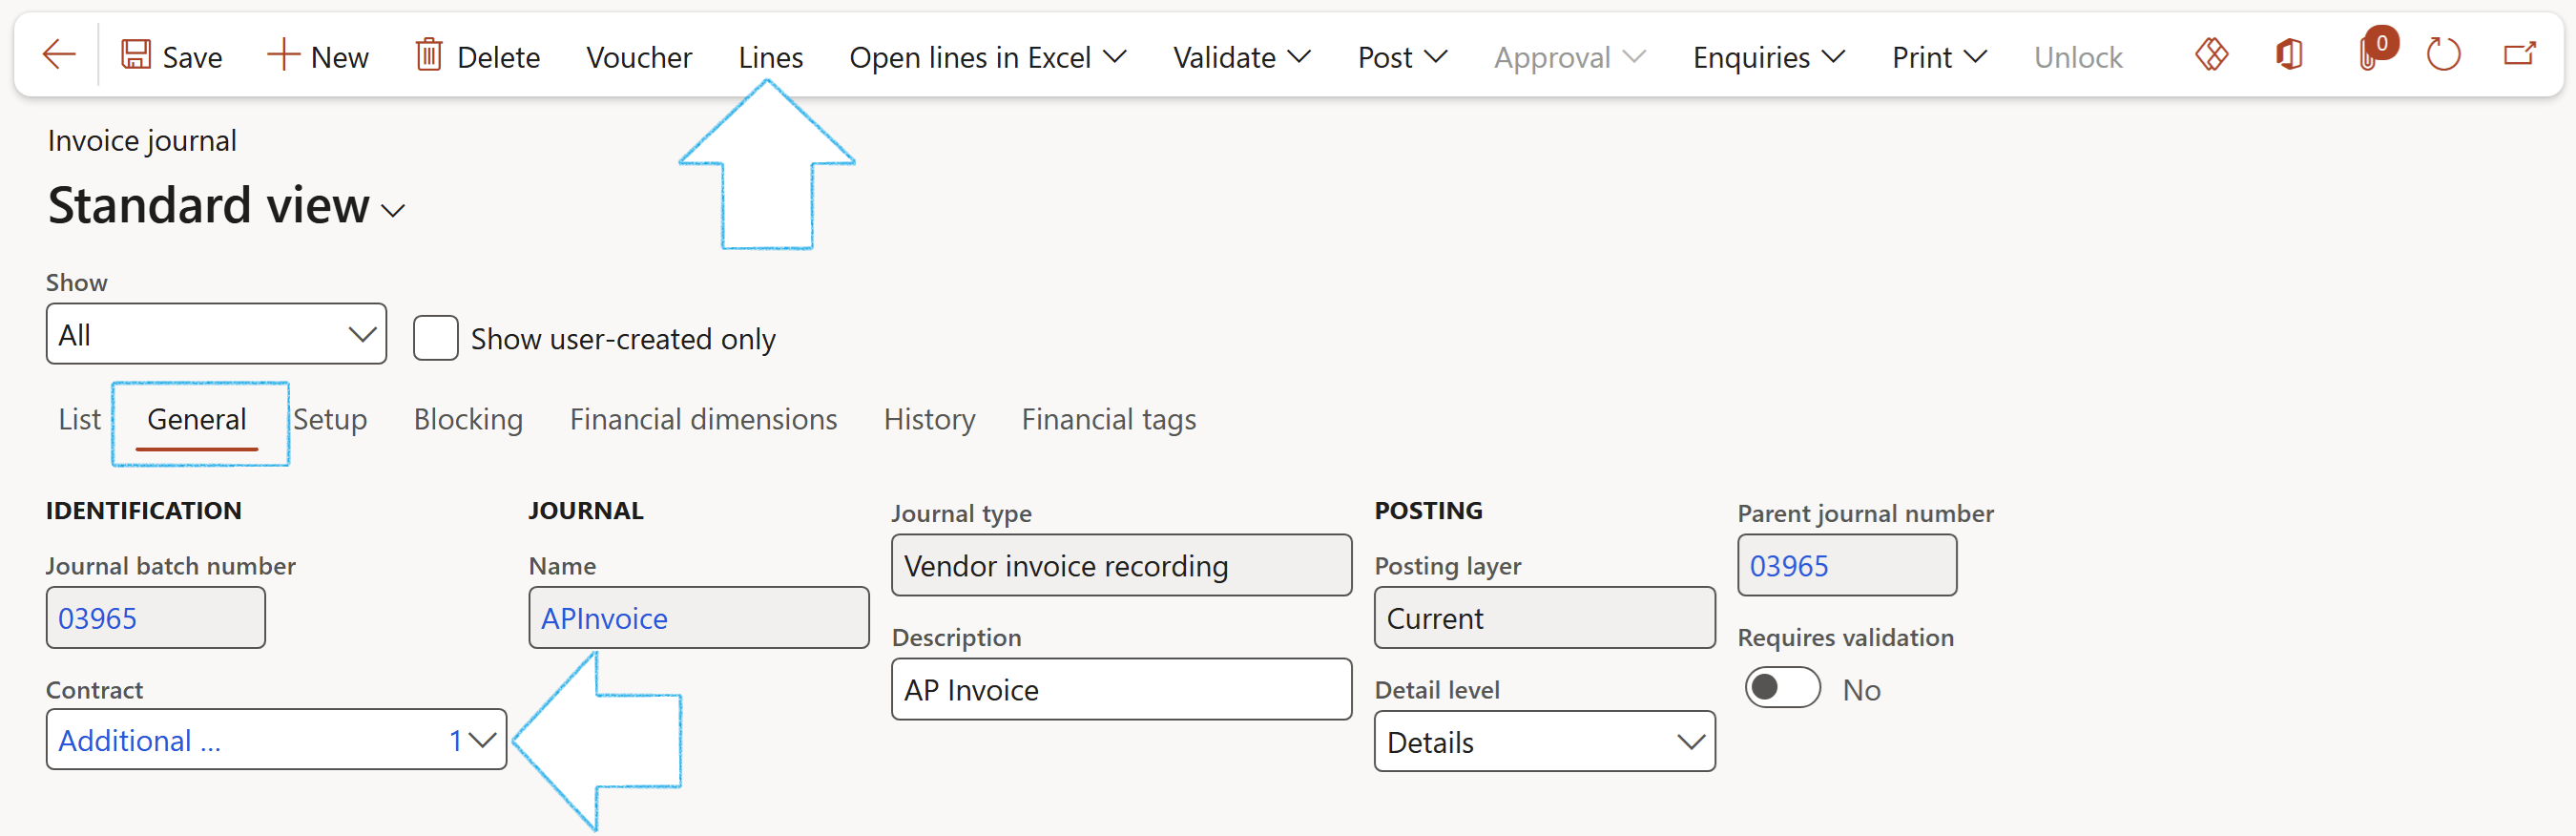
The debit leg is created based on the Item posting profiles
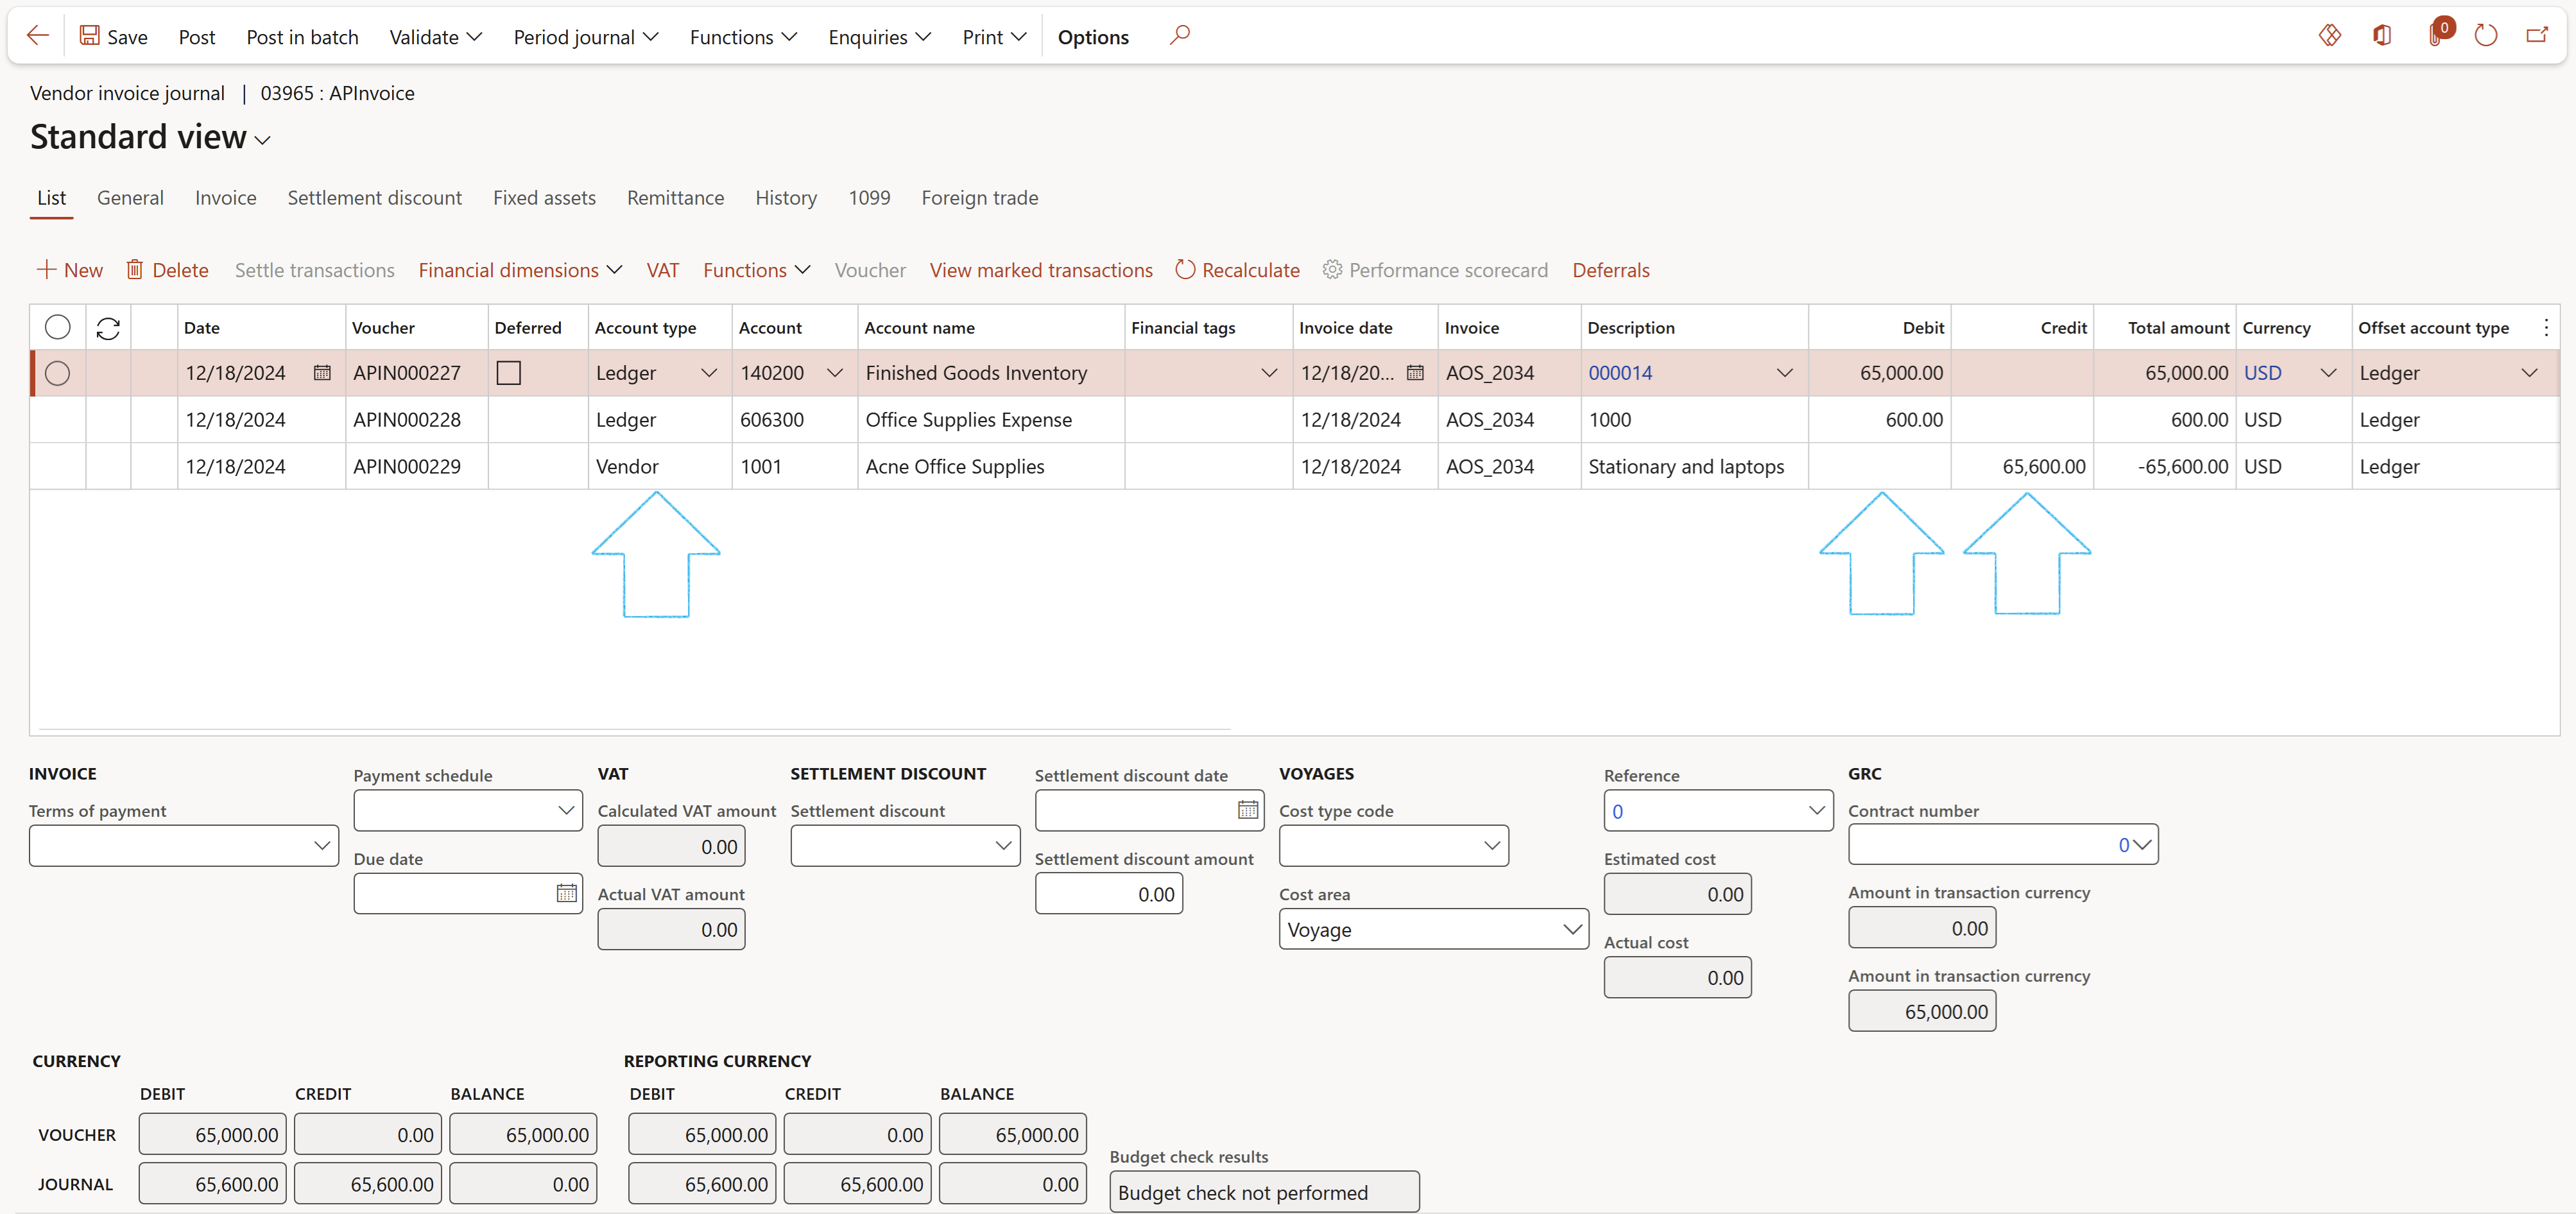
The Description field of the various lines can be added to a workflow notification.
¶ Step 34.3: Add a offset line to a Invoice Journal from the contract line distribution
Standard Dynamics 365FO functionality allows a user to breakdown a voucher line for an invoice journal between various ledger account dimensions. GRC adds functionality to be able to add contract line distributions to the invoice journal created from the contract record
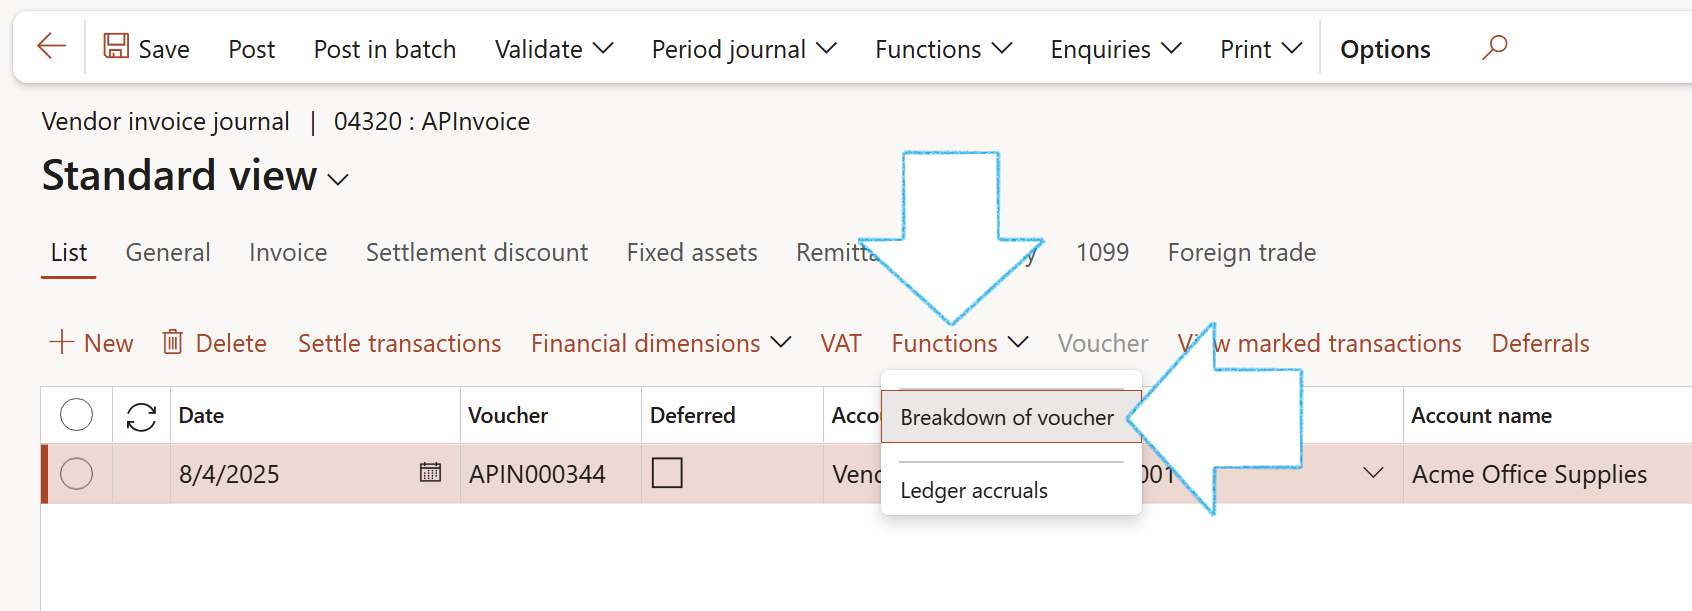
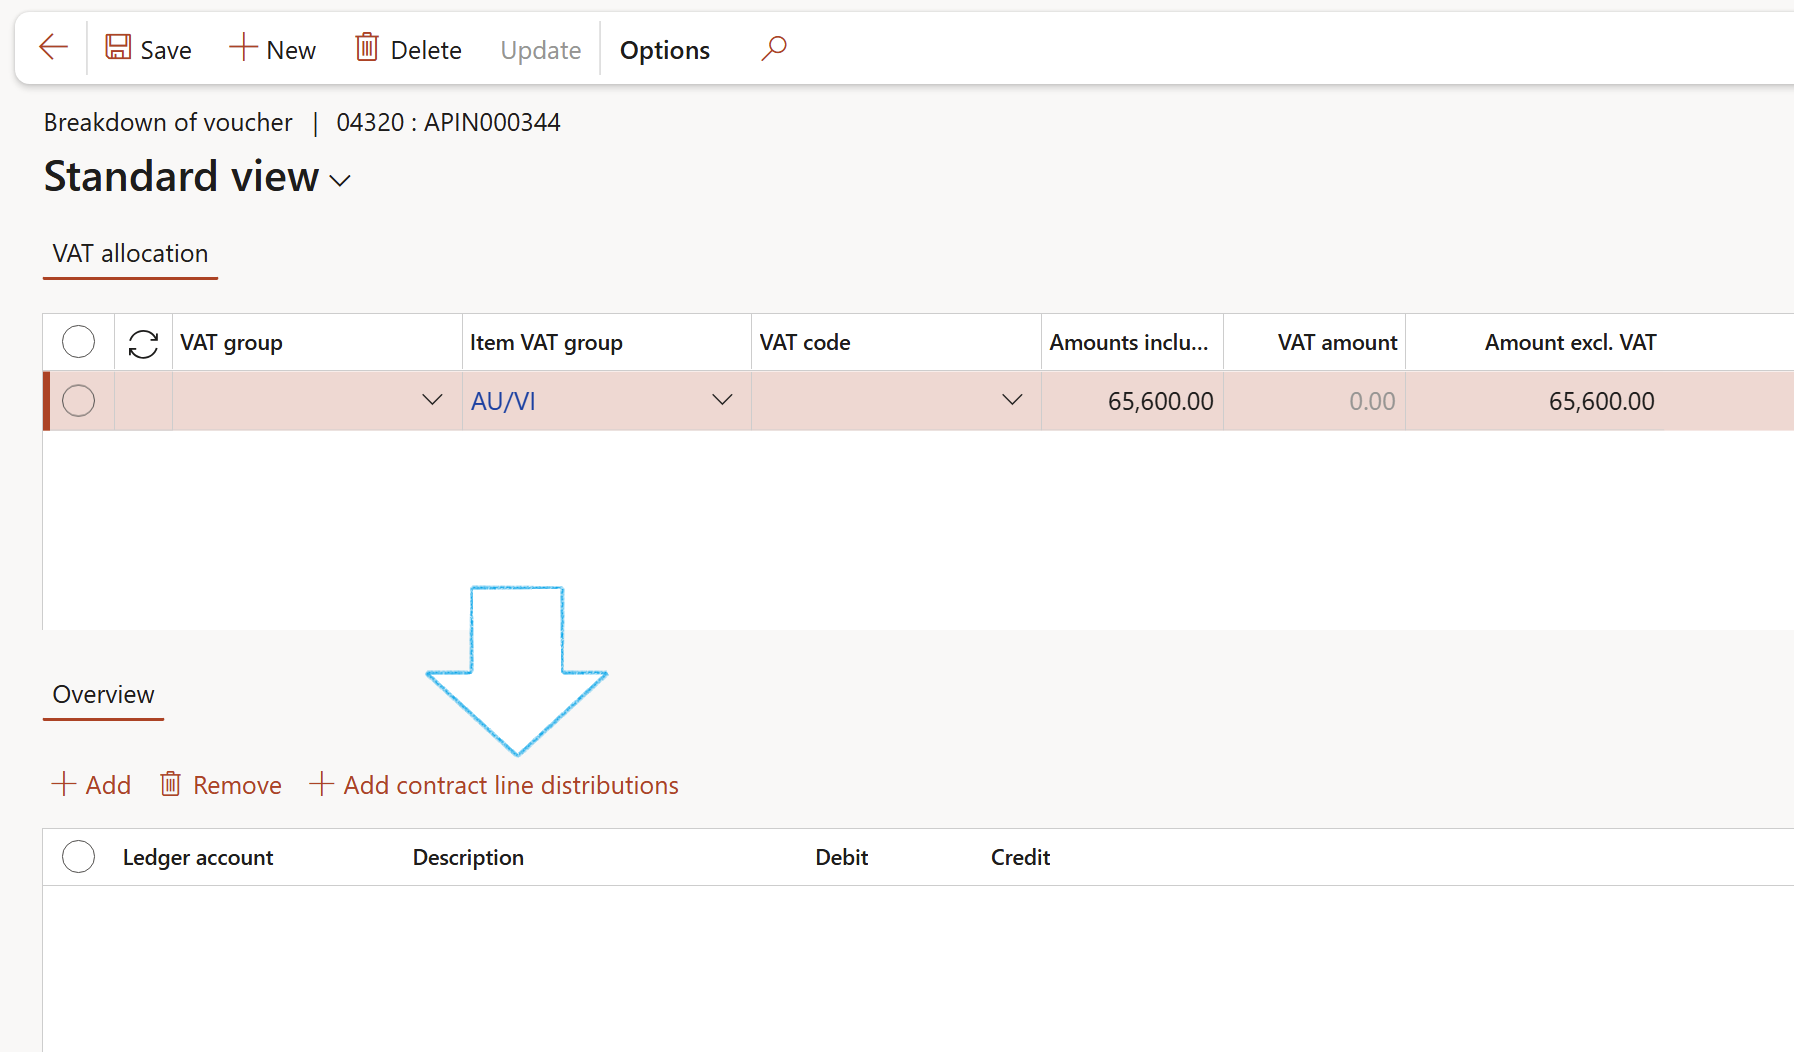
If the Amount to invoice value is higher than the Amount available the following error will appear:
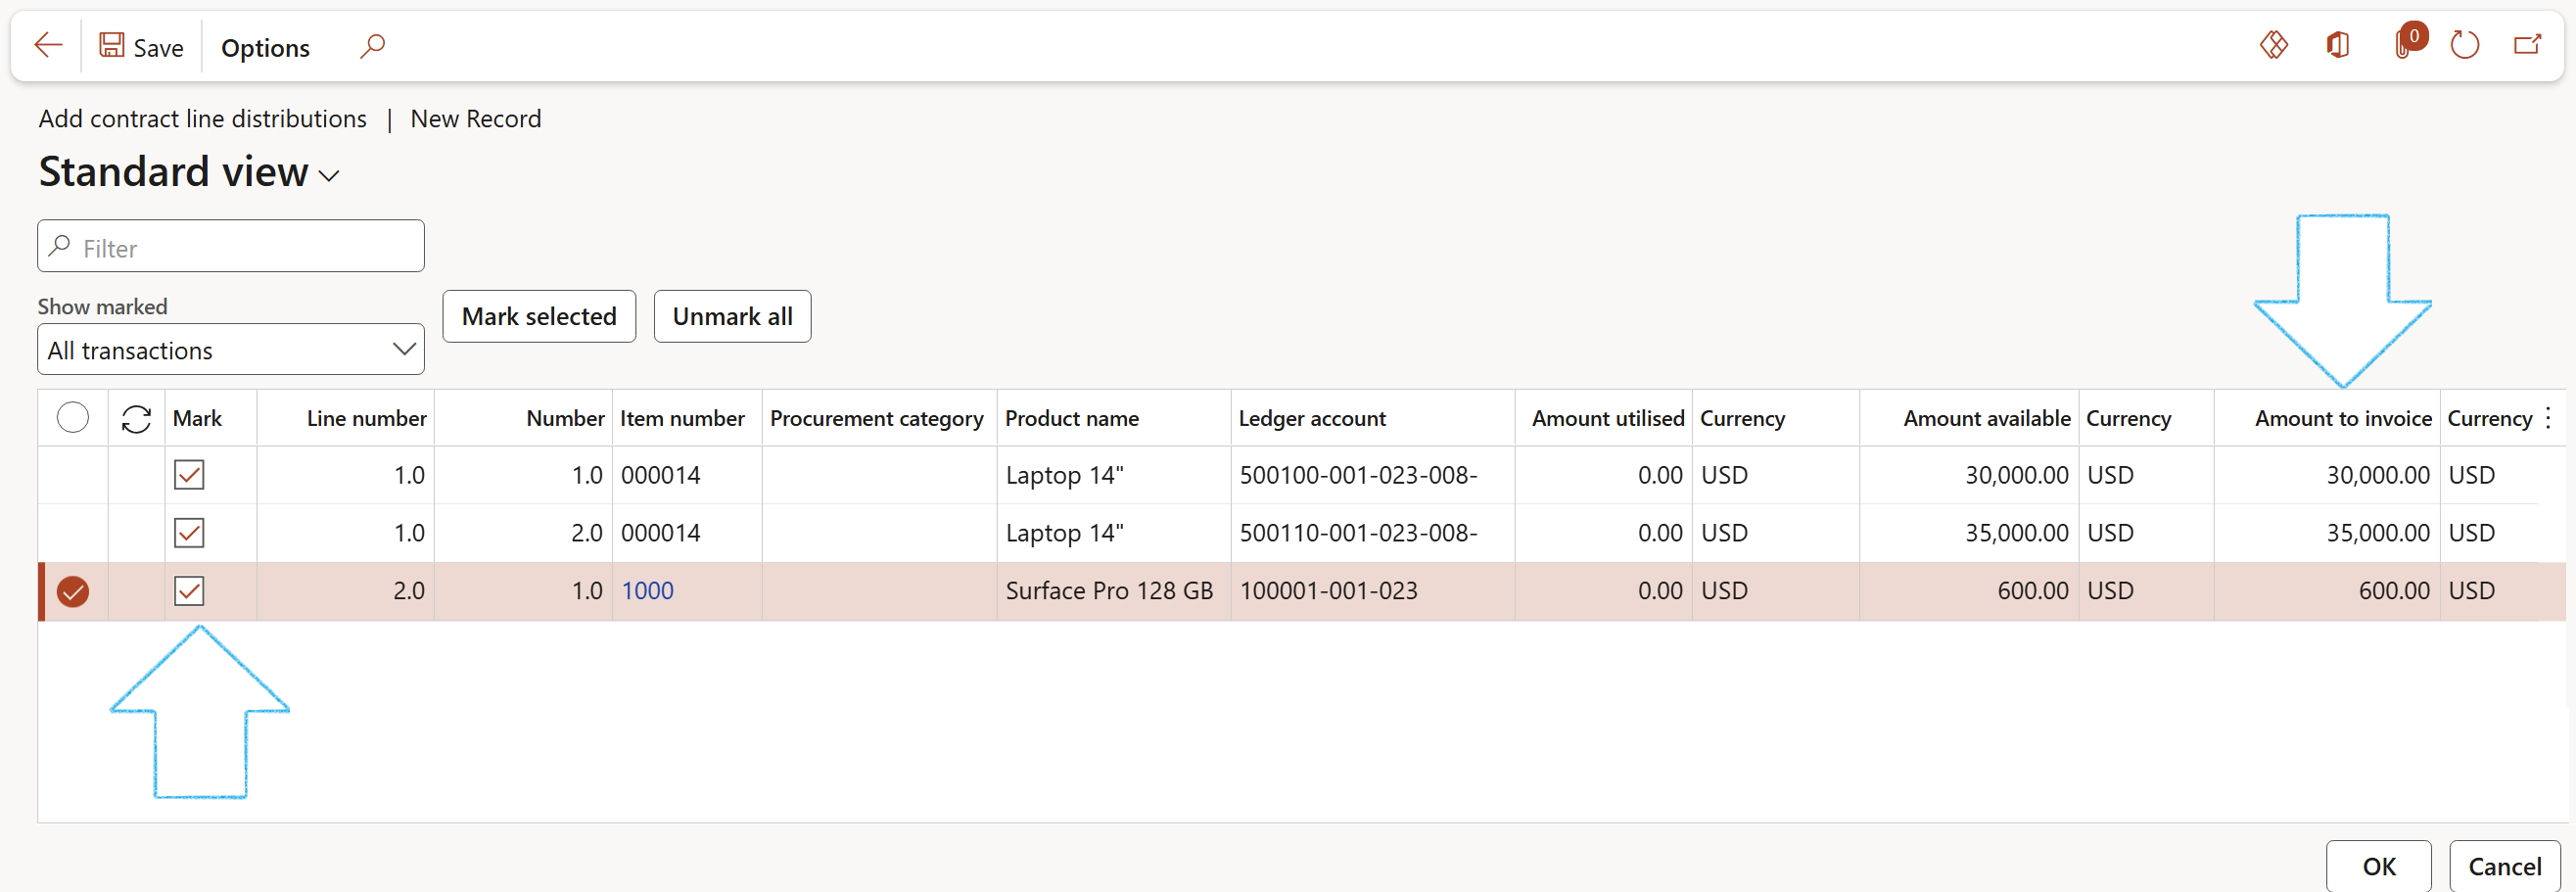
The Product Name will display the value on the Contract item line.
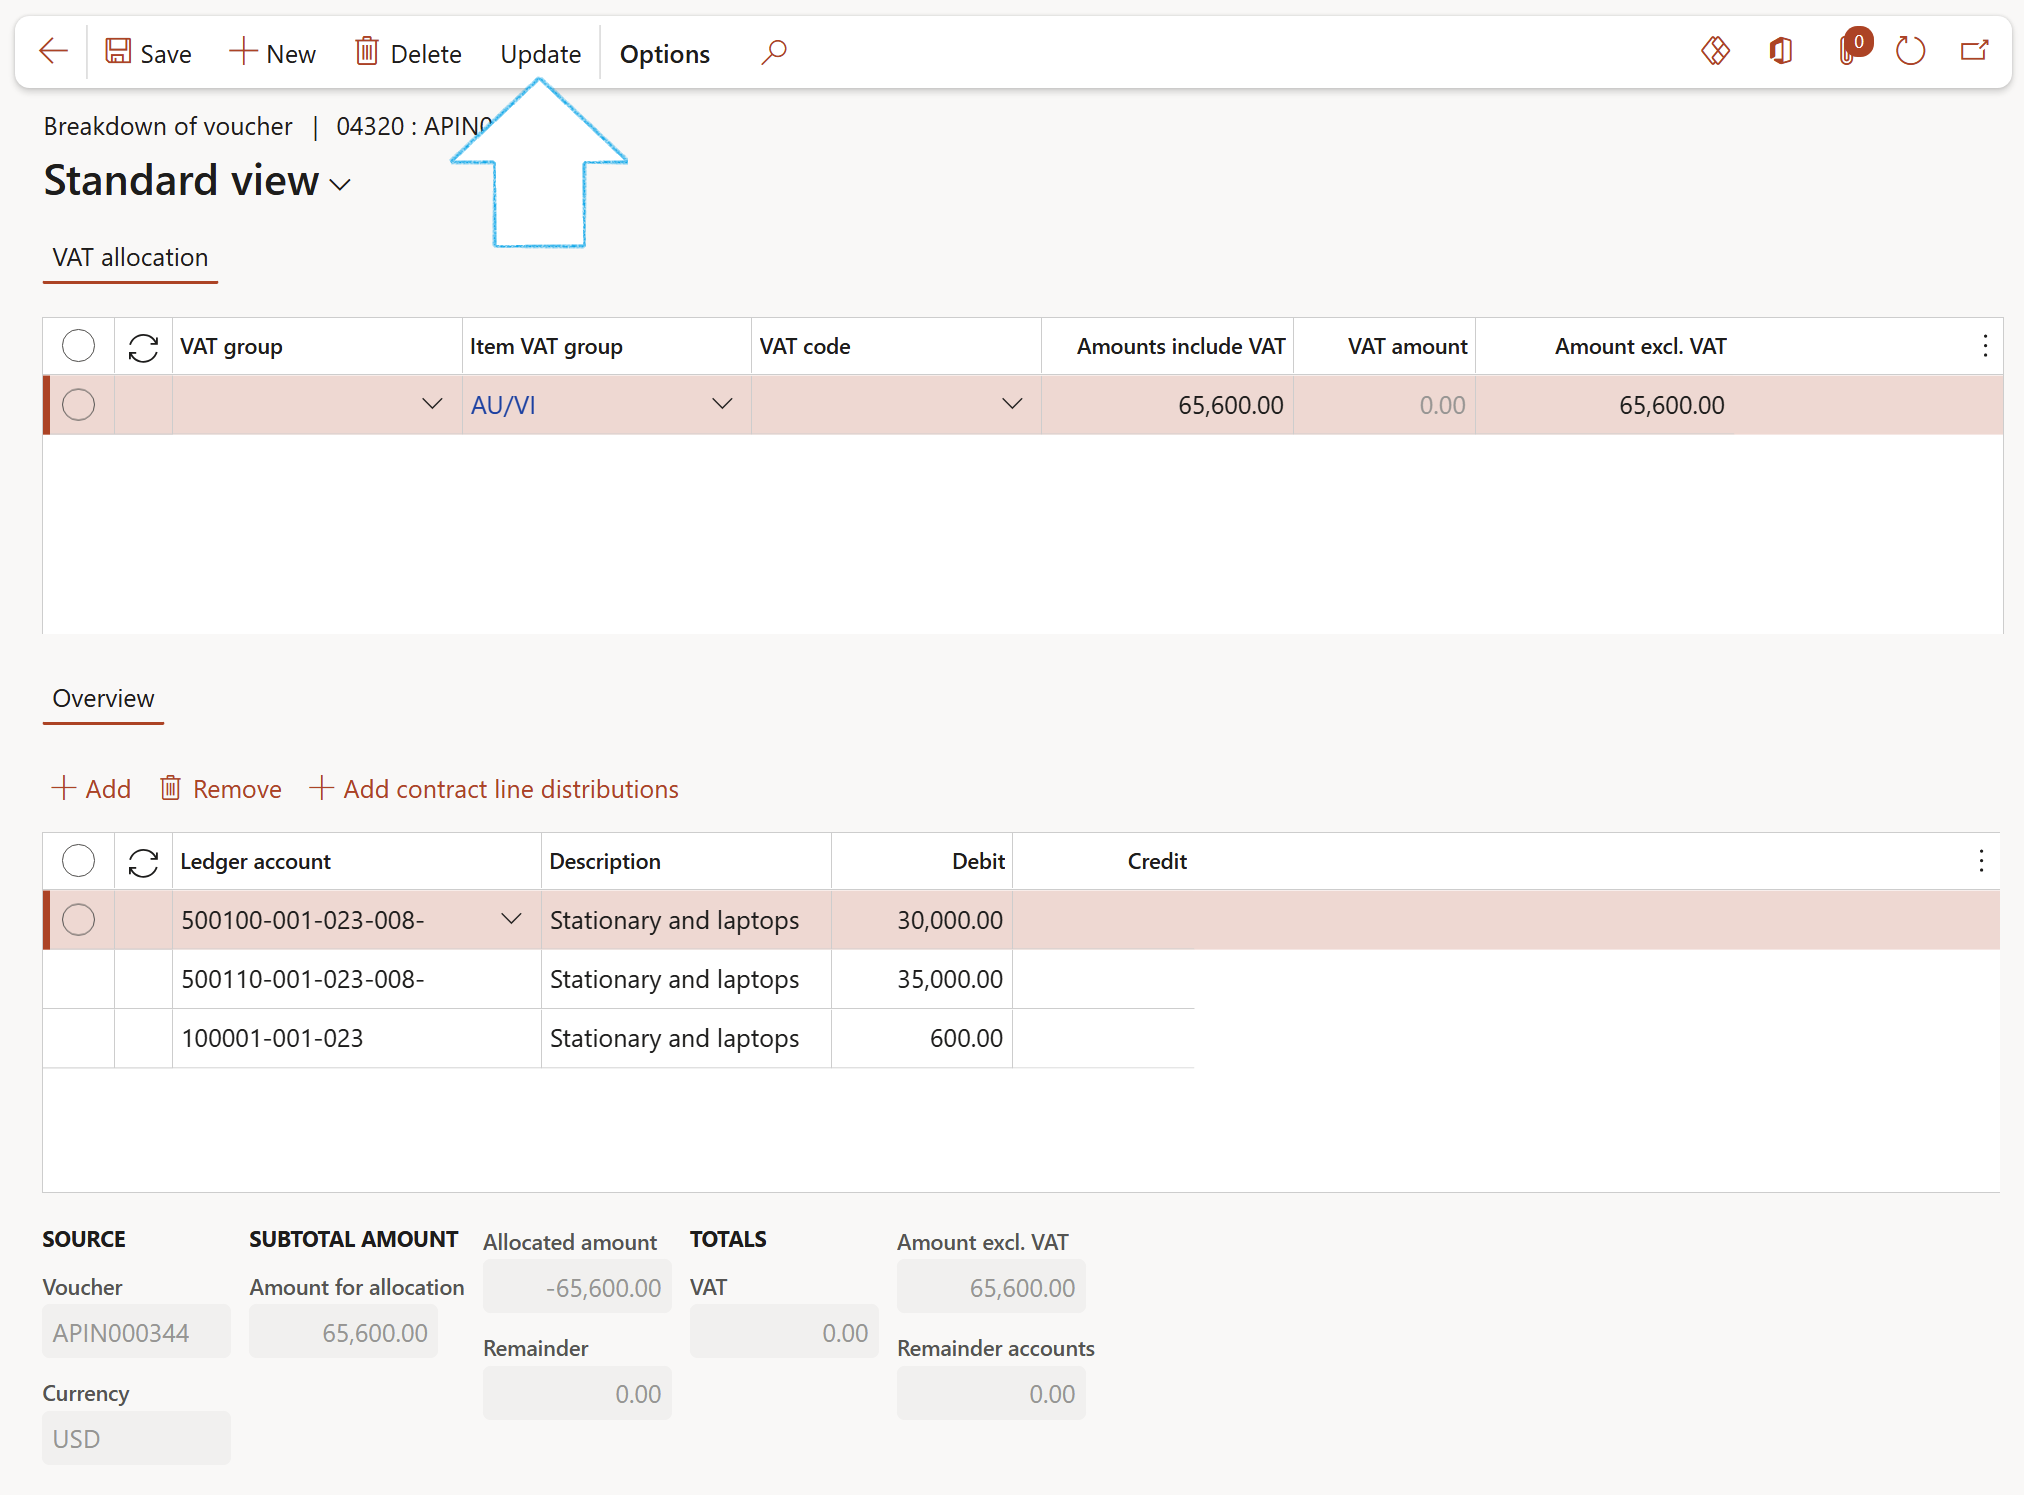
If the new invoice is a Credit note invoice (negative value):
- A verification is done to ensure the amount to credit note does not exceed Amount utilised
- Once the credit note is posted, the Amount available will increase
Go to: Budgeting > Enquiries and reports > Budget control > Budget control statisticks
- Select the relevant Parameters
- Click on the Apply parameters button in the Action pane
Note the following two columns on the Budget Control Statistics:
- Total contract line distribution amount available (The sum of all contract line distributions for a specific ledger combination)
- Budget funds available minus Total contract distribution amount available
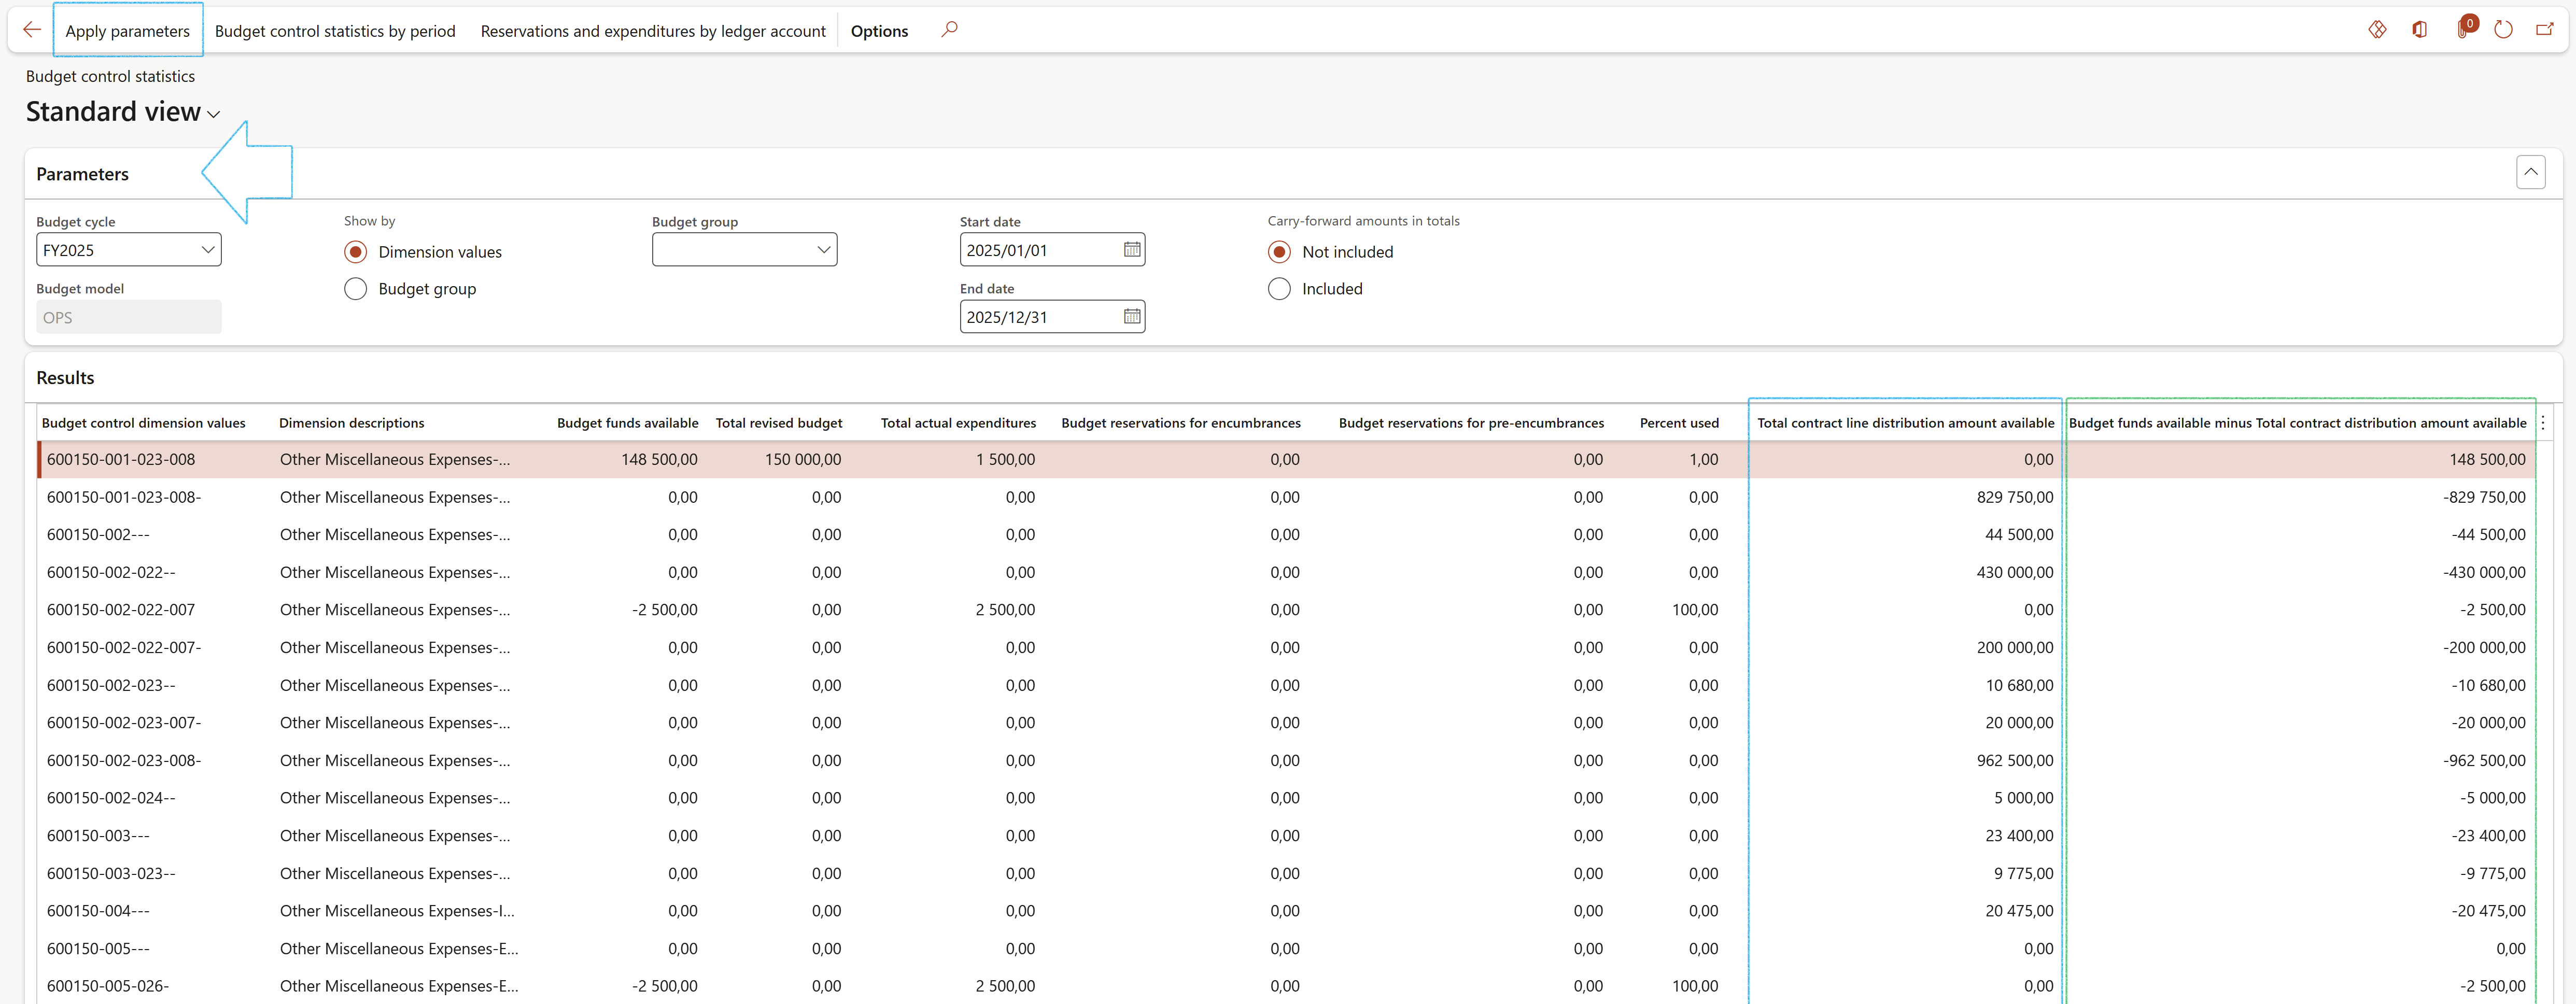
¶ Step 35: Purchase agreement from the contract
Purchase agreements refer to those agreements that commit an organization to buy a specified quantity or amount by using multiple purchase orders over time. In exchange for this commitment, the buyer receives special discounts, etc. Contracts are the starting point. One contract could have many purchase agreements linked to it.
¶ Step 35.1: Create Purchase agreement
Go to: GRC > Governance > Contracts > Contract register in legal entity
- Select the relevant contract
- Expand the Trading partners Fast tab
- In the Button strip, click on the Create agreement button and select Purchase agreement from the dropdown list
The Create agreement button will only be available when the contract is Approved
- On the Create purchase agreement dialog:
- Select the relevant Vendor account from the dropdown list
The selected Vendor account will be marked as the Prime vendor on the contract under the Trading partners Fast tab
The currency of the Prime vendor will populate the Currency field of the contract under the Content Fast tab
- Select the relevant Purchase agreement classification from the dropdown list
- Click on the OK button

If the contract from which the Purchase agreement is created, is marked as a Group contract, no Purchase agreement lines can be added or removed manually
¶ Step 35.1.1: General Fast tab
Go to: Accounts Payable > Purchase Orders > Purchase agreements
- Select the relevant Purchase Agreement record
- Open the Header view
- Expand the General Fast tab to view the details entered on the dialog
- Select the relevant Contact from the dropdown list
- Enter the Effective date
- Enter the Expiration date
- The contract is referenced under the Contract field group
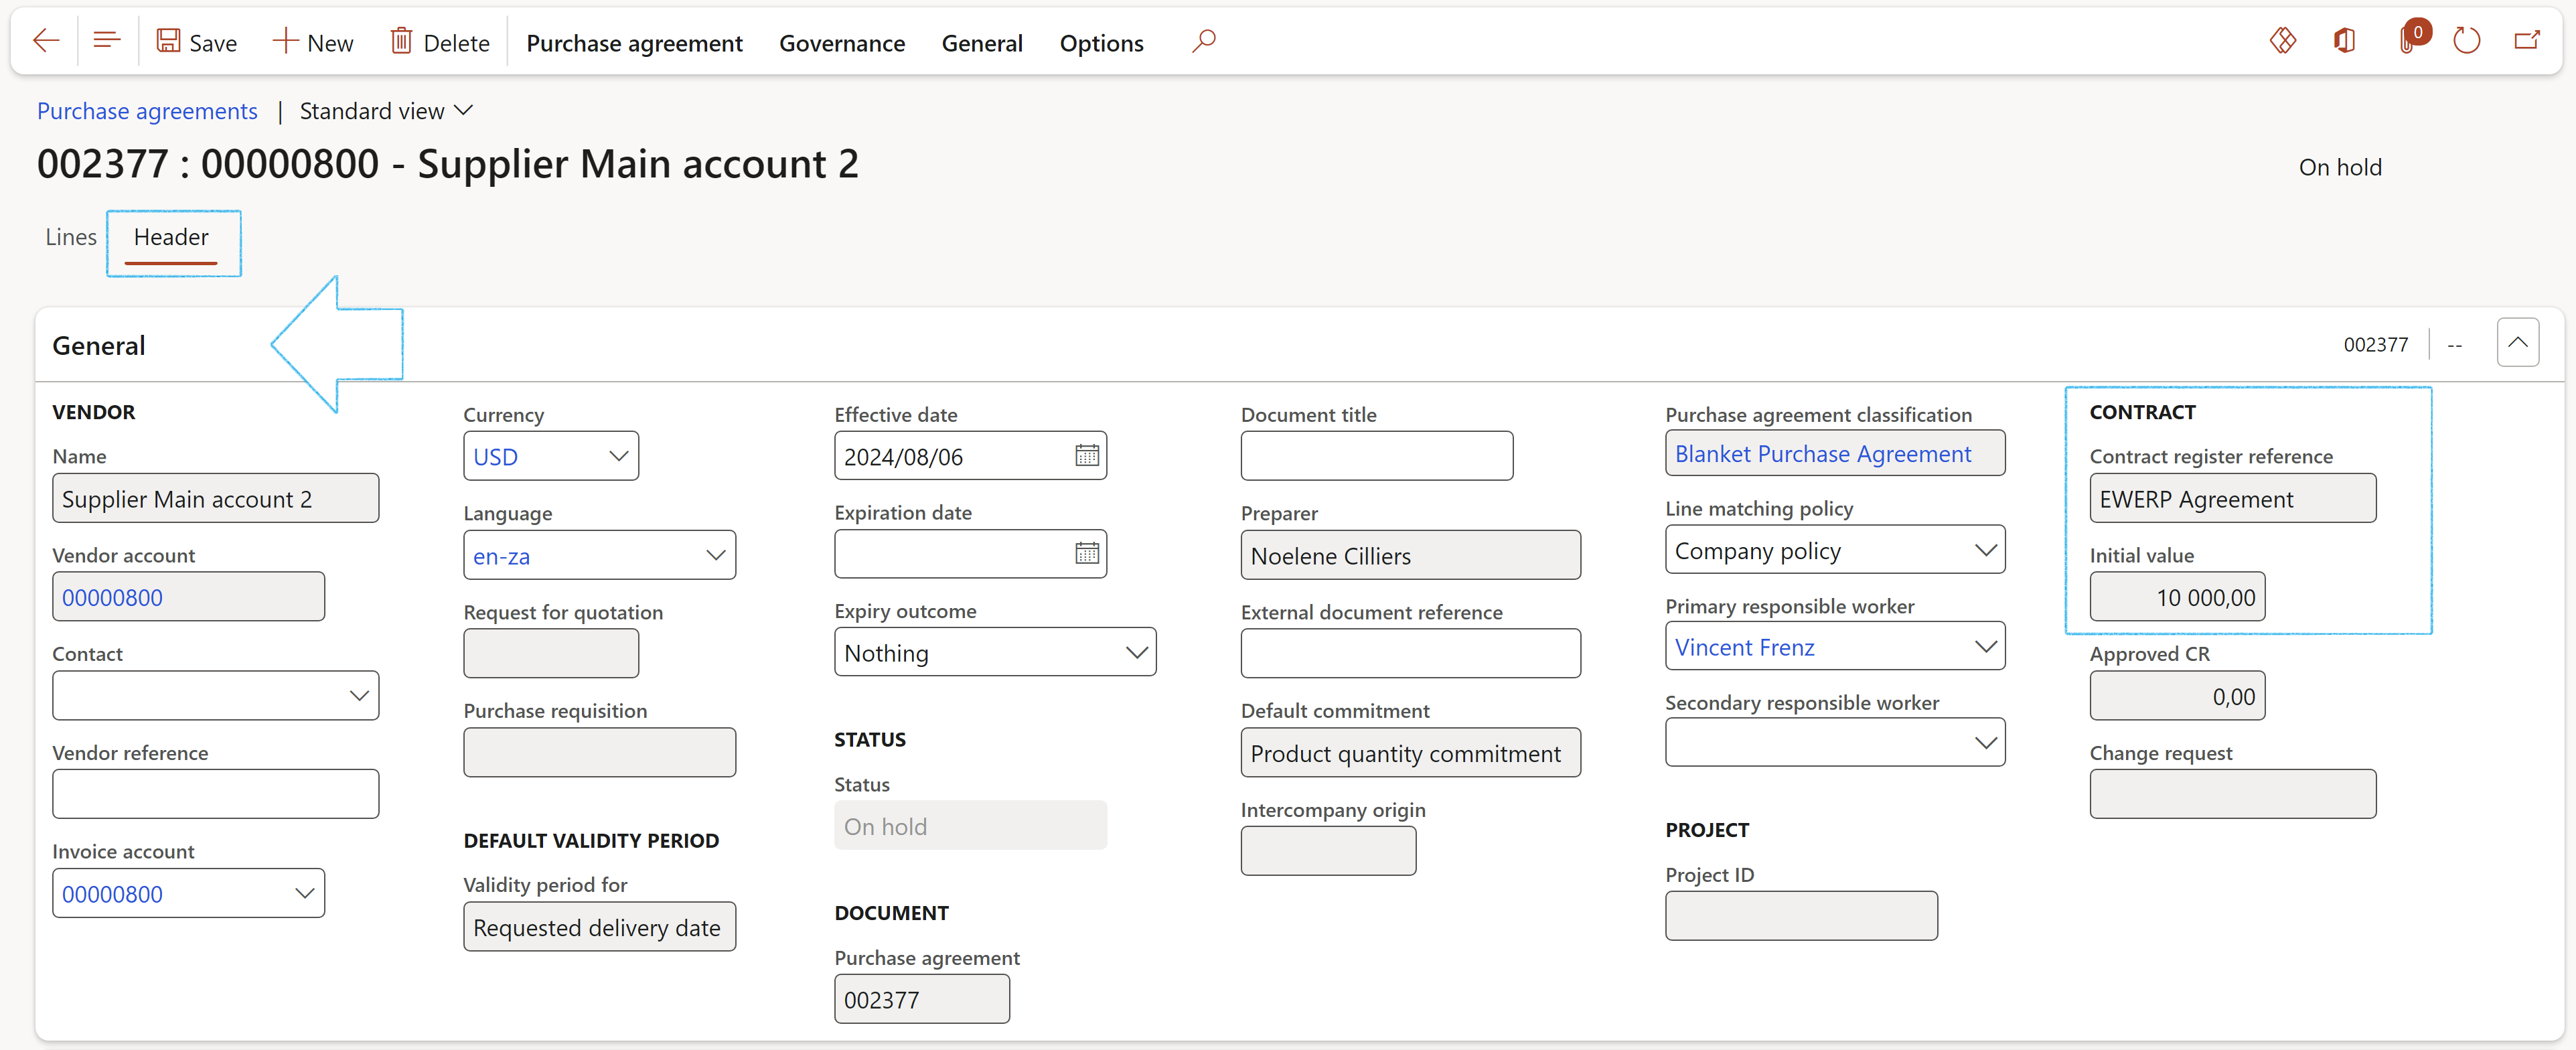
¶ Step 35.1.2: Contract administration
Contracting officers should set up, maintain and keep record on every aspect of a contract, both to provide a list of actions taken and to protect the organization’s interests under the contract (also to ensure compliance). This will provide an organizational memory of contract events.
Commercial summary
If lines were added to the Purchase agreement, click on the Recalculate button to update the total in the Line value field.
- Open the Commercials Index tab:
- The Line value which is the sum amount of the Net amount on the Purchase agreement lines, is displayed in the Line value field on the Purchase agreement Header.
- All of the “Governance tracking” entities could have a financial impact. Thus, Dynamics 365 will give a summary view of these under the Contract administration Fast tab.
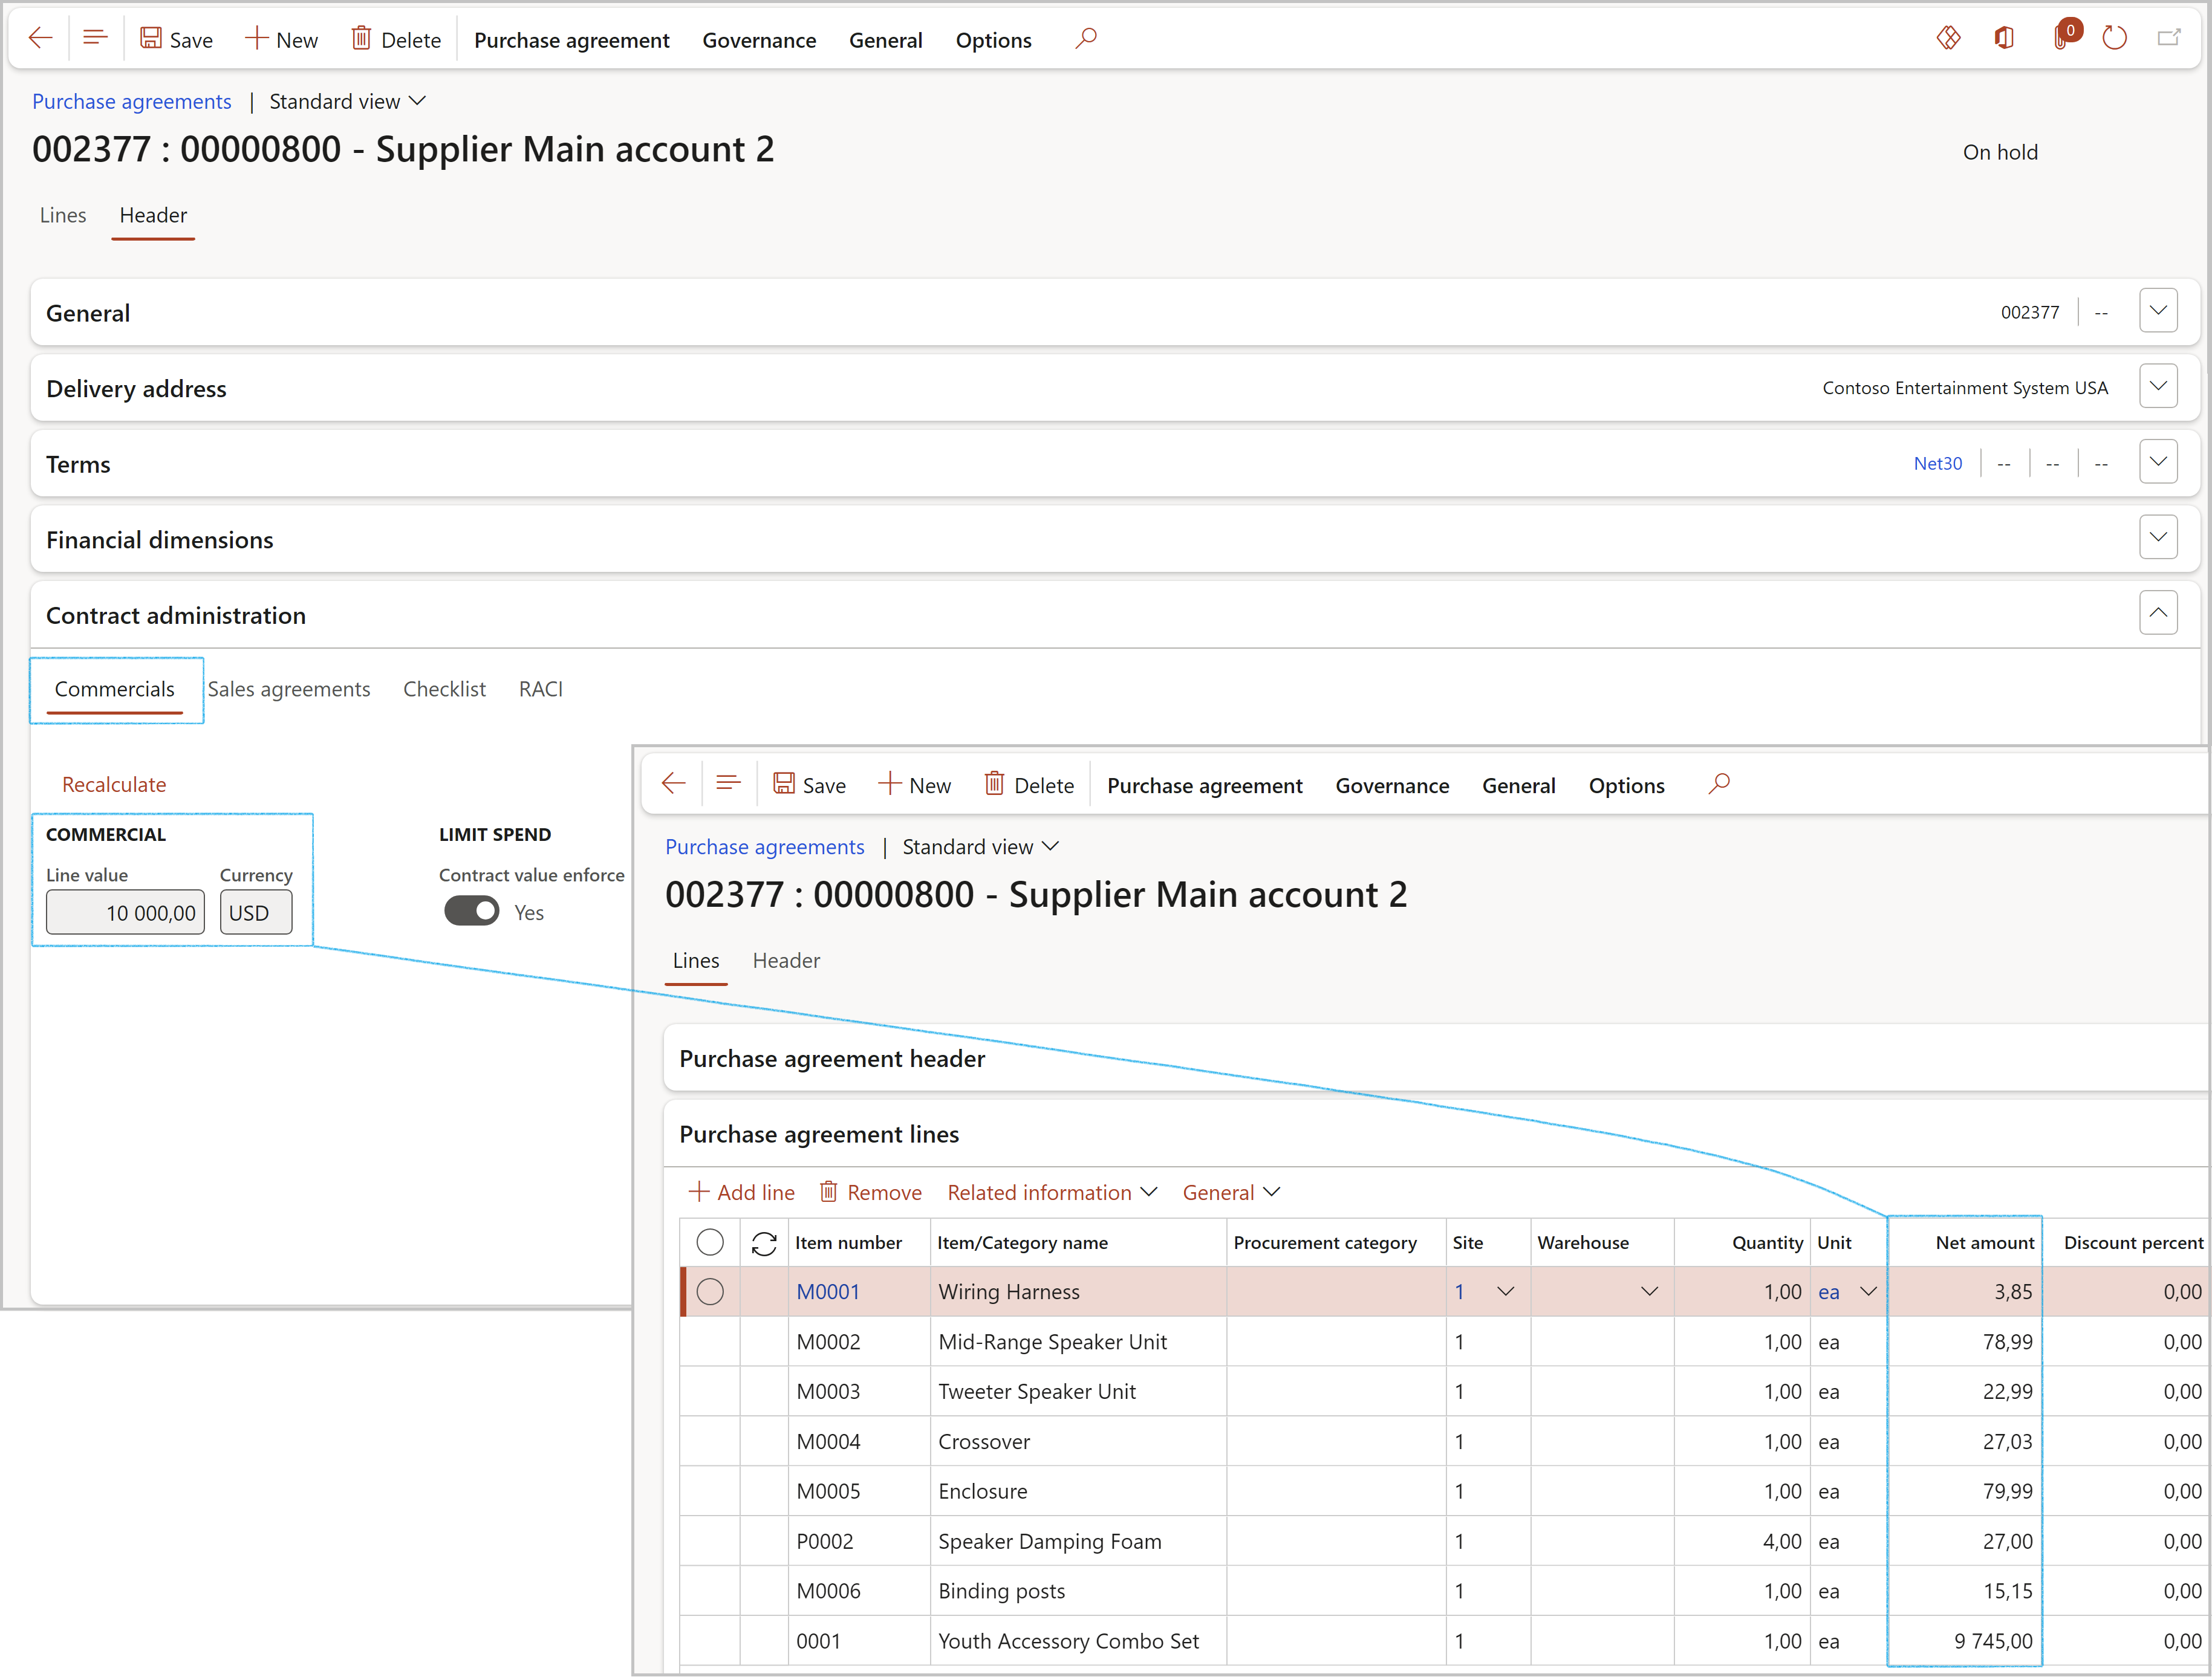
To view the details of the Contract value enforce:
- Open the Related information pane
- Expand the Contract value enforce Fast tab
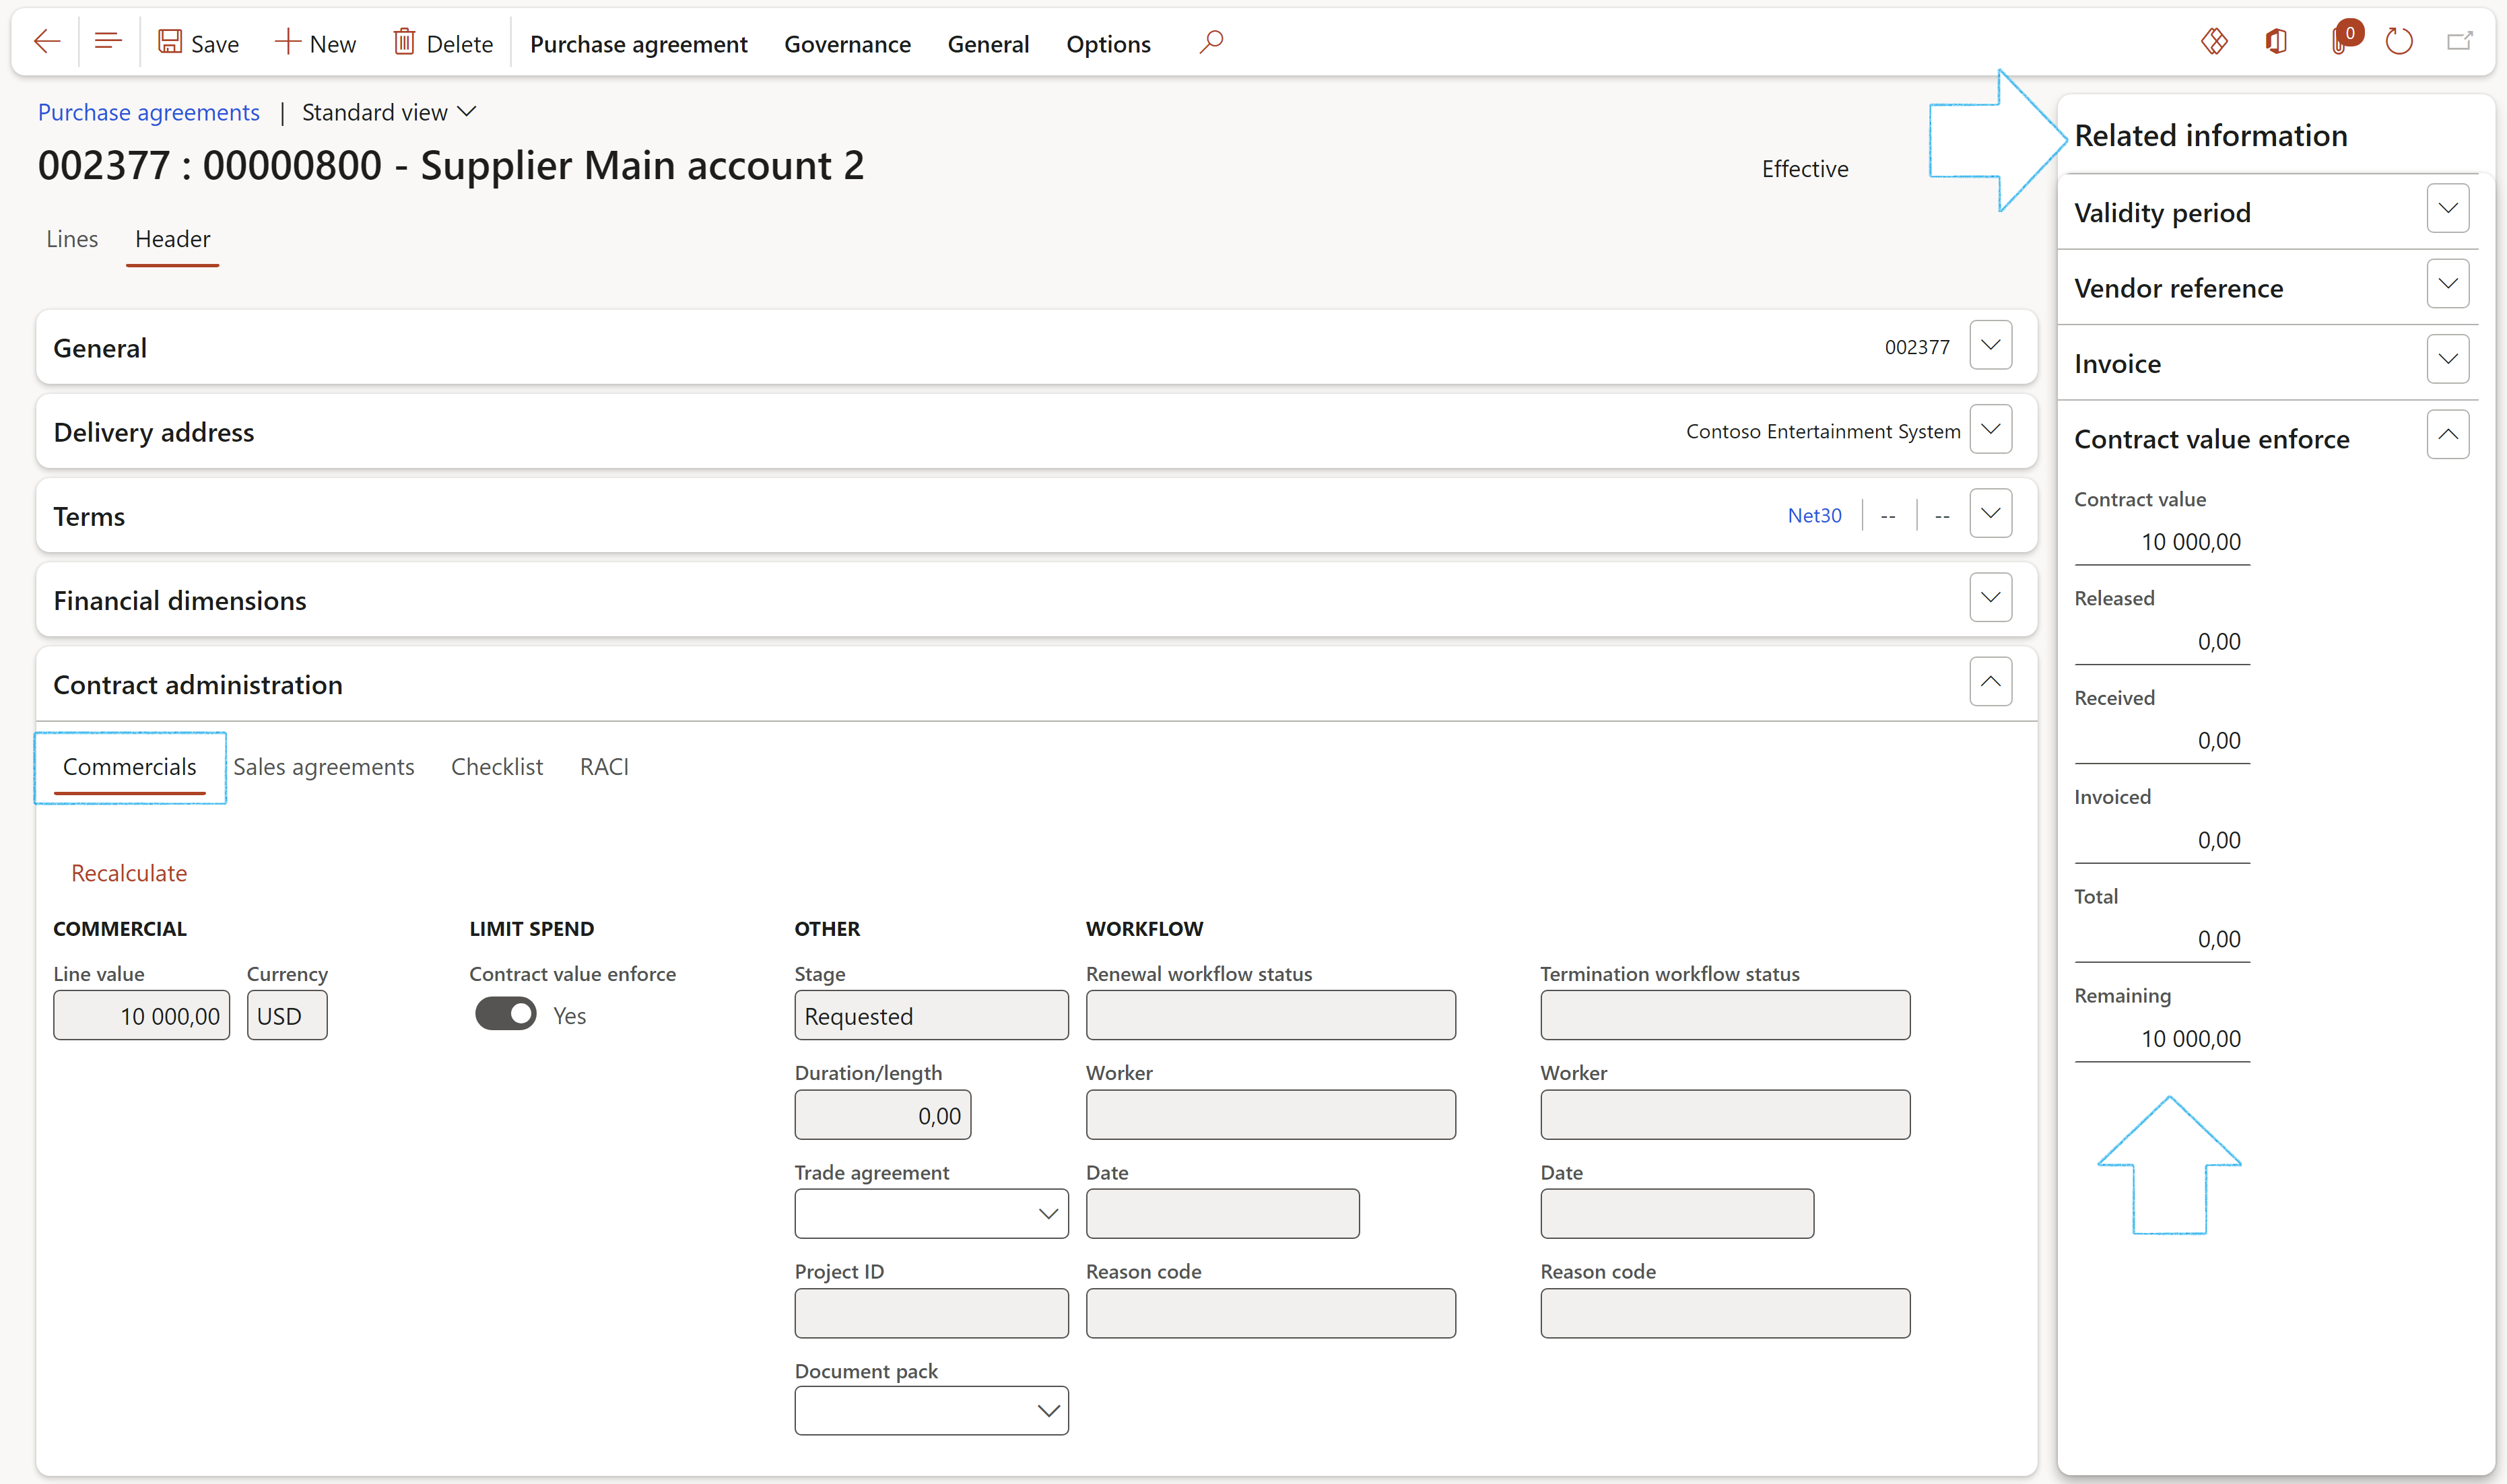
Back to back with sales
- Expand the Contract administration Fast tab
- Reference sales agreements under the Sales agreements Index tab
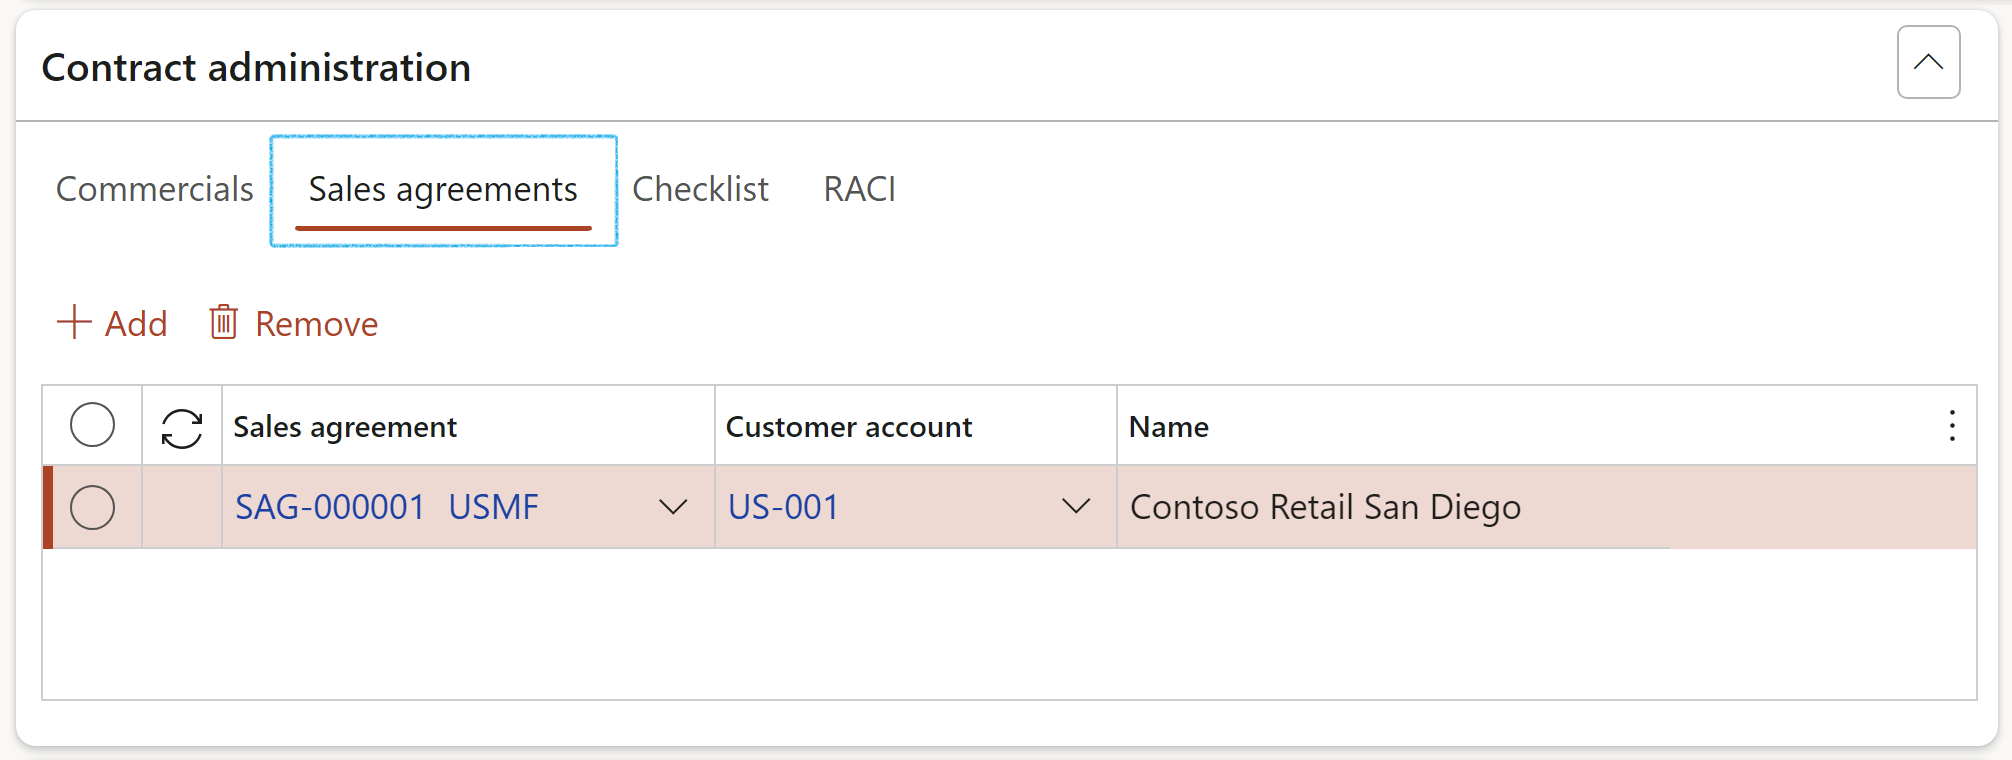
Checklist
An organization can create a formal checklist (steps to guide the buyers) to aid in the procurement process
- Open the Checklist Index tab
- Select the relevant Job plan from the dropdown list
- Click on the Save button
- Click on the Create checklist button (a checklist will be created from the job plan)
- Click on the Go to checklist button, to close a checklist item
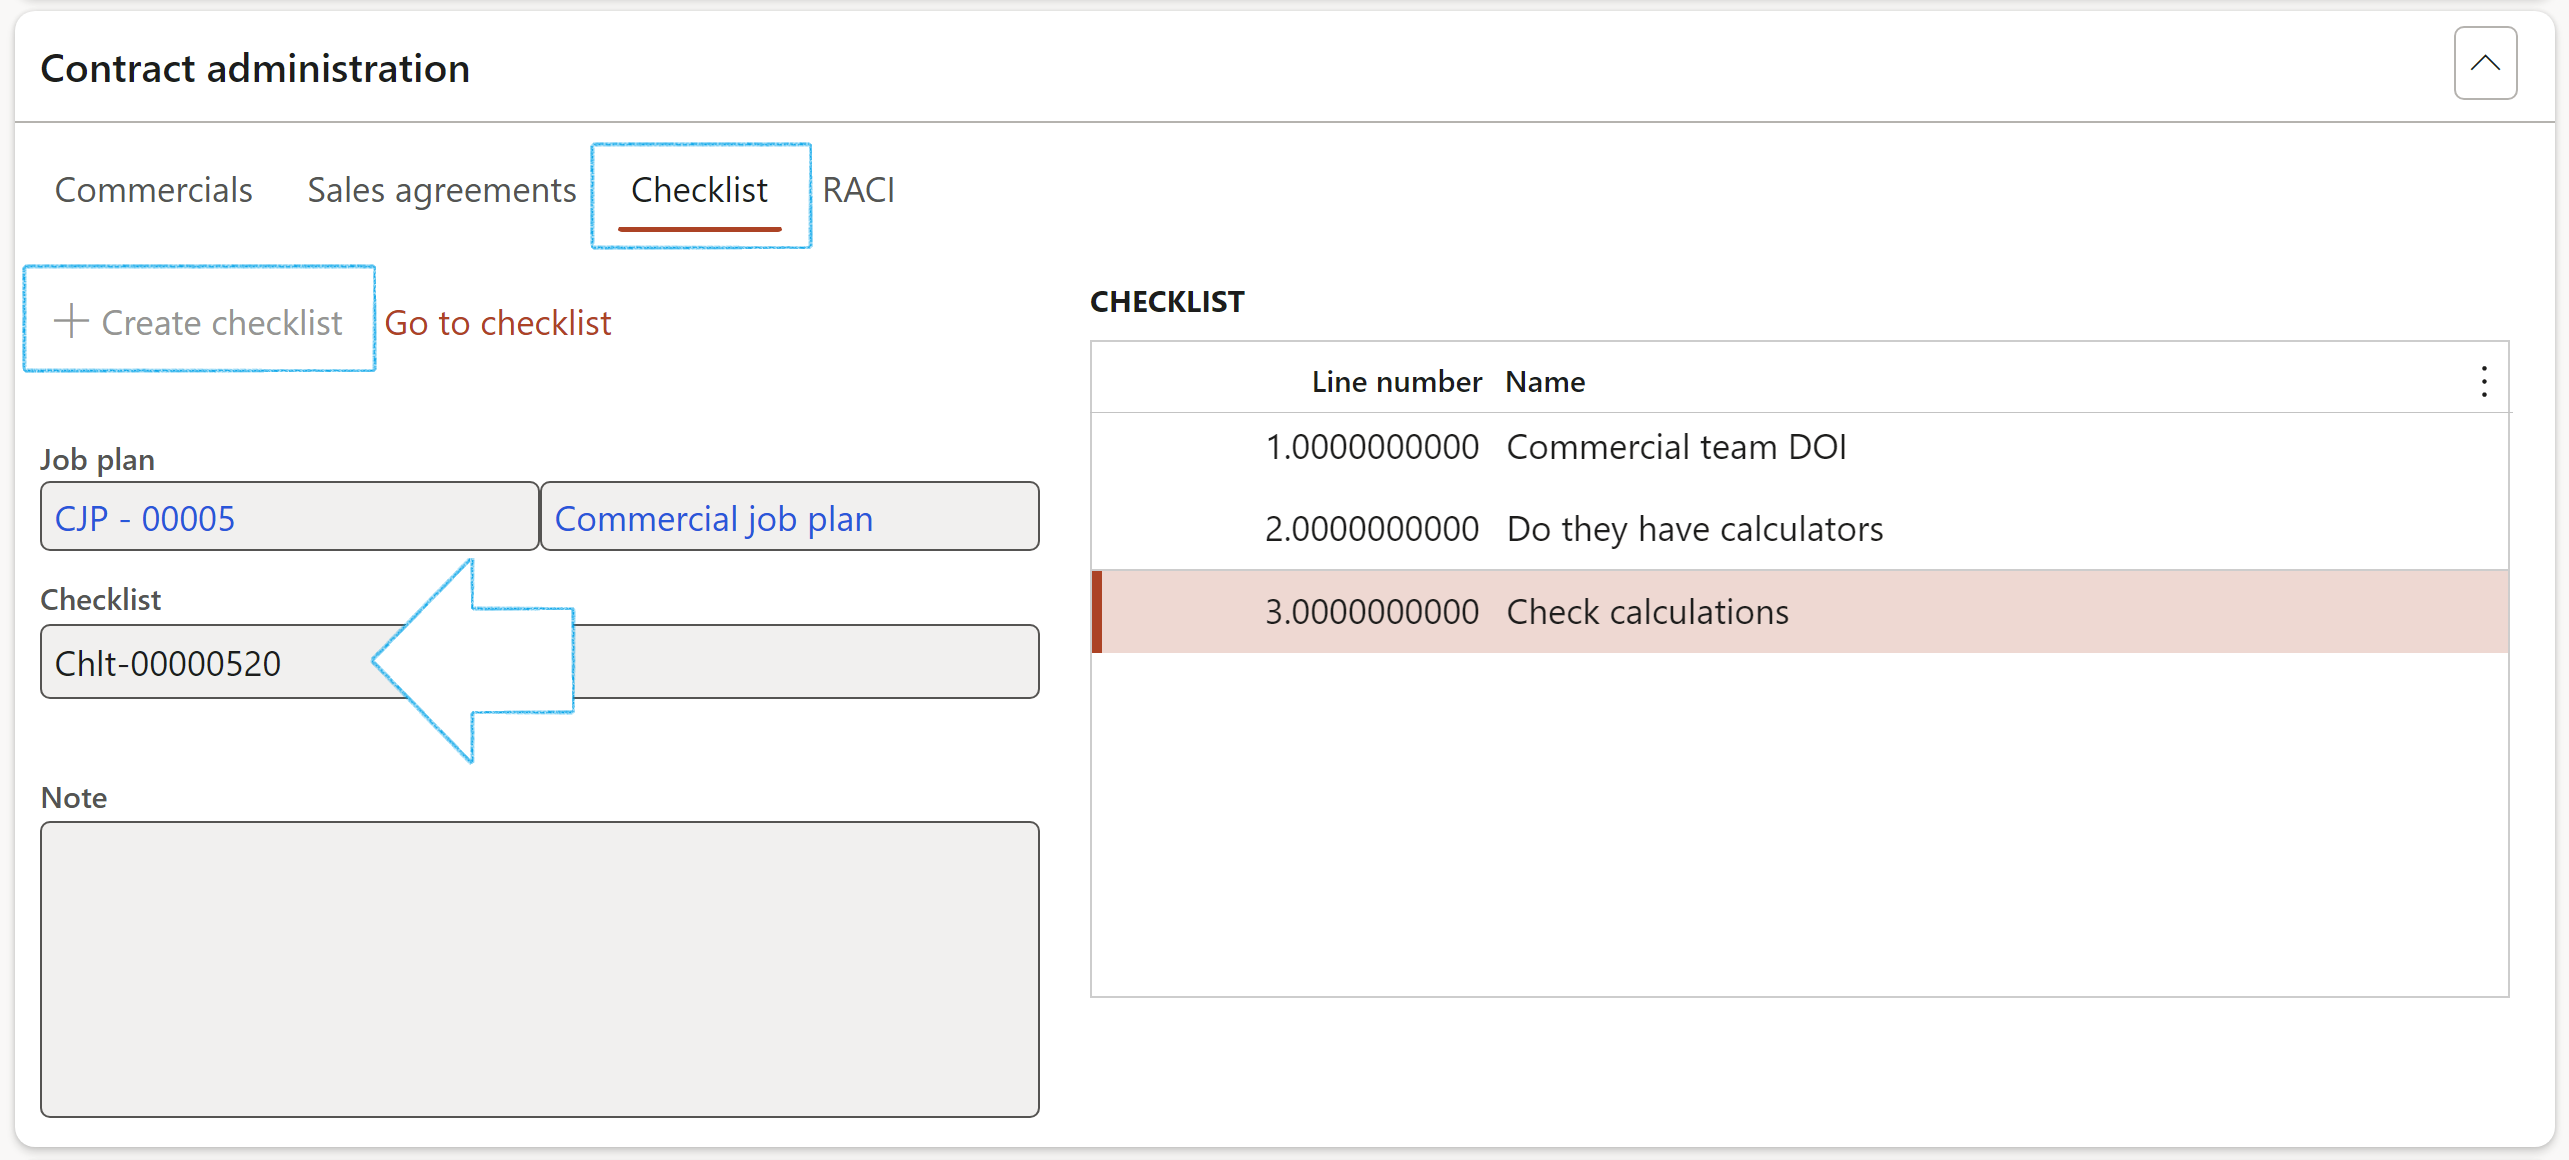
Checklists need to be closed and applicable feedback given
¶ Step 35.2: Update Purchase agreement
- On the Contract, in the Action pane, click on the Create CR button and enter the relevant detail on the dialog
- In the Related information pane, click on the link to go to the Change request
Refer to the Daily use section in the Management of change Wiki page on how to enter the relevant detail on the Change request form
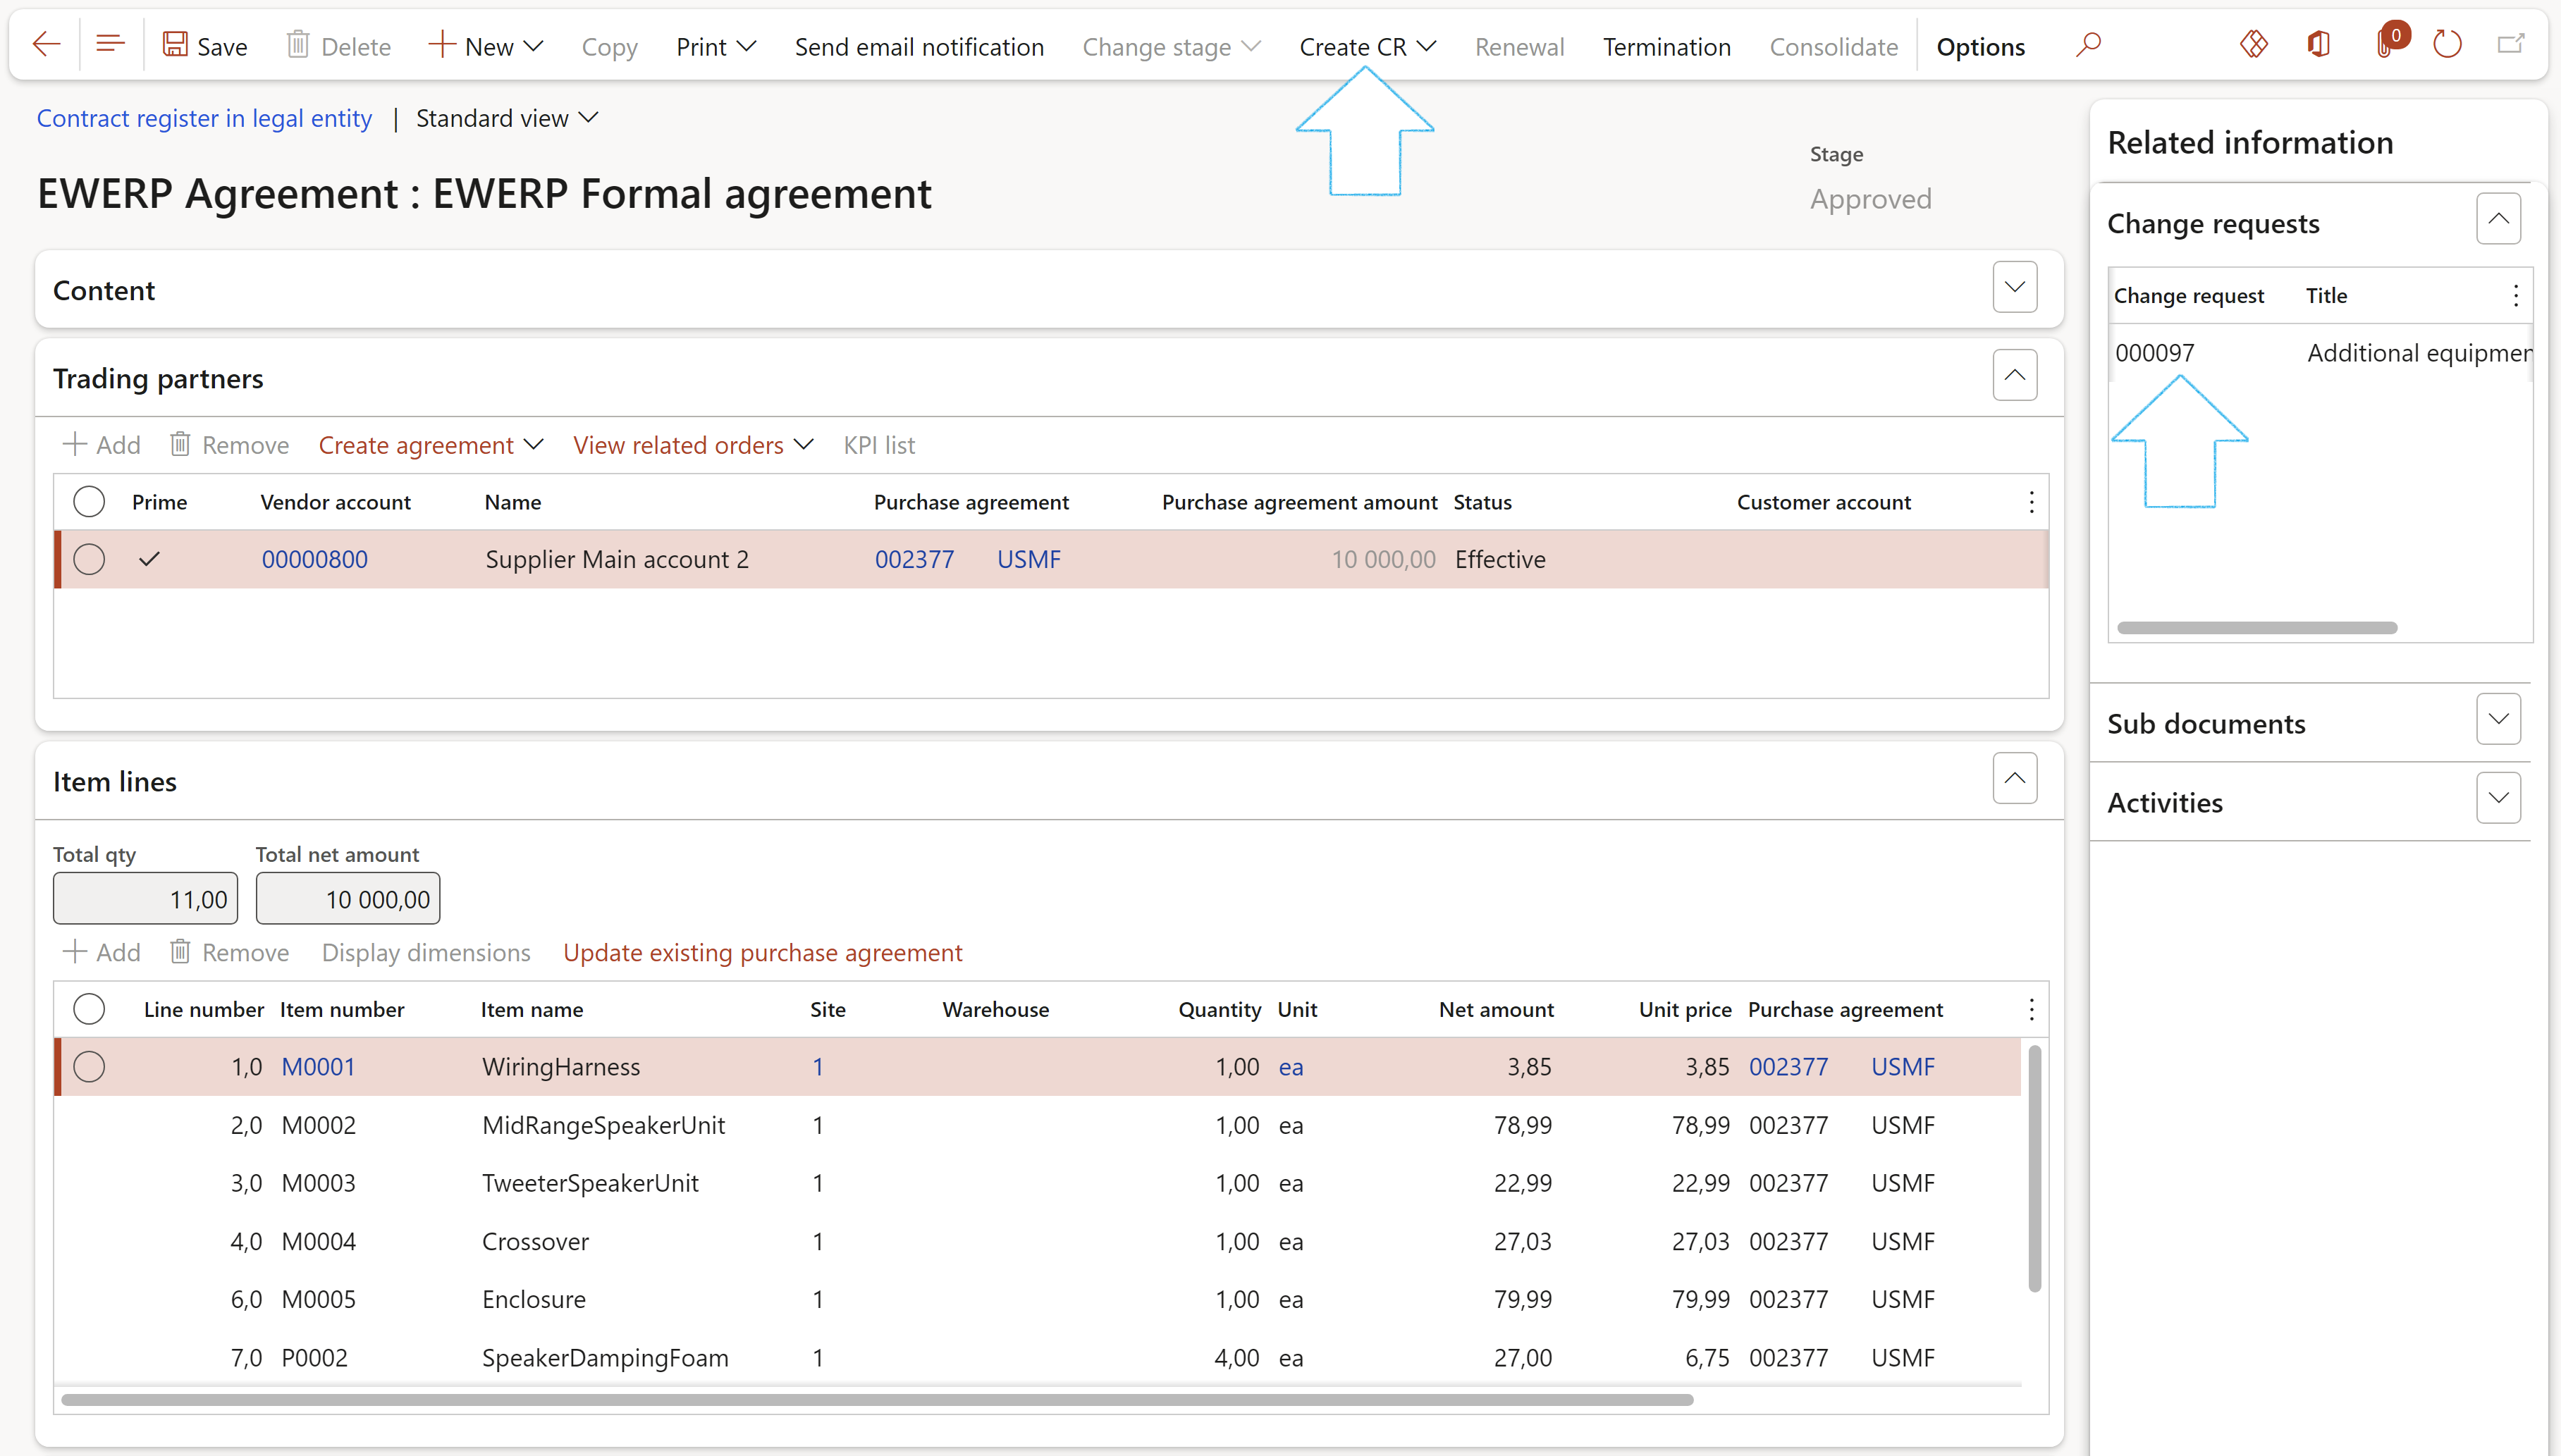
- On the Change request, in the Action pane, click on the Approve button
- A message will pop up asking the user if a new Purchase agreement must be created for this change request. Click on the No button.
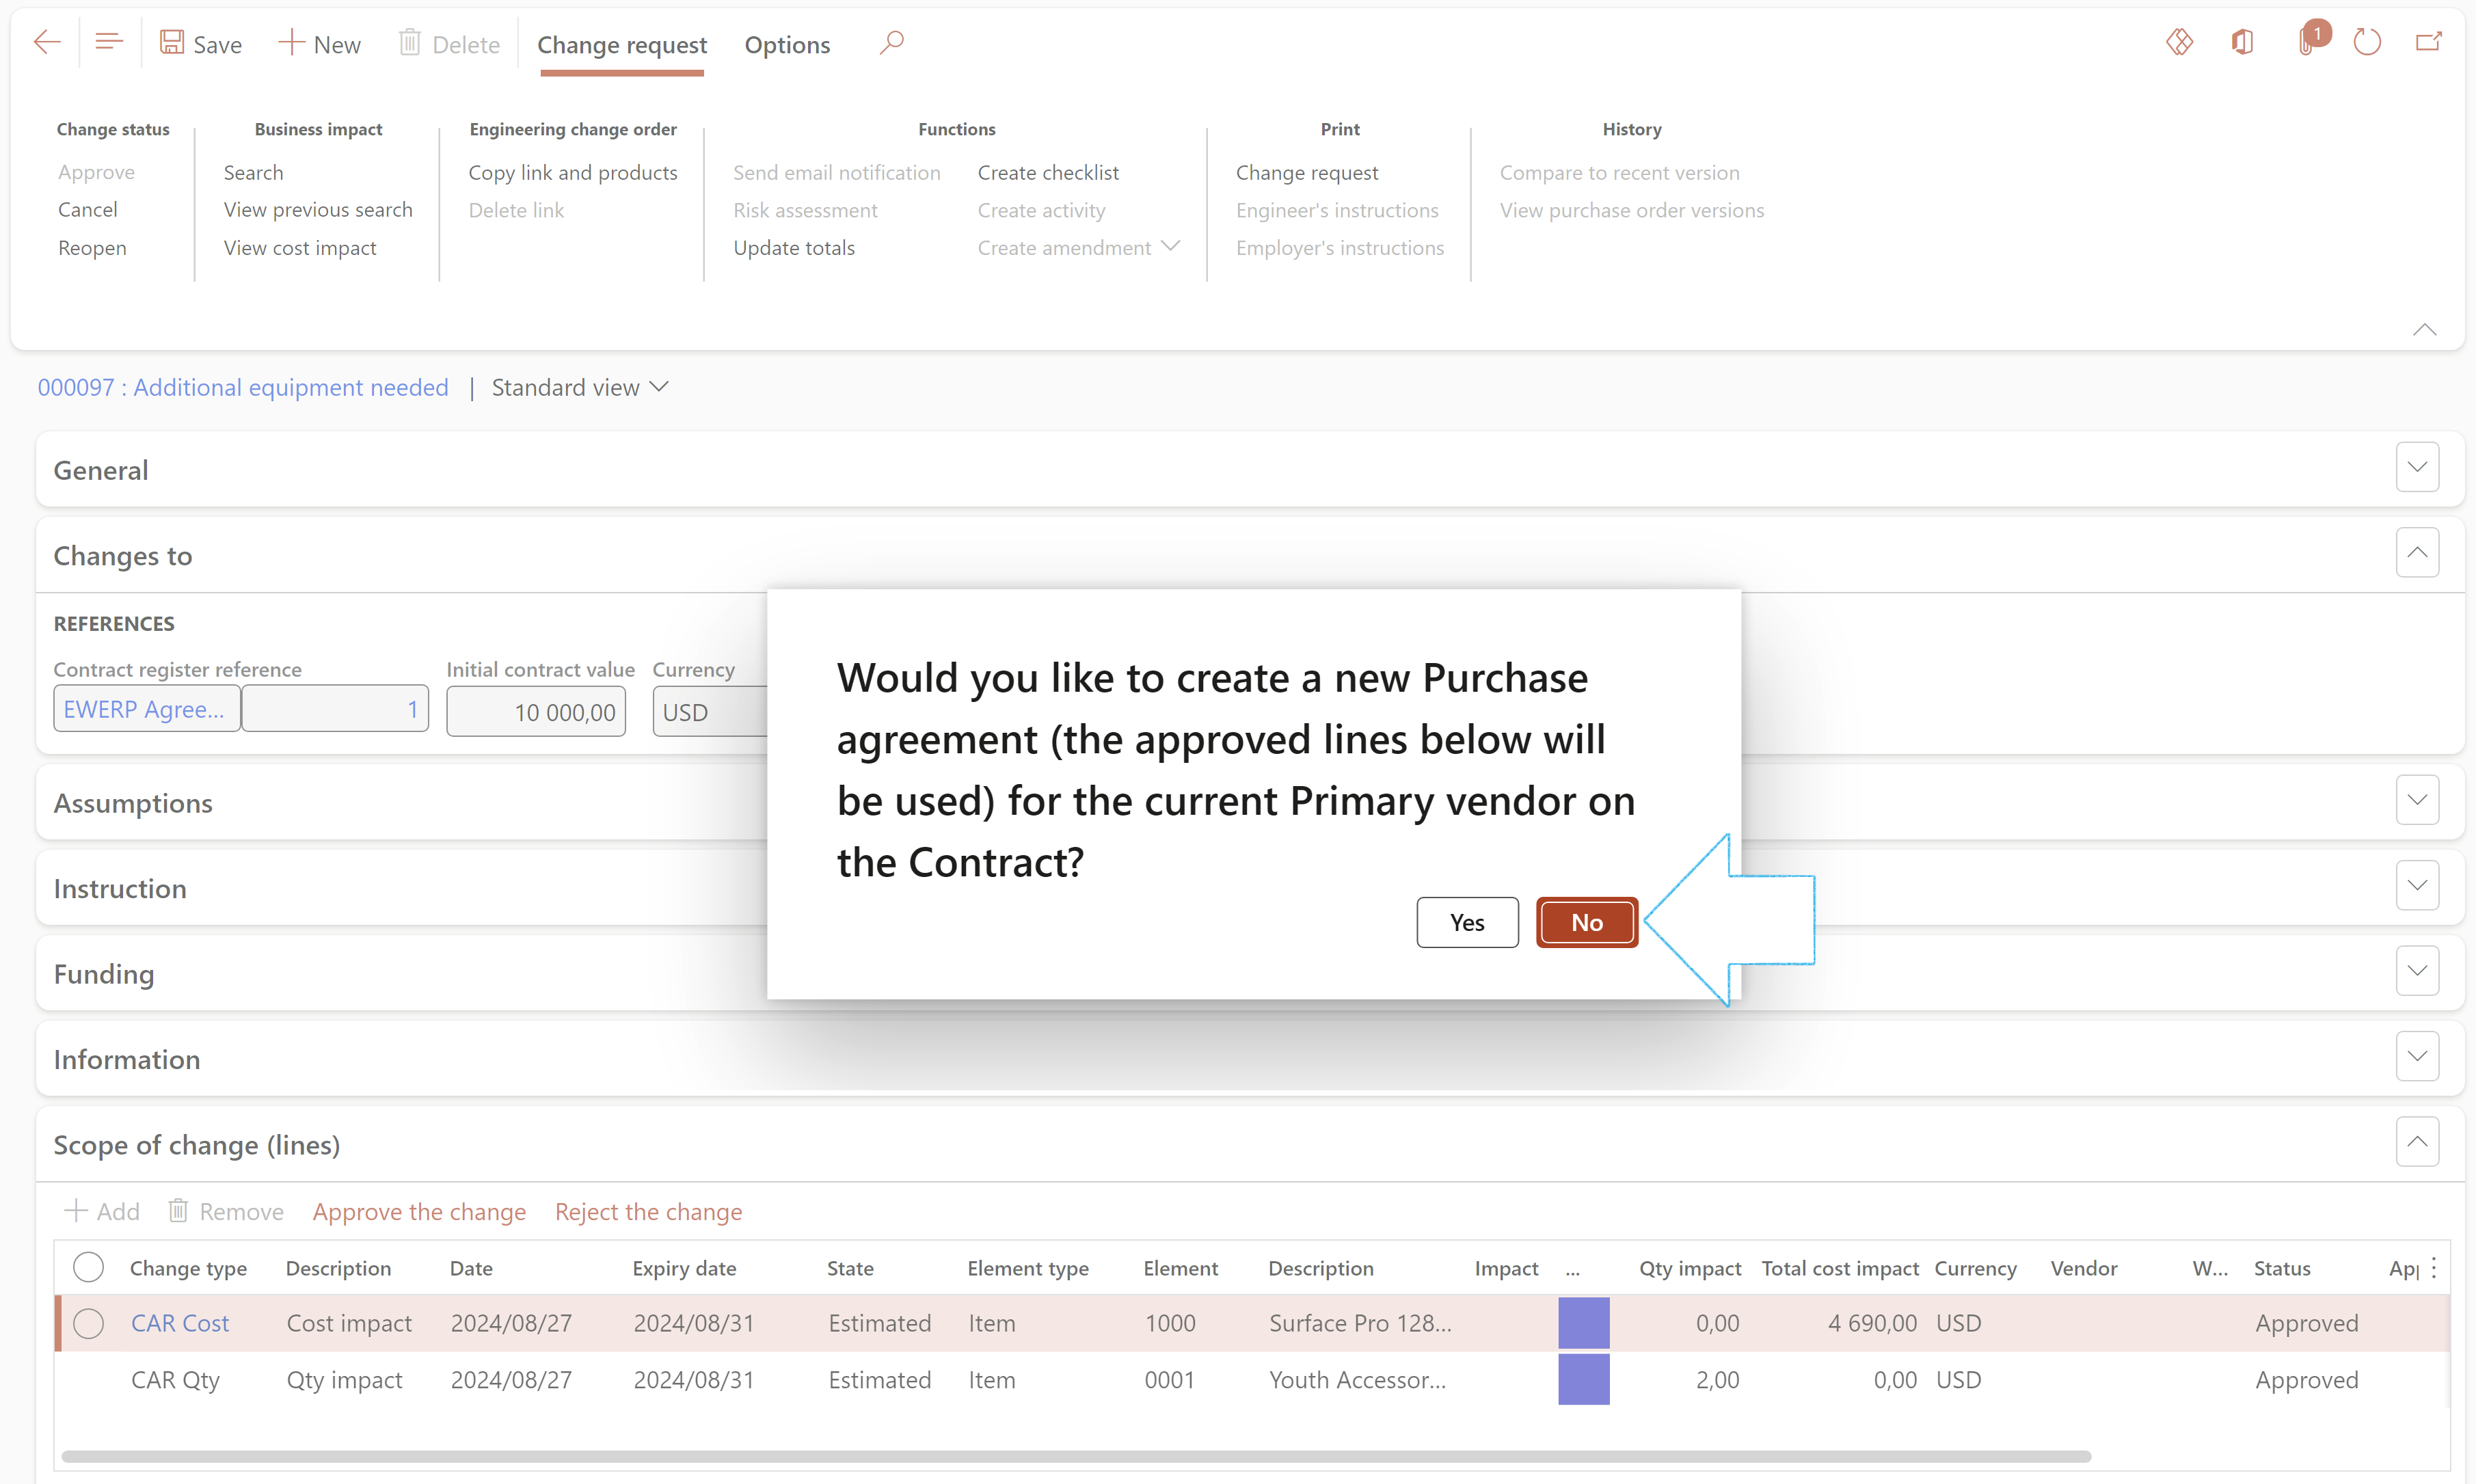
The additional lines that were created via the Change request, will now be on the Contract under the Item lines Fast tab.
- On the Contract, expand the Item lines Fast tab
- In the Button strip, click on the Update existing purchase agreement button
- On the Update existing purchase agreement dialog, select the relevant Purchase agreement from the dropdown list
- Select the line that you want to update the purchase agreement with
- On the line, select the Purchase agreement line to be updated, if applicable
- Click on the Update button
If the selected line is already present on the Purchase agreement, the Exists on purchase agreement value will be ticked and the applicable line can be selected in the Purchase agreement line column
If an Item or Procurement category does not exist on the Purchase agreement, the selected Item or Procurement category line will be added as a new line on the Purchase agreement
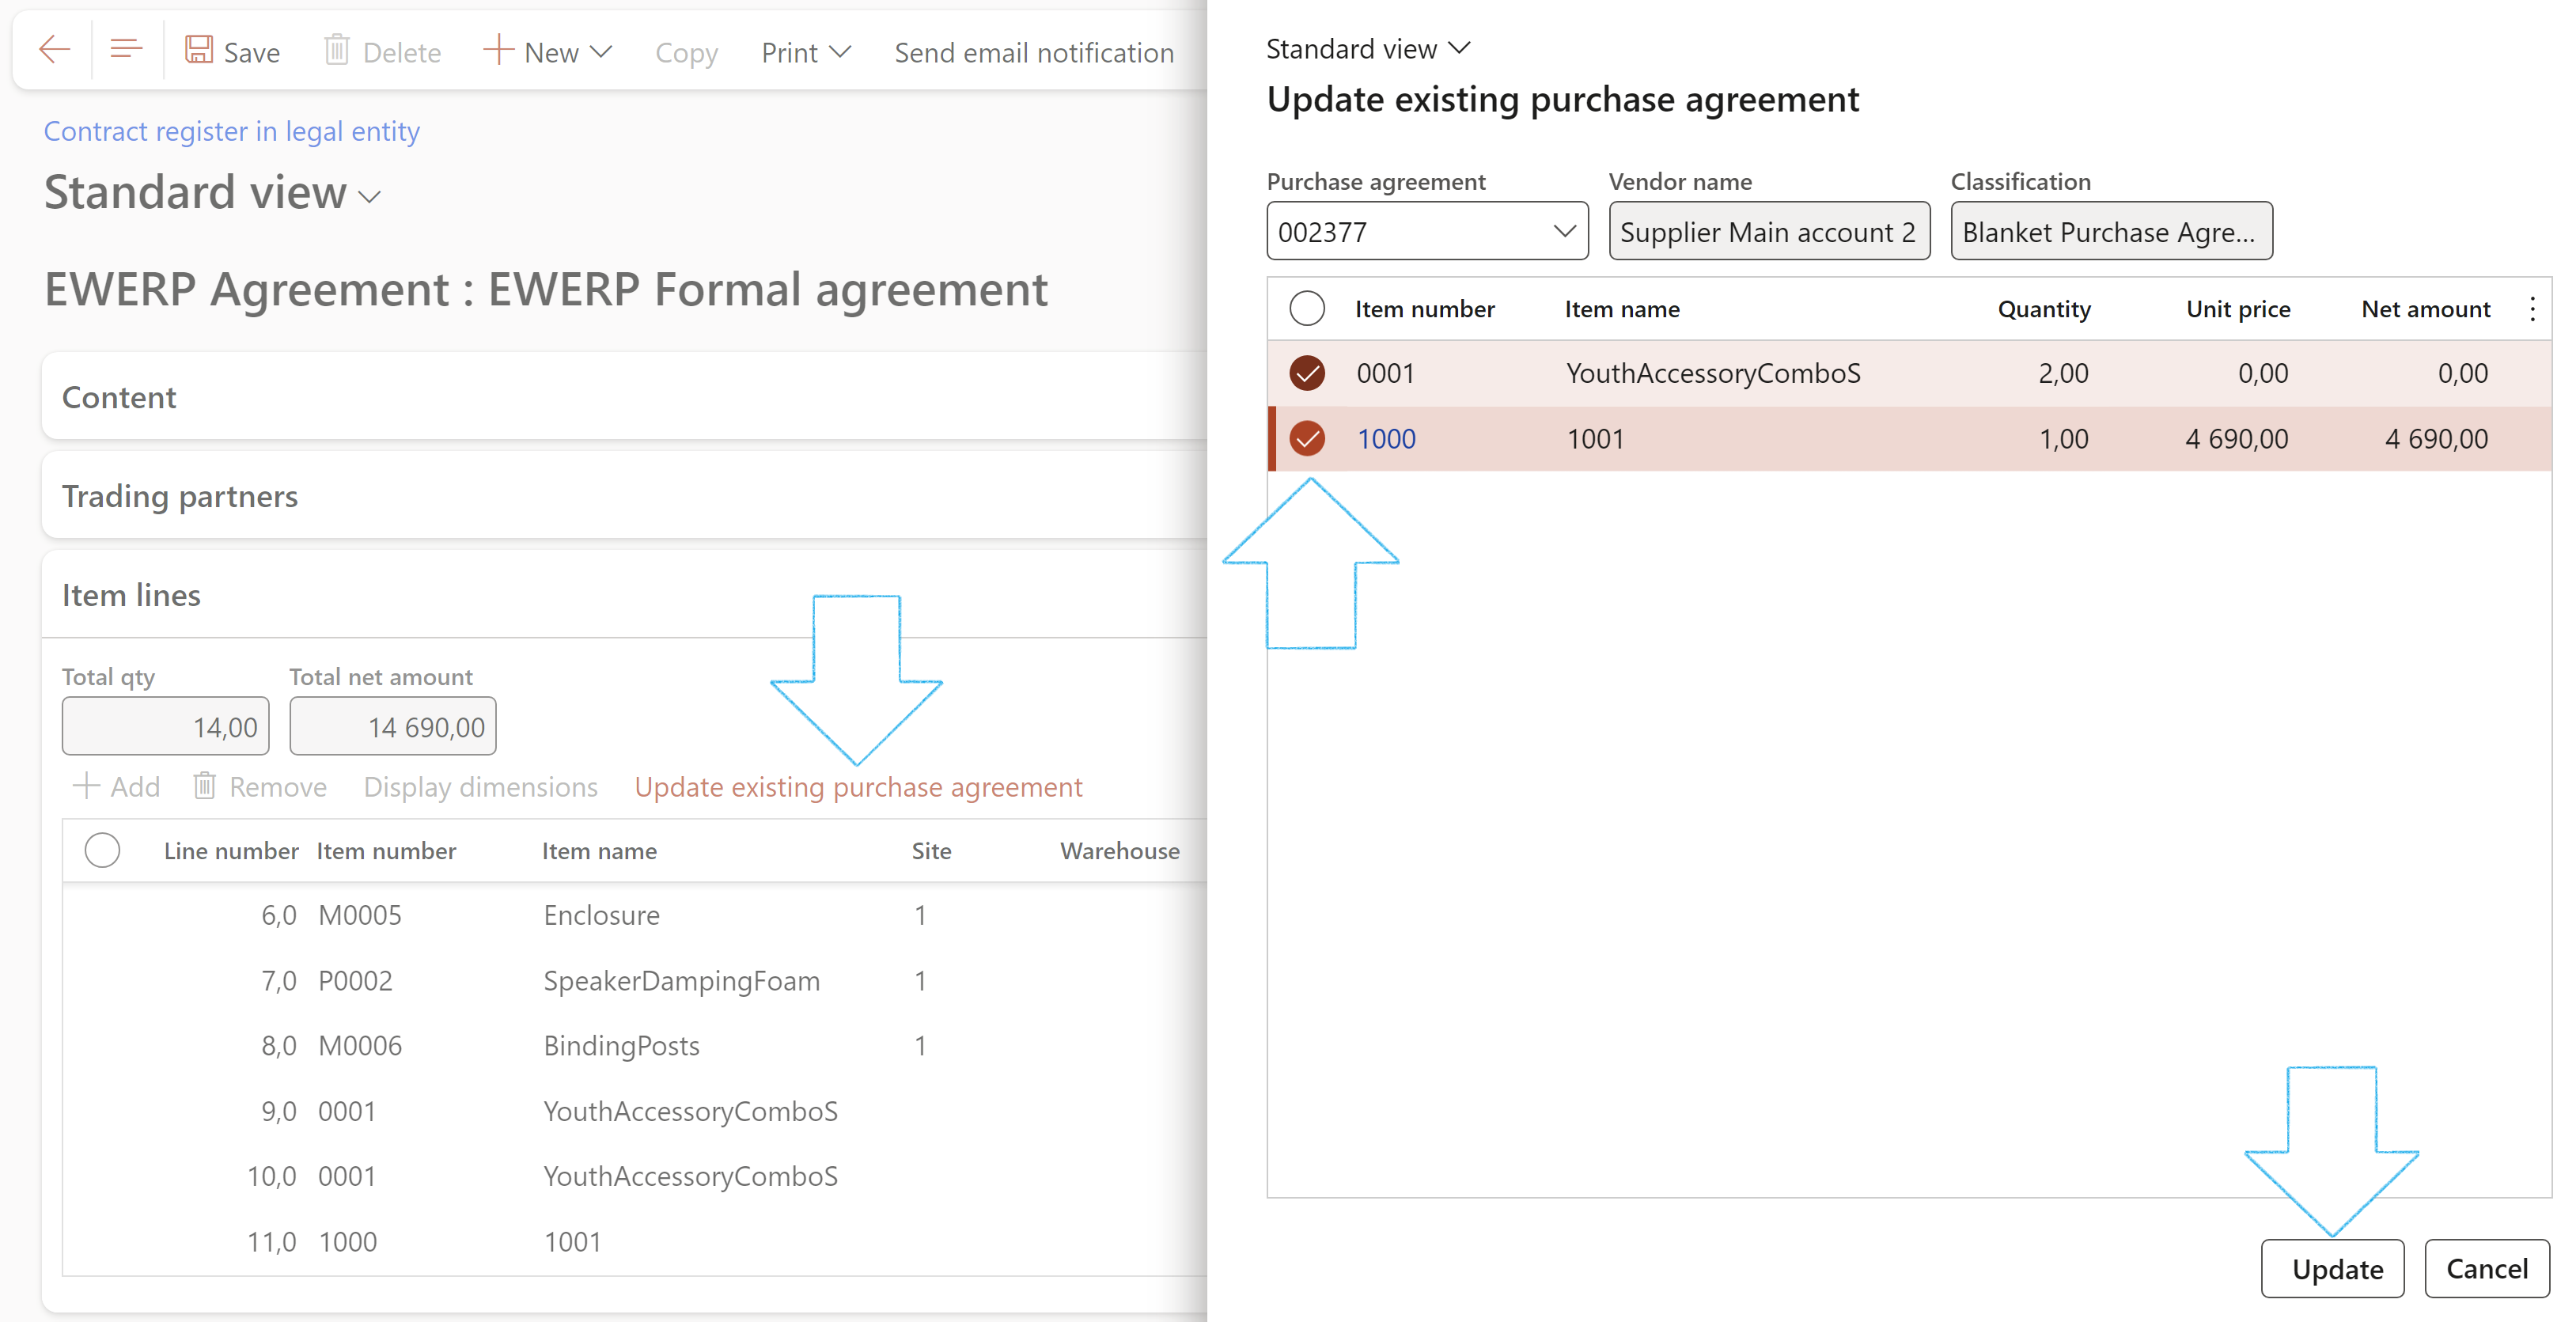
The Purchase agreement will now be referenced on the newly added Item lines on the Contract
On the Purchase agreement under the Purchase agreement lines Fast tab:
- If an Item or Procurement category existed on the Purchase agreement and the quantity of the item was changed, the quantity will be updated on the relevant Item or Procurement category line
- If an Item or Procurement category existed on the Purchase agreement and the Net amount of the item was changed, the Net amount will be updated on the relevant Item or Procurement category line
- If an Item or Procurement category did not exist on the Purchase agreement and was added as described above, the Item or Procurement category will be added under the Purchase agreement lines
¶ Step 36: Creating a Purchase agreement
Go to: GRC > Governance > Contracts > Purchase agreements
- On the Action pane, click on the New button
- On the Create purchase agreement dialog, enter the following:
- Select the relevant Vendor/Supplier account from the dropdown list
- Select the relevant Purchase agreement classification from the dropdown list
If the AP Enforce slider is set to No (on the Contract), the list of purchase agreement classification options will be filtered on where the Contract value enforce is set to No.
If the AP Enforce slider is set to Yes (on the Contract), the list of purchase agreement classification options will be filtered on where the Contract value enforce is set to Yes.
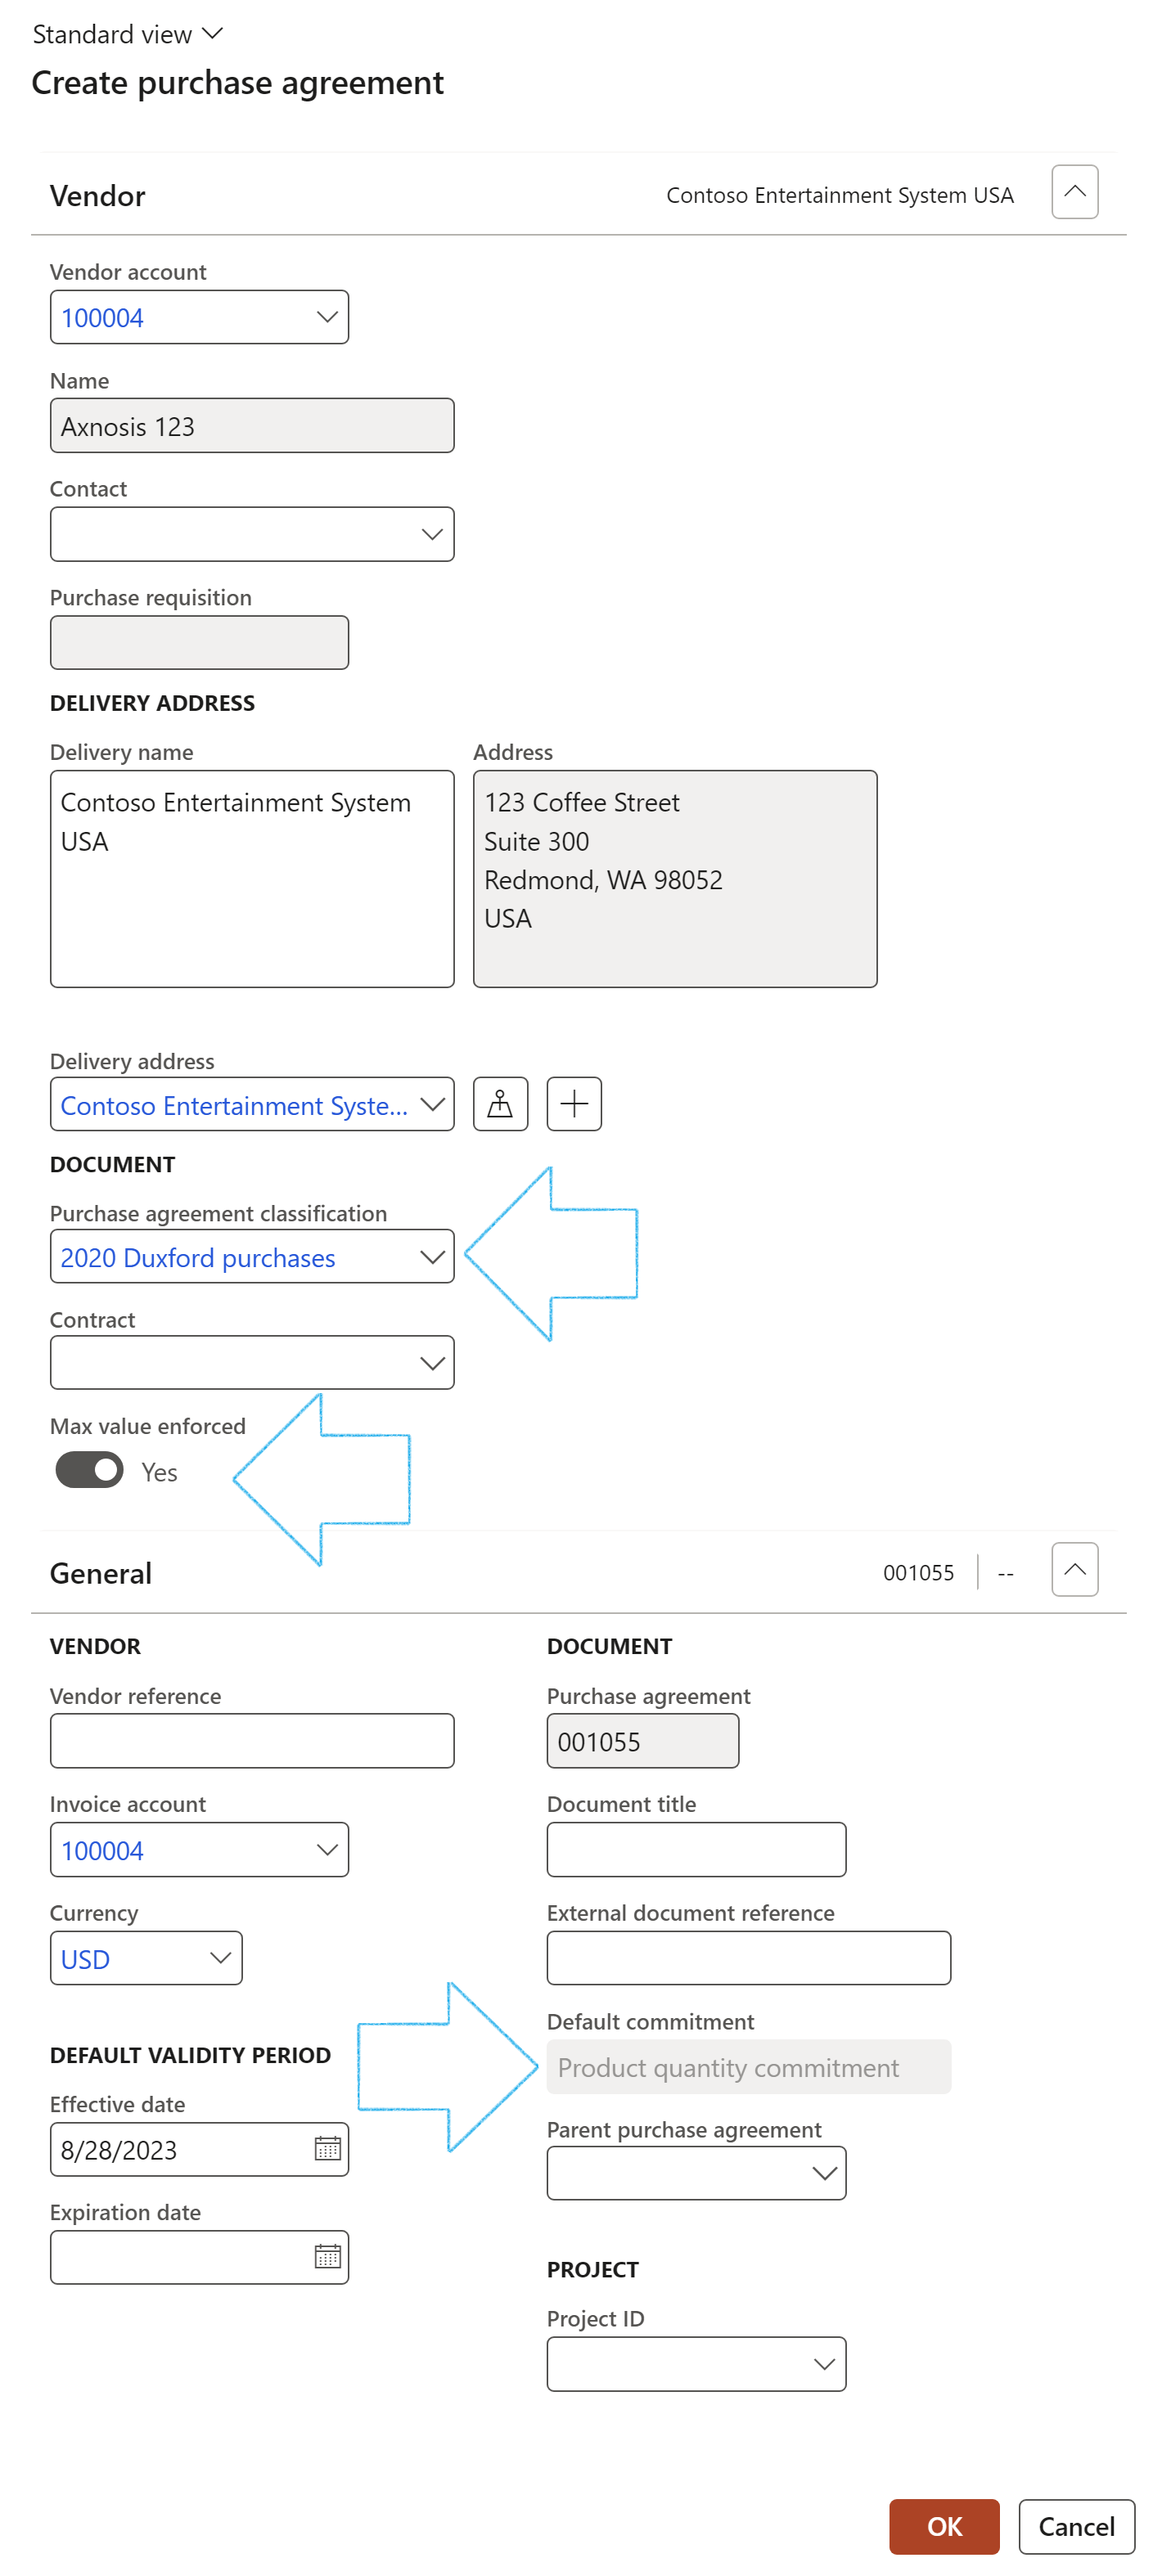
If a Purchase agreement classification is selected where Max value is enforced, the Max value enforced slider will be set to Yes, and the Default commitment field will be non-editable.
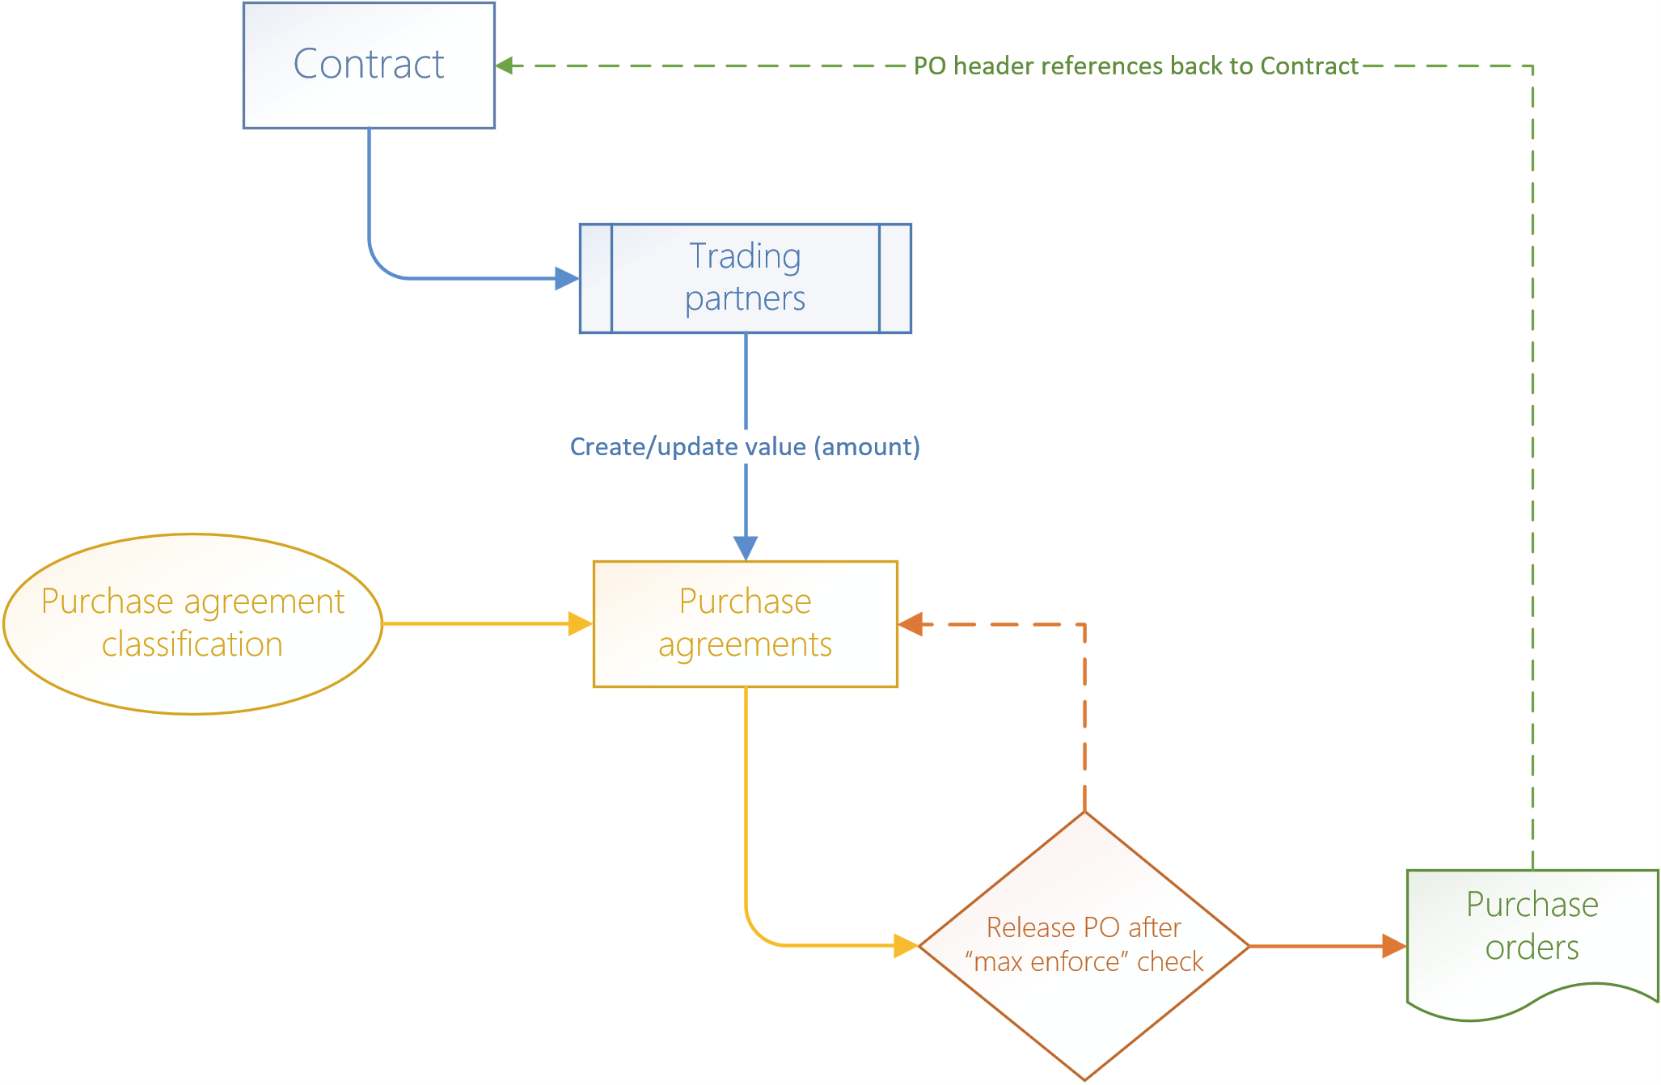
On every release (creation) of a Purchase order from a Purchase agreement (which is linked back to the contract), a check is done to show users an error message and to prevent them from releasing the next PO if the value of the next PO is going to exceed the contract value.
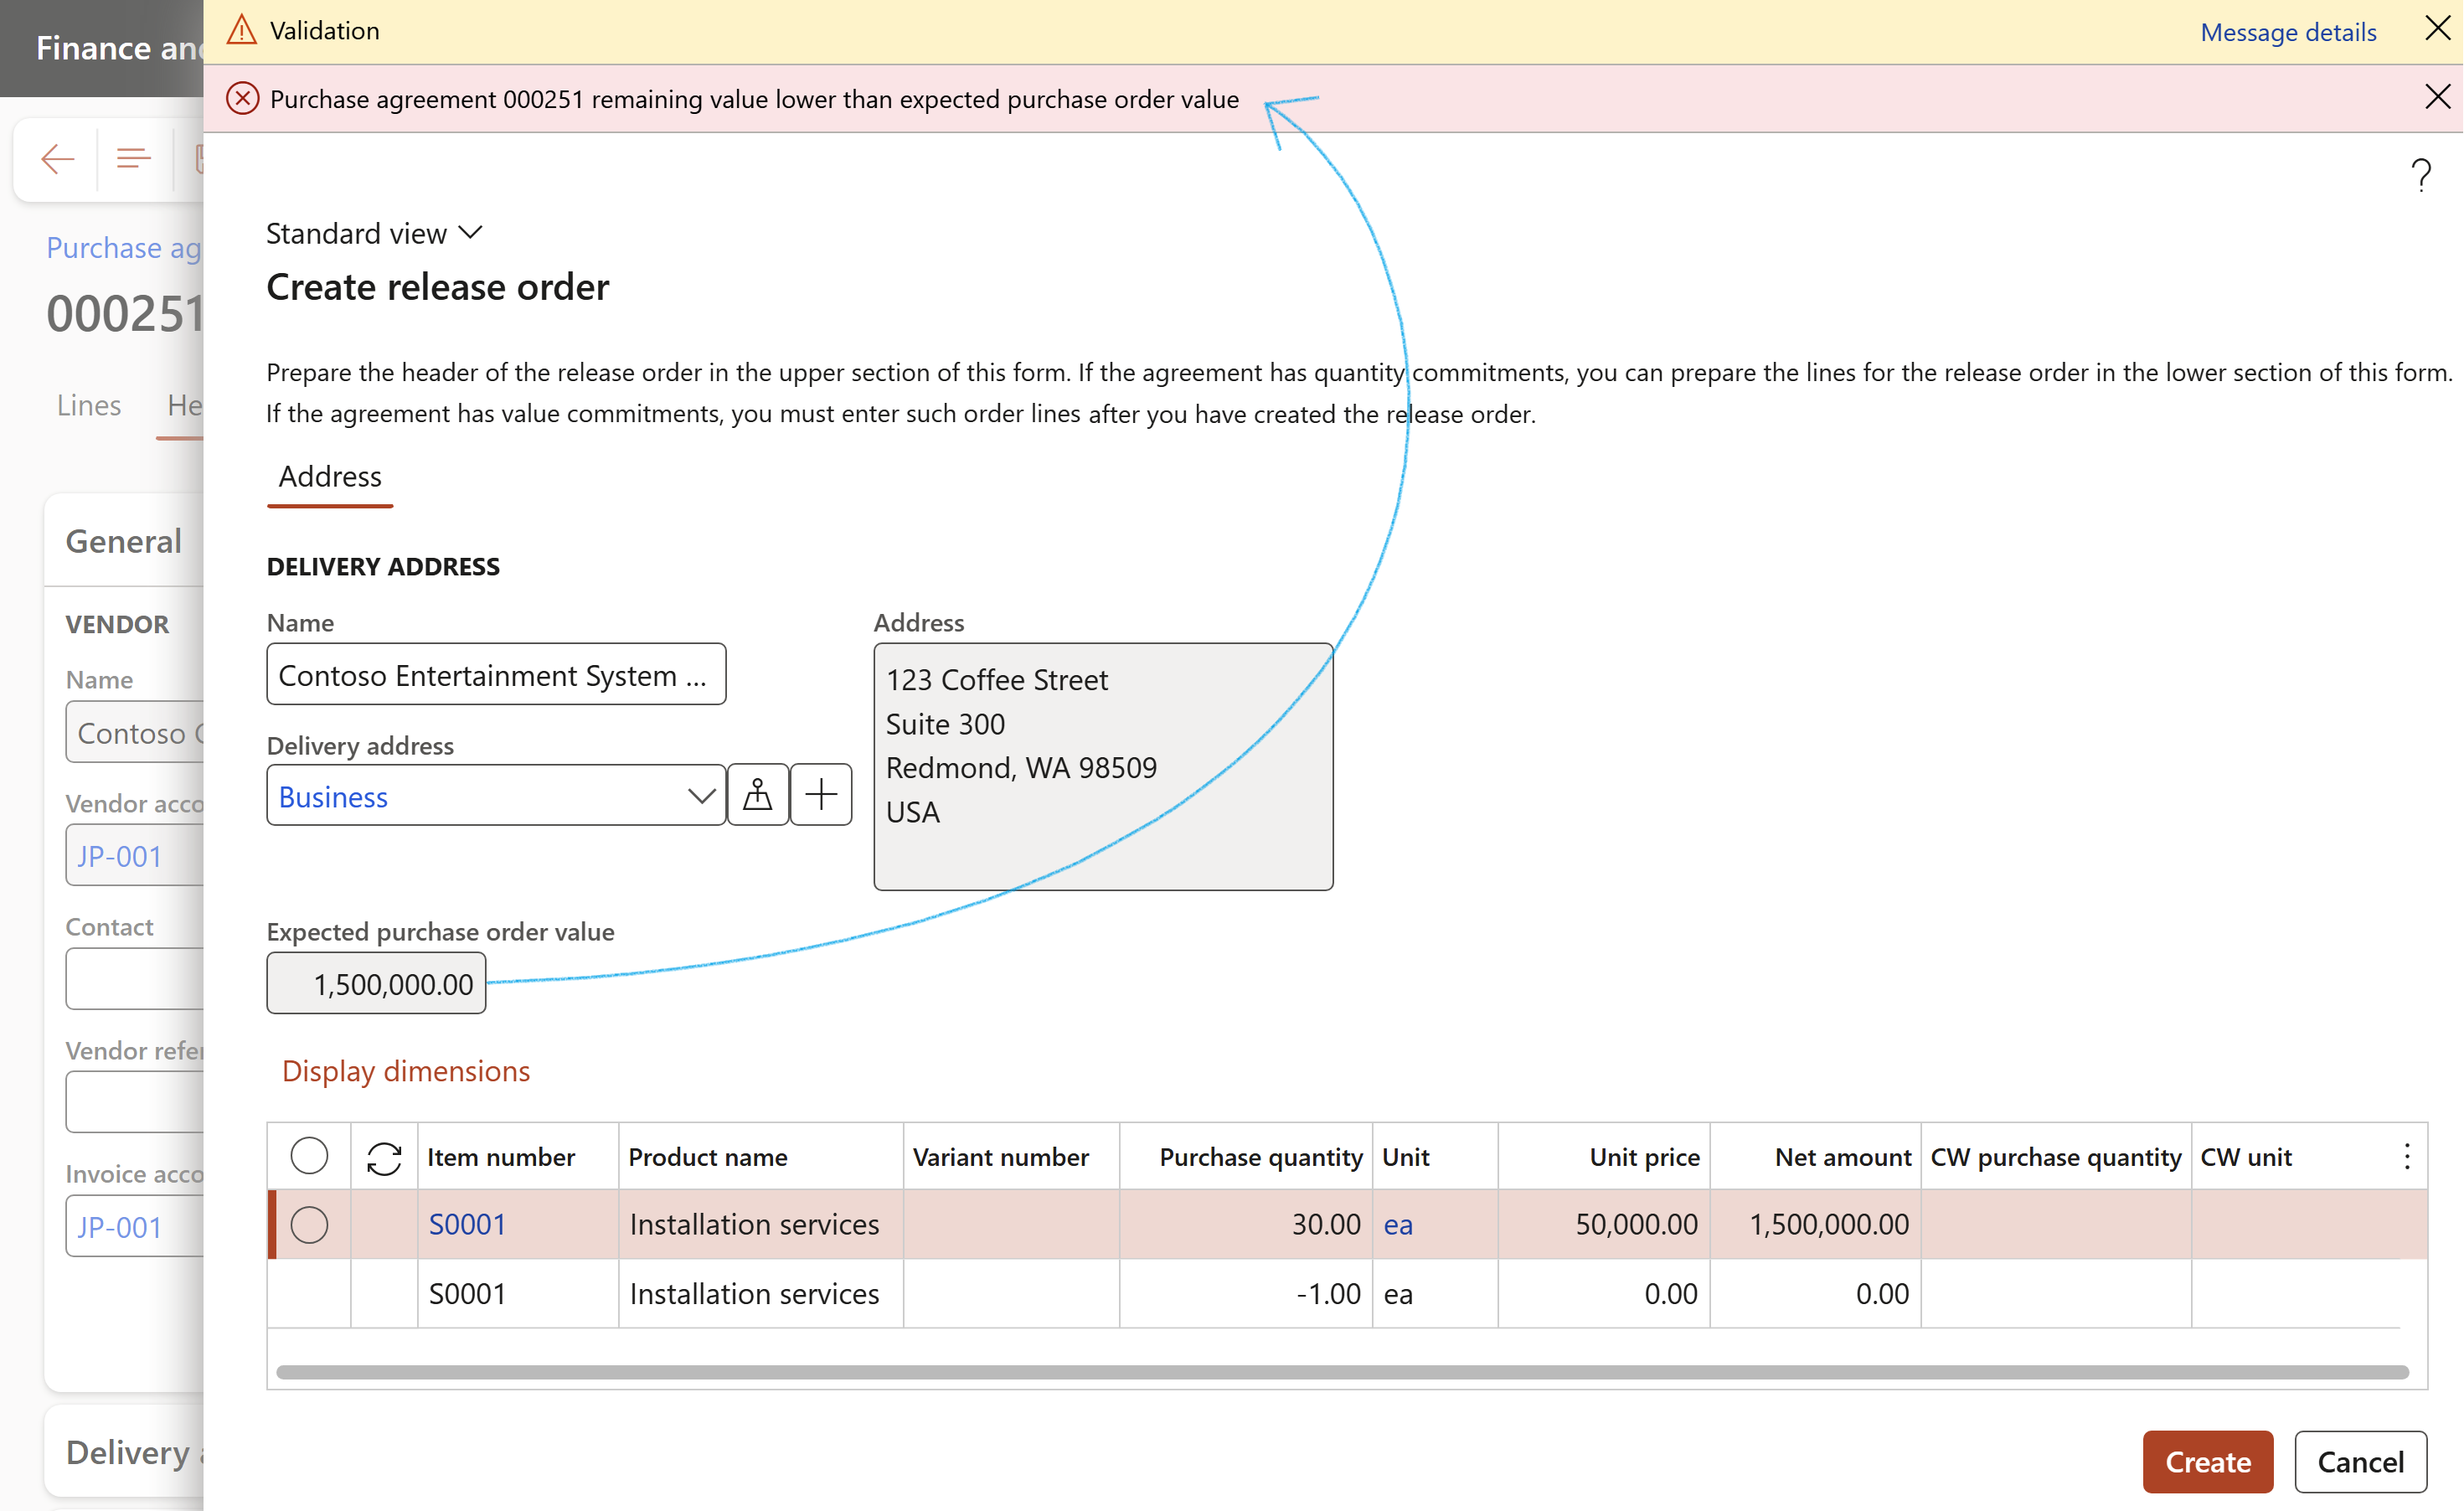
The Contract name and Document Number are referenced on the Purchase order Header
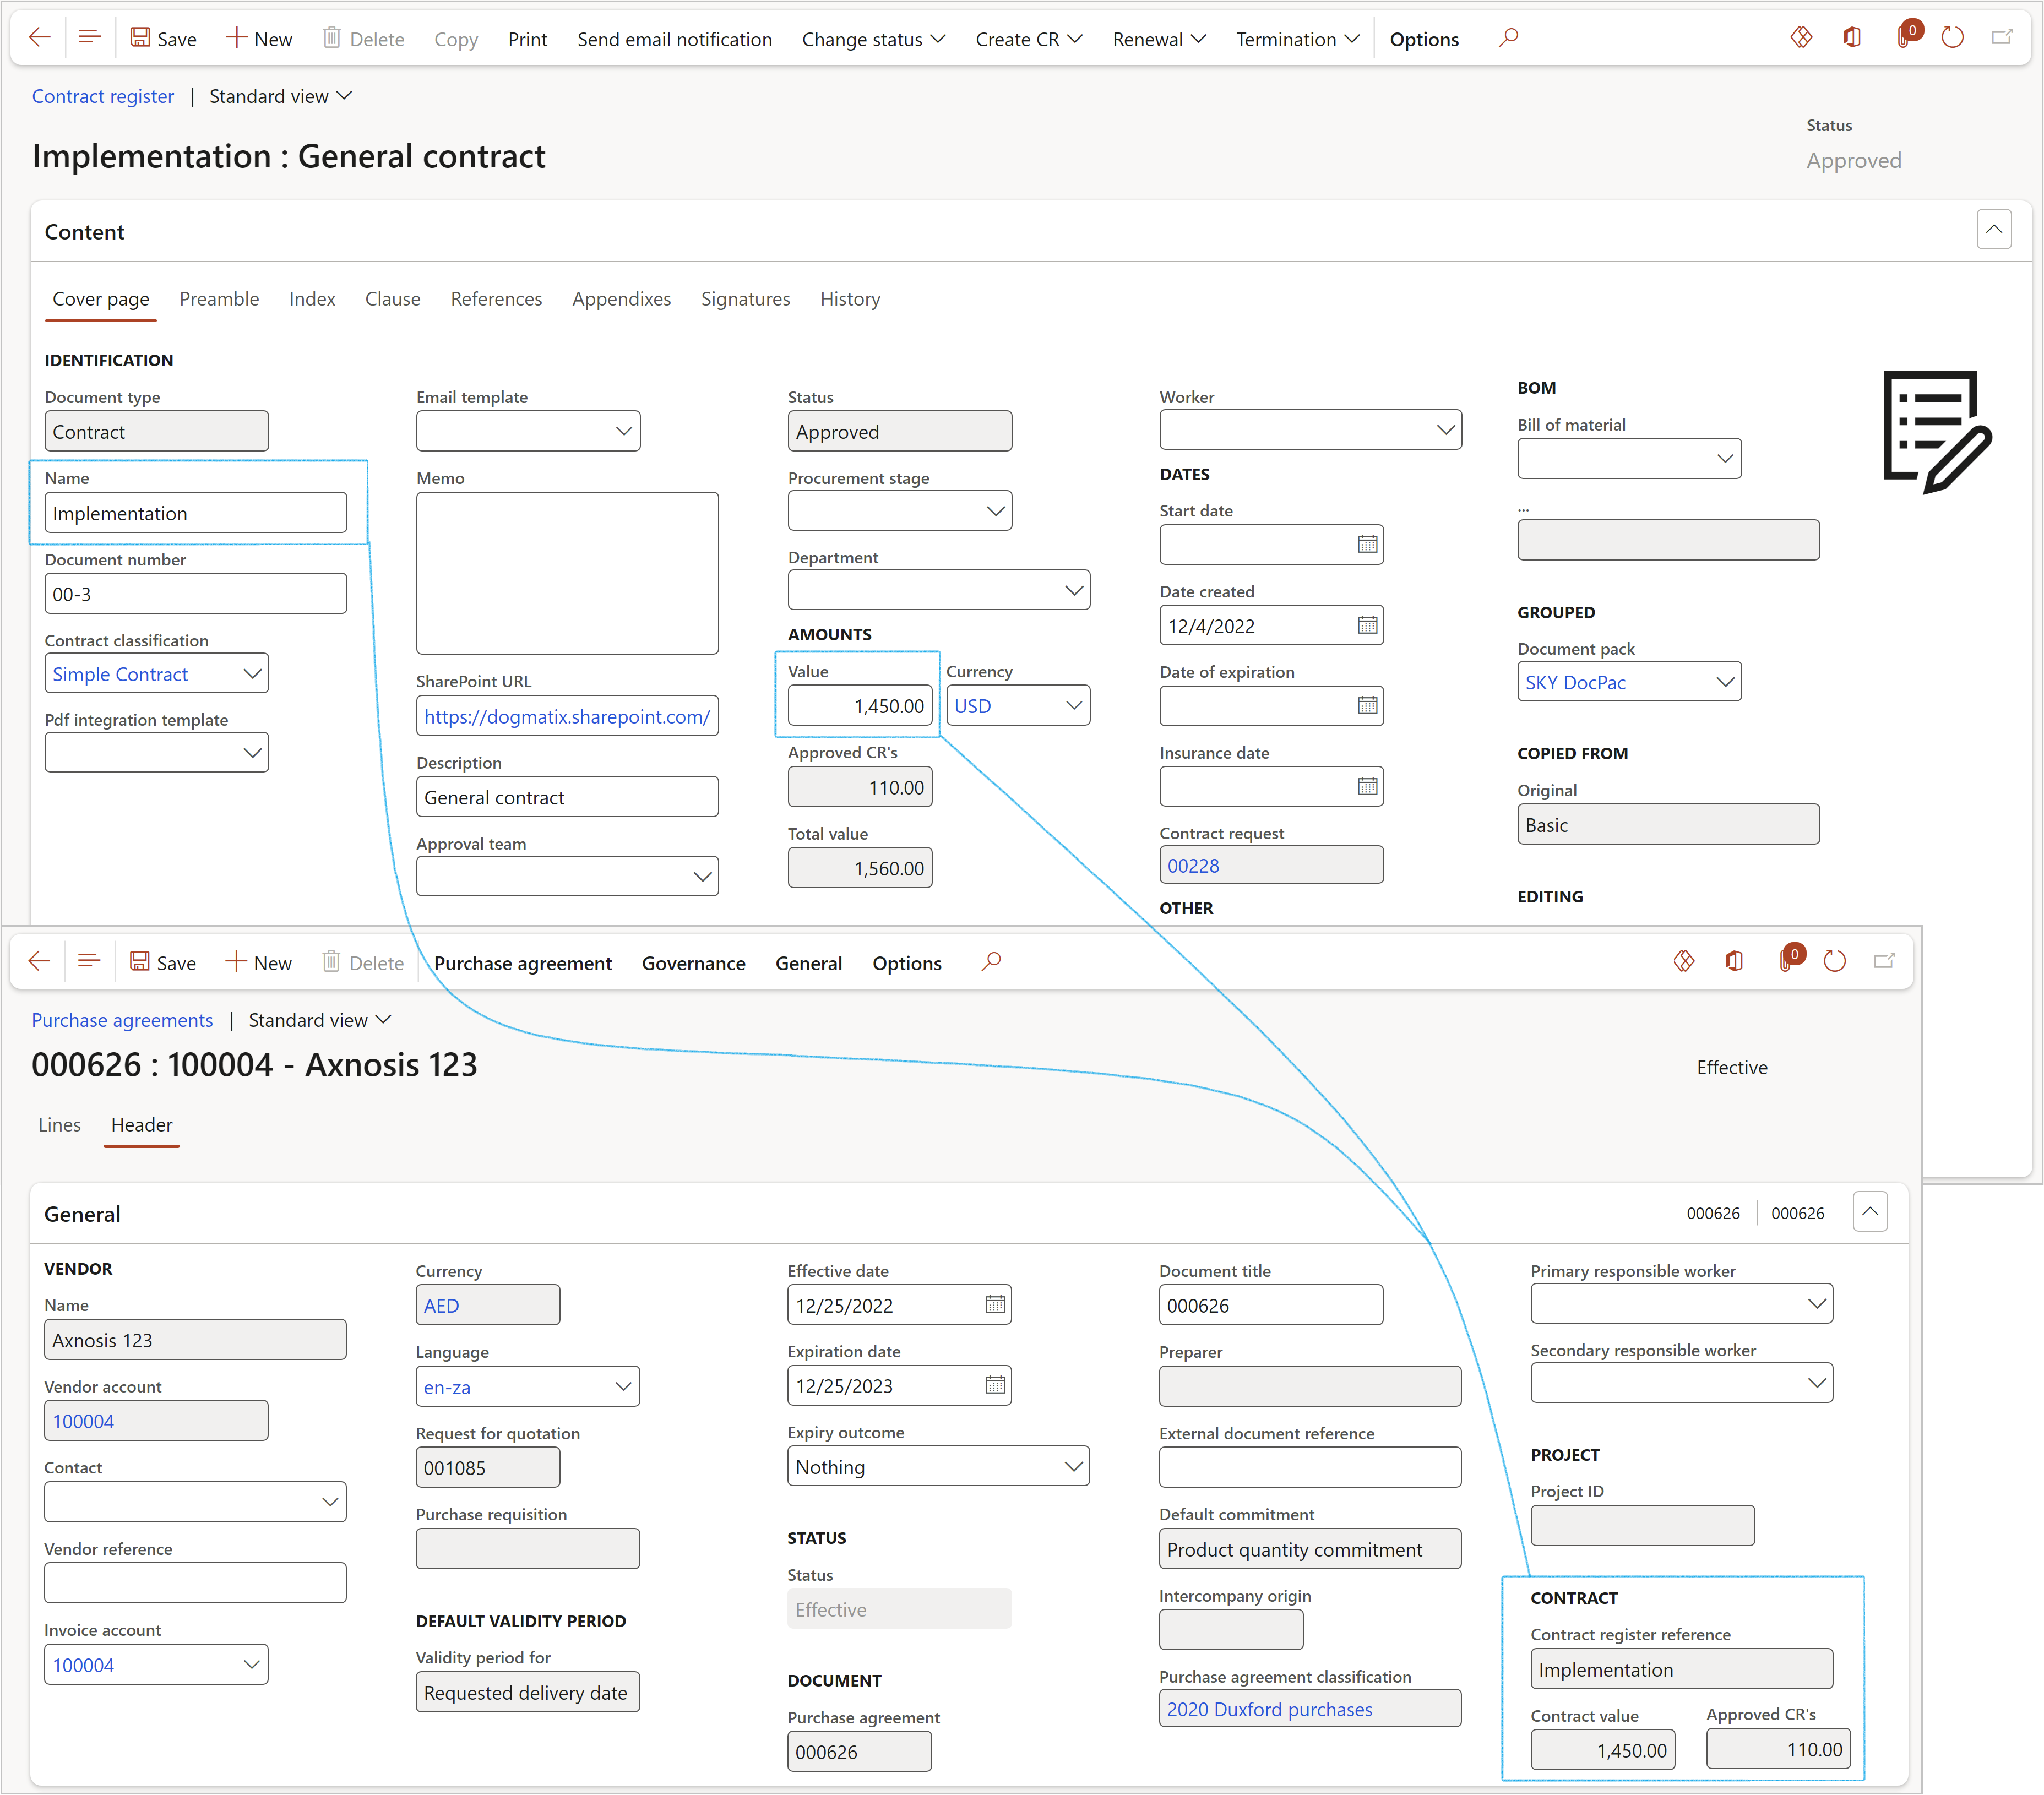
Related Purchase orders and Sales orders can be viewed:
- On the Contract detail form, under the Trading partners Fast tab, select the Vendor account/Customer account that you want to see the related PO’s or SO’s of
- Click on the View related orders button and select either Purchase orders or Sales orders
- The relevant list page will open displaying only records related to the selected Vendor account/Customer account
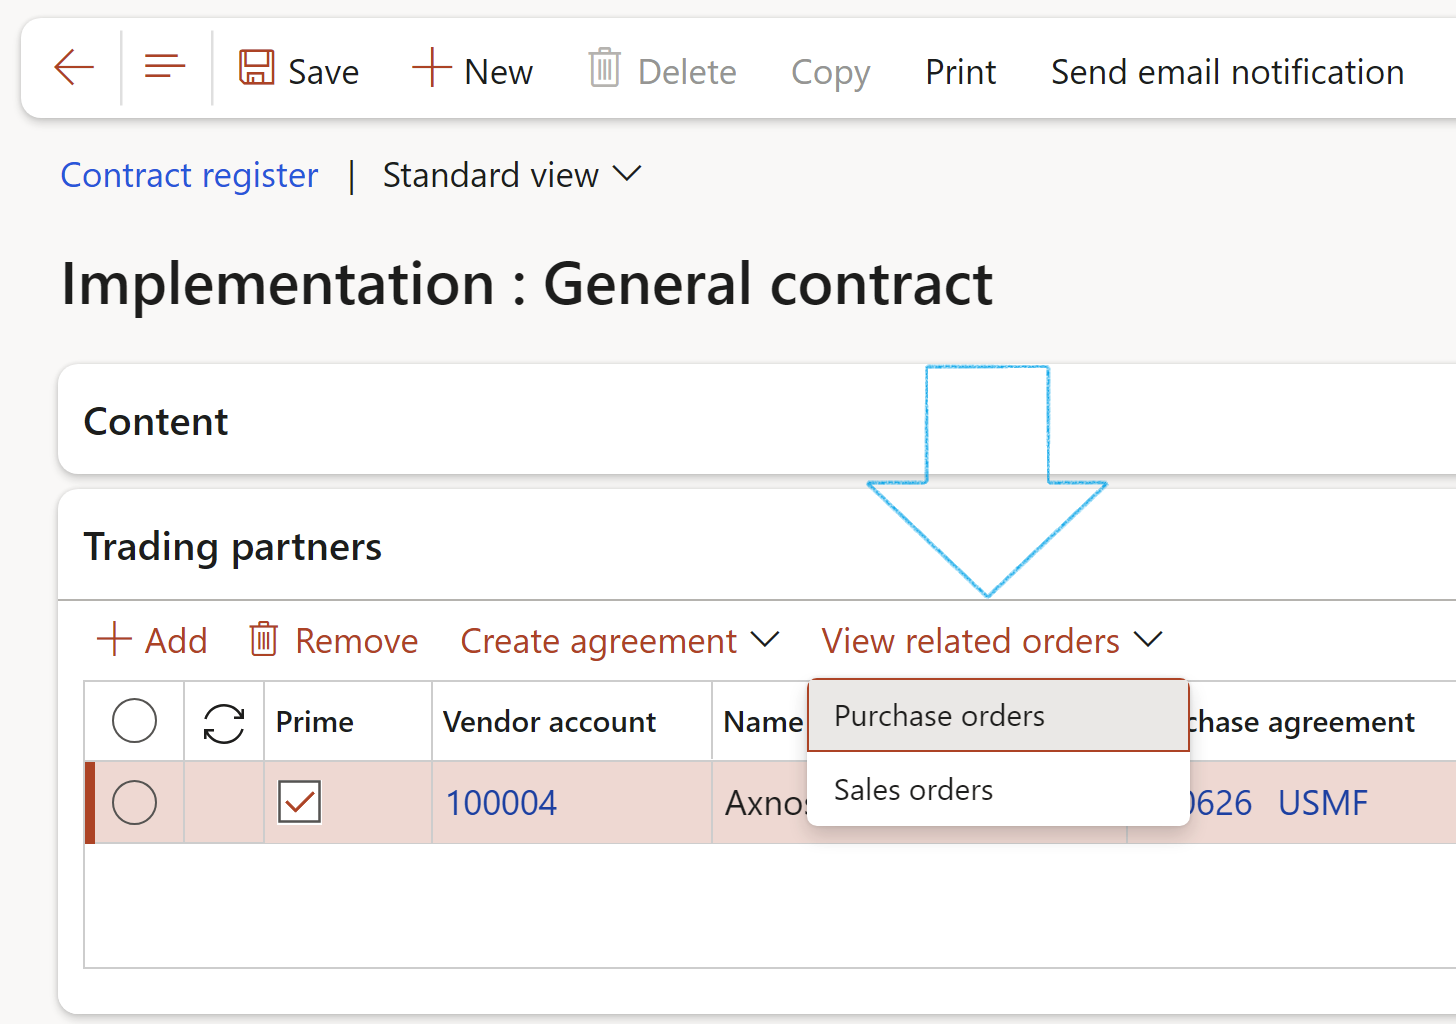
The primary vendor/customer can be indicated by ticking the Prime box
¶ Step 37: Performance management
The management of a contract involves many activities to ensure fulfilment of that contract. Events can sometimes alter or disrupt the performance of a contract. For example, a contractor may default on contractual obligations, disputes may arise about contract conditions, or there may be a need to make amendments to the contract after it has been awarded.
Whenever the fulfilment of a contract is in question, contracting officers should take the necessary steps to serve and protect the interests of the organization. The Contracting department should keep complete and up to date files to provide a record of actions taken, such as contractor/vendor/supplier performance.
¶ Step 37.1: Link KPIs
Refer to the GRC Corporate performance management Wiki page, Step 15.1
¶ Step 37.2: Create Balanced scorecard perspectives
Refer to the GRC Corporate performance management Wiki page, Step 15.2
¶ Step 37.3: Other
¶ Step 37.3.1: View risk assessment details on Vendor/Supplier profile
Go to: Procurement and sourcing > Vendors > All vendors
- Expand the Vendor profile Fast tab

- The values under the Enterprise risk Field group are updated when the “lock” button is clicked on the Enterprise risk register Lines, under the Assessment calculations and controls Fast tab, Details Index tab.
- The Vendor/Supplier is associated to the Risk register under the Associations Fast tab
¶ Step 37.3.2: View Vendor/Supplier contract performance
Go to: GRC > Governance > Reports and inquiries > Vendor contract performance
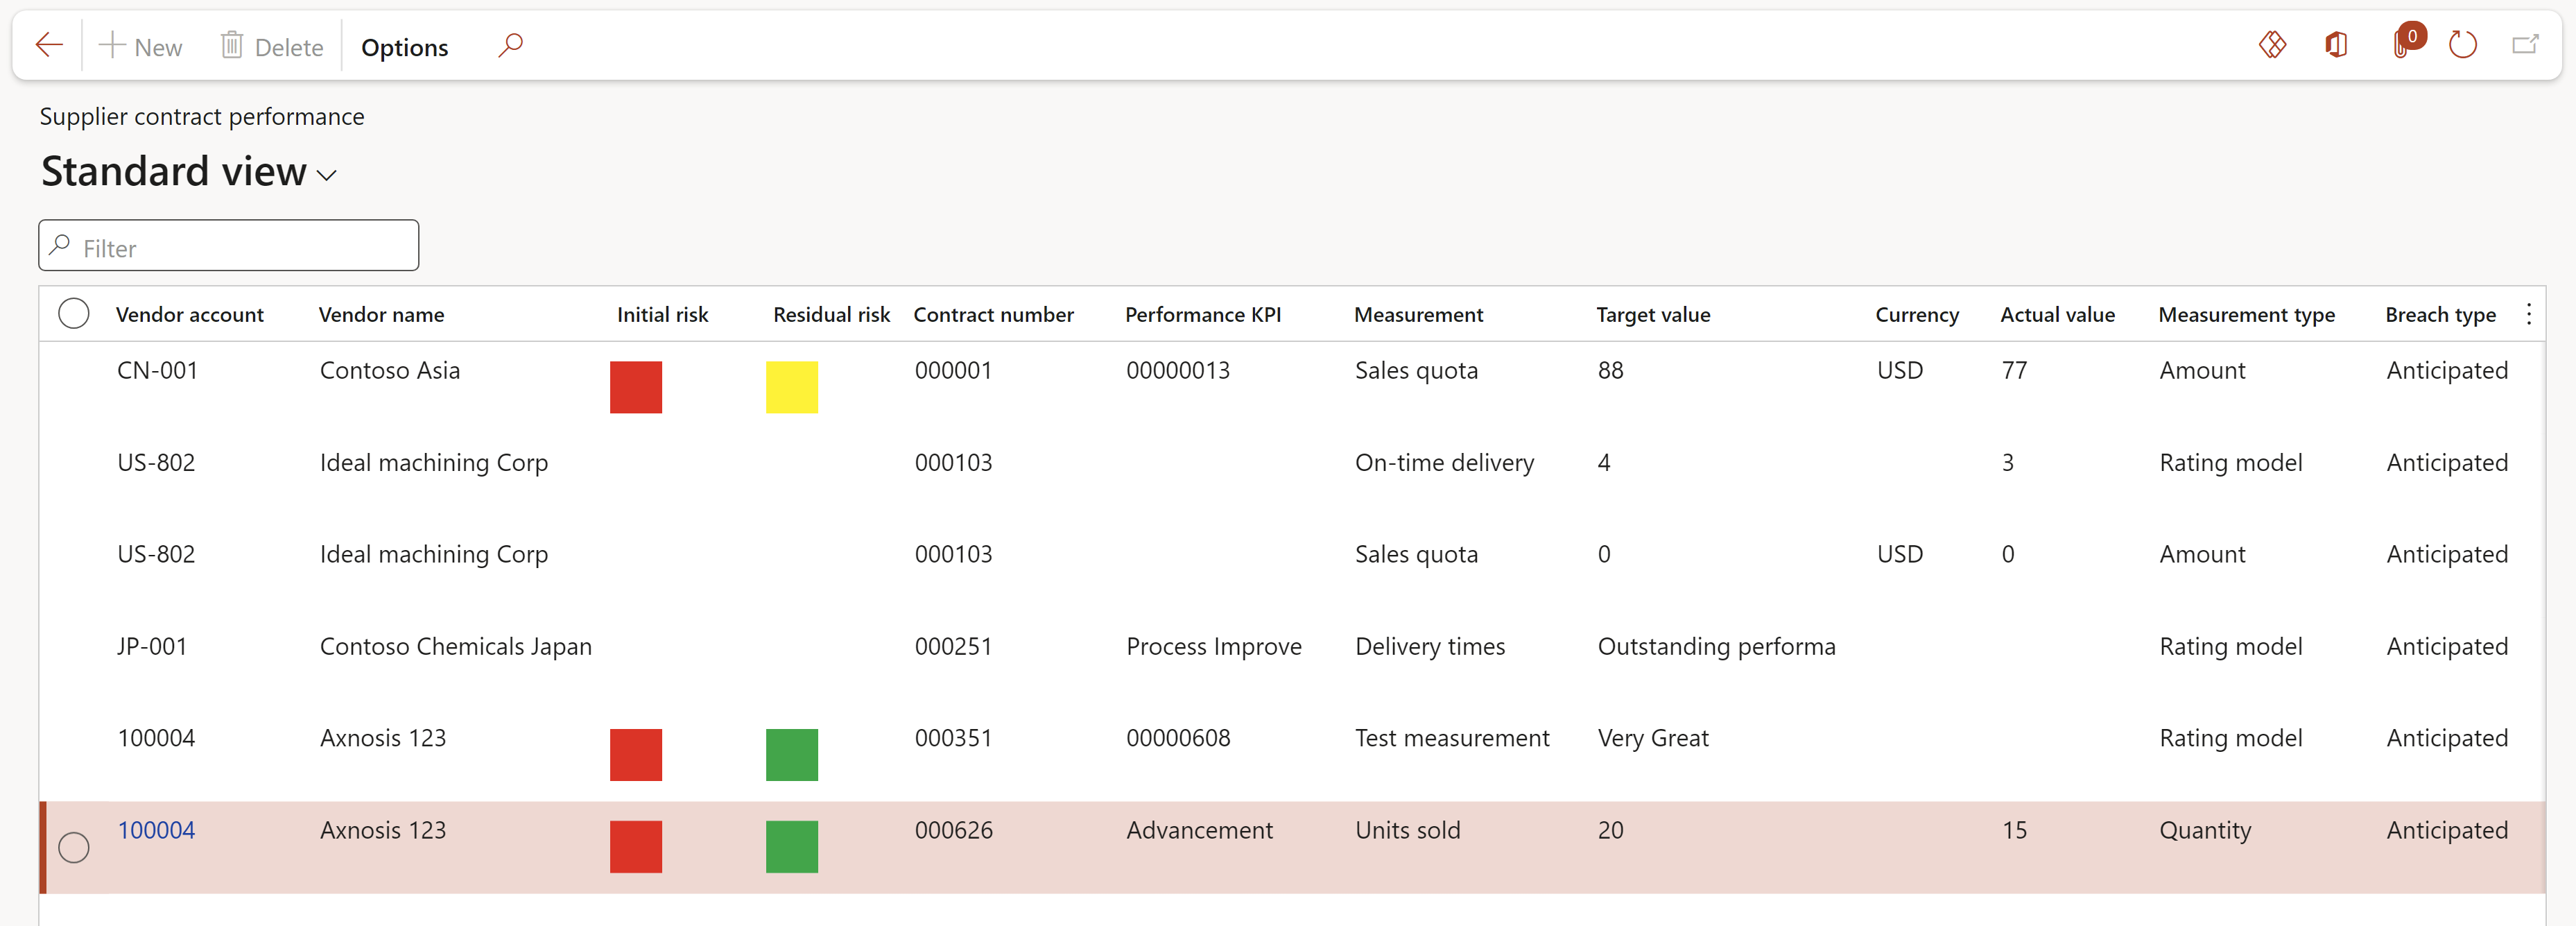
¶ Step 38: Purchase agreement workflow
¶ Step 38.1: Submit Purchase agreement workflow
The user that has been setup to request the purchase agreement workflow of contracts will do the following:
Go to: GRC > Governance > Contracts > Purchase agreements
- Select the relevant purchase agreement
- In the Action pane, click on the Workflow button, then click on Submit

- Enter a Comment on the Purchase agreement approval workflow – Submit dialog
- Click on the Submit button
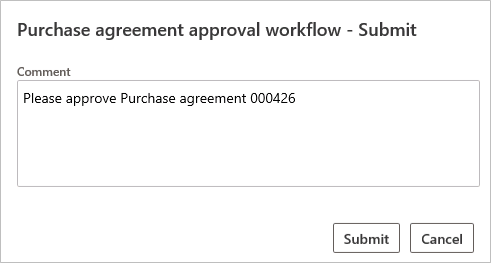
The Purchase agreement workflow status will change to Submitted
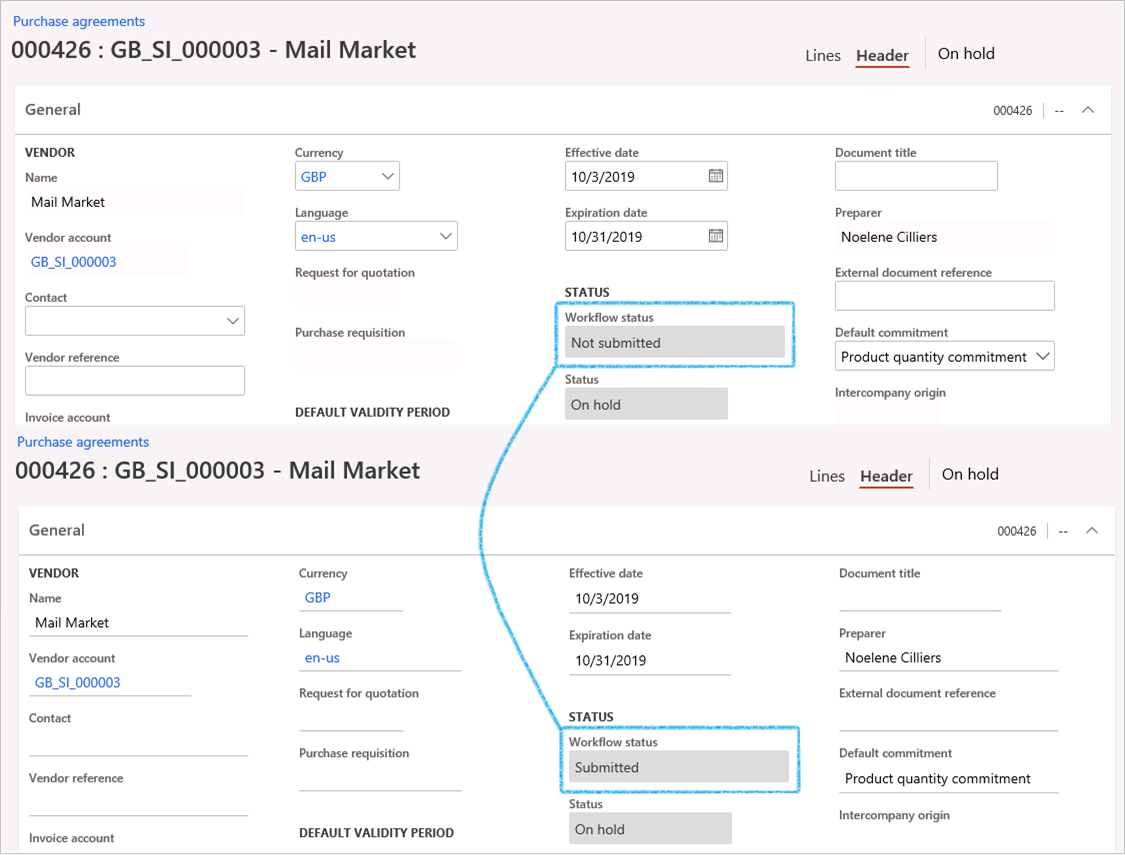
The user that has been setup to approve the purchase agreement workflow of contracts will then do the following:
- On the Action pane, click on the Workflow button
- Select Approve from the dropdown list

- Enter a Comment on the Purchase agreement approval workflow – Approve dialog
- Click on the Approve button
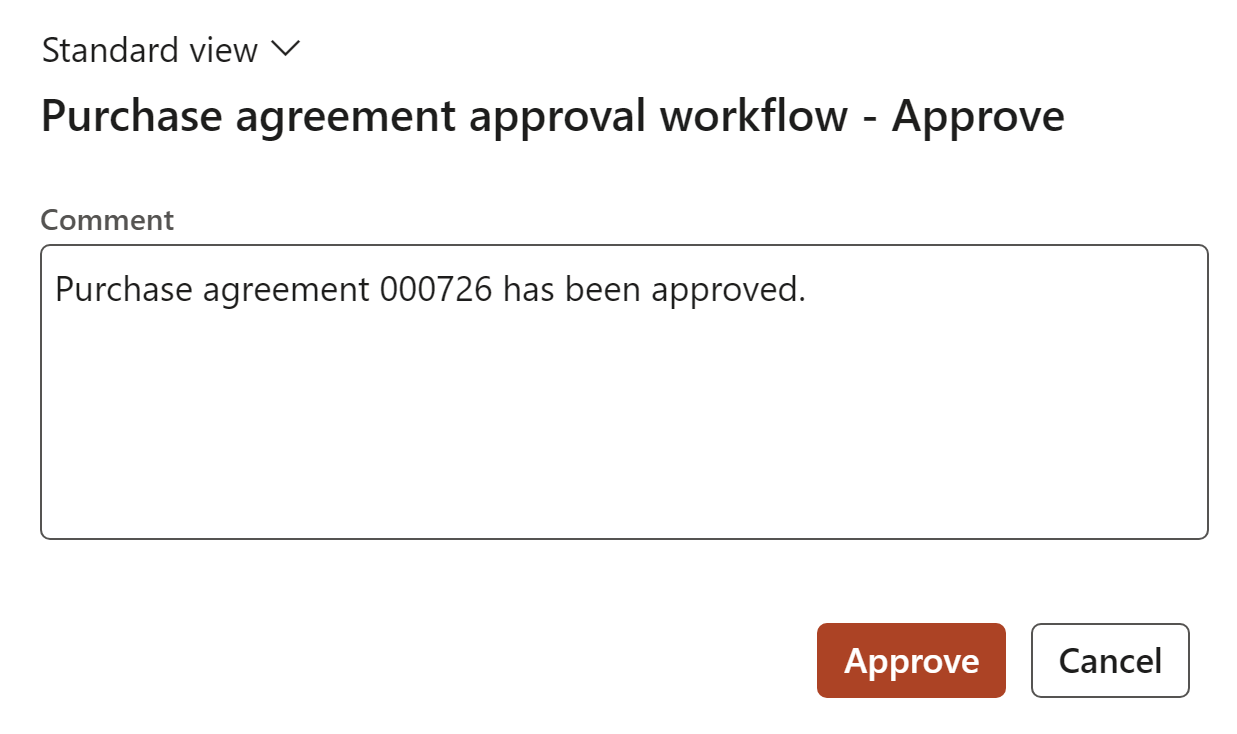
- On the Action pane, in the Generate group, click on the Confirmation button
- On the Confirm purchase agreement dialog, select Yes to Mark the agreement as effective
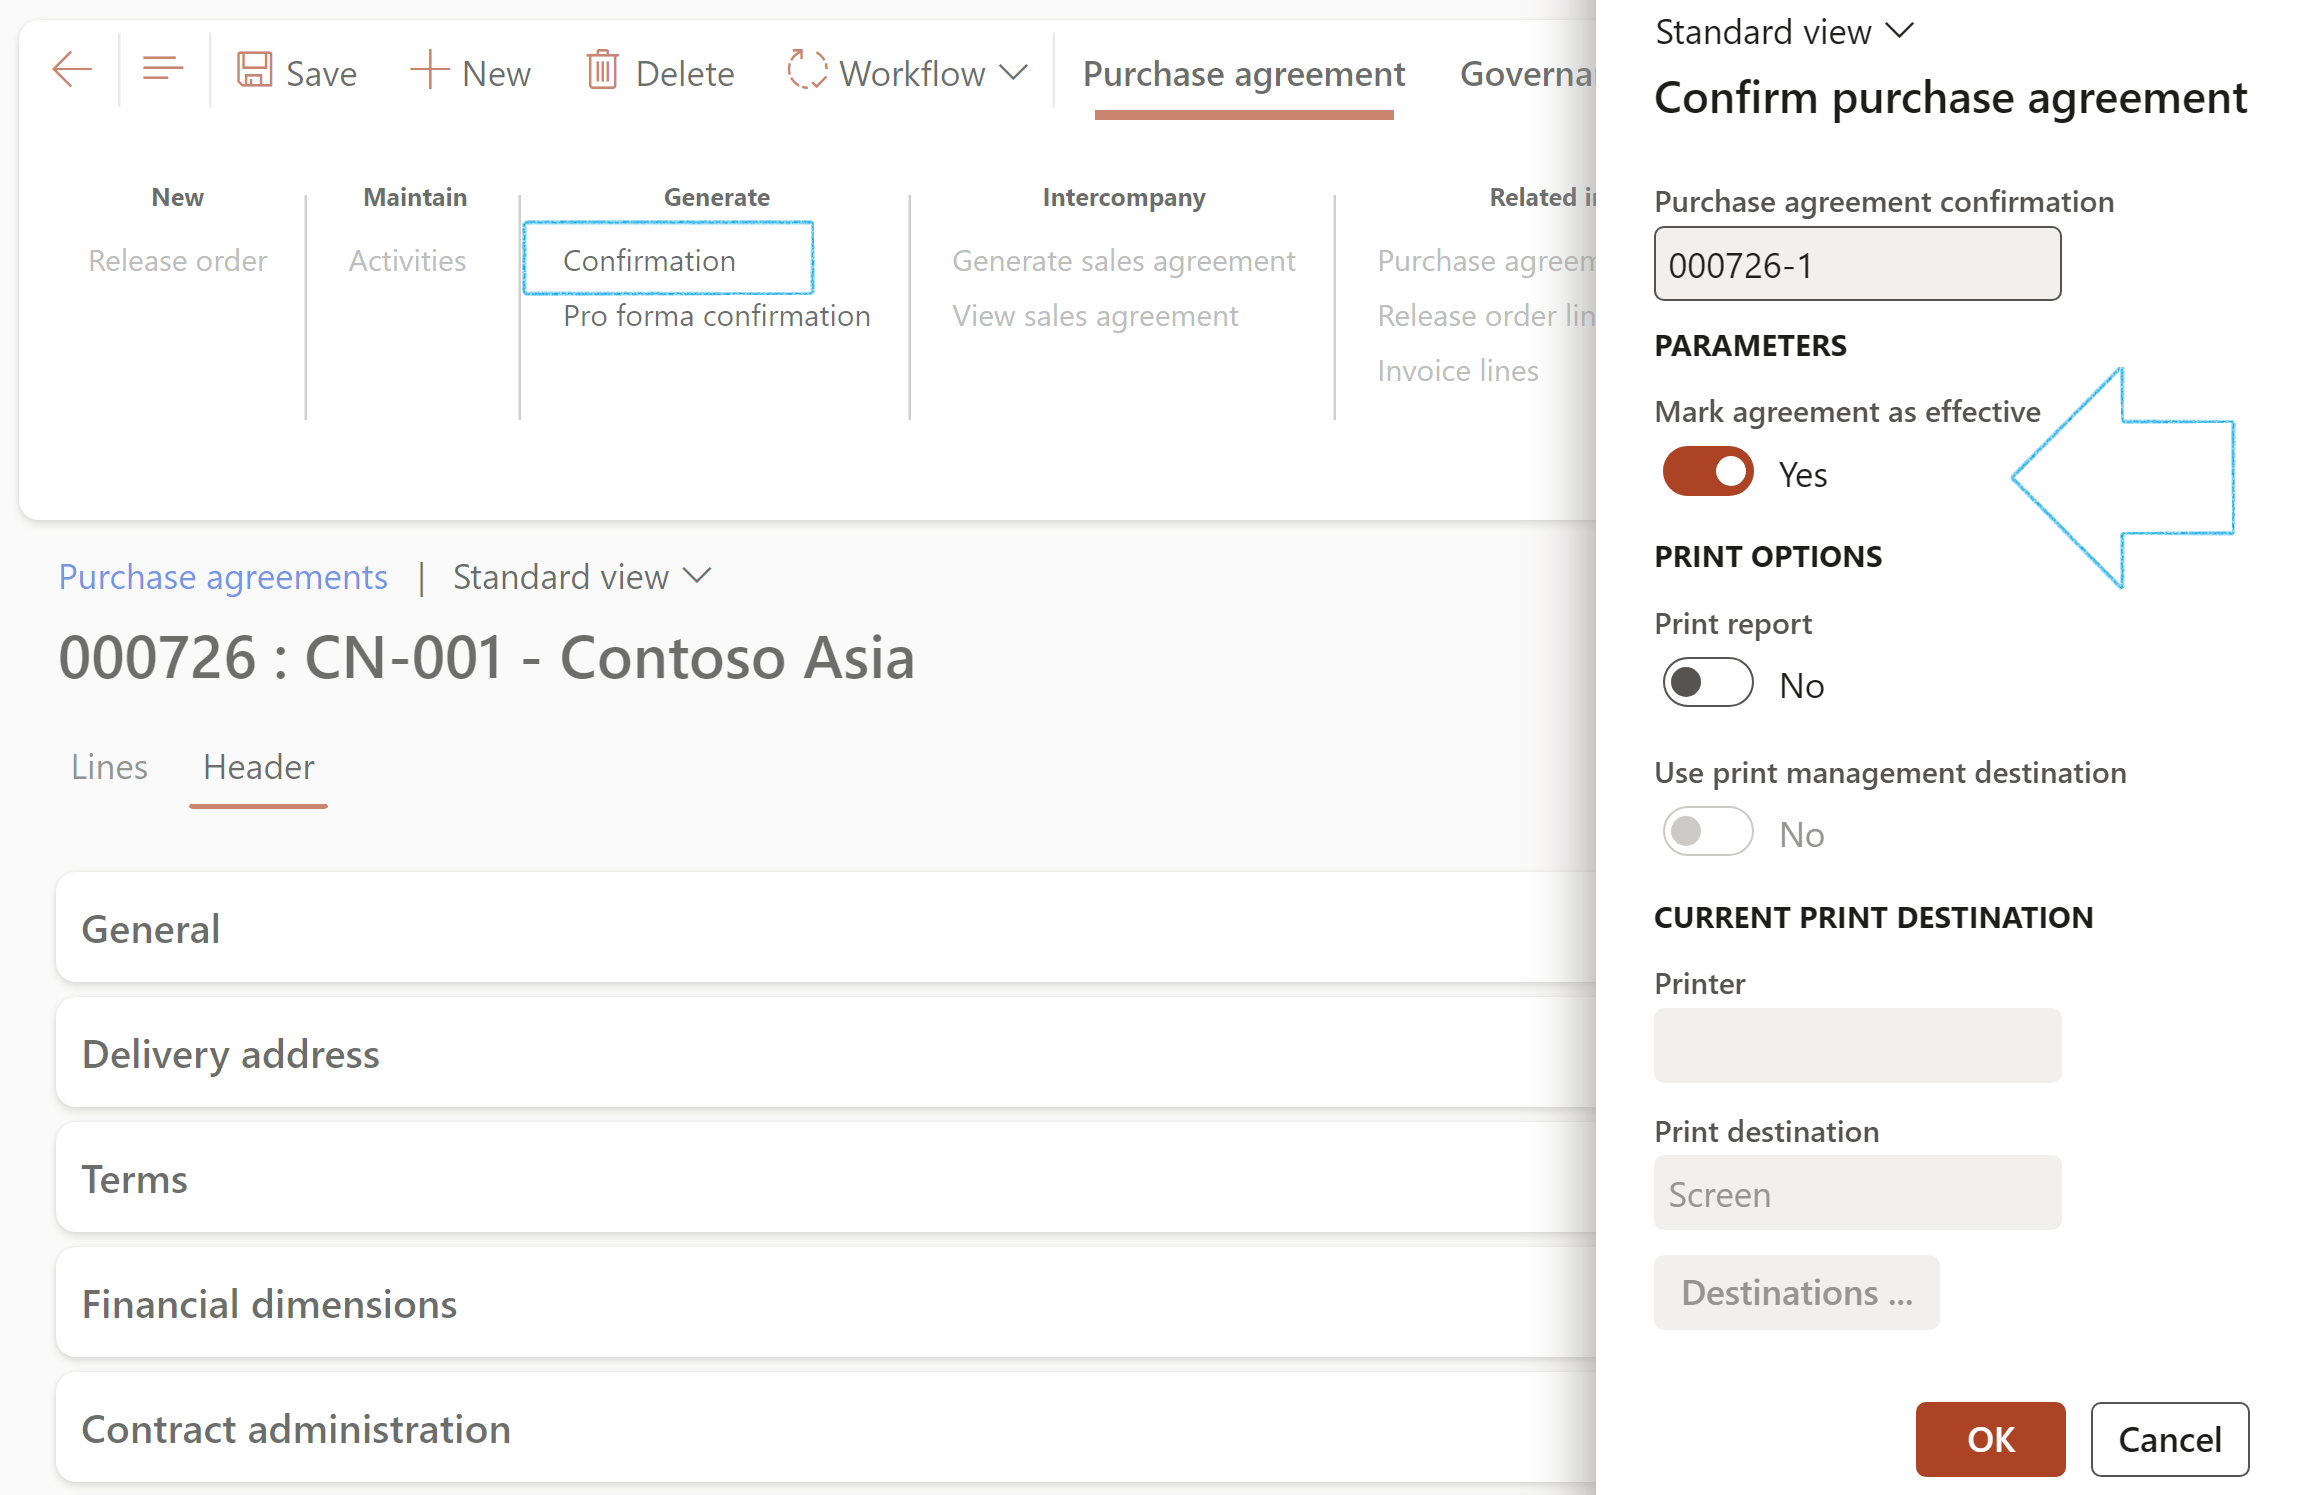
¶ Step 38.2: Purchase agreements (Manual process)
¶ Step 38.2.1: Process stages
The manual submission process for Purchase agreements are managed by selecting the various statuses of the purchase agreement set out under the Governance group. The stages can be selected in the Purchase agreement Action pane under thePurchase agreement tab, Governance group

| Stages | Rules |
| Submitted: |
|
|
Released: Negotiate: |
|
| Award: |
|
| Cancelled: |
|
| Archived: |
|
¶ Step 39: Trade agreements
Trade agreements are the primary means by which pricing and discounts are set up and applied in Dynamics 365FO. Trade agreements are commonly confused with sales and purchase agreements.
¶ Step 39.1: Trade agreement created from Purchase agreement
Go to: GRC > Governance > Contracts > Purchase agreements
- Select the relevant purchase agreement
- On the Action pane, open the Governance tab
- On the Action pane, in the Functions group, click on the Create trade agreement button
- On the Create trade agreement dialog, select the relevant Journal name from the dropdown list
- Click OK
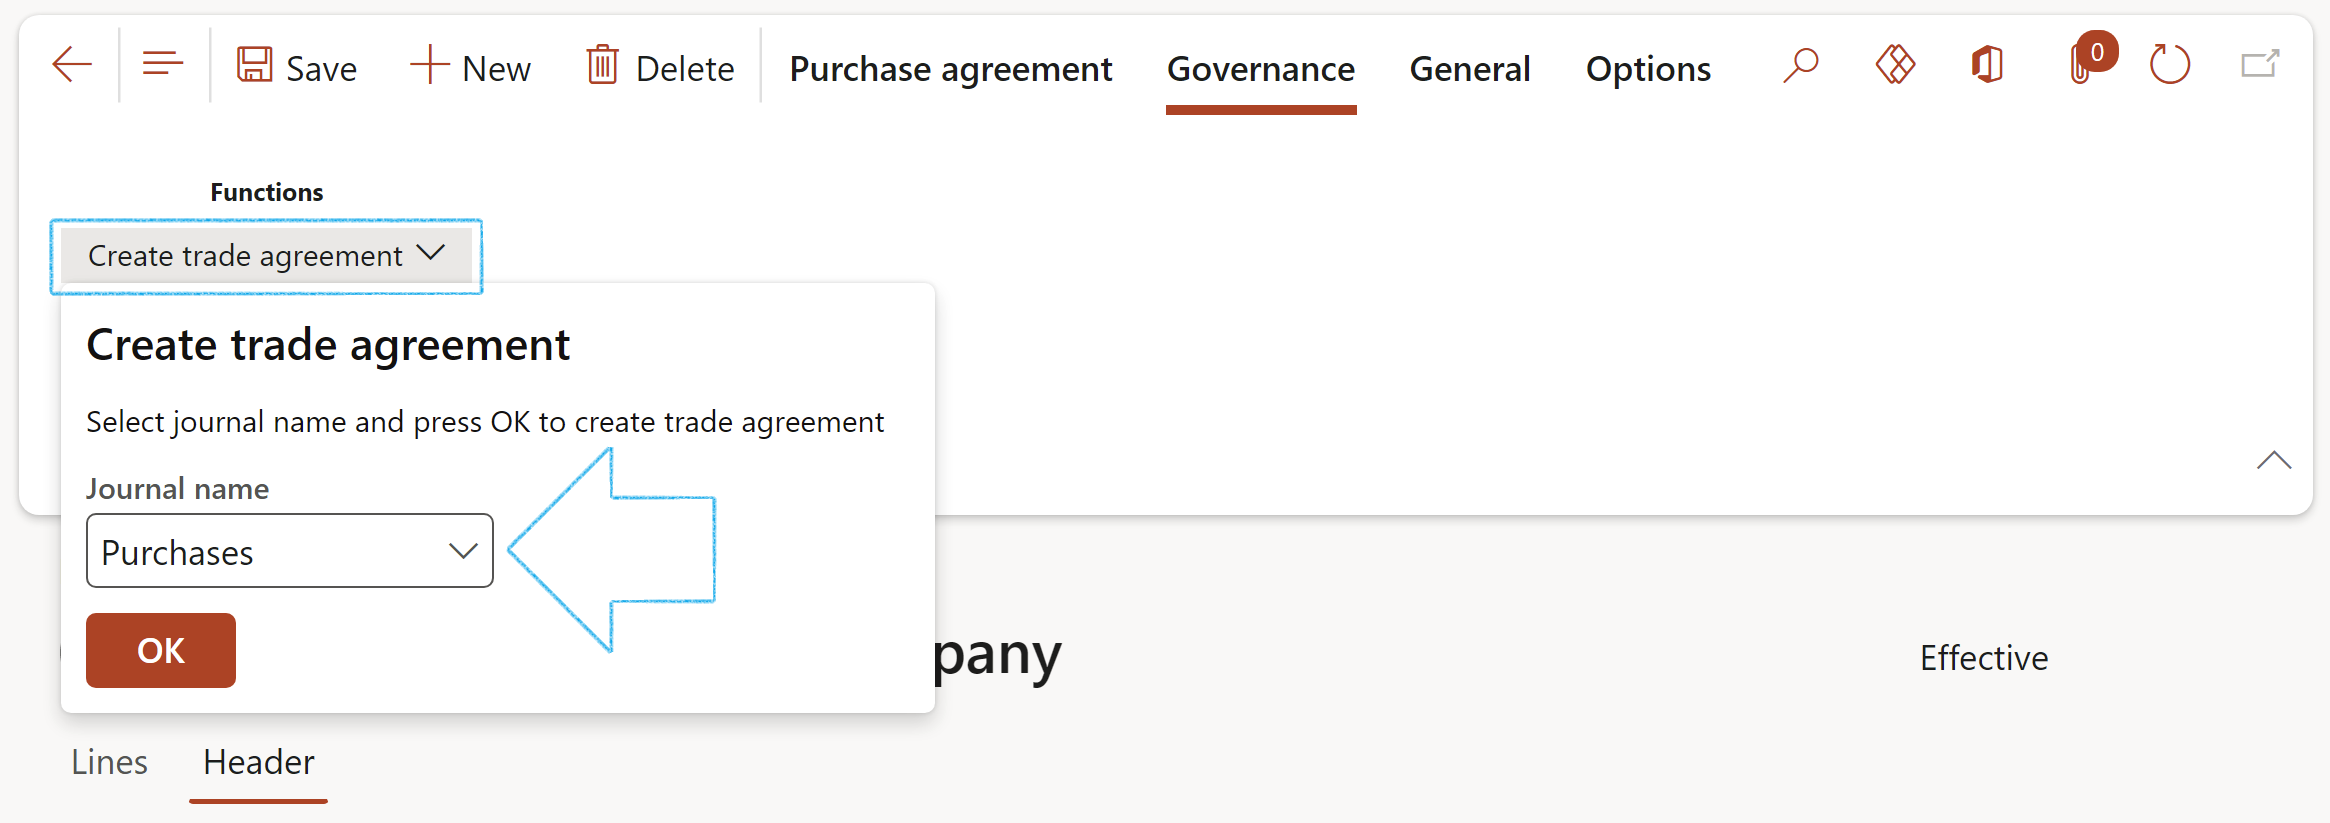
For the Governance tab to be available, the purchase agreement status must be Effective
If the purchase agreement is in a stage of either Cancelled or Archived, the Governance tab will be greyed out
The Trade agreement number will be populated in the Trade agreement field under the Contract administration Fast tab
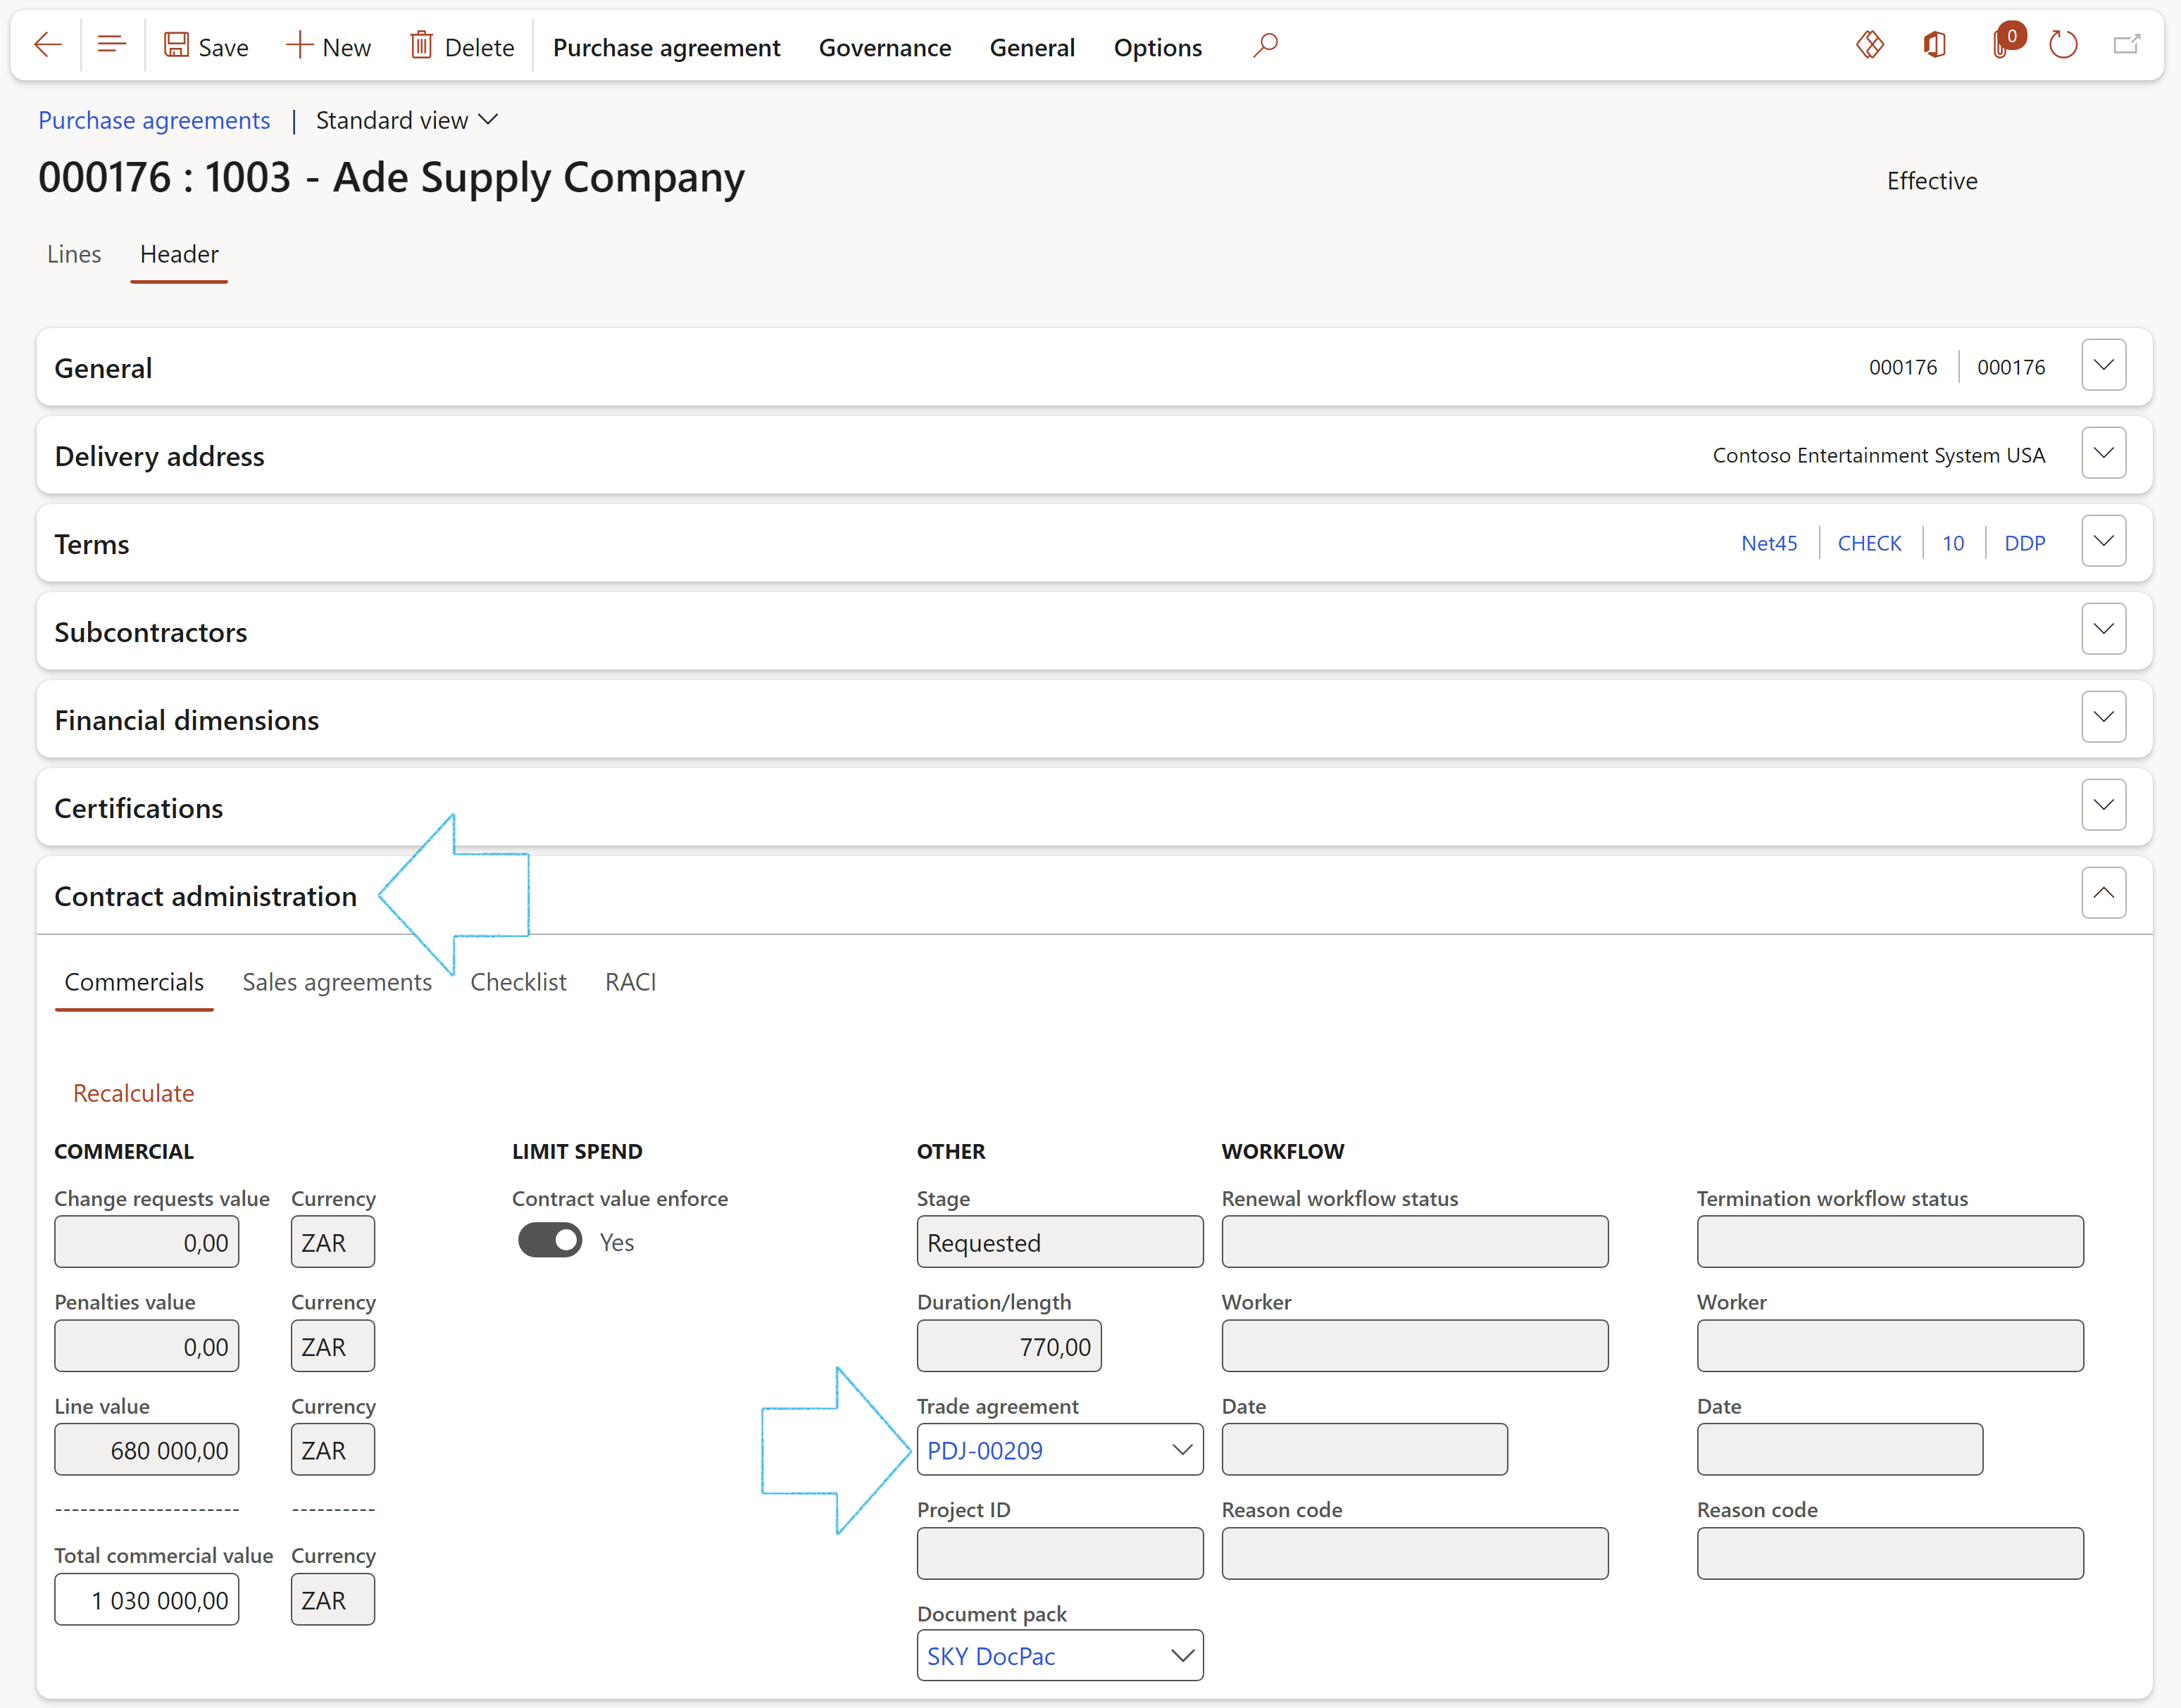
¶ Step 40: Trade restrictions
The government agencies of a country, group of countries, or international organizations as representatives of the United Nations sometimes impose sanctions and bans on trading with specific countries. This in conjunction with REACH and RoHS compliance bans, shipping specific products to specific countries, for business or political reasons, known as Geo blocking (or also embargos). You must comply with these in your import and export processes.
The Trade restrictions form in the Governance, Risk & Compliance (GRC) module lets you check your business transactions for critical business partners automatically. In the process, the system checks all trading partners who are subject to an embargo situation as a result of their company's location. If an embargo situation exists, D365 warns the user on contract creation. Future functionality will allow for complete blocking and log tracing of blocked transactions and allow for release as necessary.
Go to: GRC > Governance > Setup > Trade restrictions and sanctions
- On the Action pane, click on the New button
- Select the Sanctioned country/region from the dropdown list
- Under the Sanction Fast tab, in the Task bar, click on the New button
- Select the Sanctioning country/region from the dropdown list
- Select the relevant Effective and Expiration dates
- Enter a Description
- In the Notes box, enter the specifications of the specific sanction
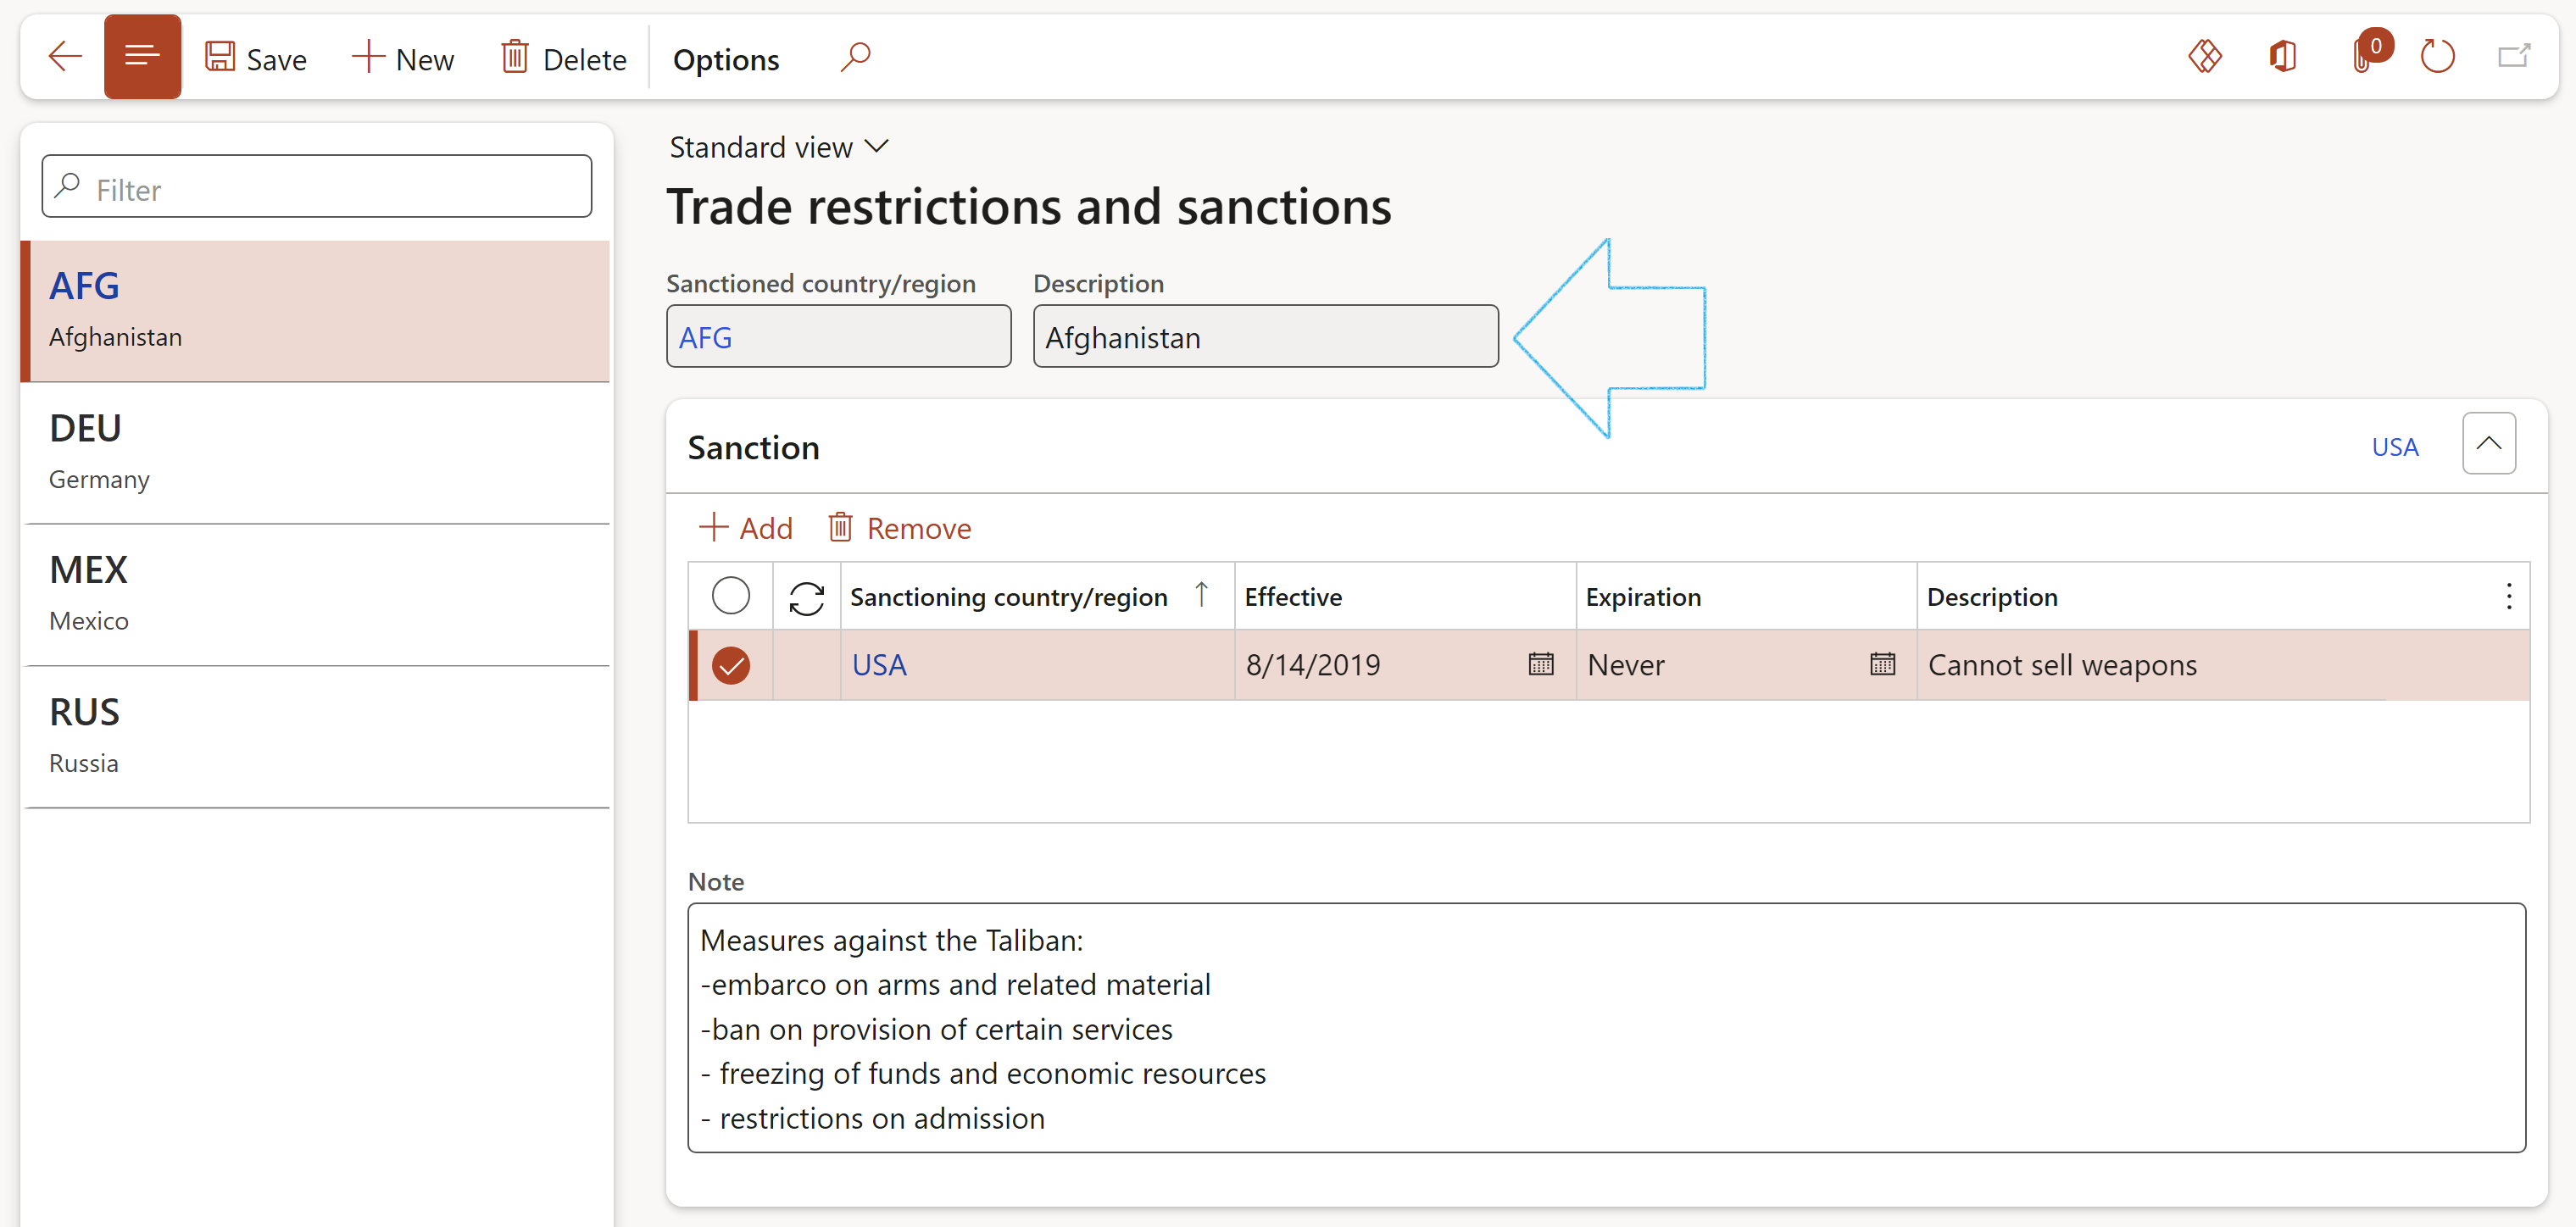
¶ Step 40.1: Trade restriction validation
Go to: GRC > Governance > Contracts > Purchase agreements
- On the Action pane, click on the New button
- In the Vendor field, select the relevant vendor from the dropdown list
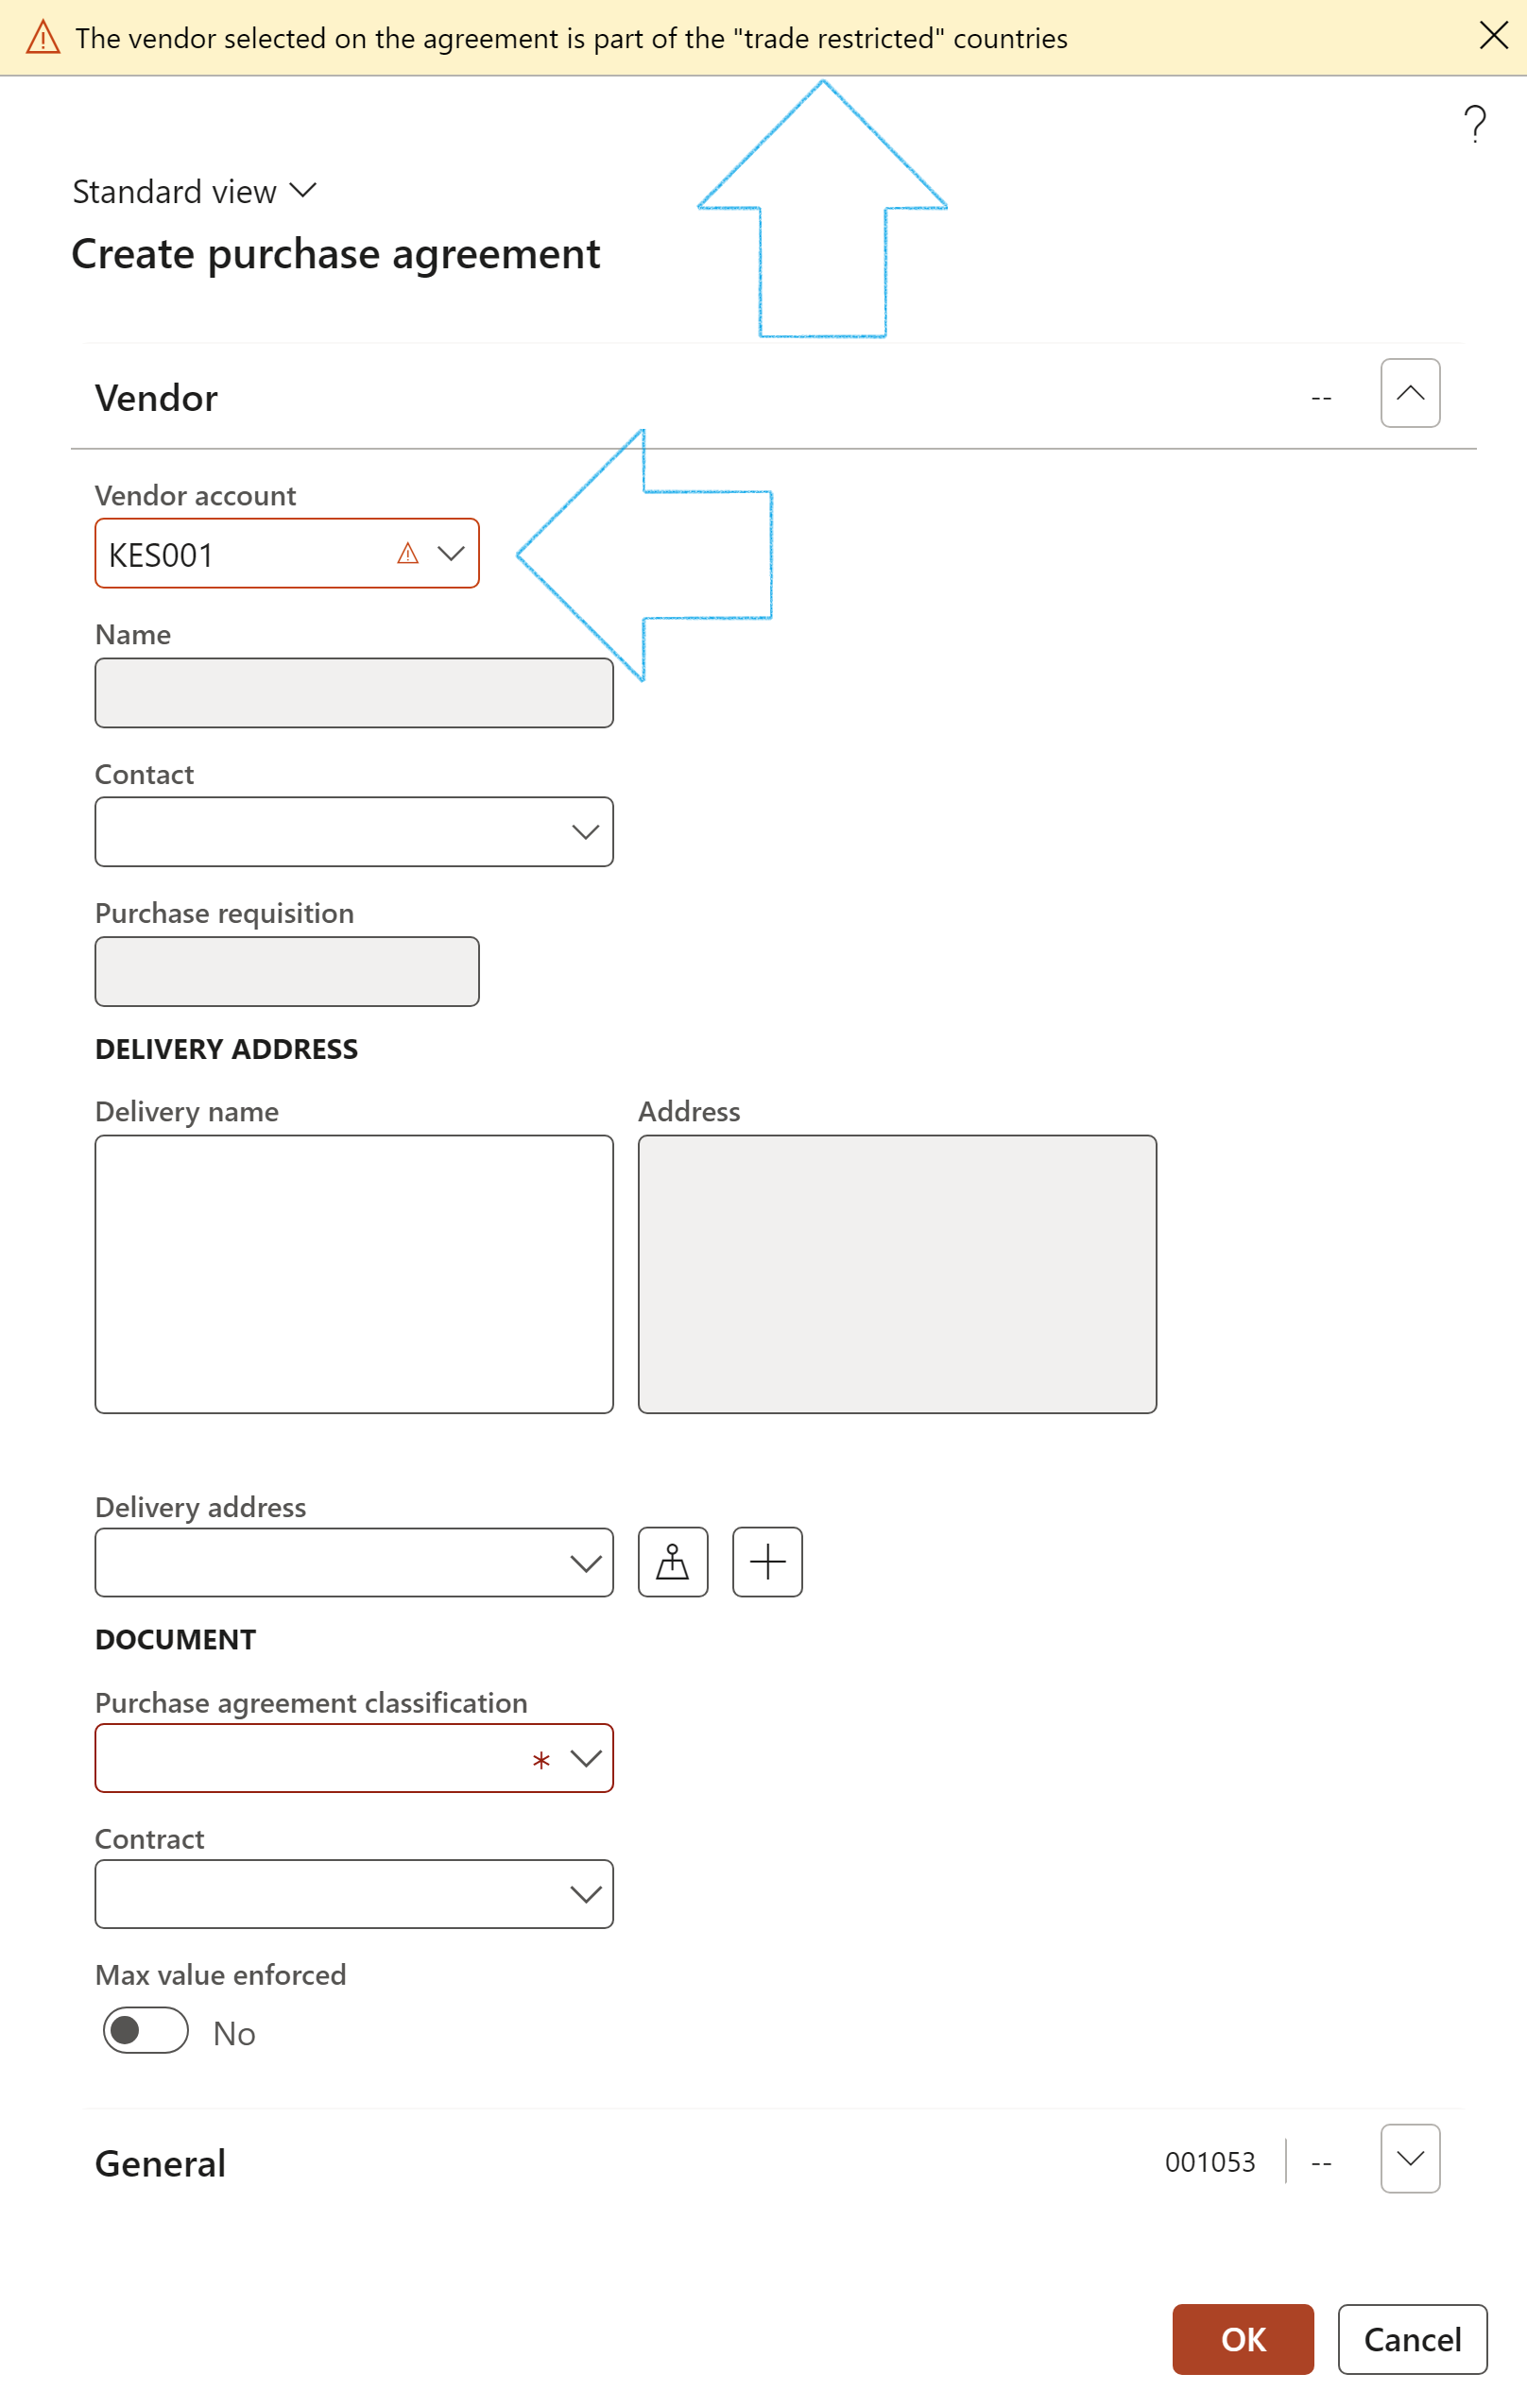
The same warning will come up when a Vendor account from a restricted country is selected under the Trading partners Fast tab on the Contract
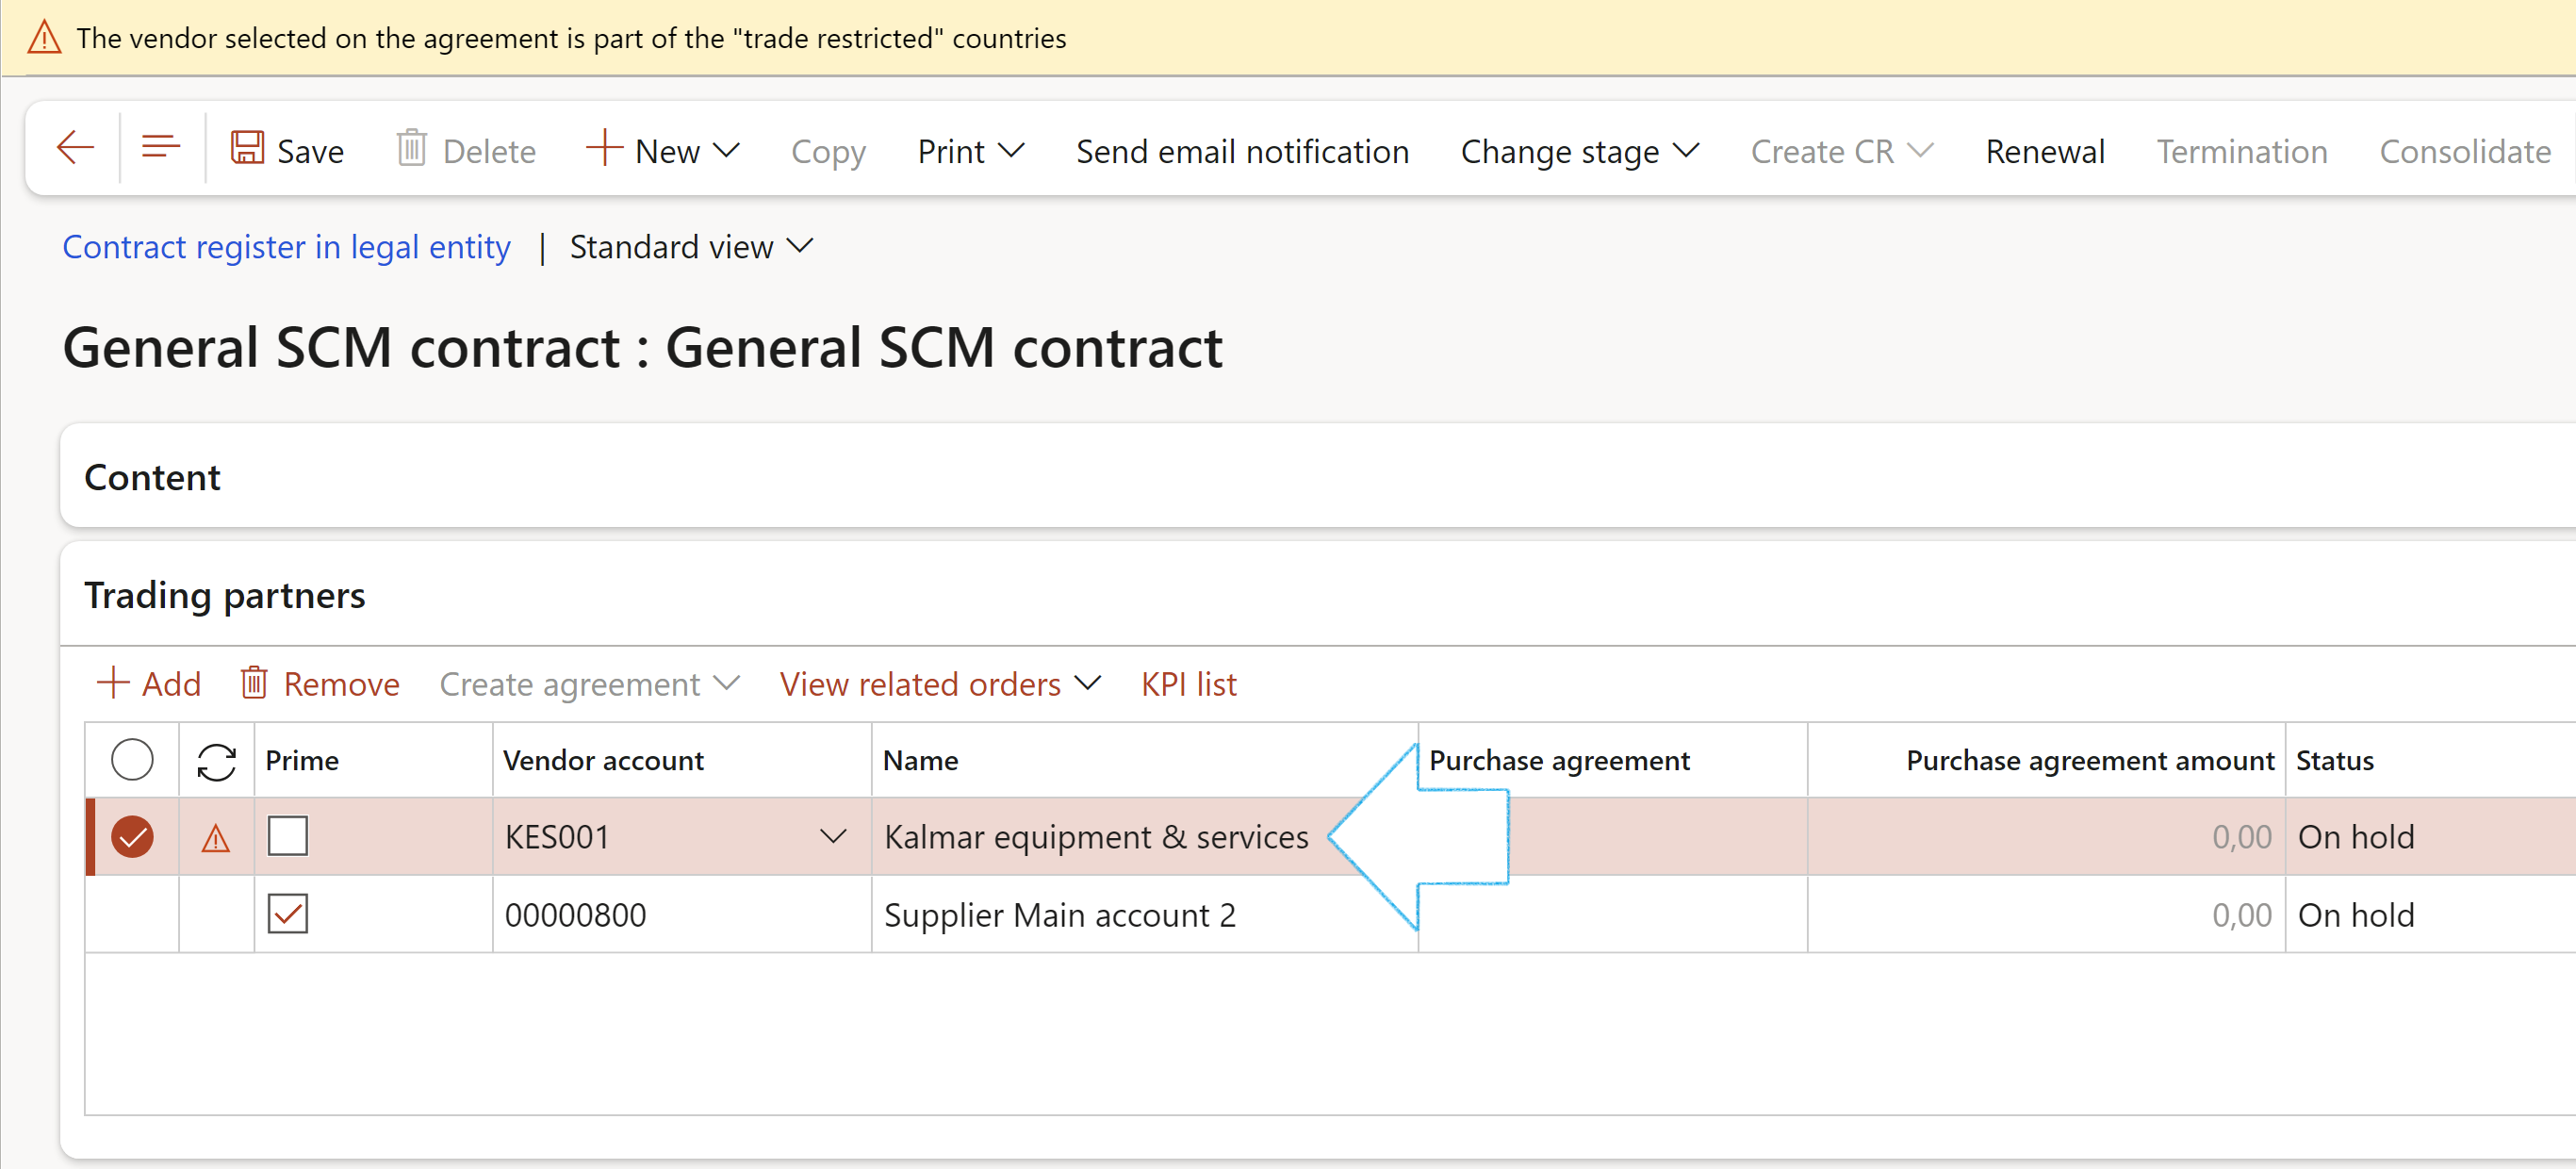
A warning will pop up if the selected Vendor’s address is in a restricted country
¶ Reports and Inquiries
¶ Step 41: Contracts register report
Go to: GRC > Governance > Reports and Inquiries > Contracts register report
- Select the relevant paramenters on the Contracts register report dialog
- Click on the OK button
If the Stage filter is left blank, the Show closed slider will have an effect
If a value is selected in the Stage filter, the Show closed slider will not have an effect
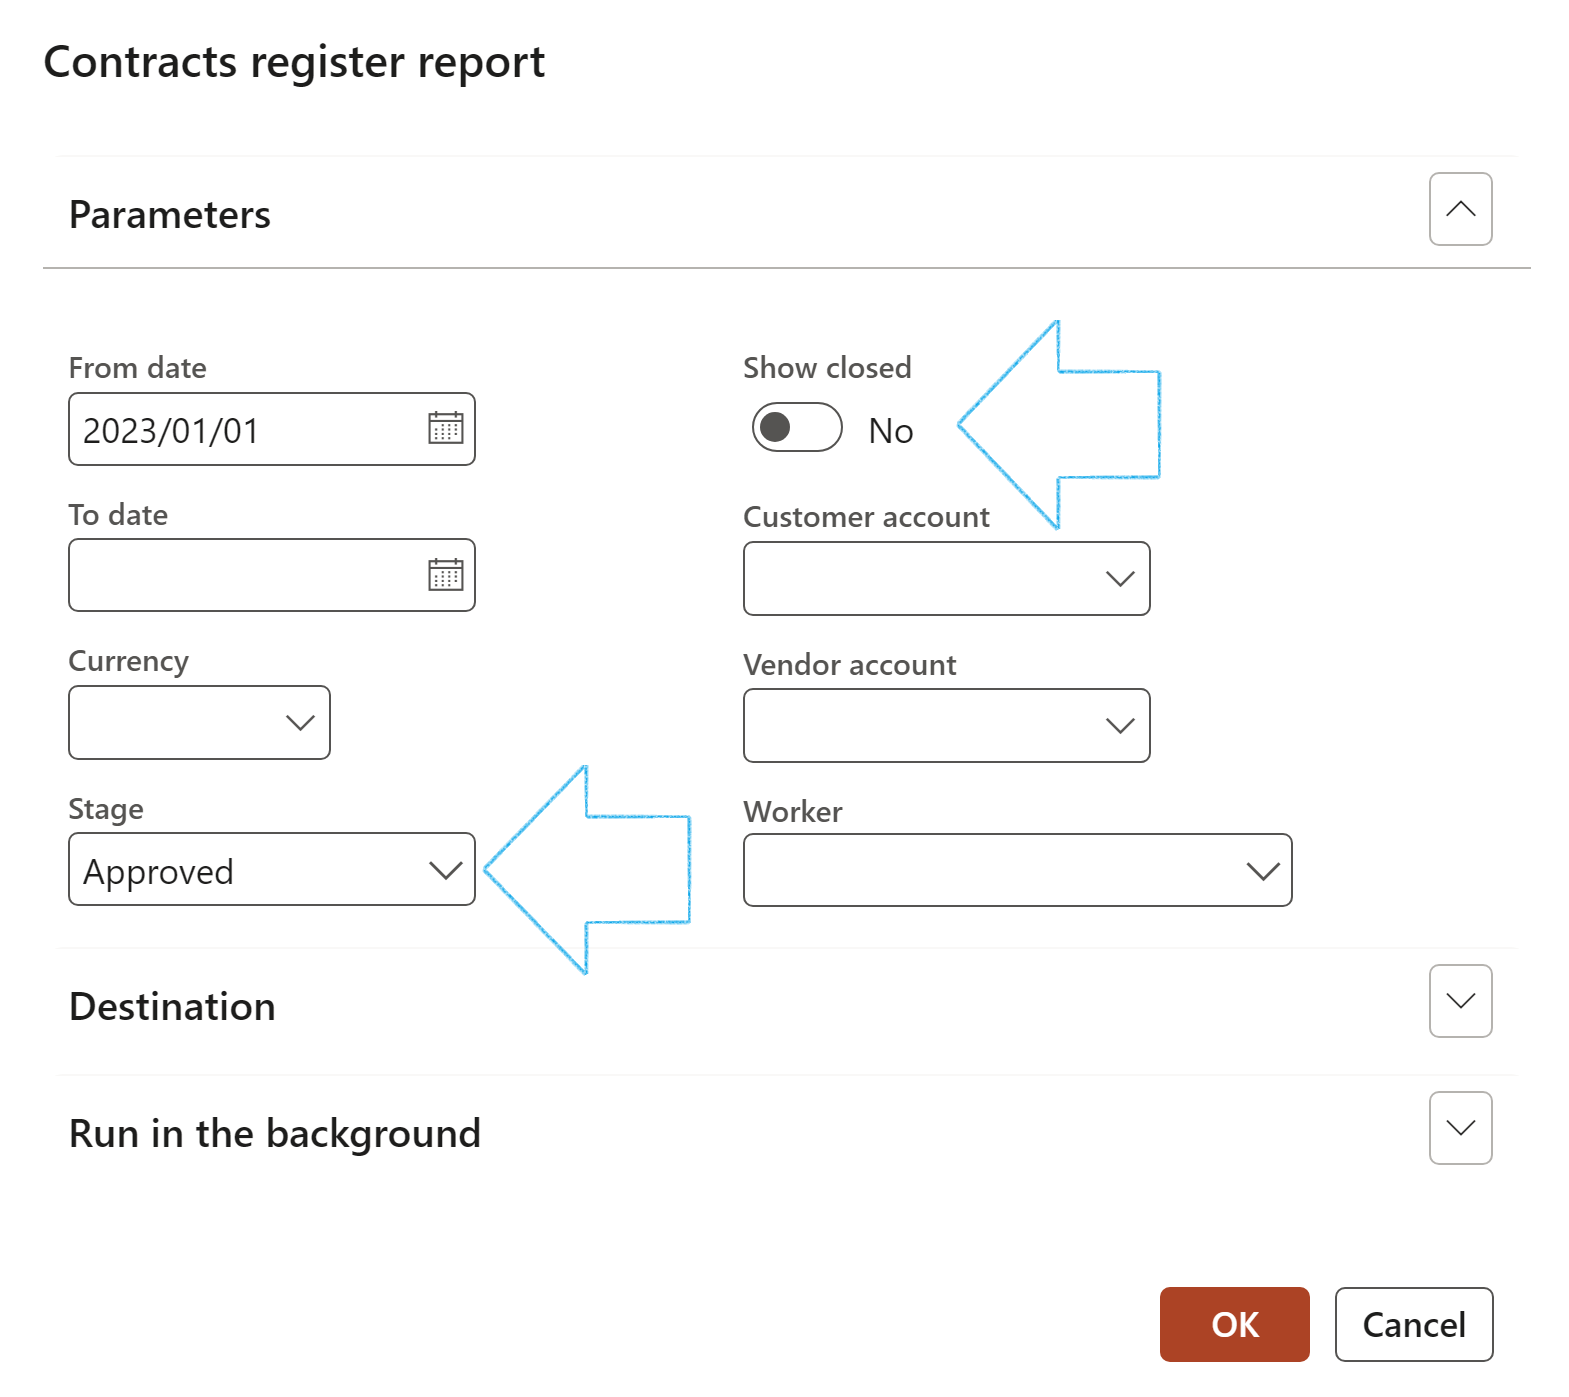
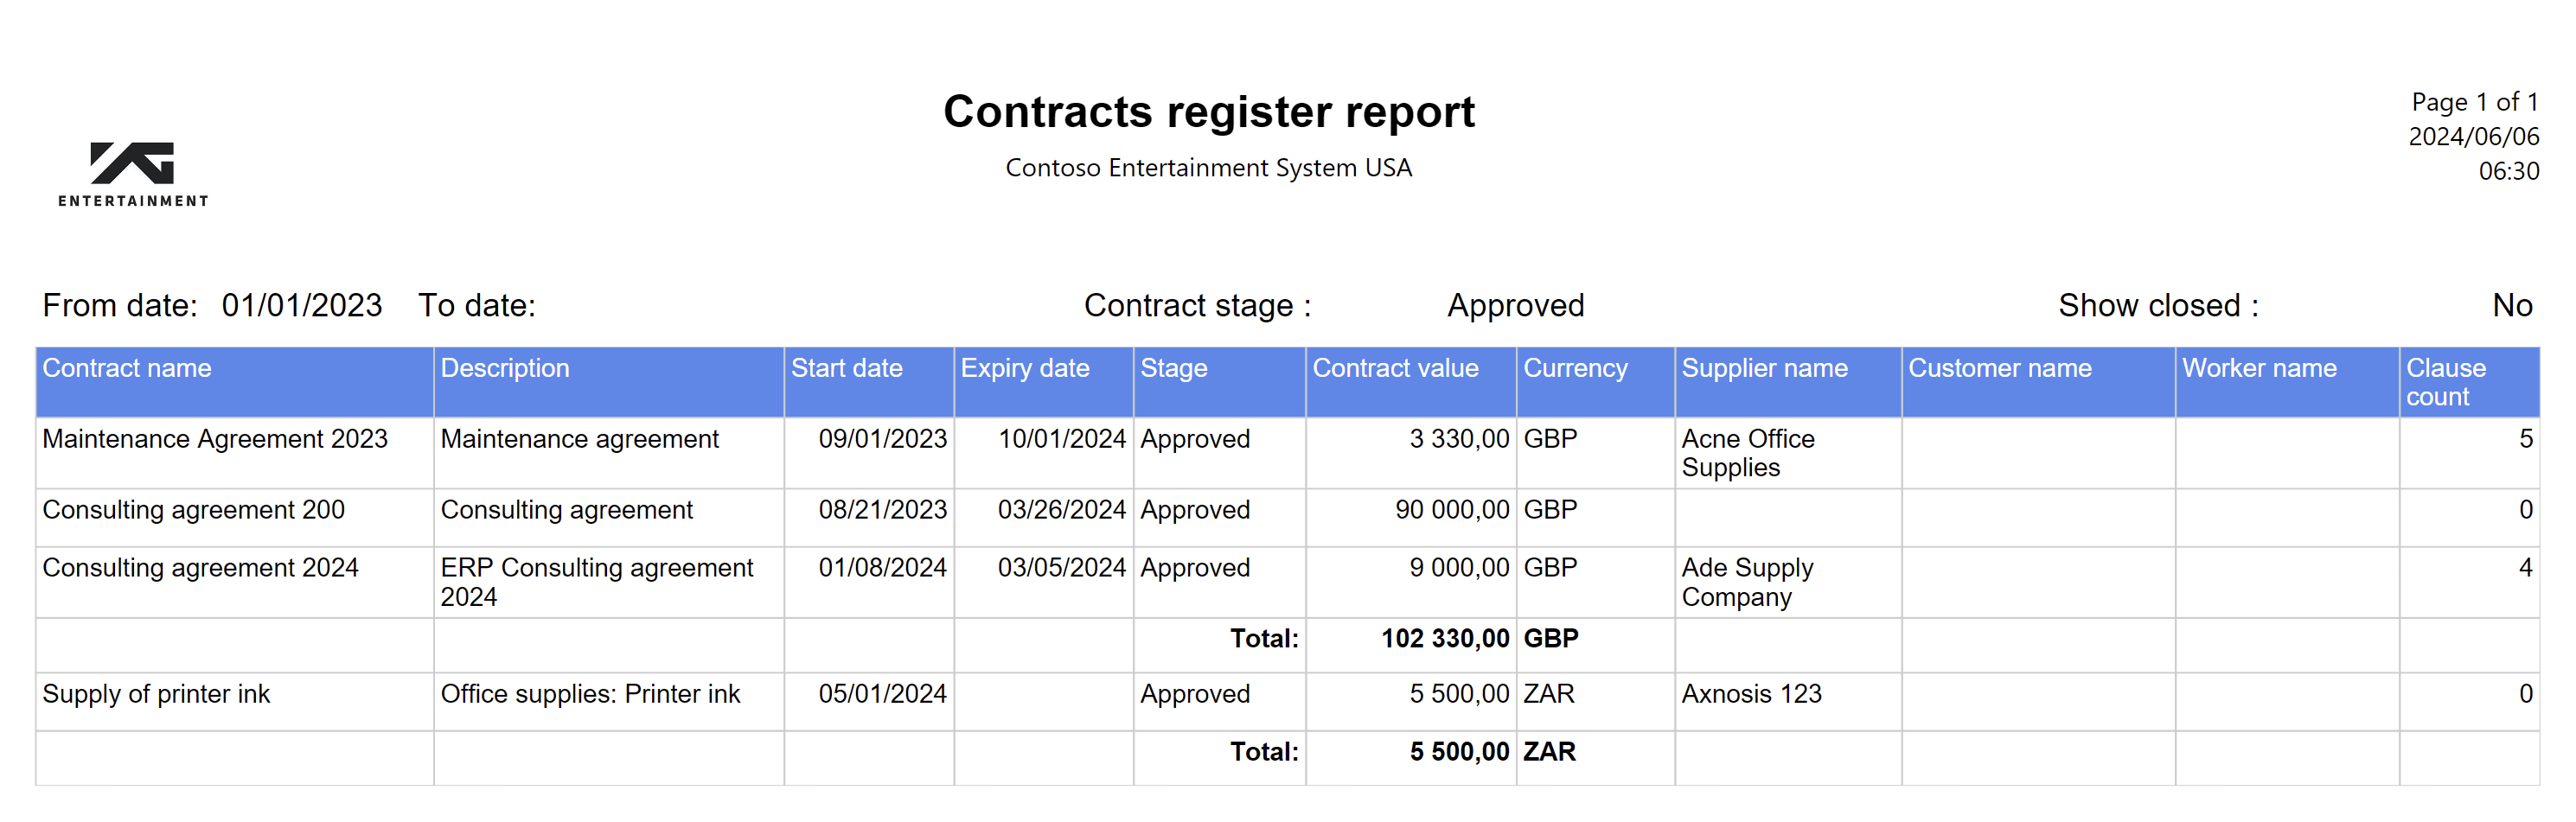
¶ Step 42: Statement of final account report
Go to: GRC > Governance > Reports and Inquiries > Contracts sofa register report
- Select the relevant parameters on the Contracts sofa register report dialog
- Click on the OK button
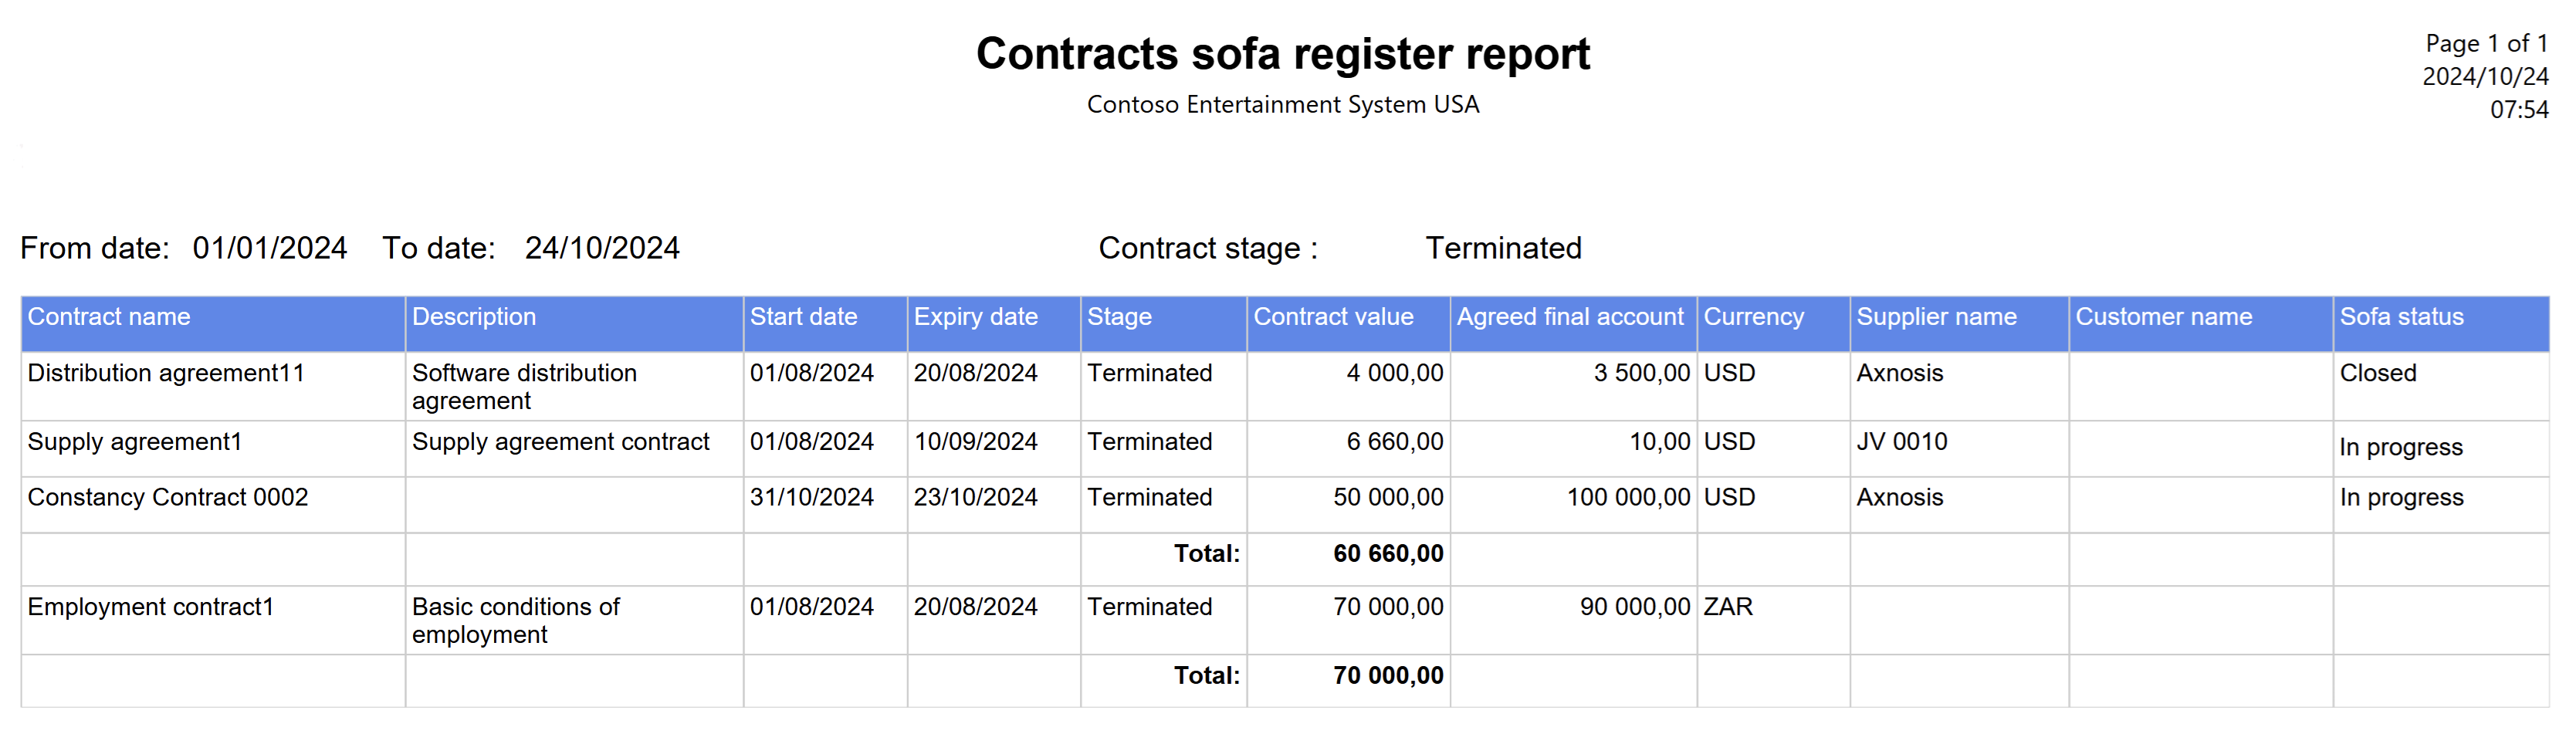
The report will display the following records:
- Only contracts with the SOFA status as In progress or Closed will be displayed
- Contracts with a status other than Archived.
- Contracts with contract Termination date within the From date and To date on the Contracts sofa register report dialog parameters.
¶ Step 43: Purchase agreement register
The Purchase agreement register tracks the current status of each Purchase agreement within your organization.
The following is displayed:
| Contract number | PR number | Submitted date |
| Supplier name | Supplier BEE level | Ownership structure |
| Department | Tender initiation date | Total item value |
| Statement of work value | Total commercial value | Commencement date |
| Expiry date |
Go to: GRC > Governance > Reports and Inquiries > Purchase agreement register
- Use the filters to search for the required register
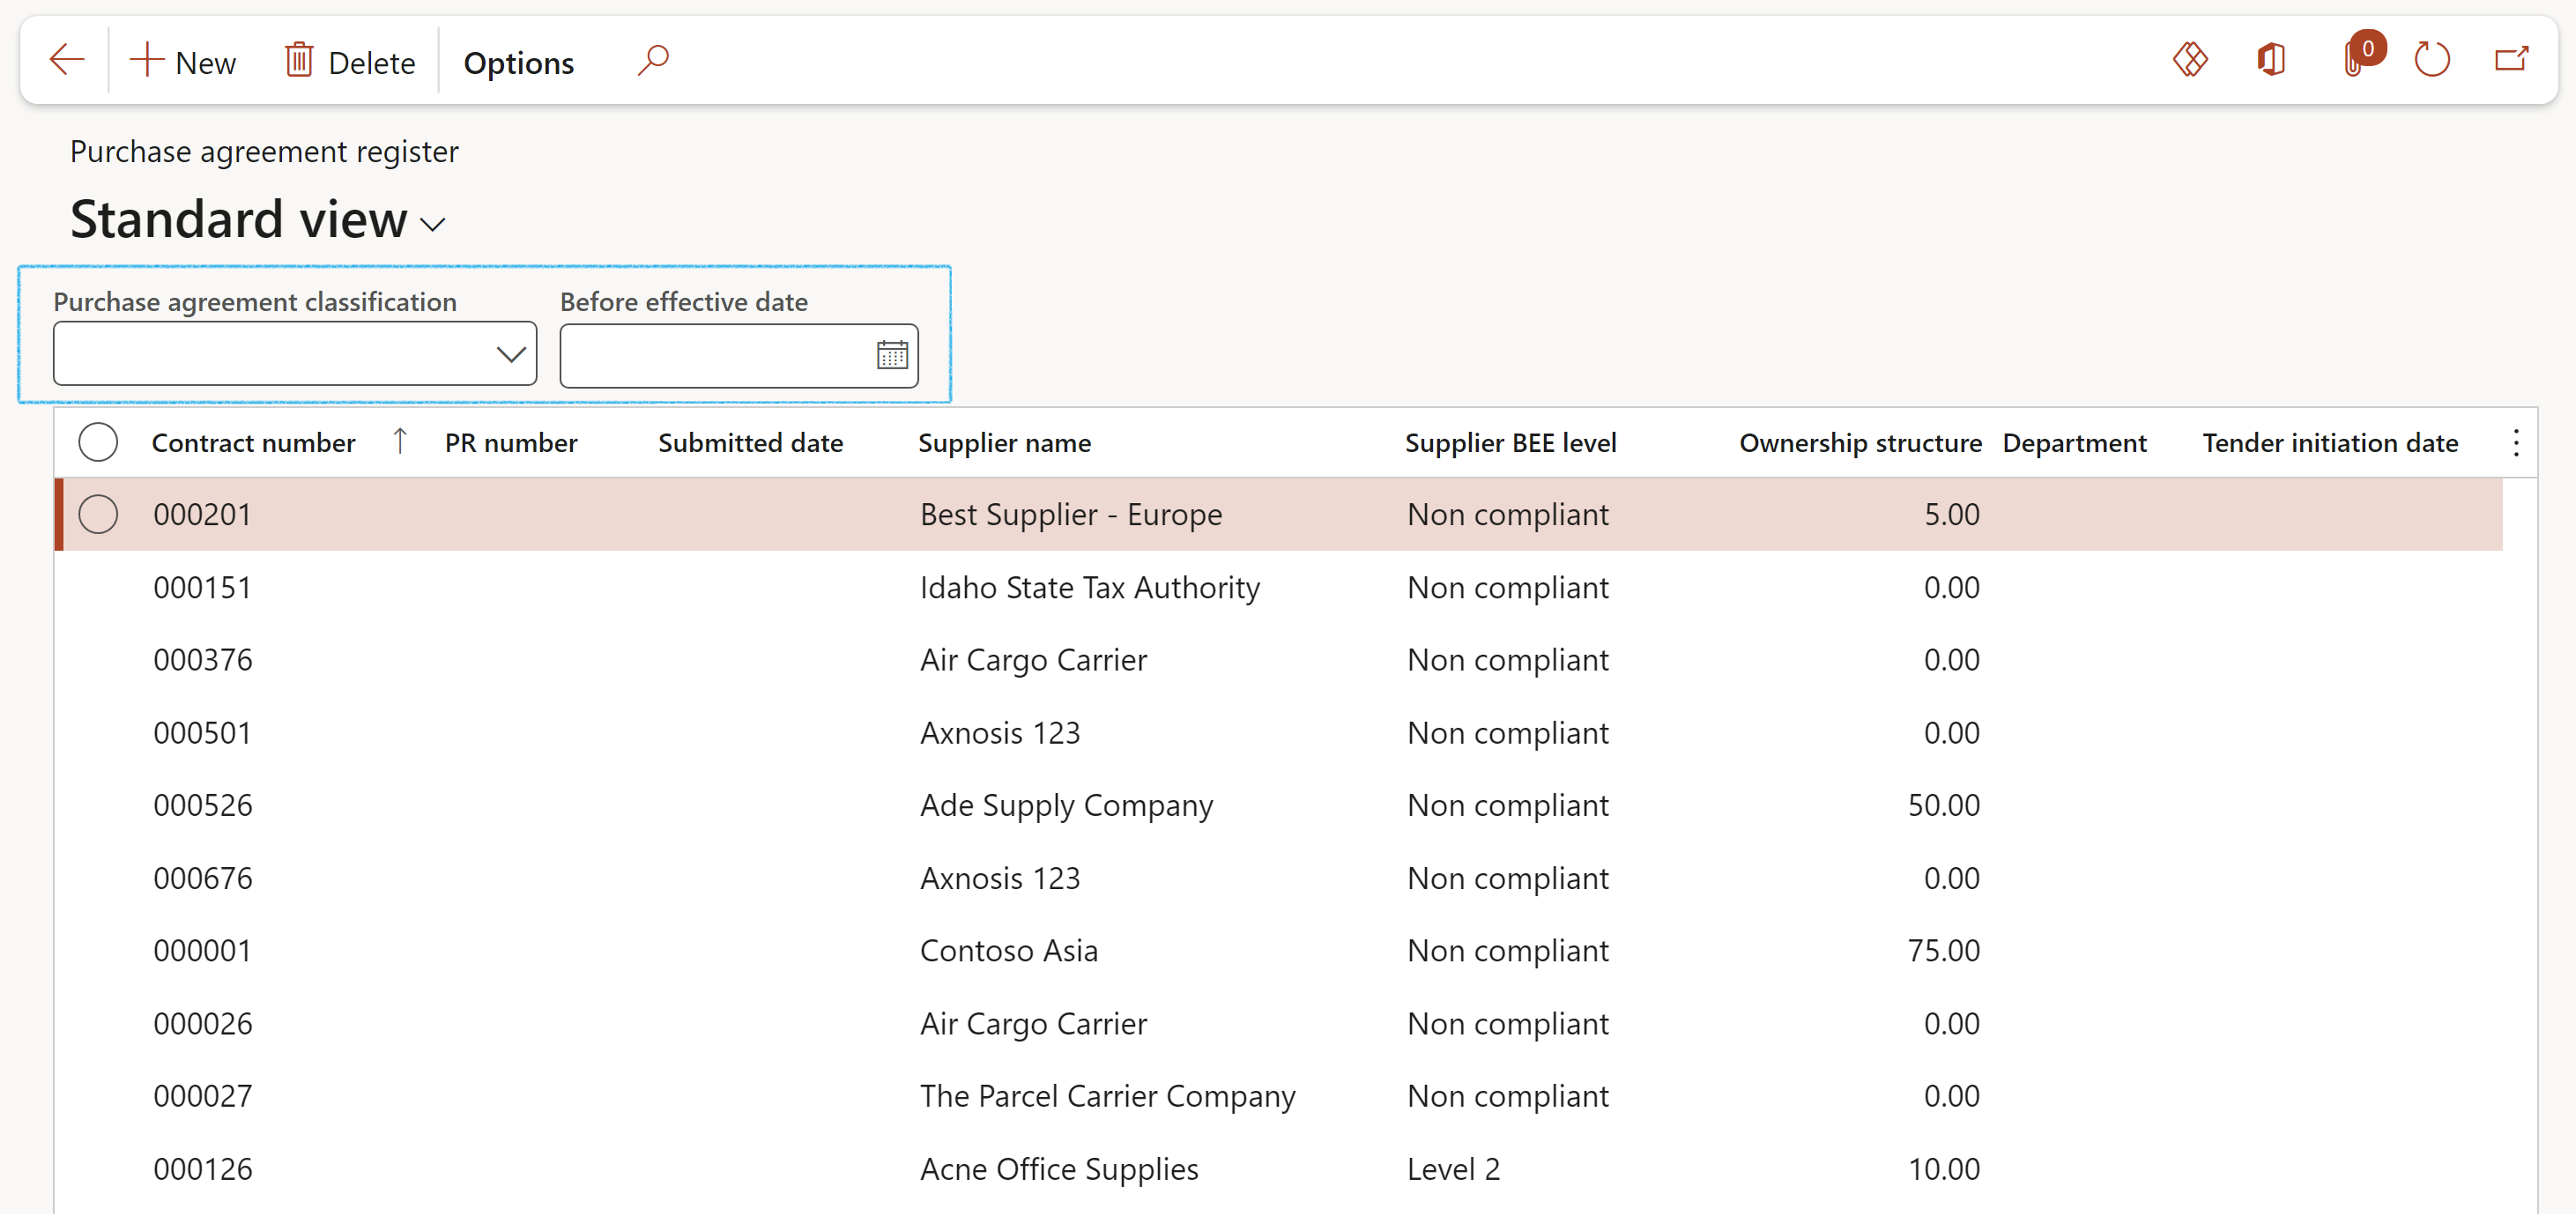
¶ Step 44: Enterprise legal and contracts workspace
Go to: GRC > Workspaces > Legal, Contracts and Tender management
- Open the Enterprise legal and contracts Index tab
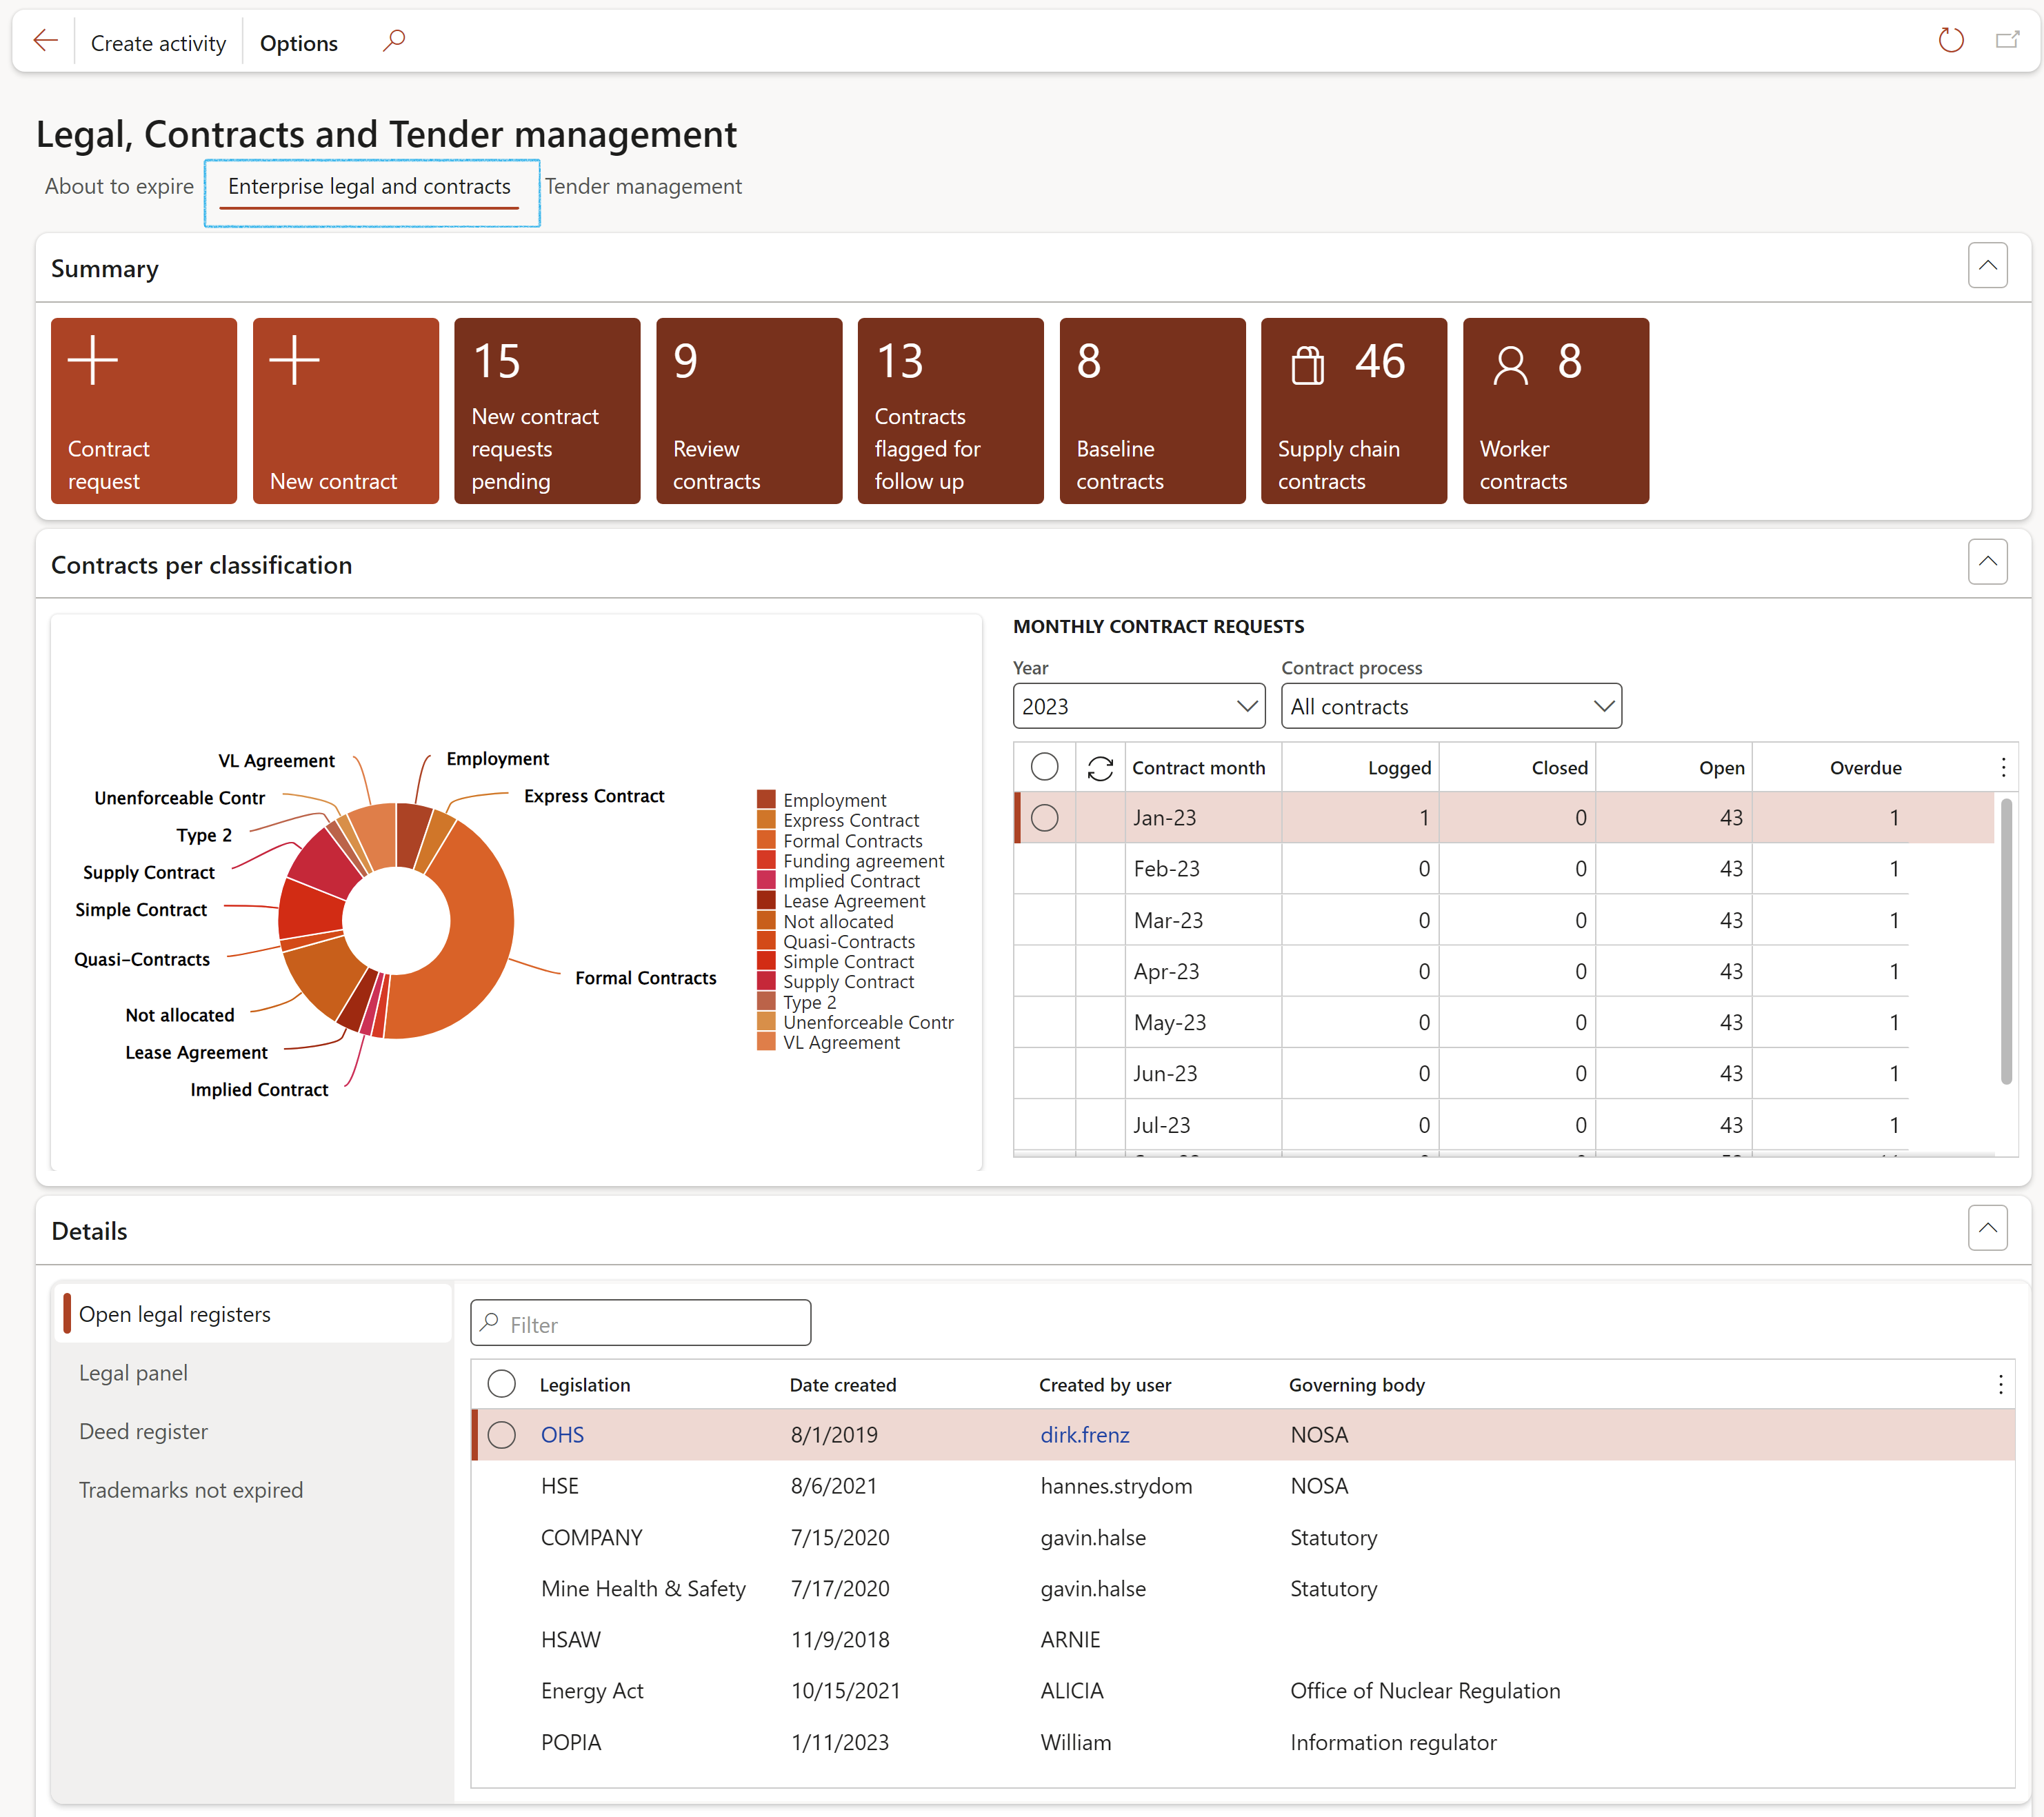
¶ Step 45: Vendor contract performance inquiry
Go to: GRC > Governance > Reports and Inquiries > Vendor contract performance
- Use the filters to search for the required register
- The following fields are displayed in the enquiry:
- Vendor Account number and Name
- Contract number
- Performance KPI
- Measurement
- Target value
- Measurement type
- If the Show breach and remedies slider is set to Yes, the following fields will be added to the enquiry
- Breach type
- Breach date
- Breach note
- Remedy type
- Compensatory damages
- Damages value
- Remedy note
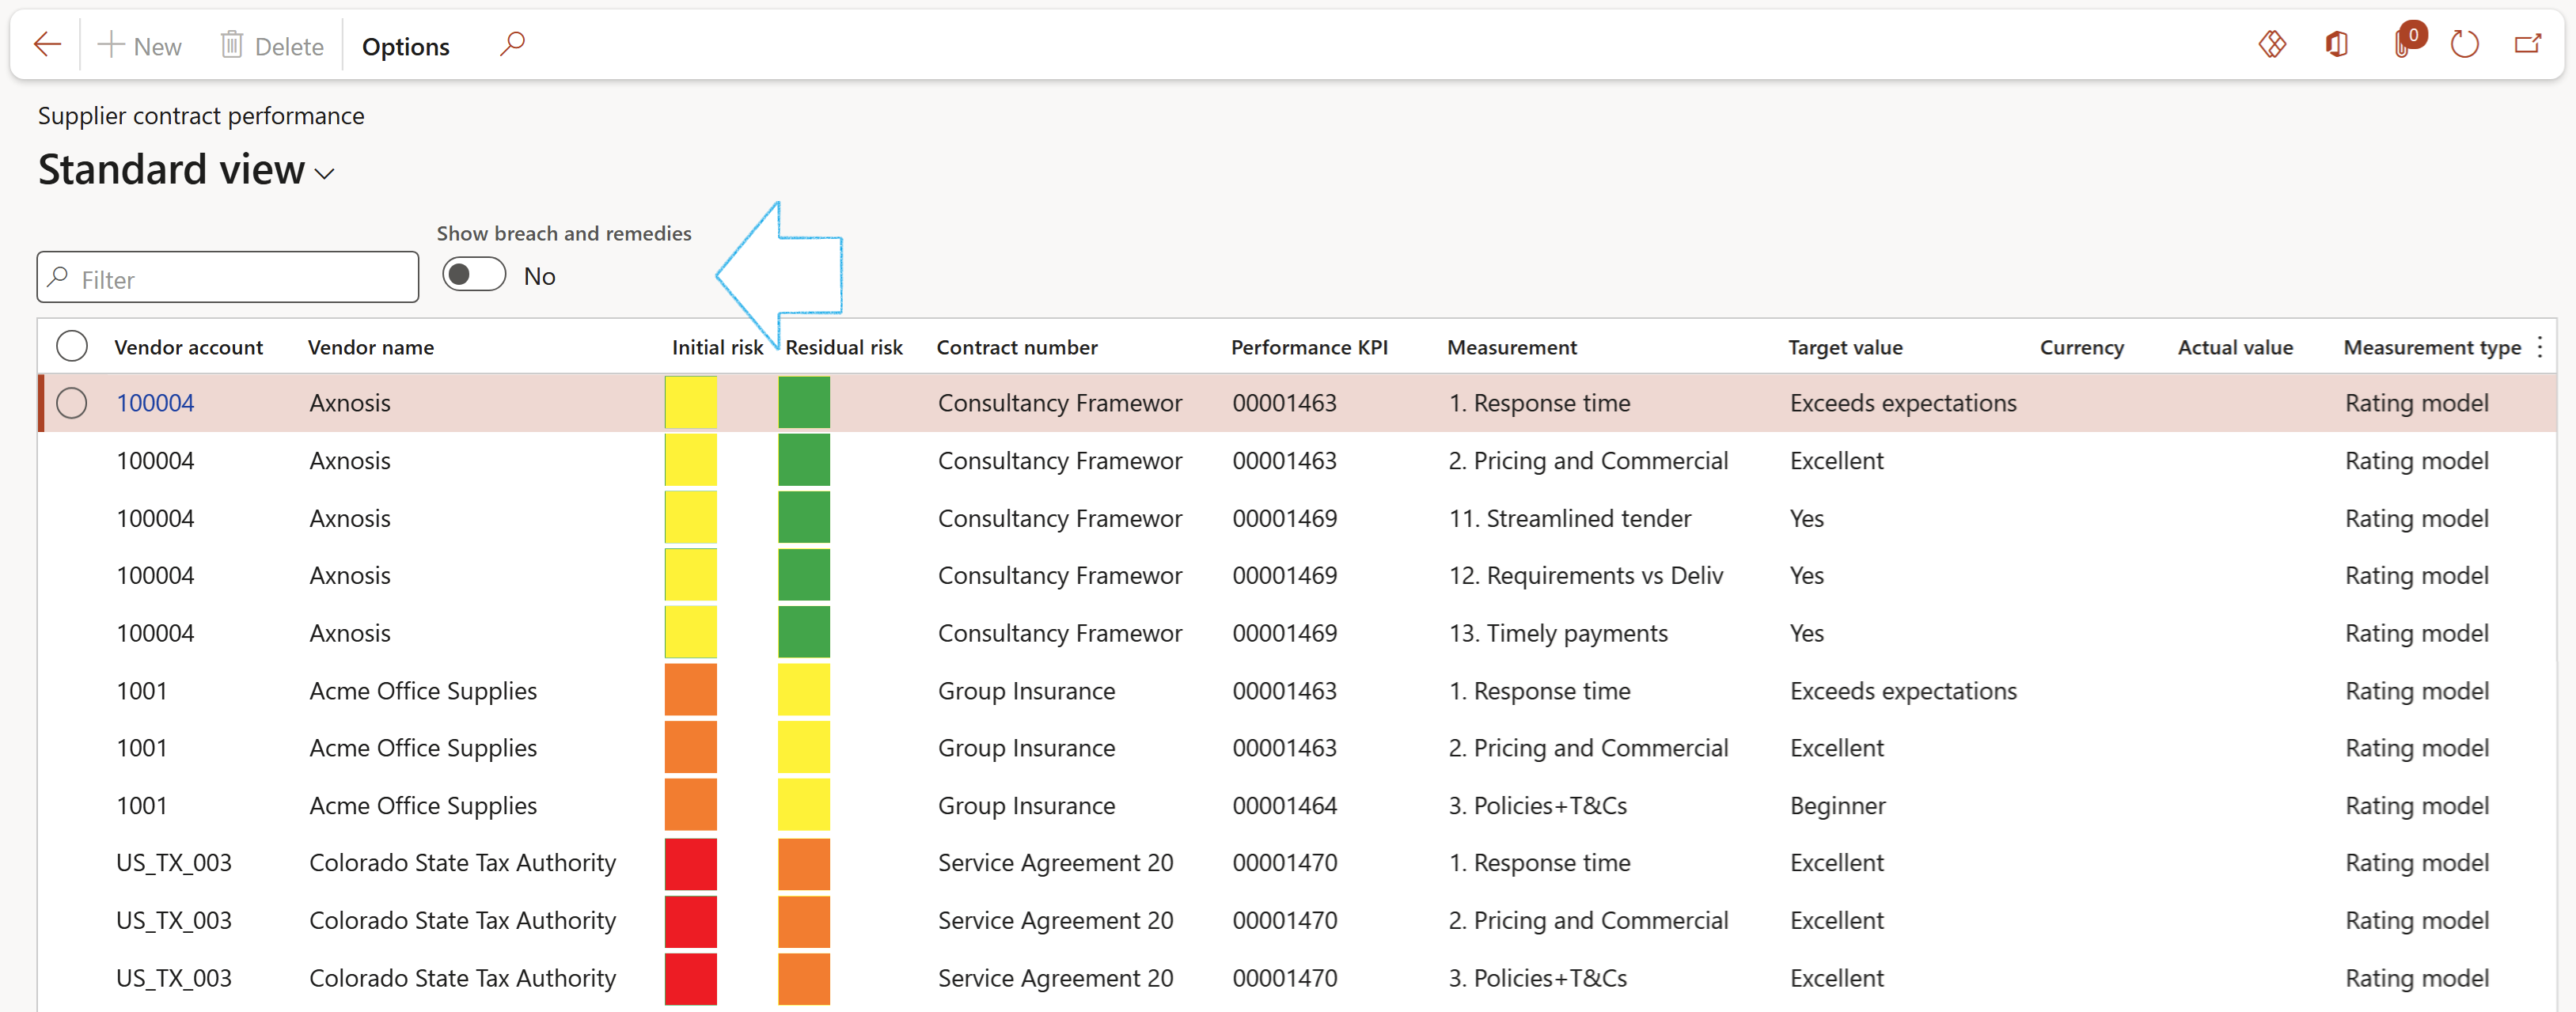
¶ Step 46: Contract expiry report
Go to: GRC > Governance > Reports and Inquiries > Contract expiry report
- Use the Expiration Date Offset (days) filter to search for the contrats expiring soon
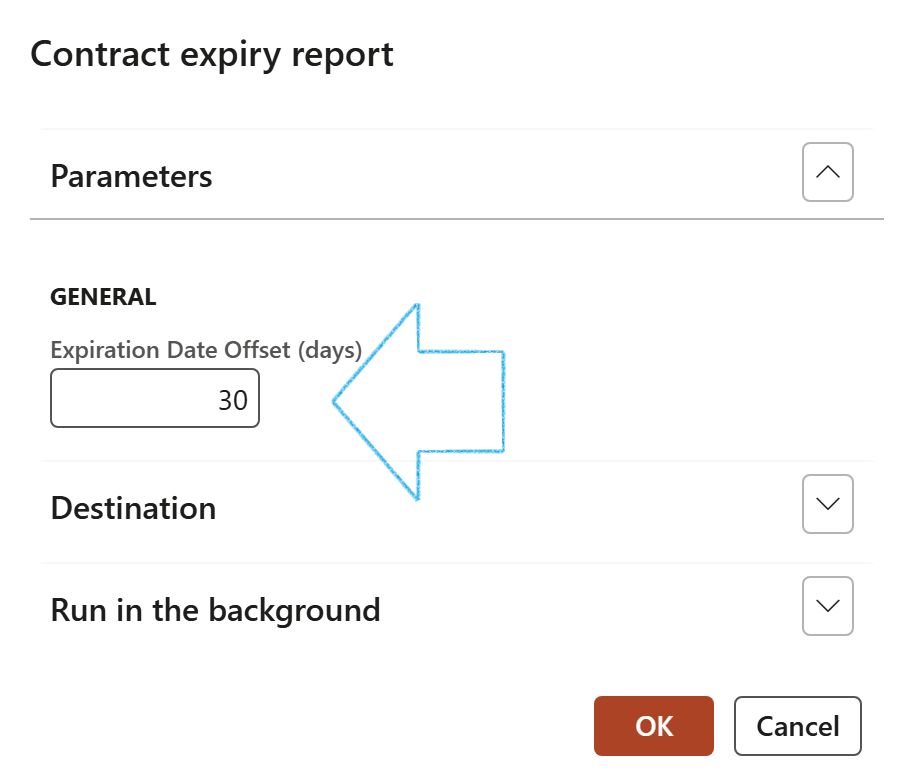
The following fields are displayed in the enquiry:
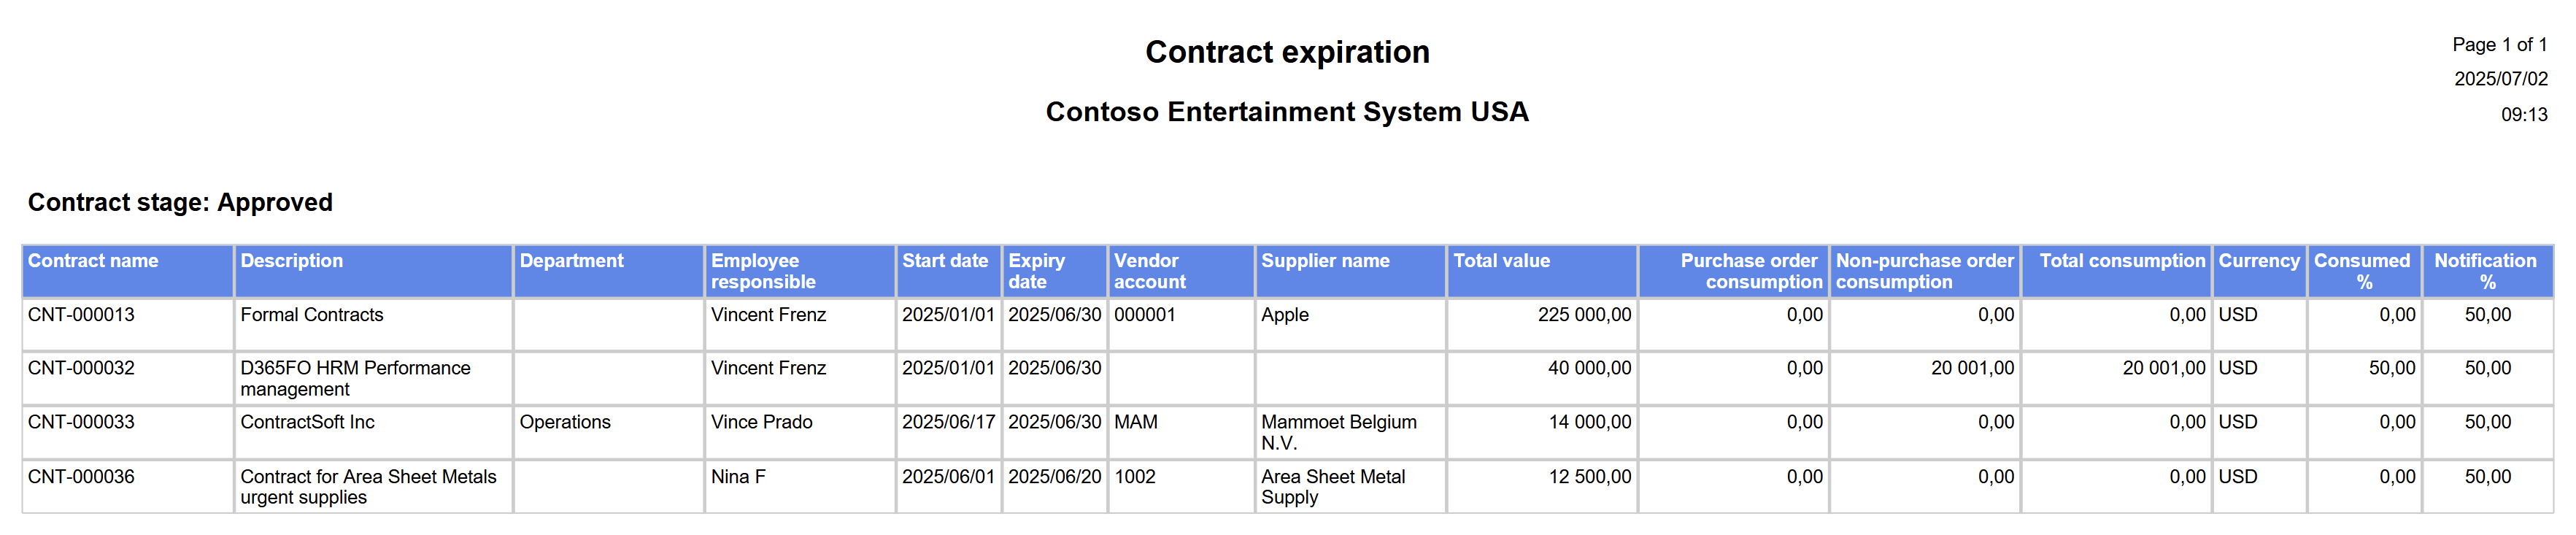
¶ Step 47: Contract expiry and consumption inquiry
Go to: GRC > Governance > Reports and Inquiries > Contract expiry and consumption inquiry
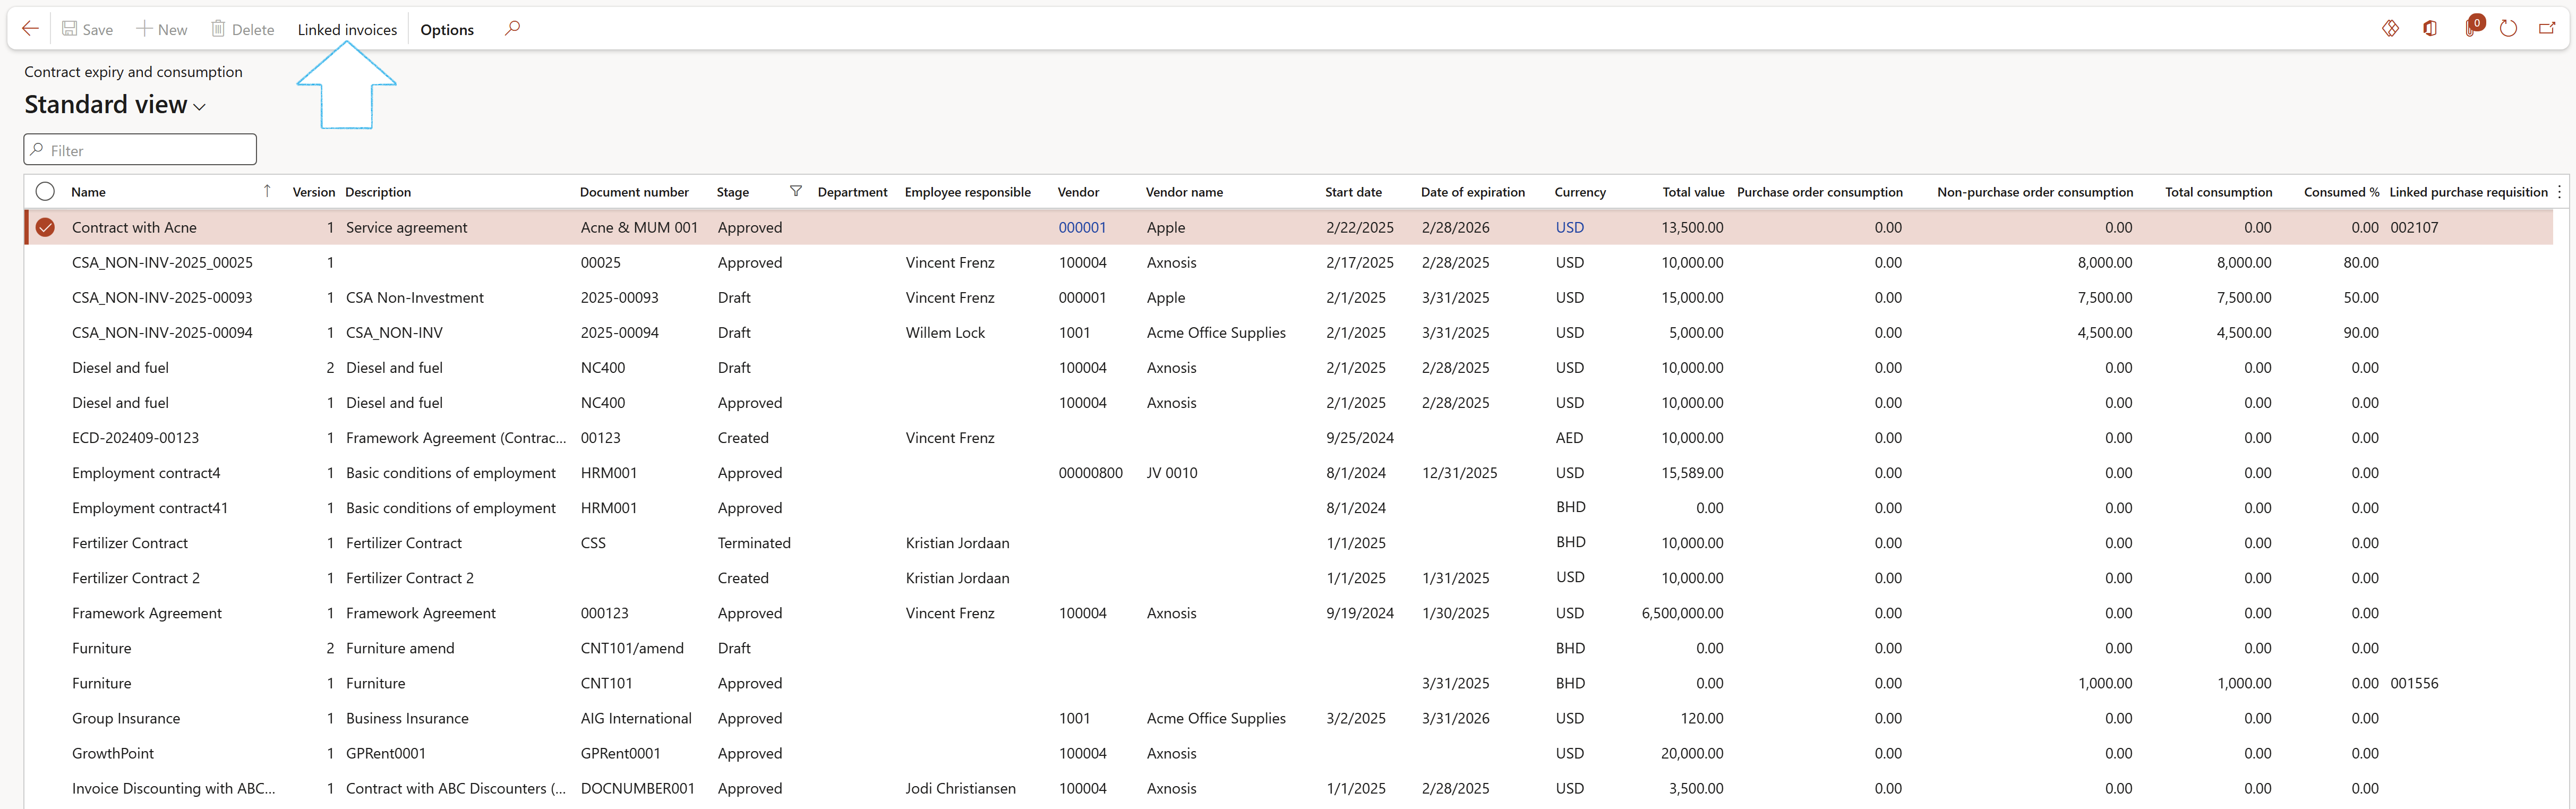
The Invoice journals linked to a contract can be viewed by clicking on the Linked invoices button