¶ Introduction
Business systems were developed based on generic requirements of various types of organizations; from diverse business segments it evolved through continuous adding support for new business processes. Consequently business systems now offer numerous functionalities, which overwhelm most of the enterprises, during project implementation.
Configuration of a business system deals with numerous "usage controls", which can be switched off or on, so as to balance its functionalities to user needs. First thing to happen is to install specific modules needed and configuring these modules, as per the scope of the project. Thousands of configuration rules are present, which define how the system should work etc.
¶ Microsoft D365 F&O basic setups
The organization of an enterprise determines the setup of its business application. For this reason, there needs to be an implementation project which includes the setup of the organization and of other core parameters before starting to work in Dynamics 365.
¶ 1. Organizational structures
If you want to set up a new Dynamics 365 environment with its own database, you have got to access the Microsoft Dynamics Lifecycle Services. From the Lifecycle Services, you can deploy a cloud-hosted environment (hosted in Microsoft Azure) or an on-premise environment (hosted in your datacenter).
Within a Dynamics 365 environment, the organization model represents the structure of the enterprise and its business processes. For this reason, it has to be configured according to the operational and statutory structure of the enterprise.
You can divide the organizational structures into the following types:
- Statutory organization structures for legal reporting - Hierarchies which comply with the regulations of public authorities (e.g., tax purposes).
- Operational organization structures for management reporting - Hierarchies which comply with the management requirements (e.g., divisional structures).
- Informal structures - Independent of organizational hierarchies.
In order to comply with the different reporting requirements, large enterprises oftentimes have got multiple organizational structures and hierarchies in parallel.
You can, for example, set up a hierarchy that matches the structure and the purpose of legal entities, another hierarchy that represents the divisional structure, and a third hierarchy that complies with regional structures.
For other enterprises, one simple hierarchy may be sufficient for all purposes.
¶ 1.1. Organizational model architecture
The organization model in Microsoft Dynamics 365 meets the requirements of the different kinds of organizations. Depending on the requirements, the organization setup includes multiple organization hierarchies in parallel (e.g., decoupling the operational organization from the statutory organization), or only one simple hierarchy that is used for all purposes.
¶ 1.1.1. Organization types
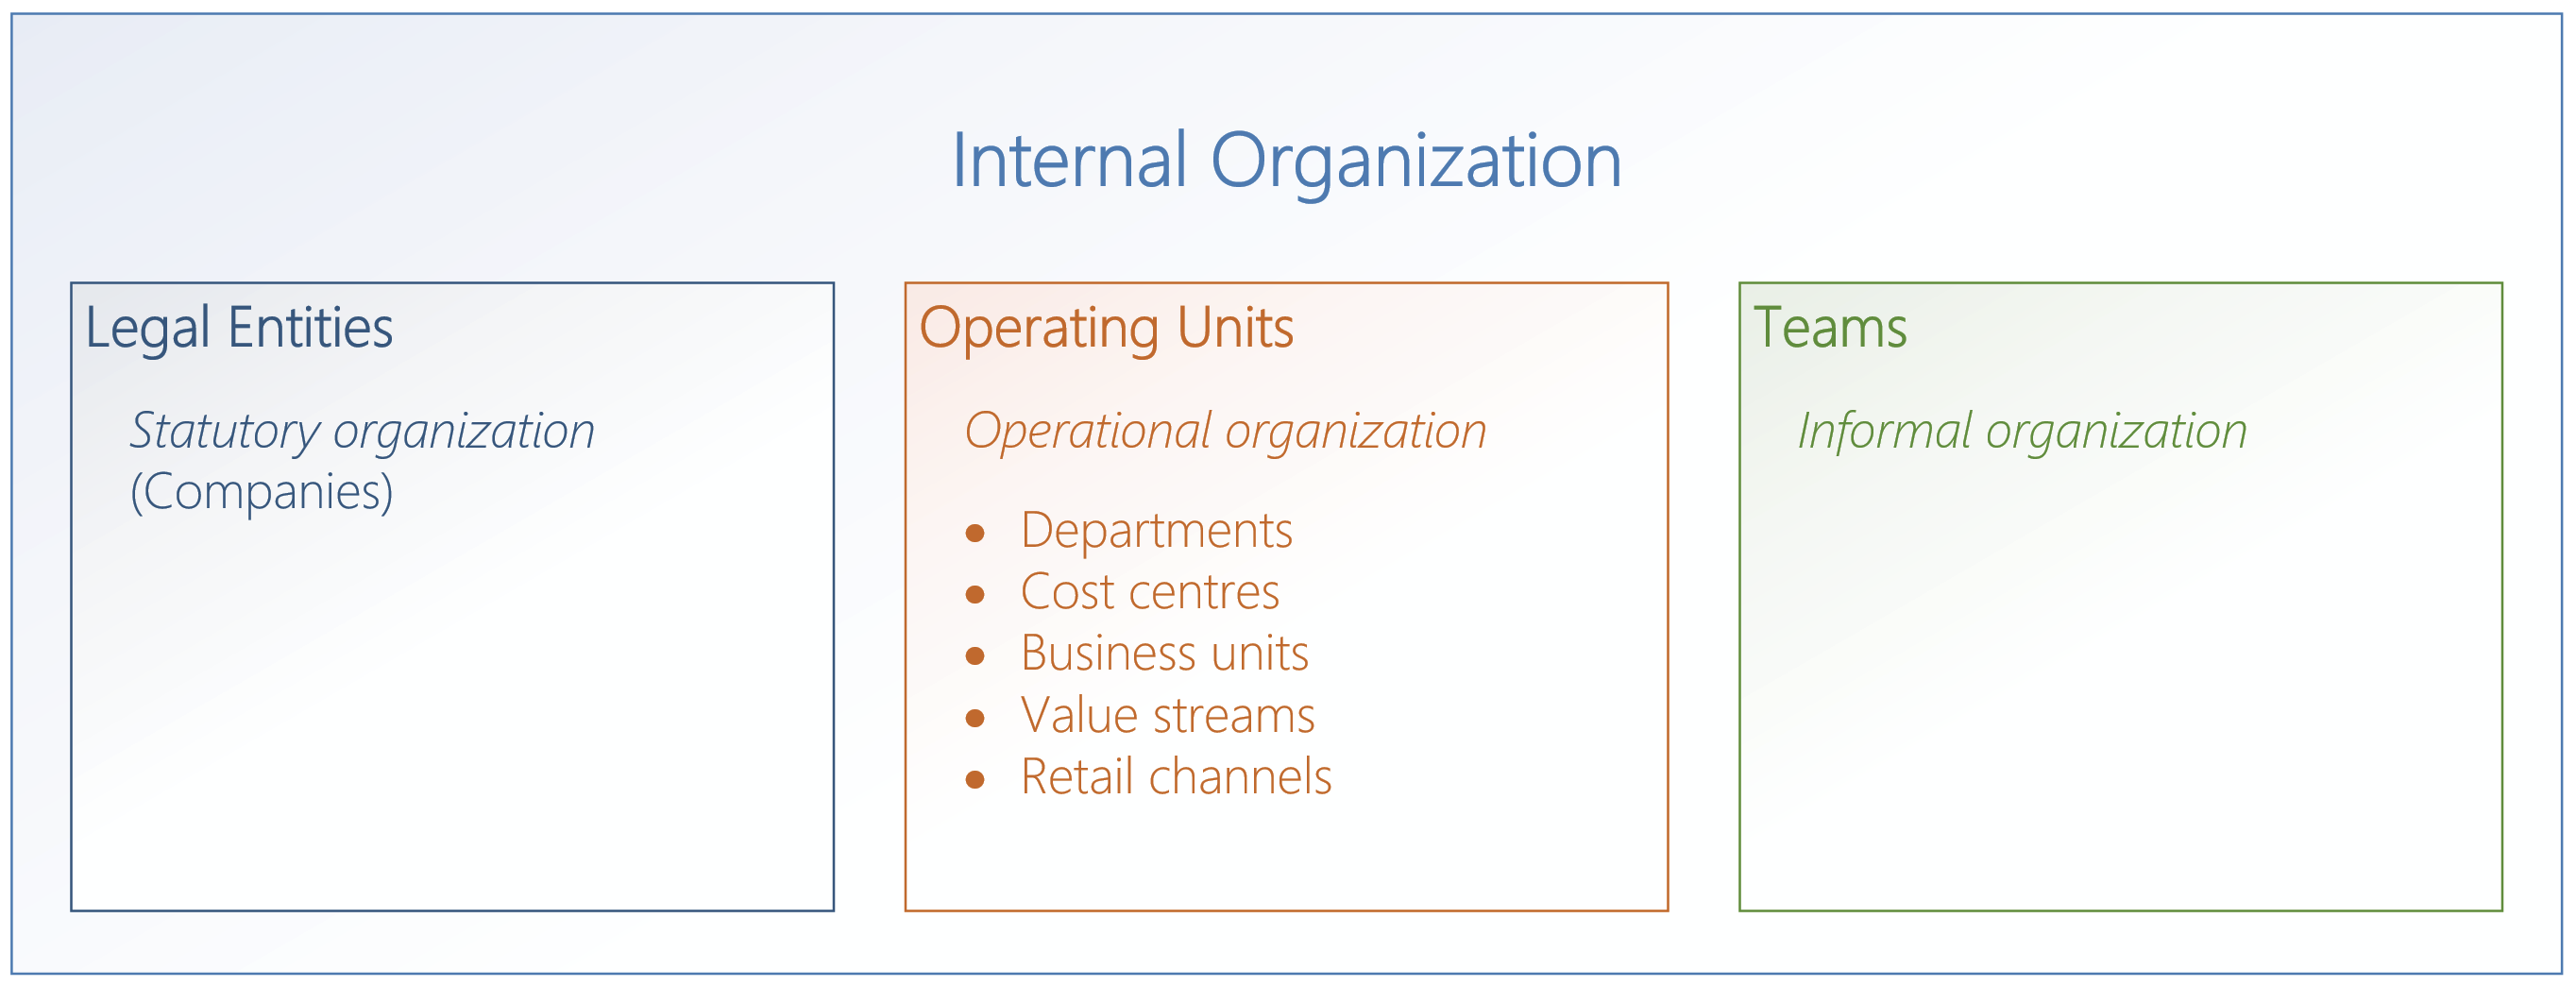
The organization model includes the following organization types:
- Legal entities - Represent the statutory organization.
- Operating units - Represent the operational organization.
- Teams - Represent informal structures.
Only organization units with the type "Legal entity" and "Operating unit" are available in organization hierarchies. The type "Team" characterizes an informal type of organizations, which is not included in hierarchies.
¶ 1.1.2. Using the Organization model within Dynamics 365
Apart from a representation of the company organization, the organization model is used in many areas of the application, including the following purposes:
- Company structure - Legal entities are linked to companies in Dynamics 365, which is why you have to set up companies as legal entities.
- Financial dimensions - Since legal entities and operating units are available as a basis for financial dimensions, it is possible to use them in financial reporting.
- Data security - Based on the organization hierarchy purpose Security, you can restrict the user access to organizations separately from the company structure.
- Business politics - Business rules for areas like approval processes and centralized payments can apply a structure which is different from the hierarchy of legal entities.
Legal entities and operating units are not only part of the organization hierarchies, but they are also included in the global address book. For this reason, the addresses and contact details of legal entities and operating units are managed in the global address book.
¶ 1.2. Organization units
The organization model includes organization units with the type "Legal entity", "Operating unit", and "team". Legal entities and operating units are the basic elements in the organizational hierarchies of an enterprise.
The list page Organization administration > Organizations > Internal organizations shows all organization unites with their type. Forms are tailored to the specific requirements of the different organization types are avaialble in the other menu items of the folder Organization administration > Organizations.
¶ 1.2.1. Legal entities
Legal entities (Organization administration > Organizations > Legal entities) are company accounts in Dynamcs 365. They are the bottom level for legal reporting. Tax reports and financial statements like balance sheets and income statements are usually based on legal entities.
If multiple legal entities, typically the companies of an affiliated group, work in a common Dynamics 365 environment, you can manage the relations between these legal entities. Depending on the requirements, you use the following features:
- Financial consolidation - Manage financial consolidation of companies in an affiliated group.
- Intercompany - Automate business processes between the legal entities of a multi-company organization.
- Organization hierarchies - Use legal entities in the organization model (e.g., for the setup of data security or approval processes).
¶ 1.2.2. Operating units
Operating units are used for reporting and for the internal control of business processes. The types of operating units that you use (e.g., business units as representation for divisions or regions) are depending on the requirements of the enterprise.
Go to: Organization administration > Organizations > Operating units
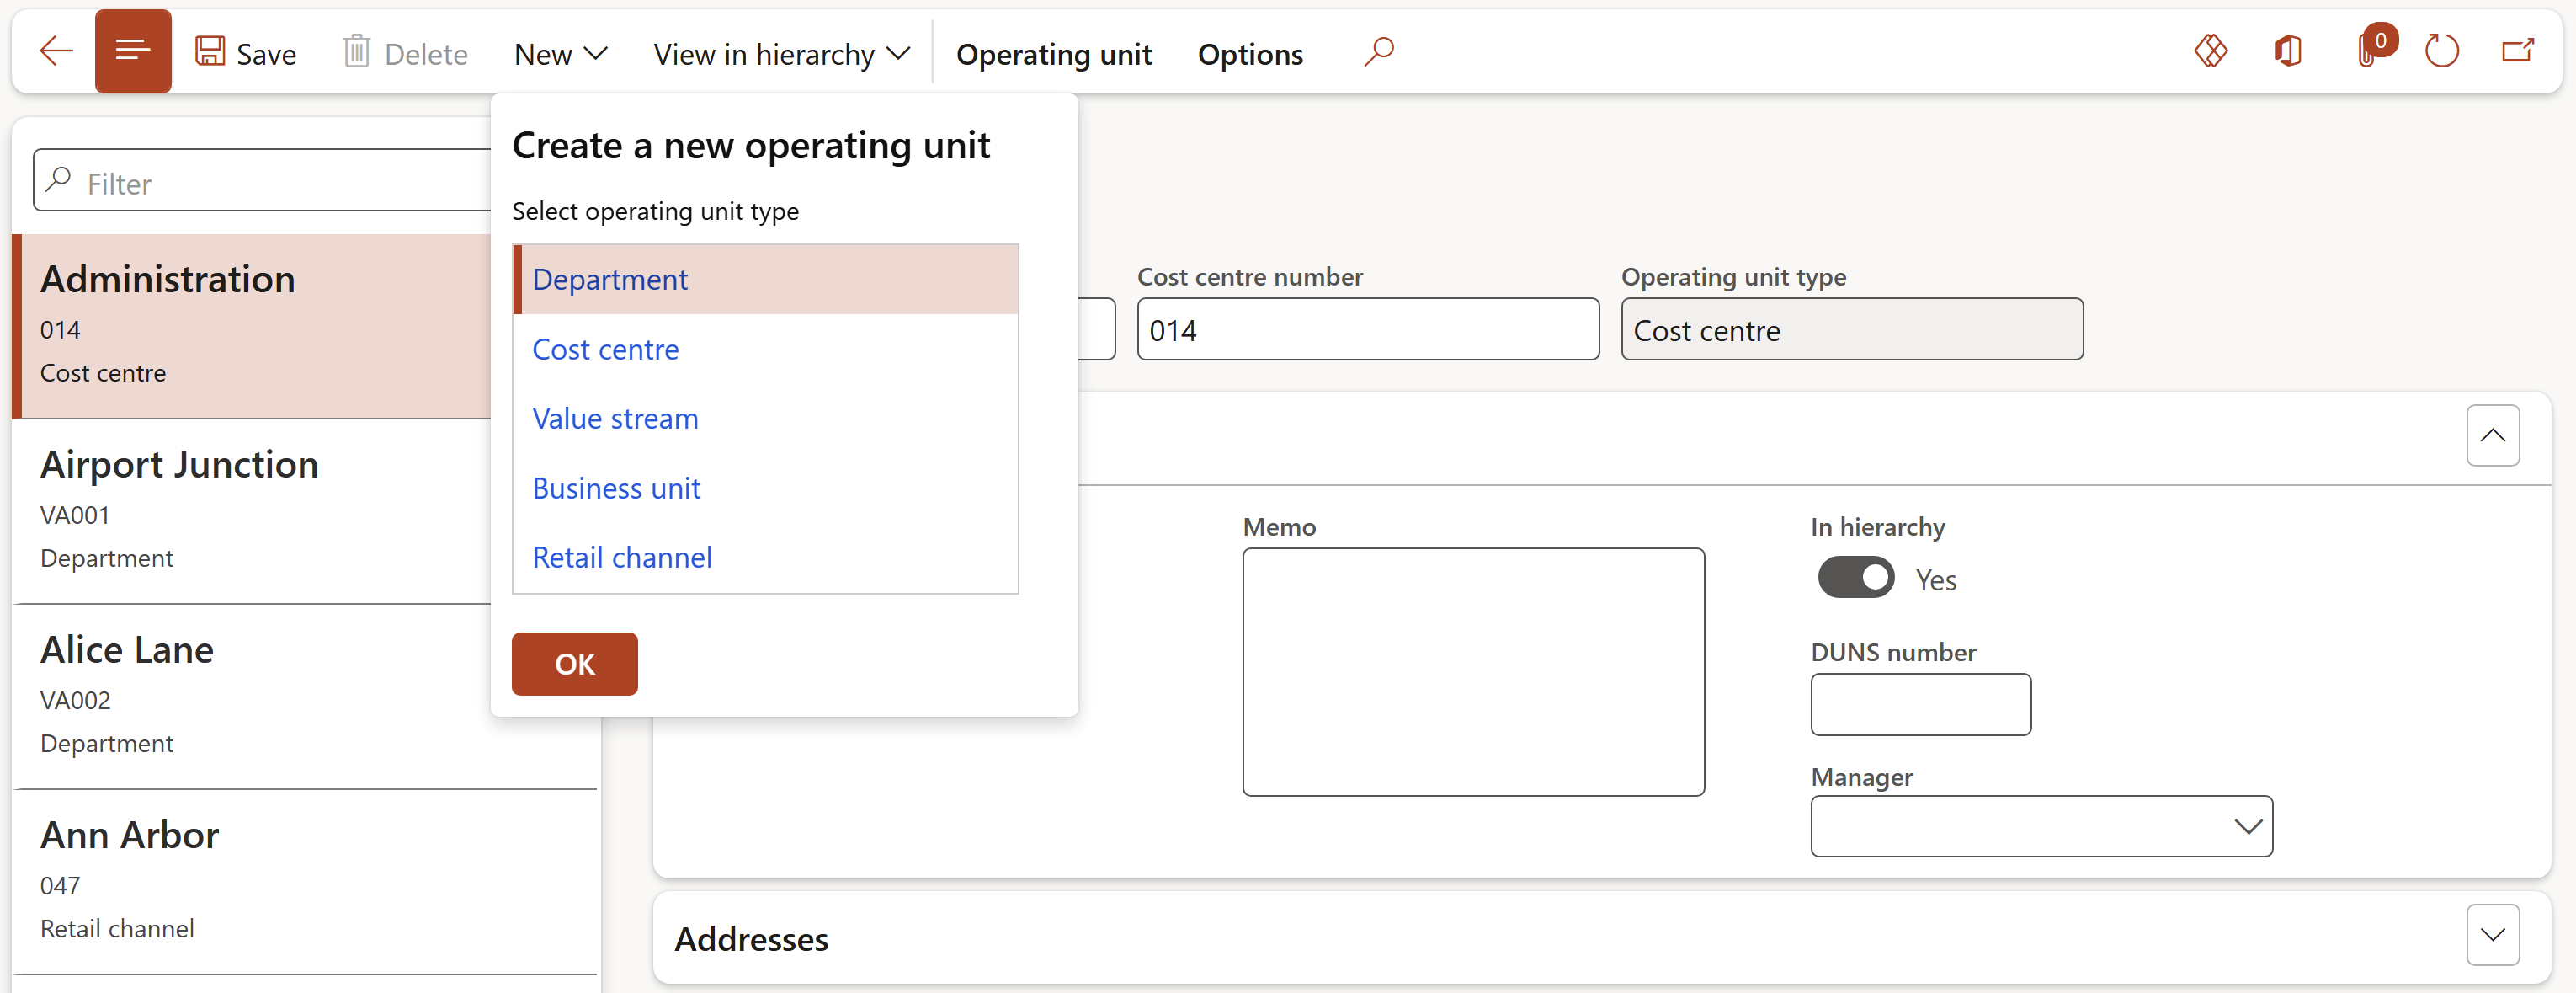
In a standard Dynamics 365 environment, there are the following operating unit types:
- Department - Functional classification (e.g., "Finance"), also used in human resources.
- Cost center - For budgeting and expenditure control.
- Value stream - For production flows in lean manufacturing.
- Business unit - For strategic business objectives (e.g., divisions).
- Retail channel - Related to the Retail and commerce module.
When you create a new operating unit in the Operating unit form, select the Operating unit type in the dropdown menu first. Then enter additional data like the name, address and contact details in the detail form.
Once an operating unit is assigned to one or more hierarchies, you can click on the View in hierarchy button to check the allocation within organizational structures.
If you want to report on the financial performance of operating units, link the operating units to financial dimensions
¶ 1.2.3. Teams
Teams (Organization administration > Organizations > Teams) represent an informal organization of an enterprise. A team simply is a group of people. There is no hierarchical organization structure that links the different teams.
Team types, which you can access with the Team types button on the Teams form, restrict the team members to different kinds of people (e.g., system users, employees, or vendor contacts).
When you create a new team, select the team type first. In order to assign people to the team, click on the Add team members button in the toolbar of the Team members tab. Depending on the team type, available members are Dynamics 365 users, employees, or vendor contacts.
Teams are used in various areas of the application, for example in the access permission setup for address books (select the applicable teams in the respective address books).
¶ 1.3. Organization hierarchy structures
An organization hierarchy shows the relationship between the organization units in line with the prupose of the hierarchy. Depending on the requirements, you can set up multiple hierarchies in parallel. The purpose(s) of a hierarchy determine its functional utilization - for example, a hierarchy with the purpose Security is used for data access permissions.
¶ 1.3.1. Organization hierarchies
The organization hierarchies in your enterprise are shown in the menu item Organization administration > Organizations > Organization hierarchies. If you want to create a new hierarchy, click on the New button and enter the Name of the hierarchy. Then click the Assign purpose button on the Purposestab to assign one or more hierarchy purposes to the hierarchy.
In order to view the hierarchy with its elements, click on the View button in the Action pane. In the hierarchy designer that is shown then, you can navigate within the hiearchy and switch the focus with a click on the respective element. You can change the hierarchy in the Edit mode and insert or remove organization units with the respective button in the toolbar. With the Cut and Paste buttons, you can move a unit and its subunits within the organization hierarchy.

Once you have finished editing the organization hierarchy, click the Publish button to activate the update. If you want to keep changes in a draft version, do not publish the update but save the changes with the Save button.
The organization structure is using validity periods, which is why you enter an effective date when you publish the hierarchy after editing. It is not possible to change the published version anymore - you can only publish another version with a later date. For this reason, you should not publish a hierarchy with a future date as long as it is still possible that there are further changes in the hierarchy.
¶ 1.3.2. Organization hierarchy purposes
In case your enterprise requires different hierarchies for the different puposes, set up multiple organization hierarchies. The organization hierarchy purposes (Organization administration > Organization > Organization hierarchy purposes) refer to functional features in Dynamics 365. For this reason, available purposes (e.g., Centralized payments or Security) and the allowed organization types per purpose are determined by the application.
In order to assign the applicable organization hierarchy or hierarchies to a purpose, select the respective hierarchy purpose in the left pane of the Organization hierarchy purposes form and click the Add button on the Assigned hierarchies tab in the right pane. Depending on the requirements, you can assign one or more hierarchies to one purpose, and one hierarchy to one or more purposes.
¶ 1.4. Legal entities (Company accounts)
Once you log on to Dynamics 365, you work in a company account - the current company (legal entity) for the session. If not specified in the Dynamics 365 web address (parameter "cmp") when accessing the application, the current company is initialized from your user options.
The navigation bar of the Dynamics 365 web client always shows the current company. Depending on the setup of the company, the banner in the dashboard displays a company-specific image. If you want to switch from one current company to another, click on the company field in the navigation bar and select the new company in the lookup.
¶ 1.4.1. Company setup
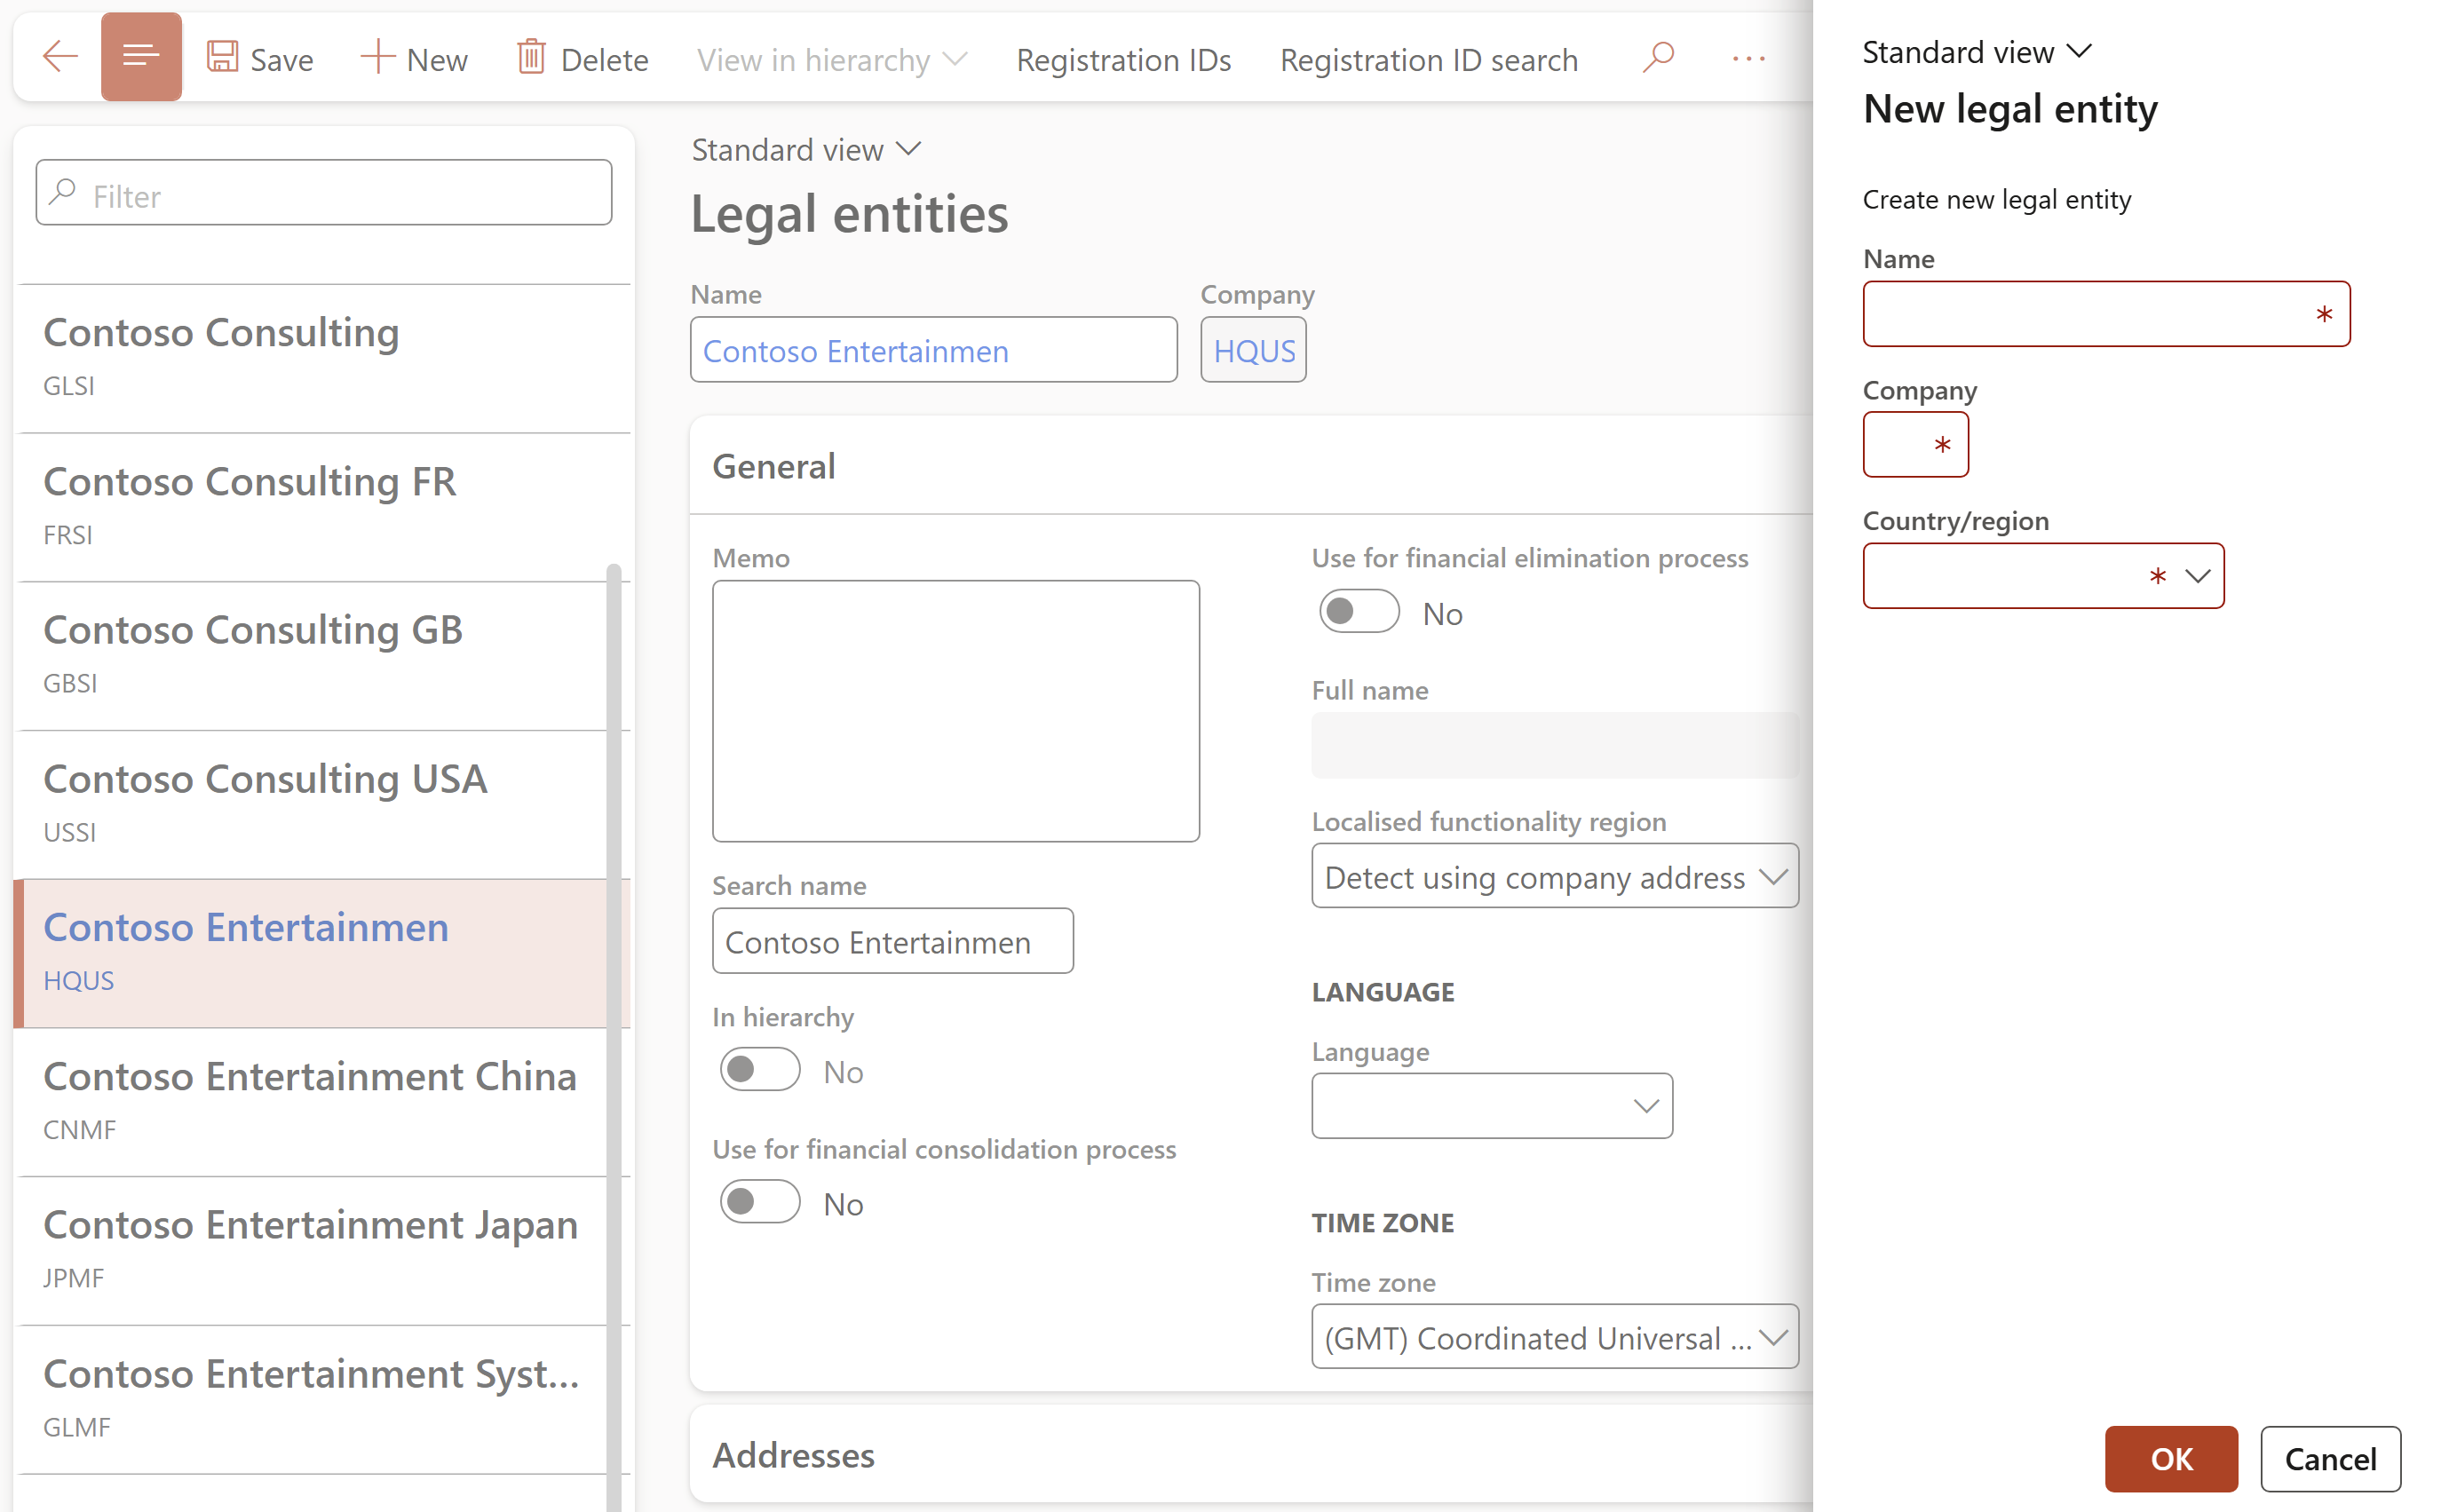
You can manage the companies (legal entities) in the form Organization administrations > Organizations > Legal entities. If you want to create a new company, click on the New button in the Action pane and enter the company name, the company ID (with up to 4 digits), and the country/region (which by default determines the applicable country-specific features) in the New legal entity dialog.
All users with appropriate permissions can select this new company as the current company afterward. But before you can enter and post transactions in the new company, the setup of the company in all applicable areas and modules (like general ledger, accounts payable, and accounts receivable) has to be finished.
Core data in the Legal entity form include the company name (which is printed on documents and reports) and further settings like the primary company address. In order to enter the primary address or an additional address (e.g., for invoicing or delivery), click on the Edit or Add button on the Addresses tab. An example of an additional address is a default delivery address that is different from the primary company address. This delivery address is the default for purchase orders (if no address is specified for the site or warehouse in the order header).
The tab Contact information contains the contact data of the company. Since the global address book includes the legal entities, company addresses and contact data are shown in the global address book.
Further important settings in the Legal entity form include the primary bank account on the tab Bank account information. In a company located in the European Union, enter the VAT registration number (VAT exempt number) on the tab Foreign trade and logistics.
The following procedure explains how to create a legal entity. The demo data company used to create this procedure is USMF.
- Go to Navigation pane > Modules > Organization administration > Organizations > Legal entities.
- Click New.
- In the Name field, type a value.
- In the Company field, type a value.
- In the Country/region field, enter or select a value.
- Click OK. In the General section, provide the following general information about the legal entity: Enter a search name, if a search name is required. A search name is an alternate name that can be used to search for this legal entity. Select whether this legal entity is being used as a consolidation company. Select whether this legal entity is being used as an elimination company.
¶ 1.4.2. Companies in the Data structure
You can set up multiple company accounts (legal entities) within a Dynamics 365 environment. Except for shared application data like parties or products, company accounts establish a separate set of data within the database. The company is a key field in all relevant Dynamics 365 tables.
The company "DAT" is a special company. Dynamics 365 automatically generates this company, which holds system data, when creating the environment. You cannot delete it, and you should not use it as a test or operational company in order to clearly distinguish company data from data that are not related to a particular company.
¶ 1.4.3. Company banner in the dashboard
In the Legal entity form, you can select a picture that is shown in the dahsboard and another picture that is printed on reports. In order to specify the dashboard image, switch to the Dashboard image tab in the Legal entity form, select the option "Banner" or "Logo" in the Dashboard company image type field and upload a picture with the Change button in the toolbar. The company image on reports is specified on the Report company logo image tab of the Legal entity form.
¶ 1.5. Cross-company data sharing
In Dynamics 365, there are some areas in which data are shared across legal entities (e.g., parties in the global address book, charts of accounts, or shared products).
Sometimes, common data management across companies is required in additional areas (e.g., if you wnat to ensure uniform payment terms). For this purpose, you can use the cross-company data sharing.
¶ 1.5.1. Setup of Cross-company data sharing
In order to set up, which tables are shared in which companies, open the System administration > Setup > Configure cross-company data sharing menu item.
If you want to create a new collection of shared data, click on the New button in the Action pane and enter a name for the data collection before you save the record. For each shared table that you want to include in the collection, click the Add button in the toolbar of the Tables and fields to share pane, select the Table name and click on the Add table button in the dropdown menu. If you expand a node with a table in the Tables and fields to share pane, you can adjust the selection of fields that are shared. Then add the companies that should use the shared data collection in the Companies which share the records in these tables pane on the right.
In order to activate data sharing for a table collection, click on the Enable button in the Action pane of the Configure cross-company data sharing form.
¶ 1.5.2. Working with Cross-company data sharing
If you insert, update, or delete records in a table and in a company, which is included in a shared table collection, the update of the table data immediately applies to all companies in the table collection.
¶ 1.6. Sites
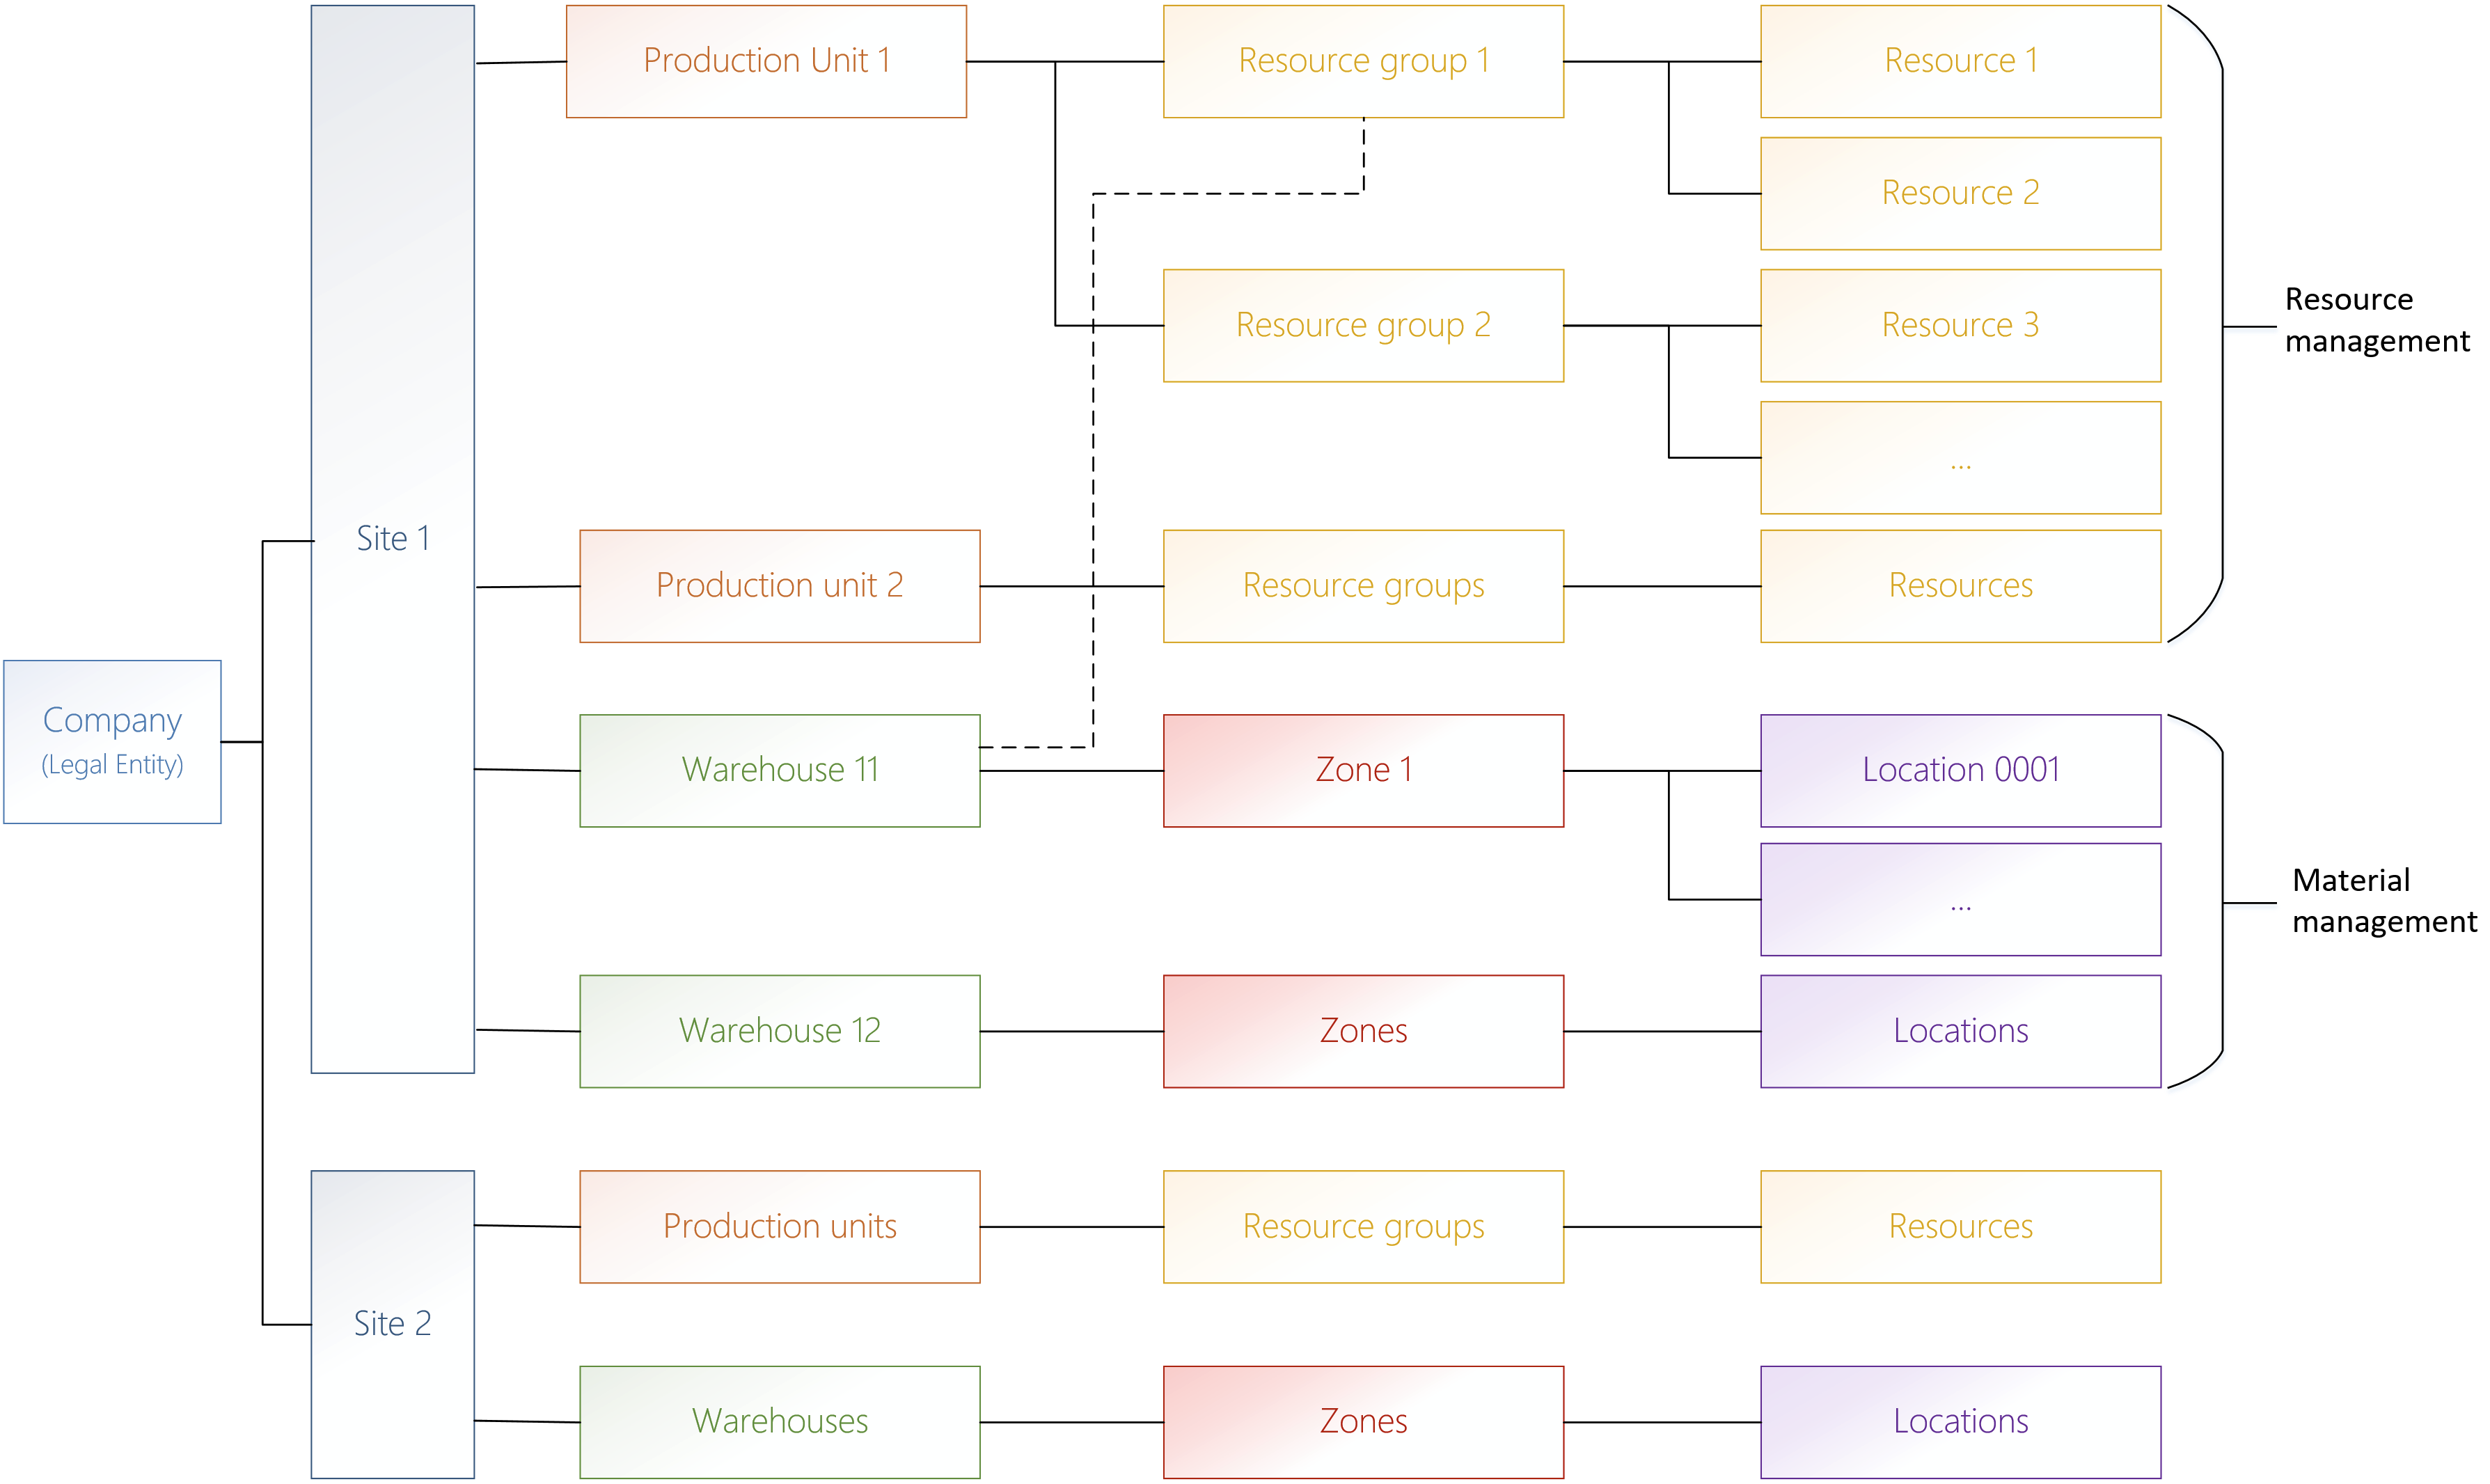
A site is a grouping of business resources, such as warehouses and production units, which share interrelated transactions, are located at a particular geographic location, and belong to a single legal entity. A single site cannot be shared by multiple legal entities.
In some organizations every site has different locations, therefore they want to be able to set up locations by site.
Other organizations have the same locations at every site, and do not want to set up the same location for every site.
Unlike company accounts, which represent legal entities, sites are a representation of subsidiaries within a company. Since sites are an inventory dimension (storage dimension), they are available in all areas of the supply chain management within Dynamics 365.
In order to calculate financial results at the site level, you can link the inventory dimension "Site" to a financial dimension. With a filter on the financial dimension, you can, for example, generate an income statement per subsidiary then.
¶ 1.6.1. Multisite functionality
The multisite functionality in Dynamics 365 includes the following options:
- Master planning - Per site or per company.
- Bills of materials - Per site or per company.
- Production control parameters - Per site or per company
- Item data (Released products) - Default order settings per site or per company
- Transactions - Sites in all inventory transactions, sales orders, purchase orders, and production orders.
- Financial reporting - Optionally for sites (if linked to a financial dimension).
¶ 1.6.2. Setup of sites
In order to create a site in the current company, access the Inventory management > Setup > Inventory breakdown > Sites menu item and click on the New button before you enter the ID, the name, and optionally the address. On the Financial dimensions tab, which is shown in case the inventory dimension "Site" is linked to a financial dimension, you can enter a dimension value for this dimension. This is mandatory if the dimension link is activated.
The link between the inventory dimension "Site" and a financial dimension is specified in the Cost management > Ledger integration policies setup > Dimension link menu item. In Edit mode, you can select a financial dimension that you want to use for sites. In order to use the dimension value that is entered in the Site form as a default in the financial transactions with the particular site, activate the link with the Activate link button in the action pane of the Dimension link form. With the Lock link button, you can prevent overriding the dimension value in a transaction.
Sites are a mandatory storage dimension that is automatically activated in all storage dimension groups. For this reason, every inventory transaction includes a dimension value for the site. In addition, each warehouse has to be linked to a site.
¶ 1.6.3. Production units
In the organization structure for material management, the Site storage dimension, which groups the warehouses, is the level below the legal entity (company). In resource management, the Production unit is an additional level in the structure of resources and resource groups. Each production unit is linked to a site and represents a plant in master planning.
¶ 1.6.4. Linking sites to the Organization model
It is not possible to include sites directly into the organization model. But you can link sites to a financial dimension, and financial dimensions to organization units, which in the end shows sites in the organization model.
In order to use sites in finance and in the organization model, complete the following implementation steps:
- Operating units - Create operating units with a common operating unit type (e.g., Department or Business unit) for the individual sites.
- Financial dimension - Set up a dimension that refers to this operating unit type.
- Account structure - Include this financial dimension in the account structure(s).
- Dimension link - Link the storage dimension Site to this financial dimension.
You can enter the name of the organization unit in the related site to visualize sites in the organization hierarchy. If the dimension link between the site and the financiel dimension is activated, you can perform financial reporting per site.
¶ 1.6.5. Departments
Departments are operating units that represent a functional area of a business, such as sales or accounting. Many companies have organizational hierarchies that display the various departments within a business. This procedure walks through the process of creating departments, and adding those departments to an organizations departmental hierarchy.
¶ 2. User and Security management
Business applications like Microsoft Dynamics 365 contain confidential data. In order to protect sensitive information, access to the application has to be limited in compliance with the requirements of the particular enterprise.
¶ 2.1. Access control
Access control in Dynamics 365 is based on two elements:
- Authentication - Identification of users.
- Authorization - User permissions.
As a prerequisite for authenticating a user in Dynamics 365, a system administrator has to create and enable a Dynamics 365 user who is linked to the Microsoft Azure Active Directory account of the user. User authentication is not only required for permission control. It is also the basis for logging user transactions and data updates. Further settings with reference to the Dynamics 365 user include the favorites, the user options, and the usage data, which enable a personalized workspace in Dynamics 365.
Dynamics 365 is using a role-based security model for authorization, which means that security roles control the access to application elements (e.g., menu items). A user in Dynamics 365 can have one or more roles, and these roles determine his permissions.
Permissions for application elements are not directly assigned to a role, but to duties and privileges. Duties and, below duties, privileges establish a grouping level for permissions in the structure of the security model.
The extensible data security framework additionally provides the option to restrict access based on effective dates or application data (e.g., based on sales territories).
¶ 2.2. Users and employees
Each person who accesses Dynamics 365 has to be set up as a Dynamics 365 user.
¶ 2.2.1. Entering user accounts
In order to create a Dynamics 365 user, open the System administration > Users > Users list page and click on the New button. In the new record, enter the User ID within Dynamics 365, the User name, the Provider (tenant of your organization in the Azure Active Directory) and the Email (Azure Active Directory user ID) and make sure that the Enabled slider is set to "Yes" (enabling the user to log on to Dynamics 365).
To manually add a user:
- Go to System administration > Users > Users.
- On the Action Pane, select New.
- In the User ID field, enter a unique identifier for the user.
- In the User name field, enter the user's name.
- In the Provider field:
- For internal users, use the defaulted value. For example, your Azure AD tenant prefixed with https://sts.windows.net/.
- For non-Azure AD users, such as Service-2-Service accounts, enter a basic text value. For example, NA. This value will help avoid incorrect authentication calls that might result in errors if a valid identity provider value is used.
- For external or guest users, add their Azure AD tenant name after https://sts.windows.net/.
- In the Email field, enter the user's full Email/User Principle Name.
- In the Company field, select the default startup company for the user.
- Select Save.
Apart from creating users manually, you can use the import wizard (click on the Import users button in the Action pane) to import Dynamics 365 users from the Azure Active Directory.
¶ 2.2.2. Security roles and permission assignment
In order to specify the permissions of the particular user, switch to the tab User's roles in the User detail form and assign the applicable security roles. Alternatively, you can use form System administration > Security > Assign users to roles to associate users with roles. In this form, you can also set up rules which assign new users automatically to security roles.
In the User detail form and in the list page, the security roles of the selected user are shown in the FactBox Roles for the selected user on the right. If a user is assigned to multiple roles, the permissions of all selected roles apply to the user. In case of overlapping permission settings for an object, the higher access level applies.
You can restrict the security roles of a user at the organization level. For this purpose, select the user in the User detail form first. Then select the role that you want to restrict on the tab User's roles, and click the button Assign organizations in the toolbar of this tab. In the Assign organizations form, you can enable global access with the selected role, or restrict the role access to particular organizations. For permissions at the level of organizations, select legal entities (or elements of an organization hierarchy with the purpose Security) in the upper pane of the Assign organizations form and click the button Grant in the toolbar of the lower pane.
¶ 2.2.3. User options
The button User options in the User form provides access to the user options of the selected user. Apart from the access from the user management, users with appropriate permissions can access their personal user options with the button Settings/User options in the navigation bar. Accessing the user options from the user management is a way to predefine settings like the language or the default for the current company.
¶ 2.2.4. Assigning employees to users
Apart from being a user, people who access Dynamics 365 are an employee, a contractor, or a contact person at an external party (e.g. customer). The global address book contains both, workers (employees and contractors) and external contact persons.
In order to assign a Dynamics 365 user to a person in the global address book (worker or external contact), open the User detail form and, in the field Person, select the person that you want to assign to the user. The button Maintain versions provides the option to enter an effective date and an expiration date.
It is imperative for workers to be linked to users via the Maintain user relation versions from the users detail form.

The worker assignment is used throughout the whole application. Examples are purchase requisitions, project accounting, human resources, case management, and sales order management. Once a user is assigned to a worker who is employed in the current company, the worker ID is used in all areas. It is, for example, the default for the field Sales taker in the order header when creating a sales order.
¶ 2.2.5. Employee management
The User form contains the user settings for the access to Dynamics 365. Separately from the user setup, the Worker form is there to manage the enterprise staff.
Workers include employees and contractors, no matter whether they are Dynamics 365 users or not. Worker records are shared across companies, and the contact details are included in the global address book. The employment of a worker determines his assignment to one or more companies.
The Worker list page (Human resources > Workers > Workers) shows all employees and contractors who are currently employed in any company of the enterprise. In order to view only current employees (workers with the type "Employee") in the current company, open the Employee list page (Human resources > Workers > Employees). If you want to view the workers who have been employed in the past, or workers with an employment in the future, click the button As of date in the Worker form or the Employee form and select the respective date.
General worker data are shared across companies, but some data - including the employment - are company-specific. In the FactBox Employment history on the right, and in the Employment form which you open with the button Worker Versions/Employment history, you can view the current and past employments of the selected worker. The tab Employment in the Worker detail form, which is only displayed if the worker has got an employment in the current company, shows the company-specific employment data in the current company.
In order to create a new worker, click the button New and, in the Hire new worker dialog, enter the First name, the Last name, the company (Legal entity) employing the worker, the Personnel number (if not deriving from a number sequence), the Worker type (employee or contractor), and the Employment start date.
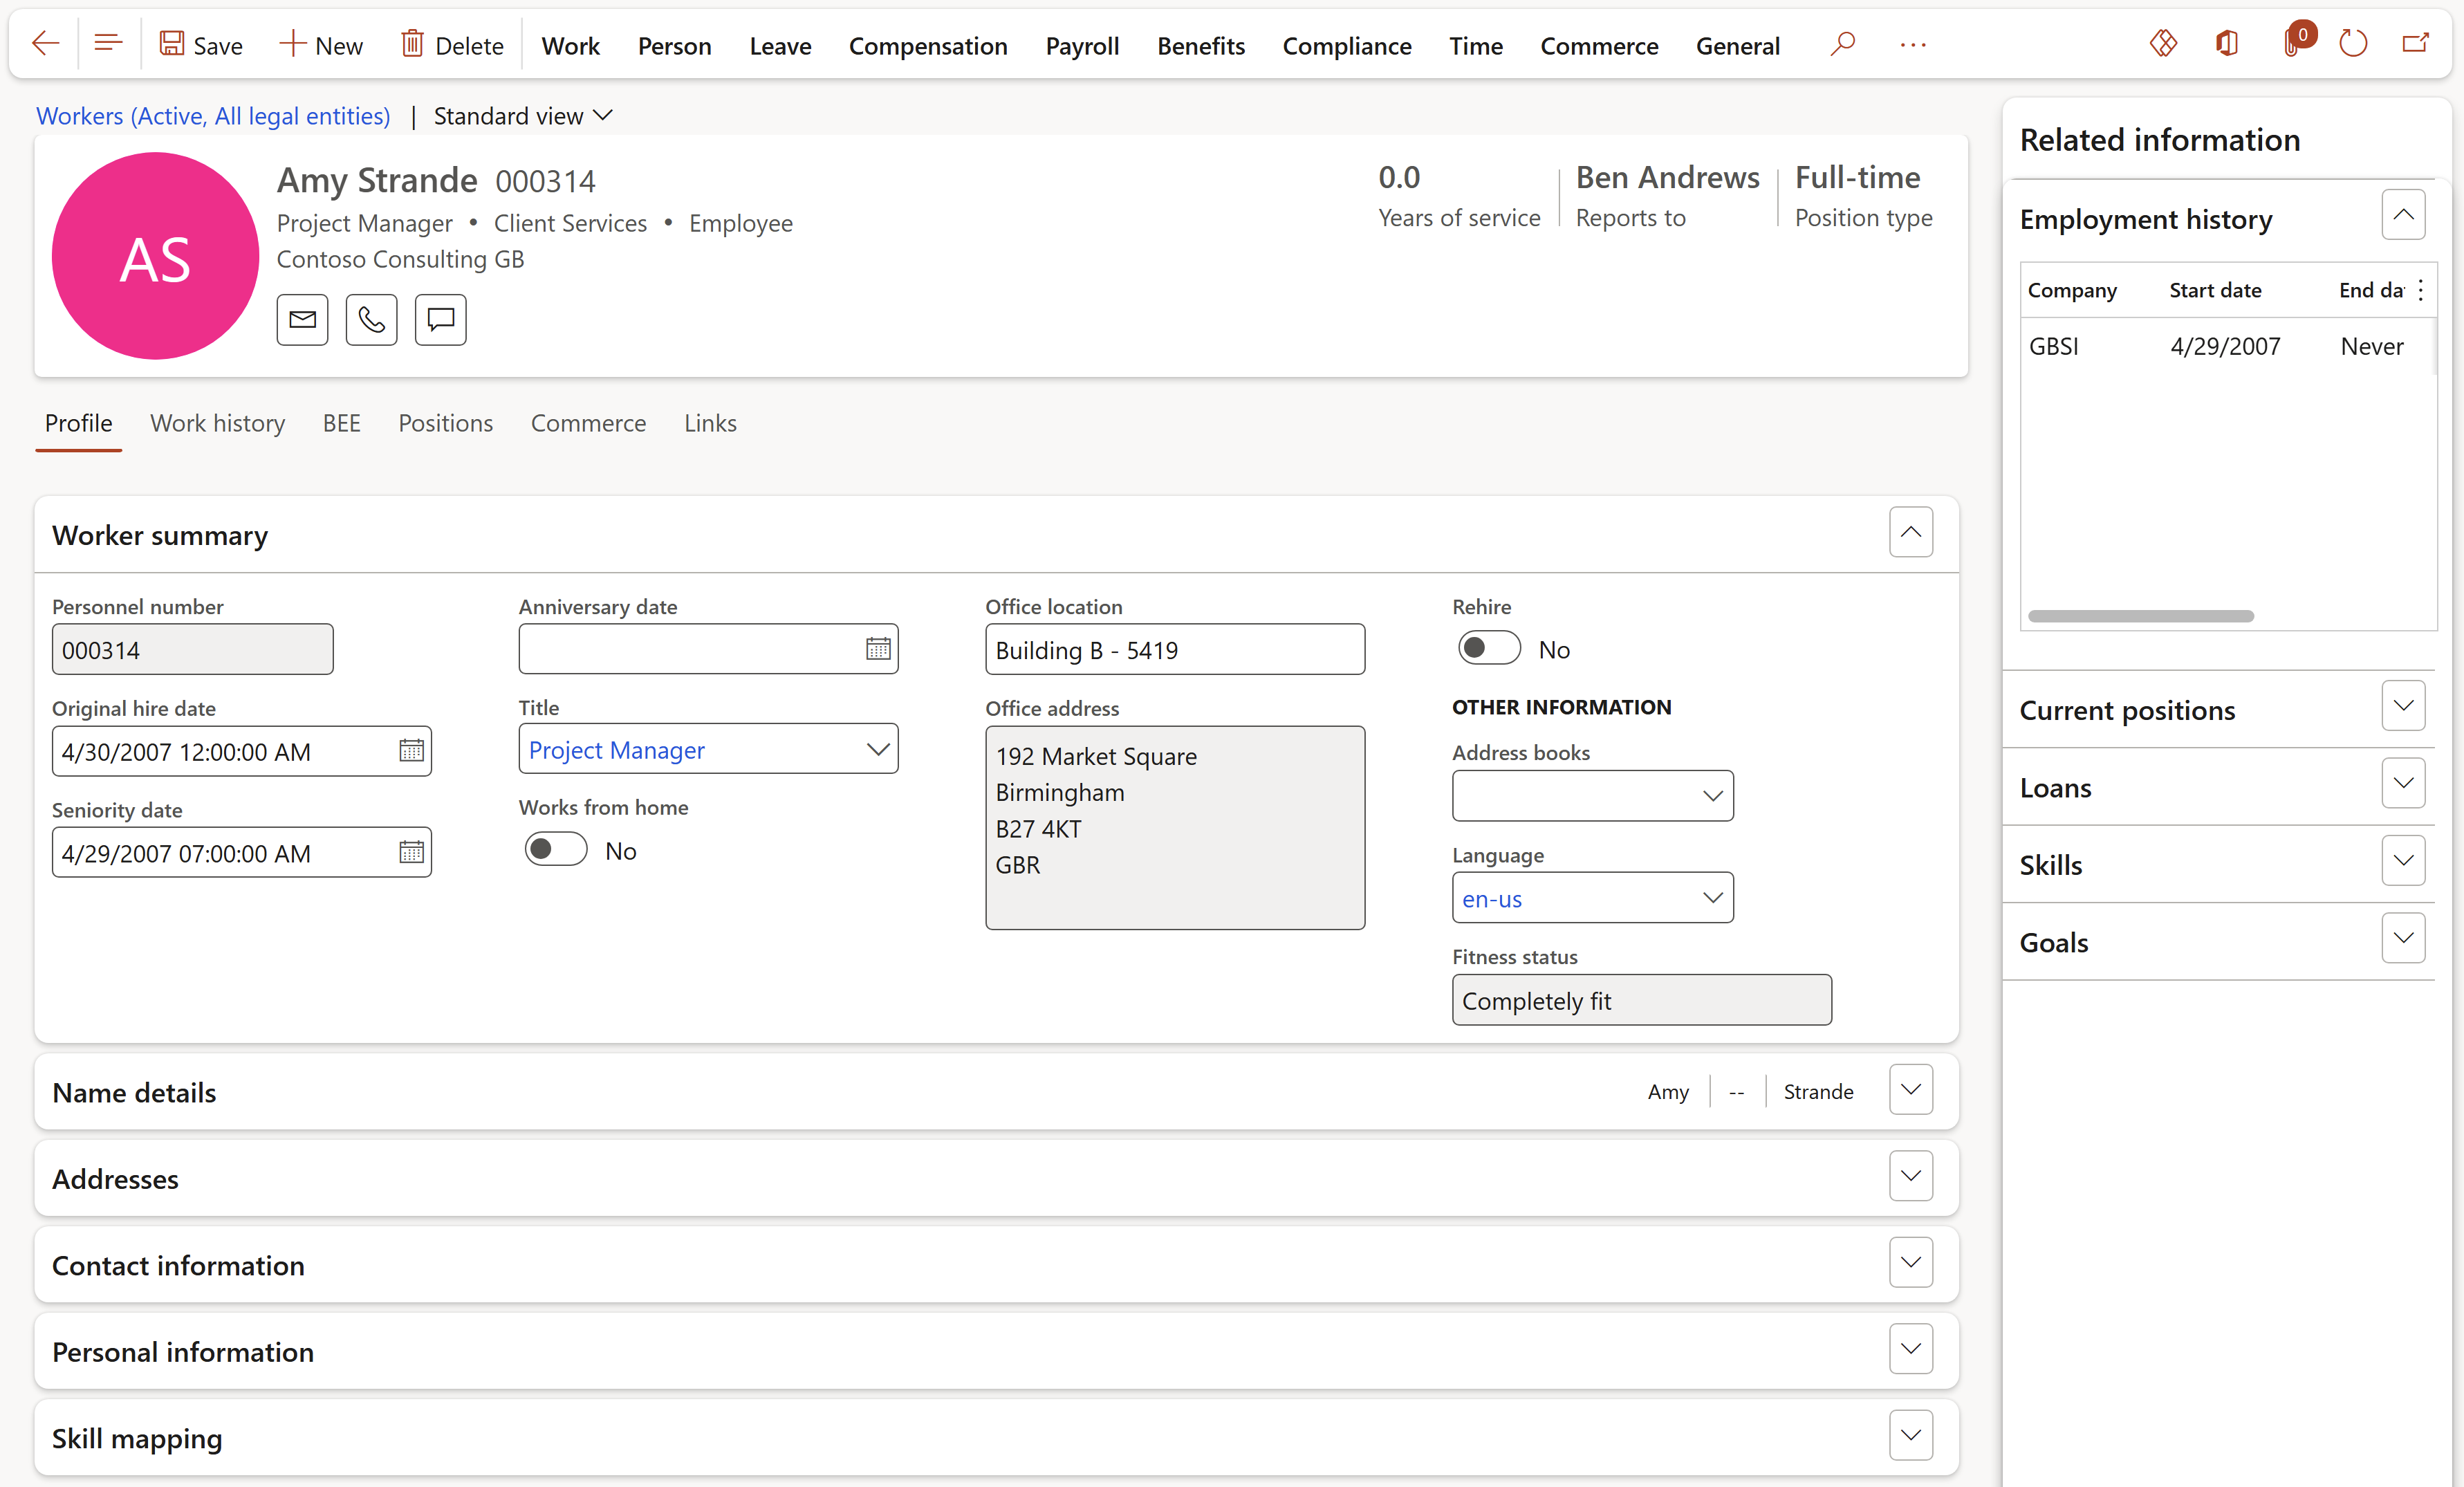
The default for the employing company is the current company. On the tab Employment in the Worker detail form, you can edit the employment in the current company or add an employment if the worker changes from this company to another company of the enterprise (or if he has got a parallel employment in another company of the enterprise).
The required detail data for a worker rprimarily depend on the Dynamics 365 modules that are used in your organization. These details include data for project accounting, human resources, and expense management.
¶ 2.2.6. Online users
If you want to know the users who are currently logged on to Dynamics 365, open the menu item System administration > Users > Online users. This inquiry shows all client sessions that are connected to the application. If you have got appropriate permissions, you can click the button End sessions in the toolbar of the tab Client sessions to log off a user.
¶ 2.2.7. User groups
User groups (System administration > Users > User groups) are not used in the role-based security setup, but for some particular settings. You can, for example, open ledger periods, which are on hold, for a specific user group. In workflows or financial journals, you can optionally apply user groups for the workflow task assignment, for approval, and for posting restrictions.
In order to assign users to a user group, select the respective group in the User group form and switch to the tab Users. On this tab, assign the applicable users by moving them from the left pane to the right pane.
¶ 2.3. Role-based security
In line with the security model in Dynmaics 365, permissions are not directly assigned to individual users, but to security roles.
¶ 2.3.1. Security model
The role-based security model includes the following elements:
- Role - Group of duties required for a job function (e.g., "Accountant").
- Duty - Group of privileges necessary for a task (E.g., "Maintain fixed assets")>
- Privilege - Permissions at the level of objects (e.g., "Post fixed assets journal").
- Permission - Low-level access restriction to securable objects (user interface elements, reports, tables and fields, service operations).
The assignment of a user to one or more roles (depending on his job functions) determines his permissions. In general, roles refer to duties, and duties reder to privileges. But if required, you can also assign a privilege directly to a role.
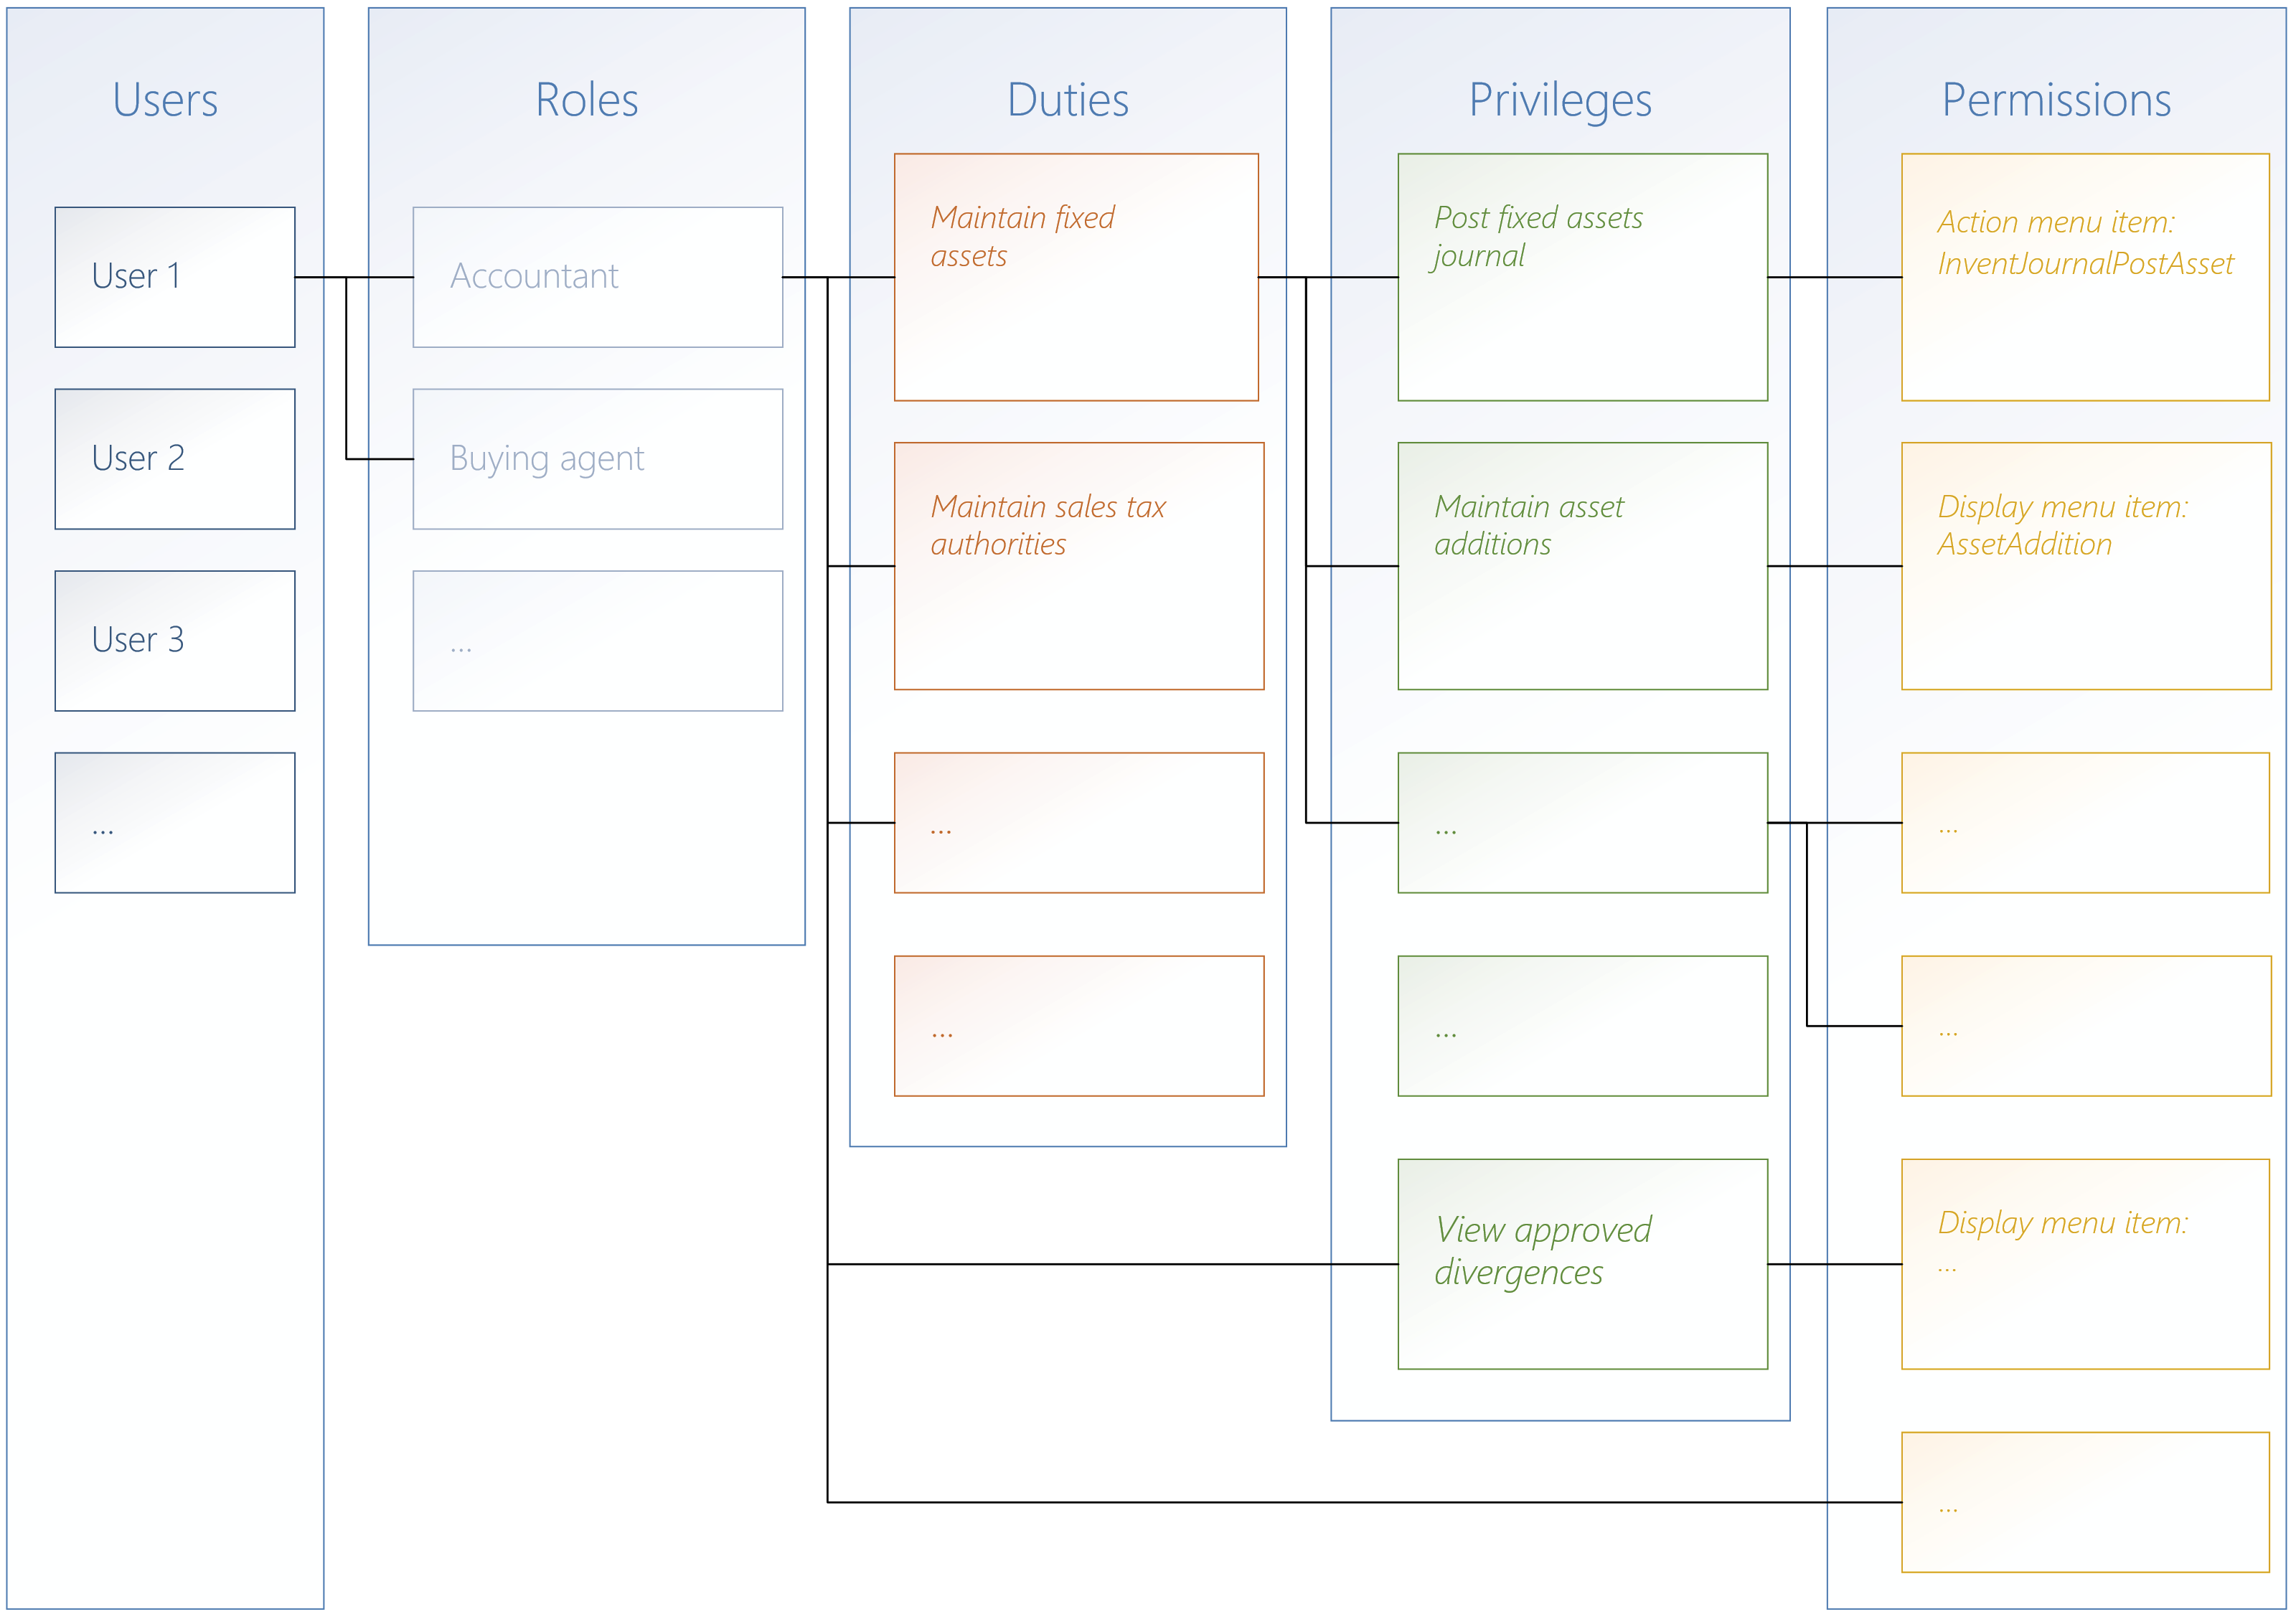
A role is a set of access permissions that are required to perform a job function. Apart from functional roles, which refer to the functional tasks, there are additional role types. In general, we can divide the roles into the following types:
- Functional roles - For example, "Buying agent".
- Organizational roles - For example, "Employee".
- Application roles - For example, "System user".
The role "System administrator" has got access to all areas of the application. The access settings for this role are not editable.
¶ 2.3.2. Managing the security configuration
You can manage the security roles, duties, and privileges in the form System administration > Security > Security configuration. This form contains the tabs Roles, Duties and Privileges with the related security elements.
On the Roles, the left pane shows the available roles in your environment. For the selected role in the left pane, you can view the duties and directly assigned privileges with a click on the respective elements in the pane References in the middle of the form. If you want to add a duty or privilege to the selected role, select the respective node (e.g., "Duties") in the pane References and click the button Add references in the toolbar of the tab. If you want to create a completely new role, click the button Create new (or the button Copy that is shown after a click on a role).
A duty is a group of privileges that are required for a particular task - e.g., for maintaining fixed assets. If you want to view or edit the duties, switch to the tab Duties of the Security configuration form. Select a duty and click on the respective element in the pane References in the middle of the form to view the related privileges (and roles). If you want to add a privilege to the selected duty, select the respective node Privileges in the pane References and click the button Add references in the toolbar of the tab.
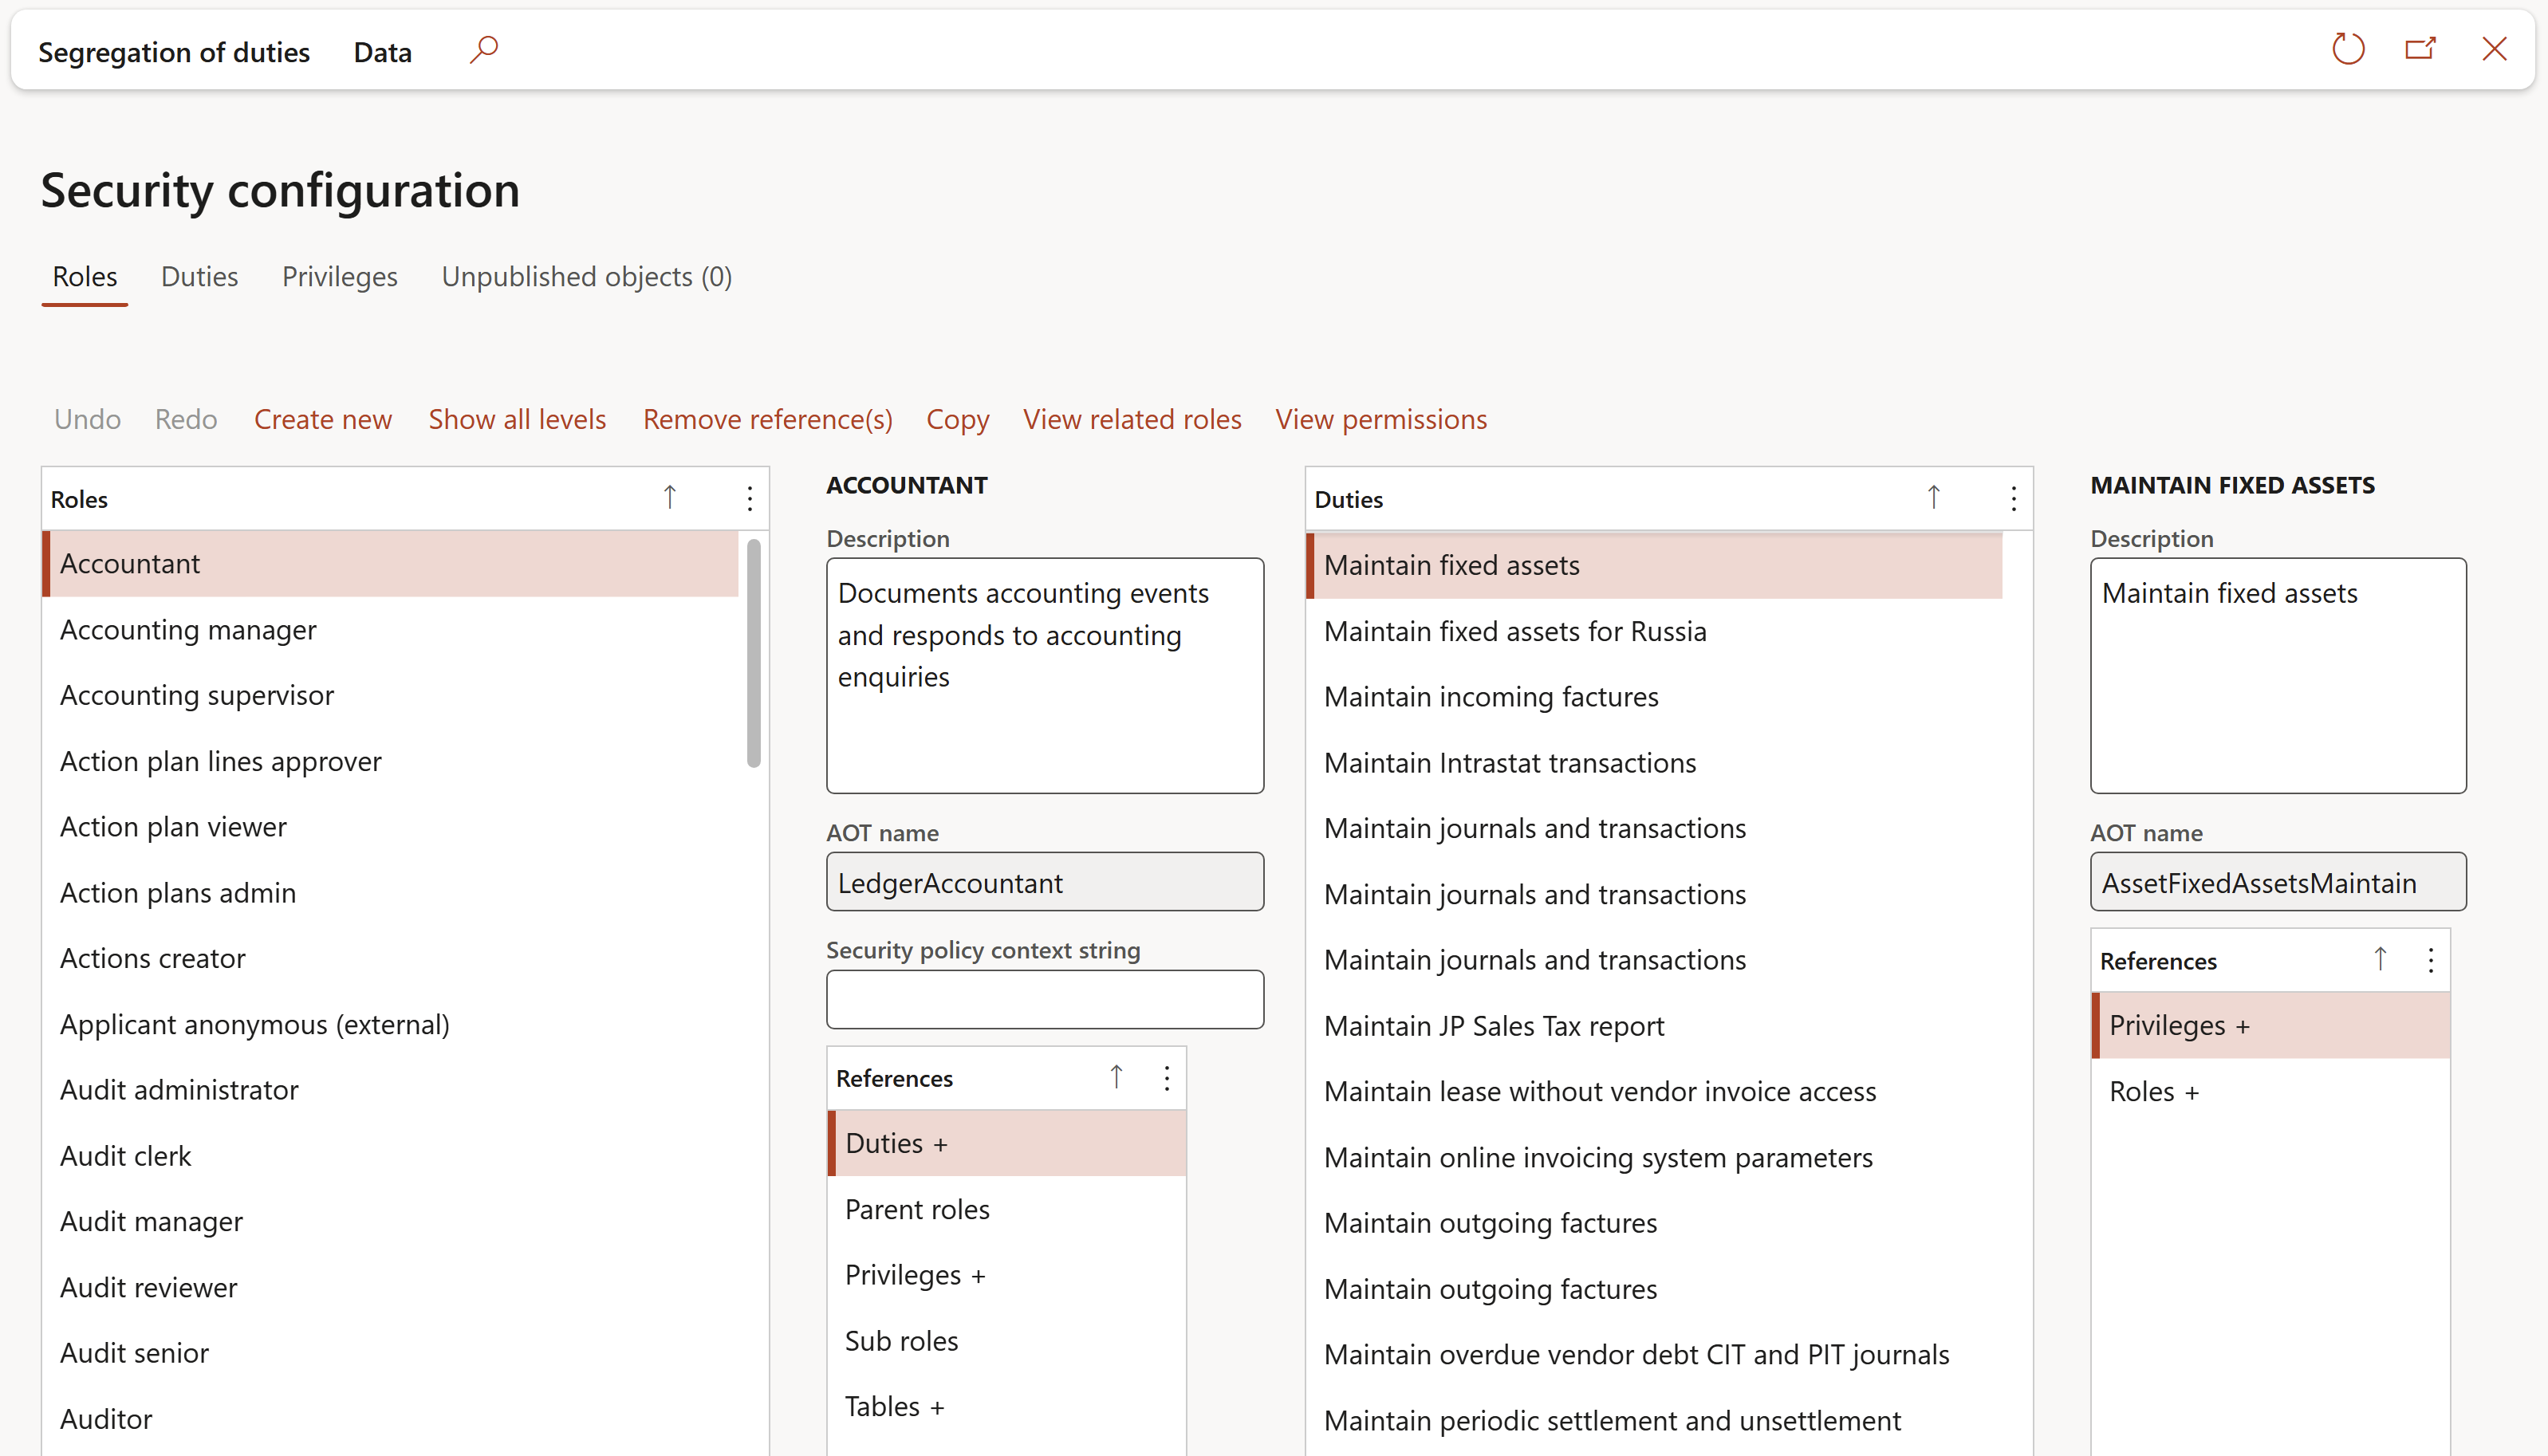
A privilege contains all permissions that are required for a particular application object, You can view and edit the security privileges on the tab Privileges of the Security configuration form. Select a privilege and click on the respective element in the pane References to view the related application objects (e.g., Action menu items). If you want to add a permission to the selected privilege, select the node in the pane References and click the button Add references in the toolbar of the tab.
Permissions specify the access restrictions at the lowest level, based on application objects. The permissions, which you can select in the security privileges, are determined by application development.
While editing the security configuration, updated elements are shown on the tab Unpublished objects. In order to activate the changes, click the button Publish all (or Publish selection) in the toolbar of this tab.
¶ 2.3.3. Security diagnostics
In all Dynamics 365 forms, the button Options/Page options/Security diagnostics displays a dialog that shows which roles, duties, and privileges grant access to the respective form. The button Add roles to user in the dialog provide access to the form Assign users to roles (if a role is selected in the dialog). If you select a duty, you can assign a role, and for a privilege, you can assign a duty.
¶ 2.3.4. Segregation of duties
The aim of the segregation of duties is to ensure, that major tasks, which depend on each other, are not executed by one person but by different users (e.g., creating purchase orders and paying vendor invoices). As a prerequisite for using the segregation of duties functionality, enter applicable rules in the menu item System administration > Security > Segregation of duties > Segregation of duties rules.
Segregation rules determine duties, which may not be assigned to one user at the same time. They do not prevent permission settings which are in conflict with a rule. But you can validate a segregation rule when you set it up, and you can execute the periodic activity System administration > Security > Segregation of duties > Verify compliance of user-role assignments to verify compliance.
¶ 3. Number sequences
Number sequences are used to generate readable, unique identifiers for master data records and transaction records that require identifiers. A master data record or transaction record that requires an identifier is referred to as a reference.
Before you can create new records for a reference, you must set up a number sequence and associate it with the reference. We recommend that you use the pages in Organization administration to set up number sequences. If module-specific settings are required, you can use the parameters page in a module to specify number sequences for the references in that module. For example, in Accounts receivable and Accounts payable, you can set up number sequence groups to allocate specific number sequences to specific customers or vendors.
When you set up a number sequence, you must specify a scope, which defines which organization uses the number sequence. The scope can be Shared, Company, Legal entity, or Operating unit. Legal entity and Company scopes can be combined with Fiscal calendar period to create even more specific number sequences.
Number sequence formats consist of segments. Number sequences with a scope other than Shared can contain segments that correspond to the scope. For example, a number sequence with a scope of Legal entity can contain a legal entity segment. By including a scope segment in the number sequence format, you can identify the scope of a particular record by looking at its number.
In addition to segments that correspond to scopes, number sequence formats can contain Constant and Alphanumeric segments. A Constant segment contains a set of letters, numbers, or symbols that does not change. An Alphanumeric segment contains a set of letters or numbers that increment every time that a number is used. Use a number sign (#) to represent incrementing numbers and an ampersand (&) to represent incrementing letters. For example, the format #####_2017 creates the sequence 00001_2017, 00002_2017, and so on.
¶ 3.1. Number sequences for completeness
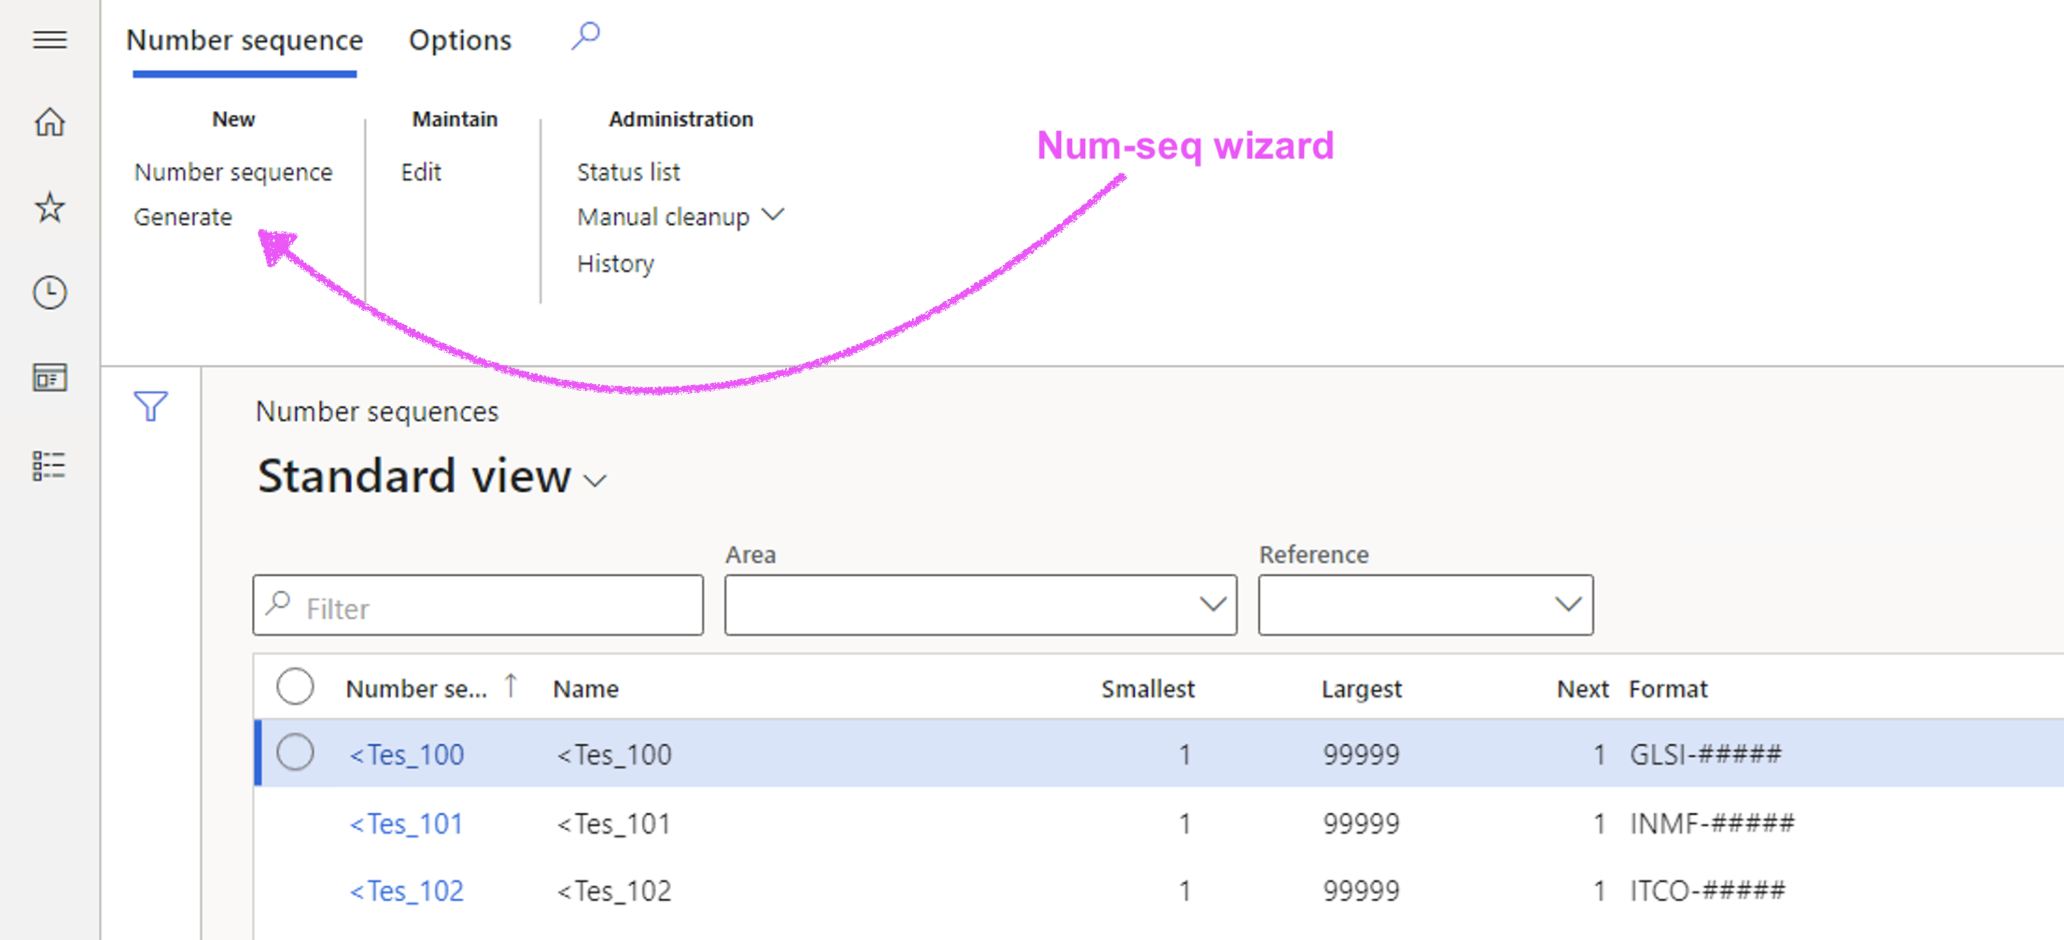
Using the Generate button; users are guided and D365 will propose/create numbering sequence records for all transactions and some master data objects.
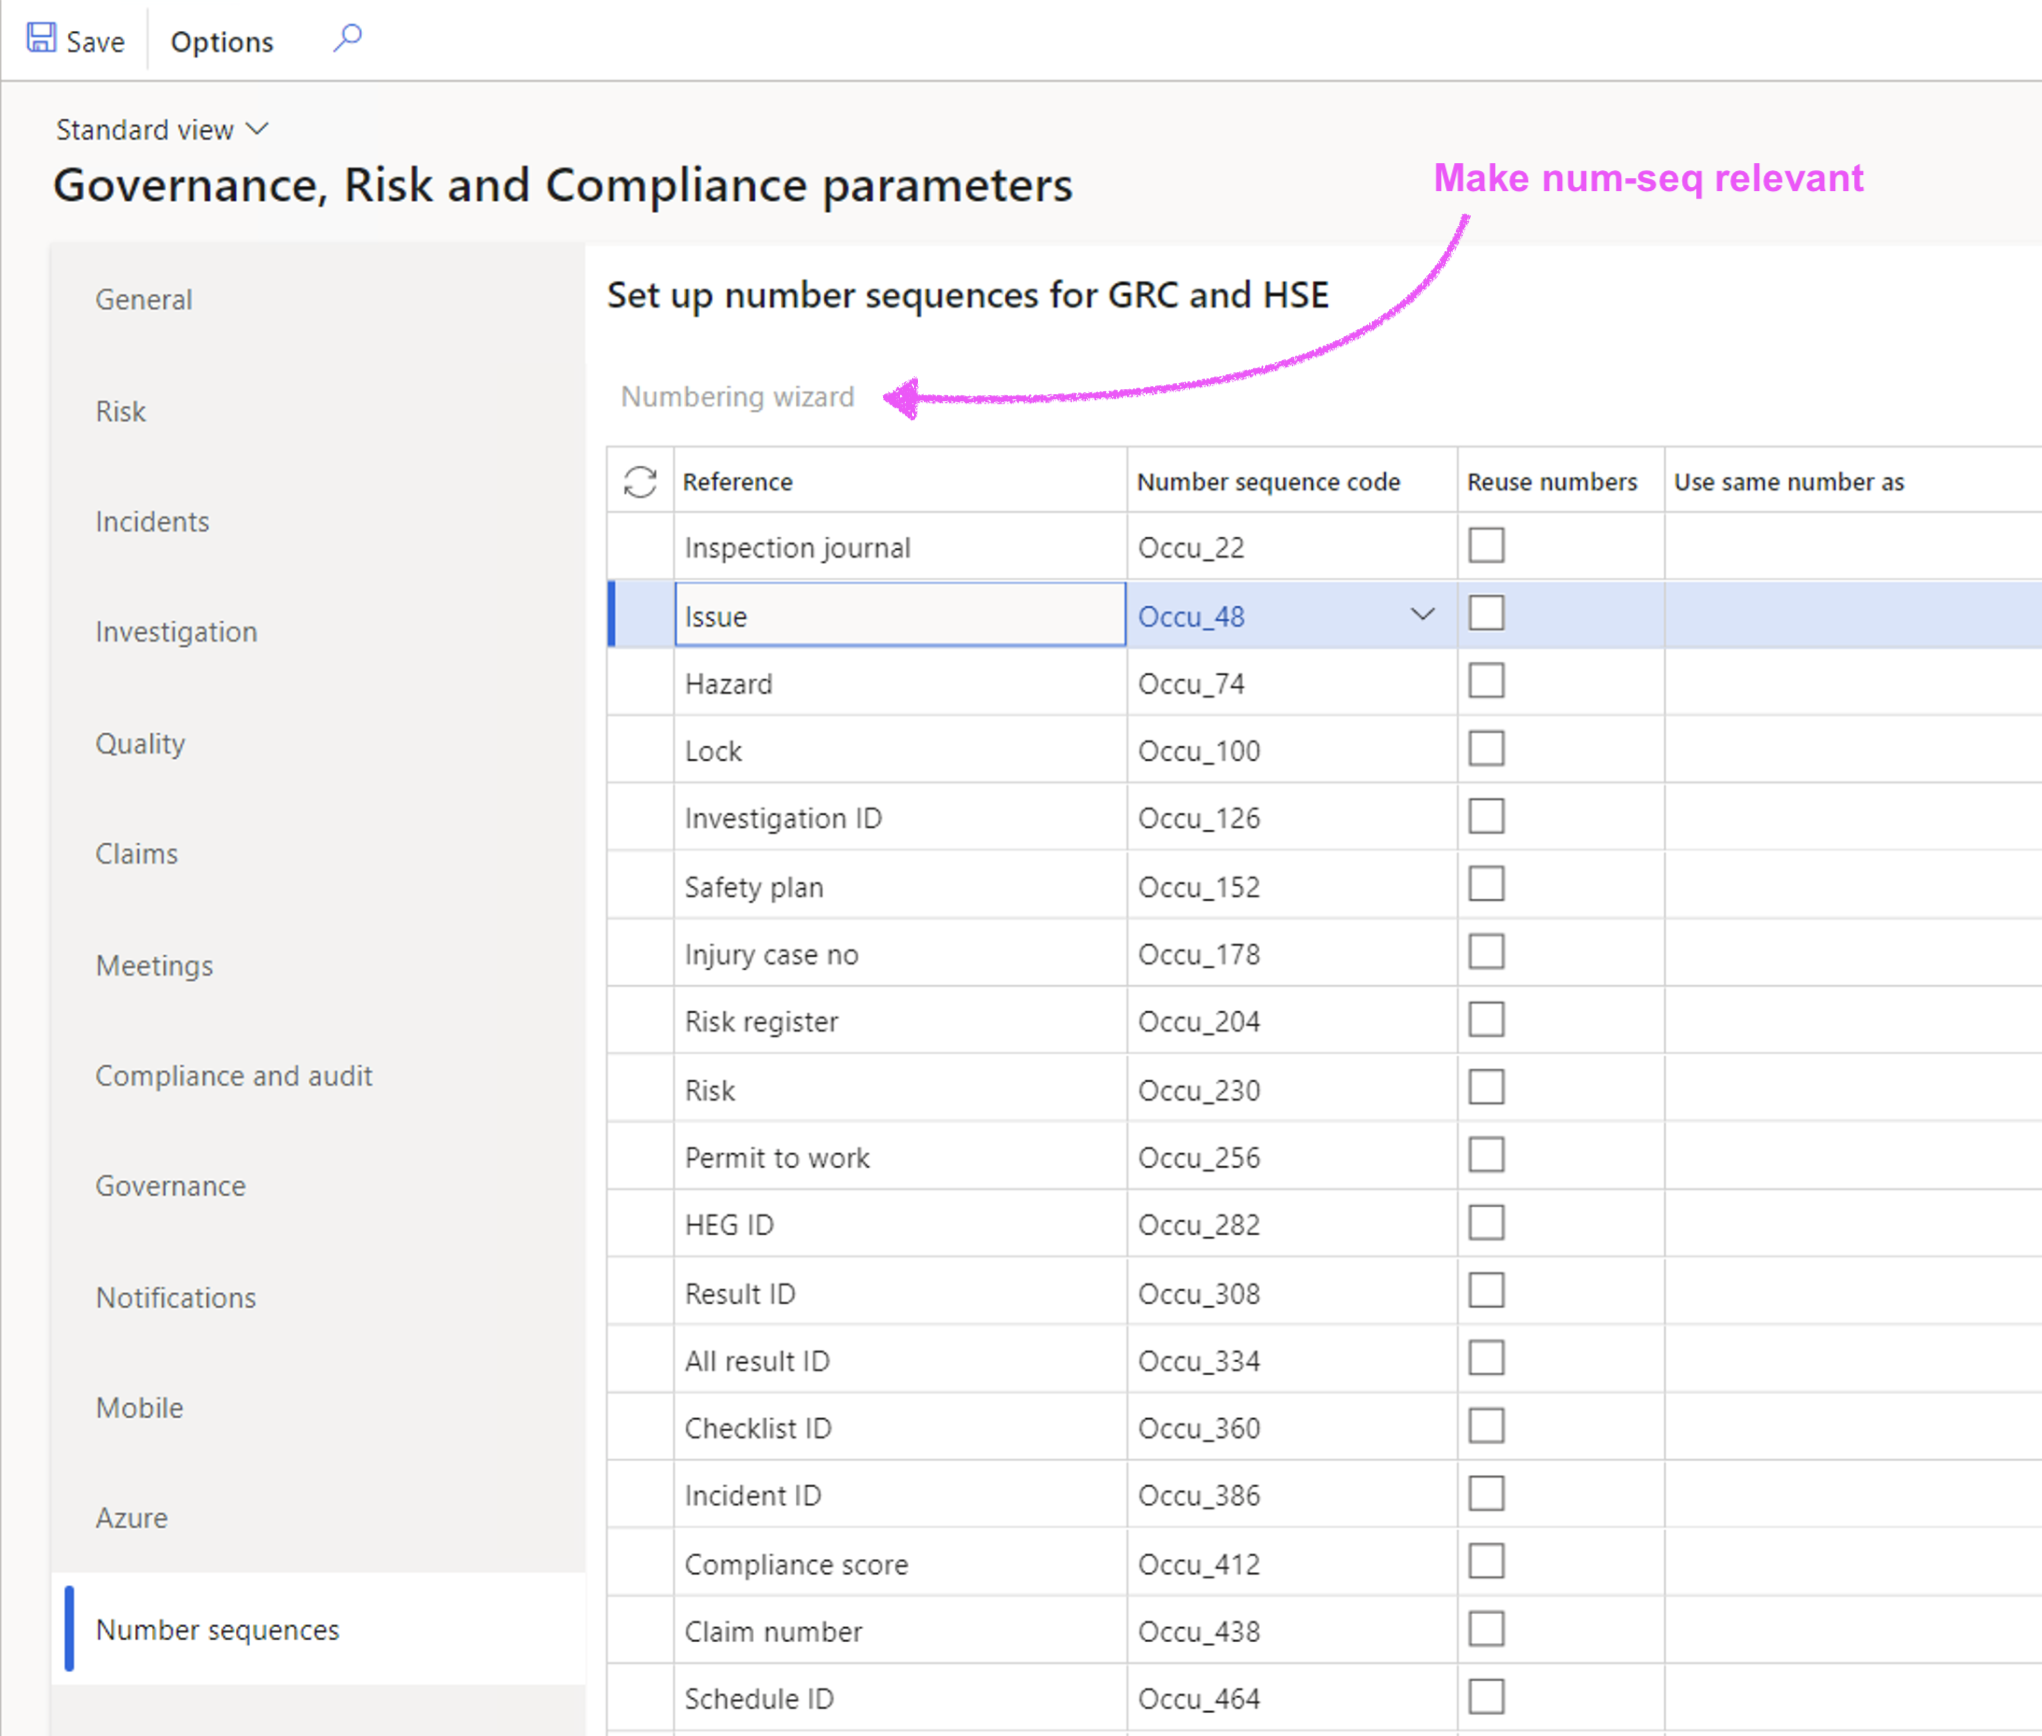
¶ 3.2. Number sequences for relevance
Then using the Numbering wizard button; D365 will change the numbering sequence records format to the relevant area (reference) being used. For example; Inspection journals; the wizard will change the generic scope text change to "Ins".
¶ 4. Items (Products)
In Microsoft Dynamics 365 items and products are referred to interchangeably. A product name is always associated with an item ID. The main concepts that are associated with items are product, product master and product variant.
- Product – A fixed product definition that does not include any variations
- Product master – A product definition that forms the basis of product variants
- Product variant – Products that are based on a product master. Product variants are made distinct through the product dimension setup and through configurations
Products are used throughout Microsoft Dynamics 365. This includes procurement, sales, and projects. You can use the On-hand inventory page to view which products are on hand.
¶ 5. Resources
“Operations” resources are the machines, tools, workers, facilities, physical areas or vendors that perform the activities of a project or a production process. They can be of different types and can have different capabilities.
- Vendor – An external resource that performs project activities or production operations. An example is a subcontractor. By linking vendor resources to a vendor account, you can generate purchases for subcontractors, based on the bill of materials (BOM) lines or production lines.
- Human resources – A project or production worker that perform an activity, either alone or as an operator of a tool or a machine. If you're using the Human resources functionality, you can link human resources to a worker. The scheduling engine can then allocate the resources, based on the competencies that are defined for the corresponding worker.
- Machine – A machine or other production equipment that is required in production.
- Tool – An instrument or device that is typically used together with another resource to perform an activity in a project or in production.
- Location – A physical location of a specific size that is required in order to perform an activity. An example is an assembly area.
- Facility – A building or fixed structure that is required in order to perform an activity.
¶ 6. Sending emails from D365
To make use of the send email function by clicking on the email icon, make sure of the following setups
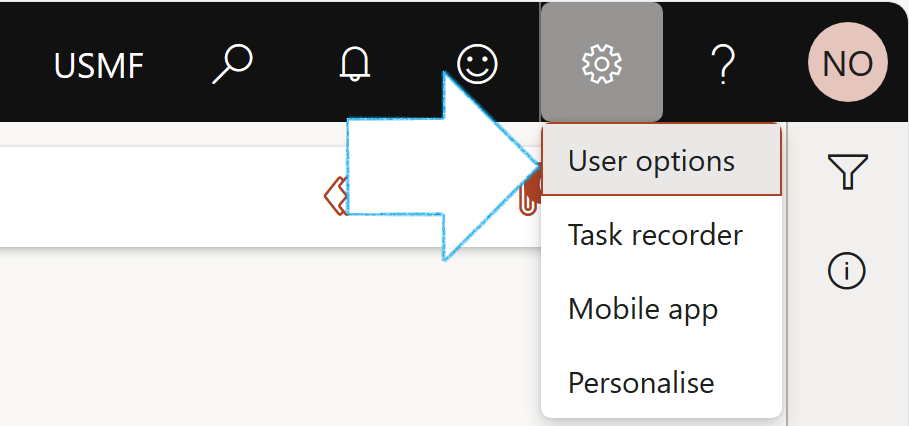
- Open your User options
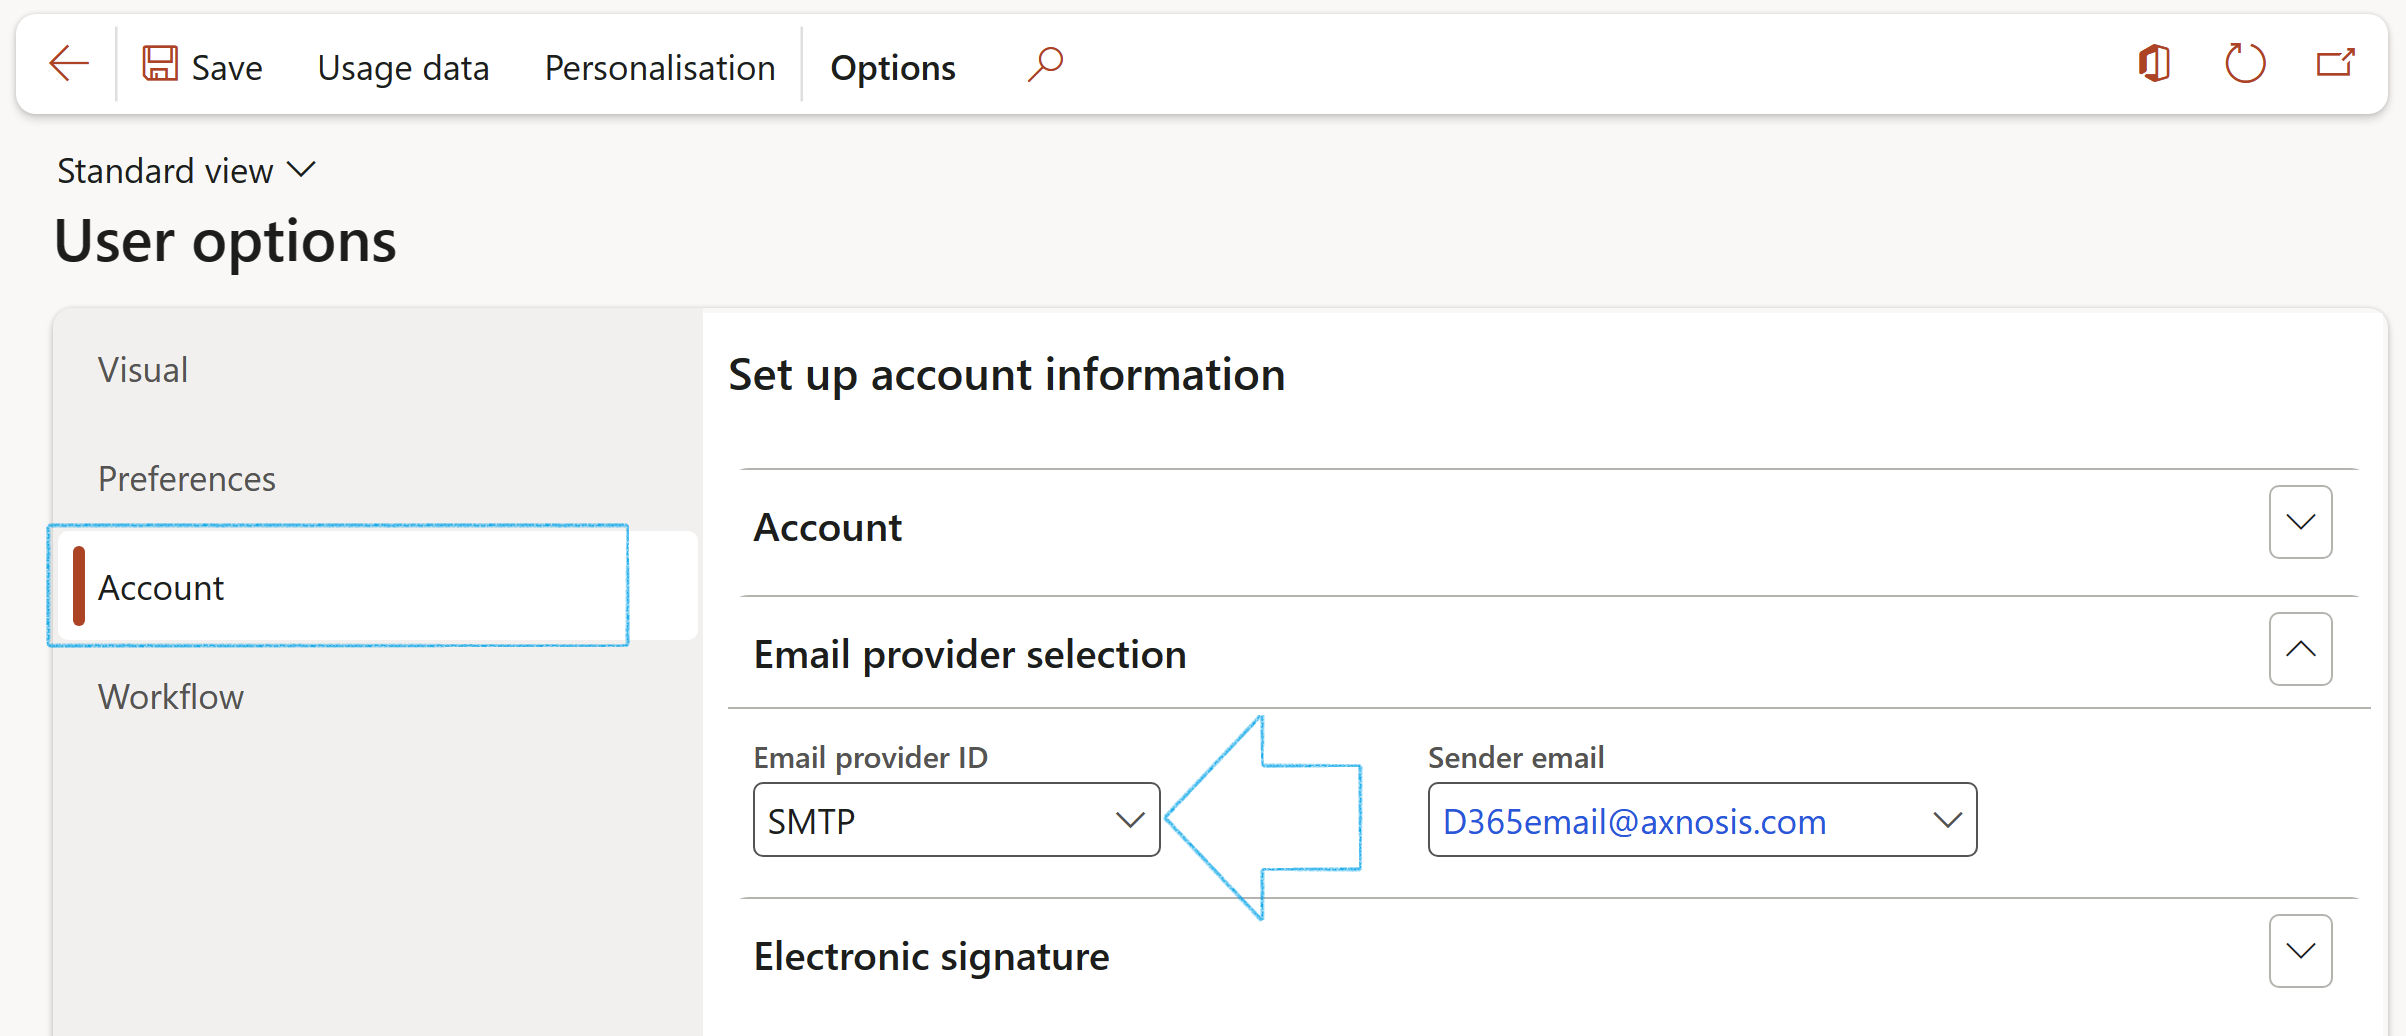
- Open the Account tab. Expand the Email provider selection Fast tab
- In the Email provider ID field, select SMTP from the dropdown list
- Click Save
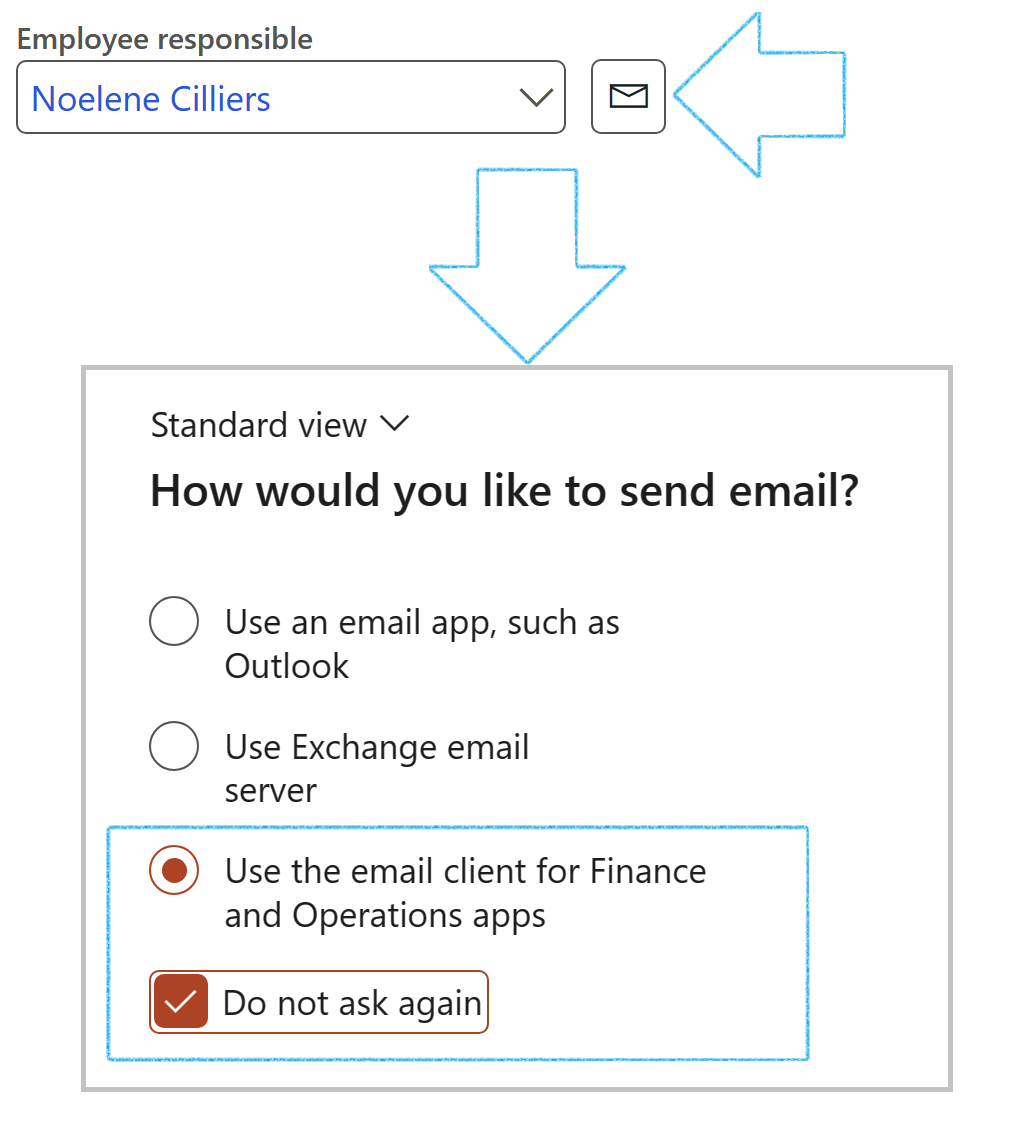
- Now, when you click on the email icon, select the following on the dialog:
- Use the email client for Finance and Operations apps
- Do not ask again
The Send email dialog will open
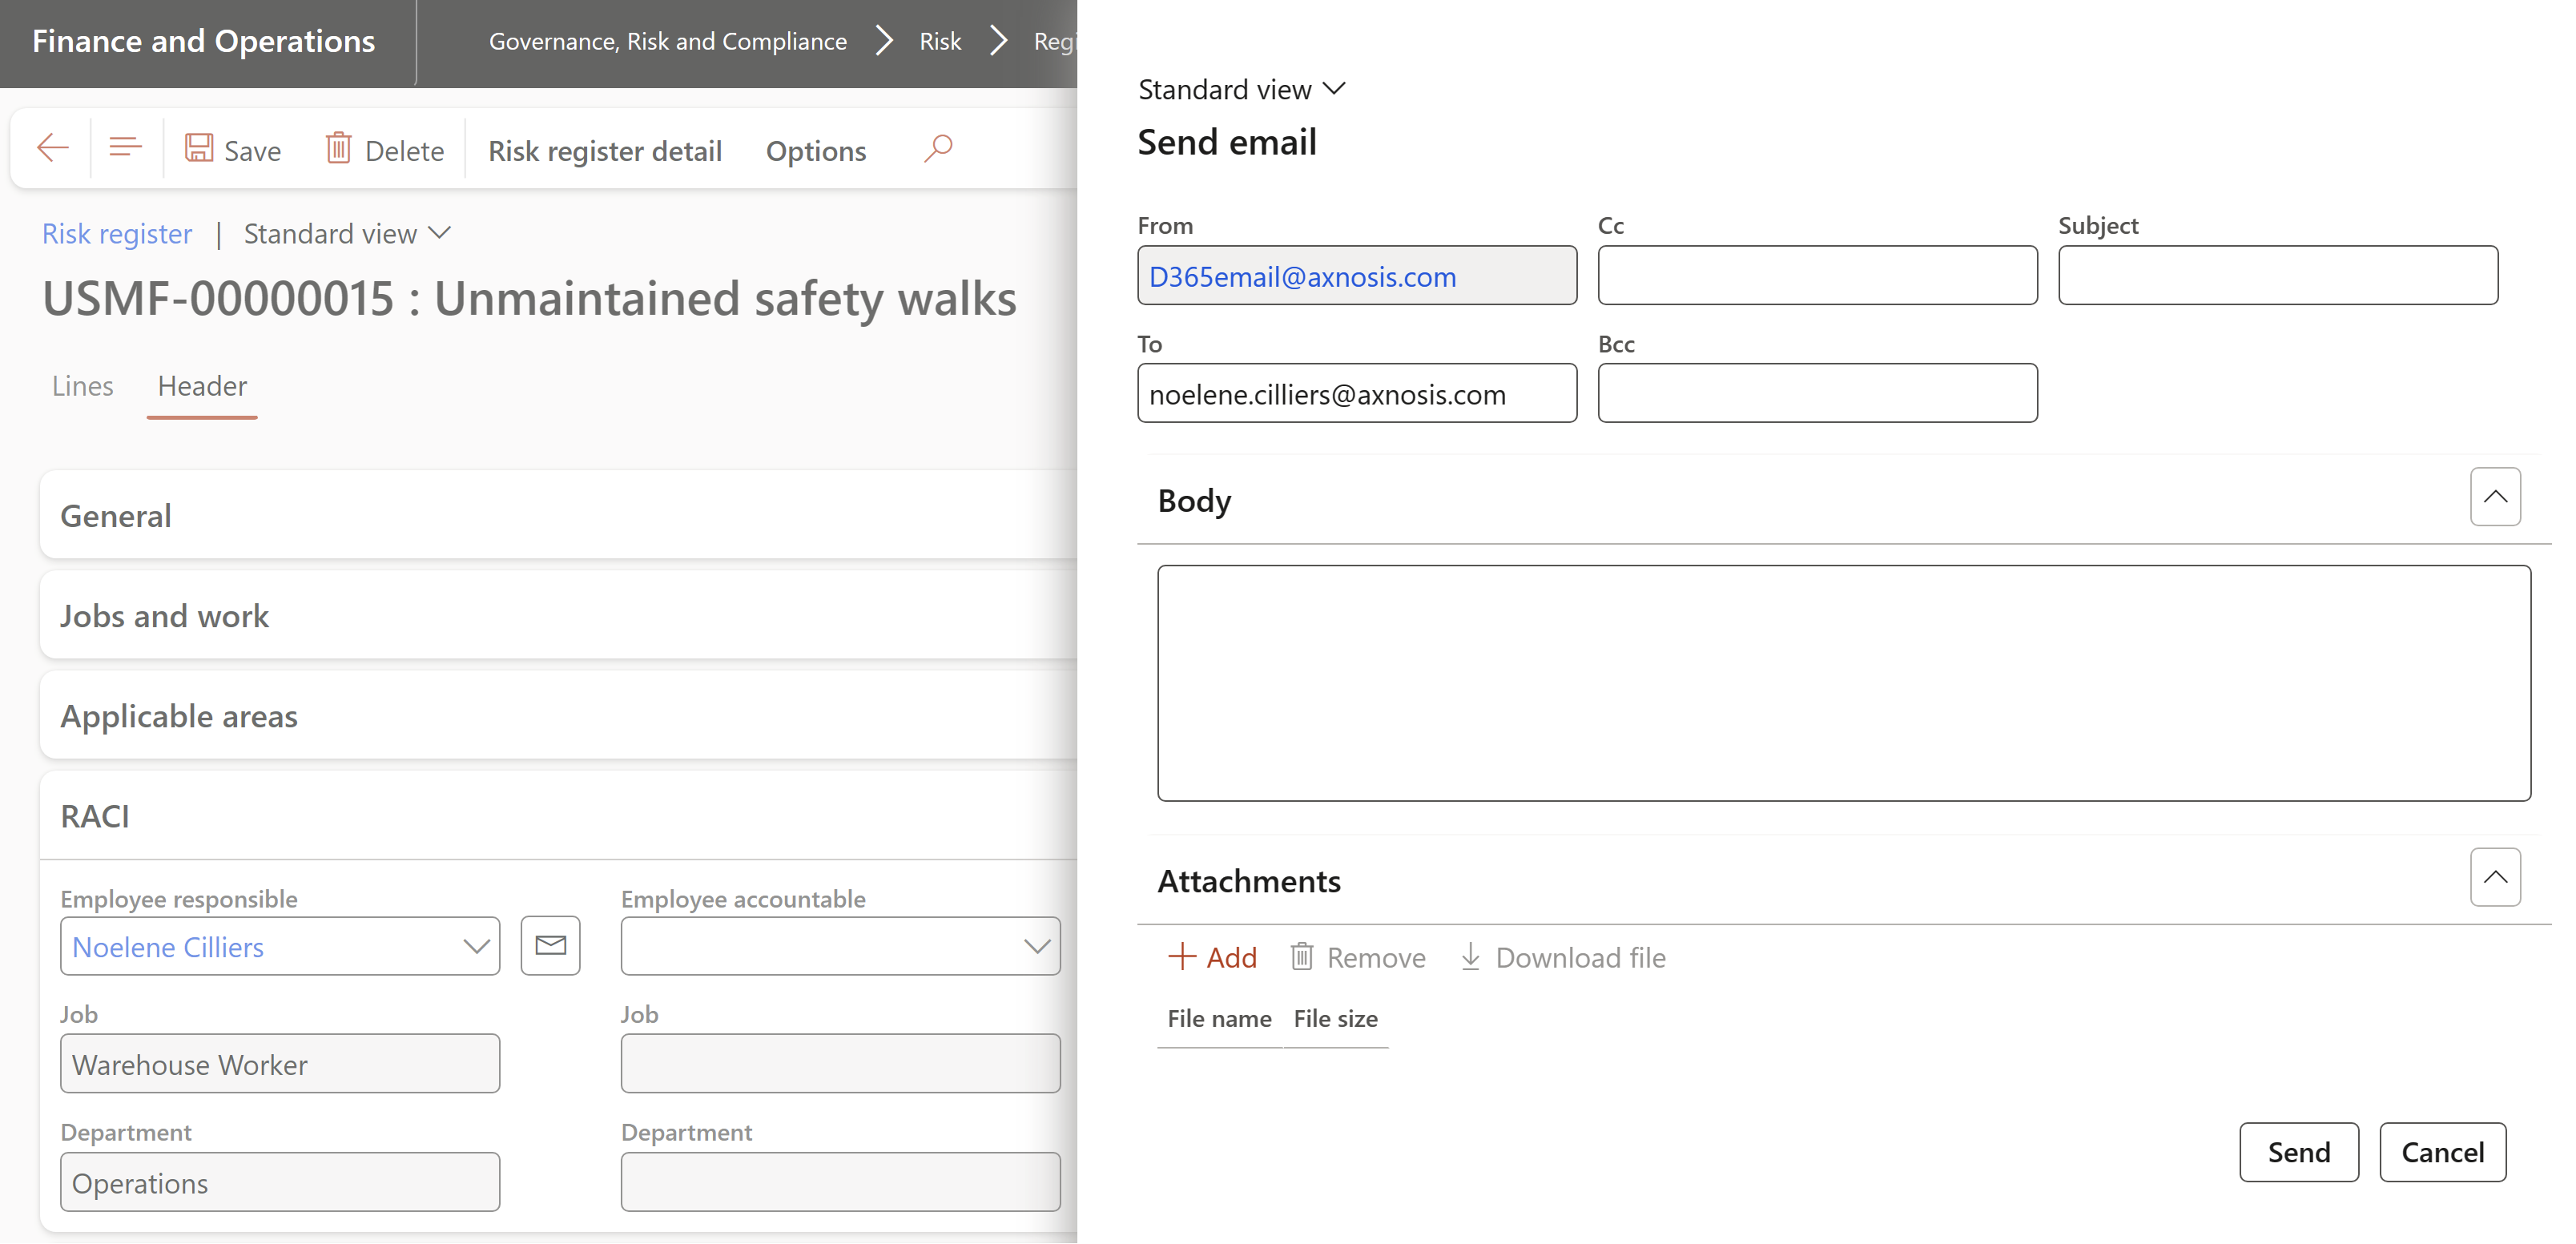
Emails can be sent to the selected workers by clicking on the email icon next to the relevant name
The selected worker must have a primary email address
¶ Axnosis specific setups
¶ 7. Enable site/location
If sites are not required in the organization of your enterprise, set up a single site which is the default in all transactions. You can enter this site as default in applicable settings - for example, in the Default order settings of released products.
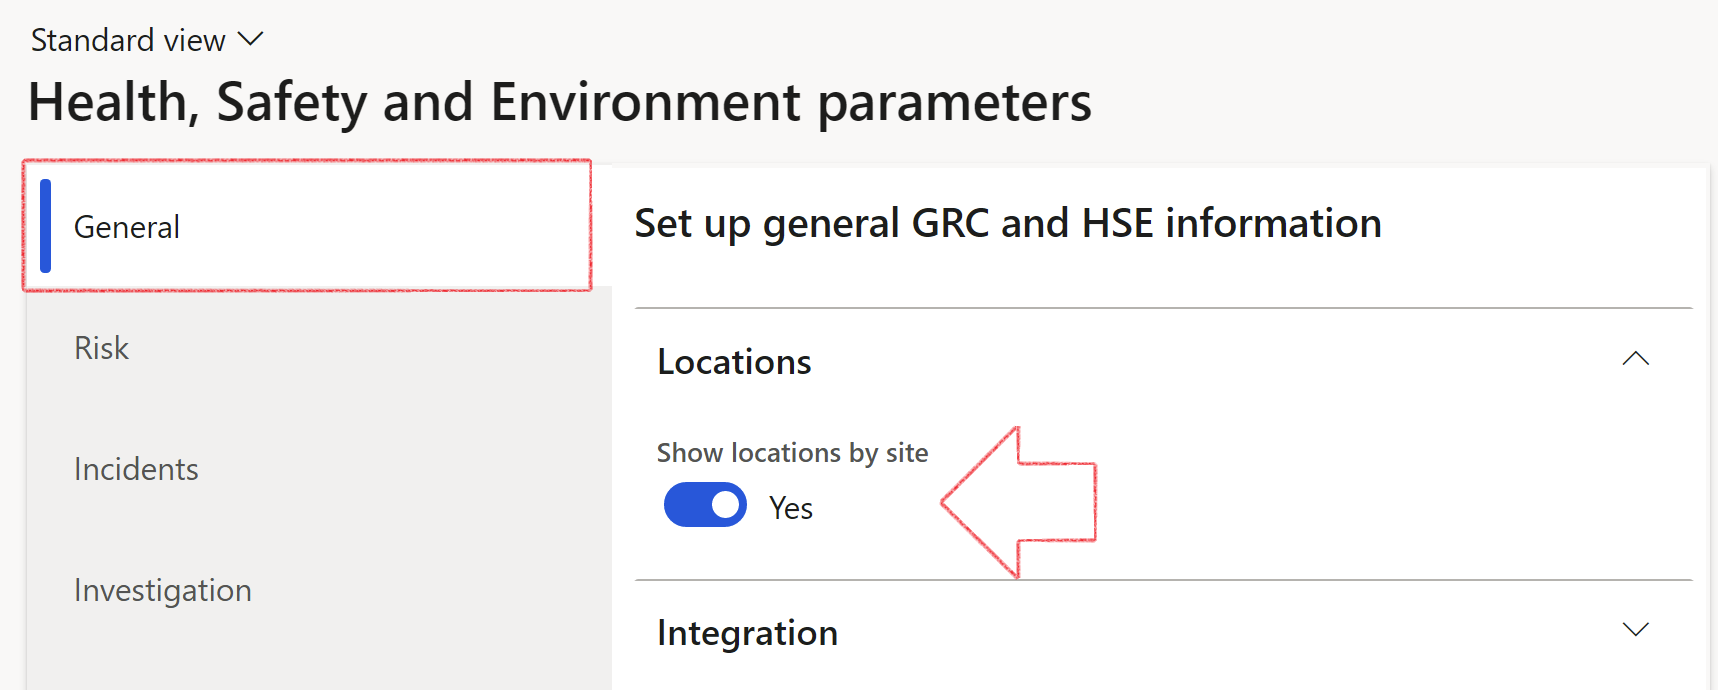
- Go to: HSE > Setups > HSE parameters
- Under the General tab, expand the Locations Fast tab
- Move the Show locations by site slider to Yes if you want to be able to select Locations filtered by the selected Site
Inventory dimensions are assigned to products (items). Before you can assign inventory dimensions, you must set up inventory dimension groups.
The inventory dimensions can be assigned to inventory dimension groups:
|
Product dimension group:
|
Storage dimension group:
|
Tracking dimension group:
|
¶ 8. Language editor
Microsoft translator is a multilingual machine translation cloud service provided by Microsoft. It is used for translating labels in D365 into different languages, but in some cases, for example in the OHS context, the meaning of some labels is incorrect. Axnosis has developed a solution for the problem.
- In the development environment:
- Use the Label file maintenance data entity to upload the following three fields:
- LabelStringUS - The Original text in US English
- LabelStringAlternative - The new label in for example, Spanish
- LanguageId - For example "es-cl"
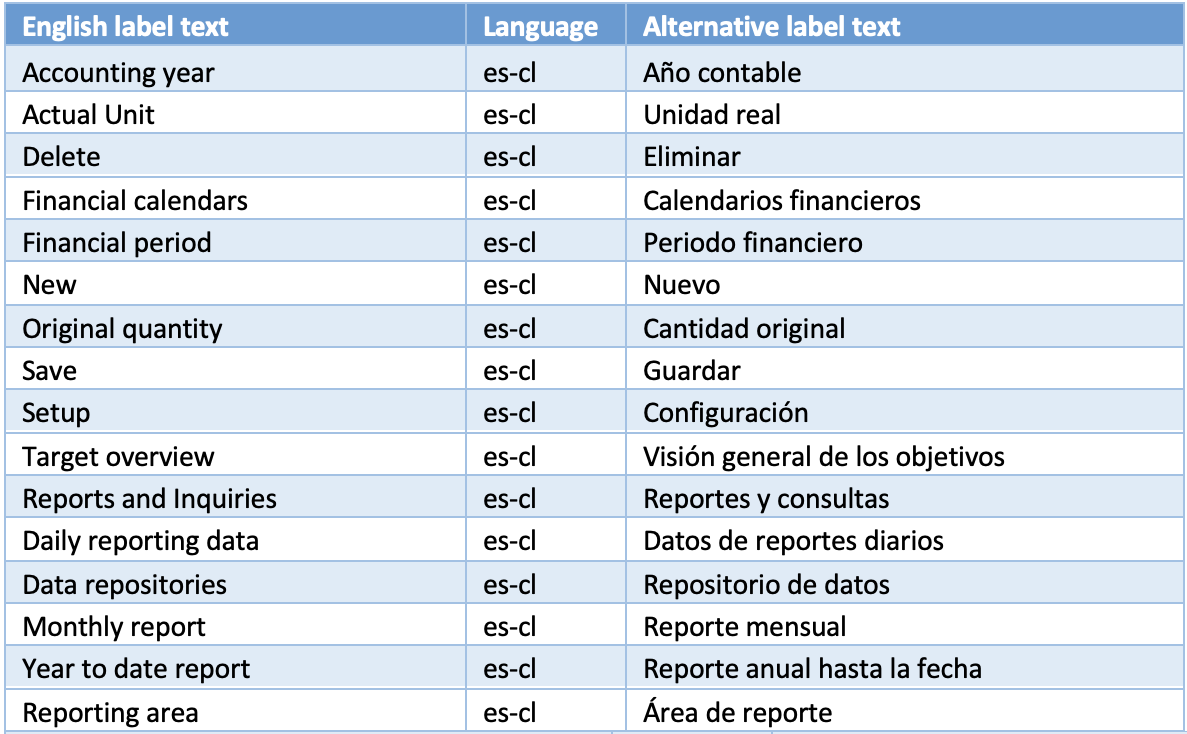
A developer has to make sure in advance, that the label folders where the changes will be written to, have full security access for his user. Checking the files out in Visual studio should also work.
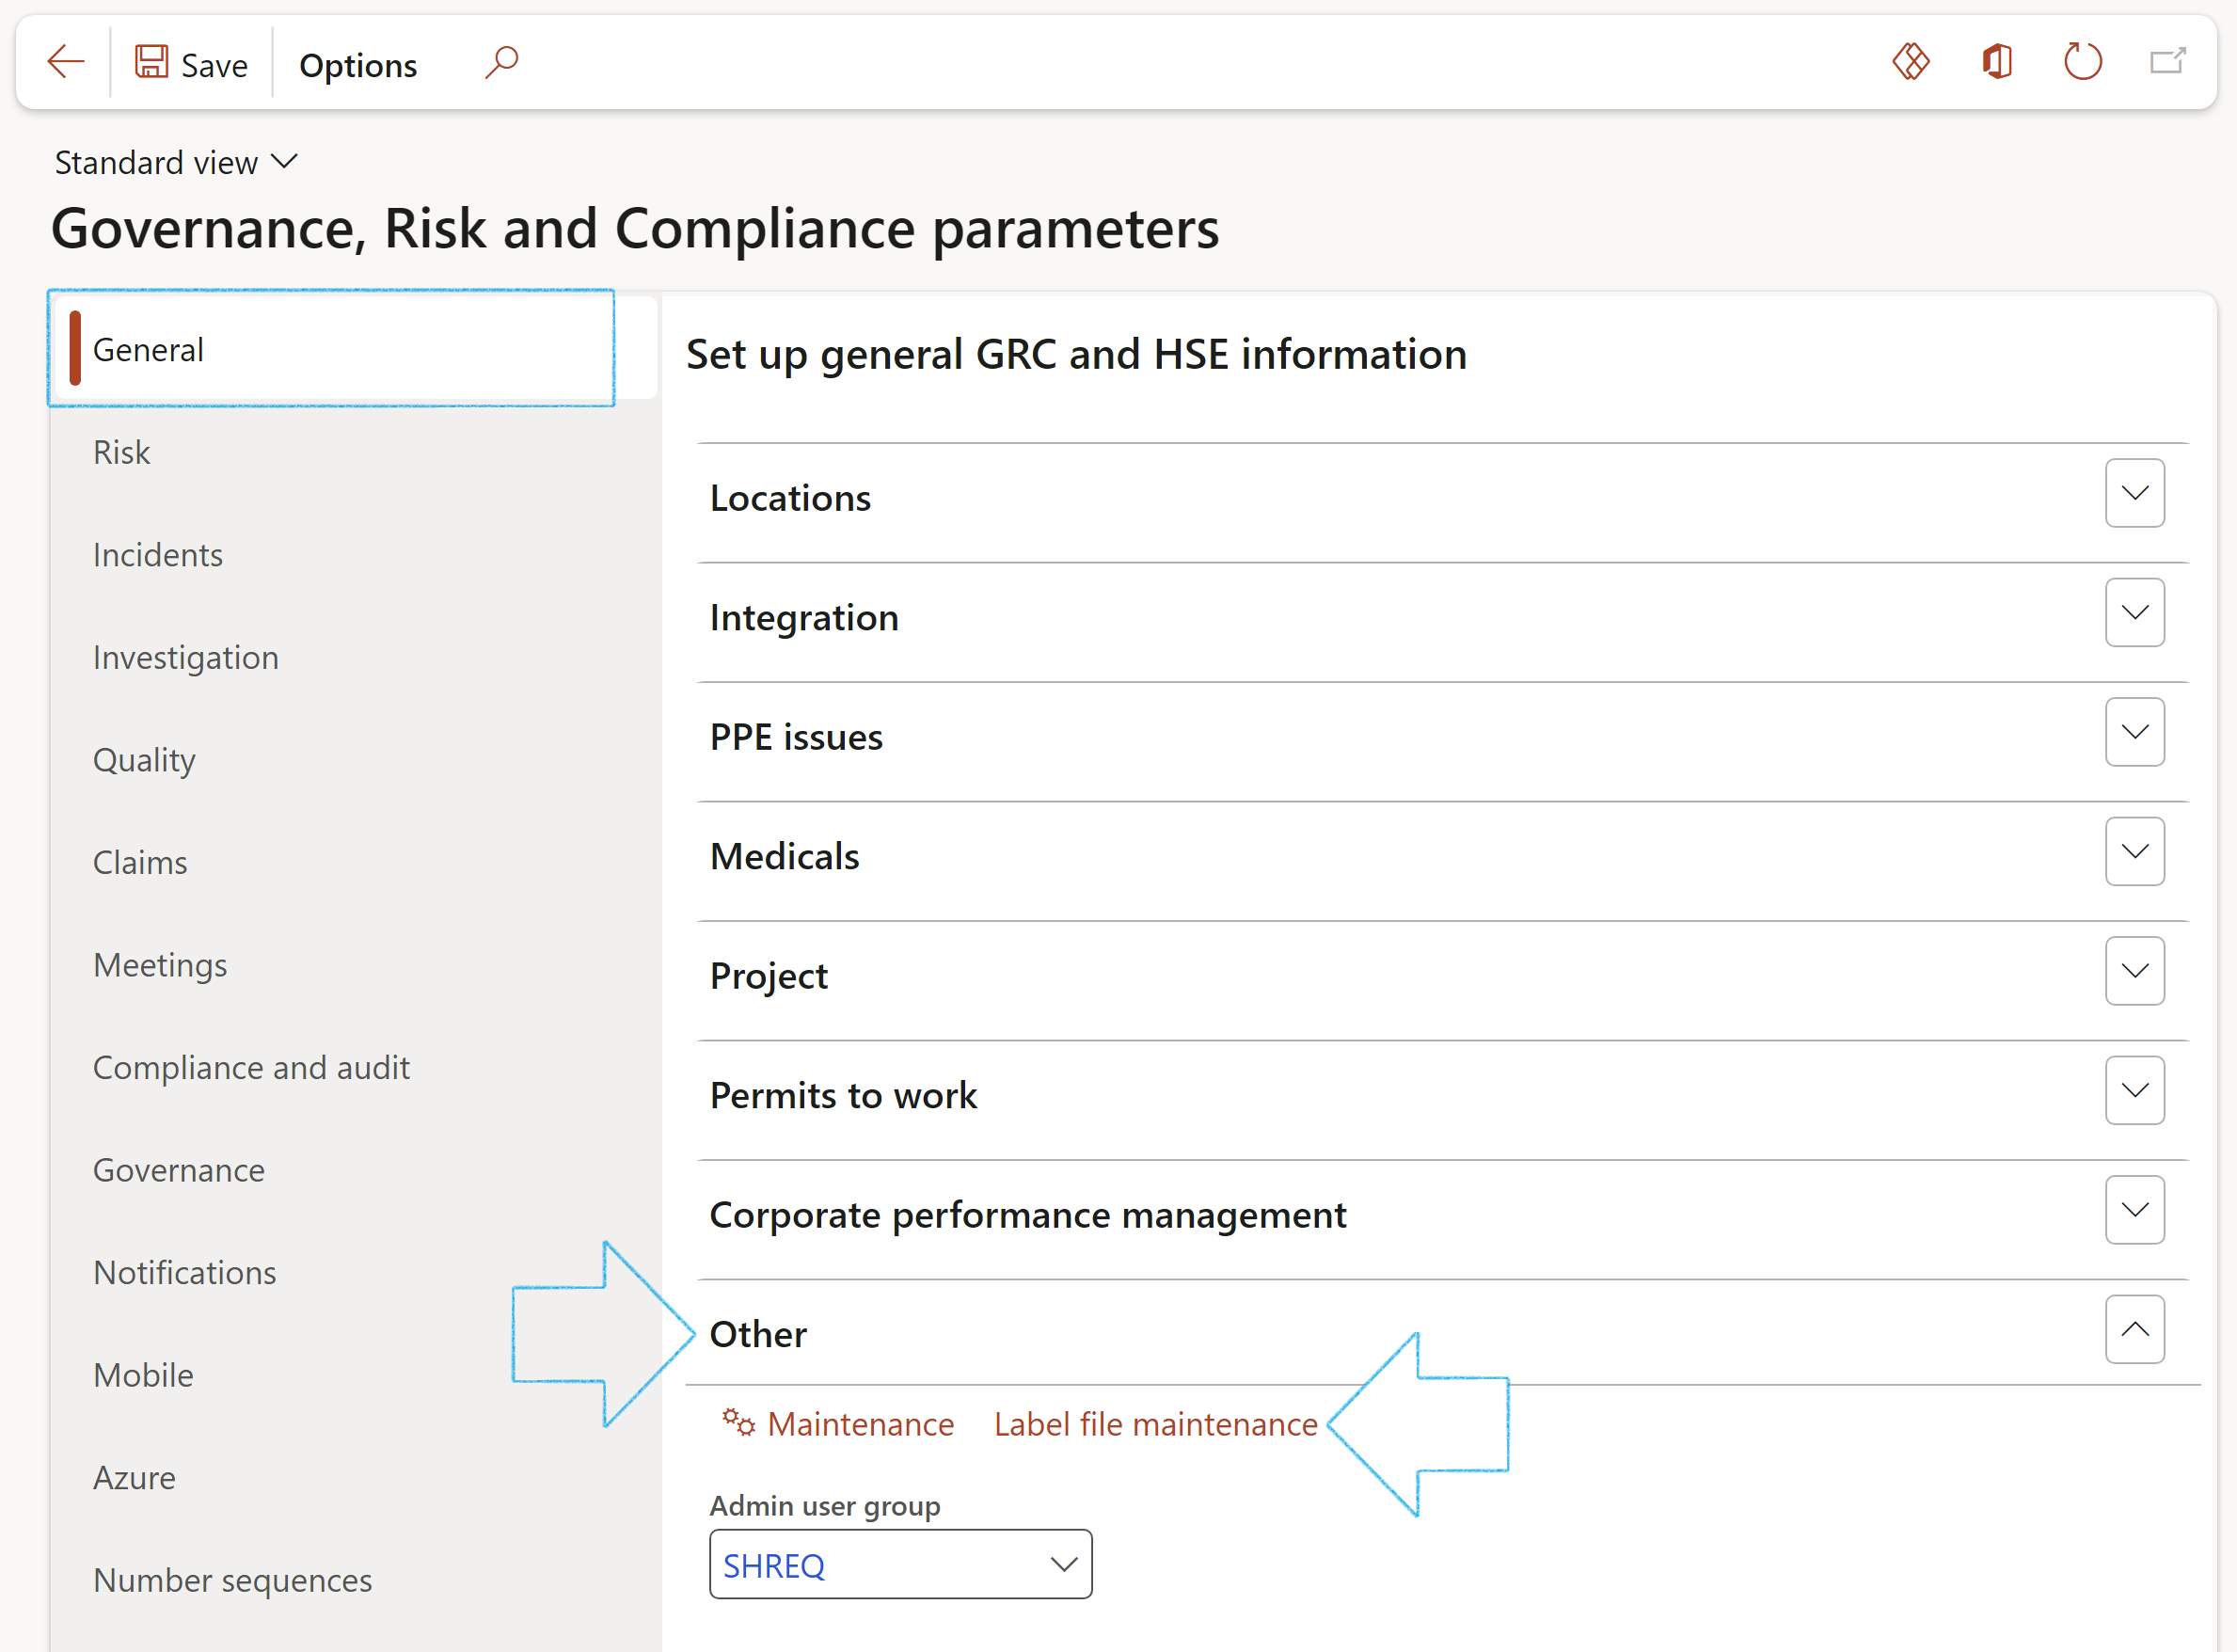
- Go to: Governance, risk and compliance > Setup > Governance, risk and compliance parameters
- Under the General tab, expand the Other Fast tab
- Click on the Label file maintenance button
- On the Label file maintenance form, select the correct Language in the filter
- Click on the Update label ID's button to populate all the new label IDs found in the OHS label file
- Click on the Commit button to write all the alternative translation texts to the label file
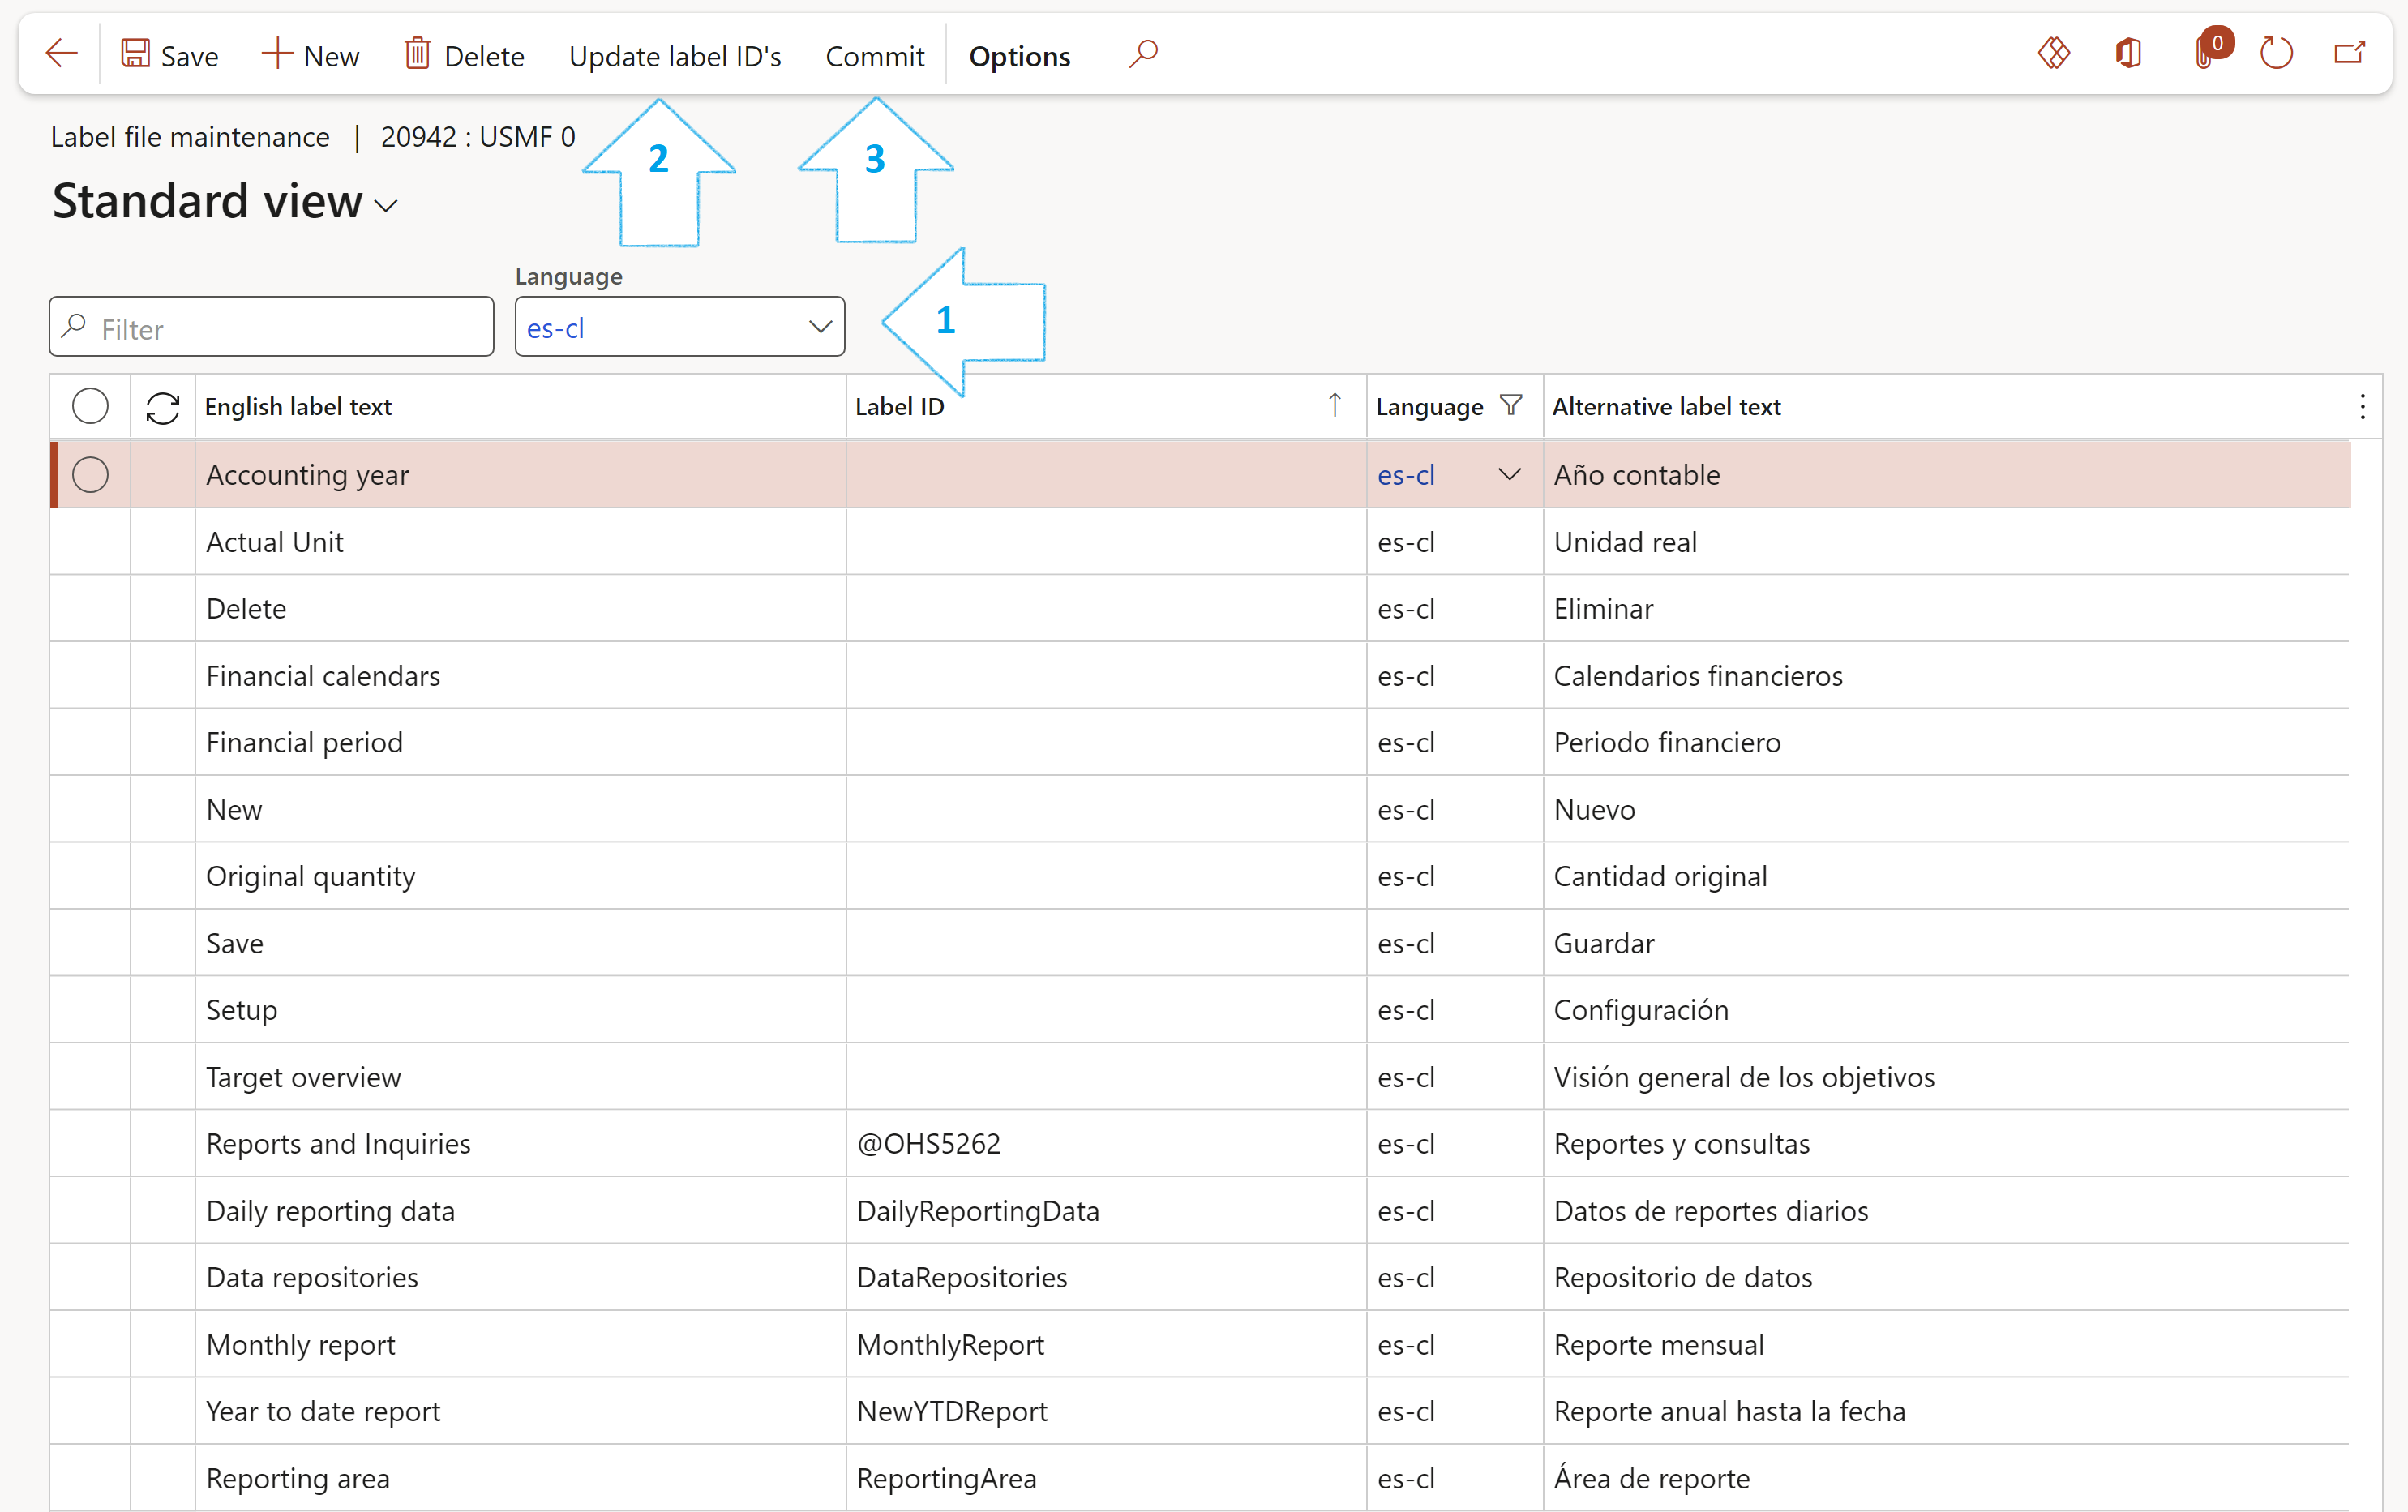
The labels without a Label ID are Microsoft system labels that will not be replaced.
The label file has to be built in Visual studio again, and the changes uploaded to Source control.
This process will have to be done with every major release where new label file versions were created by using the Microsoft translation tool. The uploading of the data entity only needs to be done if new label translations were received from a client.
¶ 10. Enable B-BBEE
Users can choose to enable or disable B-BBEE functionality
- Go to: Governance, risk and compliance > Setup > Governance, risk and compliance parameters
- Under the Governance tab, expand the B-BBEE Fast tab
- Move the Enable B-BBEE slider to Yes
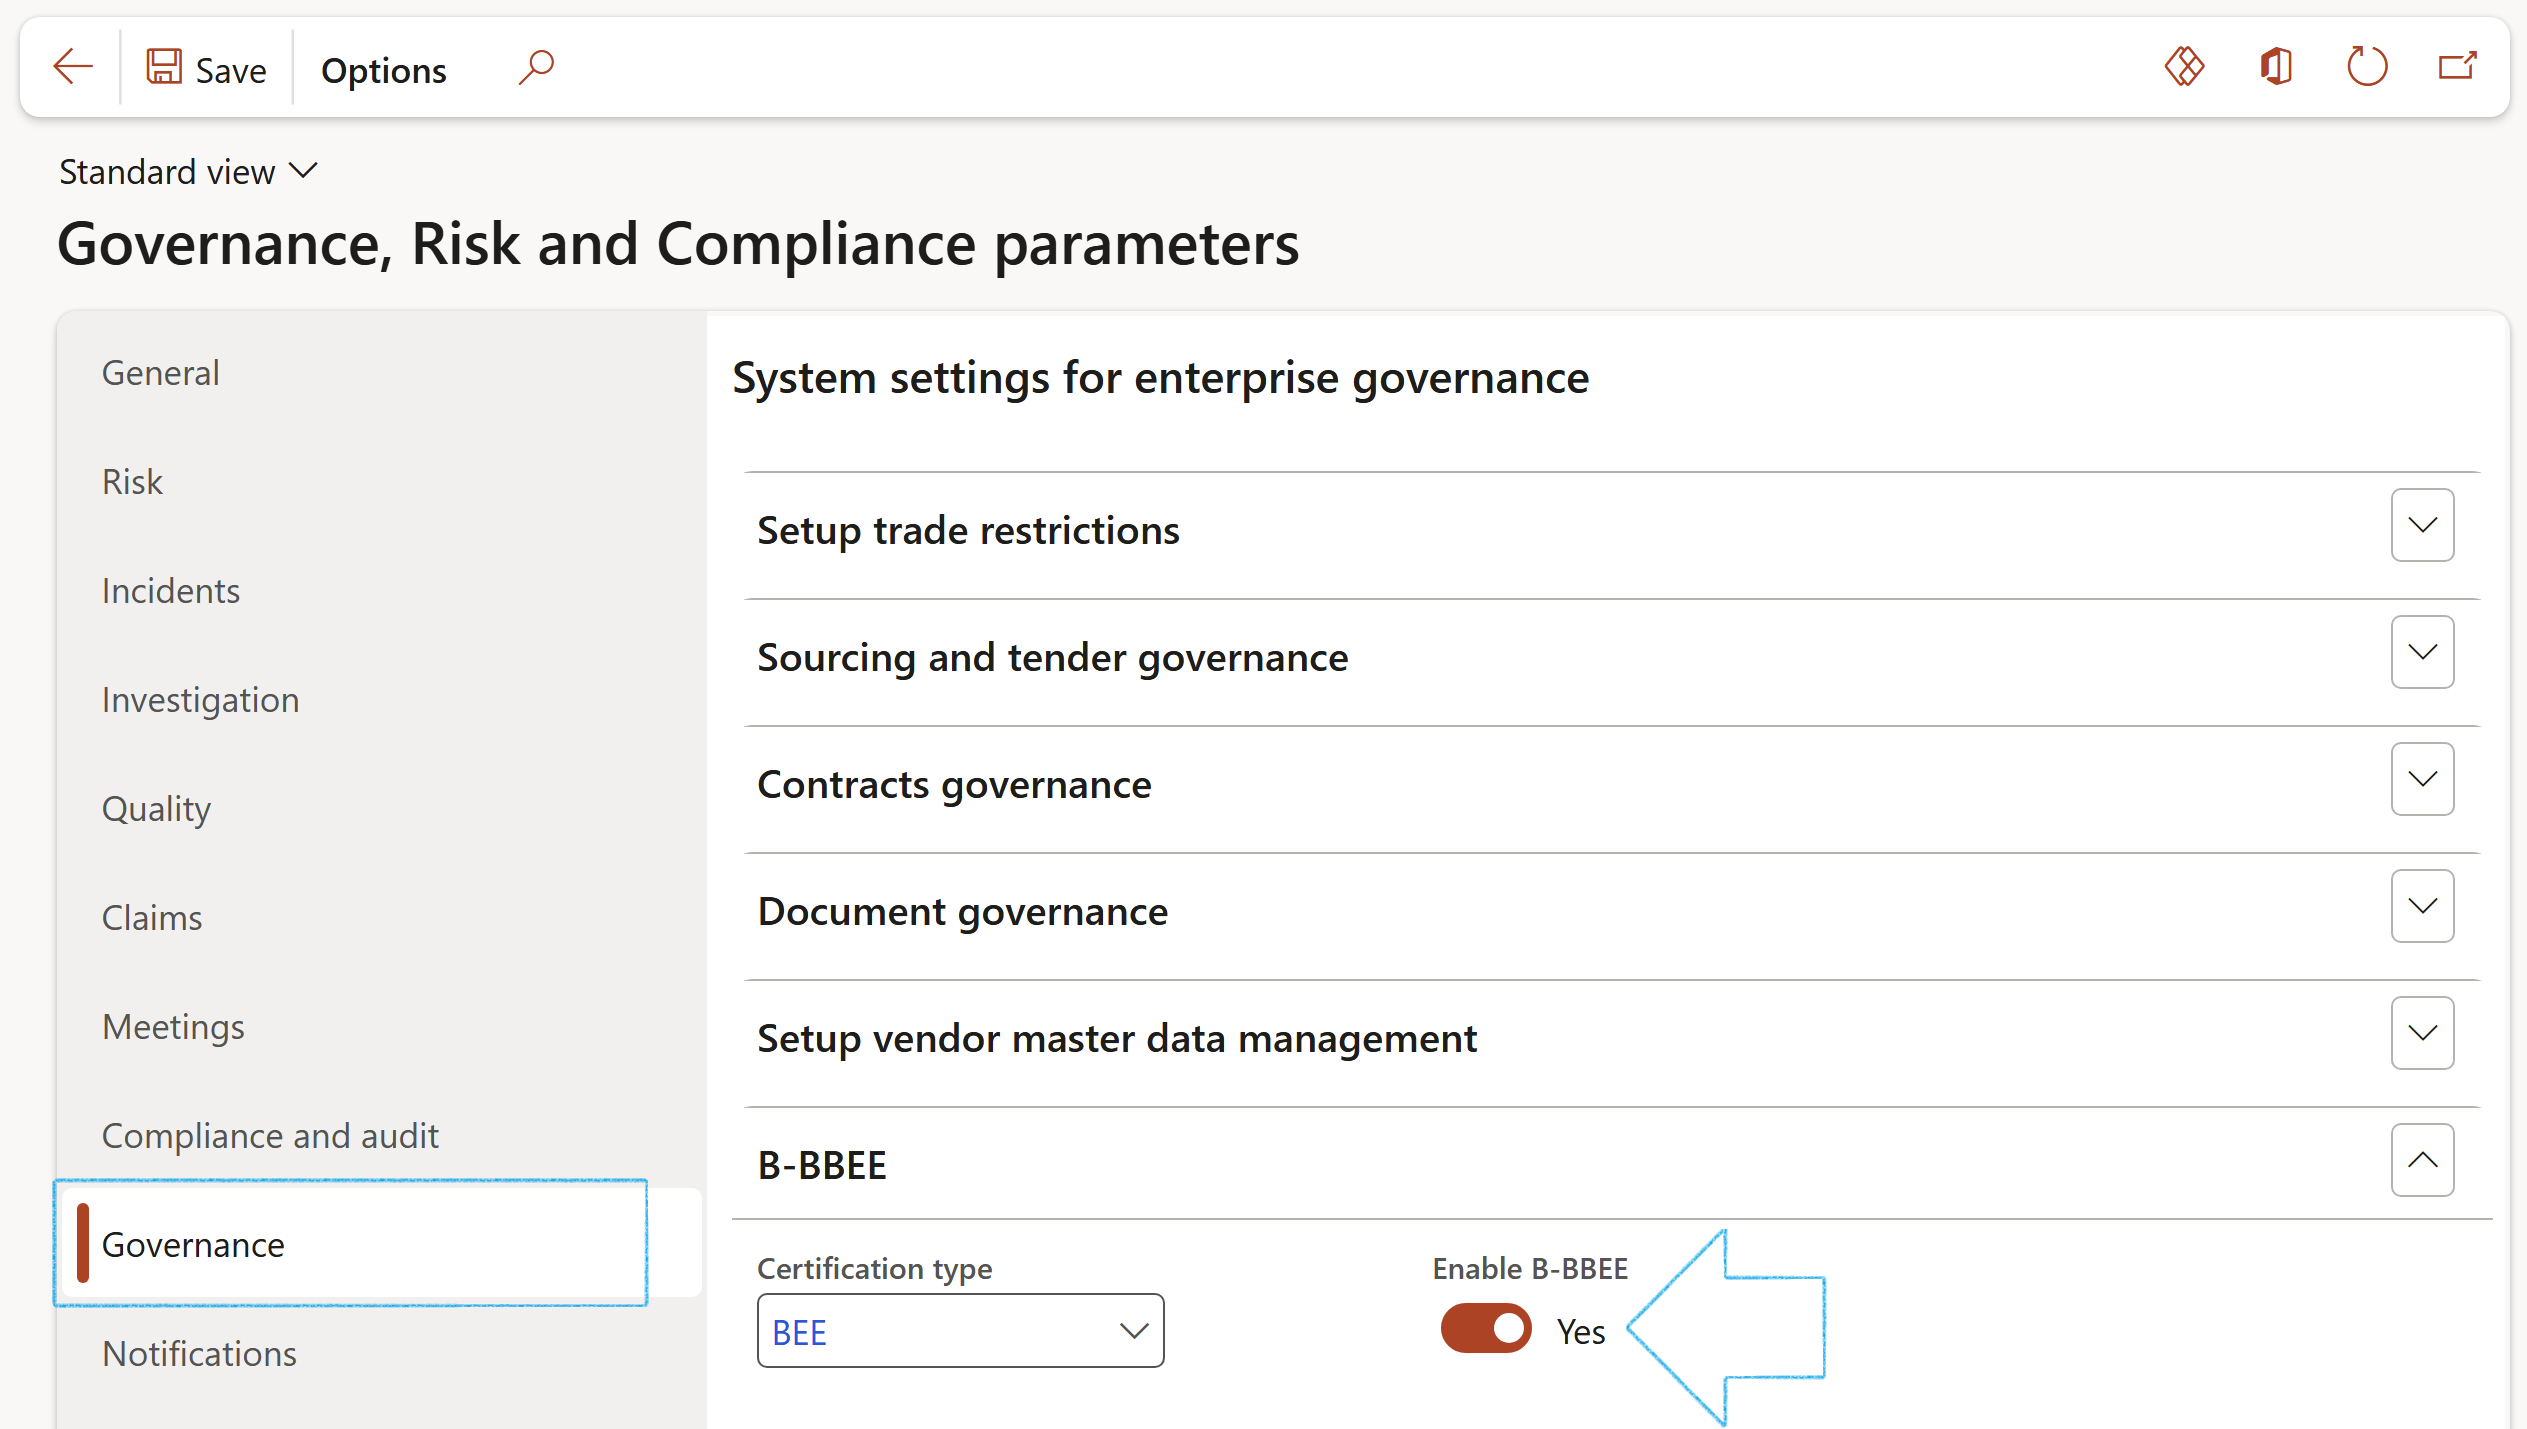
When the Enable B-BBEE slider is on Yes:
- The B-BBEE ownership Fast tab on the Legal entity detail form will be visable
- On the Procurement plan the B-BBEE button wil be visable
- The B-BBEE Fast tab will be visable on the Vendor detail form
- The Vendor certifications will now show a B-BBEE Fast tab
- The Tender evaluation report will be printed with B-BBEE details
